

Page 1

HOW TO USE
REFRIGERATOR-FREEZER
Model
R-SF62AMJ
R-SF58AMJ
R-SF48AMJ
R-S59AMJ
R-S49AMJ
使用說明書
日立無霜全自動式多門電冰箱
型號
家庭用
Six doors
Five doors
六門形式 五門形式
Thank you very much for purchasing a Hitachi
Refrigerator.
This refrigerator is designed for home use only.
Do not use this refrigerator for the business use
and/or any purpose other than storing food.
Please read this operation manual carefully
and ensure you use the appliance correctly.
In particular, be sure to read the “Safety
Suggestions” section of this operation
manual before use.
Please keep this operation manual along with
your guarantee card.
非常感謝您這次購買日立電冰箱。
此電冰箱是家庭使用的。請勿使用於業務用途和
儲存食品以外的目的上。
請詳閱本使用說明書,以達正確使用。
使用前,請務必詳閱「安全上之注意事項」。
請妥善保管本使用說明書與保証書。
● It may take time to cool for the fi rst time.
Pg.36, 37
It may take more than 4 24 hours to fully cool.
● Make sure that any food does not protrude beyond the storage height
limit of each compartment, and allow clearance between each food in
each compartment.
Pg.44, 48
Otherwise, food and/or package may not be stored in each compartment properly, and as
a result, the door may not be closed completely. It may cause the refrigerator to not cool
suf ciently and/or not make ice.
● 購買後,初次使用時,需要時間冷卻。
8, 9
頁
庫內冷卻可能需要約4小時至24小時以上。
● 請遵守可容納食物的高度,食品之間空開間隙儲放。
16, 20
頁
過分塞堵食物,會造成食品及袋子被挾住・門關不緊・變冷效率低・不能製冰。
Page 2
2
首先
INTRODUCTION
More Energy Saving
更省電
The Vacuum Compartment is very wide and can contain plentiful foods and preserve
fresh taste of the foods.
Restricts oxidization and change in color of the foods by action of the vacuum preservation and the
antioxidant vitamin.
You can select the temperature range suited for the foodstuff. Have
真空開
+1˚C
(Vacuum Comparment
Chiller) or -1˚C (Vacuum Comparment Subzero) displayed on the Control Panel for operation.
Pg
.4243
真空低溫冷凍變得更寬廣。可容納更多的食物,保持在最新鮮的狀態。
● 真空保存以及發揮維生素抗氧化機能,可以抑制食物氧化及變色。
● 可依照食物的不同選擇冷凍與冰溫的最適溫度。請從觸控操作面板中選擇「真空開
+1˚C
」或「真空開
-1˚C
」。
14頁15
頁
1. Frost Recycle Cooling
● Energy saving by effectively utilizing frost
In the past, frost adhered to the radiator was melted by a heater and discharged as defrosted water
because it lowers cooling ef ciency.
Frost Recycle Cooling utilizes the cold of frost. The compressor operation is stopped and Refrigerator
Compartment /Vegetable Compartment are cooled by utilizing the cold of frost.
● Each compartment is independently cooled effectively
A sensor and a ap are installed in each compartment of Refrigerator Compartment, Freezer Compartment
and Vegetable Compartment, and the temperature of each compartment is controlled independently.
● Prevents food from drying out, utilizing the moisture of frost (Refrigerator
Compartment/Vegetable Compartment)
In addition to the cold of frost, the moisture of frost on the radiator helps the food from drying out.
2. [“eco operation indicator lamp]
This indicator lamp will be illuminated to indicate the energy-saving operation when the compressor is
stopped during the Frost Recycle Cooling or while the compressor operates at low speed.
When too many foods are stored inside or the door are opened or closed too frequently or the door is left open for a long
time, the compressor will operate on high speed. So, eco operation indicator lamp will not be illuminated.
Please open or close the door quickly or minimize the number of times of opening and closing the door. eco operation indicator lamp will
not be also illuminated on during the quick freezing/cooling operation because the inside of the refrigerator is cooled quickly.
Pg. 58
When eco indicator lamp is not illuminated
1.
霜循環冷卻
● 以霜來冷卻達到省電功能
冰箱運轉時附著在冷卻器的霜,因為會降低冷卻功效,所以必須以加熱器來加熱溶解,再排掉除霜水。
霜循環冷卻是著眼於霜的低溫,暫時停止壓縮機運轉,充分有效利用霜的低溫來達到冷藏室、蔬果保鮮室的冷卻效果。
● 有效率的各室獨立冷卻
在冷藏室、冷凍室、蔬果保鮮室等各個存放空間裝設感應器及風葉,獨立控制各室的溫度。
●利用霜的水分來防止乾燥(冷藏室、蔬果保鮮室
)
將附著在冷卻器的霜的水分加入冷氣中,來防止食品的乾燥。
2.〔eco
運轉顯示燈〕
● 啟動霜循環冷卻,壓縮機暫時停止運轉或壓縮機低速運轉時則顯示亮燈,此時即是告知目前正在進行省電運轉。
可能是放置過多的食品、冰箱門開閉次數過於頻繁、或是冰箱門開啟時間過久等原因,以致壓縮機高速運轉,
eco
運轉則顯示滅燈。
→ 請盡可能冰箱開閉時間勿過久、及減少開閉次數。此外若正在進行急冷凍/急冷藏運轉時,因必須在短時間內
啟動壓縮機來將冰箱內的溫度降低,所以
eco
運轉則顯示滅燈。
30
頁
若沒有顯示亮燈時
Wide Vacuum Compartment
寬廣真空室
Page 3

3
使用之前
● 安全上的注意事項
................................................... 4
● 使用之前
................................................................. 8
・
設置場所
.............................................................. 8
・
在周圍請空開充分的散熱空間
............................. 8
・
箱門的平衡調整
................................................... 8
・
關於電源插頭及接地
............................................ 9
・
放入食品
.............................................................. 9
● 操作面板/各部分的名稱/儲存室
......................... 10
・
冷藏室門操作面板
............................................. 10
・
各室的名稱
........................................................ 11
・
適於儲存的食品
................................................. 11
平常的使用方式
● 冷藏室
................................................................... 12
・
調節冷藏室的溫度
............................................. 12
・
快速冷藏 (需快速冷卻的時候)
.......................... 12
・
置蛋盒(可放入雞蛋等食品,保存在冷藏室)
.... 12
・
下移式便利盒(將整個棚架往前拉,從較低的位置
可以存取食物。)
................................................. 13
・
層架及置物架可調整
.......................................... 13
・
旋轉隔板(只有六門形式)
................................. 13
● 真空室
................................................................... 14
・
使用準備
............................................................ 14
・
開閉真空室門
..................................................... 14
・
日常保養清潔的方式
.......................................... 15
・
取下真空密封墊,保養清潔時
........................... 15
● 冷凍室
................................................................... 16
・
上層冷凍室/下層冷凍室
................................... 16
・
可容納食品的高度
............................................. 16
・
調節冷凍室的溫度
............................................. 17
・
急速冷凍
............................................................ 17
● 製冰室 (自動製冰機)
............................................ 18
・
製冰方法
............................................................ 18
・
切換自動製冰機的設定內容
............................... 19
・
用於急需製冰時(急速製冰)
............................. 19
・
製冰時間與製冰能力
.......................................... 19
● 蔬果保鮮室
............................................................ 20
・
下段置物盒·寬廣上段置物盒
............................ 20
保養方法
● 保養方法/冰箱內· 冰箱外的保養
......................... 21
・
發現髒時
............................................................ 21
・
電源插頭
............................................................ 21
・
冰箱內·冰箱外的清掃
....................................... 21
● 卸除組件的方法
..................................................... 22
● 自動製冰機的保養
................................................. 23
・
製冰機清潔
........................................................ 23
・
給水槽
/
淨水濾片
.............................................. 23
・
製冰盤
............................................................... 23
遇到問題時
● 遇到問題時
............................................................ 24
・
購買後,初次使用時常有的疑問
........................ 24
・
操作面板沒有反應
............................................. 24
・
自動製冰不正常
................................................. 24
・
不冷
................................................................... 25
・
結霜·結露
......................................................... 25
・
太冷
................................................................... 25
・
聲音不對
............................................................ 26
・
冰箱發熱
............................................................ 26
・
真空冷凍上的問題
............................................. 27
・
有異味
............................................................... 28
・
箱門高低不平衡以及歪斜
................................... 28
・
其他
................................................................... 28
● 這種情況下/另購零件
.......................................... 29
●
〔
eco
運轉顯示燈〕/箱門警報器/操作面板鎖定
..... 30
● 有關碳氫化合物的冰箱/規格/可容納的食品重量
... 59
目錄
Page 4
警告
注意
此標示欄表示「可能會造成死亡或身
負重傷之預測內容」。
此圖示標示為「禁止」內容(請勿執行之事項)。
此圖示標示為「強制」內容(請務必執行之事項)。
此標示欄表示「可能會發生受傷或財
務損失之預測內容」。
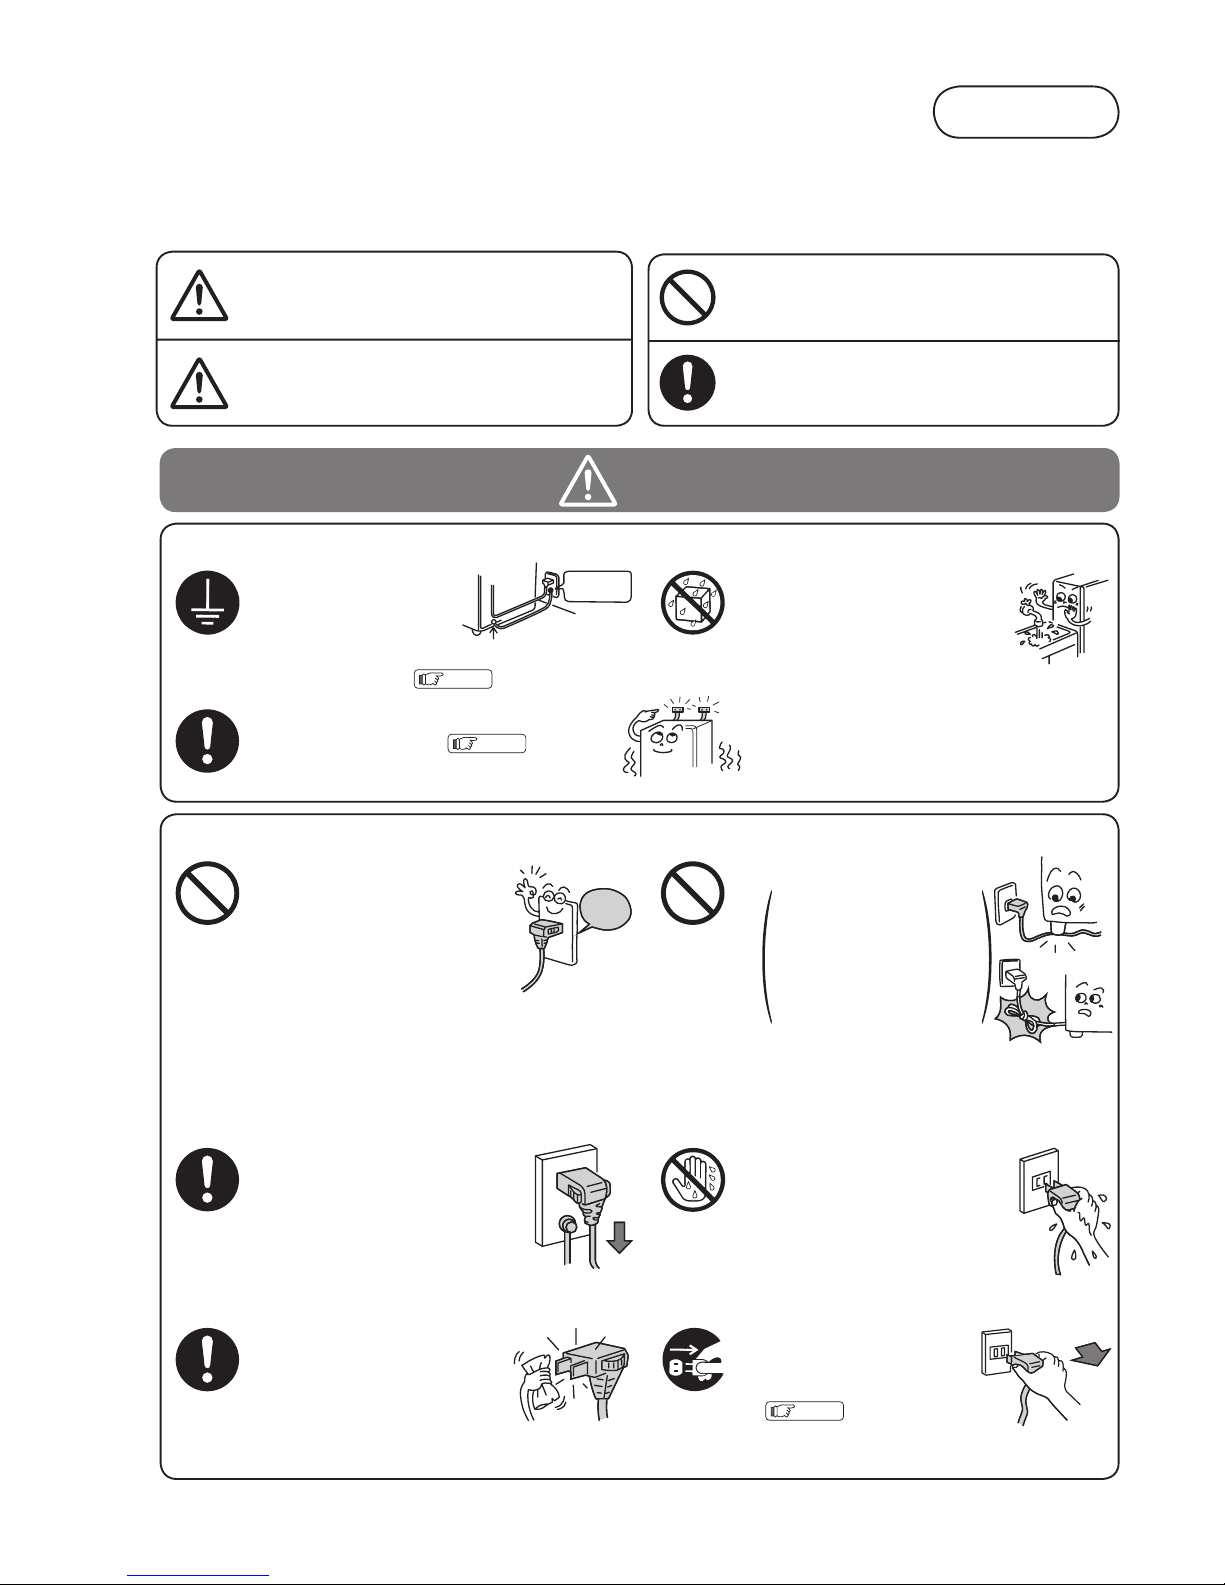
警告
安裝時
電源及電源電線
● 使用時請勿高於插座或配線
器具的額定電流。
請勿使用交流額定電壓以外
的電源。
若與其他電器插頭併用,或
使用三面插座等,會因異常
發熱而造成火災的危險。
・
請單獨使用額定電流
15A
以上的插座。
● 請勿讓電線.插頭破損。
在已受損的狀態下使用時,
會引發觸電.短路.火災的危險。
・
電源線損壞時,須由製造廠商或其服務處或
具有相關資格的人員加以更換以避免危險。
● 請勿用潮濕的手,拔除插頭。
・
發生觸電的原因。
● 進行冰箱保養,請務必
拔掉插頭。
有觸電或受傷的危險。
21
頁
・
請將插頭確實的從插座
內拔出。
● 將插頭的電線向下,將插頭確
實插入插座內。
・
如果插頭方向相反插入,會給電
線增加負擔,成為短路.觸電.
起火的原因。
・
如果插頭插得不夠完全,也將會
成為因觸電,發熱而導致火災的原因。
● 請定期清除插頭上的灰塵。
當插頭堆積灰塵時會因濕氣
而造成絕緣不良,進而引起
火災。
・
請拔除插頭再用乾布擦拭乾淨。
● 請勿設置於潮濕或會被水淋
到的場所。
・
避免因電氣絕緣不良而引起觸
電.火災的危險。
接地連接螺絲連接接地線
禁止 禁止
禁止濕手
禁止淋濕
請勿讓電線受損.加工.
接近發熱器具. 勉強彎
曲.扭曲.拉扯.乘載
重物.讓冰箱壓住電線
或捆綁電線。
● 請確實實施接地。
避免因故障.漏電等
因素而發生觸電。
・
請務必委託經銷商
執行接地工程。
9
頁
● 針對地震等天然災害做好防止翻倒處置。
・
避免因翻倒而受傷。
9
頁
接地端子
搖晃不定
電源
110V
4
安全上的注意事項
請務必遵守
為了防止危害到使用者或其他人及造成財務上的損失,請務必遵守以下事項。
■ 以下將以標示方式,區分及說明忽視標示內容而誤用
時所產生的危害與損失程度。
■ 以下將以圖示標示方式,區分及說明應遵守內容的種
類。(以下為圖示標示例)
Page 5
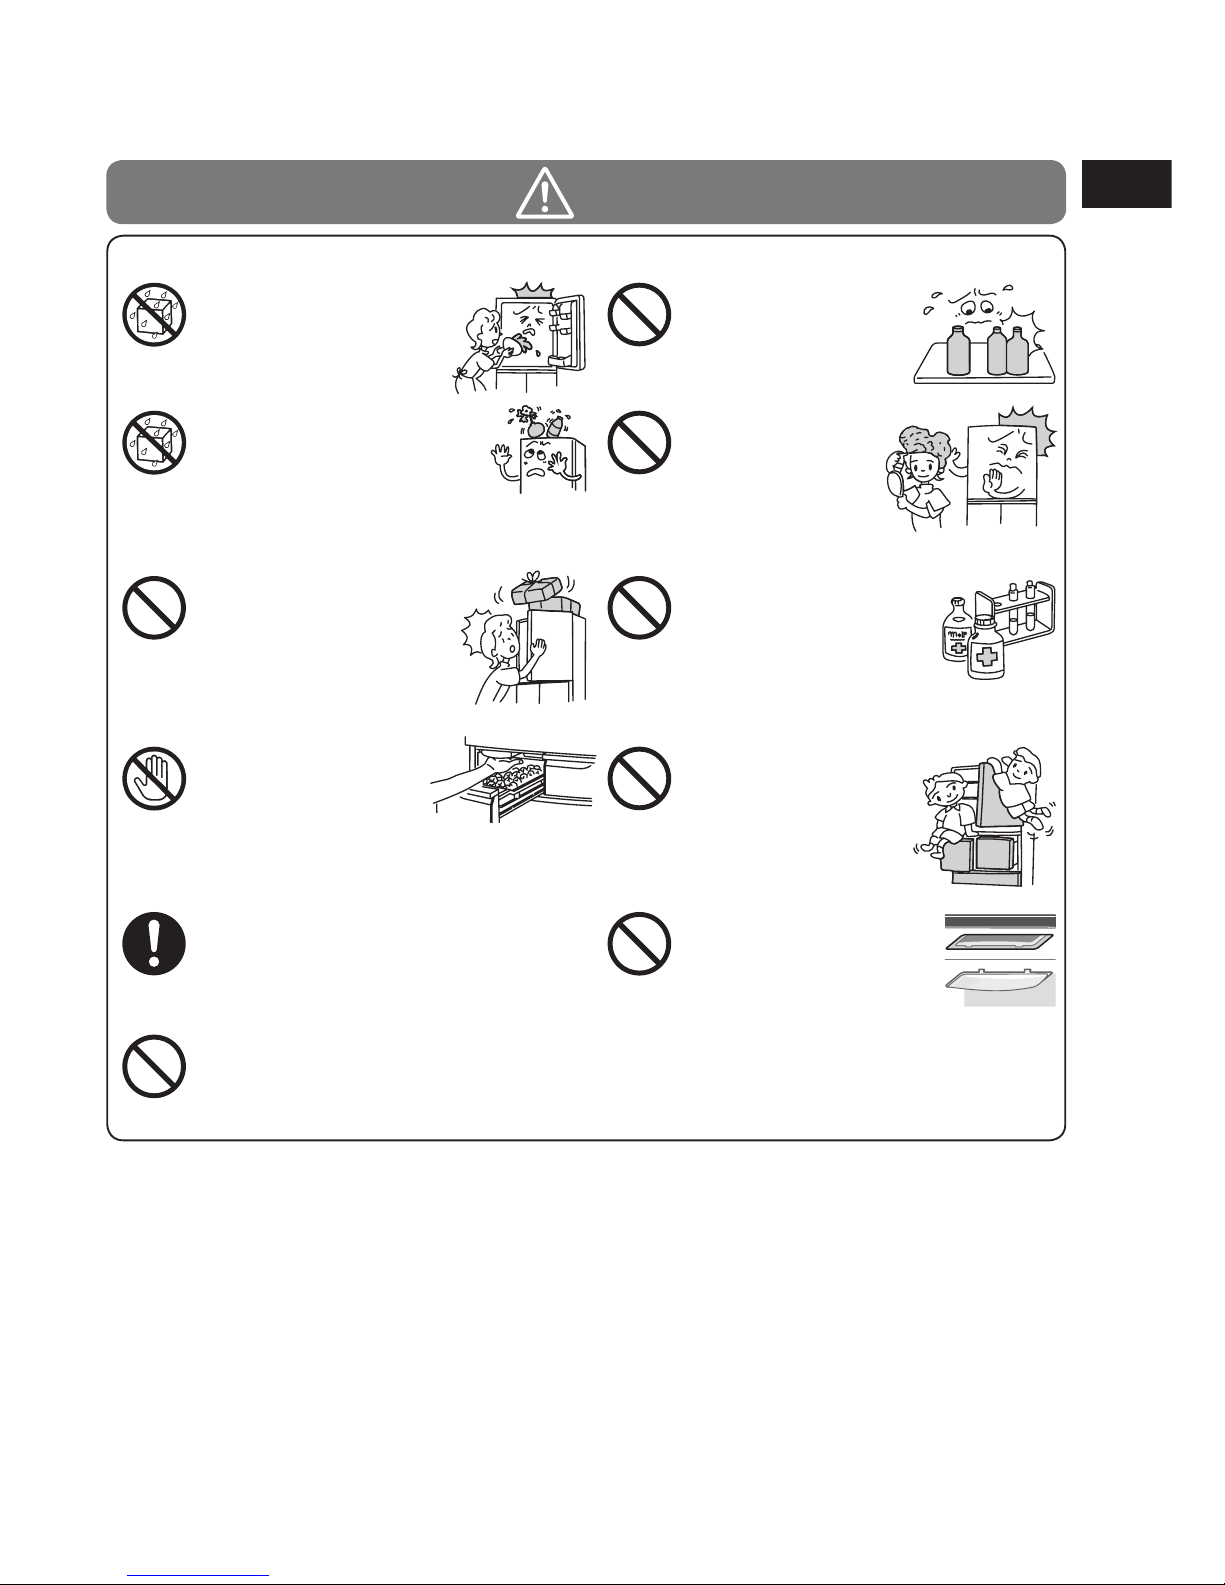
在一般使用的情況下
● 請勿用水淋濕主體與箱內。
・
避免因電氣絕緣不足而引起
觸電.火災。
● 請勿放入容易引火的物品。
・
揮發油.乙醚.LP瓦斯.
稀釋液.黏著劑會發生引
爆的危險。
● 請勿懸在箱門上嬉戲,或
踏在收納盒上。
・
避免因翻倒,夾到手指而
受傷。
● 請不要拆卸冰箱內燈的蓋子。
・
燈泡損壞時,須由製造廠商
或其服務處或具有相關資格
的人員加以更換以避免危險。
● 請勿用來保存藥品或學術試
樣。
・
必須嚴格管理的物品,不可
保存於家庭用冰箱內。
● 在附近請勿使用可燃性
噴霧用品。
・
避免因箱門開關等電
氣接點引起的火花引
發火災。
● 請勿將含水容器放在冰箱上。
・
翻倒的水會造成電氣組件絕緣不
良而發生漏電.火災.觸電的危
險。
● 請勿在冰箱上放置物品。
・
避免因開閉箱門,造成物品掉
落而受傷。
● 請不要吊掛在「下移式便取盒」上。
● 請注意不要讓孩子們玩耍。
● 請勿手觸自動製冰機的
機械部位。
・
製冰盤旋轉時,手恐怕會
受傷。
禁止淋濕
禁止淋濕
禁止
禁止
禁止
禁止
禁止
禁止
禁止
禁止接觸
警告
binder
LP gas
Benzine
5
安
全
上
的
注
意
事
項
Page 6
關於冷媒(由於這是一種可燃性的氣體,請注意以下的事項。)
●不可以螺絲等銳利物品刮
傷冰箱本體。
由於使用可燃性的冷媒,
當冷媒從冰箱內壁的配管
外洩, 會有起火.爆炸的
危險。
● 除廠商建議方法外,不
得使用機械工具或其它
工具來加速除霜的過
程。
● 請勿在冰箱內部使用
電器用品。
・
如冷媒外洩,電氣接
點所產生的火花,會
有起火.爆炸的危險。
● 請勿損傷冰箱的冷
卻管路。
冷煤配管損壞時,
請將冰箱遠離火源
並避免使用電器用
品。
配管損壞時,請儘快將門窗打開,並與經銷
商或日立技術中心聯絡。
● 安裝的時候,在周圍要離開
一些間隙,確保有足夠的散
熱空間。
8
頁
若冷媒外洩的情況持續,會
有起火.爆炸的危險。
● 如需進行廢棄處理時,請聯絡
經銷商或環保署資源回收中心
專線
(0800-085-717)
,交給他
們進行專業處理。
若冷媒外洩會有起火.爆炸的
危險。
禁止
禁止 禁止
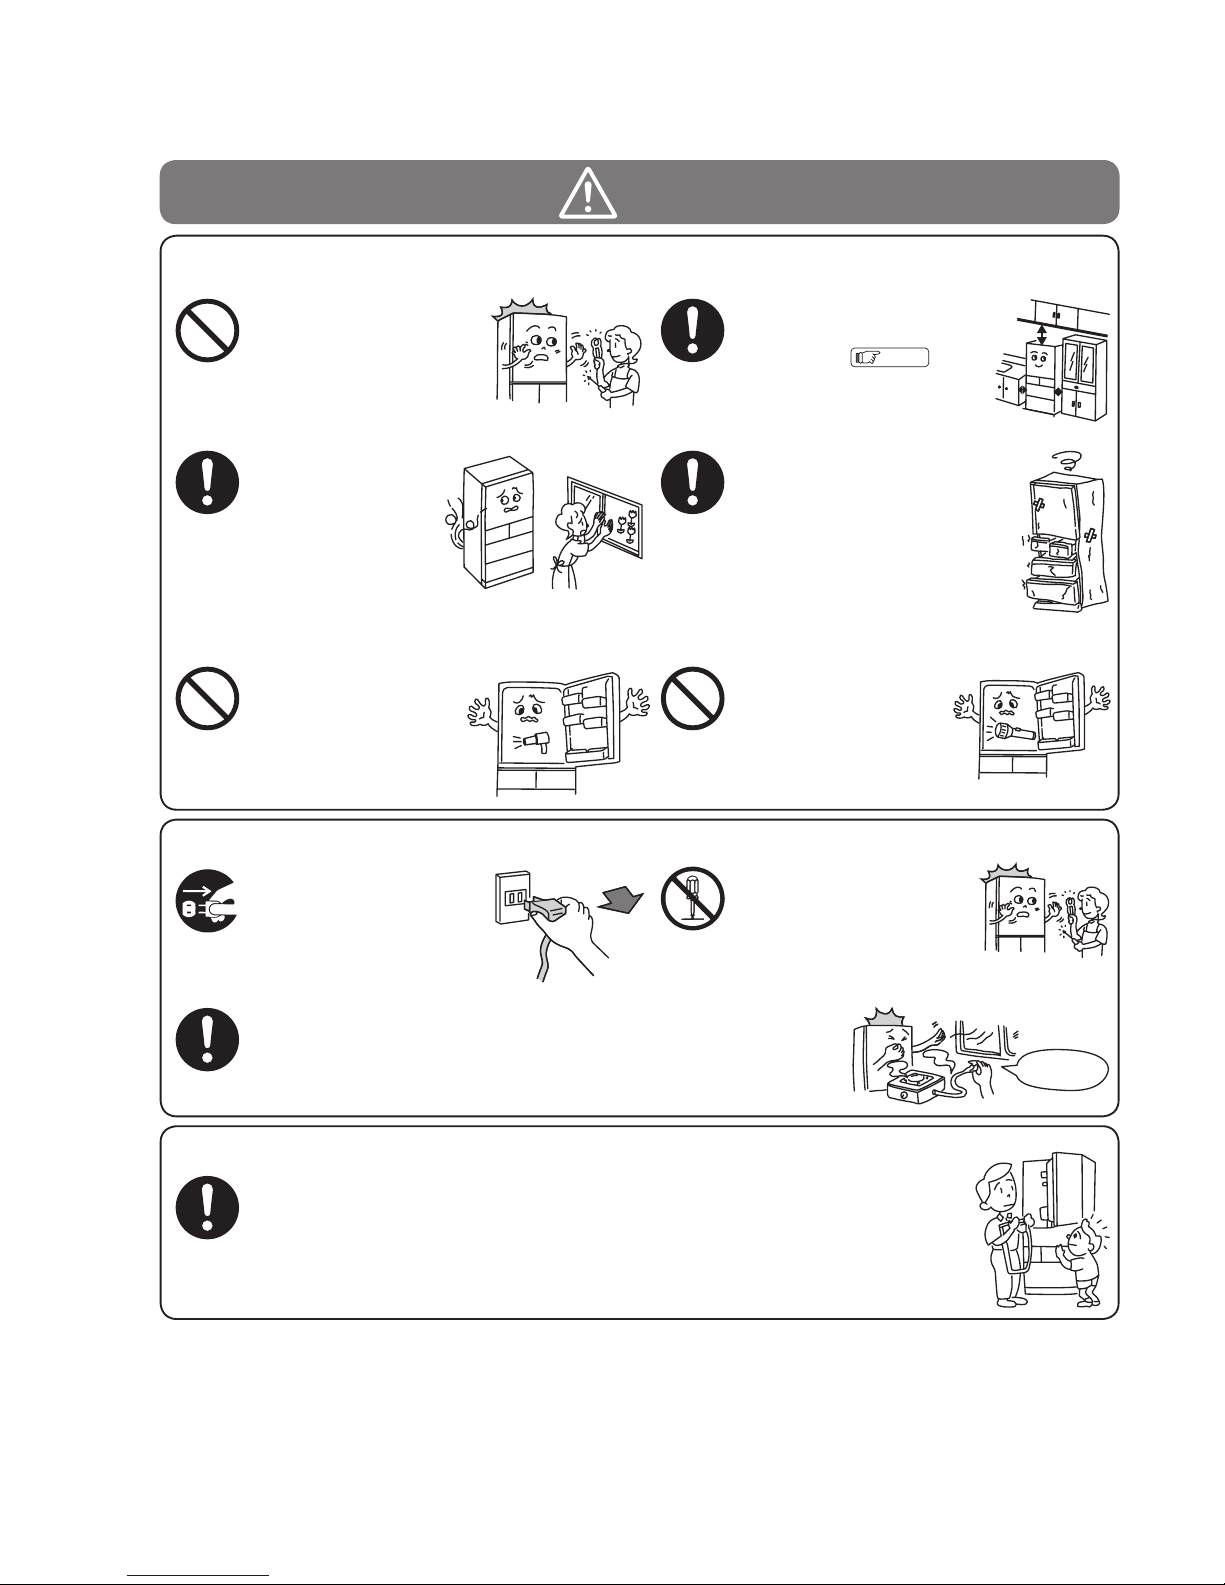
萬一有下列情形
廢棄處理時
● 當產品異常或故障時,請
拔掉插頭停止運轉。
有觸電或受傷的危險。
・
請務必在拔除插頭時握住插
頭。
● 在等待廢棄物再利用保管之際,因有幼兒被誤困在箱內之虞,請將門墊拆下來。
● 可燃性氣體外漏時,勿接觸冰箱,請立即開啟窗戶進行換氣。
・
避免因箱門開關等電氣接點的火花,而發生引爆.火災.燙傷等危險。
● 請勿自行分解.修理.改造。
避免發生火災,異常動作
而受傷。
・
需分解.維修時,請洽經銷
代理商。
禁止分解
警告
關上開關
6
Page 7

禁止
移動•搬運時
● 請勿在容易刮傷的地板
上使用冰箱滑輪。
避免因滑輪而刮傷地板。
・
請在容易刮傷的地板上鋪
上保護板。
● 搬運時,請用手持手
把搬運。
倘若沒有手持把手,可能
會因手滑而受傷。
・
請僱用2人以上手持手把
搬運。
・
搬運時請如圖示般將箱門朝上。
・
請不要用起重機等吊起把手。
在一般使用的情況下
● 請勿在超大瓶飲料的縫隙
間再塞入其他瓶罐。
・
勉強放入超大瓶飲料瓶後,
在開閉箱門時,可能會因掉
落而受傷。
● 請勿讓食品凸出層架。
・
避免因鉤到瓶罐後掉
落而受傷。
● 手腳不要放進冰箱的底部。
清理時將手伸入冰箱底下
時,可能會被鐵板割傷。
● 請勿食用有異味,
已變色的食品。
・
避免因食品腐敗而引發
疾病。
● 請勿用潮濕的手碰觸冷
凍室內的食品或容器。
・
避免凍傷。(尤其是金屬
製產品)
● 同時開啟二個以上的箱門
時,或者其他人也在碰觸冰
箱時,請確認手指是否會被
冰箱門夾住。
・
避免手指被門與門之間的縫
隙所夾傷。
● 請勿將瓶子放在冷凍室內。
・
內容物結凍會使瓶子破裂,
容易受傷。
● 開啟最底層的箱門時,請
勿讓腳靠近冰箱。
・
避免在開啟箱門時,碰觸
到腳底而受傷。
● 置放食品在下移式便利盒時、請勿層疊食品
或讓食品凸出在外、請 用蓋或保鮮紙密封
好容易流溢的食品。
● 層板與鐵絲安裝後、方可使用下移式便利盒。
● 關抽屜型的箱門時,請勿
手持上方推進。
・
按住門上方關抽屜會夾住手
指容易受傷。
禁止
禁止
禁止
禁止
禁止
禁止
禁止
禁止
禁止
注意
小心!!
有怪味
7
安
全
上
的
注
意
事
項
Page 8
8
3 3
21
使用之前
1
2
3
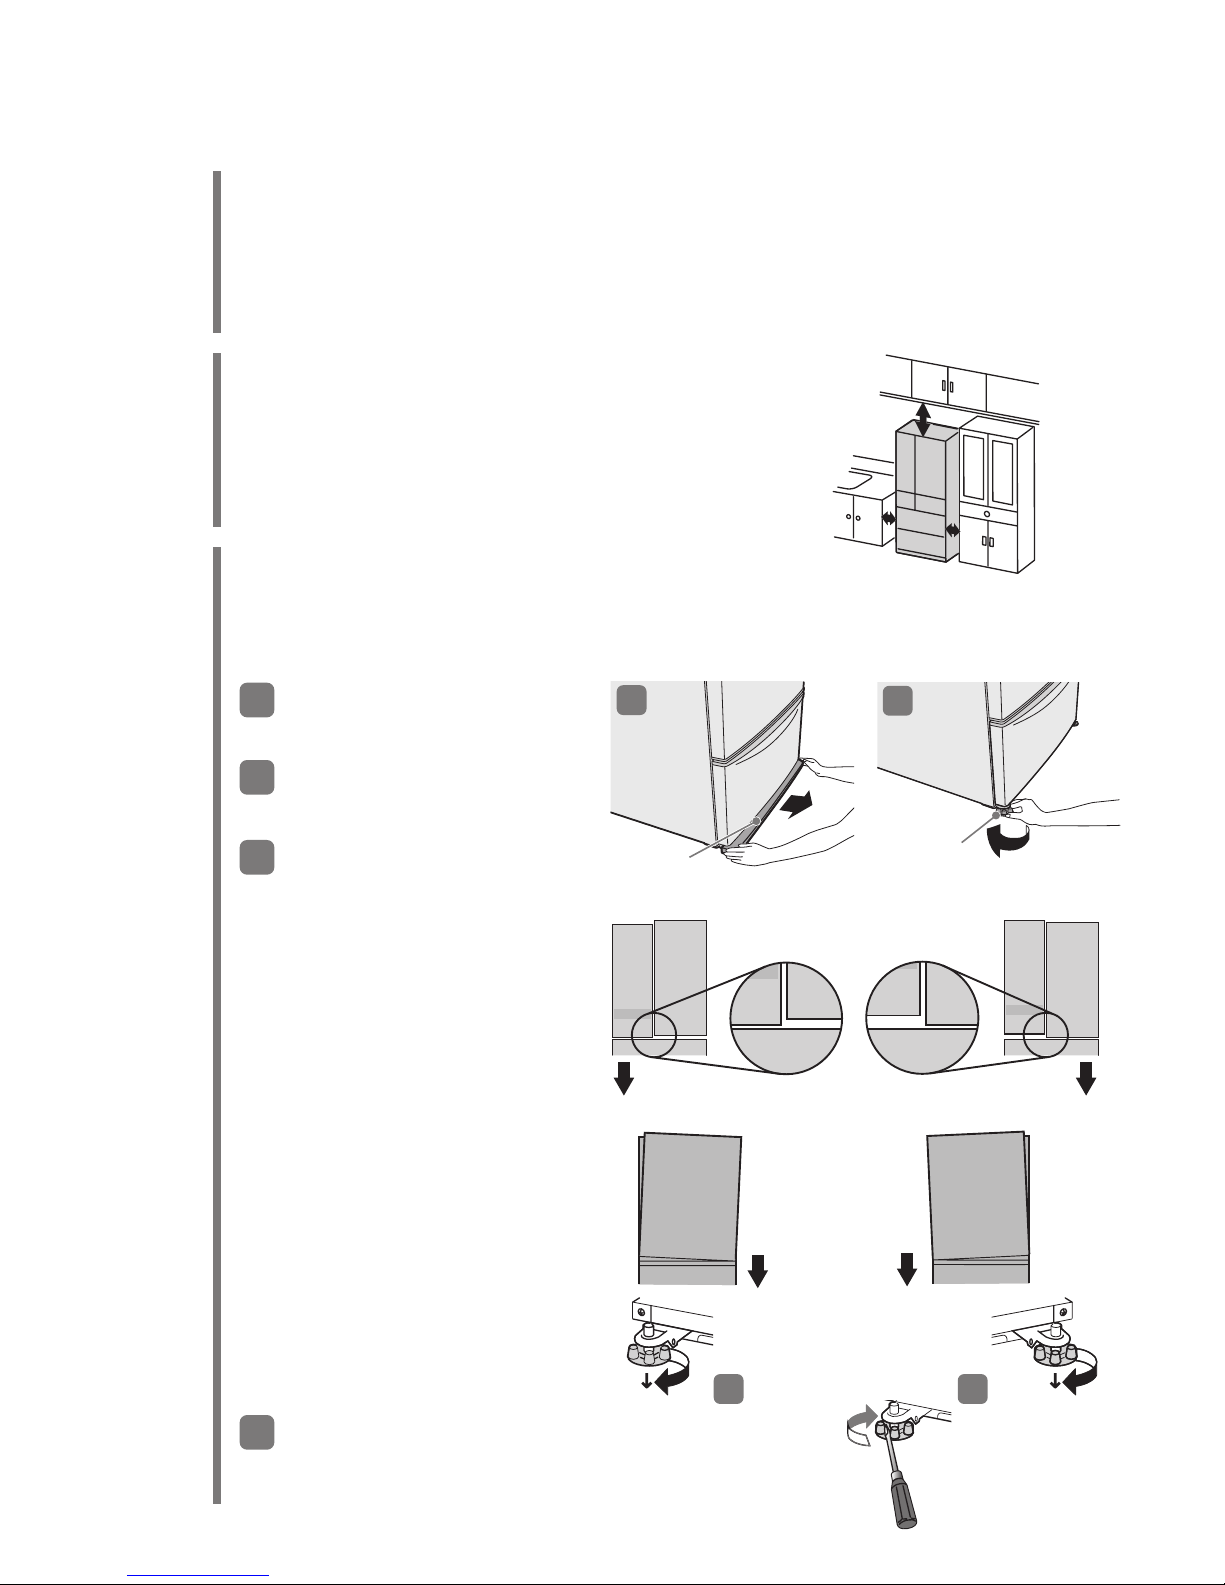
設置場所
● 堅固・水平的地板
地毯・榻榻米(日式草蓆地板)・木板地塑膠地板等恐怕會有變形・變色的可能,請墊(
1cm
厚)的板。
● 避免陽光直射和高溫
● 不潮濕・空氣流通的地方
這些可防止冷卻功率下降,避免電費增加。而且可抑止變色以及生。
在周圍請空開充分的散熱空間
● 為了保持良好冷卻效率,在周圍請空開充分的散熱空間。
● 本體側面的中央部分是比所表示的尺寸稍大。
設置時請確保充裕的空間。
● 背面可靠牆設置。若有振動音或是不願讓牆壁弄髒及變色的話,
請空開一些間隙。
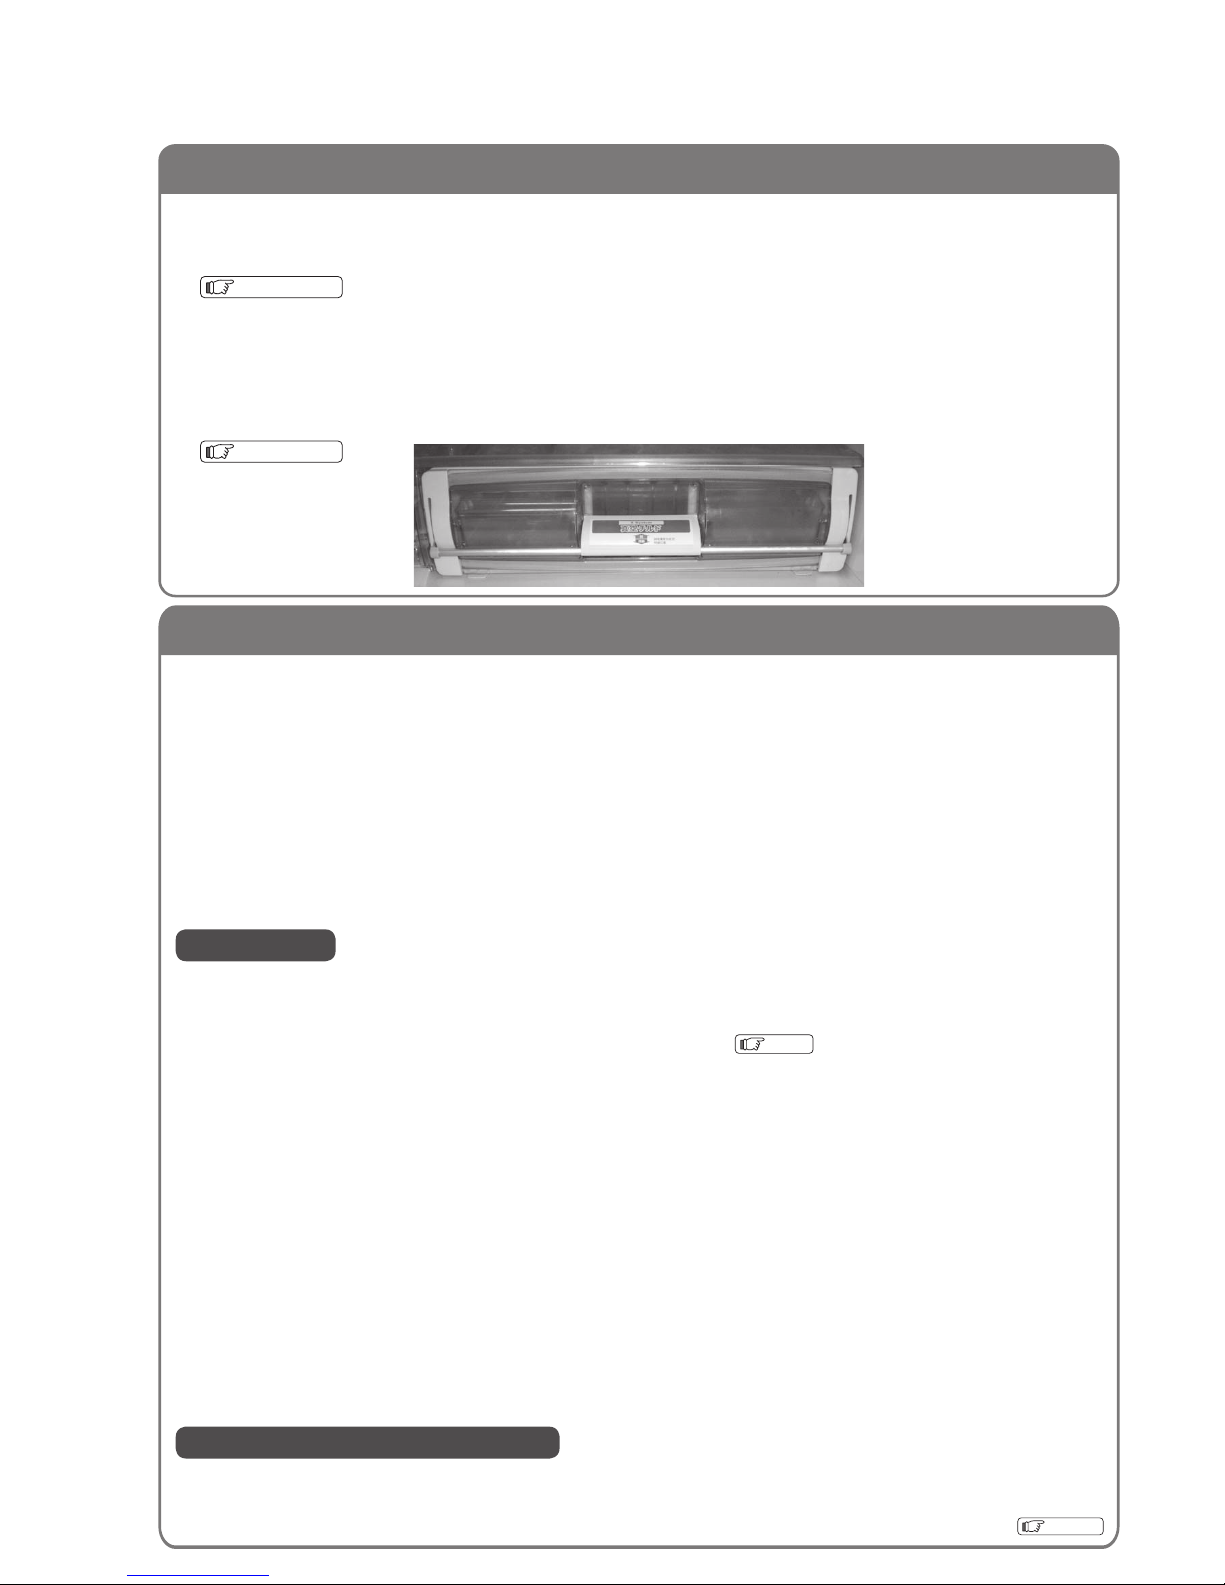
箱門的平衡調整
● 設置的地方不平,地板太軟,加上食物的重量,冰箱腳會下沉,箱門會稍有歪斜。
→
機能上沒有問題,如介意請按如下的步驟進行平衡調整。
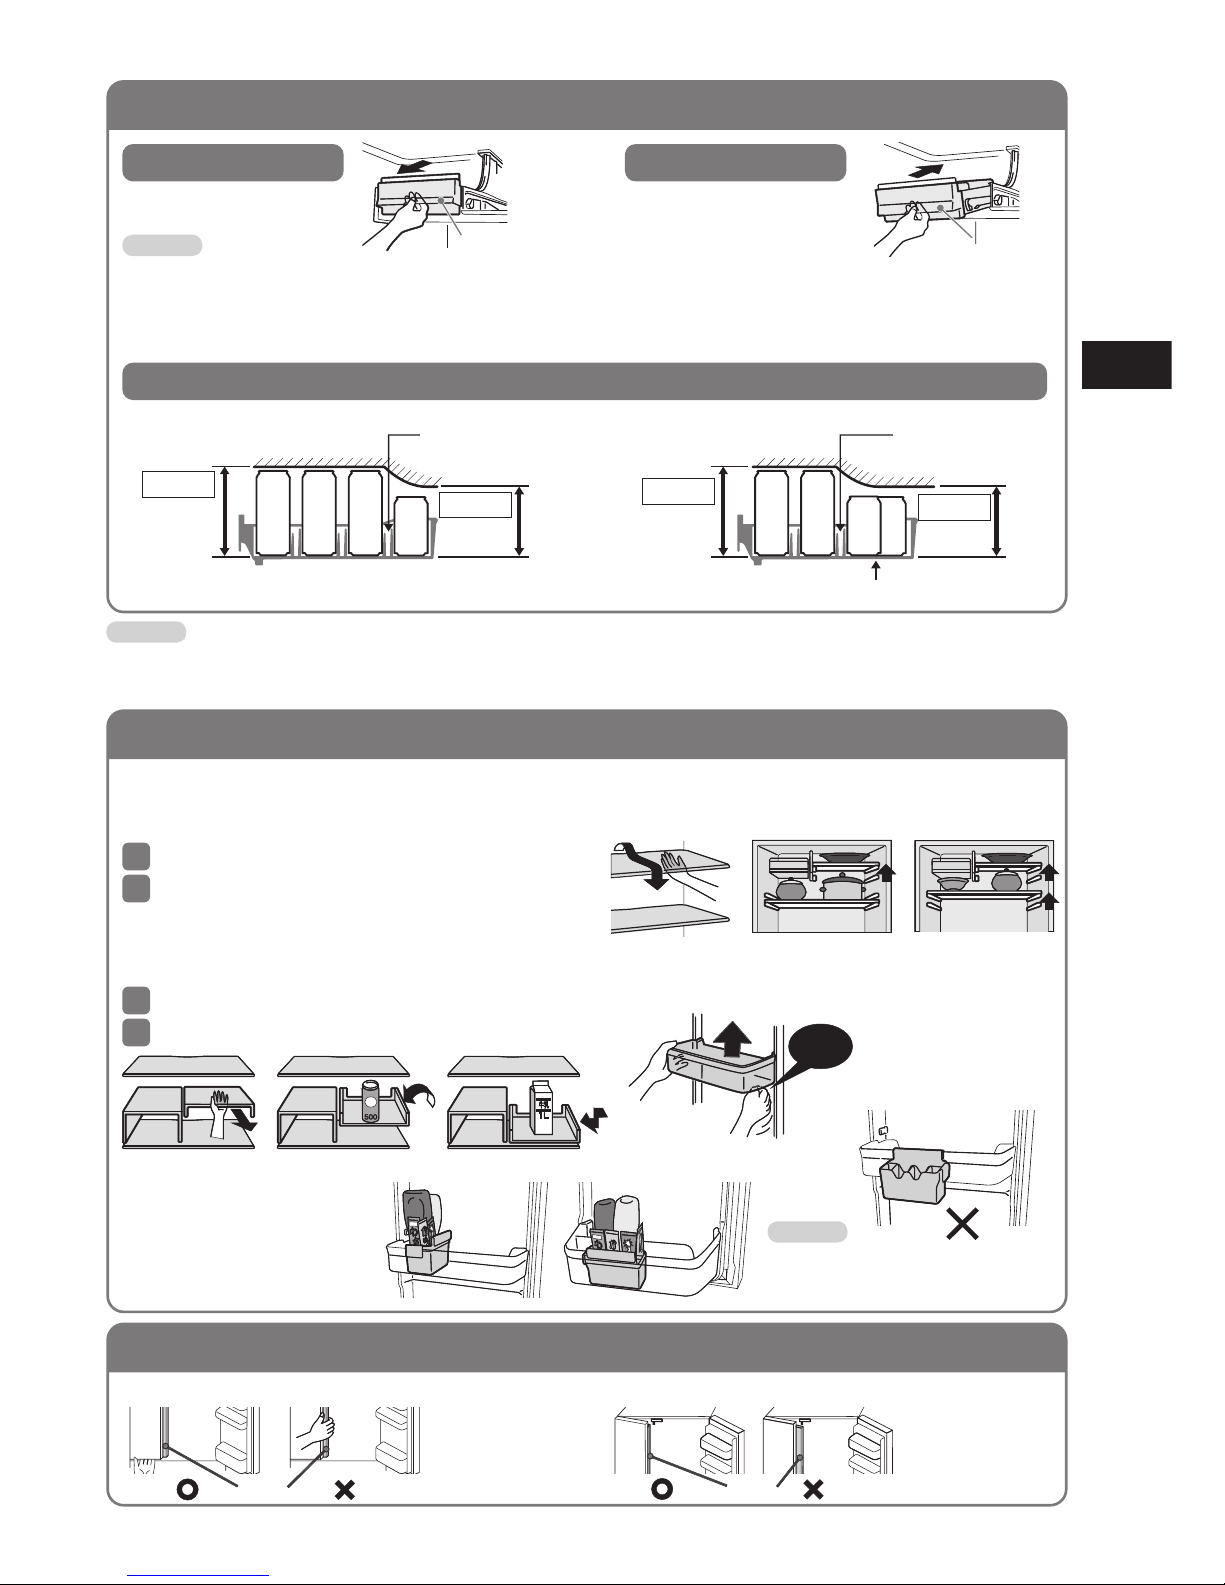
進行左右水平調整,並使冰箱的前側稍微高一點可方便關門以避免門沒關好。
手持腳座護蓋的兩端,用力拉向身前
卸下。
旋轉調整腳,把腳降低到地面固定。
(左右兩個地方)
旋轉調整腳來調整,直到電冰箱的門
平衡。
將腳座護蓋的卡榫(左右)插入安裝
孔內安裝。
● 調整腳的旋轉量是,每旋轉1圈相當於
箱門的高低差距
1mm
。
● 調整以後,因為電冰箱本體與地板適應
要花幾天時間,已經調整過的箱門會出
現高低不平。箱門高低不平衡的時候,
請再次按步驟進行平衡調整。
● 歪斜還是沒有改善的話,請使用另購部
件:「箱門調整墊」(產品型號
.R-Y6000
500
)。詳細內容請洽詢經銷店。
上方為
5cm
以上
上方為
5cm
以上
左右
1cm
以上
左右
1cm
以上
2
3
4
1
腳座護蓋
旋轉降低左
邊的調整腳
旋轉降低右
邊的調整腳
調整腳
■ 左扉下歪
■ 右側下歪
■ 調整腳難以旋轉時
請使用螺絲起子等推轉。
■ 右扉下歪
■ 左側下歪
Page 9
9
4
5
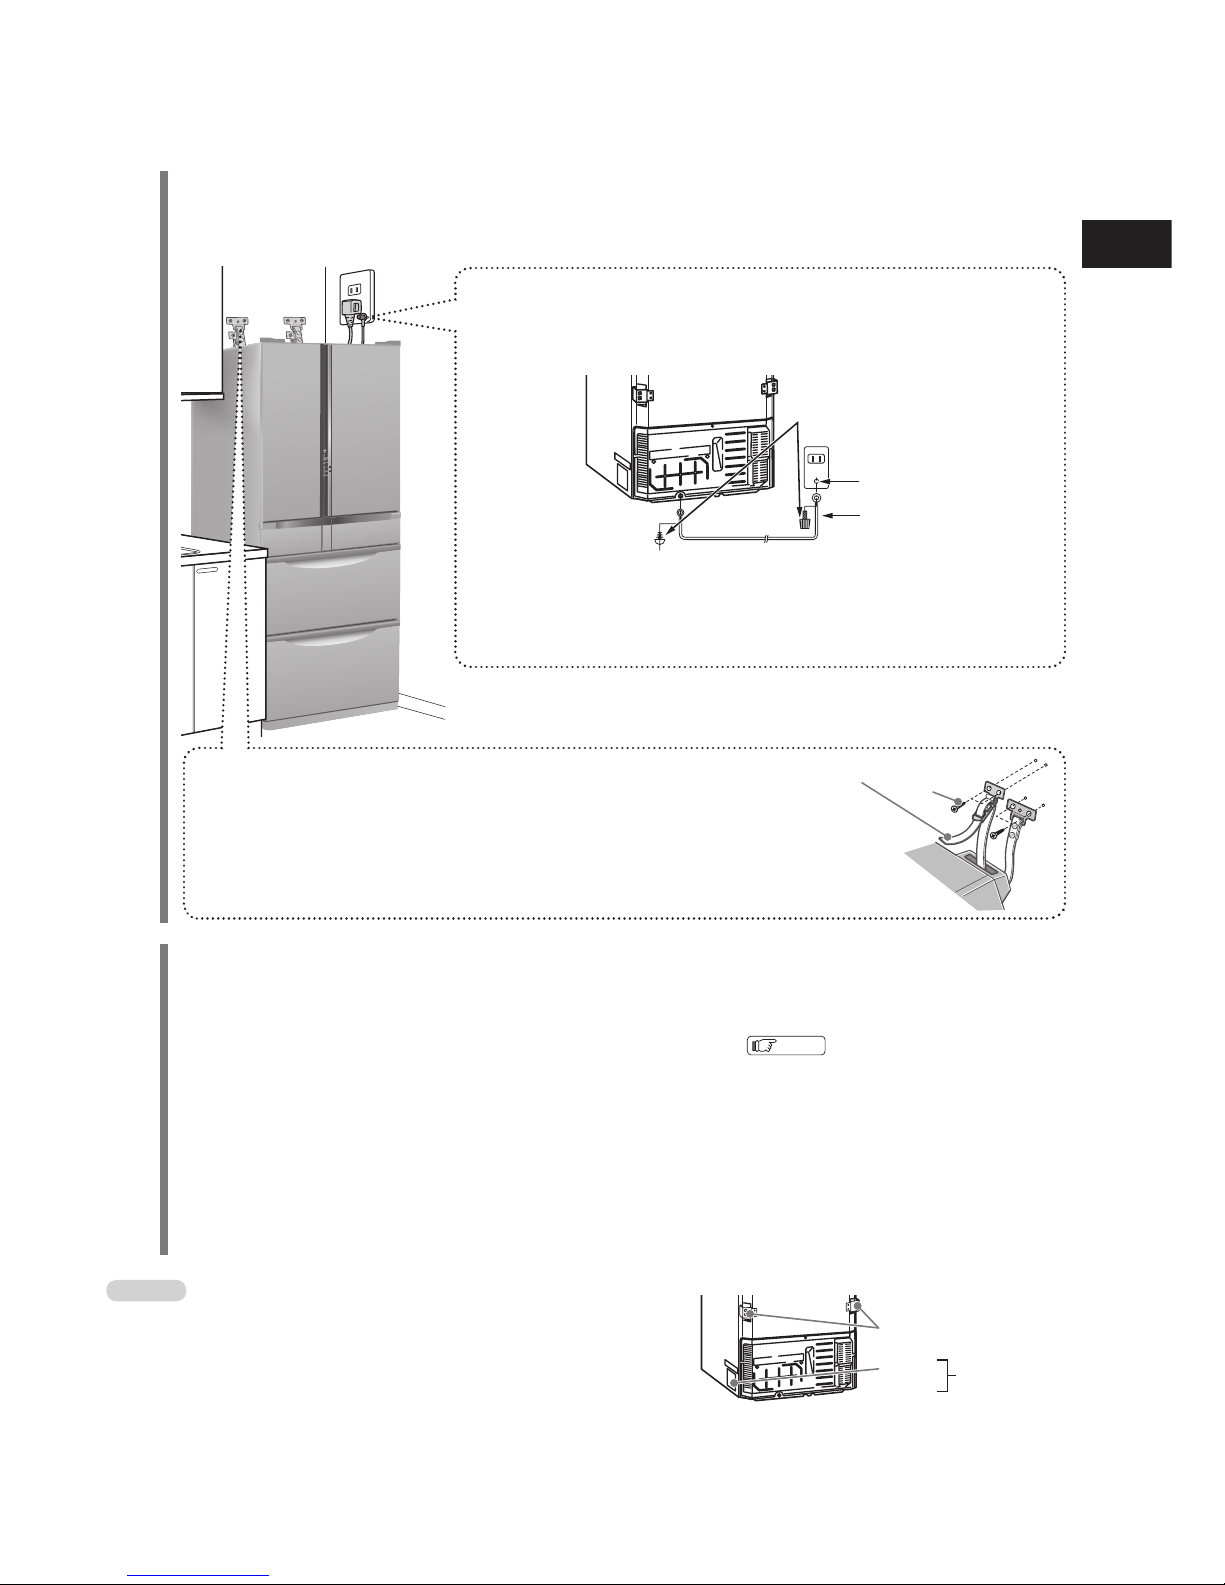
關於電源插頭及接地
● 設置後直接就可插上電源插頭。
● 請用獨立的插座。(電源
110V
・
額定電流
15A
以上)
放入食品
● 冰淇淋、未冷卻的食品、容易受傷的食品等,在冰箱尚未充分冷卻前請勿放入冰箱。
● 根據冰箱周圍溫度、食品的存放方式不同,冰箱內充分冷卻需要4小時,也有可能需要24小時以上。
● 初次使用自動製冰時,請操作自動製冰機的清潔「製冰機清潔」。
23
頁
● 自動進行連續的製冰運轉是必須在冰箱內充分冷卻之後才能開始。
(
初次使用時,最初的結冰可能需要花24小時以上。
)
● 為了盡快冷卻,請盡量減少冰箱門開閉的次數。
● 食品儲放時請保留間隙。
● 開始使用時,可能會有塑膠的氣味。為了不讓氣味悶在室內,請讓房間內保持通風良好。塑膠氣味自然
會消失。
● 魚類、肉類或乾燥後會變質的食品、或是味道強烈的食品,請用保鮮膜包覆或是放在密閉容器內之後再
放到冰箱內保存。
為了防止萬一觸電,建議實施接地。
● 如設置地方特別潮濕,請與經銷店洽商,接地線或安裝漏電開關。
● 另購部件:「地線(
2.5m
)」(產品型號
.NW-60R6 052
)
對於防備地震
● 建議使用兩條「冰箱防倒安全帶」,固定在堅固的牆壁或柱子上。
● 另購部件:「冰箱防倒安全帶」(產品型號
.R-826CV 300:1
條裝)詳細內
容請洽詢經銷店。
● 請勿將背面的標貼撕掉。標貼是為了保持性能與安全性。
● 請勿將側面下部的塑膠零件與標籤撕下。
※ 若在有硫化氣體噴出的溫泉地區等設置時,可能有必要進行配管的防處理,請預先與經銷店洽商。另外,由於
煤氣受造成的故障是不屬於保證項目以內。
不可接地線的地方
● 自來水管(有觸電的危險)
● 煤氣管(有爆炸的危險)
● 電話線及避雷針的地線(打雷時會發生危險)
接地端子
接地安裝螺絲
地線
銅線直經
1.6mm
標貼
左右
塑料部件
標籤
安全帶
通知事項
使
用
之
前
Page 10
10
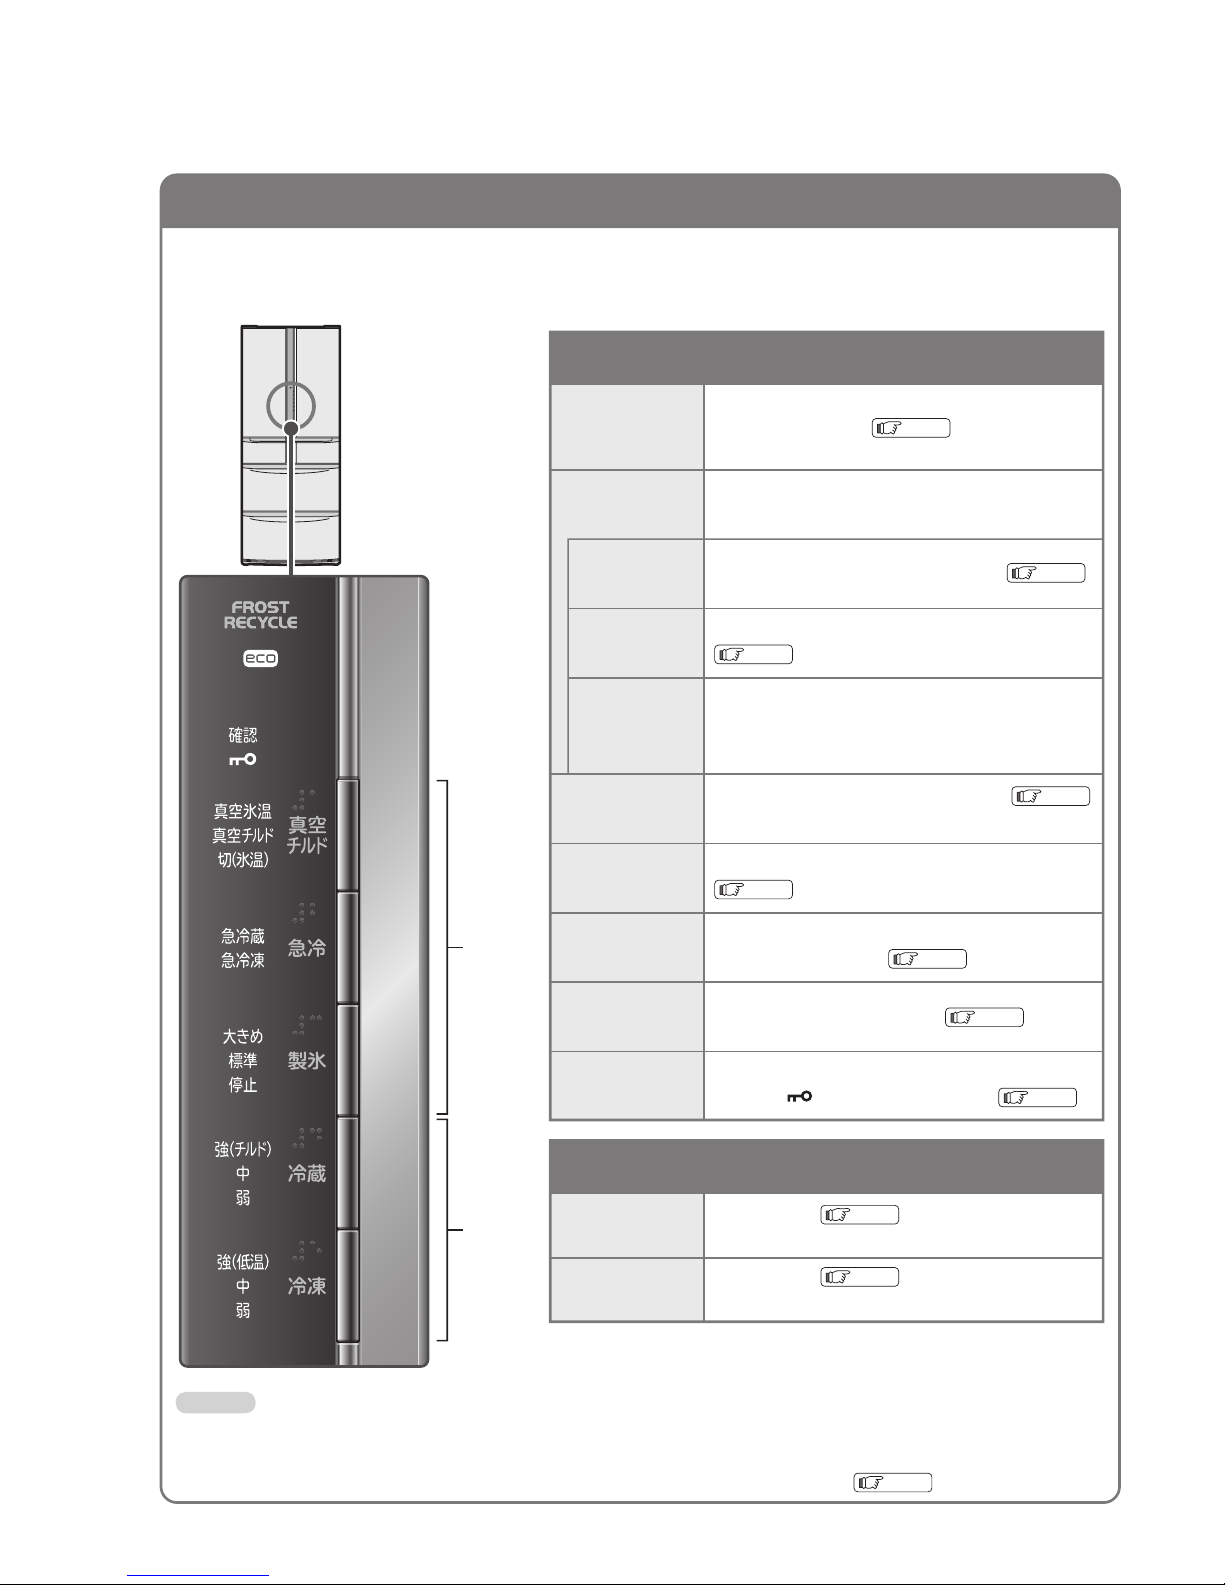
操作面板/各部分的名稱/儲存室
● 操作面板的圖像(是顯示部分全部亮燈時的影像。實際上,只有選擇的文字才亮燈。)
操作結束後,經過約2分鐘文字顯示燈則熄滅。但是急冷運轉的顯示以及
eco
運轉顯示燈則亮燈。
要確認設定時請按任何一個按鍵。顯示燈則再度亮燈。
冷藏室門操作面板
● 請在所有的門都關閉的狀態進行操作。為了防止冷藏室門開放中的操作錯誤,即使顯示文字亮燈中,按冷藏室門的操作面
板也不會有反應。
● 箱門打開時間長達1分中以上,冷藏室門操作面板的文字顯示會閃爍(冰箱門警示器)。
30
頁
通知事項
選擇
機能用的鍵
調節
溫度用的鍵
方便的機能
溫度調節
真空室
冷藏室
冷凍室
製冰功能
急冷功能
製冰機清潔
eco
運轉顯示
確認
按鍵鎖
急速冷凍
快速冷藏
急速冷凍
・
快速冷藏
(
同時
)
按
鍵選擇「真空開
+1˚C
」「真空開
-1˚C
」「真空關
-1˚C」
14
頁
出貨時,設定為「真空開
-1˚C
」。
按冷藏鍵設定
12
頁
平常請設定在「中」的位置。
按冷凍鍵設定
17
頁
平常請設定在「中」的位置。
按製冰鍵選擇冰的大小「標準」「大顆」。
19
頁
不用自動製冰時,選擇「停止」。
按急冷鍵選擇「急冷凍」「急冷藏」「急冷凍急冷藏
(
同時)」
按住製冰鍵5秒以上,可自動清洗製冰盤和給水路。
23
頁
正告知冰箱的運轉情形。
也可以將顯示燈熄滅。
30
頁
「確認」閃爍時是提示有異常。
29
頁
為了防止操作面板的操作錯誤,請按住冷藏鍵3秒
以上,使
(
操作部鎖定) 顯示亮燈
30
頁
強烈冷卻冷凍室。需儘快冷凍的時候。
17
頁
強烈冷卻冷藏室。需快速冷卻食品及飲料的時候。
12
頁
冷凍室與冷藏室同時強烈冷卻。比單獨設定為「急
冷凍」「急冷藏」的時候效果較弱。
製冰機清潔
(
按5秒閃爍
)
按鍵鎖
(
按3秒
)
Page 11

11
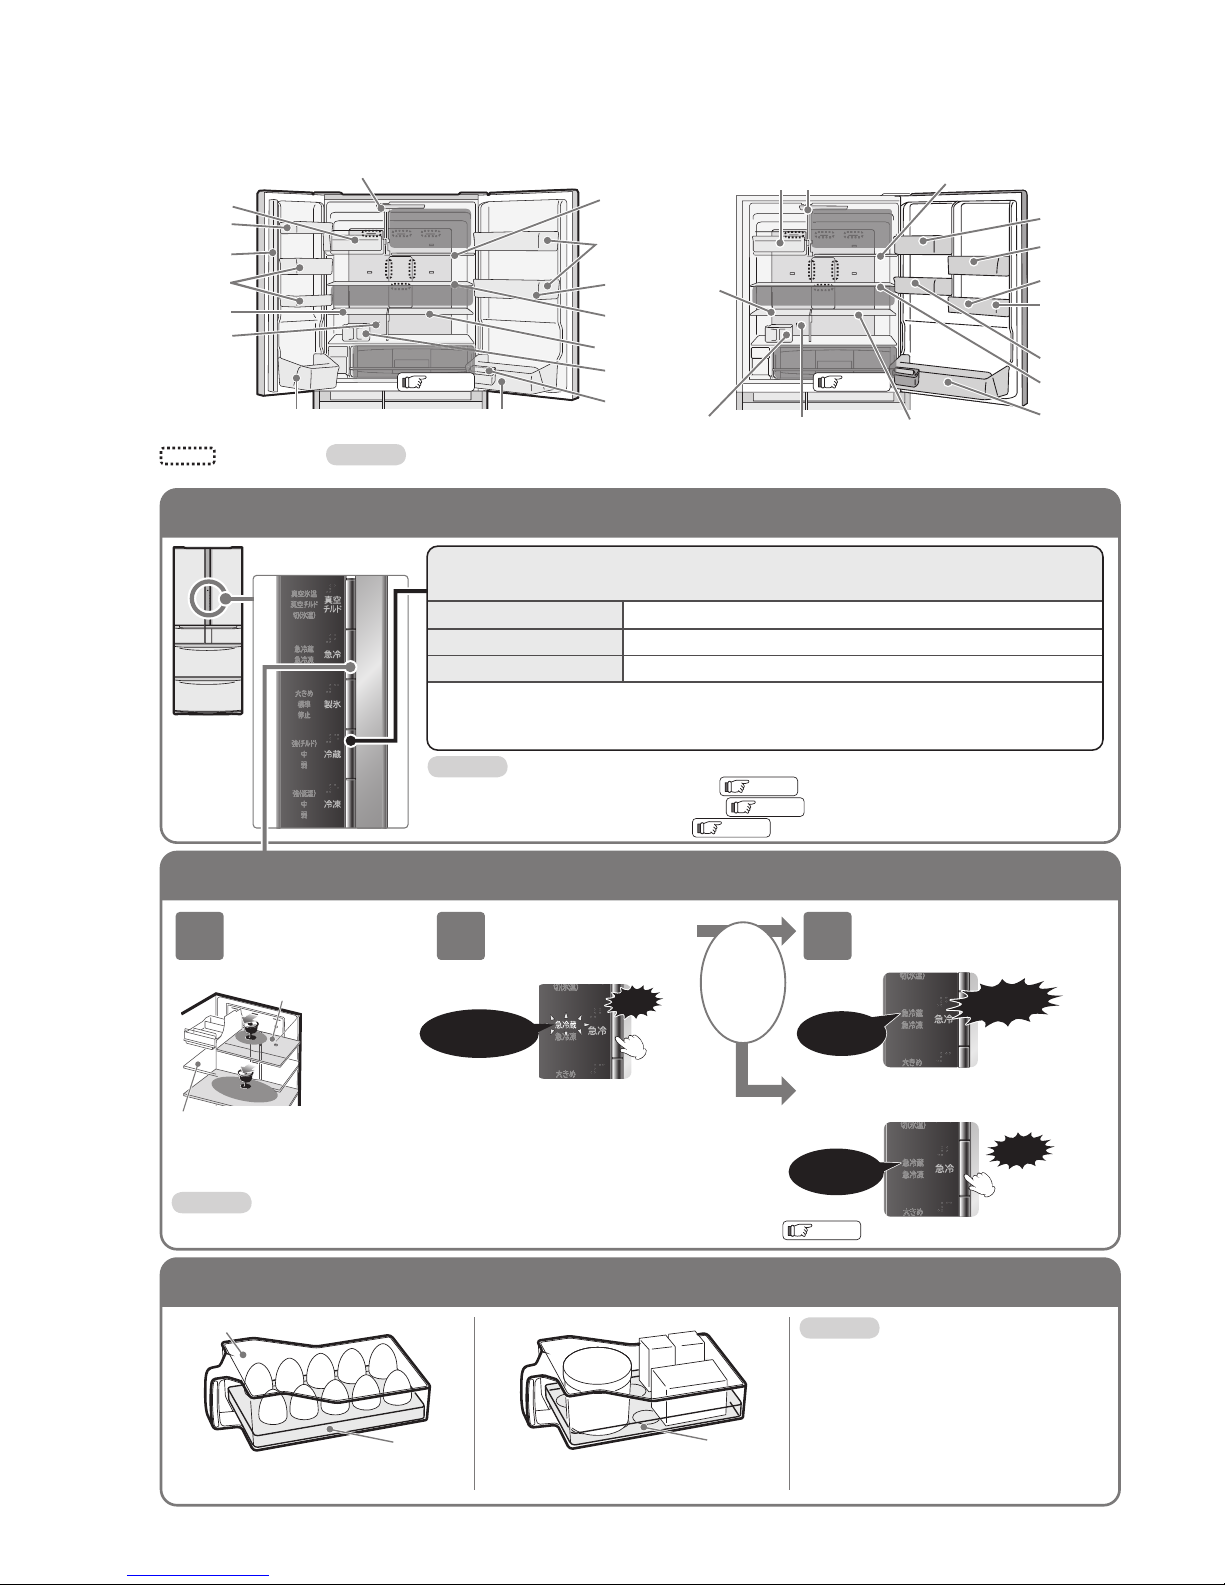
各室的名稱
適於儲存的食品
12
頁
冷藏食品
箱門置物架附近溫度會稍高。
18
頁
保存自動製冰機所製造的冰塊。
14
頁
保存的食品請參照下列一覽
16
頁
儲存冷凍食品,冰淇淋及乾糧。
16
頁
儲存冷凍食品,冰淇淋及乾糧。
低溫冷凍
17
頁
(約 -23˚C ~ -20˚C)
以比平常溫度低的低溫保存。
20
頁
蔬菜,水果,飲料
※5門式與6門式都相同。
冷藏室
(約2˚C~6˚C)
製冰室
(約-20˚C~-18˚C)
真空室
(約-1˚C~約1˚C)
上層冷凍室
(約-20˚C~-18˚C)
下層冷凍室
(約-20˚C~-18˚C)
蔬果保鮮室
(約3˚C~7˚C)
真空開
+1˚C
真空關(冰溫
)
(約-1˚C)
真空開
-1˚C
利用真空及防止氧化維生素來保存蔬菜沙拉・乳類製品
肉類・魚類等食品,可以防止食品中富含的營養素氧化。
因為比真空冷凍的溫度還低,適合保存肉類、魚類等食品。
放入其他食品有可能因低溫而結凍或變質。建議此處只用
來保存肉類、魚類食品。
關閉真空功能。建議存放需裝在「密封袋」、「密閉容器」
的食物。因為是冰溫室,食物有可能因低溫而凍結。
蔬菜沙拉,燈籠椒,蘋果,柳橙,奇異果等。
維也納香腸,乳酪片等。
牛肉,豬肉,雞肉,火腿片,香腸等。
茄子 小黃瓜
竹莢魚,沙丁魚,鯖魚,魚蛋等。
咖啡豆,茶葉,乳製品,醬料等。
●蔬菜、水果
● 密封袋包裝食品
密封袋在儲存時可能會膨脹而擠壓到其
他食品。
● 不耐低溫的蔬果
低溫可能會使得蔬菜表面變質。
●儲放肉、魚、肉類及魚類加工食品以
外的食物時,請勿設定為「真空開
-1˚C
」「真空關
-1˚C
」。
蔬菜或豆腐等水分多的食品會有凍結
的可能。
● 塑膠密閉容器
塑膠密閉容器的蓋子在儲存時可能會鬆
開或脫離原來的位置。取出時請注意。
●肉纇、加工肉
●其他
●魚纇、海鮮纇
儲存時需要注意的食品與容器
不適於儲存的食品
注意
注意
周圍溫度為
30˚C
,此溫度是在沒有放入食物,關上冰箱門時的標準溫度。夜間或不在家等情形,長期沒有開閉冰箱門取出放入食物,
因壓縮機低速運轉,可能造成較大的震動。
操
作
面
板
/
各
部
分
的
名
稱
/
儲
存
室
Page 12
12
調節冷藏室的溫度
冷藏室
下移式便利盒
下移式便利盒
低層架
可以改變高度
低層架可以改變高度
可調式置物架
(2層)
可調式置物架
置物架 (右上
)
置物架 (右下
)
蛋架
置物架 (左
)
可調式層架
蛋架
可調式層架
容器置物架
翻轉式層架
翻轉式層架
置蛋盒
冷藏室溫度感應器
軟管式容器
站立架
LED
燈
LED
燈
固定容器
置物架
容器置物架 (左
)
容器置物架 (右
)
旋轉隔板
可調式置物架
(2層)
冷藏室溫度
感應器
置蛋盒
固定層架
固定層架
快速冷藏區
快速冷藏區
真空室
快速冷藏區
快速冷藏區
真空室
● 操作時請緊握手把。
● 因食物可能會落下,請勿將食品重疊
存放。
● 因食物可能會傾倒,請勿放入過高的
食物。
● 請不要用此容器來製冰。
● 置蛋盒請勿放入下移式便利盒內。
● 因為溫度變低,請勿放置水分較多的食品或罐裝飲料。否則的話會結凍。
● 在附近放熱的食品,冷藏室溫度會降得過低。請存放在別的地方。
注意事項
注意事項
冷氣吹出口
冷藏室門操作面板
置蛋盒
(可放入雞蛋等食品,保存在冷藏室)
置蛋盒
置蛋架置蛋架
可以存放
10
個雞蛋。
雞蛋盒可以直接放入。
可將置蛋架翻轉,背面的盒架可以用來放置小型的
食品。
冷藏室溫度的調節
按冷藏鍵調節。
是在環境溫度
30˚C
、不放食物、關著門、安定時的標準值。
強( 冷凍
)
中
弱
比“中”低約1∼
3˚C
約2∼
6˚C
比“中”高約1∼
3˚C
● 通常請使用“中”的位置。溫度因使用條件而有所變動。
● 設定改為“強”或“弱”時,真空室的溫度也會改變。
● 箱門層架比左表的溫度略高。
● 操作結束後,經過約2分鐘文字顯示燈則熄滅。但是急冷運轉的顯示以及
eco
運轉顯示燈則亮燈。
10
頁
● 操作部分的詳細使用方式
10
頁
● 調節更細微的溫度時
29
頁
通知事項
●與急速冷凍機能同時使用的時候,依據冰箱的運轉狀態,效果會有變弱的可能。
17
頁
通知事項
快速冷藏
(需快速冷卻的時候)
1
在快速冷藏隔層放食
物
按急冷鍵使「急冷藏」
的顯示亮燈 ※
約45分鐘「急冷藏運轉」自動
終了,「急冷藏」顯示自動熄滅
中途停止時按急冷鍵使顯示滅燈
低層架
可調式層架
※ 設定為「急冷藏」之後,「急冷藏」以
的顯示燈經過約2分鐘即熄滅。
● 放在中央的頭部分可較快冷卻。(冷氣吹出口前面)
● 水分多的食品及罐頭飲料請離開背面存放或是移放到下層。因會有凍結、破裂的危險。
2 3
按鍵顯示燈便亮
嗶
「急冷藏」
運轉時顯示燈
亮燈,其他的
顯示燈則熄滅
※
顯示滅燈
嗶嗶嗶嗶
按鍵滅燈
嗶嗶
製冰機清潔
(按5秒閃爍)
按鍵鎖
(
按3秒
)
14
頁
14
頁
六門形式:
(R-SF62AMJ, R-SF58AMJ, R-SF48AMJ)
五門形式:
(R-S59AMJ, R-S49AMJ)
Page 13
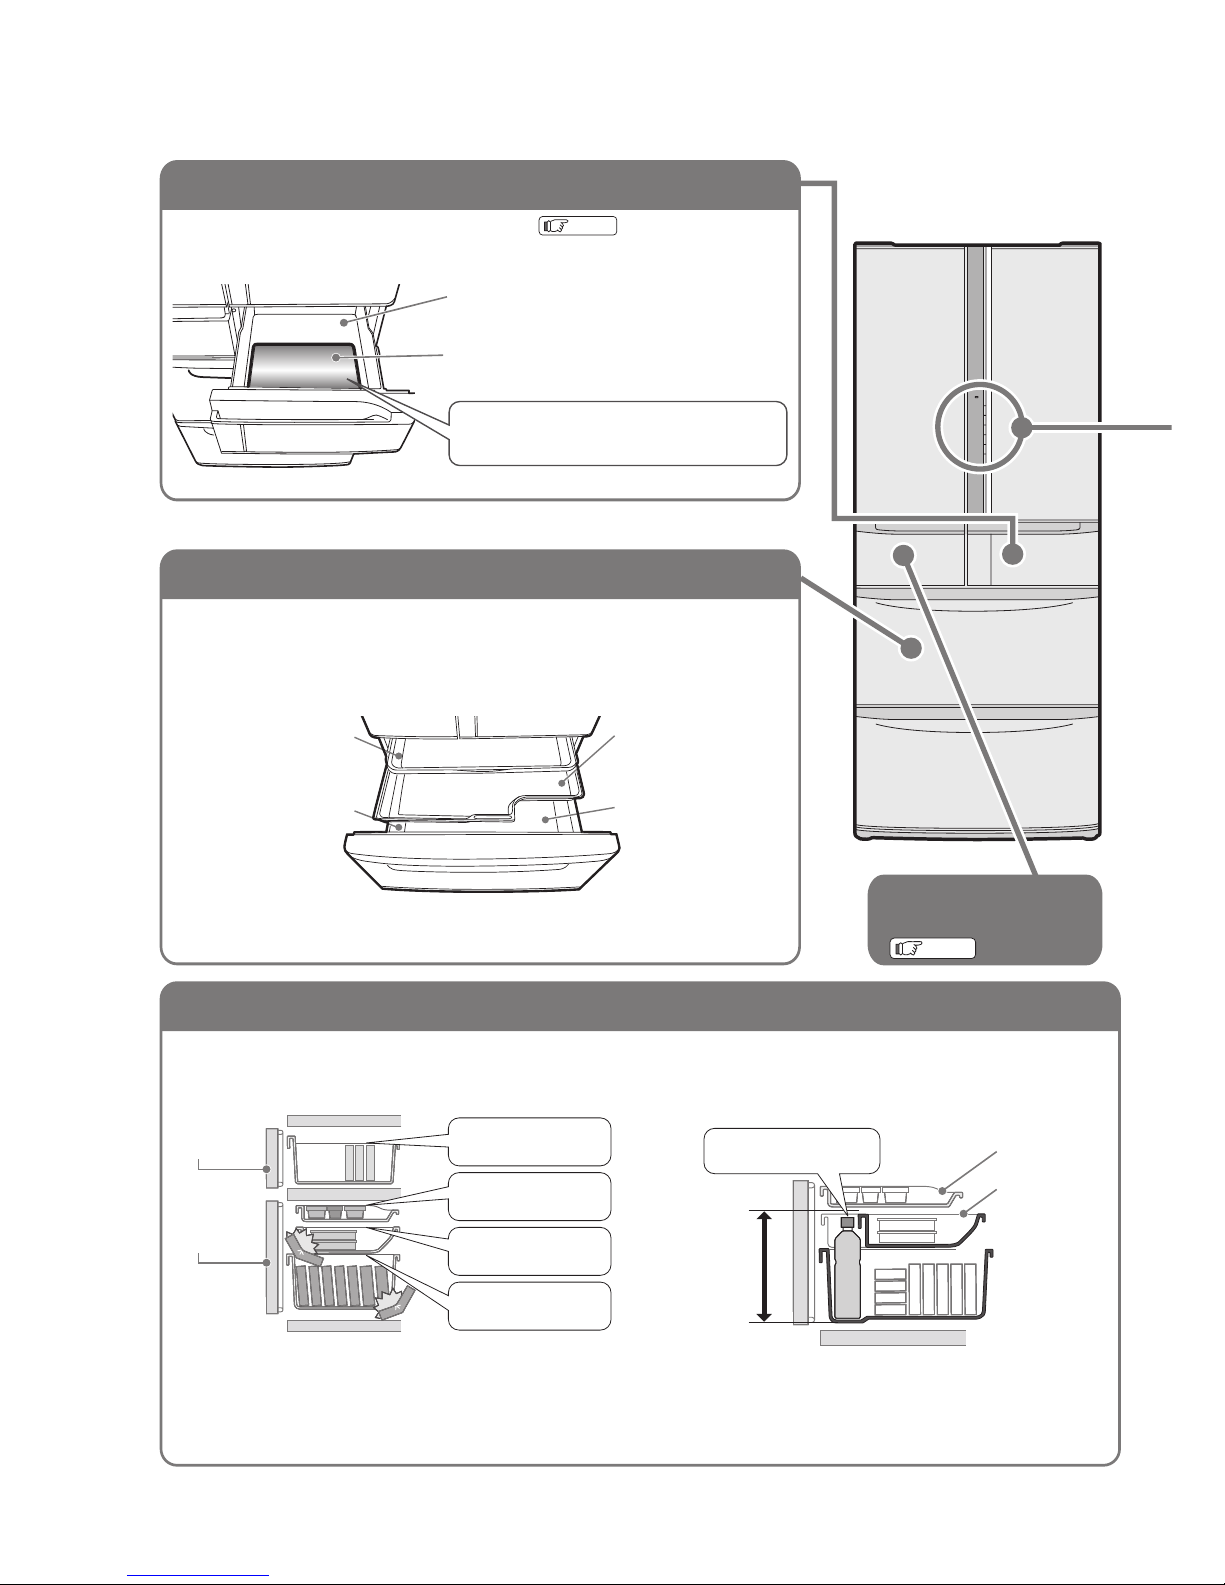
13
下移式便利盒
(將整個棚架往前拉,從較低的位置可以存取食物。)
層架及置物架可調整
旋轉隔板
(只有六門形式)
● 右側的門開著時,
請勿握住旋轉隔板
來打開左側的門。
● 請勿在旋轉隔板還
未摺疊起來時關閉
箱門。
握住把手慢慢地往前拉出。
〔
R-SF62AMJ
型
・
R-SF58AMJ
型
・
R-S59AMJ
型〕 〔
R-SF48AMJ
型
・
R-S49AMJ
型〕
握住把手慢慢地推至裡面。
拉出時
可收納的食品高度
推入時
● 請勿握把手以外的地方或任其懸掛在層架上,這會導致盒子掉下或損壞。
● 請勿在下移式便取盒被拉出的狀況下關閉箱門,這會導致盒子或食品損壞,或令箱門處於半關閉狀態。
勿將食品重疊存放。
務必將隔板以及鋼纜裝置於棚架上。
存放食品時勿讓食品超出棚架。
如果有容易溢出的食品,請存放在密閉容器內。
層架及置物架可配合食品大小進行調整。調整層架時,請先將儲藏的食品移出。
■可調式層架・低層架
■開門時 ■關門時
■翻轉式層架 ■可調式置物架(右
) (左)
可以配合存放的食品做適度的調整。
■軟管式容器站立架
可以直立放置如軟管式容器等的
小物品。可依照個人使用喜好,
將站立架掛在棚架的邊緣。
● 要關閉冰箱門時,請務必推入真空冷凍盒、置蛋盒、下移式便利盒後再關閉冷藏室門。若在拉出的狀態下關閉
冰箱門時,有可能造成冰箱門、盒、以及食品的損壞。
● 冰箱門開閉次數過於頻繁、及冰箱周圍濕度過高時,壁上會有起霧現象,冷氣出風口的周圍可能凝結成露水。
● 如果有水或食品汁液溢出時,請迅速擦乾。
● 請勿將站立架掛在棚架的外緣。關
閉冰箱門時,有可能造成冰箱門、
盒、以及食品的損壞。
● 請遵守可收納食品的高度。
冷藏室的頂部內側稍低。如上圖所示,收納食品時請勿讓食品凸出在外。
注意事項
注意事項
注意事項
第三塊隔層板的安裝
位置
19.5cm
15cm
500
ml
缶
呈之字行的配置。
前側
內側
350
ml
缶
從裡面把層架稍微抬高,往前拉出後就可取出。
把層架稍微抬高就可取出。
按照所需的高度,把層架插放到最面之後,稍微提高層
架的內側再推進去。(將層架的子扣掛在最面的部位上)
把層架翻轉後,固定在上層或下層的位置。
1
1
2
2
冷
藏
室
第二塊隔層板的安裝
位置
19.5cm
15cm
500
ml
缶
前側
內側
350
ml
缶
把手 把手
用作一般層架 款式
1
款式
2
旋轉隔板 旋轉隔板
咚咚
Page 14
14
真空室
● 將真空室密閉,啟動真空幫浦,容器中的氣壓逐漸降低,可維持真空狀態(低氧狀態)。再加上維生素盒,可以抑
制食品氧化。
● 抑制氧化的功能,可以保留食品的營養成分以及原有風味,可以比以往保存更久的時間。
● 食品用保鮮膜包覆,也不會影響真空的效果。
註: 所謂真空是指比一大氣壓的壓力還低的空間。真空室的氣壓約為
0.8
氣壓,因為比一大氣壓還低,所以本公司將
之稱為真空。
■ 請讓「真空開
+1˚C
」或「真空開
-1˚C
」在冷藏室門操作面板上顯示一次。
※ 設定為「真空關
-1˚C
」,亦可作為一般的冷藏室
(-1˚C)
10
頁
周圍溫度為
30˚C
,安定狀態下的標準溫度。
要使用真空室時,請務必將冰箱左右門打開。
● 為了讓真空室內成為真空狀態,啟動真空幫浦時,會產生聲音及震動,這不是異常現象。
● 真空室的門關緊,再關上冰箱門之後,即啟動真空幫浦。從啟動真空幫浦到完成真空狀態,約需要3分鐘的時間。
在3分鐘以內打開箱門有可能聽不到「咻」的聲音,要確認時請等3分鐘之後再確認真空狀態。
● 操作結束後,經過約2分鐘文字顯示燈則熄滅。但是急冷運轉的顯示以及
eco
運轉顯示燈則亮燈。
要確認設定時請按任何一個按鍵。顯示燈則再度亮燈。
● 按真空冷凍的按鈕,可以依順序轉換成「真空開
+1˚C
」→「真空開
-1˚C
」→「真空關
-1˚C
」→,顯示面板以及
操作聲音可以告知目前設定的狀態。
10
頁
● 維生素盒不需要定期更換。請勿拆除維生素盒。
● 因為是用比較低的溫度來保存的,所以
水分多的食品有凍結的可能。
● 當「咻」的聲音還響著時,門是
不能打開的。
● 如果沒有打開冰箱的左右箱門,
真空室則無法開啟。硬要開啟冷
凍室門時則可能造成雙邊的棚架、
真空室的破損,以及冰箱門突然
開啟。
●要關閉冰箱門時,請務必先關閉真空室
門並鎖定。如果真空室門在開著的狀態
下,關閉冰箱門時,則可能造成雙邊棚架、
真空室、食品的破損。
● 如果沒有將把手壓到最底部時,
則真空冷凍無法正常啟動。
● 如果把手變得比較重時,請用
手掌往裡推。
通知事項
通知事項
注意事項
注意事項
通知事項
通知事項
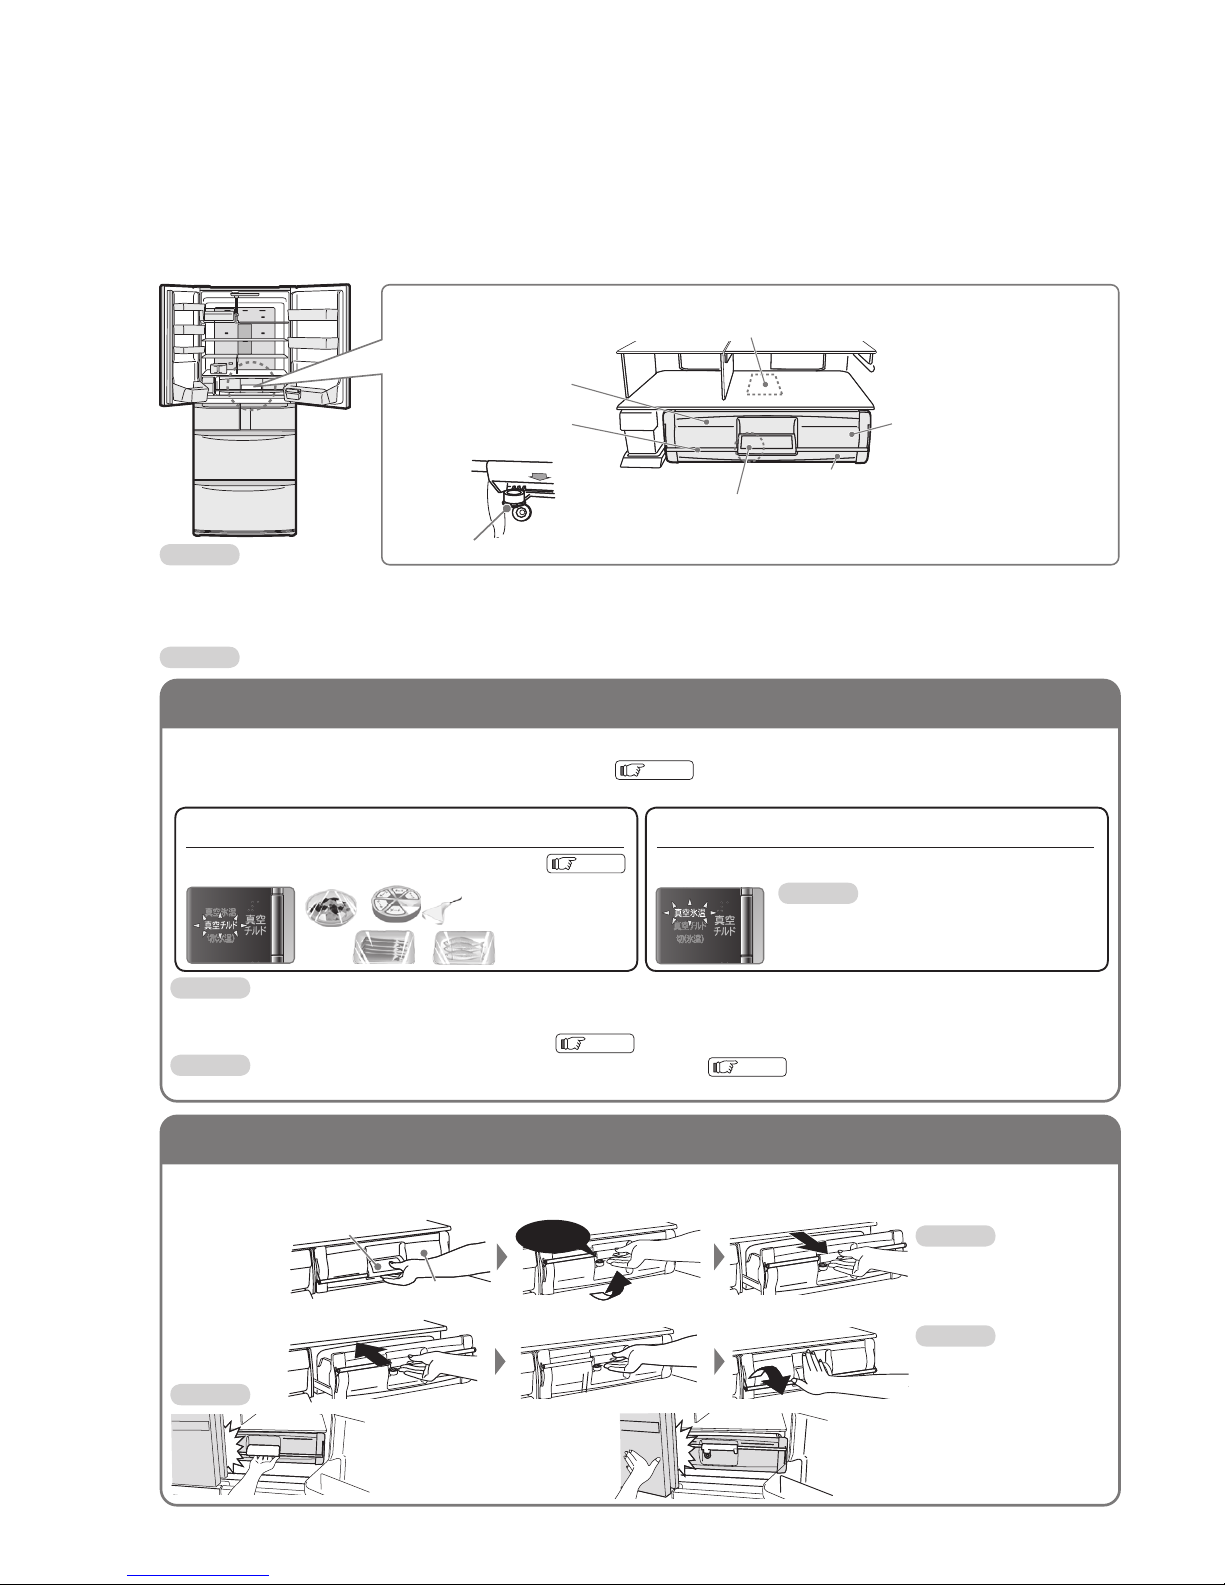
使用準備
開閉真空室門
「真空開
+1˚C
」亮燈 「真空開
-1˚C
」亮燈
詳細內容
11
頁
● 有不適合存放的食品、存放時須特別注意的食品及容器。
11
頁
● 週圍溫度過低時,水分過多的食品有可能結凍。
注意事項
注意事項
開啟箱門時
關閉箱門時
真空開
+1˚C
真空開
-1˚C
約
+1˚C
(
蔬菜、乳類製品、肉類、魚類等
)
約
-1˚C
(
特別是保存肉類、魚類以及肉類魚類加工食品
)
維生素盒(附在真空室內的頂部
)
低氧的狀態下自動產生維生素,可讓食品營養素長久保存。
真空容器
把手
從下面手握住把手開閉真空
容器。
真空冷凍盒
(
附有門
)
齒輪
(
位在真空冷凍盒的下方
)
真空解除閥(藍色
)
向上提起把手解除鎖定,藉由真空解除閥
可以解除真空狀態。
解除真空時會有「咻」的聲音。
用手從底部握住門的把手。 向上抬起把手,鎖被打開。
握住把手一直推到最裡面。
當「咻」的聲音消失時,握住把手往身前方向打開箱門。
往下按把手,鎖緊箱門。
把手
咻
箱門
Page 15
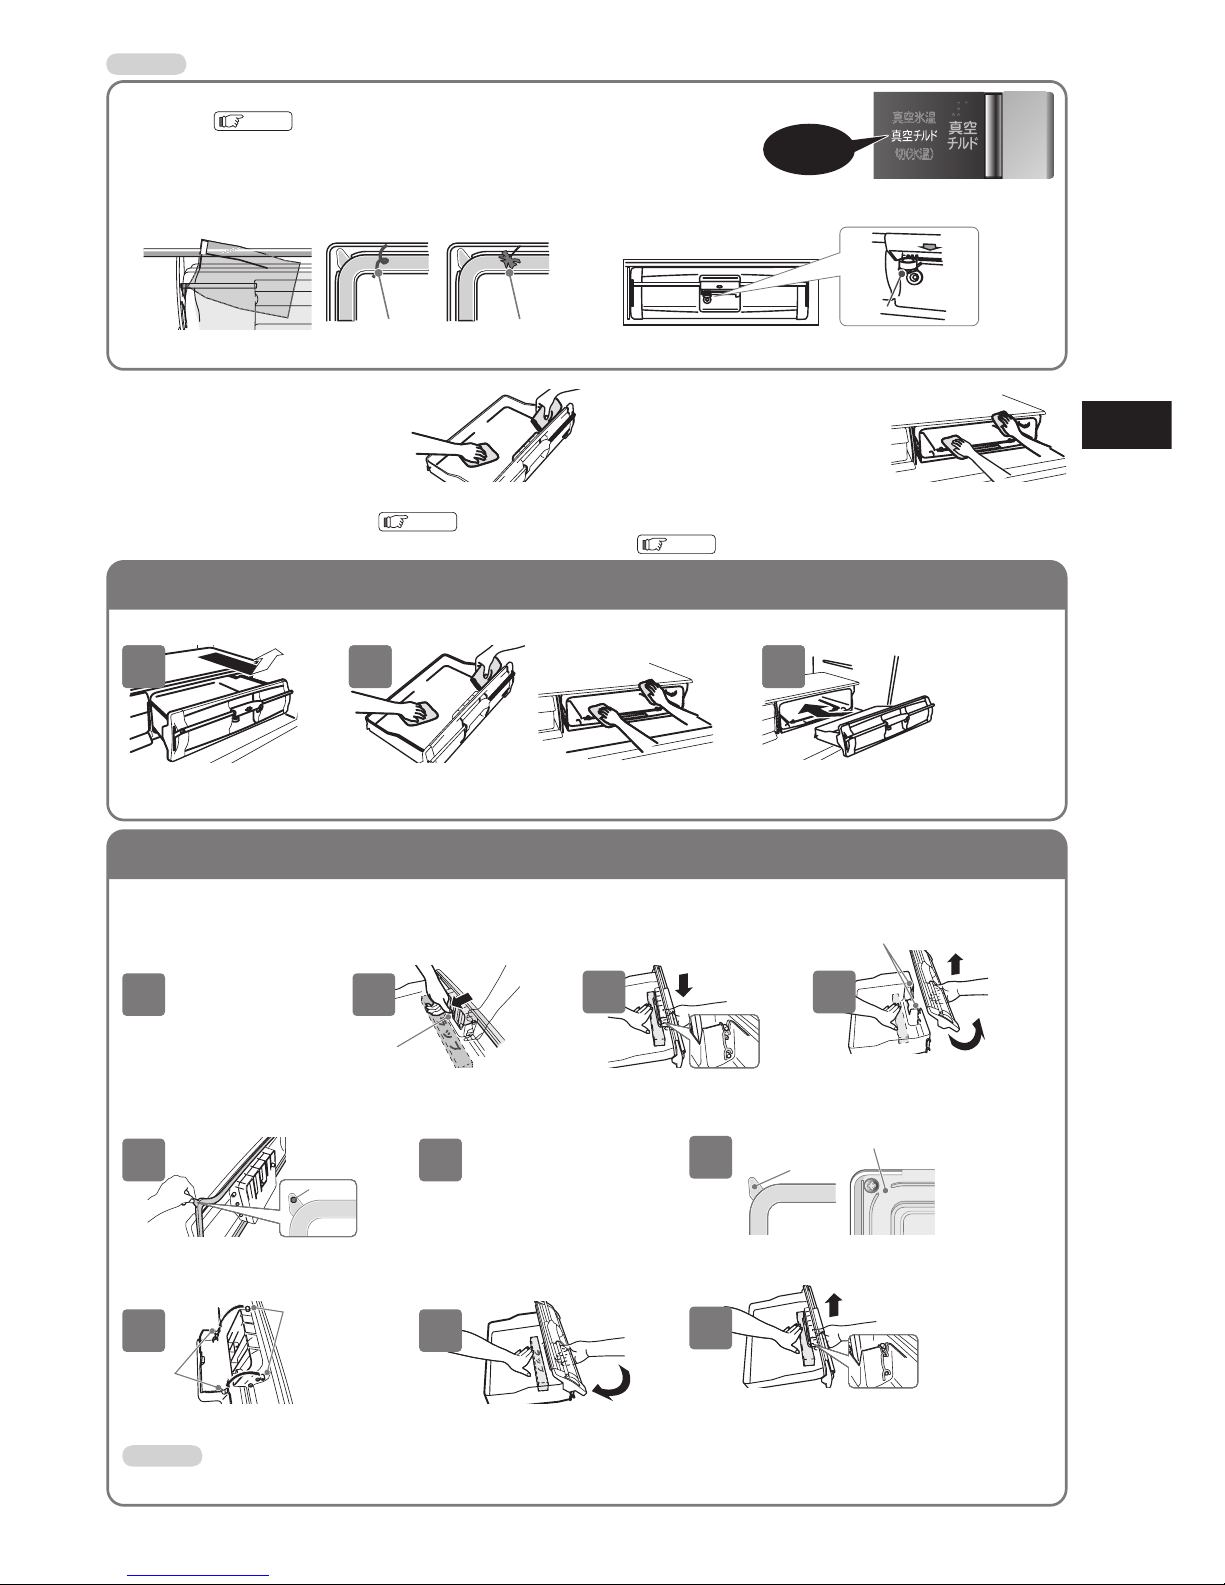
■拆除真空室門的方法
15
取下真空密封墊,保養清潔時
請取出保存在真空室內食品。
日常保養清潔的方式
1 2 3
取出真空冷凍盒(附有門)之後,請依照下列順序清潔真空室門以及真空密封墊。除了真空室門及真空密封墊之外,
請勿拆卸其他零件。
● 「真空開
-1˚C
」・「真空開
+1˚C
」的顯示燈閃爍時,則表示真空機能無法正
常啟動。
27
頁
● 真空密封墊、真空解除閥( 藍色) 如果夾到食品的包裝等、
有污垢、線頭、殘渣附著在上面時,則無法正常啟動真空
冷凍。
● 真空室內如果水或食品汁液溢出
時,請立即擦拭。
水凍結時真空冷凍盒(附有門)有
可能無法正常啟動。
● 關於真空冷凍,若遇到問題時,
27
頁
「遇到問題時」。
● 真空密封墊長期使用後,無法保持真空狀態,請更換新的密封墊。
29
頁
● 真空密封墊、真空解除閥(藍色)如果剝離或是變鬆,則
無法正常啟動真空冷凍。
● 因為真空室是密封的狀態,如果存
放水分較多的食品時,水分蒸發會
在室內凝結成露水或結成霜。如果
真空室內部或真空室門周邊附著了
水滴或結霜,請以乾布擦拭。
通知事項
● 真空室門請勿用水清洗。
● 真空密封墊如果使用溫水以外的洗潔劑,則有可能破損・變形・變色・無法保持真空狀態。
● 如果真空密封墊鬆了或是接觸不良,則有無法維持真空狀態。
注意事項
將門往身前方向拉出,將真空冷
凍盒(附有門) 輕輕地抬起抽出。
要拆除真空室門時,在冷凍盒下方
墊著保鮮膜的盒子,讓冷凍室門呈
懸空的狀態,如此的方式比較好拆
卸。 拆除冷凍盒前面的扣鉤。
用海綿等柔軟的材料用水清洗污垢,然後
用乾布擦乾淨,讓其自然乾燥。擦拭冷凍
室門的真空密封墊凹槽內的污垢。※ 請勿
使用洗潔劑。
請讓真空室門迴轉至上方的基準點。
將真空冷凍門往下押,使軸脫離。
請讓真空室門迴轉至上方的基準點。
往前拉即可拆卸。
讓真空冷凍盒(附有門)在真空容器中滑動推入。
最後再將把手鎖住。
用柔軟的布沾溫水擦拭真空密封墊以及內側的密封墊承托部。
1
1
2 3
3 4
扣
2
2
迴轉基準
以手握住右上方的真空密封墊的突起,小
心地拆下密封墊。
真空室門的軸對準冷凍盒內的軸承。
1
1
將真空密封墊的突起對準凹槽上的缺口,牢
牢地固定。
3
突起
突起
凹槽的缺口
■真空密封墊的保養清潔
■真空室門的安裝方式
2
押著冷凍盒的底面,將真空室門往上拉。再
確認突起是否有在定位。
3
真
空
室
顯示燈閃爍
請注意避免食品包
裝被夾住。
線頭殘渣 殘渣
真空解除弁
真空解除弁
Page 16
16
■ 請遵守每個盒子所能容納的食品高度。
・
箱門無法緊閉、冰箱冷卻效果變低。還有可能會造成食品、各盒子的損壞。
・
請勿讓薄型盒或是小件物品盒的底部接觸到其他食物。
可容納食品的高度
冷凍室
■ 急速地冰凍將鮮味密封的急速冷凍機能。
17
頁
・
請使用於急速冷凍肉類或魚類時。
■ 內配3 層冷凍盒,能夠充分地存放,整潔地收拾。
適於存放需長期保存的東西,容易融化的冰淇淋等。
上層冷凍室
下層冷凍室
滑動盒
冷凍包裝,密封容器等
薄滑動盒
小件物品,冷凍食品等
●將上層冷凍室的鋁盤往薄滑動盒左側移動,便可作為急冷凍盒使用。
●薄滑動盒裡請勿存放
500mL
的塑膠飲料瓶。
塑膠飲料瓶凍結後會膨脹,導致滑動盒拉不出來。
●請勿將薄滑動盒以及滑動盒拆去使用。
●食品會堵塞或掉落到冷凍盒的後面,導致關不上門。
●在豎放儲存盒儲放高的食物時,請注意不要碰
到薄滑動盒及滑動盒。
●請只使用於存放冷凍專用塑膠瓶類及能夠冷凍的
食品。
下層冷凍盒
冷凍食品,麵包,冰
淇淋等
豎放儲存盒
存放冷凍用瓶子等(高
23.5cm以下)
製冰室(自動製冰機)
的使用方法
18
頁
上層冷凍室
薄滑動盒
高
23.5cm
以下
滑動盒
下層冷凍室
(前)
上層冷凍盒
到盒子頂端為止
薄滑動盒
到
5cm
高為止
滑動盒
到盒子頂端為止
下層冷凍盒
到盒子頂端為止
豎放儲存盒
上層冷凍盒
用於儲存冷凍包裝、密封容器等的小型冷凍食品。
鋁盤(急速冷凍區)
Page 17

17
調節冷凍室的溫度
冷凍室門操作面板
●操作結束後,經過約2分鐘文字顯示燈則熄滅。但是急冷運轉的顯示以及
eco
運轉顯示燈則
亮燈。
10
頁
●操作部分的詳細使用方式
10
頁
●調節更細微的溫度時
29
頁
通知事項
急速冷凍
1
上層冷凍室的鋁盤上放
用保鮮膜包好的食品
按急冷鍵使「急冷凍」
的顯示亮燈
※
約90分鐘「急冷凍運轉」
自動終了,「急冷凍」顯
示自動熄滅
中途停止時在其他顯示再次
亮燈後按急冷鍵使顯示滅燈
※ 設定為「急冷凍」之後,「急冷凍」以
外的顯示燈經過約2分鐘即熄滅。
● 「急速冷凍」中,為了優先冷卻冷凍室,特別是冷藏室的門開關頻繁的時候,冷藏室的
溫度容易升高。
● 可以直接冷凍熱的飯等。放入熱的食品時,會有燙傷的危險,請注意!建議冷卻到
50
60˚C
之後再放。
● 「急速冷凍(急速製冰)」結束後的60分鐘以內,再次按急冷鍵時,顯示雖然燈亮,但
不運轉。60分鐘過後才開始運轉。
● 為了防止食品粘在鋁盤上,請務必包上保鮮膜。
● 將食品分開小塊、薄片,不但能快速冷卻到中心部,而且方便取出。
● 頻繁地開箱門嗎?
→ 建議您在開著箱門時動作迅速一點,盡量少開。
● 食品或袋子是否被挾著,門關緊了嗎?
→ 請在關著門的狀態檢查一下密封墊處有無縫隙。
● 是否過分塞堵食品,是否一次存放入了大量的食物呢?
→ 請遵守可容納食品的高度,儲放量注意不要影響門的開閉。
→ 食品之間請空開間隙存放。
● 上層冷凍盒薄滑動盒正確安裝好了嗎?
→ 請正確安裝好。
22
頁
2 3
「急冷凍」
運轉時顯示燈
亮燈,其他的
顯示燈則熄滅
※
急速冷凍盒
按鍵顯示便亮燈
嗶
顯示滅燈
嗶嗶嗶嗶
按鍵滅燈
遇到問題時
這種情況下 請檢查一下。是這原因嗎?
不夠冷
結霜、結露
冰淇淋太軟
密封墊之間有間隙的狀態
● 頻繁地開閉箱門會使食品的溫度上升,冰淇淋等會變軟。
注意事項
冷
凍
室
冷凍室溫度的調節
按冷凍室按鍵調節。
是在環境溫度
30˚C
、不放食物、關著門、安定時的標準值。
強 (低溫)
約
-23∼-20˚C
(低溫冷凍)
中
約
-20∼-18˚C
弱
約
-18∼-15˚C
● 通常請使用“中”的位置。溫度因使用條件而有所變動。
● 急速冷凍運轉時,溫度比左記的溫度更加低。
● 在“強(低溫)”長時間使用時,冰淇淋類會變硬、儲存的食品的解凍時間會較長。
嗶嗶
製冰機清潔
(按5秒閃爍)
按鍵鎖
(
按3秒
)
Page 18
18
製冰方法
製冰室
(自動製冰機)
冷藏室門操作面板
製冰鍵
給水線
1
2
3
自動製冰機的設定
請按製冰鍵選擇冰的大小。
19
頁
取出給水槽。
如果水減少到「給水線」,請加水。
打開蓋加水。
加到滿水線。
再裝回給水槽。
推入到超過「水槽安裝位置」的
線位。
※ 給水槽傾斜會將水灑出。
水灑出請立即擦乾。
自動開始製冰運轉,在製
冰盒裏儲冰。
滿水位
4
水槽安裝位置
5
初次製冰時、或是一星期以上沒有製冰時,請操作「製冰機清潔」。
23
頁
初次使用時,最初的製冰可能需要
24
小時以上。
通常2 ∼
3
小時可以製8 顆冰。
通知事項
製冰室
確認顯示
給水槽
冰的大小/停止製冰的開關
自動製冰機
製冰盒
冰鏟
顯示
製冰盤
製冰鍵
製冰機清潔
(按5秒閃爍)
製冰機清潔
(按5秒閃爍)
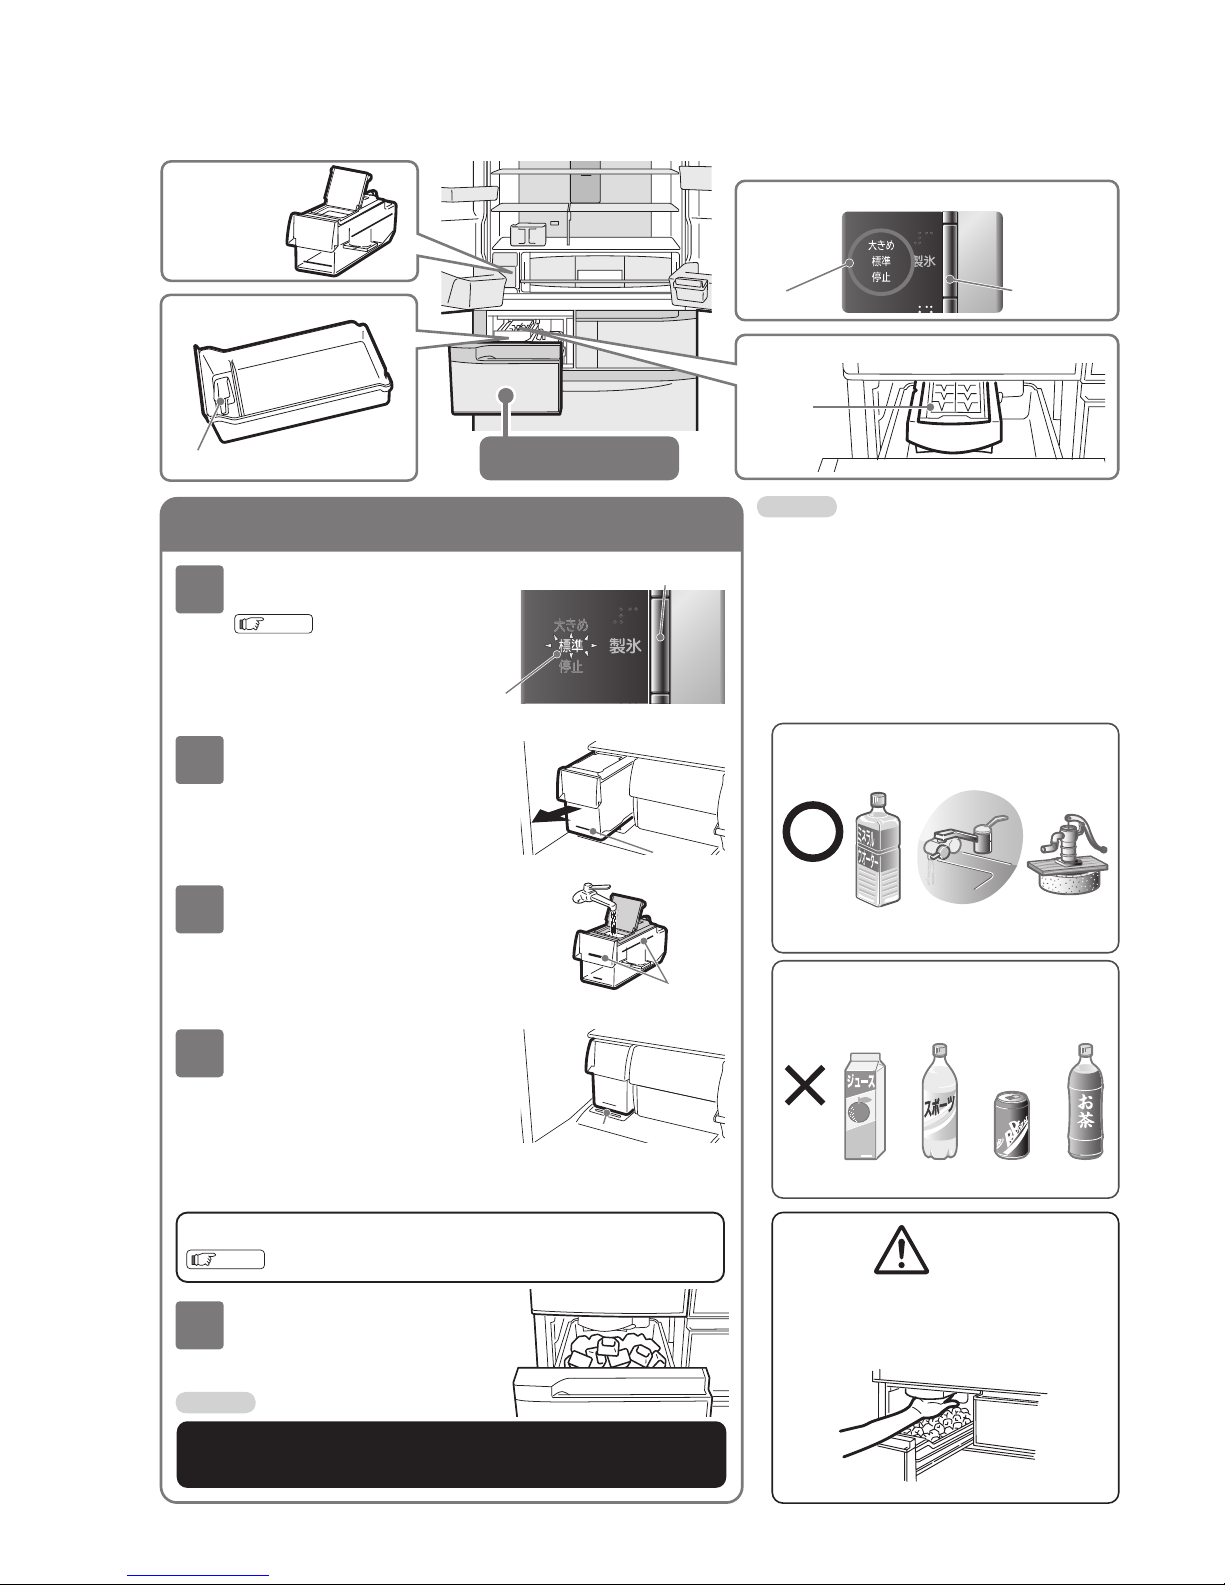
● 建議使用自來水煮沸冷卻後來製冰
*
*
請向當地相關機關確認水質狀況。
● 因衛生上的理由,請至少每週更換一次水,並
清洗容器。
● 使用含豐富礦物質的礦泉水製作冰塊時,會
產生白色的粉末,這是礦物質成分,在衛生
上無害。
● 本說明書所提到的水,皆須符合飲用水質標準。
■ 請勿觸摸自動製冰機的機械部位。
● 當製冰盤旋轉時,會有受傷的危險。
● 由於會導致故障,或是會造出畸形・連
體的冰等,請不要使用這些(液體)。
● 如下列所示,因為容易受到細菌污染,
平常請三天清洗容器一次。
注意事項
礦泉水
(硬度:
100mg/L
以下)
過濾水或
煮沸後的水
果汁類 運動飲料水 茶汽水
井水
(皆須符合飲用
水質標準。)
警告
Page 19

19
製冰時間與製冰能力
製冰鍵
標準製冰
按製冰按鍵使「標準」
燈亮
製大顆的冰
按製冰鍵使「大顆」燈
亮
按急冷鍵、「急冷凍」的顯示亮燈,轉
為急速製冰運轉,製冰時間縮短。
17
頁
※ 約90分鐘後回復通常運轉。
按製冰鍵使「停止」燈
亮後自動製冰停止、不
製冰。
切換自動製冰機的設定內容
用於急需製冰時
(急速製冰)
用自動製冰機製冰時
停止製冰
●操作結束後,經過約2分鐘文字顯示燈則熄滅。但是急冷運轉的顯示以及
eco
運轉顯示燈則亮燈。
●每按製冰鍵一下,設定按照「標準」→「大顆」→「停止」→⋯的順序切換,以顯示與操作音告知設定狀態。
●在切換製冰停止時,「停止」顯示會閃爍,約20秒後自動滅燈。
(不是故障)
●用完製冰「停止」以後,請將給水槽洗乾淨、弄乾並放回所定的位置。
特別是淨水濾片,請徹底弄乾。(清掃方法
23
頁
)
●用製冰「停止」的話,可停止自動製冰時的運轉音(離冰給水等)。
●自動製冰機上的儲冰量測知桿(通常看不見)自動檢測儲存冰塊的數量。如果儲存的冰塊達到
一定數量會自動停止製冰,當冰塊數量減少時會恢復製冰。
●最大儲冰位置標準線表示的是冰塊平放在冰盒中時的最大容量。
如果冰盒內只有一部分冰塊而還沒有滿,但是冰塊碰到了最大儲冰位置標準線,即使冰塊數量
很少,製冰機也會停止製冰。
● 自動製冰設定時,製冰盒中請勿放冰以外的冷凍食品等。
(會造成不能製冰、食品踫到製冰機的部件、門打不開、損壞部件。)
●以下的情況會造成製冰時間更長。
・
首次使用時 (可能需超過24小時
)
・
當冰箱內在同一時間儲存大量的食品時
・
箱門常被開啟/關閉
・
當停電時
・
清洗冰盤過後
・
當冬天四周的氣溫低,等等
通知事項
通知事項
注意事項
一次的製冰時間(1回8個) 製冰盒的收納量
冰塊大小 冰塊大小
運轉狀態 運轉狀態
正常運轉 正常運轉
約
110分~140
分約
90
個
標準 標準
約
150分~170
分約
60
個
大顆 大顆
急速製冰
把冰塊向前移的狀態約70分
~90
分約
130
個約90分
~110
分約
110
個
前
冰鏟
最大儲冰位置標準線
儲冰量測知桿
冰鏟冷凍食品
儲冰量測知桿
冷凍食品在裡面嗎? 冰鏟在裡面嗎?
製
冰
室
︵
自
動
製
冰
機
︶
冷藏室門的操作面板
按
Page 20

20
蔬果保鮮室
食品儲放量基準線
至盒子的端面為止
食品的高度
用來放置蕃茄,檸檬等小
型蔬菜。
蔬果保鮮室
直立容納。
(可裝入2L保特瓶)
高麗菜或生菜等中大型的
蔬果。
冷氣不會直接吹著蔬果,溫和而確實地冷卻。不用保鮮膜也能夠使蔬果的水分保持新鮮。
下段置物盒・寛廣上段置物盒
■ 這個時候要用保鮮膜包住蔬菜
● 擔心大蔥・韭菜・蔥蒜等的氣味傳到別的食品上時
● 儲存用剩了的蔬菜或水果時
● 蔬果儲量少的時候,或是已包裝的蔬菜多的時候
● 介意蔬果保鮮室內的結霜時
● 請勿將食品塞入滑動式瑣碎食品整理盒下方。
如果冰箱門沒有關緊,冷凍狀況會不好。
食品,各種抽屜會破損。
● 根據塑膠瓶的種類,有些是不能儲放的。
另外、塑膠瓶的蓋子沒關緊也不能存放。
● 外氣溫度低的時候,溫度會有降低的可能。
● 因蔬果保鮮室的濕度較高,可能因存放的蔬果量或種類不同,可能在上段置物盒或蔬果保鮮
室的頂部凝結露水。當水積多時可能對食品造成損傷,請以乾布擦拭。
● 蔬果保鮮室的門要慢慢的開閉。如開閉力量太強,直立存放的食品(瓶裝飲料等)會翻倒。
注意事項
通知事項
Page 21

21
保養方法/冰箱內
·
冰箱外的保養
冰箱背面・地板
發現髒時
冷藏室門的操作面板
箱門密封墊
電源插頭
箱門表面
汁液承接處
● 立即擦乾淨。
看不到的部分也請一年清掃一次。
● 用柔軟的布濕潤溫水擦。
污垢難以擦掉的時候,可將廚房用的中性洗潔劑稀
釋使用,用溫水濕布擦乾淨。
因為有些洗劑是不可使用的,請參考本頁的
注意事項
。
● 卸除部件時,請先將食品取出來。
● 由於此部分容易髒,請擦
乾淨。
● 附著在電源插頭上的灰塵擱置而不清掃的話,會導
致火災。請每年清掃一次。
● 箱門表面請用柔軟的布濕潤溫水擦。
● 有關不鏽鋼顏色的門,請順著表面的
細線條的方向擦拭。
● 積著汁液時,請擦乾淨。
將電源插頭從插座拔掉。
檢查
・
電線有損壞嗎?
・
電源插頭發熱嗎?
用乾布擦去灰塵等。
將電源插頭確實插入插座上。
● 請勿使用以下的東西。
鹼性和弱鹼性的廚房用洗潔劑・去污粉・肥皂粉・石油・熱開水・刷子・酸・揮發油・稀釋劑・酒精・漂白劑等等
(請確認洗潔劑的「根據家庭用品品質表示法表示」的「液性」欄)
● 沾了食用油・柑橘類的果汁・食品汁液的時候,請務必擦乾淨。
● 若使用化學抹布時,請遵守其使用上的注意事項。
箱門・塗裝面・塑膠會有受損・變色的可能。
● 因為置物箱以及抽屜式軌道的接觸面上都塗有潤滑
劑,請勿擦拭此部分。(潤滑劑是符合食品衛生法的
標準。
)
注意事項
注意事項
1
2
3
4
冰箱內·冰箱外的清掃
清掃時,請一定要把電源插頭從插座拔掉。
警告
液汁接收處
旋轉調整腳
1
將腳座護蓋往身前拉
出卸下。
安裝時,從正面插入
使調整腳浮起離開地面,將
冰箱往身前筆直地拖出。
若是容易刮壞的地板,則鋪上保護
用的板等
擦乾淨背面・牆壁・地板
上的污垢
背面由於空氣對流的關係,容易
堆積灰塵而弄髒。
2 3
蔬
果
保
鮮
室
/
保
養
方
法
/
冰
箱
內
·
冰
箱
外
的
保
養
● 冷藏室門的操作面板請用柔軟的
布乾擦。
● 請勿淋水。
否則會導致故障。
Page 22

22
卸除組件的方法
下移式便利盒
固定層架
箱門置物架
製冰室・上層冷凍室
下層冷凍室
蔬果保鮮室
製冰室・上層冷凍室
蔬果保鮮室・下層冷凍室
可調式層架・低層架
翻轉式層架
附有門的冷凍盒
● 一邊提起一邊從箱軌上拉出
來卸下。
安裝時,將層架的軸沿著箱軌
的溝推進去。
● 一邊輕敲底部左右一邊提高便可卸取。
安裝時,請完全裝入到最底。
● 打開門,向前方取出。
安裝時要將箱底面裝載在框子上。
● 將箱門向面前側完全
打開。如圖將瑣碎食
品整理滑動盒向上推
後拆下。
● 將箱門稍微往上扳
後,再慢慢向外拉
開,讓箱門傾斜。
● 將蔬果箱斜的方向向上
抬起。
● 安裝時,請將下段箱子
左右內側突出部分插入
框的四方孔內架,將下
段箱子的邊緣置在框架
上固定。
安裝冷凍盒時,請將盒子左右突出的部分向門
框兩旁的洞角插入固定。
請將滑動盒兩旁的止動裝置插入下層冷凍盒的
外側。
安裝時,把層架插放到最面之後,
稍微提一下層架的頭推進去。
(將層架的扣掛在最面的配件上)
● 稍微向上拉出。● 往身前拉出來、將右下2 處的扣鉤
拆開取下。
● 將門往身前拉,附有門
的冷凍盒輕輕地拿起將
之抽出來。詳細請參閱
14, 15
頁
1
1
稍微提高層架的
裏
頭,往身前拉出
打開門後,拉出薄滑動盒及滑動盒。
如圖,將層架竪起後翻轉、
卸除。
向上取出下層
冷凍盒。
2
2
直接把層架拉出會有可能
損傷箱門。
注意事項
止動裝置
1 2 3
■抽屜式箱門的安裝方法
框
框
咚咚
咚咚
框
Page 23

23
自動製冰機的保養
製冰機清潔
製冰盤
● 每年清掃1次
給水槽
可自動清洗製冰盤與給水路。
操作前請確認以下事項。
都確認完了之後再操作下一個步驟。
● 初次使用時
● 一週以上沒有使用時
● 清掃的標準次數
● 請將密封墊圈從水槽蓋取下,用柔軟的海綿等清洗乾淨。
● 開蓋方法
● 關蓋方法
1
1
1
請在所有的門都關閉之後,使顯示燈亮,
持續按住製冰按鈕5秒以上。
「大顆」「標準」「停止」顯示閃爍,請在蜂鳴聲響
之後放開手指,「製冰機清潔」便開始。
為了停止往製冰盤給水,請按製冰選擇鍵
讓其示為「停止」。(停止製冰)
騰空製冰盤,用流水簡單沖洗。
請按製冰鍵,使「大顆」或「標準」的顯
示亮燈。(開始自動製冰)
旋轉盒子從水槽蓋上卸
取下來。
用手指扳著扣紐將淨水濾
片從盒子裡取下來。
使用柔軟的海綿等
用水洗乾淨。
約3分鐘過後,蜂鳴聲停止,顯示滅燈以
後,除去製冰盒內的冰及水,擦乾淨。
卸取盒子時,請注意不要把水倒灑。
打開製冰室的門。
①
扳下扳手
②
拉出框子。
③
護蓋(▲部)往身前方向揭起
④
從框子裡取出製冰盤。
・
大約3
分鐘之間,顯示亮燈、蜂鳴聲會一直響。
操作「製冰機清潔」功能時在途中無法停止。
操作「製冰機清潔」功能當中,如果打開冰箱的任何一個門時,則
有可能無法正常運作。請在製冰機清潔運作結束之前不要開啟冰箱
門。
冰箱門警報音設定在停止的狀態下警報音也會發出聲響。
不含氯素的水與自來水比較,容易產生水垢・發黏,因此為了防止
細菌繁殖請定期清洗水槽。
將臨時移放在別的冷凍室內的冰塊放回製冰盒裡。
給水槽裡剩下的水,可以繼續直接使用。
※ 若顯示燈閃爍時,
請約等20秒,顯示
燈滅後再進行以下操
作。
2
2
2
3
3
●給水槽
・
是否有裝水
・
是否裝設在正確位置
●製冰盒
・
有殘留冰塊時請清除
約5秒
嗶
嗶—嗶—嗶—嗶—⋯
自來水
礦泉水・井水・淨水器的水・涼開水等
(不含氯素的水)
1
週以內1次
3天1
次
密封栓
密封墊
(前)
請從水槽蓋的後方插入,往箭頭方向
關上。
(後)
給水總蓋子
盒子
淨水濾片
給水槽
滿水線
給水線
扣紐
淨水濾片
(約3∼4年為更換的基準)
29
頁
請不要使用洗潔劑等。
請勿使用刷子
去污粉等容易刮傷
的東西。
● 設定在製冰停止而長期不用自動製冰機時,請將
給水槽洗乾淨弄乾後放回所定的位置。
● 特別是淨水濾片,請徹底弄乾。
通知事項
亮燈
護蓋
4
▲部
框子
扳手
扳手水平嗎?
扳手
水平
卡嘁
①
安裝製冰盤
②
關上護蓋。
③
將框子水平地插入到最裏面
④
扳上扳手。
亮燈
●製冰盤的「框子推不到底」時,驅動製冰盤的馬達有可能已啓動。
一旦卸除製冰盤,推入框子關上製冰室的門後,請約等1分鐘。
製冰盤的驅動馬達的準備完成後便可安裝。
通知事項
卸
除
組
件
的
方
法
/
自
動
製
冰
機
的
保
養
製冰機清潔
(按5秒閃爍)
按住5 秒以上
製冰機清潔
(按5秒閃爍)
按「停止」
使顯示亮燈
製冰機清潔
(按5秒閃爍)
按鍵使顯示亮燈
Page 24

24
遇到問題時
在委託修理之前,請再次檢查以下幾點。狀況仍然不好的時候,請聯絡所購買的經銷店或敝公司客戶服務部。
購買後,初次使用時常有的疑問
操作面板沒有反應
自動製冰不正常
這種情況下 請檢查一下。是這原因嗎?
初次使用時
不夠冷
・
不能製冰
● 夏季或食品多的時候,需要時間冷卻。
→ 剛安裝後,可能需要約4∼24小時以上。
● 初次使用時,冰箱內冷卻以後才開始製冰運作,所以較費時。
根據食品的量及存放方法,最初的製冰可能需要
24
小時以上。
→ 請迅速地開閉門或盡量少開。
→ 食品之間請空開間隙存放。
操作面板沒有反應
● 操作部鎖定功能,是否選擇了「設定」呢?
30
頁
● 冷藏室門有沒有打開呢?請關上之後,再進行操作。
完全不能製冰
所儲存的冰塊變圓
冰塊之間粘在一起
結成的冰塊一開始
就粘在一起
冰塊裡有白色混濁
製冰盤的框子拉不
出來
結的冰塊很小
冰塊有凸起
很難結冰
製冰盤裡不給水
● 冷藏室內的操作面板的「製冰選擇」顯示燈滅了嗎?
19
頁
● 給水槽推入到超過「水槽裝置位」的面了嗎?
18
頁
● 製冰盒的裡面存放了冰塊以外的東西嗎?
19
頁
● 長時間積儲著沒使用的舊冰塊,會自然變小,粘在一起。
● 是否頻繁地敞開門,是否一次存放了大量的食物呢?冰箱內的溫度上升,積儲的冰塊,會變小
並粘在一起。
● 有可能是箱門或抽屜一時沒關緊。
● 製冰盤裡的給水量不均勻時,會結成粘在一起的冰塊。
→ 請試試加水加到給水槽的滿水線。
18
頁
● 若製冰盤裡有損傷,冰塊結成時,難以從製冰盤上取下來,會粘在一起。
多次發生同樣情況時,請與經銷店洽商,嘗試更換製冰盤。
● 是因為混在水中的氣泡被封在冰塊裡面了。
→ 不是異常。
● 用礦泉水製冰了嗎?
→ 水中含有的礦泉物凍結會變白而混濁。
在水裡融化了也會有白色混濁,不過無害。
● 製冰功能的「大顆」「標準」的顯示燈亮著嗎?
→ 自動製冰機正在製冰時拉不出來。請熄滅「製冰選擇」的顯示燈。
顯示燈不滅而開始閃爍時,請約等20秒,顯示燈滅後再拉出。
23
頁
● 給水槽的水剩的很少時,會結小的冰塊。
→ 請試試加水加到給水槽的滿水線。
18
頁
● 是製冰盤的溝上積水凍結了。不是異常。
● 是否頻繁地敞開門,是否一次存放了大量的食物呢?
冰箱內恐怕是沒有充分冷卻。
→ 請試試在冰箱內冷卻前,盡量減少開閉門。
→ 請試試盡量空開儲存食品之間的間隙。
● 冬季每結一次冰可能需要4小時以上。
● 從「停止」顯示亮燈狀態,到讓「冰塊大小(大顆,標準)」顯示亮燈之後,結冰的時間會比
平常需要更長的時間。
● 食品或袋子是否被挾著,門關緊了嗎?
→ 請在關著門的狀態檢查一下密封襯條處有無縫隙。
Page 25

25
結霜・結露
太冷
這種情況下 請檢查一下。是這原因嗎?
確認冰箱的使用方法
● 冰箱門敞開著時,庫內的溫度會逐漸上升。頻繁地開閉或是長時間敞開著門的話,庫內的溫
度會難以下降。
→ 嘗試減少開閉次數,迅速地開閉等。
凝結露水
冰箱內及門・抽屜
框上結霜・結露
冰箱中凝結露水
冰箱的外側結露
(
外裝、門的密封
墊、門、抽屜等
)
蔬果保鮮室中凝結
露水
● 有可能是門或抽屜有時沒關緊。
→ 關閉抽屜及門的時候確認是否關緊了。
● 有可能是開關次數多、長時間連續打開了。
→ 試試減少開關次數,迅速地開關等。
● 防止結露用的發熱器減弱時、濕度高時,旋轉隔層部會附著露水。
29
頁
●冰箱門開閉次數過於頻繁、及冰箱周圍濕度過高時,壁上會有起
霧現象,鋁板的冷氣出風口附近可能凝結成露水。
→ 請用乾布擦拭。
● 下雨天等室內濕度高的時候會結露。
● 冰箱內及門框接觸到外面的暖空氣時,有可能結霜、結露。
→ 請用乾布擦乾淨。
●蔬果保鮮室比其他的儲存室的濕度高(是為了不讓蔬果乾燥,可以長久保存所設計的
)
→如果在意蔬果保鮮室的高濕度,請將食物以保鮮膜包覆之後在放入蔬果保鮮室內。
●凝結露水過多時,水可能積在蔬果保鮮室。
→請用乾布擦拭。
太冷
凍結了
● 溫度調節為「強」了嗎?→請設定為「中」。
12, 17
頁
● 環境溫度是否
5˚C
以下呢?→請將溫度調節為「弱」。
12, 17
頁
● 請不要放在冷氣吹出口的前面。
不冷
不冷
結霜・結露
冰淇淋太軟
確認食物的存放狀況
● 食品或袋子是否被挾著,門關緊了嗎?
→ 請在關著門的狀態檢查一下密封墊處有無縫隙。
● 是否過分塞堵食品,是否一次放入了大量的食物呢?
→ 請遵守可容納食品的高度,儲放量不要影響門的開閉。
→ 食品之間請離開間隙存放。
● 上層冷凍盒・薄滑動盒安裝好了嗎?
→ 請正確安裝好。
22
頁
確認設定溫度
● 溫度設定為「弱」時會是冷卻不足。
12, 17
頁
→ 冷卻不足的室內溫度設定請切換為「中」或「強」。
● 在夏季等,電冰箱的環境溫度高嗎?
→冷卻不足的室內溫度設定請切換為「強」。
確認安裝
● 根據電冰箱的設置場所及空隙・環境狀況等,會有難以冷卻的可能。
請確認是否正確安裝了。
8
頁
密封襯條處發生有
縫隙的狀態
遇
到
問
題
時
鋁板
Page 26

26
這種情況下 請檢查一下。是這原因嗎?
遇到問題時
冰箱發熱
電冰箱的側面發熱
箱腳底下吹出暖風
● 為了讓冷卻裝置運作時所發出的熱氣向外排而會發熱。
→剛剛安置後或是夏季,可能會有50∼60℃,不過安全上以及性能上沒有問題。
聲音不對
● 有可能是沒有正確安裝好
● 購買後,剛開始使用等冰箱還未冷卻時・箱門開閉頻繁時・周圍的溫度高時,由於壓縮機高速
運作,可能會感覺到聲音大。
→ 充分冷卻後,聲音會變小。
原因
地板彎曲
腳座護蓋脫落了
冰箱靠著牆或家具等
鋪上堅固的板以後,在板上面安置。
8
頁
請正確安裝好腳座護蓋。
8
頁
電冰箱的周圍空開間隙安置。
處置
運作音長
時常聲音變大
其他 例如聽到這
樣的聲音時
冰箱發出的聲音嘈
● 是為了讓壓縮機慢慢地運轉,是在省電運作。
● 是因為運轉力隨著庫內的溫度變化在變更。
● 如下的聲音是正常運作時發出的,並不是異常。
聲音的種類
像流水的聲音(滴哩滴哩)
像踫撞的聲音(嗊嗊・嗊嗊)
像沸騰的聲音(啵啵啵)
像燒肉的聲音(唧∼)
像摩擦的聲音(啤唏)
時常有的聲音(卡嗒卡嗒)
像什麼被卡著的聲音(嗑
嗑 )
像呻吟的聲音(噗∼)
像剛關門時的聲音(吥∼)
自動製冰機的聲音
(啾∼)
(嘎啦嘎啦)
(咯噃咯噃)
是為了冷卻電冰箱的冷媒流動聲・融霜時的水流聲・蒸發聲。
是冷藏庫的溫度變化時,或真空開
+1
˚C
室的氣壓變化時,部件的摩擦聲。
為了冷卻冰箱內開始運作時的聲音。
是控制冰箱內溫度的電氣部件或真空幫浦的運作聲。
是冰塊從自動製冰機的製冰盤離落時,以及製冰盤裡給水時的
聲音。給水槽空的時候每兩小時也會發出聲音。
「製冰選擇」的顯示滅燈時便是製冰停止,就不會發出聲音。
19
頁
聲音的發生源
Page 27

27
真空冷凍上的問題
「真空開
+1˚ C
」
或「真空開
-1˚ C
」
的顯示
打開時,
不發出「咻-」的聲音
真空機能無法正常啟動,請確認以下各項。
● 把手是否有推到最終的位置,牢牢地鎖住?
→ 如果沒有鎖住,則無法啟動真空機能。
● 真空密封墊與承托部之間是否夾著食品的包裝袋、頭髮等?
→ 只要有些微的碎屑被夾在其中,則無法維持真空。請將碎屑清除。
● 真空密封墊、真空密封墊承托部是否髒了?
→ 髒了請以布擦拭乾淨。
14, 15
頁
● 真空解除閥(藍色)是否脫落了,鬆了?
→ 請牢固地裝設在把手的洞。
● 真空墊部分是否挾著食品的包裝等,有無附著污垢、線
頭及垃圾呢?
14, 15
頁
→ 食品的包裝被挾著時,請取除。
→ 請清掃髒了的真空墊。
● 真空墊及在把手下部的真空解除閥( 藍色) 是否脫落了、
鬆了呢?
● 「真空開
-1˚C
」「真空開
+1˚C
」鍵的顯示亮著燈嗎?
● 把手往上翹著嗎?
● 真空室剛開閉後時,由於真空泵是在開始運作的準備狀
態下,可能不發出「咻-」的聲音,並不是故障。
・・・
真空解除閥
不知道是否在真空
把手不能上鎖
真空室的周圍發出
「吥∼」 的聲 音和 振動
真空室內部
有水滴或結霜
真空室的食品凍結
● 打開時如有「咻-」的聲音,便是正常。
● 真空墊部分及真空冷凍盒的面是否有食品等被挾著呢?
14, 15
頁
● 真空冷凍盒前面和門的軸是否脫落了?
14, 15
頁
● 是真空泵的運作聲音。不是異常。
● 如夜間等介意有聲音的時候,可以停止真空泵的運作。
● 頻繁地有聲音及振動時,有可能是門上挾著東西或是真空墊髒了。
14, 15
頁
● 因為真空室是密封的狀態,如果存放水分較多的食品時,水分蒸發會在室內凝結成露水或結成
霜。
→ 水分較多的食品建議以保鮮膜包覆
→ 如果附著了水滴或結霜,請以乾布擦拭。
● 是否存放了茄子、黃瓜等不耐低溫的蔬果呢?
11
頁
● 設定是在「真空開
-1˚C
」・「真空關
-1˚C
」嗎?
14
頁
這種情況下 請檢查一下。是這原因嗎?
垃圾
綫
頭
顯示燈閃爍
遇
到
問
題
時
Page 28

28
其他
觸碰到機體會感覺
到微量的電流
冷藏室門操作面
板的顯示燈熄滅
箱門內側有小的洞
電視機・收音機等
發生有雜音・映像
的花亂
塑膠零件上有像傷
痕一樣的細線
箱門面或側面・頂
面上有波紋或歪扭
● 電冰箱會帶有靜電,安全上沒有問題。
→ 介意的話,建議實施接地。
9
頁
● 操作結束後,經過約2分鐘文字顯示燈則熄滅。但是急冷運轉的顯示以及
eco
運轉顯示燈則亮
燈。如果要讓其亮燈時請按任何一個按鍵。
● 這個洞是在冰箱製造過程中,填充絕緣材料時為了讓內部的空氣往外散所
挖的洞。不是損傷也不是異常情形。
● 是從電冰箱發出的微弱電磁波的影響。
→ 請離開電視機・收音機・電話門鈴等設置。
→ 建議在離開天線等的地方接電源,實施接地。
9
頁
● 是塑膠成型時發生的樹脂流痕。
透明的部件會特別顯眼,強度上沒有問題,不會至於破裂。
● 冰箱的製造工程上,會發生有輕微的波紋或歪扭。
根據照射方向及亮度等會感到顯眼,但性能上沒有問題。
箱門高低不平衡以及歪斜
左右箱門高低不
平衡箱門歪斜
關門時其他的門會開
關上門之後再立刻
打開時感到吃力
● 有可能是設置地方沒有水平。
由於地板太軟加上儲放物的重量使箱腳下沉等的原因,箱門會有錯位。
→ 性能上沒有問題,可以照舊使用,不過介意的話,試試調整左右的調整腳。
8
頁
→ 冰箱本體傾斜的時候,請鋪上
1cm
以上厚的堅固的板。
● 因為各室的冷氣通路是相通的,關門時由於風壓使其他門會一瞬間打開。
● 是因為進入了冰箱內的空氣忽然受到冷卻,氣壓一時變低。
有異味
冰塊有異味
有塑膠味
冰箱內有異味
● 給水槽・淨水濾片髒嗎?冰塊舊嗎?
→ 為了防止「發黏」「水垢」,請定期清洗。
23
頁
● 由於自來水中的氯元素凝縮,氯的氣味會重。
● 是因為在庫內使用了多數的塑料部件,不過,充分冷卻後自然就會慢慢減輕。
● 是否直接地儲放了氣味重的食品呢?
→ 脫臭機能是不能完全去除所有的氣味。
請用保鮮膜等密封後儲放。
這種情況下 請檢查一下。是這原因嗎?
遇到問題時
孔(門內側)
Page 29

29
更換真空密封墊
● 密封墊破損時請更換。
● 更換零件的訂購
這種情況下/另購零件
另購零件
冷藏室門操作面
板的「確認」顯
示閃爍
停電了
長時間不用
除霜
想更詳細調節溫
度時
想減弱防止結露
用的散熱器時
(旋轉隔板)
(只有針對
R-SF62AMJ,
R-SF58AMJ, R-SF48AMJ
型號機種)
● 是通知自動製冰機、溫度控制或除霜裝置等有異常。
● 請確認下表的內容。閃爍還是不停的時候,請與經銷店洽商。
● 在到恢復之間,請減少箱門的開閉,避免重新再存放食品。
● 拔下電源插頭,清掃庫內及自動製冰機,所有的門打開乾燥2∼3天。
2123
頁
● 此電冰箱自動除霜,不需要操作。
溶解了的水會積在蒸發盤上,自動蒸發。
冷藏室和冷凍室的溫度設定可以調節更微細的「強」「中」「弱」。
1.
打開冷凍室下層的門。
2.
按住冷藏室門操作面板的冷藏鍵5 秒以上,直至發出「嗶-」聲。
(
可以進行細微調節。
)
3.
按冷藏、冷凍鍵調節。每按一次增強一段。
(在「強」時按,則回復為「弱」。)
4.
想停止微細調節時,請進行1 和2 的操作。
警報音「嗶嗶」響起便回復為通常的調節。
● 濕度變低時,將防止結露水的加熱器調弱可以達到省電的效果。省電有分為
1級和2級。2
級可以達到較佳的省電效果。將防止結露水的加熱器調弱時,
當濕度變高可能在回轉間隔的部位結露水。若有結露水的現象時請解除設定。
解除設定時,與省電2級的狀態時同樣操作。
警報音「嗶嗶」響、設定解除。
1.
打開冷凍室下層的門。
2.
冷藏室門關閉狀態下,按住冷藏室門的操作面板的急冷鍵3秒以上,直至發出「嗶
-
」聲。(省電1級)
3.
按住冷藏室門操作面板的急冷鍵3秒以上,直至發出「嗶-嗶-」聲 。(省電2級)
4.
關閉冷凍室下層的門。
※1長時間(10秒鐘以上)碰觸同一個鍵鈕時,可能會成確認運轉用的式樣。
閃爍
顯示閃爍模式
可考慮到的原因
請確認
製冰盤及儲冰量測知桿上,有食品等觸碰著的
可能。
告知有異常。
在製冰中途製冰「停止」時會閃爍。
箱門敞開了1分鐘以上的狀態。(門沒關緊等)
正在進行「製冰機清潔」。
真空機能有可能不是在正常運作。
有可能是設定在工作人員確認運轉用的式樣。
(※1)
請把製冰室騰空後實施「製冰機清潔」。
請與購買的經銷店商洽。
請確認
P.23
的「製冰盤」。
請確認
P.30
的「箱門警報器」。
請確認
P.23
的「自動製冰機的保養」。
請確認
P.27
的「真空冷凍上的問題」。
約10分鐘後恢復通常式樣。
使用上有問題。
「確認」閃爍3 次
「確認」閃爍
(除了閃爍3 次)
「停止」閃爍
全部的顯示閃爍。
「大顆」
「標準」
「停止」
閃爍
「真空開
+1˚C
」
或
「真空開
-1˚C
」
閃爍
確
認
嗶
嗶
約3秒
省電1級省電
2
級解除
設定溫度
顯
示
亮
燈
以下零件交換時,請務必向經銷店指明型號名,購買專用的零件。
淨水濾片的更換
● 舊了請更換。(基本上是約3∼4年)
● 訂購更換用的淨水濾片
請指定零件型號
: RJK-30
,向經銷店購買。
(拆去淨水濾片製冰能力也不會改變。)
弱 中弱 中 中強 強
持續按下按鍵
約3秒
遇
到
問
題
時
/
這
種
情
況
下
/
另
購
零
件
零件編號
R-A6200 321
R-A5700 321
R-SF62AMJ
型
R-SF58AMJ
型
R-SF48AMJ
型
R-S59AMJ
型
R-S49AMJ
型
真
空
製
冰
(低溫) (低溫)
Page 30

30
〔
eco
運轉顯示燈〕/箱 門 警 報 器/操 作 面 板 鎖 定
〔
eco
運轉顯示燈〕
自動告知冰箱的運轉狀況。霜循環冷卻時,減少電力消耗,啟動運轉時則顯示燈亮燈。
箱門的敞開狀態超過1 分鐘以上,便會發出如下表所示的警報音與
LED
顯示
燈的閃爍,以聲音與亮光告知箱門開著。
(
操作部鎖定) 的顯示燈亮燈時,按了其他的按鈕也無法操作。
是為了防止誤觸冷藏室門操作面板,及兒童亂弄冰箱所設計的功能。
夜間等特別在意亮燈時,可以將〔
eco
運轉顯示燈〕熄滅。
可以停止箱門警報
■將顯示燈熄滅的方法
持續按住
+1˚C
按鈕約
3
秒,直到〔
eco
運轉顯示燈〕
閃爍為止。
此時〔
eco
運轉顯示燈〕則熄
滅,完成設定。
■停止警報器時
按住急速冷凍鍵約3秒,
直到“嗶嗶”聲響。
警示音停止則回復到最初
的顯示。
持續按住冷藏按鈕約3 秒以
上,直到發出嗶嗶聲響時,
可以選擇操作部鎖定功能的
「設定」或「解除」。
設定操作面板鎖定時 解除操作面板鎖定時
■
回復到原來設定的方法
持續按住
+1˚C
按鈕約
3
秒,直到〔
eco
運轉顯示燈〕
亮燈為止。
此時〔
eco
運轉顯示燈〕則亮
燈,完成解除設定。此時會因
運轉情形時而亮燈,時而熄滅。
■再次使警報器響時
按住急速冷凍鍵約3秒,
直到“嗶嗶”聲響。
設定完了後則回復到最
初的顯示。
・・・
嗶嗶
嗶—
嗶—嗶—
顯示燈閃爍
顯示亮燈
約3秒
約3秒
按住3 秒
按住3 秒
●
eco
運轉顯示燈無法亮燈時,可能是以下的原因。
・
eco
運轉顯示燈是否設定為顯示燈熄滅的模式呢?→請依照上面的說明操作回復原來設定的方法。
・
一次存放太多的食品、或是冰箱門開閉的次數過於頻繁以致壓縮機進行高速運轉,所以顯示燈無法亮燈。→請盡可能冰
箱開閉時間勿過久、及減少開閉次數。
・
急冷功能(“急冷凍”、“急冷藏”)正在運轉時→運轉結束後冰箱的運轉在安定的情況下,顯示燈亮燈。
●當拔除電源插頭再插上插頭時,或停電後恢復供電時,
eco
運轉顯示燈則恢復到原來的設定。
●將冰箱門警報音關掉後,冷藏室門操作面板的文字顯示燈的閃爍也停止。此外,操作音也停止。
●一開始安裝時,冰箱門警報音室設定在會發出聲音的狀態。
●當拔除電源插頭再插上插頭時,或停電後恢復供電時,冰箱門警報音則恢復到原來的設定。
●設定後請再確認冰箱的溫度設定。
箱門警報機能是附屬於冷藏室・製冰室
・
下層冷凍室。
(上層冷凍室・蔬果保鮮室無此機能)
通知事項
通知事項
通知事項
箱門警報器
操作面板鎖定功能的設定
箱門的敞開時間
1
分鐘後
2
分鐘後
3
分鐘以後
警報音
嗶—嗶—嗶—
嗶—嗶—嗶—嗶—嗶—
連續不停響
冷藏室門操作面板
閃爍
閃爍
閃爍
嗶
嗶嗶
顯示亮燈
約3秒
按住3 秒
使之滅燈使之亮燈
・・・
嗶嗶
顯示亮燈
約3秒
按住3 秒
●設定的各種操作請在冰箱門關閉的狀態下進行。
10
頁
注意事項
按3秒以上
・・・
按鍵鎖
(
按3秒
)
Page 31

31
CONTENTS
BEFORE USE
● SAFETY SUGGESTIONS ..................................... 32
● BEFORE USE ....................................................... 36
Installation Place. .............................................. 36
Clearance around the refrigerator. .................... 36
Adjusting the refrigerator adjustable mount to
keep it level ....................................................... 36
On the Power Plug and Grounding ................... 37
Storing foods ..................................................... 37
●
CONTROL PANEL/NAME OF EACH COMPARTMENT/
STORAGE COMPARTMENT
................................. 38
Control Panel for operation ............................... 38
Name of each compartment ............................. 39
Foods which are suitable for storage in the
Vacuum Compartment ...................................... 39
GENERAL USE
● REFRIGERATOR COMPARTMENT .................... 40
Adjust the temperature of the refrigerator
compartment ..................................................... 40
Quick Cooling (When cooling food quickly) ...... 40
Multiuse Egg Case (this case can be put in the
Refrigerator Compartment with eggs in it) ........ 40
Descendible case (Pull it together with the case,
so that you can put in or take out foods at a lower
position.) ............................................................ 41
Shelves and pockets are adjustable ................. 41
Swing partition six door type only ................. 41
● VACUUM COMPARTMENT ................................ 42
Preparation before use ...................................... 42
When opening/closing the door of the Vacuum
Compartment .................................................... 42
How to maintain/care the Vacuum Compartment
... 43
How to maintain/care the Vacuum Compartment
with the vacuum packing removed ................... 43
● FREEZER COMPARTMENT ................................ 44
Upper Freezer / Lower Freezer ......................... 44
Height of the storageable food ......................... 44
Adjust the temperature of the freezeer
compartment ..................................................... 45
Quick Freezing .................................................. 45
●
ICE COMPARTMENT (AUTOMATIC ICE MAKER)
.... 46
How to make Ice ............................................... 46
How to change the Settings of the Automatic ice
maker ................................................................ 47
When you want to make ice quickly (Quick Ice
Making) .............................................................. 47
Ice making time and capacity ........................... 47
● VEGETABLE COMPARTMENT ........................... 48
Lower Case/Spacious Upper Case ................... 48
HOW TO MAINTAIN
● HOW TO MAINTAIN/HOW TO CARE THE INNER・
OUTER OF THE REFRIGERATOR ...................... 49
When dirt is found ............................................. 49
Power Plug ........................................................ 49
How to care the innerouter of the refrigerator
.. 49
● HOW TO REMOVE PARTS .................................. 50
●
HOW TO MAINTAIN THE AUTOMATIC ICE MAKER
.... 51
Ice Maker Cleaning ........................................... 51
Water supply container / Water lter ................ 51
Ice tray .............................................................. 51
TROUBLESHOOTING
● TROUBLESHOOTING.......................................... 52
FAQ when using for the rst time ..................... 52
Control Panel does not respond. ...................... 52
Automatic ice making is not properly performed.
.... 52
Refrigerator does not cool ................................ 53
Frost and/or dew occur ..................................... 53
Refrigerator cools overly ................................... 53
Abnormal operating sound is generated ........... 54
The refrigerator becomes hot ........................... 54
There is something strange with the Vacuum
Compartment .................................................... 55
It smells strange ................................................ 56
Door is not in a horizontal state ........................ 56
Others ............................................................... 56
● PRACTICAL ADVICE ON HOW TO USE THE
REFRIGERATOR/REPLACEMENT PARTS ........ 57
● [“eco” OPERATION INDICATOR LAMP]/DOOR
ALARM/LOCK FUNCTION OF THE PANEL FOR
OPERATION ......................................................... 58
● ABOUT NON-CFC REFRIGERATORS/
SPECIFICATION/STORABLE WEIGHT .............. 59
︹
e
c
o
運
轉
顯
示
燈
︺
/
箱
門
警
報
器
/
操
作
面
板
鎖
定
Page 32

WARNING
CAUTION
Suggestions headed by this pictograph
indicate "There is high chance of serious
injury or death" if ignored.
This symbol indicates something
you must not do. (Prohibited)
This symbol indicates something
you must do. (Compulsory)
Suggestions headed by this pictograph
indicate "There is a high chance of injury or
damage to property" if ignored.
WARNING
Installation
Handling the power and power cable
● Avoid usage that may
cause the wall outlet or
power cord components
to work beyond the
specifi ed voltage. Also do
not use power sources
that are not a rated voltage current.
If a power source is shared with other
appliances, double or multipoint adapters
may heat up beyond normal levels and
cause re.
Use a wall outlet rated above 15 ampere by
itself.
● Do not do anything that
may damage the power
cord or plug.
Using a damaged power cord may cause
electric shock, short circuits, or re.
Please consult with a retailer about the
repair of the power cord or plug.
● Do not insert or remove the
power plug with wet hands.
This may result in electric
shock.
● Connect the power plug
fi rmly to a power outlet with
the cord running down.
Connection of the power plug
with the cord running up could
apply stress on the cord and
cause electrical short or overheat, which
could result in electrical shock or re.
Incomplete connection of the power plug
could result in electrical shock or re due to
heat.
● Take measures to prevent overturning of refrigerator due to
earthquake, etc.
Overturning of the refrigerator could result in personal injury.
Pg.37
● Do not install the
refrigerator in damp places
or where water may splash
on.
This may impair electricity
insulation causing electric
shock or re.
earth
terminal
earth connection screwEarth
Connection
Prohibited Prohibited
Wet Hands
Prohibited
Wetting
Prohibited
trembling
and
unstable
Power
110V
The power cord or plug should
not be cut, modi ed, touched
with hot implements, bent by
force, twisted, pulled, have
heavy objects placed on it,
squeezed by the refrigerator,
or be bound or tied up.
● Install earth leakage
circuit breaker when
installing the
refrigerator in a
humid or damp environment.
Electrical leakage due to failure, etc. could
result in electrical shock.
Make sure to contact the dealer for earthing
installation.
Pg.37
32
SAFETY SUGGESTIONS
Ensure to follow
these precautions
When using this appliance, failure to follow safety precautions may result in personal harm, harm to other people,
and also damage to property.
The following pictographs categorize and explain the level
of possible harm on damage that may occur from ignoring
suggestions resulting in missing the appliances.
How the suggestions should be taken
are indicated and categorized by the
following symbols accompanied by
explanations. (The symbols below are
examples)
Page 33

WARNING
Handling the power and power cable
During normal use
● Clean the dust on the
power plug frequently.
Insulation failure from
moisture when dust
collects on the power plug
may cause re.
Unplug the power plug and wipe it with a dry cloth.
● Do not splash water on
or inside the refrigerator.
This may impair electricity
insulation causing electric
shock or re.
● Do not put in things
that may catch fi re.
Benzine, ether, LP gas,
thinner, adhesives may
ignite an explosion.
● Do not hang on the
doors or step up on the
various compartments.
Injury may be caused by
the refrigerator tipping over
or hands getting caught
between doors.
● Do not remove the cover
of the interior light.
When the interior light is
damaged, please contact either
the manufacturer, the service
centre or person with required knowledge for
replacing the light to avoid injury.
●
Drugs, chemicals,
research and experimental
substances should not be
stored in the refrigerator.
Substances that require
precise conditions for storage cannot be stored
in a domestic refrigerator.
●
Do not use fl ammable
sprays near the
refrigerator.
Sparks from points of
electrical contact such
as door switches may
ignite a re.
● Do not put water containers
on the refrigerator.
Spilled water may impair insulation
of electrical components causing
faulty electrical currents. This may result in electric
shock or re.
● Do not put things on top
of the refrigerator.
Opening and closing doors
etc. may cause things placed
on top of the refrigerator to fall
resulting in injury.
● Do not hang from the Descendible
Case.
● Children should be supervised to
ensure that they do not play with the
appliance.
● Do not touch
the machinery
components of the
Automatic ice maker.
There is a danger of injury when the ice trays are
rotating.
● Be sure to unplug the
power plug before
maintaining the
refrigerator.
Continued use may
cause electric shock or injury.
Pg.49
Always hold the plug when unplugging it.
Wetting
Prohibited
Wetting
Prohibited
Prohibited
Prohibited
Prohibited
Prohibited
Prohibited
Prohibited
Prohibited
Contact
Prohibited
binder
LP gas
Benzine
33
Safety Suggestions
Page 34

WARNING
Concerning the refrigerant (Be careful of the following related to
the use of fl ammable gas.)
● Do not scratch or
damage the main body
of the refrigerator with
a sharp object such as
screw.
Since the refrigerant used is ammable,
any leakage from the pipe inside the wall
may cause ignition and explosion.
● Do not use
mechanical devices
or other means
to accelerate the
defrosting process,
other than those
recommended by the manufacturer.
● Do not use electrical
appliances inside
the refrigerator.
If the refrigerant leaks,
sparks on the contact
may cause ignition
and explosion.
● Do not damage the
refrigerant circuit.
If you happen
to damage the
refrigerant pipe,
stay away from
the refrigerator
and avoid using fi re and electrical
appliances.
Should you damage the refrigerator, open
the window to ventilate and contact your
dealer or our repair reception desk.
● Allow clearance around
the refrigerator and keep
ventilation openings
when installing it.
Pg.36
Leakage of the refrigerant
may accumulate and cause ignition and
explosion.
● Please consult your dealer
or the Recycle Hotline
(0800-085-717) of the
Recycle Centers in the
Environmental Protection
Administration when
discarding the unit.
If the refrigerant is wet, it may
cause ignition and explosion.
Prohibited
Prohibited Prohibited
In case of emergency
When discarding the unit
● Stop the refrigerator
by unplugging it if it is
not running properly or
broken.
Continue may cause
electric shock or injury.
Always hold the plug when unplugging it.
● Before discarding the unit or recycle, remove the door packing to avoid the
risk of an infant or children to be entrapped inside.
● In the event of a fl ammable gas leak do not touch refrigerator
and open windows to let air fl ow.
Sparks from points of electrical contact such as door switches may ignite
explosions causing re or burn injuries.
● Do not disassemble,
repair, or modify your
refrigerator.
Injury may be caused by
ignition of re or faulty running.
Please consult with a retailer if any repairs
or disassembly are required.
Dissassembly
prohibited
turn off
the switch
34
Page 35

Prohibited
CAUTION
Handling the power and power cable
● On a fl oor that is easily
scratched do move the
refrigerator using the
wheels at its base.
The wheels may scratch
the oor.
For a oor that may be easily scratched, lay a
protective mat.
● Use the carrying handle
when carrying it.
Your hands may slip
resulting in injury if you
hold the refrigerator in
other places apart from
at the carry handles.
More than 2 person should carry the
refrigerator for safety reasons.
Carry it with the door facing upward; as
shown in the illustration.
Never hang the handle with a crane.
During normal use
● Do not put bottles in
the Door Baskets if they
do not sit properly on
the bottom of the front
section.
Forcing in items like large
bottles may result in them
getting tipped over, causing injury.
● Do not have food
items protruding
over the front of
the shelves.
Injury may be caused
from items like bottles getting knocked over.
● Do not put your hands
or feet under the
base surface of the
refrigerator.
When cleaning, putting
your hands under the
base surface of the refrigerator may
result in injury by cutting them on sheet
metal parts.
● Do not eat food that
smells strange or
has changed color.
Bad foods may cause
serious sickness.
●
Foods and containers
inside the Freezer
Compartment should
not be touched with
wet hands.
This may cause frost injury. (Especially in the
case of metal items)
●
When two or more doors
are being opened or
another person is using
the refrigerator, make sure
fi ngers don’t get caught.
Fingers may get caught in the spaces between
doors causing injury.
● Do not put the glass
bottles in the Freezer
Compartment.
Bottles may break from the
contents freezing and cause
injury.
● Do not have your
feet too close when
opening the bottom
door of the refrigerator.
When opening this door
you may hit the in step or other parts of your
feet resulting in injury.
● Do not stack or protrude any food storing
in the descendible case.
Be sure to seal up any spillable food.
● Be sure to attach the partitions and wire
to the descendible case before use.
● Do not hold the top of
the doors when closing
them.
If you hold the top of a door
when closing it you may get
your ngers caught or pinched causing injury.
Prohibited
Prohibited
Prohibited
Prohibited
Prohibited
Prohibited
Prohibited
Prohibited
Prohibited
caution
stink
35
Safety Suggestions
Page 36

36
BEFORE USE
1
2
3
Installation Place
The oor should be sturdy and at.
Lay the board which has 1cm thickness on the oor if the refrigerator is installed on the carpet, tatami
mat, ooring or PVC sheet ooring which may hollow or discolor.
A location away from direct sunlight and heat is recommended.
A location is not damp and has good air ow.
This will reduce adverse effects to refrigerating power and keep electricity cost down. This will also
prevent the refrigerator from discoloring and rusting.
Clearance around the refrigerator
To cool ef ciently, allow enough space around the refrigerator for
radiating heat.
The actual size of the center part of the side of the refrigerator's
main body is slightly larger than the nominal size.
Therefore, allow enough space around the refrigerator taking it
into consideration when installing the refrigerator.
The back of the refrigerator can be placed very close to a wall. If
any vibration sound occurs and/or any discolor/dirt is found on
the wall, move the refrigerator away from the wall.
Adjusting the refrigerator adjustable mount to keep it level
Left side or right side of the door may be slightly lower when the surface of the installation place is not
level or either of the left and right leg is sunk in the oor surface because of the soft oor material and
the addition of food weight.
This does not affect the refrigerator function. Adjust the refrigerator adjustable mount to keep it level
according to the procedure listed below if you want to correct it.
Correcting any left/right lean and lifting slightly the front side of the refrigerator, the door can close
easily and completely.
To remove leg cover, hold both
ends of it and pull it towards to
you applying some force.
Turn both Adjustable mounts to
lower them to the fl oor surface and
fi x them. (2 mounts: left & right)
Turn left and/or right Adjustable
mounts to make the Refrigerator
Compartment Door horizontal.
Insert the left and right pins of
the leg cover into the leg holes to
install the leg cover.
The height of the door will change
by 1mm every 1 turn of Adjustable
mount.
The adjusted door may lean because
it may take several days until the
refrigerator permanently becomes
level after adjusting.
Adjust the refrigerator legs again
to keep it level according to the
procedure if this is the case.
Use the optional parts "Door Adjusting
Plate" (Parts No. R-Y6000 500) if the
door still leans after that.
Contact your dealer for details.
Required space above the
Required space above the
refrigerator: 5cm or more
refrigerator: 5cm or more
Required space for right and
Required space for right and
left of the refrigerator: 1cm or more
left of the refrigerator: 1cm or more
2
3
4
1
Leg cover
3 3
Turn the left
Adjustable mount to
lower the left side of
the door.
Turn the right
Adjustable mount to
lower the right side
of the door.
Adjustable mounts
The left door is lower.
The right side of the door is lower.
When it is hard to turn the Adjustable
mount push and turn it with a tool such as
a driver.
The right door is lower.
The left side of the door is lower.
21
Page 37

37
4
5
On the Power Plug and Grounding
It is not a problem to plug in the power cord soon after installing the refrigerator.
Use a wall outlet exclusively when connecting the power cord. (Alternating current 110V, rated 15A or more)
Storing foods
Do not put the ice cream, foods that are not cooled well or perishable foods in the refrigerator before the
inside of the refrigerator cools fully.
It may take more than 4 hours through 24 hours to cool well the inside of the refrigerator, depending on
conditions such as the ambient temperature or the storage state of foods.
Perform
製冰機清潔
(Ice Maker Cleaning) when using the automatic ice making function rst.
Pg.51
A series of ice making operation will start automatically after the inside of the refrigerator is cooled well.
(When using for the rst time, it may take 24 hours and more to make ice.)
Minimize the number of times of opening and closing the door.
Allow clearance between each food.
It may smell like plastic for the rst time. Ventilate the room well to make sure that the room is not lled with
the smell. The smell gradually disappears.
Wrap foods such as sh/meat or foods that have a strong avor in polyethylene lm, etc. or keep them in a
sealed container.
It is recommended to ground the refrigerator
to prevent possible electrical shock.
Contact your dealer to ground the refrigerator or install an earth
leakage circuit breaker if the refrigerator is installed in especially
damp and humid places.
Option: "Earth wire (2.5m)" (Parts No. NW-60R6 052)
Preparation for an earthquake has been made
properly?
It is recommended to x the refrigerator to a sturdy wall or pillar using
two "safety belt against overturning for refrigerators".
Option: "Safety belt against overturning for refrigerators" (Parts No.
R-826CV 300: belt x 1) Contact your dealer for details.
Do not remove the sticker from the back of the refrigerator. This
sticker is necessary to secure the performance and safety.
Do not remove the plastic parts and label from the bottom part of
the side of the refrigerator.
If you wish to install the refrigerator in a hot spring area exposed to sul de gas, you may need to apply anti-
rust treatment to the piping. Contact your dealer in advance. Failure caused by gas damage will not be covered
under guarantee.
Never connect the earth wire to the following places:
Water pipe (Danger of electrical shock)
Gas pipe (Danger of explosion)
Telephone line or earth of lightning rod (Danger when lightning strikes)
Earth terminal
Earth installation screws
Earth wire
(Copper wire with diameter of
1.6mm)
Screw x 4
(attached to belt)
Stickers
Left/Right
Plastic parts
Label
Belt
Notice
Before Use
Page 38

38
CONTROL PANEL/NAME OF EACH COMPARTMENT/STORAGE COMPARTMENT
●
Control Panel Image (It is an image when all displays are turned on. Only the selected character display is
turned on when actually operating it.)
(Quick Cooling) operation and eco operation indicator lamps will not be turned off.
In order to check the setting, push either button. The indicator lamp will be illuminated again.
Control Panel for operation
Operate it with all the doors closed. The Control Panel doesn’t respond in order to prevent improper operation while
the Refrigerator Compartment Door is opened, even if the characters are displayed, when the Control Panel on the
Refrigerator Compartment Door is pressed.
All the displayed characters on the Control Panel on the Refrigerator Compartment Door ash if the door remains open
for 1 minute and more (Door Alarm).
Pg.58
Notice
Button for
selecting
the function
Button for
adjusting
the
temperature
Useful Function
Adjusting the temperature
Vacuum
Compartment
Refrigerator
Compartment
Freezer
Compartment
Ice Making
Quick Cool
Functions
Cleaning the
Ice Maker
[“eco” Operation
indicator lamp]
Check
Button Lock
Quick
Freezing
Quick Cooling
Quick
Freezing and
Quick Cooling
Push the button to select "Vacuum Compartment
Subzero", "Vacuum Compartment Chiller" or "OFF".
Pg.42
It is set to Vacuum Compartment Subzero according
to the factory default.
Push the
冷藏
button to set the temperature of the
Refrigerator Compartment.
Pg.40
Select (Mid) in ordinary usage.
Push the
冷凍
button to set the temperature of
the Freezer Compartment.
Pg.45
Select (Mid) in ordinary usage.
Push the 製冰
button to select the ice size of
"Normal" or "Large".
Pg.47
Select "Stop" when you don't need to use the
Automatic Ice Maker.
Push the 急冷 button to select "Quick
Freezing", "Quick Cooling" or "Quick Freezing
and Quick Cooling".
Ice Tray and Water Supply Line can be washed by pushing
the
製冰
button for more than 5 seconds.
Pg.51
Indicates the operation mode of the refrigerator.
The indicator lamp can be turned off.
Pg.58
確認 (Check) ashes when there is a
malfunction.
Pg.57
Push the 冷藏 button for more than 3 seconds
to display
(Button Lock display) when you
want to prevent the operational error of the
Control Panel.
Pg.58
Freezer Compartment is strongly cooled. Select
it when you want to freeze the food etc. quickly.
Pg.45
Refrigerator Compartment is strongly cooled.
Select it when you want to cool food and/or drink
quickly.
Pg.40
Freezer Compartment and Refrigerator
Compartment are strongly cooled. Cooling effect
is weaker than when "Quick Freezing" or "Quick
Cooling" is selected.
製冰機清潔
(
按5秒閃爍
)
按鍵鎖
(
按3秒
)
Page 39

39
Name of each compartment
Foods which are suitable for storage in the Vacuum Compartment
Pg.40
Refrigerating foods
The temperature of door pocket is
slightly high.
Pg.46
Store the ice cube made by auto
ice making function.
Pg.42
Foods which are suitable for
storage are as shown below.
Pg.44
Store frozens foods, ice-cream and
dried foods.
Pg.44
Store frozens foods, ice-cream and
dried foods.
・
Low Temperature Freezer
Pg.45
(About -23˚C ~ -20˚C)
Foods are preserved at lower
temperature than usual.
Pg.48
Vegetable, fruits, drink
Refrigerator compartment
(About 2˚C ~ 6˚C)
Ice compartment
(About -20˚C ~ -18˚C)
Vacuum compartment
(About -1˚C ~ 1˚C)
Upper freezer
(About -20˚C ~ -18˚C)
Lower freezer
(About -20˚C ~ -18˚C)
Vegetable compartment
(About 3˚C ~ 7˚C)
Vacuum
Compartment
Chiller
切 (Off))
(“氷温”) (Subzero)
(About -1˚C)
Vacuum
Compartment
Subzero
Vegetable salad, dairy products, meat and fish are
preserved while the vacuum power plus antioxidant vitamin
prevent natural nutrients in the foods from getting oxidized.
More suited for meat and fish storage because
the temperature is lower than that of the Vacuum
Compartment. Other foods may be frozen or change its
nature. It is recommended to store meat and sh only.
The vacuum function will not work. It is recommended
to store a sealed bag or a sealed container which
needs some care. This is an ordinal ice-temperature
compartment, so some foods may be frozen.
Vegetable salad, bell pepper, apple, orange, kiwi etc.
Vienna sausage, sliced cheese etc.
Beef, pork, poultry, ham, sausage etc.
Eggplant Cucumber
Horse mackerel, sardine, mackerel, sh roe etc.
Coffee bean, tea, dairy product, paste etc.
● Vegetables, fruits ● Food contained in a sealed bag
The bag may be in ated during storage, which
could result in crushing of other stored foods.
●
Vegetable sensitive to low temperature
The surface of the vegetable may deteriorate
due to low temperature.
Do not select "Vacuum Compartment
Subzero" and "OFF" when storing
the food other than meat, sh and
processed meat/ sh. Juicy food such
as vegetable and bean curd may freeze.
● Plastic airtight container
The lid of the container may become loose
or may not stay in place during storage. Be
careful when you take out the container.
● Meat, processed meat
● Others
● Fish, seafood
Food and container for which care
needs to be taken during storage
Food which are not suitable for
storage
Caution
Caution
The temperature is used as a guide when the temperature is stable under the condition that no food is stored with the door
closed (ambient temperature: 30˚C). The vibration may get larger, because the compressor operates at low speed when the
door is not opened or closed for a long time such as at night or during someone is away.
Control Panel/Name of Each Compartment/Storage Compartment
* This applies to both 5-door and 6-door refrigerators.
Page 40

40
Adjust the temperature of the refrigerator compartment
製冰機清潔
(按5秒閃爍)
按鍵鎖
(
按3秒
)
Control Panel on the Refrigerator
Compartment Door
Adjust the temperature of the
refrigerator compartment
Push the冷藏button to adjust the temperature of the
refrigerator compartment.
The temperatures are standard values under the speci c condition (the surrounding temperature
of 30˚C, no food stored, door closed and the temperature in the refrigerator is steady).
強 (低溫)
中
弱
About 1 3˚C lower than "中"
About 2 6˚C
About 1 3˚C higher than "
中
"
Select "中" in ordinary usage. The temperature may change depending on the operation states.
The temperatures of the Vacuum Compartment also change if selecting "
強 (低溫)
" or "弱".
Temperature of the door pocket is set slightly higher than the one in the left table.
The displayed character will disappear about 2 minutes after the operation nishes. However,
(Quick Cooling Operation) or eco operation indicator lamp will not be turned off.
For more information about the panel for operation.
Pg.38
If you adjust the temperature more nely.
Pg.57
Notice
REFRIGERATOR COMPARTMENT
Hold the carry handle securely when
handling it.
Do not stack foods, or otherwise they
may drop.
Do not put tall foods in because they
may fall down.
Do not make ice with this container.
Do not put the Multiuse Egg Case in
the Descendible Case.
Cooling effect may become weaker depending on the operation states of the refrigerator when simultaneously using this function and Quick Freezing
Pg.45
function.
Caution
Notice
Quick Cooling
(When cooling food quickly)
Multiuse Egg Case
(this case can be put in the Refrigerator Compartment with eggs in it)
1
Place the foods in the
Quick Cooling Corner
(upper shelf).
Push the
急冷
button
to display "Quick
Cooling".
※
"Quick Cooling Operation"
ends automatically after
about 45 minutes.
Push the
急冷
button to turn off the
display after turning on other displays
again, when you want to stop this function.
Lower shelf
Height adjustable pockets
Multiuse Egg Case
Egg standEgg stand
Ten eggs can be stored in this case.
The egg pack with eggs in it can be stored as it is.
When the egg stand is turned over, it can be
used for small sized food.
Indicators other than 急冷 (Quick Cooling
Operation) will be turned off about 2 minutes after
setting the 急冷 (Quick Cooling Operation).
The food cools more quickly if it is placed on the center part near the interior wall. (the front of the
Cold Air Blowout Port)
Place any juicy food and/or canned beverage on the place far from the interior wall or move them
to the Lower Shelf. Otherwise, they may freeze or explode.
2 3
Light ON pushing
the button
1 beep
The
indicator lamp will
be illuminated during
the (Quick
Cooling Operation).
Other indicator lamps
are turned off
Display OFF
4 beeps
Light OFF
pushing the
button
2
beeps
Descendible case
Descendible case
Lower shelf
The height is adjustable
Lower shelf
The height is adjustable
Height adjustable
pockets (2 levels)
Height adjustable
pockets
Door pocket
(upper)
Door pocket
(lower)
Egg stand
Door pocket (left)
Height adjustable
shelf
Egg stand
Height adjustable
shelf
Double door
pockets
Reversible shelf
Reversible shelf
Multiuse Egg Case
Refrigerator Compartment Temperature Sensor
Tube Stand
LED lamp
LED lamp
Pocket (fi xed)
Double door pockets (left) Double door pockets (right)
Swing partition
Height adjustable
pockets (2 levels)
Refrigerator
Compartment
Temperature
Sensor
Multiuse Egg Case
Fixed shelf
Fixed shelf
Quick cooling
corner
Quick cooling corner
Vacuum compartment
Quick cooling
corner
Quick cooling corner
Vacuum compartment
Don’t place any juicy food or canned beverage here because the temperature gets low. As it may be frozen.
Temperature in the Refrigerator Compartment may fall too much if warm food is stored near this sensor.
Store that kind of food in the place far away from Temperature Sensor.
Caution
Cold Air Blowout
Port
Six doors: (R-SF62AMJ, R-SF58AMJ, R-SF48AMJ) Five doors: (R-S59AMJ, R-S49AMJ)
Pg.42 Pg.42
Page 41

41
Descendible case
(Pull it together with the case, so that you can put in or take out foods at a lower position.)
Shelves and pockets are adjustable
Swing partition
six door type only
Refrigerator Compartment
Do not hold the
swing partition to
open the left door
while the right
door is open.
Do not close the
door when the
swing partition
folds out.
Hold the handle and slowly
pull out towards you.
Hold the handle and slowly
push in until the end.
When pulling out
Height of Storable Food
When pushing in
Do not hold any place other than the handle or do not put your weight on the shelf. The case may come off or damage.
The food may drop because the descendible door is inclined when it is drawn.
Do not stack foods. Use the partition and wire together with the Descendible Case before use.
Foods are stored within the case. Store foods of which contents may spill out in a sealed container.
Shelves and pockets position can be adjusted according to the size of food and drinks.
Remove the stored items before adjusting the shelves.
■ Height Adjustable Shelf・Lower Shelf
■ To open the door ■ To close the door
■ Reversible Shelf ■ Height Adjustable Pockets (Right) (Left)
It can be adjusted to the desired height.
■ Tube Stand
Small things can be placed
vertically in a neat manner.
Hang it on the edge of each
pocket as you like.
Close the door of the Refrigerator Compartment while the Vacuum Case, the Multiuse Egg Case and the Descendible
Case are in place. If the door is closed while some of them protrude, the door, the case or foods may get damaged.
Too many times of opening/closing of the door, or high humidity around the refrigerator may cause mist on
the wall, etc. or frost around the Cold Air Blowout Port.
Wipe off spilled water or food soup soon, if any.
Do not hang it outside the door pocket.
When closing the door, the door, the
case or foods may get damaged.
Caution
Caution
Caution
As a normal shelf Pattern 1 Pattern 2
Swing partition Swing partition
Front side Front side
Inner side Inner side
Remove by slightly lift up the back of the shelf and pull forward.
Remove by slightly lift up the shelf.
Adjust the shelf to the desired height and slide it until it reaches
to the interior wall, then slightly lift up the back of the shelf and
push it in.
(Hitch the forks of the shelf to the parts on the back of the shelf)
Turn over and set at either top or bottom level.
1
1
2
2
〔
Type: R-SF62AMJ・R-SF58AMJ・R-S59AMJ
〕〔
Type: R-SF48AMJ・R-S49AMJ
〕
Please follow the height of storable food.
The ceiling of the refrigerator is lower at the inner side. As indicated in the gure,
do not let food protruded out of the case when storing food.
Install position of the
third partition
19.5cm
15cm
500
ml can
Stored in a zigzag manner
350
ml can
Install position of the
second partition
19.5cm
15cm
500
ml can
350
ml can
Handle Handle
Tap-tap
Page 42

42
VACUUM COMPARTMENT
Seals the Vacuum Compartment, and lowers the air pressure inside the case into the vacuum state (under low-
oxygen conditions) by using the vacuum pump. Vitamin Case helps to suppress oxidization of foods.
The natural nutrients and good avor in the foods are preserved in a longer period than before due to
suppression of oxidization.
The vacuum effect will not change even if foods are wrapped.
Note:
The word vacuum used here means the space where the air pressure inside is lower than the atmospheric pressure. The air pressure
in the Vacuum Compartment is approximately 0.8 atm. which is lower than the atmospheric pressure, so we call such state as vacuum.
Display "Vacuum Compartment Subzero" or "Vacuum Compartment Chiller" on the Control Panel for
operation to use this function.
It is also available as a normal Ice Compartment (-1˚C) by selecting "OFF".
Pg.38
To be used as a guide under the conditions that the ambient temperature is 30˚C and is stable.
Be sure to open the left/right door of the Refrigerator Compartment.
Hold the door handle on the bottom
with your hand.
Lift the handle to release the
lock.
Push in until the end while holding the handle.
When the hissing sound stops, pull the handle towards you to open.
Fully press down the handle to lock the door.
Vitamin Case (on the ceiling inside the Vacuum Compartment)
This lets out vitamin to preserve natural nutrients in the foods for a longer period under lowoxygen conditions.
Vacuum Container
Handle
Use this handle from
beneath to open or close.
Vacuum Case
(with the door)
Toothed wheel
(Under the case inside the compartment)
Vacuum release valve (in blue)
Raise the handle to unlock it. The vacuum will be
released by the vacuum release valve.
Hissing sound is generated when releasing the vacuum.
Sound or vibration occurs when the vacuum pump starts to run in order to lower the air pressure inside the Vacuum Compartment. Such
operating sound or vibration is not abnormal.
The vacuum pump operates after the door of the Vacuum Compartment is locked and the door of the Refrigerator Compartment is closed.
It takes about 3 minutes to achieve the vacuum state after the vacuum pump starts the operation. If the door is opened before 3 minutes
pass, no hissing sound may be generated. Check the vacuum state after 3 minutes and more.
The displayed characters will disappear about 2 minutes after the operation nishes. However, (Quick Cooling) and eco operation indicator lamps
will not be turned off. Push either button to check the setting. The indicator lamp will be turned on again.
The displayed character will be changed from
真空開
+1˚C
(Vacuum Compartment Chiller)
真空開
-1˚C
(Vacuum Compartment Subzero)
真空關
-1˚C
(OFF)
(Subzero) in turn each time you push the
真空開
(Vacuum Compartment) button. The lamp and operating sound inform the operation mode.
Pg.38
The Vitamin Case needs no replacement on regular basis. Do not remove it.
Juicy foods may be frozen because it
is preserved at the temperature lower
than “Vacuum Compartment Chiller”.
The door can not be opened
when the hissing sound can
still be heard.
The Vacuum Compartment will not be opened
unless the left/right door is opened. If you try to
open it forcedly, the double pocket or the Vacuum
Compartment may get damaged or the door of the
Refrigerator Compartment will open suddenly.
Close and lock the door of the Vacuum Compartment before
closing the door of the Refrigerator Compartment. If the door
of the Refrigerator Compartment is closed with the door of
the Vacuum Compartment opened, the double pocket, the
Vacuum Compartment or foods may be damaged.
Hold down the handle to the end. Or
the Vacuum function will not work
properly.
If the handle is heavy, use the palm to
hold it down.
Notice
Notice
Caution
Caution
Notice
Notice
Preparation before use
When opening/closing the door of the Vacuum Compartment
Vacuum Compartment Chiller display ON Vacuum Compartment Subzero display ON
For more information.
Pg.39
Caution
When
opening
the door
When
closing the
door
Handle
Hiss
Door
Vacuum Compartment Chiller
Vacuum Compartment Subzero
About +1˚C
(Vegetables, dairy products, meat, sh, etc.)
About -1˚C
(Especially for preserving meat, sh, and processed meat/ sh)
Some foods are not suited to be stored, and some foods/containers require attention when storing them.
Pg.39
Juicy foods may be frozen when the ambient temperature is low.
Caution
Page 43

■ How to remove the door of the Vacuum Case
43
1 2 3
Be sure to remove foods contained in the Vacuum Compartment.
Remove the Vacuum Case (with the door) rst. Remove the door of the Vacuum Compartment and the vacuum packing in the following
way, and then maintain/care them. Do not remove other things except the door of the Vacuum Case and the vacuum packing.
If
真空開
-1˚C
(Vacuum Compartment Subzero) /
真空開
+1˚C
(Vacuum Compartment Chiller) indicator lamps ash, the vacuum
function may not be in the normal conditions.
Pg.55
The vacuum function will not work properly if some
package of foods is pinched in or dirt/dust is adhered to
the vacuum packing or the vacuum release valve (in blue).
Moisture in juicy foods stored in the Vacuum
Compartment will evaporate and cause
dew condensation or frost in the Vacuum
Compartment. If water drops and/or frost
adheres inside the Vacuum Compartment or
around the door of the Vacuum Compartment,
wipe off them with a dry cloth.
For troubleshooting about the Vacuum Compartment, see Troubleshooting
Pg.55
Replace an old vacuum packing if the vacuum state can’t be kept well.
Pg.57
The vacuum function will not work properly if the
vacuum packing or the vacuum release valve (in blue)
comes off or is loosened.
Make sure to wipe off
spilled water or food soup
soon, if any. Water will be
frozen, which may lead to
a trouble of the Vacuum
Case (with the door).
Notice
Vacuum Compartment
How to maintain/care the Vacuum Compartment
How to maintain/care the Vacuum Compartment with the vacuum packing removed
Do not rinse the door of the Vacuum Case in water.
If detergents and others except lukewarm water are used to clean the vacuum packing, the vacuum packing
may be damaged, deformed or change in color, which may cause that the vacuum state can’t be kept well.
Loosened vacuum packing or loose- tting door of the Vacuum Case may cause that the vacuum state can’t be kept well.
Caution
Pay attention that no package of
the foods is pinched.
Pull the door, lift up the edge
of the Vacuum Case (with the
door) lightly and then pull it out.
Insert a plastic wrap case or
something like that under the case
so that the door of the case will
be oating and removable without
dif cult.
Unset the tab at the edge of the
Vacuum Case.
Rinse dirty portion in water with a soft
wash sponge, wipe off the moisture with
a dry cloth, and then let it dry naturally.
Remove dirt in the groove of the vacuum
packing on the door.
Do not use the detergents, etc.
Rotate the door of the Vacuum Case
upon around the upper portion.
Hold down the door of the Vacuum
Case to unset the axis.
Rotate the door of the Vacuum
Case upon the upper side of the
door, and pull it out.
Put the Vacuum Case (with the door) back into
the Vacuum Container, and then lower the lock
of the handle.
Wipe the vacuum packing, the inside the Vacuum Case and the
packing support, using a soft cloth wet by lukewarm water.
Waste thread Scraps
The indicator
lamp ashes.
Vacuum release valve
Vacuum release valve
1
1
2 3
3 4
Tab
2
2
Rotation criteria
Grasp the tab of the vacuum packing on the observer
’
s
upper right and remove it by hand carefully.
Align the axis of the door of the Vacuum
Case to the support.
1
1
Align the tab to the notch accurately, and
then combine them together.
3
Tab
Tab
Axis of the door
of the Vacuum
Case
Support
Notch of the groove
■ How to maintain/care the vacuum packing
■ How to install the door of the Vacuum Case
2
Pull up the door of the Vacuum Case while
holding the bottom of the Vacuum Case.
Check the tab is in place.
3
Page 44

44
Store foods of which height are suited for each case.
Otherwise, the door will not be closed securely, which lead to inef cient cooling action. In addition, it may cause
damage of foods or each case.
Keep the food off from the bottom of the slimeline case and/or the slide case.
Height of the storageable food
FREEZER COMPARTMENT
With Quick Freezing System, all the moisture, natural nutrients and
good avor in the foods are preserved in an instant.
Pg.45
It is recommended to use this compartment when freezing meat and/or sh
quickly.
3-layer freezer case provides you with large storage space
compartment and convenient reach of your freeze food items.
It is suitable for storing the foods preserved for a long time and the
foods that melt easily such as ice cream.
Upper Freezer
Lower Freezer
Upper Freezer case
Slide Case
Freezing bag
Airtight container etc.
Slimline slide case
Small-item and
frozen food, etc.
Moving the aluminium tray in the Upper Freezer to the left side of the Slimline
slide case, it can be used as the Quick Freezing Corner.
Do not store any 500ml PET bottle in the Slimline slide case.
It cannot be taken out because it expands when it is frozen.
Do not use with the Slimline slide case and/or Slide case
removed.
Food may be caught in and/or drop to the inner part of the
case, and as a result, the door may not close completely.
When storing tall food in the Tall Compartment,
make sure that it does not contact with the
Slimline Slide Case and/or the Slide Case.
Store only food which can be frozen, such as
PET bottle only for freezing.
Lower freezer case
Frozen food and
bread Ice cream etc.
Tall Storage Compartment
Suitable for storing the PET
bottle for freezing (23.5cm
or less in height)
It is recommended to use this tray as a storing space
for small items such as freezing bag and airtight
container.
Aluminium tray (Quick Freezing Corner)
How to use the Ice Compartment
(Automatic ice maker)
Pg.46
Upper
Freezer
Slimline Slide
Case
Up to
23.5cm
in height
Slide Case
Lower
Freezer
(Front)
Upper Freezer case
Up to the top line of the case
Slimline slide case
Up to 5cm
Slide case
Up to the top line of the case
Lower freezer case
Up to the top line of the case
Tall Storage
Compartment
Page 45

45
Adjust the temperature of the freezeer compartment
Control Panel on the Refrigerator
Compartment Door
The displayed character will disappear about 2 minutes after the operation nishes. However,
(Quick Cooling) and eco operation indicator lamps will not be turned off.
Pg.38
For more information about the panel for operation.
Pg.38
To adjust the temperature more nely.
Pg.57
Notice
Adjust the temperature of
the freezer compartment
Push the 冷凍 button to adjust the temperature of the freezer
compartment.
The temperatures are standard values under the speci c condition (the
surrounding temperature of 30˚C, no food stored, door closed and the
temperature in the refrigerator is steady).
強 (低溫)
About -23 -20˚C
(Low temperature freezing)
中
About -20 -18˚C
弱
About -18 -15˚ C
Select "中" in ordinary usage. The temperature may change depending on the operation states.
Temperatures in the Quick Freezing operation are lower than the temperatures described in the left.
If operating the refrigerator for a long time with the "
強 (低溫)
" selected, ice cream etc. may
become hard or it may take a longer time to thaw food.
Freezer Compartment
Quick Freezing
1
Place the food wrapped
with plastic fi lm on the
aluminium tray in the
upper Freezer.
Push the
急冷
button.
※
"Quick Freezing operation"
will end automatically in
about 90 minutes.
Push the
急冷
button again if
you want to stop the operation.
Indicator lamps other than (Quick
Freezing) will be turned off about 2 minutes
after (Quick Freezing) is set.
Freezing compartment is cooled preferentially in the "Quick Freezing operation".
For that reason, temperature of the Refrigerator Compartment may rise if opening/closing the
Refrigerator Compartment door frequently.
Warm food such as rice can be easily frozen by this function. Make sure that you never burn
yourself when putting hot food in.
It is recommended to put it in after it is cooled down to 50 60˚C.
Pushing the button again within 60 minutes after the end of the "Quick Freezing (Quick
Ice Making)" operation, the lamp is illuminated, but the operation does not start. The operation
will start after 60 minutes pass.
Make sure to wrap the food with plastic lm to prevent it from sticking on the aluminium tray.
Thinly subdividing food, not only can they freeze completely soon, but also they can be taken
out easily.
Did you open the door frequently?
It is recommended to open and close the door quickly and/or minimize the number of
times of opening and closing the door.
Does any food or package caught in the door prevent the door from closing completely?
Check that there is not any space between the door seal and its contact surface with the
door closed.
Is food squeezed in? or Is a large amount of food put in at a time?
Make sure that any food does not protrude beyond the storage height limit of each
compartment, and do not store the amount of food that may prevent the door from
opening and closing.
Allow clearance between each food in each compartment.
Are Upper Freezer case and Slimline slide case installed correctly?
Install them correctly.
Pg.50
2 3
1 beep
Quick Freezing Corner
Light ON pushing
the button
Light OFF
4
beeps
Light OFF
pushing
the button
2
beeps
Troubleshooting
When this happens Please check. This is the cause.
Freezer does not
cool well enough,
frost and/or dew
occur, ice cream
becomes soft
There is a space
between the door seal
and its contact surface.
If opening and closing the door frequently, temperature of food may become higher and food such as ice
cream may become soft.
Caution
(Quick Freezing)
indicator lamp will be
turned on during the
(Quick Freezing)
operation, and other
indicator lamps will be
turned off.*
製冰機清潔
(按5秒閃爍)
按鍵鎖
(
按3秒
)
Page 46

46
ICE COMPARTMENT
(AUTOMATIC ICE MAKER)
Water Supply Container
Button for switching between Ice Size and Stop Ice Making
Control Panel for operation
AUTOMATIC ICE MAKER
Ice Case
Ice scoop
Display
Ice Tray
Ice Making
button
Ice Making button
Add water line
How to make Ice
1
2
3
Setting of the Automatic ice
maker
Push the 製冰(Ice Making)
button to select the ice
size.
Pg.47
Take off the Water Supply
Container.
Add water if water level reaches
to the "Add water line".
Open the lid and add water.
Add water until water level
reaches to the "Container-full
line".
Replace the Water Supply
Container.
Push it beyond the "Container set
position" line.
Water may spill out if the
water supply container is
inclined. Wipe off spilled water
immediately.
Ice making starts
automatically and ice is
stored in the Ice case.
4
Container set position
5
Perform
製冰機清潔
(Ice Maker Cleaning) when making ice for
the fi rst time or for the fi rst time in a week or more.
Pg.51
It may take 24 hours or more to make ice for the fi rst time.
8 ices are usually made per 2 〜 3 hours.
Notice
"Check the lamp"
製冰機清潔
(按5秒閃爍)
製冰機清潔
(按5秒閃爍)
Ice Compartment
Container-full
line
We suggest you use boiled tap-water to
make the ice after cooling.*
*: please check & verify the water quality
condition with local authority.
Change water and clean the container at
least once a week for hygiene purposes.
If the ice made of mineral water containing a
lot of mineral ingredients is put into water,
white powder may come out, however this is
those mineral ingredients and harmless.
Required to satisfy the appropriate water
quality standard
■
Do not put your hand in the mechanical
part of the Automatic ice maker.
You may be injured when the ice tray turns.
Do not use the following ones
because they may cause malfunction,
deformation or sticked ice.
Furthermore, these types of water are
easily contaminated with bacteria.
Please wash the container usually once 3 days.
Caution
Mineral
water
(Hardness: 100mg/L
or less)
Filtered water or
boiled water
Juice drink Sports
drink
TeaCarbonated
drink
Well water
(Required to satisfy
the appropriate water
quality standard)
Warning
Page 47

47
Ice making time and capacity
Ice Making button
Control Panel on the Refrigerator
Compartment Door
Making normal ice
Push the 製冰 button
to display "Normal".
Making large ice
Push the 製冰 button
to display "Large".
Push the Quick Cooling button to display
"Quick Freezing". Quick Ice Making
operation starts and ice making time
reduces.
Pg.45
It returns to the normal operation
mode in about 90 minutes.
Push the 製冰 button
to display "Stop".
Automatic Ice Maker
stops and does not
make ice.
Ice Compartment (Automatic Ice Maker)
How to change the Settings of the Automatic ice maker
When you want to make ice
quickly
(Quick Ice Making)
When making ice with the Automatic ice maker
Stop making ice
Push this
button
The displayed character will disappear about 2 minutes after the operation nishes. However, (Quick Cooling) and
eco operation indicator lamps will not be turned off.
Every time you push the 製冰 button, operation mode changes in order of Make normal ice Make large ice Stop
Ice Making. The lamp and operating sound inform the operation mode.
The lamp may ash when switching the operation mode to "Stop Ice Making", but it is turned off automatically in about 20
seconds. (It is not a malfunction)
After stopping ice making, wash the water supply container thoroughly and replace it after it dries.
In particular, dry the water lter thoroughly. (How to maintain
Pg.51
)
Stopping ice making, operation sound of automatic ice making (occurred during ice separating and water supply etc.) can
be stopped.
Amount of stored ice is automatically detected by the stored ice amount detecting lever of the
Automatic ice maker which cannot be seen usually.
Automatic ice maker stops making ice when the amount of the stored ice reaches to the
speci ed level and it restarts making ice when the amount is below the level.
Limit line of stored ice amount represents the guide line of stored ice amount when the
Automatic ice maker makes ice with ice leveled.
If the ice is stored partially, the detecting lever may contact the ice early. As a result, the
Automatic ice maker may stop making ice before the amount of stored ice is enough.
Do not store any food such as frozen food other than ice in the Ice case when
making ice automatically.
(Otherwise, it may not make ice, or the door may not open or parts may damage
because the food interferes with the parts of the Automatic ice maker.)
● It takes a long time to make ice under the following conditions.
When using for the rst time (It may take more than 24 hours) After opening/closing the door frequently
After storing a large amount of food at a time After power failure
When the ambient temperature is low under certain conditions (ex: using in winter)
After maintaining the Ice Tray
Notice
Notice
Caution
Required time for an ice making operation
(8 pcs by once)
Storage amount of the Ice case
Ice size Ice size
Operation mode
Mode
Normal operation Normal state
About 110 minutes
140 minutes
About 90 pcs
Normal Normal
About 150 minutes
170 minutes
About 60 pcs
Large Large
Quick Ice Making
Stored ice cubes are
levelled to the front
part of the case
About 70 minutes
90 minutes
About 130 pcs
About 90 minutes
110 minutes
About 110 pcs
Front
Ice scoop
Limit line of stored
ice amount
Detecting
Lever
Ice scoopFrozen food
Detecting
Lever
Is any frozen food stored in
the inner part of the Ice case?
Is the ice scoop in the inner
part of the Ice case?
Page 48

48
VEGETABLE COMPARTMENT
Spacious
Upper Case
To the edge of the case
Spacious Upper Case
Storage height limit line
Lower Case
Height of
stored food
Half-used vegetables or
small vegetables such as
tomato, lemon.
VEGETABLE
COMPARTMENT
Upright storage of items.
(2L PET bottles can be
stored)
Medium and large vegetables
such as cabbage, lettuces.
Lower Case
Stored vegetables are not exposed to cold air directly, and they are cooled gently but thoroughly. All vegetables
stay crisp, vibrant and fresh with their own moisture without wrapping with plastic lm.
Lower Case/Spacious Upper Case
■ It is recommended to wrap vegetable with
plastic fi lm when the following conditions exist.
When it is undesirable that the stored foods
absorb the smells of the stored vegetables such
as scallion, leeks, and shallots
When storing the vegetables and/or fruits which
were used partially
When the amount of the stored vegetables is
small or many wrapped vegetables are stored
When it is undesirable that dew occurs in the
Vegetable Compartment
Make sure that any stored food does not protrude beyond the storage height limit line.
Otherwise, the door may not close completely, and as a result, the refrigerator may not cool suf ciently.
Food and/or each case may damage.
Some kind of PET bottle may not be able to be stored.
Moreover, PET bottle may not be able to be stored if its cap is not completely tightened.
Temperature in this compartment may become lower when the surrounding temperature is low.
Dew may adhere to the spacious upper case or the ceiling in the Vegetable Compartment, depending
on the volume/type of vegetables, because the humidity is high in the Vegetable Compartment. Water
is no good to perishable foods. Wipe off water with a dry cloth.
Open/close the Vegetable Compartment Door slowly.
Opening/closing the door mightily, the foods stored in the tall storage compartment (PET bottle etc.)
may overturn.
Caution
Caution
Page 49

49
HOW TO MAINTAIN/HOW TO CARE THE
INNER・OUTER OF THE REFRIGERATOR
Vegetable Compartment / How To Maintain / How to Care The Inner・Outer Of The Refrigerator
The back/fl oor of the refrigerator
When dirt is found
Control Panel for operation
Door gaskets
Power Plug
Surface of door
Liquid receivers
Wipe off it immediately.
It is recommended to clean the hidden places
once a year.
Wipe off it using a soft cloth wet by lukewarm water.
If it is hard to clean dirt, wipe off it using diluted
neutral detergent for kitchen and a soft cloth wet
by lukewarm water.
Some detergents cannot be used for this purpose.
Therefore, refer to the
Caution
on this page.
Take foods out beforehand if you remove the parts.
Wipe the Control Panel for
operation with a soft dry cloth.
Make sure that water never
splash to it.
Otherwise, it may cause
malfunction.
Wipe it thoroughly because
it can become easily dirty.
If the dust on the power plug remains not cleaned,
it may cause a re. Clean it once a year.
Wipe the surface of door using a soft
cloth wet by lukewarm water.
Wipe the door in stainless color along
the hairline on the surface.
Wipe off them if liquid collects
and/or they becomes dirty.
Unplug the power cord from the outlet.
Check the following matters.
Is any damage found on the
power cord?
Does the power plug become
hot?
Remove the dust and wipe it with
a dry cloth.
Connect the power plug rmly to a power outlet.
Do not use the following ones.
Alkaline and alkalescence detergent for kitchen, plate powder, powder soap, oil, hot water, scrubbing brush, acid, benzine, thinner,
alcohol, and bleach, etc. (check the "liquid" part of "display according to the household goods quality labeling law" for detergent.)
Make sure to wipe off spilled cooking oil, citrus fruits juice and food soup.
When using a chemical dustcloth, follow the instructions of it.
It may cause damage and discoloration of the door, paintwork and plastic parts.
Do not wipe out the movable contact surface of the rail for
cases and drawers because the lubricant agent is applied to it.
(The lubricant agent complies with the Food Sanitation Law.)
Caution
Caution
1
2
3
4
How to care the inner・outer of the refrigerator
Make sure to unplug the power plug when maintaining the refrigerator.
Warning
Liquid receivers
Turn the Adjustable mounts
1
Pull the leg cover and
remove it.
Push it in from the front
when installing it.
Float the Adjustable mounts
from the fl oor and draw the
refrigerator straight.
Lay the protection board etc.
on the oor which can be easily
scratched.
Wipe off dirt on the back of
the refrigerator, wall and fl oor.
The back of the refrigerator
easily becomes dirty because
ne dust is accumulated on it
by convection of air.
2 3
Page 50

50
HOW TO REMOVE PARTS
Descendible case
Fixed shelf
Door pocket
Ice Compartment/ Upper Freezer
Lower Freezer
Vegetable Compartment
Ice Compartment/Upper Freezer
Vegetable Compartment/Lower Freezer
Height adjustable shelf・Lower shelf
Reversible shelf
Vacuum Case with the door
● Draw the Descendible
Case while lifting it, and
remove it from the rail.
When installing it, align the axis
of the case with the groove of
the rail and push it in.
● Lift up the door pocket while tapping the left/right of its bottom
surface, and remove it.
Insert the door pocket fully to the end when installing it
● Draw the door fully and lift up the case towards you.
Put the case bottom on the frame and set the case.
Draw the door fully and
pull up the Spacious
vegetable case as shown
in the gure.
Lift up the front part
of the door, and
draw it further and
incline it.
Lift up the Vegetable Case.
When installing it, insert
the pins on the left/
right inner sides of the
Vegetable Case into the
square holes on the frame,
and put the edge of the
Vegetable Case on the
frame to install it.
When installing it, insert the pins on the left/right of
the Lower freezer case into the square holes on the
frame to install it.
Moreover, hitch the pins on the left/right of the Slide
case to the outside of the Lower freezer case.
When installing the shelf, slide it until
it reaches to the interior wall, then
slightly lift up the back of the shelf and
push it in. (hitch the forks of the shelf
to the parts on the back of the shelf)
● Slightly lift up and pull out.● Draw the shelf, and pull off the
two pins on the lower right and
remove it.
●
Pull the door, lift the case
at the edge of it lightly,
and then pull it out.
For more information.
Pg.42, 43
1
1
Slightly lift up the back
of the shelf and draw it.
Draw the door fully, and draw the Slimline slide case and the Slide case
respectively.
Raise the shelf as shown in fi gure, and
turn it and remove it.
Lift up the Lower
freezer case.
2
2
Door may damage if drawing
the shelf without turning it.
Caution
Frame
Pin
1 2 3
■
How to install the slide door
Tap
Tap
Tap
Tap
Frame
Frame
Page 51

51
製冰機清潔
(按5秒閃爍)
製冰機清潔
(按5秒閃爍)
HOW TO MAINTAIN THE AUTOMATIC ICE MAKER
Ice Maker
Cleaning
Ice tray
Maintain it once a year
Water supply container
Ice tray and water supply line can be washed.
Be sure to check the followings before starting the operation.
Go to the next step after checking them.
When using for the rst time
When not used for more than one week
● Recommended maintenance intervals
● Remove the seal from the lid and wash it with a
soft wash sponge.
● How to open the lid
● How to close the lid
1
1
1
Push the
製冰
button and hold it for more
than 5 seconds after closing all the doors
and turning on the display.
Release the button when 大顆/標準/停止
indicator lamps ash and the buzzer sounds. Ice
Maker Cleaning will start.
Push the 製冰 button to stop supplying water to the ice
tray and turn on the
停止
indicator lamp. (Stop ice making)
Empty the ice tray and wash it lightly in the stream.
Push the
製冰
button to turn on the indicator lamp.
(Automatic Ice Making
starts)
Turn the case and remove it
from the lid.
Pull the tab of the water
fi lter with fi ngers and
remove it from the case.
Wash it with a soft
wash sponge etc.
The buzzer will stop and the indicator lamp will be
turned off in about 3 minutes. After that, remove
water in the Ice case and wipe the case.
Make sure that water does not spill
out when removing the case.
Open the Ice Compartment Door.
① Pull down the lever and ② draw the frame.
③
Raise the cover ( ▲ part) in the direction of the arrow.
④
Remove the ice tray from the frame.
The indicator lamp will ash and the buzzer will sound for about
3 minutes.
製冰機清潔
(Ice Maker Cleaning) can’t be interrupted.
Opening any door of the refrigerator during the Ice Maker
Cleaning may cause malfunction. Do not open/close any door
until Ice Maker Cleaning nishes.
Alarm will sound even after stopping the Door Alarm.
Water which doesn't contain chlorine may easily cause slime and/
or fur compared with tap water. Wash the Water Supply Container
regularly to prevent bacteria from breeding when such water is used.
There is no problem with using water remaining in the water supply
container, if any.
If the indicator lamp
ashes, perform the
following operation after
the “” lamp is
turned on in 20 seconds.
2
2
2
3
3
How To Remove Parts / How to Maintain the Automatic Ice Maker
About
5 seconds
1 beep
4
long beeps
Tap water
Mineral water, well water, water puri ed by water
puri er, cooled boiled water, etc. (water which doesn't
contain chlorine)
Once a week
Once three
days
Water supply
cover
Seal
(Front)
Insert the lid from its rear side and
close it in the direction of the arrow.
(Back)
Lid
Case
Water lter
Water supply
container
Container-full
line
Add water line
Tab
Water fi lter
(Replace it normally every 3〜4 years.)
Pg.57
Do not use the
detergents etc.
Do not use any cleaning
tool that can scratch it easily
such as scrubbing brush and
plate powder.
Wash the water supply container thoroughly and
replace it after drying it if you stop ice making and you
are not to use the Automatic ice maker for a while.
In particular, dry the water lter thoroughly.
Notice
Light ON
Cover
Press this button to turn on
the indicator lamp.
4
part
Frame
Lever
Is the lever in
horizontal state?
Lever
Horizontal
Click
① Set the ice tray and ② close the cover.
③
Make the frame horizontal and push
it into the end, and
④ Pull up the lever.
Push this button to turn
on the indicator lamp
Light ON
If you cannot push the frame of the ice tray into the end, the ice tray drive motor may have operated.
Remove the ice tray once and push the frame in, and wait 1 minute after closing the Ice Compartment Door.
Preparation for the ice tray drive motor nishes, and you can set the ice tray.
Notice
● Water supply container
Water is lled in it.
The container is set properly as
speci ed.
● Ice case
If there remains ice, remove it.
製冰機清潔
(按5秒閃爍)
Press this button for
more than 5 seconds
Page 52

52
TROUBLESHOOTING
Check the following points before asking repair. Contact your dealer or our customer center if the problem still exists after checking them.
FAQ when using for the fi rst time
Control Panel does not respond.
Automatic ice making is not properly performed.
When this happens Please check. This is the cause.
Refrigerator does
not cool well
enough or make
ice when using
for the fi rst time
It takes time to cool in summer or when a lot of foods are stored.
It may take more than 4 24 hours to cool fully immediately after installing.
When using for the rst time, it takes time to make ice because ice making starts after cooling
fully.
It may take more than 24 hours to make ice according to the amount of food and the way of
packing it.
Open/close the door quickly and/or minimize the number of times of opening and closing the
door.
Allow clearance between each food in each compartment.
Control Panel does
not respond.
Is Button Look selected by using the lock function on the panel for operation?
Pg.58
Is Refrigerator Compartment Door open? Operate after closing it.
Ice cannot be
made at all.
Stored ice rounds.
Ice sticks together.
Ice stuck together
is made.
There is white
impurity in ice.
Ice tray frame
cannot be drawn
Small ice is made.
Projection is
generated on ice.
It takes a long time
to make ice.
There is no ice in
the ice tray.
Is the lamp on the control panel in the Refrigerator Compartment turned off?
Pg.47
Is the water supply container pushed in beyond the "Container set position"?
Pg.46
Is anything other than ice stored in the Ice case?
Pg.47
Ice naturally becomes small or sticks mutually if ice is stored for a long term.
Do you open the door frequently or store a large amount of food at a time? As a result,
temperature in the refrigerator rises and stored ice becomes small or sticks together.
The door or the drawer compartment may not temporarily have been closed completely.
Ice stuck together may be made if the amount of water supplied to the ice tray is not even.
Add water until water level reaches to the "Container-full line" of the water supply container.
Pg.46
If the ice tray is damaged, ice may not be easily separated from the ice tray and ice stuck together
may be made. If same trouble occurs many times, consult your dealer and replace the ice tray.
It is because the ne air bubble in water is contained in ice.
It does not indicate any trouble.
Did you use mineral water to make ice?
Mineral contained in water may freeze and become white impurity in ice.It may remain after
thawing in water, but it is harmless.
Is "
大顆
"
or "
標準
"
display of "
製冰
" turned on?
Ice tray frame cannot be drawn while making ice with the Automatic ice maker. Turn off the "製冰"
lamp.
If the lamp starts ashing, wait 20 seconds until the lamp is turned off and draw the frame after
that.
Pg.51
Small ice may be made if only a small amount of water remains in the water supply container.
Add water until water level reaches to the "Container-full line" of the water supply container.
Pg.46
It is frozen water collected in the ice tray groove. It does not indicate any trouble.
Do you open the door frequently or store a large amount of food at a time?
Refrigerator may not cool fully.
Minimize the number of times of opening and closing the door until it cools fully.
Allow clearance as much as possible between each stored food.
It may take more than 4 hours to make ice in winter.
Immediately after turning on the "
製冰
" lamp, it may take longer than usual to make ice.
Does any food or package caught in the door prevent the door from closing completely?
Check that there is not any space between the door seal and its contact surface when the door is
closed.
Page 53

53
Troubleshooting
Frost and/or dew occur
Refrigerator cools overly
When this happens Please check. This is the cause.
Check the usage of the refrigerator
Temperature in the refrigerator rises little by little while its door is open. If opening/closing the
door frequently or leaving the door open for a long time, temperature cannot easily lower.
Reduce the number of times of opening and closing the door or open/close the door quickly.
Frost and/or dew
adhere to the
refrigerator interior
or the frame
of the drawer
compartment.
Dew condensation
occurs in the
Refrigerator
Compartment
Dew adheres to the outside
of the refrigerator (exterior,
door seal, door and drawer
compartment etc).
Dew condensation
occurs in the
Vegetable
Compartment
The door or the drawer compartment may not temporarily have been closed completely.
Check whether the drawer compartment or the door has been closed completely after closing
them.
The door may be opened/closed frequently or door may have remained open for a long time.
Reduce the number of times of opening and closing the door or open/close the door quickly.
Lowering the level of the defrost heater, dew may be adhered to the rotation partition part when
humidity is high.
Pg.57
Dew may adhere to the wall and/or frost may adhere around
the outlet of the cooling air of the aluminum panel when
the number of opening/closing the door is large or humidity
around the refrigerator is high.
Wipe off them with a dry cloth.
Dew may adhere to the those parts when the indoor humidity is high (ex: rainy day).
Frost and/or dew may adhere to the refrigerator interior or the door frame when the warm outside
air comes in contact with those parts.
Wipe off with a dry cloth.
The humidity in the Vegetable Compartment is higher than other compartments. (To prevent
vegetables from drying and to make them last longer)
If it is undesirable that dew adheres to the stored vegetables, wrap them with the plastic lm.
Water may drop into cases placed in the Vegetable Compartment due to dew concentration.
Wipe off them with a dry cloth.
Refrigerator
cools overly
Foods freeze
" " is selected in the temperature setting. Switch it to " ".
Pg.40, 45
The surrounding temperature is lower than 5˚C. Switch the temperature setting to " ".
Pg.40, 45
Do not place any food in front of the cold air blowout port.
Refrigerator does not cool
Refrigerator does
not cool.
Frost and/or dew
occur.
Ice cream
becomes soft.
Check the storage state of food
Does any food or package caught in the door prevent the door from closing
completely?
Check that there is not any space between the door seal and its contact surface
when the door is closed.
Is food squeezed in? or Is a large amount of food put in at a time?
Make sure that any food does not protrude beyond the storage height limit of each
compartment, and do not store the amount of food that may prevent the door from
opening and closing.
Allow clearance between each food in each compartment.
Are Upper Freezer case and Slimline slide case installed correctly?
Install them correctly.
Pg.50
Check the temperature setting
Refrigerator may not cool fully when the temperature setting is " ".
Pg.40, 45
Switch the temperature setting of the compartment where it does not fully cool to " " or " ".
Does the temperature around the refrigerator become high due to a seasonal factor (ex: using in
summer)?
Switch the temperature setting of the compartment where it does not fully cool to " ".
Check the installation state
Refrigerator may not fully cool according to the installation place, the clearance around it and the
surrounding conditions.
Check whether it has been installed correctly.
Pg.36
There is a space
between the
door seal and its
contact surface.
Aluminum panel
Dew condensation
Page 54

54
When this happens Please check. This is the cause.
The refrigerator becomes hot
The side of the
refrigerator becomes hot
Hot air comes from the
bottom of the refrigerator
Hot air may come from the bottom of the refrigerator to exhaust the heat generated when the
cooling device operates.
The temperature may reach 50 60˚C immediately after installation or in summer, but there is no
problem with the safety and the performance.
Abnormal operating sound is generated
Refrigerator may not be installed properly.
You may feel that the operation sound is large because the compressor operates in high-speed under the
following conditions: the refrigerator does not cool fully on the occasion such as using it for the rst time,
opening/closing the door frequently, the surrounding temperature is high.
The sound becomes small after cooling fully.
Possible Cause
Floor bends
Leg cover comes off
Refrigerator comes in contact with the wall or
furniture, etc.
Lay the rm board on the oor and install the refrigerator on it.
Pg.36
Install it rmly.
Pg.36
Allow clearance around the refrigerator and install it.
Possible Solution
Operation sound
lasts long
Operation sound
sometimes becomes larger
When other
sound such as
shown in the
right table is
generated by
the refrigerator
Annoying sound
is generated by
the refrigerator.
It is because the compressor operates in low-speed for conserving energy.
It is because the system changes the operating power of the refrigerator according to the
temperature change.
The following sounds are generated when the refrigerator is operating normally, so they do not
indicate any trouble.
Type of sound
Sound like water owing (trickling)
Sound like collision (tapping)
Sound like water boiling (bubbling up)
Sound like meat roasting (sizzling)
Sound like squeaking (cracking)
Sound occurred sometimes (clacking)
Sound like something is caught (clacking)
Sound like roaring (honking)
Sound caused immediately after closing the
door (booming)
Sounds caused by the Automatic ice maker
(zooming)
(rattling)
(clunking)
These sounds are caused when the refrigerant to cool the
refrigerator ows or water ows/evaporates to remove frost.
This sound is caused because the parts squeaks when the
refrigerator temperature changes.
This sound is caused when the refrigerator starts the operation
to cool.
These sounds are caused when the electric parts to control
the refrigerator temperature operates.
These sounds are caused when ice separates from the ice tray
of the Automatic ice maker or ice is supplied to the ice tray.
These sounds also occur every 2 hours if the water supply
container is empty.
If you turn off the lamp, ice making stops and the
sound does not occur.
Pg.47
Source of sound
TROUBLESHOOTING
Page 55

55
There is something strange with the Vacuum Compartment
When 真空開 +1˚C
(Vacuum Compartment
Chiller) or 真空開 -1˚C
(Vacuum Compartment
Subzero) the indicator
lamp blinks
Hissing sound
does not occur
when opening.
The vacuum function may not be operating normally. Check the followings:
Is the handle held down to the end and locked?
The vacuum function will not work unless it is locked.
Is a food package or a hair caught in the vacuum packing and the support?
A small piece of debris may prevent the vacuum function from operating. Remove it.
Does the vacuum packing/the support get dirty?
Wipe off them if it is dirty.
Pg.42, 43
Is the vacuum release valve (in blue) in place or loosened?
Attach it to the hole on the handle securely.
Are any food package etc. caught in the Vacuum
Packing? or Are there any dirt, waste thread or scraps on
it?
Pg.42, 43
If a food package is caught in the Vacuum packing,
remove it.
Clean the dirty Vacuum Packing.
Are the Vacuum Packing and/or the Vacuum Releasing
Valve (blue colored) located on the bottom of the handle
installed rmly? or Are they loose?
Is "Vacuum Compartment Chiller" or "Vacuum
Compartment Subzero" display turned on?
Is the handle pulled up?
Hissing sound may not occur immediately after opening/
closing the Vacuum Compartment because the vacuum
pump enters the preparation state for starting the
operation, but it does not indicate any trouble.
Vacuum Releasing Valve
It is not clear
whether the Vacuum
Compartment has
been vacuumized.
The handle cannot
be locked.
Booming sound and
vibration occur around the
Vacuum Compartment.
Drop of water
or frost occurs
in the Vacuum
Compartment.
Food in the Vacuum
Compartment
freezes
The Vacuum Compartment has been vacuumized properly if a vacuum releasing sound (hissing
sound) occurs when opening it.
Are any food etc. caught in the inner part of the Vacuum Compartment Case or the Vacuum
Packing?
Pg.42, 43
Are the rotation axises in the front part of the Vacuum Compartment Case and the door installed
rmly?
Pg.42, 43
This sound is caused when the vacuum pump operates. It does not indicate any trouble.
You can stop the vacuum pump operation when you want to stop the sound (ex: nighttime).
If the sound and the vibration occur frequently, something may be caught in the door or there
may be a dirt on the Vacuum Packing.
Pg.42, 43
The moisture from the juicy foods may cause dew condensation and/or frost adhering insider the
compartment because the Vacuum Compartment is sealed.
It is recommended to wrap the juicy foods with plastic lm, etc.
Wipe off water and/or frost with a dry cloth.
Is any vegetable sensitive to low temperature such as eggplant and cucumber stored?
Pg.39
Is the setting Vacuum Compartment Subzero or OFF selected?
Pg.42
When this happens Please check. This is the cause.
Lamp ashes.
Troubleshooting
・・・
Scraps
Waste
thread
Page 56

56
TROUBLESHOOTING
Others
You feel electricity a little
when touching the main
body of the refrigerator
The Control Panel for
operation is not illuminated
There is a small hole
inside the door
Radio and/or
television are
disturbed by noises
There are thin lines
like scratches on the
plastic parts
There are waving and/or distortions
on the door surface, the side and the
top surface of the refrigerator.
The refrigerator may be charged with static electricity, but there is no problem with the safety.
It is recommended to ground if you want to remove it.
Pg.37
The displayed character will disappear about 2 minutes after the operation nishes. However,
(Quick Cooling) or eco operation indicator lamp will not be turned off. Push either button to
turn it on.
This hole is used to escape the air inside when lling the heat insulation
material into the door during the production process. It is neither a aw nor
abnormal thing.
It is caused by the electromagnetic radiation slightly generated from this refrigerator.
Install the refrigerator on a place far away from the television, radio and interphone etc.
It is recommended to connect the power plug to the power outlet separated from the antenna
terminal and ground the refrigerator.
Pg.37
Those lines are caused by the liquid resin owing when plastic is molded.
They are especially conspicuous for the transparent parts, but there is no problem with the
strength and they can never lead to any cracks.
Slight waving and/or distortions are generated in the manufacturing process of the refrigerator.
They may be conspicuous according to the position of the light source and/or the brightness etc.,
but there is no problem with the performance.
Door is not in a horizontal state
Door is not in a
horizontal state
Another door opens
after closing one door.
More force is required to
open the door immediately
after closing the door.
Installation place may not be horizontal.
Left side or right side of the door may be slightly lower when the left or right leg is sunk in the
oor surface because of the soft oor material and the addition of food weight.
This does not affect the refrigerator performance. Adjust the refrigerator adjustable mount to keep
it level if you want to correct it.
Pg.36
Lay the rm board which has more than 1cm thickness on the oor if the refrigerator itself
inclines.
Another door may open for a moment by the wind pressure because cool air path connects each
compartment.
It is because air entered the Refrigerator Compartment is rapidly cooled and the pressure in the
Refrigerator Compartment temporarily lowers.
It smells strange
Ice smells
It smells like
plastic
It smells in the
refrigerator
Do the water supply container and/or water lter become dirty? or Does ice become old?
Wash them once a week to prevent "slime" and/or "fur".
Pg.51
Chlorine may strongly smell because chlorine in tap water is condensed.
This smell occurs because a lot of plastic parts are used in the refrigerator, but the smell
decreases gradually while cooling. Keep the room ventilated.
Is any food which strongly smells stored without any wrapping?
The deodorizing function cannot completely remove all smells.
Seal that kind of food with plastic lm etc. to store it.
When this happens Please check. This is the cause.
Hole (inside of the door)
Page 57

57
Flashing pattern
Possible Cause
Check Point
Food etc. may come in contact with the ice
tray or the stored ice amount detection lever.
This ashing shows that there is a problem.
It will ash if you stop ice making during the
ice making process.
Door remains open for more than 1 minute. (ex:
door is not completely closed.)
It is in process of Ice Maker Cleaning.
The vacuum function may not work properly.
It may be in the operation check mode for
serviceman. ( 1)
Empty the Ice Compartment and perform
"Cleaning the Ice Making".
Consult your dealer.
Check the points described in "Ice Tray" on
P.51.
Check the points described in "Door Alarm"
on P.58.
Check the points described in "How to
maintain the Automatic Ice Maker" on P.51.
Check the points described in "There is something
strange with the Vacuum Compartment" on P.55.
It will return to the normal mode after about 10
minutes. There is no problem with using.
"Check" ashing
3 times
"Check" ashing
(excluding ashing 3 times)
"Stop" ashing
All displays ashing
"Large"
"Normal"
"Stop"
Flashing
"
Vacuum Compartment
Subzero
"
or
"
Vacuum
Compartment Chiller
"
ashing
Check
Vacuum
Ice making
function
1 beep
Long beep
About 3
seconds
Push this button for
more than 3 seconds
PRACTICAL ADVICE ON HOW TO USE THE REFRIGERATOR/REPLACEMENT PARTS
Replacement of the vacuum packing
Replace it if it is damaged.
Order information about replacement parts
REPLACEMENT PARTS
The "Check" display
fl ashes on the
Control Panel for
operation
The electric supply failed
The refrigerator is not expected
to use for a long term
Remove frost
When you want
to adjust the
temperature
more fi nely
When you want to
save electricity
(When you want
to lower the
power level of the
dew condensation
prevention heater)
This ashing shows that there is a problem with the Automatic Ice Maker, the temperature control device or
the frost removal device etc.
Consult your dealer if the ashing does not stop even after checking the point listed in the following table.
Reduce the number of times of opening and closing the door and avoid storing food additionally until the electric supply is restored.
Unplug the power plug and maintain the inner of the refrigerator and the Automatic Ice Maker, and leave all
the door open to dry the refrigerator for 2 3 days.
Pg.4951
Any operation to remove frost is not required because this refrigerator remove frost automatically.
Thawed water is collected in the evaporating tray and automatically evaporates.
You can adjust "MIN"/"MID"/"MAX" more nely when setting the temperature
in the Refrigerator Compartment and the Freezer Compartment.
1. Open the Lower Freezer Door.
2. Push the Quick Cooling button on the control panel on the refrigerator door
for more than 5 seconds until single long beep sounds.
3.
Push the Cooling button or the Freezing button to adjust the temperature.
The temperature becomes lower by 1 step every time you push the button.(If
you push the button when "MAX" is selected, the setting returns to "MIN".
4. If you want to stop the ne adjustment, perform the operation of 1 and 2.
Two beeps sound and You can set the temperature by normal step.
You can save electricity setting this level when temperature is low.
For saving electricity, level 1 and level 2 are available. You can save more electricity when selecting level 2.
Deactivate the setting if dew occurs.
When you want to deactivate the setting, perform the same operation while level 2 for saving electricity is selected.
2 beeps sound and the setting is deactivated.
1. Open the Lower Freezer Door.
2. Push the Quick Cooling button on the control panel on the refrigerator door for
more than 3 seconds until single long beep sounds while the door is closed.
(Level 1 for saving electricity)
3.
Push the Quick Cooling button on the control panel on the refrigerator door for
more than 3 seconds until 2 long beeps sound.(Level 2 for saving electricity
4. Close the lower Freezer Door.
1 Pushing the button long (more than 10 seconds), the refrigerator may go into the operation check mode.
Level 1 for saving
electricity
Level 2 for saving
electricity
Deactivate
Temperature setting
Display ON
When replacing the following parts, make sure to tell your dealer the type name and buy the special parts.
Replacing the water fi lter
Replace the water lter when it becomes old.
(Replace it normally once 3 4 years.)
Ordering the replacement water lter
Tell your dealer the parts number: RJK-30 to buy the
replacement water lter. (Ice making capacity is the
same with a water lter removed.)
MIN MID-
MIN
MID MID-
MAX
MAX
Flashing
Troubleshooting / Practical Advice on How to Use the Refrigerator / Replacement Parts
(低溫) (低溫)
Parts number
R-A6200 321
R-A5700 321
Type: R-SF62AMJ
Type: R-SF58AMJ
R-SF48AMJ
R-S59AMJ
R-S49AMJ
(Applicable only for
R-SF62AMJ, R-SF58AMJ,
R-SF48AMJ)
Page 58

58
按鍵鎖
(
按3秒
)
■ When you want to sound the alarm again
Push the
“急冷”
button and
hold it for about 3 seconds
until "2 beeps" sound.
The displays will be returned to the
original state when the setting is
completed.
■ When you want to stop the alarm
Push the
“急冷”
button and
hold it for about 3 seconds
until "2 beeps" sound.
The displays will be returned to the
original state when Alarm stops.
[
eco
OPERATION INDICATOR LAMP
]
/DOOR ALARM/LOCK FUNCTION OF THE PANEL FOR OPERATION
[“eco” Operation indicator lamp]
Indicates the operation mode of the refrigerator automatically. This will be illuminated while it
is operating with low electric power consumption such as Frost Recycle Cooling and others.
If the door remains open for more than 1 minute, the alarm sounds as shown in the table
below and the LED lamp on the Control Panel ashes.
When this indicator lamp (Lock on the panel for operation) is illuminated, any other button will not be
actuated by pushing it. This function prevents the wrong operation or mischief of a small child.
[“eco” operation indicator lamp] can be turned off when you feel uneasy at night, etc.
The Door Alarm can be stopped.
■ How to turn off the
indicator lamp
Push the
真空開
+1˚C
(Vacuum
Compartment Chiller) for about
3 seconds until the eco
indicator lamp starts to ash.
eco operation indicator lamp is turned
off and the setting is completed.
Continue to push the 冷藏
(Cooling) button for 3 seconds
and more until it beeps twice,
and then you can select
(Setting) or (Release) of
the Lock function on the panel
for operation.
When setting the Lock as On
on the panel for operation
When releasing the Lock function
on the panel for operation
■ How to return
Push the
真空開
+1˚C
(Vacuum
Compartment Chiller) for about
3 seconds until the eco
indicator lamp is illuminated.
eco operation indicator
lamp will be turned on or off,
depending on the current
operation mode.
2
beeps
Long beep
2
long beeps
The indicator
lamp blinks
Indicator
lamp is on
About
3 seconds
About
3 seconds
Push this button and hold it
for 3 seconds
Push this button and hold it
for 3 seconds
If eco indicator lamp isn’t illuminated, check the following things.
Is the eco operation indicator lamp set as Off? Perform the above-mentioned procedure for how to return.
It will not be illuminated just after purchasing the refrigerator, or when so many foods are stored or when the number
of opening/closing the door is large, because the compressor needs to operate on high speed. Open/close the
door quickly or minimize the number of opening/closing the door.
When the quick cooling functions ( (Quick Freezing), (Quick Cooling)) work, it will be illuminated
after the quick cooling functions nish and the operation of the refrigerator gets stable.
When connecting/disconnecting the power plug or after recovering from electric power failure, it will return to the setting
where the eco operation indicator lamp is illuminated.
The ashing of the character displayed on the Control Panel for operation will be stopped where the Door Alarm is stopped. The buzzer
does not sound, too.
The Door Alarm is set as On at the time of installation.
When connecting/disconnecting the power plug or after recovering from electric power failure, it will return to the setting where the
Door Alarm sounds.
Check the temperature setting of the Refrigerator Compartment after the setting nishes.
The Door Alarm is available for the Refrigerator
Compartment, Ice Compartment and Lower
Freezer. (It is not available for the Upper Freezer
and Vegetable Compartment.)
Notice
Notice
Notice
Door Alarm
How to set the Lock function of the panel for operation
Duration when door is open
1 minute
2 minutes
Longer than 3 minutes
Alarm sound
3 long beeps
5 long beeps
It keeps continuously sounding.
Control Panel on the Refrigerator Compartment Door
Flashing
Flashing
Flashing
1
beep
2 beeps
Indicator
lamp is on
About
3 seconds
Push this button and hold it for 3 seconds
Turn off this display.Turn on this display.
2
beeps
Indicator
lamp is on
About
3 seconds
Push this button and hold it for 3 seconds
Push it for 3 seconds
and more
Perform the setting with all the doors closed.
Pg.38
Caution
Page 59

59
[
“
eco
”
Operation indicator lamp] / Door Alarm / Lock function of the panel for operation/About non-CFC refrigerators/SPECIFICATION/Storable weight
有關碳氫化合物的冰箱/規格/可容納的食品重量
ABOUT NON-CFC REFRIGERATORS/SPECIFICATION/STORABLE WEIGHT
有關碳氫化合物的冰箱
可容納的食品重量
規格
About non-CFC refrigerators
Storable weight
SPECIFICATION
Instead of CFCs, hydrocarbons are used in the coolants and insulation materials used in this refrigerator.
Hydrocarbons donot damage the ozone layer, and they are environmental-friendly materials, having an
exceptionally small affect on global warming.
CFC coolants are in ammable. The coolants are sealed in the coolant circuitry, and with normal operation
they will not leak, but should the circuitry be damaged, refrain from using ames or other electrical products,
and open windows for ventilation. After that, please contact the retail store or the repair department.
The following table shows the weight of food that can be stored on the shelves and in the cases.
● 本冰箱所使用冷媒及其他斷熱材料皆無使用氟氯化碳、而是使用碳氫化合物。碳氫化合物不會破壞地球臭氧層、
對地球溫室效應的影響非常小、屬於環保物質。
● 碳氫化合物為可燃型物質。 冷媒密封於冷媒迴路管中、在一般的使用情況下應該不會發生外洩的可能。
但萬一有冷媒管線損壞的情況發生、請遠離火源及避免使用電器用品、將門窗打開以利空氣流通。 之後、請
立即與經銷商或日立技術中心聯絡。
可容納於層架或收納盒內的食品重量如下:
R-SF62AMJ R-SF58AMJ R-S59AMJ R-S49AMJR-SF48AMJ
R-SF62AMJ
零件名稱
Name of parts
R-SF58AMJ
R-S59AMJ
R-SF48AMJ
R-S49AMJ
Descendible case
Lower shelf
Height adjustable shelf
Reversible shelf・Fixed shelf
Upper shelf of the vacuum compartment
Vacuum compartment case
Multiuse Egg Case
Tube Stand
Ice case
Upper Freezer case
Spacious Upper Case
Lower Case
Slimline slide case
Slide case
Lower freezer case
Do not store any ice cubes other than
the ones made by the automatic ice
maker.
Pg.47
請勿存放不是本自動製冰機製成的
冰塊 。
19
頁
Refrigerator
compartment
Ice compartment
Upper freezer
Lower freezer
Vegetable compartment
冷藏室
製冰室
上層冷凍室
下層冷凍室
蔬果保鮮室
7.0kg
9.0kg
19.5kg
19.0kg
6.0kg
4.5kg
2.0kg
1.3kg
7.0kg
8.0kg
16.5kg
16.5kg
5.0kg
4.0kg
2.0kg
1.3kg
4.0kg
5.5kg
16.0kg
16.0kg
4.5kg
3.0kg
2.0kg
1.3kg
7.7kg 6.2kg 5.0kg
5.3kg
7.5kg
13.5kg
4.8kg
7.0kg
12.5kg
4.0kg
6.0kg
11.0kg
8.5kg
16.0kg
7.5kg
14.5kg
6.0kg
12.0kg
Refrigerator-Freezer
620565567 477 475
750 685 685 685 685
98W 98W 90W 92W 90W
22.7 /kWh/月22.8 /kWh/
月
20.0 /kWh/月21.4 /kWh/
月
24.8 /kWh/
月
733 733 733 643 643
34 kWh/
月
31 kWh/
月
29 kWh/
月
28 kWh/
月
28 kWh/
月
113kg 106kg 103kg 96kg 94kg
110V/60Hz 110V/60Hz 110V/60Hz 110V/60Hz 110V/60Hz
1818 1818 1818 1818 1818
160W 150W 150W 150W 150W
R600a/88g R600a/88g R600a/88g R600a/88g R600a/88g
下移式便利盒
低層架
可調式層架
翻轉式層架・固定層架
真空室上方的層架
真空室盒
置蛋架
軟管式容器站立架
製冰盒
上層冷凍盒
廣上段置物盒
下段置物盒
薄滑動盒
滑動盒
下層冷凍盒
冷凍冷藏箱
Model
Rated Moter Input
Energy Factor
Deodrize
Type
Rated Heater Input
Refrigerant
Automatic Ice Maker
Total Volume
Energy Consumption
Net Weight
Quick Cooling
Door Alarm
Quick Freezing
Quick Ice Making
Rated
Voltage / Frequency
型號
電動機額定消耗電功率
能源因數值
脫臭裝置
種類
除霜輸入功率
冷媒種類/充填量
自動製冰機
總有效內容積
消耗電量
總重量(淨重)
快速冷藏
箱門警報器
急速冷凍
急速製冰
額定電壓/額定頻率
外型尺寸
Dimentions
寬
W (mm)
高
H (mm)
深
D (mm)
有
關
碳
氫
化
合
物
的
冰
箱
/
規
格
/
可
容
納
的
食
品
重
量
Page 60

日立家電(台灣)股份有限公司
台北市南京東路三段65號2樓 電話:(02)
2516-0500
日立家電網 站:
www.hsct.com.tw
日立家電技術中心一覽表
大台北技術中心
TEL: (02) 2771-8200
花蓮技術中心
TEL: (03) 852-9400
中壢技術中心
TEL: (03) 491-2219
台中技術中心
TEL: (04) 2220-1133
嘉義技術中心
TEL: (05) 236-1943
台南技術中心
TEL: (06) 260-6939
高雄技術中心
TEL: (07) 522-9100
R-SF62AMJ
R-SF58AMJ
B
R-SF48AMJ
R-S59AMJ
R-S49AMJ
 Loading...