

Page 1

HSILGNE
SPLIT TYPE AIR CONDITIONER
INDOOR UNIT/OUTDOOR UNIT
MODEL
RAS-10JH4/RAC-10JH4
RAS-14JH4/RAC-14JH4
INDOOR UNIT
OUTDOOR UNIT
RAS-10JH4
RAS-14JH4
RAC-10JH4
RAC-14JH4
Instruction manual Page 1~36
To obtain the best performance and ensure years of
trouble free use, please read this instruction manual
completely.
Инструкция по эксплуатации
Для oбecпeчeния нaилyушиx экcплyaтaциoнныx
xapaктepиcтик и мнoгoлeтнeй бeзoткaзнoй paбoты
oбopyдoвaния нeoбxoдимo пoлнocтью oзнaкoмитьcя c
дaннoй Инcтpyкциeй пo экcплyaтaции.
стр. 37~73
– 1 –
Page 2

SAFETY PRECAUTION
•
Please read the “Safety Precaution” carefully before operating the unit to ensure correct usage of the unit.
•
Pay special attention to signs of “ WARNING” and “ CAUTION”. The “Warning” section contains matters which, if
not observed strictly, may cause death or serious injury. The “Caution” section contains matters which may result in
serious consequences if not observed properly. Please observe all instructions strictly to ensure safety.
•
The signs indicate the following meanings. (The following are examples of signs.)
This sign in the figure indicates prohibition. Indicates the instructions that must be followed.
•
Please keep this manual after reading.
PRECAUTIONS DURING INSTALLATION
•
Do not reconstruct the unit.
WARNING
CAUTION
Water leakage, fault, short circuit or fire may occur if you reconstruct the unit by
yourself.
•
Please ask your sales agent or qualified technician for the installation of your unit.
Water leakage, short circuit or fire may occur if you install the unit by yourself.
•
Please use earth line.
Do not place the earth line near water or gas pipes, lightning-conductor, or the earth
line of telephone. Improper installation of earth line may cause electric shock.
•
Be sure to use the specified piping set for R410A. Otherwise, this may result in broken
copper pipes or faults.
•
A circuit breaker should be installed depending on the mounting site of the unit. Without
a circuit breaker, the danger of electric shock exists.
•
Do not install the unit near location where there is flammable gas.
The outdoor unit may catch fire if flammable gas leaks around it. Piping shall be
suitable supported with a maximum spacing of 1m between the supports.
•
Please ensure smooth flow of water when installing the drain hose. If any failure is
found in the drain path, water drops from the indoor and outdoor units, causing wet
household effects.
•
Make sure that a single phase 230V power source is used.
The use of other power sources may cause electrical components to overheat and
lead to fire.
PROHIBITION
CONNECT EARTH LINE
PROHIBITION
PROHIBITION
ENGLISH
WARNING
PRECAUTIONS DURING SHIFTING OR MAINTENANCE
•
Should abnormal situation arise (like burning smell), please stop operating the unit
and remove plug from the socket or turn off the circuit breaker. Contact your agent.
Fault, short circuit or fire may occur if you continue to operate the unit under abnormal
situation.
•
Please contact your agent for maintenance.
Improper self maintenance may cause electric shock and fire.
•
Please contact your agent if you need to remove and reinstall the unit.
Electric shock or fire may occur if you remove and reinstall the unit yourself improperly.
•
Avoid an extended period of direct air flow for your health.
•
Do not connect the power cable with an extension cable or do not plug too many leads
of the other electric appliance into the socket where this cable is plugged. In addition,
wire the cable with some allowances to prevent the cable from stretching. Not doing
so will cause an electrical shock, heat generation or fire.
•
Do not bundle the power cable, pull it, put something on it, heat it, process it, or put
it between things. Breakage of the power cable may result.
Use of a damaged cable may cause an electrical shock or a fire.
•
Do not put objects like thin rods into the panel of blower and suction side because the
high-speed fan inside may cause danger.
PROHIBITION
"OFF"
PROHIBITION
PROHIBITION
PROHIBITION
– 3 –
Page 3

WARNING
PRECAUTIONS DURING OPERATION
•
Do not use any conductor as fuse wire, this could cause fatal accident.
•
"OFF"
•
Spray cans and other combustibles should not be located within a meter of the air outlets
of both indoor and outdoor units.
As a spray can’s internal pressure can be increased by hot air, a rupture may result.
•
The product shall be operated under the manufacturer specification and not for any
other intended use.
DON'T WET
•
When operating the unit with burning equipments, regularly ventilate the room
to avoid oxygen insufficiency.
PROHIBITION
During thunder storm, please stop operating the unit and turn off the circuit breaker.
•
Do not attempt to operate the unit with wet hands. this could cause fatal accident.
STRICTLY OBSERVE
PRECAUTIONS
•
Do not direct the cool air coming out from the air-conditioner panel to face household
heating apparatus as this may affect the working of apparatus such as the electric kettle,
oven etc.
PROHIBITION
PROHIBITION
PROHIBITION
CAUTION
•
Please ensure that outdoor mounting frame is always stable, firm and without defect. If
not, the outdoor unit may collapse and cause danger.
•
Do not wash the unit with water or place a water container such as a vase on the indoor
PROHIBITION
unit.
PROHIBITION
•
Do not place plants or animals directly under the air flow as it is bad for the plants or
animals.
PROHIBITION
•
When operating the unit with the door and windows opened, (the room humidity is always above
Electrical leakage could be present and cause electric.
•
Do not climb on the outdoor unit or put objects on it.
PROHIBITION
80%) and with the air deflector facing down or moving automatically for a long period
of time, water will condense on the air deflector and drips down occasionally. This will
wet your furniture. Therefore, do not operate under such condition for a long time.
•
If the amount of heat in the room is above the cooling or heating capability of the unit (for
PROHIBITION
example: more people entering the room, using heating equipments and etc.), the preset
PROHIBITION
•
This appliance especially indoor unit cleaning must be performed by authorized
room temperature cannot be achieved.
personnel only. Consult your sales agent.
Using a commercially available detergent or similar can damage the plastic parts or
PROHIBITION
clog the drain pipe, causing water to drip with potential electric shock hazard.
•
Do not touch the air outlet, bottom surface and aluminum fin of the outdoor
unit.
DON’T TOUCH
•
Do not touch the refrigerant pipe and connecting valve.
Burns may result.
•
This appliance is not intended for use by young children or infirm persons unless they have been
You may get hurt.
DON’T TOUCH
adequately supervised by a responsible person to ensure that they can use this appliance safely.
•
Young children should be supervised to ensure that they do not play with the appliance.
– 4 –
Page 4

HSILGNE
NAMES AND FUNCTIONS OF EACH PART
INDOOR UNIT
MODEL NAME AND DIMENSIONS
OUTDOOR UNIT
Fresh Air Window
Air Purification Unit (Internal)
This traps cigarette smoke, pollen, etc.
(Refer page 10)
This blows air from outside into the room while the fresh air in
is operating.
Pre-Filter (Internal)
To prevent dust from coming into the
indoor unit. (Refer page 27)
Horizontal deflector/Vertical deflector
(Air outlet)
(Refer page 24)
Two Way Air Exchange Fan (Internal)
This operates when the Two Way Air Exchange is operating.
Indoor Unit Indicators
indicator showing the operating condition. (Refer page 7)
Light
Signal Receiver
Receive the signal from the remote controller.
Two Way Air Exchange Hose
This vents air from outside the room when the fresh air in is
operating. This vents air within the room to the outside when
the exhaust is operating.
Remote Controller
Send out operation signal to the indoor unit. So as to operate
the whole unit. (Refer page 8)
Air Outlet
When “heating” operation is performed,
cool air blows and when “cooling” or
“dehumidifying” operation is performed,
warm air blows.
Drain Port (Bottom)
Drain Hose
Drains the dehumidified water from the indoor unit to the
outdoor during “cooling” or “dehumidifying” operation.
Piping and Wiring
Air Inlets
Earth Terminal
(Lower section of the side)
MODEL WIDTH (mm) HEIGHT (mm) DEPTH (mm)
(Rear and left sides)
About the outdoor unit:
•
When “Stop” is selected during operation of the
indoor unit, the fan of the outdoor unit continues
turning for 10 to 60 seconds to cool the electric
parts down.
•
In heating operation, condensate or water due
to defrosting will flow.
Do not cover the drain port of the outdoor unit
because such water may freeze in the chilly area.
•
When the outdoor unit is hung on the ceiling,
install the bush and drain pipe on the drain port
and drain water.
0128920974HJ41-SAR ,4HJ01-SAR
8828450574HJ41-CAR ,4HJ01-CAR
– 5 –
Page 5

NAMES AND FUNCTIONS OF EACH PART
TWO WAY AIR EXCHANGE DUCT FILTER
INDOOR UNIT CONTROL PANEL
Nano-Titanium Disinfecting Deodorizing/
Dust Collecting Fresh Air In Filter
This deodorizes and eliminates dust from the air
ventilated from the outside.
(Refer to pages 11, 25)
Exhaust Pre-Filter
This traps dirt and dust particles in
the air while the exhaust is
operating.
(Refer to page 25)
Fresh Air In Pre-Filter
This traps dirt and dust particles in
the air ventilated from the outside.
(Refer to pages 11, 25)
Dirt Sensor
The Dirt Sensor detects cigarette
smoke, sprays (pesticides), alcohol,
etc. (Refer to pages 19, 34)
■ Operate after opening the front panel. (How to open the front panel, refer to page 10.)
Temporary Switch
If the remote controller does not work due
Front Panel
Power Switch
Two Way Air Exchange Selection Switch
Select one of the following: “Prohibit Two Way Air Exchange”, “Only Exhaust”,
and “Operate Two Way Air Exchange”.
Please refer to page 33 regarding installation when the Two Way Air Exchange
cannot be operated.
(When the device is shipped out of the factory, it is set to “Operate Two Way Air
Exchange”.)
to battery failure, press this switch to start
and stop operation.
• This temporary operation will be at the
most recent setting mode. (The unit will
immediately go into automatic operation
once power is switched on.)
CAUTION
Turn off the circuit breaker or pull out
the power plug if the unit is not be
operated for a long period.
✩ If the power stays on and the unit is not operated, power is slightly consumed in the control circuit. The power is
saved by turning off the power switch (or the circuit breaker when the power is supplied from the outdoor unit).
– 6 –
Page 6

INDOOR UNIT INDICATORS
Self Clean Lamp (Yellow)
This lamp lights when the device
is configured to self clean.
(Refer page 19)
Filter Lamp (Green)
When the device is operated for a total
of about 200 hours, the FILTER lamp
lights indicates that it is time to clean
the filter.The lamp goes out when the
“
(AUTO SWING)” button is pressed
while the operation is stopped. But it
does not turn off when self clean is
working.
ENGLISH
Two Way Air Exchange Lamp (Green)
This lamp lights when the fresh air in and
exhaust are operating.
Timer Lamp (Orange)
This lamp lights when the timer is working.
Operation Lamp (Yellow)
This lamp lights during operation.
The OPERATION LAMP blinks in the following cases during
heating.
(1) During Preheating
For about 2-3 minutes after starting up.
(2) During Defrosting
Defrosting will be performed about once an hour when frost
forms on the heat exchanger of the outdoor unit, for 5-10
minutes each time.
■ The “Two Way Air Exchange” lamp blinks in the following cases (It is not abnormal).
Configuring the Two Way Air Exchange Selection Switch to prohibited setting
• When “
remote controller to operate the
blinks (10 seconds).
• When “Prohibit Two Way Air Exchange” is selected and the “
“Automatic Two Way Air Exchange” (page 19) is configured with the remote controller to operate the
the device beeps twice and the “Two Way Air Exchange” lamp blinks (10 seconds).
While Operating the Two Way Air Exchange
• The two way air exchange is stopped during operation to prevent dew condensation on the two way air exchange fan
and hose and to protect the two way air exchange fan due to changes in the room temperature and outside air temperature.
At this time, the “Two Way Air Exchange” lamp blinks (lights for 10 seconds/out for 1 second) (page 32).
■ If the “Two Way Air Exchange” lamp blinks except for the above-mentioned case, the “Two Way Air Exchange”
Only Exhaust
Fan is abnormal. (Refer page 32)
” is selected and “
fresh air in
Fresh Air In During Sleep Mode Operation
(page 18), the device beeps twice and the “Two Way Air Exchange” lamp
Fresh Air In During Sleep Mode Operation
” (page 23) is configured with the
” (page 23) or the
fresh air in
(page 18),
– 7 –
Page 7

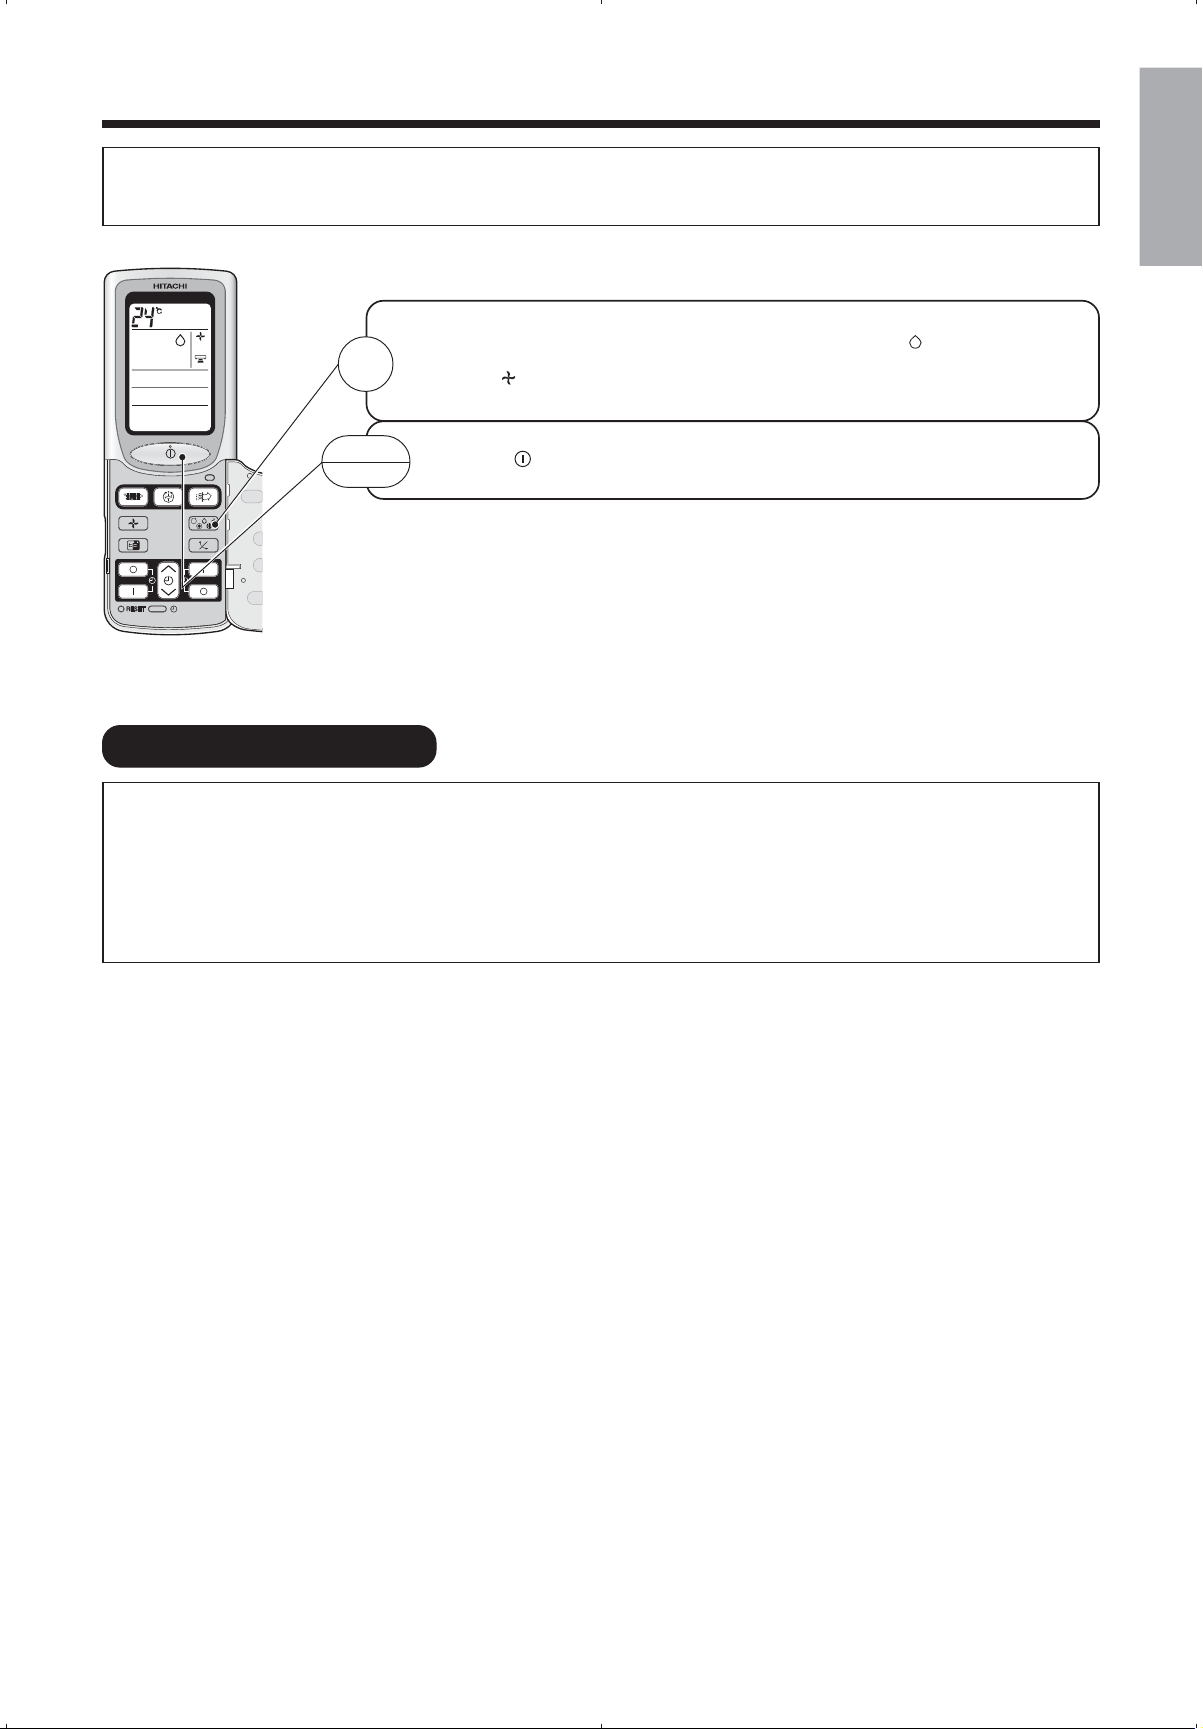
NAMES AND FUNCTIONS OF EACH PART
REMOTE CONTROLLER
• This controls the operation of the indoor unit. The range of control is about 7 meters. If indoor lighting is controlled
electronically, the range of control may be shorter, in some cases, the control signal may not be received. This
unit can be fixed on a wall using the fixture provided. Before fixing it, make sure the indoor unit can be controlled
from the remote controller.
• Handle the remote controller with care. Dropping it or getting it wet may compromise its signal transmission
capability.
• After new batteries are inserted into the remote controller, the unit will initially require approximately 10 seconds
to respond to commands and operate.
● Signal Emitting Window/Transmission Sign
Point this window toward the indoor unit when controlling it.
The transmission sign blinks when a signal is sent.
● Display
This indicates the room temperature selected, current time, timer status,
function and intensity of circulation selected.
● START / STOP Button
Press this button to start operation. Press it again to stop operation.
● HEATING Button
Heating mode direct selection.
● AUTO Button
Auto mode direct selection.
● COOLING Button
Cooling mode direct selection.
● TEMPERATURE Button
Use these buttons to raise or lower the temperature setting.
(Keep pressing and the value will change more quickly.)
● FAN Button
This determines the fan speed. Every time you press these buttons, the
intensity of circulation will change from “
(MED) ↔ (LOW) ↔ (SILENT)” (This button allows selecting the
optimal or preferred fan speed for each operation mode.)
● SLEEP Button
Use this button to set the sleep timer.
● TWO WAY AIR EXCHANGE Button
Press this button to start the two way air exchange mode.
(AUTO) ↔ (HI) ↔
– 8 –
Page 8

● SELF CLEAN Button
Use this button to set the self clean mode.
● AUTOMATIC TWO WAY AIR EXCHANGE Button
Press this button to set the automatic two way air exchange mode.
● AIR PURIFIER Button
Press this button to start the air purifier mode.
● FAN SPEED Selector
This determines the fan speed. Every time you press this button, the
intensity of circulation will change from “
(AUTO) ➔ (HI) ➔ (MED)
➔ (LOW) ➔ (SILENT)” cyclically.
● FUNCTION Selector
Use this button to select the operating mode. Every time you press this
button, the mode will change from “
(AUTO) ➔ (HEAT) ➔
(DEHUMIDIFY) ➔ (COOL) ➔ (FAN)” cyclically.
● AUTO SWING Button
Controls the angle of the horizontal air deflector.
● FRESH AIR IN DURING SLEEP MODE Button
Use this button to set the fresh air in during sleep mode.
● RESERVE Button…Time setting reservation.
● CANCEL Button…Cancel time reservation.
● TIMER Control…Use these buttons to set the timer.
ENGLISH
● TIME Button…Use this button to set and check the time.
● OFF-TIMER Button …Select the turn OFF time.
● ON-TIMER Button …Select the turn ON time.
● RESET Button
AUTO
HEAT
DEHUMIDIFY
COOL
FAN
FAN SPEED
SILENT
LOW
MED
HI
TWO WAY AIR EXCHANGE
TWO WAY AIR EXCHANGE FAN SPEED
EXHAUST
FRESH AIR IN
HI
MED
LOW
FRESH AIR IN DURING SLEEP MODE
Press this button after the batteries are replaced or when some irregular
operation is found.
SLEEPING
STOP (CANCEL)
START (RESERVE)
START/STOP
TIME
TIMER SET
TIMER SELECTOR
ON TIMER
OFF TIMER
AUTO SWING
SELF CLEAN
AUTOMATIC TWO WAY AIR EXCHANGE
AIR PURIFIER
Precautions for Use
• Do not put the remote controller in the following places.
• In direct sunlight.
• In the vicinity of a heater.
• Handle the remote controller carefully. Do not drop it on the floor, and protect it from water.
•
Once the outdoor unit stops, it will not restart for about 3 minutes (unless you turn the power switch off and
on or unplug the power cord and plug it in again). This is to protect the device and does not indicate a failure.
• If you press the FUNCTION selector button during operation, the device may stop for about 3 minutes for
protection.
– 9 –
Page 9

INSTALLING AND VERIFYING THE AIR PURIFYING FILTER/DUCT FILTER (FRESH
DEODORIZING/DUST COLLECTING FRESH AIR IN FILTER)
Please install the filters after turning off the device with the remote controller.
Open the Front Panel
1
•
Hold both sides of the front panel and lift up.
Front Panel
Removing the Pre-Filter
2 3
•
Pull out the pre-filters on the right and left.
2
Pull Out
1
Push and Lift
Pre-Filter
Attaching the Air Purifying Filter on the
4
Air Purifying Unit
•
Open the air purifying unit and attach the air
purifying filter with the jagged side up.
Removing the Air Purifying Unit
•
Remove the air purifying unit (2 pieces) by pulling
out while pushing up with both hands.
Air Purifying Unit
Air Purifying Unit
Air Purifying Filter
(Included)
•
This filter can be used for about 2 years. Please
do not wash this filter. This filter is disposable
type.
•
Optional Air Purifying Filter (SPX-CFH15).
Attaching the Air Purifying Unit
5
Air Purifying Unit
1
Insert
– 10 –
Attaching the Pre-Filter
6
•
Please attach the pre-filter with the “FRONT”
indication. (The configuration of the left and right
pre-filters is different.)
Pre-Filter
2
1
Insert
Page 10

HSILGNE
AIR IN PRE-FILTER, EXHAUST PRE-FILTER, NANO-TITANIUM DISINFECTING
Removing the Fresh Air In Pre-Filter
7 8
• Please pull out.
Attaching the Nano-Titanium Disinfecting
9
10
Deodorizing/Dust Collecting Fresh Air In
Filter
Nano-Titanium Disinfecting Deodorizing/Dust
Collecting Fresh Air In Filter (included)
Removing the Nano-Titanium Disinfecting
Deodorizing/Dust Collecting Fresh Air In
Filter Case
• Please hold the
handle of the NanoTitanium Disinfecting Deodorizing/Dust Collecting
Fresh Air In Filter
Case and pull out.
Attaching the Nano-Titanium Disinfecting
Deodorizing/Dust Collecting Fresh Air In
Filter Case
• Please hold the
handle of the case
and attach along
the slot, and then
keep pressing until
the case clicks.
• Improper filter
installation may
result in abnormal
noises.
Attaching the Fresh Air In Pre-Filter
• Please hold the handle and install the filter by
pushing it along the inner grooves.
Groove
1211
Closing the Front Panel
• Hold the front panel with both hands and pull
forward, then down.
Front Panel
• Keep pressing the front panel in the direction of
the arrow (3 places) until the panel clicks.
CAUTION
• If the front panel is loose, the panel may come off and fall.
• When opening the front panel, please do not use excessive force. If the front panel
comes off the device, this may cause it to malfunction.
• Please do not operate the device without the pre-filter. If dust enters the machine, this
may cause it to malfunction.
• When removing and installing the pre-filter, please take sufficient care not to cut your
hand with the fin of the heat exchanger.
– 11 –
Page 11

VARIOUS FUNCTIONS
AUTO RESTART CONTROL
• If there is a power failure, operation will be automatically restarted when the power is resumed with previous
operation mode and airflow direction. (As the operation is not stopped by remote controller.)
• If you intend not to continue the operation when the power is resumed, switch off the power supply.
When you switch on the circuit breaker, the operation will be automatically restarted with previous operation
mode and airflow direction.
Note: 1. If you do not require Auto Restart Control, please consult your sales agent.
2. Auto Restart Control is not available when Timer or Sleep Timer mode is set.
AUTOMATIC OPERATION
The device will automatically determine the mode of operation, HEAT or COOL depending on the initial room
temperature. The selected mode of operation will change when the room temperature varies.
■ Direct selection
1
STOP
Press the (AUTO) button. Operation start with a beep at previous AUTO mode.
Press the (START/STOP) button.
– 12 –
Page 12

■ Manual selection
Press the FUNCTION selector so that the display indicates the
of operation.
• When
• When AUTO is first selected, the device will determine the current room
1
START
STOP
• When the air conditioner has adjusted the room’s temperature to the near
• If the mode automatically selected by the unit is not satisfactory, manually
■ As the settings are stored in memory in the remote controller, you only have to press
the
AUTO has been selected, the device will automatically determine the
mode of operation, HEAT or COOL depending on the current room temperature.
temperature and select the proper operation mode accordingly.
preset temperature, it will begin to monitor operation. If the room temperature
subsequently changes, the air conditioner will once again select the appropriate
operation (heating or cooling) to adjust the temperature to the preset
temperature. The monitoring operation range is ±3°C relative to the preset
temperature.
change the mode setting (heat, dehumidify, cool or fan).
Press the
Operation starts with a beep.
Press the button again to stop operation.
(START/STOP) button next time.
(START/STOP) button.
(AUTO) mode
ENGLISH
You can raise or lower the temperature setting as necessary by maximum of 3°C.
Press the temperature button and the temperature setting will
change by 1°C each time.
• The preset temperature and the actual room temperature may vary somewhat
depending on conditions.
Press the (FAN SPEED) button to select AUTO, LOW and SILENT.
– 13 –
Page 13

HEATING OPERATION
DEFROSTING
• Use the device for heating when the outdoor temperature is under 21°C. When it is too warm (over 21°C), the
heating function may not work in order to protect the device.
• In order to keep reliability of the device, please use this device above -15°C of the outdoor temperature.
■ Direct selection
■ Manual selection
1
STOP
1
2
Press the (HEAT) button. Operation start with a beep at previous HEAT mode.
Press the (START/STOP) button.
Press the FUNCTION selector so that the display indicates (HEAT).
Set the desired FAN SPEED with the (FAN SPEED) button (the display
indicates the setting).
(AUTO) : The FAN SPEED changes automatically according to the
temperature of the air which blows out.
(HI) : Economical as the room will become warm quickly. But you
may feel a chill at the beginning.
(MED) : Quiet.
(LOW) : More quiet.
(SILENT) : Silent.
Set the desired room temperature with the TEMPERATURE buttons (the display
indicates the setting).
3
START
STOP
Defrosting will be performed about once an hour when frost forms on the heat exchange of the outdoor unit, for
5~10 minutes each time.
During defrosting operation, the operation lamp blinks in cycle of 3 seconds on and 0.5 second off. The maximum
time for defrosting is 20 minutes. (If the piping length used is longer than usual, frost will likely to form.)
The temperature setting and the actual room temperature may vary somewhat
depending on conditions.
Press the (START/STOP) button.
Heating operation starts with a beep.
Press the button again to stop operation.
■ As the settings are stored in memory in the remote controller, you only have to press
the
(START/STOP) button next time.
– 14 –
Page 14
DEHUMIDIFYING OPERATION
DEHUMIDIFYING FUNCTION
Use the device for dehumidifying when the room temperature is over 16°C. When it is under 15°C, the dehumidifying
function will not work.
Press the FUNCTION selector so that the display indicates (DEHUMIDIFY).
1
Press the
(FAN SPEED) button to select LOW and SILENT.
ENGLISH
START
STOP
• Dehumidifying takes place with a target temperature which is slightly lower than the room temperature setting.
(However, target temperature is 16°C for a temperature setting of 16°C.) If the room temperature becomes lower
than the target value, operation stops. If the room temperature becomes higher than the target value, operation
restarts.
• The preset room temperature may not be reached depending on the number of people present in the room
conditions.
Press the (START/STOP) button.
■ When you want to change the operation mode, please use the FUNCTION
selector.
■ Set the desired temperature is available.
■ You also can use the FUNCTION selector to select this operation.
– 15 –
Page 15

COOLING OPERATION
Use the device for cooling when the outdoor temperature is -10 to 42°C.
If humidity is very high (over 80%) indoors, some dew may form on the air outlet grill of the indoor unit.
■ Direct selection
Press the (COOL) button. Operation start with a beep at previous COOL
1
mode.
■ Manual selection
STOP
1
2
Press the (START/STOP) button.
Press the FUNCTION selector so that the display indicates (COOL).
Set the desired FAN SPEED with the (FAN SPEED) button (the display
indicates the setting).
(AUTO) :
(HI) : Economical as the room will become cool quickly.
(MED) : Quiet.
(LOW) : More quiet.
(SILENT) : Silent.
The FAN SPEED is HI at first and varies to MED automatically
when the preset temperature has been reached.
Set the desired room temperature with the TEMPERATURE buttons (the display
indicates the setting).
3
START
STOP
The temperature setting and the actual room temperature may vary somewhat
depending on conditions.
Press the (START/STOP) button. Cooling operation starts with a beep. Press
the button again to stop operation. The cooling function does not start if the
temperature setting is higher than the current room temperature (even though
the (OPERATION) lamp lights).
The cooling function will start as soon as you set the temperature below the
current room temperature.
■ As the settings are stored in memory in the remote controller, you only have to press
the
(START/STOP) button next time.
– 16 –
Page 16

AIR PURIFIER OPERATION (FAN)
The air purifier is operated by pressing the (AIR PURIFIER) button.
• The device beeps when it has received the signal and then the air purifier
starts.
• The OPERATION lamp on the indoor unit indicators turn on.
• The fan speed can be changed as desired.
1
Either HI, MED, LOW or SILENT can be selected.
The power of the air purifier is increased by increasing the speed of the air
conditioner’s fan, by pressing the
COOL or DEHUMIDIFY operates.
(Depending on the operation conditions, there is a case that the fan speed does
not increase.)
ENGLISH
(AIR PURIFIER) button while the HEAT,
STOP
CANCEL
Press the (START/STOP) button to stop operation.
Press the (AIR PURIFIER) button again to cancel the air purifier operation.
(During HEAT, COOL or DEHUMIDIFY operation)
FAN OPERATION
Y
ou can use the device simply as an air circulator. Use this function to dry the interior of the indoor unit at the end
of summer.
1
2
Press the FUNCTION selector so that the display indicates (FAN).
Press the
(HI) : The strongest air blow.
(MED) : Quiet.
(LOW) : More quiet.
(SILENT) : Silent
(FAN SPEED) button.
FAN SPEED (AUTO)
For the heating operation
For the cooling operation
START
STOP
…When the AUTO fan speed mode is set in the cooling/heating operation:
• The fan speed will automatically change according to the temperature of discharged
• As room temperature reaches the preset temperature, a very light breeze will blow.
• Operation starts in the “HI” mode to reach the preset temperature.
• As room temperature approaches the preset temperature, fan speed automatically
Press the (START/STOP) button.
Fan operation starts with a beep.
Press the button again to stop operation.
air.
switches to “LOW”.
– 17 –
Page 17

TWO WAY AIR EXCHANGE OPERATION
(Please refer to page 32, Understanding The Operating Mechanism)
• Operate the fresh air in and exhaust by operating the two way air exchange fan.
• The fresh air in and exhaust can be operated in combination by configuring the Two Way Air Exchange Operation
while the air conditioning operates.
• The fresh air in and exhaust cannot be operated simultaneously.
1
STOP
Press the
• The device beeps when it has received the signal
and the two way air exchange starts. By pressing
the button, the display changes as on the right.
• The OPERATION and the "Two Way Air Exchange"
lamps on the indoor unit indicators turns on.
• Although the ventilated air is deodorized by the
Nano-Titanium Disinfecting Deodorizing/Dust
Collecting Fresh Air In Filter, the odor of the
ventilated air may enter the room according to the
environment where the filter is utilized. If there is
concern regarding any odors, please stop the
device.
• Operate the exhaust for about 10 minutes every 2
hours during fresh air in to prevent dew
condensation on the two way air exchange fan and
hose and to prevent dust from plugging the hose.
• It is recommended that the self clean operation is
configured to dry the inside of the two way air
exchange hose (Refer page 30).
Press the (START/STOP) button.
Press the button. Until Fresh Air In or Exhaust on the remote controller
turns off. (During HEAT, COOL and DEHUMIDIFY operation)
button.
Turns off
(Stop)
WARNING
• If the fresh air in/exhaust function is insufficient when the air conditioning is utilized in a sealed room or
simultaneously with a heating appliance, open a window often or ventilate with a ventilating fan.
• If ventilation is insufficient, oxygen deficiency may cause asphyxiation.
• When the humidity inside the room is HIGH (more than 70%), do not use the fresh air in operation.
Dew condensation may be the cause of failure.
– 18 –
Page 18

SELF CLEAN OPERATION
(Please refer to page 34, Understanding The Operating Mechanism)
• By configuring Self Clean operation, once cooling and dehumidifying operation are performed, the device
automatically performs Self Clean operation suppressing the outbreak of mold. (This does not eliminate the
presence of mold or have a bactericidal effect.)
• As this operation cause the two way air exchange fan and hose dry, it is recommended that to set Self Clean
operation when utilizing the fresh air in operation (Refer page 18).
Press the (SELF CLEAN) button.
• The device beeps when it has received the signal and the (SELF CLEAN)
button on the remote controller turns on.
• The “SELF CLEAN” lamp on the indoor unit indicators turns on.
• This operates for about one hour and automatically stops.
1
CANCEL
• The “OPERATION” lamp on the indoor unit indicators turns on during the self
clean operation and then the “SELF CLEAN” lamp blinks. (When drying the
two way air exchange fan and hose operation is performed, the “TWO WAY
AIR EXCHANGE” lamp also turns on.)
• When cooling and dehumidifying operation are performed for a short time (less
than 1 hr.), the Self Clean operation does not perform.
To cancel, press the (SELF CLEAN) button again.
• The
• The “SELF CLEAN” lamp on the indoor unit indicators turns off.
(SELF CLEAN) button on the remote controller turns off.
ENGLISH
AUTOMATIC TWO WAY AIR EXCHANGE OPERATION
(Please refer to page 34, Understanding The Operating Mechanism)
• By configuring the Automatic Two Way Air Exchange, the “Dirt Sensor” detects the dust in the room’s air. If the air
is dirty, the air conditioning automatically operates the blower and exhaust and when the air becomes clean, the
Fresh Air In is operated.
• When the prohibit Two Way Air Exchange is selected with the Two Way Air Exchange Selection Switch (Refer
page 6), please do not configure the Automatic Two Way Air Exchange. Aside from
not able to configure any other settings.
• If Fresh Air In or Exhaust is operated using the
In or Exhaust Operation perform in the priority.
Press the button.
• The device beeps when it has received the signal and the on the remote
1
CANCEL
controller turns on.
• The “TWO WAY AIR EXCHANGE” lamp on the indoor unit indicators turns on.
To cancel, press the
• The on the remote controller turns off.
• The “TWO WAY AIR EXCHANGE” lamp on the indoor unit indicators turns
off.
button during Automatic Two Way Air Exchange Set, Fresh Air
button again.
, the remote controller is
CAUTION
• Exhaust operation may not perform in Automatic Two Way Air Exchange Operation when the air inside the room
is dirt.
In this case, please operate Exhaust operation manually by pressing the
open the windows for ventilation.
– 19 –
(Two Way Air Exchange) button or
Page 19

HOW TO SET THE TIMER
Time
After you change the
batteries:
OFF-Timer
1
Set the current time with the TIMER
control button.
Example: The current time is P.M.1:30.
1
Press the (OFF-TIMER) button.
The (OFF) mark blinks on the display.
ON TIMER
OFF TIMER
ON/OFF-Timer
➝
Start
• The device will turn on (off) and
off (on) at the designated times.
• The switching occurs first at the
preset time that comes earlier.
• The arrow mark appearing on
the display indicates the
sequence of switching operations.
➝
Stop
RESERVE
CANCEL
TIME (Current
Time)
1
TIMER) button so that
the (OFF) mark blinks.
Start
You can set the device to turn off at
the present time.
Stop
ON-Timer
Stop
The device will turn on at the designated
times.
Press the (OFF-
Start
2
Set the turn-off time
with the TIMER control
button. Press the
(RESERVE) button.
1
Press the (ON-TIMER) button.
The (ON) mark blinks on the display.
3
Press the (ON-
TIMER) button so that the
(OFF) mark lights and
the (ON) mark blinks.
How to Cancel Reservation
Point the signal window of the remote controller toward the indoor unit, and press the (CANCEL) button.
The (RESERVED) sign goes out with a beep and the (TIMER) lamp on the indoor unit indicators turns off.
NOTE
You can set only one of the OFF-timer,
ON-timer and ON/OFF-timer.
– 20 –
Page 20

2
Press the (TIME) button. The time indication starts lighting instead of blinking.
2
Set the turn-off time
with the TIMER control
button.
2
Set the turn-on time
with the TIMER control
button.
• The time indication will disappear automatically in 10 seconds.
• To check the current time setting, press the
twice. The setting of the current time is now complete.
3
Point the signal window of the remote controller toward the indoor unit, and press
the (RESERVE) button.
The (OFF) mark starts lighting instead of blinking and the (RESERVED) sign
lights. A beep occurs and the (TIMER) lamp lights on the indoor unit.
Example:
The device will turn off at P.M.11:00.
The setting of turn-off time is now complete.
3
Point the signal window of the remote controller toward the indoor unit, and press
the (RESERVE) button.
The
(ON) mark starts lighting instead of blinking and the (RESERVED) sign lights.
A beep occurs and the (TIMER) lamp lights on the indoor unit.
(TIME) button
ENGLISH
Example:
The device will turn on early so that the preset
temperature be almost reached at A.M.7:00.
The setting of the turn-on time is now complete.
4
Set the turn-on time
with the TIMER control
button.
• The timer may be used in three ways: off-timer, on-timer and ON/OFF (OFF/ON)-timer. Set the current time at first
because it serves as a reference.
5
Point the signal window of the remote controller toward the indoor unit, and press
the (RESERVE) button.
The (ON) mark starts lighting instead of blinking and the (RESERVED) sign lights.
A beep occurs and the (TIMER) lamp lights on the indoor unit.
Example:
For heating, the device will turn off at P.M.10:30, and
then turn on early so that the preset temperature be
almost reached at A.M.7:00; for cooling and
dehumidifying, it will simply turned on at A.M.7:00. The
settings of the turn on/off times are now complete.
• As the time settings are stored in memory in the remote controller, you only have to press the
order to use the same settings next time.
– 21 –
(RESERVE) button in
Page 21

HOW TO SET THE SLEEP TIMER
• The “Off Timer”, used exclusively when sleeping, stops the fan after a specified time after configuring the “Fan
Speed” appropriate before going to bed, when cooling with the air conditioning.
• The “Off Timer” stops the individual operation of the fresh air in, exhaust and air purifier after a specified time.
• By pressing the (SLEEP) button, the desired sleep time can be selected
(1 hr., 2 hrs., 3 hrs. or 7 hrs. Monitoring).
• The Sleep (7 hrs. Monitoring) operation momentarily stops cooling/
dehumidifying after operating for three hours and then the room’s temperature
1
is monitored for the next 4 hrs..
While the room is monitored, the device automatically operates/stops
repeatedly (One Hour More Timer) according to the conditions of the room.
• The Sleep (7 hrs. Monitoring) operation momentarily stops heating after
operating for three hours and then the room’s temperature is monitored for
the next 4 hrs.. When the room temperature falls by 4-5°C, the device restarts
to maintain the temperature.
• By pressing the (SLEEP) button, the display changes as follows.
2
1 hr.
➛
Operation
• The device beeps when it has received the signal and the Sleep operation
starts. The specified Sleep Timer and the stop operation time are displayed in
the display of the remote controller.
• The timer lamp of the indoor device turns on when configuring the Sleep Timer.
• The fan speed during the Sleep operation is set at silent.
• The Sleep Timer settings of the fresh air in, exhaust and the air purifier are 1,
2, 3 and 7 hrs..
Sleep
1
2
➝
timer
Set the ON-timer.
Press the (SLEEP) button and set the sleep timer.
Start
2 hrs.
➛
Operation
Canceling the Sleep Timer
The device will be turned off by the sleep timer and turned
on by on-timer.
Example:
For heating:
In this case, the device will turn off in 2 hrs. (at
A.M.1:38) and turn on early so that the preset
temperature will be almost reached at A.M.6:00
next morning.
3 hrs.
➛ ➛
Operation
Sleep
(7 hrs. Monitoring)
➛
How to Cancel Reservation
Point the signal window of the remote controller toward the indoor unit, and press the (CANCEL) button.
The
(RESERVED) sign goes out with a beep and the (TIMER) lamp on the indoor unit indicators turns off.
NOTE
If you set the sleep timer when the off-time or on/off-timer has been set earlier, the sleep
timer becomes effective instead of the off - or on/off-timer set earlier.
– 22 –
Page 22

Specifications of the One Hour More Timer
• Even after the 1, 2 or 3 hrs. Sleep Timer has expired when cooling/dehumidifying, this function monitors the
room’s temperature and automatically operates and stops (1 hr. more timer operation) one more time according
to the condition of the room (monitoring time is a maximum of 4 hrs. after the timer expires).
Cooling, Dehumidifying If the room temperature rises by 2°C, the device operates for 1 hr..
• The timer lamp of the indoor unit turns on while the room’s temperature is monitored after the 1, 2 or
3 hrs. timer expires and the
and on the remote controller turn on.
FRESH AIR IN DURING SLEEP MODE OPERATION
By configuring the “Fresh Air In During Sleep Mode”, a fresh air in operation of blowing outside air into the room is
added during the “Sleep Timer” operation (page 22) while cooling/dehumidifying. (This cannot be configured when
heating operation.)
ENGLISH
1
CANCEL
Press the button.
• The device beeps when it has received the signal and the on the remote
controller turns on.
• If the Fresh Air In During Sleep Mode is configured and set while the air
conditioning is stopped, the Fresh Air In During Sleep Mode does not operate.
When Sleep is operated while cooling/dehumidifying, the air conditioning
automatically operates the “Fresh Air In During Sleep Mode”.
• The “Two Way Air Exchange” lamp on the indoor unit indicators turns on during
Fresh Air In operating.
• Even after the Sleep Timer of the air conditioning expires, the room temperature
and the outside temperature are monitored, while the One Hour More Timer
operates and monitors (page 23). If the outside temperature is cooler than
room temperature, the Fresh Air In operates.
To cancel, press the button again.
• The
on the remote controller turns off.
– 23 –
Page 23

ADJUSTING THE AIR DEFLECTORS
Adjustment of the conditioned air in the upward and downward
1
directions.
The horizontal air deflector is automatically set to the proper angle
suitable for each operation. The deflector can be swing up and down
continuously and also set to the desired angle using the
“
(AUTO SWING)” button.
• If the “ (AUTO SWING)” button is pressed once, the
horizontal air deflector swings up and down. If the button is
pressed again, the deflector stops in its current position.
Several seconds (about 6 seconds) may be required before
the deflector starts to move.
• Use the horizontal air deflector within the adjusting range
shown in the right.
• When the operation is stopped, the horizontal air deflector
moves and stops at the position where the air closes.
CAUTION
• In “Cooling” operation, do not keep the horizontal air deflector
swinging for a long time. Some dew may form on the
horizontal air deflector and dew may drop.
When Cooling,
Dehumidifying
Vertical
about 15°
about 65°
When heating
Vertical
about 40°
about 40°
Adjustment of the conditioned air to the left and right.
2
Hold the vertical air deflector as shown in the figure and adjust the conditioned air to the left and right.
Right side: Hold the third blade from the right
end of the air deflector to adjust the direction.
The pull for the blade is marked.
Left side: Hold the third blade from the left
end of the air deflector to adjust the direction.
The pull for the blade is marked.
– 24 –
Page 24

HSILGNE
MAINTENANCE
It is recommended to carry out deep cleaning of the two way air exchange duct filters (Fresh Air In Pre-Filter,
Exhaust Pre-Filter, Nano-Titanium Disinfecting Deodorizing/Dust Collecting Fresh Air In Filter) regularly.
Cleanliness of filters differs according to environment and usage conditions. Check regularly and if the
filters are dirty, cleaning is recommended. Especially if the Fresh Air In operation is utilized often, check the
filters once every 2 weeks and if the filter is dirty, cleaning is recommended.
Although small insects may be caught in the Fresh Air In Pre-Filter, they have entered from the outside air
(outside the room) and it is not uncommon. Please wash the Fresh Air In Pre-Filter.
Opening the Front Panel
1
• Hold both sides of the front panel and lift up.
Front Panel
Removing the Fresh Air In Pre-Filter
2 3
• Please pull out to the front.
Removing the Exhaust Pre-Filter
4
• Please remove by pushing up the handle 1 and
then pulling 2.
5
Removing the Nano-Titanium Disinfecting
Deodorizing/Dust Collecting Fresh Air In
Filter Case
• Please hold the handle of the Nano-Titanium
Disinfecting Deodorizing/Dust Collecting Fresh
Air In Filter Case and pull out to the front.
Confirm the Dirt on Each of the Removed
Filters
Exhaust
Pre-Filter
• Please proceed to 7 if the filter is not dirty.
1
2
Handle
– 25 –
Page 25

MAINTENANCE
Wash Each of the Removed Filters with
6
Water
• After washing with water, please allow to drip dry.
• If the dirt is difficult to wash off, please wash with
luke warm water that does not exceed 40°C.
• Do not rub too hard when washing with water.
• Nano-Titanium Disinfecting Deodorizing/Dust
Collecting Fresh Air In Filter should wash and dry
in the shade once in every 3 months. Although it
can be washed and used repeatedly, it is
recommended that the filter is replaced every 3
years.
• Optional Nano-Titanium Disinfecting Deodorizing/
Dust Collecting Fresh Air In Filter (SPX-NFH1).
Attaching the Fresh Air In Pre-Filter
8
• Please keep the engraved mark up and attach
by pushing the filter into the device until the filter
clicks.
• Improper filter installation may result in abnormal
noises.
Attaching the Nano-Titanium Disinfecting
7
Deodorizing/Dust Collecting Fresh Air In
Filter Case
• Improper filter installation may result in abnormal
noises.
Nano-Titanium Disinfecting
Deodorizing/Dust Collecting
Fresh Air In Filter Case
(included)
Attaching the Exhaust Pre-Filter
9
• Please hold the handle and attach the filter by
pushing it along the inner grooves until the filter
clicks.
10
Groove
Close the Front Panel
• Hold the front panel with both hands and pull
forward, then down.
Front Panel
• Keep pressing the front panel in the direction of
the arrow (3 places) until the panel clicks with
both hands and pull forward, then down.
CAUTION
• Do not operate with the duct filter removed.
Dust or odors may infiltrate the room and may cause the device to malfunction.
– 26 –
Page 26

HSILGNE
CAUTION
Cleaning and maintenance must be carried out only by qualified service personal. Before cleaning, stop operation
and switch off the power supply.
1. PRE-FILTER
When the filter indicator lamp comes on, be sure to clean the filter. By doing so, the power rates are saved. In case
the air filter is full of dust, the air flow will decrease and the cooling capacity will be reduced. Further, noise may
occur. Be sure to clean the filter following the procedure below.
Front Panel
PROCEDURE
1
2
3
Open the front panel carefully and remove the filter.
Vacuum dust from the pre-filter using vacuum cleaner. If
there is too much dust, wash the filter with detergent
and rinse it thoroughly. After that, dry it in the shade.
• Set the filter with “FRONT” mark facing front, and slot
them into the original state.
• After attaching the filters, push the front panel at three
arrow portions as shown in figure and close it.
Pre-Filter
2
Insert
Front Panel
2
Pull out
1
Push and Lift
1
CAUTION
• Do not wash with hot water at more than 40°C. The filter may shrink.
• When washing it, shake off moisture completely and dry it in the shade; do not expose it directly to the sun. The
filter may shrink.
• Don’t operate the unit without filter. Fault may occur if you continue.
– 27 –
Page 27

MAINTENANCE
2. CLEANING OF FRONT PANEL AND TOP GRILL
• Remove the front panel and the top grill and wash with clean
water.
Wash it with a soft sponge.
After using neutral detergent, wash thoroughly with clean water.
• When the front panel and the top grill are not removed, wipe it
with a soft dry cloth. Wipe the remote controller thoroughly with
a soft dry cloth.
• Wipe the water thoroughly.
If water remains at indicators or signal receiver of indoor unit, it
causes trouble.
Method of removing the front panel
Be sure to hold the front panel with both hands to detach and
attach it.
Removing the Front Panel
Front Panel
Shaft
• When the front panel is fully opened with both hands,
push the right arm to the inside to release it, and
while closing the front panel slightly, put it out forward.
Removing and attaching the top grill
Removing
1 Lift up while pressing the top grill and remove from
tab. (3 places: left, centre and right)
2 Pull forward.
Ta b
Attaching the Front Panel
Shaft
Shaft
1
Step
Front Panel
Step
• Move the shafts of the left and right arms into the
steps in the unit and securely insert them into the
holes.
Attaching
1 Position the “
××
×
” sign away. Slide along the top of
××
the indoor device and press.
2 Press the top grill down and affix with the hold down
tab.
– 28 –
Ta b
Page 28

CAUTION
• Do not splash or direct water to the body of the unit when cleaning it as this may
cause short circuit.
B
E
N
E
Z
I
N
• Never use hot water (above 40°C), benzine, gasoline, acid, thinner or a brush,
because they will damage the plastic surface and the coating.
3. MAINTENANCE AT BEGINNING OF LONG OFF PERIOD
• Run the unit by setting the operation mode to (FAN) and
the fan speed to HI for about half a day on a fine day, and dry
the whole of the unit.
• Switch off the power plug or turn off the circuit breaker.
Air
Blow
HOW TO EXCHANGE THE BATTERIES IN THE REMOTE CONTROLLER
1
Remove the cover as shown in the figure and take out
the old batteries.
A
C
I
D
T
R
H
E
I
N
N
ENGLISH
2
Install the new batteries.
The direction of the batteries should match the marks in
the case.
CAUTION
1. Do not use new and old batteries, or different kinds of
batteries together.
2. Take out the batteries when you do not use the remote
controller for 2 or 3 months.
Address Changing Switch
Switch
Please operate this switch
only as advised.
Push and pull to the
direction of arrow.
✽ The Address Changing Switch is utilized to avoid
interference between remote controllers when there
are two indoor units mounted in the same room
and is normally not utilized.
(When the device is shipped out of the factory, it is
set to “A”.)
Furthermore, please ask the dealer where the
device was purchased, how the device is
configured.
– 29 –
Page 29

MAINTENANCE
■ To ensure clean usage, please dry the interior of the Two Way Air Exchange Fan and Hose.
• If this is the first time during the year (seasons) that the device is being used to cooling or dehumidifying operation,
please conduct one of the following maintenance procedures.
• If this is the first time during the year (seasons) that the device is being used to heat, please conduct one of the
following maintenance procedures.
• If odors from the fresh air window are a concern, even if maintenance has been conducted on the duct filters,
please conduct one of the following maintenance procedures.
(Two Way Air Exchange Fan and Hose)
Maintenance During the Summer
• After sealing the room, please conduct the following for 4 hrs..
4
1
2
4
2
3
3
1
1
Please perform dehumidify operation.
1
Please set the temperature to 24°C.
2
Please set the fan speed to “SILENT”.
3
Please perform the exhaust (HI) operation.
4
Maintenance During the Autumn or Rainy Season
• After opening the room, please conduct the following for 4 hrs..
Please perform heat operation.
1
Please set the temperature to 32°C.
2
Please set the fan speed to “SILENT”.
3
Please perform the exhaust (HI) operation.
4
1
4
2
3
• If the outside temperature is above 24°C, please conduct maintenance by
following the “Maintenance During the Summer” procedures. (When the
outside temperature exceeds 24°C, the machine does not operate the
heater to prevent any damage.)
Maintenance During the Winter
• After opening the room, please conduct the following for 4 hrs..
Please perform heat operation.
1
Please set the temperature to 32°C.
2
Please set the fan speed to “SILENT”.
3
Please perform the exhaust (HI) operation.
4
– 30 –
Page 30

INFORMATION
CAPABILITIES
VARIOUS FUNCTIONS
TIMER PROGRAMMING/SLEEP TIMER OPERATION
Heating Capability
• This room air conditioner utilizes a heat pump system that absorbs
exterior heat and brings it into a room to be heated. As the ambient
temperature gets lower, heating capability will also lower. In such a
situation, the inverter work to increase compressor rpm to keep the
unit’s heating capability from decreasing. If the unit’s heating
performance is still unsatisfactory, other heating appliances should
be used to augment this unit’s performance.
• The air conditioner is designed to heat an entire room so that it may take some time before you feel warm. Timer
operation is recommended for effective preheating ahead of the desired time.
CAUTION
Do not use a stove or
any other high temperature devices in proximity
to the indoor unit.
PROHIBITION
Cooling and Dehumidifying Capabilities
• If the heat present in a room exceeds the unit’s cooling capacity (for example, if there are many people in the
room or other heating appliances are used), the preset room temperature may not be reached.
• When fan speed, room temperature are set with the remote controller before starting manual operation and the
buttons are released, the indication of settings will go off in 10 seconds and only the operation mode will be
displayed.
• Pressing the
operate for approximately 3 minutes.
• During heating operation, the “OPERATION” lamp on the indoor unit indicators may blink with no air emitted for
a while.
• If you feel cold wind during heating operation with the (HI) fan speed or want to make the unit operation
quieter after the room is heated, use of
• With the (LOW), (SILENT) settings, the unit’s cooling capacity will lower slightly.
• With the (LOW), (SILENT) settings, the unit’s fan speed of heating operation will vary with the operating
conditions.
button while the unit is in operation will let the protective circuit work so that the unit will not
(AUTO) setting is recommended.
ENGLISH
• When the timer has been programmed, the unit will not operate even if the set time is reached unless the unit
receives a signal from the remote controller. Confirm that timer programming is complete (beep) and the TIMER
lamp of the indoor unit lights.
• If the
• During sleep timer operation, the fan speed sets to (SILENT) regardless of the preset speed. The remote
controller display indication will remain unchanged even with the (SILENT) setting.
(SLEEP) button is pressed while the ON/OFF timer is programmed, the sleep timer takes priority.
– 31 –
Page 31

UNDERSTANDING THE OPERATING MECHANISM
Air Purifier Operation (Page 17)
• When the two way air exchange operation is configured during the air purifier operation, the fan speed operation
(heating, cooling and dehumidifying operation when the heating, cooling and dehumidifying of the device are combined)
is combined with the two way air exchange operation.
Two Way Air Exchange Operation (Page 18)
■ Fresh Air In Operation
• When the air temperature outside the room is more than about 30°C or less than about 3°C, the fresh air in does not
operate to prevent dew condensation on the two way air exchange fan and hose and to save energy.
• If the difference in temperature between the inside and outside of the room is more than about 7°C, the fresh air in
does not operate to prevent dew condensation on the two way air exchange fan and hose, while cooling operation.
• If the difference in temperature between the inside and outside of the room is more than about 22°C, the fresh air in
does not operate to prevent dew condensation on the two way air exchange fan and hose, while heating operation.
• When the above mentioned operations have stopped, the “Two Way Air Exchange” lamp on the indoor unit
indicators blinks (lights for 10 seconds/light off for 1 second).
WARNING
• When the humidity inside the room is HIGH (more than 70%), do not use the fresh air in operation.
Dew condensation may be the cause of failure.
■ Exhaust Operation
• When the temperature inside the room is more than about 43°C, the exhaust does not operate to protect the
exhaust fan from damage.
• When the above mentioned operation has stopped, the “Two Way Air Exchange” lamp on the indoor unit
indicators blinks (lights for 10 seconds/light off for 1 second).
■ Abnormal of Two Way Air Exchange Fan
• Two Way Air Exchange Fan is abnormal if the “Two Way Air Exchange” lamp of the indoor unit indicators blinks
(lights for 4 seconds/light off for 1 second) repeatedly.
In this case, all the functions can be operated except for the Two Way Air Exchange operation.
■ Sound of the Two Way Air Exchange Operation
Type of operation Operating sound
“HI” Fresh Air In About the same when cooling (Fan Speed: “HI”).
“MED” Fresh Air In About the same when cooling (Fan Speed: “MED”).
“LOW” Fresh Air In About the same when cooling (Fan Speed: “LOW”).
“HI” Exhaust About the same when cooling (Fan Speed: “HI”).
“MED” Exhaust About the same when cooling (Fan Speed: “MED”).
“LOW” Exhaust About the same when cooling (Fan Speed: “LOW”).
✽ These are just rough indications when the fresh air in and exhaust operate independently. In addition, the operating
volume of the air conditioning changes according to the mounting conditions.
If the air conditioning operation is configured at the same time, the volume of the operation sound becomes bigger.
Sleep Timer Operation (Page 22)
• If the remote controller never receive the signal when sleep timer is set, it does not start to operate even when
reaching the set time. Please confirm the sleep timer setting by the “beep” sound and the “TIMER” lamp on the indoor
unit.
• If the vertical deflector are configured to swing while the Sleep Timer is set, it will not swing when 1hr. More Timer
operates during cooling/dehumidifying or Sleep (7 hrs. Monitoring) operation during heating.
• When sleep timer setting, if the air conditioning operation (cooling, dehumidifying, heating) is configured in combination
with the fresh air in, exhaust and air purifier, 1 hr. More Timer of the cooling and dehumidifying operation or Sleep
(7 hrs. Monitoring) timer operation during heating only the air conditioning operation performs.
– 32 –
Page 32

UNDERSTANDING THE OPERATING MECHANISM
Fresh Air In During Sleep Mode Operation (Page 23)
• By configuring Fresh Air In During Sleep Mode, the air conditioning operates the fresh air in during sleep mode
operation (while cooling or dehumidifying) when the outside air temperature is lower than room temperature.
• If “Sleep Timer” operation of the air purifier is performed while the Fresh Air In During Sleep Mode is configured,
ventilating operation that takes the air from the outside into the room air conditioning fan when the outside air temperature
is lower than room temperature.
• If the room temperature decreases about 2°C below than configured temperature while fresh air in operating, the
fresh air in operation will be stopped.
• The fan speed cannot be adjusted in fresh air in during sleep mode.
• If the heating operation is performed while the Fresh Air In During Sleep Mode is configured, Fresh Air In During Sleep
Mode operation will be canceled, however, when the heating operation is stopped, the mode returns to Fresh Air In
During Sleep Mode settings.
• If the fresh air in/exhaust operation is performed while the Fresh Air In During Sleep Mode is configured, Fresh Air In
During Sleep Mode operation will be canceled, however, when the fresh air in/exhaust operation is stopped, the mode
returns to Fresh Air In During Sleep Mode settings.
• The fresh air in does not operate depending on the room temperature/outside air temperature.
Installing the Device when the Two Way Air Exchange Cannot Operate
■ If the installation work specified for the embedded ducting cannot be vented the two way air exchange hose
outside the room, please select “Only Exhaust” or “Prohibit Two Way Air Exchange”.
ENGLISH
Two Way Air Exchange Selection Switch
1 Prohibit Two Way Air Exchange
2 Only Exhaust
3 Operate Two Way Air Exchange
When selecting “Prohibit Two Way Air Exchange”
• When the two way air exchange hose cannot be vented
outside of the room directly (installation work specified for
the embedded ducting).
• When there is a source of odor, smoke, or oily smoke in the
vicinity of the exit of the two way air exchange hose, even if
the installation work directly vents the two way air exchange
hose outside the room.
When selecting “Only Exhaust” (only exhaust
operation can be operated)
• When there is some space to vend the two way air exchange
hose between the internal and external walls, which leads
outside the room, even if the two way air exchange hose
cannot be vented outside of the room directly (conventional
construction methods).
• There is a restriction to the length of the two way air
exchange hose (maximum length is 3m).
• Please consult your local dealer where the device was
purchased regarding the details of installation work.
CAUTION
• Do not supply air from inside the wall.
• By supplying highly humid air from inside a wall or from underneath the floor, this will cause dew to form.
• And also may cause the odors from inside a wall or from underneath the floor to infiltrate the room.
– 33 –
Page 33

UNDERSTANDING THE OPERATING MECHANISM
Automatic Two Way Air Exchange Operation
• The Dirt Sensor detects cigarette smoke, sprays (pesticides), alcohol, etc.
• The Dirt Sensor may also respond to sudden temperature changes when the cooling/heating operation starts and
sudden changes in airflow when doors open and close.
• The automatic two way air exchange can be configured for two weeks at one time. The
AIR EXCHANGE) is configured for two weeks after it is set with the remote controller.
• Even the air in the room is dirty after the automatic two way air exchange operation has been configured, the exhaust
operation does not perform for 5 minutes.
• In the case the automatic two way air exchange operation performs during the air conditioning operation, the exhaust
or fresh air in operates in addition to the air conditioning.
• Once the dirt sensor detects the dirt and starts exhaust operation, even you open the window after that the exhaust
operates for at least 20 minutes and then operates the fresh air in.
• The two way air exchange operation does not perform depending on the room temperature/outside air temperature.
CAUTION
• Exhaust operation may not perform in Automatic Two Way Air Exchange Operation when the air inside the room
is dirt.
In this case, please operate Exhaust operation manually by pressing the (Two Way Air Exchange) button or
open the windows for ventilation.
(AUTOMATIC TWO WAY
Changing the Sensitivity of the Dirt Sensor
■ There are 7 levels of sensitivity
1
Press the button while the operation is stopped.
(Please operate either the fresh air in or the exhaust. Select the fan speed “HI”, “MED” or
“LOW”.)
2
The sensitivity can be selected with the Room Temperature button.
sensitivity increase/sensitivity decrease
3
2
1
• Increasing the sensitivity by one level displays “+1”.
• Decreasing the sensitivity by one level displays “–1”.
• The configuration range has 7 levels: +3 - –3.
• The +3 - –3 display will turn off after about 10 seconds.
3
Please stop the operation with the button.
Self Clean Operation (Page 19)
• By setting Self Clean operation, it automatically starts self clean operation after stopping the cooling and dehumidifying
operations. First, wash the odor components attached to the indoor heat exchanger due to the “FAN” operation (combined
with the exhaust). Next, “HEATING” (combined with the exhaust), “ONLY EXHAUST” and “FAN” operation (combined
with the exhaust) are performed to suppress the outbreak of mold in the indoor unit.
• If the outside air temperature is low, the cooling and dehumidifying may not operate.
• If the ON-TIMER has been configured, the Self Clean operation does not perform two hours before the configured
time.
• If the operation is stopped in the following conditions, the Self Clean operation does not perform. (Heating and Air
purifying operations, stopped by pressing OFF-TIMER or SLEEP TIMER.)
Timer Settings
• If the remote controller never receive the signal when timer is set, it does not start to operate even when reaching the
set time. Please confirm the timer setting by the “beep” sound and the “Timer” lamp on the indoor unit.
• When the dehumidifying is operated while the timer is configured, the timer settings will disappear from the LCD, but
the setting is not canceled. When the dehumidifying operation is stopped, the timer settings will display again.
– 34 –
Page 34

HSILGNE
REGULAR INSPECTION
WHEN ASKING FOR SERVICE, CHECK THE FOLLOWING POINTS.
PLEASE CHECK THE FOLLOWING POINTS EVERY EITHER HALF YEARLY OR YEARLY. CONTACT YOUR SALES
AGENT SHOULD YOU NEED ANY HELP.
Check to see if the unit’s earth line has been connected
1
WARNING
2
WARNING
3
WARNING
correctly.
If the earth line is disconnected or faulty, unit failure or electric
shock hazard may result.
Check to see if the mounting frame has rusted excessively
or if the outdoor unit has tilted or become unstable.
It could collapse or fall, causing injury.
Check to see if the power plug is securely inserted into the
wall socket.
If the power plug is not inserted into the wall socket securely, it
will become hot and an electric shock or fire may occured. If dust
or dirt is found on the power plug, clean the plug and insert it into
the wall socket.
AFTER SALES SERVICE AND WARRANTY
If the remote controller is not
transmitting a signal.
(Remote controller display is
dim or blank.)
When it does not operate.
When it does not cool well.
When it does not heat well.
• Do the batteries need replacement?
• Is the polarity of the inserted batteries correct?
• Is the fuse all right?
• Is the voltage extremely high or low?
• Is the circuit breaker “ON”?
• Is the power plug inserted?
• Do you have any power cut?
• Is the air filter blocked with dust?
• Is the set temperature suitable?
• Have horizontal air deflectors been adjusted to their correct positions
according to the operation mode selected?
• Are the air inlets or air outlets of indoor and outdoor units blocked?
• Is the fan speed “LOW” or “SILENT”?
STNIOP GNIWOLLOF EHT KCEHCNOITIDNOC
The following phenomena do not indicate unit failure.
<Operation start>
During heating, the operation indicator
blinks and air blow stops
Hissing or fizzy sounds
Rustling noise
The unit is preparing to blow warm air. Please wait.
<In operation>
The outdoor unit is defrosting. Please wait.
Refrigerant flow noise in the pipe or valve sound generated when flow rate is
adjusted.
Noise generated with the indoor unit fan’s rpm changing such as operation start
times.
– 35 –
.segnahc erutarepmet ot eud stcartnoc ro sdnapxe tinu eht nehw detareneg esioNesion gnikaeuqS
.no dehctiws si tinu eht nehw evlav dezirotom eht fo esioNesion gnikcilC
Page 35

Noise of the ventilation fan sucking in air present in the drain hose and blowing out
Perking noise
Changing operation noise
Mist emission Mist is generated as the air within the room is suddenly cooled by conditioned air.
Steam emitted from the outdoor unit Water generated during defrosting operation evaporates and steam is emitted.
Odors
The outdoor unit continues to operate
even if operation is stopped.
The OPERATION lamp is blinking.
Does not reach the temperature
setting.
dehumidifying water that had accumulated in the condensed water collector. For
details, consult your sales agent.
Operation noise changes due to power variations according to room temperature
changes.
Caused as the smells and particles of smoke, food, cosmetics, etc. present in room
air become attached the unit and blown off into the room again.
Defrosting is underway (as the heating operation is stopped, the microcomputer
checks frost accumulated in the indoor unit and instructs the unit to perform
automatic defrosting if necessary).
Shows preheating or defrosting operation is underway.
As the protective circuit or preheat sensor operates when unit operation is stopped
during preheating and then restarted, or when operation mode is switched from
cooling to heating, the lamp continues to blink.
Actual room temperature may deviate slightly from the remote controller’s temperature
setting depending on the number of people in the room, indoor or outdoor conditions
when the air conditioner is used for more than one room at the same time.
• If the unit still fails to operate
normally after performing the
above inspections, turn the circuit
breaker off and contact your sales
agent immediately.
Notes
• In quiet operation or stopping the running, the following phenomena may occasionally
occur, but they are not abnormal for the operation.
(1) Slight flowing noise of refrigerant in the refrigerating cycle.
(2) Slight rubbing noise from the fan casing which is cooled and then gradually
• The odor will possibly be emitted from the room air conditioner because the various
odor, emitted by smoke, foodstuffs, cosmetics and so on, sticks to it. So please clean
the air filter and the evaporator regularly to reduce the odor.
• Please contact your sales agent immediately if the air conditioner still fails to operate normally after the above inspections.
Inform your agent of the model of your unit, production number, date of installation. Please also inform him regarding
the fault.
Contact your sales agent immediately if the following
phenomena should occur:
• The circuit breaker switches off or the fuse blows
frequently.
• The switch operation is not stable.
• Foreign matter or water accidentally enters the unit interior.
• The power cord gets excessively hot or its insulation is torn or stripped.
• TIMER lamp or FILTER lamp on the indoor unit indicators blinks.
As the nature of the failure can be identified by the blinking cycle, check
( )
the blinking cycle before turning off the circuit breaker.
warmed as operation stops.
Please note:
On switching on the equipment, particularly when the room light is dimmed, a slight brightness fluctuation may
occur. This is of no consequence.
The conditions of the local Power Supply Companies are to be observed.
– 36 –
Page 36

HSILGNE
СПЛИТ-СИСТЕМА
ВНУТРЕННИЙ БЛОК/НАРУЖНЫЙ БЛОК
МОДЕЛИ
RAS-10JH4/RAC-10JH4
RAS-14JH4/RAC-14JH4
ВНУТРЕННИЙ БЛОК
НАРУЖНЫЙ БЛОК
RAS-10JH4
RAS-14JH4
RAC-10JH4
RAC-14JH4
Instruction manual Page 1~36
To obtain the best performance and ensure years of
trouble free use, please read this instruction manual
completely.
Инструкция по эксплуатации Страницы
Для достижения наивысшей производительности и
обеспечения длительной безаварийной
эксплуатации внимательно изучите данную
инструкцию по эксплуатации.
37~73
– 37 –
– 1 –
Page 37

ТЕХНИКА БЕЗОПАСНОСТИ
•
Для обеспечения надлежащего использования прибора внимательно изучите раздел «Техника безопасности»
перед работой с агрегатом.
•
Уделите особое внимание указаниям, обозначенным символами " ВНИМАНИЕ!" и " ОСТОРОЖНО!". Словом
«Внимание!» обозначены указания, несоблюдение которых может привести к тяжелой травме вплоть до смертельного
исхода. Словом «Осторожно!» обозначены указания, несоблюдение которых может привести к серьезному
повреждению оборудования или травме. Для обеспечения безопасности строго соблюдайте приведенные указания.
Символы, используемые для обозначения указаний. (Примеры символов приведены ниже.)
•
Данный символ обозначает запрет.
•
Сохраните инструкцию после прочтения.
УКАЗАНИЯ ПО МОНТАЖУ
•
Изменять конструкцию агрегата запрещается.
Несанкционированное изменение конструкции агрегата может стать причиной
утечек воды, отказов, коротких замыканий или возгораний.
•
Для монтажа агрегата обратитесь в торговое представительство нашей компании или в
уполномоченную монтажную организацию. Самостоятельный монтаж агрегата может стать
причиной утечек воды, отказов, коротких замыканий или возгораний.
•
ВНИМАНИЕ!
ОСТОРОЖНО!
Агрегат должен быть заземлен.
Запрещается прокладывать проводник заземления рядом с водо- и газопроводами,
молниеотводом или линией заземления телефонной сети. Ненадлежащий монтаж
кабеля заземления может стать причиной поражения электрическим током.
•
Используйте трубы, пригодные для работы с хладагентом R410A. В противном случае
возможно возникновение трещин в медных трубах, что приведет к выходу агрегата из строя.
•
Агрегат должен быть оснащен автоматическим выключателем, расположение
которого зависит от места установки агрегата. Отсутствие автоматического
выключателя может стать причиной поражения электрическим током.
•
Запрещается устанавливать агрегат в зонах возможного скопления
легковоспламеняющихся газов.
Наличие легковоспламеняющихся газов в зоне установки наружного блока может привести
к возгоранию. Трубопровод должен быть установлен на соответствующих опорах,
расстояние между которыми не должно превышать 1 м.
•
При монтаже системы отвода конденсата убедитесь, что обеспечивается
беспрепятственный сток жидкости. Неисправная система отвода конденсата от внутреннего
или наружного блока может привести к повышению влажности воздуха в помещении.
•
Убедитесь, что агрегат питается от однофазной сети с напряжением 230 В. Питание от
других источников может стать причиной перегрева электрических компонентов и возгорания.
Данный символ обозначает указание, которое
необходимо строго соблюдать.
ЗАПРЕЩЕНО
ЗАЗЕМЛИТЕ
ЗАПРЕЩЕНО
ЗАПРЕЩЕНО
ЙИКССУР
УКАЗАНИЯ ПО ТРАНСПОРТИРОВАНИЮ И ТЕХНИЧЕСКОМУ ОБСЛУЖИВАНИЮ
При возникновении аварийной ситуации (например, появлении запаха гари)
•
отключите агрегат, выньте вилку из розетки или выключите автоматический
ВНИМАНИЕ!
выключатель. Свяжитесь с представителем нашей компании. Продолжение
работы после обнаружения неисправности может стать причиной выхода
агрегата из строя, короткого замыкания или возгорания.
Свяжитесь с представителем нашей компании для проведения технического обслуживания.
•
Неполное, неправильное или самостоятельное выполнение технического обслуживания
может стать причиной поражения электрическим током или возгорания.
Для транспортирования или повторной установки агрегата свяжитесь с представителем
•
нашей компании. Неправильно осуществленная транспортировка или установка агрегата
может стать причиной поражения электрическим током или возгорания.
•
Не стойте длительное время в потоке воздуха от агрегата.
Запрещается использовать для подключения к источнику питания удлинитель
•
или подключать к одному источнику несколько потребителей. Кроме того, во
избежание натяжения кабель питания должен иметь запас по длине.
Невыполнение данного требования может стать причиной поражения
электрическим током, повышенного тепловыделения или возгорания.
Запрещается связывать кабель питания в узел, дергать, ставить на него тяжести,
•
нагревать, подвергать механической обработке или зажимать между предметами.
Это может стать причиной обрыва кабеля. Использование поврежденных кабелей
может стать причиной поражения электрическим током или возгорания.
Запрещается вставлять в воздуховыпускное или воздухозаборное отверстие
•
посторонние предметы (например, тонкие стержни), так как их контакт с
вращающимся на высокой скорости вентилятором может стать причиной
ЗАПРЕЩЕНО
травмы.
– 39 –
«ОТКЛ.»
ЗАПРЕЩЕНО
ЗАПРЕЩЕНО
ЗАПРЕЩЕНО
Page 38

ВНИМАНИЕ!
УКАЗАНИЯ ПО ЭКСПЛУАТАЦИИ
Запрещается использовать такие проводники, как плавкая проволока, это
•
может стать причиной несчастных случаев.
•
«ОТКЛ.»
Запрещается оставлять аэрозольные баллончики и горючие вещества на
•
расстоянии ближе одного метра от воздуховыпускного отверстия внутреннего
или наружного блока.
Повышение давления в аэрозольном баллоне в результате нагревания горячим
воздухом может привести к взрыву.
•
Использовать агрегат допускается только в целях, указанных производителем.
НЕ КАСАЙТЕСЬ
ВЛАЖНЫМИ РУКАМИ
При работах с агрегатом с использованием горелки, следует регулярно
•
проветривать помещение во избежание кислородной недостаточности.
ЗАПРЕЩЕНО
Во время грозы отключите агрегат и отключите автоматический выключатель.
Запрещается работать с агрегатом c влажными руками: это может стать
•
причиной поражения электрическим током вплоть до смертельного исхода.
ВАЖНОЕ
ТРЕБОВАНИЕ
Не направляйте струю холодного воздуха из кондиционера на такое тепловое
•
оборудование как, электрические плиты или печи, так как это может снизить их
производительность.
ЗАПРЕЩЕНО
ЗАПРЕЩЕНО
ЗАПРЕЩЕНО
Убедитесь, что наружная опорная рама установлена надежно, прочно
•
закреплена и не имеет дефектов. Несоблюдение данного требования может
привести к травме в результате падения наружного блока.
ЗАПРЕЩЕНО
Не направляйте струю воздуха из кондиционера на растения или
•
животных, так как это отрицательно влияет на их самочувствие.
ОСТОРОЖНО!
ЗАПРЕЩЕНО
Если в помещении, в котором включен кондиционер, открыто окно или дверь
•
(относительная влажность воздуха всегда выше 80 %) и направляющая
заслонка агрегата длительное время направлена вниз или покачивается, то на
ней возможно образование конденсата, который будет капать вниз. Это может
привести к повреждению мебели. Поэтому не используйте кондиционер в таких
условиях длительное время.
ЗАПРЕЩЕНО
Чистка данного оборудования, особенно внутреннего блока, должна проводиться
•
только квалифицированным специалистом. Свяжитесь с представителем нашей
компании.
Использование растворителей или подобных им средств может повредить
пластмассовые компоненты агрегата или засорить систему отвода конденсата, что
может стать причиной поражения электрическим током в результате утечек воды.
НЕ ПРИКАСАЙТЕСЬ
ЗАПРЕЩЕНО
Запрещается мыть агрегат или устанавливать на внутренний блок емкости с
•
водой, например, вазы.
Возникающие утечки электрического тока могут стать причиной поражения
электрическим током.
ЗАПРЕЩЕНО
•
Не вставайте на наружный блок и не ставьте на него посторонние предметы.
ЗАПРЕЩЕНО
Если потребность помещения в охлаждении или обогреве выше
•
производительности агрегата (например: в помещении находится много людей,
используется нагревательное оборудование и т. д.), то обеспечить заданную
температуру невозможно.
ЗАПРЕЩЕНО
Не просовывайте руки в воздуховыпускное отверстие, не
•
прикасайтесь к днищу или алюминиевым ребрам наружного блока.
Это может стать причиной травмы.
Не прикасайтесь к трубам холодильного контура и клапанам.
•
Возможно получение ожогов.
Запрещается пользоваться данным агрегатом детям или инвалидам, если они
•
НЕ ПРИКАСАЙТЕСЬ
соответствующим образом не проинструктированы квалифицированным специалистом по
безопасной эксплуатации агрегата.
•
Не позволяйте детям играть с агрегатом.
– 40 –
Page 39

ОБОЗНАЧЕНИЕ И ФУНКЦИИ КОМПОНЕНТОВ
ВНУТРЕННИЙ БЛОК
НАРУЖНЫЙ БЛОК
Отверстие для подачи нарухного воздуха
Блок очистки воздуха (внутри)
Блок предназначен для очистки а
воздуха от табачного дыма, пыльцы
и т. д. (см. стр. 46).
Фильтр грубой очистки (внутри)
Предназначен для очистки
всасываемого воздуха от пыли
(см. стр. 63).
Через данное окно в помещение подается наружный
воздух при работе в режиме подачи наружного воздуха.
Приточно-вытяжной вентилятор (внутри)
Функционирует при работе агрегата в
приточно-вытяжном режиме.
Индикаторы внутреннего блока
Состояние агрегата отображается с помощью
светодиодных индикаторов (см. стр. 43).
ЙИКССУР
Горизонтальная/вертикальная
заслонка (на воздуховыпускном
отверстии)
(См. стр. 60).
Воздуховыпускное отверстие
При работе в режиме "обогрева" в
обслуживаемое помещение подается
холодный воздух, при работе в
режимах "охлаждения" или
"осушения" – горячий воздух.
Патрубок отвода
конденсата
Зажим защитного заземления
(Снизу на боковой стороне агрегата)
(снизу)
Приемник сигналов
Принимает сигналы от пульта дистанционного
управления.
Приточно-вытяжной воздуховод
Предназначен для транспортировки наружного
воздуха в режиме подачи наружного воздуха.
Предназначен для транспортировки внутреннего
воздуха в режиме удаления воздуха.
Пульт дистанционного управления
Пульт управления посылает на внутренний блок
управляющие сигналы. Таким образом осуществляется
управление всей сплит-системой (см. стр. 44).
Шланг для отвода конденсата
Предназначен для отвода воды из внутреннего блока
при работе в режимах «охлаждение» и «осушение».
Трубы и кабели
Воздухозаборные отверстия (сзади и слева)
Описание наружного блока:
•
После отключения внутреннего блока
вентилятор наружного блока продолжает
работать в течение 10-60 с для охлаждения
электрических компонентов.
•
При работе в режиме обогрева в наружном
блоке образуется конденсат.
Не перекрывайте патрубок отвода
конденсата наружного блока, так как
скопившаяся в этом случае вода может
замерзнуть.
•
При креплении агрегата к потолку
трубопровод отвода конденсата следует
соединить с патрубком с помощью муфты.
МОДЕЛИ И РАЗМЕРЫ
МОДЕЛЬ ШИРИНА, мм ВЫСОТА, мм ГЛУБИНА, мм
0128920974HJ41-SAR ,4HJ01-SAR
8828450574HJ41-CAR ,4HJ01-CAR
– 41 –
Page 40

ОБОЗНАЧЕНИЕ И ФУНКЦИИ КОМПОНЕНТОВ
ФИЛЬТР ПРИТОЧНОГО И ВЫТЯЖНОГО ВОЗДУХА
ПАНЕЛЬ УПРАВЛЕНИЯ ВНУТРЕННЕГО БЛОКА
Дезинфицирующий, дезодорирующий
титановый нано-фильтр наружного воздуха
Фильтр предназначен для устранения
неприятных запахов и очистки от пыли
наружного воздуха (см. стр. 47 и 61).
Фильтр грубой очистки
удаляемого воздуха
Фильтр предназначен для
очистки удаляемого воздуха
от частиц грязи и пыли
(см. стр. 61).
Фильтр грубой очистки
наружного воздуха
Фильтр предназначен для
очистки наружного воздуха от
частиц грязи и пыли
(см. стр. 47 и 61).
Датчик загрязнения
Датчик предназначен для
определения уровня
загрязнения воздуха сигаретным
дымом, взвешенными частицами
(пестицидами), парами спирта
и т. д. (см. стр. 55 и 70)
Для доступа к панели управления откройте лицевую панель.
(Порядок выполнения этой операции указан на стр. 46).
Лицевая панель
Выключатель электропитания
Переключатель приточно-вытяжного режима
Выберите одно из следующих положений переключателя: "Запрет
приточно-вытяжного режима", "Только удаление воздуха" или
"Приточно-вытяжной режим".
Схемы монтажа агрегата, при которых работа в приточно-вытяжном
режиме невозможна, указаны на стр. 69.
(На заводе-изготовителе по умолчанию переключатель устанавливается
в положение «Приточно-вытяжной» режим.)
Аварийный выключатель
Если пульт дистанционного
управления не работает (например,
из-за неисправных элементов
питания), то используйте данный
выключатель для включения и
отключения кондиционера.
После включения агрегат начнет
•
работать с предыдущими
настройками. (Агрегат включится в
автоматическом режиме
непосредственно после включения
питания.)
ОСТОРОЖНО!
Перед длительным перерывом в
эксплуатации отключите
автоматический выключатель и
выньте вилку из розетки.
При включенном автоматическом выключателе неработающий агрегат потребляет небольшое количество
электроэнергии для питания цепи управления. В целях экономии электроэнергии отключите электропитание
агрегата (или отключите автоматический выключатель, если питание подается от наружного блока).
– 42 –
Page 41

ИНДИКАТОРЫ ВНУТРЕННЕГО БЛОКА
Индикатор
самоочистки (желтый)
Индикатор горит ровным
светом при работе агрегата
в режиме самоочистки
(см. стр. 55).
Индикатор загрязненности
фильтра (зеленый)
Индикатор загорается через каждые 200
часов работы агрегата, сигнализируя о
необходимости очистить ФИЛЬТР.
Если агрегат отключен, то индикатор
гаснет при нажатии кнопки " "
(АВТОМАТИЧЕСКОЕ ПОКАЧИВАНИЕ
ЗАСЛОНКИ). Индикатор не гаснет при
работе в режиме самоочистки.
Индикатор приточно-вытяжного
режима (зеленый)
Индикатор светится при работе в
приточно-вытяжном режиме.
Индикатор работы по таймеру
(оранжевый)
Индикатор горит ровным светом при
работе кондиционера по таймеру.
Индикатор работы (желтый)
Индикатор горит ровным светом во время работы агрегата.
ИНДИКАТОР РАБОТЫ мигает при работе агрегата в
режиме обогрева в следующих случаях:
(1) В режиме предварительного нагрева
В течение 2-3 минут после включения агрегата.
(2) В режиме оттаивания
Если на теплообменнике наружного блока образуется
лед, то агрегат будет переключаться в режим
оттаивания каждый час на 5-10 минут.
ЙИКССУР
Индикатор приточно-вытяжного режима (если исправен) мигает в следующих случаях:
Переключатель приточно-вытяжного режима установлен в положение «Запрет приточно-вытяжного
режима»
• Если переключатель установлен в положение "Только удаление воздуха" и выбран режим "Подача наружного
воздуха в ночном режиме" (см. стр. 59), то при включении с помощью пульта управления режима подачи
наружного воздуха (см. стр. 54) дважды раздастся звуковой сигнал и замигает индикатор "Приточно-вытяжной
режим" (10 секунд).
• Если переключатель установлен в положение "Запрет приточно-вытяжного режима" и выбран режим "Подача
наружного воздуха в ночном режиме" (см. стр. 59) или «Автоматический приточно-вытяжной режим» (см. стр.
55), то при включении с помощью пульта управления режима подачи наружного воздуха (см. стр. 18) дважды
раздастся звуковой сигнал и замигает индикатор "Приточно-вытяжной режим" (10 секунд).
Работа в приточно-вытяжном режиме
• Отключение приточно-вытяжного режима для предотвращения образования конденсата на вентиляторе и
воздуховоде и для защиты вентилятора от воздействия перепада температур между внутренним и наружным
воздухом. В течение этого времени индикатор приточно-вытяжного режима мигает (горит ровным светом в
течение 10 с, гаснет на 1 с) (см. стр. 68).
Мигание индикатора приточно-вытяжного режима при отсутствии указанных выше условий
сигнализирует о неисправности приточно-вытяжного вентилятора (см. стр. 68).
– 43 –
Page 42

ОБОЗНАЧЕНИЕ И ФУНКЦИИ КОМПОНЕНТОВ
ПУЛЬТ ДИСТАНЦИОННОГО УПРАВЛЕНИЯ
• Пульт предназначен для управления внутренним блоком. Радиус действия пульта около 7 м. Если
освещение в помещении управляется с помощью электронного оборудования, то радиус действия
пульта может быть меньше, в некоторых случаях прием управляющих сигналов может быть невозможен.
Пульт дистанционного управления можно закрепить на стене с помощью кронштейна. Перед
креплением пульта к стене необходимо убедиться, что управление внутренним блоком возможно.
• Будьте предельно осторожны при работе с пультом. Падение пульта или попадание в него воды может
снизить мощность излучаемого сигнала.
• После замены батареек внутренний блок первое время будет реагировать на управляющие сигналы с
задержкой около 10 с.
Отверстие, через которое излучается сигнал / индикатор
передачи сигнала
При передаче управляющего сигнала данное отверстие должно
быть направлено на внутренний блок. При передаче сигнала будет
мигать соответствующий индикатор.
Дисплей
Отображает уставку температуры в помещении, текущее время,
состояние таймера, режим работы и скорость вентилятора.
Кнопка ВКЛ/ОТКЛ.
Нажмите данную кнопку для включения кондиционера. Для
отключения агрегата повторно нажмите кнопку.
Кнопка «ОБОГРЕВ»
Предназначена для включения агрегата в режиме обогрева.
Кнопка «АВТОМАТИЧЕСКИЙ РЕЖИМ»
Предназначена для включения агрегата в автоматическом режиме.
Кнопка «ОХЛАЖДЕНИЕ»
Предназначена для включения агрегата в режиме охлаждения.
Кнопки задания уставки ТЕМПЕРАТУРЫ
Предназначена для увеличения или уменьшения уставки
температуры. (Нажмите и удерживайте для быстрого изменения
значения.)
Кнопка выбора скорости ВЕНТИЛЯТОРА
Предназначена для переключения скорости вентилятора.
При нажатии данной кнопки режим работы вентилятора будет
изменяться в следующем порядке: (АВТОМАТИЧЕСКИЙ РЕЖИМ)
↔ (ВЫСОКАЯ СКОРОСТЬ) ↔ (СРЕДНЯЯ СКОРОСТЬ) ↔
(НИЗКАЯ СКОРОСТЬ) ↔ (МАЛОШУМНЫЙ РЕЖИМ). (Благодаря
данной кнопке для каждого режима работы кондиционера можно
подобрать оптимальный режим работы вентилятора.)
Кнопка «НОЧНОЙ РЕЖИМ»
Предназначена для настройки таймера ночного режима.
Кнопка «ПРИТОЧНОГО-ВЫТЯЖНОГО РЕЖИМА»
Предназначена для включения агрегата в приточно-вытяжном
режиме.
– 44 –
Page 43

Кнопка «САМООЧИСТКА»
Предназначена для настройки режима самоочистки.
Кнопка «АВТОМАТИЧЕСКИЙ ПРИТОЧНО-ВЫТЯЖНОЙ РЕЖИМ»
Предназначена для включения агрегата в автоматическом
приточно-вытяжном режиме.
Кнопка «ОЧИСТКА ВОЗДУХА»
Предназначена для включения режима очистки воздуха.
Кнопка выбора СКОРОСТИ ВЕНТИЛЯТОРА
Предназначена для переключения скорости вентилятора. При
нажатии данной кнопки режим работы вентилятора будет
изменяться в следующем порядке: (АВТОМАТИЧЕСКИЙ РЕЖИМ)
(ВЫСОКАЯ СКОРОСТЬ) (СРЕДНЯЯ СКОРОСТЬ)
(НИЗКАЯ СКОРОСТЬ) (МАЛОШУМНЫЙ РЕЖИМ).
Кнопка переключения РЕЖИМОВ РАБОТЫ
Предназначена для выбора режима работы. При нажатии данной
кнопки режим работы агрегата будет изменяться в следующем
порядке: (АВТОМАТИЧЕСКИЙ РЕЖИМ) (ОБОГРЕВ)
(ОСУШЕНИЕ) (ОХЛАЖДЕНИЕ) (ВЕНТИЛЯЦИЯ).
Кнопка вкл/откл. АВТОМАТИЧЕСКОГО ПОКАЧИВАНИЯ ЗАСЛОНКИ
Предназначена для выбора угла наклона горизонтальной
направляющей заслонки.
Кнопка ПОДАЧИ НАРУЖНОГО ВОЗДУХА В НОЧНОМ РЕЖИМЕ
Предназначена для настройки подачи наружного воздуха в
ночном режиме.
Кнопка СОХРАНЕНИЯ...
Кнопка ОТМЕНЫ...
Кнопка настройки ТАЙМЕРА...
Сохранение настроек таймера.
Отмена настроек таймера.
Предназначена для настойки таймера.
Кнопка настройки ВРЕМЕНИ...
Предназначена для установки и корректировки текущей даты и времени.
Кнопка ОТКЛЮЧЕНИЯ ПО ТАЙМЕРУ…
Предназначена для задания времени ОТКЛЮЧЕНИЯ по таймеру.
Кнопка ВКЛЮЧЕНИЯ ПО ТАЙМЕРУ…
Предназначена для задания времени ВКЛЮЧЕНИЯ по таймеру.
Кнопка «RESET» (сброс)
Нажмите после замены батареек или при обнаружении сбоев в
работе агрегата.
ЙИКССУР
АВТОМАТИЧЕСКИЙ РЕЖИМ
ОБОГРЕВ
ОСУШЕНИЕ
ОХЛАЖДЕНИЕ
ВЕНТИЛЯЦИЯ
СКОРОСТЬ ВЕНТИЛЯТОРА
МАЛОШУМНЫЙ РЕЖИМ
НИЗКАЯ
СРЕДНЯЯ
ВЫСОКАЯ
ПРИТОЧНО-ВЫТЯЖНОЙ РЕЖИМ
СКОРОСТЬ ВЕНТИЛЯТОРА В ПРИТОЧНО-ВЫТЯЖНОМ РЕЖИМЕ
УДАЛЕНИЕ ВОЗДУХА
ПОДАЧА НАРУЖНОГО ВОЗДУХА
ВЫСОКАЯ
СРЕДНЯЯ
НИЗКАЯ
ПОДАЧА НАРУЖНОГО ВОЗДУХА В НОЧНОМ РЕЖИМЕ
НОЧНОЙ РЕЖИМ
ОТКЛ. (ОТМЕНА)
ВКЛ. (СОХРАНЕНИЕ)
ВКЛ/ОТКЛ.
ВРЕМЯ
НАСТРОЙКА ТАЙМЕРА
ВЫБОР ПРОГРАММЫ ТАЙМЕРА
ВКЛЮЧЕНИЕ ПО ТАЙМЕРУ
ОТКЛЮЧЕНИЕ ПО ТАЙМЕРУ
АВТОМАТИЧЕСКОЕ ПОКАЧИВАНИЕ ЗАСЛОНКИ
САМООЧИСТКА
АВТОМАТИЧЕСКИЙ ПРИТОЧНО-ВЫТЯЖНОЙ РЕЖИМ
ОЧИСТКА ВОЗДУХА
Указания по эксплуатации
• Запрещается оставлять пульт дистанционного управления в следующих местах:
• в зоне воздействия прямых солнечных лучей;
• рядом с источниками тепла.
• Будьте предельно осторожны при работе с пультом дистанционного управления. Не роняйте его на
пол и берегите от попадания внутрь воды.
• После отключения наружного блока его перезапуск возможен только через 3 мин (данное правило
не выполняется, если отключить и заново включить выключатель электропитания или извлечь и
снова вставить вилку в розетку). Это необходимо для защиты агрегата и не является
неисправностью.
• При нажатии кнопки переключения РЕЖИМОВ РАБОТЫ во время эксплуатации кондиционера, он
может отключиться, при этом в целях обеспечения защиты перезапуск осуществится через 3 мин.
– 45 –
Page 44

УСТАНОВКА И ПРОВЕРКА ВОЗДУШНЫХ ФИЛЬТРОВ (ФИЛЬТР ГРУБОЙ ОЧИСТКИ НАРУЖНОГО ВОЗДУХА, ФИЛЬТР ГРУБОЙ
ОЧИСТКИ УДАЛЯЕМОГО ВОЗДУХА, ДЕЗИНФИЦИРУЮЩИЙ И ДЕЗОДОРИРУЮЩИЙ ТИТАНОВЫЙ НАНО-ФИЛЬТР НАРУЖНОГО ВОЗДУХА)
Устанавливать фильтр следует только после отключения агрегата с помощью пульта
дистанционного управления.
Откройте лицевую панель
1
•
Возьмите лицевую панель за края и поднимите ее вверх.
Лицевая панель
Снимите фильтры грубой очистки
2 3
•
Снимите правый и левый фильтры грубой
очистки.
2
Извлеките
1
Надавите и приподнимите
Фильтр грубой
очистки
Установите фильтр тонкой очистки в раму
4
Air Purifying Unit
Откройте раму и закрепите в ней фильтр тонкой
•
очистки ребристой стороной вверх.
Снимите раму фильтра тонкой очистки
•
Снимите раму фильтра тонкой очистки
(2 элемента), взяв ее за края и потянув
вверх и на себя.
Рама фильтра тонкой очистки
Рама фильтра тонкой очистки
Фильтр тонкой очистки
(входит в комплект
поставки)
• Срок службы данного фильтра составляет
около двух лет. Мыть фильтр запрещается.
Фильтр является одноразовым.
• Марка фильтра тонкой очистки: SPX-CFH15.
Установите раму фильтра тонкой
5
очистки на место
Рама фильтра тонкой очистки
1
Вставьте
– 46 –
Установите фильтры грубой очистки
6
•
Фильтр грубой очистки должен быть
установлен так, чтобы маркировка "FRONT"
была на лицевой стороне. (Правый и левый
фильтры имеют разную форму).
Фильтр грубой очистки
1
2
Вставьте
Page 45

ФИЛЬТРЫ СИСТЕМЫ ВОЗДУХООБМЕНА (ФИЛЬТР ГРУБОЙ ОЧИСТКИ ПРИТОЧНОГО
И ВЫТЯЖНОГО ВОЗДУХА, ТИТАНОВЫЙ НАНО-ФИЛЬТР ПРИТОЧНОГО ВОЗДУХА)
Снимите фильтр грубой очистки
7 8
наружного воздуха
• Извлеките фильтр.
Установите дезинфицирующий и
9
10
дезодорирующий титановый
нано-фильтр наружного воздуха
Дезинфицирующий и дезодорирующий
титановый нано-фильтр наружного воздуха
(входит в комплект поставки)
Снимите дезинфицирующий и
дезодорирующий титановый
нано-фильтр наружного воздуха
• Извлеките
дезинфицирующий
и дезодорирующий
титановый
нано-фильтр
наружного воздуха,
взявшись за ручку
на его корпусе.
ЙИКССУР
Установите дезинфицирующий и
дезодорирующий титановый
нано-фильтр наружного воздуха в его
корпус
• Возьмите фильтр за
ручку на корпусе и
вставьте его в
соответствующее
отверстие агрегата.
Надавите на фильтр
до щелчка.
• Неправильно
установленный
фильтр может стать
причиной
посторонних шумов.
Установите фильтр грубой очистки
наружного воздуха
• Возьмите фильтр за ручку и вставьте его в
соответствующий паз агрегата.
Паз
1211
Закройте лицевую панель
• Возьмите панель двумя руками и установите
ее на место, надавливая вперед и вниз.
Лицевая панель
• Продолжайте надавливать на панель в
направлении, показанном стрелками (3
стрелки на рисунке) до тех пор, пока не
услышите щелчок.
ОСТОРОЖНО!
• Если лицевая панель не зафиксирована, она может открыться и упасть.
• Открывая лицевую панель, не следует прикладывать чрезмерную силу.
Отсутствие лицевой панели может стать причиной неисправности агрегата.
• Запрещается эксплуатировать агрегат без фильтров грубой очистки. Попадание
пыли внутрь может стать причиной неисправности агрегата.
• Будьте осторожны при снятии и установке фильтров грубой очистки, не
порежьтесь об ребра теплообменника!
– 47 –
Page 46

РЕЖИМЫ РАБОТЫ
АВТОМАТИЧЕСКИЙ ПУСК
• После исчезновения и последующего восстановления напряжения питания кондиционер включится
автоматически в том же режиме и с тем же направлением потока воздуха, которые были до
исчезновения напряжения питания. (Если агрегат не будет отключен с помощью пульта
управления.)
• Если потребность в работе кондиционера после восстановления питания отсутствует, то отключите
электропитание. При включении автоматического выключателя агрегат автоматически включится в
том же режиме и с тем же направлением потока воздуха, которые были при отключении.
Примечание:
1. Если функцию автоматического пуска необходимо отключить, обратитесь к
представителю нашей компании.
2. Функция автоматического пуска отключается, если управление агрегатом
осуществляется по таймеру.
АВТОМАТИЧЕСКИЙ РЕЖИМ
Режим работы агрегата (ОБОГРЕВ или ОХЛАЖДЕНИЕ) выбирается автоматически, в зависимости от
температуры в помещении. При изменении температуры в помещении меняется режим работы агрегата.
Непосредственное включение режима
1
ОТКЛ.
Нажмите кнопку (АВТОМАТИЧЕСКИЙ РЕЖИМ). Раздастся звуковой
сигнал, агрегат включится в АВТОМАТИЧЕСКОМ РЕЖИМЕ с
настройками, которые были при отключении.
Нажмите кнопку (ВКЛ/ОТКЛ.)
– 48 –
Page 47

Настройка параметров режима
Нажимайте кнопку переключения РЕЖИМОВ РАБОТЫ до тех пор, пока на
дисплее не появится символ (АВТОМАТИЧЕСКИЙ РЕЖИМ).
• В АВТОМАТИЧЕСКОМ РЕЖИМЕ работы агрегат переключается в
режим ОХЛАЖДЕНИЯ или ОБОГРЕВА в зависимости от текущей
температуры в помещении.
• При первом включении в АВТОМАТИЧЕСКОМ РЕЖИМЕ агрегат
определит текущую температуру в помещении и переключится в
соответствующий режим работы.
1
• Как только температура в помещении достигнет уставки, кондиционер
переключится в режим ожидания. Если температура в помещении
изменится, кондиционер переключится в соответствующий режим
работы (охлаждение или обогрев), чтобы вновь обеспечить
соответствие температуры в помещении уставке. Зона
нечувствительности при работе в режиме ожидания составляет ± 3 °C.
• При автоматическом переключении в режим, не соответствующий
потребности, переключите режим работы кондиционера вручную
(обогрев, осушение, охлаждение или вентиляция).
ЙИКССУР
ВКЛ.
ОТКЛ.
С помощью кнопки (СКОРОСТЬ ВЕНТИЛЯТОРА) выберите НИЗКУЮ
СКОРОСТЬ вентилятора или АВТОМАТИЧЕСКИЙ или МАЛОШУМНЫЙ режим работы.
Нажмите кнопку
Включение кондиционера будет сопровождаться звуковым сигналом.
Для отключения режима нажмите кнопку еще раз.
Настройки кондиционера автоматически сохраняются в памяти пульта
дистанционного управления, поэтому в следующий раз достаточно просто
включить кондиционер кнопкой (ВКЛ/ОТКЛ.).
Уставку температуры можно скорректировать в пределах ±3 °C.
При нажатии кнопки настройки ТЕМПЕРАТУРЫ
температура изменится на 1°C.
• Уставка и текущая температура в помещении могут изменяться в
зависимости от окружающих условий.
(ВКЛ/ОТКЛ.) .
– 49 –
Page 48

РЕЖИМ ОБОГРЕВА
ОТТАИВАНИЕ
• Кондиционер используется для обогрева помещения, если температура наружного воздуха опускается
ниже 21 °С. Работа в режиме обогрева при температуре наружного воздуха выше 21 °C невозможна
(функция защиты агрегата).
• Для обеспечения надежности не рекомендуется использовать кондиционер при температуре наружного
воздуха ниже минус 15 °С.
Непосредственное включение режима
Нажмите кнопку (ОБОГРЕВ). Раздастся звуковой сигнал, агрегат
1
включится в режиме ОБОГРЕВА с настройками, которые были при отключении.
ОТКЛ.
Нажмите кнопку (ВКЛ/ОТКЛ.).
Настройка параметров режима
Нажимайте кнопку переключения РЕЖИМОВ РАБОТЫ до тех пор, пока
1
2
на дисплее не появится символ (ОБОГРЕВ).
Задайте СКОРОСТЬ ВЕНТИЛЯТОРА кнопкой (СКОРОСТЬ
ВЕНТИЛЯТОРА) (на дисплее высветится соответствующий индикатор).
(АВТОМАТИЧЕСКИЙ РЕЖИМ) : СКОРОСТЬ ВЕНТИЛЯТОРА изменяется
(ВЫСОКАЯ СКОРОСТЬ) : Экономичное решение при необходимости
(СРЕДНЯЯ СКОРОСТЬ) : Пониженный уровень шума.
(НИЗКАЯ СКОРОСТЬ) : Низкий уровень шума.
(МАЛОШУМНЫЙ РЕЖИМ) : Очень низкий уровень шума.
автоматически в зависимости от температуры
подаваемого в помещение воздуха.
быстрого обогрева помещения. Первое время
после включение возможно ощущение холода.
Задайте уставку кнопками настройки ТЕМПЕРАТУРЫ (уставка высветится на
дисплее).
3
ВКЛ.
ОТКЛ.
Если на теплообменнике наружного блока образуется лед, то агрегат будет переключаться в режим
оттаивания каждый час на 5-10 минут.
Во время режима оттаивания индикатор работы мигает в следующем режиме: 3 с светится, 0,5 с
отключен. Максимальная длительность режима оттаивания составляет 20 мин. (Если длина
использованных труб превышает стандартную, то на них возможно образование льда.)
Уставка и текущая температура в помещении могут изменяться в зависимости от
окружающих условий.
Нажмите кнопку (ВКЛ/ОТКЛ.).
Включение кондиционера в режиме обогрева будет сопровождаться
звуковым сигналом.
Для отключения режима нажмите кнопку еще раз.
Настройки кондиционера автоматически сохраняются в памяти пульта
дистанционного управления, поэтому в следующий раз достаточно просто
включить кондиционер кнопкой (ВКЛ/ОТКЛ.).
– 50 –
Page 49

РЕЖИМ ОСУШЕНИЯ
ОСУШЕНИЕ
Если температура в помещении выше 16 °С, то кондиционер можно использовать для осушения. При
температуре ниже 15 °C работа в режиме осушения невозможна.
Нажимайте кнопку переключения РЕЖИМОВ РАБОТЫ до тех пор, пока
на дисплее не появится символ (ОСУШЕНИЕ).
1
С помощью кнопки (СКОРОСТЬ ВЕНТИЛЯТОРА) выберите НИЗКУЮ
СКОРОСТЬ или МАЛОШУМНЫЙ режим работы вентилятора.
ВКЛ.
ОТКЛ.
• Кондиционер начнет осушать воздух, когда температура в помещении немного превысит уставку.
(Однако, если задана уставка 16 °C, то осушение начнется при 16 °C). Если температура в помещении
станет ниже уставки, то осушение приостановится. Если температура в помещении станет выше
уставки, то осушение возобновится.
• В зависимости от количества людей в помещении температура в помещении может достичь или не
достичь уставки.
Нажмите кнопку (ВКЛ/ОТКЛ.).
Для изменения режима работы нажмите кнопку переключения
РЕЖИМОВ РАБОТЫ.
В данном режиме возможно изменение уставки температуры.
Данный режим также можно включить с помощь кнопки переключения
РЕЖИМОВ РАБОТЫ.
ЙИКССУР
– 51 –
Page 50

РЕЖИМ ОХЛАЖДЕНИЯ
Кондиционер используется для охлаждения помещения, если температура наружного воздуха
находится в диапазоне от -10 до +42 °С.
При высокой влажности воздуха в помещении (выше 80 %) на воздуховыпускной решетке внутреннего
блока может образоваться конденсат.
Непосредственное включение режима
Нажмите кнопку (ОХЛАЖДЕНИЕ). Раздастся звуковой сигнал, агрегат
1
включится в режиме ОХЛАЖДЕНИЯ с настройками, которые были при
отключении.
ОТКЛ.
Нажмите кнопку (ВКЛ/ОТКЛ.).
Настройка параметров режима
Нажимайте кнопку переключения РЕЖИМОВ РАБОТЫ до тех пор, пока на
1
2
дисплее не появится символ (ОХЛАЖДЕНИЕ).
Задайте СКОРОСТЬ ВЕНТИЛЯТОРА кнопкой (СКОРОСТЬ
ВЕНТИЛЯТОРА) (на дисплее высветится соответствующий индикатор).
(АВТОМАТИЧЕСКИЙ РЕЖИМ) : Вентилятор будет работать на ВЫСОКОЙ СКОРОСТИ до тех
(ВЫСОКАЯ СКОРОСТЬ) : Экономичное решение при необходимости быстрого
(СРЕДНЯЯ СКОРОСТЬ) : Пониженный уровень шума.
(НИЗКАЯ СКОРОСТЬ) : Низкий уровень шума.
(МАЛОШУМНЫЙ РЕЖИМ) : Очень низкий уровень шума.
пор, пока температура в помещении не достигнет уставки,
после этого он автоматически переключится на СРЕДНЮЮ
СКОРОСТЬ.
охлаждения помещения.
Задайте уставку кнопками настройки ТЕМПЕРАТУРЫ (уставка
высветится на дисплее).
3
ВКЛ.
ОТКЛ.
Уставка и текущая температура в помещении могут изменяться в
зависимости от окружающих условий.
Нажмите кнопку (ВКЛ/ОТКЛ.). Включение кондиционера в режиме
охлаждения будет сопровождаться звуковым сигналом. Для отключения
режима нажмите кнопку еще раз. Кондиционер не будет работать в
режиме охлаждения, если температура в помещении ниже уставки (даже
если светится индикатор работы ).
Кондиционер включится в режиме охлаждения, как только температура в
помещении превысит уставку.
Настройки кондиционера автоматически сохраняются в памяти пульта
дистанционного управления, поэтому в следующий раз достаточно просто
включить кондиционер кнопкой (ВКЛ/ОТКЛ.).
– 52 –
Page 51

ФУНКЦИЯ ОЧИСТКИ ВОЗДУХА (УПРАВЛЕНИЕ ВЕНТИЛЯТОРОМ)
Функция очистки воздуха активируется кнопкой (ОЧИСТКА ВОЗДУХА).
• При получении управляющего сигнала раздастся звуковой сигнал и
включается функция очистки воздуха.
• На панели управления внутреннего блока включится индикатор
РАБОТЫ.
• Возможен выбор следующих режимов работы вентилятора: высокая,
1
ВКЛ.
ОТКЛ.
средняя и низкая скорости или малошумный режим.
Чем выше скорость вентилятора при работе кондиционера в режиме
ОБОГРЕВА, ОХЛАЖДЕНИЯ или ОСУШЕНИЯ, тем выше эффективность
очистки воздуха (включается кнопкой (ОЧИСТКА ВОЗДУХА).
(В зависимости от условий эксплуатации, возможны ситуации, когда
увеличение скорости вентилятора невозможно.)
Нажмите кнопку (ВКЛ/ОТКЛ.), чтобы отключить агрегат.
Еще раз нажмите кнопку (ОЧИСТКА ВОЗДУХА), чтобы отключить
функцию очистки воздуха.
(При работе агрегата в режиме ОБОГРЕВА, ОХЛАЖДЕНИЯ или ОСУШЕНИЯ.)
РЕЖИМ ВЕНТИЛЯЦИИ
ЙИКССУР
Кондиционер можно использовать в качестве вентилятора. Данный режим используется для просушивания
внутренних компонентов внутреннего блока по завершении сезона работы в режиме охлаждения.
Нажимайте кнопку переключения РЕЖИМОВ РАБОТЫ до тех пор, пока
1
2
ВКЛ.
ОТКЛ.
СКОРОСТЬ ВЕНТИЛЯТОРА В АВТОМАТИЧЕСКОМ РЕЖИМЕ
на дисплее не появится символ (ВЕНТИЛЯЦИЯ).
Нажмите кнопку (СКОРОСТЬ ВЕНТИЛЯТОРА).
(ВЫСОКАЯ СКОРОСТЬ) : Сильный поток воздуха.
(СРЕДНЯЯ СКОРОСТЬ) : Пониженный уровень шума.
(НИЗКАЯ СКОРОСТЬ) : Низкий уровень шума.
(МАЛОШУМНЫЙ РЕЖИМ) : Очень низкий уровень шума.
Нажмите кнопку (ВКЛ/ОТКЛ.).
Включение кондиционера в режиме «вентиляция» будет
сопровождаться звуковым сигналом.
Для отключения режима нажмите кнопку еще раз.
Работа вентилятора в
АВТОМАТИЧЕСКОМ РЕЖИМЕ при работе
кондиционера в режиме охлаждения или
обогрева означает следующее:
Режим обогрева
Режим охлаждения
• Скорость вентилятора изменяется автоматически в зависимости от
температуры подаваемого в помещение воздуха.
• После того, как температура воздуха в помещении достигнет уставки,
вентилятор переключится в малошумный режим.
• Для быстрого достижения уставки вентилятор включится на ВЫСОКОЙ
скорости.
• После того, как температура в помещении достигнет уставки, скорость
вентилятора изменится на НИЗКУЮ.
– 53 –
Page 52

ПРИТОЧНО-ВЫТЯЖНОЙ РЕЖИМ
(Описание работы агрегата в данном режиме приведено на стр. 68)
• Подача наружного воздуха в помещение и удаление воздуха из помещения осуществляется
приточно-вытяжным вентилятором.
• Подача наружного воздуха и удаление воздуха из помещения осуществляется поочередно, параметры
приточно-вытяжного режима настраиваются во время работы кондиционера.
• Одновременно подавать наружный воздух и удалять воздух из помещения невозможно.
Нажмите кнопку .
• При получении управляющего сигнала
раздастся звуковой сигнал и включится
приточно-вытяжной режим. При нажатии кнопки
показания дисплея будут меняться в
последовательности, приведенной на рисунке
справа.
• На панели управления внутреннего блока
включатся индикаторы РАБОТЫ и
приточно-вытяжного режима.
• Несмотря на то, что подаваемый в помещение
наружный воздух очищается
1
дезинфицирующим и дезодорирующим
титановым нано-фильтром, возможно
присутствие определенных запахов. Это
зависит от состояния окружающей среды, При
возникновении посторонних запахов следует
отключить агрегат.
• Во избежание образования конденсата на
приточно-вытяжном вентиляторе и в
воздуховоде, а также засорения воздуховода
пылью следует включать режим удаления
воздуха не реже, чем через каждые 2 часа
работы в режиме подачи наружного воздуха.
• Для осушения воздуховода рекомендуется
периодически включать режим самоочистки
(см. стр. 66).
Отключение
(останов)
Нажмите кнопку (ВКЛ/ОТКЛ.).
ОТКЛ.
Нажимайте кнопку на пульте дистанционного управления до тех пор,
пока приточно-вытяжной режим не отключится. (При работе агрегата в
режиме ОБОГРЕВА, ОХЛАЖДЕНИЯ или ОСУШЕНИЯ.)
ВНИМАНИЕ!
• Если кондиционер, работающий в приточно-вытяжном режиме, неудовлетворительно обслуживает
закрытое помещение или используется совместно с обогревателями, то следует как можно чаще
открывать окно для проветривания или установить рециркуляционный вентилятор.
• Недостаточная вентиляция может стать причиной удушения в результате недостатка кислорода в
помещении.
• Запрещается подавать в помещение наружный воздух, если внутренний воздух имеет
ВЫСОКУЮ (более 70 %) влажность.
• Образование конденсата может стать причиной неисправности кондиционера.
– 54 –
Page 53

РЕЖИМ САМООЧИСТКИ
(Описание работы агрегата в данном режиме приведено на стр. 70)
• После работы в режиме охлаждения или осушения агрегат автоматически переключается в режим
самоочистки во избежание образования плесени. (Работа в данном режиме не устраняет плесень
полностью и не оказывает бактерицидного эффекта.)
• После работы агрегата в режиме подачи наружного воздуха (см. стр. 54) рекомендуется выполнять
самоочистку, поскольку при этом происходит осушение приточно-вытяжного вентилятора и воздуховода.
Нажмите кнопку (САМООЧИСТКА).
• При получении управляющего сигнала раздастся звуковой сигнал и на
дисплее пульта дистанционного управления появится символ
(САМООЧИСТКА).
• На панели внутреннего блока включится индикатор режима
САМООЧИСТКИ.
1
ОТМЕНА
• Агрегат будет работать в данном режиме около часа, затем
автоматически отключится.
• При работе в режиме самоочистки на панели внутреннего блока будет
светиться индикатор РАБОТЫ, а индикатор САМООЧИСТКИ будет
мигать. (При осушении приточно-вытяжного вентилятора и воздуховода
также будет гореть индикатор ПРИТОЧНО-ВЫТЯЖНОГО режима.)
• После непродолжительной работы (менее 1 часа) в режиме охлаждения
или осушения выполнять самоочистку не требуется.
Для отключения режима еще раз нажмите кнопку (САМООЧИСТКА).
• Символ (САМООЧИСТКА) на дисплее пульта дистанционного
управления погаснет.
•
Индикатор режима САМООЧИСТКИ на панели внутреннего блока отключится.
ЙИКССУР
АВТОМАТИЧЕСКИЙ ПРИТОЧНО-ВЫТЯЖНОЙ РЕЖИМ
(Описание работы агрегата в данном режиме приведено на стр. 70)
•
Управление работой агрегата в автоматическом приточно-вытяжном режиме осуществляется по показаниям
датчика загрязнения, контролирующего чистоту воздуха в помещении. Если воздух в помещении загрязнен, то
автоматически включается вентилятор и кондиционер начинает работать в режиме удаления воздуха. Как
только воздух в помещении очистится, кондиционер вернется в режим подачи наружного воздуха.
• Если переключатель приточно-вытяжного режима (см. стр. 42) установлен в положение «Запрет
приточно-вытяжного режима», то работа в автоматическом приточно-вытяжном режиме невозможна. В
этом случае на пульте дистанционного управления будет работать только кнопка .
• При ручном выборе режима подачи наружного воздуха или удаления воздуха из помещения с помощью
кнопки настройки автоматического приточно-вытяжного режима будут игнорироваться.
Нажмите кнопку .
• При получении управляющего сигнала раздастся звуковой сигнал и на
1
ОТМЕНА
дисплее пульта дистанционного управления загорится символ .
• На панели внутреннего блока включится индикатор
ПРИТОЧНО-ВЫТЯЖНОГО режима.
Для отключения режима повторно раз нажмите кнопку .
• Символ на дисплее пульта дистанционного управления
исчезнет.
• Индикатор ПРИТОЧНО-ВЫТЯЖНОГО режима на панели
внутреннего блока погаснет.
ОСТОРОЖНО!
• При определенных условиях, даже если воздух в помещении загрязнен и агрегат работает в
автоматическом приточно-вытяжном режиме, режим удаления воздуха может не включаться.
В этом случае следует вручную включить режим удаления воздуха с помощью кнопки
(приточно-вытяжной режим) или отрыть окно для проветривания помещения.
– 55 –
Page 54

НАСТРОЙКА ТАЙМЕРА
СОХРАНЕНИЕ
Время
После замены элементов питания:
ОТКЛЮЧЕНИЕ по таймеру
Вкл.
Откл.
Установите текущее время с
1
помощью кнопки настройки ТАЙМЕРА.
Пример: текущее время 13:30.
Нажмите кнопку
1
(ОТКЛЮЧЕНИЕ ПО ТАЙМЕРУ).
На дисплее замигает индикатор
(ОТКЛ.).
ОТМЕНА
ВРЕМЯ
(текущее время)
ВКЛЮЧЕНИЕ ПО ТАЙМЕРУ
ОТКЛЮЧЕНИЕ ПО ТАЙМЕРУ
Установите время отключения
кондиционера.
ВКЛЮЧЕНИЕ по таймеру
Откл.
Установите время включения
по таймеру.
ВКЛЮЧЕНИЕ/ОТКЛЮЧЕНИЕ по таймеру
Вкл.
• Включение и отключение
кондиционера
произойдет в
установленное время.
• Действие, время
которого ближе,
осуществится первым.
• Последовательность
действий обозначена на
дисплее стрелкой.
Откл.
Нажмите кнопку
1
(ОТКЛ. ПО ТАЙМЕРУ), на
дисплее начнет мигать
индикатор (ОТКЛ.).
1
Нажмите кнопку
(ВКЛЮЧЕНИЕ ПО ТАЙМЕРУ).
На дисплее начнет мигать
Вкл.
Установите время
23
отключения с помощью
кнопки настройки
ТАЙМЕРА. Нажмите
кнопку
(СОХРАНЕНИЕ).
индикатор (ВКЛ.).
Нажмите кнопку (ВКЛ.
ПО ТАЙМЕРУ), при этом
индикатор (ОТКЛ.) будет
гореть ровным светом, а
индикатор (ВКЛ.) будет
мигать.
Отмена настроек таймера
Направьте пульт дистанционного управления на внутренний блок и нажмите кнопку (ОТМЕНА).
Индикатор (СОХРАНЕНИЕ) погаснет со звуковым сигналом, также погаснет индикатор работы таймера
(ТАЙМЕР) на внутреннем блоке.
ПРИМЕЧАНИЕ
Можно задать только одно время
ВКЛЮЧЕНИЯ и одно время
ОТКЛЮЧЕНИЯ по таймеру.
– 56 –
Page 55

Нажмите кнопку (ВРЕМЯ). Цифры, показывающие время, перестанут мигать.
2
t ʌʞʪʦʱ, обозначающие время, автоматически
исчезнут через 10 с.
t ɺʡʵ проверки текущего времени дважды нажмите
кнопку (ВРЕМЯ). Теперь настройка времени
завершена.
Установите время
23
отключения с помощью
кнопки настройки
ТАЙМЕРА.
Установите время
включения с помощью
кнопки настройки
ТАЙМЕРА.
Установите время
45
включения с помощью
кнопки настройки
ТАЙМЕРА.
Направьте пульт дистанционного управления на внутренний блок и
нажмите кнопку (СОХРАНЕНИЕ).
Индикатор (ОТКЛ.) перестанет мигать и начнет гореть ровным светом,
загорится индикатор (СОХРАНЕНИЕ). На внутреннем блоке со звуковым
сигналом высветится индикатор (ТАЙМЕР).
Направьте пульт дистанционного управления на внутренний блок и
32
нажмите кнопку (СОХРАНЕНИЕ).
Индикатор (ВКЛ.) перестанет мигать и будет гореть ровным светом, загорится
индикатор (СОХРАНЕНИЕ). На внутреннем блоке со звуковым сигналом
высветится индикатор (ТАЙМЕР).
Направьте пульт дистанционного управления на внутренний блок и
нажмите кнопку (СОХРАНЕНИЕ).
Индикатор (ОТКЛ.) перестанет мигать и начнет гореть ровным светом,
загорится индикатор (СОХРАНЕНИЕ). На внутреннем блоке со звуковым
сигналом высветится индикатор (ТАЙМЕР).
ЙИКССУР
Пример:
кондиционер отключится в 23:00.
Теперь настройка времени отключения по таймеру
завершена.
Пример:
Агрегат включится раньше, чтобы к 7:00 обеспечить
температуру воздуха, соответствующую уставке.
Теперь настройка времени включения по таймеру
завершена.
Пример:
При работе в режиме обогрева агрегат отключится в
22:30 и включится раньше, чтобы к 7:00 обеспечить
температуру воздуха, соответствующую уставке. При
работе в режиме охлаждения или осушения, агрегат
включится ровно в 7:00. Теперь настройка времени
включения/отключения по таймеру завершена.
t ʂʤʜʣʤʝʖʚʖʨʲʨʦʞʦʛʜʞʢʖʦʖʗʤʨʱʥʤʨʖʟʢʛʦʩʤʨʠʡʴʭʛʣʞʛʥʤʨʖʟʢʛʦʩʘʠʡʴʭʛʣʞʛʥʤʨʖʟʢʛʦʩʞ
включение/отключение по таймеру. Перед настройкой таймера необходимо установить текущее время, так как
относительно него отсчитывается время по таймеру.
t ʃʖʧʨʦʤʟʠʞʘʦʛʢʛʣʞʖʘʨʤʢʖʨʞʭʛʧʠʞʧʤʫʦʖʣʵʴʨʧʵʘʥʖʢʵʨʞʥʩʡʲʨʖʚʞʧʨʖʣʬʞʤʣʣʤʙʤʩʥʦʖʘʡʛʣʞʵʥʤʳʨʤʢʩʘʧʡʛʚʩʴʯʞʟ
раз достаточно нажать кнопку (СОХРАНЕНИЕ), чтобы установить те же настройки таймера.
– 57 –
Page 56

НАСТРОЙКА ТАЙМЕРА НОЧНОГО РЕЖИМА
• Параметр «отключение по таймеру», используемый в таймере ночного режима, предназначен для отключения
вентилятора кондиционера, работающего в режиме охлаждения, через заданное время после выбора скорости
вентилятора.
• Параметр «отключение по таймеру», используемый в таймере ночного режима, предназначен для отключения
режима подачи наружного воздуха, режима удаления воздуха и режима очистки воздуха через заданное время.
• Выберите время отключения по таймеру ночного режима (через 1 ч, 2 ч, 3
ч или 7 ч с контролем температуры) кнопкой (НОЧНОЙ РЕЖИМ).
• При включении ночного режима (7 ч с контролем температуры) режимы
охлаждения и осушения отключаются через три часа, в течение
следующих четырех часов осуществляется контроль температуры
воздуха в помещении.
1
2
В течение периода контроля температуры агрегат будет периодически
включаться и отключаться (функция продления работы таймера на 1 ч),
чтобы поддерживать заданные параметры воздуха в помещении.
• При включении ночного режима (7 ч с контролем температуры) режим
обогрева отключается через три часа, в течение следующих четырех
часов осуществляется контроль температуры воздуха в помещении. Если
температура опускается на 4-5 °C ниже уставки, то кондиционер вновь
включается и работает до тех пор, пока температура не достигнет уставки.
• При нажатии кнопки (НОЧНОЙ РЕЖИМ) показания дисплея будут
меняться следующим образом:
1 hr.
(отключение
через 1 ч)
• При получении управляющего сигнала раздастся звуковой сигнал и включится
таймер ночного режима. На дисплее пульта дистанционного управления
загорится значок таймера ночного режима и будет отображаться время
отключения.
• При включении таймера ночного режима на панели внутреннего блока
включится индикатор работы по таймеру.
• Вентилятор начнет работать в малошумном режиме.
• С помощью таймера ночного режима можно выбрать следующее время работы
в режимах подачи наружного воздуха, удаления воздуха и режима очистки
воздуха: 1, 2, 3 и 7 ч.
2 hr.
(отключение
через 2 ч)
Отключение таймера
3 hr.
(отключение
через 3 ч)
ночного режима
Sleep (7 ч с
контролем температуры)
Таймер
ночного
режима
Задайте время ВКЛЮЧЕНИЯ по таймеру.
1
Нажмите кнопку (НОЧНОЙ РЕЖИМ) и настройте таймер ночного режима.
2
Вкл.
Кондиционер будет отключаться по таймеру ночного
режима и включаться по сигналу «ВКЛЮЧЕНИЕ по
таймеру».
Пример:
Режим обогрева:
Агрегат отключится через 2 ч (в 1:38) и
включится раньше заданного времени,
чтобы к 6:00 обеспечить температуру
воздуха, равную уставке.
Отмена настроек таймера
Направьте пульт дистанционного управления на внутренний блок и нажмите кнопку (ОТМЕНА).
Индикатор (СОХРАНЕНИЕ) погаснет со звуковым сигналом, также погаснет индикатор работы таймера
(ТАЙМЕР) на внутреннем блоке.
ПРИМЕЧАНИЕ
Если таймер ночного режима настраивается при уже заданных параметрах «отключение по
таймеру» или «включение/отключение по таймеру», то агрегат будет работать по таймеру
ночного режима, настройки прочих таймеров будут игнорироваться.
– 58 –
Page 57

Функция продления работы таймера на 1 ч
• Для режимов охлаждения и осушения: если по истечении 1, 2 или 3 ч, заданных по таймеру ночного
режима, температура воздуха в помещении не достигает заданного значения, то данная функция
автоматически продлевает время работы по таймеру на 1 ч (максимальное время контроля
температуры составляет 4 ч после истечения времени, заданного по таймеру). В течение этого
периода кондиционер будет автоматически включаться и отключаться.
Охлаждение, осушение
• Если по истечении 1, 2 или 3 ч, заданных по таймеру ночного режима, осуществляется
контроль температуры в помещении, то на панели внутреннего блока будет гореть
индикатор работы по таймеру, а на пульте дистанционного управления будут отображаться
символы и .
Если температура превысила уставку на 2 °C, то агрегат будет
работать в течение еще 1 ч.
ПОДАЧА НАРУЖНОГО ВОЗДУХА В ПОМЕЩЕНИЕ В НОЧНОМ РЕЖИМЕ
Если активирована функция «Подачи наружного воздуха в ночном режиме» и кондиционер работает в
режиме охлаждения или осушения, то во время работы по таймеру ночного режима (см. стр. 58) в
помещение также будет подаваться наружный воздух. (Данная функция не предназначена для режима
обогрева.)
Нажмите кнопку .
• При получении управляющего сигнала раздастся звуковой сигнал и на
дисплее пульта дистанционного управления появится символ .
• Если функция подачи наружного воздуха в ночном режиме
активирована и настроена при отключенном кондиционере, то
наружный воздух подаваться не будет. Если во время работы по
таймеру ночного режима кондиционер работает в режиме охлаждения
или осушения, то подача наружного воздуха будет осуществляться
1
автоматически.
• При подаче наружного воздуха на панели управления внутреннего
блока будет гореть индикатор ПРИТОЧНО-ВЫТЯЖНОГО режима.
• Если по истечении времени работы по таймеру ночного режима
активируется функция продления работы таймера на 1 ч (см. стр. 59),
то температура воздуха в помещении и температура наружного
воздуха будут контролироваться. Подача наружного воздуха будет
осуществляться только в том случае, если его температура ниже
температуры воздуха в помещении.
ЙИКССУР
ОТМЕНА
Для отключения режима повторно раз нажмите кнопку .
• Символ на дисплее пульта дистанционного управления погаснет.
– 59 –
Page 58

РЕГУЛИРОВАНИЕ ЗАСЛОНКИ
Изменение направления подачи обработанного воздуха по вертикали.
1
Горизонтальная заслонка автоматически устанавливается в
положение, оптимально подходящее для каждого режима работы
кондиционера. Переключение заслонки в режим покачивания или
задание угла наклона осуществляется кнопкой
(ПОКАЧИВАНИЕ ЗАСЛОНКИ).
• Однократное нажатие кнопки (ПОКАЧИВАНИЕ
ЗАСЛОНКИ) переключит горизонтальную заслонку в
режим покачивания. При повторном нажатии данной
кнопки заслонка остановится в положении, в котором
она находилась в момент нажатия. До момента начала
движения заслонки может пройти несколько секунд
(около 6 с).
• Рекомендуемые диапазоны изменения положения
заслонки приведены на рисунках справа.
• При отключении кондиционера горизонтальная
заслонка перемещается в положение, при котором
воздуховыпускное отверстие закрывается.
ОСТОРОЖНО!
• При работе кондиционера в режиме охлаждения не
рекомендуется активировать режим покачивания
заслонки на длительное время. На горизонтальной
заслонке может образоваться конденсат, который
будет стекать вниз.
Режим охлаждения
и осушения
Настройка по вертикали
около 15°
около 65°
Режим обогрева
Настройка по вертикали
около 40°
около 40°
Изменение направления подачи обработанного воздуха по горизонтали.
2
Возьмитесь за вертикальную заслонку, как указано на рисунке, и установите ее в требуемое положение.
Правая сторона: Возьмитесь за третье справа
лопатку вертикальной заслонки и установите
ее в требуемое положение. На участок лопатки,
Левая сторона: Возьмитесь за третью слева
лопатку вертикальной заслонки и установите
ее в требуемое положение. На участок лопатки,
за который следует браться, нанесена маркировка.
за который следует браться, нанесена маркировка.
– 60 –
Page 59

ТЕХНИЧЕСКОЕ ОБСЛУЖИВАНИЕ
Рекомендуется регулярно тщательно очищать воздушные фильтры (фильтр грубой очистки
наружного воздуха, фильтр грубой очистки удаляемого воздуха, дезинфицирующий и
дезодорирующий титановый нано-фильтр наружного воздуха).
Интервал чистки фильтров зависит от параметров окружающей среды и условий эксплуатации.
Регулярно проверяйте степень загрязнения фильтров и очищайте их при необходимости. При
частом использовании режима подачи наружного воздуха в помещение рекомендуется проверять и,
при необходимости, очищать фильтры каждые 2 недели.
В фильтр грубой очистки наружного воздуха иногда могут попадать мелкие насекомые. В этом
случае, фильтр грубой очистки наружного воздуха следует промыть водой.
Откройте лицевую панель
1
• Возьмите лицевую панель за края и поднимите ее вверх.
Лицевая панель
ЙИКССУР
Снимите фильтр грубой очистки
2 3
наружного воздуха
• Потяните на себя.
Снимите фильтр грубой очистки удаляемого воздуха
4
• Извлеките фильтр, взявшись за
ручку 1 и потянув вниз 2.
Снимите дезинфицирующий и
дезодорирующий титановый
нано-фильтр наружного воздуха
• Извлеките дезинфицирующий и
Проверьте степень загрязнения
5
фильтров
дезодорирующий титановый нано-фильтр
наружного воздуха, взявшись за ручку на
его корпусе и потянув на себя.
Фильтр грубой
очистки
удаляемого
воздуха
Ручка
1
2
– 61 –
• Если фильтры не загрязнены, перейдите к
пункту
7
.
Page 60

ТЕХНИЧЕСКОЕ ОБСЛУЖИВАНИЕ
Промойте водой все фильтры
6
• После промывки фильтров водой их следует
просушить.
• Если грязь смывается с трудом, то фильтр
следует промыть теплой водой с температурой
не выше 40 °C.
• Во время промывки не следует слишком сильно
тереть фильтр.
• Дезинфицирующий и дезодорирующий
титановый нано-фильтр наружного воздуха
следует промывать и просушивать в тени через
каждые 3 месяца. Несмотря на то, что фильтр
можно использовать повторно, рекомендуется
заменять его новым через каждые 3 года.
• Марка дезинфицирующего и дезодорирующего
титанового нано-фильтра наружного воздуха:
SPX-NFH1.
Установите фильтр грубой очистки
8
наружного воздуха
• Установите фильтр в соответствующий
паз рельефной стороной вверх и надавите
на него до щелчка.
• Неправильно установленный фильтр
может стать причиной посторонних шумов.
Установите дезинфицирующий и
7
дезодорирующий титановый
нано-фильтр наружного воздуха в его
корпус
• Неправильно установленный фильтр может
стать причиной посторонних шумов.
Корпус для дезинфицирующего и
дезодорирующего титанового
нано-фильтра наружного воздуха
(входит в комплект поставки)
Установите фильтр грубой очистки
9
удаляемого воздуха
• Возьмите фильтр за ручку и вставьте его в
соответствующий паз агрегата, надавив до
щелчка.
Паз
10
Закройте лицевую панель
• Возьмите панель двумя руками и
установите ее на место, надавливая
вперед и вниз.
Лицевая панель
• Продолжайте надавливать на панель двумя
руками в направлении, показанном
стрелками (3 стрелки на рисунке) до тех
пор, пока не услышите щелчок.
ОСТОРОЖНО!
• Запрещается эксплуатировать агрегат без воздушных фильтров.
В помещение могут проникнуть неприятные запахи и пыль, которая может стать причиной
неисправности агрегата.
– 62 –
Page 61

ОСТОРОЖНО!
Чистку и техническое обслуживание должны проводить только квалифицированные специалисты. Перед
чисткой фильтра отключите кондиционер и отсоедините его от сети питания.
1. ФИЛЬТР ГРУБОЙ ОЧИСТКИ
Если горит индикатор загрязненности фильтра, значит, необходимо очистить фильтр. Эксплуатация
агрегата с загрязненным фильтром приводит к повышенному потреблению электроэнергии. Загрязнение
фильтра приводит к снижению расхода воздуха и холодопроизводительности. Кроме того, возможно
увеличение уровня шума. Порядок очистки фильтра приведен ниже.
Лицевая панель
ПОРЯДОК ОЧИСТКИ
ЙИКССУР
1
2
3
Осторожно откройте лицевую панель и извлеките фильтр.
Очистите фильтр с помощью пылесоса. При большом
количестве пыли фильтр следует промыть водой с
моющим средством и осторожно ополоснуть. После
этого фильтр следует высушить в тени.
• Установите фильтр в исходное положение
так, чтобы надпись "FRONT" находилась с
лицевой стороны.
• После установки фильтров, опустите
лицевую панель и закройте ее, надавив в
трех местах, обозначенных на рисунке
стрелками.
Фильтр грубой
очистки
2
Вставьте
Лицевая панель
2
Извлеките
1
1
Надавите и
приподнимите
ОСТОРОЖНО!
• Запрещается промывать фильтр водой, температура которой выше 40 °C. Это может привести к
уменьшению размеров фильтра.
• После чистки тщательно удалите капли воды и высушите фильтр в тени; запрещается оставлять фильтр
под прямыми лучами солнца. Это может привести к уменьшению размеров фильтра.
• Запрещается эксплуатировать агрегат без воздушных фильтров. Это может стать причиной
неисправности агрегата.
– 63 –
Page 62

ТЕХНИЧЕСКОЕ ОБСЛУЖИВАНИЕ
2. ЧИСТКА ЛИЦЕВОЙ ПАНЕЛИ И ЗАЩИТНОЙ РЕШЕТКИ
• Снимите лицевую панель и защитную решетку, промойте их
чистой водой.
Чистить компоненты следует мягкой губкой.
После использования нейтральных моющих средств тщательно
промойте компоненты чистой водой.
• Панель и защитную решетку, установленные на кондиционере,
следует чистить сухой мягкой тканью. Тщательно протрите пульт
дистанционного управления сухой мягкой тканью.
• Тщательно удалите воду с компонентов.
Вода, оставшаяся на индикаторах или приемнике сигнала
внутреннего блока, может стать причиной неисправностей.
Указание по снятию лицевой панели
При снятии или установке лицевую панель следует держать двумя руками.
Снятие лицевой панели
Лицевая панель
Штифт
• После того, как лицевая панель будет
полностью открыта, введите под нее правую
руку, затем, медленно закрывая панель,
надавите на нее снизу.
Снятие и установка защитной решетки
Снятие
Поднимите защитную решетку до упора и
1
освободите ее из защелок. (3 петли: слева, в
центре и справа)
2
Надавите на решетку в направлении «от себя».
Защелка
Установка лицевой панели
Штифт
Штифт
1
Выемка
Лицевая панель
Выемка
• Вставьте штифты с правой и левой стороны
панели в выемки внутреннего блока и
надежно закрепите их в отверстиях.
Установка
Возьмите решетку так, чтобы маркировка " "
1
находилась на дальней стороне. Плавно вставьте
решетку вдоль верхней части внутреннего блока и
надавите.
2
Надавите на решетку по направлению вниз и
зафиксируйте ее в защелках.
– 64 –
Защелка
Page 63

ОСТОРОЖНО!
• Попадание воды на корпус агрегата в процессе чистки может вызвать
короткое замыкание.
• Запрещается использовать горячую воду (с температурой выше 40 °С),
бензин, газолин, кислоты, растворители или щетки, так как это может
повредить пластмассовую поверхность и покрытие агрегата.
B
E
N
Z
A
C
E
N
I
I
D
T
R
H
E
I
N
N
3. ТЕХНИЧЕСКОЕ ОБСЛУЖИВАНИЕ ПЕРЕД ДЛИТЕЛЬНЫМ ПЕРЕРЫВОМ В ЭКСПЛУАТАЦИИ
• Высушите все компоненты агрегата, включив его на полдня в
хорошую погоду в режиме (ВЕНТИЛЯЦИЯ) и переключив
вентилятор на ВЫСОКУЮ скорость.
• Выньте вилку из розетки или отключите автоматический
выключатель.
Подача
воздуха
ЗАМЕНА ЭЛЕМЕНТОВ ПИТАНИЯ В ПУЛЬТЕ ДИСТАНЦИОННОГО УПРАВЛЕНИЯ
Снимите крышку, как показано на рисунке, и извлеките
1
старые элементы питания.
Надавите и
потяните в
направлении,
Вставьте новые элементы питания.
2
Положение элементов питания должно
соответствовать маркировке на корпусе пульта.
ОСТОРОЖНО!
1. Запрещается одновременно устанавливать новые и старые
элементы питания или элементы питания разного типа.
2. Извлеките элементы питания, если пульт дистанционного
управления не будет использоваться более 2-3 месяцев.
указанном
стрелкой.
ЙИКССУР
Переключатель адресов
Переключатель
Использовать данный
переключатель следует
только указанным
способом.
– 65 –
Переключатель адресов предназначен для
предотвращения взаимовлияния пультов
дистанционного управления, если в помещении
установлено два внутренних блока. Обычно,
использовать данный переключатель не
требуется.
(На заводе-изготовителе по умолчанию
переключатель устанавливается в положение
«А».)
Сведения о настройках агрегата можно получить у
торгового представителя нашей компании.
Page 64

ТЕХНИЧЕСКОЕ ОБСЛУЖИВАНИЕ
Для обеспечения чистоты подаваемого воздуха следует регулярно просушивать приточно-вытяжной
вентилятор и воздуховод.
• Если в текущем году (сезоне) агрегат включается в режиме охлаждения или осушения впервые, то
следует выполнить одну из указанных ниже процедур.
• Если в текущем году (сезоне) агрегат включается в режиме обогрева впервые, то следует выполнить одну
из указанных ниже процедур.
• Если в подаваемом наружном воздухе имеются посторонние запахи (даже после очистки фильтров), то
следует выполнить одну из указанных ниже процедур.
Техническое обслуживание в летний период
• Закройте двери и окна помещения, затем в течение 4 часов
(приточно-вытяжной вентилятор и воздуховод)
выполняйте следующие процедуры:
1
4
2
4
2
3
3
1
1
Включите агрегат в режиме осушения.
1
Задайте уставку температуры 24 °C.
2
Переключите вентилятор в
3
МАЛОШУМНЫЙ режим.
Включите агрегат в режиме удаления воздуха
4
(с ВЫСОКОЙ скоростью вентилятора).
Техническое обслуживание в осенний период или дождливый сезон
• Откройте двери и окна помещения, затем в течение 4 часов
выполняйте следующие процедуры:
Включите агрегат в режиме обогрева.
1
Задайте уставку температуры 32°C.
2
Переключите вентилятор в
3
МАЛОШУМНЫЙ режим.
Включите агрегат в режиме удаления воздуха
4
(с ВЫСОКОЙ скоростью вентилятора).
1
4
2
3
• Если температура наружного воздуха выше 24 °C, то следует
выполнить процедуры, описанные в разделе "Техническое
обслуживание в летний период". (Эксплуатация агрегата в режиме
обогрева при температуре наружного воздуха выше 24 °C может
стать причиной неисправности агрегата).
Техническое обслуживание в зимний период
• Откройте двери и окна помещения, затем в течение 4 часов
выполняйте следующие процедуры:
Включите агрегат в режиме обогрева.
1
Задайте уставку температуры 32°C.
2
Переключите вентилятор в
3
МАЛОШУМНЫЙ режим.
Включите агрегат в режиме удаления
4
воздуха (с ВЫСОКОЙ скоростью
вентилятора).
– 66 –
Page 65

ДОПОЛНИТЕЛЬНЫЕ СВЕДЕНИЯ
ПРОИЗВОДИТЕЛЬНОСТЬ
РЕЖИМЫ РАБОТЫ
НАСТРОЙКА ТАЙМЕРА / РАБОТА ПО ТАЙМЕРУ НОЧНОГО РЕЖИМА
Теплопроизводительность
• Данный кондиционер является тепловым насосом, т. е.
отбирает тепло у наружного воздуха и использует его для
обогрева помещения. При снижении температуры наружного
воздуха, теплопроизводительность агрегата также
снижается. В таких случаях инвертер увеличивает скорость
вращения компрессора, что предотвращает снижение
теплопроизводительности. Если, несмотря на это,
теплопроизводительность остается неудовлетворительной
то следует использовать дополнительные обогреватели.
• Кондиционер предназначен для обогрева помещения. На нагрев воздуха до заданной температуры
требуется определенное время. Для нагрева воздуха до заданной температуры к определенному
времени рекомендуется использовать таймер.
Холодопроизводительность и производительность по осушению
• Если тепловая нагрузка в помещении превышает холодопроизводительность агрегата (например, в
помещении присутствует много людей или используются тепловыделяющие приборы), то охлаждение
воздуха до уставки температуры может оказаться невозможным.
ОСТОРОЖНО!
Запрещается
устанавливать агрегат
рядом с печами или
другими приборами,
имеющими высокую
температуру.
ЗАПРЕЩЕНО
ЙИКССУР
• Если скорость вентилятора и уставка температуры были заданы с помощью пульта дистанционного
управления до пуска агрегата в ручную и ни одна из кнопок на пульте не была нажата, то через 10 с все
индикаторы на дисплее погаснут, и будет отображаться только режим работы.
• При нажатии кнопки во время работы агрегата сработает система защиты, в результате агрегат
будет отключен приблизительно в течение 3 мин.
• При работе в режиме обогрева индикатор РАБОТЫ на панели внутреннего блока может мигать, при
этом подача воздуха в помещение будет ненадолго прекращена.
• Если при работе вентилятора на ВЫСОКОЙ скорости вам станет холодно или после того, как
помещение прогреется, вы захотите снизить уровень шума, то рекомендуется кнопкой переключить
вентилятор в АВТОМАТИЧЕСКИЙ режим.
• При работе вентилятора на НИЗКОЙ скорости или в МАЛОШУМНОМ режиме агрегат будет
работать с пониженной холодопроизводительностью.
• При работе вентилятора на НИЗКОЙ скорости или в МАЛОШУМНОМ режиме
теплопроизводительность агрегата будет зависеть от условий эксплуатации.
• Для того чтобы агрегат включился при достижении времени, заданного по таймеру, необходимо после
настройки таймера отправить с пульта дистанционного управления соответствующий управляющий
сигнал на внутренний блок. При подтверждении настройки таймера раздается звуковой сигнал и на
панели внутреннего блока загорается индикатор работы по таймеру.
• Если при заданном времени ВКЛ. или ОТКЛ. по таймеру была нажата кнопка (НОЧНОЙ РЕЖИМ), то
агрегат будет работать по таймеру ночного режима.
• Если включен таймер ночного режима, то вентилятор работает в МАЛОШУМНОМ режиме
независимо от предыдущих настроек. Несмотря на то, что вентилятор переключается в МАЛОШУМНЫЙ
режим , показания дисплея пульта дистанционного управления не меняются.
– 67 –
Page 66

ПРИНЦИП РАБОТЫ
Функция очистки воздуха (стр. 53)
• При включении приточно-вытяжного режима в момент, когда активирована функция очистки воздуха
(агрегат работает в режиме обогрева, охлаждения или осушения), режим работы вентилятора не
изменится.
Приточно-вытяжной режим (стр. 54)
Подача наружного воздуха
• Если температура наружного воздуха выше 30 или ниже 3 °C, то подача наружного воздуха
осуществляться не будет во избежание выпадения конденсата на вентиляторе и в воздуховоде или в
целях экономии электроэнергии, соответственно.
• Если разница температур внутреннего и наружного воздуха более 7 °C, то подача наружного воздуха при
работе в режиме охлаждения осуществляться не будет во избежание выпадения конденсата на
вентиляторе и в воздуховоде.
• Если разница температур внутреннего и наружного воздуха более 22 °C, то подача наружного воздуха при
работе в режиме обогрева осуществляться не будет во избежание выпадения конденсата на вентиляторе
и в воздуховоде.
• Если агрегат отключился в результате возникновения описанных выше условий, то индикатор
приточно-вытяжного режима на панели внутреннего блока будет мигать (горит ровным светом в
течение 10 с, пауза 1 с).
ВНИМАНИЕ!
Запрещается подавать в помещение наружный воздух, если внутренний воздух имеет
•
ВЫСОКУЮ (более 70 %) влажность.
Образование конденсата может стать причиной неисправности кондиционера.
Удаление воздуха
• Если температура воздуха в помещении выше 43 °C, то во избежание повреждения вентилятора удаление
воздуха осуществляться не будет.
Если агрегат отключился в результате возникновения описанных выше условий, то индикатор
•
приточно-вытяжного режима на панели внутреннего блока будет мигать (горит ровным светом в
течение 10 с, пауза 1 с).
Неисправность приточно-вытяжного вентилятора
• Частое мигание индикатора приточно-вытяжного режима на панели внутреннего блока (горит ровным
светом в течение 4 с, пауза 1 с) указывает на неисправность приточно-вытяжного агрегата.
В этом случае агрегат может работать в любом режиме, кроме приточно-вытяжного.
Уровень шума при работе в приточно-вытяжном режиме
Уровень шумаПараметры режима
Подача воздуха при ВЫСОКОЙ скорости вентилятора
Подача воздуха при СРЕДНЕЙ скорости вентилятора
Подача воздуха при НИЗКОЙ скорости вентилятора
Удаление воздуха при ВЫСОКОЙ скорости вентилятора
Удаление воздуха при СРЕДНЕЙ скорости вентилятора
Удаление воздуха при НИЗКОЙ скорости вентилятора
Уровни шума отдельно для режимов подачи наружного воздуха и удаления воздуха из помещения
приблизительно соответствуют указанным в таблице. Кроме того, расход воздуха может меняться в
зависимости от условий монтажа агрегата.
Если одновременно с этим осуществляется кондиционирование воздуха, то уровень шума будет выше.
Работа по таймеру ночного режима
• Режим работы по таймеру ночного режима включается только после получения внутренним блоком
соответствующего управляющего сигнала от пульта дистанционного управления. При подтверждении
настройки таймера ночного режима раздается звуковой сигнал и на панели внутреннего блока загорается
индикатор работы по таймеру.
• Если при включении таймера ночного режима направляющая заслонка работала в режиме автоматического
покачивания, то при активации функции продления работы таймера на 1 ч при работе агрегата в режиме
охлаждения или осушения, а также при выборе ночного режима «7 ч с контролем температуры» при работе
агрегата в режиме обогрева покачивание прекратится.
• Если при настройке таймера ночного режима совместно с подачей наружного воздуха, удалением воздуха из
помещения или очисткой воздуха предполагается кондиционирование воздуха (охлаждение, осушение или
обогрев), то при активации функции продления работы таймера на 1 ч при работе агрегата в режиме
охлаждения или осушения, а также при выборе ночного режима «7 ч с контролем температуры» при работе
агрегата в режиме обогрева будет выполняться только кондиционирование воздуха.
Аналогично уровню шума в режиме охлаждения (скорость вентилятора: ВЫСОКАЯ).
Аналогично уровню шума в режиме охлаждения (скорость вентилятора: СРЕДНЯЯ).
Аналогично уровню шума в режиме охлаждения (скорость вентилятора: НИЗКАЯ).
Аналогично уровню шума в режиме охлаждения (скорость вентилятора: ВЫСОКАЯ).
Аналогично уровню шума в режиме охлаждения (скорость вентилятора: СРЕДНЯЯ).
Аналогично уровню шума в режиме охлаждения (скорость вентилятора: НИЗКАЯ).
(стр. 58)
– 68 –
Page 67

ПРИНЦИП РАБОТЫ
Подача наружного воздуха в ночном режиме (стр. 59)
• При активации функции подачи наружного воздуха в ночном режиме (агрегат будет работать в режиме
охлаждения или осушения) наружный воздух будет подаваться в случае, если его температура ниже
температуры в помещении.
• Если при включении таймера ночного режима совместно с функцией очистки воздуха была активирована
функция подачи наружного воздуха в ночном режиме, то наружный воздух будет подаваться только в случае,
если его температура ниже температуры в помещении.
• Если температура в помещении опустится на 2 °C ниже уставки, то подача наружного воздуха будет
прекращена.
• При подаче наружного воздуха в ночном режиме регулировать скорость вентилятора невозможно.
• Если функция подачи наружного воздуха в ночном режиме была активирована во время работы агрегата в
режиме обогрева, то наружный воздух подаваться не будет. Однако если режим обогрева отключится, то
функция подачи наружного воздуха в ночном режиме будет активирована.
• Если функция подачи наружного воздуха в ночном режиме была активирована во время работы агрегата в
режиме подачи наружного воздуха или удаления воздуха из помещения, то наружный воздух подаваться не
будет. Однако если режим подачи наружного воздуха или удаления воздуха отключится, то функция подачи
наружного воздуха в ночном режиме будет активирована.
• Работа функции подачи наружного воздуха в ночном режиме не зависит от соотношения температуры
наружного воздуха и температуры воздуха в помещении.
Настройка агрегата без работы в приточно-вытяжном режиме
Если агрегат подсоединяется к имеющимся воздуховодам, не оснащенным отдельным
воздуховодом для приточно-вытяжного режима, то переключатель приточно-вытяжного режима
следует установить в положение "Только удаление воздуха" или "Запрет приточно-вытяжного
режима".
«Запрет приточно-вытяжного режима»
ЙИКССУР
Переключатель приточно-вытяжного режима
1
Запрет приточно-вытяжного режима
Только удаление воздуха
2
3
Приточно-вытяжной режим
• Воздуховод невозможно вывести за пределы
помещения (монтаж агрегата предполагает
подсоединение к имеющимся воздуховодам).
• Наличие источников неприятного запаха, дыма и паров
масла в том месте вне помещения, куда выходит
воздуховод для приточно-вытяжного режима.
"Только удаление воздуха"
• Наличие пространства между внутренней и наружной
стенами здания, достаточного для прокладки
воздуховода, при этом вывести воздуховод наружу
здания невозможно (при стандартной конструкции
здания).
• Длина воздуховода не должна превышать 3 м.
• Подробные указания по монтажу агрегата можно
получить у представителя нашей компании.
ОСТОРОЖНО!
• Запрещается подавать воздух из пространства между стенами.
• Подача влажного воздуха из пространства между стенами или из пространства под полом может
привести к образованию конденсата.
• Воздух из пространства между стенами или из пространства под полом может иметь неприятный запах.
– 69 –
Page 68

ПРИНЦИП РАБОТЫ
Автоматический приточно-вытяжной режим
• Датчик загрязнения предназначен для определения уровня загрязнения воздуха сигаретным дымом,
взвешенными частицами (пестицидами), парами спирта и т. д.
• Датчик загрязнения также позволяет обнаружить резкие колебания температуры, если при работе в режиме
охлаждения или обогрева происходят резкие изменения воздушных потоков (например, при открывании и
закрывании двери).
• При нажатии кнопки (АВТОМАТИЧЕСКИЙ ПРИТОЧНО-ВЫТЯЖНОЙ РЕЖИМ) на пульте дистанционного
управления, данный режим активируется для следующих двух недель работы агрегата.
• После включения приточно-вытяжного режима, даже если воздух в помещении загрязнен, удаление воздуха
может начаться не менее чем через 5 минут.
• Если приточно-вытяжной режим был включен при работе агрегата в одном из режимов кондиционирования,
то подача наружного воздуха или удаление воздуха из помещения осуществляется одновременно с его
кондиционированием.
• Если по сигналу датчика загрязнения был включен режим удаления воздуха, то даже в случае, если было
открыто окно, агрегат будет удалять воздух из помещения в течение не менее 20 минут, после этого режим
может измениться на подачу наружного воздуха.
• Работа функции подачи наружного воздуха не зависит от соотношения температуры наружного воздуха и
температуры воздуха в помещении.
ОСТОРОЖНО!
• При определенных условиях, даже если воздух в помещении загрязнен и агрегат работает в
автоматическом приточно-вытяжном режиме, режим удаления воздуха может не включаться.
В этом случае следует вручную включить режим удаления воздуха с помощью кнопки
(приточно-вытяжной режим) или отрыть окно для проветривания помещения.
Настройка чувствительности датчика загрязнения
Датчик имеет 7 уровней чувствительности
Отключите агрегат и нажмите кнопку .
1
(Возможна как подача, так и удаление воздуха. Переключите вентилятор на
ВЫСОКУЮ, СРЕДНЮЮ или НИЗКУЮ скорость.)
Настройка чувствительности с помощью кнопок настройки температуры.
2
увеличение/уменьшение чувствительности
3
2
1
• При увеличении чувствительности на 1 уровень на дисплее отобразится "+1".
• При уменьшении чувствительности на 1 уровень на дисплее отобразится "-1".
• Возможны 7 уровней чувствительности: от «+3» до «-3».
• Показания дисплея (от «+3» до «-3») исчезают через 10 с.
Отключите агрегат кнопкой .
3
Режим самоочистки (стр. 55)
• При включении режима самоочистки он автоматически активируется сразу после отключения режима
охлаждения или осушения. Во-первых, при работе в режиме «ВЕНТИЛЯЦИЯ" (с удалением воздуха)
устраняются запахи от теплообменника внутреннего блока. Во-вторых, для предотвращения образования
плесени во внутреннем блоке агрегат включается в режимах ОБОГРЕВА (с удалением воздуха), «ТОЛЬКО
УДАЛЕНИЕ ВОЗДУХА" и «ВЕНТИЛЯЦИЯ» (с удалением воздуха).
• Если температура наружного воздуха низкая, то работа в режимах охлаждения и осушения может быть
невозможна.
• Если задано время ВКЛЮЧЕНИЯ по таймеру, то работа в режиме самоочистки будет невозможна в
течение 2 часов до заданного времени.
• Работа в режиме самоочистки невозможна в следующих случаях: работа в режиме обогрева или очистки
воздуха, задано время ОТКЛЮЧЕНИЯ по таймеру или включен таймер ночного режима.
Настройки таймера
• Режим работы по таймеру ночного режима включается только после получения внутренним блоком
соответствующего управляющего сигнала от пульта дистанционного управления. При подтверждении
настройки таймера ночного режима раздается звуковой сигнал и на панели внутреннего блока загорается
индикатор работы по таймеру.
• Если таймер был включен при работе агрегата в режиме осушения, то настройки таймера не будут
отображаться на ЖК-дисплее пульта управления (это не означает отмену настроек). Настройки таймера
будут выведены на дисплей сразу после отключения режима осушения.
– 70 –
Page 69

РЕГУЛЯРНЫЕ ПРОВЕРКИ
ПЕРЕД ОБРАЩЕНИЕМ В СЛУЖБУ ТЕХНИЧЕСКОГО ОБСЛУЖИВАНИЯ, ПРОВЕРЬТЕ СЛЕДУЮЩЕЕ:
ЧЕРЕЗ КАЖДЫЕ ПОЛГОДА ИЛИ ГОД НЕОБХОДИМО ВЫПОЛНЯТЬ СЛЕДУЮЩИЕ ПРОВЕРКИ. ПО ВСЕМ
ВОПРОСАМ ОБРАЩАЙТЕСЬ К ПРЕДСТАВИТЕЛЯМ НАШЕЙ КОМПАНИИ.
Убедитесь в надлежащем подсоединении
заземляющего проводника.
1
ВНИМАНИЕ!
2
ВНИМАНИЕ!
3
ВНИМАНИЕ!
Если заземляющий проводник отсоединен или поврежден,
то это может стать причиной неисправности агрегата или
поражения электрическим током.
Убедитесь, что на опорной раме нет следов коррозии, а
наружный блок установлен ровно и надежно
зафиксирован.
В противном случае возможен выход агрегата из строя или
получение травмы в результате падения внутреннего блока.
Убедитесь, что вилка плотно вставлена в розетку.
Если вилка вставлена в розетку не до конца, то это может
стать причиной ее чрезмерного нагрева, поражения
электрическим током или возгорания. Прежде чем вставлять
вилку в розетку, ее следует очистить от пыли и грязи.
ЙИКССУР
ПОСЛЕПРОДАЖНОЕ ОБСЛУЖИВАНИЕ И ГАРАНТИЯ
ПРОВЕРКАНЕИСПРАВНОСТЬ
Пульт дистанционного
управления не передает сигнал.
(Дисплей пульта
управления тусклый или пустой.)
Кондиционер не работает.
Недостаточная холодопроизводительность.
Недостаточная теплопроизводительность.
• Убедитесь, что не требуется замена элементов питания.
• Убедитесь, что элементы питания установлены с соблюдением
полярности.
• Убедитесь, что предохранители не перегорели.
• Убедитесь, что напряжение питания не слишком низкое и не слишком
высокое.
• Убедитесь, что автоматический выключатель включен.
• Убедитесь, что вилка вставлена в розетку.
• Убедитесь, что цепь питания не оборвана.
• Убедитесь, что фильтр не загрязнен.
• Убедитесь, что задана соответствующая уставка температуры.
• Убедитесь, что направляющая заслонка установлена в правильное
положение.
• Убедитесь, что воздухозаборные и воздуховыпускные отверстия
внутреннего и наружного блоков не заблокированы.
• Убедитесь, что вентилятор не работает на НИЗКОЙ скорости или в
МАЛОШУМНОМ режиме.
Следующие явления не являются признаками неисправности.
При работе в режиме обогрева
мигает индикатор работы,
вентилятор отключен
Шипение или звук движения воздуха
Скрип
Шорох
<Включение агрегата>
Задержка перед подачей нагретого воздуха. Пожалуйста, подождите.
<Подача наружного воздуха>
Оттаивание наружного блока. Пожалуйста, подождите.
Шум, возникающий при протекании хладагента по трубам, или в клапане
при изменении расхода.
Шум в результате воздействия на компоненты агрегата перепадов температуры.
Шум изменения скорости вращения вентилятора, например, при включении
агрегата.
Шум включения клапана с приводом.Щелчки
– 71 –
Page 70

Шум в результате всасывания вентилятором воздуха из шланга для отвода
Булькание
Изменение уровня шума
Появление тумана
Появление пара над наружным блоком
Запахи
конденсата, воздух проходит через скопившуюся в поддоне воду. Более
подробную информацию можно получить у представителя нашей компании.
Уровень шума зависит от производительности агрегата, которая, в свою очередь,
зависит от температуры воздуха в помещении.
Появление тумана возможно при резком охлаждении воздуха в помещении
потоком холодного воздуха от кондиционера.
Пар от воды, образовавшейся при оттаивании.
Запахи дыма, пищи, парфюмерии и т. п., присутствовавшие в помещении до включения
агрегата, скапливаются в воздушных фильтрах и вновь попадают в помещение.
Наружный блок продолжает
работать после отключения
агрегата
Мигает индикатор РАБОТЫ
Температура не достигает
уставки
• Если после проведения
указанных выше проверок
причина неисправности не
обнаружена, то немедленно
свяжитесь с торговым
представителем.
Примечания
• При работе в малошумном режиме или при отключении могут наблюдаться
(1) Шум при протекании хладагента по холодильному контуру.
(2) Шум от корпуса вентилятора. Во время работы корпус охладился, а
• От кондиционера может исходить запах, так как в процессе работы он
Оттаивание не завершено (микропроцессор непрерывно следит за образованием
льда на наружном блоке и при необходимости включает режим оттаивания).
Это указывает на работу в режиме предварительного нагрева или оттаивания.
Индикатор начинает мигать при отключении агрегата в результате
срабатывания устройства защиты, при включении режима предварительного
нагрева по сигналу соответствующего датчика или при изменении режима
работы с охлаждения на обогрев.
В зависимости от количества людей в помещении и условий окружающей среды (если
наружный блок используется для обслуживания нескольких помещений) фактическая
температура в помещении может незначительно отличаться от температуры, измеряемой
датчиком, встроенным в пульт дистанционного управления.
В следующих случаях немедленно свяжитесь с
представителем нашей компании:
• Часто отключается автоматический выключатель или
перегорает предохранитель.
• Автоматический выключатель работает ненадежно.
• Внутрь агрегата случайно попали посторонние предметы или вода.
• Кабель электропитания сильно нагревается или повреждена его
изоляция.
• Индикатор работы по ТАЙМЕРУ или индикатор необходимости
чистки ФИЛЬТРА на панели внутреннего блока мигает.
Прежде чем отключить автоматический выключатель, запомните
характер мигания индикаторов. Это может помочь в диагностике
неисправности.
следующие явления (не являются неисправностью):
после отключения агрегата плавно нагревается и потрескивает.
поглощает такие запахи, как сигаретный дым, запахи еды, косметики и т. д.
Для уменьшения интенсивности запахов воздушный фильтр и испаритель
следует регулярно чистить.
) (
• Если после проведения указанных выше проверок причина неисправности не обнаружена, то немедленно
свяжитесь с представителем нашей компании. Сообщите представителю компании модель агрегата,
серийный номер и дату монтажа. Также сообщите о неисправности.
Примечание:
При включении агрегата возможны небольшие колебания яркости установленных в помещении
светильников (особенно если они работают не на полной мощности). Это не является неисправностью.
Соблюдайте требования местной электроснабжающей компании.
.
– 72 –
 Loading...