

Page 1
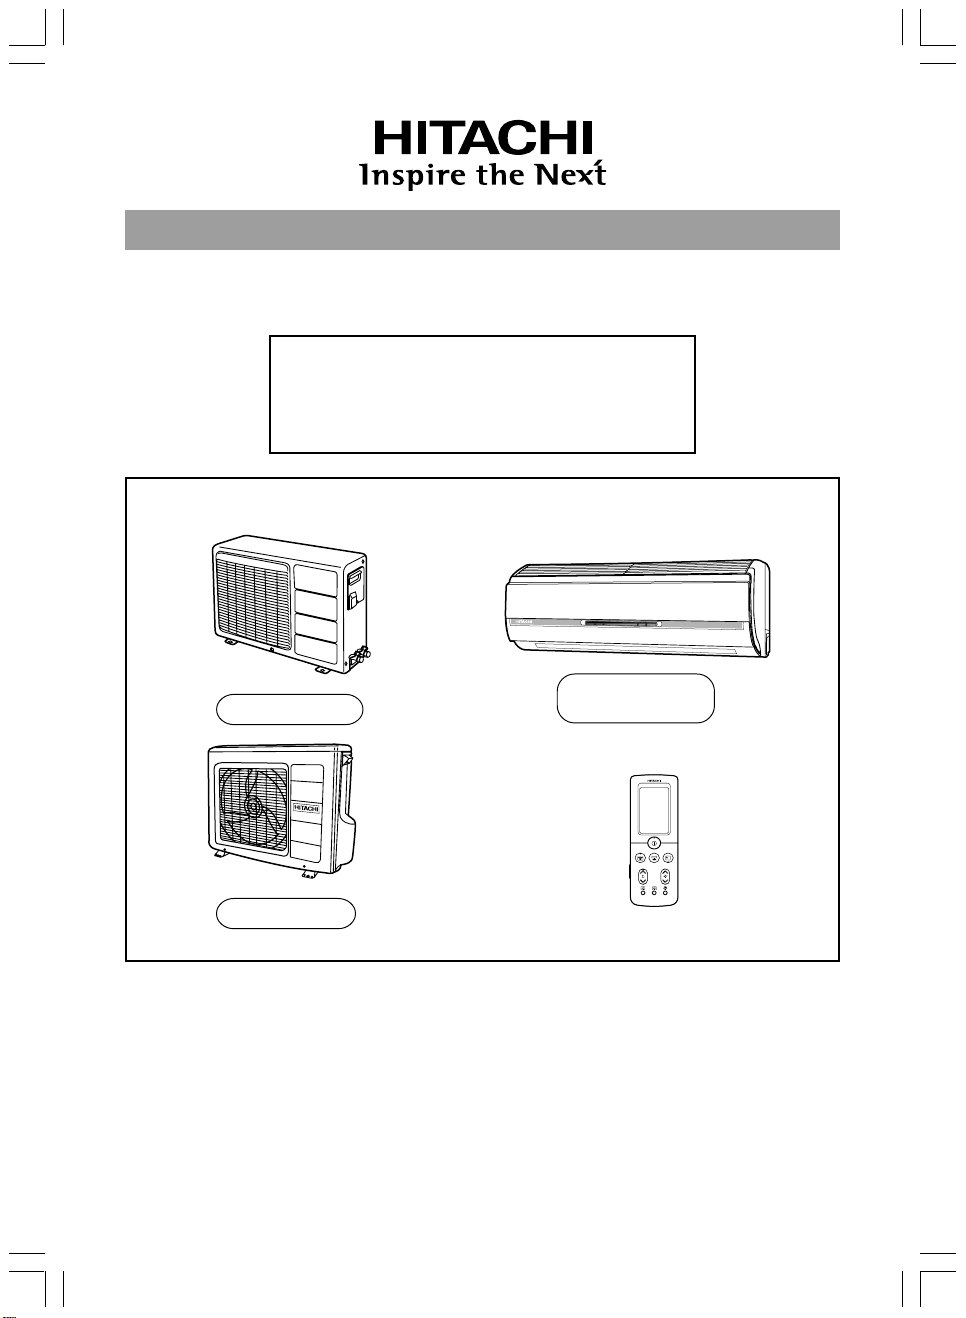
SPLIT TYPE
RAC-13EX9G
RAS-13EX9KS2
RAS-18EX9KS2
RAC-18EX9G
INDOOR UNIT/OUTDOOR UNIT
MODEL
RAS-13EX9KS2 / RAC-13EX9G
RAS-18EX9KS2 / RAC-18EX9G
OUTDOOR UNIT
Instruction Manual Page 1~40
To obtain the best performance and ensure years of trouble free use, please read this instruction manual
completely.
INDOOR UNIT
RAS13EX9KS2_EN_CH(1-10).p65 3/8/07, 3:39 PM1
使用說明書 41~80頁
請詳細閱讀這本使用說明書以了解正確的使用法,使機器長久發揮最高性能。
Page 2
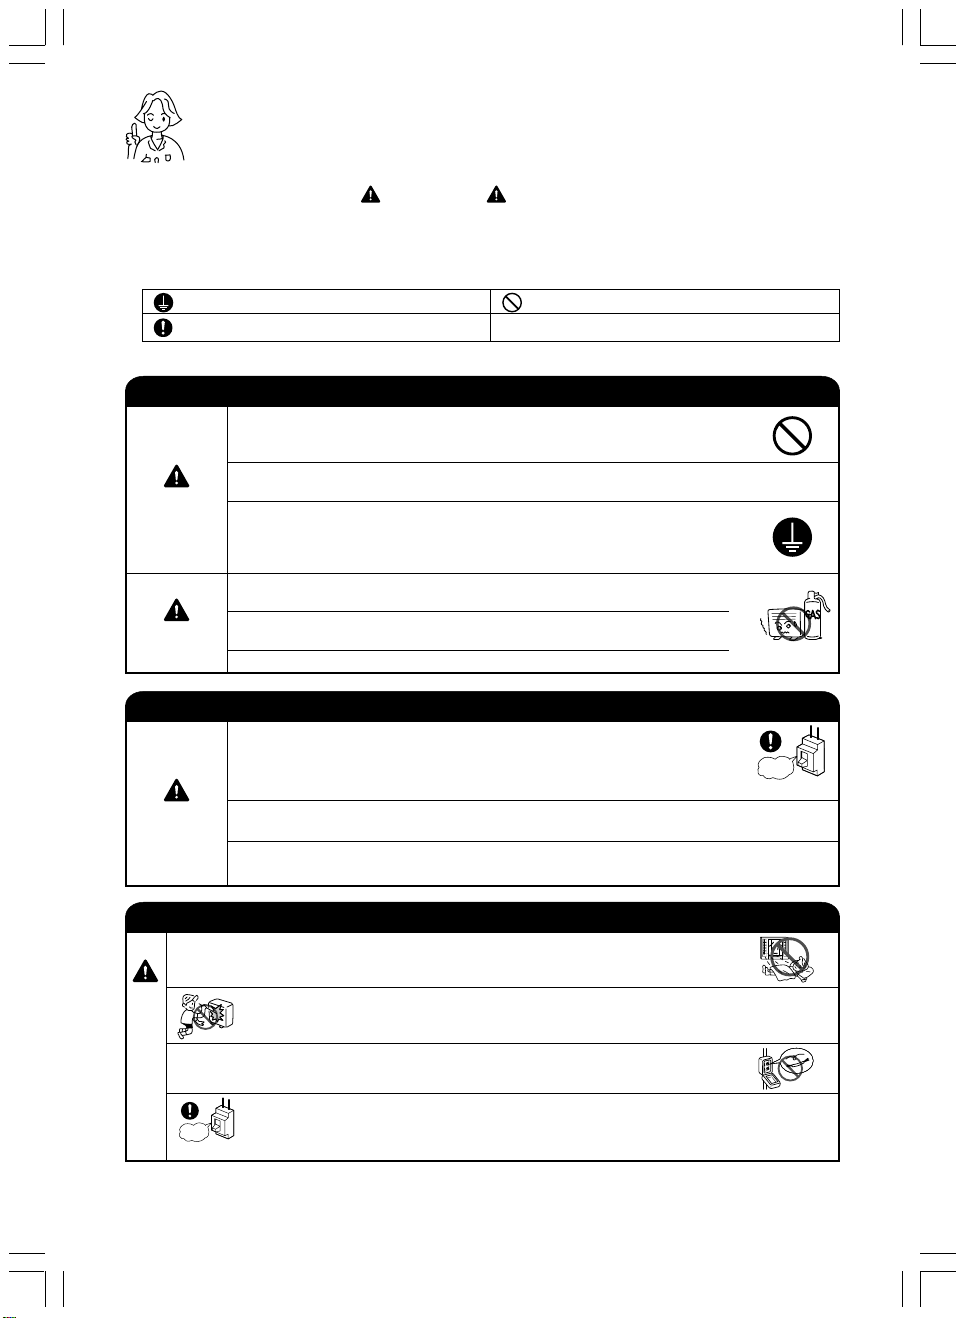
SAFETY PRECAUTION
• Please read the “Safety Precaution” carefully before operating the unit to ensure correct usage of the unit.
• Pay special attention to signs of “ Warning” and “ Caution”. The “Warning” section contains matters
which, if not observed strictly, may cause death or serious injury. The “Caution” section contains matters
which may result in serious consequences if not observed properly. Please observe all instructions
strictly to ensure safety.
• The signs indicate the following meanings.
Make sure to connect earth line.
Indicates the instructions that must be followed.
• Please keep this manual after reading.
PRECAUTIONS DURING INSTALLATION
• Do not reconstruct the unit.
Water leakage, fault, short circuit or fire may occur if you reconstruct the
unit by yourself.
• Please ask your sales agent or qualified technician for the installation of your unit.
WARNING
CAUTION
Water leakage, short circuit or fire may occur if you install the unit by yourself.
• Please use earth line.
Do not place the earth line near water or gas pipes, lightning-conductor, or
the earth line of telephone. Improper installation of earth line may cause
electric shock.
• A circuit breaker should be installed depending on the mounting site of
the unit. Without a circuit breaker, the danger of electric shock exists.
• Do not install the unit near location where there is flammable gas.
The outdoor unit may catch fire if flammable gas leaks around it.
• Please ensure smooth flow of water when installing the drain hose.
PRECAUTIONS DURING SHIFTING OR MAINTENANCE
• Should abnormal situation arise (like burning smell), please stop operating
the unit and turn off the circuit breaker. Contact your agent. Fault, short
circuit or fire may occur if you continue to operate the unit under abnormal
situation.
WARNING
• Please contact your agent for maintenance.
Improper self maintenance may cause electric shock and fire.
• Please contact your agent if you need to remove and reinstall the unit.
Electric shock or fire may occur if you remove and reinstall the unit yourself improperly.
This sign in the figure indicates prohibition.
“OFF”
PRECAUTIONS DURING OPERATION
• Avoid an extended period of direct air flow for your health.
W
A
R
N
• Do not use any conductor as fuse wire, this could cause fatal accident.
I
N
G
“OFF”
RAS13EX9KS2_EN_CH(1-10).p65 3/8/07, 3:40 PM2
• Do not put objects like thin rods into the panel of blower and suction side because
the high-speed fan inside may cause danger.
• During thunder storm, please stop operating the unit and turn off the circuit breaker.
– 2 –
Page 3
PRECAUTIONS DURING OPERATION
• The product shall be operated under the manufacturer specification and not for
any other intended use.
• Do not attempt to operate the unit with wet hands. This could cause fatal accident.
• When operating the unit with burning equipment, regularly ventilate the room to
avoid oxygen insufficiency.
• Do not direct the cool air coming out from the air-conditioner panel to face
household heating apparatus as this may affect the working of apparatus such
as the electric kettle, oven etc.
• Please ensure that outdoor mounting frame is always stable, firm and without
defect. If not, the outdoor unit may collapse and cause danger.
• Do not splash or direct water to the body of the unit when cleaning it as this may
cause short circuit.
• Do not use any aerosol or hair sprays near the indoor unit. This chemical can
adhere on heat exchanger fin and blocked the evaporation water flow to drain
C
pan. The water will drop on tangential fan and cause water splashing out from
A
indoor unit.
U
T
I
“OFF”
O
• Please switch off the unit and turn off the circuit breaker during cleaning, the highspeed fan inside the unit may cause danger.
N
• Turn off the circuit breaker if the unit is not to be operated for a long period.
• Do not climb on the outdoor unit or put objects on it.
ENGLISH
BAHASA MELAYU
THAILAND
“OFF”
• Do not water container (like vase) on the indoor unit to avoid water dripping onto
the unit. Dripping water will damage the insulator inside the unit and causes shortcircuit.
• Do not place plants directly under the air flow as it is bad for the plants.
• When operating the unit with the door and windows opened, (the room humidity is always
above 80%) and with the air deflector facing down or moving automatically for a long period of
time, water will condense on the air deflector and drips down occasionally. This will wet your
furniture. Therefore, do not operate under such condition for a long time.
• If the amount of heat in the room is above the cooling or heating capability of the unit (for
example: more people entering the room, using heating equipments and etc.), the preset room
temperature cannot be achieved.
RAS13EX9KS2_EN_CH(1-10).p65 3/8/07, 3:40 PM3
– 3 –
Page 4
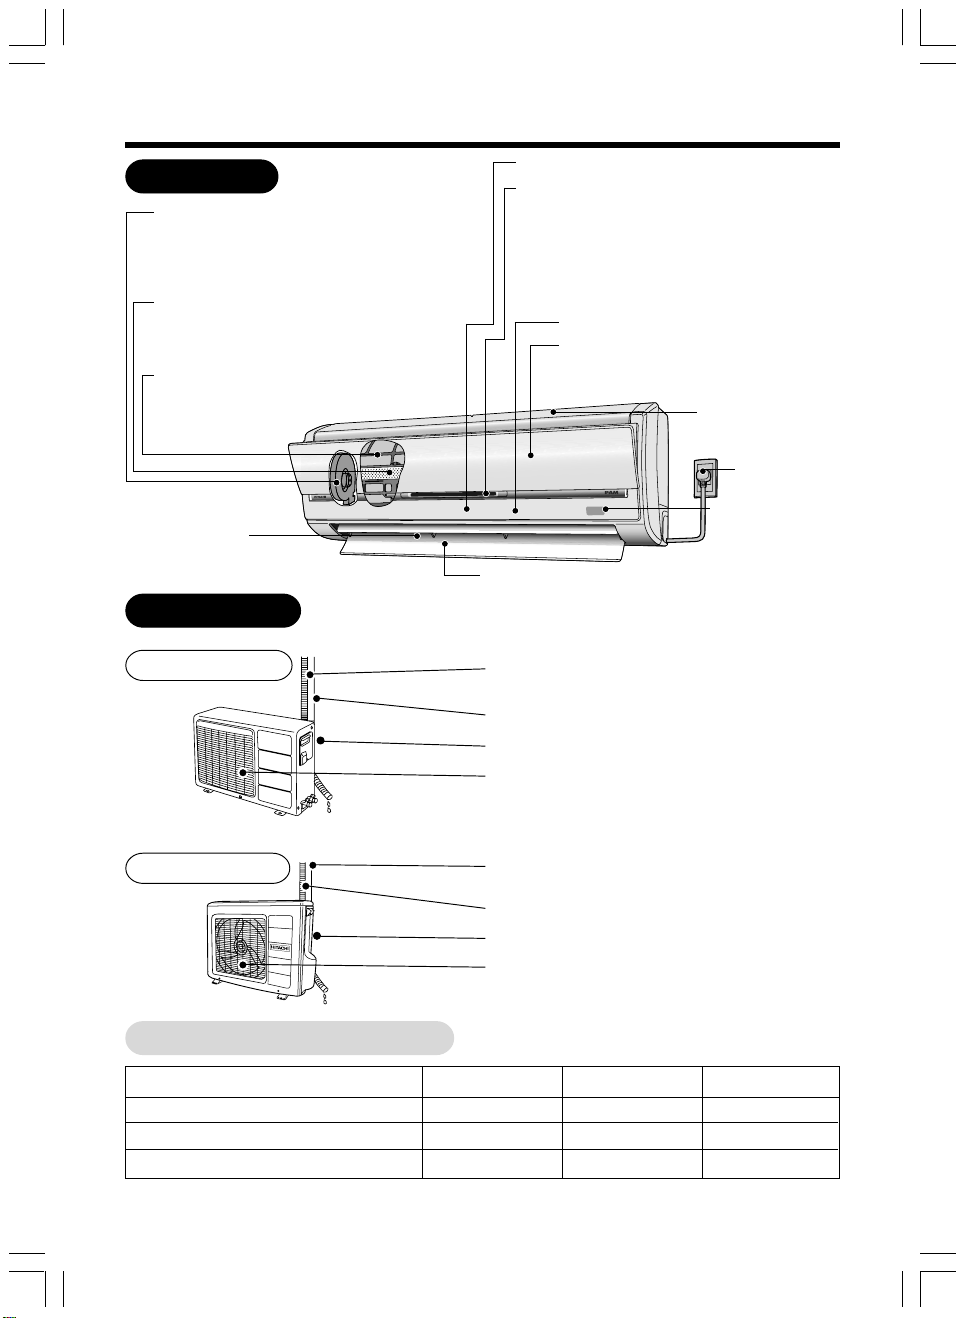
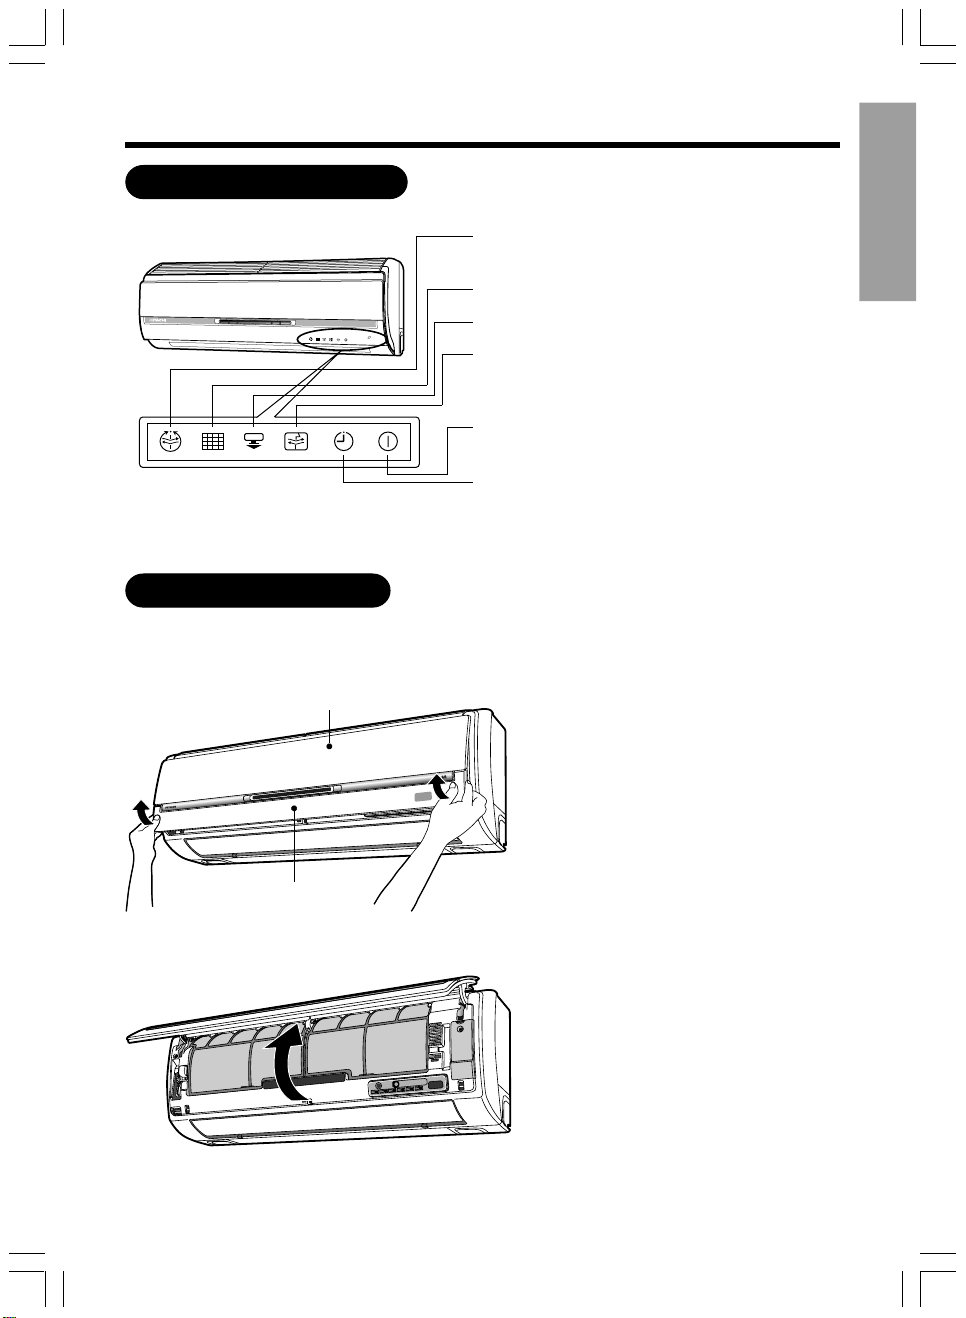
NAMES AND FUNCTIONS OF EACH PART
RAC-18EX9G
RAC-13EX9G
INDOOR UNIT
Fresh Air In Exhaust Fan (Internal)
This operates during the fresh air in, exhaust,
2-way exchange and Nano-titanium air
purifying operation.
Nano-Titanium Air Purifying Unit (Internal)
This traps cigarette smoke, pollen, etc.
(Refer page 29)
Pre-Filter (Internal)
To prevent dust from coming into
the indoor unit.
(Refer page 29)
Air Outlet
OUTDOOR UNIT
Front Panel
Fresh Air Window
This blows air from outside into the room
while the fresh air in is operating.
This blows air in the room during 2-way
exchange and Nano-titanium air purifying
operation.
Horizontal Deflector/
Vertical Deflector (Internal)
DRAIN PIPE
Condensed water drain to outside.
CONNECTING CORD
AIR INLET (BACK)
AIR OUTLET
(Refer to pages 29, 33)
Display
(Refer page 5)
Movable Panel
This panel opens during the operation
and closes when operation stop.
Top Grill
(Refer page 34)
Power Plug
Signal Receiver
Receive the
signal from the
remote
controller.
MODEL NAME AND DIMENSIONS
MODEL
RAS-13EX9KS2 / RAS-18EX9KS2
RAC-13EX9G
RAC-18EX9G
RAS13EX9KS2_EN_CH(1-10).p65 3/8/07, 3:40 PM4
DRAIN PIPE
Condensed water drain to outside.
CONNECTING CORD
AIR INLET (BACK)
AIR OUTLET
WIDTH (mm)
870
700
850
HEIGHT (mm)
298
570
800
– 4 –
DEPTH (mm)
223
210
298
Page 5
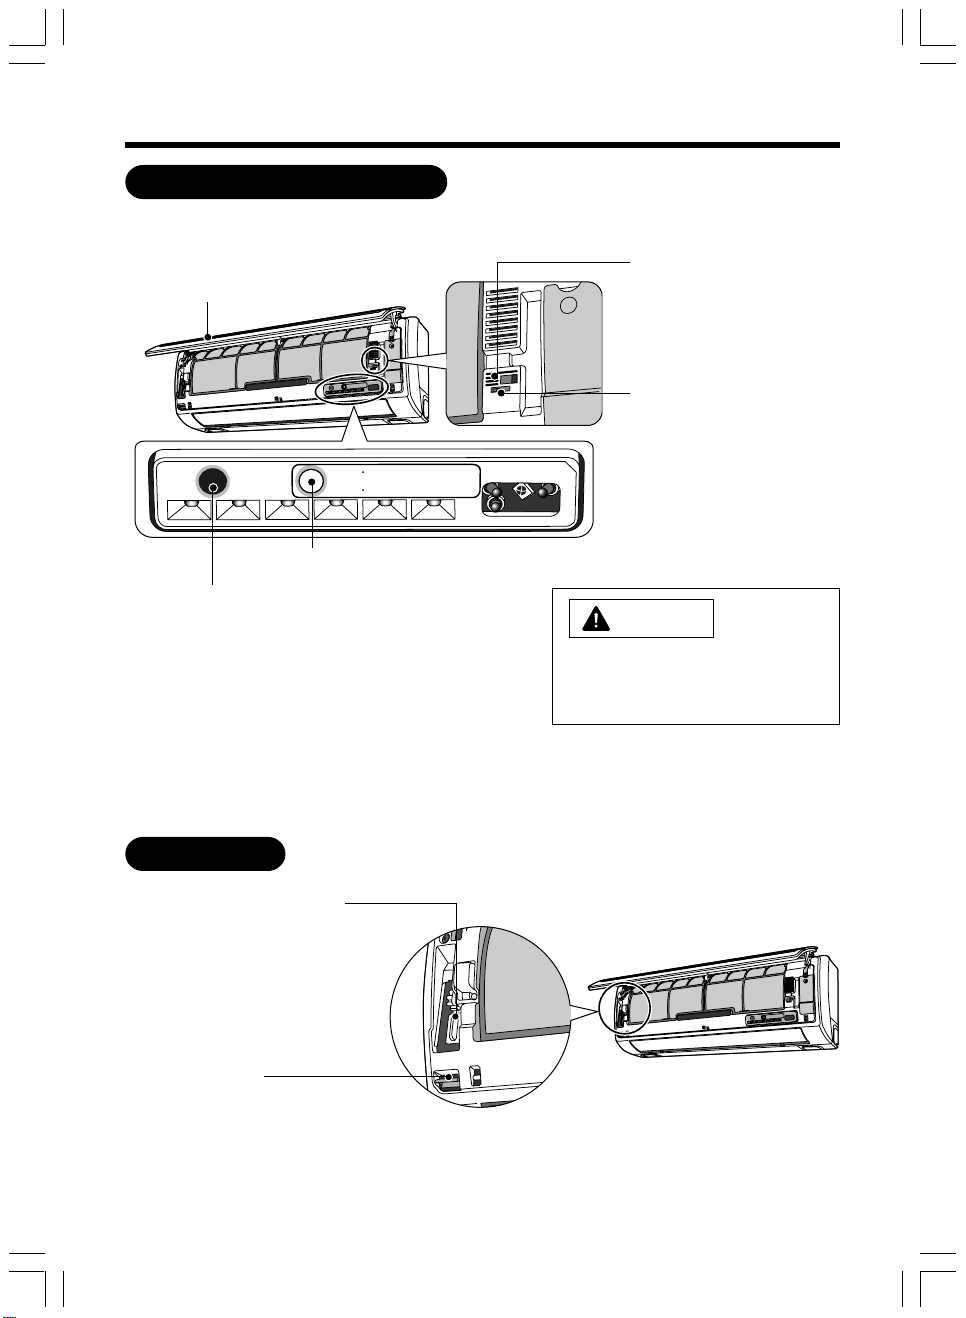
INDOOR UNIT INDICATORS
Nano Titanium
OPEN THE FRONT PANEL
●
AIR MONITOR LAMP (yellow)
This lamp lights when the air monitor is set.
●
FILTER LAMP (green)
●
SUPER COOL LAMP (yellow)
●
TWO WAY AIR EXCHANGE LAMP (green)
This lamp lights when the fresh air in and exhaust
are operating.
●
OPERATION LAMP (yellow)
This lamp lights during operation.
●
TIMER LAMP (orange)
This lamp lights when the timer is working.
ENGLISH
BAHASA MELAYU
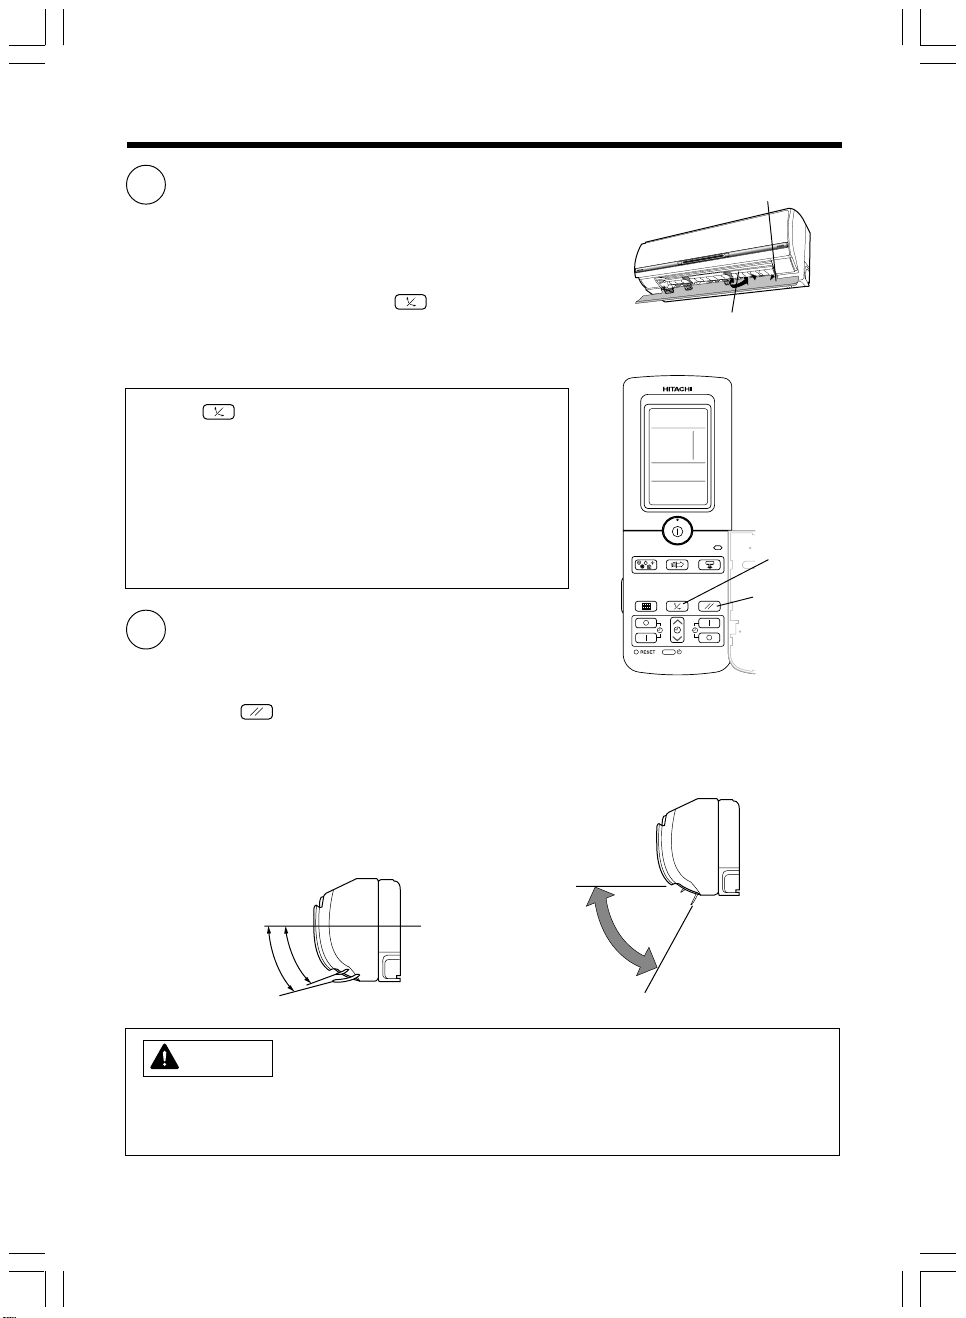
■ Turn off the device before opening the front panel.
Movable panel
Front panel
– 5 –
THAILAND
Open the Front Panel
Hold both sides of the front panel and lift
up. Do not hold the movable panel when
opening and closing the front panel.
Hold both sides of the front panel and lift
up.
RAS13EX9KS2_EN_CH(1-10).p65 3/8/07, 3:40 PM5
Page 6
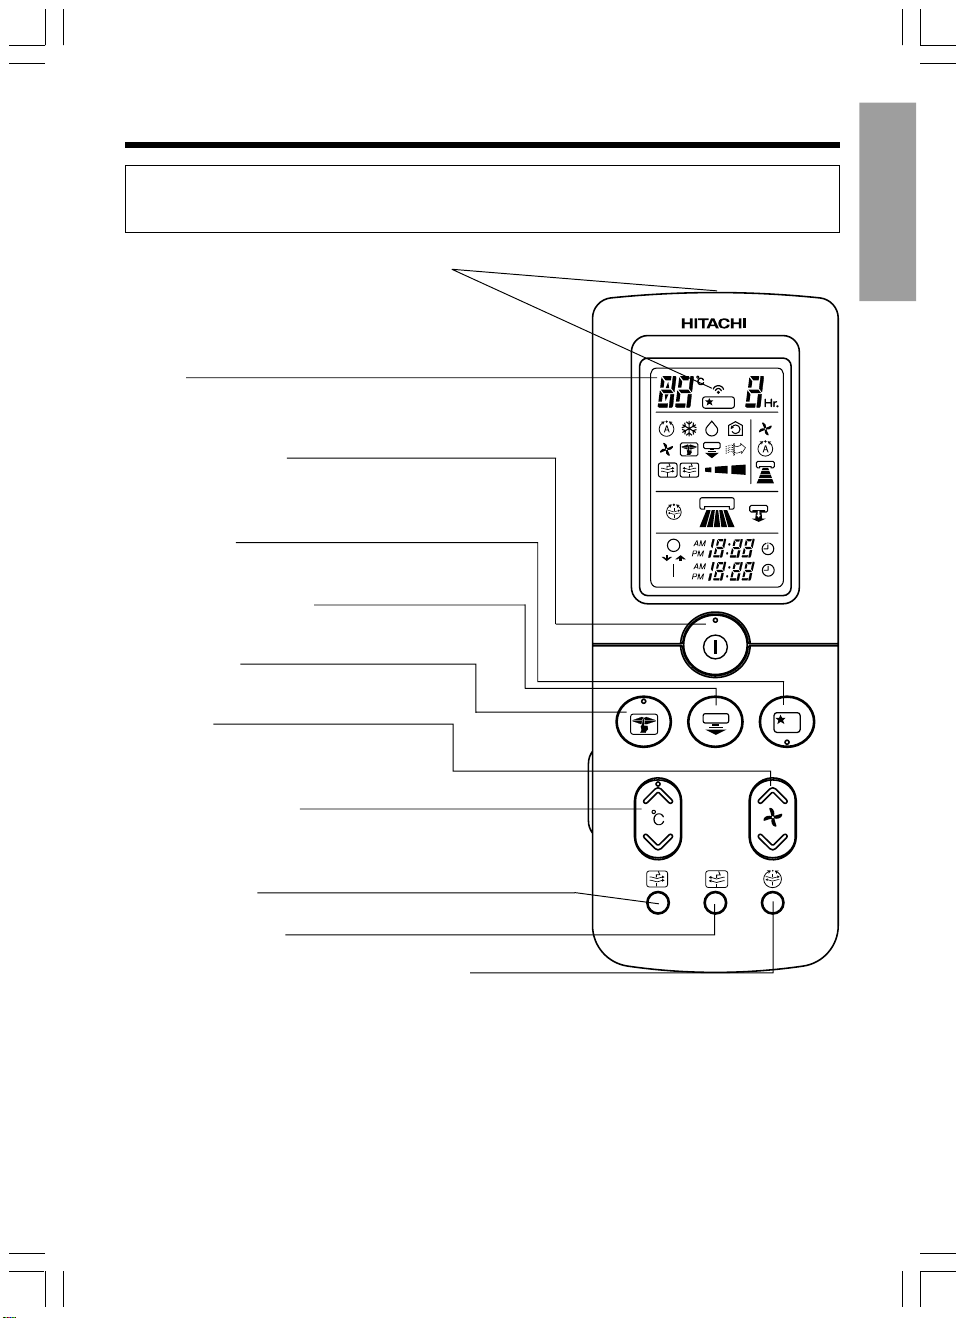
NAMES AND FUNCTIONS OF EACH PART
INDOOR UNIT CONTROL PANEL
■ Operate after opening the front panel. (How to open the front panel, refer to page 5.)
Dirt Sensor
Front Panel
TEMPORARY
SWITCH
Force Cool (For service man use only)
PUSH AND HOLD THE SWITCH FOR 3 SEC
FORCE
TO START THE FORCE COOL OPERATION.
COOL
FOR SERVICE MAN USE ONLY
Temporary Switch
If the remote controller does not work due to battery
failure, press this switch to start and stop operation.
• This temporary operation will be at the most recent
setting mode. (The unit will immediately go into
automatic operation once power is switched on.)
Turn off the circuit breaker or pull
out the power plug if the unit is not
in use for a long period.
The Dirt Sensor detects
cigarette smoke etc. (Refer
page 18)
Two Way Air Exchange
Selection Switch
Select one of the following:
“Prohibit Two Way Air
Exchange”, “Only Exhaust”,
and “Operate Two Way Air
Exchange”.
CAUTION
✩ If the power stays on and the unit is not operated, power is slightly consumed in the control circuit.
The power is saved by turning off the circuit breaker.
DUCT FILTER
Nano-Titanium Disinfecting/
Deodorizing/Dust Collecting
Fresh Air In Filter
This disinfects, deodorizes and
eliminates dust from the air
ventilated from the outside.
(Refer to pages 29, 32)
Fresh Air in Filter
This traps dirt and dust particles
in the air ventilated from the
outside. (Refer to pages 29, 32)
– 6 –
RAS13EX9KS2_EN_CH(1-10).p65 3/8/07, 3:40 PM6
Page 7
NAMES AND FUNCTIONS OF REMOTE CONTROL
REMOTE CONTROL :
about 7 meters. If indoor lighting is controlled electronically, the range of control may be
shorter. Before fixing it, make sure the indoor unit can be controlled from the remote controller.
Signal Emitting Window / Transmission Sign
Point this window toward the indoor unit when
controlling it. The transmission sign blinks when a
signal is sent.
Display
This indicates the room temperature selected, current time,
timer and intensity of circulation selected.
START / STOP Button
Press this button to start operation. Press it again to
stop operation.
SLEEP Button
Use this button to set the sleep timer.
SUPER COOLING Button
Press this button to start super cooling mode.
SILENT Button
Press this button to start silent mode.
FAN Button
Use this button to increase and decrease fan
speed.
This controls the operation of the indoor unit. The range of control is
ENGLISH
BAHASA MELAYU
THAILAND
TEMPERATURE Button
Use this button to raise or lower the temperature setting.
(Keep pressing and the value will change more quickly.)
EXHAUST Button
FRESH AIR IN Button
AUTOMATIC TWO WAY AIR EXCHANGE Button
Press this button to set the automatic two way air
exchange mode.
RAS13EX9KS2_EN_CH(1-10).p65 3/8/07, 3:40 PM7
– 7 –
Page 8
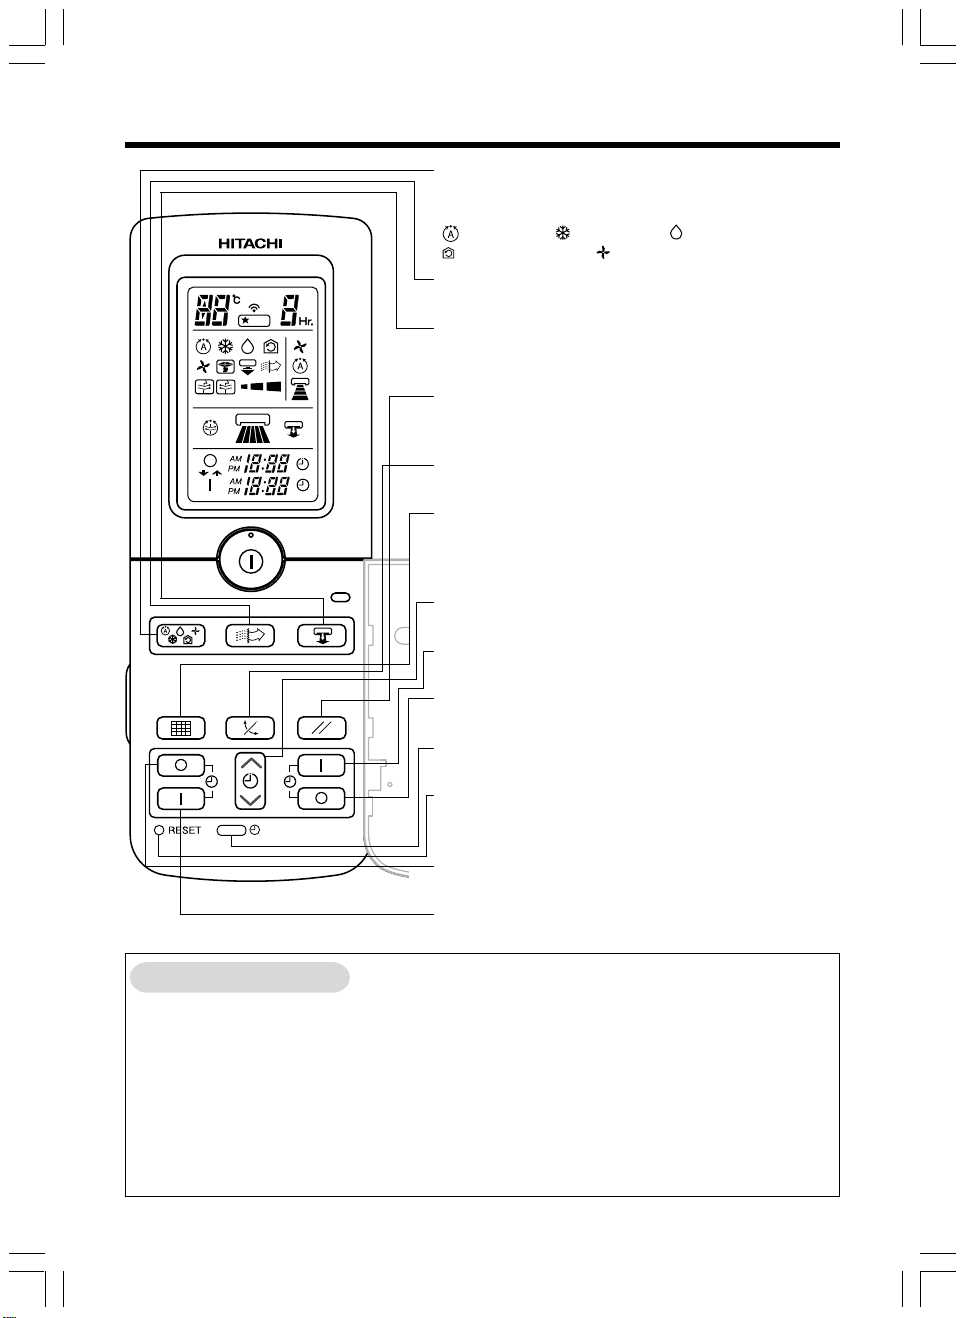
NAMES AND FUNCTIONS OF REMOTE CONTROL
FUNCTION Selector
Use this button to select the operating mode. Every
time you press this button, the mode will change from
AUTO → COOL → DEHUMIDIFY →
CIRCULATION → FAN cyclically.
AIR PURIFIER Button
Press this button to start the air purifier mode.
TWIN AIR FLOW Button
Use this button to allow two different air flows circulate
in every corner of room efficiently.
PARALLEL WING Button
Use this button to control angle of the vertical air
deflector to parallel.
AUTO SWING Button
Controls the angle of the horizontal air defelctor.
FILTER Button
Press this button when you have cleaned the filter.
About 100 hour after this, the FILTER lamp will light to
indicate that it is the time to clean the filter.
TIMER Control
Use these buttons to set the timer.
RESERVE Button
Time setting reservation.
CANCEL Button
Cancel time reservation.
TIME Button
Use this button to set and check the time.
RESET Button
Press this button after the batteries are replaced or
when some irregular operation is found.
OFF-TIMER Button
Select the turn OFF time.
ON-TIMER Button
Select the turn ON time.
Precautions for Use
• Do not put the remote controller in the following places.
• Under direct sunlight.
• In the vicinity of a heater.
• Handle the remote controller carefully. Do not drop it on the floor, and protect it from water.
• Once the outdoor unit stops, it will not restart for about 3 minutes (unless you turn the power
switch off and on or unplug the power cord and plug it in again). This is to protect the device and
does not indicate a failure.
• If you press the FUNCTION selector button during operation, the device may stop for about 3
minutes for protection.
– 8 –
RAS13EX9KS2_EN_CH(1-10).p65 3/8/07, 3:40 PM8
Page 9
MANUAL OPERATION
One of the mode lights up.
Press the to select the Operating Mode.
1
Either
To set the Fan Speed.
(AUTO), (COOL), (DEHUMIDIFY),
(CIRCULATION), (FAN).
ENGLISH
This part lights up.
Press
2
MED, LOW and select.
Fan speed display turns off after approximately 10
seconds if the operation does not start.
3
Press the (START/STOP) button to Start the
Operation.
Operation starts with a beep.
“Operation” lamp on the indoor unit turns on.
START
STOP
Press the
operation.
From next time, the operation which has been set by
the above steps 1-3 will be available just by pressing
the START/STOP button.
(FAN SPEED) button to select AUTO, HI,
Press the to set the Room
Temperature.
Increase
decrease
Remote control’s temperature
setting range is 16 ~ 32°C.
Room Temperature display turns
off after approximately 10
seconds if the operation does
not start.
(START/STOP) button again to stop the
BAHASA MELAYU
THAILAND
RAS13EX9KS2_EN_CH(1-10).p65 3/8/07, 3:40 PM9
– 9 –
Page 10
AUTOMATIC OPERATION
The device will automatically determine the mode of operation COOL, or Dehumidify, depending
on the initial room temperature. The selected mode of operation will not change when the room
temperature varies. Set the current timer before start operation.
Press the FUNCTION selector so that the display
1
indicates the
(AUTO) mode of operation.
START
STOP
Press the (START/STOP) button.
Operation starts with a beep.
Press the button again to stop operation.
■ As the settings are stored in memory in the remote
controller, you only have to press the
button next time.
You can raise or lower the temperature setting as
necessary by maximum of 3°C.
Press the temperature button and the
temperature setting will change by
1°C each time.
“ ” is displayed when the temperature higher than
•
the automatically set room temperature by 1°C is set.
•
“ ” is displayed when the temperature lower than the
automatically set room temperature by 1°C is set.
To change the fan speed.
2
Press the
• Select “AUTO”, “LOW” or “SILENT”.
(AUTO) button.
(START/STOP)
CONDITION OF AUTOMATIC OPERATION
• The selected mode of operation will not change during the operation even though the room
temperature change.
INITIAL ROOM
TEMPERATURE (APPROX.)
FUNCTION
Dehumidfy22°C - 26°C
TEMPERATURE
SETTING
27°CCoolOver 27°C
Same as
room temperature
FAN SPEED
HIGH at start, LOW after the
preset temperature is reached.
LOW
– 10 –
RAS13EX9KS2_EN_CH(1-10).p65 3/8/07, 3:40 PM10
Page 11
COOLING OPERATION
Use the device for cooling when the outdoor temperature is 21-42°C.
If humidity is very high (over 80%) indoors, some dew may form on the air outlet grille of the indoor
unit.
Press the FUNCTION selector so that the display
1
indicates
(COOL).
ENGLISH
2
3
START
STOP
Set the desired FAN SPEED with the
button (the display indicates the setting).
(AUTO) :
(HI) : Economical as the room will
(MED) : Quiet.
(LOW) : More quiet.
(SILENT) : Silent.
Set the desired room temperature with the
TEMPERATURE button (the display indicates the
setting).
The temperature setting and the actual room
temperature may vary somewhat depending on
conditions.
Press
starts with a beep. Press the button again to stop
operation. The cooling function does not start if the
temperature setting is higher than the current room
temperature (even though the
lights).
The cooling function will start as soon as you set the
temperature below the current room temperature.
the (START/STOP) button. Cooling operation
The FAN SPEED is HI at first and
varies to MED automatically when
the preset temperature has been
reached.
become cool quickly.
The range of 25-28°C is recommended as
the room temperature for cooling. If the
temperature setting is 27°C, the room
temperature will be controlled at around
27°C.
(FAN SPEED)
(OPERATION) lamp
BAHASA MELAYU
THAILAND
RAS13EX9KS2_EN_CH(11-24).p65 3/8/07, 3:41 PM11
■ As the settings are stored in memory in the remote
controller, you only have to press the
button next time.
– 11 –
(START/STOP)
Page 12
DEHUMIDIFYING OPERATION
Use the device for dehumidifying when the room temperature is over 16°C. When it is under 15°C,
the dehumidifying function will not work.
Press the FUNCTION selector so that the display
1
indicates (DEHUMIDIFY).
Press the button to select Low and Silent.
2
Set the desired room temperature with
TEMPERATURE button (the display indicates the
setting).
3
The range of 20-26°C is recommended as the
room temperature for dehumidifying.
START
STOP
DEHUMIDIFYING FUNCTION
When the room temperature is higher than the temperature setting: The device will dehumidify the
room, reducing the room temperature to the preset level. When the room temperature is lower than
the temperature setting: Dehumidifying will be performed at the temperature setting slightly lower
than the current room temperature, regardless of the temperature setting. The function will stop
(the indoor unit will stop emitting air) as soon as the room temperature becomes lower than the
setting temperature.
Press the
operation starts with a beep. Press the button again to
stop operation.
■
As the settings are stored in memory in the remote
controller, you only have to press the
button next time.
(START/STOP) button. Dehumidifying
(START/STOP)
RAS13EX9KS2_EN_CH(11-24).p65 3/8/07, 3:41 PM12
– 12 –
Page 13
AIR CIRCULATION OPERATION
You can use the device simply as an air circulator. Use this function to dry the interior of the indoor
unit.
Press the FUNCTION selector so that the display
1
indicates
Press the (FAN SPEED) button and select the
2
desired FAN SPEED (the display indicates your
choice).
(CIRCULATE).
ENGLISH
3
START
STOP
Press the temperature control button to set to the
desired temperature.
Press the (START/STOP) button. Circulating
operation starts with a beep.
Press the button again to stop operation.
BAHASA MELAYU
THAILAND
RAS13EX9KS2_EN_CH(11-24).p65 3/8/07, 3:41 PM13
– 13 –
Page 14
FAN OPERATION
You can use the device simply as an air circulator. Use this function to dry the interior of the indoor
unit.
Press the FUNCTION selector so that the display
1
indicates
Press the (FAN SPEED) button.
2
(FAN).
START
STOP
Press the (START/STOP) button. Fan operation
starts with a beep.
Press the button again to stop operation.
RAS13EX9KS2_EN_CH(11-24).p65 3/8/07, 3:41 PM14
– 14 –
Page 15
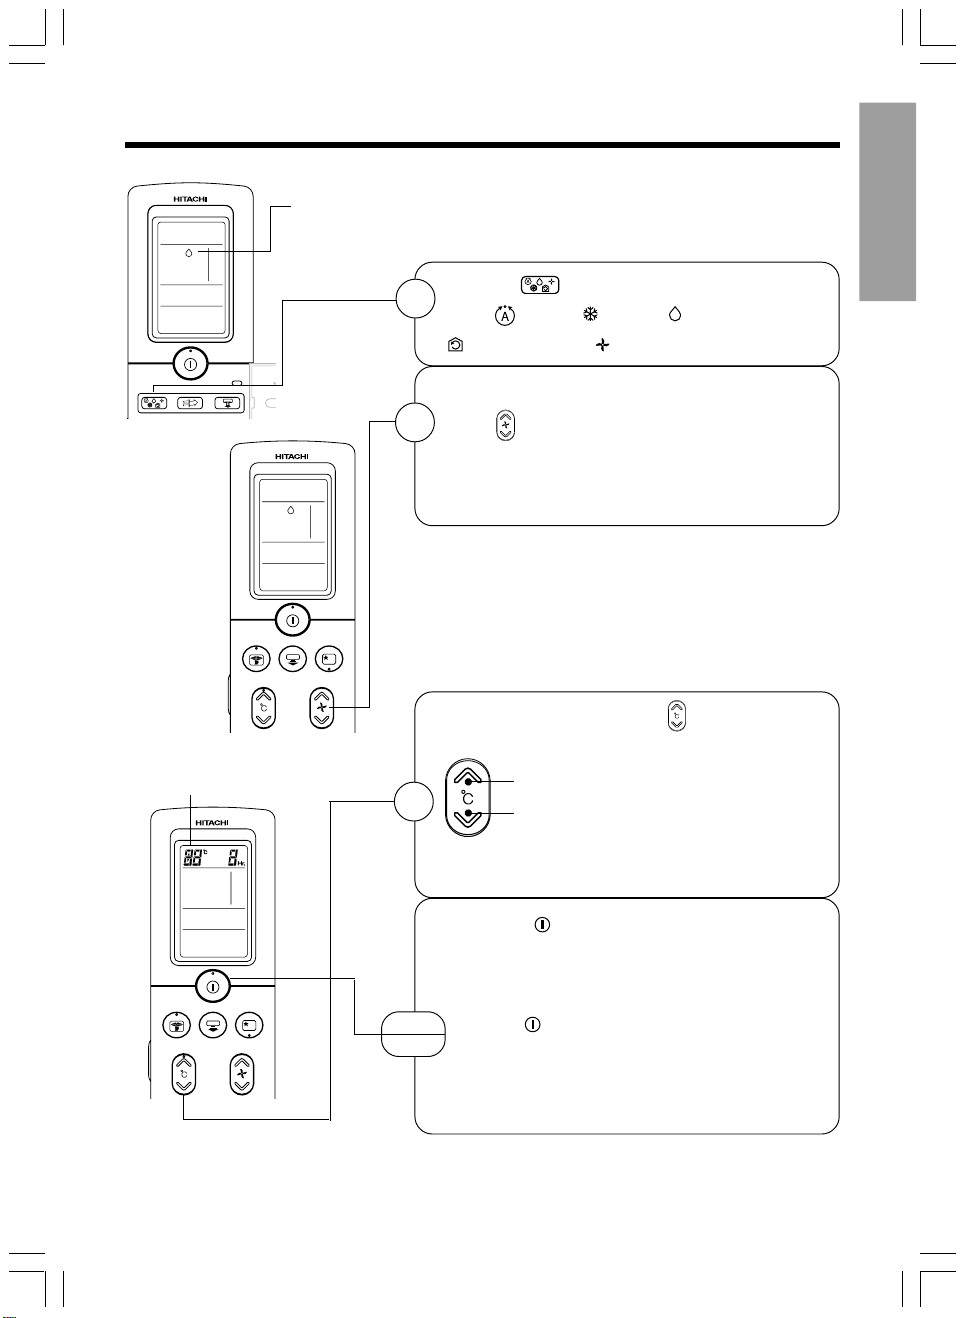
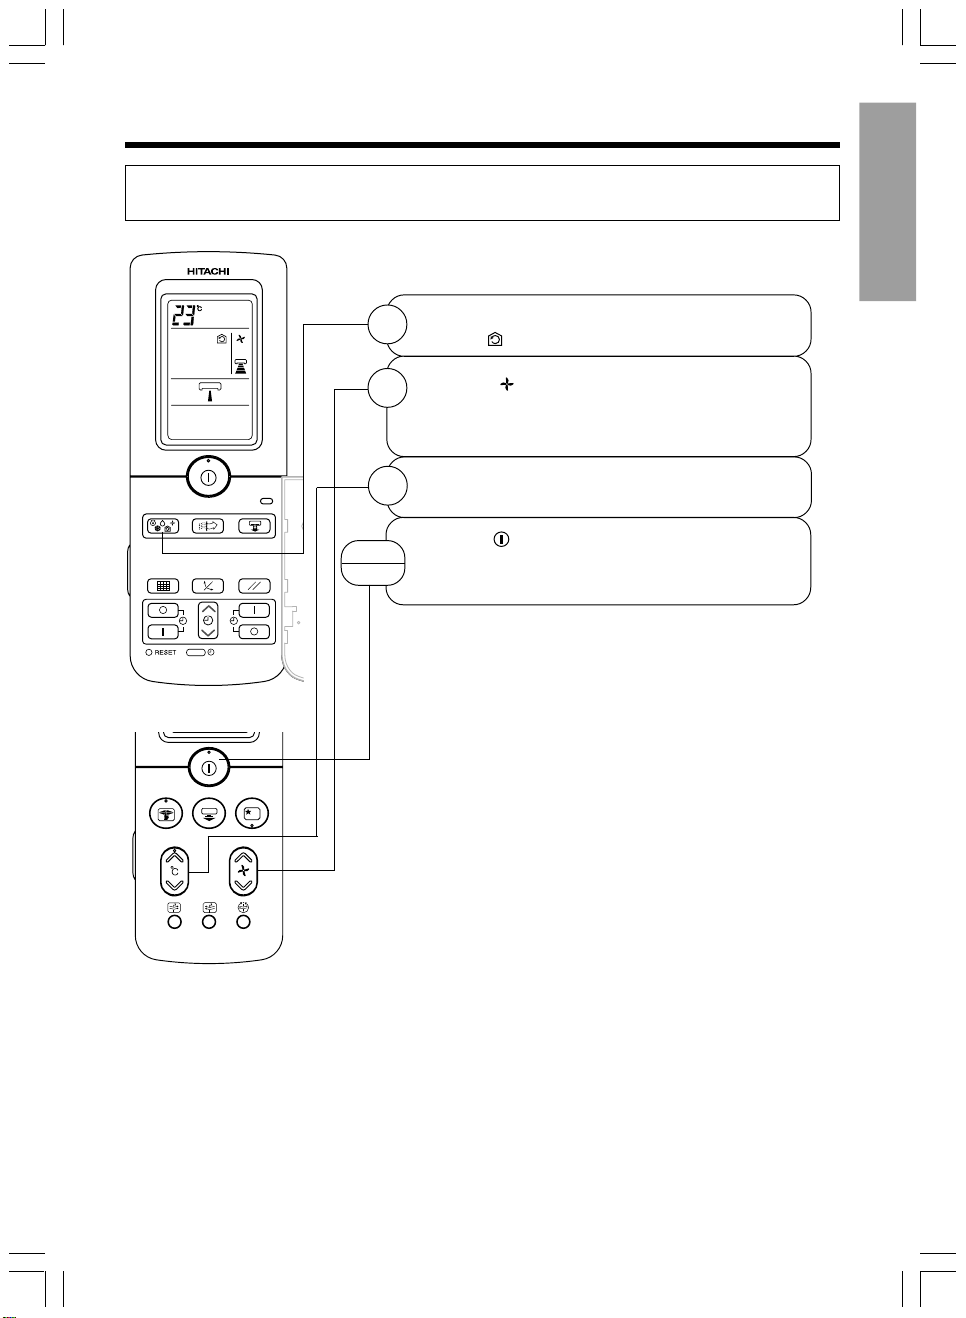
SUPER COOLING
Press the button.
• Operate start with a signal received sound “beep”.
• Unit will be forced operation in
HI fan speed for 20 minutes.
this period while temperature and fan speed setting
1
display remain unchanged. (Super cooling lamp at indoor
unit is ON).
• After 20 minutes, indicator on remote controller disappear
and unit will be in
fan speed will change to previous setting. (Super cooling
lamp at indoor unit is OFF).
• Air blow sound will be slightly high due to forced
operation.
CANCELLATION of SUPER COOLING Operation
Cancel Condition Operation mode after cancel
Press or OFF timer time is up Stop operation
(COOL) mode. Temperature and
(COOL) with SUPER
Indicator appear during
ENGLISH
BAHASA MELAYU
THAILAND
Key press
Press or
Press
or
Press
Press or
Press
20 minutes time is up
NOTE
(1) OFF TIME setting : OFF timer will be a priority over the
(2) ON TIME setting : SUPER COOLING operation will be
or
or
SUPER COOLING operation time.
a priority over the ON timer operation
time.
DEHUMIDIFYING operation
Normal COOLING operation
– 15 –
RAS13EX9KS2_EN_CH(11-24).p65 3/8/07, 3:41 PM15
Page 16
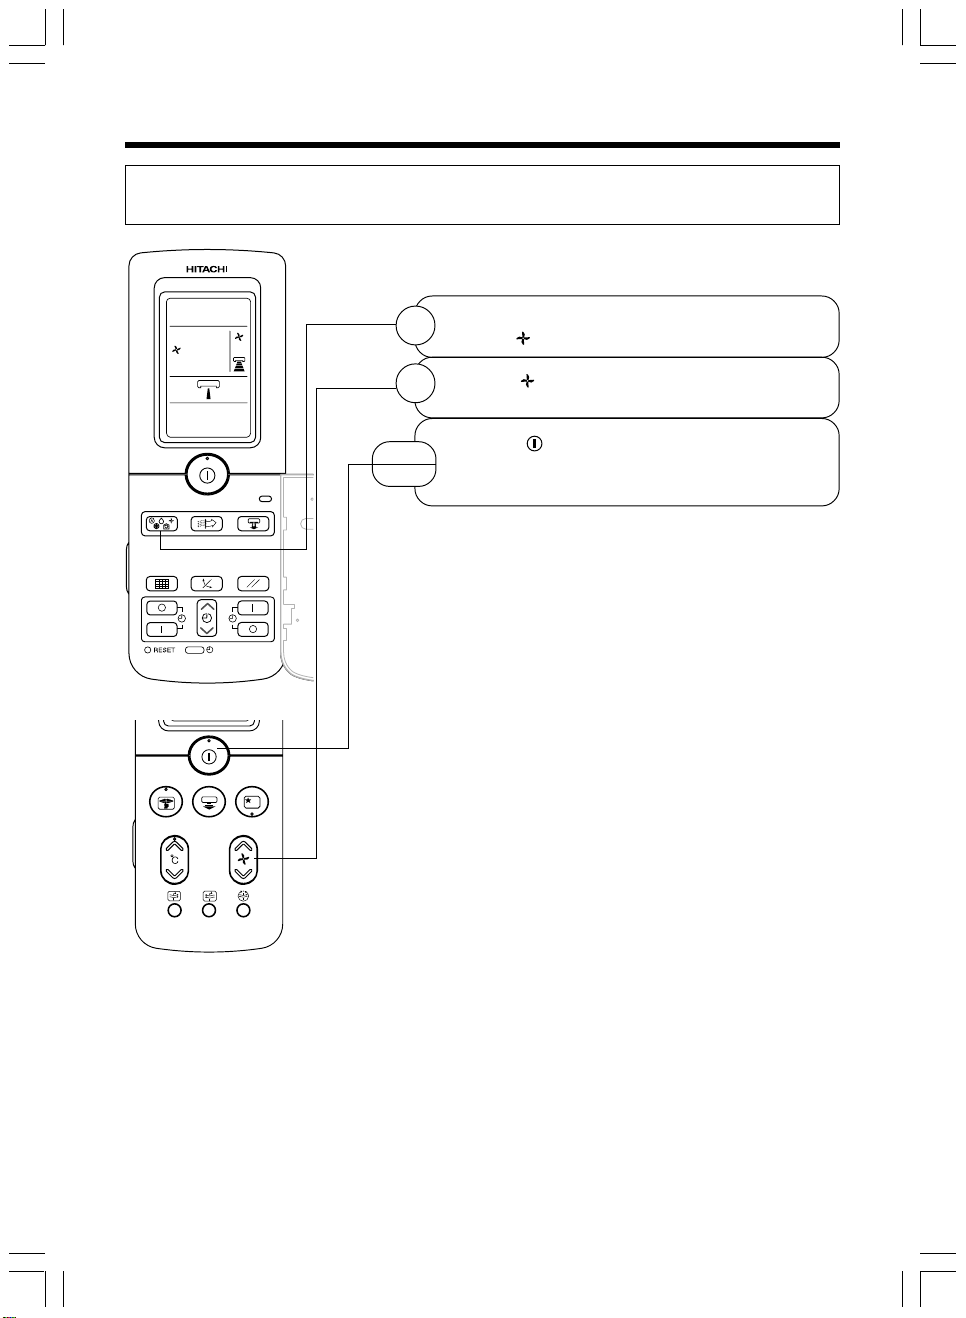
SILENT MODE
Press the button.
• Operate start with a signal received sound “beep”.
1
• Unit will be forced operation in
speed, regardless of previous setting.
CANCELLATION of SILENT Operation
Cancel Condition Operation mode after cancel
Press button.
OFF timer time is up Stop operation
Sleeping timer time is up.
(COOL) with SILENT fan
Press
Press
NOTE
Under SUPER SILENT operation and quiet environment, phenomena like flowing noise of
refrigerant in the refrigerating cycle may occur, but this is normal for the operation.
SUPER COOL button. SUPER COOL operation
button. Existing operation mode
RAS13EX9KS2_EN_CH(11-24).p65 3/8/07, 3:41 PM16
– 16 –
Page 17
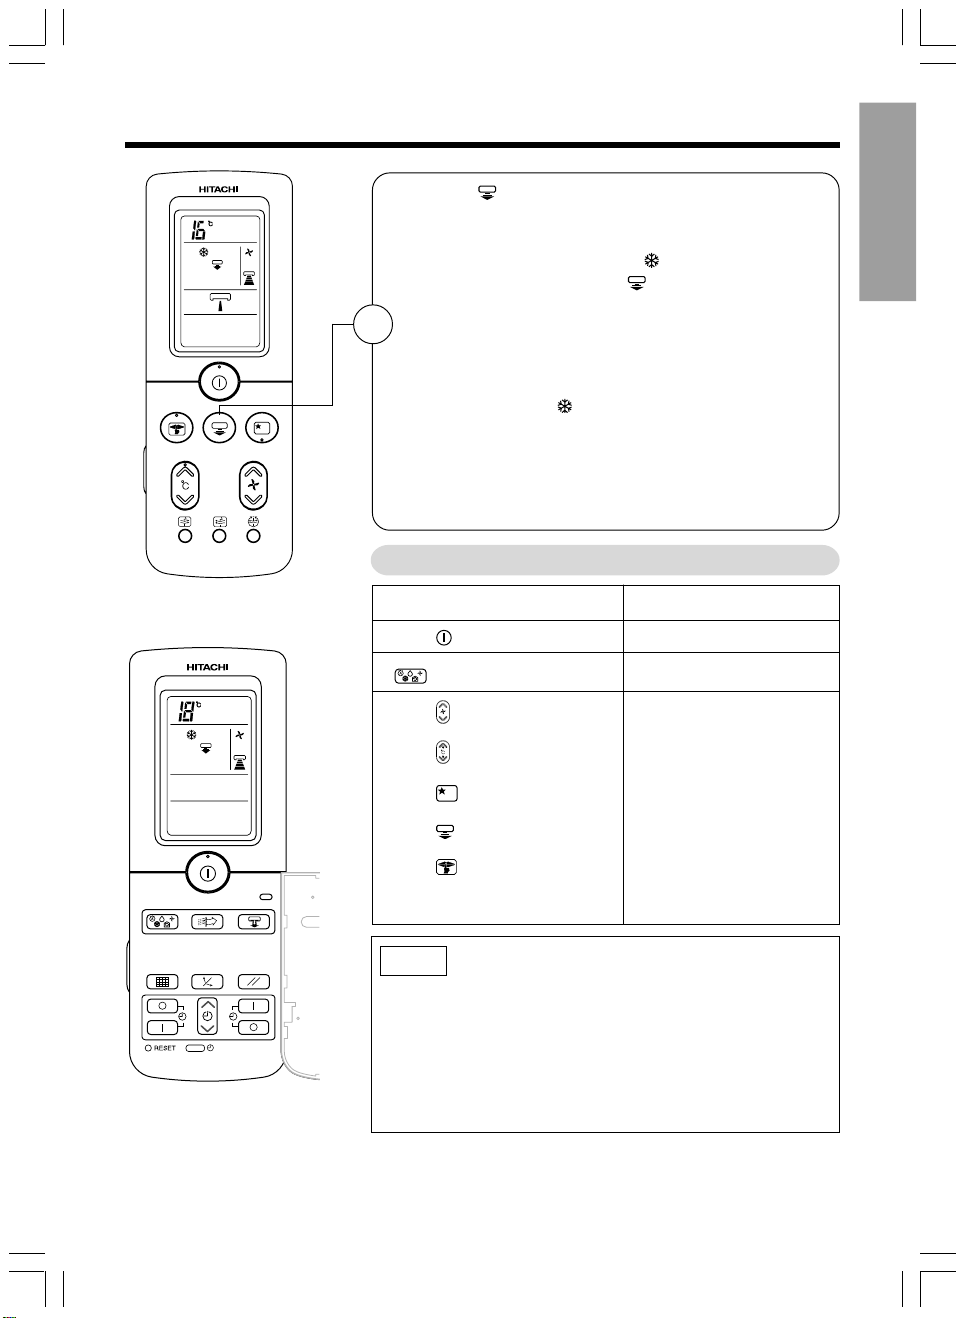
EXHAUST OPERATION
1
STOP
Press the button.
• The device beeps when it has
received the signal and the exhaust
operation starts. By pressing the
button, the display changes as on
the right.
• The OPERATION and the "Air
Exchange Operation" lamps on the
indoor unit indicators turns on.
• Although the ventilated air is
deodorized by the Nano-Titanium
Disinfecting/Deodorizing/Dust
Collecting Fresh Air In Filter, the
odor of the ventilated air may enter
the room according to the
environment where the filter is
utilized. If there is concern regarding
any odors, please stop the device.
Press the (START/STOP) button.
Press the
off.
button until Exhaust on the remote controller turns
ENGLISH
BAHASA MELAYU
THAILAND
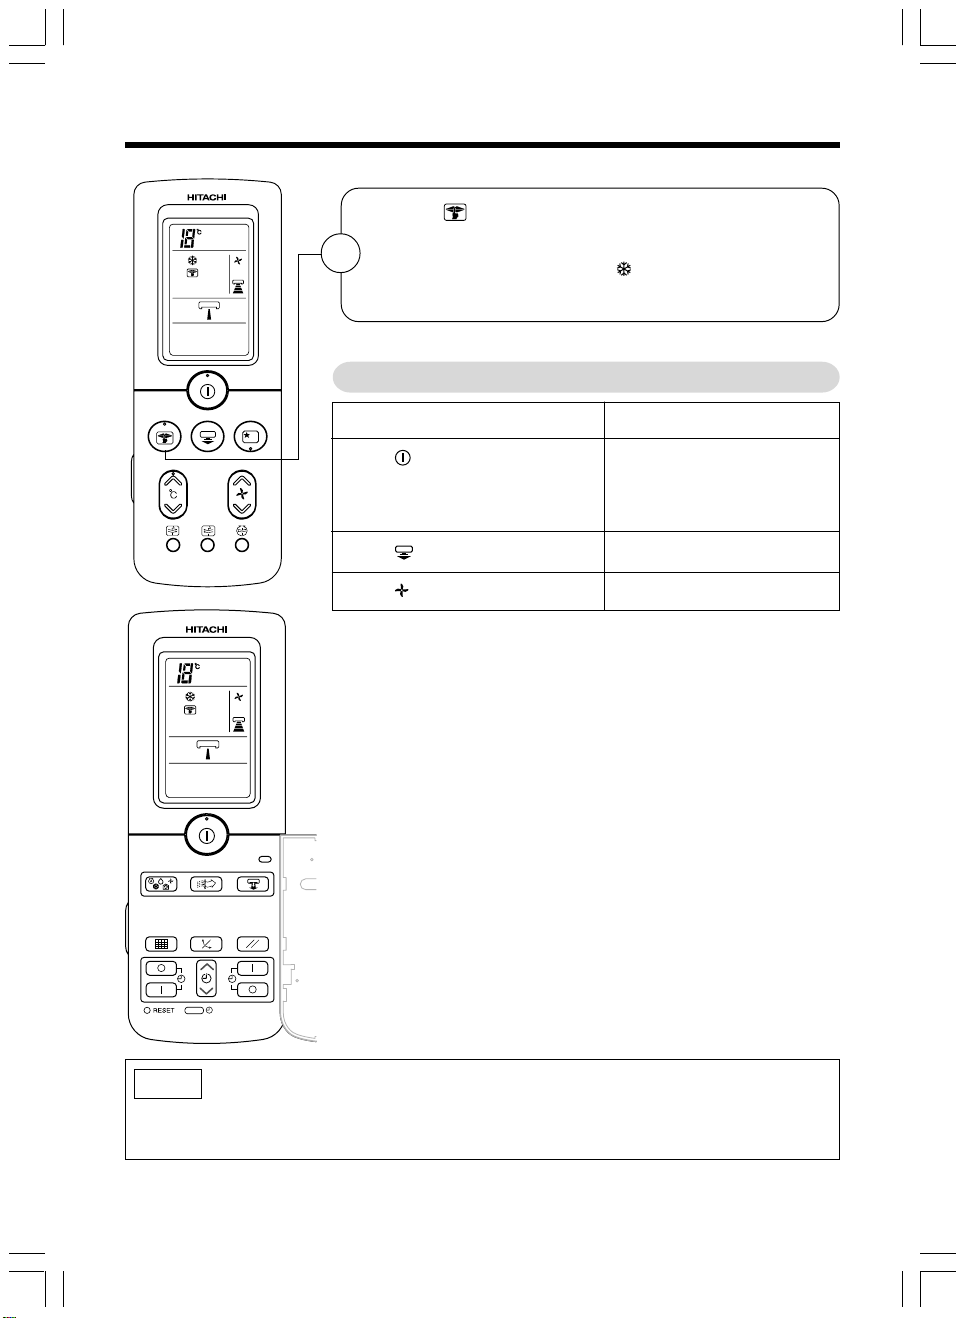
FRESH AIR IN OPERATION
1
STOP
RAS13EX9KS2_EN_CH(11-24).p65 3/8/07, 3:41 PM17
Press the button.
• The device beeps when it has
received the signal and the
exhaust operation starts. By
pressing the button, the display
changes as on the right.
• The OPERATION and the "Air
Exchange Operation" lamps on the
indoor unit indicators turns on.
• Although the ventilated air is deodorized by the Nano-Titanium
Disinfecting/Deodorizing/Dust Collecting Fresh Air In Filter, the
odor of the ventilated air may enter the room according to the
environment where the filter is utilized. If there is concern
regarding any odors, please stop the device.
Press the (START/STOP) button.
Press the
off.
button until Exhaust on the remote controller turns
– 17 –
Page 18
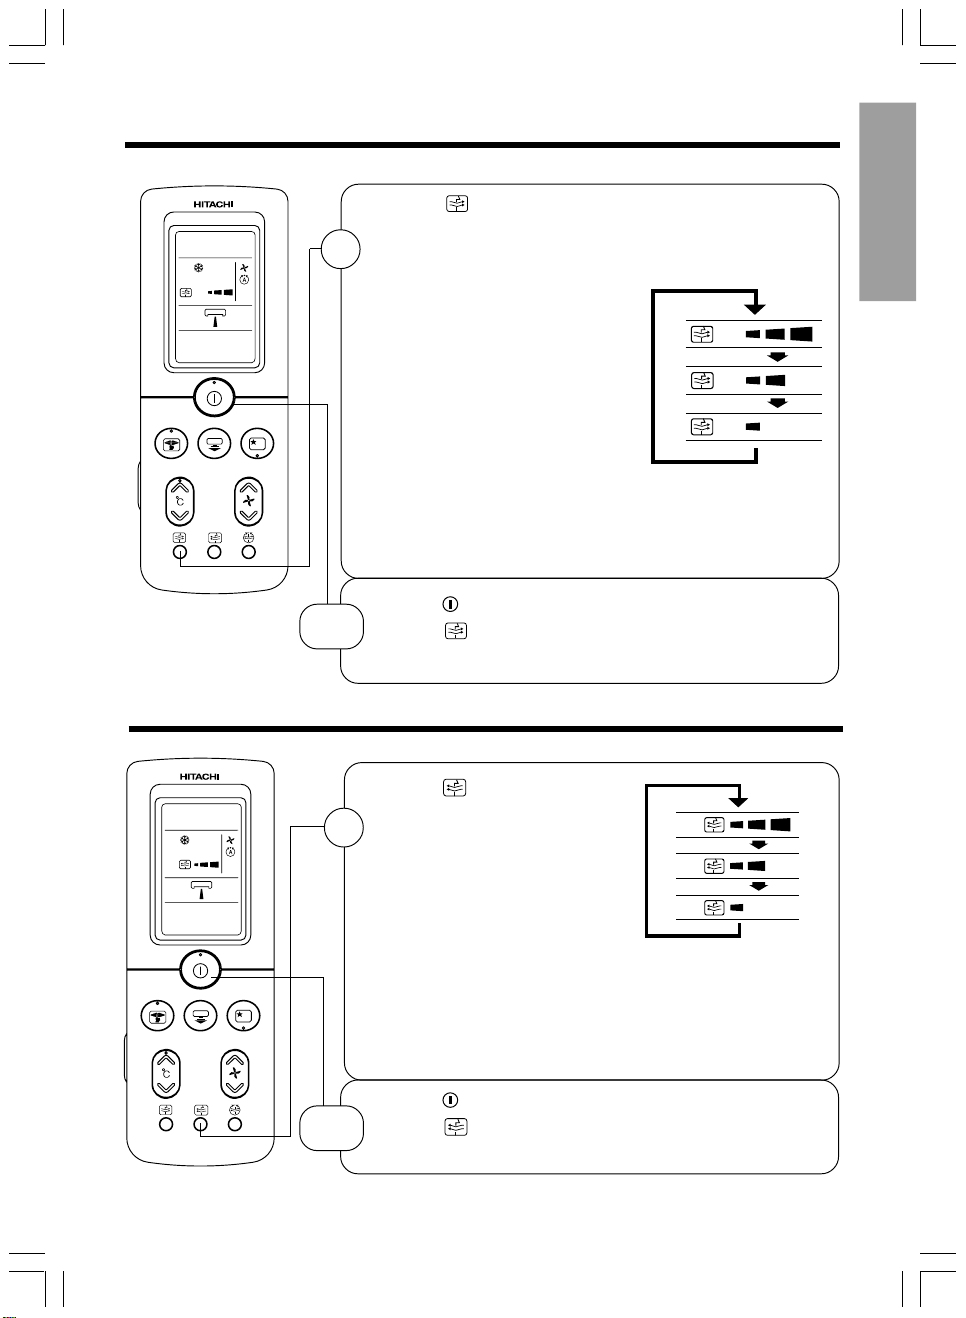
AUTOMATIC TWO WAY EXCHANGE OPERATION
• By configuring the Automatic Two Way Air Exchange, the “Dirt Sensor” detects the dust in the
room’s air. If the air is dirty, the air conditioning automatically operates the blower and exhaust
and when the air becomes clean, the Fresh Air In is operated.
• When the prohibit Two Way Air Exchange is selected with the Two Way Air Exchange Selection
Switch (Refer page 6), please do not configure the Automatic Two Way Air Exchange. Aside
from
, the remote controller is not able to configure any other settings.
• If Fresh Air In or Exhaust is operated using the button
Exchange Set, Fresh Air In or Exhaust Operation perform in the priority.
Press the button.
• The device beeps when it has received the signal and
the
1
• The “TWO WAY AIR EXCHANGE” lamp on the indoor
on the remote controller turns on.
unit indicators turns on.
during Automatic Two Way Air
button again.
CANCEL
To cancel, press the
• The
• The “TWO WAY AIR EXCHANGE” lamp on the indoor unit
on the remote controller turns off.
indicators turns off.
CAUTION
• Fresh Air In operation may not perform in Automatic Two Way Air Exchange Operation when
the air inside the room is dirty.
In this case, please operate Exhaust operation manually by pressing the
Exchange) button or open the windows for ventilation.
(Two Way Air
RAS13EX9KS2_EN_CH(11-24).p65 03/04/2007, 01:56 pm18
– 18 –
Page 19
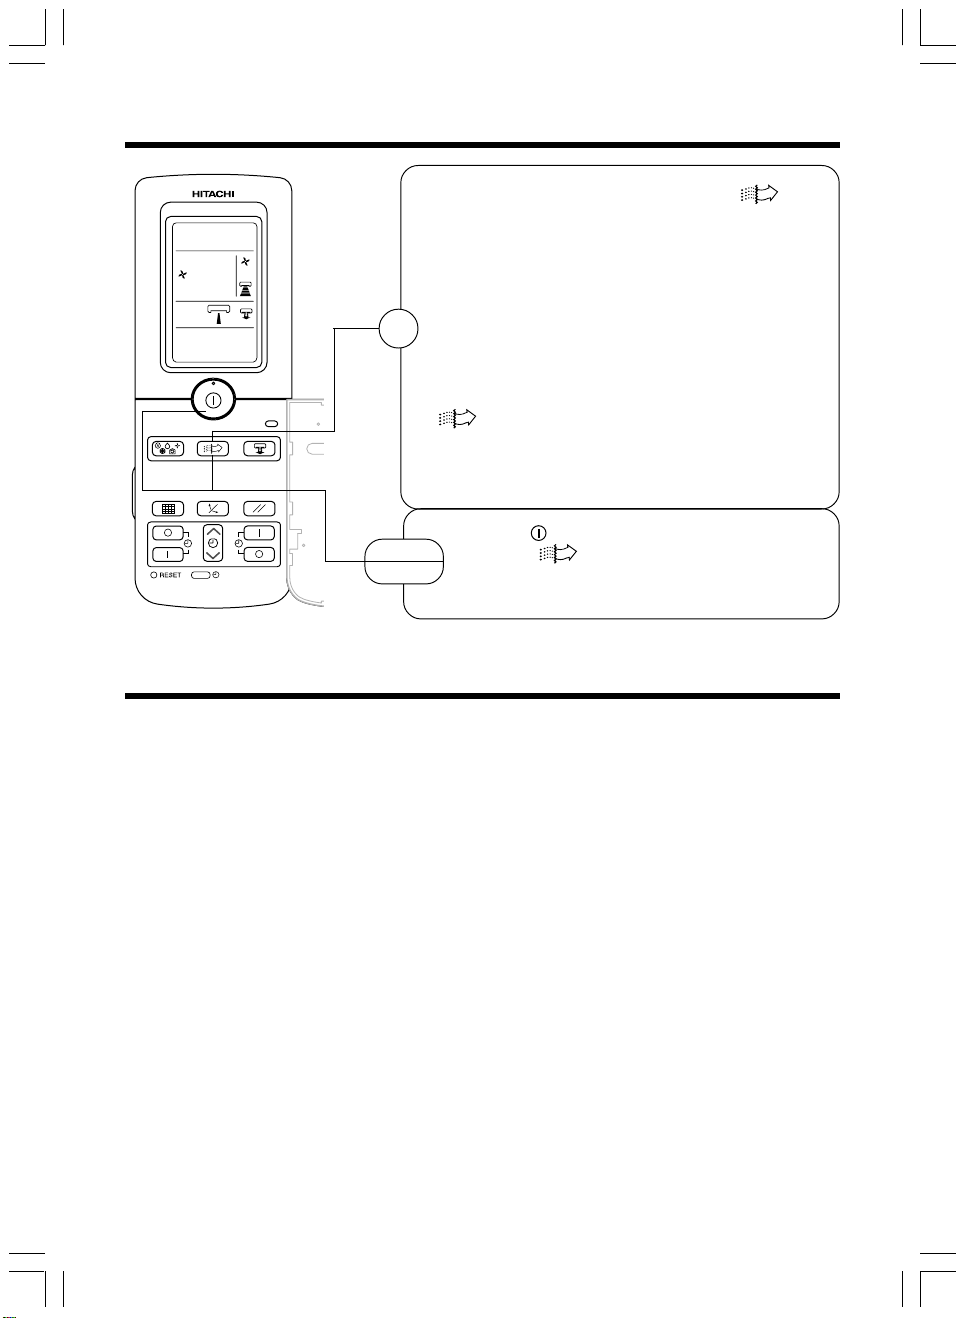
TWIN AIR FLOW OPERATION
• Press “ ” button. Remote controller sends signal,
“twin air flow” will be displayed, twin air flow with same
temperature (room air) will be blown from the fresh air
outlet by air- exchanger fan operation.
• When the air-cond operation is off, although “twin air
1
flow” is set in remote controller, twin air flow fan for
indoor unit will not function.
• During air-cond and air exchanger operation, select twin
air flow, air exchanger operation will be cancelled to
operate the twin air flow operation.
• Air exchanger fan’s noise level is higher than the aircond unit, even though the air-cond fan in “HI” fan speed.
So the noise level differential between HI, MED, LOW
speed will disappear.
• When the sleep timer is set, twin air flow operation will
be cancelled temporary.
ENGLISH
BAHASA MELAYU
Room temperature air flow
STOP
Press the button until TWIN AIR FLOW on the remote
control turns off.
• When using simultaneously with cooling operation, it
will direct the air flow from air-cond to upper part of
the room, to make the user feel cool.
THAILAND
RAS13EX9KS2_EN_CH(11-24).p65 3/8/07, 3:41 PM19
– 19 –
Page 20
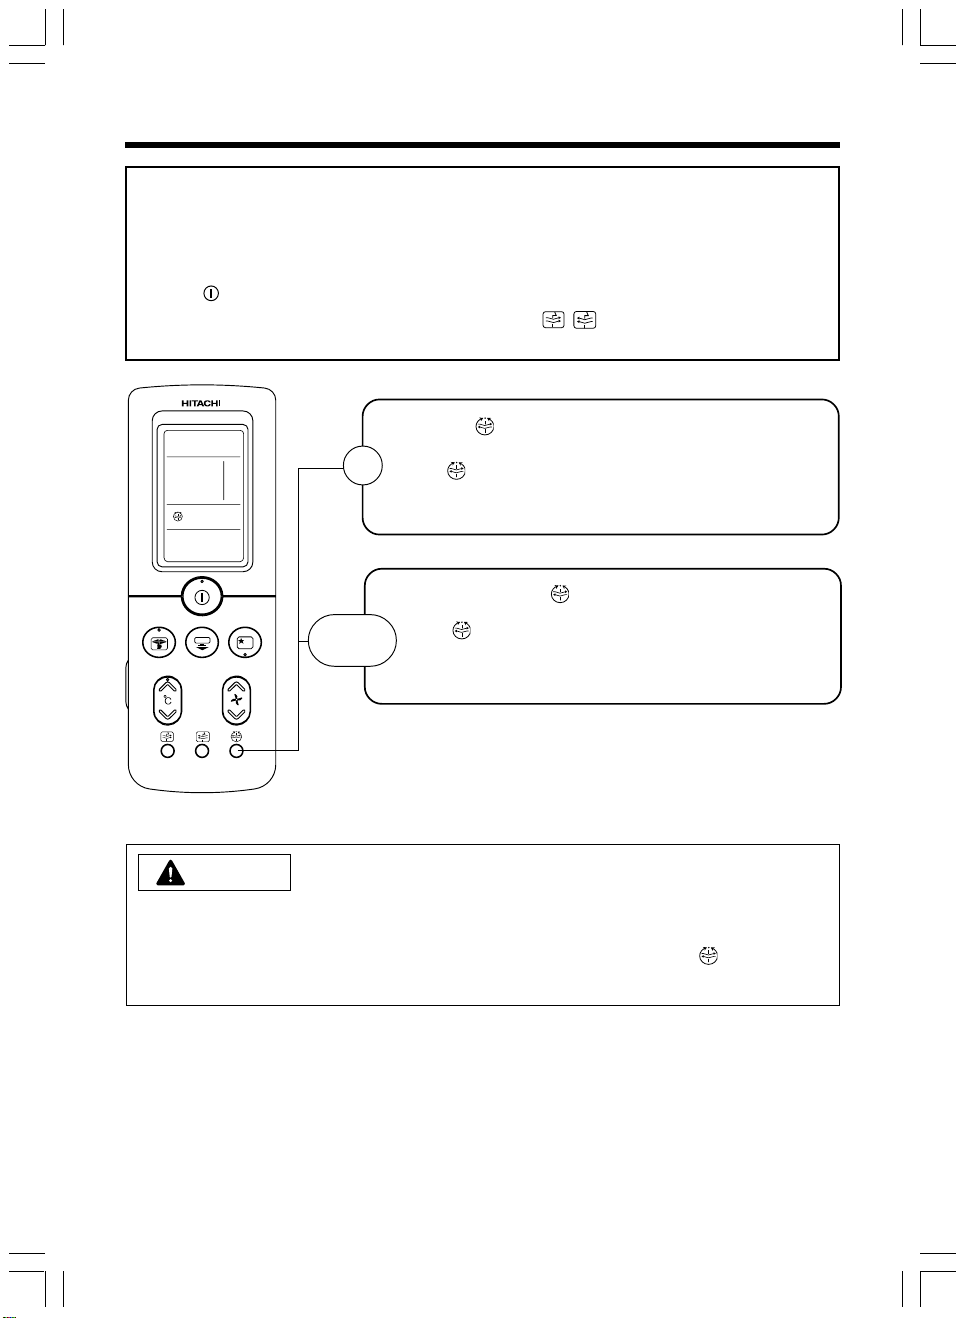
AIR PURIFIER OPERATION
The air purifier is operated by pressing the “ ” (AIR
PURIFIER) button.
• The device beeps when it has received the signal and
then the air purifier starts.
• The OPERATION lamp on the indoor unit indicators
turn on.
• The fan speed can be changed as desired. Either HI,
1
MED, LOW or SILENT can be selected.
The power of the air purifier is increased by increasing
the speed of the air conditioner’s fan, by pressing the
” (AIR PURIFER) button while the COOL or
“
DEHUMIDIFY operates.
(Depending on the operation conditions, there is a case
that the fan speed does not increase.)
STOP
CANCEL
Press the (START/STOP) to stop operation.
Press the “
cancel the air purifier operation.
(During COOL or DEHUMIDIFY operation)
” (AIR PURIFER) button again to
AIR EXCHANGER NOTES
Ventilation
• When the air temperature outside the room exceeds 30°C or drops below 3°C, the ventilation does
not operate to prevent dew condensation on the air exchanger fan and hose and to save energy.
• If the difference in temperature between the inside and outside of the room exceeds 7°C, the fresh
air in does not operate to prevent dew condensation on the air exchanger fan and hose, while
cooling.
• If the room humidity is more than 70%, the intake fresh air will not operate.
• When the above mentioned operations have stopped, the “Air Exchanger” lamp in the display
of the indoor unit blinks (10 seconds on / 1 second off).
Exhaust
• When the temperature inside the room exceeds 43°C, the exhaust does not operate to protect the
exhaust fan from damage.
• When the above mentioned operation has stopped, the “Air Exchanger” lamp in the display
of the indoor device blinks (10 seconds on / 1 second off).
RAS13EX9KS2_EN_CH(11-24).p65 03/04/2007, 03:10 pm20
– 20 –
Page 21
TWIN AIR FLOW NOTES
• When the temperature inside the room exceeds 43°C, the twin air flow and air purifier does not
operate to protect the exhaust fan from damage.
• When the above mentioned operation has stopped, the “Air Exchanger” lamp in the display
of the indoor device blinks (1 second on / 10 seconds off).
AIR EXCHANGER SPECIFICATIONS
Items Specification
Air exchanger method Air exchanger method
Fresh air volume (Hi) 10.0 m3/h
Exhaust volume (Hi) 24.0 m3/h
Testing standard JIS (Japan Industry standard) B8330
Testing condition Pipe length : 0.29 m
• Testing Condition
Pipe length : 0.29 m
Piping condition : Come out from horizontal and backward.
Use air exchanger hose.
Piping bending time : 1 time.
Others : Anti-insect and rain proof ventilate cap.
ENGLISH
BAHASA MELAYU
THAILAND
RAS13EX9KS2_EN_CH(11-24).p65 3/8/07, 3:42 PM21
– 21 –
Page 22
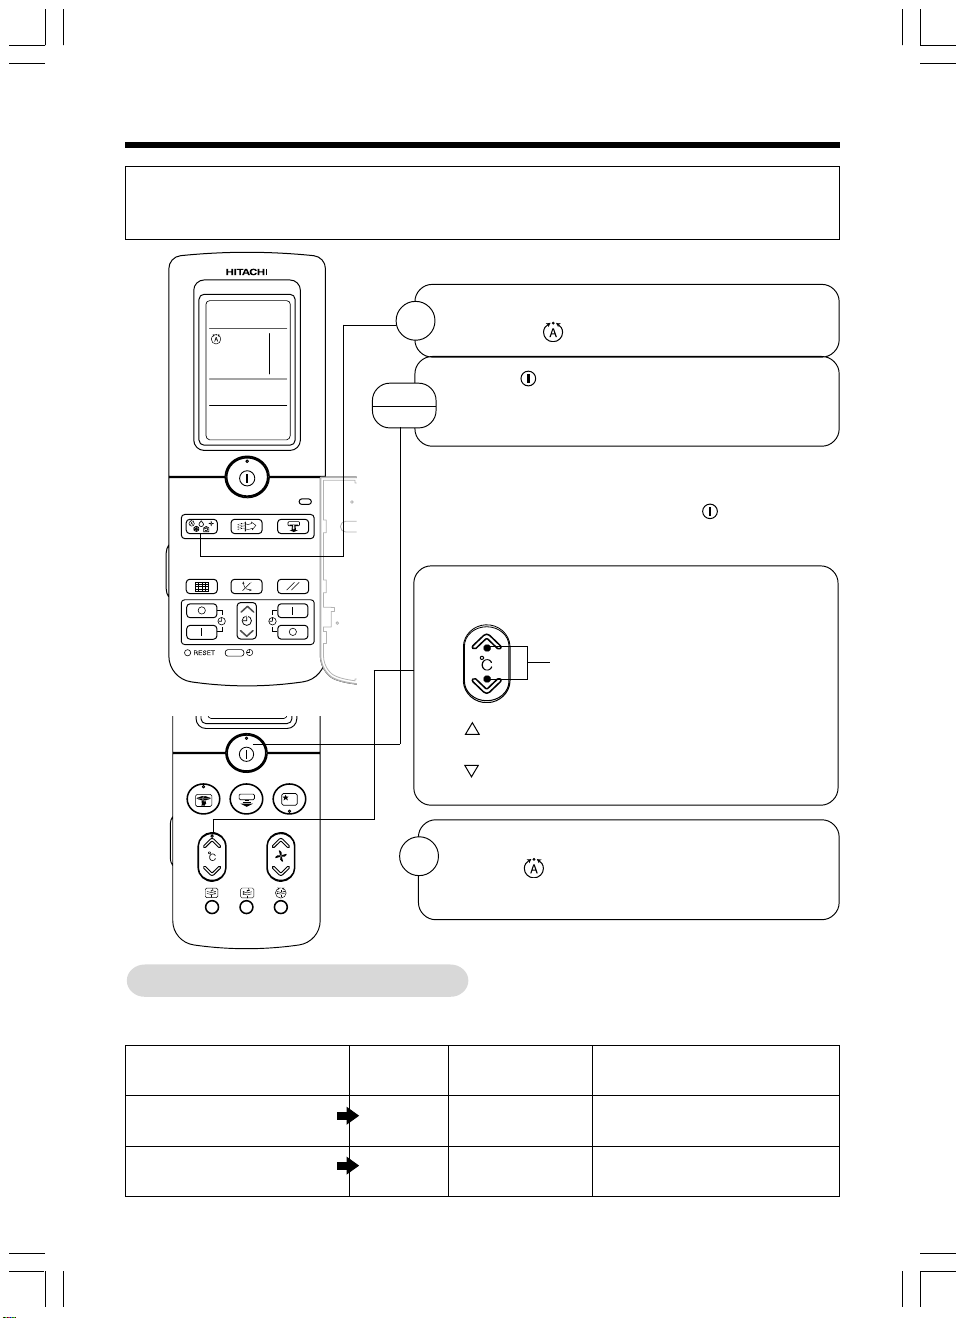
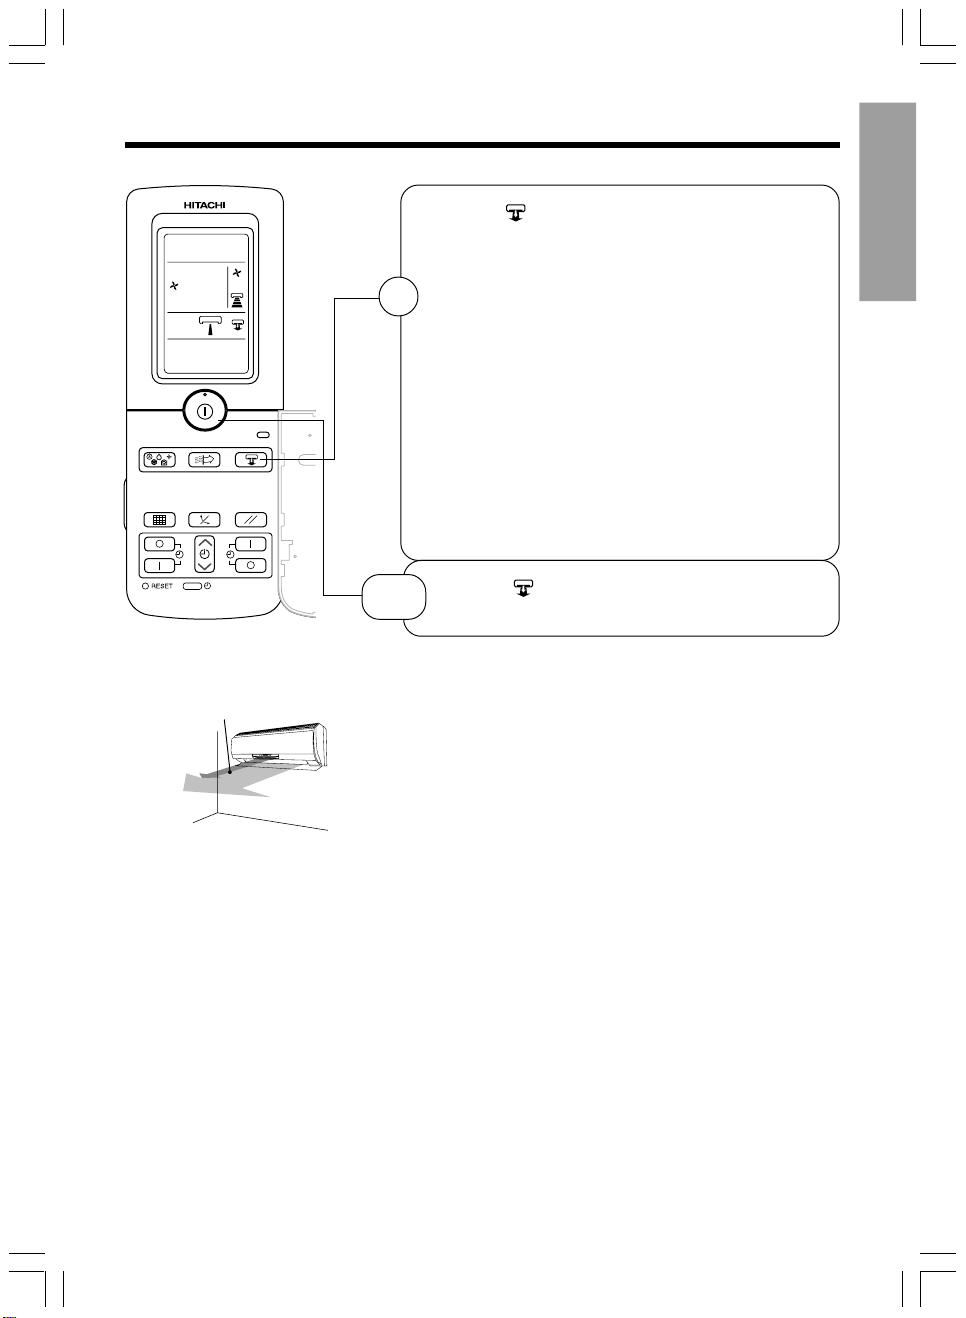
ADJUSTING THE AIR DEFLECTOR
Adjustment of the conditioned air in the upward and
1
downward directions.
According to “Dehumidifying” or “Cooling” operation,
the horizontal air deflector is automatically set to the
proper angle suitable for each operation. The
deflector can be swung up and down and also set to
the desired angle using the “
button. (If the angle of the deflector is changed, it will
not return to the auto-set position after operations
start unless the operation mode is switched.)
• If the “ (AUTO SWING)” button is pressed once, the
horizontal air deflector swings up and down. If the button
is pressed again, the deflector stops in its current position.
Several seconds (about 6 seconds) may be required before
the deflector starts to move.
• In “Cooling” operation, do not keep the horizontal air
deflector swinging for a long time. Some dew may form on
the horizontal air deflector and dew may drop.
Adjustment of the conditioned air to the left and right.
2
Hold the vertical air deflector as shown in the figure
and adjust the conditioned air to the left and right.
• If the “
once, the vertical air deflectors swing left and right
to parallel. If the button is pressed again, the
deflectors stop in their current position. Several
seconds (about 6 seconds) may be required before
the deflectors start to move.
(PARALLEL SWING)” button is pressed
(AUTO SWING)”
Horizontal Deflector
Vertical Deflector
Auto Swing
Parallel Swing
During cooling and
dehumidifying operation
Initial condition
Vertical
60°
20°
15°
CAUTION
When operating the unit in cooling operation with the air deflector facing down and moving
automatically for a long period of time, water will condensed on the air deflector and drips down
occasionally. This will wet your furniture.
– 22 –
RAS13EX9KS2_EN_CH(11-24).p65 3/8/07, 3:42 PM22
Page 23
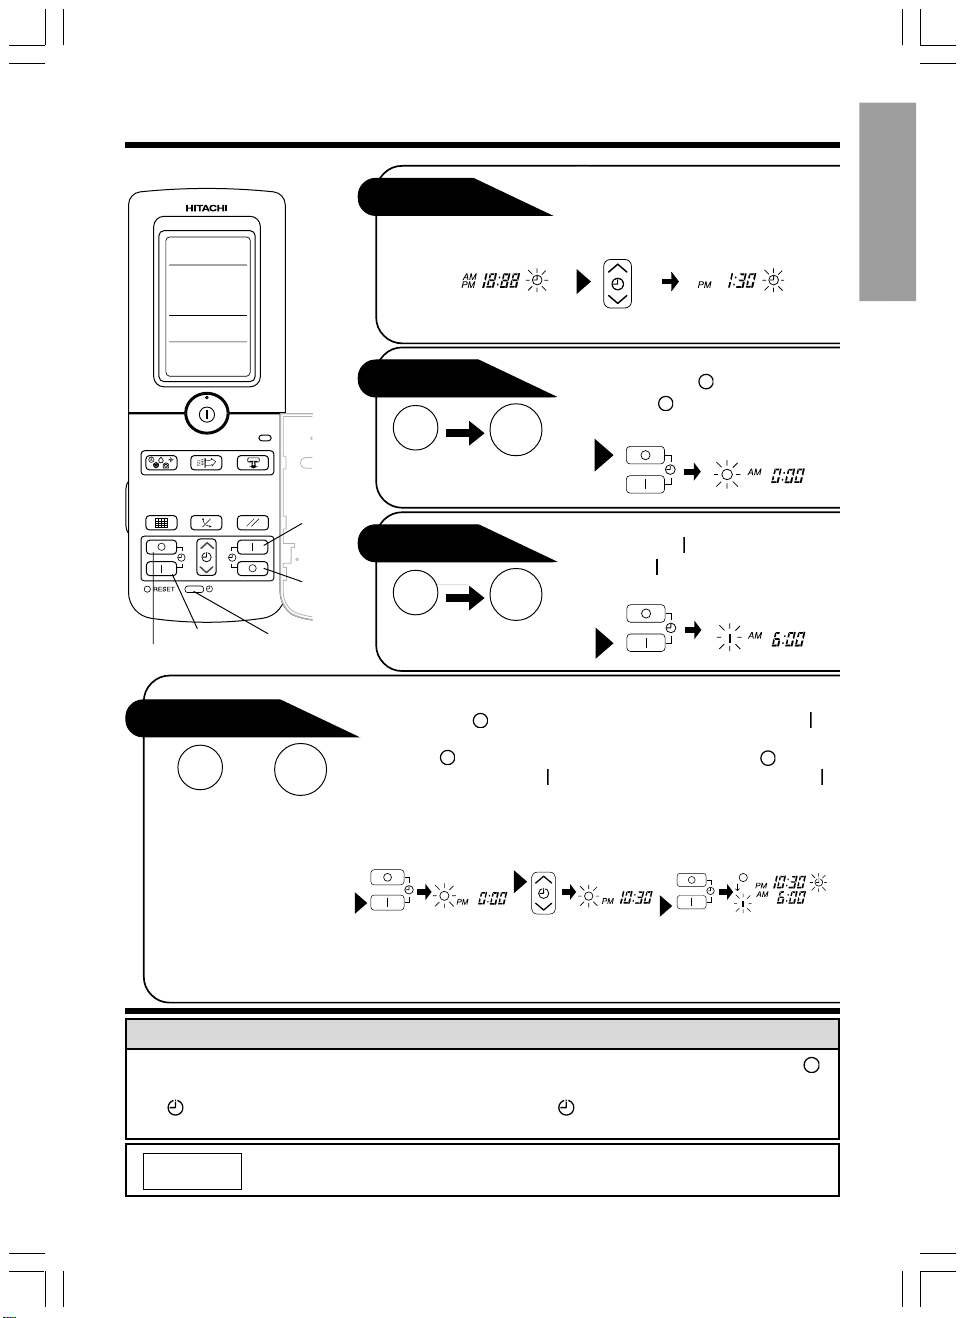
HOW TO SET THE TIMER
RESERVE
CANCEL
ON TIMER
OFF TIMER
TIME (Current
Time)
ON/OFF-Timer
➝
➝
Start
• The device will turn on (off)
and off (on) at the
designated times.
• The switching occurs first
at the preset time that
comes earlier.
• The arrow mark appearing
on the display indicates the
sequence of switching
operations.
Stop
Time
After you change the batteries:
Example: The current time is P.M.1:30.
OFF-Timer
Start
You can set the device to
turn off at the present time
Stop
ON-Timer
Stop
The device will turn on at
the designated times.
1
Press the
(OFF-TIMER) button
so that the
mark blinks.
(OFF)
Start
2
time with the TIMER
control button. Press
the
button.
1
TIMER control button.
1
Press the (OFF-TIMER)
button. The
the display.
.
1
Press the (ON-TIMER)
button. The
the display.
Set the turn-off
(RESERVE)
Set the current time with the
(OFF) mark blinks on
(ON) mark blinks on
3
Press the
(ON-TIMER) button
so that the
mark lights and the
(ON) mark blinks.
(OFF)
ENGLISH
BAHASA MELAYU
THAILAND
How to Cancel Reservation
Point the signal window of the remote controller toward the indoor unit, and press the
(CANCEL) button.
(RESERVED) sign goes out with a beep and the (TIMER) lamp on the indoor unit
The
indicators turns off.
NOTE
RAS13EX9KS2_EN_CH(11-24).p65 3/8/07, 3:42 PM23
You can set only one of the OFF-timer, ON-timer and ON/OFF-timer.
– 23 –
Page 24
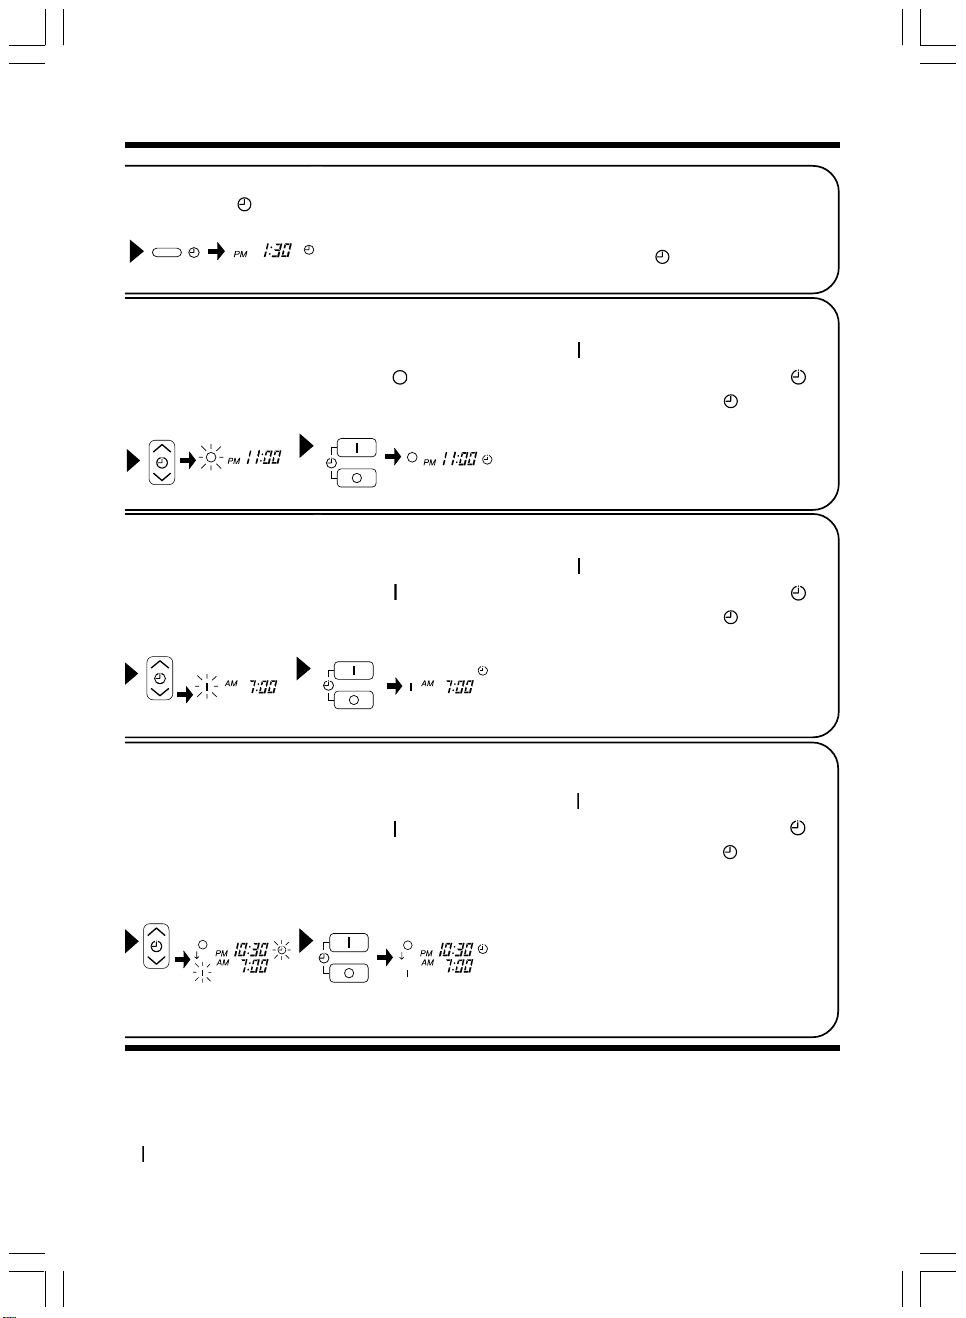
2
Press the (TIME) button. The time indication starts lighting instead of blinking.
• The time indication will disappear automatically in 10 seconds.
• To check the current time setting, press the
The setting of the current time is now complete.
2
Set the turn-off time
with the TIMER control
button.
2
Set the turn-off time
with the TIMER control
button.
3
Point the signal window of the remote controller toward
the indoor unit, and press the
(OFF) mark starts lighting instead of blinking and the
The
(RESERVED) sign lights. A beep occurs and the
lamp lights on the indoor unit.
Example:
The device will turn off at P.M.11:00.
The setting of turn-off time is now complete.
3
Point the signal window of the remote controller toward
the indoor unit, and press the
(ON) mark starts lighting instead of blinking and the
The
(RESERVED) sign lights. A beep occurs and the
lamp lights on the indoor unit.
Example:
The device will turn off at A.M.7:00.
The setting of turn-on time is now complete.
(RESERVE) button.
(RESERVE) button.
(TIME) button twice.
(TIMER)
(TIMER)
4
Set the turn-off time
with the TIMER control
button.
• The timer may be used in three ways: off-timer, on-timer and ON/OFF (OFF/ON)-timer. Set the
current time at first because it serves as a reference.
• As the time settings are stored in memory in the remote controller, you only have to press the
(RESERVE) button in order to use the same settings next time.
RAS13EX9KS2_EN_CH(11-24).p65 3/8/07, 3:42 PM24
5
Point the signal window of the remote controller toward
the indoor unit, and press the
(ON) mark starts lighting instead of blinking and the
The
(RESERVED) sign lights. A beep occurs and the (TIMER)
lamp lights on the indoor unit.
Example:
For cooling and dehumidifying, it will
simply turned on at A.M.7:00. The
settings of the turn on/off times are now
complete.
– 24 –
(RESERVE) button.
Page 25

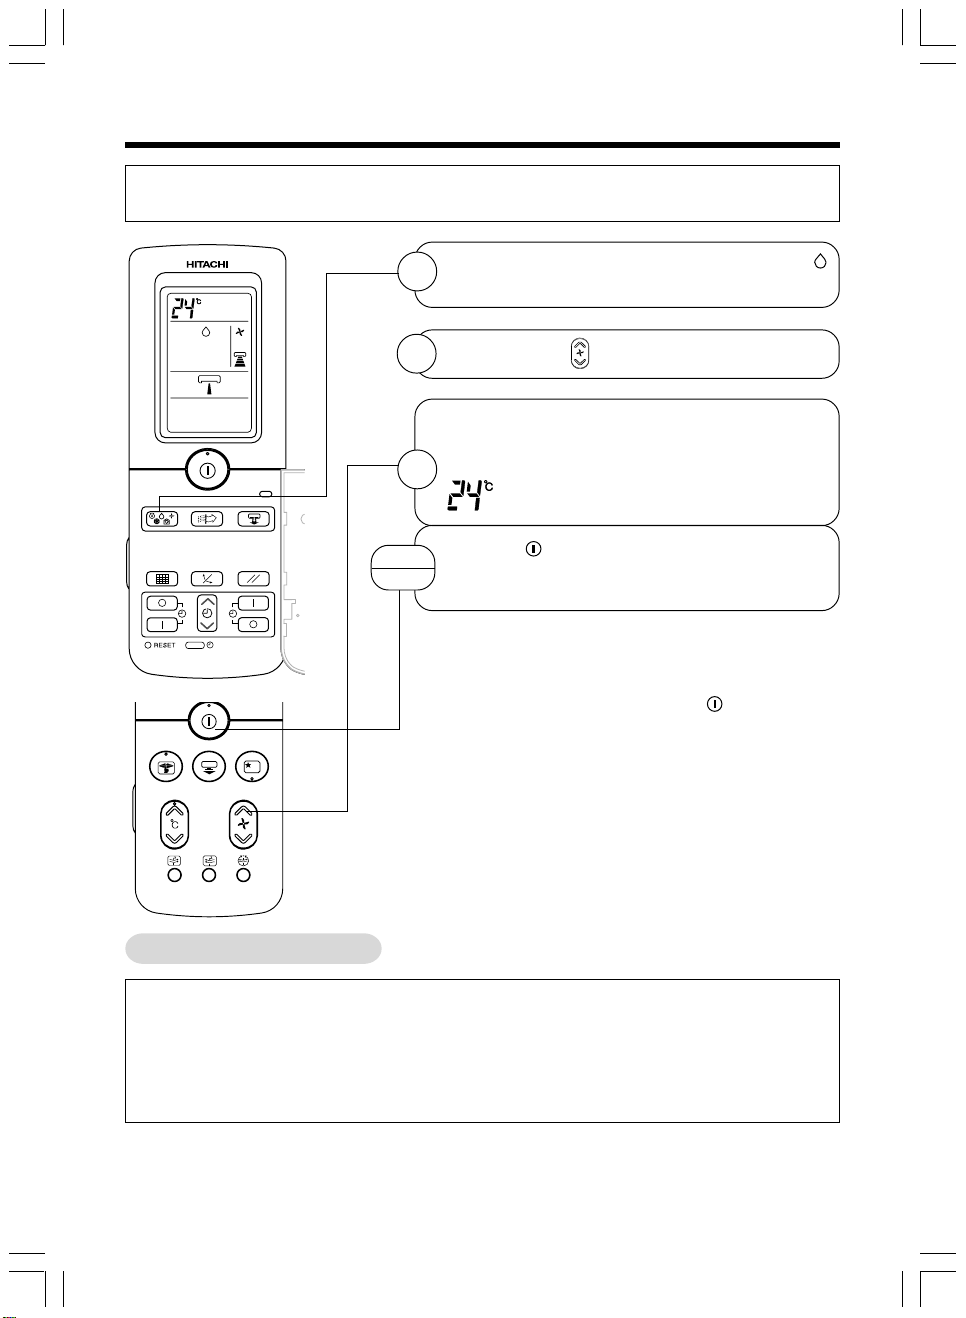
HOW TO SET THE SLEEP TIMER
• The “Off Timer”, used exclusively when sleeping, stops the fan after a specified time after
configuring the “Fan Speed” appropriate before going to bed, when cooling with the air
conditioning.
• The “Off Timer” stops the individual operation of the fresh air in, exhaust and air purifier after
a specified time.
• By pressing the (SLEEP) button, the desired sleep time
can be selected (1 hr., 2 hrs., 3 hrs. or 7 hrs. Monitoring).
• The Sleep (7 hrs. Monitoring) operation momentarily stops
cooling/dehumidifying after operating for three hours and then
1
the room’s temperature is monitored for the next 4 hrs..
While the room is monitored, the device automatically operates/
stops repeatedly (One Hour More Timer) according to the
conditions of the room.
• By pressing the (SLEEP) button, the display changes as
follows.
➛
Operation
1 hr.
➛
2 hr.
Operation
3 hr.
➛➛
Operation
Sleep
(7 hrs. Monitoring)
ENGLISH
BAHASA MELAYU
Canceling the Sleep Timer
➛
2
• The device beeps when it has received the signal and the Sleep
operation starts. The specified Sleep Timer and the stop
operation time are displayed in the display of the remote
controller.
• The timer lamp of the indoor device turns on when configuring
the Sleep Timer.
• The fan speed during the Sleep operation is set at silent.
• The Sleep Timer settings of the fresh air in, exhaust and the air
purifier are 1, 2, 3 and 7 hrs.
Sleep
1
2
➝
timer
Set the ON-timer.
Press the (SLEEP) button and set the sleep timer.
The device will be turned off by the
Start
sleep timer and turned on by on-timer.
THAILAND
RAS13EX9KS2_EN_CH(25-40).p65 3/8/07, 3:44 PM25
– 25 –
Page 26

How to Cancel Reservation
Point the signal window of the remote controller toward the indoor unit, and press the (CANCEL)
button.
The
(RESERVED) sign goes out with a beep and the (TIMER) lamp on the indoor unit
indicators turns off.
NOTE
If you set the sleep timer when the off-time or on/off-timer has been set earlier, the
sleep timer becomes effective instead of the off - or on/off-timer set earlier.
RAS13EX9KS2_EN_CH(25-40).p65 3/8/07, 3:44 PM26
– 26 –
Page 27

THE IDEAL WAYS OF OPERATION
Suitable Room Temperature
Warning
Freezing temperature is
bad for health and a waste
of electric power.
Ventilation
Caution
Do not close the room for a long period of time.
Occasionally open the door and windows to allow
the entrance
of fresh air.
Install Curtain Or Blinds
It is possible to
reduce heat
entering the room
through windows.
Effective Usage Of Timer
At night, please use the “sleep timer operation mode”,
together with your wake up time in the morning. This
will enable you to enjoy a comfortable room
temperature. Please use the timer effectively.
ENGLISH
BAHASA MELAYU
THAILAND
Do Not Forget To Clean The Air Filter
Dusty air filter will reduce the air volume and the
cooling efficiency. To prevent from wasting electric
energy, please clean the filter every 2 weeks.
RAS13EX9KS2_EN_CH(25-40).p65 3/8/07, 3:44 PM27
Please Adjust Suitable Temperature
For Baby and Children
Please pay attention to the room temperature and air
flow direction when operating the unit for baby,
children and old folks who have difficulty in movement.
(The ideal temperature different
between outdoor and indoor is
about ± 5°C).
– 27 –
Page 28

FOR USER’S INFORMATION
The Air Conditioner And The Heat Source In The Room
Caution
If the amount of heat in the room is above the cooling
capability of the air conditioner (for example: more people
entering the room, using heating equipments and etc.), the
preset room temperature cannot be achieved.
Not Operating For A Long Time
When the indoor unit is not to be used for a long
period of time, please switch off the power from the
mains. If the power from mains remains “ON”, the
indoor unit still consumes about 8W in the operation
control circuit even if it is in “OFF” mode.
When Lightning Occurs
Warning
To protect the whole unit during lightning, please stop
operating the unit and remove the plug from the socket.
OFF
Interference From Electrical Products
Caution
To avoid noise interference, please place the indoor
unit and its remote controller at least 1m away from
electrical products.
RAS13EX9KS2_EN_CH(25-40).p65 3/8/07, 3:44 PM28
– 28 –
To prevent
interference,
place at least
1m away.
Inverter-type
fluorescent
lamp.
TV
Page 29

NANO-TITANIUM DISINFECTING/DEODORIZING AIR PURIFYING FILTER/
DUCT FILTER
■ Operate after the power plug is unplugged.
Opening the Front Panel
1
• Hold both sides of the front panel and lift
up. Do not hold the movable panel when
opening and closing the front panel.
Movable panel
Front panel
• Hold both sides of the front panel and lift
up.
CAUTION
• Please do not use excessive force to open and close the movable panel.
This may cause it to malfunction.
• The movable panel automatically open and close when the power is ON/OFF and
START/STOP.
Removing the Pre-Filter
2 3
• Pull out the pre-filters on the right and
left.
2 Pull Out
1 Push and Lift
Removing the Nano-Titanium Air
Purifying Unit
• Remove the Nano-Titanium air
purifying unit (2 pieces) by pulling out
while pushing up.
Nano-Titanium Air Purifying Unit
ENGLISH
BAHASA MELAYU
THAILAND
Pre-Filter
Attaching the Nano-Titanium
4
Disinfecting/Deodorizing Air
Purifying Filter on the Nano-
Titanium Air Purifying Unit
• Open the Nano-Titanium air purifying
unit and attach the Nano-Titanium
Disinfecting/Deodorizing Air Purifying
Filter with the jagged side down.
Nano-Titanium Disinfecting/
Deodorizing Air Purifying Filter
(included) washable and reusable
up to 20 times by using vacuum
cleaner or water rinse under
running tap water.
Negative Ion Plate
RAS13EX9KS2_EN_CH(25-40).p65 3/8/07, 3:44 PM29
Nano-Titanium Air Purifying Filter
– 29 –
Attaching the Nano-Titanium Air
5
Purifying Unit
Nano-Titanium Air Purifying Unit
Page 30

INSTALLING AND VERIFYING THE FRESH AIR IN PRE-FILTER, NANO-TITANIUM
DISINFECTING/DEODORIZING/DUST COLLECTING FRESH AIR IN FILTER
Attaching the Pre-Filter
6
• Please attach the pre-filter with the
“FRONT” indication. (The configuration of
the left and right pre-filters is different.)
CAUTION
•
Please do not operate the device without the pre-filter. If
dust enters the machine, this may cause it to malfunction.
Pre-Filter
“FRONT”
indication
2 Insert
1
“FRONT”
indication
Attaching the Nano-Titanium
7
Disinfecting/Deodorizing/Dust
Collecting Fresh Air In Filter Case
•
Remove the Nano-Titanium Disinfecting/
Deodorizing/Dust Collecting Fresh Air In Filter
from the bag and orient it so that the side with
the grip comes to the front. Hold the grip and
push in the filter along the groove until it touches
the concave portion at the filter entrance.
Nano-Titanium Disinfecting/
Deodorizing/Dust Collecting
Fresh Air In Filter (included)
Push this part until it touches the concave portion
Filter entrance
“UP” indication
Check the installation of Fresh
8
Air In Pre-Filter
• Make sure that the pre-filter is installed
securely.
• Improper filter installation may
result in abnormal noises.
CAUTION
•
Even when “No fresh air in operation” or “No fresh air in/exhaust operation” is set, make sure to install the
Nano-Titanium Disinfecting/Deodorizing/Dust Collecting Fresh Air In Filter and the Fresh Air In Pre-Filter.
• Operation without the above filter and pre-filter may cause intrusion of outside dust and smell
into the indoor unit and could result in dew condensation and/or failure.
Closing the Front Panel
9
• Hold the front panel with both hands
and pull forward, then down.
Front Panel
•
Push the center of the front panel first, then
the both sides until a click sound is heard.
If the front panel is not closed properly,
the movable panel may not move.
Front Panel
1
2
Push the center part first
3
10
Movable panel
Movable panel
– 30 –
Switch on the power plug
• The movable panel closes.
CAUTION
• If the front panel is loose, the panel may
come off and fall.
• When opening the front panel, please do
not use excessive force. If the front panel
comes off the device, this may cause it to
malfunction.
• When removing and
installing the pre-filter,
please take sufficient
care not to cut your
hand with the fin of the
heat exchanger.
RAS13EX9KS2_EN_CH(25-40).p65 3/8/07, 3:44 PM30
Page 31

MAINTENANCE (PRE-FILTER, DUCT FILTER, FRONT PANEL, TOP GRILL)
The whole top grill can be washed to keep it clean.
• Remove the top grill and wash with clean water. Wash it with a soft sponge. When
using neutral detergent, wash thoroughly with clean water.
• Wipe off the water thoroughly.
The front panel and horizontal deflector may be cleaned with a dry cloth.
• When cleaning the front panel and horizontal deflector, wipe them with a soft dry cloth
together with the main body and remote control, etc.
When using chemical cloth, follow the precautions and instructions provided with it.
• Do not wash the front panel in whole.
CAUTION
Before maintenance, stop the operation by using the remote control and unplug the power plug
(or turn off the circuit breaker).
• It is recommended to carry out cleaning of the pre-filter when the FILTER lamp on indoor unit
on. By doing this, the power rates are saved.
• The Pre-Filter lamp on indoor unit turns on when the accumulated operation time measured by
the indoor unit reaches 100 hours.
ENGLISH
BAHASA MELAYU
Open the Front Panel and
1
Remove the Pre-Filter
• Confirm the dirt on the pre-filter.
Please proceed to 3 if the filter is not
dirty.
2 Pull Out
Pre-Filter
(How to open and close the front panel,
refer to page 5.)
Attach the Pre-Filter and Close
3
the Front Panel
• Please attach the pre-filter with
the “FRONT” indication. (The
configuration of the left and right
pre-filters are different.)
Pre-Filter
“FRONT”
indication
2
Insert
1 Push and Lift
1
“FRONT”
indication
Vacuum Dust Using
2
Vacuum Cleaner
• If there is too much dust, wash the filter
with detergent and rinse it thoroughly.
After that, dry it in the shade.
•
Nano-Titanium Disinfecting/Deodorizing
Air Purifying Filter can be used after
removed dust with a vacuum cleaner
and dried it in the sun for 1 day.
However, it is recommended to
the Nano-Titanium Disinfecting
Deodorizing Air Purifying Filter
approximately every 2 years.
(When drying the filter in the sun, it
could be deformed if it is placed in a
place subjected to high temperature
such as on the car bonnet.)
Switch On the Power Plug (or
4
Turn On the Circuit Breaker)
Point the Remote Control
5
to the Indoor Unit and
Press the FILTER button
• The device beeps when
signal is received.
• Please make sure that the
device beeps.
THAILAND
replace
/
CAUTION
• Do not operate the unit without the pre-filter.
• Dust may get into the gap on the heat exchanger or device and its smell may stick to the heat
exchanger or failure could be caused.
– 31 –
RAS13EX9KS2_EN_CH(25-40).p65 3/8/07, 3:44 PM31
Page 32

MAINTENANCE (continued)
• Cleanliness of filters differs according to environment and usage conditions. Check regularly, if
the filters are dirty, cleaning is recommended. Especially if the Fresh Air In operation is utilized
often, check the filters once every 2 weeks and if the filter is dirty, cleaning is recommended.
Although small insects may be caught in the Fresh Air In Pre-Filter, they have entered from the
outside air (outside the room) and it is not uncommon. Please wash the Fresh Air In Pre-Filter.
■ Operate after the power plug is unplugged.
Opening the Front Panel (How to open and close the front panel, refer to page 5.)
1
• Hold both sides of the front panel and lift up.
Do not hold the movable panel when opening and closing the front panel.
Movable panel
Front panel
Removing the Fresh Air
2
In Pre-Filter
• Please pull out to
the front.
• Outdoor dust sticks
to the lower side of
the exhaust prefilter.
Confirm the Dirt on Each of the
4
Removed Filters
• Please proceed to 6 if the filter is not
dirty.
Wash Each of the Removed
5
Filters with Water
• After washing with water, please allow
to drip dry.
• If the dirt is difficult to wash off, please
wash with luke warm water that does
not exceed 40°C.
• Nano-Titanium Disinfecting/
Deodorizing/Dust Collecting Fresh
Air In Filter should be washed and
dried in the shade once in every 3
months. Although it can be washed
and used repeatedly, it is
recommended that the filter is
replaced every 3 years.
Removing the Nano-Titanium
3
Disinfecting/Deodorizing/Dust
Collecting Fresh Air In Filter Case
• Please hold the handle of the NanoTitanium Disinfecting/Deodorizing/
Dust Colecting
Fresh Air In Filter
Case and pull out to
the front.
Nano-Titanium Disinfecting/
Dust Colecting Fresh Air In Filter
Attaching the Fresh Air In
6
Pre-Filter
• Please keep the engraved mark up
• Improper filter installation may
Deodorizing/
and attach by pushing the filter into the
device until the filter clicks.
result in abnormal noises.
Fresh Air In Pre-Filter
引
く
上
面
P
U
L
L
RAS13EX9KS2_EN_CH(25-40).p65 3/8/07, 3:44 PM32
– 32 –
Page 33

Attaching the Nano-Titanium
7
Disinfecting/Deodorizing/Dust
Collecting Fresh Air In Filter
•
Orient the Nano-Titanium Disinfecting/
Deodorizing/Dust Collecting Fresh Air In Filter so
that its grip come to the front and the “UP”
indication comes to the top. Push in the filter until
it touches the concave portion at the filter entrance.
•
Improper filter installation
may result in abnormal
noises.
Nano-Titanium Disinfecting/
Deodorizing/Dust Collecting
Fresh Air In Filter
Switch On the Power Plug.
9
• The movable panel closes.
Closing the Front Panel
8
• Hold the front panel with both hands
and pull forward, then down.
Front Panel
• Push the center of the front panel first,
then the both sides until a click sound
is heard. If the front panel is not closed
properly, the movable panel may not
move.
Front Panel
Movable panel
Movable panel
ENGLISH
BAHASA MELAYU
10
Point the Remote
Control to the Indoor
2
Unit and Press the
FILTER button.
•
The device beeps when
signal is received.
• Please make sure that
the device beeps.
CAUTION
• Please do not use excessive force to
open and close the movable panel.
This may cause it to malfunction.
• The movable panel automatically open
and close when the power is ON/OFF and
START/STOP.
Method of Removing the Front Panel
Be sure to hold the front panel with both hands to detach and attach it.
Removing the Front Panel
(How to open and close the front panel, refer
to page 5.)
1 Push the end of the right-side arm inward to
release the tab.
2 Move the left-side arm inward to release the
left tab, and then pull the panel towards you.
Front panel
2
1
Push
Attaching the Front Panel
1
Insert the left tab of the front panel along the step
on the main body until the tab goes in the hole.
2 Securely insert the tab on the right arm of
the front panel along the step on the main
body until the tab goes in the hole.
3 Make sure that the front panel is securely
attached, and then close the front panel.
Front panel
Step
1
1
Push the center part first
3
3
2
THAILAND
Ta b
RAS13EX9KS2_EN_CH(25-40).p65 3/8/07, 3:44 PM33
– 33 –
Page 34

MAINTENANCE (continued)
Method of Removing the Top Grill (How to open and close the front panel, refer to page 5.)
Removing the Top Grill
1 Lift up while pressing the top grill and remove
the stoppers.
2 Pull forward (both left and right grills).
1
Stoppers
2
CAUTION
• Do not splash or direct water to the body of the unit when cleaning it as this may cause
short circuit.
• Consult your dealer when cleaning the interior of the air conditioner.
• Do not climb on any unstable object during cleaning
You may fall or topple down and this could result in injury.
• Wear gloves during cleaning
Cleaning without gloves could cause direct contact with internal part and result in injury.
Attaching the Top Grill
1 Push and slide the top grill along the top of
the indoor unit so that the “UP” indication
goes to the back of the unit.
2 Press the top grill down and affix with the
stopper. (The shapes of the left and right
grills are different)
1
2
Cleaning the Heat Exchanger of the Indoor Unit
When cleaning the heat exchanger of the indoor unit using air-conditioner interior cleaner, attach
the cover provided with the accessory “SP-SSP2” to the front surface of the heat exchanger. For
cleaning details, refer to the instructions provided with “SP-SSP2”.
CAUTION
• Do not use any cleaner other than the accessory “SP-SSP2”.
Use of other type of cleaner could cause wet wall or furniture, water dripping, electrical
shock and/or failure.
• Do not climb on any unstable object during cleaning
You may fall or topple down and this could result in injury.
• Wear gloves during cleaning
Cleaning without gloves could cause direct contact with internal part and result in injury.
• Spilling of cleaner onto electrical parts could cause electrical shock and/or failure.
– 34 –
RAS13EX9KS2_EN_CH(25-40).p65 3/8/07, 3:45 PM34
Page 35

HOW TO EXCHANGE THE BATTERIES IN THE REMOTE CONTROLLER
Remove the cover as shown in the figure and
1
take out the old batteries.
ENGLISH
Install the new batteries.
2
The direction of the batteries should match the
marks in the case.
CAUTION
1. Do not use new and old batteries, or different kinds
of batteries together.
2. Take out the batteries when you do not use the
remote controller for 2 or 3 months.
Address Changing Switch
✽ The Address Changing Switch is utilized to avoid
interference between remote controllers when there
are two indoor units mounted in the same room and
is normally not utilized.
Switch
Please operate this switch
only as advised.
(When the device is shipped out of the factory, it is
set to “A”.)
Furthermore, please ask the dealer where the
device was purchased, how the device is configured.
Push and pull to the
direction of arrow.
BAHASA MELAYU
THAILAND
RAS13EX9KS2_EN_CH(25-40).p65 3/8/07, 3:45 PM35
– 35 –
Page 36

CAUTION
• Please use earth line.
Do not place the earth line near water or gas pipes, lightning-conductor, or the
earth line of telephone. Improper installed of earth line may cause electric shock.
• A circuit breaker should be installed depending on the mounting site of the unit.
Without a circuit breaker, the danger of electric shock exists.
IMPORTANT
The wires in this mains lead are coloured in accordance with the following code :
Green-and-yellow : Earth
Blue : Neutral
Brown : Live
As the colours of the wires in the main lead of this appliance may not correspond with the coloured
markings identifying the terminals in your plug, proceed as follows :
The wires which coloured green-and-yellow must be connected to the terminal the plug which is
marked with the letter E or by the earth symbols
The wire which is coloured blue must be connected to the terminal which is marked with the letter
N or coloured black.
The wire which is coloured brown must be connected to the terminal which is marked with the letter
L or coloured red.
NOTE
If the supply cord is damaged, it must be replaced by the manufacturer, its service agent or similarly
qualified persons in order to avoid a hazard.
or coloured green-and-yellow.
CAUTION
• Cleaning and maintenance must be carried out by only by qualified service personal. Before
cleaning, stop operation and switch off the power supply.
REGULAR INSPECTION
PLEASE CHECK THE FOLLOWING POINTS EITHER EVERY HALF YEARLY OR YEARLY.
CONTACT YOUR SALES AGENT IF YOU NEED ANY HELP.
1
Confirm
2
3
RAS13EX9KS2_EN_CH(25-40).p65 3/8/07, 3:45 PM36
Is the plug of power line firmly plugged into the socket?
(Please ensure no loose contact between them).
Is the earth line disconnected or broken?
Is the mounting frame seriously affected by rust and is the
outdoor unit tilted or unstable?
– 36 –
Page 37

AFTER SALE SERVICE AND WARRANTY
WHEN ASKING FOR SERVICE, CHECK THE FOLLOWING POINTS.
CONDITION CHECK THE FOLLOWING POINTS
• Is the fuse all right?
When it does not operate
When it does not cool well
NOTES :
• In quiet operation or stopping the operation, the following phenomena
may occasionally occur, but they are not abnormal for the operation.
(1) Slight flowing noise of refrigerant in the refrigerating cycle.
(2) Slight rubbing noise from the fan casing which is cooled and then
• The odor will possibly be emitted from the room air conditioner because
the various odor, emitted by smoke, foodstuffs, cosmetics and so on,
sticks to it. So the air filter and the evaporator regularly must be cleaned
to reduce the odor.
• Is the voltage extremely high or low?
• Is the circuit breaker “ON”?
• Was the air filter blocked with dust?
• Does sunlight fall directly on the outdoor unit?
• Is the air flow of the outdoor unit obstructed?
• Are the doors or windows opened, or is there any source
of heat in the room?
• Is the set temperature suitable?
gradually warmed as operation stops.
ENGLISH
BAHASA MELAYU
THAILAND
• Please contact your sales agent immediately if the air conditioner still fails to operate normally after
the above inspections. Inform your agent of the model of your unit, production number, date of
installation. Please also inform him regarding the fault.
• Power supply shall be connected at the rated voltage, otherwise the unit will be broken or could not
reach the specified capacity.
NOTE
If the supply cord is damaged, it must be replaced by the manufacturer, its service agent or
similarly qualified persons in order to avoid a hazard.
– 37 –
RAS13EX9KS2_EN_CH(25-40).p65 3/8/07, 3:45 PM37
Page 38

This product conforms with the protection requirements of council directives 89/336/EEC relating
to electromagnetic compatibility and 72/23/EEC relating to electrical equipment designed for use
within certain voltage limits.
Please note :
On switching on the equipment, particularly when the room light is dimmed, a slight brightness
fluctuation may occur. This is no consequence.
The conditions of the local Power Supply Companies are to be observed.
NOTE :
• Avoid to use the room air conditioner for cooling operation when the outside temperature is below
21°C (70°F).
The recommended maximum and minimum operating temperatures of the hot and cold sides should
be as below :
Minimum Maximum
Indoor
Outdoor
Dry Bulb °C
Wet Bulb °C
Dry Bulb °C
Wet Bulb °C
21 32
15 23
21 43
15 26
RAS13EX9KS2_EN_CH(25-40).p65 3/8/07, 3:45 PM38
– 38 –
Page 39

MEMO
ENGLISH
BAHASA MELAYU
THAILAND
RAS13EX9KS2_EN_CH(25-40).p65 3/8/07, 3:45 PM39
– 39 –
Page 40

MEMO
RAS13EX9KS2_EN_CH(25-40).p65 3/8/07, 3:45 PM40
– 40 –
Page 41

分離式冷氣機
RAC-13EX9G
RAS-13EX9KS2
RAS-18EX9KS2
RAC-18EX9G
室內機∕室外機
型 式
RAS-13EX9KS2 / RAC-13EX9G
RAS-18EX9KS2 / RAC-18EX9G
室外機
Instruction Manual Page 1~40
To obtain the best performance and ensure years of trouble free use, please read this instruction manual
completely.
使用說明書 41~80頁
請詳細閱讀這本使用說明書以了解正確的使用法,使機器長久發揮最高性能。
室內機
RAS18EX9KS2_CH(41-55) 3/8/07, 3:46 PM41
Page 42

安全上應特別注意之事項
• 使用前,請詳細閱讀「安全上的注意事項」,以正確的使用機體。
• 在所示注意事項的“
能會造成死亡或重傷,而“注意”欄中記載之事項,因狀況也可能造成重大之後果,所以請務必遵守,以維護安全。
• 標記事項如下。
警告”、“ 注意”需特別加以注意。“警告”欄中記載之事項,表示處理錯誤時,可
確定地線已連接。
圖象中的這標記表示禁止事項。
• 閱讀完後,請務必妥善保管。
•
請勿重組機件。
自己重組機件可能會造成漏水、故障、觸電及水災。
•
警告
注意
警告
安裝時,請委託經銷商或專門技術人員安裝。
自己安裝可能會造成漏水、觸電及火災。
•
請使用接地線。
地線請勿安裝在瓦斯管、水管、避雷針、電話之地線等場所。
•
依設置場所狀況,有必要安裝漏電斷電器。
如沒有安裝漏電斷電器時,會有觸電的危險。
•
不可安裝於有可燃氣體的場所,因為萬一氣體泄漏在機體周圍的話,可能
會發生火災。
•
安裝排水管時,請確認水可否順利的流出。
•
異常時(有焦味等),請停止運轉後把斷電器關閉,並通知經銷服務人員。有異
常而照舊連續運轉的話,會造成故障、觸電、火災等。
•
維修時,請直接向經銷服務人員接洽。
自己修理不完全的話,會有觸電、火災的危險。
•
機體要移動重新再設置時,請直接向經銷服務人員接洽。
自己移動機體,重新再設置時,若安裝不安全的話,就會有觸電、火災的危險。
圖象中的這標記表示禁止事項。
安裝上的注意事項
搬移或修理時的注意事項
“停止”
•
身體請勿長時間直接對著冷氣,以免妨礙健康。
•
警
告
•
請勿以金屬或銅線當作保險絲,以免發生故障或火災。
“停止”
RAS18EX9KS2_CH(41-55) 3/8/07, 3:46 PM42
請勿將細棒等物品插入吹出口及吸入口,由於風扇在高速運轉,易造成危險。
•
有打雷之可能時,為了保護機械,請停止運轉,並把斷電器關閉,以避故障發生。
使用上的注意事項
– 42 –
Page 43

使用上的注意事項
•
本機請使用在以一般家庭的人為對象的場所,請勿使用在保存食品、動植物、精密機器、
美術品、醫藥品等特殊場所。
警
告
•
請不要用濕手來操作開關,以免觸電。
•
與燃燒器具一起運轉時,請常換氣,否則會有氧氣不足的情形。
•
本機所吹出來的風,請不要直接吹在燃燒器具上,否則,會使燃燒器具燃燒不完全。
•
長期使用的安裝材料請隨時注意其是否穩固,不可有損傷的情形。否則機體可能會落
下造成危險。
•
清洗機體時,請絕對避免用水潑機體,因會有漏電的危險。
•
請勿在室內機旁噴酒煙霧或美乏劑。化學物會粘附在散熱片及堵塞蒸發水流向盛水盤。
水將會滴在切線形風扇飛濺而出。
•
清潔機體時,請停止運轉並把斷電器關閉。因為機體內部的風扇正以高速運轉,會造
“停止”
•
長時間不運轉時,為了安全起見,請把斷電器關閉。
•
機體上請不要放有水的容器(如花瓶),以免傾倒流入機體內部,會使機體內部
電氣絕緣劣化,產生觸電的危險。
成傷害。
•
請勿爬上機體,物品也不要放在機體上面。
“停止”
ENGLISH
中國語中國語
中國語中國語
中國語
BAHASA MELAYU
THAILAND
THAILAND
•
動植物請不要放置在風向直接吹到的場所,否則會對動植物有不良的影嚮。
•
冷氣運轉時,窗和門在開放的狀態下,風向板向下時,都請不要長時間運轉,否則上下風向板
會結露,有時會滴下來,而使傢俱弄濕。
•
房間如果有超過冷氣能力的熱源(如房間有多人進入,使用熱器具等),將無法達到所設定室溫。
RAS18EX9KS2_CH(41-55) 3/8/07, 3:46 PM43
– 43 –
Page 44

各部的名稱和功能
室內機
清新空氣入口抽風機 (內部)
當吸入清新空氣,排氣,雙向交換和納米鈦空
氣清淨程序正在進行中時,本裝置就會開始操
作。
納米鈦空氣清淨濾氣網 (內部)
防止香煙氣味,花粉等等進入室內機內部。
(詳見第 69 頁)
預濾氣網 (內部)
防止空氣中的灰塵進入室內機內部。
(詳見第 69 頁)
吸出口
室外機
RAC-13EX9G
前面板 (詳見第 69, 73 頁)
清新空氣窗
當機體吸入空氣時,此裝置從室外將空氣吹
入室內。
當進行雙向交換和納米鈦空氣清淨程序時,
此裝置吹動室內的空氣。
顯示器 (詳見第 45 頁)
活動板
活動板會在操作時打開,停止操作時則
會關上。
上柵
(詳見第 74 頁)
電源插頭
信號接受器
接受遙控器的
信號。
上下風向板、左右風向板 (內部)
排水管
凝結水向室外排出。
配管
吸入口 (背部)
吸出口
RAC-18EX9G
型號及外型尺寸
型號
RAS-13EX9KS2 / RAS-18EX9KS2
RAC-13EX9G
RAC-18EX9G
RAS18EX9KS2_CH(41-55) 3/8/07, 3:46 PM44
排水管
凝結水向室外排出。
配管
吸入口 (背部)
吸出口
寬 (mm)
870
700
850
– 44 –
高 (mm)
298
570
800
深 (mm)
223
210
298
Page 45

室內機顯示部
打開前面板
●
空氣監控指示燈 (黃)
ENGLISH
當空氣監控器啟動時,此指示燈會亮。
●
濾氣網燈 (綠)
●
Nano Titanium
特冷指示燈 (黃)
●
雙向空氣交換指示燈 (綠)
當清新空氣及排氣在運轉狀態時,指示燈會亮。
●
運轉指示燈 (黃)
中國語中國語
中國語中國語
機體保持運轉狀態時,此指示燈會亮。
●
定時指示燈 (橙)
機體做預約定時,此指示燈會亮。
中國語
BAHASA MELAYU
■ 請在打開前面板前將機器斷開。
活動板
前面板
– 45 –
打開前面上板
用雙手握著兩旁將它拉起。當開關前面板
時,請勿握著活動板。
用雙手握著兩旁將它拉起。
THAILAND
THAILAND
RAS18EX9KS2_CH(41-55) 3/8/07, 3:46 PM45
Page 46

各部的名稱和功能
室內機控制板
■ 打開前面板後操作。 (如何打開前面板, 詳見第 45 頁.)
前面板
TEMPORARY
SWITCH
快速冷卻 (只供專門技術使用)
暫時開關
如果電池損壞而不能使用遙控器操作時,請用暫時開關
開動或停止操作。
• 按下暫時開關時,機器以前次所設定的模式開動。
(再開動時,機器會以自動模式開動。)
PUSH AND HOLD THE SWITCH FOR 3 SEC
FORCE
TO START THE FORCE COOL OPERATION.
COOL
FOR SERVICE MAN USE ONLY
塵埃傳感器
塵埃傳感器偵察香煙煙塵等
等。(詳見第 58 頁。)
操作雙向空氣交換選擇鈕
選擇以下其一:
“禁止雙向空氣交換”,
“只是排氣”,“操作雙向
空氣交換”。
警告
如長期沒使用此機器請將電源開關關
掉或將電源插頭拔掉。
✩ 當此機器沒有操作而電源仍然開著時,控制電路仍會消耗少量電力。關掉斷路開關將能節省能源。
槽濾網
納米鈦抗菌/除臭/清新空氣網
收集灰塵
此裝置抗菌,除臭,並除去來自
外面的通風空氣中的灰塵。(詳見
第 69, 72 頁)
清新空氣網
此裝置收集來自外面的通風空氣
中的污垢和塵埃粒子。(詳見第
69, 72 頁)
– 46 –
RAS18EX9KS2_CH(41-55) 3/8/07, 3:46 PM46
Page 47

遙控器各部名稱和功能
遙控器 : 這遙控器用以控制室內的運轉。控制範圍是約7米以上。如要用電子方法控制室內照明的
話,控制範圍則可能比較短。
這遙控器可用附屬的配件裝牆壁上。安裝以前請先確認室內機能否由這遙控器來控制。
信號傳送窗∕傳送信號
要控制室內機時請將這信號
傳送窗指向室內機方向。
當信號傳送時,此信號將閃亮。
顯示器
這顯示所選擇的室溫、現在時刻、定時器狀態,所還擇的機能
和循環強度。
ENGLISH
中國語中國語
中國語中國語
中國語
開動∕停止鈕
按下此鈕時機器開動。再按一次,機器則停止。
睡眠鈕
請用此鈕設定睡面定時器。
特冷鈕
特冷
請用此鈕開啟
安靜鈕
請用此鈕設定
風扇鈕
請用此鈕設定提高或降低風速。
溫度調節器
請用這些調節鈕提高或降低設定溫度。(將按鈕繼續按住時溫
度變得較快。)
排氣鈕
清新空氣網鈕
自動雙向空氣交換鈕
請用此鈕設定自動雙向空氣交換模式。
模式。
安
靜模式。
BAHASA MELAYU
THAILAND
THAILAND
RAS18EX9KS2_CH(41-55) 3/8/07, 3:46 PM47
– 47 –
Page 48

遙控器各部名稱和功能
動作模式選擇鈕
請用此鈕選擇動作模式。每次按下此鈕時動作模式按照
(自動)→ (冷卻)→ (除濕)→
(循環) → (風扇)的次序改變。
空氣清淨鈕
請用此鈕選擇空氣清淨模式。
雙氣流鈕
請用此鈕以讓兩種氣流有效的在室內每個角落循環。
平衡搖擺鈕
用以調節垂直空氣偏向板平行的角度。
動搖擺鈕
自
用以調節水平空氣偏向板的角度。
濾器網鈕
清理濾器網後請按下此鈕。
亮以指示濾氣網應清掃。
器調整鈕
定時
請用這些調整設定定時器。
預校鈕
時間設定預定。
取消鈕
取消時間預校。
時間鈕
請用此鈕選擇或檢查時間模式。
重設鈕
當更換新電池或有不整常操作請按此鈕。
約100小時後,濾器網燈點
斷開定時器
選擇定時關機。
接通定時器
選擇定時開機。
使用人時應注意事項
• 遙控器不可放在下述地方。
• 直射陽光下
• 加熱器附近
• 遙控器應小心使用,不可掉落於地版下。請小心避免受濕。
• 室外機一旦停止後約3分鐘不能再開動(除非將電源開關一開一關,或把電源軟線拔掉
後再插進去)。
• 在運轉中加按下動作模式選擇鈕的話,機器就會停止3分鐘左右以側安全。
– 48 –
RAS18EX9KS2_CH(41-55) 3/8/07, 3:46 PM48
Page 49

手調操作
此燈亮起。
其中一個模式燈將亮起。
1
2
3
按下
(冷卻), (除濕), (循環)或 (風扇).
設定風扇速度。
請按
如果運轉沒有開動,大約10秒後,風扇速度顯示將關
掉。
運轉模式選擇鈕,選擇
(風扇) 鈕來選擇自動,強,中或弱。
按下 來設定溫度調節。
提高
降低
遙控器的溫度設定是介於
16°C~32°C
如果運轉沒有開動,大約10秒
後,室溫顯示將關掉。
(自動),
度之間。
ENGLISH
中國語中國語
中國語中國語
中國語
BAHASA MELAYU
THAILAND
THAILAND
RAS18EX9KS2_CH(41-55) 3/8/07, 3:46 PM49
按下 (開動/停止) 鈕開始操作。
機器發出笛聲而開動。
室內機的操作燈亮起。
開動
再次按下 (開動/停止) 鈕來停止操作。
停止
從今以後,只需按開動/停止鈕,以上步驟1-3所設定的
運轉模式將會自動啟動。
– 49 –
Page 50

自動動作
機器能按照初始室溫決定冷卻、除濕等動作模式。
室溫改變時所選擇的動作模式不會改變。
按下動作模式選擇鈕,使顯示器指示
1
作模式。
按下 (開動/停止) 鈕.
開動
機器發出笛聲而開動。
停止
將此鈕再按一次時機器停止。.
■ 各項設定狀態全被存儲於遙控器的存儲中,
止) 鈕就好。
如果要的話可以提高或降低設定溫度,最大調整值是
攝氏3度。
每次按下時溫度設定值改變
攝氏1度。
• 每當調高室溫,使新室溫比自動設定室溫高攝氏1度
“ ”
“ ”
符號。
符號。
時,遙控器將顯示
• 每當調低室溫,使新室溫比自動設定室溫低攝氏1度
時,遙控器將顯示
還擇風扇速度。
2
(自動) 鈕。
按下
• 還擇“自動”,“弱” 或“安靜”。
(自動) 的動
(開動/停
自動操作的條件
• 即使室溫改變,所選擇的操作模式在操作中也不會改變。
最初室溫
(概略值)
攝氏
27
度以上
22°C - 26°C
機能 溫度設定
冷卻
除濕
– 50 –
RAS18EX9KS2_CH(41-55) 3/8/07, 3:46 PM50
風扇速度
27°C
稍低于室溫 弱
開始是(強),達到預設
溫度以後是(弱)
Page 51

冷卻動作
當屋外溫度在攝氏 21度至42度的範圍內時可用本機進行冷卻工作。如室內濕度很高(80%以上)
時,室內機放氣口格柵上會結露。
按下動作模式選擇開關,使顯示器指示 (冷卻).
1
(風扇速度) 鈕設定所希望的風扇速度(顯示器
用
設定溫)。
(自動) :
(強) : 室溫降低較快,省時省能。
(中) : 穩靜。
2
(弱) : 更穩靜。
(安靜) : 安靜。
用溫度調節鈕設定所希望的室溫(顯示器指示設定溫
度)。
循歡強度起先是(強),然後達到
了預設溫度時自動改變為(中)。
ENGLISH
中國語中國語
中國語中國語
中國語
BAHASA MELAYU
冷卻工作時的室溫範圍最好是攝氏25度至
28
3
設定溫度和實際的室溫有時可能稍微不同。
按下 (開動/停止) 鈕,機器就發出笛聲而開始冷卻工
開動
作。要停止冷卻工作時將此鈕再按一次。如所設定的溫
停止
度高於當時的室溫的話冷卻機就不能開動(但
轉)指示燈亮。)
這時只要將溫度設定於低於當時室溫的水平的話,冷卻
機能就立刻開動。
■ 各項設定狀態全被存儲於
度。如設定溫度是27度的話,室溫就被
控制於攝氏
27
度左右。
(開動/停止) 鈕就好。
(運
THAILAND
THAILAND
RAS18EX9KS2_CH(41-55) 3/8/07, 3:46 PM51
– 51 –
Page 52

除濕動作
室溫高於攝氏16度時可用的本機進行除濕工作。當室溫低於攝氏15度時除濕功能不能起動。
按下動作模式選擇鈕,使顯示器指示 (除濕).
1
按下鈕 來選擇弱及安靜。
2
請用溫度調節鈕設定所希望的室溫(顯示器指示設
定溫度)。
3
開動
停止
■
各項設定狀態全被存儲於遙控器的存儲中,所以下次操作
機器時只要按下
除濕工作時的室內溫度範圍最好是攝氏
20度~26度。
按下 (開動/停止) 鈕,機器就發出笛聲而開始除濕
工作。要停止時將鈕再按一次。
(
開動/停止) 鈕就好。
除濕機能
要看所設定的室溫如何,本機會進行下述工作:
室溫高於設定溫度時;機器開始去除室內濕氣,使室溫降低到預設水平。
室溫低於設定溫度時;將室溫設定於稍低於實際的室溫時(無論設定溫度如何),機器就進行
除濕工作。
當室溫降低到設定溫度以下時,除濕工作就立刻停止(室內機停止發出空氣)。
– 52 –
RAS18EX9KS2_CH(41-55) 3/8/07, 3:46 PM52
Page 53

空氣循環動作
本機也可以作空氣循環機使用。此外,此功能也可以將室內機的內部弄乾。
按下動作模式選擇鈕,使顯示器指示 (循環).
1
按下 (風扇速度) 鈕而選擇所希望的循環強度(顯
2
示器指示所選擇的強度)。
ENGLISH
中國語中國語
中國語中國語
中國語
開動
停止
按下溫度調整鈕以設定所希望的溫度。
3
按下 (開動/停止) 鈕,機器就發出笛聲而開
始循環工作。
要停止鈕時將鈕再按一次。
BAHASA MELAYU
THAILAND
THAILAND
RAS18EX9KS2_CH(41-55) 3/8/07, 3:46 PM53
– 53 –
Page 54

風扇動作
本機也可以作空氣循環機使用。此外,此功能也可以將室內機的內部弄乾。
按下動作模式選擇鈕,使顯示器指示 (風扇)。
1
按下 (風扇速度) 鈕。
2
按下 (開動/停止) 鈕,機器就發出笛聲而開始
開動
風扇
停止
工作。
要停止鈕時將鈕再按一次。
RAS18EX9KS2_CH(41-55) 3/8/07, 3:46 PM54
– 54 –
Page 55

特冷動作
按下 鈕。
機器就發出笛聲而開始操作。
•
• 機器將在特強風扇速度作 (冷卻) 操作20分鐘。這期間
顯示器出現而室溫及風扇速度的設定顯示保持不定。
(室內機的特冷指示燈開動。)
1
•20 分鐘後,遙控器的顯示燈將消失而本機也將處與
(冷卻)模式。 溫度及風扇速度也將因此而回到之前
所設定的模式。 (室內機的特冷指示燈停此。).
• 此操作的風聲將稍微提高。
特冷動作的取消法
取消狀態 取消後的操作模式
按下 或設定斷開定時器 停止操作。
按下 除濕操作。
按下
或
ENGLISH
中國語中國語
中國語中國語
中國語
BAHASA MELAYU
THAILAND
THAILAND
RAS18EX9KS2_CH(41-55) 3/8/07, 3:46 PM55
按下
或
按下
或 正常冷卻操作。
按下
或
按下
或
20分鐘後結束
注
(1) 關機時間設定 : 斷開定時器比特冷優先操作。
(2) 開機時間設定 : 特冷操作比接通定時器優先操作。
– 55 –
Page 56

安靜模式
按下 鈕.
•
機器就發出笛聲而開始操作。
1
• 機器將在靜的風扇速度作 (冷卻) 操作。不顧慮先前的設。
取消安靜操作
取消狀態 取消後的操作模式
按下 鈕。
斷開定時器時間結束 停止操作。
睡眠定時器時間結束
按下
特冷鈕。 特冷操作。
按下
鈕。
現有的操作模式。
注
在特靜操作及清鏡的環境時,會發生冷凍劑流動時微小聲音的現像,這是正常操作的現像。
– 56 –
RAS18EX9KS2_CH(56-64) 3/8/07, 3:48 PM56
Page 57

排氣動作
按下 鈕。
•
機器就發出笛聲而排氣動作開始
1
。按下此鈕,顯示器的改變
操作
有如右邊圖。
• 室內機顯示部上的“運轉”指示燈
和“空氣交換運轉”指示燈亮起。
• 盡管空氣是經過納米鈦抗菌/除臭/
清新空氣收集灰塵網除臭,根據環
境及濾氣網的使用,過濾後的異味可能會進入室內。若有涉及關
於異味,請停止使用。
ENGLISH
中國語中國語
中國語中國語
中國語
清新空氣動作
按下 (開始/停止)鈕。
停止
按下遙控器的 “排氣”鈕直到關掉。
按下 鈕。
•
機器就發出笛聲而排氣動作開始
1
停止
。 按下此鈕,顯示器的改變
操作
有如右邊圖。
• 室內機顯示部上的“運轉”指示燈
和“空氣交換運轉”指示燈亮起。
• 盡管空氣是經過納米鈦抗菌/除臭/
清新空氣收集灰塵網除臭,根據環
境及濾氣網的使用,過濾後的異味可能會進入室內。若有涉及關
於異味,請停止使用。
按下 (開始/停止)鈕。
按下遙控器的 “排氣”鈕直到關掉。
BAHASA MELAYU
THAILAND
THAILAND
RAS18EX9KS2_CH(56-64) 3/8/07, 3:48 PM57
– 57 –
Page 58

自動雙向空氣交換
• 通過設定自動雙向空氣交換,“塵埃傳感器”將偵察到室內空氣裡的灰塵。如果空氣不潔淨,空
調設備將自動操作風箱及排氣。當空氣變得干淨後,吸入清新空氣動作開始啟動。
• 當使用雙向空氣交換選擇開關選擇禁止雙向空氣交換時(參閱第 46 頁),切勿設定自動雙向空
氣交換。除了
• 設置設定為自動雙向空氣交換時,如果使用
行吸入清新空氣或排氣動作。
,遙控器不能設定任何其它的設置。
按鈕操作吸入清新空氣或排氣,將優先執
按下
鈕。
•
1
取消
當遙控器上的
• 室內機顯示部上的雙向空氣交換指示燈亮起。
要取消時,將 鈕再按一次。
•
將遙控器上的
• 室內機顯示部上的雙向空氣交換指示燈關掉。
斷開。
接通,機器就發出笛聲
。
注意
• 當室內空氣不潔淨時,如果動作模式設置是自動雙向空氣交換,將不能執行吸入清新空氣
動作。
• 在這種情形之下,請按
RAS18EX9KS2_CH(56-64) 3/8/07, 3:48 PM58
鈕,以手調方式操作排氣動作,或開窗,讓空間得以通風。
– 58 –
Page 59

雙氣流動作
1
•
按 “ ”鈕。遙控器發出信號而雙氣流將顯示,空氣
更新器將操作雙氣流以同樣溫度(室溫)從清新空氣出
口吹出。
•
當冷氣操作已關閉,盡管雙氣流已在遙控器設定,室內
機的雙氣流風扇並不會操作。
•
在冷氣及空氣更新器操作時選擇雙氣流,空氣更新器操
作將取消而雙氣流操作。
•
空氣更新器風扇聲會比冷氣機高,即使冷氣風扇速度是
“強”。所以將聽不出冷氣風扇速度在強,中,弱之間
的聲音差別。
•
當設定了睡眠定時器時,雙氣流操作將暫時取消。
ENGLISH
中國語中國語
中國語中國語
中國語
室溫空氣吹出
停止
按下 鈕直到遙控器的雙氣流顯示關閉。
• 當與冷卻操作同時使用,它將把空氣吹向房間
的上部,讓使用者感覺涼快。
BAHASA MELAYU
THAILAND
THAILAND
RAS18EX9KS2_CH(56-64) 3/8/07, 3:48 PM59
– 59 –
Page 60

空氣濾清器動作
按 “ ” (空氣濾清)鈕以實行空氣濾清的操作。
• 機器收到信號後會發出笛聲,空氣濾清操作開始。
• 室內機顯示部上的運轉指示燈亮起。
• 可更換至所希望的風速。可選擇強,中,弱或安靜。
1
當冷卻或除濕操作時,按下“
冷氣機的風速,如此可以增強空氣濾清器。
(根據操作情況,風速有可能無法增加。)
” (空氣濾清)鈕以增加
STOP
CANCEL
按下 (開始/停止)鈕以停止操作。
再次按下 “
作。
(在冷卻或除濕操作時)
” (空氣濾清)鈕以取消空氣濾清的操
空氣更新器提示
通風
• 當室外溫度超過30°C或少過3°C時, 通風將不操作以避免露水凝聚在空氣更新器風扇及配管和節省能
源。
• 若室內及室外之間的溫度差別超過7°C,清新空氣吸進將不操作以避免露水凝聚在空氣更新器風扇及
配管,當冷卻的同時。
• 若室內溫度高過70%以上,清新空氣吸進將不操作。
• 當以上提及的操作停止,室內機的空氣更新器指示燈將閃動(10秒開∕1秒關)。
排氣
• 當室內溫度超過43°C時,排氣將不操作以保護排氣風扇受到損壞。
• 當以上提及的操作停止,室內機的空氣更新器指示燈將閃動(10秒開∕1秒關)。
RAS18EX9KS2_CH(56-64) 03/04/2007, 03:12 pm60
– 60 –
Page 61

雙氣流提示
• 當室內溫度超過 43°C時, 雙氣流及空氣濾請不要操作以保護排氣風扇受到損壞。
• 當以上提及的操作停止,室內機的空氣更新器指示燈將閃動(1秒開∕10秒關)。
空氣更新器動作聲音
項目 規格
空氣更新器方法 空氣更新器方法
清新空氣量 (強) 10.0 m3 小時
排氣量 (強) 24.0 m3
測試標准 JIS (日本工業標准) B8330
測試狀況
• 測試狀況
管長 : 0.29 m
配管狀況 : 從橫及向後轉出。
用空氣更新器配管。
配管彎曲次數 : 1 次。
其他 : 防昆蟲及防水通風蓋。
小時
管長 : 0.29 m
ENGLISH
中國語中國語
中國語中國語
中國語
BAHASA MELAYU
THAILAND
THAILAND
RAS18EX9KS2_CH(56-64) 3/8/07, 3:48 PM61
– 61 –
Page 62

風向板的調節法
向上下調節冷氣方向。
1
在“除濕”或“冷卻”動作中,水平風向板自動被設定
於適合每一種動作的適當角度。這風向板能上下搖擺,
也可用“
(如改變了風向板的角度的話,除非轉換動作模式,動
作開始時風向板不能回到自動設定的位置。)
• 按一次“ (自動風向)”鈕時,水平風向板會上下搖
擺。再次按下此鈕時,風向板會 在當時的位置停止,數秒
(約 6 秒) 後風向板開始運動。
• 在“冷卻”動作時不可使水平風向板擺動太久。水平風向
板上可能結露而露水會滴下來。
向左右調節冷氣方向。
2
拿住垂直風向板如圖所示而向左右調節冷氣方向。
• 按一次“
行向左右擺動。再次按下此鈕時,風向板會在當時的
位置停止,數秒(約 6 秒)後風向板開始運動。
(自動風向)”鈕設定於所希望的角度。
(平行搖擺)”鈕時,垂直風向板會平
最初狀況
水平風向板
垂直風向板
自動風向
平行搖擺
冷卻,除濕時
15°
20°
垂直
60°
注意
當冷卻操作時風向板長時間向下及自動搖擺時,風向板上會結露及偶而會滴下。這會將家具弄濕。
– 62 –
RAS18EX9KS2_CH(56-64) 3/8/07, 3:48 PM62
Page 63

定時器的設定法
定時開機
定時關機
通/斷定時器
開始
預約
時間 (現在時刻)
➝
➝
停止
設定時間
更換電池時:
實例: 現在時間是下午1:30.
斷開定時器
使機器在預定時間斷開。
接通定時器
取消
使機器在預定時間接通。
1
按 (定時關
機) 鈕。 顯示器的
(關) 標記閃動。
開始
停止
1
1
停止
1
開始
2
用定時控制鈕設
定關機時間。按
約) 鈕。
使用定時控制鈕設定時間。
按 (定時關機) 鈕。
顯示器的
按 (定時開機) 鈕。
顯示器的
(預
(關) 標記在閃動。
(開) 標記在閃動。
3
按 (定時開
機) 鈕,使 (關) 標
(開) 標記閃
記點亮
動。
中國語中國語
中國語中國語
中國語
•
機器在預定時間開動
(斷開),並在預定
時間斷開(開動)。
•
通∕斷或斷∕通的轉
換首先在較早的預設
時間發生。
•
顯示器上的箭頭標記
表示轉換動作的順
序。
預約的取消法
將遙控器的信號窗指向室內機,然後按下 (取消)鈕。機器發出笛聲而 (預約) 標記熄滅,同
時室內機上的
注
RAS18EX9KS2_CH(56-64) 3/8/07, 3:48 PM63
(定時器) 指示燈熄滅。
只可設定斷開定時器,接通定時器,通∕斷定時器中的一個。
– 63 –
Page 64

2
再按 (時間)鈕。時間指示停止閃動而開始發亮。
• 時間指示在10秒鐘內自動消失。
• 要檢查現在是刻的設定值時將
現在時刻的設定手續至此告結。
2
用定時控制鈕設定關
機時間。
2
用定時控制鈕設定開
機時間。
3
將遙控器的信號窗指向內機按下 (預約)鈕。
(關) 標記停止閃動而開始點亮,同時 (預約) 的標記點亮。
機器發出笛聲而室內機上的
3
將遙控器的信號窗指向內機按下 (預約)鈕。
(開) 標記停止閃動而開始點亮,同時 (預約)的標記點亮。 機
器發出笛聲而室內機上的
(時間) 鈕再按兩次。
(定時器)指示燈點亮。
實例:
機器在下午11.00會斷開。
斷開時間的設定手續至此告結。
(定時器)指示燈點亮。
實例:
機器在上午7.00會斷開。
接通時間的設定手續至此告結。
4
用定時控制鈕設定開
機時間。
• 這定時器有3種使用法:斷開定時器,接通定時器,以及通∕斷(斷∕通)定時器。
請先設定當時的時刻,因為這時間可作一個標準。
• 所有時間設定值全被存儲於遙控器的存儲中,所以下次要使用相同設定值時只要按下
鈕就好。
RAS18EX9KS2_CH(56-64) 3/8/07, 3:48 PM64
5
將遙控器的信號窗指向室內機,並按下 (預約)鈕。
(開) 標記停止閃動而開始點亮,同時 (預約) 的標記點亮。
機器發出笛聲而室內機上的
實例:
當冷卻與除濕時,機器在上午7:00會
開機。
通∕ 斷時間的設定手續至此告結。
– 64 –
(定時器)指示燈點亮。
(預約)
Page 65

睡眠定時器的設定法
)
• 使用冷氣時,若在睡覺前設定適當的風扇速度,過了這段預設的時間後,專為睡眠而設的“睡
眠定時器”將停止風扇的操作。
• 過了一段預設時間後,“睡眠定時器”分別停止吸入清新空氣、排氣和空氣清淨濾氣網的操
作。
• 按下 (睡眠) 鈕, 就可選擇指定的睡眠時間 (1小時, 2小時,
3小時或7小時。
• 睡眠動作模式(7小時監控模式)在操作三小時後暫停冷卻/除濕
功能,然後在接下來的4小時內繼續控制室溫。
1
控制室溫時,此裝置自動根據室溫狀況重複地操作/停止(加一
小時定時器)。
• 請按下 (睡眠)鈕, 顯示器上的指示改變如下所示:
ENGLISH
中國語中國語
中國語中國語
中國語
BAHASA MELAYU
1 小時
➛
操作
2
• 機器發出笛聲後,睡眠定時操作將開始。遙控器的顯示板上顯
示預設的睡眠定時值以及停止操作時間。
• 設定睡眠定時值時,室內機上的定時指示燈亮起。
• 在“睡眠”模式時,風扇速度設為“安靜”。
• 吸入清新空氣、排氣和空氣清淨濾氣網的睡眠定時設置是1,
2,3和7小時。
睡眠
➝
定時
1
設定定時開機。
2
按下 (睡眠) 鈕及設定睡眠定器時。
➛
2小時
操作
開始
3小時
➛➛
操作
取消
睡眠定時器
機器將由睡眠定時器斷開及由接通定時
器接通。
睡眠
(7小時監控模式
➛
THAILAND
THAILAND
RAS18EX9KS2_CH(65-80) 3/8/07, 3:49 PM65
– 65 –
Page 66

預約的取消法
將遙控器的信號窗指向室內機而按下 (取消) 鈕。
機器發出笛聲而
注
(預約) 標記熄滅。室內機上的 (定時器) 指示燈熄滅。
若斷,通∕斷或斷∕通定時器已被設定時再設定睡眠定時器的話,睡眠定時器會優先生
效。
RAS18EX9KS2_CH(65-80) 3/8/07, 3:49 PM66
– 66 –
Page 67

最佳的使用方法
室溫設定要適當
警告
過冷對健康不好且會浪費
電力。
換氣
注意
房間不要關閉太久,請偶爾打開窗戶,換新鮮空氣。
裝置窗簾或百葉窗
可隔絕從窗戶進來的
熱源。
時間預校的有效活用
晚上用“開關時間預校”再配合早上的睡醒時間,可得
到快適的溫度,請有效活用時間預校。
ENGLISH
中國語中國語
中國語中國語
中國語
BAHASA MELAYU
THAILAND
THAILAND
濾網請不要忘記清洗 為了嬰兒及小孩,請注意室溫調節
濾網的網目塞住會影響風量,減弱冷氣效果,為了不浪
費電力,請每隔2週務必清洗一次。
RAS18EX9KS2_CH(65-80) 3/8/07, 3:49 PM67
行動不便的嬰兒、小孩、老年人等使用冷氣機時,請注
意室內溫度及風向的調節。
(最佳的室外和室內溫差為攝氏 ± 5度。)
– 67 –
Page 68

顧客須知
冷氣和房間的熱源
注意
房間如果有超過冷氣能力的熱源(如房間有多人進入,使用
熱器具等),將無法達到所設定的室溫。
長時間不使用時
機器長時間不使用時,請將電源開關按在“關”處。若按在
“開”時,雖然不運轉,亦會消耗掉使用於控制回路的電力
(約8W)。
有閃電之虞時
警告
有閃電之虞時,為了保護機械而需停止運轉,請把電源插
頭拔起。
停止
注意
請將室內機及遙控器安裝在距離其他電器至少1米以
避免雜聲的干擾。
RAS18EX9KS2_CH(65-80) 3/8/07, 3:49 PM68
其他電器的干擾
– 68 –
至少1米距
離以預防
干擾。
熒火燈
電視機
Page 69

納米鈦抗菌/除臭/空氣清淨濾氣網/槽濾網
■ 請在操作前把電源插頭拔掉。
打開前面板
1
• 用雙手握著兩旁將它拉起。當開關前面板
時,請勿握著活動板。
活動板
前面板
• 用雙手握著兩旁將它拉起。
ENGLISH
中國語中國語
中國語中國語
中國語
注意
• 請不要用力開關活動板。
這會造成機身損壞。
• 當電源在 ON/OFF 及 START/STOP 時,活動板會自動開關.
取出預濾氣網
2 3
• 將左右兩邊的預濾氣網拉出。
2 拉出
1 推上拉起
預濾氣網
裝置納米鈦抗菌/除臭空氣清淨濾氣
4
網在納米鈦空氣清淨盒上
• 打開納米鈦空氣清淨盒,將納米鈦抗
菌/除臭空氣清淨濾氣網的鋸齒狀面朝
下裝上。
納米鈦抗菌/除臭空氣
清淨濾氣網 (內附)可以
用吸塵器或自來水來清
洗之後再次使用高達20
次
納米鈦空氣清淨濾氣網
負離子盤
5
取出納米鈦空氣清淨盒
• 將納米鈦空氣清淨盒 (2盒) 推上且拉
出。
納米鈦空氣清淨盒
裝置納米鈦空氣清淨盒
納米鈦空氣清淨盒
BAHASA MELAYU
THAILAND
THAILAND
RAS18EX9KS2_CH(65-80) 3/8/07, 3:49 PM69
– 69 –
Page 70

裝置及确認清新空氣預濾氣網,納米鈦抗菌/除臭/清新空氣網收集灰塵
裝置預濾氣網
6
• 請將預濾氣網上有“FRONT”標記的那
面裝上。(左右預濾氣網的構造不同。)
注意
•
請勿在沒有預濾氣網的情況下操作冷氣機。灰塵
將會進入而損壞機身。
裝置納米鈦抗菌/除臭/清新空氣集塵
7
濾氣網
• 從袋裡取出納米鈦抗菌/除臭/清新空氣
集塵濾氣網,調整方位,使備有夾的
一邊面向前方。手握住夾,沿著凹槽
方向把濾氣網推入,直至它碰觸到濾
氣網入口的凹處。
濾氣網入口
裝置納米鈦抗菌/除臭/
清新空氣集塵濾氣網
(內附)
“上”標記
推入直至它碰觸到凹處
注意
• 即使設定“不要吸入清新空氣動作模式”或“不要吸入清新空氣/排氣動作模
式”,也必須安裝納米鈦抗菌/除臭/清新空氣集塵濾氣網和清新空氣預濾氣網。
• 如不安裝上述濾氣網和預濾氣網就操作冷氣機,外界的灰塵和氣味可能會因此而
闖入室內機,並可能造成露水冷凝和/或機身損壞。
預濾氣網
1
“FRONT”
標記
2 插入
檢查清新空氣預濾氣網的裝置
8
• 確保預濾氣網安裝正確。
• 不正确的濾氣網裝置會引起噪音。
“FRONT”
標記
關上前面板
9
• 雙手握著兩旁將它拉前然後拉下。
前面板
• 先按前面板的中央部位,然後才按兩
旁,直至聽到喀_聲。如果前面板未關
緊,活動板將動彈不得。
前面板
1
2
先按中央部位
RAS18EX9KS2_CH(65-80) 3/8/07, 3:49 PM70
開啟電源
10
活動板
• 活動板將會關上。
注意
• 如果前面板太鬆的話,它可能會脫落。
• 請不要用力打開前面板。前面板脫落會造
成機身損壞。
• 拆除或安裝預濾氣網時,請小心,別讓熱
交換器的散熱片割傷
活動板
3
– 70 –
您的手。
Page 71

機器的保養 (預濾氣網,槽濾網,前面板,上柵)
可清洗上柵以保清潔。
• 卸下上柵和用水清洗。請使用柔軟的海棉。用了中性清潔劑後應用水清洗。
• 請將水份完全擦乾。
可用干布來清洗前面板及上下風向板。
• 用乾的軟質布擦前面板和左右風向板時,也把主機體和遙控器等一併擦干淨。
若使用含有化學藥物的布料,請遵守用法說明上的指示和注意事項。
• 切勿沖洗仍架在冷氣機上的前面板。
ENGLISH
注意
• 建議在室內機上的濾氣網燈亮起時清洗預濾氣網。如此能節省電源。
• 當室內機測量到累積操作時間已達到100個小時後,室內機上的預濾氣網燈就會亮起。
打開前面板及取出預濾氣網
1
• 請确認預濾氣網上的塵埃。如果濾氣
裝置預濾氣網及關上前面板
3
• 請將預濾氣網上有“FRONT”標記的
“FRONT”
標記
清掃及保養機器時,應先用遙控器停止操作及把電源插頭拔掉 (或關掉電源開關)。
用吸塵器去除塵埃
2
• 如果塵埃太多的話,請用
網不髒的話,請跳越至 3。
1
1 推上拉起
““FRONT”
標記
2 拉出
預濾氣網
(如何開關前面板, 詳見第 45 頁。)
那面裝上。(左右預濾氣網的構造不
同。)
預濾氣網
2
插入
4
5
清潔劑清洗後用水沖凈。
然後在陰暗處曬乾。
• 使用真空吸塵器去除附在納米鈦抗菌/
除臭空氣清淨濾氣網上的塵埃後,放
在太陽底下曬一天,就可循環使用納
米鈦抗菌/除臭空氣清淨濾氣網。但
是,我們建議大約每兩年更換納米鈦
抗菌/除臭空氣清淨濾氣網一次。
(如果將濾氣網放在一個高溫的地方,
例如車蓋上,曝曬,濾氣網可能會變
形。)
插上電源插頭 (或開啟電源開關)
將遙控器對準室內機後
按下濾氣網鈕
• 室內機收到信號後發出
笛聲。
• 請确定室內機有發出笛
聲。
中國語中國語
中國語中國語
中國語
BAHASA MELAYU
THAILAND
THAILAND
注意
• 請勿在沒有預濾氣網的情況下操作冷氣機。
• 塵埃可能會進入熱交換器上的間隙或冷氣機。這時,塵埃的氣味可能會吸附在熱交換器上,或
者導致發生故障。
– 71 –
RAS18EX9KS2_CH(65-80) 3/8/07, 3:49 PM71
Page 72

機器的保養 (續)
• 視環境和使用情況而定,濾網的清潔程度將有所差異。請定期檢查濾網的清潔。若濾網變髒,建議您清洗
濾網,尤其是經常操作吸入清新空氣動作模式,更應該每兩週檢查濾網一次。如果發現網變髒,建議您清
洗濾網。
雖然預濾氣網會卡住小昆蟲,防止它進入室內,但是,小昆蟲從室外空氣進入室內並不是不尋常的事。 請
清洗清新空氣預濾氣網。
■ 請在操作前把電源插頭拔掉。
打開前面板 (如何開關前面板, 詳見第 45 頁。)
1
• 用雙手握著兩旁將它拉起。當開關前面板時,請勿握著活動板。
活動板
前面板
取出清新空氣預濾氣網
2
• 請向前拉出。
• 室外塵埃吸附在排
氣預濾氣網的下
方。
請確認每個卸下的濾氣網上的塵埃
4
• 如果濾氣網不髒的話,請跳越至 6。
用水清洗每個卸下的濾氣網
5
• 用水清洗後晾乾。
• 如果塵埃很難清洗,請用不超過攝氏
40度於上的溫水清洗。
• 應在每 3 個月清洗一次納米鈦抗菌/除
臭/清新空氣網收集灰塵及在陰暗處把
它曬乾。雖然濾氣網可以反覆清洗及
使用,建議每 3 年更換一次。
取出納米鈦抗菌/除臭/清新空氣集塵
3
濾氣網
• 請握著納米鈦抗菌/除臭/清新空氣集塵
濾氣網的把柄然後
向前拉出。
納米鈦抗菌/除臭/
清新空氣集塵濾氣網
裝置清新空氣預濾氣網
6
• 請把刻上標記的面面向上,然後,把
預濾氣網推入,直至聽到喀_聲為止。
• 不正确的濾氣網裝置會引起噪音。
清新空氣預濾氣網
引
く
上
面
P
U
L
L
RAS18EX9KS2_CH(65-80) 3/8/07, 3:49 PM72
– 72 –
Page 73

7
9
10
裝置納米鈦抗菌/除臭/清新空氣集塵
濾氣網
• 調整納米鈦抗菌/除臭/清新空氣集塵濾
氣網的方位,使備有夾的一邊面向前
方,“UP(向上)”標記面向上。把
濾氣網推入,直至它
碰觸到濾氣網入口的
凹處。
• 不正确的濾氣網裝置
會引起噪音。
納米鈦抗菌/除臭/
清新空氣集塵濾氣網
插上電源插頭
• 活動板將會關上。
將遙控器對準室內機
後按下濾氣網鈕
• 室內機收到信號後發出
笛聲。
• 請确定室內機有發出笛
聲。
關上前面板
8
• 雙手握著兩旁將它拉前然後拉下。
1
活動板
活動板
3
前面板
• 先按前面板的中央部位,然後才按兩
旁,直至聽到喀_聲。如果前面板未關
緊,活動板將動彈不得。
前面板
2
先按中央部位
注意
• 請不要用力開關活動板。
這會造成機身損壞。
• 當電源在 ON/OFF 及 START/STOP 時,
活動板會自動開關.
ENGLISH
中國語中國語
中國語中國語
中國語
BAHASA MELAYU
THAILAND
THAILAND
前面板的卸下方法
當卸下和裝置前面板時,請務必使用雙手握著前面板的兩旁。
卸下前面板
(如何開關前面板, 詳見第 45 頁。)
1 向內推右臂末端,以釋放短小突出部分。
2 向內移動左臂,以釋放左邊的短小突出部
分,然後向前拉前面板。
前面板
2
RAS18EX9KS2_CH(65-80) 3/8/07, 3:49 PM73
1
推
– 73 –
裝置前面板
1 沿著主機體上的梯形裝置,插入前面板的左
邊短小突出部分,直至短小突出部分安置在
洞內。
2 沿著主機體上的梯形裝置,安穩插入前面板
右臂上的短小突出部分,直至短小突出部分
安置在洞內。
3 確定前面板已安穩地裝上,然後把前面板蓋
好。
梯形裝置
前面板
3
1
短小突出部分
2
Page 74

機器的保養 (續)
上柵的卸下方法 (如何開關前面板, 詳見第 45 頁。)
卸下上柵
1 按上柵,解開固定板,然後提起上柵。
2 拉向前 (左右兩邊的柵)。
1
固定板
2
注意
• 清洗機體時,請絕對避免用水潑機體,因會有漏電的危險。
• 欲清掃機器的內部時,請與購買的經銷商商談 (詳見第 XX 頁)。
• 請勿在不穩固的台面上清掃機器
如果機器傾覆的話,會有受傷的危險。
• 清掃時,請務必戴著手套
在沒有戴著手套的情況下觸摸機器內部的零件時,會有受傷的危險。
裝置上柵
1 推並沿著室內機上端的方向滑動上柵,使
“UP(向上)”標記面向機器後方。沿著室
內機上端的方向滑動,按下。
2 按下上柵,用固定板固定位置。 (左右柵的
構造不同。)
1
2
清洗室內機的熱交換器
當使用冷氣機內部清潔劑清洗室內機的熱交換器時,把所提供的蓋子,連同“SP-SSP2”配件系
到熱交換器前面。欲知清潔詳情,請參閱和“SP-SSP2”一起附送的使用說明。
注意
• 請勿使用另外售賣的“SP-SSP2” 以外的清潔劑。
使用其它種類的清潔劑會淋濕牆壁或家具,滴水,觸電和/或機器發生故障。
• 請勿在不穩固的台面上清掃機器。
如果機器傾覆的話,會有受傷的危險。
• 清掃時,請務必戴著手套。
在沒有戴著手套的情況下觸摸機器內部的零件時,會有受傷的危險。
• 請避免清潔劑或水淋到機體,這會引起漏電和故障。
– 74 –
RAS18EX9KS2_CH(65-80) 3/8/07, 3:49 PM74
Page 75

遙控器中電池的更換法
取下電池盒蓋如右圖所示,然後取出舊電池。
1
將新電池裝進去。
2
請注意電池極性方向應和盒內所示標記一致。
注意
1. 新電池和舊電池,或不同種類的電池不可混用。
2. 兩個月或三個月不使用遙控開關時最好把電池取
出。
更換地址開關
✽ 當同一個室內裝有兩架室內機,可使用更換地址開
關以避免兩個遙控器之間發生互相干擾的情況。通
常,使用此功能的機會甚微。
(出廠時,此裝置的設置在“A”位置。)
開關
請向售賣此冷氣機予您的經銷商查詢此裝置的出廠
設定。
壓下然後向箭頭
方向拉出。
ENGLISH
中國語中國語
中國語中國語
中國語
BAHASA MELAYU
THAILAND
THAILAND
請務必按照指示操作此開關。請務必按照指示操作此開關。
請務必按照指示操作此開關。
請務必按照指示操作此開關。請務必按照指示操作此開關。
RAS18EX9KS2_CH(65-80) 3/8/07, 3:49 PM75
– 75 –
Page 76

注意
• 請使用地線。
地線請勿安裝在煤氣管、避雷針、電話之地線等場所。
不正確的安裝法將導至漏電。
• 依設置場所狀況,有必要安裝漏電斷電器。如沒有安裝漏電斷電器,會有
觸電的危險。
重要
電源線內的主要鉛條是以顏色來區分:
青和黃 : Earth
藍: Neutral
褐: Live
本機的主要鉛條顏色或許和插頭內印著的顏色不同,請依照以下的指示:
青和黃色須銜接插頭內E字母或
藍色須銜接插頭內N字母或黑色的電極。
褐色須銜接插頭內L字母或紅色的電極。
符號或青色或青和黃的電極。
注
如果提供的軟線損壞,必須更換由制造商,服務店或有關同等資格人員提供軟線以避免危險。
注意
• 清掃及機器的保養需由專業技術人員執行。清掃室內機時應先停止操作及關閉電源。
定期檢查
半年∼1年一度的定期檢查,請以下列的要點來檢查。若有不明白之處,請與購買的經銷商連絡。
1
卻實嗎﹖
2
3
RAS18EX9KS2_CH(65-80) 3/8/07, 3:49 PM76
電源插頭是否有確實插入電源插座﹖
(請確認二者之間有無鬆掉)
接電線有脫落或中途斷掉嗎?
安裝台有嚴重的生鏽、室外機有傾斜等不安定的情形嗎﹖
– 76 –
Page 77

售後服務和保証事項
請服務人員檢修以前,請先依下列各項檢查
狀況 請檢查以下幾點
• 保險絲是否溶斷﹖
不能運轉時
冷氣不冷時
注 :
• 在穩靜操作期間,或當停止運轉時,有時會發生下述現象。但這些都不
是不正常的現象。
(1) 冷卻動作中會聽見冷凍劑流動的微小聲音。
(2) 風扇罩受熱或受冷時所發出的微小摩擦聲。
• 冷氣機有時會發出異味,但這並非不正常的現象,而時因為煙,食物,
化妝品等所發出的異味附著在上面的緣故。所以最好經常清理濾氣網和
蒸發器部份以減少異味。
• 上述各項檢查調整後,冷氣機仍舊不能正常運轉的話,請立刻通知購買的經銷商,並請將保證書上所
記載的冷氣機形式,製造號碼,安裝日期及冷氣機故障狀況告訴經銷上。
• 電壓是否過高或過低﹖
• 電源開關是否設在“ON”的位置﹖
• 濾氣網是否太髒﹖
• 陽光是否直射在室內機上﹖
• 室外機的空氣流通是否受阻﹖
• 房門或窗口是否開著或是否室內有其他熱源﹖
• 設定溫度是否適當﹖
ENGLISH
中國語中國語
中國語中國語
中國語
BAHASA MELAYU
THAILAND
THAILAND
• 電源軟線應連接在適當的定額電壓,否則機器將會損壞或不能達到預定的校能。
注
如果提供的軟線損壞,必須更換由制造商,服務電或有關同等資格人員提供軟線以避免危險。
– 77 –
RAS18EX9KS2_CH(65-80) 3/8/07, 3:49 PM77
Page 78

This product conforms with the protection requirements of council directives 89/336/EEC relating to
electromagnetic compatibility and 72/23/EEC relating to electrical equipment designed for use within certain
voltage limits.
請注意
當開動冷氣機時,特別是室內縈光燈的亮度會出現輕微的波動。這並不重要。注意您當地的電流供
應狀況。
注
• 避免在室外氣溫低于攝氏 21°C (華氏70度)時,使用此冷氣機作為冷卻操作。
室內及室外的最高與最低操作溫度建意如下:
最低 最高
室內
室外
干球 °C
濕球 °C
干球 °C
濕球 °C
21 32
15 23
21 43
15 26
RAS18EX9KS2_CH(65-80) 3/8/07, 3:49 PM78
– 78 –
Page 79

MEMO
ENGLISH
中國語中國語
中國語中國語
中國語
BAHASA MELAYU
THAILAND
THAILAND
RAS18EX9KS2_CH(65-80) 3/8/07, 3:49 PM79
– 79 –
Page 80

RAS18EX9KS2_CH(65-80) 3/8/07, 3:49 PM80
< H446 : A >
– 80 –
 Loading...