

Page 1

SPLIT TYPE AIR CONDITIONER
INDOOR UNIT/OUTDOOR UNIT
MODEL
RAS-10EH2/RAC-10EH2
RAS-14EH2/RAC-14EH2
ENGLISH
OUTDOOR UNIT
RAC-10EH2
RAC-14EH2
Instruction manual Page 1~20
To obtain the best performance and ensure years of
trouble free use, please read this instruction manual
completely.
INDOOR UNIT
RAS-10EH2
RAS-14EH2
Инструкция по эксплуатации Стр. 21-40
Для получения наилучших эксплуатационных
характеристик и обеспечения беспроблемной
эксплуатации в течение длительного времени,
прочтите полностью данное руководство по
эксплуатации.
07K162_RAS-10_14EH2_COVER 2007.10.17, 08:331
< 466 : A >
– 1 –
Page 2

SAFETY PRECAUTION
• Please read the “Safety Precaution” carefully before operating the unit to ensure correct usage of the unit.
• Pay special attention to signs of “
matters which, if not observed strictly, may cause death or serious injury. The “Caution” section
contains matters which may result in serious consequences if not observed properly. Please observe
all instructions strictly to ensure safety.
• The signs indicate the following meanings. (The following are examples of signs.)
Warning” and “ Caution”. The “Warning” section contains
MEMO
This sign in the figure indicates prohibition.
• Please keep this manual after reading.
PRECAUTIONS DURING INSTALLATION
• Do not reconstruct the unit.
Water leakage, fault, short circuit or fire may occur if you reconstruct the unit by
yourself.
• Please ask your sales agent or qualified technician for the installation of your
unit.
WARNING
CAUTION
Water leakage, short circuit or fire may occur if you install the unit by yourself.
• Please use earth line.
Do not place the earth line near water or gas pipes, lightning-conductor, or the
earth line of telephone. Improper installation of earth line may cause electric
shock.
• Be sure to use the specified piping set for R410A. Otherwise, this may result in
broken copper pipes or faults.
• A circuit breaker should be installed depending on the mounting site of the unit.
Without a circuit breaker, the danger of electric shock exists.
• Do not install the unit near a location where there is flammable gas.
The outdoor unit may catch fire if flammable gas leaks around it. Piping shall be
suitable supported with a maximum spacing of 1m between the supports.
• Please ensure smooth flow of water when installing the drain hose. If any failure
is found in the drain path, water drops from the indoor and outdoor units, causing
wet household effects.
• Make sure that a single phase 230V power source is used.
The use of other power sources may cause electrical components to overheat
and lead to fire.
Indicates the instructions that must be followed.
PROHIBITION
CONNECT EARTH LINE
PROHIBITION
PROHIBITION
WARNING
PRECAUTIONS DURING SHIFTING OR MAINTENANCE
• Should abnormal situation arise (like burning smell), please stop operating the
unit and remove plug from the socket or turn off the circuit breaker. Contact your
agent. Fault, short circuit or fire may occur if you continue to operate the unit
under abnormal situation.
• Please contact your agent for maintenance.
Improper self maintenance may cause electric shock and fire.
• Please contact your agent if you need to remove and reinstall the unit.
Electric shock or fire may occur if you remove and reinstall the unit yourself improperly.
• Avoid an extended period of direct air flow for your health.
• Do not connect the power calbe with an extension cable or do not plug too many
leads of the other electric appliance into the socket where this cable is plugged.
In addition, wire the cable with some allowances to prevent the cable from stretching.
Not doing so will cause an electrical shock, heat generation or fire.
• Do not bundle the power cable, pull it, put something on it, heat it, process it, or
put it between things. Breakage of the power cable may result.
Use of a damaged cable may cause an electrical shock or a fire.
• Do not put objects like thin rods into the panel of blower and suction side
PROHIBITION
because the high-speed fan inside may cause danger.
“OFF”
PROHIBITION
PROHIBITION
PROHIBITION
06L176_RAS-10_14EH1_COVER 11/30/06, 2:51 PM2
– 2 –
Page 3

WARNING
PRECAUTIONS DURING OPERATION
• Do not use any conductor as fuse wire, this could cause fatal accident.
“OFF”
• Spray cans and other combustibles should not be located within a meter of the air
outlets of both indoor and outdoor units.
As a spray can’s internal pressure can be increased by hot air, a rupture may result.
• The product shall be operated under the manufacturer specification and not for
any other intended use.
DON’T WET
• When operating the unit with burning equipments, regularly ventilate
the room to avoid oxygen insufficiency.
PROHIBITION
• During thunder storm, disconnect the plug top or turn off the circuit breaker.
• Do not attempt to operate the unit with wet hands, this could cause fatal accident.
STRICTLY OBSERVE
PRECAUTIONS
• Do not direct the cool air coming out from the air-conditioner panel to
face household heating apparatus as this may affect the working of
apparatus such as the electric kettle, oven etc.
PROHIBITION
ENGLISH
PROHIBITION
PROHIBITION
CAUTION
• Please ensure that outdoor mounting frame is always stable, firm and
without defect. If not, the outdoor unit may collapse and cause danger.
• Do not wash the unit with water or place a water container such as a
vase on the indoor unit.
PROHIBITION
Electrical leakage could be present and cause electric shock.
• Do not place plants or animals directly under the air flow as it is bad for the plants or
animals.
• Do not climb on the outdoor unit or put objects on it.
PROHIBITION
• When operating the unit with the door and windows opened, (the room humidity
is always above 80%) and with the air deflector facing down or moving automatically for a long period of time, water will condense on the air deflector and drips
down occasionally. This will wet your furniture. Therefore, do not operate under
such condition for a long time.
• If the amount of heat in the room is above the cooling or heating capability of the
unit (for example: more people entering the room, using heating equipments and
PROHIBITION
etc.), the preset room temperature cannot be achieved.
• This appliance especially indoor unit cleaning must be performed by authorized
personnel only. Consult your sales agent.
Using a commercially available detergent or similar can damage the plastic parts
or clog the drain pipe, causing water to drip with potential electric shock hazard.
PROHIBITION
PROHIBITION
PROHIBITION
PROHIBITION
DON’T TOUCH
• Do not touch the refrigerant pipe and connecting valve.
Burns may result.
• This appliance is not intended for use by young children or infirm persons unless they have been
adequately supervised by a responsible person to ensure that they can use this appliance safely.
• Young children should be supervised to ensure that they do not play with the appliance.
06L176_RAS-10_14EH1_En 12/1/06, 11:41 AM3
• Do not touch the air outlet, bottom surface and aluminum fin of the outdoor
unit.
You may get hurt.
DON’T TOUCH
– 3 –
Page 4

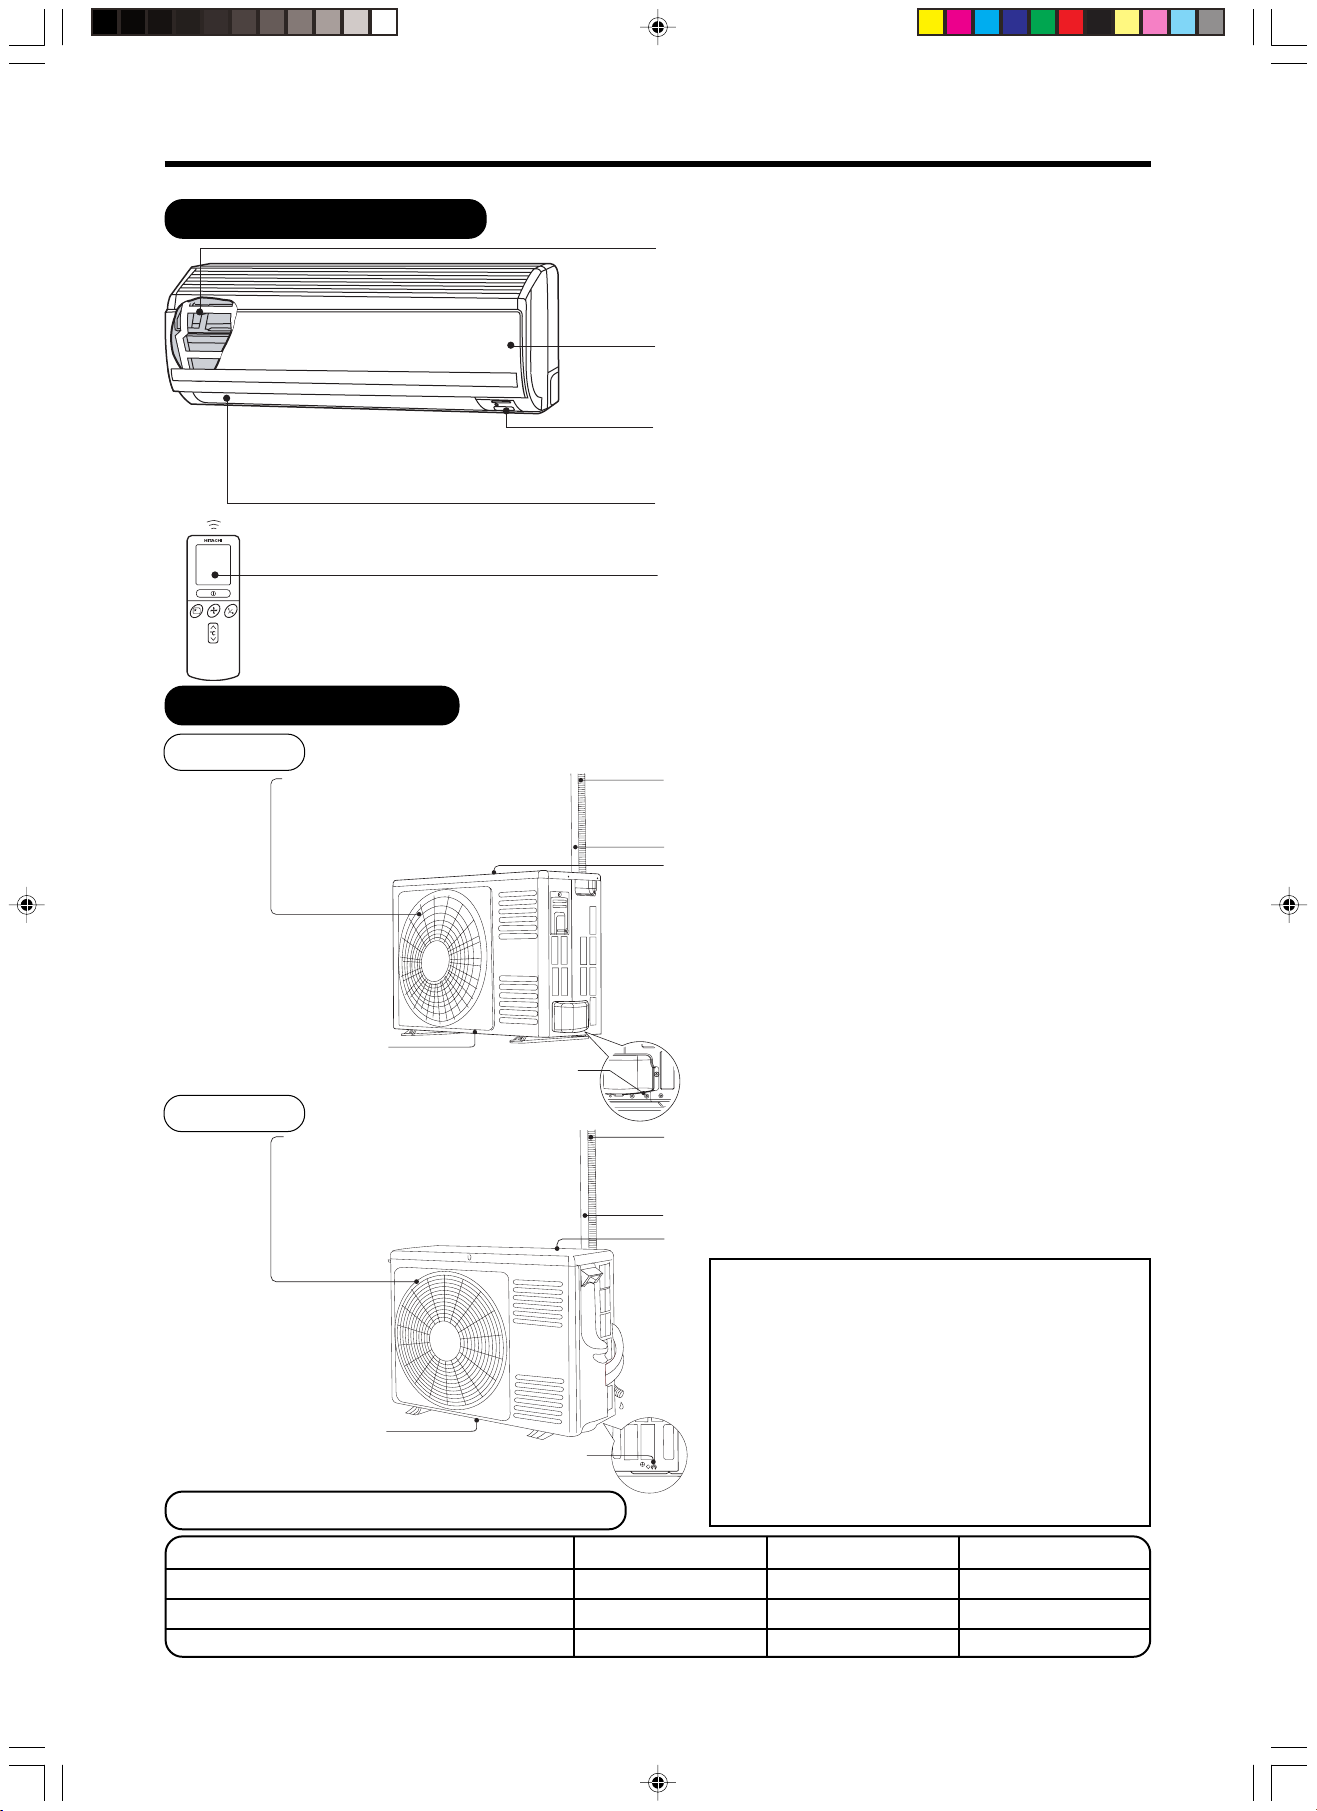
NAMES AND FUNCTIONS OF EACH PART
INDOOR UNIT
Air filter
To prevent dust from coming into the indoor unit.
(Refer page 16)
Front panel
Indoor unit indicators
Light indicator showing the operating condition.
(Refer page 5)
Horizontal deflector Vertical deflector
(Air Outlet)
(Refer page 15)
Remote controller
Send out operation signal to the indoor unit. So as
to operate the whole unit.
(Refer page 6)
OUTDOOR UNIT
RAC-10EH2
Air outlet
When “heating” operation is performed,
cool air blows and when “cooling” or
“dehumidifying” operation is performed,
warm air blows.
Drain port (Bottom)
Earth terminal
RAC-14EH2
Drain port (Bottom)
(Lower section of the side)
Air outlet
When “heating” operation is
performed, cool air blows
and when “cooling” or
“dehumidifying” operation is
performed, warm air blows.
Earth terminal
(Lower section of the side)
MODEL NAME AND DIMENSIONS
Drain hose
Drains the dehumidified water from the indoor unit to
the outdoor during “cooling” or “dehumidifying” operation.
Piping and Wiring
Air inlets (Rear and left sides)
Drain hose
Drains the dehumidified water from the indoor unit to
the outdoor during “cooling” or “dehumidifying” operation.
Piping and Wiring
Air inlets (Rear and left sides)
About the outdoor unit:
• When “Stop” is selected during operation of
the indoor unit, the fan of the outdoor unit
continues turning for 10 to 60 seconds to cool
the electric parts down.
• In heating operation, condensate or water due
to defrosting will flow.
Do not cover the drain port of the outdoor unit
because such water may freeze in the chilly area.
• When the outdoor unit is hung on the ceiling,
install the bush and drain pipe on the drain
port and drain water.
RAS-10EH2, RAS-14EH2 780 280 220
RAC-10EH2 700 505 258
RAC-14EH2 750 548 288
07K162_RAS-10_14EH2_En 2007.10.17, 08:294
MODEL WIDTH (mm) HEIGHT (mm) DEPTH (mm)
– 4 –
Page 5

NAMES AND FUNCTIONS OF EACH PART
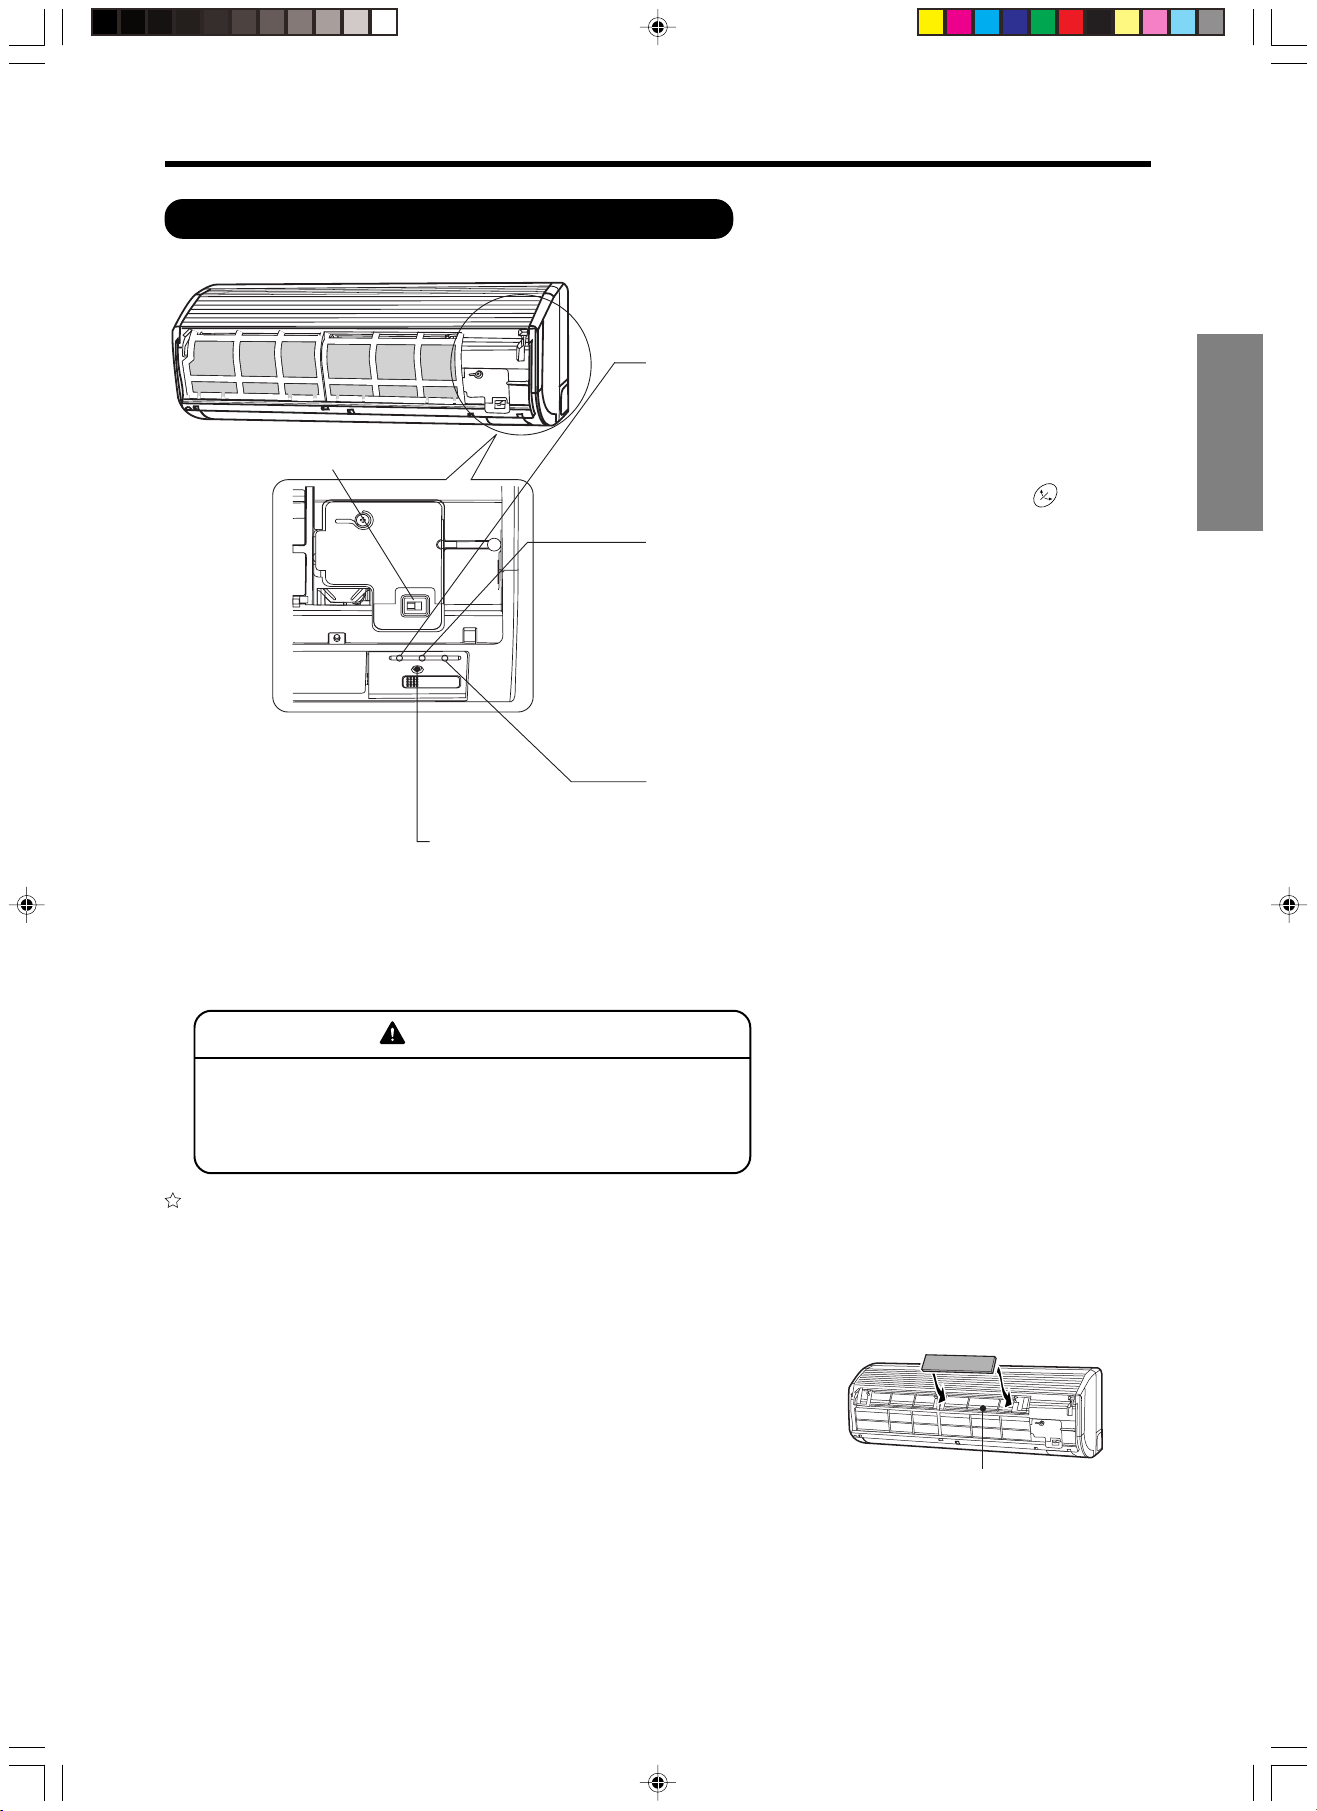
INDOOR UNIT INDICATIONS
FILTER LAMP (Green)
When the device is operated for a total of about 200
hours, the FILTER lamp lights indicates that it is time
POWER SWITCH
to clean the filter.The lamp goes out when the
“
operation is stopped.
OPERATION LAMP (Yellow)
This lamp lights during operation.
The OPERATION LAMP flashes in the following
cases during heating.
(1) During preheating
(2) During defrosting
TIMER LAMP (Orange)
This lamp lights when the timer is working.
ENGLISH
(AUTO SWING)” button is pressed while the
For about 2-3 minutes after starting up.
Defrosting will be performed about once an hour
when frost forms on the heat exchanger of the
outdoor unit, for 5-10 minutes each time.
TEMPORARY SWITCH
Use this switch to start and stop when the remote controller does not work.
●
●
This temporary operation will be at the most recent setting made. (The unit
will immediately go into automatic operation once power is switched on.)
CAUTION
Turn off the circuit breaker or pull out the power plug if
the unit is not be operated for a long period.
✩ If the power stays on and the unit is not operated, power is slightly consumed in the control circuit.
The power is saved by turning off the power switch (or the circuit breaker when the power is supplied
from the outdoor unit).
Attaching the air cleansing and deodorizing filters (Accessories) to the filter frame.
• Attach the air cleansing and deodorizing filters to the frame by
gently compress its both sides and release after insertion into
filter frame.
• The cooling capacity is slightly weakened and the cooling speed
becomes slower when the air cleansing and deodorizing filters
are used.
• Air cleansing and deodorizing filters can be used for about 2
years. When you want to renew it, please ask your sales agent.
• Optional air cleansing and deodorizing filters (SPX-CFH15).
Frame
07K162_RAS-10_14EH2_En 2007.10.17, 08:295
– 5 –
Page 6

NAMES AND FUNCTIONS OF EACH PART
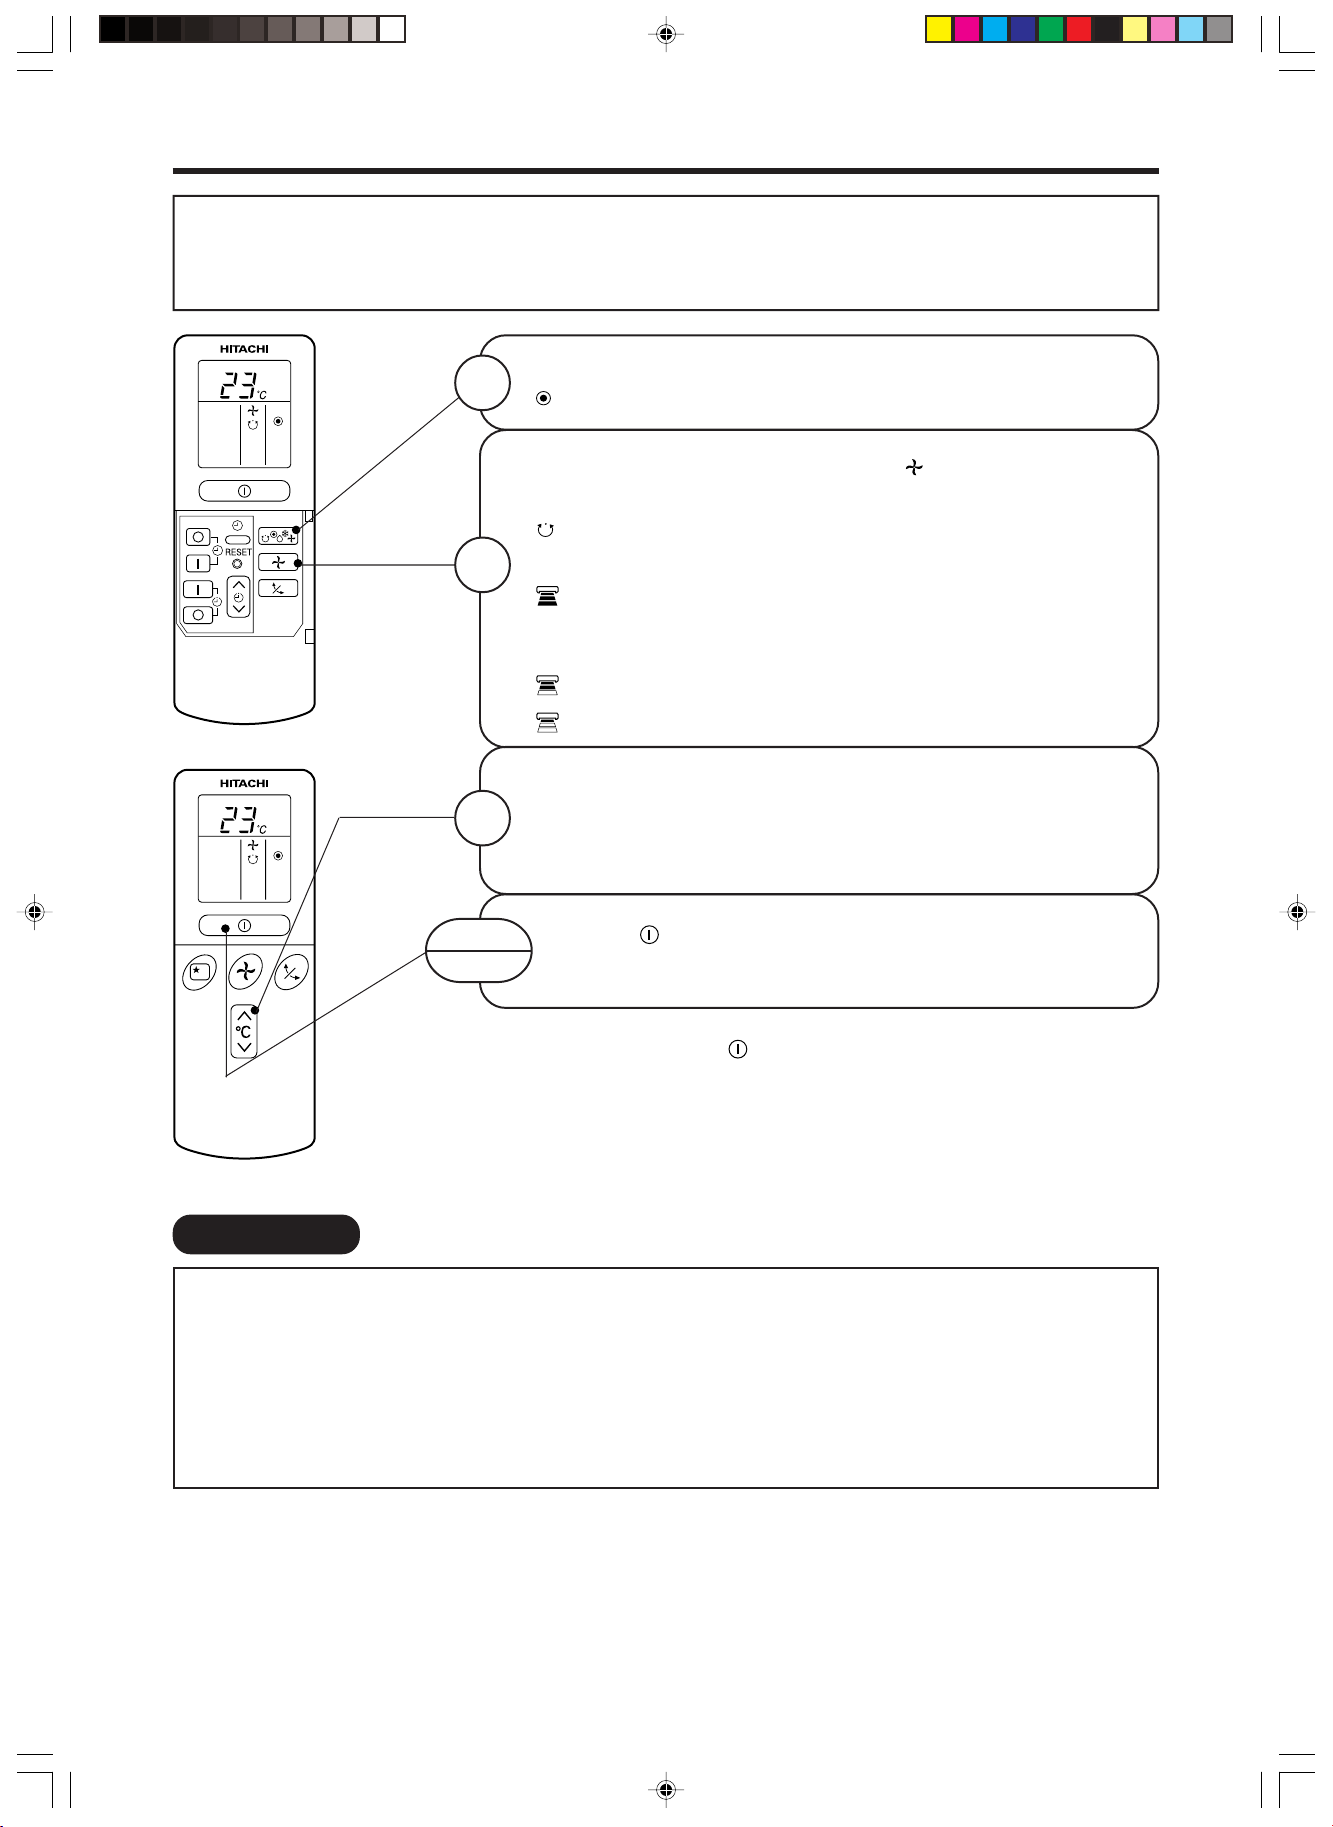
REMOTE CONTROLLER
• This controls the operation of the indoor unit.
The range of control is about 7 meters. If indoor lighting is controlled electronically, the range of
control may be shorter, in some cases, the control signal may not be received.
This unit can be fixed on a wall using the fixture provided. Before fixing it, make sure the indoor unit
can be controlled from the remote controller.
• Handle the remote controller with care.
Dropping it or getting it wet may compromise its signal transmission capability.
• After new batteries are inserted into the remote controller, the unit will initially require approximately
10 seconds to respond to commands and operate.
● Signal emitting window/transmission sign
Point this window toward the indoor unit when controlling it.
The transmission sign blinks when a signal is sent.
● Display
This indicates the room temperature selected, current time, timer status,
function and intensity of circulation selected.
● START/STOP button
Press this button to start operation. Press it again to stop operation.
● AUTO SWING button
Controls the angle of the horizontal air deflector.
● FAN SPEED selector
This determines the fan speed. Every time you press this button, the intensity of
circulation will change from (AUTO) to (HI) to (MED) to (LOW).
(This button allows selecting the optimal or preferred fan speed for each
operation mode.)
● SLEEP button
Use this button to set the sleep timer.
● TEMPERATURE buttons
Use these buttons to raise or lower the temperature setting. (Keep pressed, and
the value will change more quickly.)
● TIME button
Use this button to set and check the time and date.
● RESET button
Press this button after the batteries are replaced or when some irregular
operation is found.
● FUNCTION selector
Use this button to select the operating mode. Every time you press it, the mode
will change from (AUTO) to (HEAT) to (DEHUMIDIFY) to (COOL) and
to (FAN) cyclically.
● FAN SPEED selector
● AUTO SWING button
● TIMER control
Use these buttons to set the timer.
AUTO
HEAT
DEHUMIDIFY
COOL
FAN
FAN SPEED
LOW
MED
HI
SLEEPING
STOP (CANCEL)
START (RESERVE)
START/STOP
TIME
TIMER SET
TIMER SELECTOR
ON TIMER
OFF TIMER
AUTO SWING
● OFF-TIMER button Select the turn OFF time.
● ON-TIMER button Select the turn ON time.
● RESERVE button Time setting reservation.
● CANCEL button Cancel time reservation.
Precautions for Use
• Do not put the remote controller in the following places.
• In direct sunlight
• In the vicinity of a heater.
• Handle the remote controller carefully. Do not drop it on the floor, and
protect it from water.
• Once the outdoor unit stops, it will not restart for about 3 minutes (unless
you turn the power switch off and on or unplug the power cord and plug
it in again).
This is to protect the device and does not indicate a failure.
• If you press the FUNCTION selector button during operation, the device
may stop for about 3 minutes for protection.
– 6 –
Page 7

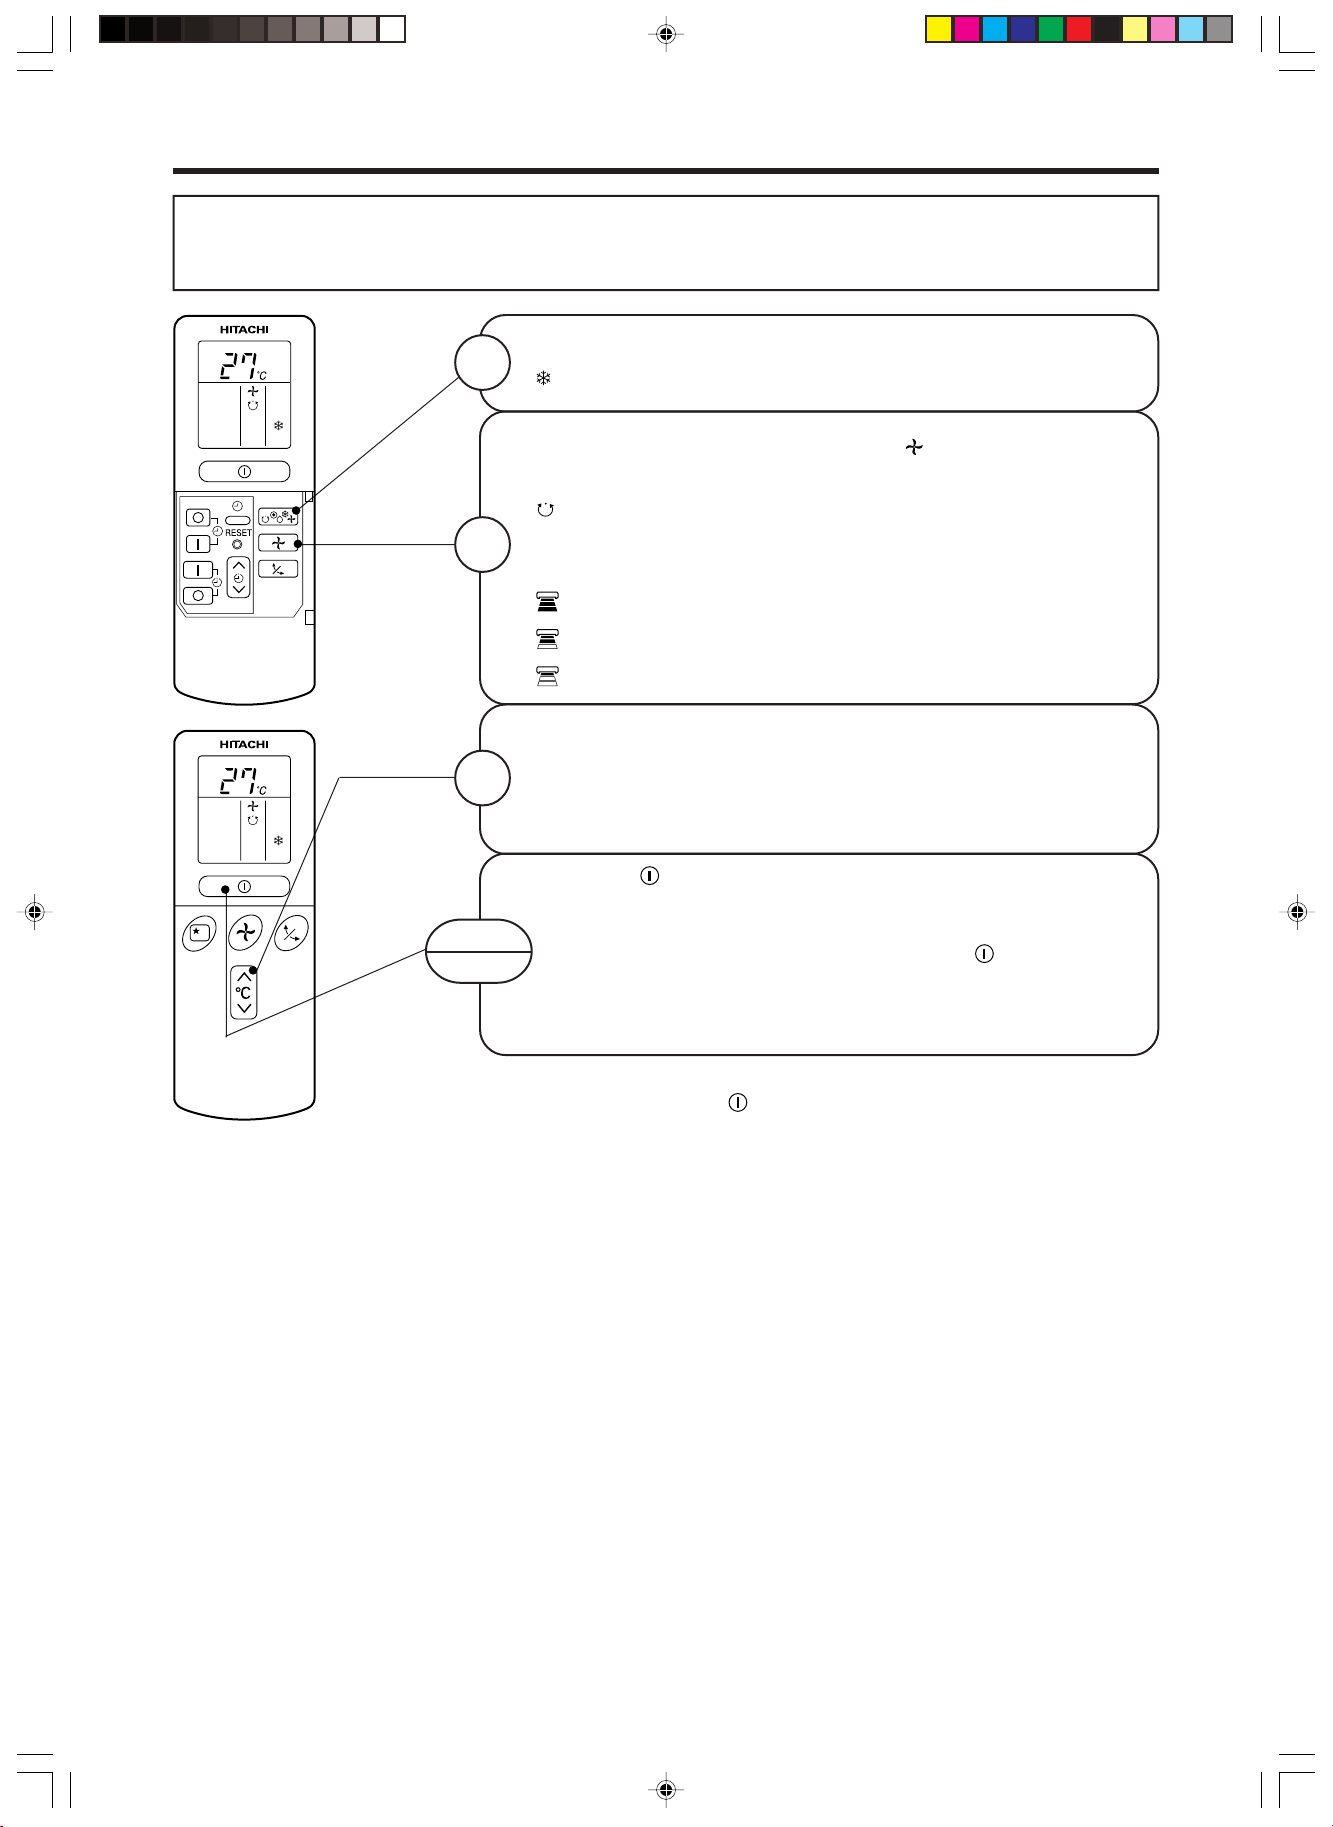
VARIOUS FUNCTIONS
■ Auto Restart Control
• If there is a power failure, operation will be automatically restarted when the power is resumed with
previous operation mode and airflow direction.
(As the operation is not stopped by remote controller.)
• If you intend not to continue the operation when the power is resumed, switch off the power supply.
When you switch on the circuit breaker, the operation will be automatically restarted with previous
operation mode and airflow direction.
Note: 1. If you do not require Auto Restart Control, please consult your sales agent.
2. Auto Restart Control is not available when Timer or Sleep Timer mode is set.
AUTOMATIC OPERATION
The device will automatically determine the mode of operation, HEAT or COOL depending on the
initial room temperature. The selected mode of operation will change when the room temperature
varies.
Press the FUNCTION selector so that the display indicates the
(AUTO) mode of operation.
1
• When AUTO has been selected, the device will automatically
determine the mode of operation, HEAT or COOL depending
on the current room temperature.
• When AUTO is first selected, the device will determine the
current room temperature and select the proper operation
mode accordingly.
• When the air conditioner has adjusted the room's temperature
to the near preset temperature, it will begin to monitor
operation. If the room temperature subsequently changes,
the air conditioner will once again select the appropriate
operation (heating or cooling) to adjust the temperature to
the preset temperature. The monitoring operation range is
+
3°C relative to the preset temperature.
• If the mode automatically selected by the unit is not
satisfactory, manually change the mode setting (heat,
dehumidify, cool or fan).
ENGLISH
START
STOP
Press the (START/STOP) button.
Operation starts with a beep.
Press the button again to stop operation.
■ As the settings are stored in memory in the remote controller, you
only have to press the
You can raise or lower the temperature setting as necessary by
maximum of 3°C.
Press the temperature button and the temperature
setting will change by 1°C each time.
• The preset temperature and the actual room temperature may
vary somewhat depending on conditions.
Press the (FAN SPEED) button, AUTO and LOW is available.
– 7 –
(START/STOP) button next time.
06L176_RAS-10_14EH1_En 12/1/06, 11:58 AM7
Page 8
HEATING OPERATION
• Use the device for heating when the outdoor temperature is under 21°C.
When it is too warm (over 21°C), the heating function may not work in order to protect the device.
• In order to keep reliability of the device, please use this device above -15°C of the outdoor
temperature.
Press the FUNCTION selector so that the display indicates
1
(HEAT).
Set the desired FAN SPEED with the (FAN SPEED) button
(the display indicates the setting).
(AUTO) : The fan speed changes automatically according
to the temperature of the air which blows out.
2
(HI) : Economical as the room will become warm
quickly.
But you may feel a chill at the beginning.
(MED) : Quiet.
(LOW) : More quiet.
Set the desired room temperature with the TEMPERATURE
buttons (the display indicates the setting).
3
START
STOP
■ Defrosting
Defrosting will be performed about once an hour when frost forms on the heat exchange of the outdoor unit,
for 5~10 minutes each time.
The temperature setting and the actual room temperature may
vary somewhat depending on conditions.
Press the (START/STOP) button. Heating operation starts
with a beep. Press the button again to stop operation.
■ As the settings are stored in memory in the remote controller, you
only have to press the
(START/STOP) button next time.
During defrosting operation, the operation lamp blinks in cycle of 3 seconds on and 0.5 second off.
The maximum time for defrosting is 20 minutes.
(If the piping length used is longer than usual, frost will likely to form.)
06L176_RAS-10_14EH1_En 11/30/06, 3:38 PM8
– 8 –
Page 9

DEHUMIDIFYING OPERATION
Use the device for dehumidifying when the room temperature is over 16°C.
When it is under 15°C, the dehumidifying function will not work.
Press the FUNCTION selector so that the display indicates
1
(DEHUMIDIFY).
The FAN SPEED is set at LOW automatically.
The FAN SPEED button does not work.
ENGLISH
START
Press the (START/STOP) button.
STOP
■ When you want to change the operation mode, please use the
FUNCTION selector.
■ Set the desired temperature is available.
■ You also can use the FUNCTION selector to select this operation.
■ Dehumidifying Function
• Dehumidifying takes place with a target temperature which is slightly lower than the room
temperature setting. (However, target temperature is 16°C for a temperature setting of 16°C.)
If the room temperature becomes lower than the target value, operation stops. If the room
temperature becomes higher than the target value, operation restarts.
• The preset room temperature may not be reached depending on the number of people present in
the room conditions.
06L176_RAS-10_14EH1_En 11/30/06, 3:38 PM9
– 9 –
Page 10
COOLING OPERATION
Use the device for cooling when the outdoor temperature is -10 to 42°C.
If humidity is very high (over 80%) indoors, some dew may form on the air outlet grille of the indoor
unit.
Press the FUNCTION selector so that the display indicates
1
2
(COOL).
Set the desired FAN SPEED with the (FAN SPEED) button
(the display indicates the setting).
(AUTO) : The FAN SPEED is HI at first and varies to MED
automatically when the preset temperature has
been reached.
(HI) : Economical as the room will become cool quickly.
(MED) : Quiet.
(LOW) : More quiet.
Set the desired room temperature with the TEMPERATURE
buttons (the display indicates the setting).
3
START
STOP
The temperature setting and the actual room temperature may
vary somewhat depending on conditions.
Press the (START/STOP) button. Cooling operation starts
with a beep. Press the button again to stop operation. The cooling
function does not start if the temperature setting is higher than
the current room temperature (even though the (OPERATION)
lamp lights).
The cooling function will start as soon as you set the temperature
below the current room temperature.
■ As the settings are stored in memory in the remote controller, you
only have to press the
(START/STOP) button next time.
06L176_RAS-10_14EH1_En 11/30/06, 3:38 PM10
– 10 –
Page 11

FAN OPERATION
You can use the device simply as an air circulator. Use this function to dry the interior of the indoor unit
at the end of summer.
Press the FUNCTION selector so that the display indicates
1
(FAN).
Press the (FAN SPEED) button.
ENGLISH
FAN SPEED (AUTO)
For the heating operation
For the cooling operation
2
(HI) : The strongest air blow.
(MED) : Quiet.
(LOW) : More quiet.
START
STOP
… When the AUTO fan speed mode is set in the cooling/heating operation:
• The fan speed will automatically change according to the temperature of
• As room temperature reaches the preset temperature, a very light breeze
• Operation starts in the “HI” mode to reach the preset temperature.
• As room temperature approaches the preset temperature, fan speed auto-
Press the (START/STOP) button. Fan operation starts with a
beep.
Press the button again to stop operation.
discharged air.
will blow.
matically switches to “LOW”.
06L176_RAS-10_14EH1_En 11/30/06, 3:38 PM11
– 11 –
Page 12
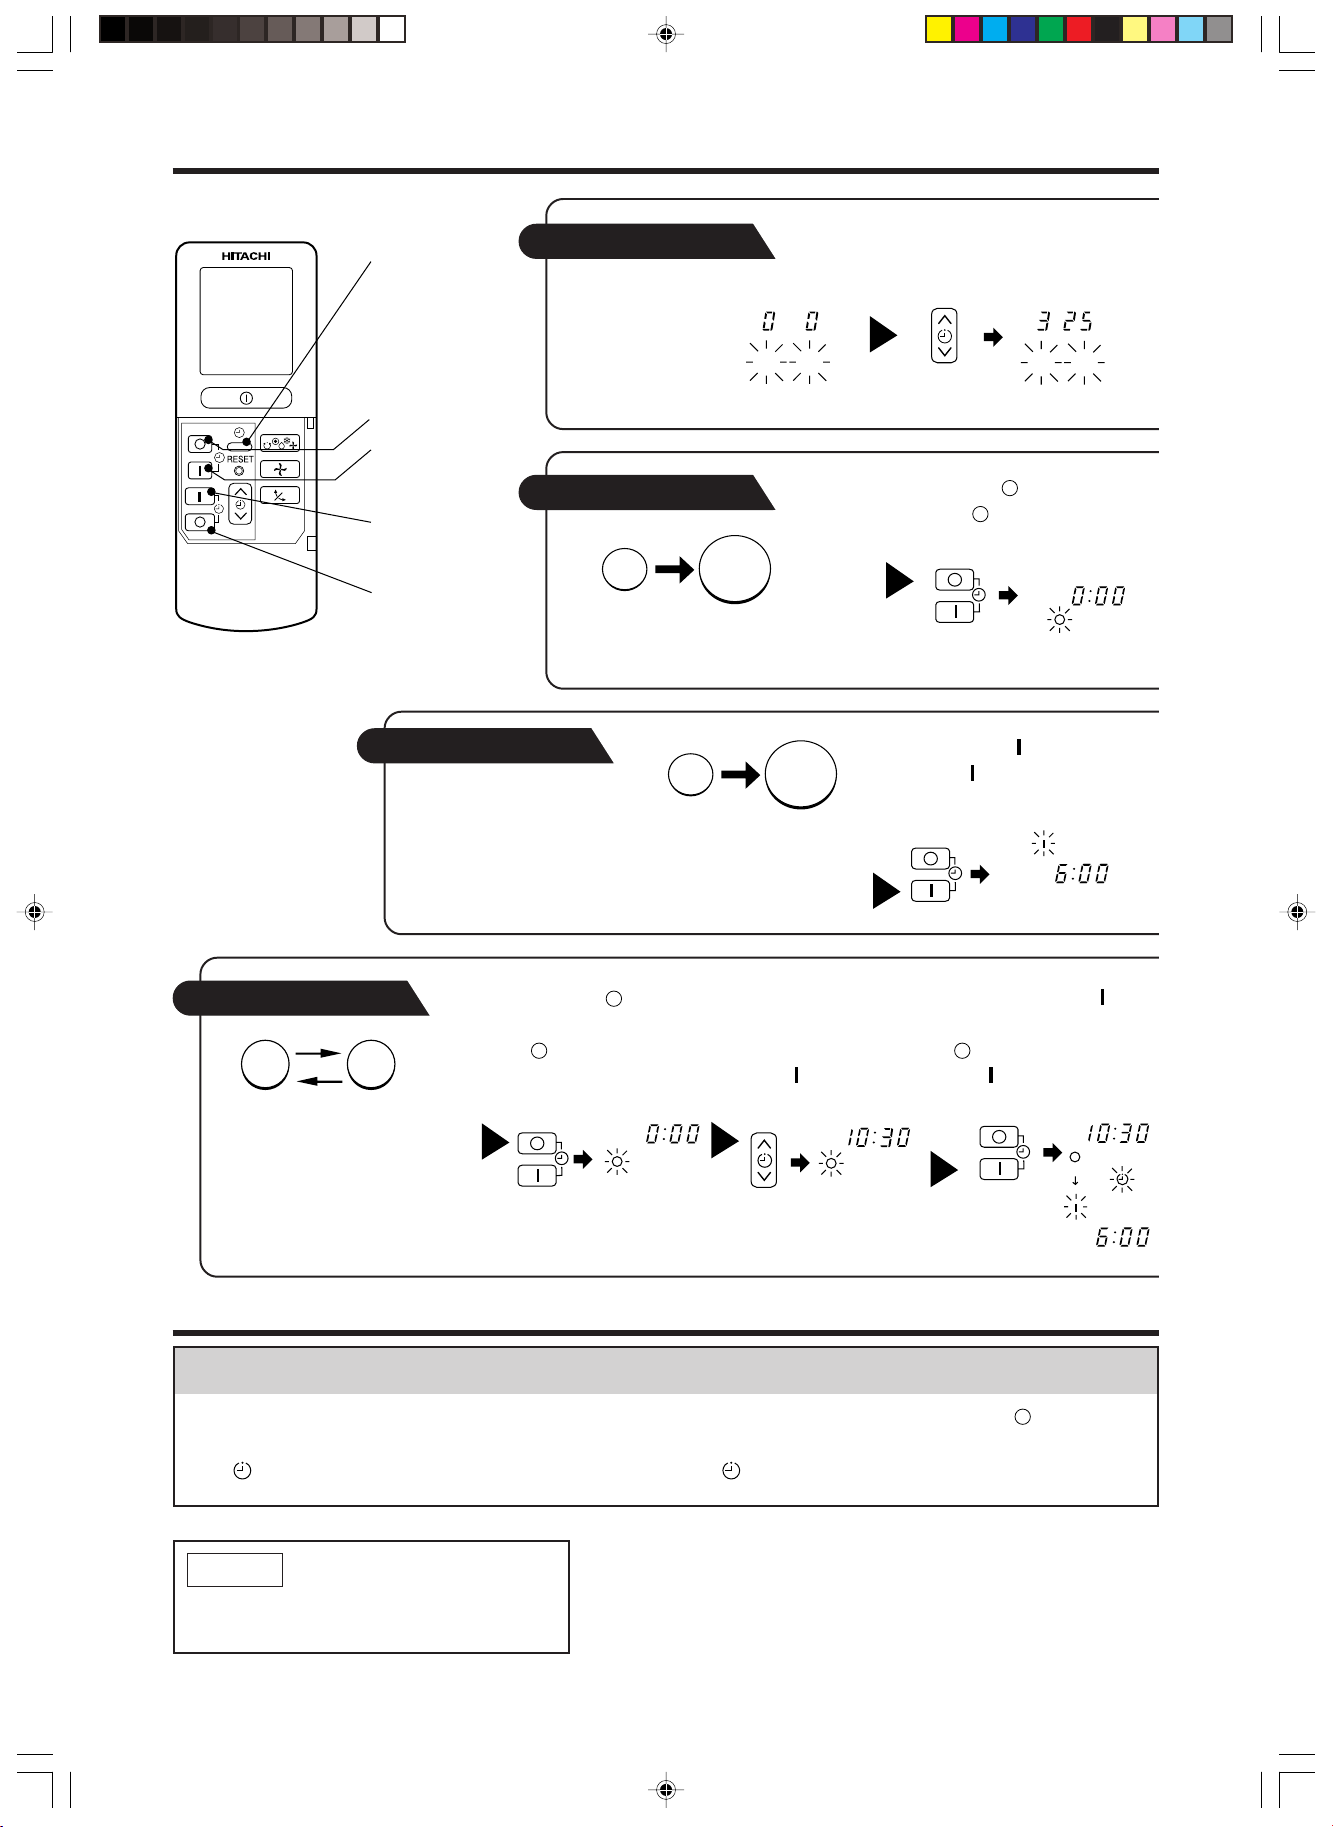
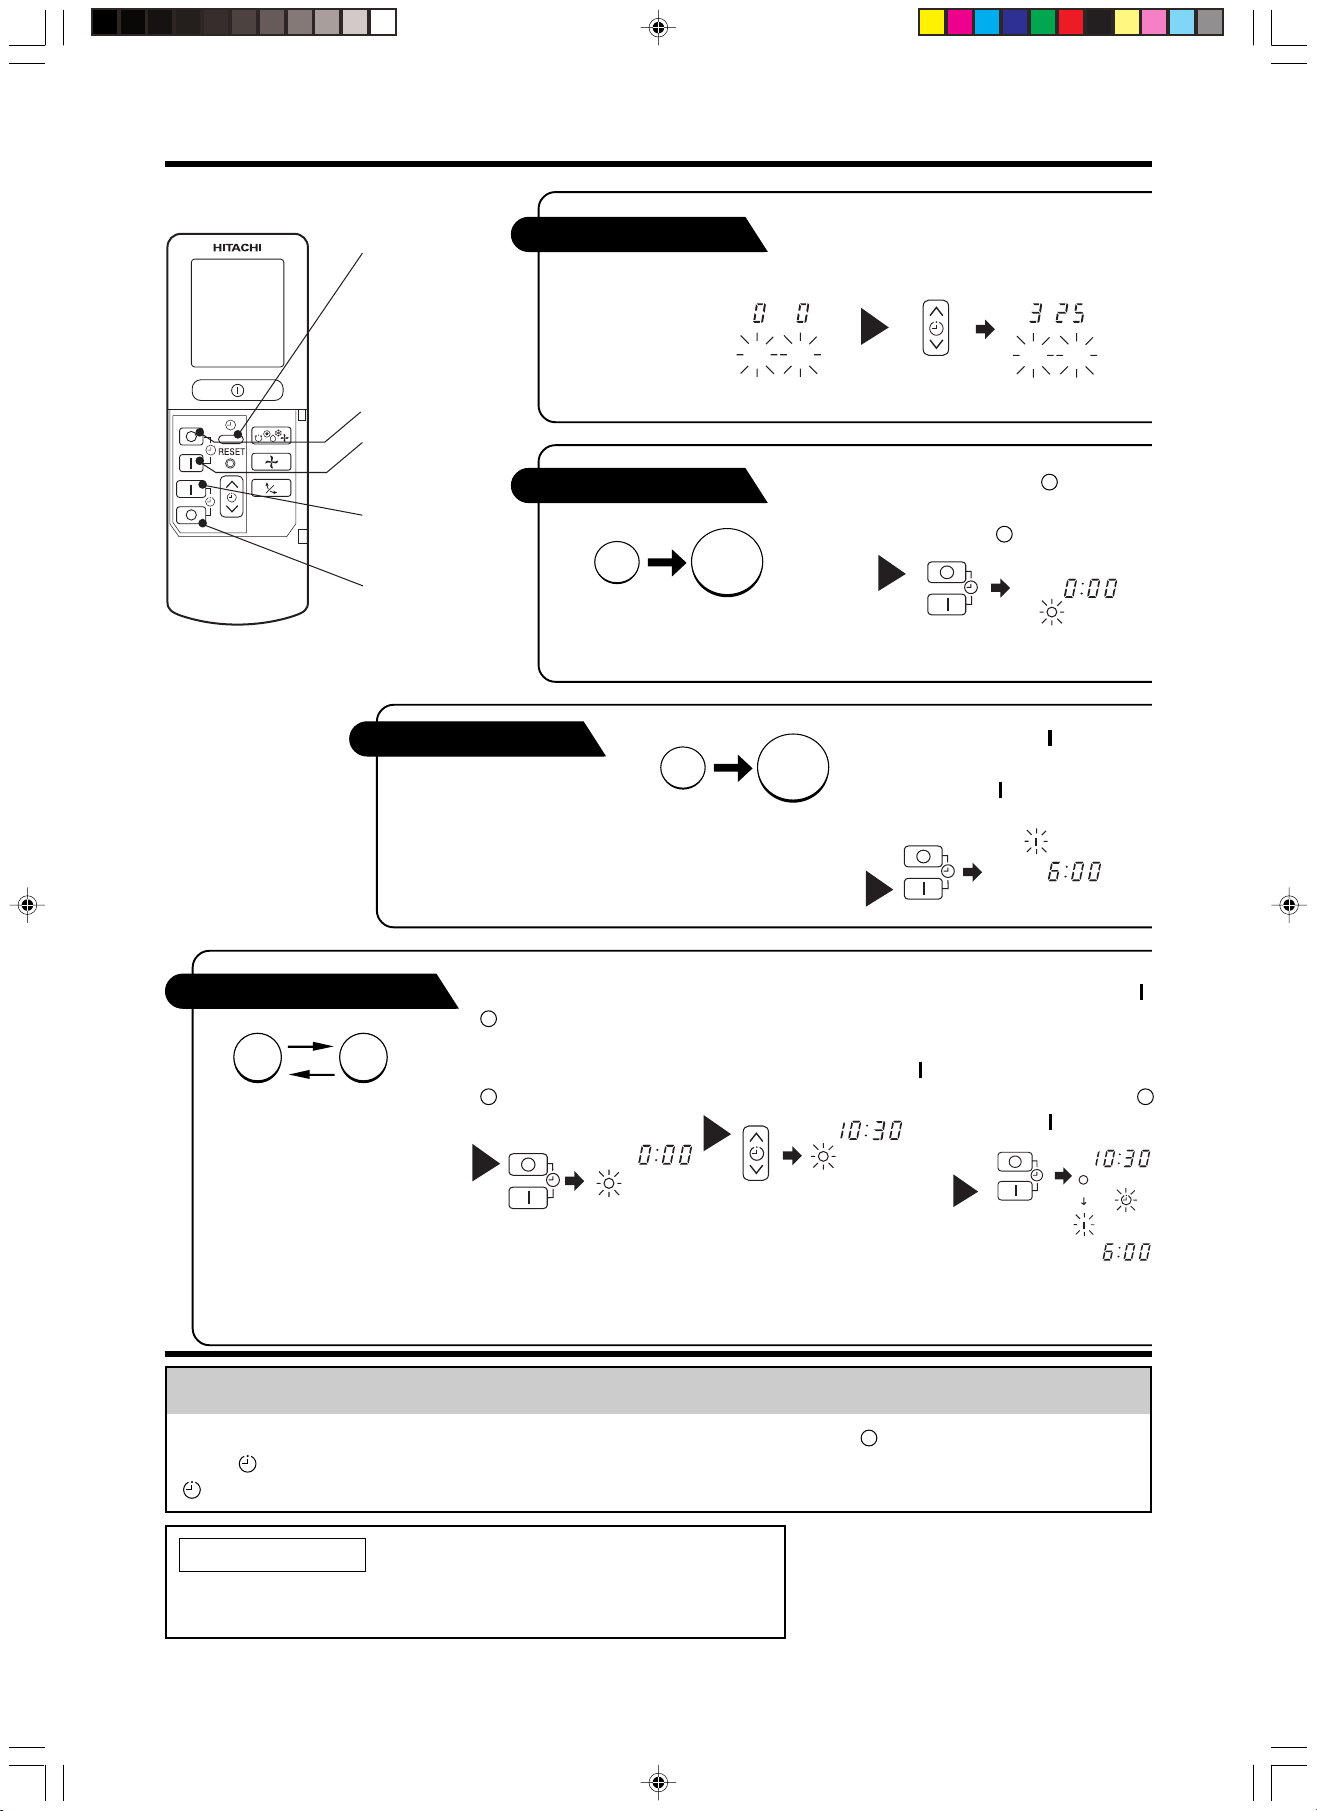
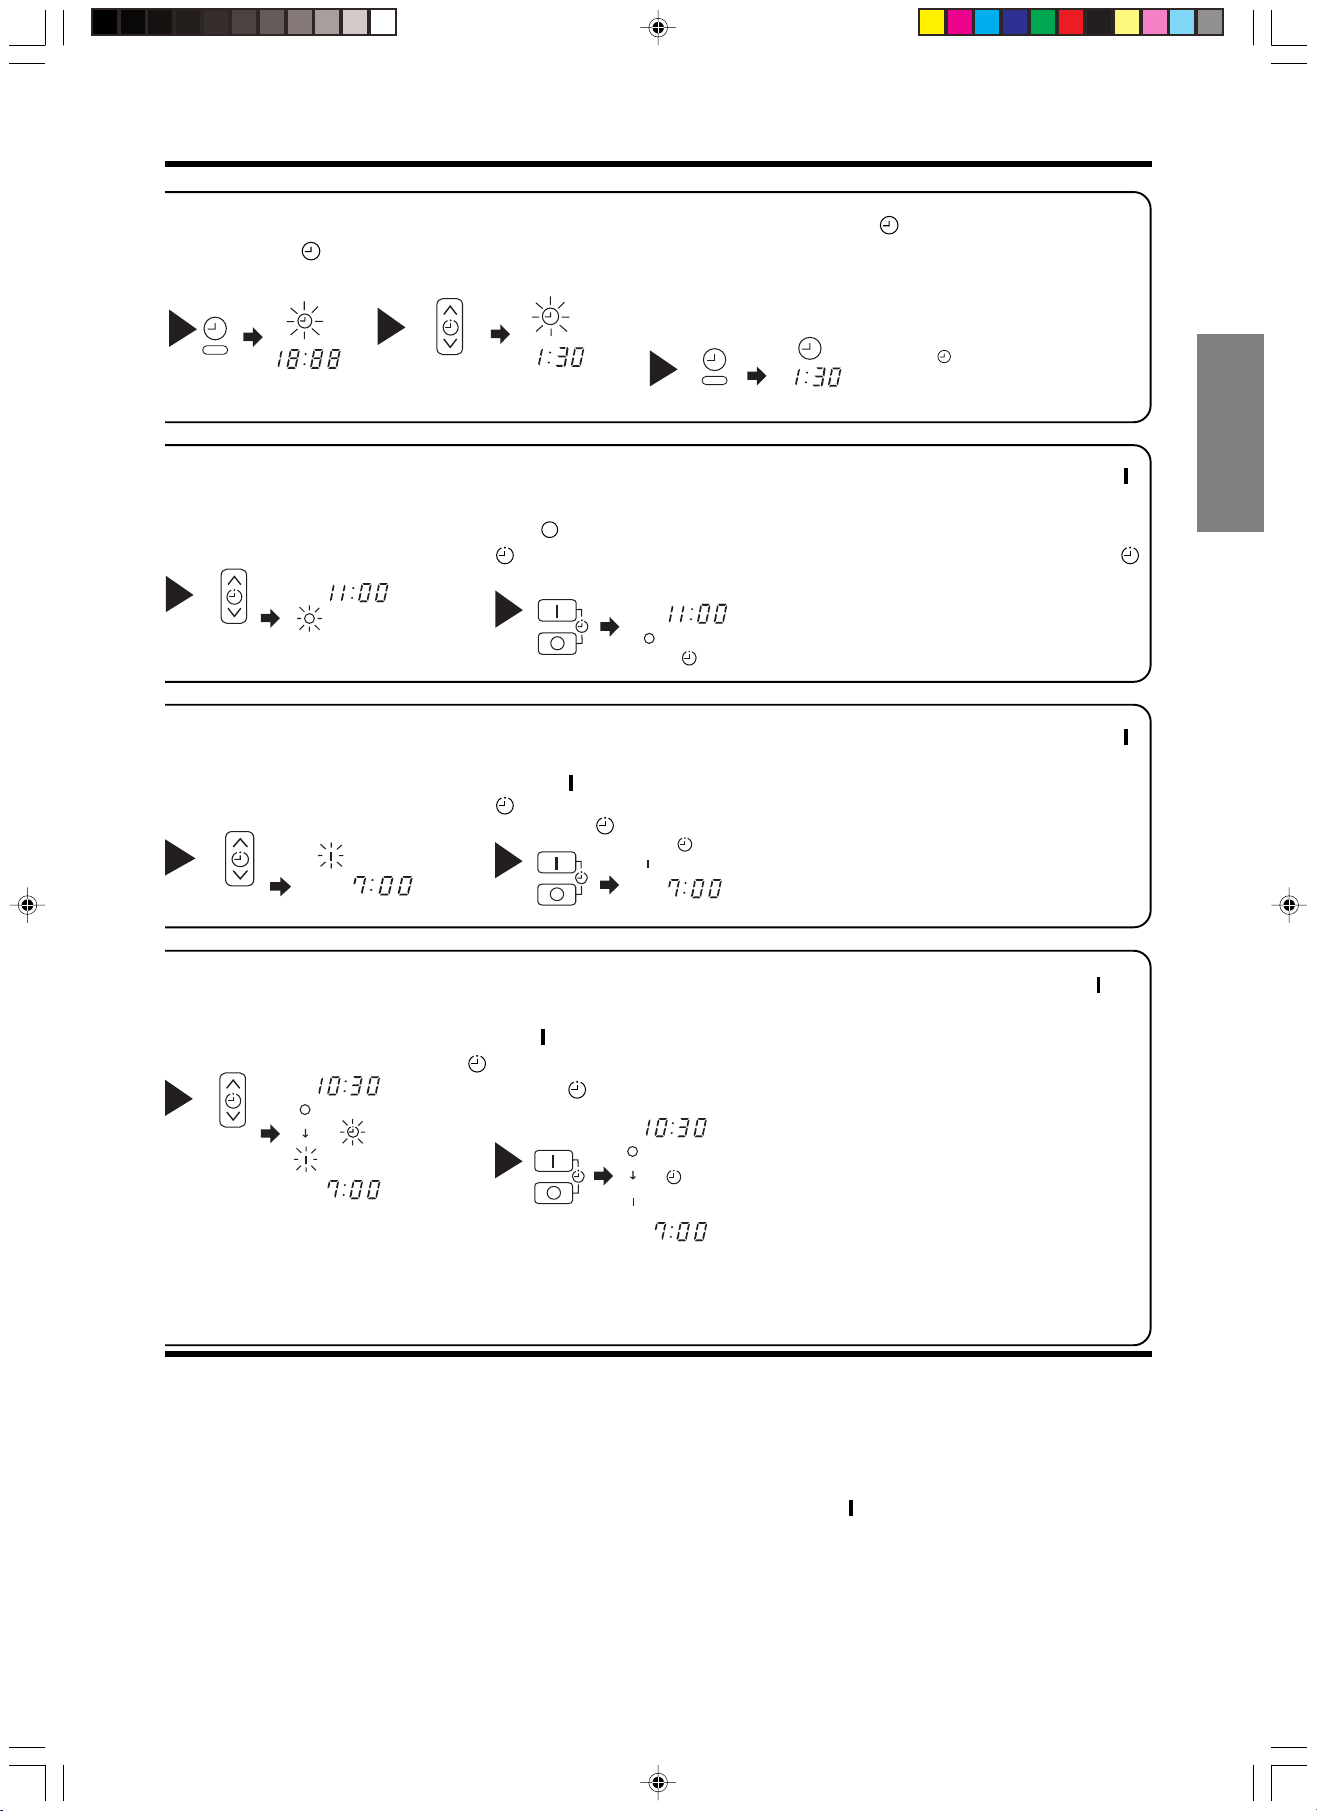
HOW TO SET THE TIMER
AM
TIME, DAY,
MONTH (current
time, day, month)
Time, Day, Month
After you change the
batteries;
1
Set the current month and day
with the TIMER control button.
OFF TIMER
ON TIMER
OFF-Timer
RESERVE
CANCEL
You can set the device to turn off at
the present time.
ON-Timer
The device will turn on at the
designated times.
Start
Stop
Stop
M D
Start
DM
1
Press the (OFF-TIMER)
button. The (OFF) mark blinks
on the display.
AM
1
Press the (ON-TIMER)
button. The (ON) mark blinks on
the display.
ON/OFF-Timer
Start Stop
1
Press the (OFFTIMER) button so that
the (OFF) mark
blinks.
2
Set the turn-off time
with the TIMER control
button.
Press the (RESERVE)
3
Press the (ON-
TIMER) button so that the
(OFF) mark lights and
the (ON) mark blinks.
button.
• The device will turn on (off) and
off (on) at the designated times.
• The switching occurs first at the
preset time that comes earlier.
• The arrow mark appearing on the
display indicates the sequence of
switching operations.
PM
PM
PM
AM
How to Cancel Reservation
Point the signal window of the remote controller toward the indoor unit, and press the (CANCEL)
button.
The
(RESERVED) sign goes out with a beep and the (TIMER) lamp turns off on the indoor unit.
NOTE
You can set only one of the OFF-timer,
ON-timer and ON/OFF-timer.
06L176_RAS-10_14EH1_En 11/30/06, 3:38 PM12
– 12 –
Page 13

2
Set the
(TIME) button.
AM
PM
2
Set the turn-off time with
3
the TIMER control button.
the TIMER control button.
PM
Set the current time with
4
Press the (TIME)
button again. The time
indication starts lighting
instead of flashing.
PM
Example: The current time is 1:30p.m.
3
Point the signal window of the remote controller toward the indoor unit,
and press the (RESERVE) button.
The (OFF) mark starts lighting instead of flashing and the (RESERVED)
sign lights. A beep occurs and the (TIMER) lamp lights on the indoor unit.
• The time indication will
disappear automatically in 10
seconds.
• To check the current time
setting, press the (TIME)
PM
button twice.
The setting of the current
time is now complete.
ENGLISH
2
Set the turn-on time with
the TIMER control button.
AM
4
Set the turn-on time with
the TIMER control button.
PM
AM
PM
3
Point the signal window of the remote controller toward the indoor unit,
Example: The device will turn off at 11:00p.m.
The setting of turn-off time is now complete.
and press the (RESERVE) button.
The (ON) mark starts lighting instead of flashing and the (RESERVED)
sign lights. A beep occurs and the (TIMER) lamp lights on the indoor unit.
Example:
AM
5
Point the signal window of the remote controller toward the indoor unit,
The device will turn on early so that the preset
temperature be almost reached at 7:00 a.m.
The setting of the turn-on time is now complete.
and press the (RESERVE) button.
The (ON) mark starts lighting instead of flashing and the (RESERVED)
sign lights. A beep occurs and the (TIMER) lamp lights on the indoor unit.
PM
AM
Example:
For heating, the device will turn off at 10:30 p.m.,
and then turn on early so that the preset
temperature be almost reached at 7:00 a.m.;
for cooling and dehumidifying, it will simply
turned on at 7:00 a.m. The settings of the turn
on/off times are now complete.
• The timer may be used in three ways: off-timer, on-timer and ON/OFF (OFF/ON)-timer. Set the
current time at first because it serves as a reference.
• As the time settings are stored in memory in the remote controller, you only have to press the
(RESERVE) button is order to use the same settings next time.
06L176_RAS-10_14EH1_En 11/30/06, 3:38 PM13
– 13 –
Page 14

HOW TO SET THE SLEEP TIMER
Set the current time at first if it is not set before (see the pages for setting the current time). Press the
(SLEEP) button and the display changes as shown below.
Mode Indication
●
SLEEP
Sleep Timer
1 hour 2 hours 3 hours 7 hours
Sleep timer off
Sleep Timer: The device will continue working for the desired number of
hours and then turn off.
Point the signal window of the remote controller toward the indoor unit, and
press the SLEEP button.
The timer information will be displayed on the remote controller. The TIMER
lamp lights with a beep from the indoor unit. When the sleep timer has
been set, the display indicates the turn-off time.
AM
Sleep
timer
1
Set the ON-timer.
Start
Example: If you set 3 hours sleep time at
11:38 p.m., the turn-off time is 2:38 a.m.
The device will be turned off by the sleep timer
and turned on by on-timer.
2
Press the (SLEEP) button and set the sleep timer.
AM
AM
For heating:
In this case, the device will turn off in
2 hours (at 1:38 a.m.) and turn on early
so that the preset temperature will be
almost reached at 6:00 next morning.
How to Cancel Reservation
Point the signal window of the remote controller toward the indoor unit, and press the (CANCEL)
button.
The
NOTE
If you set the sleep timer when the off-time or on/offtimer has been set earlier, the sleep timer becomes
effective instead of the off - or on/off-timer set earlier.
(RESERVED) sign goes out with a beep and the (TIMER) lamp turns off on the indoor unit.
06L176_RAS-10_14EH1_En 11/30/06, 3:38 PM14
– 14 –
Page 15
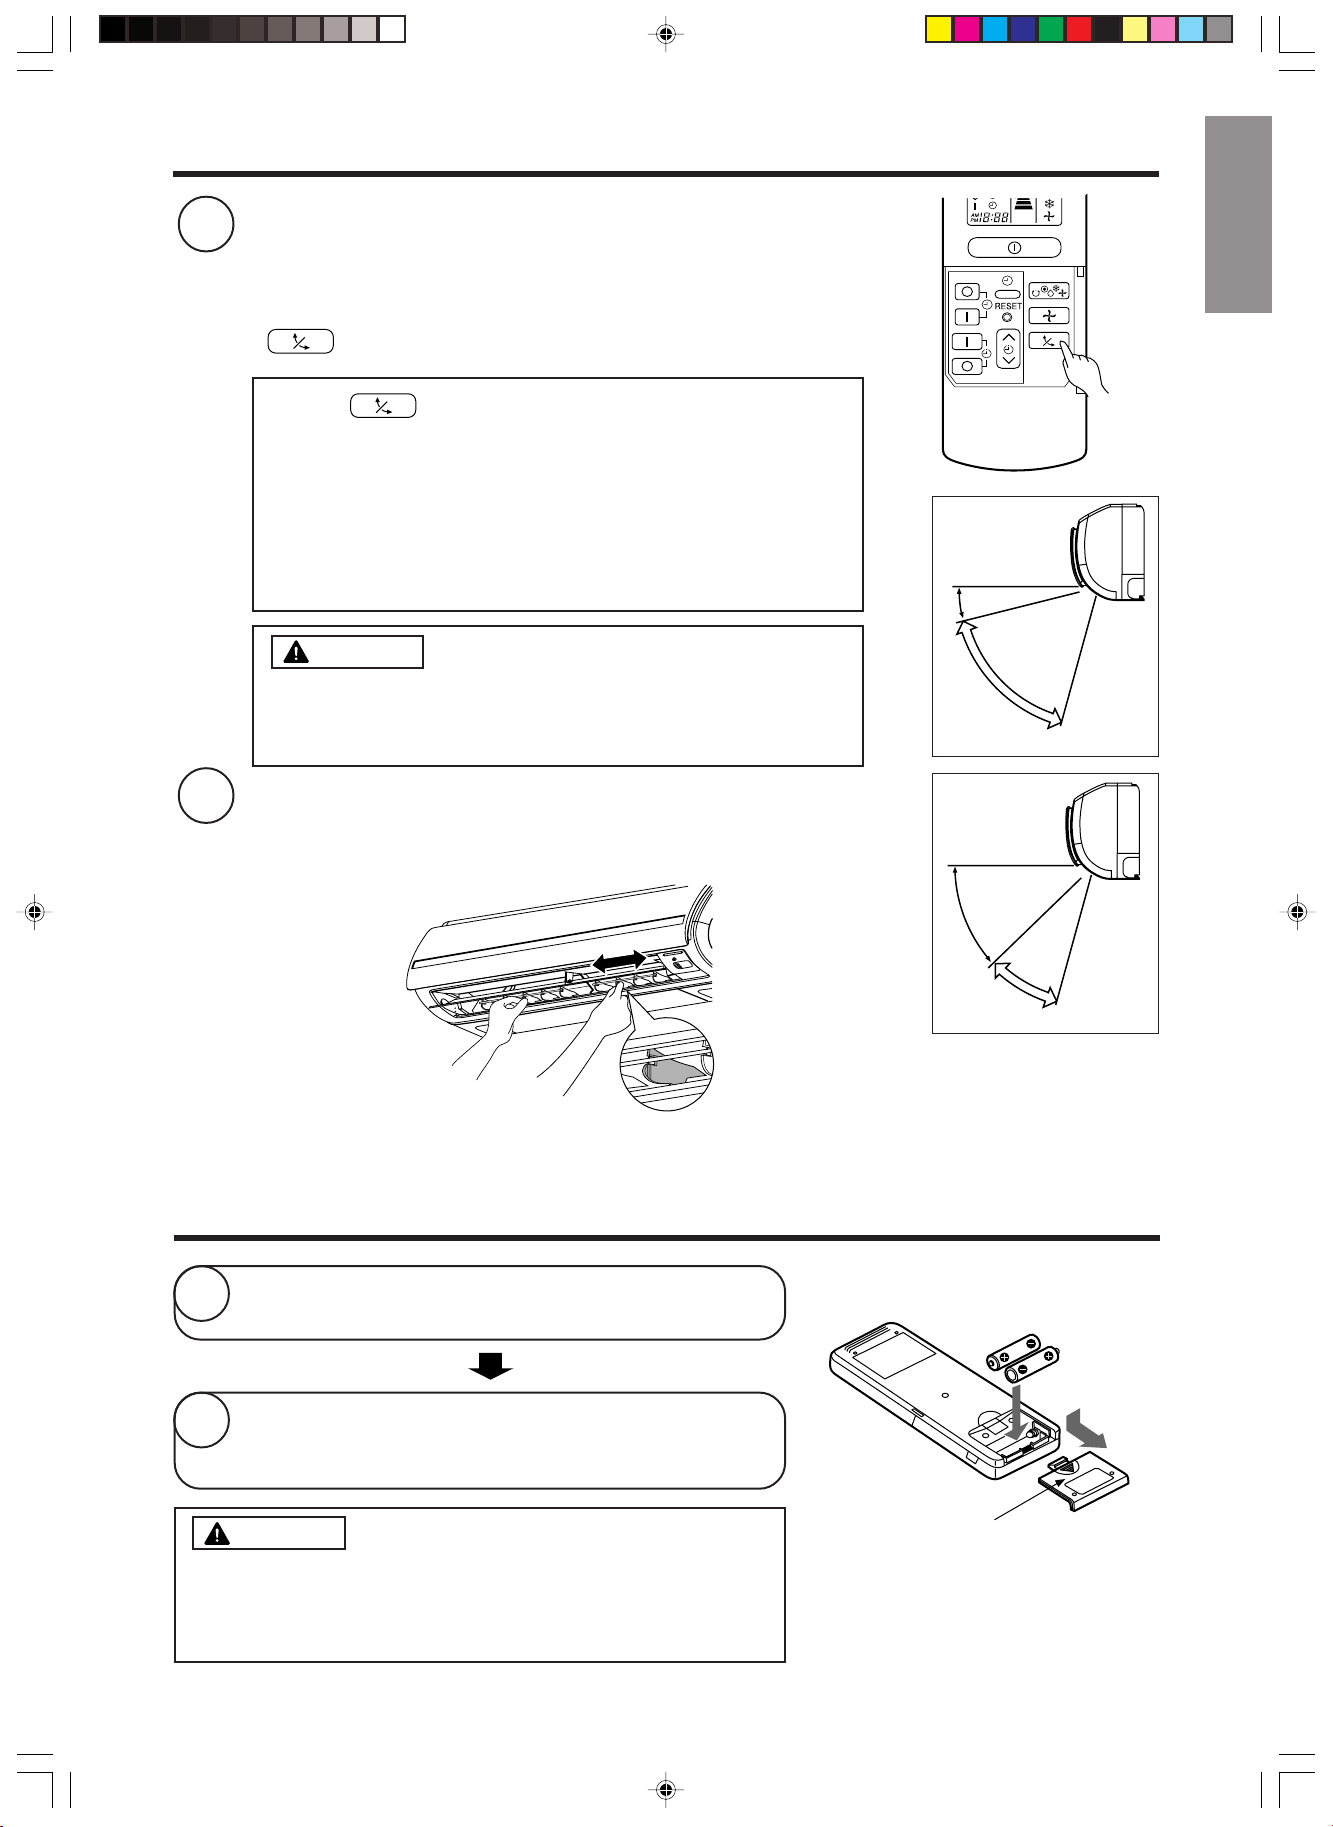
ADJUSTING THE AIR DEFLECTORS
1
2
Adjustment of the conditioned air in the upward and downward
directions.
The horizontal air deflector is automatically set to the proper angle
suitable for each operation. The deflector can be swung up and
down continuously and also set to the desired angle using the
“
•
• Use the horizontal air deflector within the adjusting range
• When the operation is stopped, the horizontal air deflector
• In “Cooling” operation, do not keep the horizontal air
Adjustment of the conditioned air to the left and right.
(AUTO SWING)” button.
If the “ (AUTO SWING)” button is pressed once, the horizontal
air deflector swings up and down. If the button is pressed again, the
deflector stops in its current position. Several seconds (about 6
seconds) may be required before the deflector starts to move.
shown in the right.
moves and stops at the position where the air outlet closes.
CAUTION
deflector swinging for a long time. Some dew may form on
the horizontal air deflector and dew may drop.
ENGLISH
When cooling,
dehumidifying
Vertical
about 15°
about 60°
When heating
Hold the vertical air deflector as shown in the figure and adjust
the conditioned air to the left and right.
Left side: Hold the third
blade from the left end
of the air deflector to
adjust the direction. The
pull for the blade is
marked.
Right side: Hold the third
blade from the right end
of the air deflector to
adjust the direction. The
pull for the blade is
marked.
Vertical
about 45°
about 30°
HOW TO EXCHANGE THE BATTERIES IN THE REMOTE CONTROLLER
1
2
Remove the cover as shown in the figure and take out
the old batteries.
Install the new batteries.
The direction of the batteries should match the marks
in the case.
CAUTION
1. Do not use new and old batteries, or different kinds of
batteries together.
2. Take out the batteries when you do not use the remote
controller for 2 or 3 months.
06L176_RAS-10_14EH1_En 11/30/06, 3:38 PM15
Push and pull to the
direction of arrow.
– 15 –
Page 16

MAINTENANCE
CAUTION
Cleaning and maintenance must be carried out only by qualified service personal. Before cleaning,
stop operation and switch off the power supply.
1. AIR FILTER
When the filter indicator lamp comes on, be sure to clean the filter. By doing so, the power rates are
saved. In case the air filter is full of dust, the air flow will decrease and the cooling capacity will be
reduced. Further, noise may occur. Be sure to clean the filter following the procedure below.
PROCEDURE
Open the front panel carefully and remove the filter.
1
Vacuum dust from the air filter using vacuum cleaner.
2
If there is too much dust, wash the filter with a detergent
and rinse it thoroughly. After that, dry it in the shade.
• Set the filter with “FRONT” mark facing front, and
3
• Do not wash with hot water at more than 40°C. The filter may shrink.
• When washing it, shake off moisture completely and dry it in the shade; do not expose it directly
to the sun. The filter may shrink.
• Don't operate the unit without filter. Fault may occur if you continue.
slot them into the original state.
• After attaching the filters, push the front panel at
three arrow portions as shown in figure and close
it.
CAUTION
06L176_RAS-10_14EH1_En 11/30/06, 3:38 PM16
– 16 –
Page 17
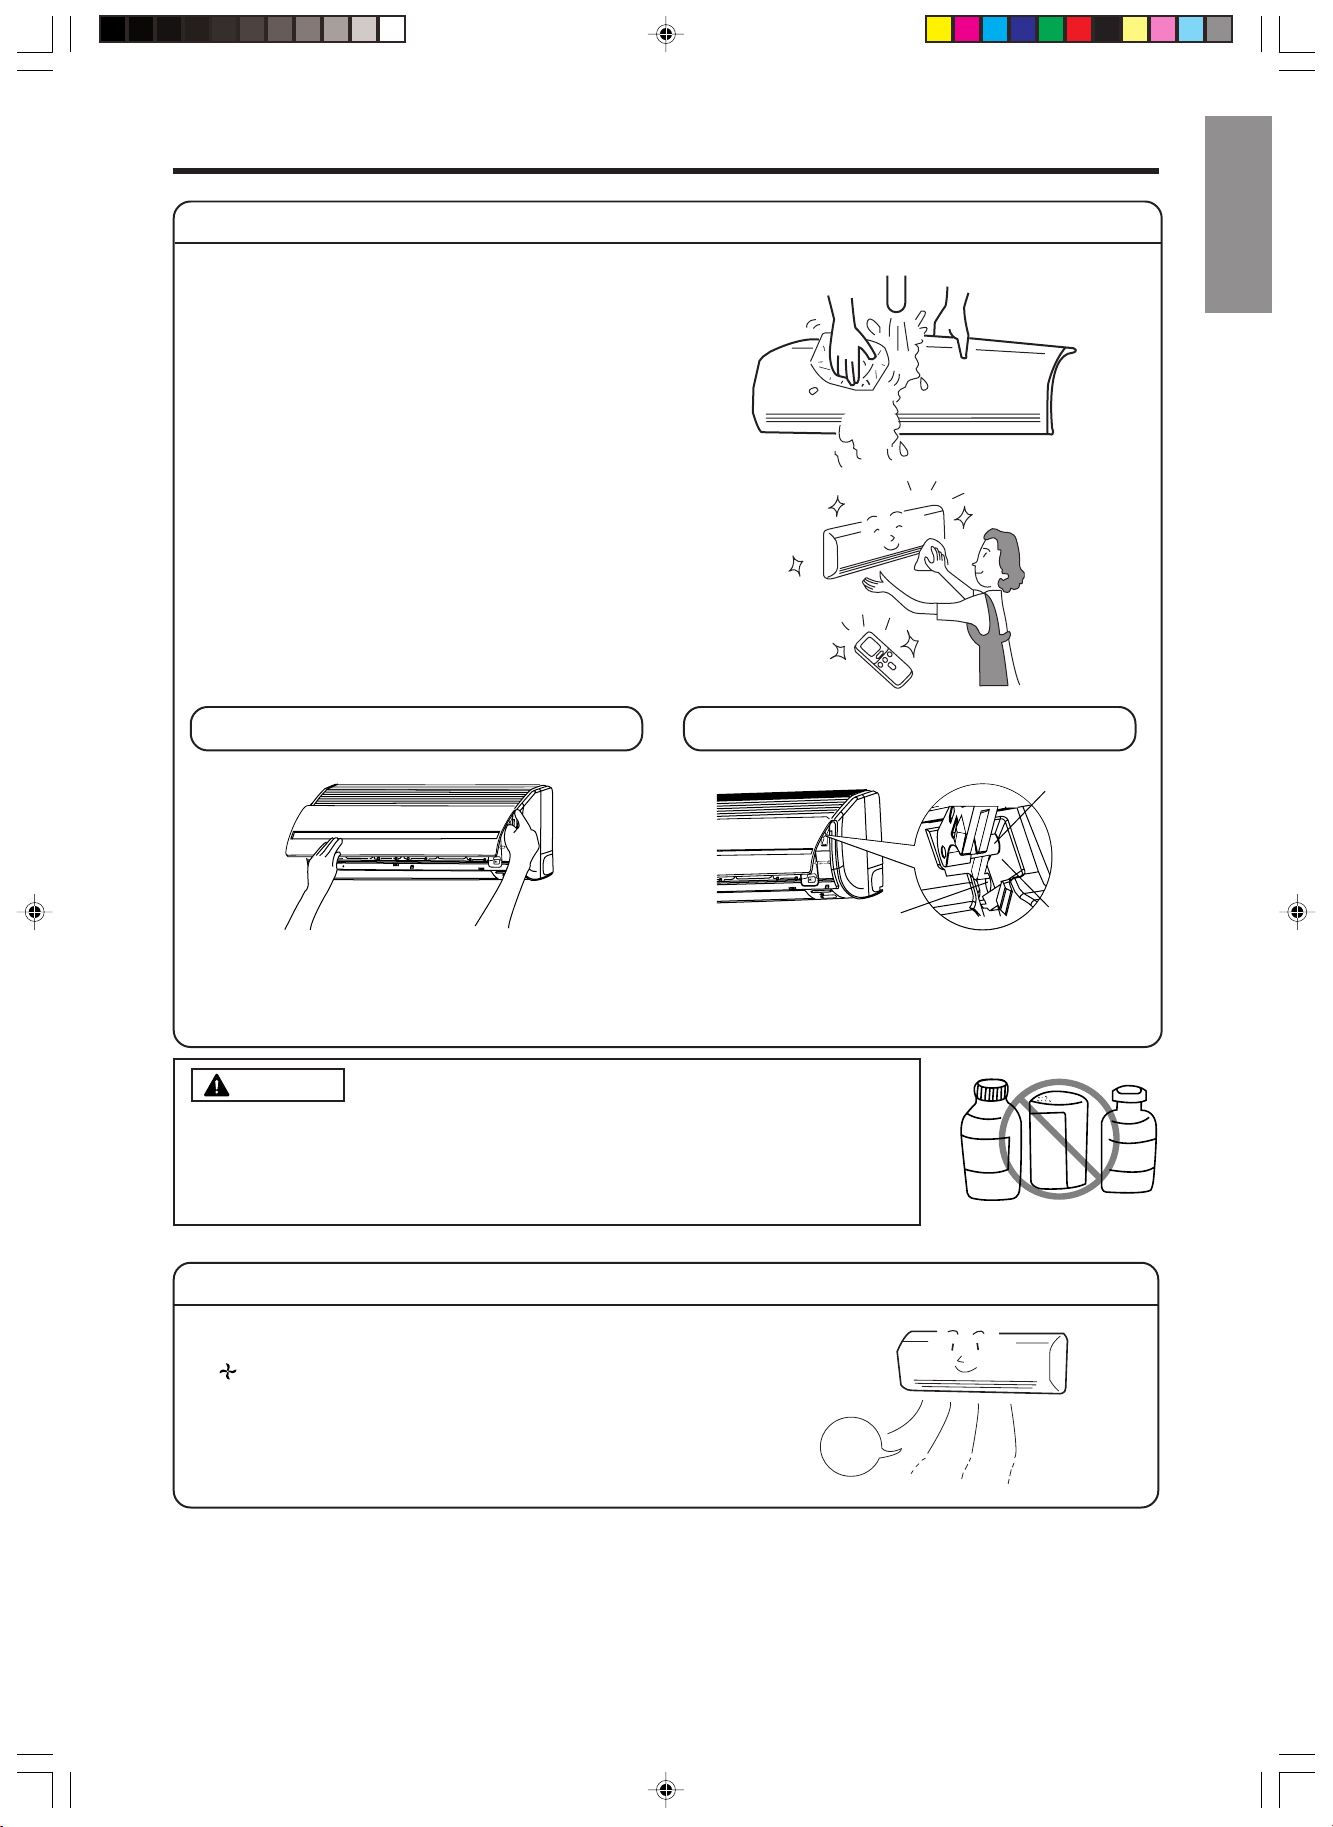
2. CLEANING OF FRONT PANEL
• Remove the front panel and wash with clean water.
Wash it with a soft sponge.
After using neutral detergent, wash thoroughly with
clean water.
• When front panel is not removed, wipe it with a soft
dry cloth. Wipe the remote controller thoroughly with
a soft dry cloth.
• Wipe the water thoroughly.
If water remains at indicators or signal receiver of
indoor unit, it causes trouble.
Method of removing the front panel.
Be sure to hold the front panel with both hands to
detach and attach it.
Removing the Front Panel Attaching the Front Panel
ENGLISH
Shaft
Hole
• When the front panel is fully opened with both
hands, push the right arm to the inside to
release it, and while closing the front panel
• Move the shafts of the left and right arms into
the steps in the unit and securely insert them
into the holes.
slightly, put it out forward.
CAUTION
• Do not splash or direct water to the body of the unit when cleaning it as
this may cause short circuit.
• Never use hot water (above 40°C), benzine, gasoline, acid, thinner or a
brush, because they will damage the plastic surface and the coating.
3. MAINTENANCE AT BEGINNING OF LONG OFF PERIOD
• Run the unit by setting the operation mode to
(FAN) and the fan speed to HI for about half a day
on a fine day, and dry the whole of the unit.
• Switch off the power plug or turn off the circuit breaker.
Air
Blow
Step
A
B
E
N
Z
C
E
N
I
I
D
T
R
H
E
I
N
N
06L176_RAS-10_14EH1_En 11/30/06, 3:38 PM17
– 17 –
Page 18

INFORMATION
CAPABILITIES
Heating Capability
• This room air conditioner utilizes a heat pump system that absorbs
exterior heat and brings it into a room to be heated. As the ambient
temperature gets lower, heating capability will also lower. In such a
situation, the inverter work to increase compressor rpm to keep the
unit’s heating capability from decreasing. If the unit’s heating performance is still unsatisfactory, other heating appliances should be used
to augment this unit’s performance.
• The air conditioner is designed to heat an entire room so that it may take some time before you feel warm.
Timer operation is recommended for effective preheating ahead of the desired time.
Cooling and Dehumidifying Capabilities
• If the heat present in a room exceeds the unit’s cooling capacity (for example, if there are many people in
the room or other heating appliances are used), the preset room temperature may not be reached.
VARIOUS FUNCTIONS
• When fan speed, room temperature are set with the remote controller before starting manual operation and
the buttons are released, the indication of settings will go off in 10 seconds and only the operation mode
will be displayed.
• Pressing the button while the unit is in operation will let the protective circuit work so that the unit will
not operate for approximately 3 minutes.
• During heating operation, the indoor unit’s color indicator lamp may flash with no air emitted for a while.
• If you feel cold wind during heating operation with the (HI) fan speed or want to make the unit operation
quieter after the room is heated, use of (AUTO) setting is recommended.
• With the (LOW) setting, the unit’s cooling capability will lower slightly.
• With the (LOW) setting, the unit’s heating capacity will vary with the operating conditions.
CAUTION
Do not use a stove
or any other
hightemperature
devices in proximity
to the indoor unit.
PROHIBITION
TIMER PROGRAMMING/SLEEP TIMER OPERATION
• When the timer has been programmed, the unit will not operate even if the set time is reached unless the
unit receives a signal from the remote controller. Confirm that timer programming is complete (beep) and
the TIMER lamp of the indoor unit lights.
• If the (SLEEP) button is pressed while the ON/OFF timer is programmed, the sleep timer takes priority.
• During sleep timer operation, the fan speed sets to (LOW) regardless of the preset speed. The remote
controller display indication will remain unchanged even with the (LOW) setting.
06L176_RAS-10_14EH1_En 11/30/06, 3:38 PM18
– 18 –
Page 19

REGULAR INSPECTION
PLEASE CHECK THE FOLLOWING POINTS EVERY EITHER HALF YEARLY OR YEARLY. CONTACT
YOUR SALES AGENT SHOULD YOU NEED ANY HELP.
Check to see if the unit’s earth line has been con-
1
WARNING
nected correctly.
If the earth line is disconnected or faulty, unit failure or
electric shock hazard may result.
Check to see if the mounting frame has rusted ex-
2
WARNING
cessively or if the outdoor unit has tilted or become
unstable.
It could collapse or fall, causing injury.
Check to see if the power plug is securely inserted
into the wall socket.
3
WARNING
If the power plug is not inserted into the wall socket
securely or becomes hot, an electric shock or fire may result.
If dust or dirt is found on the power plug, clean the plug
and insert it into the wall socket.
AFTER SALES SERVICE AND WARRANTY
WHEN ASKING FOR SERVICE, CHECK THE FOLLOWING POINTS.
ENGLISH
CONDITION CHECK THE FOLLOWING POINTS
If the remote controller is not
transmitting a signal.
(Remote controller display is
dim or blank.)
• Do the batteries need replacement?
• Is the polarity of the inserted batteries correct?
• Is the fuse all right?
• Is the voltage extremely high or low?
When it does not operate.
• Is the circuit breaker “ON”?
• Is the power plug inserted?
• Do you have any power cut?
• Is the air filter blocked with dust?
• Is the set temperature suitable?
When it does not cool well.
When it does not heat well.
• Have horizontal air deflectors been adjusted to their correct
positions according to the operation mode selected?
• Are the air inlets or air outlets of indoor and outdoor units
blocked?
• Is the fan speed “LOW”?
■ The following phenomena do not indicate unit failure.
<Operation start>
During heating, the operation
indicator blinks and air blow stops
Hissing or fizzy sounds
Squeaking noise
Rustling noise
Clicking noise
The unit is preparing to blow warm air. Please wait.
<In operation>
The outdoor unit is defrosting. Please wait.
Refrigerant flow noise in the pipe or valve sound generated when flow rate is
adjusted.
Noise generated when the unit expands or contracts due to temperature changes.
Noise generated with the indoor unit fan’s rpm changing such as operation start
times.
Noise of the motorized valve when the unit is switched on.
06L176_RAS-10_14EH1_En 11/30/06, 3:38 PM19
– 19 –
Page 20
Perking noise
Changing operation noise
Mist emission
Steam emitted from the outdoor unit
Odors
The outdoor unit continues to operate
even if operation is stopped.
The OPERATION lamp is blinking.
Does not reach the temperature
setting
Noise of the ventilation fan sucking in air present in the drain hose and blowing out
dehumidifying water that had accumulated in the condensed water collector. For
details, consult your sales agent.
Operation noise changes due to power variations according to room temperature
changes.
Mist is generated as the air within the room is suddenly cooled by conditioned air.
Water generated during defrosting operation evaporates and steam is emitted.
Caused as the smells and particles of smoke, food, cosmetics, etc. present in room
air become attached the unit and blown off into the room again.
Defrosting is underway (as the heating operation is stopped, the microcomputer
checks frost accumulated in the outdoor unit and instructs the unit to perform
automatic defrosting if necessary).
Shows preheating or defrosting operation is underway.
As the protective circuit or preheat sensor operates when unit operation is stopped
during preheating and then restarted, or when operation mode is switched from cooling
to heating, the lamp continues to blink.
Actual room temperature may deviate slightly from the remote controller's
temperature setting depending on the number of people in the room, indoor or
outdoor conditions.
• If the unit still fails to operate
normally after performing the
above inspections, turn the
circuit breaker off, or pull the
power plug out, and contact
your sales agent immediately.
Notes
• In quiet operation or stopping the running, the following phenomena may
occasionally occur, but they are not abnormal for the operation.
(1) Slight flowing noise of refrigerant in the refrigerating cycle.
(2) Slight rubbing noise from the fan casing which is cooled and then
• The odor will possibly be emitted from the room air conditioner because
the various odor, emitted by smoke, foodstuffs, cosmetics and so on,
sticks to it. So please clean the air filter and the evaporator regularly to
reduce the odor.
Contact your sales agent immediately if the
following phenomena should occur:
•
The circuit breaker switches off or the fuse blows
frequently.
•
The switch operation is not stable.
•
Foreign matter or water accidentally enters the unit interior.
•
The power cord gets excessively hot or its insulation is torn or stripped.
•
TIMER lamp on the indoor unit display blinks.
As the nature of the failure can be identified by the blinking cycle,
(
check the blinking cycle before turning off the circuit breaker.
gradually warmed as operation stops.
)
• Please contact your sales agent immediately if the air conditioner still fails to operate normally after
the above inspections. Inform your agent of the model of your unit, production number, date of
installation. Please also inform him regarding the fault.
Please note:
On switching on the equipment, particularly when the room light is dimmed, a slight brightness
fluctuation may occur. This is of no consequence.
The conditions of the local Power Supply Companies are to be observed.
06L176_RAS-10_14EH1_En 11/30/06, 3:38 PM20
– 20 –
Page 21
СПЛИТ-КОДИЦИОНЕР ВОЗДУХА
ВНУТРЕННИЙ БЛОК/НАРУЖНЫЙ БЛОК
НАРУЖНЫЙ БЛОК
RAC-10EH2
МОДЕЛЬ
RAS-10EH2/RAC-10EH2
RAS-14EH2/RAC-14EH2
ВНУТРЕННИЙ БЛОК
RAS-10EH2
RAS-14EH2
РУССКИЙ
RAC-14EH2
Instruction manual Page 1~20
To obtain the best performance and ensure years of
trouble free use, please read this instruction manual
completely.
Инструкция по эксплуатации Стр. 21-40
Для получения наилучших эксплуатационных
характеристик и обеспечения беспроблемной
эксплуатации в течение длительного времени,
прочтите полностью данное руководство по
эксплуатации.
– 21 –
Page 22
МЕРЫ БЕЗОПАСНОСТИ
• Внимательно изучите раздел “Меры безопасности” перед началом эксплуатации устройства
для обеспечения его правильного использования.
• Обращайте особое внимание на инструкции, отмеченные знаками “
ОСТОРОЖНО”. Знаком “ВНИМАНИЕ!” отмечены инструкции, несоблюдение которых
“
может привести к угрозе жизни или серьезным травмам. Знаком “ОСТОРОЖНО!” отмечены
инструкции, несоблюдение которых может привести к серьезным последствиям. Для
обеспечения безопасности в точности соблюдайте все инструкции.
• Используемые в руководстве знаки имеют следующее значение: (Ниже приведены примеры
таких знаков.)
Этим знаком на схеме обозначается запрещение.
Этим знаком обозначаются инструкции, которые
необходимо соблюдать.
• Сохраняйте данное руководство во время эксплуатации устройства.
МЕРЫ БЕЗОПАСНСТИ ПРИ УСТАНОВКЕ
• Не вносите изменений в конструкцию устройства!
Самостоятельное внесение изменений в конструкцию устройства может
привести к протечке воды, короткому замыканию или пожару.
• Установка блока должна производиться представителем продавца или
квалифицированным специалистом.
Самостоятельное выполнение установки может привести к протечке воды,
ВНИМАНИЕ
ОСТОРОЖНО
короткому замыканию или пожару.
• Используйте провод заземления.
Не размещайте провод заземления рядом с газовой или водопроводной
трубой, громоотводом или заземлением телефона. Неправильное выполнение
заземления может привести к поражению электрическим током.
• Используйте только комплект труб для R410A. В противном случае возможна
поломка медных труб или нарушения функционирования.
• В зависимости от места установки кондиционера может потребоваться
установка автоматического выключателя.
Если автоматический выключатель не установлен, существует опасность
поражения электрическим током.
• Не устанавливайте блок рядом с источником или местом хранения
воспламеняющегося газа.
Если рядом с наружным блоком возникнут утечки газа, то он может
загореться. Трубопровод должен закрепляться достаточным количеством
держателей; расстояние между держателями не должно превышать 1 м.
• При установке дренажного шланга следите, чтобы поток воды был
равномерным. В противном случае возможна утечка воды из внутреннего и
наружного блоков, что может повредить помещение или мебель.
• Должен использоваться однофазный источник питания 230 В.
Использование других источников питания может вызвать перегрев
электрических компонентов и привести к пожару.
ВНИМАНИЕ” и
ЗАПРЕЩЕНО
ЗАПРЕЩЕНО
ЗАПРЕЩЕНО
ЗАПРЕЩЕНО
МЕРЫ БЕЗОПАСНСТИ ПРИ ПЕРЕНЕСЕНИИ В ДРУГОЕ МЕСТО ИЛИ ПРОВЕДЕНИИ ОБСЛУЖИВАНИЯ
• При появлении признаков ненормальной ситуации (например запаха гари)
прекратите эксплуатацию устройства и выньте вилку кабеля питания из
ВНИМАНИЕ
розетки или выключите автоматический выключатель. Обратитесь в сервисцентр. Продолжение эксплуатации устройства в ненормальных условиях
может привести к неисправности, короткому замыканию или пожару.
• Обратитесь в сервис-центр для проведения обслуживания.
Ненадлежащее самостоятельное проведение обслуживания может привести к поражению
электрическим током или пожару.
• При необходимости снятия устройства или его установки в другом месте обратитесь в
сервис-центр.
Самостоятельное снятие устройства или его перенесение в другое место могут привести
к поражению электрическим током или пожару.
• Во избежание вреда здоровью не находитесь продолжительное время под
прямым потоком воздуха.
•
При подключении кабеля питания не используйте удлинитель и не включайте
слишком много других устройств в ту же розетку, к которой подключен кондиционер.
Кроме того, следите, чтобы при подключении кабель питания не был натянутым.
Несоблюдение этого требования приведет к поражению электрическим током,
перегреву или пожару.
•
Не завязывайте узлом кабель питания, не тяните за него, не кладите на него
различные предметы, не нагревайте его и не
зажимайте его между другими предметами. Это может привести к разрыву кабеля.
Использование поврежденного кабеля может привести к поражению
электрическим током или пожару.
• Не кладите предметы (такие как тонкие прутья) в панель вентилятора и со
стороны всасывания, поскольку наличие внутри высокоскоростного
ЗАПРЕЩЕНО
вентилятора может создать опасную ситуацию.
“ВЫКЛ”
ЗАПРЕЩЕНО
ЗАПРЕЩЕНО
ЗАПРЕЩЕНО
– 22 –
Page 23

ВНИМАНИЕ
МЕРЫ БЕЗОПАСНОСТИ ПРИ ЭКСПЛУАТАЦИИ
• Запрещается использовать любой проводник в качестве провода
предохранителя, это может привести к смертельному исходу.
• Во время грозы выньте вилку питания из розетки или выключите
“ВЫКЛ”
• Спреи и другие огнеопасные емкости не должны располагаться на расстоянии
менее 1 м от воздушных отверстий внутреннего и наружного блоков.
Поскольку внутреннее давление в емкости со спреем увеличивается при
нагревании воздуха, она может взорваться.
• устройство должно эксплуатироваться согласно инструкциям производителя
и не может использоваться для любого другого назначения, кроме
предусмотренного производителем.
НЕ МОЧИТЬ!
• При использовании оборудования с открытым пламенем в
помещении с работающим кондиционером регулярно проветривайте
помещение во избежание недостатка кислорода.
ЗАПРЕЩЕНО
автоматический выключатель.
• Не прикасайтесь к работающему устройству мокрыми руками. Это может
привести к смерти.
СТРОГО СОБЛЮДАЙТЕ
МЕРЫ БЕЗОПАСНОСТИ
• Не направляйте поток холодного воздуха из кондиционера на домашние
нагревательные устройства (электрический чайник, духовой шкаф и т. п.),
поскольку это может повлиять на работу этих устройств.
ЗАПРЕЩЕНО
ЗАПРЕЩЕНО
ЗАПРЕЩЕНО
РУССКИЙ
ОСТОРОЖНО
• Регулярно проверяйте устойчивость и надежность наружной монтажной рамы
и отсутствие дефектов на ней. В противном случае возможно падение
наружного блока, что может привести к опасной ситуации.
• Не мойте устройство водой и не ставьте сосуды с водой (например вазу с
живыми цветами) на внутренний блок.
ЗАПРЕЩЕНО
При наличии электрической утечки возможно поражение электрическим током.
• Не помещайте животных или растения под прямой поток воздуха от
кондиционера, поскольку это может нанести им вред.
• Не становитесь на наружный блок и не кладите на него какие-либо предметы.
ЗАПРЕЩЕНО
•
Если кондиционер продолжительное время работает в помещении с открытыми окнами и
дверями (при этом влажность в помещении всегда выше 80%), а дефлектор воздуха направлен
вниз или двигается автоматически, на дефлекторе будет конденсироваться вода, которая
будет время от времени стекать вниз. Это может повредить мебель. Поэтому не допускайте
длительной работы кондиционера в таких условиях.
•
Если уровень тепла в помещении превосходит охлаждающую или нагревающую
способность кондиционера (в комнате много людей, работают нагревательные
ЗАПРЕЩЕНО
•
Обслуживание данного устройства (особенно очистка внутреннего блока) должна
приборы и пр.), заданная температура помещения не может быть достигнута.
выполняться только квалифицированным специалистом. Обратитесь в сервис-центр.
Использование обычных моющих средств может повредить пластиковые детали
устройства или привести к закупориванию дренажной трубы, что может вызвать утечку
воды и, как следствие, угрозу поражения электрическим током.
ЗАПРЕЩЕНО
ЗАПРЕЩЕНО
ЗАПРЕЩЕНО
ЗАПРЕЩЕНО
• Не прикасайтесь к выходному отверстию воздуха, нижней поверхности
и алюминиевому ребру наружного блока.
НЕ ПРИКАСАТЬСЯ!
Это может привести к травме.
• Не прикасайтесь к трубе подачи хладагента и соединительному клапану.
Имеется опасность ожога.
НЕ ПРИКАСАТЬСЯ!
• Данное устройство может использоваться детьми и инвалидами только в том случае, если
они получили соответствующие инструкции от ответственного лица и могут безопасно
управлять данным устройством.
• Следует следить, чтобы маленькие дети не играли с данным устройством.
– 23 –
Page 24
ОСНОВНЫЕ ЭЛЕМЕНТЫ И ИХ НАЗНЧЕНИЕ
ВНУТРЕННИЙ БЛОК
Воздушный фильтр
Предотвращает попадание пыли во внутренний
блок.
(См. с. 36.)
Передняя панель
Индикаторы внутреннего блока
Индикатор отображения рабочего состояния блока.
(См. с. 25.)
Горизонтальный дефлектор Вертикальный дефлектор
(Выходное отверстие воздуха)
(См. с. 35.)
Пульт дистанционного управления (ПДУ)
Подает на внутренний блок сигнал,
управляющий всем кондиционером.
(См. с. 26.)
НАРУЖНЫЙ БЛОК
RAC-10EH2
Выходное отверстие воздуха
При работе в режиме нагревания выходит
поток холодного воздуха, а в режиме
охлаждения или осушки — поток теплого
воздуха.
Дренажное отверстие
(на нижней панели)
Контакт заземления
(в нижней части боковой панели)
RAC-14EH2
Выходное отверстие воздуха
При работе в режиме
нагревания выходит поток
холодного воздуха, а в
режиме охлаждения или
осушки — поток теплого
воздуха.
Дренажное отверстие
(на нижней панели)
Контакт заземления
(в нижней части боковой панели)
НАЗВАНИЕ МОДЕЛИ И ГАБАРИТЫ
Дренажный шланг
Предназначен для слива конденсированной воды при
работе в режиме охлаждения или осушки.
Трубопроводы и проводка
Воздухозаборники (на задней панели и слева)
Дренажный шланг
Предназначен для слива конденсированной воды при
работе в режиме охлаждения или осушки.
Трубопроводы и проводка
Воздухозаборники (на задней панели и слева)
Наружный блок:
•
Когда кнопка “СТОП” нажата во время работы
внутреннего блока, вентилятор внешнего
блока продолжает работать в течение 10–60
секунд для охлаждения электрических частей.
• В режиме нагревания образуется конденсат
или вода от размораживания.
Не закрывайте дренажное отверстие
внешнего блока, поскольку эта вода при
низкой температуре может замерзнуть.
• Если наружный блок подвешен к потолку,
подсоедините к дренажному отверстию
втулку и дренажную трубу и слейте воду.
МОДЕЛЬ ШИРИНА (мм) ВЫСОТА (мм) ГЛУБИНА (мм)
RAS-10EH2, RAS-14EH2 780 280 220
RAC-10EH2 700 505 258
RAC-14EH2 750 548 288
– 24 –
Page 25
ОСНОВНЫЕ ЭЛЕМЕНТЫ И ИХ НАЗНЧЕНИЕ
ИНДИКАТОРЫ ВНУТРЕННЕГО БЛОКА
ИНДИКАТОР ФИЛЬТРА (зеленый)
Когда кондиционер проработал в общей
сложности примерно 200 часов, загорается
ВЫКЛЮЧАТЕЛЬ ПИТАНИЯ
индикатор фильтра, что указывает на
необходимость очистки фильтра. Индикатор
гаснет, когда нажата кнопка
ПОВОРОТ) при неработающем кондиционере.
ИНДИКАТОР “РАБОТА” (желтый)
Этот индикатор горит во время работы кондиционера.
В режиме нагревания индикатор “РАБОТА”
мигает в следующих случаях:
(1) Во время предварительного
нагревания.
Мигает в течение примерно 2–3 минут после
включения.
(2) Во время размораживания.
Размораживание выполняется примерно раз в час
при образовании льда на теплообменнике
наружного блока, каждый раз в течение 5-10 минут.
ИНДИКАТОР ТАЙМЕРА (оранжевый)
Этот индикатор горит во время работы таймера.
(АВТО
РУССКИЙ
ВРЕМЕННЫЙ ВЫКЛЮЧАТЕЛЬ
Этот выключатель используется для включения и
•
выключения кондиционера, когда не работает ПДУ.
При работе во временном режиме используются последние
•
установленные настройки. (При включении питания
устройство сразу же переключается в автоматический
режим.)
ОСТОРОЖНО
Если кондиционер не планируется использовать в
течение продолжительного времени, выключите
выключатель или выньте вилку кабеля питания из
розетки.
Если питание включено, а устройство не используется, то происходит небольшое
потребление энергии в контрольном контуре. Энергию можно сэкономить, выключив
выключатель питания (или автоматический выключатель, если питание подается от
наружного блока).
■ Установка фильтров очистки воздуха и устранения запаха (дополнительные
компоненты) на раму фильтров.
• Для закрепления фильтров очистки воздуха и устранения
запаха на раме слегка надавите с обеих сторон фильтров,
а когда они войдут в раму фильтров, отпустите их.
• При использовании фильтров очистки воздуха и
устранения запаха мощность охлаждения немного
уменьшается, а скорость охлаждения снижается.
• Срок использования фильтров очистки воздуха и
устранения запаха составляет примерно 2 года. При
необходимости их замены обратитесь в сервис-центр.
• Дополнительные фильтры очистки воздуха и устранения
запаха (SPX-CFH15).
– 25 –
Рама
Page 26

ОСНОВНЫЕ ЭЛЕМЕНТЫ И ИХ НАЗНЧЕНИЕ
ПУЛЬТ ДИСТАНЦИОННОГО УПРАВЛЕНИЯ (ПДУ)
• Предназначен для управления внутренним блоком.
Дальность передачи сигнала с пульта составляет примерно 7 метров. Если внутреннее
освещение в помещении контролируется электронными датчиками, то дальность передачи
сигнала будет меньше, а в некоторых случаях сигнал вообще не будет приниматься.
Данный блок может устанавливаться на стене с помощью крепежных приспособлений,
входящих в комплект поставки. Перед установкой убедитесь, что с предполагаемого места
установки будет приниматься сигнал с ПДУ.
• Обращайтесь с пультом аккуратно.
Падение пульта или попадание на него воды может ухудшить способность передачи сигнала.
• После установки в пульт новых элементов питания потребуется примерно 10 секунд для
восстановления реагирования пульта на команды и нормальной его работы.
Окно передачи сигнала/индикатор передачи сигнала
•
При работе с ПДУ это окно должно быть направлено на внутренний блок.
При передаче сигнала индикатор мигает.
Дисплей
•
На дисплее отображается заданная температура воздуха, текущее время,
состояние таймера, а также выбранные режим и интенсивность циркуляции.
Кнопка “ПУСК/СТОП”
•
Нажмите эту кнопку для включения кондиционера. Еще раз нажмите ее
для выключения кондиционера.
Кнопка “АВТО ПОВОРОТ”
•
С помощью этой кнопки задается угол наклона горизонтального
дефлектора.
Переключатель “СКОРОСТЬ ВЕНТИЛЯТОРА”
•
С помощью этого переключателя задается скорость вентилятора. При
каждом нажатии на эту кнопку интенсивность
циркуляции циклически переключается между скоростями (АВТО),
(ВЫСОКАЯ), (СРЕДНЯЯ) и (НИЗКАЯ).
(С помощью этой кнопки можно выбрать оптимальную или
предпочтительную скорость вентилятора для каждого режима.)
Кнопка “СПЯЩИЙ РЕЖИМ”
•
С помощью этой кнопки регулируется таймер спящего режима.
Кнопка “ТЕМПЕРАТУРА”
•
С помощью этой кнопки повышается или понижается заданная
температура воздуха. (Если удерживать эту кнопку нажатой,
значение температуры будет меняться быстрее.)
Кнопка “ВРЕМЯ”
•
Эта кнопка используется для задания и проверки времени и даты.
Кнопка “СБРОС”
•
Нажимайте эту кнопку после замены элементов питания или при появлении
признаков нестандартной работы.
Переключатель “РЕЖИМ”
•
С помощью этого переключателя выбирается режим работы кондиционера.
При каждом нажатии на переключатель происходит циклическое
переключение режимов (АВТО), (НАГРЕВАНИЕ), (ОСУШКА),
(ОХЛАЖДЕНИЕ) и (ВЕНТИЛЯЦИЯ).
Переключатель “СКОРОСТЬ ВЕНТИЛЯТОРА”
•
Кнопка “АВТО ПОВОРОТ”
•
Кнопка “ТАЙМЕР”
•
С помощью этой кнопки задается настройка таймера.
Кнопка “ТАЙМЕР ВЫКЛЮЧЕНИЯ” Установка времени выключения.
•
Кнопка “ТАЙМЕР ВКЛЮЧЕНИЯ” Установка времени включения.
•
Кнопка “ПРОГРАММИРОВАНИЕ” Программирование параметра времени.
•
Кнопка “ОТМЕНА” Отмена программирования параметра времени.
•
Меры предосторожности при использовании пульта
• соблюдайте следующие правила при использовании ПДУ:
• Не подвергайте пульт воздействию прямого солнечного света.
• Не помещайте пульт вблизи источника тепла.
• Обращайтесь с пультом аккуратно. Не роняйте его на пол и
следите, чтобы в него не попала вода.
• После выключения наружного блока он может снова включиться
не ранее чем примерно через 3 минуты (за исключением случаев,
когда выключается и затем снова включается выключатель или
вилка кабеля питания вынимается из розетки и затем снова
вставляется).
Эта задержка предназначена для защиты устройства и не
свидетельствует о неисправности.
• Если нажать переключатель “РЕЖИМ” во время работы
кондиционера, то он может выключиться примерно на 3 минуты
для защиты.
– 26 –
Page 27
РАЗЛИЧНЫЕ ФУНКЦИИ
■■
■ Функция автоматического перезапуска
■■
•
В случае отключения энергии кондиционер автоматически включится после возобновления подачи энергии.
При этом сохраняется последний установленный режим работы и направление потока воздуха.
(Это не относится к случаю, когда кондиционер выключается с помощью ПДУ.)
Если не требуется включать кондиционер после возобновления подачи энергии, отключите питание.
•
При включении автоматического выключателя кондиционер автоматически включится в
последнем установленном режиме и с прежним направлением потока воздуха.
Примечание: 1. Если функция автоматического перезапуска не требуется, обратитесь к
представителю продавца.
2. Функция автоматического перезапуска не действует, если включены
таймер или таймер спящего режима.
АВТОМАТИЧЕСКИЙ РЕЖИМ
Кондиционер автоматически выберет нужный режим (“Обогрев” или “Охлаждение”) в
зависимости от начальной температуры воздуха в помещении. Выбранный режим работы
переключится при изменении температуры в помещении.
С помощью переключателя “РЕЖИМ” выберите режим
(АВТО).
РУССКИЙ
1
ПУСК
СТОП
• Если выбран режим “АВТО”, кондиционер
автоматически выберет нужный режим (“Обогрев” или
“Охлаждение”) в зависимости от начальной
температуры воздуха в помещении.
• При первом выборе режима “АВТО” кондиционер
определит температуру в помещении и выберет
соответствующий режим работы.
• Когда температура в помещении приблизится к
заданной, кондиционер начнет отслеживать режим
работы. Если температура в помещении снова
изменится, кондиционер снова выберет
соответствующий режим работы (“Обогрев” или
“Охлаждение”), чтобы довести температуру в
помещении до заданной. Отслеживание режима
работы включается в диапазоне 3 °C выше или ниже
заданной температуры.
• Если автоматически выбранный режим работы не
подходит, выберите режим работы (“Обогрев”,
“Осушка”, “Охлаждение” или “Вентиляция”) вручную.
Нажмите кнопку “ПУСК/СТОП”.
При начале работы раздается звуковой сигнал.
Еще раз нажмите эту кнопку для выключения
кондиционера.
■ Поскольку настройки сохраняются в памяти ПДУ, в следующий
раз достаточно будет нажать кнопку (ПУСК/СТОП).
При необходимости можно повысить или понизить заданную
температуру максимум на 3 °C.
При каждом нажатии кнопки “Температура”
заданная температура будет меняться на 1 °C.
• Заданная температура и действительная температура в
помещении могут несколько отличаться в зависимости от
конкретных условий.
Нажмите кнопку (СКОРОСТЬ ВЕНТИЛЯТОРА) (доступны
значения “АВТО” и “НИЗКАЯ”).
– 27 –
Page 28

РЕЖИМ ОБОГРЕВА
• Используйте кондиционер для обогрева помещения, когда температура наружного воздуха
ниже 21 °C.
Если на улице слишком тепло (температура выше 21 °C), режим обогрева может не
включиться в целях защиты устройства.
• Для обеспечения надежной работы кондиционера используйте его при температуре
наружного воздуха выше -15 °C.
С помощью переключателя “РЕЖИМ” выберите режим
1
2
(ОБОГРЕВ).
Задайте нужную скорость вентилятора с помощью кнопки
(СКОРОСТЬ ВЕНТИЛЯТОРА) (текущая настройка
отображается на дисплее).
(АВТО) : Скорость вентилятора меняется
автоматически соответственно
температуре выходящего воздуха.
(ВЫСОКАЯ) : Экономична, поскольку температура в
помещении возрастает быстро.
Но в начале работы кондиционера может
быть прохладно.
(СРЕДНЯЯ) : Менее интенсивная.
(НИЗКАЯ) : Самая малая.
Задайте требуемую температуру в помещении с помощью
кнопки “ТЕМПЕРАТУРА” (текущее значение
отображается на дисплее).
3
ПУСК
СТОП
■■
■ Размораживание
■■
Размораживание выполняется примерно раз в час, когда на теплообменнике наружного блока образуется
лед,каждый раз в продолжение 5–10 минут.
В зависимости от условий заданная температура и
фактическая температура в помещении могут несколько
различаться.
Нажмите кнопку “ПУСК/СТОП”. При включении режима
обогрева раздается звуковой сигнал. Еще раз нажмите
эту кнопку для выключения кондиционера.
■ Поскольку настройки сохраняются в памяти ПДУ, в следующий
раз достаточно будет нажать кнопку (ПУСК/СТОП).
Во время выполнения размораживания индикатор “Работа” мигает (горит 3 секунды, затем не горит 0,5
секунды).
Максимальная продолжительность размораживания 20 минут.
(Если трубопровод длиннее обычного, возможно образование льда.)
– 28 –
Page 29

РЕЖИМ ОСУШКИ
Используйте кондиционер для осушки воздуха, если температура в помещении выше 16 °C.
При температуре ниже 15 °C режим осушки не работает.
■■
■ Режим осушки
■■
1
ПУСК
Нажимайте переключатель “РЕЖИМ” до тех пор, пока на
дисплее не появится знак
Для скорости вентилятора автоматически
устанавливается значение “Низкая”.
При этом кнопка “СКОРОСТЬ ВЕНТИЛЯТОРА” не действует.
Нажмите кнопку “ПУСК/СТОП”.
(ОСУШКА).
СТОП
■ Если нужно изменить режим работы, используйте
переключатель “РЕЖИМ”.
■ Задание температуры доступно.
■ Можно также использовать переключатель “РЕЖИМ” для
выбора этого режима.
РУССКИЙ
• Осушка начинается, когда пороговая температура немного ниже заданной настройки
температуры. (Однако для заданной температуры 16 °C пороговая температура составляет
16 °C.)
Когда температура в помещении опускается ниже порогового значения, этот режим
отключается. Когда температура в помещении превышает пороговое значение, этот
режим включается снова.
• В зависимости от условий (количество людей в помещении и пр.) заданная температура
может не быть достигнута.
– 29 –
Page 30

РЕЖИМ ОХЛАЖДЕНИЯ
Используйте кондиционер для охлаждения при температуре наружного воздуха от -10 до 42 °C.
Если влажность в помещении очень высокая (выше 80%), на решетке выходного отверстия
воздуха внутреннего блока может образоваться роса.
Нажимайте переключатель “РЕЖИМ” до тех пор, пока на
1
2
3
дисплее не появится знак
Задайте нужную скорость вентилятора с помощью кнопки
(СКОРОСТЬ ВЕНТИЛЯТОРА) (текущая настройка
отображается на дисплее).
(АВТО) : В начале процесса устанавливается
высокая скорость вентилятора, а затем
она автоматически переключается на
среднюю , когда достигается
установленная температура .
(ВЫСОКАЯ) : Экономична, поскольку воздух в
помещении быстро охлаждается.
(СРЕДНЯЯ) : Менее интенсивная.
(НИЗКАЯ) : Самая малая.
Задайте требуемую температуру в помещении с помощью
кнопки “ТЕМПЕРАТУРА” (текущее значение
отображается на дисплее).
В зависимости от условий заданная температура и
фактическая температура в помещении могут несколько
различаться.
(ОХЛАЖДЕНИЕ).
Нажмите кнопку “ПУСК/СТОП”. При включении режима
охлаждения раздается звуковой сигнал. Еще раз нажмите
эту кнопку для выключения кондиционера. Режим
ПУСК
СТОП
охлаждения не включается, если заданная температура
выше текущей температуры в помещении (даже если
горит индикатор
Режим охлаждения включатся, как только задается
температура
ниже текущей температуры в помещении.
■ Поскольку настройки сохраняются в памяти ПДУ, в следующий
раз достаточно будет нажать кнопку
(РЕЖИМ)).
(ПУСК/СТОП).
– 30 –
Page 31

РЕЖИМ ВЕНТИЛЯЦИИ
Кондиционер можно использовать просто для обеспечения циркуляции воздуха. С помощью
этого режима осушайте внутреннее пространство внутреннего блока в конце лета.
Нажимайте переключатель “РЕЖИМ” до тех пор, пока на
дисплее не появится знак
Нажмите кнопку (СКОРОСТЬ ВЕНТИЛЯТОРА).
(ВЕНТИЛЯЦИЯ).1
2
(ВЫСОКАЯ) : Наиболее интенсивный поток воздуха.
(СРЕДНЯЯ) : Менее интенсивный поток.
(НИЗКАЯ) : Самый слабый поток.
Нажмите кнопку “ПУСК/СТОП”. При начале работы
ПУСК
СТОП
СКОРОСТЬ ВЕНТИЛЯТОРА (АВТО)
• Скорость вентилятора автоматически изменится соответственно
Для режима обогрева
Для режима охлаждения
• После достижения заданной температуры будет выходить слабый поток
• При включении кондиционера вентилятор работает с высокой скоростью
• Когда температура в помещении приближается к заданной, скорость
вентилятора раздается звуковой сигнал.
Чтобы отключить этот режим, еще раз нажмите эту
кнопку.
температуре выходящего воздуха.
воздуха.
до достижения заданной температуры.
вентилятора автоматически переключается на “Низкую”.
РУССКИЙ
… Когда выбрано значение скорости вентилятора
“АВТО” для режима охлаждения/обогрева:
– 31 –
Page 32
УСТАНОВКА ТАЙМЕРА
ВРЕМЯ, ДЕНЬ,
МЕСЯЦ
(текущее
время, день,
месяц)
ТАЙМЕР
ВЫКЛЮЧЕНИЯ
ТАЙМЕР
ВКЛЮЧЕНИЯ
ПРОГРАММИРОВАНИЕ
ОТМЕНА
Таймер включения
Кондиционер включится в
заданное время.
Время, день, месяц
После замены
элементов питания:
Таймер выключения
Можно запрограммировать
отключение кондиционера в
заданное время.
Пуск
Стоп
Стоп
M D
Пуск
1 Установите текущий день и
месяц с помощью кнопки
“ТАЙМЕР”.
DM
1 Нажмите кнопку (ТАЙМЕР
ВЫКЛЮЧЕНИЯ). На дисплее
замигает знак (ВЫКЛ.).
AM
1 Нажмите кнопку (ТАЙМЕР
ВКЛЮЧЕНИЯ). На дисплее
замигает знак (ВКЛ.).
Таймер включения/выключения
Пуск Стоп
• Кондиционер включится
(выключится) и затем
выключится (включится) в
заданное время.
Кондиционер включается в
•
то из заданных значений
времени, которое
наступает раньше.
• Появившаяся на дисплее
стрелка указывает
последовательность
включения.
1 Нажмите кнопку
(ТАЙМЕР
ВЫКЛЮЧЕНИЯ),
чтобы замигал знак
(ВЫКЛ.) на
дисплее.
PM
2 Задайте время
отключения с помощью
кнопки “ТАЙМЕР”.
Нажмите кнопку
(ПРОГРАММИРОВАНИЕ).
PM
3 Нажмите кнопку
(ТАЙМЕР
ВКЛЮЧЕНИЯ), чтобы
на дисплее поочередно
замигали знаки
(ВЫКЛ.) и (ВКЛ.).
Отмена программирования
Направьте ПДУ в сторону внутреннего блока и нажмите кнопку (ОТМЕНА).
Знак
(ЗАПРОГРАММИРОВАНО) на дисплее исчезает со звуковым сигналом, а индикатор
(ТАЙМЕР) на внутреннем блоке выключается.
AM
PM
AM
ПРИМЕЧАНИЕ
Можно выбрать только один режим: таймер выключения,
таймер включения и таймер включения/выключения.
– 32 –
Page 33
2 Нажмите
кнопку
(ВРЕМЯ).
AM
PM
3 Задайте текущее время
кнопкой “ТАЙМЕР”.
PM
Пример. Текущее время 13:30.
4 Нажмите кнопку
(ВРЕМЯ) еще раз. При этом
значок времени начинает
гореть непрерывно, а не
мигать.
PM
• Значок времени
автоматически исчезнет
через 10 секунд.
• Чтобы проверить
текущую настройку
времени, нажмите кнопку
(ВРЕМЯ) дважды.
Теперь настройка
текущего времени
завершена.
2 Задайте время отключения
с помощью кнопки
“ТАЙМЕР”.
PM
2 Задайте время включения
с помощью кнопки
“ТАЙМЕР”.
AM
4 Задайте время включения
с помощью кнопки
“ТАЙМЕР”.
PM
3 Направьте ПДУ на внутренний блок и нажмите кнопку
(ПРОГРАММИРОВАНИЕ).
Знак (ВЫКЛ.) начинает гореть непрерывно (не мигая) и загорается значок
(ЗАПРОГРАММИРОВАНО)
(ТАЙМЕР) на внутреннем блоке загорается.
PM
. Раздается звуковой сигнал, а индикатор
Пример:
Кондиционер выключится в 23:00.
Теперь установка времени отключения
завершена.
3 Направьте ПДУ на внутренний блок и нажмите кнопку
(ПРОГРАММИРОВАНИЕ).
Значок (ВКЛ.) перестает мигать и начинает гореть непрерывно, а знак
(ЗАПРОГРАММИРОВАНО) загорается. Раздается звуковой сигнал, а
индикатор (ТАЙМЕР) на внутреннем блоке загорается.
AM
Пример:
Кондиционер включится раньше, чтобы к 7:00
была почти достигнута заданная температура.
Установка времени включения завершена.
5 Направьте ПДУ на внутренний блок и нажмите кнопку
(ПРОГРАММИРОВАНИЕ).
Значок (ВКЛ.) перестает мигать и начинает гореть непрерывно, а знак
(ЗАПРОГРАММИРОВАНО) загорается. Раздается звуковой сигнал, а
индикатор (ТАЙМЕР) на внутреннем блоке загорается.
РУССКИЙ
PM
AM
AM
Пример:
Для обогрева кондиционер выключится в
22:30 и затем включится раньше, чтобы к
7:00 заданная температура была почти
достигнута; для охлаждения и осушки он
просто включится в 7:00. Настройка
времени включения и выключения теперь
завершена.
• Таймер может использоваться в трех режимах: таймер выключения, таймер включения и
таймер включения/выключения. Сначала задайте текущее время, поскольку оно
используется как контрольное значение.
• Поскольку настройки времени сохраняются в памяти ПДУ, для использования тех же
настроек в следующий раз требуется только нажать кнопку
– 33 –
(ПРОГРАММИРОВАНИЕ).
Page 34

УСТАНОВКА ТАЙМЕРА СПЯЩЕГО РЕЖИМА
Сначала установите текущее время, если оно не было установлено ранее (см. инструкции в
разделе об установке текущего времени). Нажмите кнопку
дисплей изменится как показано на рисунке ниже.
Режим Индикация
(СПЯЩИЙ РЕЖИМ). При этом
СПЯЩИЙ
●
РЕЖИМ
Таймер спящего
1 час 2 часа 3 часа 7 часов
режима
Таймер спящего режима: Кондиционер будет продолжать работать в
течение заданного количества часов, а затем выключится.
Направьте ПДУ на внутренний блок и нажмите кнопку “СПЯЩИЙ
РЕЖИМ”.
Данные таймера будут отображаться на дисплее ПДУ. Загорается
индикатор “ТАЙМЕР”, а на внутреннем блоке раздается звуковой
сигнал. Если задан таймер спящего режима, на дисплее отображается
время выключения.
Таймер
спящего
режима
Пуск
Таймер отключения спящего режима
Пример: Если установлено 3 часа
спящего режима начиная с 23:38, то
время выключения будет 2:38.
Кондиционер будет выключен командой
таймера спящего режима и включен
командой таймера включения.
1 Установите значение таймера включения.
2 Нажмите кнопку (СПЯЩИЙ РЕЖИМ) и установите значение
таймера спящего режима.
Для обогрева:
В этом случае кондиционер
выключится через 2 часа (в 1:38) и
включится рано утром, чтобы к 6:00
утра заданная температура была
почти достигнута.
Отмена программирования
Направьте ПДУ в сторону внутреннего блока и нажмите кнопку (ОТМЕНА).
Знак
ПРИМЕЧАНИЕ
Если установить значение таймера спящего
режима, а ранее было установлено значение
для таймера выключения или таймера
включения/выключения, то будет работать
таймер спящего режима, а не ранее
установленный таймер.
(ПРОГРАММИРОВАНИЕ) на дисплее исчезает со звуковым сигналом, а индикатор
(ТАЙМЕР) на внутреннем блоке выключается.
– 34 –
Page 35
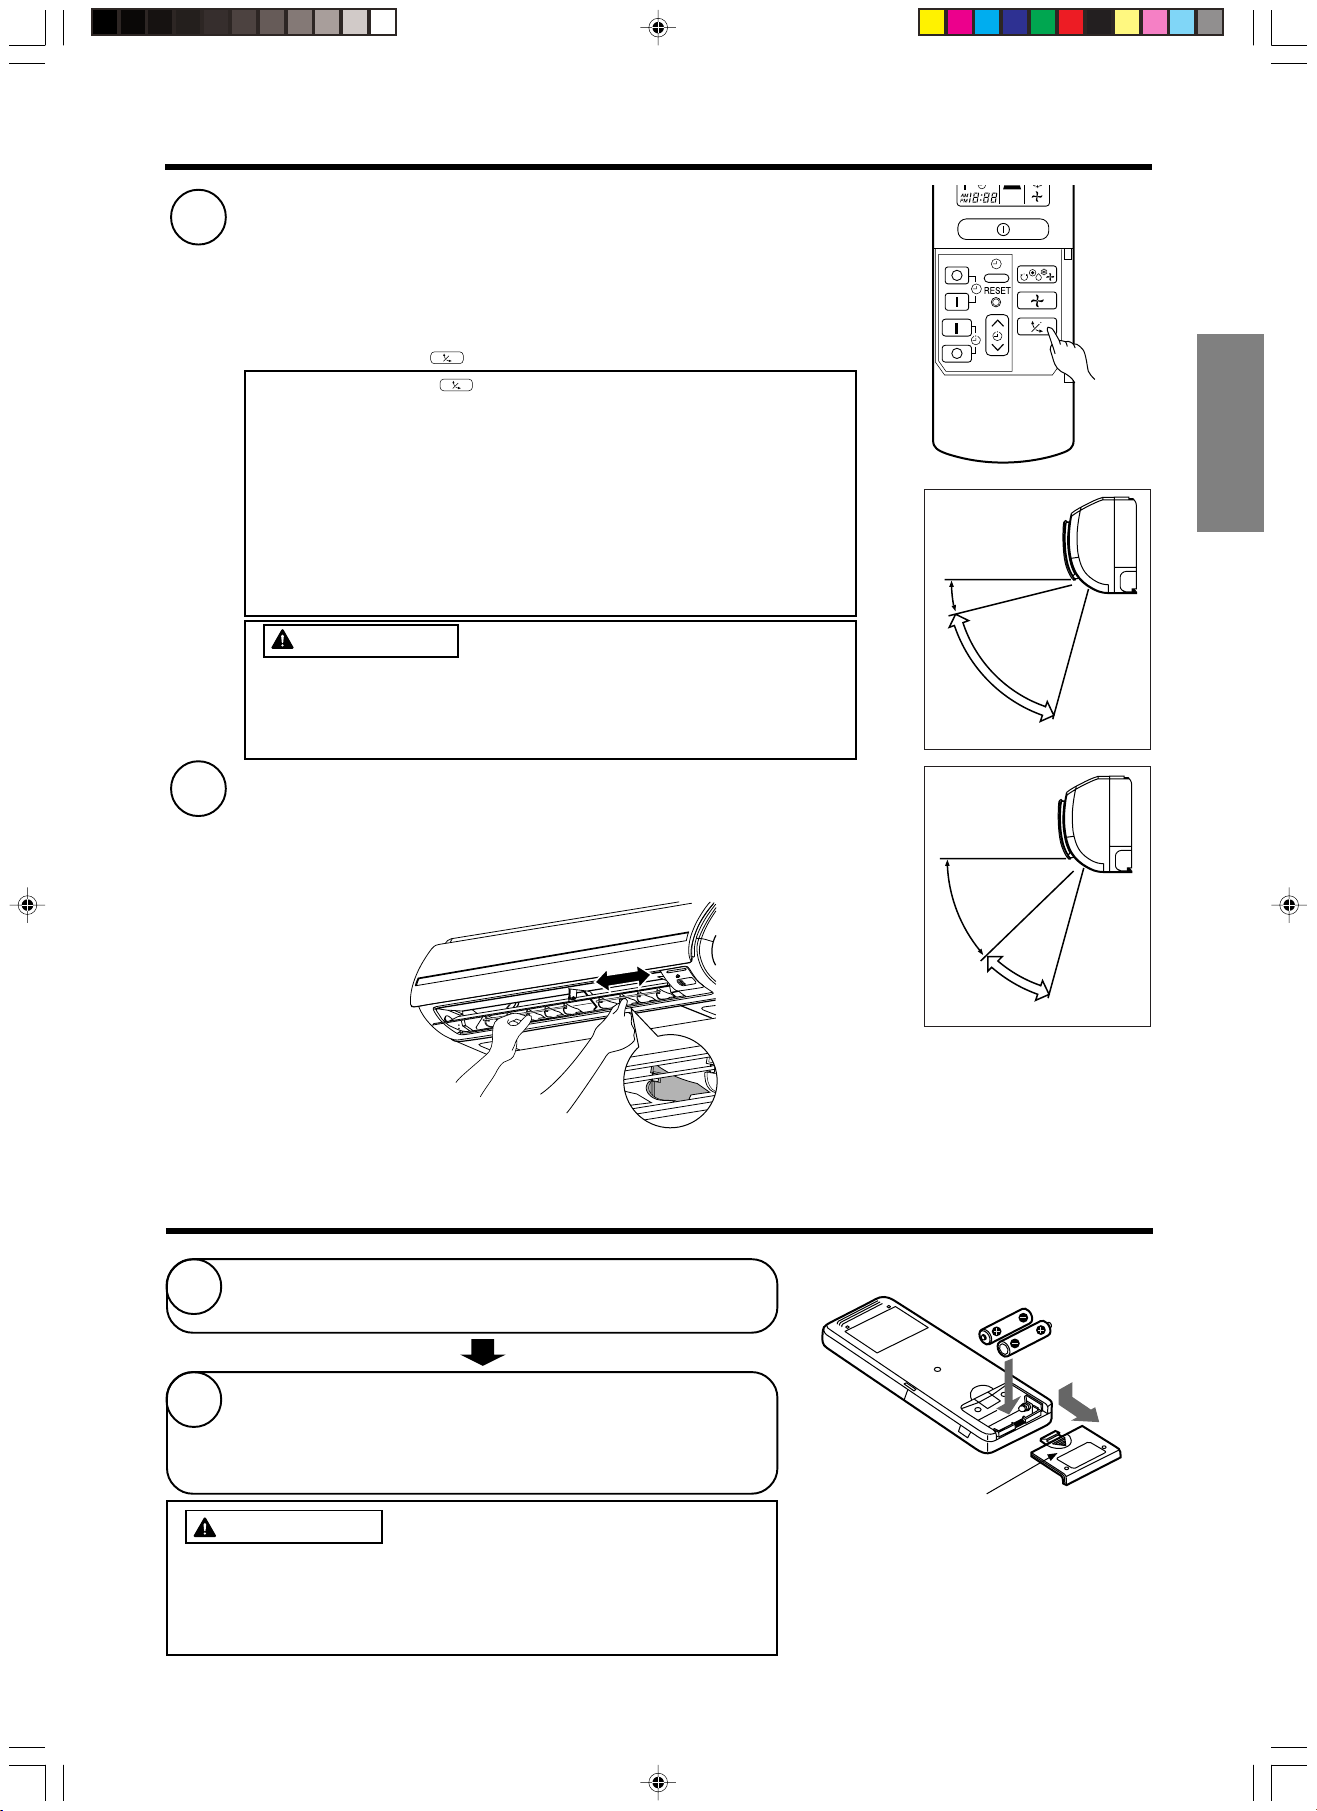
НАСТРОЙКА ДЕФЛЕКТОРОВ ВОЗДУХА
1
2
Настройка потока кондиционированного воздуха по
вертикали (верх/низ).
Угол горизонтального дефлектора, соответствующий
каждому режиму, устанавливается автоматически.
Дефлектор может постоянно поворачиваться вверх и вниз
или может быть зафиксирован под определенным углом с
помощью кнопки
•
Если кнопку
раз, горизонтальный дефлектор будет
поворачиваться вверх-вниз. Если эту кнопку
нажать еще раз, дефлектор фиксируется в
текущем положении. Перед началом движения
дефлектора может пройти некоторое время
(примерно 6 секунд).
• Диапазон настройки положения горизонтального
дефлектора показан на рисунке справа.
• При выключении кондиционера горизонтальный
дефлектор движется и фиксируется в том
положении, в котором закрывается выходное
отверстие.
ОСТОРОЖНО
• В режиме охлаждения не следует допускать
длительного перемещения горизонтального
дефлектора. При этом с него может стекать
образовавшаяся вода.
Настройка направления потока кондиционированного
воздуха по горизонтали (вправо/влево).
Придерживая вертикальный дефлектор как показано на
рисунке, настройте направление потока воздуха по
горизонтали (вправо/влево).
(АВТО ПОВОРОТ).
(АВТО ПОВОРОТ) нажать один
Охлаждение и
осушка
Вертикально
примерно
15°
примерно 60°
Обогрев
Вертикально
примерно 45°
РУССКИЙ
Левая сторона. Для
настройки направления
возьмитесь за третью
слева перегородку
дефлектора. Направление,
в котором надо потянуть за
перегородку, указано.
Правая сторона. Для настройки
направления возьмитесь за третью
справа перегородку дефлектора.
Направление, в котором надо
потянуть за перегородку, указано.
ЗАМЕНА ЭЛЕМЕНТОВ ПИТАНИЯ В ПДУ
1
2
Снимите крышку как показано на рисунке и выньте
использованные элементы питания.
Вставьте новые элементы питания.
Полюса элементов питания должны быть
направлены согласно обозначениям внутри
отделения.
ОСТОРОЖНО
Не используйте одновременно новые и старые
1.
элементы питания или элементы питания разных марок.
2. Если ПДУ не планируется использовать в течение
2–3 месяцев, выньте из него элементы питания.
примерно
30°
Нажмите и потяните в
направлении,
указанном стрелкой.
– 35 –
Page 36

ОБСЛУЖИВАНИЕ
ОСТОРОЖНО
Очистка и обслуживания устройства должны выполняться только квалифицированным
специалистом. Перед очисткой выключите кондиционер и отключите питание.
1. ВОЗДУШНЫЙ ФИЛЬТР
Когда загорается индикатор фильтра, необходимо очистить фильтр. Благодаря этому
поддерживается производительность кондиционера. Если воздушный фильтр забит пылью,
поток воздуха уменьшится и сократится мощность охлаждения кондиционера. Кроме того,
может возрасти уровень шума. Очистка фильтра должна производиться согласно
приведенным ниже инструкциям.
ПОРЯДОК ВЫПОЛНЕНИЯ
1
2
3
Аккуратно откройте переднюю крышку и выньте
фильтр.
С помощью пылесоса устраните всю пыль из
фильтра. Если пыли слишком много, вымойте
фильтр моющим средством и тщательно промойте
его. Затем оставьте его сушиться в тени.
• Расположите фильтр так, чтобы надпись
“FRONT” (ПЕРЕД) была направлена к передней
части, и вдвиньте его в исходное положение.
• После установки фильтра нажмите на
переднюю крышку в местах, показанных на
рисунке тремя стрелками, и закройте ее.
ОСТОРОЖНО
• Не мойте фильтр горячей водой при температуре выше 40 °C, поскольку это может
вызвать сжатие фильтра.
• После мытья тщательно стряхните воду и положите фильтр сушиться в тени. Не
подвергайте его воздействию прямого солнечного света. Это может вызвать сжатие
фильтра.
• Не включайте кондиционер без фильтра. В этом случае возможно возникновение
неисправности.
– 36 –
Page 37

2. ОЧИСТКА ПЕРЕДНЕЙ КРЫШКИ
• Снимите переднюю крышку и промойте ее
чистой водой.
Вымойте ее мягкой губкой.
После использования нейтрального моющего
средства промойте чистой водой.
• Если передняя крышка не снята, протирайте ее
мягкой сухой тканью. Протирайте ПДУ
тщательно мягкой сухой тканью.
• Тщательно вытирайте всю воду.
Если вода останется на индикаторах или
ресивере сигнала внутреннего блока, возможно
возникновение опасной ситуации.
Снятие передней крышки.
При снятии или установке передней крышки
обязательно держите ее обеими руками.
Снятие передней крышки Установка передней крышки
Отверстие
• Сначала полностью откройте переднюю
крышку, держа ее обеими руками,
освободите ее нажатием на правую
• Сместите стержни левой и правой
рукояток на “ступеньки” в блоке и
надежно вставьте их в отверстия.
рукоятку вовнутрь, а затем слегка
закрыв крышку, подайте ее вперед.
ОСТОРОЖНО
• При очистке не разбрызгивайте воду на корпус кондиционера и не
направляйте на него прямую струю воды, поскольку это может
привести к короткому замыканию.
• Запрещается использовать горячую воду (температура выше 40
°C), бензин, дизельное топливо, кислоту, растворитель или кисть,
поскольку они повредят пластиковую поверхность и покрытие.
РУССКИЙ
Стержень
Уступ
3. ОБСЛУЖИВАНИЕ ПЕРЕД ДЛИТЕЛЬНЫМ ОТКЛЮЧЕНИЕМ КОДИЦИОНЕРА
• В хорошую погоду включите кондиционер,
установив режим
скорость вентилятора, и дайте ему поработать
примерно полдня, после чего высушите весь
блок.
• Выньте вилку кабеля питания из розетки или
выключите автоматический выключатель.
(ВЕНТИЛЯЦИЯ) и высокую
– 37 –
Воздушный
поток
Page 38

ОБЩАЯ ИНФОРМАЦИЯ
ФУНКЦИИ
Функция обогрева
• Данный кондиционер использует систему теплового насоса,
которая поглощает внешнее тепло и переносит его в обогреваемое
помещение. При понижении температуры окружающего воздуха
понижается и обогревающая способность кондиционера. В такой
ситуации инвертер увеличивает обороты компрессора, чтобы
предотвратить снижение обогревающей способности
кондиционера. Если мощность обогрева кондиционера все равно
недостаточна, необходимо дополнительно использовать другие
нагревательные приборы.
• Кондиционер предназначен для обогрева всего помещения, поэтому почувствовать тепло можно не
сразу. Для эффективного обогрева помещения к требуемому времени рекомендуется использовать
таймер.
Функции охлаждения и осушки
• Если помещение нагрелось выше охлаждающей способности кондиционера (например, если в
помещении много людей или используются другие нагревательные приборы), то заданная температура
может не быть достигнута.
РАЗЛИЧНЫЕ ФУНКЦИИ
ОСТОРОЖНО
Не используйте
обогреватель или
другие сильно
нагревающиеся
устройства рядом
с внутренним
блоком.
ЗАПРЕЩЕНО
• Если скорость вентилятора и температура заданы на ПДУ перед началом работы в ручном режиме и
кнопки отпущены, то индикация настроек выключается через 10 секунд и будет отображаться только
режим работы.
• Если нажать кнопку во время работы устройства, то это вызовет срабатывание защитного
контура и кондиционер не будет работать в течение примерно 3 минут.
• При работе в режиме обогрева цветовой индикатор внутреннего блока может мигать, причем в течение
некоторого времени воздух из кондиционера выходить не будет.
• Если при работе в режиме обогрева с высокой (ВЫСОКАЯ) скоростью вентилятора чувствуется
поток холодного воздуха или после нагревания помещения нужно, чтобы кондиционер работал тише,
рекомендуется использовать настройку (АВТО).
• При использовании настройки (НИЗКАЯ) мощность охлаждения немного снижается.
• При использовании настройки (НИЗКАЯ) мощность обогрева кондиционера различна при различных
режимах работы.
ПРОГРАММИРОВАНИЕ ТАЙМЕРА/РАБОТА ТАЙМЕРА СПЯЩЕГО РЕЖИМА
• Если таймер запрограммирован, то даже при достижении установленного времени кондиционер
включится, только если будет получен сигнал с ПДУ. Убедитесь, что программирование таймера
завершено (об этом свидетельствует звуковой сигнал), а индикатор “ТАЙМЕР” внутреннего блока
загорелся.
• Если кнопка (СПЯЩИЙ РЕЖИМ) нажата при запрограммированном таймере включения/
выключения, то таймер спящего режима имеет приоритет.
• Во время действия таймера спящего режима устанавливается скорость вентилятора (НИЗКАЯ)
независимо от заданной скорости вентилятора. Индикация на дисплее ПДУ останется неизменной
даже при настройке скорости (НИЗКАЯ).
– 38 –
Page 39
ПЕРИОДИЧЕСКИЙ ОСМОТР
ПРОВЕРЯЙТЕ СЛЕДУЮЩИЕ ПУНКТЫ КАЖДЫЕ ШЕСТЬ ИЛИ ДВЕНАДЦАТЬ МЕСЯЦЕВ. ПРИ
НЕОБХОДИМОСТИ ОБРАТИТЕСЬ ЗА ПОМОЩЬЮ В СЕРВИС-ЦЕНТР.
Проверьте правильность подсоединения
провода заземления кондиционера.
1
ВНИМАНИЕ
2
ВНИМАНИЕ
3
ВНИМАНИЕ
Если провод заземления отсоединен или
неисправен, может возникнуть опасность поломки
кондиционера или поражения электрическим
током.
Убедитесь, что на монтажной раме наружного
блока нет сильной ржавчины и что наружный
блок не наклонился и нет опасности его
падения.
Его падение может привести к травмированию
людей.
Проверьте, что вилка кабеля питания хорошо
вставлена в розетку.
Если вилка кабеля питания вставлена в розетку
неплотно или нагревается, существует опасность
пожара или поражения электрическим током.
Если на вилке кабеля питания есть пыль или грязь,
очистите вилку и вставьте в розетку.
РУССКИЙ
ПОСЛЕПРОДАЖНОЕ ОБСЛУЖИВАНИЕ И ГАРАНТИЯ
ПЕРЕД ОБРАЩЕНИЕМ В СЕРВИС-ЦЕНТР ПРОВЕРЬТЕ СЛЕДУЮЩИЕ ПУНКТЫ
СОСТОЯНИЕ ПРОВЕРЬТЕ СЛЕДУЮЩИЕ ПУНКТЫ
ПДУ не передает
сигнал.
(Дисплей ПДУ нечеток
или пуст.)
Кондиционер не работает.
Охлаждение выполняется недостаточно
хорошо.
Обогрев выполняется недостаточно хорошо.
• Требуется ли замена элементов питания?
• Правильно ли вставлены элементы питания?
• Исправен ли предохранитель?
Не является ли напряжение слишком высоким или низким?
•
•
Находится ли автоматический выключатель в положении “ВКЛ”?
• Вставлена ли в розетку вилка кабеля питания?
• Имеет ли место отключение энергии?
• Воздушный фильтр забит пылью?
• Заданная температура адекватна?
•
Настроены ли горизонтальные дефлекторы в правильном
положении, соответствующем выбранному режиму работы?
• Входные или выходные отверстия внутреннего или
наружного блока заблокированы?
• Установлена скорость вентилятора “НИЗКАЯ”?
■ Следующие события не указывают на наличие неисправности кондиционера.
<При начале работы>
В режиме обогрева индикатор режима
мигает, а подача воздуха
прекращается
Шипящий звук
Скрипящий звук
Шорох
Щелчки
Подготовка кондиционера к выдуванию теплого воздуха. Подождите некоторое
время.
<Во время работы>
Производится размораживание наружного блока. Подождите некоторое время.
Шумный ток хладагента в трубе или звук клапана при настройке скорости потока
хладагента.
Шум при расширении или сжатии блока вследствие изменения температуры.
Шум вследствие изменения скорости вентилятора (например при начале работы).
Шум моторизованного клапана при включении кондиционера.
– 39 –
Page 40
Булькающий шум
Шум при переключении режима
Появляется туман
На внешнем блоке появляется пар
Запах
Внешний блок продолжает работать,
даже если кондиционер выключен.
Мигает индикатор “РАБОТА”.
Заданная температура не
достигается
Шум происходит вследствие всасывания вентилятором воздуха, имеющегося в
дренажном шланге, и выдувания конденсата, образовавшегося в коллекторе
конденсата. За подробной информацией обратитесь в сервис-центр.
Шум от работы кондиционера меняется соответственно изменению питания при
изменении температуры в помещении.
При резком охлаждении воздуха в помещении потоком кондиционированного воздуха
образуется туман.
При испарении воды, образовывающейся при размораживании, образуется пар.
Появляется, когда запах и частицы дыма, пищи, косметики и т. п. попадают в
кондиционер и выдувается обратно в помещение.
Выполняется размораживание (при остановке обогрева микрокомпьютер проверяет
наличие льда в наружном блоке и при необходимости дает команду начала
автоматического размораживания).
Свидетельствует о выполнении предварительного подогрева или размораживания.
Поскольку защитный контур или датчик предварительного подогрева срабатывают
при выключении и повторном включении кондиционера или при переключении режима
с охлаждения на обогрев, индикатор продолжает мигать.
Действительная температура в помещении может немного отличаться от заданной
на ПДУ в зависимости от количества людей в помещении и условий в помещении или
на улице.
• Если после выполнения
описанных выше проверок
кондиционер все равно не
работает правильно,
выключите
автоматический
выключатель или выньте
вилку кабеля питания из
розетки и сразу же
обратитесь в сервис-центр.
Примечания
• При работе кондиционера или при его выключении могут иногда
происходить следующие явления, которые не свидетельствуют
о ненормальной работе.
(1) Небольшой шум тока хладагента в цикле охлаждения.
(2) Небольшой шум трения в корпусе вентилятора, который
• Может появляться запах, когда в кондиционер попадает запах от
дыма, продуктов питания, косметики и пр. Поэтому регулярно
очищайте воздушный фильтр и испаритель для устранения запаха.
Немедленно обратитесь в сервис-центр
при возникновении следующих условий:
•
Часто выключается автоматический вык
лючатель или сгорает предохранитель.
•
Выключатель работает нестабильно.
•
Внутрь блока случайно попало постороннее вещество или вода.
•
Кабель питания сильно нагревается, или его изоляция
повреждена.
•
Мигает индикатор “ТАЙМЕР” внутреннего блока.
Происхождение неисправности может быть
определено по циклу мигания индикатора, поэтому
перед выключением автоматического выключателя
(
определите цикл мигания.
охлаждается и потом постепенно нагревается при
выключении.
)
• Если после проведения описанных выше операций кондиционер все равно не работает
правильно, немедленно обратитесь в сервис-центр. При обращении в сервис-центр сообщайте
модель кондиционера, его серийный номер и дату установки. Кроме того, опишите
неисправность.
Обратите внимание:
При включении оборудования, особенно при неярком электрическом освещении, может
наблюдаться небольшое изменение яркости освещения. Это нормальное явление.
Необходимо соблюдать предписания местных компаний, поставляющих энергию.
– 40 –
 Loading...