

Page 1

Remote Controller Manual
MODEL
SPX-RCDA
(RAR-5G1)
Remote Controller manual Page 1~11
To obtain the best performance and ensure years of trouble free use, please read this instruction manual completely.
– 1 –
Page 2
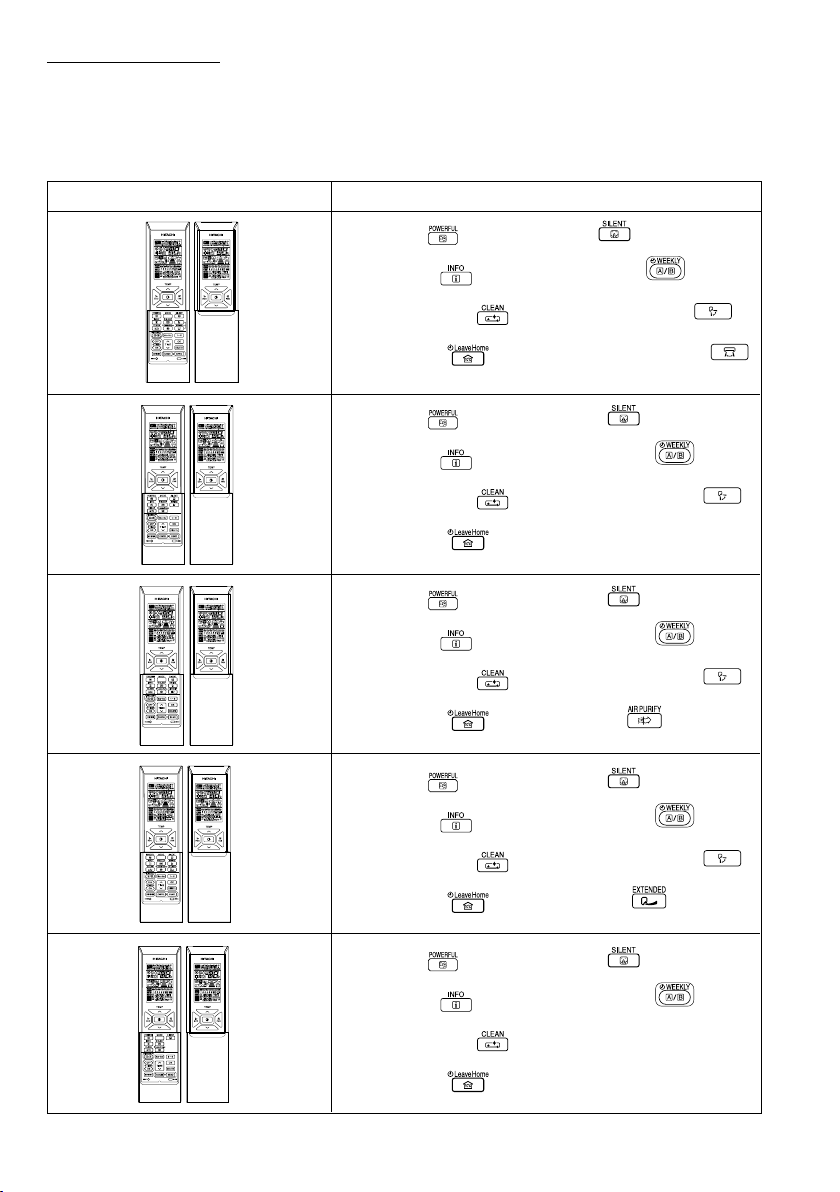
PRECAUTIONS FOR USE
● In case of power failure happen, Wired Remote Controller may not show current operating mode when power
comes back. However unit will continue to operate at previous setting mode.
● It is not recommended to use both Wireless Remote Controller and Wired Remote Controller at the same
time.
● Some features of Wireless Remote Controller are not available when use Wired Remote Controller as mentioned
below:
Standard Wireless Remote Controller
RAR-5E1
RAR-5E2
RAR-5E3
RAR-5E4
Features not available on Wired Remote Controller
● Powerfull
● Information
● One touch clean
● Leave home
● Powerfull
● Information
● One touch clean
● Leave home
● Powerfull
● Information
● One touch clean
● Leave home
● Powerfull
● Silent
● Weekly timer
● Auto swing (vertical)
● Auto swing (horizontal)
● Silent
● Weekly timer
● Auto swing (vertical)
● Silent
● Weekly timer
● Auto swing (vertical)
● Air purify
● Silent
RAR-5E5
● Information
● One touch clean
● Leave home
● Powerfull
● Information
● One touch clean
● Leave home
– 2 –
● Weekly timer
● Auto swing (vertical)
● Extended
● Silent
● Weekly timer
Page 3
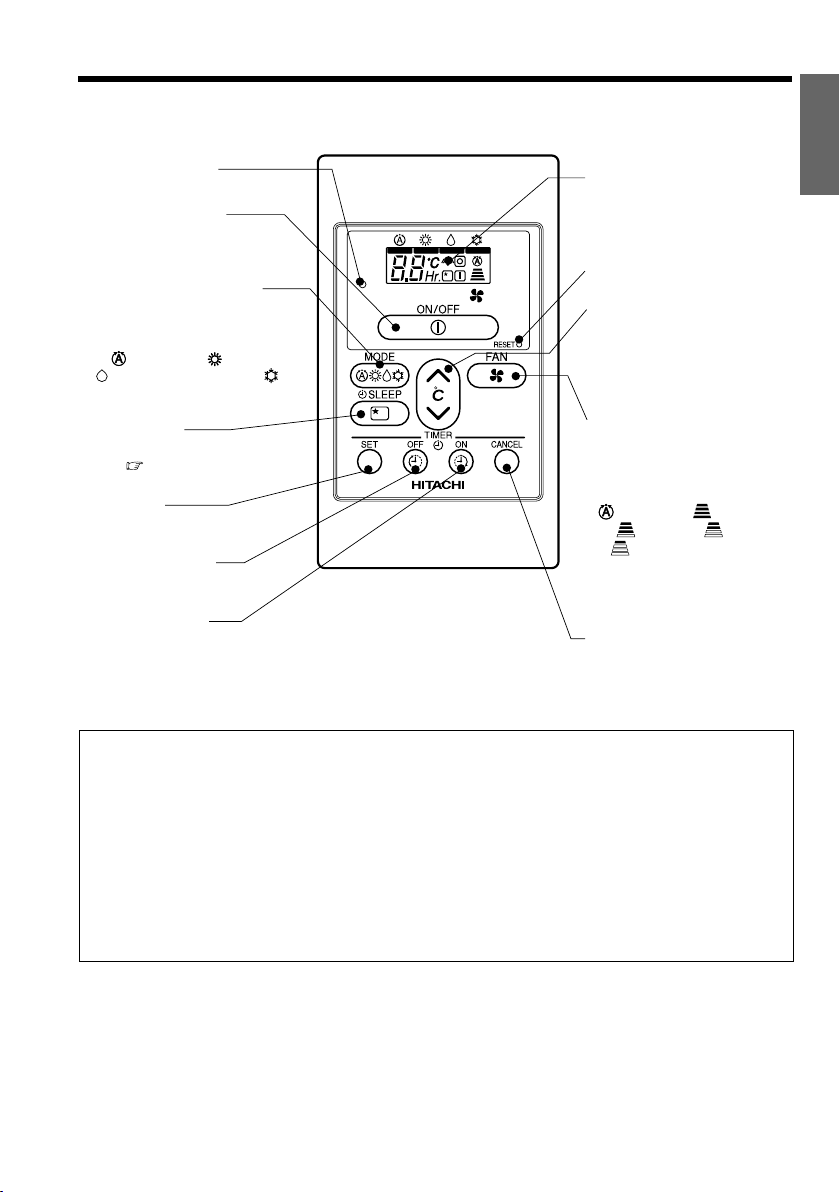
NAMES AND FUNCTIONS OF REMOTE CONTROLLER
■ This controls the operation function and timer setting of the room air conditioner.
OPERATION LAMP
START/STOP Button
Press this button to start operation.
Press it again to stop operation.
MODE SELECTOR Button
Use this button to select the
operating mode. Every time you
press it, the mode will change
(AUTO) to (HEAT)
from
to
(DEHUMIDIFY) and to
(COOL) cyclically.
SLEEP Button
Use this button to set the sleep
timer. (
SET Button
Timer setting reservation.
OFF TIMER Button
Select the turn OFF timer.
ON TIMER Button
Select the turn ON timer.
Page 10)
Transmission Sign
The transmission sign blinks
when a signal has been
send.
RESET SWITCH
ROOM TEMPERATURE
Setting Button
Room temperature setting.
Value will change quicker
when keep pressing.
FAN SPEED Button
This determines the fan
speed. Every time you press
this button, the intensity of
circulation will change from
(AUTO) to (HIGH)
(MED) to (LOW)
to
to
(SILENT)(This button
allows selecting the optimal
or preferred fan speed for
each operation mode).
CANCEL Button
Cancel timer reservation.
ENGLISH
Precautions for Use
O Do not put the remote controller in the following places.
O Under direct sunlight.
O In the vicinity of a heater.
O Handle the remote controller carefully. Do not drop it on the ß oor, and protect it from water.
O Once the outdoor unit stops, it will not restart for about 3 minutes (unless you turn the power switch
off and on or unplug the power cord and plug it in again).
This is to protect the device and does not indicate a failure.
O If you press the MODE SELECTOR button during operation, the device may stop for about 3 minutes
for protection.
– 3 –
Page 4
VARIOUS FUNCTIONS
■ Auto Restart Control
● If there is a power failure, operation will be automatically restarted when the power is resumed with
previous operation mode.
(As the operation is not stopped by remote controller.)
● If you intend not to continue the operation when the power is resumed, switch off the power supply.
When you switch on the circuit breaker, the operation will be automatically restarted with previous operation
mode.
Note: 1. If you do not require Auto Restart Control, please consult your sales agent.
2. Auto Restart Control is not available when Timer or Sleep Timer mode is set.
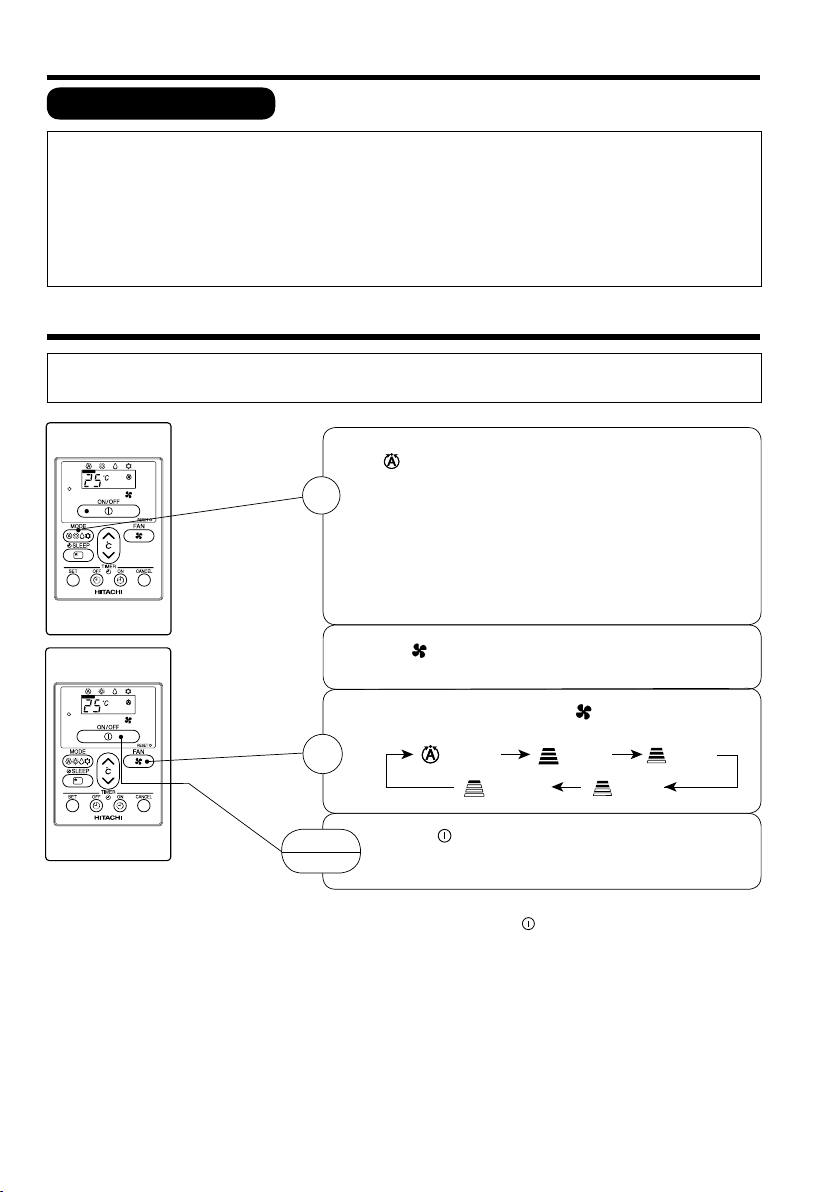
AUTOMATIC OPERATION
The device will automatically determine the mode of operation, HEAT or COOL depending on the current
room temperature. The selected mode of operation will change when the room temperature varies.
Press the MODE selector button so that the display indicates
the
(AUTO) mode of operation.
O When AUTO has been selected, the device will automatically
1
determine the mode of operation, HEAT or COOL depending
on the current room temperature. However the mode of
operation will not change when indoor unit is connected
to multi type outdoor unit.
O If the mode automatically selected by the unit is not
satisfactory, manually change the mode setting (HEAT,
DEHUMIDIFY or COOL).
Press the (FAN SPEED) button to select AUTO, HIGH, MED,
LOW or SILENT.
Set the desired FAN SPEED with the
display indicates the setting).
2
START
STOP
■ As the settings are stored in the memory in the remote controller,
you only have to press the
(AUTO) (HIGH) (MED)
Press the
Operation starts.
Press the button again to stop operation.
– 4 –
(SILENT) (LOW)
(START/STOP) button.
(FAN SPEED) button (the
(START/STOP) button next time.
Page 5

HEATING OPERATION
● Use the device for heating when the outdoor temperature is under 21°C.
When it is too warm (over 21°C), the heating function may not work in order to protect the device.
● In order to maintain reliability of the device, please use this device when outdoor temperature is above
–15°C
Press the MODE SELECTOR button so that the display indicates
(HEAT).
1
ENGLISH
Set the desired FAN SPEED with the
(the display indicates the setting).
(AUTO) (HIGH) (MED)
2
3
START
STOP
Q As the settings are stored in the memory of the remote controller, you
only have to press the
Q During AUTO fan, the fan speed automatically changes as below:
O When the difference between room temperature and setting temperature
is large, fan starts to run at HI speed.
O After room temperature reaches the preset temperature, fan speed
will be changed to lower speed to obtain optimum room temperature
condition for natural healthy heating.
Set the desired room temperature with the ROOM TEMPERATURE
setting button (the display indicates the setting).
The temperature setting and the actual room temperature may
vary depending on conditions.
Press the
Press the button again to stop operation.
(START/STOP) button. Heating operation starts.
(SILENT) (LOW)
(START/STOP) button next time.
(FAN SPEED) button
Defrosting
Defrosting will be performed about once an hour when frost forms on the heat exchange of the outdoor unit,
for 5~10 minutes each time.
During defrosting operation, the operation lamp blinks in a cycle of 3 seconds on and 0.5 second off.
The maximum time for defrosting is 20 minutes.
However, if the indoor unit is connected to multi type outdoor unit, the maximum time for defrosting is 15
minutes.
(If the piping length used is longer than usual, frost is likely to form.)
– 5 –
Page 6

DEHUMIDIFYING OPERATION
Use the device for dehumidifying when the room temperature is over 16°C.
When it is under 15°C, the dehumidifying function will not work.
Press the MODE SELECTOR button so that the display indicates
(DEHUMIDIFY).
Press
speed.
Set the desired room temperature with the ROOM TEMPERATURE
setting button (the display indicates the setting).
The range of 20-26ûC is recommended as the
(FAN SPEED) button to select SILENT or LOW fan
room temperature for dehumidifying.
START
STOP
Press the (START/STOP) button. Dehumidifying operation
starts. Press the button again to stop operation.
■ As the settings are stored in the memory in the remote controller, you
only have to press the
(START/STOP) button next time.
Q Dehumidifying Function
O When the room temperature is higher than the temperature setting: The device will dehumidify the room,
reducing the room temperature to the preset level.
When the room temperature is lower than the temperature setting: Dehumidifying will be performed at the
temperature setting slightly lower than the current room temperature, regardless of the temperature setting.
O The preset room temperature may not be reached depending on the number of people present in the room
or other room conditions.
– 6 –
Page 7

COOLING OPERATION
Use the device for cooling when the outdoor temperature is –10 ~ 43°C.
If indoor humidity is very high (80%), some dew may form on the air outlet grille of the indoor unit.
Press the MODE SELECTOR button so that the display indicates
(COOL).
ENGLISH
Set the desired FAN SPEED with the
(the display indicates the setting).
(AUTO) (HIGH) (MED)
Set the desired room temperature with the ROOM TEMPERATURE
setting button (the display indicates the setting).
The temperature setting and the actual room temperature may
vary depending on conditions.
Press the
START
STOP
Press the button again to stop operation. The cooling function
does not start if the temperature setting is higher than the current
room temperature (even though the
The cooling function will start as soon as you set the temperature
below the current room temperature.
Q As the settings are stored in the memory of the remote controller, you
only have to press the
Q During AUTO fan, the fan speed automatically changes as below:
O When th e differ ence between ro om temp erature and setting
temperature is large, fan starts to run at HI speed.
O After room temperature reaches the preset temperature, fan speed
will be changed to lower speed to obtain optimum room temperature
condition for natural healthy cooling.
(START/STOP) button. Cooling operation starts.
(SILENT) (LOW)
(START/STOP) button next time.
(FAN SPEED) button
(OPERATION) lamp lights).
– 7 –
Page 8

LEAVE HOME(LH) AND CLEAN (ONE TOUCH CLEAN) OPERATIONS
O Leave Home (LH) and CLEAN(One Touch Clean) operations activation buttons are not available on this device.
The operations shall be activated by wireless remote controller.
O Please refer to wireless 'Remote Controller Manual' to activate the operations.
NOTE
O If or is displayed on the wired remote controller display, the unit will operate Leave Home
(LH) operation mode or CLEAN (One Touch Clean) which shall be activated by wireless remote controller.
O Push start/stop button to stop Leave Home (LH) or CLEAN (One Touch Clean) operation.
– 8 –
Page 9

TIMER RESERVATION
■ ON Timer and OFF Timer are available.
OFF Timer Reservation
■ Operation stop at setting timer
OFF TIMER setting
1
● Select the OFF TIMER by pressing the (OFF)
Button.
● Setting timer will change according to the below
sequence when you press the button.
0.5 hour interval
● The value change quicker if you keep pressing the
button.
2
Press the (SET) button
● OFF TIMER is reserved.
● The (OFF) Mark starts lighting instead of blinking.
ON Timer Reservation
ON TIMER setting
1
● Select the ON TIMER by pressing the (ON)
Button.
● At the beginning of setting, timer is set to 6 hours.
● Setting timer will change according to the below
sequence.
0.5 hour interval
1 hour interval
1 hour interval
ENGLISH
■ O pera tio n wil l sta rt fo r s et t ing
temperat ure at setting ti mer (The
starting time may different depend
on the ro om tem per ature and set
temperature).
● The value change quicker if you keep pressing the
button.
2
Press the (SET) button
● ON TIMER is reserved.
● The (ON) Mark starts lighting instead of blinking.
CANCELLATION of Timer Reservation
1
Press the (CANCEL) button
● As the timer settings are stored in remote controller
memory, you only have to press the
in order to use the same setting next time.
(SET) button
– 9 –
Page 10

HOW TO SET THE SLEEP TIMER
Example: Setting 3 hours
sleep timer.
Mode
4 4 44
Sleep timer
Sleep Timer: The device will continue working for the designated
number of hours and then turn off.
Press the SLEEP button.
The timer information will be displayed on the remote controller.
1 hour 2 hours 3 hours 7 hours
Indication
Sleep timer off
1
How to Cancel Reservation
Press the (CANCEL) button. The
and (RESERVED) sign goes out.
Explanation of the sleep timer
The device will control the FAN SPEED and room temperature
automatically so as to be quiet and good for people’s health.
NOTE
● If you set the sleep timer after the off or on-timer has been
set, the sleep timer becomes effective instead of the off or
on-timer set earlier.
● You can not set other timer during sleep timer operation.
● After sleep timer time is up and when press sleep button
again, the sleep timer will be set as last setting.
● Sleep timer effective only once.
– 10 –
Page 11

INSTALLATION OF WIRED REMOTE CONTROLLER
(a) Connection to the electrical box;
● Remove the cover of electric box
● Connect the connector of wired remote controller to CN1102 of electrical board
● Assemble back the cover of electrical box
(b) Wiring installation for wired remote controller (2 methods);
● Wired remote controller casing can be opened by pressing the slots with minus screw driver (see below
diagram)
Top casing
Bottom casing
● Decide the Þ xing location of remote controller so that the length of wire shall be within 15 meters.
● Do not cut the provided wire. Excess wire should be properly wound and Þ tted at safe
!
CAUTION
Wall recessed wiring installation (Supplied)
1. When connecting the wires via the wall’s
recessed slot;
Á Fix the bottom casin g to the wal l by
provided screw.
Á Ass emble the top casi ng to the fixed
bottom casing.
(Refer to the illustration below for detail
installation)
Lead wires (3 strands)
are inserted through and
fastened via a rib-clip
place.
● Do not join the wire with additional wire.
Wiring installation illustrations
Inside top wiring installation (Alternative)
2. When the wires to be connected from the inside top portion
of top casing;
Á Break off a perforated aperture located at the top portion
of the bottom casing by nipper. Smoothen the aperture
by cutter.
Fix the bottom casing to the wall by provided screw.
Á Connect the wires to the lead wires connector.
Á Mount the wires through the provided slot on top casing.
Á Assemble the top casing to the Þ xed bottom casing
Wall
mounting
screws
(2 pieces)
(provided)
(Refer to the illustration below for detail installation)
Wires
ENGLISH
Location of wall
mounting screw
Lead wires connector
Wires
Lead wires
connector
Wires
– 11 –
Lead wires
connector
Lead wires
(3 strands)
Wires
Wall mounting screws (2 pieces to
be used) (provided)
Page 12

MEMO
......................................................................................................................................................................................
......................................................................................................................................................................................
......................................................................................................................................................................................
......................................................................................................................................................................................
......................................................................................................................................................................................
......................................................................................................................................................................................
......................................................................................................................................................................................
......................................................................................................................................................................................
......................................................................................................................................................................................
......................................................................................................................................................................................
......................................................................................................................................................................................
......................................................................................................................................................................................
......................................................................................................................................................................................
......................................................................................................................................................................................
......................................................................................................................................................................................
......................................................................................................................................................................................
......................................................................................................................................................................................
......................................................................................................................................................................................
......................................................................................................................................................................................
......................................................................................................................................................................................
......................................................................................................................................................................................
......................................................................................................................................................................................
......................................................................................................................................................................................
......................................................................................................................................................................................
......................................................................................................................................................................................
......................................................................................................................................................................................
......................................................................................................................................................................................
......................................................................................................................................................................................
......................................................................................................................................................................................
......................................................................................................................................................................................
......................................................................................................................................................................................
......................................................................................................................................................................................
......................................................................................................................................................................................
......................................................................................................................................................................................
......................................................................................................................................................................................
......................................................................................................................................................................................
......................................................................................................................................................................................
......................................................................................................................................................................................
......................................................................................................................................................................................
– 12 –
 Loading...