

Hitachi RAM-90NP5B Installation manual
CONDENSED WATER DISPOSAL OF OUTDOOR UNIT
There are holes on the base of Outdoor unit for condensed
water to exhaust.
In order to fl ow condensed water to the drain, the unit is
installed on a stand or a block so that the unit is 100mm
above the ground as shown fi gure. Join the drain pipe to
one hole.
At fi rst insert one portion of the hook to the base (Portion A),
then pull the drain pipe in the direction shown by the arrow
while inserting the hook into the base. After installation,
check whether the drain pipe cling to the base fi rmly.
When Using and Installing In Cold Areas
When the air conditioner is used in low temperature and in
snowy conditions, water from the heat exchanger may freeze
on the base surface to cause poor drainage. When using the
air conditioner in such areas, do not install the bushings. Keep
a minimum of 250mm between the drain hole and the ground.
When using the drain pipe, consult your sales agent.
For more details, refer to the installation Manual for Cold
Areas.
WARNING ........ Incorrect methods of installation may cause death or serious injury.
CAUTION ......... Improper installation may result in serious consequence.
Make sure to connect earth wire.
This sign in the fi gures indicates prohibition.
SPLIT UNIT AIR CONDITIONER
INSTALLATION MANUAL
Outdoor
Unit RAM-90NP5B
(Mark is exclusive use tool for R410A)
●
+ – Screwdriver ● Measuring Tape ● Knife ● Saw
●
ø 65mm Power Drill ● Hexagonal Wrench Key
( 4mm) ●Wrench (14, 17, 22, 26mm) Gas
Leakage Detector ● Pipe Cutter ● Putty ● Vinyl Tape
●
Pliers ● Flare Tool Vacuum Pump Adapter
Manifold Valve Charge Hose Vacuum Pump
● Carefully read through the procedures of proper
installation before starting installation work.
● The sales agent should inform customers regarding
the correct operation of installation.
SAFETY PRECAUTION
● Read the safety precautions carefully before operating the unit.
● The contents of this section are vital to ensure safety. Please pay special attention to the following sign.
WARNING
CAUTION
● A circuit breaker must be installed in the house distribution box for the direct connected power supply wire to the outdoor
unit. In case of other installations a main switch with a contact gap or more than 3.5mm has to be installed. Without a
circuit breaker, the danger of electric shock exists.
● Do not install the unit near a location where there is fl ammable gas. The outdoor unit may catch fi re if fl ammable
gas leaks around it.
● Be sure to tighten the fl are nut to the specifi ed torque using a torque wrench. If the fl are nut is tightened excessively, it may
crack as time elapses, cause refrigerant leakage.
● Please ensure smooth fl ow of water when installing the drain hose.
● An IEC approved power cord should be used. Power cord type: NYM.
●
Please request your sales agent or qualifi ed technician to install your unit. Water leakage, short circuit or fi re may occur if you
do the installation work yourself.
●
Please observe the instructions stated in the installation manual during the process of installation. Improper installation may
cause water leakage, electric shock and fi re.
●
Make sure that the units are mounted at locations which are able to provide full support to the weight of the units. If not, the
units may collapse and impose danger.
●
Observe the rules and regulations of the electrical installation and the methods described in the installation manual when dealing
with the electrical work. Use power cables approved by the authorities of your country.
●
Be sure to use the specifi ed wire for connecting the indoor and outdoor units. Please ensure that the connections are tight after
the conductors of the wire are inserted into the terminals. Improper insertion and loose contact may cause over-heating and fi re.
●
Please use the specifi ed components for installation work. Otherwise, the units may collapse or water leakage, electric shock
and fi
re may occur.
●
Be sure to use the specifi ed piping set for R-410A. Otherwise, this may result in broken copper pipes or faults.
●
When installing or removing an air conditioner, only specifi ed refrigerant (R410A) shall be allowed, do not allow air or moisture to
remain in the refrigeration cycle. Otherwise, pressure in the refrigeration cycle may become abnormally high leading to possibility
of unit rupture.
●
Be sure to ventilate fully if a refrigerant gas leak while at work. If the refrigerant gas comes into contact with fi re, a poisonous
gas may occur
.
●
After completion of installation work, check to make sure that there is no refrigeration gas leakage. If the refrigerant gas leaks
into the room, coming into contact with fi re in the fan-driven heater, space heater, etc., a poisonous gas may occur.
●
Unauthorized modifi cations to the air conditioner may be dangerous. If a breakdown occurs please call a qualifi ed air conditioner
technician or electrician. Improper repairs may result in water leakage, electric shock and fi re,
etc.
●
Be sure to connect the earth wire from the power supply wire to the outdoor unit and between the outdoor and
indoor unit. Improper earthing may cause electric shock.
FOR SERVICE PERSONNEL ONLY
Tools Needed For Installation Work
Be sure that the unit operates in proper condition after installation. Explain to customer the proper way of operating
the unit as described in the user’s guide.
THE CHOICE OF MOUNTING SITE
(Please note the following matters and obtain permission from customer before installation).
WARNING
● The Outdoor unit must be mounted at a location which can support heavy weight. Otherwise, noise and vibration will increase.
CAUTION
●
Do not expose the unit under direct sunshine or rain. Besides, ventilation must be good and clear of obstruction.
●
The air blown out of the unit should not point directly to animals or plants.
●
The clearances of the unit from top, left, right and front are specifi ed in fi gure below. At least 3 of the above sides must be open air.
●
Be sure that the hot air blown out of the unit and noise do not disturb the neighbourhood.
●
Do not install at a location where there is fl ammable gas, steam, oil and smoke.
●
The location must be convenient for water drainage.
●
Place the Outdoor unit and its connecting cord at least 1m away from the antenna or signal line of television, radio or telephone.
This is to avoid noise interference.
Names of Outdoor Components
Drain Pipe
1
Dimension of Mounting Stand
of the Outdoor unit
(unit: mm)
BASE
DRAIN PIPE
Figure showing the Installation of Outdoor Unit.
3
Bush
QtyNo. Item
10
11
Height difference
Height difference between indoor units should
be not more than 5m.
Piping length
Mount the Outdoor unit on stable ground to prevent vibration and
increase of noise level.
Decide the location for piping after sorting out the different types of
pipe available.
Flare adaptor for piping
The fl are adaptor for piping is required
depending on combination of indoor units.
ø9.52 (3/8”) ➝ ø 12.7 (1/2”)
Parts number TA261D-4 001
ø12.7(1/2”) ➝ ø 9.52 (3/8”)
Parts number TA261D-6 002
ø12.7(1/2”) ➝ ø 15.88(5/8”)
Parts number TA261D-6 003
One unit of 1.5kW, 1.8kW, 2.5kW, 3.5kW, 5.0kW
(5.0kW unit: Optional fl are adaptor for piping is necessary.)
One unit of 1.5kW, 1.8kW, 2.5kW, 3.5kW, 5.0kW
(5.0kW unit: Optional fl are adaptor for piping is necessary.)
One unit of 1.5kW, 1.8kW, 2.5kW, 3.5kW, 5.0kW
(5.0kW unit: Optional fl are adaptor for piping is necessary.)
One unit of 1.5kW, 1.8kW, 2.5kW, 3.5kW, 5.0kW
(1.8-3.5kW unit: Optional fl are adaptor for piping is necessary.)
One unit of 1.5kW, 1.8kW, 2.5kW, 3.5kW, 5.0kW
(1.8-3.5kW unit: Optional fl are adaptor for piping is necessary.)
When removing side plate, pull the handle
after releasing the hook by pulling it
downward.
Face this side (suction side) of
the unit to the wall.
Remove side
cover when
connecting
the piping and
connecting cord.
To the outdoor unit, up to fi ve indoor units can be connected until
the total value of each units’s capacity reaches 15.5 kW.
The pipe connection ports of the outdoor unit and connectable indoor
units are shown above.
[Outdoor unit installation]
CAUTION
●
Make sure to connect to
two or more indoor units.
1. Proper place for installation
1.1 Outdoor unit
(1) Keep the space around the unit for maintenance and avoiding the effects of hindrance for normal ventilation of the unit.
(2) The northern or eastern side of the building is better to install. At the installation on the southern or western side unavoidably, some blind
should be set up for the unit. (In this case, the blind must not obstruct the ventilation of the unit.)
(3) You’d better not put the unit at a place where is full of dirt and at a place where is wet in the rain.
(4) Place as near as possible to the indoor unit.
(5) Install the unit in a stable place to minimize vibration or noise.
(6) After arranging the cords and pipes, secure them in place.
WARNING
● If you cannot attach the side cover due to the connecting cord, press the connecting cord in direction to the front panel
to fi x it.
● Be sure that the hooks of the side cover is fi xed in certainly. Otherwise water leakage may occur and this causes short
circuit or faults.
● The connecting cord should not touch to service valve and pipes. (It becomes high temperature in heating operation.)
● This appliance must be earthed.
● Power is supplied through outdoor unit, do not connect power source to indoor unit.
Wiring of The Outdoor Unit
● Please remove the side cover for wire connection.
WARNING
● The naked part of the wire core should be 10 mm and fi x it to the terminal tightly. Then try to pull the individual wire to check if the
contact is tight. Improper insertion may burn the terminal.
● Be sure to use only power cables approved from the authorities in your country.
● Please refer to the installation manual for wire connection to the terminals of the units. The cabling must meet the standards of electrical
installation.
● There is a AC voltage of 220-240V between the L and N terminals. Therefore, before servicing, be sure to remove the plug from the
AC outlet or switch off the main switch.
2. In the electrical installation a separator with a contact gap of more than 3mm has to be installed. During
cleaning or service the set has to be switched off with this separator.
3. Installation procedure and notice
Especially, the selection of installation place need great care for the split type air conditioner, because it
is very diffi cult to move from place to place after the fi rst installation.
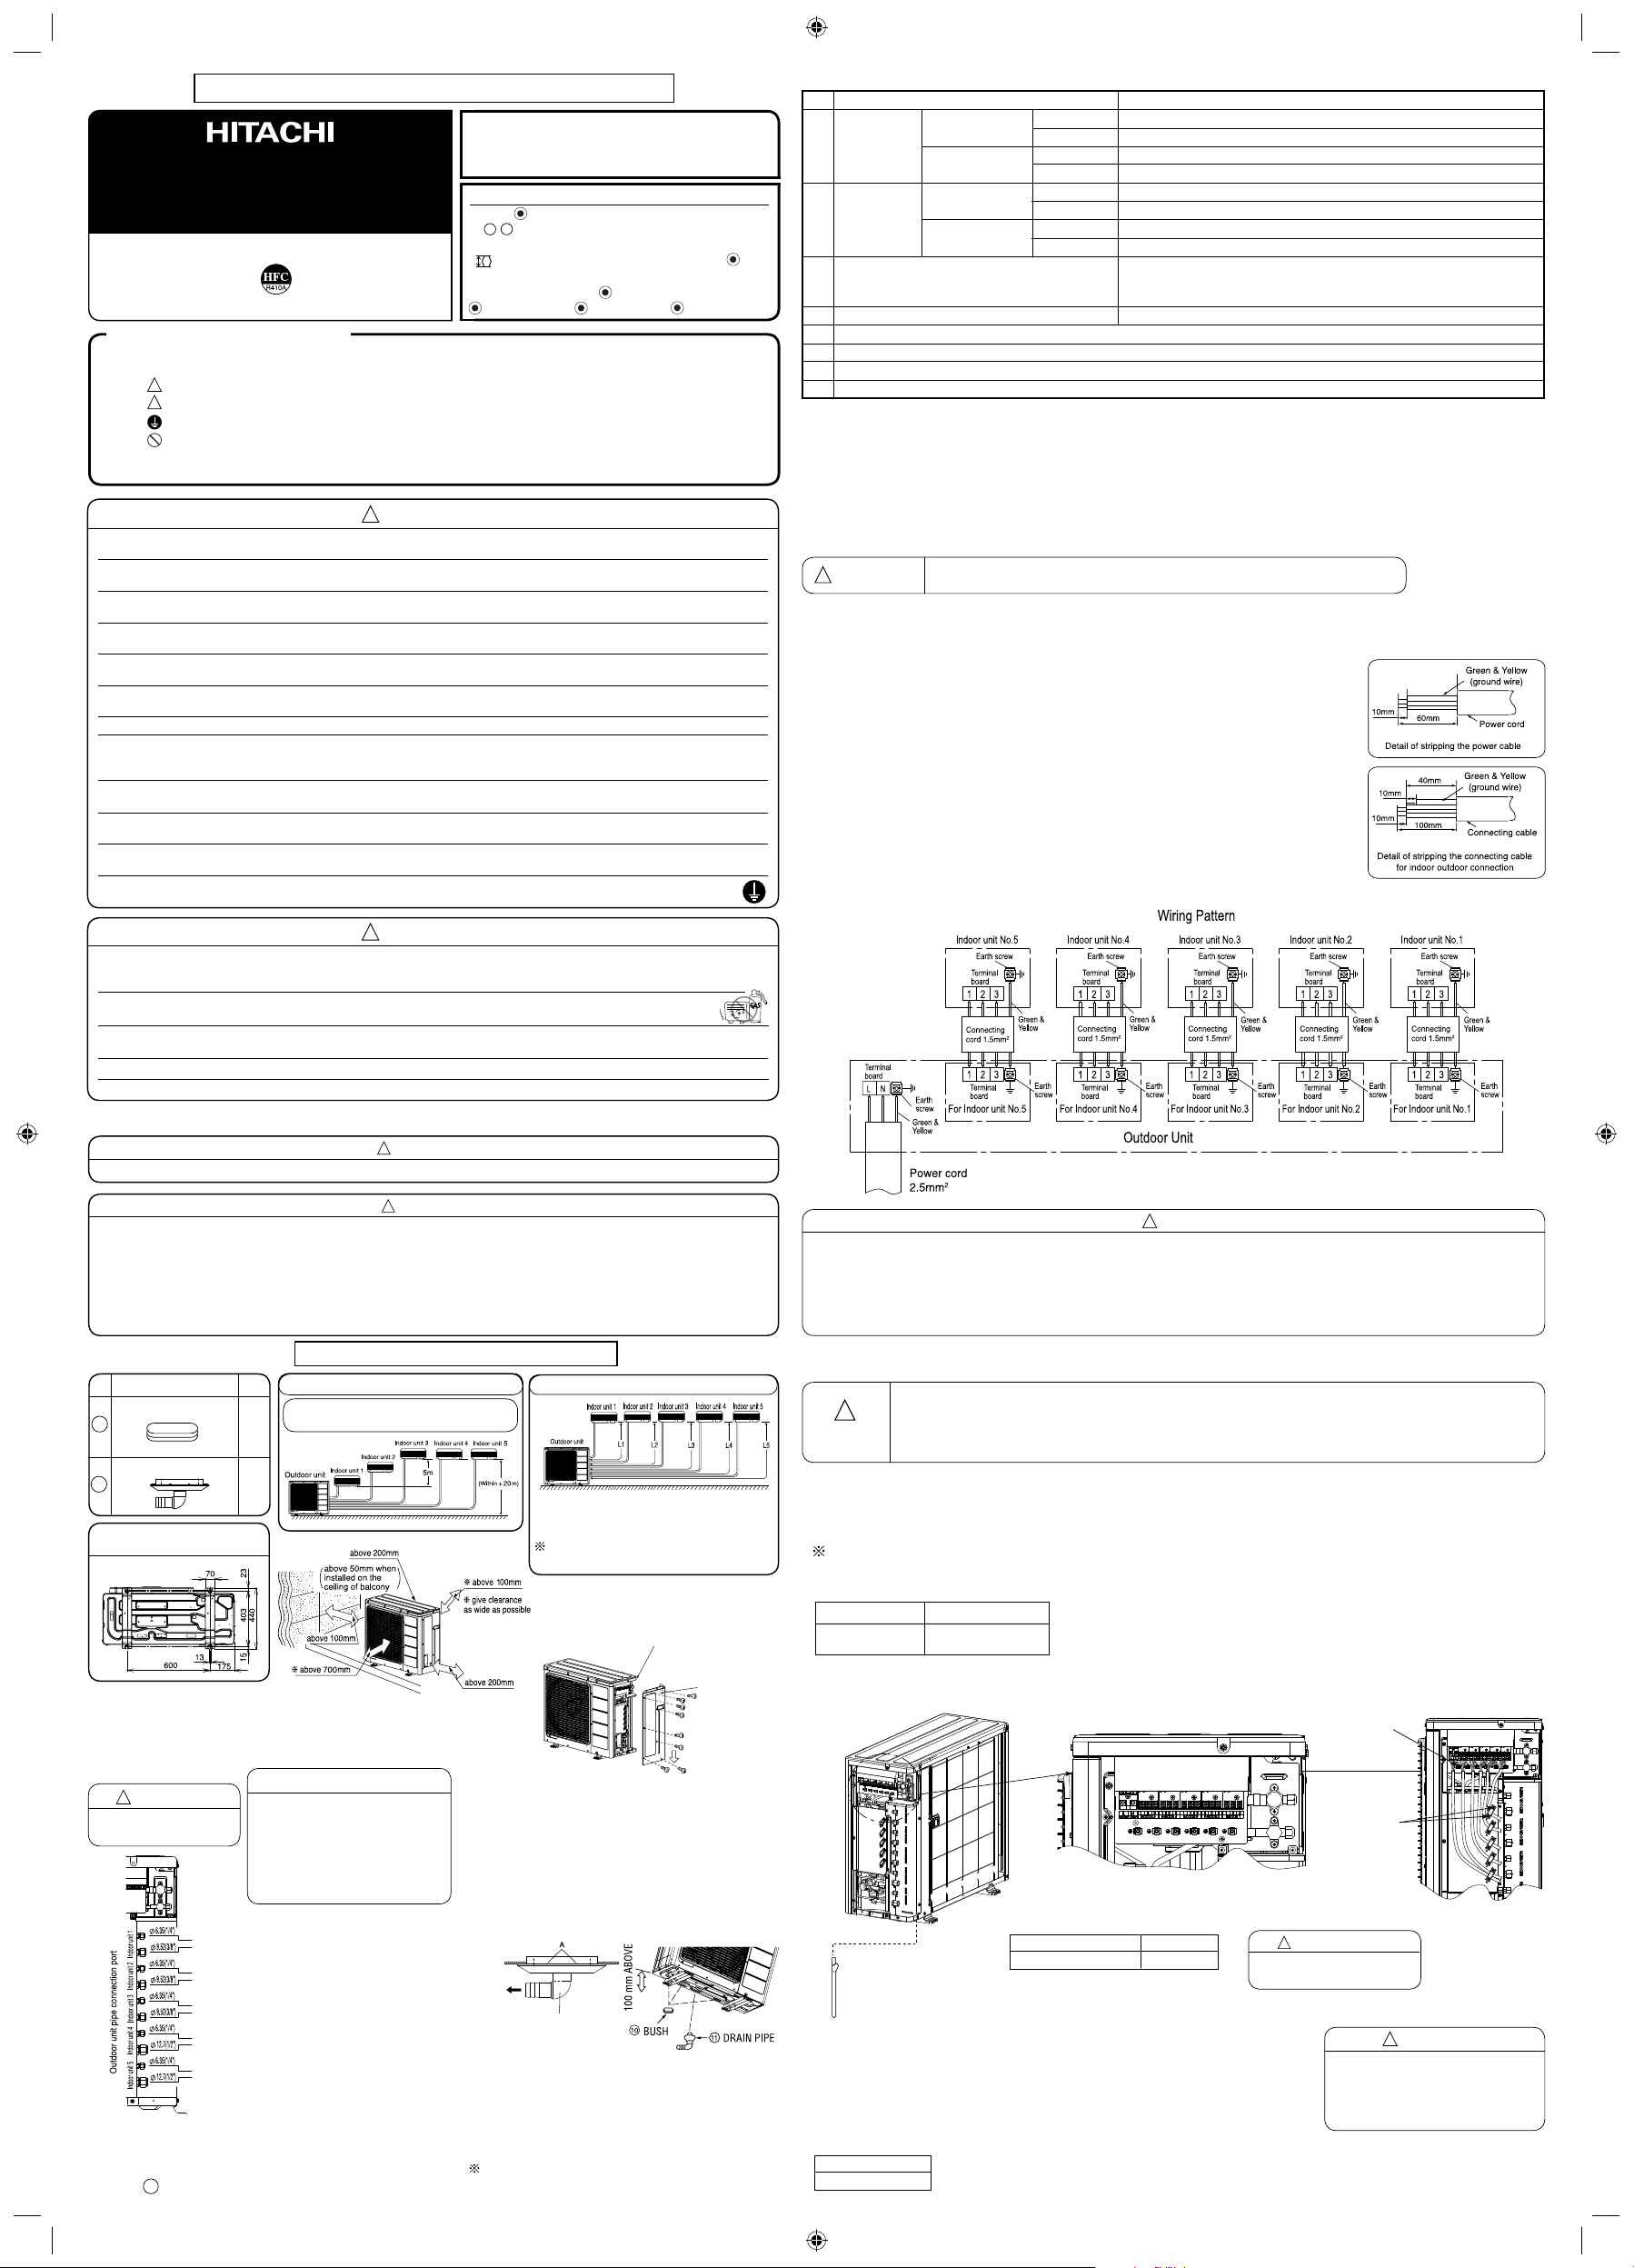
3.1 Wiring
(1) Those terminal blocks for connecting the indoor and outdoor cables should be installed starting
from the righthand side, in a sequence of 1, 2, 3, 4, 5; in accordance with the units’ numbering
system, as illustrated in the diagram.
The left hand-most terminal block is for the power supply
connection use.
(2) Connect the electrical wiring between the Indoor and Outdoor unit, as shown in Fig. 3-1. Never
connect the wiring by mistake.
In case of wrong connection, the unit does not operate properly and it may cause malfunction.
(3) The connecting cord must be fi xed by the band which is located near the terminal board.
3.2 Connection of the connecting cords and power cord
(1) Cut off the connecting cord, the power cord and strip the insulation of the wire, as shown in Fig. 3-2.
(2) Connect the connecting cord and power cord to the terminal board. (Fig. 3-3-2)
(3) Fix the connecting cords and power cord with steel band certainly. (Fig. 3-3-2)
3.3 Checking for the electric source and the voltage range
●
Before installation, the power source must be checked and necessary wiring work must be completed. To make the wiring capacity proper,
use the wire gauges list below for the lead-in from a pole transformer and for the wiring from a switch board of fuse box to the main
switch and outdoor unit in consideration of the locked rotor current.
●
Do not connect wrongly at terminal “1 2 3” of indoor and outdoor unit.
To avoid misconnection, please refer attached terminal label as shown in Fig. 3-3-1.
●
To avoid connecting cord scratch or clamp by side cover, it must be fi x by band as shown in Fig. 3-3-2.
● Investigate the power supply capacity and other electrical conditions at the installation location.
Depending on the model of room air conditioner to be installed, request the customer to make
arrangements for the necessary electrical work etc.
The electrical work includes the wiring work up the outlet. In localities where electrical conditions
are poor, use of a voltage regulator is recommended.
Circuit Breaker
25A
Bind connecting cords to make them
fi t between the convex sections.
Grounding rod (optional)
(Earth wire and grounding rod are not supplied.
Please use optional items below.)
IMPORTANT
Procedures of Wiring
Fig. 3-2
WARNING
Type of grounding rod
SP-EB-2
Length
900mm
Cable length
up to 25m
Wire cross-section
2.5mm
2
IMPORTANT
Fig. 3-1
<
IA1235: A
>
Fig. 3-3-2
If you wish to prepare the copper tubes and insulation material in the fi eld, we recommend the following.
No.
Material
Specifi cation
1 Cooper tube
Deoxidized annealed copper pipe with 6.35mm O.D., 0.8mm wall thickness.
4.0kW or less
Small dia.
Deoxidized annealed copper pipe with 9.52mm O.D., 1.0mm wall thickness.
Large dia.
Deoxidized annealed copper pipe with 6.35mm O.D., 0.8mm wall thickness.Small dia.
Deoxidized annealed copper pipe with 12.7mm O.D., 1.0mm wall thickness.
Large dia.
5.0kW
2 Flare nut
Flare nuts with 6.35mm O.D..
4.0kW or less
Small dia.
Flare nuts with 9.52mm O.D..
Large dia.
Flare nuts with 6.35mm O.D..
Small dia.
Flare nuts with 12.7mm O.D..
Large dia.
5.0kW
3 Insulation for refrigerating pipe
Foamed polyethylene insulation pipe which does not corrode the copper tube.
●
Large dia. pipe side: 15mm I.D.., 8mm wall thickness.
●
Small dia. pipe side: 8mm I.D., 7mm wall thickness.
4
Connecting cord
Refer to item 3.3.
5 Vinyl tape
6 Sealer (Putty)
7 Refrigerator oil
8 Bushing for refrigerating pipes
Pull downward
(L1 + L2 + L3 + L4 + L5) = Maximum 75m
Minimum piping length for each indoor unit is 3m.
Maximum piping length for one indoor unit is 25m.
In case the pipe length is more than 30m, add
refrigerant R410A at 15 gram per every meter exceeds.
CAUTION
Note:
● Outdoor supply cords shall not
be lighter than polychloroprene
sheathed flexible cord with code
designation 60245 IEC 57.
Connect the
earth cord
After remove the
screw and cover,
put the connecting
cables and fi x the
cover with screw.
Fig. 3-3-1
Arrange power cord so they do
not touch service valve.
CAUTION
!
!
!
!
!
!
INS RAM-90NP5B 1INS RAM-90NP5B 1 2/27/15 9:22 AM2/27/15 9:22 AM
!
!
!
!
!
!
4. Preparation of Pipe
● Use a pipe cutter to cut the copper pipe.
● Before fl aring, please put on the fl are nut.
Outer
Diameter (Ø)
6.35 (1/4”)
9.52 (3/8”)
12.7 (1/2”)
15.88 (5/8”)
Imperial fl aring tool
0
~ 0.5mm
0
~ 0.5mm
0
~ 0.5mm
0
~ 0.5mm
Rigid fl aring tool
A (mm)
● Please use exclusive tool
1.0mm
1.0mm
1.0mm
1.0mm
● Please be careful when bending the copper pipe.
● Screw in manually while adjusting the center. After that, use of torque wrench to tighten the connection.
CAUTION
● In case of removing fl are nut of a indoor unit, fi rst remove a nut of small diameter side, or seal
cap of large diameter side will fl y out. Free from water into the piping when working.
● During connection, keep away from water.
● Be sure to tighten the fl are nut to the specifi ed torque using a torque wrench. If the fl are nut is
tightened excessively, it may crack as time elapses, causing refrigerant leakage.
● Install the unit in a stable place to minimize vibration or noise.
● After arranging the cords and pipes, secure them in place.
Tighten all the way by hand.
Do not tighten all at once, but tighten it while
fi tting the fl ared surface to the pipe.
CAUTION
5. Pipe Connection
5.1 Pipe connection
Connecting the pipe to outdoor unit
(1) Remove the fl are nut and seal cap from the service valve.
(2) Apply refrigerator oil to the service valve and the fl ared
portion of the pipe.
(3) Using a wrench, security tighten.
● Jagged edge will cause leakage.
● Point the side to be trimmed downwards during trimming
to prevent copper chips from entering the pipe.
6. Removal Of Air From The Pipe And Gas Leakage Inspection
This system integrates 5 sub-systems of piping with 1 pair of service valves installed. That pair will be used for air purging and
pumping down operations. Furthermore, due to valves are not installed to cover up the connecting mouths, there is a need for
all unutilized connecting mouths to be tightly covered up by seal caps and fl ared nuts.
CAUTION: Should all unutilized connecting mouths are not tightly covered up by seal caps and fl ared nuts, there will be
potential gas leaks occurring.
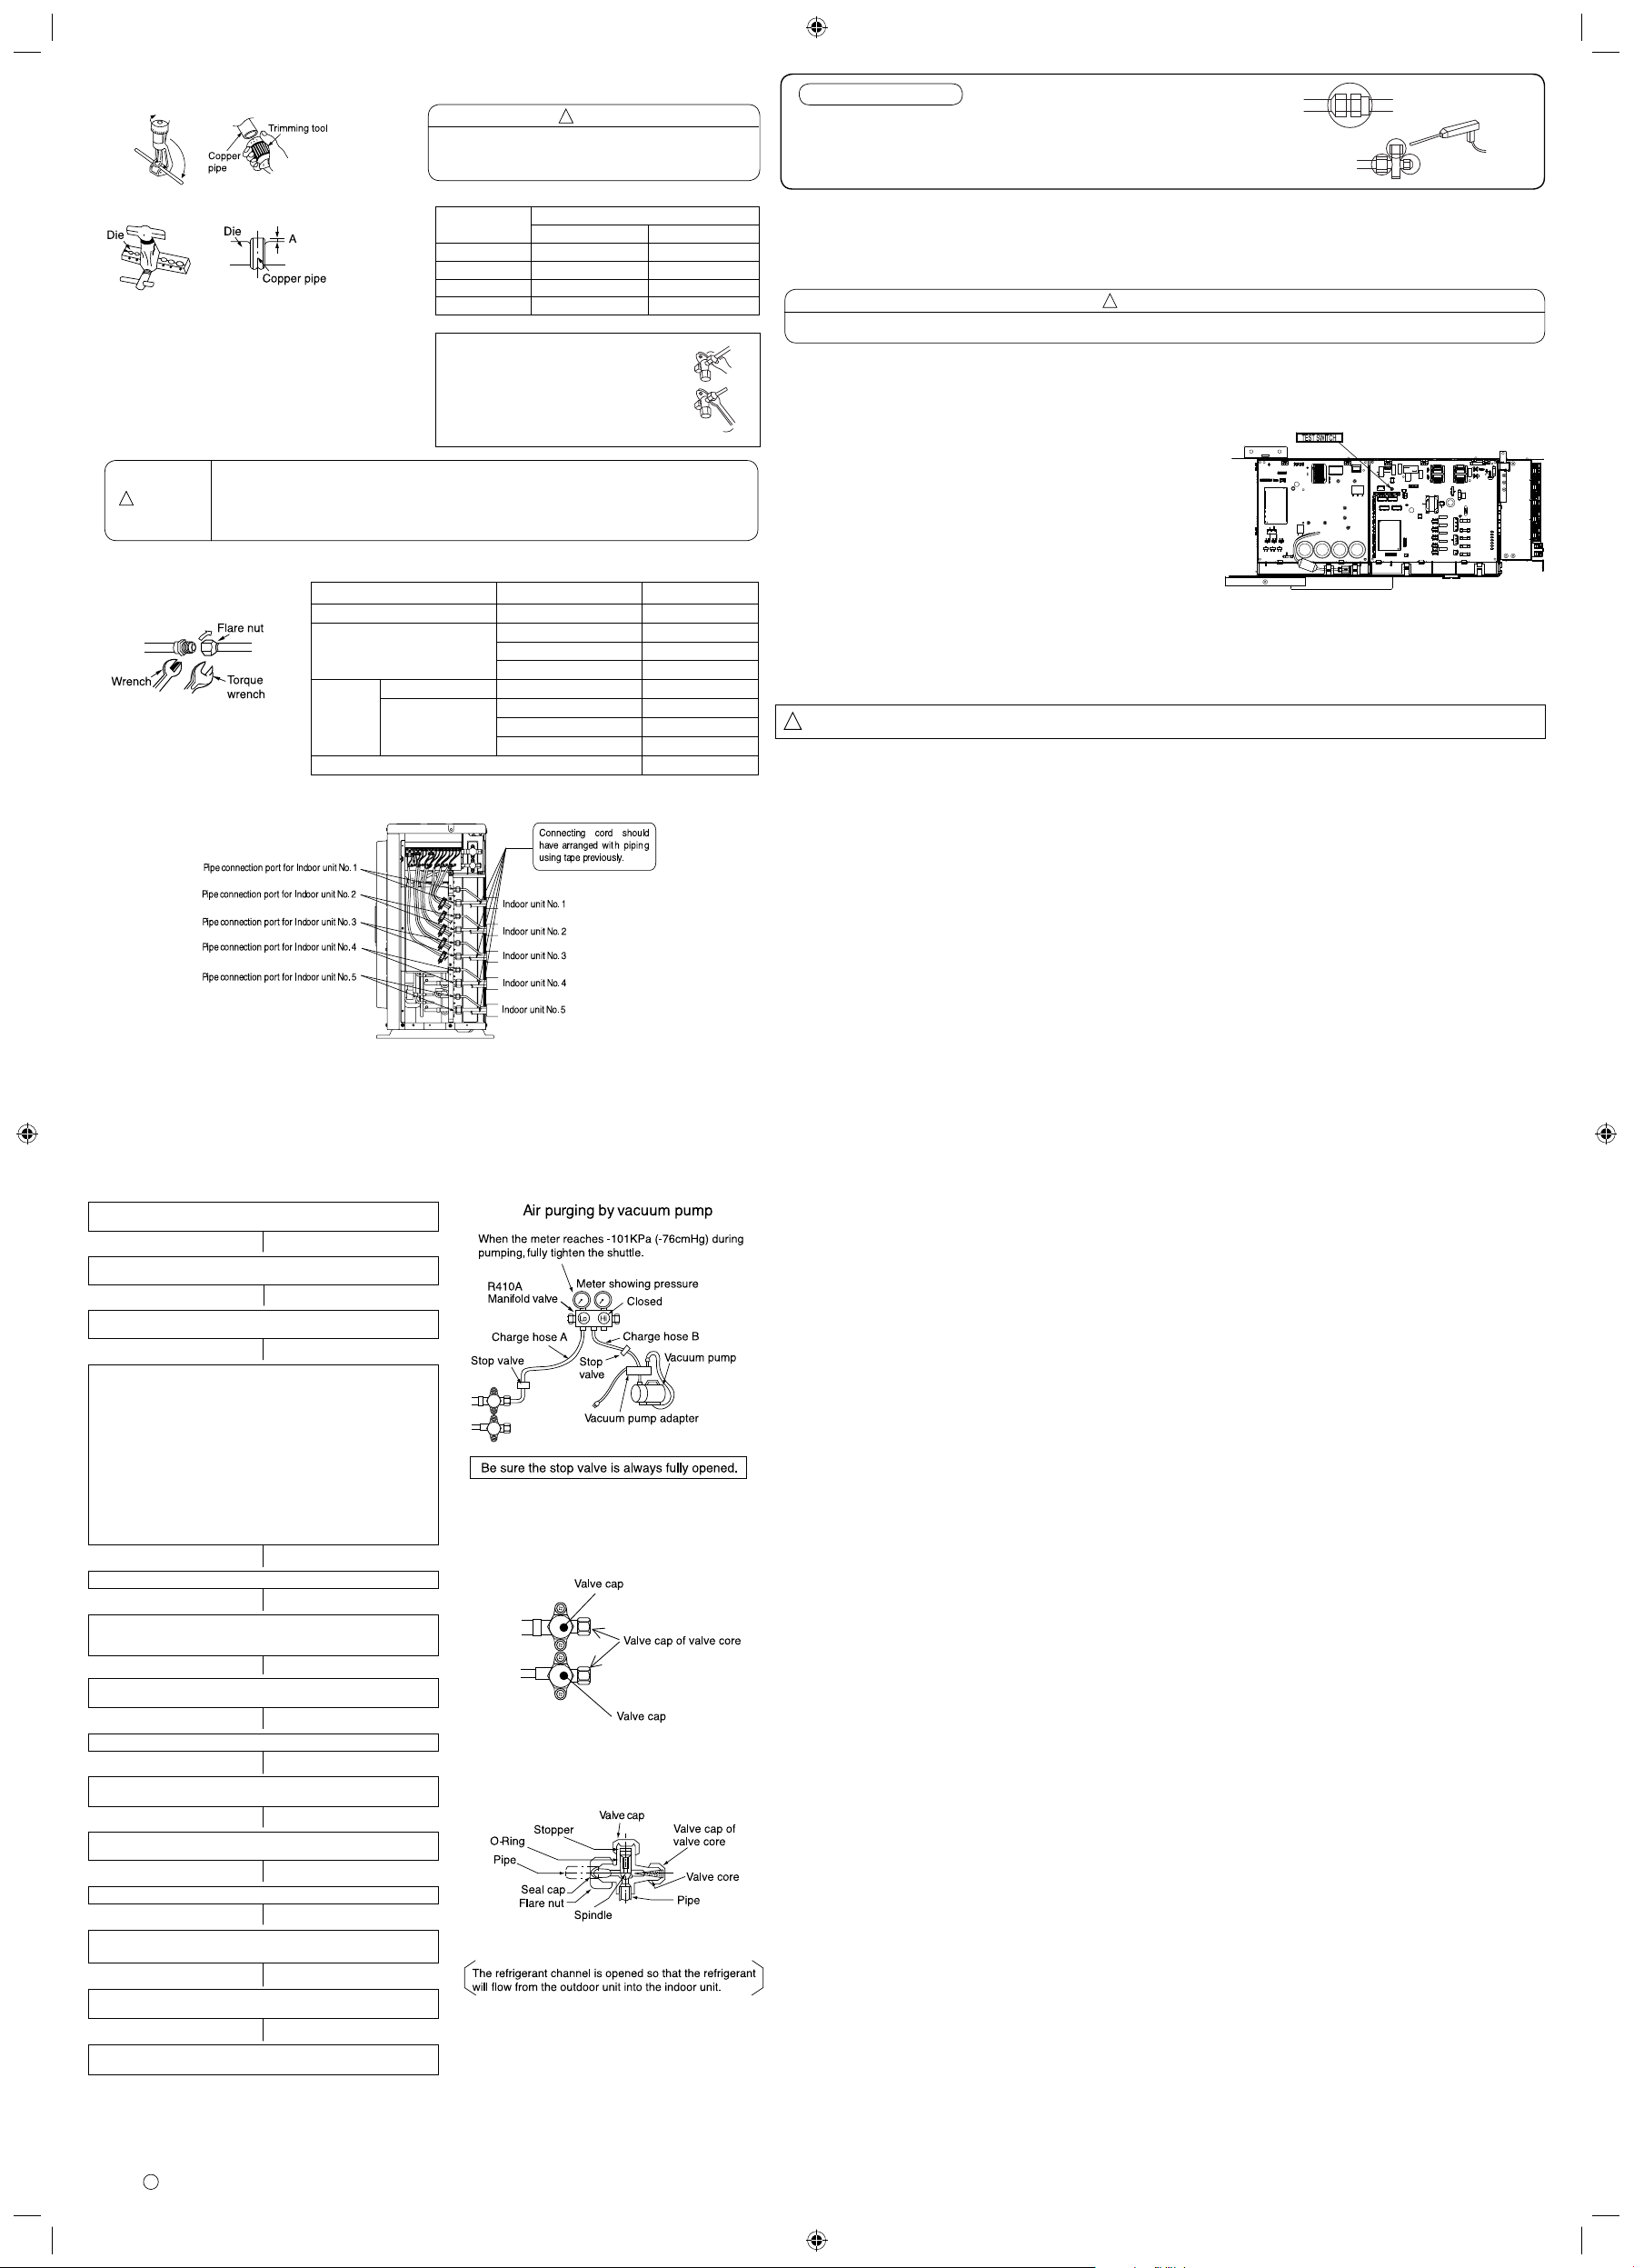
6.1 Air purging by using vacuum pump
Fig. 6-1
Fig. 6-2
Fig. 6-3
<
IA1235: A
>
Outer diameter of pipe (Ø)
Torque N·m (kgf · cm)
Small diameter side
Large diameter side
6.35 (1/4”)
13.7-18.6 (140-190)
9.52 (3/8”)
34.3-44.1 (350-450)
12.7 (1/2”)
44.1-53.9 (450-550)
Small diameter side
Large diameter side
6.35 (1/4”)
19.6-24.5 (200-250)
9.52 (3/8”)
19.6-24.5 (200-250)
12.7 (1/2”)
29.4-34.3 (300-350)
Valve head
cap
12.3-15.7 (125-160)
Valve core cap
15.88 (5/8”)
49.0-58.8 (500-600)
15.88 (5/8”)
29.4-34.3 (300-350)
7. Operation test
● Please ensure that the air conditioner is in normal operating condition during the operation test.
● Explain to your customer the proper operation procedures as described in the user’s manual.
● If the indoor unit does not operate, check to see that the connections are correct.
CAUTION
● Trial run should be conducted on one unit at a time to check for incorrect wiring of connecting cord.
Fig. 6-4
8. Recovery of refrigerant during relocation or uninstalling of unit
(1) Switching ON the outdoor unit’s test switch will run the forced cooling
operation.
(2) After operating for around 5 minutes, rotate the service valve spindle
located at the side of the small pipe rim, in a clockwise direction to
achieve a full shut off.
(3) After operating for around 2~3 minutes, rotate the service valve spindle
located at the side of the large pipe rim, in a clockwise direction to
attain a full shut off.
(4) Immediately stop the forced cooling operation and switch OFF the
power supply.
(5) Use a spanner or similar tools to tighten fully all valve cap and valve
core cap to their specifi ed torque values.
(6) Install and tighten the seal caps and fl ared nuts on all connecting
mouths of each and every piping installed.
9. Forced Cooling Operation
Pressing the outdoor unit’s test switch for more than 1 second will start the
forced cooling operation.
Please run this operation whenever there is a need to perform trouble-shooting
or recovery of outdoor unit’s refrigerant.
CAUTION: In the event that the service valve spindle had been closed, do not operate it for more than 5 minutes.
Remove the valve cap from the service valves located at both the large
and small pipe rims
➤
After removing the valve cap of the valve core of the service valves
located at the large pipe rim, connect the charging hose A.
➤
After connecting the vacuum suction pump adaptor, connect the charging
hose B to the adaptor.
➤
During relocation or at any one time when the air conditioner unit
is removed and re-installed, there is a possibility of getting a closed
electric-powered valve. Should the electric-powered valve be closed,
even with air purging being conducted, certain amount of air is still
trapped within that area, hence, there is a need to open up the electricpowered valve to do an air purging. Under such circumstances, before
using the vacuum-suction pump, the main power supply (LN terminal)
should be connected to enable a complete opening up of the valve.
After connecting the power supply for approximately 90 seconds, the
valve will be fully opened up, after which disconnect the power supply
and start using the vacuum suction pump.
(Refer to “Power Supply Terminal Connections” in regards to the LN
terminal)
CAUTION: Ingress of air during the operating cycle may cause increase
in pressure and other breakdowns.
➤
Switch off the outdoor unit’s power supply
➤
Shutting off via the manifold valve handle Hi, the handle Lo will open
up and operate the vacuum pump that will run a vacuum suction for
approximately 60 minutes.
➤
Upon a full shut off via the manifold valve handle Lo, the vacuum pump
will stop operating.
➤
Check to ensure that there is no gas leakage.
➤
After removing the charging hose A, rotate the service valve spindles
(2 units on both sides) in an anti-clockwise direction to fully open up.
➤
Reinstall the cap nuts to their original positions and tighten them to their
specifi ed torque values.
➤
Disconnect the charge hose from the service valve.
➤
Tighten the valve cap of valve core.
[Torque 12.3 - 15.7 N·m (125 - 160 kgf·cm)]
➤
Attach the valve cap to the spindles of each large and small dia. pipe
side service valves.
➤
Tighten the valve cap of the spindle.
[Torque 19.6 - 24.5 N·m (200 - 250 kgf·cm)]
Gas leakage inspection
Please use gas leakage detector to check if leakage occurs
at connection of fl are nut as shown on the right.
If gas leakage occurs, further tighten the connection to stop leakage. (Use the detector provided
for R410A)
!
!
!
!
INS RAM-90NP5B 2INS RAM-90NP5B 2 2/27/15 9:22 AM2/27/15 9:22 AM
 Loading...