

Page 1
– 1 –
ENGLISHDEUTSCHFRANÇAISITALIANOESPAÑOL
PORTUGUÊS
Eλληνικά РУССКИЙ
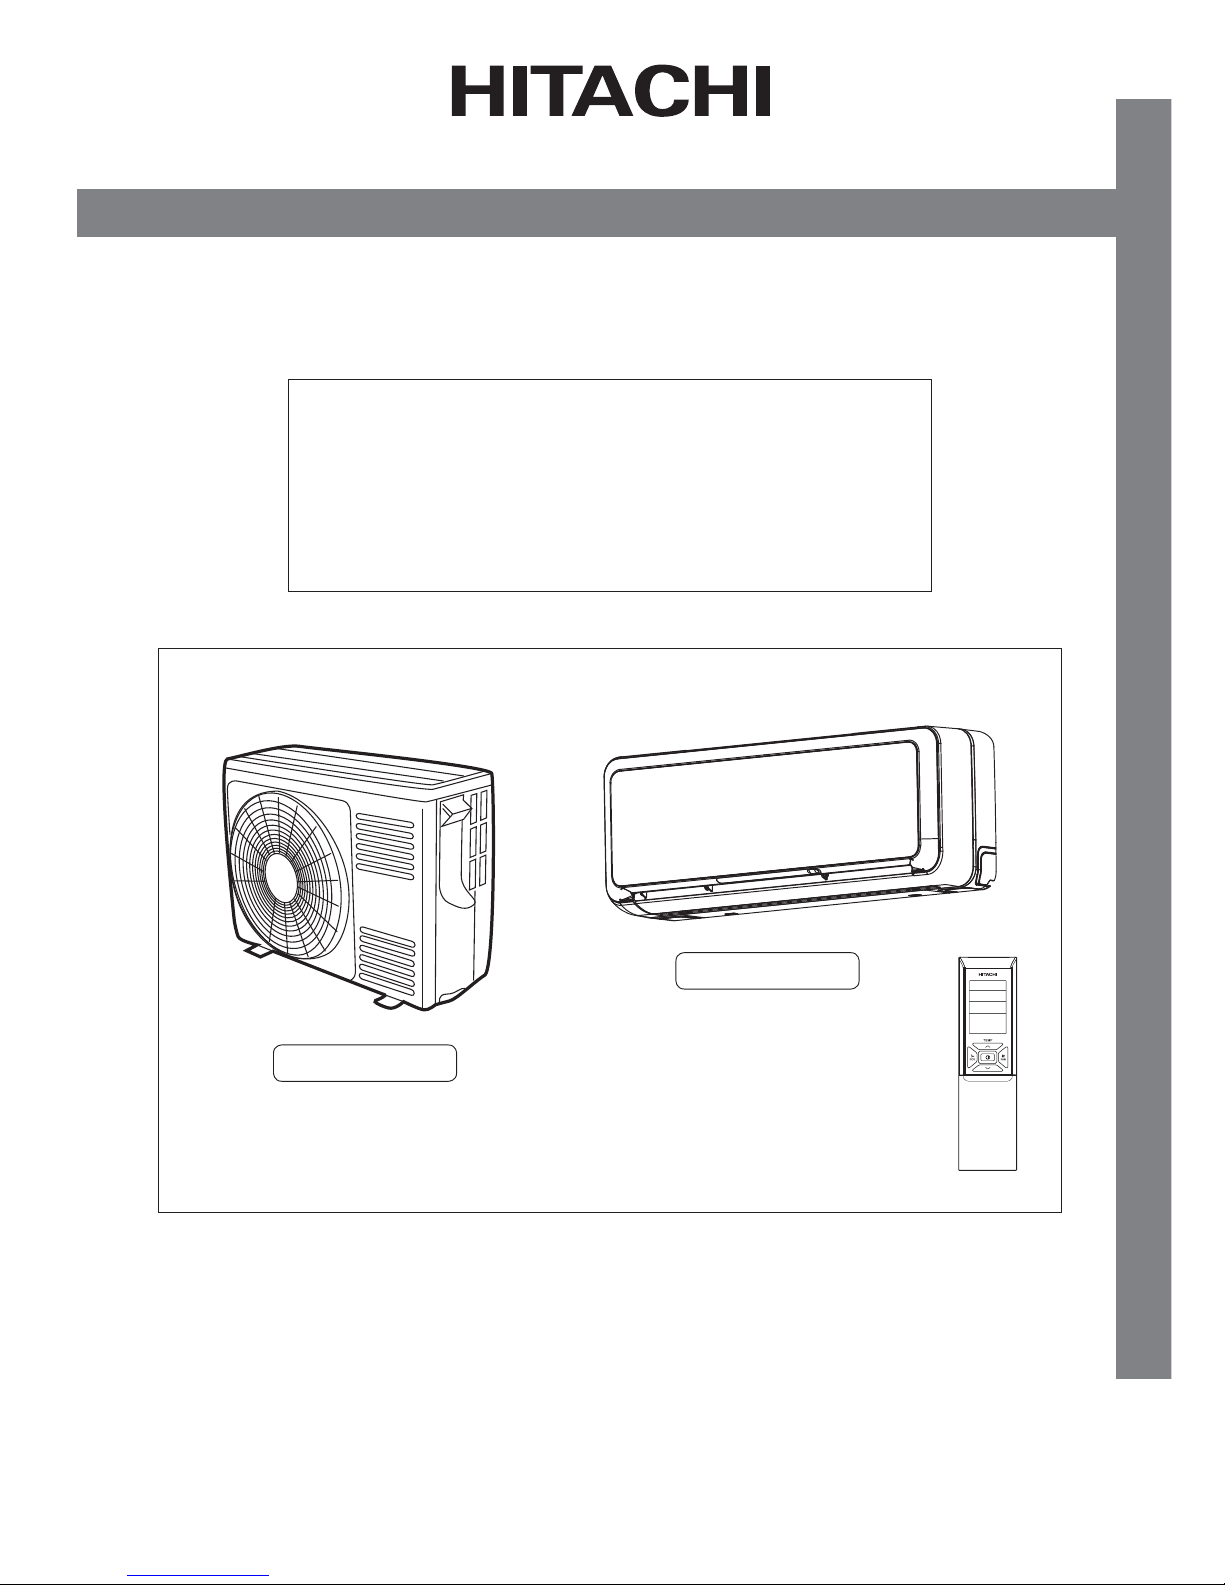
SPLIT TYPE AIR CONDITIONER
INDOOR UNIT / OUTDOOR UNIT
MODEL
RAK-50PXA / RAC-50WXA
OUTDOOR UNIT INDOOR UNIT
RAC-50WXA
RAK-50PXA
Page 2
– 2 –
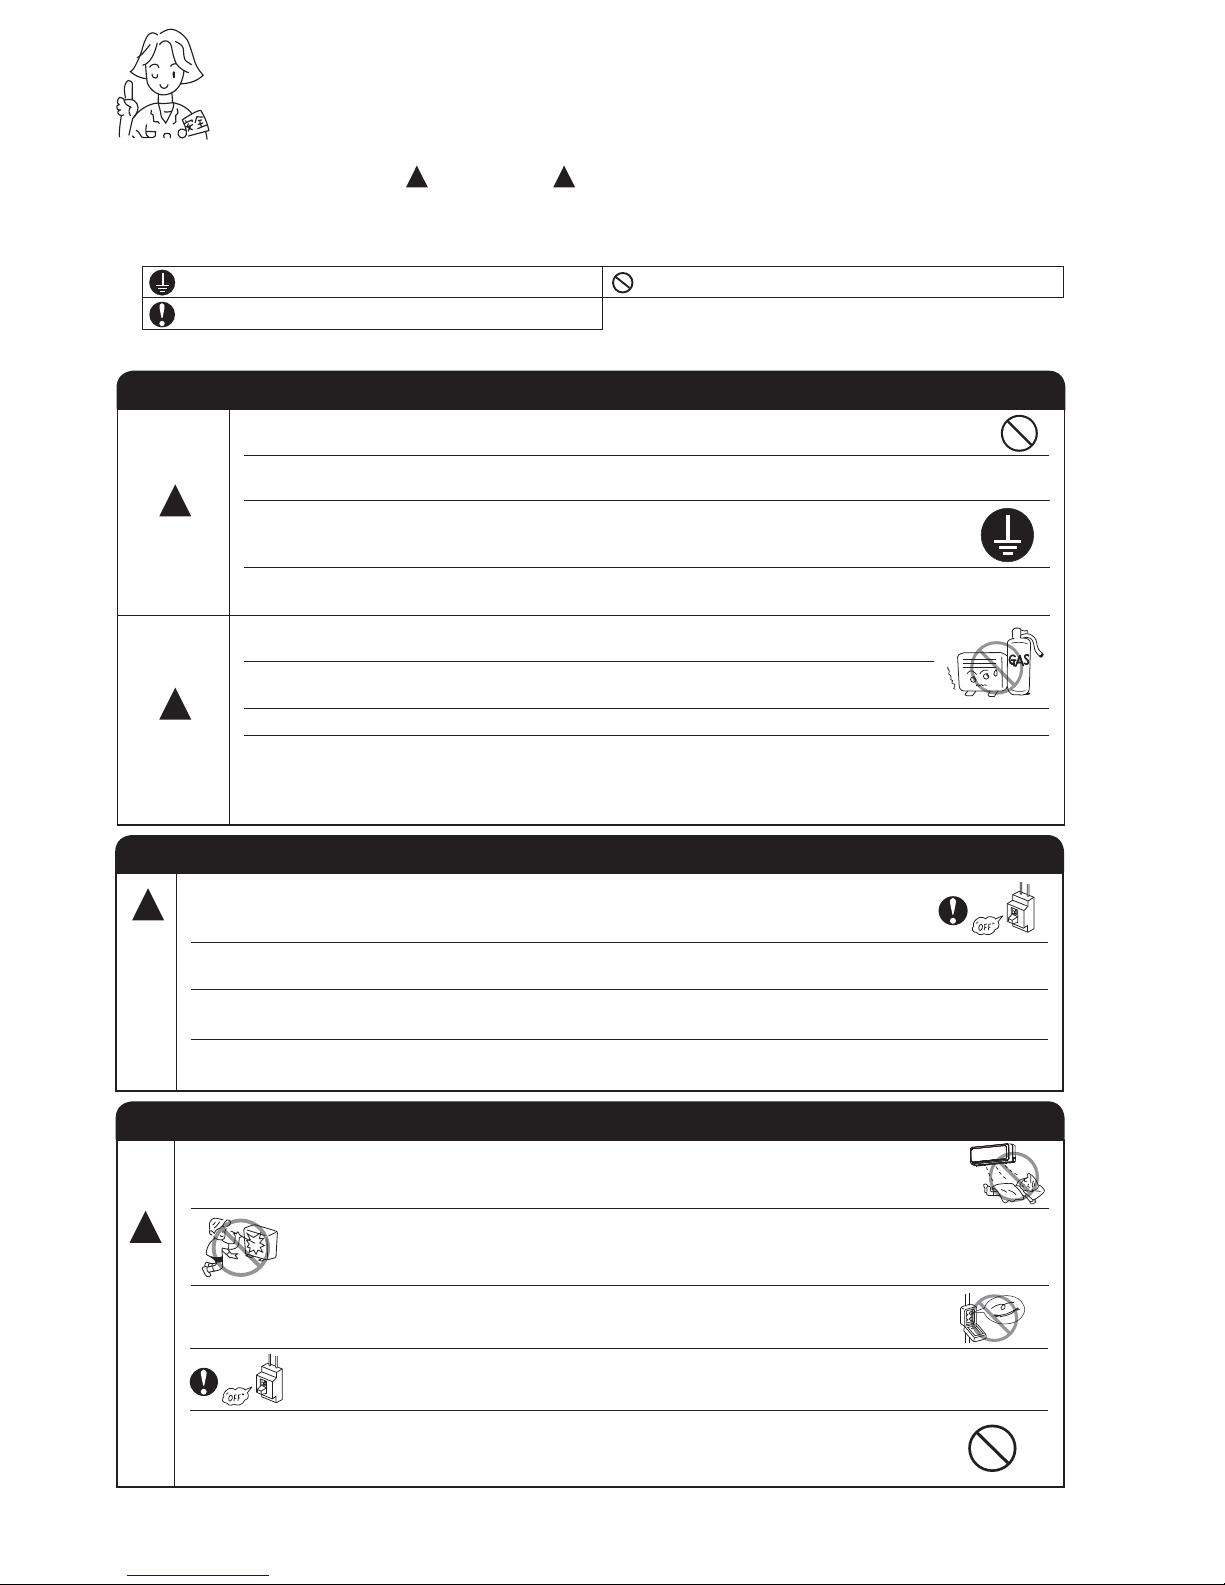
SAFETY PRECAUTION
O Please read the “Safety Precaution” carefully before operating the unit to ensure correct usage of the unit.
O Pay special attention to signs of “
!
Warning” and “!Caution”. The “Warning” section contains matters which, if not
observed strictly, may cause death or serious injury. The “Caution” section contains matters which may result in serious
consequences if not observed properly. Please observe all instructions strictly to ensure safety.
O The sign indicate the following meaning
O Please keep this manual after reading.
PRECAUTIONS DURING OPERATION
O Avoid an extended period of direct air ow for your health.
W
A
R
N
I
N
G
!
O Do not insert a nger, a rod or other objects into the air outlet or inlet. As the fan is rotating
at a high speed, it will cause injury. Before cleaning, be sure to stop the operation and turn
the breaker OFF.
O Do not use any conductor as fuse wire, this could cause fatal accident.
PRECAUTIONS DURING SHIFTING OR MAINTENANCE
O Should abnormal situation arises (like burning smell), please stop operating the unit and turn
off the circuit breaker. Contact your agent. Fault, short circuit or re may occur if you continue
to operate the unit under abnormal situation.
OPlease contact your agent for maintenance. Improper self maintenance may cause electric
shock and re.
OPlease contact your agent if you need to remove and reinstall the unit. Electric shock or re
may occur if you remove and reinstall the unit yourself improperly.
OIf the supply cord is damaged, it must be replaced by the special cord obtainable at
authorized service/parts centers.
W
A
R
N
I
N
G
!
O
During thunder storm, disconnect and turn off the circuit breaker.
WARNING
PRECAUTIONS DURING INSTALLATION
O Do not reconstruct the unit.
Water leakage, fault, short circuit or re may occur if you reconstruct the unit by yourself.
O Please ask your sales agent or quali ed technician for the installation of your unit. Water
leakage, short circuit or re may occur if you install the unit by yourself.
O Please use earth line.
Do not place the earth line near water or gas pipes, lightning-conductor, or the earth
line of telephone. Improper installation of earth line may cause electric shock.
O Be sure to use the speci ed piping set for R410A. Otherwise, this may result in broken
copper pipes or faults.
O A circuit breaker should be installed depending on the mounting site of the unit. Without
a circuit breaker, the danger of electric shock exists.
O Do not install near location where there is ammable gas. The outdoor unit may catch
re if ammable gas leaks around it.
O Please ensure smooth ow of water when installing the drain hose.
O Do not install the indoor unit in a machine shop or kitchen where vapor from oil or its
mist ows to the indoor unit. The oil will deposit on the heat exchanger, thereby reducing
the indoor unit performance and may deform and in the worst case, break the plastic
parts of the indoor unit.
CAUTION
!
!
O
Spray cans and other combustibles should not be located within a meter of the air outlets
of both indoor and outdoor units.
As a spray can’s internal pressure can be increased by hot air, a rupture may result.
Make sure to connect earth line. The sign in the gure indicates prohibition.
Indicates the instructions that must be followed.
Page 3
– 3 –
ENGLISH
PRECAUTIONS DURING OPERATION
O Do not attempt to operate the unit with wet hands, this could cause fatal
accident.
O When operating the unit with burning equipments, regularly ventilate the
room to avoid oxygen insuf ciency.
O Do not direct the cool air coming out from the air-conditioner panel to face
household heating apparatus as this may affect the working of apparatus
such as the electric kettle, oven etc.
O Do not use any aerosol or hair sprays near the indoor unit. This chemical
can adhere on heat exchanger n and blocked the evaporation water ow
to drain pan. The water will drop on tangential fan and cause water splashing
out from indoor unit.
O Please ensure that outdoor mounting frame is always stable, rm and
without defect. If not, the outdoor unit may collapse and cause danger.
O Do not splash or direct water to the body of the unit when cleaning it as
this may cause short circuit.
O When operating the unit with the door and windows opened, (the room humidity is always above
80%) and with the air de ector facing down or moving automatically for a long period of time,
water will condense on the air de ector and drips down occasionally. This will wet your furniture.
Therefore, do not operate under such condition for a long time.
O If the amount of heat in the room is above the cooling or heating capability of the unit (for
example: more people entering the room, using heating equipments and etc.), the preset room
temperature cannot be achieved.
O
This appliance is not intended for use by young children or in rm persons unless they have been
adequately supervised by a responsible person to ensure that they can use the appliance safely.
O Young children should be supervised to ensure that they do not play with the appliance.
O Do not climb on the outdoor unit or put objects on it.
O Please switch off the unit and turn off the circuit breaker during cleaning,
the high-speed fan inside the unit may cause danger.
O Turn off the circuit breaker if the unit is not to be operated for a long period.
C
A
U
T
I
O
N
O The product shall be operated under the manufacturer speci cation and
not for any other intended use.
O Do not put water container (like vase) on the indoor unit to avoid water
dripping into the unit. Dripping water will damage the insulator inside the
unit and causes short-circuit.
O Do not place plants directly under the air ow as it is bad for the plants.
!
Page 4
– 4 –
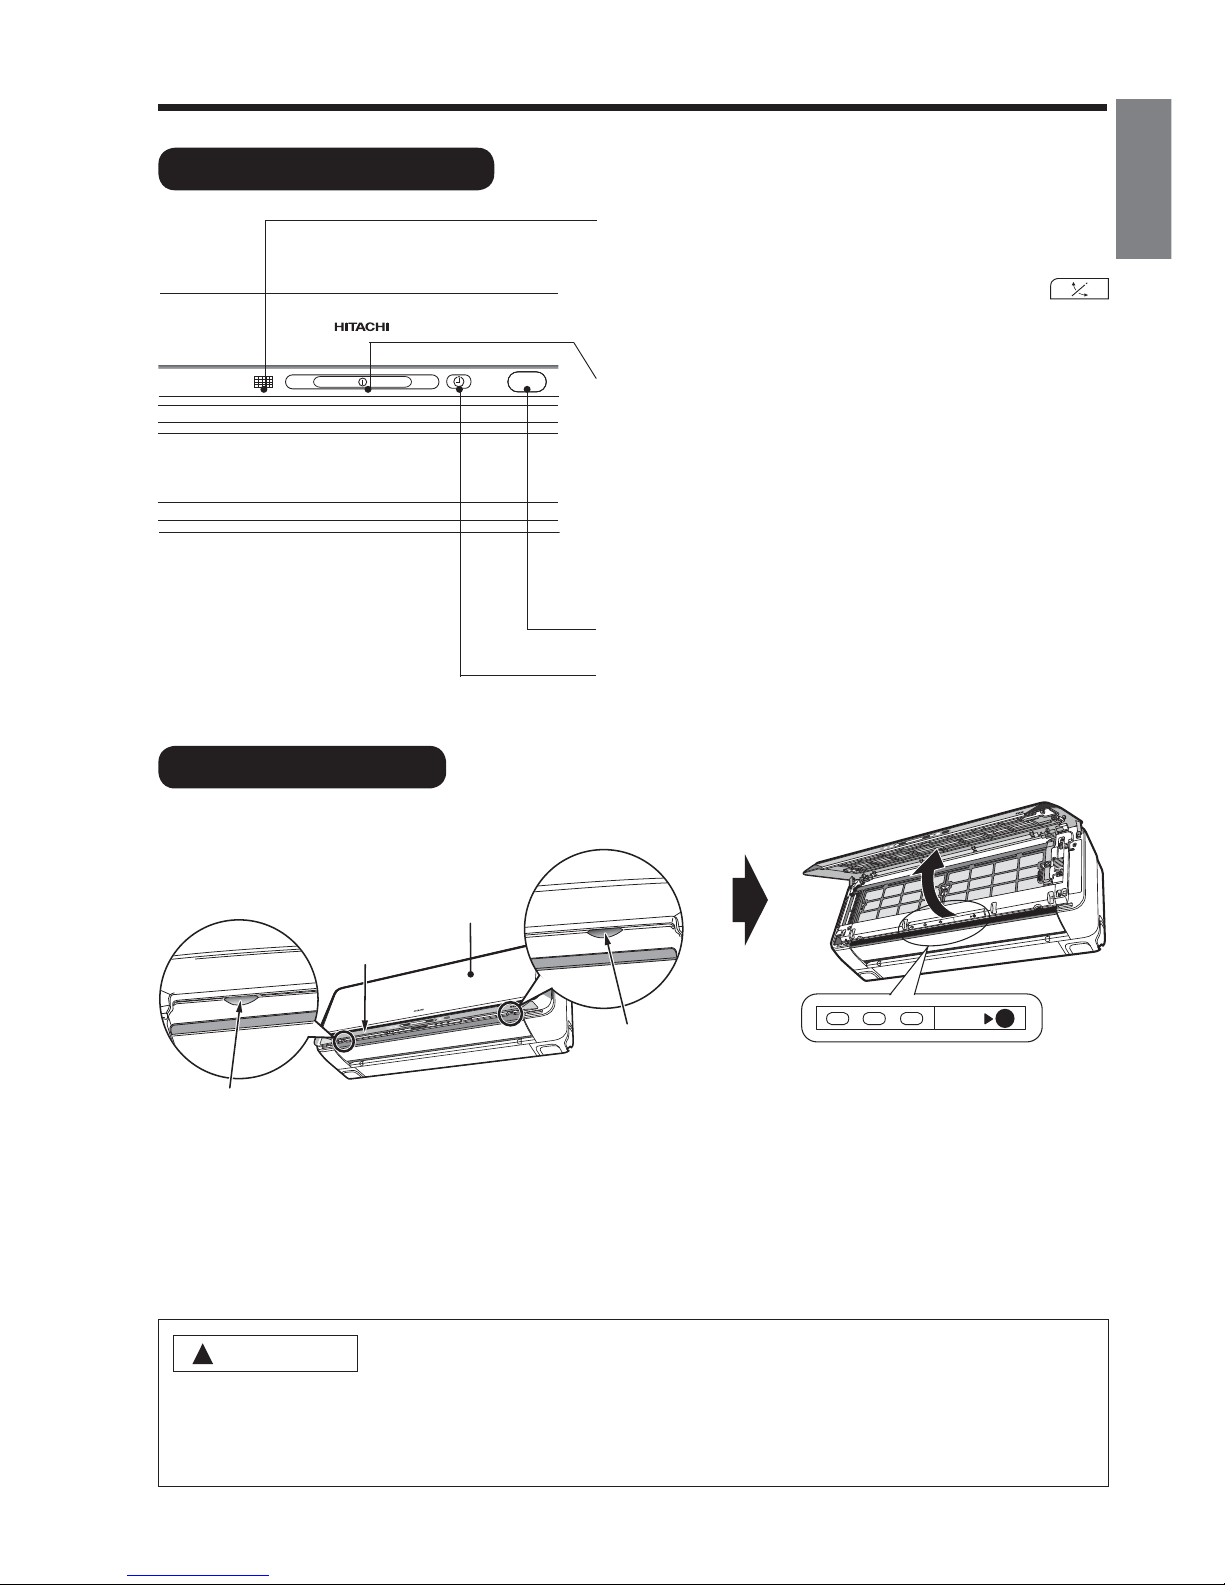
INDOOR UNIT
NAMES AND FUNCTIONS OF EACH PART
Electrical Dust Collector
Negative ions are generated to capture all air-borne
dirt and dust particle.
AIR PURIFYING FILTER
Pre- lter
To prevent dust from coming into the indoor unit.
FRONT PANEL
MOVEABLE PANEL
It will be open when the air conditioner is operate
and close when the air conditioner is not in operation.
(Occasionally it may not be open during the operating
mode)
HORIZONTAL DEFLECTOR
O
VERTICAL
DEFLECTOR (AIR OUTLET)
Indoor unit indicators
Light indicator showing the operating condition.
WIDTH (mm)
795
MODEL
HEIGHT (mm)
295
DEPTH (mm)
198
MODEL NAME AND DIMENSIONS
Q Moveable Panel
O It will open up automatically when the air conditioner is in operation to allow a large quantity of air
owing through as a sort of heat exchange; and it will close up automatically when the air conditioner
stopped operating. Avoid physical adjustments as it may damage the panels’ mechanisms.
O Please do not touch the moving panels during operations as they may pinch your ngers.
RAK-50PXA
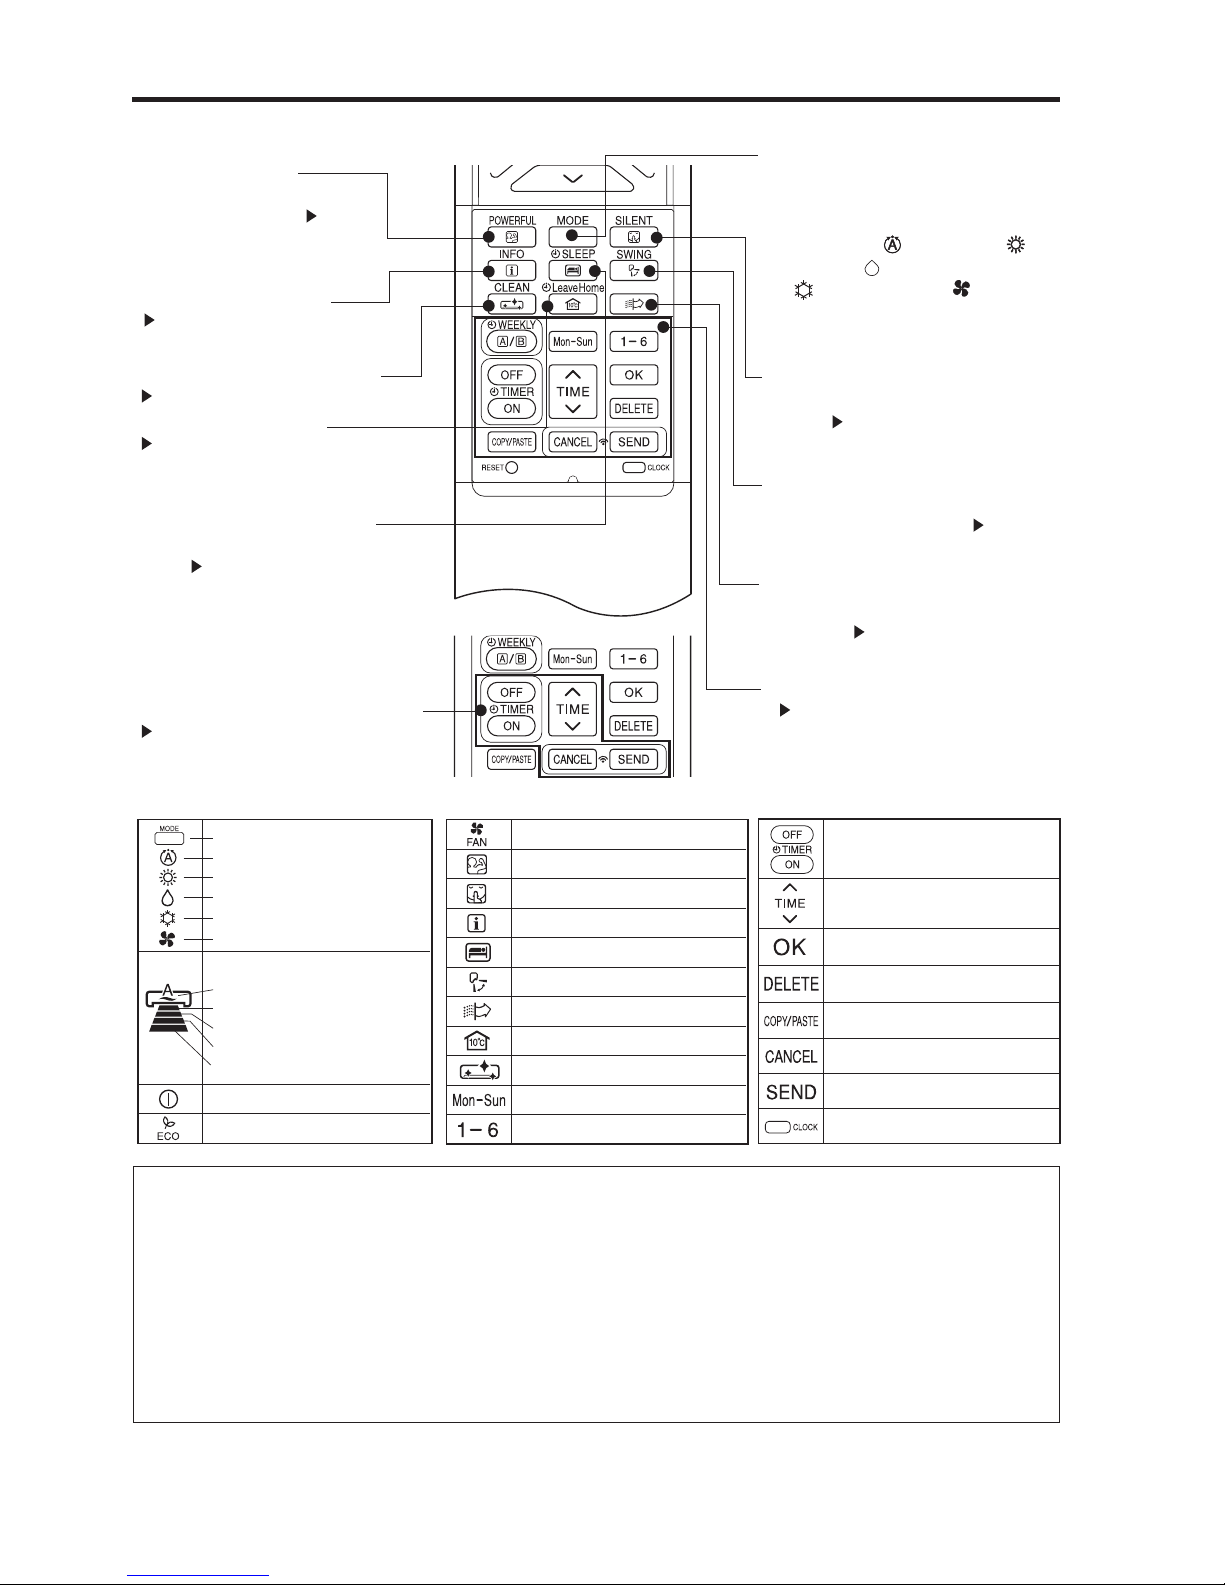
REMOTE CONTROLLER
Send out operation signal to the indoor unit. So as to
operate the whole unit.
(Refer Remote control manual)
RAC-50WXA 792 600 299
OUTDOOR UNIT
Drain pipe
Condensed water drain to outside.
Connecting cord and insulation pipe for piping
Air inlet (Back, Right and Left side)
Air outlet
O Air purifying and deodorizing lters are not washable and reusable up to 20 times by using vacuum cleaner or water
rinse under running tap water. Type number for this air cleansing lter is <SPX-CFH22>. Please use this number
for ordering when you want to renew it.
O Air purifying lter should be cleaned every month or sooner if noticeable loading occurs. When used overtime,
it may loose its deodorizing function. For maximum performance, it is recommended to replace it every 1 year
depending on application requirements.
NOTE
Page 5
– 5 –
ENGLISH
INDOOR UNIT INDICATORS
FILTER LAMP
When the device is operated for a total of about 200
hours, the FILTER lamp lights to indicate that it is time
to clean the lter. The lamp goes out when the “
(AUTO SWING)” button is pressed while the device is on
“STANDBY MODE”.
OPERATION LAMP
This lamp lights during operation.
The OPERATION LAMP ashes in the following cases
during heating.
(1) During preheating
For about 2–3 minutes after starting up.
(2) During defrosting
Defrosting will be performed about once every one
hour when frost forms on the heat exchanger of the
outdoor unit, for 5–10 minutes each time.
SIGNAL RECEIVING PORT
TIMER LAMP
This lamp lights when the timer is working.
OPERATION INDICATOR
TEMPORARY SWITCH
Use this switch to start and stop when the remote controller does not work.
O By pressing the temporary switch, the operation is done in previously set operation mode.
O When the operation is done using the temporary switch after the power source is turned off and turn on
again, the operation is done in automatic mode.
TEMPORARY
SWIT
TEMPORARY
SWIT
Front panel
Moveable panel
Hand grip point
O Lift the front panel
Hand grip point
O Do not hold the moveable panel when
the front panel is in either opened/
closed position.
1. Opening up the front panel
O Never try to force open/close the moveable panel manually.
Manually opening or closing the moveable panel may cause breakdowns (The moveable panel will
automatically close or open when the power supply is switched on or switched off and whenever the
unit is in operations or has stopped operating.
!
CAUTION
Page 6
– 6 –
Minimum Maximum Minimum Maximum
Indoor Dry bulb °C 21 32 20 27
Wet bulb °C 15 23 12 19
Outdoor Dry bulb °C 21 43 2 21
Wet bulb °C 15 26 1 15
Cooling Heating
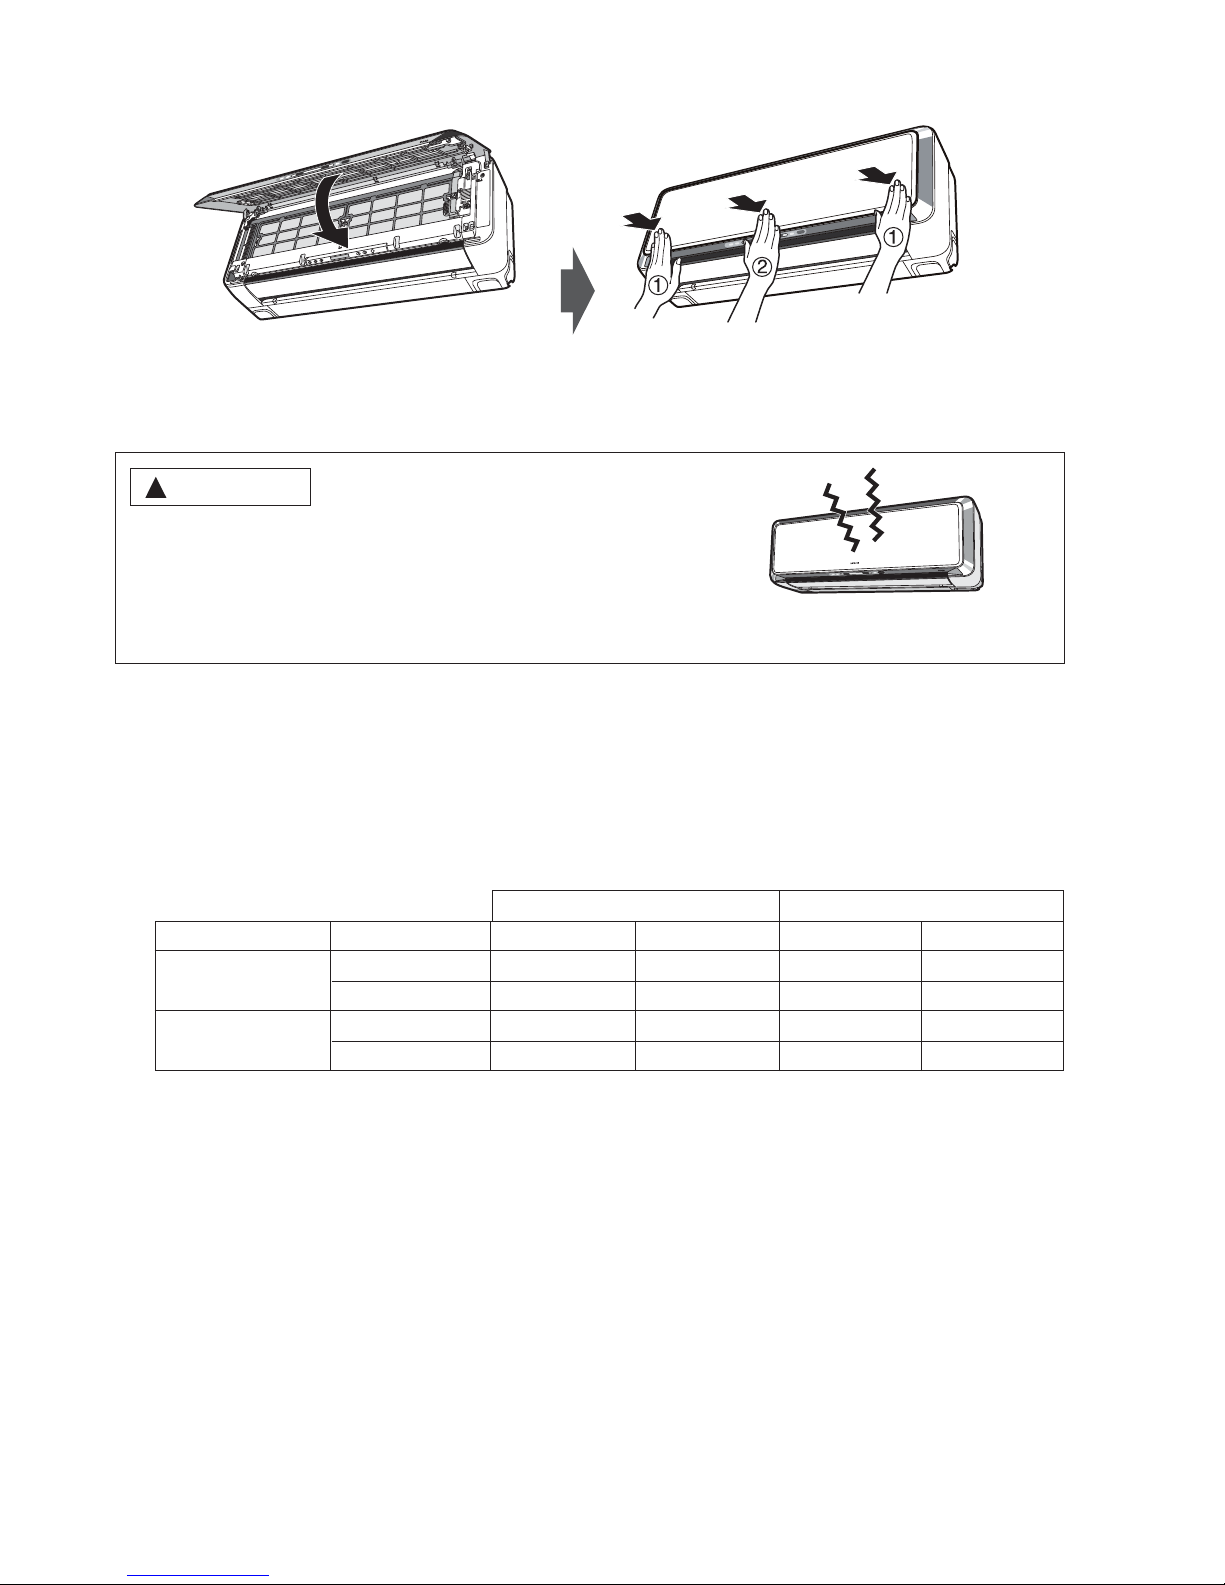
O Pull toward the down direction.
2. Closing the Front Panel
O When front panel is shaky, there is a possibility panel coming off
and falling down.
O Do not apply extra force on the front panel when it is opened up in
the upright position.
Also frequent removal of the front panel from the front cover may
cause damage.
CAUTION
!
O Initially press the left and the right sides of the front
panel and nally press the central portion until you
hear a clicking sound.
Note
O The recommended temperature range for safety testing should be as below:
Page 7
– 7 –
ENGLISH
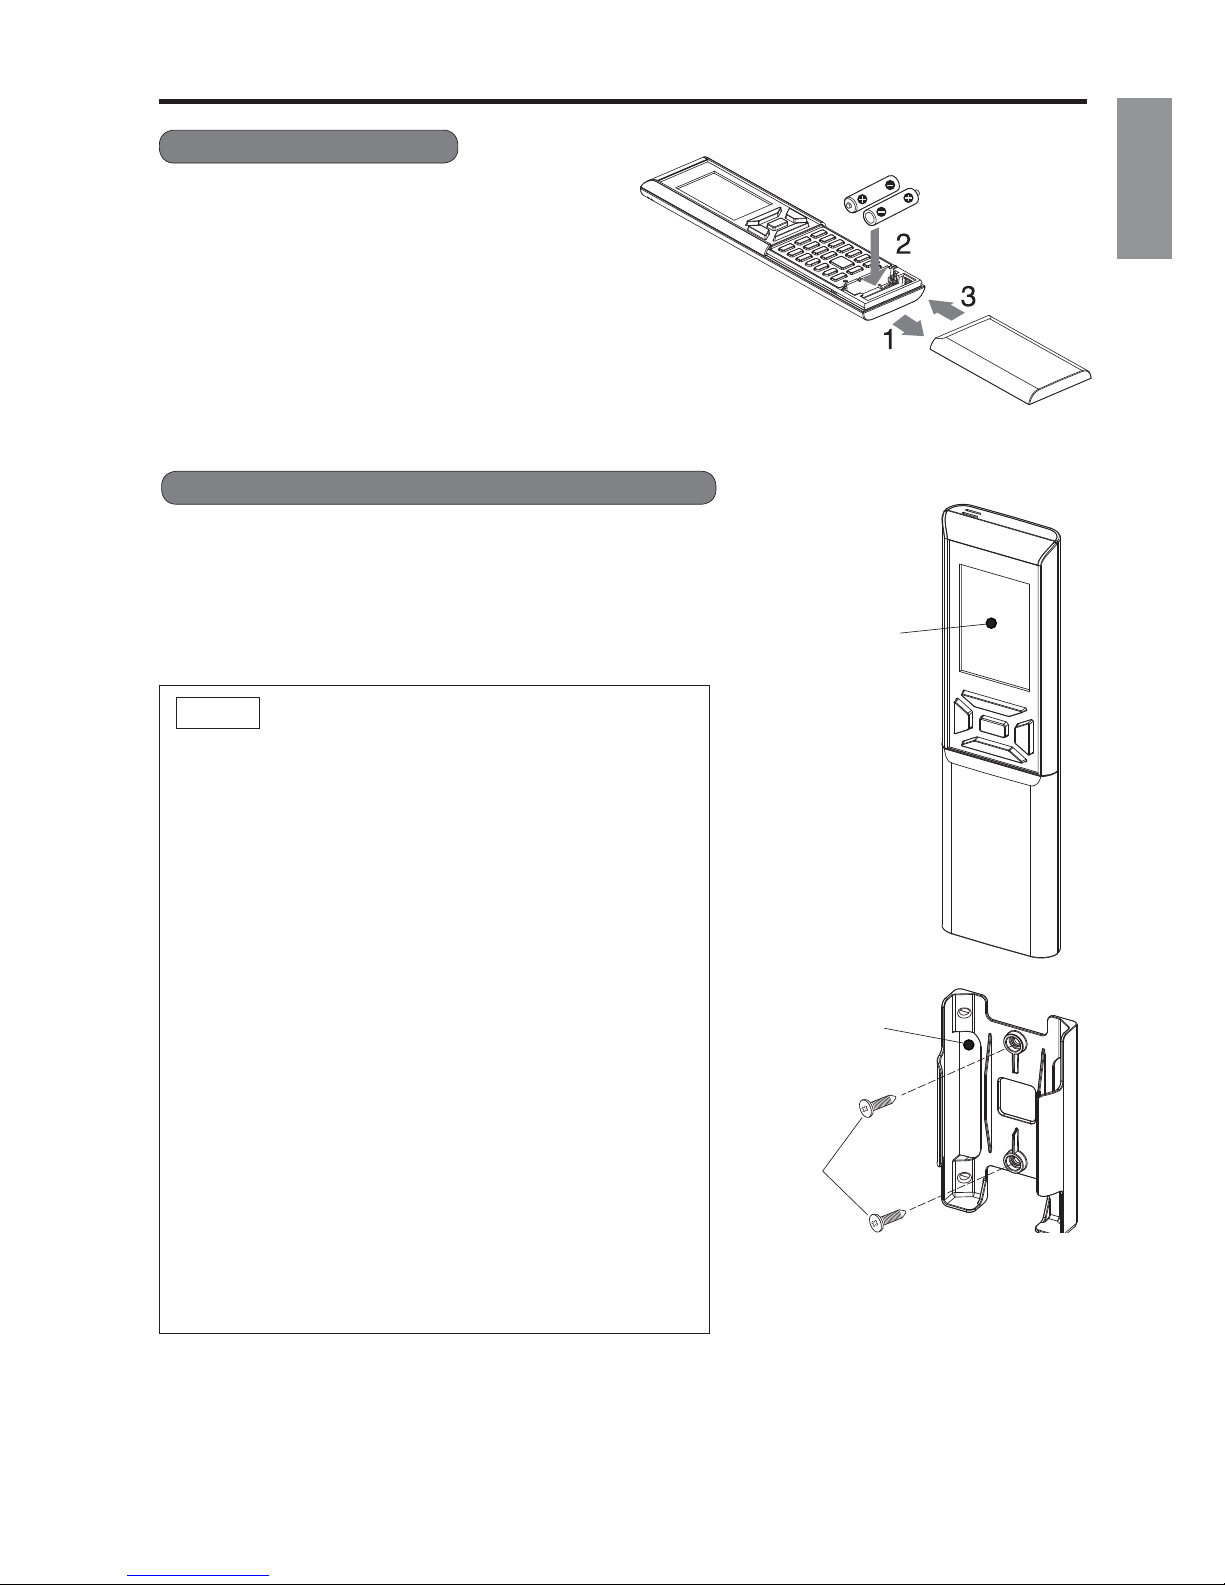
PREPARATION BEFORE OPERATION
Ƶ To install the batteries
Ƶ To fix the remote controller holder to the wall
1. Slide the cover to take it off.
2. Install two dry batteries AAA.LR03 (alkaline).
The direction of the batteries should match the
marks in the case.
3. Replace the cover at its original position.
1. Choose a place from where the signals can reach the unit.
2. Fix the remote controller holder to a wall, a pillar or similar
location with the provided screws.
3. Place the remote controller in the remote controller holder.
NOTE
Notes on batteries
ƽ When replacing the batteries, use batteries of the same
type, and replace both old batteries together.
ƽ When the system is not used for a long time, take the
batteries out.
ƽThe batteries will last for approximately 1 year. However, if
the remote controller display begins to fade and degradation
of reception performance occurs within a year, replace both
batteries with new size AAA.LR03 (alkaline).
ƽThe attached batteries are provided for the initial use of
the system.
The usable period of the batteries may be short depending
on the manufactured date of the air conditioner.
Notes on the remote controller
ƽNever expose the remote controller to direct sunlight.
ƽDust on the signal transmitter or receiver will reduce the
sensitivity. Wipe off dust with soft cloth.
ƽSignal communication may be disabled if an electronic-
starter-type uorescent lamp (such as inverter-type lamps)
is in the room. Consult the shop if that is the case.
ƽ If the remote controller signals happen to operate another
appliance, move that appliance to somewhere else, or
consult the service shop.
ƽ When the remote controller is not in use, please close the
slide cover to prevent failure.
Remote controller
Screws
Remote controller holder
Page 8

– 8 –
PREPARATION BEFORE OPERATION
Ƶ To set calendar and clock
1. Press (RESET) button when first time setting.
"Year" blinks.
2. Press
(TIME) button to set the current year.
3. Press
(CLOCK) button. "Day" and "Month"
blink.
4. Press
(TIME) button to set the current day and
month.
5. Press
(CLOCK) button. "CLOCK" blinks.
6. Press
(TIME) button to set the clock to the current
time.
7. Press
(CLOCK) button.
Calendar and clock are set.
To modify the calendar and clock, press
(CLOCK)
button.
Then follow steps 1 to 7.
Calendar and clock need to be set again after
After changing the batteries,
1. Press
(RESET) button.
2. Direct remote controller towards indoor unit and
3. The calendar and clock from indoor unit will be transmitted.
Ƶ Calendar and clock will not be transmitted from indoor
unit when the following occurs:
ƽ When there is a power failure.
ƽ When breaker is OFF by user (unit is not in STANDBY
MODE).
NOTE
Note on setting the calendar and clock.
ƽ If the calendar and clock are not set, the ON-timer, OFF-timer and Weekly Timer cannot be set.
ƽ If the calendar and clock are not set correctly, the ON-timer, OFF-timer and Weekly Timer will not
operate correctly.
ƽ When the ON-timer, OFF-timer and Weekly Timer are set, the calendar and clock cannot be changed. If
changing batteries.
press (INFO) button.
there is a need to change the calendar and clock, ON-timer, OFF-timer and Weekly Timer need to be
cancelled.
AIR PURIFYS
Page 9
– 9 –
ENGLISH
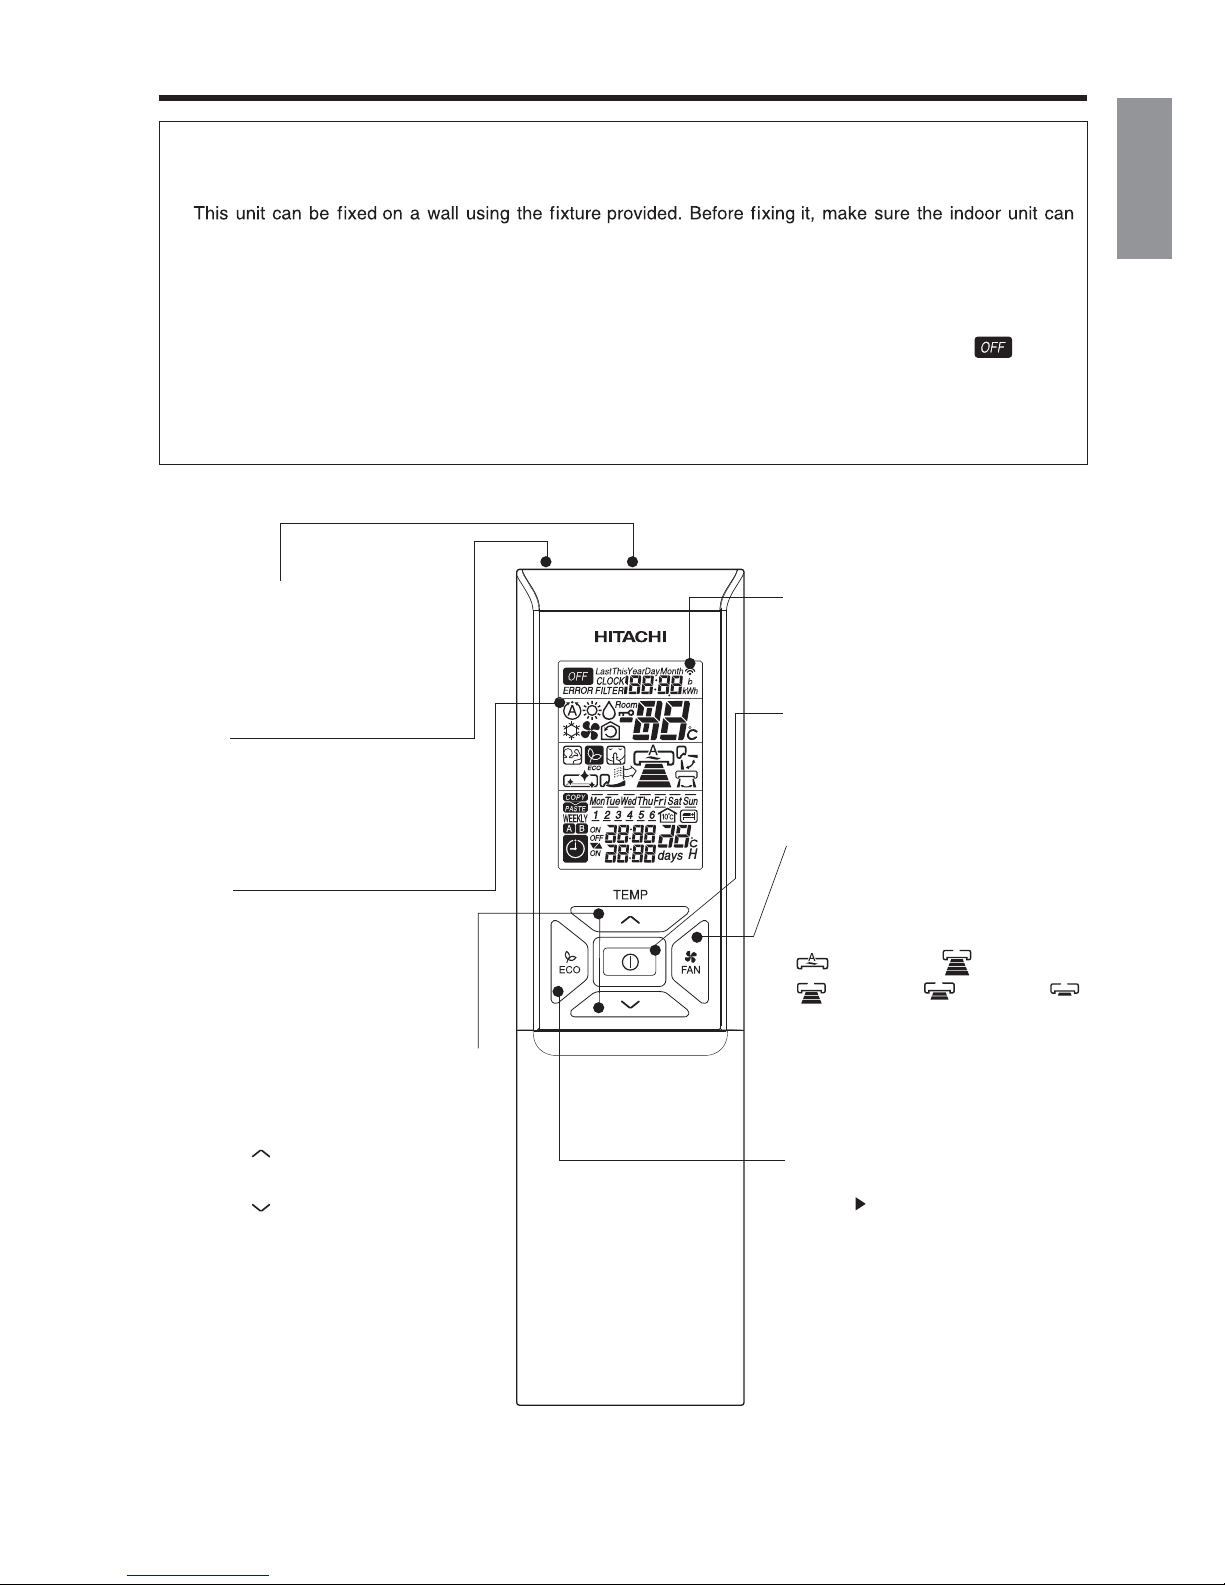
REMOTE CONTROLLER
ƽ This controls the operation of the indoor unit. The range of control is about 7 meters. If indoor lighting is
controlled electronically, the range of control may be shorter.
be controlled from the remote controller.
ƽ Handle the remote controller with care. Dropping it or getting it wet may compromise its signal transmission
capability.
ƽ After new batteries are inserted into the remote controller, the unit will initially require approximately 10
seconds to respond to commands and operate.
ƽ When remote controller is not in use for about 3 minutes during OFF condition, indicated by on the
display, the LCD will turn off.
ƽ During clock setting, the LCD will turn off about 10 minutes later if the remote controller is not in use.
ƽ When pressing any button, the LCD will turn on.
ƽ The LCD will not turn off during TIMER setting.
Signal Transmitting/Receiving
Window
Point this window towards the
indoor unit when controlling it.
Sensor
A temperature sensor inside the
remote controller senses ambient
temperature around the remotecontroller.
Display
This indicates the room temperature
selected, current time, timer status,
function and airflow rate selected.
ROOM TEMPERATURE setting Buttons
Press these buttons to set the room
temperature.
Press the [
] button to raise the room
temperature.
Press the [
] button to lower the room
temperature.
Keep pressing and the value will change
more quickly.
ECO Button
Use this button to set the ECO
START/STOP button
Press this button to start
operation. Press it again to stop
operation.
FAN SPEED selector Button
This determines the fan speed.
Every time you press this button,
the ange
from
(AUTO) (HIG H)
(MED) (LOW)
(SILENT) (This button allows
optimal or preferred
fan speed for each operation mode).
Transmission sign
The transmission sign lights up
䇆
䇆
䇆
䇆
NAMES AND FUNCTIONS OF REMOTE
when a signal is sent.
airflow rate will ch
selection of
CONTROLLER
ler
mode.( p.19 )
Page 10
– 10 –
MODE SELECTOR
AUTO
HEAT
DEHUMIDIFY
COOL
FAN
FAN SPEED
AUTO
SILENT
LOW
MED
HI
START / STOP
ECO
Precautions for Use
ƽ
Do not put the remote controller in the following places.
ƽ
Under direct sunlight.
ƽ
In the vicinity of a heater.
ƽ
Handle the remote controller carefully. Do not drop it on the floor, and protect it from water.
ƽ
Once the outdoor unit stops, it will not restart for about 3 minutes (unless you turn the power switch
off and on or unplug the power cord and plug it in again).
This is to protect the device and does not indicate a failure.
ƽ
If you press the MODE selector button during operation, the device may stop for about 3 minutes for
protection.
POWERFUL Button
Use this button to set the
POWERFUL mode.
INFORMATION Button
ONE TOUCH CLEAN Button
ON / OFF TIMER setting Buttons
MODE selector Button
Use this button to select the
operating mode. Every time you
press this button, the mode will
change from
(AUTO)
(HEAT)
(DEHUMIDIFY)
(COOL) and (FAN)
cyclically.
SILENT Button
Use this button to set the SILENT
mode.
AUTO SWING (Vertical) Button
Controls the angle of the
.rotce lfed ria latnoziroh
AIR PURIFIER Button
WEEKLY TIMER setting Buttons
LEAVE HOME Button
ECO SLEEP TIMER Button
Use this button to set the eco sleep
timer.
FAN
POWERFUL
SILENT
INFO
SLEEP TIMER
AUTO SWING (VERTICAL)
AIR PURIFIER
LEAVE HOME
CLEAN
DAY
PROGRAM NO.
ON / OFF TIMER
TIME
OK
DELETE
COPY / PASTE
CANCEL
SEND
CLOCK
AIR PURIFYS
䇆
䇆
䇆䇆
Use this button to start air purifying
function.
NAMES AND FUNCTIONS OF REMOTE CONTROLLER
( p.17)
( p.31)
( p.21)
( p.20 )
( p.22)
( p.23)
( p.18 )
( p.25)
( p.16)
( p.16)
Page 11

– 11 –
ENGLISH
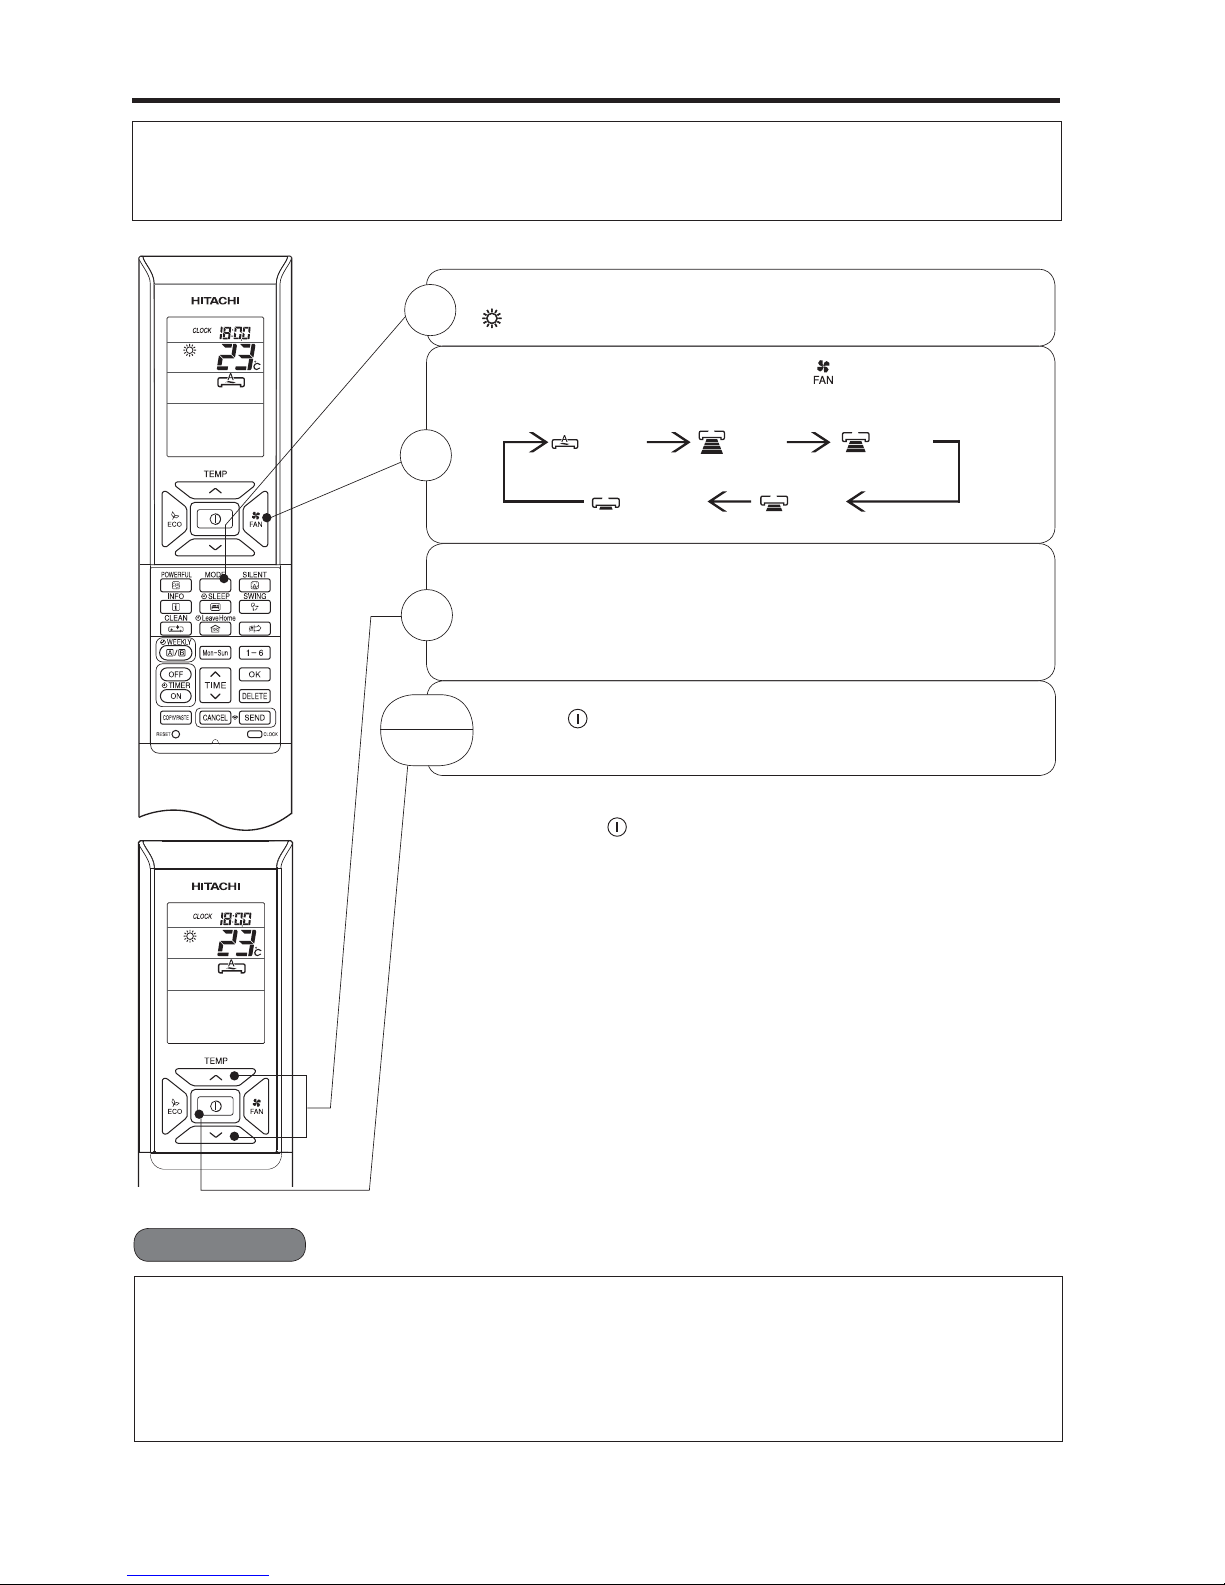
AUTOMATIC OPERATION
The device will automatically determine the mode of operation, HEAT or COOL depending on the current
room temperature. The selected mode of operation will change when the room temperature varies.
However, the mode of operation will not change when indoor unit is connected to multi type outdoor unit.
VARIOUS FUNCTIONS
Ƶ Auto Restart Control
ƽ If there is a power failure, operation will be automatically restarted when the power is resumed with previous operation
mode and airflow direction.
(As the operation is not stopped by remote controller.)
ƽ If you intend not to continue the operation when the power is resumed, switch off the power supply.
When you switch on the circuit breaker, the operation will be automatically restarted with previous operation mode
and air flow direction.
Note: 1. If you do not require Auto Restart Control, please consult your sales agent.
2. Auto Restart Control is not available when
Timer or Sleep Timer mode is set.
Ƶ As the settings are stored in the memory the remote controller, you
(START/STOP) button next time.
Press the MODE selector button so that the display indicates the
(AUTO) mode of operation.
ƽ When AUTO has been selected, the device will automatically
determine the mode of operation, HEAT or COOL depending on
the current room temperature. However the mode of operation will
not change when indoor unit is connected to multi type outdoor
unit.
ƽ If the mode automatically selected by the unit is not satisfactory,
manually change the mode setting (HEAT, DEHUMIDIFY, COOL
or FAN).
Press the (FAN SPEED) button to select AUTO, HI, MED, LOW or
SILENT.
Press the
(START/STOP) button.
Operation starts with a beep.
Press the button again to stop operation.
Set the desired room temperature with the TEMPERATURE buttons
(the display indicates the setting).
The temperature setting and the actual room temperature may vary
depending on conditions.
START
STOP
1
2
3
Set the desired FAN SPEED with the (FAN SPEED) button (the
display indicates the setting).
AIR PURIFYS
only have to press the
(AUTO)
(HIGH)
(MED)
(LOW)
(SILENT)
of
Page 12
– 12 –
HEATING OPERATION
ƽ Use the device for heating when the outdoor temperature is under 21°C.
When it is too warm (over 21°C), the heating function may not work in order to protect the device.
ƽ In order to maintain reliability of the device, please use this device when outdoor temperature is above -15°C.
Press the MODE selector button so that the display indicates
(HEAT).
Set the desired FAN SPEED with the (FAN SPEED) button
(the display indicates the setting).
Set the desired room temperature with the TEMPERATURE buttons
(the display indicates the setting).
The temperature setting and the actual room temperature may
vary depending on conditions.
Press the
(START/STOP) button. Heating operation starts with
a beep. Press the button again to stop operation.
Ƶ As the settings are stored in the memory of the remote controller, you only
have to press the (START/STOP) button next time.
Ƶ During AUTO fan, the fan speed automatically changes as below:
ƽWhen the difference between room temperature and setting temperature
is large, fan starts to run at HI speed.
ƽAfter room temperature reaches the preset temperature, fan speed
will be changed to lower speed to obtain optimum room temperature
condition for natural healthy heating.
START
STOP
Ƶ Defrosting
Defrosting will be performed about once an hour when frost forms on the heat exchange of the outdoor unit,
for 5~10 minutes each time.
During defrosting operation, the operation lamp blinks in a cycle of 3 seconds on and 0.5 second off.
The maximum time for defrosting is 20 minutes.
However, if the indoor unit is connected to multi type outdoor unit, the maximum time for defrosting is 15 minutes.
(If the piping length used is longer than usual, frost is likely to form.)
1
2
3
AIR PURIFYS
(AUTO)
(HIGH)
(MED)
(LOW)
(SILENT)
Page 13
– 13 –
ENGLISH
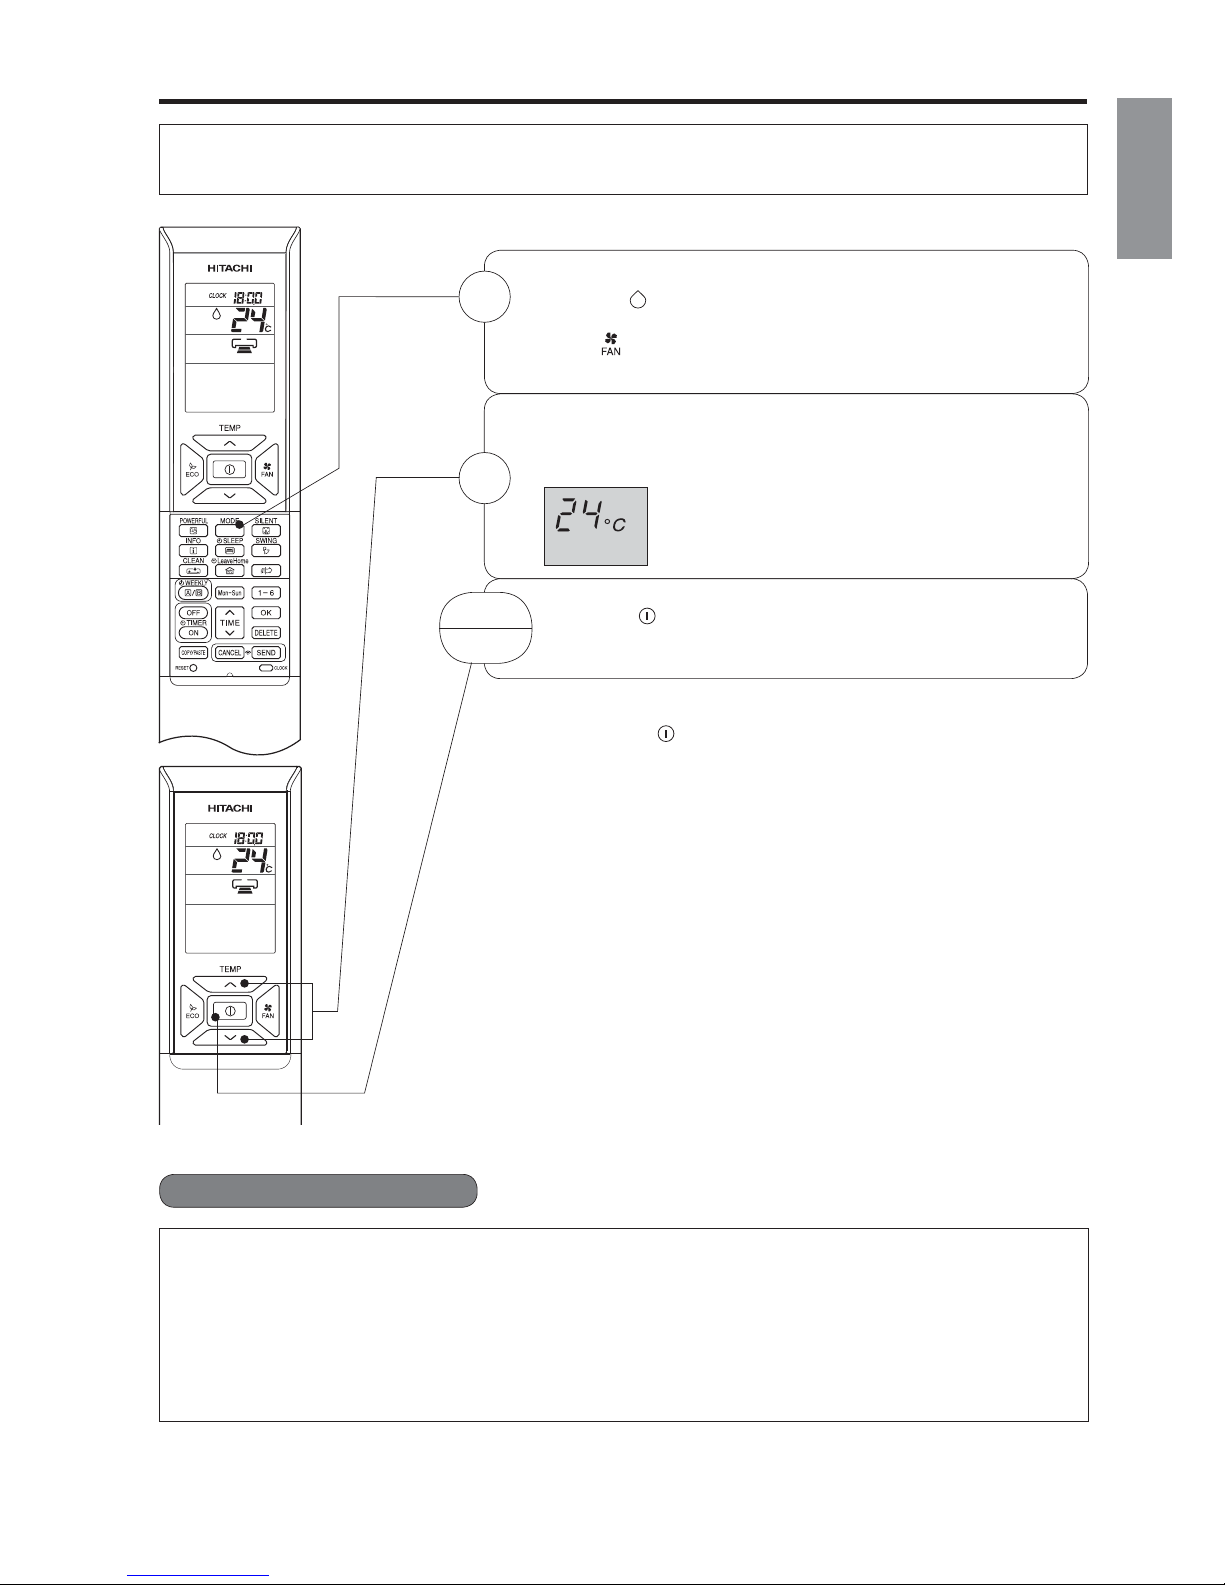
DEHUMIDIFYING OPERATION
Ƶ Dehumidifying Function
ƽ When the room temperature is higher than the temperature setting: The device will dehumidify the
room, reducing the room temperature to the preset level.
When the room temperature is lower than the temperature setting: Dehumidifying will be performed at
the temperature setting slightly lower than the current room temperature, regardless of the temperature
setting.
ƽ The preset room temperature may not be reached depending on the number of people present in the
room or other room conditions.
Set the desired room temperature with the ROOM
TEMPERATURE setting buttons (the display indicates the
setting).
The range of 20-26 C is recommended as the room
temperature for dehumidifying.
Press the (START/STOP) button. Dehumidifying operation
starts with a beep. Press the button again to stop operation.
ƵAs the settings are stored in the memory of the remote controller, you only
have to press the
(START/STOP) button next time.
START
STOP
Press the MODE selector button so that the display
indicates
(DEHUMIDIFY).
The fan speed is set at LOW.
Press
(FAN SPEED) button to select SILENT or LOW fan
speed.
Use the device for dehumidifying when the room temperature is over 16°C.
When it is under 15°C, the dehumidifying function will not work.
1
2
AIR PURIFYS
Ý
Page 14
– 14 –
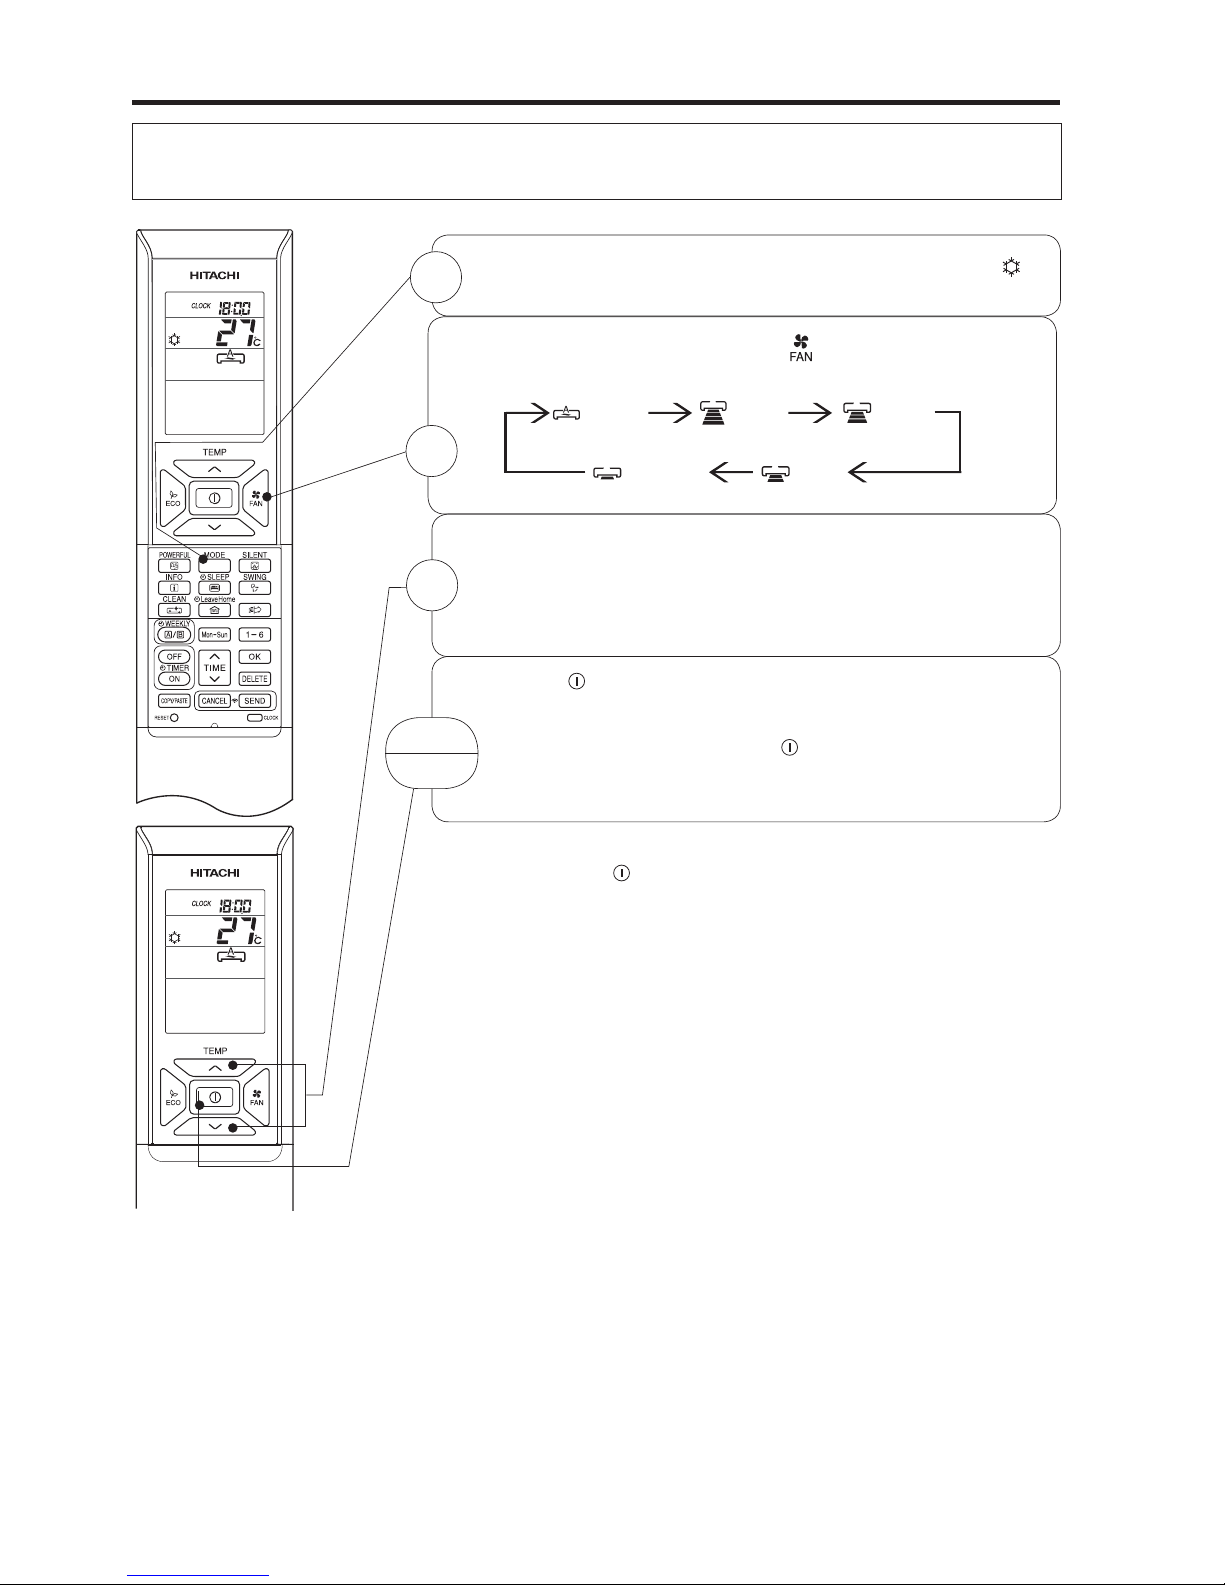
COOLING OPERATION
Use the device for cooling when the outdoor temperature is -10~ 43°C.
If indoors humidity is very high (80%), some dew may form on the air outlet grille of the indoor unit.
Press the MODE selector button so that the display indicates
(COOL).
Set the desired F
AN SPEED with the
(FAN SPEED) button (the
display indicates the setting).
Set the desired room temperature with the TEMPERATURE buttons
(the display indicates the setting).
The temperature setting and the actual room temperature may vary
depending on conditions.
Press the
(START/STOP) button. Cooling operation starts with a
beep. Press the button again to stop operation. The cooling function
does not start if the temperature setting is higher than the current
room temperature (even though the
(OPERATION) lamp lights).
The cooling function will start as soon as user set the temperature
below the current room temperature.
Ƶ
As the settings are stored in the memory of the remote controller, you only
have to press the
(START/STOP) button next time.
Ƶ During AUTO fan, the fan speed automatically changes as below:
ƽ When the difference between room temperature and setting tem-
perature is large, fan starts to run at HI speed.
ƽ After room temperature reaches the preset temperature, fan speed
will be changed to lower speed to obtain optimum room temperature
condition for natural healthy cooling.
START
STOP
1
3
AIR PURIFYS
(AUTO)
(HIGH)
(MED)
(LOW)
(SILENT)
2
Page 15

– 15 –
ENGLISH
FAN OPERATION
User can use the device simply as an air circulator.
START
STOP
1
2
Press the MODE selector so that the display indica set
(FAN).
Press the
(START/STOP) button. Fan operation starts with
a beep. Press the button again to stop operation.
AIR PURIFYS
Set the desired FAN SPEED with the (FAN SPEED) button
(the display indicates the setting).
(HIGH)
(MED)
(LOW)
(SILENT)
Page 16
– 16 –
AIR PURIFYING OPERATION
Negative ions are gener at ed by the plasma electrode in the indoor unit.
Dust, mold and odour particles are captured by negative ions and are caught by the stainless pre-filter.
Press the
“ ” is displayed on the LCD.
Press (AIR PURIFYING) button again.
Press (START/STOP) button. Or
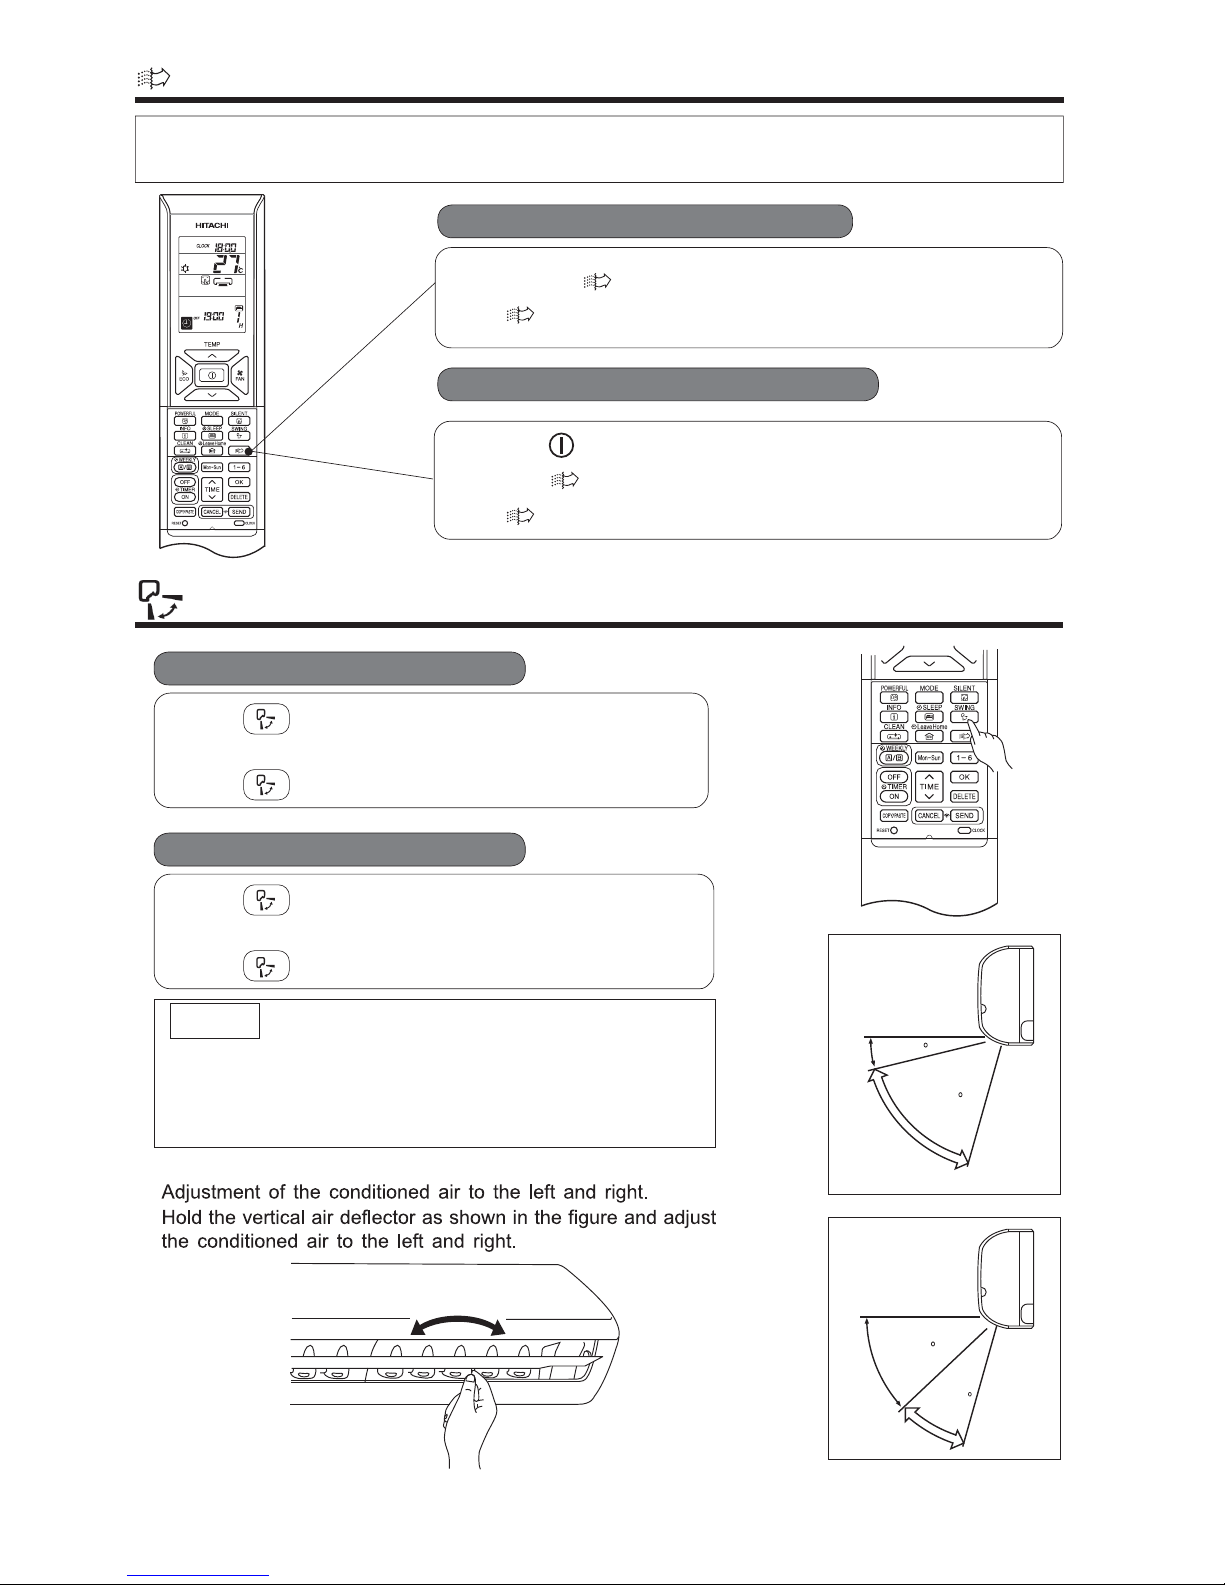
AUTO SWING OPERATION
Vertic al
Vertical
about 15
about 60
about 45
about 30
When cooling,
dehumidifying
When heating
AIR PURIFYS
AIR PURIFYS
(AIR PURIFYING) button during operation.
Ƶ To start AIR PURIFYING operation
“ ” disappears from the LCD.
ƽ
ƽ
ƽ
Ƶ To start Vertical Auto Swing
Ƶ To cancel Vertical Auto Swing
NOTE
ƽ
During cooling and dehumidifying operation, do not keep
the deflectors swinging or in the lower position (in the case
of vertical auto swing) for a long time. It may cause dew
condensation on the deflectors.
Press (AUTO SWING (VERTICAL)) button. The
deflector(s) will start to swing up and down.
is displayed on the LCD.
Press (AUTO SWING (VERTICAL)) button again. The
deflector(s) will stop in the current position.
disappeared from the LCD.
ƽ
ƽ
Ƶ To cancel AIR PURIFYING operation
Page 17
– 17 –
ENGLISH
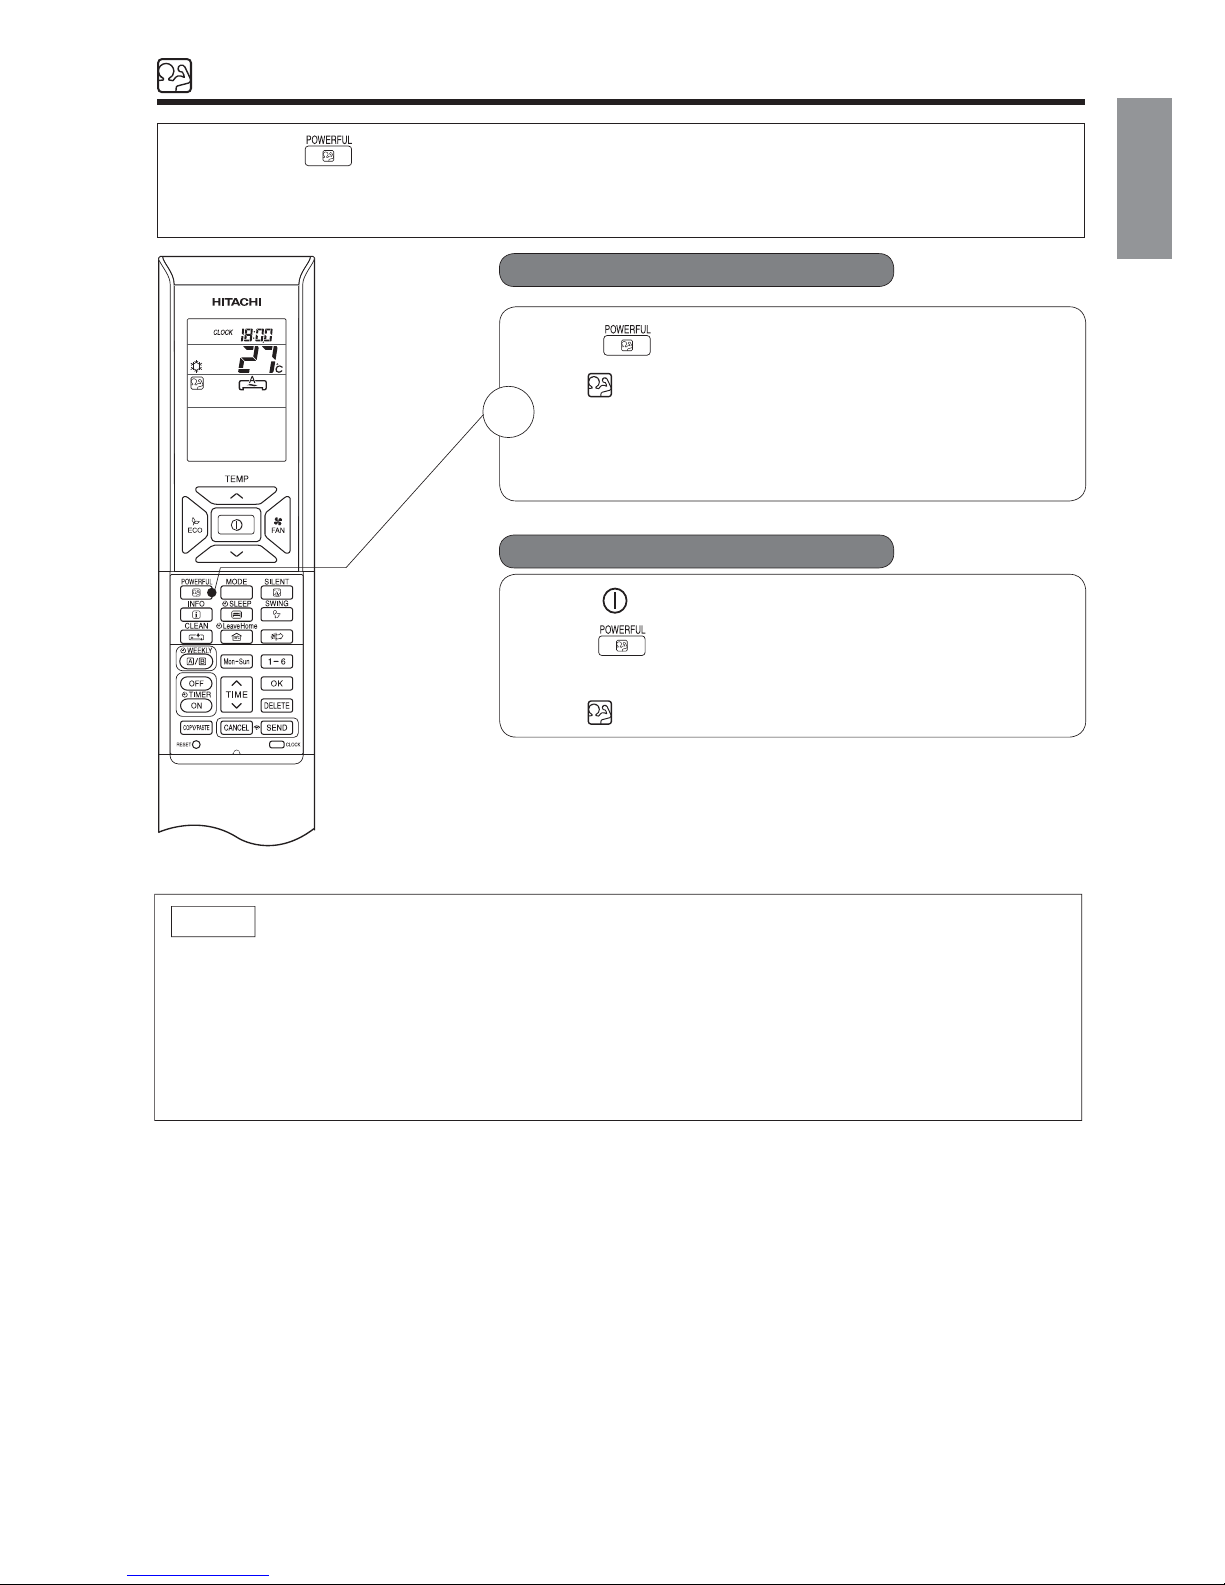
POWERFUL OPERATION
ƽ By pressing (POWERFUL) button during AUTO, HEATING, DEHUMIDIFYING, COOLING or FAN
operation, the air conditioner performs at the maximum power.
ƽ During POWERFUL operation, cooler or warmer air will be blown out from indoor unit for COOLING
or HEATING operation respectively.
Ƶ To start POWERFUL operation
Ƶ To cancel POWERFUL operation
Press (POWERFUL) button during operation.
ƽ
“
” is displayed on the LCD.
POWERFUL operation ends in 20 minutes. Then the system
automatically operates with the previous settings used before
POWERFUL operation.
Press
(POWERFUL) button again.
POWERFUL operation stops.
“
” disappears from the LCD.
1
NOTE
ƽ When SLEEP mode, ECO mode, SILENT mode or LEAVE HOME mode is selected, POWERFUL
operation is cancelled.
ƽ During POWERFUL operation, capacity of the air conditioner will not increase
– if the air conditioner is already running at maximum capacity.
– just before defrost operation (when the air conditioner is running in HEATING operation).
ƽ After auto restart, POWERFUL operation is cancelled and previous operation shall start.
For multi model connections, POWERFUL operation may not function depending on operation conditions.
AIR PURIFYS
ƽ
Press (START/ STOP) button.Or
ƽ
ƽ
Page 18
– 18 –
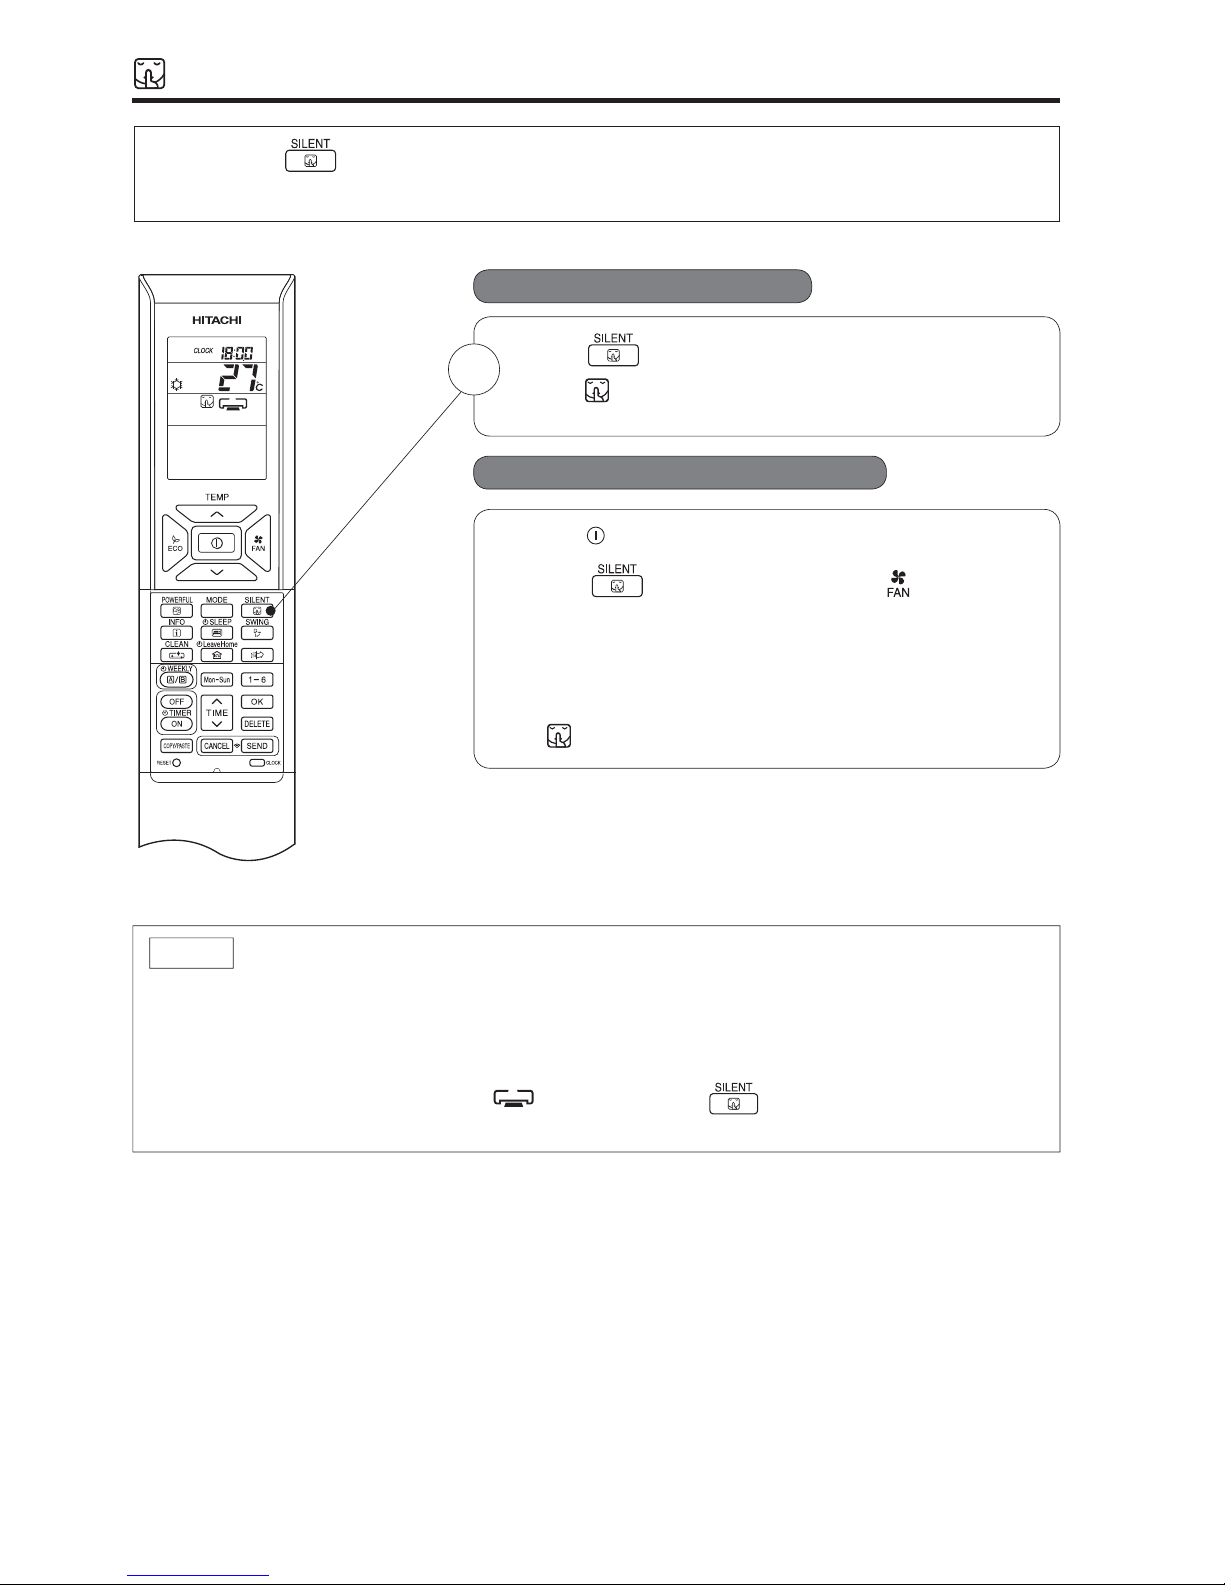
SILENT OPERATION
ƽ By pressing (SILENT) button during AUTO, HEATING, DEHUMIDIFYING, COOLING or FAN
operation, the fan speed will change to ultra slow.
Ƶ To start SILENT operation
Ƶ To cancel SILENT operation
Press (SILENT) button during operation.
ƽ
“ ” is displayed on the LCD. Fan speed will be ultra
slow.
ƽ Press (START/STOP) button. Or
ƽ
Press (SILENT) button again or (FAN SPEED)
button.
Fan speed will return to previous fan speed before SILENT
operation starts.
SILENT operation stops.
“
” disappears from the LCD.
1
NOTE
ƽ When POWERFUL operation is selected, SILENT operation is cancelled. Fan speed will return to
previous fan speed before SILENT operation.
ƽ After auto restart, SILENT operation is cancelled. Fan speed will return to previous fan speed before
SILENT operation.
ƽ During any operation with fan speed (SILENT), if press (SILENT) button, fan speed will
not change.
AIR PURIFYS
Page 19

– 19 –
ENGLISH
ECO OPERATION
ƽ By pressing the (ECO) button during AUTO, HEATING,
DEHUMIDIFYING or COOLING operation, the air conditioner
performs the "ECO" operation.
1
Ƶ To start ECO operation
ƵTo cancel ECO operation
Press (ECO) button during operation.
ƽ
“ ” is displayed on the LCD.
Energy saving operation will start by changing the set
temperature higher or lower automatically and reducing operation
power consumption. This function may vary based on the
connected outdoor unit.
ƽ Press (START/STOP) button. Or
ƽ Press (ECO) button again.
“
” disappears from the LCD.
NOTE
ƽ ECO function will not be effective when power consumption is low.
ƽ By pressing (POWERFUL) button, ECO operation is cancelled.
ƽ After auto restart, ECO operation is cancelled and previous operation mode shall start.
ƽ For multi model connections, energy saving operation shall start only by changing set temperature higher
or lower automatically. However, effectiveness of ECO depends on operation conditions.
AIR PURIFYS
ECO operation is an energy saving function by changing set temperature automatically and by limiting the
ma x imum power consumption value.
Page 20
– 20 –
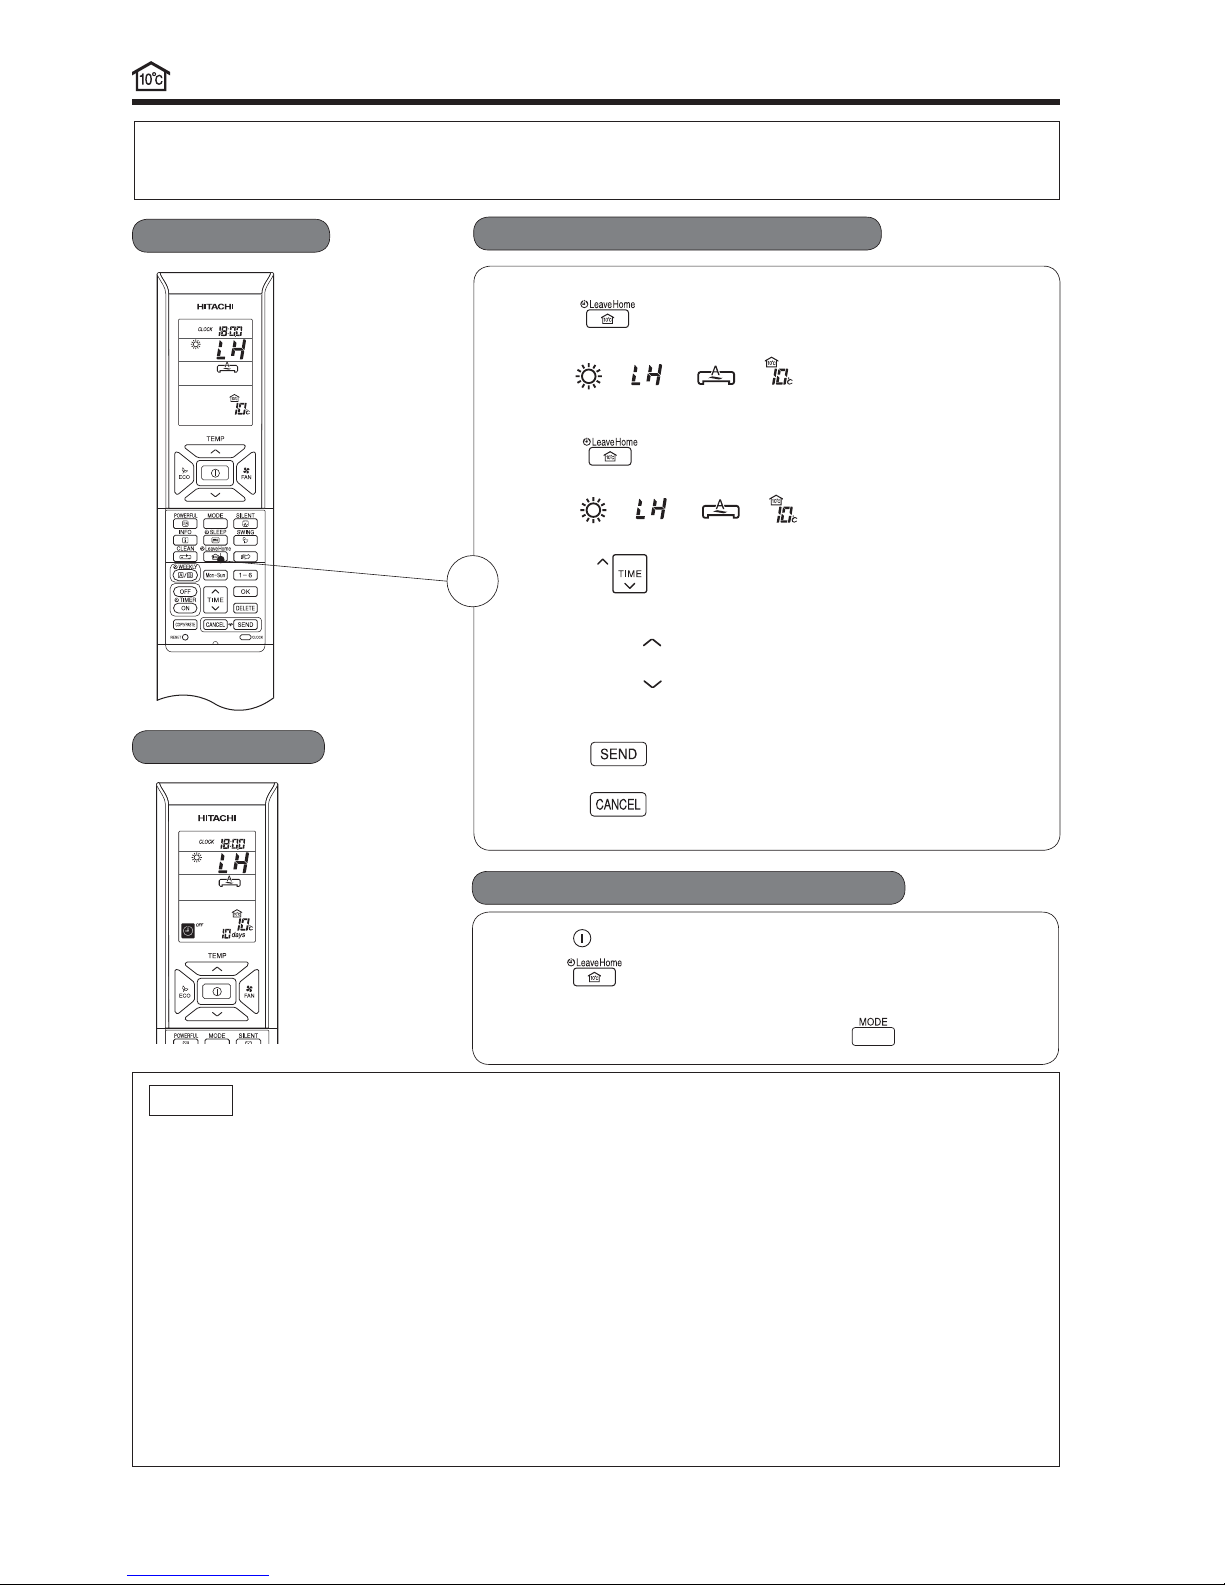
LEAVE HOME(LH) OPERATION
Ƶ To start LEAVE HOME operation
Press
(LEAVE HOME) button during stop or operation.
ƽ
Room temperature is set at 10°C and heating operation starts.
“
”, “ ”, “ ”, “ ” is displayed on the LCD.
Press
(LEAVE HOME) button during stop or operation.
Room temperature is set at 10°C and heating operation starts.
“
”, “ ”, “ ”, “ ” is displayed on the LCD.
ƽ Set number of operation days (1 to 99 days), if needed.
Press
(TIME) button to select number of days.
Number of days blink.
* Press “
(UP)” to set number of days from 1 day, 2 days, 3
days ..... 98 days, 99 days, 1 day and so on.
* Press “
(DOWN)” to set number of days from 99 days, 98
days, 97 days .... 3 days, 2 days, 1 day, 99 days and so on.
* Number of day is counted when clock indicates 0:00.
ƽ Press (SEND) button to con firm number of operation
days. Display for number of operation days will stop blinking.
ƽPress (CANCEL) button to reset number of operation
days or to have continuous operation.
1
Ƶ To cancel LEAVE HOME operation
ƽ Press (START/STOP) button. Or
ƽ
Press
(LEAVE HOME) button again.
ƽ Change to other operation mode by pressing (MODE) button.
NOTE
ƽ After reaching the set number of operation days for Leave Home or by pressing the (Leave Home) button again,
ƽ During Leave Home operation, fan speed and horizontal air deflector position cannot be changed.
ƽ By pressing (Leave Home) button, implementation of Weekly Timer or Once Timer only Timer is cancelled.
ƽ In case of power supply shut down, after autorestart, all setting for number of days operation will be reset and unit
shall be in continuous operation.
ƽ
or AUTO mode, Leave Home operation cannot operate even though it is possible to set Leave Home operation.
In order to start Leave Home operation, all rooms must stop its operation. Then, press (LEAVE HOME) button to
operate Leave Home operation.
ƽ For multi connections, when all rooms are running HEATING operation, it is possible to operate Leave Home operation
by pressing the (LEAVE HOME) button.
ƽ For multi connections, if two or more rooms are set to operate Leave Home operation, the capability to reach the
set temperature at 10°C may not possible. In addition, this also depends on outdoor temperature.
Continuous operation
Day timer operation
AIR PURIFYS
Prevent the room temperature from falling too much by setting temperature automatically when no one is at home.
This operation is able to operate by" Continuous operation" or " Day timer operation" . Please use " Day timer operation"
to set the number of days up to 99 days.
the unit will operate in previous mode.
Option 1. Continuous operation.
Option 2. Day timer operation.
10°C
ƽ
Return to previous operation mode. Or
oFor multi connections, when each room is running in different operation mode such as FAN only, COOLING, DEHUMIDIFYING
POWERFUL,SILENT and ECO operations are not applicable during Leave Home.
ƽ
Page 21
– 21 –
ENGLISH
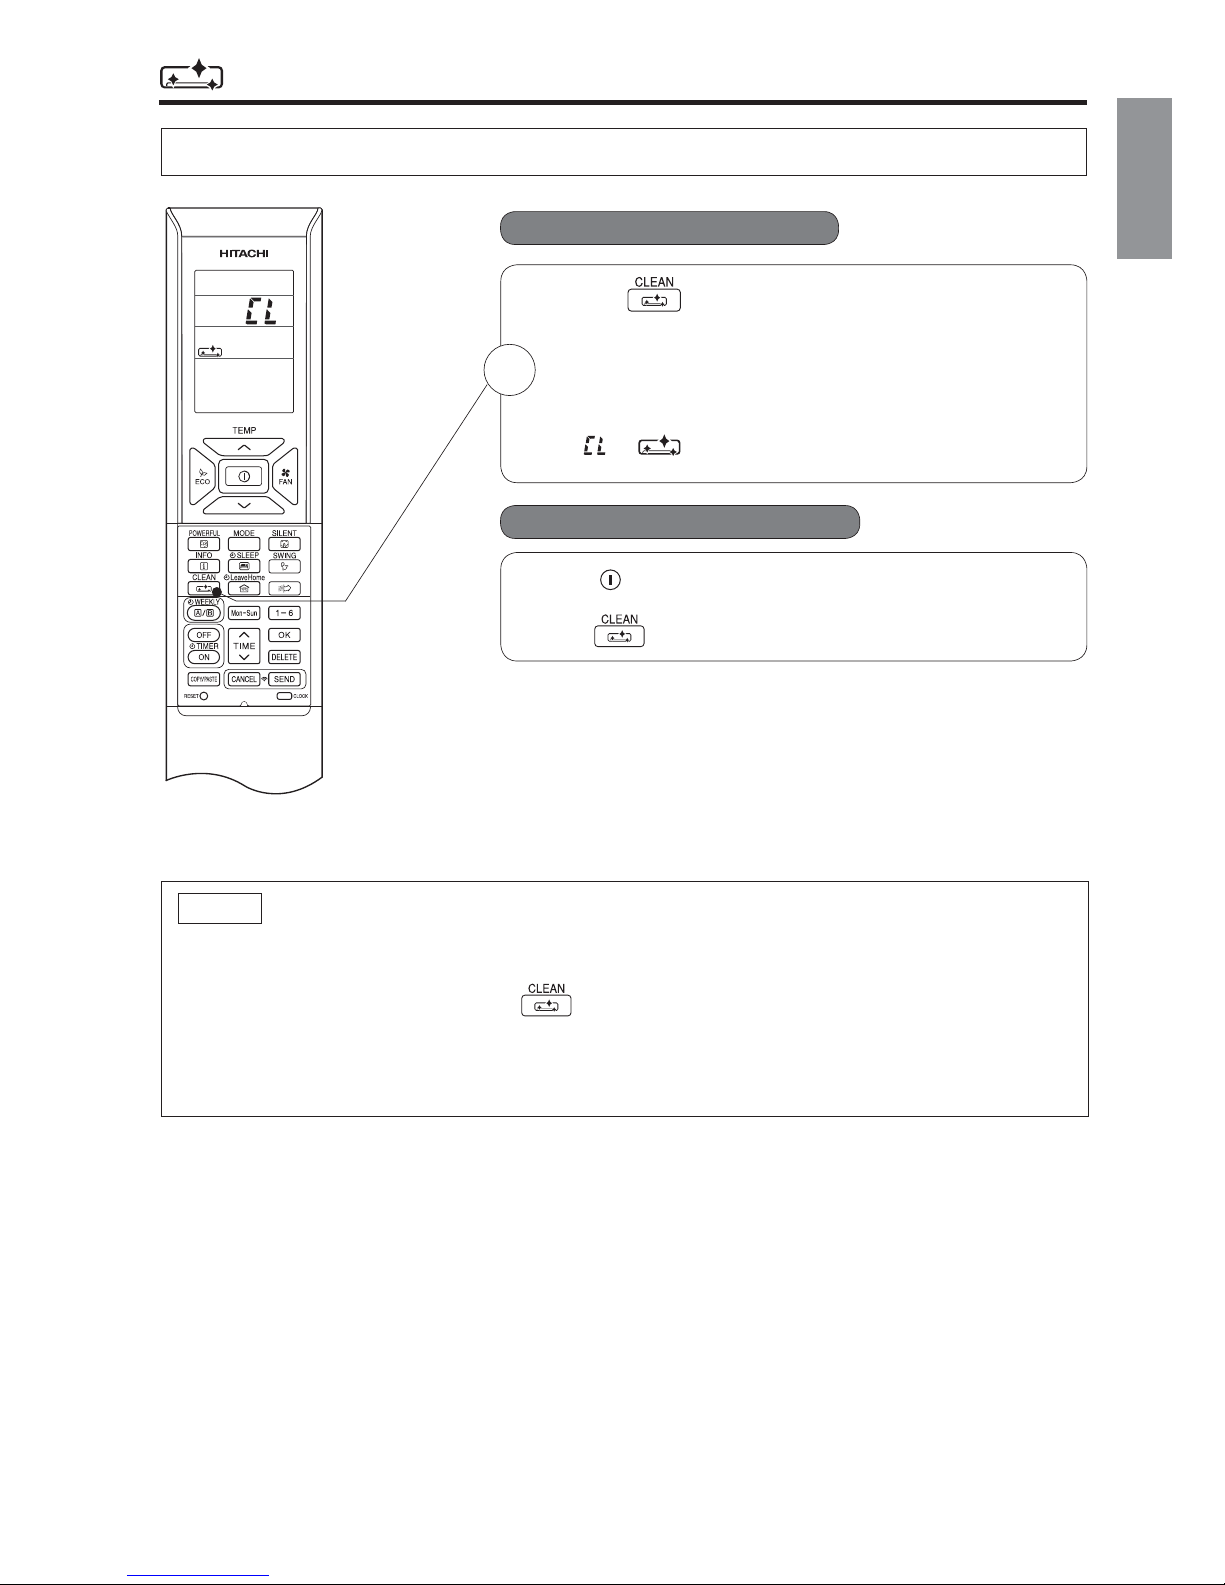
CLEAN (ONE TOUCH CLEAN) OPERATION
Drying indoor heat exchanger after cooling operation to prevent mildew.
Ƶ To start CLEAN operation
Ƶ To cancel CLEAN operation
ƽ Press (CLEAN) button when unit is OFF.
Total time taken for One Touch Clean operation is 60 minutes.
During this operation, HEATING or FAN operation shall
operate.
During one touch clean, operation lamp is blinking.
“
”, “ ” is displayed on the LCD.
ƽ Press (START/STOP) button. Or
ƽ Press (CLEAN) button again.
1
AIR PURIFYS
NOTE
ƽ When CLEAN operation finish, unit will switch OFF automatically.
ƽ If Weekly Timer or Once Timer is set, there is a need to cancel those timer before operating CLEAN function.
ƽ For multi connections, when pressing (CLEAN) button, operation is limited to FAN operation.
ƽ For multi connections, when one room operates CLEAN operation first, other rooms can operate
COOLING, DEHUMIDIFYING or FAN operation. However, when other rooms need to operate HEATING
operation, air conditioner will be in STANDBY mode. After CLEAN operation finish, HEATING operation
will start.
Page 22
– 22 –
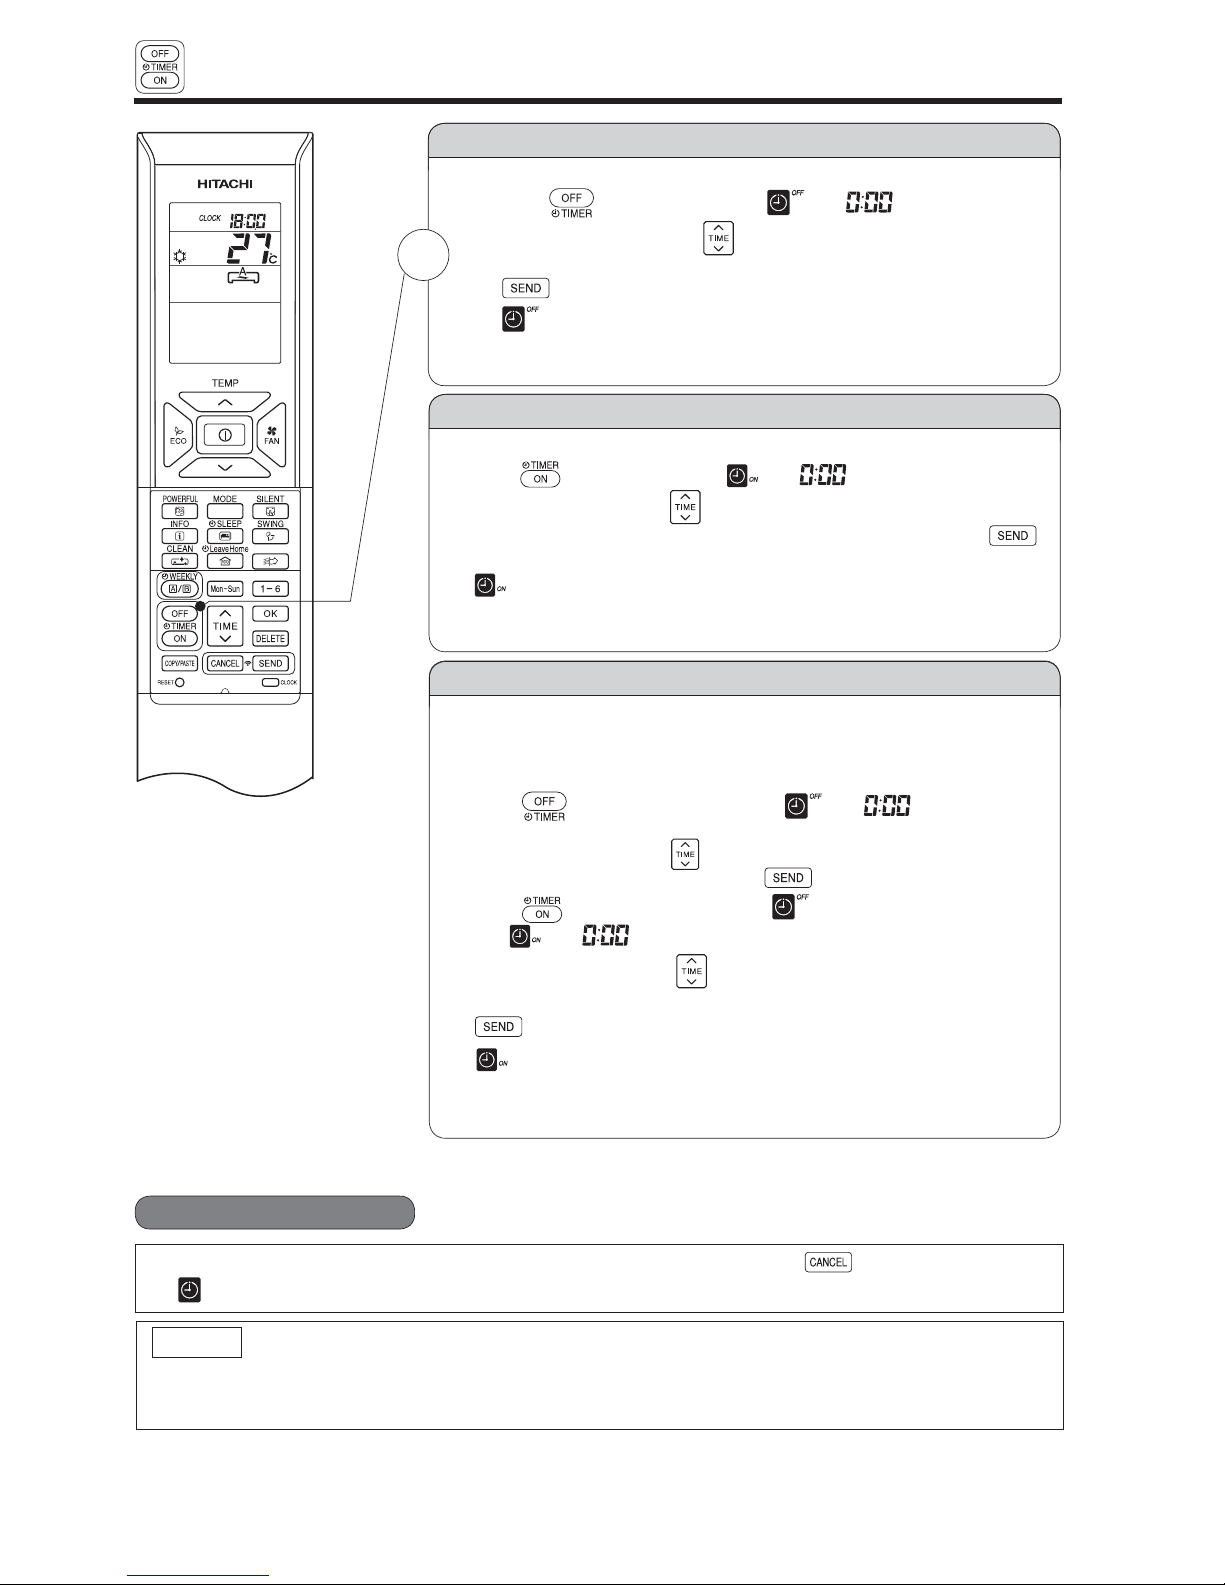
ONCE TIMER (ON/OFF TIMER) OPERATION
The device can be set to turn off at a preset time.
1. Press
(OFF-TIMER) button. and blink on the display.
2. Set the "turn-off time" with
(TIME) button.
3. After setting, direct the remote controller towards the indoor and press
(SEND) button.
and "set time" lights up instead of blinking.
A beep sound emitted from indoor unit and the (TIMER) lamp on the
indoor unit lights up.
ON TIMER
The device will turn on at a designated time.
1. Press
(ON-TIMER) button. and blink on the display.
2. Set the "turn-on time" with
(TIME) button.
3. After setting, direct the remote controller towards the indoor and press
(SEND) button.
and "set time" light up instead of blinking.
A beep sound emitted from indoor unit and the (TIMER) lamp on the indoor
unit lights up.
ON/OFF TIMER
ƽ The device will turn on (off) and off (on) at the designated time.
ƽ The switching occurs first at the preset time that comes earlier.
ƽ The arrow mark appears on the display to indicate the sequence of switching
operations.
1. Press
(OFF-TIMER) button so that and blink on the
display.
2. Set the "turn-off" time with
(TIME) button. After setting, direct the remote
controller towards the indoor and press
(SEND) button.
3. Press
(ON-TIMER) button so that and set "turn-off" time light up.
The
and blink.
4. Set the "turn-on" time with
(TIME) button.
5. After setting, direct the remote controller towards the indoor and press
(SEND) button
and set "turn-on" time light up instead of blinking.
A beep sound emitted from indoor unit and the (TIMER) lamp on the indoor
unit lights up.
ƵThe timer may be used in three ways: OFF-timer, ON timer and ON/OFF (OFF/ON)-
timer. Set the current time first because it serves as a reference.
Ƶ To cancel Reservation
ƽ Point the signal window of the remote controller towards the indoor unit and press (CANCEL) button.
and "ON or OFF set time" goes out with a beep and the (TIMER) lamp on the indoor unit turns off.
NOTE
ƽ User can set only one of the OFF-timer, ON-timer or ON/OFF-timer.
ƽ If WEEKLY TIMER already set, by setting the ONCE TIMER, ONCE TIMER operation
ONCE TIMER operation is complete, WEEKLY TIMER operation will be activated.
OFF TIMER
1
AIR PURIFYS
is prioriti z ed. When
-
Page 23
– 23 –
ENGLISH
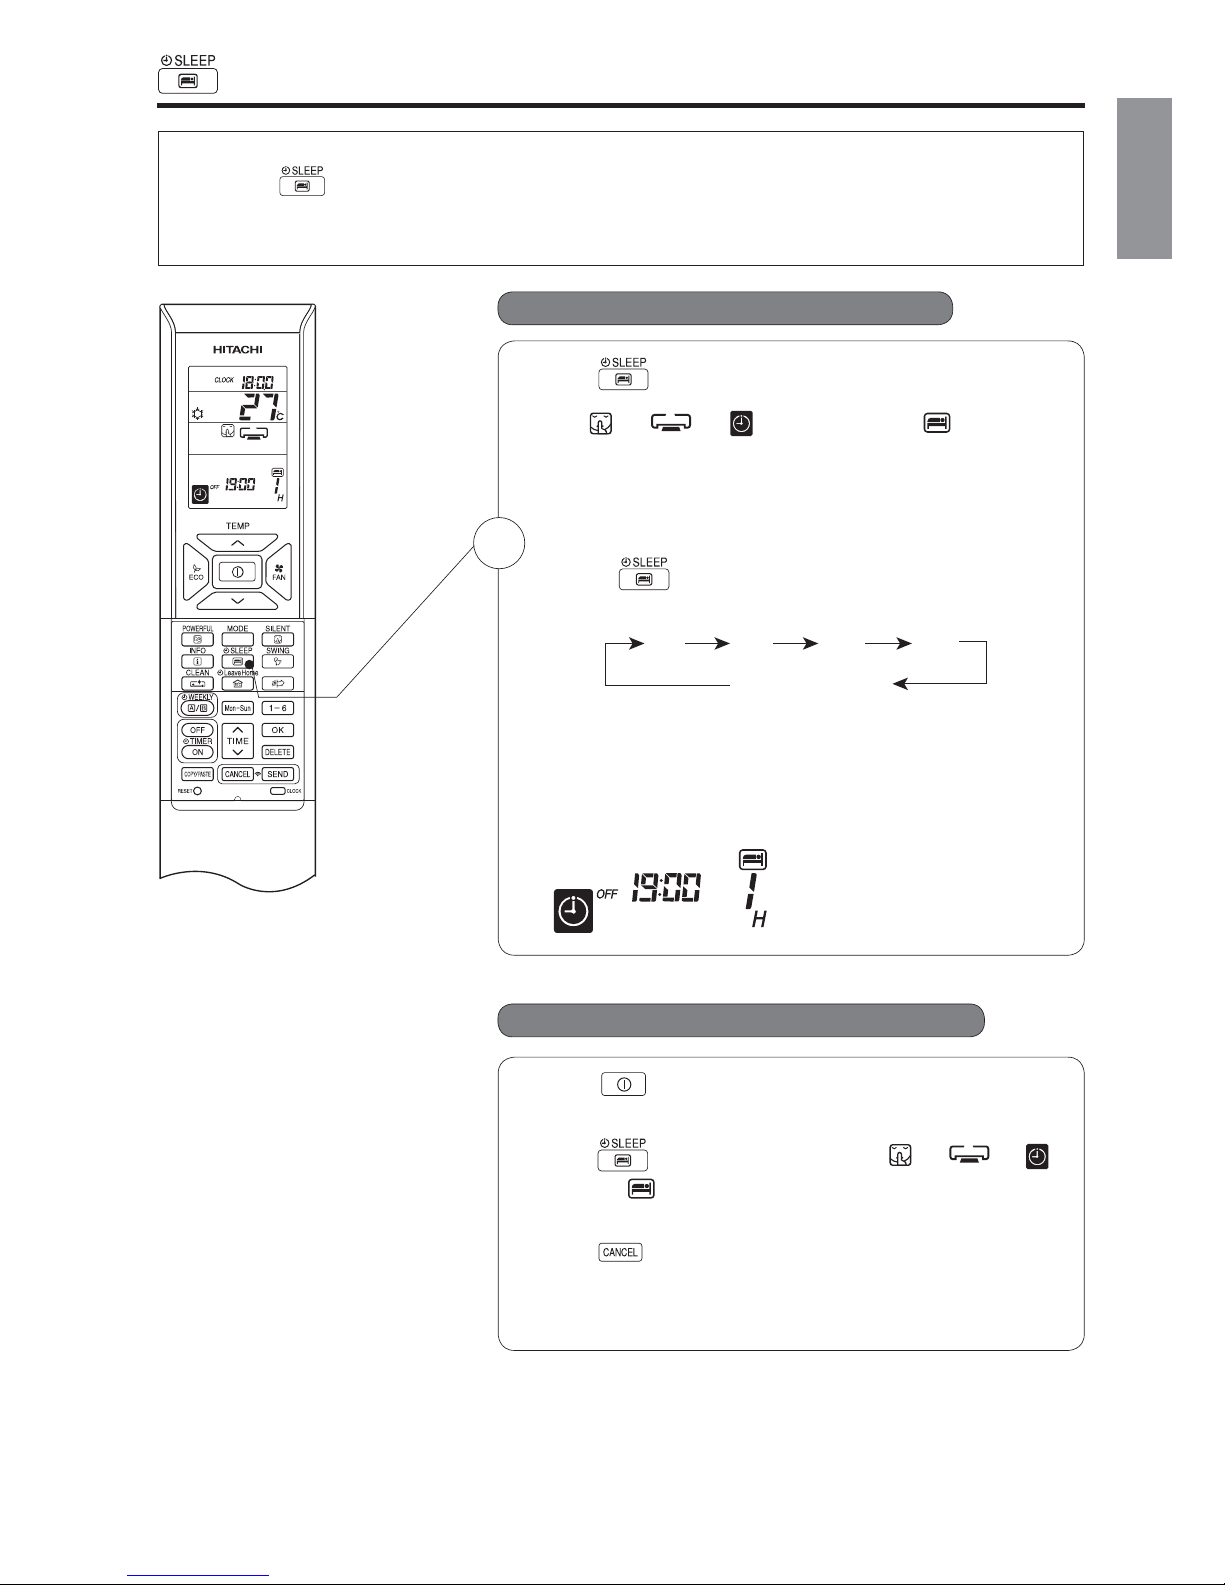
E C O SLEEP TIMER OPERATION
By pressing (SLEEP) button during AUTO, HEATING, DEHUMIDIFYING, COOLING or FAN operation,
Ƶ To start EC O SLEEP TIMER operation
Ƶ To cancel ECO SLEEP TIMER operation
Press (SLEEP) button during operation.
ƽ “ ”, “ ”, “ ”, “OFF”, off time, “ ” and number
of hour are displayed on the remote controller display.
ƽ During ECO SLEEP TIMER operation, fan speed will be ultra
ƽ A beep sound emitted from indoor unit and the (TIMER) lamp
on the indoor unit lights up.
Pressing
(SLEEP) button repeatedly, the number of hour
ƽ During ECO SLEEP TIMER operation, air conditioner will continue
to operate for the designated number of hours and then turn
off.
ƽ When the ECO SLEEP TIMER has been set, the display on the
remote controller indicates the turn off time.
Press
(START/STOP) button.
ƽ Room air conditioner will switch off.
Press
(SLEEP) button again until “ ”, “ ”, “ ”,
off time, “
” and number of hour disappear from the remote
controller display.
Press
(CANCEL) button.
ƽ A beep sound emitted from indoor unit and the (TIMER) lamp
on the indoor unit turns off.
ƽ SLEEP TIMER operation is cancelled.
1
Example: If ECO SLEEP TIMER is
set for 1 hour at 18:00, the switch
off time will be at 19:00.
1 H 2 H 3 H 7 H
SLEEP TIMER off
AIR PURIFYS
.gni vas ygrene ni stluser tl .deeps naf eht secuder dna erutarepmet moor eht stfihs tinu eht
will change as below:
The timer can be set up to a duration of 7 hours.
slow.
s
Set the current time first before operating the ECO SLEEP TIMER operation.
Page 24
– 24 –
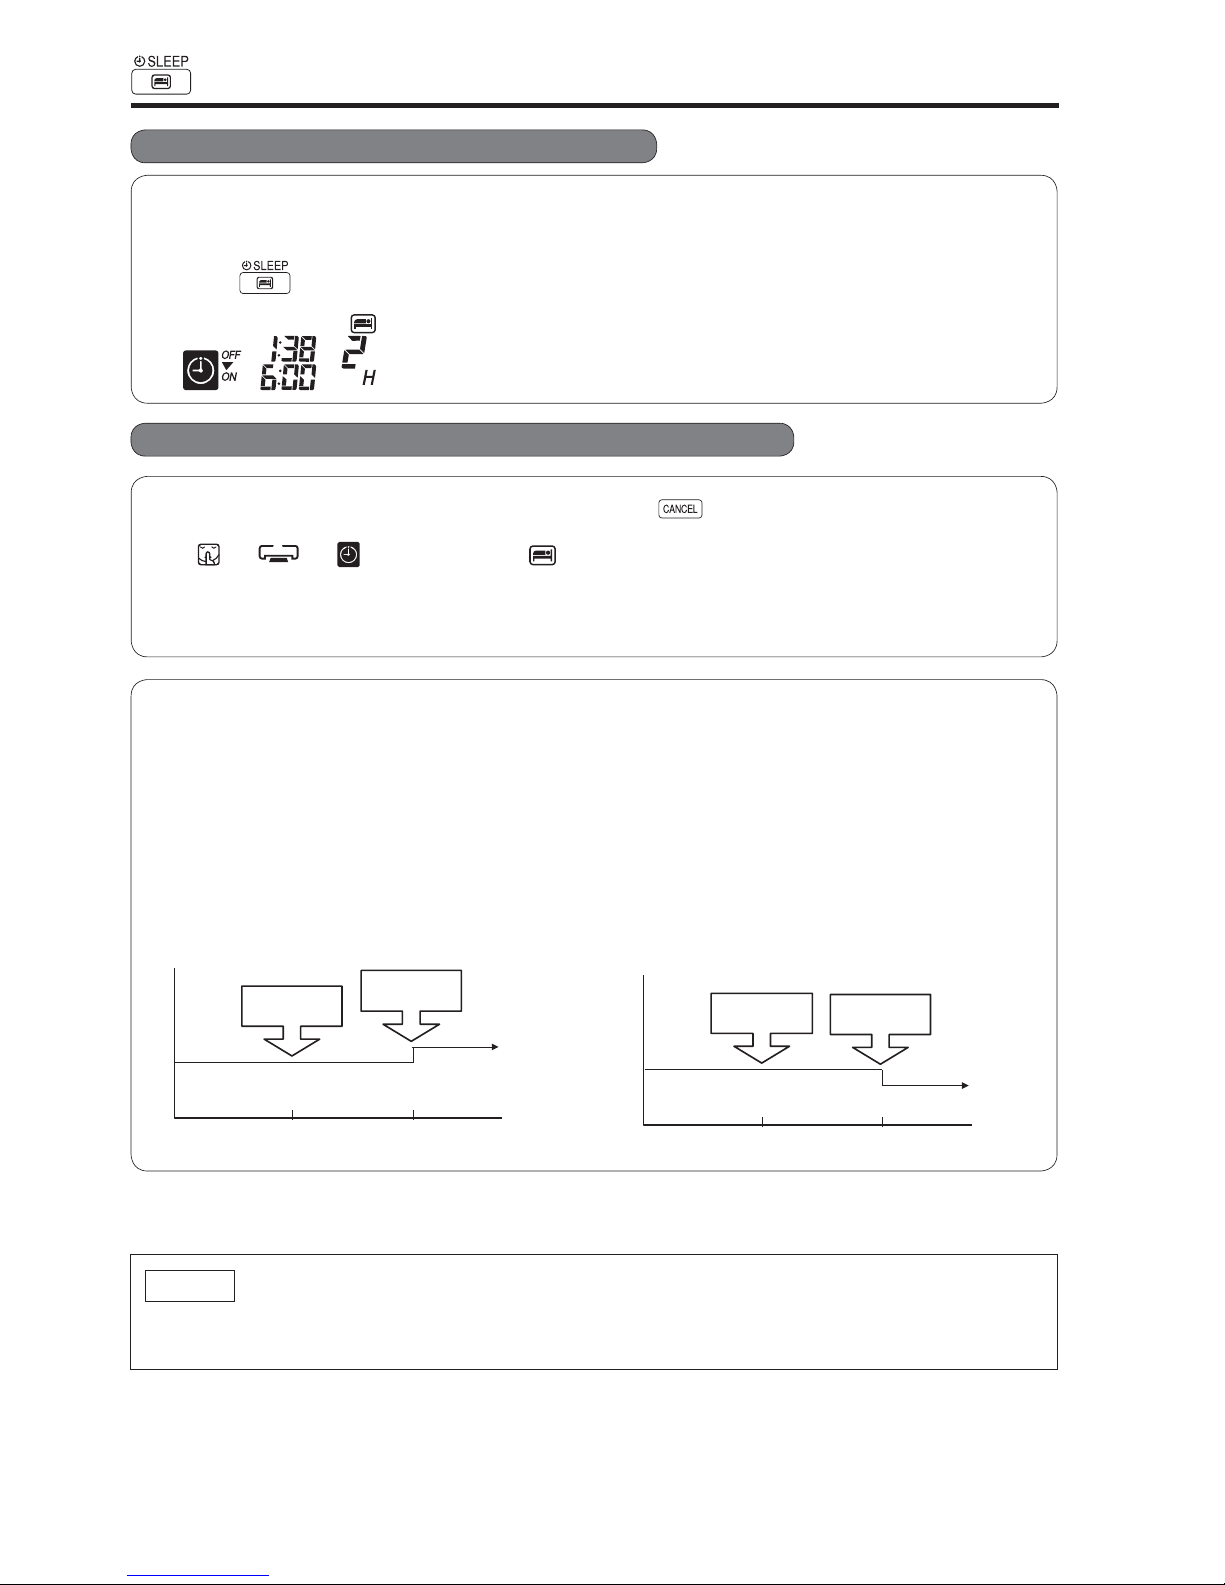
Ƶ To set EC O SLEEP TIMER and ON TIMER
Ƶ To cancel EC O SLEEP TIMER and ON TIMER operation
The air conditioner will be turned off by ECO SLEEP TIMER and turned on by ON TIMER.
1.
Set the ON TIMER.
2. Press
(SLEEP) button and set ECO SLEEP TIMER.
Direct the remote controller towards the indoor unit and press
(CANCEL) button.
ƽ “ ”, “ ”, “ ”, “OFF”, off time, “ ”, number of hour, "ON" and ON TIMER set time disappear
from the remote controller display.
ƽ A beep sound emitted from indoor unit and the (TIMER) lamp on the indoor unit turns off.
ƽ P TIMER and ON TIMER reservations are cancelled.
30 minutes after setting ECO SLEEP TIMER, outdoor fan speed will be reduced to lower the noise level and to
1 hour after setting ECO SLEEP TIMER, set temperature will be slightly shifted. Amount of temperature
These automatic operation changes contribute to energy saving without losing comfort.
The level of energy consumption depends on outside temperature, room temperature, set temperature or air
conditioner type.
Cooling operation [diagram representation
for illustrative purpose only]
In this case, air conditioner will turn off in 2 hours (at 1:38) and it will be
turned on at 6:00 the next morning.
NOTE
ƽ If ECO SLEEP TIMER is set when OFF TIMER or ON/OFF TIMER has been set earlier, the ECO
Heating operation [diagram representation for
illustrative purpose only]
Temperature
30 minutes
Outdoor fan
speed reduce
Shift
temperature
1 hour
Temperature
30 minutes
Outdoor fan
speed reduce
Shift
temperature
1 hour
EC O SLEEP TIMER OPERATION
Example:
have comfort operation.
shifted depends on type of air conditioner.
SLEEP TIMER becomes effective instead of the OFF TIMER or ON/OFF TIMER.
ECO SLEE
Page 25
– 25 –
ENGLISH
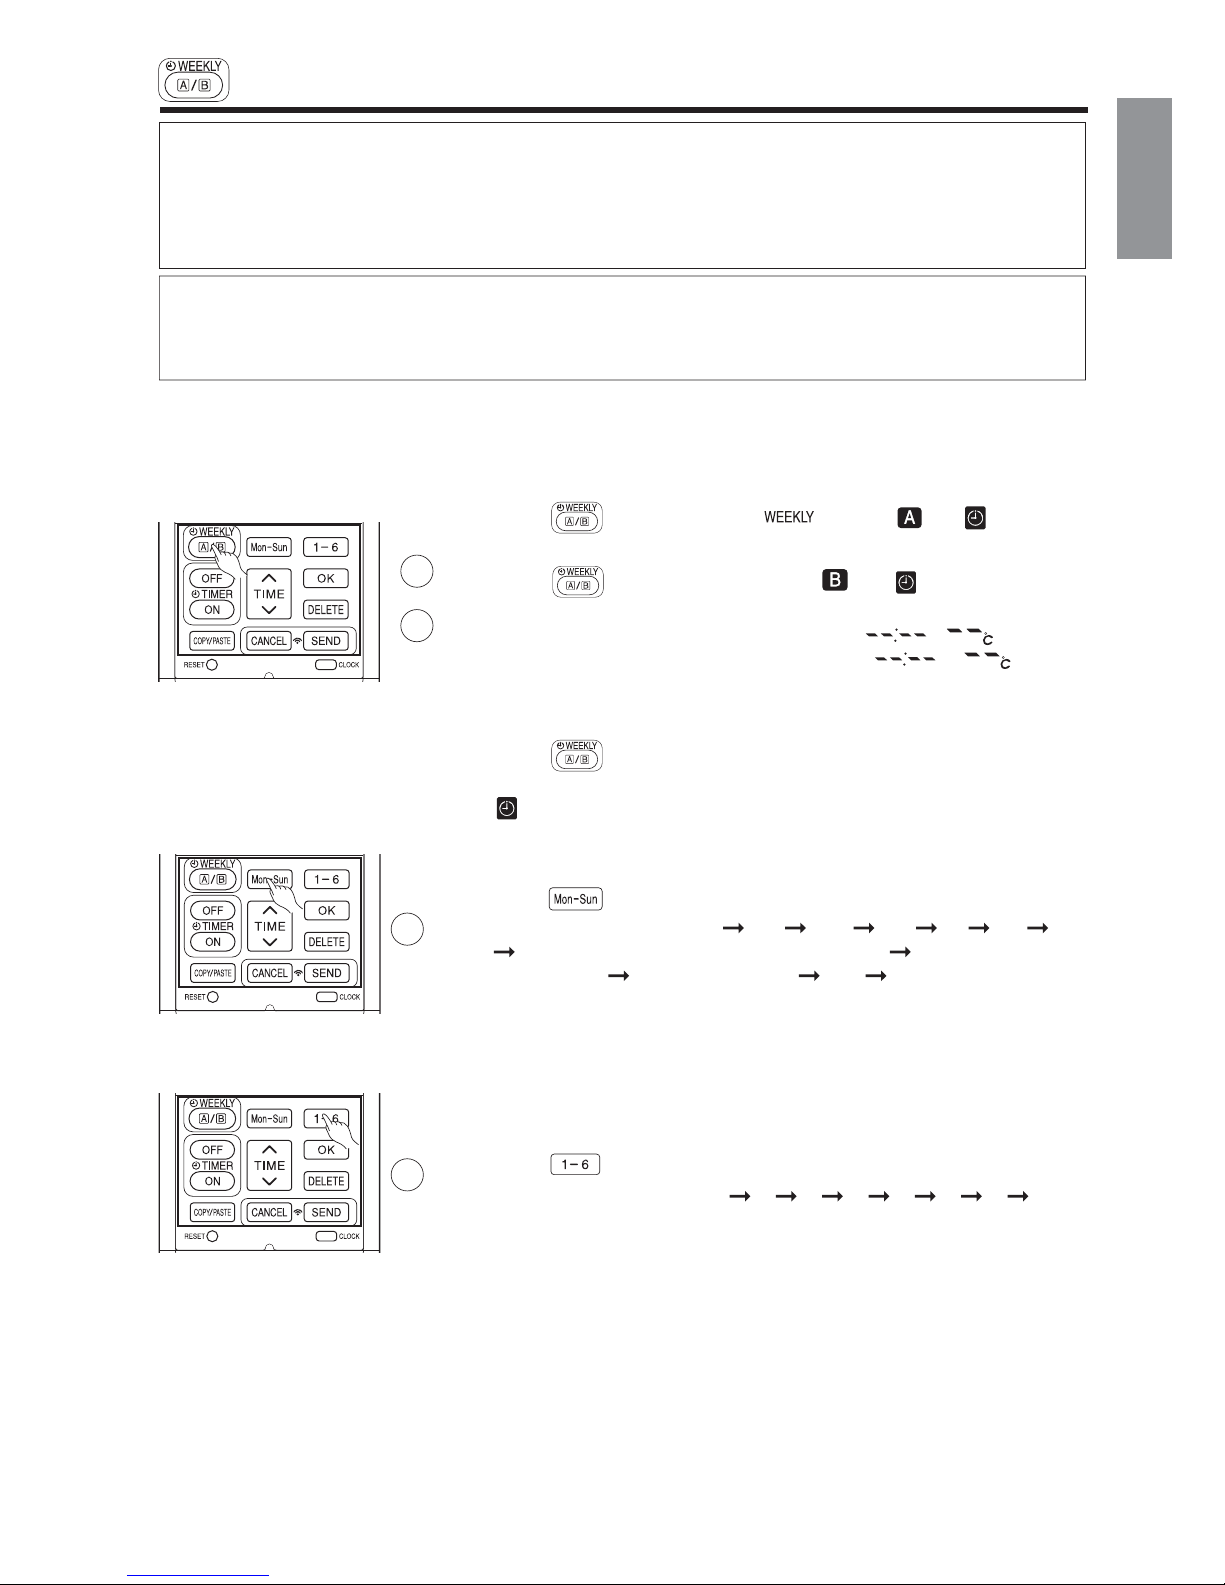
ƽ If calendar and clock are not set, the reservation setting for WEEKL
ƽ lt is possible to select Mode A or Mode B.For each mode ,up to 6 programs can be set per day. ln total, a
maximum of 42 programs can be set for a week for each mode.
Y TIMER cannot be set.
ƽ If calendar and clock are not set correctly, WEEKLY TIMER will not operate correctly.
ƽ Reservation for calendar and clock shall be set rst before operating WEEKLY TIMER.
WEEKLY TIMER OPERATION
Ƶ How to set a WEEKLY TIMER.
1. Select Mode A or Mode B.
Press
(WEEKLY) button. lights up. and blink on the
display. (Mode A is selected).
Press
(WEEKLY) button again, and blink on the display.
(Mode B is selected).
ƽ If no reservation has been made, ON/OFF, , appear.
ƽ If reservation has been made, ON/OFF, , will not
appear.
Press
2. Set a program.
(WEEKLY) button for about 3 seconds. The selection mode
can be changed.
, day: Mon, program no. : 1, ON/OFF, setting time and setting
temperature blink on the display.
Press
3. Select the desired day of the wekk.
(DAY) button
The day changes from Mon
Tue Wed Thu Fri Sat Sun
Mon, Tue, Wed, Thu, Fri, Sat, Sun [Full days] Mon, Tue, Wed, Thu,
Fri [weekday]
Sat, Sun [weekend] Mon Tue ......
Select [Full days] for daily reservation.
Select [weekday] for Monday to Friday reservation.
Select [weekend] for Saturday and Sunday reservation.
ƽAfter reservation has been set, it is easy to check and edit at the same
time.
4. Press
button to select a program number.
The number changes from 1
2 3 4 5 6 1 2 .....
ƽ If program number has been set, follow above in order to make
changes.
1
2
Step 1: Set the reservation schedule to the remote controller. Send the registered reservation to indoor
unit and then operate.
Step 2: Select Mode A or Mode B and activate or deactivate WEEKLY TIMER .
Step 3: Copy and cancel the reservation schedule.
Step 1: Set reservation schedule to the remote controller. Send the registered reservation
to indoor unit and then operate.
3
4
fi
Page 26

– 26 –
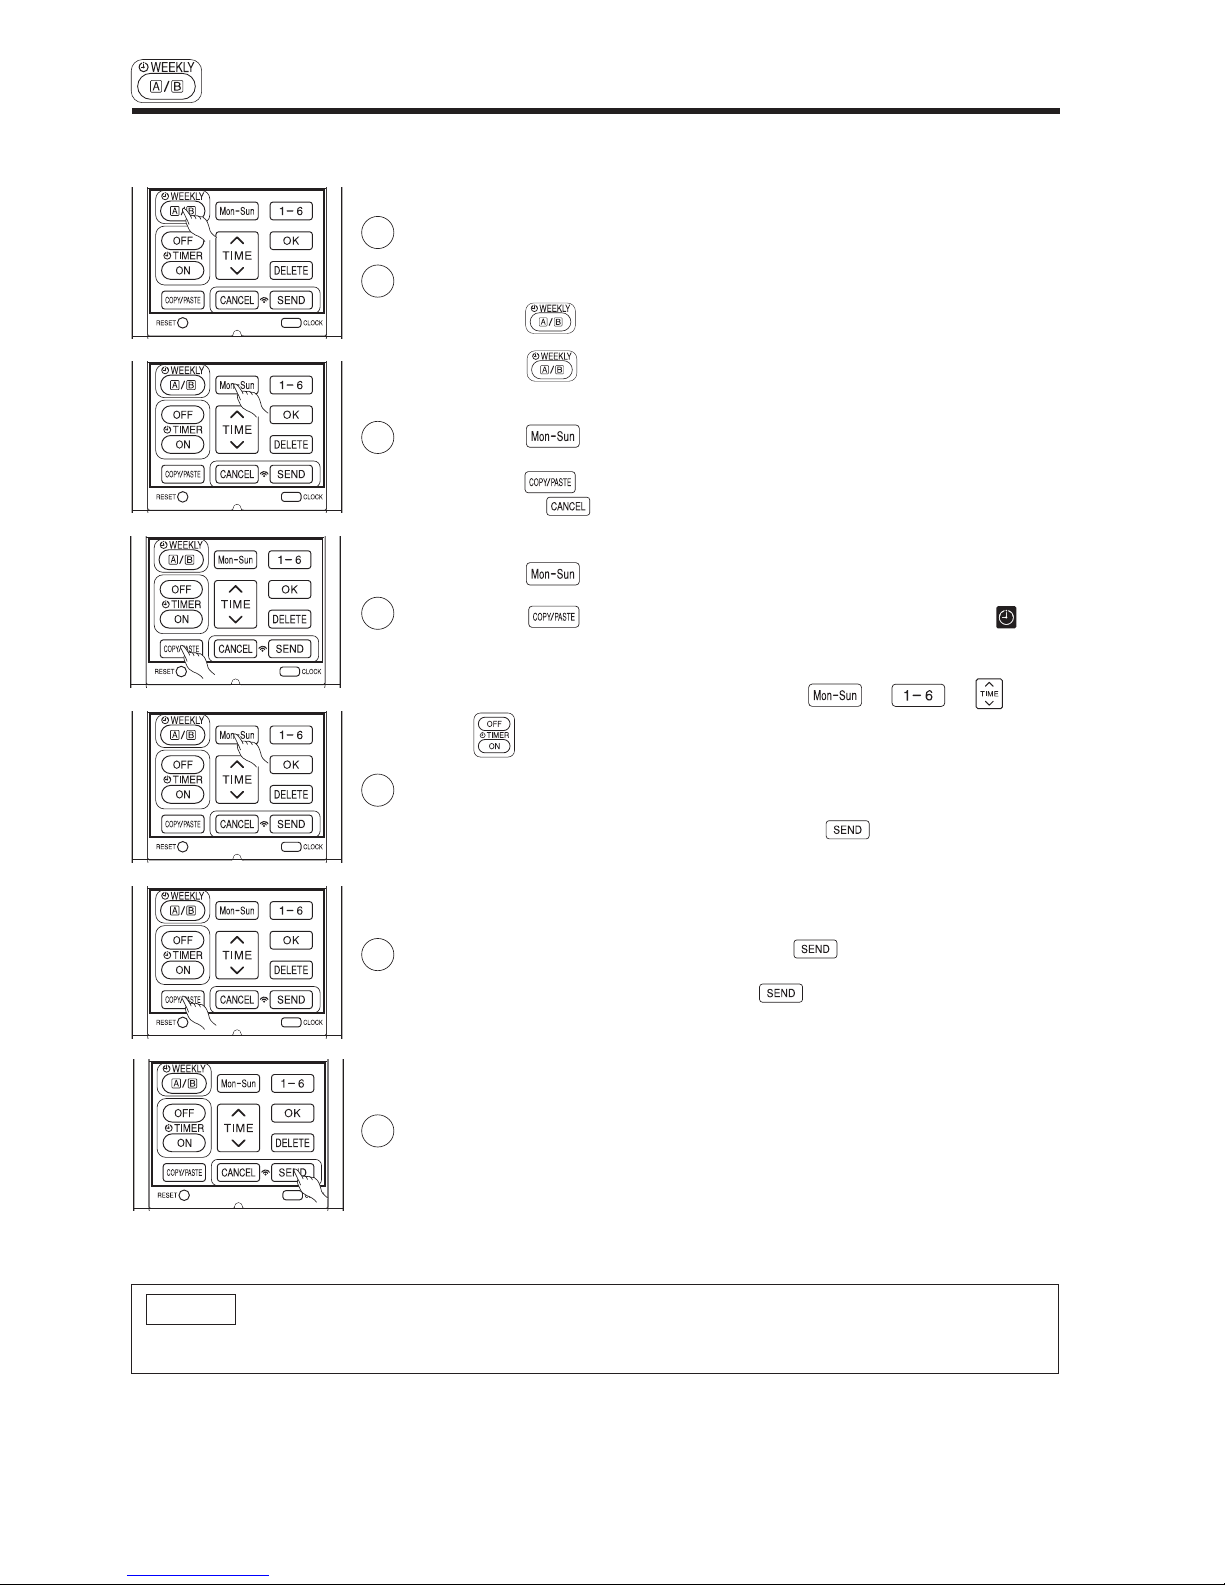
5. Press (ON-OFF TIMER) button to select ON TIMER or OFF TIMER
reservation.
6. Press
(TIME) button to set time reservation.
7. Press (TEMP
or ) button to set temperature reservation.
8. Press
(OK) button. The reservations are set. Day, program
number, ON reservation, setting temperature will light up.
will be
continuously blinks. If reservation is not complete, settings will not be
stored in memory.
To continue with the reservation, press
buttons.
Follow step 3 to 8 for reservation.
9. After all the reservations have been set, press
(SEND) button while
directing the remote controller towards the indoor unit for about 3 seconds.
Timer lamp on the indoor unit will blink rapidly.
After beep sound emitted from indoor unit, TIMER lamp will light up.
Please ensure that the TIMER lamp lights up.
This indicates that the reservation has been stored in the indoor unit and
Timer function has been completed.
The reservation contents will appear on the remote controller display.
If TIMER lamp on the indoor unit does not light up, press
(SEND) button while directing the remote controller towards the indoor
unit for about 3 seconds.
CAUTION ! Do not press
(CANCEL) button during reservation
setting because this will result in all reservation contents to be lost.
The reservation contents will not stored in the indoor unit until
(SEND) button has been pressed.
5
6
7
8
9
NOTE
ƽ Up to 6 programs can be set per day. Setting ON TIMER or OFF TIMER for each program number can
be at random. When pressing
(SEND) button, the set ON TIMER or OFF TIMER for each program
number will automatically arranged so that program number 1 shall have the earliest time and program
number 6 shall have the latest time.
If the setting time is the same, Priority will be given to the latest reservation contents.
ƽ CAUTION ! If the remote controller is left idle and (SEND) button is not pressed within 3 minutes
after reservations have been made , all current reservations will be lost.
WEEKLY TIMER OPERATION
ƽ
ƽ
ƽ
Page 27

– 27 –
ENGLISH
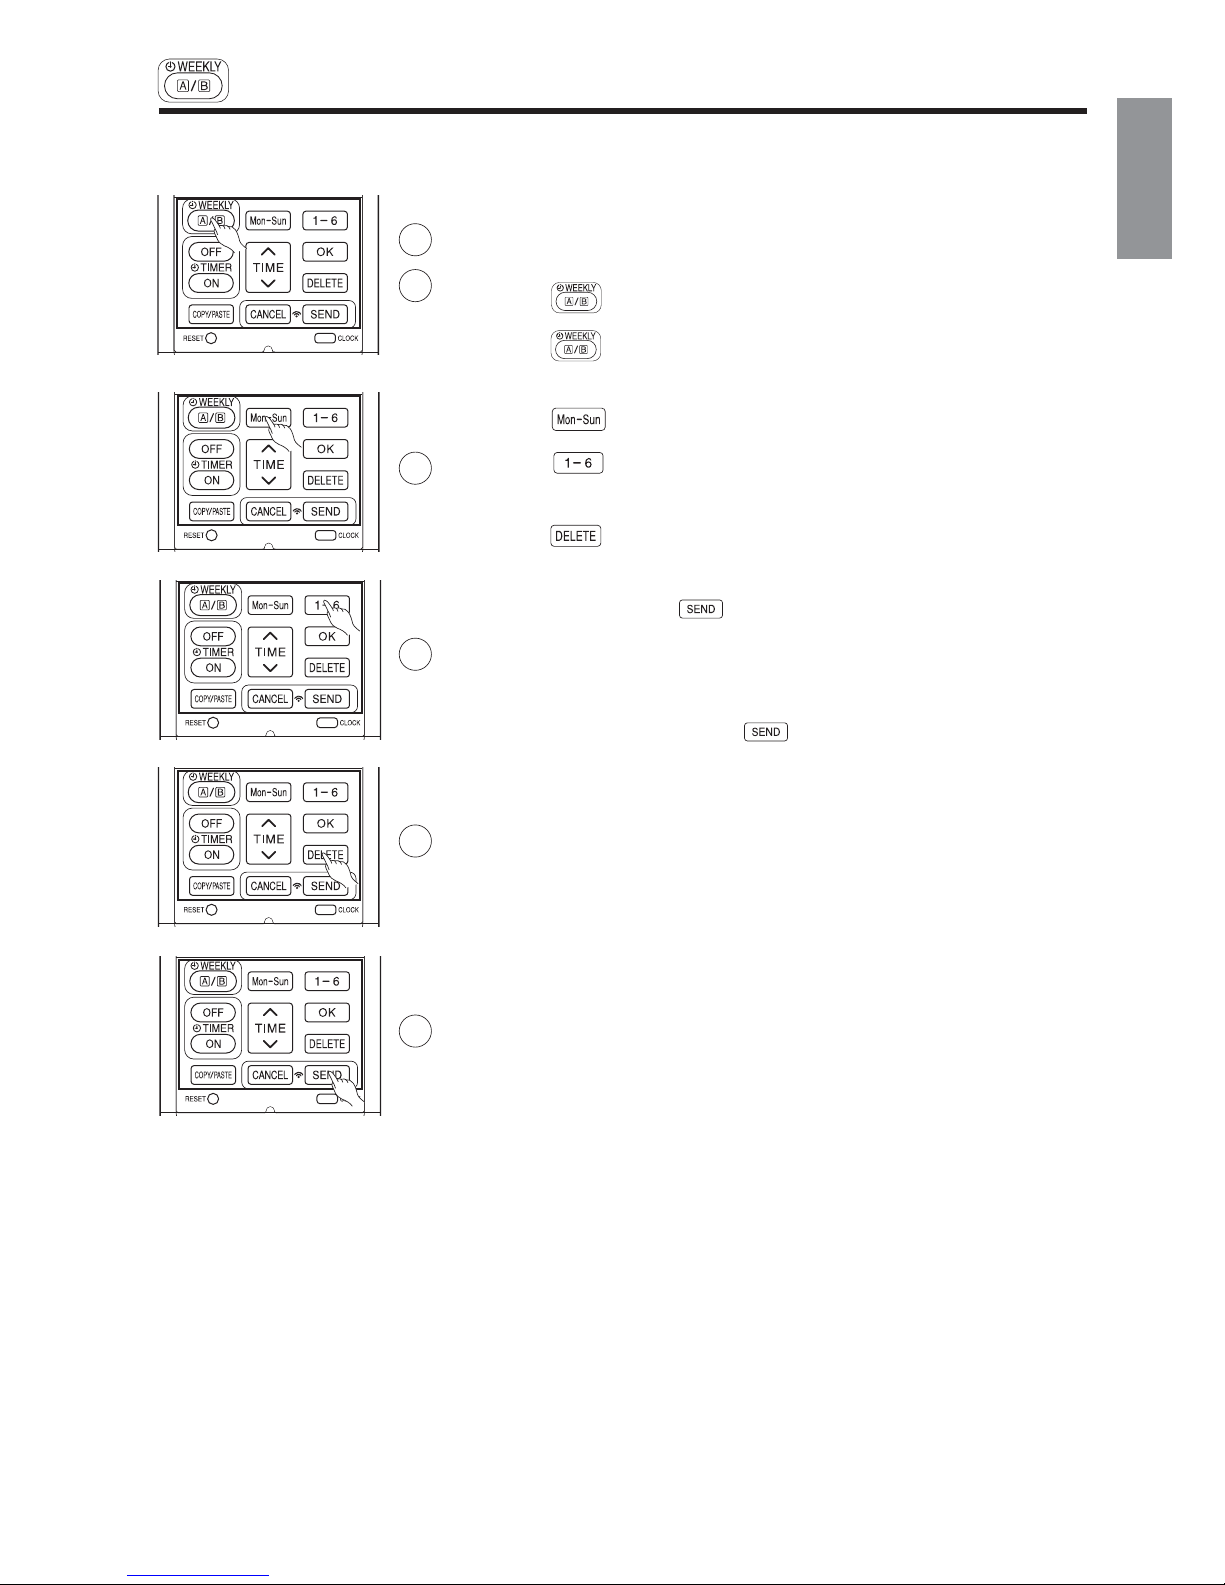
Ƶ How to select Mode A or Mode B of WEEKLY TIMER setting.
1. Press
(WEEKLY) button. and blink on the display.
(Normally Mode A will blink first).
2. Press
(WEEKLY) button again. and blink on the display.
3.
Select Mode A or Mode B. Press
(SEND) button while directing the
remote controller towards the indoor unit for about 3 seconds. Timer lamp
on the indoor unit will blink rapidly
.
After beep sound emitted from indoor unit,
TIMER lamp will light up.
3OHDVHHQVXUHWKDWWKH7,0(5ODPSOLJKWVXS
This indicates that Mode A or Mode B selection and active WEEKLY TIMER
have been conf
irmed.
Ƶ Setting non-active WEEKLY TIMER .
1.
Direct the remote c
ontroller towards the indoor unit and press
(CANCEL) button.
Beep sound will be emitted from indoor unit and TIMER lamp will be OFF
.
Reservation indication on remote display will also disappear.
This indicates that non-active WEEKL
Y TIMER has been confirmed.
ƽ To activate back the setting of WEEKLY TIMER , repeat the steps for
"How to select Mode
A or Mode B of WEEKLY TIMER setting".
NOTE
ƽ When setting ONCE TIMER, operation of WEEKLY TIMER is interrupted. After ONCE TIMER operation
is complete, WEEKLY TIMER operation will be activated.
ƽ When ONCE TIMER is cancelled, operation of WEEKLY TIMER is also cancelled. Need to set WEEKLY
TIMER operation for activation.
ƽ After auto restart, WEEKLY TIMER operation is cancelled. Need to set WEEKLY TIMER operation for
activation.
1
2
1
WEEKLY TIMER OPERATION
Step 2: Select Mode A or Mode B and activate or deactivate WEEKLY TIMER.
3
Page 28
– 28 –
Ƶ How to copy and paste.
Editing the reservation schedule is easy by copying data from one day to
another day.
1. Press
(WEEKLY) button to select Mode A or Mode B.
2. Press
(WEEKLY) button for about 3 seconds to start editing the
reservation schedule.
3. Press
(DAY) button to select a day of the week to copy.
4. Press
(COPY/PASTE) button. Then "PASTE" blinks on the display.
* Press
(CANCEL) button to cancel the COPY mode. Normal
setting mode is activated.
5. Press
(DAY) button to select a day of the week to paste.
6. Press
(COPY/PASTE) button one more time to paste. only
blinks on the display.
7. To continue copying to other days, press
or or or
.
Then start from step 3.
8. After copy and paste completed, press
(SEND) button while
Timer lamp on the indoor unit will blink rapidly.
After beep sound emitted from indoor unit, TIMER lamp will light up.
Please ensure that the TIMER lamp lights up.
If TIMER lamp does not light up, Press
(SEND) button again.
ƽ Reservation data will not change if (SEND) button is not pressed.
Step 3: Copy and cancel the reservation schedule.
NOTE
ƽ If there is no reservation data, copying data from one day to another day cannot be done.
1
2
3
4
5
6
8
WEEKLY TIMER OPERATION
directing the remote controller towards the indoor unit for about 3 seconds.
Page 29
– 29 –
ENGLISH
Step 3: Copy and cancel the reservation schedule.
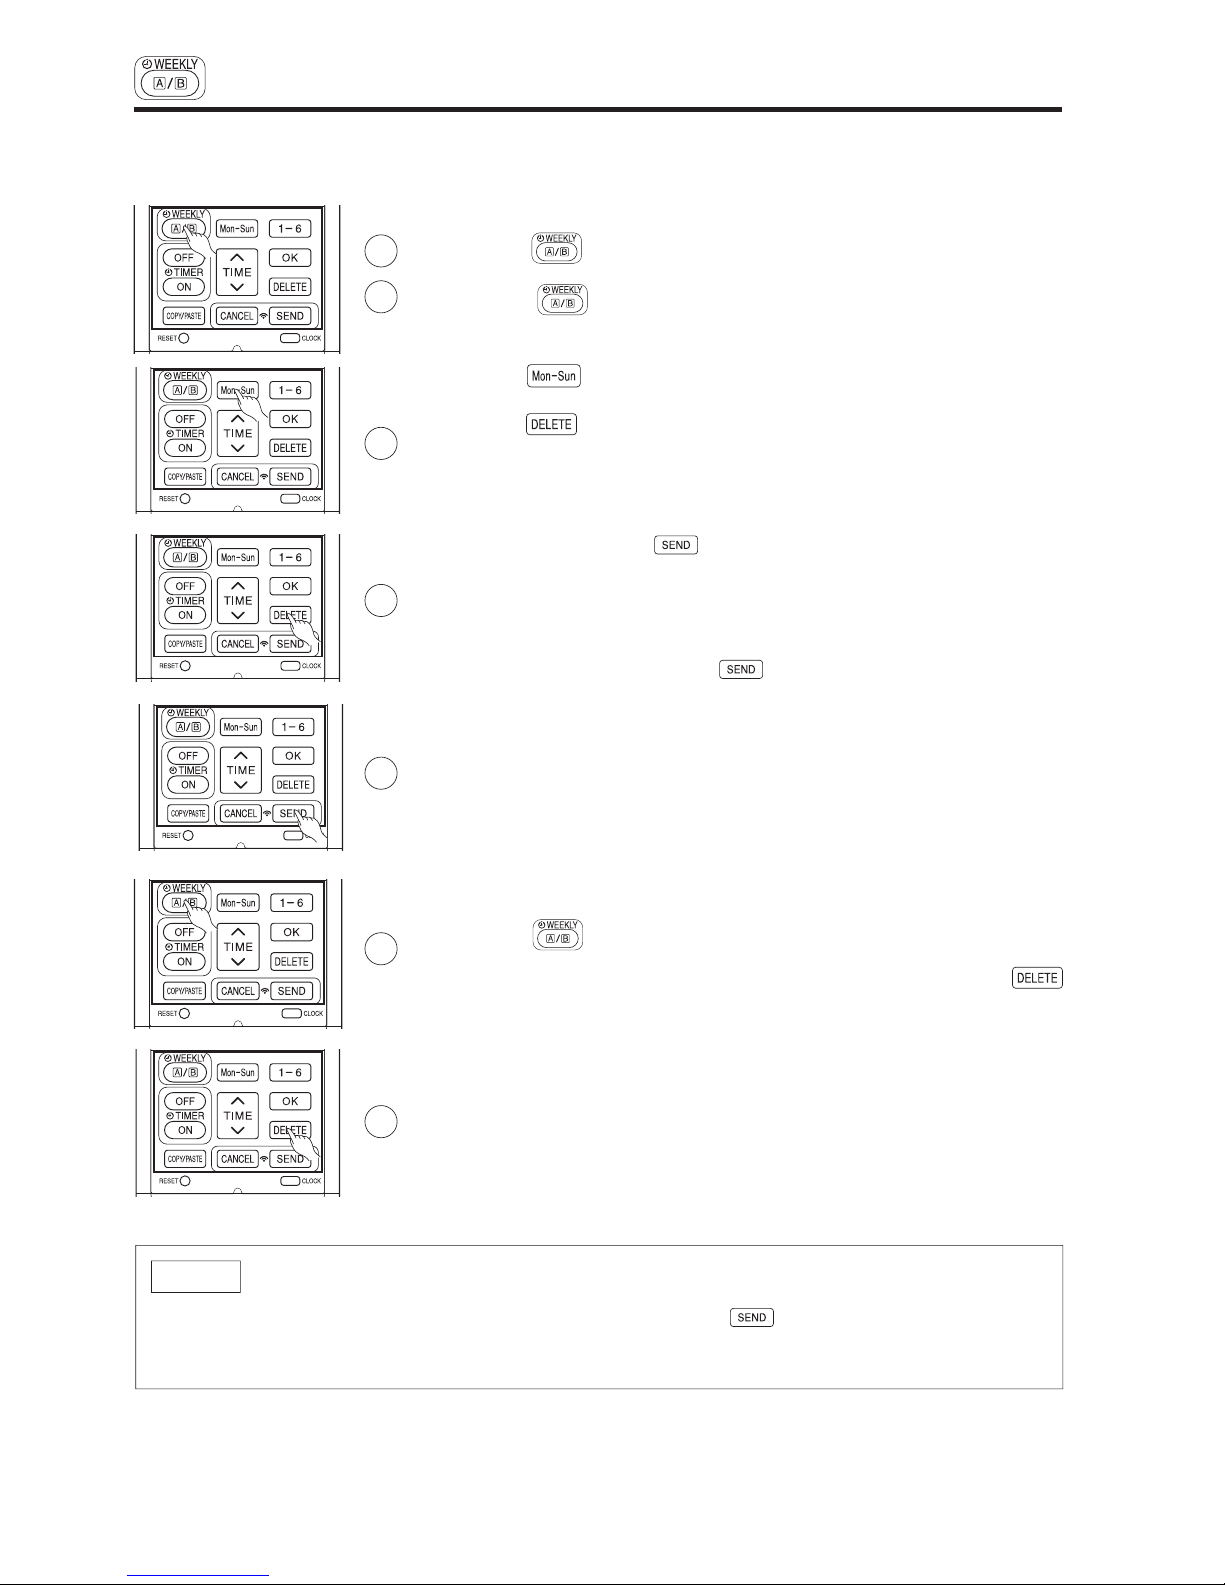
Ƶ How to delete WEEKLY TIMER data.
[Delete one program number reservation]
1. Press
(WEEKLY) button to select Mode A or Mode B.
2. Press
(WEEKLY) button for 3 seconds to start editing the reserva-
tion schedule.
3. Press
(DAY) button to select a day of the week to edit.
4. Press
to select program number. Selected program number will
blink.
5. Press
(DELETE) button. Reservation of selected program number
is deleted.
6. After deleting, press
(SEND) button while directing the remote
controller towards the indoor unit for about 3 seconds. Timer lamp on
After beep sound emitted from indoor unit, TIMER lamp will light up.
Please ensure that the TIMER lamp lights up.
ƽ Reservation will not change if (SEND) button is not pressed.
1
2
3
4
5
6
WEEKLY TIMER OPERATION
the indoor unit will blink rapidly.
Page 30
– 30 –
Step 3: Copy and cancel the reservation schedule.
[Delete one day reservation]
1. Press
(WEEKLY) button to select Mode A or Mode B.
2. Press
(WEEKLY) button for 3 seconds to start editing the
reservation schedule.
3. Press
(DAY) button to select a day of the week to edit.
4.
Press
(DELETE) button for about 10 seconds. Reservations for all
program numbers will be deleted.
ƽ If press for a short time, reservation for one program number will be
deleted.
5. After deleting, press
(SEND) button while directing the remote
controller towards the indoor unit for about 3 seconds. T
imer lamp on
After beep sound emitted from indoor unit,
TIMER lamp will light up.
Please ensure that the TIMER lamp lights up.
ƽ Reservation will not change if (SEND) button is not pressed.
1
1
2
NOTE
ƽ
transmitted to indoor unit. TIMER lamp will remain off and no changes will be done to the reservations
stored in the indoor unit.
3
2
4
5
WEEKLY TIMER OPERATION
[Delete Mode A or Mode B]
1. Press
(WEEKLY) button to select Mode A or Mode B.
(DELETE) button for about 10 seconds while Mode A
or Mode B display
blinks.
After beep sound emitted from indoor unit, reservations for Mode A
or
Mode B will disappear
.
the indoor unit will blink rapidly.
If all reservations in the remote controller were deleted and pressed
(SEND) button, no signal will be
2. Direct the remote controller towards the indoor unit and press
Page 31

– 31 –
ENGLISH
INFO FUNCTION
ƽ By pressing (INFO) button, temperature around remote controller and monthly power consumption
will be displayed on the remote controller.
ƽ After changing the batteries, direct the remote controller towards the indoor unit and press (INFO)
button.
Current calendar and clock will be transmitted from indoor unit.
ƽ In order to receive information from indoor unit, the distance between remote controller and receiver of indoor
units is within 2 meters.
Ƶ To check temperature around remote controller
Ƶ Current calendar and clock can be retrieved
from indoor unit
Ƶ To check monthly power consumption
Press (INFO) button.
Temperature will be displayed for 10 seconds.
Direct the remote controller towards the receiver of indoor unit (within 2
meters in front of indoor unit) and press
(INFO) button. Wait
for 2 seconds for signal transmission.
Once received the current calendar and clock, check whether they
are correct or not by pressing
(CLOCK) button.
ƽ If there is no power supply to indoor unit or calendar and clock
have not been set, INFO function cannot be used for sending or
receiving information.
Direct the remote controller towards the receiver of indoor unit (within 2
meters in front of indoor unit) and press
(INFO) button. Wait
for 2 seconds for signal transmission.
While temperature around remote controller is displayed,press
(INFO) button repeatedly. The display will show as below:
this month power consumption amount for heating
last month
power consumption for heating
this month power consumption
amount for cooling
last month power consumption amount for
cooling
temperature around remote control this month power
consumption amount for heating ...... cyclically.
ƽ If indication is not given, bring remote controller closer to the
receiver of the indoor unit.
ƽ lndicated value shall be regarded as a guide only.
1
NOTE
ƽ In case failure occurs to the air conditioner, by pressing (INFO) button, an error code will
be displayed.
Direct the remote controller towards the receiver of indoor unit (within 2 meters in front of indoor unit)
and press
(INFO) button. Wait for 2 seconds for signal transmission.
An error code will be displayed.
Call service center and inform the error code.
AIR PURIFYS
Page 32

– 32 –
OPERATION MODE LOCK
The remote controller can be set to fix the HEATING mode (including FAN), COOLING mode (including FAN) and
DEHUMIDIFYING mode (including FAN) operations.
Ƶ Method to lock HEATING mode (including FAN) operation.
Press
(ECO) and (POWERFUL) buttons simultaneously for about 5
seconds when the remote controller is OFF.
“
”, “ ” and “ ” will be displayed for about 10 seconds. Later, “ ” and
“
” will remain.
This indicates that HEATING mode operation is locked.
When preesing
(MODE) button, “ ” or “ ” will be displayed.
ƵMethod to unlock HEATING mode (including FAN) operation.
Press
(ECO) and (POWERFUL) buttons simultaneously for about 5
seconds when the remote controller is OFF.
All operation mode symbols will appear on the display for about 10 seconds. After
that, operation mode symbol before cancellation will be displayed.
This indicates that HEATING mode operation is unlocked.
Ƶ Method to lock COOLING and DEHUMIDIFYING modes (including FAN)
operations.
Press
(ECO) and (SILENT) buttons simultaneously for about 5 seconds
when the remote controller is OFF.
“
”, “ ”, “ ” and “ ” will be displayed for about 10 seconds. Later, “ ”
and “
” will remain.
This indicates that COOLING and DEHUMIDIFYING mode operation is locked.
When pressing
(MODE) button, “ ”, “ ” or “ ” will be displayed.
Ƶ Method to unlock COOLING and DEHUMIDIFYING modes (including FAN)
operations.
Press
(ECO) and (SILENT) buttons simultaneously for about 5 seconds
when the remote controller is OFF.
All operation mode symbols will appear on the display for about 10 seconds. After
that, operation mode symbol before cancellation will be displayed.
This indicates that COOLING and DEHUMIDIFYING modes operation is unlocked.
NOTE
ƽ Operation Mode Lock function will not activate if TIMER reservations activate.
TIMER reservations shall be deactivated first. Then, Operation Mode Lock function can be activated.
ƽ HEATING, COOLING and DEHUMIDIFYING mode (including FAN) operations can be unlocked by pressing
the
(RESET) button. However, by pressing the (RESET) button, all the information stored
in the remote controller will disappear. You may need to set the necessary information again.
ƽ For multi connections, unit and mode which is set to lock HEATING and switched on first shall have
higher priority. Other units which are chosen to operate at different modes shall be in STANDBY until
either the first unit operation is switched off or the mode is selected to be same as the first unit.
AIR PURIFYS
AIR PURIFYS
AIR PURIFYS
AIR PURIFYS
Page 33

– 7 –
ENGLISH
Suitable Room Temperature Install curtain or blinds
Ventilation Effective Usage Of Timer
Do Not Forget To Clean The Pre- lter
Please Adjust Suitable Temperature
For Baby And Children
Warning
Freezing temperature
is bad for health and a
waste of electric power.
It is possible
to reduce
heat entering
the room
through
windows.
At night, please use the “OFF or ON timer
operation mode”, together with your wake
up time in the morning. This will enable you
to enjoy a comfortable room temperature.
Please use the timer effectively.
Dusty pre- lter will reduce the air volume
and the cooling ef ciency. To prevent
from wasting electric energy, please clean
the pre- lter every 2 weeks.
Please pay attention to the room temperature
and air ow direction when operating the unit
for baby, children and old folks who have
dif culty in movement.
Caution
Do not close the room for a long period
of time. Occasionally open the door and
windows
to allow the
entrance of
fresh air.
THE IDEAL WAYS OF OPERATION
Page 34

– 8 –
FOR USER’S INFORMATION
The Air Conditioner And The Heat Source In The Room
Not Operating For A Long Time
When Lightning Occurs
Caution
If the amount of heat in the room is above the
cooling capability of the air conditioner (for
example: more people entering the room, using
heating equipments and etc.), the preset room
temperature cannot be achieved.
When the indoor unit is not to be used for a long
period of time, please switch off the power from
the mains. If the power from mains remains
“ON”, the indoor unit still consumes about 8W in
the operation control circuit even if it is in “OFF”
mode.
Warning
To protect the whole unit during lightning, please
stop operating the unit and remove the plug from
the socket.
Interference From Electrical Products
Caution
To avoid noise interference, please place the
indoor unit and its remote controller at least 1m
away from electrical products.
Inverter-type
uorescent
lamp.
TV
To prevent
interference,
place at least
1m away.
OFF
Page 35

– 9 –
ENGLISH
ATTACHING THE AIR PURIFYING FILTERS
1
Open the front panel
O Pull up the front panel by holding it at both sides with
both hands.
2
Remove the pre- lter
O Push upward to release the claws and pull out the
pre- lter.
3
Attaching the air purifying lters
O Attach the air purifying lters to the frame by gently
compress its both sides and release after insertion
into pre- lter frame.
4
Attach the pre- lters
O Attach the pre- lters by ensuring that the surface written
“FRONT” is facing front.
O After attaching the pre- lters, push the front panel at
three arrow portions as shown in gure and close it.
Cleaning and maintenance must be carried out when lter lamp lights. Before cleaning, stop operation
and switch off the power supply.
!
!
CAUTION
Do not bend the air purifying
lter as it may cause damage
to the structure.
Please do not smell direct from
source of lter.
NOTE
O In case of removing the air purifying lters, please follow the above procedures.
O The cooling capacity is slightly weakened and the cooling speed becomes slower when the air purifying
lters are used. So, set the fan speed to "HIGH" when using it in this condition.
O Do not operate the air conditioner without pre- lter. Dust may enter the air conditioner and fault may
occur.
Claws
(4 places)
CAUTION
Page 36

– 10 –
MAINTENANCE
Cleaning and maintenance must be carried out when lter lamp lights. Before cleaning, stop operation and
switch off the power supply.
1. PRE-FILTER
Clean the pre- lter, as it removes dust inside the room. In case the pre- lter is full of dust, the air ow
will decrease and the cooling capacity will be reduced. Further, noise may occur. Be sure to clean the
pre- lter following the procedure below.
!
CAUTION
1
Open the front panel and remove the pre- lter
O Gently lift and remove the air purifying lters
from the air purifying lter frame.
2
Vacuum dust from the pre- lter and air purifying
lter using vacuum cleaner. If there is too much
dust, rinse under running tap water and gently
brush it with soft bristle brush. Allow lters to dry
in shade.
3
O Re-insert the air purifying lter to the lter frame.
Set the pre- lter with “FRONT” mark facing front,
and slot them into the original state.
O After attaching the pre- lters, push the front
panel at three arrow portions as shown in
gure and close it.
O Do not wash with hot water at more than 40°C. The pre- lter may shrink.
O When washing it, shake off moisture completely and dry it in the shade; do not expose it directly to the
sun. The pre- lter may shrink.
PROCEDURE
!
CAUTION
Page 37

– 11 –
ENGLISH
2. Washable Front Panel
O Remove the front panel and wash with clean water.
Wash it with a soft sponge.
After using neutral detergent, wash thoroughly with
clean water.
O When front panel is not removed, wipe it with a soft
dry cloth. Wipe the remote controller thoroughly with
a soft dry cloth.
O Wipe the water thoroughly.
If water remains at indicators or signal receiver of
indoor unit, it causes trouble.
Method of removing the front panel.
Be sure to hold the front panel with both hands to
detach and attach it.
CAUTION
O Do not splash or direct water to the body of the unit when cleaning it as
this may cause short circuit.
O Never use hot water (above 40°C), benzine, gasoline, acid, thinner or a
brush, because they will damage the plastic surface and the coating.
Removing the Front Panel
O When the front panel is fully opened with both
hands, push the right arm to the outside to
release it, and while closing the front panel
slightly, pull it out forward.
Attaching the Front Panel
O Move the projections of the left and right arms
into the Flanges in the unit and securely insert
them into the holes.
Projection
Hole
Flange
Arm
!
Page 38

– 12 –
1
2
3
REGULAR INSPECTION
PLEASE CHECK THE FOLLOWING POINTS BY QUALIFIED SERVICE PERSONNEL EITHER
EVERY HALF YEARLY OR YEARLY. CONTACT YOUR SALES AGENT OR SERVICE SHOP.
Is the earth line disconnected or broken?
Is the mounting frame seriously affected by rust and is the outdoor unit tilted or unstable?
Is the plug of power line rmly plugged into the socket?
(Please ensure no loose contact between them).
Cleaning and maintenance must be carried out only by quali ed service personnel. Before cleaning, stop
operation and switch off the power supply.
3. MAINTENANCE BEFORE LONG OFF PERIOD
O Run the unit by setting the operation mode to (COOL),
the temperature to 32°C and the fan speed to HI for about
half a day on a ne day, and dry the whole of the unit.
O Switch off the power plug.
Air
Blow
Con rm
!
CAUTION
Page 39

– 13 –
ENGLISH
AFTER SALE SERVICE AND WARRANTY
WHEN ASKING FOR SERVICE, CHECK THE FOLLOWING POINTS.
When it does not operate
O Is the fuse all right?
O Is the voltage extremely high or low?
O Is the circuit breaker “ON”?
O Is the setting of operation mode different from other indoor units?
O Is the pre- lter blocked with dust?
O Does sunlight fall directly on the outdoor unit?
O Is the air ow of the outdoor unit obstructed?
O Are the doors or windows opened, or is there any source of heat
in the room?
O Is the set temperature suitable?
O Are the air inlets or air outlets of indoor and outdoor units
blocked?
O Is the fan speed “LOW” or “SILENT”?
CONDITION CHECK THE FOLLOWING POINTS
Notes
O In quiet operation or stopping the operation, the following phenomena may
occassionally occur, but they are not abnormal for the operation.
(1) Slight owing noise of refrigerant in the refrigerating cycle.
(2) Slight rubbing noise from the fan casing which is cooled and then
gradually warmed as operation stops.
O The odor will possibly be emitted from the room air conditioner because the
various odor, emitted by smoke, foodstuffs, cosmetics and so on, sticks to it.
So the pre- lter and the evaporator regularly must be cleaned to reduce the
odor.
O Please contact your sales agent immediately if the air conditioner still fails to operate normally after the above
inspections. Inform your agent of the model of your unit, production number, date of installation. Please also
inform him regarding the fault.
O Power supply shall be connected at the rated voltage, otherwise the unit will be broken or could not reach the
speci ed capacity.
When it does not cool well
When it does not hot well
If the remote controller is
not transmitting a signal.
O Do the batteries need replacement?
O Is the polarity of the inserted batteries correct?
Remote controller
display is dim or blank.)
NOTE:
O If the supply cord is damaged, it must be replaced by the special cord obtainable at authorized service
parts centers.
O On switching on the equipment, particularly when the room light is dimmed, a slight brightness uctuation
may occur. This is of no consequence.
The conditions of the local Power Supply Companies are to be observed.
Page 40

– 14 –
MEMO
......................................................................................................................................................................................
......................................................................................................................................................................................
......................................................................................................................................................................................
......................................................................................................................................................................................
......................................................................................................................................................................................
......................................................................................................................................................................................
......................................................................................................................................................................................
......................................................................................................................................................................................
......................................................................................................................................................................................
......................................................................................................................................................................................
......................................................................................................................................................................................
......................................................................................................................................................................................
......................................................................................................................................................................................
......................................................................................................................................................................................
......................................................................................................................................................................................
......................................................................................................................................................................................
......................................................................................................................................................................................
......................................................................................................................................................................................
......................................................................................................................................................................................
......................................................................................................................................................................................
......................................................................................................................................................................................
......................................................................................................................................................................................
......................................................................................................................................................................................
......................................................................................................................................................................................
......................................................................................................................................................................................
......................................................................................................................................................................................
......................................................................................................................................................................................
......................................................................................................................................................................................
......................................................................................................................................................................................
......................................................................................................................................................................................
......................................................................................................................................................................................
......................................................................................................................................................................................
......................................................................................................................................................................................
......................................................................................................................................................................................
......................................................................................................................................................................................
......................................................................................................................................................................................
......................................................................................................................................................................................
......................................................................................................................................................................................
......................................................................................................................................................................................
Page 41

– 15 –
DEUTSCH
SPLIT-KLIMAANLAGE
INNENGERÄT/AUSSENGERÄT
MODELL
RAK-50PXA / RAC-50WXA
AUSSENGERÄT INNENGERÄT
RAC-50WXA
RAK-50PXA
Page 42

– 16 –
SICHERHEITSHINWEISE
O Lesen Sie die folgenden Sicherheitshinweise sorgfältig durch, bevor Sie das Gerät in Betrieb nehmen, um eine ordnungsgemäße
Verwendung sicherzustellen.
O Achten Sie besonders auf mit Warnung und Vorsicht gekennzeichnete Hinweise. Wenn mit „Warnung“ gekennzeichnete Hinweise
nicht strengstens beachtet werden, kann dies schwere oder tödliche Verletzungen zur Folge haben. Wenn mit „Vorsicht“ gekennzeichnete
Hinweise nicht ordnungsgemäß beachtet werden, kann dies schwerwiegende Folgen haben. Bitte beachten Sie alle Anweisungen
genauestens, um die Sicherheit zu gewährleisten.
O Die Symbole haben folgende Bedeutung:
VORSICHTSMASSNAHMEN FÜR DEN BETRIEB
O Vermeiden Sie im Interesse Ihrer Gesundheit direkte Zugluft über einen längeren Zeitraum.
W
A
R
N
U
N
G
!
O Stecken Sie keine Gegenstände (Finger, Stangen usw.) in den Lufteinlass oder -auslass. Da der Lüfter
mit hoher Drehzahl rotiert, kann dies zu Verletzungen führen. Stellen Sie vor dem Reinigen sicher, dass
das Gerät ausgeschaltet ist und der Trennschalter auf AUS gestellt wurde.
O Verwenden Sie keinen Leiter als Sicherungsdraht, da dies zu einem tödlichen Unfall führen könnte.
VORSICHTSMASSNAHMEN FÜR DEN TRANSPORT UND FÜR WARTUNGSARBEITEN
O
Bei ungewöhnlichen Vorkommnissen (wie Brandgeruch) nehmen Sie das Gerät außer Betrieb und schalten den
Trennschalter aus. Wenden Sie sich an Ihren Händler. Wenn Sie das Gerät bei ungewöhnlichen Vorkommnissen
weiter betreiben, kann es zu Störungen, Kurzschlüssen oder einem Brand kommen.
O
Wenden Sie sich an Ihren Händler, um Wartungsarbeiten durchführen zu lassen. Unsachgemäße Wartungsarbeiten
durch den Gerätebesitzer können zu Stromschlägen und einem Brand führen.
O
Wenden Sie sich an Ihren Händler, wenn das Gerät entfernt oder neu installiert werden muss. Wenn Sie das Gerät
selbst unsachgemäß entfernen und neu installieren, kann es zu Stromschlägen oder einem Brand kommen.
O
Wenn das Netzkabel beschädigt ist, muss es durch das spezielle Kabel ersetzt werden, das bei autorisierten
Service- bzw. Ersatzteilzentren erhältlich ist.
W
A
R
N
U
N
G
!
O
Trennen Sie das Gerät während eines Gewitters von der Stromversorgung und schalten
Sie den Trennschalter aus.
WARNUNG
VORSICHTSMASSNAHMEN FÜR DIE INSTALLATION
O
Versuchen Sie nicht, das Gerät selbst zusammenzubauen.
Wenn Sie das Gerät selbst zusammenbauen, kann es zu Wasserlecks, Störungen, Kurzschlüssen oder einem
Brand kommen.
O
Beauftragen Sie Ihren Händler oder einen quali zierten Techniker mit der Installation des Geräts. Wenn Sie
das Gerät selbst installieren, kann es zu Wasserlecks, Störungen, Kurzschlüssen oder einem Brand kommen.
O
Schließen Sie das Erdungskabel an.
Verlegen Sie das Erdungskabel nicht in der Nähe von Wasser- oder Gasleitungen, Blitzableitern oder dem
Erdungskabel des Telefons. Unsachgemäße Installation des Erdungskabels kann zu Stromschlägen führen.
O
Verwenden Sie ausschließlich die angegebenen Leitungen für R410A. Die Verwendung anderer Leitungen
kann Defekte an den Kupferleitungen oder Störungen zur Folge haben.
O
Es muss ein Trennschalter installiert werden, der für den Montageort geeignet ist. Ohne Trennschalter besteht
Stromschlaggefahr.
O
Installieren Sie das Gerät nicht in der Nähe von Orten, an denen sich entzündbare Gase be nden. Das
Außengerät kann in Brand geraten, wenn entzündbare Gase in seiner Nähe entweichen.
O
Stellen Sie bei der Installation des Ab ussschlauchs einen gleichmäßigen Wasser uss sicher.
O
Installieren Sie das Innengerät nicht in Werkstätten oder Küchen, in denen Ölnebel oder Dunst in das Gerät
eindringen kann. Das Öl lagert sich am Wärmetauscher ab, reduziert hierdurch die Leistung und kann die
Kunststoffbauteile des Geräts verformen oder im schlimmsten Fall zerstören.
VORSICHT
!
!
O
Sprühdosen und andere brennbare Materialien dürfen nicht in einem Abstand von weniger als 1 Meter
von den Luftauslässen der Innen- und Außengeräte abgestellt werden.
Die Erhöhung des Innendrucks einer Sprühdose durch heiße Luft kann zu Rissen und Beschädigungen
führen.
Stellen Sie sicher, dass ein Erdungskabel angeschlossen ist.
Das abgebildete Symbol weist auf ein Verbot hin.
Dieses Symbol weist darauf hin, dass die Anweisungen
beachtet werden müssen.
Page 43

– 17 –
DEUTSCH
VORSICHTSMASSNAHMEN FÜR DEN BETRIEB
O Versuchen Sie nicht, das Gerät mit nassen Händen zu bedienen – es besteht
Lebensgefahr.
O Wenn Sie das Gerät bei gleichzeitigem Gebrauch von Brennstoffen betreiben,
lüften Sie den Raum regelmäßig, um eine ausreichende Sauerstoffzufuhr zu
gewährleisten.
O Richten Sie die kalte Luftströmung aus der Luftaustrittsblende nicht direkt auf Geräte
zum Heizen und zur Warmwasserbereitung (z. B. Wasserkocher, Ofen), da sie dadurch
in ihrer Funktion beeinträchtigt werden können.
O Verwenden Sie keine Aerosole oder Haarspray in der Nähe des Innengeräts.
Die chemische Substanz kann sich an den Wärmetauscherrippen anlagern und den
Verdampfer-Wasserdurch uss zur Ab usswanne blockieren. Das Wasser tropft dann
auf den Querstromlüfter und läuft aus dem Innengerät heraus.
O Überprüfen Sie regelmäßig, dass der Anbaurahmen für das Außengerät sicher
befestigt und nicht beschädigt ist. Andernfalls könnte das Außengerät herunterfallen
und eine Gefahr darstellen.
O
Achten Sie beim Reinigen des Geräts darauf, dass kein Wasser auf das Gerätegehäuse
tropft oder in das Gehäuse eindringt, da es sonst zu einem Kurzschluss kommen kann.
O Wenn das Gerät bei geöffneten Türen und/oder Fenstern betrieben wird (bei einer Luftfeuchtigkeit im Raum
von über 80 %) und der Luftde ektor für eine längere Zeit nach unten weist oder sich automatisch bewegt,
kondensiert Wasser am Luftde ektor und tropft gelegentlich herunter. Damit Ihre Einrichtung nicht feucht
wird, vermeiden Sie derartige Betriebsbedingungen über einen längeren Zeitraum.
O Wenn die Temperatur im Raum die Kühl- bzw. Heizleistung des Geräts übersteigt (z. B. wenn sich mehrere
Personen im Raum aufhalten, zusätzliche Heizgeräte verwendet werden usw.), kann die voreingestellte
Raumtemperatur nicht erreicht werden.
O
Dieses Gerät sollte nicht von Kindern oder Personen mit eingeschränkten körperlichen oder mentalen
Fähigkeiten bedient werden, es sei denn, sie wurden von einer verantwortlichen Person in der sicheren
Bedienung des Geräts unterwiesen und werden angemessen beaufsichtigt.
O Achten Sie darauf, dass Kinder nicht mit dem Gerät spielen.
O Stellen Sie sich nicht auf das Außengerät und stellen Sie keine Gegenstände
darauf ab.
O Schalten Sie beim Reinigen das Gerät und den Trennschalter aus, da der
Hochgeschwindigkeitslüfter im Gerät ein Verletzungsrisiko darstellt.
O Schalten Sie den Trennschalter aus, wenn das Gerät für einen längeren Zeitraum
nicht verwendet wird.
V
O
R
S
I
C
H
T
O Das Produkt muss entsprechend der Herstellerspezi kation bedient werden und
ist für keine sonstigen Verwendungszwecke vorgesehen.
O Stellen Sie keine Wasserbehälter (wie z. B. eine Vase) auf das Innengerät, um zu
vermeiden, dass Wasser in das Gerät eindringt. Tropfwasser kann die Geräteisolierung
beschädigen und zu einem Kurzschluss führen.
O Stellen Sie keine P anzen direkt unter den Luftstrom, da die Zugluft den
P anzen schadet.
Page 44

– 18 –
INNENGERÄT
BEZEICHNUNGEN UND FUNKTIONEN DER EINZELNEN TEILE
BEZEICHNUNG UND ABMESSUNGEN DES MODELLS
Q Bewegliche Blende
O Sie wird im Klimaanlagenbetrieb automatisch geöffnet und wieder geschlossen, wenn die Klimaanlage
nicht mehr genutzt wird. Vermeiden Sie mechanische Änderungen der Blendenstellung, da diese den
Blendenmechanismus beschädigen können.
O Berühren Sie die bewegliche Blende nicht während des Betriebs, da Sie sich dabei die Finger einklemmen
könnten.
AUSSENGERÄT
Ab ussleitung
Kondenswasserab uss nach außen
Verbindungsleitung und Rohrisolierung für
Leitungen
Lufteinlass (Rückseite, rechte und linke Seite)
Luftauslass
MODELL BREITE (mm) HÖHE (mm)
TIEFE (mm)
RAK-50PXA 795 295
198
RAC-50WXA 792 600 299
Elektrischer Staubabscheider
Es werden negativ geladene Ionen erzeugt, um jegliche
Schmutz- und Staubpartikel aus der Luft zu entfernen.
LUFTREINIGUNGSFILTER
Vor lter
Verhindert das Eindringen von Staub in das Innengerät.
FRONTBLENDE
BEWEGLICHE BLENDE
Sie ist im Klimaanlagenbetrieb geöffnet und wird geschlossen, wenn die Klimaanlage nicht genutzt wird.
(Es kann vorkommen, dass die Blende auch im Betriebsmodus geschlossen ist.)
HORIZONTALER DEFLEKTOR
O
VERTIKALER
DEFLEKTOR (LUFTAUSLASS)
ANZEIGEN DES INNENGERÄTS
Leuchten, die den Betriebszustand anzeigen.
FERNBEDIENUNG
Sendet ein Betriebssignal an das Innengerät für den
Betrieb des gesamten Geräts.
(Siehe Anleitung für Fernbedienung)
O Luftreinigungs lter und Filter mit lufterfrischender Funktion können gewaschen und bis zu 20 Mal
wiederverwendet werden, indem sie mit einem Staubsauger oder durch Abspülen unter ießendem Wasser
gereinigt werden. Die Typennummer für diesen Luftreinigungs lter lautet <SPX-CFH22>. Bitte geben Sie
diese Nummer an, wenn Sie einen neuen Luftreinigungs lter bestellen möchten.
O Der Luftreinigungs lter sollte jeden Monat gereinigt werden bzw. früher, falls er sich merklich zugesetzt hat.
Bei Dauergebrauch kann der Luftreinigungs lter seine lufterfrischende Funktion verlieren. Für eine optimale
Leistung sollte er je nach Anforderung der unterschiedlichen Anwendungen einmal pro Jahr ausgetauscht
werden.
HINWEIS
Page 45

– 19 –
DEUTSCH
FILTER-LAMPE
Wenn das Gerät eine Gesamtbetriebsdauer von ca. 200 Stunden
erreicht hat, leuchtet die FILTER-Lampe auf und zeigt dadurch an,
dass der Filter gereinigt werden muss. Die Lampe erlischt, wenn
die Taste
(AUTOMATIK-SCHWINGKLAPPE) gedrückt wird,
während sich das Gerät im STANDBY-MODUS befi ndet.
BETRIEBSANZEIGE
Diese Anzeige leuchtet während des Betriebs auf.
In den folgenden Fällen blinkt die BETRIEBSANZEIGE beim Heizbetrieb:
(1) Während des Vorheizens
Für die Dauer von ca. 2 bis 3 Minuten nach dem Starten
(2) Während des Entfrosterbetriebs
Die Entfrostung wird etwa einmal pro Stunde
durchgeführt, wenn sich Frost auf dem Wärmetauscher
des Außengeräts bildet. Die Entfrostungsdauer beträgt
jeweils ca. 5 bis 10 Minuten.
SIGNALEMPFÄNGER
TIMER-LAMPE
Diese Lampe leuchtet, wenn der Timer in Betrieb ist.
MANUELLER EIN-/AUSSCHALTER
Mit diesem Schalter können Sie das Gerät ein- bzw. ausschalten, wenn die Fernbedienung nicht funktioniert.
O Wenn Sie den manuellen Ein-/Ausschalter drücken, wird das Gerät im zuvor eingestellten Betriebsmodus gestartet.
O Wenn der Betrieb über den manuellen Ein-/Ausschalter gestartet wird, nachdem die Stromzufuhr unterbrochen und dann
wiederhergestellt wurde, läuft das Gerät im Automatikbetrieb.
T
T
T
T
Frontblende
Bewegliche Blende
Hand grip point
O Frontblende anheben
Hier anfassen
O Halten Sie die bewegliche Blende nicht fest
(weder wenn die Frontblende geöffnet noch
wenn sie geschlossen ist)
1. Öffnen der Frontblende
O Versuchen Sie in keinem Fall, die bewegliche Blende mit Gewalt von Hand zu öffnen.
Das manuelle Öffnen oder Schließen der beweglichen Blende kann zu Störungen führen. (Die bewegliche Blende wird
automatisch geöffnet und geschlossen, wenn die Stromversorgung ein- bzw. ausgeschaltet wird oder das Gerät in
Betrieb ist bzw. angehalten wird.)
BETRIEBSANZEIGE
ANZEIGEN DES INNENGERÄTS
!
VORSICHT
Page 46

– 20 –
2. Schließen der Frontblende
O Wenn die Frontblende nicht fest eingesetzt ist, kann sich die Blende
lösen und herunterfallen.
O Vermeiden Sie zusätzliche Kraftanwendung auf die Frontblende, wenn
sie in aufrechter Position geöffnet ist.
Auch ein häu ges Entfernen der Frontblende von der Frontabdeckung
kann Schäden verursachen.
Hinweis
O Im Folgenden sehen Sie die empfohlenen Temperaturen für die Sicherheitsprüfungen:
O Blende nach unten drücken. O Drücken Sie zunächst auf der rechten und linken
Seite gegen die Frontblende und schließlich in der
Mitte, bis ein Klicken zu hören ist.
!
VORSICHT
Kühlbetrieb Heizbetrieb
Minimal Maximal Minimal Maximal
Innen
Trockenkugel (°C) 21 32 20 27
Feuchtkugel (°C) 15 23 12 19
Außen
Trockenkugel (°C) 21 43 2 21
Feuchtkugel (°C) 15 26 1 15
Page 47

DEUTSCH
– 47 –
VOR DEM BETRIEB
■ So bauen Sie die Batterien ein
■
So befestigen Sie die Fernbedienungshalterung an der Wand
1. Schieben Sie die Abdeckung nach unten, um sie
abzunehmen.
2. Legen Sie zwei trockene Alkaline-Batterien (AAA,
LR03) ein.
Die Batterien müssen wie in der Darstellung im
Gehäuse ausgerichtet eingesetzt werden.
3. Bringen Sie die Abdeckung in der ursprünglichen
Position an.
1. Wählen Sie einen Ort aus, an dem die Signale das Gerät
erreichen.
2. Befestigen Sie die Fernbedienungshalterung mit den im
Lieferumfang enthaltenen Schrauben an der Wand, einer Säule
oder einem ähnlichen Ort.
3. Setzen Sie die Fernbedienung in die Halterung ein.
HINWEIS
Hinweise zu den Batterien
● Verwenden Sie beim Austauschen der Batterien denselben
Typ und ersetzen Sie beide Batterien gleichzeitig.
● Nehmen Sie die Batterien aus dem Gerät, wenn Sie es über
einen längeren Zeitraum nicht verwenden.
● Die Lebensdauer der Batterien beträgt ungefähr ein Jahr. Sollten
innerhalb eines Jahres jedoch die Fernbedienungsanzeige
und der Empfang schwächer werden, ersetzen Sie beide
Batterien durch neue Alkaline-Batterien (AAA, LR03).
● Die im Lieferumfang enthaltenen Batterien dienen der
erstmaligen Inbetriebnahme des Systems.
Die Lebensdauer dieser Batterien kann je nach
Herstellungsdatum der Klimaanlage sehr kurz sein.
Hinweise zur Fernbedienung
● Setzen Sie die Fernbedienung niemals direkter
Sonneneinstrahlung aus.
● Durch Staub auf dem Signalgeber oder dem Empfänger wird
die Leistungsfähigkeit beeinträchtigt. Entfernen Sie Staub
mit einem weichen Tuch.
●
Die Signalübertragung wird unter Umständen deaktiviert, wenn
sich im selben Raum eine Leuchtstof ampe mit elektronischem
Starter (z. B. Wechselrichter-Glühlampen) be ndet. Wenden
Sie sich in einem solchen Fall an den Fachhändler.
●
Sollten die Fernbedienungssignale von einem anderen Gerät
empfangen werden, stellen Sie das entsprechende Gerät an
einem anderen Ort auf, oder wenden Sie sich an den Fachhändler.
● Wenn die Fernbedienung nicht verwendet wird, schließen
Sie die Abdeckung, um Fehlfunktionen zu vermeiden.
Fernbedienung
Schrauben
Fernbedienungshalterung
Page 48

– 48 –
VOR DEM BETRIEB
■
So stellen Sie den Kalender und die Uhr ein
1. Drücken Sie auf (RESET-Taste), wenn Sie
erstmalig die Zeit einstellen. Die „Jahr“-Anzeige blinkt.
2. Drücken Sie die Taste
(ZEIT) zum Einstellen des
aktuellen Jahrs.
3. Drücken Sie auf
(UHRZEIT-Taste). Die
Anzeigen „Tag“ und „Monat“ blinken.
4. Drücken Sie die Taste
(ZEIT) zum Einstellen des
aktuellen Tags und des Monats.
5. Drücken Sie auf
(UHRZEIT-Taste). Die Anzeige
„UHRZEIT“ blinkt.
6. Drücken Sie die Taste
(ZEIT) zum Einstellen der
aktuellen Uhrzeit.
7. Drücken Sie auf
(UHRZEIT-Taste).
Der Kalender und die Uhrzeit sind nun korrekt eingestellt.
Um Änderungen am Kalender oder der Uhrzeit vorzunehmen,
drücken Sie
(UHRZEIT-Taste).
Führen Sie anschließend die Schritte 1 bis 7 durch.
Kalender und Uhrzeit müssen nach dem Austauschen der
Batterien neu eingestellt werden.
Nach dem Batteriewechsel:
1. Drücken Sie auf
(RESET-Taste).
2. Richten Sie die Fernbedienung auf das Innengerät, und
drücken Sie die
(INFO)-Taste.
3. Der Kalender und die Uhrzeit des Innengeräts werden
übertragen.
■ Der Kalender und die Uhrzeit des Innengeräts werden
in den folgenden Fällen nicht übertragen:
● Es kommt zu einem Stromausfall.
● Der Trennschalter wurde vom Benutzer abgeschaltet
(Gerät be ndet sich nicht im STANDBY-MODUS).
HINWEIS
Hinweis zum Einstellen von Kalender und Uhrzeit
● Wenn der Kalender und die Uhrzeit nicht eingestellt werden, können auch der Ein- und Ausschalt-Timer
sowie der Wochen-Timer nicht eingestellt werden.
● Wenn der Kalender und die Uhrzeit nicht korrekt eingestellt werden, funktionieren der Ein- und Ausschalt-
Timer sowie der Wochen-Timer nicht einwandfrei.
● Wenn der EIN- und AUS-Timer sowie der Wochen-Timer eingestellt sind, können die Einstellungen für den
Kalender und die Uhrzeit nicht geändert werden. Wenn Sie die Einstellungen für den Kalender und die Uhrzeit
ändern möchten, müssen Sie zunächst den EIN- und AUS-Timer sowie den Wochen-Timer löschen.
Page 49

DEUTSCH
– 49 –
BEZEICHNUNGEN UND FUNKTIONEN DER FERNBEDIENUNG
FERNBEDIENUNG
● Hiermit wird der Betrieb des Innengeräts gesteuert. Die Reichweite der Fernbedienung beträgt etwa 7 Meter.
Wird die Innenraumbeleuchtung elektronisch gesteuert, kann die Reichweite der Fernbedienung kürzer sein.
Dieses Gerät kann mit der bereitgestellten Halterung an der Wand montiert werden. Stellen Sie vor der
Montage sicher, dass das Innengerät über die Fernbedienung gesteuert werden kann.
● Gehen Sie umsichtig mit der Fernbedienung um. Die Signalübertragung kann beeinträchtigt werden, wenn
sie fallen gelassen oder feucht wird.
● Wenn neue Batterien in die Fernbedienung eingelegt werden, dauert es etwa 10 Sekunden, bis das Gerät
auf Befehle reagiert und angesteuert werden kann.
● Wird die Fernsteuerung im ausgeschalteten Zustand für ca. 3 Minuten nicht genutzt (angezeigt durch
in der Anzeige), wird die LCD-Anzeige deaktiviert.
● Nach dem Einstellen der Uhrzeit wird die LCD-Anzeige innerhalb von ca. zehn Minuten abgeschaltet,
wenn die Fernbedienung nicht verwendet wird.
● Die LCD-Anzeige wird eingeschaltet, sobald Sie eine beliebige Taste drücken.
● Die LCD-Anzeige wird nicht abgeschaltet, während Sie den TIMER einstellen.
Fenster zum Übertragen/
Empfangen von Signalen
Richten Sie dieses Infrarotfenster auf
das Innengerät, um es zu steuern.
Sensor
Die Umgebungstemperatur wird
durch einen Temperatursensor
in der Fernbedienung erfasst.
Display
Auf dem Display
werden die gewählte
Raumtemperatur, die
aktuelle Uhrzeit, der
Timer-Status, die Funktion
und die ausgewählte
Luftstromrate angezeigt.
Tasten zum Einstellen der
RAUMTEMPERATUR
Drücken Sie diese Tasten, um die
Raumtemperatur einzustellen.
Drücken Sie auf [
], um die
Raumtemperatur zu erhöhen.
Drücken Sie auf [
], um die
Raumtemperatur zu senken.
Bei gedrückter Taste ändert sich
der Wert schneller.
ECO-Taste
Mit dieser Taste stellen Sie den
ECO-Modus ein. (
S. 59)
START/STOPP-Taste
Drücken Sie diese Taste, um
das Gerät einzuschalten. Durch
erneutes Drücken wird das Gerät
ausgeschaltet.
LÜFTERDREHZAHLAUSWAHLTaste
Hiermit wird die Lüfterdrehzahl
festgelegt. Wenn Sie diese Taste
drücken, wird die Luftstromrate wie
folgt geändert:
(AUTO) ➞
(HOCH) ➞ (MITTEL) ➞
(GERING) ➞ (LEISE) (Mit
dieser Taste können Sie die optimale
oder bevorzugte Lüfterdrehzahl für
jeden Betriebsmodus einstellen).
Übertragungssymbol
Das Übertragungssignal leuchtet
auf, wenn ein Signal gesendet wird.
Page 50

– 50 –
BETRIEBSARTWÄHLER
AUTO
HEIZEN
ENTFEUCHTEN
KÜHLEN
LÜFTER
LÜFTERDREHZAHL
AUTO
GERÄUSCHARM
NIEDRIG
MITTEL
HOCH
START/STOPP
ECO
Vorsichtsmaßnahmen bei der Verwendung
●
Schützen Sie die Fernbedienung vor:
● direkter Sonneneinstrahlung
● unmittelbarer Einwirkung eines Heizgeräts
●
Gehen Sie umsichtig mit der Fernbedienung um. Lassen Sie sie nicht fallen und schützen Sie sie vor Wasser.
●
Nachdem das Außengerät angehalten wurde, startet es erst nach etwa 3 Minuten wieder (sofern Sie
es nicht über den Netzschalter aus- und wieder einschalten bzw. das Netzkabel abziehen und dann
wieder einstecken).
Das dient zum Schutz des Geräts und weist nicht auf einen Fehler hin.
●
Wenn Sie die MODUSAUSWAHL-Taste während des Betriebs drücken, wird das Gerät zu seinem
Schutz etwa 3 Minuten lang angehalten.
POWERFUL-Taste
Mit dieser Taste stellen Sie
den POWERFUL-Modus ein.
( S. 57)
INFO-Taste
(
S. 71)
ONE-TOUCH-CLEAN-Taste
(
S. 61)
TIMER EIN/AUS-Einstelltasten
(
S. 62)
MODUSAUSWAHL-Taste
Mit dieser Taste wählen Sie den
Betriebsmodus aus. Wenn Sie
diese Taste drücken, wird der
Modus wie folgt geändert:
(AUTO) ➞ (HEIZEN) ➞
(ENTFEUCHTEN) ➞ (KÜHLEN)
und ➞ (VENTILATOR) (in
wiederkehrender Reihenfolge).
GERÄUSCHARM-Taste
Mit dieser Taste stellen Sie den
GERÄUSCHARM-Modus ein.
(
S. 58)
AUTOMATIK-SCHWINGKLAPPENTaste (vertikal)
Legt den Winkel für den horizontalen
Luftde ektor fest. ( S. 56)
AUTOMATIK-SCHWINGKLAPPEN-
Taste (horizontal)
Legt den Winkel für den vertikalen
Luftde ektor fest. (
S. 56)
WOCHEN-TIMER-Einstelltasten
(
S. 65)
LEAVE-HOME-Taste
(
S. 60)
BEZEICHNUNGEN UND FUNKTIONEN DER FERNBEDIENUNG
ECO-RUHE-TIMER-Taste
Mit dieser Taste stellen Sie den
ECO-Ruhe-Timer ein. (
S. 63)
LÜFTER
POWERFUL
GERÄUSCHARM
INFO
BETRIEBSZEIT-TIMER
AUTO-SCHWING (VERTIKAL)
LEAVE HOME
SAUBER
TAG
PROGRAMMNR.
TIMER EIN/AUS
UHRZEIT
OK
LÖSCHEN
KOPIEREN/EINFÜGEN
STORNIEREN
SENDEN
UHRZEIT
LUFTREINIGUNGSSCHALTER
LUFTREINIGUNGSSCHALTER
Verwenden Sie diesen Schalter, um
die Luftreinigungsfunktion zu starten.
(p.56)
Page 51

DEUTSCH
– 32 –
AUTOMATIKBETRIEB
Das Gerät bestimmt den Betriebsmodus (HEIZEN oder KÜHLEN) automatisch anhand der aktuellen
Raumtemperatur. Der gewählte Betriebsmodus ändert sich, wenn sich die Raumtemperatur ändert. Der
Betriebsmodus ändert sich jedoch nicht, wenn das Innengerät mit einem Außengerät der Multi-Bauart verbunden ist.
VERSCHIEDENE FUNKTIONEN
■ Automatische Neustartfunktion
● Bei einem Stromausfall wird das Gerät automatisch im vorherigen Betriebsmodus und mit der vorherigen Luftstromrichtung
neu gestartet, wenn die Stromversorgung wiederhergestellt ist.
(Da das Gerät nicht über die Fernbedienung angehalten wurde.)
● Wenn der Betrieb nach Wiederherstellung der Stromversorgung nicht fortgesetzt werden soll, schalten Sie die
Stromversorgung aus.
Wenn Sie den Trennschalter einschalten, wird das Gerät automatisch im vorherigen Betriebsmodus und mit der
vorherigen Luftstromrichtung neu gestartet.
Hinweis: 1. Wenn Sie die Automatische Neustartfunktion nicht benötigen, wenden Sie sich bitte an Ihren Fachhändler.
2. Die automatische Neustartfunktion ist im Timer- und Betriebszeit-Timer-Modus nicht verfügbar.
■
Da die Einstellungen im Speicher der Fernbedienung abgelegt werden,
müssen Sie beim nächsten Mal nur die
(START/STOPP)-Taste drücken.
Drücken Sie die Auswahltaste MODE, sodass die Anzeige den
Betriebsmodus
(AUTO) darstellt.
● Bei Auswahl von AUTO ermittelt das Gerät den Betriebsmodus
(HEIZEN oder KÜHLEN) automatisch anhand der aktuellen
Raumtemperatur. Der Betriebsmodus ändert sich jedoch nicht,
wenn das Innengerät mit einem Außengerät der Multi-Bauart
verbunden ist.
● Wenn der vom Gerät automatisch gewählte Modus Ihnen
nicht zusagt, können Sie die Moduseinstellung (HEIZEN,
ENTFEUCHTEN, KÜHLEN oder LÜFTER) manuell ändern.
Drücken Sie zur Auswahl von AUTO, HOCH, MITTEL, NIEDRIG oder
LEISE die
(LÜFTERDREHZAHL)-Taste.
Drücken Sie die Taste
(START/STOPP).
Bei Betriebsstart wird ein Signalton ausgegeben.
Drücken Sie die Taste erneut, um das Gerät anzuhalten.
Stellen Sie die gewünschte Raumtemperatur über die TEMPERATUR-
Tasten ein (die Einstellung wird auf dem Display angezeigt).
Die Temperatureinstellung und die tatsächliche Raumtemperatur
können je nach Bedingungen abweichen.
START
STOPP
Stellen Sie die gewünschte Ventilatordrehzahl mit der Taste
(VENTILATORDREHZAHL) ein (die Einstellung wird angezeigt).
(AUTO) (HOCH) (MITTEL)
(GERÄUSCHARM) (NIEDRIG)
– 51 –
Page 52

– 52 –
HEIZBETRIEB
● Verwenden Sie das Gerät zum Heizen, wenn die Außentemperatur unter 21°C liegt.
Wenn die Außentemperatur zu hoch ist (über 21°C), funktioniert die Heizfunktion möglicherweise nicht,
um das Gerät zu schützen.
● Verwenden Sie dieses Gerät ab einer Außentemperatur von -15°C, um einen langfristig zuverlässigen
Gerätebetrieb zu gewährleisten.
Drücken Sie die MODUSAUSWAHL-Taste, damit auf dem Display
der Betriebsmodus (HEIZEN) angezeigt wird.
Stellen Sie die gewünschte LÜFTERDREHZAHL über die Taste
(LÜFTERDREHZAHL) ein (die Einstellung wird auf dem Display
angezeigt).
(AUTO) (HOCH) (MITTEL)
(GERÄUSCHARM) (NIEDRIG)
Stellen Sie die gewünschte Raumtemperatur über die TEMPERATURTasten ein (die Einstellung wird auf dem Display angezeigt).
Die Temperatureinstellung und die tatsächliche Raumtemperatur
können je nach Bedingungen abweichen.
Drücken Sie die Taste
(START/STOPP). Zu Beginn des
Heizbetriebs wird ein Signalton ausgegeben. Drücken Sie die Taste
erneut, um das Gerät anzuhalten.
■
Da die Einstellungen im Speicher der Fernbedienung abgelegt werden,
müssen Sie beim nächsten Mal nur die
(START/STOPP)-Taste drücken.
■ Im Modus AUTO ändert sich die Lüfterdrehzahl wie folgt automatisch:
● Bei einem großen Unterschied zwischen Raumtemperatur und eingestellter
Temperatur läuft der Lüfter mit der Drehzahleinstellung HOCH an.
● Erreicht die Raumtemperatur den eingestellten Wert, wird die
Lüfterdrehzahl verringert, um die optimale Raumtemperatur für ein
gesünderes Heizen beizubehalten.
START
STOPP
Die Entfrostung wird etwa einmal pro Stunde durchgeführt, wenn sich Frost auf dem Wärmetauscher des
Außengeräts bildet. Die Entfrostungsdauer beträgt jeweils ca. 5 bis 10 Minuten.
Beim Entfrosten blinkt die Betriebsanzeige im folgenden Muster: 3 Sekunden ein, 0,5 Sekunden aus.
Die maximale Dauer für den Entfrosterbetrieb beträgt 20 Minuten.
Besteht jedoch eine Verbindung zwischen dem Innengerät und einem Außengerät der Multi-Bauart, beträgt
die maximale Betriebsdauer für den Entfrosterbetrieb 15 Minuten.
(Wenn eine längere Leitung als gewöhnlich verwendet wird, steigt die Wahrscheinlichkeit der Frostbildung.)
Entfrosten
Page 53

DEUTSCH
– 53 –
ENTFEUCHTERBETRIEB
■ Entfeuchterfunktion
● Wenn die Raumtemperatur über der Temperatureinstellung liegt: Das Gerät entfeuchtet den Raum und kühlt
die Raumtemperatur auf den voreingestellten Wert.
Wenn die Raumtemperatur unter der Temperatureinstellung liegt: Das Entfeuchten erfolgt bei einer
Temperatureinstellung, die etwas unter der aktuellen Raumtemperatur liegt. Dabei spielt es keine Rolle,
welche Temperatur eingestellt ist.
● Je nach Anzahl der Personen im Raum oder anderen Raumbedingungen wird die eingestellte Raumtemperatur
möglicherweise nicht erreicht.
Stellen Sie die gewünschte Raumtemperatur über die
RAUMTEMPERATUR-Einstelltasten ein (die Einstellung wird auf
dem Display angezeigt).
Für den Entfeuchterbetrieb sollte die Raumtemperatur
zwischen 20 und 26°C liegen.
Drücken Sie die Taste (START/STOPP). Zu Beginn des
Entfeuchterbetriebs wird ein Signalton ausgegeben. Drücken Sie
die Taste erneut, um das Gerät anzuhalten.
■ Da die Einstellungen im Speicher der Fernbedienung abgelegt werden, müssen Sie beim nächsten Mal nur die
(START/STOPP)-
Taste drücken.
START
STOPP
Drücken Sie die Auswahltaste MODE, sodass in der Anzeige
(ENTFEUCHTEN) erscheint.
Die Einstellung für die Lüfterdrehzahl ist NIEDRIG.
Drücken Sie die Taste (LÜFTERDREHZAHL), um LEISE oder
GERING auszuwählen.
Verwenden Sie das Gerät zum Entfeuchten, wenn die Raumtemperatur über 16 °C liegt.
Unter 15 °C steht die Entfeuchterfunktion nicht zur Verfügung.
Page 54

– 54 –
KÜHLBETRIEB
Verwenden Sie das Gerät zum Kühlen, wenn die Außentemperatur zwischen -10 und 43 °C liegt.
Wenn die Luftfeuchtigkeit im Raum sehr hoch ist (80 %), kann sich Kondensat am Luftauslassgitter des Innengeräts bilden.
Drücken Sie die Auswahltaste MODE, sodass in der Anzeige
(KÜHLEN) erscheint.
■
Da die Einstellungen im Speicher der Fernbedienung abgelegt werden,
müssen Sie beim nächsten Mal nur die
(START/STOPP)-Taste drücken.
■ Im Modus AUTO ändert sich die Lüfterdrehzahl wie folgt automatisch:
● Bei einem großen Unterschied zwischen Raumtemperatur und
eingestellter Temperatur läuft der Lüfter mit der Drehzahleinstellung
HOCH an.
● Wenn die Raumtemperatur die voreingestellte Temperatur erreicht
hat, wird die Lüfterdrehzahl gesenkt, um eine optimale Raumtemperatur für eine natürliche, gesunde Kühlung zu erreichen.
START
STOPP
Stellen Sie die gewünschte Ventilatordrehzahl mit der Taste
(VENTILATORDREHZAHL) ein (die Einstellung wird angezeigt).
(AUTO) (HOCH) (MITTEL)
(GERÄUSCHARM) (NIEDRIG)
Stellen Sie die gewünschte Raumtemperatur über die TEMPERATURTasten ein (die Einstellung wird auf dem Display angezeigt).
Die Temperatureinstellung und die tatsächliche Raumtemperatur
können je nach Bedingungen abweichen.
Drücken Sie die Taste
(START/STOPP). Zu Beginn des
Kühlbetriebs wird ein Signalton ausgegeben. Drücken Sie die
Taste erneut, um das Gerät anzuhalten. Die Kühlfunktion wird
nicht gestartet, wenn die Temperatureinstellung über der aktuellen
Raumtemperatur liegt (auch wenn die BETRIEBSANZEIGE
leuchtet). Der Kühlbetrieb wird gestartet, sobald der Benutzer eine
Temperatureinstellung unter der aktuellen Raumtemperatur wählt.
Page 55

DEUTSCH
– 55 –
LÜFTERBETRIEB
Der Benutzer kann das Gerät einfach als Luftumwälzungsventilator verwenden.
START
STOPP
Drücken Sie die MODUSAUSWAHL-Taste, damit auf dem
Display der Betriebsmodus
(LÜFTER) angezeigt wird.
Stellen Sie die gewünschte LÜFTERDREHZAHL über die (LÜFTERDREHZAHL)Taste ein. (Die Einstellung wird auf dem Display angezeigt.)
Drücken Sie die (START/STOPP)-Taste. Zu Beginn des
Lüfterbetriebs wird ein Signalton ausgegeben. Drücken Sie die
Taste erneut, um das Gerät anzuhalten.
1
2
(AUTO) (HOCH) (MITTEL)
(GERÄUSCHARM) (NIEDRIG)
Page 56

– 56 –
Beim Kühlbetrieb,
Entfeuchten
etwa 15°
etwa 45°
Vertikal
Vertical
etwa 60°
etwa 30°
LUFTREINIGUNGSSCHALTER BETRIEBS
Negative Ionen werden von der Plasmaelektrode im Außengerät erzeugt. Staub, Schimmel und Ge'?**+*#
AIR PURIFYS
Zum Starten des LUFTREINIGUNGSSCHALTER Betriebs
Drücken Sie die Taste (LUFTREINIGUNGSSCHALTER) während
des Betriebs.
“ ” wird auf der LCD-Anzeige angezeigt.
Zum Abbrechen des LUFTREINIGUNGSSCHALTER Betriebs
Drücken Sie die (START/STOPP) Taste.Oder
Drücken Sie die Taste
(LUFTREINIGUNGSSCHALTER) noch einmal.
“ ” wird auf der LCD-Anzeige angezeigt.
LUFTSTROM RICHTIG EINSTELLEN
So starten Sie vertikales automatisches Schwingen
AIR PURIFYS
Drücken Sie die (AUTOMATISCHES SCHWINGEN (VERTIKAL))
#""$?#
wird auf der LCD-Anzeige angezeigt.
So brechen Sie vertikales automatisches Schwingen ab
Drücken Sie die (AUTOMATISCHES SCHWINGEN (VERTIKAL))
#""$Q#
wird nicht mehr auf dem LCD-Display angezeigt.
HINWEIS
+J@__|__"$
?Q
(beim vertikalen automatischen Schwingen). Dies kann zur Bildung
*J?"$#
Einstellen der klimatisierten Luft nach links und rechts.
Den horizontalen Luftreflektor gemäß Abbildung halten und
verstellen, um die klimatisierte Luft nach links und rechts zu
verstellen.
Beim Heizungsbetrieb
Page 57

DEUTSCH
– 57 –
POWERFUL-BETRIEB
● Durch Drücken der (POWERFUL)-Taste während des Modus AUTO, HEIZEN, ENTFEUCHTEN,
KÜHLEN oder LÜFTER läuft die Klimaanlage mit maximaler Kraft.
●
Im POWERFUL-Modus gibt das Innengerät in den Modi KÜHLEN oder HEIZEN kalte bzw. warme Luft ab.
■ So wird der POWERFUL-Modus gestartet
■ So wird der POWERFUL-Modus beendet
●
Drücken Sie während des Betriebs auf (POWERFUL-Taste).
„ “ wird auf dem LCD-Display angezeigt.
POWERFUL-Modus endet in 20 Minuten. Anschließend nimmt
das Gerät den Betrieb mit den Einstellungen auf, die vor dem
POWERFUL-Modus verwendet wurden.
● Drücken Sie die Taste (START/STOPP). Oder
● Drücken Sie erneut auf (POWERFUL-Taste).
Der POWERFUL-Modus wird beendet.
„ “ wird nicht mehr auf dem LCD-Display angezeigt.
HINWEIS
● Beim Auswählen von Betriebszeit-, ECO-, Geräuscharm- oder LEAVE-HOME-Modus wird der POWERFUL-
Betrieb beendet.
● Im POWERFUL-Modus wird die Kapazität der Klimaanlage nicht erhöht,
– wenn das Gerät bereits die maximale Kapazität ausschöpft.
– bevor der Entfrostungsbetrieb aufgenommen wird (wenn die Klimaanlage im HEIZEN-Modus läuft).
● Nach dem automatischen Neustart wird der POWERFUL-Modus beendet und die vorangegangene
Betriebsart wieder aufgenommen.
● Bei Verbindungen mit mehreren Modellen funktioniert der POWERFUL-Modus je nach Betriebsbedingungen
möglicherweise nicht.
Page 58

– 58 –
GERÄUSCHARMER BETRIEB
● Durch Drücken der (GERÄUSCHARM)-Taste im Modus AUTO, HEIZEN, ENTFEUCHTEN, KÜHLEN
oder LÜFTER wird die Lüfterdrehzahl zu sehr niedrig geändert.
■ So wird der GERÄUSCHARM-Modus gestartet
■ So wird der GERÄUSCHARM-Modus beendet
● Drücken Sie während des Betriebs auf (GERÄUSCHARM-
Taste).
„
“ wird auf dem LCD-Display angezeigt. Die Lüfterdrehzahl
ist sehr niedrig.
● Drücken Sie die (START/STOPP)-Taste. Oder
● Drücken Sie die Taste (LEISE) erneut oder die Taste
(LÜFTERDREHZAHL).
Der Betrieb kehrt vor dem Beginn des GERÄUSCHARM-Modus
zur vorangegangenen Lüfterdrehzahl zurück.
Der GERÄUSCHARM-Modus wird beendet.
„ “ wird nicht mehr auf dem LCD-Display angezeigt.
HINWEIS
● Beim Auswählen des POWERFUL-Modus wird der GERÄUSCHARM-Modus beendet. Vor dem Beginn
des GERÄUSCHARM-Modus kehrt die Lüfterdrehzahl zur vorangegangenen Lüfterdrehzahl zurück.
● Nach dem automatischen Neustart wird der GERÄUSCHARM-Modus abgebrochen. Vor dem Beginn
des GERÄUSCHARM-Modus kehrt die Lüfterdrehzahl zur vorangegangenen Lüfterdrehzahl zurück.
● Während des Betriebs mit der Lüfterdrehzahl (GERÄUSCHARM), wird beim Drücken von
(GERÄUSCHARM-Taste) die Lüfterdrehzahl nicht geändert.
Page 59

DEUTSCH
– 59 –
ECO-BETRIEB
Der ECO-Modus stellt eine Energiesparfunktion dar, da die eingestellte Temperatur automatisch geändert und
der maximale Stromverbrauch reduziert wird.
● Durch Drücken auf (ECO-Taste) im AUTO-, HEIZEN-,
ENTFEUCHTEN- oder KÜHLEN-Betrieb läuft die Klimaanlage
im „ECO“-Modus.
■ So wird der ECO-Modus gestartet
■ So wird der ECO-Modus beendet
● Drücken Sie während des Betriebs auf (ECO-Taste).
„
“ wird auf dem LCD-Display angezeigt.
Im Energiesparmodus wird zunächst die eingestellte Temperatur
automatisch erhöht oder gesenkt und der Stromverbrauch reduziert.
Diese Funktion kann je nach verbundenem Außengerät variieren.
● Drücken Sie die Taste (START/STOPP). Oder
● Drücken Sie erneut auf (ECO-Taste).
„ “ wird nicht mehr auf dem LCD-Display angezeigt.
HINWEIS
● Die ECO-Funktion wird nicht genutzt, wenn der Stromverbrauch niedrig ist.
● Durch Drücken auf die (POWERFUL)-Taste wird der ECO-Modus beendet.
● Nach dem automatischen Neustart wird der ECO-Modus beendet und der vorangegangene Modus
wiederaufgenommen.
● Bei Verbindungen mit mehreren Modellen wird der Energiesparbetrieb ausschließlich durch das
automatische Erhöhen oder Senken der eingestellten Temperatur geändert. Die Effektivität des ECOModus hängt jedoch von den Betriebskonditionen ab.
Page 60

– 60 –
LEAVE-HOME (LH)-MODUS
Verhindern Sie, dass die Raumtemperatur zu stark fällt, indem Sie die Temperatur automatisch auf 10°C einstellen, wenn niemand zuhause ist.
Dieser Modus kann mit den Einstellungen „Durchgehender Betrieb“ oder „Tage-Timer-Betrieb“ betrieben werden. Bitte verwenden Sie „Tage-Timer-
Betrieb“, um die Anzahl der Tage auf bis zu 99Tage zu erhöhen.
■ So wird der LEAVE-HOME-Modus gestartet
Option 1. Durchgehender Betrieb.
● Drücken Sie während des Betriebs auf (LEAVE-HOME-Taste).
Die Raumtemperatureinstellung beträgt 10 °C und der Heizvorgang beginnt.
„
“, „ “, „ “, „ “ wird auf dem LCD-Display angezeigt.
Option 2. Tage-Timer-Betrieb.
● Drücken Sie während des Betriebs auf (LEAVE-HOME-Taste).
Die Raumtemperatureinstellung beträgt 10 °C und der Heizvorgang beginnt.
„ “, „ “, „ “, „ “ wird auf dem LCD-Display angezeigt.
● Stellen Sie ggf. die Anzahl der Betriebstage (1 bis 99 Tage) ein.
Drücken Sie die Taste
(ZEIT), um die Anzahl der Tage auszuwählen.
Die Anzahl der Tage blinkt.
* Drücken Sie die Taste „
(AUFWÄRTS)“, um die Anzahl der Tage um je
einen Tag zu erhöhen. 98 Tage, 99 Tage, 1 Tag usw.
* Drücken Sie die Taste „
(ABWÄRTS)“, um die Anzahl der Tage um je einen
Tag zu verringern. 3 Tage, 2 Tage, 1 Tag, 99 Tage usw.
* Die Tag wird gezählt, wenn die Uhr 0:00 anzeigt.
● Drücken Sie die Taste (SENDEN), um die Anzahl der Betriebstage zu
bestätigen. Die Anzeige für die Anzahl an Betriebstagen hört auf zu blinken.
● Drücken Sie auf (STORNIEREN-Taste), um die Anzahl an Betriebsta-
gen zurückzusetzen oder durchgehenden Betrieb auszuwählen.
■ So wird der LEAVE-HOME-Modus beendet
● Drücken Sie die Taste (START/STOPP). Oder
● Drücken Sie erneut auf (LEAVE-HOME-Taste).
Kehren Sie zur vorherigen Betriebsart zurück. Oder
●
Wechseln Sie durch Drücken der Taste (MODUS) zu einem anderen Betriebsmodus.
HINWEIS
● Wenn die Anzahl an Betriebstagen für Leave Home erreicht wird oder Sie die (Leave Home)-Taste erneut drücken, wird die Einheit im
vorangegangenen Modus betrieben.
● Im Leave-Home-Modus können die Lüfterdrehzahl und die Position des horizontalen Luftde ektors nicht geändert werden.
● Durch Drücken der (Leave Home)-Taste wird die Verwendung von Wochen-Timer oder Einmal-Timer beendet.
● Nach einem Stromausfall werden nach dem automatischen Neustart alle Einstellungen für die Anzahl an Betriebstagen zurückgesetzt, und
das Gerät läuft im durchgehenden Betrieb.
● Wenn bei mehreren Verbindungen in jedem Raum ein anderer Betriebsmodus verwendet wird, z.B. NUR LÜFTER, KÜHLEN, ENTFEUCHTEN
oder AUTO, kann der Leave-Home-Modus zwar eingestellt, aber nicht betrieben werden.
Um den Leave-Home-Modus starten zu können, muss der Betrieb in allen Räumen beendet werden. Drücken Sie anschließend die (LEAVE
HOME)-Taste, um den Leave Home-Modus zu starten.
● Wenn bei mehreren Verbindungen für jeden Raum der HEIZEN-Modus ausgewählt wurde, kann der Leave Home-Modus durch Drücken der
(LEAVE HOME)-Taste gestartet werden.
● Wenn bei mehreren Verbindungen für in mindestens zwei Räumen der Leave-Home-Modus ausgewählt wurde, kann die voreingestellte
Temperatur von 10°C unter Umständen nicht erreicht werden. Dies hängt zudem von der Außentemperatur ab.
● Der POWERFUL-, GERÄUSCHARM- und ECO-Modus ist im Leave-Home-Modus nicht möglich.
Durchgehender Betrieb
Tage-Timer-Betrieb
Page 61

DEUTSCH
– 61 –
SAUBER (ONE-TOUCH-CLEAN)-MODUS
Trocknen des Wärmetauschers innen nach dem Kühlen, um Schimmel vorzubeugen.
■ So wird der SAUBER-Modus gestartet
■ So wird der SAUBER-Modus beendet
● Drücken Sie die (SAUBER)-Taste, wenn die Einheit ausgeschaltet
ist.
Die für den One-Touch-Clean-Modus erforderliche Zeit beträgt 60 Minuten.
Während dieses Vorgangs sind die Modi HEIZEN und LÜFTER aktiv.
Im One-Touch-Clean-Modus blinkt die Betriebsanzeige.
„ “, „ “ wird auf dem LCD-Display angezeigt.
● Drücken Sie die Taste (START/STOPP). Oder
● Drücken Sie erneut auf (SAUBER-Taste).
HINWEIS
● Nach dem Ende des SAUBER-Modus wird das Gerät automatisch abgeschaltet.
● Wenn der Wochen-Timer oder der Einmal-Timer eingestellt ist, müssen sie vor dem Ausführen der SAUBER-Funktion beendet
werden.
● Wenn Sie bei mehreren Verbindungen die (REINIGEN)-Taste drücken, wird der Betrieb auf den Modus LÜFTER beschränkt.
● Wenn bei mehreren Verbindungen in einem Raum zunächst die SAUBER-Funktion ausgeführt wird, können in den anderen
Räumen die Modi KÜHLEN, ENTFEUCHTEN oder LÜFTER genutzt werden. Wenn in den anderen Räumen jedoch der Modus
HEIZEN eingesetzt werden muss, arbeitet die Klimaanlage im STANDBY-Modus. Nach Abschluss des Modus REINIGEN wird der
Modus HEIZEN gestartet.
Page 62

– 62 –
TIMER-BETRIEB (TIMER EIN/AUS)
Sie können das Gerät so einrichten, dass es zu einer vorgegebenen Uhrzeit ausgeschaltet wird.
1. Drücken Sie die Taste (AUS-TIMER). und blinken im Display.
2. Stellen Sie die Abschaltzeit mit der Taste
(ZEIT) ein.
3. Richten Sie die Fernbedienung nach dem Einstellen auf das Innengerät, und drücken Sie die
(SENDEN)-Taste.
und „Uhrzeit einstellen“ leuchten auf, anstatt zu blinken.
Es ertönt ein Signalton über das Innengerät, und die (TIMER)-Lampe des Innengeräts
leuchtet auf.
EINSCHALT-TIMER
Das Gerät wird zu den vorgegebenen Uhrzeiten eingeschaltet.
1. Drücken Sie auf
(AUSSCHALT-TIMER-Taste). und blinken auf dem
Display.
2. Stellen Sie die Aktivierungszeit mit der Taste (ZEIT) ein.
3. Richten Sie die Fernbedienung nach dem Einstellen auf das Innengerät, und drücken Sie die
(SENDEN)-Taste.
und die voreingestellte Uhrzeit leuchten auf, anstatt zu blinken.
Es ertönt ein Signalton über das Innengerät, und die (TIMER)-Lampe des Innengeräts leuchtet auf.
TIMER EIN/AUS
● Das Gerät wird zu den vorgegebenen Uhrzeiten ein- und ausgeschaltet (bzw. aus- und einge-
schaltet).
● Das Umschalten erfolgt zuerst zu der eingestellten Uhrzeit, die am frühesten eintritt.
● Das Pfeilsymbol, das auf dem Display erscheint, gibt die Reihenfolge der Umschaltvorgänge
an.
1. Drücken Sie die Taste
(AUS-TIMER), sodass und im Display blinken.
2. Stellen Sie die Abschaltzeit mit der Taste
(ZEIT) ein. Richten Sie die Fernbedienung nach
dem Einstellen auf das Innengerät, und drücken Sie die
(SENDEN)-Taste.
3. Drücken Sie auf
(EINSCHALT-TIMER-Taste), sodass und die voreingestellte
Ausschaltzeit au euchten.
und blinken.
4. Stellen Sie die Aktivierungszeit mit der Taste
(ZEIT) ein.
5. Richten Sie die Fernbedienung nach dem Einstellen auf das Innengerät, und drücken Sie die
(SENDEN)-Taste.
und die eingestellte Einschaltzeit leuchten auf, anstatt zu blinken.
Es ertönt ein Signalton über das Innengerät, und die (TIMER)-Lampe des Innengeräts leuchtet auf.
■ Der Timer kann auf drei Arten verwendet werden: AUS-Timer, EIN-Timer und EIN/AUS (AUS/EIN)-
Timer. Stellen Sie zuerst die aktuelle Uhrzeit ein, da diese als Bezugspunkt verwendet wird.
■ So stornieren Sie eine Reservierung
● Richten Sie das Infrarotfenster der Fernbedienung auf das Innengerät und drücken (STORNIEREN-Taste).
und die eingestellte Aktivierungs- oder Abschaltzeit erlöschen mit einem akustischen Signal, und die Leuchte (TIMER) an der Raumeinheit erlischt.
HINWEIS
● Der Benutzer kann nur jeweils einen Timer-Modus festlegen: den AUS-Timer, den EIN-Timer oder den EIN/AUS-Timer.
● Wenn bei bereits eingestelltem WOCHEN-TIMER zusätzlich der EINMAL-TIMER aktiviert wird, hat der EINMAL-TIMER Priorität. Wenn der Betrieb
des EINMAL-TIMER abgeschlossen wurde, wird der WOCHEN-TIMER aktiviert.
AUSSCHALT-TIMER
Page 63

DEUTSCH
– 63 –
ECO-RUHE-TIMER-MODUS
Der Timer kann auf bis zu 7 Stunden eingestellt werden.
Wenn Sie die
(RUHE)-Taste während des Modus AUTO, HEIZEN, ENTFEUCHTEN, KÜHLEN oder LÜFTER drücken, schaltet die
Einheit die Raumtemperatur um und reduziert die Lüfterdrehzahl. Dies führt zu Energieeinsparungen.
Stellen Sie die aktuelle Uhrzeit ein, bevor Sie den ECO-RUHE-TIMER verwenden.
■ Starten des ECO-RUHE-TIMERS
■ So brechen Sie den ECO-RUHE-TIMER ab
Drücken Sie während des Betriebs die Taste (RUHE).
● „ ”, „ ”, „ ”, AUS, Deaktivierungszeit, „ ” und die
Stunde werden auf dem Display der Fernbedienung angezeigt.
● Bei aktiviertem ECO-RUHE-TIMER dreht sich der Lüfter sehr langsam.
● Die Raumeinheit gibt einen Signalton aus, und die Leuchte (TIMER) an der
Raumeinheit leuchtet auf.
Drücken Sie wiederholt die
(RUHE)-Taste. Die Stunden werden wie
folgt geändert:
● Bei aktivem ECO-RUHE-TIMER wird die Klimaanlage für die angegebene
Anzahl von Stunden weiter betrieben und dann ausgeschaltet.
● Wurde der ECO-RUHE-TIMER eingestellt, zeigt das Display der
Fernbedienung die Abschaltzeit an.
Drücken Sie die Taste
(START/STOPP).
● Die Raumklimaanlage wird ausgeschaltet.
Drücken Sie erneut die
(RUHE)-Taste, bis „ ”, „ ”,
„
”, Deaktivierungszeit, „ ” und die Stunde auf dem Display der
Fernbedienung erlöschen.
Drücken Sie die Taste
(ABBRECHEN).
● Das Innengerät gibt einen Signalton aus, und die (TIMER)-Leuchte am
Innengerät wird deaktiviert.
● Der RUHE-TIMER wird deaktiviert.
Beispiel: Wird der ECO-RUHETIMER um 18 Uhr auf eine
Stunde eingestellt, erfolgt die
Deaktivierung um 19 Uhr.
1 h 2 h 3 h 7 h
RUHE-TIMER aus
SWING
Page 64

– 64 –
ECO-RUHE-TIMER-MODUS
■ So stellen Sie ECO-RUHE-TIMER und EIN-TIMER ein
■ So brechen Sie ECO-RUHE-TIMER und EIN-TIMER ab
Die Klimaanlage wird durch den ECO-RUHE-TIMER deaktiviert und durch den EIN-TIMER aktiviert.
1. Stellen Sie den EIN-TIMER ein.
2. Drücken Sie die
(RUHE)-Taste, und stellen Sie den ECO-RUHE-TIMER ein.
Richten Sie die Fernbedienung auf das Innengerät, und drücken Sie die
(ABBRECHEN)-Taste.
● „ ”, „ ”, „ ”, AUS, Deaktivierungszeit, „ ”, Stunde, EIN und Einstellzeit des EIN-TIMERS erlöschen auf
dem Display der Fernbedienung.
● Das Innengerät gibt einen Signalton aus, und die (TIMER)-Leuchte am Innengerät wird deaktiviert.
● ECO-RUHE-TIMER- und EIN-TIMER-Reservierungen werden abgebrochen.
30 Minuten nach dem Einstellen des ECO-RUHE-TIMERS wird die Drehzahl des Außenlüfters verringert, um die Geräuschentwicklung
zu minimieren und für Komfortbetrieb zu sorgen.
Eine Stunde nach Einstellen des ECO-RUHE-TIMERS wird die Einstelltemperatur leicht verändert. Der Umfang dieser Veränderung
variiert je nach Art der Klimaanlage.
Diese automatischen Änderungen tragen zur Energieersparnis bei und beeinträchtigen den Komfort nicht.
Das Niveau des Energieverbrauchs variiert je nach Außentemperatur, Raumtemperatur, Einstelltemperatur oder Art der Klimaanlage.
Kühlbetrieb [Diagrammdarstellung
nur zur Illustration]
Beispiel:
In diesem Fall wird die Klimaanlage in zwei Stunden (um 1:38 Uhr) aus- und um 6 Uhr
am nächsten Morgen wieder eingeschaltet.
HINWEIS
● Wird der ECO-RUHE-TIMER eingestellt, wenn der AUS-TIMER oder der EIN-/AUS-TIMER bereits eingestellt sind, wird der ECO-
RUHE-TIMER anstelle des AUS- oder EIN-/AUS-TIMERS aktiv.
Heizbetrieb [Diagrammdarstellung
nur zur Illustration]
Temperatur
30 Minuten
Außenventilator
Drehzahlverringerung
Außenventilator
Drehzahlverringerung
Ändern der
Temperatur
1 h
Temperatur
30 Minuten
Ändern der
Temperatur
1 h
Page 65

DEUTSCH
– 65 –
● Sie können Modus A oder Modus B auswählen. Für jeden Modus können pro Tag bis zu 6Programme eingestellt werden. Insgesamt
können maximal 42Programme für eine Woche für jeden Modus eingestellt werden.
● Werden Kalender und Uhr nicht eingestellt, kann die Reservierungseinstellung für den WOCHEN-TIMER nicht vorgenommen werden.
● Werden Kalender und Uhr nicht richtig eingestellt, funktioniert der WOCHEN-TIMER nicht korrekt.
● Die Reservierung für Kalender und Uhr muss vor der Aktivierung des WOCHEN-TIMERS de niert werden.
WOCHEN-TIMER-BETRIEB
■ So stellen Sie einen WOCHEN-TIMER ein
1. Wählen Sie Modus A oder Modus B aus.
Drücken Sie die Taste (WÖCHENTLICH). leuchtet auf. und
blinken in der Anzeige. (Modus A ist ausgewählt).
Drücken Sie die Taste (WÖCHENTLICH) erneut. und blinken in der
Anzeige. (Modus B ist ausgewählt).
● Wurde keine Reservierung vorgenommen, erscheinen ON/OFF, , .
●
Wurde eine Reservierung vorgenommen, erscheinen EIN/AUS, , nicht.
2. Stellen Sie ein Programm ein.
Halten Sie die Taste (WÖCHENTLICH) für ca. drei Sekunden gedrückt. Der
Auswahlmodus kann geändert werden.
, Tag: Monat, Programmnummer: 1, EIN/AUS, Einstellungszeit und
Einstellungstemperatur blinken in der Anzeige.
3. Wählen Sie den gewünschten Wochentag aus.
Drücken Sie die (TAG)-Taste.
Der Tag wechselt von Mon
Die Mit Don Fre Sam Son Mon, Die,
Mit, Thu, Fre, Sam, Son [Ganze Tage] Mon, Die, Mit, Don, Fre [Wochentag] Sam,
Son [Wochenende] Mon Die ......
Wählen Sie [Ganze Tage] für eine tägliche Reservierung.
Wählen Sie [Wochentag] für eine Reservierung von Montag bis Freitag.
Wählen Sie [Wochenende] für eine Reservierung am Samstag und Sonntag.
● Nach dem Einstellen der Reservierung können Sie die Werte gleichzeitig prüfen und
bearbeiten.
4. Drücken Sie die Taste
, um eine Programmnummer auszuwählen.
Die Nummer wechselt zwischen 1
2 3 4 5 6 1 2 .....
● Wurde die Programmnummer eingestellt, führen Sie die oben angegebenen Schritte
aus, um Änderungen vorzunehmen.
1
2
Schritt 1: Stellen Sie den Reservierungsplan für die Fernbedienung ein. Senden Sie die eingetragene
Reservierung an die Raumeinheit, und aktivieren Sie diese.
Schritt 2: Wählen Sie Modus A oder Modus B, und aktivieren oder deaktivieren Sie den WOCHEN-TIMER.
Schritt 3: Kopieren und Abbrechen des Reservierungsplans
Schritt 1: Stellen Sie den Reservierungsplan für die Fernbedienung ein. Senden Sie die
eingetragene Reservierung an die Raumeinheit, und aktivieren Sie diese.
3
4
Page 66

– 66 –
5. Drücken Sie die Taste
(EIN-AUS-TIMER), um EIN-TIMER oder AUS-TIMER
auszuwählen.
6. Drücken Sie die Taste
(ZEIT), um die Zeitreservierung einzustellen.
7. Drücken Sie die Taste (TEMP oder ), um die Temperaturreservierung einzustellen.
8. Drücken Sie die Taste (OK). Die Reservierungen sind eingestellt. Tag,
Programmnummer, EIN-Reservierung und Einstelltemperatur leuchten auf.
blinkt
fortlaufend. Ist die Reservierung nicht vollständig, werden die Einstellungen nicht im
Speicher abgelegt.
Wenn Sie die Reservierung fortsetzen möchten, drücken Sie die Tasten
.
Führen Sie die Schritte 3 bis 8 für die Reservierung aus.
9. Wurden alle Reservierungen eingestellt, drücken Sie die
(SENDEN)-Taste ca. drei
Sekunden lang, während Sie die Fernbedienung auf das Innengerät richten. Die TimerLeuchte an der Raumeinheit blinkt schnell.
Gibt die Raumeinheit einen Signalton aus, leuchtet die TIMER-Leuchte.
Stellen Sie sicher, dass die TIMER-Leuchte leuchtet.
Dies zeigt an, dass die Reservierung in der Raumeinheit gespeichert und dass die
Timer-Funktion abgeschlossen wurde.
Der Reservierungsinhalt erscheint auf dem Display der Fernbedienung.
●
Leuchtet die TIMER-Leuchte am Innengerät nicht auf, richten Sie die Fernbedienung auf
das Innengerät, und drücken Sie die (SENDEN)-Taste ca. drei Sekunden lang.
● ACHTUNG! Drücken Sie während der Reservierungseinstellung nicht die Taste
(ABBRECHEN), da damit alle Reservierungsinhalte verloren gehen.
● Die Reservierungsinhalte werden erst dann in der Raumeinheit gespeichert, wenn
die Taste (SENDEN) gedrückt wurde.
5
6
7
8
9
HINWEIS
● Sie können bis zu sechs Programme pro Tag einrichten. Die Einstellungen für EIN- und AUS-TIMER je Programmnummer können
beliebig gewählt werden. Wenn Sie die (SENDEN)-Taste drücken, werden EIN- und AUS-Timer je Programmnummer
so angeordnet, dass Programm 1 den frühesten und Programm 6 den spätesten Zeitpunkt erhält.
Ist die Einstellzeit gleich, erhalten die neuesten Reservierungsinhalte Priorität.
● ACHTUNG! Wird die Fernbedienung innerhalb von drei Minuten nach dem Einstellen der Reservierungen nicht genutzt und
die
(SENDEN)-Taste in dieser Zeit nicht gedrückt, gehen alle aktuellen Reservierungen verloren.
WÖCHENTLICHER TIMER-BETRIEB
Page 67

DEUTSCH
– 67 –
■ Auswählen von Modus A oder B des WÖCHENTLICHEN TIMERS
1. Drücken Sie die Taste
(WÖCHENTLICH). und blinken in der Anzeige. (In
der Regel blinkt Modus A zuerst.)
2.
Drücken Sie die Taste (WÖCHENTLICH) erneut. und blinken in der Anzeige.
3. Wählen Sie Modus A oder Modus B aus. Halten Sie die Fernbedienung in Richtung des
Innengeräts, und drücken Sie die (SENDEN)-Taste ca. drei Sekunden lang. Die
Timer-Leuchte an der Raumeinheit blinkt schnell.
Gibt die Raumeinheit einen Signalton aus, leuchtet die TIMER-Leuchte.
Stellen Sie sicher, dass die Timer-Leuchte au euchtet.
Dies zeigt an, dass die Auswahl von Modus A oder B und der aktive WÖCHENTLICHE
TIMER bestätigt wurden.
■ Einstellen des nicht aktiven WÖCHENTLICHEN TIMERS
1. Richten Sie die Fernbedienung auf das Innengerät, und drücken Sie die
(ABBRECHEN)-Taste.
Die Raumeinheit gibt einen Signalton aus, und die TIMER-Leuchte erlischt. Die
Reservierungsanzeige auf der Fernbedienung erlischt ebenfalls.
Dies weist darauf hin, dass der nicht aktive WÖCHENTLICHE TIMER bestätigt wurde.
● Wenn Sie den WÖCHENTLICHEN TIMER wieder aktivieren möchten, wiederholen
Sie die Schritte unter „Auswählen von Modus A oder B der Einstellung für den
WÖCHENTLICHEN TIMER“.
HINWEIS
● Beim Einstellen des EINMAL-TIMERS wird der WÖCHENTLICHE TIMER unterbrochen. Nach Abschluss des EINMAL-TIMERS wird
der WÖCHENTLICHE TIMER aktiviert.
● Wird der EINMAL-TIMER abgebrochen, wird auch der WÖCHENTLICHE TIMER abgebrochen. Der WÖCHENTLICHE TIMER muss
zur Aktivierung eingestellt werden.
● Nach dem automatischen Neustart wird der WÖCHENTLICHE TIMER abgebrochen. Der WÖCHENTLICHE TIMER muss zur Aktivierung
eingestellt werden.
1
2
1
WOCHEN-TIMER-BETRIEB
Schritt 2: Wählen Sie Modus A oder Modus B, und aktivieren oder deaktivieren Sie den
WOCHEN-TIMER.
3
Page 68

– 68 –
■ Kopieren und Einfügen
Das Bearbeiten der Reservierungsplanung wird durch das Kopieren von Daten von einem
zum anderen Tag vereinfacht.
1. Drücken Sie die Taste
(WÖCHENTLICH), um Modus A oder B auszuwählen.
2. Drücken Sie die Taste
(WÖCHENTLICH) für ca. drei Sekunden, um mit der
Bearbeitung des Reservierungsplans zu beginnen.
3. Drücken Sie die Taste
(TAG), um den zu kopierenden Wochentag auszuwählen.
4. Drücken Sie die Taste (KOPIEREN/EINFÜGEN). Anschließend blinkt „EINFÜGEN“
im Display.
* Drücken Sie die Taste
(ABBRECHEN), um den Modus KOPIEREN abzubrechen.
Der normale Einstellungsmodus wird aktiviert.
5. Drücken Sie die Taste (TAG), um einen Wochentag zum Einfügen auszuwählen.
6. Drücken Sie die Taste (KOPIEREN/EINFÜGEN) erneut. Nur blinkt im Display.
7. Wenn Sie mit dem Kopieren von Daten in andere Tage fortfahren möchten, drücken Sie
oder oder oder .
Beginnen Sie dann ab Schritt 3.
8. Drücken Sie nach dem Abschluss von Kopieren und Einfügen drei Sekunden lang die
(SENDEN)-Taste. Richten Sie dabei die Fernbedienung auf das Innengerät. Die
Timer-Leuchte an der Raumeinheit blinkt schnell.
Wenn die Raumeinheit einen Signalton ausgibt, leuchtet die TIMER-Leuchte auf.
Stellen Sie sicher, dass die Timer-Leuchte au euchtet.
Leuchtet die TIMER-Leuchte nicht auf, drücken Sie erneut die Taste
(SENDEN).
● Die Reservierungsdaten werden nicht geändert, wenn die Taste (SENDEN) nicht
gedrückt wird.
Schritt 3: Kopieren und Abbrechen des Reservierungsplans
HINWEIS
● Liegen keine Reservierungsdaten vor, können keine Daten von einem Tag zum anderen kopiert werden.
1
2
3
4
5
6
8
WOCHEN-TIMER-BETRIEB
Page 69

DEUTSCH
– 69 –
Schritt 3: Kopieren und Abbrechen des Reservierungsplans
■ Löschen der WÖCHENTLICHEN TIMER-Daten.
[Löschen einer Programmnummerreservierung]
1. Drücken Sie die Taste
(WÖCHENTLICH), um Modus A oder B auszuwählen.
2. Drücken Sie die Taste (WÖCHENTLICH) drei Sekunden lang, um mit der Bearbeitung des Reservierungsplans zu beginnen.
3. Drücken Sie die Taste
(TAG), um einen Wochentag zur Bearbeitung auszuwäh-
len.
4. Drücken Sie die Taste , um die Programmnummer auszuwählen. Die ausgewählte Programmnummer blinkt.
5. Drücken Sie die Taste
(LÖSCHEN). Die Reservierung aller Programmnummern
wird gelöscht.
6. Drücken Sie nach dem Löschen drei Sekunden lang die (SENDEN)-Taste. Richten
Sie dabei die Fernbedienung auf das Innengerät. Die Timer-Leuchte an der Raumeinheit
blinkt schnell.
Gibt die Raumeinheit einen Signalton aus, leuchtet die TIMER-Leuchte.
Stellen Sie sicher, dass die TIMER-Leuchte au euchtet.
●
Die Reservierung wird nicht geändert, wenn die Taste (SENDEN) nicht gedrückt wird.
1
2
3
4
5
6
WOCHEN-TIMER-BETRIEB
Page 70

– 70 –
Schritt 3: Kopieren und Abbrechen des Reservierungsplans
[Löschen einer Tagesreservierung]
1. Drücken Sie die Taste (WÖCHENTLICH), um Modus A oder B auszuwählen.
2. Drücken Sie die Taste
(WÖCHENTLICH) drei Sekunden lang, um mit der
Bearbeitung des Reservierungsplans zu beginnen.
3. Drücken Sie die Taste
(TAG), um einen Wochentag zur Bearbeitung auszuwählen.
4. Drücken Sie die Taste (LÖSCHEN) ca. zehn Sekunden lang. Die Reservierungen
für alle Programmnummern werden gelöscht.
●
Wenn Sie die Taste nur kurz drücken, wird die Reservierung für eine Programmnummer
gelöscht.
5. Drücken Sie nach dem Löschen drei Sekunden lang die (SENDEN)-Taste. Richten
Sie dabei die Fernbedienung auf das Innengerät. Die Timer-Leuchte an der Raumeinheit
blinkt schnell.
Gibt die Raumeinheit einen Signalton aus, leuchtet die TIMER-Leuchte.
Stellen Sie sicher, dass die TIMER-Leuchte au euchtet.
●
Die Reservierung wird nicht geändert, wenn die Taste (SENDEN) nicht gedrückt wird.
1
1
2
HINWEIS
● Nach Löschen aller Reservierungen in der Fernbedienung und Drücken der (SENDEN)-Taste, wird kein Signal an das
Innengerät gesendet. Die TIMER-Leuchte bleibt aus, und die Reservierungen in der Raumeinheit werden nicht geändert.
3
2
4
5
WOCHEN-TIMER-BETRIEB
[Löschen von Modus A oder B]
1. Drücken Sie die Taste (WÖCHENTLICH), um Modus A oder B auszuwählen.
2.
Richten Sie die Fernbedienung auf das Innengerät, und drücken Sie die (LÖSCHEN)Taste ca. zehn Sekunden lang, während die Anzeige von Modus A oder B blinkt.
Gibt die Raumeinheit einen Signalton aus, erlöschen die Reservierungen für Modus A oder B.
Page 71

DEUTSCH
– 71 –
INFO-FUNKTION
● Durch Drücken der (INFO)-Taste werden die Umgebungstemperatur der Fernbedienung und der monatliche Stromverbrauch
auf der Fernbedienung angezeigt.
● Richten Sie die Fernbedienung nach dem Austauschen der Batterien auf das Innengerät, und drücken Sie die (INFO)-Taste.
Der aktuelle Kalender und die Uhrzeit des Innengeräts werden übertragen.
● Um Informationen vom Innengerät zu erhalten, muss die Entfernung zwischen der Fernbedienung und dem Empfänger der
Innengeräte mindestens 2 Meter betragen.
■
So prüfen Sie die Umgebungstemperatur der Fernbedienung
■ Der aktuelle Kalender und die Uhrzeit können
vom Innengerät abgerufen werden
■ So wird der monatliche Stromverbrauch geprüft
Drücken Sie auf (INFO-Taste).
Die Temperatur wird 10 Sekunden lang angezeigt.
Richten Sie die Fernbedienung auf den Empfänger des Innengeräts (nicht weiter
als 2 Meter vom Innengerät entfernt), und drücken Sie die
(INFO)-Taste.
Warten Sie 2 Sekunden auf die Übertragung des Signals.
Prüfen Sie nach dem Empfang des aktuellen Kalenders und der Uhrzeit, ob die
Daten korrekt sind, indem Sie auf
(UHRZEIT-Taste) drücken.
● Wenn das Innengerät nicht mit Strom versorgt wird oder der Kalender und die
Uhrzeit nicht eingestellt wurden, kann die INFO-Funktion nicht zum Senden
und Empfangen von Informationen verwendet werden.
Richten Sie die Fernbedienung auf den Empfänger des Innengeräts (nicht weiter als
2 Meter vom Innengerät entfernt), und drücken Sie die
(INFO)-Taste. Warten
Sie 2 Sekunden auf die Übertragung des Signals.
Drücken Sie, während die Umgebungstemperatur der Fernbedienung angezeigt
wird, mehrmals die
(INFO)-Taste. Das Display wird wie folgt angezeigt:
der Stromverbrauch dieses Monats für das Heizen
der Stromverbrauch des
vergangenen Monats für das Heizen
der Stromverbrauch dieses Monats für das
Kühlen der Stromverbrauch des vergangenen Monats für das Kühlen die
Umgebungstemperatur der Fernbedienung der Stromverbrauch dieses Monats
für das Heizen ...... (in wiederkehrender Reihenfolge).
● Halten Sie die Fernbedienung näher an das Innengerät, falls die Anzeige nicht
korrekt ist.
● Der angezeigte Wert dient nur zur Orientierung.
HINWEIS
● Im Fall einer Fehlfunktion der Klimaanlage wird durch Drücken der (INFO)-Taste ein Fehlercode angezeigt.
Richten Sie die Fernbedienung auf den Empfänger des Innengeräts (nicht weiter als 2 Meter vom Innengerät entfernt), und
drücken Sie die (INFO)-Taste. Warten Sie 2 Sekunden auf die Übertragung des Signals.
Ein Fehlercode wird angezeigt.
Teilen Sie den Fehlercode dem Service-Zentrum mit.
Page 72

– 72 –
BETRIEBSMODUSSPERRE
Die Fernbedienung kann zum Sperren des Modus HEIZEN (einschließlich LÜFTER), KÜHLEN (einschließlich LÜFTER) und ENTFEUCHTEN
(einschließlich LÜFTER) eingestellt werden.
■ Methode zum Sperren des Modus HEIZEN (einschließlich VENTILATOR)
Drücken Sie gleichzeitig die Tasten (ECO) und (POWERFUL) ca. fünf Sekunden lang, wenn
die Fernbedienung ausgeschaltet ist.
„
“, „ “ und „ “ werden ca. 10 Sekunden angezeigt. Später verbleiben „ “ und „ “.
Dies weist darauf hin, dass der Modus HEIZEN gesperrt ist.
Wenn Sie die
(MODUS)-Taste drücken, werden „ ”oder „ ” angezeigt.
■ Methode zum Freigeben des Modus HEIZEN (einschließlich VENTILATOR)
Drücken Sie gleichzeitig die Tasten
(ECO) und (POWERFUL) ca. fünf Sekunden lang, wenn
die Fernbedienung ausgeschaltet ist.
Alle Betriebsmodussymbole werden ca. zehn Sekunden lang angezeigt. Anschließend wird das
Betriebsmodussymbol vor dem Abbrechen angezeigt.
Dies weist darauf hin, dass der Modus HEIZEN freigegeben wurde.
■ Methode zum Freigeben der Modi KÜHLEN und ENTFEUCHTEN (einschließlich VENTILATOR)
Drücken Sie gleichzeitig die Tasten
(ECO) und (GERÄUSCHARM) ca. fünf Sekunden lang,
wenn die Fernbedienung ausgeschaltet ist.
„
“, „ ”, „ ” und „ ” werden ca. zehn Sekunden lang angezeigt. Später verbleiben
„ ” und “ “.
Dies weist darauf hin, dass die Modi KÜHLEN und ENTFEUCHTEN gesperrt sind.
Wenn Sie die
(MODUS)-Taste drücken, werden „ ”, „ ” oder „ ” angezeigt.
■ Methode zum Freigeben der Modi KÜHLEN und ENTFEUCHTEN (einschließlich VENTILATOR)
Drücken Sie gleichzeitig die Tasten
(ECO) und (GERÄUSCHARM) ca. fünf Sekunden lang,
wenn die Fernbedienung ausgeschaltet ist.
Alle Betriebsmodussymbole werden ca. zehn Sekunden lang angezeigt. Anschließend wird das
Betriebsmodussymbol vor dem Abbrechen angezeigt.
Dies weist darauf hin, dass die Modi KÜHLEN und ENTFEUCHTEN freigegeben wurden.
HINWEIS
● Die Funktion zum Sperren von Betriebsmodi wird nicht aktiviert, wenn die TIMER-Reservierungen aktiv sind.
Deaktivieren Sie zunächst die TIMER-Reservierungen. Anschließend können Sie die Betriebsmodussperre aktivieren.
● Die Modi HEIZEN, KÜHLEN und ENTFEUCHTEN (einschließlich LÜFTER) können durch Drücken der (RESET)-Taste
freigegeben werden. Wenn Sie jedoch die
(RESET)-Taste drücken, werden alle in der Fernbedienung gespeicherten
Informationen gelöscht. Sie müssen die erforderlichen Informationen ggf. neu einstellen.
● Bei mehreren Verbindungen haben die zuerst eingeschaltete Einheit und der Modus mit gesperrtem Modus HEIZEN Priorität.
Die anderen Einheiten, die mit einem anderen Modus betrieben werden, verbleiben in BEREITSCHAFT, bis entweder die erste
Einheit ausgeschaltet oder der gleiche Modus wie bei der ersten Einheit ausgewählt wird.
Page 73

– 21 –
DEUTSCH
Angemessene Raumtemperatur
Vorhänge oder Jalousien anbringen
Sie können
damit
verhindern,
dass Hitze
durch die
Fenster in
das Zimmer
gelangt.
IDEALER BETRIEB
Warnung
Zu kühle Temperaturen sind gesundheitsschädlich und verbrauchen viel Strom.
Lüftung
Vorsicht
Räume sollten regelmäßig gelüftet werden.
Öffnen Sie gelegentlich die Tür und die
Fenster,
damit frische Luft
hereingelassen wird.
Effektive Nutzung des Timers
Verwenden Sie nachts den Ausschalt- oder
Einschalt-Timer und stellen Sie Ihre morgendliche
Aufwachzeit ein. So haben Sie stets eine
angenehme Raumtemperatur. Nutzen Sie den
Timer effektiv.
Nicht vergessen, den Vor lter zu reinigen
Angemessene Temperatur für
Säuglinge und Kinder wählen
Durch verstaubte Vor lter wird das Luftvolumen
reduziert und die Kühlleistung beeinträchtigt.
Um den Stromverbrauch niedrig zu halten,
sollte der Filter alle zwei Wochen gereinigt
werden.
Achten Sie bei der Verwendung der Klimaanlage
für Säuglinge, Kinder und ältere Menschen
mit eingeschränkter Bewegungsfreiheit auf die
Raumtemperatur und die
Richtung des Luftstroms.
Page 74

– 22 –
INFORMATIONEN FÜR DEN BENUTZER
Klimaanlage und Wärmequellen im selben Raum
Wenn das Gerät über einen längeren Zeitraum nicht verwendet wird
Bei Gewittern
Wenn das Innengerät für einen längeren Zeitraum nicht
betrieben wird, unterbrechen Sie die Stromversorgung
über das Netz. Wenn die Stromversorgung über das Netz
nicht getrennt wird, verbraucht das Gerät weiter 8 Watt
im Betriebsschaltkreis, auch wenn es sich im Modus AUS
be ndet.
TV
AUS
Vorsicht
Wenn die Temperatur im Raum die Kühlleistung der
Klimaanlage übersteigt (z. B. wenn sich mehrere
Personen im Raum aufhalten, zusätzliche Heizgeräte
verwendet werden usw.), kann die voreingestellte
Raumtemperatur nicht erreicht werden.
Warnung
Um das gesamte Gerät während Gewittern zu
schützen, schalten Sie das Gerät aus und ziehen den
Stecker aus der Steckdose.
Störungen durch elektrische Geräte
Vorsicht
Um elektrische Störungen zu vermeiden, sollte ein
Abstand von einem Meter zwischen elektrischen
Geräten und dem Innengerät sowie der Fernbedienung
eingehalten werden.
WechselrichterLeuchtstof ampe
Fernseher
Mindestab
stand 1 Meter,
um Störungen
zu vermeiden.
Page 75

– 23 –
DEUTSCH
ANBRINGEN DER LUFTREINIGUNGSFILTER
1
Öffnen der Frontblende
O Heben Sie die Frontblende an. Halten Sie sie dabei
an beiden Seiten mit den Händen.
2
Ausbauen des Vor lters
O Drücken Sie den Vor lter nach oben, um die Klemmen
zu lösen, und ziehen Sie den Vor lter heraus.
3
Anbringen der Luftreinigungs lter
O Bringen Sie die Luftreinigungs lter am Rahmen an,
indem Sie sie vorsichtig zusammendrücken und nach
dem Einsetzen in den Vor lterrahmen wieder loslassen.
4
Anbringen der Vor lter
O Befestigen Sie die Vor lter so, dass die Kennzeichnung
FRONT nach vorne weist.
O Drücken Sie nach dem Einsetzen der Vor lter wie
abgebildet an den drei mit Pfeilen gekennzeichneten
Stellen gegen die Frontblende, um sie zu schließen.
Klemmen
(4 Stück)
Wenn die Filterlampe leuchtet, muss das Gerät gereinigt und gewartet werden. Stellen Sie vor dem Reinigen
sicher, dass das Gerät ausgeschaltet ist und die Stromversorgung getrennt wurde.
VORSICHT
VORSICHT
Verbiegen Sie den Luftreinigungs lter nicht, da dies die
Struktur beschädigen könnte.
Riechen Sie bitte nicht direkt
an der Quelle oder dem Filter.
HINWEIS
O Beachten Sie beim Entfernen der Luftreinigungs lter die oben beschriebene Vorgehensweise.
O Bei Verwendung der Luftreinigungs lter sind die Kühlleistung und die Kühlgeschwindigkeit etwas geringer.
Deshalb sollten Sie in diesem Fall die Lüfterdrehzahl auf HOCH einstellen.
O Betreiben Sie die Klimaanlage nicht ohne Vorfilter. Staub könnte in die Klimaanlage gelangen
und zu Funktionsstörungen führen.
Page 76

– 24 –
1. VORFILTER
Reinigen Sie den Vor lter, da er Staub aus der Raumluft entfernt. Ist der Vor lter mit Staub zugesetzt, wird
das Luftvolumen reduziert und die Kühlleistung beeinträchtigt. Außerdem kann es zu Geräuschentwicklung
kommen. Beachten Sie beim Reinigen des Vor lters die folgende Vorgehensweise.
1
Öffnen Sie die Frontblende und entfernen Sie
den Vor lter.
O Heben Sie den Luftreinigungs lter vorsichtig
an und lösen Sie ihn so aus dem Luftreinigungs lterrahmen.
2
Entfernen Sie den Staub mit einem Staubsauger
vom Vor lter und Luftreinigungs lter. Zu viel Staub
kann unter ießendem Wasser abgespült und
mit einer weichen Bürste vorsichtig abgebürstet
werden. Lassen Sie die Filter im Schatten trocknen.
3
O Setzen Sie den Luftreinigungs lter wieder in
den Filterrahmen ein. Setzen Sie den Vor lter
so ein, dass die Kennzeichnung FRONT nach
vorne weist, und lassen Sie ihn wieder in die
dafür vorgesehenen Vertiefungen einrasten.
O Drücken Sie nach dem Einsetzen der Vor lter
wie abgebildet an den drei mit Pfeilen gekenn
zeichneten Stellen gegen die Frontblende, um
sie zu schließen.
WARTUNG
Wenn die Filterlampe leuchtet, muss das Gerät gereinigt und gewartet werden. Stellen Sie vor dem Reinigen
sicher, dass das Gerät ausgeschaltet ist und die Stromversorgung getrennt wurde.
VORSICHT
VORGEHENSWEISE
VORSICHT
O Verwenden Sie zum Abspülen kein heißes Wasser mit einer Temperatur über 40 °C. Dadurch kann der
Vor lter einlaufen.
O Schütteln Sie das Wasser nach dem Abspülen vollständig vom Filter ab und lassen Sie ihn im Schatten
trocknen. Vermeiden Sie direkte Sonneneinstrahlung, da der Vor lter sonst einlaufen könnte.
Page 77

– 25 –
DEUTSCH
2. Abwaschbare Frontblende
O Achten Sie beim Reinigen des Geräts darauf, dass kein Wasser auf das
Gerätegehäuse tropft oder in das Gehäuse eindringt, da es sonst zu
einem Kurzschluss kommen kann.
O Verwenden Sie niemals heißes Wasser (mit einer Temperatur über
40 °C), Kraftstoff, Säure, Verdünner oder Bürsten, da dadurch die
Kunststoffober äche und die Beschichtung beschädigt werden.
Abnehmen der Frontblende
O Wenn Sie die Frontblende mit beiden Händen
vollständig geöffnet haben, drücken Sie den
rechten Arm der Blende nach außen, um
die Arretierung zu lösen. Schließen Sie die
Frontblende dann leicht und ziehen Sie sie
dabei nach vorne.
Anbringen der Frontblende
O Führen Sie die Ansätze des rechten und
linken Arms in die Flansche des Geräts und
führen Sie sie sicher in die entsprechenden
Öffnungen ein..
Ansatz
Öffnung
Flansch
Arm
Vorgehensweise zum Ausbau der Frontblende:
Halten Sie die Frontblende beim Abnehmen und
Anbringen immer mit beiden Händen fest.
O Trocknen Sie die Frontblende sorgfältig ab.
Wasserreste an den Anzeigen oder am Signalempfänger des Innengeräts verursachen Störungen.
O Wenn die Frontblende nicht entfernt wird, wischen
Sie sie mit einem weichen, trockenen Tuch ab.
Wischen Sie die Fernbedienung mit einem weichen,
trockenen Tuch ab.
VORSICHT
O Entfernen Sie die Frontblende und reinigen Sie sie
mit sauberem Wasser.
Waschen Sie sie mit einem weichen Schwamm ab.
Nach der Verwendung eines neutralen Reinigungs
mittels spülen Sie sie gründlich mit sauberem Wasser.
Page 78

– 26 –
1
2
3
REGELMÄSSIGE INSPEKTION
LASSEN SIE DIE FOLGENDEN PUNKTE BITTE HALBJÄHRLICH ODER JÄHRLICH DURCH
QUALIFIZIERTES WARTUNGSPERSONAL ÜBERPRÜFEN. WENDEN SIE SICH AN IHREN
HÄNDLER ODER WARTUNGSDIENST.
Ist das Erdungskabel nicht angeschlossen oder beschädigt?
Ist der Anbaurahmen stark verrostet, und ist das Außengerät
schief bzw. liegt nicht stabil auf?
Ist der Stecker des Stromkabels fest in die Steckdose
eingesteckt?
(Vergewissern Sie sich bitte, dass kein Wackelkontakt vorliegt.)
3. WARTUNG VOR LÄNGEREN NUTZUNGSPAUSEN
O Betreiben Sie das Gerät an einem Schönwettertag in der
Betriebsart
(KÜHLEN) mit 32 °C Temperatureinstellung und
Lüfterdrehzahl HOCH, um das Gerät vollständig zu trocknen.
O Ziehen Sie das Netzkabel ab.
Luft-
strom
Überprüfen
Reinigung und Wartung dürfen nur von quali ziertem Wartungspersonal ausgeführt werden. Stellen Sie vor
dem Reinigen sicher, dass das Gerät ausgeschaltet ist und die Stromversorgung getrennt wurde.
VORSICHT
Page 79

– 27 –
DEUTSCH
KUNDENDIENST UND GARANTIE
Das Gerät funktioniert nicht.
O Ist die Sicherung in Ordnung?
O Ist die Spannung äußerst hoch oder niedrig?
O Ist der Trennschalter eingeschaltet?
O Unterscheidet sich der Betriebsmodus von dem anderer
Innengeräte?
O Hat sich der Vor lter mit Staub zugesetzt?
O Ist das Außengerät direkter Sonneneinstrahlung ausgesetzt?
O Wird der Luftstrom des Außengeräts behindert?
O Sind Türen oder Fenster geöffnet, oder gibt es eine Wärmequelle
im Raum?
O Ist die eingestellte Temperatur angemessen?
O Ist der Lufteinlass oder der Luftauslass des Innen- bzw.
Außengeräts blockiert?
O Ist die Lüfterdrehzahl auf NIEDRIG oder GERÄUSCHARM
eingestellt?
ZUSTAND FOLGENDE PUNKTE ÜBERPRÜFEN
Hinweise
O Im geräuscharmen Betrieb oder nach dem Ausschalten können gelegentlich
die folgenden Geräusche auftreten – sie stellen aber keine Fehlfunktion dar.
(1) Schwache Fließgeräusche des Kältemittels im Kühlkreislauf.
(2) Schwache Geräusche vom Lüftergehäuse, das gekühlt wird und sich
nach dem Beenden des Betriebs langsam erwärmt.
O Die Raumklimaanlage kann unter Umständen unangenehme Gerüche
abgeben, wenn sich z. B. Rauch-, Essens- und Kosmetikgerüche anlagern.
Zur Geruchsvermeidung müssen daher der Vor lter und der Verdampfer
regelmäßig gereinigt werden.
O Setzen Sie sich bitte umgehend mit Ihrem Händler in Verbindung, falls die Klimaanlage auch nach Überprüfung
der oben genannten Punkte nicht normal funktioniert. Teilen Sie Ihrem Händler das Gerätemodell, die
Seriennummer und das Installationsdatum mit. Informieren Sie ihn auch über alle relevanten Details hinsichtlich
der Störung.
O Die Stromversorgung muss an ein Stromnetz mit der erforderlichen Nennspannung angeschlossen sein –
andernfalls kann das Gerät beschädigt werden oder die angegebene Leistung nicht erreichen.
Unzureichende Kühlleistung
Unzureichende Heizleistung
Fernbedienung überträgt
keine Signale.
O Müssen die Batterien ersetzt werden?
O Sind die Batterien richtig eingesetzt (Polarität korrekt)?
(Anzeige der Fernbedienung ist dunkel oder leer.)
HINWEIS:
O Wenn das Netzkabel beschädigt ist, muss es durch das spezielle Kabel ersetzt werden, das bei
autorisierten Service- bzw. Ersatzteilzentren erhältlich ist.
O Wenn das Gerät eingeschaltet wird, kann vor allem bei gedimmtem Raumlicht ein leichtes Flackern
auftreten. Dies hat jedoch keinerlei Auswirkungen.
Die Bedingungen der lokalen Netzbetreiber sind zu beachten.
WENN SIE SICH AN DEN KUNDENDIENST WENDEN,
ÜBERPRÜFEN SIE DIE FOLGENDEN PUNKTE.
Page 80

– 28 –
NOTIZEN
......................................................................................................................................................................................
......................................................................................................................................................................................
......................................................................................................................................................................................
......................................................................................................................................................................................
......................................................................................................................................................................................
......................................................................................................................................................................................
......................................................................................................................................................................................
......................................................................................................................................................................................
......................................................................................................................................................................................
......................................................................................................................................................................................
......................................................................................................................................................................................
......................................................................................................................................................................................
......................................................................................................................................................................................
......................................................................................................................................................................................
......................................................................................................................................................................................
......................................................................................................................................................................................
......................................................................................................................................................................................
......................................................................................................................................................................................
......................................................................................................................................................................................
......................................................................................................................................................................................
......................................................................................................................................................................................
......................................................................................................................................................................................
......................................................................................................................................................................................
......................................................................................................................................................................................
......................................................................................................................................................................................
......................................................................................................................................................................................
......................................................................................................................................................................................
......................................................................................................................................................................................
......................................................................................................................................................................................
......................................................................................................................................................................................
......................................................................................................................................................................................
......................................................................................................................................................................................
......................................................................................................................................................................................
......................................................................................................................................................................................
......................................................................................................................................................................................
......................................................................................................................................................................................
......................................................................................................................................................................................
......................................................................................................................................................................................
......................................................................................................................................................................................
Page 81

– 29 –
FRANÇAIS
SYSTÈME DE CLIMATISATION SPLIT SYSTEM
UNITÉ INTÉRIEURE / GROUPE EXTÉRIEUR
MODÈLE
RAK-50PXA / RAC-50WXA
RAC-50WXA
RAK-50PXA
UNITÉ EXTÉRIEURE UNITÉ INTÉRIEURE
Page 82

– 30 –
CONSIGNES DE SÉCURITÉ
O Avant d’utiliser l’unité, lisez attentivement la section « Précautions de sécurité » pour prendre connaissance des recommandations d’utilisation de l’unité.
O Tenez tout particulièrement compte des symboles « Avertissement » et « Attention ». La section « Avertissement » contient des instructions qui,
si elles ne sont pas scrupuleusement respectées, peuvent provoquer de graves blessures ou causer la mort de l’utilisateur. La section « Attention » contient
des instructions importantes. Le non-respect de ces instructions peut entraîner de graves conséquences. Suivez attentivement ces instructions pour garantir
votre sécurité.
O Ce symbole englobe les signifi cations suivantes.
O Conservez ce manuel après l’avoir lu.
PRÉCAUTIONS D’UTILISATION
O Évitez toute exposition prolongée devant un débit d’air direct.
A
V
E
R
T
I
S
S
E
M
E
N
T
!
O N’insérez pas vos doigts, une tige ou toute autre objet dans la sortie ou l’entrée d’air. Le ventilateur
tourne à une vitesse élevée et pourrait entraîner des blessures. Avant de nettoyer l’appareil, mettez-le
hors tension et coupez le disjoncteur (OFF).
O Pour éviter tout risque mortel d’électrocution, n’utilisez aucun objet conducteur comme fusible.
PRÉCAUTIONS CONCERNANT LE DÉPLACEMENT OU LA MAINTENANCE
O Si une situation anormale survient (odeur de brûlé, par exemple), cessez d’utiliser l’unité et coupez
le disjoncteur. Contactez votre installateur. Si vous continuez d’utiliser l’unité dans des conditions
anormales, vous risquez de provoquer une panne, un court-circuit ou un incendie.
OContactez votre installateur pour procéder à la maintenance de l’appareil. Une mauvaise maintenance
vous expose à un risque d’électrocution et d’incendie.
O
Contactez votre installateur si vous devez déposer et réinstaller l’unité. Si vous déposez et réinstallez
vous-même l’unité, vous vous exposez à une électrocution ou risquez de provoquer un incendie.
OSi le câble d’alimentation est endommagé, vous devez le remplacer par le câble spécial disponible dans
les centres de dépannage agréés.
A
V
E
R
T
I
S
S
E
M
E
N
T
!
O
En cas d’orage, coupez le disjoncteur.
PRÉCAUTIONS D’INSTALLATION
O Ne remontez pas l’unité.
Si vous remontez vous-même l’unité, vous risquez de provoquer une fuite d’eau, une panne, un court-circuit
ou un incendie.
O Contactez votre installateur ou un technicien qualifi é pour procéder à l’installation de votre unité. Si vous
installez vous-même l’unité, vous risquez de provoquer une fuite d’eau, un court-circuit ou un incendie.
O Utilisez le fi l de terre.
Ne placez pas la ligne de terre près d’une tuyauterie de gaz ou d’eau, d’un paratonnerre ou du câblage de terre
pour le téléphone. Une mauvaise installation de la ligne de terre vous expose à un risque d’électrocution.
O Veillez à installer les tuyaux conformément au gaz R410A utilisé. Dans le cas contraire, les tuyaux de cuivre
pourraient se fi ssurer ou présenter des défauts.
O Un disjoncteur spécifi que au système doit être installé. L’absence de disjoncteur vous expose à un risque
d’électrocution.
O N’installez pas l’unité à proximité d’une source de gaz infl ammable. Si une fuite de gaz se produisait à proximité,
le groupe extérieur risquerait de prendre feu.
O Vérifi ez que le fl ux d’eau est continu lorsque vous installez le tuyau d’évacuation.
O N’installez pas l’unité intérieure dans un atelier ou une cuisine où des vapeurs d’huile ou de la buée pourraient
pénétrer dans l’unité intérieure. L’huile risque de se déposer sur l’échangeur de chaleur, réduisant ainsi la
performance de l’unité intérieure, et de déformer, voire de rompre les parties en plastique de l’unité intérieure.
!
!
Véri ez que le l de terre est connecté. Le symbole af ché dans la gure indique une interdiction.
Indique les instructions à suivre.
AVERTIS
S EMENT
ATTENTION
O
Les pulvérisateurs et autres combustibles doivent se trouver à plus d’un mètre des sorties d’air de
l’unité intérieure et du groupe extérieur.
L’air chaud étant susceptible d’augmenter la pression interne des pulvérisateurs, il existe un risque
de rupture.
Page 83

– 31 –
FRANÇAIS
PRÉCAUTIONS D’UTILISATION
O Pour éviter tout risque mortel d’électrocution, ne manipulez jamais l’appareil
avec les mains mouillées.
O Si vous utilisez l’appareil avec d’autres équipements de chauffage, aérez
régulièrement la pièce pour éviter tout risque d’asphyxie.
O Ne dirigez pas le débit d’air froid du climatiseur vers des appareils électroménagers de
chauffage (bouilloires électriques, four, etc.) pour ne pas perturber leur fonctionnement.
O N’utilisez aucune bombe aérosol ni laque à proximité de l’unité intérieure. Ces produits
chimiques peuvent adhérer à la surface des ailettes de l’échangeur de chaleur
et empêcher ainsi l’évaporation de l’eau vers le bac d’évacuation. L’eau coulerait
alors sur le ventilateur tangentiel et serait projetée hors de l’unité intérieure.
O Véri ez que le support de montage extérieur est parfaitement stable, fermement
installé et ne présente aucun défaut. Sinon, le groupe extérieur pourrait se décrocher
et entraîner de graves conséquences.
O
Lorsque vous lavez l’unité, évitez d’éclabousser ou de verser de l’eau directement
sur la structure pour éviter tout risque de court-circuit.
O Lorsque le climatiseur fonctionne avec porte et fenêtres ouvertes (le niveau d’humidité de la pièce peut
être supérieur à 80 %) et que le dé ecteur d’air est orienté vers le bas ou se déplace automatiquement
pendant une période prolongée, de l’eau se condensera sur le dé ecteur d’air et tombera parfois sous forme
de gouttelettes. Cette humidité risque d’abîmer vos meubles. Par conséquent, ne prolongez par l’utilisation
de l’appareil dans ces conditions.
O Si la quantité de chaleur présente dans la pièce dépasse les capacités de refroidissement ou de chauffage
de l’unité (par exemple, davantage de personnes dans la pièce, utilisation d’appareils de chauffage, etc.),
la température de consigne ne peut pas être atteinte.
O
Cet appareil n’est pas destiné à être utilisé par des enfants ou des personnes handicapées, à moins qu’ils
aient reçu des instructions quant à l’utilisation de l’appareil par une personne responsable de leur sécurité.
O Les jeunes enfants doivent être surveillés a n de s’assurer qu’ils ne jouent pas avec l’appareil.
O Ne montez pas sur le groupe extérieur et ne posez aucun objet dessus.
O Mettez l’unité hors tension et coupez le disjoncteur pendant le nettoyage de l’appareil
pour éviter tout risque de blessure en raison du ventilateur qui tourne à grande
vitesse dans l’unité intérieure.
O Coupez le disjoncteur si l’unité doit être arrêtée pendant une période prolongée.
O Le produit doit être exclusivement utilisé conformément aux spécifications
du fabricant.
O Stellen Sie keine Wasserbehälter (wie z. B. eine Vase) auf das Innengerät, um zu
vermeiden, dass Wasser in das Gerät eindringt. Tropfwasser kann die Geräteisolierung
beschädigen und zu einem Kurzschluss führen.
O
Ne placez aucun récipient d’eau (vase, par exemple) sur l’unité intérieure pour
éviter que des gouttes ne tombent dans l’unité. Un écoulement d’eau pourrait
endommager l’isolant à l’intérieur de l’unité et provoquer un court-circuit.
A
T
T
E
N
T
I
O
N
Page 84

– 32 –
UNITÉ INTÉRIEURE
NOM ET FONCTION DE CHAQUE PIÈCE
Collecteur de poussière électrique
Des ions négatifs sont générés pour collecter toute la
poussière et ses particules en suspension dans l'air.
FILTRE À AIR
Filtre d’entrée
Empêche la poussière de pénétrer dans l’unité intérieure.
(Reportez-vous au manuel d'instructions)
PANNEAU AVANT
PANNEAU ORIENTABLE
Il est ouvert lorsque le climatiseur est en fonctionnement, et fermé dans le cas contraire. (Dans
certains cas, il peut rester fermé en mode de fonctionnement.)
DÉFLECTEUR HORIZONTAL
O
DÉFLECTEUR VER-
TICAL (SORTIE D'AIR)
INDICATEURS DE L'UNITÉ INTÉRIEURE
Voyants indiquant les conditions de fonctionnement.
TÉLÉCOMMANDE
Envoie le signal de fonctionnement à l'unité intérieure.
Permet de commander toute l'unité.
(Reportez-vous au manuel de la télécommande.)
LARGEUR (mm)
795
MODÈLE
HAUTEUR (mm)
295
PROFONDEUR (mm)
198
NOM ET DIMENSIONS DU MODÈLE
Q Panneau orientable
O Il s'ouvre automatiquement lorsque le climatiseur est en fonctionnement pour provoquer un fort débit
d'air comme échange thermique, et se ferme automatiquement dans le cas contraire. Évitez tout
actionnement manuel, qui pourrait endommager ses mécanismes.
O
Ne touchez pas les panneaux orientables pendant le fonctionnement, au risque de coincer vos doigts.
RAK-50PXA
RAC-50WXA 792 600 299
UNITÉ EXTÉRIEURE
Tuyau d'évacuation
Vidange de l'eau condensée vers l'extérieur.
Câble de raccordement et tuyau d'isolation pour
la tuyauterie
Prise d'air (arrière et côté gauche)
Sortie d'air
O Les ltres à air désodorisants sont lavables et réutilisables 20 fois. Leur nettoyage peut s'effectuer avec un
aspirateur ou par rinçage à l'eau du robinet. La référence de ce ltre à air est <SPX-CFH22>. Utilisez cette
référence lorsque vous souhaitez commander un nouveau ltre.
O Le ltre à air doit être nettoyé une fois par mois ou plus fréquemment en cas de formation de dépôts. Après
une période d'utilisation prolongée, le ltre peut perdre ses propriétés désodorisantes. Pour obtenir des
performances optimales, il est recommandé de le remplacer chaque année si nécessaire.
REMARQUE
Page 85

– 33 –
FRANÇAIS
VOYANT DU FILTRE
Après environ 200 heures d'utilisation, le voyant FILTRE
de l'appareil s'allume pour indiquer qu'il est nécessaire
de nettoyer le ltre. Le voyant s'éteint si vous appuyez
sur le bouton
(BALAYAGE AUTOMATIQUE)
lorsque l'appareil est en MODE VEILLE.
TÉMOIN DE FONCTIONNEMENT
Ce témoin s'allume lorsque l'appareil est en fonctionnement.
Lors de la phase de chauffage, le TÉMOIN DE FONCTIONNEMENT clignote dans les cas suivants.
(1) Lors du préchauffage
Pendant 2 à 3 minutes après le démarrage.
(2) Lors du dégivrage
Un dégivrage de 5 à 10 minutes a lieu environ
toutes les heures si du givre se forme au niveau
de l'échangeur thermique du groupe extérieur.
PORT DE RÉCEPTION DE SIGNAL
VOYANT DU PROGRAMMATEUR
Ce voyant s'allume lorsque le programmateur est déclenché.
TEMPORARY
ITC
TEMPORARY
ITC
Panneau avant
Panneau orientable
Point d'ouverture
manuelle
O Soulevez le panneau avant
Point d'ouverture
manuelle
O Ne retenez pas le panneau orientable lorsque
le panneau avant est en position ouverte ou
fermée.
1. Ouverture du panneau avant
INDICATEURS DE L'UNITÉ INTÉRIEURE
INDICATEUR DE FONCTIONNEMENT
COMMUTATEUR TEMPORAIRE
Utilisez ce commutateur pour démarrer et arrêter l'appareil si la télécommande ne fonctionne pas.
O Lorsque vous appuyez sur le commutateur temporaire, l'appareil fonctionne selon le mode dé ni précédemment.
O Si vous utilisez le commutateur temporaire après un redémarrage de l'appareil, ce dernier fonctionne en mode
automatique.
O N'essayez jamais de forcer manuellement l'ouverture ou la fermeture du panneau orientable.
L'ouverture ou la fermeture manuelle du panneau orientable peut provoquer des défaillances. (Le
panneau orientable se ferme ou s'ouvre automatiquement lorsque l'appareil est allumé ou éteint et à
chaque fois que l'unité entre en fonctionnement ou s'arrête.)
!
ATTENTION
Page 86

– 34 –
2. Fermeture du panneau avant
O Appuyez vers le bas. O Appuyez tout d'abord sur les côtés gauche et droit du
panneau avant, puis au centre jusqu'à entendre un clic.
O Lorsque le panneau avant est instable, il peut arriver qu'il se détache
et tombe.
O Ne forcez pas le panneau orientable lorsqu'il est ouvert en position
verticale.
D'autre part, un démontage trop fréquent du panneau avant de la
façade peut provoquer des dommages.
!
ATTENTION
Remarque
O La plage de températures recommandée selon le test de sécurité est donnée ci-dessous:
Refroidissement Chauffage
Minimum Maximum Minimum Maximum
Intérieur
Bulbe sec (°C) 21 32 20 27
Bulbe humide (°C) 15 23 12 19
Extérieur
Bulbe sec (°C) 21 43 2 21
Bulbe humide (°C) 15 26 1 15
Page 87

– 87 –
FRANÇAIS
PRÉPARATION AVANT L’UTILISATION
■ Installation des piles
■ Fixation du support mural de la télécommande
1. Faites glisser le couvercle pour l'enlever.
2. Installez deux piles alcalines AAA.LR03.
Mettez les piles dans le bon sens en vous aidant
des repères du compartiment.
3. Remettez le couvercle en place.
1. Choisissez un endroit depuis lequel le signal peut atteindre l'unité.
2. Fixez le support de la télécommande sur un mur, une colonne
ou un emplacement similaire à l'aide des vis fournies.
3. Placez la télécommande dans son support.
REMARQUE
Remarques concernant les piles
● Lorsque vous remplacez les piles, utilisez des piles du même
type et changez les deux piles usagées en même temps.
● Si vous prévoyez de ne pas utiliser le système pendant
une période prolongée, retirez les piles.
● Les piles durent environ 1 an. Néanmoins, si l'af chage
de la télécommande commence à s'estomper et que son
fonctionnement n'est plus optimal dans l’année, remplacez
les deux piles alcalines AAA.LR03 par des neuves.
● Les piles fournies sont prévues pour l'utilisation initiale du
système.
En fonction de la date de fabrication du climatiseur, il est
possible que la période d’utilisation des piles soit plus courte.
Remarques concernant la télécommande
● N'exposez jamais la télécommande aux rayons directs du
soleil.
● La présence de poussière sur l'émetteur ou le récepteur du
signal réduit leur sensibilité. Enlevez la poussière à l'aide
d'un chiffon doux.
● Le signal de la télécommande peut ne pas fonctionner si
une lampe uorescente à démarrage électronique (comme
une lampe à inverseur) se trouve dans la pièce. Si tel est
le cas, consultez votre revendeur.
● Si le signal de la télécommande commande également un
autre appareil, placez cet appareil à un autre endroit ou
consultez votre revendeur.
● Lorsque la télécommande n'est pas utilisée, fermez le
couvercle coulissant a n de prévenir les défaillances.
Télécommande
Vis
Support
de la
télécommande
Page 88

– 88 –
PRÉPARATION AVANT L’UTILISATION
■ Réglage de la date et de l'heure
1. Appuyez sur le bouton (Réinitialiser) pour
commencer le réglage. « Year » (Année) se met à clignoter.
2. Appuyez sur le bouton
(Heure) pour régler l'année.
3. Appuyez sur le bouton
(Horloge). « Day » (Jour)
et « Month » (Mois) se mettent à clignoter.
4. Appuyez sur le bouton
(Heure) pour régler le jour
et le mois.
5. Appuyez sur le bouton
(Horloge). « CLOCK »
(Horloge) se met à clignoter.
6. Appuyez sur le bouton
(Heure) pour mettre l'horloge
à l'heure.
7. Appuyez sur le bouton
(Horloge).
Le réglage de la date et de l'heure est maintenant terminé.
Pour modi er la date et l'heure, appuyez sur le bouton
(Horloge).
Suivez ensuite les étapes 1 à 7.
La date et l'heure doivent être réglées de nouveau après
le remplacement des piles.
Une fois les piles remplacées :
1. Appuyez sur le bouton
(Réinitialiser).
2. Dirigez la télécommande vers l'unité intérieure, puis
appuyez sur le bouton
(INFO).
3. La date et l'heure de l'unité intérieure sont transmises.
■ La date et l'heure de l'unité intérieure ne seront pas
transmises dans les cas suivants :
● Lorsqu'il y a une coupure de courant.
● Lorsque le disjoncteur est mis sur OFF (Arrêt) par
l'utilisateur (l'unité n'est pas en mode STANDBY
[Veille]).
REMARQUE
Remarques concernant le réglage de la date et de l'heure
● Si la date et l'heure ne sont pas réglées, les fonctions ON-Timer (Minuterie d'activation), OFF-Timer
(Minuterie de désactivation) et Weekly Timer (Minuterie hebdomadaire) ne pourront pas être réglées.
● Si la date et l'heure ne sont pas réglées correctement, les fonctions ON-Timer (Minuterie d'activation), OFF-Timer
(Minuterie de désactivation) et Weekly Timer (Minuterie hebdomadaire) ne fonctionneront pas correctement.
● Une fois les fonctions ON-Timer (Minuterie d'activation), OFF-Timer (Minuterie de désactivation) et Weekly
Timer (Minuterie hebdomadaire) réglées, la date et l'heure ne peuvent pas être modi ées. Si vous devez
modi er la date et l'heure, vous devez annuler le réglage des fonctions ON-Timer (Minuterie d'activation),
OFF-Timer (Minuterie de désactivation) et Weekly Timer (Minuterie hebdomadaire).
Page 89

– 89 –
FRANÇAIS
NOM ET DESCRIPTION DES FONCTIONS DE LA TÉLÉCOMMANDE
TÉLÉCOMMANDE
● La télécommande contrôle le fonctionnement de l'unité intérieure. La télécommande offre une portée
d'environ 7 mètres. Si l'éclairage de la pièce est contrôlé électroniquement, cette portée peut être inférieure.
L'unité peut être installée au mur à l'aide du support de xation fourni. Avant de l'installer au mur, véri ez
que l'unité intérieure peut être contrôlée à l'aide de la télécommande.
● Manipulez la télécommande avec soin. Si vous la faites tomber ou versez accidentellement de l'eau
dessus, la transmission du signal en sera affectée.
● Après le remplacement des piles de la télécommande, il faut environ 10 secondes à l'unité pour recevoir
le signal et fonctionner normalement.
● Lorsque la télécommande n'est pas utilisée, en mode OFF (Arrêt), ce qui est indiqué à l'écran par ,
l'écran s'éteint au bout de 3 minutes environ.
● Lorsque la télécommande n'est pas utilisée lors du réglage de l'horloge, l'écran LCD s'éteint au bout de
10 minutes environ.
● Pour rallumer l'écran LCD, il suf t d'appuyer sur n'importe quel bouton.
● L'écran LCD ne s'éteint pas pendant le réglage de la fonction TIMER (Programmateuer).
Fenêtre de transmission/
réception du signal
Dirigez cette fenêtre vers l'unité
intérieure a n de contrôler cette
dernière.
Sonde
Une sonde de température située
à l'intérieur de la télécommande
détecte la température ambiante
autour de celle-ci.
Écran
Il indique la température de consigne
pour la pièce ainsi que l'heure, l'état
de la minuterie, la fonction et le débit
d'air sélectionnés.
Boutons de réglage de la température
de la pièce
Ces boutons permettent de régler la
température de la pièce.
Appuyez sur le bouton [
] pour
augmenter la température de la pièce.
Appuyez sur le bouton [
] pour diminuer
la température de la pièce.
Si vous maintenez le bouton enfoncé, la
valeur changera plus rapidement.
Bouton ECO (Économie)
Ce bouton permet de passer au
mode ECO (Économie). (
p. 99)
Bouton Marche/Arrêt
Appuyez sur ce bouton pour
mettre l'appareil en marche.
Appuyez à nouveau dessus
pour l’arrêter.
Bouton de sélection FAN
SPEED (Vitesse de ventilation)
Il permet de régler la vitesse de
ventilation. Appuyez sur ce bouton
pour faire défiler les différents
niveaux d'intensité du débit d’air :
(AUTO) (Automatique) ➞
(HIGH) (Rapide) ➞ (MED)
(Moyen) ➞
(LOW) (Lent) ➞
(SILENT) (Silencieux). (Ce
bouton permet de sélectionner la
vitesse optimale ou préférée de
ventilation pour chaque mode de
fonctionnement.)
Symbole de transmission
Lorsqu'un signal est envoyé, le
symbole de transmission s'allume.
Page 90

– 90 –
Mode
Automatique
Chauffage
Déshumidi cation
Refroidissement
Ventilation
Vitesse de ventilation
Automatique
Silencieux
Lent
Moyen
Rapide
Marche/Arrêt
Économie
Précautions d'utilisation
●
Ne laissez pas la télécommande dans les endroits suivants :
● Au soleil.
● Près d'un radiateur.
●
Manipulez la télécommande avec soin. Ne la laissez pas tomber par terre et protégez-la de l'humidité.
●
Une fois arrêté, le groupe extérieur ne redémarre pas avant environ 3 minutes (à moins de le mettre
hors tension, puis sous tension ou de débrancher, puis de rebrancher le câble d'alimentation).
Cette procédure est destinée à protéger l'appareil et n'indique aucun dysfonctionnement.
●
Si vous appuyez sur le bouton de sélection MODE alors que l'appareil est en cours de fonctionnement,
celui-ci risque de s'arrêter pendant environ 3 minutes pour des raisons de sécurité.
Bouton POWERFUL
(Puissance)
Ce bouton permet de passer
au mode POWERFUL
(Puissance). (
p. 97)
Bouton INFO
(Informations)
(
p. 111)
Bouton CLEAN (Nettoyage
en une touche)
(
p. 101)
Boutons de réglage ON/OFF
TIMER (Minuterie d'activation/
désactivation)
(
p. 102)
Bouton de sélection MODE
Ce bouton permet de sélectionner le
mode de fonctionnement. Appuyez
sur ce bouton pour faire dé ler
les différents modes de façon
cyclique:
AUTO (Automatique)
➞
HEAT (Chauffage) ➞
DEHUMIDIFY (Déshumidi cation) ➞
COOL (Refroidissement) et ➞
FAN (Ventilation).
Bouton SILENT (Silencieux)
Ce bouton permet de passer au
mode SILENT (Silencieux). (
p. 98)
Bouton AUTO SWING (Balayage
automatique) (Vertical)
Le bouton permet de contrôler
l'angle du dé ecteur d'air vertical.
(
p. 96)
Bouton AUTO SWING (Balayage
automatique) (Horizontal)
Le bouton permet de contrôler
l'angle du dé ecteur d'air horizontal.
( p. 96)
Boutons de réglage
WEEKLY TIMER (Minuterie
hebdomadaire)
(
p. 105)
Bouton LEAVE HOME
(Absence)
(
p. 100)
NOM ET DESCRIPTION DES FONCTIONS DE LA TÉLÉCOMMANDE
Bouton ECO SLEEP TIMER
(Programmateur de veille
économique)
Utilisez ce bouton pour régler
le programmateur de veille
économique. (
p. 103)
Ventilation
Puissance
Silencieux
Informations
Mode nuit
Balayage automatique (vertical)
Absence
Nettoyage
Jour
Nº de programme
Minuterie d'activation/
désactivation
Heure
OK
Supprimer
Copier/Coller
Annuler
Envoyer
Horloge
Touche PURIFICATEUR D’AIR
Touche PURIFICATEUR D’AIR
Utilisez cette bouche pour mettre en
l’air. (p.96)
Page 91

FRANÇAIS
– 58 –
AUTOMATIC OPERATION
L'appareil sélectionnera automatiquement le mode de fonctionnement HEAT (Chauffage) ou COOL
(Refroidissement) en fonction de la température ambiante de la pièce. Le mode de fonctionnement
sélectionné s'adaptera aux variations de température de la pièce. Il restera cependant inchangé si l'unité
intérieure est connectée à un groupe extérieur multibloc.
FONCTIONS DIVERSES
■ Contrôle du redémarrage automatique
● En cas de coupure de courant, cette fonction permet de redémarrer automatiquement l'unité après le rétablissement de
l'alimentation électrique en conservant le mode de fonctionnement et la direction du débit d'air précédemment sélectionnés.
(À condition que le fonctionnement ne soit pas arrêté à l'aide de la télécommande.)
● Si vous ne souhaitez pas que l'appareil redémarre une fois le courant rétabli, mettez-le hors tension.
Lorsque vous réarmez le disjoncteur, l'unité redémarre automatiquement en conservant le mode de fonctionnement
et la direction du débit d'air précédemment sélectionnés.
Remarques: 1. Si vous n'avez pas besoin de la commande de redémarrage automatique, consultez votre revendeur.
2. La fonction de contrôle du redémarrage automatique n'est pas disponible si le mode TIMER
(Programmateur) ou SLEEP TIMER (Mode nuit) est sélectionné.
■ Les réglages étant stockés dans la mémoire de la télécommande, il
vous suf t d'appuyer sur le bouton
(START/STOP) (Marche/Arrêt)
pour les réactiver.
Appuyez sur le bouton de sélection MODE jusqu'à ce que l'écran
af che le mode de fonctionnement
(Automatique).
● Une fois en mode AUTO (Automatique), l'appareil sélectionne
automatiquement le mode de fonctionnement, HEAT (Chauffage) ou
COOL (Refroidissement), en fonction de la température ambiante
de la pièce. Il restera cependant inchangé si l'unité intérieure est
connectée à un groupe extérieur multibloc.
● Si le mode automatiquement sélectionné par l'unité ne convient pas,
modi ez-le manuellement en choisissant l'un des modes suivants :
HEAT (CHAUFFAGE), DEHUMIDIFY (DÉSHUMIDIFICATION),
COOL (REFROIDISSEMENT) ou FAN (VENTILATION).
Appuyez sur le bouton (FAN SPEED) (Vitesse de ventilation) pour
sélectionner l'une des options suivantes : AUTO (Automatique), HIGH
(Rapide), MED (Moyen), LOW (Lent) ou SILENT (Silencieux).
Appuyez sur le bouton
(Marche/Arrêt).
L'appareil démarre en émettant un bip.
Appuyez à nouveau sur le bouton pour l'arrêter.
Réglez la température de la pièce à votre convenance à l'aide des
boutons TEMPERATURE (le réglage est indiqué à l'écran).
La température réglée et la température réelle de la pièce peuvent
varier selon les conditions.
Marche
Arrêt
Sélectionnez la vitesse de ventilation souhaitée à l'aide du bouton
(Vitesse de ventilation) (le réglage est indiqué à l'écran).
(AUTO) (HIGH) (MED)
(Automatique) (Rapide) (Moyen)
(SILENT) (LOW)
(Silencieux) (Lent)
– 91 –
Page 92

– 92 –
MODE CHAUFFAGE
● Utilisez l'appareil pour chauffer une pièce lorsque la température extérieure est inférieure à 21 °C.
Si la température est trop élevée (plus de 21 °C), le mode chauffage peut être désactivé a n de protéger
l'appareil.
● Pour garantir la abilité de l'appareil, utilisez-le lorsque la température extérieure est supérieure à -15 °C.
Appuyez sur le bouton de sélection MODE jusqu'à ce que l'écran
af che (Chauffage).
Sélectionnez la vitesse de ventilation souhaitée à l'aide du bouton
(le réglage est indiqué à l'écran).
(AUTO) (HIGH) (MED)
(Automatique) (Rapide) (Moyen)
(SILENT) (LOW)
(Silencieux) (Lent)
Réglez la température de la pièce à votre convenance à l'aide des
boutons TEMPERATURE (le réglage est indiqué à l'écran).
La température réglée et la température réelle de la pièce peuvent
varier selon les conditions.
Appuyez sur le bouton
(Marche/Arrêt). Le mode chauffage démarre
en émettant un bip. Appuyez à nouveau sur le bouton pour l'arrêter.
■ Les réglages étant stockés dans la mémoire de la télécommande, il vous
suf t d'appuyer sur le bouton
(START/STOP) (Marche/Arrêt) pour les
réactiver.
■ Lorsqu'elle est réglée sur AUTO (Automatique), la vitesse de ventilation
change automatiquement comme suit:
● Lorsque l'écart entre la température de la pièce et la température de
consigne est important, le ventilateur passe à la vitesse HI (Rapide).
● Lorsque la température de la pièce atteint la température de consigne,
le ventilateur passe à une vitesse plus lente a n d'obtenir des conditions
de température ambiante optimales pour un chauffage naturel et sain.
Marche
Arrêt
Un dégivrage de 5 à 10 minutes a lieu environ toutes les heures si du givre se forme au niveau de l'échange
de chaleur du groupe extérieur.
Pendant le dégivrage, le voyant de fonctionnement clignote par cycle de 3 secondes à 0,5 seconde d'intervalle.
Le temps de dégivrage maximal est de 20 minutes.
Cependant, si l'unité intérieure est connectée à un groupe extérieur multibloc, ce délai est réduit à 15 minutes.
(L'utilisation d'une tuyauterie plus longue que d'ordinaire peut entraîner la formation de givre.)
Dégivrage
Page 93

– 93 –
FRANÇAIS
MODE DÉSHUMIDIFICATION
■ Mode déshumidi cation
● Lorsque la température de la pièce est supérieure à la température de consigne, l'appareil déshumidi e la
pièce a n de réduire la température ambiante à la valeur de consigne.
Lorsque la température de la pièce est inférieure à la température de consigne, la déshumidi cation s'effectue
à une température légèrement inférieure à celle de la pièce, quelle que soit la température de consigne.
● La température de consigne peut ne pas être atteinte en fonction du nombre de personnes présentes dans
la pièce ou d'autres facteurs.
Réglez la température de la pièce à votre convenance à l'aide
des boutons TEMPERATURE (le réglage est indiqué à l'écran).
Pour déshumidi er une pièce, il est recommandé de
choisir une température comprise entre 20 et 26 °C.
Appuyez sur le bouton (Marche/Arrêt). Le mode déshumidi cation
démarre en émettant un bip. Appuyez à nouveau sur le bouton
pour l'arrêter.
■ Les réglages étant stockés dans la mémoire de la télécommande, il
vous suf t d'appuyer sur le bouton
(START/STOP) (Marche/Arrêt)
pour les réactiver.
Marche
Arrêt
Appuyez sur le bouton de sélection MODE jusqu'à ce que l'écran
af che (Déshumidi cation).
La vitesse de ventilation est réglée sur LOW (Lent).
Appuyez sur le bouton (Vitesse de ventilation) pour sélectionner
SILENT (Silencieux) ou LOW (Lent).
Utilisez l'appareil pour déshumidi er une pièce lorsque la température ambiante est supérieure à 16 °C.
En dessous de 15 °C, le mode déshumidi cation ne fonctionne pas.
Page 94

– 94 –
MODE REFROIDISSEMENT
Utilisez l'appareil pour rafraîchir une pièce lorsque la température extérieure est comprise entre -10 et 43 °C.
Si l'humidité de la pièce est très élevée (80 %), des gouttelettes de condensation peuvent se former sur la grille
de la sortie d'air de l'unité intérieure.
Appuyez sur le bouton de sélection MODE jusqu'à ce que l'écran
af che
(Refroidissement).
■ Les réglages étant stockés dans la mémoire de la télécommande, il
vous suf t d'appuyer sur le bouton
(START/STOP) (Marche/Arrêt)
pour les réactiver.
■ Lorsqu'elle est réglée sur AUTO (Automatique), la vitesse de ventilation
change automatiquement comme suit :
● Lorsque l'écart entre la température de la pièce et la température de
consigne est important, le ventilateur passe à la vitesse HI (Rapide).
● Lorsque la température de la pièce atteint la température de consigne,
le ventilateur passe à une vitesse plus lente a n d'obtenir des conditions
de température ambiante optimales pour un refroidissement naturel
et sain.
Marche
Arrêt
Sélectionnez la vitesse de ventilation souhaitée à l'aide du bouton
(Vitesse de ventilation) (le réglage est indiqué à l'écran).
(AUTO) (HIGH) (MED)
(Automatique) (Rapide) (Moyen)
(SILENT) (LOW)
(Silencieux) (Lent)
Réglez la température de la pièce à votre convenance à l'aide des
boutons TEMPERATURE (le réglage est indiqué à l'écran).
La température réglée et la température réelle de la pièce peuvent
varier selon les conditions.
Appuyez sur le bouton
(Marche/Arrêt). Le mode refroidissement
démarre en émettant un bip. Appuyez à nouveau sur le bouton pour
l'arrêter. Le mode refroidissement ne démarre pas si la température de
consigne est supérieure à la température de la pièce (même si le voyant
[Fonctionnement] est allumé). Le mode refroidissement s'arrête dès
que vous choisissez une température inférieure à celle de la pièce.
Page 95

– 95 –
FRANÇAIS
(AUTO) (HIGH) (MED)
(Automatique) (Rapide) (Moyen)
(SILENT) (LOW)
(Silencieux) (Lent)
MODE VENTILATION
Vous pouvez utiliser l'appareil comme un simple recycleur d'air.
MARCHE
ARRÊT
Appuyez sur le bouton de sélection MODE jusqu'à ce que
l'écran af che
(FAN) (Ventilation).
Sélectionnez la vitesse de ventilation souhaitée à l'aide du bouton
(FAN SPEED) (Vitesse de ventilation) (le réglage est indiqué à l'écran).
Appuyez sur le bouton (START/STOP) (Marche/Arrêt).
Le mode ventilation démarre en émettant un bip. Appuyez à
nouveau sur le bouton pour l'arrêter.
1
2
Page 96

– 96 –
FONCTION DE PURIFICATION DE L'AIR
Des ions négatifs sont générés par l'électrode plasma dans l'appareil intérieur.
La poussière, les moisissures et les odeurs sont capturées par les ions négatifs et retenues par le pré
AIR PURIFYS
Pour enclencher le mode PURIFICATEUR D’AIR
Appuyez sur la touche (PURIFICATEUR D’AIR) en cours de fonctionnement.
“
Pour annuler le mode PURIFICATEUR D’AIR
Appuyez sur la touche (MARCHE/ARRÊT). Ou
Appuyez une nouvelle fois sur la touche (PURIFICATEUR D’AIR).
“
MODE BALAYAGE AUTOMATIQUE
Pour démarrer le balayage vertical automatique
AIR PURIFYS
Appuyez sur le bouton (AUTO SWING (VERTICAL)) (Balayage
vers le haut et le bas.
Pour annuler le balayage vertical automatique
Appuyez à nouveau sur le bouton (AUTO SWING (VERTICAL))
position actuelle.
n'apparaît plus à l'écran.
REMARQUE
la plus basse (en cas de balayage vertical automatique. De la
condensation pourrait se former sur les défl ecteurs.
Ajustement de l’air conditionné vers la gauche ou la droite.
Tenez le volet d’air vertical comme indiqué sur la figure et
ajustez l’airconditionné vers la gauche ou la droite.
Pendant les modes
derefroidissement,
Pendant le
mode de
chauffage
Environ 15°
Environ 45°
Vertical
Vertical
Environ 60°
Environ 30°
Page 97

– 97 –
FRANÇAIS
MODE PUISSANCE
● Lorsque vous appuyez sur le bouton (POWERFUL) (Puissance) en mode AUTO (Automatique),
HEATING (Chauffage), DEHUMIDIFYING (Déshumidi cation), COOLING (Refroidissement) ou FAN
(Ventilation), le climatiseur tourne à la puissance maximum.
● En mode POWERFUL (Puissance), l'unité intérieure souf era de l'air plus froid ou plus chaud selon si
elle se trouve en mode COOLING (Refroidissement) ou HEATING (Chauffage) respectivement.
■ Activation du mode POWERFUL (Puissance)
■ Désactivation du mode POWERFUL (Puissance)
● Appuyez sur le bouton (Puissance) lors du
fonctionnement de l'appareil.
« » s'af che à l'écran.
Le mode POWERFUL (Puissance) s'arrête au bout de
20 minutes. Le système revient alors automatiquement au
mode dans lequel il fonctionnait avant l'activation du mode
POWERFUL (Puissance).
● Appuyez sur le bouton (Marche/Arrêt). ou
● Appuyez à nouveau sur le bouton (Puissance).
Le mode POWERFUL (Puissance) est arrêté.
« » n'apparaît plus à l'écran.
REMARQUE
● Lorsque vous sélectionnez le mode SLEEP (Nuit), ECO (Économie), SILENT (Silencieux) ou LEAVE
HOME (Absence), le mode POWERFUL (Puissance) est annulé.
● En mode POWERFUL (Puissance), la capacité du climatiseur n'augmente pas :
– si celui-ci fonctionne déjà à la capacité maximale,
– juste avant le mode dégivrage (lorsque le climatiseur fonctionne en mode HEATING [Chauffage]).
● Après un redémarrage automatique, le mode POWERFUL (Puissance) est annulé et le mode précédemment
sélectionné est réactivé.
● En cas de raccordements multiples, il est possible que le mode POWERFUL (Puissance) ne fonctionne
pas, en fonction des conditions d'utilisation.
Page 98

– 98 –
MODE SILENCIEUX
● Lorsque vous appuyez sur le bouton (SILENT) (Silencieux) en mode AUTO (AUTOMATIQUE),
HEATING (CHAUFFAGE), DEHUMIDIFYING (DÉSHUMIDIFICATION), COOLING (REFROIDISSEMENT)
ou FAN (VENTILATION), la vitesse du ventilateur devient extrêmement lente.
■ Activation du mode SILENT (Silencieux)
■ Désactivation du mode SILENT (Silencieux)
● Appuyez sur le bouton (Silencieux) lors du
fonctionnement de l'appareil.
«
» s'af che à l'écran. La vitesse de ventilation devient
extrêmement lente.
● Appuyez sur le bouton (START/STOP) (Marche/Arrêt). ou
● Appuyez à nouveau sur le bouton (Silencieux) ou sur le
bouton (Vitesse de ventilation).
La vitesse de ventilation revient au réglage qui existait avant
l'activation du mode SILENT (Silencieux).
Le mode SILENT (Silencieux) s'arrête.
« » n'apparaît plus à l'écran.
REMARQUE
● Lorsque vous sélectionnez le mode POWERFUL (Puissance), le mode SILENT (Silencieux) est annulé.
La vitesse de ventilation revient au réglage qui existait avant l'activation du mode SILENT (Silencieux).
● Après un redémarrage automatique, la fonction SILENT (Silencieux) est annulée. La vitesse de ventilation
revient au réglage qui existait avant l'activation du mode SILENT (Silencieux).
● Si la vitesse de ventilation est déjà réglée sur (Silencieux), quel que soit le mode, elle ne changera
pas si vous appuyez sur le bouton
(Silencieux).
Page 99

– 99 –
FRANÇAIS
MODE ÉCONOMIE
Le mode ECO (Économie) économise l'énergie en modi ant automatiquement la température de consigne et en
limitant la valeur de consommation d'énergie maximum.
● Lorsque vous appuyez sur le bouton (Économie) en
mode AUTO (AUTOMATIQUE), HEATING (CHAUFFAGE),
DEHUMIDIFYING (DÉSHUMIDIFICATION) ou COOLING
(REFROIDISSEMENT), le climatiseur passe au mode
« ECO » (Économie).
■ Activation du mode ECO (Économie)
■ Désactivation du mode ECO (Économie)
● Appuyez sur le bouton (Économie) en cours de fonctionnement.
«
» s'af che à l'écran.
Le mode ECO (Économie) démarre en augmentant ou en réduisant
automatiquement la température de consigne et en diminuant la
consommation d'énergie. Cette fonction peut varier en fonction du
groupe extérieur qui est connecté.
● Appuyez sur le bouton (Marche/Arrêt). ou
● Appuyez à nouveau sur le bouton (Économie).
« » n'apparaît plus à l'écran.
REMARQUE
● Le mode ECO (Économie) n'est pas ef cace lorsque la consommation d'énergie est faible.
● Lorsque vous appuyez sur le bouton POWERFUL (Puissance), le mode ECO (Économie) est annulé.
● Après un redémarrage automatique, le mode ECO (Économie) est annulé et le mode précédemment
sélectionné est réactivé.
● En cas de raccordements multiples, le mode ECO (Économie) démarre uniquement en augmentant
ou en réduisant automatiquement la température de consigne. Toutefois, l'ef cacité du mode ECO
(Économie) dépend des conditions de fonctionnement.
Page 100

– 100 –
MODE ABSENCE
Pour empêcher toute diminution excessive de la température ambiante, réglez automatiquement la température sur 10°C lorsque vous vous
absentez. Ce mode peut fonctionner de deux façons: «Fonctionnement continu» et «Fonctionnement pendant un nombre de jours». Utilisez le
«Fonctionnement pendant un nombre de jours» pour spéci er un nombre de jours inférieur à 99.
■ Activation du mode LEAVE HOME (Absence)
Option 1. Fonctionnement continu.
● A ppuyez sur le bouton (Absence) en cours d'arrêt ou de fonctionnement.
La température de la pièce est réglée sur 10°C et le mode chauffage démarre.
«
», « », « », « » s'af chent à l’écran.
Option 2. Fonctionnement pendant un nombre de jours.
● Appuyez sur le bouton (Absence) en cours d'arrêt ou de fonctionnement.
La température de la pièce est réglée sur 10°C et le mode chauffage démarre.
« », « », « », « » s'af chent à l’écran.
● Réglez le nombre de jours de fonctionnement (1 à 99jours) si nécessaire.
Appuyez sur le bouton (Heure) pour sélectionner le nombre de jours.
Le nombre de jours clignote.
* Appuyez sur
(HAUT) pour régler le nombre de jours comme suit: 1jour,
2jours, 3jours... 98jours, 99jours, 1jour, etc.
*
Appuyez sur « (BAS)» pour régler le nombre de jours comme suit: 99jours,
98jours, 97jours... 3jours, 2jours, 1jour, 99jours, etc.
* Le nombre de jours est compté lorsque l'horloge indique 0:00.
●
Appuyez sur le bouton (Envoyer) pour con rmer le nombre de jours de
fonctionnement. Le nombre de jours cesse de clignoter.
● Appuyez sur le bouton (Annuler) pour régler à nouveau le nombre de
jours de fonctionnement ou pour utiliser le fonctionnement continu.
■ Désactivation du mode LEAVE HOME (Absence)
● Appuyez sur le bouton (Marche/Arrêt). ou
● Appuyez à nouveau sur le bouton (Absence).
Revenez au mode de fonctionnement précédent. ou
● Passez à un autre mode de fonctionnement en appuyant sur le bouton (Mode).
REMARQUE
● Une fois que le nombre de jours sélectionné pour le mode LEAVE HOME (Absence) a été atteint ou lorsque vous appuyez à nouveau sur
le bouton LEAVE HOME (Absence), l'appareil revient au mode de fonctionnement précédemment sélectionné.
● En mode LEAVE HOME (Absence), la vitesse de ventilation et la position du dé ecteur d'air horizontal ne peuvent pas être modi ées.
● Lorsque vous appuyez sur le bouton LEAVE HOME (Absence), la fonction Weekly Timer (Minuterie hebdomadaire) ou Once Timer (Minuterie
ponctuelle) est annulée.
● En cas de coupure de courant, après le redémarrage automatique, tous les réglages de fonctionnement pendant un nombre de jours sont
annulés et l'appareil passe en fonctionnement continu.
● En cas de connexions multiples, lorsque chaque pièce utilise un mode de fonctionnement différent, notamment FAN only (Ventilateur
seulement), COOLING (Refroidissement), DHUMIDIFYING (Déshumidi cation) ou AUTO (Automatique), le mode Leave Home (Absence) n'est
pas disponible, même s'il peut être réglé.
Pour démarrer le mode LEAVE HOME (Absence), le fonctionnement doit être arrêté dans toutes les pièces. Appuyez ensuite sur le bouton
LEAVE HOME (Absence) pour démarrer le fonctionnement en mode LEAVE HOME (Absence).
● En cas de raccordements multiples, lorsque toutes les pièces fonctionnent en mode HEATING (Chauffage), il est possible de passer au
mode LEAVE HOME (Absence) en appuyant sur le bouton LEAVE HOME (Absence).
● En cas de raccordements multiples, si deux pièces ou plus sont réglées sur le mode LEAVE HOME (Absence), il peut s'avérer impossible
d'atteindre la température de consigne de 10 °C. En outre, cela dépend également de la température extérieure.
● Les modes POWERFUL (Puissance), SILENT (Silencieux) et ECO (Économie) ne sont pas disponibles en mode Leave Home (Absence).
Fonctionnement continu
Fonctionnement pendant un nombre de jours
 Loading...