

Page 1
– 1 –
ENGLISH
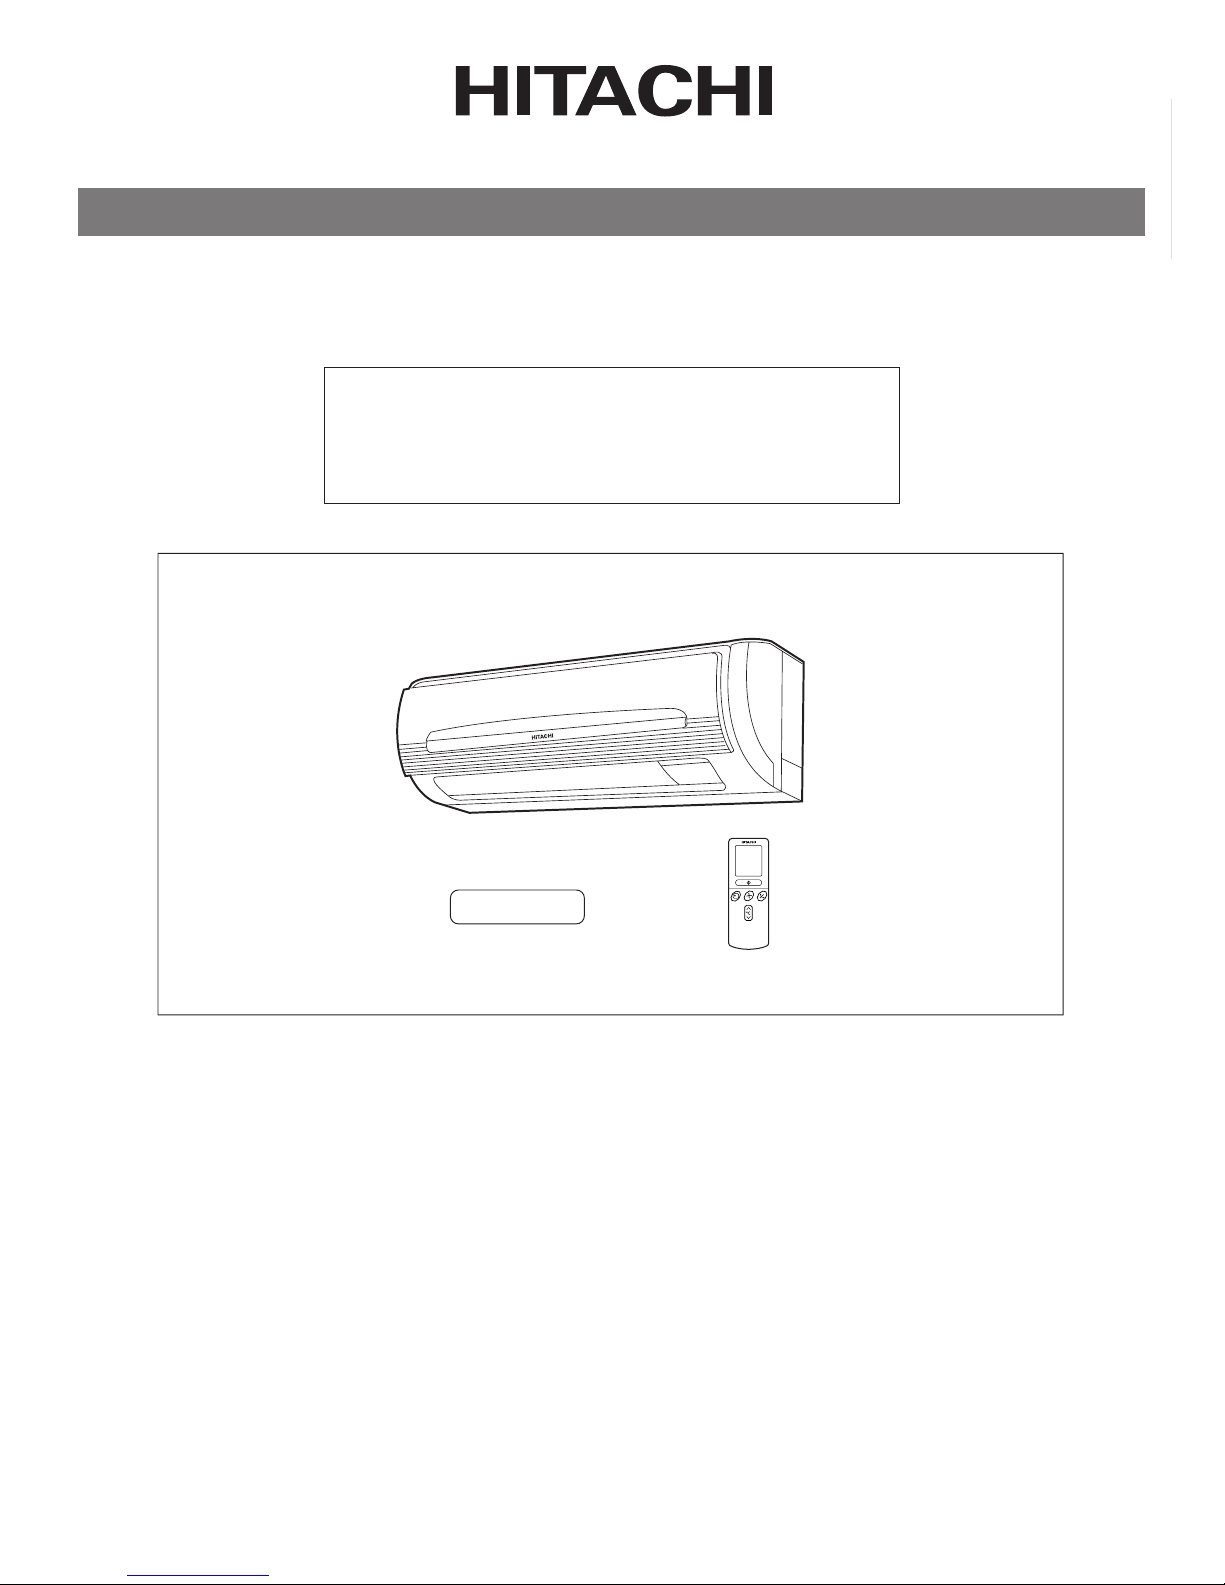
SPLIT TYPE AIR CONDITIONER
INDOOR UNIT/OUTDOOR UNIT
INDOOR UNIT
MODEL
RAK-50NH5
RAK-50NH5
Instruction manual Page 1~26
To obtain the best performance and ensure years of trouble
free use, please read this instruction manual completely.
Bedlenungsanleitung Suite 27~52
Bitte lesen Sie diese Bedienungsanleitung aufmerksam
durch, um durch richtige Bedienung jahrelangen und
störungsfreien Betrieb zu gewährleisten.
Mode d’emploi Page 53~78
Des performances optimales et un fonctionnement à long
terme seront assurés en appliquant les présentes
instructions après avoir entièrement lu ce mode d’emploi.
Manuale di istruzioni Pag. 79~104
Per garantire la migliore prestazione e la più lunga
durataleggere attentamente e al completo le seguanti
istruzioni.
Manual de instrucciones Página 105~130
Para obtener el mejor funcionamiento y asegurar años de
uso libre de problemas, lea cuidadosamente este manual
de instrucciones.
Manual de instruções Página 131~156
A fim de obter um bom funcionamento e de garantir uma
utilização sem falhas durante muitos anos, é favor ler este
manual de instruções completamente.
O‰ЛБ›В˜ XВИЪИЫМФ‡ ™ÂÏ›‰· 157~182
°И· ЩЛУ О·П‡ЩВЪЛ ‰˘У·Щ‹ ·fi‰ФЫЛ О·И ЩЛУ М·ОЪФ¯ЪfiУИ·
О·И ¯ˆЪ›˜ ЪФ‚П‹М·Щ· ¯Ъ‹ЫЛ ЩЛ˜ Ы˘ЫОВ˘‹˜ ·˘Щ‹˜,
·Ъ·О·ПФ‡МВ ‰И·‚¿ЫЩВ П‹Ъˆ˜ ЩИ˜ Ф‰ЛБ›В˜ ¯ВИЪИЫМФ‡ ЩЛ˜.
Инструкция по эксплуатации
стр. 183~208
Для обеспечения наилууших эксплуатационных
характеристик и многолетней безотказной работы
оборудования необходимо полностыо оэнакомиться с
данной Инструкцией по эксплуатации.
Page 2
– 2 –
!
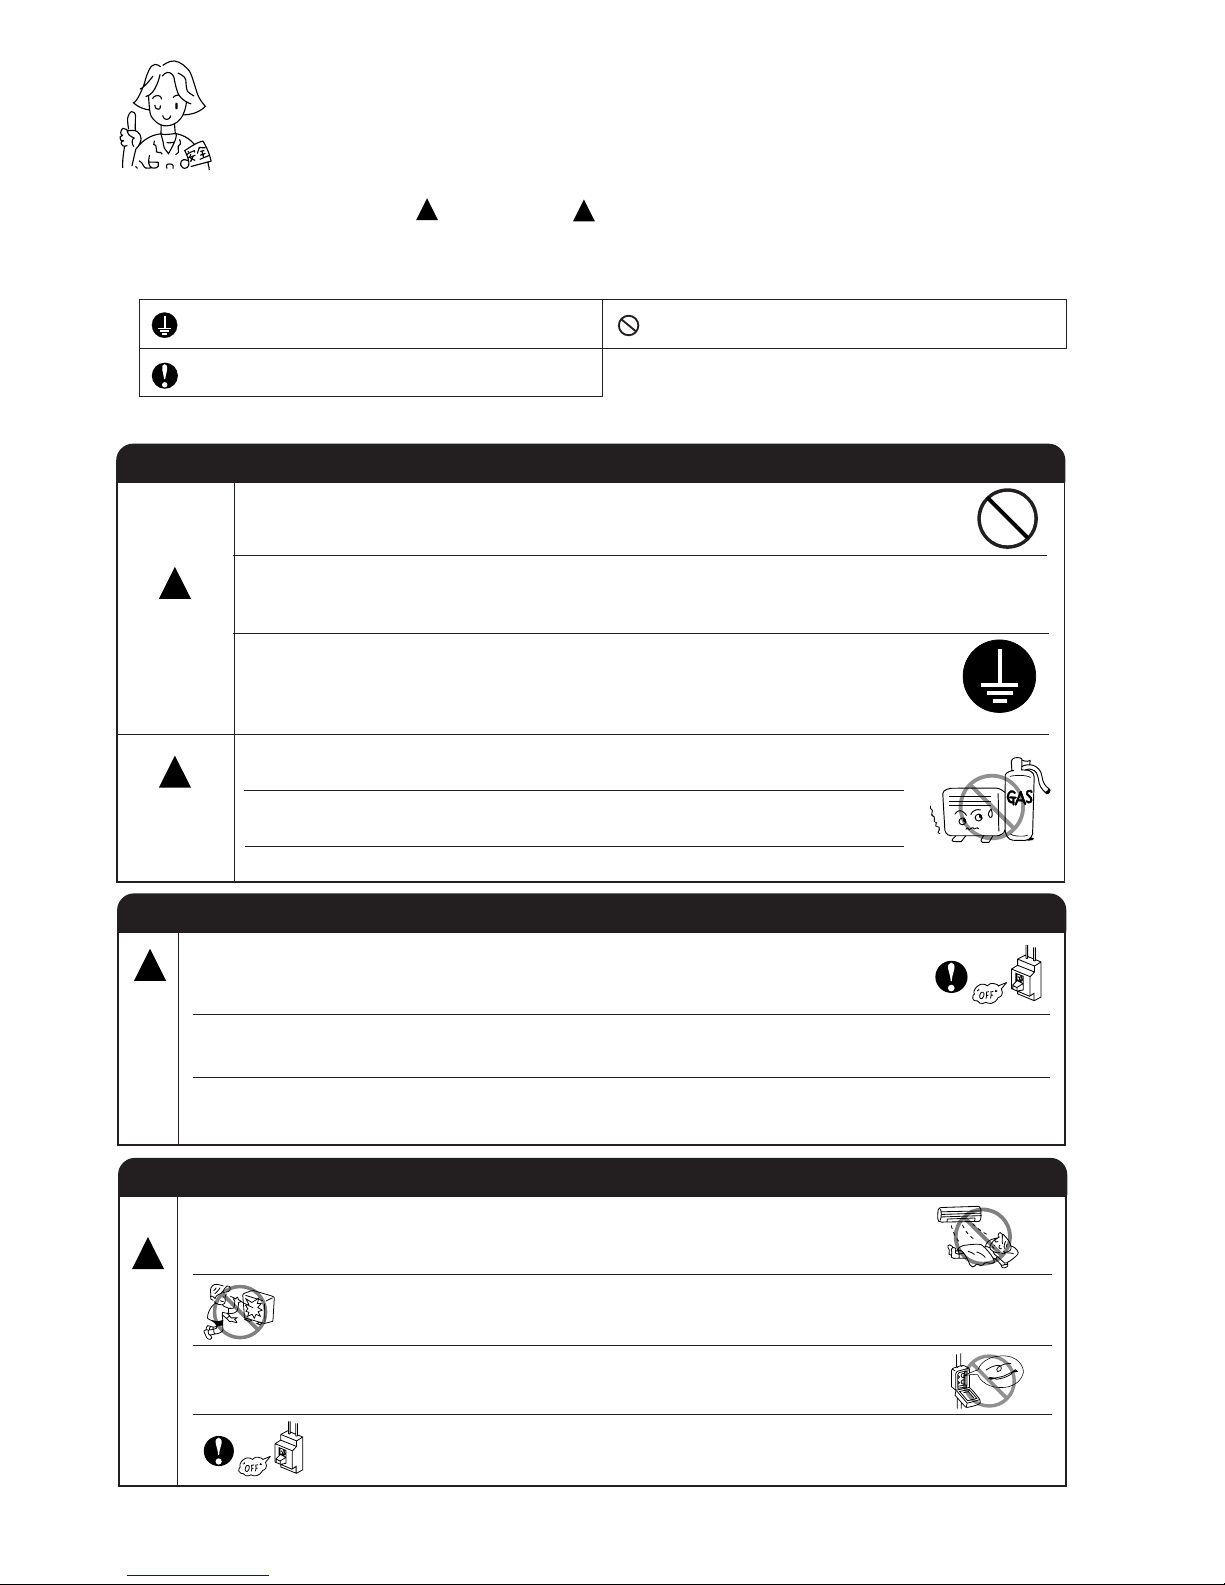
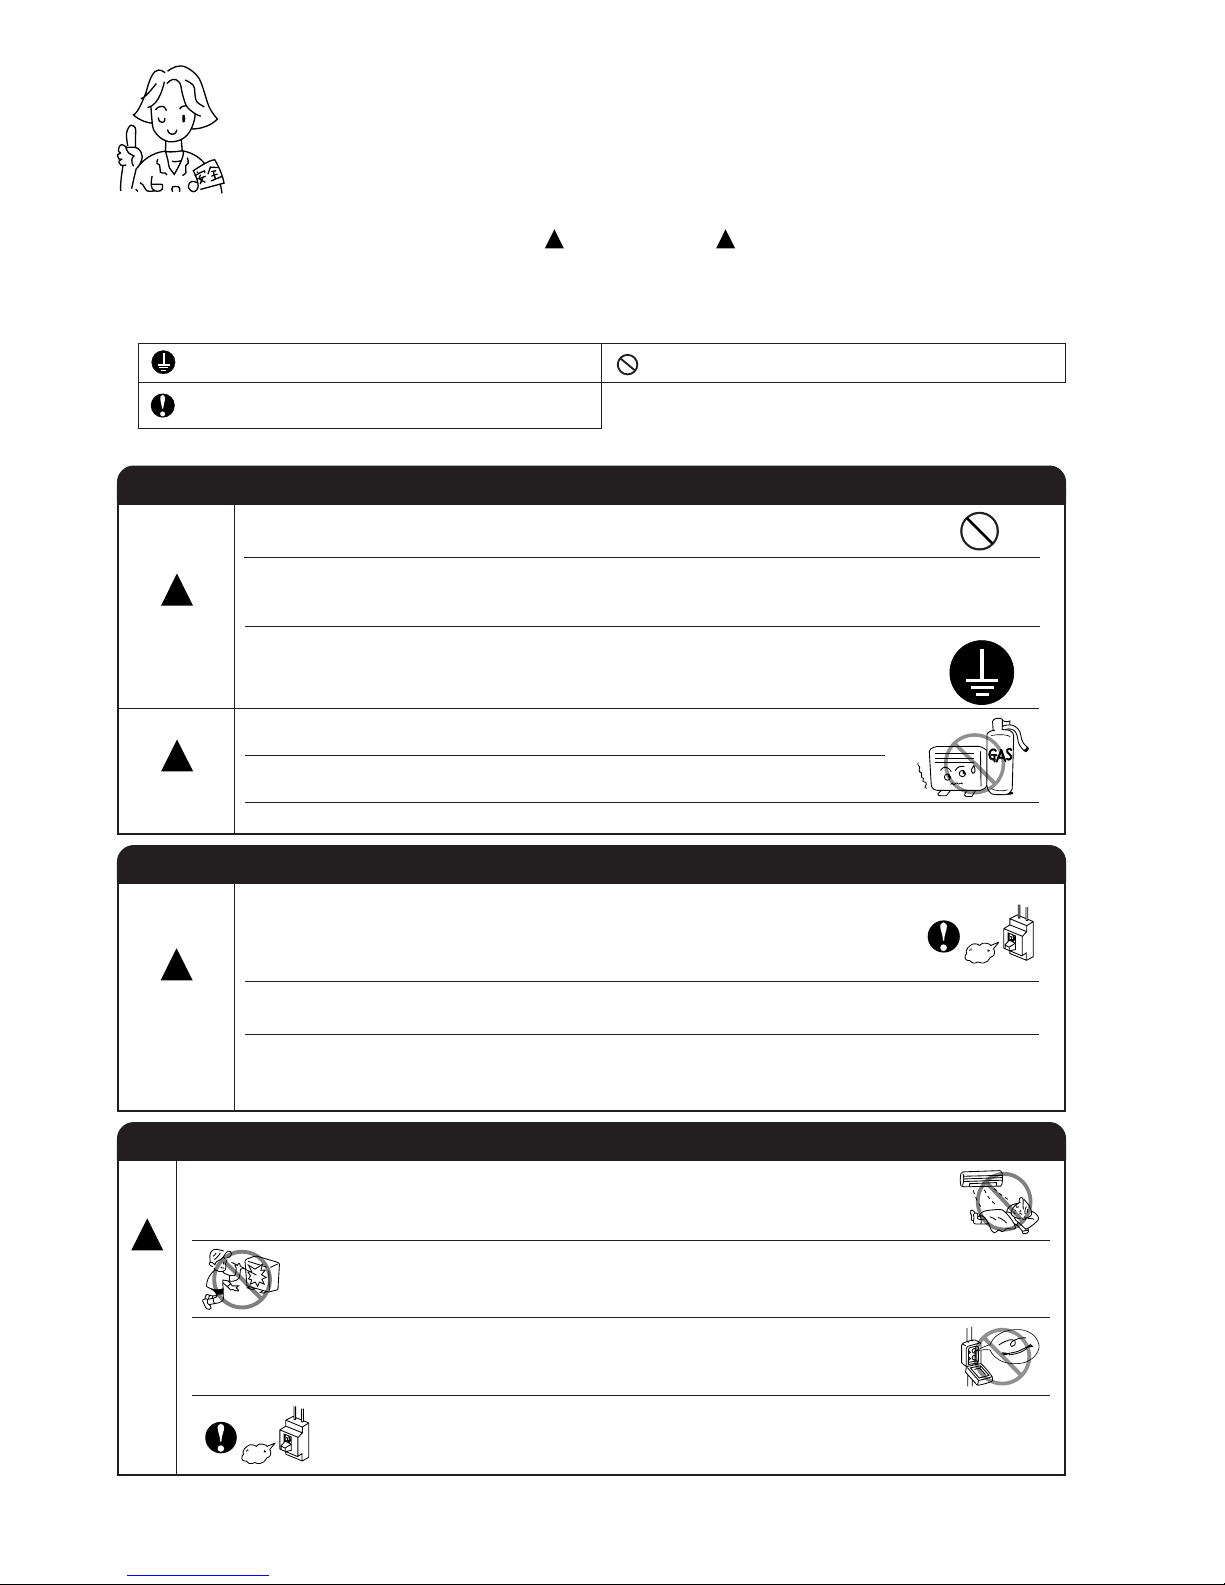
SAFETY PRECAUTION
●
Please read the “Safety Precaution” carefully before operating the unit to ensure correct usage of the unit.
●
Pay special attention to signs of “ Warning” and “ Caution”. The “Warning” section contains matters which,
if not observed strictly, may cause death or serious injury. The “Caution” section contains matters which may
result in serious consequences if not observed properly. Please observe all instructions strictly to ensure safety.
●
The sign indicate the following meanings.
●
Please keep this manual after reading.
WARNING
PRECAUTIONS DURING INSTALLATION
●
Do not reconstruct the unit.
Water leakage, fault, short circuit or fire may occur if you reconstruct the
unit by yourself.
●
Please ask your sales agent or qualified technician for the installation of
your unit. Water leakage, short circuit or fire may occur if you install the unit
by yourself.
●
Please use earth line.
Do not place the earth line near water or gas pipes, lightning-conductor, or
the earth line of telephone. Improper installation of earth line may cause
electric shock.
●
A circuit breaker should be installed depending on the mounting site of the
unit. Without a circuit breaker, the danger of electric shock exists.
●
Do not install near location where there is flammable gas. The outdoor unit
may catch fire if flammable gas leaks around it.
●
Please ensure smooth flow of water when installing the drain hose.
CAUTION
!
!
PRECAUTIONS DURING SHIFTING OR MAINTENANCE
PRECAUTIONS DURING OPERATION
●
Avoid an extended period of direct air flow for your health.
W
A
R
N
I
N
G
!
●
Should abnormal situation arises (like burning smell), please stop operating the unit
and turn off the circuit breaker. Contact your agent. Fault, short circuit or fire may
occur if you continue to operate the unit under abnormal situation.
●
Please contact your agent for maintenance. Improper self maintenance may cause
electric shock and fire.
●
Please contact your agent if you need to remove and reinstall the unit. Electric
shock or fire may occur if you remove and reinstall the unit yourself improperly.
●
Do not put objects like thin rods into the panel of blower and suction side
because the high-speed fan inside may cause danger.
●
During thunder storm, disconnect and turn off the circuit breaker.
●
Do not use any conductor as fuse wire, this could cause fatal accident.
!
Make sure to connect earth line.
Indicates the instructions that must be followed.
The sign in the figure indicates prohibition.
W
A
R
N
I
N
G
!
Page 3
– 3 –
ENGLISH
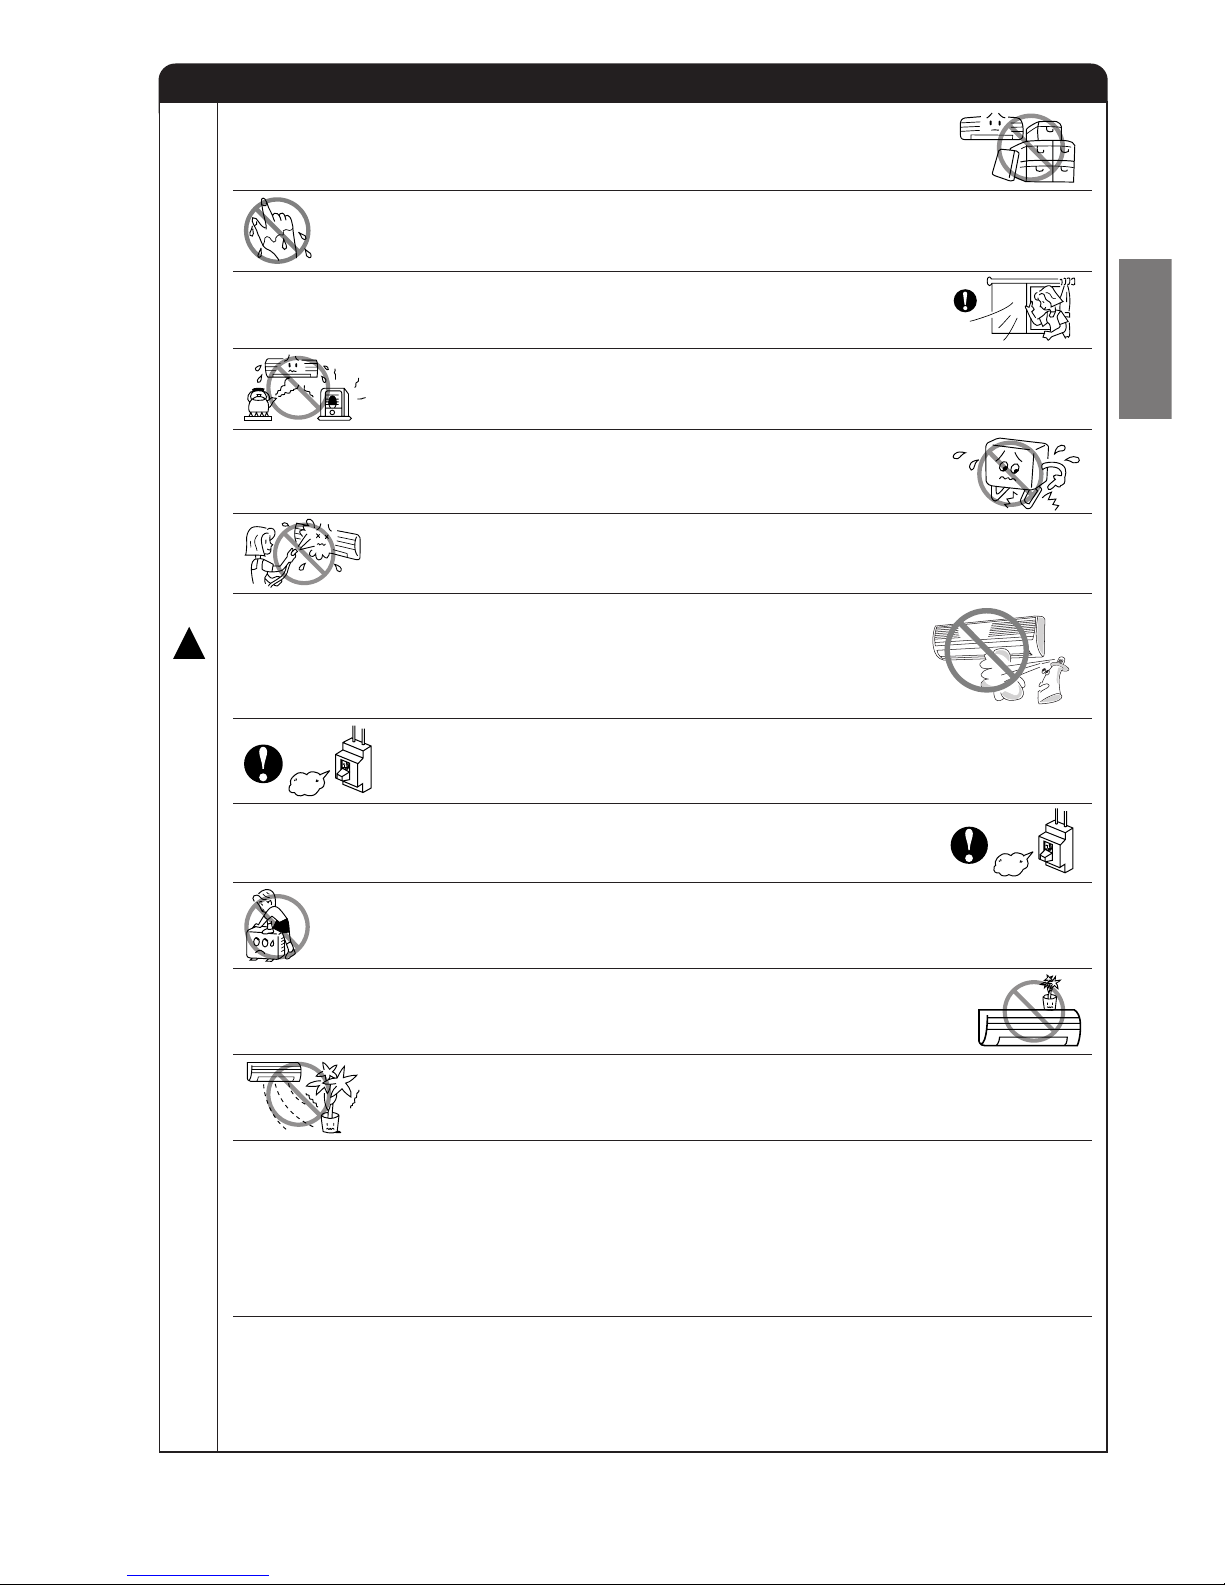
PRECAUTIONS DURING OPERATION
●
Do not attempt to operate the unit with wet hands, this could cause fatal
accident.
●
When operating the unit with burning equipments, regularly ventilate the
room to avoid oxygen insufficiency.
●
Do not direct the cool air coming out from the air-conditioner panel to face
household heating apparatus as this may affect the working of apparatus
such as the electric kettle, oven etc.
●
Do not place plants directly under the air flow as it is bad for the plants.
●
Please ensure that outdoor mounting frame is always stable, firm and
without defect. If not, the outdoor unit may collapse and cause danger.
●
Do not splash or direct water to the body of the unit when cleaning it as this
may cause short circuit.
●
When operating the unit with the door and windows opened, (the room humidity is always above
80%) and with the air deflector facing down or moving automatically for a long period of time,
water will condense on the air deflector and drips down occasionally. This will wet your furniture.
Therefore, do not operate under such condition for a long time.
●
If the amount of heat in the room is above the cooling or heating capability of the unit (for
example: more people entering the room, using heating equipments and etc.), the preset room
temperature cannot be achieved.
●
This appliance is not intended for use by young children or infirm persons unless they have been
adequately supervised by a responsible person to ensure that they can use the appliance safely.
●
Young children should be supervised to ensure that they do not play with the appliance.
●
Do not climb on the outdoor unit or put objects on it.
●
Please switch off the unit and turn off the circuit breaker during cleaning, the
high-speed fan inside the unit may cause danger.
●
Turn off the circuit breaker if the unit is not to be operated for a long period.
C
A
U
T
I
O
N
!
●
The product shall be operated under the manufacturer specification and
not for any other intended use.
●
Do not put water container (like vase) on the indoor unit to avoid water
dripping into the unit. Dripping water will damage the insulator inside the unit
and causes short-circuit.
●
Do not use any aerosol or hair sprays near the indoor unit. This chemical
can adhere on heat exchanger fin and blocked the evaporation water flow
to drain pan. The water will drop on tangential fan and cause water splashing
out from indoor unit.
Page 4
– 4 –
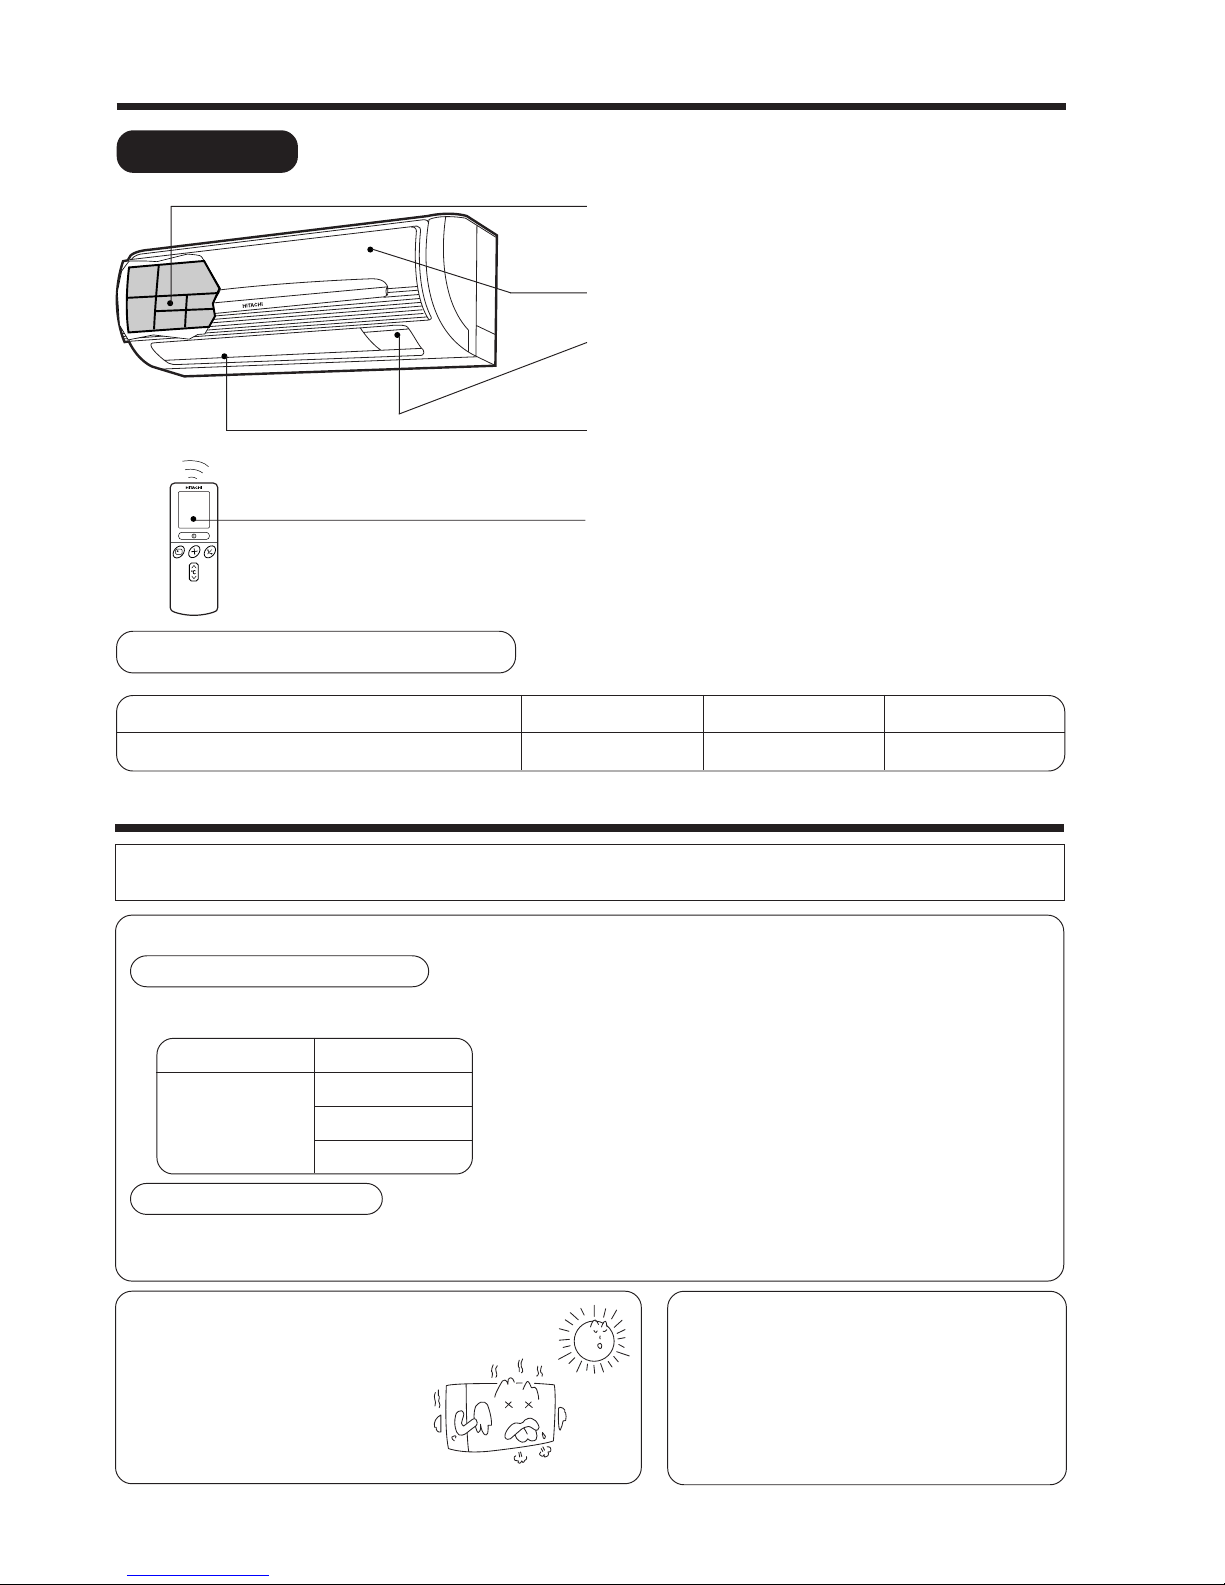
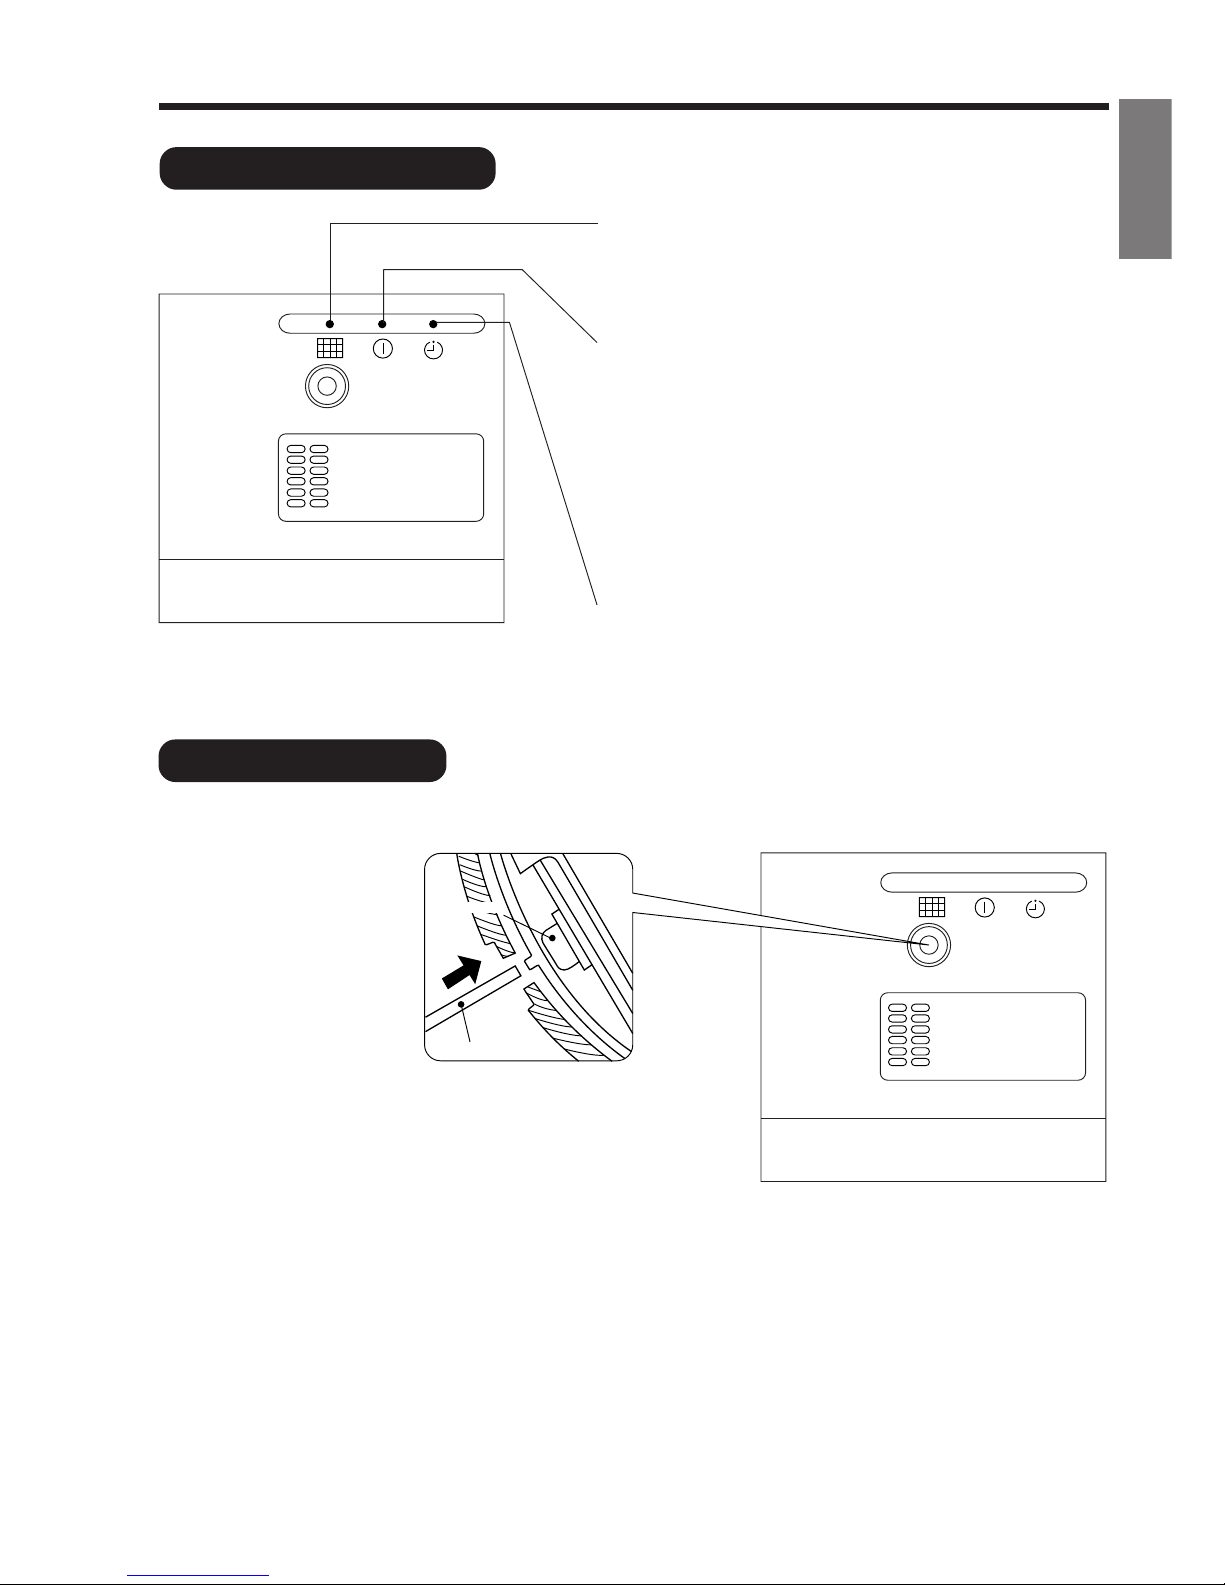
INDOOR UNIT
NAMES AND FUNCTIONS OF EACH PART
Air filter
To prevent dust from coming into the indoor unit.
(Refer page 21)
Front panel
Indoor unit indicators
Light indicator showing the operating condition.
(Refer page 5)
Horizontal deflector
●
Vertical deflector
(Air Outlet)
(Refer page 16)
Remote controller
Send out operation signal to the indoor unit. So as to
operate the whole unit.
(Refer page 6)
WIDTH (mm)
780
MODEL
RAK-50NH5
HEIGHT (mm)
280
DEPTH (mm)
210
MODEL NAME AND DIMENSIONS
MULTI-AIR CONDITIONER
With this multi-air conditioner, several indoor units can be connected to one outdoor unit to be driven. You can operate
the required number of indoor units.
Combination of Operations:
● You cannot operate the indoor units in the
following combinations.
● The indoor unit which is switched on first continues to
operate, but other indoor units which is switched on later
does not operate while the lamp lights.
● To re-start an indoor unit which was operated later, stop
the indoor unit which was operated first or later and reset
the type of operation, then perform operation again.
One unit
Heating
Other unit
Cooling
Dehumidifying
Circulating (fan)
Adjusting the Number of Indoor Units:
Decrease the number of indoor
units to be operated especially
when it is very hot or cold or
when you want to reach the
present temperature quickly.
Stopped Indoor Units:
When an indoor unit is operated in the cooling,
heating or dehumidifying mode in the room, the
sound of refrigerant flow may be heard from a
stopped indoor unit or a stopped indoor unit may
become warm. This is because the indoor unit
returns refrigerant to the outdoor unit to be ready
for operation.
When operation mode is selected:
● When heating operation is automatically selected for the first indoor unit, the next indoor unit will then start to heat.
Also, if cooling or dehumidifying is automatically selected for the first indoor unit, the next indoor unit will also start
to cool or dehumidify.
During automatic operation:
Page 5
– 5 –
ENGLISH
INDOOR UNIT INDICATORS
OPERATION INDICATOR
FILTER LAMP
When the device is operated for a total of about 100
hours, the FILTER lamp lights to indicate that it is time
to clean the filter.
OPERATION LAMP
This lamp lights during operation.
The OPERATION LAMP flashes in the following cases
during heating.
(1) During preheating
For about 2–3 minutes after starting up.
(2) During defrosting
Defrosting will be performed about once every one
hour when frost forms on the heat exchanger of the
outdoor unit, for 5–10 minutes each time.
TIMER LAMP
This lamp lights when the timer is working.
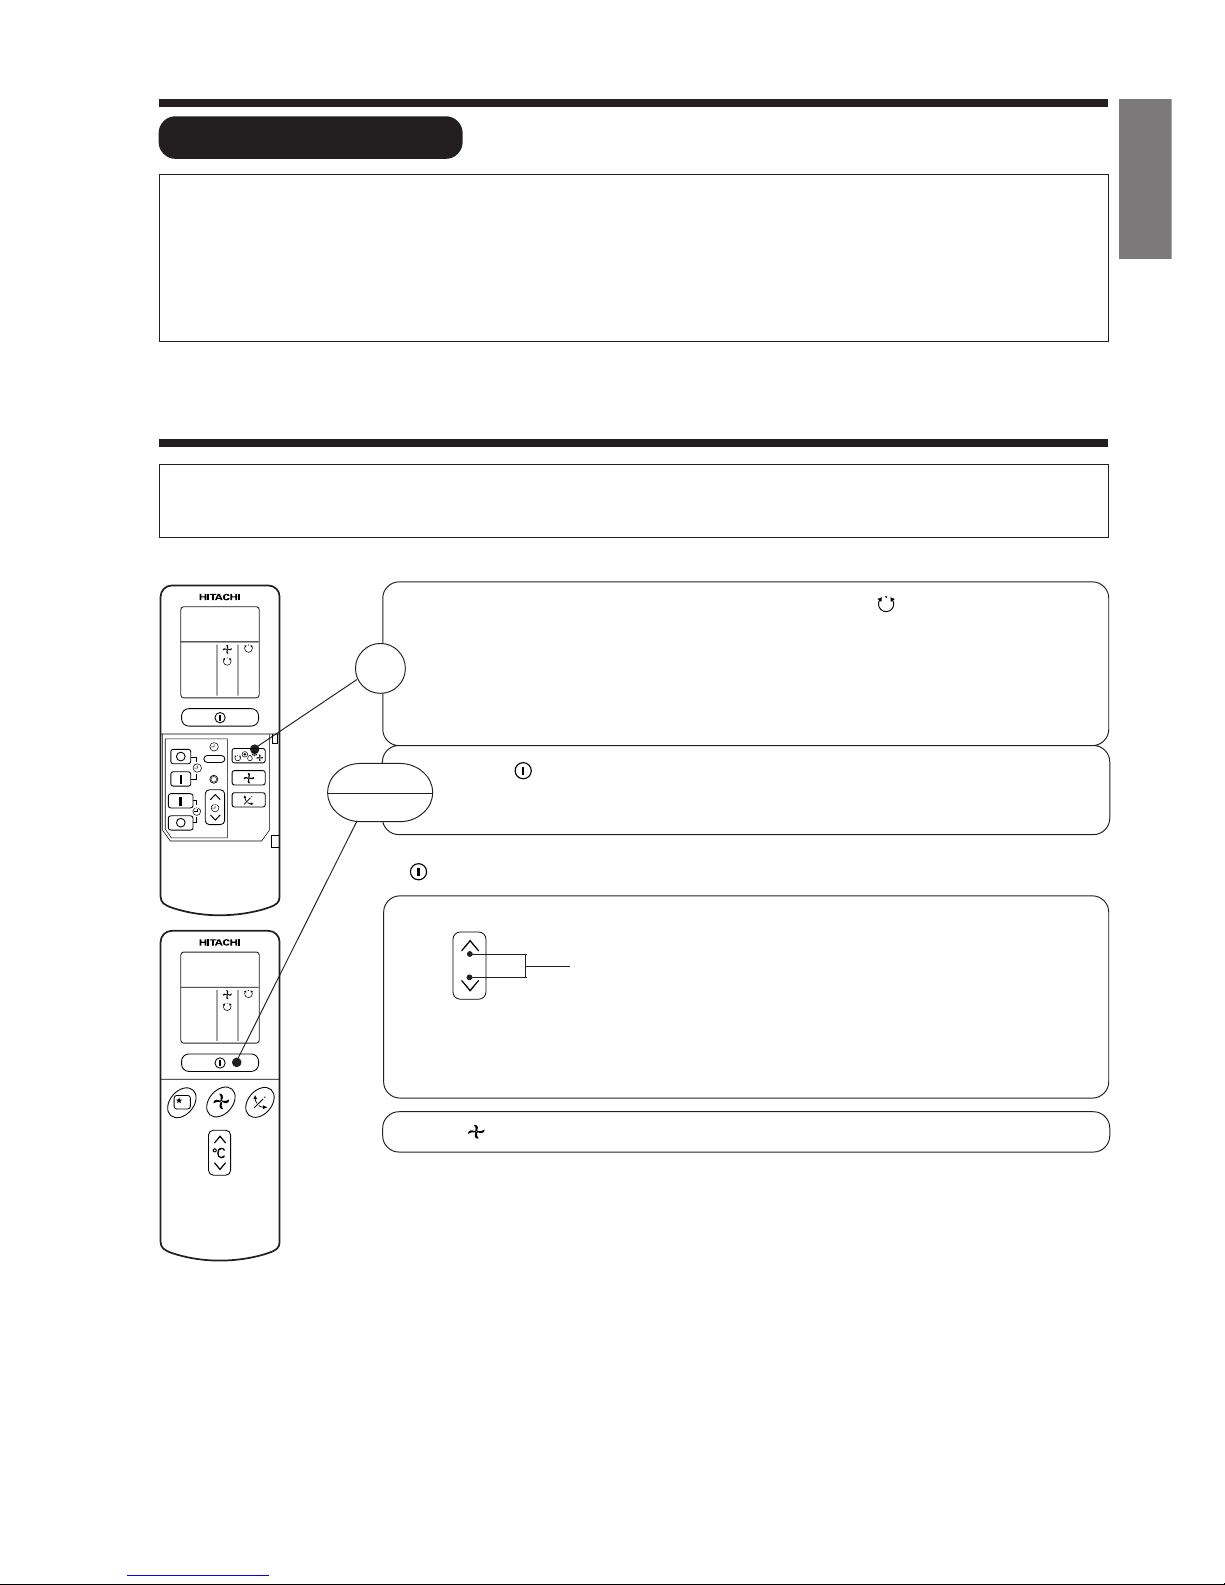
TEMPORARY
SWITCH
TEMPORARY
SWITCH
Press
Temporary Switch
Non-conductor Stick
TEMPORARY SWITCH
Use this switch to start and stop when the remote controller does not work. [Use non-conductor stick
(example toothpick)]
● By pressing the temporary switch, the operation is done in previously set operation mode.
● When the operation is done using the temporary switch after the power source is turned off and turn on
again, the operation is done in automatic mode.
Page 6

– 6 –
AUTO
HEAT
DEHUMIDIFY
COOL
FAN
FAN SPEED
LOW
MED
HI
SLEEPING
STOP (CANCEL)
START (RESERVE)
START/STOP
TIME
TIMER SET
TIMER SELECTOR
ON TIMER
OFF TIMER
AUTO SWING
˚
CH
RESET
˚
CH
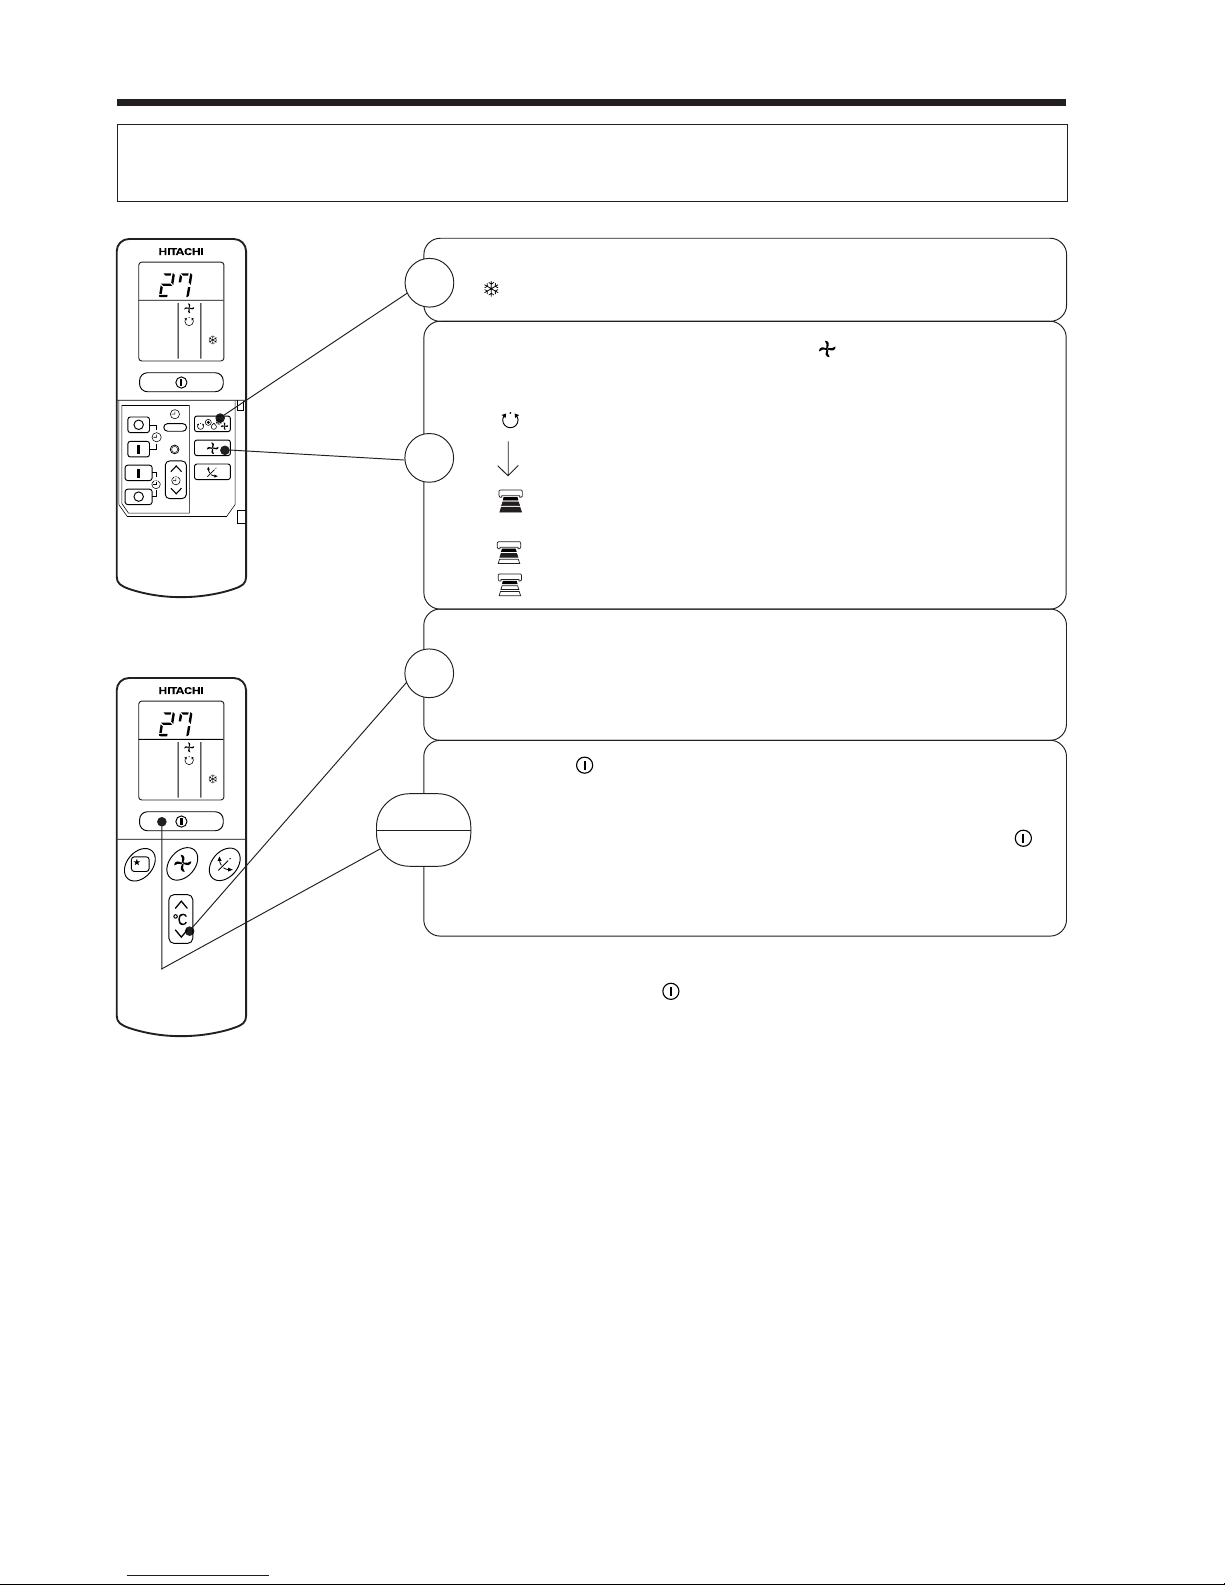
NAMES AND FUNCTIONS OF REMOTE CONTROL UNIT
REMOTE CONTROLLER
● This controls the operation of the indoor unit. The range of control is about 7 meters. If indoor lighting is controlled
electronically, the range of control may be shorter.
This unit can be fixed on a wall using the fixture provided. Before fixing it, make sure the indoor unit can be controlled
from the remote controller.
● Handle the remote controller with care. Dropping it or getting it wet may compromise its signal transmission capability.
● After new batteries are inserted into the remote controller, the unit will initially require approximately 10 seconds to
respond to commands and operate.
●
Signal emitting window/transmission sign
Point this window toward the indoor unit when controlling it.
The transmission sign blinks when a signal is sent.
● Display
This indicates the room temperature selected, current time, timer status, function
and intensity of circulation selected.
● START/STOP button
Press this button to start operation. Press it again to stop operation.
● SLEEP button
Use this button to set the sleep timer.
● TEMPERATURE buttons
Use these buttons to raise or lower the temperature setting. (Keep pressed, and
the value will change more quickly.)
● TIME button
Use this button to set and check the time and date.
● RESET buttons
● FUNCTION selector
Use this button to select the operating mode. Every time you press it,
the mode will change from (AUTO) to (HEAT) to (DEHUMIDIFY) to
(COOL) and to (FAN) cyclically.
● FAN SPEED selector
This determines the fan speed. Every time you press this button, the intensity
of circulation will change from (AUTO) to (HI) to (MED) to (LOW)
(This button allows selecting the optimal or preferred fan speed for each operation
mode).
● AUTO SWING button
Controls the angle of the horizontal air deflector.
● TIMER control
Use this button to set the timer.
● OFF-TIMER button Select the turn OFF time.
● ON-TIMER button Select the turn ON time.
● RESERVE button Time setting reservation.
● CANCEL button Cancel time reservation.
Precautions for Use
● Do not put the remote controller in the following places.
● Under direct sunlight.
● In the vicinity of a heater.
● Handle the remote controller carefully. Do not drop it on the floor,
and protect it from water.
● Once the outdoor unit stops, it will not restart for about 3 minutes
(unless you turn the power switch off and on or unplug the power
cord and plug it in again).
This is to protect the device and does not indicate a failure.
● If you press the FUNCTION selector button during operation, the
device may stop for about 3 minutes for protection.
Page 7
– 7 –
ENGLISH
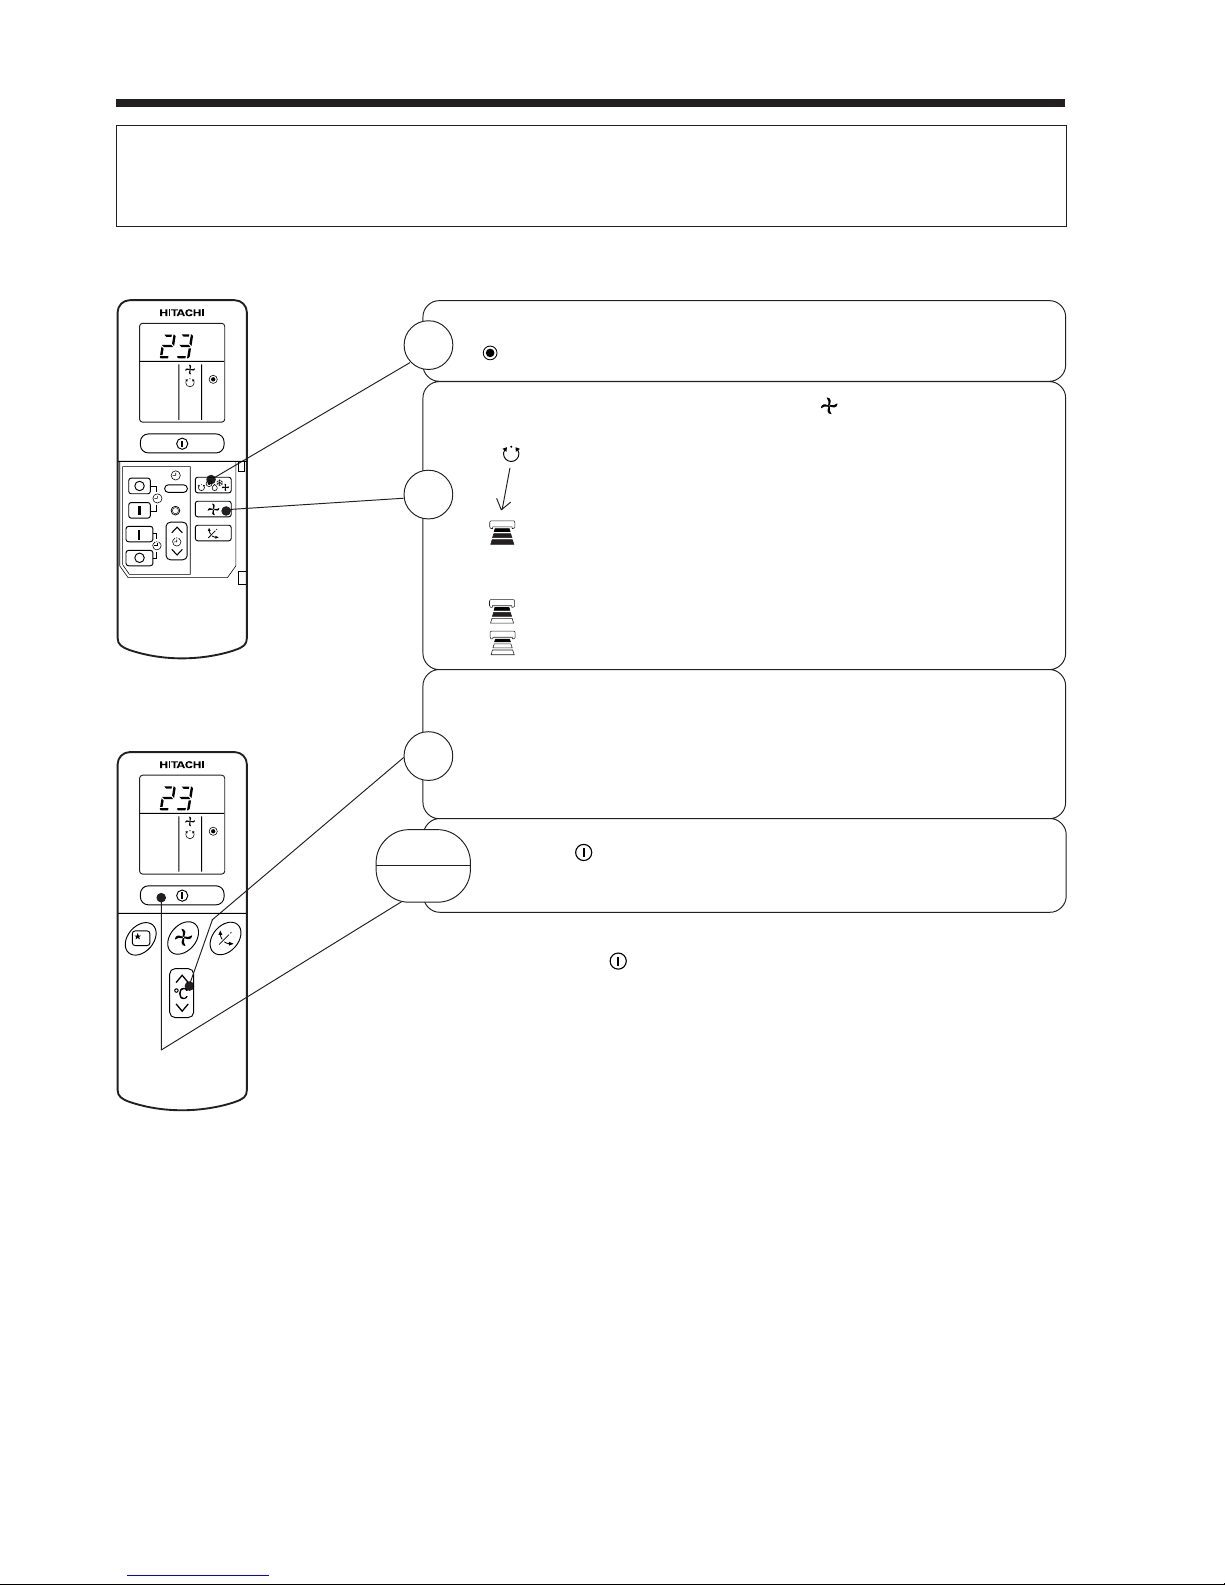
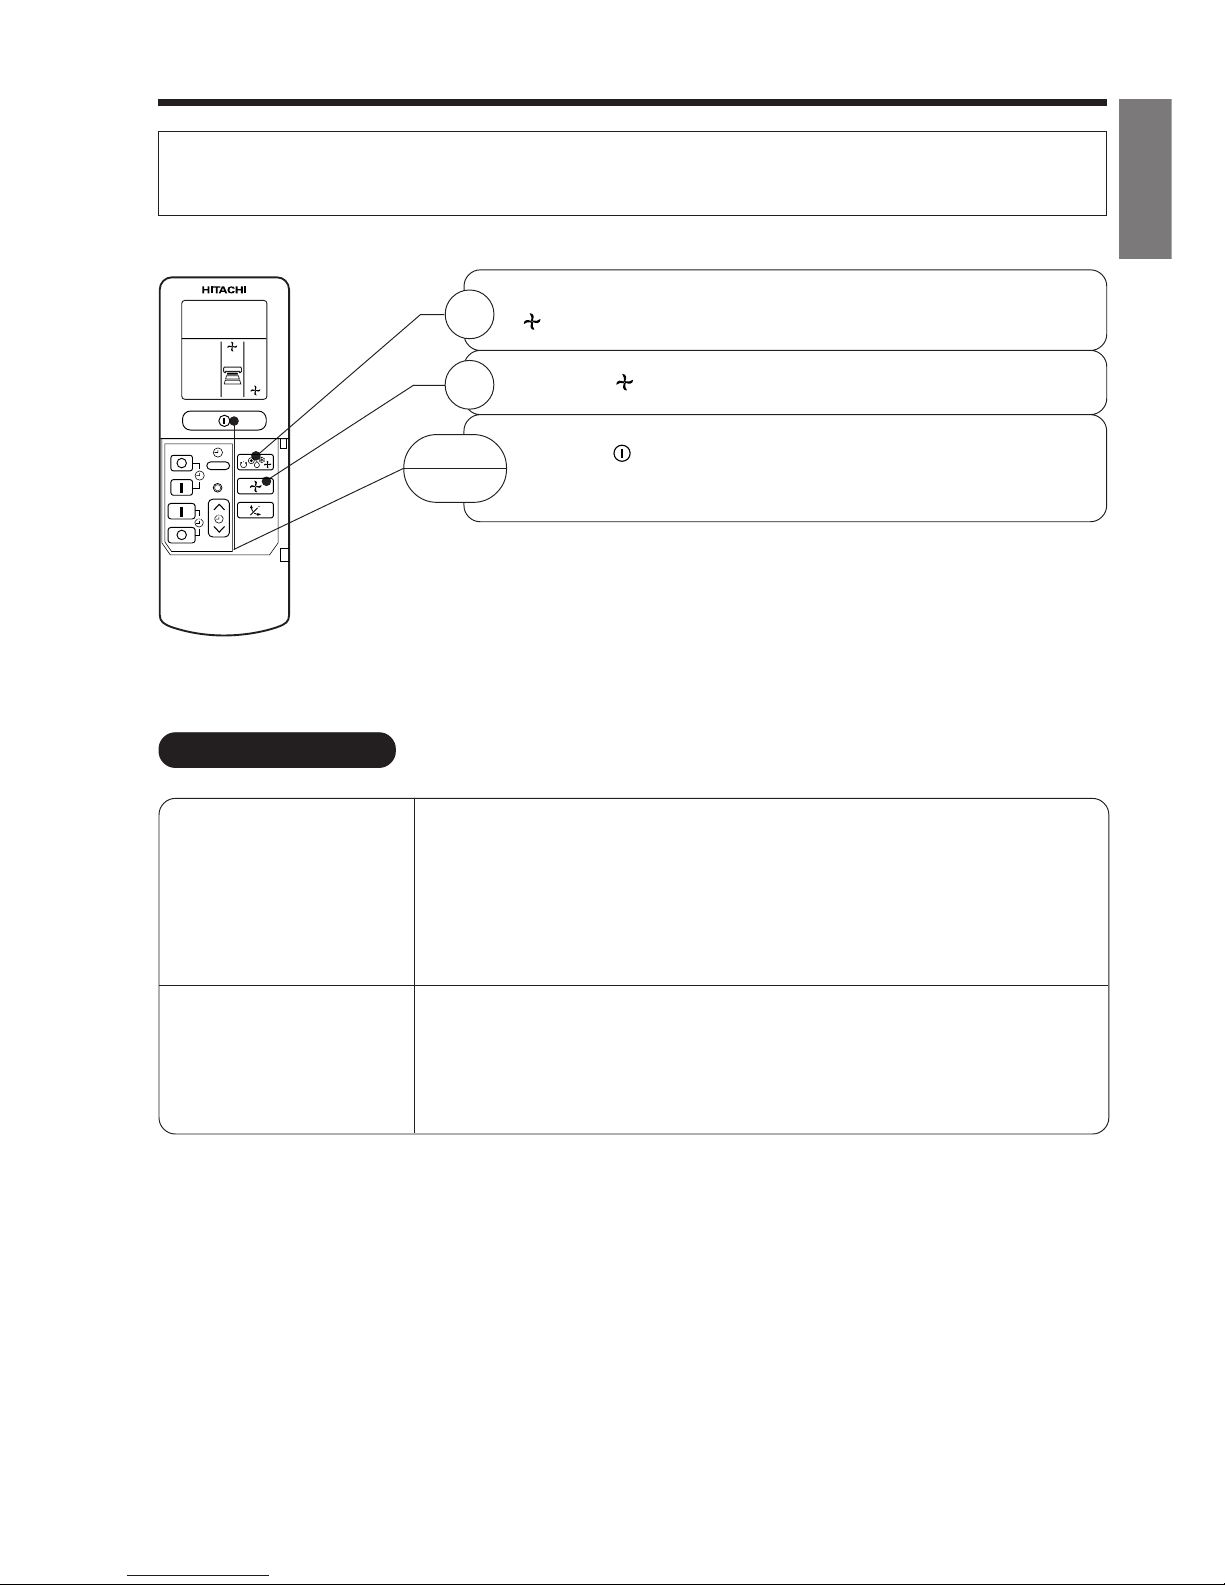
AUTOMATIC OPERATION
The device will automatically determine the mode of operation, HEAT, COOL or DEHUMIDIFY depending on the current room
temperature. The selected mode of operation will change when the room temperature varies. However the mode of operation will
not change when indoor unit connected to multi type outdoor unit.
■ As the settings are stored in memory in the remote controller, you only have to press the
(START/STOP) button next time.
Press the FUNCTION selector so that the display indicates the (AUTO) mode of operation.
● When AUTO has been selected, the device will automatically determine the mode of
operation, HEAT, COOL or DEHUMIDIFY depending on the current room temperature.
However the mode of operation will not change when indoor unit connected to multi type
outdoor unit.
● If the mode automatically selected by the unit is not satisfactory, manually change the
mode setting (heat, dehumidify, cool or fan).
Press the (START/STOP) button.
Operation starts with a beep.
Press the button again to stop operation.
You can raise or lower the temperature setting as necessary by maximum of 3°C.
Press the temperature button and the temperature setting will change by
1°C each time.
● The preset temperature and the actual room temperature may vary somewhat depending on
conditions.
● The display does not indicate the preset temperature in the AUTO mode. If you change the
setting, the indoor unit will produce a beep.
1
START
STOP
°C
RESET
Press the (FAN SPEED) button, AUTO and LOW is available.
VARIOUS FUNCTIONS
■ Auto Restart Control
● If there is a power failure, operation will be automatically restarted when the power is resumed with previous operation mode
and airflow direction.
(As the operation is not stopped by remote controller.)
● If you intend not to continue the operation when the power is resumed, switch off the power supply.
When you switch on the circuit breaker, the operation will be automatically restarted with previous operation mode and airflow
direction.
Note: 1. If you do not require Auto Restart Control, please consult your sales agent or OFF by remote control.
2. Auto Restart Control is not available when Timer or Sleep Timer mode is set.
Page 8
– 8 –
HEATING OPERATION
● Use the device for heating when the outdoor temperature is under 21°C.
When it is too warm (over 21°C), the heating function may not work in order to protect the device.
● In order to keep reliability of the device, please use this device above -15°C of the outdoor temperature.
Press the FUNCTION selector so that the display indicates
(HEAT).
Set the desired FAN SPEED with the (FAN SPEED) button
(the display indicates the setting).
(AUTO): The fan speed is HI at first and varies to
MED or LOW automatically when the preset
temperature has been reached.
(HI) : Economical as the room will become warm
quickly.
But you may feel a chill at the beginning.
(MED) : Fan speed slow.
(LOW) : Fan speed slower.
Set the desired room temperature with the TEMPERATURE
buttons (the display indicates the setting).
The temperature setting and the actual room temperature may
vary somewhat depending on conditions.
Press the (START/STOP) button. Heating operation starts
with a beep. Press the button again to stop operation.
■ As the settings are stored in memory in the remote controller, you only
have to press the (START/STOP) button next time.
1
2
3
START
STOP
˚
C
RESET
˚
C
Page 9
– 9 –
ENGLISH
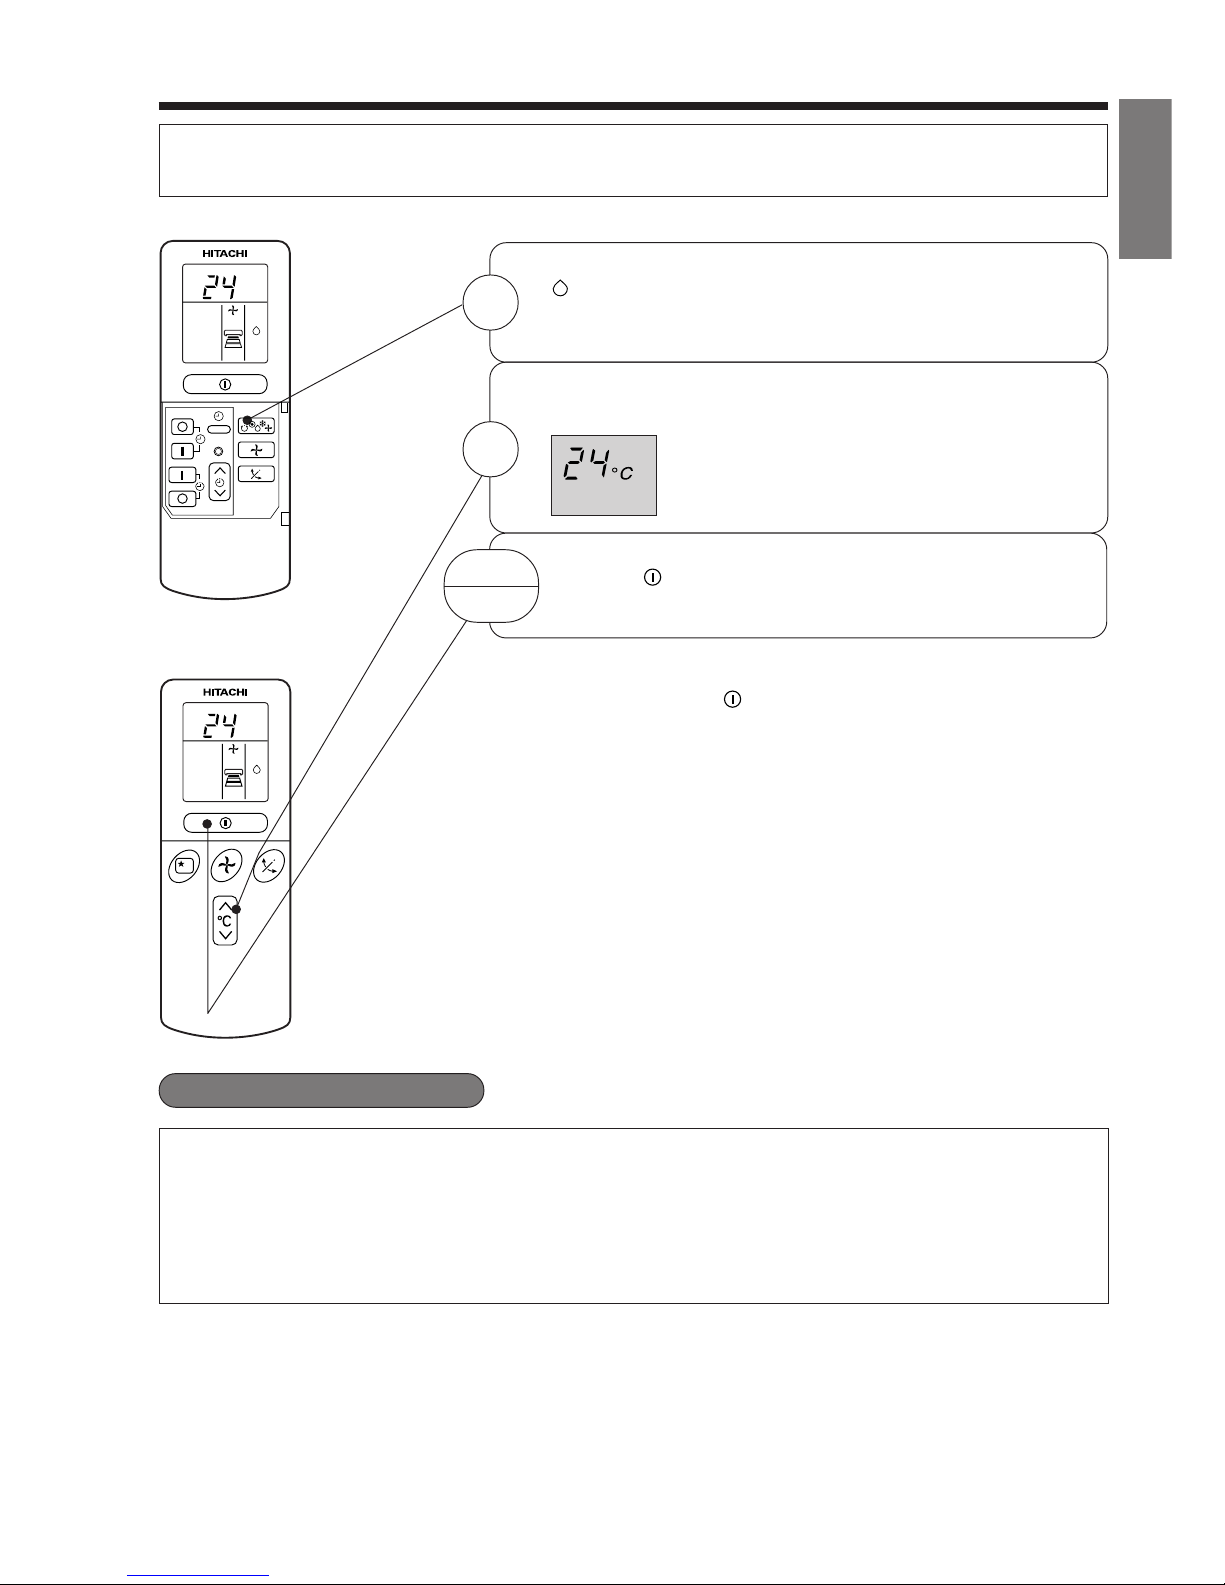
DEHUMIDIFYING OPERATION
Use the device for dehumidifying when the room temperature is over 16°C.
When it is under 15°C, the dehumidifying function will not work.
■ Dehumidifying Function
When the room temperature is higher than the temperature setting: The device will dehumidify the room,
reducing the room temperature to the preset level.
When the room temperature is lower than the temperature setting: Dehumidifying will be performed at
the temperature setting slightly lower than the current room temperature, regardless of the temperature
setting. The function will stop (the indoor unit will stop emitting air) as soon as the room temperature
becomes lower than the setting temperature.
Set the desired room temperature with the TEMPERATURE
button (the display indicates the setting).
The range of 20-26˚C is recommended as
the room temperature for dehumidifying.
Press the (START/STOP) button. Dehumidifying operation
starts with a beep. Press the button again to stop operation.
2
■ As the settings are stored in memory in the remote controller, you
only have to press the
(START/STOP) button next time.
START
STOP
Press the FUNCTION selector so that the display indicates
(DEHUMIDIFY).
The FAN SPEED is set at LOW automatically.
The FAN SPEED button does not work.
1
RESET
˚
C
˚
C
Page 10
– 10 –
˚
C
RESET
˚
C
COOLING OPERATION
Use the device for cooling when the outdoor temperature is –10~43°C.
If in doors humidity is very high (80%), some dew may form on the air outlet grille of the indoor unit.
Press the FUNCTION selector so that the display indicates
(COOL).
Set the desired FAN SPEED with the
(FAN SPEED) button
(the display indicates the setting).
(AUTO): The FAN SPEED is HI at first and varies to
MED or LOW automatically when the preset
temperature has been reached.
(HI) : Economical as the room will become cool
quickly.
(MED) : Fan speed slow.
(LOW) : Fan speed slower.
Set the desired room temperature with the TEMPERATURE
button (the display indicates the setting).
The temperature setting and the actual room temperature may
vary some how depending on conditions.
Press the
(START/STOP) button. Cooling operation starts
with a beep. Press the button again to stop operation. The
cooling function does not start if the temperature setting is
higher than the current room temperature (even though the
(OPERATION) lamp lights). The cooling function will start as
soon as you set the temperature below the current room
temperature.
■ As the settings are stored in memory in the remote controller, you
only have to press the
(START/STOP) button next time.
1
2
START
STOP
3
Page 11
– 11 –
ENGLISH
FAN SPEED (AUTO)
.....
When the AUTO fan speed mode is set in the cooling/heating operation:
For the heating operation
● The fan speed will automatically change according to the temperature
of discharged air.
● When the difference of room temperature and setting temperature is
large, fan starts to run at HI speed.
● When the room temperature reaches setting temperature, fan speed
changes to LOW automatically.
● When the difference of room temperature and setting temperature is
large, fan starts to run at HI speed.
● After room temperature reaches the preset temperature, the cooling
operation, which changes the fan speed and room temperature to obtain
optimum conditions for natural healthful cooling will be performed.
For the cooling operation
FAN OPERATION
You can use the device simply as an air circulator. Use this function to dry the interior of the indoor
unit at the end of summer.
Press the FUNCTION selector so that the display indicates
(FAN).
Press the (FAN SPEED) button.
Press the (START/STOP) button. Fan operation starts with
a beep. Press the button again to stop operation.
1
2
START
STOP
RESET
Page 12
– 12 –
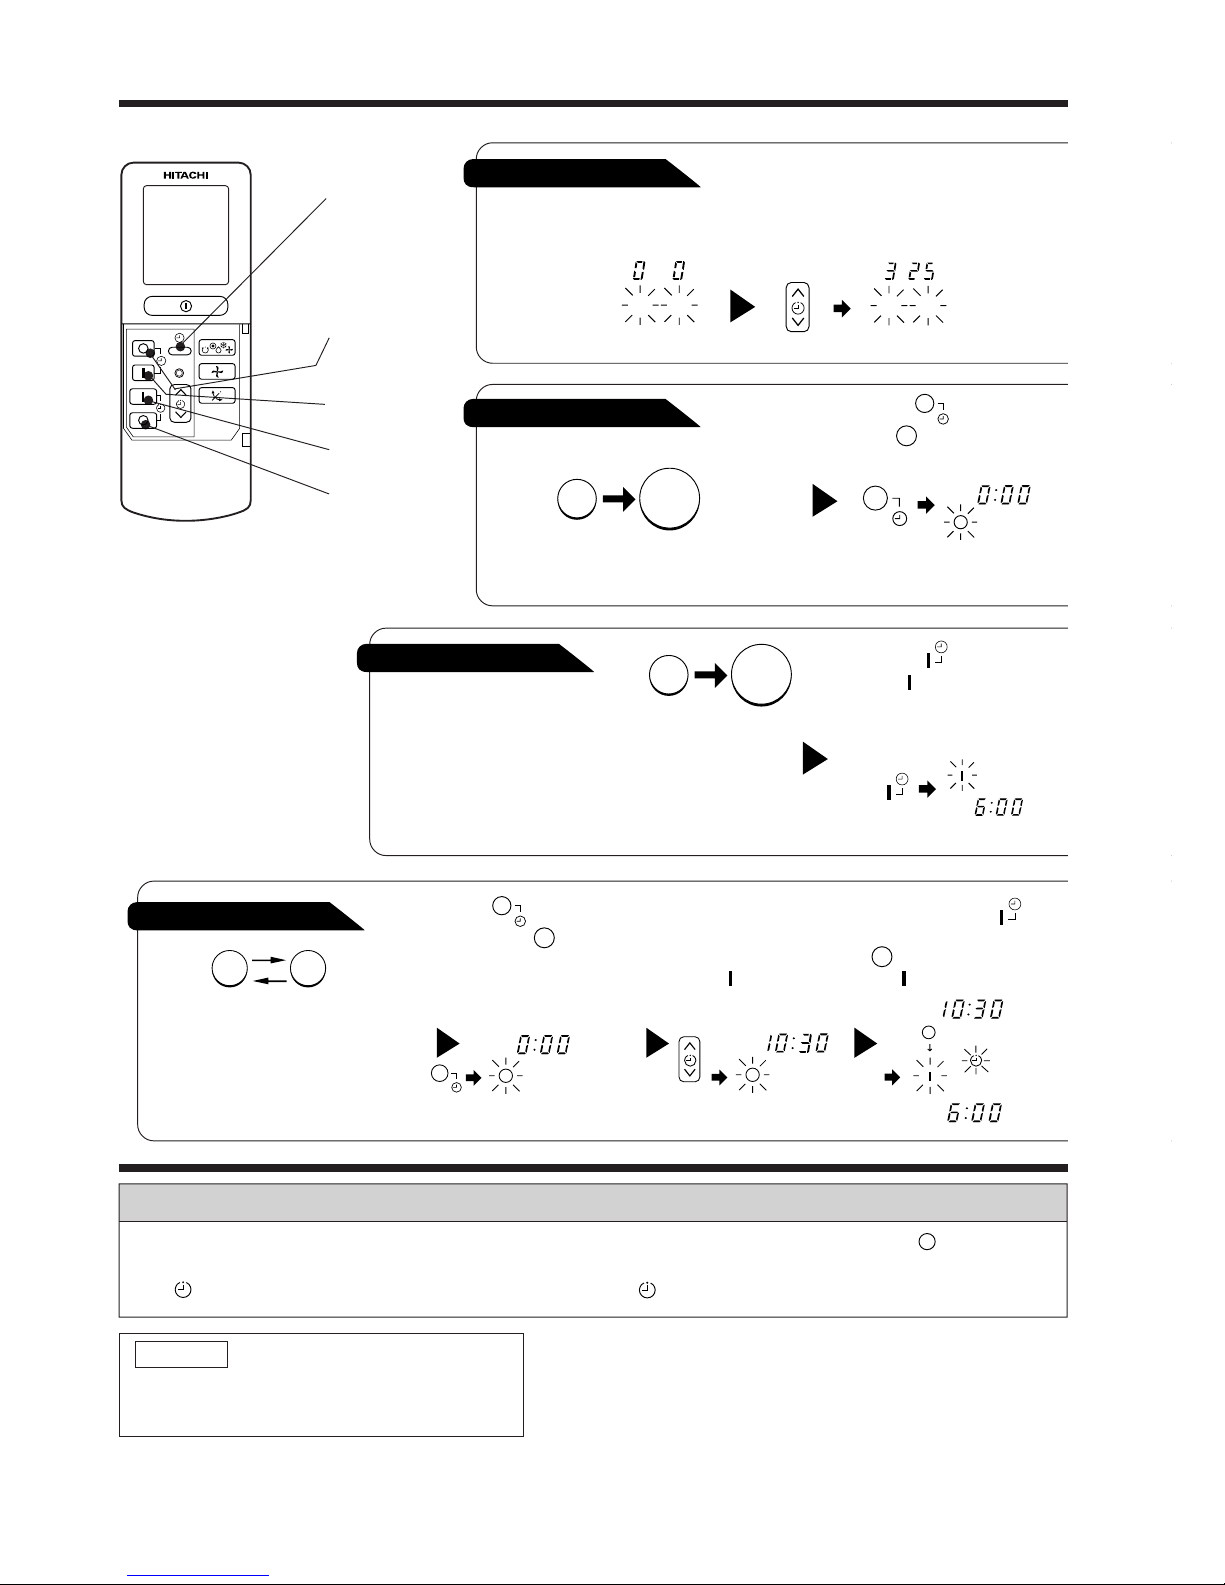
HOW TO SET THE TIMER
ON/OFF-Timer
● The device will turn on (off) and off
(on) at the designated times.
● The switching occurs first at the
preset time that comes earlier.
● The arrow mark appearing on the
display indicates the sequence of
switching operations.
1
Press the (ON-OFF)
button so that the (OFF)
mark blinks.
OFF-Timer
You can set the device to turn off
at the present time.
After you change the
batteries;
How to Cancel Reservation
Point the signal window of the remote controller toward the indoor unit, and press the (CANCEL)
button.
The (RESERVED) sign goes out with a beep and the (TIMER) lamp turns off on the indoor unit.
1
Set the current month and
day with the TIMER control
button.
1
Press the (OFF-TIMER)
button. The (OFF) mark blinks
on the display.
1
Press the (ON-TIMER)
button the (ON) mark blinks
on the display.
2
Set the turn-off time
with the TIMER control
button.
Press the (RESERVE)
button.
3
Press the (ON-
TIMER) button so that the
(OFF) mark lights and
the (ON) mark blinks.
NOTE
You can set only one of the OFF-timer,
ON-timer and ON/OFF-timer.
ON-Timer
Time, Day, Month
● The device will turn on
at the designated times.
TIME, DAY,
MONTH
(current time,
day, month)
OFF TIMER
ON TIMER
RESERVE
CANCEL
M D
M D
AM
STOP
Start
AM
Start
Stop
PM
Start Stop
PM
AM
PM
RESET
Page 13

– 13 –
ENGLISH
3
Point the signal window of the remote controller toward the indoor unit, and
press the (RESERVE) button.
The (OFF) mark starts lighting instead of flashing and the sign (RESERVED)
lights. A beep occurs and the (TIMER) lamp lights on the indoor unit.
● The time indication will disappear
automatically in 10 second.
● To check the current time setting,
press the (TIME) button twice.
The setting of the current time is
now complete.
● The timer may be used in three ways: off-timer, on-timer, and ON/OFF (OFF/ON)-timer. Set
the current time at first because it serves as a reference.
● As the time settings are stored in memory in the remote controller, you only have to press
the (RESERVE) button in order to use the same settings next time.
2
Press the
(TIME) button.
3
Set the current time with the
TIMER control button.
Example: The current time is 1:30 p.m.
2
Set the turn-off time with the
TIMER control button.
The setting of turn-off time is now complete.
Example: The device will turn off at 11:00p.m.
Example:
The device will turn on at 7:00 a.m.
The setting of the turn-on time is now complete.
4
Set the turn-on time with the
TIMER control button.
5
Point the signal window of the remote controller toward the indoor unit, and
press the (RESERVE) button.
The (ON) mark starts lighting instead of flashing and the (RESERVED) sign
lights. A beep occurs and the (TIMER) lamp lights on the indoor unit.
3
Point the signal window of the remote controller toward the indoor unit, and
press the (RESERVE) button.
The (ON) mark starts lighting instead of flashing and the (RESERVED) sign
lights. A beep occurs and the (TIMER) lamp lights on the indoor unit.
2
Set the turn-on time with the
TIMER control button.
Example:
The device will turn off at 10:30 p.m. and it will be turned on
at 7:00 a.m.
The settings of the turn-on/off times are now complete.
4
Press the (TIME) button again.
The time indication starts lighting
instead of flashing.
PM PM
AM
PM
PM
PM
AM
AM
AM
AM
PM
PM
Page 14

– 14 –
HOW TO SET THE SLEEP TIMER
1
Set the ON-timer.
Set the current time at first if it is not set before (see the pages for setting
the current time). Press the (SLEEP) button, and the display changes as
shown below.
Mode
Sleep timer
Indication
1 hour 2 hours 3 hours 7 hours
Sleep timer off
44 44
1
Sleep Timer: The device will continue working for the designated
number of hours and then turn off.
Point the signal window of the remote controller toward the indoor
unit, and press the SLEEP button.
The timer information will be displayed on the remote controller.
The TIMER lamp lights with a beep from the indoor unit. When the
sleep timer has been set, the display indicates the turn-off time.
Example: If you set 3 hours sleep
time at 11:38 p.m., the turn-off
time is 2:38 a.m.
2
Press the (SLEEP) button and set the sleep timer.
The device will be turned off by the sleep
timer and turned on by on-timer.
How to Cancel Reservation
Point the signal window of the remote controller toward the indoor unit, and press the (CANCEL)
button.
The (RESERVED) sign goes out with a beep and the (TIMER) lamp turns off on the indoor unit.
For heating:
In this case, the device will turn off
in 2 hours (at 1:38 a.m.) and turn
on early so that the preset
temperature will be almost reached
at 6:00 next morning.
SLEEP
H
H
AM
AM
Sleep
timer
Start
H
Page 15
– 15 –
ENGLISH
Explanation of the sleep timer
The device will control the FAN SPEED and room temperature automatically
so as to be quiet and good for people’s health.
● If date or current time is not set, sleep timer can not be set.
● If you set the sleep timer after the off-, on/off- or off/on-timer has been
set, the sleep timer becomes effective instead of the off-, on/off- or off/
on-timer set earlier.
● You can not set other timer during sleep timer operation.
● After sleep timer time is up and when press sleep button again, the
sleep timer will be set as last setting.
● Sleep timer effective only once.
NOTE
Page 16
– 16 –
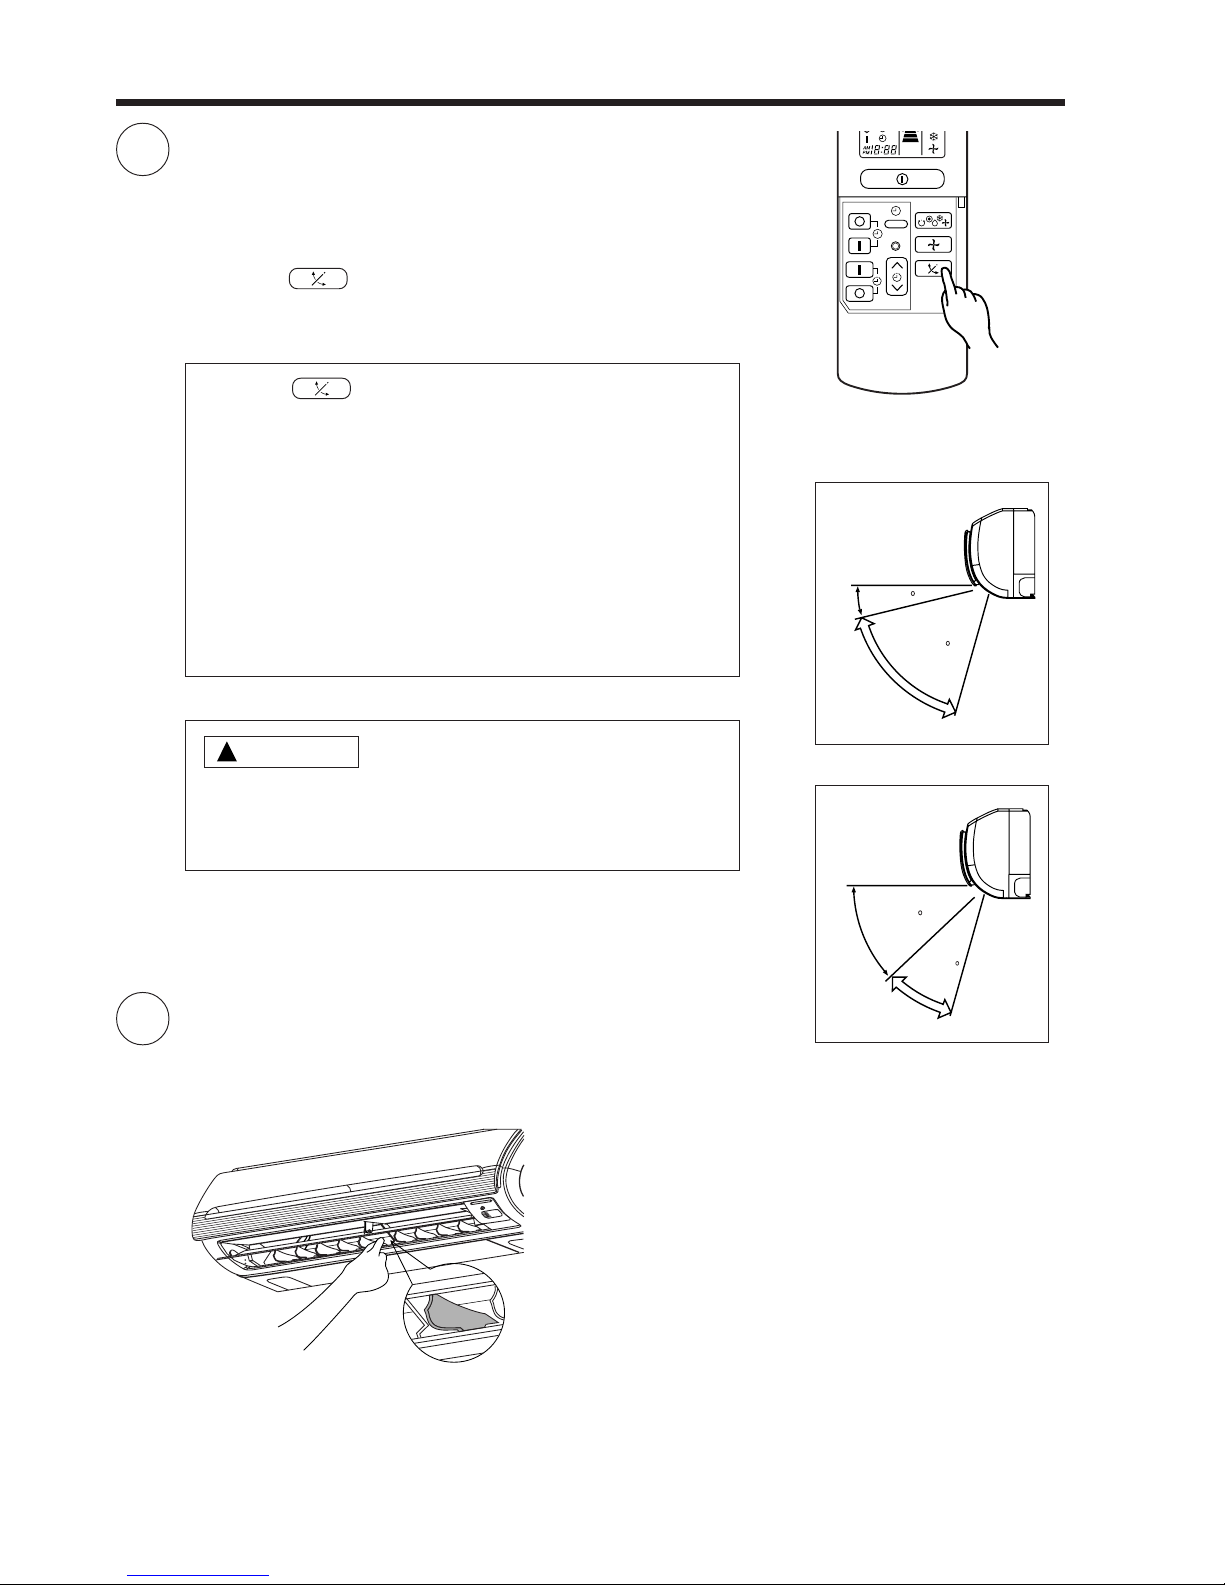
ADJUSTING THE AIR DEFLECTOR
1
2
Adjustment of the conditioned air to the left and right.
Hold the vertical air deflector as shown in the figure and adjust
the conditioned air to the left and right.
● If the “ (AUTO SWING)” button is pressed once,
the horizontal air deflector swings up and down. If the
button is pressed again, the deflector stops in its current
position. Several seconds (about 6 seconds) may be
required before the deflector starts to move.
● Use the horizontal air deflector within the adjusting range
shown on the right.
● When the operation is stopped, the horizontal air deflector
moves and stops at the position where the air outlet
closes.
Vertical
Vertical
about 15
about 60
about 45
about 30
When cooling,
dehumidifying
When heating
!
CAUTION
● In “Cooling” operation, do not keep the horizontal air
deflector swinging for a long time. Some dew may form
on the horizontal air deflector and dew may drop.
RESET
Adjustment of the conditioned air in the upward and downward
directions.
The horizontal air deflector is automatically set to the proper
angle suitable for each operation. The deflector can be swung
up and down continuously and also set to the desired angle
using the “ (AUTO SWING)” button.
Page 17
– 17 –
ENGLISH
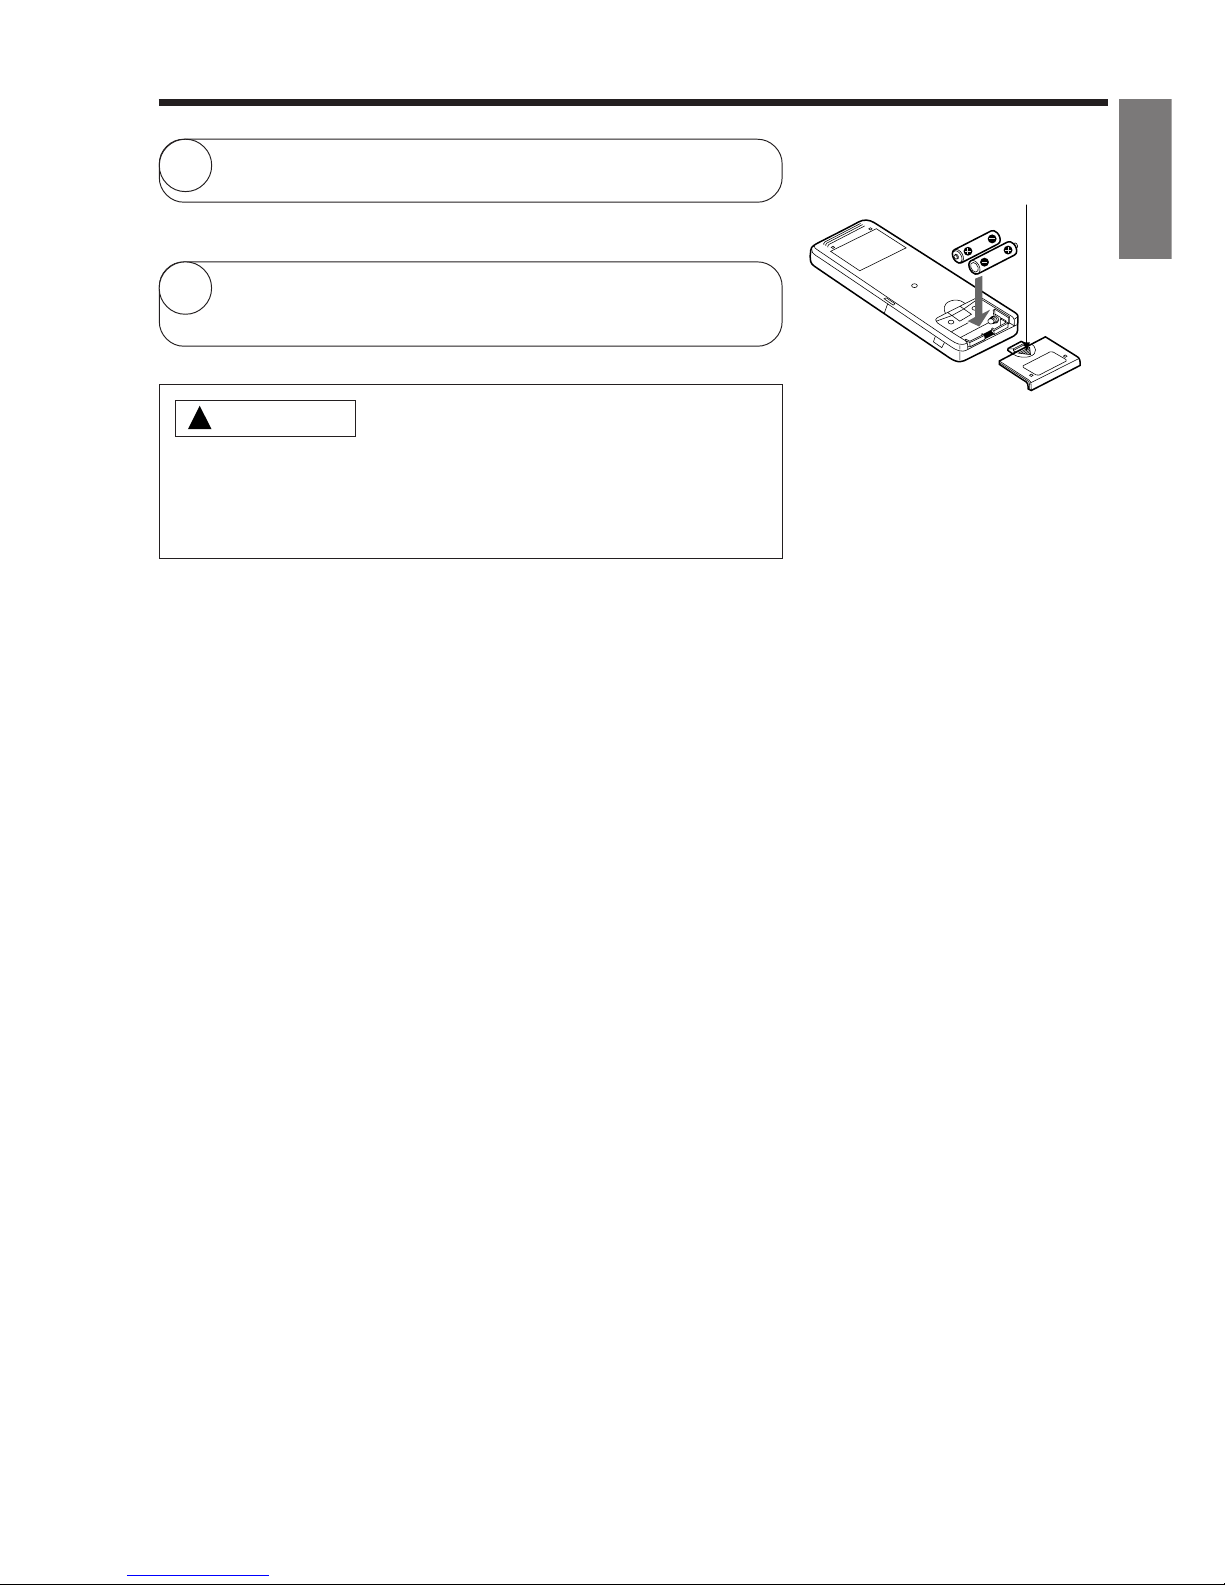
HOW TO EXCHANGE THE BATTERIES IN THE REMOTE CONTROLLER
1
Remove the cover as shown in the figure and take out the
old batteries.
=
2
Install the new batteries.
The direction of the batteries should match the marks in the
case.
1. Do not use new and old batteries, or different kinds of batteries
together.
2. Take out the batteries when you do not use the remote controller
for 2 or 3 months.
CAUTION
!
Push and pull to the
direction of arrow
Page 18
– 18 –
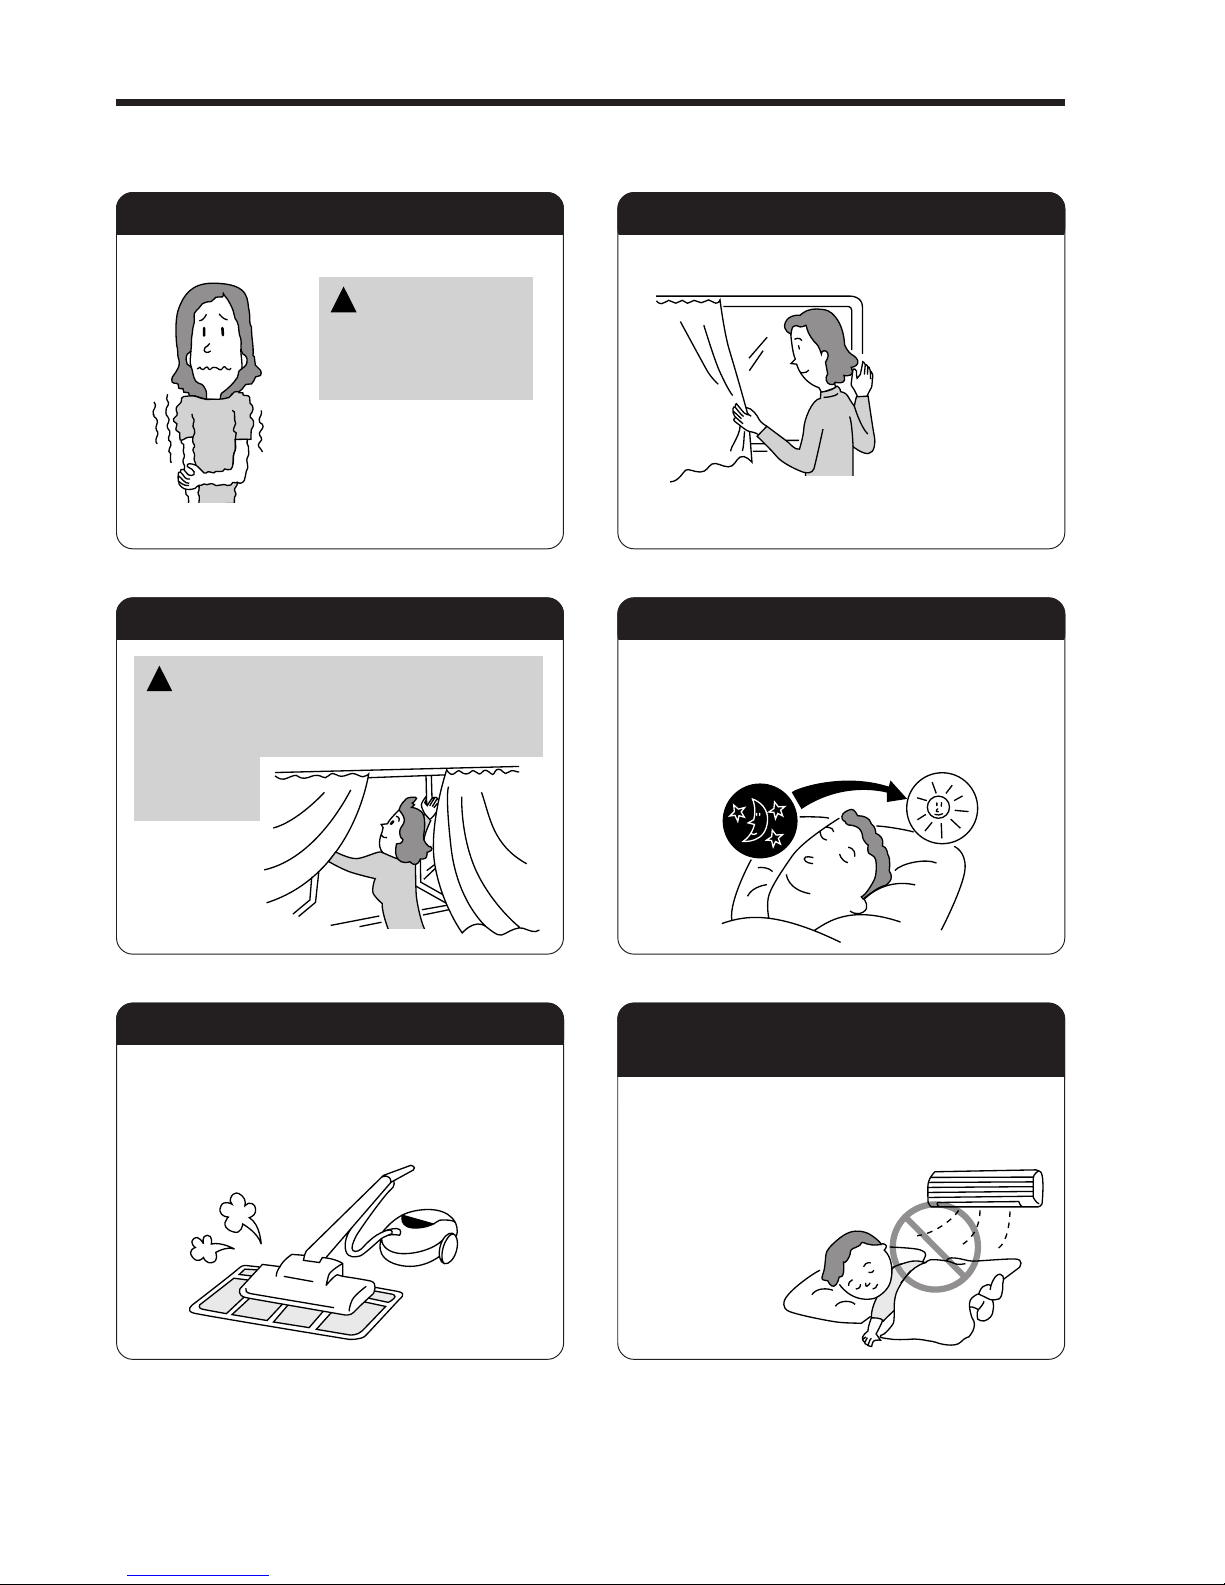
Suitable Room Temperature Install curtain or blinds
Ventilation Effective Usage Of Timer
Do Not Forget To Clean The Air Filter
Please Adjust Suitable Temperature
For Baby And Children
Warning
Freezing temperature
is bad for health and a
waste of electric power.
!
It is possible to
reduce heat
entering the
room through
windows.
At night, please use the “OFF or ON timer
operation mode”, together with your wake up
time in the morning. This will enable you to
enjoy a comfortable room temperature. Please
use the timer effectively.
Dusty air filter will reduce the air volume and
the cooling efficiency. To prevent from wasting
electric energy, please clean the filter every 2
weeks.
Please pay attention to the room temperature
and air flow direction when operating the unit
for baby, children and old folks who have
difficulty in movement.
Caution
Do not close the room for a long period of
time. Occasionally open the door and windows
to allow the
entrance of
fresh air.
!
THE IDEAL WAYS OF OPERATION
Page 19
– 19 –
ENGLISH
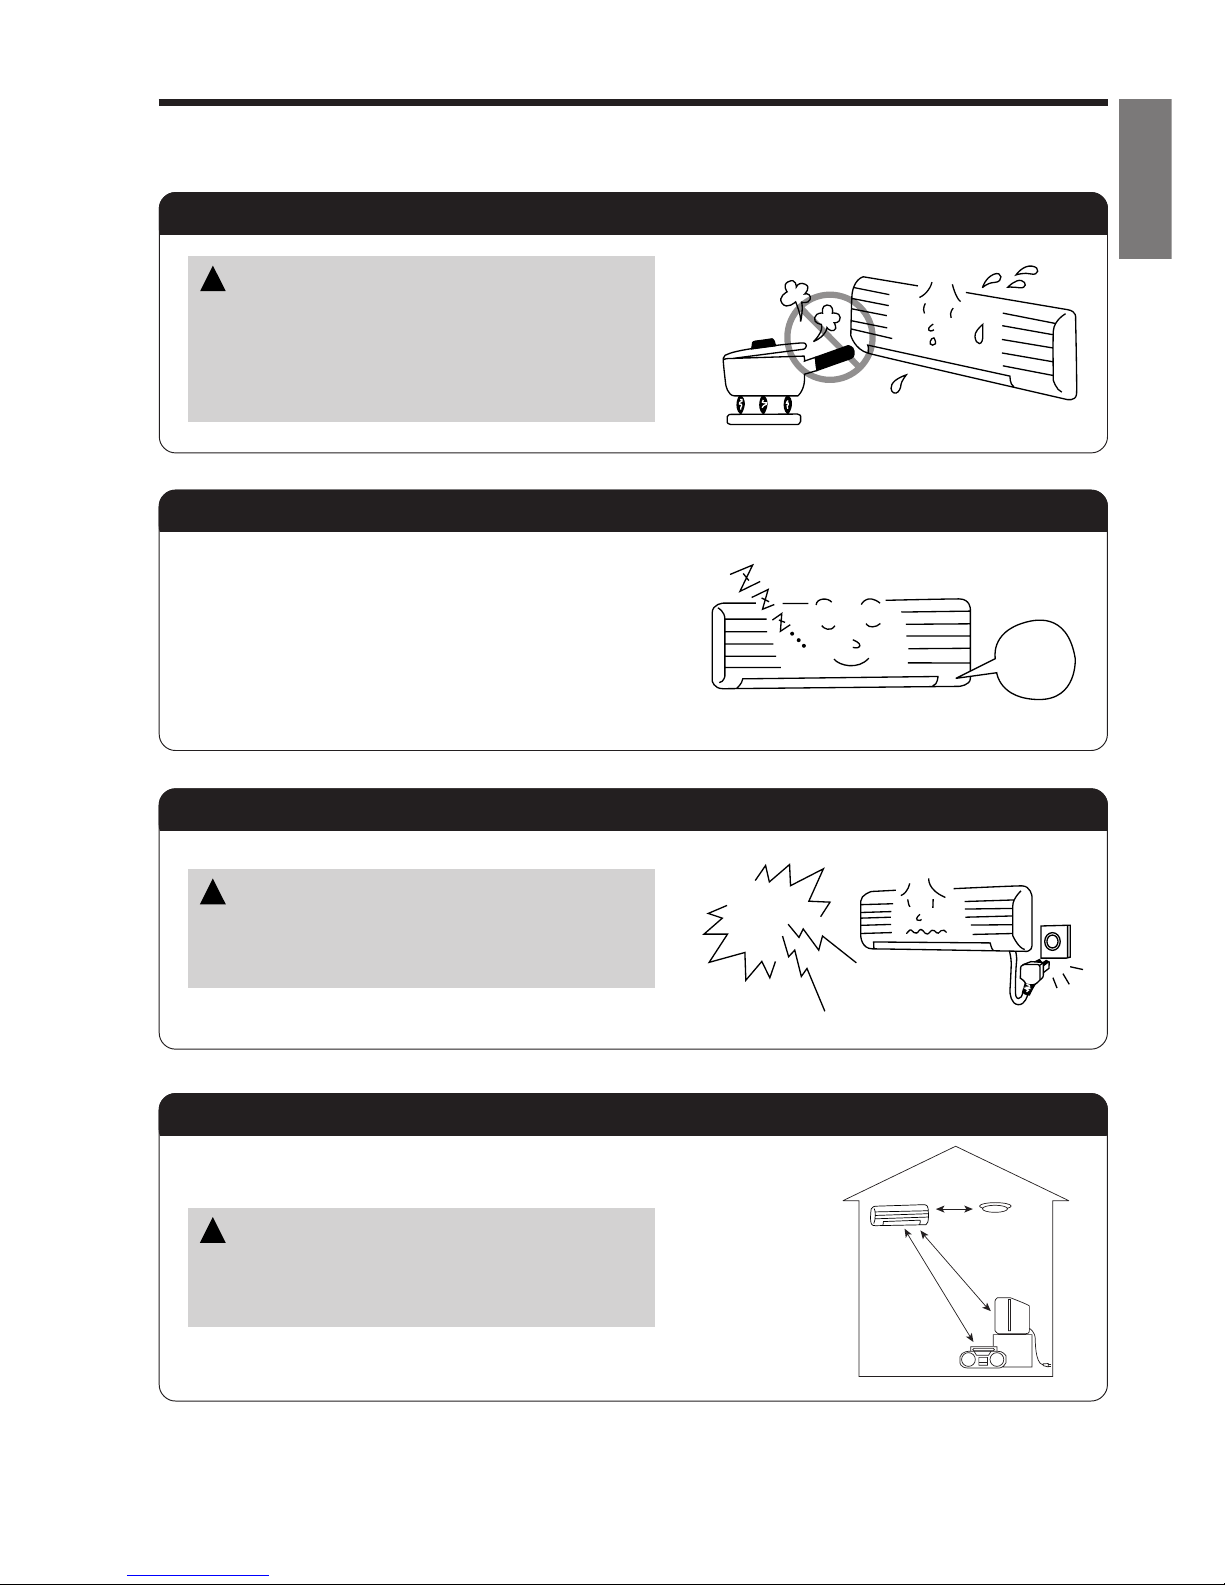
FOR USER’S INFORMATION
The Air Conditioner And The Heat Source In The Room
Not Operating For A Long Time
When Lightning Occurs
Caution
If the amount of heat in the room is above the cooling
capability of the air conditioner (for example: more
people entering the room, using heating equipments
and etc.), the preset room temperature cannot be
achieved.
!
When the indoor unit is not to be used for a long
period of time, please switch off the power from the
mains. If the power from mains remains “ON”, the
indoor unit still consumes about 8W in the operation
control circuit even if it is in “OFF” mode.
Warning
To protect the whole unit during lightning, please
stop operating the unit and remove the plug from the
socket.
!
OFF
Interference From Electrical Products
Caution
To avoid noise interference, please place the indoor
unit and its remote controller at least 1m away from
electrical products.
!
Inverter-type
fluorescent
lamp.
To prevent
interference,
place at least
1m away.
TV
Page 20

– 20 –
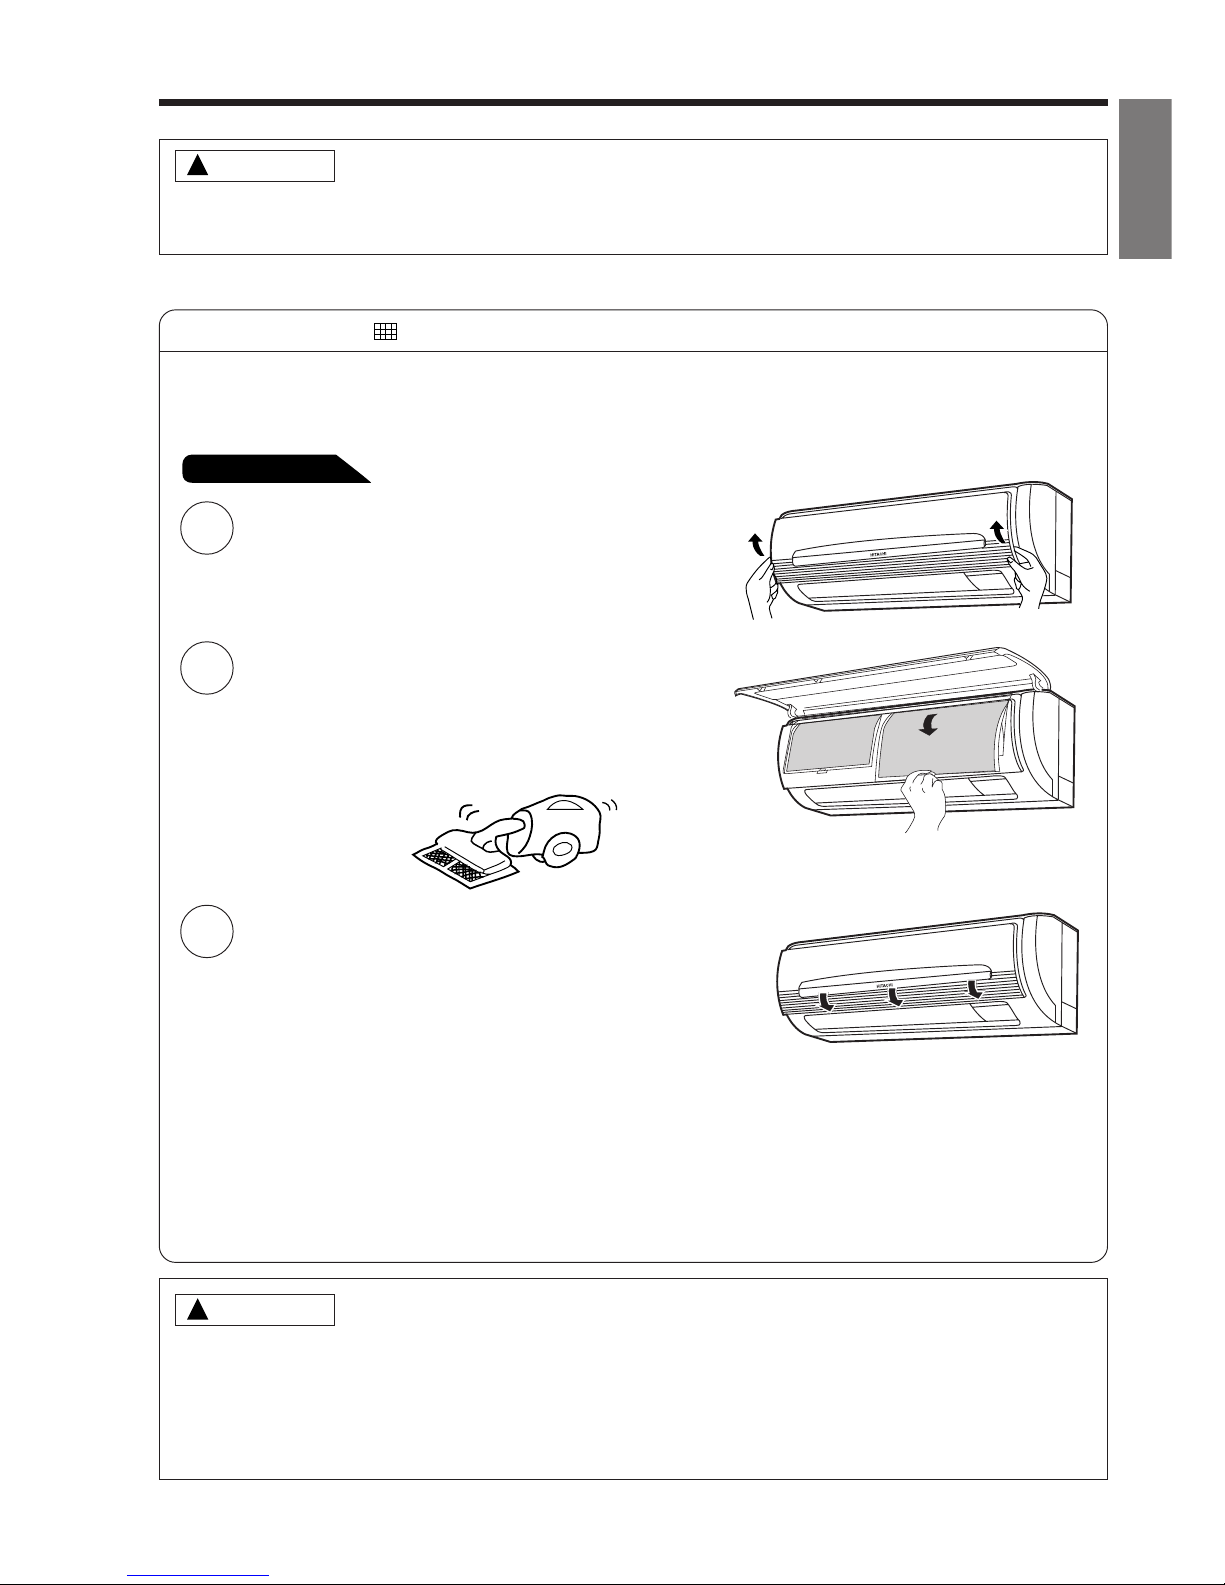
ATTACHING THE AIR CLEANSING FILTERS
1
2
3
4
Cleaning and maintenance must be carried out only by qualified service personal. Before cleaning,
stop operation and switch off the power supply.
CAUTION
!
!
CAUTION
NOTE
Open the front panel.
● Pull up the front panel by holding it at both sides
with both hands.
Remove the filter.
● Push upward to release the claws and pull out the
filter.
Attaching the air cleansing filters to the filter.
● Attach the air cleansing filters to the frame by gently
compress its both sides and release after insertion
into filter frame.
Do not bend the air cleansing
filter as it may cause damage to
the structure.
● In case of removing the air cleansing filters, please follow the above procedures.
● The cooling capacity is slightly weakened and the cooling speed becomes slower when the air
cleansing filters are used. So, set the fan speed to "HIGH" when using it in this condition.
● Air cleansing filters are washable and reusable up to 20 times by using vacuum cleaner or water rinse
under running tap water. Type number for this air cleansing filter is <SPX-CFH11>. Please use this
number for ordering when you want to renew it.
● Do not operate the air conditioner without filter. Dust may enter the air conditioner and fault may occur.
Attach the filters.
● Attach the filters by ensuring that the surface written
“FRONT” is facing front.
● After attaching the filters, push the front panel at
three arrow portion as shown in figure and close it.
Page 21
– 21 –
ENGLISH
MAINTENANCE
Cleaning and maintenance must be carried out only by qualified service personal. Before cleaning,
stop operation and switch off the power supply.
1. AIR FILTER
Clean the air filter, as it removes dust inside the room. In case the air filter is full of dust, the air flow
will decrease and the cooling capacity will be reduced. Further, noise may occur. Be sure to clean the
filter following the procedure below.
!
CAUTION
1
2
3
!
CAUTION
PROCEDURE
Open the front panel and remove the filter
● Gently lift and remove the air cleansing filter
from the air filter frame.
Vacuum dust from the air filter and air cleansing
filter using vacuum cleaner. If there is too
much dust, air filter only rinse under running
tap water and gently brush it with soft bristle
brush. Allow filters to dry in shade.
● Re-insert the air cleansing filter to the filter
frame. Set the filter with “FRONT” mark facing
front, and slot them into the original state.
● After attaching the filters, push the front panel
at three arrow portions as shown in figure
and close it.
● Do not wash with hot water at more than 40°C. The filter may shrink.
● When washing it, shake off moisture completely and dry it in the shade; do not expose it directly to
the sun. The filter may shrink.
● Do not use detergent on the air cleansing filter as some detergent may deteriorate the filter
electrostatic performance.
NOTE:
● Air cleansing filter should be cleaned every month or sooner if noticeable loading occurs. When
used overtime, it may loose its deodorizing function. For maximum performance, it is recommended
to replace it every 3-6 months depending on application requirements.
Page 22
– 22 –
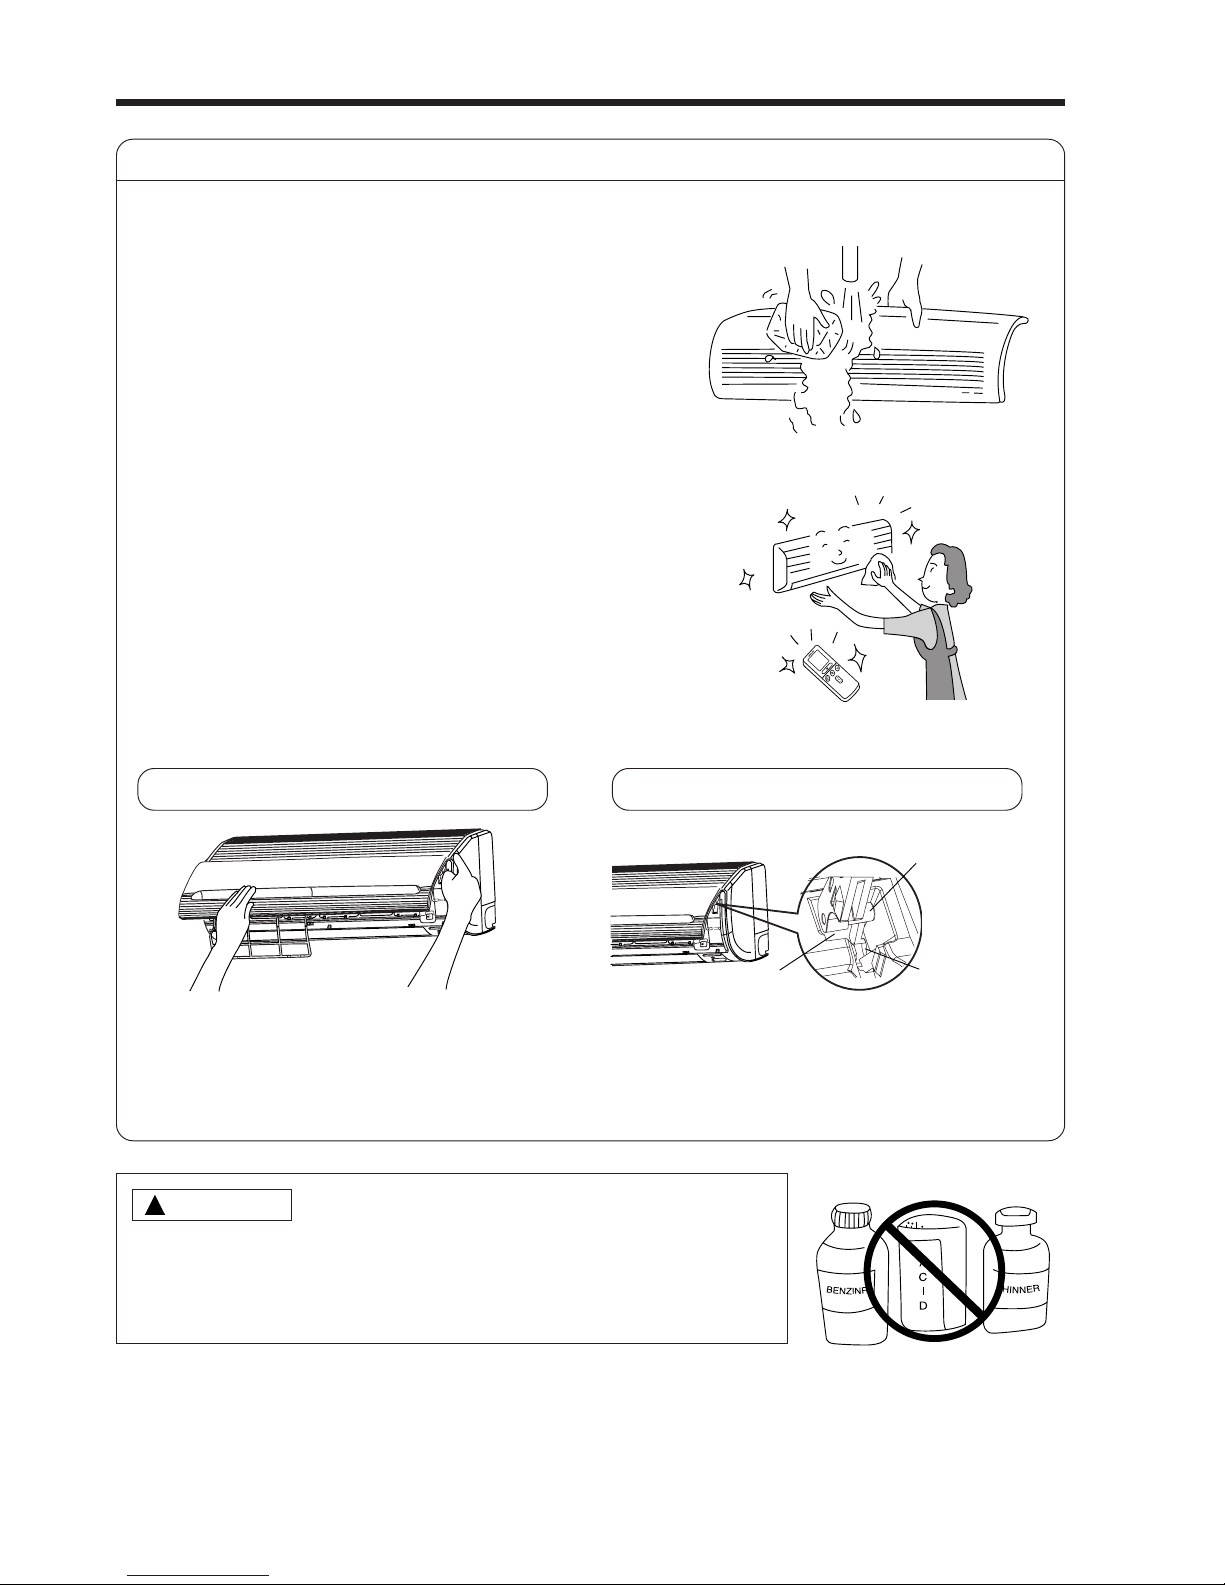
2. Washable Front Panel
● Remove the front panel and wash with clean
water.
Wash it with a soft sponge.
After using neutral detergent, wash thoroughly
with clean water.
● When front panel is not removed, wipe it with
a soft dry cloth. Wipe the remote controller
thoroughly with a soft dry cloth.
● Wipe the water thoroughly.
If water remains at indicators or signal
receiver of indoor unit, it causes trouble.
Method of removing the front panel.
Be sure to hold the front panel with both hands
to detach and attach it.
!
CAUTION
● Do not splash or direct water to the body of the unit when cleaning
it as this may cause short circuit.
● Never use hot water (above 40°C), benzine, gasoline, acid, thinner or
a brush, because they will damage the plastic surface and the coating.
Removing the Front Panel
● When the front panel is fully opened with
both hands, push the right arm to the inside
to release it, and while closing the front panel
slightly, put it out forward.
Attaching the Front Panel
● Move the projections of the left and right
arms into the Flanges in the unit and
securely insert them into the holes.
Projection
Flange
Hole
Page 23
– 23 –
ENGLISH
3. MAINTENANCE AT BEGINNING OF LONG OFF PERIOD
● Run the unit by setting the operation mode to
(COOL), the temperature to 32°C and the fan speed
to HI for about half a day on a fine day, and dry the
whole of the unit.
● Switch off the power plug.
1
2
3
REGULAR INSPECTION
PLEASE CHECK THE FOLLOWING POINTS BY QUALIFIED SERVICE PERSONAL EITHER
EVERY HALF YEARLY OR YEARLY. CONTACT YOUR SALES AGENT OR SERVICE SHOP.
Is the earth line disconnected or broken?
Is the mounting frame seriously affected by rust and is the
outdoor unit tilted or unstable?
Is the plug of power line firmly plugged into the socket?
(Please ensure no loose contact between them).
Air
Blow
Cleaning and maintenance must be carried out only by qualified service personal. Before cleaning,
stop operation and switch off the power supply.
!
CAUTION
Confirm
Page 24
– 24 –
AFTER SALE SERVICE AND WARRANTY
WHEN ASKING FOR SERVICE, CHECK THE FOLLOWING POINTS.
When it does not operate
● Is the fuse all right?
● Is the voltage extremely high or low?
● Is the circuit breaker “ON”?
● Was the air filter cleaned?
● Does sunlight fall directly on the outdoor unit?
● Is the air flow of the outdoor unit obstructed?
● Are the doors or windows opened, or is there any source of
heat in the room?
● Is the set temperature suitable?
CONDITION CHECK THE FOLLOWING POINTS
Notes
● In quiet operation or stopping the operation, the following phenomena
may occassionally occur, but they are not abnormal for the operation.
(1) Slight flowing noise of refrigerant in the refrigerating cycle.
(2) Slight rubbing noise from the fan casing which is cooled and then
gradually warmed as operation stops.
● The odor will possibly be emitted from the room air conditioner because
the various odor, emitted by smoke, foodstuffs, cosmetics and so on,
sticks to it. So the air filter and the evaporator regularly must be cleaned
to reduce the odor.
●
Please contact your sales agent immediately if the air conditioner still fails to operate normally after the above
inspections. Inform your agent of the model of your unit, production number, date of installation. Please also
inform him regarding the fault.
●
Power supply shall be connected at the rated voltage, otherwise the unit will be broken or could not reach the
specified capacity.
When it does not cool well
When it does not hot well
Page 25
– 25 –
ENGLISH
MEMO
.....................................................................................................................................................................................
.....................................................................................................................................................................................
.....................................................................................................................................................................................
.....................................................................................................................................................................................
.....................................................................................................................................................................................
.....................................................................................................................................................................................
.....................................................................................................................................................................................
.....................................................................................................................................................................................
.....................................................................................................................................................................................
.....................................................................................................................................................................................
.....................................................................................................................................................................................
.....................................................................................................................................................................................
.....................................................................................................................................................................................
.....................................................................................................................................................................................
.....................................................................................................................................................................................
.....................................................................................................................................................................................
.....................................................................................................................................................................................
.....................................................................................................................................................................................
.....................................................................................................................................................................................
.....................................................................................................................................................................................
.....................................................................................................................................................................................
.....................................................................................................................................................................................
.....................................................................................................................................................................................
Please note:
On switching on the equipment, particularly when the room light is dimmed, a slight brightness fluctuation
may occur. This is of no consequence.
The conditions of the local Power Supply Companies are to be observed.
Minimum Maximum Minimum Maximum
Indoor
Dry bulb °C2132 2027
Wet bulb °C1523 1219
Outdoor
Dry bulb °C21 43 2 21
Wet bulb °C15 26 1 15
Note
● Avoid to use the room air conditioner for cooling operation when the outside temperature is below
21°C (70°F).
The recommended maximum and minimum operating temperatures of the hot and cold sides
should be as below:
Cooling Heating
Page 26

– 26 –
MEMO
.....................................................................................................................................................................................
.....................................................................................................................................................................................
.....................................................................................................................................................................................
.....................................................................................................................................................................................
.....................................................................................................................................................................................
.....................................................................................................................................................................................
.....................................................................................................................................................................................
.....................................................................................................................................................................................
.....................................................................................................................................................................................
.....................................................................................................................................................................................
.....................................................................................................................................................................................
.....................................................................................................................................................................................
.....................................................................................................................................................................................
.....................................................................................................................................................................................
.....................................................................................................................................................................................
.....................................................................................................................................................................................
.....................................................................................................................................................................................
.....................................................................................................................................................................................
.....................................................................................................................................................................................
.....................................................................................................................................................................................
.....................................................................................................................................................................................
.....................................................................................................................................................................................
.....................................................................................................................................................................................
.....................................................................................................................................................................................
.....................................................................................................................................................................................
.....................................................................................................................................................................................
.....................................................................................................................................................................................
.....................................................................................................................................................................................
.....................................................................................................................................................................................
.....................................................................................................................................................................................
.....................................................................................................................................................................................
.....................................................................................................................................................................................
.....................................................................................................................................................................................
.....................................................................................................................................................................................
.....................................................................................................................................................................................
.....................................................................................................................................................................................
.....................................................................................................................................................................................
.....................................................................................................................................................................................
.....................................................................................................................................................................................
Page 27

– 27 –
DEUTSCH
AUFGETEILTE ART-KLIMAANLAGE
INNENGERÄT / AUSSENGERÄT
INNENGERÄT
MODELL
RAK-50NH5
RAK-50NH5
Instruction manual Page 1~26
To obtain the best performance and ensure years of trouble
free use, please read this instruction manual completely.
Bedlenungsanleitung Suite 27~52
Bitte lesen Sie diese Bedienungsanleitung aufmerksam
durch, um durch richtige Bedienung jahrelangen und
störungsfreien Betrieb zu gewährleisten.
Mode d’emploi Page 53~78
Des performances optimales et un fonctionnement à long
terme seront assurés en appliquant les présentes
instructions après avoir entièrement lu ce mode d’emploi.
Manuale di istruzioni Pag. 79~104
Per garantire la migliore prestazione e la più lunga
durataleggere attentamente e al completo le seguanti
istruzioni.
Manual de instrucciones Página 105~130
Para obtener el mejor funcionamiento y asegurar años de
uso libre de problemas, lea cuidadosamente este manual
de instrucciones.
Manual de instruções Página 131~156
A fim de obter um bom funcionamento e de garantir uma
utilização sem falhas durante muitos anos, é favor ler este
manual de instruções completamente.
O‰ЛБ›В˜ XВИЪИЫМФ‡ ™ÂÏ›‰· 157~182
°И· ЩЛУ О·П‡ЩВЪЛ ‰˘У·Щ‹ ·fi‰ФЫЛ О·И ЩЛУ М·ОЪФ¯ЪfiУИ·
О·И ¯ˆЪ›˜ ЪФ‚П‹М·Щ· ¯Ъ‹ЫЛ ЩЛ˜ Ы˘ЫОВ˘‹˜ ·˘Щ‹˜,
·Ъ·О·ПФ‡МВ ‰И·‚¿ЫЩВ П‹Ъˆ˜ ЩИ˜ Ф‰ЛБ›В˜ ¯ВИЪИЫМФ‡ ЩЛ˜.
Инструкция по эксплуатации
стр. 183~208
Для обеспечения наилууших эксплуатационных
характеристик и многолетней безотказной работы
оборудования необходимо полностыо оэнакомиться с
данной Инструкцией по эксплуатации.
Page 28
– 28 –
SICHERHEITSMASSNAHMEN
WARNUNG
VORSICHTSMASSNAHMEN WÄHREND DES EINBAUS
VORSICHT
!
!
VORSICHTSMASSNAHMEN WÄREND VERLEGUNG ODER WARTUNG
VORSICHTSMASSNAHMEN WÄHREND DES BETRIEBS
W
A
R
N
U
N
G
!
WARNUNG
!
AUS
AUS
●
Bitte lesen Sie die Sicherheitsmaßnahmen vor der Inbetriebnahme des Gerätes sorgfältig durch.
●
Beachten Sie in besonderem Maße die Schriftzüge “ WARNUNG” und “ VORSICHT”. Der “WARNUNG”-Teil enthält
Sachen, die wenn nicht strikt beachtet werden, dann könnte Tod oder ernste Verletzungen die Folge sein. Der “VORSICHT”-
Teil enthält Sachrn, die wenn nicht richtig beachtet werden, dann könnte es ernste Konsequenzen haben. Bitte beachten
Sie strikt alle Anweisungen um Sicherheit zu gewährleisten.
●
Die Symbole haben folgende Bedeutung:
●
Bitte bewahren Sie dieses Heft auf.
●
Bauen Sie das Gerät nicht selbst ein, sonst könnten Probleme wie Wasserlecken,
Kurzschluss oder Feuer auftreten.
●
Wenden Sie sich bitte an den Händler oder an einen qualifizierten Techniker für den
Einbau des Gerätes. Sollten Sie persönlich den Einbau ausführen, dann könnte
Wasserleck, Kurzschluß oder Feuer die Folge sein.
●
Verwnden Sie bitte einen Schutzleiter.
Der Schutzleiter darf nicht in der Nähe von Gas-, Wasserröhren oder dem Schutzleiter
eines Telephons plaziert werden. Falsche Installation des Schutzleiters könnte
elektrischen Schlag verursachen.
●
Ein Unterbrecher sollte jenach Montagestandort eingesetzt werden. Ohne den
Unterbrecher besteht die Gefahr des elektrischen Schlages.
●
Nicht in der Nähe von brennbarem Gas montieren. Das Außengerät köntte Feuer
fangen, wenn brennbares Gas in seiner Umgebung entweicht.
●
Achten Sie beim Einbau darauf, daß eine einwandfreie Wasserableitung möglich ist.
●
Im Falle, dass eine ungewöhnliche Situation eintreten sollte (zum Beispiel Brandgeruch),
darf das Gerät nicht mehr betrieben werden und muss mit dem Ausschalter abgeschaltet
werden. Bitte wenden Sie sich an Ihren Händler. Erdfehler, Kurzschluss oder Feuer
können auftreten, wenn Sie das Gerät unter abnormalen Bedingungen weiter betreiben.
●
Bitte wenden Sie sich für die Wartung an den Händler. Inkorrekte Wartung, die
Sie persönlich ausführen, könnte elektrischen Schlag verursachen.
●
Bitte wenden Sie sich an den Händler, sollten Sie das Gerät abbauen und
wieder einbauen wollen. Elektrischer Scglag oder Feuer könnten die Folgen
sein, wenn Sie es fehlerhaft ausführen sollten.
●
Aus gesundheitlichen Gründen sollten Sie es vermeiden für längere Zeit dem
direkten Luftstrom ausgesetzt zu sein.
●
Keine Gegenstände wie Stäbe in die Luftansaug- oder Luftauslaßöffnungen
einschieben. Sonst verursacht der Hochgeschwindigkeitsventilator Gefahr.
●
Verwenden Sie nicht irgend einen Draht als Sicherung. Das könnte
lebesgefährlich werden.
●
Während Gewitter muss das Gerät ausgeschaltet werden und der Stecker
aus der Steckdose gezogen werden.
! !
Das Erdungskabel muss angeschlossen sein.
Dieses Symbol zeigt die Anweisungen an, die befolgt
werden müssen.
Dieses Symbol heißt “verboten”.
Page 29
– 29 –
DEUTSCH
VORSICHTSMASSNAHMEN WÄHREND DES BETRIEBS
V
O
R
S
I
C
H
T
!
AUS
AUS
●
Das Gerät soll nur für die vom Hersteller vorgeschriebenen Zwecke
verwendet werden und nicht für andere Zwecke.
●
Das Gerät niemals mit nassen Händen betätigen. Tödliche Unfälle können
dadurch zustandekommen.
●
Wenn Verbrennungsgeräte wie Gasherd in betrieb sind, dann lüften Sie
regelmäßig, um Sauerstoffmangel zu vermeiden.
●
Richten Sie die ausströmende Luft nicht auf Heitzhaushaltsgeräte wie
elektrische Kanne oder Oven. Denn das beeinträchtigt die Leistung dieser
Geräte.
●
Sorgen Sie bitte dafür, daß das Gestell des Außengerätes stabil, standhaft,
schadenfrei und in gutem Zustand ist. Denn sonst könnte das Gerät
einstürzen und Gefahren verursachen.
●
Niemals Wasser auf das Gerät spritzen oder direkt gießen, was Kurzschluß
zur Folge haben könnte.
●
Nicht auf das Außengerät steigen oder Gegenstände darauf stellen.
●
Wenn das Gerät für längere Zeit mit offener Tür und/oder Fenster läuft (Die Luftfeuchtigkeit über
80%) und mit Luftreflektor nach unten gerichtet oder automatisch schwenkend, dann verdünstet
Wasser am Reflektor und tropft runter. Dies würde Ihre Möbel naß machen. Daher lassen Sie Ihr
Gerät nicht unter solchen Umständen für längere Zeit laufen.
●
Als de kamerwarmte boven de koeling of verwarmings kapaciteit van de unit is, b.v. er zijn veel
mensen in de kamer of apparaten die warmte afstralen in gebruik zijn, het vooringestelde
kamertempertuur zal niet haalbaar zijn.
●
Dieses Gerät ist für den Gebrauch von kleinen Kindern nicht beabsichtigt oder schwache Personen,
wenn sie entsprechend beaufsichtigt worden sind durch eine verantwortliche Person, um sich zu
überzeugen, können sie das Gerät verwenden sicher.
●
Kleine Kinder sollten beaufsichtigt werden, um sicherzustellen, dass sie nicht tun Spiel mit dem
Gerät.
●
Bitte schalten Sie das Gerät aus und schalten Sie den Ausschalter ab, während
das Gerät gereinigt wird, der Hochgeschwindigkeitsventilator innerhalb des
Geräts könnte eine Gefahr darstellen.
●
Bitte stellen Sie den Ausschalter ab, wenn das Gerät längere Zeit nicht
benutzt wird.
●
Keine Wasserbehälter (wie Vasen) auf das Innengerät stellen, damit kein
Wasser reintropft. Reintropfendes Wasser beschädigt die Isolation im Gerät
und führt zum Kurzschluß.
●
Setzen Sie Pflanzen nicht dem direkten Luftstrom aus, da es sie schadet.
●
Benutzen Sie keine Aerosol- oder Haarsprays nahe der Innenmaßeinheit.
Diese Chemikalie kann auf Wärmeaustauscherflosse haften und den
Verdampfungwasserfluß blockieren, um Wanne abzulassen. Das Wasser
fällt auf tagential Ventilator und verursacht Wasser zum Spritzen heraus
von der Innenmaßeinheit.
Page 30

– 30 –
INNENGERÄT
BEZEICHNUNGEN UND FUNKTIONEN VON JEDEM TEIL
LUFTFILTER
Verhindert das Eindringen von Staub in das Innengerät.
(Siehe Seite 47)
Vordergitter
Anzeiger Am Innengerät
Leuchtanzeige des Betriebszustandes.
(Siehe Seite 31)
Horizontalblende
●
Vertikalblende (Luftauslass)
(Siehe Seite 42)
Fernbedienung
Sendet Signale an das Innengerät, zum Betrieb der
gesamten Anlage.
(Siehe Seite 32)
WEITE (mm)
780
MODELL
RAK-50NH5
HÖHE (mm)
280
TIEFE (mm)
210
MODELL-BEZEICHNUNG UND ABMESSUNGEN
GEBÄUDEKLIMAANLAGE
Mit diesem Hochleistungsgerät können je nach Bedarf mehrere Innenraum-Klimaanlagen betrieben werden.
Betriebsanordnung:
● Die Innenraumgeräte können nicht in folgender
Kombination betrieben werden:
● Das zuerst eingeschaltete Innenraumgerät beginnt als
erstes zu arbeiten, während die später eingeschalteten
Geräte nicht arbeiten, solange die Signalleuchte
eingeschaltet ist.
● Um ein später betriebenes Innenraumgerät erneut zu
starten, muß das zuerst betriebene Innenraumgerät
angehalten, die Betriebsart neu gewählt und das Gerät
dann wieder eingeschaltet werden.
Einzelnes Klimagerät
Heizung
Zusätzliches Klimagerät
Kühlung
Entfeuchtung
Luftumwälzung (Gebläse)
Einstellung der Anzahl Innenraumgeräte:
Verringern Sie die Anzahl der in Betrieb
befindlichen Innenraumgeräte an
besonders warmen oder kalten Tagen
oder wenn Sie die gewünschte
Temperatur in einem bestimmten Raum
schnell erzielen möchten.
Abgeschaltete Innenraumgeräte:
Ein im Kühl-, Heiz- oder Entfeuchtungsbetrieb
arbeitendes Innenraumgerät kann Geräusche
oder Wärme entwickeln, wenn das betreffende
Gerät Kühlmittel an das Außenraumgerät
abgibt.
Wenn Betrieb Modus vorgewählt wird
● Wenn Heiztätigkeit automatisch für die erste Innenmaßeinheit vorgewählt wird, die folgende Innenmaßeinheit beginnen
dann zu heizen. Auch beim Abkühlen oder dehumidifying automatisch für die erste. Innenmaßeinheit vorgewählt wird,
die folgende Innenmaßeinheit beginnt auch abzukühlen oder dehumidify.
Während des automatischen Betriebes
Page 31

– 31 –
DEUTSCH
KÜHLEINHEIT-ANZEIGEN
BETRIEBSANZEIGE
FILTER-KONTROLLAMPE
Nach etwa 100 Betriebsstunden des Gerätes leuchtet
die Filter-Kontrollampe auf, um damit anzuzeigen, däß
das Filter gereinigt werden muß.
BETRIEBSLAMPE
Diese Lampe leuchtet während des Betriebs.
Die BETRIEBSLAMPE blinkt während der Heizphase in
den folgenden Fällen.
(1) Während des Vorheizens
Nach dem Einschalten etwa 2-3 Minuten lang.
(2) Während des Auftauens
Das Entfrosten wird ungefähr einmal durchgeführt
alle eine Stunde, als Frost auf sich bildet auf dem
Wärmeaustauscher der im Freienmaßeinheit, für
5-10 Minuten jede Zeit.
ZEITSCHALTER-KONTROLLAMPE
Leuchtet wenn die Zeitschaltuhr läuft.
TEMPORARY
SWITCH
TEMPORARY
SWITCH
TEMPORÄRSCHALTER
Diesen Schalter verwenden, wenn die Fernbedienung nicht funktioniert. [Verwnden Sie einen nichtleitenden
Stab (Beispiel Zahnstocher)]
● Bei Betätigung des temporärschalters arbeitet das Gerät in der vorher eingestellten Betriebsart.
● Wenn vorher die Stromversorgung aus war und der Temporärschalter verwendet wird, dann läuft das
Gerät in Automatik-Betribsart.
Page 32

– 32 –
˚
CH
RESET
˚
CH
AUTOMATIK
HEIZBETRIEB
ENTFEUCHTEN
KÜHLBETRIEB
VENTILATOR
LUFT-INTENSITÄT
Niedrig
Mittel
Hoch
SCHLAF
STOP (LÖSCHUNG)
START (SUBSKRIPTION)
START/STOP
ZEIT
ZEITSCHALTER-EINSTELLUNG
ZEITSCHALTER-WÄHLER
EINSCHALTZEIT
AUSSCHALTZEIT
AUTOSCHWENK
BEDIENUNGSELEMENTE UND IHRE FUNKTIONEN
FERNBEDIENUNG
● Mit Hilfe der Fernbedienung kann der Betrieb des Kühleinheit gesteuert werden.
Der Steuerungsbereich beträgt etwa 7 Meter. Falls die Innenbeleuchtung elektronisch gesteuert wird, kann der
Steuerungsbereich kürzer sein.
Diese Fernbedienung kann mit Hilfe der mitgelieferten Befestigung an einer Wand angebracht werden. Vor dem
Anbringen ist darauf zu achten, daß die Kühleinheit mit der Fernbedienung gesteuert werden kann.
● Handeln Sie das Fernbedienungsgerät sorgfältig. Lassen es fallen bzw. nass werden kann die Signalübertragung
gefährden.
● Beim Wechseln der Batterien in dem Fernbedienungsapparat wird die Einheit erst nach 10 Sekunden die Befehle
beantworten und starten zum laufen.
● Signalsendefenster/Übertragungsanzeige
Dieses Fenster auf das Innengerät, wenn dieses gesteuert werden soll. Die Übertraungsanzeige
blinkt, wenn ein Signal gesandt wurde.
● Display
Zeigt die gewählte Raumtemperatur, die derzeitige Uhrzeil, den Zeitschalterstatus, die Funktion
und die Intensität der gewählten Luftumwälzung an.
● START/STOP-Taste
Diese Taste drücken, um den Betrieb zu beginnen. Die Taste nochmals drücken, um den
Betrieb zu stoppen.
● Einschlaftaste (SLEEP)
Diese Taste verwenden, um den Einschlaf-Zeitschalter einzustellen.
● Temperaturregeltasten
Verwenden Sie diese Tasten, um die eingestellte Temperatur zu erhöhen oder zu vermindern.
(Die entsprechende Taste gedrückt halten, um die Einstellung schneller zu ändern.)
● Zeittasten
Diese Taste verwenden, um Zeit und Datum einzustellen und zu prüfen.
● Rückstelltasten (RESET)
● Betriebsart-Wahltaste
Verwenden Sie diese Taste, um die Betriebsart zu wählen. Mit jeder Betätigung dieser Taste
wird die Betriebsart zyklisch von (Automatik) auf (Heizbetrieb),
(Entfeuchten), (Kühlbetrieb) und (Ventilator) umgeschaltet.
● Ventilatordrehzahltaste
Damit wird die Ventilatordrehzahl eingestellt. Mit jedem Drücken dieser Taste wird die
Intensität der Luftumwälzung von (Automatik) auf (Hoch), (Mittel) und (Niedrig)
(Diese Taste erlaubt die Auswahl der optimale bzw. gewünschte Ventilatorgeschwindigkeit
für jede Betriebsart.)
● Taste für automatisches Schwenken
Steuert den Winkel des horziotalen Luftreflektors.
● Zeitschalter-Regler
Diese Tasten verwenden, um den Zeitschalter einzustellen.
● Ausschaltzeittaste Wählt die Ausschaltzeit.
● Einschaltzeittaste Wählt die Einschaltzeit.
● Reserviertaste Reservierung der Zeiteinstellung.
● Löschtaste Löschen der reservierten Zeit.
Vorsichtsmaßnahmen bel der Verwendung
● Die Fernbedienung nicht an den folgenden Orten ablegen.
● In direktem Sonnenlicht
● In der Nähe einer Heizung
● Die Fernbedienung sorgfältig behandeln. Nicht fallen lassen und vor Wasser
schützen.
● Wenn das Außengerät einmal stoppt, dann schaltet es für etwa 3 Minuten
nicht ein (ausgenommen, wenn Sie den Netzschalter aus-und einschalten
oder das Netzkabel abziehen und wieder anstecken).
Dies dient für den Schutz des Gerätes und stellt keine Störung dar.
● Falls Sie die Betriebsart-Wahltaste während des Betriebs drücken, dann
kann das Gerät zum Schutze für etwa 3 Minuten stoppen.
Page 33

– 33 –
DEUTSCH
AUTOMATIKBETRIEB
■
Da die Einstellungen in dem Speicher der Fernbedienung gespeichert werden, müssen Sie das
nächste Mal nur die START/STOP-Taste drücken.
Die Betriebsart-Wahltaste drücken, so daß das Display die Betriebsart (AUTOMATIK)
anzeigt.
●
Wenn AUTOMATIK gewählt wurde, bestimmt die Einheit automatisch die Betriebsart
HEIZBETRIEB, KÜHLBETRIEB oder ENTFEUCHTEN, abhängig von der derzeitigen
Raumtemperatur.
Jedoch die Betriebsart wll nicht Änderung, als Innenmaßeinheit an
multi Art im Freienmaßeinheit anschloß.
● Wenn die vom Gerät automatisch eingestellte Betriebsart nicht die gewünschte ist, kann
durch entsprechenden Tastendruck (WÄRMEN, ENTFEUCHTEN, KÜHLEN oder
KÜHLGEBLÄSE) eine andere Betriebsart eingestellt werden.
Die START/STOP-Taste drücken. Der Betrieb startet mit einem Piepton. Diese
Taste nochmals drücken, um den Betrieb zu stoppen.
Sie können die Temperatureinstellung wie erforderlich um maximal 3°C erhöhen oder vermindern.
Bei jedem Betätigen der Temperaturtaste ändert sich die
Temperatureinstellung jeweils um 1°C.
● Die voreingestellte Temperatur und die tatsächliche Raumtemperatur können in Abhängigkeit
von den Bedingungen etwas variieren.
● Das Display zeigt in der Betriebsart AUTOMATIK nicht die voreingestellte Temperatur an. Falls
Sie die Einstellung ändern, erzeugt die Zimmereinheit einen Piepton.
START
STOP
°C
1
RESET
Die Einheit bestimmt automatische die Betriebsart
HEIZBETRIEB, KÜHLBETRIEB oder ENTFEUCHTEN, abhängig von der
derzeitigen Raumtemperatur.
Die gewählte Betriebsart wird dann gewechselt, wenn die Zimmertemperatur sich verändert.
Jedoch die Betriebsart wll nicht Änderung, als Innenmaßeinheit an multi Art im Freienmaßeinheit anschloß.
Die (Ventilatordrehzahl) Taste drücken. “Automatik” und “Niedrig” stéhen zur Verfügung.
VERSCHIEDENE FUNKTIONEN
■ Auto Restart Steuerung
● Beim Stromabfall, wird der Betrieb in der vorhergehenden Betriebsart und Luftflussrichtung automatisch neugestartet, sobald
die Stromversorgung wieder hergestellt worden ist. (Dies erfolgt, weil der Betrieb nicht durch die Fernbedienung unterbrochen
worden ist)
● Um den Betrieb beim Stromversorgungswiederherstellung nicht weiterzuführen, schalten Sie die Stromquelle ab. Beim Betätigen
des Selbstausschalters wird der Betrieb mit der vorhergehenden Betriebsart und Luftflussrichtung automatisch neugestartet.
Hinweis: 1. Wenn Sie nicht Selbstwiederanlauf Steuerung benötigen, beraten Sie bitte Ihr Verkäufe Mittel oder OFF durch
Fernbedienung.
2. Die Auto Restart Steuerung kann nicht verwendet werden, wenn das Modus Timer oder Sleep eingestellt ist.
Page 34

– 34 –
HEIZBETRIEB
● Die Einheit für Heizbetrieb verwenden, wenn die Außentemperatur unter 21°C liegt. Bei warmem Wetter
(über 21°C) arbeitet die Heizfunktion vielleicht nicht, um die Einheit zu schützen.
● Auf befehle bis behalte zuverlässigkeit der vorrichtung, erfreue gebrauch das vorrichtung obig -15°C der
outdoor temperatur.
■ Da die Einstellungen in dem Speicher der Fernbedienung gespeichert
werden, müssen Sie das nächste Mal nur die START/STOPTASTE drücken.
1
2
3
START
STOP
˚
C
RESET
˚
C
Die Betriebsart-Wahltaste drücken, so daß das Display
(HEIZBETRIEB) anzeigt.
Die gewünschte Intensität der Luftzirkulation mit der
Ventilatordrehzahltaste einstellen (das Display zeigt die
Einstellung an).
(AUTOMATIK) : Die Intensität der Luftzirkulation ist zuerst
auf HOCH eingestellt und variiert
automatisch auf MITTEL order NIEDRIG,
wenn die voreingestellte Temperatur
erreicht ist.
(Hoch) : Besonders wirtschaftlich, da der Raum
schnell erwärmt wird. Am Beginn können
Sie jedoch eine Kühlung fühlen.
(Mittel) : Ruhiger Betrieb
(Niedrig) : Noch ruhigerer Betrieb
Die gewünschte Raumtemperatur mit den Temperaturregeltasten
einstellen (das Display zeigt die Einstellung an).
Die eingestellte Temperatur und die tatsächliche
Raumtemperatur können etwas abweichen, abhängig von den
Verwendungsbedingungen.
Die START/STOP-Taste drücken. Der Heizbetrieb beginnt
mit einem Piepton. Diese Taste nochmals drücken, um den
Betrieb zu stoppen.
Page 35

– 35 –
DEUTSCH
ENTFEUCHTUNGSBETRIEB
Das Gerät für das Entfeuchten verwenden, wenn die Raumtemperatur über 16°C beträgt. Beträgt die
Raumtemperatur unter 15°C, arbeitet die Entfeuchtungsfunktion nicht.
■ Entfeuchtungsfunktion
Die folgende Operation erfolgt in Abhängigkeit von der eingestellten Raumtemperatur.
Wenn die Raumtemperatur höher als die Temperatureinstellung ist: Das Gerät entfeuchtet den Raum und
reduziert die Raumtemperatur auf den voreingestellten Wert.
Wenn die Raumtemperatur niedriger als die Temperatureinstellung ist: Das Entfeuchten erfolgt bei einer
Raumtemperatur, die etwas niedriger als die derzeitige Raumtemperatur ist, unabhängig von der
Temperatureinstellung.
Die Funktion stoppt (die Zimmereinheit stoppt den Luftstrom), sobald die Raumtemperatur niedriger als der
Einstellwert ist.
Die Betriebsarten-Wahltaste drücken, so daß das Display
(Entfeuchtungstaste) anzeigt.
Die Ventilatordrehzahl wird automatisch auf “Niedrig” eingestellt.
Die Ventilatordrehzahltaste arbeitet nicht.
Die gewünschte Raumtemperatur mit den Temperaturregeltasten
einstellen (das Display zeigt die Einstellung an).
Eine Raumtemperatur im Bereich von 20-26°C
wird für die Entfeuchtung empfohlen.
Drücken Sie die (START/STOP) Taste. Die Aufnahme des
Entfeuchtungsbetriebs wird akustisch angezeigt. Taste nochmals
drücken, um den Betrieb zu stoppen.
2
■ Da die Einstellungen in dem Speicher der Fernbedienung gespeichert
werden, müssen Sie das nächste Mal nur die START/STOP-Taste
drücken.
START
STOP
1
RESET
˚
C
˚
C
Page 36

– 36 –
KÜHLBETRIEB
Das Gerät für Kühlbetrieb verwenden, wenn die Außentemperatur –10 bis 43 ˚C beträgt.
Bei sehr hoher Luftfeuchtigkeit (über 80%) in dem zu kühlenden Raum, kann sich Frost
an dem Luftauslaßgrill der Innengerätes bilden.
Die Betriebsart-Wahltaste drücken, bis (KÜHLBETRIEB) auf
dem Display angezeigt wird.
Die gewünschte Intensität der Luftzirkulation mit der
(Ventilatordrehzahltaste) einstellen (das Display zeigt die Einstellung
an).
(AUTOMATIK) : Die Intensität der Luftzirkulation ist
zuerst auf HOCH eingestellt und variiert
automatisch auf MITTEL order
NIEDRIG, wenn die voreingestellte
Temperatur erreicht ist.
(Hoch) : Wirtschaftlich, da der Raum schnell
gekühlt wird.
(Mittel) : Ruhiger Betrieb
(Niedrig) : Noch ruhigerer Betrieb
Die gewünschte Raumtemperatur mit den Temperaturregeltasten
einstellen (das Display zeigt die Einstellung an).
Die Temperatureinstellung und die tasächliche Raumtemperatur
können in Abhängigkeit von den Bedingungen etwas variieren.
Die (START/STOP) Taste drücken. Der Kühlbetrieb beginnt
mit einem Piepton. Diese Taste nochmals drücken, um den Betrieb
zu stoppen. Die Kühlfunktion startet nicht, wenn die
Temperatureinstellung höher als die derzeitige Raumtemperatur
ist (obwohl die Betriebs-Kontrollampe leuchtet). Die Kühlfunktion
startet, sobald Sie die Temperatur unter die derzeitige
Raumtemperatur eingestellt haben.
■ Da die Einstellungen in dem Speicher der Fernbedienung gespeichert
werden, müssen Sie das nächste Mal nur die START/STOP-Taste
drücken.
1
2
˚
C
RESET
˚
C
3
START
STOP
Page 37

– 37 –
DEUTSCH
VENTILATIONSBETRIEB
Sie können das Gerät auch einfach für eine Zirkulation der Luft verwenden. Diese
Funktion ist für das Trocknen des Inneren der Innengerätes am Ende der SommerSaison zu verwenden.
Die Betriebsarten-Wahltaste drücken, so daß das Display
(VENTILATOR) anzeigt.
Die (Ventilatordrehzahltaste) drücken.
Die START/STOP-Taste drücken. Der Zirkulationsbetrieb
beginnt mit einem Piepton. Diese Taste nochmals drücken, um
den Betrieb zu stoppen.
VENTILATORDREHZAHL
......
Wenn der automatische Ventilatordrehzahlmodus im Kühl/Heizbetrieb
(AUTOMATIK) eingestellt ist:
Für Heizbetrieb
● Die Ventilatordrehzahl ändert automatisch in Abhängigkeit von der
Temperatur der abgeblasenen Luft.
● Wenn der Unterschied zwischen Raumtemperatur und eingestellter
Temperatur groß ist, beginnt der Lüfter mit hoher Drehzahl (HI) zu laufen.
● Wenn die Raumtemperatur die eingestellte Temperatur erreicht,
verlangsamt sich die Lüfterdrehzahl automatisch auf LOW.
● Wenn der Unterschied zwischen Raumtemperatur und eingestellter
Temperatur groß ist, beginnt der Lüfter mit hoher Drehzahl (HI) zu laufen.
● Nachdem die Raumtemperatur die voreingestellte Temperatur ereicht
hat, wird der Kühlbetrieb ausgeführt, bei dem die Ventilatordrehzahl und
die Raumtemperatur geändert werden, um die optimalen Bedingungen
für eine natürliche, gesunde Kühlung zu erhalten.
Für Kühlbetrieb
1
2
STOP
START
RESET
Page 38

– 38 –
RESET
EINSTELLEN DER ZEITSCHALTUHR
Ein-/Ausschalt-Zeitschaltuhr
● Die Einheit schaltet zu den
voreingestellten Zeitpunkten ein
(aus) und aus (ein).
● Der Schaltvorgang wird zuerst für
die voreingestellte Zeit ausgeführt,
die früher auftritt.
● Die auf dem Display erscheinende
Pfeilmarkierung zeigt die
Reihenfolge der Schaltvorgänge an.
1
Die Ausschaltzeit-
Zeitschaltertaste drücken,
so daß die (OFF)
Markierung blinkt.
Ausschalt-Zeitschaltuhr
Sie können das Gerät so einstellen, daß es
zur voreingestellten Zeit ausschaltet.
Nach dem
Austauschen der
Batterien:
Löschen der Einstellungen
Das Signalfenster der Fernbedienung auf das Innengerät richten und die (LÖSCHUNG)-Taste
drücken.
Das Symbol (SUBSKRIPTION) erlischt mit einem Piepton und die (ZEITSCHALTER)-Kontrollampe
an dem Innengerät erlischt.
1
Den gegenwärtigen Monat
und Tag mit der
Zeitschaltuhrtaste einstellen.
1
Die Ausschaltzeit-
Zeitschaltertaste drücken. Die (OFF)
Markierung blinkt auf dem Display.
1
Die Einschaltzeit-
Zeitschaltertaste drücken.
Die (ON) Markierung blinkt
auf dem Display.
2
Die Ausschaltzeit mit
der Zeitschaltuhrtaste
einstellen. Die
Reservierungstaste
drücken.
3
Die Einschaltzeit-
Zeitschaltertaste drücken,
so daß die (OFF)
Markierung leuchtet und
die (ON) Markierung
blinkt.
VORSICHT
Sie können nur jeweils eine der Ausschalt-Zeitschaltuhr, Einschalt-Zeitschaltuhr und Ein/AusschaltZeitschaltuhr einstellen.
Einschalt-Zeitschaltuhr
Zeit, Tag, Monat
● Das Gerät wird zur
voreingestellten Zeit
eingeschaltet.
Zeit, Tag,
Monat
(gegenwärtige
Zeit, Tag,
Monat
AusschaltZeitschaltuhr
EinschaltZeitschaltuhr
SUBSKRIPTION
LÖSUNG
M D
M D
AM
STOP
Start
AM
Start
Stop
PM
Start Stop
PM
AM
PM
Page 39

– 39 –
DEUTSCH
3
Das Signalfenster der Fernbedienung auf das Innengerät richten und
die (SUBSKRIPTION)-Taste drücken.
Die (STOP)-Markierung wechselt von Blinken auf Dauerlicht und das
Symbol leuchtet auf. Ein Piepton ertönt und die (ZEITSCHALTERKontrollampe) an dem Innengerät leuchtet auf.
● Die Zeitanzeige verschwindet
automatisch nach 10 Sekunde.
● Um die derzeitige
Uhrzeiteinstellung zu
kontrollieren, die (ZEIT)Taste zweimal drücken.
Damit ist die Einstellung der
derzeitigen Uhrzeit beendet.
● Die Zeitschaltuhr kann auf drei Arten verwendet werden: Ausschalt-Zeitschaltuhr, Einschalt-
Zeitschaltuhr und Ein/Ausschalt- (Aus/Einschalt-) Zeitschaltuhr. Zuerst die derzeitige Uhrzeit
einstellen, da diese als Referenz dient.
● Da die Zeiteinstellungen in dem Speicher der Fernbedienung gespeichert werden, müssen Sie
nur die (SUBSKRIPTION)-Taste drücken, um die gleichen Einstellungen das nächste Mal zu
verwenden.
2
Die
(ZEIT)-Taste
drücken.
3
Die gegenwärtige Zeit mit der
Zeitschaltuhrtaste einstellen.
Beispiel: Die derzeitige Uhrzeit ist 1:30 Uhr (nachmittags).
2
Die Ausschaltzeit mit der
Zeitschaltuhrtaste einstellen.
Damit ist die Einstellung der Ausschaltzeit beendet.
Beispiel: Die Einheit soll um 11:00 Uhr (abends)
ausschalten.
Beispiel:
Die Anlage schaltet bei 7,00 a.m. ein.
Damit ist die Einstellung der Einschaltzeit beendet.
4
Die Einschaltzeit mit der
Zeitschaltuhrtaste einstellen.
5
Das Signalfenster der Fernbedienung auf das Innengerät richten und
die (SUBSKRIPTION)-Taste drücken.
Die (START)-Markierung wechselt von Blinken auf Dauerlicht und das
Symbol leuchtet auf. Ein Peipton ertönt und die (ZEITSCHALTERKontrollampe) an dem Innengerät leuchtet auf.
3
Das Signalfenster der Fernbedienung auf die Zimmereinheit richten und
die (SUBSKRIPTION)-Taste drücken.
Die (START)-Markierung wechselt von Blinken auf Dauerlicht und das
Symbol leuchtet auf. Ein Piepton ertönt und die (ZEITSCHALTERKontrollampe) an dem Innengerät leuchtet auf.
2
Die Einschaltzeit mit der
Zeitschaltuhrtaste einstellen.
Beispiel:
Die Anlage dreht sich weg um 10,30 P.M. und sie wird bei 7,00 a.m.
eingeschaltet.
Damit sind die Einstelungen der Ein-/Ausschaltzeiten beendet.
4
Die (ZEIT)-Taste nochmals
drücken. Die Zeitanzeige wechselt von
Blinken auf Dauerlicht.
PM PM
AM
PM
PM
PM
AM
AM
AM
AM
PM
PM
Page 40

– 40 –
EINSTELLEN DER EINSCHLAF-ZEITSCHALTUHR
1
Die Einschalt-Zeitschaltuhr einstellen.
Zuerst die derzeitige Uhrzeit einstellen, da diese als Referenz dient (siehe die Seiten für
das Einstellen der derzeitigen Uhrzeit) Die (SCHLAF)-Taste drücken, wodurch das
Display wie folgt ändert.
Betriebsart
Einschlaf-
Zeitschaltuhr
Einschlaf-Zeitschaltuhr: Das Gerät setzt den Betrieb für die eingegebene
Anzahl an Stunden (1, 2, 3 oder 7) fort und schaltet danach aus. Das
Signalfenster der Fernbedienung auf das Innengerät richten und die
SCHLAF-Taste drücken. Die Zeitschaltuhr-Informationen werden an der
Fernbedienung angezeigt. Die ZEITSCHALTER-Kontrollampe an dem
Innengerät leuchtet auf und ein Piepton ertönt. Wenn die EinschlafZeitschaltuhr eingestellt wurde, zeigt das Display die Ausschaltzeit an.
Beispiel: Wenn die EinschlafZeitschaltuhr um 11:38 Uhr (abends)
auf 3 Stunden eingestellt wird, ist die
Ausschaltzeit 2:38 Uhr (morgens).
Das Gerät wird von der Einschlaf-Zeitschaltuhr
aus- und von der Einschalt-Zeitschaltuhr
eingeschaltet.
Freigabe der Einstellung
Das Singnalfenster der Fernbedienung auf das Innengerät richten und die (LÖSCHUNG)-Taste drücken.
Das Symbol (SUBSKRIPTION) erlischt mit einem Piepton, und die (ZEITSCHALTER)-Kontrollampe
des Innengerätes schaltet aus.
Anzeige
1 Stunde 2 Stunden 3 Stunden 7 Stunden
Freigabe der Einschlaf-Zeitschaltuhr
1
4
4
4
2
Die (SCHLAF)-Taste drücken und die Einschlaf-Zeitschaltuhr
einstellen.
Für Beheizung:
In diesem Fall wird die Anlage innerhalb von
2 Stunden (um 1.38 Uhr) abgeschaltet und
frühzeitig eingeschaltet, so daß die
voreingestellte Temperatur ungefähr um 6.00
Uhr morgens erreicht ist.
4
SCHLAF
H
H
AM
AM
Sleep
timer
Start
H
Page 41

– 41 –
DEUTSCH
Erläuterung der Einschlaf-Zeitschaltuhr
Das Gerät reguliert die Intensität der Luftzirkulation und die Raumtemperatur
automatisch, um ruhigen Betrieb und optimale Gesundheit des Anwenders
sicherzustellen.
● Wenn das Datum oder die aktuelle Zeit nicht eingestellt wurde, kann
der Sleep-Timer nicht eingestellt werden.
● Wenn Sie den Sleep-Timer einstellen, nachdem der Off-, On/Off- oder
Off/On-Timer eingestellt wurde, wird anstelle des Off-. On/Off- oder
Off/On-Timers der Sleep-Timer aktiviert.
● Während des Sleep-Timer-Betriebs können Sie keinen anderen Timer
einstellen.
● Wird nach Ablauf der eingestellten Zeit des “Sleep”-Zeitschalters die
“Sleep”-Taste erneut betätigt, dann gilt für den “Sleep”-Zeitschalter
wieder die vorherige Einstellung.
● Die jeweilige Einstellung des “Sleep”-Zeitschalters gilt nur einmal.
NOTIZ
Page 42

– 42 –
EINSTELLUNG DER LUFTREFLEKTOREN
1
Einstellen der klimatisierten Luft in Aufwärts- und
Abwärtsrichtung.
Die horizontalen Luftleitlamellen werden entsprechend
des jeweiligen Betriebsmodus automatisch auf den
optimalen Winkel eingestellt. Die Luftleitlamellen können
kontinuierlich nach oben und unten schwingen und
ebenfalls mit der Taste (AUTO-SWING) auf den
gewünschten Winkel eingestellt werden.
● Mit dem ersten Drücken der
(AUTOSCHWENK)-Taste wird der horizontale
Luftreflektor nach oben und unten geschwenkt.
Sobald diese Taste das nächste Mal gedrückt wird,
stoppt der Luftreflektor in der derzeitigen Position.
Mehrere Sekunden (etwa 6 Sekunden) sind
erforderlich, bevor sich der Luftreflektor zu bewegen
beginnt.
● Benutzen Sie den horizontalen Luftstromrichter
innerhalb des einstellbaren Bereichs, wie rechts
dargestellt.
● Wenn der Betrieb aufhört, bewegt sich der
horizontale Luftstromrichter und bleibt in der Position
stehen, in der der Luftauslass geschlossen ist.
RESET
2
Einstellen der klimatisierten Luft nach links und rechts.
Den horizontalen Luftreflektor gemäß Abbildung halten und
verstellen, um die klimatisierte Luft nach links und rechts
zu verstellen.
!
VORSICHT
● Bei Kühlbetrieb sollte man den horizontalen
Luftreflektor nicht für längere Zeit schwenken lassen.
Es kann sich Kondensat am Luftreflektor bilden,
das in Form von kleinen Tropfen abtropfen kann.
Beim Kühlbetrieb,
Entfeuchten
Beim
Heizungsbetrieb
etwa 60˚
etwa 15˚
etwa 45˚
etwa
30˚
Vertikal
Vertikal
Page 43

– 43 –
DEUTSCH
AUSTAUSCHEN DER BATTERIEN DER FERNBEDIENUNG
1
Den Deckel gemäß Abbildung abnehmen und die alten
Batterien herausnehmen.
=
2
Die neuen Batterien einsetzen.
Dabei die in dem Batteriefach angegebene Richtung einhalten.
VORSICHT
1. Niemals alte und neue oder unterschiedliche Batterien verwenden.
2. Die Batterien herausnehmen, wenn die Fernbedienung für längere
Zeit (2-3 Monate) nicht benutzt wird.
Drücken und in
Pfeilrichtung abziehen
!
Page 44

– 44 –
DIE IDEALEN BETRIEBSBEDINGUNGEN
Empfohlene Raumtemperatur Bringen Sie Vorhänge oder
Rollos an
Belüftung
Effektiver Gebrauch der Zeitschaltuhr
Bitte Vergessen Sie nicht die
Filter zu reinigen
Stellen Sie geeignete Temperaturen
für Kinder und Säuglinge ein
Warnung
Zu kalte Raumtemperatur ist schlecht für
die Gesundheit und
verschwendet nur
unnötig elektrische
Energie.
!
Nachts benutzen Sie bitte den “An oder Aus
Zeitschalterbetriebsmodus”, zusammen mit
Ihrer Aufwachzeit am Morgen. So werden Sie
eine angenehme Zimmertemperatur geniessen
können. Bitte benutzten Sie den Zeitschalter
effektiv.
Bitte achten Sie auf die Raumttemperatur und
den Weg des Luftstromes, wenn das Gerät in
der Nähe von Babys, Kindern und älteren
Leuten betrieben wird.
Vorsicht
Schließen Sie den raum nich für längeren
Zeitraum. Öffnen Sie gelegentlich Fenster und
Türen um
Frischluft
herein zu
lassen.
!
Staubige Luftfilter reduzieren das Luftvolumen
und mindern somit die Kühlleistung. Um
Energieverschwendung vorzubbeugen,
reinigen Sie die Filter alle 2 Wochen.
So ist es
möglich die
einstrahlende
Sonnenwäme
zu reduzieren.
Page 45

– 45 –
DEUTSCH
INFORMATIONEN FÜR DEN ANWENDER
Klimaanlage und Heitzgeräte in einem Raum
Nicht-Benützung für einen längeren Zeitraum
Bei Gewitter
Vorsicht
Wenn die Menge der Wärme größer ist als die
Kühlleistung der Klimaanlage (z.B. mehrere Leute
kommen in den Raum, Gebrauch von Heitzgeräten
usw.) kann die eingestellte Temperatur nicht erreicht
werden.
!
Wenn die Inneneinheit für ein en längern Zeitraum
nicht genützt wird, schalten Siebitte den Netzstecker
aus. Ist der Netzstecker auf “ON”, verbraucht die
Inneneinheit trotz ausgeschalteter Steuereinheit eine
Leistung von 8 Watt.
Warnung
Um die Inneneinheit vor Beschädigung bei Gewitter
zu schützen, schalten Sie bitte die Einheit aus und
trennen Sie den Stecker ab.
!
Ausschalten
Störung Von den Elektrischen Produkten
Vorsicht
Um Impulsstörung zu vermeiden, setzen Sie bitte
die Innenmaßeinheit und seinen Remotesteuerpult
an leat 1m weg von den electical Produkten.
!
Inverter-Art
Leuchtstofflampe.
Störung Platz
1m verhindern
mindestens weg.
TV
Page 46

– 46 –
1
Öffnen Sie die Frontplatte.
● Die Vorderplatte ist mit beiden Händen an den
entsprechenden Seiten nach oben zu ziehen.
2
Nehmen Sie die Filter heraus.
● Nach oben schieben, um die Arretierung
zu lösen und den Filter rausziehen.
3
4
Setzen Sie die Filter ein.
● Wenn Sie die Filter befestigen, vergewissern Sie sich
daß die mit “FRONT” markierte Oberfläche nach vorne
zeigt.
● Nach dem Einsetzen der Filter drücken Sie die Frontplatte
an den drei mit Pfeilen gekennzeichneten Stellen an
(siehe Abbildung), und schließen Sie die Frontplatte.
Reinigung und Wartung müssen von qualifiziertem Personal ausgeführt werden. Vor der Reinigung
ist das Gerät außer Betrieb zu setzen und die Stromversorgung auszuschalten.
VORSICHT
!
VORSICHT
!
Die Befestigung der Luft Reinigungsfilter zum Filter.
● Fügen Sie die Luft Reinigungsfilter dem Rahmen bei
freundlich zusarnmenpressend es beide Seiten und
Ausgabe nach Der Einfügung in den Filterrahmen.
Die Luft Reinigungsfilter nicht
biegen, wie es Schaden der
Struktur verursachen kann.
Anmerkungen:
● Wenn Sie die Luft Reinigungsfilter bitte entfernen, folgen Sie den obengenannten Verfahren.
● Die kühl werfende Kapazität wird ein bisschen geschwächt und die kühl werdende Geschwindigkeit
wird langsamer, werm die Luft Reingungsfilter verwendet wird. Also, gehen Sie unter fächeln Sie
Geschwindigkeit zu “HOCH”, wenn Sie es in dieser Bedingung verwenden.
● Luft können Reinigungsfilter gewaschen werden und verwendeten bis zu 20mal, einen Staubsauger
verwendend oder es unter laufendem Klaps-Wasser waschend. Die Zahl für diese Luft Reinigungsfilter
ist <SPX-CFH11> Bitte verwenden Sie diese Zahl, um zu bestellen, wenn Sie es erneuern wollen.
● Betreiben Sie die Klimaanlage nicht ohne Filter. Staubpartikel könnten in die Klimaanlage eindringen und
einen Defekt verursachen.
DIE BEFESTIGUNG DER LUFT, DIE FILTER REINIGT
Page 47

– 47 –
DEUTSCH
WARTUNG
1. LUFTFILTER
Den Luftfilter reinigen, da sich Staub an diesem ansammelt. Falls die Luftfilter mit Staub verstopft sind,
nehmen Luftstrom und Kühlleistung ab. Darüberhinaus könnte Geräusch entstehen. Reinigen Sie die Luftfilter
folgendermaßen.
1
2
3
!
VORSICHT
VORGÄNGE
Reinigung und Wartung müssen von qualifiziertem Personal ausgeführt werden. Vor der Reinigung
ist das Gerät außer Betrieb zu setzen und die Stromversorgung auszuschalten.
VORSICHT
!
Die Vorderplatte öffnen und den Filter entfernen
● Freundlich entfernt Heben und die Luft
Reinigungsfilter von der Luft filter Rahmen.
Vakuumstaub vom Luftfilter und Luft
Reinigungsfilter, der rinen Staubsauger verwendet.
Wenn es viel Staub gibt, nur spülen unter
laufendem Klaps-Wasser und bürsten es freundlich
mit einer weichen Borste-Bürste. Erlauben Sie
Filter, im Schatten zu trocknen.
● Die Luft Reinigungsfilter zum Filterrahmen
wiedereinfügen. Setzen Sie den Filter mit dem
“Vorder”-Zeichen, das Vorderseite
gegenübersteht, und stecken Sie sie in den
ursprünglichen Zustand ein.
● Nach dem Einsetzen der Filter drücken Sie die
Frontplatte an den drei mit Pfeilen
gekennzeichneten Stellen an (siehe Abbildung),
und schließen Sie die Frontplatte.
● Niemals mit heißem Wasser mit einer Temperatur von mehr als 40°C waschen. Das Filter könnte
schrumpfen.
● Nach dem Waschen das Wasser vollständig abschütteln und danach das Filter im Schatten trocknen
lassen; niemals direkt der Sonne aussetzen. Das Filter könnte schrumpfen.
● Reinigungsmittel auf der Luft Reinigungsfilter nicht verwenden, wie ein Reinigungsmittel die .filter
elektrostatische Leistung verschlechtern kann..
Anmerkungen:
● Reinigungsfilter der Luft sollte jeden Monat order eher gereinigt werden, wenn das erkennbare Laden
vorkommt. Wenn verwendete berstuden es seine Deodorieren-Funktion lösen kann.
Um die beste Leistung
zu gewährleisten, empfehlen wir ein Auswechseln in Abständen von 3-6 Monaten
(applikationsabhängig).
Page 48

– 48 –
2. Waschbarer Frontplatte
● Die Vorderplatte entfernen und mit sauberem
Wasser reinigen.
Er sollte mit einem weichen Schwamm gewaschen
werden.
Nachdem man ein neutrales Waschmittel benutzt
hat, gründlich mit klarem Wasser nachspülen.
● Wenn man den Frontplatte nicht abbaut, sollte man
ihn mit einem weichen trockenen Tuch abwischen.
Die Fernbedienung sollte man gründlich mit einem
weichen trockenen Tuch abwischen.
● Das Wasser muss gründlich abgewischt
werden. Wenn Wasser im Innengerät verbleibt,
zum Beispiel an den Anzeigeinstrumenten oder
Impulsempfängern, können Störungen die Folge
sein.
Vorgehen zur Entfernung der Vorderplatte.
Die Vorderplatte ist sowohl zur Entfernung als auch
zur Befestigung mit beiden Händen festzuhalten.
Entfernung des Frontplatte
● Wenn der Frontplattel mit beiden Händen
vollständig geöffnet ist, schieben Sie den
rechten Arm hinein um den Grill zu lösen
und wenn Sie dann den Frontplatte leicht
schliessen, nehmen Sie ihn nach vorne
heraus.
Befestigung des Frontplatte
● Bewegen Sie die Nasen der rechten und
linken Arme in die Flanschen am Gerät und
befestigen Sie sie gut in den Löchern.
Nase
Loch
Flansch
!
VORSICHT
● Spritzen Sie kein Wasser auf das Gerät oder richten Sie kein Wasser
beim Saubermachen darauf, sonst kann es zu Kurzschlüssen kommen.
● Bitte benutzen Sie kein heisses Wasser (über 40˚C), Benzol, Benzin,
Säure, Verdünner oder eine Bürste, weil dadurch die Plastikoberfläche
und die Beschichtung beschädigt werden.
Page 49

– 49 –
DEUTSCH
3. INSTANDHALTUNG VOR LÄNGERER NICHTVERWENDUNG
● Betreiben Sie das Gerät in der Betriebseinstellung
(KÜHLEN), mit der Temperatureinstellung auf
32˚C und der Ventilatorgeschwindigkeit auf (HOCH)
ungefähr einen halben Tag lang bei schönem Wetter,
und trocknen Sie das ganze Gerät.
● Netzschalter ausschalten.
REGELMÄSSIGE KONTROLLE
Luftge-
bläse
Reinigung und Wartung müssen von qualifiziertem Personal ausgeführt werden. Vor der Reinigung
ist das Gerät außer Betrieb zu setzen und die Stromversorgung auszuschalten.
VORSICHT
!
BITTE FOLGENDE PUNKTE JÄHRLICH ODER HALBJÄHRLICH PRÜFEN. WENDEN SIE
SICH BITTE AN DEN HÄNDLER, SOLLTEN SIE IRGEND EINE HILFE BRAUCHEN.
1
2
3
Ist der Schutzleiter abgetrennt oder unterbrochen?
Ist das Gestell weitgehend verrostet oder steht das Außengerät schief
oder instabil?
Sitzt der Netzstecker fest in der Steckdose?
(Darauf achten, daß kein loser Kontakt zwischen den beiden besteht.)
Bestätigen
Page 50

– 50 –
KUNDENDIENST NACH DEM VERKAUF UND GARRANTIE
BEVOR SIE SICH AN EINEN WARTUNGSTECHNIKER WENDEN, DIE FOLGENDEN
PUNKTE KONTROLLIEREN
● Ist die Sicherung in Ordnung?
● Ist die Spannung extrem hoch oder niedrig?
● Ist der Ausschalter “AN”?
● Haben Sie den Belüftungsfilter gereinigt?
● Fällt direktes Sonnenlicht auf das Aussengerät?
● Ist der Luftstrom des Aussengerätes blockiert?
● Sind die Türen oder Fenster offen, oder befindet sich eine
Heitzquelle in dem Raum?
● Ist die eingestellte Temperatur geeignet?
FALL ZUKONTROLLIERENDE PUNKTE
Anmerkungen
● Bei ruhigem betrieb bzw. nach dem Abschalten des Gerätes könnten die
folgenden Zustände auftreten, die jedoch keinerlei Probleme darstellen.
(1) Ströhmungsgeräusche des Kühlmittels im Kühlmittelkreis.
(2) Schleifegeräusche des Gebläsegehäuses während des Abkühlens oder
des Erwärmens.
● Aufgrund angesammelter Fremdpartikel (Rauch, Eßwaren, Kosmetika usw.)
kann es zu geruchsbelästigung durch das Raumklimagerät kommen. Zur
Geruchsverminderung müssen Belüftungsfilter und Verdunster regelmäßig
gereinigt werden.
●
Bitte wenden Sie sich sofort an den Händler, sollte Ihr Gerät trotz der oben beschriebenen Kontrollen nicht
richtig funktionieren. Informieren Sie Ihren Händler über das Modell, Produktionnummer und Datum des Einbaus
Ihres Gerätes. Bitte informieren Sie ihn über die Natur des Defektes.
●
Der Strom muss die Nennspannung haben, sonst wird das Gerät kaputtgehen, oder es wird die spezifizierte
Leistung nicht erreichen können.
Wenn das Gerät nicht
funktioniert
Wenn das Gerät nicht
richtig kühlt
Wenn es nicht gut heizt
Page 51

– 51 –
DEUTSCH
Hinweis:
Beim Einschalten des Gerätes können, besonders bei gedämpften Leuchten, kurzfristige
Helligkeitsschwankungen auftreten, die jedoch völlig unbedenklich sind.
Die Anschlußbedingungen des örtlichen Stromversorgungsunternehmes sind einzuhalten.
MEMO
.....................................................................................................................................................................................
.....................................................................................................................................................................................
.....................................................................................................................................................................................
.....................................................................................................................................................................................
.....................................................................................................................................................................................
.....................................................................................................................................................................................
.....................................................................................................................................................................................
.....................................................................................................................................................................................
.....................................................................................................................................................................................
.....................................................................................................................................................................................
.....................................................................................................................................................................................
.....................................................................................................................................................................................
.....................................................................................................................................................................................
.....................................................................................................................................................................................
.....................................................................................................................................................................................
.....................................................................................................................................................................................
.....................................................................................................................................................................................
.....................................................................................................................................................................................
.....................................................................................................................................................................................
.....................................................................................................................................................................................
.....................................................................................................................................................................................
.....................................................................................................................................................................................
.....................................................................................................................................................................................
.....................................................................................................................................................................................
Minimum Maximum Minimum Maximum
Innen
trockene Birne °C21322027
nasse Birne °C15231219
im Freien
trockene Birne °C21 43 2 21
nasse Birne °C15 26 1 15
Anmerkung
● Vermeiden Sie, die Raumklimaanlage für abkühlenden Betrieb zu verwenden, wenn die Außentemperatur
unter 21°C (70°F) ist.
Die empfohlenen maximalen und minimalen Temperaturen der heißen und kalten Seiten sollten als unten
sein:-
Abkühlend Heizend
Page 52

– 52 –
MEMO
.....................................................................................................................................................................................
.....................................................................................................................................................................................
.....................................................................................................................................................................................
.....................................................................................................................................................................................
.....................................................................................................................................................................................
.....................................................................................................................................................................................
.....................................................................................................................................................................................
.....................................................................................................................................................................................
.....................................................................................................................................................................................
.....................................................................................................................................................................................
.....................................................................................................................................................................................
.....................................................................................................................................................................................
.....................................................................................................................................................................................
.....................................................................................................................................................................................
.....................................................................................................................................................................................
.....................................................................................................................................................................................
.....................................................................................................................................................................................
.....................................................................................................................................................................................
.....................................................................................................................................................................................
.....................................................................................................................................................................................
.....................................................................................................................................................................................
.....................................................................................................................................................................................
.....................................................................................................................................................................................
.....................................................................................................................................................................................
.....................................................................................................................................................................................
.....................................................................................................................................................................................
.....................................................................................................................................................................................
.....................................................................................................................................................................................
.....................................................................................................................................................................................
.....................................................................................................................................................................................
.....................................................................................................................................................................................
.....................................................................................................................................................................................
.....................................................................................................................................................................................
.....................................................................................................................................................................................
.....................................................................................................................................................................................
.....................................................................................................................................................................................
.....................................................................................................................................................................................
.....................................................................................................................................................................................
.....................................................................................................................................................................................
Page 53

– 53 –
FRANÇAIS
CLIMATISEUR FENDU DE TYPE
APPAREIL D’INTÉRIEUR/UNITE D’EXTÉRIEUR
APPAREIL D’INTÉRIEUR
MODÈLE
RAK-50NH5
RAK-50NH5
Instruction manual Page 1~26
To obtain the best performance and ensure years of trouble
free use, please read this instruction manual completely.
Bedlenungsanleitung Suite 27~52
Bitte lesen Sie diese Bedienungsanleitung aufmerksam
durch, um durch richtige Bedienung jahrelangen und
störungsfreien Betrieb zu gewährleisten.
Mode d’emploi Page 53~78
Des performances optimales et un fonctionnement à long
terme seront assurés en appliquant les présentes
instructions après avoir entièrement lu ce mode d’emploi.
Manuale di istruzioni Pag. 79~104
Per garantire la migliore prestazione e la più lunga
durataleggere attentamente e al completo le seguanti
istruzioni.
Manual de instrucciones Página 105~130
Para obtener el mejor funcionamiento y asegurar años de
uso libre de problemas, lea cuidadosamente este manual
de instrucciones.
Manual de instruções Página 131~156
A fim de obter um bom funcionamento e de garantir uma
utilização sem falhas durante muitos anos, é favor ler este
manual de instruções completamente.
O‰ЛБ›В˜ XВИЪИЫМФ‡ ™ÂÏ›‰· 157~182
°И· ЩЛУ О·П‡ЩВЪЛ ‰˘У·Щ‹ ·fi‰ФЫЛ О·И ЩЛУ М·ОЪФ¯ЪfiУИ·
О·И ¯ˆЪ›˜ ЪФ‚П‹М·Щ· ¯Ъ‹ЫЛ ЩЛ˜ Ы˘ЫОВ˘‹˜ ·˘Щ‹˜,
·Ъ·О·ПФ‡МВ ‰И·‚¿ЫЩВ П‹Ъˆ˜ ЩИ˜ Ф‰ЛБ›В˜ ¯ВИЪИЫМФ‡ ЩЛ˜.
Инструкция по эксплуатации
стр. 183~208
Для обеспечения наилууших эксплуатационных
характеристик и многолетней безотказной работы
оборудования необходимо полностыо оэнакомиться с
данной Инструкцией по эксплуатации.
Page 54

– 54 –
●
Veuillez lire les “précautions à suivre” attentivement avant d’opérer l’appareil afin d’en assurer un emploi correct.
●
Veuillez être très attentif aux signes “ Avertissement” et “ Attention”. La section portant sur “Avertissement”
contient des instructions qui, si elles ne sont pas observées peuvent causer de graves blessures et même la mort.
La section portant sur “Attention” contient des instructions qui, si elles ne sont pas observées peuvent avoir de
graves conséquences. Veuillez suivre toutes les instructions très strictement afin d’assurer un maximum de sécurité.
●
Le signal possède la signification suivante:
●
Veuillez garder ce manuel après lecture.
AVERTISSEMENT
ATTENTION
!
!
A
V
E
R
T
I
S
S
E
M
E
N
T
!
AVERTISSEMENT
!
●
Lors d’une tempête, débranchez et coupez l’interrupteur.
ARRÊT
ARRÊT
PRÉCAUTIONS À SUIVRE
PRÉCAUTIONS À SUIVRE LORS DE L’INSTALLATION
●
Ne remontez pas l’unité.
Une fuite d’eau, une erreur, un court-circuit ou un incendie peut se produire si
vous remontez l’unité par vous-même.
●
Veuillez demander à votre vendeur ou votre technicien qualifié de procéder à
l’installation de votre appareil. Des fuites d’eau ou même des risques de feu
sont possibles si vous essayez d’installer votre appareil vous-même.
●
Veuillez utiliser un fil de terre.
Ne placez pas le fil de terre près de l’eau, des tuyaux à gaz, du paratonnerre
ou de la ligne du téléphone. Une erreur dans l’installation d’un fil de terre peut
causer une électrocution.
●
Un interrupteur devrait être placé suivant l’endroit de l’installation de votre
appareil. Sans un interrupteur, le danger d’électrocution est présent.
●
Veuillez ne pas installer votre appareil près de gaz inflammables. L’appareil
d’extérieur peut prendre feu s’il y a fuite de gaz inflammable.
●
Veuillez vous assurer que l’eau coule normalement lors de l’installation du
tuyau d’évacuation.
PRÉCAUTIONS À SUIVRE LORS D’UN DÉPLACEMENT OU D’UNE MAINTENANCE
●
Dans des situations anormales. Comme la présence d’une odeur brûlé. Veuillez
interrompre le fonctionnement de votre appareil immédiatement et couper
l’interrupteur. Contactez votre l’agent de vendre. Un malfonctionnement, un courtcircuit ou un feu peut se reproduit si votre appareil est en marche continue dans une
situation anormale.
●
Veuillez prendre contact avec votre vendeur pour la maintenance de votre appareil.
Une maintenance inappropriée peut causer de graves blessures ou la mort.
●
Veuillez prendre contact avec votre vendeur si vous désirez déplacer votre appareil.
Electrocution et feu peuvent se produire si vous déplacez votre appareil vous-même.
PRÉCAUTIONS LORS DE L’UTILISATION DE VOTRE APPAREIL
●
N’introduisez pas de longues tiges dans le panneau du souffleur et de
l’aspirateur parce que le ventilateur interne est une source de danger.
●
Evitez tout contact direct avec le flux d’air pour votre santé.
●
N’ utilisez aucun conducteur d’électricité tel qu’un fusible. Cela pourrait causer
un accident mortel.
!
!
Assurez-vous de brancher la prise de terre.
Indique les instructions à suivre.
Ce signal dans le schéma indique une interdiction.
Page 55

– 55 –
FRANÇAIS
●
Débranchez votre appareil et coupez l’interrupteur pendant le nettoyage parce
que la haute vitesse de l’évantail qui est à l’intérieur de l’appareil, peut poser
un danger.
●
Coupez l’interrupteur lors que l’appareil n’est pas en marche pour une longue
période.
A
T
T
E
N
T
I
O
N
!
ARRÊT
ARRÊT
●
L’appareil doit être utilisé en suivant les instructions du fabriquant et non
pour tout autre usage que celui spécifié.
●
N’essayez pas de toucher l’appareil avec des mains humides. Cela pourrait
causer un accident mortel.
●
Si vous utilisez votre appareil près de choses qui brûlent, assurez-vous
qu'il y a assez d’oxygène dans la pièce en aérant de temps-en-temps.
PRÉCAUTIONS LORS DE L’UTILISATION DE VOTRE APPAREIL
●
Lorsque vous utilisez votre appareil avec portes et fenêtres ouvertes, (l’humidité est toujours
supérieure à 80%) et avec le volet d’air poussé vers le bas ou bougeant automatiquement pour
une période prolongée, l’eau va se condenser sur le volet d’air et gouttera. Ceci endommagera
vos meubles. C’est pourquoi il est recommandé de ne pas utiliser l’appareil dans de telles conditions
pendant un long moment.
●
Lorsque la chaleur régnant dans la pièce dépasse la capacité de refroidissement ou de chauffage
de l’unité (par exemple : Nombreuses personnes entrant dans la pièce, utilisation d’appareils de
chauffage, etc.), la température programmée ne peut pas être atteinte.
●
Cet appareil n’est pas destiné pour l’utilisation par les petits enfants ou les personnes infirmes à
moins qu’ils sont suffisamment supervisés par une personne responsable pour s’assurer qu’ils
peuvent l’utiliser bien.
●
Les petits enfants devraient être supervisés pour garantir qu’ils ne jouent pas avec l’appareil.
●
Ne dirigez pas l’air qui sort du panneau de votre climatiseur directement sur
des appareils de chauffage car ceci peut endommager le fonctionnement
d’appareils tel que la bouilloire électrique, le four, etc.
●
Veuillez vous assurer que l’appareil d’extèrieur est bien monté, stable et
sans défaut. Sinon il pourrait tomber et devenir une source de danger.
●
N’éclaboussez pas ou ne dirigez pas d’eau directement sur l’appareil quand
vous lavez. Ceci pourrait causer un court-circuit.
●
Ne mettez pas de plantes directement sous l’ arrivée d’air car ceci est mauvais
pour vos plantes.
●
Ne montez pas sur l’appareil d’extérieur et ne posez aucun objet dessus.
●
Ne posez aucun récipient d’eau tel qu’un vase sur l’appareil d’extérieur afin
d’éviter tout contact avec l’eau. L’eau pourrait endommager l’isolant à l’intérieur
de l’appareil et causer un court-circuit.
●
N’employez aucune laque d’aérosol ou près de l’unité d’intérieur. Ce produit
chimique peut adhérer sur l’aileron d’échangeur de chaleur et bloquer
l’écoulement de l’eau d’évaporation pour vidanger la casserole. L’eau se
laissera tomber sur le ventilateur tagential et causera l’eau à l’éclaboussure
dehors à partir de l’unité d’intérieur.
Page 56

– 56 –
APPAREIL D’INTÉRIEUR
NOMS ET FONCTIONS DE CHAQUE PARTIE
Filtre À Air
Afin d’empêcher la poussière de pénêtrer dans
l’appareil d’intérieur.
(vous référer à la page 73)
Grille frontale
Clignotants De L’appareil D’interieur
Clignotant lumineux indiquant les conditions
d’utilisation. (vous référer à la page 57)
Volet Horizontal
●
Volet Vertical (Sortie D’Air)
(vous référer à la page 68)
Télécommande
Pour envoyer un signal d’utilisation à l’appareil
d’intérieur, pour faire fonctionner les deux appareils.
(vous référer à la page 58)
LONGUEUR (mm)
780
MODÈLE
RAK-50NH5
HAUTEUR (mm)
280
PROFONDEUR (mm)
210
NOM DU MODÈLE ET DIMENSIONS
SYSTÈME DE CLIMATISATION À PLUSIEURS É
Avec ce système de climatisation à plusieurs éléments, plusieurs appareils intérieurs peuvent être connectés à un appareil
extérieur placé sous leur gestion. Ceci vous permet de commander le nombre d’appareils intérieurs de votre choix.
Combinaison des modes de fonctionnement:
● Les appareils intérieurs ne peuvent pas être
mis en service dans les cas de combinaisons suivantes:
● L’appareil intérieur qui est mis en marche en premier
continue à fonctionner tandis que les autres appareils
intérieurs qui ont été mis en marche après ne
fonctionnent pas bien que leurs témoins soient allumés.
● Pour remettre un appareil intérieur en marche qui a été
mis en fonction après, il suffit d’arrêter l’appareil intérieur
qui a été mis en fonction en premier ou en dernier, de
réinitialiser le mode de fonctionnement puis de remettre
en marche.
Un module
Chauffage
Autre module
Refroidissement
Déshumidification
Circulation (ventilateur)
Sélection du nombre d’appareils
intérieurs:
Diminuer le nombre d’appareils
intérieurs à mattre en service,
notamment s’il fait très chaud ou très
froid ou lorsque vous désirez atteindre
rapidement la température préréglée.
Appareils intérieurs arrêtés:
Lorsqu’un appareil intérieur fonctionne en mode de
refroidissement, chauffage ou déshumidification dans une
seule pièce, le bruit de circulation du liquide réfrigérant
risque d’être produit par un appareil intérieur arrêté ou un
appareil intérieur arrête risque de chauffer. Ceci provient
du fait que l’appareil intérieur renvoie le réfrigérant à
l’appareil extérieur de façon à le mettre en disposition
pour qu’il puisse entrer en fonctionnement.
Quand le mode d’opération est choisi:
● Quand le chauffage est automatiquement choisi pour la première unit d’intérieur, la prochaine unité d’intérieur commencent
alors à chauffer. En outre, si se refroidissant ou dehumidifying est automatiquement choisi pour la première unité d’intérieur,
la prochaine unité d’intérieur commencera également à se refroidir ou dehumidify.
Pendant l’opération automatique:
Page 57

– 57 –
FRANÇAIS
INDICATEUR MODE DE FONCTIONNEMENT
CLIGNOTANTS DU CLIMATISEUR
TÉMOIN FILTRE
L’appareil ayant fonctionné pendant 100 heures, le
témoin FILTRE s’allume pour signaler qu’il est temps de
procéder à l’entretien du filtre.
LAMPE DE FONCTIONNEMENT
Cette lampe s’allume lors du fonctionnement de l’appareil.
La lampe d’opération s’allume lors qu’elle se chauffe dans
ces cas suivants:
(1) Lors d’une préchauffage
Pour environ 2–3 minutes après le commencement.
(2) Lors d’une décongelation
Le dégivrage sera exécuté environ une fois toute les
une heure où le gel forme sur sur l’échangeur de
chaleur de l’unité extérieure, pendant 5-10 minutes
chaque fois.
LAMPE DE MINUTERIE
Cette lampe est allumée lorsque la minuterie est utilisée.
TEMPORARY
SWITCH
Appuyez
Tige non conductrice
Interrupteur Temporaire
TEMPORARY
SWITCH
INTERRUPTEUR TEMPORAIRE
Utilisez cet interrupteur pour mettre en route ou arrêter l’appareil lorsque la télécommande ne marche pas.
[Utilisez une tige non conductrice comme un cure-dent]
● L’interrupteur temporaire déclenche le fonctionnement de l’appareil dans le mode sélectionné
précédemment.
● Lorsque l’utilisation se fait en poussant l’interrupteur temporaire après que l’appareil soit arrêté, lorsqu’il
est remis en marche, le fonctionnement se fait en mode automatique.
Page 58

– 58 –
˚
CH
RESET
˚
CH
AUTOMATIQUE
CHAUFFAGE
DÉSHUMIDIFICATION
REFROIDISSEMENT
VENTILATEUR
PUISSANCE DE SOUFFLERIE
FAIBLE
MOYEN
FORT
TEMPORISATION
ARRÊT (ANNULATION)
MISE EN MARCHE (RÉSERVE)
MISE EN MARCHE/ARRÊT
HEURE
RÉGLAGE DE MINUTERIE
SÉLECTEUR DE MINUTERIE
MINUTERIE DE MISE EN FONCTION
MINUTERIE DE MISE À L’ARRÊT
OSCILLATION AUTOMATIQUE
● Fenêtre d’émission des rayons/signe de transmission
Diriger le boîtier de télécommande vers l’appareil intérieru pour contrôler ses fonctions.
Le signe de transmission des signaux infrarouges clignote pendant la transmission.
● Afficheur
II fait apparaître la température intérieure de la pièce qui a été sélectionnée avec
l’heure normale, les rédglages horaires, la fonction choisie et la puissance de circulation.
● Touche MISE EN MARCHE/ARRÊT
Appuyer sur cette touche pour mettre l’appareil en marche.
Une seconde pression de la touche l’arrête.
● Touche de temporisation
Se servir de cette touche pour régler la minuterie de temporisation.
● Touches de réglage de température
Se servir de ces touches pour augmenter ou diminuer le réglage de température. (Le fait
d’appuyer et d’immobiliser la touche en position basse provoque un changement rapide des
indications.)
● Touche de réglage horaire
Se servir de cette touche pour mettre à l’heure et contrôler l’heure actuelle.
● Touches de remise à zéro
● Touche de sélection de mode de fonctionnement
Se servir de cette touche pour sélectionner le mode de fonctionnement. À chaque pression
exercée, le mode change successivement de la façon suivante: à et de à et
avec un retour au premier mode indiqué.
● Touche de réglage de pulssance de soufflerie
Ce réglage cale l’intensité de circulation. À chaque fois que cette touche est pressée, l’intensité
de circulation change successivement de la façon suivante:
(AUTO) à (HI) à (MED) à (LOW) (Cette touche sert à sélectionner la vitesse
idéale ou désirée pour le ventilateur, quel que soit le mode de fonctionnement.)
● Touche d’oscillation automatique
Assure un contrôle sur l’angle d’orientation du déflecteur d’air horizontal.
● Touche de minuterie
Se servir de ces touches pour régler la minuterie.
● Touche de mise à l’arrêt
Permet de choisir l’heure à laquelle l’appareil doit s’arrêter.
● Touche de mise en fonction
Permet de choisir l’heure à laquelle l’appareil doit entrer en fonction.
● Touche de réservation
Réservation de réglage horaire.
● Touche d’annulation
Réservation de durée d’annulation.
DÉSIGNATION DES ÉLÉMENTS CONSTITUTIFS ET FONCTIONS
BOÎTIER DE TÉLÉCOMMANDE
● Il permet de commander l’appareil intérieur. La limite de distance est d’environ 7 métres.
Si l’éclairage intérieur du domicile est placé sous gestion électronique, il se peut que la portée utile des signaux de
télécommande soit plus courte.
Ce dispositif peut être fixé au mur à l’aide des accessoires fournis à cet effet. Avant de le fixer, vérifier que l’appareil
intérieur peut être contrôlé par le boîtier de télécommande.
● Manipuler la télécommande avec beaucoup de précaution. Sa capacité de transmission des signaux peut être compromise
si elle tombe ou se mouille.
● Après avoir mis des piles neuves dans la télécommande, l’unité met environ 10 secondes avant de répondre aux
commandes et de fonctionner.
Mesures de précaution relatives à l’utilisation de l’appareil
● Ne jamais laisser le boîtier de télécommande dans les endroits suivants.
● En plein soleil.
● Près d’un appareil de chauffage.
● Utiliser délicatement le boîtier de télécommande. Ne pas le laisser tomber par terre
et le mettre à l’abri de toute aspersion d’eau.
● Dès que l’appareil extérieur s’arrête, il sera maintenu sur arrêt pendant 3 minutes
environ (à moins que l’alimentation ait été coupée puis remise en fonction ou que le
cordon d’alimentation at été débranchée puis rebranchée).
Cette disposition a pour but de protéger l’appareil, mais ne signifie nullement qu’il est
en panne.
● II est possible que l’appareil cesse de fonctionner et reste arrêté pendant au moins
3 minutes à des fins de protection si la touche de sélection de mode a été pressée
en cours de fonctionnement.
Page 59

– 59 –
FRANÇAIS
FONCTIONNEMENT AUTOMATIQUE
L’appareil détermine automatiquement le mode de fonctionnement, CHAUFFAGE, REFROIDISSMENT ou DÉSHUMIDIFICATION
en fonction de la température actuelle de la pièce. Le mode d’opération choisi change lorsque la température de la pièce varie.
Cependant le changement de wll de mode de fonctionnement pas quand l’unité d’intérieur s’est reliée multi au type unité
extérieure.
■ Étant donné que les réglages sont conservés dans la mémoire du boîtier de télécommande,
la seule opération à faire quand l’appareil doit être remis en marche consiste à appuyer sur
la touche (MISE EN MARCHE/ARRÊT).
La température peut être augmentée ou réduite suivant les besoins dans des limites maximum
de 3°C.
Appuyer sur le bouton des températures et la température variera
de 1°C à chaque fois.
● Le préréglage de température et la température réelle de la pièce risquent de présenter
quelques différences suivant les conditions d’utilisation de l‘appareil.
● L’afficheur ne fait pas apparaître le préréglage de température pendant le mode de
fonctionnement AUTO. Si le réglage est modifié, l’appareil intérieur émettra un signal
sonore en conséquence.
°C
MISE EN
MARCHE
ARRÊT
1
RESET
Appuyer sur la touche de sélection de mode de fonctionnement pour faire apparaître le
mode de fonctionnement (AUTO).
● Dès que le mode de fonctionnement AUTO est sélectionné, l’appareil détermine
automatiquement le mode de fonctionnement, CHAUFFAGE, REFROIDISSMENT ou
DÉSHUMIDIFICATION en fonction de la température actuelle de la pièce. Cependant
le changement de wll de mode de fonctionnement pas quand l’unité d’intérieur s’est
reliée multi au type unité extérieure.
● Si le mode automatique sélectionné ne vous satisfait pas, vous pouvez changer
manuellement la position du mode (chauffage, déhumidification, refroidissement,
ventilation).
Appuyer sur la touche (MISE EN MARCHE/ARRÊT). La mise en fonction commence
avec l’émission d’un signal sonore. Appuyer encore une fois sur cette touche pour
arrêter l’appareil.
Appuyer sur la touche (FAN SPEED). Les modes AUTO et LOW sont disponibles.
FONCTIONS DIVERSES
■ Remise à zéro automatique des commandes
● Lorsque le courant est rétabli après une coupure, l’appareil se remet à fonctionner automatiquement selon le mode et la direction du
courant d’air choisis précédemment. (Parce que le fonctionnement n’a pas été arrêté à l’aide de la télécommande.)
● Mettre l’interrupteur sur OFF si l’on ne veut pas que l’appareil se remette à fonctionner quand le courant électrique sera rétabli. Quand
l’interrupteur est de nouveau sur ON, l’appareil se remet à fonctionner automatiquement avec la direction du courant d’air sélectionnée
précédemment.
Remarque: 1.
Si vous n’avez pas besoin de la commande automatique de relancement, consultez svp votre consignataire
ou OFF par la télécommande.
2. La remise à zéro automatique des commandes n’est pas disponible quand les fonctions Programmateur ou Nuit sont
activées.
Page 60

– 60 –
˚
C
RESET
˚
C
FONCTIONNEMENT EN MODE DE CHAUFFAGE
● L’appareil peut être commuté en mode de fonctionnement de mode chauffage quand la température
extérieure est inférieure à 21°C. Quand il fait chaud (quand il fait plus de 21°C à l’extérieur), le
mode de fonctionnement de mode de chauffage risque de ne pas entrer en fonction par mesure
de protection de, l’appareil.
● Aux commandent pour gardent fiabilité des dispositif, plaire usage ce dispositif audessus -15°C des
outdoor température.
Appuyer sur la touche de sélection de mode de fonctionnement
pour faire apparaître le mode de fonctionnement (CHAUFFAGE).
Régler l’intensité de circulation désirée avec la touche de réglage
de puissance de fonctionnement de la soufflerie (l’afficheur fait
apparaître le réglage effectué).
(AUTO) :L’intensité de circulation est réglé sur “FORT” à
la mise en fontion puis se commute
automatiquement sur “MOYEN” ou “FAIBLE”
dès que la température préréglée est atteinte.
(FORT) : Réglage économique parce qu’il permet de
chauffer rapidement l’intérieur de la pièce.
Cependant, une sensation de fraîcheur est
ressentie pendant les premières minutes de
fonctionnement.
(MOYEN) :Mode de fonctionnement silencieux.
(FAIBLE) : Mode de fonctionnement encore plus silencieux.
Régler la température intérieure de la pièce désirée avec les touches
de réglage de température (l’afficheur fait apparaître le réglage qui
est effectué).
Le réglage de température et la température réelle de la pièce
risquent de présenter quelques différences suivant les conditions
d’utilisation de l’appareil.
Appuyer sur la touche (MISE EN MARCHE/ARRÊT). Le mode
de chauffage est appliqué et confirmé par l’émission d’un signal
sonore. Appuyer encore une fois sur cette touche pour arrêter
l’appareil.
■ Étant donné que les réglages sont conservés dans la mémoire du
boîtier de télécommande, la seule opération à faire quand l’appareil
doit être remis en marche consiste à appuyer sur la touche (MISE
EN MARCHE/ARRÊT).
MISE EN
MARCHE
ARRÊT
3
2
1
Page 61

– 61 –
FRANÇAIS
RESET
˚
C
˚
C
FONCTIONNEMENT EN DÉSHUMIDIFICATION
L’appareil peut être utilisé pour commander une déshumidification quand la température intérieure
de la pièce est supérieure à 16°C. Quand la température est inférieure à 15°C, la fonction de
déshumidification ne peut pas être appliquée.
Appuyer sur la touche de sélection de mode de fonctionnement
pour faire apparaître le mode de fonctionnement
(DÉSHUMIDIFICATION).
Le fonctionnement est ponctué d’un signal sonore.
Le réglage de puissance de soufflerie est automatiquement
réglé sur “FAIBLE” La touche de réglage de puissance de
fonctionnement de la soufflerie est inopérante.
Régler la température intérieure de la pièce désirée avec les
touches de réglage de température (l’afficheur fait apparaître le
réglage qui est effectué).
1
■ Fonction de déshumidification
La fonction de déshumidification est exécutée suivant le réglage de température de la pièce. Quand la
température intérieure de la pièce est plus haute que la température préréglée: L’appareil entreprendra une
déshumidification de l’air intérieur de la pièce tout en ramenant la température de la pièce au niveau du
préréglage.
Quand la température intérieure de la pièce est plus basse que la température préréglée: L’appareil
entreprendra une déshumidification de l’air intérieur de la pièce avec un réglage de température intérieure
de la pièce légèrement inférieur à la température actuelle de la pièce, quel que soit le réglage de température
qui a été fait.
La fonction cesse (l’appareil intérieur ne pulse plus d’air dans la pièce) dès que la température intérieure
de la pièce est plus basse que la température préréglée.
Appuyez sur la touche (START/STOP). L’opération de
déshumidification commence avec le bip. Appuyez sur la touche
pour faire cesser l’opération.
MISE EN
MARCHE
ARRÊT
■ Étant donné que les réglages sont conservés dans la mémoire du boîtier
de télécommande, la seule opération à faire quand l’appareil doit être
remis en marche consiste à appuyer sur la touche (MISE EN MARCHE/
ARRÊT).
Une température ambiante de l’ordre de 20-26°C
est recommandée pour la déshumidification.
2
Page 62

– 62 –
FONCTIONNEMENT EN MODE DE RÉFRIGÉRATION
L’appareil peut être utilisé en mode de réfrigération quand la température extérieure se situe entre
–10 et 43°C.
Si le taux d’humidité intérieur est particulièrement élevé (supérieur à 80°C), une formation de gel risque
de se produire sur la grille de refoulement d’air de l’appareil intérieur.
Appuyer sur la touche de sélection de mode de fonctionnement
pour faire apparaître le mode de fonctionnement
(REFROIDISSEMENT).
Régler l’intensité de circulation désirée avec la touche
(PUISSANCE DE SOUFFLERIE) de la soufflerie (l’afficheur
fait apparaître le réglage efectué).
(AUTO) : L’intensité de circulation est réglé sur “FORT” à
la mise en fontion puis se commute
automatiquement sur “MOYEN” ou “FAIBLE”
dès que la température préréglée est atteinte.
(FORT) : Réglage économique parce qu’il permet de
refroidir rapidement l’interieur de la pièce.
(MOYEN) : Mode de fonctionnement silencieux.
(FAIBLE) : Mode de fonctionnement encore plus silencieux.
Régler la température intérieure de la piéce désirée avec les
touches de réglage TEMPÉRATURE (l’afficheur fait apparaître le
réglage qui est effectué).
Le réglage de température et la température réelle de la piéce
risquent de présenter quelques différences suivant les conditions
d’utilisation de l’appareil.
Appuyer sur la touche (MISE EN MARCHE/ARRÊT). Le mode
de réfrigération est appliqué et confirmé par l’émission d’un signal
sonore. Appuyer encore une fois sur cette touche pour arrêter
l’appareil. Le mode de réfrigération n’entre pas en fonction quand
le réglage de température est supérieur à la température actuelle
de la pièce (bien que le témoin RUN soit allumé). Le mode de
réfrigération est appliqué dès que la température est réglé plus
bas que la température réelle de la pièce.
■ Étant donné que les réglages sont conservés dans la mémoire du
boîtier de télécommande, la seule opération à faire quand l’appareil
doit être remis en marche consiste à appuyer sur la touche (MISE
EN MARCHE/ARRÊT).
1
2
˚
C
RESET
˚
C
3
MISE EN
MARCHE
ARRÊT
Page 63

– 63 –
FRANÇAIS
FONCTIONNEMENT DE VENTILATEUR
Il est également possible de se servir de l’appareil comme d’un simple appareil de circulation
d’air. Choisir cette fonction pour assécher l’air intérieur de l’appareil intérieur quand l’été est
terminé.
Appuyer sur la touche de sélection de mode de fonctionnement
pour faire apparaître le mode de fonctionnement
(VENTILATEUR).
Utiliser la touche (PUISSANCE DE SOUFFLERIE).
Appuyer sur la touche (MISE EN MARCHE/ARRÊT). Le
mode de circulation d’air est appliqué et confirmé par l’émission
d’un signal sonore. Appuyer encore une fois sur cette touche
pour arrêter l‘appareil.
1
2
MISE EN
MARCHE
ARRÉT
VITESSE DE FONCTIONNEMENT DE
....
Lorsque le mode de fonctionnement automatique de
VENTILATEUR (AUTOMATIQUE) ventilateur est réglé en mode de refroidissement/chauffage:
Cas du mode de chauffage
● La vitesse de fonctionnement du ventilateur changera automatiquement
en fonction de la température de l’air pulsé.
● Lorsqu’il y a une grande différence entre la température ambiante et la
température de réglage, le ventilateur commence à tourner à grande
vitesse (HI).
● Lorsque la température ambiante atteint la température de réglage, la
vitesse du ventilateur passe automatiquement sur LOW (lent).
● Lorsqu’il y a une grande différence entre la température ambiante et la
température de réglage, le ventilateur commence à tourner à grande
vitesse (HI).
● Dès que la température ambiante de la pièce atteint la température
préréglée, le mode de fonctionnement de refroidissement qui fait varier
la vitesse de fonctionnement du ventilateur et la température de la pièce
de façon à obtenir des conditions de fonctionnement optimales et un
refroidissement optimal et sain dans la pièce serait exécuté.
Cas du mode de
refroidissement
RESET
Page 64

– 64 –
PROCÉDÉ DE RÉGLAGE DE LA MINUTERIE
Minuterie de mise en fonction/
mise à l’arrêt
● L’appareil entrera en fonction
(s’arrêtera) et s’arrêtera (entrera en
fonction) aux heures préréglées.
● La commutation se produit tout d’abord
pour l’heure préréglée qui apparaît en
premier.
● La flèche qui apparaît dans l’afficheur
indique dans quel ordre les opérations
de commutation se déroulent.
1
Appuyer sur la
touche (minuterie
de mise à l’arrêt) pour
que le signe (arrêt)
clignote.
Minuterie de mise à l’arrêt
Il est possible de faire un préréglage de
mise à l’arrêt de l’appareil à l’heure actuelle.
Après avoir remplacé
les piles;
Comment annuler une programmation
Diriger la fenêtre de transmission des signaux du boîtier de télécommande vers l’appareil intérieur et
appuyer sur la touche (ANNULATION).
La marque (RÉSERVE) s’éteint en même temps qu’un signal sonore est émis et le témoin
(MINUTERIE) s’éteint aussi dans l’appareil intérieur.
1
Introduire le mois et le jour
avec la touche de réglage de
minuterie.
1
Appuyer sur la touche
(minuterie de mise à l’arrêt). Le
signe (arrêt) clignote dans l’afficheur.
1
Appuyer sur la touche
(minuterie de mise en fonction)
pour que le signe (mise en
fonction) clignote dans l’afficheur.
2
Introduire l’heure de
mise à l’arrêt avec la
touche de minuterie.
Appuyer sur la touche
(réservation).
3
Appuyer sur la touche
(minuterie de mise en
fonction) pour que le
signe (arrêt) clignote
et que le signe (mise
en fonction) clignote.
MESURE DE PRÉCAUTION
Un seul mode de minuterie peut être utilisé à la fois: mise à l’arrêt,
mise en fonction et mise en fonction/mise à l’arrêt.
Minuterie de mise en fonction
Heure, jour, mois
● L’appareil se mettra en
marche à l’heure préréglée
HEURE,
JOUR, MOIS
(heure
actuelle, jour,
moois)
MINUTERIE
DE MISE À
L’ARRÊT
MINUTERIE
DE MISE EN
FONCTION
RÉSERVE
ANNULATION
RESET
M D
M D
AM
Arr t
Muse en
fonction
AM
Arr t
Muse en
fonction
Page 65

– 65 –
FRANÇAIS
3
Diriger la fenêtre de transmission des signaux du boîtier de télécommande
vers l’appareil intérieur et appuyer sur la touche (RÉSERVE). La marque
(ARRÊT) s’allume au lieu de clignoter et la marque (RÉSERVE)
s’allume. Un signal sonore est émis et le témoin (MINUTERIE) s’allume
dans l’appareil intérieur.
● L’indication horaire disparaît
automatiquement dans la 10
seconde qui suit.
● Appuyer deux fois de suite sur la
touche (HEURE) pour vérifier
l’heure qu’il est.
Ceci termine les opérations de mise
à l’heure de l’horloge.
● La minuterie peut être utilisée de trois façons différentes: en minuterie de mise à l’arrêt, en
minuterie de mise en fonction et en minuterie marche/arrêt (arrêt/marche). Mettre d‘abord l’horloge
à l’heure parce que ce réglage sert de référence.
● Étant donné que les réglages horaires sont conservés dans la mémoire du boîtier de
télécommande, la seule opération qui vous incombe pour réutiliser les réglages horaires actuels
consiste à appuyer sur la touche (RÉSERVE).
2
Appuyer sur
la touche
(HEURE)..
3
Introduire l’heure avec la touche
de réglage de minuterie.
Exemple: L’heure actuelle est 13h30.
2
Introduire l’heure de mise à
l’arrêt avec la touche de minuterie.
Ceci conclue les réglages de mise à l’arrêt de l’appareil
par minuterie d’arrêt.
Exemple: L’appareil s’arrêtera à 23h00.
Exemple:
Le appareil s’allumera à 7,00 heures du matin.
Ceci conclue les réglages de mise en fonction de l’appareil par
minuterie de mise en fonction.
4
Introduire l’heure de mise en
fonction avec la touche de
minuterie.
5
Diriger la fenêtre de transmission des signaux du boîtier de télécommande vers
l’appareil intérieur et appuyer sur la touche (RÉSERVE). La marque s’allume
au lieu de clignoter et la marque (RÉSERVE) s’allume. Un signal sonore est
émis et le témoin (MINUTERIE) s’allume dans l’appareil intérieur.
3
Diriger la fenêtre de transmission des signaux du boîtier de télécommande
vers l’appareil intérieur et appuyer sur la touche (RÉSERVE). La marque
(MISE EN FONCTION) s’allume au lieu de clignoter et la marque
(RÉSERVE) s’allume. Un signal sonore est émis et le témoin (MINUTERIE)
s’allume dans l’appareil intérieur.
2
Introduire l’heure de mise
en fonction avec la touche de
minuterie.
Exemple:
Le appareil s’éteindra à 10,30 P.M. et il sera allumé à 7,00 heures
du matin.
Ceci conclue les réglages de mise en fonction/d‘arrêt de l’appareil
par minuterie de mise en fonction/d’arrêt.
4
Appuyer encore une fois sur la touche (HEURE).
PM PM
AM
PM
PM
PM
AM
AM
AM
AM
PM
PM
Page 66

– 66 –
COMMENT RÉGLER LA MINUTERIE DE TEMPORISATION
Mode
Minuterie de
temporisation
4
1
444
Indication
1 heure 2 heures 3 heures 7 heures
Annulation de la fonction minuterie de temporisation
1
Faire les réglages de la minuterie de mise en fonction.
Mettre tout d’abord l’horloge à l’heure car son réglage sert de référence par la suite (se
reporter aux pages pour obtenir de plus amples détails sur la façon de mettre l’horloge
à l’heure). Appuyer sur la touche (TEMPORISATION) pour que les indications de
l’afficheur changent de la façon suivante.
Minuterie de temporisation: L’appareil intérieur fonctionnera pendant le
nombre d’heures programmé (1, 2, 3 ou 7) puis s’arrêtera. Diriger la fenêtre
de transmission des signaux du boîtier de télécommande vers l’appareil
intérieur et appuyer sur la touche . Les renseignements relatifs à la
minuterie apparaissent dans le boîtier de télécommande.
Le témoin MINUTERIE s’allume en même temps qu’un signal sonore est
émis de l’appareil intérieur.
Dès que la fonction de minuterie de temporisation a été réglée, l’afficheur fait
apparaître l”heure de mise à l’arrêt.
Exemple: Quand un réglage de 3 heures
est programmé à la minuterie de
temporisation à 23h38, l’heure de mise à
l’arrêt sera 2h38.
2
Appuyer sur la touche (TEMPORISATION) et faire les
réglages nécessaires de la minuterie de temporisation.
L’appareil intérieur s’arrêtera par l’intermédiaire de la
minuterie de temporisation puis se mettra en fonction
par l’intermédiaire de la minuterie de mise en fonction.
Comment annuler une programmation
Diriger la fenêtre de transmission des signaux du boîtier de télécommande vers l’appareil intérieur et
appuyer sur la touche (ANNULATION).
La marque (RÉSERVE) s’éteint en même temps qu’un signal sonore est émis et le témoin
(MINUTERIE) s’éteint aussi dans l’appareil intérieur.
Pour chauffer:
Dans ce cas, l’appareil s’arrêtera dans
2 heures (à 1h38) et se mettra en
marche tôt pour que la température
préréglée soit presque atteinte le
lendemain matin à 6 heures
TEMPORISATION
H
H
AM
AM
Minuterie
de
temporisa-
tion
Mise en
fonction
H
Page 67

– 67 –
FRANÇAIS
Explication relative à la minuterie de temporisation
L’appareil contrôle l’intensité de circulation et la température intérieure de la
pièce en mode automatique de façon à assurer à la fois un fonctionnement
silencieux et approprié à la santé de l’utilisateur.
● Vous ne pouvez pas activer le minuteur de mise en veille si la date
ou l’heure en cours n’a pas été réglée auparavant.
● Si vous réglez le minuteur de mise en veille après le minuteur
éteint-, allumé/éteint- ou éteint/allumé, le minuteur de mise en veille
s’activera au lieu du minuteur éteint-, allumé/éteint- ou éteint/allumé.
● Aucun autre minuteur ne peut être réglé tant que le minuteur de mise
en veille est actif.
● Une fois que la minuterie de nuit atteint son terme, veuillez appuyer
de nouveau sur le bouton du sommeil. La minuterie se règle alors sur
le dernier réglage.
● La minuterie de nuit fonctionne une seule fois.
MESURE DE PRÉCAUTION
Page 68

– 68 –
AJUSTEZ LE VOLET D’AIR
1
Le réglage d’orientation de l’air conditionné.
Le déflecteur d’air horizontal est réglé automatiquement
sur l’angle qui convient à chaque mode de fonctionnement.
Le déflecteur peut osciller constamment de haut en bas et
peut être réglé sur un angle donné en appuyant sur la
touche “ (AJUSTEMENT AUTOMATIQUE)”.
● Si la touche “
(AJUSTEMENT AUTOMATIQUE)
”
est appuyée une fois, le volet horizontal d’air bouge
de bas en haut. Si la touche est appuyée à nouveau,
le volet s'arrête à la position présente. Quelques
secondes sont requises avant que le volet ne se mette
à bouger (6 secondes).
● Le déflecteur d’air horizontal doit être utilisé
seulement dans la limite de réglage comme c’est
montré à droite.
● Quand le mode de fonctionnement est interoupu, le
déflecteur d’air horizontal se déplace et s’arrête dans
la position de fermeture de l’échappement d’air.
RESET
2
Ajustement de l’air conditionné vers la gauche ou la
droite.
Tenez le volet d’air vertical comme indiqué sur la figure
et ajustez l’air conditionné vers la gauche ou la droite.
● Lors du refroidissement, ne laissez pas le volet
horizontal d’air bouger trop longtemps. De l’eau
pourrait se condenser sur le volet horizontal et
goutter.
ATTENTION
!
Lorsque
refroidissement,
déshumidifier
Lorsque chauffage
environ 15˚
Vertical
environ 60˚
environ 45˚
Vertical
environ
30˚
Page 69

– 69 –
FRANÇAIS
COMMENT REMPLACER LES PILES DU BOÎTIER DE TÉLÉCOMMANDE
1
=
2
ATTENTION
Appuyer sur le couvercle et le
faire coulisser en agissant dans la
direction indiquée par la flêche.
1. Ne jamais mélanger des piles usées et des piles ni des piles
de différentes marques.
2. Retirer les piles du boîtier de télécommande quand celui-ci est
appelé à ne pas étre utilisé pendant deux ou trois mois.
Retirer le couvercle en procédant de la façon représentée sur
l’illustration ci-contre et retirer les piles usées.
Installer des piles neuves. Le sens dans lequel les piles sont
disposées doit correspondre aux repères qui se trouvent dans
le boîtier de télécommande.
!
Page 70

– 70 –
LES CONDITIONS IDÉALES D’UTILISATION
Température De La Piece
Appropriee
Installez des rideaux ou des
volets
Ventilation
Utilisation efficace de la minuterie
N’oubliez pas de nettoyer le filtre à air
Assurez-vous qu’une température appropriée
est sélectionnée pour les bébés et les enfants
La nuit, veuillez utiliser le mode de fonctionnent
de OFF ou ON minuterie en même temps que
la minuterie de reveil matin. Cela vous
permettra d’avoir une température de chambre
agréable. Veuillez utiliser la minuterie
effcacement.
Un filtre à air poussiéreux réduit le volume
d'air et l’efficacité du refroidissement. Pour
empêcher tout gaspillage d’énergie, veuillez
nettoyer votre filtre toutes les deux semaines.
Soyez prudent avec la température de la pièce
et la direction de l’arrivée d’air, lorsqu'un bébé,
un enfant, ou une personne âgée est présent.
Avertissement
Ne fermez pas la pièce pendant trop
longtemps. A l’occasion, ouvrez la porte et
les fenêtres
pour
renouveler
l’air dans
la pièce.
Avertissement
Une température trop
basse est mauvaise
pour la santé et
favorise le gaspillage
d’énergie.
Il est possible
de réduire
l’entrée de la
chaleur
extérieure en
installant
rideaux ou
volets.
!
!
Page 71

– 71 –
FRANÇAIS
POUR L’INFORMATION DES UTILISATEURS
L’air Conditionné Et Les Sources De Chaleur Dans La Pièce
Utilisation Interrompue Pendant Une Longue Période De Temps
En Cas D’éclair
Attention
Si la quantité de chaleur dans la pièce surpasse de
beaucoup la capacité de refroidissement du
climatiseur (par exemple, plus de gens entrant dans
la pièce, utilisant des appareils de chauffage et etc,)
la température sélectionnée ne peut être atteinte.
Lorsque l’appareil d’intérieur n’est pas utilisé pendant
une longue période de temps, veuillez couper le
courant général. Si le courant général est sous
utilisation, l’appareil d’intérieur consommera à peu
près 8W pour contrôler le circuit même en mode
“ARRÊT”.
Avertissement
Pour protéger l’appareil en cas d’éclairs, veuillez
arrêter d’utiliser l’appareil et retirer la prise du courant.
À L’ARRÊT
!
!
Interférence Des Produits Électriques
Attention
Pour éviter l’interférence de bruit, placez svp l’unité
d’intérieur et son contrôleur à distance au leat 1m
loin des produits electical.
!
Lampe
fluorescente
d’Inverseur-type.
Pour empêcher
l’endroit au moins
1m d’interférence
parti.
TV
Page 72

– 72 –
1
Ouvrez le panneau frontal.
● Tirez le panneau frontal en tenant les deux extrémités
des deux mains.
2
Enlevez les filtres.
● Poussez vers le haut pour déclencher les
attaches et retirez le filtre.
3
4
Attachez les filtres.
● Attachez les filtres en vous assurant que la surface
indiquant “FRONT” est bien tournée vers l’avant.
● Après attachement des filtres, poussez le panneau
frontal à la position marquée de trois flèches, comme
la figure l’indique, et fermez-le.
MESURE DE PRÉCAUTION
Seuls des personnes agréées sont autorisées à s’occuper du nettoyage et de l’entretien. Avant de
nettoyer, arrêtez toute opération et débranchez l’appareil de la prise.
ATTENTION
!
ATTENTION
!
Le fait d’attacher l’air nettoyant des filtres au filtre.
● Attachez l’air nettoyant des filtres à la chrpente en
en comprimant doucement cela les deux côtés et
liberation après l’insertion dans la charpente de filtre.
Ne tourner pas l’air nettoyant
le filtre comme il peut provoquer
le dommage à la structure.
● En enlevant l’air nettoyant des filtres, suivez s’il vous plaît les susdits filtres.
● La capacité se refroidissant est légèrement affaiblie et la vitesse se refroidissant devient plus lent
quand l’air nettoyant des filtres est utilisé. A insi mettez la vitesse de fan “à HAUT” en l’utilisant
dans cette condition.
● L’air nettoyant des filtres peut être lavé et a utilisé jusqu’à 20 fois en utilisant un aspirateur ou
en le lavant sous l’eau de robinet courante. Le nombre pour cet air nettoyant le filtre est
<SPX-CFH11>. S’il vous plaît utilisez ce nombre d’ordonner quand vous voulez le renouveler.
● Ne faites pas marcher le climatiseur sans filtre. La poussiere entrerait à l’intérieur du climatiseur et
entraînerait des pannes.
LE FAIT D’ATTACHER L’AIR NETTOYANT DES FILTRES
Page 73

– 73 –
FRANÇAIS
1. FILTRE À AIR
Nettoyez le filtre car il attrappe la poussière présente dans la pièce. Au cas où le filtre à air est plein de
poussière, le flux d’air diminuera et la capacité de refroidissement en sera réduite. De plus, l’appareil
deviendra bruyant. Veuillez vous assurer que vous nettoyez le filtre suivant la méthode décrite ci-dessous.
MAINTENANCE
1
2
3
ATTENTION
PROCÉDURE
Seuls des personnes agréées sont autorisées à s’occuper du nettoyage et de l’entretien. Avant de
nettoyer, arrêtez toute opération et débranchez l’appareil de la prise.
ATTENTION
!
!
Ouvrez le panneau frontal et retirez le filtre
● Doucement l’ascenseur et enlève l’air
nettoyant le filtre du filtre à air charpente.
Poussière À vide du filtre à air et l’air nettoyant
le filtre en utilisant un aspirateur. S’il y a trop de
poussière rincent seulement sous l’eau de
robinet courante et le brossent doucement avec
une brosse de poil molle. Permettez au filtre de
vous sécher dans l’ombre.
● Réinsérer l’air nettoyant le filtre à la charpente
de filtre. Mettez le filtre avec la marque “de
DEVANT” faisant face au front et à la fente
eux dans l’état original.
● Après attachement des filtres, poussez le
panneau frontal à la position marquée de trois
flèches, comme la figure l’indique, et fermezle.
● Ne lavez pas avec de l’eau chaude à plus de 40°C. Le filtre rétrécirait.
● Lorsque vous le lavez, secouez les gouttelettes d’eau complètement et laissez le sécher à l’ombre;
ne pas exposer au soleil. Le filtre rétrécirait.
● N’utiliser pas de détersif sur l’air nettoyant le filtre comme un détersif peut détériorer le filtre la
performance électrostatique.
NOTE:
● L’air nettoyant le filtre devrait être nettoyé chaque mois ou plus bientôt si le chargement évident se
produit. Quand les heures supplémentaires utilisées, il peut desserré sa fonction désodorisante.
Pour une performance maximale, il est recommandé de le remplacer tous les 3-6 mois selon les
besoins d’application.
Page 74

– 74 –
2. Panneau frontal lavable
● Retirez le panneau frontal et lavez à l’eau claire.
Nettoyez la grille d’aspiration avec un épouge doux.
Nettoyez soigneusement la grille d’aspiration avec
l’eau propre surtout après l’usage de détergent
neutre.
● Lorsque le panneau frontal n’est pas retiré, essuyez-
le à l’aide d’un chiffon doux et sec. Essuyez la
télécommande à l’aide d’un chiffon doux et sec.
● Essuyez soigneusement tout eau. Si les indicateurs
ou le receivoir des signaux de l’appareil d’intérieur
est mouillé, cela donnera des problèmes.
Méthode de retrait du panneau frontal
Il faut tenir la grille d’aspiration avec les deux mains
pour la faire détacher ou attacher.
● Il ne faut pas verser ou diriger l’eau directement sur l’appareil pendant
le nettoyage parceque cela peut causer un court – circuit.
● N’utilisez jamais l’eau chand (au dessus de 40°C), le benzène,
l’essence, l’acide, le dissolvant ou une brosse parceque tous cela
peuveut endommager la surface en plastique et le récouvrement.
Retrait du panneau frontal
● Lorsque le panneau frontal est entièrement
ouvert des deux mains, poussez le bras droit
vers l’intérieur pour le relâcher, et en fermant
le panneau frontal légèrement, soulevez-le
vers l’avant.
Attachement du panneau frontal
● Déplacez les projections sur le gauche et
droit en mettant aux raccordements
d’appareil et faire entrez ces projections dans
les orifices fermement.
ATTENTION
!
Page 75

– 75 –
FRANÇAIS
3. MAINTENANCE APRES UNE LONGUE PERIODE D’ARRÊT
● Mettez le reglage de l’appareil au mode de
(REFROIDISSEMENT) a la temperature de 32°C
et la vitesse de l’evantail a HI pour une demie journee
s’il fait beau et le mettez sur sec pour toute la nuit.
● Débranchez la prise de courant.
INSPECTION RÉGULIÈRE
Air
Soufflé
Seuls des personnes agréées sont autorisées à s’occuper du nettoyage et de l’entretien. Avant de
nettoyer, arrêtez toute opération et débranchez l’appareil de la prise.
ATTENTION
!
VEUILLEZ VÉRIFIER LES POINTS SUIVANTS TOUS LES SIX MOIS OU TOUS LES ANS.
CONTACTEZ VOTRE VENDEUR SI VOUS AVEZ BESOIN D’AIDE.
Est-ce que la ligne de terre est déconnectée ou cassée?
Est-ce que le support est sérieusement attaqué par la rouille et estce que l’appareil est stable ou mal positionné?
Confirmé
La fiche du câble d’alimentation est-elle correctement placée dans
la prise?
(S’assurer qu’il n’y a pas de mauvais contact entre les deux).
1
2
3
Page 76

– 76 –
SERVICE APRES VENTE ET GUARANTIE
LORSQUE VOUS DEMANDEZ UN SERVICE APRÈS VENTE, VEUILLEZ VÉRIFIER LES
POINTS SUIVANTS.
● Le fusible, est-il en bon état?
● Le voltage, est-il extrèmement élevé ou bas?
● Est - ce que l’interupteur est sur ‘MARCHE’?
● Le filtre à air est-il propre?
● Est - ce que les rayons du soleil chauffent directement sur
l’appareil d’exterieur.
● Est - ce que le current d’air de l’appareil d’exterieur soit
obloque?
● Les portes ou les fenêtres, sont-elles ouvertes ou y-a-t’il des
sources de chaleur?
● La température, est-elle appropriée?
CONDITION VÉRIFIEZ LES POINTS SUIVANTS
Notes
● Lors d’une utilisation lente et d'un arrêt, les phénomènes suivants peuvent
se produire à l’occasion, mais ils ne sont pas totalement inadéquats.
(1) Un bruit du réfrigérant dans le tuyau de réfrigération.
(2) Un petit bruit de la case du ventilateur qui refroidit et se réchauffe petit
à petit après arrêt.
● Une odeur sera émise par l’appareil car il a tendance à garder les odeurs
comme la fumée, les aliments, les cosmétiques, et ainsi de suite. Aussi, le
filtre à air et l’évaporateur doivent-ils être nettoyés régulièrement pour réduire
les odeurs.
●
Veuillez contacter votre vendeur immédiatement si le climatiseur ne fonctionnne pas normalement après
l’inspection ci-dessus. Informez votre agent du modèle de votre appareil, du numéro de série et de la date
d’installation. Veuillez aussi l’informer du défaut en question.
●
La source d’electrique doit etre branche au voltage regimente si non l’appereil va se cases ou on ne peut pas
obteuir la capabilite specifie.
Lorsque l’appareil n’est pas
en marche
Lorsque l’appareil ne
refroidit pas efficacement
Quand il ne chauffe pas
lieu.
Page 77

– 77 –
FRANÇAIS
Attention:
En démarrant l’appareil, il est possible qu’un changement de la luminosité se manifeste à courte échéance.
Pourtant, c’est un phénomène absolument négligeable qui n’apparaît qu’ avec les variateurs de lumière.
Il est recommandé d’observer les conditions des centrales électriques locales.
MEMO
.....................................................................................................................................................................................
.....................................................................................................................................................................................
.....................................................................................................................................................................................
.....................................................................................................................................................................................
.....................................................................................................................................................................................
.....................................................................................................................................................................................
.....................................................................................................................................................................................
.....................................................................................................................................................................................
.....................................................................................................................................................................................
.....................................................................................................................................................................................
.....................................................................................................................................................................................
.....................................................................................................................................................................................
.....................................................................................................................................................................................
.....................................................................................................................................................................................
.....................................................................................................................................................................................
.....................................................................................................................................................................................
.....................................................................................................................................................................................
.....................................................................................................................................................................................
.....................................................................................................................................................................................
.....................................................................................................................................................................................
.....................................................................................................................................................................................
.....................................................................................................................................................................................
.....................................................................................................................................................................................
.....................................................................................................................................................................................
Minimum Maximum Minimum Maximum
D’intérieur
Ampoule sèche °C21 32 20 27
Ampoule humide °C15 23 12 19
Extérieur
Ampoule sèche °C21 43 2 21
Ampoule humide °C15 26 1 15
Note
● Évitez d’employer le climatiseur de pièce pour l’opération de refroidissement quand la température extérieure
est en-dessous de 21°C (70°F).
Les températures maximum et minimum recommandées des côtés chauds et froids devraient être en tant
que ci-dessous:-
Se refroidissant Chauffant
Page 78

– 78 –
MEMO
.....................................................................................................................................................................................
.....................................................................................................................................................................................
.....................................................................................................................................................................................
.....................................................................................................................................................................................
.....................................................................................................................................................................................
.....................................................................................................................................................................................
.....................................................................................................................................................................................
.....................................................................................................................................................................................
.....................................................................................................................................................................................
.....................................................................................................................................................................................
.....................................................................................................................................................................................
.....................................................................................................................................................................................
.....................................................................................................................................................................................
.....................................................................................................................................................................................
.....................................................................................................................................................................................
.....................................................................................................................................................................................
.....................................................................................................................................................................................
.....................................................................................................................................................................................
.....................................................................................................................................................................................
.....................................................................................................................................................................................
.....................................................................................................................................................................................
.....................................................................................................................................................................................
.....................................................................................................................................................................................
.....................................................................................................................................................................................
.....................................................................................................................................................................................
.....................................................................................................................................................................................
.....................................................................................................................................................................................
.....................................................................................................................................................................................
.....................................................................................................................................................................................
.....................................................................................................................................................................................
.....................................................................................................................................................................................
.....................................................................................................................................................................................
.....................................................................................................................................................................................
.....................................................................................................................................................................................
.....................................................................................................................................................................................
.....................................................................................................................................................................................
.....................................................................................................................................................................................
.....................................................................................................................................................................................
.....................................................................................................................................................................................
Page 79

– 79 –
ITALIANO
CONDIZIONATORE DELL’ARIA SPACCATO DEL TIPO
UNITA’ INTERNA/UNITA’ ESTERNA
UNITA’ INTERNA
MODELLO
RAK-50NH5
RAK-50NH5
Instruction manual Page 1~26
To obtain the best performance and ensure years of trouble
free use, please read this instruction manual completely.
Bedlenungsanleitung Suite 27~52
Bitte lesen Sie diese Bedienungsanleitung aufmerksam
durch, um durch richtige Bedienung jahrelangen und
störungsfreien Betrieb zu gewährleisten.
Mode d’emploi Page 53~78
Des performances optimales et un fonctionnement à long
terme seront assurés en appliquant les présentes
instructions après avoir entièrement lu ce mode d’emploi.
Manuale di istruzioni Pag. 79~104
Per garantire la migliore prestazione e la più lunga
durataleggere attentamente e al completo le seguanti
istruzioni.
Manual de instrucciones Página 105~130
Para obtener el mejor funcionamiento y asegurar años de
uso libre de problemas, lea cuidadosamente este manual
de instrucciones.
Manual de instruções Página 131~156
A fim de obter um bom funcionamento e de garantir uma
utilização sem falhas durante muitos anos, é favor ler este
manual de instruções completamente.
O‰ЛБ›В˜ XВИЪИЫМФ‡ ™ÂÏ›‰· 157~182
°И· ЩЛУ О·П‡ЩВЪЛ ‰˘У·Щ‹ ·fi‰ФЫЛ О·И ЩЛУ М·ОЪФ¯ЪfiУИ·
О·И ¯ˆЪ›˜ ЪФ‚П‹М·Щ· ¯Ъ‹ЫЛ ЩЛ˜ Ы˘ЫОВ˘‹˜ ·˘Щ‹˜,
·Ъ·О·ПФ‡МВ ‰И·‚¿ЫЩВ П‹Ъˆ˜ ЩИ˜ Ф‰ЛБ›В˜ ¯ВИЪИЫМФ‡ ЩЛ˜.
Инструкция по эксплуатации
стр. 183~208
Для обеспечения наилууших эксплуатационных
характеристик и многолетней безотказной работы
оборудования необходимо полностыо оэнакомиться с
данной Инструкцией по эксплуатации.
Page 80

– 80 –
●
Leggere attentamente i “Margini di Sicurezza” prima del funzionamento per accertarsi di usare il condizionatore in modo
corretto.
●
Prestare particolare attenzione ai simboli di “ Avvertenza” e di “ Cautela”. La sezione “Avvertenza” contiene delle
regole, che se non osservate rigorosamente si possono provocare gravi incidenti oppure la morte. La sezione “Cautela”
contiene delle regole che se non osservate attentamente possono essere causa di gravi conseguenze. Osservare
rigorosamente tutte le istruzioni per prevenire eventuali pericoli.
●
Significato dei simboli utilizzati.
●
Conservare il manuale dopo averlo letto con cura.
AVVERTENZA
CAUTELA
!
!
A
V
V
E
R
T
E
N
Z
A
!
AVVERTENZA
!
●
Spegnere il condizionatore e l’interruttore automatico durante i temporali.
ARRESTO
ARRESTO
MARGINI DI SICUREZZA
PRECAUZIONI DURANTE L’INSTALLAZIONE
PRECAUZIONI DURANTE UNO SPOSTAMENTO OPPURE DURANTE LA MANUTENZIONE
●
Non riporate/rimontate da soli il condizionatore.
Ne potrebbero derivare perdite d’acqua, malfunzionamenti, corti circuiti od
incendi.
●
Si consiglia di fare installare il condizionatore dal rivenditore oppure da un
tecnico specializzato. Potrebbe accadere una perdita d’acqua, un corto circuito
oppure prender fuoco se l’installazione viene fatta di propria iniziativa.
●
Mettere a massa.
Non collocare la messa a terra accanto ai tubi del gas e dell’acqua, al parafulmine
oppure vicino alla messa a terra del telefono. L’installazione impropria della
messa a terra potrebbe provocare una scossa elettrica.
●
Dovrebbe essere installato un interruttore automatico (per eventuali sovraccarichi)
a secondo della posizione dell’unità. Senza il tale interruttore automatico si
incorre in pericolo di una scossa elettrica.
●
Non installare l’unità vicino a fonti di gas infiammabile. L’unità esterna può
incendiarsi se avvengono della perdite di gas infiammabile.
●
Accertarsi che il flusso dell’acqua sia scorrevole quando viene installato il tubo
di drenaggio.
●
In una situazione anormale (per esempio quando c’è odore di bruciato), spegnere
il condizionatore e l’interruttore automatico. Contattare il rivenditore. Se si fa
funzionare l’unità in condizioni anormali si possono causare guasti, corto circuiti
o incendi.
●
Una manutenzione sbagliata può causare una scossa elettrica e prender fuoco.
●
Contattare il rivenditore in caso di reinstallazione e eventuale spostamento
dell’unità. Se tale reinstallazione e spostamento vengono fatti di propria iniziativa
in modo non corretto, si incorre in pericolo di una scossa elettrica e potrebbe
prendere fuoco.
●
Non inserire oggetti appuntiti tipo filo di ferro nel pannello di aspirazione dell’aria
e del compressore poichè il ventilatore ad alta velocità può provocare danni.
●
Non utilizzare nessun tipo di filo conduttore come filo fusibile, questo potrebbe
provocare danni inevitabili.
PRECAUZIONI DURANTE IL FUNZIONAMENTO
●
Evitare il contatto diretto con il flusso d’aria per un periodo prolungato, per
ragioni di salute.
!
!
Assicuratevi di aver collegato la messa a terra.
Seguire attentamente le istruzioni.
Il simbolo sopra la figura, significa proibito.
Page 81

– 81 –
ITALIANO
PRECAUZIONI DURANTE IL FUNZIONAMENTO
●
Spegnere il condizionatore e l’interruttore automatico durante le pulizie, in
quanto la ventola interna ad alta velocità può essere pericolosa.
C
A
U
T
E
L
A
!
ARRESTO
ARRESTO
●
Se accade che qualcosa brucia nella stanza dove il condizionatore é in funzione,
ventilare regolarmente la stanza per prevenire insufficienza di ossigeno.
●
Il prodotto deve essere utilizzato secondo le specifiche del fabbricatore e per
nessun altro motivo o scopo.
●
Evitare di mettere in funzione l’apparecchio con le mani bagnate, questo
potrebbe causare gravi danni.
●
Quando il condizionatore é in funzionamento con porta e finistre aperte (l’umidità della stanza é
sempre superiore dell’ 80%) e con il deflettore dell’aria spostato verso il basso oppure automaticamente
in movimento per lungo tempo, l’aqua si condensa sul deflettore dell’aria gocciolando di quando in
quando, bagnando i mobili. Quindi evitare di farlo funzioneare in tali condizioni per un periodo prolungato.
●
Se il calore dell’ambiente è superiore alla portata di raffreddamento o riscaldamento del condizionatore
(se, per esempio, un numero elevato di persone si trovano nella stanza, o se si utilizzano altre
apparecchiature di riscaldamento ecc), non sarà possible raggiungere la temperatura ambiente
impostata.
●
Questo apparecchio non è inteso ad uso dei bambini in giovane età o persone inferme a meno che
siano adeguatamente sorvegliati da una persona responsabile per assicurarsi che usino l’apparecchio
in modo sicuro.
●
I bambini in giovane età dovrebbero essere sorvegliati per accertarsi che non giochino con l’apparecchio.
●
Evitare di salire sull’unità esterna e di appoggiare oggetti di ogni tipo.
●
Non spostare il flusso d’aria fredda del condizionatore d’aria in direzione di
elettrodomestici tipo forno, bollitore ecc, oppure verso impianti di riscaldamento
ciò può influire sulla funzionalità di tali apparecchi.
●
Accertarsi che il telaio di supporto esterno sia fissato saldamente e senza
difetti. In caso contrario l’unità esterna può crollare e provocare danni.
●
Evitare di spruzzare oppure gettare acqua direttamente sulla cassetta del
condizionatore d’aria quando si pulisce, poichè ciò può provocare un corto circuito.
●
Evitare di esporre le piante direttamente al flusso d’aria, ciò le danneggerebbe.
●
Spegnere l’interruttore automatico se si prevede di non usare il condizionatore
per un lungo periodo di tempo.
●
Non mettere contenitori d’acqua (tipo vasi da fiori) sull’apparecchio esterno, per
evitare che l’acqua goccioli nella parte interna dell’unità. L’acqua gocciolando
nella parte interna dell’unità danneggia l’isolatore e provoca un corto circuito.
●
Non usi alcuni spruzzi di capelli o dell’aerosol vicino all’unità dell’interno. Questo
prodotto chimico può aderirsi sull’aletta dello scambiatore di calore ed ostruire
il flusso dell’acqua di evaporazione per vuotare la vaschetta. L’acqua cadrà sul
ventilatore tangenziale e causerà l’acqua che spruzza fuori dall’unità dell’interno.
Page 82

– 82 –
UNITA’ INTERNA
IDENTIFICAZIONE E FUNZIONE DEI COMPONENTI
Filtro Dell’Aria
Impedisce alla polvere di entrare nell’ unità interna.
(Vedi pag. 99)
Pannello Anteriore
Indicatori Unità Interna
La spia dell’indicatore segnale la messa in opera.
(Vedi pag. 83)
Deflettore Orizzontale
●
Deflettore Verticale
(Bocca Di Uscita Dell’Aria)
(Vedi pag. 94)
Controllo A Distanza
Emette il segnale di comando all’unità interna, in modo
da far funzionare tutto l’apparecchio.
(Vedi pag. 84)
LARGHEZZA (mm)
780
MODELLO
RAK-50NH5
ALTEZZA (mm)
280
PROFONDITA’ (mm)
210
IDENTIFICAZIONE E DIMENSIIONI DEL MODELLO
CONDIZIONATORE D’ARIA MULTI-AIR
Con questo condizionatore multi-air è possibile collegare diversi apparecchi interni a una unità esterna di comando.
È possibile far funzionare il numero desiderato di apparecchi.
Combinazione di operazioni:
● Non è possibile far funzionare gli apparecchi con
le seguenti combinazioni.
● L’apparecchio interno acceso per primo è in funzione, ma gli altri
apparecchi interni accesi in un secondo momento non sono in
funzione mentre la spia luminosa è accesa.
● Per riavviare un apparecchio acceso in un secondo momento,
spegnere l’apparecchio acceso per primo o quello acceso in un
secondo momento e selezionare nuovamente il tipo di operazione,
quindi ripetere l’operazione.
Una unità
Riscaldamento
Altra unità
Refrigerazione
Deumidificazione
Circolazione (ventilatore)
Regolazione del numero di unità interne:
Diminuire il numero di apparecchi in
funzione, specialmente quando fa
molto caldo o molto freddo oppure
quando si desidera raggiungere
velocemente la temperatura stabilita.
Unità interne spente:
Quando un apparecchio interno opera in un ambiente in
modalità refrigerazione, riscaldamento o deumidificazione,
è possibile avvertire il rumore del flusso del refrigerante
da un altro apparecchio oppure si può verificare che un
apparecchio non funzionante si surriscaldi. Ciò avviene
perché l’apparecchio convoglia il refrigerante all’unità
esterna per essere pronto al funzionamento.
Quando il modo di funzionamento è selezionato:
● Quando il riscaldamento è selezionato automaticamente per la prima unità dell’interno, l’unità dell’interno seguente allora
comincia riscaldare. Inoltre, se raffreddandosi o dehumidifying è selezionato automaticamente per la prima unità dell’interno,
l’unità dell’interno seguente inoltre cominci raffreddarsi o dehumidify.
Durante il funzionamento automatico:
Page 83

– 83 –
ITALIANO
INDICATORI DELL’UNITÀ DI RAFFREDDAMENTO
INDICATORE DI FUNZIONAMENTO
SPIA FILTRO
Quando l’unità ha funzionato per un totale di circa 100
ore, la spia FILTRO si illumina per indicare che è tempo
di pulire il filtro.
SPIA DI FUNZIONAMENTO
Questa si illumina durante il funzionamento.
Durante il riscaldamento la SPIA DI FUNZIONAMENTO
lampeggia nei seguenti casi.
(1) Durante il preriscaldamento
Per circa 2-3 minuti dopo l’avviamento.
(2) Durante lo sbrinamento
Il disgelamento sarà effettuato circa una volta ogni
un’ora in cui il gelo forma sul sullo scambiatore di
calore dell’unità esterna, per 5-10 minuti ogni volta.
SPIA TIMER
Questa spia si illumina quando il timer é in funzion.
TEMPORARY
SWITCH
Premere
Oggetto non conduttore
(bastoncino)
Interrutore Secondario
TEMPORARY
SWITCH
INTERRUTORE SECONDARIO
Usare questo interrutore per accensione e spegnimento quando il comando a distanza non funziona.
[Utilizzare un oggetto non conduttore (per esempio uno stuzzucadenti)]
● Quando si preme l’interruttore di servizio, l’apparecchio funziona secondo le modalità precedentemente
impostate.
● Quando il funzionamento avviene utilizzando l’interrutore secondario, dopo che l’alimentazione é disattivata
e quindi riattivata, il modo di funzionamento é automatico.
Page 84

– 84 –
˚
CH
RESET
˚
CH
AUTOMATICO
RISCALDAMENTO
DEUMIDIFICAZIONE
RAFFREDDAMENTO
VENTILATORE
VELOCITA’ VENTILATORE
BASSA
MEDIA
ALTA
SPEGNIMENTO AUTOMATICO
ARRESTO (CANCELLAZIONE)
AVVIO (RISERVA)
AVVIO/ARRESTO
ORARIO
IMPOSTAZIONE TIMER
SELETTORE TIMER
ACCENSIONE VIA TIMER
SPEGNIMENTO VIA TIMER
OSCILLAZIONE AUTOMATICA
● Finestrella emissione segnali/simbolo trasmissione
Puntare questa finestrella verso l’unità interna quando si desidera comandare il
funzionamento di quest’ultima. II marchio di trasmissione lampeggia quando viene
trasmesso un segnale.
● Display
Questo display indica la temperatura ambiente selezionata, l’orario corrente, lo stato
del timer, la funzione e l’intensità di circolazione selezionati.
● Tasto AVVIO/ARRESTO
Premere questo tasto per avviare il funzionamento. Premerlo nuovamente per
interrompere il funzionamento.
● Tasto di spegnimento automatico
Controlla la funzione di spegnimento automatico.
● Tasti controllo temperatura
Utilizzare questi tasti per aumentare o diminuire l’impostazione della temperatura.
(Tenere premuto per cambiare il valore più in fretta).
● Tasto del tempo
Usare questo tasto per controllare e regolare l’orario e la data.
● Tasti di resettamento (RESET)
● Tasto selezione di funzionamento
Utilizzare questo tasto per selezionare il modo di funzionamento.
Ogni volta che il tasto viene premuto, il modo cambia da (AUTO) a
(Riscaldamento) e quindi a (Deumidificazione), (Raffreddamento) e
(Ventilatore) in sequenza.
● Tasto velocità ventilatore
Questo tasto determina l’intensità della circolazione dell’aria. Ogni volta che questo
tasto viene premuto, l’intensità della circolazione cambia da (AUTO) a (ALTA)
e quindi a (MEDIA) e (BASSA) (Questo pulsante permette di selezionare la
velocità della ventola ottimale o preferita per ogni modalità di funzionamento.)
● Tasto di oscillazione automatica
Controlla l’angolo di oscillazione del deflettore orizzontale dell’aria.
● Comando del timer
Usare questo tasto per attivare il timer.
● Tasto di spegnimento via timer Imposta l’ora di spegnimento via timer.
● Tasto di accensione via timer Imposta l’ora di accensione via timer.
● Tasto di memorizzazione Memorizzazione dell’impostazione del timer.
● Tasto di cancellazione Cancellazione dell’impostazione del timer.
NOMI E FUNZIONI DELLE PARTI
TELECOMANDO
● Questo telecomando serve per comandare il funzionamento del l’unità di raffreddamento. Il campo di lavoro del
telecomando è di circa 7 metri. Se l’illuminazione fosse controllata elettronicamente, il campo di lavoro potrebbe
essere inferiore.
Questo telecomando può essere fissata al muro utilizzando l’accessorio apposito in dotazione.
Prima di fissare il telecomando, accertarsi che esso sia in grado di comandare l’unità di raffreddamento.
● Maneggiare il telecomando con cura. Eventuali urti o contatti con l’acqua possono comprometterne la capacità di
trasmissione dei segnali.
● Dopo la sostituzione delle batterie del telecomando, l’unità può impiegare circa 10 secondi per rispondere ai comandi.
Precauzioni per l’uso
● Non lasciare il telecomando nei luoghi seguenti.
● Esposto alla luce solare diretta.
● In prossimità di un dispositivo di riscaldamento.
● Maneggiare l’unità di telecomando con attenzione. Non farlo cadere e proteggerlo
dall’acqua.
● Una volta che l’unità esterna si è fermata, essa non si riavvia per circa 3 minuti (a
meno che non si disattivi e si riattivi l’alimentazione con l’interruttore di accensione
o non si scolleghi e si ricolleghi il cavo di alimentazione).
Ciò serve per proteggere l’unità e non indica un guasto.
● Se si preme il tasto di selezione del modo di funzionamento durante il funzionamento,
l’unità potrebbe fermarsi per circa 3 minuti per motivi di sicurezza.
Page 85

– 85 –
ITALIANO
■ Dato che le impostazioni sono memorizzate nel telecomando, la volta successiva sarà sufficiente
premere il solo tasto (AVVIO/ARRESTO).
Premere il tasto di selezione delle operazioni in modo che il display indichi il modo
(AUTOMATIO).
● Quando il modo AUTO è stato selezionato, l’unità determina automaticamente il modo di
funzionamento tra RISCALDAMENTO, RAFFREDDAMENTO o DEUMIDIFICAZIONE a
seconda della temperatura ambiente attuale. Tuttavia il cambiamento del wll di modo di
funzionamento non quando l’unità dell’interno ha collegato multi a tipo unità esterna.
● Se la funzione selezionata automaticamente dal condizionatore non fosse soddisfacente,
è possibile cambiarla manualmente (riscaldamento, deumidificatore, raffreddamento o
ventola).
Premere il tasto (AVVIO/ARRESTO). II funzionamento viene attivato con un segnale
acustico. Premere nuovamete il tasto per interrompere il funzionamento.
E’possibile aumentare o diminuire l’impostazione della temperatura quando necessario per un massimo
di 3˚C.
Premere il tasto temperatura e la stessa cambierà di 1°C ella volta.
● La temperatura preimpostata e la temperatura ambiente reale potrebbero essere leggermente
diverse a seconda delle condizioni.
● Nel modo AUTO, il display non indica la temperatura preimpostata. Se si cambia l’impostazione,
l’unità interna produce un segnale acustico.
1
AVVIO
ARRESTO
FUNZIONAMENTO AUTOMATICO
L’unità determina automaticamente il modo di funzionamento, RISCALDAMENTO, RAFFREDDAMENTO o DEUMIDIFICAZIONE
a seconda della temperatura ambiente attuale.
La funzione selezionata combierà a seconda della temperatura ambiente. Tuttavia
il cambiamento del wll di modo di funzionamento non quando l’unità dell’interno ha collegato multi a tipo unità esterna.
RESET
Premere il tasto (velocità della ventola). Sono disponibili i modi di selezione automatica e quello
di bassa velocità.
°C
FUNZIONI VARIE
■ Funzione di riavvio automatico
● In caso di interruzione di corrente, l’unità si riavvia automaticamente nella modalità e con la direzione del flusso d’aria precedenti.
(L’unità non è stata spenta con il telecomando.)
● Per spegnere l’unità al ripristino della corrente, disinserire l’interruttore di rete.
Quando si reinserisce l’interruttore di rete, l’unità si riavvia automaticamente nella modalità e con la direzione del flusso d’aria
precedenti.
Nota: 1. Se non richiedete il controllo auto di riavviamento, consulti prego il vostro agente di vendite o OFF tramite telecomando.
2. La funzione di riavvio automatico non è disponibile quando sono impostati il Timer oppure la modalità Sleep Timer.
Page 86

– 86 –
˚
C
RESET
˚
C
RISCALDAMENT
● Utilizzare l’unità per il riscaldamento quando la temperatura esterna scende sotto i 21°C. Quando fa
caldo (sopra i 21°C), il riscaldamento potrebbe non funzionare per motivi di sicurezza dell’unità.
● In ingiungere a trattenere affidabilità degli dispositivo, accontentano adoperano questa dispositivo above
-15°C degli ail’aperta temperatura.
Premere il tasto di selezione delle operazioni in modo che il display
indichi il modo (RISCALDAMENTO).
Impostare l’intensità di circolazione desiderata per mezzo del tasto
della velocità del ventilatore (il display indica l’impostazione).
(AUTO) : L’intensità della circolazione è “ALTA” all’inizio
e diviene automaticamente “MEDIA” o “BASSA”
quando la temperatura preimpostata viene
raggiunta.
(ALTA) : Un modo economico in quanto la temperatura
ambiente aumenta rapidamente.
E’però possibile sentire freddo all’inizio.
(MEDIA) : Modo silenzioso.
(BASSA): Ancora più silenzioso.
Impostare la temperatura ambiente desiderata per mezzo dei tasti
di controllo della temperatura (il display indica le impostazioni).
L’impostazione della temperatura e la temperatura ambiente reale
possono differire leggermente a seconda delle condizioni.
Premere il tasto (AVVIO/ARRESTO). II riscaldamento inzia con
un segnale acustico. Premere nuovamente il tasto per interrompere
il funzionamento.
■
Dato che le impostazioni sono memorizzate nel telecomando, la
volta successiva sarà sufficiente premere il solo tasto (AVVIO/
ARRESTO).
1
2
3
AVVIO
ARRESTO
Page 87

– 87 –
ITALIANO
RESET
˚
C
˚
C
DEUMIDIFICAZIONE
Utilizzare l’unità per la deumidificazione quando la temperatura ambiente è sopra i 16˚C.
Quando la temperatura ambiente è sotto ai 15˚C, la deumidificazione non funziona.
Premere il tasto di selezione delle operazioni in modo che il display
indichi il modo
(DEUMIDIFICAZIONE).
La ventola viene automaticamente portata sulla velocità bassa.
Il tasto di velocità della ventola non funziona.
Impostare la temperatura ambiente desiderata per mezzo dei tasti
di controllo della temperatura (il display indica le impostazioni).
Per la deumidificazione si consiglia una
temperatura ambiente tra i 20-26°C.
1
Quando la temperatura ambiente è più alta della temperatura impostata:
L’unità deumidifica la stanza riducendo la temperatura ambiente fino al livello preimpostato.
Quando la temperatura ambiente è più bassa della temperatura impostata:
La deumidificazione viene eseguita con la temperatura impostata leggermente più bassa della
temperatura ambiente attuale indipendentemente dall’impostazione della temperatura stessa.
II funzionamento viene interrotto (l’unità interna smette di emettere aria) non appena la temperatura
ambiente diviene più bassa della temperatura impostata.
■ Funzione di deumidificazione
AVVIO
ARRESTO
Premere il tasto (AVVIO/ARRESTO). Le operazioni di
deumidificazione inizieranno con un bip. Premere nuovamente il
tasto per arrestare le operazioni.
■ Dato che le impostazioni sono memorizzate nel telecomando, la volta
successiva sarà sufficiente premere il solo tasto (AVVIO/ARRESTO).
2
Page 88

– 88 –
RAFFREDDAMENTO
Utilizzare l’unità per il raffreddamento quando la temperatura esterna è di –10~43°C. Se
l’umidità fosse estremamente elevata (maggiore di 80°C) all’interno, sulla griglia di uscita
dell’aria dell’unità interna si potrebbe formare del ghiaccio.
Premere il tasto di selezione delle operazioni in modo che il
display indichi il modo (RAFFREDDAMENTO).
Impostare l’intensità di circolazione desiderata col tasto
(VELOCITA’ VENTILATORE) (il display indica l’impostazione).
(AUTO) : L’intensità della circolazione è “ALTA” all’inizio
e diviene automaticamente “MEDIA” o
“BASSA” quando la temperatura preimpostata
viene raggiunta.
(ALTA) : Un modo economico in quanto la temperatura
ambiente diminuisce rapidamente.
(MEDIA) : Modo silenzioso.
(BASSA) : Ancora più silenzioso.
Impostare la temperatura ambiente desiderata con i tasti di
controllo della temperatura (il display indica l’impostazione).
L’impostazione della temperatura e la temperatura ambiente
reale possono differire leggermente a seconda delle condizioni.
Premere il tasto (AVVIO/ARRESTO). II funzionamento viene
attivato con un segnale acustico. Premere nuovamete il tasto
per interrompere il funzionamento. II raffreddamento non si
avvia se l’impostazione della temperatura è più alta della
temperatura attuale della stanza (per quanto la spia
(FUNZIONAMENTO) si illumini). II raffreddamento inizia non
appena viene impostata una temperatura più bassa della
temperatura ambiente.
■ Dato che le impostazioni sono memorizzate nel telecomando, la volta
successiva sarà sufficiente premere il solo tasto (AVVIO/ARRESTO).
1
2
3
˚
C
RESET
˚
C
AVVIO
ARRESTO
Page 89

– 89 –
ITALIANO
RESET
1
VELOCITA’ DELLA
.....
Se la velocità della ventola AUTO viene impostata durante il riscaldamento
VENTOLA (AUTO) o raffreddamento:
Durante il riscaldamento
● La velocità della ventola cambia automaticamente a seconda della
temperatura dell’aria scaricata.
● Quando la differenza tra la temperatura interna e quella impostata e
troppo elevata, la ventola comincia a girare ad alta velocità (HI).
● Quando la temperatura interna ha raggiunto il valore impostato, la velocità
della ventola si abbassa automaticamente (LOW).
● Quando la differenza tra la temperatura interna e quella impostata e
troppo elevata, la ventola comincia a girare ad alta velocità (HI).
● Raggiuntala, viene eseguito il raffreddamento normale, che cambia la
velocità della ventola e la temperatura ambiente per garantire condizioni
di comfort ottimale.
Durante il raffreddamento
VENTILATORE
E’ possibile utilizzare l’unità semplicemente come un dispositivo per la circolazione dell’aria.
Utilizzare questa funzione per asciugare l’interno dell’unità interna alla fine dell’estate.
Premere il tasto di selezione delle operazioni in modo che il
display indichi il modo (VENTILATORE).
Premere il tasto (VELOCITA’ VENTILATORE).
Premere il tasto (AVVIO/ARRESTO). II funzionamento viene
attivato con un segnale acustico. Premere nuovamente il tasto
per interrompere il funzionamento.
AVVIO
ARRESTO
2
Page 90

– 90 –
RESET
COME IMPOSTARE IL TIMER
Timer accensione/segnimento
● L’unità si accende (o si spegne) e
si spegne (o si accende) agli orari
determinati.
● La prima operazione di accensione/
spegnimento avviene all‘orario
preimpostato che viene raggiunto
per primo.
● La freccia che appare sul display
indica la sequenza delle operazioni
di accensione/spegnimento.
1
Premere il tasto
(SPEGNIMENTO VIA
TIMER) in modo che
l’indicazione
(ARRESTO) del display
lampeggi.
Timer spegnimento
Si può far sì che il condizionatore si
spenga all’ora attuale.
Dopo aver cambiato le
batterie:
Come cancellare un’impostazione
Puntare il telecomando verso l’unità interna e premere il tasto (CANCELLAZIONE).
L’indicazione (RISERVA) si spegne con un segnale acustico e la spia (TIMER) sull’unità interna
si spegne a sua volta.
1
Impostare il giorno ed il
mese con i tasti di controllo del
timer.
1
Premere il tasto
(SPEGNIMENTO VIA TIMER).
L’indicazione (ARRESTO)
lampeggia sul display.
1
Premere il tasto
(ACCENSIONE VIA TIMER).
L’indicazione (ACCENSIONE)
lampeggia sul display.
2
Regolare l’orario di
spegnimento con i tasti
di controllo del timer.
Premere il tasto
(RISERVA).
3
Premere il tasto
(ACCENSIONE VIA
TIMER) in modo che
l’indicazione
(ARRESTO) si accenda e
quella (ACCENSIONE)
lampeggi.
ATTENZIONE
E’possibile impostare uno solo dei timer di
spegnimento, accensione o accensione/spegnimento.
Timer accensione
Orario, giorno, mese
● L’unità si accende
all’ora impostata.
ORARIO,
GIORNO,
MESE (ora
esatta, giorno,
mese)
SPEGNIMENTO
VIA TIMER
ACCENSIONE
VIA TIMER
RISERVA
CANCELLAZIONE
M D
M D
AM
Arresto
Avvio
AM
Avvio
Arresto
PM
PM
AM
PM
Avvio
Arresto
Page 91

– 91 –
ITALIANO
3
Puntare il telecomando verso l’unità interna e premere il tasto (RISERVA).
Il marchio (ARRESTO) rimane illuminato invece di lampeggiare e l’indicazione
(ORARIO) si illumina. Viene prodotto un segnale acustico e la spia
(TIMER) sull’unità interna si illumina.
● L’indicazione dell’orario
scompare automaticamente in
10 secondo.
● Per controllare l’impostazione
corrente dell’orario premere due
volte il tasto (ORARIO).
L’impostazione dell’orario corrente
è ora completa.
● Il timer può essere utilizzato in tre modi: timer spegnimento, timer accensione, e timer
spegnimento/accensione (accensione/spegnimento). Come prima cosa impostare l’orario
corretto in quanto esso serve come riferimento.
● A questo punto le impostazioni sono memorizzate nel telecomando e basta semplicemente
premere il tasto (RISERVA) per utilizzare le stesse impostazioni la volta successiva.
2
Premere il
tasto
(ORARIO).
3
Impostare l’ora esatta con i tasti
di controllo del timer.
Esempio: L’orario corrente è 1:30 p.m.
2
Impostare l’ora di
spegnimento con i tasti di
controllo del timer.
L’impostazione dell’orario di
spegnimento è ora completa.
Esempio: L’unità si spegne alle 11:00 p.m.
Esempio:
L’apparecchio si accenderà a 7.00 a.m.. Questo completa
l’impostazione della funzione oraria.
4
Impostare l’ora di
accensione con i tasti di
controllo del timer.
5
Puntare il telecomando verso l’unità interna e premere il tasto (RISERVA).
Il marchio (AVVIO) rimane illuminato invece di lampeggiare e l’indicazione
(ORARIO) si illumina. Viene prodotto un segnale acustico e la spia
(TIMER) sull’unità interna si illumina.
3
Puntare il telecomando verso l’unità interna e premere il tasto (RISERVA).
Il marchio (AVVIO) rimane illuminato invece di lampeggiare e l’indicazione
(ORARIO) si illumina. Viene prodotto un segnale acustico e la spia
(TIMER) sull’unità interna si illumina.
2
Impostare l’ora di
accensione con i tasti di
controllo del timer.
Esempio:
L’apparecchio si spegnerà a 10.30 p.m. e sarà acceso a 7.00 a.m..
Questo completa l’impostazione della funzione oraria.
4
Premere nuovamente il tasto (ORARIO).
L’indicazione dell’orario rimane illuminata invece di
lampeggiare.
PM PM
AM
PM
PM
PM
AM
AM
AM
AM
PM
PM
Page 92

– 92 –
COME IMPOSTARE IL TIMER PER LO SPEGNIMENTO AUTOMATICO
Modo
Timer spegimento
automatico
Indicazione
1 ora 2 ore 3 ore 7 ore
Cancellazione timer
1
4444
SPEGNIMENTO
H
H
AM
AM
Timer
spegnimento
automatico
Avvio
1
Impostare il timer di accensione.
Come prima cosa impostare l’orario corretto in quanto esso serve come riferimento
(vedere le pagine per l’impostazione dell’orario corrente). Premere il tasto
(SPEGNIMENTO) ed il display cambierà come indicato in basso.
Timer spegnimento automatico: L’unità rimane in funzione per il numero
di ore designato (1, 2, 3 o 7) e quindi si spegne.
Puntare il telecomando verso l’unità interna e quindi premere il tasto
(SPEGNIMENTO).
Le informazioni sul timer vengono visualizzate sull’unità di telecomando.
La spia (TIMER) sull’unità interna si illumina con un segnale acustico.
Quando il timer per lo spegnimento automatico è stato impostato, il
display indica l’orario di spegnimento.
Esempio: Se si imposta il timer per
3 ore alle 11:38 p.m., l’orario di
spegnimento è alle 2:38 a.m.
2
Premere il tasto (SPEGNIMENTO) ed impostare il timer per lo
spegnimento automatico.
Per il riscaldamento:
In questo caso, l’apparecchio si
spegne dopo 2 ore (alle ore 1:38) e si
riaccende presto in modo tale che la
temperatura stabilita venga raggiunta
alle ore 6:00 del giorno seguente.
L’unità viene spenta dal timer per lo
spegnimento automatico e viene accesa dal
timer di accensione.
Come cancellare un’impostazione
Puntare il telecomando verso l’unità interna e premere il tasto (CANCELLAZIONE).
L’indicazione (RISERVA) si spegne con un segnale acustico e la spia (TIMER) sull’unità interna si
spegne a sua volta.
H
Page 93

– 93 –
ITALIANO
Particolari riguardanti il timer per lo spegnimento automatico
L’unità controlla automaticamente I’intensità della circolazione e la
temperatura ambiente in modo da ottenere un funzionamento silenzioso e
non dannoso alla salute delle persone.
● Se non sono stati impostati i valori “data” od “ora”, la funzione “riposo”
non può essere utilizzata.
● Se la funzione “riposo” viene selezionata dopo aver impostato il
temporizzatore, solo la prima verrà attivata.
● Altre funzioni orarie non possono essere utilizzate durante le operazioni
di “riposo”.
● Una volta terminata la funzione “riposo” e selezionato nuovamente il
tasto SLEEP (riposo), questa riprenderà i valori precedentemente
impostati.
● La funzione “riposo” è effettiva una sola volta.
NOTE
Page 94

– 94 –
DEFLETTORI ARIA
1
Regolazione del flusso dell’aria condizionata verso l’alto
e verso il basso.
Il deflettore d’aria viene automaticamente impostato con
angolazioni specifiche per ogni operazione. Il deflettore
può essere fatto oscillare su e giù continuamente;
alternativamente è possible impostare l’angolazione
desiderata usando il tasto “ (AUTO SWING Oscillazione automatica)”.
● Premendo il tasto di regolazione “ (AUTO
SWING)” per la prima volta, il deflettore orizzontale
dell’aria si muove su e giù. Se il tasto viene premuto
una seconda volta, il deflettore si ferma nella
posizione in cui si trova. Trascorrono diversi secondi
(circa 6 secondi) prima che il deflettore inizi a
muoversi.
● Regolare il deflettore entro il campo di regolazione
indicato qui a destra.
● Quando si spegne il condizionaore il deflettore
orizzontale si ferma nella posizione in cui la bocca di
uscita dell’aria viene chiusa.
RESET
2
Regolazione del flusso dell’aria condizionata verso sinistra e
verso destra.
Afferrare il deflettore dell’aria come indicato nella figura e
regolare il flusso dell’aria verso sinistra e verso destra.
ATTENZIONE
● Nell’operazione di “Raffreddamento” non utilizzare il
deflettore orizzontale dell’aria in movimento per lungo
tempo. Si potrebbe formare della condensa sul
deflettore e l’acqua gocciolerebbe giù.
!
Circa 15˚
Circa 60˚
Verticale
Durante il
riscaldamento
Durante il
raffreddamento e la
deumidificazione
Circa 45˚
Circa
30˚
Verticale
Page 95

– 95 –
ITALIANO
COME CAMBIARE LE BATTERIE DEL TELECOMANDO
1
Rimuovere il coperchio come indicato nella figura ed estrarre
le batterie scariche.
=
2
Inserire le nuove batterie.
Fare corrispondere la direzione delle batterie con i marchi
all’interno del vano.
Premere e quindi tirare
nella direzione della freccia
CAUTELA
1. Non utilizzare batterie vecchie e nuove o tipi diversi di batterie assieme.
2. Rimuovere le batterie quando si prevede di non utilizzare il telecomando
per 2 o 3 mesi.
!
Page 96

– 96 –
CONSIGLI PRATICI PER IL FUNZIONAMENTO IDEALE
Temperatura Ambiente Appropriata
Ricorrere All’uso Delle Tende
Ventilazione
Utilizzo Del Timer In Modo Efficace
Non Dimenticare Di Pulire Il Filtro
Dell’aria
Regolare La Temperatura Adatta A
Bambini Piccoli E Grandi
Avvertenza
Una temperatura da
gelo danneggia la salute e incide sul
consumo di elettricità.
Tenendo le
tende chiuse é
possibile
ridurre il calore
che entra nella
stanza
attraverso i
vetri.
Durante la notte è bene utilizzare la modalità
di funzionamento timer assieme alla sveglia
del mattino. Si potrà così dormire in un
ambiente a temperatura confortevole.
Utilizzare il timer in modo efficace.
Prestare particolare attenzione alla
temperatura ambiente e alla direzione del
flusso dell’aria dove ci sono bambini piccoli e
grandi e persone anziane che
dormono.
Cautela
Evitare di tenere la stanza chiusa per lungo
tempo, aprire porta e finistre, di quando in
quando, per
riciclare l’aria
della stanza.
Un filtro dell’aria impolverato riduce il volume
dell’aria e il rendimento del raffreddamento.
Per evitare uno spreco inutile di energia, pulire
il filtro ogni due settimane.
!
!
Page 97

– 97 –
ITALIANO
UNFORMAZIONI UTILI
Il Condizionatore D’aria E La Fonte Di Calore Nella Stanza
Quando Non Viene Usato Per Un Periodo Prolungato
Quando C’è Il Temporale Con Fulmini
Attenzione
Se la quantità di calore nella stanza é superiore alla
portata di raffreddamento del condizionatore d’aria
(per esempio: la presenza di più persone nella stanza,
l’utilizzo di impianti di riscaldamento ecc...) non sarà
possibile raggiungere la temperatura ambiente
prefissata.
Quando si prevede di non usare il condizionatore
d’aria per un periodo prolungato togliere il cavo di
alimentazione dalla presa. Se l’alimentazione rimane
“ON” e non viene interrotta il condizionatore continua
a consumare circa 8W nell’operazione controllo
circuito anche se il modo di funzionamento é OFF/
Arresto.
Avvertenza
Per evitare che l’unità si danneggi durante una scarica
di fulmine, interrompere il funzionamento dell’unità e
togliere la spina dalla presa.
ARRESTO
!
!
Interferenza da rumore elettrico
Attenzione
Per evitare l’interferenza di rumore, disponga prego
l’unità dell’interno ed il relativo regolatore a distanza
almeno 1m via dai prodotti elettrici.
!
Invertitore-tipo
lampada
fluorescente.
Per impedire
l’interferenza,
disponga almeno
1m assente.
TV
Page 98

– 98 –
1
Aprire il pannello anteriore.
● Estrarre il pannello frontale sollevandone le
estremità con le mani.
2
Togliere i filtri.
● Spingere verso l’alto per liberare i gancetti ed
estrarre il filtro.
3
4
Inserire i filtri.
● Montare il filtro assicurandosi che il lato con la scritta
“FRONT” sia rivolto verso di voi.
● Dopo aver inserito i filtri, premere sul pannello
anteriore in corrispondenza delle tre frecce come
mostrato nella figura e chiudere.
La manutenzione e pulizia devono essere eseguite esclusivamente da personale di servizio qualificato.
Prima di iniziare la pulizia, arrestare il funzionamento e togliere potenza.
CAUTELA
!
CAUTELA
!
Note:
● Quando rimuovono i filtri di pulizia dell’aria, segua prego i suddetti filtri.
● La capienza di reffreddamento è indebolita un po’e la velocità di reffreddamento diventa più
lenta quando i filtri di pulizia dell’aria sono utilizzati. Così, regoli la velocità del ventilatore “a
MASSIMO” quando usando esso in questa circostanza.
● I filtri di pulizia dell’aria possono essere lavati ed usati fino a 20 volte, usando un aspirapolvere o
la sciacquatura del filtro sotto l’acqua di rubinetto funzionante. Il numero di codice di questo filtro,
da indicarsi al momento dell’ordinazione, è <SPX-CFH11>.
● Non utilizzate il condizionatore senza filtro. Polvere potrebbe depositarsi all’interno dello stesso e
causare malfunzionamenti.
Fissando I filtri di pulizia dell’aria al filtro.
● Fissi I filtri di pulizia dell’aria alla struttura
delicatamente comprimendola entrambi i lati e liberisi
dopo l’inserzione nella struttura del filtro.
Non pieghi il filtro di pulizia
dell’aria come può danneggiare
la struttura.
FISSAGGIO DEI FILTRI DI PULIZIA DELL’ARIA
Page 99

– 99 –
ITALIANO
1
2
3
MANUTENZIONE
1. FILTRO ARIA
Pulire il filtro dell’aria in quanto esso rimuove la polvere dalla stanza. Quando il filtro viene intasato dalla
polvere il flusso dell’aria diminuisce e la portata di raffreddamento viene ridotta. Inoltre, l’apparecchio può
divenire rumoroso. Accertarsi di pulire regolarmente il filtro seguendo la procedura indicata in basso.
PROCEDURA
CAUTELA
La manutenzione e pulizia devono essere eseguite esclusivamente da personale di servizio qualificato.
Prima di iniziare la pulizia, arrestare il funzionamento e togliere potenza.
CAUTELA
!
!
NOTE:
● Il filtro di pulizia dell’aria dovrebbe essere pulito ogni mese o più presto se il caricamento notevole
accade. Una volta usato fuori orario, può slacciare la relativa funzione di deodorizzazione. Per le
prestazioni massime, è suggerito per sostituirlo ogni 3-6 mesi secondo i requisiti di applicazione.
Aprire il pannello frontale ed estrarre il filtro
● Delicatamente alzi e rimuova il filtri di pulizia
dell’aria dalla struttura del filtro dell’aria.
Polveri di vuoto dal filtro dell’aria e dal filtro di
pulizia dell’aria usando un aspirapolvere. Se ci
è troppa risciacquatura della polvere soltanto
sotto l’acqua di rubinetto funzionante e spazzolila
delicatamente con una spazzola di setola molle.
Permetta che il flitro si asciughi in schermo.
● Reinserisca il filtro di pulizia dell’aria alla
struttura del filtro. Regoli il filtro con la parte
anteriore “ANTERIORE” dei rivestimenti del
contrassegno e scanalili nell’originale
dichiarano.
● Dopo aver inserito i filtri, premere sul pannello
anteriore in corrispondenza delle tre frecce
come mostrato nella figura e chiudere.
● Non lavare il filtro con acqua calda a temperatura superiore ai 40°C. Il filtro potrebbe altrimente
deformarsi.
● Quando si lava il filtro, eliminare la maggior parte dell’acqua scuotendolo e quindi lasciare asciugare
all’ombra; non esporre il filtro direttamente alla luce solare. Il filtro potrebbe altrimenti defomarsi.
● Non usi il detersivo sul filtro di pulizia dell’aria come un certo detersivo può deteriorare le prestazioni
elettrostatiche del filter.
Page 100

– 100 –
2. Pulizia del pannello frontale
● Rimuovere il pannello frontale e lavare con acqua.
Lavare con una spugna morbida.
Utilizzare un detergente neutro e lavare con acqua.
● Se il pannello frontale non viene rimosso, pulirlo
con un panno morbido ed asciutto. Pulire il
telecomando con un panno morbido ed asciutto.
● Asciugare completamente eventuali tracce d’acqua
sul ricevitore segnali dell’unità interna in modo da
evitare problemi.
Estrazione del pannello frontale.
Nel togliere o inserire la griglia di aspirazione
assicurarsi di trattenerla con entrambe le mani.
Per rimuovere il pannello frontale
● Sollevare completamente il pannello frontale
con le mani e liberarlo facendo leva con la
mano destra, abbassare leggermente il
pannello ed estrarlo.
Per montare il pannello frontale
● Spingere le sporgenze del braccio destro e
del braccio sinistro nelle flange dell’unità e
inserirle bene nelle aperture.
Sporgenza
Apertura
Flangia
CAUTELA
● Non spruzzare acqua direttamente sul condizionatore durante le
pulizie. Ciò può causare un corto circuito.
● Non utilizzare acqua calda (sopra i 40˚C), benzina, acido, solvente o
spazzole, in modo da evitare di danneggiare la superficie della plastica.
!
 Loading...