

Page 1

ENGLISH
SPLIT TYPE AIR CONDITIONER
INDOOR UNIT/OUTDOOR UNIT
MODEL
RAK-18PPA/RAC-18WPA
RAK-25PPA/RAC-25WPA
RAK-35PPA/RAC-35WPA
ENGLISH
OUTDOOR UNIT
RAC-18WPA
RAC-25WPA
RAC-35WPA
Instruction manual Page 1~36
To obtain the best performance and ensure years of
trouble free use, please read this instruction manual
completely.
INDOOR UNIT
RAK-18PPA
RAK-25PPA
RAK-35PPA
Manual de instrucciones Página 145~180
Para obtener el mejor funcionamiento y asegurar años
de uso libre de problemas, lea cuidadosamente este
manual de instrucciones.
Bedlenungsanleitung Seite 37~72
Bitte lesen Sie diese Bedienungsanleitung aufmerksam
durch, um durch richtige Bedienung jahrelangen und
störungsfreien Betrieb zu gewährleisten.
Mode d’emploi Page 73~108
Des performances optimales et un fonctionnement à
long terme seront assurés en appliquant les présentes
instructions après avoir entièrement lu ce mode
d’emploi.
Manuale di istruzioni Pag. 109~144
Per garantire la migliore prestazione e la più lunga
durataleggere attentamente e al completo le seguanti
istruzioni.
Manual de instruções Página 181~216
A m de obter um bom funcionamento e de garantir
uma utilização sem falhas durante muitos anos, é
favor ler este manual de instruções completamente.
Οδηγίες χρήσης ™ÂÏ›‰· 217~252
°И· ЩЛУ О·П‡ЩВЪЛ ·fi‰ФЫЛ ЩФ˘ ОПИМ·ЩИЫЩИОФ‡ О·И БИ·
ЩЛУ М·ОЪФЪfiıВЫМЛ ¯Ъ‹ЫЛ ЩФ˘ ¯ˆЪ›˜ ЪФ‚П‹М·Щ·,
‰И·‚¿ЫЩВ ЪФЫВОЩИО¿ ·˘Щ¤˜ ЩИ˜ Ф‰ЛБ›В˜ ¯Ъ‹ЫЛ˜.
– 1 –
Page 2

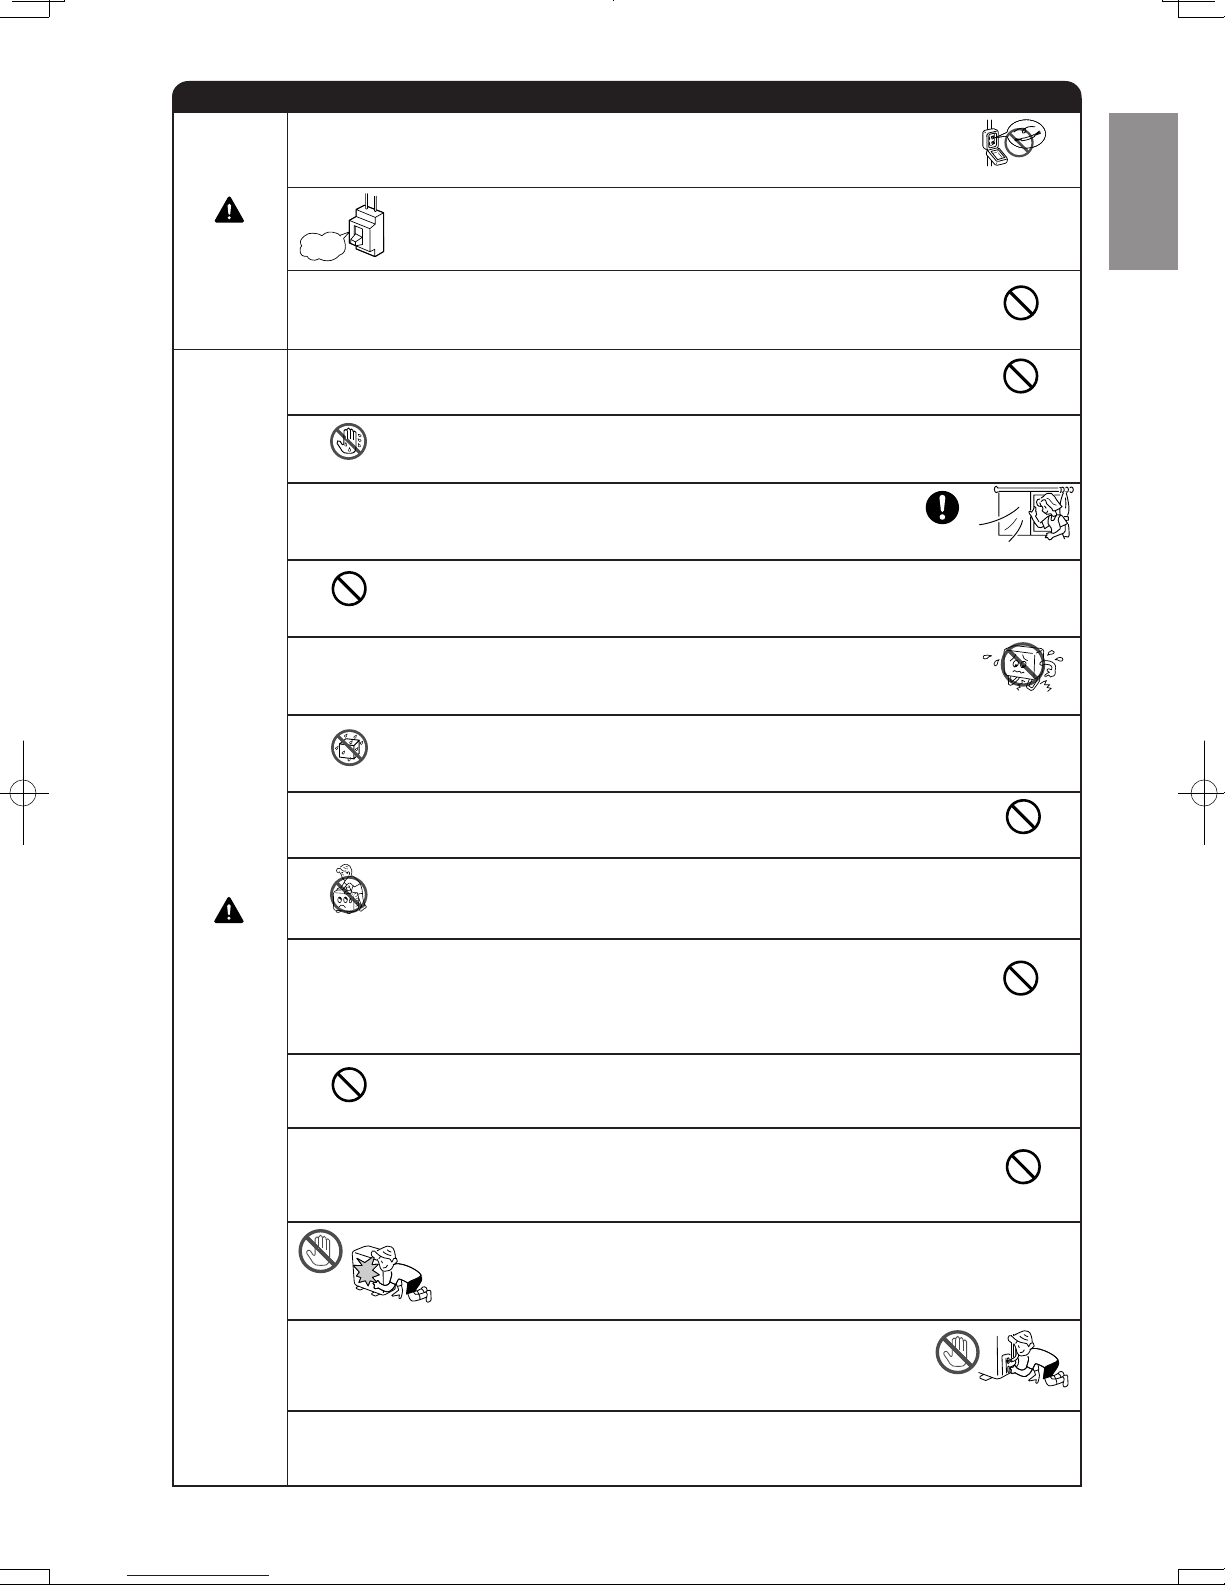
SAFETY PRECAUTION
• Please read the “Safety Precaution” carefully before operating the unit to ensure correct usage of the unit.
• Pay special attention to signs of “
matters which, if not observed strictly, may cause death or serious injury. The “Caution” section
contains matters which may result in serious consequences if not observed properly. Please observe
all instructions strictly to ensure safety.
• The signs indicate the following meanings. (The following are examples of signs.)
This sign in the figure indicates prohibition. Indicates the instructions that must be followed.
• Please keep this manual after reading.
PRECAUTIONS DURING INSTALLATION
• Do not reconstruct the unit.
Water leakage, fault, short circuit or fire may occur if you reconstruct the unit by
yourself.
• Please ask your sales agent or qualified technician for the installation of your
unit.
WARNING
CAUTION
Water leakage, short circuit or fire may occur if you install the unit by yourself.
• Please use earth line.
Do not place the earth line near water or gas pipes, lightning-conductor, or the
earth line of telephone. Improper installation of earth line may cause electric
shock.
• Be sure to use the specified piping set for R410A. Otherwise, this may result in
broken copper pipes or faults.
• A circuit breaker should be installed depending on the mounting site of the unit.
Without a circuit breaker, the danger of electric shock exists.
• Do not install the unit near a location where there is flammable gas.
The outdoor unit may catch fire if flammable gas leaks around it. Piping shall be
suitable supported with a maximum spacing of 1m between the supports.
• Please ensure smooth flow of water when installing the drain hose. If any failure
is found in the drain path, water drops from the indoor and outdoor units, causing
wet household effects.
• Make sure that a single phase 230V power source is used.
The use of other power sources may cause electrical components to overheat
and lead to fire.
Warning” and “ Caution”. The “Warning” section contains
PROHIBITION
CONNECT EARTH LINE
PROHIBITION
PROHIBITION
WARNING
PRECAUTIONS DURING SHIFTING OR MAINTENANCE
• Should abnormal situation arise (like burning smell), please stop operating the
unit and remove plug from the socket or turn off the circuit breaker. Contact your
agent. Fault, short circuit or fire may occur if you continue to operate the unit
under abnormal situation.
• Please contact your agent for maintenance.
Improper self maintenance may cause electric shock and fire.
• Please contact your agent if you need to remove and reinstall the unit.
Electric shock or fire may occur if you remove and reinstall the unit yourself improperly.
• Avoid an extended period of direct air flow for your health.
• Do not connect the power calbe with an extension cable or do not plug too many
leads of the other electric appliance into the socket where this cable is plugged.
In addition, wire the cable with some allowances to prevent the cable from stretching.
Not doing so will cause an electrical shock, heat generation or fire.
• Do not bundle the power cable, pull it, put something on it, heat it, process it, or
put it between things. Breakage of the power cable may result.
Use of a damaged cable may cause an electrical shock or a fire.
• Do not put objects like thin rods into the panel of blower and suction side
PROHIBITION
because the high-speed fan inside may cause danger.
– 2 –
“OFF”
PROHIBITION
PROHIBITION
PROHIBITION
Page 3
ENGLISH
PRECAUTIONS DURING OPERATION
• Do not use any conductor as fuse wire, this could cause fatal accident.
PROHIBITION
WARNING
“OFF”
• Spray cans and other combustibles should not be located within a meter of the air
outlets of both indoor and outdoor units.
As a spray can’s internal pressure can be increased by hot air, a rupture may result.
• The product shall be operated under the manufacturer specification and not for
any other intended use.
• Do not attempt to operate the unit with wet hands, this could cause fatal accident.
• During thunder storm, disconnect the plug top or turn off the circuit breaker.
DON’T WET
• When operating the unit with burning equipments, regularly ventilate
the room to avoid oxygen insufficiency.
STRICTLY OBSERVE
PRECAUTIONS
• Do not direct the cool air coming out from the air-conditioner panel to
PROHIBITION
face household heating apparatus as this may affect the working of
apparatus such as the electric kettle, oven etc.
• Please ensure that outdoor mounting frame is always stable, firm and
without defect. If not, the outdoor unit may collapse and cause danger.
• Do not wash the unit with water or place a water container such as a
vase on the indoor unit.
PROHIBITION
Electrical leakage could be present and cause electric shock.
ENGLISH
PROHIBITION
PROHIBITION
PROHIBITION
CAUTION
• Do not place plants or animals directly under the air flow as it is bad for the plants or
animals.
PROHIBITION
• Do not climb on the outdoor unit or put objects on it.
PROHIBITION
• When operating the unit with the door and windows opened, (the room humidity
is always above 80%) and with the air deflector facing down or moving automatically for a long period of time, water will condense on the air deflector and drips
down occasionally. This will wet your furniture. Therefore, do not operate under
PROHIBITION
such condition for a long time.
• If the amount of heat in the room is above the cooling or heating capability of the
unit (for example: more people entering the room, using heating equipments and
PROHIBITION
etc.), the preset room temperature cannot be achieved.
• This appliance especially indoor unit cleaning must be performed by authorized
personnel only. Consult your sales agent.
Using a commercially available detergent or similar can damage the plastic parts
or clog the drain pipe, causing water to drip with potential electric shock hazard.
PROHIBITION
• Do not touch the air outlet, bottom surface and aluminum fin of the outdoor
unit.
DON’T TOUCH
You may get hurt.
• Do not touch the refrigerant pipe and connecting valve.
Burns may result.
DON’T TOUCH
• This appliance is not intended for use by young children or infirm persons unless they have been
adequately supervised by a responsible person to ensure that they can use this appliance safely.
• Young children should be supervised to ensure that they do not play with the appliance.
– 3 –
Page 4
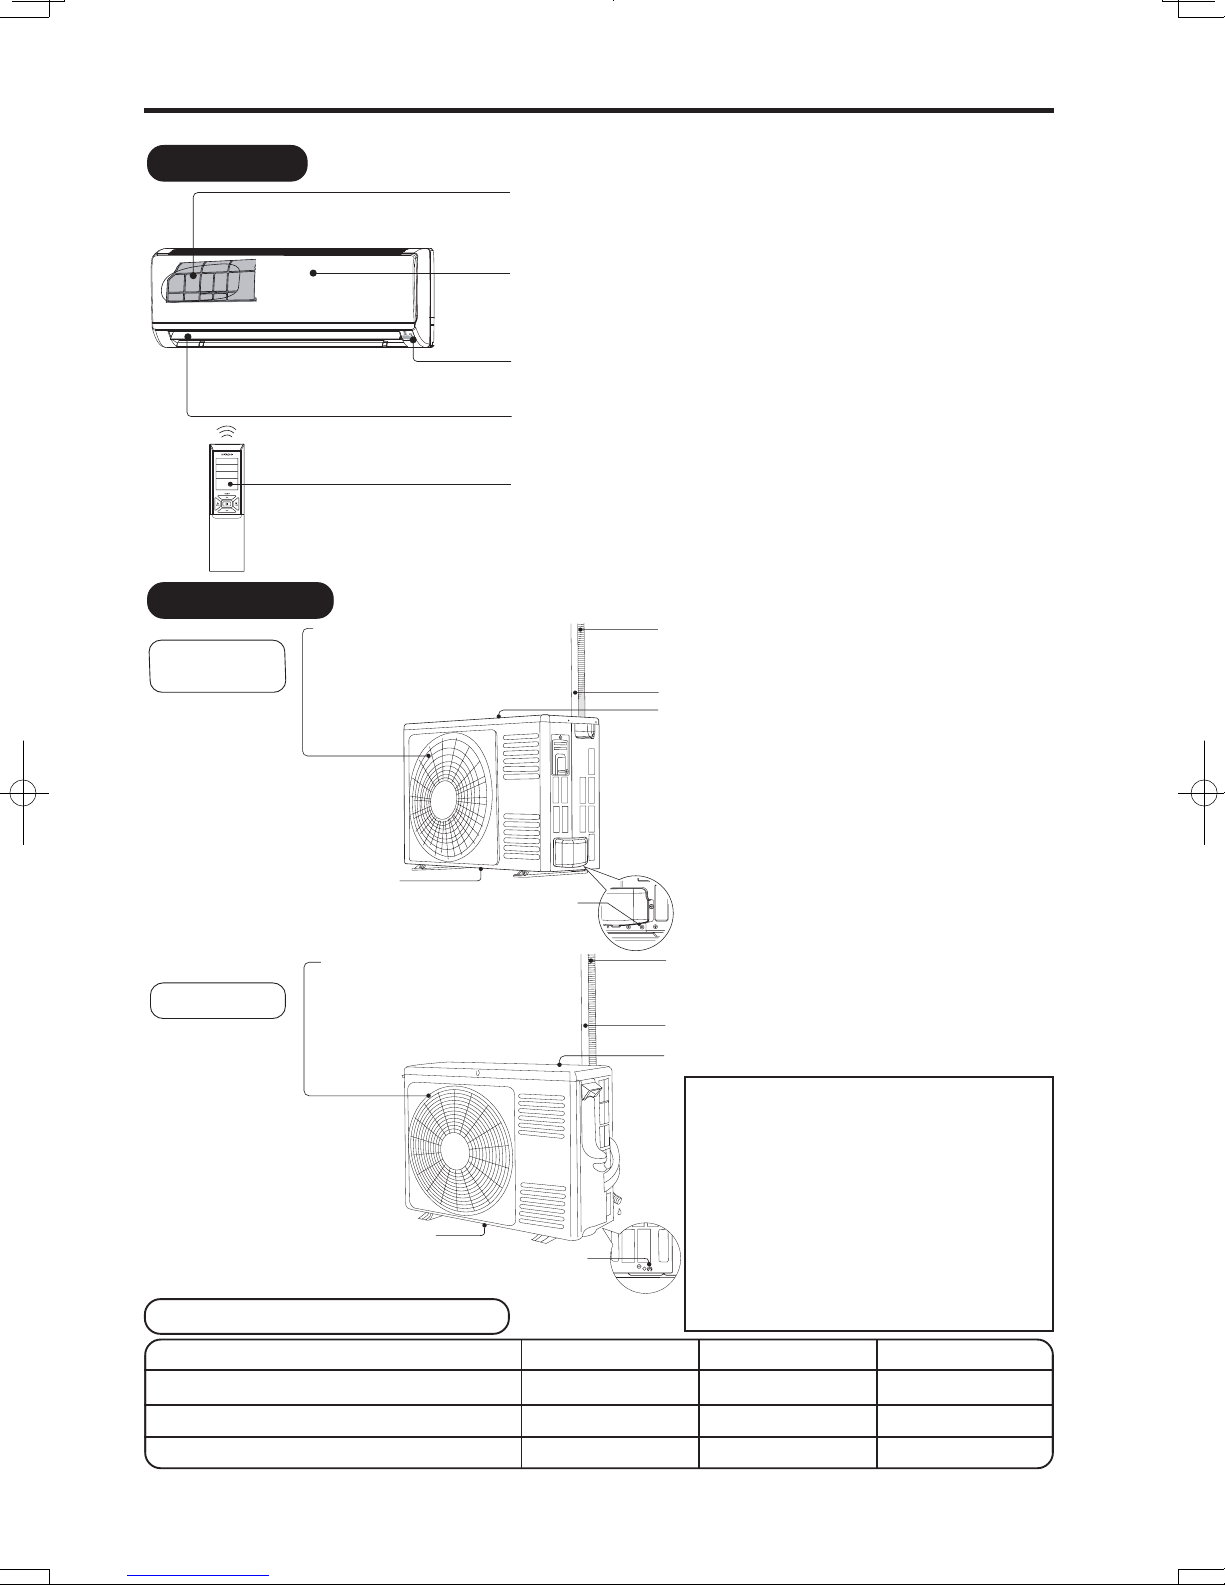
NAMES AND FUNCTIONS OF EACH PART
INDOOR UNIT
Air filter
To prevent dust from coming into the indoor unit.
(Refer page )
Front panel
Indoor unit indicators
Light indicator showing the operating condition.
(Refer page 5)
Horizontal deflector Vertical deflector
(Air Outlet)
(Refer page )
Remote controller
Send out operation signal to the indoor unit. So as
to operate the whole unit.
(Refer page 6)
OUTDOOR UNIT
Air outlet
RAC-18WPA
RAC-25WPA
Wh en “heati ng” o pera tion is
performed, cool air blows and
when “cooling” or “dehumidifying”
operation is performed, warm air
blows.
31
31
Drain hose
Drains the dehumidified water from the indoor unit to the
outdoor during “cooling” or “dehumidifying” operation.
Piping and Wiring
Air inlets (Rear and left sides)
Drain port
RAC-35WPA
(Bottom)
(Lower section of the side)
Air outlet
Wh en “he ati ng” o pera tio n is
performed, cool air blows and
when “cooling” or “dehumidifying”
operation is performed, warm air
blows.
Drain port
(Bottom)
(Lower section of the side)
Earth terminal
Earth terminal
MODEL NAME AND DIMENSIONS
MODEL WIDTH (mm) HEIGHT (mm) DEPTH (mm)
RAK-18PPA , RAK-25PPA , RAK-35PPA
RAC-18WPA , RAC-25WPA
RAC-35WPA
Drain hose
Drains the dehumidified water from the indoor unit to the
outdoor during “cooling” or “dehumidifying” operation.
Piping and Wiring
Air inlets (Rear and left sides)
About the outdoor unit:
• When “Stop” is selected during operation
of the indoor unit, the fan of the outdoor
unit continues turning for 10 to 60
seconds to cool the electric parts down.
• In heating operation, condensate or
water due to defrosting will flow.
Do not cover the drain port of the outdoor
unit because such water may freeze in
the chilly area.
• When the outdoor unit is hung on the
ceiling, install the bush and drain pipe
on the drain port and drain water.
780 280 218
700 505 258
750 548 288
– 4 –
Page 5
HSILGNE
NAMES AND FUNCTIONS OF EACH PART
recent
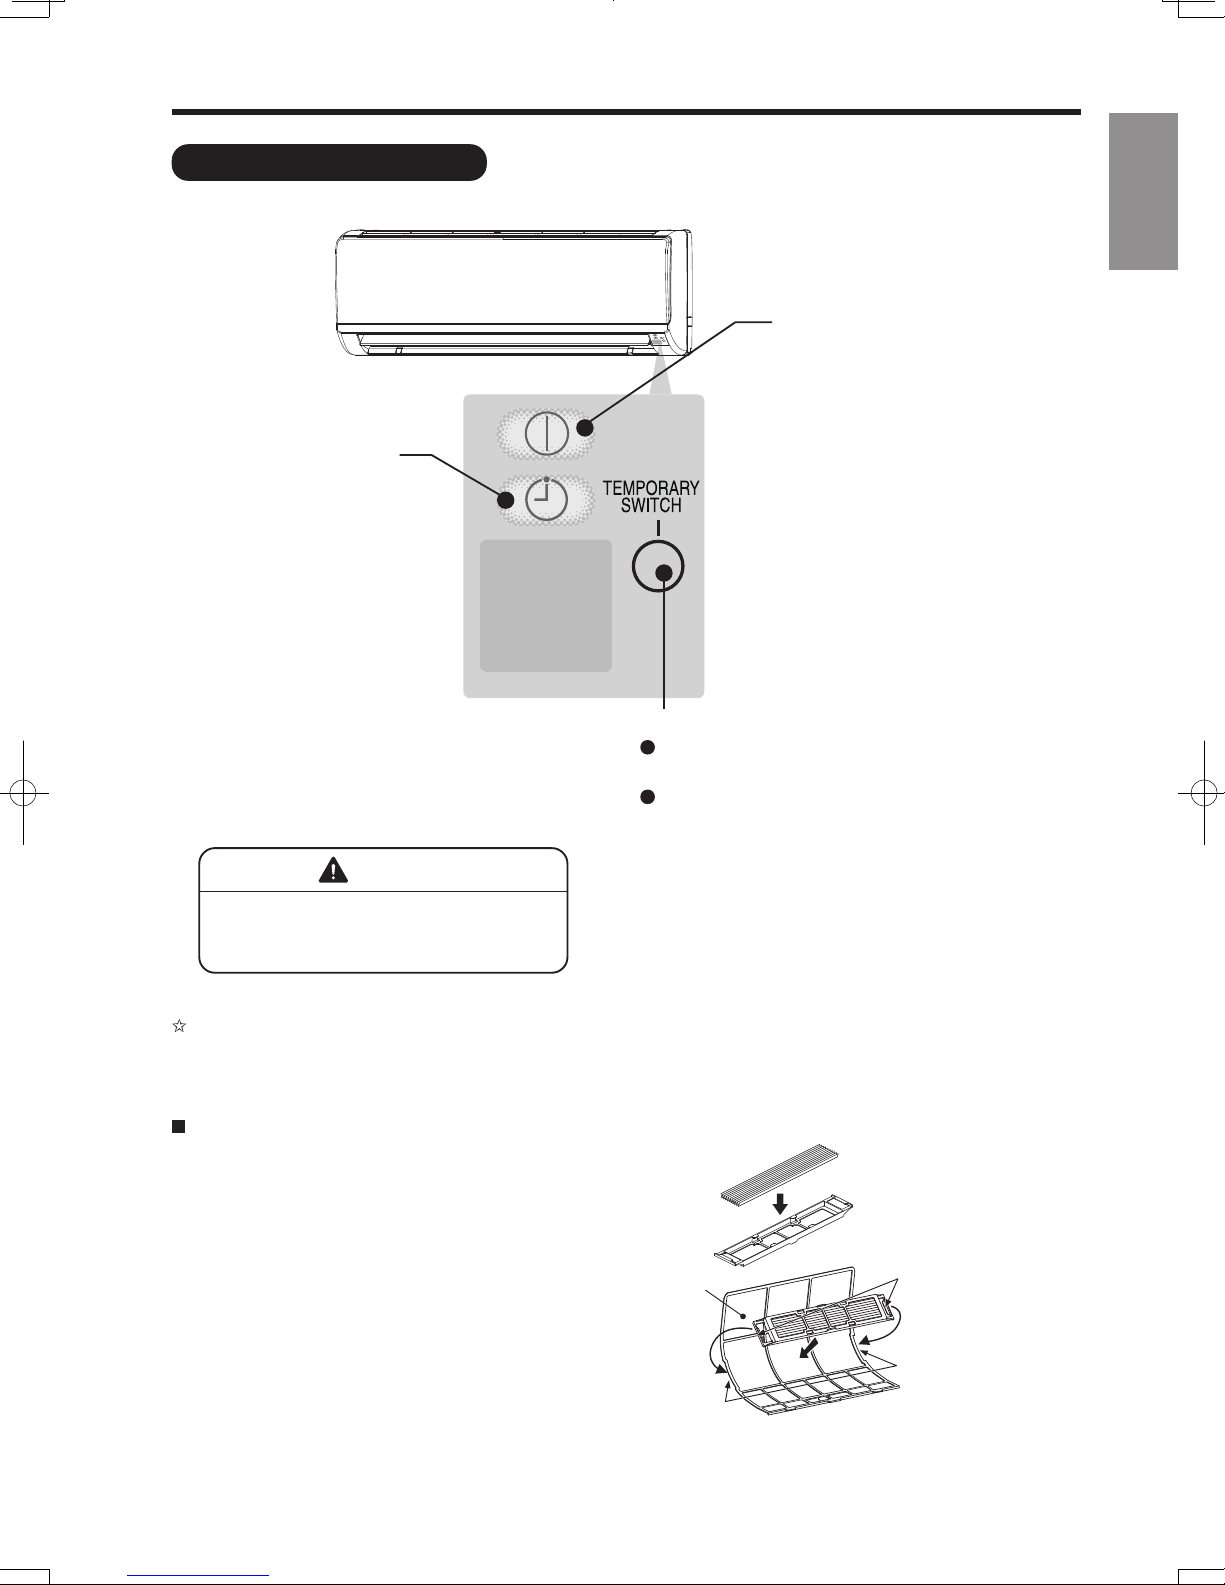
INDOOR UNIT INDICATIONS
TIMER LAMP (Orange)
This lamp lights when the
timer is working.
ENGLISH
OPERATION LAMP (Yellow)
This lamp lights during operation.
The OPERATION LAMP flashes
in the following cases during
heating.
(1) During preheating
For about 2-3 minutes after
starting up.
(2) During defrosting
Defrosting will be performed
about once an hour when frost
forms on the heat exchanger
of the outdoor unit, for 5-10
minutes each time.
TEMPORARY SWITCH
Use this switch to start and stop when the remote
controller does not work.
This temporary operation will be at the most
setting made. (The unit will immediately go into
automatic operation once power is switched on.)
CAUTION
Turn off the circuit breaker or pull out
the power plug if the unit is not be
operated for a long period.
If the power stays on and the unit is not operated, power is slightly consumed in the control circuit.
The power is saved by turning off the power switch (or the circuit breaker when the power is supplied
from the outdoor unit).
Attaching the Wasabi-Nano Titanium Air Cleaning
Mesh (Accessories) to the filter frame.
s Attach the
to the C-case by gently compress its both sides
and release after insertion into filter frame.
s The cooling capacity is slightly weakened and
the cooling speed becomes slower when the
Wasabi-Nano Titanium Air Cleaning Mesh
s
Wasabi-Nano Titanium Air Cleaning Mesh
and reusable up to 20 times by using vacuum
cleaner or water rinse under running tap water.
When you want to renew it, please ask your sales
agent. Optional air cleansing and deodorizing
filters.
Wasabi-Nano Titanium Air Cleaning Mesh
.
are used.
are washable
Wasabi-Nano Titanium Air Cleaning Mesh
C-case
Air Filter
Claw
Filter Frame
– 5 –
Page 6
PREPARATION BEFORE OPERATION
HSILGNE
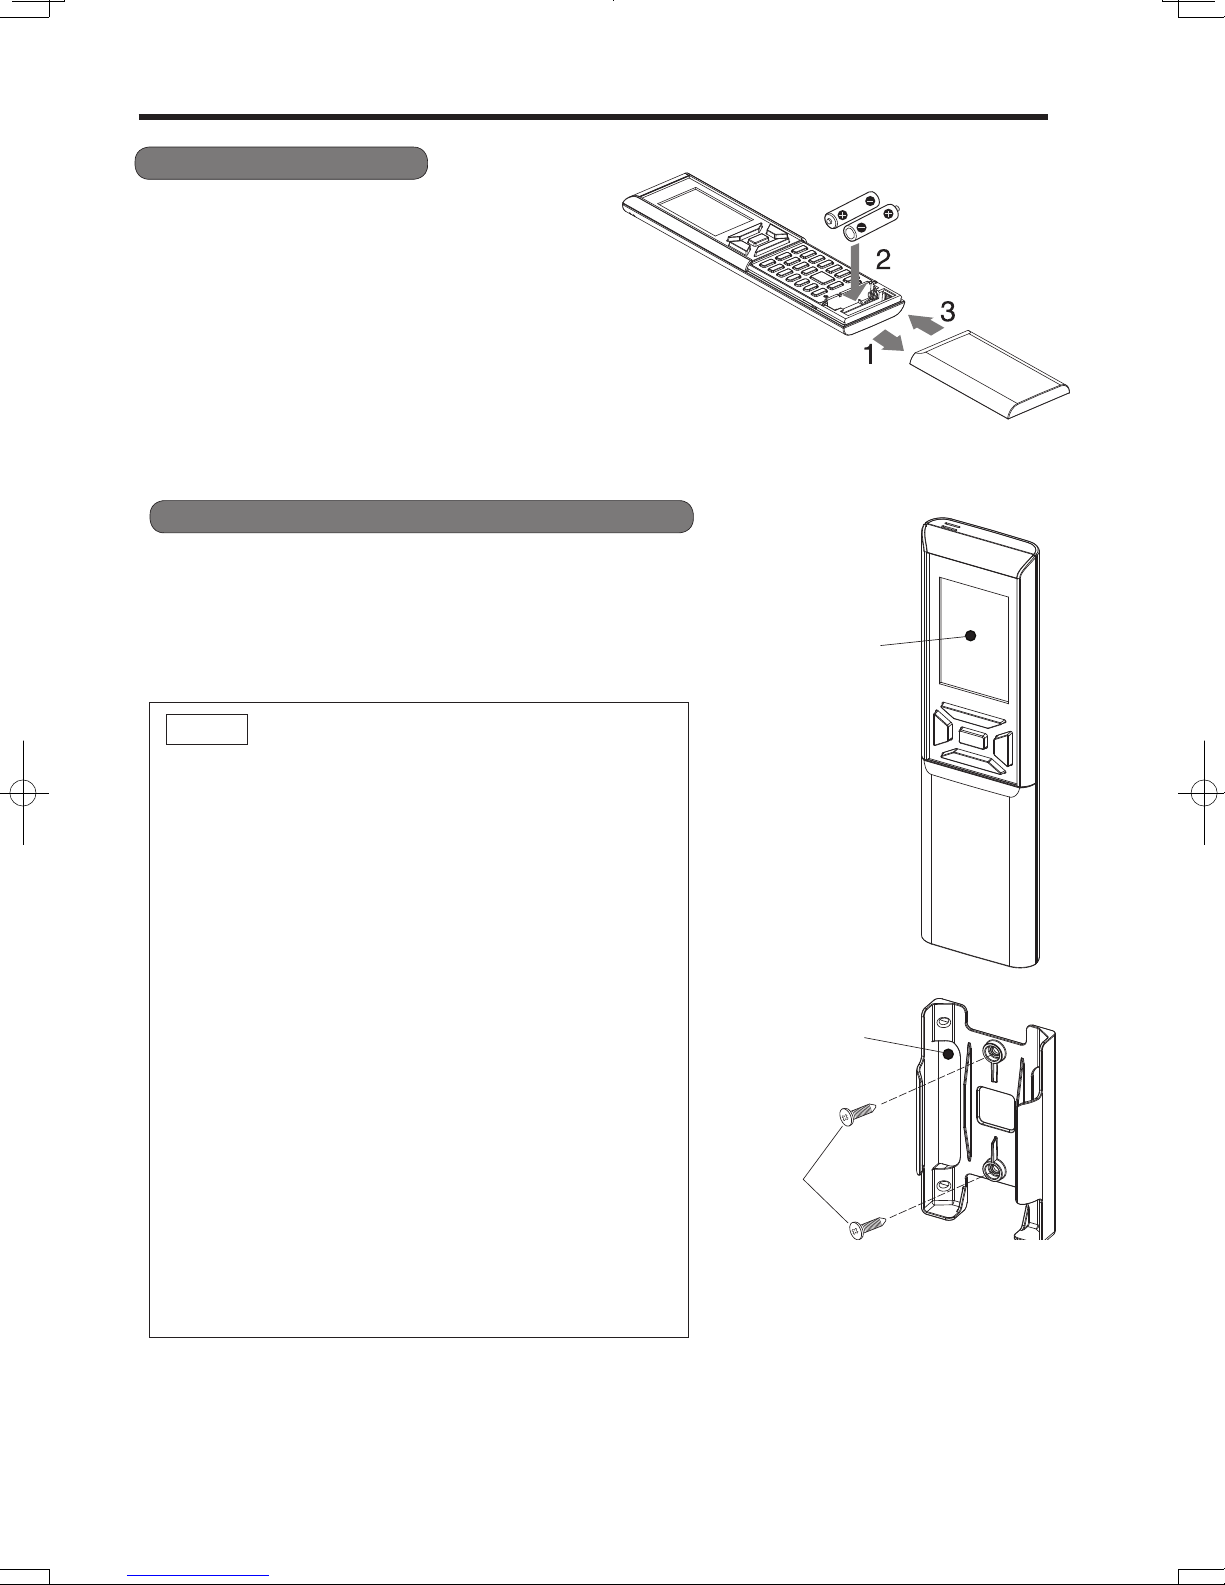
■ To install the batteries
1. Slide the cover to take it off.
Install two dry batteries AAA.LR03 (alkaline).
2.
The direction of the batteries should match
the
marks in the case.
3. Replace the cover at its original position.
■ To fix the remote controller holder to the wall
1. Choose a place from where the signals can reach the unit.
2. Fix the remote controller holder to a wall, a pillar or similar
location with the provided screws.
Place the remote controller in the remote controller holder.
3.
NOTE
Notes on batteries
● When replacing the batteries, use batteries of the same
type, and replace both old batteries together
● When the system is not used for a long time, take the
batteries out.
● The batteries will last for approximately 1 year. However, if
the remote controller display begins to fade and degradation
of reception performance occurs within a year
batteries with new size AAA.LR03 (alkaline).
● The attached batteries are provided for the initial use of
the system.
The usable period of the batteries may be short depending
on the manufactured date of the air conditioner.
.
, replace both
Remote controller
Remote controller holder
Notes on the remote controller
● Never expose the remote controller to direct sunlight.
● Dust on the signal transmitter or receiver will reduce the
sensitivity
● Signal communication may be disabled if an electronic-
starter-type
. Wipe off dust with soft cloth.
uorescent lamp (such as inverter-type lamps)
is in the room. Consult the shop if that is the case.
● If the remote controller signals happen to operate another
appliance,
move that appliance to somewhere else, o
consult the service shop.
● When the remote controller is not in use, please close the
slide cover to prevent failure.
Screws
r
– 6 –
Page 7
HSILGNE
PREPARATION BEFORE OPERATION
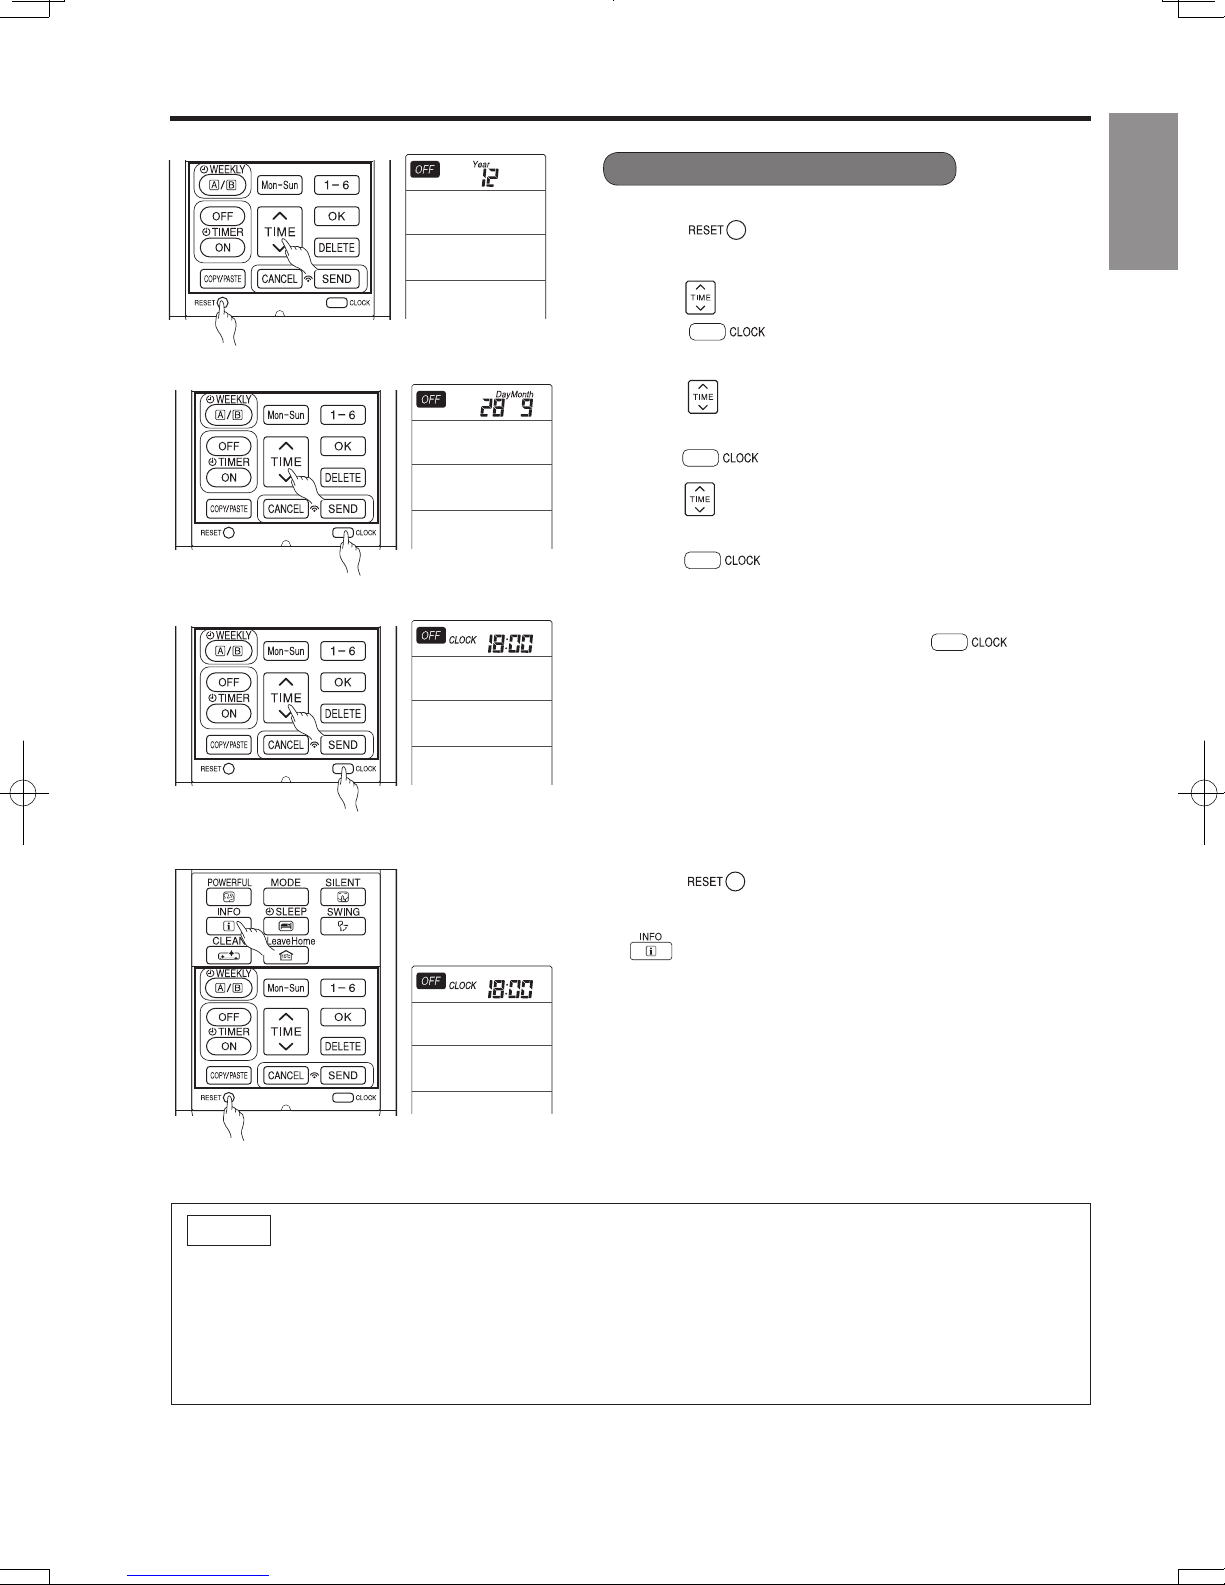
1. Press (RESET) button when first time setting.
■ To set calendar and clock
"Year" blinks.
ENGLISH
2. Press
3. Press
"Month" blink.
4. Press
month.
5. Press
6. Press
time.
7. Press
Calendar and clock are set.
To modify the calendar and clock, press
button.
Then follow steps 1 to 7.
Calendar and clock shall be set again after changing
batteries.
After changing the batteries,
1. Press
(TIME) button to set the current year.
(CLOCK) button. Next, "Day" and
(TIME) button to set the current day and
(CLOCK) button. Next, "CLOCK" blinks.
(TIME) button to set the clock to the current
(CLOCK) button.
(CLOCK)
(RESET) button.
2. Direct remote control towards indoor unit and press
(INFO) button.
3. The calendar and clock from indoor unit will be transmitted.
■ Calendar and clock will not be transmitted from indoor
unit when the following occurs:
● When there is a power failure.
● When breaker is OFF by user (unit is not in STANDBY
MODE).
NOTE
Note on setting the calendar and clock.
● If the calendar and clock are not set, the ON-timer, OFF-timer and Weekly Timer cannot be set.
● If the calendar and clock are not set correctly, the ON-timer, OFF-timer and Weekly Timer will not
operate correctly.
● When the ON-timer, OFF-timer and Weekly Timer are set, the calendar and clock cannot be changed. If
need to change the calendar and clock, ON-timer, OFF-timer and Weekly Timer need to be cancelled.
– 7 –
Page 8

HSILGNE
NAMES AND FUNCTIONS OF REMOTE CONTROLLER
HSILGNE
MODE SELECTOR
AUTO
HEAT
DEHUMIDIFY
COOL
FAN
FAN SPEED
AUTO
SILENT
LOW
MED
HI
START / STOP
ECO
Precautions for Use
●
Do not put the remote controller in the following places.
●
Under direct sunlight.
●
In the vicinity of a heater.
●
Handle the remote controller carefully. Do not drop it on the floor, and protect it from water.
●
Once the outdoor unit stops, it will not restart for about 3 minutes (unless you turn the power switch
off and on or unplug the power cord and plug it in again).
This is to protect the device and does not indicate a failure.
●
If you press the MODE selector button during operation, the device may stop for about 3 minutes for
protection.
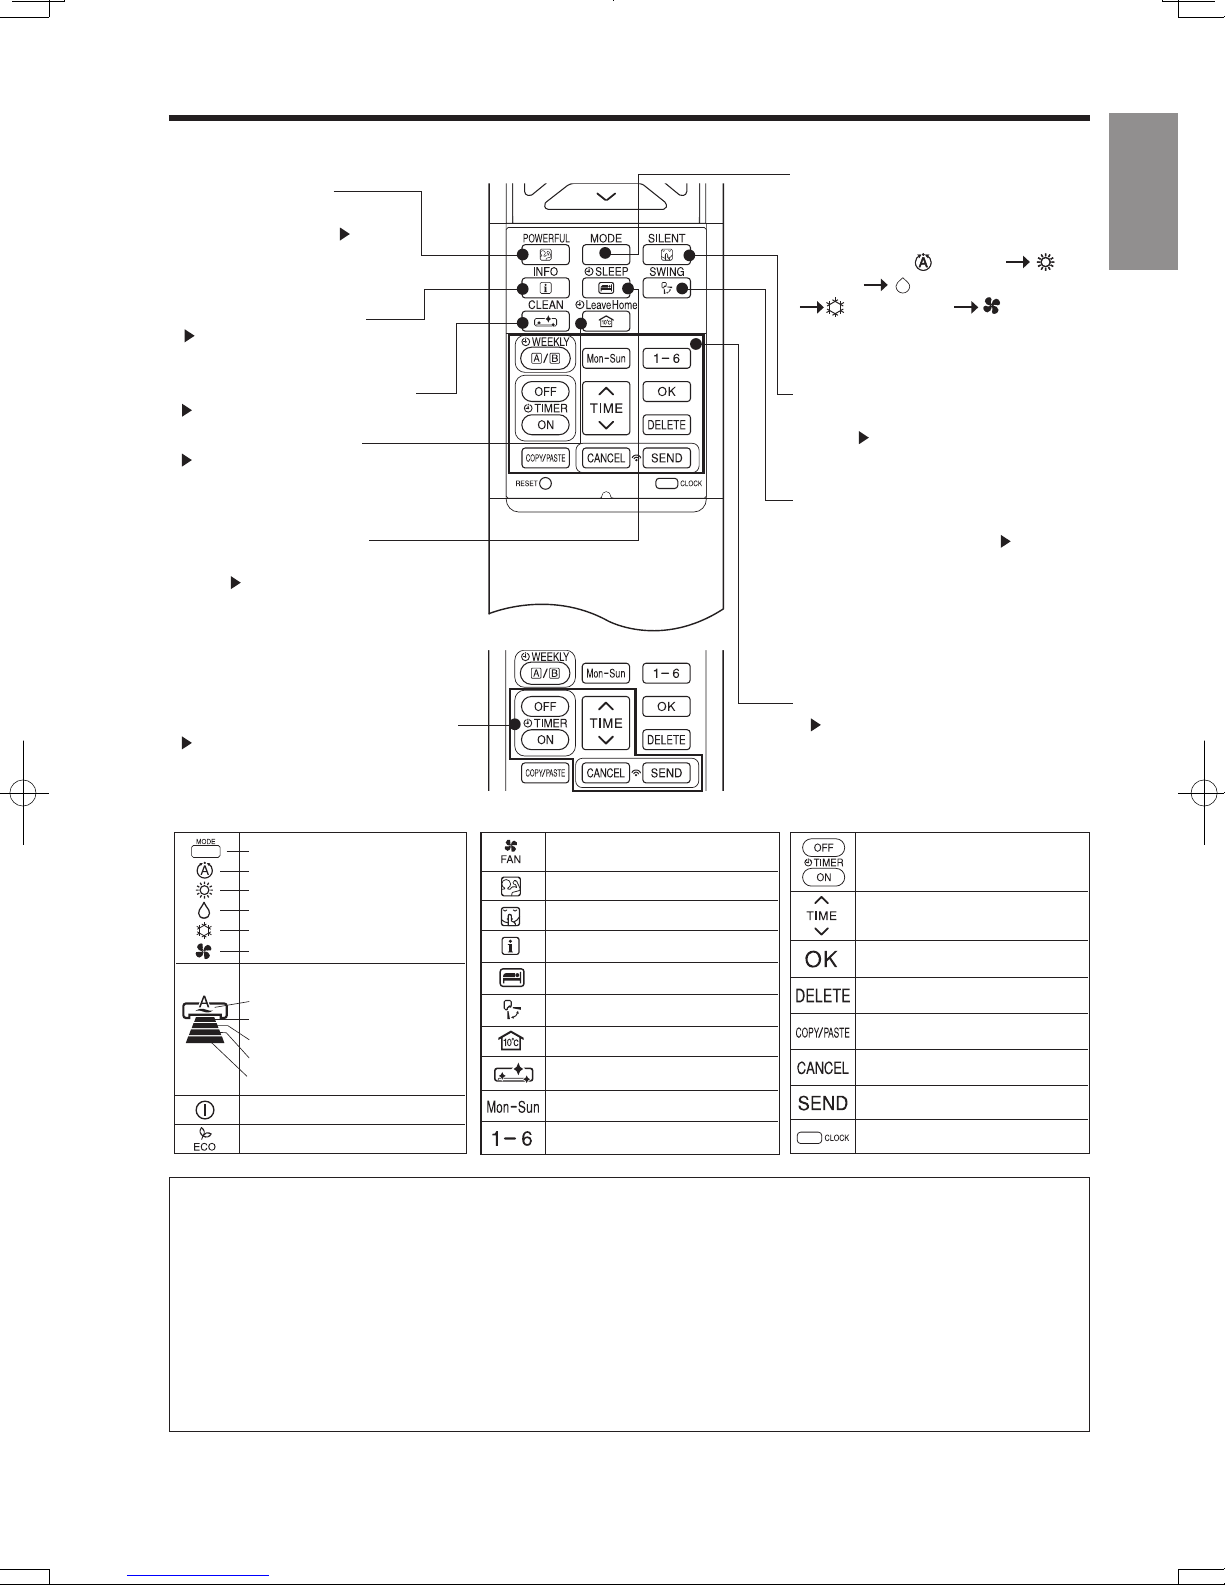
POWERFUL Button
Use this button to set the
POWERFUL mode.
INFORMATION Button
ONE TOUCH CLEAN Button
ON / OFF TIMER setting Buttons
MODE selector Button
Use this button to select the
operating mode. Every time you
press this button, the mode will
change from
(AUTO)
(HEAT)
(DEHUMIDIFY)
(COOL) and
(FAN)
cyclically.
SILENT Button
Use this button to set the SILENT
mode.
AUTO SWING (Vertical) Button
Controls the angle of the
horizontal air deflector.
WEEKLY TIMER setting Buttons
LEAVE HOME Button
NAMES AND FUNCTIONS OF REMOTE CONTROLLER
SLEEP TIMER Button
Use this button to set the sleep
timer.
FAN
POWERFUL
SILENT
INFO
SLEEP TIMER
AUTO SWING (VERTICAL)
LEAVE HOME
CLEAN
DAY
PROGRAM NO.
ON / OFF TIMER
TIME
OK
DELETE
COPY / PASTE
CANCEL
SEND
CLOCK
( p.16)
( p.30 )
( p.20 )
( p.19)
( p.21)
( p.22)
( p.17)
( p.24)
( p.15)
REMOTE CONTROLLER
● This controls the operation of the indoor unit. The range of control is about 7 meters. If indoor lighting is
controlled electronically, the range of controller may be shorter.
This unit can be fixed on a wall using the fixture provided. Before fixing it, make sure the indoor unit can
be controlled from the remote controller.
● Handle the remote controller with care. Dropping it or getting it wet may compromise its signal transmission
capability.
● After new batteries are inserted into the remote controller, the unit will initially require approximately 10
seconds to respond to commands and operate.
● When remote controller is not in use for about 3 minutes during OFF condition, indicated by on the
display, the LCD will turn off.
● During clock setting, the LCD will turn off about 10 minutes later if the remote controller is not in use.
● When pressing any button, the LCD will turn on.
● The LCD will not turn off during TIMER setting.
Transmission sign
Signal Transmitting/Receiving
Window
Point this window towards the
indoor unit when controlling it.
The transmission sign lights up
when a signal is sent.
START/STOP button
Sensor
A temperature sensor inside the
remote controller senses ambient
temperature around the remotecontroller.
Display
This indicates the room temperature
selected, current time, timer status,
function and airflow rate selected.
ROOM TEMPERATURE setting Buttons
Press these buttons to set the room
temperature.
Press the [
temperature.
Press the [
temperature.
] button to raise the room
] button to lower the room
Press this button to start
operation. Press it again to stop
operation.
FAN SPEED selector Button
This determines the fan speed.
Every time you press this button
the ange from
airflow rate will ch
(AUTO) (HIG H)
(MED) (LOW)
(SILENT) (This button allows
selection of
fan speed for each operation mode).
ECO Button
Use this button to set the ECO
mode.( p.18)
➔
➔
optimal or preferred
Keep pressing and the value will change
more quickly.
– 8 –
➔
➔
Page 9
HSILGNE
NAMES AND FUNCTIONS OF REMOTE CONTROLLER
POWERFUL Button
Use this button to set the
POWERFUL mode.
( p.16)
INFORMATION Button
( p.30 )
ONE TOUCH CLEAN Button
( p.20 )
LEAVE HOME Button
( p.19)
SLEEP TIMER Button
Use this button to set the sleep
timer.
( p.22)
ON / OFF TIMER setting Buttons
( p.21)
MODE selector Button
Use this button to select the
operating mode. Every time you
press this button, the mode will
change from
(HEAT)
(COOL) and (FAN)
(AUTO)
(DEHUMIDIFY)
cyclically.
SILENT Button
Use this button to set the SILENT
( p.17)
mode.
AUTO SWING (Vertical) Button
Controls the angle of the
horizontal air deflector.
( p.15)
WEEKLY TIMER setting Buttons
( p.24)
ENGLISH
MODE SELECTOR
AUTO
HEAT
DEHUMIDIFY
COOL
FAN
FAN SPEED
AUTO
SILENT
LOW
MED
HI
START / STOP
ECO
FAN
POWERFUL
SILENT
INFO
SLEEP TIMER
AUTO SWING (VERTICAL)
LEAVE HOME
CLEAN
DAY
PROGRAM NO.
ON / OFF TIMER
TIME
OK
DELETE
COPY / PASTE
CANCEL
SEND
CLOCK
Precautions for Use
●
Do not put the remote controller in the following places.
●
Under direct sunlight.
●
In the vicinity of a heater.
●
Handle the remote controller carefully. Do not drop it on the floor, and protect it from water.
●
Once the outdoor unit stops, it will not restart for about 3 minutes (unless you turn the power switch
off and on or unplug the power cord and plug it in again).
This is to protect the device and does not indicate a failure.
●
If you press the MODE selector button during operation, the device may stop for about 3 minutes for
protection.
– 9 –
Page 10
HSILGNE
VARIOUS FUNCTIONS
■ Auto Restart Control
● If there is a power failure, operation will be automatically restarted when the power is resumed with previous operation
mode and airflow direction.
(As the operation is not stopped by remote controller.)
● If you intend not to continue the operation when the power is resumed, switch off the power supply.
When you switch on the circuit breaker, the operation will be automatically restarted with previous operation
and air flow
Note: 1. If you do not require Auto Restart Control, please consult your sales agent.
direction.
2. Auto Restart Control is not available when Timer or Sleep Timer mode is set.
mode
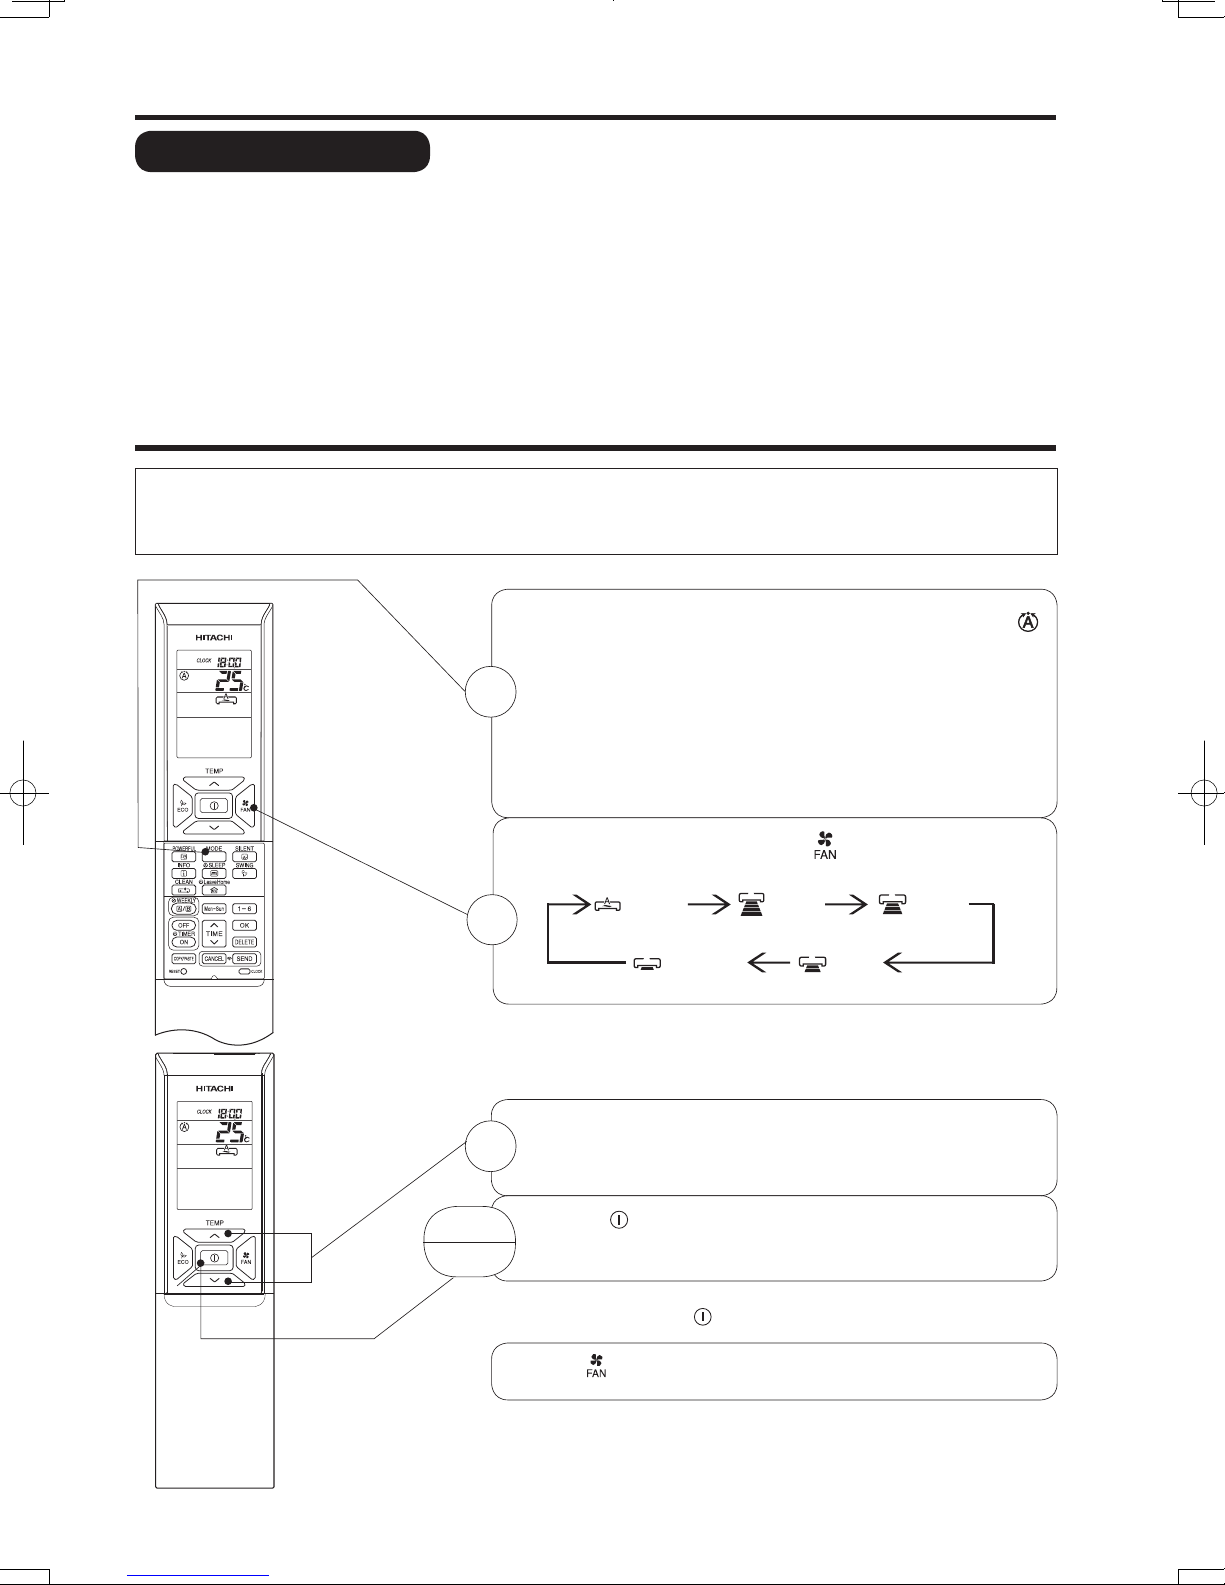
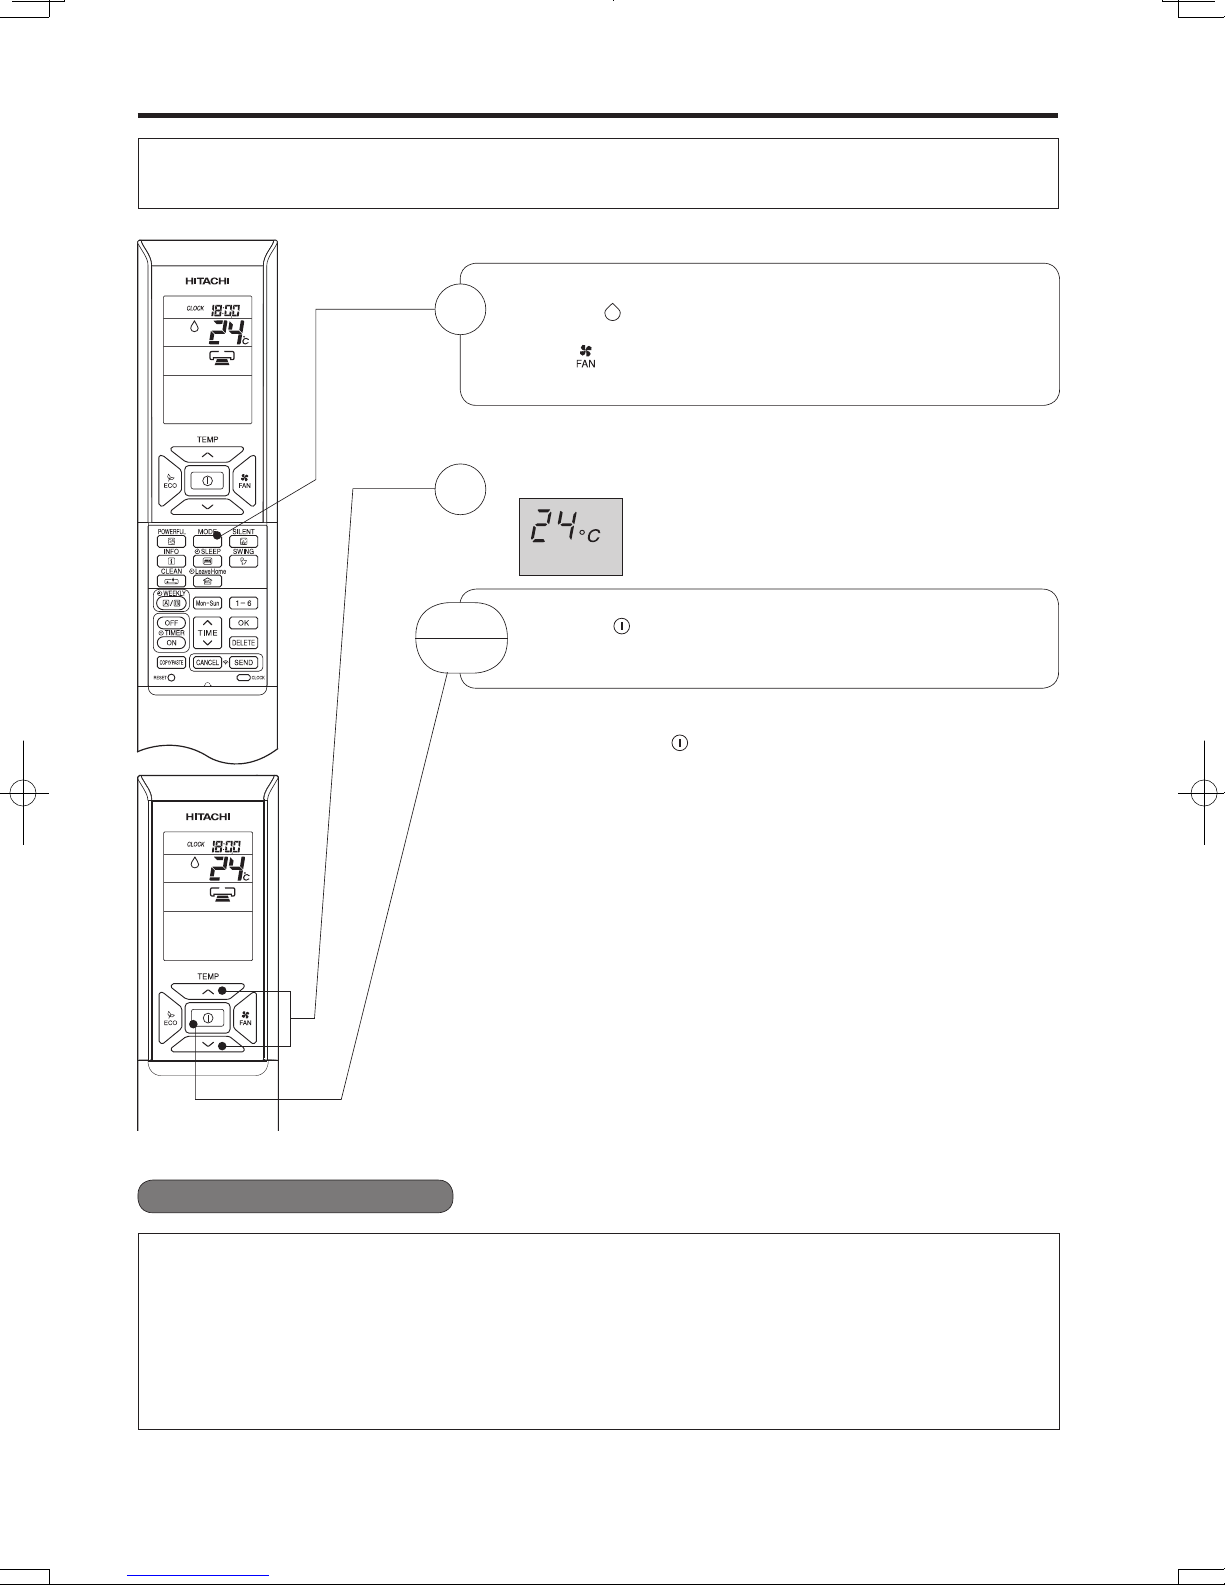
AUTOMATIC OPERATION
The device will automatically determine the mode of operation, HEAT or COOL depending on the current
room temperature. The selected mode of operation will change when the room temperature varies.
However, the mode of operation will not change when indoor unit is connected to multi type outdoor unit.
Press the MODE selector button so that the display indicates the
(AUTO) mode of operation.
● When AUTO has been selected, the device will automatically
1
determine the mode of operation, HEAT or COOL depending on
the current
not change when indoor unit is connected to multi type
unit.
● If the mode automatically selected by the unit is not satisfactory
manually change the mode setting (HEAT, DEHUMIDIFY, COOL
or FAN).
room temperature. However the mode of operation will
outdoor
,
Set the desired FAN SPEED with the (FAN SPEED) button (the
display indicates the setting).
(AUTO)
(HIGH)
2
(SILENT)
Set the desired room temperature with the TEMPERATURE buttons
(the display indicates the setting).
3
The temperature setting and the actual room temperature may vary
depending on conditions.
START
STOP
Press the
Operation starts with a beep.
Press the button again to stop operation.
■ As the settings are stored in the memory the remote controller, you
Press the (FAN SPEED) button to select AUTO, HI, MED, LOW or
SILENT.
(START/STOP) button.
(START/STOP) button next time.only have to press the
(LOW)
of
(MED)
– 10 –
Page 11
HSILGNE
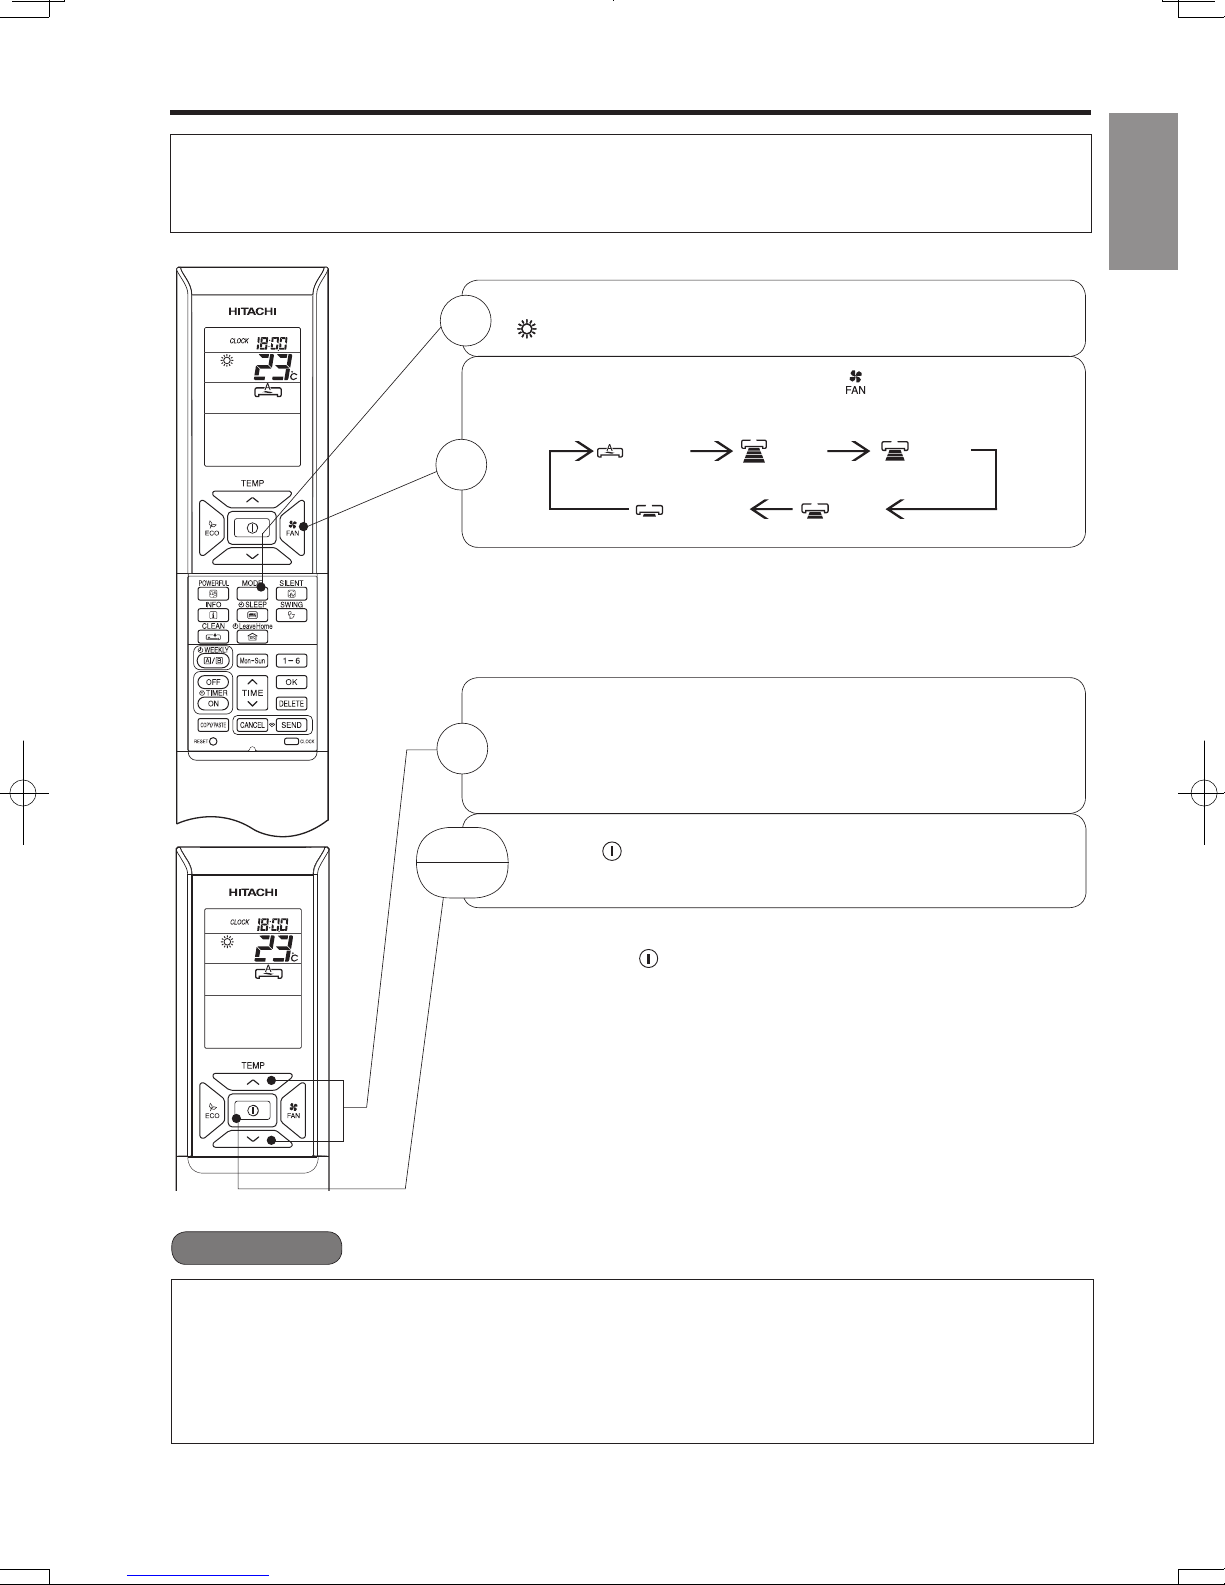
HEATING OPERATION
● Use the device for heating when the outdoor temperature is under 21°C.
When it is too warm (over 21°C), the heating function may not work in order to protect the device.
●
In order to maintain reliability of the device, please use this device when outdoor temperature is above -15°C.
Press the MODE selector button so that the display indicates
1
(HEAT).
Set the desired FAN SPEED with the (FAN SPEED) button
(the display indicates the setting).
ENGLISH
(AUTO)
(HIGH)
(MED)
2
(SILENT)
Set the desired room temperature with the TEMPERATURE buttons
(the display indicates the setting).
3
START
STOP
The temperature setting and the actual room temperature may
vary depending on conditions.
Press the
a beep. Press the button again to stop operation.
■ As the settings are stored in the memory of the remote controller, you only
■
have to press the (START/STOP) button next time.
■ During AUTO fan, the fan speed automatically changes as below:
● When the difference between room temperature and setting temperature
is large, fan starts to run at HI speed.
● After room temperature reaches the preset temperature, fan speed
will be changed to lower speed to obtain optimum room temperature
condition for natural healthy heating.
(START/STOP) button. Heating operation starts with
(LOW)
■ Defrosting
Defrosting will be performed about once an hour when frost forms on the heat exchange of the outdoor unit,
for 5~10 minutes each time.
During defrosting operation, the operation lamp blinks in a cycle of 3 seconds on and 0.5 second off.
The maximum time for defrosting is 20 minutes.
However, if the indoor unit is connected to multi type outdoor unit, the maximum time for defrosting is 15 minutes.
(If the piping length used is longer than usual, frost is likely to form.)
– 11 –
Page 12
HSILGNE
DEHUMIDIFYING OPERATION
HSILGNE
COOLING OPERATION
Use the device for cooling when the outdoor temperature is -10~ 43°C.
If indoors humidity is very high (80%), some dew may form on the air outlet grille of the indoor unit.
Press the MODE selector button so that the display indicates
(COOL).
Set the desired FAN SPEED with the
(FAN SPEED) button (the
display indicates the setting).
Set the desired room temperature with the TEMPERATURE buttons
(the display indicates the setting).
The temperature setting and the actual room temperature may vary
depending on conditions.
Press the
(START/STOP) button. Cooling operation starts with a
beep. Press the button again to stop operation. The cooling function
does not start if the temperature setting is higher than the current
room temperature (even though the (OPERATION) lamp lights).
The cooling function will start as soon as user set the temperature
below the current room temperature.
■
As the settings are stored in the memory of the remote controller, you only
have to press the
(START/STOP) button next time.
■ During AUTO fan, the fan speed automatically changes as below:
● When the difference between room temperature and setting tem-
perature is large, fan starts to run at HI speed.
● After room temperature reaches the preset temperature, fan speed
will be changed to lower speed to obtain optimum room temperature
condition for natural healthy cooling.
START
STOP
1
3
(AUTO)
(HIGH)
(MED)
(LOW)
(SILENT)
2
Use the device for dehumidifying when the room temperature is over 16°C.
When it is under 15°C, the dehumidifying function will not work.
1
2
START
STOP
■ As the settings are stored in the memory of the remote controller, you
Press the MODE selector button so that the display
indicates
The fan speed is set at LOW.
Press
speed.
Set the desired room temperature with the ROOM
TEMPERATURE setting buttons (the display indicates the
setting).
Press the (START/STOP) button. Dehumidifying operation
starts with a beep. Press the button again to stop operation.
only have to press the
(DEHUMIDIFY).
(FAN SPEED) button to select SILENT or LOW fan
The range of 20-26°C is recommended as the room
temperature for dehumidifying.
(START/STOP) button next time.
■ Dehumidifying Function
● When the room temperature is higher than the temperature setting: The device will dehumidify the
room, reducing the room temperature to the preset level.
When the room temperature is lower than the temperature setting: Dehumidifying will be performed at
the temperature setting slightly lower than the current room temperature, regardless of the temperature
setting.
● The preset room temperature may not be reached depending on the number of people present in the
room or other room conditions.
– 12 –
Page 13

HSILGNE
COOLING OPERATION
Use the device for cooling when the outdoor temperature is -10~ 43°C.
If indoors humidity is very high (80%), some dew may form on the air outlet grille of the indoor unit.
ENGLISH
1
2
3
START
STOP
Press the MODE selector button so that the display indicates
(COOL).
Set the desired FAN SPEED with the
display indicates the setting).
Set the desired room temperature with the TEMPERATURE buttons
(the display indicates the setting).
The temperature setting and the actual room temperature may vary
depending on conditions.
Press the
beep. Press the button again to stop operation. The cooling function
does not start if the temperature setting is higher than the current
room temperature (even though the (OPERATION) lamp lights).
The cooling function will start as soon as user set the temperature
below the current room temperature.
(AUTO)
(SILENT)
(START/STOP) button. Cooling operation starts with a
(HIGH)
(FAN SPEED) button (the
(MED)
(LOW)
As the settings are stored in the memory of the remote controller, you only
■
have to press the
■ During AUTO fan, the fan speed automatically changes as below:
● When the difference between room temperature and setting tem-
perature is large, fan starts to run at HI speed.
● After room temperature reaches the preset temperature, fan speed
will be changed to lower speed to obtain optimum room temperature
condition for natural healthy cooling.
– 13 –
(START/STOP) button next time.
Page 14

HSILGNE
FAN OPERATION
User can use the device simply as an air circulator.
Press the MODE selector so that the display indicates
1
(FAN).
Set the desired FAN SPEED with the (FAN SPEED) button
(the display indicates the setting).
2
START
STOP
(AUTO)
(SILENT)
Press the
a beep. Press the button again to stop operation.
(START/STOP) button. Fan operation starts with
(HIGH)
(LOW)
(MED)
– 14 –
Page 15
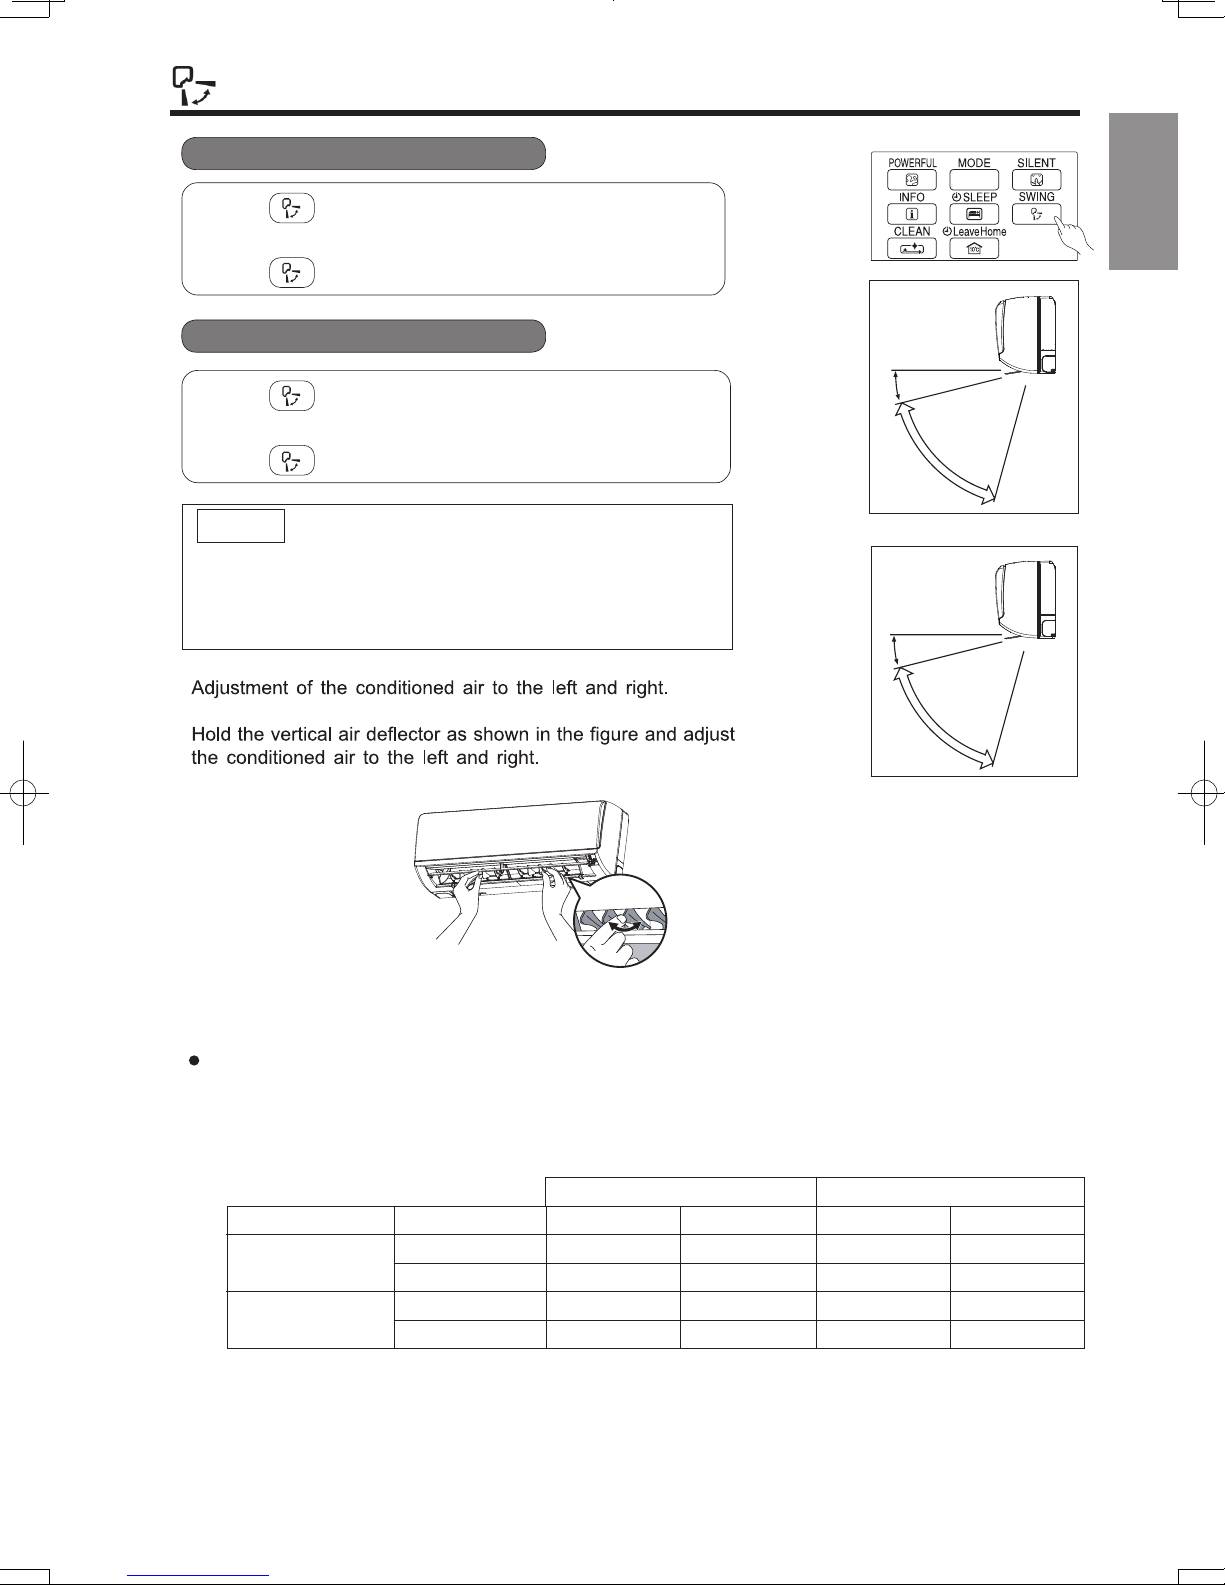
HSILGNE
AUTO SWING OPERATION
■ To start Vertical Auto Swing
●
Press (AUTO SWING (VERTICAL)) button. The
deflector(s) will start to swing up and down.
is displayed on the LCD.
■ To cancel Vertical Auto Swing
●
Press (AUTO SWING (VERTICAL)) button again. The
deflector(s) will stop in the current position.
disappeared from the LCD.
NOTE
●
During cooling and dehumidifying operation, do not keep
the deflectors swinging or in the lower position (in the case
of vertical auto swing) for a long time. It may cause dew
condensation on the deflectors.
ENGLISH
When cooling,
dehumidifying
Vertical
about 10°
about 40°
When heating
Vertical
about 10°
about 45°
Note
Avoid to use the room air conditioner for cooling operation when the outside temperature is below
-10°C (14°F).
The recommended maximum and minimum operating temperatures of the hot and cold sides
should be as below:
Indoor Dry bulb °C 21 32 20 27
Outdoor Dry bulb °C 21 43 2 21
gnitaeHgnilooC
Minimum Maximum Minimum Maximum
Wet bulb °C 15 23 12 19
Wet bulb °C 15 26 1 15
– 15 –
Page 16
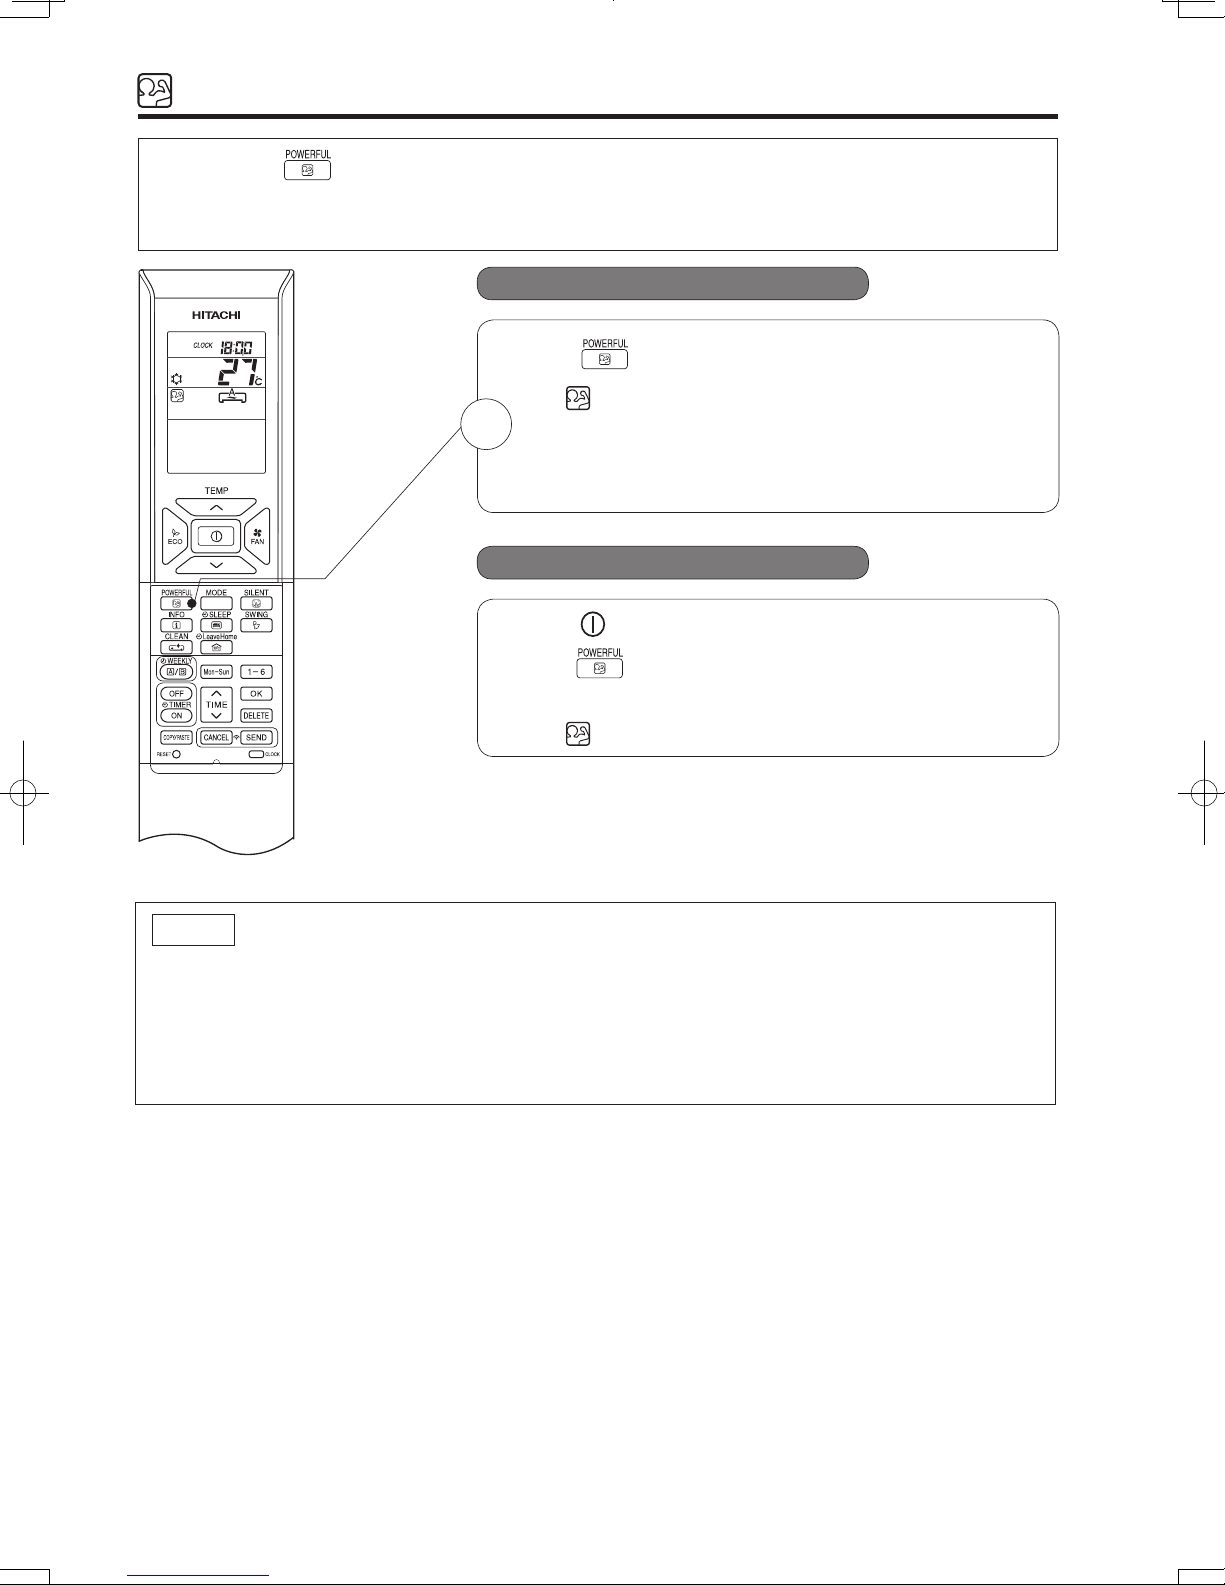
HSILGNE
POWERFUL OPERATION
● By pressing (POWERFUL) button during AUTO, HEATING, DEHUMIDIFYING, COOLING or FAN
operation, the air conditioner performs an the maximuum power.
● During POWERFUL operation, cooler or warmer air will be blown out from indoor unit for COOLING of
HEATING operation respectively.
■ To start POWERFUL operation
●
Press (POWERFUL) button during operation.
” is displayed on the LCD.
“
1
POWERFUL operation ends in 20 minutes. Then the system
automatically operates with the previous settings used before
POWERFUL operation.
■ To cancel POWERFUL operation
●
Press (START/ STOP) button.Or
●
Press
(POWERFUL) button again.
POWERFUL operation stops.
“
” disappears from the LCD.
NOTE
● When SLEEP mode, ECO mode, SILENT mode or LEAVE HOME mode is selected, POWERFUL
operation is cancelled.
● During POWERFUL operation, capacity of the air conditioner will not increase
– if the air conditioner is already running at maximum capacity.
just before defrost operation (when the air conditioner is running in HEATING operation).
–
● After auto restart, POWERFUL operation is cancelled and previous operation shall start.
– 16 –
Page 17
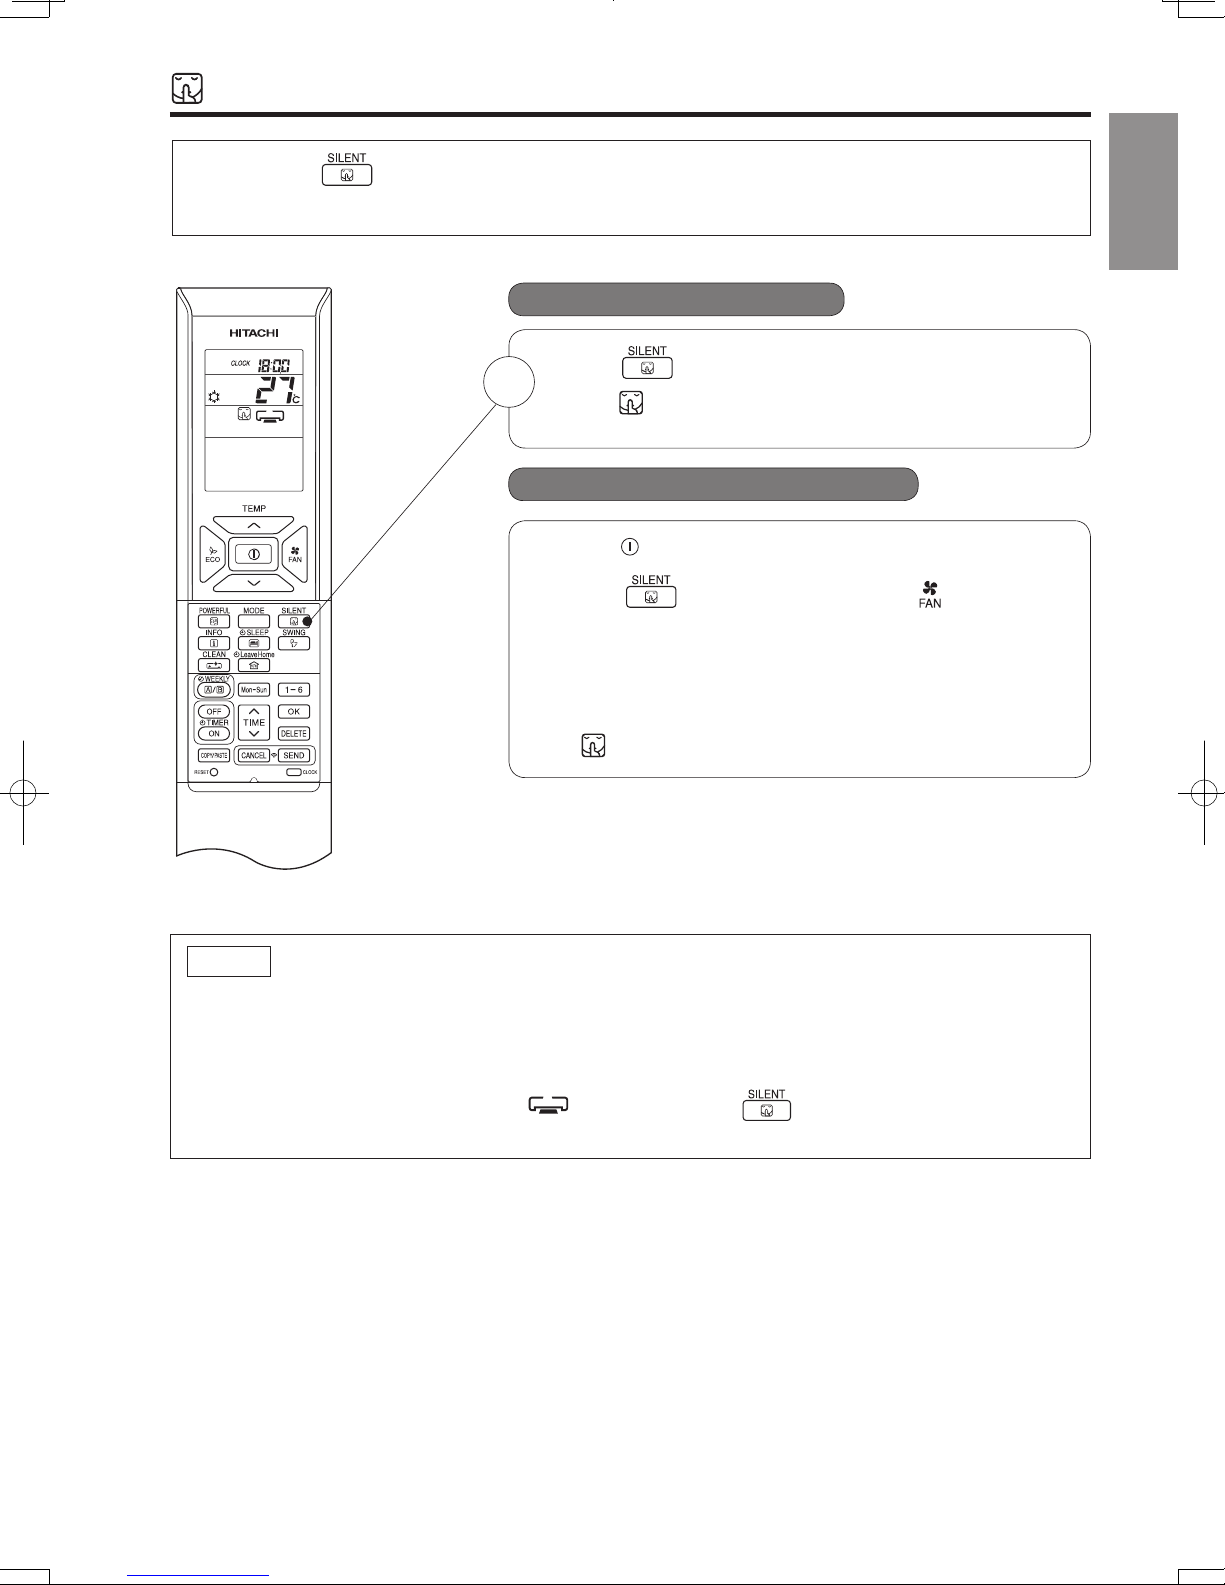
HSILGNE
SILENT OPERATION
● By pressing (SILENT) button during AUTO, HEATING, DEHUMIDIFYING, COOLING or FAN
operation, the fan speed will change to ultra slow.
■ To start SILENT operation
●
Press (SILENT) button during operation.
1
“
” is displayed on the LCD. Fan speed will be ultra
slow.
■ To cancel SILENT operation
● Press (START/STOP) button. Or
● Press (SILENT) button again or (FAN SPEED)
button.
Fan speed will return to previous fan speed before SILENT
operation starts.
SILENT operation stops.
ENGLISH
“
” disappears from the LCD.
NOTE
● When POWERFUL operation is selected, SILENT operation is cancelled. Fan speed will return to
previous fan speed before SILENT operation.
● After auto restart, SILENT operation is cancelled. Fan speed will return to previous
fan speed before SILENT operation.
● During any operation with fan speed (SILENT), if press (SILENT) button, fan speed will
not change.
– 17 –
Page 18
HSILGNE
ECO OPERATION
HSILGNE
LEAVE HOME(LH) OPERATION
■ To start LEAVE HOME operation
Press
(LEAVE HOME) button during stop or operation.
●
Room temperature is set at 10°C and heating operation starts.
“
”, “ ”, “ ”, “ ” is displayed on the LCD.
Press
(LEAVE HOME) button during stop or operation.
Room temperature is set at 10°C and heating operation starts.
“
”, “ ”, “ ”, “ ” is displayed on the LCD.
● Set number of operation days (1 to 99 days), if needed.
Press
(TIME) button to select number of days.
Number of days blink.
* Press “
(UP)” to set number of days from 1 day, 2 days, 3
days ..... 98 days, 99 days, 1 day and so on.
* Press “
(DOWN)” to set number of days from 99 days, 98
days, 97 days .... 3 days, 2 days, 1 day, 99 days and so on.
* Number of day is counted when clock indicates 0:00.
● Press (SEND) button to confirm number of operation
days. Display for number of operation days will stop blinking.
● Press (CANCEL) button to reset number of operation
days or to have continuous operation.
■ To cancel LEAVE HOME operation
● Press (START/STOP) button.Or
● Press (LEAVE HOME) button again.
● Change to other operation mode by pressing (MODE) button.
NOTE
● After reaching the set number of operation days for Leave Home or by pressing the (Leave Home) button again,
● During Leave Home operation, fan speed and horizontal air deflector position cannot be changed.
● By pressing (Leave Home) button, implementation of Weekly Timer or One Timer only Timer is cancelled.
● In case of power supply shut down, after autorestart, all setting for number of days operation will be reset and unit
shall be in continuous operation.
●
For multi connections, when each room is running in different operation mode such as FAN only, COOLING, DEHUMIDIFYING
or AUTO mode, Leave Home operation cannot operate even though it is possible to set Leave Home operation.
In order to start Leave Home operation, all rooms must stop its operation. Then, press (LEAVE HOME) button to
operate Leave Home operation.
● For multi connections, when all rooms are running HEATING operation, it is possible to operate Leave Home operation
by pressing the (LEAVE HOME) button.
● For multi connections, if two or more rooms are set to operate Leave Home operation, the capability to reach the
set temperature at 10°C may not possible. In addition, this also depends on outdoor temperature.
Continuous operation
Day timer operation
Prevent the room temperature from falling too much by setting temperature automatically when no one is at home.
This operation is able to operate by" Continuous operation" or " Day timer operation" . Please use " Day timer operation"
to set the number of days up to 99 days.
10°C
°
●
Option 1. Continuous operation.
Option 2. Day timer operation.
Return to previous operation mode.Or
othe unit will operate in previous mode.
POWERFUL,SILENT and ECO operations are not applicable during Leave Home.
●
1
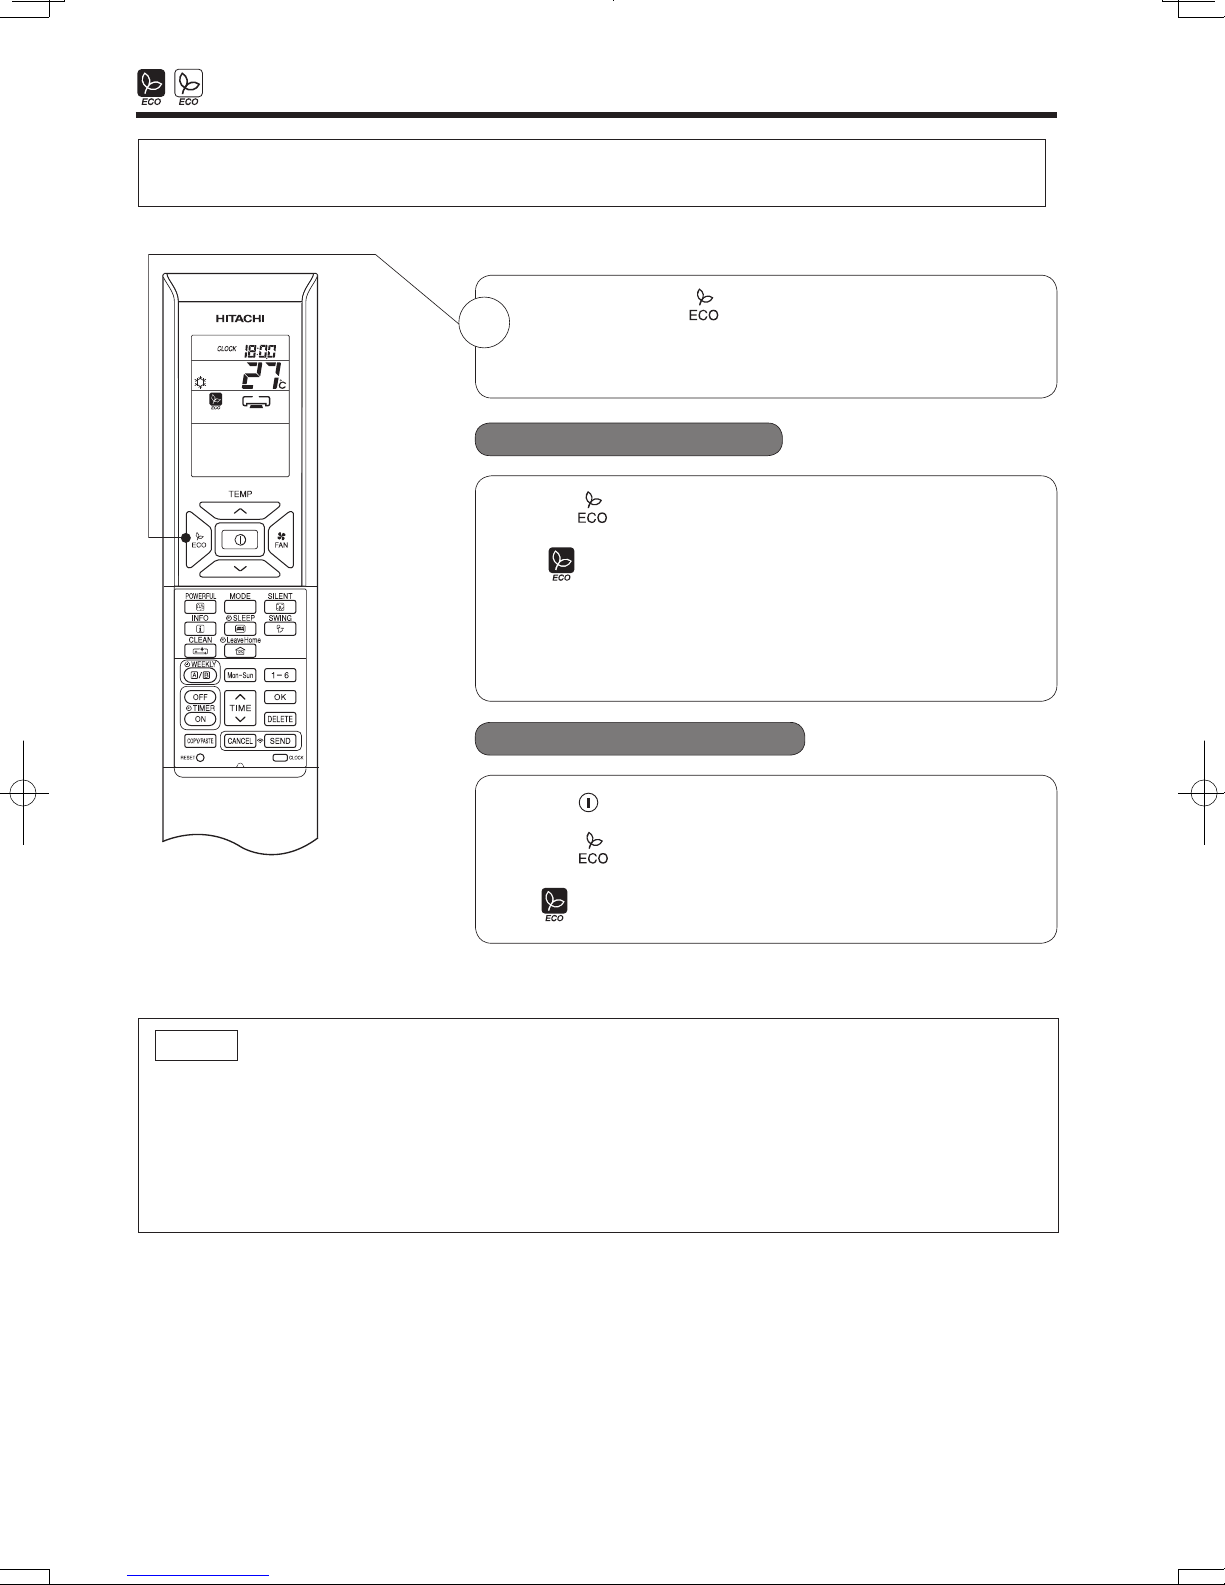
ECO operation is an energy saving function by changing set temperature automatically and by limiting the
ma x imum power consumption value.
● By pressing the (ECO) button during AUTO, HEATING,
1
DEHUMIDIFYING or COOLING operation, the air conditioner
performs the "ECO" operation.
■ To start ECO operation
●
Press (ECO) button during operation.
“
” is displayed on the LCD.
Energy saving operation will start by changing the set
temperature higher or lower automatically and reducing operation
power consumption. This function may vary based on the
connected outdoor unit.
■ To cancel ECO operation
●
Press (START/STOP) button.Or
●
Press (ECO) button again.
” disappears from the LCD.
“
NOTE
●
ECO function will not be effective when power consumption is low.
●
By pressing (POWERFUL) button, ECO operation is cancelled.
●
After auto restart, ECO operation is cancelled and previous operation mode shall start.
●
For multi model connections, energy saving operation shall only start by changing set temperature higher
r lower automatically. However, effectiveness of ECO depends on operation conditions.
o
– 18 –
Page 19
HSILGNE
LEAVE HOME(LH) OPERATION
°
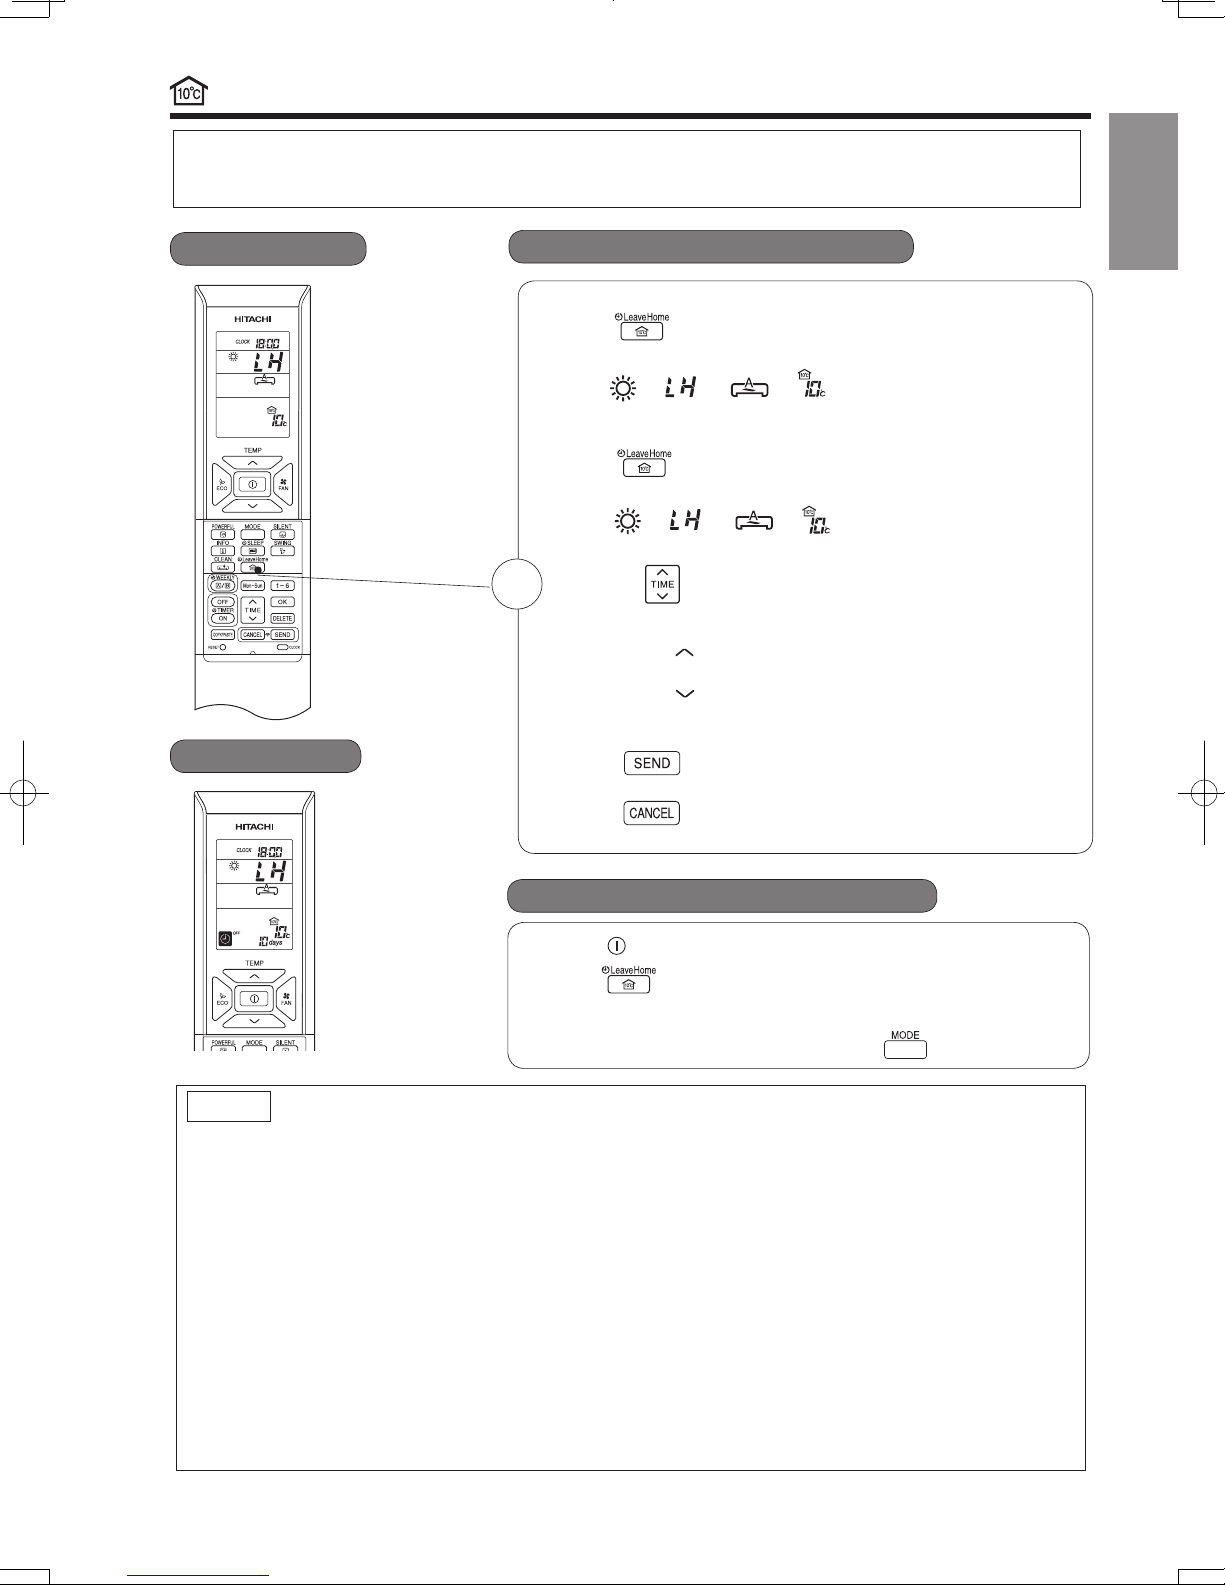
Prevent the room temperature from falling too much by setting temperature automatically when no one is at home.
This operation is able to operate by" Continuous operation" or " Day timer operation" . Please use " Day timer operation"
to set the number of days up to 99 days.
10°C
Continuous operation
Day timer operation
■ To start LEAVE HOME operation
Option 1. Continuous operation.
Press
●
Room temperature is set at 10°C and heating operation starts.
“
Option 2. Day timer operation.
●
Press
Room temperature is set at 10°C and heating operation starts.
“
● Set number of operation days (1 to 99 days), if needed.
1
Press
Number of days blink.
* Press “
* Press “
* Number of day is counted when clock indicates 0:00.
● Press (SEND) button to confirm number of operation
days. Display for number of operation days will stop blinking.
● Press (CANCEL) button to reset number of operation
days or to have continuous operation.
(LEAVE HOME) button during stop or operation.
”, “ ”, “ ”, “ ” is displayed on the LCD.
(LEAVE HOME) button during stop or operation.
”, “ ”, “ ”, “ ” is displayed on the LCD.
(TIME) button to select number of days.
(UP)” to set number of days from 1 day, 2 days, 3
days ..... 98 days, 99 days, 1 day and so on.
(DOWN)” to set number of days from 99 days, 98
days, 97 days .... 3 days, 2 days, 1 day, 99 days and so on.
ENGLISH
■ To cancel LEAVE HOME operation
● Press (START/STOP) button.Or
● Press (LEAVE HOME) button again.
Return to previous operation mode.Or
● Change to other operation mode by pressing (MODE) button.
NOTE
● After reaching the set number of operation days for Leave Home or by pressing the (Leave Home) button again,
othe unit will operate in previous mode.
● During Leave Home operation, fan speed and horizontal air deflector position cannot be changed.
● By pressing (Leave Home) button, implementation of Weekly Timer or One Timer only Timer is cancelled.
● In case of power supply shut down, after autorestart, all setting for number of days operation will be reset and unit
shall be in continuous operation.
●
For multi connections, when each room is running in different operation mode such as FAN only, COOLING, DEHUMIDIFYING
or AUTO mode, Leave Home operation cannot operate even though it is possible to set Leave Home operation.
In order to start Leave Home operation, all rooms must stop its operation. Then, press (LEAVE HOME) button to
operate Leave Home operation.
● For multi connections, when all rooms are running HEATING operation, it is possible to operate Leave Home operation
by pressing the (LEAVE HOME) button.
● For multi connections, if two or more rooms are set to operate Leave Home operation, the capability to reach the
set temperature at 10°C may not possible. In addition, this also depends on outdoor temperature.
●
POWERFUL,SILENT and ECO operations are not applicable during Leave Home.
– 19 –
Page 20
HSILGNE
CLEAN (ONE TOUCH CLEAN) OPERATION
HSILGNE
ONCE TIMER (ON/OFF TIMER) OPERATION
The device can be set to turn off at a preset time.
1. Press
(OFF-TIMER) button. and blink on the display.
2. Set the "turn-off time" with
(TIME) button.
3. After setting, direct the remote controller towards the indoor and press
(SEND) button.
and "set time" lights up instead of blinking.
A beep sound emitted from indoor unit and the (TIMER) lamp on the
indoor unit lights up.
ON TIMER
The device will turn on at a designated time.
1. Press
(ON-TIMER) button. and blink on the display.
2. Set the "turn-on time" with
(TIME) button.
3. After setting, direct the remote controller towards the indoor and press
(SEND) button.
and "set time" light up instead of blinking.
A beep sound emitted from indoor unit and the (TIMER) lamp on the indoor
unit lights up.
ON/OFF TIMER
● The device will turn on (off) and off (on) at the designated time.
● The switching occurs first at the preset time that comes earlier.
● The arrow mark appears on the display to indicate the sequence of switching
operations.
1. Press
(OFF-TIMER) button so that and blink on the
display.
2. Set the "turn-off" time with
(TIME) button. After setting, direct the remote
controller towards the indoor and press
(SEND) button.
3. Press
(ON-TIMER) button so that and set "turn-off" time light up.
The
and blink.
4. Set the "turn-on" time with
(TIME) button.
5. After setting, direct the remote controller towards the indoor and press
(SEND) button
and set "turn-on" time light up instead of blinking.
A beep sound emitted from indoor unit and the (TIMER) lamp on the indoor
unit lights up.
■
The timer may be used in three ways: OFF-timer, ON-timer and ON/OFF (OFF/ON)-
timer. Set the current time first because it serves as a reference.
■ To cancel Reservation
●
Point the signal window of the remote controller towards the indoor unit and press (CANCEL) button.
and "ON or OFF set time" goes out with a beep and the (TIMER) lamp on the indoor unit turns off.
NOTE
●
User can set only one of the OFF-timer, ON-timer or ON/OFF-timer.
●
If WEEKLY TIMER already set, by setting the ONCE TIMER, ONCE TIMER operation is prioriti zed. When
ONCE TIMER operation is complete, WEEKLY TIMER operation will be activated.
OFF TIMER
1
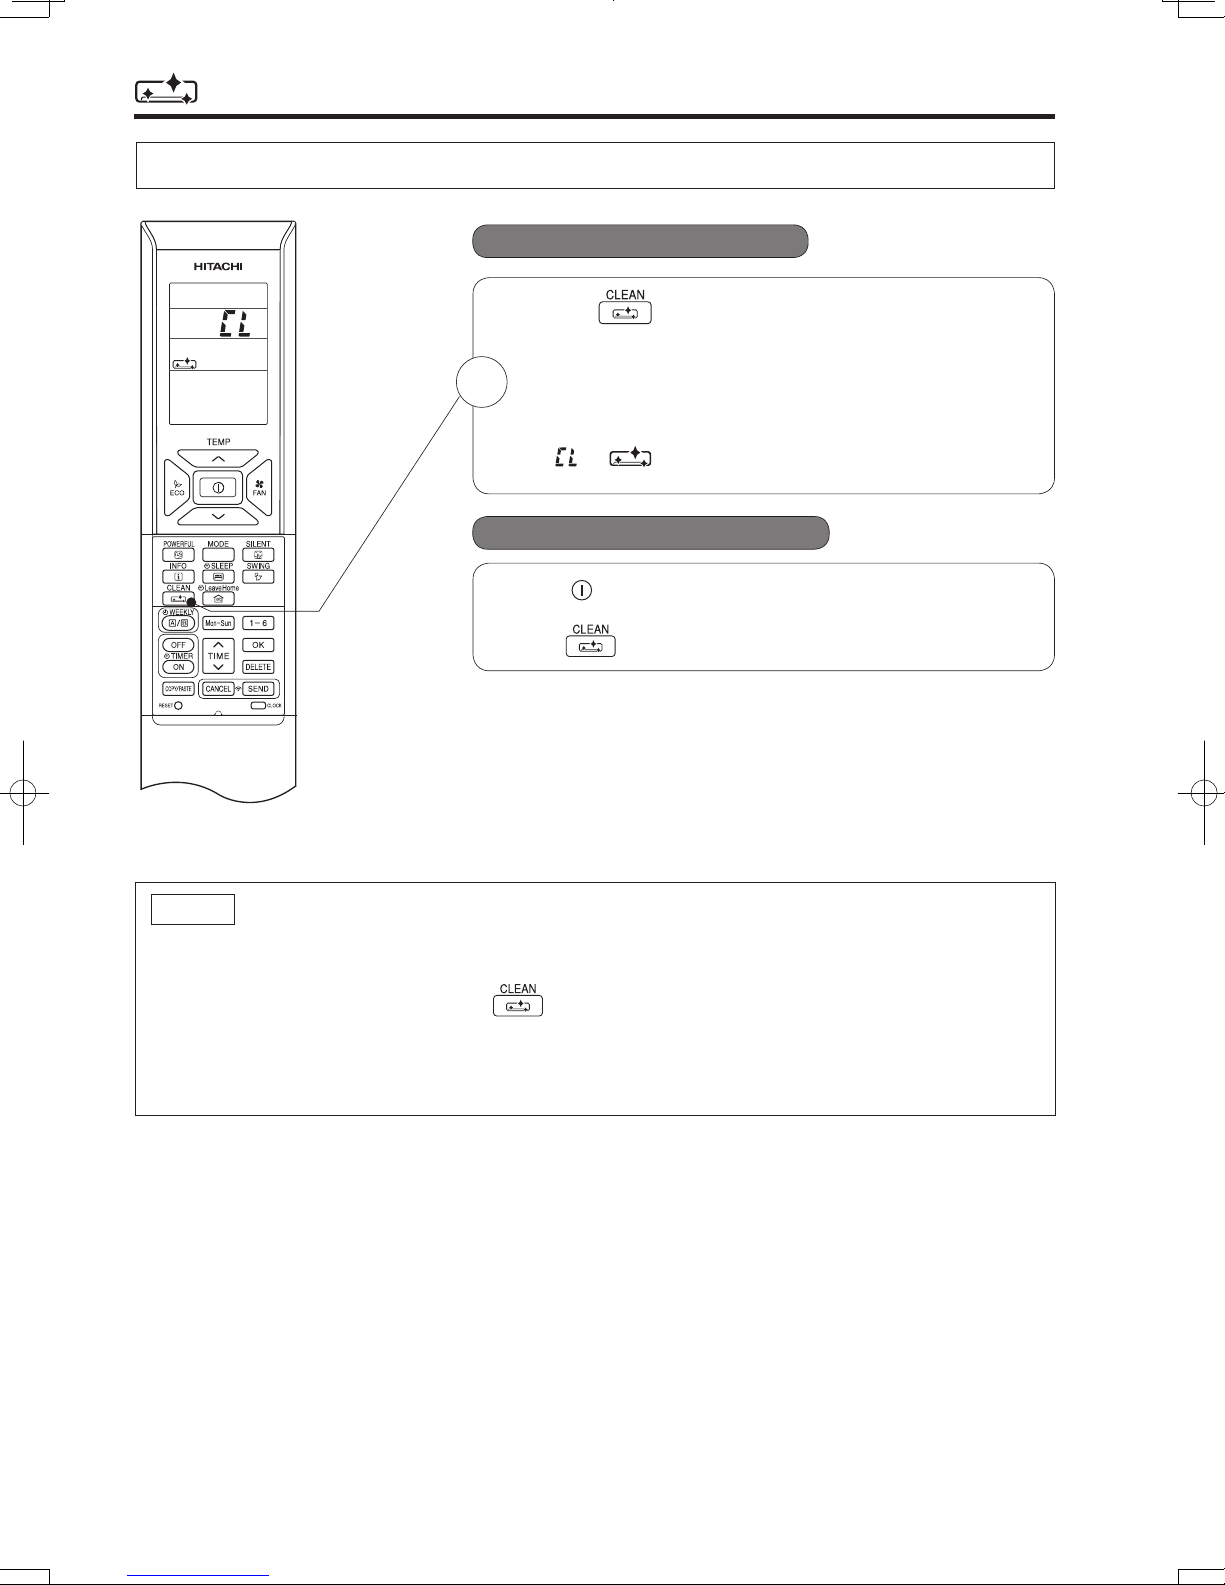
Drying indoor heat exchanger after cooling operation to prevent mildew.
■ To start CLEAN operation
● Press (CLEAN) button when unit is OFF.
Total time taken for One Touch Clean operation is 60 minutes.
During this operation, HEATING or FAN operation shall
1
operate.
During one touch clean, operation lamp is blinking.
“
”, “ ” is displayed on the LCD.
■ To cancel CLEAN operation
● Press (START/STOP) button.Or
● Press (CLEAN) button again.
NOTE
● When CLEAN operation finish, unit will switch OFF automatically.
●
If Weekly Timer or Once Timer is set, there is a need to cancel those timer before operating CLEAN function.
● For multi connections, when pressing (CLEAN) button, operation is limited to FAN operation.
● For multi connections, when one room operates CLEAN operation first, other rooms can operate
COOLING, DEHUMIDIFYING or FAN operation. However, when other rooms need to operate HEATING
operation, air conditioner will be in STANDBY mode. After CLEAN operation finish, HEATING operation
will start.
– 20 –
Page 21
HSILGNE
ONCE TIMER (ON/OFF TIMER) OPERATION
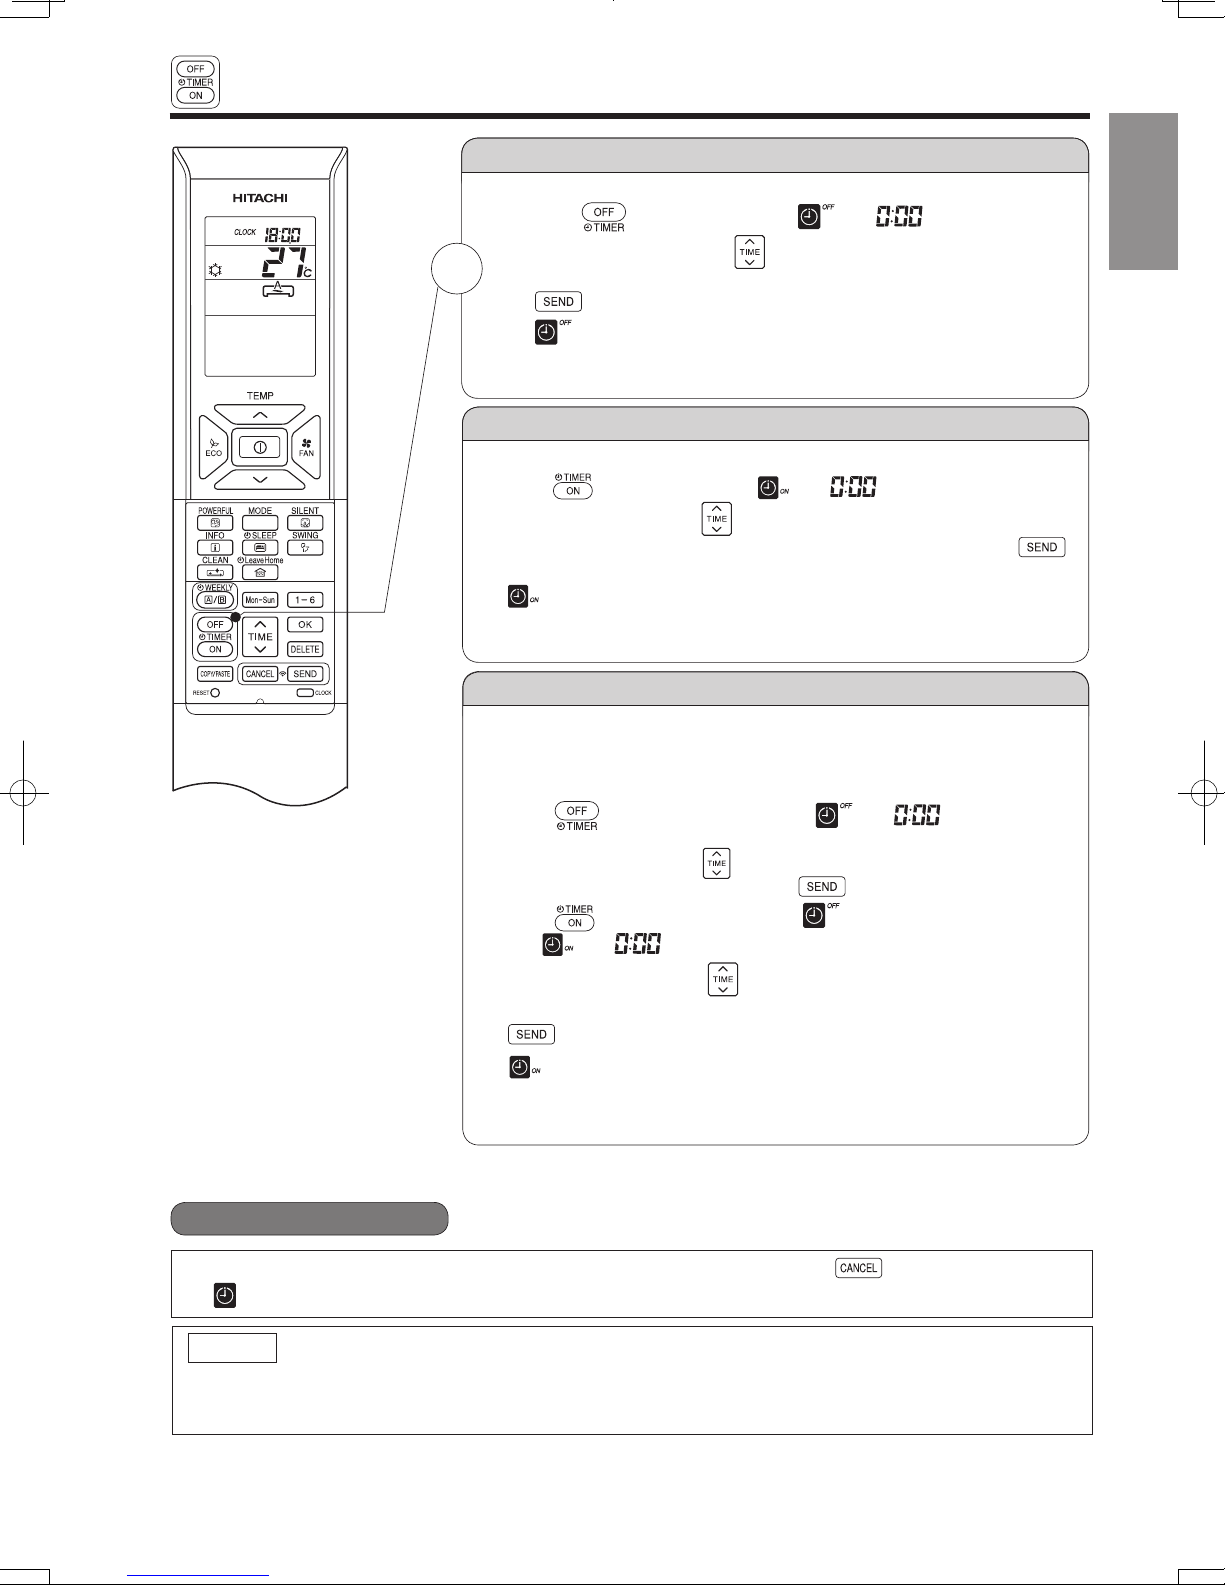
OFF TIMER
The device can be set to turn off at a preset time.
1. Press
2. Set the "turn-off time" with
1
3. After setting, direct the remote controller towards the indoor and press
A beep sound emitted from indoor unit and the (TIMER) lamp on the
indoor unit lights up.
ON TIMER
The device will turn on at a designated time.
1. Press
2. Set the "turn-on time" with
3. After setting, direct the remote controller towards the indoor and press
(SEND) button.
A beep sound emitted from indoor unit and the (TIMER) lamp on the indoor
and "set time" light up instead of blinking.
unit lights up.
(OFF-TIMER) button. and blink on the display.
(SEND) button.
and "set time" lights up instead of blinking.
(ON-TIMER) button. and blink on the display.
(TIME) button.
(TIME) button.
ENGLISH
ON/OFF TIMER
● The device will turn on (off) and off (on) at the designated time.
● The switching occurs first at the preset time that comes earlier.
● The arrow mark appears on the display to indicate the sequence of switching
operations.
1. Press
display.
2. Set the "turn-off" time with
controller towards the indoor and press
3. Press
The
4. Set the "turn-on" time with
5. After setting, direct the remote controller towards the indoor and press
A beep sound emitted from indoor unit and the (TIMER) lamp on the indoor
unit lights up.
■
The timer may be used in three ways: OFF-timer, ON-timer and ON/OFF (OFF/ON)-
timer. Set the current time first because it serves as a reference.
(OFF-TIMER) button so that and blink on the
(TIME) button. After setting, direct the remote
(SEND) button.
(ON-TIMER) button so that and set "turn-off" time light up.
and blink.
(TIME) button.
(SEND) button
and set "turn-on" time light up instead of blinking.
■ To cancel Reservation
●
Point the signal window of the remote controller towards the indoor unit and press (CANCEL) button.
and "ON or OFF set time" goes out with a beep and the (TIMER) lamp on the indoor unit turns off.
NOTE
●
User can set only one of the OFF-timer, ON-timer or ON/OFF-timer.
●
If WEEKLY TIMER already set, by setting the ONCE TIMER, ONCE TIMER operation is prioriti zed. When
ONCE TIMER operation is complete, WEEKLY TIMER operation will be activated.
– 21 –
Page 22
HSILGNE
E C O SLEEP TIMER OPERATION
. gn i v as yg r ene n i s t l use r t l . deeps na f eh t secude r dna e r u t a r epme t moo r eh t s t f i hs t i nu eh t
HSILGNE
■ To set SLEEP TIMER and ON TIMER
The air conditioner will be turned off by ECO SLEEP TIMER and turned on by ON TIMER.
1. Set the ON TIMER.
2. Press
(SLEEP) button and set ECO SLEEP TIMER.
Direct the remote controller towards the indoor unit and press
(CANCEL) button.
● “ ”, “ ”, “ ”, “OFF”, off time, “ ”, number of hour, "ON" and ON TIMER set time disappear
from the remote controller display.
● A beep sound emitted from indoor unit and the (TIMER) lamp on the indoor unit turns off.
●
30 minutes after setting ECO SLEEP TIMER, outdoor fan speed will be reduced to lower the noise level and to
1 hour after setting ECO SLEEP TIMER, set temperature will be slightly shifted. Amount of temperature
These automatic operation changes contribute to energy saving without losing comfort.
The level of energy consumption depends on outside temperature, room temperature, set temperature or air
conditioner type.
Cooling operation [diagram representation
for illustrative purpose only]
In this case, air conditioner will turn off in 2 hours (at 1:38) and it will be
turned on at 6:00 the next morning.
NOTE
●
Heating operation [diagram representation for
illustrative purpose only]
Temperature
30 minutes
Outdoor fan
speed reduce
Shift
temperature
1 hour
Temperature
30 minutes
Outdoor fan
speed reduce
Shift
temperature
1 hour
EC O SLEEP TIMER OPERATION
Example:
ECO SLEEP TIMER and ON TIMER reservations are cancelled.
have comfort operation.
shifted depends on type of air conditioner.
■ To cancel EC O SLEEP TIMER and ON TIMER operation
● If ECO SLEEP TIMER is set when OFF TIMER or ON/OFF TIMER has been set earlier, the ECO
SLEEP TIMER becomes effective instead of the OFF TIMER or ON/OFF TIMER.
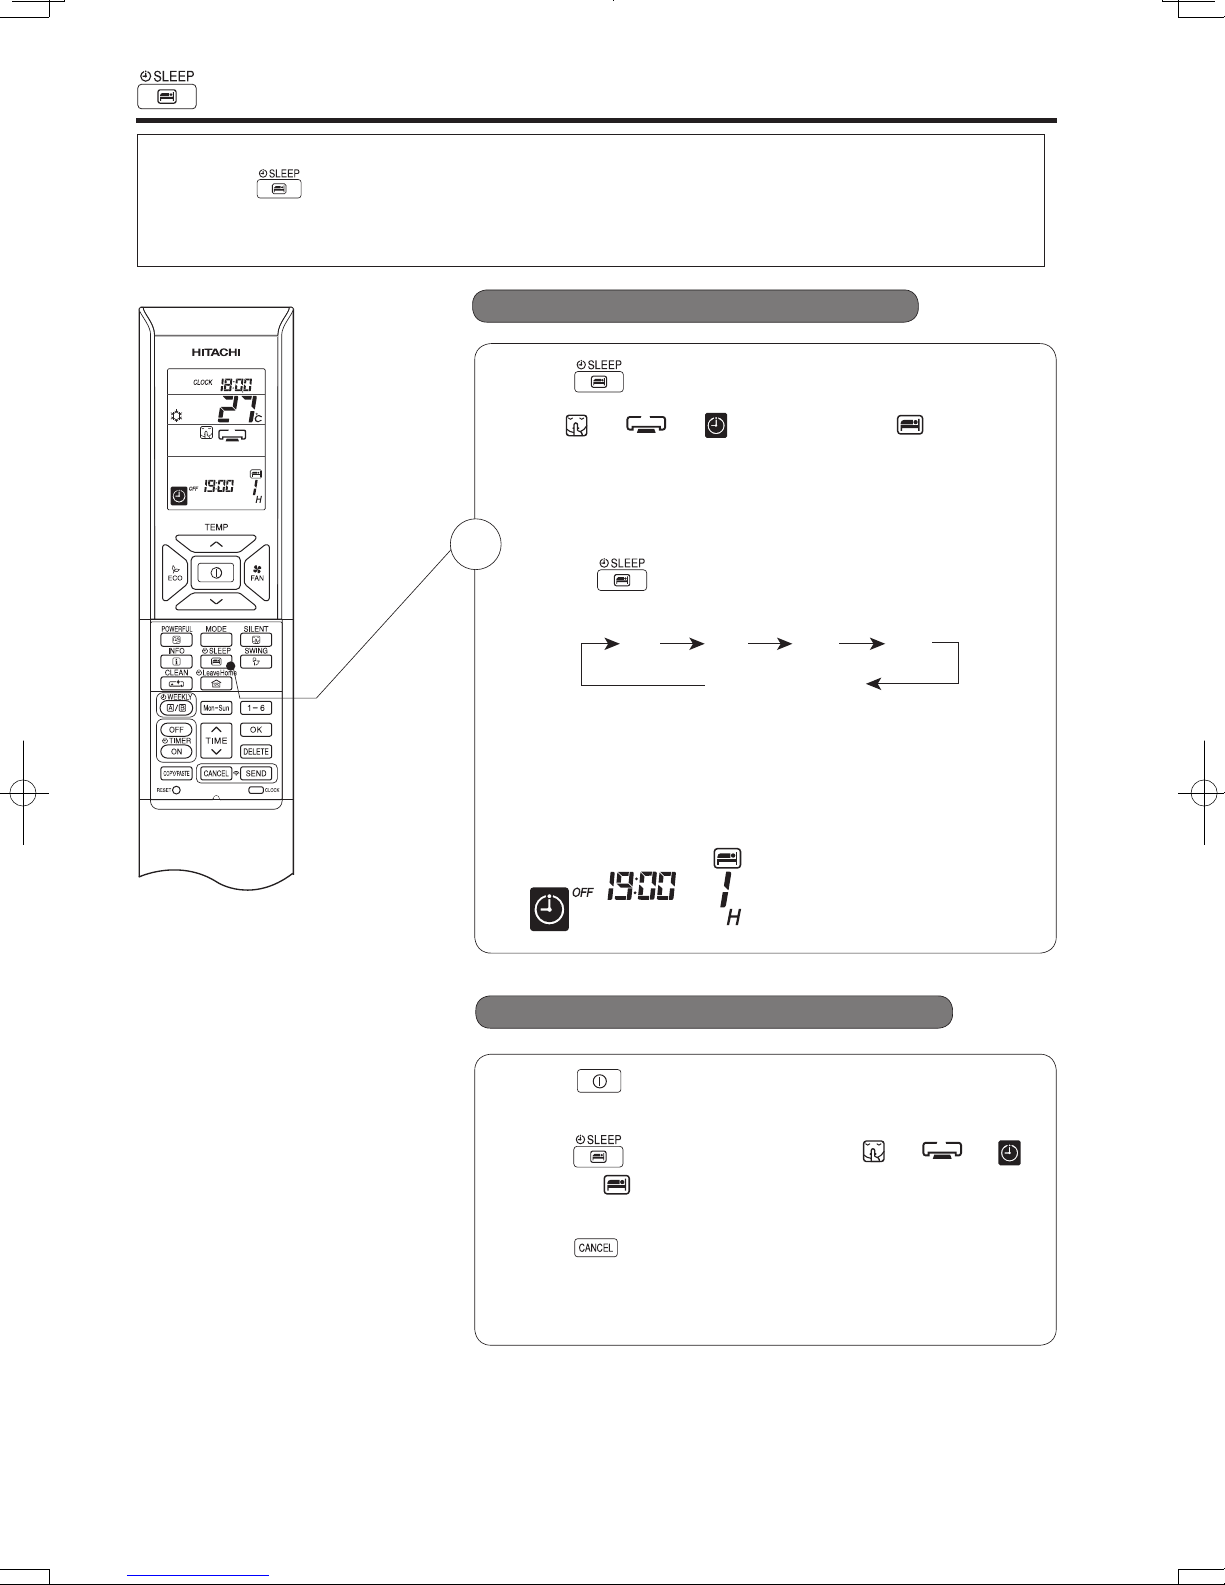
The timer can be set up to a duration of 7 hours.
By pressing
(SLEEP) button during AUTO, HEATING, DEHUMIDIFYING, COOLING or FAN operation,
Set the current time first before operating the ECO SLEEP TIMER operation.
■ To start EC O SLEEP TIMER operation
Press (SLEEP) button during operation.
● “ ”, “ ”, “ ”, “OFF”, off time, “ ” and number
of hour are displayed on the remote controller display.
● During ECO SLEEP TIMER operation, fan speed will be ultra
slow.
● A beep sound emitted from indoor unit and the (TIMER) lamp
1
on the indoor unit lights up.
Pressing
(SLEEP) button repeatedly, the number of hours
will change as below:
1 H 2 H 3 H 7 H
SLEEP TIMER off
● During ECO SLEEP TIMER operation, air conditioner will
continue to operate for the designated number of hours and
then turn off.
●
When the ECO SLEEP TIMER has been set, the display on
the remote controller indicates the turn off time.
Example: If ECO SLEEP TIMER is
set for 1 hour at 18:00, the switch
off time will be at 19:00.
■ To cancel ECO SLEEP TIMER operation
Press
● Room air conditioner will switch off.
Press
off time, “
(START/STOP) button.
(SLEEP) button again until “ ”, “ ”, “ ”,
” and number of hour disappear from the remote
controller display.
Press
● A beep sound emitted from indoor unit and the (TIMER) lamp
(CANCEL) button.
on the indoor unit turns off.
● SLEEP TIMER operation is cancelled.
– 22 –
Page 23
HSILGNE
EC O SLEEP TIMER OPERATION
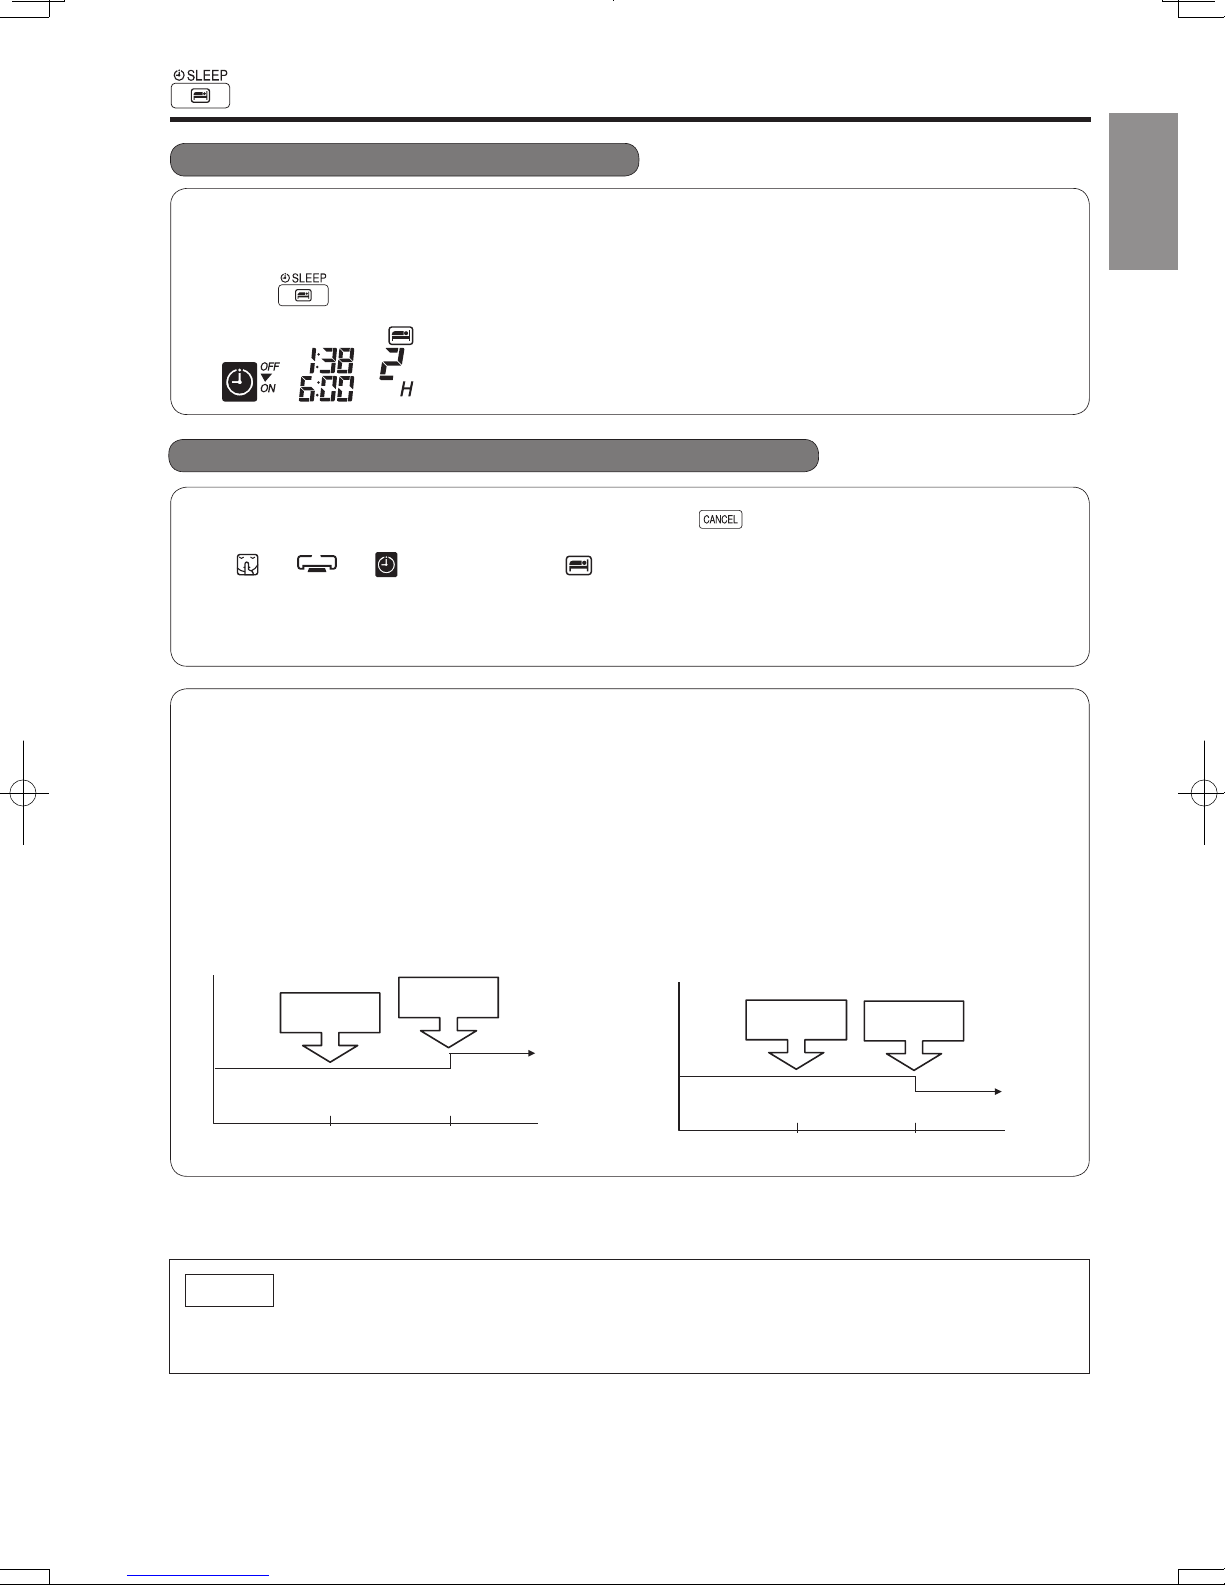
■ To set SLEEP TIMER and ON TIMER
The air conditioner will be turned off by ECO SLEEP TIMER and turned on by ON TIMER.
1. Set the ON TIMER.
2. Press
(SLEEP) button and set ECO SLEEP TIMER.
Example:
In this case, air conditioner will turn off in 2 hours (at 1:38) and it will be
turned on at 6:00 the next morning.
■ To cancel EC O SLEEP TIMER and ON TIMER operation
Direct the remote controller towards the indoor unit and press
● “ ”, “ ”, “ ”, “OFF”, off time, “ ”, number of hour, "ON" and ON TIMER set time disappear
from the remote controller display.
● A beep sound emitted from indoor unit and the (TIMER) lamp on the indoor unit turns off.
●
ECO SLEEP TIMER and ON TIMER reservations are cancelled.
30 minutes after setting ECO SLEEP TIMER, outdoor fan speed will be reduced to lower the noise level and to
have comfort operation.
1 hour after setting ECO SLEEP TIMER, set temperature will be slightly shifted. Amount of temperature
shifted depends on type of air conditioner.
These automatic operation changes contribute to energy saving without losing comfort.
The level of energy consumption depends on outside temperature, room temperature, set temperature or air
conditioner type.
(CANCEL) button.
ENGLISH
Cooling operation [diagram representation
for illustrative purpose only]
Temperature
Outdoor fan
speed reduce
30 minutes
Shift
temperature
1 hour
Heating operation [diagram representation for
illustrative purpose only]
Temperature
Outdoor fan
speed reduce
30 minutes
Shift
temperature
1 hour
NOTE
●
● If ECO SLEEP TIMER is set when OFF TIMER or ON/OFF TIMER has been set earlier, the ECO
SLEEP TIMER becomes effective instead of the OFF TIMER or ON/OFF TIMER.
– 23 –
Page 24
HSILGNE
WEEKLY TIMER OPERATION
HSILGNE
5. Press (ON-OFF TIMER) button to select ON TIMER or OFF TIMER
reservation.
6. Press
(TIME) button to set time reservation.
7. Press (TEMP
or ) button to set temperature reservation.
8. Press
(OK) button. The reservations are set. Day, program
number, ON reservation, setting temperature will light up.
will be
continuously blinks. If reservation is not complete, settings will not be
stored in memory.
To continue with the reservation, press
buttons.
Follow step 3 to 8 for reservation.
9. After all the reservations have been set, press
(SEND) button while
directing the remote controller towards the indoor unit for about 3 seconds.
Timer lamp on the indoor unit will blink rapidly.
After beep sound emitted from indoor unit, TIMER lamp will light up.
Please ensure that the TIMER lamp lights up.
This indicates that the reservation has been stored in the indoor unit and
Timer function has been completed.
The reservation contents will appear on the remote controller display.
If TIMER lamp on the indoor unit does not light up, press
(SEND) button while directing the remote controller towards the indoor
unit for about 3 seconds.
CAUTION ! Do not press
(CANCEL) button during reservation
setting because this will result in all reservation contents to be lost.
The reservation contents will not stored in the indoor unit until
(SEND) button has been pressed.
5
6
7
8
9
NOTE
● Up to 6 programs can be set per day. Setting ON TIMER or OFF TIMER for each program number can
number will automatically arranged so that program number 1 shall have the earliest time and program
number 6 shall have the latest time.
If the setting time is the same, Priority will be given to the latest reservation contents.
after reservations have been made , all current reservations will be lost.
WEEKLY TIMER OPERATION
●
●
●
be at random. When pressing
(SEND) button, the set ON TIMER or OFF TIMER for each program
● CAUTION ! If the remote controller is left idle and (SEND) button is not pressed within 3 minutes
●
lt is possible to select Mode A or Mode B.For each mode ,up to 6 programs can be set per day. ln total, a
maximum of 42 programs can be set for a week for each mode.
●
If calendar and clock are not set, the reservation setting for WEEKL
●
If calendar and clock are not set correctly, WEEKLY TIMER will not operate correctly.
●
Reservation for calendar and clock shall be set rst before operating WEEKLY TIMER. fi
Y TIMER cannot be set.
Step 1 : Set the reservation schedule to the remote controller. Send the registered reservation to indoor
unit and then operate.
Step 2 : Select Mode A or Mode B and activate or deactivate WEEKLY TIMER .
Step 3 : Copy and cancel the reservation schedule.
Step 1 : Set reservation schedule to the remote controller. Send the registered reservation
to indoor unit and then operate.
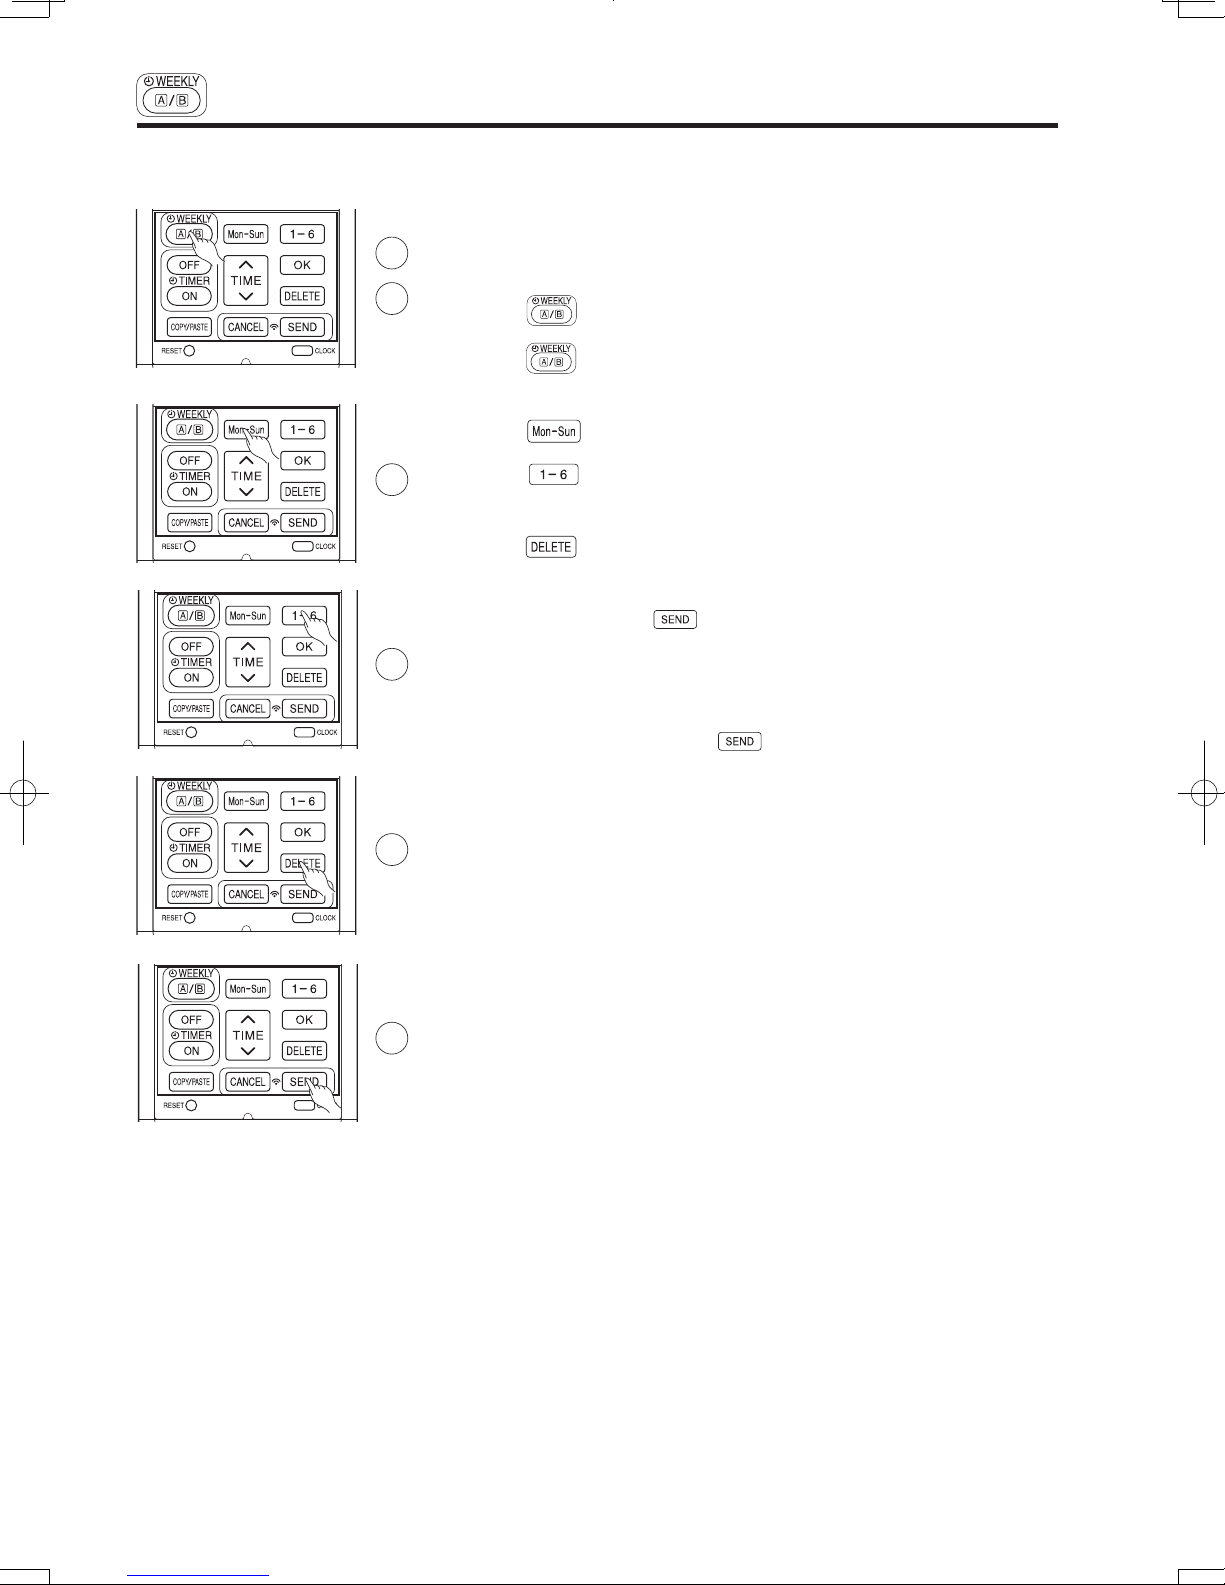
How to set a WEEKLY TIMER.
■
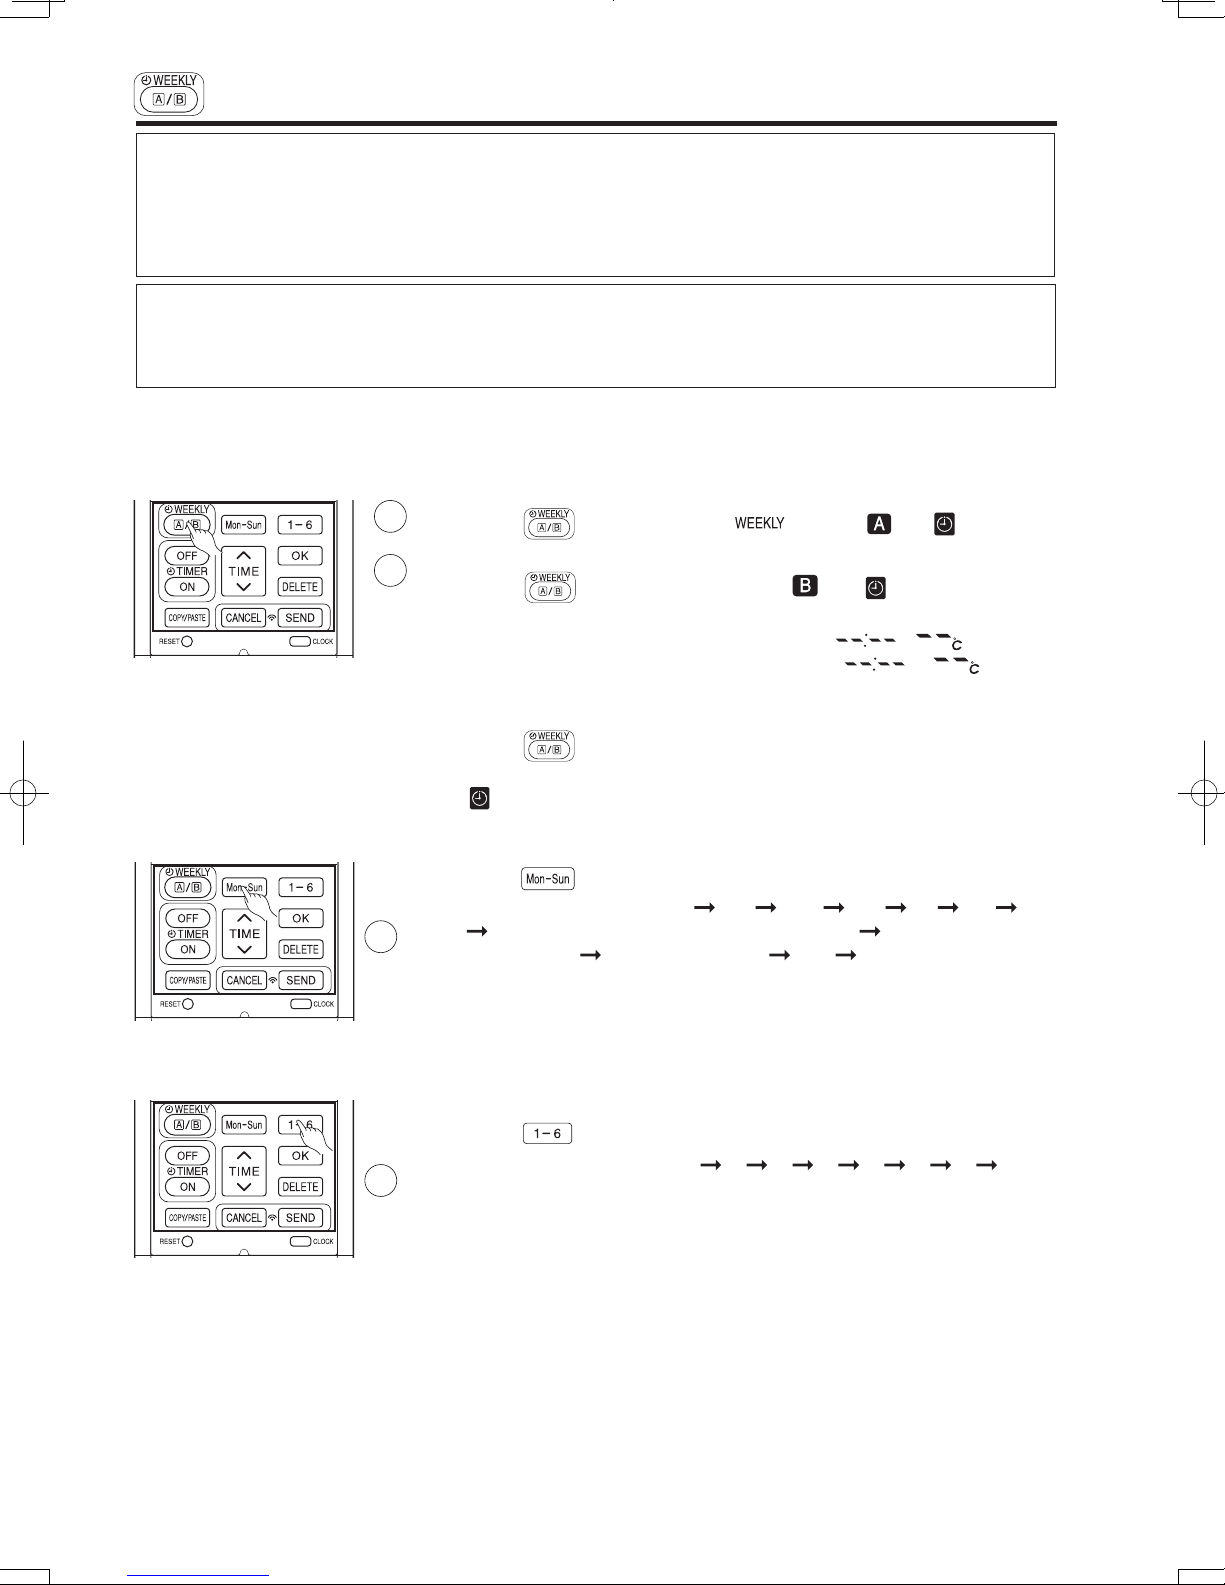
1. Select Mode A or Mode B.
1
2
3
Press
display. (Mode A is selected).
Press
(Mode B is selected).
● If no reservation has been made, ON/OFF, , appear.
● If reservation has been made, ON/OFF, , will not
appear.
2. Set a program.
Press
can be changed.
, day: Mon, program no. : 1, ON/OFF, setting time and setting
temperature blink on the display.
3. Select the desired day of the wekk.
Press
The day changes from Mon
Mon, Tue, Wed, Thu, Fri, Sat, Sun [Full days] Mon, Tue, Wed, Thu,
Fri [weekday]
Select [Full days] for daily reservation.
Select [weekday] for Monday to Friday reservation.
Select [weekend] for Saturday and Sunday reservation.
● After reservation has been set, it is easy to check and edit at the same
time.
(WEEKLY) button. lights up. and blink on the
(WEEKLY) button again, and blink on the display.
(WEEKLY) button for about 3 seconds. The selection mode
(DAY) button.
Tue Wed Thu Fri Sat Sun
Sat, Sun [weekend] Mon
Tue ......
4
4. Press
The number changes from 1
● If program number has been set, follow above in order to make
changes.
button to select a program number.
2 3 4 5 6 1 2 .....
– 24 –
Page 25
HSILGNE
directing the remote controller towards the indoor unit for about 3 seconds.
WEEKLY TIMER OPERATION
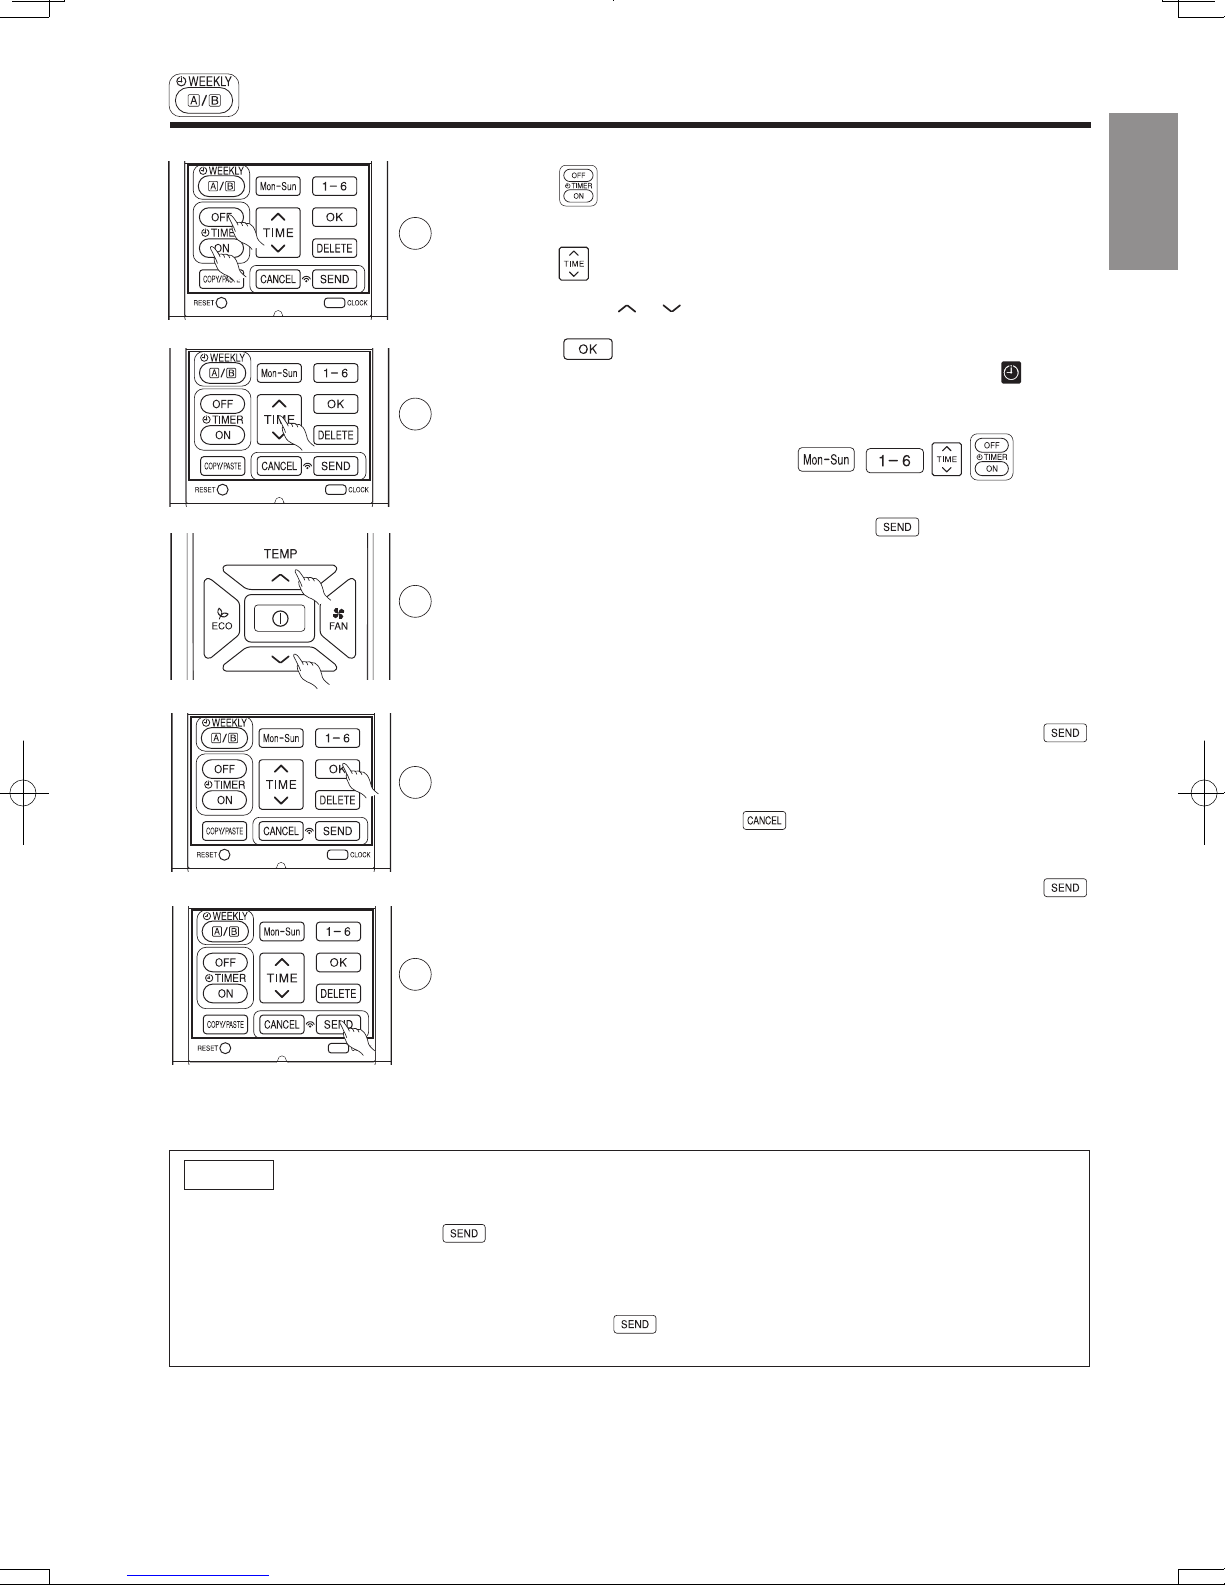
5. Press (ON-OFF TIMER) button to select ON TIMER or OFF TIMER
5
reservation.
6. Press
(TIME) button to set time reservation.
ENGLISH
7. Press (TEMP
8. Press
number, ON reservation, setting temperature will light up.
continuously blinks. If reservation is not complete, settings will not be
6
7
stored in memory.
To continue with the reservation, press
Follow step 3 to 8 for reservation.
9. After all the reservations have been set, press
Timer lamp on the indoor unit will blink rapidly.
After beep sound emitted from indoor unit, TIMER lamp will light up.
Please ensure that the TIMER lamp lights up.
This indicates that the reservation has been stored in the indoor unit and
Timer function has been completed.
The reservation contents will appear on the remote controller display.
●
If TIMER lamp on the indoor unit does not light up, press
or ) button to set temperature reservation.
(OK) button. The reservations are set. Day, program
buttons.
(SEND) button while
(SEND) button while directing the remote controller towards the indoor
8
unit for about 3 seconds.
●
CAUTION ! Do not press
setting because this will result in all reservation contents to be lost.
●
The reservation contents will not stored in the indoor unit until
(SEND) button has been pressed.
(CANCEL) button during reservation
will be
9
NOTE
● Up to 6 programs can be set per day. Setting ON TIMER or OFF TIMER for each program number can
be at random. When pressing
number will automatically arranged so that program number 1 shall have the earliest time and program
number 6 shall have the latest time.
If the setting time is the same, Priority will be given to the latest reservation contents.
● CAUTION ! If the remote controller is left idle and (SEND) button is not pressed within 3 minutes
after reservations have been made , all current reservations will be lost.
(SEND) button, the set ON TIMER or OFF TIMER for each program
– 25 –
Page 26

HSILGNE
WEEKLY TIMER OPERATION
HSILGNE
■ How to copy and paste.
Editing the reservation schedule is easy by copying data from one day to
another day.
1. Press
(WEEKLY) button to select Mode A or Mode B.
2. Press
(WEEKLY) button for about 3 seconds to start editing the
reservation schedule.
3. Press
(DAY) button to select a day of the week to copy.
4. Press
(COPY/PASTE) button. Then "PASTE" blinks on the display.
* Press
(CANCEL) button to cancel the COPY mode. Normal
setting mode is activated.
5. Press
(DAY) button to select a day of the week to paste.
6. Press
(COPY/PASTE) button one more time to paste. only
blinks on the display.
7. To continue copying to other days, press
or or or
.
Then start from step 3.
8. After copy and paste completed, press
(SEND) button while
directing the remote controller towards the indoor unit for about 3 seconds.
Timer lamp on the indoor unit will blink rapidly.
After beep sound emitted from indoor unit, TIMER lamp will light up.
Please ensure that the TIMER lamp lights up.
If TIMER lamp does not light up, Press
(SEND) button again.
● Reservation data will not change if (SEND) button is not pressed.
Step 3: Copy and cancel the reservation schedule.
NOTE
● If there is no reservation data, copying data from one day to another day cannot be done.
1
2
3
4
5
6
8
WEEKLY TIMER OPERATION
Step 2: Select Mode A or Mode B and activate or deactivate WEEKLY TIMER.
■ How to select Mode A or Mode B of WEEKLY TIMER setting.
1
2
1. Press
(Normally Mode A will blink first).
2. Press
(WEEKLY) button. and blink on the display.
(WEEKLY) button again. and blink on the display.
3. Select Mode A or Mode B. Press
3
1
remote controller towards the indoor unit for about 3 seconds. Timer lamp
on the indoor unit will blink rapidly.
After beep sound emitted from indoor unit, TIMER lamp will light up.
Please ensure that the TIMER lamp lights up.
This indicates that Mode A or Mode B selection and active WEEKLY TIMER
have been confirmed.
■ Setting non-active WEEKLY TIMER .
1. Direct the remote controller towards the indoor unit and press
(CANCEL) button.
Beep sound will be emitted from indoor unit and TIMER lamp will be OFF.
Reservation indication on remote display will also disappear.
This indicates that non-active WEEKLY TIMER has been confirmed.
●
To activate back the setting of WEEKLY TIMER , repeat the steps for
"How to select Mode A or Mode B of WEEKLY TIMER setting".
(SEND) button while directing the
NOTE
●
When setting ONCE TIMER, operation of WEEKLY TIMER is interrupted. After ONCE TIMER operation
is complete, WEEKLY TIMER operation will be activated.
●
When ONCE TIMER is cancelled, operation of WEEKLY TIMER is also cancelled. Need to set WEEKLY
TIMER operation for activation.
●
After auto restart, WEEKLY TIMER operation is cancelled. Need to set WEEKLY TIMER operation for
activation.
– 26 –
Page 27

HSILGNE
directing the remote controller towards the indoor unit for about 3 seconds.
WEEKLY TIMER OPERATION
Step 3: Copy and cancel the reservation schedule.
■ How to copy and paste.
1
2
Editing the reservation schedule is easy by copying data from one day to
another day.
ENGLISH
1. Press
2. Press
reservation schedule.
3
4
5
6
3. Press
4. Press
* Press
setting mode is activated.
5. Press
6. Press
blinks on the display.
7. To continue copying to other days, press
.
Then start from step 3.
8. After copy and paste completed, press
Timer lamp on the indoor unit will blink rapidly.
After beep sound emitted from indoor unit, TIMER lamp will light up.
Please ensure that the TIMER lamp lights up.
If TIMER lamp does not light up, Press
● Reservation data will not change if (SEND) button is not pressed.
(WEEKLY) button to select Mode A or Mode B.
(WEEKLY) button for about 3 seconds to start editing the
(DAY) button to select a day of the week to copy.
(COPY/PASTE) button. Then "PASTE" blinks on the display.
(CANCEL) button to cancel the COPY mode. Normal
(DAY) button to select a day of the week to paste.
(COPY/PASTE) button one more time to paste. only
or or or
(SEND) button while
(SEND) button again.
8
NOTE
● If there is no reservation data, copying data from one day to another day cannot be done.
– 27 –
Page 28
HSILGNE
WEEKLY TIMER OPERATION
HSILGNE
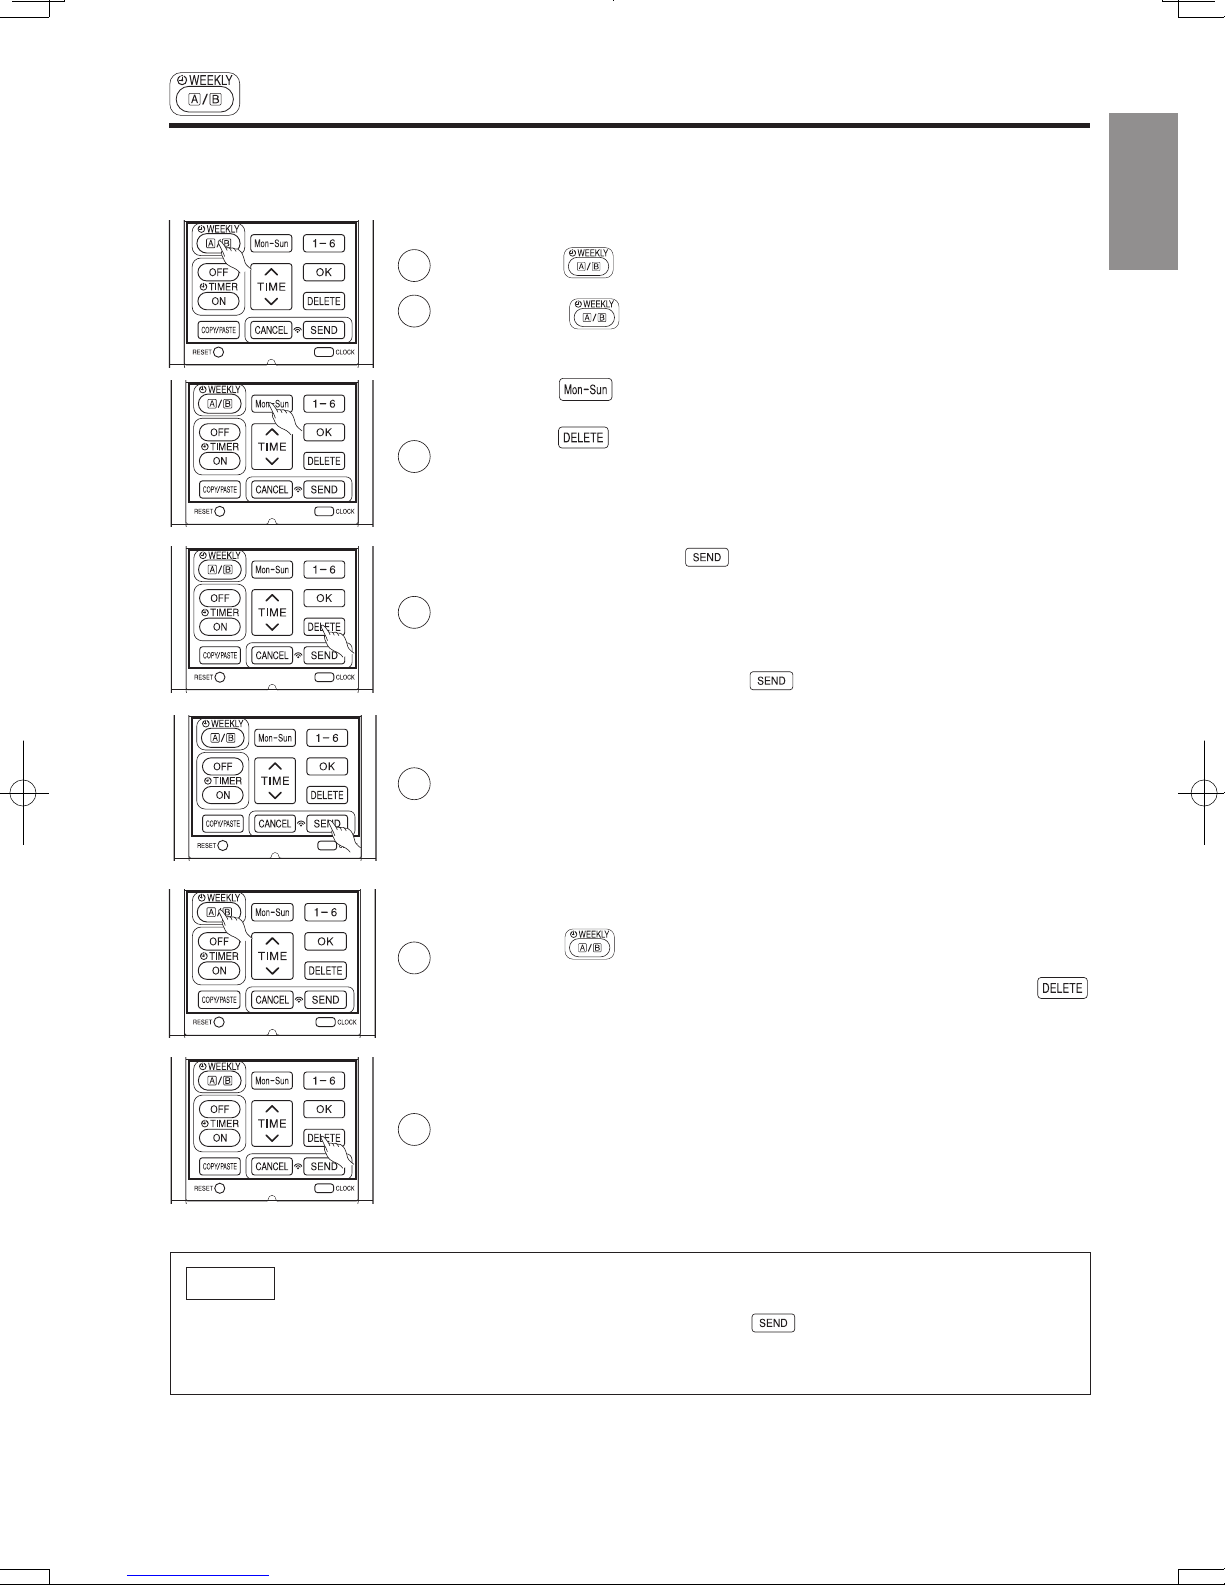
Step 3: Copy and cancel the reservation schedule.
[Delete one day reservation]
1. Press
(WEEKLY) button to select Mode A or Mode B.
2. Press
(WEEKLY) button for 3 seconds to start editing the
reservation schedule.
3. Press
(DAY) button to select a day of the week to edit.
4. Press
(DELETE) button for about 10 seconds. Reservations for all
program numbers will be deleted.
● If press for a short time, reservation for one program number will be
deleted.
5. After deleting, press
(SEND) button while directing the remote
controller towards the indoor unit for about 3 seconds. Timer lamp on the
indoor unit will blink rapidly.
After beep sound emitted from indoor unit, TIMER lamp will light up.
Please ensure that the TIMER lamp lights up.
● Reservation will not change if (SEND) button is not pressed.
1
1
2
NOTE
●
If all reservations in the remote controller were deleted and pressed
(SEND) button, no signal will be
transmitted to indoor unit. TIMER lamp will remain off and no changes will be done to the reservations
stored in the indoor unit.
3
2
4
5
WEEKLY TIMER OPERATION
[Delete Mode A or Mode B]
1. Press
(WEEKLY) button to select Mode A or Mode B.
2. Direct the remote controller towards the indoor unit and press
(DELETE) button for about 10 seconds while Mode A or Mode B display
blinks.
After beep sound emitted from indoor unit, reservations for Mode A or
Mode B will disappear.
Step 3: Copy and cancel the reservation schedule.
1
■ How to delete WEEKLY TIMER data.
[Delete one program number reservation]
2
3
4
1. Press
2. Press (WEEKLY) button for 3 seconds to start editing the reserva-
tion schedule.
3. Press
4. Press
blink.
5. Press
is deleted.
6. After deleting, press
controller towards the indoor unit for about 3 seconds. Timer lamp on the
indoor unit will blink rapidly.
After beep sound emitted from indoor unit, TIMER lamp will light up.
Please ensure that the TIMER lamp lights up.
● Reservation will not change if (SEND) button is not pressed.
(WEEKLY) button to select Mode A or Mode B.
(DAY) button to select a day of the week to edit.
to select program number. Selected program number will
(DELETE) button. Reservation of selected program number
(SEND) button while directing the remote
5
6
– 28 –
Page 29
HSILGNE
controller towards the indoor unit for about 3 seconds. Timer lamp on the
WEEKLY TIMER OPERATION
Step 3: Copy and cancel the reservation schedule.
[Delete one day reservation]
1
2
3
4
1. Press
2. Press
reservation schedule.
3. Press
4. Press
program numbers will be deleted.
● If press for a short time, reservation for one program number will be
deleted.
5. After deleting, press
indoor unit will blink rapidly.
After beep sound emitted from indoor unit, TIMER lamp will light up.
Please ensure that the TIMER lamp lights up.
● Reservation will not change if (SEND) button is not pressed.
(WEEKLY) button to select Mode A or Mode B.
(WEEKLY) button for 3 seconds to start editing the
(DAY) button to select a day of the week to edit.
(DELETE) button for about 10 seconds. Reservations for all
(SEND) button while directing the remote
5
ENGLISH
[Delete Mode A or Mode B]
1
1. Press
2. Direct the remote controller towards the indoor unit and press
(DELETE) button for about 10 seconds while Mode A or Mode B display
blinks.
After beep sound emitted from indoor unit, reservations for Mode A or
Mode B will disappear.
(WEEKLY) button to select Mode A or Mode B.
2
NOTE
●
If all reservations in the remote controller were deleted and pressed
transmitted to indoor unit. TIMER lamp will remain off and no changes will be done to the reservations
stored in the indoor unit.
(SEND) button, no signal will be
– 29 –
Page 30
HSILGNE
INFO FUNCTION
HSILGNE
OPERATION MODE LOCK
The remote controller can be set to fix the HEATING mode (including FAN), COOLING mode (including FAN) and
DEHUMIDIFYING mode (including FAN) operations.
■ Method to lock HEATING mode (including FAN) operation.
Press
(ECO) and (POWERFUL) buttons simultaneously for about 5
seconds when remote controller is OFF.
“
”, “ ” and “ ” will be displayed for about 10 seconds. Later, “ ” and
“
” will remain.
This indicates that HEATING mode operation is locked.
(MODE) button, “ ” or “ ” will be displayed.
■ Method to unlock HEATING mode (including FAN) operation.
Press
(ECO) and (POWERFUL) buttons simultaneously for about 5
seconds when the remote controller is OFF.
All operation mode symbols will appear on the display for about 10 seconds. After
that, operation mode symbol before cancellation will be displayed.
This indicates that HEATING mode operation is unlocked.
■ Method to lock COOLING and DEHUMIDIFYING modes (including FAN)
operations.
Press
(ECO) and (SILENT) buttons simultaneously for about 5 seconds
when the remote controller is OFF.
“ ”, “
”, “ ” and “ ” will be displayed for about 10 seconds. Later, “ ”
and “
” will remain.
This indicates that COOLING and DEHUMIDIFYING mode operation is locked.
(MODE) button, “ ”, “ ” or “ ” will be displayed.
■ Method to unlock COOLING and DEHUMIDIFYING modes (including FAN)
operations.
Press
(ECO) and (SILENT) buttons simultaneously for about 5 seconds
when the remote controller is OFF.
All operation mode symbols will appear on the display for about 10 seconds. After
that, operation mode symbol before cancellation will be displayed.
This indicates that COOLING and DEHUMIDIFYING modes operation is unlocked.
NOTE
● Operation Mode Lock function will not activate if TIMER reservations activate.
TIMER reservations shall be deactivated first. Then, Operation Mode Lock function can be activated.
● HEATING, COOLING and DEHUMIDIFYING mode (including FAN) operations can be unlocked by pressing
the
(RESET) button. However, by pressing the (RESET) button, all the information stored
in the remote controller will disappear. You may need to set the necessary information again.
● For multi connections, unit and mode which is set to lock HEATING and switched on first shall have
higher priority. Other units which are chosen to operate at different modes shall be in STANDBY until
either the first unit operation is switched off or the mode is selected to be same as the first unit.
When preessing
When pressing
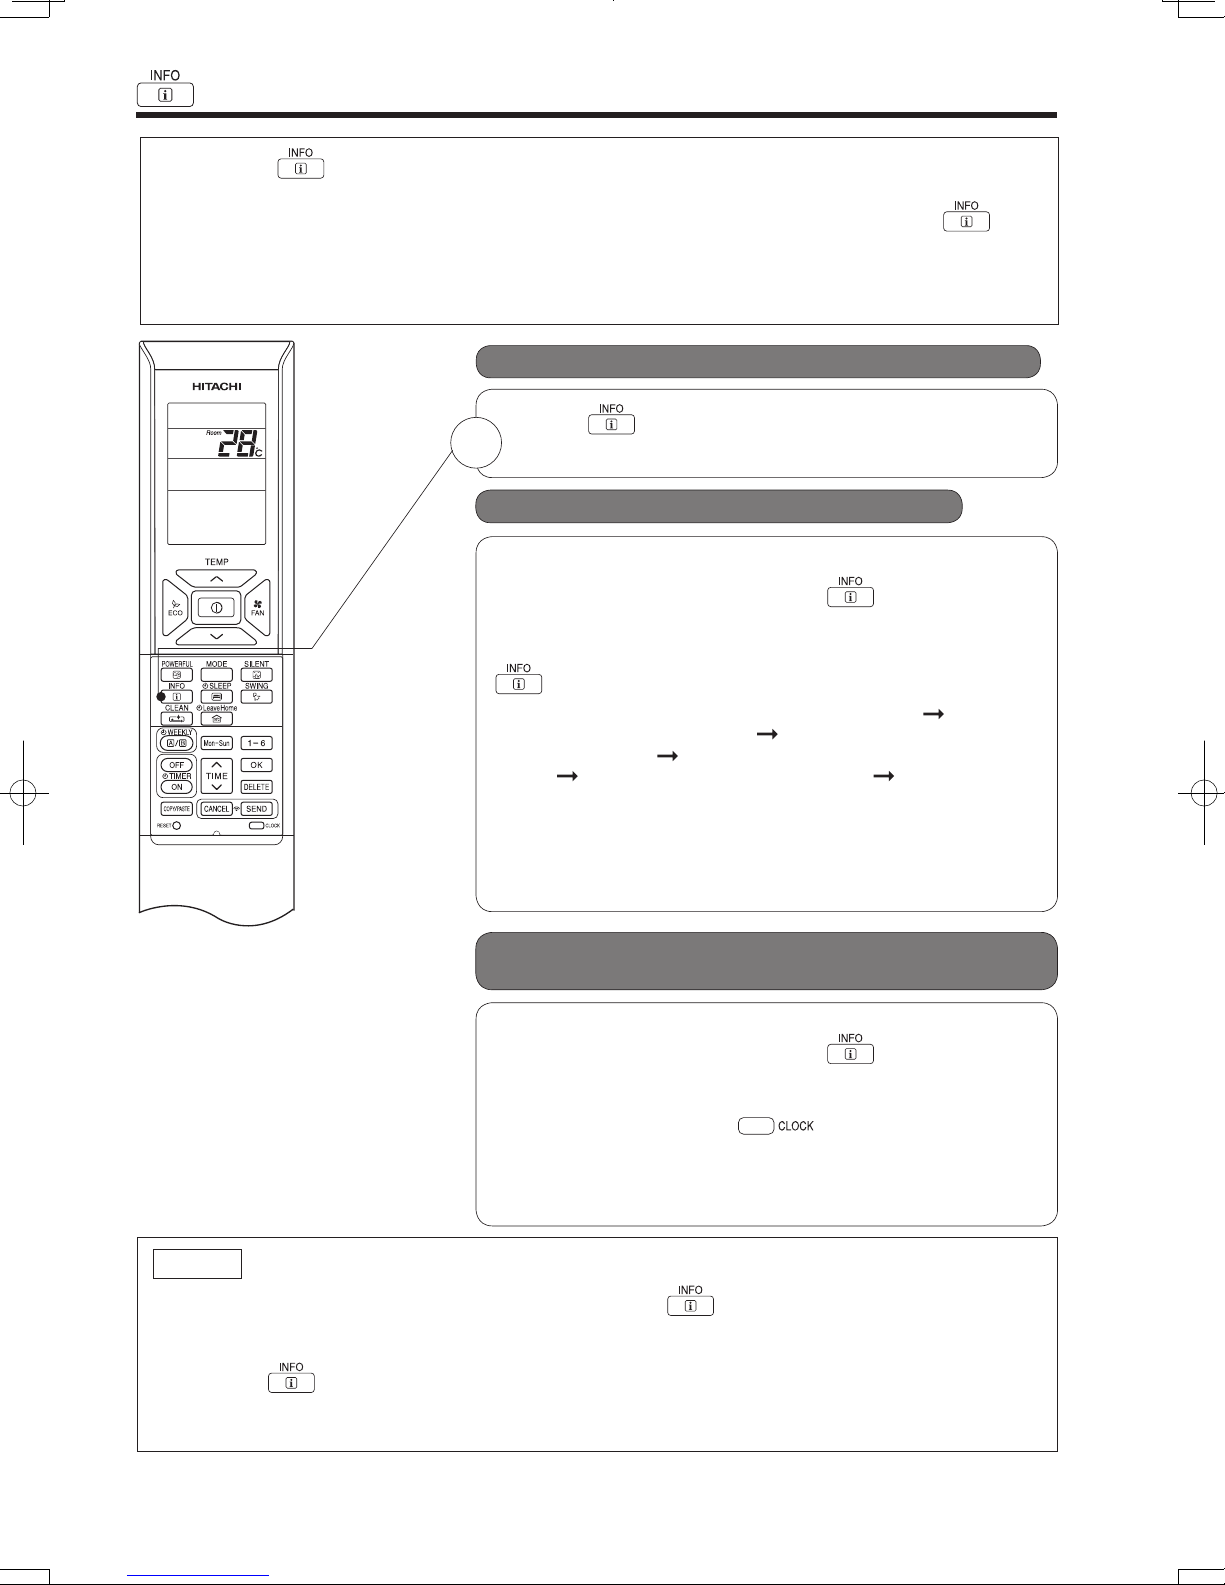
● By pressing (INFO) button, temperature around remote controller and monthly power consumption
will be displayed on the remote controller.
● After changing the batteries, direct the remote controller towards the indoor unit and press
button.
Current calendar and clock will be transmitted from indoor unit.
●
In order to receive information from indoor unit, the distance between remote controller and receiver of indoor
units is within 2 meters.
(INFO)
■ To check temperature around remote controller
Press (INFO) button.
1
Temperature will be displayed for 10 seconds.
■ To check monthly power consumption
Direct the remote controller towards the receiver of indoor unit (within 2
meters in front of indoor unit) and press
for 2 seconds for signal transmission.
While temperature around remote controller is displayed, press
(INFO) button repeatedly. The display will show as below:
this month power consumption amount for heating
power consumption for heating
amount for cooling
cooling
consumption amount for heating ...... cyclically.
●
If indication is not given, bring remote controller closer to the
receiver of the indoor unit.
lndicated value shall be regarded as a guide only.
●
temperature around remote control this month power
last month power consumption amount for
this month power consumption
(INFO) button. Wait
last month
■ Current calendar and clock can be retrieved
from indoor unit
Direct the remote controller towards the receiver of indoor unit (within 2
meters in front of indoor unit) and press
NOTE
●
In case failure occurs to the air conditioner, by pressing (INFO) button, an error code will
be displayed.
Direct the remote controller towards the receiver of indoor unit (within 2 meters in front of indoor unit)
and press
An error code will be displayed.
Call service center and inform the error code.
(INFO) button. Wait for 2 seconds for signal transmission.
for 2 seconds for signal transmission.
Once received the current calendar and clock, check whether they
are correct or not by pressing
● If there is no power supply to indoor unit or calendar and clock
have not been set, INFO function cannot be used for sending or
receiving information.
– 30 –
(CLOCK) button.
(INFO) button. Wait
Page 31

HSILGNE
OPERATION MODE LOCK
The remote controller can be set to fix the HEATING mode (including FAN), COOLING mode (including FAN) and
DEHUMIDIFYING mode (including FAN) operations.
■ Method to lock HEATING mode (including FAN) operation.
ENGLISH
Press
seconds when remote controller is OFF.
“
“
This indicates that HEATING mode operation is locked.
When preessing
■ Method to unlock HEATING mode (including FAN) operation.
Press
seconds when the remote controller is OFF.
All operation mode symbols will appear on the display for about 10 seconds. After
that, operation mode symbol before cancellation will be displayed.
This indicates that HEATING mode operation is unlocked.
■ Method to lock COOLING and DEHUMIDIFYING modes (including FAN)
Press
when the remote controller is OFF.
“
and “
(ECO) and (POWERFUL) buttons simultaneously for about 5
”, “ ” and “ ” will be displayed for about 10 seconds. Later, “ ” and
” will remain.
(MODE) button, “ ” or “ ” will be displayed.
(ECO) and (POWERFUL) buttons simultaneously for about 5
operations.
(ECO) and (SILENT) buttons simultaneously for about 5 seconds
”, “ ”, “ ” and “ ” will be displayed for about 10 seconds. Later, “ ”
” will remain.
This indicates that COOLING and DEHUMIDIFYING mode operation is locked.
When pressing
■ Method to unlock COOLING and DEHUMIDIFYING modes (including FAN)
operations.
Press
when the remote controller is OFF.
All operation mode symbols will appear on the display for about 10 seconds. After
that, operation mode symbol before cancellation will be displayed.
This indicates that COOLING and DEHUMIDIFYING modes operation is unlocked.
(ECO) and (SILENT) buttons simultaneously for about 5 seconds
(MODE) button, “ ”, “ ” or “ ” will be displayed.
NOTE
● Operation Mode Lock function will not activate if TIMER reservations activate.
TIMER reservations shall be deactivated first. Then, Operation Mode Lock function can be activated.
● HEATING, COOLING and DEHUMIDIFYING mode (including FAN) operations can be unlocked by pressing
the
in the remote controller will disappear. You may need to set the necessary information again.
● For multi connections, unit and mode which is set to lock HEATING and switched on first shall have
higher priority. Other units which are chosen to operate at different modes shall be in STANDBY until
either the first unit operation is switched off or the mode is selected to be same as the first unit.
(RESET) button. However, by pressing the (RESET) button, all the information stored
– 31 –
Page 32

MAINTENANCE
HSILGNE
2. CLEANING OF FRONT PANEL
• Remove the front panel and wash with clean water.
Wash it with a soft sponge.
After using neutral detergent, wash thoroughly with
clean water.
• When front panel is not removed, wipe it with a soft
dry cloth. Wipe the remote controller thoroughly with
a soft dry cloth.
• Wipe the water thoroughly.
If water remains at indicators or signal receiver of
indoor unit, it causes trouble.
Method of removing the front panel.
Be sure to hold the front panel with both hands to
detach and attach it.
CAUTION
Removing the Front Panel Attaching the Front Panel
• When the front panel is fully opened with both
hands, push the right arm to the inside to
release it, and while closing the front panel
slightly, put it out forward.
• Move the shafts of the left and right arms into
the steps in the unit and securely insert them
into the holes.
• Do not splash or direct water to the body of the unit when cleaning it as
this may cause short circuit.
• Never use hot water (above 40°C), benzine, gasoline, acid, thinner or a
brush, because they will damage the plastic surface and the coating.
3. MAINTENANCE AT BEGINNING OF LONG OFF PERIOD
• Run the unit by setting the operation mode to
(FAN) and the fan speed to HI for about half a day
on a fine day, and dry the whole of the unit.
• Switch off the power plug or turn off the circuit breaker.
B
E
N
Z
I
N
E
T
H
I
N
N
E
R
A
C
I
D
Air
Blow
ENGLISH
Shaft
Hole
2 1
Shaft
Hole
2 1
CAUTION
Cleaning and maintenance must be carried out only by qualified service personal. Before cleaning,
stop operation and switch off the power supply.
1. AIR FILTER
Please clean the filter once about every two weeks. By doing so, the power rates are saved. In
case the air filter is full of dust, the air flow will decrease and the cooling capacity will be reduced.
Further, noise may occur. Be sure to clean the filter following the procedure below.
PROCEDURE
Open the front panel carefully and remove the filter.
1
Vacuum dust from the air filter using vacuum cleaner.
2
If there is too much dust, wash the filter with a detergent
and rinse it thoroughly. After that, dry it in the shade.
• Set the filter with “FRONT” mark facing front, and
3
slot them into the original state.
• After attaching the filters, push the front panel at
three arrow portions as shown in figure and close
it.
CAUTION
TEMPORARY
SWITCH
TEMPORARY
SWITCH
TEMPORARY
SWITCH
• Do not wash with hot water at more than 40°C. The filter may shrink.
• When washing it, shake off moisture completely and dry it in the shade; do not expose it directly
to the sun. The filter may shrink.
• Don't operate the unit without filter. Fault may occur if you continue.
– 32 –
Page 33

2. CLEANING OF FRONT PANEL
ENGLISH
• Remove the front panel and wash with clean water.
Wash it with a soft sponge.
After using neutral detergent, wash thoroughly with
clean water.
• When front panel is not removed, wipe it with a soft
dry cloth. Wipe the remote controller thoroughly with
a soft dry cloth.
• Wipe the water thoroughly.
If water remains at indicators or signal receiver of
indoor unit, it causes trouble.
Method of removing the front panel.
Be sure to hold the front panel with both hands to
detach and attach it.
Removing the Front Panel Attaching the Front Panel
ENGLISH
2 1
Shaft
Hole
• When the front panel is fully opened with both
hands, push the right arm to the inside to
release it, and while closing the front panel
• Move the shafts of the left and right arms into
the steps in the unit and securely insert them
into the holes.
slightly, put it out forward.
CAUTION
• Do not splash or direct water to the body of the unit when cleaning it as
this may cause short circuit.
• Never use hot water (above 40°C), benzine, gasoline, acid, thinner or a
brush, because they will damage the plastic surface and the coating.
3. MAINTENANCE AT BEGINNING OF LONG OFF PERIOD
• Run the unit by setting the operation mode to
(FAN) and the fan speed to HI for about half a day
on a fine day, and dry the whole of the unit.
2 1
Shaft
Hole
A
B
E
N
C
E
Z
N
I
T
R
H
E
I
N
I
D
N
• Switch off the power plug or turn off the circuit breaker.
– 33 –
Air
Blow
Page 34

INFORMATION
ENGLISH
REGULAR INSPECTION
PLEASE CHECK THE FOLLOWING POINTS EVERY EITHER HALF YEARLY OR YEARLY. CONTACT
YOUR SALES AGENT SHOULD YOU NEED ANY HELP.
1
2
3
WARNING
WARNING
Check to see if the unit’s earth line has been con-
nected correctly.
If the earth line is disconnected or faulty, unit failure or
electric shock hazard may result.
Check to see if the mounting frame has rusted ex-
cessively or if the outdoor unit has tilted or become
unstable.
It could collapse or fall, causing injury.
AFTER SALES SERVICE AND WARRANTY
WHEN ASKING FOR SERVICE, CHECK THE FOLLOWING POINTS.
CONDITION CHECK THE FOLLOWING POINTS
• Do the batteries need replacement?
• Is the polarity of the inserted batteries correct?
• Is the fuse all right?
• Is the voltage extremely high or low?
• Is the circuit breaker “ON”?
• Is the power plug inserted?
• Do you have any power cut?
• Is the air filter blocked with dust?
• Is the set temperature suitable?
• Have horizontal air deflectors been adjusted to their correct
positions according to the operation mode selected?
• Are the air inlets or air outlets of indoor and outdoor units
blocked?
• Is the fan speed “LOW”or “SILENT”?
When it does not operate.
When it does not cool well.
When it does not heat well.
If the remote controller is not
transmitting a signal.
(Remote controller display is
dim or blank.)
The following phenomena do not indicate unit failure.
<Operation start>
The unit is preparing to blow warm air. Please wait.
<In operation>
The outdoor unit is defrosting. Please wait.
Refrigerant flow noise in the pipe or valve sound generated when flow rate is
adjusted.
Noise generated when the unit expands or contracts due to temperature changes.
Noise generated with the indoor unit fan’s rpm changing such as operation start
times.
Noise of the motorized valve when the unit is switched on.
During heating, the operation
indicator blinks and air blow stops
Hissing or fizzy sounds
Squeaking noise
Rustling noise
WARNING
Clicking noise
Check to see if the power plug is securely inserted
into the wall socket.
If the power plug is not inserted into the wall socket
securely or becomes hot, an electric shock or fire may result.
If dust or dirt is found on the power plug, clean the plug
and insert it into the wall socket.
ENGLISH
CAPABILITIES
Heating Capability
• This room air conditioner utilizes a heat pump system that absorbs
exterior heat and brings it into a room to be heated. As the ambient
temperature gets lower, heating capability will also lower. In such a
situation, the inverter work to increase compressor rpm to keep the
unit’s heating capability from decreasing. If the unit’s heating performance is still unsatisfactory, other heating appliances should be used
to augment this unit’s performance.
• The air conditioner is designed to heat an entire room so that it may take some time before you feel warm.
Timer operation is recommended for effective preheating ahead of the desired time.
CAUTION
Do not use a stove
or any other
hightemperature
devices in proximity
to the indoor unit.
PROHIBITION
Cooling and Dehumidifying Capabilities
• If the heat present in a room exceeds the unit’s cooling capacity (for example, if there are many people in
the room or other heating appliances are used), the preset room temperature may not be reached.
– 34 –
Page 35

REGULAR INSPECTION
ENGLISH
PLEASE CHECK THE FOLLOWING POINTS EVERY EITHER HALF YEARLY OR YEARLY. CONTACT
YOUR SALES AGENT SHOULD YOU NEED ANY HELP.
Check to see if the unit’s earth line has been con-
1
WARNING
nected correctly.
If the earth line is disconnected or faulty, unit failure or
electric shock hazard may result.
Check to see if the mounting frame has rusted ex-
2
WARNING
cessively or if the outdoor unit has tilted or become
unstable.
It could collapse or fall, causing injury.
Check to see if the power plug is securely inserted
into the wall socket.
3
WARNING
If the power plug is not inserted into the wall socket
securely or becomes hot, an electric shock or fire may result.
If dust or dirt is found on the power plug, clean the plug
and insert it into the wall socket.
AFTER SALES SERVICE AND WARRANTY
ENGLISH
WHEN ASKING FOR SERVICE, CHECK THE FOLLOWING POINTS.
CONDITION CHECK THE FOLLOWING POINTS
If the remote controller is not
transmitting a signal.
(Remote controller display is
dim or blank.)
When it does not operate.
When it does not cool well.
When it does not heat well.
The following phenomena do not indicate unit failure.
During heating, the operation
indicator blinks and air blow stops
Hissing or fizzy sounds
Squeaking noise
Rustling noise
Clicking noise
• Do the batteries need replacement?
• Is the polarity of the inserted batteries correct?
• Is the fuse all right?
• Is the voltage extremely high or low?
• Is the circuit breaker “ON”?
• Is the power plug inserted?
• Do you have any power cut?
• Is the air filter blocked with dust?
• Is the set temperature suitable?
• Have horizontal air deflectors been adjusted to their correct
positions according to the operation mode selected?
• Are the air inlets or air outlets of indoor and outdoor units
blocked?
• Is the fan speed “LOW”or “SILENT”?
<Operation start>
The unit is preparing to blow warm air. Please wait.
<In operation>
The outdoor unit is defrosting. Please wait.
Refrigerant flow noise in the pipe or valve sound generated when flow rate is
adjusted.
Noise generated when the unit expands or contracts due to temperature changes.
Noise generated with the indoor unit fan’s rpm changing such as operation start
times.
Noise of the motorized valve when the unit is switched on.
– 35 –
Page 36

Perking noise
ENGLISH
Changing operation noise
Mist emission
Steam emitted from the outdoor unit
Odors
The outdoor unit continues to operate
even if operation is stopped.
The OPERATION lamp is blinking.
Does not reach the temperature
setting
Noise of the ventilation fan sucking in air present in the drain hose and blowing out
dehumidifying water that had accumulated in the condensed water collector. For
details, consult your sales agent.
Operation noise changes due to power variations according to room temperature
changes.
Mist is generated as the air within the room is suddenly cooled by conditioned air.
Water generated during defrosting operation evaporates and steam is emitted.
Caused as the smells and particles of smoke, food, cosmetics, etc. present in room
air become attached the unit and blown off into the room again.
Defrosting is underway (as the heating operation is stopped, the microcomputer
checks frost accumulated in the outdoor unit and instructs the unit to perform
automatic defrosting if necessary).
Shows preheating or defrosting operation is underwa y.
As the protective circuit or preheat sensor operates when unit operation is stopped
during preheating and then restarted, or when operation mode is switched from cooling
to heating, the lamp continues to blink.
Actual room temperature may deviate slightly from the remote controller's
temperature setting depending on the number of people in the room, indoor or
outdoor conditions.
• If the unit still fails to operate
normally after performing the
above inspections, turn the
circuit breaker off, or pull the
power plug out, and contact
your sales agent immediately.
Notes
• In quiet operation or stopping the running, the following phenomena may
occasionally occur, but they are not abnormal for the operation.
(1) Slight flowing noise of refrigerant in the refrigerating cycle.
(2) Slight rubbing noise from the fan casing which is cooled and then
• The odor will possibly be emitted from the room air conditioner because
the various odor, emitted by smoke, foodstuffs, cosmetics and so on,
sticks to it. So please clean the air filter and the evaporator regularly to
reduce the odor.
• Please contact your sales agent immediately if the air conditioner still fails to operate normally after
the above inspections. Inform your agent of the model of your unit, production number, date of
installation. Please also inform him regarding the fault.
Contact your sales agent immediately if the
following phenomena should occur:
The circuit breaker switches off or the fuse blows
•
frequently.
•
The switch operation is not stable.
•
Foreign matter or water accidentally enters the unit interior.
•
The power cord gets excessively hot or its insulation is torn or stripped.
•
TIMER lamp on the indoor unit display blinks.
As the nature of the failure can be identified by the blinking cycle,
(
check the blinking cycle before turning off the circuit breaker.
gradually warmed as operation stops.
)
Please note:
On switching on the equipment, particularly when the room light is dimmed, a slight brightness
fluctuation may occur. This is of no consequence.
The conditions of the local Power Supply Companies are to be observed.
– 36 –
Page 37

AUFGETEILTE KLIMAANLAGE
INNENGERÄT/AUSSENGERÄT
MODELL
HFC
R410A
RAK-18PPA/RAC-18WPA
RAK-25PPA/RAC-25WPA
RAK-35PPA/RAC-35WPA
DEUTSCH
AUSSENGERÄT
RAC-18WPA
RAC-25WPA
RAC-35WPA
Instruction manual Page 1~36
To obtain the best performance and ensure years of
trouble free use, please read this instruction manual
completely.
INNENGERÄT
RAK-18PPA
RAK-25PPA
RAK-35PPA
Manual de instrucciones Página 145~180
Para obtener el mejor funcionamiento y asegurar años
de uso libre de problemas, lea cuidadosamente este
manual de instrucciones.
Bedlenungsanleitung Seite 37~72
Bitte lesen Sie diese Bedienungsanleitung aufmerksam
durch, um durch richtige Bedienung jahrelangen und
störungsfreien Betrieb zu gewährleisten.
Mode d’emploi Page 73~108
Des performances optimales et un fonctionnement à
long terme seront assurés en appliquant les présentes
instructions après avoir entièrement lu ce mode
d’emploi.
Manuale di istruzioni Pag. 109~144
Per garantire la migliore prestazione e la più lunga
durataleggere attentamente e al completo le seguanti
istruzioni.
Manual de instruções Página 181~216
A m de obter um bom funcionamento e de garantir
uma utilização sem falhas durante muitos anos, é
favor ler este manual de instruções completamente.
Οδηγίες χρήσης ™ÂÏ›‰· 217~252
°И· ЩЛУ О·П‡ЩВЪЛ ·fi‰ФЫЛ ЩФ˘ ОПИМ·ЩИЫЩИОФ‡ О·И БИ·
ЩЛУ М·ОЪФЪfiıВЫМЛ ¯Ъ‹ЫЛ ЩФ˘ ¯ˆЪ›˜ ЪФ‚П‹М·Щ·,
‰И·‚¿ЫЩВ ЪФЫВОЩИО¿ ·˘Щ¤˜ ЩИ˜ Ф‰ЛБ›В˜ ¯Ъ‹ЫЛ˜.
– 37 –
Page 38

SICHERHEITSMASSNAHMEN
• Bitte lesen Sie die Sicherheitsmaßnahmen vor der Inbetriebnahme der Klimaanlage aufmerksam durch.
• Beachten Sie besonders die mit “ Warning” und “ Caution”. bezeichneten Abschnitte. Die mit
“WARNUNG” bezeichneten Abschnitte enthalten Punkte, die zum Tode oder zu ernshaften
Verletzungen führen können, wenn sie nicht strikt eingehalten werden. Bei Nichteinhaltung der mit
“VORSICHT” bezeichneten Abschnitte kann es zu ernsthaften Konsequenzen kommen. Bitte beachten
Sie strikt alle Anweisungen, um Sicherheit zu gewährleisten.
• Die Symbole haben folgende Bedeutung. (Nachstehend sind einige Beispiele von Signalen.)
Dieses Symbol heißt “verboten”.
• Bitte bewahren Sie diese Anleitung sorgfältig auf.
VORSICHTSMASSNAHMEN WÄHREND DES EINBAUS
• Bauen Sie das Gerät nicht selbst ein, sonst könnten Probleme wie Wasserlecken,
Kurzschluß oder Feuer auftreten.
• Wenden Sie sich bitte an den Händler oder an einen qualizierten Techniker für
den Einbau des Gerätes. Sollten Sie persönlich den Einbau ausführen, dann
könnte Wasserleck, Kurzschluß oder Feuer die Folge sein.
WARNUNG
VORSICHT
• Verwenden Sie bitte einen Schutzleiter(Erdunagsleitung).
Der Schutzleiter darf nicht in der Nähe von Gas-, Wasserröhren oder dem Schutzleiter eines Telephons plaziert werden. Falsche Installation des Schutzleiters
könnte elektrischen Schlag verursachen.
• Verwenden Sie nur den angegebenen Rohrsatz für R410A. Andernfalls könnte
ein Rohrschaden oder Defekt stattnden.
• Ein Unterbrecher sollte jenach Montagestandort eingesetzt werden.
Ohne den Unterbrecher besteht die Gefahr des elektrischen Schlages.
• Montieren Sie das Gerät nicht in der Nähe von brennbarem Gas.
Das Außen-gerät könnte Feuer fangen, wenn brennbares Gas in seiner Umgebung entweicht. Die Rohrleitungen sind gut abzustützen, wobei der Zwischenraum zwischen den Stützen nicht mehr als 1 m betragen soll.
• Achten Sie beim Einbau darauf, daß eine einwandfreie Wasserableitung möglich ist.
Wenn in der Abußleitung Defekte auftreten, tropft Wasser von den Innen- und
Außen-geräten und verursacht Wasserschäden an der Wohnungseinrichtung.
• Überprüfen Sie, dass eine einphasige 230V Stromquelle eingesetzt ist.
Die Anwendung von anderen Stromquellen kann zu einem Überhitzen der
elektrischen Komponenten, und deswegen zu einem Feuerbruch bringen.
Dieses Symbol zeigt die Anweisungen an, die befolgt
werden müssen.
VERBOT
DIE ERDLEITUNG
ANSCHLIESSEN
VERBOT
VERBOT
VORSICHTSMASSNAHMEN WÄHREND DES TRANSPORTS UND DER WARTUNG
• Im Falle anormaler Begebenheiten (z.B. es riecht verbrannt), das Gerät sofort ausschalten und den Stecker aus der Steckdose ziehen. Verständigen Sie Ihren Fachhändler.
Weiterer Betrieb des Gerätes unter anormalen Bedingungen kann zu Kurzschluß
und Feuergefahr führen.
• Bitte wenden Sie sich für die Wartung an Ihren Fachhändler oder an einen Kundendienst.
Selbst ausgeführte, fehlerhafte Wartung kann zu Feuer- und Stromschlaggefahr führen.
• Bitte wenden Sie sich für den Ausbau und Einbau des Gerätes an Ihren Fachhändler oder an einen
Kundendienst.
Selbst ausgeführter, fehlerhafter Ausbau und Einbau können zu Feuer- und Stromschlaggefahr führen.
• Aus gesundheitlichen Gründen sollten Sie es vermeiden für längere Zeit dem
direkten Luftstrom ausgesetzt zu sein.
WARNUNG
• Kein Verlängerungskabel an das Netzkabel anschließen oder zu viele andere Elektrogeräte an
die Netzsteckdose, in die das Netzkabel eingesteckt ist, anschließen.
Darüber hinaus das Kabel mit etwas zusätzlicher Kabellänge verdrahten, damit das Kabel keiner
Zugspannung ausgesetzt ist.
Nichtbeachtung kann einen Stromschlag, Wärmeentwicklung oder einen Brand zur Folge haben.
• Das Netzkabel nicht bündeln, daran ziehen, etwas darauf stellen, es erwärmen,
es bearbeiten oder zwischen Gegenstände legen. Nichtbeachtung kann Brechen
des Netzkabels zur Folge haben.
Verwendung eines beschädigten Netzkabels kann einen Stromschlag oder einen
Brand zur Folge haben.
• Keine Gegenstände wie Stäbe in die Luftansaug- oder Luftauslaßöffnungen
VERBOT
einschieben. Sonst verursacht der Hochgeschwindigkeitsventilator Gefahr.
– 38 –
“AUS”
“OFF”
VERBOT
VERBOT
VERBOT
Page 39

WARNUNG
VORSICHTSMASSNAHMEN WÄHREND DES BETRIEBS
• Verwenden Sie nicht irgend einen Draht als Sicherung. Das könnte lebesgefährlich
werden.
• Während eines Gewitters den Netzanschluß trennen oder den Unterbrecher-
“AUS”
“OFF”
• Spritzbehälter und andere Brennstoffe müssen an wenigstens ein Meter weg von
Ablüftern der Innen- und Außeneinheiten aufgestellt werden.
Der Innendr uck eines Spritzbehälters wird von Warmluft erhöht werden; dies kann
einen Bruch verursachen.
• Das Gerät darf nur für die vom Hersteller vorgeschriebenen Zwecke verwendet
werden und nicht für andere Zwecke.
NICHT BENETZEN
• Wenn Verbrennungsgeräte wie Gasherd in Betrieb sind, dann lüften
Sie regelmäßig, um Sauerstoffmangel zu vermeiden.
VERBOT
• Sorgen Sie bitte dafür, daß das Gestell des Außengerätes stabil, standhaft, schadenfrei und in gutem Zustand ist. Denn sonst könnte das Gerät einstürzen und
Gefahren verursachen.
VERBOT
schalter ausschalten.
• Das Gerät niemals mit nassen Händen Betätigen. Tödliche Unfälle können
dadurch zustandekommen.
VORSICHTSMASSNAHMEN
STRENG BEFOLGEN
• Richten Sie die aus dem Innengerät ausströmende Kühlluft nicht auf
Heizgeräte, Warmhalteaschen, Öfen usw., da sonst das Leistungs-
vermögen dieser Geräte beeinträchtigt werden kann.
• Die Einheit mit Wasser nicht waschen und keinen Wasserbehälter (wie eine
Schale) innerhalb der Inneneinheit stellen.
Eine Elektroleakage könnte erfolgen und einen elektrischen Schlag verursachen.
VERBOT
VERBOT
VERBOT
VERBOT
DEUTSCH
VORSICHT
• Keine Tiere oder Panzen unmittelbar unter dem Luftstrom halten, da dies
schädlich für Tiere oder Panzen ist.
VERBOT
• Nicht auf das Außengerät steigen oder Gegenstände darauf stellen.
VERBOT
• Wenn das Gerät für längere Zeit bei geöffneten Türen und/oder Fenstern (Luftfeuchtigkeit über 80%) bzw. bei nach unten weisendem oder automatisch schwen-
kendem Luftreektor betrieben wird, dann kann Wasser an dem Luftreektor kon-
densieren und gelegentlich abtropfen. Dadurch können Ihre Möbel naß werden.
VERBOT
Daher lassen Sie Ihr Gerät unter solchen Bedingungen nicht für längere Zeit laufen.
• Wenn die Wärmemenge im Raum größer als die Kühl- oder Heizleistung des Gerätes ist (z.B. wenn zuviele Personen im Zimmer sind oder Heizgeräte verwendet
VERBOT
werden), dann kann die voreingestellte Raumtemperatur nicht erreicht werden.
• Besonders dieses Gerät Die Reinigung des Innengerätes darf nur durch Fachleute erfolgen. Wenden Sie sich an Ihren Verkaufsagenten.
Die Anwendung von handelsüblichen Reinigungsmitteln oder ähnlichen Produk-
ten kann die Plastikteile beschädigen bzw. das Abußrohr verstopfen; dies verur-
VERBOT
sacht ein Wassertropfen mit darauffolgender Gefahr von elektrischem Schlag.
• Den Luftabuss, die untere Oberäche sowie den Aluminiumügel der Außeneinheit nicht berühren.
NICHT BERÜHREN
Man könnte sich verletzen.
• Das Kühlmittelrohr sowie das Anschlussventil nicht berühren.
Man könnte sich verbrennen.
NICHT BERÜHREN
• Dieses Gerät ist nicht für die Bedienung durch junge Kinder oder ungeübte Personen vorgesehen, so lange diese nicht durch eine verantwortliche Person eingewiesen wurden, sodaß sie
das Gerät sicher bedienen können.
• Junge Kinder sollten das Gerät nur unter Beobachtung bedienen, um sicherzustellen, daß sie
nicht mit dem Gerät spielen.
– 39 –
Page 40

BEZEICHNUNGEN UND FUNKTIONEN JEDES EINZELTEILS
INNENGERÄT
Luftlter
Verhindert das Eindringen von Staub in das Innengerät
(Siehe Seite 67)
Stirntafel
Anzeigen am Innengerät
Leuchtanzeige zur Darstellung des Betriebszustandes.
(Siehe Seite 41)
Horizontaler Luftableiter vertikaler Luftableiter
(Abluftausgang)
(Siehe Seite 67)
Fernbedienung
Sendet Betriebssignale an das Innengerät.
Dadurch wird die ganze Anlage betrieben.
(Siehe Seite 42)
AUSSENGERÄT
Ablaßschlauch
Sorgt während der Betriebsarten “Kühlen” oder “Entfeuchten”
für das Abführen des beim Entfeuchten entstehenden Wassers
vom Innengerät zum Außengerät.
Verrohrung und Verdrahtung
Lufteingänge (Hinten und links)
Ablaßschlauch
Sorgt während der Betriebsarten “Kühlen” oder “Entfeuchten”
für das Abführen des beim Entfeuchten entstehenden Wassers
vom Innengerät zum Außengerät.
Verrohrung und Verdrahtung
Lufteingänge (Hinten und links)
Über das Außengerät:
• Wenn während des Betriebs des Innengerätes
• Im Heizbetrieb ießt wegen des Enteisens Kon-
• Wenn das Außengerät an der Decke aufgehängt
RAC-18WPA
RAC-25WPA
RAC-35WPA
Abluftausgang
In der Betriebsart “Heizen” strömt
kühle Luft aus, und in der Betriebsart “Kühlen” oder “Entfeuchten”
strömt Warmluft aus
Abuß
(unten)
(Im unteren Bereich seitlich)
Abluftausgang
In der Betriebsart “Heizen”
strömt kühle Luft aus, und in
der Betriebsart “Kühlen” oder
“Entfeuchten” strömt Warmluft
aus.
Abuß
(unten)
(Im unteren Bereich seitlich)
.
Erdungsklemme
Erdungsklemme
MODELLBEZEICHNUNG UND ABMESSUNGEN
“Stop” gewählt wird, läuft der Ventilator des
Außengerätes weitere 10 bis 60 Sekunden,
damit sich die Elektroteile abkühlen.
densat oder Wasser.
Den Abuß des Außengerätes nicht abdecken,
weil dieses Wasser in der kalten Zone gefrieren
kann.
ist, die Buchse und das Abußrohr am Abuß
installieren und das Wasser ablaufen lassen.
MODELL BREITE (mm) HÖHE (mm) TIEFE (mm)
RAK-18PPA, RAK-25PPA , RAK-35PPA 780 280 218
RAC-18WPA, RAC-25WPA 700 505 258
RAC-35WPA 750 548 288
– 40 –
Page 41

BEZEICHNUNGEN UND FUNKTIONEN JEDES EINZELTEILS
ANZEIGEINSTRUMENTE FÜR INNENRAUMGERÄT
BETRIEBSLAMPE (Gelb)
Diese Lampe leuchtet während des
Betriebs.Die BETRIEBSLAMPE
blinkt während desHeizbetriebs in
den folgenden Fällen.
ZEITSCHATER
KONTROLLAMPE
(Orange)
Diese Lampe leuchtet,
wenn der Zeitgeber
arbeitet.
TEMPORARY
SWITCH
(1) Beim Vorheizen
Etwa 2-3 Minuten lang nach
dem Einschalten.
(2) Beim Enteisen
Wenn sich am Wärmetauscher
der Außenan-lage Frost bildet,
wird das Enteisen etwa einmalstündlich jeweils 5-10 Minuten
durchgeführt.
DEUTSCH
TEMPORÄR-SCHALTER
• Wenn die Fernbedienung nicht arbeitet, diesen
VORSICHT
Wenn das Gerät über einen längeren
Zeitraum nicht eingesetzt werden soll,
den Unterbrecherschalter ausschalten
Schalter zum Starten und Ausschalten benutzen.
• Diese vorübergehende Funktion wird zu der neusten Einstellung gemacht. (Die Einheit schaltet beim
Einschaltung sofort auf automatische Betriebsart
um.)
oder den Netzstecker herausziehen.
Wenn der Strom eingeschaltet bleibt und das Gerät nicht betrieben wird, wird durch den Steuer-
stromkreis in geringem Umfang Strom verbraucht. Durch Ausschalten des Netzschalters (oder
des Unterbrecherschalters, wenn die Stromversorgung über das Außengerät erfolgt) wird Strom
gespart.
Wasabi-Nano Titani Luftreinigungsgerät anbringen
Gewebe (Zubehör) zum Filterrahmen.
• Bringen Sie das Wasabi-Nano Titani Luftreinigungsgewebe an dem C-Gehäuse an, indem Sie dieses leicht
an beiden Seiten andrücken und nach dem Einsetzen
in den Filterrahmen loslassen.
• Die Kühlkapazität wird leicht geschwächt und die Kühlgeschwindigkeit wird verlangsamt, wenn das Wasabi-Nano
Titan Luftreinigungsgewebe verwendet wird.
• Wasabi-Nano Titan Luftreinigungsgewebe sind waschbar
und können bis zu 20 mal wiederverwendet werden,
wenn man zur Reinigung einen Staubsauger verwendet
oder es unter dem Wasserhahn auswäscht. Wenn Sie
das Gewebe austauschen möchten, fragen Sie bitte bei
Ihrem Verkäufer nach. Optionale Luftreinigungslter und
geruchtilgende Filter.
Wasabi-Nano Titan Luftreinigungsgewebe
C-Gehäuse
Luftlter
Kralle
Filterrahmen
– 41 –
Page 42

VORBEREITUNG VOR DEM BETRIEB
Batterien einlegen
1. Schieben Sie die Abdeckung weg,
um das Gerät zu öffnen.
2. Setzen Sie zwei trockene AAA.LR03 (Alkali-) Batterien ein.
Die Richtung zum Einsetzen der Batterien muss zu den
Markierungen im Gehäuse passen.
3. Setzen Sie die Abdeckung wieder in die ursprüngliche Position.
Zum Befestigen der Fernbedienungshalterung an der Wand
1. Wählen Sie einen Ort, an welchem die Signale das Gerät erreichen können.
2. Befestigen Sie die Fernsteuerungshalterung an der Wand,
einem Pfeiler oder einem ähnlichen
Standort mit den mitgelieferten Schrauben.
3. Platzieren Sie die Fernbedienung in der Fernbedienungshalterung.
FERNBEDIENUNG
HINWEIS
Hinweise zu den Batterien
• Wenn Sie die Batterien austauschen, verwenden Sie
Batterien desselben Typs und tauschen Sie beide alten
Batterien gleichzeitig aus.
• Wenn das System über längere Zeit nicht in Betrieb ist,
nehmen Sie die Batterien heraus.
• Die Batterien halten ca. 1 Jahr lang. Wenn die Anzeige der
Fernbedienung langsam schwindet und die Empfangsleistung innerhalb eines Jahres abnimmt, tauschen Sie beide
Batterien gegen neue AAA.LR03 (Alkali-) Batterien aus.
• Die beigefügten Batterien werden für den Erstgebrauch
des Systems mitgeliefert.
Die Nutzungsdauer der Batterien kann kurz sein, je nach
Herstellungsdatum der Klimaanlage.
Hinweise zur Fernsteuerung
• Setzen Sie die Fernsteuerung niemals direktem Sonnenlicht
aus.
• Staub auf dem Signalsender oder -empfänger reduziert die
Empndlichkeit. Wischen Sie den Staub mit einem weichen
Tuch ab.
• Die Signalkommunikation kann deaktiviert sein, wenn sich
eine Leuchtstofampe mit einem Elektronikstarter (wie z.B.
eine Inverterleuchte) im Raum bendet. Lassen Sie sich in
diesem Falle im Geschäft beraten.
• Wenn das Fernsteuerungssignal versehentlich ein anderes
Gerät bedient, stellen Sie dieses andere Gerät an
einem anderen Standort auf oder lassen Sie sich im
Service-Geschäft beraten.
• Wenn die Fernsteuerung nicht in Gebrauch ist, schließen
Sie bitte die Schiebeabdeckung, um eine Fehlfunktion zu
vermeiden.
Halter der Fernbedienung
Schraube
– 42 –
Page 43

VORBEREITUNG VOR DEM BETRIEB
Zum Einstellen des Kalenders und der Uhr
1. Drücken Sie die Taste (ZURÜCKSETZEN) bei
der ersten Zeit-Einstellung. Die Anzeige „Jahr“ blinkt.
2. Drücken
einzustellen.
3. Drücken
nat“ blinken.
4. Drücken
und den Monat einzustellen.
5. Drücken
„UHR“ blinkt.
6. Drücken
der Uhr einzustellen.
7. Drücken
Der Kalender und die Uhrzeit sind eingestellt.
Um den Kalender und die Uhrzeit zu ändern, drücken Sie
Befolgen Sie dann die Schritte 1 bis 7.
Nach dem Batterieaustausch müssen der Kalender und
die Uhr noch einmal eingestellt werden.
Sie die Taste (ZEIT), um das aktuelle Jahr
Sie die Taste (UHR). „Tag“ und „Mo-
Sie die Taste (ZEIT), um den aktuellen Tag
Sie die Taste (UHR). Die Anzeige
Sie die Taste (ZEIT), um die aktuelle Uhrzeit an
Sie die Taste (UHR).
die Taste (UHR).
DEUTSCH
Nach dem Austausch der Batterien,
1. drücken Sie die Taste (ZURÜCKSETZEN).
2. Richten Sie die Fernsteuerung auf das Innenraumgerät
und drücken Sie
3. Der Kalender und die Uhr des Innenraumgerätes werden
übertragen.
Der Kalender und die Uhr werden nicht von dem
die Taste (INFO).
Innenraumgerät übertragen, wenn folgendes
geschieht:
• Im Falle eines Stromausfalls.
• Wenn der Aus-Schalter von dem Anwender auf AUS
geschaltet wurde (das Gerät bendet sich nicht im
STANDBY-MODUS).
HINWEIS
Beachten Sie die Einstellung des Kalenders und der Uhr.
• Wenn der Kalender und die Uhr nicht eingestellt sind, können die Zeitschaltuhr-EIN, Zeitschaltuhr-AUS
und die Wochenzeitschaltuhr nicht eingestellt werden.
• Wenn der Kalender und die Uhr nicht richtig eingestellt sind, können die Zeitschaltuhr-EIN, ZeitschaltuhrAUS und die Wochenzeitschaltuhr nicht richtig funktionieren.
• Wenn die Zeitschaltuhr-EIN, Zeitschaltuhr-AUS und die Wochenzeitschaltuhr eingestellt sind, können
der Kalender und die Uhr nicht umgestellt werden. Wenn es notwendig ist, den Kalender und die
Uhr umzustellen, müssen die Zeitschaltuhr-EIN, die Zeitschaltuhr-AUS und die Wochenzeitschaltuhr
ausgeschaltet werden.
– 43 –
Page 44

BEZEICHNUNGEN UND FUNKTIONEN DER FERNBEDIENUNG
FERNBEDIENUNG
• Diese steuert den Betrieb des Innenraumgerätes. Der Regelbereich der Fernsteuerung liegt bei ca. 7 Metern.
Wenn die Innenbeleuchtung elektronisch gesteuert wird, kann der Regelbereich der Fernsteuerung kleiner sein.
Das Gerät kann mit der mitgelieferten Halterung an der Wand befestigt werden. Bevor Sie das Gerät
befestigen, stellen Sie sicher, dass das Innenraumgerät mit der Fernsteuerung gesteuert werden kann.
• Gehen Sie sorgfältig mit der Fernsteuerung um. Wenn Sie diese fallen oder nass werden lassen, kann dies die
Signalübertragungsfähigkeit beeinträchtigen.
• Nachdem neue Batterien in die Fernsteuerung eingelegt wurden, braucht das Gerät anfangs 10 Sekunden,
um auf die Befehle zu reagieren und in Betrieb zu gehen.
• Wenn die Fernsteuerung für ca. 3 Minuten im AUS-geschalteten Zustand nicht in Gebrauch ist, wird
auf der Anzeige angezeigt und das LCD schaltet sich aus.
• Während der Einstellung der Uhr schaltet das LCD sich ca. 10 Minuten später aus, wenn die Fernsteuerung
nicht in Gebrauch ist.
• Wenn Sie irgendeine Taste drücken, schaltet sich das LCD ein.
• Das LCD schaltet sich während der ZEIT-Schaltuhr-Einstellung nicht aus.
Signalübertragungs-/
Empfangsfenster
Richten Sie dieses Fenster auf
das Innenraumgerät, wenn Sie
dieses steuern.
Sensor
Ein Temperatursensor in der
Fernbedienung erfasst die
Umgebungstemperatur um
die Fernsteuerung herum.
Anzeige
Diese zeigt die ausgewählte
Raumtemperatur, die aktuelle Zeit,
den Zeitschaltstatus, die Funktion
und die ausgewählte Luftmenge an.
Tasten zur Einstellung der
RAUMTEMPERATUR
Drücken Sie diese Tasten, um die
Raumtemperatur einzustellen.
Drücken Sie die Taste [
Raumtemperatur zu erhöhen.
Drücken Sie die Taste [
Raumtemperatur abzusenken.
Halten Sie die Taste gedrückt, um
den Wert schneller zu ändern.
], um die
], um die
Übertragungssignal
Das Übertragungssignal leuchtet
auf, wenn ein Signal gesendet wird.
START/STOPP-Taste
Drücken Sie diese Taste, um den
Betrieb zu starten. Drücken Sie
diese Taste noch einmal, um den
Betrieb zu stoppen.
Auswahltaste für die
GEBLÄSEGESCHWINDIGKEIT
Diese legt die Gebläsegeschwindigkeit fest.
Jedes Mal, wenn Sie diese Taste drücken,
wechselt die Luftmenge von (AUTO)
(HOCH) (MITTEL)
(NIEDRIG) (GERÄUSCHARM)
(Diese Taste ermöglicht Ihnen, die
optimale oder bevorzugte Gebläsegeschwindigkeit für jeden Betriebsmodus
auszuwählen).
ECO-Taste
Verwenden Sie diese Taste, um
den ECO-Modus einzuschalten.
(►p.54)
– 44 –
Page 45

BEZEICHNUNGEN UND FUNKTIONEN DER FERNBEDIENUNG
Taste für STARKE
LEISTUNG
Drücken Sie diese Taste,
um den Modus für STARKE
LEISTUNG einzustellen.
(►p.52)
INFORMATIONS-Taste
(►p.66)
Taste zur REINIGUNG BEI
EINMALIGEM DRÜCKEN(►p.56)
Taste HAUS VERLASSEN
(►p.55)
Taste SCHLAFMODUS
DER ZEITSCHALTUHR
Drücken Sie diese Taste,
um den Schlafmodus der
Zeitschaltuhr einzustellen.
(►p.58)
Einstelltasten
EIN-/AUS-ZEITSCHALTUHR
(►p.57)
MODUS-Auswahltaste
Drücken Sie diese Taste, um den
Betriebsmodus auszuwählen.
Jedes Mal, wenn Sie diese Taste
drücken, ändert sich der Modus
periodisch von (AUTO)
(WÄRME) (ENTFEUCHTEN) (KÜHLEN) und
(GEBLÄSE).
Taste GERÄUSCHARM
Diese Taste versetzt das Gerät in
den GERÄUSCHARM-Modus.
(►p.53)
AUTOMATISCHES SCHWINGEN
(vertikale) Taste
Steuert den Winkel des horizontalen
Windabweisers.(►p.51)
Einstelltasten für die
WOCHENZEITSCHALTUHR
(►p.60)
DEUTSCH
MODUSAUSWAHL
AUTO
HEIZEN
ENTFEUCHTEN
KÜHLEN
GEBLÄSE
GEBLÄSEGESCHWINDIGKEIT
AUTO
GERÄUSCHARM
NIEDRIG
MITTEL
HOCH
START / STOPP
ECO
GEBLÄSE
LEISTUNGSSTARK
GERÄUSCHARM
INFO
SCHLAFZEITSCHALTUHR
AUTOMATISCHES
SCHWINGEN (VERTIKAL)
HAUS VERLASSEN
REINIGEN
TAG
PROGRAMM NR.
ZEITSCHALTUHR EIN /
AUS
ZEIT
OK
LÖSCHEN
KOPIEREN / EINFÜGEN
ABBRECHEN
SENDEN
UHR
Vorsichtsmaßnahmen beim Gebrauch
• Legen Sie die Fernsteuerung nicht an die folgenden Stellen.
• In direktes Sonnenlicht.
• In die Nähe von Heizgeräten.
• Behandeln Sie die Fernsteuerung sorgfältig. Lassen Sie diese nicht auf den Boden fallen und schützen
Sie diese gegen Wasser.
• Sobald das Außengerät sich ausschaltet, startet es erst nach 3 Minuten erneut (es sei denn, Sie
schalten den Einschaltknopf aus und ein oder ziehen das Stromkabel und stecken dieses wieder ein).
Dies geschieht, um das Gerät zu schützen und zeigt keine Störung an.
• Wenn Sie die MODUS-Auswahltaste während des Betriebs drücken, kann das Gerät zum Schutz für ca.
3 Minuten stoppen.
– 45 –
Page 46

VERSCHIEDENE FUNKTIONEN
Automatische Neustartsteuerung
• Bei einem Stromausfall wird der Betrieb automatisch im vorhergehenden Betriebsmodus
und der Luftstromrichtung neu gestartet, sobald wieder Strom vorhanden ist.
(Da der Betrieb nicht von der Fernsteuerung gestoppt wird.)
• Wenn Sie beabsichtigen, den Betrieb nicht fortzuführen, sobald wieder Strom vorhanden ist, schalten
Sie die Stromzufuhr aus. Wenn Sie den Schutzschalter betätigen, wird der Betrieb automatisch im
vorhergehenden Betriebsmodus und der Luftstromrichtung neu gestartet.
Hinweis: 1. Wenn Sie die Auto-Neustart-Steuerung nicht wünschen, lassen Sie sich bitte von Ihrem
Vertriebsmitarbeiter beraten.
2. Die Auto-Neustart-Steuerung ist nicht verfügbar, wenn der Zeitschaltuhr- oder
Schlafzeitschaltuhr-Modus eingestellt ist.
AUTOMATISCHER BETRIEB
Das Gerät stellt automatisch den Betriebsmodus WÄRMEN oder KÜHLEN fest, je nach der aktuellen Raumtemperatur. Der ausgewählte Betriebsmodus wechselt, wenn die Raumtemperatur variiert. Der Betriebsmodus
ändert sich jedoch nicht, wenn das Innenraumgerät an das Außengerät des Multityps angeschlossen wird.
Drücken Sie die MODUS-Auswahltaste, um auf der Anzeige den
(AUTO) Modus für den Betrieb anzuzeigen.
• Wenn der AUTO-Modus ausgewählt wurde, stellt das Gerät automatisch den Betriebsmodus WÄRMEN oder KÜHLEN, je nach der
1
aktuellen Raumtemperatur fest. Der Betriebsmodus ändert sich
jedoch nicht, wenn das Innenraumgerät an das Außengerät des
Multityps angeschlossen wird.
• Wenn der von dem Gerät automatisch ausgewählte Modus nicht
zufriedenstellend ist, ändern Sie manuell die Moduseinstellung
(WÄRMEN, ENTFEUCHTEN; KÜHLEN oder GEBLÄSE).
2
3
START
STOPP
Stellen Sie die gewünschte GEBLÄSEGESCHWINDIGKEIT mit der
Taste (GEBLÄSEGESCHWINDIGKEIT) ein (die Anzeige zeigt die
Einstellung an).
(AUTO) (HOCH) (MITTEL)
(GERÄUSCHARM) (NIEDRIG)
Stellen Sie die gewünschte Raumtemperatur mit den RAUMTEMPERATURTasten ein (die Anzeige zeigt die Einstellung an).
Die Temperatureinstellung und die tatsächliche Raumtemperatur
können je nach den Bedingungen variieren.
Drücken Sie die
Der Betrieb startet mit einem Piepston.
Drücken Sie die Taste noch einmal, um den Betrieb zu stoppen.
Da die Einstellungen im Speicher in der Fernsteuerung gespeichert sind,
müssen Sie beim nächsten Mal nur die (START/STOPP) Taste drücken.
Drücken Sie die Taste (GEBLÄSEGESCHWINDIGKEIT), um AUTO,
HOCH, MITTEL, NIEDRIG oder GERÄUSCHARM auszuwählen.
(START/STOPP) Taste.
– 46 –
Page 47

WÄRMEBETRIEB
• Verwenden Sie das Gerät zum Wärmen, wenn die Außentemperatur unter 21°C liegt.
Wenn es zu warm ist (mehr als 21°C), funktioniert die Wärmefunktion möglicherweise nicht, um das
Gerät zu schützen.
• Um die Zuverlässigkeit des Gerätes zu erhalten, verwenden Sie dieses Gerät bitte bei einer Außentemperatur
von mehr als -15°C.
1
2
3
START
STOPP
Drücken Sie die MODUS-Auswahltaste, so dass die Anzeige
(WÄRMEN) anzeigt.
Stellen Sie die gewünschte GEBLÄSEGESCHWINDIGKEIT mit
der Taste
zeigt die Einstellung an).
Stellen Sie die gewünschte Raumtemperatur mit den RAUMTEMPERATUR
Tasten ein (die Anzeige zeigt die Einstellung an).
Die Temperatureinstellung und die tatsächliche Raumtemperatur
können je nach den Bedingungen variieren.
Drücken Sie die
mit einem Piepston. Drücken Sie die Taste noch einmal, um den Betrieb
zu stoppen.
(GEBLÄSEGESCHWINDIGKEIT) ein (die Anzeige
(AUTO) (HOCH) (MITTEL)
(GERÄUSCHARM) (NIEDRIG)
(START/STOPP) Taste. Der Wärmebetrieb startet
-
DEUTSCH
Da die Einstellungen im Speicher in der Fernsteuerung gespeichert
sind, müssen Sie beim nächsten Mal nur die (START/STOPP) Taste
drücken.
Während des AUTO Gebläsebetriebes wird die Gebläsegeschwindigkeit
automatisch, wie unten beschrieben, geändert:
• Wenn der Unterschied zwischen der Raumtemperatur und der
eingestellten Temperatur groß ist, startet das Gebläse mit der HOHEN
Geschwindigkeit.
• Nachdem die Raumtemperatur die voreingestellte Temperatur
erreicht hat, wechselt die Gebläsegeschwindigkeit auf eine niedere
Geschwindigkeit, um einen optimalen Raumtemperaturzustand für
eine natürliche gesunde Heizung zu erreichen.
Abtauen
Das Abtauen erfolgt ca. einmal pro Stunde, wenn sich Frost auf dem Wärmetauscher des Außengerätes bildet; der Vorgang dauert jeweils 5~10 Minuten.
Während des Abtaubetriebs blinkt die Betriebsleuchte in Zyklen von 3 Sekunden ein und 0,5
Sekunden aus.
Die maximale Abtaudauer beträgt 20 Minuten.
Wenn jedoch das Innneraumgerät an ein mehrfach Außengerät angeschlossen ist, beträgt die
maximale Zeit für das Abtauen 15 Minuten. (Wenn die eingesetzte Verrohrungslänge länger ist als
normal, kann sich Frost bilden.)
– 47 –
Page 48

ENTFEUCHTUNGSBETRIEB
Verwenden Sie das Gerät zur Entfeuchtung, wenn die Raumtemperatur über 16°C liegt.
Wenn diese unter 15°C liegt, funktioniert die Entfeuchtungsfunktion nicht.
Drücken Sie die MODUS-Auswahltaste, so dass die
1
2
Anzeige (ENTFEUCHTEN) anzeigt.
Die Gebläsegeschwindigkeit ist auf NIEDRIG eingestellt.
Drücken Sie die (GEBLÄSEGESCHWINDIGKEITS-)
Taste, um die GERÄUSCHARME oder NIEDRIGE
Gebläsegeschwindigkeit auszuwählen.
Stellen Sie die gewünschte Raumtemperatur mit den
RAUMTEMPERATUR-Einstelltasten ein (die Anzeige gibt die
Einstellung an).
Der Bereich von 20-26°C wird als Raumtemperatur
für Entfeuchtung empfohlen.
START
STOPP
Drücken Sie die
tungsbetrieb startet mit einem Piepston. Drücken Sie die
Taste noch einmal, um den Betrieb zu stoppen.
Da die Einstellungen im Speicher in der Fernsteuerung gespeichert
sind, müssen Sie beim nächsten Mal nur die (START/STOPP)
Taste drücken.
(START/STOPP) Taste. Der Entfeuch-
Entfeuchtungsfunktion
• Wenn die Raumtemperatur höher ist als die Temperatureinstellung: Das Gerät entfeuchtet den Raum
und reduziert die Raumtemperatur auf den voreingestellten Wert. Wenn die Raumtemperatur geringer
ist, als die Temperatureinstellung: Die Entfeuchtung erfolgt bei einer Raumtemperatureinstellung, die
leicht geringer ist, als die aktuelle Raumtemperatur, gleichgültig, welche Temperatur eingestellt ist.
• Die voreingestellte Raumtemperatur kann möglicherweise nicht erreicht werden, je nach dem, wie
viele Personen sich in dem Raum befinden oder bei anderen Raumbedingungen.
– 48 –
Page 49

KÜHLBETRIEB
Verwenden Sie das Gerät zum Kühlen, wenn die Außentemperatur -10°~43°C beträgt.
Wenn die Luftfeuchtigkeit innen sehr hoch ist (80%), kann sich Kondenswasser auf dem
Luftaustrittsgitter des Innenraumgerätes bilden.
1
2
3
START
STOPP
Drücken Sie die MODUS-Auswahltaste; die Anzeige zeigt
(KÜHLEN) an.
Stellen Sie die gewünschte GEBLÄSEGESCHWINDIGKEIT mit
der Taste
zeigt die Einstellung an).
Stellen Sie die gewünschte Raumtemperatur mit den RAUMTEMPERATUR
Tasten ein (die Anzeige zeigt die Einstellung an).
Die Temperatureinstellung und die tatsächliche Raumtemperatur
können je nach den Bedingungen variieren.
Drücken Sie die
einem Piepston. Drücken Sie die Taste noch einmal, um den
Betrieb zu stoppen. Die Kühlfunktion startet nicht , wenn die
Temperatureinstellung höher ist als die aktuelle Raumtemperatur
(selbst wenn, die (BETRIEBS-) Leuchte eingeschaltet ist).
Die Kühlfunktion startet erst, sobald der Benutzer die Temperatur
niedriger als die aktuelle Zimmertemperatur einstellt.
(GEBLÄSEGESCHWINDIGKEIT) ein (die Anzeige
(AUTO) (HOCH) (MITTEL)
(GERÄUSCHARM) (NIEDRIG)
(START/STOPP) Taste. Der Kühlbetrieb startet mit
-
DEUTSCH
Da die Einstellungen im Speicher in der Fernsteuerung gespeichert
sind, müssen Sie beim nächsten Mal nur die (START/STOPP)
Taste drücken.
Während des AUTO Gebläsebetriebes wird die Gebläsegeschwindigkeit
automatisch, wie unten beschrieben, geändert:
• Wenn der Unterschied zwischen der Raumtemperatur und der
eingestellten Temperatur groß ist, startet das Gebläse mit der
HOHEN Geschwindigkeit.
• Nachdem die Raumtemperatur die voreingestellte Temperatur
erreicht hat, wechselt die Gebläsegeschwindigkeit auf eine niedere
Geschwindigkeit, um einen optimalen Raumtemperaturzustand für
eine natürliche, gesunde Kühlung zu erreichen.
– 49 –
Page 50

GEBLÄSEBETRIEB
Der Anwender kann das Gerät einfach zur Luftzirkulation verwenden.
Drücken Sie die MODUS-Auswahltaste, so dass die Anzeige
1
(GEBLÄSE) angezeigt wird.
Stellen Sie die gewünschte GEBLÄSEGESCHWINDIGKEIT mit
der Taste
zeigt die Einstellung an).
(GEBLÄSEGESCHWINDIGKEIT) ein (die Anzeige
2
START
STOPP
(AUTO) (HOCH) (MITTEL)
(GERÄUSCHARM) (NIEDRIG)
Drücken Sie die (START/STOPP) Taste. Der Gebläsebetrieb
startet mit einem Piepston. Drücken Sie die Taste noch einmal, um
den Betrieb zu stoppen.
– 50 –
Page 51

LUFTSTROM RICHTIG EINSTELLEN
Zum Start des vertikalen automatischen Schwingens
• Drücken Sie die Taste (AUTOMATISCHES SCHWINGEN
(VERTIKAL)). Der/Die Ableiter startet/starten nach oben und
unten zu schwingen.
wird auf der LCD-Anzeige angezeigt.
Zum Abbrechen des vertikalen automatischen Schwingens
• Drücken Sie noch einmal die Taste (AUTOMATISCHES
SCHWINGEN (VERTIKAL)). Der/Die Ableiter stoppt/stoppen
in der aktuellen Position.
verschwindet von der LCD Anzeige.
Beim Kühlbetrieb,
Entfeuchten
Vertikal
etwa 10°
DEUTSCH
etwa 40°
HINWEIS
Beim Heizungs-
• Lassen Sie die Ableiter im Kühl- und Entfeuchtungsbetrieb
nicht über lange Zeit schwingen oder in der unteren Positon
(beim automatischen vertikalen Schwingen). Dies kan zu
Tau-kondensation an den Ableitern führen.
Einstellen der klimatisierten Luft nach links und rechts.
Den horizontalen Luftreflektor gemäß Abbildung halten
und verstellen, um die klimatisierte Luft nach links und
rechts zu verstellen.
HINWEIS
• Vermeiden Sie es, die Luftklimaanlage für den Kühlbetrieb einzusetzen, wenn die Außentemperatur weniger als -10°C (14°F) beträgt.
Die empfohlenen minimalen und maximalen Betriebstemperaturen für die Warm- und Kaltseite
sollten unter den folgenden Temperaturen liegen:
betrieb
Vertical
etwa 10°
etwa 45°
Innen Trockentemperatur °C 21 32 20 27
Feuchttemperatur °C 15 23 12 19
Außen Trockentemperatur °C 21 43 2 21
Feuchttemperatur °C 15 26 1 15
Kühlung Heizung
Minimum Maximum Minimum Maximum
– 51 –
Page 52

LEISTUNGSSTARKER BETRIEB
• Wenn Sie die Taste (LEISTUNGSSTARKER BETRIEB) während des AUTO-, HEIZ-, ENTFEUCH-
TUNGS-, KÜHLUNGS- oder GEBLÄSEBETRIEBES drücken, schaltet die Klimaanlage auf maximale Leistung.
• Während des LEISTUNGSSTARKEN Betriebs wird kühlere oder wärmere Luft aus dem Innenraumgerät
entsprechend zum KÜHL- oder HEIZBETRIEB ausgeblasen.
Zum Starten des LEISTUNGSSTARKEN Betriebs
• Drücken Sie die Taste (LEISTUNGSSTARK)
während des Betriebs.
“ wird auf der LCD-Anzeige angezeigt.
„
1
Der LEISTUNGSSTARKE Betrieb wird nach 20 Minuten beendet.
Dann läuft das System automatisch mit den voreingestellten
Einstellungen, die vor dem leistungsstarken Betrieb verwendet
wurden.
Zum Abbrechen des LEISTUNGSSTARKEN Betriebs
• Drücken Sie die (START/STOPP) Taste.Oder
• Drücken Sie die Taste
einmal.
Der LEISTUNGSSTARKE Betrieb stoppt.
„
“ wird auf der LCD-Anzeige angezeigt.
(LEISTUNGSSTARK) noch
HINWEIS
• Im SCHLAF-Modus, ECO-Modus, GERÄUSCHARM-Modus oder HAUS VERLASSEN Modus ist der
LEISTUNGSSTARKE Betrieb ausgeschaltet.
• Während des LEISTUNGSSTARKEN Betriebs erhöht sich die Kapazität der Klimaanlage nicht, wenn
– die Klimaanlage bereits mit maximaler Kapazität läuft.
– direkt vor dem Abtaubetrieb (wenn die Klimaanlage im HEIZBETRIEB läuft).
• Nach dem automatischen Neustart ist der LEISTUNGSSTARKE Betrieb ausgeschaltet und der
vorhergehende Betrieb wird gestartet.
– 52 –
Page 53

GERÄUSCHARMER BETRIEB
• Wenn Sie die Taste (GERÄUSCHARM) bei AUTO-, HEIZ-, ENTFEUCHTUNGS-, KÜHLUNGS- oder
GEBLÄSEBETRIEB drücken, schaltet die Gebläsegeschwindigkeit auf ultralangsam.
Zum Starten des GERÄUSCHARMEN Betriebs
• Drücken Sie die Taste (GERÄUSCHARM) während
1
des Betriebs.
„
“ wird auf der LCD-Anzeige angezeigt.
Die Gebläsegeschwindigkeit ist ultra-langsam.
Zum Abbrechen des GERÄUSCHARMEN Betriebs
• Drücken Sie die (START/STOPP) Taste. Oder
DEUTSCH
• Drücken Sie die
oder die Taste (GEBLÄSEGESCHWINDIGKEIT).
Die Gebläsegeschwindigkeit schaltet auf die vorhergehende
Geschwindigkeit zurück, die eingeschaltet war, bevor der
GERÄUSCHARME Betrieb gestartet wurde.
Der GERÄUSCHARME Betrieb stoppt.
„
“ auf der LCD-Anzeige schaltet aus.
Taste (GERÄUSCHARM) noch einmal
HINWEIS
• Wenn der LEISTUNGSSTARKE Betrieb ausgewählt wird, wird der GERÄUSCHARME Betrieb
ausgeschaltet. Die Gebläsegeschwindigkeit schaltet vor dem GERÄUSCHARMEN Betrieb auf die
vorhergehende Geschwindigkeit zurück.
• Nach dem automatischen Neustart wird der Betrieb abgebrochen. Die Gebläsegeschwindigkeit
schaltet vor dem GERÄUSCHARMEN Betrieb auf die vorhergehende Geschwindigkeit zurück.
• Während jedem Betrieb mit der Gebläsegeschwindigkeit
Drücken der Taste (GERÄUSCHARM) die Gebläsegeschwindigkeit nicht.
(GERÄUSCHARM), ändert sich durch
– 53 –
Page 54

ECO BETRIEB
Der ECO Betrieb ist eine Energiesparfunktion, indem Sie automatisch die Temperatur ändern und den
maximalen Stromverbrauchswert einschränken.
1
• Wenn die Taste (ECO) während des AUTO-, HEIZ-,
ENFEUCHTUNGS- oder KÜHL-Betriebs gedrückt wird,
führt die Klimaanlage den „ECO“ Betrieb automatisch aus.
Zum Starten des ECO Betriebs
• Drücken Sie die Taste (ECO) während des Betriebs.
„ “ wird auf der LCD-Anzeige angezeigt.
Der Energiesparbetrieb startet durch automatisches Ändern
der eingestellten Temperatur auf eine höhere oder niederere
Temperatur und reduziert so den Stromverbrauch während
des Betriebs. Diese Funktion kann basierend auf dem angeschlossenen Außengerät variieren.
Zum Abbrechen des ECO Betriebs
• Drücken Sie die (START/STOPP) Taste.Oder
• Drücken Sie die
Taste (ECO) während des Betriebs.
„ “ wird auf der LCD-Anzeige angezeigt.
HINWEIS
• Die ECO Funktion ist nicht effektiv, wenn der Stromverbrauch niedrig ist.
• Durch Drücken der Taste (LEISTUNGSSTARK), wird der ECO Betrieb ausgeschaltet.
• Nach dem automatischen Neustart ist der ECO Betriebmodus ausgeschaltet und der vorhergehende
Betrieb wird gestartet.
• Bei Anschlüssen für mehrere Modelle startet der Energiesparbetrieb durch automatisches Ändern
der Einstelltemperatur auf eine höhere oder niederere Temperatur. Dennoch hängt die Wirksamkeit
des ECO Betriebs von den Betriebsbedingungen ab.
– 54 –
Page 55

HAUS VERLASSEN (LH) BETRIEB
Verhindern Sie, dass die Raumtemperatur automatisch weit unter die Einstelltemperatur von 10°C fällt, wenn niemand zu Hause ist.
Dieser Betrieb kann im „Dauerbetrieb“ oder im „Tages-Zeitschaltuhrbetrieb“ laufen. Verwenden Sie bitte den
„Tages-Zeitschaltuhrbetrieb“, um die Anzahl der Tage auf bis zu 99 Tage einzustellen.
Dauerbetrieb Zum Starten des HAUS VERLASSEN Betriebs
Option 1. Dauerhafter Betrieb.
Drücken Sie die Taste (HAUS VERLASSEN) während des Betriebs.
• Die Raumtemperatur wird auf 10°C eingestellt und der Heizbetrieb startet.
„ “, „ “, „ “, „ “ wird auf der LCD-Anzeige angezeigt.
Option 2. Tages-Zeitschaltuhrbetrieb.
(HAUS VERLASSEN) bei ausge-
(SENDEN), um die Anzahl der
(ABBRECHEN), um die Anzahl
Tageszeitschaltuhrbetrieb
• Drücken Sie die Taste
schaltetem Gerät oder wenn das Gerät in Betrieb ist.
Die Raumtemperatur wird auf 10°C eingestellt und der Heizbetrieb startet.
„ “, „ “, „ “, „ “ wird auf der LCD-Anzeige angezeigt.
• Stellen Sie die Anzahl der Betriebstage (1 bis 99 Tage) ein, falls erforderlich.
Drücken Sie die Taste (ZEIT), um die Anzahl der Tage auszuwählen.
1
Die Anzahl Tage blinkt.
*
Drücken Sie „ (NACH OBEN)“, um die Anzahl der Tage von 1
Tag, 2 Tage, 3 Tage ... 98 Tage, 99 Tage, 1 Tag usw. einzustellen.
* Drücken Sie „ (NACH UNTEN)“, um die Anzahl der Tage von
99 Tag, 98 Tage, 97 Tage ... 3 Tage, 2 Tage, 1 Tag, 99 Tage usw.
einzustellen.
* Die Anzahl Tage wird gezählt, wenn die Uhr 0:00 anzeigt.
• Drücken Sie die Taste
Betriebstage zu bestätigen. Die Anzeige der Anzahl der
Betriebstage blinkt dann nicht mehr.
• Drücken Sie die Taste
Betriebstage zurückzusetzen oder auf Dauerbetrieb umzuschalten.
DEUTSCH
Zum Abbrechen des HAUS VERLASSEN Betriebs
• Drücken Sie die (START/STOPP) Taste. Oder
• Drücken Sie noch einmal die Taste
(HAUS VERLASSEN).
Schalten Sie zum vorhergehenden Betriebsmodus zurück. Oder
• Schalten Sie auf einen anderen Betriebsmodus um, indem Sie die
Taste (MODUS) drücken.
HINWEIS
• Nachdem Sie die eingestellte Anzahl Betriebstage für Haus verlassen erreicht haben oder durch nochmaliges
Drücken der Taste (Haus verlassen), arbeitet das Gerät im vorhergehenden Modus.
• Während des Betriebs Haus verlassen, können die Gebläsegeschwindigkeit und die Position des horizontalen
Windabweisers nicht verändert werden.
• Wenn Sie die Taste (Haus verlassen) drücken, wird die Anwendung der Wochenzeitschaltuhr oder der einmaligen
Zeitschaltuhr abgebrochen.
• Sollte der Strom ausfallen, werden nach dem automatischen Neustart alle Einstellungen für die Anzahl Betriebstage
zurückgesetzt und das Gerät arbeitet im Dauerbetrieb.
• Bei Mehrfachanschlüssen, wenn jeder Raum mit verschiedenen Betriebsmodi läuft, wie z.B. im Modus nur GEBLÄSE,
KÜHLEN, ENTFEUCHTEN oder AUTOMATIK, kann Haus verlassen nicht in Betrieb genommen werden, auch
wenn es möglich sein sollte, den Betrieb Haus verlassen einzustellen. Um den Betrieb Haus verlassen einzustellen,
müssen alle Räume ihren Betrieb stoppen. Drücken Sie dann die Taste (HAUS VERLASSEN), um den Betrieb Haus
verlassen einzuschalten.
• Bei Mehrfachanschlüssen, wenn alle Räume im HEIZBETRIEB laufen, ist es möglich, den Betrieb Haus verlassen
einzuschalten, indem Sie die Taste (HAUS VERLASSEN) drücken.
• Bei Mehrfachanschlüssen, wenn zwei oder mehr Räume darauf eingestellt sind, im Haus verlassen Betrieb zu laufen,
kann es sein, dass es nicht möglich ist, die eingestellte Temperatur von 10°C zu erreichen. Des Weiteren hängt dies
ebenfalls von der Außentemperatur ab.
• LEISTUNGSSTARK, GERÄUSCHARM und ECO Betriebe sind während des Haus verlassen Betriebs nicht anwendbar.
– 55 –
Page 56

REINIGEN (REINIGEN MIT EINEM TASTENDRUCK) BETRIEB
Trocknen des Innenraum-Wärmetauschers nach dem Kühlbetrieb, um Pilzbildung zu vermeiden.
Zum Starten des REINIGEN Betriebs
• Drücken Sie die Taste (REINIGEN) wenn das Gerät
AUSgeschaltet ist.
Die Gesamtzeitdauer für den Reinigungsbetrieb mit einem
1
Tastendruck beträgt 60 Minuten. Während dieser Zeit muss
der HEIZ- oder GEBLÄSE-Betrieb laufen.
Während der Reinigung mit einem Tastendruck blinkt die
Betriebsleuchte.
„
“, „ “ wird auf der LCD-Anzeige angezeigt.
Zum Abbrechen des REINIGEN Betriebs
• Drücken Sie die (START/STOPP) Taste.Oder
• Drücken Sie noch einmal die
Taste (REINIGEN).
HINWEIS
• Wenn der REINIGUNGSbetrieb beendet ist, schaltet sich das Gerät automatisch AUS.
• Wenn die Wochenzeitschaltuhr oder die Einmal-Zeitschaltuhr eingestellt ist, müssen Sie diese Zeitschaltuhren
ausschalten, bevor Sie die Funktion REINIGUNG einschalten.
• Bei Mehrfachanschlüssen ist der Betrieb auf den GEBLÄSE-Betrieb begrenzt,
Taste (REINIGEN) drücken.
• Bei Mehrfachanschlüssen, wenn ein Raum zuerst im Betrieb REINIGUNG arbeitet, können die anderen
Räume im KÜHL-, ENTFEUCHTUNGS- oder GEBLÄSE-Betrieb arbeiten. Wenn jedoch die anderen
Räume im HEIZ-Betrieb arbeiten müssen, schaltet die Klimaanlage auf den STANDBY-Modus. Wenn
der REINIGUNGS-Betrieb beendet ist, startet der HEIZ-Betrieb.
wenn Sie die
– 56 –
Page 57

EINMAL-ZEITSCHALTUHR (ZEITSCHALTUHR EIN/AUS) BETRIEB
ZEITSCHALTUHR AUS
Das Gerät kann so eingestellt werden, dass es nach einer voreingestellten
Zeit ausschaltet.
(ZEITSCHALTUHR AUS) und
Taste (ZEIT) die Zeit aus.
1
1. Drücken Sie die Taste
blinkt auf der Anzeige.
2. Schalten Sie mit der
3. Richten Sie nach dem Einstellen die Fernbedienung auf den Innenraum
und drücken
und „Zeit einstellen“ leuchtet, anstatt zu blinken.
Ein Piepton ertönt, der von dem Innenraumgerät ausgesandt wird
und die Leuchte (ZEIT) am Innenraumgerät schaltet sich ein.
Sie die Taste (SENDEN).
ZEITSCHALTUHR EIN
Das Gerät schaltet zu einer bestimmten Zeit ein.
1. Drücken Sie die Taste
blinkt auf der Anzeige.
2. Stellen Sie mit der
3. Nach der Einstellung richten Sie die Fernbedienung in den Innenraum
und drücken Sie die
und „Zeit einstellen“ leuchtet, anstatt zu blinken.
Ein Piepton ertönt, der von dem Innenraumgerät ausgesandt wird
und die Leuchte (ZEIT) am Innenraumgerät schaltet sich ein.
(ZEITSCHALTUHR EIN) und
Taste (ZEIT) Tdie „Einschaltzeit ein“.
Taste (SENDEN)
DEUTSCH
ZEITSCHALTUHR EIN/AUS
• Das Gerät schaltet zu einer bestimmten Zeit ein (aus) und aus (ein).
• Das Schalten erfolgt zur zuerst zu Standardzeiten.
• Die Pfeilmarkierung erscheint auf der Anzeige, um die Reihenfolge
der Schaltvorgänge anzuzeigen.
1. Drücken Sie die Taste
2. Stellen Sie mit der
der Einstellung richten Sie die Fernbedienung auf den Innenraum aus und
drücken Sie die
3. Drücken Sie die Taste
und einstellen der „Ausschaltzeit“, aueuchten.
Die
4. Stellen Sie mit der
5. Nach der Einstellung richten Sie die Fernbedienung in den Innenraum
und drücken Sie die
„Einstellzeit“ leuchtet auf, anstatt zu blinken.
Ein Piepton ertönt, der von dem Innenraumgerät ausgesandt wird
und die Leuchte (ZEIT) am Innenraumgerät schaltet sich ein.
Die Zeitschaltuhr kann auf drei Arten verwendet werden: AUS-Zeitschaltuhr,
EIN-Zeitschaltuhr und EIN/AUS (AUS/EIN)-Zeitschaltuhr. Stellen Sie die
aktuelle Zeit zuerst ein, da diese als Referenz dient.
Zum Abbrechen der Vormerkung
(ZEITSCHALTUHR AUS), so dass und
auf der Anzeige blinken.
Taste (ZEIT) die „Ausschaltzeit" ein. Nach
Taste (SENDEN).
(ZEITSCHALTUHR EIN), so dass
und blinken.
Taste (ZEIT) die „Einschaltzeit ein“.
Taste (SENDEN) und die eingestellte
• Richten Sie das Signalfenster der Fernbedienung auf das Innenraumgerät und drücken Sie die Taste
(ABBRECHEN).
(ZEITSCHALTUHR) Leuchte am Innenraumgerät schaltet sich aus.
Die Anzeigen „EIN oder AUS Einstellzeit“ schalten mit einem Piepston aus und die
HINWEIS
• Der Benutzer kann nur eine Einstellung vornehmen, #AUS-Zeitschaltuhr, EIN-Zeitschaltuhr oder EIN/
AUS-Zeitschaltuhr.
• Wenn die WOCHENZEITSCHALTUHR bereits eingestellt ist, durch Einstellen der EINMAL ZEITSCHALTUHR, wird dem Betrieb Vorrang gegeben Wenn der EINMAL ZEITSCHALTUHR Betrieb fertig ist, wird die
WOCHEN-ZEITSCHALTUHR aktiviert.
– 57 –
Page 58

ECO-SCHLAFZEITSCHALTUHRBETRIEB
Die Zeitschaltuhr kann bis zu einer Dauer von 7 Stunden eingestellt werden.
Wenn Sie die
Betrieb drücken, schaltet das Gerät die Raumtemperatur um und reduziert die Gebläsegeschwindigkeit.
Dies führt zu Energieeinsparungen.
Stellen Sie zuerst die aktuelle Zeit ein, bevor Sie den ECO-SCHLAFZEITSCHALTUHRBETRIEB starten.
Taste (SCHLAFEN) während des AUTO-, HEIZ-, ENTFEUCHTEN-, KÜHL- oder GEBLÄSE-
Zum Starten des ECO-SCHLAFZEITSCHALTUHR Betriebs
Drücken Sie die Taste (SCHLAF) während des Betriebs.
1
• Es wird “
die Stundenanzahl auf der Anzeige der Fernbedienung
angezeigt.
• Während des ECO-SCHLAFZEITSCHALTUHRBETRIEBS läuft
das Gebläse mit ultralangsamer Geschwindigkeit.
• Ein Piepton ertönt, der von dem Innenraumgerät ausgesandt
wird und die Leuchte (ZEIT) am Innenraumgerät schaltet sich ein.
Drücken Sie die Taste
Stundenanzahl ändert sich, wie unten dargestellt:
1 Stunde 2 Stunden 3 Stunden 7 Stunden
• Während des ECO-SCHLAFZEITSCHALTUHRBETRIEBS
läuft die Klimaanlage für eine bestimmte Stundenanzahl
weiter und schaltet dann aus.
• Wenn die ECO-SCHLAFZEITSCHALTUHR eingestellt ist,
zeigt die Anzeige an der Fernbedienung die Ausschaltzeit an.
”, “ ”, “ ”, “AUS”, Auszeit, “ ” und
(SCHLAF) wiederholt und die
SCHLAFMODUS DER ZEITSCHALTUHR aus
Beispiel: Wenn die ECO-SCHLAFZEITSCHALTUHR um 18.00 Uhr
auf 1 Stunde eingestellt wird, ist
die Ausschaltzeit 19.00 Uhr.
Zum Abbrechen des ECO-SCHLAFZEITSCHALTUHR Betriebs
Drücken Sie die (START/STOPP) Taste.
• Die Zimmerklimaanlage schaltet aus.
Drücken Sie noch einmal die Taste
“ ”, “ ”, Ausschaltzeit, “ ” und die Anzahl Stunden von
der Anzeige der Fernbedienung verschwindet
Drücken Sie die Taste
• Ein Piepston wird von dem Innenraumgerät ausgesandt und
die (ZEITSCHALTUHR) Leuchte am Innenraumgerät wird
ausgeschaltet.
• Der SCHLAFZEITSCHALTUHRBETRIEB wird abgebrochen.
– 58 –
(ABBRECHEN).
(SCHLAF), bis “ ”,
Page 59

ECO-SCHLAFZEITSCHALTUHRBETRIEB
Zum Einstellen der ECO-SCHLAFZEITSCHALTUHR und der ZEITSCHALTUHR EIN
Die Klimaanlage wird von der ECO-SCHLAFZEITSCHALTUHR ausgeschaltet und von der ZEITSCHALTUHR
EIN eingeschaltet.
1. Stellen Sie die ZEITSCHALTUHR EIN ein.
2. Drücken Sie die Taste
(SCHLAFEN) und stellen Sie die ECO-SCHLAFZEITSCHALTUHR ein.
Beispiel:
In diesem Fall schaltet die Klimaanlage nach 2 Stunden (um 1.38 Uhr) aus
und wird um 6.00 Uhr am nächsten Morgen wieder eingeschaltet.
Zum Abbrechen des Betriebs ECO-SCHLAFZEITSCHALTUHR und ZEITSCHALTUHR EIN
Richten Sie die Fernbedienung auf das Innenraumgerät und drücken Sie die Taste (ABBRECHEN).
• “
”, “ ”, “ ”, “AUS”, Ausschaltzeit, “ ”, Anzahl Stunden, "EIN" und ZEITSCHALTUHR EIN Zeit
einstellen verschwinden von der Anzeige der Fernsteuerung.
• Ein Piepston wird von dem Innenraumgerät ausgesandt und die (ZEITSCHALTUHR) Leuchte am Innenraumgerät
wird ausgeschaltet.
• Die ECO-SCHLAFZEITSCHALTUHR und ZEITSCHALTUHR EIN Vormerkungen werden abgebrochen.
30 Minuten nach dem Einstellen der ECO-SCHLAFZEITSCHALTUHR wird die Geschwindigkeit des Außengebläses reduziert, um den Geräuschpegel zu verringern und einen angenehmen Betrieb zu ermöglichen.
1 Stunde nach dem Einstellen der ECO-SCHLAFZEITSCHALTUHR wird die eingestellte Temperatur
leicht verschoben. Die Verschiebung der Temperatur hängt von der Art der Klimaanlage ab.
Diese automatischen Betriebsänderungen tragen zum Energiesparen bei, ohne dass an Komfort eingebüßt wird.
Die eingesparte Energie hängt von der Außentemperatur, Raumtemperatur, eingestellter Temperatur und dem
Klimaanlagentyp ab.
DEUTSCH
Kühlbetrieb [Diagrammdarstellung nur zu
Illustrationszwecken]
Temperatur
Außengerätegeblä-
segeschwindigkeit
reduzieren
30 Minuten 1 Stunde
Verschieben
Temperatur
Heizbetrieb [Diagrammdarstellung nur zu
Illustrationszwecken]
Temperatur
Außengerätegeblä-
segeschwindigkeit
reduzieren
30 Minuten 1 Stunde
Verschieben
Temperatur
HINWEIS
• Wenn die ECO-SCHLAFZEITSCHALTUHR eingestellt wird, bei zuerst eingestellter ZEITSCHALTUHR
AUS oder ZEITSCHALTUHR EIN/AUS, wird die ECO-SCHLAFZEITSCHALTUHR anstatt der ZEITSCHALTUHR AUS oder ZEITSCHALTUHR EIN/AUS wirksam.
– 59 –
Page 60

WOCHENZEITSCHALTUHR-BETRIEB
• Modus A oder Modus B können ausgewählt werden. Bei jedem Modus können bis zu 6 Programme pro Tag
eingestellt werden. Insgesamt können maximal 42 Programme für eine Woche in jedem Modus eingestellt werden.
• Wenn der Kalender und die Uhrzeit nicht eingestellt sind, kann die Einstellung Vormerken für die WOCHENZEITSCHALTUHR nicht eingestellt werden.
• Wenn Kalender und Zeitschaltuhr nicht richtig eingestellt sind, funktioniert die WOCHENZEITSCHALTUHR
nicht richtig.
• Die Vormerkung für Kalender und Uhr müssen zuerst eingestellt werden, bevor die WOCHENZEITSCHALTUHR
benutzt werden kann.
Schritt 1: Stellen Sie den Vormerkplan auf der Fernbedienung ein. Senden Sie die aufgezeichnete
Vormerkung an das Innenraumgerät und nehmen Sie dieses dann in Betrieb.
Schritt 2: Wählen Sie Modus A oder Modus B aus und aktivieren oder deaktivieren Sie die WOCHEN-
ZEITSCHALTUHR.
Schritt 3: Kopieren Sie den Vormerkplan und brechen Sie diesen ab.
Schritt 1: Stellen Sie den Vormerkplan auf der Fernbedienung ein. Senden Sie die
aufgezeichnete Vormerkung an das Innenraumgerät und nehmen Sie dieses
dann in Betrieb.
Einstellung der WOCHENZEITSCHALTUHR:
1
2
1. Wählen Sie Modus A oder Modus B aus.
Drücken Sie die Taste
und blinkt auf der Anzeige. (Modus A ist ausgewählt).
Drücken Sie noch einmal die Taste
blinken auf der Anzeige. (Modus B ist ausgewählt).
• Wenn keine Vormerkung gemacht wurde, erscheint EIN/AUS
, .
• Wenn eine Vormerkung gemacht wurde, erscheint EIN/AUS
, nicht.
2. Stellen Sie ein Programm ein.
(WÖCHENTLICH). Leuchtet auf
(WÖCHENTLICH), und
Drücken Sie die Taste
lang. Der Auswahlmodus kann geändert werden.
Tag: Monat, Programm Nr.: 1, EIN/AUS, Zeit einstellen und Tem-
peratur einstellen blinken auf der Anzeige.
3. Wählen Sie den gewünschten Wochentag aus.
Drücken Sie
Der Tag wechselt von MO DI MI DO FR SA SO
3
4
MO, DI, MI, DO, FR, SA, SO [volle Tage] MO, DI, MI, DO, FR
[Wochentag] SA, SO [Wochenende] MO DI ...
Wählen Sie [volle Tage] für Tagesvormerkungen.
Wählen Sie [Wochentag] für eine Vormerkung von Montag bis Freitag.
Wählen Sie [Wochenende] für eine Vormerkung an Samstag und
Sonntag.
• Nachdem die Vormerkung eingestellt wurde, ist es einfach diese
gleichzeitig zu prüfen und zu bearbeiten.
4. Drücken Sie die Taste , um eine Programmnummer auszuwählen.
Die Programmnummer wechselt von 1 2 3 4 5
6 1 2 .....
• Wenn die Programmnummer eingestellt wurde, folgen Sie den
obigen Anmerkungen um Änderungen vorzunehmen.
die Taste (TAG).
(WÖCHENTLICH) ca. 3 Sekunden
– 60 –
Page 61

WOCHENZEITSCHALTUHR-BETRIEB
5. Drücken Sie die Taste (ZEITSCHALTUHR EIN-AUS), um die
5
ZEITSCHALTUHR EIN oder die ZEITSCHALTUHR AUS Vormerkung auszuwählen.
6. Drücken Sie die
7. Drücken Sie (TEMP
einzustellen.
6
8. Drücken Sie die Taste
Tag, Programmnummer, Vormerkung EIN, Temperatureinstellung
leuchten auf. Blinken dauerhaft. Wenn die Vormerkung nicht
fertiggestellt ist, werden die Einstellungen nicht im Speicher
abgespeichert.
Um mit der Vormerkung fortzufahren, drücken Sie die Tasten
.
Taste (ZEIT), um die Zeitvormerkung einzustellen.
oder ) Taste, um die Temperaturvormerkung
(OK). Die Vormerkungen sind eingestellt.
DEUTSCH
7
Folgen Sie Schritt 3 bis 8, um Vormerkungen einzustellen.
9. Nachdem alle Vormerkungen eingestellt wurden, drücken Sie die
Taste
Sekunden lang auf das Innenraumgerät. Die Zeitschaltuhrleuchte auf
dem Innenraumgerät blinkt schnell.
8
9
Nachdem ein Piepston von dem Innenraumgerät ausgesandt wurde,
leuchtet die ZEITSCHALTUHR-Leuchte auf.
Bitte stellen Sie sicher, dass die Zeitschaltuhrleuchte aueuchtet.
Dies zeigt an, dass die Vormerkung im Innenraumgerät gespeichert
wurde und die Zeitschaltuhr-Funktion fertiggestellt wurde.
Der Vormerkungsinhalt erscheint auf der Fernbedienungsanzeige.
• Wenn die ZEITSCHALTUHR-Leuchte auf dem Innenraumgerät
nicht aueuchtet, drücken Sie die Taste
richten Sie dabei für ca. 3 Sekunden die Fernbedienung auf das
Innenraumgerä
• ACHTUNG! Drücken Sie die Taste
während der Vormerkungseinstellung, da dies dazu führt, dass
alle Vormerkungsinhalte verloren gehen.
• Die Vormerkungsinhalte werden nur solange in dem Innenraumgerät
gespeichert, bis die Taste
(SENDEN) und richten Sie dabei die Fernbedienung ca. 3
(SENDEN) und
(ABBRECHEN) nicht
(SENDEN) gedrückt wird.
HINWEIS
• Es können bis zu 6 Programme pro Tag eingestellt werden. Die Einstellungen ZEITSCHALTUHR
AUS oder ZEITSCHALTUHR EIN für jede Programmnummer können zufällig gewählt werden. Wenn die
Taste (SENDEN) gedrückt wird, wird die Einstellung ZEITSCHALTUHR EIN oder ZEITSCHALTUHR
AUS für jede Programmnummer automatisch angeordnet, so dass die Programmnummer 1 die früheste
Zeit und die Programmnummer 6 die späteste Zeit hat.
Wenn die Zeiteinstellung dieselbe ist, wird dem letzten Vormerkungsinhalt Vorrang gegeben.
• ACHTUNG! Wenn die Fernsteuerung nicht benutzt wird und die Taste
von 3 Minuten, nachdem Vormerkungen gemacht wurden, gedrückt wird, gehen alle aktuellen Vormerkungen verloren.
(SENDEN) nicht innerhalb
– 61 –
Page 62

WOCHENZEITSCHALTUHR-BETRIEB
Schritt 2: Wählen Sie Modus A oder Modus B aus und aktivieren oder deaktivieren Sie
die WOCHENZEITSCHALTUHR.
Wie wird Modus A oder Modus B der WOCHENZEITSCHALTUHR
1
Einstellung ausgewählt.
2
3
1
1. Drücken Sie die Taste
auf der Anzeige. (Normalerweise blinkt zuerst Modus A).
2. Drücken Sie noch einmal die Taste
blinken auf der Anzeige.
3. Wählen Sie Modus A oder Modus B aus. Drücken Sie die Taste
(SENDEN) und richten Sie die Fernbedienung dabei für ca. 3 Sekunden auf das Innenraumgerät. Die Zeitschaltuhrleuchte auf dem
Innenraumgerät blinkt schnell.
Nachdem ein Piepston von dem Innenraumgerät ausgesandt wurde,
leuchtet die ZEITSCHALTUHR-Leuchte auf.
Bitte stellen Sie sicher, dass die Zeitschaltuhrleuchte aueuchtet.
Dies zeigt an, dass die Modus A oder Modus B Auswahl und die aktive Wochenzeitschaltuhr bestätigt wurden.
Einstellung WOCHENZEITSCHALTUHR inaktiv.
1. Richten Sie die Fernbedienung auf das Innenraumgerät und drücken
Sie die Taste
Ein Piepston wird von dem Innenraumgerät ausgesandt und die
ZEITSCHALTUHR Leuchte ist AUS. Die Vormerkungsanzeige auf
der Fernbedienung geht ebenfalls aus.
Dies gibt an, dass WOCHENZEITSCHALTUHR inaktiv bestätigt wurde.
(ABBRECHEN).
(WÖCHENTLICH). und blinkt
(WÖCHENTLICH), und
• Um die Einstellung der WOCHENZEITSCHALTUHR wieder zu
aktivieren, wiederholen Sie die Schritte „Wie wird Modus A
oder Modus B für die Einstellung WOCHENZEITSCHALTUHR
ausgewählt“.
HINWEIS
• Wenn die Einstellung EINMAL-ZEITSCHALTUHR vorgenommen wird, wird der Betrieb der WOCHENZEITSCHALTUHR unterbrochen. Wenn der EINMAL-ZEITSCHALTUHR Betrieb fertiggestellt ist, wird der Betrieb
WOCHENZEITSCHALTUHR aktiviert.
• Wenn EINMAL-ZEITSCHALTUHR abgebrochen wird, wird der Betrieb WOCHENZEITSCHALTUHR
ebenfalls abgebrochen. Es ist erforderlich, den Betrieb WOCHENZEITSCHALTUHR zu aktivieren.
• Nach dem automatischen Neustart ist der Betrieb WOCHENZEITSCHALTUHR abgebrochen. Es ist
erforderlich, den Betrieb WOCHENZEITSCHALTUHR zu aktivieren.
– 62 –
Page 63

WOCHENZEITSCHALTUHR-BETRIEB
Schritt 3: Kopieren Sie den Vormerkplan und brechen Sie diesen ab.
Wie man kopiert und einfügt.
1
2
Bearbeiten des Vormerkplans erfolgt einfach durch Kopieren der Daten
von einem auf den anderen Tag.
1. Drücken Sie die Taste
oder Modus B auszuwählen.
(WÖCHENTLICH), um Modus A
2. Drücken Sie die Taste
lang, um die Bearbeitung des Vormerkplans zu starten.
(WÖCHENTLICH) ca. 3 Sekunden
DEUTSCH
3
3. Drücken Sie die Taste
kopieren, auszuwählen.
4. Drücken Sie die Taste
blinkt „EINFÜGEN“ auf der Anzeige. * Drücken Sie die Taste
(ABBRECHEN), um den KOPIER-Modus abzubrechen. Der normale
4
Einstellmodus ist aktiviert.
5. Drücken Sie die Taste
Einfügen, auszuwählen.
6. Drücken Sie die Taste
Einfügen. Blinkt nur auf der Anzeige.
(TAG), um einen Tag der Woche zu
(KOPIEREN/EINFÜGEN). Dann
(TAG), um einen Tag der Woche zum
(KOPIEREN/EINFÜGEN) einmal zum
5
7. Um mit dem Kopieren anderer Tage fortzufahren, drücken Sie
oder oder oder .
Starten Sie dann mit Schritt 3.
6
8
8. Nachdem Kopieren und Einfügen fertiggestellt ist, drücken Sie die Taste
(SENDEN), während Sie die Fernbedienung ca. 3 Sekunden lang
auf das Innenraumgerät richten. Die Zeitschaltuhrleuchte auf dem
Innenraumgerät blinkt schnell.
Nachdem ein Piepston von dem Innenraumgerät ausgesandt wurde,
leuchtet die ZEITSCHALTUHR-Leuchte auf.
Bitte stellen Sie sicher, dass die Zeitschaltuhrleuchte aueuchtet.
Wenn die ZEITSCHALTUHR Leuchte nicht aueuchtet, drücken Sie
noch einmal die Taste
(SENDEN).
HINWEIS
• Wenn es keine Vormerkdaten gibt, können keine Daten von einem Tag auf den anderen kopiert werden.
• Die Vormerkdaten ändern sich nicht, wenn die Taste
nicht gedrückt wird.
– 63 –
(SENDEN)
Page 64

WOCHENZEITSCHALTUHR-BETRIEB
Schritt 3: Kopieren Sie den Vormerkplan und brechen Sie diesen ab.
Wie werden WOCHENZEITSCHALTUHR Daten gelöscht.
1
[Löschen einer Programmnummer-Vormerkung]
2
3
4
1. Drücken Sie die Taste
Modus B auszuwählen.
2. Drücken Sie die Taste
lang, um die Bearbeitung des Vormerkplans zu starten.
3. Drücken Sie die Taste
Bearbeitung auszuwählen.
4. Drücken Sie
ausgewählte Programmnummer blinkt.
5. Drücken Sie die Taste
ausgewählten Programmnummer wird gelöscht.
6. Nach dem Löschen drücken Sie 3 Sekunden lang die Taste
(SENDEN) und richten Sie die Fernbedienung dabei auf das
Innenraumgerät. Die Zeitschaltuhrleuchte im Innenraumgerät blinkt
schnell.
Nachdem ein Piepston von dem Innenraumgerät ausgesandt wurde,
leuchtet die ZEITSCHALTUHR-Leuchte auf.
Bitte stellen Sie sicher, dass die Zeitschaltuhrleuchte aueuchtet.
, um die Programmnummer auszuwählen. Die
(WÖCHENTLICH), um Modus A oder
(WÖCHENTLICH) ca. 3 Sekunden
(TAG), um einen Tag der Woche zur
(LÖSCHEN). Die Vormerkung der
5
• Die Vormerkdaten ändern sich nicht, wenn die Taste
(SENDEN) nicht gedrückt wird.
6
– 64 –
Page 65

WOCHENZEITSCHALTUHR-BETRIEB
Schritt 3: Kopieren Sie den Vormerkplan und brechen Sie diesen ab.
[Eine Tagesvormerkung löschen]
1
2
3
4
5
1. Drücken Sie die Taste
Modus B auszuwählen.
2. Drücken Sie die Taste
lang, um die Bearbeitung des Vormerkplans zu starten.
3. Drücken Sie die Taste
Bearbeitung auszuwählen.
4. Drücken Sie die Taste
Vormerkungen für alle Programmnummern werden gelöscht.
• Wenn Sie kurz drücken, wird die Vormerkung für eine Programmnummer
gelöscht.
5. Nach dem Löschen drücken Sie 3 Sekunden lang die Taste
(SENDEN) und richten Sie die Fernbedienung dabei auf das
Innenraumgerät. Die Zeitschaltuhrleuchte im Innenraumgerät blinkt
schnell.
Nachdem ein Piepston von dem Innenraumgerät ausgesandt wurde,
leuchtet die ZEITSCHALTUHR-Leuchte auf.
Bitte stellen Sie sicher, dass die Zeitschaltuhrleuchte aueuchtet.
• Die Vormerkungen ändern sich nicht, wenn die Taste
nicht gedrückt wird.
(WÖCHENTLICH), um Modus A oder
(WÖCHENTLICH) ca. 3 Sekunden
(TAG), um einen Tag der Woche zur
(LÖSCHEN) 10 Sekunden lang. Die
(SENDEN)
DEUTSCH
[Modus A oder Modus B löschen]
1
1. Drücken Sie die Taste
Modus B auszuwählen.
2. Richten Sie die Fernbedienung auf das Innenraumgerät und drücken
Sie die Taste
Anzeige Modus A oder Modus B blinkt.
Nachdem ein Piepston von dem Innenraumgerät ausgesandt wurde,
erlöschen die Vormerkungen für Modus A oder Modus B.
(LÖSCHEN) für ca. 10 Sekunden, während die
(WÖCHENTLICH), um Modus A oder
2
HINWEIS
• Wenn alle Vormerkungen in der Fernbedienung gelöscht wurden und die Taste (SENDEN) gedrückt
wurde, wird kein Signal an das Innenraumgerät übertragen. Die ZEITSCHALTUHRLAMPE bleibt aus und
es werden keine Änderungen an den im Innenraumgerät gespeicherten Vormerkungen vorgenommen.
– 65 –
Page 66

INFO-FUNKTION
• Wenn Sie die Taste (INFO) drücken, wird die Temperatur um die Fernbedienung herum und der monatliche
Stromverbrauch auf der Fernbedienung angezeigt.
• Nach dem Wechseln der Batterien richten Sie die Fernbedienung auf das Innenraumgerät und drücken
Sie die
Der aktuelle Kalender und die Uhr wird von dem Innenraumgerät übertragen.
• Um die Daten von dem Innenraumgerät zu erhalten, muss der Abstand zwischen der Fernbedienung und
dem Empfänger der Innenraumgeräte in einem Bereich von 2 Metern liegen.
Taste (INFO).
Zum Prüfen der Temperatur, um die Fernsteuerung herum
Drücken Sie die Taste (INFO).
1
Die Temperatur wird 10 Sekunden lang angezeigt.
Zum Prüfen des monatlichen Stromverbrauchs
Richten Sie die Fernbedienung auf den Empfänger des Innenraumgerätes (innerhalb von 2 Metern vor dem Innenraumgerät)
und drücken Sie die Taste (INFO). Warten Sie 2 Sekunden
lang auf die Signalübertragung.
Während die Temperatur um die Fernbedienung angezeigt wird,
drücken Sie wiederholt die
Folgendes an:
Der monatliche Stromverbrauch für Heizen
stromverbrauch für Heizen dieser Monatsstromverbrauch für
Kühlen letzter Monatsstromverbrauch für Kühlen Temperatur
um die Fernbedienung herum dieser Monatsstromverbrauch
für periodisches Heizen.
• Wenn die Angabe nicht vorgegeben ist, gehen Sie mit der
Fernbedienung näher an den Empfänger des Innenraumgerätes heran.
• Der angegebene Wert wird nur als Richtwert betrachtet.
Taste (INFO). Die Anzeige zeigt
letzter Monats-
Aktueller Kalender und Uhr können von dem
Innenraumgerät abgerufen werden
Richten Sie die Fernbedienung auf den Empfänger des Innenraumgerätes (innerhalb von 2 Metern vor dem Innenraumgerät) und
drücken Sie die Taste (INFO). Warten Sie 2 Sekunden lang
auf die Signalübertragung.
Sobald der aktuelle Kalender und die Uhrzeit empfangen wird,
prüfen Sie, ob diese richtig sind oder nicht, indem Sie die Taste
(UHR) drücken.
• Wenn das Innenraumgerät nicht mit Strom versorgt wird oder
der Kalender und die Uhrzeit nicht eingestellt wurden, kann
die INFO Funktion nicht zum Senden oder Empfangen von
Daten verwendet werden.
HINWEIS
• Im Falle einer Störung an der Klimaanlage wird durch Drücken der Taste (INFO) der Fehlercode
angezeigt.
Richten Sie die Fernbedienung auf den Empfänger des Innenraumgerätes (innerhalb von 2 Metern
vor dem Innenraumgerät) und drücken Sie die Taste (INFO). Warten Sie 2 Sekunden lang auf
die Signalübertragung.
Es wird ein Fehlercode angezeigt.
Rufen Sie das Service-Center an und geben Sie den Fehlercode durch.
– 66 –
Page 67

BETRIEBSMODUSSPERRE
Die Fernbedienung kann benutzt werden um den Betrieb HEIZMODUS (inklusive GEBLÄSE), KÜHLMODUS
(inklusive GEBLÄSE) und ENTFEUCHTUNGSMODUS (inklusive GEBLÄSE) einzustellen.
Methode zum Sperren des HEIZMODUS (inklusive GEBLÄSE) Betriebes
Drücken Sie die Tasten
für ca. 5 Sekunden, wenn die Fernbedienung AUSGESCHALTET ist.
”, “ ” und “ ” werden für ca. 10 Sekunden angezeigt. Später bleibt “ ”
“
und “ ”.
Dies zeigt an, dass der HEIZMODUS Betrieb gesperrt ist.
Wenn Sie die Taste
Methode zum Entsperren des HEIZMODUS (inklusive GEBLÄSE) Betriebes
Drücken Sie die Tasten
für ca. 5 Sekunden, wenn die Fernbedienung AUSGESCHALTET ist.
Alle Betriebsmodussymbole erscheinen für ca. 10 Sekunden auf der Anzeige.
Anschließend wird das Betriebsmodussymbol vor dem Abbrechen angezeigt.
Dies zeigt an, dass der HEIZMODUS Betrieb entsperrt ist.
Methode zum Sperren des KÜHL- und ENTFEUCHTUNGSMODI (inklusive
GEBLÄSE) Betriebes.
Drücken Sie die Tasten
ca. 5 Sekunden, wenn die Fernbedienung AUSGESCHALTET ist.
”, “ ”, “ ” und “ ” wird für ca. 10 Sekunden angezeigt. Später bleibt “ ”
“
und “ ”.
(ECO) und (LEISTUNGSSTARK) gleichzeitig
(MODUS) drücken, wird “ ” oder “ ” angezeigt.
(ECO) und (LEISTUNGSSTARK) gleichzeitig
(ECO) und (GERÄUSCHARM) gleichzeitig für
DEUTSCH
Dies zeigt an, dass der KÜHL- und ENTFEUCHTUNGSMODUS Betrieb gesperrt ist.
Wenn Sie die Taste (MODUS) drücken, wird “ ” oder “ ” angezeigt.
Methode zum Entsperren des KÜHL- und ENTFEUCHTUNGSMODI (inklusive
GEBLÄSE) Betriebes.
Drücken Sie die Tasten
5 Sekunden, wenn die Fernbedienung AUSGESCHALTET ist.
Alle Betriebsmodussymbole erscheinen für ca. 10 Sekunden auf der Anzeige.
Anschließend wird das Betriebsmodussymbol vor dem Abbrechen angezeigt.
Dies zeigt an, dass der KÜHL- und ENTFEUCHTUNGSMODUS Betrieb entsperrt ist.
(ECO) und (GERÄUSCHARM) gleichzeitig für ca.
HINWEIS
• Die Betriebsmodussperrfunktion wird nicht aktiviert, wenn die ZEITSCHALTUHR Vormerkung aktiviert ist.
Die ZEITSCHALTUHR Vormerkung muss zuerst deaktiviert werden. Dann kann die Betriebsmodussperrfunktion aktiviert werden.
• Der HEIZ-, KÜHL- und ENTFEUCHTUNGSMODUS (inklusive GEBLÄSE) Betrieb kann durch Drücken der
Taste
gedrückt wird, werden alle Daten, die in der Fernbedienung gespeichert sind, gelöscht. Sie müssen die
erforderlichen Daten wieder einstellen.
• Bei Mehrfachanschlüssen muss das Gerät und der Modus, die eingestellt sind, um das HEIZEN zu sperren
und zuerst eingeschaltet werden, den höchsten Vorrang haben. Andere Geräte, die ausgewählt werden, um
in verschiedenen Modi zu arbeiten, müssen im STANDBY Modus sein, bis entweder der erste Gerätebetrieb
ausgeschaltet wird oder der Modus so ausgewählt wird, dass er dem ersten Gerät entspricht.
(ZURÜCKSETZEN) entsperrt werden. Wenn jedoch die Taste (ZURÜCKSETZEN)
– 67 –
Page 68

WARTUNG
VORSICHT
Reinigung und Wartung darf nur von qualiziertem Fachpersonal durchgeführt werden. Vor dem
Reinigen Betrieb beenden und Netzstrom ausschalten.
1. LUFTFILTER
Dafür sorgen, den Filter einmal alle zwei Wochen zu reinigen; dadurch wird Strom gespart. Wenn der
Luftfil-ter mit Staub gefüllt ist, lässt die Luftzufuhr nach und die Kühlkapazität verringert sich. Außerdem entstehen Geräusche. Dafür sorgen, den Filter auf nachstehende Weise zu reinigen.
VORGEHENSWEISE
Die Stirntafel vorsichtig öffnen und den Filter herausne-
1
hmen.
7(0325$5<
6:,7&+
Mit einem Staubsauger Staub aus dem Luftlter absaugen.
2
Bei zu starker Verschmutzung, den Filter mit einem
Waschmittel auswaschen und ihn gründlich spülen.
Danach den Filter an einem schattigen Ort trocknen.
7(0325$5<
6:,7&+
7(0325$5<
6:,7&+
• Die Filter mit der Markierung “Front” nach vorne
3
einsetzen und sie in Originalstellung anbringen.
• Nach Anbringen der Filter die Stirntafel an drei
Punkten, wie in der Abbildung dargestellt, drücken
und schließen.
VORSICHT
• Anlage mit Wasser nicht über 40°C spülen, da sonst der Filter schrumpfen würde.
• Restfeuchtigkeit vollständig abschütteln und im Schatten trocknen. Direkte Sonneneinstrahlung kann
Schrumpfen des Filters bewirken.
• Das Gerät nicht ohne Filter laufen lassen. Nichtbeachtung kann zum Ausfall des Gerätes führen.
– 68 –
Page 69

2. REINIGEN DER STIRNTAFEL
• Die Stirntafel abnehmen und mit klarem Wasser
abwaschen.
Zum Waschen einen weichen Schwamm verwenden.
Nach Verwendung eines neutralen Waschmittels,
gründlich mit klarem Wasser abwaschen.
• Wird die Stirntafel nicht abgenommen, diese mit
einem weichen, trockenen Tuch abwischen.
Die Fernbedienung gründlich mit einem weichen,
trockenen Tuch abwischen.
• Das Wasser gründlich abwischen.
Wenn an den Anzeigeinstrumenten oder dem
Signalempfänger des Innengerätes Wasser
zurückbleibt, verursacht es Störungen.
Verfahren zum Abnehmen der Stirntafel.
Darauf achten, die Stirntafel zum Abnehmen und
Anbringen mit beiden Händen zu halten.
Abnehmen der Stirntafel Anbringen der Stirntafel
DEUTSCH
Achse
Loch
• Wenn die Stirntafel mit beiden Händen vollständig
geöffnet wurde, den rechten Arm zum Lösen nach
innen drücken und ihn nach vorne herausnehmen,
• Die Achsen des linken und rechten Arms in die
Stufen des Gerätes bewegen und sie fest und
sicher in die Loche einsetzen.
während man die Stirntafel leicht schließt.
VORSICHT
• Beim Säubern des Gerätes kein Wasser auf den Gerätekörper spritzen
oder gießen, da dies einen Kurzschluß verursachen könnte.
• Niemalsheißes Wasser (über 40°C), Benzin, Säure, Verdünner oder eine
Bürste verwenden, da dadurch die Kunststofflächen und die Farbe des
Gerätes beschädigt werden.
3. INSTANDHALTUNG VOR LÄNGERER NICHTVERWENDUNG
• Lassen Sie die Anlage bei schönem Wetter
etwa einen halben Tag lang laufen, wobei
Sie die Betriebsart auf (VENTILATOR)und
die Gebläsedrehzahl auf HI einstellen und so die
ganze Anlage trocknen.
• Den Netzstecker herausziehen. Oder den
Unterbrecherschalter ausschaltenr.
Luftstrom
Achse
Loch
A
B
E
N
C
E
Z
I
N
D
T
R
H
E
I
N
I
N
– 69 –
Page 70

INFORMATIONEN
LEISTUNGSFÄHIGKEITEN
Wärmefähigkeit
• Diese Raumklimaanlage benutzt ein Heizpumpensystem, das
durch
die absorbierte Außenwärme den Raum beheizt. Wenn die
Raumtemperatur niedriger sinkt, so wird ebenfalls die Heizleistung
reduziert. In einer solchen Situation arbeitet der Inverter, um die
Umdrehungszahl des Kompressors zu erhöhen, um einen
Abfall der Heizleistung des Gerätes zu verhindern. Sollte die
Einheitsleistung immer noch unzufriedenstellend sein, so müssen
andere Heizgeräte verwendet werden, um die Einheitsleistung zu
erhöhen.
• Die Klimaanlage ist zum Heizen eines ganzen Raums geplant, so dass eine bestimmte Zeit benötigt ist,
bevor man sich erwärmt. Die Timer Funktion ist zum Vorziehen im Vergleich zu der gewünschten Zeit.
VORSICHT
Keinen Ofen oder
andere Hochheizgeräte
in der Nähe der internen
Einheit einsetzen.
VERBOT
Kühl- und Entfeuchtleistungen
• Wenn die Wärme in einem Raum die Kühlleistungsfähigkeit der Einheit überschreitet, (zum Beispiel, wenn
mehrere Leute in einem Raum anwesend sind oder weitere Heizgeräte betätigt sind), kann die voreingestellte Raumtemperatur nicht erreicht werden.
– 70 –
Page 71

REGELMÄSSIGE KONTROLLE
BITTE FOLGENDE PUNKTE JÄHRLICH ODER HALBJÄHRLICH PRÜFEN. WENDEN SIE SICH BITTE AN
DEN HÄNDLER, SOLLTEN SIE IRGEND EINE HILFE BRAUCHEN.
Überprüfen Sie, ob die Einheitserdleitung korrekt
angeschlossen worden ist.
1
2
3
WARNUNG
WARNUNG
WARNUNG
Mit nicht angeschlossener oder defekter Erdleitung
kann eine Einheitsstörung oder Elektroschockgefahr
auftreten.
Überprüfen Sie, ob das Montagegerüst zu viel verrostet
ist und ob die Außeneinheit geneigt oder instabil
geworden ist.
Unter diesen Bedingungen könnte das Gerüst zusammenstürzen und Schaden verursachen.
Vergewissern, ob der Netzstecker fest und sicher in
die Netzsteckdose eingesteckt ist.
Wenn der Netzstecker nicht fest und sicher in die Netzsteckdose eingesteckt ist oder wenn er heiß wird, kann dies einen
Stromschlag oder einen Brand zur Folge haben.
Wenn der Netzstecker staubig oder verschmutzt ist, den
Stecker reinigen und ihn in die Netzsteckdose einstecken.
DEUTSCH
KUNDENDIENST NACH DEM VERKAUF UND GARRANTIE
BEVOR SIE SICH AN EINEN WARTUNGSTECHNIKER WENDEN, DIE FOLGENDEN PUNKTE KONTROLLIEREN.
FALL ZUKONTROLLIERENDE PUNKTE
Keine Signalsendung vom
Fernbediengerät.
(Das Fernbediendisplay
zeigt niedrige Helligkeit oder ist leer.)
Wenn das Gerät nicht funktioniert.
Wenn das Gerät nicht richtig kühlt.
Wenn es nicht gut heizt.
Die nachstehenden Ereignisse zeigen keine Einheitsstörung an.
Beim Heizen blinkt der Betriebsan-
zeiger und der Luftuss stoppt
Störungsschall oder Pfeifen
Knirschen
Rostendes Geräusch Geräusch erzeugt, wenn der Inneneinheitsventilator wechselt die U/M-Drehzahl.
Klingeln Geräusch des gesteuerten Ventils erzeugt beim Einschalten der Einheit.
• Sind die Batterien zu wechseln?
• Ist die Polarität der eingeführten Batterien korrekt?
• Ist die Sicherung in Ordnung?
• Ist die Spannung extrem hoch oder niedrig?
• Steht der Überlastschalter auf Ein (“ON”)?
• Ist der Netzstecker eingesteckt?
• Haben Sie eine Stromunterbrechung?
• Ist der Luftlter mit Staub verstopft?
• Ist die eingestellte Temperatur geeignet?
• Wurden die horizontalen Luftableiter entsprechend der eingestellten
Betriebsart in ihre richtigen Positionen eingestellt?
• Sind die ZU-/Abluftleitungen der internen und externen Einheit verstopft?
• Ist die Ventilatorgeschwindigkeit “NIEDRIG” oder “RUHIGER”?
<Betriebsstart>
Die Einheit bereitet ein Blasen von warmer Luft. Bitte warten.
<Im Betrieb>
Die Außeneinheit ist beim Entfrosten. Bitte warten.
Geräusch beim Kühlmitteluss in dem Rohr oder Ventilgeräusch während
derEinstellung der Flussmenge.
Geräusch erzeugt, wenn die Einheit aufgrund von Temperaturänderungen
sich ausdehnt oder schrumpft.
– 71 –
Page 72

( )
Keckgeräusch
Geräusch beim Betriebswechseln
Nebelemission
Dampf, der von der Außeneinheit
abgegeben wird
Gerüche
Die Außeneinheit läuft weiter, auch
wenn der Betrieb gestoppt worden ist.
Die Betriebslampe blinkt.
Die Temperatureinstellung wird nicht
erreicht.
Geräusch des Ventilators beim Saugen der Luft in dem Abussschlauch und beim
Entlassen des Entfeuchtwassers, das in dem Kondenswassersammler angesammelt
worden ist. Für weitere Einzelheiten, befragen Sie Ihren Verkaufsagent.
Das Betriebsgeräusch ändert aufgrund der Stromänderungen gleichzeitig der
Raumtemperaturänderungen.
Der Nebel wird beim plötzlichen durch die klimatisierte Luft verursachten Abkühlen
der Raumluft erzeugt.
Wasser, das beim Entfrosten verdampft, mit erfolgtem Dampfabgeben.
Erzeugt von Partikeln von Rauch, Nahrung, Koszmetikprodukten, usw., die in der
Raumluft anwesend sind und an der Einheit haften.
Enteisung ist im Gange (da der Heizbetrieb unterbrochen ist, überprüft der
Mikrocomputer, ob sich im Außengerät Eis angesammelt hat und weist das
Gerät an, bei Bedarf einen automatischen Enteisungsvorgang vorzunehmen).
Zeigt, dass das Vorheizen- oder Entfrostverfahren im Laufe ist.
Wenn der Schutzschalter oder der Vorheizsensor arbeiten, wenn die Einheit beim
Vorheizen gestoppt ist und dann wieder eingeschaltet, oder wenn die Betriebsart
vom Kühlen auf Heizen umgeschaltet ist, so blinkt die Lampe weiter.
Die tatsächliche Raumtemperatur kann je nach Zahl der Personen im Raum und
den Bedingungen der Innen- oder Außengeräte geringfügig von der auf der
Fernbedienung eingestellten Temperatur abweichen.
• Wenn das Gerät nach Vornahme
der oben angegebenen Inspektionen nach wie vor nicht normal
arbeitet, den Unterbrecherschalter
ausschalten oder den Netzstecker
herausziehen und sofort den
Kundendienst zu Rate ziehen.
Kontaktieren Sie sofort Ihren Verkaufsagent
beim Eintreten folgender Ereignisse:
• Der Selbstausschalter schaltet aus oder die
Sicherung bläst häug.
• Die Schaltfunktion ist nicht stabil.
• Fremdkörper oder Wasser gehen zufällig in die Einheitsinnenseite ein.
• Der Stromkabel wird viel zu warm oder der Isolator ist abgenutzt oder abisoliert.
• Die ZEITGEBERLAMPE auf dem Inneneinheitsdisplay blinkt.
Da der Störungstyp mittels des Blinkzyklus identiziert werden kann,
soüberprüfen Sie den Blinkzyklus, bevor den Selbstausschalter auszuschalten.
Anmerkungen
• Bei ruhigem Betrieb bzw. nach dem Abschalten des Gerätes könnten die
folgenden Zustände auftreten, die jedoch keinerlei Probleme darstellen.
(1) Ströhmungsgeräusche des Kühlmittels im Kühlmittelkreis.
(2) Schleifegeräusche des Ventilatorgehäuses während des Abkühlens
oder des Erwärmens.
• Aufgrund angesammelter Fremdpartikel (Rauch, Eßwaren, Kosmetika
usw.) kann es zu geruchsbelästigung durch das Raumklimagerätkommen.
Zu Saisonbeginn sollten daher das Luftlter und der Verdunster gereinigt
werden, um diese Geruchsbelästigung zu reduzieren.
• Bitte wenden Sie sich sofort an den Händler, solte Ihr Gerät trotz der oben beschriebenen Kontrollen nicht
richtig funktionieren. Informieren Sie Ihren Händler über das Modell, Produktionsnummer und Datum des
Einbaus Ihres Gerätes. Bitte informieren Sie ihn über die Natur des Defektes.
Zur Beachtung:
Beim Einschalten des Gerätes (besonders bei abgeblendeter Raumbeleuchtung) kann es zu einer geringen
Helligkeitsschwankung kommen. Dies stellt jedoch kein Problem dar.
Die Bedingungen des örtlichen Elektrizitätswerkes sind zu beachten.
– 72 –
Page 73

CLIMATISEUR SPLIT
APPAREIL INTÉRIEUR/APPAREIL EXTÉRIEUR
MODÈLES
HFC
R410A
RAK-18PPA/RAC-18WPA
RAK-25PPA/RAC-25WPA
RAK-35PPA/RAC-35WPA
FRANÇAIS
APPAREIL EXTÉRIEUR
RAC-18WPA
RAC-25WPA
RAC-35WPA
Instruction manual Page 1~36
To obtain the best performance and ensure years of
trouble free use, please read this instruction manual
completely.
APPAREIL INTÉRIEUR
RAK-18PPA
RAK-25PPA
RAK-35PPA
Manual de instrucciones Página 145~180
Para obtener el mejor funcionamiento y asegurar años
de uso libre de problemas, lea cuidadosamente este
manual de instrucciones.
Bedlenungsanleitung Seite 37~72
Bitte lesen Sie diese Bedienungsanleitung aufmerksam
durch, um durch richtige Bedienung jahrelangen und
störungsfreien Betrieb zu gewährleisten.
Mode d’emploi Page 73~108
Des performances optimales et un fonctionnement à
long terme seront assurés en appliquant les présentes
instructions après avoir entièrement lu ce mode
d’emploi.
Manuale di istruzioni Pag. 109~144
Per garantire la migliore prestazione e la più lunga
durataleggere attentamente e al completo le seguanti
istruzioni.
Manual de instruções Página 181~216
A m de obter um bom funcionamento e de garantir
uma utilização sem falhas durante muitos anos, é
favor ler este manual de instruções completamente.
Οδηγίες χρήσης ™ÂÏ›‰· 217~252
°И· ЩЛУ О·П‡ЩВЪЛ ·fi‰ФЫЛ ЩФ˘ ОПИМ·ЩИЫЩИОФ‡ О·И БИ·
ЩЛУ М·ОЪФЪfiıВЫМЛ ¯Ъ‹ЫЛ ЩФ˘ ¯ˆЪ›˜ ЪФ‚П‹М·Щ·,
‰И·‚¿ЫЩВ ЪФЫВОЩИО¿ ·˘Щ¤˜ ЩИ˜ Ф‰ЛБ›В˜ ¯Ъ‹ЫЛ˜.
– 73 –
Page 74

PRÉCAUTIONS À SUIVRE
• Veuillez lire les “précautions à suivre” attentivement avant de mettre l’appareil en marche an d’en assurer un emploi correct.
• Veuillez être très attentif aux signes “
contient des instructions qui, si elles ne sont pas observées peuvent causer de graves blessures et même la mort.La
section portant sur “Attention” contient des instructions qui, si elles ne sont pas observées peuvent avoir de graves
conséquences. Veuillez suivre toutes les instructions très strictement an d’assurer un maximum de sécurité.
• Le signal possède la signication suivante. (Des exemples de signaux sont reportés ci-dessous.)
Avertissement” et “ Attention”. La section portant sur “Avertissement”
Ce signal dans le schéma indique une interdiction.
• Veuillez garder ce manuel après lecture.
PRÉCAUTIONS À PRENDRE LORS DE L’INSTALLATION
• Ne remontez pas l’unité.
Une fuite d’eau, une erreur, un court-circuit ou un incendie peut se produire si vous
remontez l’unité par vous-même.
• Veuillez demander à votre vendeur ou votre technicien qualié de procéder à
l’installation de votre appareil. Des fuites d’eau ou même des risques de feu sont
possibles si vous essayez d’installer votre appareil vous-même.
AVERTISSEMENT
ATTENTION
• Veuillez utiliser un l de terre.
Ne placez pas le l de terre près de l’eau, des tuyaux à gaz, du paratonnerre ou de
la ligne du téléphone. Une erreur dans l’installation d’un l de terre peut causer une
électrocution.
• Veiller à utiliser le kit de tuyaux spécique pour R410A. Dans le cas contraire, les
tuyaux en cuivre risquent de se casser ou il peut y avoir une panne.
• Un interrupteur devrait être placé suivant l’endroit de l’installation de votre appareil.
Sans un interrupteur, le danger d’électrocution est présent.
• Ne pas installer l’appareil à proximité de gaz inammables.
En cas de fuites de gaz inammables autour de l’installation, le groupe de condensation risque de prendre feu. Les tubes devront correctement être xés avec un
maximum d’espace de 1m entre les supports.
• Veuillez vous assurer que l’eau coule normalement lors de l’installation du tuyau
d’évacuation. En cas de circuit de vidange défectueux, de l’eau s'écoule des appareils intérieur et extérieur et endommage vos meubles.
• S’assurer de n’utiliser qu’une seule phase de 230V pour l’alimentation électrique.
L’emploi d’une alimentation électrique autre que celle indiquée peut provoquer une
surchauffe et même un incendie.
Indique les instructions à suivre.
INTERDICTION DE
CONWECT EARTH LINE
INTERDICTION DE
INTERDICTION DE
PRÉCAUTIONS À SUIVRE LORS D’UN DÉPLACEMENT OU D’UNE MAINTENANCE
• En cas d’anomalie (par ex., odeur de brûlé), mettez l’appareil hors tension et retirez la
che de la prise ou désactivez le coupe-circuit. Contacter votre revendeur.
Un appareil qui reste en fonctionnement en situation anormale risque de provoquer
une panne, un court-circuit ou un début d’incendie.
• Veuillez faire appel au service de votre agent commercial habituel pour que les opérations de maintenance soient faites correctement. Noter qu’une maintenance anormale et personnelle de l’appareil peut
se traduire par une électrocution voire un amorçage électrique.
• Veuillez faire appel au service de votre agent commercial habituel pour que les opérations de démontage
et réinstallation de l’appareil soient faites correctement.
En effet, une électrocution voire un amorçage électrique peuvent se produire en voulant exécuter ce
travail personnellement.
• Evitez tout contact direct avec le ux d’air pour votre santé.
ATTENTION
• Ne branchez pas le câble d’alimentation à l’aide d’une rallonge et ne raccordez pas
trop de ches d’autres appareils électriques à la prise où ce câble est branché. En
outre, acheminez le câble sans trop le tendre pour éviter qu’il ne s’étire. Si vous tendez
trop le câble, un choc électrique, un dégagement de chaleur ou un incendie risque de
se produire.
• Ne tirez pas et ne placez aucun objet sur le câble d’alimentation, ne l’enroulez pas,
ne le chauffez pas, ne le traitez pas et ne le placez pas entre des objets, sinon vous
risquez del’endommager. L’utilisation d’un câble endommagé risque de provoquer un
choc électrique ou un incendie.
• N’introduisez pas de longues tiges dans le panneau du soufeur et de
l’aspirateur parce que le ventilateur interne est une source de danger.
INTERDICTION DE
– 74 –
“ARRÊT”
“OFF”
INTERDICTION DE
INTERDICTION DE
INTERDICTION DE
Page 75

PRÉCAUTIONS À PRENDRE LORS DE L’UTILISATION DE VOTRE APPAREIL
• N’utilisez aucun conducteur d’électricité tel qu’un fusible. Cela pourrait causer un
accident mortel.
INTERDICTION DE
AVERTISSEMENT
“ARRÊT”
• Ne placer aucune bouteille ou bidon de combustible à moins d’un mètre des
orices d’évacuation de l’air ni sur l’unité interne ou externe.
La pression à l’intérieur de la bouteille ou du bidon pourrait augmenter à cause
de l’air chaud et les faire exploser.
• L’appareil doit être utilisé conformément aux spécications du fabricant et non
pas à des ns de celles qui y sont spéciées.
NE PAS MOUILLER
• Si l’appareil est mis en service en présence d’équipements de chauffage
à pétrole lampant ou autre, assurer un apport régulier d’oxygène à la
pièce pour éviter tout risque de saturation de l’oxygène.
INTERDICTION DE
• Veuillez vous assurer que la cadre d’installation l’appareil extérieur est bien
installé en position, stable et sans défaut. Sinon il pourrait tomber et devenir
une source de danger.
INTERDICTION DE
“OFF”
• En cas d’orage, débranchez la che ou désactivez le coupe-circuit.
INTERDICTION DE
INTERDICTION DE
• Ne jamais mettre l’appareil en marche les mains humides car ceci peut constituer
un risque d’accident qui peut être grave.
PRENDRE TOUTES
LES PRÉCAUTIONS
QUI S’IMPOSENT
• Ne dirigez pas l’air qui sort du panneau de votre climatiseur directement sur
des appareils de chauffage car ceci peut endommager le fonctionnement
d’appareils tel que la bouilloire électrique, le four, etc.
INTERDICTION DE
• Ne pas laver l’unité avec de l’eau ni placer un récipient contenant de l’eau
sur l’unité interne.
Il pourrait se produire un contact électrique qui risquerait de provoquer un court-circuit.
FRANÇAIS
ATTENTION
• Il n’est pas recommandé de placer des plantes ou des animaux directement
sous l’arrivée d'air.
INTERDICTION DE
• Ne montez pas sur l’appareil extérieur ni ne posez a d’objet dessus.
INTERDICTION DE
• Lorsque vous utilisez votre appareil avec portes et fenêtres ouvertes, (l’humidité
est toujours supérieure à 80%) et avec le volet d’air poussé vers le bas ou bougeant
automatiquement pour une période prolongée, l’eau va se condenser sur le volet d’air
et s’é gouttera. Ceci endommagera vos meubles. C’est pourquoi il est recommandé
de ne pas utiliser l’appareil dans de telles conditions pendant un long moment.
INTERDICTION DE
• Lorsque la chaleur régnant dans la pièce dépasse la capacité de refroidissement
ou de chauffage de l’unité (par exemple: Nombreuses personnes entrant dans la
INTERDICTION DE
pièce, utilisation d’appareils de chauffage, etc.), la température programmée ne
peut pas être atteinte.
• Cet appareil plus particulièrement. L’unité interne ne doit être nettoyée que par du
personnel autorisé. Il faut alors contacter le revendeur.
Ne pas utiliser de détergents ni de produits semblables vendus dans le commerce pour ne pas abîmer les pièces en plastique ou boucher le tuyau de vidange, ce qui provoquerait une fuite d’eau et représenterait donc un risque po-
INTERDICTION DE
tentiel de court-circuit.
• Ne pas toucher l’orice de sortie de l’air, la surface du fond ni la lame d’aluminium
de l’unité externe.
NE PAS TOUCHER
Risque de blessures.
• Ne pas toucher le tuyau du réfrigérant ni la soupape de raccordement.
Risque de brûlures.
NE PAS TOUCHER
• Cet appareil n’est pas destiné à être utilisé par de jeunes enfants ou des personnes inrmes, excepté
sous la surveillance d’une personne responsable qui s’assurera qu’ils peuvent utiliser cet appareil en
toute sécurité.
• Les jeunes enfants doivent être gardés sous surveillance an de vérier qu’ils ne jouent pas avec
l’appareil.
– 75 –
Page 76

NOM ET FONCTIONS DE CHAQUE PIÈCE
APPAREIL INTÉRIEUR
Filtre à air
Empêche la poussière de pénétrer dans l’appa-reil intérieur.
(Voir page 103)
Panneau frontal
Indicateurs de l’appareil intérieur
Voyant indiquant le mode de fonctionnement.(Voir page 77)
Déecteur horizontal Déecteur vertical(Sortie d’air)
(Voir page 103)
Télécommande
Envoie un signal de fonctionnement à l’appareil intérieur.
Permet de faire fonctionner l’appareildans son ensemble.
(Voir page 78)
APPAREIL EXTÉRIEUR
RAC-18WPA
RAC-25WPA
RAC-35WPA
Sortie d'air
Lorsque l’appareil fonctionne en mode
chauffage, l'air évacué est frais et lorsque
l’appareil fonctionne en mode refroidisse-
ment ou déshumi-dication, l’air évacué
est chaud.
Drain port
(Bottom)
(partie inférieure latérale)
Sortie d'air
Lorsque l’appareil fonctionne en mode
chauffage, l'air évacué est frais et
lorsque l’appareil fonctionne
refroidissement ou déshumi-dication,
l’air évacué est chaud.
Drain port
(Bottom)
(partie inférieure latérale)
Borne de terre
en mode
Borne de terre
NOM DU MODÈLE ET DIMENSIONS
Tuyau de vidange
Évacue l’eau de l’appareil intérieur vers l’appareil
extérieur pendant le fonctionnement en mode
refroidissement ou déshumidication
.
Tuyaux et câbles
Entrées d'air (à l'arrière et à gauche)
Tuyau de vidange
Évacue l’eau de l’appareil intérieur vers l’appareil
extérieur pendant le fonctionnement en mode re-
froidissement ou déshumidication.
Tuyaux et câbles
Entrées d'air (à l'arrière et à gauche)
À propos de l'appareil extérieur :
• Si “Stop” est sélectionné pendant le fonctionnement
de l’appareil intérieur, le ventilateur de l’appareil
extérieur continue de fonctionner pendant 10 à 60
secondes pour refroidir les composants électriques.
• Lors du fonctionnement en mode chauffage, de la
condensation ou de l’eau provenant du dégivrage
s’écoule.
Ne recouvrez pas l’orice de vidange de l’appareil
extérieur, sinon cette eau risque de geler dans
la zone de refroidissement.
• En cas de xation de l’appareil extérieur au plafond,
installez la douille et le tuyau de vidange sur l’orice
de vidange et vidangez l’eau.
MODÉLE LARGEUR (mm) HAUTEUR (mm)
RAK-18PPA, RAK-25PPA , RAK-35PPA 780 280 218
RAC-18WPA, RAC-25WPA 700 505 258
RAC-35WPA 750 548 288
PROFONDEUR (mm)
– 76 –
Page 77

NOM ET FONCTIONS DE CHAQUE PIÈCE
INDICATEURS DE L'APPAREIL INTÉRIEUR
VOYANT DU
MINUTERIE(Orange)
Ce voyant s’allume lorsque
le minuterie fonctionne.
TEMPORARY
SWITCH
VOYANT DE FONCTIONNEMENT
(Jaune)
Ce voyant s’allume pendant le fonctionnement de l’appareil.
Pendant le chauffage, le VOYANT
DE FONCTIONNEMENT clignote
dans les cas suivants :
(1) Pendant le préchauffage
Environ 2 à 3 minutes après le
démarrage.
(2) Pendant le dégivrage
Le dégivrage s’effectue environ
une fois par heure pendant 5 à
10 minutes lorsque du givre se
forme sur l’échangeur de chaleur de l’appareil extérieur.
FRANÇAIS
INTERRUPTEUR TEMPORAIRE
• Cet interrupteur permet de démarrer et d’arrêter
ATTENTION
Désactivez le coupe-circuit ou débran-
chez la che d’alimentation si l’appareil
ne doit pas être utilisé pendant une
l’appareil lorsque la télécommande ne fonctionne
pas.
• Ce fonctionnement temporaire a lieu selon le
dernier mode saisi (I’unité se met tout de suite à
fonctionner automatiquement quand I’alimentation
électrique est activée).
période prolongée.
Si l’appareil est sous tension mais ne fonctionne pas, de l’électricité est légèrement consommée
par le circuit de commande. Pour économiser de l’électricité, mettez l’appareil hors tension (ou
désactivez le coupe-circuit si l’alimentation provient de l’appareil extérieur).
Tamis ltrant d'air Wasabi-Nano Titane
Montage du tamis ltrant d’air Wasabi-Nano Titane
(accessoire) sur le support du ltre.
• Montez le tamis ltrant d’air Wasabi-Nano Titane sur le
boîtier en C en comprimant légèrement ses deux côtés
et relâchez-le après l’avoir inséré dans le support du
ltre.
• L'efcacité du refroidissement est légèrement atténuée
et la vitesse de refroidissement est plus lente lorsque le
tamis ltrant d'air Wasabi-Nano Titane est utilisé.
• Le tamis ltrant d’air Wasabi-Nano Titane est nettoyable
et réutilisable jusqu’à 20 fois en utilisant un aspirateur
ou en le rinçant sous l’eau du robinet.
Pour son remplacement, veuillez vous adresser à votre
point de vente habituel. Des ltres d’assainissement de
l’air et désodorisants sont disponibles en option.
Filtre à air
Boîtier en C
Patte
Support de ltre
– 77 –
Page 78

PRÉPARATION AVANT L'UTILISATIION
Pour installer les piles
1. Faites glisser le cache pour le dégager.
2. Installez deux piles de type AAA.LR03 (alcalines).
Le sens des piles doit correspondre aux repères
sur le boîtier.
3. Remettez en place le cache.
Pour xer le support de la télécommande sur un mur
1. Choisissez un emplacement où les signaux peuvent atteindre l'appareil.
2. Fixez le support de la télécommande sur un mur, un pilier ou
un emplacement similaire avec les vis fournies.
3. Posez la télécommande sur son support.
Télécommande
REMARQUE
Remarques concernant les piles
• Pour le remplacement des piles, utilisez des piles du même
type et changez les deux piles à la fois.
• Lorsque le système n'est pas utilisé pendant une période
de temps prolongée, enlevez les piles.
• Les piles durent environ une année. Toutefois, si l'afchage
à l'écran commence à faiblir et qu'une dégradation de
la réception se produit avant un an, remplacez les deux
piles par des neuves de format AAA.LR03 (alcalines).
• Les piles fournies sont prévues pour l'utilisation initiale
du système.
La durée d'utilisation des piles peut être plus courte, selon
la date de fabrication du climatiseur.
Remarques concernant la télécommande
• N'exposez jamais la télécommande à la lumière directe du
soleil.
• La présence de poussière sur l'émetteur ou le récepteur
réduira la sensibilité. Éliminez la poussière en passant un
chiffon doux.
• La communication du signal peut être perturbée par un
éclairage uorescent de type à commande électronique
(tel que les lampes de type à variateur) se trouvant dans la
pièce. Consultez le centre de service dans ce cas.
• Si les signaux de la télécommande se mettent à actionner
un autre appareil, déplacez ce dernier dans un autre
emplacement ou consultez le centre de service.
• Lorsque la télécommande n'est pas utilisée, veillez à refermer
le cache coulissant pour éviter toute risque de panne.
Support de télécommande
Vis
– 78 –
Page 79

PRÉPARATION AVANT L'UTILISATIION
Pour régler la date et l'heure
1. Appuyez sur la touche (RÉINITIALISATION)
pour le réglage initial de la date et de l'heure. "Year"
(année) clignote.
2. Appuyez sur la touche
en cours.
3. Appuyez sur la touche
(jour) et "Month" (mois) clignotent.
4. Appuyez sur la touche
le mois en cours.
5. Appuyez sur la touche
(horloge) clignote.
(TEMPS) pour régler l'année
(HORLOGE). "Day"
(TEMPS) pour régler le jour et
(HORLOGE). "CLOCK"
6. Appuyez sur la touche
actuelle.
7. Appuyez sur la touche
La date et l'heure sont réglées.
Pour changer la date et l'heure, appuyez sur la touche
(CLOCK).
Suivez ensuite les étapes 1 à 7.
La date et l'heure doivent être réglées après le remplacement des piles.
Après avoir remplacé les piles,
1. Appuyez sur la touche
2. Pointez la télécommande en direction de l'appareil intérieur et appuyez sur la touche
3. La date et l'heure de l'appareil intérieur seront transmises.
(TEMPS) pour régler l'heure
(HORLOGE).
(RÉINITIALISATION).
(INFO).
La date et l'heure ne seront pas transmises de
l'apparel intérieur dans les cas suivants :
• En cas de panne de courant.
• Lorsque le disjoncteur est positionné sur "OFF" (arrêt) par
l'utilisateur (l'appareil n'est pas en MODE ATTENTE).
FRANÇAIS
REMARQUE
Remarques concernant le réglage de la date et de l'heure :
• Si la date et l'heure ne sont pas réglées, le minuteur de mise en marche, le minuteur d'arrêt et le programmateur
hebdomadaire ne peuvent pas être réglés.
• Si la date et l'heure ne sont pas réglées correctement, le minuteur de mise en marche, le minuteur
d'arrêt et le programmateur hebdomadaire ne fonctionneront pas convenablement.
• Lorsque le minuteur de mise en marche, le minuteur d'arrêt et le programmateur hebdomadaire sont
réglés, la date et l'heure ne peuvent pas être changées. S'il y a lieu, pour changer le date et l'heure, le
minuteur de mise en marche, le minuteur d'arrêt et le programmateur hebdomadaire doivent être annulés.
– 79 –
Page 80

NOMENCLATURE ET FONCTIONS DE LA TÉLÉCOMMANDE
TÉLÉCOMMANDE
• Elle permet de commander l'appareil intérieur. La portée de commande est d'environ 7 mètres.
Si l'éclairage intérieur est commandé électroniquement, la portée de commande peut être moindre.
La télécommande peut être implantée sur un mur à l'aide de la xation fournie. Avant de la xer, assurez-vous
que l'appareil intérieur peut être actionné par la télécommande.
• Manipulez la télécommande avec soin. Ne pas la laisser tomber ni l'exposer à l'humidité, ce qui risquerait de
compromettre sa capacité de transmission du signal.
• Après avoir installé des piles neuves dans la télécommande, l'appareil nécessite au départ environ 10
secondes pour répondre aux commandes et fonctionner.
• Lorsque la télécommande n'est pas utilisée pendant 3 minutes en condition d'arrêt, ce qui est indiqué par
l'écran LCD, celui-ci s'éteint.
• Au cours du réglage de l'horloge, l'écran LCD s'éteint environ 10 minutes plus tard si la télécommande
n'est pas utilisée.
• L'écran LCD se rallume en appuyant sur une touche quelconque.
• L'écran LCD ne s'éteint pas lors du réglage de la MINUTERIE.
Cellule de transmission/réception
du signal
Pointez cette cellule vers
l'appareil intérieur pour le
commander.
Capteur
Une sonde de température à
l'intérieur de la télécommande
détecte la température ambiante
autour de la télécommande.
Écran
Il indique la température choisie pour
la pièce, l'heure en cours, l'état des
minuteurs, la fonction et le débit d'air
sélectionnés.
Touches de réglage de TEMPÉRATURE
AMBIANTE
Appuyez sur ces touches pour régler la
température ambiante.
Appuyez sur la touche [
la température ambiante.
Appuyez sur la touche [
la température ambiante.
Maintenez la touche enfoncée pour
changer la valeur plus rapidement.
] pour augmenter
] pour baisser
Indicateur de transmission
L'indicateur de transmission s'allume
lorsqu'un signal est émis.
TOUCHE MARCHE/ARRÊT
Appuyez sur cette touche pour la
mise en service de la télécommande.
Appuyez une nouvelle fois pour
arrêter la télécommande.
Touche de sélection de VITESSE
DE VENTILATEUR
Elle détermine la vitesse du ventilateur.
À chaque fois que vous appuyez sur
cette touche, le débit d'air change
de (AUTO) (HAUTE)
(SILENCE)
(Cette touche permet de choisir
la vitesse optimale ou préférée du
ventilateur pour chaque mode de
fonctionnement).
Touche ECO
Utilisez cette touche pour passer en
mode ECO.
(►p.90)
– 80 –
Page 81

NOMENCLATURE ET FONCTIONS DE LA TÉLÉCOMMANDE
Touche PLEINE
PUISSANCE
Utilisez cette touche pour
passer en mode PLEINE
PUISSANCE. (►p.88)
Touche INFORMATIONS
(►p.102)
Touche NETTOYAGE À
ACTION DIRECTE (►p.92)
Touche DÉPART MAISON
(►p.91)
Touche MINUTERIE
D'EXTINCTION
Utilisez cette touche pour régler
la minuterie d'extinction.(►p.94)
Touches de réglage de MINUTEUR
MISE EN MARCHE / ARRÊT
(►p.93)
Touche de sélection du MODE
Utilisez cette touche pour choisir
le mode de fonctionnement.
À chaque fois que vous appuyez
sur cette touche, le mode
change alternativement de
(AUTO) (CHAUFFAGE)
(DÉSHUMIDIFICATION)
(RAFRAÎCHISSEMENT) et
(VENTILATION).
Touche SILENCE
Utilisez cette touche pour passer
en mode SILENCE. (►p.89)
Touche OSCILLATION AUTO
(Verticale)
Commande l'angle du déecteur
d'air horizontal. (►p.87)
Touches de réglage de
PROGRAMMATEUR HEBDOMADAIRE
(►p.96)
FRANÇAIS
SÉLECTEUR DE MODE
AUTO
CHAUFFAGE
DÉSHUMIDIFICATION
RAFRAÎCHISSEMENT
VENTILATION
VITESSE DU VENTILATEUR
AUTO
SILENCE
BASSE
MOYENNE
HAUTE
MARCHE / ARRÊT
ECO
VENTILATION
PLEINE PUISSANCE
SILENCE
INFO
MINUTERIE
D'EXTINCTION
OSCILLATION AUTO
(VERTICALE)
DÉPART MAISON
NETTOYAGE
JOUR
N° DE PROGRAMME
MINUTEUR DE MISE EN
MARCHE / ARRÊT
HEURE
OK
EFFACER
COPIER / COLLER
ANNULER
VALIDER
HORLOGE
Précautions d'usage
• N'installez pas la télécommande dans les emplacements suivants :
• À la lumière directe du soleil.
• À proximité d'un radiateur.
• Manipulez la télécommande avec soin. Ne la laissez pas tomber au sol et protégez-la de l'eau.
• Une fois que l'appareil extérieur s'arrête, il ne se réenclenche pas pendant environ 3 minutes (à moins
que vous le mettiez hors tension et sous tension ou que vous débranchiez et rebranchiez le cordon
d'alimentation électrique).
Cela est prévu pour protéger l'appareil et n'est en aucun cas révélateur d'une panne.
• Si vous appuyez sur la touche de sélection du MODE en cours de fonctionnement, l'appareil peut
s'arrêter pendant environ 3 minutes à titre de protection.
– 81 –
Page 82

FONCTIONS DIVERSES
Commande de redémarrage automatique
• En cas de panne de courant, le fonctionnement reprend automatiquement lorsque le
courant est rétabli avec le mode de fonctionnement et le sens du flux d'air précédents.
(Quand le fonctionnement n'est pas arrêté par la télécommande).
• Si vous souhaitez interrompre le fonctionnement lorsque le courant est rétabli, mettez l'appareil
hors tension. Lorsque vous remettez en circuit le disjoncteur, le fonctionnement reprend
automatiquement avec le mode de fonctionnement et le sens de flux d'air précédents.
Remarque: 1. Si vous n'avez pas besoin d'utiliser la commande de redémarrage automatique,
adressez-vous à votre agent commercial.
2. La commande de redémarrage automatique n'est pas disponible lorsque le mode
minuteur ou minuterie d'extinction est programmé.
FONCTIONNEMENT AUTOMATIQUE
L'appareil détermine automatiquement le mode de fonctionnement, CHAUFFAGE ou RAFRAÎCHISSEMENT,
en fonction de la température ambiante actuelle. Le mode de fonctionnement sélectionné change lorsque la
température ambiante varie. Toutefois, le mode de fonctionnement ne change pas lorsque l'appareil intérieur
est relié à un appareil extérieur multi-type.
Appuyez sur la touche de sélection du MODE pour que l'écran afche
le mode
• Si AUTO a été sélectionné, l'appareil détermine automatiquement
le mode de fonctionnement, CHAUFFAGE ou RAFRAÎCHISSEMENT,
1
en fonction de la température actuelle de la pièce. Toutefois, le mode
de fonctionnement ne change pas lorsque l'appareil intérieur est
relié à un appareil extérieur multi-type.
• Si le mode sélectionné automatiquement par l'appareil n'est pas
satisfaisant, modiez manuellement la programmation du mode
(CHAUFFAGE, DÉSHUMIDIFICATION, RAFRAÎCHISSEMENT
ou VENTILATION).
(AUTO) de fonctionnement.
2
3
MARCHE
ARRÊT
Réglez la VITESSE DU VENTILATEUR à la valeur voulue avec la
touche
Réglez la température ambiante à la valeur voulue avec les touches
de TEMPÉRATURE (l'écran afche le réglage).
Le réglage de la température et la température ambiante réelle peuvent varier selon les conditions.
Appuyez sur la touche
Le fonctionnement se déclenche avec un bip.
Appuyez une nouvelle fois sur la touche pour arrêter le fonctionnement.
Les réglages étant sauvegardés dans la mémoire de la télécommande, il
vous suft d'appuyer sur la touche
Appuyez sur la touche
AUTO, HAUTE, MOYENNE, BASSE ou SILENCE.
(VITESSE DU VENTILATEUR) (l'écran afche le réglage).
(AUTO) (HAUTE) (MOYENNE)
(SILENCE) (BASSE)
(MARCHE/ARRÊT).
(MARCHE/ARRÊT) la fois suivante.
(VITESSE DU VENTILATEUR) pour sélectionner
– 82 –
Page 83

UTILISATION DE LA FONCTION CHAUFFAGE
• Utilisez l'appareil pour la fonction chauffage lorsque la température extérieure est en dessous de 21 °C.
Lorsqu'il fait trop chaud (au-dessus de 21 °C), la fonction chauffage peut ne pas se déclencher an de
protéger l'appareil.
• Pour ne pas compromettre la abilité de l'appareil, veuillez l'utiliser lorsque la température extérieure se
situe au-dessus de -15 °C.
1
2
3
MARCHE
ARRÊT
Appuyez sur la touche de sélection du MODE de façon à ce que
l'écran affiche (CHAUFFAGE).
Réglez la VITESSE DU VENTILATEUR à la valeur voulue avec la
touche
Réglez la température ambiante à la valeur voulue avec les touches
de TEMPÉRATURE (l'écran afche le réglage).
Le réglage de la température et la température ambiante réelle
peuvent varier selon les conditions.
Appuyez sur la touche
déclenche avec un bip. Appuyez une nouvelle fois sur la touche pour
arrêter le fonctionnement.
(VITESSE DU VENTILATEUR) (l'écran afche le réglage).
(AUTO) (HAUTE) (MOYENNE)
(SILENCE) (BASSE)
(MARCHE/ARRÊT). Le fonctionnement se
FRANÇAIS
Les réglages étant sauvegardés dans la mémoire de la télécommande,
il vous suft d'appuyer sur la touche (MARCHE/ARRÊT) la fois suivante.
Dans le mode ventilateur AUTO, la vitesse du ventilateur varie automa-
tiquement comme suit :
• Lorsque la différence entre la température ambiante et la température
de réglage est importante, le ventilateur s'enclenche à HAUTE vitesse.
• Dès que la température ambiante atteint la valeur préréglée, le
ventilateur passe à la vitesse inférieure pour obtenir une condition
de température ambiante optimale pour un chauffage naturel sain.
Dégivrage
Le dégivrage s ’effectue environ une fois toutes les heures pendant 5 ~ 10 minutes lorsque du
givre se forme sur l'échangeur de chaleur de l'appareil extérieur.
Au cours du dégivrage, le voyant de fonctionnement clignote de manière cyclique en s'allumant
pendant 3 secondes et s'éteignant pendant 0,5 seconde.
Le dégivrage dure 20 minutes au maximum.
Toutefois, si l'appareil intérieur est relié à un appareil extérieur multi-type, le dégivrage dure
au maximum 15 minutes (si la longueur de la tuyauterie est anormalement longue, du givre est
susceptible de se former).
– 83 –
Page 84

UTILISATION DE LA FONCTION DÉSHUMIDIFICATION
Utilisez l'appareil pour la fonction de déshumidication lorsque la température extérieure est supérieure
à 16 °C.
Lorsqu'elle se situe en dessous de 15 °C, la fonction de déshumidication est inopérante.
Appuyez sur la touche de sélection du MODE de façon à ce
que l'écran
1
2
affiche (DÉSHUMIDIFICATION).
Le ventilateur est réglé à vitesse BASSE.
Appuyez sur la touche (VITESSE DU VENTILATEUR) pour
sélectionner la vitesse SILENCE ou BASSE du ventliateur.
Paramétrez la température ambiante voulue avec les touches de
réglage de
TEMPÉRATURE AMBIANTE (l'écran afche le réglage).
La plage de 20 à 26 °C est recommandée comme
température ambiante pour la déshumidication.
MARCHE
ARRÊT
Les réglages étant sauvegardés dans la mémoire de la télécommande,
Appuyez sur la touche
déshumidification se déclenche avec un bip. Appuyez une
nouvelle fois sur la touche pour arrêter le fonctionnement.
il vous suft d'appuyer sur la touche (MARCHE/ARRÊT) la fois
suivante.
(MARCHE/ARRÊT). La fonction de
Fonction de déshumidication
• Lorsque la température ambiante est plus élevée que le réglage de température : L'appareil procède à
la déshumidification de la pièce en réduisant la température ambiante au niveau préréglé. Lorsque la
température ambiante est moins élevée que le réglage de température : La déshumidification a lieu à
la valeur de réglage de température légèrement inférieure à la température actuelle de la pièce, quel
que soit le réglage de température.
• La température ambianté préréglée peut ne pas être atteinte selon le nombre de personnes présentes
dans la pièce ou d'autres conditions liées à la pièce.
– 84 –
Page 85

UTILISATION DE LA FONCTION RAFRAÎCHISSEMENT
Utilisez l'appareil pour la fonction rafraîchissement lorsque la température extérieure est de -10~43 °C.
Si le taux d'humidité intérieur est très élevé (80 %), de la buée peut se former sur la grille de sortie d'air
de l'appareil intérieur.
1
2
3
MARCHE
ARRÊT
Appuyez sur la touche de sélection du MODE de façon à ce que
l'écran afche (RAFRAÎCHISSEMENT).
Réglez la VITESSE DU VENTILATEUR à la valeur voulue avec la
touche
Réglez la température ambiante à la valeur voulue avec les touches
de TEMPÉRATURE (l'écran afche le réglage).
Le réglage de la température et la température ambiante réelle peuvent varier selon les conditions.
Appuyez sur la touche ( MARCHE/ARRÊT). La fonction rafraîchissement se déclenche avec un bip. Appuyez une nouvelle fois sur la
touche pour arrêter le fonctionnement. La fonction rafraîchissement
ne se déclenche pas si le réglage de température est plus élevé
que la température actuelle de la pièce (même si le voyant
(FONCTIONNEMENT) s'allume). La fonction rafraîchissement se
déclenche dès que l'utilisateur règle la température en dessous de
la température actuelle de la pièce.
(VITESSE DU VENTILATEUR) (l'écran afche le réglage).
(AUTO) (HAUTE) (MOYENNE)
(SILENCE) (BASSE)
FRANÇAIS
Les réglages étant sauvegardés dans la mémoire de la télécommande, il
vous suft d'appuyer sur la touche (MARCHE/ARRÊT) la fois suivante.
Dans le mode ventilateur AUTO, la vitesse du ventilateur varie automa-
tiquement comme suit :
• Lorsque la différence entre la température ambiante et la température
de réglage est importante, le ventilateur s'enclenche à HAUTE vitesse.
• Dès que la température ambiante atteint la valeur préréglée, le
ventilateur passe à la vitesse inférieure pour obtenir une condition de
température ambiante optimale pour un rafraîchissement naturel sain.
– 85 –
Page 86

UTILISATION DE LA FONCTION VENTILATION
L'appareil peut être utilisé simplement pour assurer la circulation d'air.
Appuyez sur la touche de sélection du MODE de façon à ce que
1
l'écran affiche (VENTILATION).
Réglez la VITESSE DU VENTILATEUR à la valeur voulue avec la
touche
(VITESSE DU VENTILATEUR) (l'écran afche le réglage).
2
MARCHE
ARRÊT
(AUTO) (HAUTE) (MOYENNE)
(SILENCE) (BASSE)
Appuyez sur la touche ( MARCHE/ARRÊT). La fonction de
ventilation se déclenche avec un bip. Appuyez une nouvelle fois sur
la touche pour arrêter le fonctionnement.
– 86 –
Page 87

RÉGLAGE DU SENS DE FLUX D’AIR
Pour enclencher l'oscillation automatique verticale
• Appuyez sur la touche (OSCILLATION AUTO (VERTICALE)).
Le ou les déecteurs se mettront à osciller de haut en bas.
s'afche sur l'écran LCD.
Pour annuler l'oscillation automatique verticale
• Appuyez une nouvelle fois sur la touche (OSCILLATION
AUTO (VERTICALE)). Le ou les déecteurs s’arrêtent à la
position en cours.
disparaît sur l'écran LCD.
Pendant les modes
derefroidissement,
dedéshumidication
Vertical
Environ 10°
Environ 40°
REMARQUE
• Lors du fonctionnement en modes rafraîchissement et
déshumidication, ne laissez pas les déecteurs osciller ou
dans la position du bas (en cas d'oscillation verticale) pendant
une période de temps prolongée. Cela peut entraîner la
formation de buée par condensation sur les déecteurs.
Ajustement de l’air conditionné vers la gauche ou la droite.
Tenez le volet d’air vertical comme indiqué sur la figure
et ajustez l’airconditionné vers la gauche ou la droite.
REMARQUE
Pendant le
mode de
chauffage
Vertical
Environ 10°
Environ 45°
FRANÇAIS
• Évitez d’utiliser le climatiseur pour le refroidissement lorsque la température extérieure est
inférieure à -10 °C (14 °F).
Les températures de fonctionnement maximales et minimales recommandées pour le chauffage
et le refroidissement sont les suivantes :
Extérieur
Intérieur
Atmosphère sèche °C 21 32 20 27
Atmosphère humide °C 15 23 12 19
Atmosphère sèche °C 21 43 2 21
Atmosphère humide °C 15 26 1 15
Refroidissement Chauffage
Minimum Maximum Minimum Maximum
– 87 –
Page 88

FONCTIONNEMENT EN MODE PLEINE PUISSANCE
• En appuyant sur la touche ( PLEINE PUISSANCE) au cours du fonctionnement en mode AUTO,
CHAUFFAGE, DÉSHUMIDIFICATION, RAFRAÎCHISSEMENT ou VENTILATION, le climatiseur fonctionne
à pleine puissance.
• Dans le mode PLEINE PUISSANCE, l'air refroidi ou réchauffé est diffusé par l'appareil intérieur pour la
fonction RAFRAÎCHISSEMENT ou CHAUFFAGE respectivement.
Pour enclencher le mode PLEINE PUISSANCE
• Appuyez sur la touche (PLEINE PUISSANCE) en
cours de fonctionnement.
“
” s'affiche sur l'écran LCD.
1
Le fonctionnement à PLEINE PUISSANCE se termine en 20
minutes. Le système fonctionne automatiquement avec les
réglages précédents qui étaient utilisés avant le fonctionnement
à PLEINE PUISSANCE.
Pour annuler le mode PLEINE PUISSANCE
• Appuyez sur la touche (MARCHE/ARRÊT).Ou
• Appuyez une nouvelle fois sur la touche
PUISSANCE).
Le fonctionnement à PLEINE PUISSANCE s'arrête.
“
” s'affiche sur l'écran LCD.
(PLEINE
REMARQUE
• Lorsque le mode SLEEP, ECO, SILENCE ou DÉPART MAISON est sélectionné, le mode PLEINE
PUISSANCE est annulé.
• Dans le mode PLEINE PUISSANCE, la capacité du climatiseur n'augmente pas
– si le climatiseur fonctionne déjà à sa scapacité maximale.
– immédiatement avant le dégivrage (lorsque le climatiseur fonctionne en mode CHAUFFAGE).
• Après un redémarrage automatique, le mode PLEINE PUISSANCE est annulé et le fonctionnement
doit s'enclencher sur le mode précédent.
– 88 –
Page 89

FONCTIONNEMENT EN MODE SILENCE
• En appuyant sur la touche (SILENCE) au cours du fonctionnement en mode AUTO, CHAUFFAGE,
DÉSHUMIDIFICATION, RAFRAÎCHISSEMENT ou VENTILATION, la vitesse du ventilateur passe en
mode ultra ralenti.
Pour enclencher le mode SILENCE
• Appuyez sur la touche (SILENCE) en cours de
1
fonctionnement.
“
” s'affiche sur l'écran LCD. La vitesse du ventilateur
sera ultra ralentie.
Pour annuler le mode SILENCE
• Appuyez sur la touche (MARCHE/ARRÊT). Ou
• Appuyez une nouvelle fois sur la touche
ou sur la touche (VITESSE DU VENTILATEUR).
La vitesse du ventilateur revient à la valeur précédente
avant que le mode SILENCE soit enclenché.
Le fonctionnement en mode SILENCE s'arrête.
“
” disparaît sur l'écran LCD.
(SILENCE)
FRANÇAIS
REMARQUE
• Lorsque le mode PLEINE PUISSANCE est sélectionné, le mode SILENCE est annulé. La vitesse du
ventilateur revient à la valeur précédente avant le fonctionnement en mode SILENCE.
• Après un redémarrage automatique, le fonctionnement en mode SILENCE est annulé. La vitesse du
ventilateur revient à la valeur précédente avant le fonctionnement en mode SILENCE.
• En cours de fonctionnement avec le mode
est actionnée, la vitesse du ventilateur ne change pas.
(SILENCE) du ventilateur, si la touche (SILENCE)
– 89 –
Page 90

FONCTIONNEMENT EN MODE ECO
Le mode ECO à économie d'énergie intervient en faisant varier automatiquement la température
programmée et en limitant la valeur maximale de la consommation électrique.
• En appuyant sur la touche (ECO) au cours du fonctionnement
1
en mode AUTO, CHAUFFAGE, DÉSHUMIDIFICATION,
RAFRAÎCHISSEMENT ou VENTILATION, le climatiseur
passe en mode "ECO".
Pour enclencher le mode ECO
• Appuyez sur la touche (ECO) en cours de fonctionnement.
“ ” s'affiche sur l'écran LCD.
Le fonctionnement en mode économie d'énergie intervient en
faisant varier automatiquement la température programmée
à la hausse ou à la baisse et en réduisant la consommation
électrique en fonctionnement. Cette fonction peut varier selon
l'appareil extérieur relié.
Pour annuler le mode ECO
• Appuyez sur la touche (MARCHE/ARRÊT).Ou
• Appuyez sur la touche
“ ” s'affiche sur l'écran LCD.
(ECO) en cours de fonctionnement
REMARQUE
• La fonction ECO n'est pas effective lorsque la consommation électrique est faible.
• Le mode ECO est annulé en appuyant sur la touche (PLEINE PUISSANCE).
• Après un redémarrage automatique, le mode ECO est annulé et le mode de fonctionnement précédent
doit s'enclencher.
• Pour les liaisons multi-modèle, le mode économie d'énergie doit intervenir uniquement en faisant varier
automatiquement à la hausse ou à la baisse la température programmée. L'efcacité du mode ECO
dépend toutefois des conditions de fonctionnement.
– 90 –
Page 91

FONCTIONNEMENT EN MODE DÉPART MAISON (LH)
Empêche la température ambiante de baisser excessivement en programmant automatiquement une température
de 10 °C lorsque personne n'est à la maison.
Ce mode peut opérer en "Fonctionnement continu" ou "Fonctionnement par minuteur en jours". Utiliser l'option
"Fonctionnement par minuteur en jours" pour programmer le nombre de jours jusqu'à 99.
Fonctionnement continu Pour enclencher le mode DÉPART MAISON
Option 1. Fonctionnement continu.
Appuyez sur la touche (DÉPART MAISON) en cours de fonctionnement.
• La température ambiante est réglée à 10 °C et le chauffage s'enclenche.
”, “ ”, “ ”, “ ” s'afche sur l'écran LCD.
• “
Option 2. Fonctionneur par minuteur en jours.
• Appuyez sur la touche (DÉPART MAISON) en cours
d'arrêt ou de fonctionnement.
La température ambiante est réglée à 10 °C et le chauffage s'enclenche.
“ ”, “ ”, “ ”, “ ” s'afche sur l'écran LCD.
• Programmez au besoin le nombre de jours de fonctionnement (1 à 99).
Appuyez sur la touche (TEMPS) pour sélectionner le nombre de jours.
1
Fonctionnement par minuteur en jours
Le nombre de jours clignote.
* Appuyez sur la touche “
1 jour, 2 jours, 3 jours ..... 98 jours, 99 jours, 1 jour et ainsi de suite.
* Appuyez sur la touche “
99 jours, 98 jours, 97 jours .... 3 jours, 2 jours, 1 jour, 99 jours et
ainsi de suite.
* Le nombre de jours est décompté lorsque l'horloge indique 0:00.
• Appuyez sur la touche
jours programmé. L'afchage du nombre de jours programmé s'arrête
de clignoter.
• Appuyez sur la touche (ANNULER) pour remettre à zéro le nombre
de jours programmé ou passer en mode de fonctionnement continu.
(HAUT)” pour programmer un nombre de
(BAS)” pour programmer un nombre de
(VALIDER) pour conrmer le nombre de
FRANÇAIS
Pour annuler le mode DÉPART MAISON
• Appuyez sur la touche (MARCHE/ARRÊT).Ou
• Appuyez une nouvelle fois sur la touche
Revenez au mode de fonctionnement précédent.Ou
• Passez à un autre mode de fonctionnement en appuyant sur la touche
(MODE).
(DÉPART MAISON)
REMARQUE
• Le nombre de jours de fonctionnement programmé pour le mode Départ maison étant atteint ou en appuyant une
nouvelle fois sur la touche (DÉPART MAISON), l'appareil revient au mode de fonctionnement précédent.
• Au cours du fonctionnement en mode Départ maison, la vitesse du ventilateur et la position du déflecteur d'air
horizontal ne peuvent pas être modifiées.
• En appuyant sur la touche (Départ maison), la programmation de la Minuterie hebdomadaire ou du Minuteur à
programmation unique est annulée.
• En cas de panne de courant, après un redémarrage automatique, toute la programmation du nombre de jours de
fonctionnement sera remise à zéro et l'appareil doit passer en mode de fonctionnement continu.
• En cas de liaisons multiples, lorsque chaque pièce est régie par un mode de fonctionnement différent, tel que le mode
VENTILATION uniquement, RAFRAÎCHISSEMENT, DÉSHUMIDIFICATION ou AUTO, le mode Départ maison est
inopérant bien qu'il puisse être programmé. Pour pouvoir activer le mode Départ maison, les fonctions dans toutes les
pièces doivent être arrêtées. Appuyez ensuite sur la touche (DÉPART MAISON) pour activer le mode Départ maison.
• En cas de liaisons multiples, lorsque toutes les pièces sont régies par la fonction CHAUFFAGE, il est possible
d'activer le mode Départ maison en appuyant sur la touche (DÉPART MAISON).
• En cas de liaisons multiples, si deux ou plusieurs pièces sont programmées avec la fonction Départ maison, il peut se révéler
impossible qu'elles atteignent la température programmée de 10 °C. De plus, cela dépend également de la température extérieure.
• Les modes de fonctionnement PLEINE PUISSANCE, SILENCE et ECO ne sont pas opérationnels dans le mode Départ maison.
– 91 –
Page 92

FONCTION NETTOYAGE (NETTOYAGE PAR TOUCHE À ACTION DIRECTE)
Déshumidication de l'échangeur de chaleur intérieur après les opérations de rafraîchissement pour
éviter la formation de moisissure.
Pour lancer l'opération NETTOYAGE
• Appuyez sur la touche (NETTOYAGE) alors que
l'appareil est à l'état d'arrêt.
La durée totale de l'opération de nettoyage est de 60 minutes.
1
Au cours de cette opération, la fonction CHAUFFAGE ou
VENTILATION doit être mise en service.
Au cours du nettoyage, le voyant de fonctionnement clignote.
“
”, “ ” s'affiche sur l'écran LCD.
Pour annuler l'opération NETTOYAGE
• Appuyez sur la touche (MARCHE/ARRÊT).Ou
• Appuyez une nouvelle
fois sur la touche (NETTOYAGE).
REMARQUE
• Une fois l'opération NETTOYAGE terminée, l'appareil se met automatiquement hors service.
• Si le Programmateur hebdomadaire ou le Minuteur à programmation unique sont paramétrés, il est
nécessaire de les annuler avant d'utiliser la fonction de NETTOYAGE.
• En cas de liaisons multiples, lorsque la touche
au mode de fonctionnement VENTILATION.
• En cas de liaisons multiples, lorsque l'opération de NETTOYAGE est effectuée au niveau d'une pièce
en premier, la fonction RAFRAÎCHISSEMENT, DÉSHUMIDIFICATION ou VENTILATION peut être
utilisée pour les autres pièces. Toutefois, si la fonction CHAUFFAGE doit être utilisée au niveau des
autres pièces, le climatiseur passe en mode ATTENTE. Une fois l'opération NETTOYAGE terminée, la
fonction CHAUFFAGE est mise en service.
( NETTOYAGE) est actionnée, l'opération est limitée
– 92 –
Page 93

UTILISATION DU MINUTEUR À PROGRAMMATION UNIQUE (MINUTEUR DE MISE EN MARCHE/ARRÊT)
MINUTEUR D'ARRÊT
L'appareil peut être programmé pour s'arrêter à une heure déterminée.
1. Appuyez sur la touche
sur l'écran.
1
2. Programmez l'heure d'arrêt avec la touche
3. Après la programmation, pointez la télécommande sur l'appareil intérieur
et appuyez sur la touche
et l'heure programmée s'allument au lieu de clignoter.
Un bip est émis par l'appareil intérieur et le voyant (MINUTERIE) de
l'appareil intérieur s'allume.
MINUTEUR DE MISE EN MARCHE
L'appareil se déclenche à une heure déterminée.
1. Appuyez sur la touche
clignotent sur l'écran.
2. Programmez l'heure de mise en marche avec la touche
3. Après la programmation, pointez la télécommande sur l'appareil intérieur et
appuyez sur la touche
et l'heure programmée s'allument au lieu de clignoter.
Un bip est émis par l'appareil intérieur et le voyant (MINUTERIE) de
l'appareil intérieur s'allume.
(MINUTEUR ARRÊT). et clignotent
(TEMPS).
(VALIDER).
(MINUTEUR MISE EN MARCHE). et
(TEMPS).
(VALIDER).
FRANÇAIS
MINUTEUR DE MISE EN MARCHE/ARRÊT
• L'appareil se déclenche (s'arrête) à l'heure déterminée.
• La commutation se produit d'abord à l'heure prédéterminée qui apparaît en premier.
• La èche apparaît sur l'écran pour indiquer la séquence des opérations de commutation.
1. Appuyez sur la touche (MINUTEUR ARRÊT) de façon à ce que et
2. Programmez l'heure d'arrêt avec la touche
programmation, pointez la télécommande sur l'appareil intérieur et
appuyez sur la touche
3. Appuyez sur la touche
à ce que
L'indication
4. Programmez l'heure de mise en marche avec la touche
5. Après la programmation, pointez la télécommande sur l'appareil intérieur et
appuyez sur la touche
Un bip est émis par l'appareil intérieur et le voyant (MINUTERIE) de
l'appareil intérieur s'allume.
Le minuteur peut être utilisé de trois différentes manières: minuterie d'arrêt,
minuterie de mise en marche et minuterie MISE EN MARCHE/ARRÊT (ON/
OFF). Réglez l'heure actuelle en premier puisqu'elle sert de référence.
Pour annuler la programmation
clignotent sur l'écran.
(TEMPS). Après la
(VALIDER).
(MINUTEUR MISE EN MARCHE) de façon
et l'heure d'arrêt programmée s'allument.
et clignotent.
(TEMPS).
(VALIDER).
et l'heure de mise en marche programmée s'allument au lieu de clignoter.
• Pointez la cellule de la télécommande sur l'appareil intérieur et appuyez sur la touche (ANNULER). et l'heure de
mise en marche ou d'arrêt programmée disparaissent avec un bip et le voyant (MINUTERIE) de l'appareil intérieur s'éteint.
REMARQUE
• L'utilisateur peut programmer une seule fonction de minuterie : arrêt, mise en marche ou mise en marche/arrêt.
• Si le PROGRAMMATEUR HEBDOMADAIRE est déjà paramétré, le fonctionnement du MINUTEUR À PROGRAMMATION
UNIQUE s'il est paramétré est prioritaire. Le MINUTEUR À PROGRAMMATION UNIQUE s'étant déclenché, le
PROGRAMMATEUR HEBDOMADAIRE sera activé.
– 93 –
Page 94

UTILISATION DE LA MINUTERIE D'EXTINCTION ECO
La minuterie peut être programmée pour une durée jusqu'à 7 heures.
En appuyant sur la touche
DÉSHUMIDIFICATION, RAFRAÎ CHISSEMENT ou VENTILATION, l'appareil change la température ambiante
et réduit la vitesse du ventilateur. Il en résulte une économie d'énergie.
Réglez l'heure actuelle avant d'utiliser la fonction MINUTERIE D'EXTINCTION ECO.
(SLEEP) au cours du fonctionnement en mode AUTO, CHAUFFAGE,
Pour mettre en service la fonction MINUTERIE D'EXTINCTION ECO
Appuyez sur la touche (SLEEP) en cours de fonctionnement.
• “
”, “ ”, “ ”, “OFF”, heure d'extinction, “ ” et le
nombre d'heures sont afchés sur l'écran de la télécommande.
• Au cours du fonctionnement de la MIINUTERIE D'EXTINCTION
ECO, la vitesse du ventilateur sera ultra ralentie.
1
• Un bip est émis par l'appareil intérieur et le voyant (MINUTERIE)
de l'appareil intérieur s'allume.
En appuyant sur la touche
le nombre d'heures change comme suit :
1 H
Arrêt de la MINUTERIE D'EXTINCTION
• Au cours du fonctionnement de la MINUTERIE D'EXTINCTION
ECO, le climatiseur continue à fonctionner pendant le nombre
d'heures déni et s'arrête.
• Lorsque la MINUTERIE D'EXTINCTION ECO a été programmée,
l'écran sur la télécommande afche l'heure d'arrêt.
2 H 3 H 7 H
(SLEEP) de manière répétée,
Exemple : Si la MINUTERIE
D'EXTINCTION ECO a été
programmée pendant 1 heure à
18:00, l'arrêt interviendra à 19:00.
Pour annuler la fonction MINUTERIE D'EXTINCTION ECO
Appuyez sur la touche (MARCHE/ARRÊT).
• Le climatiseur s'arrête.
Appuyez une nouvelle fois sur la touche
ce que “ ”, “ ”, “ ”, heure d'extinction, “ ” et le nombre
d'heures ne soient plus afchés sur l'écran de la télécommande.
Appuyez sur la touche
• Un bip est émis par l'appareil intérieur et le voyant (MINUTERIE)
de l'appareil intérieur s'éteint.
• La fonction MINUTERIE D'EXTINCTION est annulée.
(ANNULER).
(SLEEP) jusqu'à
– 94 –
Page 95

UTILISATION DE LA MINUTERIE D'EXTINCTION ECO
Pour programmer la MINUTERIE D'EXTINCTION ECO et le MINUTEUR DE MISE EN MARCHE
Le climatiseur sera arrêté par la MINUTERIE D'EXTINCTION ECO et mis en service par le MINUTEUR DE
MISE EN MARCHE.
1. Programmez le MINUTEUR DE MISE EN MARCHE.
2. Appuyez sur la touche
(SLEEP) et programmez la MINUTERIE D'EXTINCTION ECO.
Exemple :
Dans ce cas, le climatisateur s'arrête dans 2 heures (à 1:38)) et sera remis
en service à 6:00 le matin suivant.
Pour annuler la MINUTERIE D'EXTINCTION ECO et le MINUTEUR DE MISE EN MARCHE
Pointez la télécommande en direction de l'appareil intérieur et appuyez sur la touche (ANNULER).
• “
”, “ ”, “ ”, “OFF”,heure d'extinction, “ ”, le nombre d'heures, "ON" et l'heure de programmation
du MINUTEUR DE MISE EN MARCHE ne sont plus afchés sur l'écran de la télécommande.
• Un bip est émis par l'appareil intérieur et le voyant (MINUTERIE) de l'appareil intérieur s'éteint.
• La programmation de la MINUTERIE D'EXTINCTION ECO et du MINUTEUR DE MISE EN MARCHE est
annulée.
30 minutes après la programmation de la MINUTERIE D'EXTINCTION ECO, la vitesse du ventilateur extérieur
est réduite pour diminuer le niveau de bruit et améliorer le confort.
1 heure après la programmation de la MINUTERIE D'EXTINCTION ECO, la température programmée
sera légèrement décalée. La valeur de décalage de la température dépend du type de climatiseur.
Ces changements automatiques intervenant dans le fonctionnement contribuent à économiser l'énergie sans
perte de confort.
Le niveau de consommation d'énergie dépend de la température extérieure, de la température ambiante, de la
température programmée ou du type de climatiseur.
FRANÇAIS
Fonction de rafraîchissement [schéma à titre
d'illustration uniquement]
Température
Décalage de
Réduction de la vitesse
du ventilateur extérieur
30 minutes 1 heure
température
Fonction de chauffage [schéma à titre
d'illustration uniquement]
Température
Réduction de la vitesse
du ventilateur extérieur
30 minutes 1 heure
Décalage de
température
REMARQUE
• Si la MINUTERIE D'EXTINCTION ECO est programmée lorsque le MINUTEUR D'ARRÊT ou le MINUTEUR
DE MISE EN MARCHE/ARRÊT a été programmé plus tôt, la MINUTERIE D'EXTINCTION ECO sera
effective au lieu du MINUTEUR D'ARRÊT ou du MINUTEUR DE MISE EN MARCHE/ARRÊT.
– 95 –
Page 96

UTILISATION DU PROGRAMMATEUR HEBDOMADAIRE
• Il est possible de sélectionner le Mode A ou le Mode B pour chaque option, jusqu'à 6 programmes pouvant
être paramétrés par jour. Au total, un maximum de 42 programmes peut être paramétré pendant une
semains pour chaque mode.
• Si la date et l'heure ne sont pas réglées, le PROGRAMMATEUR HEBDOMADAIRE ne peut pas être paramétré.
• Si la date et l'heure ne sont pas réglées convenablement, le PROGRAMMATEUR HEBDOMADAIRE ne
fonctionnera pas correctement.
• Le réglage de la date et de l'heure doit être effectué au préalable pour pouvoir utiliser le PROGRAMMATEUR
HEBDOMADAIRE.
Étape 1 : Programmer les paramètres sur la télécommande. Transmettre les paramètres de programmation
à l'appareil intérieur puis les utiliser.
Étape 2 : Sélectionner le Mode A ou le Mode B et activer ou désactiver le PROGRAMMATEUR HEBDOMADAIRE.
Étape 3 : Copier et annuler les paramètres de programmation.
Étape 1 : Programmez les paramètres sur la télécommande. Transmettre les paramètres
de programmation à l'appareil intérieur puis les utiliser.
Comment paramétrer le PROGRAMMATEUR HEBDOMADAIRE.
1
2
3
4
1. Sélectionnez le Mode A ou le Mode B.
Appuyez sur la touche
tent sur l'écran. (le Mode A est sélectionné).
Appuyez une nouvelle fois sur la touche
et clignotent sur l'écran. (le Mode B est sélectionné).
• Si aucune programmation n'a été effectuée, ON/OFF,
s'afchent.
• Si une programmation a été effectuée, ON/OFF,
ne s'afchent pas.
2. Paramétrez un programme.
Appuyez sur la touche
secondes. Le mode sélectionné peut être changé.
, jour: Lun, n° de programme. : 1, ON/OFF, heure programmée et
température programmée clignotent à l'écran.
3. Sélectionnez le jour voulu de la semaine.
Appuyez sur la touche
L'indication des jours change de Lun Mar Mer Jeu Ven
Sam Dim Lun, Mar, Mer, Jeu, Ven, Sam, Dim [Jours entiers]
Lun, Mar, Mer, Jeu, Ven [jours de la semaine] Sam, Dim [week-
end] Lun Mar ......
Sélectionnez [Jours entiers] pour une programmation quotidienne.
Sélectionnez [jours de la semaine] pour la programmation du lundi au vendredi.
Sélectionnez [week-end] pour la programmation du samedi et du dimanche.
• Une fois que la programmation a été effectuée, il est facile de la vérier
et de l'éditer en même temps.
4. Appuyez sur la touche pour sélectionner un numéro de
programme.
Le numéro change de 1 2 3 4 5 6 1 2 .....
• Si le numéro de programme a été paramétré, suivez l'ordre indiqué
ci-dessus pour effectuer une modication.
(HEBDOMADAIRE). et cligno-
(HEBDOMADAIRE),
,
,
(HEBDOMADAIRE) pendant environ 3
(JOUR).
– 96 –
Page 97

UTILISATION DU PROGRAMMATEUR HEBDOMADAIRE
5. Appuyez sur la touche (MINUTEUR MISE EN MARCHE-ARRÊT)
5
pour sélectionner la programmation MINUTEUR DE MISE EN
MARCHE ou MINUTEUR D'ARRÊT.
6. Appuyez sur la touche
7. Appuyez sur la touche (TEMP
température.
6
7
8
9
8. Appuyez sur la touche (OK). Les paramètres de programmation
sont dénis. Le jour, le numéro de programme, la programmation
de mise en marche, la température programmée s'allument.
clignote en continu. Si la programmation n'est pas complète, les
paramètres ne seront pas sauvegardés dans la mémoire.
pour continuer la programmation, appuyez sur les touches
Suivez les étapes 3 à 8 pour la programmation.
.
9. Après avoir effectué la programmation, appuyez sur la touche
(VALIDER) tout en pointant la télécommande sur l'appareil intérieur
pendant environ 3 secondes. Le voyant de minuterie sur l'appareil
intérieur clignotera rapidement.
Après un bip émis par l'appareil intérieur, le voyant MINUTERIE s'allume.
Assurez-vous que le voyant MINUTERIE s'allume.
Cela indique que la programmation a été sauvegardée dans l'appareil
intérieur et que la fonction minuterie a été activée.
Le contenu de la programmation s'afchera sur l'écran de la télécommande.
• Si le voyant MINUTERIE de l'appareil intérieur ne s'allume pas,
appiuyez sur la touche
commande sur l'appareil intérieur pendant environ 3 secondes.
• ATTENTION ! N'appuyez pas sur la touche
cours de la programmation, ce qui entraînera une perte de tous les
paramètres de programmation.
• Le contenu de la programmation n'est pas sauvegardé dans l'appareil
intérieur tant que la touche
(TEMPS) pour programmer l'heure.
ou ) pour programmer la
FRANÇAIS
(VALIDER) tout en pointant la télé-
(ANNULER) au
(VALIDER) n'a pas été pressée.
REMARQUE
• Jusqu'à 6 programmes peuvent être paramétrés par jour. Le paramétrage du MINUTEUR DE MISE
EN MARCHE ou du MIINUTEUR D'ARRÊT pour chaque numéro de programme peut s'effectuer de
manière aléatoire. En appuyant sur la touche (VALIDER), le MINUTEUR DE MISE EN MARCHE
ou le MIINUTEUR D'ARRÊT paramétré pour chaque numéro de programme sera automatiquement
organisé de façon à ce que le numéro de programme 1 comporte l'heure la plus en avance et le
numéro de programme 6 l'heure la plus tardive.
Si l'heure programmée est la même, la priorité sera donnée au contenu de programmation le plus récent.
• ATTENTION ! Si la télécommande n'est pas actionnée et que la touche
dans un délai de 3 minutes suivant la programmation, tous les paramètres actuels de programmation seront
perdus.
(VALIDER) n'est pas pressée
– 97 –
Page 98

UTILISATION DU PROGRAMMATEUR HEBDOMADAIRE
Étape 2 : Sélectionner le Mode A ou le Mode B et activer ou désactiver le PROGRAMMATEUR
HEBDOMADAIRE.
Comment sélectionner le Mode A ou le Mode B de paramétrage
1
du PROGRAMMATEUR HEBDOMADAIRE.
2
3
1
1. Appuyez sur la touche
sur l'écran. (Le Mode A clignote normalement en premier).
2. Appuyez une nouvelle
et clignotent sur l'écran.
3. Sélectionnez le Mode A ou le Mode B. Appuyez sur la touche
(VALIDER) tout en pointant la télécommande sur l'appareil intérieur
pendant environ 3 secondes. Le voyant de minuterie sur l'appareil
intérieur clignotera rapidement.
Après un bip émis par l'appareil intérieur, le voyant MINUTERIE s'allume.
Assurez-vous que le voyant MINUTERIE s'allume.
Cela indique que la sélection du Mode A ou du Mode B et l'activation
du PROGRAMMATEUR HEBDOMADAIRE ont été validées.
Désactivation du PROGRAMMATEUR HEBDOMADAIRE
1. Pointez la télécommande en direction de l'appareil intérieur et
appuyez sur la touche
Un bip sera émis par l'appareil intérieur et le voyant MINUTERIE
s'éteindra. Les indications de programmation sur l'écran de la télécommande disparaîtront également.
Cela indique que la désactivation du PROGRAMMATEUR
HEBDOMADAIRE a été confirmée.
(HEBDOMADAIRE). et clignotent
fois sur la touche (HEBDOMADAIRE),
(ANNULER).
• Pour réactiver le paramétrage du PROGRAMMATEUR
HEBDOMADAIRE, répétez les étapes de la procédure
"Comment sélectionner le Mode A ou le Mode B de paramétrage
du PROGRAMMATEUR HEBDOMADAIRE".
REMARQUE
• Lors du paramétrage du MINUTEUR À PROGRAMMATION UNIQUE, le fonctionnement du PROGRAMMATEUR
HEBDOMADAIRE est interrompu. Le MINUTEUR À PROGRAMMATION UNIQUE s'étant déclenché, le
PROGRAMMATEUR HEBDOMADAIRE sera activé.
• Une fois que le MINUTEUR À PROGRAMMATION UNIQUE est annulé, le fonctionnement du PROGRAMMATEUR
HEBDOMADAIRE est également annulé. Il est nécessaire de paramétrer le fonctionnement du
PROGRAMMATEUR HEBDOMADAIRE pour son activation.
• Après un redémarrage automatique, la fonction du PROGRAMMATEUR HEBDOMADAIRE est annulée.
Il est nécessaire de paramétrer le fonctionnement du PROGRAMMATEUR HEBDOMADAIRE pour son
activation.
– 98 –
Page 99

UTILISATION DU PROGRAMMATEUR HEBDOMADAIRE
Étape 3 : Copier et annuler les paramètres de programmation.
Comment copier et coller les paramètres.
1
2
L'édition des paramètres de programmation s'effectue facilement en copiant
les données d'un jour sur l'autre.
1. Appuyez sur la touche
le Mode A ou le Mode B.
(HEBDOMADAIRE) pour sélectionner
2. Appuyez sur la touche
secondes pour commencer à éditer les paramètres de programmation.
(HEBDOMADAIRE) pendant environ 3
3
3. Appuyez sur la touche
semaine à copier.
4. Appuyez sur la touche
(coller) clignote sur l'écran. * Appuyez sur la touche (ANNULER)
pour annuler le mode COLLER. Le mode de paramétrage normal
4
est activé.
5. Appuyez sur la touche
semaine à coller.
6. Appuyez une nouvelle fois sur la touche
pour coller. uniquement clignote sur l'écran.
(JOUR) pour sélectionner un jour de la
(COPIER/COLLER). Puis "PASTE"
FRANÇAIS
(JOUR) pour sélectionner un jour de la
(COPIER/COLLER)
5
7. Pour continuer à copier d'autres jours, appuyez sur
ou ou .
Puis commencez à partir de l'étape 3.
6
8
8. Après avoir procédé à la copie et au collage des paramètres, appuyez
sur la touche
l'appareil intérieur pendant environ 3 secondes. Le voyant de minuterie
sur l'appareil intérieur clignotera rapidement.
Après un bip émis par l'appareil intérieur, le voyant MINUTERIE s'allume.
Assurez-vous que le voyant MINUTERIE s'allume.
Si le voyant MINUTERIE ne s'allume pas, appuyez une nouvelle fois
sur la touche
(VALIDER) tout en pointant la télécommande sur
(VALIDER).
ou
REMARQUE
• S'il n'existe aucune donnée de programmation, la copie des données d'un jour sur l'autre ne peut pas s'effectuer.
• Les données de programmation ne changeront pas si la touche
(VALIDER) n'est pas pressée.
– 99 –
Page 100

UTILISATION DU PROGRAMMATEUR HEBDOMADAIRE
Étape 3 : Copier et annuler les paramètres de programmation.
Comment effacer les données du PROGRAMMATEUR HEBDOMADAIRE.
1
[Effacer un numéro de programme]
2
3
4
5
1. Appuyez sur la touche
le Mode A ou le Mode B.
2. Appuyez sur la touche
secondes pour commencer à éditer les paramètres de programmation.
3. Appuyez sur la touche
semaine à éditer.
4. Appuyez sur
numéro de programme sélectionné clignote.
5. Appuyez sur la touche
sélectionné est supprimé.
6. Après la suppression, appuyez sur la touche
en pointant la télécommande sur l'appareil intérieur pendant environ
3 secondes. Le voyant de minuterie sur l'appareil intérieur clignotera
rapidement.
Après un bip émis par l'appareil intérieur, le voyant MINUTERIE s'allume.
Assurez-vous que le voyant MINUTERIE s'allume.
• Les données de programmation ne changeront pas si la touche
(VALIDER) n'est pas pressée.
pour sélectionner le numéro de programme. Le
(HEBDOMADAIRE) pour sélectionner
(HEBDOMADAIRE) pendant environ 3
(JOUR) pour sélectionner un jour de la
(EFFACER). Le numéro de programme
(VALIDER) tout
6
– 100 –
 Loading...