

Hitachi RAK-25PXA, RAC-25WXA, RAK-35PXA, RAC-35WXA Installation Manual
RAK-25PXA/RAC-25WXA
RAK-35PXA/RAC-35WXA
Wasabi
DROC REWOP FO NOITCENNOC
WARNING
s THIS APPLIANCE MUST BE
EARTHED.
Procedures of Wiring
s
s
s
s
s
s
When power supplies to Outdoor Unit
Wiring of The Indoor Unit
s
s Remove the cover from the terminal base and screw the cable.
s Pull at the and in the directions as shown by
arrows to remove the cover.
Method to remove the low cover
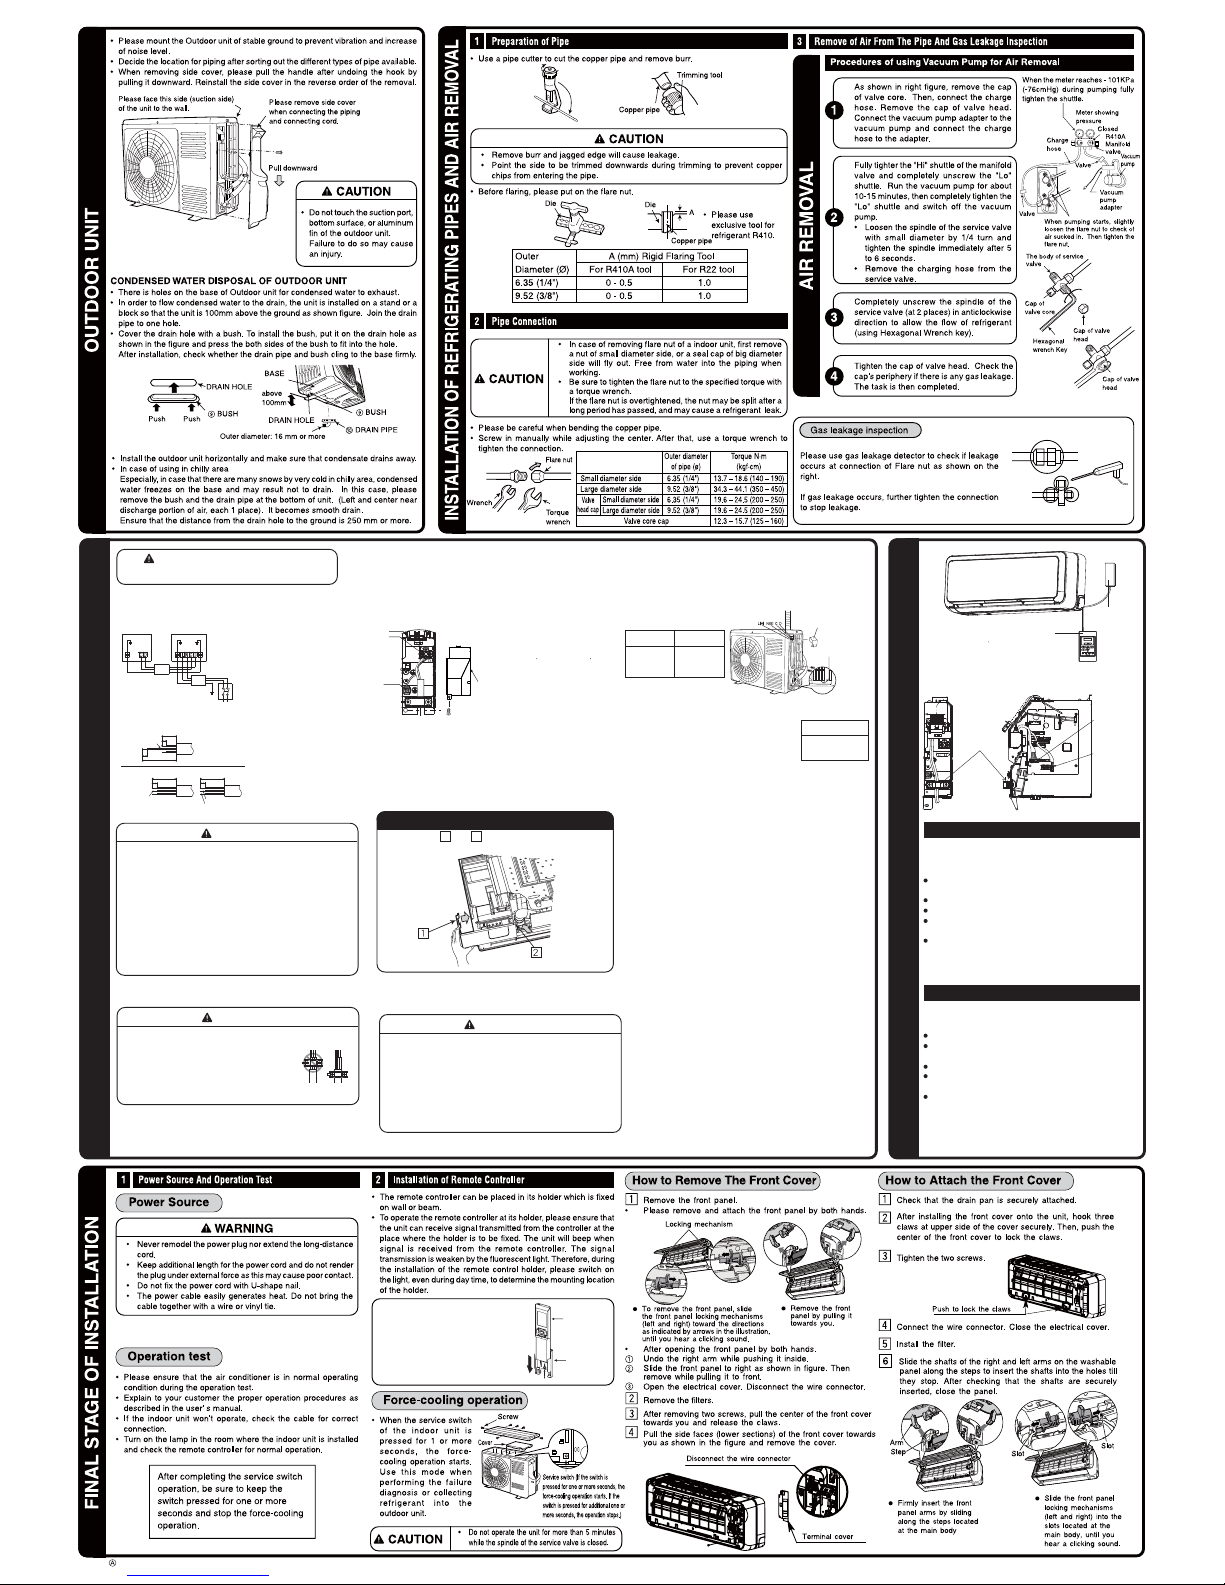
Wiring of the Outdoor Unit
s Please remove the side cover for wire connection.
Checking for the electric source and the voltage range
IMPORTANT
Wire length Wire gauge
up to 6m 1.6mm
2
up to 15m 2.5mm
2
up to 20m 4.0mm
2
s
s
cover
Earth terminal
IMPORTANT
Fuse Capacity
16A time
delay fuse
WARNING
WARNING
1 2
The naked part of the wire core should be 10mm fix it to
the terminal tightly. Then try to pull the individual wire to
check if the contact is tight. Improper insertion may burn
the terminal.
Be sure to use only wire specified for the use of airconditioner.
Please refer to the manual for wire connection and the
wiring technique should meet the standard of the electrical
installation.
There is an AC voltage drop between the LN terminal if the
power is on. Therefore, be sure to remove the plug from its
socket.
Leave some space in the connecting
cord for ma intenance purpose and be
sure to secure it with the cord band.
Secure the connecting cord along the
coated part of the wire using the cord
band. Do not exert pressure on the wire
as this may cause overheating or fire.
For wire connection of the Indoor unit, you need to remove the
front cover, the low cover under the body of the unit and
terminal cover.
s
s
s
WARNING
If you cannot attach the side plate due to the connection
cord, please press the connecting cord in the direction to
the front panel to fix it.
Be sure that the hooks of the side cover fixed in certainly.
Otherwise water leakage may occur and this causes short
circuit or faults.
The connecting cord should not touch to service valve
and pipes. (it becomes high temperature in heating
operation.)
s
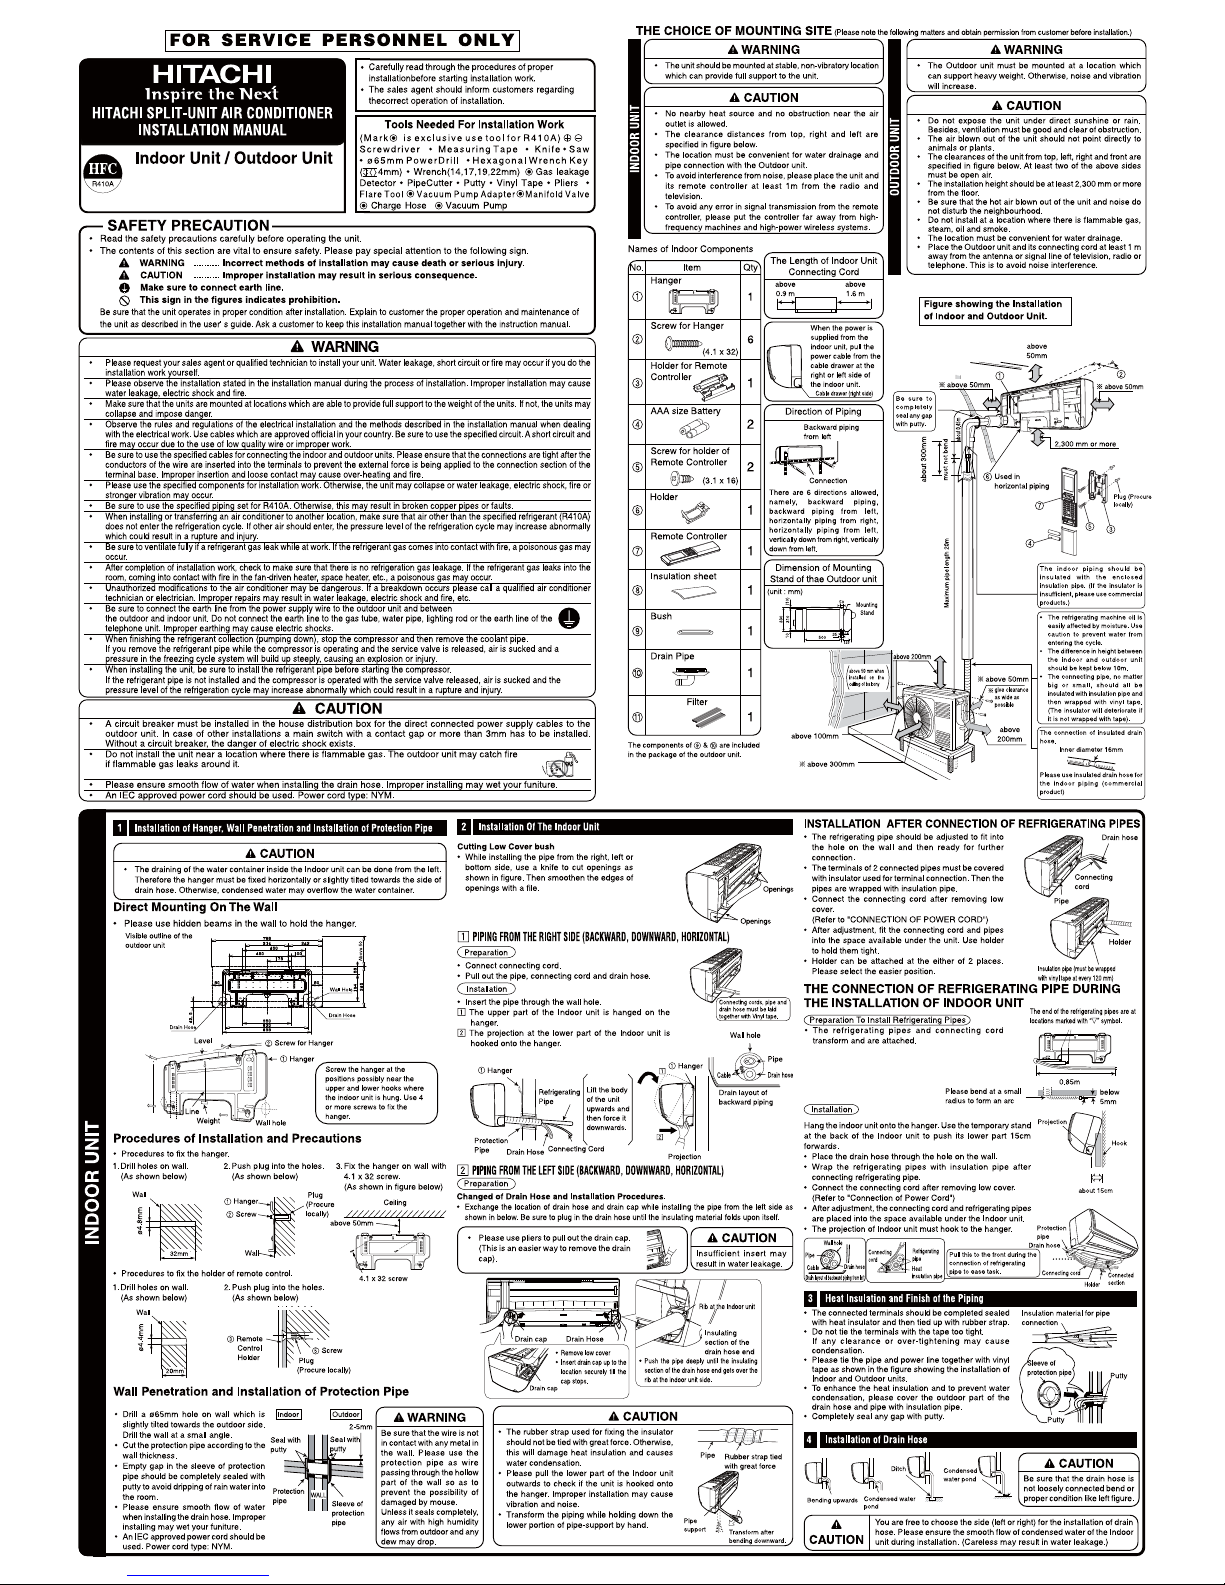
Before installation, the power source must be checked and
necessary wiring work must be completed. To make the wiring
capacity proper, use the wire gauge list below for the wiring
from house distribution fuse box to the outdoor unit in consideration of the blocked rotor current.
Investigate the power supply capacity
and other electrical conditions at the
installing location.
Depending on the model of room air conditioner to be installed, request the customer
to make arrangements for the necessary
electrical work etc.
The electrical work includes the wiring
work up the outdoor unit. In localities
where electrical conditions are poor, use of
a voltage regulation is recommended.
Install outdoor for the room air conditioner
within the reaching range of the line cord.
Wired remote controller
RAC Adapter
WIRED REMOTE CONTROLLER
H-LINK
HOW TO CONNECT THE OPTIONAL PARTS
(RAC Adapter, Weekly Timer, Wired Remote Control)
[For all optional part, please refer catalog for part number]
As for connecting to H-Link, a separately purchased RAC
Adapter is required.
To install the wiring the electrical box cover must be
opened.
Connect the connector of RAC adapter to CN7.
Assemble back the cover of electrical box.
Please refer to the respective user manual of RAC
Adapter for further details.
Please be careful not to damage lead wires by edge of
plate when connecting the optional parts.
[For all optional part, please refer catalog for part number]
Connection to the electrical box:
Remove the cover of electrical box.
Connect the connector of Weekly Timer/wired remote
controller to CN9.
Assemble back the cover of electrical box.
Please refer to the respective user manual of Weekly
Timer/wired remote controller for further details.
Please be careful not to damage lead wires by edge of
plate when connecting the optional parts.
Connecting
earth
screw
teminal
cover
Securely screw in the power cord
and connecting cord so that it will
not get loose or disconnect.
Tightening torque reference value:
1.2 to 1.6 N m (12 to 16 kgf cm)
Excessive tightening may damage
the interior of the cord requiring
replacement.
C
D
Detail of cutting the connecting cord
Green + Yellow
Green + Yellow
Green + Yellow
Indoor Unit
Outdoor Unit
30mm
10mm
10mm
70mm
10mm
50mm
10mm
50mm
Strip wires
L N C D
(A) (B)
ø1.6 or
ø2.0
Indoor Unit Outdoor Unit
Connecting Cord
AC 220-230V
1ø 50Hz
RAC Adapter
cord
Fix the
wired remote
controller
cord and
RAC adapter
cord by band.
Wired remote
controller cord
The remote controller
must be slide in
the remote controller
holder, in the direction
as shown in the figure,
until it hooks at the
lower end of the remote
controller holder.
Screw (2 pieces)
Remote
Controller
Holder
Remote
Controller
<1458L : >
 Loading...