

Page 1

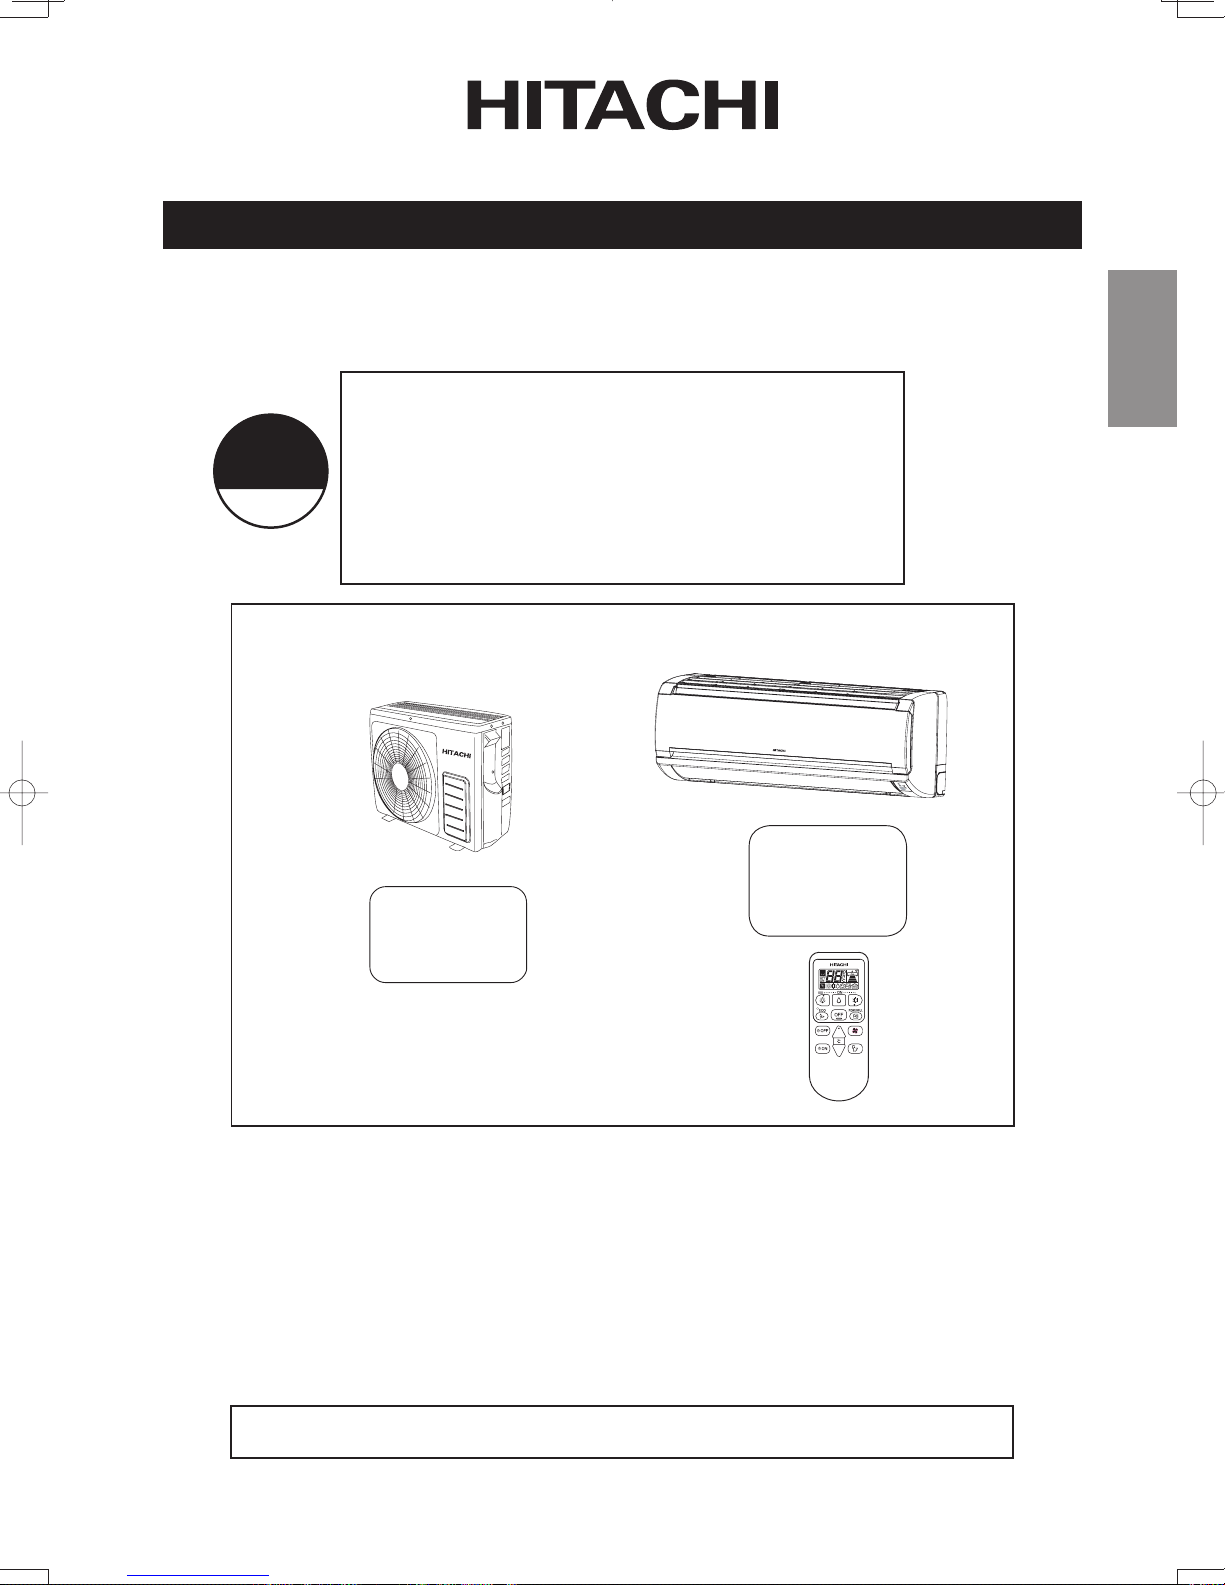
SPLIT TYPE AIR CONDITIONER
INDOOR UNIT/OUTDOOR UNIT
MODEL
RAS-E10HB/RAC-E10HB
RAS-E10HBG/RAC-E10HBG
RAS-E14HB/RAC-E14HB
RAS-E14HBG/RAC-E14HBG
ENGLISH
ENGLISH
OUTDOOR UNIT
RAC-E10HB
RAC-E10HBG
RAC-E14HB
RAC-E14HBG
Instruction manual
To obtain the best performance and ensure years of
trouble free use, please read this instruction manual
completely.
Page 1~10
INDOOR UNIT
RAS-E10HB
RAS-E10HBG
RAS-E14HB
RAS-E14HBG
L.H
Οδηγίες χρήσης
°И· ЩЛУ О·П‡ЩВЪЛ ·fi‰ФЫЛ ЩФ˘ ОПИМ·ЩИЫЩИОФ‡ О·И БИ·
ЩЛУ М·ОЪФЪfiıВЫМЛ ¯Ъ‹ЫЛ ЩФ˘ ¯ˆЪ›˜ ЪФ‚П‹М·Щ·,
‰И·‚¿ЫЩВ ЪФЫВОЩИО¿ ·˘Щ¤˜ ЩИ˜ Ф‰ЛБ›В˜ ¯Ъ‹ЫЛ˜.
™ÂÏ›‰· 27
31~40
Manuale di istruzioni
Per garantire la migliore prestazione e la più lunga
durata leggere attentamente e interamente le seguanti
istruzioni.
Manual de instrucciones
Para obtener el mejor funcionamiento y asegurar años
de uso libre de problemas, lea cuidadosamente este
manual de instrucciones.
This room air conditioner is only for consumer usage.
Do not use for preservation of foods, animals, plants, precision machines, art, medicine or such.
Pag. 11~20
Página 21~30
– 1 –
Mode d’emploi
Des performances optimales et un fonctionnement à
long terme seront assurés en appliquant les présentes
instructions après avoir entièrement lu ce mode
d’emploi.
Page 41~50
Page 2
SAFETY PRECAUTION
• Do not place plants directly under the airfl ow as it is bad for the plants.
• Do not direct the cool air coming out from the air-conditioner panel to face
household heating apparatus as this may affect the working of apparatus such
as the electric kettle, oven etc.
• The product shall be operated under the manufacturer specifi cation and not
for any other intended use.
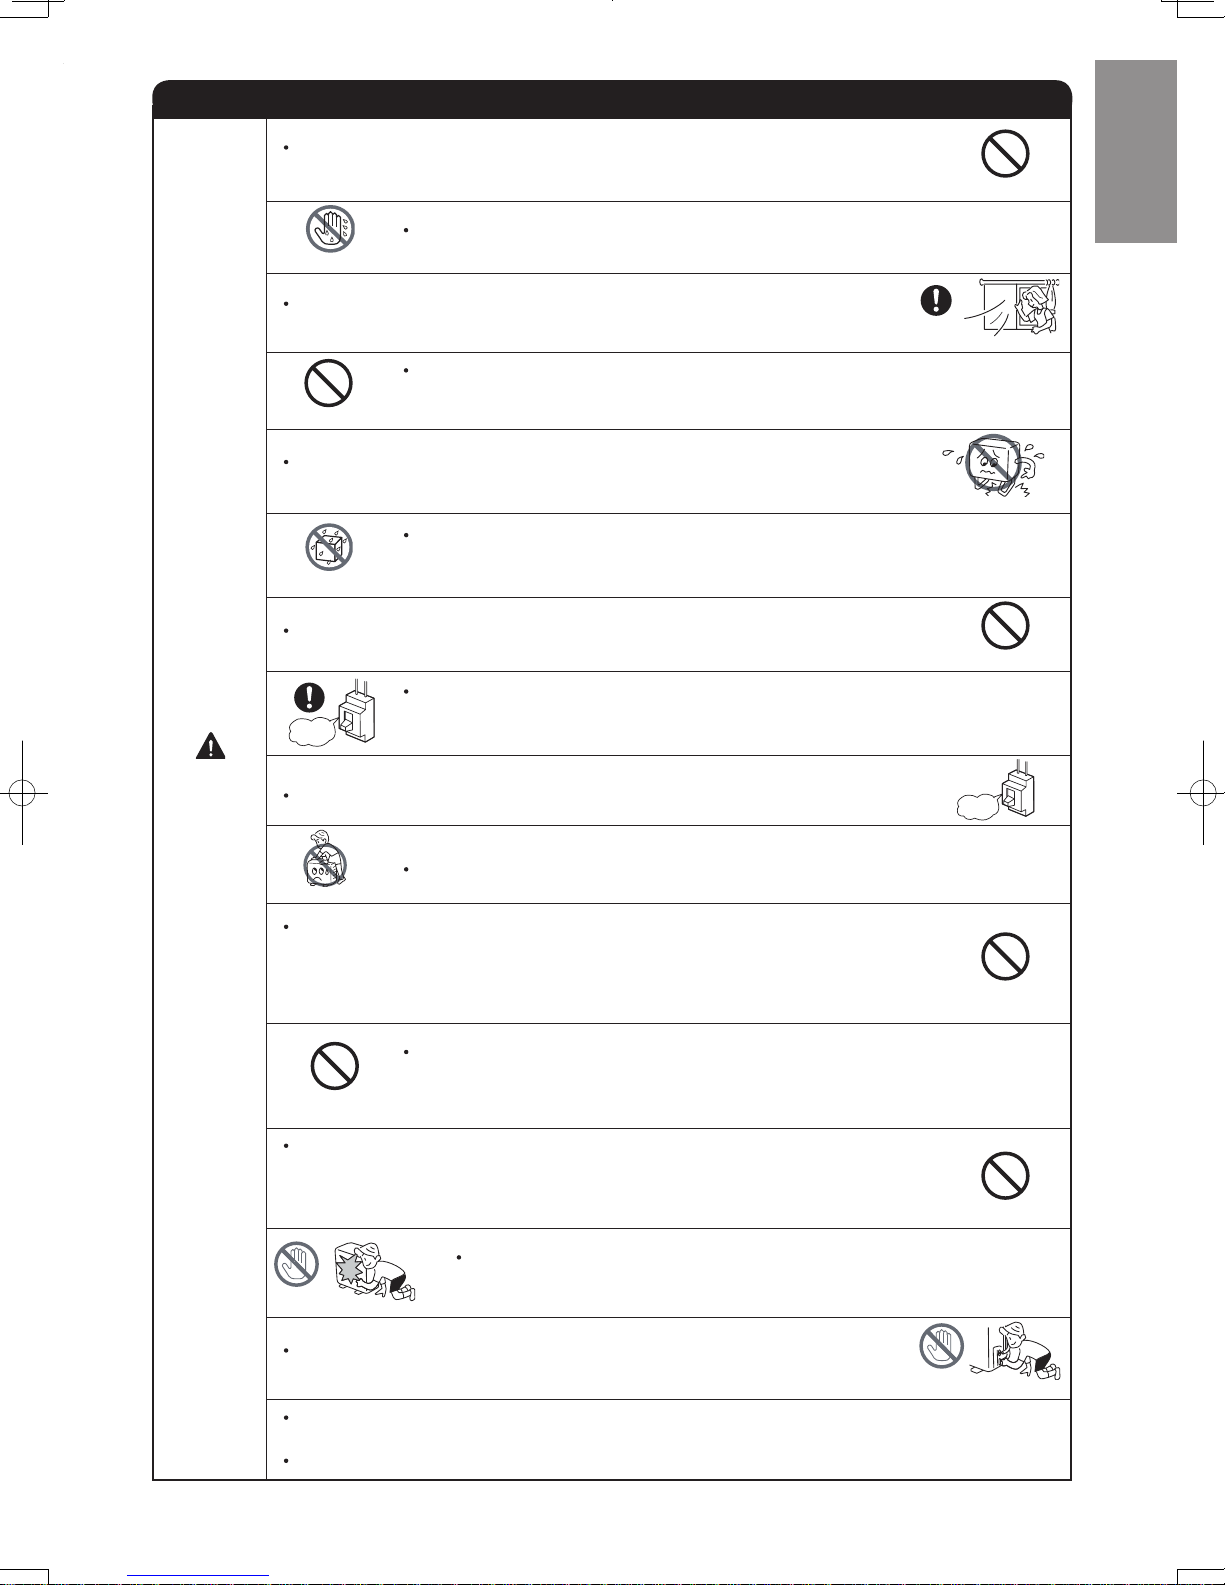
PRECAUTIONS DURING OPERATION
CAUTION
• Do not attempt to operate the unit with wet hands, this could cause fatal
accident.
• When operating the unit with burning equipments, regularly ventilate
the room to avoid oxygen insuffi ciency.
• Please ensure that outdoor mounting frame is always stable, fi rm and without
defect. If not, the outdoor unit may collapse and cause danger.
• Do not wash the unit with water or place a water container such as a vase on
the indoor unit.
Electrical leakage could be present and cause electric shock.
• Be sure to stop the operation by using the remote controller and turn off the
circuit breaker during cleaning, the high-speed fan inside the unit may cause
danger.
• Turn off the circuit breaker if the unit is not be operated for a long period.
• Do not climb on the outdoor unit or put objects on it.
• When operating the unit with the door and windows opened, (the room
humidity is always above 80%) and with the air defl ector facing down or moving
automatically for a long period of time, water will condense on the air deflector
and drips down occasionally. This will wet your furniture. Therefore, do not
operate under such condition for a long time.
• If the amount of heat in the room is above the cooling or heating capability of
the unit (for example: more people entering the room, using heating equipments
and etc.), the preset room temperature cannot be achieved.
• Indoor unit cleaning must be performed by authorized personnel only. Consult
This appliance is not intended for use by young children or infirm persons unless they have been
Young children should be supervised to ensure that they do not play with the appliance.
your sales agent.
adequately supervised by a responsible person to ensure that they can use this appliance safely.
Using a commercially available detergent or similar can damage the plastic parts
or clog the drain pipe, causing water to drip with potential electric shock hazard.
• Do not touch the air outlet, bottom surface and aluminium fi n of the outdoor
unit.
You may get hurt.
Do not touch the refrigerant pipe and connecting valve.
Burns may result.
PROHIBITION
DON’T WET
PROHIBITION
PROHIBITION
PROHIBITION
DON’T TOUCH
“OFF”
PROHIBITION
PROHIBITION
PROHIBITION
PROHIBITION
PROHIBITION
DON’T TOUCH
STRICTLY OBSERVE
PRECAUTIONS
“OFF”
DEUTSCHFRANÇAISITALIANOSPANISHPORTUGUÊS
∂ППЛУИО¿
ENGLISH
•
•
•
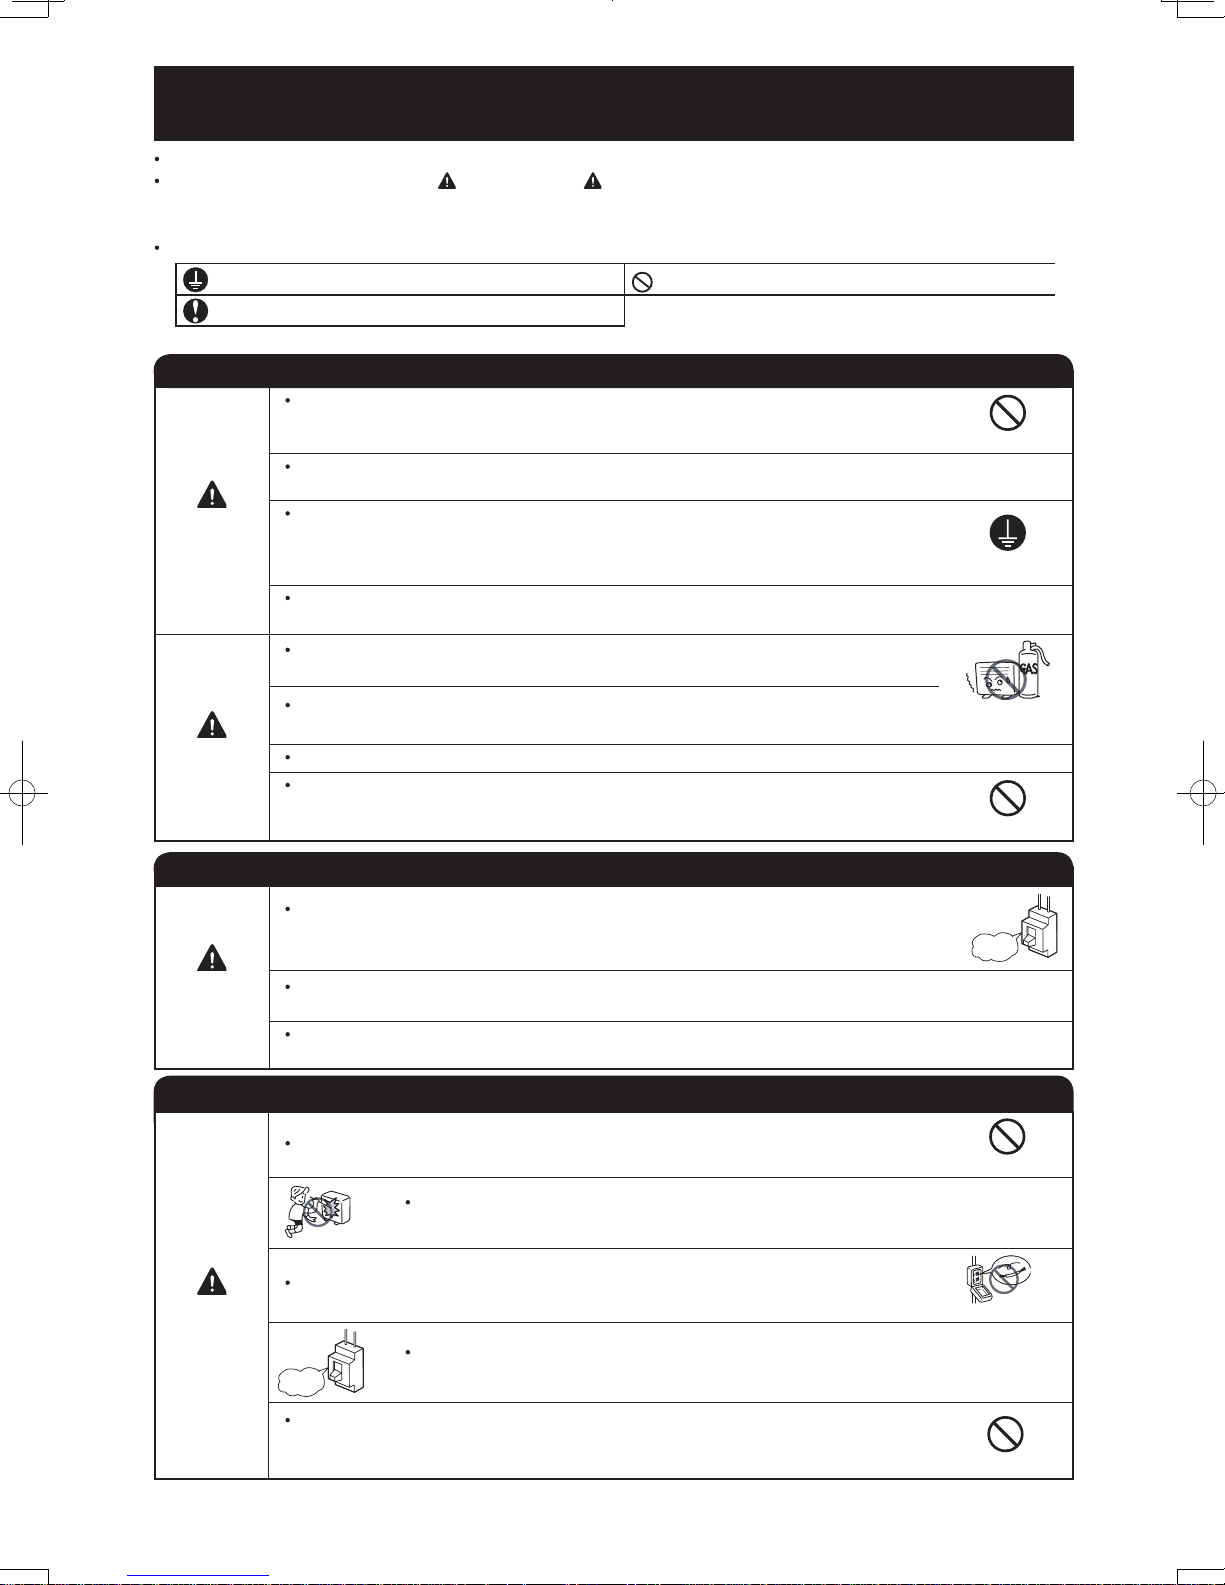
• Please read the “Safety Precaution” carefully before operating the unit to ensure correct usage of the unit.
• Pay special attention to signs of “
not observed strictly, may cause death or serious injury. The “Caution” section contains matters which may result
in serious consequences if not observed properly. Please observe all instructions strictly to ensure safety.
• The signs indicate the following meanings. (The following are examples of signs.)
• Please keep this manual after reading.
Make sure to connect earth line.
Indicates the instructions that must be followed.
• Do not reconstruct the unit.
Water leakage, fault, short circuit or fi re may occur if you reconstruct the unit by
yourself.
• Please ask your sales agent or qualified technician for the installation of your unit.
WARNING
Water leakage, short circuit or fire may occur if you install the unit by yourself.
• Please use earth line.
Do not place the earth line near water or gas pipes, lightning-conductor, or the
earth line of telephone. Improper installation of earth line may cause electric
shock or fire.
• Be sure to use the specifi ed piping set for R410A. Otherwise, this may result in
broken copper pipes or faults.
• A circuit breaker should be installed depending on the mounting site of the unit.
CAUTION
Without a circuit breaker, the danger of electric shock exists.
•
• Please ensure smooth fl ow of water when installing the drain hose.
• Make sure that a single phase power source is used.
The use of other power sources may cause electrical components to overheat
and lead to fi re.
Do not install the unit near a location where there is flammable gas.
The outdoor unit may catch fire if flammable gas leaks around it.
Warning” and “ Caution”. The “Warning” section contains matters which, if
This sign in the figure indicates prohibition.
PRECAUTIONS DURING INSTALLATION
220V-230V
PROHIBITION
CONNECT EARTH LINE
PROHIBITION
PROHIBITION
PRECAUTIONS DURING SHIFTING OR MAINTENANCE
Should abnormal situation arise (like burning smell), please stop operating the
•
unit and turn off the circuit breaker. Contact your
fire may occur if you continue to operate the unit
WARNING
• Please contact your agent for maintenance. Improper self maintenance may cause electric
shock and fi re.
• Please contact your agent if you need to remove and reinstall the unit. Electric shock or fi re
may occur if you remove and reinstall the unit yourself improperly.
Avoid an extended period of direct airflow for your health.
•
• Do not put objects like thin rods into the panel of blower and suction side
PROHIBITION
• Do not use any conductor as fuse wire, this could cause fatal accident.
WARNING
• During thunder storm, disconnect the plug top and turn off the circuit
“OFF”
• Spray cans and other combustibles should not be located within a meter of the
air outlets of both indoor and outdoor units.
As a spray can’s internal pressure can be increased by hot air, a rupture may result.
agent. Fault, short circuit or
under abnormal situation.
PRECAUTIONS DURING OPERATION
because the high-speed fan inside may cause danger.
breaker.
– 2 –
“OFF”
PROHIBITION
PROHIBITION
PROHIBITION
Page 3
PRECAUTIONS DURING OPERATION
the unit (for example: more people entering the room, using heating equipments
Do not touch the air outlet, bottom surface and aluminium fi n of the outdoor
DEUTSCHFRANÇAISITALIANOSPANISHPORTUGUÊS
∂ППЛУИО¿
ENGLISH
The product shall be operated under the manufacturer specifi cation and
•
for any other intended use.
• Do not attempt to operate the unit with wet hands, this could cause
DON’T WET
When operating the unit with burning equipments, regularly ventilate
•
the room to avoid oxygen insuffi
PROHIBITION
accident.
ciency.
• Do not direct the cool air coming out from the air-conditioner panel to
household
heating apparatus as this may affect the working of apparatus
as the electric kettle, oven etc.
not
STRICTLY OBSERVE
PRECAUTIONS
PROHIBITION
ENGLISH
fatal
face
such
CAUTION
• Please ensure that outdoor mounting frame is always stable, fi rm and
defect. If not, the outdoor unit may collapse and cause danger
.
• Do not wash the unit with water or place a water container such as a vase
the indoor unit.
PROHIBITION
Electrical leakage could be present and cause electric shock.
• Do not place plants directly under the airfl ow as it is bad for the plants.
• Be sure to stop the operation by using the remote controller and turn off
“OFF”
circuit breaker during cleaning, the high-speed fan inside the unit may cause
danger
.
• Turn off the circuit breaker if the unit is not be operated for a long period.
• Do not climb on the outdoor unit or put objects on it.
PROHIBITION
• When operating the unit with the door and windows opened, (the
humidity
automatically
and
is always above 80%) and with the air defl ector facing down or
for a long period of time, water will condense on the air defl
drips down occasionally. This will wet your furniture. Therefore, do
moving
operate under such condition for a long time.
without
room
ector
not
PROHIBITION
on
PROHIBITION
the
“OFF”
PROHIBITION
•
PROHIBITION
• Indoor unit cleaning must be performed by authorized personnel only.
your sales agent.
Using a commercially available detergent or similar can damage the plastic parts
clog the drain pipe, causing water to drip with potential electric
or
DON’T TOUCH
•
Do not touch the refrigerant pipe and connecting valve.
Burns may result.
This appliance is not intended for use by young children or infirm persons unless they have been
•
adequately supervised by a responsible person to ensure that they can use this appliance safely.
Young children should be supervised to ensure that they do not play with the appliance.
•
If the amount of heat in the room is above the cooling or heating capability of
and etc.), the preset room temperature cannot be achieved.
Consult
shock hazard.
PROHIBITION
•
unit.
You may get hurt.
DON’T TOUCH
– 3 –
Page 4
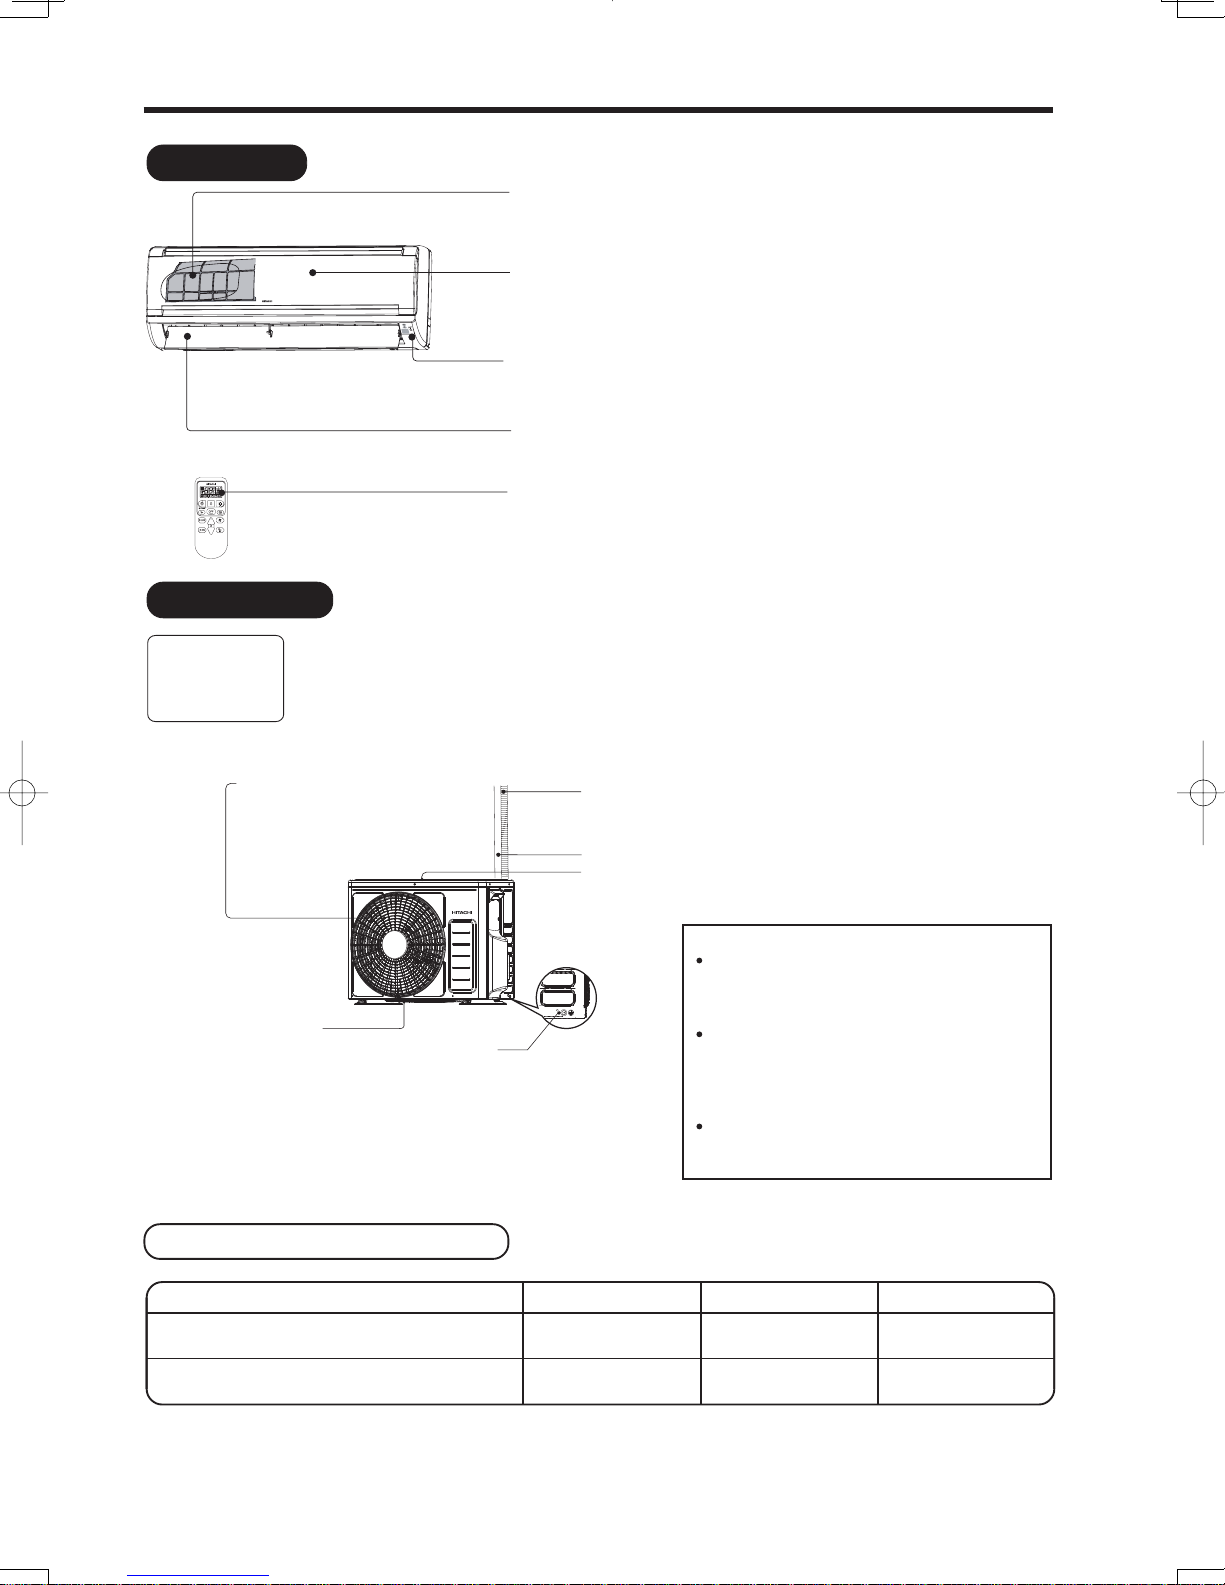
NAMES AND FUNCTIONS OF EACH PART
INDOOR UNIT
Air filter
To prevent dust from coming into the indoor unit.
(Refer page 6)
Front panel
(Refer page 7 )
Indoor unit indicators
Light indicator showing the operating condition.
(Refer page 5)
Horizontal deflector Vertical deflector
(Air Outlet)
Remote controller
Send out operation signal to the indoor unit. So as
to operate the whole unit.
OUTDOOR UNIT
RAC-E10HB
RAC-E10HBG
RAC-E14HB
RAC-E14HBG
Air outlet
When “heating” operation is
performed, cool air blows and
when “cooling” or “dehumidifying”
operation is performed, warm air
blows.
Drain port
(Bottom)
(Lower section of the side)
Earth terminal
MODEL NAME AND DIMENSIONS
MODEL WIDTH (mm) HEIGHT (mm) DEPTH (mm)
RAS-E10HB , RAS-E10HBG
RAS-E14HB , RAS-E14HBG
RAC-E10HB , RAC-E10HBG
RAC-E14HB , RAC-E14HBG
Drain hose
Drains the dehumidified water from the indoor unit to the
outdoor during “cooling” or “dehumidifying” operation.
Piping and Wiring
Air inlets (Rear and left sides)
About the outdoor unit:
When “Stop” is selected during operation
of the indoor unit, the fan of the outdoor
unit continues turning for 10 to 60
seconds to cool the electric parts down.
In heating operation, condensate or
water due to defrosting will flow.
Do not cover the drain port of the outdoor
unit because such water may freeze in
the chilly area.
When the outdoor unit is hung on the
ceiling, install the bush and drain pipe
on the drain port and drain water.
780 280 210
660 530 278
– 4 –
Page 5

NAMES AND FUNCTIONS OF EACH PART
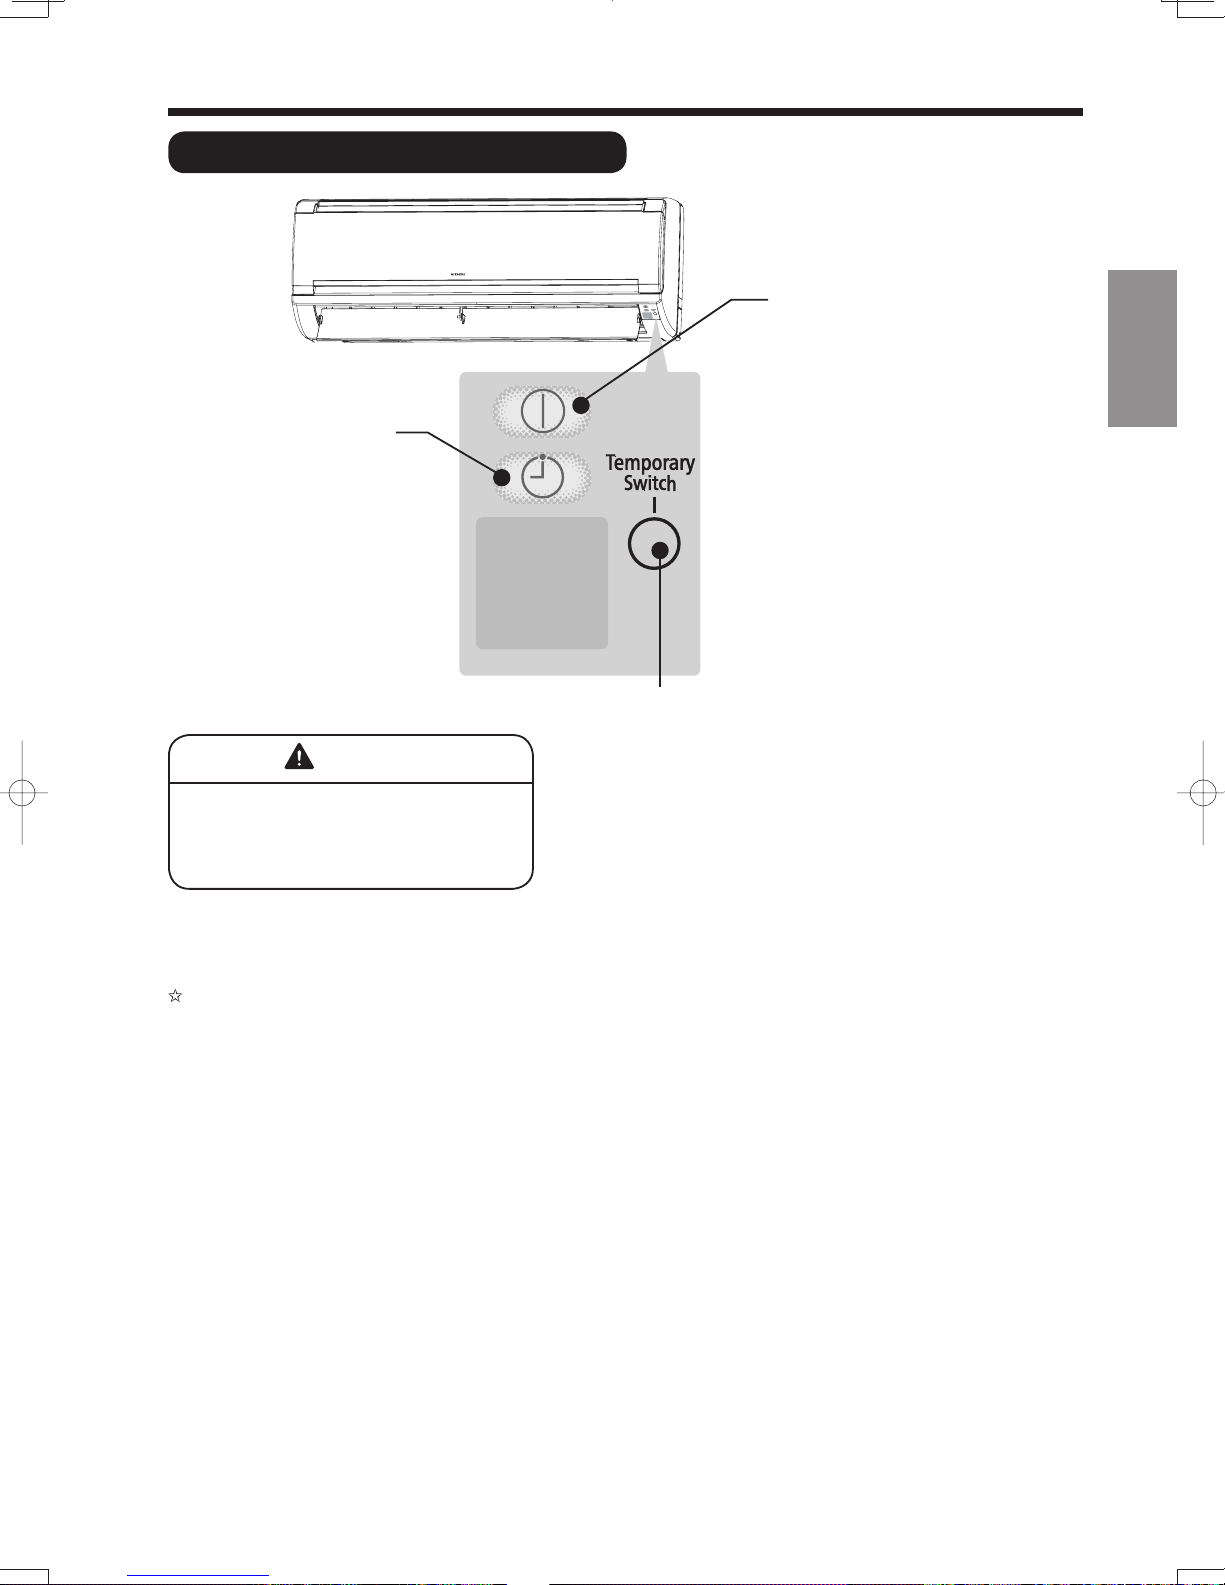
INDOOR UNIT INDICATIONS
TIMER LAMP (Orange)
This lamp lights when the
timer is working.
HSILGNE
ENGLISH
OPERATION LAMP (Yellow)
This lamp lights during operation.
The OPERATION LAMP flashes
in the following cases during
heating.
(1) During preheating
For about 2-3 minutes after
starting up.
(2) During defrosting
Defrosting will be performed
about once an hour when frost
forms on the heat exchanger
of the outdoor unit, for 5-10
minutes each time.
TEMPORARY SWITCH
Use this switch to start and stop when the remote
controller does not work.
CAUTION
Turn off the circuit breaker
if the unit is not be operated
for a long period.
If the power stays on and the unit is not operated, power is slightly consumed in the control circuit.
The power is saved by turning off the power switch (or the circuit breaker when the power is supplied
from the outdoor unit).
By pressing the temporary switch, the operation is
done in automatic mode.
When the operation is done using the temporary
switch after the power source is turned off and turn
on again, the operation is done in automatic mode.
– 5 –
Page 6

NAMES AND FUNCTIONS OF REMOTE CONTROLLER
MODE
POWERFUL Button
3
ECO Button
Use this button to set the ECO mode
) egaP (
6
L.H
Press this button to start
powerful operation.
3
4
4
4
3
7
– 2 –
Page 7
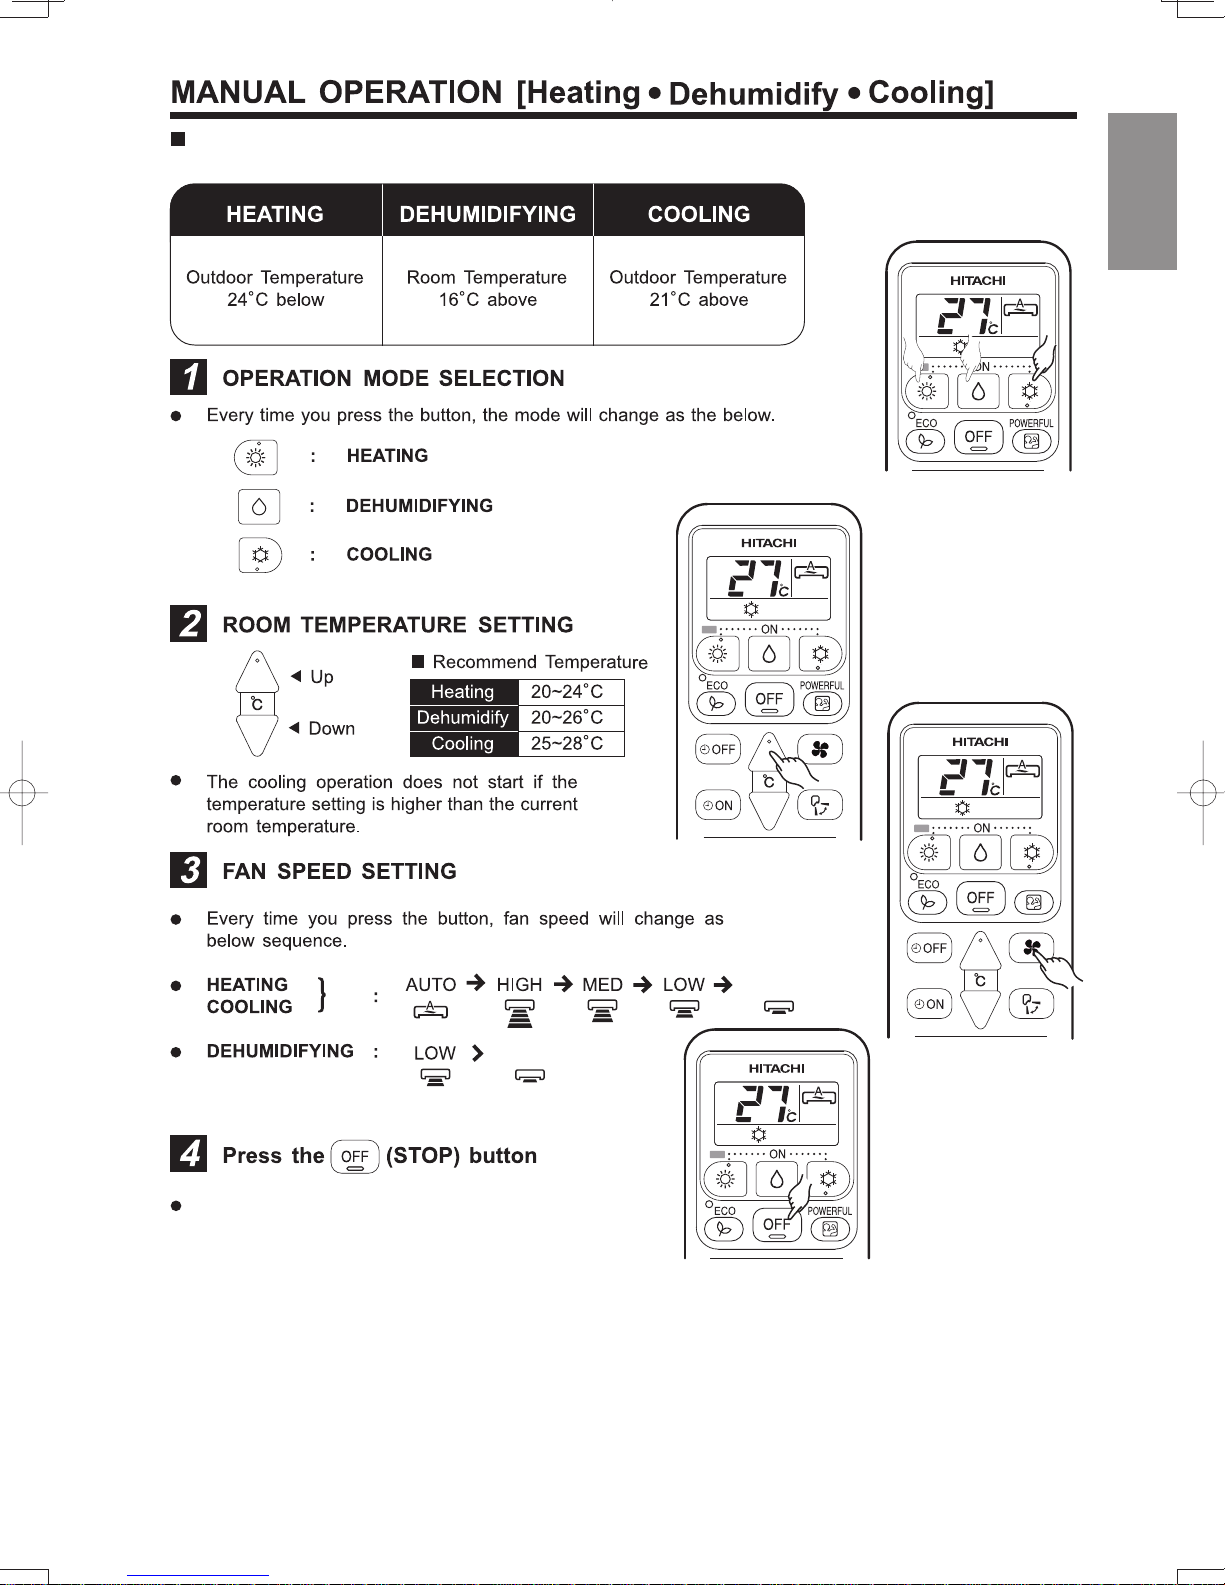
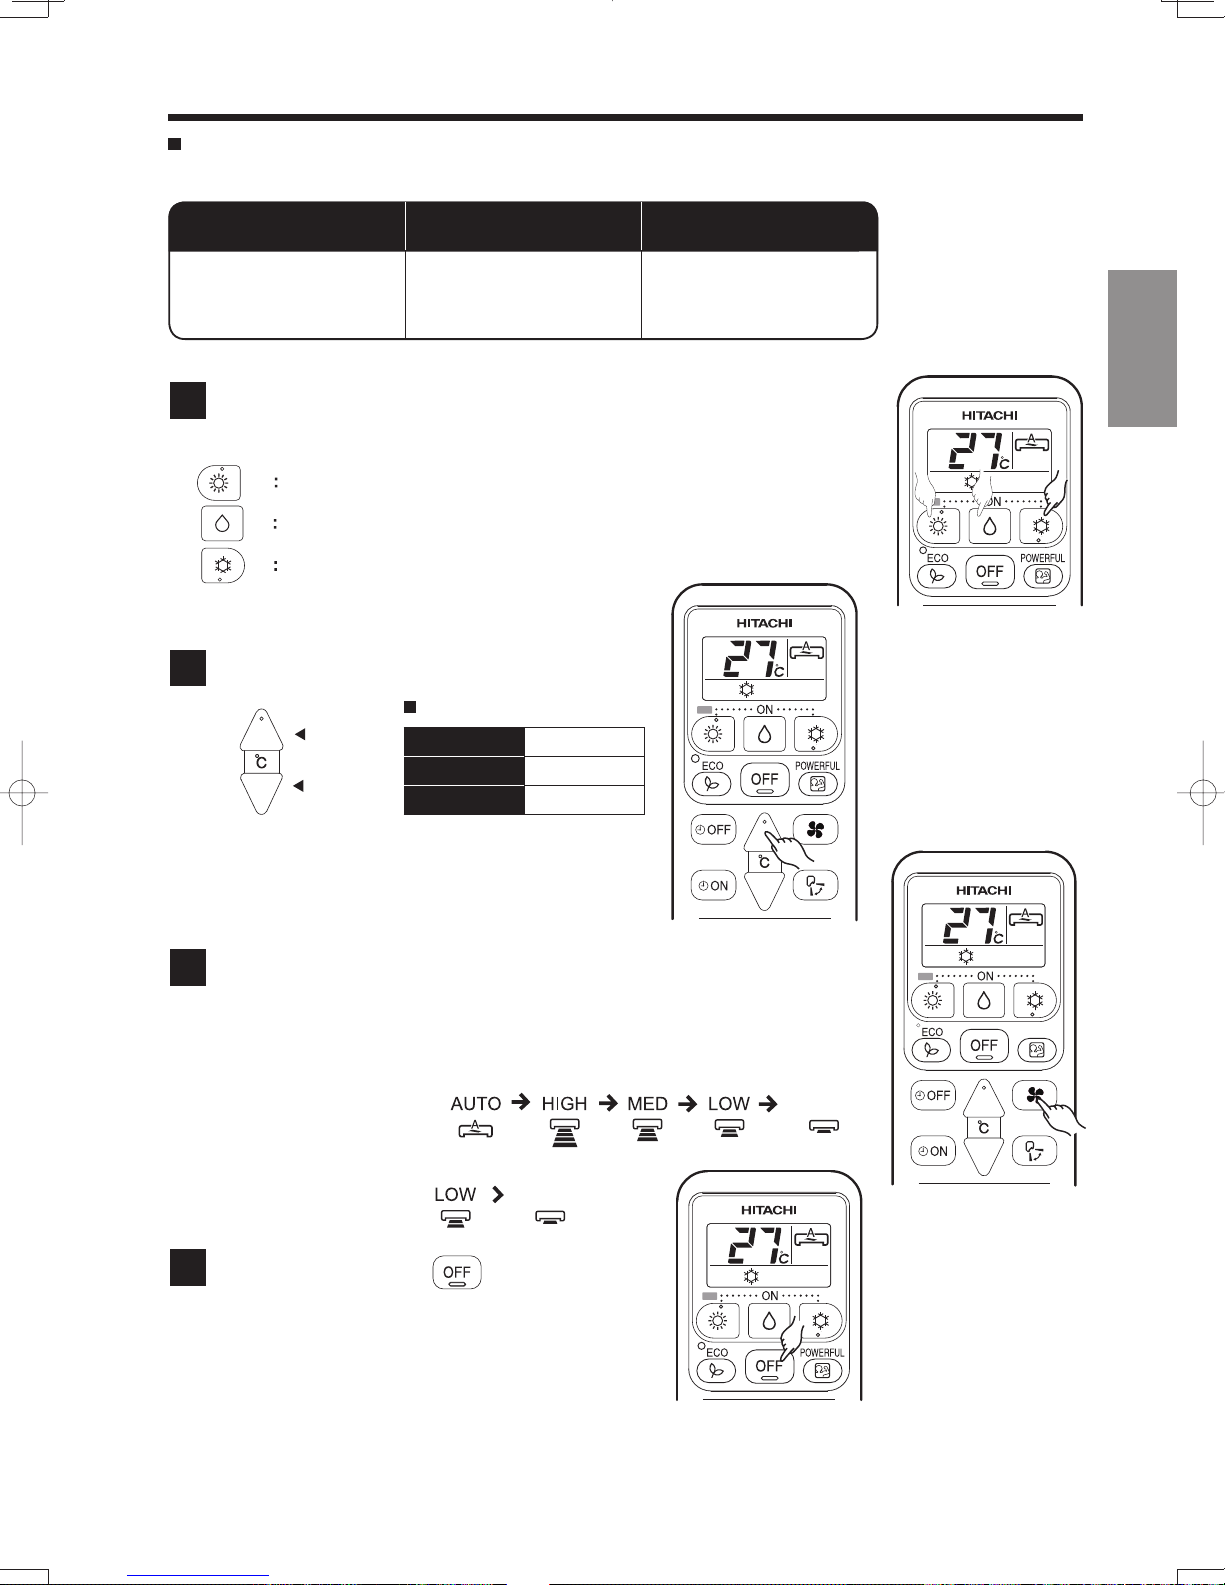
Please use under below condition when you want to set the function mode, room temperature
and fan speed manually.
L.H
L.H
ENGLISH
Operation stops with a beep.
L.H
POWERFUL
SILENT
SILENT
L.H
– 3 –
Page 8
1
2
L.H
L.H
on
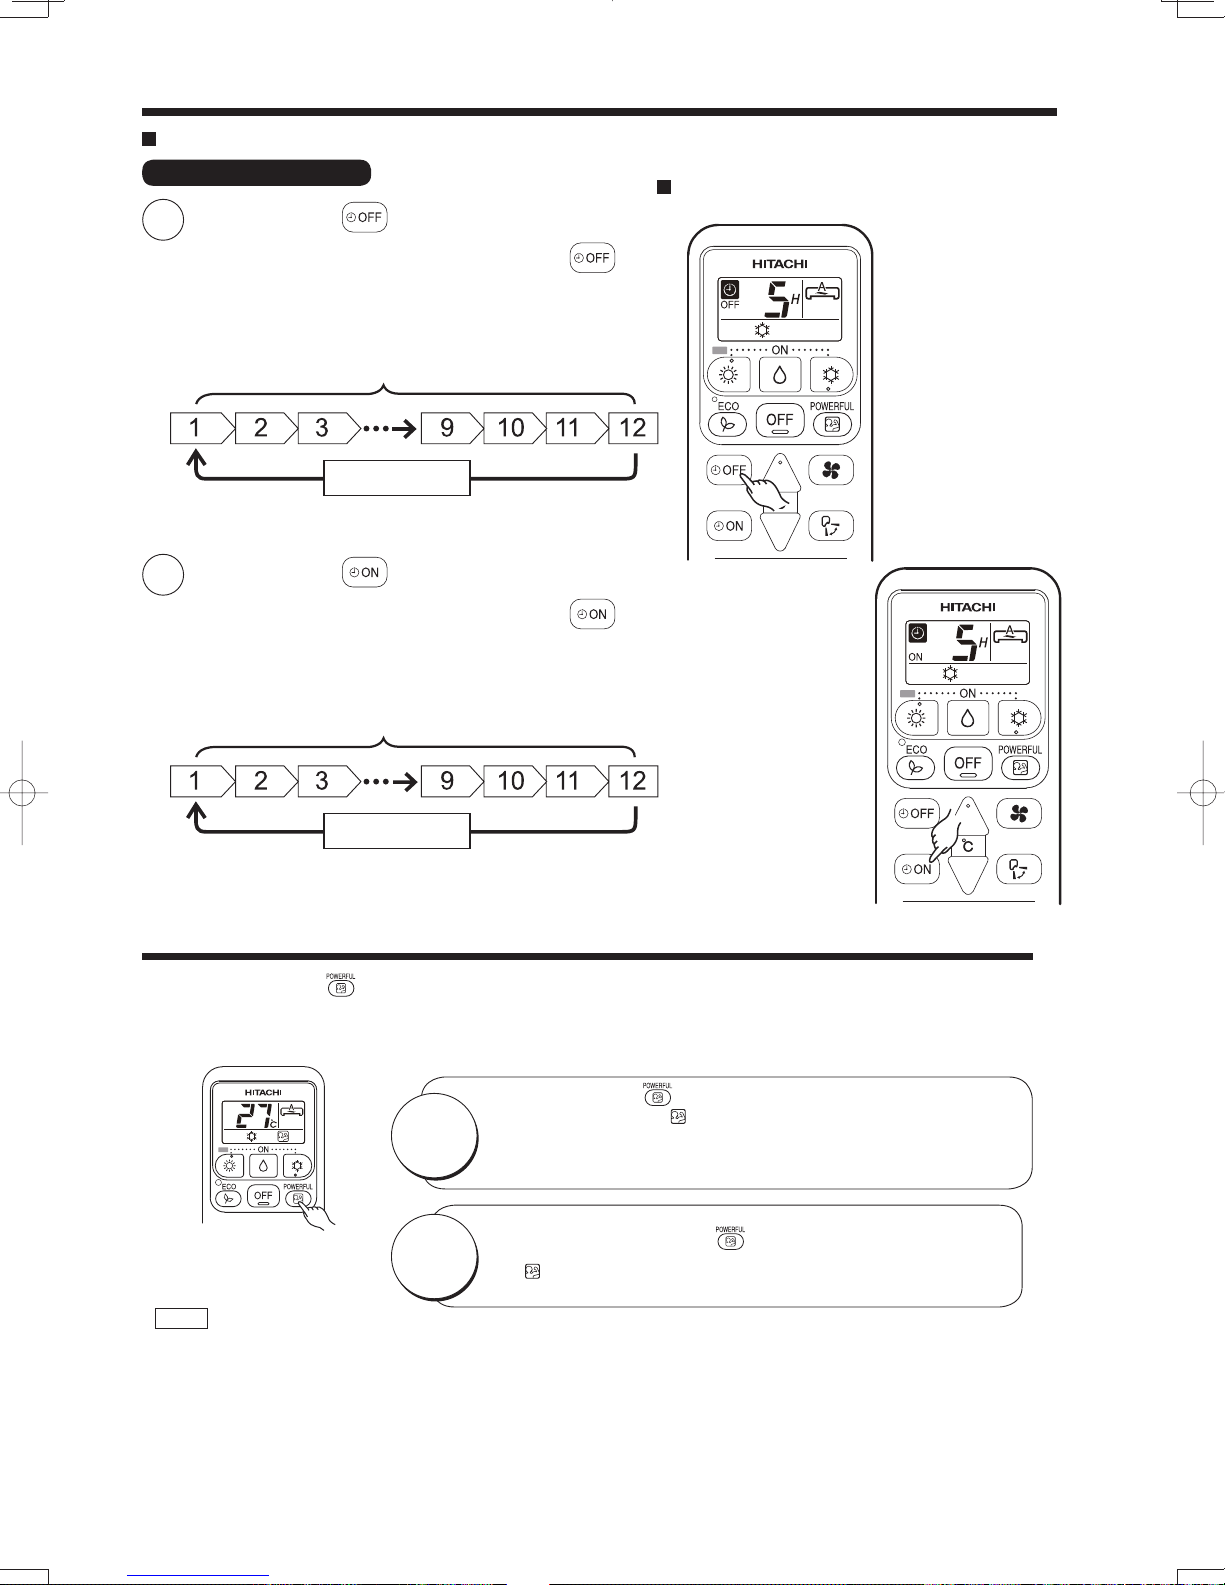
POWERFUL OPERATION
By pressing (POWERFUL) button during AUTO, HEATING, DEHUMIDIFYING, COOLING or FAN
t
operation, the air conditioner performs at maximum power.
During POWERFUL operation, cooler or warmer air will be blown out from indoor unit for COOLING or
t
HEATING operation respectively.
L.H
NOTE
When ECO mode, or LEAVE HOME mode is selected, POWERFUL operation is cancelled.
t
During POWERFUL operation, capacity of the air conditioner will not increase
t
– if the air conditioner is already running at maximum capacity.
–
just before defrost operation (when the air conditioner is running in HEATING operation).
After auto restart, POWERFUL operation is cancelled and previous operation shall start.
t
Press the (POWERFUL) button during operation.
t
“ ” is displayed on the LCD.
START
CANCEL
POWERFUL operation ends in 20 minutes. Then the system
automatically operates with the previous settings used before
POWERFUL operation.
Press the (POWERFUL) button again.
t
“ ” disappears from the LCD.
– 4 –
Page 9
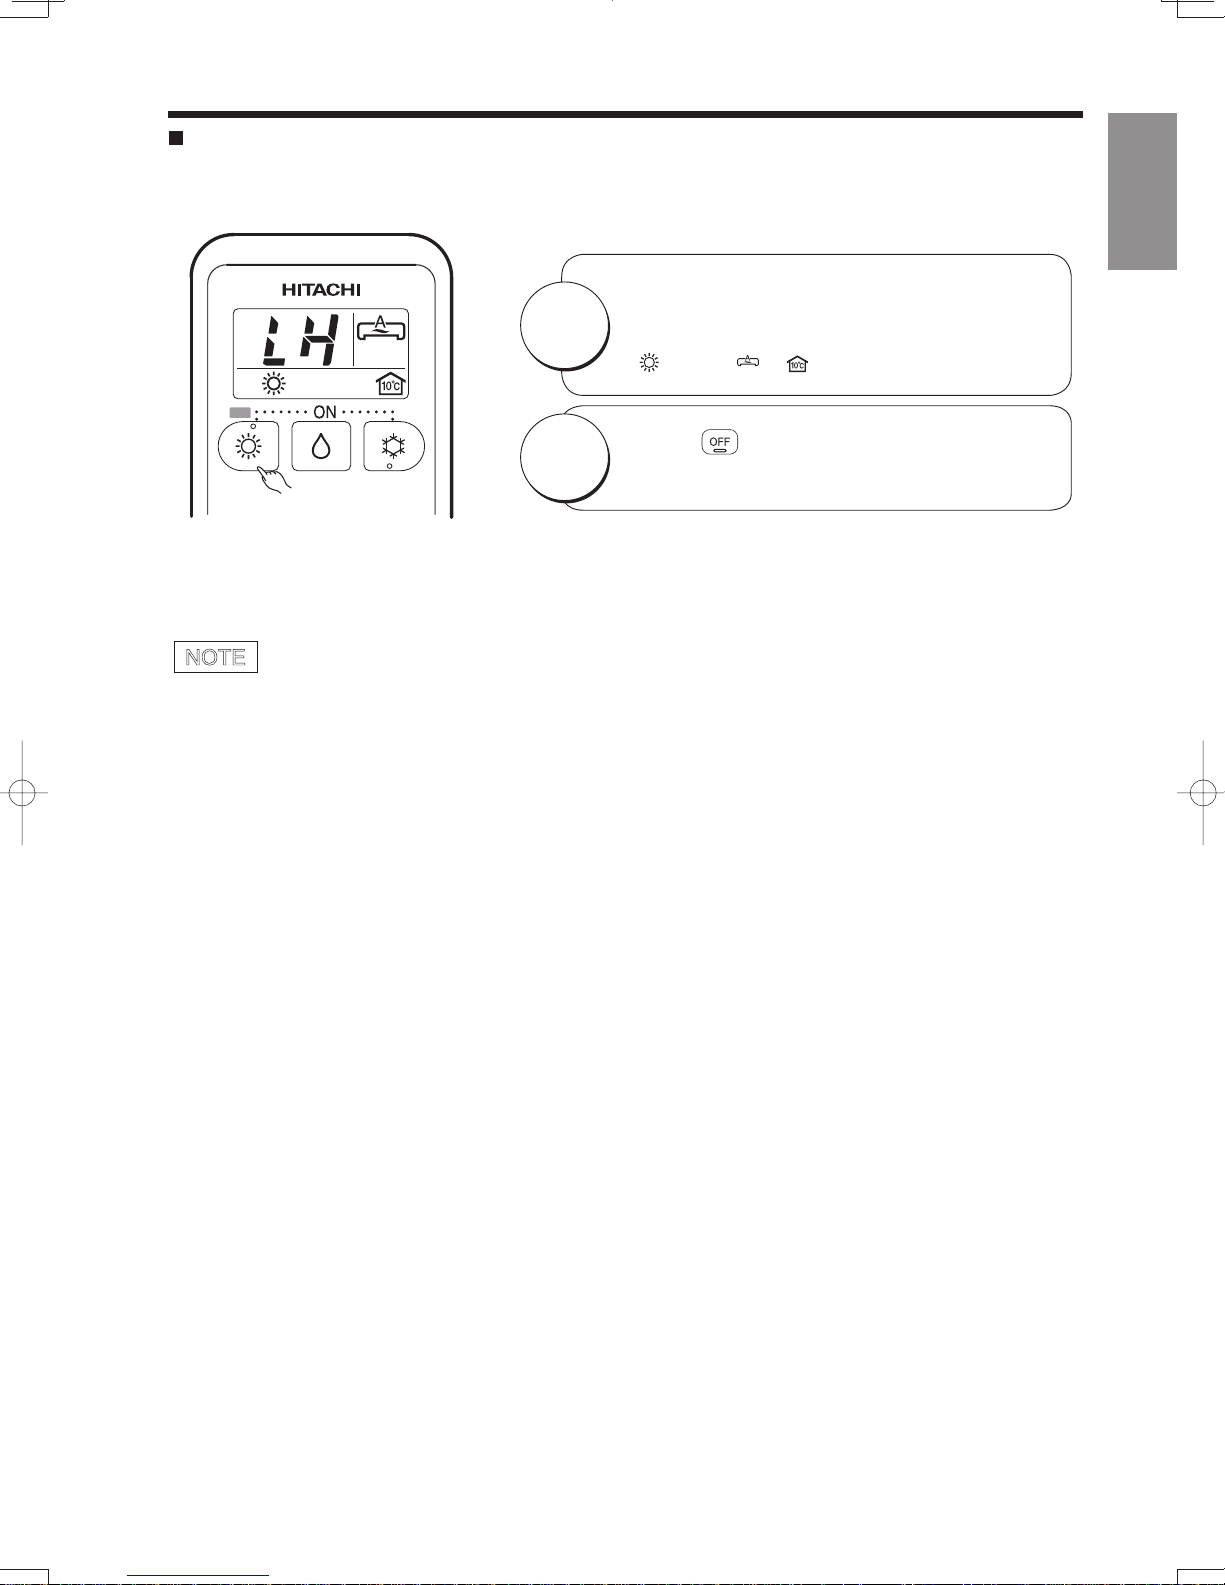
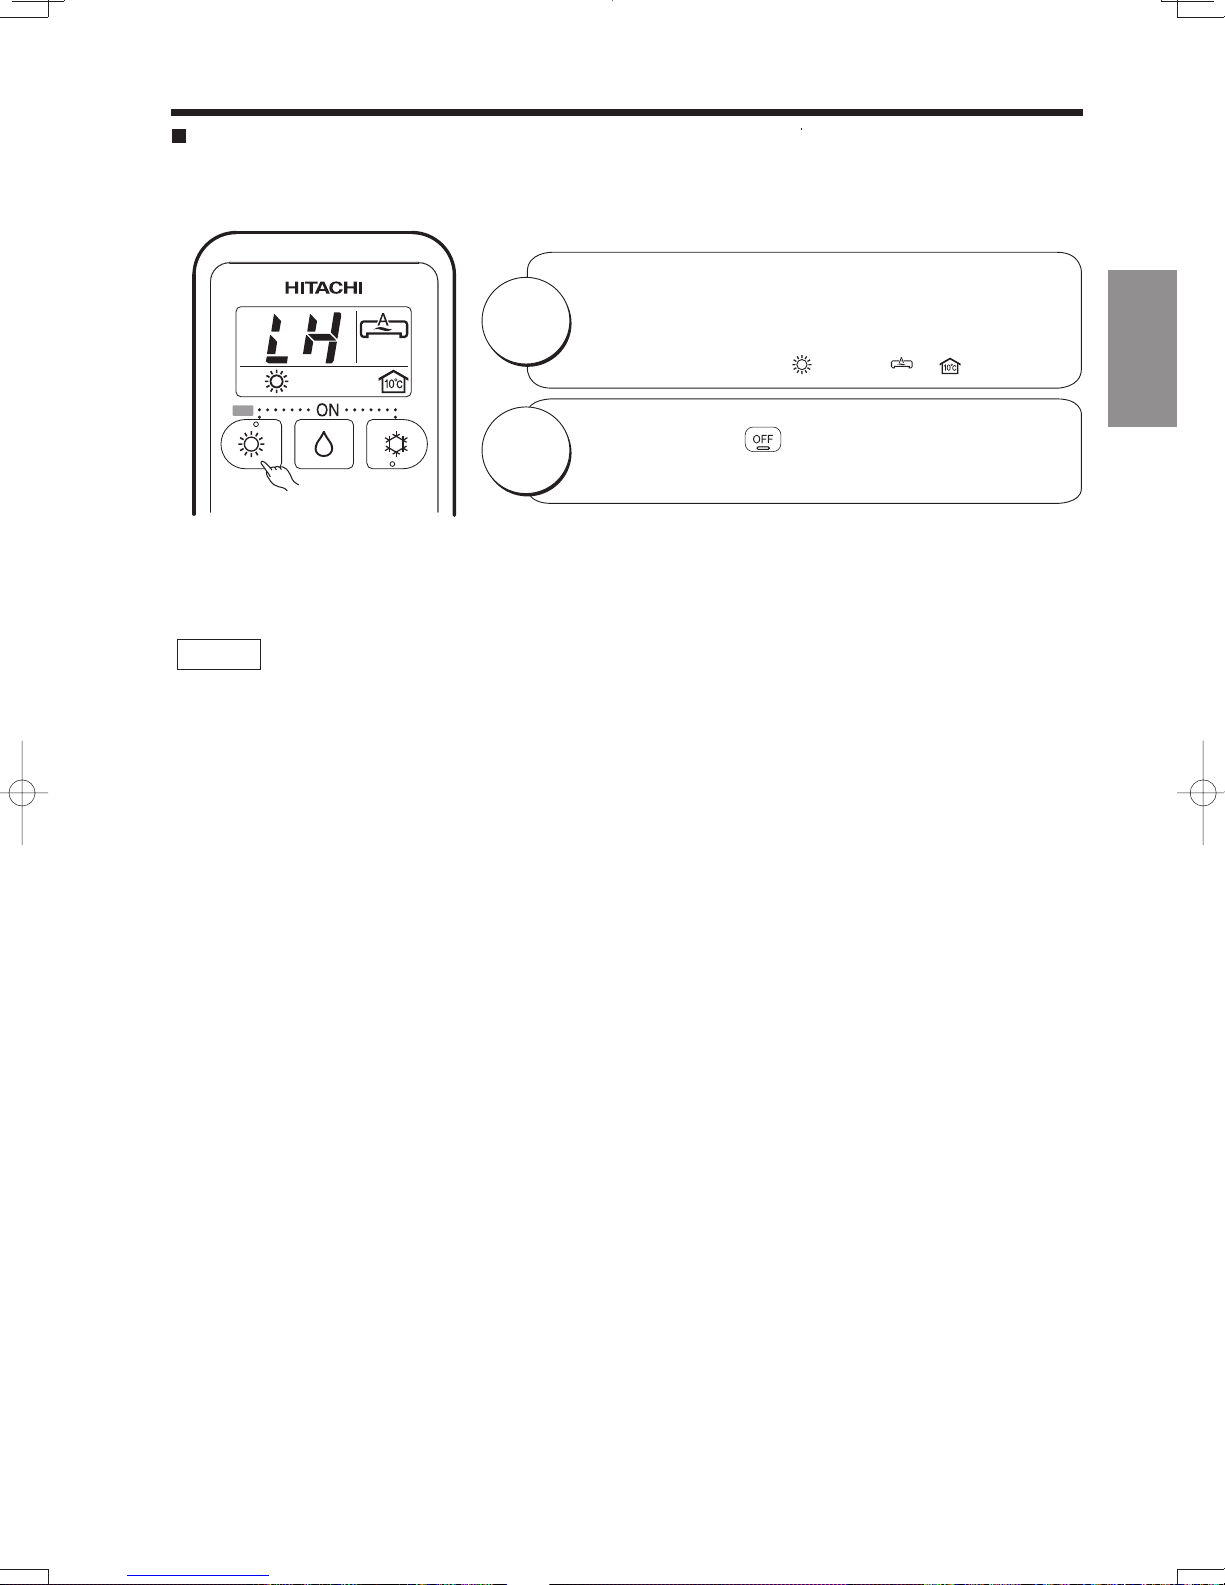
LEAVE HOME(LH) OPERATION
Prevent the room temperature from falling too much by setting temperature at 10 deg automatically when no
one is at home.
Hold down the HEATING Button for 3-5 seconds to start
START
L.H
CANCEL
NOTE
Leave Home operation.
Room temperature is automatically set at 10 deg.
t
t
“ ”,“ LH ”,“ ”,“ ”, is displayed on the LCD.
Press the (STOP) button.
Change to other Operation Mode.
ENGLISH
● During Leave Home operation, fan speed and horizontal air deflector position cannot be changed.
– 5 –
Page 10
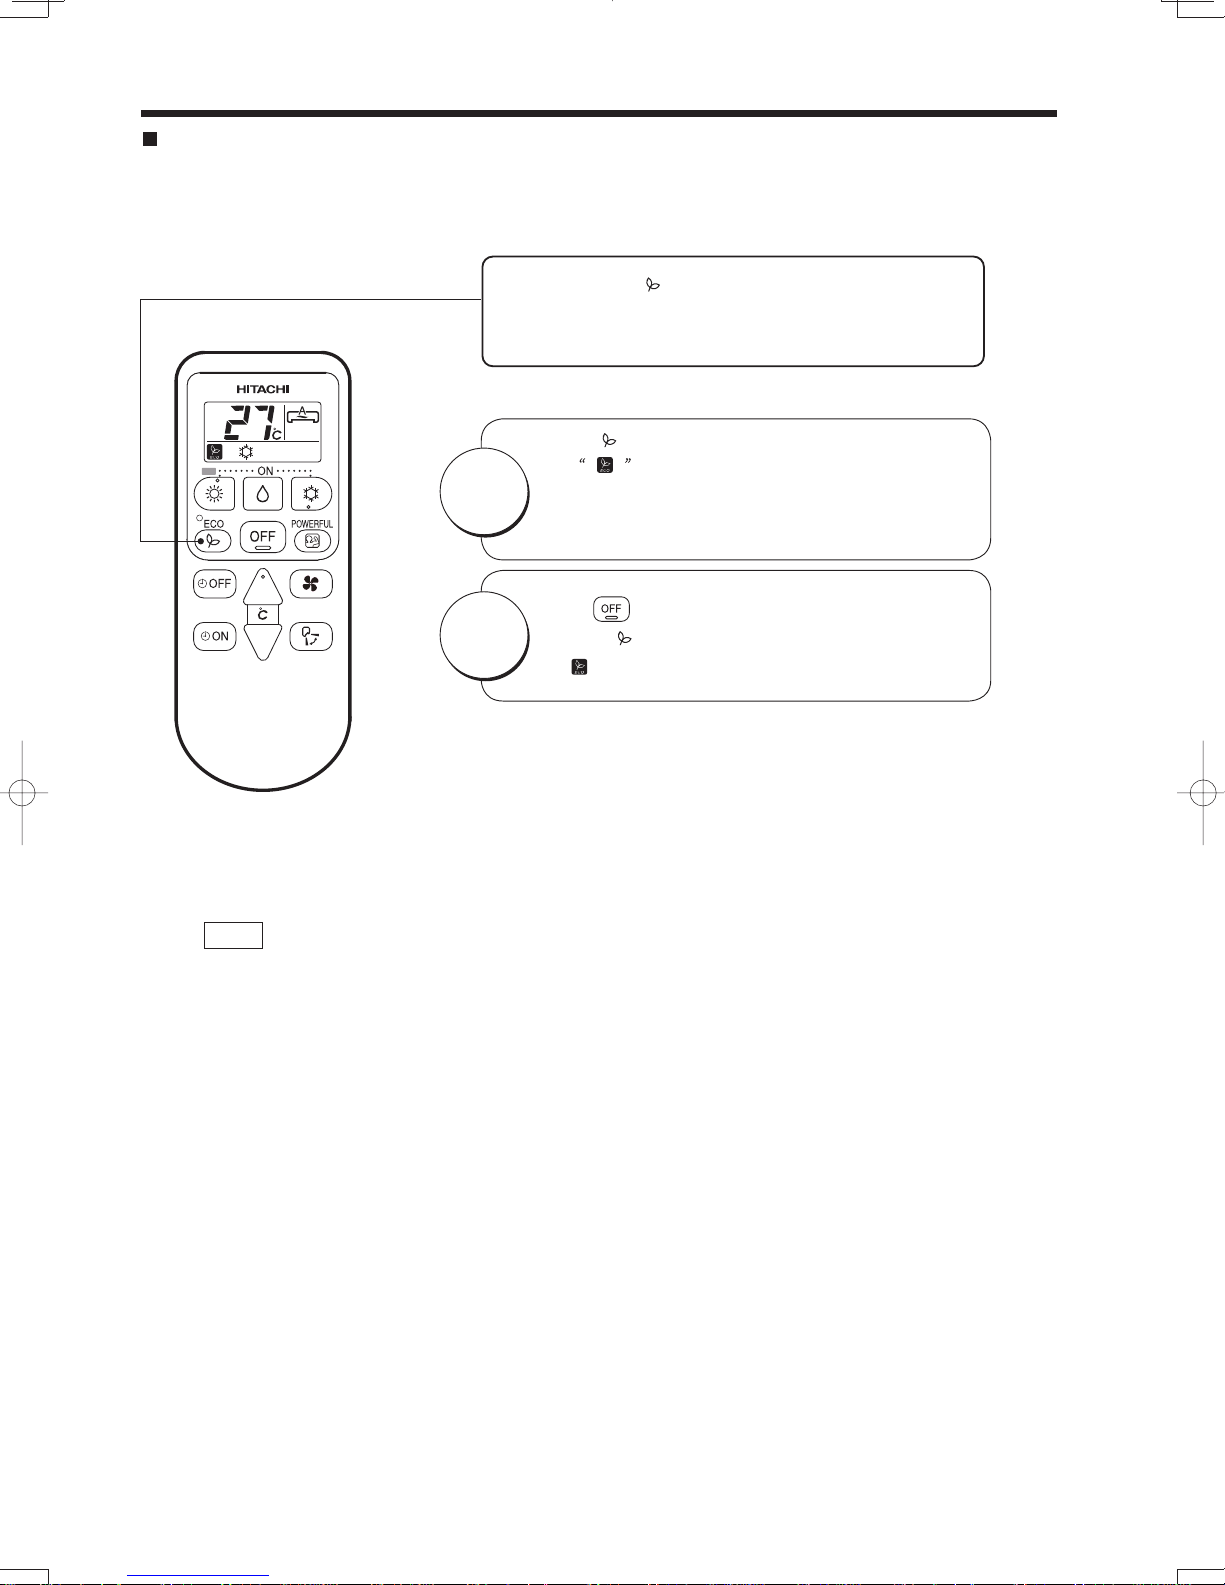
ECO OPERATION
Energy saving operation by changing set temperature and by limiting the maximum power consumption value.
By pressing the (ECO) button during Auto, Heating,
Dehumidifying or Cooling operation, the air conditioner
performs the “ECO” operation.
Press (ECO) button during operation.
t
L.H
START
CANCEL
is displayed on the LCD.
Energy saving operation will start by changing
t
the set temperature higher or lower and
saving operation power consumption.
Press (START/STOP) button.
t
Press (ECO) button again
“ ” disappears from the LCD.
t
NOTE
In case the power consumption is already low,ECO operation will not reduce the
t
power consumption.
t
By pressing (POWERFUL) button, ECO operation is cancelled.
t
After auto restart, ECO operation is cancelled and previous operation mode shall start.
– 6 –
Page 11
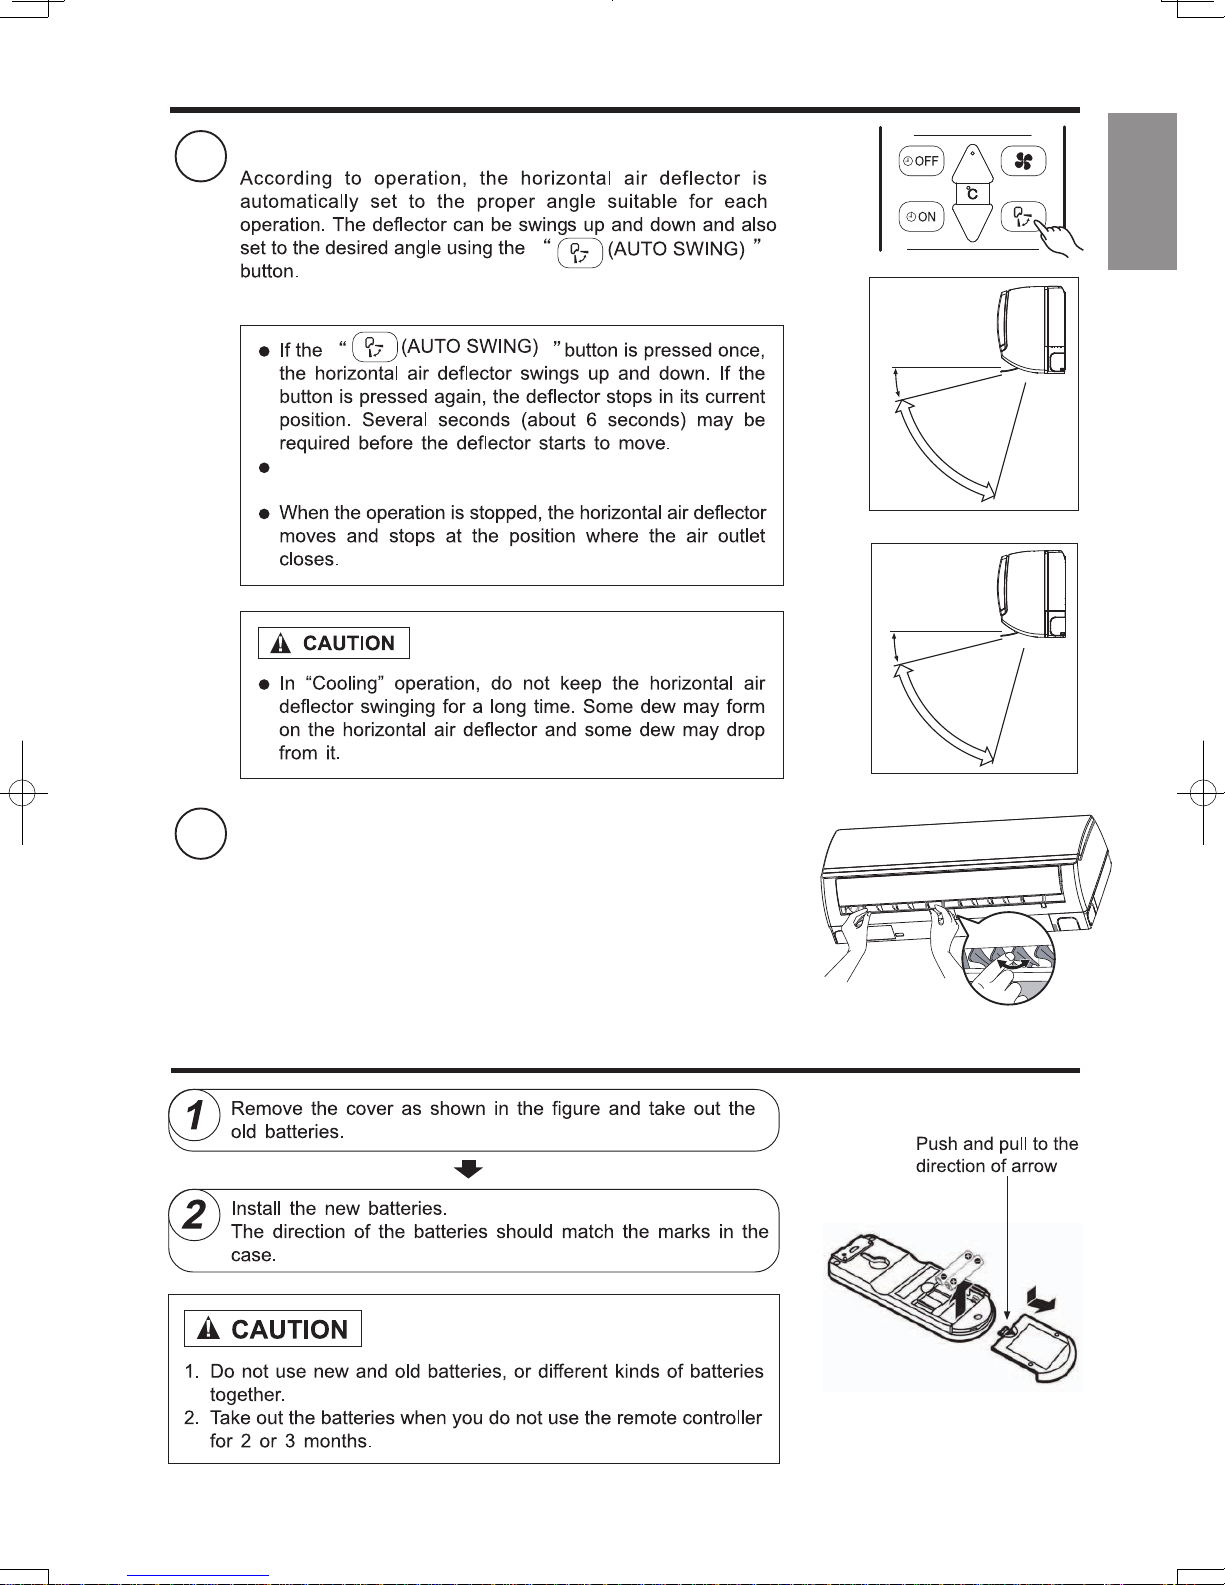
ADJUSTING THE AIRFLOW DIRECTION
Adjust the airflow upward and downward.
1
The adjusting range of the horizontal air deflector is shown
on the right.
When cooling,
dehumidifying
Horizontal
Vertical
about 10°
about 40°
When heating
Horizontal
Vertical
about 10°
ENGLISH
about 45°
Adjust the airflow to left and right.
2
Hold the vertical air deflector as shown on the right and
adjust the airflow to left and right.
HOW TO EXCHANGE THE BATTERIES IN THE REMOTE CONTROLLER
– 7 –
Page 12

MEMO
......................................................................................................................................................................................
......................................................................................................................................................................................
......................................................................................................................................................................................
......................................................................................................................................................................................
......................................................................................................................................................................................
......................................................................................................................................................................................
......................................................................................................................................................................................
......................................................................................................................................................................................
......................................................................................................................................................................................
......................................................................................................................................................................................
......................................................................................................................................................................................
......................................................................................................................................................................................
......................................................................................................................................................................................
......................................................................................................................................................................................
......................................................................................................................................................................................
......................................................................................................................................................................................
......................................................................................................................................................................................
......................................................................................................................................................................................
......................................................................................................................................................................................
......................................................................................................................................................................................
......................................................................................................................................................................................
......................................................................................................................................................................................
......................................................................................................................................................................................
......................................................................................................................................................................................
......................................................................................................................................................................................
......................................................................................................................................................................................
......................................................................................................................................................................................
......................................................................................................................................................................................
......................................................................................................................................................................................
......................................................................................................................................................................................
......................................................................................................................................................................................
......................................................................................................................................................................................
......................................................................................................................................................................................
......................................................................................................................................................................................
......................................................................................................................................................................................
......................................................................................................................................................................................
......................................................................................................................................................................................
......................................................................................................................................................................................
......................................................................................................................................................................................
– 8 –
Page 13
MAINTENANCE
CAUTION
Cleaning and maintenance must be carried out only by qualified service personal. Before cleaning,
stop operation and switch off the power supply.
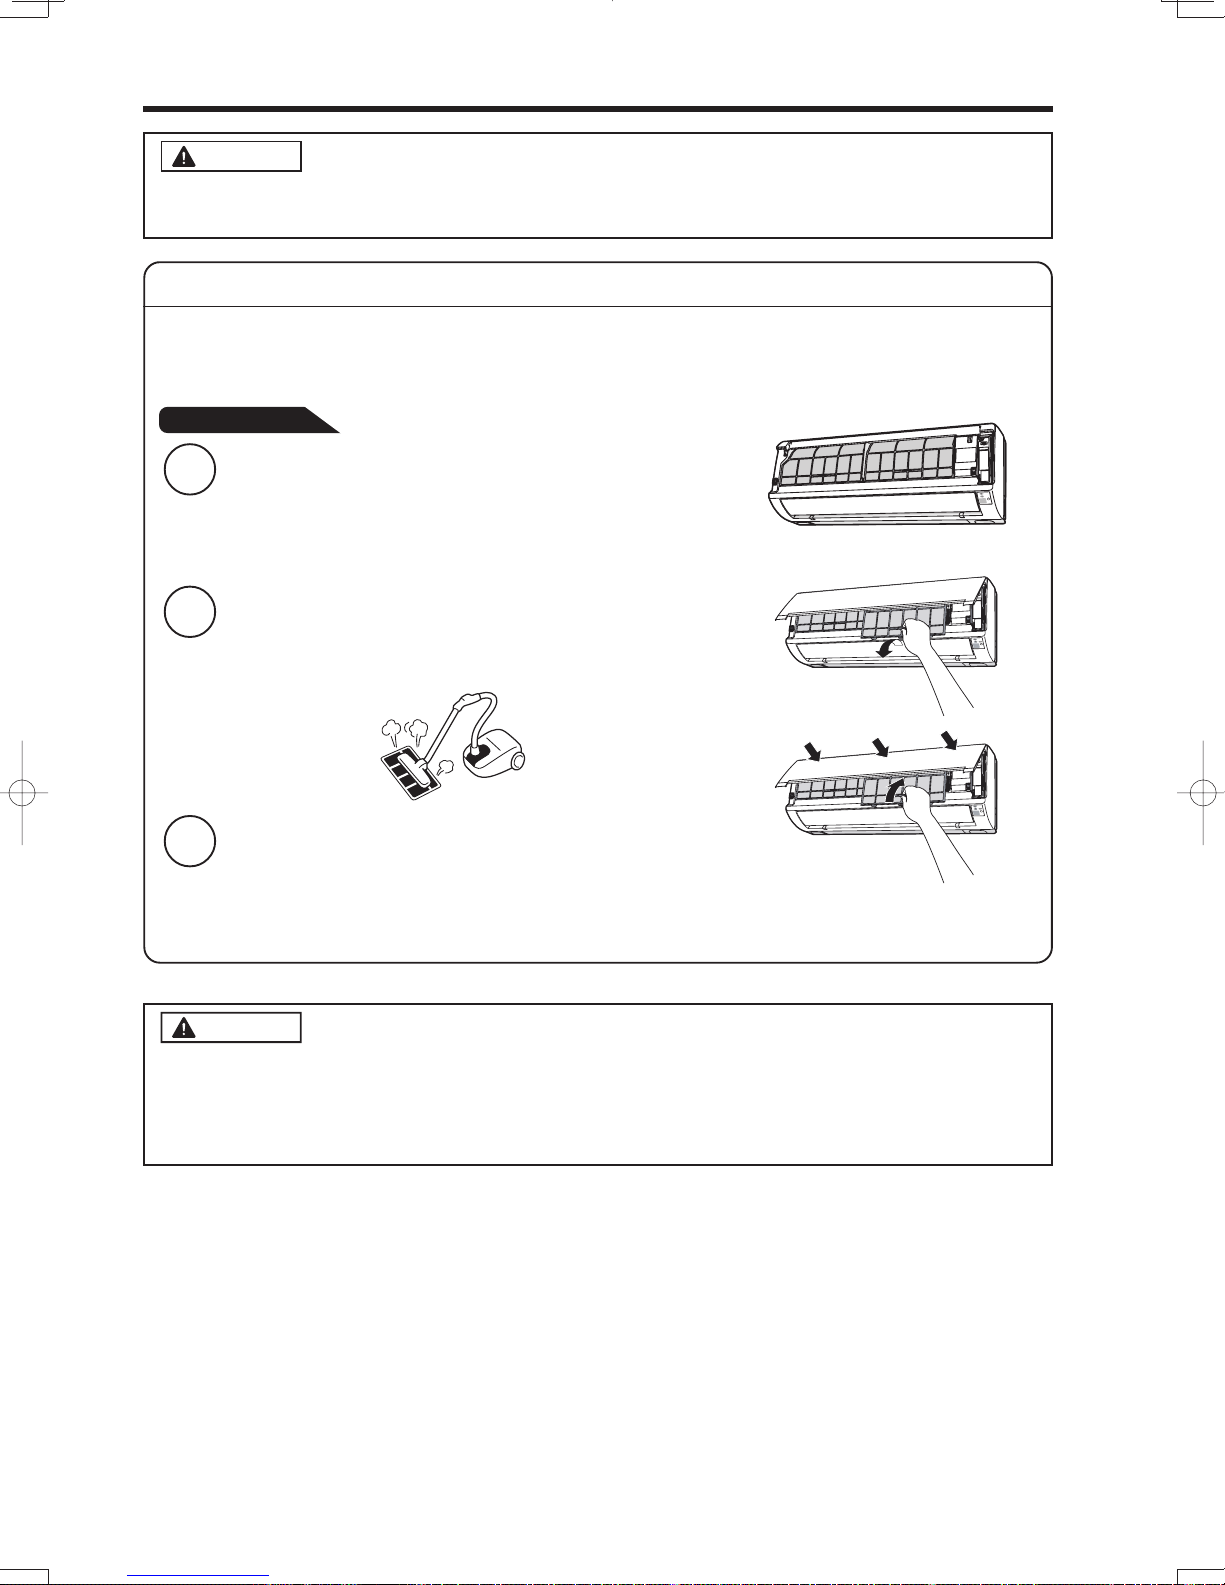
1. AIR FILTER
Please clean the filter once about every two weeks. By doing so, the power rates are saved. In
case the air filter is full of dust, the air flow will decrease and the cooling capacity will be reduced.
Further, noise may occur. Be sure to clean the filter following the procedure below.
PROCEDURE
Open the front panel carefully and remove the filter.
1
Vacuum dust from the air filter using vacuum cleaner.
2
If there is too much dust, wash the filter with a detergent
and rinse it thoroughly. After that, dry it in the shade.
7(0325$5<
6:,7&+
s Set the filter with “FRONT” mark facing front, and
3
s Do not wash with hot water at more than 40°C. The filter may shrink.
s When washing it, shake off moisture completely and dry it in the shade; do not expose it directly
to the sun. The filter may shrink.
s Don't operate the unit without filter. Fault may occur if you continue.
slot them into the original state.
s After attaching the filters, push the front panel at
three arrow portions as shown in figure and close
it.
CAUTION
– 6 –
Page 14
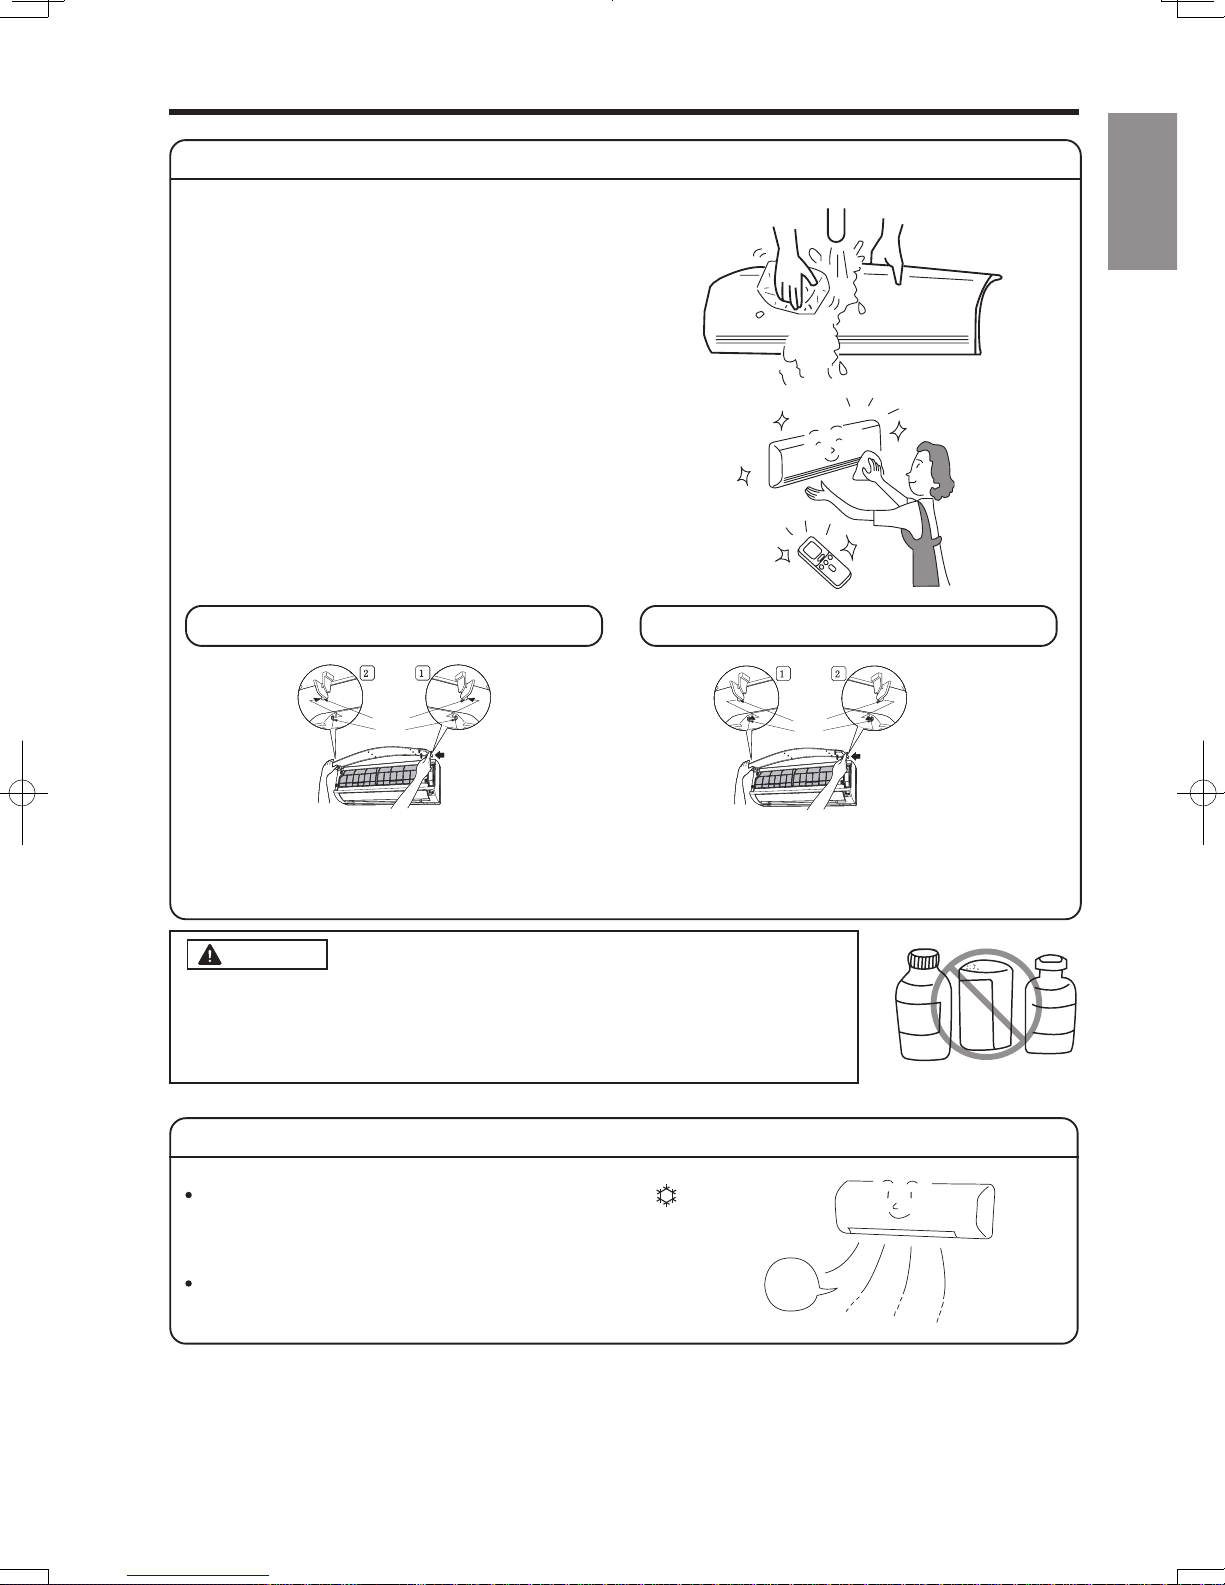
2. CLEANING OF FRONT PANEL
HSILGNE
• Remove the front panel and wash with clean water.
Wash it with a soft sponge.
After using neutral detergent, wash thoroughly with
clean water.
• When front panel is not removed, wipe it with a soft
dry cloth. Wipe the remote controller thoroughly with
a soft dry cloth.
• Wipe the water thoroughly.
If water remains at indicators or signal receiver of
indoor unit, it causes trouble.
Method of removing the front panel.
Be sure to hold the front panel with both hands to
detach and attach it.
Removing the Front Panel Attaching the Front Panel
2 1
Shaft
Hole
1 2
Shaft
Hole
ENGLISH
• When the front panel is fully opened with both
hands, push the right arm to the inside to
release it, and while closing the front panel
• Move the shafts of the left and right arms into
the steps in the unit and securely insert them
into the holes.
slightly, put it out forward.
CAUTION
• Do not splash or direct water to the body of the unit when cleaning it as
this may cause short circuit.
• Never use hot water (above 40°C), benzine, gasoline, acid, thinner or a
brush, because they will damage the plastic surface and the coating.
3. MAINTENANCE BEFORE LONG OFF PERIOD
Run the unit by setting the operation mode to (COOL),
the temperature to 32°C and the fan speed to HI for about half
a day on a fine day, and dry the whole of the unit.
Switch off the power plug or turn off the circuit breaker.
Air
Blow
A
B
E
N
C
E
Z
N
I
D
T
R
H
E
I
N
I
N
– 7 –
Page 15
INFORMATION
CAPABILITIES
Heating Capability
s This room air conditioner utilizes a heat pump system that absorbs
exterior heat and brings it into a room to be heated. As the ambient
temperature gets lower, heating capability will also lower. In such a
situation, the inverter work to increase compressor rpm to keep the
unit’s heating capability from decreasing. If the unit’s heating performance is still unsatisfactory, other heating appliances should be used
to augment this unit’s performance.
s The air conditioner is designed to heat an entire room so that it may take some time before you feel warm.
Timer operation is recommended for effective preheating ahead of the desired time.
Cooling and Dehumidifying Capabilities
s If the heat present in a room exceeds the unit’s cooling capacity (for example, if there are many people in
the room or other heating appliances are used), the preset room temperature may not be reached.
CAUTION
Do not use a stove
or any other
hightemperature
devices in proximity
to the indoor unit.
PROHIBITION
– 8 –
Page 16
REGULAR INSPECTION
ENGLISH
PLEASE CHECK THE FOLLOWING POINTS EVERY EITHER HALF YEARLY OR YEARLY. CONTACT
YOUR SALES AGENT SHOULD YOU NEED ANY HELP.
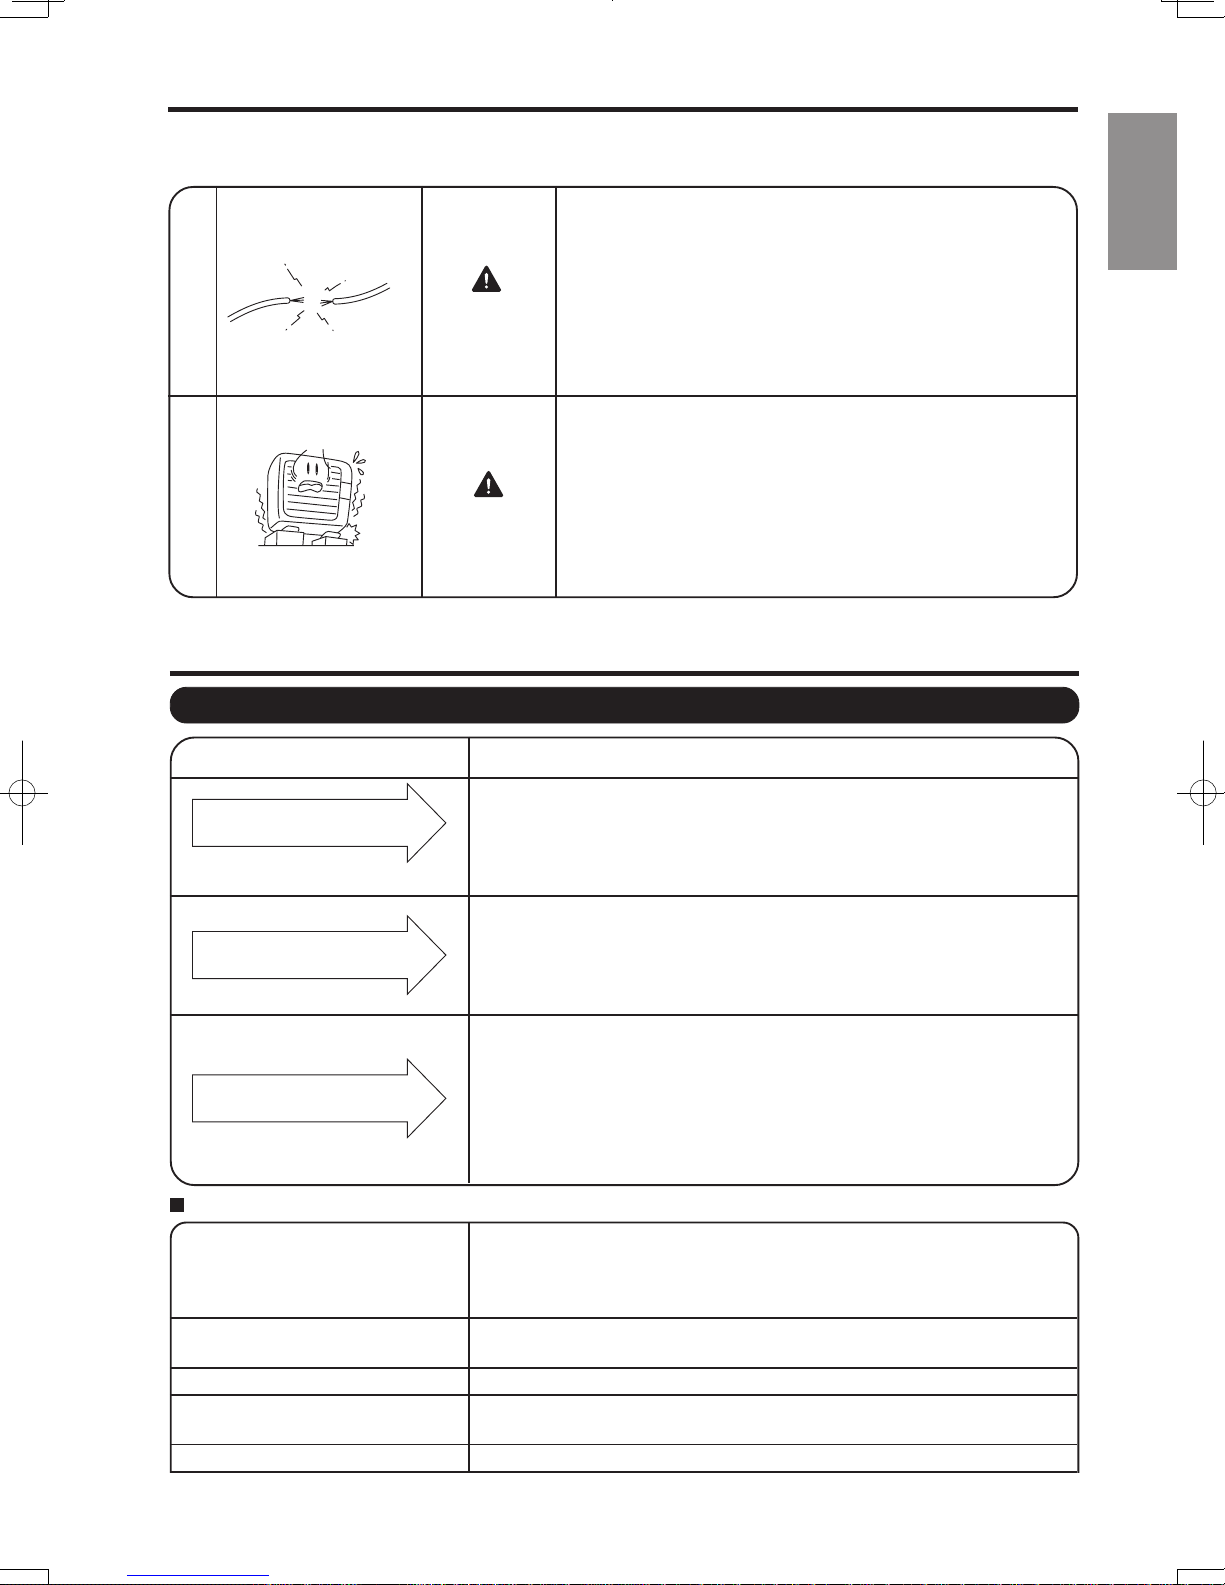
Check to see if the unit’s earth line has been con-
1
WARNING
nected correctly.
If the earth line is disconnected or faulty, unit failure or
electric shock hazard may result.
Check to see if the mounting frame has rusted ex-
2
WARNING
cessively or if the outdoor unit has tilted or become
unstable.
It could collapse or fall, causing injury.
AFTER SALES SERVICE AND WARRANTY
WHEN ASKING FOR SERVICE, CHECK THE FOLLOWING POINTS.
CONDITION CHECK THE FOLLOWING POINTS
If the remote controller is not
transmitting a signal.
(Remote controller display is
dim or blank.)
When it does not operate.
• Do the batteries need replacement?
• Is the polarity of the inserted batteries correct?
• Is the fuse all right?
• Is the voltage extremely high or low?
• Is the circuit breaker “ON”?
• Is the power plug inserted?
• Do you have any power cut?
ENGLISH
When it does not cool well.
When it does not heat well.
The following phenomena do not indicate unit failure.
During heating, the operation
indicator blinks and air blow stops
Hissing or fizzy sounds
Squeaking noise
Rustling noise
Clicking noise
• Is the air filter blocked with dust?
• Is the set temperature suitable?
• Have horizontal air deflectors been adjusted to their correct
positions according to the operation mode selected?
• Are the air inlets or air outlets of indoor and outdoor units
blocked?
• Is the fan speed “LOW”or “SILENT”?
<Operation start>
The unit is preparing to blow warm air. Please wait.
<In operation>
The outdoor unit is defrosting. Please wait.
Refrigerant flow noise in the pipe or valve sound generated when flow rate is
adjusted.
Noise generated when the unit expands or contracts due to temperature changes.
Noise generated with the indoor unit fan’s rpm changing such as operation start
times.
Noise of the motorized valve when the unit is switched on.
– 9 –
Page 17
Perking noise
ENGLISH
Changing operation noise
Mist emission
Steam emitted from the outdoor unit
Odors
The outdoor unit continues to operate
even if operation is stopped.
The OPERATION lamp is blinking.
Does not reach the temperature
setting
•
If the unit still fails to operate
normally after performing the
above inspections, turn the
circuit breaker off and contact
your sales agent immediately.
Noise of the ventilation fan sucking in air present in the drain hose and blowing out
dehumidifying water that had accumulated in the condensed water collector. For
details, consult your sales agent.
Operation noise changes due to power variations according to room temperature
changes.
Mist is generated as the air within the room is suddenly cooled by conditioned air.
Water generated during defrosting operation evaporates and steam is emitted.
Caused as the smells and particles of smoke, food, cosmetics, etc. present in room
air become attached the unit and blown off into the room again.
Defrosting is underway (as the heating operation is stopped, the microcomputer
checks frost accumulated in the outdoor unit and instructs the unit to perform
automatic defrosting if necessary).
Shows preheating or defrosting operation is underwa y.
As the protective circuit or preheat sensor operates when unit operation is stopped
during preheating and then restarted, or when operation mode is switched from cooling
to heating, the lamp continues to blink.
Actual room temperature may deviate slightly from the remote controller's
temperature setting depending on the number of people in the room, indoor or
outdoor conditions.
Contact your sales agent immediately if the
following phenomena should occur:
The circuit breaker switches off or the fuse blows
•
frequently.
•
The switch operation is not stable.
•
Foreign matter or water accidentally enters the unit interior.
•
The power cord gets excessively hot or its insulation is torn or stripped.
•
TIMER lamp on the indoor unit display blinks.
As the nature of the failure can be identified by the blinking cycle,
(
check the blinking cycle before turning off the circuit breaker.
)
Notes
• In quiet operation or stopping the running, the following phenomena may
occasionally occur, but they are not abnormal for the operation.
(1) Slight flowing noise of refrigerant in the refrigerating cycle.
(2) Slight rubbing noise from the fan casing which is cooled and then
gradually warmed as operation stops.
• The odor will possibly be emitted from the room air conditioner because
the various odor, emitted by smoke, foodstuffs, cosmetics and so on,
sticks to it. So please clean the air filter and the evaporator regularly to
reduce the odor.
• Please contact your sales agent immediately if the air conditioner still fails to operate normally after
the above inspections. Inform your agent of the model of your unit, production number, date of
installation. Please also inform him regarding the fault.
Please note:
On switching on the equipment, particularly when the room light is dimmed, a slight brightness
fluctuation may occur. This is of no consequence.
The conditions of the local Power Supply Companies are to be observed.
– 1 –
0
Page 18
CONDIZIONATORE D’ARIA SPLIT
UNITÀ INTERNA/UNITÀ ESTERNA
HFC
R410A
RAS-E10HB/RAC-E10HB
RAS-E10HBG/RAC-E10HBG
RAS-E14HB/RAC-E14HB
RAS-E14HBG/RAC-E14HBG
RAC-E10HB
RAC-E10HBG
RAC-E14HB
RAC-E14HBG
MODELLI
ITALIANO
UNITÀ INTERNAUNITÀ ESTERNA
RAS-E10HB
RAS-E10HBG
RAS-E14HB
RAS-E14HBG
L.H
Instruction manual
To obtain the best performance and ensure years of
trouble free use, please read this instruction manual
completely.
Manuale di istruzioni
Per garantire la migliore prestazione e la più lunga
durata leggere attentamente e interamente le seguanti
istruzioni.
Manual de instrucciones
Para obtener el mejor funcionamiento y asegurar años
de uso libre de problemas, lea cuidadosamente este
manual de instrucciones.
Questo ambiente con aria condizionata è solo ad uso dell’utente.
Non utilizzarla per la conservazione di cibi, per animali, piante, macchine di precisione, arte, medicine o simili.
Page 1~10
Pag. 11~20
Página 21~30
– 11 –
Οδηγίες χρήσης
°И· ЩЛУ О·П‡ЩВЪЛ ·fi‰ФЫЛ ЩФ˘ ОПИМ·ЩИЫЩИОФ‡ О·И БИ·
ЩЛУ М·ОЪФЪfiıВЫМЛ ¯Ъ‹ЫЛ ЩФ˘ ¯ˆЪ›˜ ЪФ‚П‹М·Щ·,
‰И·‚¿ЫЩВ ЪФЫВОЩИО¿ ·˘Щ¤˜ ЩИ˜ Ф‰ЛБ›В˜ ¯Ъ‹ЫЛ˜.
Mode d’emploi
Des performances optimales et un fonctionnement à
long terme seront assurés en appliquant les présentes
instructions après avoir entièrement lu ce mode
d’emploi.
™ÂÏ›‰· 27
31~40
Page 41~50
Page 19
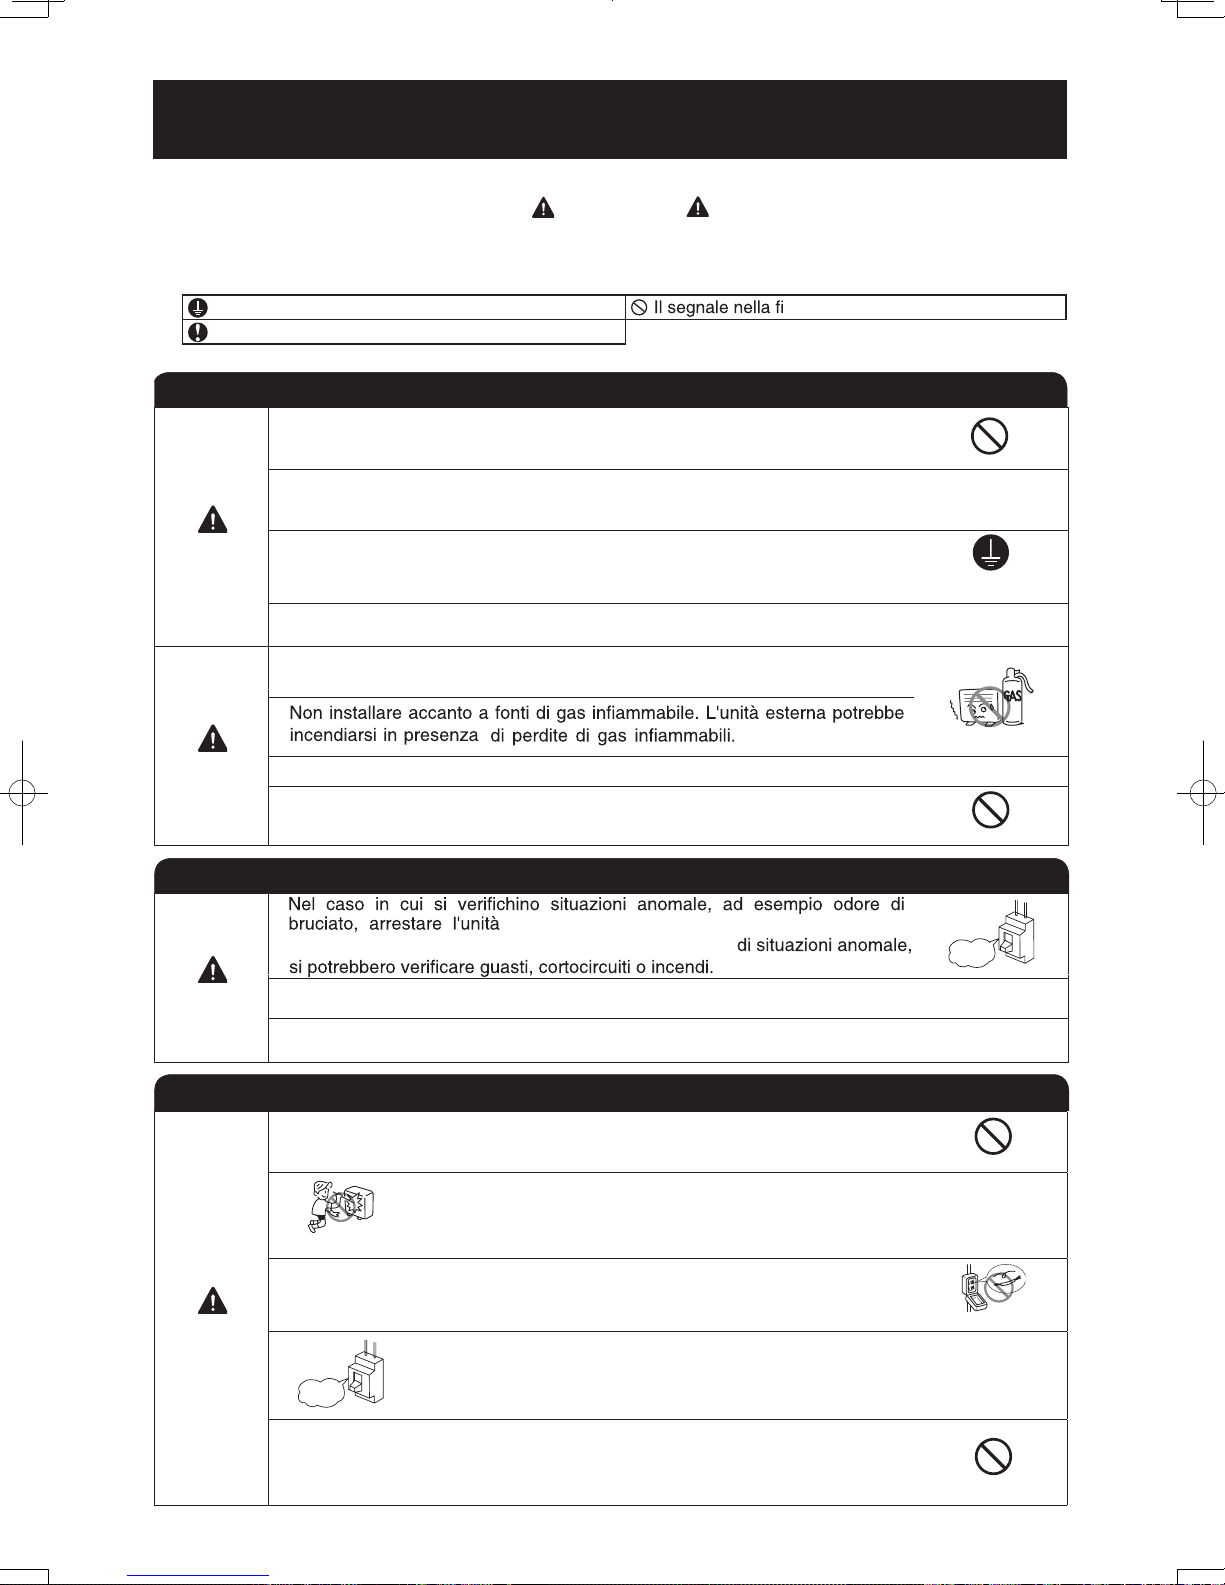
PRECAUZIONI DI SICUREZZA
• Per assicurare un utilizzo corretto dell'unità, leggere attentamente le "Precauzioni di sicurezza" prima di avviare
l'apparecchio.
• Prestare particolare attenzione ai segnali di “ Avvertenza” e “ Attenzione”. La sezione "Avvertenza" contiene istruzioni che, se non strettamente osservate, possono causare il decesso o lesioni di grave entità. La sezione
"Attenzione" contiene istruzioni che, se non strettamente osservate, possono causare gravi conseguenze. Per un
utilizzo sicuro, osservare attentamente tutte le istruzioni.
• I simboli hanno i seguenti signicati. (Seguono esempi di simboli.)
Assicurarsi di collegare la linea di terra.
Indica le istruzioni da seguire.
•
Conservare il manuale dopo averlo letto con cura.
PRECAUZIONI DURANTE L'INSTALLAZIONE
• Non riassemblare l'unità.
Se si riassembla l'unità da soli potrebbero vericarsi perdite d'acqua, guasti, cor-
tocircuiti o incendi.
• Per l'installazione dell'unità, richiedere l'intervento dell'agente di vendita o di un tecnico specializzato.
Se si installa l'unità da soli potrebbero vericarsi perdite d'acqua, guasti, cortocircuiti o incendi.
AVVERTENZA
ATTENZIONE
• Utilizzare la linea di terra.
Non posizionare la linea di terra accanto a tubature dell'acqua o del gas, li della luce o linea
telefonica. Una errata installazione della linea di terra potrebbe causare scosse elettriche.
• Assicurarsi di utilizzare il set di tubi corretto per R410A. In caso contrario, si po-
trebbero vericare la rottura dei tubi di rame o guasti.
• I
n base al luogo di installazione dell'unità, è necessario installare un interruttore di circuito.
In assenza di un interruttore di circuito sussiste il pericolo di scossa elettrica.
•
• Assicurare un usso regolare d'acqua durante l'installazione del essibile di drenaggio.
gura indica una proibizione.
PROIBIZIONE
COLLEGARE LINEA DI
MESSA A TERRA
PROIBIZIONE
PRECAUZIONI DURANTE LO SPOSTAMENTO O LA MANUTENZIONE
AVVERTENZA
AVVERTENZA
• Assicurarsi che venga utilizzata una fonte d'alimentazione da 220V-230V monofase.
Altrimenti può vericarsi surriscaldamento ai componenti elettrici, provocando un incendio.
•
e l'interruttore di circuito. Contattare l'agente di
zona. Se si continua ad utilizzare l'unità in presenza
PROIBIZIONE
“SPENTO”
• Per la manutenzione, contattare l'agente di zona. La manutenzione eseguita impropriamente dall'utente potrebbe causare scosse elettriche e incendi.
• Se si desidera rimuovere e installare nuovamente l'unità, contattare l'agente di zona. La rimozione
e reinstallazione eseguita impropriamente dall'utente potrebbe causare scosse elettriche o incendi.
PRECAUZIONI DURANTE IL FUNZIONAMENTO
• Evitare un'esposizione prolungata diretta al usso di aria che potrebbe essere
dannosa per la salute.
• Non inserire oggetti appuntiti tipo lo di ferro nel pannello di ventilazione e aspirazione in
quanto l'alta velocità della ventola interna può causare situazioni di pericolo.
PROIBIZIONE
• N
on utilizzare materiale conduttore come fusibili poiché potrebbe comportare in-
cidenti mortali.
“SPENTO”
• In caso di temporale, scollegare e spegnere l'interruttore di circuito.
PROIBIZIONE
PROIBIZIONE
• Non collocare bombolette spray e altri combustibili entro una distanza di un metro
dalle uscite dell'aria delle unità interne ed esterne.
La pressione interna delle bombolette spray può aumentare a contatto con l'aria
calda e provocarne l'esplosione.
PROIBIZIONE
– 12 –
Page 20
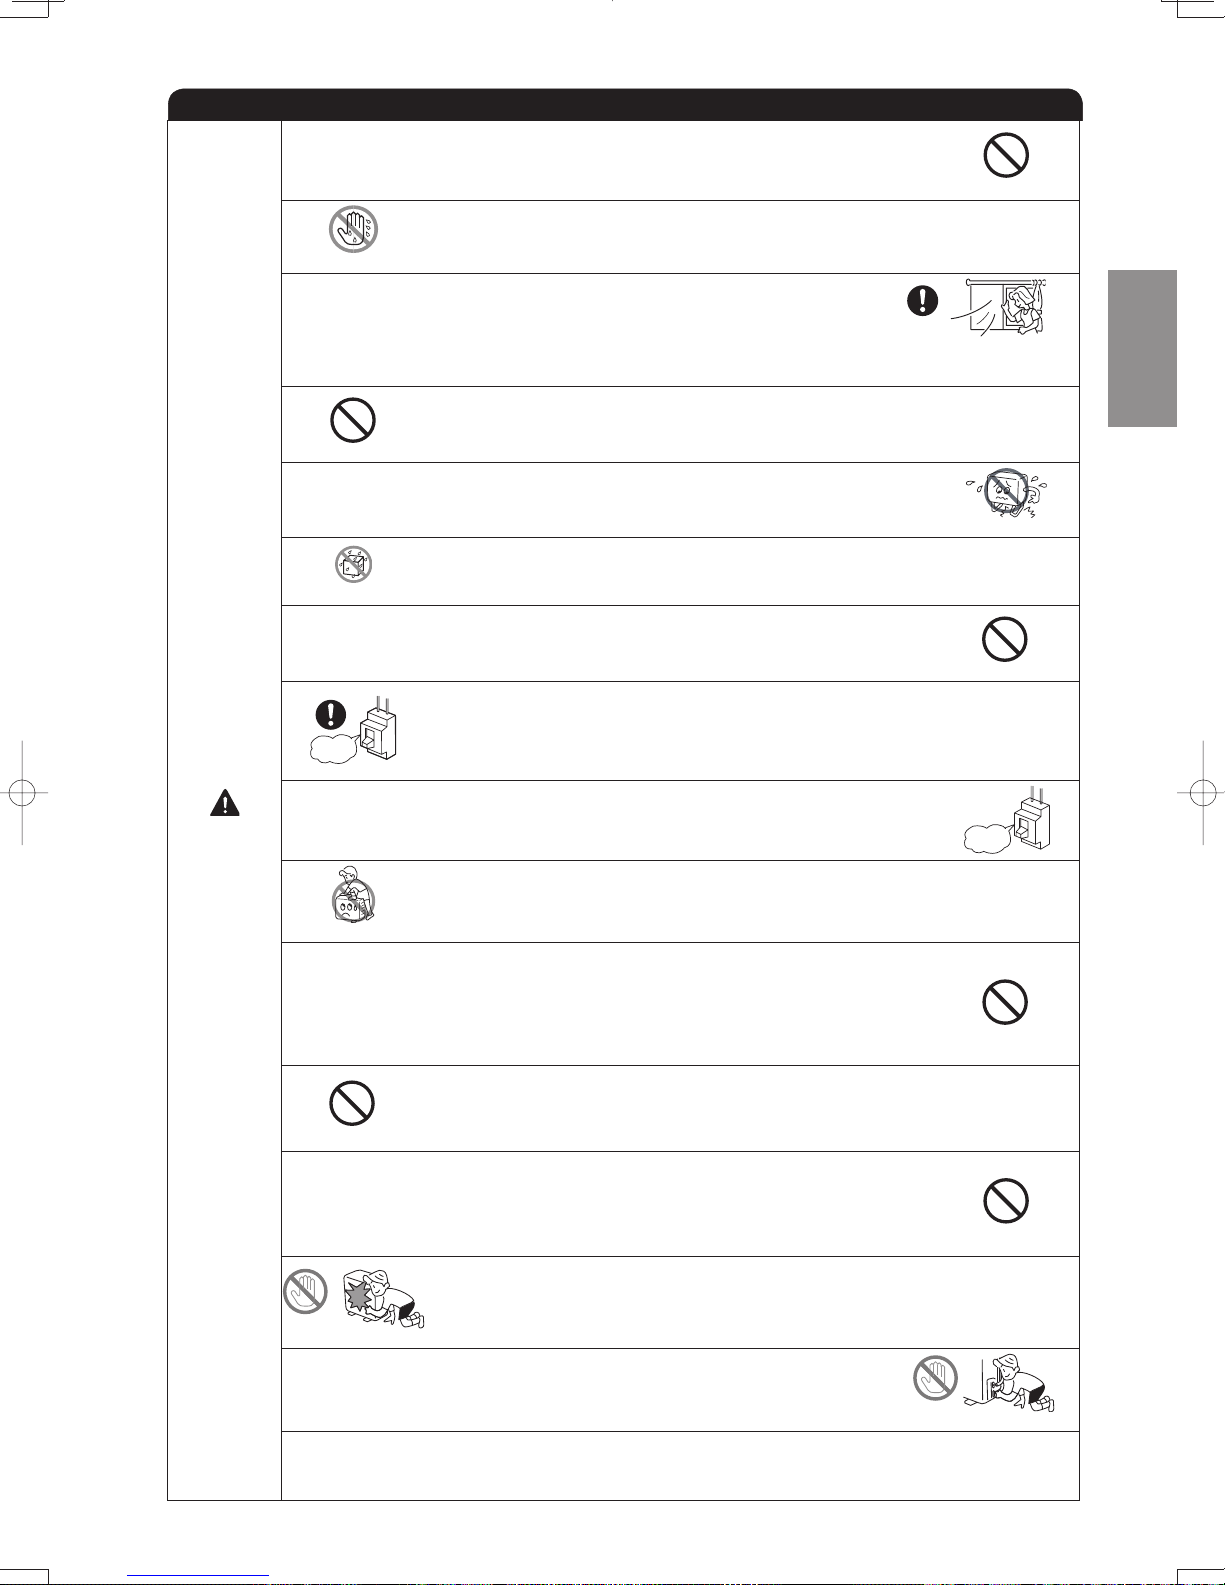
• Il prodotto deve essere utilizzato esclusivamente secondo le istruzioni del produttore.
PRECAUTIONS DURING OPERATION
• Non maneggiare l'unità con le mani umide. Tale operazione potrebbe causare
NON BAGNARE
incidenti mortali.
• Durante il funzionamento dell'unità con apparecchiature a combustione,
ventilare regolarmente la stanza per evitare un'insufcienza di ossigeno.
OSSERVARE RIGO-
ROSAMENTE LE
PRECAUZIONI
• Non direzionare l'aria fredda che fuoriesce dal pannello del condizionatore
verso elettrodomestici che producono calore, quali bollitori e forni elettrici,
PROIBIZIONE
poiché ciò potrebbe comprometterne il funzionamento.
• Assicurarsi che il telaio di montaggio esterno sia sempre stabile, saldo e privo
di difetti. In caso contrario, l'unità esterna potrebbe cadere causando pericoli.
• Non lavare l'unità con acqua o posizionare un contenitore di acqua, ad esempio
un vaso, sull'unità interna.
PROIBIZIONE
Un'eventuale scintilla può provocare una scossa elettrica.
• Non posizionare piante sotto il usso diretto dell'aria in quanto dannoso per le
piante stesse.
• Assicurarsi di arrestare il funzionamento utilizzando il telecomando e di spegnere
“SPENTO”
l'interruttore di circuito durante la pulizia, poiché la ventola ad alta velocità presente all'interno dell'apparecchio potrebbe rappresentare un pericolo.
PROIBIZIONE
ITALIANO
PROIBIZIONE
PROIBIZIONE
ATTENZIONE
• Se l'unità non viene utilizzata per un lungo periodo, spegnere l'interruttore di circuito.
“SPENTO”
• Non salire sull'unità esterna né appoggiarvi oggetti.
PROIBIZIONE
• Durante il funzionamento dell'unità con porte e nestre aperte (l'umidità ambiente
è sempre superiore all'80%) e con il Deettore dell'aria rivolto verso il basso o in
modalità di movimento automatico per un lungo periodo di tempo, sul Deetto-
re dell'aria si forma una condensa che occasionalmente determina la caduta di
gocce d'acqua. Ciò potrebbe bagnare l'arredo. Pertanto, non utilizzare l'unità in
PROIBIZIONE
queste condizioni per un lungo periodo.
• Se la quantità di calore della stanza è superiore alla potenza di raffreddamento o
riscaldamento dell'unità (ad esempio, la presenza nella stanza di molte persone,
l'utilizzo di apparecchiature di riscaldamento e così via), non è possibile raggiun-
PROIBIZIONE
gere la temperatura ambiente programmata.
• La pulizia dell'unità interna deve essere effettuata esclusivamente da personale
autorizzato. Rivolgersi al proprio rivenditore.
Utilizzare un detergente disponibile in commercio o simili può danneggiare le parti
in plastica o intasare il tubo di scarico, provocando sgocciolamenti con il potenziale rischio di scosse elettriche.
PROIBIZIONE
• Non toccare l'uscita dell'aria, la supercie inferiore e la nitura in alluminio dell'unità esterna.
NON TOCCARE
Pericolo di lesioni.
• Non toccare il tubo del refrigerante e la valvola di collegamento.
Pericolo di ustioni.
NON TOCCARE
• Questo dispositivo può essere utilizzato da bambini o persone inferme solo se adeguatamente assistiti da un adulto che garantisca l'utilizzo sicuro del dispositivo.
• Tenere i bambini fuori dalla portata del dispositivo.
– 13 –
Page 21

NOMI E FUNZIONI DELLE PARTI
UNITÀ INTERNA
Filtro dell’aria
Impedisce alla polvere di penetrare nell’unità interna.
(Vedere pagina 16)
Pannello anteriore
(Vedere pagina 17)
Indicatori unità interna
Spia che indica il funzionamento.
(Vedere pagina 15)
Defl ettore orizzontale Defl ettore verticale (Uscita dell’aria)
Telecomando
Invia un segnale all’unità interna che consente il funzionamento
dell’intera unità.
UNITÀ ESTERNA
RAC-E10HB
RAC-E10HBG
RAC-E14HB
RAC-E14HBG
Uscita dell'aria
Durante il funzionamento in modalità di
riscaldamento, viene soffi ata aria fredda;
durante il funzionamento in modalità di
raffreddamento o di deumidifi cazione,
viene soffi ata aria calda.
Uscita di scarico
(parte inferiore)
Terminale di messa a terra
(sezione inferiore della parte laterale)
NOME MODELLO E DIMENSIONI
MODELLO LARGHEZZA (mm) ALTEZZA (mm) PROFONDITÀ (mm)
RAS-E10HB, RAS-E10HBG
RAS-E14HB, RAS-E14HBG
RAC-E10HB, RAC-E10HBG
RAC-E14HB, RAC-E14HBG
Flessibile di scarico
Durante il funzionamento in modalità di raffreddamento o di deumidifi cazione,
consente lo scarico dell'acqua condensata dall'unità interna a quella esterna.
Tubazioni e cablaggi
Prese d'aria (lati posteriore e sinistro)
Informazioni sull'unità esterna:
• Se si seleziona “Stop” durante il funzionamento
dell’unità interna, la ventola dell’unità esterna
continua a girare per 10-60 secondi allo scopo
di raffreddare le parti elettriche.
• In modalità di riscaldamento si verifi ca un
fl usso di acqua di condensa o di acqua
derivante dalla sbrinatura. Non coprire l’uscita
di scarico dell’unità esterna, perché nelle
zone fredde tale acqua potrebbe gelare.
• Se l’unità esterna viene collocata sul soffi tto,
collegare la boccola e il tubo di drenaggio
all’uscita di scarico e scaricare l’acqua.
780 280 210
660 530 278
– 14 –
Page 22
NOMI E FUNZIONI DELLE PARTI
INDICATORI UNITÀ INTERNA
SPIA TIMER (Arancione)
Questa spia si illumina
quando il timer è in
funzione.
SPIA FUNZIONAMENTO (Giallo)
Questa spia rimane accesa
durante il funzionamento.
Durante il riscaldamento, la SPIA
FUNZIONAMENTO lampeggia nei
seguenti casi.
(1) Durante il preriscaldamento
Per circa 2-3 minuti dopo
l’avvio.
(2) Durante lo sbrinamento
Lo sbrinamento viene eseguito
approssimativamente una
volta ogni ora, con cicli
di 5-10 minuti per volta,
quando si forma la brina sullo
scambiatore di calore dell’unità
esterna.
ITALIANO
INTERRUTTORE TEMPORANEO
Utilizzare questo interruttore per avviare e arrestare
VORSICHT
Se l'unità non viene utilizzata per un
lungo periodo, spegnere
di circuito.
Se l’alimentazione rimane attiva ma l’unità non è in funzione, si verifi ca un leggero consumo di
energia nel circuito di controllo. Per risparmiare energia, disattivare l’interruttore di alimentazione (o
l’interruttore di rete nel caso in cui l’alimentazione venga fornita dall’unità esterna).
l'interruttore
l'apparecchio quando il telecomando non funziona.
●
Premendo l'interruttore temporaneo, il funzionamento
viene eseguito nella modalità automatica.
● Quando il funzionamento viene eseguito utilizzando
l'interruttore temporaneo dopo avere interrotto e riattivato
l'alimentazione, viene utilizzata la modalità automatica.
– 15 –
Page 23

NOMI E FUNZIONI DEL TELECOMANDO
Il telecomando controlla le funzioni operative e le impostazioni del timer del climatizzatore. Il telecomando ha
un raggio d’azione di 7 metri. Se l'illuminazione interna è controllata elettronicamente, il raggio d'azione può
essere più breve.
Trasmissione del segnale
Simbolo di trasmissione
Il simbolo di trasmissione
lampeggia quando viene
Pulsante MODALITÀ
Selezionare la modalità operativa.
(
Pagina 11)
Pulsante di arresto
STOP
Premere il pulsante STOP per
fermare il funzionamento.
Pulsante ECO
Utilizzare questo pulsante per
impostarela modalità ECO. ( Pagina 14)
PULSANTE OFF/TIMER
Selezionare l'ora d'arresto OFF.
Pagina 12)
(
Pulsante TIMER ON
Selezionare l'ora d'avvio ON.
Pagina 12)
(
L.H
inviato un segnale.
Pulsante POTENTE
Premere questo pulsante
per attivare il funzionamento
potente (
pagina 12).
Pulsante TEMPERATURA
Impostazione della temperatura
ambiente. Il valore cambia
più velocemente quando il
pulsante è tenuto premuto.
( Pagina 11)
Pulsante di velocità del
ventilatore FAN SPEED
Seleziona la velocità del ventilatore
in modalità di raffreddamento e
riscaldamento.
( Pagina 11)
Pulsante d'oscillazione
AUTO SWING
Controlla la direzione del
defl ettore orizzontale dell'aria.
(
Pagina 15)
Precauzioni per l'uso
• Non lasciare il telecomando sotto i raggi diretti del sole o in alta temperatura.
• Evitare che cada a terra e che venga a contatto con acqua.
• Se si preme il pulsante FUNCTION durante il funzionamento, il climatizzatore può arrestarsi per circa
3 minuti per auto-protezione, e quindi riavviarsi.
– 10 –
Page 24
OPERAZIONE MANUALE [Riscaldamento • Deumidifi cazione • Raffreddament]
Utilizzare nelle seguenti condizioni quando si vuole impostare manualmente la modalità di funzionamento, la
temperatura ambiente e la velocità della ventola.
RISCALDAMENTO DEUMIDIFICAZIONE RAFFREDDAMENTO
Temperatura esterna di
24°C o meno
IMPOSTAZIONI MODALITÀ OPERATIVA
1
• Ogni qualvolta si preme il pulsante, la modalità cambia come indicato di seguito.
RISCALDAMENTO
DEUMIDIFICAZIONE
RAFFREDDAMENTO
IMPOSTAZIONE TEMPERATURA AMBIENTE
2
Su
Giù
• Il funzionamento in raffreddamento non ha
inizio, se il valore di temperatura impostato è
più alto della corrente temperatura ambiente.
Temperatura ambiente a
16°C o più
Temperatura raccomandata
Riscaldamento
Deumidifi cazione 20~26˚C
Raffreddamento
20~24˚C
25~28˚C
Temperatura esterna di
21°C o più
L.H
ITALIANO
L.H
IMPOSTAZIONE DELLA VELOCITÀ DEL VENTILATORE
3
• Ogni qualvolta si preme il pulsante, la velocità del ventilatore
cambia come indicato di seguito.
•
RISCALDAMENTO
:
RAFFREDDAMENTO
•
DEUMIDIFICAZIONE :
Premere il pulsante
4
• Il funzionamento di arresta con un beep.
}
SILENT
(STOP)
– 11 –
L.H
POWERFUL
SILENT
L.H
Page 25
PRENOTAZIONE CON TIMER
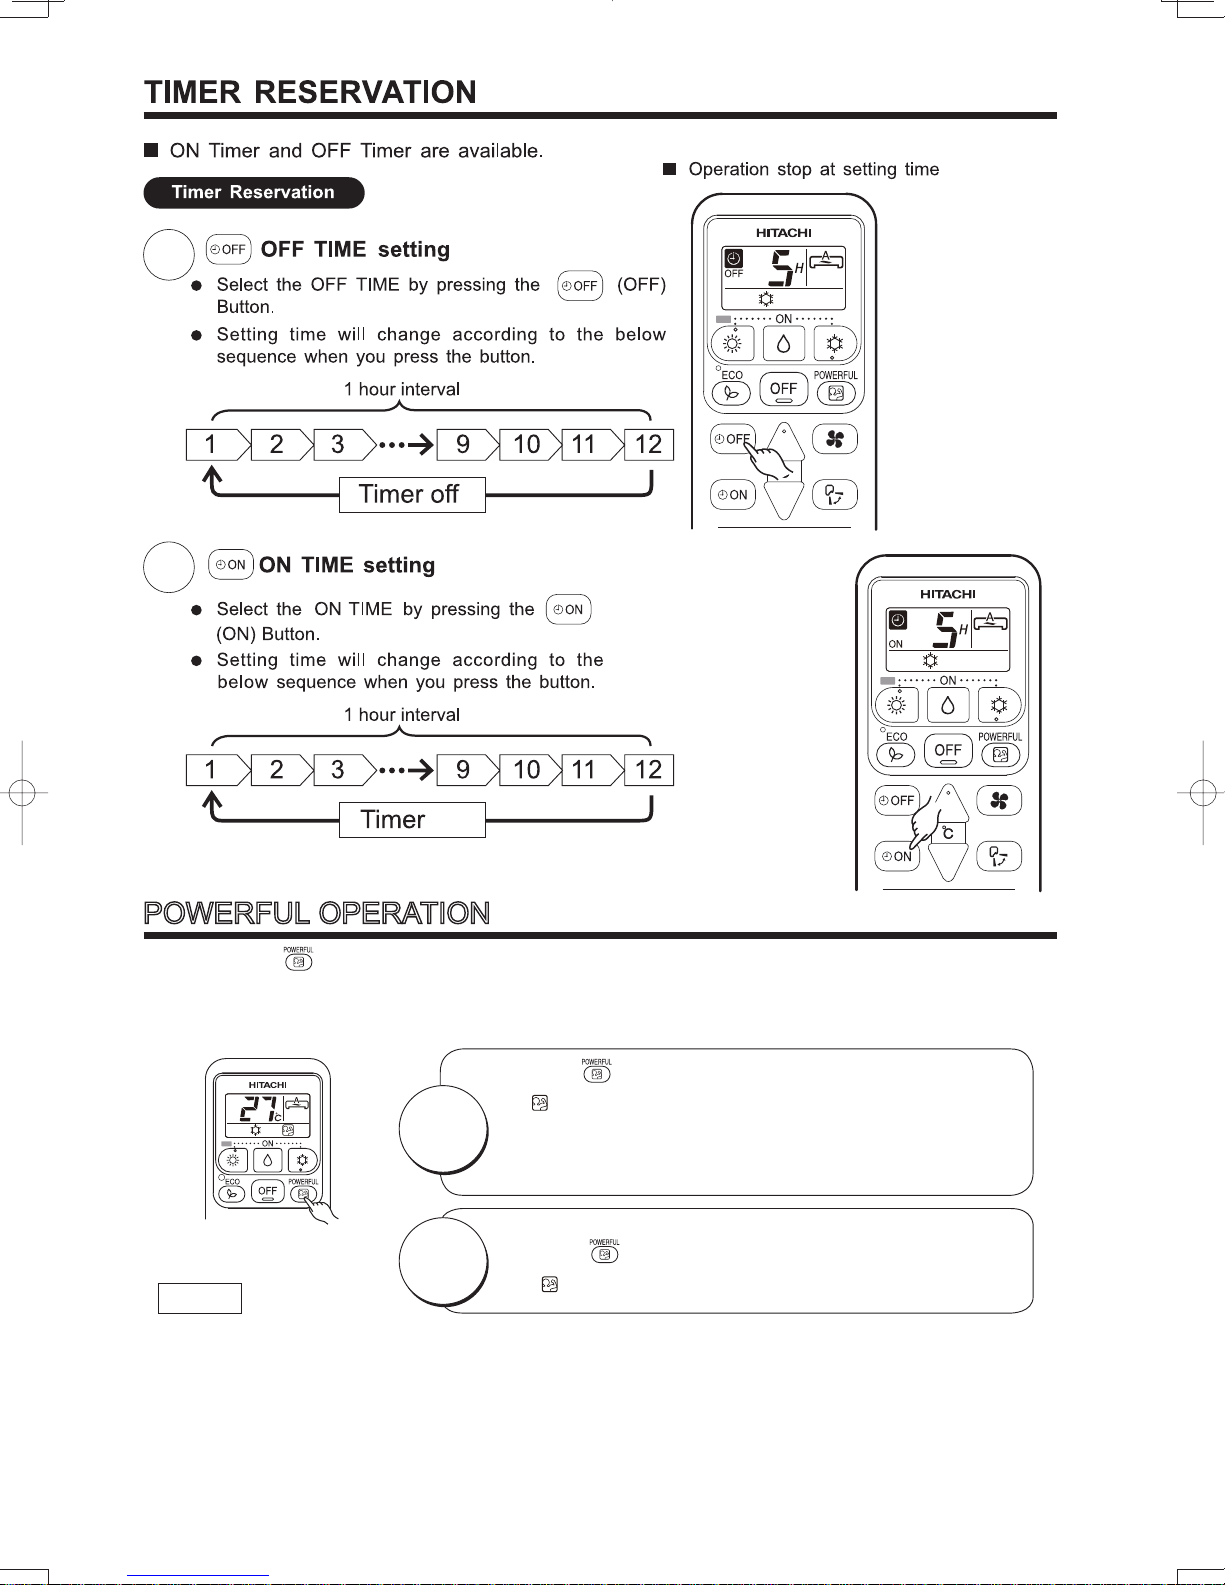
Sono disponibili ON Timer ed OFF Timer.
Prenotazione con timer
Impostazione OFF TIME
1
• Selezionare OFF TIME premendo il pulsante
(OFF).
• L'ora impostata cambia secondo la sequenza che
segue quando il pulsante viene premuto.
Intervallo di un'ora
Timer off
Il funzionamento si arresta
all'ora stabilita.
L.H
Impostazione
2
• Selezionare ON TIME premendo il pulsante
(ON).
• L'ora impostata cambia secondo la sequenza che
segue quando il pulsante viene premuto.
Intervallo di un'ora
ON TIME
L.H
Timer on
FUNZIONAMENTO POTENTE
•
Premendo il pulsante (POTENTE) durante il funzionamento AUTO, RISCALDAMENTO, DEUMIDIFICAZIONE,
RAFFREDDAMENTO o VENTOLA, il condizionatore funziona alla massima potenza.
•
Durante il funzionamento POTENTE, l'aria più fredda o più calda verrà emessa dall'unità interna rispettivamente
per il funzionamento RAFFREDDAMENTO o RISCALDAMENTO.
Premere il pulsante (POTENTE) durante il funzionamento.
•
L.H
START
Sull'LCD comparirà " "
Il funzionamento POTENTE termina dopo 20 minuti. Quindi il
sistema funziona automaticamente con le impostazioni
precedenti utilizzate prima del funzionamento POTENTE.
CANCEL
NOTA
• Quando sono selezionate la modalità ECO o FUORI CASA, il funzionamento POTENTE viene annullato.
• Durante il funzionamento POTENTE, la capacità del condizionatore non aumenta.
– se il condizionatore è già alla massima capacità.
– appena prima del funzionamento di scongelamento (quando il condizionatore funziona in RISCALDAMENTO).
• Dopo il riavvio automatico, il funzionamento POTENTE viene annullato e verrà avviato il funzionamento
precedente.
Premere di nuovo il pulsante (POTENTE).
•
" "non compare più sull'LCD.
– 12 –
Page 26
FUNZIONAMENTO FUORI CASA (LH)
Evitare che la temperatura ambiente scenda troppo impostando automaticamente la temperatura a 10 gradi
quando non si è a casa.
Per avviare il funzionamento Fuori casa tenere premuto il
START
pulsante RISCALDAMENTO per 3-5 secondi.
La temperatura ambiente è automaticamente impostata
t
a 10 gradi.
t
Sull'LCD compariranno“ ”,“ LH ”,“ ”,“ ”.
L.H
CANCEL
Premere il pulsante (STOP).
Passare ad un'altra modalità di funzionamento.
NOTA
● Durante il funzionamento Fuori casa, la velocità della ventola e la posizione orizzontale del
deflettore dell'aria non possono essere cambiati.
ITALIANO
– 13 –
Page 27

FUNZIONAMENTO ECO
Il funzionamento a risparmio energetico è attivo cambiando la temperatura impostata e riducendo il valore del
consumo energetico massimo.
Premendo il pulsante (ECO) durante il funzionamento Automatico,
Riscaldamento, Deumidicazione o Rareddamento, l'aria
condizionata avvia il funzionamento "ECO".
Premere il pulsante (ECO) durante il funzionamento.
“ ”compare sull'LCD.
START
L.H
CANCEL
Il funzionamento a risparmio energetico si attiverà modificando
la temperatura impostata ad un valore superiore o inferiore e
salvando il consumo di potenza di funzionamento.
Premere il pulsate (AVVIA/ARRESTA).
Premere di nuovo il pulsante (ECO)
“ ” non compare più sull'LCD.
NOTA
Nel caso in cui il consumo di energia fosse già ridotto, il funzionamento ECO non lo ridurrà ulteriormente.
Premendo il pulsante (POTENTE), il funzionamento ECO viene annullato.
Dopo il riavvio automatico, il funzionamento ECO viene annullato e verrà avviata la modalità di funzionamento precedente.
– 14 –
Page 28

REGOLAZIONE DELLA DIREZIONE DEL FLUSSO DELL'ARIA
Regolare il fl usso dell'aria verso l'alto o verso il basso.
1
A seconda della modalità di funzionamento, il defl ettore orizzontale
dell'aria viene posizionato all'angolo adatto a ciascuna condizione di
funzionamento. Il defl ettore può oscillare in alto e in basso oppure
orientato a un angolo idoneo usando il pulsante “
SWING)”.
• Premendo il tasto di regolazione “
AUTOMATICA)” per la prima volta, il defl ettore orizzontale
dell’aria si muove su e giù. Se il tasto viene premuto una
seconda volta, il defl ettore si ferma nella posizione in cui
si trova. Potrebbero trascorrere diversi secondi (circa 6
secondi) prima che il defl ettore inizi a muoversi.
• Il raggio di regolazione del defl ettore orizzontale dell'aria è
mostrato sulla destra.
• All’arresto del funzionamento, il defl ettore orizzontale dell’aria si
muove e si ferma nella posizione in cui l’uscita dell’aria si chiude.
(OSCILLAZIONE
(AUTO
Durante il
raffreddamento e la
deumidifi cazione
orizzontale
Circa 10°
Circa 40°
Durante il
riscaldamento
ITALIANO
CAUTELA
• Durante il modo di funzionamento “Raffreddamento”, non
lasciare che il defl ettore orizzontale dell’aria oscilli per un
lungo periodo di tempo. Sul defl ettore potrebbe formarsi
della condensa che pottrebbe gocciolare a terra.
Regolare il fl usso dell'aria verso sinistra e verso destra.
2
Tenere il defl ettore verticale dell'aria come mostrato sulla destra e
regolare il fl usso dell'aria verso sinistra e verso destra.
orizzontale
Circa 10°
Circa 45°
COME SOSTITUIRE LE BATTERIE DEL TELECOMANDO
Rimuovere il coperchio come indicato nella fi gura ed
1
estrarre le batterie scariche.
Premere e quindi
tirare in direzione
della freccia.
Installare la nuove batterie.
2
Fare corrispondere la direzione delle batterie con i marchi
all’interno del vano.
CAUTELA
1. Non utilizzare batterie vecchie e nuove o tipi diversi di batterie
assieme.
2. Rimuovere le batterie quando si prevede di non utilizzare il
telecomando per 2 o 3 mesi.
– 15 –
Page 29

MEMO
......................................................................................................................................................................................
......................................................................................................................................................................................
......................................................................................................................................................................................
......................................................................................................................................................................................
......................................................................................................................................................................................
......................................................................................................................................................................................
......................................................................................................................................................................................
......................................................................................................................................................................................
......................................................................................................................................................................................
......................................................................................................................................................................................
......................................................................................................................................................................................
......................................................................................................................................................................................
......................................................................................................................................................................................
......................................................................................................................................................................................
......................................................................................................................................................................................
......................................................................................................................................................................................
......................................................................................................................................................................................
......................................................................................................................................................................................
......................................................................................................................................................................................
......................................................................................................................................................................................
......................................................................................................................................................................................
......................................................................................................................................................................................
......................................................................................................................................................................................
......................................................................................................................................................................................
......................................................................................................................................................................................
......................................................................................................................................................................................
......................................................................................................................................................................................
......................................................................................................................................................................................
......................................................................................................................................................................................
......................................................................................................................................................................................
......................................................................................................................................................................................
......................................................................................................................................................................................
......................................................................................................................................................................................
......................................................................................................................................................................................
......................................................................................................................................................................................
......................................................................................................................................................................................
......................................................................................................................................................................................
......................................................................................................................................................................................
......................................................................................................................................................................................
– 16 –
Page 30

MANUTENZIONE
CAUTELA
La pulizia e la manutenzione devono essere eseguite esclusivamente da personale qualifi cato. Prima di
eseguire la pulizia, arrestare il funzionamento e disinserire l’interruttore di accensione.
1. FILTRO ARIA
Pulire il fi ltro ogni due settimane circa. Ciò consente inoltre di risparmiare energia. Se il fi ltro è pieno di
polvere, il fl usso d’aria diminuisce e la capacità di raffreddamento risulta ridotta. Inoltre potrebbe essere
generato del rumore. Accertarsi di pulire il fi ltro attenendosi alla procedura riportata di seguito.
PROCEDURA
Aprire delicatamente il pannello anteriore e rimuovere
1
il fi ltro.
Rimuovere la polvere dal fi ltro dell’aria con un
2
aspirapolvere. Se è presente una quantità eccessiva
di polvere, lavare il fi ltro con un detergente e
risciacquarlo abbondantemente. Quindi lasciarlo
asciugare all’ombra.
TEMPORARY
SWITCH
TEMPORARY
SWITCH
• Collocare i fi ltri con la scritta “FRONT” (DAVANTI)
3
rivolta verso l’alto e fi ssarli nella posizione
originale.
TEMPORARY
SWITCH
• Dopo avere riagganciato i fi ltri, premere il
pannello anteriore nei tre punti indicati dalle
frecce, come illustrato in fi gura, e chiuderlo.
CAUTELA
• Non lavare il fi ltro con acqua calda a temperatura superiore ai 40°C. Il fi ltro potrebbe altrimente
deformarsi.
• Quando si lava il fi ltro, eliminare la maggior parte dell’acqua scuotendolo e quindi lasciare asciugare
all’ombra; non esporre il fi ltro direttamente alla luce solare. Il fi ltro potrebbe altrimenti defomarsi.
• Non utilizzare l’unità senza fi ltro, perché potrebbero verifi carsi dei guasti.
– 16 –
Page 31

2. PULIZIA DEL PANNELLO ANTERIORE
• Rimuovere il pannello anteriore e lavarlo con acqua
pulita.
Utilizzare una spugna morbida per lavare il pannello.
Dopo avere utilizzato un detergente neutro, risciacquare
bene con acqua pulita.
• Per pulire il pannello anteriore senza rimuoverlo, utilizzare un
panno morbido asciutto. Pulire bene anche il telecomando
con un panno morbido asciutto.
• Asciugare completamente l’acqua.
Se rimane dell’acqua sugli indicatori o sul ricettore
del segnale dell’unità interna, si possono vericare
malfunzionamenti.
Metodo di rimozione del pannello anteriore.
Per rimuovere e ricollocare il pannello anteriore, afferrare
sempre il pannello con entrambe le mani.
ITALIANO
Rimozione del pannello anteriore
Asta
Foro
• Dopo avere sollevato completamente il pannello
anteriore con entrambe le mani, sganciarlo
spingendo il braccio destro all’interno. Quindi
• Collocare le aste dei bracci sinistro e destro negli
Ricollocazione del pannello anteriore
appositi supporti dell’unità e inserirle saldamente
nei fori.
richiudere leggermente il pannello anteriore e
tirarlo verso di sé.
CAUTELA
• Non gettare o dirigere acqua sul condizionatore durante le operazioni di
pulizia;questopotrebbecausareuncortocircuito.
• Non utilizzare acqua bollente(sopra i 40°C), benzolo, benzina, acido,
solventeounaspazzolapoichèessidanneggianolasuperciediplastica
eleniture.
Asta
Foro
A
B
E
N
C
E
Z
I
N
D
T
R
H
E
I
N
I
N
3. MANUTENZIONE PRIMA DI UN LUNGO PERIODO DI INUTILIZZO
• Avviare l'unità impostando la modalità di funzionamento
su
(FREDDO),latemperaturaa32°Celavelocità
della ventola su ALTA per circa mezza giornata in un
giornodibeltempoperdeumidicarel'unitàintera.
• Disinserire l’interruttore di accensione. O disattivare
l'interruttore di rete.
– 17 –
Flusso
dell'aria
Page 32

INFORMAZIONE
CAPACITÀ
Capacità di riscaldamento
• Questo climatizzatore è dotato della funzione pompa di calore
che assorbe il calore esterno e riscalda il locale. Se si riduce la
temperature ambiente, si riduce anche la capacità di riscaldamento.
In una condizione simile, l'inverter agisce in modo da aumentare il
regime del compressore, per evitare che la capacità di riscaldamento
dell’unità diminuisca. Se la capacità di riscaldamento dell’unità è
ancora insoddisfacente occorre utilizzare altre fonti di calore.
• Il climatizzatore è progettato per riscaldare un intero locale, quindi può essere necessario un certo periodo
di tempo prima che si avverta l’effetto di riscaldamento. Per un preriscaldamento effi ciente all’orario
desiderato, si raccomanda di utilizzare il timer.
Capacità di raffreddamento e deumidifi cazione
• Se il calore presente nel locale supera la capacità di raffreddamento dell’unità (ad esempio per la presenza
di numerose persone o di altre fonti di calore nel locale), potrebbe non essere possibile raggiungere la
temperature preimpostata.
CAUTELA
Non utilizzare stufe
o altri apparecchi ad
alta temperatura in
prossimità dell’unità
per interni.
DIVIETO
– 18 –
Page 33

CONTROLLI PERIODICAMENTE
CONTROLLARE I PUNTI SEGUENTI OGNI SEI MESI OPPURE UNA VOLTA ALL’ANNO.
CONTATTARE IL SERVIZIO DI ASSISTENZA IN CASO DI NECESSITÀ.
Vericare che la messa a terra dell’unità sia collegata
1
AVVERTENZA
correttamente.
In caso di scollegamento o guasto alla massa sussiste il
rischio di danni all’unità e scosse elettriche.
Vericare che il telaio non sia arrugginito oppure che
2
AVVERTENZA
l’unità per esterni non sia inclinata oppure sia diventata
instabile.
In caso di caduta, sussiste il rischio di lesioni personali.
ASSISTENZA DOPO LA VENDITA E GARANZIA
ITALIANO
CONTROLLARE I SEGUENTI PUNTI QUANDO VIENE RICHIESTA L’ASSISTENZA DOPO LA VENDITA
CONDIZIONE CONTROLLA I PUNTI SEGUENTI
Il telecomando non
trasmette alcun segnale.
(Il display del telecomando è
sfocato o spento.)
Quando il condizionatore
non funziona.
Quando il condizionatore non
raffredda o non riscalda bene.
I seguenti fenomeni non indicano un guasto all’unità.
Durante il riscaldamento,
l’indicatore di funzionamento
lampeggia ed il usso d’aria
si interrompe.
Sibili o rumori anomali
Cigolio
Fruscio
Rumore di “clic” Rumore della valvola motorizzata all’avviamento dell’unità.
• Le batterie devono essere sostituite?
• Le batterie sono inserite con le polarità corrette?
• Il fusibile è intatto?
• Il voltaggio è estremamente alto o basso?
• L’interruttore è su “ACCENSIONE”?
• La spina del cavo di alimentazione è inserita?
• Si verica un’interruzione di corrente?
• Il ltro è otturato dalla polvere?
• La temperatura impostata è appropriata?
• I deettori orizzontali dell'aria sono stati regolati nelle posizioni corrette
in base alla modalità di funzionamento selezionata?
• Le entrate e le uscite dell’aria delle unità per interni ed esterni sono intasate?
• La velocità della ventola è “BASSA” o “SILENZIOSO”?
<All’avviamento>
L’unità è pronta per fornire aria calda. Attendere prego.
<Durante il funzionamento>
L’unità per esterni è in modalità di sbrinamento. Attendere prego.
Rumore di usso del refrigerante nella tubazione o nella valvola generato quando viene regolato il usso.
Rumore generato quando l’unità si espande o contrae a causa delle variazioni di temperatura.
Rumore generato quando la velocità della ventola dell’unità per interni
cambia, ad es. all’avviamento.
– 19 –
Page 34

( )
Rumore della ventola che aspira l’aria presente nel essibile di scarico
Rumore sordo
Rumore durante il cambio della
modalità di funzionamento
Emissione di vapore
Vapore emesso dall’unità per esterni L’acqua generata durante la sbrinatura evapora e si forma il vapore.
Odori
L’unità per esterni rimane in
funzione anche quando viene
spenta.
La spia FUNZIONAMENTO
lampeggia.
Non raggiunge l’impostazione
della temperatura.
•
Se l'unità non funziona correttamente
dopo aver eseguito i controlli sopra
descritti, spegnere l'interruttore di circuito
e contattare immediatamente l'agente di
zona.
e scarica l’acqua deumidificata (accumulata nel serbatoio dell’acqua
condensata). Per informazioni, rivolgersi al servizio di assistenza.
Rumore dovuto alle variazioni di potenza in base alle variazioni di temperatura
nel locale.
Il vapore si forma quando l’aria nel locale viene repentinamente raffreddata
dall’aria condizionata.
Gli odori e le particelle di fumo, alimenti, cosmetici ecc. presenti nel locale
vengono aspirati e reintrodotti nel locale.
La sbrinatura è in corso (quando il funzionamento in modalità di riscaldamento
viene interrotto, il microcomputer controlla se è presente del ghiaccio
nell'unità esterna e, se necessario, indica all'unità di eseguire la sbrinatura
automatica).
Mostra il preriscaldamento o la sbrinatura in corso.
Poiché il circuito protettivo o il sensore di preriscaldamento continuano a
funzionare quando l’unità viene spenta e riavviata durante il preriscaldamento,
oppure quando l’unità commuta dal raffreddamento al riscaldamento, la spia
continua a lampeggiare.
La temperatura effettiva della stanza potrebbe essere leggermente diversa
dalla temperatura impostata sul telecomando, a seconda del numero
di persone presenti nella stanza e delle condizioni interne ed esterne.
Contattare immediatamente il servizio di assistenza
se si verica uno dei seguenti fenomeni:
• L’interruttore di rete si disinserisce oppure
il fusibile salta frequentemente.
• L’interruttore di rete non funziona regolarmente.
• Sono penetrati accidentalmente acqua o corpi estranei nell’unità.
• Il cavo di alimentazione si surriscalda eccessivamente oppure il relativo
isolamento è usurato.
• La spia TIMER sul display dell’unità per interni lampeggia.
Poiché la natura del guasto può essere identicata dal tipo di
lampeggio, controllare il tipo di lampeggio prima di disinserire
l’interruttore di rete.
• Se dopo aver svolto le sopra indicate ispezioni il condizionatore d’aria non dovesse funzionare, contattare immediatamente il servizio di assistenza. Comunicare al servizio di assistenza il numero del modello dell’unità, il
numero di fabbricazione, la data di installazione. Informarlo anche del tipo di guasto.
Nota bene:
Quando si accende l’apparecchio, in particolare a luci basse, si possono avere variazioni della luminosità
dell’illuminazione. Ciò è normale.
Le condizioni per l’uso poste dall’ENEL o altro ente preposto devono venire scrupolosamente osservate.
Note
• Durante il funzionamento silenzioso/riposo oppure quando si interrompe il
funzionamento si possono a volte riscontrare i fenomeni indicati di seguito:
ma non sono comunque segni di funzionamento anormale.
(1) Un leggero rumore prodotto dal usso del liquido refrigerante all’interno
del ciclo.
(2) Un leggero rumore di sfregamento prodotto dal contenitore della ventola
che viene raffreddato e quindi gradualmente riscaldato quando il
funzionamento si interrompe.
• Il condizionato d’aria potrebbe essere fonte.di odori in quanto vari odori,
prodotti da fumo, cibi, cosmetici e così via, possono aderire ad esso.
Pulire perciò il ltro dell’aria e l’evaporatore di quando in quando per
eleminare tali odori.
– 20 –
Page 35

UNIDAD DE AIRE ACONDICIONADO DE TIPO SPLIT
UNIDAD INTERIOR/UNIDAD EXTERIOR
MODELO
HFC
R410A
RAS-E10HB/RAC-E10HB
RAS-E10HBG/RAC-E10HBG
RAS-E14HB/RAC-E14HB
RAS-E14HBG/RAC-E14HBG
RAC-E10HB
RAC-E10HBG
RAC-E14HB
RAC-E14HBG
ESPAÑOL
UNIDAD INTERIORUNIDAD EXTERIOR
RAS-E10HB
RAS-E10HBG
RAS-E14HB
RAS-E14HBG
L.H
Instruction manual
To obtain the best performance and ensure years of
trouble free use, please read this instruction manual
completely.
Manuale di istruzioni
Per garantire la migliore prestazione e la più lunga
durata leggere attentamente e interamente le seguanti
istruzioni.
Manual de instrucciones
Para obtener el mejor funcionamiento y asegurar años
de uso libre de problemas, lea cuidadosamente este
manual de instrucciones.
El acondicionador de aire de esta habitación es solamente para uso de los consumidores.
No lo utilice para la conservación de alimentos, animales, plantas, máquinas de precisión, obras de arte, medicamentos
o similar.
Page 1~10
Pag. 11~20
Página 21~30
– 21 –
Οδηγίες χρήσης
°И· ЩЛУ О·П‡ЩВЪЛ ·fi‰ФЫЛ ЩФ˘ ОПИМ·ЩИЫЩИОФ‡ О·И БИ·
ЩЛУ М·ОЪФЪfiıВЫМЛ ¯Ъ‹ЫЛ ЩФ˘ ¯ˆЪ›˜ ЪФ‚П‹М·Щ·,
‰И·‚¿ЫЩВ ЪФЫВОЩИО¿ ·˘Щ¤˜ ЩИ˜ Ф‰ЛБ›В˜ ¯Ъ‹ЫЛ˜.
Mode d’emploi
Des performances optimales et un fonctionnement à
long terme seront assurés en appliquant les présentes
instructions après avoir entièrement lu ce mode
d’emploi.
™ÂÏ›‰· 27
31~40
Page 41~50
Page 36

PRECAUCIONES DE SEGURIDAD
• Para un uso correcto de la unidad, lea detenidamente las “Precauciones de seguridad” atentamente antes de utilizarla.
• Preste especial atención a los signos de " Advertencia" y " Precaución". La sección “Advertencia” contiene instrucciones
que, de no seguirse al pie de la letra, pueden provocar la muerte o lesiones graves. La sección “Precaución” contiene instrucciones cuyo incumplimien to puede tener graves consecuencias. Respete estrictamente todas las instrucciones para garantizar la
seguridad.
• Los símbolos tienen los siguientes signicados. (A continuación se especican ejemplos de símbolos.)
Asegúrese de conectar la línea a tierra.
Indica las instrucciones que deben seguirse.
Después de leerlo, guarde este manual para referencias futuras.•
PRECAUCIONES DURANTE LA INSTALACIÓN
• No vuelva a montar la unidad.
ADVERTENCIA
PRECAU-
CIÓN
Pueden producirse fugas de agua, averías, cortocircuitos o incendios si vuelve a montarla
usted mismo/a.
• Confíe la instalación de la unidad a su agente de ventas o a un técnico cualicado.
Pueden producirse fugas de agua, cortocircuitos o incendios si instala la unidad usted
mismo.
• Use la línea de tierra.
No instale el cable de tierra en las proximidades de tuberías de gas o de agua, de un
pararrayos ni tampoco del cableado a tierra del teléfono. Una instalación incorrecta de
la línea de tierra puede provocar una descarga eléctrica o un incendio.
• Asegúrese de utilizar el conjunto de tuberías especicado para R410A. De lo contrario,
pueden producirse averías o roturas en las tuberías de cobre.
En función de la ubicación de montaje de la unidad, debe instalarse un interruptor.
•
Sin un interruptor, existe peligro de descarga eléctrica.
•
• Asegúrese de que el agua circule sin obstáculos cuando instale la manguera de desagüe.
• Asegúrese de utilizar una fuente de alimentación monofásica de 220 V-230 V.
El uso de otras fuentes de alimentación puede provocar que los componentes eléctricos
se recalienten y causen un incendio.
PROHIBICIÓN
CONECTE LA LÍNEA DE
TIERRA
PROHIBICIÓN
PROHIBICIÓN
ADVERTENCIA
ADVERTENCIA
PRECAUCIONES DURANTE EL DESPLAZAMIENTO O EL MANTENIMIENTO
Si se produce alguna situación anómala (por ejemplo, olor a quemado), deje de
•
utilizar la unidad y desconecte el disyuntor. Póngase en contacto con su agente. Si
continúa utilizando la unidad en una situación anómala, pueden producirse averías,
cortocircuitos o incendios.
“APAGADO”
• Póngase en contacto con su agente para las tareas de mantenimiento. Un mantenimiento incorrecto realizado
por usted mismo/a puede provocar descargas eléctricas e incendios.
• Póngase en contacto con su agente si necesita retirar y volver a instalar la unidad. Puede producirse una descarga
eléctrica o un incendio si retira y vuelve a instalar la unidad usted mismo/a de forma incorrecta.
PRECAUCIONES DURANTE EL USO
• Evite un período prolongado de ujo de aire directo para proteger su salud.
PROHIBICIÓN
• No coloque objetos como varillas nas en el panel del ventilador y en el lado de aspiración, porque el interior del ventilador de alta velocidad puede provocar una situación de
PROHIBICIÓN
• No use ningún conductor como hilo fusible, ya que podría provocar un accidente de
fatales consecuencias.
“APAGADO”
• No debe haber botes de aerosol y otros envases inamables en un radio de 1 metro de
las salidas de aire de las unidades interior y exterior.
La presión interna del envase de aerosol podría aumentar como consecuencia del aire
caliente, provocando un reventón.
peligro.
PROHIBICIÓN
• Durante una tormenta, desconecte la parte superior del enchufe y apague el interruptor.
PROHIBICIÓN
– 22 –
Page 37

PRECAUTIONS DURING OPERATION
• El producto debe utilizarse de acuerdo con la especicación del fabricante y no
se le dará ningún otro uso.
• No intente utilizar la unidad con las manos húmedas, ya que podría sufrir un accidente mortal.
NO MOJAR
• Cuando utilice la unidad con equipos térmicos, ventile regularmente la es-
tancia para evitar la insuciencia de oxígeno.
• No dirija el aire frío que sale del panel del aparato de aire acondicionado
directamente hacia aparatos de calefacción domésticos, ya que podría
PROHIBICIÓN
afectar a su rendimiento (por ejemplo una tetera eléctrica, un horno, etc.).
• Asegúrese de que el marco de montaje exterior esté siempre estable, rme y sin defec-
tos. En caso contrario, la unidad exterior puede desplomarse, con el consiguiente peligro.
• No lave la unidad con agua ni coloque ningún recipiente de agua, como un
orero, en la unidad interior.
PROHIBICIÓN
Pueden producirse fugas eléctricas y causar una descarga eléctrica.
OBSERVE ESTRICTAMENTE LAS PRECAU-
PROHIBICIÓN
CIONES
PROHIBICIÓN
ESPAÑOL
PRECAU-
CIÓN
• No coloque plantas directamente debajo de la corriente de aire, ya que es nocivo para ellas
• Asegúrese de detener el funcionamiento utilizando el mando a distancia y
“APAGADO”
apagar el interruptor durante la limpieza, ya que el ventilador de alta velocidad
dentro de la unidad puede causar peligro.
• Desconecte el interruptor si no tiene previsto utilizar la unidad durante un período prolongado.
• No se suba a la unidad exterior ni coloque objetos sobre la misma.
PROHIBICIÓN
• Cuando utilice la unidad con la puerta y las ventanas abiertas (la humedad de la estancia siempre es superior al 80%), y con el deector de aire orientado hacia abajo
o moviéndose automáticamente durante un largo período de tiempo, se condensará
agua en el deector de aire y goteará ocasionalmente. Sus muebles pueden mojarse.
Por lo tanto, no utilice el aparato en estas condiciones durante un periodo prolongado.
• Si el calor de la estancia es superior a la capacidad de refrigeración o calefacción de la
unidad (por ejemplo: entran más personas en la estancia, uso de equipos de calefac-
PROHIBICIÓN
ción etc.), no se podrá alcanzar la temperatura preestablecida de la estancia.
• La limpieza de la unidad interior debe ser realizada por personal autorizado.
Consulte a su agente de ventas.
El uso de un detergente comercial o productos similares puede dañar las partes plásticas o atascar la tubería de desagüe, haciendo que el agua gotee con
el consiguiente riesgo de provocar una descarga eléctrica.
.
PROHIBICIÓN
“APAGADO”
PROHIBICIÓN
PROHIBICIÓN
NO TOCAR
• No toque el tubo de refrigerante y la válvula de conexión.
Puede sufrir quemaduras.
• Este dispositivo no está diseñado para ser utilizado por niños o personas con minusvalías cognitivas, a menos que sean supervisados adecuadamente por una persona responsable que se
asegure de que lo utilicen de manera segura.
• Es preciso vigilar a los niños para que no jueguen con el dispositivo.
• No toque la salida de aire, la supercie inferior de aluminio ni la aleta de
aluminio de la unidad exterior.
Podría lesionarse.
NO TOCAR
–
– 23 –
Page 38

NOMBRES Y FUNCIONES DE CADA COMPONENTE UNIDAD INTERIOR NOMBRE DEL
UNIDAD INTERIOR
Filtro de aire
Para impedir que se introduzca polvo en la unidad interior.
(Consulte la pág. 26)
Panel frontal
(Consulte la pág. 27)
Indicadores de la unidad interior
Indicador luminoso del estado de funcionamiento.
(Consulte la pág. 25)
De ector horizontal De ector vertical (Salida de aire)
Mando a distancia
Envía señales de funcionamiento a la unidad interior.
Controla toda la unidad.
UNIDAD EXTERIOR
RAC-E10HB
RAC-E10HBG
RAC-E14HB
RAC-E14HBG
Acerca de la unidad exterior:
• Cuando se selecciona “Stop” durante el
funcionamiento de la unidad interior, el ventilador
de la unidad exterior sigue girando durante 10 a
60 segundos para enfriar las partes eléctricas.
• Durante la operación de calefacción, se acumula
agua o agua condensada debido al desescarche.
No cubra el desagüe de la unidad exterior ya que
en áreas frías el agua se podría congelar.
• Si la unidad externa va colgada en el techo,
instale el manguito y la manguera de drenaje en
el desagüe y vacíe el agua.
NOMBRE DEL MODELO Y DIMENSIONES
MODELO ANCHO (mm) ALTO (mm) PROFUNDIDAD (mm)
RAS-E10HB, RAS-E10HBG
RAS-E14HB, RAS-E14HBG
RAC-E10HB, RAC-E10HBG
RAC-E14HB, RAC-E14HBG
780 280 210
660 530 278
– 24 –
Page 39

NOMBRES Y FUNCIONES DE CADA COMPONENTE
INDICADORES DE LA UNIDAD INTERIOR
INDICADOR LUMINOSO DE
FUNCIONAMIENTO (Amarillo)
Este piloto se enciende durante el
funcionamiento de la unidad.
El indicador luminoso de
funcionamiento parpadea en los
INDICADOR LUMINOSO
DEL PROGRAMADOR
(Naranja)
Este piloto se enciende
cuando el programador
está activado.
Desconecte el interruptor si la unidad
no va a utilizarse durante un
prolongado.
PREAUCIÓN
período
INTERRUPTOR TEMPORAL
Utilice este interruptor para poner en marcha y detener
el aparato cuando el mando a distancia no funcione.
Al pulsar el interruptor temporal, el funcionamiento
●
tendrá lugar en modo automático.
Cuando el aparato funcione usando el interruptor temporal
●
tras apagarlo y encenderlo de nuevo, lo hará en modo
automático.
siguientes casos, durante la función
de calefacción.
(1) Mientras se precalienta
Durante unos 2-3 minutos
después de ponerse en marcha.
(2) Durante el proceso de
desescarche
El desescarche se realizará
aproximadamenta cada hora
durante 5-10 minutos, y siempre
que que se forme escarcha en
el intercambiador de calor de la
unidad exterior.
ESPAÑOL
Si la alimentación permanece encendida y la unidad no se usa, el circuito de control consumirá un
poco de energía. Para ahorrar energía, desconecte el interruptor de alimentación (o el enchufe,
cuando la unidad interior se alimenta de la exterior).
– 25 –
Page 40

NOMBRES Y FUNCIONES DEL MANDO A DISTANCIA
Controla el funcionamiento y la confi guración del programador. El alcance del mando es de unos 7 metros. Si
la iluminación interior es controlada electrónicamente, el alcance del mando puede ser menor.
Transmisión de señal
Símbolo de transmisión
El símbolo de transmisión
parpadea cuando se ha
Tecla MODO
Para seleccionar el modo de
funcionamiento.
Página 19)
(
L.H
Tecla DETENER
Presione este botón para detener el
funcionamiento.
Tecla ECO
Use este botón para confi gurar
el modo ECO.
Página 22)
(
Tecla PROGRAMADOR
APAGADO
Para seleccionar la hora de APAGADO.
( Página 20)
Tecla PROGRAMADOR
ENCENDIDO
Para seleccionar la hora de ENCENDIDO.
( Página 20)
enviado una señal.
Tecla MÁXIMA POTENCIA
Pulse esta tecla para iniciar la
función máxima potencia. (
página 20)
Tecla TEMPERATURA
Confi guración de la temperatura
ambiente. El valor cambiará más rápido
cuando se mantiene presionado.
( Página 19)
Tecla VELOCIDAD DEL
VENTILADOR
Para seleccionar la velocidad del
ventilador para modos frío y calor.
(
Página 19)
Tecla OSCILACIÓN
AUTOMÁTICA
Permite controlar el ángulo del
defl ector de aire horizontal.
Página 23)
(
Precauciones de uso
• No exponga el mando a distancia a la luz solar directa ni a altas temperaturas.
• No lo tire al suelo y protéjalo del agua.
• Si presiona la tecla FUNCIÓN durante el funcionamiento, el aire acondicionado podría pararse
durante 3 minutos para proteger su equipo antes de ponerse nuevamente en funcionamiento.
– 18 –
Page 41

FUNCIONAMIENTO MANUAL (Calefacción - Deshumidifi cación - Refrigeración)
Por favor, tenga en cuenta las siguientes condiciones cuando quiera confi gurar manualmente el modo de
funcionamiento, la temperatura y la velocidad del ventilador.
CALEFACCIÓN DESHUMIDIFICACIÓN REFRIGERACIÓN
Temperatura exterior
24˚C
SELECCIÓN DE MODO
1
• Cada vez que presione este tecla, el modo cambiará como se indica a continuación.
CALEFACCIÓN
DESHUMIDIFICACIÓN
REFRIGERACIÓN
CONFIGURACIÓN DE LA TEMPERATURA AMBIENTE
2
Arriba
Abajo
• La función frío no comenzará si la
confi guración de temperatura es más alta
que la temperatura ambiente actual.
Temperatura Ambiente
16˚C
Temperatura Recomendada
Calefacción
Deshumidifi cación
Refrigeración
20~24˚C
20~26˚C
25~28˚C
Temperatura exterior
arriba de 21˚C
L.H
L.H
ESPAÑOL
VELOCIDAD DEL VENTILADOR
3
• Cada vez que presione esta tecla, la velocidad del ventilador
cambiará de acuerdo a la siguiente secuencia.
•
CALEFACCIÓN
REFRIGERACIÓN
•
DESHUMIDIFICACIÓN
Presione el
4
• La función se para con un bip.
}
:
botón (DETENER)
SILENT
– 19 –
L.H
POWERFUL
SILENT
L.H
Page 42

USO DEL PROGRAMADOR
Hay un programador de ENCENDIDO y otro de APAGADO.
Uso del programador
1
• Seleccione la HORA DE APAGADO presionando
• La hora cambiará de acuerdo a la siguiente
Confi guración de HORA DE APAGADO
la tecla (APAGADO).
secuencia al presionar la tecla.
Intervalos de 1 hora
Programador de apagado
Detención a la hora establecida
L.H
2
• Seleccione la HORA DE ENCENDIDO presionando
• La hora cambiará de acuerdo con la siguiente
Confi guración de HORA DE ENCENDIDO
la tecla
secuencia cuando presiona la tecla.
(ENCENDIDO).
Intervalos de 1 hora
L.H
Programador de encendido (ON)
FUNCIÓN MÁXIMA POTENCIA
•
Pulsando la tecla (POWERFUL) durante las funciones AUTOMÁTICA, CALEFACCIÓN, DESHUMIDIFICACIÓN,
REFRIGERACIÓN o VENTILADOR, el aire acondicionado realiza la función con su máxima potencia.
•
Durante la función MÁXIMA POTENCIA, el aire más frío o más caliente será expulsado desde dentro de la unidad para
REFRIGERAR o CALENTAR respectivamente.
Pulse la tecla de (MÁXIMA POTENCIA) durante esta función.
•
L.H
START
Se muestra “ ” en la pantalla LCD.
La función MÁXIMA POTENCIA dura 20 minutos. Una vez terminado,
se activa automáticamente la última función que había antes de
seleccionar la función de MÁXIMA POTENCIA.
CANCEL
NOTA
• Cuando se selecciona el modo ECO o modo LEAVE HOME (Irse de casa), la función
de MÁXIMA POTENCIA se cancela.
• Durante la función MÁXIMA POTENCIA, la capacidad del aire acondicionado no aumentará en los siguientes casos:
- si el aire acondicionado ya se está ejecutando a su máxima capacidad.
- justo antes de la función descongelar (cuando el aire acondicionado está ejecutando la función
CALEFACCIÓN).
• Si hubiera un reinicio automático, la función MÁXIMA POTENCIA se anulará y volverá a la función anterior.
Pulse
la tecla
(MÁXIMA POTENCIA) de nuevo.
•
“ ”
desaparece del LCD.
– 2 0 –
Page 43

FUNCIÓN IRSE DE CASA (LH-LEAVE HOME)
Evite que la temperatura de la habitación baje demasiado configurando la temperatura a 10 grados
automáticamente cuando no haya nadie en casa.
Pulse la tecla CALEFACCIÓN durante 3-5
segundos para iniciar la función Irse de casa.
START
L.H
La temperatura de la habitación se establece
t
automáticamente a 10 grados.
t
Se muestra en la pantalla LCD“ ”,“ LH ”,“ ”,“ ” .
CANCEL
Pulse la tecla (APAGAR).
Cambiar a otro Modo de funcionamiento.
NOTA
● Durante la función Irse de casa, la velocidad del ventilador y la posición del deflector de aire horizontal
no se pueden cambiar.
ESPAÑOL
– 21 –
Page 44

FUNCIÓN ECO
Función de ahorro de energía cambiando la conguración de la temperatura y limitando el valor de consumo máximo
de energía.
La función (ECO) es compatible con los modos
Automático, Calefacción, Deshumidificación o
Refrigeración.
Pulse la tecla (ECO) cuando su equipo esté funcionando.
Se muestra “ ” en la pantalla LCD.
L.H
START
CANCEL
La función de ahorro de energía se iniciará ajustando arriba
o abajo la temperatura según proceda, y ahorrando energía.
Pulse la tecla .
Pulse la tecla (ECO) de nuevo
“ ” desaparece de la pantalla LCD.
NOTA
En caso de que el consumo de energía ya sea bajo, la función ECO no reducirá más el consumo.
Si pulsa la tecla MÁXIMA POTENCIA, la función de ahorro de energía ECO se anulará.
Después de un reinicio automático, la función ECO se anulará y el equipo volverá a funcionar en
el modo anteriormente seleccionado.
– 22 –
Page 45

CÓMO AJUSTAR LA DIRECCIÓN DEL FLUJO DE AIRE
Ajuste el fl ujo de aire hacia arriba y hacia abajo.
1
De acuerdo con el funcionamiento, el defl ector de aire horizontal
se colocará automáticamente en el ángulo adecuado para cada
modo de funcionamiento. El defl ector puede oscilar arriba y abajo
y también colocarse en el ángulo deseado utilizando la tecla “
(OSCILACIÓN AUTOMÁTICA)”.
En el enfriamiento y
deshumidifi cación
Horizontal
• Si se presiona una vez la tecla “
AUTOMÁTICA)”, el defl ector horizontal oscilará arriba
y abajo. Si se presiona una segunda vez, el defl ector
se detendrá en la posición actual. Es posible que haya
que esperar varios segundos (unos 6 segundos) antes
de que el defl ector se empiece a mover.
• La rejilla de ajuste del defl ector de aire horizontal se
muestra a la derecha.
• Cuando se detiene el funcionamiento, el defl ector
horizontal se mueve y se detiene en la posición en la
que se cierre la salida de aire.
(OSCILACIÓN
PRECAUCIÓN
•
En la función de refrigeración, no mantenga el defl ector
horizontal oscilando durante mucho tiempo. Se podrían
formar gotas de agua en el defl ector horizontal y caer
sobre los objetos.
Ajuste el fl ujo de aire a izquierda y a derecha.
2
Sujete el defl ector de aire vertical como se muestra en el dibujo y
ajuste el fl ujo de aire a izquierda y a derecha.
alrededor de 10°
alrededor
de 40°
En el
calentamiento
Horizontal
alrededor de 10°
alrededor
de 45°
ESPAÑOL
SUSTITUCIÓN DE LAS PILAS DEL MANDO A DISTANCIA
Retire la tapa tal como se muestra en la fi gura y extraiga
1
las pilas gastadas.
Instale las pilas nuevas.
2
Insértelas en la dirección que se indica en el
compartimiento.
PRECAUCIÓN
1. No utilice una combinación de pilas nuevas y viejas, ni de
pilas distintas.
2. Extraiga las pilas si no tiene previsto utilizar el mando a
distancia durante al menos 2 ó 3 meses.
Empuje y tire en
la dirección de la
fl echa.
– 23 –
Page 46

MEMO
......................................................................................................................................................................................
......................................................................................................................................................................................
......................................................................................................................................................................................
......................................................................................................................................................................................
......................................................................................................................................................................................
......................................................................................................................................................................................
......................................................................................................................................................................................
......................................................................................................................................................................................
......................................................................................................................................................................................
......................................................................................................................................................................................
......................................................................................................................................................................................
......................................................................................................................................................................................
......................................................................................................................................................................................
......................................................................................................................................................................................
......................................................................................................................................................................................
......................................................................................................................................................................................
......................................................................................................................................................................................
......................................................................................................................................................................................
......................................................................................................................................................................................
......................................................................................................................................................................................
......................................................................................................................................................................................
......................................................................................................................................................................................
......................................................................................................................................................................................
......................................................................................................................................................................................
......................................................................................................................................................................................
......................................................................................................................................................................................
......................................................................................................................................................................................
......................................................................................................................................................................................
......................................................................................................................................................................................
......................................................................................................................................................................................
......................................................................................................................................................................................
......................................................................................................................................................................................
......................................................................................................................................................................................
......................................................................................................................................................................................
......................................................................................................................................................................................
......................................................................................................................................................................................
......................................................................................................................................................................................
......................................................................................................................................................................................
......................................................................................................................................................................................
– 2 4 –
Page 47

MANTENIMIENTO
PRECAUCIÓN
La limpieza y el mantenimiento deben ser realizados anualmente por personal cualifi cado. Antes de limpiar,
detenga el funcionamiento y apague la unidad.
1. FILTRO DE AIRE
Por favor, limpie el fi ltro una vez cada dos semanas aproximadamente. Al hacerlo, además, ahorrará
energía. Si el fi ltro de aire está lleno de polvo, el fl ujo de aire y la capacidad de refrigeración se verán
afectados. Además, la unidad podría producir ruido. Asegúrese de limpiar el fi ltro según el procedimiento
que se indica a continuación.
PROCEDIMIENTO
Abra con cuidado el panel frontal y retire el fi ltro.
1
Aspire el polvo del fi ltro de aire con un aspirador.
2
Si se ha acumulado demasiado polvo, lave el
fi ltro con un detergente y aclárelo a conciencia. A
continuación, déjelo secar a la sombra.
TEMPORARY
SWITCH
TEMPORARY
SWITCH
• Sujete los fi ltros con la señal FRONT (Frontal)
3
hacia delante, e insértelos en su lugar.
TEMPORARY
SWITCH
• Después de colocar los fi ltros, empuje el panel
frontal por los tres puntos indicados por las fl echas,
tal como se indica en la fi gura, y ciérrelo.
PRECAUCIÓN
• No lo lave con agua caliente a más de 40°C. El fi ltro podría encogerse.
• Después de lavarlo, elimine todo resto de humedad y déjelo secar a la sombra; no lo exponga
directamente a la luz del sol. El fi ltro podría encogerse.
• No haga funcionar la unidad sin fi ltro. Podría dañarse la unidad.
– 26 –
Page 48

2. LIMPIEZA DEL PANEL FRONTAL
• Retire el panel frontal y lávelo con agua limpia.
Frótelo con una esponja suave.
Después de utilizar detergente neutro, aclare
concienzudamente con agua limpia.
• Sipreerenoretirarelpanel frontal, límpielocon
un paño seco suave. Limpie el mando a distancia
con un paño seco suave.
• Seque concienzudamente los restos de humedad.
Si deja restos de humedad en los indicadores o
en el receptor de señales de la unidad interior, el
funcionamiento se podría ver afectado.
Método para retirar el panel frontal.
Asegúrese de sujetar el panel frontal con ambas
manos al extraerlo y al insertarlo.
Extracción del panel frontal
Eje
Agujero Agujero
• Una vez que haya abierto por completo el panel
frontal con ambas manos, empuje el brazo
derecho hacia el interior para soltarlo y, mientras
• Mueva los ejes de los brazos izquierdo y derecho
hacia el tramo de la unidad e insértelos de forma
segura en los agujeros.
Inserción del panel frontal
lo cierra ligeramente, sáquelo hacia delante.
PRECAUCIÓN
• Al limpiarlo, no derrame ni dirija el agua directamente al cuerpo de la
unidad, ya que podría provocar un cortocircuito.
• No utilice nunca agua caliente (por encima de los 40°C), bencina,
gasolina,ácido,disolventeouncepillo,porquepodríadañarlasupercie
y el revestimiento de plástico.
Eje
ESPAÑOL
A
B
E
N
C
E
Z
I
N
D
T
R
H
E
I
N
I
N
3. MANTENIMIENTO ANTES DE UN LARGO PERÍODO DE INACTIVIDAD
• Haga funcionar la unidad en el modo (REFRIGERACIÓN),
a una temperatura de 32 °C y con el ventilador en velocidad
ALTAduranteaproximadamentemediodía(enundíaconbuen
tiempo),ysequetotalmentelaunidad.
• Desenchufe la unidad de la toma de alimentación. O apague
el interruptor.
– 27 –
Corriente
de aire
Page 49

INFORMACIÓN
CAPACIDADES
Capacidad de calefacción
• Esta unidad de aire acondicionado de interior utiliza un sistema
de bomba de calor que absorbe el calor exterior y lo transfi ere a
la habitación que se quiere calentar. Conforme baja la temperatura
ambiente, también se reduce la capacidad de calefacción. En
tal situación, el inversor trabaja para incrementar la velocidad del
compresor, a fi n de evitar que se reduzca la capacidad de calefacción
de la unidad. Si la unidad sigue sin calentar lo sufi ciente, deben
utilizarse otros aparatos de calefacción para aumentar su rendimiento.
• Esta unidad de aire acondicionado ha sido diseñada para calentar una habitación entera, por lo que
puede pasar algún tiempo antes de que sienta el calor.
Se recomienda la utilización del programador para un calentamiento previo de la habitación antes de la
hora deseada.
Capacidad de refrigeración y deshumidifi cación
• Si el calor ambiente supera la capacidad de refrigeración de la unidad (por ejemplo, si en la habitación
hay muchas personas o se están utilizando otros aparatos de calefacción), es posible que no se alcance
la temperatura ambiente seleccionada.
PRECAUCIÓN
No utilice una
cocina u otros
dispositivos de
generación de
altas temperaturas
cerca de la unidad
interior.
PROHIBICIÓN
– 28 –
Page 50

INSPECCIÓN REGULAR
COMPRUEBE LOS SIGUIENTES PUNTOS CADA SEIS MESES O ANUALMENTE. SI
NECESITA AYUDA, PÓNGASE EN CONTACTO CON SU DISTRIBUIDOR.
Compruebe que la línea de tierra de la unidad esté
1
2
ADVERTENCIA
ADVERTENCIA
correctamente conectada.
Si la línea de tierra está desconectada o defectuosa, pueden
producirse daños en la unidad o descargas eléctricas.
Compruebe que el bastidor de jación no se haya
oxidado en exceso, y que la unidad exterior no se
haya inclinado o esté inestable.
Podría soltarse y caer, causando lesiones.
SERVICIO POSVENTA Y GARANTÍA
ESPAÑOL
ANTES DE SOLICITAR SERVICIO, COMPRUEBE LOS SIGUIENTES PUNTOS.
SITUACIÓN COMPRUEBE LOS SIGUIENTES PUNTOS
Si el mando a distancia no
transmite ninguna señal.
(El visualizador está tenue
o no muestra nada.)
Si no funciona.
Si no enfría correctamente.
Si no calienta correctamente.
Las siguientes circunstancias no indican un fallo de la unidad de aire acondicionado.
Durante el proceso de calefacción,
el indicador luminoso de funcionamiento parpadea y la unidad deja
de emitir aire
Sonidos sibilantes o gaseosos
Chirridos
Crujidos
Chasquidos Ruido de la válvula motorizada cuando se enciende la unidad.
• ¿Es necesario cambiar las pilas?
• ¿Se han colocado las pilas en la posición correcta?
• ¿Está el fusible en buenas condiciones?
• ¿Es el voltaje demasiado alto o bajo?
• ¿Está el interruptor en la posición ON (funcionamiento)?
• ¿Está enchufado el cable de alimentación?
• ¿Ha habido algún apagón?
• ¿Está el ltro de aire obstruido por el polvo?
• ¿Es correcta la temperatura seleccionada?
• ¿Se ha ajustado correctamente la posición de los deectores horizon-
tales al modo de funcionamiento seleccionado?
• ¿Están obstruidas las entradas de aire de las unidades interiores o exteriores?
• ¿Está la velocidad del ventilador en “BAJA” o “SILENCIOSO” ?
<Inicio del funcionamiento>
La unidad se está preparando para emitir aire caliente. Por favor espere.
<Durante el funcionamiento>
La unidad exterior se está desescarchando. Por favor espere.
Ruido de la circulación del refrigerante por el tubo o la válvula a causa de
un ajuste del caudal de ujo.
Ruido generado por la expansión o contracción de la unidad debido a
cambios de temperatura.
Ruido generado por un cambio de la velocidad de giro del ventilador de
la unidad interior, cuando se pone en marcha.
– 29 –
Page 51

( )
Ruidos de ltración
Cambio de ruidos de
funcionamiento
Generación de vapor
Vapor emitido por la unidad exterior
Olores
La unidad exterior sigue
funcionando a pesar de que
se ha apagado.
El indicador luminoso de
funcionamiento parpadea.
No se alcanza la temperatura
seleccionada.
Si tras las inspecciones mencionadas
•
la unidad sigue sin funcionar
normalmente, desactive el disyuntos
y pó ngase en contacto de inmediato
con el agente de ventas.
Ruido que produce el ventilador cuando aspira el aire presente en la manguera
de drenaje y expulsa agua de deshumidicación acumulada en el colector del
agua de condensación. Para obtener más detalles, consulte a su distribuidor.
El ruido del funcionamiento cambia debido a las variaciones de potencia en
función de los cambios de la temperatura ambiente.
Se produce vapor cuando el aire interior de la habitación es enfriado de forma
rápida por el aire acondicionado.
El agua generada durante el proceso de desescarche se evapora y esto produce vapor.
Los olores y las partículas de humo, comida, cosméticos, etc., presentes en el
ambiente, se adhieren a la unidad y vuelven a ser expulsados a la habitación
por la corriente de aire.
La unidad está desescarchando. Una vez detenido el proceso de calefacción,
el microordenador comprueba si hay escarcha acumulada en la unidad exterior
y ordena al equipo que realice el desescarche automático, si es necesario.
Indica que la unidad se está precalentando o a punto de realizar el desescarche.
El piloto seguirá parpadeando mientras el circuito de protección o el sensor
de precalentamiento estén en funcionamiento (cuando el equipo se detenie
durante el precalentamiento y luego se reinicia), o mientras el modo de
funcionamiento cambie de refrigeración a calefacción.
La temperatura ambiente actual puede ser ligeramente distinta al valor
del mando a distancia en función del número de personas presentes en la
habitación y de las condiciones interiores y exteriores.
Póngase en contacto inmediatamente con o servicio técnico
si se produce alguna de las siguientes circunstancias:
• El interruptor se apaga o el fusible se funde con frecuencia.
• El funcionamiento del interruptor no es estable.
• Se han introducido accidentalmente elementos extraños o agua en el
interior de la unidad.
• El cable de alimentación se calienta en exceso o el material aislante
está roto o deteriorado.
• El indicador luminoso del temporizador, en el visualizador de la unidad
interior, parpadea.
Puesto que la naturaleza del fallo puede identicarse por el ciclo
del parpadeo, compruebe el ciclo antes de apagar el interruptor.
• Si la unidad de aire acondicionado sigue sin funcionar correctamente después de realizar estas inspecciones,
póngase en contacto con o servicio técnico. Indique al distribuidor el modelo de la unidad, el número de fabricación y la fecha de instalación. Explíquele también en qué consiste la avería.
Tenga presente lo siguiente:
Al encender el equipo, especialmente cuando la habitación está poco iluminada, pueden producirse leves
uctuaciones del brillo. Esto no tiene ninguna importancia.
Se deben observar las normas de la compañía de electricidad local.
Notas
• Durante el funcionamiento silencioso o durante su detención, se pueden
producir ocasionalmente las siguientes circunstancias, que no suponen
un funcionamiento anormal.
(1) Leve ruido del uido en el ciclo de refrigeración.
(2) Leve ruido de fricción en la cubierta del ventilador, que se enfría
y calienta gradualmente cuando se detiene.
• Es posible que la unidad interior emita un mal olor debido al humo y las
partículas de comida, cosméticos, etc., que se han adherido a ella. Limpie
con regularidad el ltro de aire y el evaporador para reducir los olores.
– 30 –
Page 52

∫§πª∞Δπ™Δπ∫√ ¢π∞πƒ√Àª∂¡√À ΔÀ¶√À
∂™øΔ∂ƒπ∫∏ ª√¡∞¢∞/∂•øΔ∂ƒπ∫∏ ª√¡∞¢∞
ª√¡Δ∂§√
HFC
R410A
RAS-E10HB/RAC-E10HB
RAS-E10HBG/RAC-E10HBG
RAS-E14HB/RAC-E14HB
RAS-E14HBG/RAC-E14HBG
RAC-E10HB
RAC-E10HBG
RAC-E14HB
RAC-E14HBG
∂™øΔ∂ƒπ∫∏ ª√¡∞¢∞∂•øΔ∂ƒπ∫∏ ª√¡∞¢∞
Eλληνικά
RAS-E10HB
RAS-E10HBG
RAS-E14HB
RAS-E14HBG
L.H
Instruction manual
To obtain the best performance and ensure years of
trouble free use, please read this instruction manual
completely.
Manuale di istruzioni
Per garantire la migliore prestazione e la più lunga
durata leggere attentamente e interamente le seguanti
istruzioni.
Manual de instrucciones
Para obtener el mejor funcionamiento y asegurar años
de uso libre de problemas, lea cuidadosamente este
manual de instrucciones.
συγκεκριμένη συσκευή κλιματισμού του αέρα είναι μόνο για οικιακή χρήση.
Να μη χρησιμοποιείται για τη συντήρηση τροφίμων,ζώων,φυτών,μηχανημάτων ακριβείας,έργων τέχνης,φαρμάκων
ή άλλων παρεμφερών ειδών.
Page 1~10
Pag. 11~20
Página 21~30
– 31 –
Οδηγίες χρήσης
°И· ЩЛУ О·П‡ЩВЪЛ ·fi‰ФЫЛ ЩФ˘ ОПИМ·ЩИЫЩИОФ‡ О·И БИ·
ЩЛУ М·ОЪФЪfiıВЫМЛ ¯Ъ‹ЫЛ ЩФ˘ ¯ˆЪ›˜ ЪФ‚П‹М·Щ·,
‰И·‚¿ЫЩВ ЪФЫВОЩИО¿ ·˘Щ¤˜ ЩИ˜ Ф‰ЛБ›В˜ ¯Ъ‹ЫЛ˜.
Mode d’emploi
Des performances optimales et un fonctionnement à
long terme seront assurés en appliquant les présentes
instructions après avoir entièrement lu ce mode
d’emploi.
™ÂÏ›‰· 27
31~40
Page 41~50
Page 53

ΠΡΟΦΥΛΑΞΗ ΑΣΦΑΛΕΙΑΣ
• Διαβάστε προσεκτικά τα "Προφυλάξεις ασφαλείας" πριν τη λειτουργία της συσκευής για να είστε σίγουροι ότι θα τη χρησιμοποιήσετε σωστά.
• Προσέξτε ιδιαίτερα τις ενδείξεις « Προειδοποίηση» και « Προσοχή». Η ενότητα «Προειδοποίηση» αναφέρεται σε θέματα που, εάν
δεν τηρηθούν με αυστηρότητα, μπορεί να προκαλέσουν θάνατο ή σοβαρό τραυματισμό. Η ενότητα «Προσοχή» αναφέρεται σε θέματα που,
εάν δεν τηρηθούν σωστά, μπορεί να έχουν σοβαρές συνέπειες. Τηρείτε αυστηρά όλες τις οδηγίες για να διασφαλίσετε την ασφάλεια.
• Οι ενδείξεις υποδεικνύουν τις παρακάτω έννοιες: (Τα παρακάτω είναι παραδείγματα συμβόλων.)
Βεβαιωθείτε ότι έχετε συνδέσει το καλώδιο γείωσης.
Υποδεικνύει τις οδηγίες που πρέπει να τηρηθούν.
•
º˘Ï¿ÍÙ ÙȘ Ô‰ËÁ›Â˜ ¯Ú‹Û˘ ·ÊÔ‡ ÙȘ ‰È·‚¿ÛÂÙÂ.
ΠΡΟΦΥΛΑΞΕΙΣ ΚΑΤΑ ΤΗΝ ΕΓΚΑΤΑΣΤΑΣΗ
• Μην ανακατασκευάσετε τη μονάδα.
Εάν ανακατασκευάσετε τη μονάδα μόνοι σας, μπορεί να προκληθεί διαρροή νερού, βλάβη,
βραχυκύκλωμα ή πυρκαγιά.
• Απευθυνθείτε στον αντιπρόσωπο πωλήσεων ή σε εξειδικευμένο τεχνικό για την εγκατάσταση της μονάδας.
Εάν εγκαταστήσετε τη μονάδα μόνοι σας, μπορεί να προκληθεί διαρροή νερού, βραχυκύκλωμα ή πυρκαγιά.
ΠΡΟΕΙΔΟ-
ΠΟΙΗΣΗ
ΠΡΟΣΟΧΗ
• Χρησιμοποιήστε καλώδιο γείωσης.
Μην τοποθετήσετε το καλώδιο γείωσης κοντά σε σωλήνες νερού ή αερίου, ηλεκτροφόρο αγωγό
ή καλώδιο γείωσης τηλεφώνου. Η ακατάλληλη εγκατάσταση του καλωδίου γείωσης μπορεί να
προκαλέσει ηλεκτροπληξία ή πυρκαγιά.
• Φροντίστε να χρησιμοποιήσετε το σωστό σετ σωλήνων για το R410A. Διαφορετικά, μπορεί να
σπάσουν οι χαλκοσωλήνες ή να προκληθούν βλάβες.
• Ανάλογα με την τοποθεσία εγκατάστασης της μονάδας, πρέπει να τοποθετηθεί ένας διακόπτης
κυκλώματος.
Εάν δεν τοποθετηθεί διακόπτης κυκλώματος, υπάρχει κίνδυνος ηλεκτροπληξίας.
Μην πραγματοποιήσετε την εγκατάσταση κοντά σε σημείο όπου υπάρχει
•
εύφλεκτο αέριο. Εάν υπάρξει
εξωτερική μονάδα, μπορεί να προκληθεί πυρκαγιά.
• Διασφαλίστε την ομαλή ροή του νερού κατά την εγκατάσταση του εύκαμπτου σωλήνα αποστράγγισης.
διαρροή εύφλεκτου αερίου κοντά στην
Η ένδειξη στην εικόνα σημαίνει απαγόρευση.
ΑΠΑΓΟΡΕΥΣΗ
ΣΥΝΔΕΣΤΕ ΤΗ ΓΡΑΜΜΗ
ΓΕΙΩΣΗΣ
ΑΠΑΓΟΡΕΥΣΗ
ΠΡΟΕΙΔΟ-
ΠΟΙΗΣΗ
ΠΡΟΕΙΔΟ-
ΠΟΙΗΣΗ
• Χρησιμοποιήστε μονοφασική πηγή τροφοδοσίας ρεύματος 220V-230V.
Η χρήση άλλων πηγών τροφοδοσίας μπορεί να προκαλέσει την υπερθέρμανση των ηλεκτρικών εξαρτημάτων με κίνδυνο πυρκαγιάς.
ΑΠΑΓΟΡΕΥΣΗ
ΠΡΟΦΥΛΑΞΕΙΣ ΚΑΤΑ ΤΗ ΜΕΤΑΦΟΡΑ Ή ΤΗ ΣΥΝΤΗΡΗΣΗ
Σε περίπτωση μη φυσιολογικής κατάστασης (π.χ. μυρωδιά καμένου), διακόψτε τη
•
λειτουργία της μονάδας
τον αντιπρόσωπο. Εάν συνεχίσετε να λειτουργείτε τη
κατάσταση μπορεί να προκληθεί βλάβη βραχυκύκλωμα ή πυρκαγιάά
• Επικοινωνήστε με τον αντιπρόσωπο για συντήρηση. Εάν κάνετε ακατάλληλες εργασίες συντήρησης μόνοι σας, μπορεί
να προκληθεί ηλεκτροπληξία και πυρκαγιά.
• Εάν θέλετε να αποσυνδέσετε και να εγκαταστήσετε ξανά τη μονάδα, επικοινωνήστε με τον αντιπρόσωπο. Εάν αποσυνδέσετε και εγκαταστήσετε ξανά τη μονάδα μόνοι σας με ακατάλληλο τρόπο, μπορεί να προκληθεί ηλεκτροπληξία ή πυρκαγιά.
και κλείστε το διακόπτη κυκλώματος. Επικοινωνήστε με
μονάδα σε μη φυσιολογική
“ΚΛΕΙΣΤΟ”
ΠΡΟΦΥΛΑΞΕΙΣ ΚΑΤΑ ΤΗ ΛΕΙΤΟΥΡΓΙΑ
• Αποφύγετε την απευθείας ροή αέρα για μεγάλο χρονικό διάστημα για λόγους υγείας.
ΑΠΑΓΟΡΕΥΣΗ
• Μην βάζετε αντικείμενα όπως λεπτές ράβδους στα σημεία εισόδου του αέρα και εξαερισμού επειδή υπάρχει κίνδυνος από τη λειτουργία του ανεμιστήρα υψηλής ταχύτητας.
ΑΠΑΓΟΡΕΥΣΗ
• Μην χρησιμοποιείτε κανέναν αγωγό ως καλώδιο ασφάλειας. Μπορεί να προκληθεί
θανατηφόρο ατύχημα.
• Κατά τη διάρκεια καταιγίδων, αποσυνδέετε το βύσμα από την πρίζα και κλείνετε τον
“ΚΛΕΙΣΤΟ”
διακόπτη κυκλώματος
.
ΑΠΑΓΟΡΕΥΣΗ
• Τυχόν δοχεία από σπρέι και άλλα καύσιμα υλικά δεν πρέπει να βρίσκονται σε ακτίνα
ενός μέτρου από τις εξόδους αέρα της εσωτερικής και της εξωτερικής μονάδας.
Η εσωτερική πίεση σε ένα δοχείο σπρέι μπορεί να αυξηθεί λόγω του θερμού αέρα με
αποτέλεσμα τη διάρρηξή του.
ΑΠΑΓΟΡΕΥΣΗ
– 62 –
Page 54

• Η λειτουργία του προϊόντος πρέπει να γίνεται σύμφωνα με τις προδιαγραφές του κα-
PRECAUTIONS DURING OPERATION
τασκευαστή και μόνο για την προβλεπόμενη χρήση.
• Μην επιχειρήσετε να χειριστείτε τη μονάδα με βρεγμένα χέρια. Κάτι τέτοιο μπορεί να
ΜΗΝ ΒΡΕΧΕΤΕ
• Κατά τη λειτουργία της μονάδας με εξοπλισμό καύσης, πρέπει να αερίζετε
τακτικά το χώρο για να αποφύγετε πιθανή ανεπάρκεια οξυγόνου.
ΑΠΑΓΟΡΕΥΣΗ
• Βεβαιωθείτε ότι το εξωτερικό πλαίσιο στήριξης είναι πάντα σταθερό, ισχυρό
και χωρίς ελαττώματα. Εάν δεν είναι, μπορεί να καταρρεύσει η εξωτερική μονάδα και να δημιουργηθεί κίνδυνος.
ΑΠΑΓΟΡΕΥΣΗ
• Μην τοποθετείτε φυτά ακριβώς κάτω από τη ροή αέρα. Δεν είναι καλό για τα φυτά.
προκαλέσει θανατηφόρο ατύχημα.
ΤΗΡΗΣΤΕ ΠΡΟ-
ΣΕΚΤΙΚΑ ΤΙΣ
ΠΡΟΦΥΛΑΞΕΙΣ
• Μην κατευθύνετε τον κρύο αέρα που βγαίνει από την πρόσοψη του κλιματιστικού απευθείας πάνω σε οικιακές συσκευές θέρμανσης, καθώς μπορεί να επηρεαστεί η λειτουργία των συσκευών αυτών, όπως π.χ. της ηλεκτρικής κουζίνας,
του φούρνου, κ.λπ.
• Μην πλένετε τη συσκευή με νερό και μην τοποθετείτε επάνω στην εσωτερική μονάδα
δοχεία με νερό, όπως βάζα.
Τυχόν διαρροή ρεύματος μπορεί να προκαλέσει ηλεκτροπληξία.
ΑΠΑΓΟΡΕΥΣΗ
ΑΠΑΓΟΡΕΥΣΗ
ΑΠΑΓΟΡΕΥΣΗ
ΠΡΟΣΟΧΗ
• Κατά τον καθαρισμό, βεβαιωθείτε ότι έχετε διακόψει τη λειτουργία χρησιμοποιώντας
“ΚΛΕΙΣΤΟ”
• Εάν η μονάδα πρόκειται να παραμείνει εκτός λειτουργίας για μεγάλο χρονικό διάστημα, κλείστε το διακόπτη κυκλώματος.
ΑΠΑΓΟΡΕΥΣΗ
• Κατά τη λειτουργία της μονάδας με ανοιχτή την πόρτα και τα παράθυρα (η υγρασία του
δωματίου είναι πάντα πάνω από 80%) και το πτερύγιο εκτροπής αέρα στραμμένο προς
τα κάτω ή κινούμενο αυτόματα για μεγάλο χρονικό διάστημα, το νερό συγκεντρώνεται
στο πτερύγιο εκτροπής αέρα και στάζει κατά διαστήματα. Έτσι, μπορεί να βραχούν τα
έπιπλά σας. Αυτό δημιουργεί κίνδυνο να βραχούν τα έπιπλά σας. Για το λόγο αυτό, μην
χρησιμοποιείτε τη συσκευή με αυτές τις συνθήκες για μεγάλο χρονικό διάστημα.
ΑΠΑΓΟΡΕΥΣΗ
• Ο καθαρισμός της εσωτερικής μονάδας πρέπει να πραγματοποιείται μόνον από εξουσιοδοτημένο προσωπικό. Συμβουλευθείτε τον αντιπρόσωπο.
Τα συνηθισμένα απορρυπαντικά του εμπορίου μπορεί να καταστρέψουν τα πλαστικά
μέρη ή να φράξουν το σωλήνα αποστράγγισης, προκαλώντας διαρροή νερού με πιθανό κίνδυνο ηλεκτροπληξίας.
ΜΗΝ ΑΓΓΙΖΕΤΕ
το τηλεχειριστήριο και κλείστε το διακόπτη κυκλώματος. Η υψηλή ταχύτητα του ανεμιστήρα στο εσωτερικό της μονάδας μπορεί να προκαλέσει κίνδυνο.
• Μην σκαρφαλώνετε στην εξωτερική μονάδα και μην τοποθετείτε αντικείμενα πάνω σε
αυτήν.
• Εάν η θερμότητα στο χώρο υπερβαίνει τη δυνατότητα ψύξης ή θέρμανσης της μονάδας
(για παράδειγμα: μπαίνουν στο χώρο περισσότερα άτομα, γίνεται χρήση εξοπλισμού θέρμανσης, κ.λπ.), δεν είναι δυνατό να επιτευχθεί η προκαθορισμένη θερμοκρασία δωματίου.
• Μην αγγίζετε την έξοδο του αέρα, την κάτω επιφάνεια και το πτερύγιο αλουμινίου της
εξωτερικής μονάδας.
Υπάρχει κίνδυνος τραυματισμού.
Eλληνικά
“ΚΛΕΙΣΤΟ”
ΑΠΑΓΟΡΕΥΣΗ
ΑΠΑΓΟΡΕΥΣΗ
• Μην αγγίζετε το σωλήνα ψυκτικού και τη βαλβίδα σύνδεσης.
Μπορεί να πάθετε εγκαύματα.
• Η συσκευή αυτή δεν προορίζεται για χρήση από μικρά παιδιά ή ασθενικά άτομα, εκτός εάν υπάρχει κατάλληλη επίβλεψη από υπεύθυνο άτομο που θα διασφαλίζει την ασφαλή χρήση αυτής της συσκευής.
• Τα μικρά παιδιά πρέπει να επιβλέπονται προκειμένου να διασφαλιστεί ότι δεν παίζουν με τη συσκευή.
ΜΗΝ ΑΓΓΙΖΕΤΕ
– 33 –
Page 55

√¡√ª∞™π∂™ ∫∞π §∂πΔ√Àƒ°π∂™ ∫∞£∂ ª∂ƒ√À™
∂™øΔ∂ƒπ∫∏ ª√¡∞¢∞
º›ÏÙÚÔ ·¤Ú·
∞ФЪЪФК¿ ЩЛ ЫОfiУЛ ВМФ‰›˙ФУЩ¿˜ ЩЛУ У· МВИ ЫЩЛУ ВЫˆЩВЪИО‹
МФУ¿‰·. (μП. ЫВП›‰· 36)
ªЪФЫЩИУfi П·›ЫИФ
ÌÔÓ¿‰·. (μÏ. ÛÂÏ›‰· 37)
∂У‰В›НВИ˜ ВЫˆЩВЪИО‹˜ МФУ¿‰·˜
ºˆЩВИУ¤˜ ВУ‰В›НВИ˜ (П·М¿ОИ·) Ф˘ ‰В›¯УФ˘У ЩЛУ О·Щ¿ЫЩ·ЫЛ
ПВИЩФ˘ЪБ›·˜ ЩЛ˜ МФУ¿‰·˜. (μП. ЫВП›‰· 35)
√ÚÈ˙fiÓÙȘ ÂÚÛ›‰Â˜ ∫¿ıÂÙ˜ ÂÚÛ›‰Â˜ (ŒÍÔ‰Ô˜ ·¤Ú·)
ΔЛПВ¯ВИЪИЫЩ‹ЪИФ
™Щ¤ПУВИ ЩФ Ы‹М· ПВИЩФ˘ЪБ›·˜ ЫЩЛУ ВЫˆЩВЪИО‹ МФУ¿‰·. ∂П¤Б¯ВИ
ЩЛ ПВИЩФ˘ЪБ›· ФПfiОПЛЪЛ˜ ЩЛ˜ МФУ¿‰·˜.
RAS-E10HB, RAS-E10HBG
RAS-E14HB, RAS-E14HBG
RAC-E10HB, RAC-E10HBG
RAC-E14HB, RAC-E14HBG
780 280 210
660 530 278
– 34 –
Page 56

√¡√ª∞™π∂™ ∫∞π §∂πΔ√Àƒ°π∂™ ∫∞£∂ ª∂ƒ√À™
∂¡¢∂π•∂π™ ∂™øΔ∂ƒπ∫∏™ ª√¡∞¢∞™
§∞ª¶∞∫π §∂πΔ√Аƒ°π∞™ (∫›ЩЪИУФ)
ΔФ П·М¿ОИ ·˘Щfi ·У¿‚ВИ ЫЩЛ ‰И¿ЪОВИ·
ЩЛ˜ ПВИЩФ˘ЪБ›·˜. ΔФ §∞ª¶∞∫π
§∂πΔ√Аƒ°π∞™ ·У·‚ФЫ‚‹УВИ ЫЩИ˜
·Ъ·О¿Щˆ ВЪИЩТЫВИ˜ ЫЩЛ ‰И¿ЪОВИ·
§∞ª¶∞∫π Гƒ√¡√¢π∞∫√¶Δ∏
(¶ФЪЩФО·П›)
ΔФ П·М¿ОИ ·˘Щfi ·У¿‚ВИ
fiЩ·У ПВИЩФ˘ЪБВ› Ф
¯ЪФУФ‰И·ОfiЩЛ˜.
Ù˘ ı¤ÚÌ·ÓÛ˘.
(1) ∫·Ù¿ ÙËÓ ÚÔı¤ÚÌ·ÓÛË
(2) ∫·Ù¿ ÙËÓ ·fi„˘ÍË
°È· 2-3 ÏÂÙ¿ ÂÚ›Ô˘ ÌÂÙ¿ ÙËÓ
ÂÎΛÓËÛË.
∏ ·fi„˘НЛ ı· Ъ·БМ·ЩФФИВ›Щ·И
ВЪ›Ф˘ М›· КФЪ¿ ЩЛУ ТЪ· fiЩ·У
Ы¯ЛМ·ЩИЫЩВ› ¿БФ˜ ЫЩФ ЫЩФИ¯В›Ф
ВУ·ПП·Б‹˜ ıВЪМfiЩЛЩ·˜ ЩЛ˜
ВНˆЩВЪИО‹˜ МФУ¿‰·˜, БИ· 5-10
ПВЩ¿ О¿ıВ КФЪ¿.
¶ƒ√™øƒπ¡√™ ¢π∞∫√¶Δ∏™
Χρησιμοποιήστε αυτόν το διακόπτη για να εκκινήσετε και
¶ƒ√™√Ã∏
Εάν η μονάδα πρόκειται να παραμείνει
εκτός λειτουργίας για μεγάλο χρονικό
διάστημα, κλείστε το διακόπτη κυκλώματος.
να διακόψετε τη λειτουργία της συσκευής όταν δεν λειτουργεί
το τηλεχειριστήριο.
● Πατώντας τον προσωρινό διακόπτη, η συσκευή τίθεται σε
αυτόματο τρόπο λειτουργίας.
Όταν χρησιμοποιείτε τον προσωρινό διακόπτη μετά από
●
διακοπή και επαναφορά της τροφοδοσίας ρεύματος,
ακολουθείται ο αυτόματος τρόπος λειτουργίας.
∞У ‰ВУ ОПВ›ЫВЩВ ЩФ ‰И·ОfiЩЛ ЪВ‡М·ЩФ˜ О·И ‰ВУ ¯ЪЛЫИМФФИВ›ЩВ ЩЛ Ы˘ЫОВ˘‹, ˘¿Ъ¯ВИ МИОЪ‹ ФЫfiЩЛЩ·
ЪВ‡М·ЩФ˜ ЫЩФ О‡ОПˆМ·. °И· ВНФИОФУfiМЛЫЛ ВУ¤ЪБВИ·˜, ОПВ›УВЩВ ЩФ ‰И·ОfiЩЛ ЪВ‡М·ЩФ˜ ЩЛ˜ МФУ¿‰·˜ (‹ ЩФУ
·ЫК·ПВИФ‰И·ОfiЩЛ fiЩ·У Л ЩЪФКФ‰ФЫ›· Б›УВЩ·И ·fi ЩЛУ ВНˆЩВЪИО‹ МФУ¿‰·).
Eλληνικά
– 35 –
Page 57

ΟΙ ΛΕΙΤΟΥΡΓΙΕΣ ΤΟΥ ΤΗΛΕΧΕΙΡΙΣΤΗΡΙΟΥ ΚΑΙ ΟΙ ΟΝΟΜΑΣΙΕΣ ΤΟΥΣ
Έτσι γίνεται ο χειρισμός της λειτουργίας και της ρύθμισης του χρονοδιακόπτη του κλιματιστικού δωματίου. Η εμβέλεια του
χειριστηρίου είναι περίπου 7 μέτρα. Εάν ο φωτισμός του χώρου ελέγχεται ηλεκτρονικά, η εμβέλεια του χειριστηρίου μπορεί
να είναι μικρότερη.
Μετάδοση σήματος
Ένδειξη μετάδοσης
Η ένδειξη μετάδοσης
αναβοσβήνει όταν έχει αποσταλεί
Κουμπί ΛΕΙΤΟΥΡΓΙΑ
Επιλέξτε τον τρόπο λειτουργίας.
Σελίδα 2 )
(
Πλήκτρο ΔΙΑΚΟΠΗΣ
7
Πατήστε αυτό το πλήκτρο για
να σταματήσει η λειτουργία.
Κουμπί ECO
Χρησιμοποιήστε αυτό το κουμπί για
να ορίσετε τη λειτουργία ECO
( Σελίδα 30)
Πλήκτρο ΑΠΕΝΕΡΓΟΠΟΙΗΣΗΣ
ΧΡΟΝΟΔΙΑΚΟΠΤΗ
Επιλέξτε τον χρόνο ΑΠΕΝΕΡΓΟΠΟΙΗΣΗΣ.
( Σελίδα 28)
Πλήκτρο ΕΝΕΡΓΟΠΟΙΗΣΗΣ
ΧΡΟΝΟΔΙΑΚΟΠΤΗ
Επιλέξτε τον χρόνο
ΕΝΕΡΓΟΠΟΙΗΣΗΣ.
(
Σελίδα 28)
L.H
κάποιο σήμα.
Κουμπί POWERFUL
Πατήστε αυτό το κουμπί για να
εκκινήσετε την ισχυρή λειτουργία.
( Σελίδα 28)
Πλήκτρο ΘΕΡΜΟΚΡΑΣΙΑΣ
Ρύθμιση θερμοκρασίας
δωματίου. Η τιμή θα αλλάζει
πιο γρήγορα όταν συνεχίζετε να
πατάτε.
( Σελίδα 27)
Πλήκτρο ΤΑΧΥΤΗΤΑΣ
ΑΝΕΜΙΣΤΗΡΑ
Επιλέξτε την ταχύτητα
ανεμιστήρα για τη λειτουργία
Ψύξη και Θέρμανση.
( Σελίδα 27)
Πλήκτρο ΑΥΤΟΜΑΤΗΣ
ΠΕΡΙΣΤΡΟΦΗΣ
Έλεγχος της γωνίας του
οριζόντιου ανακλαστήρα αέρα.
( Σελίδα 31)
Προφυλάξεις για τη χρήση
ñ Μην τοποθετείτε το τηλεχειριστήριο υπό άμεσο ηλιακό φως και υψηλή θερμοκρασία.
ñ Μην το αφήσετε να πέσει στο πάτωμα και προστατεύστε το από το νερό.
ñ Εάν πατήσετε το πλήκτρο ΛΕΙΤΟΥΡΓΙΑ κατά τη διάρκεια της λειτουργίας, το κλιματιστικό μπορεί να σταματήσει
για περίπου 3 λεπτά για προστασία πριν μπορέσετε να το ξεκινήσετε ξανά.
– 26 –
Page 58

ΧΕΙΡΟΚΙΝΗΤΗ ΛΕΙΤΟΥΡΓΙΑ [Θέρμανση • Αφύγρανση • Ψύξη]
Να γίνεται χρήση κάτω από την παρακάτω συνθήκη όταν θέλετε να ρυθμίσετε τον τρόπο λειτουργίας, τη θερμοκρασία
δωματίου και την ταχύτητα του ανεμιστήρα χειροκίνητα.
ΘΕΡΜΑΝΣΗ ΑΦΥΓΡΑΝΣΗ ΨΥΞΗ
Θερμοκρασία εξωτερικών
χώρων κάτω των 24˚C
ΕΠΙΛΟΓΗ ΤΡΟΠΟΥ ΛΕΙΤΟΥΡΓΙΑΣ
1
ñ Κάθε φορά που πατάτε το πλήκτρο, αλλάζει ο τρόπος λειτουργίας ως εξής.
ΡΥΘΜΙΣΗ ΘΕΡΜΟΚΡΑΣΙΑΣ ΔΩΜΑΤΙΟΥ
2
Επάνω
Κάτω
ñ Η λειτουργία ψύξης δεν ξεκινά, εάν η ρύθμιση
θερμοκρασίας είναι υψηλότερη από την τρέχουσα
θερμοκρασία δωματίου.
Θερμοκρασία δωματίου: άνω
των 16˚C
ΘΕΡΜΑΝΣΗ
ΑΦΥΓΡΑΝΣΗ
ΨΥΞΗ
Συνιστώμενη θερμοκρασία
Θερμανση 20~24˚C
Αφυγρανση 20~26˚C
Ψυξη 25~28˚C
Θερμοκρασία εξωτερικών
χώρων άνω των 21˚C
L.H
L.H
Eλληνικά
ΡΥΘΜΙΣΗ ΤΑΧΥΤΗΤΑΣ ΑΝΕΜΙΣΤΗΡΑ
3
ñ Κάθε φορά που πατάτε το πλήκτρο, αλλάζει η ταχύτητα ανεμιστήρα
με την εξής σειρά.
ñ
ΘΕΡΜΑΝΣΗ }
:
ΨΥΞΗ
ñ
ΑΦΥΓΡΑΝΣΗ :
Πατήστε το πλήκτρο
4
ñ Η λειτουργία σταματάει με έναν
SILENT
(ΔΙΑΚΟΠΗ)
βραχύ ήχο (μπιπ).
L.H
POWERFUL
SILENT
L.H
– 27 –
Page 59

ΑΠΟΘΗΚΕΥΣΗ ΡΥΘΜΙΣΕΩΝ ΧΡΟΝΟΔΙΑΚΟΠΤΗ
Διατίθενται ο Χρονοδιακόπτης ΕΝΕΡΓΟΠΟΙΗΣΗΣ και ο Χρονοδιακόπτης ΑΠΕΝΕΡΓΟΠΟΙΗΣΗΣ.
Αποθήκευση των Ρυθμίσεων του χρονοδιακόπτη
Ρύθμιση ΧΡΟΝΟ ΑΠΕΝΕΡΓΟΠΟΙΗΣΗΣ
1
ñ Επιλέξτε τον ΧΡΟΝΟ ΑΠΕΝΕΡΓΟΠΟΙΗΣΗΣ πατώντας
το Πλήκτρο
ñ Ο χρόνος ρύθμισης θα αλλάξει σύμφωνα με την
παρακάτω σειρά όταν πατήσετε το πλήκτρο.
(ΑΠΕΝΕΡΓΟΠΟΙΗΣΗ).
Μεσοδιάστημα 1 ώρας
Απενεργοποίηση χρονοδιακόπτη
Η λειτουργία σταματά στον χρόνο ρύθμισης
L.H
Ρύθμιση
2
ñ Επιλέξτε τον ΧΡΟΝΟ ΕΝΕΡΓΟΠΟΙΗΣΗΣ πατώντας το
Πλήκτρο
ñ Ο χρόνος ρύθμισης θα αλλάξει σύμφωνα με την
παρακάτω σειρά όταν πατήσετε το πλήκτρο.
ΧΡΟΝΟ ΕΝΕΡΓΟΠΟΙΗΣΗΣ
(ΕΝΕΡΓΟΠΟΙΗΣΗ).
L.H
Μεσοδιάστημα 1 ώρας
Ενεργοποιηση χρονοδιακόπτη
ΛΕΙΤΟΥΡΓΙΑ POWERFUL
•
Πατώντας το κουμπί (POWERFUL) κατά τη διάρκεια των λειτουργιών ΑΥΤΟΜΑΤΗ, ΘΕΡΜΑΝΣΗΣ,
ΑΦΥΓΡΑΝΣΗΣ,ΨΥΞΗΣ ή ΑΝΕΜΙΣΤΗΡΑ, το κλιματιστικό λειτουργεί στη μέγιστη ισχύ.
•
Κατά τη διάρκεια της λειτουργίας POWERFUL, η εσωτερική μονάδα του κλιματιστικού θα απελευθερώνει ψυχρότερο
ή θερμότερο αέρα στη λειτουργία ΨΥΞΗΣ και ΘΕΡΜΑΝΣΗΣ, αντίστοιχα.
Πατήστε το κουμπί (POWERFUL) κατά τη διάρκεια της λειτουργίας.
•
L.H
START
Προβάλλεται “ ” στην οθόνη LCD.
Η λειτουργία POWERFUL τελειώνει σε 20 λεπτά. Στη συνέχεια, το σύστημα
περνάει αυτόματα στη λειτουργία που είχε οριστεί πριν την λειτουργία POWERFUL.
CANCEL
ΣΗΜΕΙΩΣΗ
• Όταν επιλεγεί λειτουργία ECO ή λειτουργία LEAVE HOME, τότε η λειτουργία POWERFUL ακυρώνεται.
• Κατά τη διάρκεια της λειτουργίας POWERFUL, η απόδοση του κλιματιστικού δεν αυξάνεται
- εάν το κλιματιστικό λειτουργεί ήδη στη μέγιστη δυνατή απόδοση.
- αμέσως πριν τη λειτουργία απόψυξης (όταν το κλιματιστικό βρίσκεται σε λειτουργία ΘΕΡΜΑΝΣΗΣ).
• Μετά από την αυτόματη επανεκκίνηση, η λειτουργία POWERFUL ακυρώνεται και αρχίζει η προηγούμενη
λειτουργία.
Πατήστε ξανά το κουμπί (POWERFUL).
“ ”
• Το
εξαφανίζεται από την οθόνη LCD.
– 2 8 –
Page 60

ȁǼǿȉȅȊȇīǿǹ³/($9(+20(´/+
Εμποδίζει την υπερβολική πτώση της θερμοκρασίας δωματίου ρυθμίζοντας αυτόματα τη θερμοκρασία στους 10
βαθμούς όταν δεν βρίσκεται κανένας στο σπίτι.
Κρατήστε πατημένο το κουμπί ΘΕΡΜΑΝΣΗ για 3-5
START
/+
CANCEL
ΣΗΜΕΙΩΣΗ
δευτερόλεπτα για να εκκινήσετε τη λειτουργία LEAVE HOME.
Η θερμοκρασία δωματίου ρυθμίζεται αυτόματα στους 10 βαθμούς.
t
t
Προβάλλονται τα“ ”,“ LH ”,“ ”,“ ”,στην οθόνη LCD.
Πατήστε το κουμπί (ΔΙΑΚΟΠΗ).
Επιλέξτε έναν διαφορετικό Τρόπο Λειτουργίας.
● ȀĮIJȐIJȘȜİȚIJȠȣȡȖȓĮ³/($9(+20(´ȘIJĮȤȪIJȘIJĮĮȞİȝȚıIJȒȡĮțĮȚȘșȑıȘIJȠȣȠȡȚȗȩȞIJȚȠȣțĮIJİȣșȣȞIJȒȡĮ
ĮȑȡĮİȓȞĮȚĮȝİIJȐȕȜȘIJİȢ
Eλληνικά
– 29 –
Page 61

ΛΕΙΤΟΥΡΓΙΑ ECO
Θα αρχίσει η λειτουργία εξοικονόμησης ενέργειας, αλλάζοντας την ρυθμισμένη θερμοκρασία και περιορίζοντας τη
μέγιστη τιμή κατανάλωσης ενέργειας.
Πατώντας το κουμπί (ECO) κατά τη διάρκεια των
λειτουργιών Αυτόματη, θέρμανσης,αφύγρανσης
και ψύξης, το κλιματιστικό περνάει σε
λειτουργία "ECO".
Πατήστε το κουμπί (ECO) κατά τη λειτουργία.
Προβάλλεται " " στην οθόνη LCD.
L.H
START
CANCEL
Η λειτουργία εξοικονόμησης ενέργειας αρχίζει
αυξάνοντας ή μειώνοντας τη θερμοκρασία,
ελαττώνοντας την κατανάλωση ενέργειας λειτουργίας.
Πατήστε το κουμπί (ΈΝΑΡΞΗ/ΔΙΑΚΟΠΗ).
Πατήστε το κουμπί (ECO) ξανά.
Το " " εξαφανίζεται από την οθόνη LCD.
ΣΗΜΕΙΩΣΗ
Σε περίπτωση που η κατανάλωση ενέργειας είναι ήδη χαμηλή, η λειτουργία ECO δεν πρόκειται
να μειώσει την κατανάλωση ενέργειας.
Πατώντας το κουμπί (POWERFUL), η λειτουργία ECO ακυρώνεται.
Μετά την αυτόματη επανεκκίνηση, η λειτουργία ECO ακυρώνεται και αρχίζει η προηγούμενη λειτουργία.
– 30 –
Page 62

ΠΡΟΣΑΡΜΟΓΗ ΤΗΣ ΚΑΤΕΥΘΥΝΣΗΣ ΡΟΗΣ ΤΟΥ ΑΕΡΑ
Προσαρμογή της ροή του αέρα προς τα πάνω και προς τα κάτω.
1
Ανάλογα με τη λειτουργία, ο οριζόντιος ανακλαστήρας αέρα ρυθμίζεται
αυτόματα στη σωστή γωνία που είναι κατάλληλη για κάθε λειτουργία. Ο
ανακλαστήρας μπορεί να περιστραφεί προς τα επάνω και προς τα κάτω
και επίσης να ρυθμιστεί στην επιθυμητή γωνία χρησιμοποιώντας το
πλήκτρο “
ñ ∞Ó ·Ù‹ÛÂÙ ̛· ÊÔÚ¿ ÙÔ ÎÔ˘Ì› “
∫π¡∏™∏ ¶∂ƒ™π¢ш¡)”, ФИ ФЪИ˙fiУЩИВ˜ ВЪЫ›‰В˜ ОИУФ‡УЩ·И
Ы˘УВ¯Т˜ В¿Уˆ О·И О¿Щˆ. ∞У ·Щ‹ЫВЩВ Н·У¿ ЩФ ОФ˘М›, ФИ
ВЪЫ›‰В˜ ЫЩ·М·ЩФ‡У ЫЩЛ ı¤ЫЛ ЫЩЛУ ФФ›· ‚Ъ›ЫОФУЩ·И. яЫˆ˜
Ъ¤ВИ У· ВЪ¿ЫФ˘У МВЪИО¿ ‰В˘ЩВЪfiПВЩ· (ВЪ›Ф˘ 6) БИ·
У· ·Ъ¯›ЫФ˘У У· ОИУФ‡УЩ·И ФИ ВЪЫ›‰В˜.
ñ Το εύρος προσαρμογής του οριζόντιου κετευθυντήρα αέρα
φαίνεται στη δεξιά εικόνα.
ñ ŸЩ·У ЫЩ·М·Щ‹ЫВИ У· ПВИЩФ˘ЪБВ› ЩФ ОПИМ·ЩИЫЩИОfi, ФИ ФЪИ˙fiУЩИВ˜
ВЪЫ›‰В˜ ОИУФ‡УЩ·И О·И ЫЩ·М·ЩФ‡У ЫЩЛ ı¤ЫЛ Ф˘ ‚Ъ›ЫОФУЩ·И
fiЩ·У ОПВ›УВИ Л ¤НФ‰Ф˜ ·¤Ъ·.
(ΑΥΤΟΜΑΤΗ ΠΕΡΙΣΤΡΟΦΗ)”.
(∞ÀΔ√ª∞Δ∏
ŸÙ·Ó „‡¯ÂÈ
οÓÔÓÙ·˜
·Ê‡ÁÚ·ÓÛË
οριζόντιας
Á˘Úˆ ÛÙÔ˘˜ 10Æ
Á˘Úˆ ÛÙÔ˘˜ 40Æ
ŸÙ·Ó ıÂÚÌ·›ÓÂÈ
οριζόντιας
¶ƒ√™√Ã∏
ñ ™В ПВИЩФ˘ЪБ›· “ж‡НЛ˜”, МЛУ ·К‹УВЩВ ЩИ˜ ФЪИ˙fiУЩИВ˜ ВЪЫ›‰В˜
У· ВОЩВПФ‡У ·ПИУ‰ЪФМИО‹ О›УЛЫЛ БИ· МВБ¿ПФ ¯ЪФУИОfi
‰И¿ЫЩЛМ·. ªФЪВ› У· Ы¯ЛМ·ЩИЫЩВ› ˘БЪ·Ы›· ЫЩИ˜ ФЪИ˙fiУЩИВ˜
ВЪЫ›‰В˜ О·И У· ЫЩ¿НВИ УВЪfi.
Προσαρμογή της ροής του αέρα προς τα αριστερά και προς τα δεξιά.
2
Κρατήστε τον κατακόρυφο κατευθυντήρα όπως φαίνεται στη δεξιά εικόνα,
για να προσαρμόσετε τη ροή του αέρα προς τα αριστερά και προς τα
δεξιά
.
∞§§∞°∏ ª¶∞Δ∞ƒπø¡ ™Δ√ Δ∏§∂Ã∂πƒπ™Δ∏ƒπ√
∞Ê·ÈÚ¤ÛÙ ÙÔ Î¿Ï˘ÌÌ· fiˆ˜ ‰Â›¯ÓÂÈ Ë ÂÈÎfiÓ· Î·È ‚Á¿ÏÙ ÙȘ
1
·ÏȤ˜ ̷ٷڛ˜.
ΔÔÔıÂÙ‹ÛÙ ηÈÓÔ‡ÚÁȘ ̷ٷڛ˜.
2
√È fiÏÔÈ ÙˆÓ Ì·Ù·ÚÈÒÓ Ú¤ÂÈ Ó· Â›Ó·È ÙÔÔıÂÙË̤ÓÔÈ fiˆ˜
˘Ô‰ÂÈÎÓ‡Ô˘Ó Ù· ÛËÌ¿‰È· ÛÙË ı‹ÎË.
Á˘Úˆ ÛÙÔ˘˜ 10Æ
Á˘Úˆ ÛÙÔ˘˜ 45Æ
¶È¤ÛÙÂ Î·È ÙÚ·‚‹ÍÙ ÚÔ˜ ÙËÓ
ηÙ‡ı˘ÓÛË Ô˘ ‰Â›¯ÓÂÈ ÙÔ ‚¤ÏÔ˜.
Eλληνικά
¶ƒ√™√Ã∏
1. ªЛУ ¯ЪЛЫИМФФИВ›ЩВ ·ПИ¤˜ О·И О·ИУФ‡ЪБИВ˜ М·Щ·Ъ›В˜ М·˙› Ф‡ЩВ
М·Щ·Ъ›В˜ ‰И·КФЪВЩИОФ‡ Щ‡Ф˘.
2. ∞У ‰ВУ ЪfiОВИЩ·И У· ¯ЪЛЫИМФФИ‹ЫВЩВ ЩФ ЩЛПВ¯ВИЪИЫЩ‹ЪИФ БИ· 2 ‹ 3
М‹УВ˜, ‚Б¿ПЩВ ЩИ˜ М·Щ·Ъ›В˜.
– 3 1 –
Page 63

MEMO
......................................................................................................................................................................................
......................................................................................................................................................................................
......................................................................................................................................................................................
......................................................................................................................................................................................
......................................................................................................................................................................................
......................................................................................................................................................................................
......................................................................................................................................................................................
......................................................................................................................................................................................
......................................................................................................................................................................................
......................................................................................................................................................................................
......................................................................................................................................................................................
......................................................................................................................................................................................
......................................................................................................................................................................................
......................................................................................................................................................................................
......................................................................................................................................................................................
......................................................................................................................................................................................
......................................................................................................................................................................................
......................................................................................................................................................................................
......................................................................................................................................................................................
......................................................................................................................................................................................
......................................................................................................................................................................................
......................................................................................................................................................................................
......................................................................................................................................................................................
......................................................................................................................................................................................
......................................................................................................................................................................................
......................................................................................................................................................................................
......................................................................................................................................................................................
......................................................................................................................................................................................
......................................................................................................................................................................................
......................................................................................................................................................................................
......................................................................................................................................................................................
......................................................................................................................................................................................
......................................................................................................................................................................................
......................................................................................................................................................................................
......................................................................................................................................................................................
......................................................................................................................................................................................
......................................................................................................................................................................................
......................................................................................................................................................................................
......................................................................................................................................................................................
– 3 2 –
Page 64

™À¡Δ∏ƒ∏™∏
¶ƒ√™√Ã∏
√ О·ı·ЪИЫМfi˜ О·И Л Ы˘УЩ‹ЪЛЫЛ Ъ¤ВИ У· ВОЩВПФ‡УЩ·И МfiУФ ·fi ¤МВИЪФ ЪФЫˆИОfi. ¶ЪИУ ЩФУ О·ı·ЪИЫМfi, ЫЩ·М·Щ‹ЫЩВ
ЩЛ ПВИЩФ˘ЪБ›· О·И Ы‚‹ЫЩВ ЩФ ‰И·ОfiЩЛ ЪВ‡М·ЩФ˜.
1. ºπ§Δƒ√ ∞∂ƒ∞
Καθαρίζετε το φίλτρο κάθε δύο εβδομάδες. ŒЩЫИ, ВНФИОФУФМВ›ЩВ ВУ¤ЪБВИ·. ™В ВЪ›ЩˆЫЛ Ф˘ ЩФ К›ПЩЪФ ·¤Ъ· В›У·И
БВМ¿ЩФ ЫОfiУЛ, Л ЪФ‹ ЩФ˘ ·¤Ъ· МВИТУВЩ·И О·И Л ·fi‰ФЫЛ „‡НЛ˜ ¤КЩВИ. ∂ИП¤ФУ, МФЪВ› У· ·ОФ‡БВЩ·И О·И ıfiЪ˘‚Ф˜.
∫·ı·Ъ›˙ВЩВ ЩФ К›ПЩЪФ ·ОФПФ˘ıТУЩ·˜ ¿УЩ· ЩЛУ ·Ъ·О¿Щˆ ‰И·‰ИО·Ы›·.
¢È·‰Èηۛ·
∞УФ›НЩВ ЪФЫВОЩИО¿ ЩФ МЪФЫЩИУfi П·›ЫИФ О·И ·К·ИЪ¤ЫЩВ
1
ÙÔ Ê›ÏÙÚÔ.
∞ÔÌ·ÎÚ‡ÓÂÙ ÙË ÛÎfiÓË ·fi ÙÔ Ê›ÏÙÚÔ ·¤Ú· Ì ÌÈ·
2
ЛПВОЩЪИО‹ ЫОФ‡·. ∞У ˘¿Ъ¯ВИ ˘ВЪ‚ФПИО‹ ЫОfiУЛ,
П‡УВЩВ ЩФ К›ПЩЪФ МВ ‰И¿П˘М· ·ФЪЪ˘·УЩИОФ‡ О·И
НВП‡УВЩВ О·П¿. ªВЩ¿, ·К‹ЫЩВ ЩФ У· ЫЩВБУТЫВИ
ЩВПВ›ˆ˜ ЫЩЛ ЫОИ¿.
TEMPORARY
SWITCH
TEMPORARY
SWITCH
ñ ΔÔÔıÂÙ‹ÛÙ ÙÔ Ê›ÏÙÚÔ ÛÙËÓ ·Ú¯È΋ ÙÔ˘ ı¤ÛË Ì ÙËÓ
3
¤Ó‰ÂÈÍË “FRONT” ÛÙÚ·Ì̤ÓË ÚÔ˜ ÙÔ Ì¤ÚÔ˜ Û·˜.
ñ ∞КФ‡ ЩФФıВЩ‹ЫВЩВ Щ· К›ПЩЪ·, И¤ЫЩВ ЩФ МЪФЫЩИУfi
TEMPORARY
SWITCH
Ï·›ÛÈÔ ÛÙ· ÛËÌ›· Ô˘ ‰Â›¯ÓÔ˘Ó Ù· ÙÚ›· ‚¤ÏË ÛÙËÓ
ÂÈÎfiÓ· Î·È ÎÏ›ÛÙ ÙÔ.
¶ƒ√™√Ã∏
ñ ªЛУ ЩФ П¤УВЩВ МВ ˙ВЫЩfi УВЪfi ЫВ ıВЪМФОЪ·Ы›· МВБ·П‡ЩВЪЛ ·fi 40ЖC. ΔФ К›ПЩЪФ МФЪВ› У· М·˙¤„ВИ О·И У·
ηٷÛÙÚ·Ê›.
ñ ŸЩ·У ЩФ П¤УВЩВ, ЩИУ¿НЩВ ЩВПВ›ˆ˜ Щ· УВЪ¿ О·И ·К‹ЫЩВ ЩФ У· ЫЩВБУТЫВИ ЫЩЛ ЫОИ¿. ªЛУ ЩФ ·К‹ЫВЩВ ВОЩВıВИМ¤УФ
ÛÙÔÓ ‹ÏÈÔ. ªÔÚ› Ó· Ì·˙¤„ÂÈ Î·È Ó· ηٷÛÙÚ·Ê›.
ñ ªЛУ ı¤ЫВЩВ ЫВ ПВИЩФ˘ЪБ›· ЩЛ МФУ¿‰· ¯ˆЪ›˜ ЩФ К›ПЩЪФ. А¿Ъ¯ВИ О›У‰˘УФ˜ ‚П¿‚Л˜.
– 36 –
Page 65

2. ∫∞£∞ƒπ™ª√™ ∆√À ª¶ƒ√™∆π¡√À ¶§∞π™π√À
ñ ∞К·ИЪ¤ЫЩВ ЩФ МЪФЫЩИУfi П·›ЫИФ О·И П‡УЩВ ЩФ МВ
О·ı·Ъfi УВЪfi.
ГЪЛЫИМФФИ‹ЫЩВ ¤У· М·П·Оfi ЫКФ˘ББ¿ЪИ.
ªФЪВ›ЩВ У· ¯ЪЛЫИМФФИ‹ЫВЩВ ¤У· М·П·Оfi ·ФЪЪ˘·УЩИОfi
О·И МВЩ¿ У· НВП‡УВЩВ МВ ¿КıФУФ УВЪfi.
ñ ∞У ЩФ МЪФЫЩИУfi П·›ЫИФ ‰ВУ ·К·ИЪВ›Щ·И, ЫОФ˘›ЫЩВ
ЩФ МВ ¤У· М·П·Оfi, ЫЩВБУfi ·У›. ™ОФ˘›ЫЩВ ЩФ
ЩЛПВ¯ВИЪИЫЩ‹ЪИФ О·П¿ МВ ¤У· М·П·Оfi, ЫЩВБУfi ·У›.
ñ ™ОФ˘›ЫЩВ ЪФЫВОЩИО¿ ЩФ УВЪfi.
∞У ·Ъ·МВ›УВИ ˘БЪ·Ы›· ЫЩ· П·М¿ОИ· ‹ ЫЩФ ‰¤ОЩЛ
Ы‹М·ЩФ˜ ЩЛ˜ ВЫˆЩВЪИО‹˜ МФУ¿‰·˜, МФЪВ› У·
‰ЛМИФ˘ЪБЛıВ› Ъfi‚ПЛМ·.
∆ЪfiФ˜ ·К·›ЪВЫЛ˜ ЩФ˘ МЪФЫЩИУФ‡ П·ИЫ›Ф˘.
∫Ъ·Щ¿ЩВ ЩФ МЪФЫЩИУfi П·›ЫИФ О·И МВ Щ· ‰˘Ф Ы·˜ ¯¤ЪИ·
fiЩ·У ЩФ ‚Б¿˙ВЩВ О·И ЩФ ‚¿˙ВЩВ ЫЩЛ ı¤ЫЛ ЩФ˘.
∞К·›ЪВЫЛ ЩФ˘ МЪФЫЩИУФ‡ П·ИЫ›Ф˘
∆ФФı¤ЩЛЫЛ ЩФ˘ МЪФЫЩИУФ‡ П·ИЫ›Ф˘
°ÏÒÛÛ·
∆Ú‡·
с ∞КФ‡ ¤¯ВЩВ ·УФ›НВИ ЩФ МЪФЫЩИУfi П·›ЫИФ О·И ЩФ ОЪ·Щ¿ЩВ
Ì ٷ ‰˘Ô Û·˜ ¯¤ÚÈ·, ȤÛÙ ÛÙË ‰ÂÍÈ¿ ÏÂ˘Ú¿ ÁÈ· Ó·
··ÛÊ·Ï›ÛÂÈ Î·È ·ÊÔ‡ ÙÔ ÎÏ›ÛÂÙ ϛÁÔ, ÙÚ·‚‹ÍÙ ÙÔ
ñ ªВЩ·ОИУ‹ЫЩВ ЩИ˜ БПТЫЫВ˜ ЩФ˘ ‚Ъ·¯›ФУ· ЩЛ˜
·ЪИЫЩВЪ‹˜ О·И ‰ВНИ¿˜ ПВ˘Ъ¿˜ М¤Ы· ЫЩФ˘˜ Ф‰ЛБФ‡˜
ЩЛ˜ МФУ¿‰·˜ О·И ‚¿ПЩВ ЩИ˜ ЫЩИ˜ ЩЪ‡В˜.
ÚÔ˜ ÙÔ Ì¤ÚÔ˜ Û·˜ ÁÈ· Ó· ‚ÁÂÈ ·fi ÙË ı¤ÛË ÙÔ˘.
¶ƒ√™√Ã∏
ñ ªËÓ ¯‡ÓÂÙÂ Î·È ÌËÓ Ï¤ÓÂÙ Ì ÓÂÚfi ÙË ÌÔÓ¿‰· fiÙ·Ó ÙËÓ Î·ı·Ú›˙ÂÙ ÁÈ·Ù›
МФЪВ› У· ЪФОПЛıВ› ‚Ъ·¯˘О‡ОПˆМ·.
ñ ªЛУ ¯ЪЛЫИМФФИВ›ЩВ ˙ВЫЩfi УВЪfi (¿Уˆ ·fi 40ЖC), ‚ВУ˙›УЛ, ФН¤·, ПВИ·УЩИО¿ ‹
‚Ô‡ÚÙÛ·, ÁÈ·Ù› ˘¿Ú¯ÂÈ Î›Ó‰˘ÓÔ˜ Ó· ηٷÛÙÚ·ÊÔ‡Ó ÔÈ Ï·ÛÙÈΤ˜ ÂÈÊ¿ÓÂȘ ηÈ
ÙÔ ¯ÚÒÌ· Ù˘ ÌÔÓ¿‰·˜.
3. ΣΥΝΤΗΡΗΣΗ ΠΡΙΝ ΑΠΟ ΤΗ ΜΕΓΑΛΗ ΠΕΡΙΟΔΟ ΑΠΕΝΕΡΓΟΠΟΙΗΣΗΣ
°ÏÒÛÛ·
∆Ú‡·
Eλληνικά
A
B
E
N
C
E
Z
I
N
D
T
R
H
E
I
N
I
N
ñ Λειτουργήστε τη μονάδα στον τρόπο λειτουργίας ΨΥΞΗ
σε θερμοκρασία 32°C και με ΥΨΗΛΗ ταχύτητα ανεμιστήρα για
περίπου μισή ημέρα, όπου επικρατούν καλές συνθήκες, και
στεγνώστε ολόκληρη τη μονάδα.
ñ Aπoσuvδέστε το καλώδιο ρεύματος. 'H κλείστε τοv
ασφαλειοδιακόπτη.
,
Ροή αέρα
– 37 –
Page 66

¶§∏ƒ√º√ƒπ∂™
∞¶√¢√™∏
£ÂÚÌ·ÓÙÈ΋ ·fi‰ÔÛË
с ∞˘Щfi ЩФ ОПИМ·ЩИЫЩИОfi ‰ˆМ·Щ›Ф˘ ¯ЪЛЫИМФФИВ› ¤У· Ы‡ЫЩЛМ· ·УЩП›·˜
ıВЪМfiЩЛЩ·˜ Ф˘ ·ФЪЪФК¿ ВНˆЩВЪИО‹ ıВЪМfiЩЛЩ· О·И ЩЛ ‰ИФ¯ВЩВ‡ВИ ЫВ ¤У·
¯ТЪФ ЪФОВИМ¤УФ˘ У· ЩФУ ıВЪМ¿УВИ. ŸЩ·У Л ВНˆЩВЪИО‹ ıВЪМФОЪ·Ы›· ¤КЩВИ,
МВИТУВЩ·И О·И Л ıВЪМ·УЩИО‹ ИО·УfiЩЛЩ· ЩЛ˜ Ы˘ЫОВ˘‹˜. ™ЩЛУ ВЪ›ЩˆЫЛ ·˘Щ‹,
ЩФ Ы‡ЫЩЛМ· ·У·ЫЩЪФК¤· (inverter) ·ЪВМ‚·›УВИ О·И ·˘Н¿УВИ ЩЛУ Щ·¯‡ЩЛЩ·
ВЪИЫЩЪФК‹˜ ЩФ˘ Ы˘МИВЫЩ‹ ТЫЩВ У· ·ФЩЪ·В› Л МВ›ˆЫЛ ЩЛ˜ ıВЪМ·УЩИО‹˜
ИО·УfiЩЛЩ·˜. ∞У Л ıВЪМ·УЩИО‹ ·fi‰ФЫЛ ЩЛ˜ Ы˘ЫОВ˘‹˜ ВН·ОФПФ˘ıВ› У· МЛУ В›У·И
ИО·УФФИЛЩИО‹, Ъ¤ВИ У· ¯ЪЛЫИМФФИ‹ЫВЩВ О·И ¿ППВ˜ Ы˘ЫОВ˘¤˜ ı¤ЪМ·УЫЛ˜.
ñ ΔФ ОПИМ·ЩИЫЩИОfi ¯ЪВИ¿˙ВЩ·И ·ЪОВЩfi ¯ЪfiУФ БИ· У· ˙ВЫЩ¿УВИ ФПfiОПЛЪФ ЩФ ‰ˆМ¿ЩИФ. ∂У‰В›ОУ˘Щ·И У· ¯ЪЛЫИМФФИВ›ЩВ
ЩЛ ПВИЩФ˘ЪБ›· ЩФ˘ ¯ЪФУФ‰И·ОfiЩЛ ТЫЩВ У· ЪФıВЪМ·УıВ› Ф ¯ТЪФ˜ ЪИУ ЩЛУ ВИı˘МЛЩ‹ ТЪ·.
∞fi‰ÔÛË „‡Í˘ Î·È ·Ê‡ÁÚ·ÓÛ˘
ñ ∞Ó Ë ıÂÚÌfiÙËÙ· ÛÙÔ ‰ˆÌ¿ÙÈÔ ˘ÂÚ‚·›ÓÂÈ ÙËÓ „˘ÎÙÈ΋ ÈηÓfiÙËÙ· Ù˘ ÌÔÓ¿‰·˜ (fiÙ·Ó ÁÈ· ·Ú¿‰ÂÈÁÌ· ˘¿Ú¯Ô˘Ó
ФПП¿ ¿ЩФМ· ЫЩФ ‰ˆМ¿ЩИФ ‹ ¯ЪЛЫИМФФИФ‡УЩ·И Ы˘ЫОВ˘¤˜ ı¤ЪМ·УЫЛ˜), ЩfiЩВ ›Ыˆ˜ ‰ВУ ВИЩВ˘¯ıВ› Л Ъ˘ıМИЫМ¤УЛ
ıВЪМФОЪ·Ы›· ‰ˆМ·Щ›Ф˘.
¶ƒ√™√Ã∏
ªЛУ ЩФФıВЩВ›ЩВ
ЛПВОЩЪИО¤˜ ОФ˘˙›УВ˜
‹ ¿ППВ˜ Ы˘ЫОВ˘¤˜
Ф˘ ·Ъ¿БФ˘У ˘„ЛП‹
ıВЪМfiЩЛЩ· ОФУЩ¿ ЫЩЛУ
ВЫˆЩВЪИО‹ МФУ¿‰·.
∞¶∞°√ƒ∂À∂Δ∞π
– 38 –
Page 67

∆∞∫∆π∫√™ ∂§∂°Ã√™
∂§∂°Ã∂∆∂ ∆∞ ¶∞ƒ∞∫∞∆ø ™∏ª∂π∞ ∫∞£∂ ∂•π ª∏¡∂™ ◊ ªπ∞ º√ƒ∞ ∆√ Ã√¡√. ∂¶π∫√π¡ø¡∏™∆∂ ª∂ ∆√¡
∞¡∆π¶ƒ√™ø¶√ ¶ø§∏™∏™ ∞¡ Ã∂π∞∑∂™∆∂ ∫∞¶√π∞ µ√∏£∂π∞.
∂ϤÁÍÙÂ Â¿Ó Á›ÓÂÈ ÛˆÛÙ¿ Ë Û‡Ó‰ÂÛË Ù˘ ÁÚ·ÌÌ‹˜
Á›ˆÛ˘.
1
∫π¡¢À¡√™
∞Ó Ë ÁÚ·ÌÌ‹ Á›ˆÛ˘ ·ÔÛ˘Ó‰Âı› ‹ ‰ÂÓ ¤¯ÂÈ Á›ÓÂÈ
ЫˆЫЩ¿, МФЪВ› У· ЪФОПЛıВ› ‚П¿‚Л ЫЩЛ Ы˘ЫОВ˘‹ ‹
ЛПВОЩЪФПЛН›·.
2
∫π¡¢À¡√™
Л ВНˆЩВЪИО‹ МФУ¿‰· Б¤ЪУВИ ‹ В›У·И ·ЫЩ·ı‹˜.
ªÔÚ› Ó· ¤ÛÂÈ ÚÔηÏÒÓÙ·˜ ÙÚ·˘Ì·ÙÈÛÌfi.
∂°°À∏™∏ ∫∞π ™À¡∆∏ƒ∏™∏ ª∂∆∞ ∆∏¡ ¶ø§∏™∏
√∆∞¡ ∫∞§∂π∆∂ °π∞ ∂¶π™∫∂À∏, ∂§∂°•∆∂ ∆∞ ¶∞ƒ∞∫∞∆ø ™∏ª∂π∞.
∫∞∆∞™∆∞™∏ ∂§∂°•∆∂ ∆∞ ¶∞ƒ∞∫∞∆ø ™∏ª∂π∞
∂ϤÁÍÙÂ Â¿Ó Ë ‚¿ÛË ÛÙ‹ÚÈ͢ ¤¯ÂÈ ÛÎÔ˘ÚÈ¿ÛÂÈ ‹ ¿Ó
∆Ф ЩЛПВ¯ВИЪИЫЩ‹ЪИФ ‰ВУ
ВО¤МВИ Ы‹М·.
(∏ ФıfiУЛ ЩФ˘ ЩЛПВ¯ВИЪИЫЩЛЪ›Ф˘
В›У·И ЫОФЩВИУ‹ ‹ ОВУ‹.)
∆Ф ОПИМ·ЩИЫЩИОfi ‰ВУ ПВИЩФ˘ЪБВ›.
∆Ф ОПИМ·ЩИЫЩИОfi ‰ВУ „‡¯ВИ О·П¿.
∆Ф ОПИМ·ЩИЫЩИОfi ‰ВУ ˙ВЫЩ·›УВИ О·П¿.
• √È Ì·Ù·Ú›Â˜ ¯ÚÂÈ¿˙ÔÓÙ·È ·ÓÙÈηٿÛÙ·ÛË;
• √È Ì·Ù·Ú›Â˜ ¤¯Ô˘Ó ÙÔÔıÂÙËı› ÛˆÛÙ¿ (Ì ÙË ÛˆÛÙ‹ ÔÏÈÎfiÙËÙ·);
• ∂›Ó·È Ë ·ÛÊ¿ÏÂÈ· ÂÓÙ¿ÍÂÈ;
• ª‹ˆ˜ Ë Ù¿ÛË Â›Ó·È Ôχ ˘„ËÏ‹ ‹ Ôχ ¯·ÌËÏ‹;
• ∂›У·И Ф ‰И·ОfiЩЛ˜ ЩЛ˜ ·ЫК¿ПВИ·˜ ·УФИОЩfi˜;
• ∂›Ó·È Û˘Ó‰Â‰Â̤ÓÔ ÛÙËÓ Ú›˙· ÙÔ Î·ÏÒ‰ÈÔ Ú‡̷ÙÔ˜;
• À¿Ú¯ÂÈ ‰È·ÎÔ‹ Ú‡̷ÙÔ˜;
• ª‹ˆ˜ ÙÔ Ê›ÏÙÚÔ ·¤Ú· Â›Ó·È ‚Ô˘ÏˆÌ¤ÓÔ ·fi ÛÎfiÓË;
• ∂›У·И ЫˆЫЩ¿ Ъ˘ıМИЫМ¤УЛ Л ıВЪМФОЪ·Ы›·;
• √И ФЪИ˙fiУЩИВ˜ ВЪЫ›‰В˜ ·¤Ъ· В›У·И Ъ˘ıМИЫМ¤УВ˜ ЫЩЛУ О·Щ¿ППЛПЛ
ı¤ЫЛ ·У¿ПФБ· МВ ЩФУ ВИПВБМ¤УФ ЩЪfiФ ПВИЩФ˘ЪБ›·˜;
• ª‹ˆ˜ ФИ В›ЫФ‰ФИ ‹ ФИ ¤НФ‰ФИ ·¤Ъ· ЩЛ˜ ВЫˆЩВЪИО‹˜ О·И ЩЛ˜ ВНˆЩВЪИО‹˜
ÌÔÓ¿‰·˜ Â›Ó·È ÌÏÔηÚÈṲ̂Ó˜;
• H Ъ‡ıМИЫЛ ЩЛ˜ Щ·¯‡ЩЛЩ·˜ ·УВМИЫЩ‹Ъ· В›У·И “ГAªH§H” ‹ “A£OƒАµH” ?
Eλληνικά
∆· ·Ъ·О¿Щˆ К·ИУfiМВУ· ‰ВУ ·ФЩВПФ‡У ВУ‰В›НВИ˜ ‚П¿‚Л˜ ЩЛ˜ МФУ¿‰·˜.
∫·Ù¿ ÙË ı¤ÚÌ·ÓÛË, ÙÔ Ï·Ì¿ÎÈ
ПВИЩФ˘ЪБ›·˜ ·У·‚ФЫ‚‹УВИ О·И
ЫЩ·М·Щ¿ У· ‚Б·›УВИ ·¤Ъ·˜
◊¯ÔÈ ÛÊ˘Ú›ÁÌ·ÙÔ˜
◊¯Ô˜ ÙÚÈ̷͛ÙÔ˜
◊¯Ô˜ ıÚÔ˝ÛÌ·ÙÔ˜
ªÂÙ·ÏÏÈÎfi˜ ‹¯Ô˜ (ÎÏÈÎ) £fiÚ˘‚Ô˜ ÙÔ˘ ÌÔÙ¤Ú Ù˘ ‚·Ï‚›‰·˜ fiÙ·Ó ·Ó¿‚ÂÈ Ë ÌÔÓ¿‰·.
<∂ОО›УЛЫЛ ПВИЩФ˘ЪБ›·˜>
∏ МФУ¿‰· ВЩФИМ¿˙ВЩ·И У· ‚Б¿ПВИ ˙ВЫЩfi ·¤Ъ·. ¶Ъ¤ВИ У· ВЪИМ¤УВЩВ.
<∫·Щ¿ ЩЛ ПВИЩФ˘ЪБ›·>
∏ ВНˆЩВЪИО‹ МФУ¿‰· ВОЩВПВ› ·fi„˘НЛ. ¶Ъ¤ВИ У· ВЪИМ¤УВЩВ.
£fiЪ˘‚ФИ Ф˘ ФКВ›ПФУЩ·И ЫЩЛ ЪФ‹ „˘ОЩИОФ‡ ЫЩИ˜ ЫˆПЛУТЫВИ˜ ‹ ıfiЪ˘‚Ф˜
Ф˘ ·Ъ¿БВЩ·И ·fi ЩЛ ‚·П‚›‰· fiЩ·У Ъ˘ıМ›˙ВЩ·И Л ЪФ‹.
£fiЪ˘‚Ф˜ Ф˘ ·Ъ¿БВЩ·И fiЩ·У Л МФУ¿‰· ‰И·ЫЩ¤ППВЩ·И ‹ Ы˘ЫЩ¤ППВЩ·И
ВН·ИЩ›·˜ ЩˆУ ·ПП·БТУ ЫЩЛ ıВЪМФОЪ·Ы›·.
£fiЪ˘‚Ф˜ Ф˘ ·Ъ¿БВЩ·И fiЩ·У ·˘Н¿УФУЩ·И ФИ ЫЩЪФК¤˜ ЩФ˘ ·УВМИЫЩ‹Ъ·
ЩЛ˜ ВЫˆЩВЪИО‹˜ МФУ¿‰·˜ О·ıТ˜ ·Ъ¯›˙ВИ Л ПВИЩФ˘ЪБ›·.
– 39 –
Page 68

( )
√͇˜ ‹¯Ô˜
£fiÚ˘‚Ô˜ ηٿ ÙËÓ ·ÏÏ·Á‹ Ù˘
ПВИЩФ˘ЪБ›·˜
™¯ËÌ·ÙÈÛÌfi˜ ÂÏ·ÊÚÈ¿˜ ÔÌ›¯Ï˘
∞ЩМfi˜ ‚Б·›УВИ ·fi ЩЛУ ВНˆЩВЪИО‹
ÌÔÓ¿‰·
√Ṳ̂˜
∏ ВНˆЩВЪИО‹ МФУ¿‰· Ы˘УВ¯›˙ВИ
У· ПВИЩФ˘ЪБВ› ·ОfiМЛ О·И ·КФ‡
ОПВ›ЫВЩВ ЩФ ОПИМ·ЩИЫЩИОfi.
∆Ф П·М¿ОИ ПВИЩФ˘ЪБ›·˜
·Ó·‚ÔÛ‚‹ÓÂÈ.
¢ÂÓ ÌÔÚ› Ó· ÂÈÙ¢¯ı› Ë
Ъ˘ıМИЫМ¤УЛ ıВЪМФОЪ·Ы›·
£fiЪ˘‚Ф˜ ЩФ˘ ·УВМИЫЩ‹Ъ· ВН·ВЪИЫМФ‡ Ф˘ ·ФЪЪФК¿ ЩФУ ·¤Ъ· Ф˘ ‚Ъ›ЫОВЩ·И ЫЩФ
ЫˆП‹У· ·ФЫЩЪ¿ББИЫЛ˜ О·И ВОЩФНВ‡ВИ ЩФ УВЪfi Ф˘ ¤¯ВИ М·˙В˘ЩВ› ЫЩФ Ы˘ПП¤ОЩЛ
Ы˘М˘ОУˆМ¿ЩˆУ. °И· ПВЩФМ¤ЪВИВ˜, ·В˘ı˘УıВ›ЩВ ЫЩФУ ·УЩИЪfiЫˆФ ТПЛЫЛ˜
Ù˘ Û˘Û΢‹˜.
√ ıfiЪ˘‚Ф˜ ПВИЩФ˘ЪБ›·˜ ·ПП¿˙ВИ ПfiБˆ МВЩ·‚ФПТУ ЩЛ˜ ИЫ¯‡Ф˜ ·У¿ПФБ· МВ ЩИ˜
·ПП·Б¤˜ ЫЩЛ ıВЪМФОЪ·Ы›· ‰ˆМ·Щ›Ф˘.
™¯ËÌ·Ù›˙ÂÙ·È ÌÈ· ÂÏ·ÊÚÈ¿ ÔÌ›¯ÏË Î·ıÒ˜ Ô ·¤Ú·˜ ÛÙÔ ‰ˆÌ¿ÙÈÔ „‡¯ÂÙ·È ·fiÙÔÌ·
·fi ÙÔÓ ÎÏÈÌ·ÙÈṲ̂ÓÔ ·¤Ú·.
∆Ф УВЪfi Ф˘ ·Ъ¿БВЩ·И ·fi ЩЛ ПВИЩФ˘ЪБ›· ·fi„˘НЛ˜ ВН·ЩМ›˙ВЩ·И О·И ·Ф‚¿ППВЩ·И
МВ ЩЛ МФЪК‹ ·ЩМТУ.
√КВ›ПФУЩ·И ЫЩИ˜ М˘Ъˆ‰И¤˜ О·И Щ· ЫˆМ·Щ›‰И· О·УФ‡, К·БЛЩТУ, О·ПП˘УЩИОТУ ОЩП.
Ф˘ ˘¿Ъ¯Ф˘У ЫЩФ ‰ˆМ¿ЩИФ, Щ· ФФ›· ¤Ъ¯ФУЩ·И ЫВ В·К‹ МВ ЩЛУ МФУ¿‰· О·И
‰ИФ¯ВЩВ‡ФУЩ·И О·И ¿ПИ ЫЩФ ¯ТЪФ.
°›УВЩ·И ·fi„˘НЛ (О·ıТ˜ ЫЩ·М·Щ¿ Л ПВИЩФ˘ЪБ›· ı¤ЪМ·УЫЛ˜, Ф МИОЪФВВНВЪБ·ЫЩ‹˜
‰И·ИЫЩТУВИ ЩЛ Ы˘ЫЫТЪВ˘ЫЛ ¿БФ˘ ЫЩЛУ ВНˆЩВЪИО‹ МФУ¿‰· О·И ‰›УВИ ВУЩФП‹ У·
Б›УВИ ·˘ЩfiМ·ЩЛ ·fi„˘НЛ, ВКfiЫФУ ¯ЪВИ¿˙ВЩ·И).
¢В›¯УВИ fiЩИ ВОЩВПВ›Щ·И ЪФı¤ЪМ·УЫЛ ‹ ·fi„˘НЛ.
∂¿У ЩФ ЪФЫЩ·ЩВ˘ЩИОfi О‡ОПˆМ· ‹ Ф ·ИЫıЛЩ‹Ъ·˜ ЪФı¤ЪМ·УЫЛ˜ ПВИЩФ˘ЪБВ› fiЩ·У
ОПВ›ЫВЩВ ЩЛ МФУ¿‰· ЫЩЛ ‰И¿ЪОВИ· ЩЛ˜ ЪФı¤ЪМ·УЫЛ˜ О·И МВЩ¿ ЩЛУ ·У¿„ВЩВ
Н·У¿, ‹ В¿У ·ПП¿НВЩВ ЩФУ ЩЪfiФ ПВИЩФ˘ЪБ›·˜ ·fi „‡НЛ ЫВ ı¤ЪМ·УЫЛ, ЩФ П·М¿ОИ
Ы˘УВ¯›˙ВИ У· ·У·‚ФЫ‚‹УВИ.
∏ Ъ·БМ·ЩИО‹ ıВЪМФОЪ·Ы›· ‰ˆМ·Щ›Ф˘ МФЪВ› У· ·ФОП›УВИ ВП·КЪТ˜ ·fi ЩЛУ ЩИМ‹
ЩЛ˜ ıВЪМФОЪ·Ы›·˜ ЫЩФ ЩЛПВ¯ВИЪИЫЩ‹ЪИФ О·И ·˘Щfi ВН·ЪЩ¿Щ·И ·fi ЩФУ ·ЪИıМfi ЩˆУ
·ЩfiМˆУ Ф˘ ‚Ъ›ЫОФУЩ·И ЫЩФ ‰ˆМ¿ЩИФ, ЩИ˜ ВЫˆЩВЪИО¤˜ О·И ВНˆЩВЪИО¤˜ Ы˘Уı‹ОВ˜
fiЩ·У ЩФ ОПИМ·ЩИЫЩИОfi ¯ЪЛЫИМФФИВ›Щ·И БИ· ВЪИЫЫfiЩВЪ· ·fi ¤У· ‰ˆМ¿ЩИ·.
•
Αν η μονάδα εξακολουθεί να μην
λειτουργεί κανονικά μετά τους
παραπάνω ελέγχους, κλείστε το
διακόπτη κυκλώματος και
επικοινωνήστε άμεσα με τον
αντιπρόσωπο πωλήσεων.
∂ИОФИУˆУ‹ЫЩВ ·М¤Ыˆ˜ МВ ЩФУ ·УЩИЪfiЫˆФ ·У
Ы˘М‚В› О¿ЩИ ·fi Щ· ·Ъ·О¿Щˆ:
• √ ‰È·ÎfiÙ˘ ·ÛÊ·Ï›·˜ ÎÏ›ÓÂÈ ‹ Ë ·ÛÊ¿ÏÂÈ· η›ÁÂÙ·È
Û˘¯Ó¿.
• ∏ ПВИЩФ˘ЪБ›· ЩФ˘ ‰И·ОfiЩЛ В›У·И ·ЫЩ·ı‹˜.
• •¤У· ·УЩИОВ›МВУ· ‹ УВЪfi ¤¯Ф˘У МВИ О·Щ¿ П¿ıФ˜ ЫЩФ ВЫˆЩВЪИОfi ЩЛ˜ МФУ¿‰·˜.
• ∆Ô Î·ÏÒ‰ÈÔ Ú‡̷ÙÔ˜ ˙ÂÛÙ·›ÓÂÙ·È ˘ÂÚ‚ÔÏÈο ‹ Ë ÌfiÓˆÛ‹ ÙÔ˘ Â›Ó·È Êı·Ṳ́ÓË
‹ ·ÔÁ˘Ìӈ̤ÓË.
• ∆Ф П·М¿ОИ ЩФ˘ ¯ЪФУФ‰И·ОfiЩЛ ЫЩЛУ ВЫˆЩВЪИО‹ МФУ¿‰· ·У·‚ФЫ‚‹УВИ.
∂Âȉ‹ Ë Ê‡ÛË ÙÔ˘ ÚÔ‚Ï‹Ì·ÙÔ˜ ÌÔÚ› Ó· ‰È·ÈÛÙˆı› ·fi ÙÔÓ ÙÚfiÔ Ô˘
·Ó·‚ÔÛ‚‹ÓÂÈ ÙÔ Ï·Ì¿ÎÈ, ÂϤÁÍÙ ÙÔ ¯ÚfiÓÔ Ô˘ ·Ú·Ì¤ÓÂÈ ·Ó·Ì̤ÓÔ Î·È
Û‚ËÛÙfi ÚÈÓ ÎÏ›ÛÂÙ ÙÔÓ ‰È·ÎfiÙË.Ù˘ ·ÛÊ¿ÏÂÈ·˜.
™ЛМВИТЫВИ˜
• ∫·Щ¿ ЩЛУ ‹ЪВМЛ ПВИЩФ˘ЪБ›· ЩФ˘ ОПИМ·ЩИЫЩИОФ‡ ‹ fiЩ·У ЩФ ОПВ›УВЩВ, МФЪВ› У·
·Ъ·ЩЛЪЛıФ‡У ВЪИЫЩ·ЫИ·О¿ Щ· ·Ъ·О¿Щˆ К·ИУfiМВУ·, Щ· ФФ›· fiМˆ˜ В›У·И
К˘ЫИФПФБИО¿.
• (1) ∂П·КЪfi˜ ıfiЪ˘‚Ф˜ ЪФ‹˜ „˘ОЩИОФ‡ ЫЩФУ О‡ОПФ „‡НЛ˜.
(2) ∂П·КЪfi˜ ıfiЪ˘‚Ф˜ ЩЪИН›М·ЩФ˜ ·fi ЩФ ВЪ›‚ПЛМ· ЩФ˘ ·УВМИЫЩ‹Ъ· ЩФ ФФ›Ф
„‡¯ВЩ·И О·И МВЩ¿ ıВЪМ·›УВЩ·И ЫЩ·‰И·О¿ О·ıТ˜ ЫЩ·М·Щ¿ Л ПВИЩФ˘ЪБ›·.
• ∂›У·И Иı·Уfi У· ·У·‰‡ВИ ФЫМ¤˜ ЩФ ОПИМ·ЩИЫЩИОfi. ∞˘Щfi Ы˘М‚·›УВИ ВВИ‰‹ ФИ
‰И¿КФЪВ˜ М˘Ъˆ‰И¤˜ ЩФ˘ ¯ТЪФ˘, Ф˘ ЪФ¤Ъ¯ФУЩ·И ·fi ЩФУ О·Уfi, Щ· К·БЛЩ¿,
Щ· О·ПП˘УЩИО¿ ОЩП., ·ФЪЪФКТУЩ·И ·fi ЩФ ОПИМ·ЩИЫЩИОfi. ∫·ı·Ъ›˙ВЩВ Щ·ОЩИО¿
ЩФ К›ПЩЪФ ·¤Ъ· О·И ЩФУ ВН·ЩМИЫЩ‹Ъ· БИ· У· ВЪИФЪИЫЩФ‡У ФИ ФЫМ¤˜.
• ∂ИОФИУˆУ‹ЫЩВ ·М¤Ыˆ˜ МВ ЩФУ ·УЩИЪfiЫˆФ В¿У ЩФ ОПИМ·ЩИЫЩИОfi ВН·ОФПФ˘ıВ› У· МЛУ ПВИЩФ˘ЪБВ› О·УФУИО¿ МВЩ¿ ЩФ˘˜
·Ъ·¿Уˆ ВП¤Б¯Ф˘˜. ∂УЛМВЪТЫЩВ ЩФУ ·УЩИЪfiЫˆФ БИ· ЩФ МФУЩ¤ПФ ЩФ˘ ОПИМ·ЩИЫЩИОФ‡ Ы·˜, ЩФУ ·ЪИıМfi ·Ъ·БˆБ‹˜ О·И
ЩЛУ ЛМВЪФМЛУ›· ВБО·Щ¿ЫЩ·ЫЛ˜. ∂›ЫЛ˜, ВУЛМВЪТЫЩВ ЩФУ Ы¯ВЩИО¿ МВ ЩЛ ‚П¿‚Л.
¶·Ъ·О·ПФ‡МВ ЫЛМВИТЫЩВ:
ŸЩ·У ‚¿˙ВЩВ ЫВ ПВИЩФ˘ЪБ›· ЩЛ Ы˘ЫОВ˘‹, ВИ‰ИО¿ fiЩ·У Ф КˆЩИЫМfi˜ ЩФ˘ ‰ˆМ·Щ›Ф˘ В›У·И ¯·МЛПfi˜, МФЪВ› У· ·Ъ·ЩЛЪЛıВ›
МИ· ВП·КЪИ¿ ‰И·О‡М·УЫЛ ЩЛ˜ КˆЩВИУfiЩЛЩ·˜. ∞˘Щfi ‰ВУ Ъ¤ВИ У· Ы·˜ ·УЛЫ˘¯‹ЫВИ.
√И О·УФУИЫМФ› ЩЛ˜ ¢∂∏ Ъ¤ВИ У· ЩЛЪФ‡УЩ·И.
– 40 –
Page 69

FRANÇAIS
CLIMATISEUR SPLIT
UNITÉ INTÉRIEURE/GROUPE EXTÉRIEUR
MODÈLES
RAS-E10HB/RAC-E10HB
RAS-E10HBG/RAC-E10HBG
RAS-E14HB/RAC-E14HB
RAS-E14HBG/RAC-E14HBG
GROUPE EXTÉRIEUR
RAC-E10HB
RAC-E10HBG
RAC-E14HB
RAC-E14HBG
Instruction manual Page 1~10
To obtain the best performance and ensure years of
trouble free use, please read this instruction manual
completely.
UNITÉ INTÉRIEURE
RAS-E10HB
RAS-E10HBG
RAS-E14HB
RAS-E14HBG
L.H
Οδηγίες χρήσης ™ÂÏ›‰· 27
°И· ЩЛУ О·П‡ЩВЪЛ ·fi‰ФЫЛ ЩФ˘ ОПИМ·ЩИЫЩИОФ‡ О·И БИ·
ЩЛУ М·ОЪФЪfiıВЫМЛ ¯Ъ‹ЫЛ ЩФ˘ ¯ˆЪ›˜ ЪФ‚П‹М·Щ·,
‰И·‚¿ЫЩВ ЪФЫВОЩИО¿ ·˘Щ¤˜ ЩИ˜ Ф‰ЛБ›В˜ ¯Ъ‹ЫЛ˜.
31~40
Manuale di istruzioni Pag. 11~20
Per garantire la migliore prestazione e la più lunga
durata leggere attentamente e interamente le seguanti
istruzioni.
Manual de instrucciones Página 21~30
Para obtener el mejor funcionamiento y asegurar años
de uso libre de problemas, lea cuidadosamente este
manual de instrucciones.
Cet appareil de conditionnement d’air pour locaux est destiné uniquement à l’usage des consommateurs.
Ne l’utilisez pas pour la conservation de produits alimentaires,animaux, plantes, machines de précision, objets d’art,
médicaments ou similaires.
Mode d’emploi Page 41~50
Des performances optimales et un fonctionnement à
long terme seront assurés en appliquant les présentes
instructions après avoir entièrement lu ce mode
d’emploi.
– 41 –
Page 70

CONSIGNES DE SÉCURITÉ
• Veuillezlireattentivementlesconsignesdesécuritéavantdemettreenservicel'appareilandel'utilisercorrectement.
• Portez une attention particulière aux mentions “ Avertissement” et “ Attention”.Lesmentions"Avertissement"
indiquentdespoints,quis'ilsnesontpasstrictementobservés,peuvententraînerlamortoudesblessuresgraves.
Lesmentions"Attention"indiquentdespointsquipeuvententraînerdegravesconséquencess'ilsnesontpascorrectementobservés.Veuillezobserverimpérativementtouteslesconsignespourgarantirvotresécurité.
• Lespictogrammesontlessignicationsindiquéesci-dessous.(Figurentci-dessousdesexemplesdesignalétique).
Indique les instructions à suivre.
Veuillez garder ce manuel après lecture.
•
PRÉCAUTIONS À OBSERVER LORS DE L'INSTALLATION
• Nepasmodierl'appareil.
Une fuite d'eau, une défaillance, un court-circuit ou un incendie peuvent résulter d'une
modicationquevousauriezeffectuée.
• Veuillezdemanderànotrereprésentantouàuntechnicienqualiéd'installervotreappareil.
Unefuited'eau,uncourt-circuitouunincendiepeuventseproduiresivouseffectuezvous-mêmel'installation.
AVERTISSEMENT
• Veuillezutiliserunelignedemiseàlaterre.
N'installez pas la ligne de mise à terre à proximité de canalisations d'eau ou de gaz, d'un
paratonnerreoudelalignedemiseàlaterred'untéléphone.Unemauvaiseinstallation
delalignedemiseàlaterrepeutentraînerdesdéchargesélectriquesouunincendie.
• VeillezàutiliserlatuyauteriespéciéepourlegazréfrigérantR410A.Sinon,ilpeuten
résulterunerupturedestuyauxencuivreouunedéfaillance.
• Undisjoncteurdoitêtreprévu,selonlelieudemontagedel'appareil.
Sansdisjoncteur,ilexisteunrisquededéchargeélectrique.
•
prendre feu.
ATTENTION
• Veillezàbieninstallerletuyaudevidangepourassurerunebonneévacuationdel'eau.
• Assurez-vousd'utiliserunealimentationélectriquede220V-230Vmonophasée.
L'utilisationd'unautre typed'alimentationélectriquepeut entraînerunesurchauffedes
composantsélectriquesetunincendie.
à proximité, le groupe extérieur risquerait de
AVERTISSEMENT
RACCORDEMENTDELA
LIGNEDEMISEÀLATERRE
AVERTISSEMENT
AVERTISSEMENT
PRÉCAUTIONS À OBSERVER LORS DU DÉPLACEMENT OU DE L'ENTRETIEN
Si une situation anormale survient (odeur de brûlé, par exemple), cessez
•
d’utiliser l’unité et coupez le disjoncteur. Contactez votre installateur. Si vous
continuez d’utiliser l’unité dans des conditions anormales,vous risquez de
provoquer une panne, un court-circuit ou un incendie.
AVERTISSEMENT
• Veuillezcontacterlerevendeuroudistributeurpourl'entretien.Unentretienquevousauriezmaleffectuévousmêmepeutentraînerdesdéchargesélectriquesetunincendie.
• Veuillezcontacterlerevendeuroudistributeursivoussouhaitezdéposeretréinstallerl'appareil.Desdéchargesélectriquesouunincendiepeuventseproduiresivouseffectuezvous-mêmeetdemanièrenonréglementaireladéposeetlaréinstallationdel'appareil.
PRÉCAUTIONS À OBSERVER LORS DE L'UTILISATION
• Pourvotresanté,évitezl'expositionprolongéeauuxd'airdirect.
• N'introduisezpasd'objetscommedestigesmincesdanslepanneaudelasoufanteou
lecôtéaspiration,leventilateuràhautevitesseàl'intérieurpouvantconstituerundanger.
AVERTISSEMENT
• N'utilisezpasdeconducteurcommeunlàfusible,cequipourraintcauserunaccident
AVERTISSEMENT
mortel.
• Encasd'orage,débranchezlacheélectriqueetmettezledisjoncteurhorscircuit.
"ARRÊT"
• Des bombesaérosoloud'autrescombustiblesnedoivent êtreapprochésà moinsd'un
mètredessortiesd'airoudel'unitéintérieureetdugroupeextérieur.
Lapressioninterned'unebombeaérosolpeutêtreaugmentéeparl'airchaudetuneexplosionpeutseproduire.
– 42 –
"ARRÊT"
AVERTISSEMENT
AVERTISSEMENT
AVERTISSEMENT
Page 71

PRECAUTIONS DURING OPERATION
• L'appareil doit être utilisé selon les indications du fabricant et non pas pour d'autres usages.
• Ne pas manipuler l'appareil avec les mains mouillées, ce qui peut provoquer un accident
ATTENTION À
L'HUMIDITÉ
• Lors de l'utilisation de l'appareil avec des équipements de combustion, aérer régulièrement la pièce pour éviter le manque d'oxygène.
AVERTISSEMENT
• Assurez-vous que le support de xation à l'extérieur est stable, solide et résistant.
En cas contraire, le groupe extérieur peut s'effondrer et entraîner un danger.
AVERTISSEMENT
• Ne pas poser de plantes directement en dessous du ux d'air, ce qui peut leur être défavorable.
mortel.
OBSERVER STRICTE-
MENT LES PRÉCAUTIONS
• Ne pas diriger l'air frais diffusé par le climatiseur sur des appareils électroménagers
chauffants, ce qui peut dégrader leur efcacité, comme dans le cas des bouilloires
électriques, des fours, etc.
• Ne pas laver l'appareil avec de l'eau ni poser de récipient contenant de l'eau, comme un
vase, sur l'unité intérieure.
Une fuite électrique peut être présente et causer une électrocution.
AVERTISSEMENT
AVERTISSEMENT
AVERTISSEMENT
ATTENTION
• Veillez à arrêter l'appareil en utilisant la télécommande et à mettre hors circuit le disjoncteur pour le nettoyage, le ventilateur à haute vitesse l'intérieur de l'appareil pouvant
"ARRÊT"
constituer un risque.
• Mettez le disjoncteur hors circuit si l'appareil ne doit pas être utilisé pendant une période
de temps prolongée.
• Ne pas monter sur le groupe extérieur ni poser d'objets dessus.
AVERTISSEMENT
• Lors de l'utilisation de l'appareil avec la porte et les fenêtres ouvertes (l'humidité ambiante est toujours au-dessus de 80%) et avec le volet d'air tourné vers le bas ou se déplaçant automatiquement
pendant une période de temps prolongée, de l'eau se condensera sur le volet d'air et peut s'égoutter.
Cela risque de détériorer vos meubles en les mouillant. Il est donc conseillé de ne pas continuer à
utiliser l'appareil dans ces conditions pendant pour une période de temps prolongée.
• Lorsque la chaleur régnant dans la pièce dépasse la capacité de refroidissement ou de
chauffage de l'appareil (par exemple, dans le cas où de nombreuses personnes entrent
AVERTISSEMENT
dans la pièce ou en cas d'utilisation d'un appareil de chauffage, etc.), la température
programmée ne peut pas être atteinte.
• Le nettoyage de l'unité intérieure ne doit être effectué que par du personnel habilité pour cette inter-
vention. Contactez le revendeur ou distributeur.
L'utilisation de produits détergents ou équivalents du commerce peut abîmer les pièces en plastique
ou boucher le tuyau de vidange, ce qui peut entraîner une fuite d'eau et un risque d'électrocution.
• Ne pas toucher l'orice de sortie d'air, la surface du fond ni les ailettes en aluminium du
groupe extérieur.
NE PAS TOUCHER
Vous pouvez vous blesser.
"ARRÊT"
FRANÇAIS
AVERTISSEMENT
AVERTISSEMENT
• Ne pas toucher le tuyau de réfrigérant ni la soupape de raccordement.
Vous pouvez vous brûler.
• Cet appareil n'est pas destiné à être utilisé par des enfants en bas âge ou des personnes handicapées, sauf
en cas de surveillance adéquate par un personne responsable qui s'assurera qu'ils peuvent utiliser cet appareil
en toute sécurité.
• Les enfants en bas âge doit être surveillés pour s'assurer qu'ils ne jouent pas avec l'appareil.
NE PAS TOUCHER
– 4 3 –
Page 72

NOM ET FONCTIONS DE CHAQUE PIÈCE
UNITÉ INTÉRIEURE
Filtre à air
Empêche la poussière de pénétrer dans l’unité intérieure.
(Voir page 4 6)
Panneau frontal
(Voir page 4 7)
Indicateurs de l'unité intérieure
Voyant indiquant le mode de fonctionnement.
(Voir page )4 5
Déecteur horizontal Déecteur vertical
(Sortie d’air)
Télécommande
Envoie un signal de fonctionnement à l'unité intérieure.
Permet de faire fonctionner l’appareildans son ensemble.
RAS-E10HB, RAS-E10HBG
RAS-E14HB, RAS-E14HBG
RAC-E10HB, RAC-E10HBG
RAC-E14HB, RAC-E14HBG
780 280 210
660 530 278
– 4 4 –
Page 73

NOM ET FONCTIONS DE CHAQUE PIÈCE
INDICATEURS DE L’UNITÉ INTÉRIEURE
VOYANT DE LA
MINUTERIE (Orange)
Ce voyant s’allume lorsque
la minuterie fonctionne.
VOYANT DE FONCTIONNEMENT
(Jaune)
Ce voyant s’allume pendant le
fonctionnement de l’appareil.
Pendant le chauffage, le VOYANT
DE FONCTIONNEMENT clignote
dans les cas suivants :
(1) Pendant le préchauffage
Environ 2 à 3 minutes après le
démarrage.
(2) Pendant le dégivrage
Le dégivrage s’effectue environ
une fois par heure pendant 5
à 10 minutes lorsque du givre
se forme sur l’échangeur de
chaleur du groupe extérieur.
INTERRUPTEUR TEMPORAIRE
Utilisez ce commutateur pour démarrer et arrêter l’appareil
si la télécommande ne fonctionne pas.
ATTENTION
Coupez le disjoncteur si l'unité doit être
arrêtée pendant une période prolongée.
● Lorsque vous appuyez sur le commutateur temporaire,
l'appareil fonctionne en mode automatique.
● Si vous utilisez le commutateur temporaire après un
redémarrage de l’appareil, ce dernier fonctionne
en mode automatique.
Si l’appareil est sous tension mais ne fonctionne pas, de l’électricité est légèrement consommée
par le circuit de commande. Pour économiser de l’électricité, mettez l’appareil hors tension (ou
désactivez le coupe-circuit si l’alimentation provient du groupe extérieur).
FRANÇAIS
– 45 –
Page 74

NOMENCLATURE ET FONCTIONS DE LA TÉLÉCOMMANDE
Elle permet de commander à distance les fonctions du climatiseur et de régler la minuterie. La portée de
commande est d'environ 7 mètres. Si l'éclairage intérieur est commandé électroniquement, la portée de
commande peut être moindre.
Transmission de signal
Indicateur de transmission
L'indicateur de transmission
clignote lorsqu’un signal a
Touche MODE
Pour sélectionner le mode de
fonctionnement. (
Page 35)
Touche ARRÊT
Appuyez sur cette touche pour
arrêter le fonctionnement.
Touche ECO
Utilisez cette touche pour passer
en mode ECO. (
Page 38)
TOUCHE
MINUTEUR D’ARRÊT
Sélectionnez l’heure d’arrêt.
Page 36)
(
Touche MINUTEUR
DE MISE EN MARCHE
Sélectionnez l’heure de mise en
marche. (
Page 36)
L.H
été transmis.
Touche PUISSANCE
Appuyez sur cette touche
pour activer le mode de
fonctionnement pleine
puissance. (
Page 36)
Touche TEMPÉRATURE
Réglage de la
température ambiante.
La valeur change plus
rapidement en maintenant
la touche enfoncée.
Page 35)
(
Touche VITESSE DU
VENTILATEUR
Sélectionnez la vitesse
du ventilateur pour le
mode rafraîchissement ou
chauffage. (
Page 35)
Touche BALAYAGE
AUTOMATIQUE
Commande l'angle du
défl ecteur d'air horizontal.
(
Page )
39
Précautions d'usage
• N’exposez pas la télécommande à la lumière directe du soleil et à des températures élevées.
• Ne la laissez pas tomber au sol et protégez-la de l'eau.
• Si vous appuyez sur la touche FONCTION en cours de fonctionnement, le climatiseur peut s'arrêter
pendant environ 3 minutes à titre de protection, avant de pouvoir le remettre en marche.
– 34 –
Page 75

COMMANDE MANUELLE [Chauffage .Déshumidifi cation .Rafraîchissement]
Veuillez utiliser les conditions ci-dessous si vous souhaitez régler le mode de fonctionnement, la température
ambiante et la vitesse du ventilateur manuellement.
CHAUFFAGE DÉSHUMIDIFICATION RAFRAÎCHISSEMENT
Température extérieure
en dessous de 24°C
SÉLECTION DU MODE DE FONCTIONNEMENT
1
• À chaque fois que vous appuyez sur la touche, le mode de fonctionnement change
comme suit :
RÉGLAGE DE TEMPÉRATURE AMBIANTE
2
Augmenter
Baisser
• Le rafraîchissement ne s’enclenche pas si le
réglage de la température est supérieur à la
température actuelle de la pièce.
Température ambiante
au-dessus de 16°C
CHAUFFAGE
DÉSHUMIDIFICATION
RAFRAÎCHISSEMENT
Température recommandée
Chauffage 20~24˚C
Déshumidifi cation
Rafraîchissement
Température extérieure
au-dessus de 21°C
L.H
20~26˚C
25~28˚C
L.H
L.H
RÉGLAGE DE VITESSE DU VENTILATEUR
3
• À chaque fois que vous appuyez sur la touche, la vitesse du
ventilateur change dans l’ordre suivant :
•
CHAUFFAGE
:
RAFRAÎCHISSEMENT
•
DÉSHUMIDIFICATION :
Appuyez sur la touche
4
• Le fonctionnement s'arrête avec un bip.
}
(ARRÊT)
POWERFUL
L.H
FRANÇAIS
– 35 –
Page 76

PROGRAMMATION DE LA MINUTERIE
Un minuteur de MISE EN MARCHE et un minuteur d'ARRÊT sont prévus.
Le fonctionnement s'arrête à l’heure programmée
Programmation de la minuterie
1
• Sélectionnez l'HEURE d'ARRÊT en appuyant sur
• L’heure programmée change selon la séquence
Réglage de l'HEURE d'ARRÊT
la touche
suivante lorsque vous appuyez sur la touche :
(ARRÊT).
Intervalle d'1 heure
Arrêt du minuteur
2
• Sélectionnez l'HEURE de MISE EN MARCHE en
• L’heure programmée change selon la séquence
Réglage de l'HEURE de MISE EN MARCHE
appuyant sur la touche
suivante lorsque vous appuyez sur la touche :
Intervalle d'1 heure
(EN FONCTION).
Arrêt en fonction
L.H
L.H
FONCTIONNEMENT EN MODE PUISSANCE
• En appuyant sur la touche (PUISSANCE) au cours du fonctionnement en mode AUTO, CHAUFFAGE,
DÉSHUMIDIFICATION, RAFRAÎCHISSEMENT ou VENTILATION, le climatiseur fonctionne à pleine puissance.
• Dans le mode PUISSANCE, l'air refroidi ou réchauffé est diffusé par l'unité intérieure pour la fonction
RAFRAÎCHISSEMENT ou CHAUFFAGE respectivement.
Appuyez sur la touche (PUISSANCE) en cours de
fonctionnement.
“ ” s’affiche sur l’écran LCD.
L.H
REMARQUE
• Lorsque le mode ECO ou ABSENCE est sélectionné, le mode PUISSANCE est annulé.
• Dans le mode PUISSANCE, l’effi cacité du climatiseur n'augmente pas
– si le climatiseur fonctionne déjà à sa capacité maximale.
– immédiatement avant le dégivrage (lorsque le climatiseur fonctionne en mode CHAUFFAGE).
• Après un redémarrage automatique, le mode PUISSANCE est annulé et le fonctionnement doit s'enclencher
sur le mode précédent.
START
CANCEL
Le fonctionnement dans le mode PUISSANCE se termine en 20 minutes.
Le système fonctionne automatiquement avec les réglages précédents
qui étaient utilisés avant le fonctionnement dans le mode PUISSANCE.
Appuyez une nouvelle fois sur la touche (PUISSANCE).
“ ” disparaît sur l’écran LCD.
– 36 –
Page 77

FONCTIONNEMENT EN MODE ABSENCE(LH)
Empêche la température ambiante de baisser excessivement en programmant automatiquement la température
à 10°C lorsque personne n'est à la maison.
Maintenez enfoncée la touche CHAUFFAGE pendant 3 à 5
secondes pour enclencher le mode Absence.
START
L.H
La température ambiante est programmée
automatiquement à 10°C.
“ ”, “ LH ”, “ ”, “ ” s’affichent sur l’écran LCD.
CANCEL
Appuyez sur la touche (ARRÊT).
Changement sur un autre mode de fonctionnement.
REMARQUE
• Au cours du fonctionnement en mode Absence, la vitesse du ventilateur et la position du défl ecteur d'air
horizontal ne peuvent pas être modifi ées.
FRANÇAIS
– 37 –
Page 78

FONCTIONNEMENT EN MODE ECO
Fonctionnement en mode économie d’énergie par le changement de la température programmée et la limitation
de la valeur maximale de consommation électrique.
En appuyant sur la touche (ECO) au cours du
fonctionnement en mode Auto, Chauffage, Déshumidification
ou Rafraîchissement, le climatiseur fonctionne en mode “ECO”.
Appuyez sur la touche (ECO) en cours de
L.H
START
CANCEL
fonctionnement.
“ ” s’affiche sur l’écran LCD.
Le fonctionnement en mode économie d'énergie
intervient en faisant varier la température
programmée à la hausse ou à la baisse et en
réduisant la consommation électrique en
fonctionnement.
Appuyez sur la touche (MARCHE/ARRÊT).
Appuyez une nouvelle fois sur la touche (ECO).
“ ” disparaît sur l’écran LCD.
REMARQUE
• Si la consommation électrique est déjà faible, le mode ECO ne la réduira pas davantage.
• Le mode ECO est annulé en appuyant sur la touche (PUISSANCE).
• Après un redémarrage automatique, le mode ECO est annulé et le mode de
fonctionnement précédent doit s'enclencher.
– 38 –
Page 79

RÉGLAGE DE LA DIRECTION DE SOUFFLAGE D’AIR
Réglez le fl ux d’air vers le haut et le bas.
1
Suivant le mode de fonctionnement, le défl ecteur d’air horizontal est
réglé automatiquement sur l’angle adapté à chaque mode. Le défl ecteur
peut osciller de haut en bas et peut également être réglé sur un angle
donné à l'aide de la touche “ (BALAYAGE AUTOMATIQUE)”.
Lors du rafraîchissement,
de la déshumidifi cation
• Si la touche “
pressée une seule fois, le déflecteur d’air horizontal oscille
de haut en bas. En appuyant une nouvelle fois sur la touche,
le déflecteur s’arrête dans la position en cours. Le déflecteur
peut prendre plusieurs secondes (environ 6 secondes) pour
s’enclencher.
• La plage de réglage du défl ecteur d’air horizontal est illustrée
à droite.
• Lorsque le fonctionnement est arrêté, le défl ecteur d’air horizontal
se déplace et s’arrête à la position où la sortie d’air se ferme.
(BALAYAGE AUTOMATIQUE)” est
Horizontal
Lors du
chauffage
Horizontal
environ 10°
environ 40°
ATTENTION
• En mode “Rafraîchissement”, ne laissez pas le défl ecteur
d’air horizontal osciller pendant une période de temps
prolongée. De la buée peut se former sur le défl ecteur d’air
horizontal et goutter.
Réglez le fl ux d’air à gauche et à droite.
2
Maintenez le défl ecteur d’air vertical comme illustré à droite et
réglez le fl ux d’air à gauche et à droite.
environ 10°
environ 45°
COMMENT REMPLACER LES PILES DE LA TÉLÉCOMMANDE
Enlevez le cache comme représenté sur la fi gure et retirez les
1
piles usagées.
Installez les piles de rechange.
2
Le sens des piles doit correspondre aux repères marqués sur le
boîtier.
Poussez et tirez dans
le sens de la fl èche.
FRANÇAIS
ATTENTION
1. Ne mélangez pas des piles neuves et usagées ou de type différent.
2. Enlevez les piles si vous ne devez pas utiliser la télécommande
pendant 2 à 3 mois.
– 39 –
Page 80

MEMO
......................................................................................................................................................................................
......................................................................................................................................................................................
......................................................................................................................................................................................
......................................................................................................................................................................................
......................................................................................................................................................................................
......................................................................................................................................................................................
......................................................................................................................................................................................
......................................................................................................................................................................................
......................................................................................................................................................................................
......................................................................................................................................................................................
......................................................................................................................................................................................
......................................................................................................................................................................................
......................................................................................................................................................................................
......................................................................................................................................................................................
......................................................................................................................................................................................
......................................................................................................................................................................................
......................................................................................................................................................................................
......................................................................................................................................................................................
......................................................................................................................................................................................
......................................................................................................................................................................................
......................................................................................................................................................................................
......................................................................................................................................................................................
......................................................................................................................................................................................
......................................................................................................................................................................................
......................................................................................................................................................................................
......................................................................................................................................................................................
......................................................................................................................................................................................
......................................................................................................................................................................................
......................................................................................................................................................................................
......................................................................................................................................................................................
......................................................................................................................................................................................
......................................................................................................................................................................................
......................................................................................................................................................................................
......................................................................................................................................................................................
......................................................................................................................................................................................
......................................................................................................................................................................................
......................................................................................................................................................................................
......................................................................................................................................................................................
......................................................................................................................................................................................
– 40 –
Page 81

ENTRETIEN
ATTENTION
Lenettoyageetl’entretiendel’appareilnedoiventêtreeffectuésquepardespersonnesqualiées.
Avant le nettoyage, arrêtez l’appareil et coupez l’alimentation.
1. FILTRE A AIR
Nettoyezleltreunefoischaquesdeuxsemaines.Vousréduirezainsilaconsommationd’électricité.Sile
ltreàairestpoussiéreux,leuxd’airestréduit,lacapacitéderefroidissementdiminuéeetdesbruitspeuvent
égalementêtreoccasionnés.Veillezànettoyerleltreenrespectantlaprocéduresuivante.
PROCÉDURE
Ouvrez soigneusement le panneau frontal et retirez
1
leltre.
Enlevezlapoussièredultreàairàl’aided’unaspirateur.
2
En cas d’accumulation trop importante de poussière,
nettoyez le filtre avec un détergent et rincez-le
abondamment.Parlasuite,séchez-leàl’ombre.
• Insérez le ltre dans sa position initiale, le côté
3
• Ne lavez pas avec de l’eau chaude à plus de 40°C. Le filtre rétrécirait.
• Lorsque vous le lavez, secouez les gouttelettes d’eau complètement et laissez le sécher à l’ombre;
• N’utilisez pas l’appareil sans filtre. Il pourrait ne plus fonctionner.
“FRONT”orientéversl'avant.
• Unefoisleltrexé,appuyezsurlestroissections
échéesdupanneaufrontalcommeillustréetrefermez-le.
ATTENTION
ne pas exposer au soleil. Le filtre rétrécirait.
– 46 –
Page 82

FRANÇAIS
2. NETTOYAGE DU PANNEAU FRONTAL
• Retirez le panneau frontal et lavez-le à l’eau claire.
Utilisez une éponge douce.
Après avoir utilisé un détergent neutre, lavez-le soigneusement à l'eau claire.
• Si vous n’avez pas retiré le panneau frontal, essuyezle avec un chiffon sec et doux. Faites de même avec
la télécommande.
• Essuyez l’eau soigneusement.
Des problèmes peuvent survenir si les indicateurs
ou le récepteur de signaux de l’unité intérieure
restent humides.
Procédure de retrait du panneau frontal.
Veillez à tenir le panneau frontal des deux mains
pour le retirer et le remettre.
Retrait du panneau frontal Fixation du panneau frontal
Axe
Interstice
• Lorsque vous ouvrez complètement le panneau
frontal des deux mains, placez le bras droit à
l’intérieur pour le détacher. Rabaissez le panneau
• Placez les axes des bras droit et gauche dans les
rails de l’appareil et insérez-les correctement dans
les interstices.
Interstice
frontal pour le retirer.
ATTENTION
• Ne pas verser d’eau sur ou contre le corps de l’appareil pendant le nettoyage.
Il y aurait risque de court-circuit.
• Ne jamais utiliser d’eau chaude (plus de 40°C), ni benzène, essence, acide,
diluant ou une brosse; ces produits vont endommager les surfaces plastiques
et la peinture de l’appareil.
3. MAINTENANCE AVANT UN ARRÊT PROLONGÉ
• Faites fonctionner l’unité en réglant le mode de
fonctionnement sur (Refroidissement), la température
sur 32 °C et la vitesse de ventilation sur HI (Rapide)
pendant une demie journée avec une météo clémente,
puis laissez l’unité sécher totalement.
• Débranchez la prise d'alimentation. Ou désactivez le
coupe-circuit.
Débit
d’air
Axe
A
B
E
N
C
E
Z
I
N
T
R
H
E
I
N
I
D
N
– 47–
Page 83

INFORMATIONS
CAPACITÉ
Capacité de chauffage
• Cette appareil d’air climatisé utilise un système de pompe à chaleur
qui absorbe la chaleur externe et l’achemine vers la pièce pour la
chauffer. La capacité de chauffage diminue au fur et à mesure que
la température diminue. Dans ce cas, l’inverseur fonctionne pour
augmenterlarotationducompres-seuretainsiéviter que la
capacité de chauffage de l’appareil ne diminue.Si cette solution
n’est pas encore satisfaisante, il faut ajouter d’autres appreils
de chauffage pour améliorer les performances de l’appareil.
• Cette appareil d’air climatisé est conçue pour chauffer toute une pièce et il faut donc attendre un certain temps pour
quelachaleursefassesentir.Ilestconseilléd’utiliserlaMinuteriepourunpréchauffageefcaceavantl’heurevoulue.
CAUTION
Ne pas utiliser un four
ou une autre source
de chaleur à proximité
de l’unité intérieure.
INTERDICTIONDE
Capacité de réfrigération et de déshumidication
• Il sera impossible d’atteindre la température désirée si la chaleur de la pièce dépasse la capacité de réfrigération
del’appareil(parexemples’ilyabeaucoupdemondeouuneautresourcedechaleurdanslapièce).
– 48 –
Page 84

INSPECTION RÉGULIÈRE
VEUILLEZ VÉRIFIER LES POINTS SUIVANTS TOUS LES SIX MOIS OU TOUS LES ANS. CONTACTEZ
VOTRE VENDEUR SI VOUS AVEZ BESOIN D’AIDE.
Vérier si l’unité est branchée correctement à la terre.
1
AVERTISSEMENT
Si le conducteur de terre est débranché ou défectueux,
l’appareil peut tomber en panne ou il peut y avoir risque
de court-circuit.
2
S’assurer qu’il n’y a pas de rouille dans le tableau de
montage et que le groupe extérieur n’est pas instable
AVERTISSEMENT
ou mise de travers.
En effet, elle pourrait dans ce cas tomber et blesser quelqu’un.
SERVICE APRÈS-VENTE ET GARANTIE
LORSQUE VOUS DEMANDEZ UN SERVICE APRÈS VENTE, VEUILLEZ VÉRIFIER LES POINTS SUIVANTS.
CONDITION VÉRIFIEZ LES POINTS SUIVANTS
Si la télécommande ne transmet
pas de signaux.
(L’écran de la télécommande
est éteint ou à peine visible.)
Lorsque l’appareil refuse de
fonctionner.
Lorsque l’appareil n’assure ni un
refrodissément ni un chauffage.
• Faut-il remplacer les piles?
• La polarité des piles est-elle correcte?
FRANÇAIS
• Le fusible, est-il en bon état?
• Le tension, est-il extrèmement élevé ou bas?
• L’interrupteur le coupe-circuit est-il en position de marche (“EN FONCTION”)?
• La che d’alimentation est-elle branchée ?
• Une coupure de courant s’est-elle produite?
• Le ltre, est-il bouché par la poussière?
• La température, est-elle appropriée?
• Les déecteurs d'air horizontaux ont-ils été correctement positionnés
conformément au mode de fonctionnement sélectionné ?
• Y a t’il des obstacles aux orices d’entrée ou de sortie de l’air de l'unité
intérieure ou du groupe extérieur ?
• Le ventilateur est-il à la vitesse “FAIBLE” ou “SILENCE”?
Les phénomènes suivants n’indiquent pas un défaut de l’appareil.
En mode chauffage, l’indicateur de
fonctionnement clignote et l’appareil
cesse de soufer de l’air.
Chuintement ou sifement
Grincement
Bruissement
Claquement Bruit de la soupape motorisée quand l’appareil se met en marche.
<Début du fonctionnement>
L’appareil se prépare à soufer de l’air chaud. Attendre.
<Fonctionnement>
Le groupe extérieur se dégèle. Attendre.
Bruit dû au réfrigérant dans les tuyaux ou à la soupape, à cause du ux,
quand lavitesse de ux est réglée.
Bruit que fait l’appareil quand elle se dilate ou se contracte à cause des changementsde température.
Bruit dû au changement de rotation de l'unité intérieure, par exemple au momentoù
elle se met à fonctionner.
– 49 –
Page 85

Bruit de vide
Bruit durant le changement de
fonctionnement
Production de brouillard
Vapeur émise par le groupe extérieur
Odeurs
Le groupe extérieur continue à
fonctionner même si elle est
débranchée.
Voyant FONCTIONNEMENT qui
clignote.
La température saisie n’est pasobtenue.
•
Si l'unité ne fonctionne toujours pas
normalement après les vérifications
indiquées plus haut, coupez le
disjoncteur et contactez immédiatement
votre revendeur.
Bruit que fait le ventilateur en aspirant l’air qui se trouve dans le tuyau de
vidange et en soufant l’eau de la déshumidication qui s’est accumulée
dans le collecteur de condensation. Contacter le revendeur pour avoir de
plus amples informations.
Bruit que fait l’appareil quand elle change de mode de fonctionnement en
fonction des changements de température de la pièce.
Il se forme du brouillard lorsque l’air de la pièce est soudainement réfrigéré
par l’air climatisé.
Eau qui s’ évapore durant l’ opération de décongélation.
Elles sont dues aux odeurs et aux particules de fumée, d’aliments, de
cosmétiques, etc. dans l’air de la pièce. Celles-ci sont captées par l’unité
et soufées de nouveau dans la piéce.
Décongélation (le fonctionnement en mode chauffage cesse, le micro-ordinateur vérie la glace accumulée dans le groupe extérieur et ordonne à
l'appareil de se décongeler automatiquement, au besoin).
Indique que la phase de préchauffage ou de décongélation a eu lieu.
Il clignote lorsque le circuit de protection ou le capteur de préchauffage
continue à fonctionner après que l’unité s’est arrêtée ou durant le préchauffage,
pour ensuite recommencer, ou quand le mode de fonctionnement passe de
réfrigération à chauffage.
La température ambiante réelle peut légèrement différer de celle saisie sur la
télécommande, et ce, en fonction du nombre de personnes présentes dans la
pièce et des conditions intérieur ou extérieure.
Contacter immédiatement le revendeur si une des
anomalies suivantes devait se produire:
• L’interrupteur s’éteint ou le fusible brûlefréquemment.
• Le fonctionnement du commutateur n’est pas stable.
• Une substance étrangère ou de l’eau a pénétré
accidentellementdans l'unité intérieure.
• Le câble d’alimentation électrique chauffe trop, la gaine s’est déchirée
ou est incrustée.
• Le voyant de la MINUTERIE de l'unité intérieure clignote.
Vu que le cycle de clignotement indique la nature du défaut, vérier
( )
comment est ce cycle avant de mettre l’interrupteur sur OFF.
• Veuillez contacter votre vendeur immédiatement si le climatiseur ne fonctionnne pas normalement après
l’inspection ci-dessus. Informez votre agent du modèle de votre appareil, du numéro de série et de la date
d’installation. Veuillez aussi l’informer du défaut en question.
À noter:
Au moment de la mise en marche de l’équipement, notamment lorsque la pièce est sombre, une légère variation
de luminosité risque de se produire. Ceci n’a pas d’effet nuisible.
Les conditions imposées par les compagnies d’électricité locales doivent être respectées.
Remarques
• Lors d’une utilisation lente et d’un arrêt, les phénomènes suivants peuvent
se produire à l’occasion, mais ils ne sont pas totalement inadéquats.
(1) Un bruit du réfrigérant dans le tuyau de réfrigération.
(2) Un petit bruit de la case du ventilateur qui refroidit et se réchauffe
petit à petit après arrêt.
• Une odeur sera émise par l’appareil car il a tendance à garder les
odeurs comme la fumée, les aliments, les cosmétiques, et ainsi de
suite. Veuillez donc nettoyer le ltre à air et l’évaporateur régulièrement
pour réduire les odeurs.
– 50 –
 Loading...