

Hitachi RAC-18WPA, RAK-18PPA, RAK-25PPA, RAK-35PPA, RAC-35WPA Instruction Manual
...
ENGLISH
SPLIT TYPE AIR CONDITIONER
INDOOR UNIT/OUTDOOR UNIT
MODEL
RAK-18PPA/RAC-18WPA
RAK-25PPA/RAC-25WPA
RAK-35PPA/RAC-35WPA
ENGLISH
OUTDOOR UNIT
RAC-18WPA
RAC-25WPA
RAC-35WPA
Instruction manual Page 1~36
To obtain the best performance and ensure years of
trouble free use, please read this instruction manual
completely.
INDOOR UNIT
RAK-18PPA
RAK-25PPA
RAK-35PPA
Manual de instrucciones Página 145~180
Para obtener el mejor funcionamiento y asegurar años
de uso libre de problemas, lea cuidadosamente este
manual de instrucciones.
Bedlenungsanleitung Seite 37~72
Bitte lesen Sie diese Bedienungsanleitung aufmerksam
durch, um durch richtige Bedienung jahrelangen und
störungsfreien Betrieb zu gewährleisten.
Mode d’emploi Page 73~108
Des performances optimales et un fonctionnement à
long terme seront assurés en appliquant les présentes
instructions après avoir entièrement lu ce mode
d’emploi.
Manuale di istruzioni Pag. 109~144
Per garantire la migliore prestazione e la più lunga
durataleggere attentamente e al completo le seguanti
istruzioni.
Manual de instruções Página 181~216
A m de obter um bom funcionamento e de garantir
uma utilização sem falhas durante muitos anos, é
favor ler este manual de instruções completamente.
Οδηγίες χρήσης ™ÂÏ›‰· 217~252
°И· ЩЛУ О·П‡ЩВЪЛ ·fi‰ФЫЛ ЩФ˘ ОПИМ·ЩИЫЩИОФ‡ О·И БИ·
ЩЛУ М·ОЪФЪfiıВЫМЛ ¯Ъ‹ЫЛ ЩФ˘ ¯ˆЪ›˜ ЪФ‚П‹М·Щ·,
‰И·‚¿ЫЩВ ЪФЫВОЩИО¿ ·˘Щ¤˜ ЩИ˜ Ф‰ЛБ›В˜ ¯Ъ‹ЫЛ˜.
– 1 –

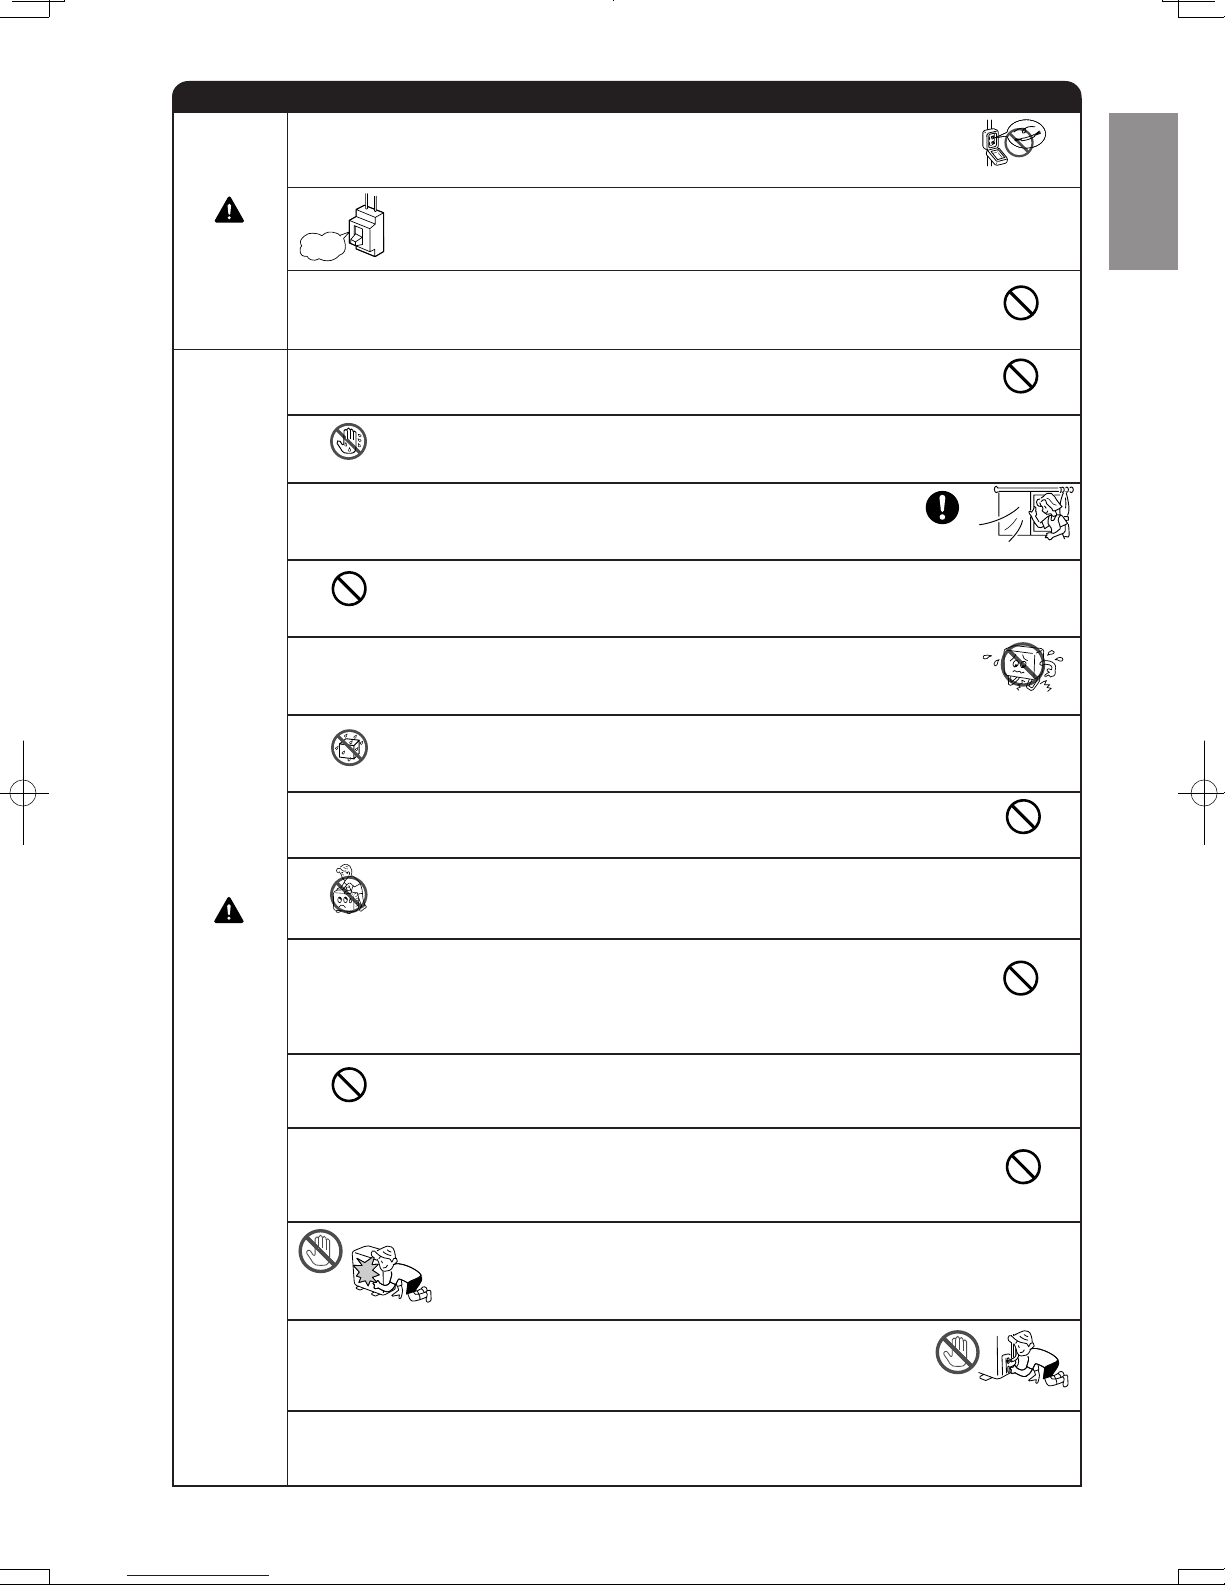
SAFETY PRECAUTION
• Please read the “Safety Precaution” carefully before operating the unit to ensure correct usage of the unit.
• Pay special attention to signs of “
matters which, if not observed strictly, may cause death or serious injury. The “Caution” section
contains matters which may result in serious consequences if not observed properly. Please observe
all instructions strictly to ensure safety.
• The signs indicate the following meanings. (The following are examples of signs.)
This sign in the figure indicates prohibition. Indicates the instructions that must be followed.
• Please keep this manual after reading.
PRECAUTIONS DURING INSTALLATION
• Do not reconstruct the unit.
Water leakage, fault, short circuit or fire may occur if you reconstruct the unit by
yourself.
• Please ask your sales agent or qualified technician for the installation of your
unit.
WARNING
CAUTION
Water leakage, short circuit or fire may occur if you install the unit by yourself.
• Please use earth line.
Do not place the earth line near water or gas pipes, lightning-conductor, or the
earth line of telephone. Improper installation of earth line may cause electric
shock.
• Be sure to use the specified piping set for R410A. Otherwise, this may result in
broken copper pipes or faults.
• A circuit breaker should be installed depending on the mounting site of the unit.
Without a circuit breaker, the danger of electric shock exists.
• Do not install the unit near a location where there is flammable gas.
The outdoor unit may catch fire if flammable gas leaks around it. Piping shall be
suitable supported with a maximum spacing of 1m between the supports.
• Please ensure smooth flow of water when installing the drain hose. If any failure
is found in the drain path, water drops from the indoor and outdoor units, causing
wet household effects.
• Make sure that a single phase 230V power source is used.
The use of other power sources may cause electrical components to overheat
and lead to fire.
Warning” and “ Caution”. The “Warning” section contains
PROHIBITION
CONNECT EARTH LINE
PROHIBITION
PROHIBITION
WARNING
PRECAUTIONS DURING SHIFTING OR MAINTENANCE
• Should abnormal situation arise (like burning smell), please stop operating the
unit and remove plug from the socket or turn off the circuit breaker. Contact your
agent. Fault, short circuit or fire may occur if you continue to operate the unit
under abnormal situation.
• Please contact your agent for maintenance.
Improper self maintenance may cause electric shock and fire.
• Please contact your agent if you need to remove and reinstall the unit.
Electric shock or fire may occur if you remove and reinstall the unit yourself improperly.
• Avoid an extended period of direct air flow for your health.
• Do not connect the power calbe with an extension cable or do not plug too many
leads of the other electric appliance into the socket where this cable is plugged.
In addition, wire the cable with some allowances to prevent the cable from stretching.
Not doing so will cause an electrical shock, heat generation or fire.
• Do not bundle the power cable, pull it, put something on it, heat it, process it, or
put it between things. Breakage of the power cable may result.
Use of a damaged cable may cause an electrical shock or a fire.
• Do not put objects like thin rods into the panel of blower and suction side
PROHIBITION
because the high-speed fan inside may cause danger.
– 2 –
“OFF”
PROHIBITION
PROHIBITION
PROHIBITION
ENGLISH
PRECAUTIONS DURING OPERATION
• Do not use any conductor as fuse wire, this could cause fatal accident.
PROHIBITION
WARNING
“OFF”
• Spray cans and other combustibles should not be located within a meter of the air
outlets of both indoor and outdoor units.
As a spray can’s internal pressure can be increased by hot air, a rupture may result.
• The product shall be operated under the manufacturer specification and not for
any other intended use.
• Do not attempt to operate the unit with wet hands, this could cause fatal accident.
• During thunder storm, disconnect the plug top or turn off the circuit breaker.
DON’T WET
• When operating the unit with burning equipments, regularly ventilate
the room to avoid oxygen insufficiency.
STRICTLY OBSERVE
PRECAUTIONS
• Do not direct the cool air coming out from the air-conditioner panel to
PROHIBITION
face household heating apparatus as this may affect the working of
apparatus such as the electric kettle, oven etc.
• Please ensure that outdoor mounting frame is always stable, firm and
without defect. If not, the outdoor unit may collapse and cause danger.
• Do not wash the unit with water or place a water container such as a
vase on the indoor unit.
PROHIBITION
Electrical leakage could be present and cause electric shock.
ENGLISH
PROHIBITION
PROHIBITION
PROHIBITION
CAUTION
• Do not place plants or animals directly under the air flow as it is bad for the plants or
animals.
PROHIBITION
• Do not climb on the outdoor unit or put objects on it.
PROHIBITION
• When operating the unit with the door and windows opened, (the room humidity
is always above 80%) and with the air deflector facing down or moving automatically for a long period of time, water will condense on the air deflector and drips
down occasionally. This will wet your furniture. Therefore, do not operate under
PROHIBITION
such condition for a long time.
• If the amount of heat in the room is above the cooling or heating capability of the
unit (for example: more people entering the room, using heating equipments and
PROHIBITION
etc.), the preset room temperature cannot be achieved.
• This appliance especially indoor unit cleaning must be performed by authorized
personnel only. Consult your sales agent.
Using a commercially available detergent or similar can damage the plastic parts
or clog the drain pipe, causing water to drip with potential electric shock hazard.
PROHIBITION
• Do not touch the air outlet, bottom surface and aluminum fin of the outdoor
unit.
DON’T TOUCH
You may get hurt.
• Do not touch the refrigerant pipe and connecting valve.
Burns may result.
DON’T TOUCH
• This appliance is not intended for use by young children or infirm persons unless they have been
adequately supervised by a responsible person to ensure that they can use this appliance safely.
• Young children should be supervised to ensure that they do not play with the appliance.
– 3 –
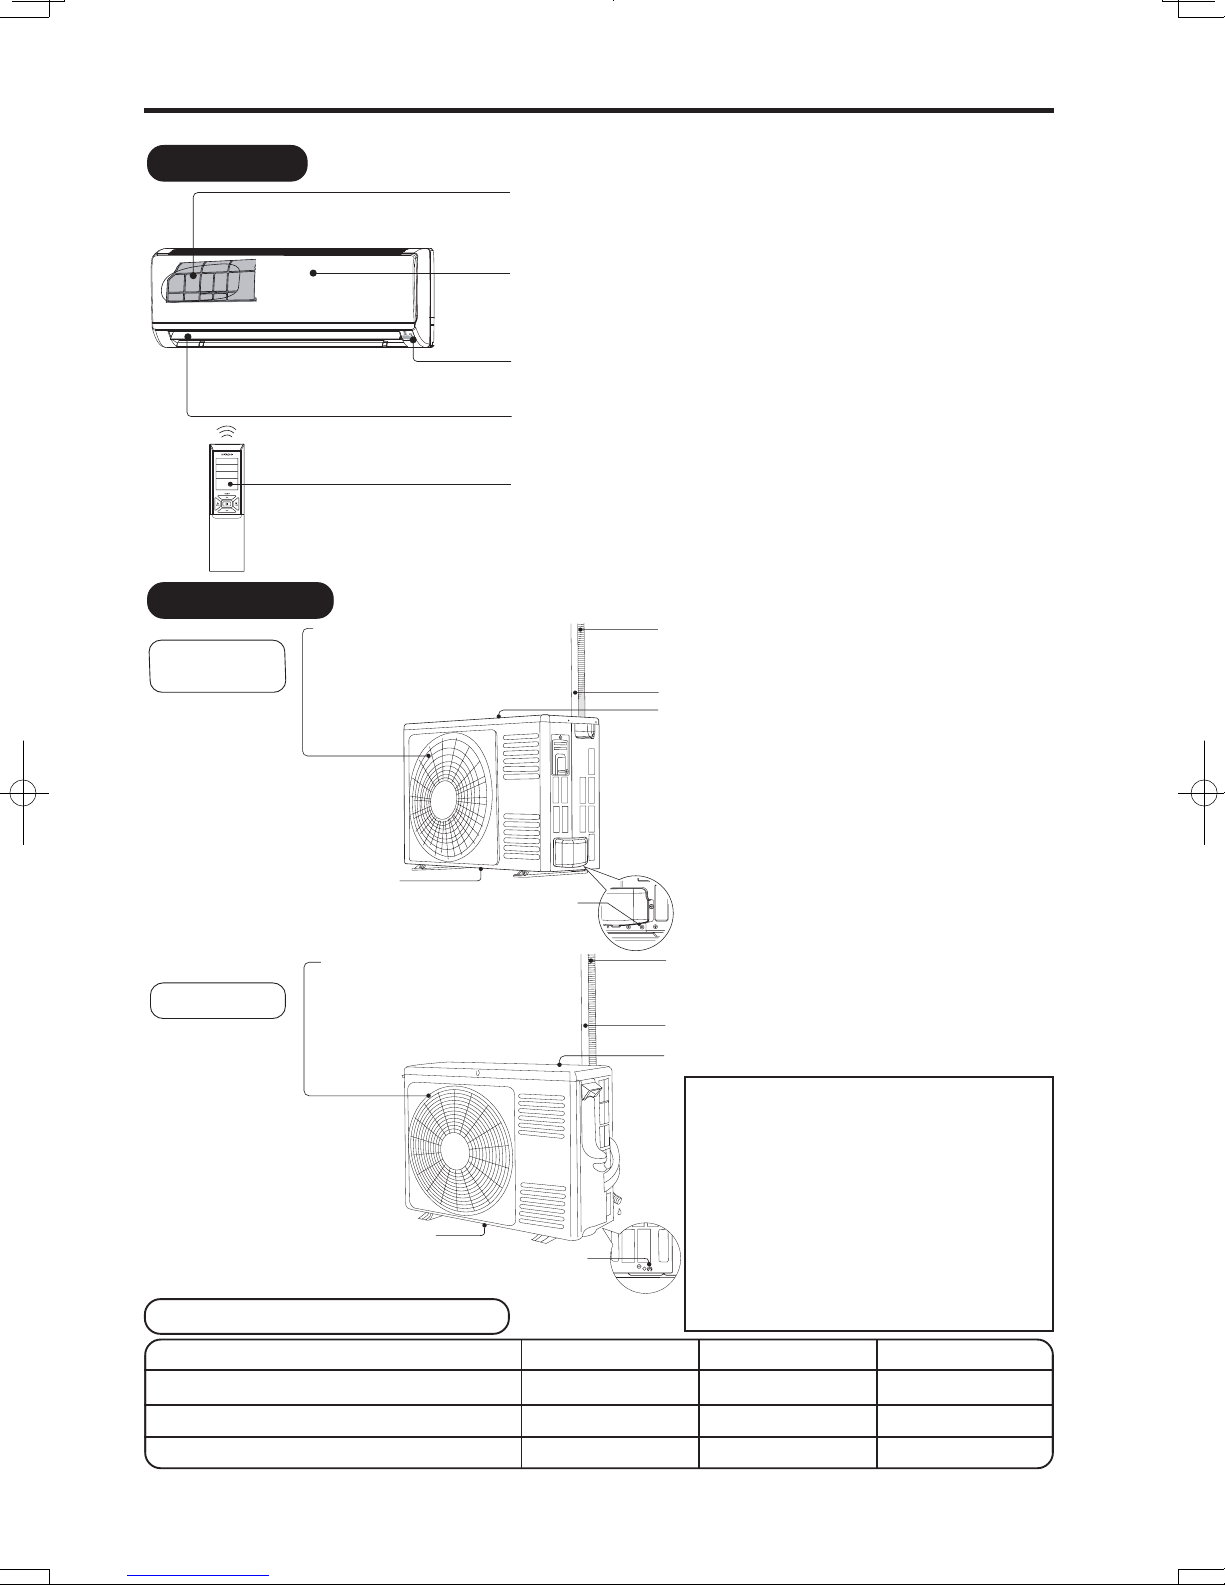
NAMES AND FUNCTIONS OF EACH PART
INDOOR UNIT
Air filter
To prevent dust from coming into the indoor unit.
(Refer page )
Front panel
Indoor unit indicators
Light indicator showing the operating condition.
(Refer page 5)
Horizontal deflector Vertical deflector
(Air Outlet)
(Refer page )
Remote controller
Send out operation signal to the indoor unit. So as
to operate the whole unit.
(Refer page 6)
OUTDOOR UNIT
Air outlet
RAC-18WPA
RAC-25WPA
Wh en “heati ng” o pera tion is
performed, cool air blows and
when “cooling” or “dehumidifying”
operation is performed, warm air
blows.
31
31
Drain hose
Drains the dehumidified water from the indoor unit to the
outdoor during “cooling” or “dehumidifying” operation.
Piping and Wiring
Air inlets (Rear and left sides)
Drain port
RAC-35WPA
(Bottom)
(Lower section of the side)
Air outlet
Wh en “he ati ng” o pera tio n is
performed, cool air blows and
when “cooling” or “dehumidifying”
operation is performed, warm air
blows.
Drain port
(Bottom)
(Lower section of the side)
Earth terminal
Earth terminal
MODEL NAME AND DIMENSIONS
MODEL WIDTH (mm) HEIGHT (mm) DEPTH (mm)
RAK-18PPA , RAK-25PPA , RAK-35PPA
RAC-18WPA , RAC-25WPA
RAC-35WPA
Drain hose
Drains the dehumidified water from the indoor unit to the
outdoor during “cooling” or “dehumidifying” operation.
Piping and Wiring
Air inlets (Rear and left sides)
About the outdoor unit:
• When “Stop” is selected during operation
of the indoor unit, the fan of the outdoor
unit continues turning for 10 to 60
seconds to cool the electric parts down.
• In heating operation, condensate or
water due to defrosting will flow.
Do not cover the drain port of the outdoor
unit because such water may freeze in
the chilly area.
• When the outdoor unit is hung on the
ceiling, install the bush and drain pipe
on the drain port and drain water.
780 280 218
700 505 258
750 548 288
– 4 –
HSILGNE
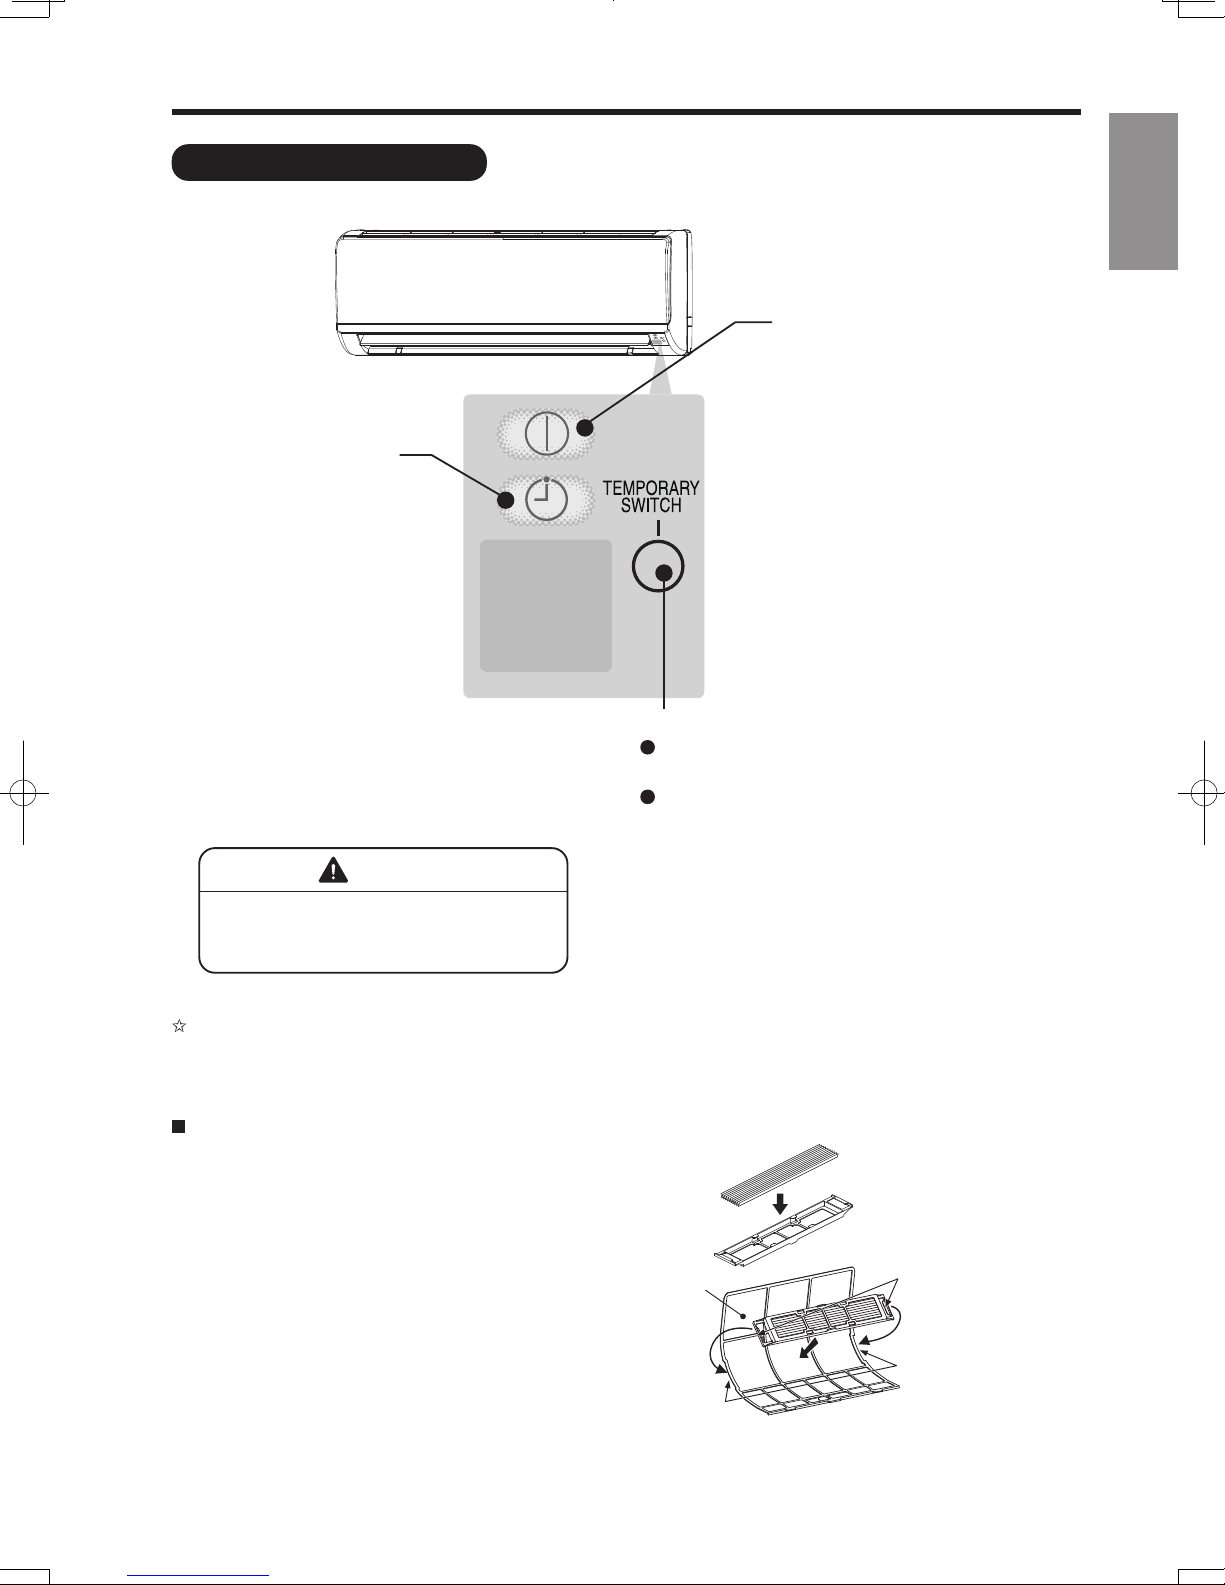
NAMES AND FUNCTIONS OF EACH PART
recent
INDOOR UNIT INDICATIONS
TIMER LAMP (Orange)
This lamp lights when the
timer is working.
ENGLISH
OPERATION LAMP (Yellow)
This lamp lights during operation.
The OPERATION LAMP flashes
in the following cases during
heating.
(1) During preheating
For about 2-3 minutes after
starting up.
(2) During defrosting
Defrosting will be performed
about once an hour when frost
forms on the heat exchanger
of the outdoor unit, for 5-10
minutes each time.
TEMPORARY SWITCH
Use this switch to start and stop when the remote
controller does not work.
This temporary operation will be at the most
setting made. (The unit will immediately go into
automatic operation once power is switched on.)
CAUTION
Turn off the circuit breaker or pull out
the power plug if the unit is not be
operated for a long period.
If the power stays on and the unit is not operated, power is slightly consumed in the control circuit.
The power is saved by turning off the power switch (or the circuit breaker when the power is supplied
from the outdoor unit).
Attaching the Wasabi-Nano Titanium Air Cleaning
Mesh (Accessories) to the filter frame.
s Attach the
to the C-case by gently compress its both sides
and release after insertion into filter frame.
s The cooling capacity is slightly weakened and
the cooling speed becomes slower when the
Wasabi-Nano Titanium Air Cleaning Mesh
s
Wasabi-Nano Titanium Air Cleaning Mesh
and reusable up to 20 times by using vacuum
cleaner or water rinse under running tap water.
When you want to renew it, please ask your sales
agent. Optional air cleansing and deodorizing
filters.
Wasabi-Nano Titanium Air Cleaning Mesh
.
are used.
are washable
Wasabi-Nano Titanium Air Cleaning Mesh
C-case
Air Filter
Claw
Filter Frame
– 5 –
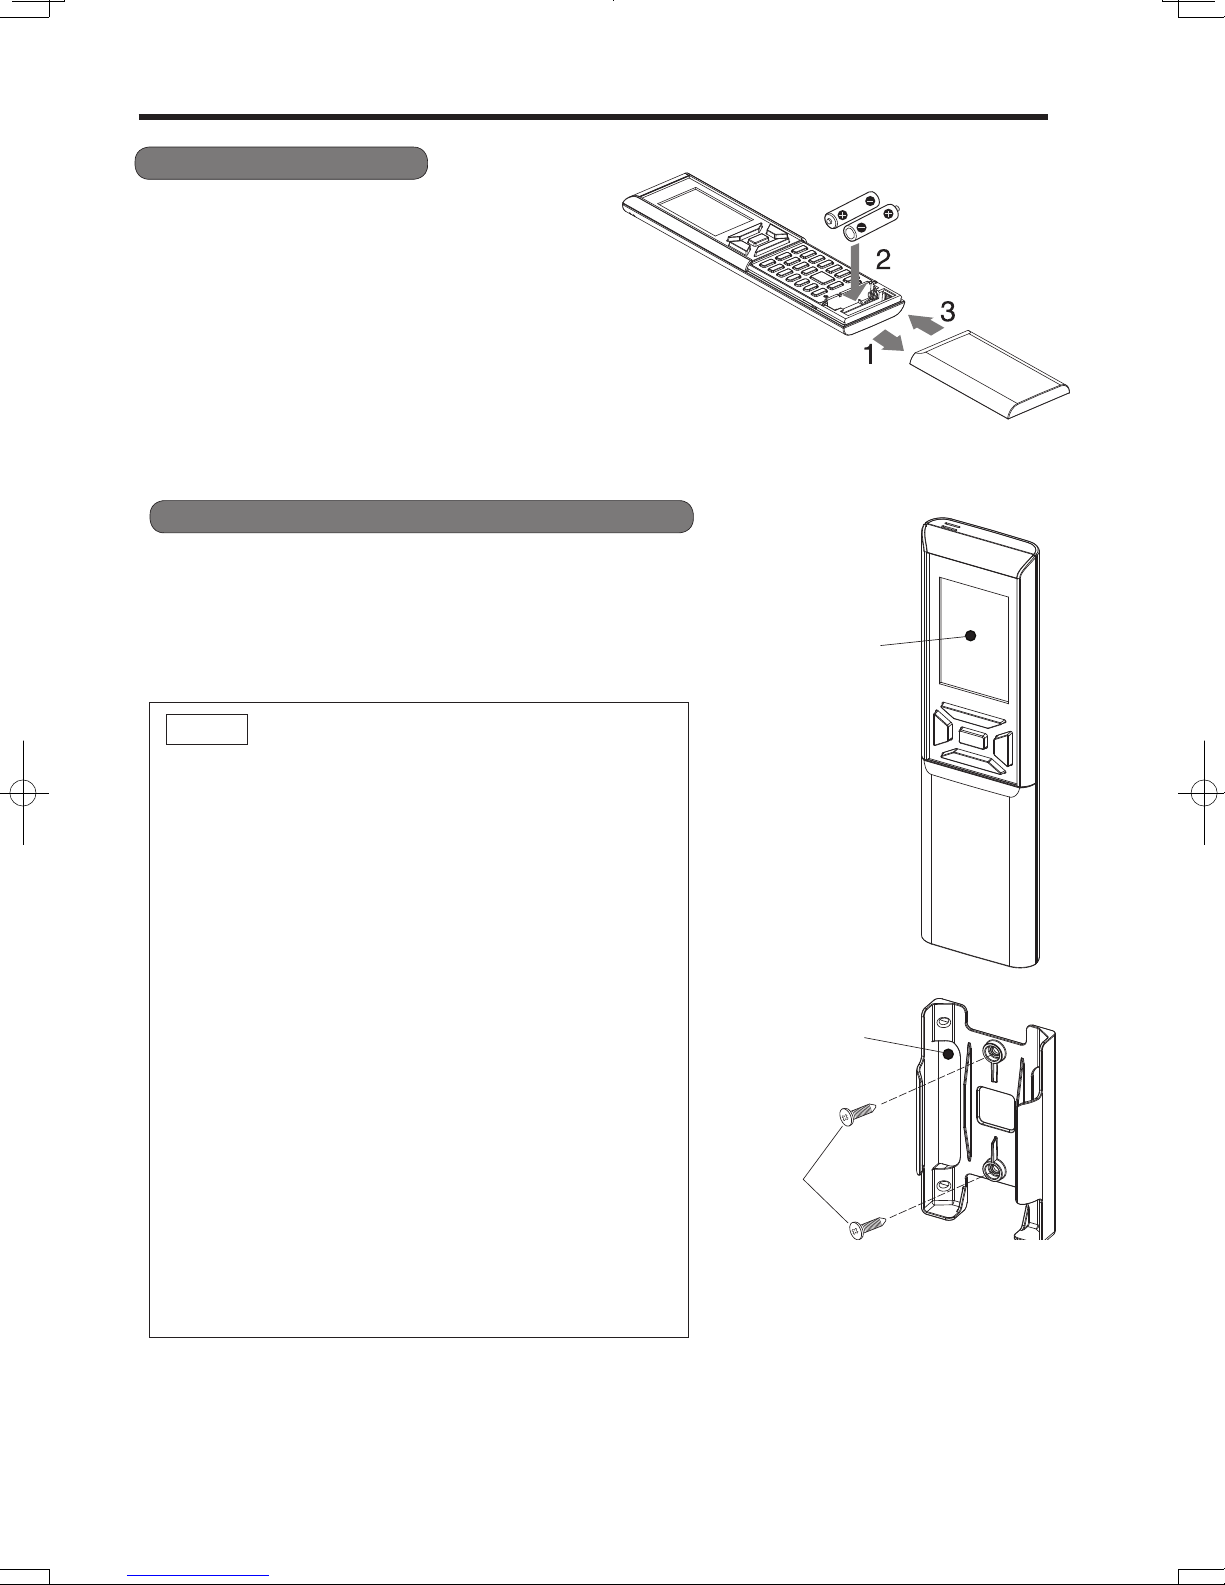
PREPARATION BEFORE OPERATION
HSILGNE
■ To install the batteries
1. Slide the cover to take it off.
Install two dry batteries AAA.LR03 (alkaline).
2.
The direction of the batteries should match
the
marks in the case.
3. Replace the cover at its original position.
■ To fix the remote controller holder to the wall
1. Choose a place from where the signals can reach the unit.
2. Fix the remote controller holder to a wall, a pillar or similar
location with the provided screws.
Place the remote controller in the remote controller holder.
3.
NOTE
Notes on batteries
● When replacing the batteries, use batteries of the same
type, and replace both old batteries together
● When the system is not used for a long time, take the
batteries out.
● The batteries will last for approximately 1 year. However, if
the remote controller display begins to fade and degradation
of reception performance occurs within a year
batteries with new size AAA.LR03 (alkaline).
● The attached batteries are provided for the initial use of
the system.
The usable period of the batteries may be short depending
on the manufactured date of the air conditioner.
.
, replace both
Remote controller
Remote controller holder
Notes on the remote controller
● Never expose the remote controller to direct sunlight.
● Dust on the signal transmitter or receiver will reduce the
sensitivity
● Signal communication may be disabled if an electronic-
starter-type
. Wipe off dust with soft cloth.
uorescent lamp (such as inverter-type lamps)
is in the room. Consult the shop if that is the case.
● If the remote controller signals happen to operate another
appliance,
move that appliance to somewhere else, o
consult the service shop.
● When the remote controller is not in use, please close the
slide cover to prevent failure.
Screws
r
– 6 –
HSILGNE
PREPARATION BEFORE OPERATION
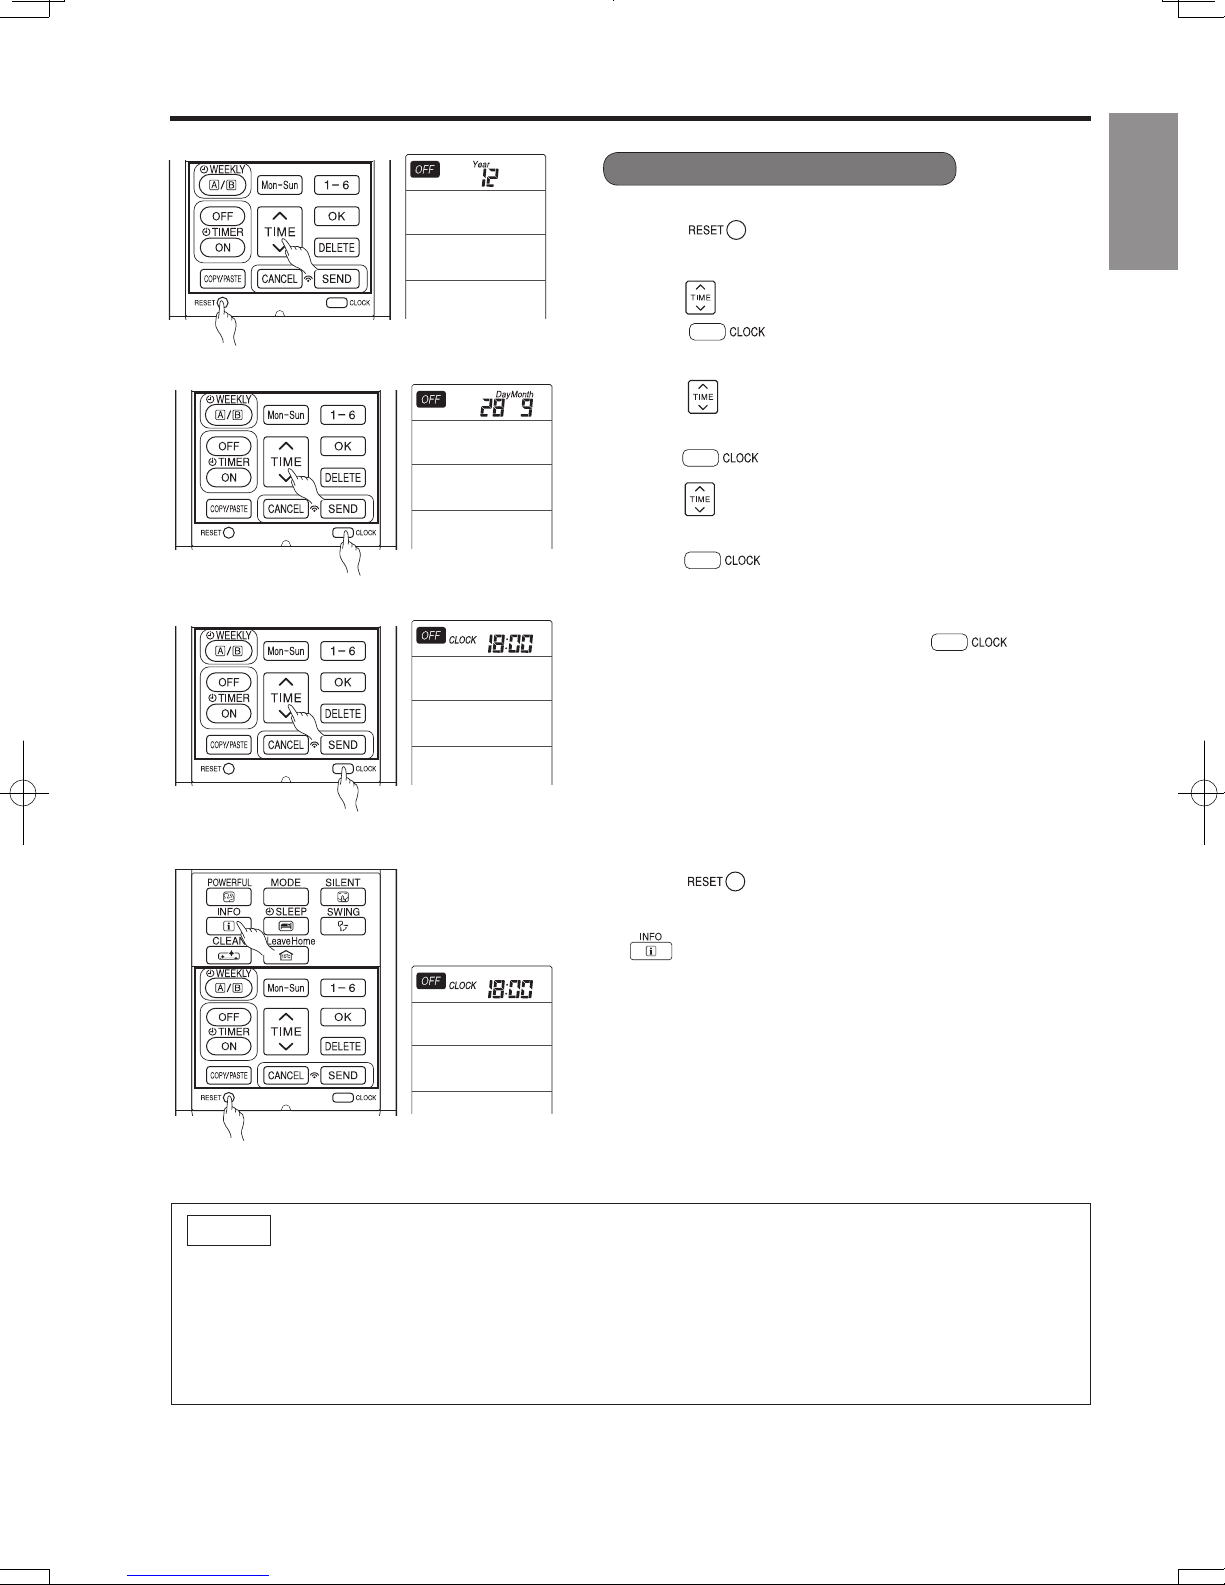
1. Press (RESET) button when first time setting.
■ To set calendar and clock
"Year" blinks.
ENGLISH
2. Press
3. Press
"Month" blink.
4. Press
month.
5. Press
6. Press
time.
7. Press
Calendar and clock are set.
To modify the calendar and clock, press
button.
Then follow steps 1 to 7.
Calendar and clock shall be set again after changing
batteries.
After changing the batteries,
1. Press
(TIME) button to set the current year.
(CLOCK) button. Next, "Day" and
(TIME) button to set the current day and
(CLOCK) button. Next, "CLOCK" blinks.
(TIME) button to set the clock to the current
(CLOCK) button.
(CLOCK)
(RESET) button.
2. Direct remote control towards indoor unit and press
(INFO) button.
3. The calendar and clock from indoor unit will be transmitted.
■ Calendar and clock will not be transmitted from indoor
unit when the following occurs:
● When there is a power failure.
● When breaker is OFF by user (unit is not in STANDBY
MODE).
NOTE
Note on setting the calendar and clock.
● If the calendar and clock are not set, the ON-timer, OFF-timer and Weekly Timer cannot be set.
● If the calendar and clock are not set correctly, the ON-timer, OFF-timer and Weekly Timer will not
operate correctly.
● When the ON-timer, OFF-timer and Weekly Timer are set, the calendar and clock cannot be changed. If
need to change the calendar and clock, ON-timer, OFF-timer and Weekly Timer need to be cancelled.
– 7 –

HSILGNE
NAMES AND FUNCTIONS OF REMOTE CONTROLLER
HSILGNE
MODE SELECTOR
AUTO
HEAT
DEHUMIDIFY
COOL
FAN
FAN SPEED
AUTO
SILENT
LOW
MED
HI
START / STOP
ECO
Precautions for Use
●
Do not put the remote controller in the following places.
●
Under direct sunlight.
●
In the vicinity of a heater.
●
Handle the remote controller carefully. Do not drop it on the floor, and protect it from water.
●
Once the outdoor unit stops, it will not restart for about 3 minutes (unless you turn the power switch
off and on or unplug the power cord and plug it in again).
This is to protect the device and does not indicate a failure.
●
If you press the MODE selector button during operation, the device may stop for about 3 minutes for
protection.
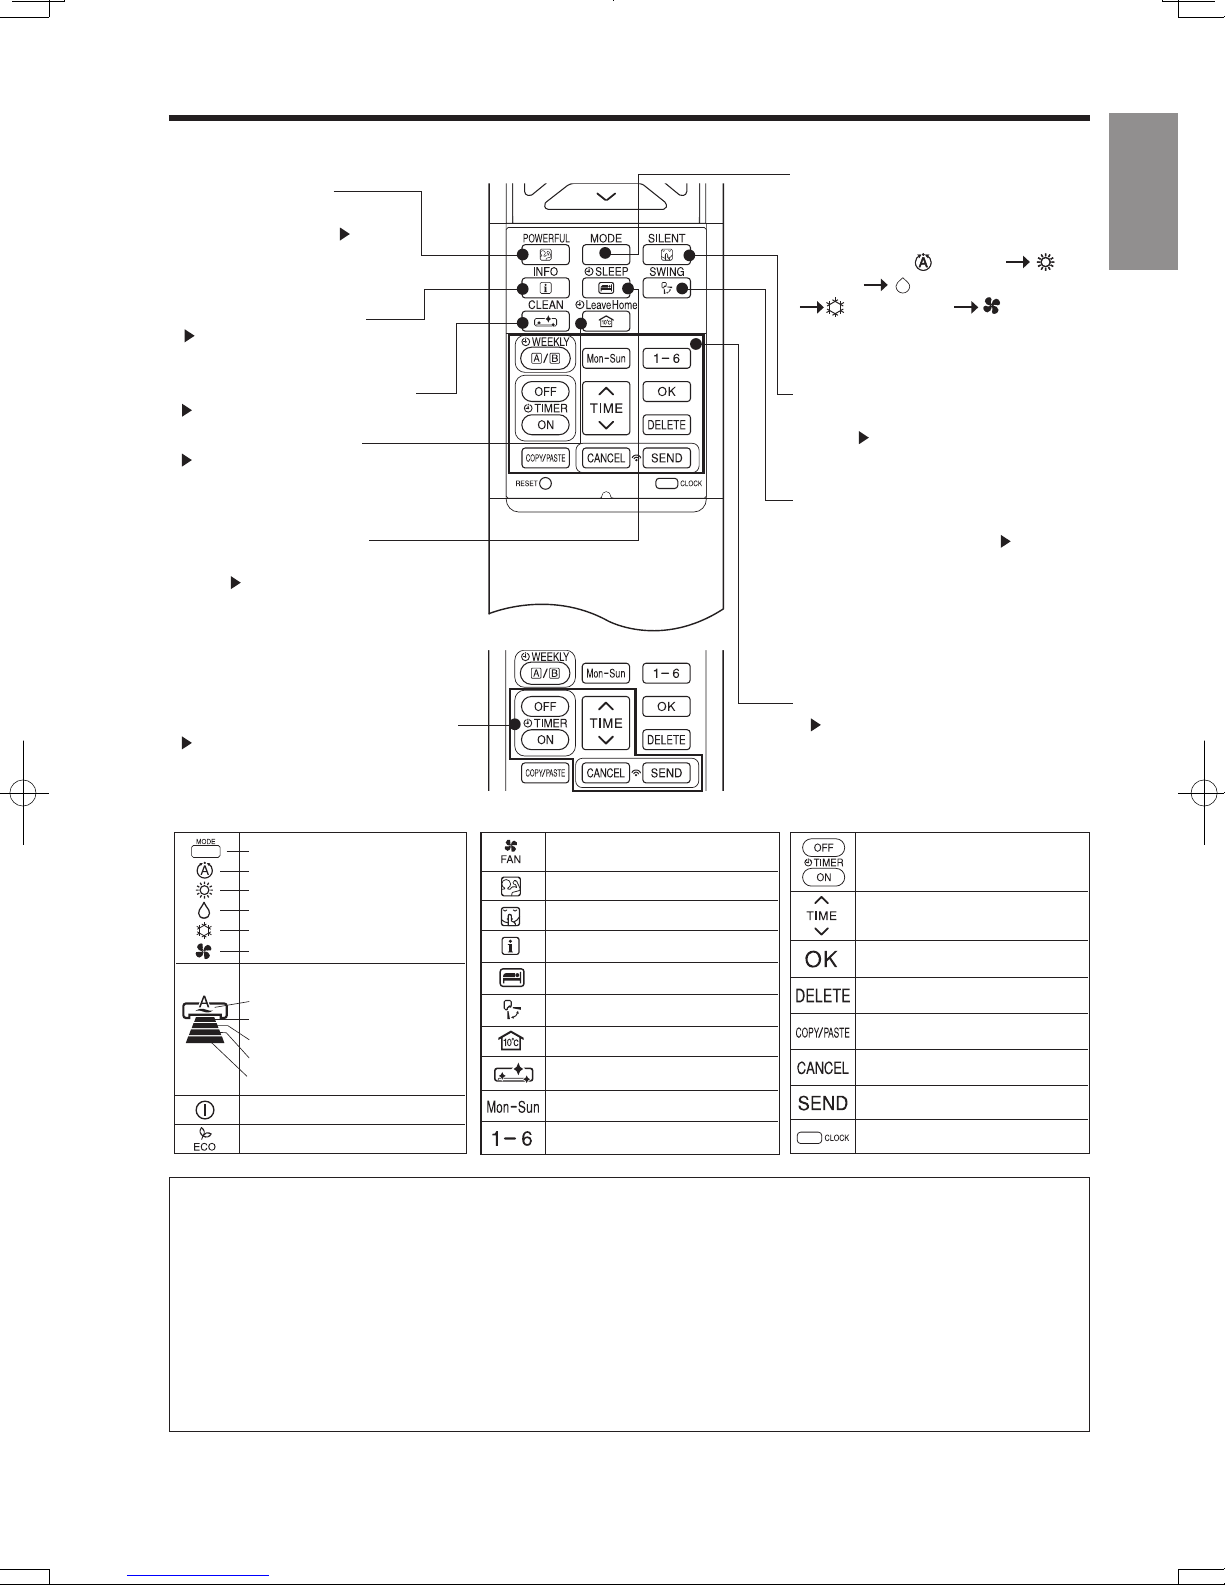
POWERFUL Button
Use this button to set the
POWERFUL mode.
INFORMATION Button
ONE TOUCH CLEAN Button
ON / OFF TIMER setting Buttons
MODE selector Button
Use this button to select the
operating mode. Every time you
press this button, the mode will
change from
(AUTO)
(HEAT)
(DEHUMIDIFY)
(COOL) and
(FAN)
cyclically.
SILENT Button
Use this button to set the SILENT
mode.
AUTO SWING (Vertical) Button
Controls the angle of the
horizontal air deflector.
WEEKLY TIMER setting Buttons
LEAVE HOME Button
NAMES AND FUNCTIONS OF REMOTE CONTROLLER
SLEEP TIMER Button
Use this button to set the sleep
timer.
FAN
POWERFUL
SILENT
INFO
SLEEP TIMER
AUTO SWING (VERTICAL)
LEAVE HOME
CLEAN
DAY
PROGRAM NO.
ON / OFF TIMER
TIME
OK
DELETE
COPY / PASTE
CANCEL
SEND
CLOCK
( p.16)
( p.30 )
( p.20 )
( p.19)
( p.21)
( p.22)
( p.17)
( p.24)
( p.15)
REMOTE CONTROLLER
● This controls the operation of the indoor unit. The range of control is about 7 meters. If indoor lighting is
controlled electronically, the range of controller may be shorter.
This unit can be fixed on a wall using the fixture provided. Before fixing it, make sure the indoor unit can
be controlled from the remote controller.
● Handle the remote controller with care. Dropping it or getting it wet may compromise its signal transmission
capability.
● After new batteries are inserted into the remote controller, the unit will initially require approximately 10
seconds to respond to commands and operate.
● When remote controller is not in use for about 3 minutes during OFF condition, indicated by on the
display, the LCD will turn off.
● During clock setting, the LCD will turn off about 10 minutes later if the remote controller is not in use.
● When pressing any button, the LCD will turn on.
● The LCD will not turn off during TIMER setting.
Transmission sign
Signal Transmitting/Receiving
Window
Point this window towards the
indoor unit when controlling it.
The transmission sign lights up
when a signal is sent.
START/STOP button
Sensor
A temperature sensor inside the
remote controller senses ambient
temperature around the remotecontroller.
Display
This indicates the room temperature
selected, current time, timer status,
function and airflow rate selected.
ROOM TEMPERATURE setting Buttons
Press these buttons to set the room
temperature.
Press the [
temperature.
Press the [
temperature.
] button to raise the room
] button to lower the room
Press this button to start
operation. Press it again to stop
operation.
FAN SPEED selector Button
This determines the fan speed.
Every time you press this button
the ange from
airflow rate will ch
(AUTO) (HIG H)
(MED) (LOW)
(SILENT) (This button allows
selection of
fan speed for each operation mode).
ECO Button
Use this button to set the ECO
mode.( p.18)
➔
➔
optimal or preferred
Keep pressing and the value will change
more quickly.
– 8 –
➔
➔
HSILGNE
NAMES AND FUNCTIONS OF REMOTE CONTROLLER
POWERFUL Button
Use this button to set the
POWERFUL mode.
( p.16)
INFORMATION Button
( p.30 )
ONE TOUCH CLEAN Button
( p.20 )
LEAVE HOME Button
( p.19)
SLEEP TIMER Button
Use this button to set the sleep
timer.
( p.22)
ON / OFF TIMER setting Buttons
( p.21)
MODE selector Button
Use this button to select the
operating mode. Every time you
press this button, the mode will
change from
(HEAT)
(COOL) and (FAN)
(AUTO)
(DEHUMIDIFY)
cyclically.
SILENT Button
Use this button to set the SILENT
( p.17)
mode.
AUTO SWING (Vertical) Button
Controls the angle of the
horizontal air deflector.
( p.15)
WEEKLY TIMER setting Buttons
( p.24)
ENGLISH
MODE SELECTOR
AUTO
HEAT
DEHUMIDIFY
COOL
FAN
FAN SPEED
AUTO
SILENT
LOW
MED
HI
START / STOP
ECO
FAN
POWERFUL
SILENT
INFO
SLEEP TIMER
AUTO SWING (VERTICAL)
LEAVE HOME
CLEAN
DAY
PROGRAM NO.
ON / OFF TIMER
TIME
OK
DELETE
COPY / PASTE
CANCEL
SEND
CLOCK
Precautions for Use
●
Do not put the remote controller in the following places.
●
Under direct sunlight.
●
In the vicinity of a heater.
●
Handle the remote controller carefully. Do not drop it on the floor, and protect it from water.
●
Once the outdoor unit stops, it will not restart for about 3 minutes (unless you turn the power switch
off and on or unplug the power cord and plug it in again).
This is to protect the device and does not indicate a failure.
●
If you press the MODE selector button during operation, the device may stop for about 3 minutes for
protection.
– 9 –
HSILGNE
VARIOUS FUNCTIONS
■ Auto Restart Control
● If there is a power failure, operation will be automatically restarted when the power is resumed with previous operation
mode and airflow direction.
(As the operation is not stopped by remote controller.)
● If you intend not to continue the operation when the power is resumed, switch off the power supply.
When you switch on the circuit breaker, the operation will be automatically restarted with previous operation
and air flow
Note: 1. If you do not require Auto Restart Control, please consult your sales agent.
direction.
2. Auto Restart Control is not available when Timer or Sleep Timer mode is set.
mode
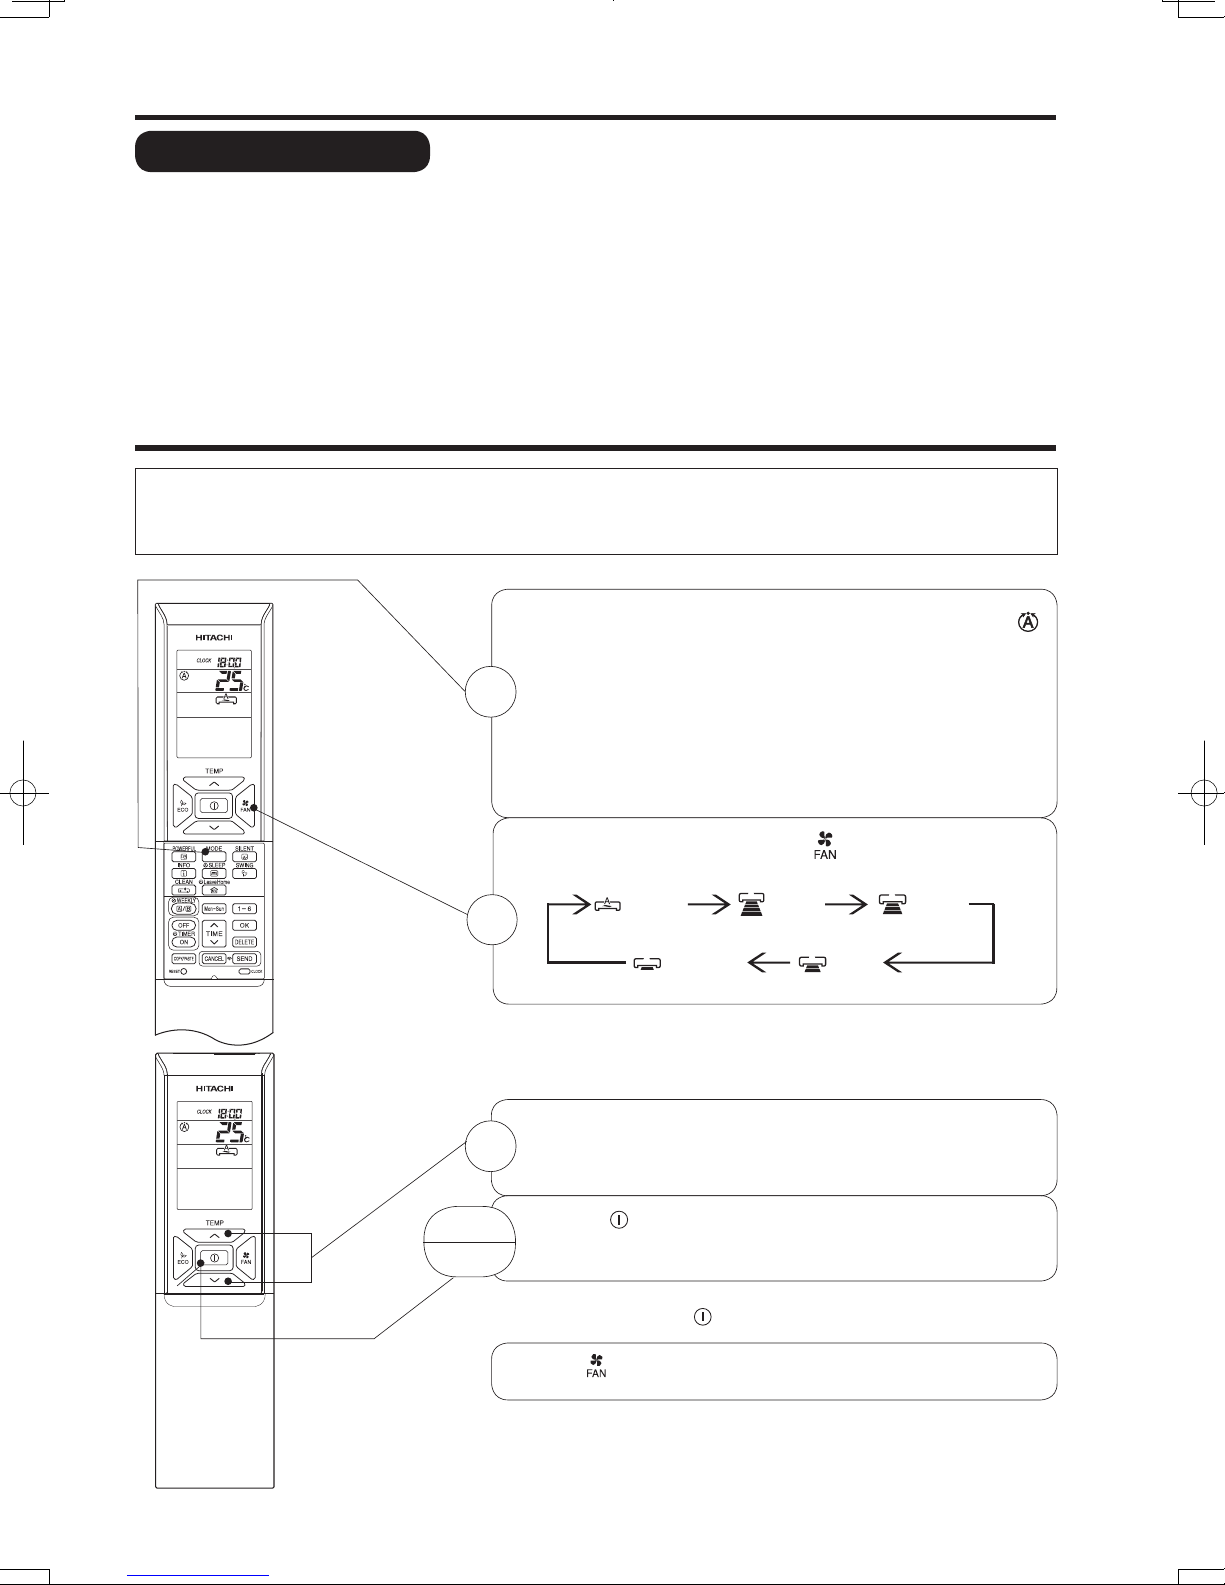
AUTOMATIC OPERATION
The device will automatically determine the mode of operation, HEAT or COOL depending on the current
room temperature. The selected mode of operation will change when the room temperature varies.
However, the mode of operation will not change when indoor unit is connected to multi type outdoor unit.
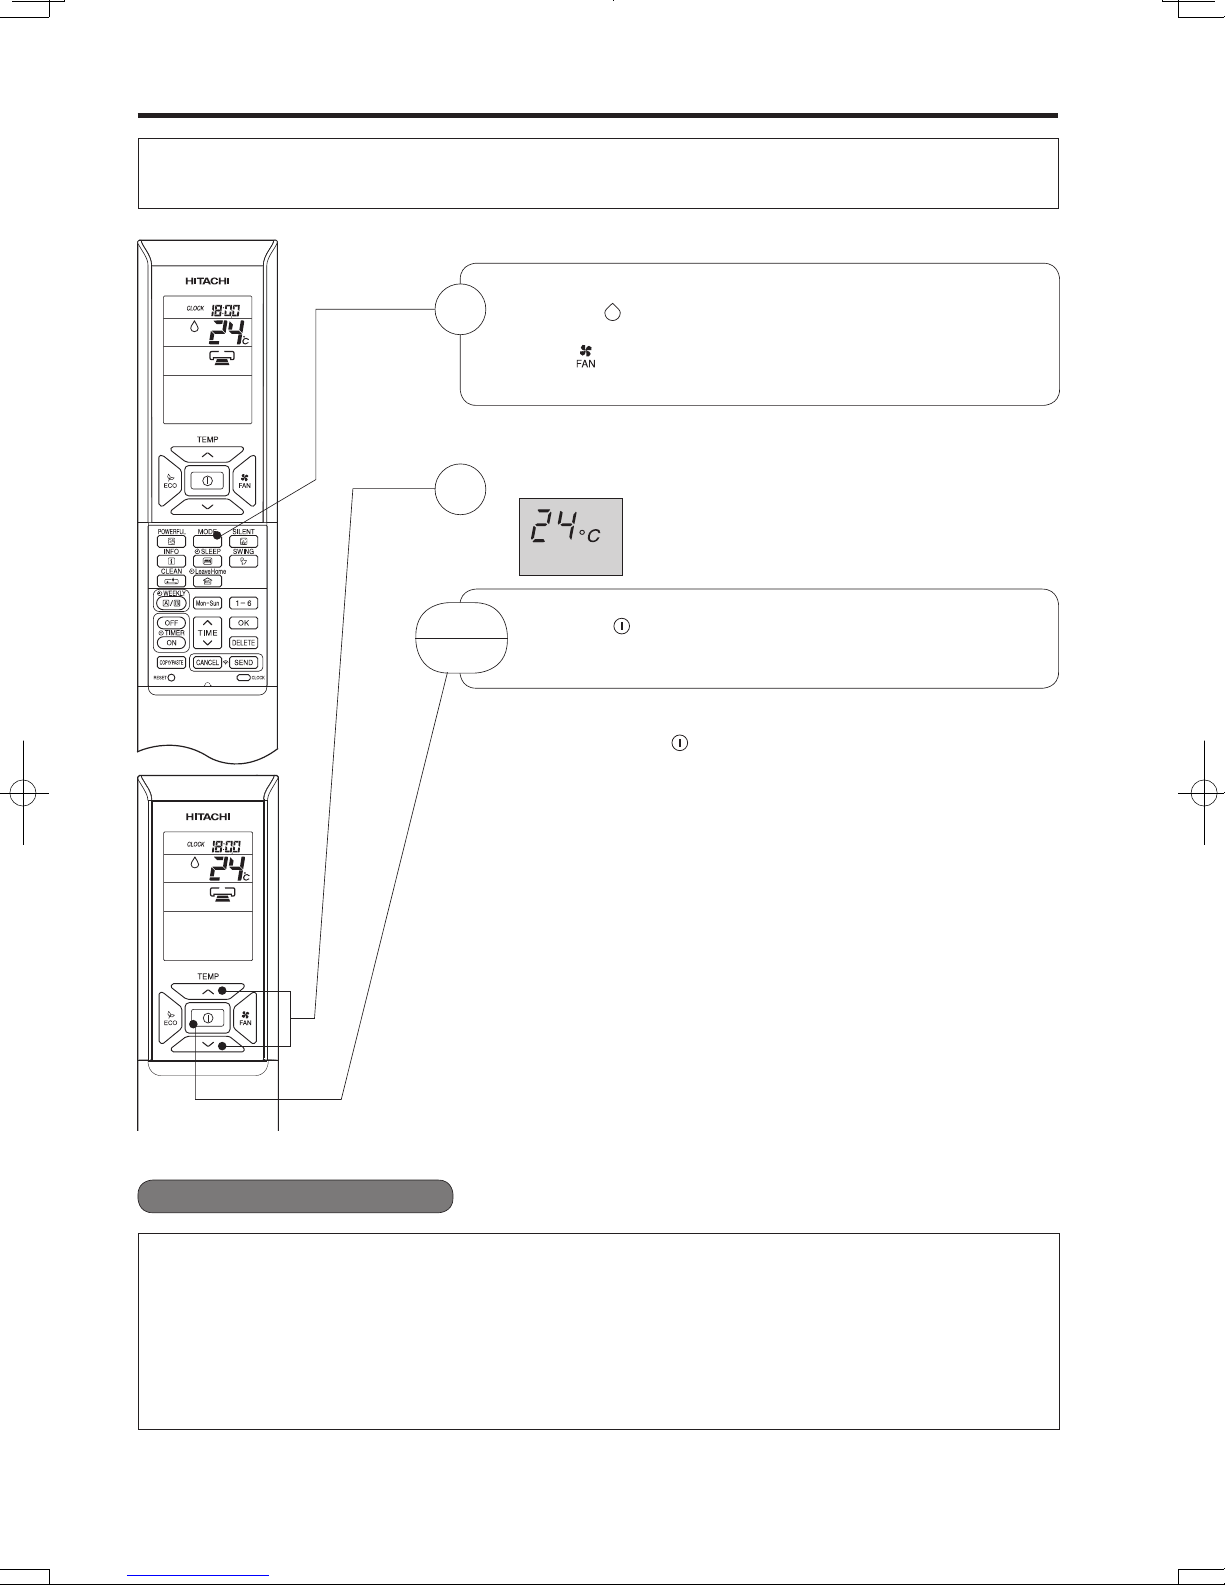
Press the MODE selector button so that the display indicates the
(AUTO) mode of operation.
● When AUTO has been selected, the device will automatically
1
determine the mode of operation, HEAT or COOL depending on
the current
not change when indoor unit is connected to multi type
unit.
● If the mode automatically selected by the unit is not satisfactory
manually change the mode setting (HEAT, DEHUMIDIFY, COOL
or FAN).
room temperature. However the mode of operation will
outdoor
,
Set the desired FAN SPEED with the (FAN SPEED) button (the
display indicates the setting).
(AUTO)
(HIGH)
2
(SILENT)
Set the desired room temperature with the TEMPERATURE buttons
(the display indicates the setting).
3
The temperature setting and the actual room temperature may vary
depending on conditions.
START
STOP
Press the
Operation starts with a beep.
Press the button again to stop operation.
■ As the settings are stored in the memory the remote controller, you
Press the (FAN SPEED) button to select AUTO, HI, MED, LOW or
SILENT.
(START/STOP) button.
(START/STOP) button next time.only have to press the
(LOW)
of
(MED)
– 10 –
HSILGNE
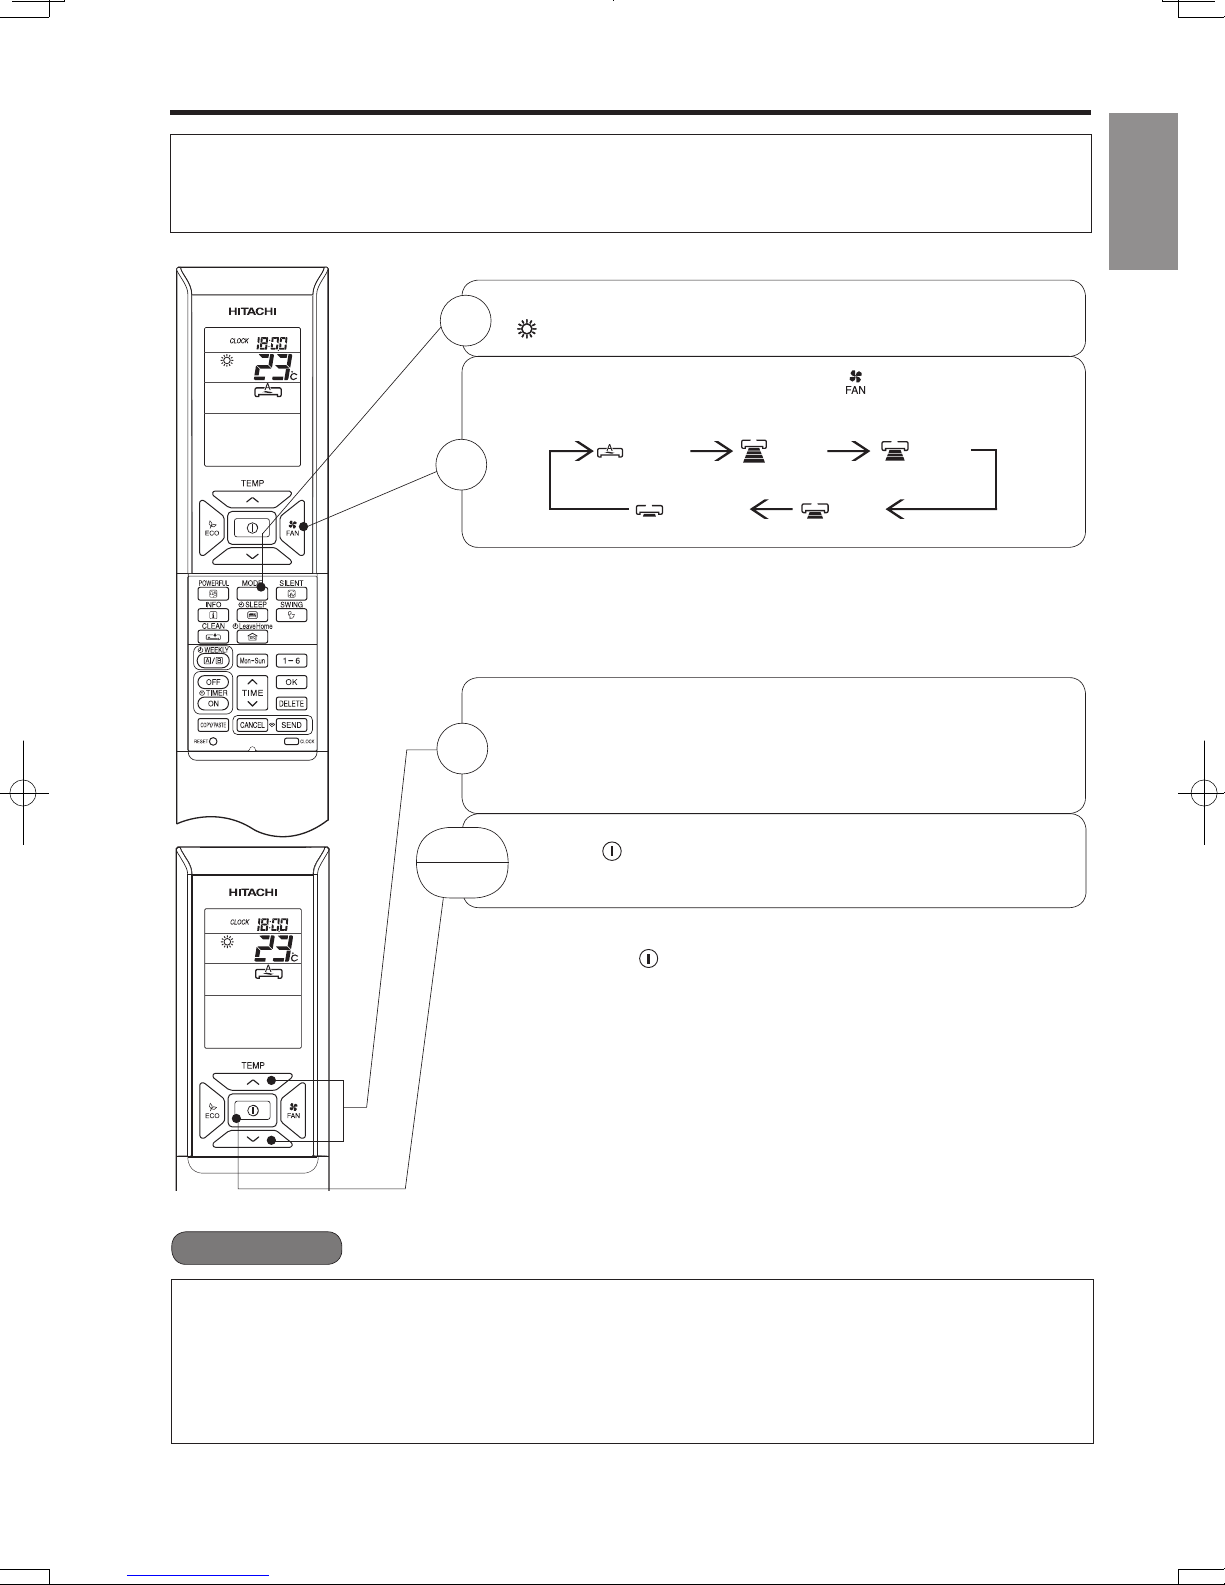
HEATING OPERATION
● Use the device for heating when the outdoor temperature is under 21°C.
When it is too warm (over 21°C), the heating function may not work in order to protect the device.
●
In order to maintain reliability of the device, please use this device when outdoor temperature is above -15°C.
Press the MODE selector button so that the display indicates
1
(HEAT).
Set the desired FAN SPEED with the (FAN SPEED) button
(the display indicates the setting).
ENGLISH
(AUTO)
(HIGH)
(MED)
2
(SILENT)
Set the desired room temperature with the TEMPERATURE buttons
(the display indicates the setting).
3
START
STOP
The temperature setting and the actual room temperature may
vary depending on conditions.
Press the
a beep. Press the button again to stop operation.
■ As the settings are stored in the memory of the remote controller, you only
■
have to press the (START/STOP) button next time.
■ During AUTO fan, the fan speed automatically changes as below:
● When the difference between room temperature and setting temperature
is large, fan starts to run at HI speed.
● After room temperature reaches the preset temperature, fan speed
will be changed to lower speed to obtain optimum room temperature
condition for natural healthy heating.
(START/STOP) button. Heating operation starts with
(LOW)
■ Defrosting
Defrosting will be performed about once an hour when frost forms on the heat exchange of the outdoor unit,
for 5~10 minutes each time.
During defrosting operation, the operation lamp blinks in a cycle of 3 seconds on and 0.5 second off.
The maximum time for defrosting is 20 minutes.
However, if the indoor unit is connected to multi type outdoor unit, the maximum time for defrosting is 15 minutes.
(If the piping length used is longer than usual, frost is likely to form.)
– 11 –
HSILGNE
DEHUMIDIFYING OPERATION
HSILGNE
COOLING OPERATION
Use the device for cooling when the outdoor temperature is -10~ 43°C.
If indoors humidity is very high (80%), some dew may form on the air outlet grille of the indoor unit.
Press the MODE selector button so that the display indicates
(COOL).
Set the desired FAN SPEED with the
(FAN SPEED) button (the
display indicates the setting).
Set the desired room temperature with the TEMPERATURE buttons
(the display indicates the setting).
The temperature setting and the actual room temperature may vary
depending on conditions.
Press the
(START/STOP) button. Cooling operation starts with a
beep. Press the button again to stop operation. The cooling function
does not start if the temperature setting is higher than the current
room temperature (even though the (OPERATION) lamp lights).
The cooling function will start as soon as user set the temperature
below the current room temperature.
■
As the settings are stored in the memory of the remote controller, you only
have to press the
(START/STOP) button next time.
■ During AUTO fan, the fan speed automatically changes as below:
● When the difference between room temperature and setting tem-
perature is large, fan starts to run at HI speed.
● After room temperature reaches the preset temperature, fan speed
will be changed to lower speed to obtain optimum room temperature
condition for natural healthy cooling.
START
STOP
1
3
(AUTO)
(HIGH)
(MED)
(LOW)
(SILENT)
2
Use the device for dehumidifying when the room temperature is over 16°C.
When it is under 15°C, the dehumidifying function will not work.
1
2
START
STOP
■ As the settings are stored in the memory of the remote controller, you
Press the MODE selector button so that the display
indicates
The fan speed is set at LOW.
Press
speed.
Set the desired room temperature with the ROOM
TEMPERATURE setting buttons (the display indicates the
setting).
Press the (START/STOP) button. Dehumidifying operation
starts with a beep. Press the button again to stop operation.
only have to press the
(DEHUMIDIFY).
(FAN SPEED) button to select SILENT or LOW fan
The range of 20-26°C is recommended as the room
temperature for dehumidifying.
(START/STOP) button next time.
■ Dehumidifying Function
● When the room temperature is higher than the temperature setting: The device will dehumidify the
room, reducing the room temperature to the preset level.
When the room temperature is lower than the temperature setting: Dehumidifying will be performed at
the temperature setting slightly lower than the current room temperature, regardless of the temperature
setting.
● The preset room temperature may not be reached depending on the number of people present in the
room or other room conditions.
– 12 –

HSILGNE
COOLING OPERATION
Use the device for cooling when the outdoor temperature is -10~ 43°C.
If indoors humidity is very high (80%), some dew may form on the air outlet grille of the indoor unit.
ENGLISH
1
2
3
START
STOP
Press the MODE selector button so that the display indicates
(COOL).
Set the desired FAN SPEED with the
display indicates the setting).
Set the desired room temperature with the TEMPERATURE buttons
(the display indicates the setting).
The temperature setting and the actual room temperature may vary
depending on conditions.
Press the
beep. Press the button again to stop operation. The cooling function
does not start if the temperature setting is higher than the current
room temperature (even though the (OPERATION) lamp lights).
The cooling function will start as soon as user set the temperature
below the current room temperature.
(AUTO)
(SILENT)
(START/STOP) button. Cooling operation starts with a
(HIGH)
(FAN SPEED) button (the
(MED)
(LOW)
As the settings are stored in the memory of the remote controller, you only
■
have to press the
■ During AUTO fan, the fan speed automatically changes as below:
● When the difference between room temperature and setting tem-
perature is large, fan starts to run at HI speed.
● After room temperature reaches the preset temperature, fan speed
will be changed to lower speed to obtain optimum room temperature
condition for natural healthy cooling.
– 13 –
(START/STOP) button next time.

HSILGNE
FAN OPERATION
User can use the device simply as an air circulator.
Press the MODE selector so that the display indicates
1
(FAN).
Set the desired FAN SPEED with the (FAN SPEED) button
(the display indicates the setting).
2
START
STOP
(AUTO)
(SILENT)
Press the
a beep. Press the button again to stop operation.
(START/STOP) button. Fan operation starts with
(HIGH)
(LOW)
(MED)
– 14 –
HSILGNE
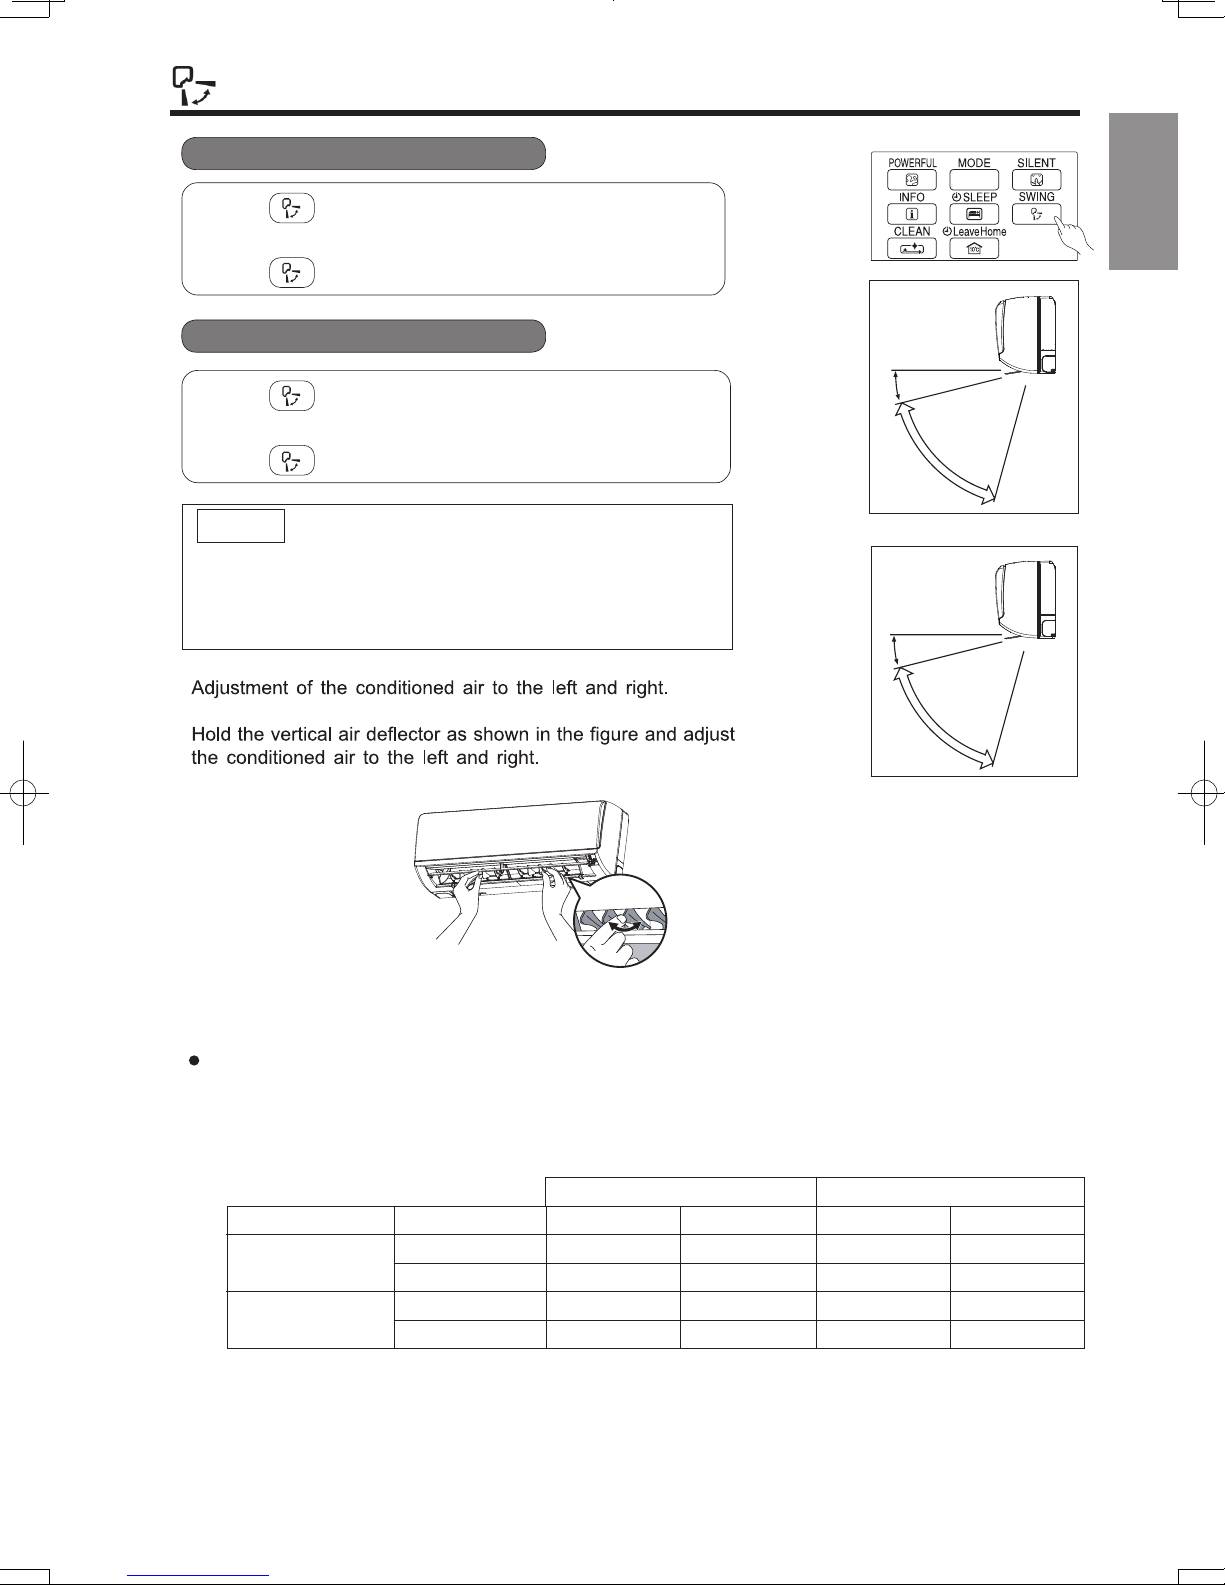
AUTO SWING OPERATION
■ To start Vertical Auto Swing
●
Press (AUTO SWING (VERTICAL)) button. The
deflector(s) will start to swing up and down.
is displayed on the LCD.
■ To cancel Vertical Auto Swing
●
Press (AUTO SWING (VERTICAL)) button again. The
deflector(s) will stop in the current position.
disappeared from the LCD.
NOTE
●
During cooling and dehumidifying operation, do not keep
the deflectors swinging or in the lower position (in the case
of vertical auto swing) for a long time. It may cause dew
condensation on the deflectors.
ENGLISH
When cooling,
dehumidifying
Vertical
about 10°
about 40°
When heating
Vertical
about 10°
about 45°
Note
Avoid to use the room air conditioner for cooling operation when the outside temperature is below
-10°C (14°F).
The recommended maximum and minimum operating temperatures of the hot and cold sides
should be as below:
Indoor Dry bulb °C 21 32 20 27
Outdoor Dry bulb °C 21 43 2 21
gnitaeHgnilooC
Minimum Maximum Minimum Maximum
Wet bulb °C 15 23 12 19
Wet bulb °C 15 26 1 15
– 15 –
HSILGNE
POWERFUL OPERATION
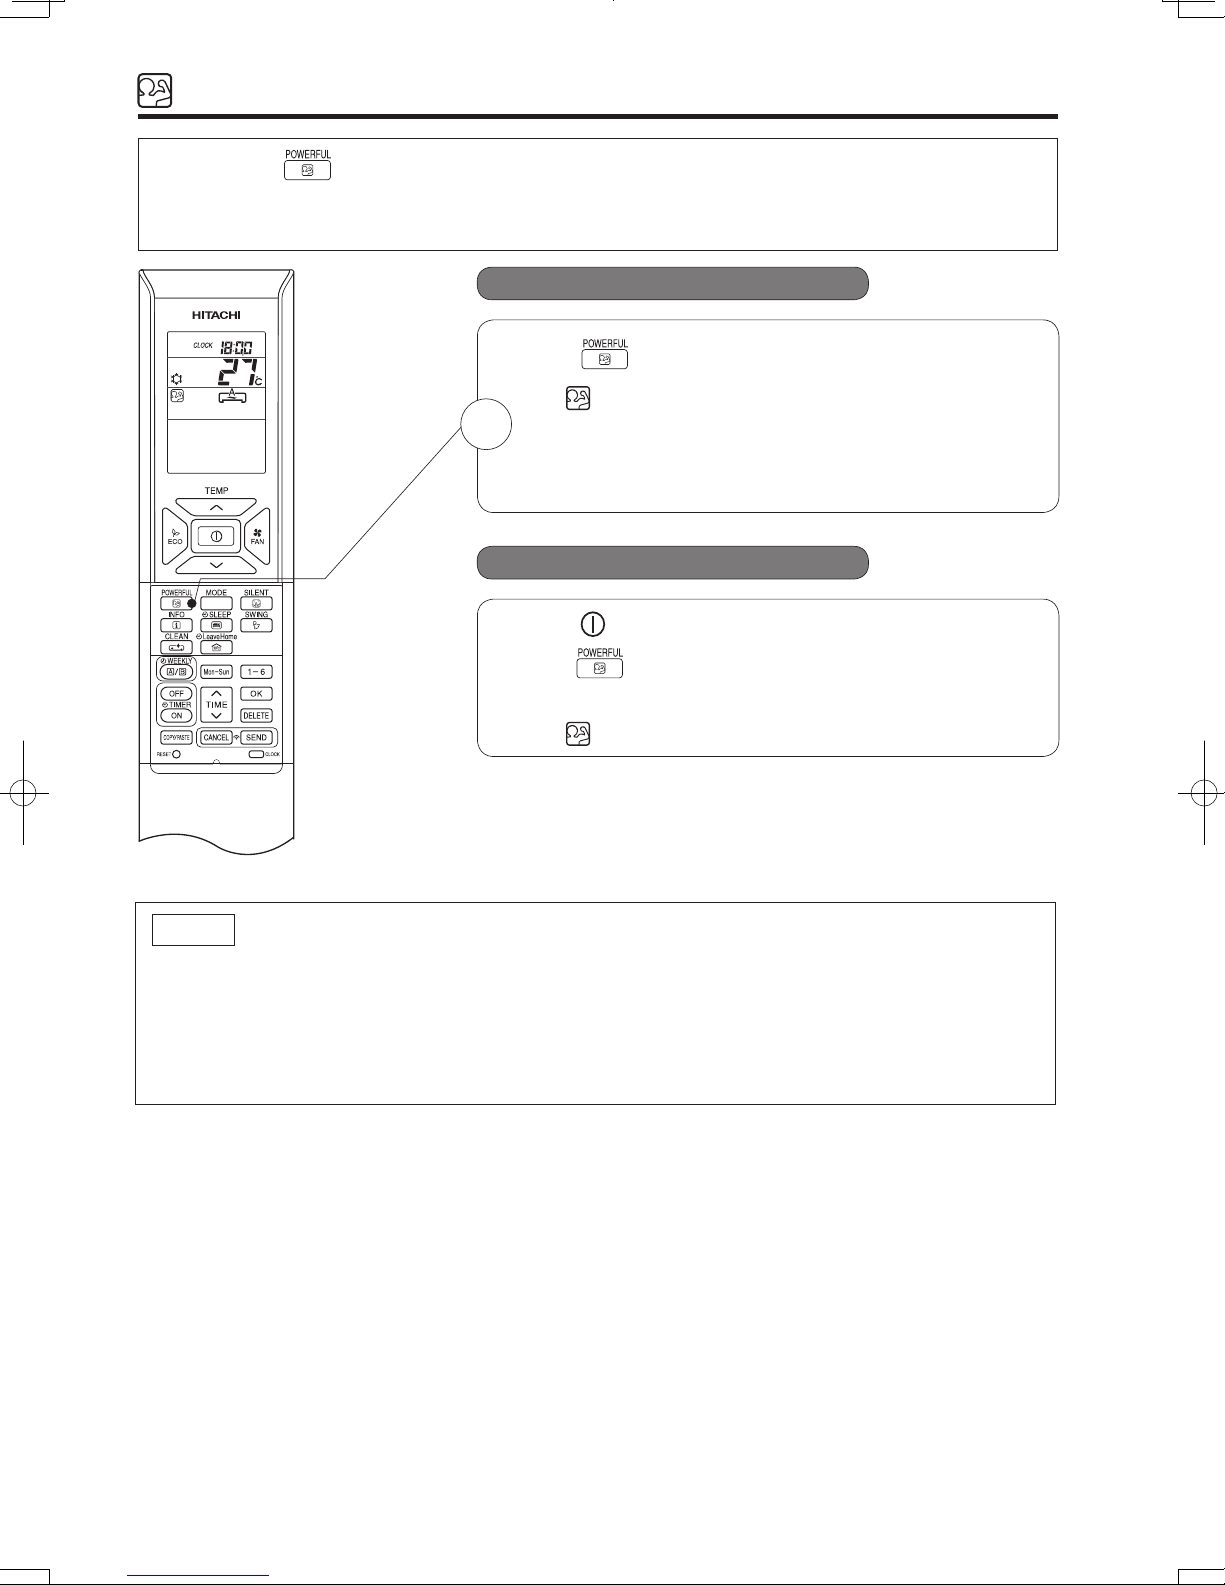
● By pressing (POWERFUL) button during AUTO, HEATING, DEHUMIDIFYING, COOLING or FAN
operation, the air conditioner performs an the maximuum power.
● During POWERFUL operation, cooler or warmer air will be blown out from indoor unit for COOLING of
HEATING operation respectively.
■ To start POWERFUL operation
●
Press (POWERFUL) button during operation.
” is displayed on the LCD.
“
1
POWERFUL operation ends in 20 minutes. Then the system
automatically operates with the previous settings used before
POWERFUL operation.
■ To cancel POWERFUL operation
●
Press (START/ STOP) button.Or
●
Press
(POWERFUL) button again.
POWERFUL operation stops.
“
” disappears from the LCD.
NOTE
● When SLEEP mode, ECO mode, SILENT mode or LEAVE HOME mode is selected, POWERFUL
operation is cancelled.
● During POWERFUL operation, capacity of the air conditioner will not increase
– if the air conditioner is already running at maximum capacity.
just before defrost operation (when the air conditioner is running in HEATING operation).
–
● After auto restart, POWERFUL operation is cancelled and previous operation shall start.
– 16 –
HSILGNE
SILENT OPERATION
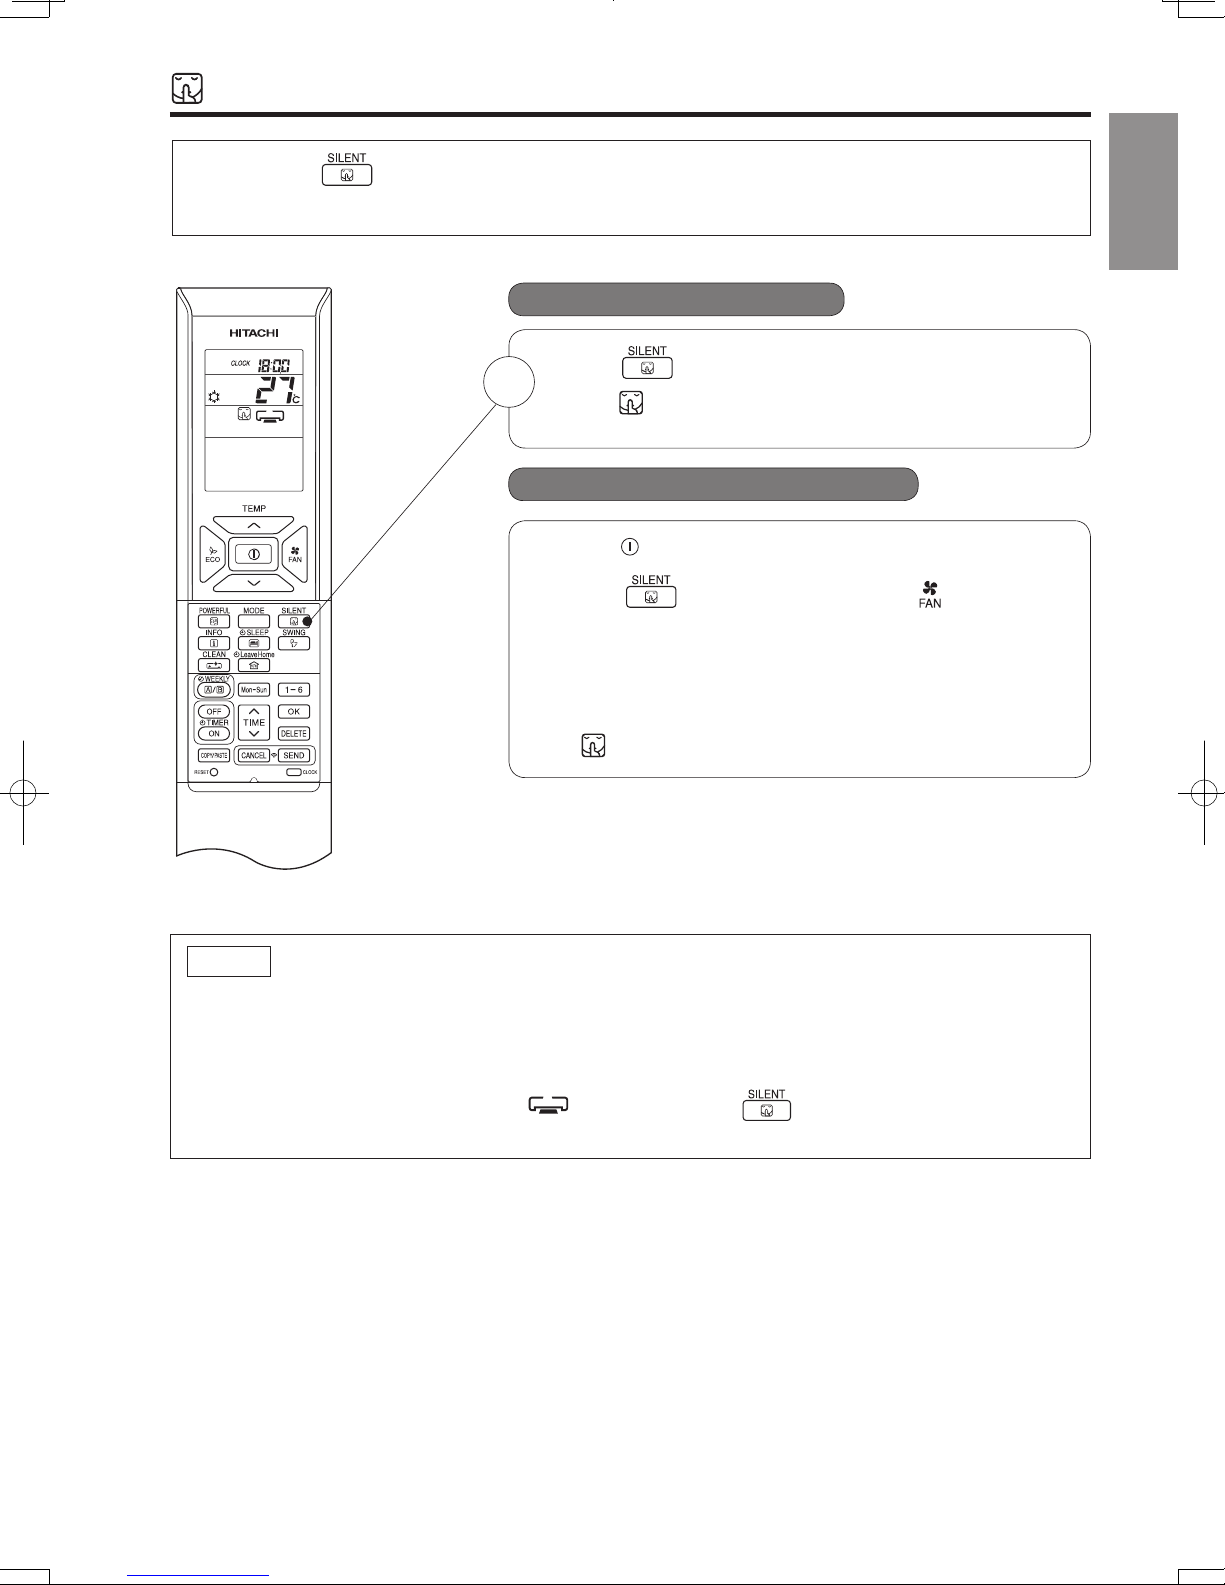
● By pressing (SILENT) button during AUTO, HEATING, DEHUMIDIFYING, COOLING or FAN
operation, the fan speed will change to ultra slow.
■ To start SILENT operation
●
Press (SILENT) button during operation.
1
“
” is displayed on the LCD. Fan speed will be ultra
slow.
■ To cancel SILENT operation
● Press (START/STOP) button. Or
● Press (SILENT) button again or (FAN SPEED)
button.
Fan speed will return to previous fan speed before SILENT
operation starts.
SILENT operation stops.
ENGLISH
“
” disappears from the LCD.
NOTE
● When POWERFUL operation is selected, SILENT operation is cancelled. Fan speed will return to
previous fan speed before SILENT operation.
● After auto restart, SILENT operation is cancelled. Fan speed will return to previous
fan speed before SILENT operation.
● During any operation with fan speed (SILENT), if press (SILENT) button, fan speed will
not change.
– 17 –
HSILGNE
ECO OPERATION
HSILGNE
LEAVE HOME(LH) OPERATION
■ To start LEAVE HOME operation
Press
(LEAVE HOME) button during stop or operation.
●
Room temperature is set at 10°C and heating operation starts.
“
”, “ ”, “ ”, “ ” is displayed on the LCD.
Press
(LEAVE HOME) button during stop or operation.
Room temperature is set at 10°C and heating operation starts.
“
”, “ ”, “ ”, “ ” is displayed on the LCD.
● Set number of operation days (1 to 99 days), if needed.
Press
(TIME) button to select number of days.
Number of days blink.
* Press “
(UP)” to set number of days from 1 day, 2 days, 3
days ..... 98 days, 99 days, 1 day and so on.
* Press “
(DOWN)” to set number of days from 99 days, 98
days, 97 days .... 3 days, 2 days, 1 day, 99 days and so on.
* Number of day is counted when clock indicates 0:00.
● Press (SEND) button to confirm number of operation
days. Display for number of operation days will stop blinking.
● Press (CANCEL) button to reset number of operation
days or to have continuous operation.
■ To cancel LEAVE HOME operation
● Press (START/STOP) button.Or
● Press (LEAVE HOME) button again.
● Change to other operation mode by pressing (MODE) button.
NOTE
● After reaching the set number of operation days for Leave Home or by pressing the (Leave Home) button again,
● During Leave Home operation, fan speed and horizontal air deflector position cannot be changed.
● By pressing (Leave Home) button, implementation of Weekly Timer or One Timer only Timer is cancelled.
● In case of power supply shut down, after autorestart, all setting for number of days operation will be reset and unit
shall be in continuous operation.
●
For multi connections, when each room is running in different operation mode such as FAN only, COOLING, DEHUMIDIFYING
or AUTO mode, Leave Home operation cannot operate even though it is possible to set Leave Home operation.
In order to start Leave Home operation, all rooms must stop its operation. Then, press (LEAVE HOME) button to
operate Leave Home operation.
● For multi connections, when all rooms are running HEATING operation, it is possible to operate Leave Home operation
by pressing the (LEAVE HOME) button.
● For multi connections, if two or more rooms are set to operate Leave Home operation, the capability to reach the
set temperature at 10°C may not possible. In addition, this also depends on outdoor temperature.
Continuous operation
Day timer operation
Prevent the room temperature from falling too much by setting temperature automatically when no one is at home.
This operation is able to operate by" Continuous operation" or " Day timer operation" . Please use " Day timer operation"
to set the number of days up to 99 days.
10°C
°
●
Option 1. Continuous operation.
Option 2. Day timer operation.
Return to previous operation mode.Or
othe unit will operate in previous mode.
POWERFUL,SILENT and ECO operations are not applicable during Leave Home.
●
1
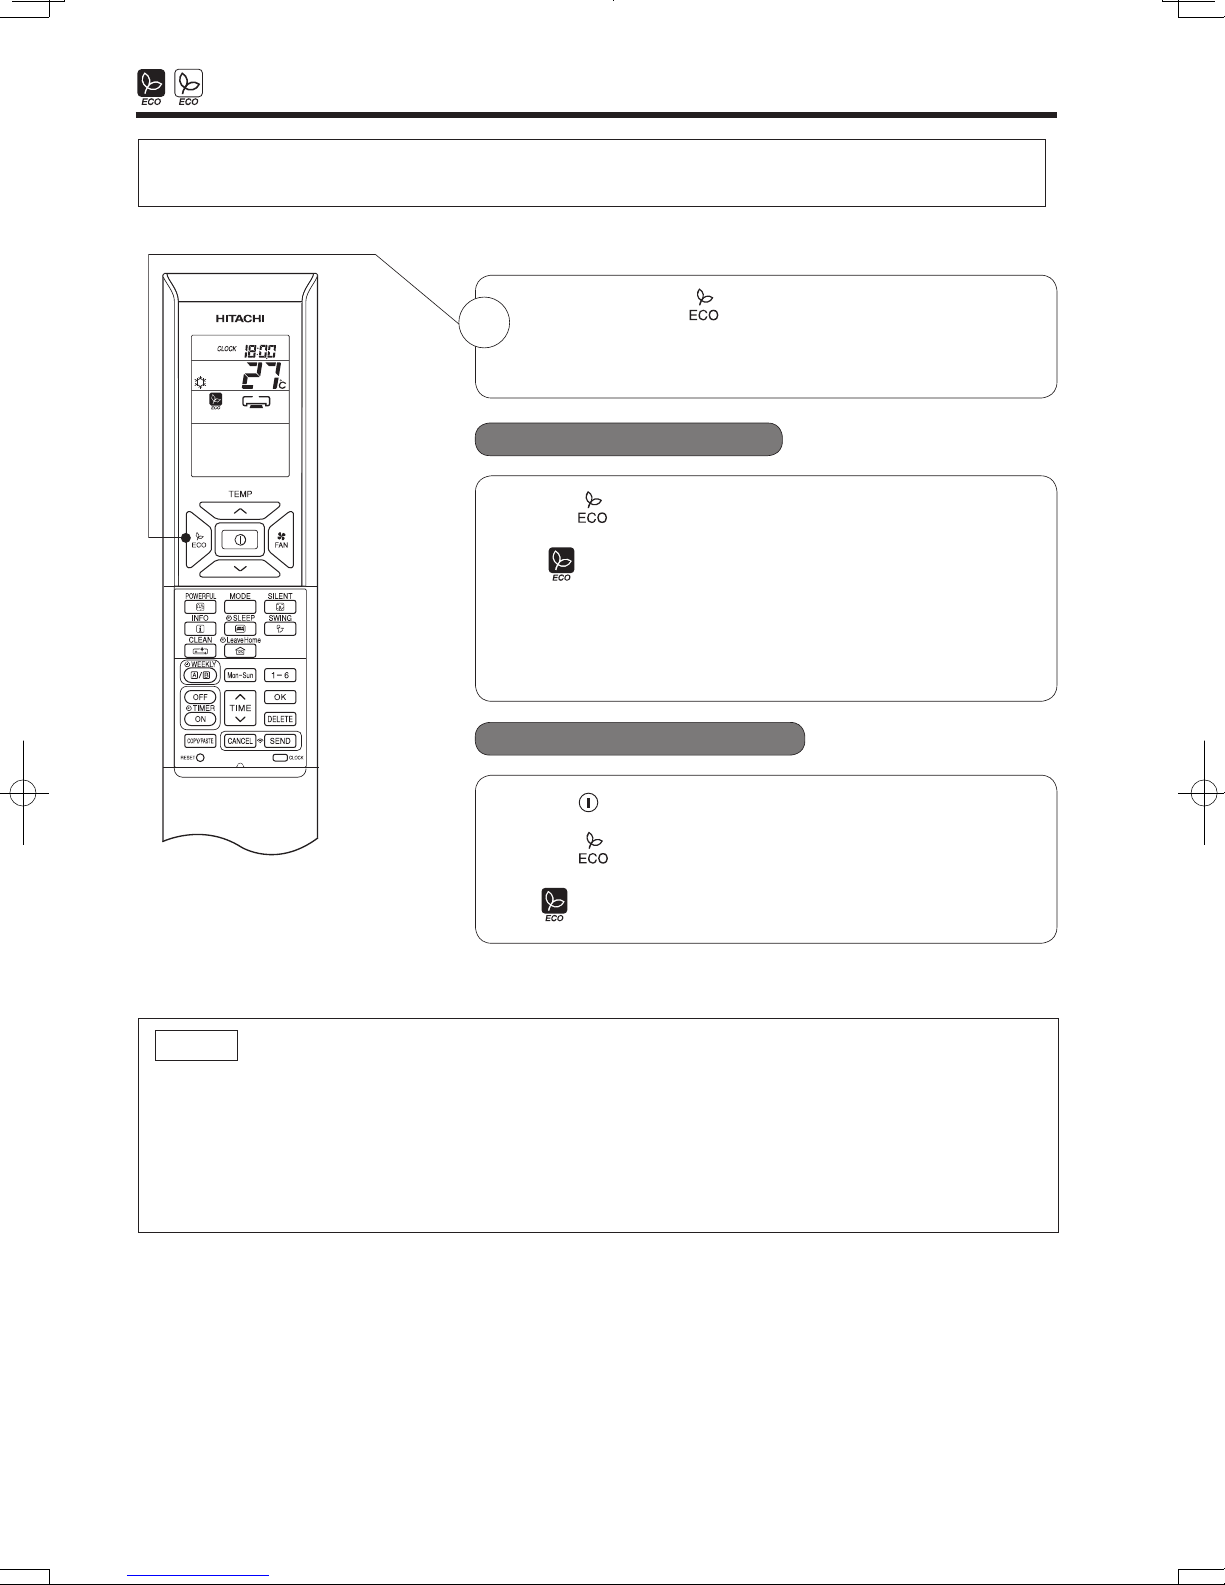
ECO operation is an energy saving function by changing set temperature automatically and by limiting the
ma x imum power consumption value.
● By pressing the (ECO) button during AUTO, HEATING,
1
DEHUMIDIFYING or COOLING operation, the air conditioner
performs the "ECO" operation.
■ To start ECO operation
●
Press (ECO) button during operation.
“
” is displayed on the LCD.
Energy saving operation will start by changing the set
temperature higher or lower automatically and reducing operation
power consumption. This function may vary based on the
connected outdoor unit.
■ To cancel ECO operation
●
Press (START/STOP) button.Or
●
Press (ECO) button again.
” disappears from the LCD.
“
NOTE
●
ECO function will not be effective when power consumption is low.
●
By pressing (POWERFUL) button, ECO operation is cancelled.
●
After auto restart, ECO operation is cancelled and previous operation mode shall start.
●
For multi model connections, energy saving operation shall only start by changing set temperature higher
r lower automatically. However, effectiveness of ECO depends on operation conditions.
o
– 18 –
HSILGNE
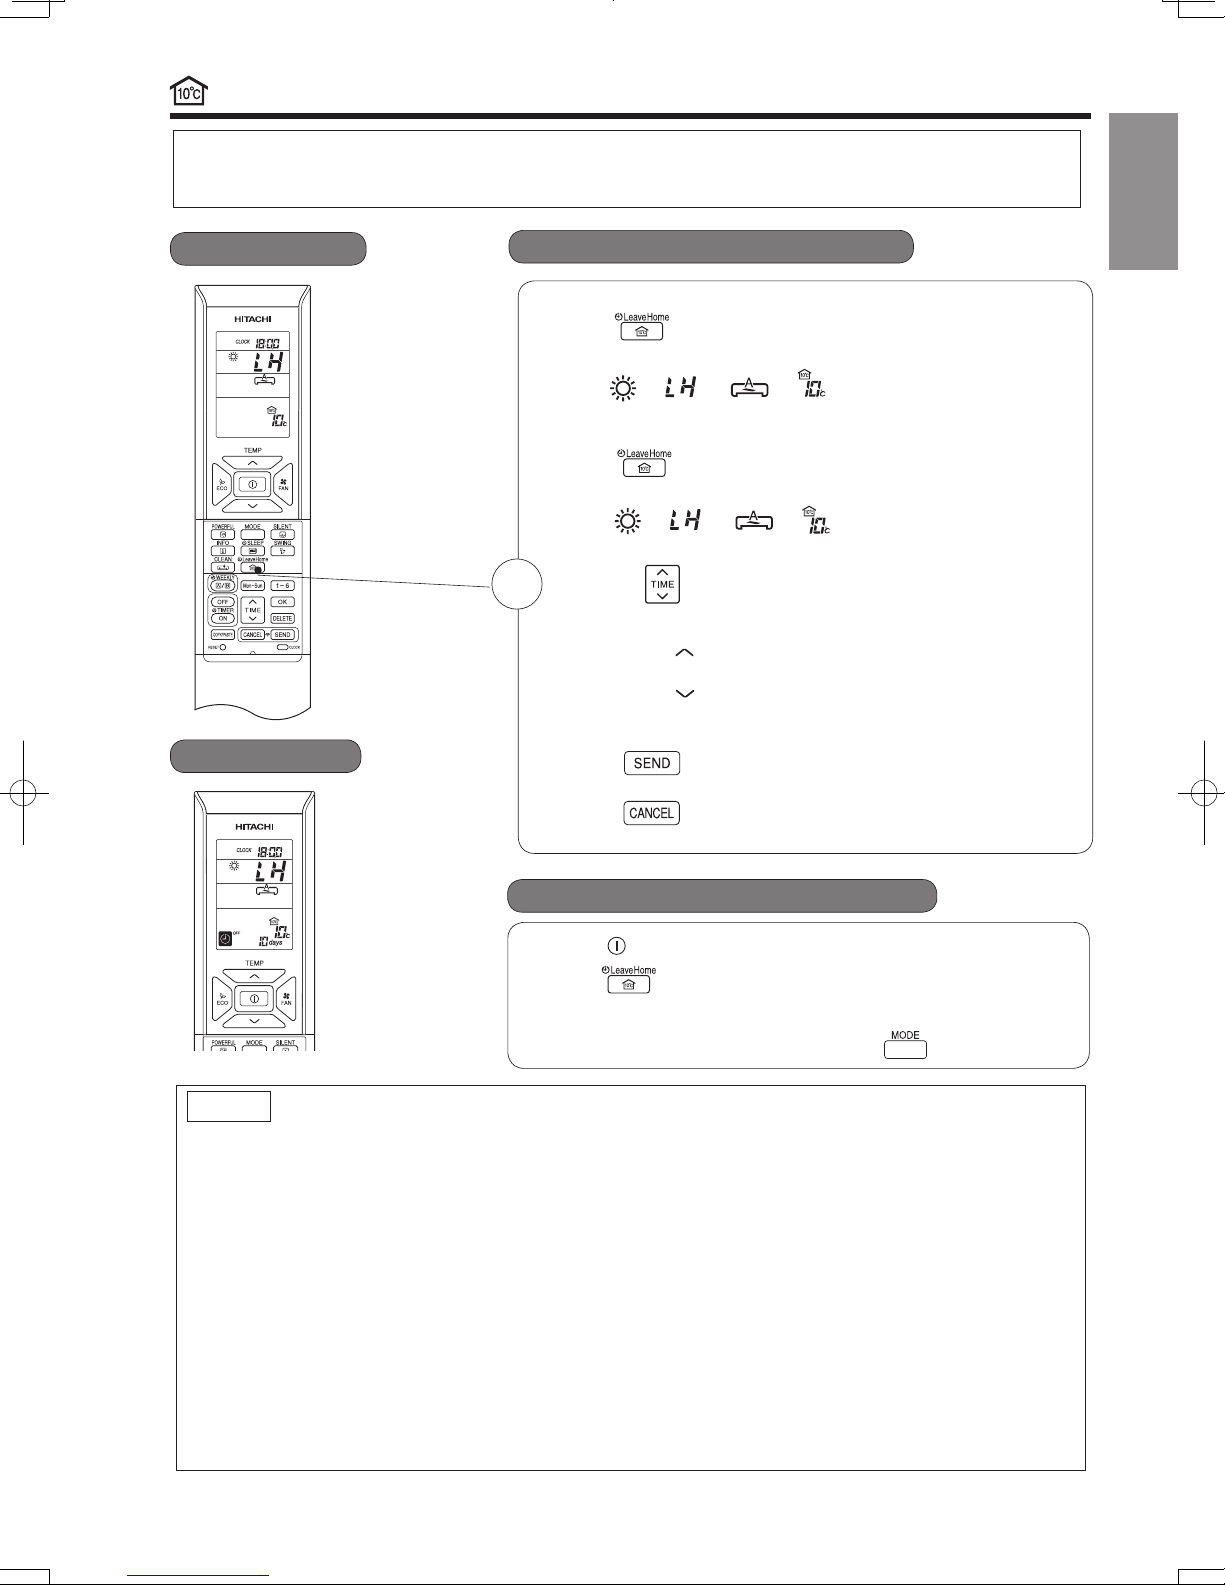
LEAVE HOME(LH) OPERATION
°
Prevent the room temperature from falling too much by setting temperature automatically when no one is at home.
This operation is able to operate by" Continuous operation" or " Day timer operation" . Please use " Day timer operation"
to set the number of days up to 99 days.
10°C
Continuous operation
Day timer operation
■ To start LEAVE HOME operation
Option 1. Continuous operation.
Press
●
Room temperature is set at 10°C and heating operation starts.
“
Option 2. Day timer operation.
●
Press
Room temperature is set at 10°C and heating operation starts.
“
● Set number of operation days (1 to 99 days), if needed.
1
Press
Number of days blink.
* Press “
* Press “
* Number of day is counted when clock indicates 0:00.
● Press (SEND) button to confirm number of operation
days. Display for number of operation days will stop blinking.
● Press (CANCEL) button to reset number of operation
days or to have continuous operation.
(LEAVE HOME) button during stop or operation.
”, “ ”, “ ”, “ ” is displayed on the LCD.
(LEAVE HOME) button during stop or operation.
”, “ ”, “ ”, “ ” is displayed on the LCD.
(TIME) button to select number of days.
(UP)” to set number of days from 1 day, 2 days, 3
days ..... 98 days, 99 days, 1 day and so on.
(DOWN)” to set number of days from 99 days, 98
days, 97 days .... 3 days, 2 days, 1 day, 99 days and so on.
ENGLISH
■ To cancel LEAVE HOME operation
● Press (START/STOP) button.Or
● Press (LEAVE HOME) button again.
Return to previous operation mode.Or
● Change to other operation mode by pressing (MODE) button.
NOTE
● After reaching the set number of operation days for Leave Home or by pressing the (Leave Home) button again,
othe unit will operate in previous mode.
● During Leave Home operation, fan speed and horizontal air deflector position cannot be changed.
● By pressing (Leave Home) button, implementation of Weekly Timer or One Timer only Timer is cancelled.
● In case of power supply shut down, after autorestart, all setting for number of days operation will be reset and unit
shall be in continuous operation.
●
For multi connections, when each room is running in different operation mode such as FAN only, COOLING, DEHUMIDIFYING
or AUTO mode, Leave Home operation cannot operate even though it is possible to set Leave Home operation.
In order to start Leave Home operation, all rooms must stop its operation. Then, press (LEAVE HOME) button to
operate Leave Home operation.
● For multi connections, when all rooms are running HEATING operation, it is possible to operate Leave Home operation
by pressing the (LEAVE HOME) button.
● For multi connections, if two or more rooms are set to operate Leave Home operation, the capability to reach the
set temperature at 10°C may not possible. In addition, this also depends on outdoor temperature.
●
POWERFUL,SILENT and ECO operations are not applicable during Leave Home.
– 19 –
HSILGNE
CLEAN (ONE TOUCH CLEAN) OPERATION
HSILGNE
ONCE TIMER (ON/OFF TIMER) OPERATION
The device can be set to turn off at a preset time.
1. Press
(OFF-TIMER) button. and blink on the display.
2. Set the "turn-off time" with
(TIME) button.
3. After setting, direct the remote controller towards the indoor and press
(SEND) button.
and "set time" lights up instead of blinking.
A beep sound emitted from indoor unit and the (TIMER) lamp on the
indoor unit lights up.
ON TIMER
The device will turn on at a designated time.
1. Press
(ON-TIMER) button. and blink on the display.
2. Set the "turn-on time" with
(TIME) button.
3. After setting, direct the remote controller towards the indoor and press
(SEND) button.
and "set time" light up instead of blinking.
A beep sound emitted from indoor unit and the (TIMER) lamp on the indoor
unit lights up.
ON/OFF TIMER
● The device will turn on (off) and off (on) at the designated time.
● The switching occurs first at the preset time that comes earlier.
● The arrow mark appears on the display to indicate the sequence of switching
operations.
1. Press
(OFF-TIMER) button so that and blink on the
display.
2. Set the "turn-off" time with
(TIME) button. After setting, direct the remote
controller towards the indoor and press
(SEND) button.
3. Press
(ON-TIMER) button so that and set "turn-off" time light up.
The
and blink.
4. Set the "turn-on" time with
(TIME) button.
5. After setting, direct the remote controller towards the indoor and press
(SEND) button
and set "turn-on" time light up instead of blinking.
A beep sound emitted from indoor unit and the (TIMER) lamp on the indoor
unit lights up.
■
The timer may be used in three ways: OFF-timer, ON-timer and ON/OFF (OFF/ON)-
timer. Set the current time first because it serves as a reference.
■ To cancel Reservation
●
Point the signal window of the remote controller towards the indoor unit and press (CANCEL) button.
and "ON or OFF set time" goes out with a beep and the (TIMER) lamp on the indoor unit turns off.
NOTE
●
User can set only one of the OFF-timer, ON-timer or ON/OFF-timer.
●
If WEEKLY TIMER already set, by setting the ONCE TIMER, ONCE TIMER operation is prioriti zed. When
ONCE TIMER operation is complete, WEEKLY TIMER operation will be activated.
OFF TIMER
1
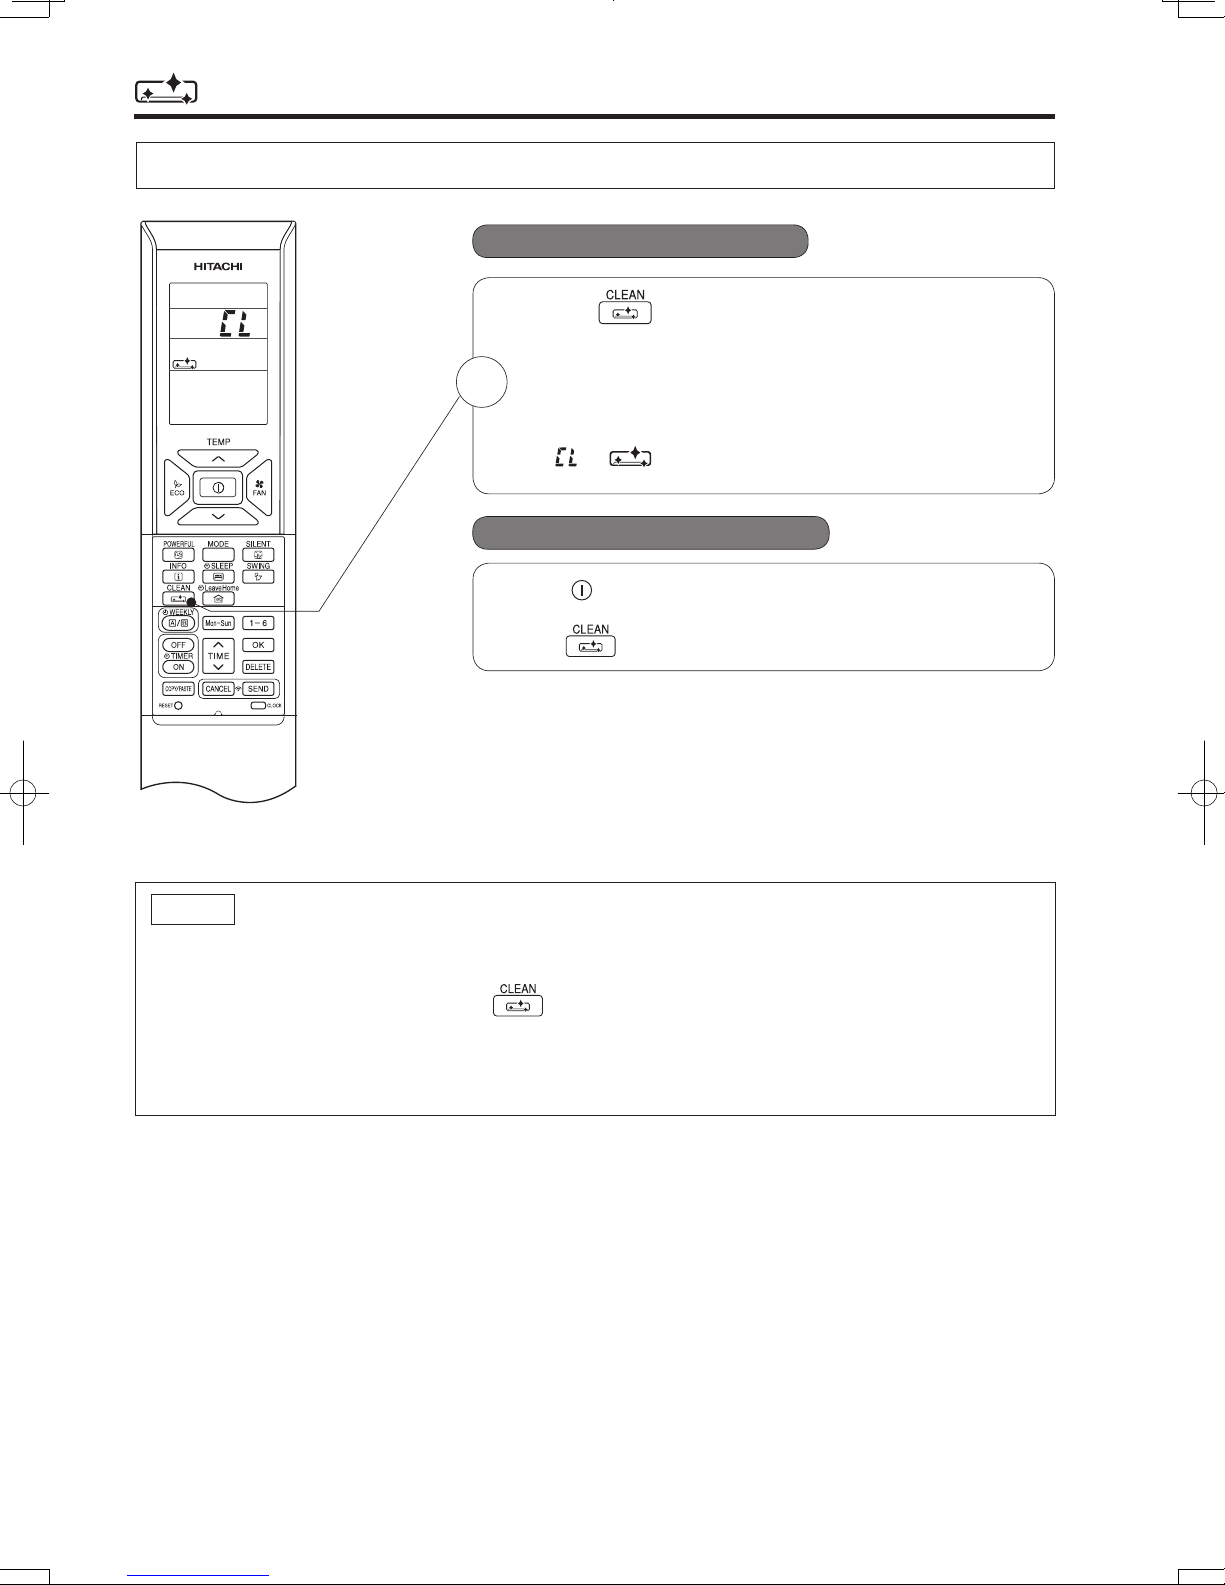
Drying indoor heat exchanger after cooling operation to prevent mildew.
■ To start CLEAN operation
● Press (CLEAN) button when unit is OFF.
Total time taken for One Touch Clean operation is 60 minutes.
During this operation, HEATING or FAN operation shall
1
operate.
During one touch clean, operation lamp is blinking.
“
”, “ ” is displayed on the LCD.
■ To cancel CLEAN operation
● Press (START/STOP) button.Or
● Press (CLEAN) button again.
NOTE
● When CLEAN operation finish, unit will switch OFF automatically.
●
If Weekly Timer or Once Timer is set, there is a need to cancel those timer before operating CLEAN function.
● For multi connections, when pressing (CLEAN) button, operation is limited to FAN operation.
● For multi connections, when one room operates CLEAN operation first, other rooms can operate
COOLING, DEHUMIDIFYING or FAN operation. However, when other rooms need to operate HEATING
operation, air conditioner will be in STANDBY mode. After CLEAN operation finish, HEATING operation
will start.
– 20 –
HSILGNE
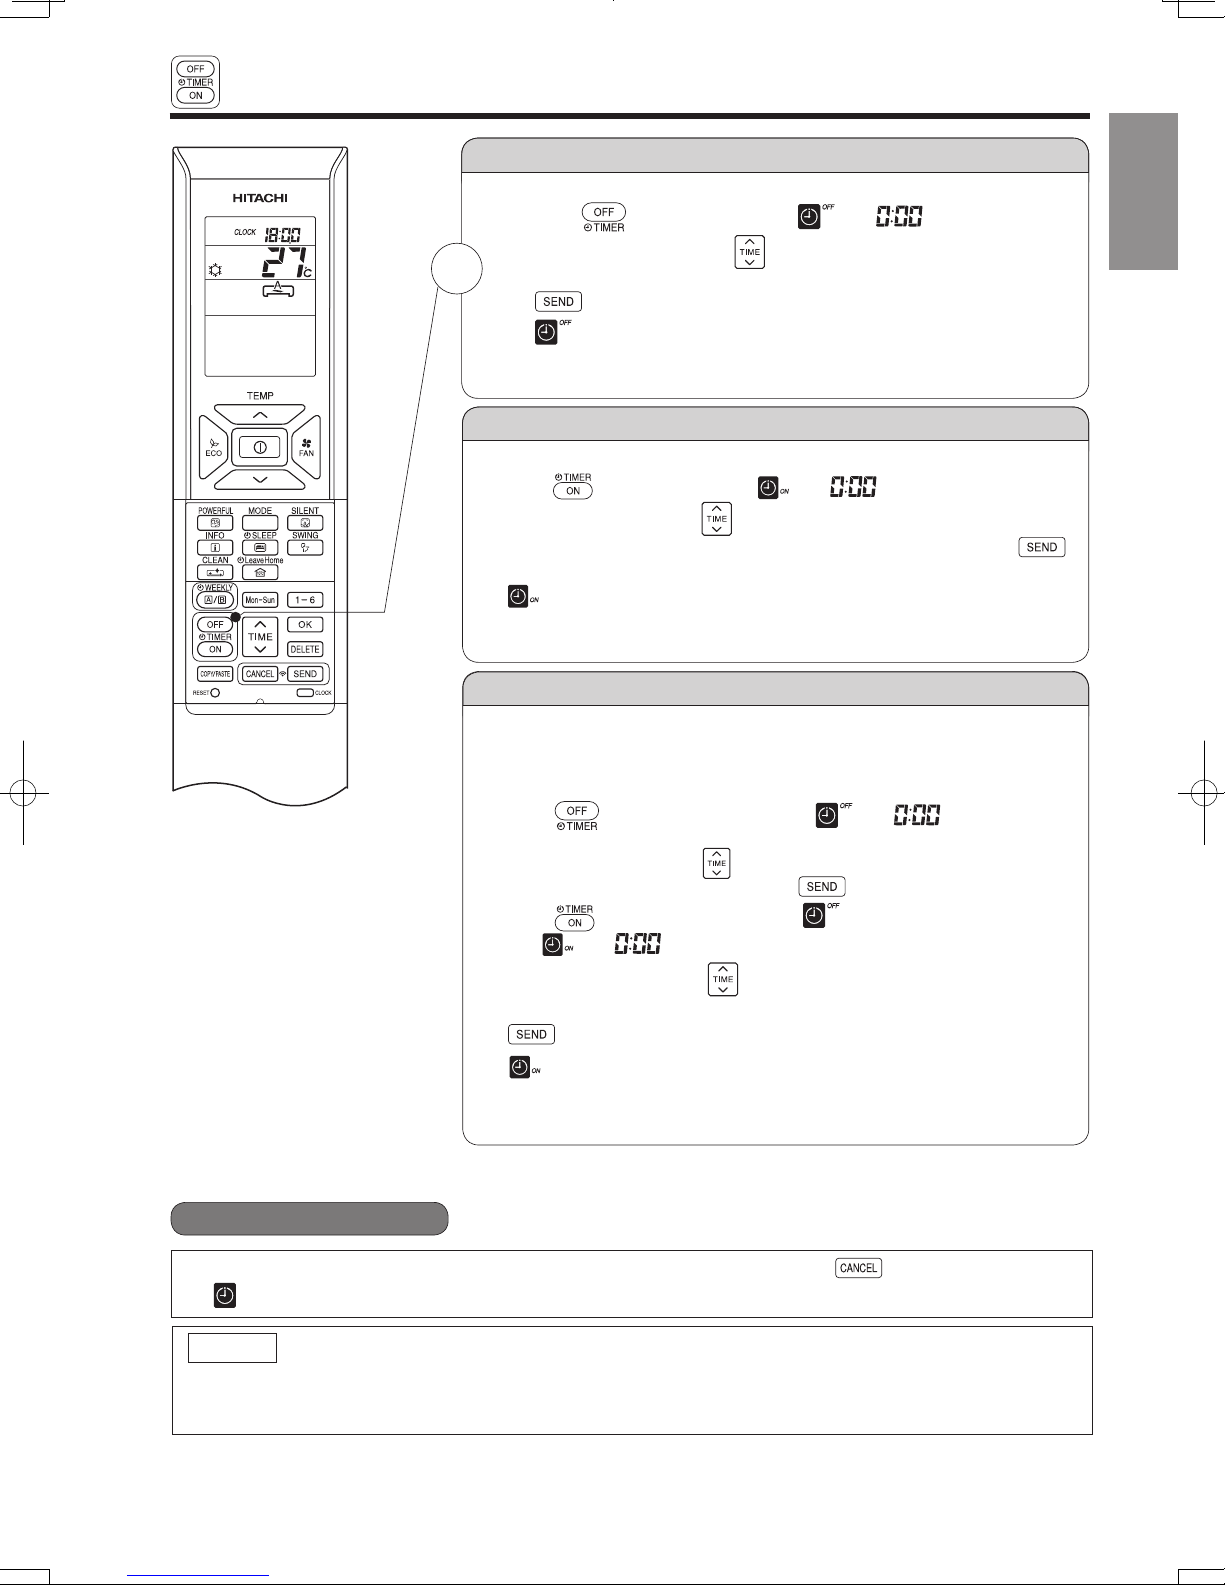
ONCE TIMER (ON/OFF TIMER) OPERATION
OFF TIMER
The device can be set to turn off at a preset time.
1. Press
2. Set the "turn-off time" with
1
3. After setting, direct the remote controller towards the indoor and press
A beep sound emitted from indoor unit and the (TIMER) lamp on the
indoor unit lights up.
ON TIMER
The device will turn on at a designated time.
1. Press
2. Set the "turn-on time" with
3. After setting, direct the remote controller towards the indoor and press
(SEND) button.
A beep sound emitted from indoor unit and the (TIMER) lamp on the indoor
and "set time" light up instead of blinking.
unit lights up.
(OFF-TIMER) button. and blink on the display.
(SEND) button.
and "set time" lights up instead of blinking.
(ON-TIMER) button. and blink on the display.
(TIME) button.
(TIME) button.
ENGLISH
ON/OFF TIMER
● The device will turn on (off) and off (on) at the designated time.
● The switching occurs first at the preset time that comes earlier.
● The arrow mark appears on the display to indicate the sequence of switching
operations.
1. Press
display.
2. Set the "turn-off" time with
controller towards the indoor and press
3. Press
The
4. Set the "turn-on" time with
5. After setting, direct the remote controller towards the indoor and press
A beep sound emitted from indoor unit and the (TIMER) lamp on the indoor
unit lights up.
■
The timer may be used in three ways: OFF-timer, ON-timer and ON/OFF (OFF/ON)-
timer. Set the current time first because it serves as a reference.
(OFF-TIMER) button so that and blink on the
(TIME) button. After setting, direct the remote
(SEND) button.
(ON-TIMER) button so that and set "turn-off" time light up.
and blink.
(TIME) button.
(SEND) button
and set "turn-on" time light up instead of blinking.
■ To cancel Reservation
●
Point the signal window of the remote controller towards the indoor unit and press (CANCEL) button.
and "ON or OFF set time" goes out with a beep and the (TIMER) lamp on the indoor unit turns off.
NOTE
●
User can set only one of the OFF-timer, ON-timer or ON/OFF-timer.
●
If WEEKLY TIMER already set, by setting the ONCE TIMER, ONCE TIMER operation is prioriti zed. When
ONCE TIMER operation is complete, WEEKLY TIMER operation will be activated.
– 21 –
HSILGNE
E C O SLEEP TIMER OPERATION
. gn i v as yg r ene n i s t l use r t l . deeps na f eh t secude r dna e r u t a r epme t moo r eh t s t f i hs t i nu eh t
HSILGNE
■ To set SLEEP TIMER and ON TIMER
The air conditioner will be turned off by ECO SLEEP TIMER and turned on by ON TIMER.
1. Set the ON TIMER.
2. Press
(SLEEP) button and set ECO SLEEP TIMER.
Direct the remote controller towards the indoor unit and press
(CANCEL) button.
● “ ”, “ ”, “ ”, “OFF”, off time, “ ”, number of hour, "ON" and ON TIMER set time disappear
from the remote controller display.
● A beep sound emitted from indoor unit and the (TIMER) lamp on the indoor unit turns off.
●
30 minutes after setting ECO SLEEP TIMER, outdoor fan speed will be reduced to lower the noise level and to
1 hour after setting ECO SLEEP TIMER, set temperature will be slightly shifted. Amount of temperature
These automatic operation changes contribute to energy saving without losing comfort.
The level of energy consumption depends on outside temperature, room temperature, set temperature or air
conditioner type.
Cooling operation [diagram representation
for illustrative purpose only]
In this case, air conditioner will turn off in 2 hours (at 1:38) and it will be
turned on at 6:00 the next morning.
NOTE
●
Heating operation [diagram representation for
illustrative purpose only]
Temperature
30 minutes
Outdoor fan
speed reduce
Shift
temperature
1 hour
Temperature
30 minutes
Outdoor fan
speed reduce
Shift
temperature
1 hour
EC O SLEEP TIMER OPERATION
Example:
ECO SLEEP TIMER and ON TIMER reservations are cancelled.
have comfort operation.
shifted depends on type of air conditioner.
■ To cancel EC O SLEEP TIMER and ON TIMER operation
● If ECO SLEEP TIMER is set when OFF TIMER or ON/OFF TIMER has been set earlier, the ECO
SLEEP TIMER becomes effective instead of the OFF TIMER or ON/OFF TIMER.
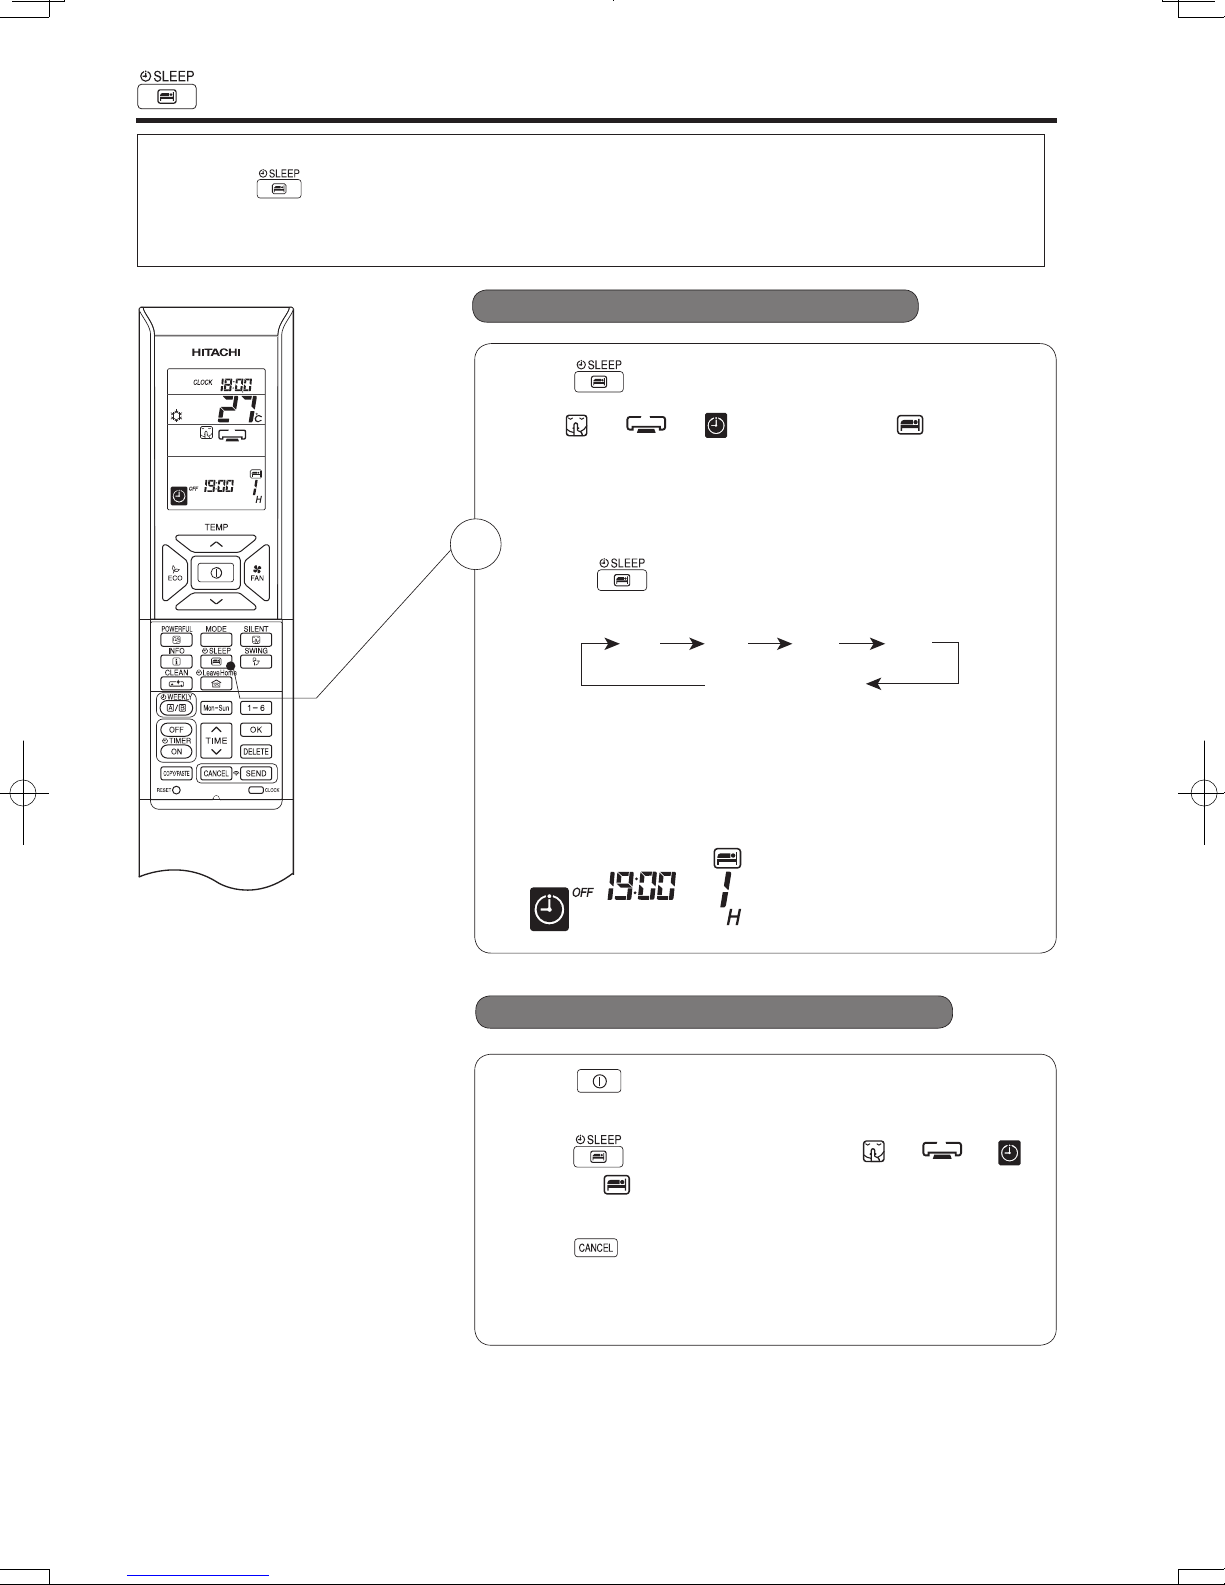
The timer can be set up to a duration of 7 hours.
By pressing
(SLEEP) button during AUTO, HEATING, DEHUMIDIFYING, COOLING or FAN operation,
Set the current time first before operating the ECO SLEEP TIMER operation.
■ To start EC O SLEEP TIMER operation
Press (SLEEP) button during operation.
● “ ”, “ ”, “ ”, “OFF”, off time, “ ” and number
of hour are displayed on the remote controller display.
● During ECO SLEEP TIMER operation, fan speed will be ultra
slow.
● A beep sound emitted from indoor unit and the (TIMER) lamp
1
on the indoor unit lights up.
Pressing
(SLEEP) button repeatedly, the number of hours
will change as below:
1 H 2 H 3 H 7 H
SLEEP TIMER off
● During ECO SLEEP TIMER operation, air conditioner will
continue to operate for the designated number of hours and
then turn off.
●
When the ECO SLEEP TIMER has been set, the display on
the remote controller indicates the turn off time.
Example: If ECO SLEEP TIMER is
set for 1 hour at 18:00, the switch
off time will be at 19:00.
■ To cancel ECO SLEEP TIMER operation
Press
● Room air conditioner will switch off.
Press
off time, “
(START/STOP) button.
(SLEEP) button again until “ ”, “ ”, “ ”,
” and number of hour disappear from the remote
controller display.
Press
● A beep sound emitted from indoor unit and the (TIMER) lamp
(CANCEL) button.
on the indoor unit turns off.
● SLEEP TIMER operation is cancelled.
– 22 –
HSILGNE
EC O SLEEP TIMER OPERATION
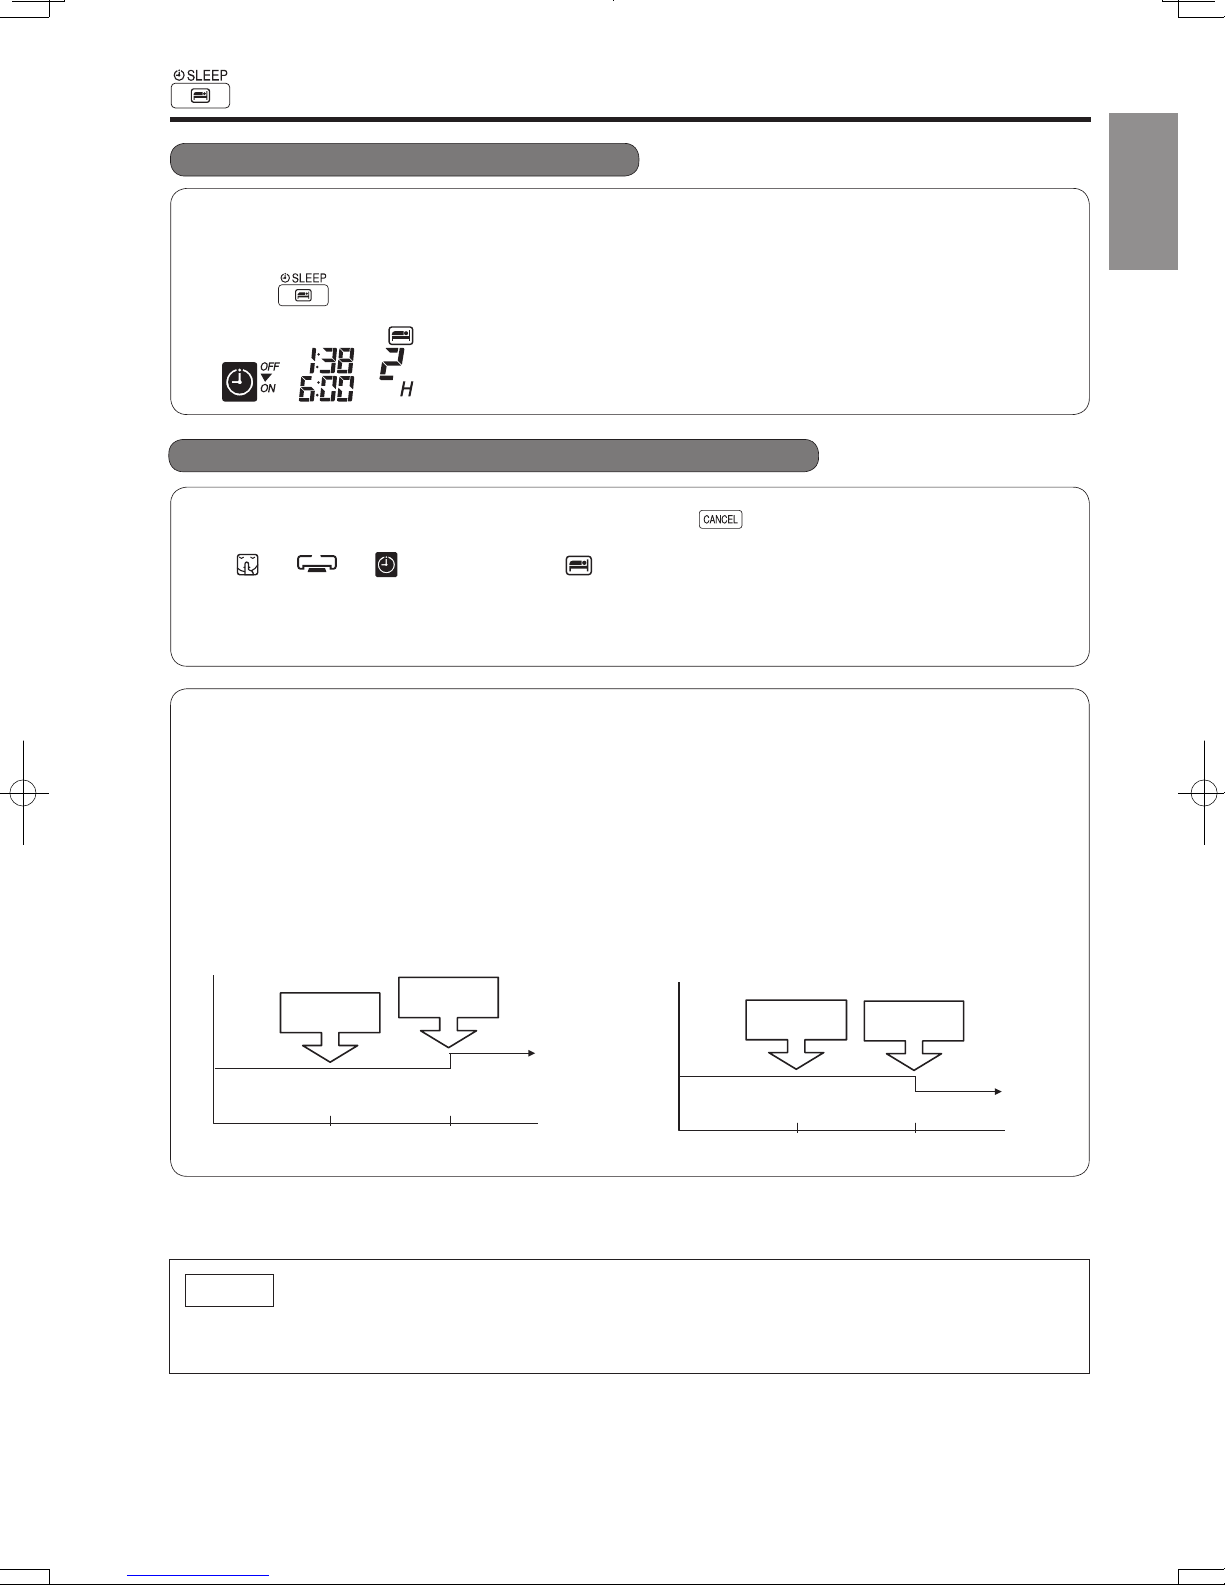
■ To set SLEEP TIMER and ON TIMER
The air conditioner will be turned off by ECO SLEEP TIMER and turned on by ON TIMER.
1. Set the ON TIMER.
2. Press
(SLEEP) button and set ECO SLEEP TIMER.
Example:
In this case, air conditioner will turn off in 2 hours (at 1:38) and it will be
turned on at 6:00 the next morning.
■ To cancel EC O SLEEP TIMER and ON TIMER operation
Direct the remote controller towards the indoor unit and press
● “ ”, “ ”, “ ”, “OFF”, off time, “ ”, number of hour, "ON" and ON TIMER set time disappear
from the remote controller display.
● A beep sound emitted from indoor unit and the (TIMER) lamp on the indoor unit turns off.
●
ECO SLEEP TIMER and ON TIMER reservations are cancelled.
30 minutes after setting ECO SLEEP TIMER, outdoor fan speed will be reduced to lower the noise level and to
have comfort operation.
1 hour after setting ECO SLEEP TIMER, set temperature will be slightly shifted. Amount of temperature
shifted depends on type of air conditioner.
These automatic operation changes contribute to energy saving without losing comfort.
The level of energy consumption depends on outside temperature, room temperature, set temperature or air
conditioner type.
(CANCEL) button.
ENGLISH
Cooling operation [diagram representation
for illustrative purpose only]
Temperature
Outdoor fan
speed reduce
30 minutes
Shift
temperature
1 hour
Heating operation [diagram representation for
illustrative purpose only]
Temperature
Outdoor fan
speed reduce
30 minutes
Shift
temperature
1 hour
NOTE
●
● If ECO SLEEP TIMER is set when OFF TIMER or ON/OFF TIMER has been set earlier, the ECO
SLEEP TIMER becomes effective instead of the OFF TIMER or ON/OFF TIMER.
– 23 –
HSILGNE
WEEKLY TIMER OPERATION
HSILGNE
5. Press (ON-OFF TIMER) button to select ON TIMER or OFF TIMER
reservation.
6. Press
(TIME) button to set time reservation.
7. Press (TEMP
or ) button to set temperature reservation.
8. Press
(OK) button. The reservations are set. Day, program
number, ON reservation, setting temperature will light up.
will be
continuously blinks. If reservation is not complete, settings will not be
stored in memory.
To continue with the reservation, press
buttons.
Follow step 3 to 8 for reservation.
9. After all the reservations have been set, press
(SEND) button while
directing the remote controller towards the indoor unit for about 3 seconds.
Timer lamp on the indoor unit will blink rapidly.
After beep sound emitted from indoor unit, TIMER lamp will light up.
Please ensure that the TIMER lamp lights up.
This indicates that the reservation has been stored in the indoor unit and
Timer function has been completed.
The reservation contents will appear on the remote controller display.
If TIMER lamp on the indoor unit does not light up, press
(SEND) button while directing the remote controller towards the indoor
unit for about 3 seconds.
CAUTION ! Do not press
(CANCEL) button during reservation
setting because this will result in all reservation contents to be lost.
The reservation contents will not stored in the indoor unit until
(SEND) button has been pressed.
5
6
7
8
9
NOTE
● Up to 6 programs can be set per day. Setting ON TIMER or OFF TIMER for each program number can
number will automatically arranged so that program number 1 shall have the earliest time and program
number 6 shall have the latest time.
If the setting time is the same, Priority will be given to the latest reservation contents.
after reservations have been made , all current reservations will be lost.
WEEKLY TIMER OPERATION
●
●
●
be at random. When pressing
(SEND) button, the set ON TIMER or OFF TIMER for each program
● CAUTION ! If the remote controller is left idle and (SEND) button is not pressed within 3 minutes
●
lt is possible to select Mode A or Mode B.For each mode ,up to 6 programs can be set per day. ln total, a
maximum of 42 programs can be set for a week for each mode.
●
If calendar and clock are not set, the reservation setting for WEEKL
●
If calendar and clock are not set correctly, WEEKLY TIMER will not operate correctly.
●
Reservation for calendar and clock shall be set rst before operating WEEKLY TIMER. fi
Y TIMER cannot be set.
Step 1 : Set the reservation schedule to the remote controller. Send the registered reservation to indoor
unit and then operate.
Step 2 : Select Mode A or Mode B and activate or deactivate WEEKLY TIMER .
Step 3 : Copy and cancel the reservation schedule.
Step 1 : Set reservation schedule to the remote controller. Send the registered reservation
to indoor unit and then operate.
How to set a WEEKLY TIMER.
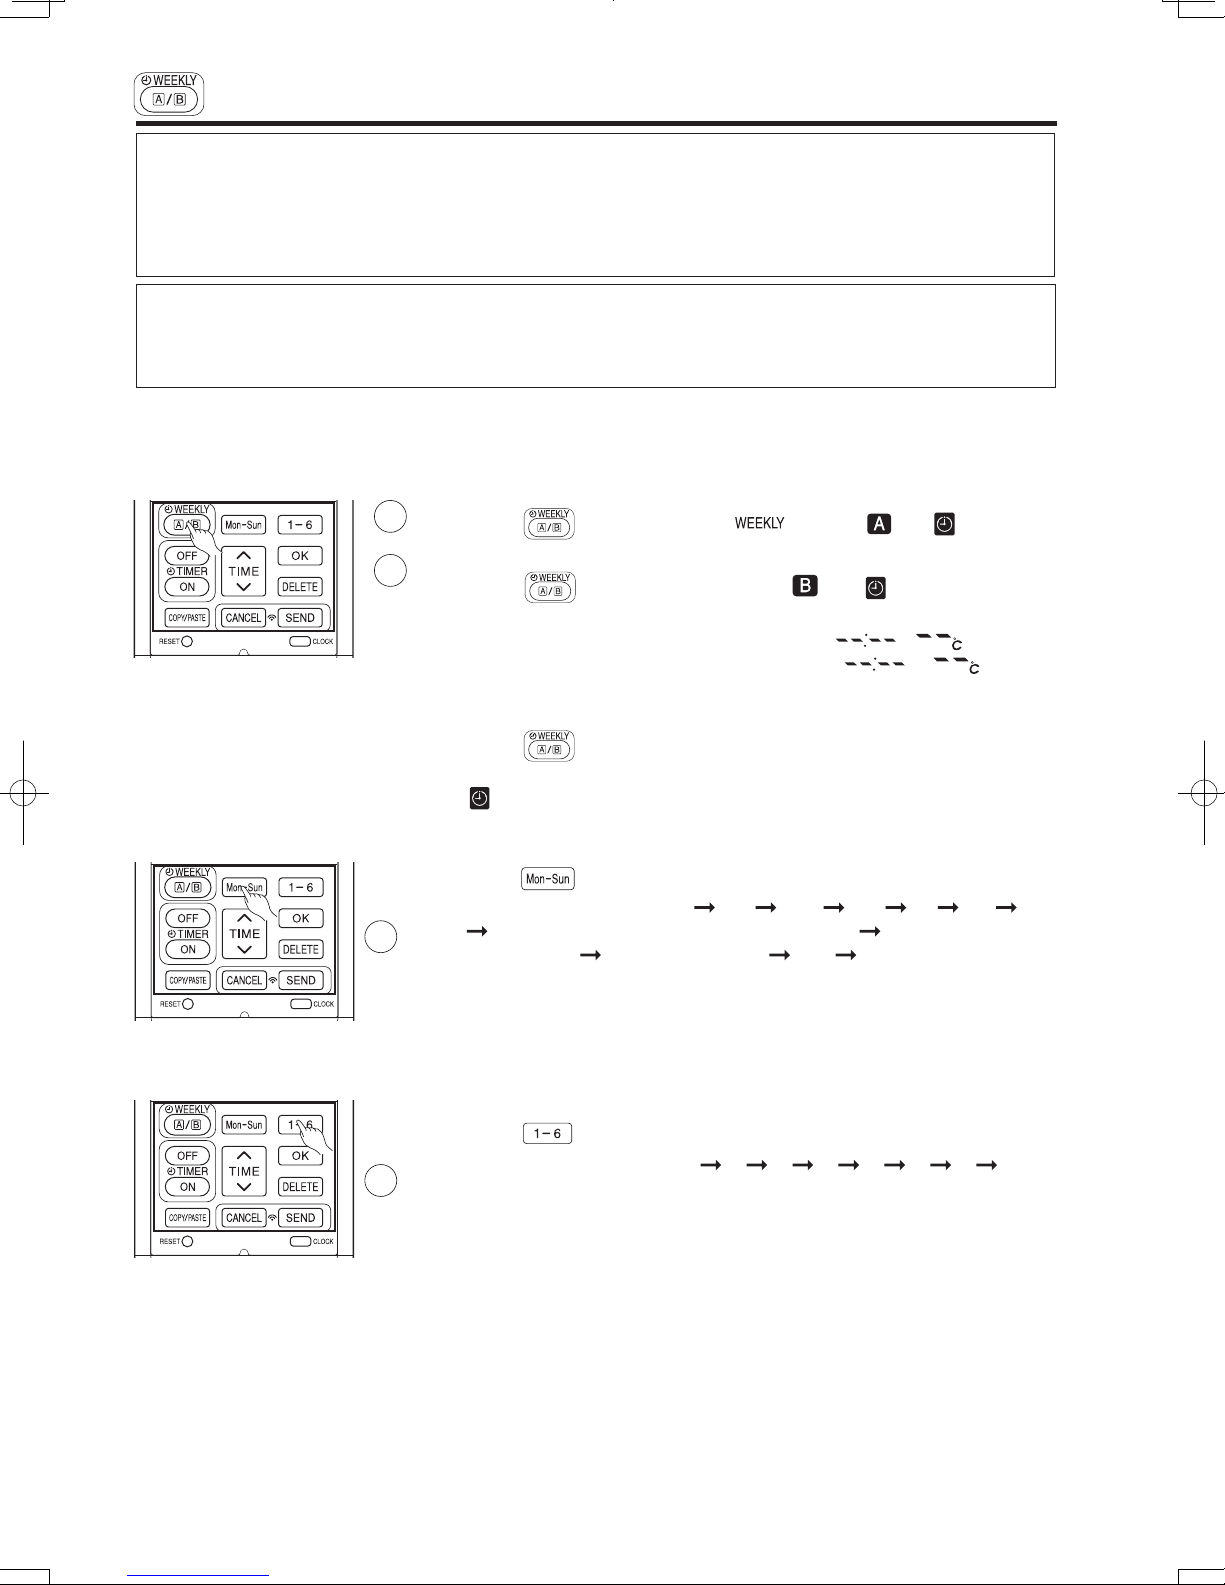
■
1. Select Mode A or Mode B.
1
2
3
Press
display. (Mode A is selected).
Press
(Mode B is selected).
● If no reservation has been made, ON/OFF, , appear.
● If reservation has been made, ON/OFF, , will not
appear.
2. Set a program.
Press
can be changed.
, day: Mon, program no. : 1, ON/OFF, setting time and setting
temperature blink on the display.
3. Select the desired day of the wekk.
Press
The day changes from Mon
Mon, Tue, Wed, Thu, Fri, Sat, Sun [Full days] Mon, Tue, Wed, Thu,
Fri [weekday]
Select [Full days] for daily reservation.
Select [weekday] for Monday to Friday reservation.
Select [weekend] for Saturday and Sunday reservation.
● After reservation has been set, it is easy to check and edit at the same
time.
(WEEKLY) button. lights up. and blink on the
(WEEKLY) button again, and blink on the display.
(WEEKLY) button for about 3 seconds. The selection mode
(DAY) button.
Tue Wed Thu Fri Sat Sun
Sat, Sun [weekend] Mon
Tue ......
4
4. Press
The number changes from 1
● If program number has been set, follow above in order to make
changes.
button to select a program number.
2 3 4 5 6 1 2 .....
– 24 –
HSILGNE
directing the remote controller towards the indoor unit for about 3 seconds.
WEEKLY TIMER OPERATION
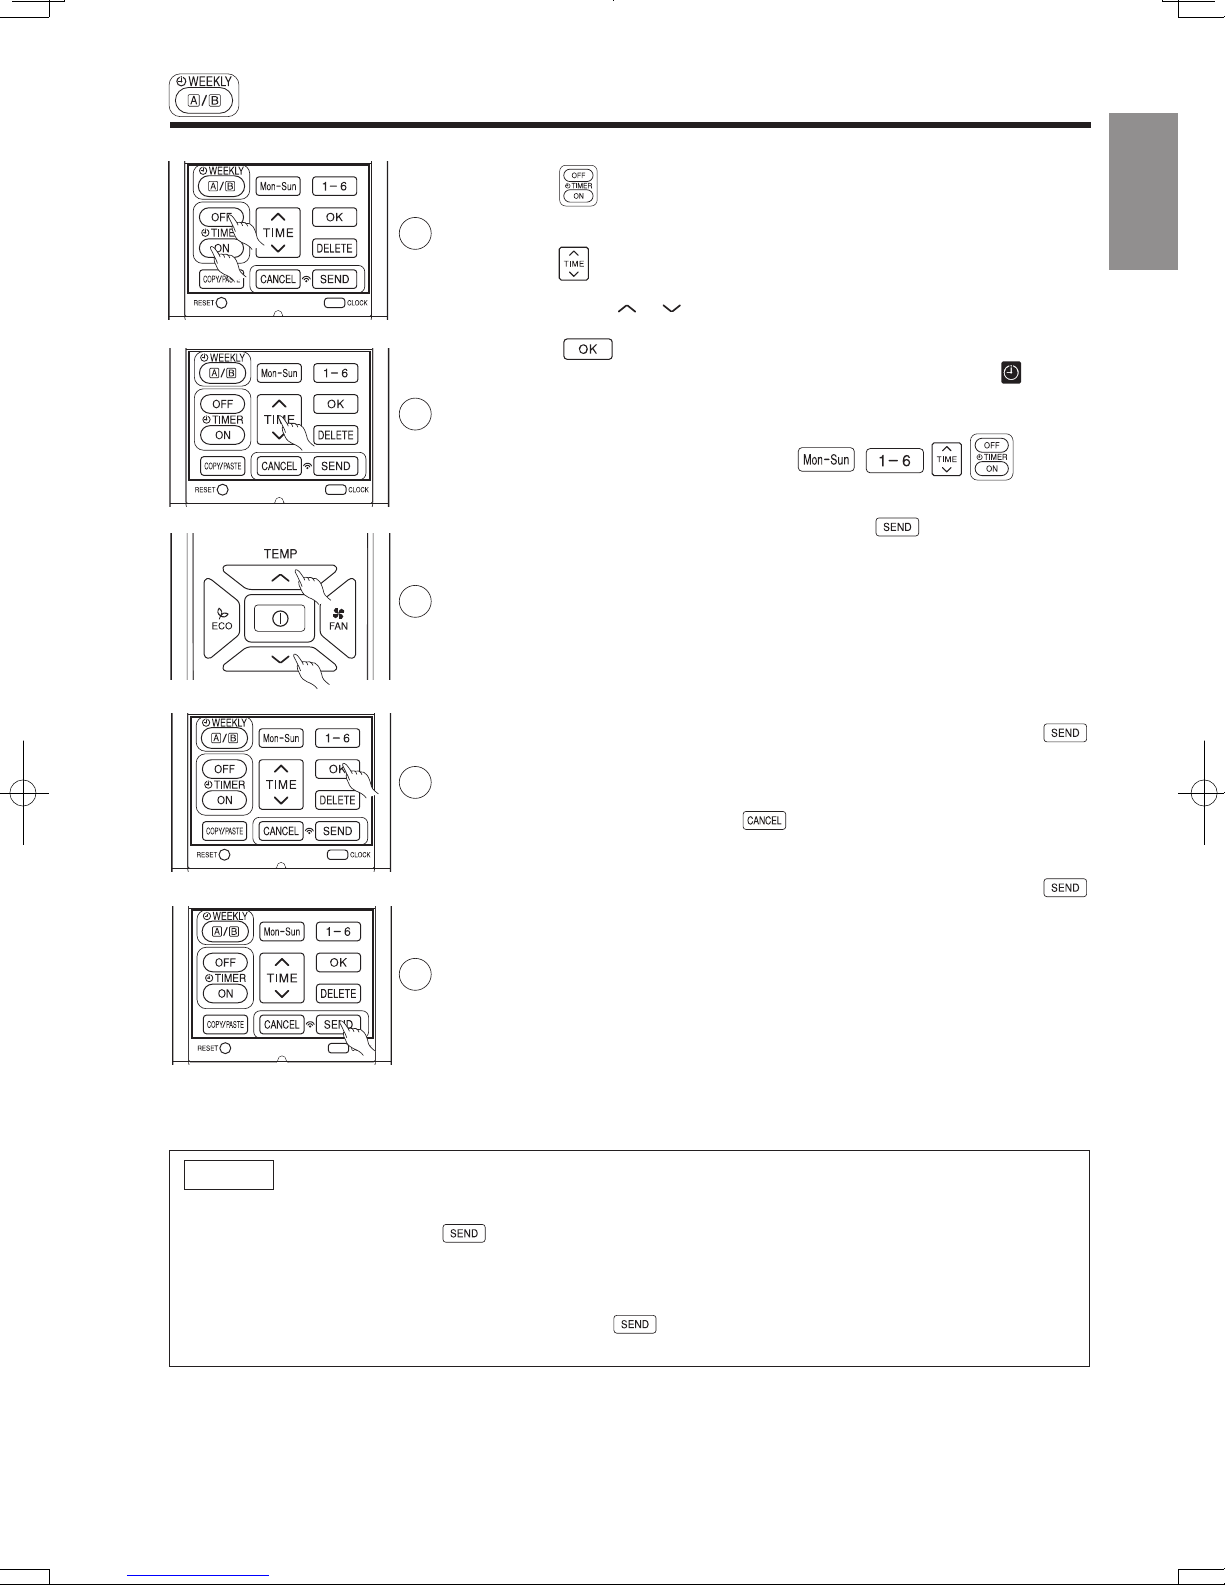
5. Press (ON-OFF TIMER) button to select ON TIMER or OFF TIMER
5
reservation.
6. Press
(TIME) button to set time reservation.
ENGLISH
7. Press (TEMP
8. Press
number, ON reservation, setting temperature will light up.
continuously blinks. If reservation is not complete, settings will not be
6
7
stored in memory.
To continue with the reservation, press
Follow step 3 to 8 for reservation.
9. After all the reservations have been set, press
Timer lamp on the indoor unit will blink rapidly.
After beep sound emitted from indoor unit, TIMER lamp will light up.
Please ensure that the TIMER lamp lights up.
This indicates that the reservation has been stored in the indoor unit and
Timer function has been completed.
The reservation contents will appear on the remote controller display.
●
If TIMER lamp on the indoor unit does not light up, press
or ) button to set temperature reservation.
(OK) button. The reservations are set. Day, program
buttons.
(SEND) button while
(SEND) button while directing the remote controller towards the indoor
8
unit for about 3 seconds.
●
CAUTION ! Do not press
setting because this will result in all reservation contents to be lost.
●
The reservation contents will not stored in the indoor unit until
(SEND) button has been pressed.
(CANCEL) button during reservation
will be
9
NOTE
● Up to 6 programs can be set per day. Setting ON TIMER or OFF TIMER for each program number can
be at random. When pressing
number will automatically arranged so that program number 1 shall have the earliest time and program
number 6 shall have the latest time.
If the setting time is the same, Priority will be given to the latest reservation contents.
● CAUTION ! If the remote controller is left idle and (SEND) button is not pressed within 3 minutes
after reservations have been made , all current reservations will be lost.
(SEND) button, the set ON TIMER or OFF TIMER for each program
– 25 –

HSILGNE
WEEKLY TIMER OPERATION
HSILGNE
■ How to copy and paste.
Editing the reservation schedule is easy by copying data from one day to
another day.
1. Press
(WEEKLY) button to select Mode A or Mode B.
2. Press
(WEEKLY) button for about 3 seconds to start editing the
reservation schedule.
3. Press
(DAY) button to select a day of the week to copy.
4. Press
(COPY/PASTE) button. Then "PASTE" blinks on the display.
* Press
(CANCEL) button to cancel the COPY mode. Normal
setting mode is activated.
5. Press
(DAY) button to select a day of the week to paste.
6. Press
(COPY/PASTE) button one more time to paste. only
blinks on the display.
7. To continue copying to other days, press
or or or
.
Then start from step 3.
8. After copy and paste completed, press
(SEND) button while
directing the remote controller towards the indoor unit for about 3 seconds.
Timer lamp on the indoor unit will blink rapidly.
After beep sound emitted from indoor unit, TIMER lamp will light up.
Please ensure that the TIMER lamp lights up.
If TIMER lamp does not light up, Press
(SEND) button again.
● Reservation data will not change if (SEND) button is not pressed.
Step 3: Copy and cancel the reservation schedule.
NOTE
● If there is no reservation data, copying data from one day to another day cannot be done.
1
2
3
4
5
6
8
WEEKLY TIMER OPERATION
Step 2: Select Mode A or Mode B and activate or deactivate WEEKLY TIMER.
■ How to select Mode A or Mode B of WEEKLY TIMER setting.
1
2
1. Press
(Normally Mode A will blink first).
2. Press
(WEEKLY) button. and blink on the display.
(WEEKLY) button again. and blink on the display.
3. Select Mode A or Mode B. Press
3
1
remote controller towards the indoor unit for about 3 seconds. Timer lamp
on the indoor unit will blink rapidly.
After beep sound emitted from indoor unit, TIMER lamp will light up.
Please ensure that the TIMER lamp lights up.
This indicates that Mode A or Mode B selection and active WEEKLY TIMER
have been confirmed.
■ Setting non-active WEEKLY TIMER .
1. Direct the remote controller towards the indoor unit and press
(CANCEL) button.
Beep sound will be emitted from indoor unit and TIMER lamp will be OFF.
Reservation indication on remote display will also disappear.
This indicates that non-active WEEKLY TIMER has been confirmed.
●
To activate back the setting of WEEKLY TIMER , repeat the steps for
"How to select Mode A or Mode B of WEEKLY TIMER setting".
(SEND) button while directing the
NOTE
●
When setting ONCE TIMER, operation of WEEKLY TIMER is interrupted. After ONCE TIMER operation
is complete, WEEKLY TIMER operation will be activated.
●
When ONCE TIMER is cancelled, operation of WEEKLY TIMER is also cancelled. Need to set WEEKLY
TIMER operation for activation.
●
After auto restart, WEEKLY TIMER operation is cancelled. Need to set WEEKLY TIMER operation for
activation.
– 26 –

HSILGNE
directing the remote controller towards the indoor unit for about 3 seconds.
WEEKLY TIMER OPERATION
Step 3: Copy and cancel the reservation schedule.
■ How to copy and paste.
1
2
Editing the reservation schedule is easy by copying data from one day to
another day.
ENGLISH
1. Press
2. Press
reservation schedule.
3
4
5
6
3. Press
4. Press
* Press
setting mode is activated.
5. Press
6. Press
blinks on the display.
7. To continue copying to other days, press
.
Then start from step 3.
8. After copy and paste completed, press
Timer lamp on the indoor unit will blink rapidly.
After beep sound emitted from indoor unit, TIMER lamp will light up.
Please ensure that the TIMER lamp lights up.
If TIMER lamp does not light up, Press
● Reservation data will not change if (SEND) button is not pressed.
(WEEKLY) button to select Mode A or Mode B.
(WEEKLY) button for about 3 seconds to start editing the
(DAY) button to select a day of the week to copy.
(COPY/PASTE) button. Then "PASTE" blinks on the display.
(CANCEL) button to cancel the COPY mode. Normal
(DAY) button to select a day of the week to paste.
(COPY/PASTE) button one more time to paste. only
or or or
(SEND) button while
(SEND) button again.
8
NOTE
● If there is no reservation data, copying data from one day to another day cannot be done.
– 27 –
HSILGNE
WEEKLY TIMER OPERATION
HSILGNE
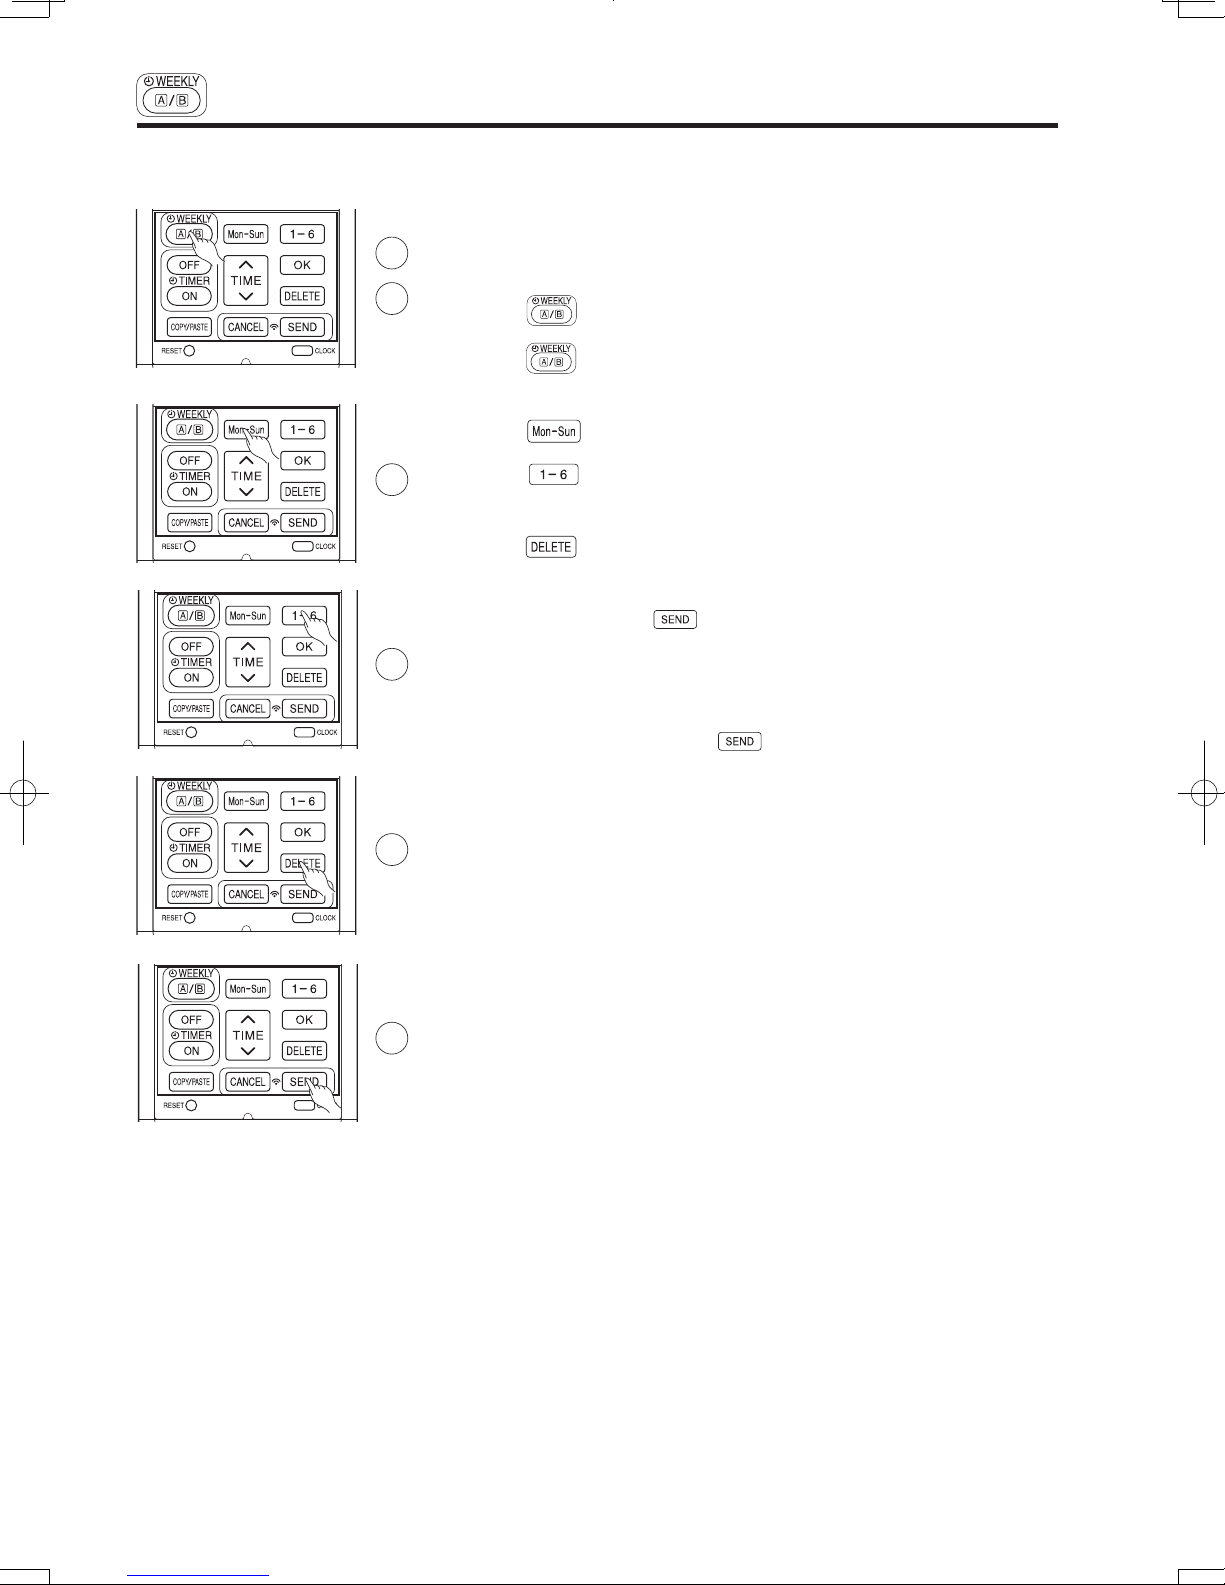
Step 3: Copy and cancel the reservation schedule.
[Delete one day reservation]
1. Press
(WEEKLY) button to select Mode A or Mode B.
2. Press
(WEEKLY) button for 3 seconds to start editing the
reservation schedule.
3. Press
(DAY) button to select a day of the week to edit.
4. Press
(DELETE) button for about 10 seconds. Reservations for all
program numbers will be deleted.
● If press for a short time, reservation for one program number will be
deleted.
5. After deleting, press
(SEND) button while directing the remote
controller towards the indoor unit for about 3 seconds. Timer lamp on the
indoor unit will blink rapidly.
After beep sound emitted from indoor unit, TIMER lamp will light up.
Please ensure that the TIMER lamp lights up.
● Reservation will not change if (SEND) button is not pressed.
1
1
2
NOTE
●
If all reservations in the remote controller were deleted and pressed
(SEND) button, no signal will be
transmitted to indoor unit. TIMER lamp will remain off and no changes will be done to the reservations
stored in the indoor unit.
3
2
4
5
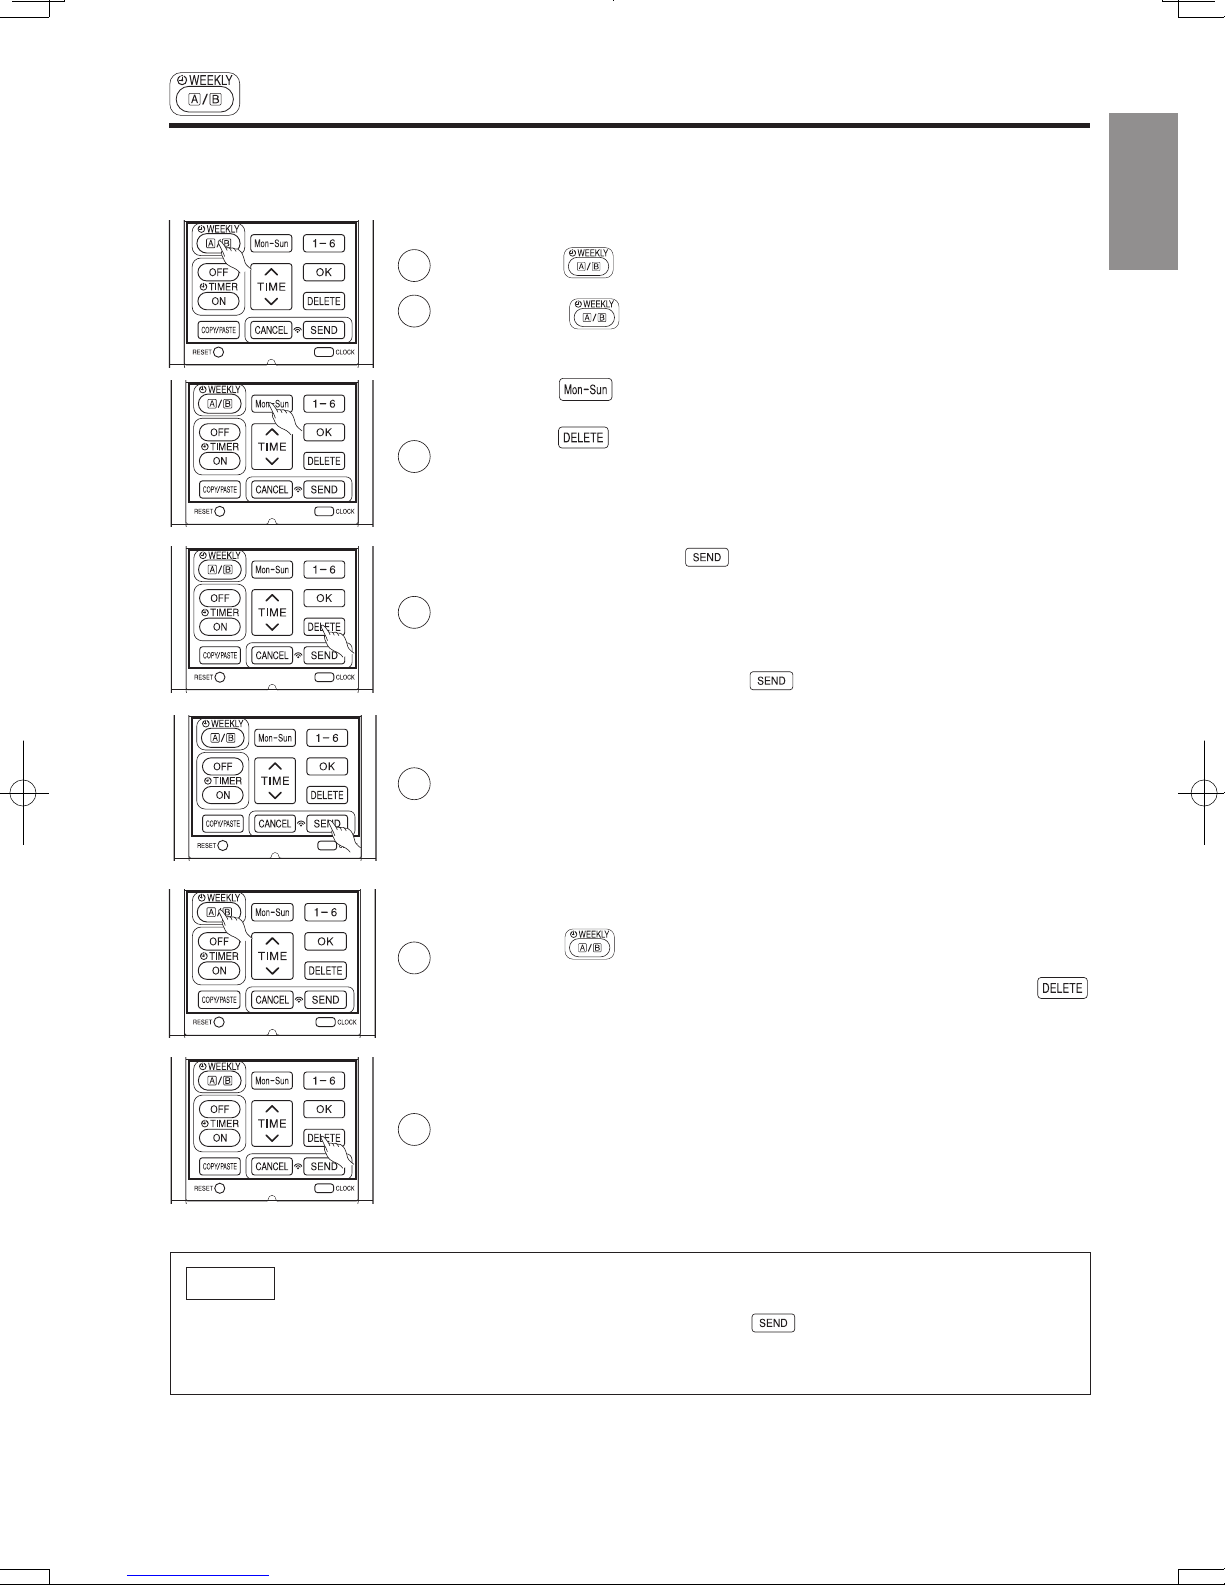
WEEKLY TIMER OPERATION
[Delete Mode A or Mode B]
1. Press
(WEEKLY) button to select Mode A or Mode B.
2. Direct the remote controller towards the indoor unit and press
(DELETE) button for about 10 seconds while Mode A or Mode B display
blinks.
After beep sound emitted from indoor unit, reservations for Mode A or
Mode B will disappear.
Step 3: Copy and cancel the reservation schedule.
1
■ How to delete WEEKLY TIMER data.
[Delete one program number reservation]
2
3
4
1. Press
2. Press (WEEKLY) button for 3 seconds to start editing the reserva-
tion schedule.
3. Press
4. Press
blink.
5. Press
is deleted.
6. After deleting, press
controller towards the indoor unit for about 3 seconds. Timer lamp on the
indoor unit will blink rapidly.
After beep sound emitted from indoor unit, TIMER lamp will light up.
Please ensure that the TIMER lamp lights up.
● Reservation will not change if (SEND) button is not pressed.
(WEEKLY) button to select Mode A or Mode B.
(DAY) button to select a day of the week to edit.
to select program number. Selected program number will
(DELETE) button. Reservation of selected program number
(SEND) button while directing the remote
5
6
– 28 –
HSILGNE
controller towards the indoor unit for about 3 seconds. Timer lamp on the
WEEKLY TIMER OPERATION
Step 3: Copy and cancel the reservation schedule.
[Delete one day reservation]
1
2
3
4
1. Press
2. Press
reservation schedule.
3. Press
4. Press
program numbers will be deleted.
● If press for a short time, reservation for one program number will be
deleted.
5. After deleting, press
indoor unit will blink rapidly.
After beep sound emitted from indoor unit, TIMER lamp will light up.
Please ensure that the TIMER lamp lights up.
● Reservation will not change if (SEND) button is not pressed.
(WEEKLY) button to select Mode A or Mode B.
(WEEKLY) button for 3 seconds to start editing the
(DAY) button to select a day of the week to edit.
(DELETE) button for about 10 seconds. Reservations for all
(SEND) button while directing the remote
5
ENGLISH
[Delete Mode A or Mode B]
1
1. Press
2. Direct the remote controller towards the indoor unit and press
(DELETE) button for about 10 seconds while Mode A or Mode B display
blinks.
After beep sound emitted from indoor unit, reservations for Mode A or
Mode B will disappear.
(WEEKLY) button to select Mode A or Mode B.
2
NOTE
●
If all reservations in the remote controller were deleted and pressed
transmitted to indoor unit. TIMER lamp will remain off and no changes will be done to the reservations
stored in the indoor unit.
(SEND) button, no signal will be
– 29 –
HSILGNE
INFO FUNCTION
HSILGNE
OPERATION MODE LOCK
The remote controller can be set to fix the HEATING mode (including FAN), COOLING mode (including FAN) and
DEHUMIDIFYING mode (including FAN) operations.
■ Method to lock HEATING mode (including FAN) operation.
Press
(ECO) and (POWERFUL) buttons simultaneously for about 5
seconds when remote controller is OFF.
“
”, “ ” and “ ” will be displayed for about 10 seconds. Later, “ ” and
“
” will remain.
This indicates that HEATING mode operation is locked.
(MODE) button, “ ” or “ ” will be displayed.
■ Method to unlock HEATING mode (including FAN) operation.
Press
(ECO) and (POWERFUL) buttons simultaneously for about 5
seconds when the remote controller is OFF.
All operation mode symbols will appear on the display for about 10 seconds. After
that, operation mode symbol before cancellation will be displayed.
This indicates that HEATING mode operation is unlocked.
■ Method to lock COOLING and DEHUMIDIFYING modes (including FAN)
operations.
Press
(ECO) and (SILENT) buttons simultaneously for about 5 seconds
when the remote controller is OFF.
“ ”, “
”, “ ” and “ ” will be displayed for about 10 seconds. Later, “ ”
and “
” will remain.
This indicates that COOLING and DEHUMIDIFYING mode operation is locked.
(MODE) button, “ ”, “ ” or “ ” will be displayed.
■ Method to unlock COOLING and DEHUMIDIFYING modes (including FAN)
operations.
Press
(ECO) and (SILENT) buttons simultaneously for about 5 seconds
when the remote controller is OFF.
All operation mode symbols will appear on the display for about 10 seconds. After
that, operation mode symbol before cancellation will be displayed.
This indicates that COOLING and DEHUMIDIFYING modes operation is unlocked.
NOTE
● Operation Mode Lock function will not activate if TIMER reservations activate.
TIMER reservations shall be deactivated first. Then, Operation Mode Lock function can be activated.
● HEATING, COOLING and DEHUMIDIFYING mode (including FAN) operations can be unlocked by pressing
the
(RESET) button. However, by pressing the (RESET) button, all the information stored
in the remote controller will disappear. You may need to set the necessary information again.
● For multi connections, unit and mode which is set to lock HEATING and switched on first shall have
higher priority. Other units which are chosen to operate at different modes shall be in STANDBY until
either the first unit operation is switched off or the mode is selected to be same as the first unit.
When preessing
When pressing
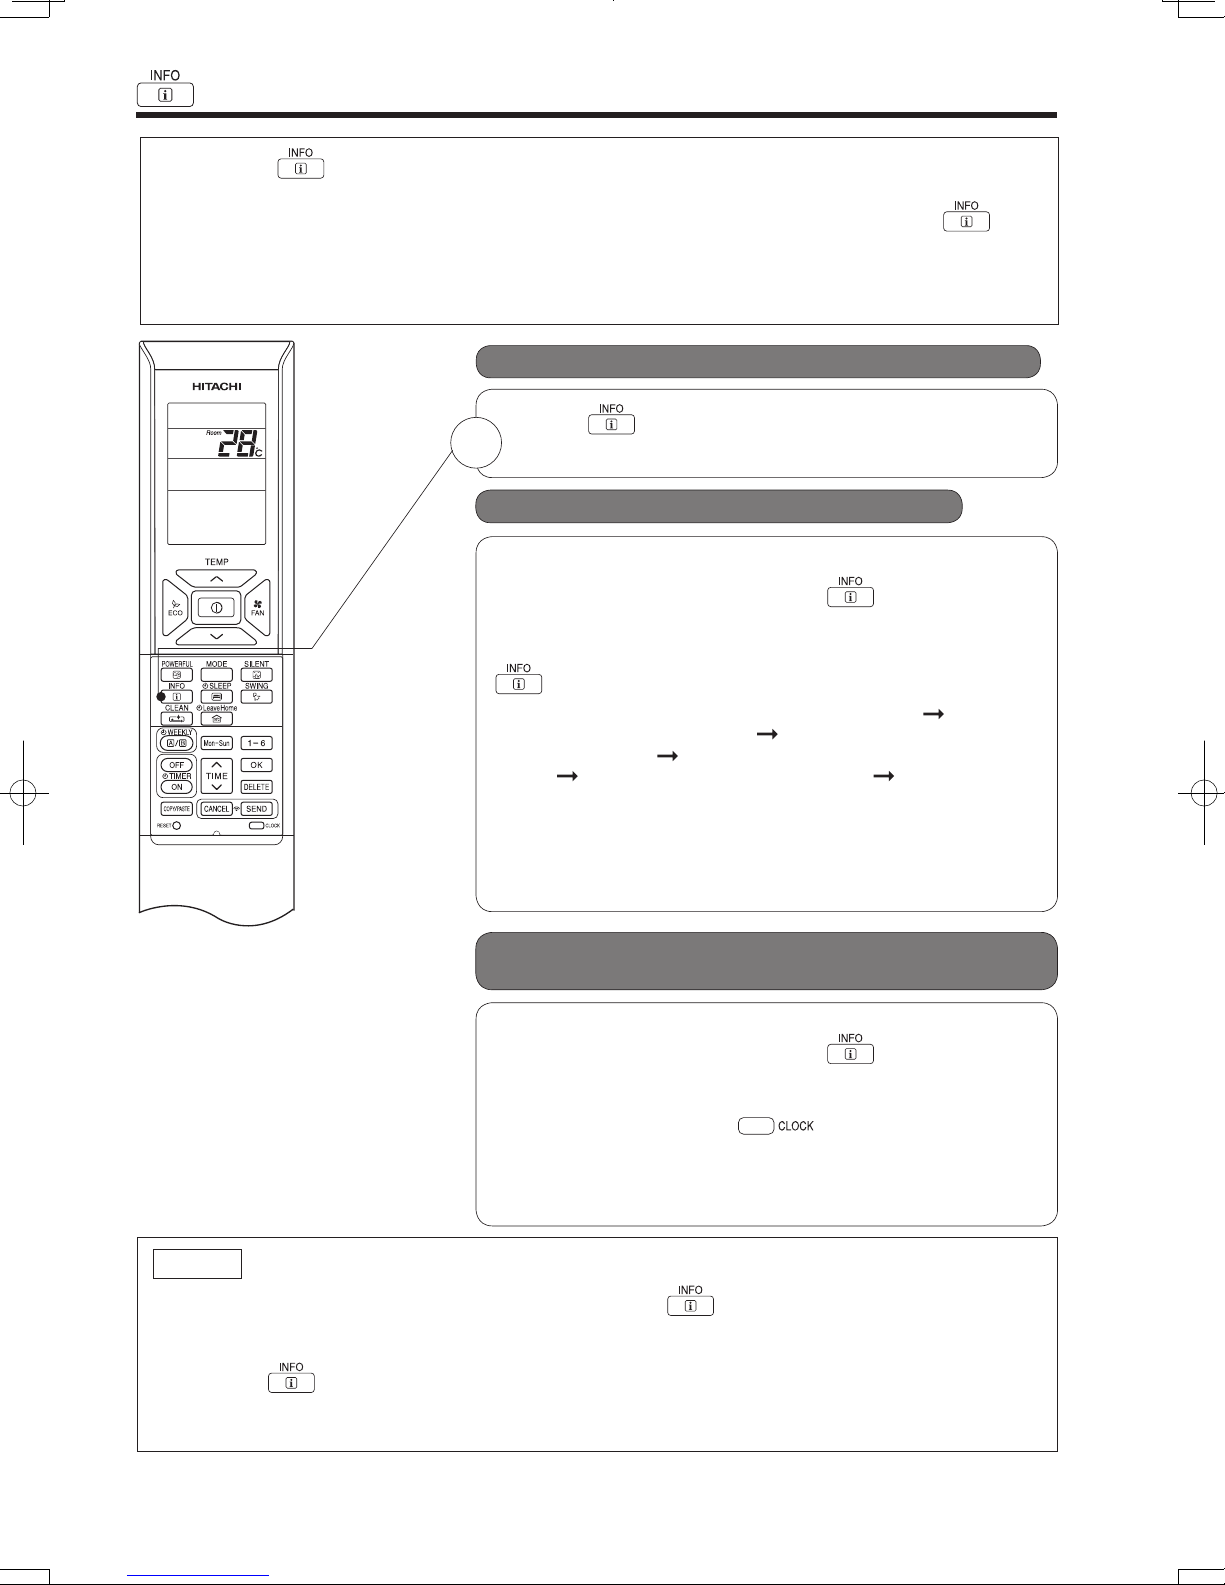
● By pressing (INFO) button, temperature around remote controller and monthly power consumption
will be displayed on the remote controller.
● After changing the batteries, direct the remote controller towards the indoor unit and press
button.
Current calendar and clock will be transmitted from indoor unit.
●
In order to receive information from indoor unit, the distance between remote controller and receiver of indoor
units is within 2 meters.
(INFO)
■ To check temperature around remote controller
Press (INFO) button.
1
Temperature will be displayed for 10 seconds.
■ To check monthly power consumption
Direct the remote controller towards the receiver of indoor unit (within 2
meters in front of indoor unit) and press
for 2 seconds for signal transmission.
While temperature around remote controller is displayed, press
(INFO) button repeatedly. The display will show as below:
this month power consumption amount for heating
power consumption for heating
amount for cooling
cooling
consumption amount for heating ...... cyclically.
●
If indication is not given, bring remote controller closer to the
receiver of the indoor unit.
lndicated value shall be regarded as a guide only.
●
temperature around remote control this month power
last month power consumption amount for
this month power consumption
(INFO) button. Wait
last month
■ Current calendar and clock can be retrieved
from indoor unit
Direct the remote controller towards the receiver of indoor unit (within 2
meters in front of indoor unit) and press
NOTE
●
In case failure occurs to the air conditioner, by pressing (INFO) button, an error code will
be displayed.
Direct the remote controller towards the receiver of indoor unit (within 2 meters in front of indoor unit)
and press
An error code will be displayed.
Call service center and inform the error code.
(INFO) button. Wait for 2 seconds for signal transmission.
for 2 seconds for signal transmission.
Once received the current calendar and clock, check whether they
are correct or not by pressing
● If there is no power supply to indoor unit or calendar and clock
have not been set, INFO function cannot be used for sending or
receiving information.
– 30 –
(CLOCK) button.
(INFO) button. Wait
 Loading...