

Page 1

SPLIT TYPE AIR CONDITIONER
INDOOR UNIT/OUTDOOR UNIT
MODEL
ENGLISH
RAS-E18CY
OUTDOOR UNIT
RAC-18C9(J)
Instruction manual Page 1~22
To obtain the best performance, please read this instruction manual completely.
Arahan pengendalian Muka surat 23~44
Untuk mendapatkan prestasi yang tinggi, sila baca arahan ini sepenuhnya.
(J) / RAC-18C9(J)
INDOOR UNIT
RAS-E18CY(J)
– 1 –
Page 2
SAFETY PRECAUTION
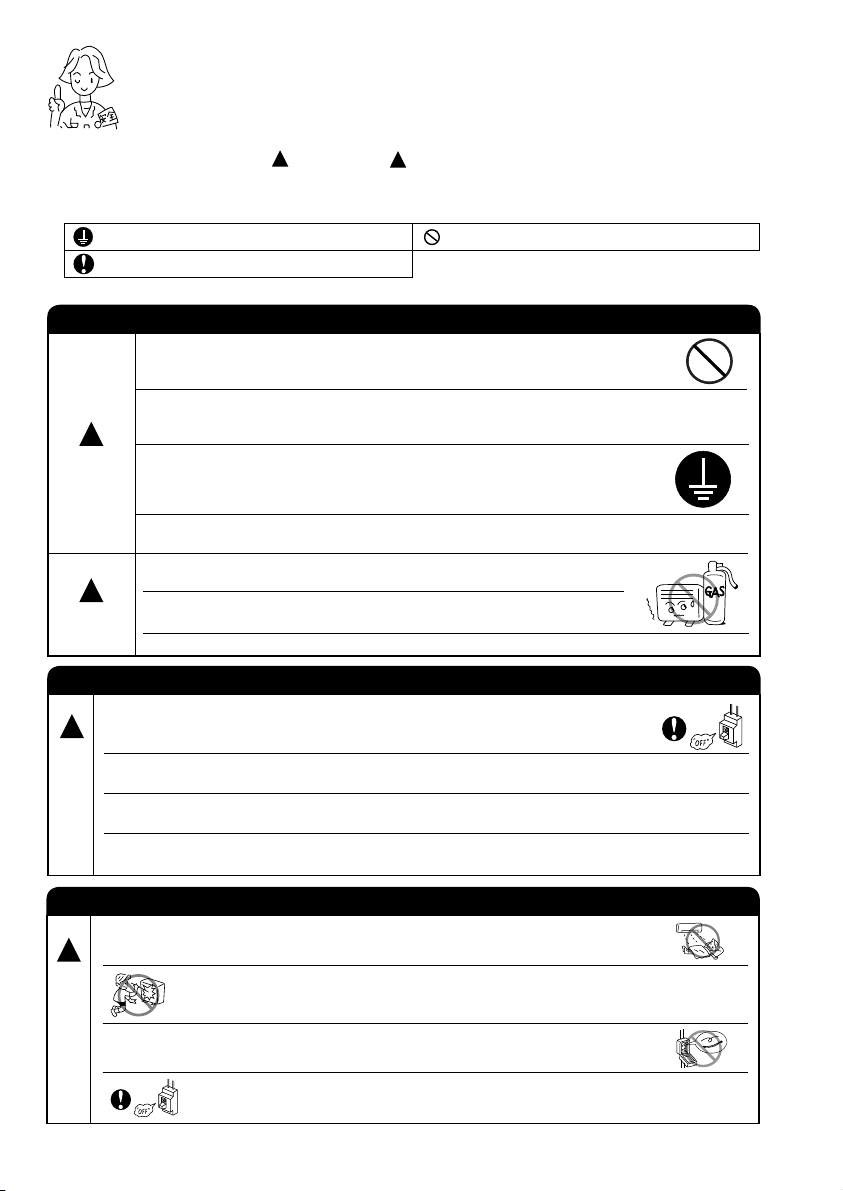
●
Please read the “Safety Precaution” carefully before operating the unit to ensure correct usage of the unit.
●
Pay special attention to signs of “ Warning” and “ Caution”. The “Warning” section contains matters which,
if not observed strictly, may cause death or serious injury. The “Caution” section contains matters which may result
in serious consequences if not observed properly. Please observe all instructions strictly to ensure safety.
●
The sign indicate the following meanings.
Make sure to connect earth line.
Indicates the instructions that must be followed.
●
Please keep this manual after reading.
PRECAUTIONS DURING INSTALLATION
●
Do not reconstruct the unit.
Water leakage, fault, short circuit or re may occur if you reconstruct
the unit by yourself.
●
Please ask your sales agent or quali ed technician for the installation
of your unit. Water leakage, short circuit or re may occur if you install
!
WARNING
!
CAUTION
the unit by yourself.
●
Please use earth line.
Do not place the earth line near water or gas pipes, lightning-conductor,
or the earth line of telephone. Improper installation of earth line may
cause electric shock.
●
Be sure to use the speci ed piping set for R22. Otherwise, this may
result in broken copper pipes or faults.
●
A circuit breaker should be installed depending on the mounting site of
the unit. Without a circuit breaker, the danger of electric shock exists.
●
Do not install the unit near a location where there is ammable gas.
The outdoor unit may catch re if ammable gas leaks around it.
●
Please ensure smooth ow of water when installing the drain hose.
!
!
The sign in the gure indicates prohibition.
PRECAUTIONS DURING SHIFTING OR MAINTENANCE
●
Should abnormal situation arises (like burning smell), please stop operating the unit
and turn off the circuit breaker. Contact your agent. Fault, short circuit or re may
!
W
G
occur if you continue to operate the unit under abnormal situation.
●
Please contact your agent for maintenance. Improper self maintenance may cause
A
electric shock and re.
R
N
●
Please contact your agent if you need to remove and reinstall the unit. Electric
I
shock or re may occur if you remove and reinstall the unit yourself improperly.
N
●
If the supply cord is damaged, it must be replaced by the special cord
obtainable at authorized service/parts centers.
PRECAUTIONS DURING OPERATION
●
Avoid an extended period of direct air ow for your health.
!
●
W
A
R
N
●
Do not use any conductor as fuse wire, this could cause fatal accident.
I
N
G
Do not insert a nger, a rod or other objects into the air outlet or inlet. As
the fan is rotating at a high speed, it will cause injury. Before cleaning, be
sure to stop the operation and turn the breaker OFF.
●
During thunder storm, disconnect and turn off the circuit breaker.
– 2 –
Page 3
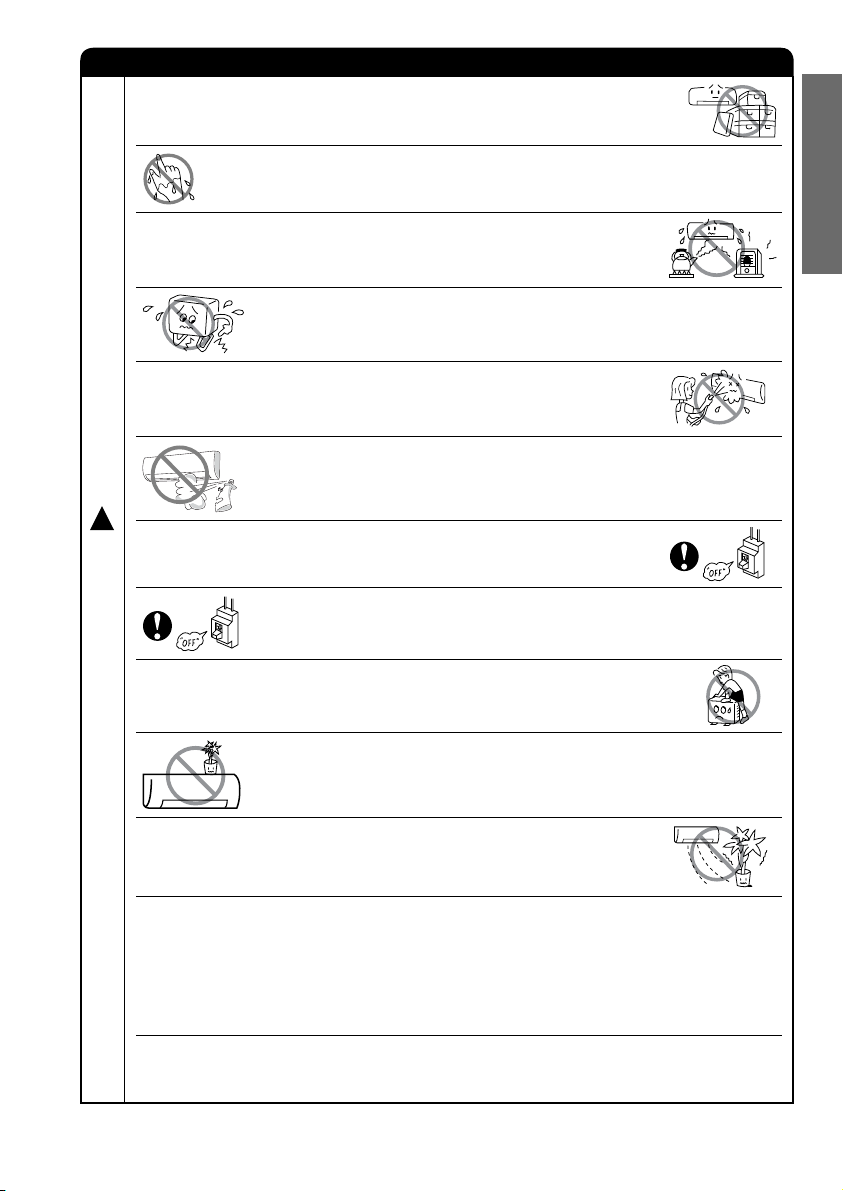
PRECAUTIONS DURING OPERATION
●
The product shall be operated under the manufacturer speci cation and
not for any other intended use.
●
Do not attempt to operate the unit with wet hands, this could cause fatal
accident.
●
Do not direct the cool air coming out from the air-conditioner panel to face
household heating apparatus as this may affect the working of apparatus
such as the electric kettle, oven etc.
●
Please ensure that outdoor mounting frame is always stable, rm and
without defect. If not, the outdoor unit may collapse and cause danger.
●
Do not splash or direct water to the body of the unit when cleaning it as
this may cause short circuit.
●
Do not use any aerosol or hair sprays near the indoor unit. This chemical
can adhere on heat exchanger n and blocked the evaporation water
ow to drain pan. The water will drop on tangential fan and cause water
splashing out from indoor unit.
!
●
Please switch off the unit and turn off the circuit breaker during cleaning,
C
the high-speed fan inside the unit may cause danger.
A
U
T
I
O
N
●
Turn off the circuit breaker if the unit is not to be operated for a long period.
ENGLISH
●
Do not climb on the outdoor unit or put objects on it.
●
Do not put water container (like vase) on the indoor unit to avoid water
dripping into the unit. Dripping water will damage the insulator inside the
unit and causes short-circuit.
●
Do not place plants directly under the air ow as it is bad for the plants.
●
When operating the unit with the door and windows opened, (the room humidity is always above
80%) and with the air de ector facing down or moving automatically for a long period of time,
water will condense on the air de ector and drips down occasionally. This will wet your furniture.
Therefore, do not operate under such condition for a long time.
●
If the amount of heat in the room is above the cooling capability of the unit (for example: more
people entering the room, using heating equipments and etc.), the preset room temperature
cannot be achieved.
●
This appliance is not intended for use by young children unless they have been adequately
supervised by a responsible person to ensure that they can use the appliance safely.
●
Young children should be supervised to ensure that they do not play with the appliance.
– 3 –
Page 4
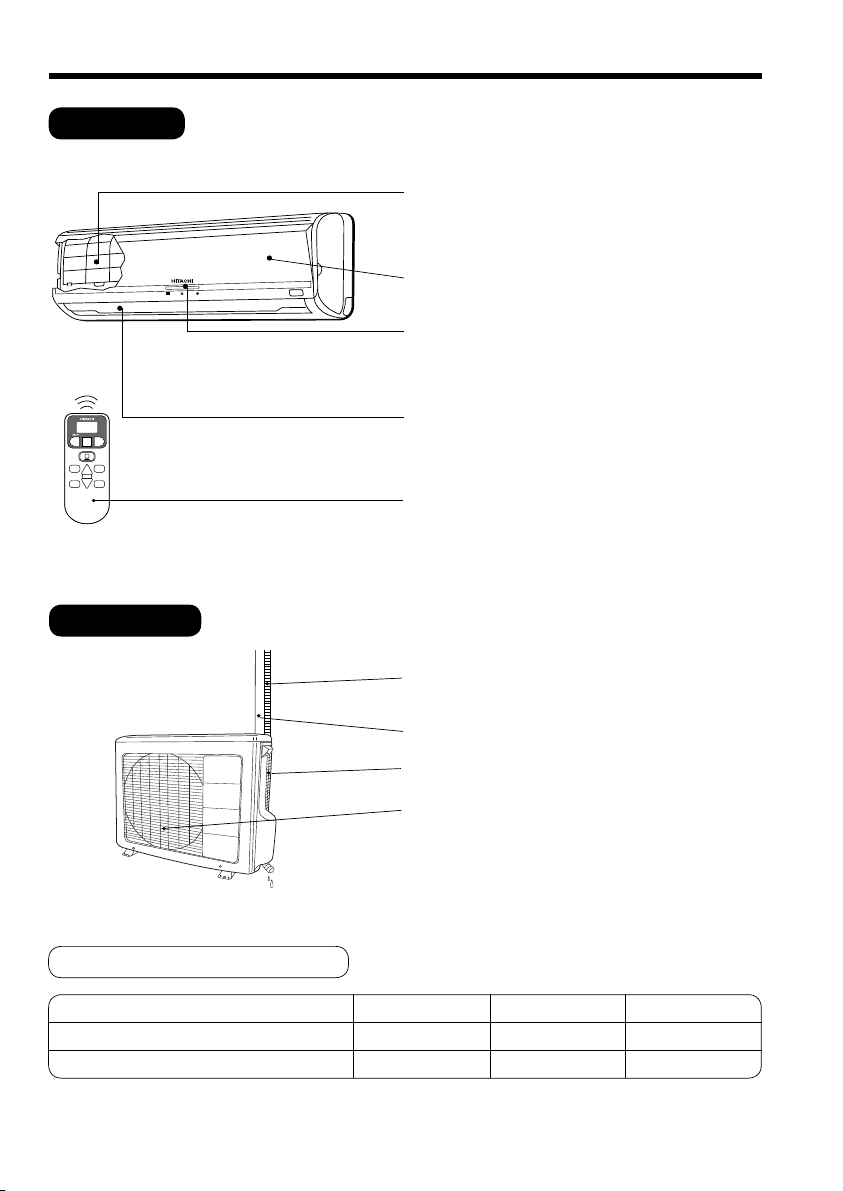
NAMES AND FUNCTIONS OF EACH PART
INDOOR UNIT
Pre- lter
To prevent dust from coming into the indoor unit.
(Refer page 17)
Front panel
Indoor unit indicators
Light indicator showing the operating condition.
(Refer page 5)
OUTDOOR UNIT
MODEL NAME AND DIMENSIONS
Horizontal de ector
(Air Outlet)
(Refer page 12)
Remote controller
Send out operation signal to the indoor unit. So as
to operate the whole unit.
(Refer page 6)
Drain pipe
Condensed water drain to outside.
Connecting cord and insulation pipe for piping
Air inlet (Back and Left side)
Air outlet
●
Vertical de ector
MODEL
RAS-E18CY
RAC-18C9(J)
WIDTH (mm)
(J)
1030
750
– 4 –
HEIGHT (mm)
295
570
DEPTH (mm)
207
280
Page 5
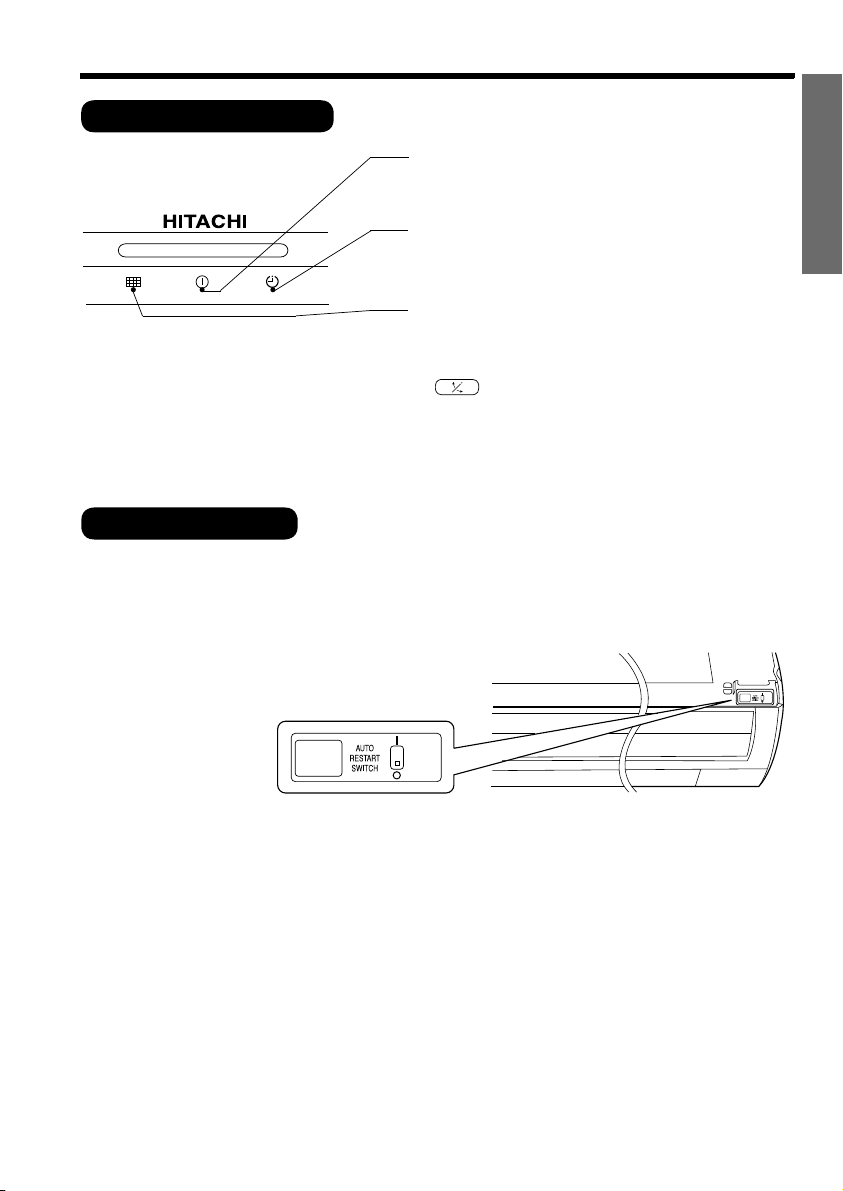
INDOOR UNIT INDICATORS
OPERATION LAMP
This lamp lights during operation.
OPERATION INDICATOR
TIMER LAMP
ENGLISH
This lamp lights when the timer is working.
FILTER LAMP
When the device is operated for a total of about 200
hours, the FILTER lamp lights to indicate that it is
time to clean the lter. The lamp goes out when the
“ (AUTO SWING)” button is pressed while the
device is on “STANDBY MODE”.
● This gure shows the opening condition of
front panel. Refer to page 16 in relation to
how to open or close the front panel.
AUTO RESTART SWITCH
● In the event of power failure, the air conditioner will restart automatically in the previously selected mode
once the power is restored.
● In the event of power failure during TIMER operation, the timer will be reset and the unit will begin or stop
operating under a new timer setting.
– 5 –
Page 6
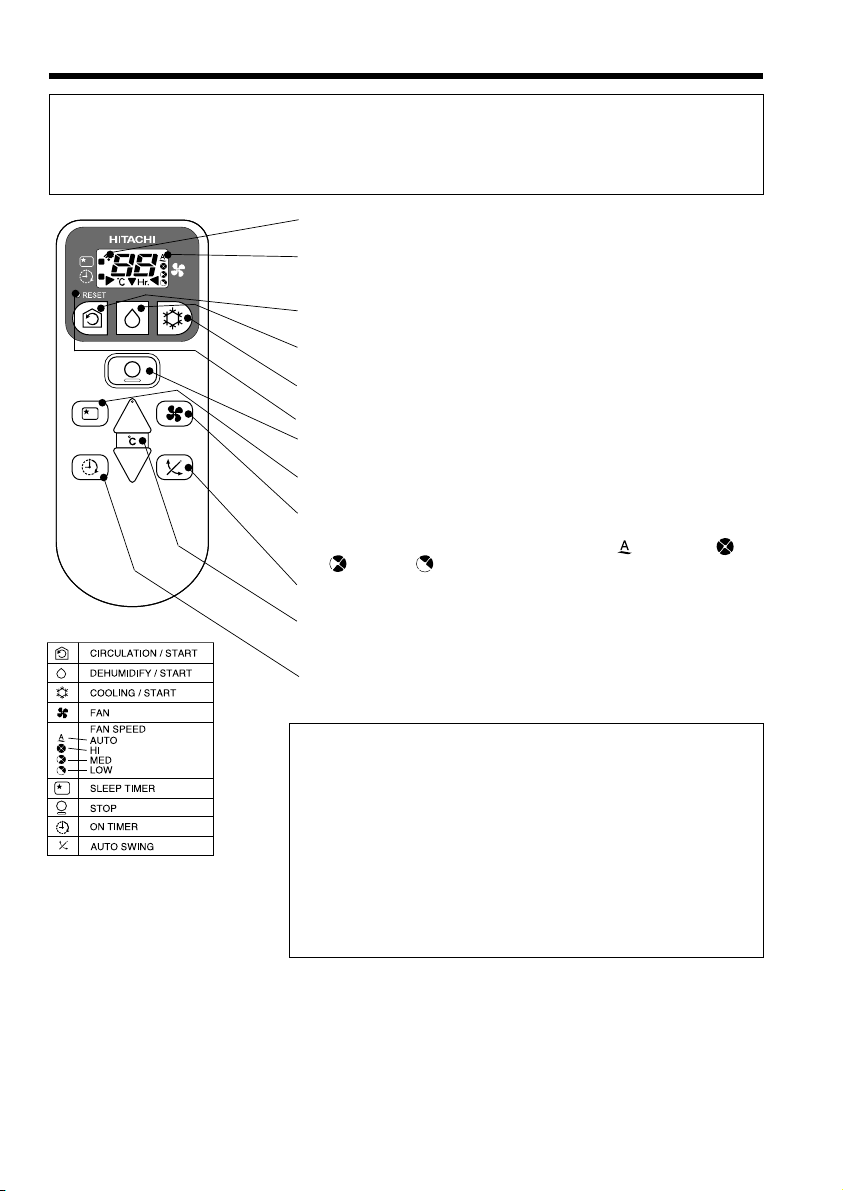
NAMES AND FUNCTIONS OF REMOTE CONTROL UNIT
REMOTE CONTROLLER
This controls the operation of the indoor unit. The range of control is about 7 meters. If indoor lighting
is controlled electronically, the range of control may be shorter.
This unit can be xed on a wall using the xture provided. Before xing it, make sure the indoor unit
can be controlled from the remote controller.
● Transmission sign
The transmission sign blinks when a signal is sent.
● Display
This indicates the room temperature selected, timer status, function
and intensity of circulation selected.
● CIRCULATION button
Use this button to set air circulation in the room or start operation.
● DEHUMIDIFYING button
Use this button to dehumidify the room or start operation.
● COOLING button
Use this button to set cooling mode in the room or start operation.
● RESET button
● STOP button
Press this button to stop operation only.
● SLEEP button
Use this button to set the sleep timer.
● FAN SPEED selector
This determines the fan speed. Every time you press this button,
the intensity of circulation will change from (AUTO) to (HI)
to (MED) to (LOW).
● AUTO SWING button
Controls the angle of the horizontal air de ector.
● TEMPERATURE button
Use this button to raise or lower the temperature setting. (Keep
pressed, and the value will change more quickly.)
● ON-TIMER button Select the turn ON time.
Precautions for Use
● Do not put the remote controller in the following places.
● In direct sunlight.
● In the vicinity of a heater.
● Handle the remote controller carefully. Do not drop it on the
oor, and protect it from water.
● Once the outdoor unit stops, it will not restart for about 3
minutes (unless you turn the power switch off and on or unplug
the power cord and plug it in again).
This is to protect the device and does not indicate a failure.
● If you press the FUNCTION selector button during operation,
the device may stop for about 3 minutes for protection.
– 6 –
Page 7
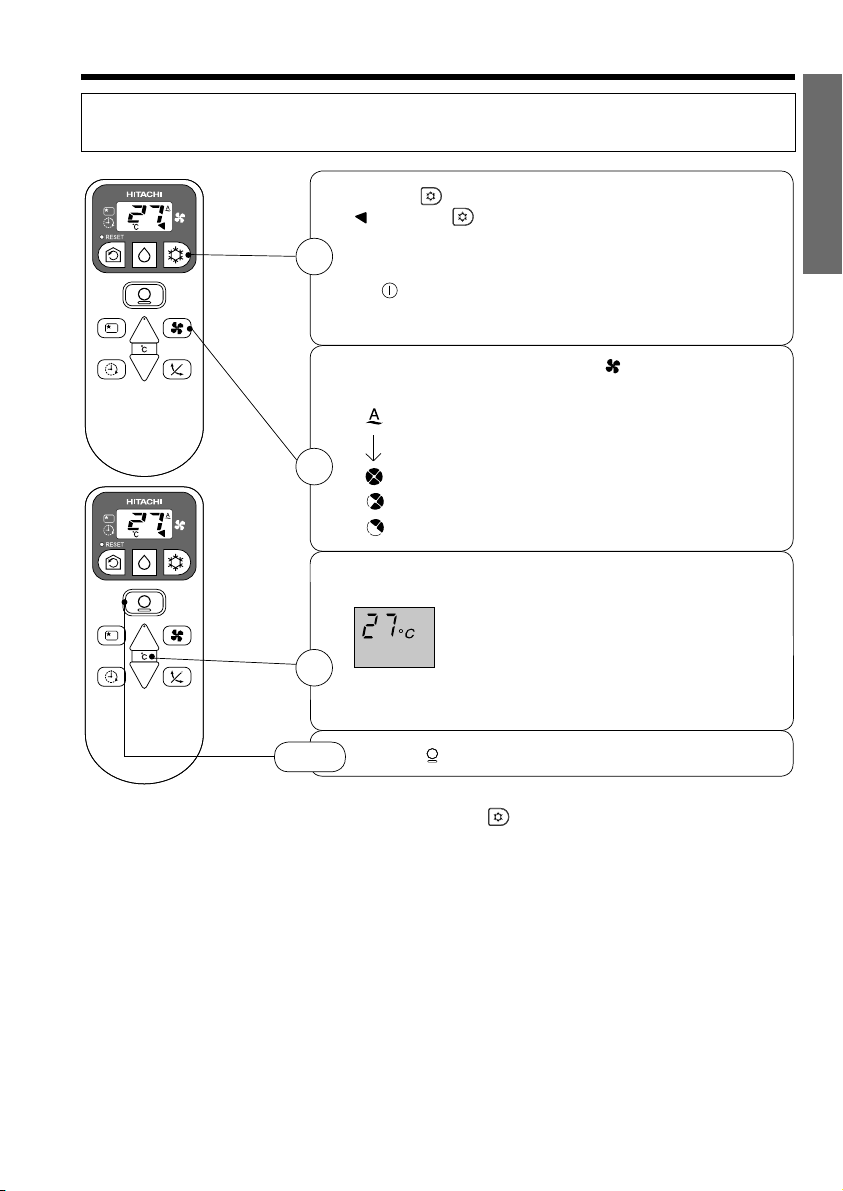
COOLING OPERATION
Use the device for cooling when the outdoor temperature is 21-43°C.
If humidity is very high (over 80%) indoors, some dew may form on the air outlet grille of the indoor unit.
1
2
3
STOP
Press the (COOLING) button so that the display indicates
pointing to button.
Cooling operation starts with a beep.
The cooling function does not start if the temperature setting
is higher than the current room temperature (even though
the (OPERATION) lamp lights). The cooling function will
start as soon as you set the temperature below the current
room temperature.
Set the desired FAN SPEED with the
(the display indicates the setting).
(AUTO) : The FAN SPEED is HI at rst and varies to
(HI) : Economical as the room will become cool quickly.
(MED) : Fan speed slow.
(LOW) : Fan speed slower.
Set the desired room temperature with the TEMPERATURE
button (the display indicates the setting).
The temperature setting and the actual room temperature may
vary somehow depending on conditions.
Press the
MED or LOW automatically when the preset
temperature has been reached.
The range of 25-28°C is recommended as the
room temperature for cooling.
If the temperature setting is 27°C, the room
temperature will be controlled at around 27°C.
(STOP) button to stop operation.
(FAN SPEED) button
ENGLISH
■ As the settings are stored in memory in the remote controller, you
only have to press the (COOLING) button next time.
– 7 –
Page 8
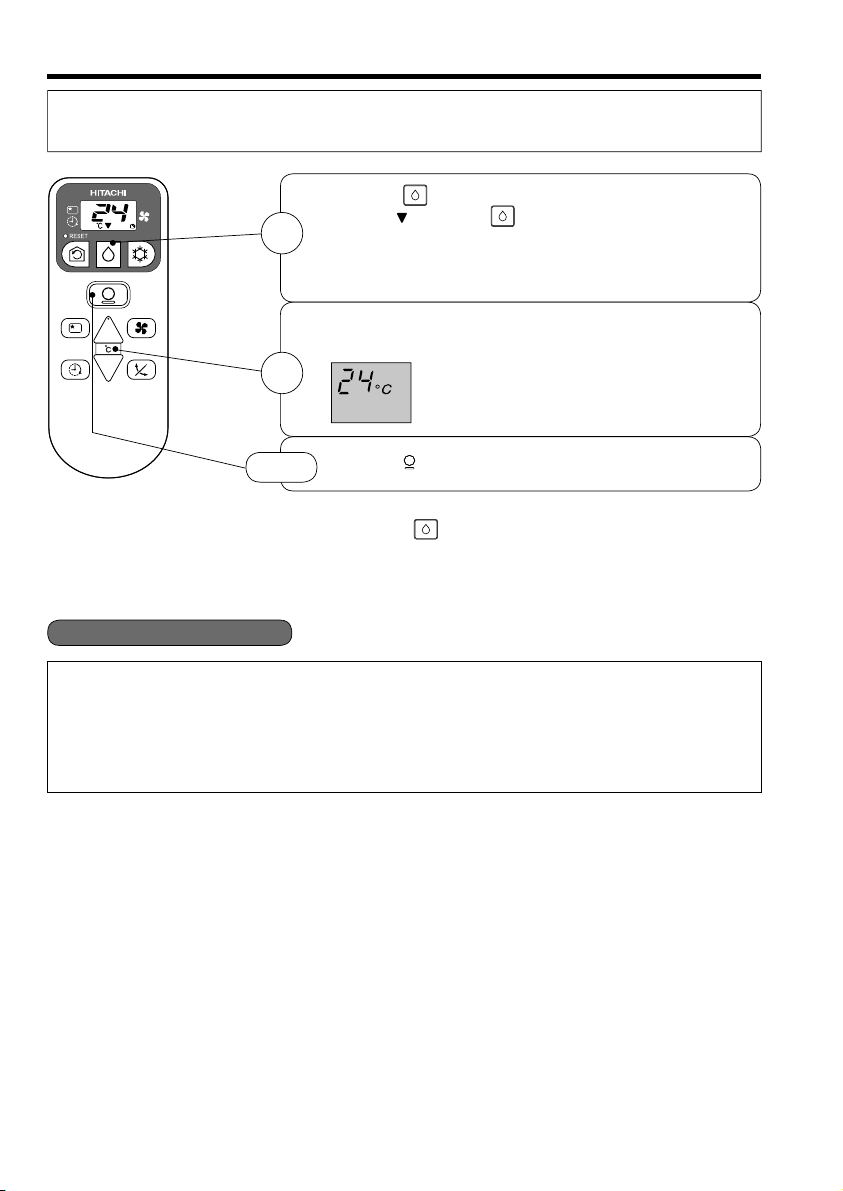
DEHUMIDIFYING OPERATION
Use the device for dehumidifying when the room temperature is over 16°C.
When it is under 15°C, the dehumidifying function will not work.
Press the (DEHUMIDIFY) button so that the display
indicates pointing to button.
Dehumidifying operation starts with a beep.
1
The FAN SPEED is set at LOW automatically.
The FAN SPEED button does not work.
Set the desired room temperature with the TEMPERATURE
button (the display indicates the setting).
The range of 20-26C is recommended as the
2
room temperature for dehumidifying.
STOP
■ As the settings are stored in memory in the remote controller, you only
Press the (STOP) button to stop operation.
have to press the (DEHUMIDIFY) button next time.
■ Dehumidifying Function
When the room temperature is higher than the temperature setting: The device will dehumidify the room,
reducing the room temperature to the preset level.
When the room temperature is lower than the temperature setting: Dehumidifying will be performed at
the temperature setting slightly lower than the current room temperature, regardless of the temperature
setting. The function will stop (the indoor unit will stop emitting air) as soon as the room temperature
becomes lower than the setting temperature.
– 8 –
Page 9

CIRCULATION OPERATION
1
Press the (CIRCULATION) button so that the display
indicates pointing to button.
Circulating operation starts with a beep.
■ Circulation Function
Press the FAN SPEED button and select the desired FAN
SPEED (the display indicates your choice).
2
Press the temperature control button to set to the desired
3
temperature.
STOP
Press the (STOP) button to stop operation.
■ As the settings are stored in memory in the remote controller, you
only have to press the (CIRCULATION) button next time.
ENGLISH
● During circulation operation, compressor will not be running and there is no cooling operation with only
indoor fan running.
● When the setting temperature is higher than room temperature, indoor fan will stop running.
– 9 –
Page 10
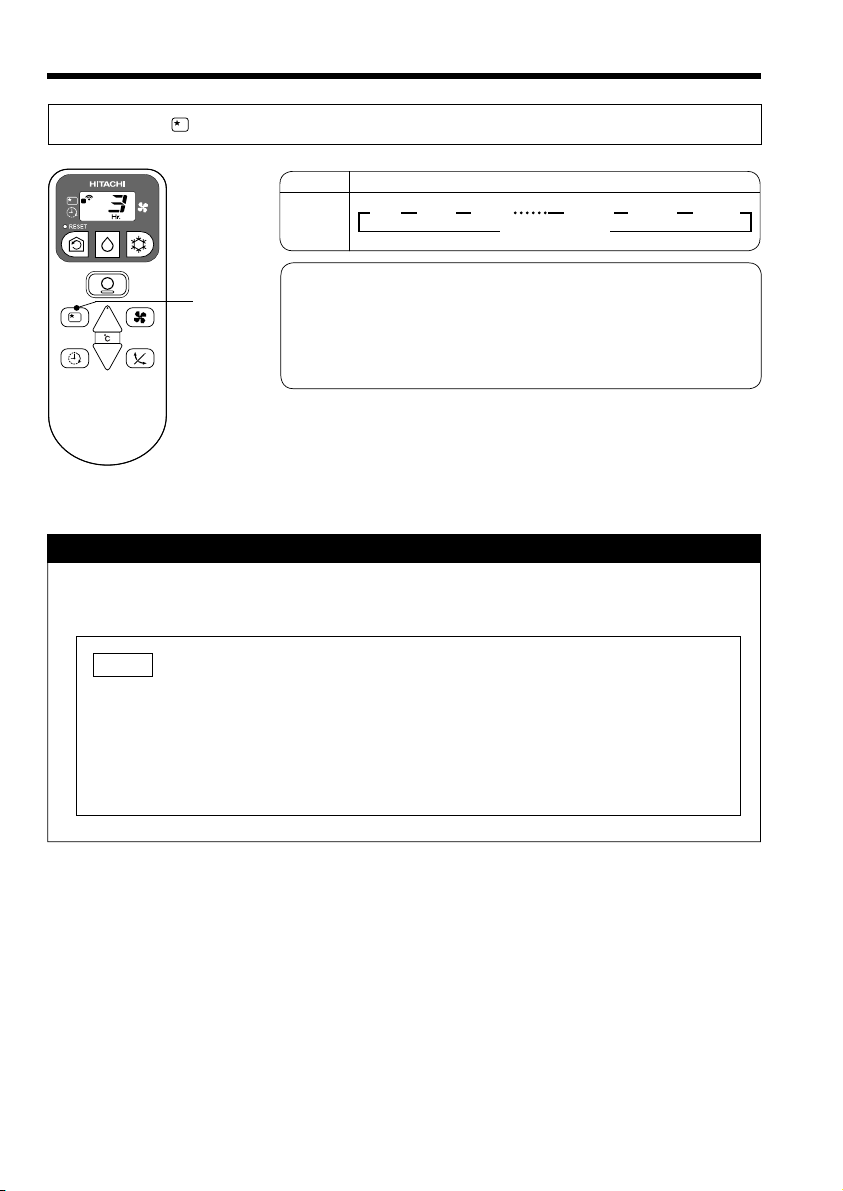
HOW TO SET THE SLEEP TIMER
Press the (SLEEP) button, and the display changes as shown below.
SLEEP
Mode
444
1 hr 2 hrs 3 hrs 10 hrs 11 hrs 12 hrs
Sleep
timer
Sleep Timer: The device will continue working for the designated
number of hours and then turn off.
Point the signal window of the remote controller toward the indoor
unit, and press the SLEEP button.
The timer information will be displayed on the remote controller.
The TIMER lamp lights with a beep from the indoor unit.
Indication
44
Sleep timer off
4
1
Explanation of the sleep timer
The device will control the FAN SPEED and room temperature automatically so as to
be quiet and good for people’s health.
NOTE
● You can not set other timer during sleep timer operation.
● After sleep timer time is up and when press sleep button again, the sleep timer
will be set as last setting.
● Sleep timer effective only once.
– 10 –
Page 11
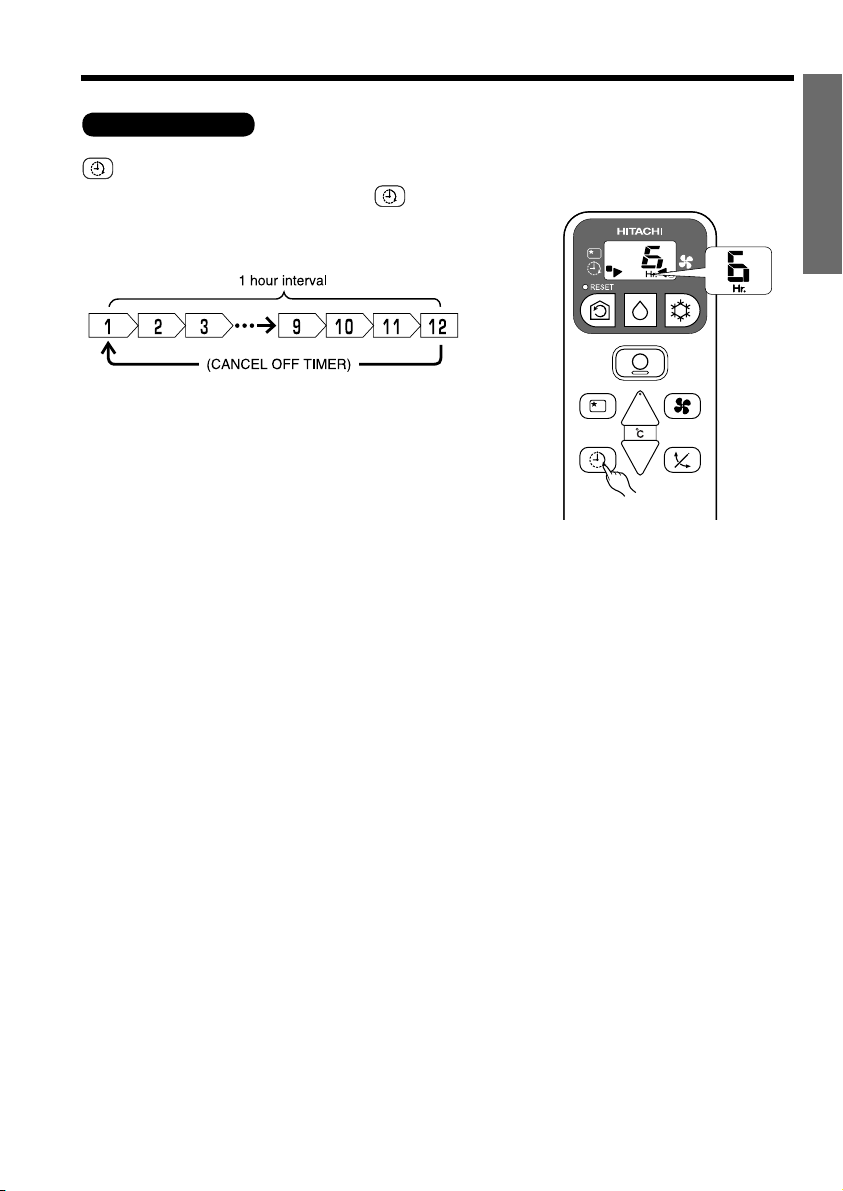
HOW TO SET THE TIMER
ON Timer Reservation
ON TIME setting
● Select the ON TIMER by pressing the (ON)
Button.
● Setting time will change according to the below
sequence.
■ Operation will start for setting
temperature at setting time (The starting
time may different depend on the room
temperature and set temperature).
ENGLISH
– 11 –
Page 12

AIR FLOW LOUVERS ADJUSTMENTS
1. Adjusting the left and right air ow directions
Move the vertical air ow louvers as illustrated,
to adjust the air ow to ow towards the left or
right directions.
2. Adjusting the downward air ow direction.
During the “Dehumidifying” or “Cooling” operating
modes, the horizontal air ow louvers are automatically adjusted to suit the air ow angles of
each operating mode. The air ow louvers are
designed to direct air ow in upward and downward directions. Pressing the automatic air ow
control button, these air ow louvers can also be
adjusted to any air ow angle of one’s choice.
Press the AUTOMATIC AIR FLOW DIRECTION
once will activate the horizontal air ow louvers
to direct the air ows upwards and downwards.
Press the control button again, the horizontal air
ow louvers will stop moving and remain xed at
the position at the point when the control button
was pressed
During the “Dehumidifying” or “Cooling” operat-
ing modes, set the horizontal air ow louvers to
move within the range as recommended in the
illustration
Adjusting the air ow louvers will direct air ows
to assist in reducing the room temperature and
to correct any temperature imbalance
During the “Cooling” operating mode, do not
adjust the horizontal air ow louvers to swing
outside the range as indicated by arrows in the
illustration. Do not operate the horizontal air ow
louvers in durations longer than it is necessary.
Condensate may form and drip along the horizontal air ow louvers.
After stopping the operations of the unit by
pressing control button, the horizontal air
ow louvers will move to park at a position that
covers up the air outlet vent.
While the automatic air ow direction mode is in
operation, any physical adjustment to the horizontal air ow louvers will shift the swing range.
However, with no further physical adjustments,
the air ow louvers will readjust automatically to
the original swing range setting. (Should the louvers could not return to the original swing range
setting, stop the operation of the air conditioner
unit, remove the power supply plug and re-plug
it into the power mains socket and restart the air
conditioner unit. This will return the swing range
to its original setting)
– 12 –
Page 13
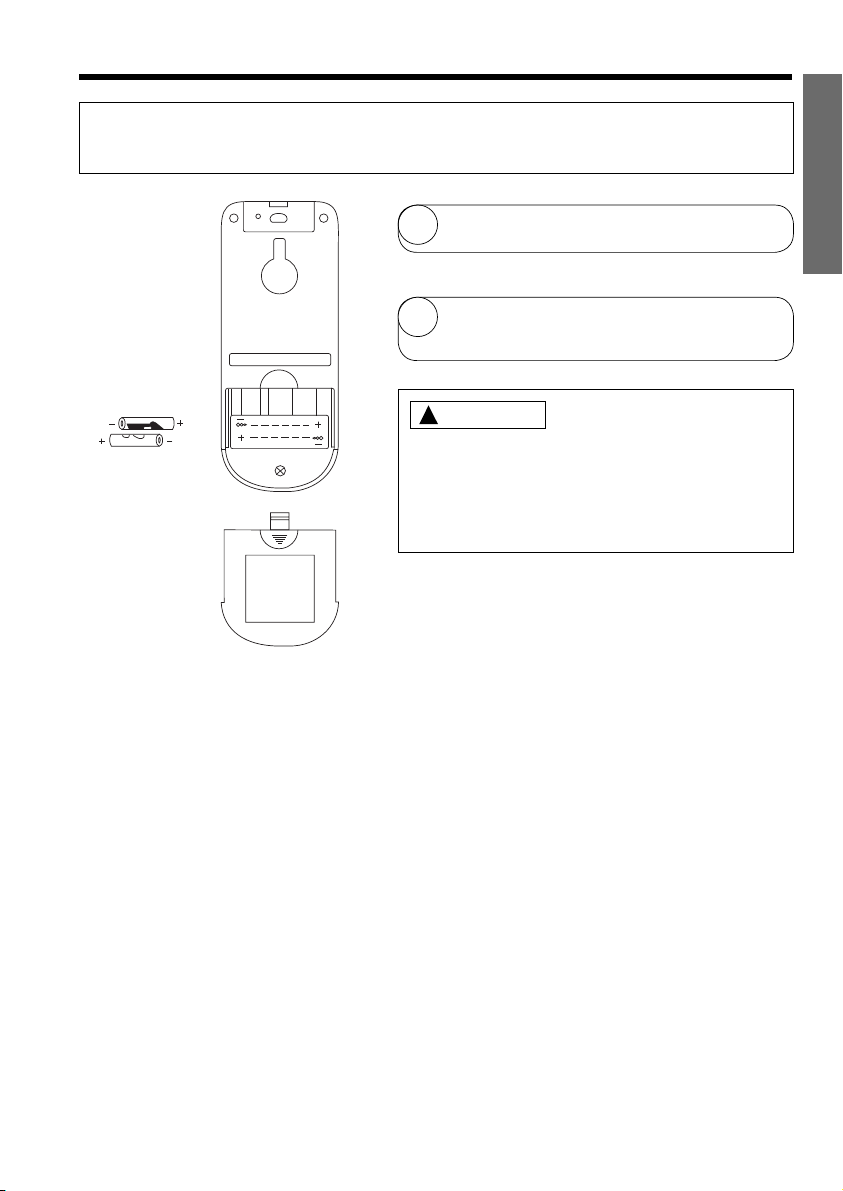
HOW TO EXCHANGE THE BATTERIES IN THE REMOTE CONTROLLER
When using the remote control, there is no response from the air conditioner unit and or the remote control
has fading and dim displays, the batteries in the remote control device need to be removed and replaced
with new ones
Remove the cover as shown in the gure and
1
take out the old batteries.
=
Install the new batteries.
2
The direction of the batteries should match the
marks in the case.
CAUTION
!
1. Do not use new and old batteries, or different kinds
of batteries together.
2. Take out the batteries when you do not use the remote
controller for 2 or 3 months.
3. Use high quality and high performance AAA batteries
to avoid short operating life and electrolyte leakages
ENGLISH
– 13 –
Page 14
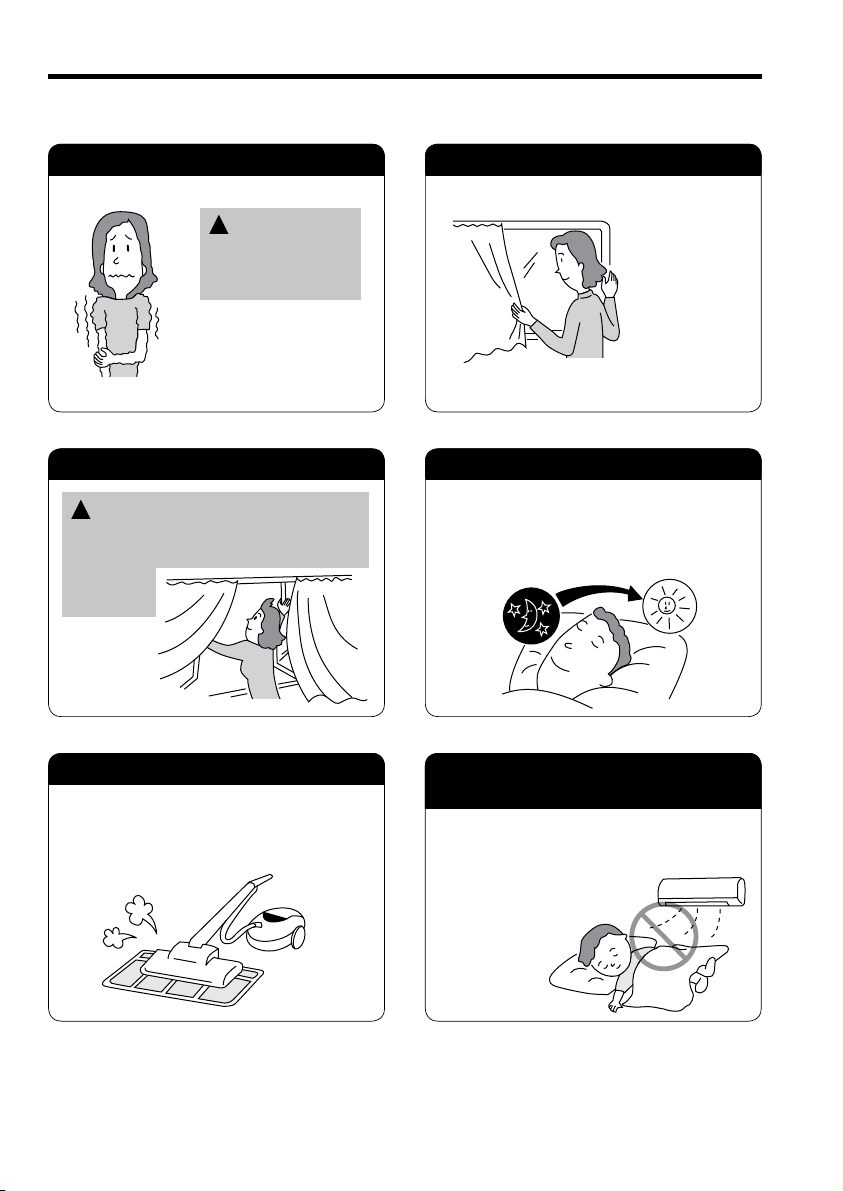
THE IDEAL WAYS OF OPERATION
Suitable Room Temperature Install curtain or blinds
Warning
!
Freezing temperature
is bad for health and a
waste of electric power.
Ventilation Effective Usage Of Timer
Caution
!
Do not close the room for a long period of
time. Occasionally open the door and windows
to allow the
entrance of
fresh air.
At night, please use the “OFF or ON timer
operation mode”, together with your wake up
time in the morning. This will enable you to
enjoy a comfortable room temperature. Please
use the timer effectively.
It is possible
to reduce heat
entering the
room through
windows.
Do Not Forget To Clean The Air Filter
Dusty air lter will reduce the air volume and
the cooling ef ciency. To prevent from wasting
electric energy, please clean the lter every
2 weeks.
Please Adjust Suitable Temperature
For Baby And Children
Please pay attention to the room temperature
and air ow direction when operating the unit
for baby, children and old folks who have
dif culty in movement.
– 14 –
Page 15
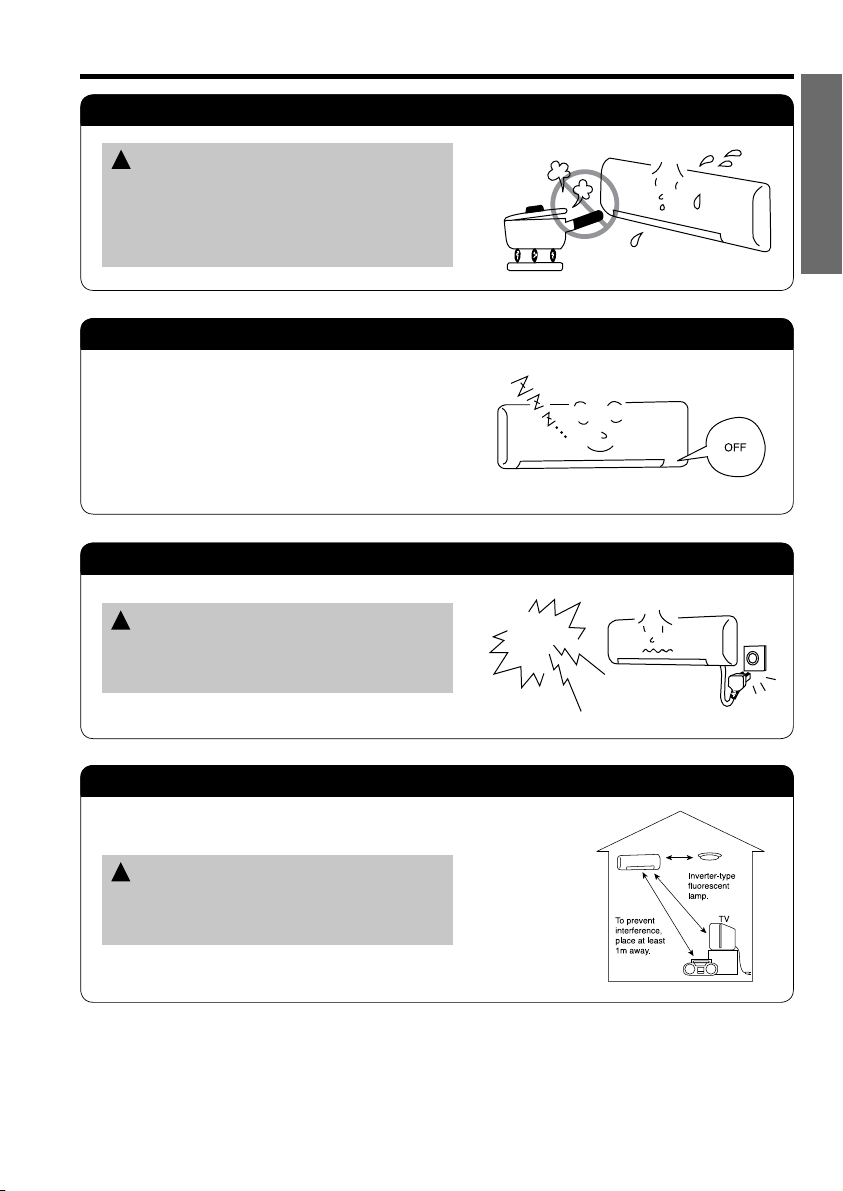
FOR USER’S INFORMATION
The Air Conditioner And The Heat Source In The Room
Caution
!
If the amount of heat in the room is above the cooling
capability of the air conditioner (for example: more
people entering the room, using heating equipments
and etc.), the preset room temperature cannot be
achieved.
Not Operating For A Long Time
When the indoor unit is not to be used for a long
period of time, please switch off the power from the
mains. If the power from mains remains “ON”, the
indoor unit still consumes about 8W in the operation
control circuit even if it is in “OFF” mode.
When Lightning Occurs
Warning
!
To protect the whole unit during lightning, please
stop operating the unit and remove the plug from
the socket.
ENGLISH
Interference From Electrical Products
Caution
!
To avoid noise interference, please place the indoor
unit and its remote controller at least 1m away from
electrical products.
– 15 –
Page 16

ATTACHING THE AIR PURIFYING AND DEODORIZING FILTERS
CAUTION
!
Cleaning and maintenance must be carried out only by quali ed service personal. Before cleaning,
stop operation and switch off the power supply.
Open the front panel.
1
● Pull up the front panel by holding it at both sides
with both hands.
Remove the pre- lter.
2
● Push upward to release the claws and pull out the
lter.
Attaching the air purifying and deodorizing lters
3
to the lter.
● Attach the air purifying and deodorizing lters to
the frame by gently compress its both sides and
release after insertion into lter frame.
!
CAUTION
Do not bend the air purifying
and deodorizing lter as it may
cause damage to the structure.
Attach pre- lters.
4
● Attach the pre- lters by ensuring that the surface
written “FRONT” is facing front.
● After attaching the pre- lters, push the front panel at
three arrow portion as shown in gure and close it.
Claws
(4 places)
NOTE
● In case of removing the air purifying and deodorizing lters, please follow the above procedures.
● The cooling capacity is slightly weakened and the cooling speed becomes slower when the air
purifying and deodorizing lters are used. So, set the fan speed to "HIGH" when using it in this
condition.
● Air purifying and deodorizing lters are washable and reusable up to 20 times by using vacuum
cleaner or water rinse under running tap water. Type number for this air purifying filter is
<SPX-CFH5>. Please use this number for ordering when you want to renew it.
● Do not operate the air conditioner without lter. Dust may enter the air conditioner and fault may
occur.
– 16 –
Page 17

MAINTENANCE
!
CAUTION
Cleaning and maintenance must be carried out only by quali ed service personal. Before cleaning,
stop operation and switch off the power supply.
1. PRE-FILTER
Clean the pre- lter, as it removes dust inside the room. In case the pre- lter is full of dust, the air
ow will decrease and the cooling capacity will be reduced. Further, noise may occur. Be sure to
clean the lter following the procedure below.
Open the front panel and remove the lter
1
● Gently lift and remove the air purifying and
deodorizing lter from the pre- lter frame.
Vacuum dust from the pre- lter and air purifying
2
and deodorizing lter using vacuum cleaner. If
there is too much dust, rinse under running tap
water and gently brush it with soft bristle brush.
Allow lters to dry in shade.
ENGLISH
● Re-insert the air purifying and deodorizing
3
lter to the lter frame. Set the lter with
“FRONT” mark facing front, and slot them
into the original state.
● After attaching the lters, push the front panel
at three arrow portions as shown in gure and
close it.
NOTE:
● Air purifying and deodorizing lter should be cleaned every month or sooner if noticeable loading
occurs. When used overtime, it may loose its deodorizing function. For maximum performance, it
is recommended to replace it every 1 year depending on application requirements.
!
CAUTION
● Do not wash with hot water at more than 40°C. The lter may shrink.
● When washing it, shake off moisture completely and dry it in the shade; do not expose it directly
to the sun. The lter may shrink.
● Do not use detergent on the air purifying and deodorizing lter as some detergent may deteriorate
the lter electrostatic performance.
– 17 –
Page 18

2. Washable Front Panel
● Remove the front panel and wash with clean
water.
Wash it with a soft sponge.
After using neutral detergent, wash thoroughly
with clean water.
● When front panel is not removed, wipe it with
a soft dry cloth. Wipe the remote controller
thoroughly with a soft dry cloth.
● Wipe the water thoroughly.
If water remains at indicators or signal
receiver of indoor unit, it causes trouble.
Method of removing the front panel.
Be sure to hold the front panel with both hands
to detach and attach it.
Removing the Front Panel
● When the front panel is fully opened with both
hands, push the right arm to the inside to
release it, and while closing the front panel
● Move the projections of the left and right arms
Attaching the Front Panel
into the Flanges in the unit and securely
insert them into the holes.
slightly, put it out forward.
!
CAUTION
● Do not splash or direct water to the body of the unit when cleaning it
as this may cause short circuit.
● Never use hot water (above 40°C), benzine, gasoline, acid, thinner or
a brush, because they will damage the plastic surface and the coating.
3. MAINTENANCE AT BEGINNING OF LONG OFF PERIOD
● Run the unit by setting the operation mode to (COOL),
the temperature to 32°C and the fan speed to HI for about
half a day on a ne day, and dry the whole of the unit.
● Switch off the power plug.
– 18 –
Page 19

!
CAUTION
● Please use earth line.
Do not place the earth line near water or gas pipes, lightning-conductor, or the earth
line of telephone. Improper installation of earth line may cause electric shock.
● A circuit breaker should be installed depending on the mounting site of the unit. Without a circuit
breaker, the danger of electric shock exists.
IMPORTANT
The wires in this mains lead are coloured in accordance with the following code:
Green-and-yellow : Earth
Blue : Neutral
Brown : Live
As the colours of the wires in the mains lead of this appliance may not correspond with the coloured
markings identifying the terminals in your plug, proceed as follows:
The wire which is coloured green-and-yellow must be connected to the terminal in the plug which is
marked with the letter E or by the earth symbol or coloured green or green-and-yellow.
The wire which is coloured blue must be connected to the terminal which is marked with the letter
N or coloured black.
The wire which is coloured brown must be connected to the terminal which is marked with the letter
L or coloured red.
NOTE
If the supply cord is damaged, it must be replaced by the special cord obtainable at authorized
service/parts centers.
!
CAUTION
Cleaning and maintenance must be carried out only by quali ed service personal. Before cleaning,
stop operation and switch off the power supply.
REGULAR INSPECTION
ENGLISH
PLEASE CHECK THE FOLLOWING POINTS BY QUALIFIED SERVICE PERSONAL EITHER
EVERY HALF YEARLY OR YEARLY. CONTACT YOUR SALES AGENT OR SERVICE SHOP.
1
2
3
Is the earth line disconnected or broken?
Is the mounting frame seriously affected by rust and is the
outdoor unit tilted or unstable?
Is the plug of power line rmly plugged into the socket?
(Please ensure no loose contact between them).
– 19 –
Page 20

AFTER SALE SERVICE AND WARRANTY
WHEN ASKING FOR SERVICE, CHECK THE FOLLOWING POINTS.
CONDITION CHECK THE FOLLOWING POINTS
● Is the fuse all right?
When it does not operate
When it does not cool well
Notes
● In quiet operation or stopping the operation, the following phenomena
may occassionally occur, but they are not abnormal for the operation.
(1) Slight owing noise of refrigerant in the refrigerating cycle.
(2) Slight rubbing noise from the fan casing which is cooled and then
● The odor will possibly be emitted from the room air conditioner because
the various odor, emitted by smoke, foodstuffs, cosmetics and so on,
sticks to it. So the air lter and the evaporator regularly must be cleaned
to reduce the odor.
● Is the voltage extremely high or low?
● Is the circuit breaker “ON”?
● Was the air lter cleaned?
● Does sunlight fall directly on the outdoor unit?
● Is the air ow of the outdoor unit obstructed?
● Are the doors or windows opened, or is there any source
of heat in the room?
● Is the set temperature suitable?
gradually warmed as operation stops.
● Please contact your sales agent immediately if the air conditioner still fails to operate normally after the
above inspections. Inform your agent of the model of your unit, production number, date of installation.
Please also inform him regarding the fault.
● Power supply shall be connected at the rated voltage, otherwise the unit will be broken or could not reach
the speci ed capacity.
Please note:
On switching on the equipment, particularly when the room light is dimmed, a slight brightness uctuation
may occur. This is of no consequence.
The conditions of the local Power Supply Companies are to be observed.
NOTE:
If the supply cord is damaged, it must be replaced by the manufacturer, its service agent or similarly
quali ed person in order to avoid a hazard.
– 20 –
Page 21

This product conforms with the protection requirements of council directives 89/336/EEC relating to
electromagnetic compatibility and 73/23/EEC relating to electrical equipment designed for use within
certain voltage limits.
Note
● Avoid to use the room air conditioner for cooling operation when the outside temperature is below
21°C (70°F).
The recommended maximum and minimum operating temperatures of the hot and cold sides
should be as below:
Minimum Maximum
Indoor Dry bulb °C 21 32
Wet bulb °C 15 23
Outdoor Dry bulb °C 21 52
Wet bulb °C 15 31
MEMO
......................................................................................................................................................................................
......................................................................................................................................................................................
......................................................................................................................................................................................
......................................................................................................................................................................................
......................................................................................................................................................................................
......................................................................................................................................................................................
......................................................................................................................................................................................
......................................................................................................................................................................................
......................................................................................................................................................................................
......................................................................................................................................................................................
......................................................................................................................................................................................
......................................................................................................................................................................................
......................................................................................................................................................................................
......................................................................................................................................................................................
......................................................................................................................................................................................
......................................................................................................................................................................................
......................................................................................................................................................................................
......................................................................................................................................................................................
......................................................................................................................................................................................
......................................................................................................................................................................................
......................................................................................................................................................................................
......................................................................................................................................................................................
......................................................................................................................................................................................
......................................................................................................................................................................................
......................................................................................................................................................................................
ENGLISH
– 21 –
Page 22

MEMO
......................................................................................................................................................................................
......................................................................................................................................................................................
......................................................................................................................................................................................
......................................................................................................................................................................................
......................................................................................................................................................................................
......................................................................................................................................................................................
......................................................................................................................................................................................
......................................................................................................................................................................................
......................................................................................................................................................................................
......................................................................................................................................................................................
......................................................................................................................................................................................
......................................................................................................................................................................................
......................................................................................................................................................................................
......................................................................................................................................................................................
......................................................................................................................................................................................
......................................................................................................................................................................................
......................................................................................................................................................................................
......................................................................................................................................................................................
......................................................................................................................................................................................
......................................................................................................................................................................................
......................................................................................................................................................................................
......................................................................................................................................................................................
......................................................................................................................................................................................
......................................................................................................................................................................................
......................................................................................................................................................................................
......................................................................................................................................................................................
......................................................................................................................................................................................
......................................................................................................................................................................................
......................................................................................................................................................................................
......................................................................................................................................................................................
......................................................................................................................................................................................
......................................................................................................................................................................................
......................................................................................................................................................................................
......................................................................................................................................................................................
......................................................................................................................................................................................
......................................................................................................................................................................................
......................................................................................................................................................................................
......................................................................................................................................................................................
......................................................................................................................................................................................
– 22 –
Page 23

PENYAMAN UDARA UNIT BERASINGAN
UNIT DALAM BILIK/UNIT LUAR BILIK
MODEL
RAS-E18CY
UNIT LUAR BILIK UNIT DALAM BILIK
RAC-18C9(J)
Instruction manual Page 1~22
To obtain the best performance, please read this instruction manual completely.
Arahan pengendalian Muka surat 23~44
Untuk mendapatkan prestasi yang tinggi, sila baca arahan ini sepenuhnya.
(J) / RAC-18C9(J)
RAS-E18CY(J)
BAHASA MALAYSIA
– 23 –
Page 24

PERKARA YANG PERLU DIAMBIL
PERHATIAN UNTUK KESELAMATAN
●
Sebelum menggunakan penyaman udara baca dengan teliti “Perkara yang perlu diambil perhatian” untuk mengetahui
cara pengendalian yang betul.
●
Ambil perhatian terhadap perkara yang bertanda “ Amaran” dan “ Perhatian”. Perkara dalam ruangan “Amaran”
adalah perkara yang boleh membawa kesan maut atau kecederaan apabila berlaku kesilapan, manakala perkara dalam
ruangan “Perhatian” boleh mendatangkan kesan yang serius. Sila patuhi perkara tersebut untuk menjaga keselamatan.
●
Tanda-tanda di bawah membawa makna seperti berikut.
!
!
Pastikan dawai bumi dipasang.
Tanda ini bermaksud langkah yang perlu dilakukan.
●
Selepas membaca, tolong simpan buku ini dengan baik.
Tanda ini bermaksud langkah yang ditegah.
PERKARA YANG PERLU DIAMBIL PERHATIAN DALAM PEMASANGAN
●
Jangan membina semula unit.
Pembinaan semula yang dilakukan sendiri mungkin boleh menyebabkan kebocoran air, kemalangan,
kejutan elektrik atau kebakaran.
●
Minta wakil jualan atau juruteknik untuk melakukan kerja pemasangan.
!
AMARAN
!
PERHATIAN
Pemasangan yang dilakukan dengan sendiri mungkin boleh menyebabkan kebocoran air, kejutan
elektrik dan kebakaran.
●
Tolong pasangkan dawai bumi.
Jangan pasangkan dawai bumi pada paip gas, paip air, konduktor kilat dan dawai bumi bagi
telefon.
Pembumian yang tidak sempurna membawa kemungkinan berlakunya kejutan elektrik.
●
Pastikan anda menggunakan set paip untuk R22. Sekiranya tidak, ia mungkin akan mengakibatkan
paip-paip tembaga pecah atau rosak.
●
Pasangkan alat pemutus litar semasa litar pintas mengikut keadaan tempat pemasangan. Jika
tidak memasang alat ini, terdapat kemungkinan berlaku kejutan elektrik.
●
Jangan pasang di tempat yang terdapat gas mudah terbakar kerana kebocoran gas ke sekeliling
unit luar bilik akan menyebabkan kebakaran.
●
Pastikan air dapat mengalir dengan lancar semasa memasang salur air.
PERKARA YANG PERLU DIAMBIL PERHATIAN SEMASA MENGALIH DAN MEMBAIKI
●
Jika terdapat perkara luar biasa (berbau hangus), hentikan operasi penyaman udara dan keluarkan plag
bekalan kuasa. Hubungi wakil jualan. Jika teruskan operasi, kemalangan, kejutan elektrik dan kebakaran
mungkin berlaku.
!
●
Hubungi wakil jualan untuk membaiki kerosakan.
A
Membaiki kerosakan dengan sendiri boleh menyebabkan kejutan elektrik atau kebakaran.
M
●
Hubungilah wakil jualan jika anda hendak mengalihkan penyaman udara untuk dipasang di tempat lain.
A
Pengalihan dan pemasangan semula dengan sendiri yang tidak sempurna boleh mengakibatkan kejutan elektrik dan
R
kebakaran.
A
N
●
Tali bekalan yang rosak mesti digantikan dengan tali bekalan yang boleh didapati daripada pusat alatganti yang berkuasa.
PERKARA YANG PERLU DIAMBIL PERHATIAN DALAM PENGENDALIAN
●
Jangan biarkan badan terdedah kepada udara sejuk dalam jangka masa panjang demi menjaga kesihatan.
!
●
A
M
A
R
●
Jangan gunakan logam atau loyang sebagai dawai us bagi mengelakkan kemalangan atau kebakaran.
A
N
Jangan masukkan jari, ranting atau lain-lain benda ke ruang udara masuk dan keluar kerana kipas yang
berpusing dengan laju dalam unit penyaman boleh membahayakan.
Sebelum membuat kerja-kerja penyelenggaraan, pastikan unit tidak beroperasi dan pastikan suis utama dimatikan.
●
Padamkan penyaman udara semasa berlaku kilat dan cabutkan plag bagi mengelakkan kemalangan.
– 24 –
Page 25

PERKARA YANG PERLU DIAMBIL PERHATIAN DALAM PENGENDALIAN
●
Jangan gunakan alat ini sebagai tempat menyimpan makanan, haiwan
dan tumbuhan, peralatan canggih, barangan seni dan ubat-ubatan.
●
Jangan sentuh suis bekalan kuasa dengan tangan yang basah untuk
mengelakkan kejutan elektrik.
●
Jangan halakan udara yang keluar dari penyaman udara ini ke arah
peralatan pembakaran kerana akan menyebabkan pembakaran tidak
lengkap.
●
Sentiasa pastikan alat pemasangan adalah kukuh dan tiada kerosakan
untuk mengelakkan unit luar bilik daripada terjatuh.
●
Jangan pancurkan air ke atas penyaman udara semasa membersihkannya
kerana mungkin mengakibatkan berlakunya litar pintas.
●
Jangan gunakan aerosol atau penyembur rambut bedekatan dengan unit
dalam bilik. Bahan kimia ini boleh melekat pada sirip petukaran kepanasan
dan menyekat penyejatan pengaliran air kepada pan pengaliran. Air akan
!
P
●
Sila padamkan suis dan cabutkan plag semasa membersihkan penyaman
E
udara kerana kipas dalam penyaman udara yang berpusing dengan laju
R
boleh mencederakan.
H
A
T
I
A
N
●
Jangan berdiri di atas unit luar bilik atau meletakkan beban di atasnya.
jatuh pada kipas tangential dan menyebabkan air menyimbah dari unit dalam
bilik.
●
Jika tidak menggunakan penyaman udara untuk jangka masa yang panjang,
sila cabutkan plag demi keselamatan.
BAHASA MALAYSIA
●
Jangan letakkan bekas yang mengandungi air (seperti pasu bunga) kerana
jika air tertumpah ke dalam unit, ini boleh mengakibatkan kejutan elektrik.
●
Jangan letakkan haiwan atau tumbuhan di tempat angin bertiup keluar
kerana akan mendatangkan kesan buruk terhadap haiwan atau tumbuhan.
●
Jangan pasangkan penyaman udara untuk jangka masa yang panjang semasa pintu dan tingkap
terbuka (kelembapan dalam bilik melebihi 80%), serta semasa pengawal aliran udara hala ke
bawah atau pengawal aliran udara beroperasi secara automatik. Jika tidak, air akan terkondensasi
pada pengawal aliran udara mendatar dan akan menitis ke bawah dan membasahi perkakas
rumah.
●
Jika terdapat sumber haba yang melebihi kapasiti penyaman udara (terdapat terlalu ramai orang
atau menggunakan alat pemanasan), suhu dalam bilik tidak akan mencapai suhu yang ditetapkan.
●
Alat ini tidak sesuai digunakan oleh kanak-kanak melainkan jika mereka telah diawasi oleh orang
yang bertanggungjawab untuk memastikan mereka boleh menggunakan alat ini dengan selamat.
●
Kanak-kanak haruslah dijaga untuk memastikan mereka tidak bermain dengan alat ini.
– 25 –
Page 26

NAMA DAN FUNGSI SETIAP BAHAGIAN
UNIT DALAM BILIK
PRA-PENAPIS
Menghalang habuk masuk ke dalam unit dalam bilik.
(Lihat mukasurat 39)
PANEL DEPAN
LAMPU PENANDA UNIT DALAM BILIK
Menunjukkan keadaan operasi.
(Lihat mukasurat 27)
PENGAWAL ALIRAN UDARA MENDATAR DAN
MENEGAK (LUBANG UDARA KELUAR)
(Lihat mukasurat 34)
ALAT KAWALAN JAUH
Memberi isyarat kepada unit dalam bilik untuk
mengawal operasi penyaman udara.
(Lihat mukasurat 28)
UNIT LUAR BILIK
NOMBOR SIRI DAN UKURAN LUAR
MODEL
RAS-E18CY
RAC-18C9(J)
(J)
SALUR AIR
Menyalurkan air terkondensasi keluar.
PAIP DAN KABEL PENYAMBUNG
LUBANG UDARA MASUK (SEBELAH KIRI DI
BELAKANG)
LUBANG UDARA KELUAR
Mengeluarkan udara panas.
LEBAR (mm)
1030
750
– 26 –
TINGGI (mm)
295
570
TEBAL (mm)
207
280
Page 27

BAHAGIAN PENUNJUK UNIT DALAM BILIK
BAHAGIAN OPERASI
LAMPU OPERASI
Lampu ini bernyala semasa unit beroperasi.
LAMPU PEMASA
Lampu ini bernyala apabila menggunakan fungsi pemasa.
LAMPU PENAPIS UDARA
Apabila unit ini telah beroperasi selama 200 jam, lampu
penapis udara akan menyala sebagai peringatan untuk
membersihkan penampis udara. Lampu ini akan terpadam
apabila butang “ (peredaran automatik)’ ditekan
sementara unit dalam keadaan “STANDBY MODE”.
BAHASA MALAYSIA
● Rajah ini menunjukkan keadaan di mana panel
depan dibuka. Cara membuka dan menutup
panel depan boleh dirujuk di mukasurat 38.
SUIS AUTO RESTART
● Apabila ada gangguan bekalan elektrik, penyaman udara akan beroperasi semula secara automatik pada
mod yang telah dipilih apabila bekalan elektrik pulih.
● Jika gangguan bekalan elektrik semasa operasi TIMER digunakan, TIMER perlu diset semula dan unit akan
mula beroperasi atau berhenti dengan masa baru yang ditetapkan.
– 27 –
Page 28

NAMA DAN FUNGSI SETIAP BAHAGIAN ALAT KAWALAN JAUH
ALAT KAWALAN JAUH
Alat ini mengawal operasi unit dalam bilik. Lingkungan kawalan adalah kira-kira 7 meter. Jika pencahayaan
dalam bilik telah dikawal secara elektronik, lingkungan kawalan mungkin akan menjadi lebih dekat.
Alat ini boleh diletakkan di dinding dengan menggunakan pemegang yang dibekalkan. Sebelum meletakkannya,
pastikan unit dalam bilik (penyaman udara) boleh dikawal dari alat kawalan jauh.
● Pemancar Isyarat
Pemancar isyarat akan berkelip apabila isyarat dipancarkan.
● Paparan
Bahagian ini menunjukkan suhu bilik yang dipilih, status pemasa, fungsi
dan tekanan peredaran yang dipilih.
● Butang Peredaran Udara
Gunakan batang ini untuk memilih operasi peredaran udara di dalam
bilik atau memulakan operasi.
● Butang Pengeringan
Gunakan butang ini untuk pengeringan air di dalam bilik atau
memulakan operasi.
● Butang Pendinginan
Gunakan butang ini untuk memilih operasi pendinginan atau
memulakan operasi.
● Butang PENGATURAN SEMULA
● Butang BERHENTI
Tekan butang ini untuk berhenti operasi.
● Butang TIDUR
Gunakan butang ini untuk menentukan pemasa.
● Pemilih KELAJUAN KIPAS
Butang ini adalah untuk memilih kelajuan kipas. Setiap kali anda menekan
butang ini, tekanan peredaran akan bertukar dari
ke (SEDERHANA) ke (RENDAH)
● Butang PENYELARAS ARAH ALIRAN UDARA AUTOMATIK
Menyelaras sudut arah aliran udara mendatar.
● Butang SUHU
Gunakan butang ini untuk menaik atau merendahkan suhu tetapan. (Tekan
secara berterusan, nilai suhu akan berubah lebih cepat.)
● Butang Pemasa-ON Untuk memilih pemasa-ON.
(AUTO) ke (TINGGI)
Langkah berjaga-jaga dalam Penggunaan
● Jangan letakkan alat kawalan jauh di tempat-tempat berikut.
● Terdedah secara terus kepada cahaya matahari.
● Berdekatan dengan pemanas.
● Pegang alat kawalan jauh dengan berhati-hati. Jangan biarkan
alat ini terjatuh ke lantai dan lindungi dari terkena air.
● Sebaik saja unit luar berhenti, ia tidak akan beroperasi
semula dalam jangka masa 3 minit (kecuali anda padamkan
suis bekalan kuasa dan cabutkan plag kemudian pasangkan
semula plag). Ini adalah untuk melindungi unit ini dan bukan
menandakan sebarang kerosakan.
● Jika anda menekan butang pemilih FUNGSI ketika penyaman
udara beroperasi, unit luar akan berhenti kira-kira 3 minit
sebagai perlindungan.
– 28 –
Page 29

OPERASI PENDINGINAN
Gunakan unit ini untuk pendinginan apabila suhu luar ialah 21-43°C.
Jika kelembapan adalah terlalu tinggi (melebihi 80%) di dalam bilik, titisan air akan kelihatan pada jeriji
unit dalam.
Tekan butang (PENDINGINAN) dan paparan akan
menunjukkan mengarah ke arah butang
Operasi pendinginan bermula dengan bunyi “beep”.
Operasi pendinginan tidak akan bermula jika tetapan suhu
1
lebih tinggi daripada suhu semasa yang ada di dalam bilik
(walaupun lampu
akan bermula sebaik sahaja anda membuat tetapan suhu di
bawah suhu semasa bilik berkenaan.
Tetapkan KELAJUAN KIPAS yang dikehendaki dengan butang
(KELAJUAN KIPAS) (paparan akan menunjukkan tetapan).
(AUTO) : KELAJUAN KIPAS pada permulaan ialah
2
(TINGGI) : Lebih ekonomi untuk pendinginan bilik
(SEDERHANA) : Perlahan.
(RENDAH) : Lebih Perlahan.
Tetapkan suhu bilik yang dikehendaki dengan butang SUHU
(paparan akan menunjukkan tetapan).
3
Tetapan suhu dan suhu bilik yang biasa mungkin akan berbagai,
bagaimanapun ia bergantung kepada keadaan.
(OPERASI) menyala). Fungsi pendinginan
TINGGI dan ia akan berubah kepada
SEDERHANA atau RENDAH secara
automatik apabila suhu tetapan dicapai.
secara pantas.
Jarak di antara 25-28°C adalah suhu bilik yang
disyorkan untuk pendinginan.
Jika tetapan suhu ialah 27°C, suhu bilik akan
dikawal sekitar 27°C.
.
ENGLISH
BAHASA MALAYSIA
BERHENTI
Tekan butang (BERHENTI) untuk menghentikan operasi.
■ Disebabkan tetapan telah disimpan di dalam memori alat kawalan
jauh, anda hanya perlu menekan butang (PENDINGINAN) pada
masa yang akan datang.
– 29 –
Page 30

OPERASI PENGERINGAN
Gunakan unit ini untuk pengeringan apabila suhu bilik melebihi 16°C.
Apabila ia di bawah 15°C, fungsi pengeringan tidak akan berlaku.
Tekan butang dan paparan akan menunjukkan
mengarah ke arah butang .
1
Operasi pengeringan bermula dengan bunyi “beep”.
KELAJUAN KIPAS telah ditetapkan RENDAH secara automatik.
Butang KELAJUAN KIPAS tidak beroperasi.
Tetapkan suhu bilik yang dikehendaki dengan butang SUHU
(paparan akan menunjukkan tetapan).
2
Jarak di antara 20-26°C adalah suhu bilik yang
disyorkan untuk pengeringan.
BERHENTI
Tekan butang (BERHENTI) untuk menghentikan operasi.
■ Disebabkan tetapan telah disimpan di dalam memori alat kawalan
jauh, anda hanya perlu menekan butang (PENGERINGAN)
pada masa yang akan datang.
■ Fungsi Pengeringan
Apabila suhu bilik adalah lebih tinggi daripada suhu tetapan: Unit akan mengering dan mengurangkan
suhu bilik kepada tahap yang telah ditetapkan.
Apabila suhu bilik lebih rendah daripada suhu tetapan: Pengeringan akan beroperasi dengan menetapkan
suhu lebih rendah sedikit daripada suhu bilik semasa, bergantung pada nilai suhu yang ditetapkan.
Fungsi ini akan berhenti (penyaman udara berhenti mengeluarkan udara) sebaik sahaja suhu bilik
menjadi lebih rendah dari suhu tetapan.
– 30 –
Page 31

OPERASI PEREDARAN UDARA
1
2
3
Tekan butang (PEREDARAN) dan paparan akan
menunjukkan mengarah ke arah butang
Operasi peredaran udara bermula dengan bunyi “beep”.
Tekan butang KELAJUAN KIPAS dan pilih KELAJUAN KIPAS
yang diingini (paparan akan menunjukkan pilihan anda).
Tekan butang kawalan suhu untuk tetapan suhu yang diingini.
.
BERHENTI
■ Fungsi Peredaran Udara
● Semasa operasi peredaran udara, kompressor tidak akan berfungsi dan tidak berlaku operasi penyejukan
dengan kipas sahaja berfungsi.
● Apabila suhu tetapan lebih tinggi daripada suhu bilik, kipas untuk unit dalam akan memberhentikan operasi.
Tekan butang (BERHENTI) untuk menghentikan operasi.
■ Disebabkan tetapan telah disimpan di dalam memori alat kawalan
jauh, anda hanya perlu menekan butang (PEREDARAN)
pada masa yang akan datang.
BAHASA MALAYSIA
– 31 –
Page 32

BAGAIMANA MEMBUAT TETAPAN PEMASA TIDUR
Tekan butang (TIDUR), dan perubahan akan dilihat terpapar seperti di
bawah.
Mode
Pemasa
Tidur
4
44
1 jam 2 jam 3 jam 10 jam 11 jam 12 jam
Penunjuk
4
Sleep timer off
4
4
1
Pemasa Tidur: Unit akan terus bertugas untuk beberapa jam yang
TIDUR
dirancang dan kemudian berhenti.
Arahkan isyarat pemuka alat kawalan jauh setentang ke unit
penyaman udara dan tekan butang TIDUR.
Keterangan pemasa akan dipaparkan pada alat kawalan jauh.
Lampu pemasa bernyala dengan bunyi “beep” daripada penyaman
udara.
Penerangan pemasa tidur
Unit akan mengawal KELAJUAN KIPAS dan suhu bilik secara automatik untuk mewujudkan suasana
yang tenang dan baik untuk kesihatan.
NOTA
● Anda tidak boleh membuat tetapan pemasa yang lain semasa pemasa tidur beroperasi.
● Selepas masa pemasa tidur telah tamat dan butang tidur ditekan semula, pemasa tidur akan
ditetapkan semula kepada yang asal.
● Pemasa tidur hanya berkesan sekali.
– 32 –
Page 33

BAGAIMANA MEMBUAT TETAPAN PEMASA
HIDUPKAN Penyelarasan Pemasa
Penyelarasan masa-ON
1
● Pilih pemasa-ON dengan menekan butang
(ON).
● Penetapan masa akan berubah mengikut turutan di
bawah setiap kali anda menekan butang.
■ Operasi akan bermula untuk penetapan
suhu pada masa tertentu (Masa
permulaan mungkin boleh berubah
bergantung kepada suhu bilik dan suhu
yang ditetapkan).
BAHASA MALAYSIA
– 33 –
Page 34

PENYELARASAN PENGAWAL ALIRAN UDARA
1. Menyelaraskan arah aliran udara kiri dan kanan
Gerakkan pengawal aliran udara menegak seperti di
dalam ilustrasi untuk menyelaras pengaliran udara supaya mengalir ke arah kiri atau kanan.
2. Menyelaraskan arah aliran udara ke bawah.
Semasa operasi “Pengeringan” atau “Penyejukan”, pen-
gawal aliran udara melintang akan diselaraskan secara
automatik supaya sesuai dengan sudut aliran udara
bagi setiap operasi. Pengawal aliran udara direka untuk
mengawal aliran udara ke arah atas dan ke bawah.
Dengan menekan butang kawalan aliran udara automatik,
pengawal aliran udara ini juga dapat diselaraskan ke
mana-mana sudut aliran udara yang dipilih.
Dengan menekan butang ARAH ALIRAN UDARA AU-
TOMATIK sekali, ia akan menghidupkan pengawal aliran
udara melintang untuk mengawal aliran udara ke atas
dan ke bawah. Dengan menekan butang kawalan sekali
lagi, pengawal aliran udara melintang akan berhenti
bergerak pada posisi semasa butang kawalan ditekan.
Semasa operasi “Pengeringan” dan “Penyejukan”, tetap-
kan pengawal aliran udara melintang supaya bergerak
dalam lingkungan yang dicadangkan di dalam ilustrasi.
Melaraskan pengawal aliran udara akan mengawal
aliran udara supaya dapat mengurangkan suhu bilik
dan memperbaiki sebarang ketidak stabilan suhu.
Semasa operasi “Penyejukan”, jangan biarkan pengawal
aliran udara melintang bergerak ke arah lingkungan yang
ditunjukkan di dalam ilustrasi. Jangan biarkan pengawal
aliran udara melintang beroperasi melebihi masa yang
diperlukan. Titisan air mungkin akan terbentuk dan
menitis di sepanjang pengawal aliran udara melintang.
Selepas menghentikan operasi unit dengan menekan
butang kawalan, pengawal aliran udara melintang
akan bergerak ke arah posisi yang akan menutup lubang
udara keluar.
Semasa arah aliran udara automatik sedang beroperasi,
sebarang penyelarasan terhadap pengawal aliran udara
melintang secara zikal akan mengalihkan sudut penyelaras arah aliran udara. Walaubagaimanapun, pengawal
aliran udara akan diselaraskan secara automatik ke arah
sudut asal setelah itu. (Sekiranya pengawal aliran udara
tidak boleh kembali ke sudut asal, hentikan operasi
penyaman udara dan keluarkan plag bekalan kuasa.
Setelah itu, masukkan semula plag ke dalam soket
utama dan hidupkan semula penyaman udara. Ini akan
mengembalikan penyelaras arah aliran udara ke sudut
asal yang telah ditetapkan).
– 34 –
Ketika pendinginan,
pengeringan
Menegak
Lebih
kurang 15°
Lebih
kurang
60°
Page 35

!
BAGAIMANA MENUKAR BATERI ALAT KAWALAN JAUH
Semasa menggunakan alat kawalan jauh, sekiranya tidak ada tindak balas daripada unit penghawa dingin
atau paparan pada alat kawalan jauh semakin hilang atau malap, bateri yang terdapat di dalam alat kawalan
jauh perlu ditukar dan diganti dengan yang baru.
Keluarkan penutup seperti yang ditunjukkan dalam
1
gambarajah dan keluarkan bateri lama.
=
Pasangkan bateri baru.
2
Arah bateri mesti sepadan dengan tanda dalam kotak.
PERKARA YANG PERLU DIAMBIL PERHATIAN
1. Jangan gunakan bateri lama bersama bateri baru, atau
menggunakan bateri yang berlainan jenis.
2. Keluarkan bateri jika anda tidak menggunakan alat kawalan
jauh untuk 2 atau 3 bulan.
3. Gunakan bateri AAA yang berkualiti tinggi dan yang
berprestasi tinggi untuk mengelakkan jangka hayat
yang pendek atau kebocoran elektroli.
BAHASA MALAYSIA
– 35 –
Page 36

CARA PENGENDALIAN YANG PALING SESUAI
Penentuan suhu bilik yang sesuai
Amaran
!
Suhu yang terlalu
rendah boleh menjejaskan kesihatan dan
menyebabkan pembaziran tenaga elektrik.
Peredaran masuk udara segar
Perhatian
!
Jangan biarkan bilik tertutup untuk jangka
masa yang panjang, buka pintu dan tingkap
sesekali supaya udara segar beredar masuk.
Langkah ini
penting
terutamanya
bagi tempat
yang
menggunakan
peralatan
gas.
Memasang tirai
Boleh
mengurangkan
haba yang
masuk melalui
tingkap.
Penggunaan pemasa yang berkesan
Sila gunakan pemasa secara berkesan
Gunakan operasi TIDUR pada waktu malam
dan bersesuian dengan waktu bangun untuk
mendapat suhu bilik yang menyelesakan.
Jangan lupa membersihkan penapis udara
Penapis udara yang tersumbat akan menghalang
pergerakan udara serta mengurangkan kesan
pendinginan. Sila bersihkan penapis udara
setiap 2 minggu untuk menjimatkan tenaga
elektrik.
Sila ambil perhatian terhadap suhu dalam bilik
dan arah aliran udara apabila terdapat bayi,
kanak-kanak atau orang tua di dalam bilik.
(Biasanya suhu bilik yang
berbeza sebanyak ±5°C
dengan suhu luar
bilik adalah
sesuai).
– 36 –
Laraskan suhu bilik yang sesuai
untuk bayi dan kanak-kanak
Page 37

PERKARA PENTING UNTUK PELANGGAN
Pendinginan dan Sumber Haba dalam bilik
Perhatian
!
Jika terdapat sumber haba yang melebihi kapasiti
pendinginan penyaman udara (terdapat terlalu
ramai orang atau peralatan pemanasan dalam bilik),
suhu dalam bilik tidak akan mencapai suhu yang
ditetapkan.
Tidak menggunakan penyaman udara untuk jangka masa panjang
Jika tidak menggunakan unit dalam bilik bagi jangka
masa panjang, sila padamkan suis bekalan kuasa.
Jika suis bekalan kuasa dipasang, walaupun unit
dalam bilik tidak beroperasi, tenaga elektrik akan
dibazirkan dalam litar pengawal (kira-kira 8W).
Semasa berlakunya kilat
Amaran
!
Semasa berlakunya kilat, hentikan operasi penyaman
udara dan keluarkan plagnya demi melindungi unit ini.
BAHASA MALAYSIA
Gangguan Daripada Alat-Alat Elektrik
Perhatian
!
Untuk mengelakkan gangguan bunyi, pasang unit
dalam bilik dan alat kawalan jauh sekurang-kurangnya
1m daripada alat-alat elektrik yang lain.
– 37 –
Page 38

MEMASANG PENAPIS PEMBERSIH UDARA
PERHATIAN
!
Kerja pembersihan dan penjagaan hendaklah dilakukan oleh para pembakal. Sebelum kerja
pembersihan, hentikan operasi dan keluarkan plag bekalan kuasa.
Buka panel depan.
1
● Tarik panel depan dengan memegang kedua sisi
dengan kedua-dua belah tangan.
Mengeluarkan pra-penapis.
2
● Tolak penapis udara ke atas supaya tertanggal dari
penyangkut dan tarik keluar penapis udara.
Memasang penapis pembersih udara.
3
● Pasang penapis pembersih udara ke rangka dengan
menekan perlahan ke dua sisi dan dilepaskan setelah
memasuki rangka penapis udara.
Penyangkut
(4 tempat)
!
PERHATIAN
Jangan bengkokkan penapis
pembersih udara kerana
ia akan mengakibatkan
kerosakkan pada strukturnya.
Memasang pra-penapis.
4
● Pasang penapis udara dengan memastikan tanda
“FRONT” menghala ke hadapan.
● Setelah memasang penapis itu, tekan panel depan
mengikut 3 anak panah yang ditunjukkan dan tutup.
NOTA
● Jika ingin menanggalkan penapis pembersih udara, sila ikuti prosedur diatas.
● Kapasiti penyejuk berkurang sedikit dan kecepatan penyejukan menjadi lebih lambat bila penapis pembersih
udara digunakan. Oleh itu set kelajuan kipas pada "HIGH" jika menggunakannya dengan cara seperti ini.
● Penapis pembersih udara boleh dibasuh dan digunakan semula hingga 20 kali dengan menggunakan
pembersih hampagas atau membilasnya dengan air paip yang mengalir.
Jenis nombor penapis pembersih udara ini adalah <SPX-CFH5>. Sila gunakan no. ini untuk membuat
pesanan.
● Jangan pasang penyaman udara tanpa penapis udara. Habuk akan memasuki penyaman udara dan boleh
mengakibatkan kerosakan.
– 38 –
Page 39

PENJAGAAN
!
PERHATIAN
Kerja pembersihan dan penjagaan hendaklah dilakukan oleh para pembakal. Sebelum kerja
pembersihan, hentikan operasi dan keluarkan plag bekalan kuasa.
1. PRA-PENAPIS
Pra-penapis perlu dibersihkan kerana ia menyedut habuk di dalam bilik. Apabila pra-penapis diliputi
oleh habuk, ia akan menghalang pengaliran udara dan kesan pendinginan juga akan berkurang.
Selain itu, ia juga mungkin menyebabkan bunyi bising. Pastikan pra-penapis dibersihkan mengikut
prosedur di bawah.
Buka panel depan dan keluarkan penapis udara
1
● Angkat dan keluarkan penapis pembesih
udara daripada pra-penapis dengan perlahan.
● Bersihkan habuk daripada pra-penapis dan
2
3
NOTA:
● Penapis pembersih udara hendaklah dibersihkan setiap bulan atau lebih awal jika terlalu kotor.
!
●
Jangan cuci dengan air panas yang suhunya lebih dari 40°C. Penapis udara mungkin mengecut.
●
Selepas mencucikannya, goncangkan penapis udara untuk keluarkan air dan keringkannya di tempat
yang teduh. Jangan terdedah terus kepada cahaya matahari kerana penapis udara mungkin mengecut.
●
Jangan gunakan sabun pada penapis pembersih udara kerana sabun boleh mengakibatkan ia
kehilangan keupayaan elektrostatik.
penapis pembesih udara dengan pembersih
vakum. Jika terdapat terlalu banyak habuk,
bilaskan di bawah aliran air paip dan berus
perlahan dengan berus yang lembut. Biarkan
kering di tempat yang teduh.
● Masukkan semula penapis pembersih udara
ke pra-penapis. Pastikan bahagian penapis
udara yang bertanda "FRONT" menghala
ke atas dan sorongkan penapis udara ke
kedudukan asalnya.
● Setelah memasang penapis itu, tekan
panel depan mengikut 3 anak panah yang
ditunjukkan dan tutup.
Penggunaan yang lama akan menyebabkan ia kehilangan fungsi pewangi. Pengguna disarankan
menukarnya setiap tahun bergantung kepada keperluan untuk keberkesanan optima.
PERHATIAN
BAHASA MALAYSIA
– 39 –
Page 40

2. Cara membersihkan panel depan
● Tanggalkan panel depan dan basuh dengan air
bersih.
Gunakan span lembut.
Selepas membasuh dengan sabun, bilas dengan
air bersih.
● Sekiranya panel depan tidak dibuka, cuci dengan
menggunakan kain basah. Bersihkan alat kawalan
jauh dengan menggunakan kain kering dan lembut.
● Lapkan air sekeringnya.
Sekiranya air didapati pada bahagian penunjuk
atau penanda penerima, ia boleh menyebabkan
litar pintas.
Cara untuk membuka dan memasang panel depan.
Pastikan memegang panel depan dengan kedua-
dua belah tangan untuk membuka dan memasa-
ngnya.
Membuka Panel Depan
Penyangga
● Buka panel depan, tolakkan penyangga
dibahagian kanan dan kiri sehingga terkeluar
dari lubang penyangga.
!
PERHATIAN
● Jangan gunakan air berlebihan semasa membersihkan unit kerana
Pemasangan Panel Depan
● Gerakkan penyangga di bahagian kanan
dan kiri melalui tapak sehingga ke lubang
penyangga.
boleh menyebabkan litar pintas.
● Jangan menggunakan air panas (melebihi 40°C), benzena, gasolin,
asid, air thinner atau berus kerana akan merosakkan permukaan
plastik dan lapiskan pelindung.
3.
PENGENDALIAN SEKIRANYA TIDAK MENGGUNAKAN UNTUK JANGKA MASA PANJANG
● Pasangkan penyaman udara dengan mode operasi
(DINGIN), suhu dalam 32°C dan laraskan
kelajuan kipas pada HI untuk setengah hari dalam
suatu hari yang bercuaca baik. Keringkan seluruh
unit penyaman udara.
● Keluarkan plag bekalan kuasa.
– 40 –
Page 41

!
AMARAN
● Pastikan menyambung kewayar bumi.
Jauhkan wayar bumi dari air atau paip gas, pengalir kilat atau telefon wayar bumi.
Penyambungan wayar bumi yang tidak sempurna boleh menyebabkan berlaku kejutan
elektrik.
● Litar pemutus mestilah dipasang berhampiran dengan unit. Tanpa litar pemutus boleh menyebabkan
kemungkinan berlaku kejutan elektrik.
PENTING
Wayar utama diwarnakan berdasarkan kod berikut:
Hijau-dan-kuning : Bumi
Biru : Neutral
Coklat : Hidup
Sekiranya warna wayar utama tidak bersamaan dengan warna terminal di palam, ikuti arahan berikut:
Wayar yang berwarna hijau-dan-kuning mesti disambungkan ke palam terminal yang bertanda E atau
simbol Earth atau warna hijau atau hijau-dan-kuning.
Wayar yang berwarna biru mesti disambungkan keterminal bertanda N atau warna hitam.
Wayar yang berwarna coklat mesti di sambungkan ke terminal bertanda L atau warna merah.
NOTA
Sekiranya wayar didapati rosak, ia mesti ditukarkan dengan wayar yang boleh didapati dari pusat
servis/barangan yang diiktiraf.
!
PERHATIAN
Kerja pembersihan dan penjagaan hendaklah dilakukan oleh para pembakal. Sebelum kerja
pembersihan, hentikan operasi dan keluarkan plag bekalan kuasa.
PEMERIKSAAN DALAM JANGKA MASA TERTENTU
BAHASA MALAYSIA
JALANKAN PEMERIKSAAN DALAM MASA 1/2 ~ 1 TAHUN. SILA PERIKSA BERDASARKAN
PERKARA PENTING DI BAWAH. JIKA TERDAPAT PERKARA YANG TIDAK DIFAHAMI,
HUBUNGILAH WAKIL JUALAN ANDA.
1
2
3
Adakah dawai bumi tercabut atau terputus?
Adakah plag dimasukkan ke dalam soket secara kukuh?
(Pastikan tiada kelonggaran antara plag dengan soket).
Adakah tapak unit luar bilik telah berkarat dengan serius, dan
kukuhkan unit luar bilik?
– 41 –
Page 42

PERKHIDMATAN LEPAS JUALAN DAN JAMINAN
SEBELUM MEMINTA SERVIS, PERIKSAKAN PERKARA BERIKUT
KEADAAN PERIKSA PERKARA BERIKUT
Apabila penyaman udara
tidak beroperasi
Apabila penyaman udara
tidak beroperasi dengan baik.
● Adakah us masih sempurna?
● Adakah voltan terlalu tinggi atau rendah?
● Adakah suis bekalan kuasa dipasang?
● Adakah penapis udara tersumbat?
● Adakah cahaya matahari dipancar secara terus ke unit
penyaman udara?
● Adakah aliran udara penyaman udara terhalang?
● Adakah pintu atau tingkap bilik terbuka, ataupun terdapat
sumber haba dalam bilik?
● Adakah suhu yang ditetapkan itu sesuai?
Nota
● Semasa dalam operasi yang senyap atau penyaman udara telah
dihentikan, perkara berikut mungkin berlaku sekali-kala, tetapi semuanya
normal bagi operasi itu.
(1) Bunyi pengaliran agen penyejuk dalam saluran kitarannya.
(2) Bunyi geseran daripada kipas yang pada asalnya sejuk telah menjadi
panas setelah operasi dihentikan.
● Bau-bauan mungkin tersebar keluar dari bilik penyaman udara kerana
bau-bauan daripada rokok, makanan, kosmetik dan sebagainya yang
terperangkap dalamnya. Oleh itu kerap bersihkan penapis udara dan
alat pengewap untuk menghilangkan bau-bauan.
● Jika penyaman udara masih tidak dapat beroperasi dengan normal setelah memeriksa perkara di atas, sila
beritahu wakil jualan tentang jenis unit, kod penghasilan, tarikh pemasangan dan masalah yang dihadapi.
● Palam kuasa hendaklah menggunakan voltan yang disyorkan, jika tidak unit akan rosak atau kapasiti yang
ditetapkan tidak dapat dicapai.
Sila ambil perhatian:
Tali bekalan yang rosak mesti digantikan dengan tali bekalan yang boleh didapati daripada pusat
alatganti yang berkuasa.
NOTA:
Jika wayar pembekal kuasa rosak, ia mesti ditukarkan oleh pengilang, wakil servis atau mereka yang
bertauliah untuk mengelakkan sebarang kemalangan.
– 42 –
Page 43

Produk ini telah diuji dan disahkan mengikut akta 89/336/EEC pemeriksaan sambungan arus elektromagnet
dan 73/23/EEC pemeriksaan alatan elektrik dengan had voltage yang tertentu.
Nota
● Apabila suhu luar bilik dibawah 21°C (70°F) elakkan daripada menggunakan penyaman udara
untuk operasi kesejukan.
Suhu operasi maksimum dan minimum untuk bahagian sejuk dan panas adalah seperti berikut:
Minima Maxima
Dalam Bangunan Bebuli Kering °C 21 32
Bebuli Basah °C 15 23
Luar Bangunan Bebuli Kering °C 21 52
Bebuli Basah °C 15 31
MEMO
......................................................................................................................................................................................
......................................................................................................................................................................................
......................................................................................................................................................................................
......................................................................................................................................................................................
......................................................................................................................................................................................
......................................................................................................................................................................................
......................................................................................................................................................................................
......................................................................................................................................................................................
......................................................................................................................................................................................
......................................................................................................................................................................................
......................................................................................................................................................................................
......................................................................................................................................................................................
......................................................................................................................................................................................
......................................................................................................................................................................................
......................................................................................................................................................................................
......................................................................................................................................................................................
......................................................................................................................................................................................
......................................................................................................................................................................................
......................................................................................................................................................................................
......................................................................................................................................................................................
......................................................................................................................................................................................
......................................................................................................................................................................................
......................................................................................................................................................................................
......................................................................................................................................................................................
......................................................................................................................................................................................
BAHASA MALAYSIA
– 43 –
Page 44

MEMO
......................................................................................................................................................................................
......................................................................................................................................................................................
......................................................................................................................................................................................
......................................................................................................................................................................................
......................................................................................................................................................................................
......................................................................................................................................................................................
......................................................................................................................................................................................
......................................................................................................................................................................................
......................................................................................................................................................................................
......................................................................................................................................................................................
......................................................................................................................................................................................
......................................................................................................................................................................................
......................................................................................................................................................................................
......................................................................................................................................................................................
......................................................................................................................................................................................
......................................................................................................................................................................................
......................................................................................................................................................................................
......................................................................................................................................................................................
......................................................................................................................................................................................
......................................................................................................................................................................................
......................................................................................................................................................................................
......................................................................................................................................................................................
......................................................................................................................................................................................
......................................................................................................................................................................................
......................................................................................................................................................................................
......................................................................................................................................................................................
......................................................................................................................................................................................
......................................................................................................................................................................................
......................................................................................................................................................................................
......................................................................................................................................................................................
......................................................................................................................................................................................
......................................................................................................................................................................................
......................................................................................................................................................................................
......................................................................................................................................................................................
......................................................................................................................................................................................
......................................................................................................................................................................................
......................................................................................................................................................................................
......................................................................................................................................................................................
......................................................................................................................................................................................
– 44 –
Page 45

MEMO
......................................................................................................................................................................................
......................................................................................................................................................................................
......................................................................................................................................................................................
......................................................................................................................................................................................
......................................................................................................................................................................................
......................................................................................................................................................................................
......................................................................................................................................................................................
......................................................................................................................................................................................
......................................................................................................................................................................................
......................................................................................................................................................................................
......................................................................................................................................................................................
......................................................................................................................................................................................
......................................................................................................................................................................................
......................................................................................................................................................................................
......................................................................................................................................................................................
......................................................................................................................................................................................
......................................................................................................................................................................................
......................................................................................................................................................................................
......................................................................................................................................................................................
......................................................................................................................................................................................
......................................................................................................................................................................................
......................................................................................................................................................................................
......................................................................................................................................................................................
......................................................................................................................................................................................
......................................................................................................................................................................................
......................................................................................................................................................................................
......................................................................................................................................................................................
......................................................................................................................................................................................
......................................................................................................................................................................................
......................................................................................................................................................................................
......................................................................................................................................................................................
......................................................................................................................................................................................
......................................................................................................................................................................................
......................................................................................................................................................................................
......................................................................................................................................................................................
......................................................................................................................................................................................
......................................................................................................................................................................................
......................................................................................................................................................................................
......................................................................................................................................................................................
BAHASA MALAYSIA
– 45 –
Page 46

MEMO
......................................................................................................................................................................................
......................................................................................................................................................................................
......................................................................................................................................................................................
......................................................................................................................................................................................
......................................................................................................................................................................................
......................................................................................................................................................................................
......................................................................................................................................................................................
......................................................................................................................................................................................
......................................................................................................................................................................................
......................................................................................................................................................................................
......................................................................................................................................................................................
......................................................................................................................................................................................
......................................................................................................................................................................................
......................................................................................................................................................................................
......................................................................................................................................................................................
......................................................................................................................................................................................
......................................................................................................................................................................................
......................................................................................................................................................................................
......................................................................................................................................................................................
......................................................................................................................................................................................
......................................................................................................................................................................................
......................................................................................................................................................................................
......................................................................................................................................................................................
......................................................................................................................................................................................
......................................................................................................................................................................................
......................................................................................................................................................................................
......................................................................................................................................................................................
......................................................................................................................................................................................
......................................................................................................................................................................................
......................................................................................................................................................................................
......................................................................................................................................................................................
......................................................................................................................................................................................
......................................................................................................................................................................................
......................................................................................................................................................................................
......................................................................................................................................................................................
......................................................................................................................................................................................
......................................................................................................................................................................................
......................................................................................................................................................................................
......................................................................................................................................................................................
– 46 –
Page 47

MEMO
......................................................................................................................................................................................
......................................................................................................................................................................................
......................................................................................................................................................................................
......................................................................................................................................................................................
......................................................................................................................................................................................
......................................................................................................................................................................................
......................................................................................................................................................................................
......................................................................................................................................................................................
......................................................................................................................................................................................
......................................................................................................................................................................................
......................................................................................................................................................................................
......................................................................................................................................................................................
......................................................................................................................................................................................
......................................................................................................................................................................................
......................................................................................................................................................................................
......................................................................................................................................................................................
......................................................................................................................................................................................
......................................................................................................................................................................................
......................................................................................................................................................................................
......................................................................................................................................................................................
......................................................................................................................................................................................
......................................................................................................................................................................................
......................................................................................................................................................................................
......................................................................................................................................................................................
......................................................................................................................................................................................
......................................................................................................................................................................................
......................................................................................................................................................................................
......................................................................................................................................................................................
......................................................................................................................................................................................
......................................................................................................................................................................................
......................................................................................................................................................................................
......................................................................................................................................................................................
......................................................................................................................................................................................
......................................................................................................................................................................................
......................................................................................................................................................................................
......................................................................................................................................................................................
......................................................................................................................................................................................
......................................................................................................................................................................................
......................................................................................................................................................................................
BAHASA MALAYSIA
– 47 –
Page 48

MEMO
......................................................................................................................................................................................
......................................................................................................................................................................................
......................................................................................................................................................................................
......................................................................................................................................................................................
......................................................................................................................................................................................
......................................................................................................................................................................................
......................................................................................................................................................................................
......................................................................................................................................................................................
......................................................................................................................................................................................
......................................................................................................................................................................................
......................................................................................................................................................................................
......................................................................................................................................................................................
......................................................................................................................................................................................
......................................................................................................................................................................................
......................................................................................................................................................................................
......................................................................................................................................................................................
......................................................................................................................................................................................
......................................................................................................................................................................................
......................................................................................................................................................................................
......................................................................................................................................................................................
......................................................................................................................................................................................
......................................................................................................................................................................................
......................................................................................................................................................................................
......................................................................................................................................................................................
......................................................................................................................................................................................
......................................................................................................................................................................................
......................................................................................................................................................................................
......................................................................................................................................................................................
......................................................................................................................................................................................
......................................................................................................................................................................................
......................................................................................................................................................................................
......................................................................................................................................................................................
......................................................................................................................................................................................
......................................................................................................................................................................................
......................................................................................................................................................................................
......................................................................................................................................................................................
......................................................................................................................................................................................
......................................................................................................................................................................................
......................................................................................................................................................................................
– 48 –
 Loading...