

Page 1
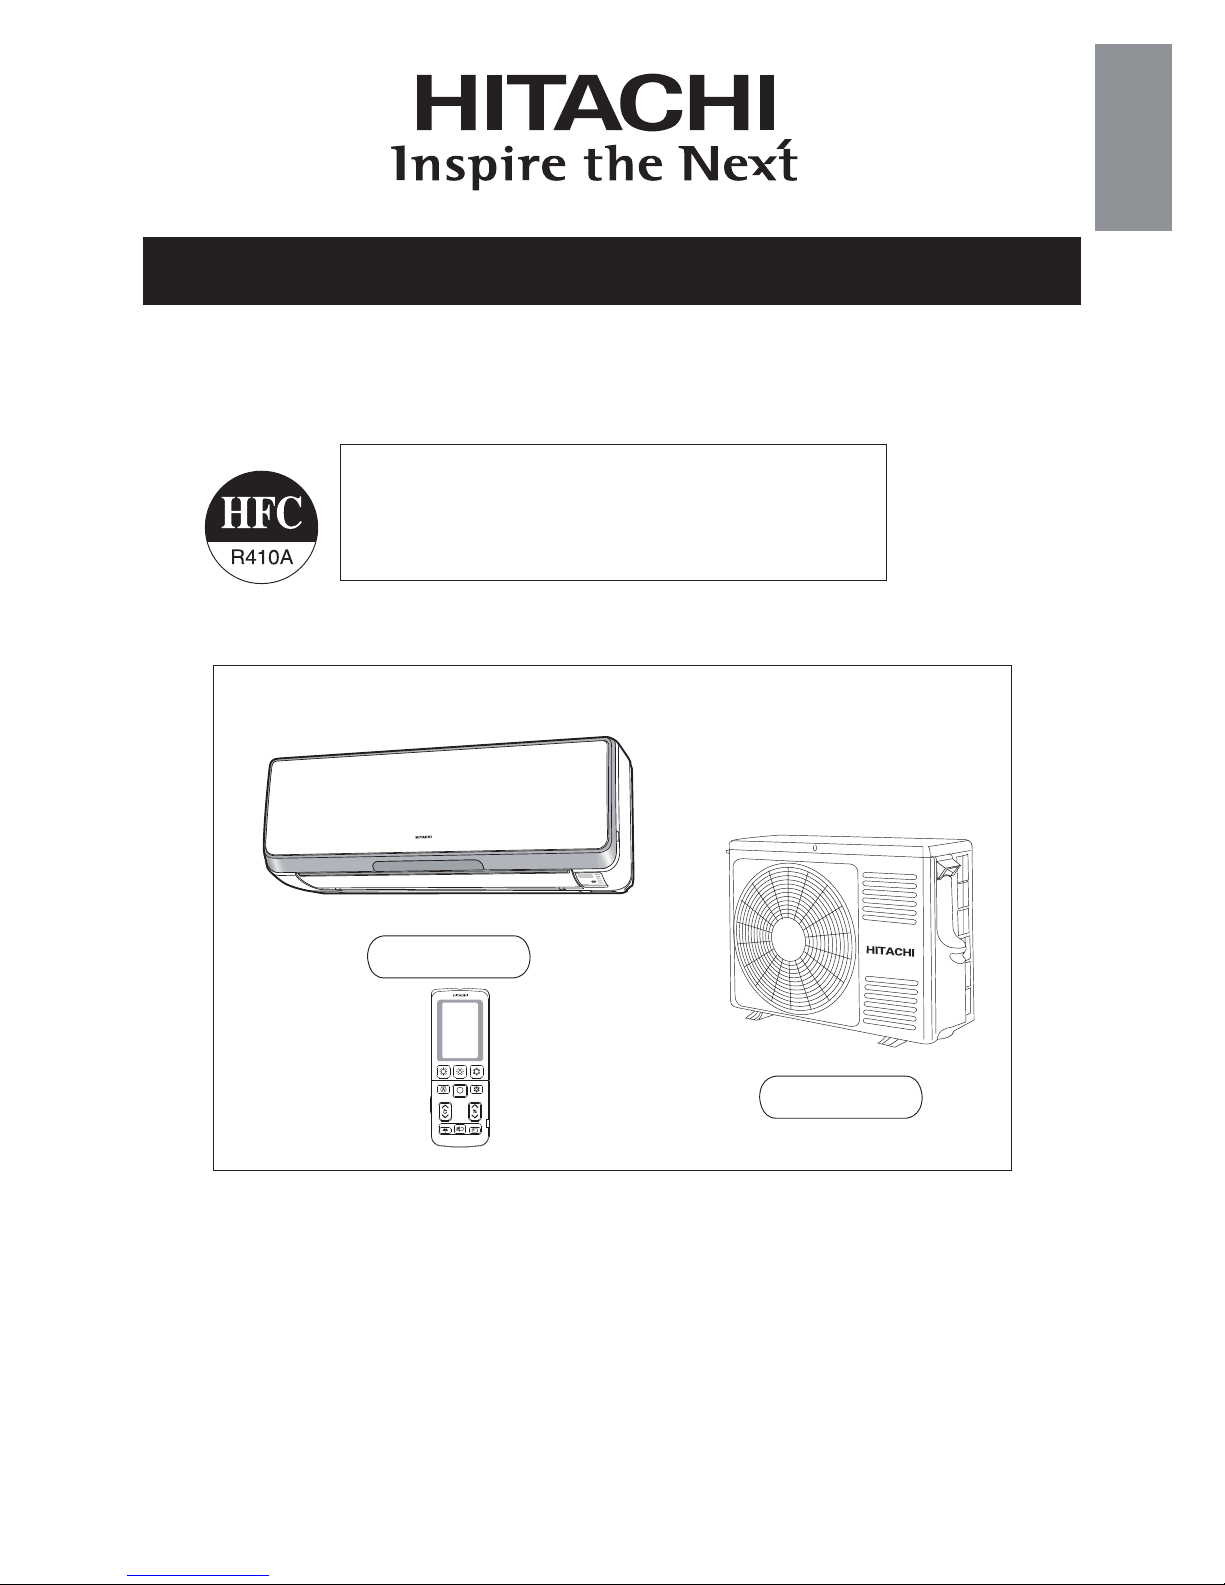
OUTDOOR UNIT
INDOOR UNIT
– 1 –
Instruction manual
Page 1~48
To obtain the best performance and ensure years of trouble free use, please read this instruction manual completely.
SPLIT TYPE AIR CONDITIONER
INDOOR UNIT/OUTDOOR UNIT
MODEL
ENGLISH
DEUTSCHFRANÇAISITALIANOSPANISHPORTUGUÊS
∂ППЛУИО¿
«®¬¬¥£¤
RAS-1 SH3
RAS-18SH3/RAC-18SH3
8
RAC-1 SH
8
Для достижения наивысшей производительности и обеспечения длительной безаварийной
внимательно изучите данную инструкцию .
Инструкция по эксплуатации
стр.
49 ~9 6
работы
3
Page 2
• Please read the “Safety Precaution” carefully before operating the unit to ensure correct usage of the unit.
• Pay special attention to signs of “
Warning” and “ Caution”. The “Warning” section contains matters which, if
not observed strictly, may cause death or serious injury. The “Caution” section contains matters which may result
in serious consequences if not observed properly. Please observe all instructions strictly to ensure safety.
• The signs indicate the following meanings. (The following are examples of signs.)
• Please keep this manual after reading.
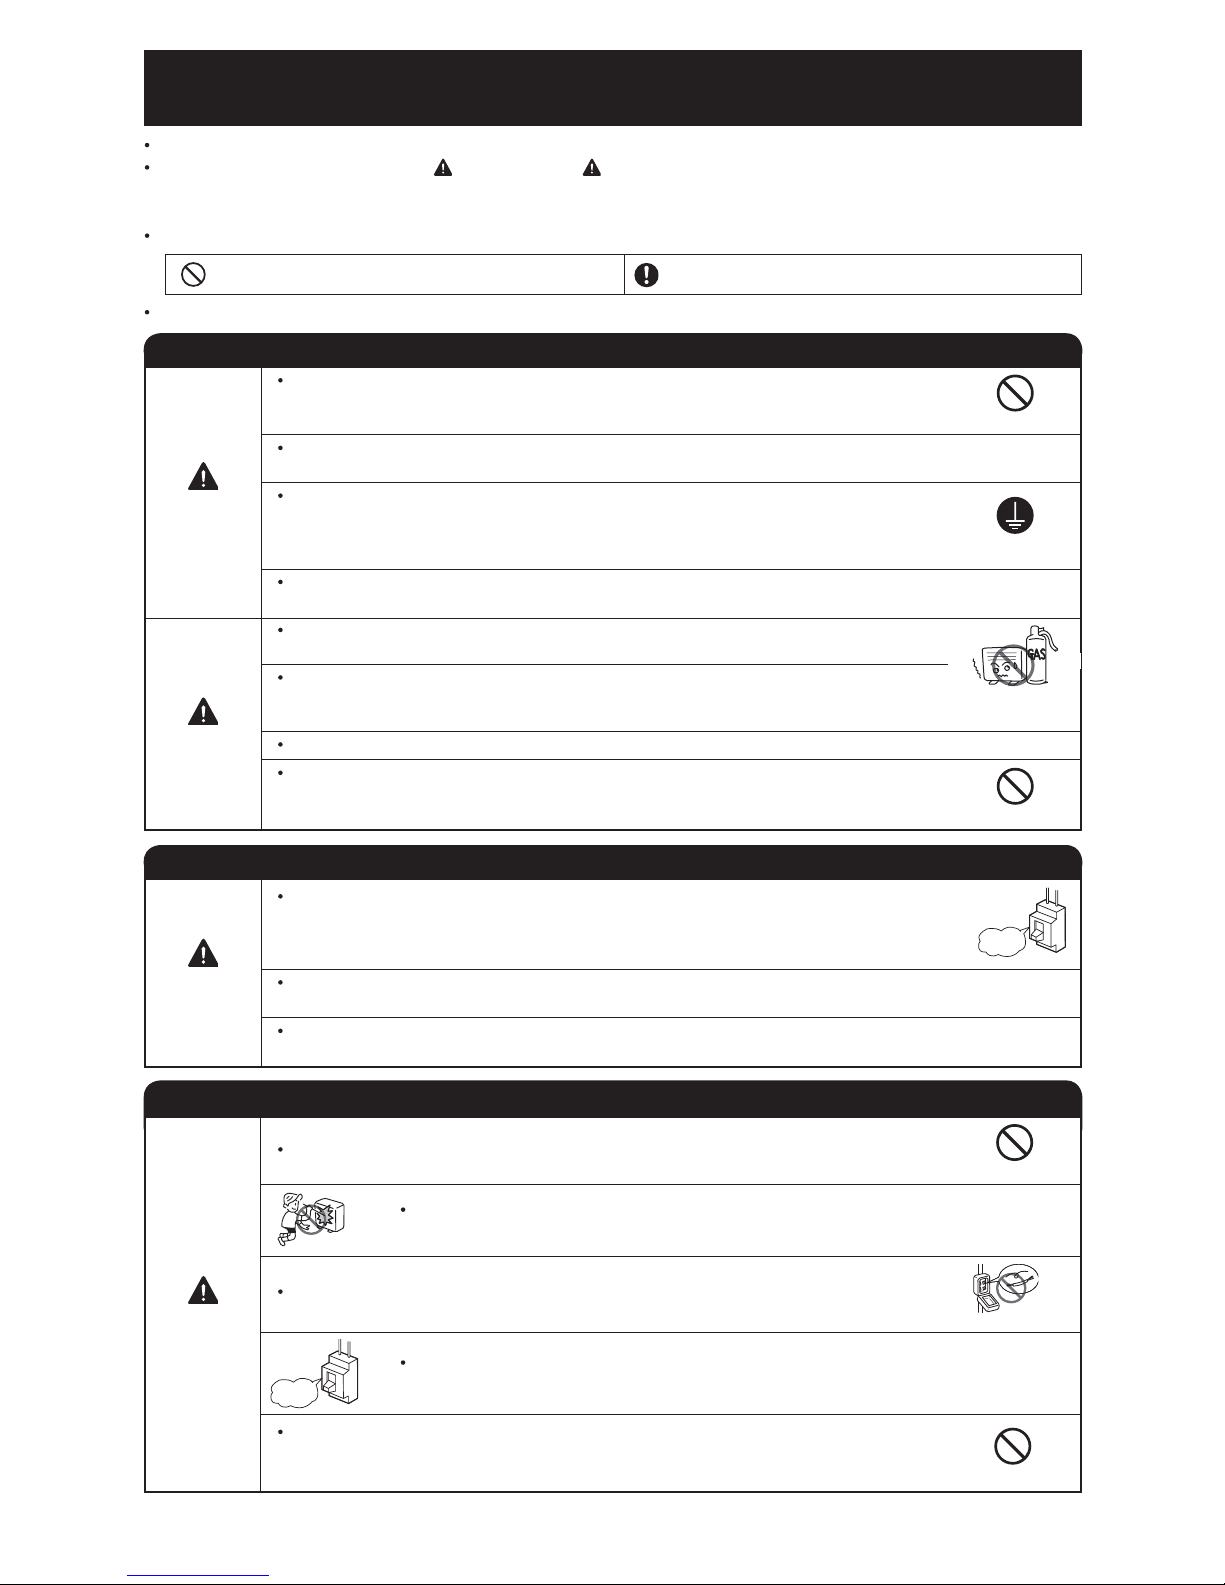
PRECAUTIONS DURING OPERATION
WARNING
WARNING
SAFETY PRECAUTION
• Do not reconstruct the unit.
Water leakage, fault, short circuit or fi re may occur if you reconstruct the unit by
yourself.
• Please ask your sales agent or qualified technician for the installation of your unit.
Water leakage, short circuit or fire may occur if you install the unit by yourself.
• Please use earth line.
Do not place the earth line near water or gas pipes, lightning-conductor, or the
earth line of telephone. Improper installation of earth line may cause electric
shock or fire.
• Be sure to use the specifi ed piping set for R410A. Otherwise, this may result in
broken copper pipes or faults.
• A circuit breaker should be installed depending on the mounting site of the unit.
Without a circuit breaker, the danger of electric shock exists.
• Do not install the unit near a location where there is fl ammable gas. The outdoor
unit may catch fi re if fl ammable gas leaks around it. Piping shall be suitable
supported with a maximum spacing of 1m between the supports.
• Please ensure smooth fl ow of water when installing the drain hose.
• Make sure that a single phase 220V power source is used.
The use of other power sources may cause electrical components to overheat
and lead to fi re.
PRECAUTIONS DURING INSTALLATION
PROHIBITION
CONNECT EARTH LINE
PROHIBITION
WARNING
CAUTION
•
• Should abnormal situation arise (like burning smell), please stop operating the
unit and remove plug from the socket. Contact your agent. Fault, short circuit or
fi re may occur if you continue to operate the unit under abnormal situation.
• Please contact your agent for maintenance. Improper self maintenance may cause electric
shock and fi re.
• Please contact your agent if you need to remove and reinstall the unit. Electric shock or fi re
may occur if you remove and reinstall the unit yourself improperly.
PRECAUTIONS DURING SHIFTING OR MAINTENANCE
• Do not use any conductor as fuse wire, this could cause fatal accident.
• During thunder storm, disconnect the plug top and turn off the circuit
breaker.
• Do not put objects like thin rods into the panel of blower and suction side
because the high-speed fan inside may cause danger.
• Spray cans and other combustibles should not be located within a meter of the
air outlets of both indoor and outdoor units.
As a spray can’s internal pressure can be increased by hot air, a rupture may result.
PROHIBITION
PROHIBITION
PROHIBITION
PROHIBITION
“OFF”
“OFF”
This sign in the fi gure indicates prohibition. Indicates the instructions that must be followed.
PROHIBITION
– 2 –
Avoid an extended period of direct airflow for your health.
Page 3
• Do not place plants directly under the airfl ow as it is bad for the plants.
• Do not direct the cool air coming out from the air-conditioner panel to face
household heating apparatus as this may affect the working of apparatus such
as the electric kettle, oven etc.
• The product shall be operated under the manufacturer specifi cation and not
for any other intended use.
PRECAUTIONS DURING OPERATION
CAUTION
• Do not attempt to operate the unit with wet hands, this could cause fatal
accident.
• When operating the unit with burning equipments, regularly ventilate
the room to avoid oxygen insuffi ciency.
• Please ensure that outdoor mounting frame is always stable, fi rm and without
defect. If not, the outdoor unit may collapse and cause danger.
• Do not wash the unit with water or place a water container such as a vase on
the indoor unit.
Electrical leakage could be present and cause electric shock.
• Be sure to stop the operation by using the remote controller and turn off the
circuit breaker during cleaning, the high-speed fan inside the unit may cause
danger.
• Turn off the circuit breaker if the unit is not be operated for a long period.
• Do not climb on the outdoor unit or put objects on it.
• When operating the unit with the door and windows opened, (the room
humidity is always above 80%) and with the air defl ector facing down or moving
automatically for a long period of time, water will condense on the air deflector
and drips down occasionally. This will wet your furniture. Therefore, do not
operate under such condition for a long time.
• If the amount of heat in the room is above the cooling or heating capability of
the unit (for example: more people entering the room, using heating equipments
and etc.), the preset room temperature cannot be achieved.
• Indoor unit cleaning must be performed by authorized personnel only. Consult
This appliance is not intended for use by young children or infirm persons unless they have been
Young children should be supervised to ensure that they do not play with the appliance.
your sales agent.
adequately supervised by a responsible person to ensure that they can use this appliance safely.
Using a commercially available detergent or similar can damage the plastic parts
or clog the drain pipe, causing water to drip with potential electric shock hazard.
• Do not touch the air outlet, bottom surface and aluminium fi n of the outdoor
unit.
You may get hurt.
Do not touch the refrigerant pipe and connecting valve.
Burns may result.
PROHIBITION
DON’T WET
PROHIBITION
PROHIBITION
PROHIBITION
DON’T TOUCH
“OFF”
PROHIBITION
PROHIBITION
PROHIBITION
PROHIBITION
PROHIBITION
DON’T TOUCH
STRICTLY OBSERVE
PRECAUTIONS
“OFF”
DEUTSCHFRANÇAISITALIANOSPANISHPORTUGUÊS
∂ППЛУИО¿
РУССКИЙ
– 3 –
ENGLISH
•
•
•
Page 4
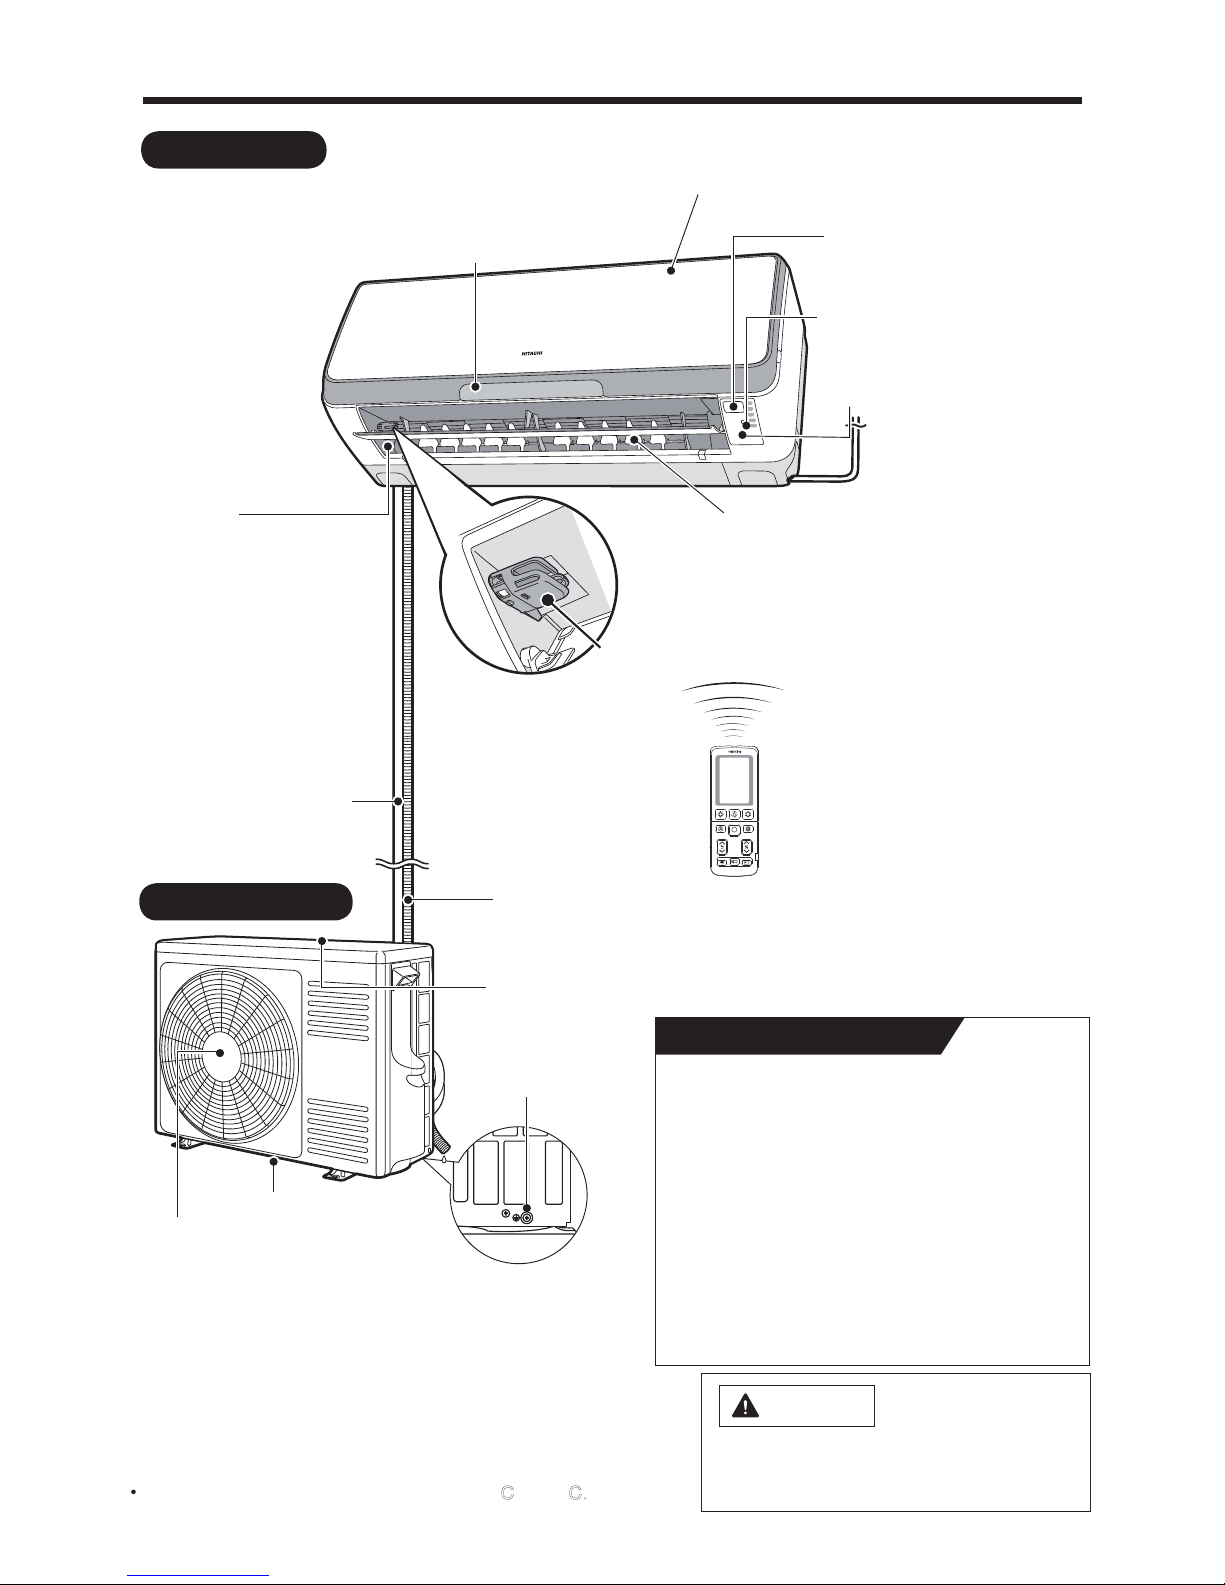
Drain Port (bottom)
Air Outlet
Discharges cool air when in heating
mode and warm air when in cooling
and dry cool modes, and warm or
cold air when in the dehumidifying
mode.
NAMES AND FUNCTIONS OF EACH PART
INDOOR UNIT
OUTDOOR UNIT
Signal Receiver
(internal)
Receive signal from the
remote control.
Indicator
Front Panel
(Page 8)
Horizontal/
Vertical Air Deflector
(internal)
Air Outlet
Remote Controller
Pipe/Wiring
Drain Hose
Drains dehumidified water generated from the indoor unit when in
the cooling, dehumidifying and dry cool modes.
Air Inlet (rear and left side)
噝 Even if the operation is stopped, the outdoor
unit fan continues to rotate for 10~60 seconds
to cool down the electrical parts.
噝 In heating operation, condensed water and
defrosted water is discharged from the outdoor
unit. Do not block the drain port as the water in
the drain may freeze in a cold area.
噝 Even during cooling operation, the water
condensed in the pipe, etc. may flow out from
the outdoor unit.
噝 When installing the outdoor unit under eaves,
etc. of the apartment, install a bush and drain
pipe on the drain port for drainage treatment.
ABOUT OUTDOOR UNIT
(Understanding The Operating Mechanism, page 39)
Earth Terminal
(side bottom)
噝 While the power is on, a very small amount of power is
consumed within the control circuit even when the unit
is not in operation.
Power can be saved if the circuit breaker is switched off.
CAUTION
Pull out the power plug if the unit is not in
use for a long period.
(Or turn off the circuit breaker.)
Infrared
Dynamic Air Deflection Sensor
Temporary Operation Switch
(Forced Cooling Switch)
When the remote
controller does not
work due to factors
like dead batteries,
you can press the
temporary operation
switch to start
temporary
operation. (Page 44)
– 4 –
Ion Mist Unit
Operation temperature of outdoor is -15ą to 43ą
Page 5
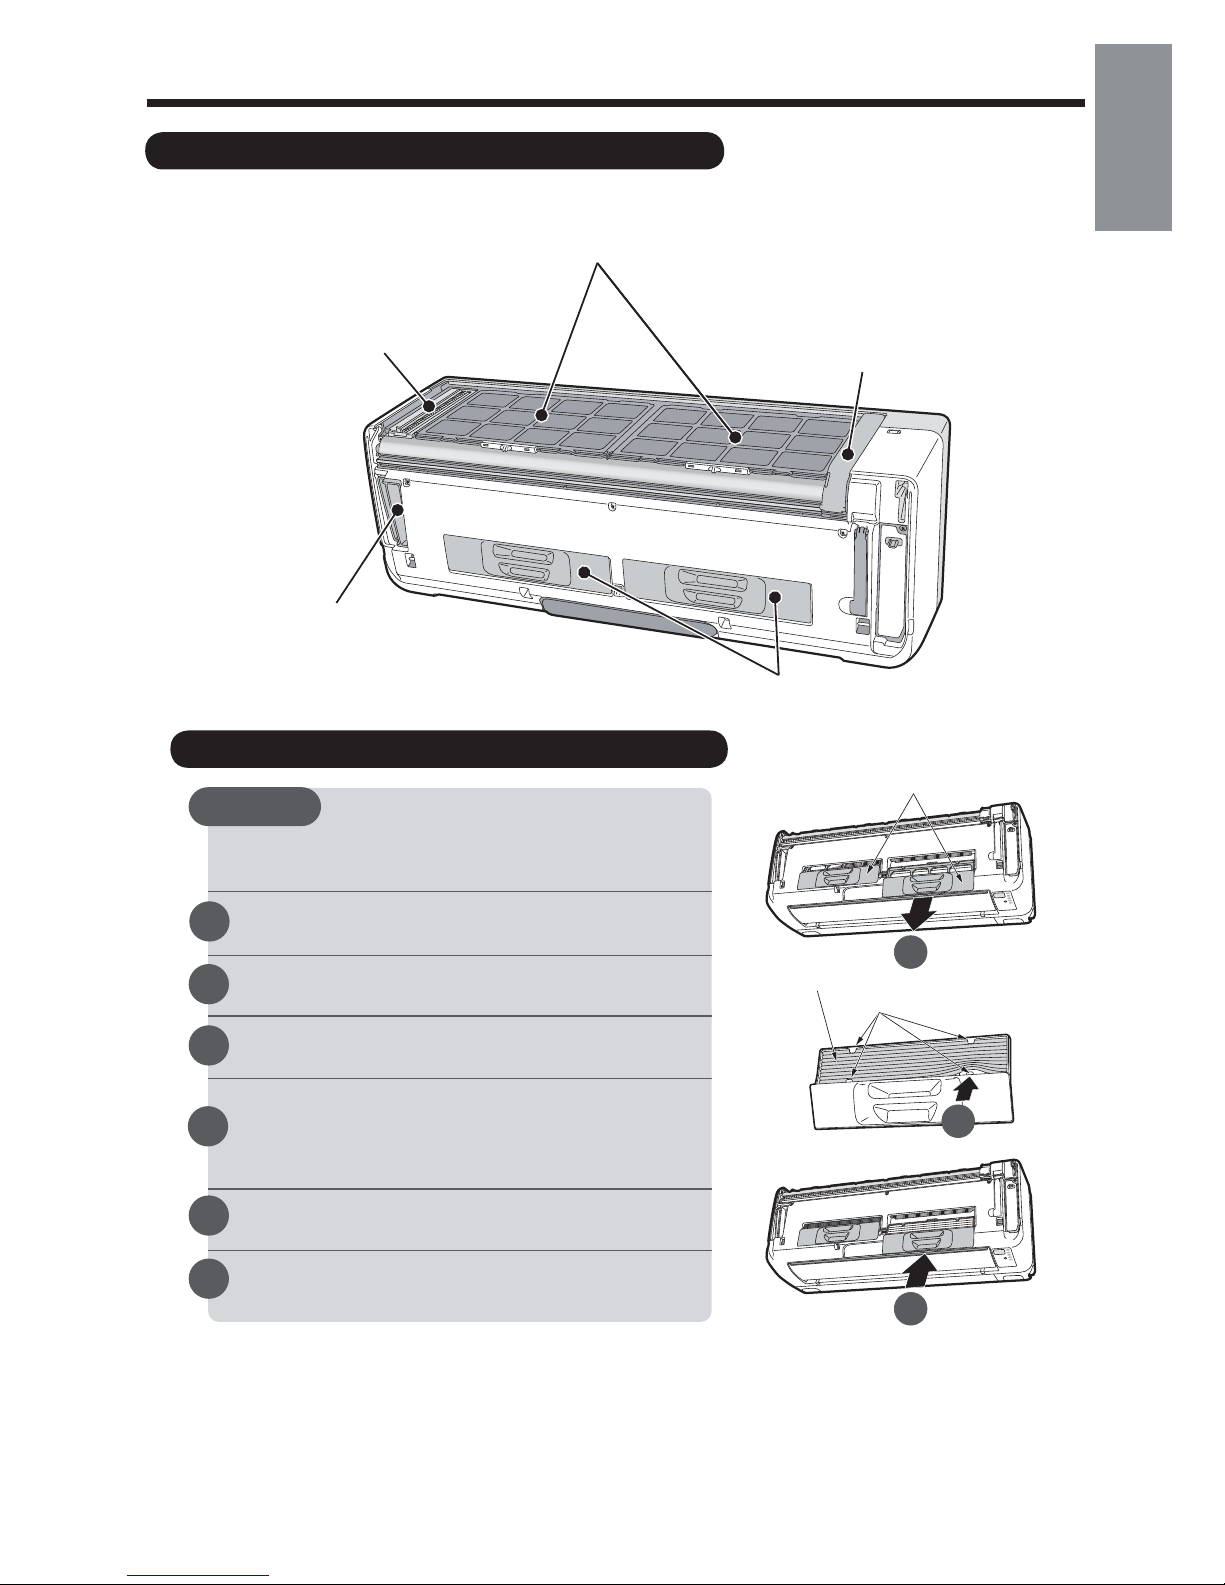
Air Cleaning Mesh Box
DEUTSCHFRANÇAISITALIANOSPANISHPORTUGUÊS
∂ППЛУИО¿
РУССКИЙ
Replace the air cleaning mesh box.
Dž“Make sure that it clicks into place.”
Dž“If it dose not click into place, abnormal sounds
may be heard or the box may fall off.”
Close the front panel.
Ą
INDOOR UNIT CONTROL PANEL / CLEANING UNIT
Open the front panel to operate. (How to open the front panel, page 8)
Dust Catcher
Collects the dust swept by
the cleaning unit. (At front
and top.) (Page 37)
Dust Box
Collects and keeps the dust
that has been cleaned.
(Page 34)
Stainless Mesh Filter
(inside)
Collects particulates and dusts in the air. (Page 35)
Air Cleaning Mesh Box
Preparation
Stop the air conditioner, and disconnect
the power supply (or turn off the circuit breaker).
Open the front panel.
Pull out the air cleaning mesh box as illustrated to
remove it.
Insert the air cleaning mesh into the slot as illustrated.
Connect the power cord (or turn on the circuit breaker).
Jaw
With the air cleaning mesh used, the air-conditioning capability will fall slightly.
Remove dust from the surface with a vacuum cleaner, and DO NOT clean it with water.
(We recommend you clean it once every 6 months and replace it once every 2 years.)
– 5 –
ENGLISH
Cleaning Unit
Cleans the dust
caught by the
stainless mesh
filter.
Wasabi-Nano Titanium Air Cleaning Mesh
How to Attach the Wasabi-Nano Titanium Air Cleaning Mesh
Page 6

Transmission Indicator
The transmission indicator
ROOM TEMPERATURE
Button
Press this button to set the
room temperature. Keep
pressing and the value will
change more quickly.
STOP Button
HEAT Button
Press this button to start
heating operation.
(Page 14)
DEHUMIDIFY Button
Press this button to start
dehumidifying operation.
(Page 14)
COOL Button
Press this button to start
cooling operation.
(Page 15)
DRY COOL Button
Press this button to start dry
cool operation. (Page 16)
AUTO Button
Press this button to
start automatic operation.
(Page 13)
BUTTONS TO
START OPERATIONS
Remote controller can be used when it is fixed on a wall or pillar using the remote controller holder.
Before fixing it, make sure the indoor unit can be controlled from the remote controller fixing point.
SLEEP TIMER Operation Button
Press this button to start sleep timer
operation. (Page 29)
REMOTE CONTROLLER
Transmits the operation and timer settings to the indoor unit.
The LCD shown in the illustration below is the display immediately after the reset switch is pressed. Usually not
all the data are displayed. On the LCD shown below, the functions not available for this room air conditioner are
also displayed.
NAMES AND FUNCTIONS OF EACH PART (continued)
Transmission Part
HUMIDITY Button
Press this button to set the
humidity for dehumidify and
dry cool operations.
Screw
INFRARED HUMAN-PRESENCE
SENSING Button
Press this button to enter
the dynamic air deflection mode.
(Page 19, 20)
Press this button to start I on mist
operation.
– 6 –
Press this button to stop any
operation except the preset timer.
lit when a signal is sent.
ION MIST Button
(Page 18)
Page 7

These are preset functions
except for
(SAVE).
Preset can be done if these
buttons are pressed while the
air conditioner is stopped,
however, the unit will not
function accordingly.
FUNCTION SELECTOR
Buttons
Each time when you press,
blinking changes in the
following sequence (page 12,
21, 22, 23):
ON/OFF Button
Use this button to set or cancel
the function selected by the
function selector.
FUNCTION SELECTOR
(When the door is open)
MANUAL CLEAN Button
Starts filter cleaning operation
while the air conditioner
operation is stopped. (Page 32)
FAN SPEED Button
VERTICAL AIRFLOW Button
Use this button to swing the
vertical air deflector or to adjust
the angle to your preference.
(Page 24)
HORIZONTAL AIRFLOW
Button
Use this button to swing the
horizontal air deflector or
to adjust the angle to your
preference. (Page 25)
SET TIME Button
Use this button to set and
check the current time.
(Page 11)
TIMER Buttons
RESET Button
Press this button after the
batteries are replaced and
when the air conditioner does
not function properly. (Page 11)
DEUTSCHFRANÇAISITALIANOSPANISHPORTUGUÊS
∂ППЛУИО¿
РУССКИЙ
POWERFULL Button
Press this button to start
powerful operation. (Page 18)
MANUAL/AUTO Button
Press this button to switch
between auto/manual
dehumidifying and dry
cool operation. (Page 17)
DYNAMIC AIR DEFLECTION
Button
Press this button to start
dynamic air operation.
(Page 20)
– 7 –
ENGLISH
Press this button to
select fan speed.
Four options are available:
Auto, H i, M ed,L ow,and Silent.
Page 8
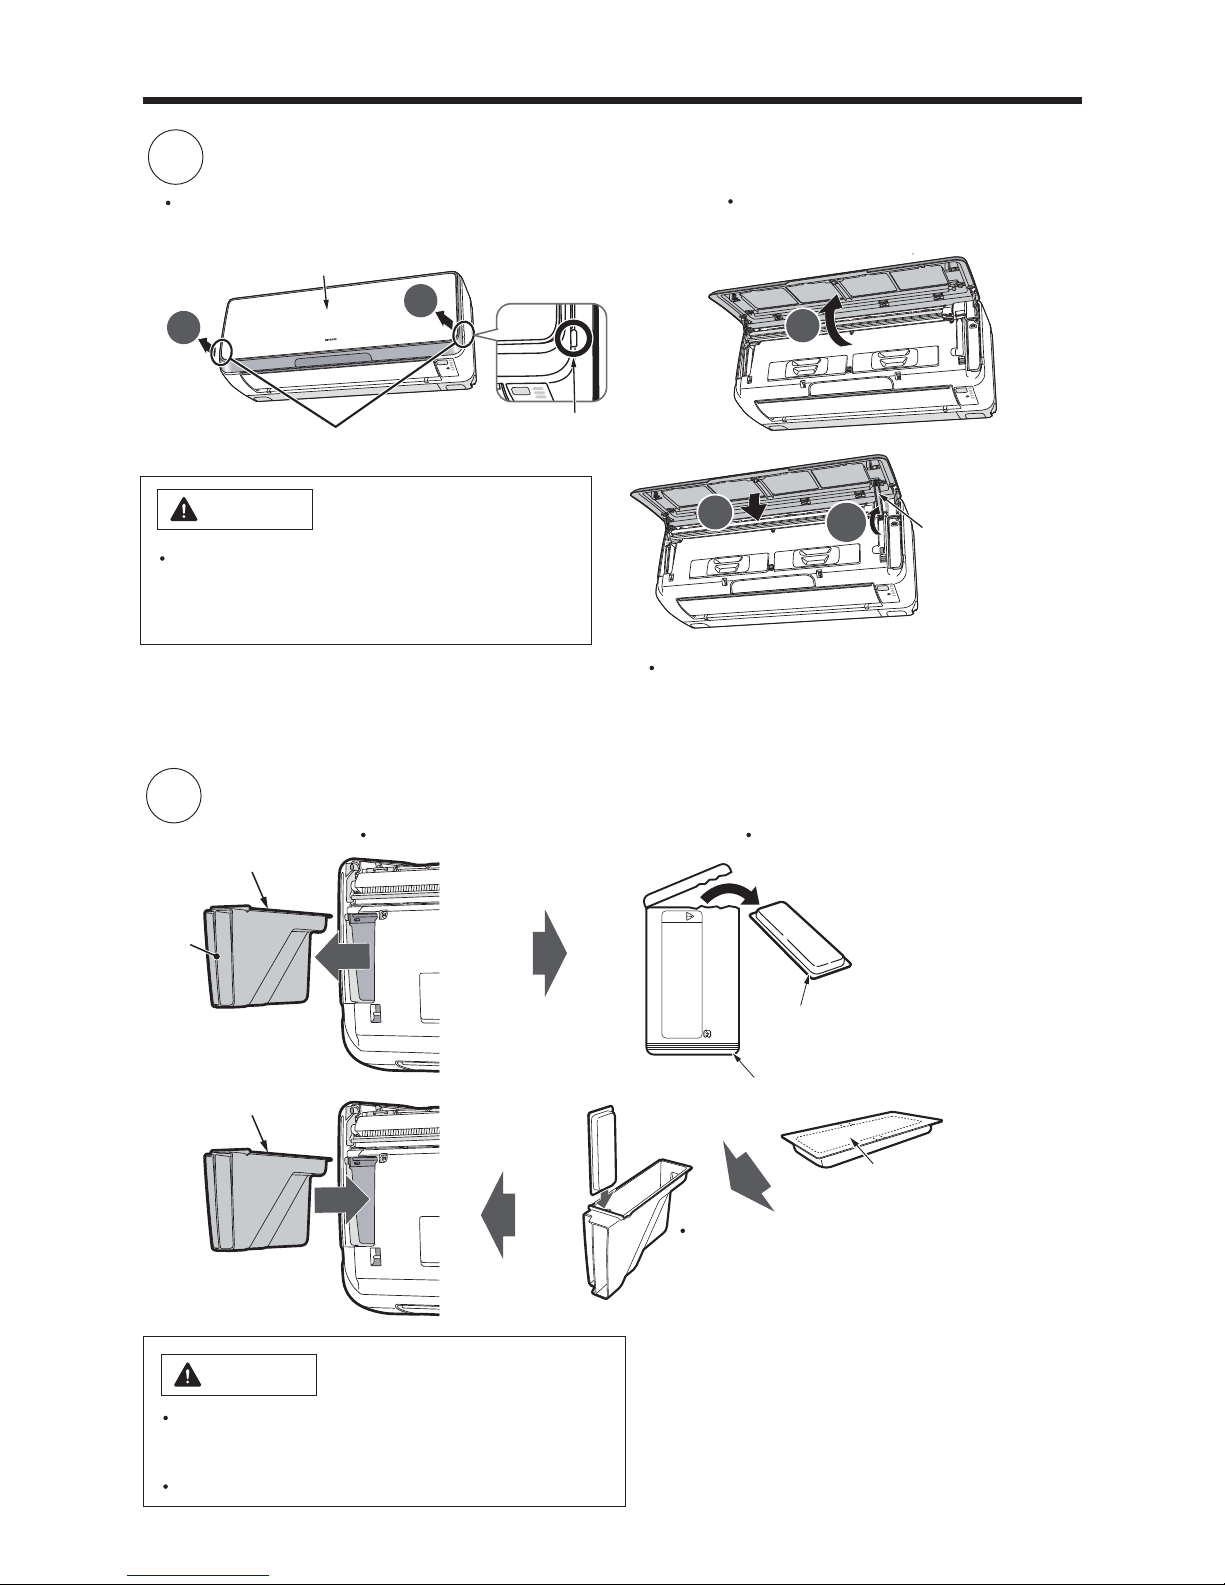
•
2
•
Take out the anti-mold wasabi
cassette from the aluminium bag.
Do not remove or tear
the aluminium sheet on
the surface nor make a
hole on it.
•
Remove the dust box housing
Dust Box Housing
Dust Box Housing
Handle
INSTALLING ANTI-MOLD WASABI CASSETTE
Open the front panel.
• Do not hold the movable panel
when opening and closing the
front panel.
Front panel
Gripping part
Gripping part
Panel support
• Hold and lift up the front panel.
•
Push up the panel support until it
clicks to lock it.
Lower the front panel and fix in
position with the panel support.
Install the anti-mold wasabi cassette.
Aluminium bag
Slide the anti-mold
wasabi cassette that
has been taken out of
the wrapper directly
into the Dust Box
Housing.
CAUTION
• Do not put your face close to the package when
you open it.
Your eyes or nose may be irritated by wasabi aroma.
• Do NOT eat.
1
No daily maintenance is required. However,
the effectiveness of anti-mold wasabi cassette
will be lost after approximately 10 years have
elapsed. Replace the anti-mold wasabi cassette
in such event.
この中に「防カビわさびカセット」が入っています
●製品の取扱説明書を確認して確実に取り付けてください。
●開封時は顔を近づけないでください。
わさびの香り成分で、目や鼻に刺激を感じることがあります。
●「防カビわさびカセット」の表面のアルミシートを
はがしたり、破ったり、穴をあけたりしないでください。
「防カビわさびカセット」の効果がなくなります。
●食べられません。
注
意
CAUTION
•
Do not open the front panel during operation
.
It may interrupt the movable panel to work properly.
Be sure to stop
the operation first before opening
the front panel.
Anti-mold wasabi
cassette
– 8 –
Page 9
DEUTSCH
DEUTSCHFRANÇAISITALIANOSPANISHPORTUGUÊS
∂ППЛУИО¿
РУССКИЙ
Close the front panel.
• Hold and lift up the front panel.
CAUTION
• If the front panel is loose, it may come off and drop.
• When opening the front panel upwards, please do not use excessive force.
If the front panel comes off the device, this may cause it to malfunction.
• When the front panel remains open, be sure to push up the panel
support.
•
Push down the panel support until it clicks.
Push the both ends of the front panel first and
then its center until it clicks.
•
Pull it downward.
3
– 9 –
ENGLISH
Page 10

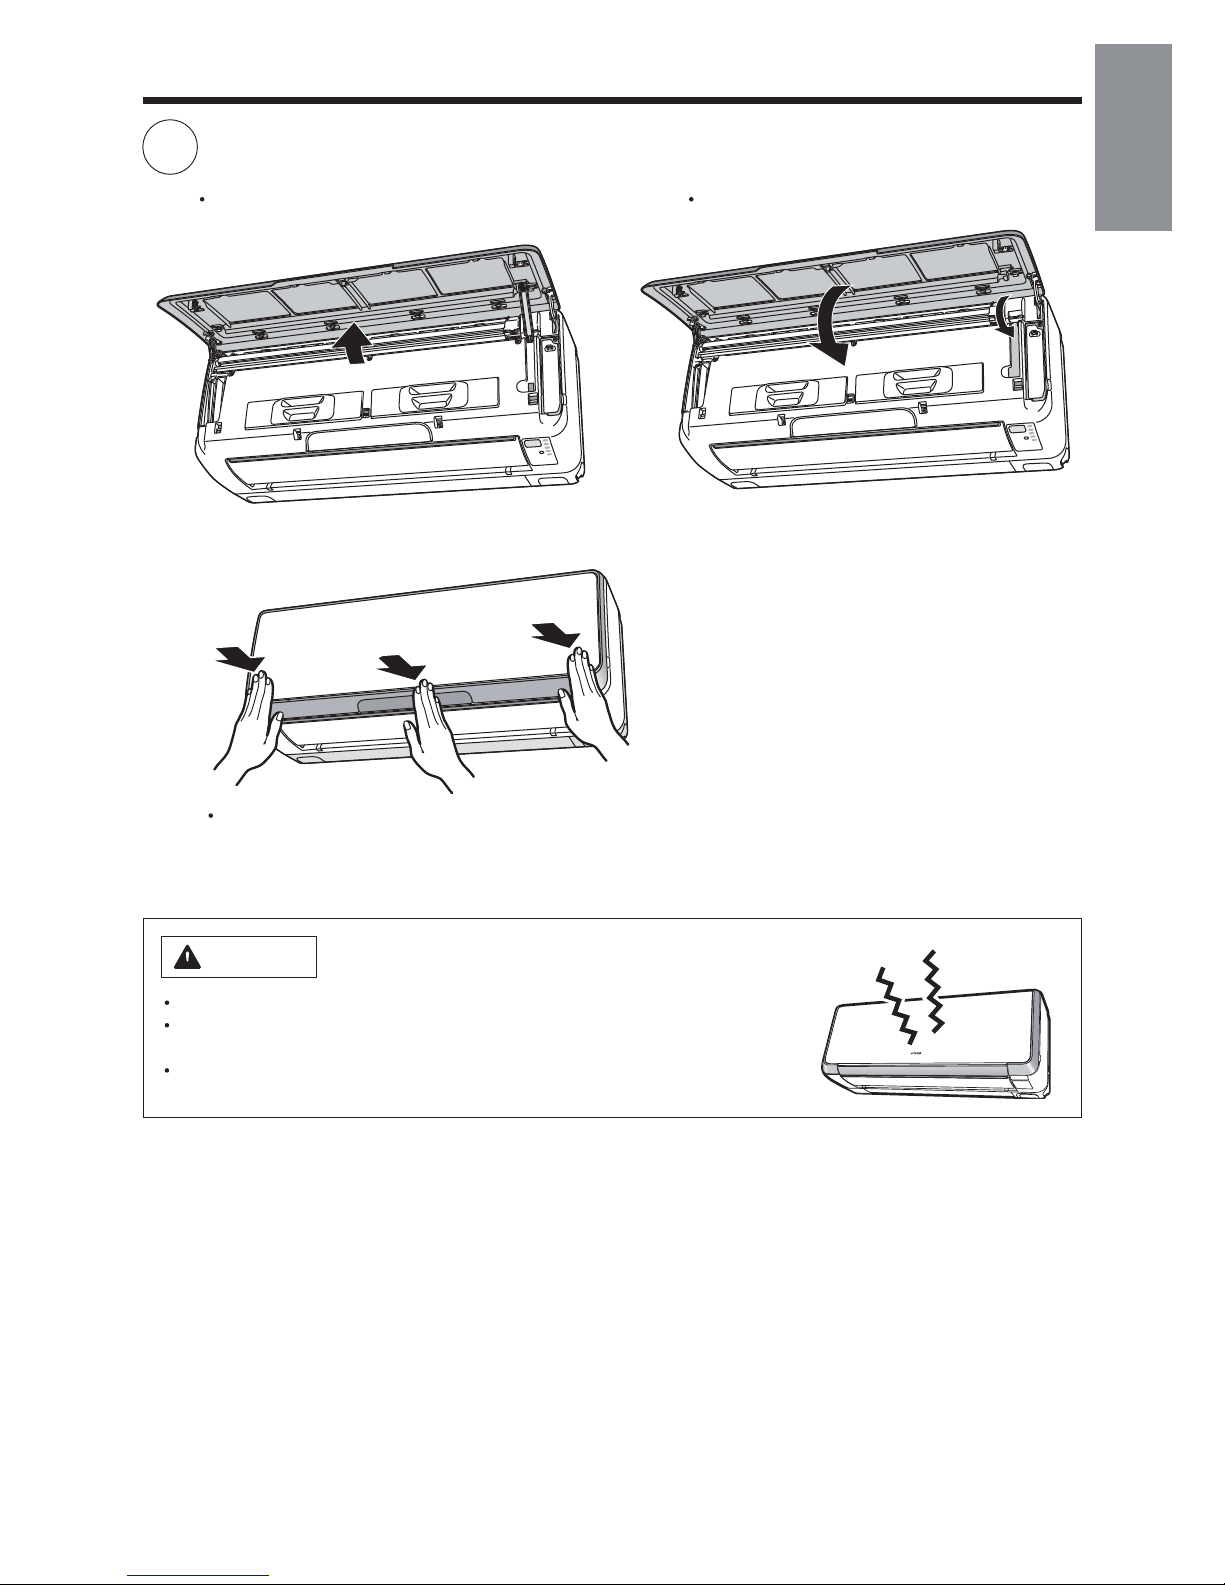
FILTER CLEANING UNIT OPERATION CHECK
Make sure the power plug is firmly plugged into the power outlet.
WARNING
• Be sure to use the power outlet exclusively for
air conditioner
Use of other power outlet may cause heat, which
could result in fire.
• Make sure that dust is not deposited on the
power plug and be sure to plug in until the blades
of the plug are fully inserted to avoid unstable
plug-in
and dust from being accumulated
Use of air conditioner with dusty power plug or
improper power connection could result in electrical
shock or fire.
CAUTION
Do not operate with
wet hands
It may cause electric
shock.
Compulsory
Wet Hand
Prohibited
Performing operation check after the power is turned on.
Perform the filter cleaning unit operation check
• After the power is turned on (after the power plug is inserted into the power
outlet or after the circuit breaker is switched on after power failure), the
cleaning unit makes one cycle of back and forth movement.
• At this time, the
(CLEAN) indicator is lit.
• One cycle of operation check will take approximately 5 minutes.
• During the operation check, the unit performs “Fan” operation while the movable
panel and horizontal air deflector remain closed.
• If the
(CLEAN) indicator blinks (lit for 4 seconds/off 1 second) after the
operation check, refer to “Troubleshooting” on page 44.
Cleaning Unit
There is a filter cleaning wiper inside.
Dust catcher
CAUTION
Do not put your fingers or a stick etc into the top surface during
the filter cleaning operation
It may result in injury or malfunction.
• The illustration shows the unit without front
panel for your reference only.
1
2
Compulsory
7(0325$5<
6:,7&+
– 10 –
Page 11
DEUTSCHFRANÇAISITALIANOSPANISHPORTUGUÊS
∂ППЛУИО¿
РУССКИЙ
DEUTSCH
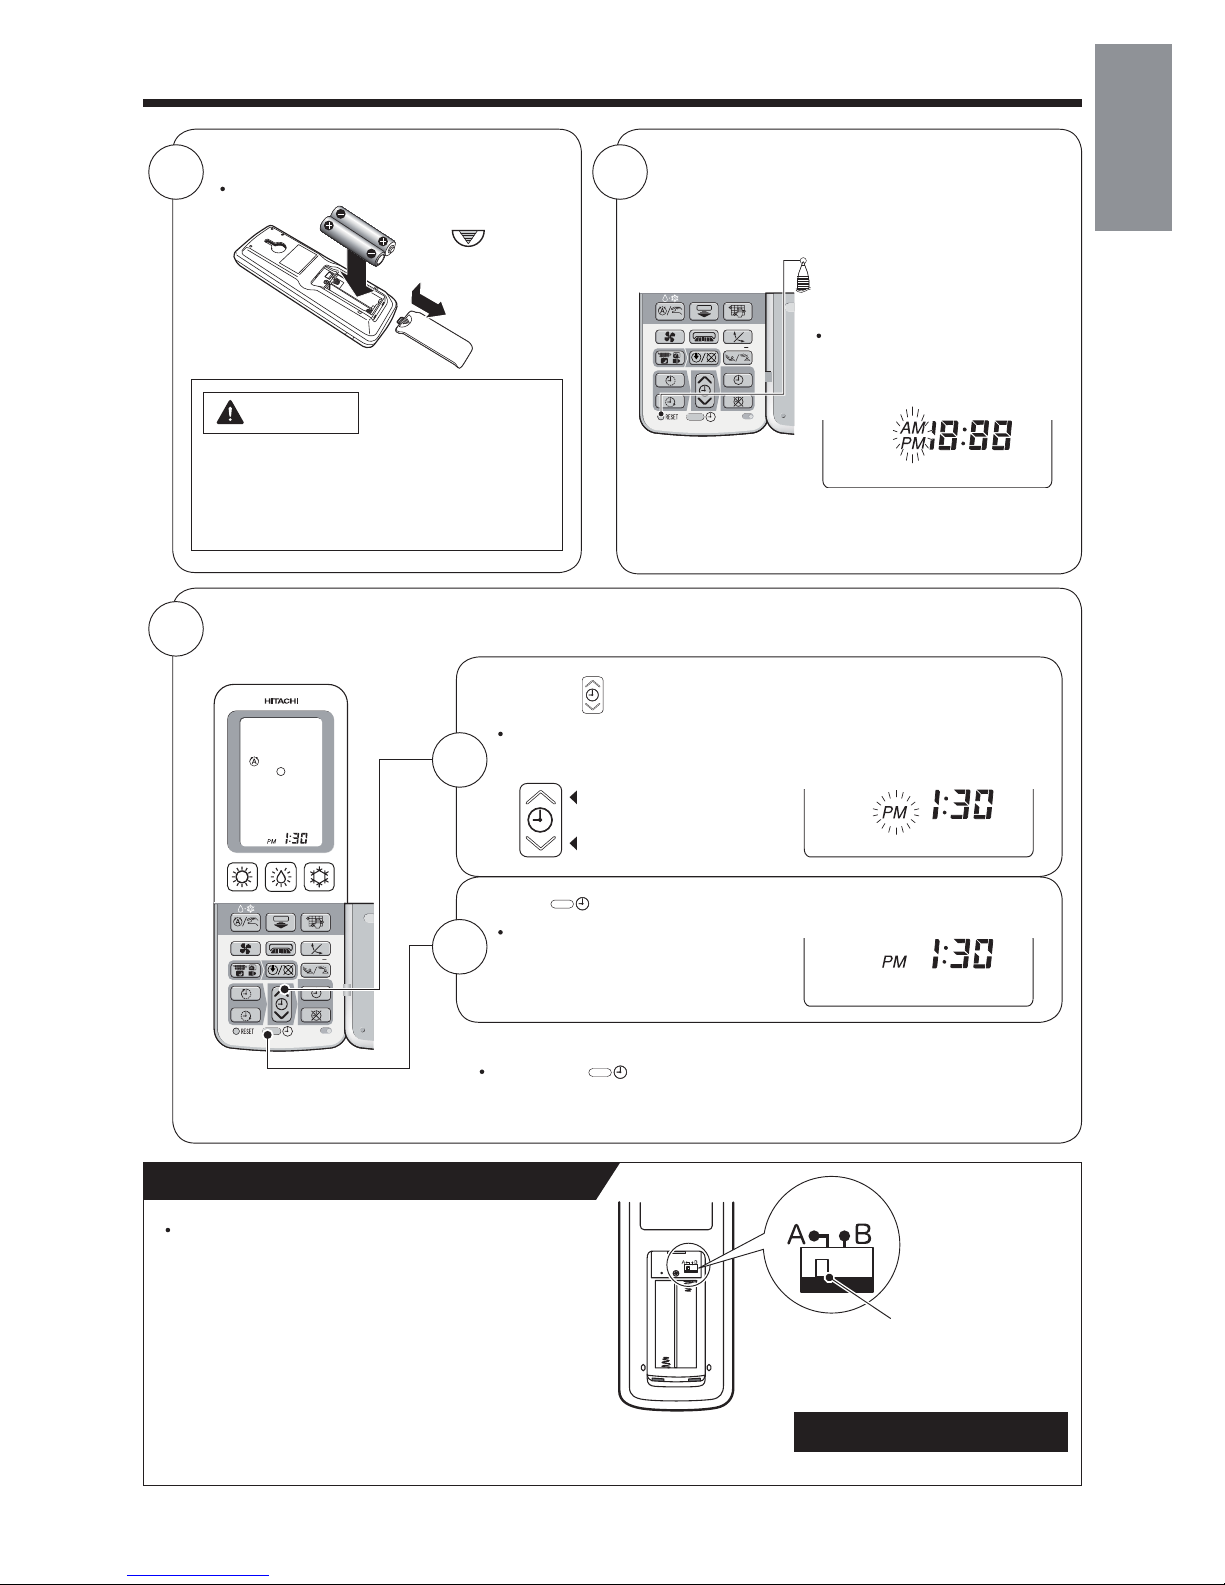
Address
Address
PREPARE THE REMOTE CONTROLLER
Install the batteries.
• Use two AAA-size batteries.
Set the current time (Ex: set to 1:30 p.m.)
RESET
1
2
Press the (TIMER) button to adjust to the current time.
• You can fast forward the time by continuously pressing the
button.
Confirm the current time
• Press the
(SET TIME) button to check the current time
(The time display disappears 3 minutes later). If necessary,
readjust the time following the above procedure 1 and 2.
• Address selector switch is used to prevent
remote controller signal interference in such
circumstance where 2 indoor units are used in
the same room. This switch is not usually used.
(The factory setting is at “A” side.)
For this setting, please make an inquiry to your
sales agent.
Address selector
switch
Switch lever
Remote controller
backside
Do not operate by yourself.
Push mark
and pull.
ABOUT ADDRESS SELECTOR SWITCH
Time is incremented
Time is decremented
Press
(SET TIME) button to set the current time.
• “AM” or “PM” is lit instead of
blinking. It automatically goes
off in 10 seconds.
1
2
Open the cover and press the RESET
button with a sharp tip item.
3
• 18:88 lights up on the current
time display and “AM” and
“PM” start blinking.
CAUTION
1. Do not mix new and old batteries, or
different type of batteries together.
2. Remove the batteries when you do
not use the remote controller for 2 or 3
months.
DEUTSCH
– 11 –
ENGLISH
Page 12
1
While (SAVE) is blinking, point the remote controller towards
the unit and press the (ON/OFF) button.
• A short beep sounds and
(SAVE) indicator turns on.
Press the (FUNCTION SELECTOR)
button until
(SAVE) blinks.
Press the (FUNCTION SELECTOR) button again until
(SAVE) blinks.
While
(SAVE) is blinking, point the remote controller towards
the unit and press the (ON/OFF) button.
• A short beep sounds and
(SAVE) indicator turns off, indicates
the setting is released.
Notes for “save” setting
• If ampere is set to “Save”, the maximum heating capacity slightly lowers
and starting up of heating operation will take a little longer. Besides,
the preset temperature may not be reached if outside temperature is
low.
• Point the remote controller to the signal receiver of the unit
Signal reception distance is approximately 7m in front of the unit.
However, this distance may be shorter or the signal may not be
receivable if there is an electronic lighting device in the same room.
• Handle the remote controller with care
Dropping it or getting it wet may compromise its signal transmission
capability. After new batteries are inserted into the remote controller,
the unit require approximately 10 seconds before it can respond to
commands and begin operation.
WHEN OPERATING THE REMOTE CONTROLLER
Approximately
7m from the front
PREPARE THE REMOTE CONTROLLER (continued)
Ampere setting (Standard/Save) can be selected.
If you experience frequent circuit breaker tripping, set ampere to “Save” to avoid this problem.
(Ampere is set to “Standard” at the time of purchase.)
4
2
RELEASE
– 12 –
Page 13
SPANISHPORTUGUÊS
∂ППЛУИО¿
РУССКИЙ
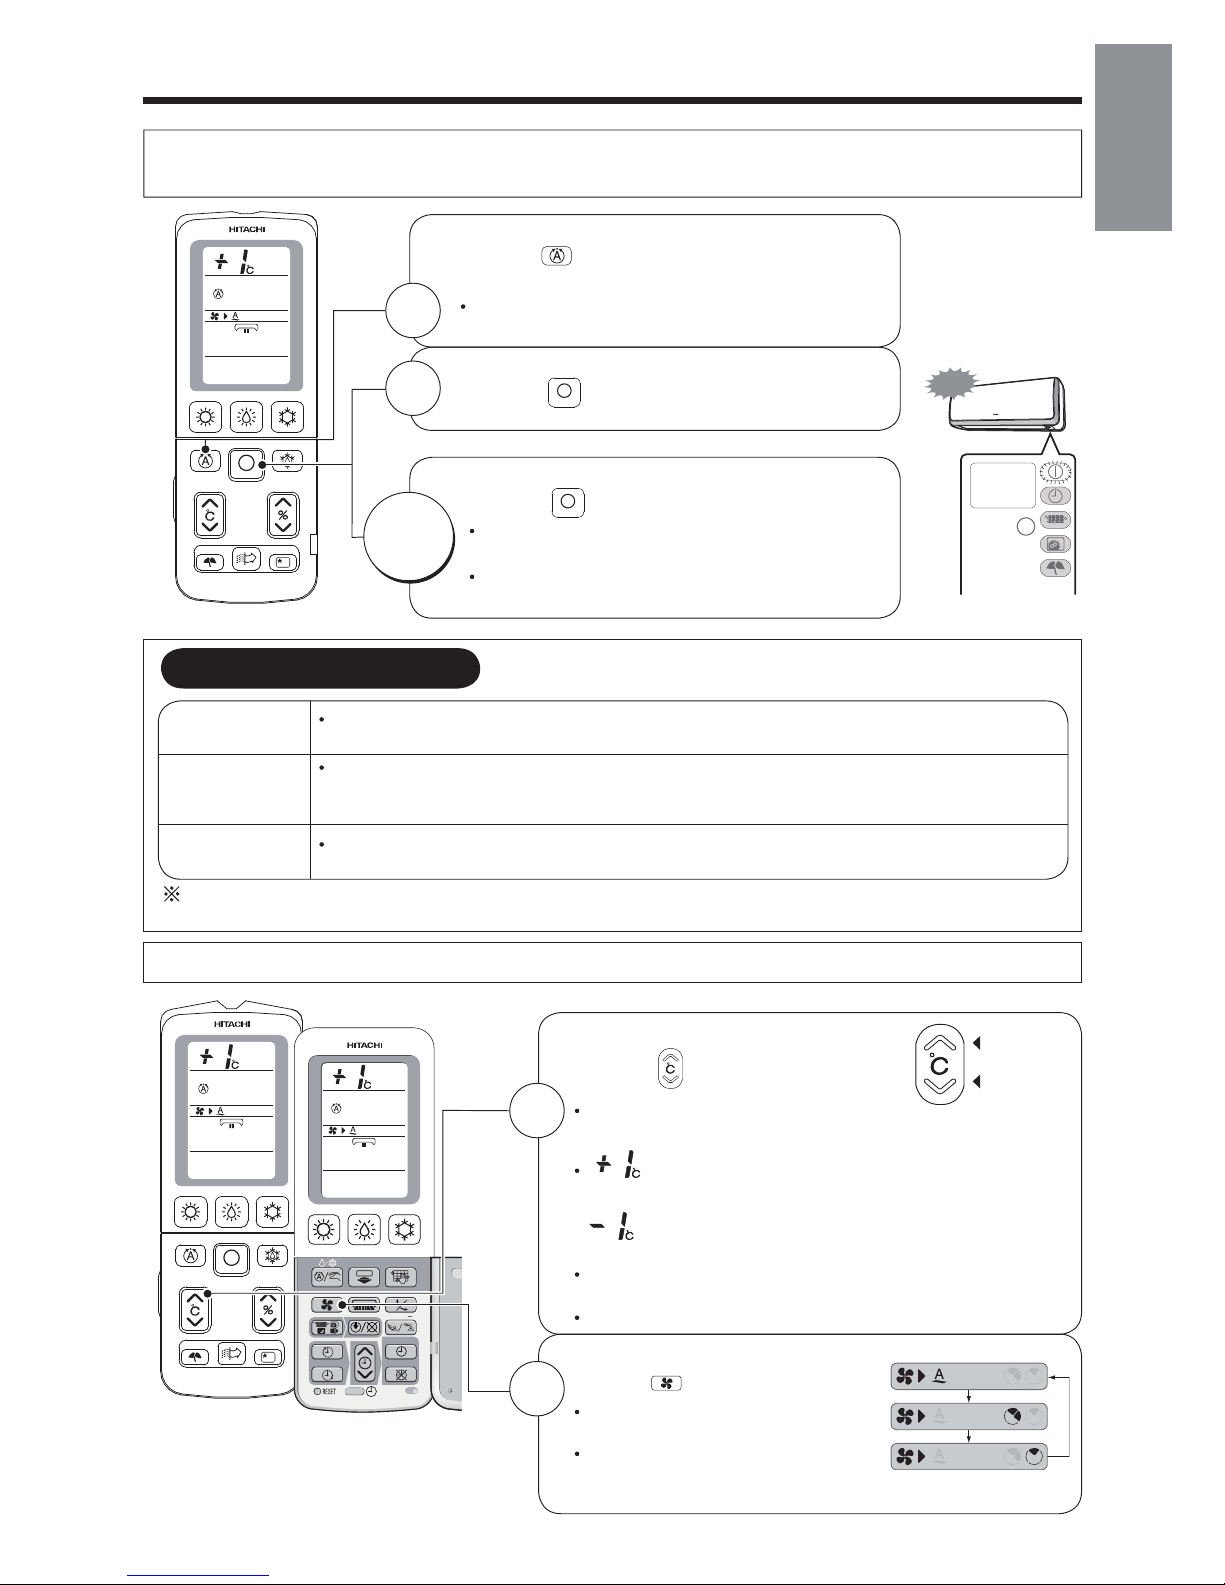
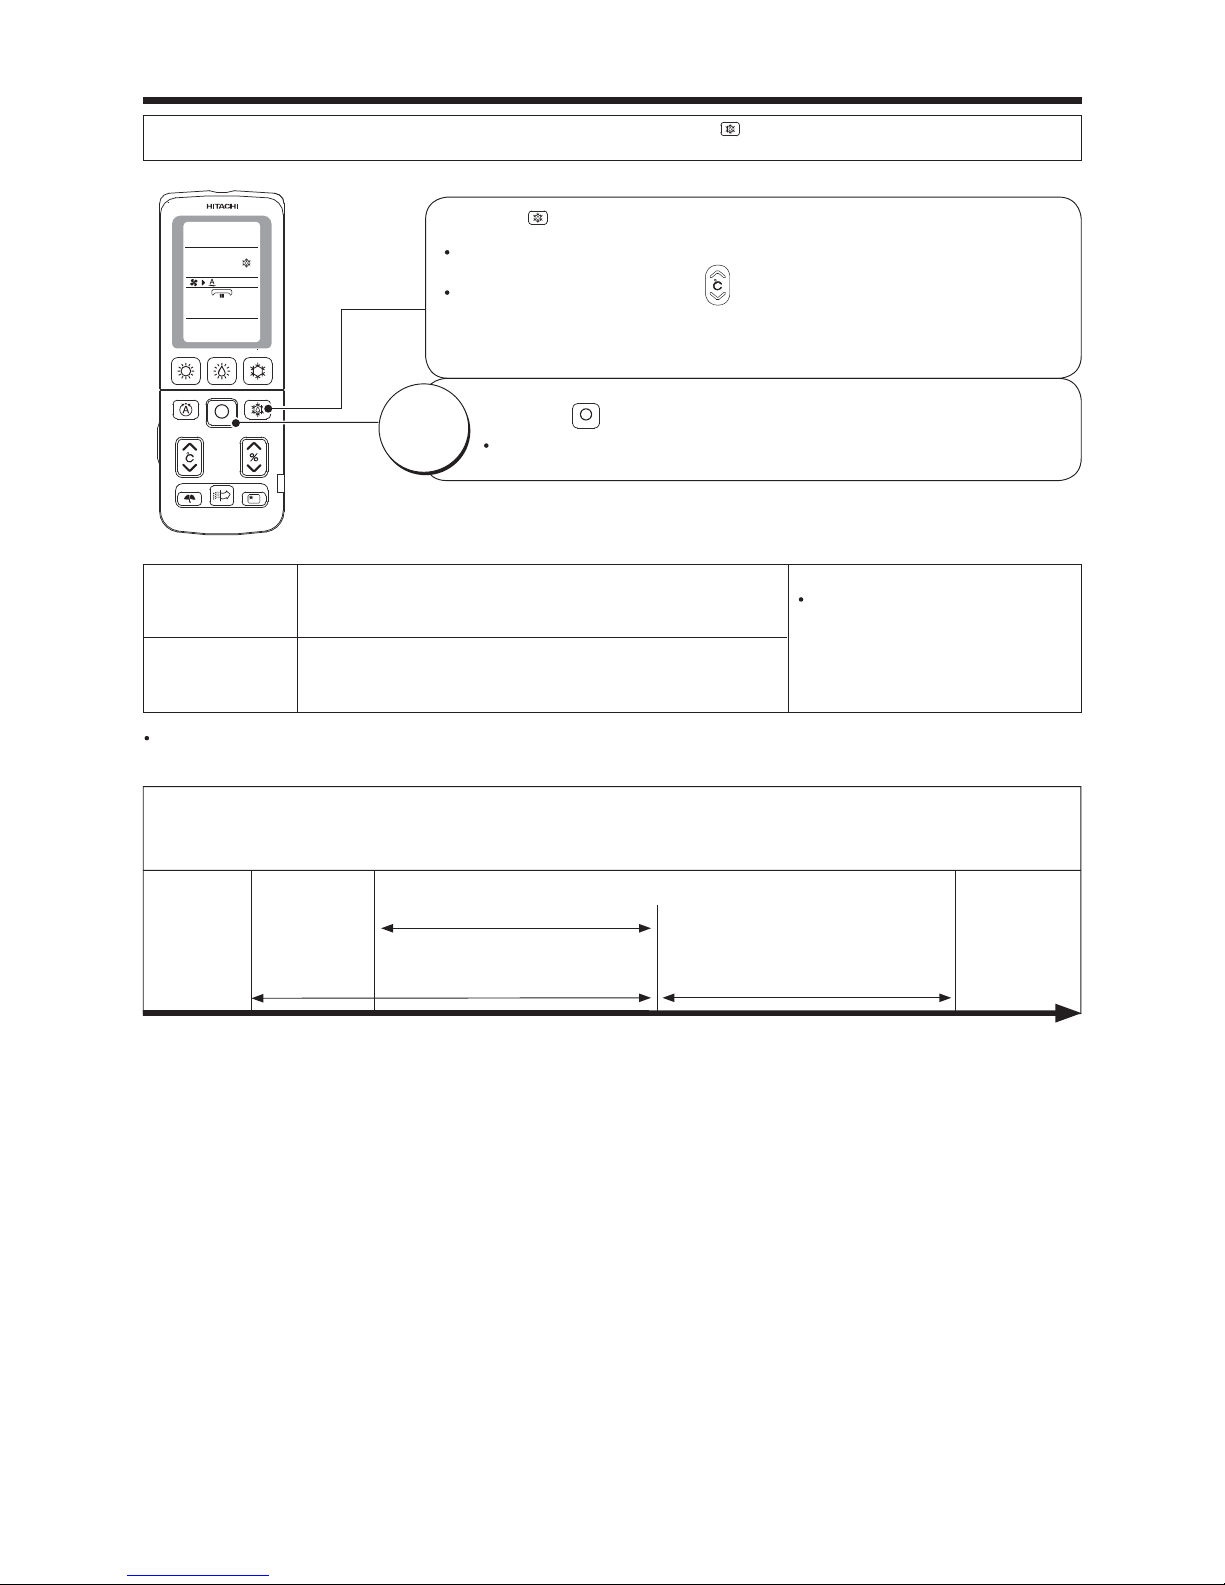
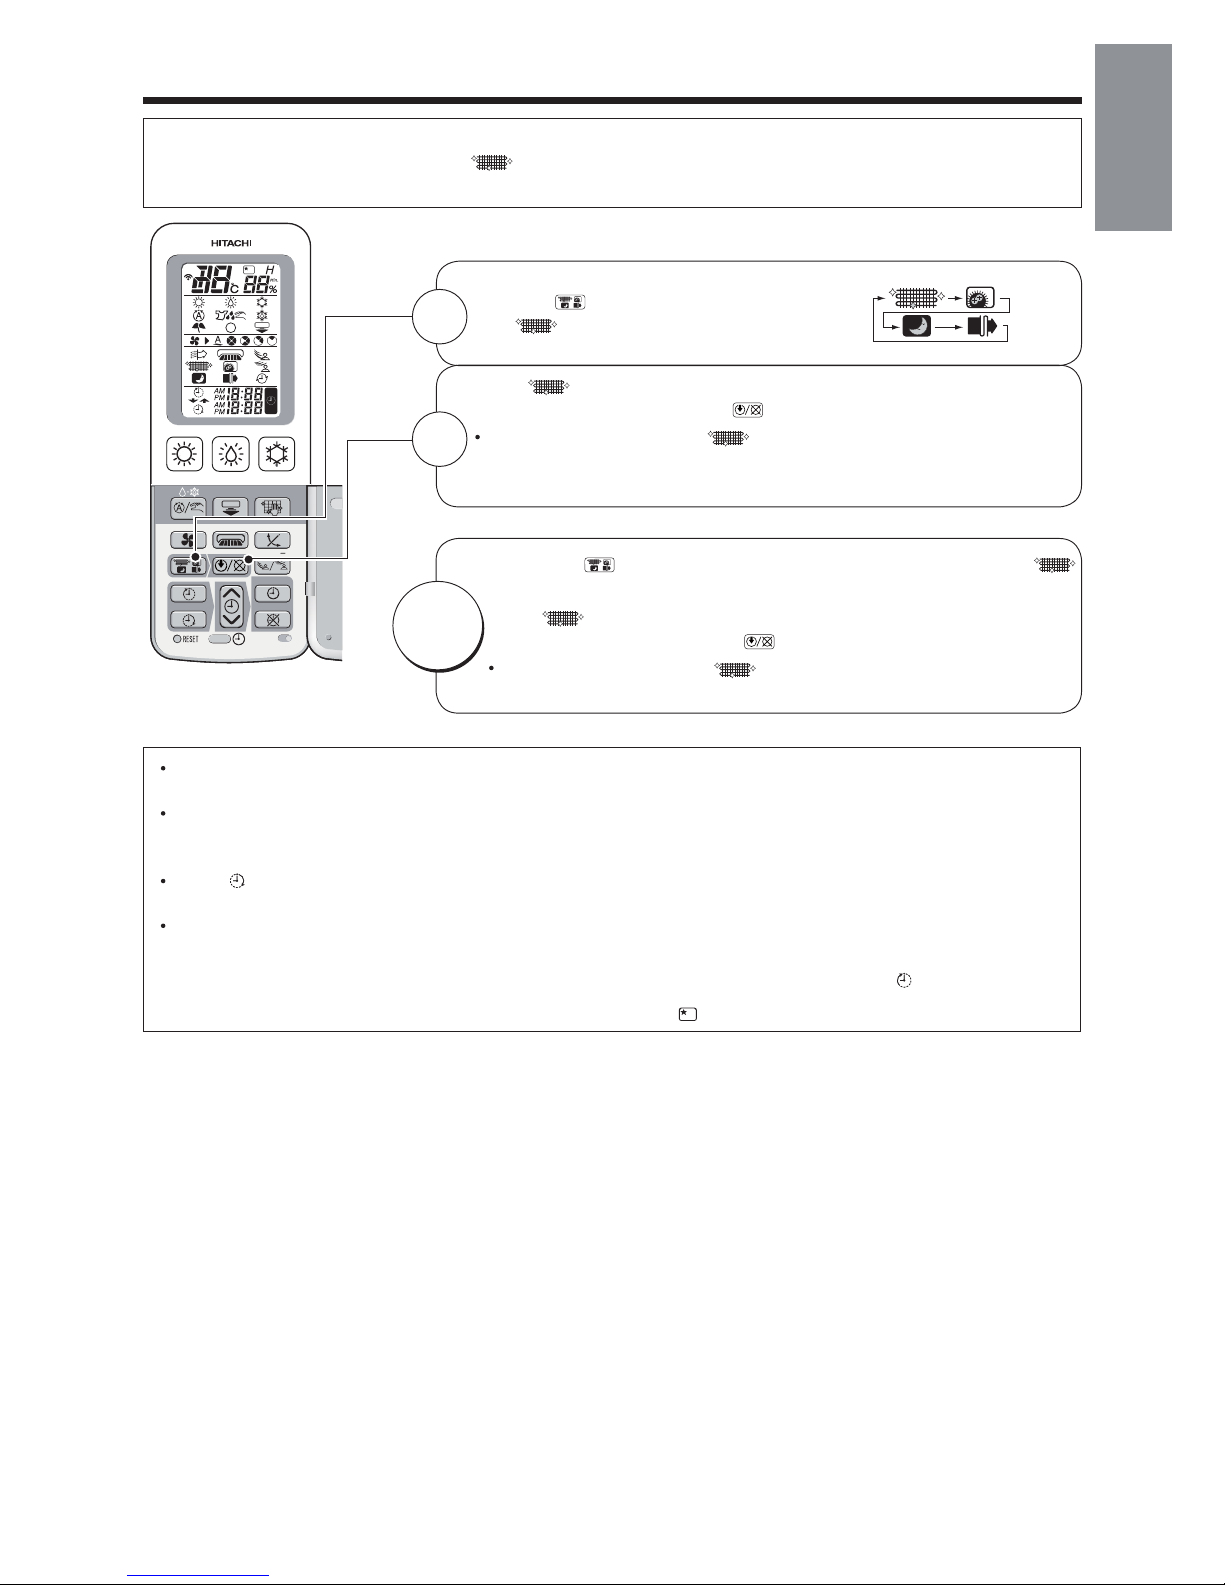
AUTOMATIC OPERATION
•
•
•
nj
1
2
2
1
7(0325$5<
6:,7&+
Based on the room temperature and outside temperature, the unit determines the most suitable operation
mode (heating, dehumidifying or cooling) and a comfortable temperature. (Set the current time on the remote
controller before starting operation.)
Press the (AUTOMATIC OPERATION) button
to set the operation mode to auto.
•
Every time you press it, the mode will change as
shown in the chart on the right.
Press the (STOP) button.
Press the (STOP) button again.
A short beep sounds and the automatic
operation stops.
Operation mode will be displayed on the
remote controller display.
Increase
Decrease
Adjust the room temperature
Press the (ROOM TEMPERATURE)
button.
• Every time you press it, a short beep sounds and the
temperature will change by 1°C.
•
is displayed if the temperature is set higher than
the automatically set room temperature by 1°C.
is displayed if the temperature is set lower than the
automatically set room temperature by 1°C.
• The adjustable temperature range is not higher or lower
than 3°C of the automatically set room temperature.
• Humidity setting cannot be adjusted.
Select the fan speed
Press the (FAN SPEED) button.
• “AUTO”, “LOW” and “SILENT”
can be selected.
• Every time you press it, the
mode will change as shown in
the chart on the right.
Beep
STOP
• Performs heating operation when the room temperature is below 23°C.
Set the temperature to be around 23°C.
• Performs dehumidifying operation when the room temperature is 23~26°C.
The preset temperature will be the room temperature at the time of start of air conditioner
operation.
• Performs cooling operation when the room temperature is above 27°C.
Set the temperature to be around 27°C.
Room temperature and fan speed can be adjusted to your preference.
AUTOMATIC OPERATION
Heating
Dehumidifying
Cooling
Even if dehumidifying operation is set, the air conditioner may not execute dehumidifying if the room humidity
is not very high. This is not a malfunction.
DEUTSCHFRANÇAISITALIANOSPANISHPORTUGUÊS
∂ППЛУИО¿
РУССКИЙ
– 13 –
ENGLISH
Page 14
•
•
•
HEATING OPERATION
Press the (HEAT) button to start heating operation.
Press the (HEAT) button.
• Adjust the room temperature and fan speed to your preference.
Temperature range between 16°C~32°C can be set.
Press the (STOP) button.
A short beep sounds and heating operation stops.
STOP
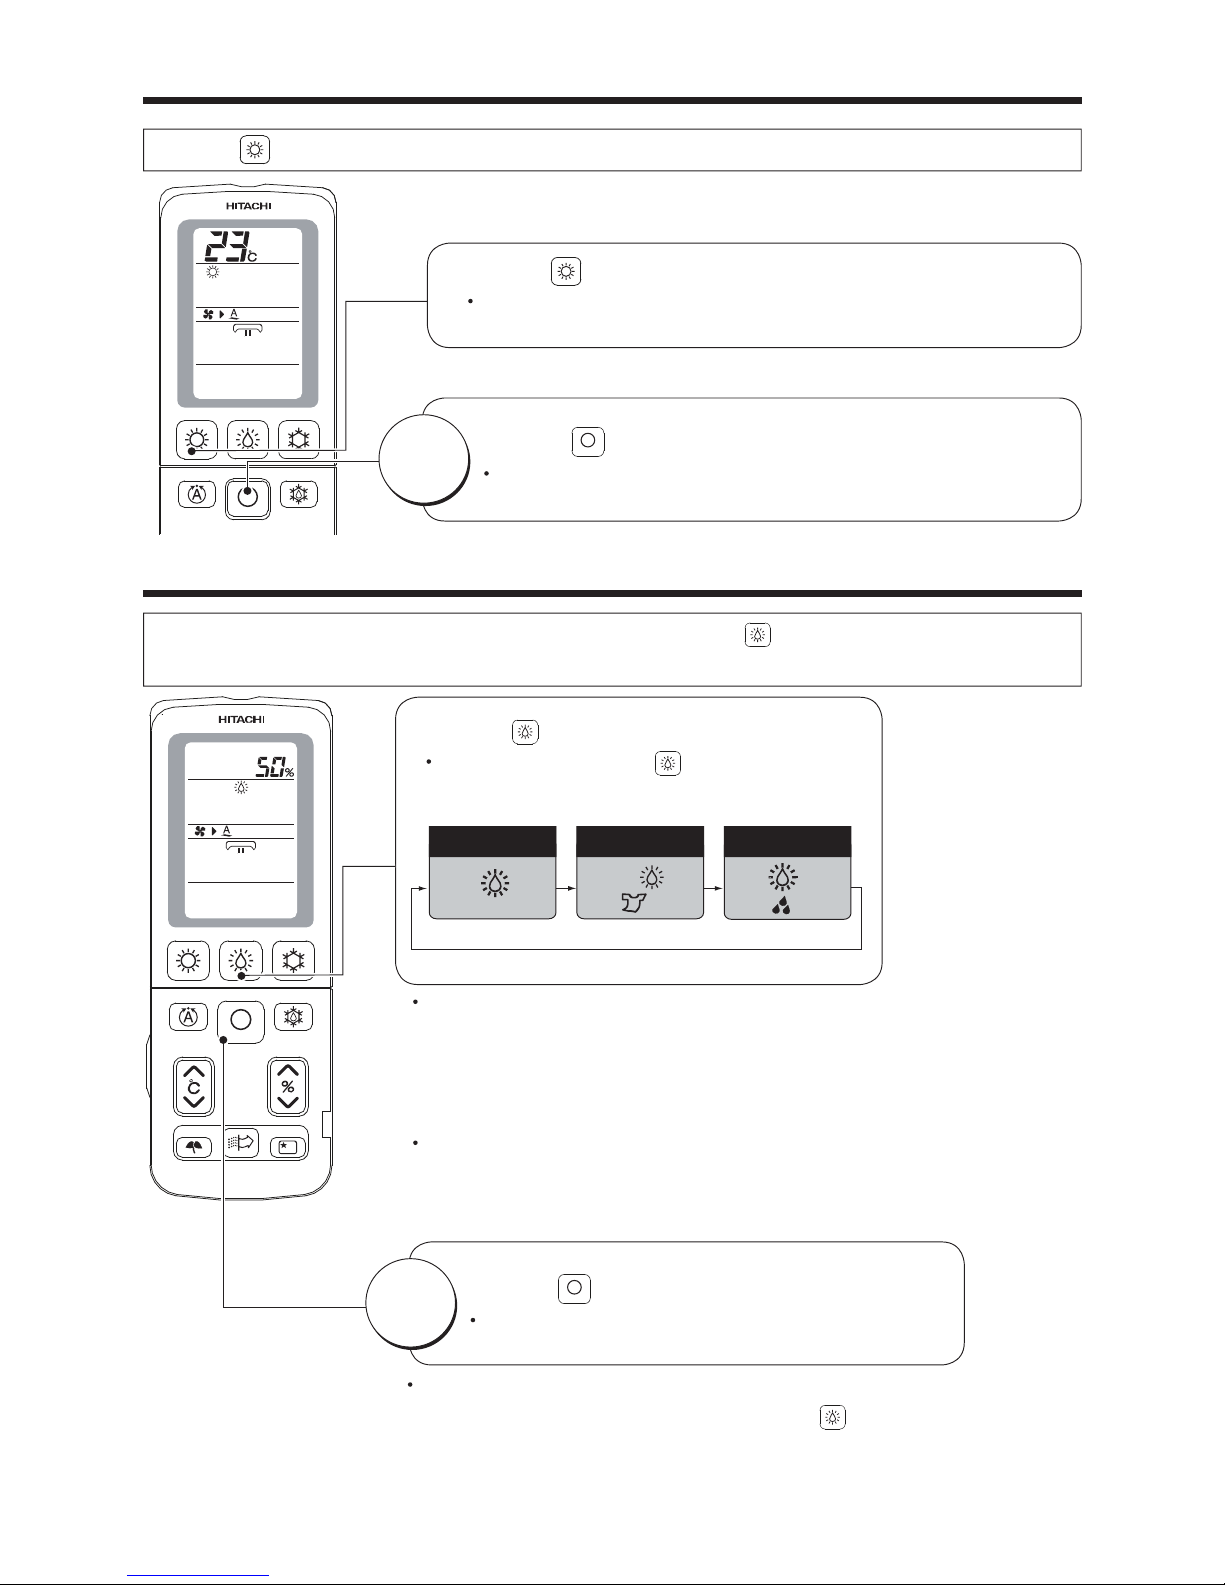
DEHUMIDIFYING OPERATION
3 types of dehumidifying operations can be performed by pressing the (DEHUMIDIFY) button.
Performs powerful dry operation without lower down the room temperature.
Press the (DEHUMIDIFY) button.
• Every time you press the (DEHUMIDIFY) button,
the mode will change as shown in the chart below.
Condensation
Control
Auto
Dehumidifying
Quick
Laundry
(“AUTO” flashes for 5 seconds)
•
In auto dehumidifying mode, fine adjustment of room temperature, humidity
adjustment and fan speed selection can be made to your preference.
Every time you press the ROOM TEMPERATURE button, the temperature will change
by 1°C. (Temperature setting range is not higher or lower than 3°C.) Every time
you press the HUMIDITY button, the humidity will change by 5%. (Humidity setting
range is 40%~70%.)
• In quick laundry mode, fine adjustment of room temperature and fan speed
Press the (STOP) button.
• A short beep sounds and dehumidifying operation stops.
STOP
• After the dehumidifying operation is stopped, the remote controller will display the
operation mode that had been set before the (DEHUMIDIFY) button was
pressed.
ENGLISH
DEUTSCHFRANÇAISITALIANOSPANISHPORTUGUÊS
∂ППЛУИО¿
РУССКИЙ
– 14 –
selection can be made to your preference. (Fine adjustment of room
temperature and humidity adjustment cannot be made in condensation
control mode.)
Page 15
DEHUMIDIFYING OPERATION (continued)
Auto
Dehumidifying
Operation modeIn this situation
Operating mechanism
• In damp
weather
• In most of the cases, the room temperature at the time the button is
pressed becomes the preset temperature.
(
When room temperature is below 12°C, set 13°C. When it is
13°C~22°C, set +2°C. When it is below 23°C~26°C, set room
temperature. When it is above 26°C, set 26°C)
•
Target humidity is around 50~60%. If the humidity becomes lower than
the target value, operation stops. If it becomes higher than the target
value, operation resume.
• The operation mode may automatically be switched to cooling or
heating for temperature control. (Refer to table below)
• To dry the
laundry
quickly
• Detects outdoor temperature, room temperature and humidity to
automatically select the most suitable combination of heating and
powerful dehumidifying operations.
• This operation is performed together with stainless plasma air purifying
operation.
• Priority is given to laundry drying.
Be sure use this mode when no one is in the room as the room
temperature and humidity will be high temporarily.
• 3-hour timer function is used for this operation mode.
• When
controlling
condensation
formed on
windows in
winter time
• To control the condensation, priority is given to the operation for
lowering humidity.
Therefore, the room temperature goes down in
this operation mode. The operation stops if the room temperature
becomes 1°C or below.
• 2-hour timer function is used for this operation mode.
Condensation
Control
Quick Laundry
• Be careful when condensation control operation is performed if the outside temperature is low as it will lower the
room temperature.
• (OFF TIMER) and (ON TIMER) (page 26), which are to be set using clock function, are not available during
dehumidifying (quick laundry and condensation control modes) operation. However, the timer (for 30 minutes
and 1-9 hours) can be set for quick laundry and condensation control modes with the (SLEEP) button.
• To set to your desired temperature and humidity while executing dehumidifying, it is recommended to use manual
dehumidifying function. (Page 17)
• If you do not wish room temperature to be too high when drying the laundry, use the preference (Powerful) mode
instead of quick laundry mode. (Page 18)
The operation mode may automatically be switched to cooling or heating for temperature control.
At this time, the room humidity may vary by approximately 10%.
Heating
operation
Dehumidifying operation
Operation
stop
Cooling
operation
About 3
°C
Approx. 3°C if outside temp. is
below approx. 32°C.
Approx. 1°C if outside temp. is
above approx. 32°C.
Room temperature set
Current room temperature
1ºC
COOLING OPERATION
Press the (COOL) button to start cooling operation.
Press the
(COOL) button.
• Adjust the room temperature and fan speed to your preference.
Temperature range between 16°C~32°C can be set.
Press the
(STOP) button.
• A short beep sounds and cooling operation stops.
STOP
– 15 –
ENGLISH
Page 16
•
If you want to set the desired temperature and humidity during dry cool operation, we recommend
you use the manual cooling operation. (Page 17)
STOP
DRY COOL OPERATION
When you operates cooling operation with the dry function, press the (DRY COOL) button, the air conditioner
automatically sets temperature and humidity in dry cool mode.
Press the (DRY COOL) button.
•
Adjust the room temperature and fan speed to your preference.
• Every time you press the (ROOM TEMPERATURE) button, the
temperature will change by 1°C.
(Temperature setting range from the auto set temperature is not higher or
lower than 3°C.)
Press the (STOP) button.
• A short beep sounds and dry cool operation stops.
Humidity
to be set
Temperature
to be set
Based on the detected outside and room temperature,
the temperature is set on an hourly basis within the range
of 24~28°C.
• Even if the room temperature
reached the preset temperature,
the air conditioner may continue
to operate if the preset humidity
has not been reached.
50% when temperature above 27°C is set.
55% when temperature of 26°C is set.
60% when temperature below 25°C is set.
Dry
intermittent
operation
Dry cool operation
Operation
stops
Cooling
operation
About 3ºC
Approx. 3°C if outside temp. is
below approx. 32°C.
Approx. 1°C if outside temp. is
above approx. 32°C.
Room temperature set Current room temperature
About 1ºC
The operation mode may automatically be switched to cooling or heating for temperature control.
If the room temperature is lower than the preset temperature, intermittent operation (repeat of operation state
and stop state) is performed to avoid excessive lowering of temperature and to control the humidity.
DEUTSCHFRANÇAISITALIANOSPANISHPORTUGUÊS
∂ППЛУИО¿
РУССКИЙ
– 16 –
Page 17
ĄThe default setting is AUTO.
DžAdjustment Range of Dehumidifying Operation
Room Temperature
Room Temperature
Humidity
Humidity
Automatically adjusted in the
range of
50% to 60%
Auto-controlled
temperature
±3°C
Auto-controlled
temperature
±3°C
Auto dry cool
operation
Manual dry cool
operation
DžAdjustment Range of Dry Cool Operation
Setting Range of AUTO/MANUAL Operation
•
•
Press the AUTO/MANUAL button.
Example: Dehumidifying
Indicates
MANUAL
40%~70%
40%~70%
40%~70%
SWITCHING BETWEEN AUTO/MANUAL DEHUMIDIFYING/DRY COOL OPERATION
The AUTO/MANUAL button allows you to set the temperature and humidity manually during
dehumidifying/
dry cool operation.
operation
operation
10°C~32°C
16°C~32°C
– 17 –
ENGLISH
Switches to the manual mode if the machine is working in the auto
dehu
midifying/dry cool operation.
Switches to the auto mode if the machine is working in the manual
dehu
midifying/dry cool operation.
Auto dehumidifying
Manual dehumidifying
Page 18
噝Ion mist operation is the combined operation mode of the fan operation
and moisturizing operation.
噝If the Ion mist mode is set while the air conditiconer is in basic operation mode, the air purifying function by
the electric dust collector will operate together.
Press the (ION MIST) button.
噝Adjust the fan speed to your preference. “HI”, “MED”, “LOW”, “SILENT”
can be selected.
噝When only Ion mist operation is set,
and (ON TIMER) preset cannot be done.
(OFF TIMER)
Press the (STOP) button.
噝A short beep sounds and Ion mist
operation
stops.
STOP
Press the (ION MIST) button.
CANCEL
during
operation
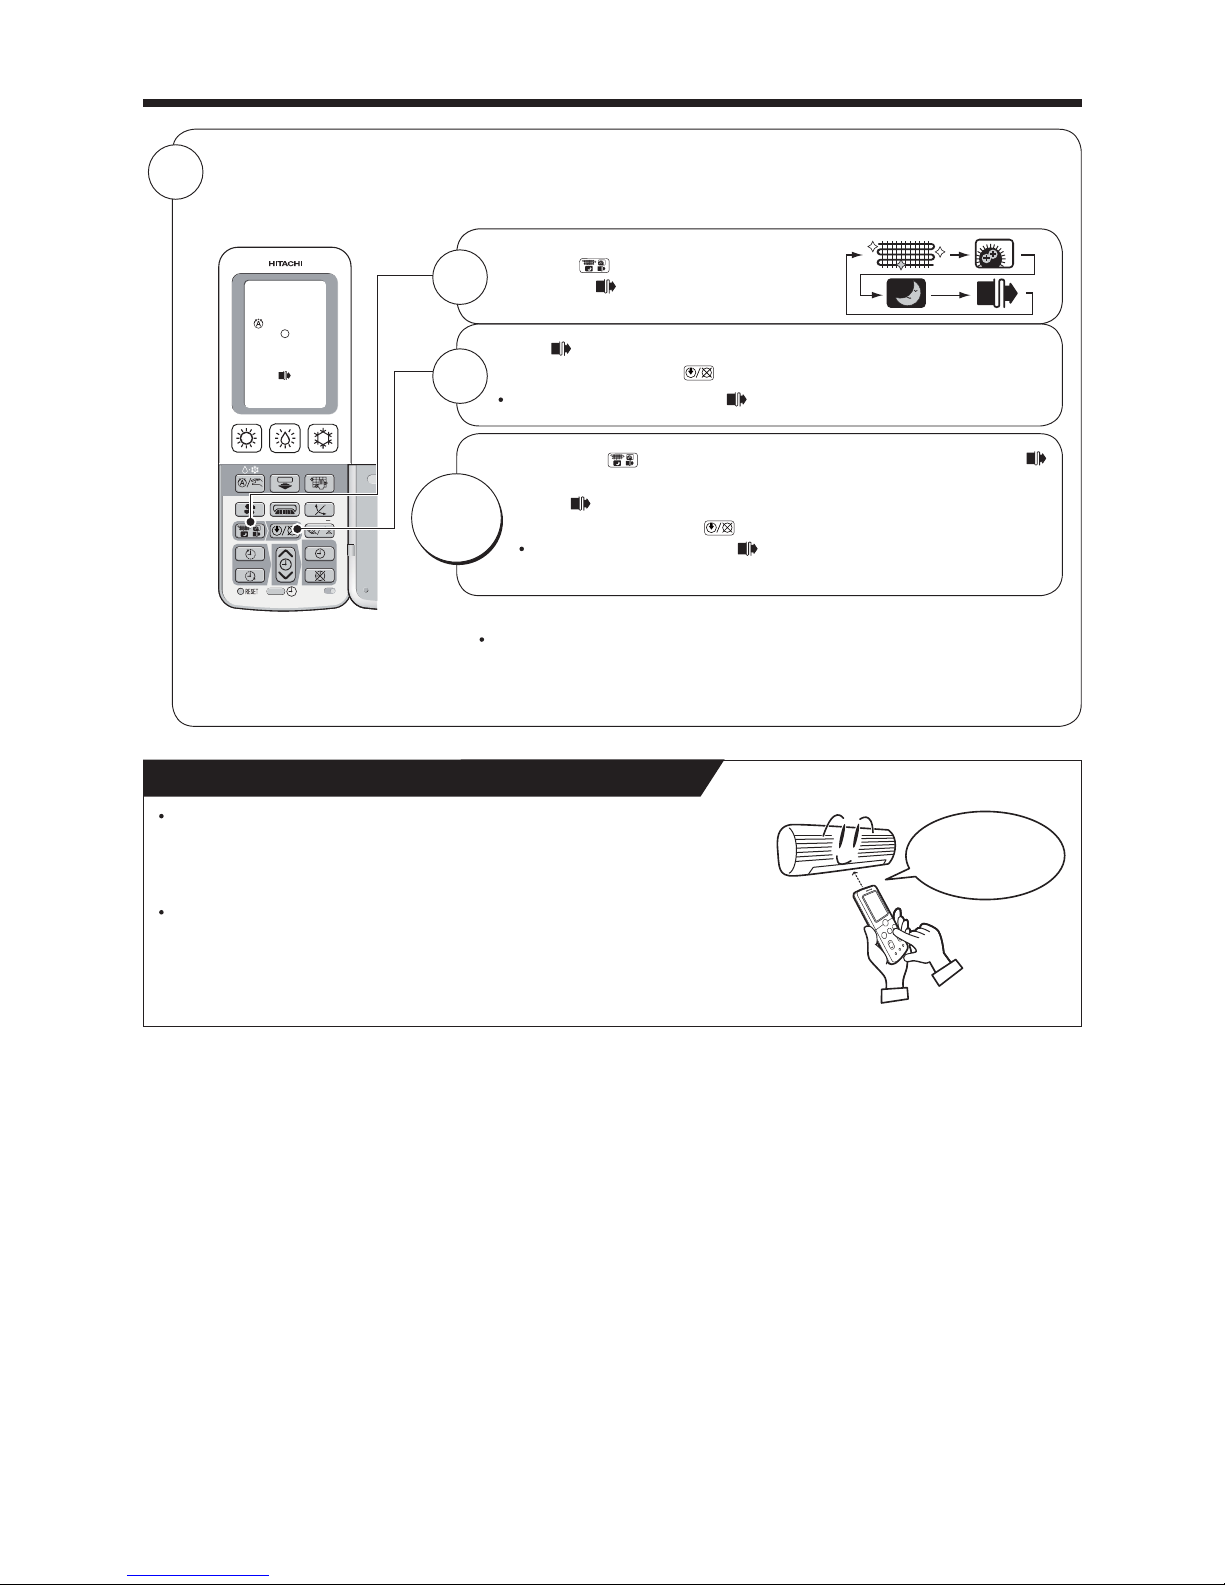
POWERFUL OPERATION
噝
噝The airflow will be extended so that the air can reach even further during powerful operation.
(Extended Airflow)
Press the (POWERFUL PERATION) button during operation.
噝A short beep sounds and the preference (Powerful) operation starts.
( POWERFUL) indicator lit on the remote controller.)
CANCEL
Press the (POWERFUL PERATION) button again.
噝 POWERFUL) indicator turns off on the remote controller.
Operation modeIn this situation
Operating mechanism
Heating
噝 When you want the room to be
a little warmer
噝 Set approximately 2°C higher than the preset
temperature. Powerful heating operation is
performed.
Cooling
噝 When you want a little cooler
air
噝 When you want the room to be
a little cooler
Auto Dehumidifying
噝 When you want to remove
humidity a little faster
噝 Laundry drying efficiency is enhanced.
噝 Condensation-control efficiency is enhanced.
Dehumidifying
噝 Set approximately 3°C lower than the preset
temperature. Powerful cooling operation is
performed.
噝 High speed dehumidifying operation is performed
aiming to achieve humidity of approximately 40%.
Condensation
Control
Quick Laundry
By pressing the (POWERFUL PERATION) button during auto, heating, dehumidifying, cooling or stainless
plasma air purifying operation, the air conditioner performs the “Powerful” operation.
ION MIST OPERATION
– 18 –
, the electric dust collector operation
,,,
Page 19

Example: Cooling
With the infrared sensor, the air conditioner can detect the activity level in a room and adjust the temperature
and humidity automatically, thus achieving the purpose of energy saving.
Press the INFRARED SENSOR button.
The infrared sensor automatically adjusts the
indoor temperature and humidity according to
the activity level in the room. However, the
temperature
and humidity specified by the
remote controller remain unchanged.
1
•
The energy saving effect can be achieved only after the energy-saving temperature control function keeps
working
for more than 2 hours.
In the energy-saving temperature-control mode, the energy consumption saved by the air conditioner varies with
the activity level.
•
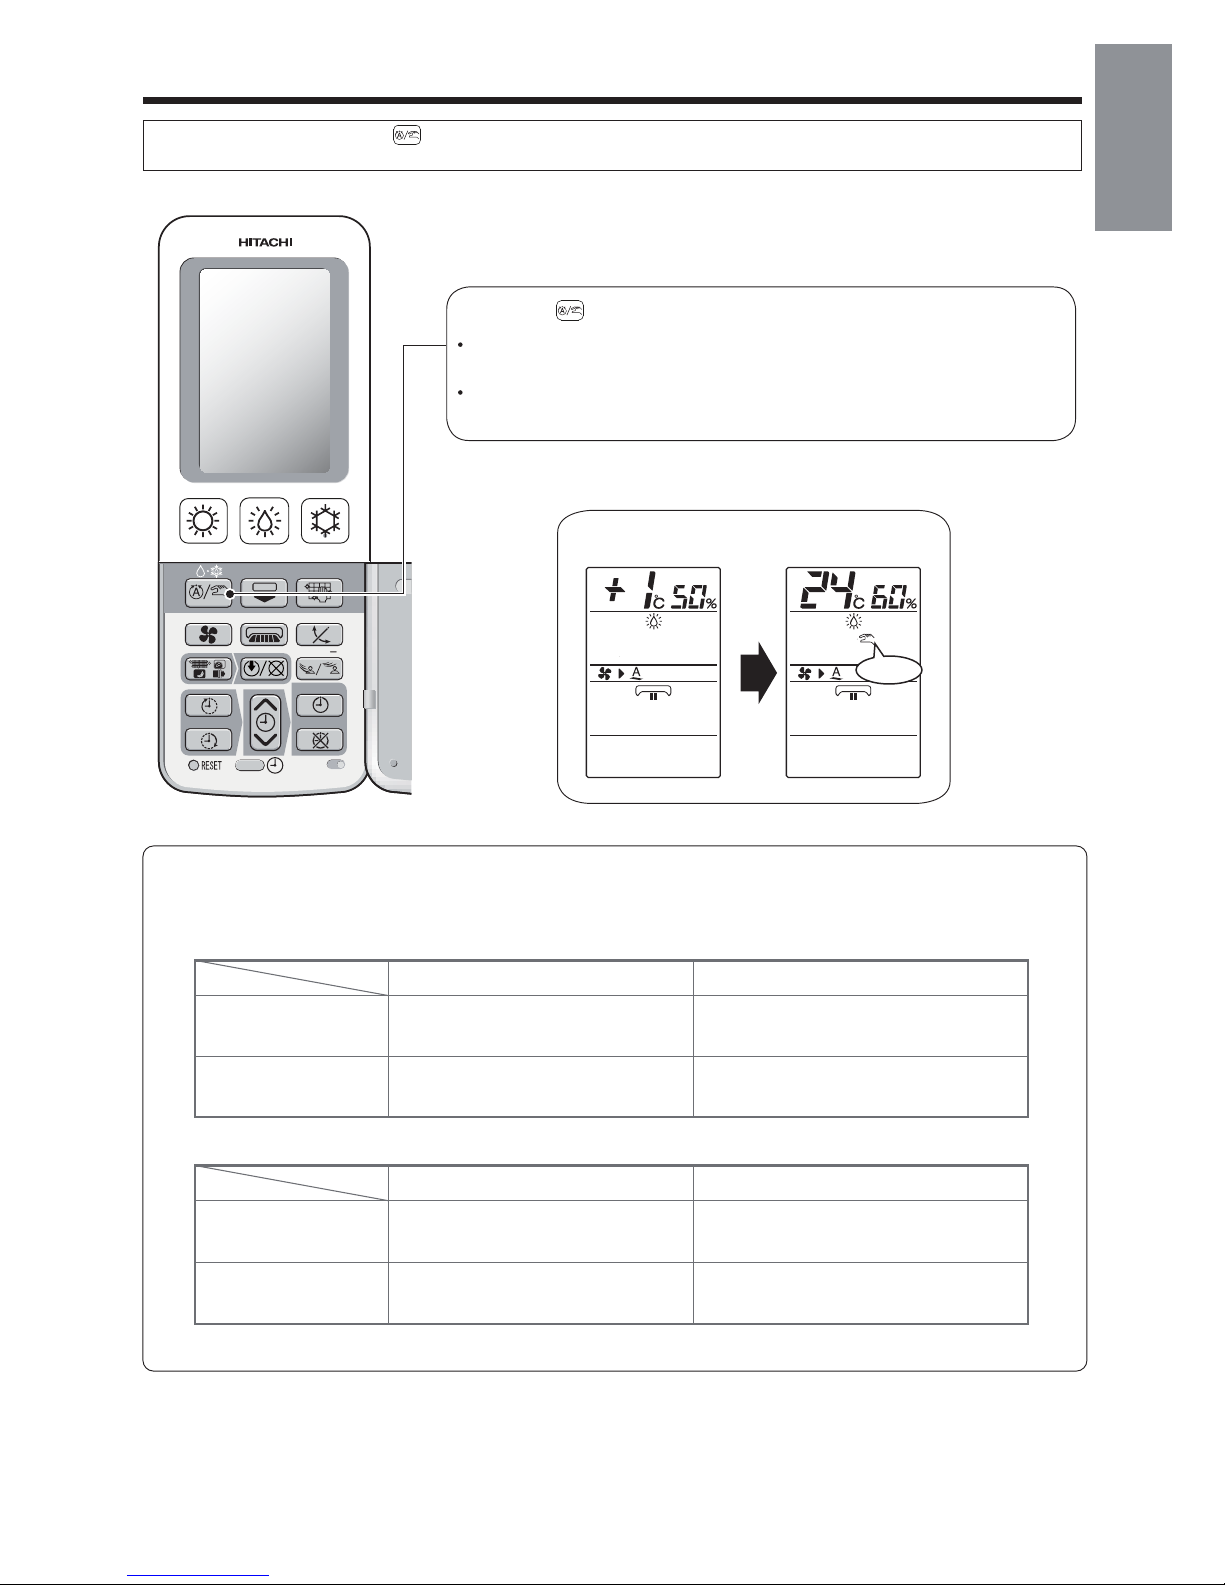
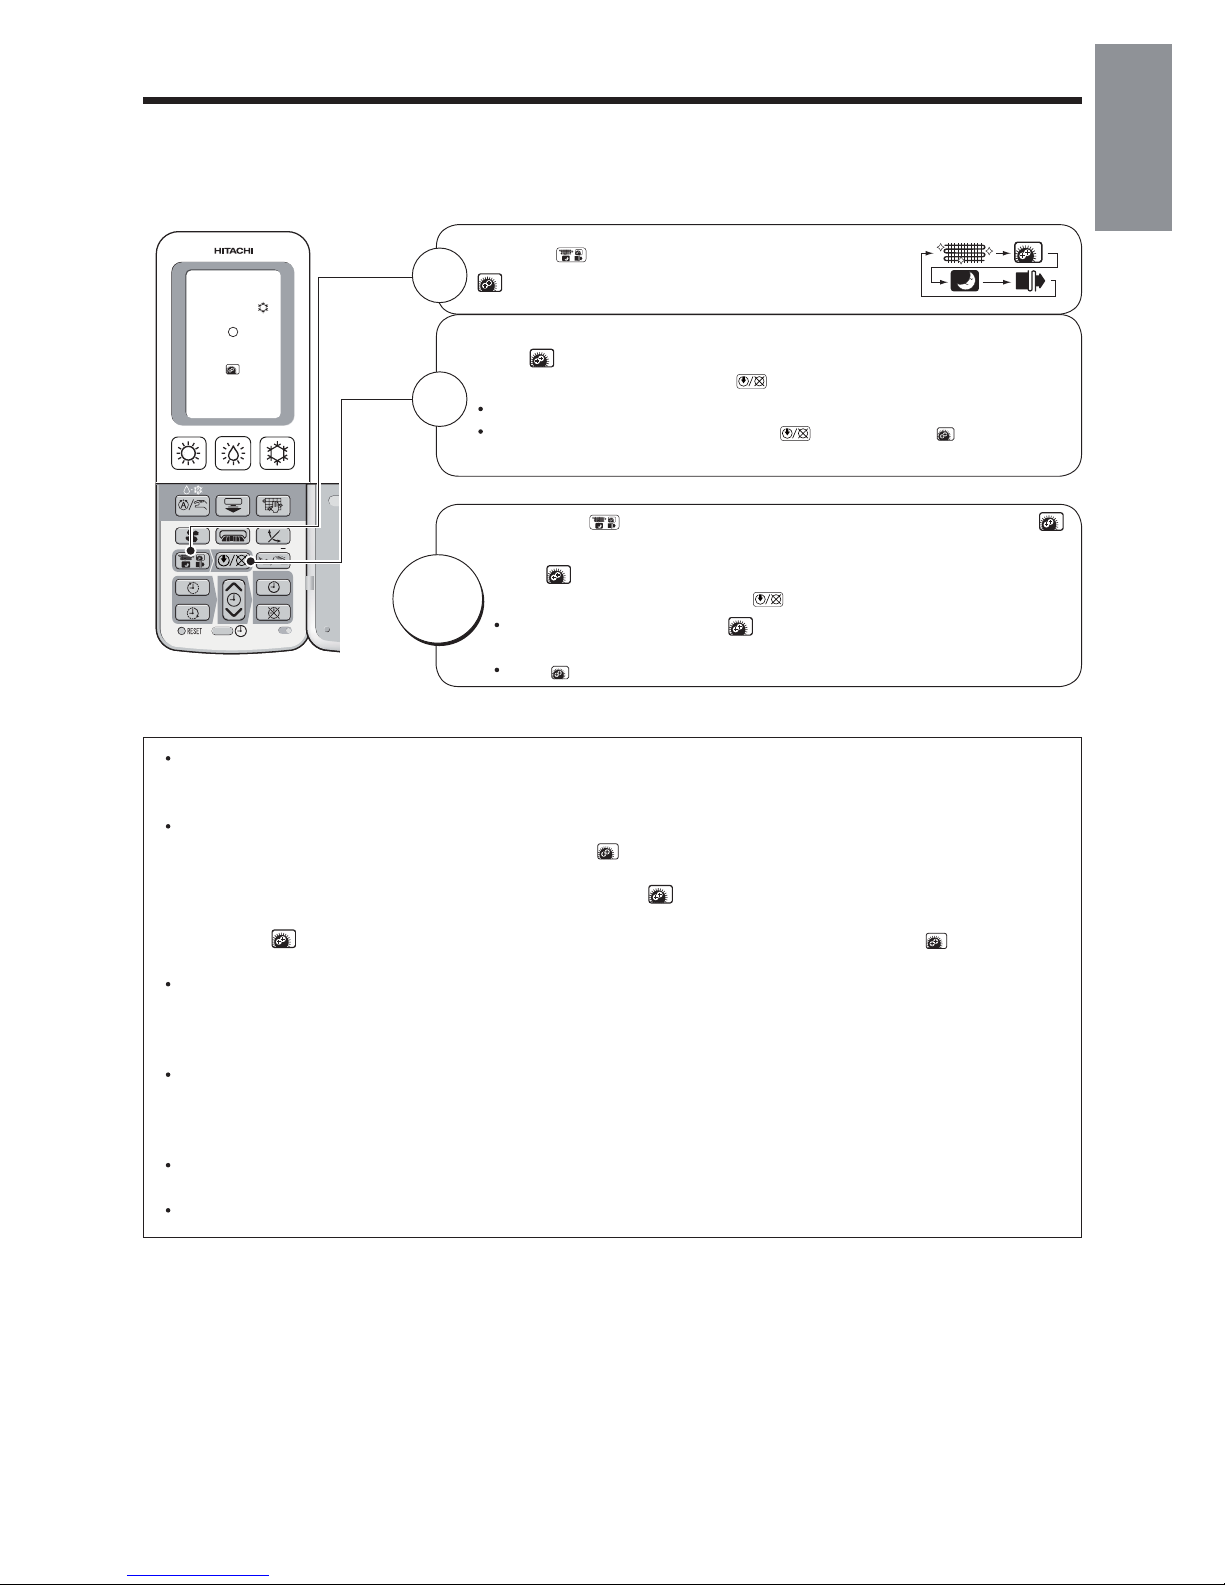
INFRARED HUMAN PRESENCE SENSING FUNCTION
•
Sensor in operation
Operation mode
Reduces the preset temperature
in one of the following cases:
Operation Description
Heating
Cooling
Auto
Dehumidifying/Dry Cool
Dehumidifying/Dry Cool
Operation mode Actions in case of no person
eDecreases the temperature by 2°C.
eIncreases the temperature by 2°C .
eIncreases the temperature by 5–10%.
eEnergy-saving operation in auto mode.
•
•
•
●
●
●
●
·
·
Auto
Cooling
Heating
·
·
•
•
Raises the preset temperature
in one of the following cases:
Low activity level
Low indoor temperature
•
•
Increases the preset temperature
in one of the following cases:
Energy-saving operation in auto
mode.
The infrared sensor detects changes to the infrared generated by human bodies. Therefore, the accuracy
of infrared
sensor may be affected negatively in the following cases:
e
e
The activity level is very low (reading, watching TV, etc.) or human bodies are blocked by a screen, cabinet, or glass board.
eeThe indoor temperature is very high and exceeds or approaches the human body temperature (when the refrigeration
just begins).
e
e
The person wears thick clothes and turns his/her back to the air conditioner.
eeCurtains or plant leaves swing due to pet movement or airflow.
Low activity level
Low indoor temperature
•
•
The tracing function (Page 20) can further reduce the energy consumption.
After detecting that the person leaves the room for 30 minutes, the air conditioner turns to the energy-saving modes
according to the settings in the remote controller as shown in the right table, but the preset temperature and humidity
in the remote controller remain unchanged.
When the air conditioner works in powerful operation, setting the energy-saving mode will cancel the powerful operation.
High activity level
High indoor temperature
– 19 –
ENGLISH
Page 20
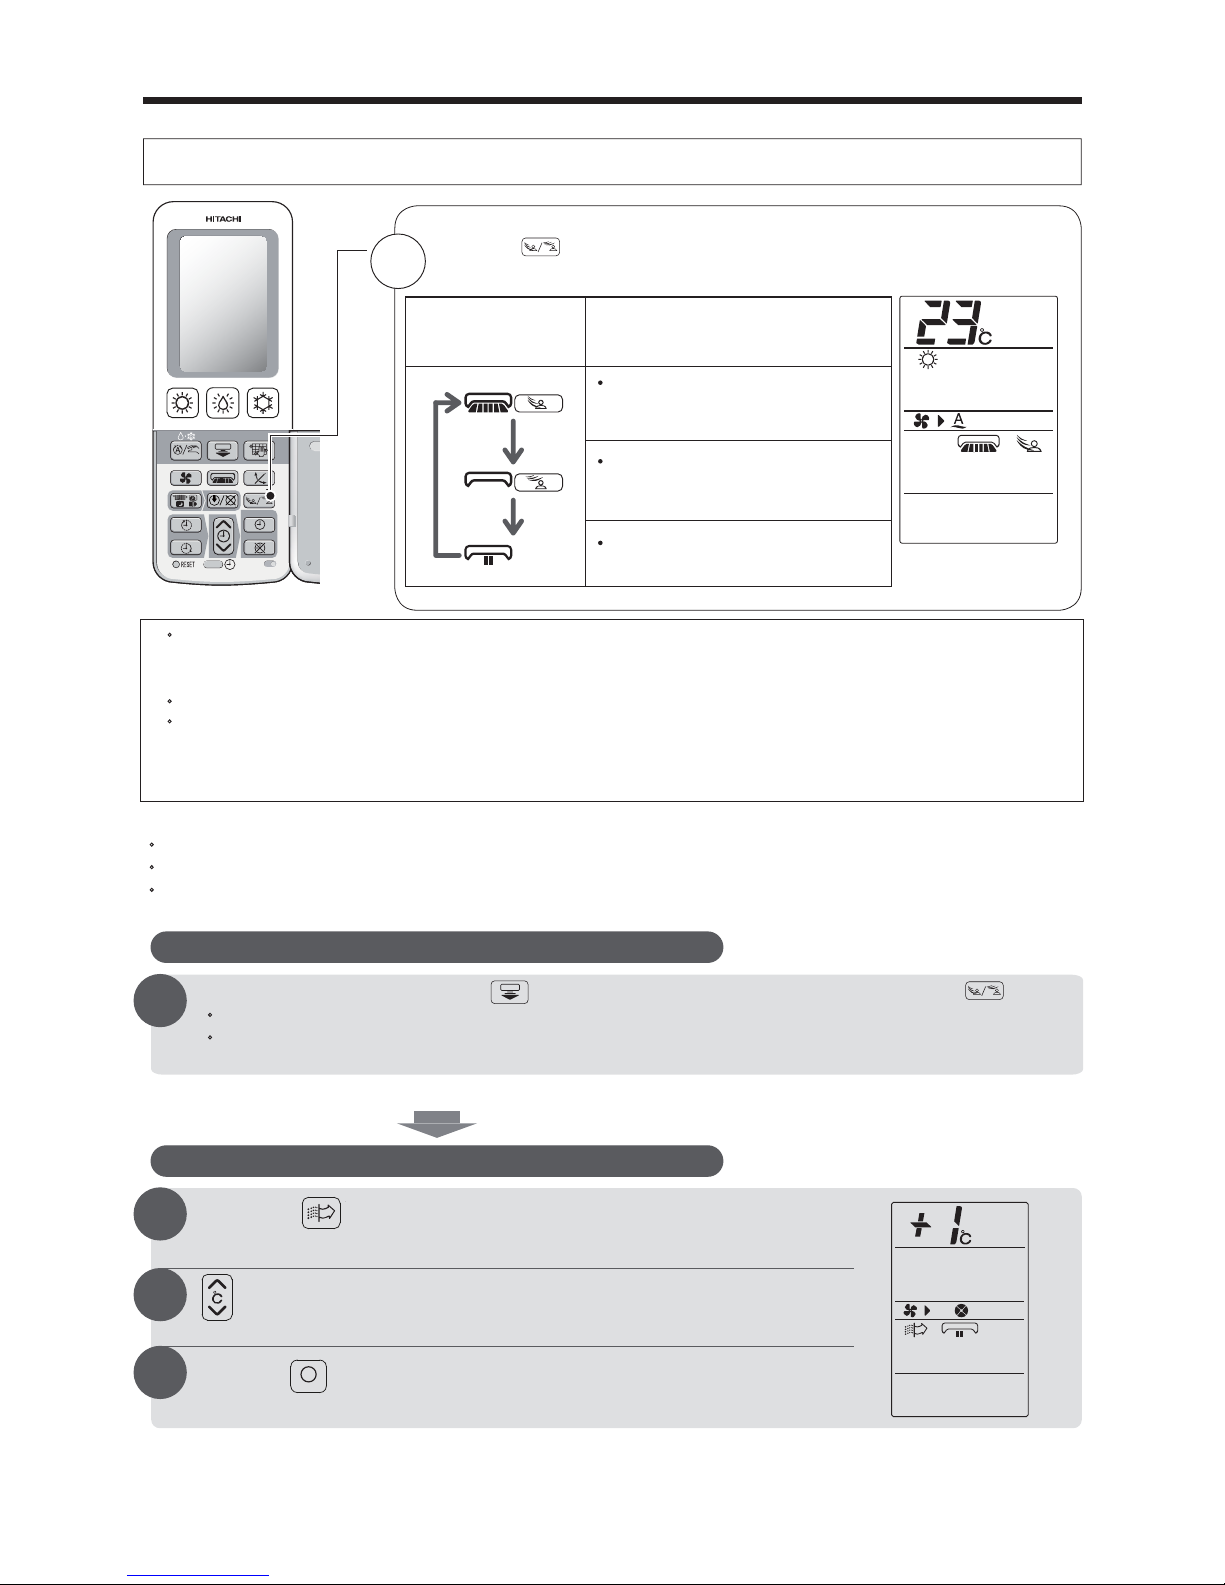
DYNAMIC AIR DEFLECTION FUNCTION (TRACING/EVASION)
The infrared sensor can detect the position of people and automatically change the airflow direction.
Press the AUTO AIR DEFLECTION button to switch the air deflection
mode.
ƽHow to change the detection speed of the sensor of the dynamic air deflection (tracing/evasion) function:
e
There are 2 detection speeds: “Standard” (by intervals of 15"–3') and “Slow” (by intervals of 1'–10').
e
The remote controller is set to the standard speed by default.
e
When the detection speed of the sensor is too high, set the detection speed to “Slow”
(when people and pets in the room behave frequently, resulting in frequent changes to the airflow direction).
e
After the dynamic air deflection mode is set, the sensor usually works once every 15 seconds to 3 minutes to
detect the position of the person and adjusts the airflow direction accordingly.
(The airflow direction does not change with the movement of human body immediately.)
e
If the dynamic air deflection mode fails to achieve the desired effect, adjust the airflow direction manually.
e
When the machine works in cooling, dehumidifying, or dry cool operation after the dynamic air deflection is set,
if the indoor humidity/temperature is very high, the left/right/upper/lower air deflectors may change their angles
to prevent drop of condensed water. After the temperature falls, the air conditioner returns to the dynamic air
deflection status.
1
e(Tracing) Adjusts the airflow direction
automatically to send the air flow to
the location of the person.
e
(Tracing) Adjusts the airflow direction
automatically to keep the air flow away
from the location of the person.
e
Return to the setting prior to the dynamic
air deflection mode.
Pressing the
DYNAMIC
AIR DEFLECTION
button
Release the
Dynamic Air
Deflection button
Operation Description
Example: Heating
Hold down after the running stops
Select the desire setting.
(Finely tuned within +3 to -3. The indicator turns off 10 seconds later)
Press the (STOP) button eThe settings are saved.
Set the detection speed of the sensor to “Slow”.
After the running stops, hold down for more than 5 seconds while pressing and holding .
e
At this time, the air conditioner beeps for signal receiving.
e
Return to the “Standard” mode by repeating the above procedure (until the air conditioner beeps for
signal receiving).
In addition to “Standard” and “Slow” modes, you can also fine tune the detection speed of the sensor.
Fine tune the detection speed of the sensor
DEUTSCHFRANÇAISITALIANOSPANISHPORTUGUÊS
∂ППЛУИО¿
РУССКИЙ
– 20 –
Page 21
2
1
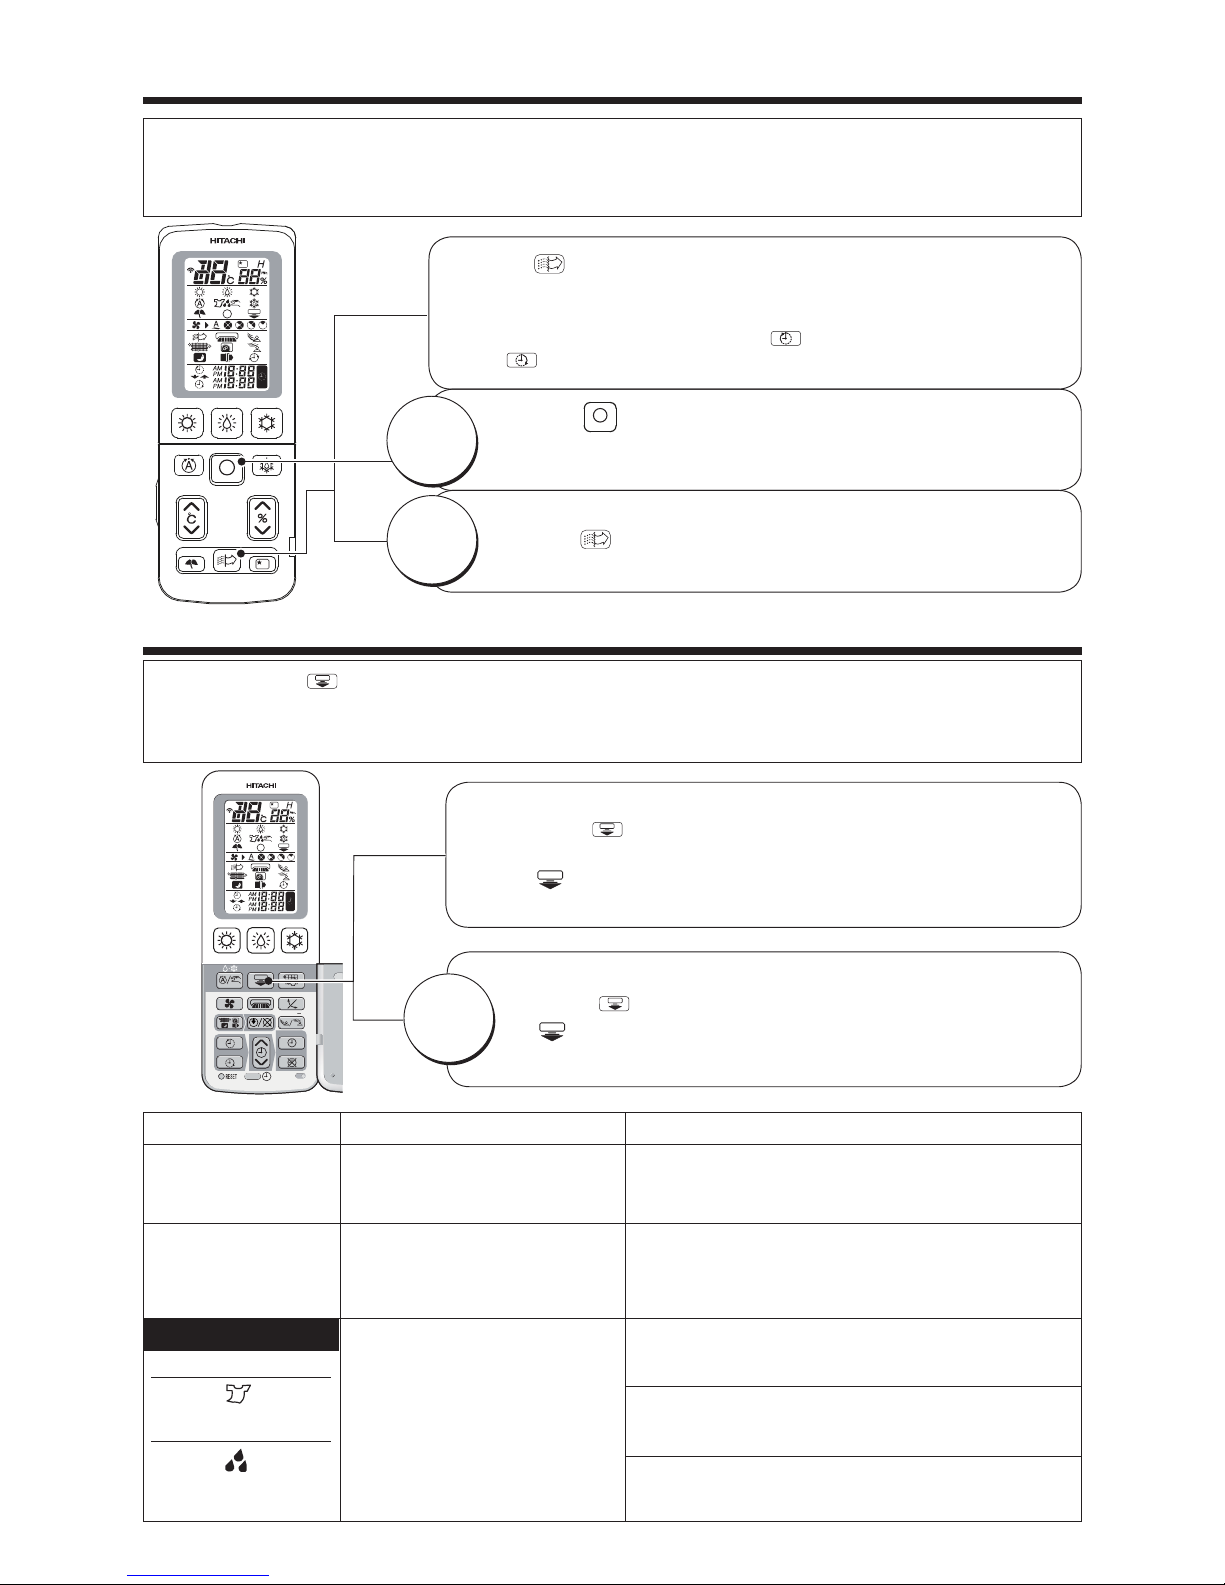
INTERNAL CLEANING OPERATION
The internal cleaning operation is automatically performed after cooling, dehumidifying or dry cool operation to
control mold growth by configuring the (INTERNAL CLEAN) operation. (There is no mold removing function
and disinfecting/sterilizing effect.)
Press the (FUNCTION SELECTOR) button
until (INTERNAL CLEAN) blinks.
While (INTERNAL CLEAN) is blinking, point the remote controller
towards the unit and press the (ON/OFF) button.
• A short beep sounds and (INTERNAL CLEAN) indicator turns on
at the remote controller.
Press the (FUNCTION SELECTOR) button again until
(INTERNAL CLEAN) blinks.
While (INTERNAL CLEAN) is blinking, point the remote controller
towards the unit and press the (ON/OFF) button.
• A short beep sounds and (INTERNAL CLEAN) indicator turns off
on the remote controller.
• Internal cleaning operation is not performed if the duration of cooling, dehumidifying or dry cool operation is
too short (below approximately 10 minutes).
• If the internal cleaning mode is set, the internal cleaning operation will automatically start when cooling,
dehumidifying or dry cool operation is stopped. During internal cleaning, the heating operation and fan operation
(with stainless plasma air purifying) are performed to control the mold growth inside the indoor unit.
• While (ON TIMER) is set, internal cleaning operation is not performed from 2 hours before the preset
time.
• Internal cleaning operation is not performed if the air conditioner operation is stopped in any of the following
conditions below.
(heating operation, stainless plasma air purifying operation, quick laundry operation and (OFF TIMER) stop
under condensation control operation, operation stopped by
(SLEEP) button.)
ENGLISH
DEUTSCHFRANÇAISITALIANOSPANISHPORTUGUÊS
∂ППЛУИО¿
РУССКИЙ
– 21 –
ENGLISH
STOP
Page 22
1
2
By configuring (SLEEP) operation while the sleep timer is set for auto, heating, dehumidifying, cooling and
dry cool modes, the air conditioner supports your comfortable sleeping environment.
Press the (FUNCTION SELECTOR) button
until (SLEEP) blinks.
While (SLEEP) is blinking, point the remote controller towards the unit
and press the (ON/OFF) button.
• A short beep sounds and (SLEEP) indicator turns on on the remote
controller.
Press the (FUNCTION SELECTOR) button again until (SLEEP)
blinks.
While (SLEEP) is blinking, point the remote controller towards the
unit and press the (ON/OFF) button.
• A short beep sounds and (SLEEP) indicator turns off on the remote
controller.
STOP
• When in cooling operation, the temperature and humidity will be controlled in combination with dehumidifying
operation.
• When in dehumidifying or dry cool mode, temperature is controlled to a comfortable level with the preset
humidity target level of 60%.
• When in heating operation, temperature is controlled in the same manner as ordinary sleep mode.
• When in automatic operation, a control is executed according to the operation mode set by the auto
function.
– 22 –
SLEEP OPERATION
Page 23
1
2
The air conditioner detects indoor temperature and humidity. Once the temperature and humidity reaches to a
level conductive to mold growth, the dehumidifying and stainless plasma air purifying operations automatically
start.
Press the (FUNCTION SELECTOR) button until
(MOLD MONITOR) blinks.
While (MOLD MONITOR) is blinking, point the remote controller
towards the unit and press the (ON/OFF) button.
• Preset the mold monitor operation.
• During the mold monitor operation, (ON/OFF) and (MONITOR)
indicators on the indoor unit turns on.
Press the (FUNCTION SELECTOR) button again until
(MOLD MONITOR) blinks.
While (MOLD MONITOR) is blinking, point the remote controller
towards the unit and press the (ON/OFF) button.
• A short beep sounds and (MOLD MONITOR) indicator
turns
off
on the remote controller.
• The (MONITOR) indicator on the indoor unit turns off.
CANCEL
• Mold monitoring operation is a preset function. Even if mold monitoring mode is preset, the actual operation
will be performed only when the detected temperature and humidity has reached the level conducive to mold
growth.
• The setting of mold monitoring mode is valid for 2 weeks from the last remote control operation.
(If any remote control operation is performed while (MOLD MONITOR) is set, the preset mold monitoring
mode is valid for 2 weeks from such remote control operation.)
Once the above mentioned 2 weeks have elapsed, the (MONITOR) indicator on the indoor unit turns
off.
(However,
(MOLD MONITOR) indication on the remote controller remains on. If the (MONITOR)
indicator on the indoor unit is off, please reset or cancel the mold monitoring mode.)
• When mold monitoring mode is set, the fan operation is performed for approximately 3 minutes once every
approximately 20 minutes and the room temperature and humidity are detected.
(The movable panel and horizontal air deflector remain closed when temperature and humidity are
detected.)
• In the first cycle of mold monitoring operation, dehumidifying operation is performed for 4 hours consecutively
if the detected temperature and humidity are 10°C and more and 70% and more, respectively. From the
second cycle onwards, dehumidifying operation is performed if the detected temperature and humidity reach
the above mentioned level and will stop once the humidity has gone down.
• For the duration of 20 minutes after mold monitoring operation temporarily stops, the mold monitoring operation
is not performed immediately even if mold monitoring mode remains set and the humidity exceeds 70%.
• There is no function to remove mold that has grown.
– 23 –
ENGLISH
MOLD MONITOR OPERATION
Page 24
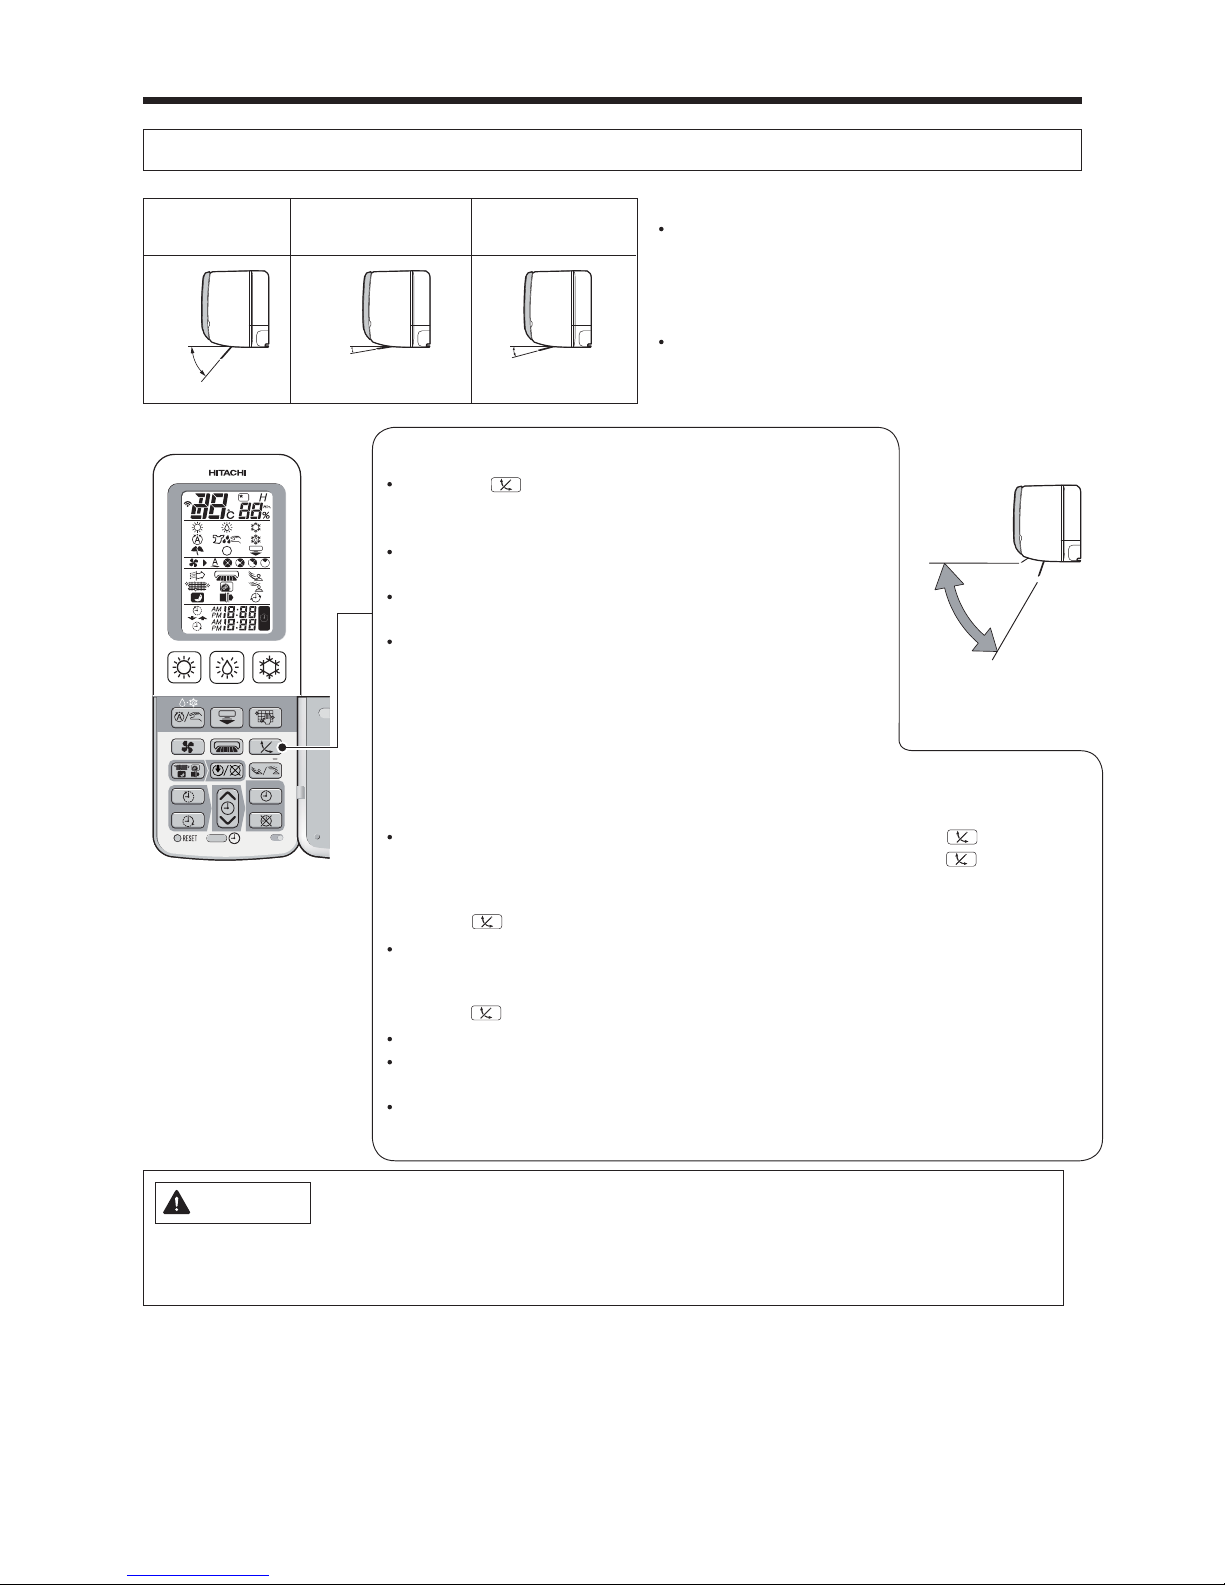
60°
15°
10°
50°
ADJUSTING THE VERTICAL AIRFLOW DIRECTION
Please operate with the remote controller. (Moving by hands may cause malfunction.)
Cooling
operation
Heating
operation
Dehumidifying/
Dry Cool operation
About
About
About
Set automatically
• Air conditioner automatically set to the suitable
angle for each operation (Horizontal air deflector
only. The angle of the vertical air deflector is set to
the front). Usually vertical airflow direction control
is not required.
• If room temperature and humidity continue to be
high during cooling, dehumidifying or dry cool
operation, the angle of horizontal air deflector may
change to prevent dripping of condensed water.
Swing
angle
About
Horizontal
Vertical airflow swing
• When the (VERTICAL AIRFLOW) button is pressed,
a short beep sounds and the vertical air deflector repeats
swinging.
• When the air conditioner stops operation, the swing of the
vertical air deflector also stops and the air outlet closes.
• If the operation resumes, the vertical air deflector is
automatically set to the suitable angle for each operation.
• Even if the swing mode is set, the vertical air deflector may
stop swinging depending on the room temperature and
humidity. (Page 25)
(It may take approximately 10 seconds for the air deflector
to start moving. This is due to the checking operation to set
the air deflector to the correct angle.)
Vertical air flow of your preference
• To set the vertical airflow direction to your desired angle, press the (VERTICAL
AIRFLOW) button to move the vertical air deflector, and press the (VERTICAL
AIRFLOW) button again to stop air deflector at your desired angle.
Press the (VERTICAL AIRFLOW) button.
• A short beep sounds and the vertical air deflector repeats swinging.
(Vertical airflow swing)
Press the (VERTICAL AIRFLOW) button again at your preferred angle.
• The swing stops at the position where the button is pressed.
• The air outlet closes if the operation stops. The horizontal air deflector will return to
the preset position when the operation resumes.
• If the operation mode is changed, the horizontal air deflector will automatically be
set to the proper angle suitable for the newly set mode.
CAUTION
DO not operate long hours with cooling, dehumidifying, dry operation, airflow swing operation nor
the vertical air deflector in downward state.
Some dew may form on the vertical air deflector and drop which may wet your furniture.
ENGLISH
DEUTSCHFRANÇAISITALIANOSPANISHPORTUGUÊS
∂ППЛУИО¿
РУССКИЙ
– 24 –
Page 25

•
The movements of the left and right air deflectors displayed in the remote controllers
are not synchronous with movements of the actual air deflectors.
ADJUSTING THE HORIZONTAL AIRFLOW DIRECTION
Adjust the horizontal airflow direction
• The angle of horizontal airflow direction is set to the front at the
time of purchase.
• Every time the button is pressed, the mode of the horizontal air deflector
changes as below.
• A short beep sounds and the angle of the horizontal air deflector changes.
Front
Horizontal
swing
preferred angle
Horizontal angle of your preference
• • To set the horizontal airflow direction to your desired angle, move the
horizontal air deflector and press the (HORIZONTAL AIRFLOW) button
again to stop air deflector’s movement once it has reached your desired
angle.
Press the (HORIZONTAL AIRFLOW) button again to fix your preferred
angle during horizontal airflow swing.
• Fan speed may be increased depending on the angle of the horizontal air
deflector.
• Even if the horizontal airflow direction has been adjusted to your desired
angle, the angle of horizontal air deflector may change in the event the room
temperature and humidity continue to be high during cooling, dehumidifying
or dry cool operation. The angle will change back to your desired angle once
the temperature and humidity have been lowered by the air conditioning
operation.
CAUTION
Do not operate long hours with cooling, dehumidifying, dry cool operation and horizontal airflow swing
operation.
Some dew may form on the horizontal air deflector and drop which may wet your furniture.
In the following cases, the swing stops even when vertical swing and horizontal swing are set.
In Heating operation In Dehumidifying operation In Dry Cool operation
• During preheat operation.
• During defrost operation.
• When the room temperature
reaches the temperature which
had been set.
• When the humidity is reached
to the humidity which has been
set.
• When the room temperature is
below 1°C.
• When the temperature is below
the temperature which has been
set and the operation is stop.
The movement scope of the left/right air deflectors are set to the following
5 positions:
– 25 –
ENGLISH
Page 26
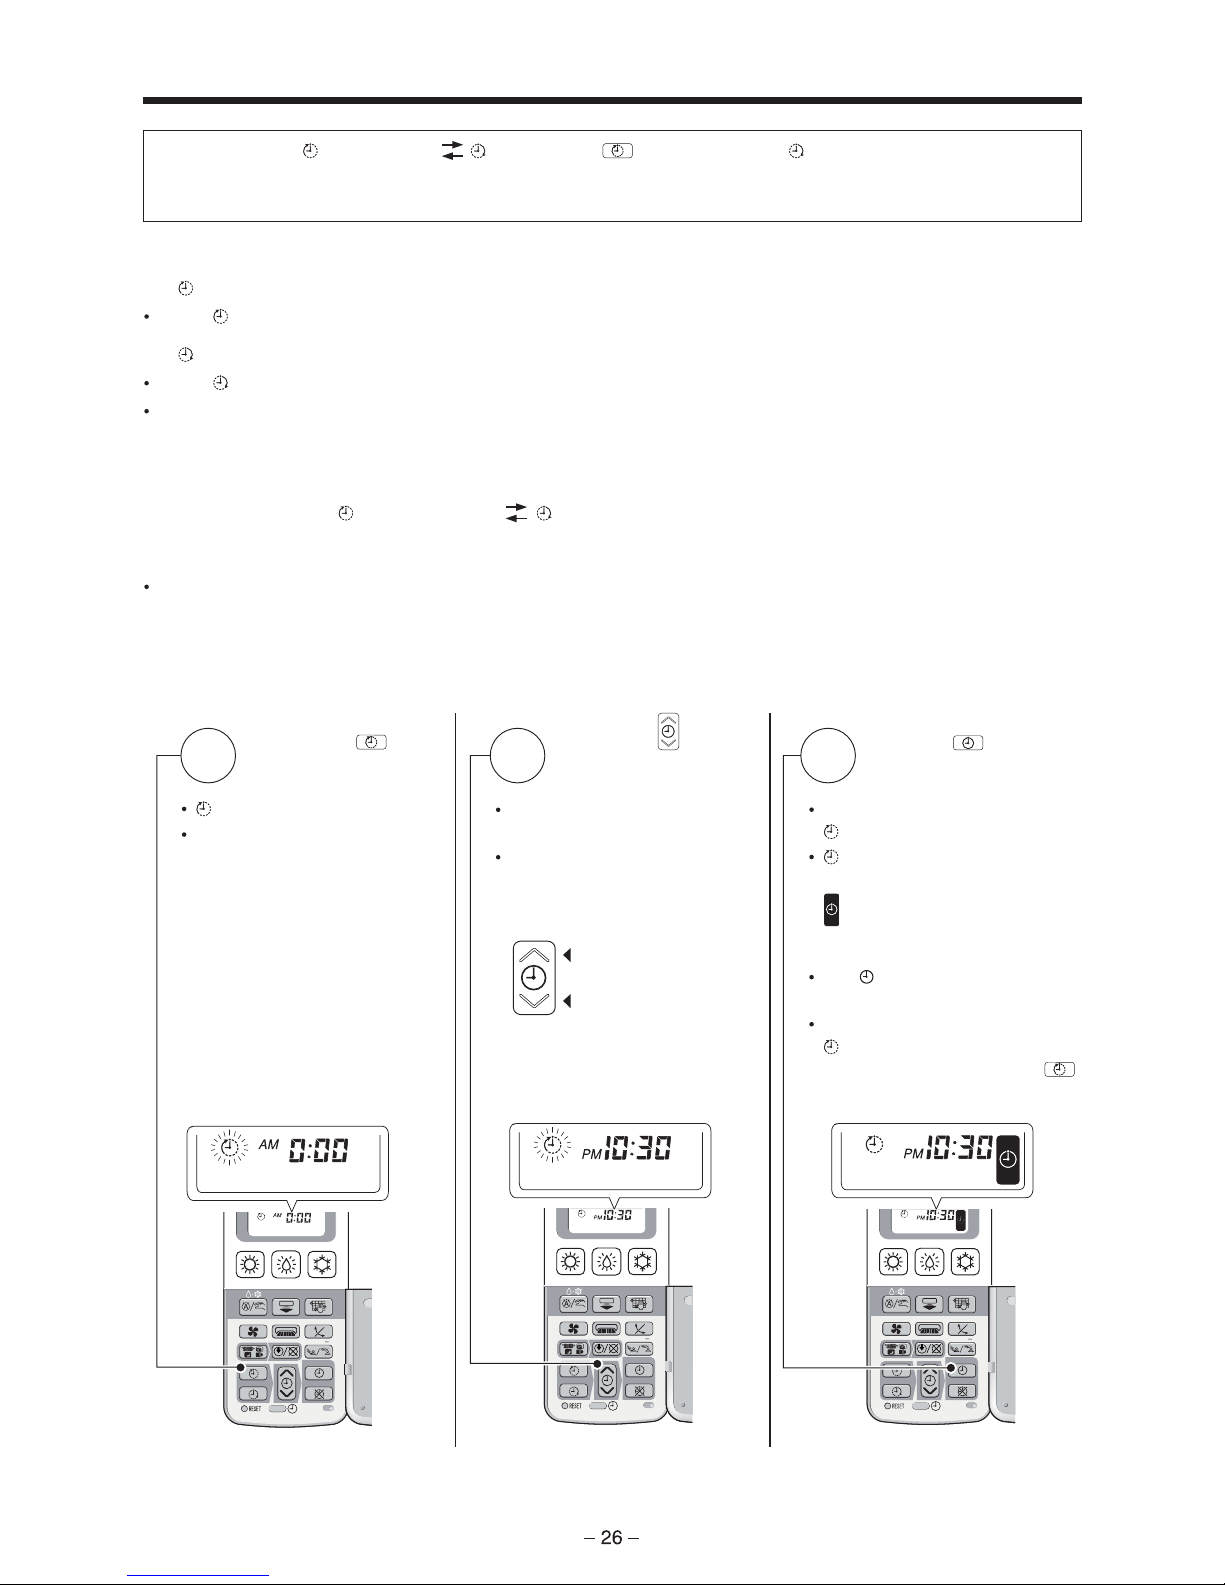
TIMER PRESET OPERATION
How to preset the timer
1
3
2
3 types of timers, (OFF TIMER) (ON TIMER), (OFF TIMER) and (ON TIMER) are available. Only
one of these timers can be preset at a time.
Operation mode, temperature, humidity and fan speed, etc. must be set before setting the timer.
For
(OFF TIMER) preset
• When
(OFF TIMER) is set, the operation stops at the preset time.
For
(ON TIMER) preset
• When
(ON TIMER) is set, the operation starts so that the preset temperature is reached at the preset time.
• The air conditioner starts operation a maximum of 60 minutes before the preset time, depending on conditions
including room temperature and preset temperature.
How to preset the (OFF TIMER) (ON TIMER)
(For example: When setting the timer to stop operation at 10:30 p.m. and your desired temperature is reached at
7:00 a.m.)
• The timer with earlier preset time will function first, based on the time at which the timer is set.
Press the
(OFF
TIMER) button.
•
(OFF TIMER) blinks.
• 0:00 a.m. or the previous preset
time is displayed.
Press the
(TIMER)
button to set the time.
• Time can be set in increments
of 10 minutes.
• The time can be fast-forwarded
by continuously pressing the
button.
Time is incremented
Time is decremented
Press the
(PRESET)
button.
• A short beep sounds and the
(OFF TIMER) is set.
•
(OFF TIMER) indication
stops blinking and lights up.
(TIMER SET) will be
displayed.
• The
(TIMER) indicator on the
indoor unit lights up.
• To change the preset time for
(OFF TIMER) ,return to
procedure and press the
(OFF TIMER) button.
Page 27
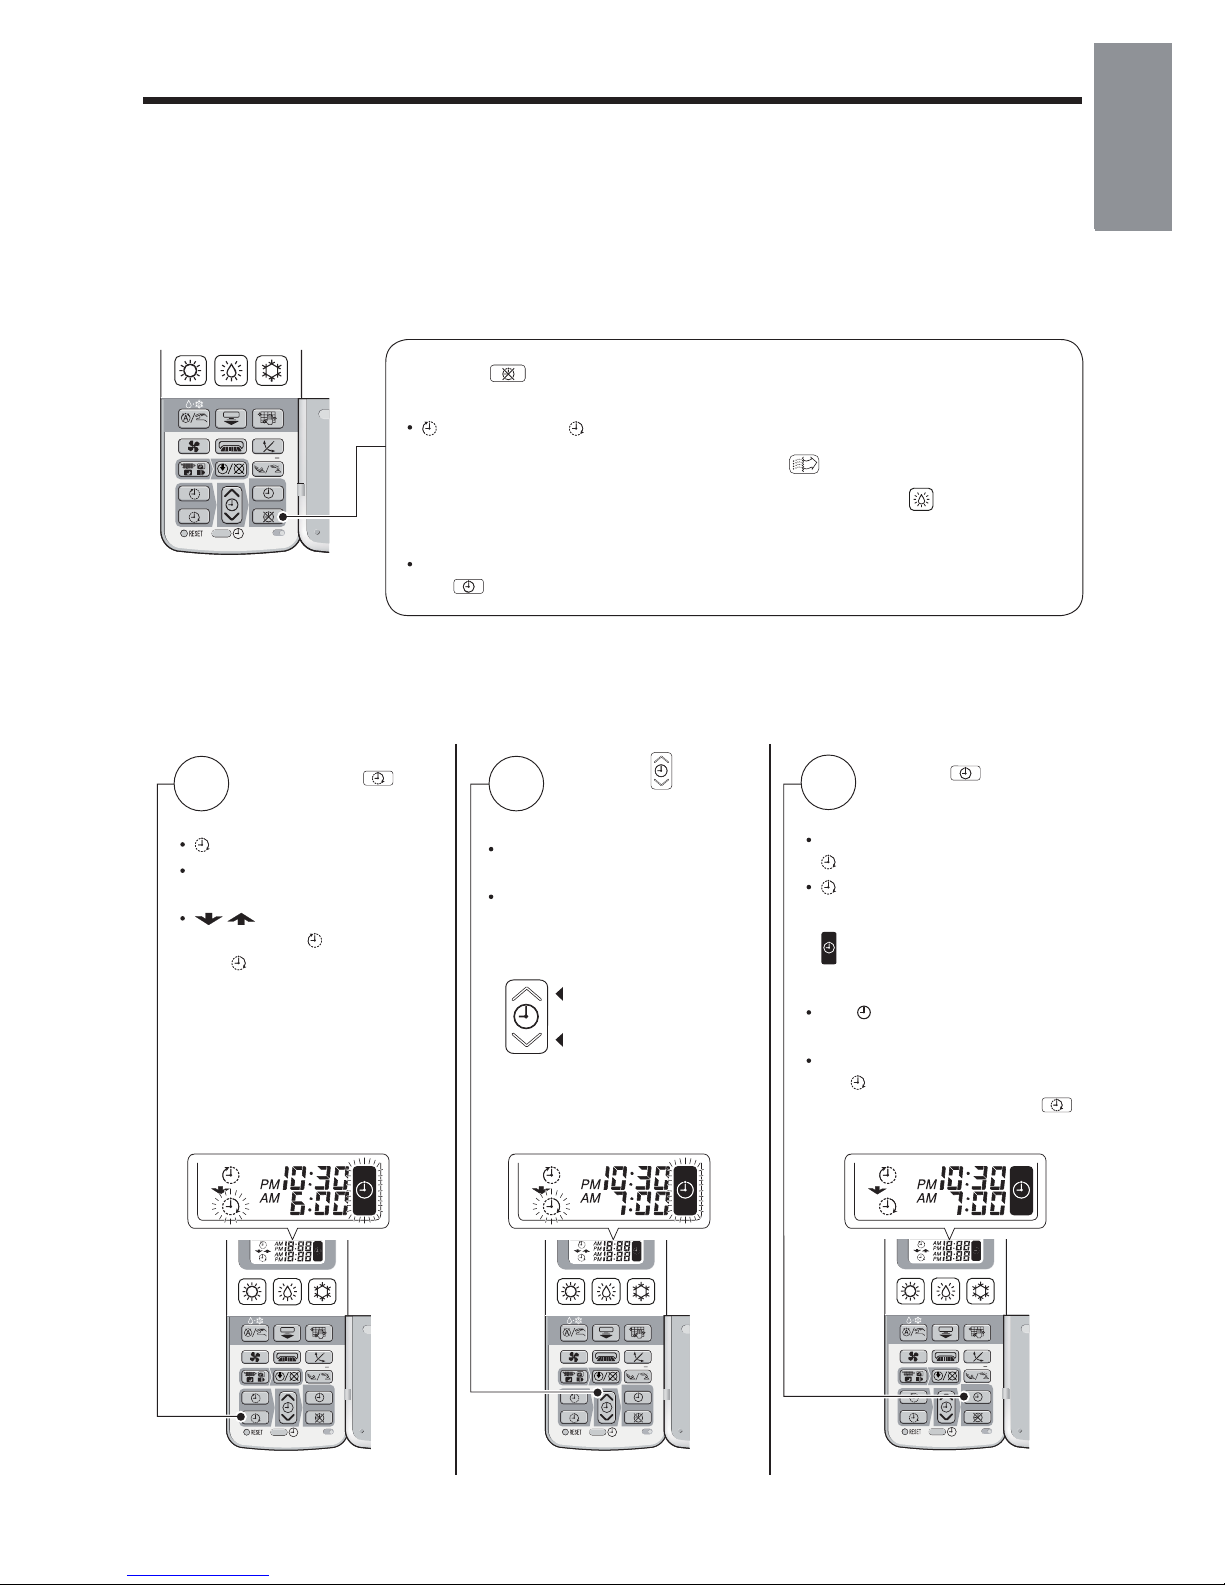
4
5
6
How to cancel the preset timer
Press the (CANCEL) button.
(All the preset timer will erase)
•
(OFF TIMER) / (ON TIMER), which are to be set using the clock function,
cannot be set during the operation set by the
(AIR
during the quick laundry or condensation control mode
PURIFYING) buttons or
operation.
under (DEHUMIDIFY)
• As the time settings are stored in memory in the remote controller, just press
the
(PRESET) button in order to use the same settings next time.
Press the
(ON
TIMER) button.
•
(ON TIMER) blinks.
• 6:00 a.m. or the previous preset
time is displayed.
•
display indicates the
sequence of
(OFF TIMER)
and
(ON TIMER) function.
Press the
(TIMER)
button to set the time.
• Time can be set in increments
of 10 minutes.
• The time can be fast-forwarded
by continuously pressing the
button.
Time is incremented
Time is decremented
Press the (PRESET)
button.
• A short beep sounds and the
(ON TIMER) is set.
•
(ON TIMER) indication stops
blinking and lights up.
(TIMER SET) will be
displayed.
• The
(TIMER) indicator on the
indoor unit lights up.
• To change the preset time
for
(ON TIMER) ,return to
procedure and press the
(ON TIMER) button.
ENGLISH
DEUTSCHFRANÇAISITALIANOSPANISHPORTUGUÊS
∂ППЛУИО¿
РУССКИЙ
DEUTSCHFRANÇAISITALIANOSPANISHPORTUGUÊS
∂ППЛУИО¿
РУССКИЙ
– 27 –
ENGLISH
Page 28
1
2
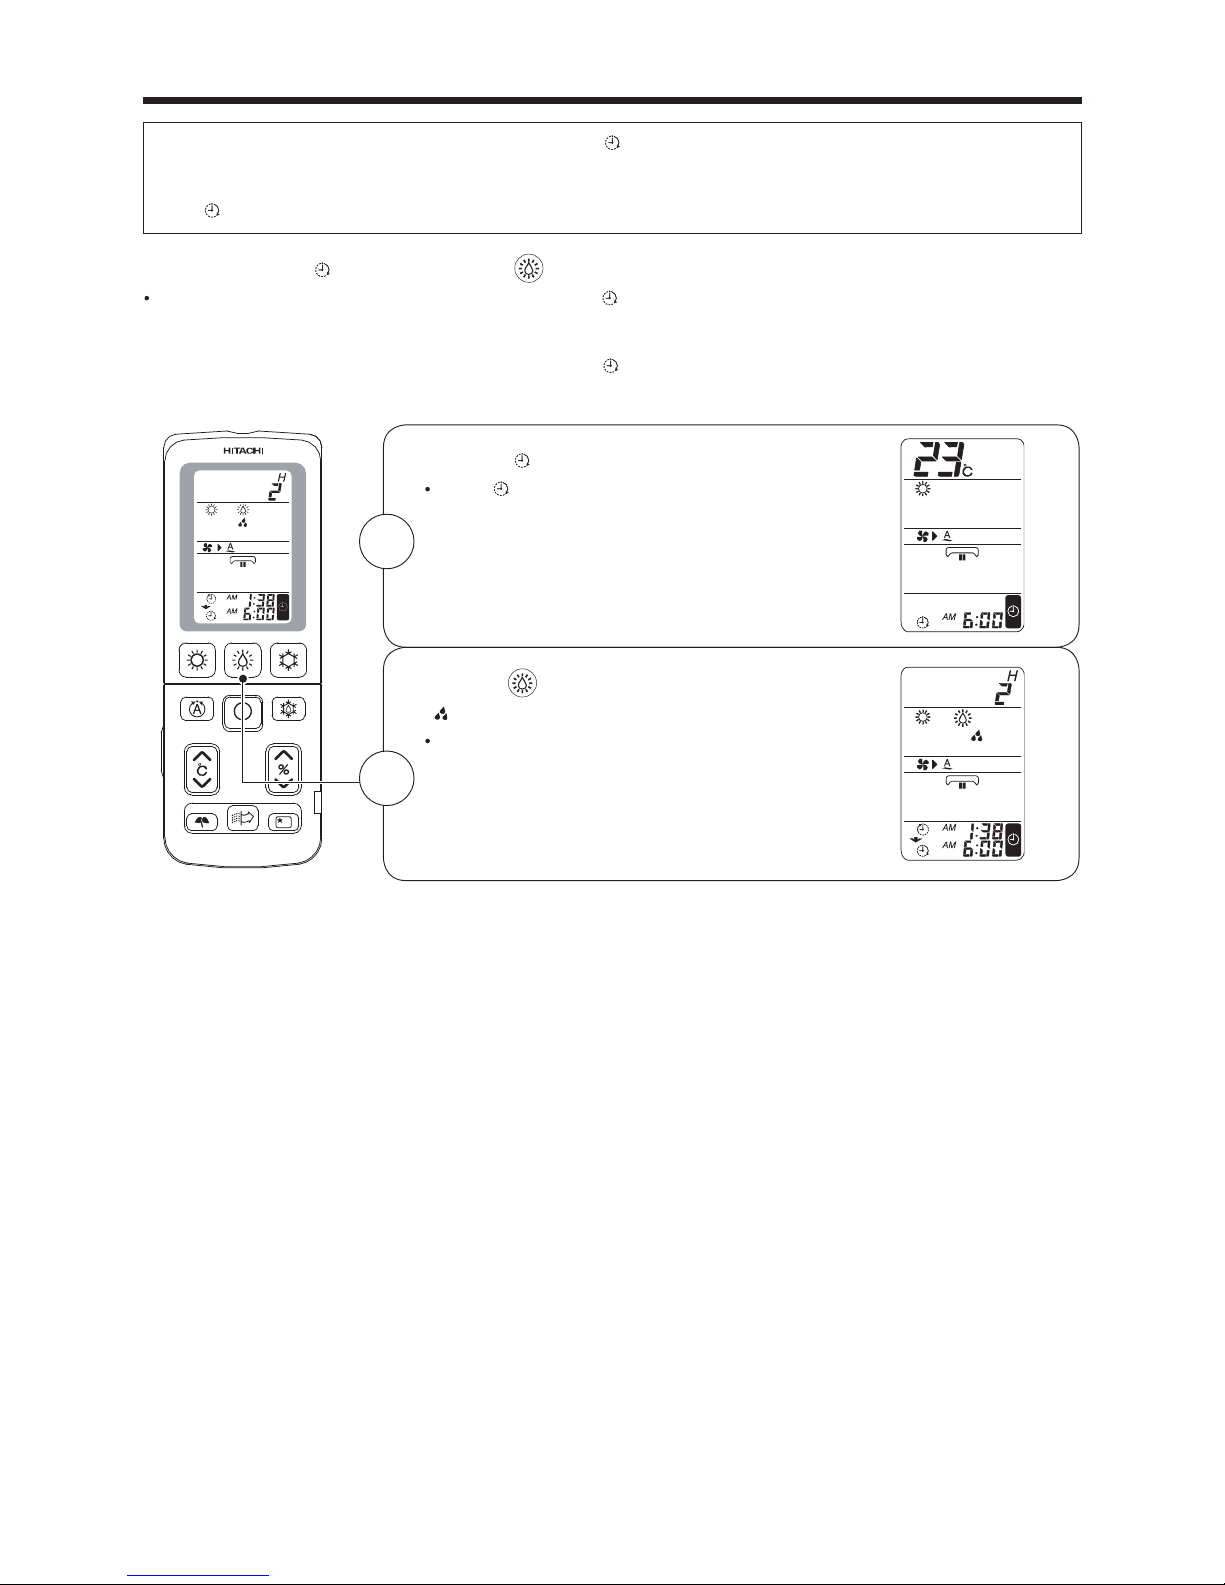
FURTHER CONVENIENT TIMER FUNCTION
Dehumidifying (Condensation control) operation and
(ON TIMER) for heating operation can be set at the
same time.
Dehumidifying (Condensation control) operation controls the condensation which may occur in the morning
while
(ON TIMER) for heating operation warms up the room by the time you wake up.
Combination of (ON TIMER) and (DEHUMIDIFY) button
• Dehumidifying (Condensation control) operation and (ON TIMER) for heating operation for the next morning
can be set in combination before you go to sleep.
The display below is shown in the case where
(ON TIMER) is set for heating operation and then
dehumidifying operation (Condensation control) is executed at 11:38 p.m.
Preset the
(ON TIMER).
• When
(ON TIMER) is set, the air conditioner starts
operation so that the preset room temperature is
almost reached at the ON TIMER time. Check the
settings of the air conditioners when you set the timer.
(Page 26, 27)
Press the
(DEHUMIDIFY) button.
(
symbol is displayed)
• The dehumidifying (Condensation control) operation
stops at 1:38 a.m, two hours after the start of the
dehumidifying operation, and the heating operation
starts in order to reach the preset temperature by
6:00 a.m.
– 28 –
Page 29
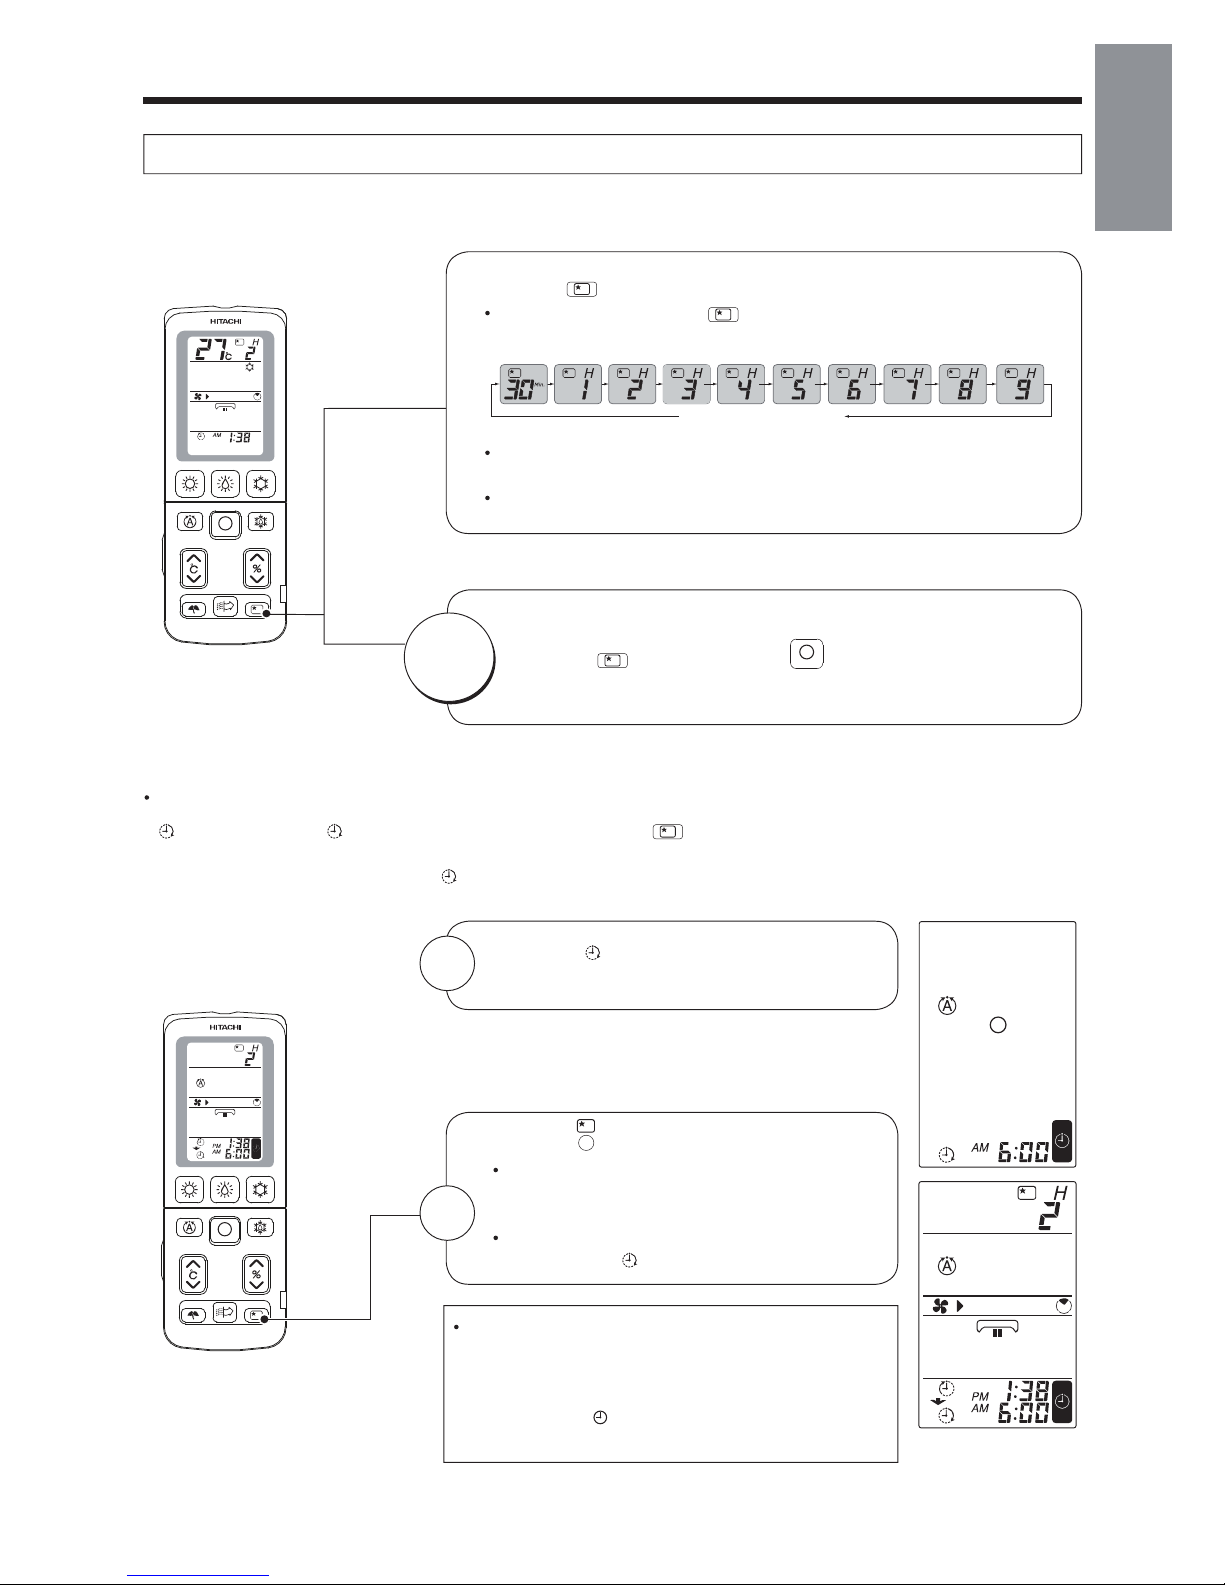
1
2
SLEEP TIMER OPERATION
Configuring the fan speed appropriate for sleeping and stop the operation at specified time.
The display below indicates sleep timer which is set for 2 hours at 11:38 p.m. and the turn off time will be
1:38 p.m.
Press the (SLEEP) button.
• Every time you press the (SLEEP) button, the mode will change
as shown below.
Cancel the sleep timer
• Preset time of sleep timer and the time at which the operation stops
will be displayed on the remote controller.
• Fan speed remain “SILENT” during sleep timer operation.
CANCEL
Press the (SLEEP) button or (CANCEL) button.
Combination of Sleep Timer and On Timer operation
• Set the operation to auto stop by sleep timer operation, it can be set to start the operation next morning by
(ON TIMER). Set (ON TIMER) first and then press the (SLEEP) button.
The display below indicates
(ON TIMER) which is set at 6:00 a.m. and 2 hours sleep time at
11:38 p.m.
Preset the
(ON TIMER).
(Page 26, 27)
Press the
(SLEEP) button.
• The unit will turn off in 2 hours (at 1:38 a.m.)
and will turn on in order to reach the preset
temperature by 6:00 a.m.
•
The time range of sleep timer operation should
be set before (ON TIMER) time.
• When the sleep timer has been programmed, the unit
will not operate even if the set time is reached unless
the unit receives a signal from the remote controller.
Confirm that Sleep Timer programming is complete
(beep) and the
(TIMER) indicator of the indoor unit
turns on.
DEUTSCHFRANÇAISITALIANOSPANISHPORTUGUÊS
∂ППЛУИО¿
РУССКИЙ
– 29 –
ENGLISH
Page 30

1
FILTER CLEANING OPERATION
(Filter Cleaning Unit Operation Check, page 10)
CAUTION
Do not put your fingers or a stick etc into the top part of the indoor unit during filter cleaning
operation.
It may result in injury or malfunction.
Automatic filter cleaning operation
• Automatically cleans the micro mesh stainless filter when the basic air-conditioning operation such as
cooling has ended. (Refer to page 31 for automatic filter cleaning operation)
• Automatic filter cleaning mode is set at the time of purchase.
Forward movement
Sweeps and collects the dust on the
micro mesh stainless filter.
Dust catcher
(1) Cleaning unit collects the dust
swept by the cleaning unit on
its forth movement.
(2) It turns over by the travelling
force of the cleaning unit which
is travelling back. At this time,
the dust collected by the dust
catcher is put into the dust
box.
Backward movement
Once the filter cleaning operation has been
completed, the cleaning unit returns to the
position at which air conditioning operation
is not obstructed.
– 30 –
Page 31

(Troubleshooting, page 41)
• The cleaning unit makes one cycle of back and forth movement to sweep the dust on the micro mesh
stainless filter and the dust catcher puts the collected dust into the dust box.
• One cycle of filter cleaning operation will take approximately 5 minutes.
•
(CLEAN) indicator lit during filter cleaning operation.
• Horizontal air deflectors remain closed when fan operation starts.
Conditions under which automatic filter cleaning is performed
• When the air conditioner operates for more than 15 minutes and stop, automatic filter cleaning is performed
in one of the following conditions.
(1) Accumulated operating hours of the air conditioner have exceeded 8 hours.
(2) Air conditioner is not operated for more than one week.
(To clean the dust which is naturally deposited on the top filter.)
CAUTION: The accumulated operating hours will not be reset if the automatic filter cleaning operation is
stopped before its completion.
• If the air conditioner is in operation continuously, the operation is stopped and automatic filter cleaning
operation is performed once 24 hours have elapsed.
After the completion of automatic filter cleaning, the operation will return to the operation mode which had
been set prior to the automatic filter cleaning.
Automatic filter cleaning is not performed if the air conditioner operation is stopped by sleep timer or off timer
function.
If you use sleep timer or off timer every time, manual filter cleaning should be executed approximately once
every 2~3 days. (Page 32)
However, if no manual filter cleaning is performed, automatic filter cleaning will be performed approximately
once a week after the air conditioner operation is stopped by sleep timer or off timer function to protect the
device.
About the noise during filter cleaning
• A whirring motor noise is generated due to driving of the cleaning unit.
• A clapping noise is generated when the dust catcher collects the dust
swept by the cleaning unit.
• A clapping noise is generated when the dust catcher is turned over by the
cleaning unit.
• A sweeping sound is generated when the cleaning unit sweeps the dust.
Press the (STOP) button twice.
• Press (STOP) button on the remote controller twice to
stop the process of filter cleaning operation.
STOP
• The air blown from the air conditioner will become softer when the air conditioner is operated immediately
after filter cleaning operation.
• Remove and clean the micro mesh stainless filter in the case where filter cleaning operation is prohibited.
(Page 35)
• Only during the filter cleaning operation that was started by pressing the
(MANUAL CLEAN) button on
the remote controller, the filter cleaning operation stops if the
(MANUAL CLEAN) button on the remote
controller is pressed one more time.
DEUTSCHFRANÇAISITALIANOSPANISHPORTUGUÊS
∂ППЛУИО¿
РУССКИЙ
– 31 –
ENGLISH
Page 32

3
2
FILTER CLEANING OPERATION (continued)
Manual filter cleaning operation
Use the remote controller to run filter cleaning operation when the air conditioner operation is stop.
before it is initialized.
Press the
(MANUAL CLEAN) button when the air-conditioner stops.
•
•
•
•
•
The cleaning unit makes one cycle of back and forth movement to sweep
the dust on the micro mesh stainless filter and the dust catcher puts the
collected dust into the dust box.
• One cycle of filter cleaning operation will take approximately 5 minutes.
• During manual filter cleaning operation, movable panel and horizontal air
deflectors remain closed when fan operation starts.
STOP
Press the (STOP) button twice.
• Press
(STOP) button on the remote controller twice to stop the process
of filter cleaning operation.
Maintenance
(Maintenance, page 34)
HOW TO PROHIBIT THE FILTER CLEANING OPERATION
• With the remote controller, you can make a setting in which no filter cleaning operation is
performed.
• This setting should be made only when the air conditioner is stopped.
Press the (MANUAL CLEAN) button while pressing the (ON/OFF)
button (remain for 5 seconds).
• A double short beep sounds and the filter cleaning is not performed (filter
cleaning operation is prohibited) is set.
• If the
(MANUAL CLEAN) button is pressed while pressing down
the (ON/OFF) button again (hold the buttons for 5 seconds), a
single short beep sounds and the setting returns to the filter cleaning
operation.
Filter cleaning operation (Normal)
(at time of purchase)
“Beep” sound
Filter cleaning operation
is prohibited
“Beep Beep” sound
• If the filter cleaning operation is
prohibited, the operation check (page
10), automatic filter cleaning
operation and manual filter cleaning
operation are not performed.
– 32 –
If the air conditioner is not in use for a long period, it is recommended to manually run filter cleaning
No daily maintenance is required. However, dust amount varies depending on the environment in which
the air conditioner is used. Check the dust amount approximately once every two years and throw the
Greasy dirt can also be cleaned by the combined function of filter cleaning and micro mesh stainless filter. If the
dirt looks heavy, remove the micro mesh stainless filter, dust catcher and filter cleaning wiper to wash them with
water. (Maintenance, page 34~38)
dust, if any.
Page 33

1
2
3
4
IN THE EVENT THE NOISE OF FILTER CLEANING OPERATION IS VERY OBVIOUS,
YOU CAN EXECUTE FILTER CLEANING AT THE TIME YOU PREFER BY COMBINING
“MANUAL FILTER CLEANING OPERATION” AND THE “SETTING FOR PROHIBITING
FILTER CLEANING OPERATION”
Set to prohibit the filter cleaning operation.
Return to the filter cleaning operation setting.
Operate the manual filter cleaning operation. (Page 32)
Set to prohibit the filter cleaning operation again.
(Method of setting , , , page 32)
• If the filter cleaning is performed after a long interval, dust on the micro mesh stainless filter may not be
completely cleaned just by one cycle of filter cleaning. To avoid this, frequent filter cleaning is recommended.
(Standard cleaning frequency is once every 2~3 days.)
• If the filter is not cleaned evenly at the time the filter cleaning has been completed, perform the manual filter
cleaning operation one more time after an interval of at least 5 minutes. (To protect the appliance, the filter
cleaning cannot be performed again within 5 minutes after the previous filter cleaning is completed.)
• Filter may not be cleaned evenly due to long interval of filter cleaning or due to the environment in which
the air conditioner is used. To solve this problem, clean the micro mesh stainless filter. (Page 35)
IN THE FOLLOWING CASES, THE (CLEAN) INDICATOR REPEATEDLY BLINKS,
LIGHT UP OR DIM. (IT IS NOT A MALFUNCTION)
•
If the (MANUAL CLEAN) button is pressed while the filter cleaning operation is
prohibited, a long beep
sounds and the
(CLEAN) indicator blinks. (Lit for 1 second/off for 1 second, for 10 seconds)
• To protect the appliance, the filter cleaning operation is not performed even if the
(MANUAL
CLEAN) button on the remote controller is pressed during approximately 5 minutes after filter
cleaning operation (i.e., filter cleaning operation which is performed after the air conditioner power
is turned on; automatic filter cleaning operation; and manual filter cleaning operation which is
performed using the remote controller). A long beep sounds and
(CLEAN) indicator blinks. (Lit for
1 second/off for 1 second, for 10 seconds)
The filter cleaning unit is out of order if the
(CLEAN) indicator on the indoor unit still repeatedly
on for 4 seconds/off for 1 second. In this case, filter cleaning operation is unavailable, however other
functions of the air conditioner are available without being affected.
• Contact your sales agent if the filter cleaning unit malfunction.
DEUTSCHFRANÇAISITALIANOSPANISHPORTUGUÊS
∂ППЛУИО¿
РУССКИЙ
– 33 –
ENGLISH
Page 34

2
3
1
MAINTENANCE
• Before cleaning, stop unit operation with the remote controller and turn off the circuit breaker.
WARNING
•
Do not expose the unit to water as it may cause an electric shock.
•
For cleaning inside the air conditioner, consult your sales agent.
•
Avoid using detergent when cleaning the heat exchanger of the indoor unit. Unit failure may result.
•
When cleaning the heat exchanger with a vacuum cleaner, make sure to wear gloves so as not to injure your
hands on the heat exchanger fins.
CAUTION
Maintenance of dust box
• No daily maintenance is required. However, dust amount varies
depending on the environment in which the air conditioner is
used. Check the dust amount approximately once every two years
and throw the dust, if any.
• Some type of dust may be accumulated on the rear surface of the
dust catcher.
It is recommended to clean the dust catcher together with the dust box.
Dust box
Stop the operation with the remote controller and
unplug the power
supply
(or turn off the circuit breaker).
Wash the dust box with water.
• If the dirt is stubborn, wash with the dust box with warm water
below 40°C.
• After washing, dry it in the shade.
Turn on the power supply (or turn on the circuit breaker).
– 34 –
Page 35

•
•
1
2
3
4
No daily maintenance is required. However, filter should be cleaned
if the dirt is noticeable due to the environment in which the air
conditioner is used.
stainless mesh filter
Stop the operation with the remote
controller and unplug the power plug
(or turn off the circuit breaker).
Open the front panel.
(Refer to page 8 on opening the front panel)
Remove the front panel.
Push
Push
Arm
Arm
Push the end of the right-side arm outward to
release the tab.
Move the left-side arm outward to release the
left tab, and then pull the panel towards you.
DEUTSCHFRANÇAISITALIANOSPANISHPORTUGUÊS
∂ППЛУИО¿
РУССКИЙ
Maintenance of Stainless Mesh Filter
Remove the front stainless mesh filter.
Filter locks
Hold this part to pull it out
Slide the left and right stainless filter locks
towards the direction as illustrated.
Slightly lift up the stainless mesh filter
and pull it out towards you.
– 35 –
ENGLISH
Page 36

5
6
7
8
9
MAINTENANCE (continued)
Maintenance of mesh stainless filter (continued)
Vacuum the dust.
• In the event the stainless mesh filter is heavily dirty and the dust cannot
be cleaned with a vacuum cleaner, wash the filter with neutral detergent
and rinse well with water, and then dry the filter in the shade.
• Align the filter with the top face of the indoor unit, and then slide and push it in.
(The shape of the left and right filters is the same.)
• Tighten the left and right filter locks to the indicated direction.
Attach the front panel.
Insert the shaft of the left arm along the step on the unit into the hole.
Securely insert the shaft of the right arm along the step on the unit into the hole.
Make sure that the front panel is securely attached, and then close the front panel.
Close the front panel.
(Refer to page 9 on closing the front panel)
Turn on the power supply (or turn on the circuit breaker).
• Improper installation of the micro mesh stainless filter could result in malfunction. Filter cleaning
operation can not be performed properly and the
(CLEAN) indicator blinks.
• Do not operate the air conditioner without the micro mesh stainless filter.
Dust goes in the gap of the heat exchanger as well as inside the appliance and may cause unpleasant smell
on the heat exchanger or could result in malfunction.
• Be extra careful not to cut your hand with the fin of the heat exchanger when removing and reattaching
the micro mesh stainless filter.
CAUTION
Attach the stainless mesh filter.
– 36 –
Page 37

1
2
3
4
5
6
7
Maintenance of dust catcher
No daily maintenance is required. However, filter should be cleaned if the dirt is noticeable due to the
environment in which the air conditioner is used.
Some type of dust may not go in the dust box but be accumulated on the rear surface of the dust catcher.
It is recommended to check the dust amount on the dust catcher approximately once every 2 years and
clean the dust catcher if it is dirty.
Stop the operation with the remote controller and unplug
the power supply (or turn off the circuit breaker).
Remove the front panel.
(Refer to page 35 on removing the front panel)
Remove the dust catcher.
• Remove the dust catcher as shown with arrows.
• If dust is accumulated at the inner side of the dust catcher,
remove the dust with a vacuum cleaner.
Wash with water.
• Please wash with water.
• If the dirt is stubborn, use a mild detergent and wash with warm
water below 40°C.
• Dry completely in the shade.
Attach the dust catcher.
• Hold the dust catcher for the top face with its side having the lever
facing towards you. Insert and push in the dust catcher in the arrow
direction until it clicks.
Attach the front panel.
(Refer to page 36 on attaching the front panel)
Improper installation of the dust catcher could result in malfunction. Filter cleaning operation can not
be performed properly and the
(CLEAN) indicator blinks.
CAUTION
DEUTSCHFRANÇAISITALIANOSPANISHPORTUGUÊS
∂ППЛУИО¿
РУССКИЙ
Turn on the power supply (or turn on the circuit breaker).
– 37 –
ENGLISH
Page 38

MAINTENANCE (continued)
Maintenance of Ion mist unit
Stop the operation with the remote controller
and unplug the power supply (or turn off the
circuit breaker).
Slowly open the vertical air deflectors using
both hands.
CAUTION
s Be sure to open slowly using both hands as shown
in the illustration.
Otherwise, it may cause malfunction.
s Do not use excessive force to move the air deflector
beyond the stopper located below it.
Otherwise, it may cause malfunction.
Remove the dirt on the ion mist unit
with a toothbrush.
噝 Be sure to use a dry toothbrush.
噝 Lightly brushed off the dust.
Horizontal air
deflectors
CAUTION
噝 Do not touch the r conditioner is in operation
High voltage generated at these parts could result in electrical shock.
噝 Do not splash or direct water to the ion mist unit
It may cause short circuit or malfunction.
– 38 –
Turn on the power supply.
(or turn on the circuit breaker)
ion mist unit while the ai
Ion Mist Unit
1
2
3
4
• Be s
in th
Oth
• Do
bey
Oth
Page 39

DEUTSCHFRANÇAISITALIANOSPANISHPORTUGUÊS
∂ППЛУИО¿
РУССКИЙ
UNDERSTANDING THE OPERATING MECHANISM
NAMES AND FUNCTIONS OF EACH PART (Page 4)
CAUTION
Do not use a stove or any
other high temperature
devices in proximity to
the indoor unit.
PROHIBITION
– 39 –
ENGLISH
Heating capability
• This room air conditioner utilizes a heat pump system that absorbs exterior heat and brings it into a room to
be heated. As the ambient temperature gets lower, heating capability will also lower. In such a situation, the
PAM and inverter work to increase compressor rpm to keep the unit’s heating capability from decreasing. If
the unit’s heating performance is still unsatisfactory, other heating appliances should be used to augment
this unit’s performance.
• The air conditioner is designed to heat an entire room so that it may take some time before you feel warm.
Timer operation is recommended for effective preheating ahead of the desired time. (Page 26)
• When outside temperature becomes lower while humidity remains high, condensation forms on the heat
exchanger of the outdoor unit and the heating efficiency may be affected if condensation is not removed. To
prevent this problem, the air conditioner performs condensation-removing operation automatically. At this
time, the heating operation is suspended and it usually takes approximately 5~10 minutes (maximum of 20
minutes) to resume the heating operation.
Cooling, dehumidifying and dry cool capabilities
• If the heat present in a room exceeds the unit’s cooling capacity (for example, if there are many people in
the room or other heating appliances are used), the preset room temperature may not be reached.
• The preset temperature may not be reached if a heat source or humidity which exceeds the air conditioner’s
dehumidifying ability is present in the room.
Piping which is too long could lower the heating/cooling performance.
Page 40

THE IDEAL WAYS OF OPERATION
1. An average room temperature setting is probably the best for you as well
as being economical.
• Excessive cooling or heating is not recommended for health reasons. High
electricity bills may also result.
• Close the curtains or blinds to prevent heat from flowing into or escaping the
room as well as to make more effective use of electricity.
2. At intervals, the doors and windows should be opened to let fresh air in.
Make sure the room is ventilated when operating the air
conditioner at the same time as other heating appliances.
3. Make efficient use of mold monitor when going out.
(Refer to mold monitor)
4. Make efficient use of the timer before going to sleep.
(Refer to page 26~28 on using the timer)
5. The following must never be used for cleaning the indoor and outdoor
units:
• Benzine, thinner and scrub can damage plastic surfaces or coating.
• Hot water above 40°C can shrink the filter and deform plastic parts.
6. Do not block the air intake and air outlet.
• Do not block the air outlets and intakes of the indoor and outdoor units with
curtains or other obstacles which could degrade air conditioner performance
and cause unit failure.
cold
hot
CAUTION
– 40 –
Page 41

DEUTSCHFRANÇAISITALIANOSPANISHPORTUGUÊS
∂ППЛУИО¿
РУССКИЙ
• This is for filter cleaning operation check.
• In basic air-conditioner operation (cooling operation etc.), the filter cleaning operation
will not start even when the
(MANUAL CLEAN) button on the remote controller is
pressed.
( (CLEAN) indicator lit for 1 second/off for 1 second, for 10 seconds)
• During filter cleaning operation or within 5 minutes after the operation, even when
the
(MANUAL CLEAN) button on the remote controller is pressed, the filter
cleaning operation will not restart to protect the device.
( (CLEAN) indicator lit for 1 second/off for 1 second, for 10 seconds)
• Is “filter cleaning operation prohibited” being set?
Please return to the filter cleaning operation setting.
(
(CLEAN) indicator lit for second/off for 1 second, for 10 seconds)
• Are micro mesh stainless filter, dust catcher, filter cleaning wiper, wiper cover correctly
installed?
(
(CLEAN) indicator lit for 4 seconds/off for 1 second)
• Filter cleaning is not performed if the air conditioner operation is stopped by Sleep
Timer or Off Timer function. However, if the air conditioner is stopped by Sleep
Timer or Off Timer every time, filter cleaning will be performed approximately once
a week.
• A whirring motor noise is generated due to driving of the cleaning unit.
• A clapping noise is generated when the dust catcher collects the dust swept by the
cleaning unit.
• A clapping noise is generated when the dust catcher is turned over by the cleaning
unit.
• A sweeping sound is generated when the cleaning unit sweeps the dust.
• After the filter cleaning wiper maintenance, is the cleaning unit return to the right
end part using the remote controller?
• Are micro mesh stainless filter, dust catcher, filter cleaning wiper, wiper cover correctly
installed?
(
(CLEAN) indicator lit for 4 seconds/off for 1 second)
TROUBLESHOOTING
FILTER CLEANING OPERATION
Filter cleaning is
performed after
the power is
turned on (after
the plug-in or after
the circuit breaker
is switched on
after power failure)
Filter cleaning
operation does not
start
(
(CLEAN)
indicator blinks
or lit and dim
repeatedly)
Noise occurred
during filter
cleaning operation
Cleaning unit
stops halfway
• Filter may not be cleaned evenly depending on the environment in which the air
conditioner is used. To solve this problem, clean the micro mesh stainless filter.
• Depending on dust amount, the micro mesh stainless filter may not be completely
cleaned by manual filter cleaning operation performed at your preferred time while
filter cleaning operation is prohibited.
Micro mesh
stainless filter is
still dirty
– 41 –
ENGLISH
Page 42

TROUBLESHOOTING (continued)
Anti-mold
wasabi cassette
Dust box
ANTI-MOLD WASABI CASSETTE
• Anti-mold elements with wasabi aroma prevents mold growth inside the dust box in which the dust collected
by filter cleaning operation is kept. Although only a trace amount of anti-mold elements is released, there may
be wasabi smell in the room depending on the environment in which the air conditioner is used. If you feel this
smell is unpleasant, block one of the anti-mold element outlets with a commercially available adhesive tape. If
this measure is taken, the amount of anti-mold element to be released will be reduced and the anti-mold effect
will also be less accordingly. To prevent mold growth, frequent cleaning of the dust box is recommended.
Outlet (2 places)
The gap made on
the side surface
Block one of the outlets with an
adhesive tape (Either one of 2
outlets)
• Do the batteries need replacement?
• Is the polarity of the inserted batteries correct?
• Is the power plug inserted properly?
• Is the fuse blown out or circuit breaker tripped?
• Is there a blackout? (Operation remains idle after a blackout.)
• Is the micro mesh stainless filter blocked with dust?
• Is the set temperature suitable?
• Have the vertical air deflector been adjusted to the correct positions according to
the operation mode selected?
• Are the air inlets and air outlets of indoor and outdoor units blocked?
• Is the fan speed “LOW” or “SILENT”?
• Check “filter cleaning operation”.
PLEASE CHECK THE FOLLOWING BEFORE SERVICE
Signal cannot be
received
(Remote controller
display is dim or
blank)
Operation does
not start
Does not cool well
Does not heat well
(CLEAN)
indicator blinks
– 42 –
Page 43

Except for anti-mold wasabi cassette, no smell-generating material or
substance is used for air conditioner. This is due to the smell or odor, such
as cigarette, cosmetics and food, present in the room that is sucked in
and then blown out by the air conditioner.
Indicates preheating or defrosting operation is underway.
Indicates internal cleaning operation is underway. (Page 21)
Refrigerant flow noise in the pipe or valve sound generated when flow
rate is adjusted.
Noise generated when the unit expands or contracts due to temperature
changes.
Noise generated with the indoor unit fan’s rpm changing such as operation
start times.
Noise of the motorized valve when the unit is switched on.
Operation noise changes due to power variations according to room
temperature changes.
Mist is generated as the air within the room is suddenly cooled by
conditioned air.
Water generated during defrosting operation evaporates and steam is
emitted.
Auto fresh defrosting is activated (as the heating operation is stopped, the
microcomputer checks frost accumulated in the indoor unit and instructs
the unit to perform automatic defrosting if necessary).
Depending on the number of person in the room and the conditions of
the room, actual room temperature may deviate slightly from the remote
controller’s setting.
THE FOLLOWING CASES DOES NOT INDICATE MALFUNCTION
TROUBLESHOOTING (continued)
Odors
In heating operation,
(OPERATION) indicator lit
and dim repeatedly
(OPERATION),
(CLEAN), indicators lit after
the operations of cooling,
dehumidifying and dry cool
Hissing or fizzy sound
Squeaking noise
Rustling sound
Clicking sound
Operation sound changes
Mist emission
Steam emitted from outdoor unit
Outdoor unit continues to
operate even if operation is
stopped and
(OPERATION)
indicator blinks
Preset temperature cannot be
reached
DEUTSCHFRANÇAISITALIANOSPANISHPORTUGUÊS
∂ППЛУИО¿
РУССКИЙ
– 43 –
ENGLISH
Page 44

CONTACT YOUR SALES AGENT IMMEDIATELY ON FOLLOWING CASES
In the event that any trouble or phenomenon listed below still occurs even after a
check has been conducted according to the troubleshooting procedures on page
41~44 , disconnect the power plug from the outlet (or switch off the circuit breaker)
and immediately contact your sales agent.
• The circuit breaker switches off or the fuse blows frequently.
• The switch operation is not stable.
• Foreign matter or water accidentally enters the unit interior.
• The power cord gets excessively hot or its insulation is torn or stripped.
•
(TIMER) indicator or (MONITOR) indicator on the indoor unit display blinks.
TEMPORARY OPERATION
Press the temporary switch to start temporary operation if the remote controller cannot function due
to dead batteries.
1
Disconnect the power supply.
(Or turn off the circuit breaker.)
2
3
Automatic operation starts when the temporary switch
is pressed.
• The air conditioner performs force-cooling operation if the temporary
switch is pressed for at least 5 seconds. This operation is allowed to
sales agents only. Users must not perform this operation.
Reconnect the power supply.
(Or turn on the circuit breaker.)
IF THE UNIT WOULD NOT BE USED FOR A LONG PERIOD OF TIME (MORE THAN
1 MONTH), PLEASE FOLLOW THE STEPS BELOW FOR MAINTENANCE
• On a sunny
day, perform stainless plasm
a air
purifying (Fan) operation for approximately
one half day. Mold can easily grow if air
conditioner is not used for a long period of
time while its inside is left wet.
1
Dry the interior of
the indoor unit.
2
Unplug the power
plug or turn off the
circuit breaker.
3
Remove the
batteries from the
remote controller.
TROUBLESHOOTING (continued)
7(0325$5<
6:,7&+
7(0325$5<
6:,7&+
– 44 –
Page 45

REGULAR INSPECTION
PLEASE CHECK THE FOLLOWING POINTS EVERY EITHER HALF YEARLY OR YEARLY. CONTACT YOUR
SALES AGENT SHOULD YOU NEED ANY HELP.
WARNING
Is the plug plugged into the socket firmly?
If the earth line is disconnected or faulty, unit failure or
electric shock hazard may result.
• If the plug have dust or dirt, please clean it before plug in.
WARNING
Is the unit’s earth line connected correctly?
Please make sure earth line is connected correctly.
•
If the earth line is disconnected or faulty, it may result in
malfunction or electric shock.
WARNING
Is the mounting frame stable?
Check to see if the mounting frame has rusted excessively
or if the outdoor unit has tilted or become unstable.
• If the outdoor unit collapsed or fell, it could cause injury.
INSPECTION AND MAINTENANCE
Air conditioner is designed to perform automatic filter cleaning to maintain
the interior of air conditioner clean. However, the interior of air conditioner
may get dirty and the air conditioning performance may be lowered after air
conditioner is used for a few seasons.
Beside maintenance, please perform inspection as well
Dust deposited inside the indoor unit may block the drainage path of dehumidified water and could result in
water dripping.
•
Maintenance inspection is recommended in addition to ordinary cleaning.
Request your sales agent for maintenance inspection
Maintenance inspection requires technical expertise. Use of commercially available cleaning agent may cause
crack on resin part and clogging of drainage path, which could result in water dripping and electrical shock.
• Consult your sales agent for inspection and maintenance.
CAUTION
DEUTSCHFRANÇAISITALIANOSPANISHPORTUGUÊS
∂ППЛУИО¿
РУССКИЙ
– 45 –
ENGLISH
Page 46

OPERATION DISPLAY CHART
Operation mode Display
•
•
•
• Cooling operation (page 15)
operation (page 14)
•
Automatic operation (page 13)
Heating operation (page 14)
(DEHUMIDIFY) (Auto dehumidifying, condensation control, Quick laundry)
• Stainless plasma air purifying operation (page 18)
Dry cool operation (page 16)
• Combined operation of automatic, manual, heating, dehumidifying, cooling, dry cool
operations and Stainless air cleaning operation (page 18)
Infrared human presence detection (page 19)
Dynamic air deflection (tracing/evasion) (page 20)
• During internal cleaning operation (page 21)
• During preset of the mold monitor operation (page 23)
• During mold monitor operation (page 23)
• Filter cleaning operation (page 30)
• Timer preset operation (page 26)
• Sleep timer operation (page 29)
•
•
(TIMER) indicator lit if timer preset is set in every operations.
– 46 –
7(0325$5<
6:,7&+
7(0325$5<
6:,7&+
7(0325$5<
6:,7&+
7(0325$5<
6:,7&+
7(0325$5<
6:,7&+
7(0325$5<
6:,7&+
7(0325$5<
6:,7&+
•
Page 47

MEMO
DEUTSCHFRANÇAISITALIANOSPANISHPORTUGUÊS
∂ППЛУИО¿
РУССКИЙ
– 47 –
ENGLISH
Page 48

< 4647E : A >
Page 49

НАРУЖНЫЙ БЛОК
ВНУТРЕННИЙ БЛОК
RAS-1
RAS-1 SH2
СПЛИТ-СИСТЕМЫ
МОДЕЛЬ
ENGLISH
DEUTSCHFRANÇAISITALIANOSPANISHPORTUGUÊS
∂ППЛУИО¿
РУССКИЙ
РУССКИЙ
ВНУТРЕННИЙ БЛОК/НАРУЖНЫЙ БЛОК
– 49 –
Instruction manual
Page 1~48
To obtain the best performance and ensure years of trouble free use, please read this instruction manual completely.
8SH2 / RAC-18SH2
8
RAC-1
SH28
Для достижения наивысшей производительности и обеспечения длительной безаварийной
внимательно изучите данную инструкцию .
Инструкция по эксплуатации
стр.
49 ~9 6
работы
3
3
3
3
Page 50

ТЕХНИКА БЕЗОПАСНОСТИ
•
Для обеспечения надлежащего использования прибора перед началом работы с ним внимательно ознакомьтесь с разделом
«Техника безопасности».
•
Тщательно изучите указания, обозначенные символами « Внимание!» и « Осторожно!». Словом «Внимание!» обозначены
указания, несоблюдение которых может привести к тяжелой травме вплоть до смертелного исхода. Словом «Осторожно!»
обозначены указания, несоблюдение которых может привести к серьезным последствиям. Для обеспечения безопасности строго
соблюдайте приведенные указания.
•
Символы, используемые для обозначения указаний. (Примеры символов приведены ниже.)
•
Сохраните инструкцию после прочтения.
Данный символ обозначает запрет.
Данный символ обозначает указание, которое необходимо строго соблюдать.
УКАЗАНИЯ ПО ЭКСПЛУАТАЦИИ
ВНИМАНИЕ!
ВНИМАНИЕ!
•
Изменять конструкцию агрегата запрещается.
Несанкционированное изменение конструкции агрегата может стать причиной утечек воды,
отказов, коротких замыканий или возгораний.
•
Для монтажа агрегата обратитесь в торговое представительство или квалифицированную
монтажную организацию. Самостоятельный монтаж агрегата может стать причиной утечек
воды, отказов, коротких замыканий или возгораний.
•
Агрегат должен быть заземлен.
Запрещается прокладывать проводник заземления рядом с водо- и газопроводами,
молниеотводом или линией заземления телефонной сети. Неправильно установленное
заземление может стать причиной поражения электрическим током.
•
Используйте трубы, пригодные для работы с хладагентом R4 0A. В противном случае возможно
возникновение трещин в медных трубах, что приведет к выходу агрегата из строя.
•
Агрегат должен быть оснащен автоматическим выключателем, расположение которого зависит
от места установки агрегата. Отсутствие автоматического выключателя может стать причиной
поражения электрическим током.
•
Запрещается устанавливать агрегат в зонах, в которых присутствуют легковоспламеняющиеся
газы. Наличие легковоспламеняющихся газов в атмосфере, окружающей наружный блок,
может привести к возгоранию. Трубопровод должен быть установлен на соответствующих
опорах, расстояние между которыми не должно превышать м.
•
Системы отвода конденсата должна обеспечивать беспрепятственный сток воды.
•
Убедитесь, что агрегат питается от однофазной сети с напряжением 220~230 В. Питание от других
источни-ков может стать причиной перегрева электрических компонентов и
возгорания.
УКАЗАНИЯ ПО МОНТАЖУ
ЗАПРЕЩЕНО
ЗАЗЕМЛИТЕ
ЗАПРЕЩЕНО
ВНИМАНИЕ!
ОСТОРОЖНО!
•
Не находитесь длительное время в потоке воздуха от агрегата.
•
При возникновении аварийной ситуации (например, появлении запаха гари) отключите
агрегат, выньте вилку из розетки или отключите автоматический выключатель. Свяжитесь
с представителем нашей компании. Продолжение работы после обнаружения неисправности
может стать причиной выхода агрегата из строя, короткого замыкания или возгорания.
•
По поводу выполнения технического обслуживания свяжитесь с представителем нашей компании. Неполное,
неправильное или самостоятельное выполнение технического обслуживания может стать причиной поражения
электрическим током или возгорания.
•
По поводу демонтажа, транспортировки и повторной установки агрегата обратитесь к представителю нашей
компании. Неправильно осуществленная транспортировка или установка агрегата может стать причиной
поражения электрическим током или возгорания.
УКАЗАНИЯ ПО ТРАНСПОРТИРОВАНИЮ И ТЕХНИЧЕСКОМУ ОБСЛУЖИВАНИЮ
•
Не используйте вместо предохранителей проволочные «жучки» – это может привести к
травме или пожару.
•
Во время грозы отключите агрегат, выньте вилку из розетки или отключите автоматический выключатель.
•
Не вставляйте в воздуховыпускное или воздухозаборное отверстие посторонние предметы
(например, тонкие стержни), поскольку их соприкосновение с вращающимся на высокой
скорости вентилятором может привести к травме.
•
Запрещается оставлять аэрозольные баллончики и горючие вещества на расстоянии ближе
одного метра от воздуховыпускного отверстия внутреннего или наружного блока.
Повышение давления в аэрозольном баллоне в результате нагревания горячим воздухом
может привести к взрыву.
ЗАПРЕЩЕНО
ЗАПРЕЩЕНО
ЗАПРЕЩЕНО
ЗАПРЕЩЕНО
ОТКЛ.
ОТКЛ.
ЗАПРЕЩЕНО
– 5 0 –
Page 51

DEUTSCHFRANÇAISITALIANOSPANISHPORTUGUÊS
∂ППЛУИО¿
РУССКИЙ
ENGLISH
РУССКИЙ
УКАЗАНИЯ ПО ЭКСПЛУАТАЦИИ
•
Используйте агрегат только по прямому назначению, указанному производителем.
ЗАПРЕЩЕНО
НЕ ПРИКАСАЙТЕСЬ
МОКРЫМИ РУКАМИ
•
Не прикасайтесь к агрегату мокрыми руками, это может привести к несчастному случаю.
СТРОГО
СОБЛЮДАЙТЕ!
•
При работах с агрегатом с использованием горелки, следует регулярно проветривать
помеще-ние во избежание кислородной недостаточности.
ЗАПРЕЩЕНО
•
Не направляйте струю холодного воздуха из кондиционера на такое тепловое оборудова-
ние как, электрические плиты или печи, так как это может снизить их
производительность.
ЗАПРЕЩЕНО
•
Убедитесь, что наружная опорная рама установлена надежно, прочно закреплена и не имеет
дефектов. Несоблюдение данного требования может привести к травме в результате падения
наружного блока.
ЗАПРЕЩЕНО
•
Запрещается мыть агрегат или устанавливать на внутренний блок емкости с водой, например,
вазы. Утечка воды может стать причиной поражения электрическим током.
ЗАПРЕЩЕНО
•
Не направляйте струю воздуха из кондиционера на растения или животных, так как это
отрицательно влияет на их самочувствие.
ОТКЛ.
ОСТОРОЖНО!
•
Перед выполнением работ c агрегатом остановите его с пульта дистанционного управления
и отключите автоматический выключатель. Прикосновение к вращающемуся вентилятору
травмоопасно!
ОТКЛ.
•
Отключите автоматический выключатель, если не планируете пользоваться агрегатом в
течение длительного времени.
ЗАПРЕЩЕНО
•
Не вставайте на наружный блок и не ставьте на него посторонние предметы.
ЗАПРЕЩЕНО
•
Если в помещении, в котором включен кондиционер, открыто окно или дверь (относительная
влажность воздуха всегда выше 80%), а направляющая заслонка агрегата длительное
время направлена вниз или покачивается, то на ней возможно образование конденсата,
который будет капать вниз. Это может привести к повреждению мебели. Поэтому не
используйте кондиционер в таких условиях длительное время.
ЗАПРЕЩЕНО
•
Если потребность помещения в охлаждении или обогреве выше производительности
агрегата (например: в помещении находится много людей, используется нагревательное
оборудование и т. д.), то обеспечить заданную температуру будет невозможно.
ЗАПРЕЩЕНО
•
Очистка внутреннего блока должна выполняться только квалифицированным специалистом.
Свяжитесь с представителем нашей компании.
Использование растворителей или подобных им средств может повредить пластмассовые
компоненты агрегата или засорить систему отвода конденсата, что может стать причиной
поражения электрическим током в результате утечек воды.
НЕ ПРИКАСАЙТЕСЬ
•
Не просовывайте руки в воздуховыпускное отверстие, не прикасайтесь к днищу или
алюминиевым ребрам наружного блока. Это может стать причиной травмы.
НЕ ПРИКАСАЙТЕСЬ
•
Не прикасайтесь к трубам холодильного контура и клапанам. Возможно получение
ожогов.
•
Данное устройство не предназначено для использования детьми и пожилыми людьми. Они могут эксплуатировать
его только под наблюдением ответственного лица для обеспечения безопасности.
•
Необходимо следить за детьми, чтобы они не играли с устройством.
– 5 1 –
Page 52

ОБОЗНАЧЕНИЕ И ФУНКЦИИ КОМПОНЕНТОВ
ВНУТРЕННИЙ БЛОК
(см. «Принцип работы», стр. )
Лицевая панель
(стр. )
ИК датчик (внутренний блок)
Принимает сигналы пульта дис-
танционного управления.
ИК-датчик динамического распределения воздуха
Индикатор
Воздуховыпускное
отверстие
Пульт дистанционного
управления
Трубопроводы/
электрические
провода
Шланг для отвода конденсата
Отводит конденсат, образующийся во внутреннем блоке при
работе в режиме охлаждения, осушения или охлаждения с
осушением.
Воздухозаборные отверстия (сзади и слева)
Зажим заземления
(внизу справа)
НАРУЖНЫЙ БЛОК
Воздуховыпускное отверстие
Выпускает холодный воздух в режиме обогрева
и горячий в режимах охлаждения и охлаждения
с осушением, а также холодный или горячий в
режиме осушения.
ОПИСАНИЕ НАРУЖНОГО БЛОКА
Электрод для сбора пыли
ОСТОРОЖНО!
Если вы не собираетесь пользоваться
агрегатом длительное время, выньте вилку
шнура питания из розетки или отключите
автоматический выключатель.
• После останова агрегата вентилятор
продолжает вращаться в течение 10-60 с для
охлаждения электрических компонентов.
• При работе в режиме обогрева из наружного
блока вытекает конденсат и оттаявшая
вода. Не перекрывайте патрубок для
отвода конденсата наружного блока, так
как скопившаяся в этом случае вода может
замерзнуть.
• Конденсат может образоваться в трубке и
в режиме охлаждения.
• При креплении агрегата под свесом крыши
трубопровод от вода конденсата следует
соединить с патрубком с помощью муфты.
• После включения автоматического выключателя
неработающий агрегат потребляет небольшое
количество электроэнергии для питания цепи
управления.
После отключения автоматического выключателя
внутри агрегата некоторое время присутствует
опасное напряжение.
– 5 2 –
87
56
(принудительное включение режима охлаждения)
Аварийный ввыключатель
При неисправных элементах питания
или пульта дистанционного управления,
используйте данн
ый выключатель для
включения и отключения кондиционера
(стр. 92).
(внутри)
Горизонтальная и
вентикальная жалюзи
ППааттррууббооккддлляяооттввоодда
а
ккооннддееннссаатта
а
Лицевая панель
(стр. )
ИК датчик (внутренний блок)
Принимает сигналы пульта дистанционного управления.
ха
Индикатор
56
(принудительное включение режима охлаждения)
Аварийный ввыключатель
При неисправных элементах питания
или пульта дистанционного управления,
используйте данн
ый выключатель для
включения и отключения кондиционера
(стр. 92).
Signal
Receiv
remote
Indicator
(Page 8)
Horizontal/
Vertical Air Deflector
(internal)
Infrared
Dynamic Air Deflection Sensor
Tempor
(Forced
Ion Mist Unit
Аварийный выключатель
(внутри)
Горизонтальная и
вентикальная жалюзи
Устройство для распыления ионов
Page 53

DEUTSCHFRANÇAISITALIANOSPANISHPORTUGUÊS
∂ППЛУИО¿
РУССКИЙ
Dž
Dž
Закройте лицевую панель.
Ą
УСТРОЙСТВО ВНУТРЕННЕГО БЛОКА / УЗЕЛ ОЧИСТКИ
Установка нано-титанового воздушного фильтра
Подготовка
Откройте лицевую панель. (порядок выполнения этой операции указан на стр. 56)
Воздушный фильтр
Воздушный фильтр
Потяните воздушный фильтр, как показано на
рисунке, и извлеките его.
Откройте лицевую панель.
Вставьте воздушный фильтр в отсек, как показано
на рисунке.
В противном случае могут быть слышны
нетипичные звуки или фильтр может выпасть.
Установите на место воздушный фильтр.
Он должен зафиксироваться со щелчком.
Подключите кабель питания (или включите
питание в сети).
При засорении воздушного фильтра эффективность работы кондиционера немного снижается.
Удаляйте пыль с его поверхности пылесосом и НЕ мойте его водой.
(Рекомендуется выполнять очистку фильтра каждые 6 месяцев и заменять его каждые 2 года.)
РУССКИЙ
– 5 3 –
Пылесборник
Собирает пыль, сметенную
щеткой
(стр. 85).
(внутри)
Удерживает содержащиеся в воздухе частицы и пыль (стр. 83).
Узел очистки
Счищает пыль, захваченную
мелкоячеистым фильтром из
нержавеющей стали.
Контейнер для пыли
Тонко-ячеистый фильтр грубой очистки
Накапливает пыль
удаленную с фильтров
(стр. 82)
Отключите кондиционер и отсоедините кабель
питания от сети
Нано-титановый воздушный фильтр
(тонкой очистки)
Держатели фильтра
Как прикрепить сетку для очистки воздуха Wasabi-Nano Titanium
Wasabi-Nano Titanium
Page 54

ОБОЗНАЧЕНИЕ И ФУНКЦИИ КОМПОНЕНТОВ (продолжение)
ПУЛЬТ ДИСТАНЦИОННОГО УПРАВЛЕНИЯ
Посылает на внутренний блок управляющие сигналы и настройки таймера.
Показанный на рисунке ниже экран появляется на ЖК дисплее сразу после нажатия кнопки сброса. Обычно
все данные одновременно не отоб-ражаются. На рисунке ниже также показаны функции, недоступные
для комнатного кондиционера.
КНОПКИ УПРАВЛЕНИЯ
РЕЖИМАМИ РАБОТЫ
Окно ИК передатчика
Кнопка ОБОГРЕВ
Нажмите данную кнопку для
включения режима обогрева
(стр. 62).
Кнопка ОСУШЕНИЕ
Нажмите данную кнопку
для включения режима
осушения (стр. 62).
Кнопка ОХЛАЖДЕНИЕ
Нажмите данную кнопку
включения для включения
режима охлаждения (стр. 63).
Кнопка ОХЛАЖДЕНИЕ
С ОСУШЕНИЕМ
Нажмите данную кнопку
для включения режима
охлаждения с осушением (стр. 64).
Кнопка АВТОМАТИЧЕСКИЙ
РЕЖИМ
Нажмите эту кнопку, чтобы
включить автоматический
режим (стр. 61).
Индикатор передачи
Мигает во время передачи
сигнала дистанционного
управления.
Кнопка СТОП
Нажмите эту кнопку, чтобы
остановить любую операцию,
за исключением предустановки
таймера.
Кнопка настройки
ТЕМПЕРАТУРЫ
Используется для изменения
уставки температуры.
Нажмите и удерживайте
для быстрого изменения
значения.
Кнопка настройки
ВЛАЖНОСТИ
Используется для изменения
уставки влажности в
режимах осушения и охлаждения с осушением.
Кнопка ОБНАРУЖЕНИЯ
ПРИСУТСТВИЯ ЧЕЛОВЕКА
С ПОМОЩЬЮ ИНФРАКРАСНОГО
ИЗЛУЧЕНИЯ
Нажмите эту кнопку, чтобы
включить режим динамического
изменения направления потока
воздуха. (стр. , )
Кнопка ТАЙМЕРА отключения
Нажмите данную кнопку для
режима работы по таймеру
(стр. ).
Кнопка ОЧИСТКА ВОЗДУХА
Нажмите эту кнопку, чтобы включить
функцию плазменной очистки воздуха
(циркуляция воздуха) (стр. 66).
Пультом дистанционного управления можно пользоваться и когда он находится в настенном держателе.
Держатель следует установить так, чтобы находящийся в нем пульт мог управлять внутренним блоком.
Винт
– 5 4 –
67
68
77
Кнопка РАСПЫЛЕНИЕ ИОНОВ
Нажмите эту кнопку для включения
распыления ионов. (Страница 18)
Page 55

DEUTSCHFRANÇAISITALIANOSPANISHPORTUGUÊS
∂ППЛУИО¿
РУССКИЙ
(при открытой дверце пульта)
Кнопка ОЧИСТКА
Запускает операцию очистки
фильтра после останова
кондиционера (стр. ).
Кнопка ПОЛНАЯ МОЩНОСТЬ
Нажмите эту кнопку для
включения устройства на
полную мощность (стр. ).
Кнопка ВРУЧНУЮ/АВТО
Нажмите эту кнопку для
переключения между
автоматическим и ручным
осушением и сухим
охлаждением (стр. ).
Кнопка переключения
СКОРОСТИ ВЕНТИЛЯТОРА
Позволяет выбирать
скорость вентилятора.
Доступно четыре режима:
Авто, Сильный, Слабый,
Мягкий и Тихий.
ПЕРЕКЛЮЧАТЕЛЬ ФУНКЦИЙ
Позволяет выбирать
предустановленные
функции (кроме
(СОХРАНЕНИЕ). Во
избежание некорректной работы агрегата
пользуйтесь этими
кнопками, только когда
кондиционер остановлен.
Кнопка ВЫБОРА ФУНКЦИИ
При последовательном
нажатии этой кнопки
поочередно начинают мигать
пиктограммы соответствующ
функций (стр. , , , ):
ВКЛ/ОТКЛ. функции
Устанавливает или отменяет
функцию, установленную
кнопкой выбора.
Кнопка ВЕРТИКАЛЬНАЯ
ЗАСЛОНКА
Включение покачивания
вертикальной заслонки или
ее установки под требуемым углом (стр. ).
Кнопка ГОРИЗОНТАЛЬНАЯ
ЗАСЛОНКА
Включение покачивания
горизонтальной заслонки
или ее установки под
требуемым углом (стр. ).
Кнопка ДИНАМИЧЕСКОЕ
РАСПРЕДЕЛЕНИЕ ВОЗДУХА
Нажмите эту
кнопку, чтобы включить
динамическое распределение
воздуха
(стр. )
.
Кнопки ТАЙМЕРА
Кнопка настройки ТАЙМЕРА
Предназначена для ввода
и проверки текущей даты и
времени (стр. 59 ).
Кнопка RESET (сброс)
Нажмите данную кнопку
после замены батарей в
пульте управления или в
случае некорректной работы
кондиционера (стр. 59 ).
РУССКИЙ
– 5 5 –
80
66
65
60 69 70 71
72
73
68
Page 56

2
Ручка
1
この中に「防カビわさびカセット」が入っています
●製品の取扱説明書を確認して確実に取り付けてください。
●開封時は顔を近づけないでください。
わさびの香り成分で、目や鼻に刺激を感じることがあります。
●
「防カビわさびカセット」
の表面のアルミシートを
はがしたり、破ったり、穴をあけたりしないでください。
「防カビわさびカセット」の効果がなくなります。
●食べられません。
注
意
УСТАНОВКА ПРОТИВОПЛЕСНЕВОЙ КАССЕТЫ С ВАСАБИ
Откройте лицевую панель.
•
Лицевая панель
Возьмитесь здесь
Возьмитесь здесь
•
Возьмитесь за переднюю
панель справа и слева и
приподнимете её.
ОСТОРОЖНО!
•
Не открывайте лицевую панель во время
работы кондиционера.
Перед тем как открывать лицевую панель,
убедитесь, что кондиционер остановлен.
•
Установка противоплесневой кассеты с васаби.
•
Извлеките противоплесневую кассету
с васаби из алюминиевой упаковки.
Противоплесневая
кассета с васаби
Алюминиевая
упаковка
•
Не проделывайте отверстий
в алюминиевой пластинке
кассеты, не снимайте и не
разрывайте её.
Кассета не требует обслуживания. Срок
службы кассеты составляет примерно 10 лет,
после чего она подлежит замене.
ОСТОРОЖНО!
•
В время распаковки не наклоняйтесь над кассетой.
Васаби может раздражать слизистые оболочки глаз
и носа.
• НЕ УПОТРЕБЛЯЙТЕ В ПИЩУ.
– 5 6 –
Открывая или закрывая лицевую панель, не
беритесь за жалюзи воздуховыпускного отверстия.
Это может привести к нарушению работы
жалюзи
Опора панели
Опустите лицевую панель и
зафиксируйте её на опоре.
•
Поднимите опору, чтобы она
зафиксировалась со щелчком.
Контейнер для пыли
Контейнер для пыли
Извлеките контейнер для пыли
Сразу же установите кассету в контейнер,
как показано на рисунке.
Page 57

DEUTSCH
DEUTSCHFRANÇAISITALIANOSPANISHPORTUGUÊS
∂ППЛУИО¿
РУССКИЙ
3
РУССКИЙ
Закройте лицевую панель.
•
Возьмитесь за переднюю панель справа и
слева, и приподнимете её.
•
Нажмите на опору панели и опустите её.
Раздастся характерный щелчок.
•
Опустите панель.
Нажмите сначала на правый и левый
края, а затем на центр лицевой панели.
Раздастся щелчок.
ОСТОРОЖНО!
– 5 7 –
• Незакрепленная панель может оторваться и упасть.
• Открывая панель, не прикладывайте излишнего усилия. Панель
может оторваться, и станет неисправным.
• Открытую панель следует зафиксировать на опоре.
кондиционер
Page 58

1
2
– 58 –
ПРОВЕРКА РАБОТОСПОСОБНОСТИ УЗЛА ОЧИСТКИ
Убедитесь, что вилка плотно и до упора вставлена в розетку.
ВНИМАНИЕ!
Обязательно!
Обязательно!
•
Перед подключением к розетке убедитесь,
что штыревые контакты вилки не загрязнены.
Вилка должна быть вставлена до упора и
плотно удерживаться в розетке
Загрязнение вилки или ненадежный её контакт
с розеткой могут привести к поражению
электрическим током или пожару.
•
Убедитесь, что к данной розетке подключен
только один кондиционер
Подключение нескольких потребителей к
одной
розетке может привести к её перегреву и
пожару.
ОСТОРОЖНО!
Не прикасайтесь
мокрыми руками!
Это может привести
к поражению
электрическим
током.
Не прикасайтесь
мокрыми руками!
Проверьте работоспособность после включения
питания.
Проверьте работоспособность узла очистки фильтра
• После подачи питания (установки вилки в розетку или включения
цикл (прямой и обратный выключателя) узел очистки выполнит один
автоматического выключателя) узел очистки выполнит один рабочий
рабочий цикл (прямой и обратный ход щетки).
• Длительность цикла проверки работоспособности узла очистки
фильтра составляет приблизительно 5 минут.
• При этом будет светиться индикатор (ОЧИСТКА).
• Во время проверки работоспособности кондиционер работает в
режиме вентиляции, при этом подвижная панель и горизонтальная
заслонка закрыты.
(4 с ВКЛ. / с ОТКЛ.), см. «Устранение неисправностей», стр. .
• Если по завершении проверки индикатор (ОЧИСТКА) мигает
Пылесборник
Узел очистки
Внутри установлена щетка для очистки фильтра.
• Для большей наглядности кондиционер
показан без лицевой панели.
ОСТОРОЖНО!
Не просовывайте пальцы или посторонние предметы внутрь
кондиционера во время автоматической очистки фильтра
Это может привести к травме или к поломке агрегата.
92
7(0325$5<
6:,7&+
Page 59

DEUTSCHFRANÇAISITALIANOSPANISHPORTUGUÊS
∂ППЛУИО¿
РУССКИЙ
DEUTSCH
Address
Address
RESET
1
2
1
2
3
DEUTSCH
– 59 –
РУССКИЙ
ПОДГОТОВКА ПУЛЬТА ДИСТАНЦИОННОГО УПРАВЛЕНИЯ К РАБОТЕ
Установка элементов питания.
• Используйте два элемента питания
типа AAA.
Нажмите на и
снимите крышку
отсека для батарей
ОСТОРОЖНО!
1.
Запрещается одновременно
устанавливать новые и старые
элементы питания или элементы
питания разного типа.
2.
Извлеките элементы питания, если
пульт дистанционного управления не
будет использоваться более -3 месяцев.
Откиньте крышку пульта и нажмите
кнопку RESET тонким стержнем.
• На дисплее начнут мигать
буквы «AM» и «PM», а
также цифры «18:88».
Установите текущее время (например 1:30 дня)
Войдите в режим установки текущего времени, нажав кнопку
(ТАЙМЕР).
• При длительном нажатии время изменяется быстрее.
Увеличение времени
Уменьшение времени
Введите текущее время, нажав кнопку (ВРЕМЯ).
•
Надписи «AM» или «РМ» перестанут
мигать и автоматически погаснут
через 10 с.
Проверьте текущее время
(ВРЕМЯ), чтобы проверить текущее время
(Отображение времени исчезнет через 3 минуты).
При необ-ходимости
• Нажмите кнопку
подстройте его, выполнив операции 1 и 2.
ПЕРЕКЛЮЧАТЕЛЬ АДРЕСА ВНУТРЕННЕГО БЛОКА
• Переключатель адреса используется,
если в помещении установлено два
внутренних блока. Он позволяет исключить
выполнение кондиционером команд с пульта
управления от другого агрегата. Данный
переключатель обычно не используется.
(Заводская настройка – положение «А».)
Перед тем как изменить положение
переключателя, проконсультируйтесь у
представителя нашей компани.
Тыльная сторона
пульта дистанци-
онного управления
Переключатель
адреса
Движок переключателя
Самостоятельное использование
запрещается!
Page 60

1
4
2
– 60 –
ПОДГОТОВКА ПУЛЬТА ДИСТАНЦИОННОГО УПРАВЛЕНИЯ К РАБОТЕ (продолжение)
Задание уставки потребляемого тока («стандартный»/ «пониженный»).
При частых срабатываниях автоматического выключателя измените уставку потребляемого
тока на «пониженный» (заводская настройка: «стандартный»).
Нажимайте кнопку (ВЫБОРА ФУНКЦИЙ)
до тех пор, пока на
дисплее начнет
дистанционного управления на кондиционер и нажмите кнопку
(ВКЛ/ОТКЛ.).
•
Указания по применению настройки пониженного потребляемого
тока
• Если выбрать уставку пониженного потребляемого тока, то
максимальная теплопроизводительность агрегата будет
несколько хуже, а достижение требуемой температуры в режиме
обогрева займет больше времени. Кроме того, при очень низкой
температуре наружного воздуха достичь требуемой температуры
в помещении будет невозможно.
УКАЗАНИЯ ПО ИСПОЛЬЗОВАНИЮ ПУЛЬТА ДИСТАНЦИОННОГО УПРАВЛЕНИЯ
Приблизительно
7 м от лицевой
панели
• Направляйте пульт на ИК датчик внутреннего блока
Дальность действия пульта не превышает 7 м от лицевой панели
агрегата. При работе электросварочного аппарата в одной комнате
с агрегатом это расстояние может быть меньше, либо агрегат
вообще не будет принимать команды с пульта.
• Будьте предельно осторожны при работе с пультом
Падение пульта или попадание в него воды может снизить
мощность излучаемого сигнала. После замены батарей внутренний
блок первое время будет реагировать на управляющие сигналы с
задержкой около 10 с.
ОТМЕНА
мигать символ ( ).
ОГРАНИЧЕНИЕ ПО ТОКУ
Во время мигания символа ( ) направьте
ОГРАНИЧЕНИЕ ПО ТОКУ
Раздастся короткий звуковой сигнал, символ
перестанет мигать и будет отображаться постоянно.
(
ОГРАНИЧЕНИЕ
ПО ТОКУ
)
Нажимайте к
нопку выбора функций (ВЫБОРА ФУНКЦИЙ)
до тех пор, пока на дисплее начнет мигать символ
Во время мигания символа
пульт дистанционного управления на кондиционер и
кнопку (ВКЛ/ОТКЛ.).
• Раздастся короткий звуковой сигнал и символ
погаснет,указывая,что уставка
пониженного потребляемого тока отменена.
( )
ОГРАНИЧЕНИЕ ПО ТОКУ
направьте
( )
ОГРАНИЧЕНИЕ ПО ТОКУ
нажмите
( )
ОГРАНИЧЕНИЕ ПО ТОКУ
Page 61

SPANISHPORTUGUÊS
∂ППЛУИО¿
РУССКИЙ
1
2
2
1
•
DEUTSCHFRANÇAISITALIANOSPANISHPORTUGUÊS
∂ППЛУИО¿
РУССКИЙ
– 61 –
РУССКИЙ
АВТОМАТИЧЕСКИЙ РЕЖИМ
Нажимайте кнопку переключения РЕЖИМОВ
РАБОТЫ до тех пор, пока на дисплее не появится
символ (АВТОМАТИЧЕСКИЙ РЕЖИМ).
•
При последовательном нажатии кнопки индикация
изменяется, как показано на рисунке справа.
Зуммер
Нажмите кнопку (CTOП).
Нажмите кнопку (CTOП) еще раз.
•
Раздастся короткий звуковой сигнал и
работа в автоматическом режиме будет
прекращена.
•
На дисплее пульта дистанционного управления
будет отображен текущий режим работы.
CTOП
АВТОМАТИЧЕСКИЙ РЕЖИМ
Обогрев
Осушение
Охлаждение
• Осуществляется, если температура в помещении ниже 23°C.
Уставка температуры должна быть выше 23°C.
• Осуществляется при температуре в помещении 23~26°C.
Уставка равна температуре в помещении на момент пуска кондиционера.
• Осуществляется, если температура в помещении выше 27°C.
Уставка температуры должна быть ниже 27°C.
Кондиционер может не выполнять осушения, даже если оно было включено, если влажность в
помещении невысока. Это нормальное явление.
Температура в помещении и скорость вентилятора могут задаваться пользователем.
Ввод уставки температуры в помещении
Нажимайте кнопку (ТЕМПЕРАТУРА).
• При каждом нажатии кнопки подается короткий
звуковой сигнал, а температура изменяется на 1°C.
•
указывает, что установленная температура
выше автоматически выбранной уставки на 1°C.
указывает, что установленная температура ниже
автоматически выбранной уставки на 1°C.
• Диапазон регулирования уставки пользователем
составляет 3°C от автоматически выбранной уставки.
• Уставка влажности в помещении не регулируется.
Увеличение
Уменьшение
Ввод скорости вентилятора
Нажмите кнопку (СКОРОСТЬ
ВЕНТИЛЯТОРА).
• С её помощью можно выбрать
настройки «авто», «низкая»,
«малошумный режим».
• При последовательном нажатии
кнопки индикация изменяется, как
показано на рисунке справа.
7(0325$5<
6:,7&+
Агрегат выбирает режим работы (обогрев, осушение или охлаждение) и поддерживает комфортную
температуру в зависимости от температуры в помещении и . (Перед началом
установите текущее время на пульте дистанционного управления.)
атмосферного воздуха
работы
Page 62

•
ENGLISH
DEUTSCHFRANÇAISITALIANOSPANISHPORTUGUÊS
∂ППЛУИО¿
РУССКИЙ
– 62 –
РЕЖИМ ОБОГРЕВА
Для включения режима обогрева нажмите кнопку (ОБОГРЕВ).
Нажмите кнопку (ОБОГРЕВ).
•
Задайте требуемую температуру в помещении и скорость вентилятора.
Температура задается в диапазоне 16°C~32°C.
CTOП
Нажмите кнопку (CTOП).
• Раздастся короткий звуковой сигнал, и кондиционер прекратит
работу в режиме охлаждения.
РЕЖИМ ОСУШЕНИЯ
Нажатием кнопки (ОСУШЕНИЕ) можно выбрать три режима осушения. Кондиционер эффективно
осушает воздух без понижения температуры в помещении.
Нажмите кнопку (ОСУШЕНИЕ).
•
При последовательном нажатии кнопки (ОСУШЕНИЕ)
режимы выбираются в следующей последовательности:
Автоматическое
осушение
Быстрая сушка
Предотвращение
запотевания
(Символ “автоматического” режима мигает в течение 5 с)
• Во время автоматического осушения можно точно задавать
температуру в помещении, влажность и скорость вентилятора.
При каждом нажатии кнопки ТЕМПЕРАТУРА уставка температуры в
помещении
изменяется на 1°C (диапазон настройки ± 3°C). При каждом
нажатии кнопки
ВЛАЖНОСТЬ уставка влажности в помещении
изменяется на 5%. (диапазон настройки 40%~70%.)
• Во время быстрой сушки можно задавать температуру в помещении
и скорость вентилятора. (При работе функции предотвращения
образования конденсата настройка температуры и влажности в
помещении невозможна.)
CTOП
Нажмите кнопку (CTOП).
• Раздастся короткий звуковой сигнал, и кондиционер прекратит
работу в режиме осушения.
• После прекращения работы в режиме осушения на дисплее пульта
дистанционного управления будет отображен символ режима,
действовавшего до нажатия кнопки (ОСУШЕНИЕ).
Page 63

– 63 –
РЕЖИМ ОСУШЕНИЯ (продолжение)
Режим работы Назначение Принцип работы
Автоматическое
осушение
• Используется
в сырую
погоду
• В большинстве случаев в качестве уставки используется
температура в помещении на момент нажатия кнопки.
(
Если она ниже 12°C, задайте13°C. Если она составляет 13°C~22°C,
задайте +2°C. Если она составляет 23°C~26°C, задайте текущую
температуру в помещении. Если она выше 26°C, задайте 26°C)
• Уставка влажности составляет 50~60%. После того, как текущая
влажность станет ниже уставки, осушение прекратится. Если
влажность станет выше уставки, осушение возобновится.
• Для поддержания требуемой температуры кондиционер может
автоматически переходить в режим обогрева или охлаждения
(см. таблицу внизу страницы).
• Используется
для быстрой
сушки белья
Быстрая сушка
•
Предотвращение
запотевания в хо лодное время
года
Предотвращение
запотевания
• На основе значений температуры наружного воздуха, влажности и
температуры в помещении, выбирается наиболее эффективное
сочетание обогрева с мощным осушением.
• Данная операция осуществляется совместно с плазменной
очисткой воздуха.
• Основной целью является сушка белья.
Проследите, чтобы при этом в помещении не было людей,
поскольку влажность и температура сильно повысятся.
• Продолжительность работы в этом режиме задается в пределах
3 ч.
• Главная цель – снижение влажности воздуха в помещении. При
этом температура в помещении также снижается. Операция
останавливается, если темпера в помещении опускается до 1°C
или ниже.
• Продолжительность работы в этом режиме задается в пределах
2 ч.
•
Так как при работе функции предотвращения образования конденсата температура в помещении понижается,
крайне осторожно пользуйтесь данной функцией при низких температурах наружного воздуха.
• Кнопки (ОТКЛЮЧЕНИЕ ПО ТАЙМЕРУ) и
(ВКЛЮЧЕНИЕ ПО ТАЙМЕРУ) (стр. ) в режиме осушения
(быстрой сушки и предотвращения образования конденсата) недоступны. Таймер для этих операций (на
30 минут и 1-9 часов) можно задать кнопкой (НОЧНОЙ РЕЖИМ).
• Чтобы задать уставки температуры и влажности в помещении во время выполнения осушения,
рекомендуется использовать функцию ручного осушения (стр. 65)
•
Если во время сушки белья нежелательно, чтобы температура в помещении была слишком высокой, вместо
режима быстрой сушки используйте режим максимальной дальнобойности струи воздуха (стр. 66)
Для поддержания требуемой температуры кондиционер может автоматически переходить в режим
обогрева или охлаждения. При этом влажность в помещении может изменяться приблизительно на
10%.
Прекращение
работы
Режим
обогрева
Осушение
Прибл. 3
°C
Прибл. 3°C, если наружная
температура ниже 32°C.
Прибл. 1°C, если наружная
температура выше 32°C.
Режим
охлаждения
Уставка температуры в помещении
Текущая температура в помещении
1
°C
РЕЖИМ ОХЛАЖДЕНИЯ
Для включения режима охлаждения нажмите кнопку (ОХЛАЖДЕНИЕ).
Нажмите кнопку (ОХЛАЖДЕНИЕ).
• Задайте требуемую температуру в помещении и скорость вентилятора.
Температура задается в диапазоне 16°C~32°C.
CTOП
Нажмите кнопку (CTOП).
• Раздастся короткий звуковой сигнал, и кондиционер прекратит
работу в режиме охлаждения.
РУССКИЙ
74
Page 64

•
DEUTSCHFRANÇAISITALIANOSPANISHPORTUGUÊS
∂ППЛУИО¿
РУССКИЙ
– 64 –
РЕЖИМ ОХЛАЖДЕНИЯ С ОСУШЕНИЕМ
Кондиционер переходит в данный режим при нажатии кнопки (ОХЛАЖДЕНИЕ С ОСУШЕНИЕМ).
Нажмите кнопку (ОХЛАЖДЕНИЕ С ОСУШЕНИЕМ).
• Задайте требуемую температуру в помещении и скорость
вентилятора.
• При каждом нажатии кнопки (ТЕМПЕРАТУРА) уставка температуры
в помещении изменяется на 1°C.
(Диапазон настройки составляет ± 3°C от уставки, используемой в
автоматическом режиме работы кондиционера.)
CTOП
Нажмите кнопку (CTOП).
• Раздастся короткий звуковой сигнал, и кондиционер прекратит
работу в режиме охлаждения с осушением.
Уставка
влажности
Уставка
температуры
Задается в диапазоне 24~28°C с учетом ежечасно
измеряемой текущей температуры наружного воздуха
и температуры в помещении.
50% при уставке температуры выше 27°C.
55% при уставке температуры 26°C.
60% при уставке температуры ниже 25°C.
• Кондиционер может
продолжить работу и
после достижения уставки
температуры, чтобы достичь
уставки влажности.
Для поддержания требуемой температуры кондиционер может автоматически переходить в режим обогрева
Если в режиме охлаждения с осушением необходимо изменить температуру или влажность, рекомендуется
использовать функцию ручного охлаждения. (стр. 65)
или охлаждения. Если температура в помещении ниже уставки, то кондиционер будет работать с перерывами,
чтобы не допустить её излишнего понижения и обеспечить поддержание заданной влажности.
Прекращение
работы
Осушение с
перерывами
Охлаждение с осушением
Прибл. 3°C
Прибл. 1°C
Прибл. 3°C, если наружная
температура ниже 32°C.
Прибл. 1°C, если наружная
температура выше 32°C.
Охлаждение
Уставка температуры в помещении Текущая температура в помещении
Выбирайте режим работы кондиционера с учетом температуры наружного воздуха.
Обогрев
•
Температура наружного воздуха
от -20°C до 21°C
(Работа в режиме обогрева при температуре
наружного воздуха выше -20°C и ниже 24°C,
невозможна (функция защиты агрегата).
Осушение
•
Температура наружного
воздуха от 1°C до 35°C
(При температуре в помещении ниже
1°C охлаждение не включается.)
Охлаждение с
осушением
•
Температура
наружного воз духа от 25°C~35°C
• Не включайте режим охлаждения в холодное время года.
Охлаждение
•
Температура
наружного
воздуха от 22°C
до 43°C
Page 65

Dž
Влажность
Влажность
ТЕМПЕРАТУРА
ТЕМПЕРАТУРА
Автоматическая регулировка от
50 % до 60 %
Dž
40%~70%
40%~70%
40%~70%
10°C~32°C
16°C~32°C
– 65 –
РУССКИЙ
ПЕРЕКЛЮЧЕНИЕ МЕЖДУ ОСУШЕНИЕМ/СУХИМ ОХЛАЖДЕНИЕМ В АВТОМАТИЧЕСКОМ/РУЧНОМ РЕЖИМЕ
Кнопка АВТО/РУЧНОЙ
позволяет вручную настраивать температуру и влажность при осушении/сухом
охлаждении.
Ą
По умолчанию выбрано АВТО.
Нажмите кнопку
АВТО/РУЧНОЙ.
Пример:
• Переключение в ручной режим, если устройство работает в
автоматическом режиме осушения/сухого охлаждения.
• Переключение в автоматический режим, если устройство работает
в ручном режиме осушения/сухого охлаждения.
Настройка диапазона для работы в режим АВТО/РУЧНОЙ
Диапазон регулировки в режиме сухого охлаждения
Диапазон регулировки в режиме осушения
Автоматическое
осушение
Автоматически настраиваемая
температура ±3 °C
Автоматически настраиваемая
температура ±3 °C
Осушение вручную
Сухое охлаждение
вручную
Автоматическое сухое
охлаждение
Осушение
«ВРУЧНУЮ» выбрано
Page 66

– 66 –
Нажмите кнопку (ОЧИСТКА ВОЗДУХА).
• Установите требуемую скорость вентилятора: «высокую», «среднюю»,
«низкую», «малошумный режим».
• Когда кондиционер выполянет только очистку воздуха, задание
настроек с помощью кнопок (ОТКЛЮЧЕНИЕ ПО ТАЙМЕРУ) и
(ВКЛЮЧЕНИЕ ПО ТАЙМЕРУ) невозможно.
CTOП
ОТМЕНА
во время
работы
Нажмите кнопку (CTOП).
• Раздастся короткий звуковой сигнал, и плазменная очистка
воздуха прекратится.
Нажмите кнопку (ОЧИСТКА ВОЗДУХА).
РЕЖИМ МАКСИМАЛЬНОЙ МОЩНОСТИ
•
• Режим максимальной мощности включается нажатием кнопки
(РЕЖИМ МАКСИМАЛЬНОЙ
МОЩНОСТИ) во время работы кондиционера в следующих режимах: автоматический, охлаждение,
обогрев, осушение или плазменная очистка воздуха.
• Струя воздуха будет иметь максимально возможную дальнобойность.
Нажмите кнопку
время работы кондиционера.
(РЕЖИМ МАКСИМАЛЬНОЙ МОЩНОСТИ) во
• Раздастся короткий звуковой сигнал и кондиционер начнет работу в
режиме максимальной мощности. (На дисплее пульта управления
появится символ
(МАКСИМАЛЬНАЯ МОЩНОСТЬ).)
ОТМЕНА
Нажмите кнопку
еще раз.
(РЕЖИМ МАКСИМАЛЬНОЙ МОЩНОСТИ)
• (Символ
(МАКСИМАЛЬНАЯ МОЩНОСТЬ)
на дисплее пульта
управления погаснет.)
Режим работы Когда применяется
Принцип работы
Обогрев
Охлаждение
• Если требуется прогреть
помещение немного
сильнее
• Температура устанавливается приблизительно
на 2°C выше уставки. Обогрев выполняется с
максимальной мощностью.
• Если требуется обдув более
прохладным воздухом
• Если требуется охладить
помещение немного сильнее
• Температура устанавливается приблизительно
на 3°C ниже уставки. Охлаждение выполняется
с максимальной мощностью.
Осушение
Автоматическое
осушение
Быстрая сушка
Предотвращение
запотевания
• Если требуется несколько
ускорить осушение
• Осушение осуществляется с максимальной
скоростью до тех пор, пока влажность воздуха
не станет меньше 40 %.
• Ускорение сушки белья.
• Более эффективное предотвращение
образования конденсата в помещении.
• Если функция плазменной очистки воздуха была запущена самостоятельно, то включатся
вентилятор и плазменный электрод, которые совместно используются для сбора пыли.
• Если функция плазменной очистки воздуха была запущена совместно с одним из основных режимов
работы кондиционера, то помимо выполнения своей основной задачи он будет использовать
плазменный электрод для сбора пыли.
ПЛАЗМЕННАЯ ОЧИСТКА ВОЗДУХА
только
Режим распыления ионов является совместным режимом работы вентилятора, электрической сборки
пыли и увлажнения.
Если режим распыления ионов задан, кондиционер находится в базовом рабочем режиме, то также
будет работать функция очистки воздуха, реализуемая электрическим сборником пыли.
Нажмите кнопку (РАСПЫЛЕНИЕ ИОНОВ).
Установите требуемую скорость вентилятора: «высокую», «среднюю»,
«низкую», «малошумный режим».
Когда задан лишь режим распыления ионов, задание настроек
с помощью кнопок (ОТКЛЮЧЕНИЕ ПО ТАЙМЕРУ) и
(ВКЛЮЧЕНИЕ ПО ТАЙМЕРУ) невозможно.
Нажмите кнопку (CTOП).
Последует короткий звуковой сигнал и режим распыления
ионов прекратит свою работу. ,,,
Нажмите кнопку (РАСПЫЛЕНИЕ ИОНОВ).
Page 67

1
•
●
●
●
●
·
·
·
·
•
•
Повышение предустановленной температуры
в одном из следующих случаев:
Низкий уровень активности
Низкая температура в помещении
•
•
Низкий уровень активности
Низкая температура в помещении
•
•
Увеличение предустановленной температуры
в одном из следующих случаев:
Энергосберегающая работа в автоматическом
режиме.
Высокий уровень активности
Высокая температура в помещении
– 67 –
ИК-ДАТЧИК ЧЕЛОВЕЧЕСКОГО ПРИСУТСТВИЯ
Пример:
• Инфракрасный датчик автоматически
регулирует температуру и влажность в
помещении в зависимости от уровня
активности в нем. Однако температура и
влажность, настроенные с помощью пульта
ДУ, не изменяются.
•
•
• В энергосберегающем режиме регулирования температуры степень экономии энергии зависит от
уровня активности в помещении.
• Функция отслеживания (стр. ) помогает экономить электроэнергию еще более эффективно.
• Включение энергосберегающего режима отменяет работу в режиме максимальной мощности.
• Понижает температуру на 2°C.
• Повышает температуру на 2°C.
• Повышает температуру на 5-10%.
•
Энергосберегающая работа в автоматическом режиме.
• При отсутствии людей в комнате в течение 30 минут кондиционер автоматически переходит в
энергосберегающий режим в соответствии с параметрами, указанными в правой таблице дисплея
пульта ДУ. Однако значения заданной температуры и влажности, отображаемые на дисплее
пульта ДУ, остаются неизменными.
• Очень низкий уровень активности (чтение, просмотр телевизора и т. д.) или препятствия между
телом и кондиционером (например, экран, шкаф или стекло).
• В помещении очень высокая температура, равная температуре человеческого тела или
превышающая ее (при запуске охлаждения).
• На человеке толстая одежда, и он обращен спиной к кондиционеру.
• Шторы или листья растений качаются из-за движения домашних животных или потока воздуха.
Снижение предустановленной температуры
в одном из следующих случаев:
Охлаждение
Датчик включен
Режим работы
Описание
Режим работы
Работа кондиционера при отсутствии людей в комнате
Охлаждение
Авто
Обогрев
Осушение/Охлаждение
с осушением
Осушение/Охлаждение
с осушением
Обогрев
Охлаждение
Авто
РУССКИЙ
68
С помощью инфракрасного датчика присутствия кондиционер может определять уровень активн
ости в
помещении и автоматически регулировать температуру и влажность, обеспечивая эконо
мию
электроэнергии.
Нажмите кнопку .
ДАТЧИК ПРИСУТСТВИЯ
Энергосберегающий эффект можно увидеть при работе этой функции в течение не менее 2 час
ов
.
Инфракрасный датчик определяет тепловое излучение, выделяемое человеческим телом. Поэт
ому
точность работы инфракрасного датчика может снижаться в следующих случаях:
Page 68

1
Нажатие кнопки
ДИНАМИЧЕСКОЕ
РАСПРЕДЕЛЕНИЕ
ВОЗДУХА
Обогрев
Пример:
Описание
Отпустите
кнопку
динамического
изменения
направления
потока
воздуха
DEUTSCHFRANÇAISITALIANOSPANISHPORTUGUÊS
∂ППЛУИО¿
РУССКИЙ
– 68 –
ФУНКЦИЯ ДИНАМИЧЕСКОГО РАСПРЕДЕЛЕНИЯ ВОЗДУХА (ОТСЛЕЖИВАНИЕ/УКЛОНЕНИЕ)
Инфракрасный датчик может определять положение людей и автоматически изменять направление
воздушного потока.
(Отслеживание) Автоматическая
регулировка воздушной струи для
ее направления в сторону людей.
Чтобы включить режим изменения направления потока воздуха, нажмите
кнопку АВТОМАТИЧЕСКОЕ ИЗМЕНЕНИЕ НАПРАВЛЕНИЯ ПОТОКА
ВОЗДУХА.
Восстановление значения,
выбранного до включения
функции динамического
распределения воздуха.
(Уклонение) Автоматическая
регулировка воздушной струи для
предотвращения подачи воздуха
в сторону людей.
•
После включения режима динамического распределения воздуха датчик автоматически срабатывает в интервале
от 15 секунд до 3 минут для определения положения человека, а затем регулирует направление воздушного потока
соответствующим образом. (Направление воздуха не изменяется сразу вслед за перемещением человека.)
•
Когда кондиционер работает в режиме охлаждения, осушения или сухого охлаждения после включения
динамического распределения воздуха, при очень высокой температуре или влажности левый, правый,
верхний и нижний дефлекторы могут изменять свое положение для предотвращения падения конденсата.
После снижения температуры кондиционер снова перейдет в режим динамического распределения воздуха.
• Если с помощью динамического распределения воздуха не удалось добиться нужного эффекта,
отрегулируйте направление воздушного потока вручную.
ƽ
Изменение скорости реагирования датчика функции динамического распределения воздуха
(отслеживание/уклонение):
•
Существует 2 скорости обнаружения: «Стандартная» (интервал от 15 секунд до 3 минут) и «Медленная»
(интервал от 1 до 10 минут).
•
По умолчанию на пульте ду установлена стандартная скорость.
•
Если скорость обнаружения слишком высокая, установите режим «Медленная».
(когда по комнате часто перемещаются люди и животные, что приводит к изменению направления
воздушного потока.)
Установка значения «Медленная» для скорости обнаружения датчика.
После остановки удерживайте кнопку более 5 секунд, нажимая и удерживая .
•
В этот момент кондиционер подаст звуковое оповещение о получении сигнала.
•
Вернитесь в режим скорости «Стандартная» с помощью описанной выше процедуры (кондиционер
должен снова подать звуковой сигнал).
Кроме выбора режима скорости «Стандартная» или «Медленная», можно самостоятельно отрегулировать
скорость обнаружения.
Регулировка скорости обнаружения датчика
Удерживайте кнопку после остановки.
Выберите нужное значение.
Нажмите кнопку (СТОП).
(Настройка в диапазоне от +3 до -3. Индикатор выключается через 10 секунд.)
•
Параметры будут сохранены.
Page 69

2
1
ENGLISH
DEUTSCHFRANÇAISITALIANOSPANISHPORTUGUÊS
∂ППЛУИО¿
РУССКИЙ
– 69 –
РУССКИЙ
ОПЕРАЦИЯ ВНУТРЕННЕЙ ОЧИСТКИ
Внутренняя очистка выполняется автоматически по завершению работы в режиме охлаждения, осушения
и охлаждения с осушением с целью ограничения роста плесени. Чтобы функция (ВНУТРЕННЯЯ
ОЧИСТКА) выполнялась, ее следует активировать. (При внутренней очистке удаление плесени и
дезинфекции/стерилизации не происходит.)
Нажимайте кнопку выбора функций
(ВЫБОРА ФУНКЦИИ), пока на дисплее
начнет мигать символ (ВНУТРЕННЯЯ
ОЧИСТКА).
Во время мигания символа (ВНУТРЕННЯЯ ОЧИСТКА) направьте
пульт дистанционного управления на кондиционер и нажмите кнопку
(ВКЛ/ОТКЛ.).
• Раздастся короткий звуковой сигнал и символ (ВНУТРЕННЯЯ
ОЧИСТКА) перестанет мигать.
CTOП
Нажимайте кнопку выбора функций (ВЫБОРА ФУНКЦИИ), пока
на дисплее снова не начнет мигать символ (ВНУТРЕННЯЯ
ОЧИСТКА).
Во время мигания символа (ВНУТРЕННЯЯ ОЧИСТКА)
направьте пульт дистанционного управления на кондиционер и
нажмите кнопку (ВКЛ/ОТКЛ.).
• Раздастся короткий звуковой сигнал и символ (ВНУТРЕННЯЯ
ОЧИСТКА) погаснет.
• Операция внутренней очистки не выполняется, если время работы в режимах охлаждения, осушения
или охлаждения с осушением не превышает 10 минут.
• После активации данной функции внутренняя очитка будет автоматически производиться по
завершении работы в режимах охлаждения, осушения и охлаждения с осушением. Во время внутренней
очистки включаются режимы обогрева и вентиляции (с плазменной очисткой воздуха). Это позволяет
ограничить рост плесени внутри кондиционера.
• Если было задано включение по таймеру (ВКЛЮЧЕНИЕ ПО ТАЙМЕРУ), то внутренняя очистка не
запускается, если до времени включения осталось менее 2 часов.
• Внутренняя очистка не запускается, если кондиционер был остановлен при следующих условиях.
(в режиме обогрева, плазменной очистки воздуха, быстрой сушки или таймером отключения
(ОТКЛЮЧЕНИЕ ПО ТАЙМЕРУ) в режиме предотвращения образования конденсата, а также кнопкой
(НОЧНОЙ РЕЖИМ).)
Page 70

1
2
– 70 –
НОЧНОЙ РЕЖИМ
Функция (НОЧНОЙ РЕЖИМ) позволяет задать таймер и режим работы (автоматический, обогрев,
осушение, охлаждение или охлаждение с осушением), обеспечивающие комфортные условия для
сна.
Нажимайте кнопку выбора функций
(ВЫБОРА ФУНКЦИИ) до тех пор, пока на
дисплее начнет мигать символ (НОЧНОЙ
РЕЖИМ).
Во время мигания символа (НОЧНОЙ РЕЖИМ) направьте пульт
дистанционного управления на кондиционер и нажмите кнопку
(ВКЛ/ОТКЛ.).
• Раздастся короткий звуковой сигнал и символ (НОЧНОЙ
РЕЖИМ) перестанет мигать.
CTOП
Нажимайте кнопку выбора функций (ВЫБОРА ФУНКЦИИ) до тех
пор, пока на дисплее снова не начнет мигать символ (НОЧНОЙ
РЕЖИМ).
Во время мигания символа (НОЧНОЙ РЕЖИМ) направьте пульт
дистанционного управления на кондиционер и нажмите кнопку
(ВКЛ/ОТКЛ.).
• Раздастся короткий звуковой сигнал и символ (НОЧНОЙ
РЕЖИМ) погаснет.
• В режиме охлаждения температура и влажность в помещении поддерживаются в комбинации с
режимом осушения.
• В режиме осушения или охлаждения с осушением комфортная температура поддерживается при
заданной влажности 60%.
• В режиме обогрева кондиционер работает также, как в обычном ночном режиме.
• В автоматическом режиме поддержание температуры осуществляется переключением режимов
работы кондиционера.
Page 71

1
2
•
– 71 –
ENGLISH
ФУНКЦИЯ ПРЕДОТВРАЩЕНИЯ РОСТА ПЛЕСЕНИ
Кондиционер измеряет температуру и влажность воздуха в помещении. Когда они достигают значений,
при которых возможен рост плесени, автоматически запускается режим осушения и плазменная очистка
воздуха.
Нажимайте кнопку выбора функций , пока на дисплее
не начнет мигать символ (ПРЕДОТВРАЩЕНИЕ
ОБРАЗОВАНИЯ ПЛЕСЕНИ).
Во время мигания символа (ПРЕДОТВРАЩЕНИЕ ОБРАЗОВАНИЯ
ПЛЕСЕНИ) направьте пульт дистанционного управления на кондиционер
и нажмите кнопку (ВКЛ/ОТКЛ.).
Функция предотвращения роста плесени активирована.
В режиме предотвращения образования плесени на дисплее внутреннего
блока отображаются индикаторы (ВКЛ/ВЫКЛ) и
ОБРАЗОВАНИЯ ПЛЕСЕНИ).
(ПРЕДОТВРАЩЕНИЕ
ОТМЕНА
Нажимайте кнопку выбора функций , пока на дисплее снова не начнет
мигать символ (ПРЕДОТВРАЩЕНИЕ ОБРАЗОВАНИЯ ПЛЕСЕНИ).
Во время мигания символа (ПРЕДОТВРАЩЕНИЕ ОБРАЗОВАНИЯ
ПЛЕСЕНИ) направьте пульт дистанционного управления на кондиционер
и нажмите кнопку (ВКЛ/ОТКЛ.).
• Раздастся короткий звуковой сигнал и символ
(ПРЕДОТВРАЩЕНИЕ
ОБРАЗОВАНИЯ ПЛЕСЕНИ) погаснет.
• Также погаснет индикатор (КОНТРОЛЬ) на внутреннем блоке.
• Функция предотвращения роста плесени должна быть активирована пользователем. Будучи активированной,
она запускает осушение и плазменную очистку только при обнаружении условия для образования плесени.
• Настройка предотвращения роста плесени действует в течение двух недель со времени последнего
использования пульта дистанционного управления (то есть нажатия любой кнопки пульта после того, как была
активирована функция (ПРЕДОТВРАЩЕНИЕ ОБРАЗОВАНИЯ ПЛЕСЕНИ).
По истечении указанных двух недель индикатор (КОНТРОЛЬ) на внутреннем блоке погаснет.
(Но на дисплее пульта управления символ (ПРЕДОТВРАЩЕНИЕ ОБРАЗОВАНИЯ ПЛЕСЕНИ) останется. Если
индикатор (КОНТРОЛЬ) на внутреннем блоке погас, функцию предотвращения роста плесени следует
отменить или активировать повторно.)
•
При активированной функции предотвращения роста плесени через каждые 20 минут приблизительно на три
минуты включается вентилятор, после чего измеряются температура и влажность в помещении.
(Подвижная панель и горизонтальная заслонка во время измерения температуры и влажности остаются
закрытыми.)
• Во время первого рабочего цикла функции предотвращения роста плесени осушение производится непрерывно
в течение 4 часов, если измеренная температура составила 10°C и выше, а влажность 70%. Начиная со второго
цикла, осушение начинается, если измеренная температура и влажность превышают указанные значения, и
прекращается, как только влажность становится меньше 70%.
• В течение 20 минут по окончании рабочего цикла функция предотвращения роста плесени не включается, даже
если влажность превышает 70%.
• Для удаления образовавшейся плесени никакой функции не предусмотрено.
РУССКИЙ
Page 72

ENGLISH
DEUTSCHFRANÇAISITALIANOSPANISHPORTUGUÊS
∂ППЛУИО¿
РУССКИЙ
– 72 –
ИЗМЕНЕНИЕ НАПРАВЛЕНИЯ ПОДАЧИ ВОЗДУХА ПО ВЕРТИКАЛИ
Данная операция выполняется с пульта дистанционного управления (не изменяйте положение заслонки
вручную, она может выйти из строя).
Режим
охлаждения
Режим
обогрева
Охлаждение с
осушением
Прибл.
15°
Прибл.
50°
Прибл.
10°
Автоматическая установка
•
Горизонтальная заслонка автоматически
устанавливается в положение, оптимально
подходящее для каждого режима работы кондиционера. Вертикальная заслонка
устанавливается на заводе в положение для подачи
воздуха вперед. Обычно направление подачи
воздуха по горизонтали не регулируется.
•
Если при работе в режиме охлаждения или
охлаждения с осушением температура и влажность
воздуха в помещении остаются высокими, положение
горизонтальной заслонки может изменяться для
предотвращения стекания конденсата.
Установка горизонтальной заслонки под требуемым углом
•
Для того чтобы воздух подавался под определенным углом по вертикали, нажмите
кнопку (ВЕРТИКАЛЬНАЯ ПОДАЧА). Когда горизонтальная заслонка отклонится на
требуемый угол, нажмите кнопку (ВЕРТИКАЛЬНАЯ ПОДАЧА) еще раз, и заслонка
остановится в данном положении.
Нажмите кнопку (ВЕРТИКАЛЬНАЯ ПОДАЧА).
•
Раздастся короткий звуковой сигнал и горизонтальная заслонка возобновит
покачивание. (Покачивание горизонтальной заслонки)
Нажмите кнопку (ВЕРТИКАЛЬНАЯ ПОДАЧА), когда она отклонится на требуемый угол.
•
Заслонка остановится в положении, в котором она находилась в момент нажатия кнопки.
•
При отключении кондиционера воздуховыпускное отверстие закрывается. При
возобновлении работы горизонтальная заслонка займет заданное ранее положение.
•
При изменении режима работы кондиционера горизонтальная заслонка займет
оптимально подходящее для него положение.
Покачивание горизонтальной заслонки
•
При однократном нажатии кнопки
ПОДАЧА) раздается короткий звуковой сигнал и
горизонтальная заслонка начинает покачиваться.
•
При отключении кондиционера горизонтальная заслонка
перемещается в положение, при котором воздуховыпускное
отверстие закрывается.
•
При возобновлении работы кондиционера горизонтальная
заслонка автоматически устанавливается в положение,
оптимально подходящее для текущего режима работы.
•
Даже когда покачивание заслонки включено, она может прекратить
го при достижении определенной температуры и влажности. (Стр. )
(С момента нажатия кнопки и до начала покачивания может
пройти до 10 с. В течение этого времени кондиционер
проверяет соответствие положения заслонки режиму работы
и условиям в помещении.)
(ВЕРТИКАЛЬНАЯ
Горизонталь
Прибл.
60°
Угол
покачивания
ОСТОРОЖНО!
НЕ эксплуатируйте кондиционер в течение длительного времени в режимах охлаждения, осушения, сухого
охлаждения, распределения воздуха, а также при нахождении вертикального воздушного дефлектора в
нижнем положении.
На вертикальном воздушном дефлекторе может образоваться влага, способная при падении намочить мебель.
73
Page 73

– 73 –
ИЗМЕНЕНИЕ НАПРАВЛЕНИЯ ПОДАЧИ ВОЗДУХА ПО ГОРИЗОНТАЛИ
Изменение направления подачи воздуха по горизонтали
• Кондиционеры поставляются с вертикальной заслонкой, установленной
в положении для подачи воздуха вперед.
• При каждом нажатии кнопки направление подачи воздуха по горизонтали
изменяется, как показано ниже.
• Изменение направления подачи воздуха по горизонтали сопровождается
• Движения левого и правого воздушных дефлекторов на пульте ДУ не
синхронизированы с фактическим перемещением дефлекторов.
коротким звуковым сигналом.
подача
перед
Пользовательский угол
Покачивание вертикальной
заслонки
Установка вертикальной заслонки под требуемым
углом
• Запустите покачивание вертикальной заслонки и остановите его
• Левый и правый воздушные дефлекторы могут находиться в следующих
5 положениях:
повторным нажатием кнопки
(ГОРИЗОНТАЛЬНАЯ ПОДАЧА), когда
она займет требуемое положение.
Остановите вертикальную заслонку в требуемом положении,
повторно нажав кнопку
(ГОРИЗОНТАЛЬНАЯ ПОДАЧА).
• Скорость вентилятора может увеличиваться в зависимости от
положения вертикальной заслонки.
• Даже если вертикальная заслонка была установлена с заданным углом,
её положение может измениться, если при работе в режиме охлаждения,
осушения или охлаждения с осушением температура и влажность в
помещении продолжают оставаться высокими. Подача воздуха под
заданным углом возобновится после того, как кондиционер понизит
температуру и влажность в помещении.
ОСТОРОЖНО!
При работе кондиционера в режиме охлаждения, осушении и охлаждения с осушением не
рекомендуется активировать режим покачивания заслонки на длительное время.
На ней может образоваться конденсат, который будет стекать на предметы интерьера.
Покачивание вертикальной и горизонтальной заслонок может быть прекращено в следующих
случаях.
В режиме обогрева В режиме осушения
В режиме охлаждения с осушением
• В режиме предварительного
прогрева.
• В режиме оттаивания.
• При достижении заданной
температуры в помещении.
• При достижении заданной
влажности в помещении.
• Если температура в
помещении ниже 1°C.
• Когда температура в
помещении становится ниже
заданной и работа кондиционера останавливается.
РУССКИЙ
Page 74

1
3
2
НАСТРОЙКА ТАЙМЕРА
В кондиционере предусмотрено три таймера: (ОТКЛЮЧЕНИЕ ПО ТАЙМЕРУ) (ВКЛЮЧЕНИЕ ПО
ТАЙМЕРУ),
(ОТКЛЮЧЕНИЕ ПО ТАЙМЕРУ) и (ВКЛЮЧЕНИЕ ПО ТАЙМЕРУ). Одновременно можно
запрограммировать только один таймер.
Перед установкой таймера следует задать режим работы, температуры, влажности и скорость
вентилятора.
Порядок установки таймера
Установка (ОТКЛЮЧЕНИЕ ПО ТАЙМЕРУ)
• Когда запрограммировано
время.
(ОТКЛЮЧЕНИЕ ПО ТАЙМЕРУ), кондиционер прекратит работу в заданное
Установка
(ВКЛЮЧЕНИЕ ПО ТАЙМЕРУ)
• Когда запрограммировано
(ВКЛЮЧЕНИЕ ПО ТАЙМЕРУ), кондиционер включится таким образом, чтобы
к назначенному времени в помещении была достигнута заданная температура.
• В зависимости от текущей и заданной температуры в помещении, кондиционер может включиться не
позднее, чем за 60 минут до назначенного времени.
Установка функции (ОТКЛЮЧЕНИЕ ПО ТАЙМЕРУ) (ВКЛЮЧЕНИЕ ПО ТАЙМЕРУ)
(Например, требуется, чтобы кондиционер отключился в 10.30 вечера, а к 7.00 утра обеспечил заданную температуру в помещении.)
• Первым сработает таймер, для которого было задано более раннее время.
Нажмите кнопку
(ОТКЛЮЧЕНИЕ ПО
ТАЙМЕРУ).
•
(ОТКЛЮЧЕНИЕ ПО
ТАЙМЕРУ) начнет мигать.
• На дисплее отобразится
«АМ 0.00» или предыдущая
настройка времени.
Установите время,
нажимая кнопку
(ТАЙМЕР).
• Время устанавливается с
шагом 10 минут.
• При длительном нажатии
время изменяется быстрее.
Увеличение времени
Уменьшение времени
Нажмите кнопку
(УСТАНОВИТЬ).
•
Раздастся короткий
звуковой сигнал и
(ОТКЛЮЧЕНИЕ ПО
ТАЙМЕРУ) будет установлено.
• Символ (ОТКЛЮЧЕНИЕ
ПО ТАЙМЕРУ) прекратит
мигать и будет отображаться
непрерывно.
Появится символ
(ТАЙМЕР
УСТАНОВЛЕН).
•
Загорится индикатор (КОНТРОЛЬ) на внутреннем блоке.
•
Чтобы изменить время
(ОТКЛЮЧЕНИЕ ПО ТАЙМЕРУ),
вернитесь к шагу 1 и нажмите
кнопку
(ОТКЛЮЧЕНИЕ
ПО ТАЙМЕРУ).
– 74 –
Page 75

4
5
6
•
DEUTSCHFRANÇAISITALIANOSPANISHPORTUGUÊS
∂ППЛУИО¿
РУССКИЙ
DEUTSCHFRANÇAISITALIANOSPANISHPORTUGUÊS
∂ППЛУИО¿
РУССКИЙ
– 75 –
Отмена настроек таймера
Нажмите кнопку (ОТМЕНА).
(Все настройки таймера будут удалены)
• Функции (ОТКЛЮЧЕНИЕ ПО ТАЙМЕРУ) / (ВКЛЮЧЕНИЕ ПО ТАЙМЕРУ),
использующие встроенные часы, не могут быть активированы в режиме
(ОЧИСТКА ВОЗДУХА), а также в режимах быстрой сушки или
предотвращения образования конденсата, запущенных кнопкой
(ОСУШЕНИЕ).
• Настройки времени автоматически сохраняются в памяти пульта
дистанционного управления, поэтому в следующий раз достаточно просто
нажать кнопку
(СОХРАНЕНИЕ), чтобы установить те же настройки
таймера.
РУССКИЙ
Нажмите кнопку
(ВКЛЮЧЕНИЕ ПО
ТАЙМЕРУ).
•
(ВКЛЮЧЕНИЕ ПО
ТАЙМЕРУ) начнет мигать.
• На дисплее отобразится
«АМ 6.00» или предыдущая
настройка времени.
•
указывает последова-
тельность функций
(ОТКЛЮЧЕНИЕ ПО
ТАЙМЕРУ) и
(ВКЛЮЧЕНИЕ
ПО ТАЙМЕРУ).
Установите время,
нажимая кнопку
(ТАЙМЕР).
• Время устанавливается с
шагом 10 минут.
• При длительном нажатии
время изменяется быстрее.
Увеличение времени
Уменьшение времени
Нажмите кнопку
(УСТАНОВИТЬ).
•
Раздастся короткий
звуковой сигнал и
(ВКЛЮЧЕНИЕ ПО ТАЙМЕРУ)
будет установлено.
• Символ (ВКЛЮЧЕНИЕ
ПО ТАЙМЕРУ) прекратит
мигать и будет отображаться
непрерывно.
Появится символ
(ТАЙМЕР
УСТАНОВЛЕН).
•
Загорится индикатор (КОНТРОЛЬ) на внутреннем блоке.
•
Чтобы изменить время
(ВКЛЮЧЕНИЕ ПО ТАЙМЕРУ),
вернитесь к шагу 4 и нажмите
кнопку
(ВКЛЮЧЕНИЕ ПО
ТАЙМЕРУ).
Page 76

1
2
– 76 –
ТАЙМЕР НОЧНОГО РЕЖИМА
(ВКЛЮЧЕНИЕ ПО ТАЙМЕРУ) в режиме обогрева может быть произведено одновременно с активацией
режима осушения (предотвращения образования конденсата).
Режим осушения (предотвращение запотевания) устранит запотевание окон, а режим обогрева,
активированный функцией
(ВКЛЮЧЕНИЕ ПО ТАЙМЕРУ), прогреет помещение ко времени вашего
пробуждения.
Совместное использование кнопок (ВКЛЮЧЕНИЕ ПО ТАЙМЕРУ) и
(ОСУШЕНИЕ)
• Осушение (предотвращение запотевания) и (ВКЛЮЧЕНИЕ ПО ТАЙМЕРУ) для обогрева следующим
утром следует запрограммировать перед отходом ко сну.
На показанном ниже дисплее видно, что начало работы в режиме осушения (предотвращения
запотевания) запланировано на 11.38 вечера. Кроме того, установлено
(ВКЛЮЧЕНИЕ ПО ТАЙМЕРУ)
в режиме обогрева.
Задайте
(ВКЛЮЧЕНИЕ ПО ТАЙМЕРУ).
• Когда запрограммировано
(ВКЛЮЧЕНИЕ
ПО ТАЙМЕРУ), кондиционер включится таким
образом, чтобы к назначенному времени в
помещении была достигнута заданная температура. Перед тем как устанавливать таймер,
проверьте уставки кондиционера. (Cтр. , )
Нажмите кнопку
(ОСУШЕНИЕ).
(на дисплее появится символ
)
• Работа в режиме осушения (предотвращения
запотевания) продлится два часа и прекратится
в 1.38 ночи. Режим обогрева включится так, чтобы
помещение прогрелось к 6.00 утра.
74
75
Page 77

1
2
DEUTSCHFRANÇAISITALIANOSPANISHPORTUGUÊS
∂ППЛУИО¿
РУССКИЙ
– 77 –
РУССКИЙ
ТАЙМЕР ЗАДЕРЖКИ ОТКЛЮЧЕНИЯ
Настройка скорости вентилятора, не мешающей сну, и отключения кондиционера в назначенное время.
На показанном ниже дисплее таймер ночного режима установлен на 2 часа, начиная с 11.38 вечера.
Отключение кондиционера произойдет в 1.38 ночи.
Нажмите кнопку (НОЧНОЙ РЕЖИМ).
• При последовательном нажатии кнопки (НОЧНОЙ РЕЖИМ)
индикация изменяется в следующей последовательности.
Отмена таймера ночного режима
•
Заданная продолжительность ночного режима и время отключения
отображаются на дисплее пульта дистанционного управления.
• В ночном режиме поддерживается скорость вентилятора
«МАЛОШУМНЫЙ РЕЖИМ».
ОТМЕНА
Нажмите кнопку (НОЧНОЙ РЕЖИМ) или (ОТМЕНА).
Совместное использование таймера ночного режима и включения по таймеру
• Кондиционер, автоматически отключенный таймером ночного режима, может быть включен следующим
утром функцией (ВКЛЮЧЕНИЕ ПО ТАЙМЕРУ). Задайте сначала (ВКЛЮЧЕНИЕ ПО ТАЙМЕРУ), а затем
нажмите кнопку (НОЧНОЙ РЕЖИМ).
На дисплее, показанном ниже, таймер ночного режима установлен на 2 часа начиная с 11.38 вечера,
а
(ВКЛЮЧЕНИЕ ПО ТАЙМЕРУ) назначено на 6.00 утра.
Задайте
(ВКЛЮЧЕНИЕ ПО ТАЙМЕРУ).
(Cтр. , )
режима должно быть раньше времени
Нажмите кнопку
(НОЧНОЙ РЕЖИМ).
• Агрегат отключится через 2 часа (в 1.38
ночи) и включится так, чтобы обеспечить
требуемую температуру в помещении к
6.00 утра.
• Заданное время отключения ночного
(ВКЛЮЧЕНИЕ ПО ТАЙМЕРУ).
• После срабатывания таймера ночного режима
агрегат не включится даже в назначенное время,
пока не получит сигнала с пульта дистанционного
управления. Убедитесь, что программирование
таймера ночного режима завершено (подан
звуковой сигнал), а на внутреннем блоке загорелся
индикатор
(ТАЙМЕР).
74
75
Page 78

1
– 78 –
ОЧИСТКА ФИЛЬТРА
(Проверка работоспособности узла очистки, стр. 10)
ОСТОРОЖНО!
Не просовывайте пальцы или посторонние предметы в верхнюю часть внутреннего блока во
время выполнения очистки фильтра.
Это может привести к травме или к поломке агрегата.
Операция автоматической очистки фильтра
• Автоматическая очистка мелкоячеистого фильтра из нержавеющей стали по завершении
работы кондиционера в основном режиме, например, режиме охлаждения. (Описание операции
автоматической очистки фильтра см. на стр. )
• Функция автоматической очистки фильтра активируется на заводе-изготовителе.
Прямой ход
Щетка сметает пыль с мелкоячеистого
фильтра из нержавеющей стали.
Во в ремя обратного хода
Пылесборник
(1) Собирает пыль, стряхиваемую
щеткой во время прямого хода.
(2)
щетки он переворачивается,
и собранная пыль попадает в
Обратный ход
Пройдя по всему фильтру, щетка
возвращается в исходное положение,
в котором она не мешает прохождению
воздуха через кондиционер.
79
контейнер
.
Page 79

DEUTSCHFRANÇAISITALIANOSPANISHPORTUGUÊS
∂ППЛУИО¿
РУССКИЙ
– 79 –
ENGLISH
РУССКИЙ
(Устранение неисправностей, стр. )
• Щетка выполняет один рабочий цикл, состоящий из прямого и обратного хода. Пыль собирается
пылесборником, который затем помещает ее в контейнер для пыли.
• Длительность цикла очистки фильтра составляет приблизительно 5 минут.
• Во время выполнения очистки фильтра светится индикатор
(ОЧИСТКА).
• Во время запуска вентилятора горизонтальные заслонки остаются закрытыми.
Условия выполнения автоматической очистки фильтра
• Автоматическая очистка фильтра начинается после того, как кондиционер остановится, проработав
не менее 15 минут, и выполняется одно из следующих условий.
(1) Общая наработка кондиционера превышает 8 часов.
(2) Кондиционер перед этим не работал более одной недели.
(Удаляется пыль, осевшая на верхнем фильтре.)
ВНИМАНИЕ!: Общая наработка кондиционера не может быть обнулена, если операция автоматической
очистки фильтра была прервана до завершения.
• При непрерывной работе кондиционера через каждые 24 часа он останавливается, после чего
выполняется автоматическая очистка фильтра.
По завершении этой операции работа кондиционера возобновляется в режиме, в котором он находился
на момент начала очистки.
Автоматическая очистка фильтра не выполняется, если кондиционер был остановлен таймером
ночного режима или функцией отключения по таймеру.
Если Вы пользуетесь таймером ночного режима или отключением по таймеру постоянно, то очистку
фильтра следует запускать в ручном режиме каждые 2-3 дня. (Cтр. )
Однако если ручная очистка не выполнялась, то для защиты агрегата от повреждения автоматическая
очистка будет выполнена приблизительно через неделю после остановки кондиционера таймером
ночного режима или функцией отключения по таймеру.
Шум во время очистки фильтра
• Во время перемещения щетки электродвигатель издает жужжащий
звук.
• Во время сбора пыли пылесборником слышно похлопывание.
• Хлопок также слышен, когда пылесборник переворачивается над
контейнером для пыли.
• Сметая пыль, щетка издает шелестящий звук.
CTOП
Дважды нажмите кнопку (CTAPT/CTOП).
• Чтобы остановить автоматическую очистку фильтра, два раза
нажмите кнопку (CTAPT/CTOП) на пульте дистанционного
управления.
• При включении кондиционера сразу по завершении очистки фильтра струя подаваемого воздуха
ощущается мягче.
•
• Только очистка фильтра, запущенная нажатием кнопки (РУЧНАЯ ОЧИСТКА) на пульте
дистанционного управления, останавливается повторным нажатием этой кнопки.
89
80
Если автоматическая очистка запрещена, снимите и очистите мелкоячеистый фильтр.(Стр.83)
Page 80

2
– 80 –
ОЧИСТКА ФИЛЬТРА (продолжение)
Очистка фильтра в ручном режиме
• Очистка фильтра в ручном режиме выполняется по команде с пульта дистанционного управления
при остановленном кондиционере.
• Если кондиционер не использовался в течение длительного времени, то данную операцию
рекомендуется выполнить перед тем, как запускать его в основном режиме.
Нажмите кнопку (РУЧНАЯ ОЧИСТКА), когда кондиционер
остановлен.
• Щетка выполняет один рабочий цикл, состоящий из прямого и
обратного хода. Пыль собирается пылесборником, который затем
помещает ее в контейнер для пыли.
• Длительность цикла очистки фильтра составляет приблизительно
5 минут.
•
CTOП
Нажмите кнопку (CTOП) дважды.
• Чтобы остановить автоматическую очистку фильтра, два раза
нажмите кнопку (CTOП) на пульте дистанционного управления.
Техническое обслуживание
3
• Ежедневного обслуживания не требуется. Количество собираемой пыли зависит от условий
эксплуатации кондиционера. Проверять загрязненность фильтра и удалять пыль рекомендуется
не реже одного раза в два года. (Техническое обслуживание, стр. )
• Чтобы удалить жирные загрязнения, сначала выполните очистку фильтра, а затем снимите и промойте
мелкоячеистый фильтр. Чтобы удалить липкие загрязнения, снимите мелкоячеистый фильтр из
нержавеющей стали, пылесборник, контейнер для пыли и щетку и промойте их водой. (Техническое
обслуживание, стр. ~ )
КАК ЗАПРЕТИТЬ ВЫПОЛНЕНИЕ ОЧИСТКИ ФИЛЬТРА
• Запретить выполнение очистки фильтра можно командой с пульта дистанционного
управления.
• Данная команда подается, когда кондиционер остановлен.
Нажмите кнопку (РУЧНАЯ ОЧИСТКА) при нажатой кнопке
(ВКЛ/ ОТКЛ.) (и не отпускайте их в течение 5 с).
• Раздастся два коротких звуковых сигнала, и выполнение очистки
фильтра будет запрещено.
• При повторном длительном (в течение 5 с) нажатии кнопок
(РУЧНАЯ ОЧИСТКА) и (ВКЛ/ОТКЛ.) будет подан один
короткий звуковой сигнал, и функция очистки фильтра будет
снова активирована.
Очистка фильтра разрешена
(заводская настройка)
Один звуковой сигнал
Очистка фильтра
запрещена
Два звуковых сигнала
• Если очистка фильтра запрещена,
то проверка работоспособности
(стр. ), а также очистка в
автоматическом
1
и ручном 2
режимах не выполняется.
82
82
86
58
Во
время чистки в ручном режиме вентилятор работает а горизонтальная
заслонка остается за
крытой
Page 81

1
2
3
4
DEUTSCHFRANÇAISITALIANOSPANISHPORTUGUÊS
∂ППЛУИО¿
РУССКИЙ
– 81 –
РУССКИЙ
ЕСЛИ ВО ВРЕМЯ ВЫПОЛНЕНИЯ ОПЕРАЦИИ ОЧИСТКИ ФИЛЬТРА СЛЫШЕН
СИЛЬНЫЙ ШУМ, ЗАПРЕТИТЕ, А ЗАТЕМ РАЗРЕШИТЕ ЕЁ, ПОСЛЕ ЧЕГО
ЗАПУСТИТЕ СНОВА В РУЧНОМ РЕЖИМЕ
Запретите выполнение операции очистки фильтра.
Снова разрешите выпо
лнение операции очистки фильтра.
Выполните операцию очистки фильтра в ручном режиме. (Cтр. )
Снова запретите выпо
лнение операции очистки фильтра.
(порядок выполнения указан на 1, 2, 4, стр. )
• Если операция очистки фильтра не выполнялась в течение длительного времени, то за один цикл
всю пыль из мелкоячеистого фильтра удалить будет невозможно. Во избежание этого выполняйте
данную операцию чаще. (Pекомендуемая периодичность: один раз в два - три дня.)
• Если фильтр был очищен неравномерно, то выполните операцию очистки в ручном режиме еще
один раз через 5 минут. (Интервал 5 минут предусмотрен для защиты кондиционера от поломки.)
• Причиной неравномерного удаления пыли может быть длительный интервал между очистками или
условия в помещении, где установлен кондиционер. Для решения этой проблемы следует промыть
мелкоячеистый фильтр из нержавеющей стали. (Cтр. )
СИГНАЛЫ СВЕТОДИОДНОГО ИНДИКАТОРА (ОЧИСТКА): ПЕРИОДИЧЕСКОЕ
МИГАНИЕ, ИЗМЕНЕНИЕ ЯРКОСТИ СВЕЧЕНИЯ (НЕ ЯВЛЯЕТСЯ
НЕИСПРАВНОСТЬЮ)
•
Если нажать кнопку (РУЧНАЯ ОЧИСТКА) в то время, как выполнение операции очистки
запрещено, подается длительный звуковой сигнал и индикатор
(ОЧИСТКА) начинает мигать.
(В течение 10 с: 1 с горит, 1 с не горит)
• Для предотвращения поломки кондиционера операция очистки не выполняется в течение 5 минут
после завершения предыдущей очистки даже после нажатия кнопки
(РУЧНАЯ ОЧИСТКА).
Это касается случаев, когда очистка должна выполняться после включения кондиционера, а
также автоматической очистки и ручной очистки по команде с пульта дистанционного управления.
Подается длительный звуковой сигнал и индикатор
(ОЧИСТКА) начинает мигать. (В течение
10 с: 1 с горит, 1 с не горит)
Узел очистки неисправен, если индикатор
(ОЧИСТКА) светится непрерывно в течение 4 с,
а затем гаснет на 1 с. В этом случае выполнение операции очистки невозможно, но кондиционер
способен выполнять все остальные функции.
• По поводу неисправности узла очистки обратитесь в представительство нашей компании.
80
80
83
Page 82

2
3
1
– 82 –
ТЕХНИЧЕСКОЕ ОБСЛУЖИВАНИЕ
•
Перед тем как приступать к обслуживанию агрегата, остановите его с помощью пульта дистанционного управления и
выньте вилку из розетки (отключите автоматический выключатель).
ВНИМАНИЕ!
•
Во избежание поражения электрическим током не допускайте попадания жидкостей в агрегат.
•
По поводу очистки кондиционера изнутри проконсультируйтесь в представительстве нашей компании.
•
Во избежание выхода кондиционера из строя не применяйте моющие средства для очистки теплообменника.
•
Во избежание порезов об острые ребра теплообменника очистку теплообменника пылесосом следует выполнять в
перчатках.
ОСТОРОЖНО!
Обслуживание контейнера для пыли
•
Ежедневного обслуживания не требуется. Количество собираемой
пыли зависит от условий эксплуатации кондиционера. Проверять
загрязненность и удалять пыль рекомендуется не реже одного раза
в два года.
•
Пыль определенных видов может откладываться на задней
поверхности пылесборника, поэтому его рекомендуется очищать
вместе с контейнером для пыли.
Остановите кондиционер с помощью пульта
дистанционного управления и выньте вилку из
розетки (отключите автоматический выключатель).
Промойте контейнер для пыли водой.
•
Сильные загрязнения контейнера для пыли следует удалять
теплой водой (до 40 °C).
Контейнер для пыли
•
После промывки высушите контейнер для пыли в тени.
Включите питание устройства (или включите питание
в сети).
Page 83

•
•
1
2
3
4
2
1
DEUTSCHFRANÇAISITALIANOSPANISHPORTUGUÊS
∂ППЛУИО¿
РУССКИЙ
– 83 –
Ежедневного обслуживания не требуется. При наличии
видимых загрязнений, вызванных условиями эксплуатации
кондиционера, фильтр следует снять и очистить.
Остановите кондиционер с помощью
пульта дистанционного управления и
выньте вилку из розетки (отключите
автоматический выключатель).
Откройте лицевую панель.
(порядок выполнения этой операции указан на стр. ).
Снимите лицевую панель.
Нажать
Нажать
ДержательДержатель
Нажмите на правый держатель, как показано
на рисунке, чтобы освободить его конец.
Сдвиньте левый держатель наружу, чтобы
освободить его конец, а затем потяните
Слегка приподнимите фильтр и
извлеките его, потянув на себя.
Возьмитесь здесь,
чтобы извлечь фильтр
Фиксатор фильтра
панель на себя.
1
2
РУССКИЙ
56
Очистка сетчатого префильтра
сетчатый префильтр
Поверните левую и правую защелки
фильтра в
соответствии с
Снимите верхний сетчатый префильтр
изображением.
Page 84

5
6
7
8
9
•
– 84 –
ТЕХНИЧЕСКОЕ ОБСЛУЖИВАНИЕ (продолжение)
Очистите фильтр пылесосом
• Если загрязнения фильтра невозможно удалить пылесосом,
очистите фильтр нейтральным моющим средством, а затем
промойте его водой и высушите в тени.
• Приложите фильтр по краю верхней поверхности внутреннего блока, а затем вдвиньте его внутрь
(форма правого и левого фильтра одинакова).
Установите на место лицевую панель.
1 Вставьте на свое место в левом отверстии ось на конце левого держателя.
Затяните левую и правую защелки в соответствии с указанным положением.
2 Вставьте на свое место в правом отверстии ось на конце правого держателя.
3 Убедитесь в надежности крепления лицевой панели и закройте её.
Закройте лицевую панель.
(порядок выполнения этой операции указан на стр. )
Включите питание устройства (или включите питание в сети).
ОСТОРОЖНО!
57
Очистка сетчатого фильтра (продолжение)
Установите сетчатый фильтр .
• Неправильная установка мелкоячеистого фильтра может привести к
возникновению неисправности. Выполнение операции очистки фильтра станет невозможным
и индикатор
(ОЧИСТКА) начнет мигать.
• Запрещается использовать кондиционер без фильтра.
Проникновение пыли в теплообменник и другие внутренние части кондиционера может привести к
появлению неприятного запаха и выходу агрегата из строя.
• При снятии и установке мелкоячеистого фильтра соблюдайте
осторожность, чтобы не порезаться об острые края ребер теплообменника.
Page 85

1
2
3
4
5
6
7
DEUTSCHFRANÇAISITALIANOSPANISHPORTUGUÊS
∂ППЛУИО¿
РУССКИЙ
– 85 –
ENGLISH
Обслуживание пылесборника
Ежедневного обслуживания не требуется. При наличии видимых загрязнений, вызванных условиями
эксплуатации кондиционера, фильтр следует снять и очистить.
Пыль определенного вида может оседать на задней поверхности пылесборника, не попадая в
контейнер. Рекомендуется не реже одного раза в два года осматривать и при необходимости очищать
пылесборник.
Остановите кондиционер с помощью пульта дистанционного
управления и выньте вилку из розетки (отключите
автоматический выключатель).
Снимите лицевую панель.
(порядок выполнения этой операции указан на стр. )
Снимите пылесборник.
•
Снимите пылеулавливатель в соответствии с указателями в
виде стрелок.
• Удалите пылесосом пыль, осевшую внутри пылесборника.
Промойте водой.
• Промойте пылесборник водой.
• Сильные загрязнения удалите нейтральным моющим средством,
а затем промойте теплой водой (до 40 °C).
• Полностью высушите пылесборник в тени.
Установите пылесборник на место.
• Удерживая верхний пылесборник крючком к себе, вставьте его
в кондиционер и прижмите. Крючок защелкнется.
Установите на место лицевую панель.
(порядок выполнения этой операции указан на стр. )
Включите питание устройства (или включите питание в сети).
ОСТОРОЖНО!
Неправильная установка пылесборника может привести к неисправности кондиционера.
Выполнение операции очистки фильтра станет невозможным и индикатор
(ОЧИСТКА)
начнет мигать.
РУССКИЙ
83
84
Page 86

1
2
3
4
•
– 86 –
ТЕХНИЧЕСКОЕ ОБСЛУЖИВАНИЕ (продолжение)
Очистка электродов электрического пылеулавливателя
Остановите кондиционер с помощью
пульта дистанционного управления и
выньте вилку из розетки (отключите
автоматический выключатель).
Взявшись обеими руками, медленно
откройте горизонтальную заслонку.
ОСТОРОЖНО!
• Во избежание поломки заслонки, открывайте её
медленно, взявшись обеими руками (см. рис.).
В противном случае возможен выход из строя.
•
Не прикладывайте излишнего усилия к заслонке,
выводя её за нижний ограничитель.
В противном случае возможен выход из строя.
оризонтальная
заслонка
Электроды для очистки воздуха
Удалите грязь с электрического
пылеулавливателя с помощью
зубной щетки.
• Зубная щетка должна быть обязательно сухой.
• Удаляйте пыль, проводя щетку с легким нажатием.
Включите питание устройства
(или включите питание в сети).
ОСТОРОЖНО!
• Не касайтесь электродов электрического пылеулавливателя во время работы устройства
во время работы кондиционера, поскольку они находятся под высоким напряжением.
•
Не допускайте попадания брызг или большего количества воды на электроды электрического
пылеулавливателя
Это может привести к короткому замыканию и выходу агрегата из строя.
оризонтальная
заслонка
Электроды для очистки воздуха
Удалите пыль с устройства для
распыления ионов зубной
щеткой.
Не касайтесь устройства для распыления ионов во время работы кондиционера
во время работы кондиционера, поскольку они находятся под высоким напряжением.
Не брызгайте на устройство для распыления ионов и не подвергайте воздействию
потока воды
Это может привести к короткому замыканию и выходу агрегата из строя.
Обслуживание устройства для распыления ионов
er
he
Horizontal air
deflectors
Page 87

DEUTSCHFRANÇAISITALIANOSPANISHPORTUGUÊS
∂ППЛУИО¿
РУССКИЙ
– 87 –
ENGLISH
ПРИНЦИП РАБОТЫ
ОБОЗНАЧЕНИЕ И ФУНКЦИИ КОМПОНЕНТОВ (СТР. )
РУССКИЙ
Возможности по обогреву
• Комнатный кондиционер работает в режиме теплового насоса, забирая тепло снаружи и перенося
его внутрь помещения. Если наружная температура понижается, то и теплопроизводительность
кондиционера также понижается. В этой ситуации инверторный преобразователь с АИМ увеличивает
частоту вращения двигателя компрессора, чтобы компенсировать падение теплопроивзодительности.
Если же она остается недостаточной, то вместе с кондиционером следует использовать другие
отопительные приборы.
• Нагрев помещения кондиционер осуществляет в течение определенного времени. Поэтому
рекомендуется использовать таймер, обеспечивающий прогрев помещения к назначенному сроку
(стр. ).
• При низкой температуре и высокой влажности наружного воздуха на теплообменнике наружного
блока образуется конденсат, в результате чего теплопроизводительность кондиционера падает.
Чтобы устранить данную проблему, агрегат выполняет операцию автоматического удаления
конденсата. На время её проведения обычно 5-10, (максимум 20 минут) обогрев приостанавливается,
после чего возобновляется.
Возможности по охлаждению, осушению и охлаждению с осушением
• Если тепловая нагрузка помещения превышает холодопроизводительность кондиционера (например,
при большом количестве людей или при использовании отопительных приборов), он не сможет
обеспечить заданную температуру в помещении.
• Заданная температура в помещении не может быть достигнута, если в помещении присутствуют
источники тепла и влажности, влияние которых превышает возможности кондиционера по
осушению.
Тепло- и холодопроизводительность кондиционера снижается при большой длине труб между
внутренним и наружным блоками.
ОСТОРОЖНО!
Не устанавливайте
внутренний блок
рядом с кухонной
плитой или другими источниками
тепла.
ЗАПРЕЩЕНО
52
74
Page 88

– 88 –
ОПТИМАЛЬНЫЕ УСЛОВИЯ ЭКСПЛУАТАЦИИ
1. Уставка температуры в помещении должна обеспечивать наиболее
комфортные условия при наименьших энергозатратах.
• Чрезмерное охлаждение или нагрев помещения вредны для здоровья, а
также требуют большого расхода электроэнергии.
• Во избежание потерь или проникновения излишнего тепла в помещение,
Горячий
Холод
закройте занавески или жалюзи.
2.
Во время, когда кондиционер не работает, проветривайте помещение.
Во время работы кондиционера совместно с
отопительными приборами помещение должно
вентилироваться.
ОСТОРОЖНО!
3. Уходя из помещения, активируйте функции контроля качества воздуха
и предотвращения образования плесени.
(См. датчик предотвращения образования плесени).
4. Перед тем, как ложиться спать, запрограммируйте таймер
(использование таймера описано на стр. - ).
5. Категорически запрещается использовать для очистки внутреннего и
наружного блока:
• бензин, растворитель или абразивные средства, способные повредить
пластиковые поверхности или покрытие;
• воду температурой выше 40 °С, поскольку фильтр и пластиковые детали
могут деформироваться под действием тепла.
6. Не перекрывайте воздухозаборное и воздуховыпускное отверстия.
• Не перекрывайте посторонними предметами воздухозаборные и
воздуховыпускные отверстия наружного и внутреннего блоков. Это
может привести к ухудшению характеристик или выходу кондиционера
из строя.
74
76
Page 89

DEUTSCHFRANÇAISITALIANOSPANISHPORTUGUÊS
∂ППЛУИО¿
РУССКИЙ
– 89 –
ENGLISH
УСТРАНЕНИЕ НЕИСПРАВНОСТЕЙ
ОЧИСТКА ФИЛЬТРА
Очистка фильтра
выполняется после
включения
питания
кондиционера
(установки вилки
в розетку или
включения автоматического выключателя
после устранения
пропадания
питания)
• Проверка работоспособности узла очистки фильтра.
Операция очистки
фильтра
не запускается
(Индикатор
(ОЧИСТКА)
периодически
изменяет яркость
свечения)
• В при работе кондиционера в основном режиме (охлаждение и т.д.) операция
очистки фильтра запускается только при нажатии кнопки
(РУЧНАЯ
ОЧИСТКА) на пульте дистанционного управления. (Сигнал индикатора
(ОЧИСТКА) в течение 10 c: 1с – светится, 1 с – не светится.)
• Чтобы не допустить повреждения кондиционера, операция очистки фильтра
недоступна в течение ми-нут по окончании предыдущей очистки, даже если
была нажата кнопка
(РУЧНАЯ ОЧИСТКА). (Сигнал индикатора
(
(ОЧИСТКА) в течение 10 c: 1 с – светится, 1 с – не светится.)
• Если выполнение функции очистки фильтра было запрещено, разрешите
выполнение данной операции.
(Сигнал индикатора
(ОЧИСТКА) в течение 10 c: 1 с – светится, 1 с – не
светится.)
• Фильтр, пылесборник, контейнер для пыли, щетка и её крышка были
установлены неправильно. (Сигнал индикатора
(ОЧИСТКА): 4 с – светится,
1 с – не светится.)
• Очистка фильтра не выполняется, если кондиционер был остановлен
таймером ночного режима или функцией отключения по таймеру. Но если
таймер ночного режима или функция отключения по таймеру используются
постоянно, кондиционер будет выполнять очистку фильтра приблизительно
один раз в неделю.
Шум во время
очистки
фильтра
• Во время перемещения щетки электродвигатель издает жужжащий звук.
• Во время сбора пыли пылесборником слышно похлопывание.
• Хлопок также слышен, когда пылесборник переворачивается над контейнером
для пыли.
• Сметая пыль, щетка издает шелестящий звук.
Узел очистки
останавливается на середине
рабочего хода
• После завершения предыдущей очистки узел не был возвращен в крайнее
правое положение с помощью пульта дистанционного управления.
(ОЧИСТКА): 4 с – светится,
• Фильтр, пылесборник, контейнер для пыли, щетка и её крышка были
установлены неправильно. (Сигнал индикатора
1 с – не светится.)
•
Неравномерная очистка фильтра может быть вызвана особенностями условий
эксплуатации кондиционера. Для решения этой проблемы фильтр следует снять и
промыть.
•
Фильтр поглотил очень большое количество пыли, которое невозможно удалить в ходе
операции очистки. Для решения этой проблемы фильтр следует снять и промыть.
РУССКИЙ
Мелкоячеистый
префильтр
очищается не
полностью
Page 90

Контейнер для пыли
– 90 –
ТЕХНИЧЕСКОЕ ОБСЛУЖИВАНИЕ (продолжение)
ПРОТИВОПЛЕСНЕВАЯ КАССЕТА С ВАСАБИ
•
Противоплесневые вещества с запахом васаби предотвращают рост плесени в контейнере, где хранится пыль,
собранная в ходе выполнения операции очистки фильтра. Хотя данные вещества выделяются в крайне малых
количествах, в определенных условиях эксплуатации кондиционера в помещении может ощущаться запах васаби.
Если он неприятен для вас, заклейте одно из отверстий в кассете липкой лентой. После этого уменьшится
количество выделяемых веществ и, соответственно, противоплесневый эффект. Для предотвращения роста
плесени рекомендуется чаще очищать контейнер.
Противоплесневая
кассета с васаби
Два отверстия
сбоку кассеты
Заклейте одно из осверстий
липкой лентой
ПЕРЕД ОБРАЩЕНИЕМ В СЛУЖБУ ТЕХНИЧЕСКОГО
ОБСЛУЖИВАНИЯ ПРОВЕРЬТЕ СЛЕДУЮЩЕЕ:
Не выполняются
команды пульта
дистанционного управления (дисплей
светится тускло или
не светится)
•
Элементы питания требуют замены.
•
Элементы питания установлены с обратной полярностью.
Кондиционер не
включается
•
Вилка шнура питания не до конца вставлена в розетку.
•
Перегорел предохранитель или сработал автоматический выключатель.
•
Произошло исчезновение напряжения электросети (после восстановления напряжения
агрегат переходит в дежурный режим).
Низкая холодо- или
теплопроизводительность
•
Мелкоячеистый фильтр забит пылью.
•
Задана недостижимая уставка температуры.
•
Положение горизонтальной заслонки не соответствует выбранному режиму работы.
•
Заблокированы воздухозаборные и воздуховыпускные отверстия внутреннего и
наружного блоков.
•
Вентилятор работает на НИЗКОЙ скорости или в МАЛОШУМНОМ режиме.
Мигает индикатор
(ОЧИСТКА)
•
Выполните проверку работоспособности узла очистки фильтра.
Page 91

DEUTSCHFRANÇAISITALIANOSPANISHPORTUGUÊS
∂ППЛУИО¿
РУССКИЙ
– 91 –
ENGLISH
ТЕХНИЧЕСКОЕ ОБСЛУЖИВАНИЕ (продолжение)
ПРИЗНАКИ, НЕ УКАЗЫВАЮЩИЕ НА НЕИСПРАВНОСТЬ
РУССКИЙ
Запахи
Кроме противоплесневой кассеты с васаби, в кондиционере нет источников
запахов. Поэтому запахи табачного дыма, парфюмерии или пищи будут
всасываться и выдуваться вместе с воздухом обратно в помещение.
Во время работы в режиме
обогрева яркость свечения
индикатора
(РАБОТА)
изменяется с периодичностью
Указывает на выполнение операции предварительного прогрева или
размораживания.
После завершения работы в
режимах охлаждения, осушения
и охлаждения с осушением
светятся индикаторы
(РА-
БОТА),
(ОЧИСТКА)
Указывает на выполнение операции внутренней очистки (стр. ).
Шипящий звук
Шум, издаваемый трубопроводами и клапаном холодильного контура при
изменении расхода хладагента.
Шум, издаваемый конструкцией агрегата при тепловом расширении или
сжатии при остывании.
Скрипящий звук
Шум, издаваемый наружным блоком при изменении скорости вентилятора,
например, при пуске агрегата.
Шуршащий звук
Шум, издаваемый клапаном с электроприводом при включении агрегата.
Щелчки
Это явление связано с изменениями производительности в зависимости от
изменения температуры в помещении.
Изменение шума во время
работы
Это явление вызвано резким охлаждением воздуха в помещении струей
воздуха из кондиционера.
Появление тумана возле
внутреннего блока
Это явление вызвано испарением воды во время выполнения операции
оттаивания.
Появление пара возле
наружного блока
Наружный блок продолжает
работать, когда внутренний блок
остановлен и мигает индикатор
(РАБОТА)
Активирована функция автоматического оттаивания (после прекращения
обогрева микропроцессорный контроллер обнаружил образование льда во
внутреннем блоке и запустил оттаивание).
Это может быть вызвано присутствием большого количества людей и
другими условиями в помещении.
Заданная температура в
помещении не достигается
69
Page 92

1
(или выключите аварийный выключатель).
2
3
(или включите аварийный выключатель).
1 2 3
– 92 –
ТЕХНИЧЕСКОЕ ОБСЛУЖИВАНИЕ (продолжение)
ОБЯЗАТЕЛЬНО ОБРАТИТЕСЬ В СЛУЖБУ ТЕХНИЧЕСКОГО ОБСЛУЖИВАНИЯ В
СЛЕДУЮЩИХ СЛУЧАЯХ
Если после выполнения операций, описанных на стр. - , неисправность
не устраняется, выньте вилку сетевого шнура из розетки (отключите
автоматический выключатель) и немедленно обратитесь в службу
технического обслуживания в следующих случаях:
• Частое срабатывание автоматического выключателя или перегорание
предохранителя.
• Нестабильная работа выключателя.
• Попадание постороннего предмета или воды внутрь агрегата.
• Перегрев шнура питания, повреждение или разрыв его изоляции.
• Мигание индикатора (ТАЙМЕР) или (КОНТРОЛЬ) на внутреннем блоке.
РАБОТА С АВАРИЙНЫМ ВЫКЛЮЧАТЕЛЕМ
Если пульт дистанционного управления не работает из-за разряженных батарей, нажмите на
аварийный выключатель, чтобы запустить кондиционер в аварийном режиме.
После нажатия аварийного выключателя кондиционер
Повторно подключите устройство к источнику питания
Отключите устройство от источника питания
начнет работу автоматически.
• После нажатия аварийного выключателя в течение с происходит принудительное включение режима охлаждения. Данная
операция выполняется только представителями изготовителя,
пользователям кондиционера выполнять ее запрещено.
ЕСЛИ ВЫ НЕ ПЛАНИРУЕТЕ ИСПОЛЬЗОВАТЬ КОНДИЦИОНЕР В ТЕЧЕНИЕ
ДЛИТЕЛЬНОГО ВРЕМЕНИ, ВЫПОЛНИТЕ СЛЕДУЮЩИЕ ОПЕРАЦИИ
Просушите внутренний
блок изнутри.
Извлеките вилку из
розетки (отключите
автоматический
выключатель).
Извлеките
элементы питания
из пульта
дистанционного
управления.
• В солнечную погоду выполняйте
операцию плазменной очистки воздуха
(вентиляции) в течение половины дня.
Рост плесени во внутреннем блоке
возможен, если в нем осталась влага.
89
92
7(0325$5<
6:,7&+
7(0325$5<
6:,7&+
Page 93

DEUTSCHFRANÇAISITALIANOSPANISHPORTUGUÊS
∂ППЛУИО¿
РУССКИЙ
– 93 –
ENGLISH
РУССКИЙ
РЕГУЛЯРНЫЕ ПРОВЕРКИ
УКАЗАННЫЕ НИЖЕ ОПЕРАЦИИ СЛЕДУЕТ ВЫПОЛНЯТЬ ОДИН РАЗ В ПОЛГОДА ИЛИ ЕЖЕГОДНО. ПРИ
НЕОБХОДИМОСТИ ПРОКОН-СУЛЬТИРУЙТЕСЬ В ПРЕДСТАВИТЕЛЬСТВЕ НАШЕЙ КОМПАНИИ.
ВНИМАНИЕ!
ВНИМАНИЕ!
ВНИМАНИЕ!
Проверьте, плотно ли вставлена вилка в розетку?
Отсоединение или обрыв заземления может привести к
повреждению агрегата или поражению электрическим током.
•
Осмотрите вилку перед тем, как вставлять её в розетку. При
необходимости удалите загрязнения.
Проверьте правильность подключения заземления.
Убедитесь, что оно выполнено правильно.
•
Отсоединение или обрыв заземления может привести к повреждению
агрегата или поражению электрическим током.
Проверьте надежность крепления монтажной рамы.
Убедитесь в надежности крепления монтажной рамы к
стене, а наружного блока – к монтажной раме.
• Перекос и падение наружного блока может привести к
увечью.
ПРОВЕРКА И ОБСЛУЖИВАНИЕ
Для поддержания чистоты воздуха в помещении, кондиционер
выполняет операцию внутренней очистки. Но после нескольких лет
работы он может засориться настолько, что это заметно скажется на его
производительности.
Помимо выполнения обслуживания обязательно проверьте следующее:
Пыль, собирающаяся во внутреннем блоке, может забить канал стока конденсата, образующегося во
время осушения, в результате чег
о из кондиционера будет капать вода.
•
Кроме очистки внутреннего блока проверьте канал для отвода конденсата.
Очистка внутреннего блока должна выполняться только квалифицированным специалистом.
Использование растворителей или подобных им средств может повредить пластмассовые компоненты
агрегата или засорить систему отвода конденсата, что может стать причиной поражения электрическим током в результате утечек воды.
• Свяжитесь с представителем нашей компании.
ОСТОРОЖНО!
Page 94

– 94 –
СИГНАЛЫ ИНДИКАТОРОВ ВНУТРЕННЕГО БЛОКА
ытобар мижеР ротакиднИ
• Автоматический режим (стр. 61)
• Режим обогрева (стр. 62)
•
Режим осушения (автоматическое осушение, предотвращение запотевания,
быстрая сушка) (стр. 62)
• Режим охлаждения (стр. 63)
• Режим охлаждения с осушением (стр. 64)
• Операция плазменной очистки воздуха (стр. 66)
•
Выполнение плазменной очистки воздуха совместно с режимом: автоматическим,
ручным, обогрева, осушения, охлаждения, охлаждения с осушением (стр. 66)
• Инфракрасное обнаружение человеческого присутствия (стр. )
Динамическое распределение воздуха (отслеживание/уклонение) (стр. 68)
• Выполнение внутренней очистки (стр. 69)
• Активация функции предотвращения образования плесени (стр. )
• Работа активированной функции предотвращения образования плесени
(стр. )
• Выполнение очистки фильтра (стр. )
• Настройка таймера (стр. )
• Таймер ночного режима активирован (стр. )
• Индикатор
(ТАЙМЕР) горит ровным светом, если таймер используется
постоянно.
67
71
71
74
77
78
7(0325$5<
6:,7&+
7(0325$5<
6:,7&+
7(0325$5<
6:,7&+
7(0325$5<
6:,7&+
7(0325$5<
6:,7&+
7(0325$5<
6:,7&+
7(0325$5<
6:,7&+
Page 95

DEUTSCHFRANÇAISITALIANOSPANISHPORTUGUÊS
∂ППЛУИО¿
РУССКИЙ
– 95 –
РУССКИЙ
Для записей
Page 96

< 4647E : A >
 Loading...