

Hitachi RA-08LEDF, RA-10LEDF, RA-13LEDF, RA-08LDF, RA-10LDF Operation And Installation Manual
...Page 1
SAFETY PRECAUTION
●
Read the safety precautions carefully before operating the unit.
●
The contents of this section are vital to ensure safety. Please pay special attention to the following sign.
WARNING ........ Incorrect methods of installation may cause death or serious injury.
CAUTION ......... Improper installation may result in serious consequence.
The sign in the gure indicates prohibition.
Be sure that the unit operates in proper condition after installation. Explain to customer the proper way of operating the unit
as described in the user’s manual.
!
!
WINDOW TYPE ROOM AIR CONDITIONER
OPERATION AND INSTALLATION MANUAL
PRECAUTIONS DURING INSTALLATION
●
Please ask sales agent or quali ed technician for the installation of the unit. Water leakage,
short circuit or re may occur if install the unit improperly.
●
Please use earth line.
Do not place the earth line near water or gas pipes, lightning-conductor, or the earth line
of telephone. Improper installation of earth line may cause electric shock.
●
A circuit breaker should be installed depending on the mounting site of the unit. Without
a circuit breaker, the danger of electric shock exists.
●
Do not install near location where there is ammable gas. The unit may catch re if
ammable gas leaks around it.
●
If drain pan is used, please ensure that when installing the drain hose, water is able to
ow freely without any obstruction.
CAUTION
!
!
WARNING
PRECAUTIONS DURING SHIFTING OR MAINTENANCE
●
If abnormal situation arises (like burning smell), please stop the unit and turn off the
circuit breaker. Fault, short circuit or re may occur if the unit is continue to operate under
abnormal situation.
● Please contact your agent for maintenance. Improper maintenance may cause electric
shock and re.
● Please contact your agent if need to remove and reinstall the unit. Electric shock or re
may occur if you remove and reinstall the unit improperly.
WARNING
!
MODEL
RA-08LEDF
RA-10LEDF
RA-13LEDF
PARTS IDENTIFICATION AND OPERATIONS
1
Cabinet
2
Suction Grille
3
Front Cover
4
Horizontal De ectors
5
Vertical De ector
6
Air Exhaust Lever
7
Switch Panel Cover
Model
RA-08LEDF
RA-10LEDF
RA-13LEDF
Width
18
1
2”, 470mm
22
3
64”, 560mm
Height
13
1
2”, 345mm
14
3
4”, 375mm
Depth
25
3
16”, 640mm
27
29
32”, 709mm
CONTROL PANEL INDICATION LAMP
TEMPORARY SWITCH
Use the temporary switch for start or stop operation when operation cannot be done with the remote controller.
By pressing the temporary switch, [use non-conductor stick (for example: toothpick),] the operation will follow previous
operation mode.
When the operation is done using the temporary switch, after the power source is turned off and is turned on again, the
operation is done in automatic mode.
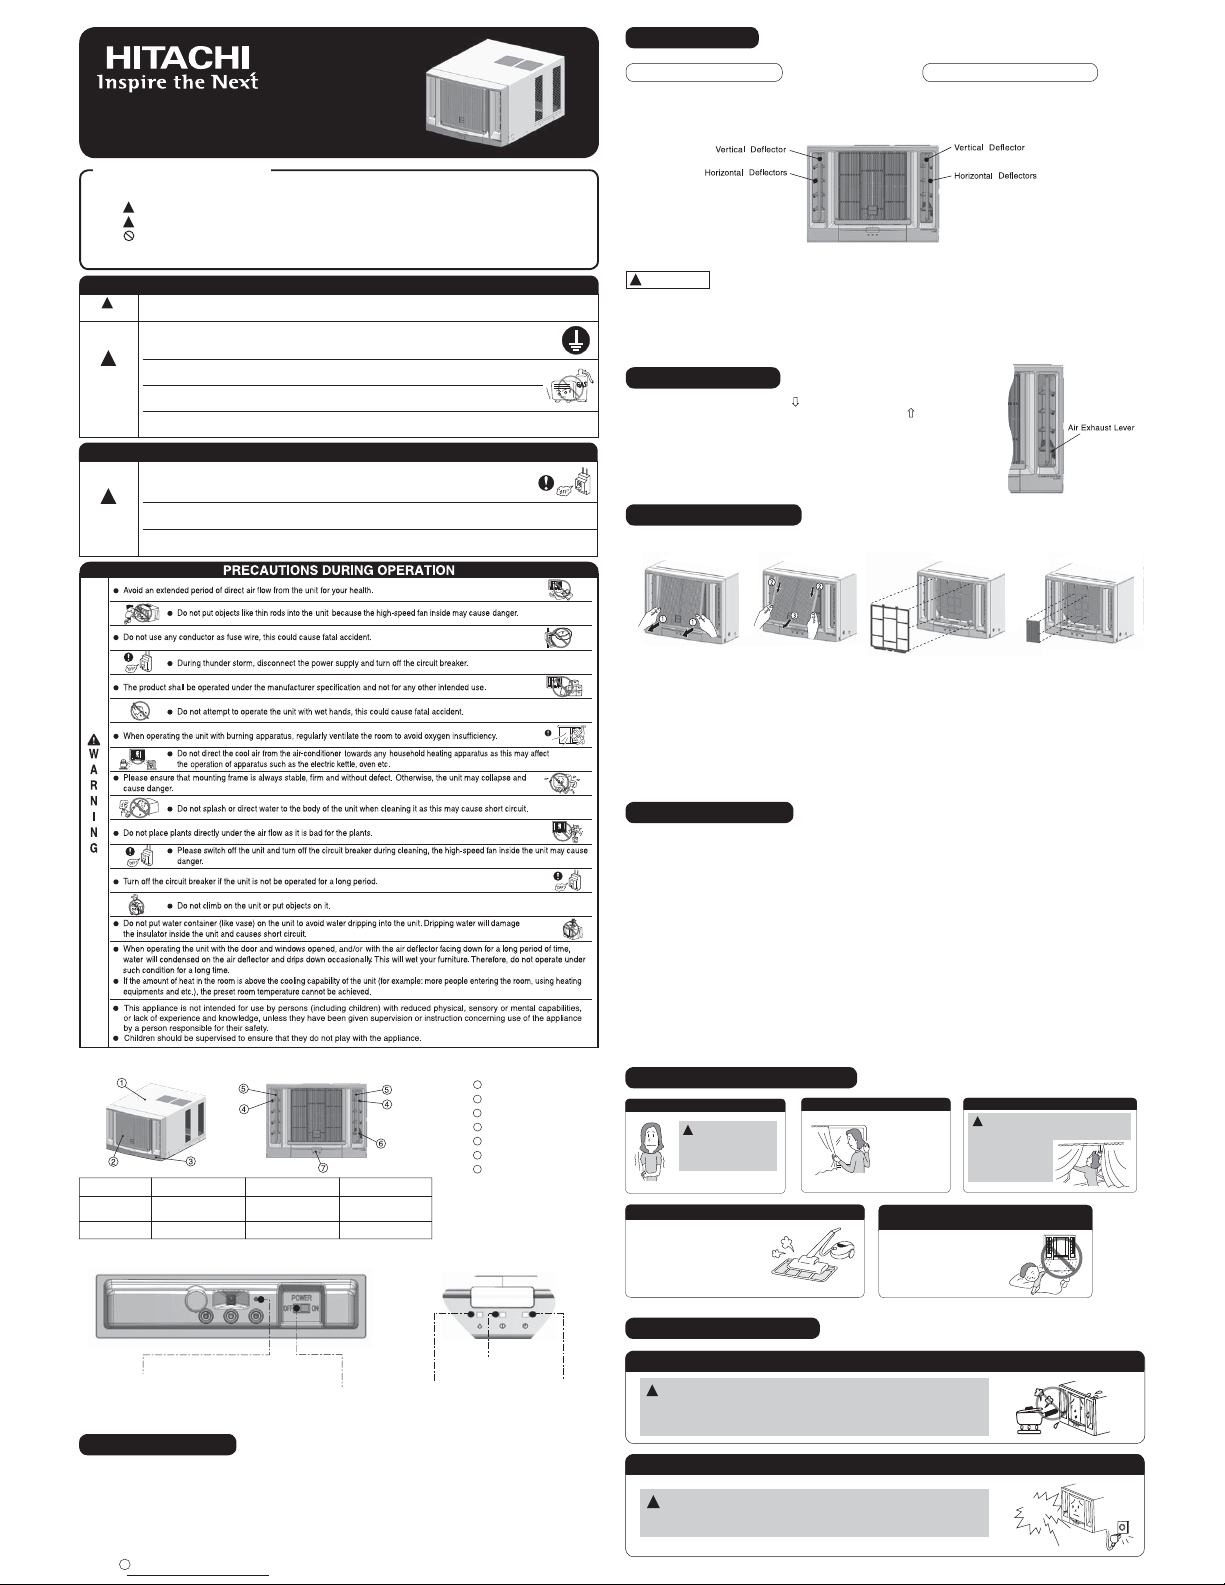
AIR DEFLECTORS
Vertical de ectors at both sides of outlets can be set to
either auto-swing or static position to direct discharge air
rightward, leftward or forward direction.
Horizontal de ectors at both sides of the outlets can
be set to direct discharge air upward, downward or
forward direction.
VERTICAL DEFLECTORS HORIZONTAL DEFLECTORS
To avoid dew forming on the de ectors which eventually may drip to the oor, please do not adjust horizontal de ectors
extremely downward position or vertical de ectors extremely leftward or rightward position during cool operation for a long
time.
Also, do not adjust the vertical de ectors position by hand or any other object.
!
CAUTIONS
AIR EXHAUST LEVER
AIR PURIFYING FILTER
Set the air exhaust lever to the down ( OPEN) position for air ventilation in
the room. The air exhaust lever should normally be kept in up (
CLOSE)
position during cooling operation and in the case of typhoon.
NOTES ON OPERATION
TEMPERATURE AND HUMIDITY
Avoid to use the room air conditioner for cooling operation when the outside temperature is below 21°C (70°F). Recommended
operation humidity should be below 80%. Continuous operation at over 80% humidity (indoor) will cause some dews form
on the outlet grille and de ectors of the unit.
NOISE
In a quiet environment during the starting or stopping the operation, phenomena like owing sound of refrigerant in the
refrigerating cycle and rubbing noise from the fan casing may occasionally occur, but this is normal for the operation.
Water will be condensed on the evaporator coil and collected in the bottom tray, it is picked up by the condenser fan and
blown onto the condenser coil, this creates a “splashing” sound which is normal.
ODOR
The odor will possibly be emitted from the room air conditioner especially at the starting of operation and in a high
humidity condition. This is not abnormal phenomena because of the various kind of odors emitted by smoke, food stuffs,
cosmetics and others which may stick to the room air conditioner. So, the pre- lter and the evaporator regularly must be
cleaned to reduce the odor.
THE IDEAL WAYS OF OPERATION
Suitable Room Temperature
Warning
Freezing temperature
is bad for health and a
waste of electric power.
!
Install curtain or blinds
It is possible
to reduce heat
entering the room
through windows.
Ventilation
Caution
Do not close the room for a long period of
time. Occasionally
open the door and
windows to allow the
entrance of fresh air.
!
Do Not Forget To Clean The Pre-Filter
Dusty pre- lter will reduce the air
volume and the cooling ef ciency.
To prevent from wasting electric
energy, please clean the pre- lter
every 20 days.
Please Adjust Suitable Temperature
For Baby And Children
Please pay attention to the
room temperature and air ow
direction when operating the
unit for baby, children and old
people who have dif culty in
movement.
FOR USER’S INFORMATION
The Air Conditioner And The Heat Source In The Room
Caution
If the amount of heat in the room is above the cooling capability of the air conditioner (for
example: more people entering the room, using heating equipments and etc.), the preset
room temperature cannot be achieved.
!
When Lightning Occurs
Warning
To protect the unit during lightning, please stop operating the unit and remove the plug
from the socket.
!
<
IA1049: A
>
TEMPORARY SWITCH
Use this switch to start operation and stop
when the remote controller does not work.
Normally do not use this switch
POWER SWITCH
DEHUMIDIFY LAMP
OPERATION LAMP
TIMER LAMP
1. Pull and remove the suction grille 2. Remove the pre- lter 3. Install the air purifying lter in
the frame
4. Install back the pre- lter and
close the suction grille
Always stop the operation before installing the air purifying lter.
Air purifying lter is washable and can be use for 1 year time. Type number for this air purifying lter is <SPX-CFH8W>.
Please use this number for ordering when you want to renew it.
Page 2

●
Do not use hot water above 40°C for cleaning the pre- lter.
●
Do not operate the air conditioner without the pre- lter.
CAUTION
!
Never use hot water above 50°C, erosive chemicals or brush to clean the front cover and suction grille because they
will damage the plastic surface.
!
CAUTIONS
●
The installation material must be corrosion proof, especially the air conditioner is installed near the sea or hot spring.
●
Do not install air conditioner in the places where there is a possibility of in ammable gas leaks.
●
Secure tightly the cabinet with screws to the frame. Otherwise there may be danger of the air conditioner dropping.
●
Please keep the recommended installation dimensions. Otherwise waterdrops or malfunction may occur.
!
CAUTIONS
POWER SOURCE
●
Check the capacity of wiring and power outlet. The power outlet should be used exclusively for the air conditioner. Do
not use it with other appliances. Any wiring must follow the national wiring regulation.
●
Ground the air conditioner to prevent danger of electric shock.
●
Connect the air conditioner with power source securely.
●
Use a fuse as below:
RA-08LEDF
RA-10LEDF
RA-13LEDF
Voltage rating
Operatable
Voltage range
50Hz 220V
15A time delay fuse
50Hz 198-242V
This appliance must be earth
CAUTION
!
SLIDE OUT OF UNIT
After slide in the unit, please install a sealer between
the base pan and cabinet to prevent from entering rain
water in case of typhoon. Fasten the unit to cabinet
at the side with the screw, then re t the front cover.
1
Remove the four screws which fasten the base pan
to the cabinet at the side and back.
2
Remove the stopper at front left side of base. (RA-13LEDF)
3
Slide out the unit by pulling the handles.
DRAIN PAN
Drain Pan edge shall not exceed the cabinet roller.
!
CAUTIONS
INSTALLATION WORK INSPECTION CHECK LIST
CAUTION
When using the operation of auto swing function, Please manually turn the vertical de ector to the utmost right angle before switching
on the auto swing function.
An abnormal sound will occur when adjusting the vertical de ector before switching on the auto swing. This abnormality does not affect
the operation.
It there is any abnormalities in the vertical movement during the auto swing operation, please do the above setting again.
When raining, rain water will enter the outdoor side. An abnormal sound will occur during operation of unit in raining conditions and
approximately 10 minutes after rain stop. This will not affect the performance or liability of the room air conditioner.
MEMO
.....................................................................................................................................................................................................
.....................................................................................................................................................................................................
.....................................................................................................................................................................................................
Model
RA-08LEDF
RA-10LEDF
RA-13LEDF
a
365
395
* Recommended dimension for performance testing purpose only.
b
490
580
c
Over 200
Over 200
d
Over
100
e
Over
1200
f
Over
150
g
Over
900
h
Over
200
i
Over
200
j*
130 or more
160 or more
Dimension (mm)
Recommended temperature range for safety testing should be as below:
Cold side : Dry bulb 21 – 32°C
Wet bulb 15 – 23°C
Hot side : Dry bulb 21 – 43°C
Wet bulb 15 – 26°C
<
IA1049: A
>
Always turn off and unplug the unit before any cleaning or maintenance to ensure safety
CAUTION
!
PRE-FILTER
If the pre- lter is clogged with dust, the air ow volume will be decreased and resulting in poor cooling performance, and
increased operating noise. Be sure to clean the lter about every 20 days.
1 Remove the suction grille by pulling the bottom corner and slightly lift up the
suction grille.
2 - 3 Pull downward to unhook the suction grille and remove the suction grille.
● Lift and unhook the bottom of the pre- lter and remove it.
● Remove dust from the pre- lter by using a vacuum cleaner. If the pre- lter
is very dirty, wash it with detergent and rinse properly with water. Dry
the pre- lter with soft cloth and do not expose it to heat or under direct
sunlight.
● Install the pre- lter by tting the top hooks and then hook the bottom of
the pre- lter.
● Attach the suction grille back to its place by hooking at the top side to
the front cover, then gently push at bottom corner.
Clean the front cover and suction grille with a soft dry cloth. When it is excessively dirty, wipe it with a soft cloth dampened
with mild soap, then wipe it again thoroughly with a soft dry cloth.
The suction grille can also be removed and be washed with water and mild soap. Remove the suction grille in the
following manner.
1 Remove the suction grille by pulling the bottom corner
and slightly lift up the suction grille .
2 - 3 Pull downward to unhook the suction grille and remove
the suction grille.
Does not operate at all
Poor cooling performance
Check the following items before asking for service. If the malfunction persists, please contact service centre.
1
Is the power cord loosened or unplugged?
2
Is the fuse blown out or the circuit breaker tripped?
3
Is the voltage normal?
4
Is the main switch set to “OFF” position?
1
Is the pre- lter covered with heavy dust?
Clean pre- lter and replace it.
2
Is the temperature setting correctly?
3
Is the sunlight fall directly in the air conditioner?
4
Is the air ow on the rear side (outdoor) blocked?
Leave a space of 900 mm (3 feet) behind the rear side of air conditioner.
5
The doors or windows may be opened widely or there are other sources of heat in
the room.
6
Is the ventilation damper opened?
Symptom Check
If the power supply cord is damaged, it must be replaced by the manufacturer, its service agent or similiarly quali ed
persons in order to avoid a hazard.
CAUTION
!
Remove all the shipping parts before installation and consult an authorised dealer concerning installation requirements,
otherwise may damage the air conditioner.
LOCATION
●
Select a location that can support the weight of the air conditioner and will not cause increased operating noise and
vibration.
●
Select a location to avoid direct sunlight on the air conditioner.
●
Select a good location for ef cient air circulation.
●
Select a location where there is no obstacles near the air inlet and outlet.
INSTALLATION INSTRUCTIONS
REMOVE THE FRONT COVER
1
Remove the rubber plug from the base pan.
2
Install the drain pan by using 2 pieces of screws (provided) at the cabinet.
3
Connect the drain pan with the drain hose to drain point. (Drain hose or tubing
can be purchase locally. Drain hose inner diameter should be around ø13mm
or 1/2 inch.)
4 Pour 2 glasses of water into the drain pan to ensure the drainage is functioning
normal.
5
Slide the air conditioner unit back into the cabinet.
CONDENSED WATER DRAINAGE
This air conditioner use a “turbo fan splashing ring” which is designed to splash the condensated water on the condenser
surface for maximum cooling ef ciency, thus producing a splashing sound.
If you are uncomfortable with the sound, you can install an outside drainage by using
the following procedure which may, reduce the cooling operation performance.
Have you removed the shipping parts? Please check the caution sheet which is
attached at front cover.
Is the incline of room air conditioner regarding front and rear, right and left all right
after installation?
Is the strength of installation suf cient?
Have you grounded the room air conditioner?
Have you fastened the unit to the cabinet?
Have you done a test operation, and are there any abnormal phenomena?
Item
No.
1
2
3
4
5
6
Check Item Con rm
MAINTENANCE
BEFORE ASKING FOR SERVICE
FRONT COVER AND SUCTION GRILLE
Remove the front cover in the following manner.
1 Remove the suction grille by pulling the bottom corner and
slightly lift up the suction grille.
2 - 3 Pull downward to unhook the suction grille and remove
the suction grille.
4 Lift and unhook the bottom of the pre- lter and remove it.
5 Remove two screws which secure the front cover.
6 Remove the front cover from lower side. Disconnect the
timing motor connector at right side of the electrical box.
The Drain Pan can be used in any positions as below and be secured by 2 screws to avoid water dropping problem:
POWER CORD ARRANGEMENT
If power cord is withdrawn from left side of unit, please
arrange the power cord as in gure after installing the
front cover.
20mm or more 20mm or more
Page 3

– 1 –
NAMES AND FUNCTIONS OF REMOTE CONTROLLER
REMOTE CONTROLLER
This controls the operation of the air conditioner. Signal range to reach air conditioner is about 7 meters.
If inverter lamp is used, the range of control may be shorter.
It can be xed on a wall using the xture provided. Before xing it, make sure the air conditioner can
be controlled from the remote controller.
O Transmission sign
The transmission sign blinks when a signal is sent.
O Display
This indicates the room temperature setting, timer status, operation
mode and fan speed setting.
O CIRCULATION button
Press this button to set air circulation in the room or start the
operation.
O DEHUMIDIFYING button
Press this button to dehumidify the room or start the operation.
O COOLING button
Press this button to set cooling mode in the room or start the
operation.
O RESET button
O STOP button
Press this button to stop the operation.
O SLEEP TIMER button
Press this button to set the sleep timer.
O FAN SPEED button
Press this button to change the fan speed. Every time you press
this button, the intensity of circulation will change from
(AUTO)
to
(HI) to (MED) to (LOW).
O AUTO SWING button
Press this button to set auto swing or stop angle of the vertical air
de ector.
O TEMPERATURE button
Press this button to raise or lower the temperature setting. (Keep
pressed, and the value will change more quickly.)
O ON-TIMER button Press this button to setting the turn on time.
Precautions
O Do not put the remote controller in the following places.
O In direct sunlight.
O Near a heat source.
O Handle the remote controller carefully. Do not drop it on the
oor, and away from water.
O Once the air conditioner stops, it will not restart for about 3
minutes (unless you turn the power switch off and on or unplug
the power cord and plug it in again).
This is to protect the device and does not indicate a failure.
MODEL: RA-08LEDF, RA-10LEDF and RA-13LEDF
– 4 –
HOW TO SET THE ON TIMER
Q Operation will start for setting temperature at setting time (The starting time may
different depend on the room temperature and set temperature).
HOW TO REPLACE THE BATTERIES IN THE REMOTE CONTROLLER
1
Remove the cover as shown in the gure and take out
the old batteries.
2
Install the new batteries.
The terminal of the batteries should match the marks in
the case.
1. Do not use new and old batteries, or different kinds of
batteries together.
2. Take out the batteries when you do not use the remote
controller for 2 months or longer.
3. Use high quality and high performance AAA batteries to avoid
short operating life and electrolyte leakages
!
When using the remote controller, if there is no response from the air conditioner or the remote controller display is
dim, please try to replace the batteries.
CAUTION
Press the (ON TIMER) button, and the display changes as shown below.
Mode
ON TIMER
44
4
1
Indication
1 hr 2 hrs 3 hrs 10 hrs 11 hrs 12 hrs
Cancel ON TIMER
444
<
IA1051: A
>
Page 4

– 3 –
Q Circulation Function
O During circulation operation, compressor will not run and there is no cooling operation with only
fan running.
O When the setting temperature is higher than room temperature, fan will stop running.
CIRCULATION OPERATION
Press the (CIRCULATION) button so that the display indicates pointing to button.
Circulating operation starts with a beep.
Press the FAN SPEED button and select the desired FAN SPEED (the display indicates
your choice).
Press the temperature control button to set to the desired temperature.
Q As the settings are stored in memory in the remote controller, you only have to press the
(CIRCULATION) button next time.
3
Press the (STOP) button to stop operation.
STOP
1
2
HOW TO SET THE SLEEP TIMER
Press the (SLEEP TIMER) button, and the display changes as shown below.
SLEEP TIMER: The device will continue working for the designated number of hours
and then turn off.
Point the signal window of the remote controller toward the indoor unit, and press
the SLEEP TIMER button.
The timer information will be displayed on the remote controller. The TIMER lamp
lights with a beep from the indoor unit.
SLEEP
TIMER
Mode
SLEEP TIMER
44
4
1
Indication
1 hr 2 hrs 3 hrs 10 hrs 11 hrs 12 hrs
Cancel sleep timer
4
4
Q After sleep timer time is up and when press sleep timer button again, the timer will be set as last setting.
Q Sleep timer effective only once.
NOTE
4
– 2 –
COOLING OPERATION
Use the device for cooling when the outdoor temperature is 21 ~ 43°C.
If indoor humidity is very high (over 80%), some dew may form on the air outlet grille and de ectors of the unit.
Press the (COOLING) button so that the display indicates pointing to button.
Cooling operation starts with a beep.
The cooling function does not start if the temperature setting is higher than the current room
temperature. The cooling function will start as soon as you set the temperature below the
current room temperature.
Set the desired FAN SPEED with the
(FAN SPEED) button (the display indicates the setting).
(AUTO) : The FAN SPEED is HI at rst and change to MED or LOW automatically when
the preset temperature has been reached.
(HI) : High fan speed.
(MED) : Medium fan speed.
(LOW) : Low fan speed.
Set the desired room temperature with the TEMPERATURE button (the display indicates the
setting).
The range of 25 ~ 28°C is recommended as the room temperature for cooling.
The temperature setting and the actual room temperature may vary depending on conditions.
Press the
(STOP) button to stop operation.
Q
As the settings are stored in memory in the remote controller, you only have to press the
(COOLING) button next time.
1
2
STOP
3
Q Dehumidifying Function
When the room temperature is higher than the temperature setting: The device will start to dehumidify and lower the
room temperature to the preset level.
When the room temperature is lower than the temperature setting: Dehumidifying will be performed at the temperature
setting slightly lower than the current room temperature, regardless of the temperature setting. The function will stop
(the fan will stop emitting air) as soon as the room temperature becomes lower than the setting temperature. You
might feel a bit colder in dehumidifying operation.
DEHUMIDIFYING OPERATION
Use the device for dehumidifying when the room temperature is over 16°C.
When it is under 15°C, the dehumidifying function will not work.
Q As the settings are stored in memory in the remote controller, you only have
to press the
(DEHUMIDIFYING) button next time.
Set the desired room temperature with the TEMPERATURE button (the
display indicates the setting).
The range of 20-26C is recommended as the room
temperature for dehumidifying.
2
Press the (DEHUMIDIFY) button so that the display indicates
pointing to
button.
Dehumidifying operation starts with a beep.
The FAN SPEED is set at LOW automatically.
The FAN SPEED button does not work.
1
Press the (STOP) button to stop operation.
STOP
Cooling
“ ”
and
dehumidifying
“ ”
Explanation of the sleep timer
The device will control the FAN SPEED and room temperature automatically so as to be quiet and good for people’s
health.
You can set the sleep timer to turn off after 1 to 12 hours. The FAN SPEED and room temperature will be controlled
as shown below.
Function Operation
The room temperature will be
controlled 2°C above the setting
temperature and the FAN SPEED
will be set to LOW setting 1 hour
after the setting of the sleep timer.
 Loading...