

Page 1
Page 2
– 2 –
SAFETY PRECAUTION
● Please read the “Safety Precaution” carefully before operating the unit to ensure correct usage of the unit.
●
Pay special attention to signs of “ Warning” and “ Caution”. The “Warning” section contains matters which,
if not observed strictly, may cause death or serious injury. The “Caution” section contains matters which may
result in serious consequences if not observed properly. Please observe all instructions strictly to ensure safety.
● “ ” sign in attached figure indicates prohibition.
● Please keep this manual after reading.
PRECAUTIONS DURING INSTALLATION
WARNING
●
Please ask your sales agent or qualified technician for the installation of your unit. Water
leakage, short circuit or fire may occur if you install the unit yourself.
●
Please use earth line.
Do not place the earth line near water or gas pipes, lightning-conductor or the earth line
of telephone. Improper installation of earth line may cause electric shock.
●
A circuit breaker should be installed depending on the mounting site of the unit. Without
a circuit breaker, the danger of electric shock exists.
●
Do not install near location where there is flammable gas. The unit may catch fire if
flammable gas leaks around it.
●
Please ensure smooth flow of water when installing the drain hose. (For drain model)
CAUTION
PRECAUTIONS DURING SHIFTING OR MAINTENANCE
WARNING
●
Should abnormal situation arises (like burning smell), please stop operating the unit and turn off the
circuit breaker. Contact your agent. Fault, short circuit or fire may occur if you continue to operate
the unit under abnormal situation.
●
Please contact your agent for maintenance. Improper self maintenance may cause electric shock
and fire.
●
Please contact your agent if you need to remove and reinstall the unit.
Electric shock or fire may occur if you remove and reinstall the unit yourself improperly.
PRECAUTIONS DURING OPERATION
●
Avoid an extended period of direct air flow for your health.
●
Do not put objects like thin rods into the panel of blower and suction side because the high-speed fan inside may cause
danger.
●
Do not use any conductor as fuse wire, this could cause fatal accident.
●
During thunder storm, disconnect and turn off the circuit breaker.
●
The product shall be operated under the manufacturer specification and not for any other intended use.
●
Do not attempt to operate the unit with wet hands, this could cause fatal accident.
●
When operating the unit with burning equipments, regularly ventilate the room to avoid oxygen insufficiency.
●
Do not direct the cool air coming out from the air-conditioner panel to face household heating apparatus as this may affect
the working of apparatus such as the electric kettle, oven etc.
●
Please ensure that unit mounting frame is always stable, firm and without defect. If not, the unit may collapse and
cause danger.
●
Do not splash or direct water to the body of the unit when cleaning it as this may cause short circuit.
●
Do not place plants directly under the air flow as it is bad for the plants.
●
Please switch off the unit and turn off the circuit breaker during cleaning, the high-speed fan inside the unit may cause
danger.
●
Turn off the circuit breaker if the unit is not be operated for a long period.
●
Do not climb on the unit or put objects on it.
●
Do not put water container (like vase) on the unit to avoid water dripping into the unit. Dripping water will damage
the insulator inside the unit and causes short circuit.
●
When operating the unit with the door and windows opened, and with the air deflector facing down for a long period of time, water
will condensed on the air deflector and drips down occasionally. This will wet your furniture. Therefore, do not operate under such
condition for a long time.
●
If the amount of heat in the room is above the cooling capability of the unit (for example: more people entering the room, using heating
equipments and etc.), the preset room temperature cannot be achieved.
W
A
R
N
I
N
G
Page 3
– 3 –
PARTS IDENTIFICATION AND OPERATIONS
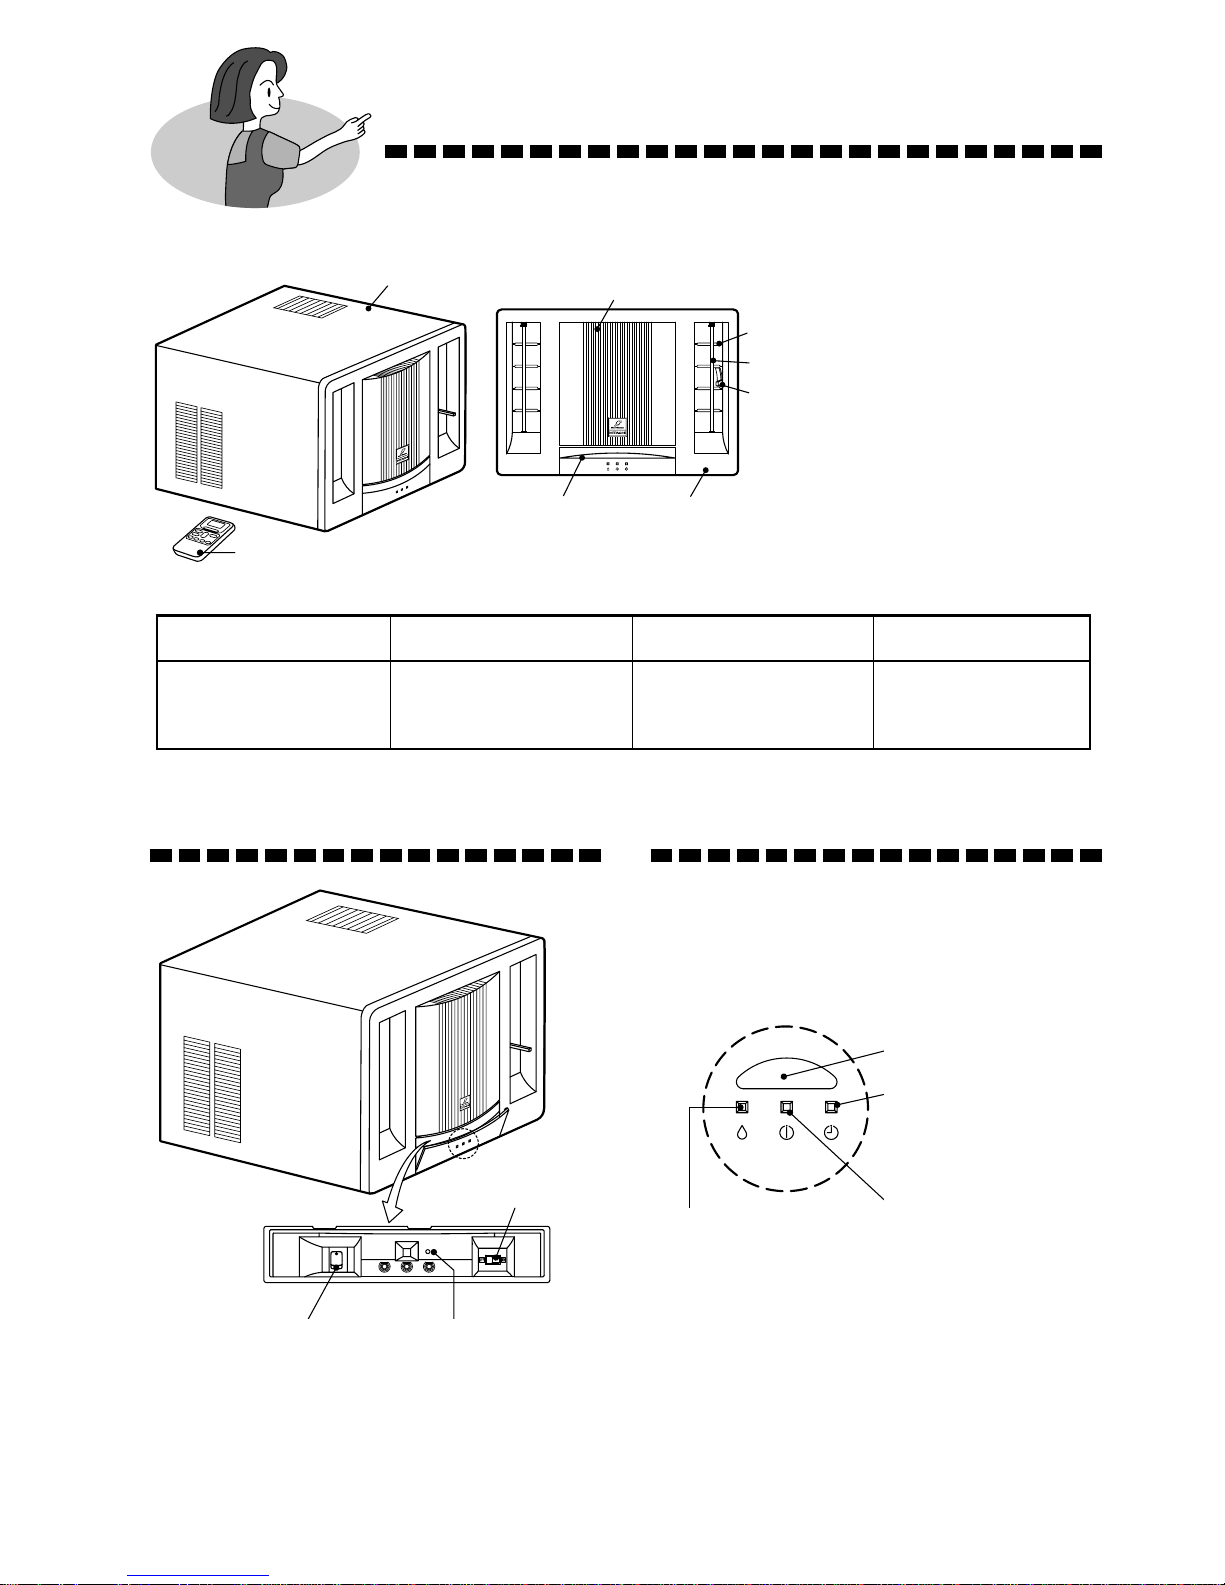
1 Cabinet
2 Suction Grille
3 Horizontal Deflectors
4 Vertical Deflector
5 Air Exhaust Lever
6 Front Cover
7 Control Panel Cover
1
2
3
4
5
76
REMOTE CONTROLLER
CONTROL PANEL INDICATION LAMP
POWER SWITCH
AUTO SWING
SWITCH
TEMPORARY SWITCH
Use this switch to start operation and stop when
the remote controller does not work. Normally do
not use this switch.
RECEIVING PART
TIMER LAMP
This lamp lights when the
timer is set.
OPERATION lamp
This lamp lights when the
unit is operating.
DEHUMIDIFY lamp
This lamp lights when the
dry mode is working.
Model Width Height Depth
181/2", 470mm 139/16", 345mm 237/20", 610mm
RA-08JDF2
RA-10JDF2
Page 4
– 4 –
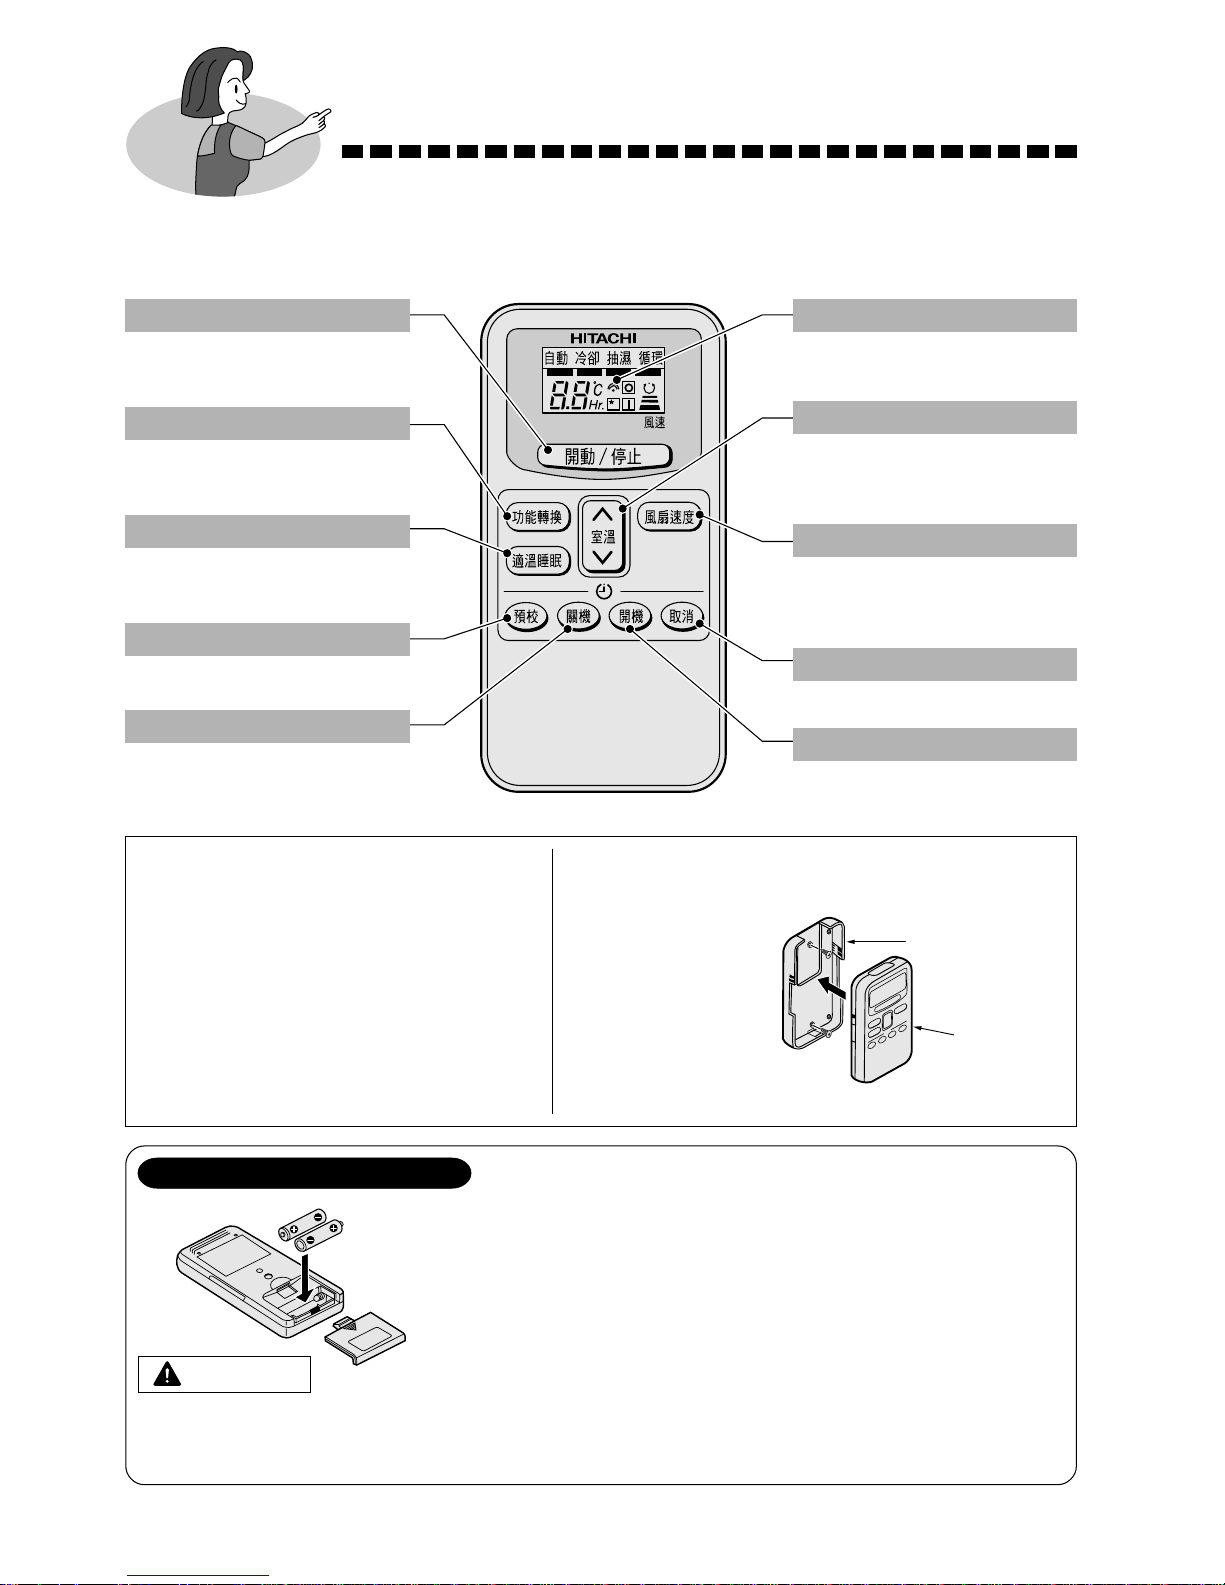
NAMES AND FUNCTIONS OF REMOTE CONTROL UNIT
■ This controls the operation function and timer setting of the room air conditioner.
The range of control is about 4 meters. If indoor lighting is controlled electronically,
the range of control may be shorter.
Signal Transmission
∞
ON/OFF Button
Press this button to start operation.
Press it again to stop operation.
FUNCTION Button
Select the operation mode.
(☞ page 7)
SLEEP TIMER Button
Use this button to set the sleep
timer. (☞ page 6)
RESERVE Button
Timer setting reservation.
OFF TIMER Button
Select the turn OFF timer.
TRANSMISSION Sign
The transmission sign blinks
when a signal has been sent.
TEMPERATURE Button
Room temperature setting.
Value will change quicker when
keep pressing. (☞ page 7)
FAN SPEED Button
Select the fan speed for cooling
and circulation mode.
(☞ page 7)
CANCEL Button
Cancel timer reservation.
ON TIMER Button
Select the turn ON timer.
Precautions for Use
● Do not put the remote controller in direct
sunlight and high temperature.
● Do not drop it on the floor, and protect it
from water.
● If you press the FUNCTION selector
button during operation, the air
conditioner may stop for about 3 minutes
for protection before you can start it
again. (unless you turn off and on again
the power source)
You can use the remote controller by fixing it on the wall
with the accessory parts.
● Before fixing it,
make sure the
unit can be
controlled by the
remote control
unit at the fixing
position.
HOLDER
REMOTE
CONTROLLER
BATTERIES INSTALLATION
● The direction of batteries must match the mark in the case.
● Do not mix use the old and new or different kinds of batteries together.
● Take out the batteries when you do not use it for more than one month.
CAUTION
Slightly push
and slide out
the cover.
■ BATTERIES
●
Please use AAA type of batteries.
●
Life of batteries is about 1 year for normal usage.
●
Replace the batteries when the lighting of LCD becomes dim.
●
After replace the batteries and if operation is abnormal, take
out the batteries and install again after 5 seconds.
Page 5
– 5 –
HOW TO USE
AUTOMATIC OPERATION
■ The device will automatically determine the operation mode either COOL or
DEHUMIDIFY depending on the initial room temperature.
Press the (START/STOP) button
● Operation start with a “beep”.
Press the (START/STOP) button
● Please make sure you have selected the (Automatic) mode
by using the (FUNCTION) button.
● The starting operation will occur an abnormal sound (turbo
sound) which doesn’t affect the operation.
● The fan speed selector does not work at this operation.
1
STOP
■ You can slightly adjust the room temperature.
Press the (ROOM TEMPERATURE) button
● Temperature setting change by 1°C for each 1 time press.
2 Up
2 Down
● You can raise or lower the temperature setting by a maximum of
3°C.
●
The display does not indicate the preset temperature in the
Automatic
mode. Device will receive the setting by a “beep”.
1
■ CONDITION OF AUTOMATIC OPERATION
●
The selected mode of operation will not change during the operation even though the room
temperature change.
Initial room temperature
Function Temperature setting FAN SPEED
(approx.)
HIGH at start, LOW after
Over 27°C COOL 27°C the preset temperature is
reached
16 ~ 27°C DEHUMIDIFY
Slightly lower than the
QUIET
room temperature
Page 6

– 6 –
HOW TO SET THE SLEEP TIMER
■ When the room temperature is higher than the thermostat set temperature, only the fan operates to
circulate the upper hotter air downwards. This makes temperature distribution of the room evenly at
heating. This operation is useful in winter when using other heating equipment.
Press the (START/STOP) button
● Operation start with a signal received sound “beep”.
Press the (START/STOP) button
● Make sure you have select the (Circulate) mode by using
the (FUNCTION) button.
● You can select the fan speed and desired temperature.
1
STOP
Example: Setting 3 hours
sleep time.
THE RANGE OF CONTROL FOR WIRELESS REMOTE CONTROL UNIT
Mode Indication
Sleep Timer
1 hour 2 hours
Sleep timer off
3 hours 7 hours
Sleep Timer: The device will continue working for the desired
number of hours and then turn off.
Point the signal window of the remote controller toward the
unit, and press the
(SLEEP TIMER) button.
The timer information will be displayed on the remote
controller.
The TIMER lamp lights with a beep.
CIRCULATION OPERATION
ROOM AIR
CONDITIONER
ROOM AIR CONDITIONER
RECEIVING PART
CEILING
RECEIVING PART
about 20°
about 3m
WALL
FLOOR
REMOTE CONTROL
UNIT
about
75°
4m
about
50°
about
50°
Page 7
– 7 –
MANUAL OPERATION [Cooling • Dehumidify • Circulation]
■ Please use under below condition when you want to set the function mode, room temperature and
fan speed by manually.
DEHUMIDIFYING COOLING
Room Temperature Outdoor Temperature
16°C above 22–42°C
OPERATION MODE SELECTION
● Every time you press the button, the mode will change as the
below sequence.
(Auto) (Cool) (Dehumidify) (Circulation)
1
ROOM TEMPERATURE SETTING
2 Up
2 Down
● The cooling operation does not start if the
temperature setting is higher than the current
room temperature.
2
FAN SPEED SETTING
●
Every time you press the button, fan speed will change as the below
sequence.
● COOLING :
● CIRCULATION :
● DEHUMIDIFY :
(QUIET) (FIXED)
(QUIET)(LOW)(HIGH)
(QUIET)(LOW)(HIGH)(Auto)
3
Press the (START/STOP) button
● Operation start with a signal received sound “beep”.
Press the (START/STOP) button
● As the settings are stored in memory in the remote control unit, you only
have to press the (START/STOP) button next time.
4
STOP
■ Recommend Temperature
Dehumidify 16~26°C
Cooling 25~28°C
Page 8
– 8 –
■ DEHUMIDIFYING CONDITION
●
Operation condition depend on the setting Temperature.
SETTING TEMPERATURE OPERATION CONDITION
LOWER THAN ROOM
TEMPERATURE
HIGHER THAN ROOM
TEMPERATURE
Device will dehumidify, reducing the room temperature to the
preset level.
Operation stop when room temperature becomes lower than
setting temperature and start again operation when it is higher
than setting temperature.
Dehumidifying will be performed with the room temperature set
slightly lower than the current room temperature regardless the
temperature setting. (When room temperature is lower 16°C,
setting temperature will be 16°C.)
Operation stop when room temperature becomes lower than
setting temperature and start again operation when it is higher
than setting temperature.
■ FAN SPEED MODE AND OPERATION CONDITION
CIRCULATION COOLING
“Auto” Not available
“High” Full speed for room temperature distribution. Quick cooling for economical operation
“Low” Quiet
“Quiet” Super Quiet
High speed at the starting of operation
and change to low when the preset
temperature has been achieved.
CAUTION
●
Continuous operation at high humidify (over 80% at indoors) will cause some dews form on the air outlet grille
of the unit.
Page 9

– 9 –
OFF TIME setting
●
Select the OFF TIME by pressing the
(OFF) button.
●
Setting time will change according to the below
sequence when you press the button.
0.5 hour interval 1 hour interval
●
The value change more quickly if you keep pressing
the button.
Press the (Reserve) button
●
OFF TIMER reserved with a signal received
sound “beep”.
● The (OFF) Mark starts lighting instead of
blinking.
1
OFF Timer Reservation
2
ON TIME setting
● Select the ON TIME by pressing the (ON)
button.
● At the beginning of setting, time 6 hours was set.
● Setting time will change according to the below
sequence.
0.5 hour interval 1 hour interval
●
The value change more quickly if you keep pressing
the button.
Press the (Reserve) button
● ON TIMER reserved with a signal received
sound “beep”.
●
The (ON) Mark starts lighting instead of blinking.
1
2
ON Timer Reservation
1
Press the (Cancel) button
●
As the time settings are stored in remote controller
memory, you only have to press the (Reserve)
button in order to use the same setting next time.
CANCELLATION of Timer Reservation
■ Operation stop at setting time
■ ON Timer and OFF Timer are available.
TIMER RESERVATION
■ Operation will start for setting
temperature at setting time (The starting
time may different depend on the room
temperature and set temperature).
Page 10
– 10 –
AIR DEFLECTORS
VERTICAL DEFLECTORS
Vertical deflectors at both sides of outlets can
be set to either auto-swing or static position to
direct discharge air rightward, leftward or
forward direction.
HORIZONTAL DEFLECTORS
Horizontal deflectors at both sides of the outlets
can be set to direct discharge air upward,
downward or forward direction.
Vertical
Deflector
Vertical
Deflector
Horizontal
Deflectors
Horizontal
Deflectors
CAUTION
To avoid dew forming on the deflectors which eventually may drip to the floor, please do not adjust
horizontal deflectors extremely downward position or vertical deflectors extremely leftward or
rightward position during cool operation for a long time.
Also, do not adjust the vertical deflectors position by hand or any other object.
Set the air exhaust lever to the OPEN (pull) position for
air ventilation in the room. The air exhaust lever should
normally be kept in CLOSE (push inward) position
during cooling operation and in the case of typhoon.
Air Exhaust Lever
AIR EXHAUST LEVER
Use the temporary switch for start or stop
operation when operation cannot be done with
the remote controller.
By pressing the temporary switch, [use nonconductor stick (example toothpick)], the
operation is done in previously set operation
mode.
When the operation is done using the temporary
switch, after the power source is turned off and
is turned on again, the operation is done in
automatic mode.
TEMPORARY SWITCH
POWER SWITCH
AUTO SWING SWITCH
● When the AUTO SWING switch is turned to “ON” position, the vertical deflectors automatically oscillate
right and left sweeping the cold air alternately to obtain comfortable cooling.
● The vertical deflectors may be stopped at any position when the AUTO SWING switch is turned “OFF”.
When you do not use the room air conditioner, set the power switch to “OFF”.
POWER SWITCH
TEMPORARY
SWITCH
AUTO SWING
SWITCH
Page 11
– 11 –
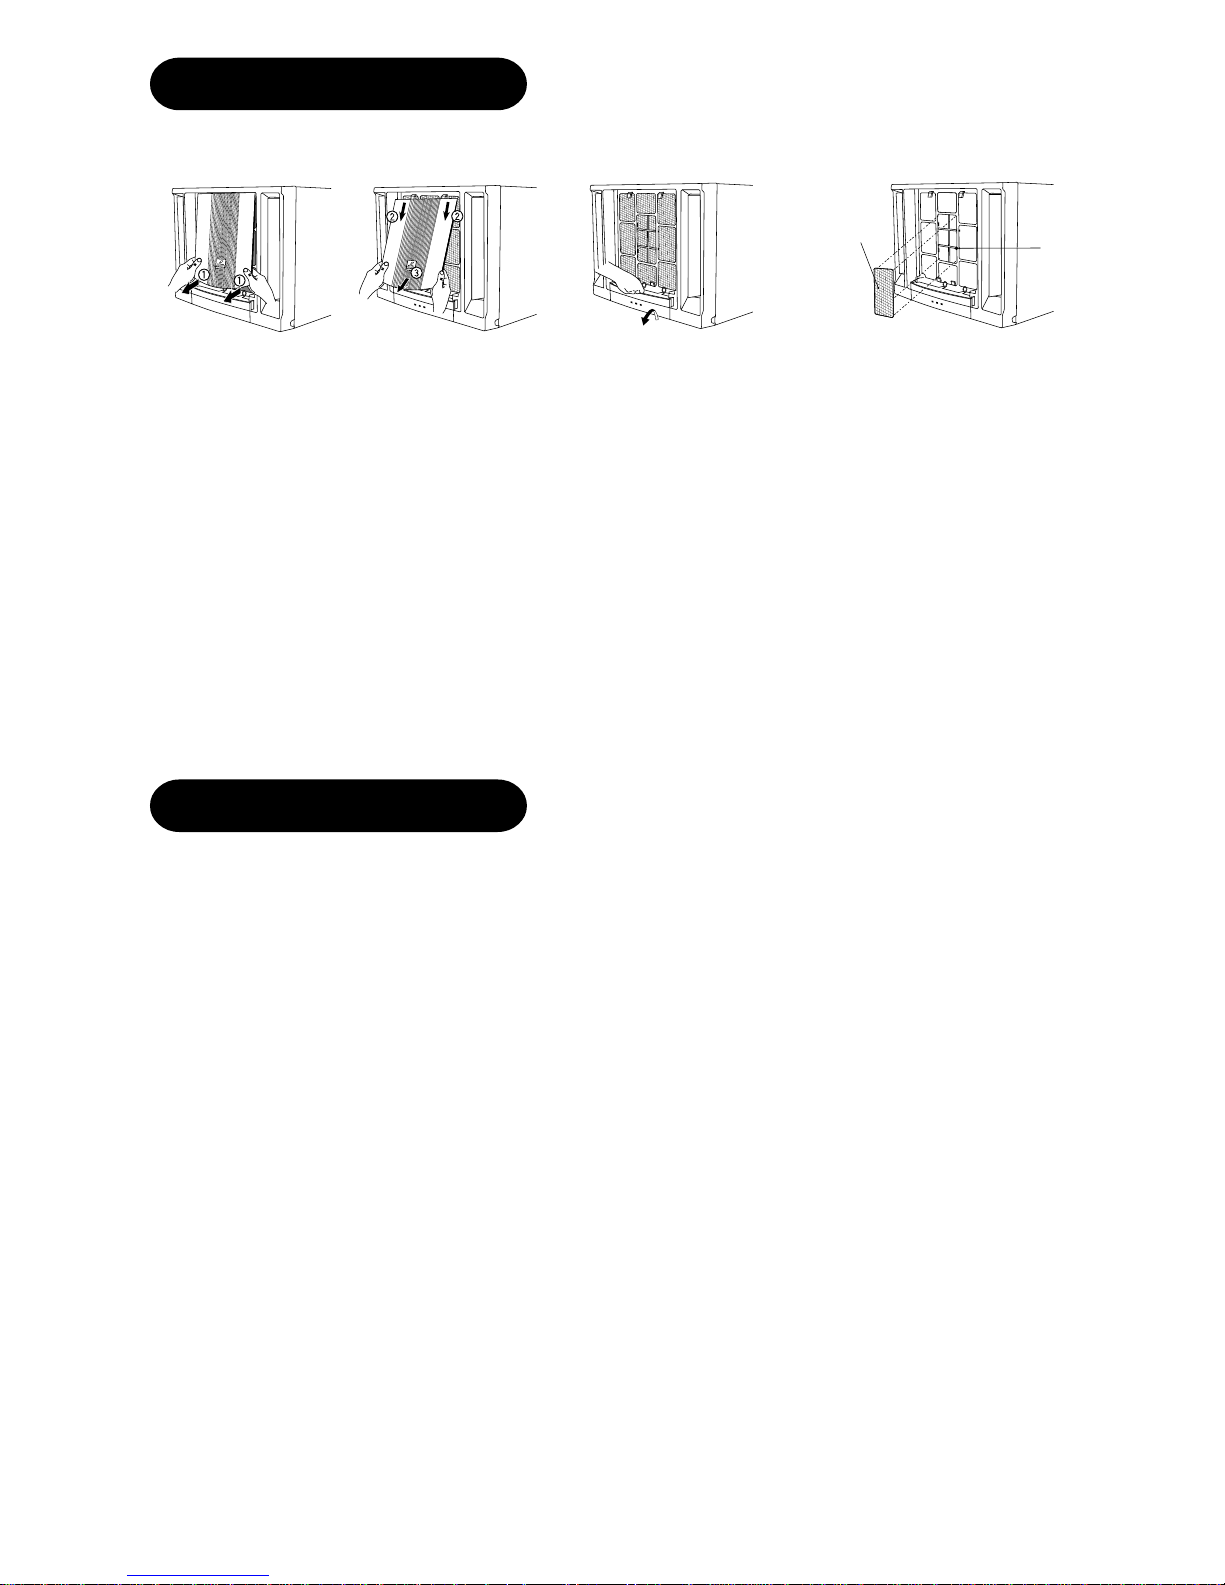
AIR CLEANING FILTER
ALWAYS STOP THE OPERATION BEFORE INSTALLING THE AIR CLEANING FILTER.
AIR CLEANING FILTER IS WASHABLE AND REUSABLE UP TO 20 TIMES BY USING VACUUM
CLEANER OR RINSE WITH RUNNING TAP WATER.
AIR CLEANING FILTER SHOULD BE CLEANED EVERY MONTH OR SOONER IF NOTICEABLE
LOADING OCCURS. WHEN USE OVERTIME, IT MAY LOSE ITS DEODORIZING FUNCTION.
FOR MAXIMUM PERFORMANCE, IT IS RECOMMENDED TO REPLACE IT EVERY 3-6 MONTHS
DEPENDING ON APPLICATION REQUIREMENT.
TYPE NUMBER FOR THIS AIR CLEANING FILTER IS <SPX-CFH8W>, PLEASE USE THIS
NUMBER FOR ORDERING WHEN YOU WANT TO RENEW IT.
TEMPERATURE AND HUMIDITY
Avoid to use the room air conditioner for cooling operation when the outside temperature is below
21°C (70°F). Recommended operation humidity should be below 80%. Continuous long operation at
over 80% humidity (indoor) will cause some dews form on the outlet grille of the unit.
NOISE
In a quiet environment or stopping and starting operation, phenomena like flowing noise of
refrigerant in the refrigerating cycle and rubbing noise from the fan casing may occasionally occur,
but this is normal for the operation.
Water will condense on the evaporator coil and collected in the bottom tray, it is picked up by the
condenser fan and blown onto the condenser coil, this creates a “splashing” noise which is normal.
ODOR
The odor will possibly be emitted from the room air conditioner especially at the starting of operation
and in a high humidity condition. This is not abnormal phenomena because of the various kind of
odors emitted by smoke, food stuffs, cosmetics and others which may stick to the room air
conditioner. So, please clean the air filter and evaporator at the beginning of long no operation period
to reduce the odor.
NOTES ON OPERATION
Air Cleaning
Filter
Hook
1. Open the suction grille
2. Remove the normal
filter
3. Install the air cleaning filter
in the frame
4. Install back the normal filter
and close the suction grille
Page 12

– 12 –
THE IDEAL WAYS OF OPERATION
FOR USER’S INFORMATION
The Air Conditioner And The Heat Source In The Room
Caution
If the amount of heat in the room is above the cooling capability of the air
conditioner (for example: more people entering the room, using heating
equipments and etc.), the preset room temperature cannot be achieved.
After Power Failure
Not Operating For A Long Time
When Lightning Occurs
Warning
To protect the whole unit during lightning, please stop operating the unit
and remove the plug from the socket.
VentilationSuitable Room Temperature
Warning
Freezing temperature
is bad for health and a
waste of electric
power.
Install Curtain or Blinds
It is possible to
reduce heat
entering the room
through windows.
Caution
Do not close the room for a long
period of time. Occasionally open the
door and windows to
allow the entrance
of fresh air.
When the power is resumed after a power failure, the unit will still remain
“OFF”. To operate the unit, please press the “ON/OFF” button again.
(For remote control type only)
When the unit is not to be used for a long period of time, please switch off the
power from the mains. If the power from mains remains “ON”, the unit still consumes
about 10W in the operation control circuit even if it is in “OFF” mode.
(For remote control type only)
Please Adjust Suitable Temperature
For Baby And Children
Do Not Forget To Clean The Air Filter
Dusty air filter will reduce the air
volume and the cooling efficiency. To
prevent from
wasting electric
energy, please
clean the filter
every 2 weeks.
Please pay attention to the room
temperature and air flow
direction when operating
the unit for baby, children
and old folks who have
difficulty in movement.
Effective Usage Of Timer
At night, please use the “OFF or ON timer
operation mode”, together with your wake
up time in the morning. This will enable you
to enjoy a comfortable room temperature.
Please use the timer
effectively. (Wireless
remote control model only)
Operate
After power
failure
OFF
Page 13

– 13 –
MAINTENANCE
CAUTION
ALWAYS TURN OFF AND UNPLUG BEFORE ANY CLEANING
OR MAINTENANCE TO ENSURE SAFETY.
If the air filter is clogged with dust, the air flow volume will decrease and resulting in poor
cooling performance, and increased operating noise. Be sure to clean the filter about every
20 days.
1 Remove the suction grille by pulling at both
bottom corner and then lift it up slightly before
pull downward to unhook the suction grille.
2 Lift and unhook the bottom of the air filter and
remove it.
3 Remove dust from the filter by using a vacuum
cleaner. If the filter is very dirty, wash it with
detergent and rinse properly with water. Dry it
with soft cloth and do not expose it to heat or
under direct sunlight.
4 Install the filter by fitting the top hooks and then
hook the bottom of the filter.
5 Attach the suction grille back to its place by
hooking at the top side to the front cover, then
gently push at both bottom corner.
CAUTION
● Do not use hot water above 40°C for cleaning the filter.
● Do not operate the air conditioner with the filter removed.
AIR FILTER
SUCTION
GRILLE
HOOK
Page 14

– 14 –
Clean the front cover and suction grille with a soft dry cloth. When it is excessively dirty, wipe
it with a soft cloth dampened with mild soap, then wipe it again thoroughly with a soft dry
cloth.
The suction grille can also be removed and be washed with water and mild soap. Remove
the suction grille in the following manner.
1 Pull the suction grille at both bottom
corner and released it.
2 Lift up the suction grille slightly.
3 Remove the suction grille by pulling
downward to release it from the hook
hole located at the top side.
BEFORE ASKING FOR SERVICE
Check the following items before asking for service. If the malfunction persists,
please contact service centre.
Symptom Cause
Does not operate 1 Is the power cord loosened or unplugged?
at all 2 Is the fuse blown out or the circuit breaker tripped?
3 Is the voltage normal?
4 Is the main switch set to “OFF” position?
Poor cooling 1 Is the air filter covered with heavy dust?
performance Clean the filter and replace it.
2 Is the temperature setting correctly?
3 Is the sunlight fall directly in the air conditioner?
4 Is the air flow on the rear side (outdoor) blocked?
Leave a space of 900 mm (3 feet) behind the rear side of air
conditioner.
5 The doors or windows may be opened widely or there are
other sources of heat in the room.
6 Is the ventilation damper opened?
CAUTIONS
IF THE POWER SUPPLY CORD IS DAMAGED, IT MUST BE REPLACED BY THE ONE
SPECIALLY PREPARED AND ONLY AVAILABLE FROM THE MANUFACTURER OR ITS
SERVICE AGENT.
CAUTION
FRONT COVER AND SUCTION GRILLE
Never use hot water above 50°C, erosive chemicals or brush to clean the front cover and
suction grille because they will damage the plastic surface.
Page 15

– 15 –
Wall
494mm
357m
m
Over 200mm
Over
100mm
Over 150mm
Outdoor
Side
Wall or
obstacles
Over
900mm
5mm
266mm
Screw
Indoor
Side
80mm
Over
1200mm
Floor
Side View
Over
200mm
Over
200mm
Back View
-5~5mm
INSTALLATION INSTRUCTIONS
REMOVE ALL THE SHIPPING PARTS BEFORE
INSTALLATION AND CONSULT YOUR DEALER
CONCERNING INSTALLATION REQUIREMENTS.
● Select a location that can support the weight of the air conditioner and will not cause
increased operating noise and vibration.
● Select a location where direct sunlight does not fall on your air conditioner.
● Select a good location for efficient air circulation.
● Select a place where there is no obstacles near the air inlet and outlet.
LOCATION
CAUTION
● The installation material must be fully strong against corrosion, especially in case the air
conditioner to be installed near the sea or hot spring.
● Do not install air conditioner in the places where there is a possibility of inflammable gas
leaks.
● Secure tightly the cabinet with screws. Otherwise there may be danger of the air conditioner
dropping.
● Please keep the recommended installation dimensions. Otherwise waterdrops may occur.
Indoor
side
Outdoor
side
Page 16

– 16 –
POWER SOURCE
●
Check the capacity of wiring and power outlet. The power outlet should be used exclusively
for the air conditioner. Do not use it with other appliances. Any wiring must follow the
national wiring regulation.
●
Ground the air conditioner to prevent danger of electric shock.
●
Connect the air conditioner with power source securely.
●
Use a fuse as below:
Voltage rating 50Hz 220-240V
Operatable
50Hz 198-264V
Voltage range
CAUTION
WARNING – THIS APPLIANCE MUST BE EARTHED.
REMOVE THE FRONT COVER
Remove the front cover in the following manner.
1 Pull the suction grille at both bottom corner and
release it.
2 Remove the air filter.
3 Remove two screws which secure the front cover.
4 Remove the front cover from lower side.
15A time delay fuse
RA-08JDF2
RA-10JDF2
Page 17

– 17 –
SLIDE OUT OF UNIT
1 Remove the four screws which
fasten the base pan to the cabinet
at the side and back.
2 Slide out the unit by pulling the
handles.
After slide in the unit, please install the sealer between the base pan and cabinet to prevent
from entering rain water in case of typhoon. Fasten the unit to cabinet at the side with the
screw, then refit the front cover.
Sealer
Handle
95mm
POWER CORD ARRANGEMENT
If power cord is withdrawn from left side
of unit, please arrange the power cord as
in figure after installing the front cover.
Power
cord
Front cover
(Inside view)
Guider
Base pan
Minimum
30mm
When the screws at the both side of the cabinet cannot be fasten, please use the stopper (a
“L” shape metal plate that is provided in the plastic bag with the sealer) to fix the cabinet and
the base pan located at in front of the unit.
The steps to fix the stopper are as below:
1 Remove the screw which fasten the plastic band
and electrical box to the base pan.
2 Fix and align the stopper into the rectangular
hole of the cabinet.
3 Fasten back the screw to fix plastic band, stopper
and electrical box to the base pan.
STOPPER
TEMPERATURE
TEST
COOLER
1
2
3
4
5
6
7
Cabinet
Electrical box
Stopper
Base pan
Plastic band
Control panel
Page 18

– 18 –
INSTALLATION WORK INSPECTION CHECK LIST
DRAIN PAN
CONDENSED WATER DRAINAGE
This air conditioner employs a “turbo fan splashing ring” which is designed to splash
the condensated water on the condenser surface for maximum cooling efficiency,
thus producing a splashing sound.
If you are uncomfortable with the sound, you can install an outside drainage by using
the following procedure which may, however cause a small loss of performance.
1 Remove the rubber plug from the base pan.
2 Install the drain pan by using 2 pieces of screws
(provided) at the cabinet.
3 Connect the drain pan with the drain hose. (Drain
hose or tubing can be purchase locally to satisfy
your particular needs. Drain hose inner diameter
size should be around ø13mm or 1/2 inch.)
4 Slide the air conditioner unit back into the cabinet.
Item No. Check Item Initials
1
Have you removed the shipping parts? Please check
the caution sheet which was attached at front cover.
2
Is the incline of room air conditioner regarding
front and rear, right and left all right after installation?
3 Is the strength of installation sufficient?
4 Have you grounded your room air conditioner?
5 Have you fastened the unit to the cabinet?
6
Have you done a test operation, and are there
any abnormal phenomena?
Drain hose
Rubber plug
Screws
Drain pan
Cabinet
CAUTION
BEFORE START OPERATION OF AUTO SWING FUNCTION, PLEASE TURN THE RIGHT
VERTICAL DEFLECTOR TO THE MOST RIGHTWARD AND SWITCH ON THE AUTO SWING
SWITCH TO CHECK THE VERTICAL DEFLECTOR MOVEMENT.
THE ABNORMAL SOUND WILL OCCUR DURING VERTICAL DEFLECTOR ADJUSTMENT
AND IT DOESN'T AFFECT THE AUTO-SWING OPERATION.
DURING USAGE IF THE VERTICAL DEFLECTOR CHANGES ANGLE THEN PLEASE DO
THE ABOVE SETTING AGAIN.
WHEN RAINING, RAIN WATER WILL ENTER THE OUTDOOR UNIT. WHEN THE AIR
CONDITIONER STARTS OPERATING (AFTER RAINING) FOR ABOUT 10 MINUTES, THERE
WILL BE AN ABNORMAL NOISE FROM OUTDOOR UNIT. THIS WILL NOT EFFECT THE
PERFORMANCE OR LIABILITY OF THE AIR CONDITIONER.
Page 19

– 19 –
安全上應特別注意之事項
● 使用前,請詳細閱讀「安全上的注意事項」,以正確的使用機體。
● 在所示注意事項的“ 警告”、“ 注意”需特別加以注意。“警告”欄中記載之事項,表示處理錯誤時,
可能會造成死亡或重傷,而“注意”欄中記載之事項,因狀況也可能造成重大之後果,所以請務必遵守,以
維護安全。
● 另外圖像中的“ ”表示禁止事項。
● 閱讀完後,請務必妥善保管。
安裝上的注意事項
警告
●
安裝時,請委託經銷商或專門技術人員安裝。
自己安裝可能會造成漏水、觸電及火災。
●
請使用接地線。
地線請勿安裝在瓦斯管、水管、避雷針、電話之地線等場所。
●
依設置場所狀況,有必要安裝漏電斷電器。
如沒有安裝漏電斷電器時,會有觸電的危險。
●
不可安裝於有可燃氣體的場所,因為萬一氣體泄漏在機體周圍的
話,可能會發生火災。
●
安裝排水管時,請確認水可否順利的流出。(排水管型)
注意
搬移或修理時的注意事項
警告
●
異常時(有焦味等),請停止運轉後把斷電器關閉,並通知經銷服務人
員。有異常而照舊連續運轉的話,會造成故障、觸電、火災等。
●
維修時,請直接向經銷服務人員接洽。
自己修理不完全的話,會有觸電、火災的危險。
●
機體要移動重新再設置時,請直接向經銷服務人員接洽。
自己移動機體,重新再設置時,若安裝不安全的話,就會有觸電、火災的危險。
使用上的注意事項
警
告
●
身體請勿長時間直接對著冷氣,以免妨礙健康。
●
請勿將細棒等物品插入吹出口及吸入口,由於風扇在高速運轉,易造成危險。
●
請勿以金屬或銅線當作保險絲,以免發生故障或火災。
●
有打雷之可能時,為了保護機械,請停止運轉,並把斷電器關閉,以避免故障發生。
●
本機請使用在以一般家庭的人為對象的場所,請勿使用在保存食品、動植物、精密機
器、美術品、醫藥品等特殊場所。
●
請不要用濕手來操作開關,以免觸電。
●
與燃燒器具一起運轉時,請常換氣,否則會有氧氣不足的情形。
●
本機所吹出來的風,請不要直接吹在燃燒器具上,否則,會使燃燒器具燃燒不完全。
●
長期使用的安裝材料請隨時注意其是否穩固,不可有損傷的情形。否則機體可能會落
下造成危險。
●
清洗機體時,請絕對避免用水潑機體,因會有漏電的危險。
●
動植物請不要放置在風向直接吹到的場所,否則會對動植物有不良的影嚮。
●
清潔機體時,請停止運轉並把斷電器關閉。因為機體內部的風扇正以高速運轉,會造
成傷害。
●
長時間不運轉時,為了安全起見,請把斷電器關閉。
●
請勿爬上機體,物品也不要放在機體上面。
●
機體上請不要放有水的容器(如花瓶),以免傾倒流入機體內部,會使機體內部
電氣絕緣劣化,產生觸電的危險。
●
冷氣運轉時,窗和門在開放的狀態下,風向板向下時,都請不要長時間運轉,否則上下風向板
會結露,有時會滴下來,而使傢俱弄濕。
●
房間如果有超過冷氣能力的熱源(如房間有多人進入,使用熱器具等),將無法達到所設定室溫。
Page 20

– 20 –
部件名稱及操作
1 機箱
2 吸氣柵
3 水平風向調整板
4 垂直風向調整板
5 排氣桿
6 前面蓋
7 控制板蓋
遙控器
控制板 指示燈
電源開關
自動搖擺開關
接收部
定時器燈
定時器設定後這指示
燈點亮。
操作燈
機器操作中這指示燈
點亮。
1
2
3
4
5
76
暫時開關
遙控器失靈時請用此鈕
開動或停止機器,但通
常不需要使用此鈕。
除濕燈
機器開始除濕操作
時這指示燈點亮。
237/20"
, 610mm
181/2"
, 470mm
139/16"
, 345mm
RA-08JDF2
RA-10JDF2
型號
寬度
長度高度
Page 21

– 21 –
遙控器各部名稱及功能
■ 控制冷氣機的操作及時間的設定。控制範圍是約 4 米。如果室內
照明燈是以電子方法控制時,控制範圍則可能較短。
信號傳送
∞
開/關鈕
按下此鈕以開始操作。
再按一次則停止操作。
功能轉換鈕
選擇操作模式。
(☞ 第24頁)
適溫睡眠鈕
設定睡眠時間。
(☞ 第23頁)
預校鈕
時間設定預校。
關機鈕
選擇關機時間。
傳送信號
當信號傳送時,此信號
將閃亮。
室溫鈕
室溫設定。持續按下此
鈕溫度調節值將轉換得
更快。(☞ 第24頁)
風扇速度鈕
冷卻及循環操作的風扇
速度選擇。( ☞ 第24頁)
取消鈕
取消時間預校。
開機鈕
選擇開機時間。
使用注意事項
● 遙控器不可放在陽光直射及高
溫的地方。
● 不可掉落於地板上及避免受
濕。
● 在操作中如按下功能轉換鈕,
冷氣機將會停止操作 3 分鐘左右
以策安全。
(除非關掉及再開
動電源開關。)
你可使用附加部件把遙控器安裝在牆上。
● 安裝前,
請確保冷
氣機可從
遙控器安
裝位置被
它控制。
固定板
遙控器
乾電池安裝法
● 電池極性方向應和盒內所示標記一致。
● 新舊或不同種類電池不可混用。
● 超過一個月不使用遙控器時,最好把電池取出。
注意
稍微壓下然
後滑出蓋子
■ 乾電池
● 請使用 AAA 型乾電池。
● 乾電池的壽命在正常使用是大約一年。
● 液晶顯示燈變為暗淡時清更換乾電池。
● 更換乾電池後如果操作不正常,請取出電池,
5秒後再裝回。
Page 22

– 22 –
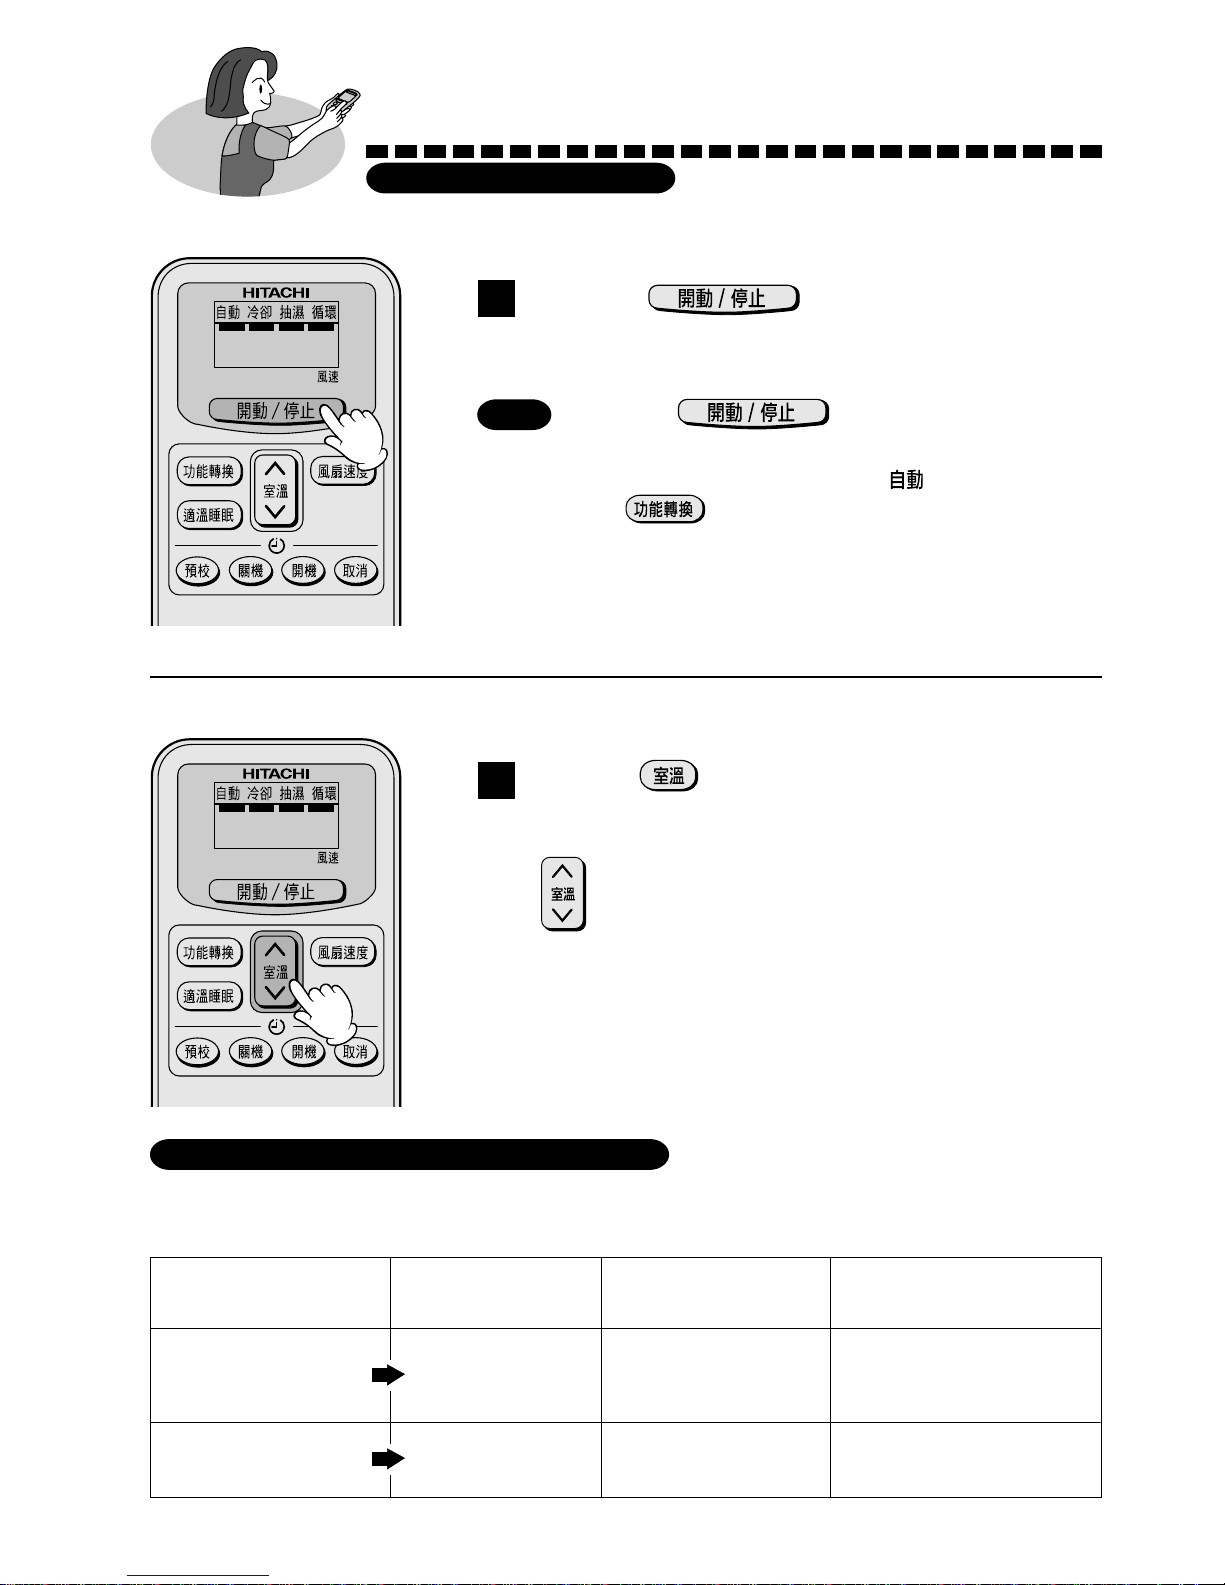
使用法
自動操作
■ 冷氣機將按照最初室溫自動確定冷卻或除濕操作。
按下
鈕
● “嗶”一聲開始操作。
按下
鈕
● 請確定你已使用 鈕選擇 模式。
● 開始操作時會發出異聲(超速聲)但不會影嚮操作功能。
● 在此操作下,風扇速度選擇將無法使用。
1
停止
■ 你可稍微調節室溫。
按下
鈕
● 每按下一次溫度設定將轉換 1℃。
2
上
2
下
● 你可最多提高或降低溫度設定 3℃。
● 在自動操作模式時,顯示器將不會顯示出所預設的溫
度。冷氣機以“嗶”聲作為設定信號的接收。
1
■ 自動操作的條件
●
即使室溫改變,所選擇的操作模式在操作中也不會改變。
最初室溫(概略值) 功能 溫度設定 風扇速度
攝氏 27 度以上 冷卻 27℃
開始是(強),達到預設
溫度以後是“弱”
攝氏 16 ∼ 27 度 除濕 稍低於室溫 安靜
Page 23

– 23 –
如何設定適溫睡眠
■ 如室溫高於恆溫器設定溫度的話,只有風扇動作而使上面的暖氣循環到下面。如
這風扇動作和其他加熱器具配合使用的話,就可得到較暖的室內溫度分佈。這種
動作模式在冬天特別有用。
按下 鈕
● “嗶”一聲開始操作。
按下
鈕
● 請確定你已使用 鈕選擇 模式。
● 你可選擇風扇速度及所希望之室溫。
1
停止
例:設定 3 個小時睡眠時間。
無線遙控器的控制範圍
模式 指示
適溫睡眠
循環操作
適溫睡眠:裝置將繼續操作至要求數小時後再關
閉。
將遙控器的信號窗描向冷氣機,再按
鈕。
定時器的資料將會顯示在遙控器上。
定時器會在“嗶”一聲後亮燈。
Page 24

– 24 –
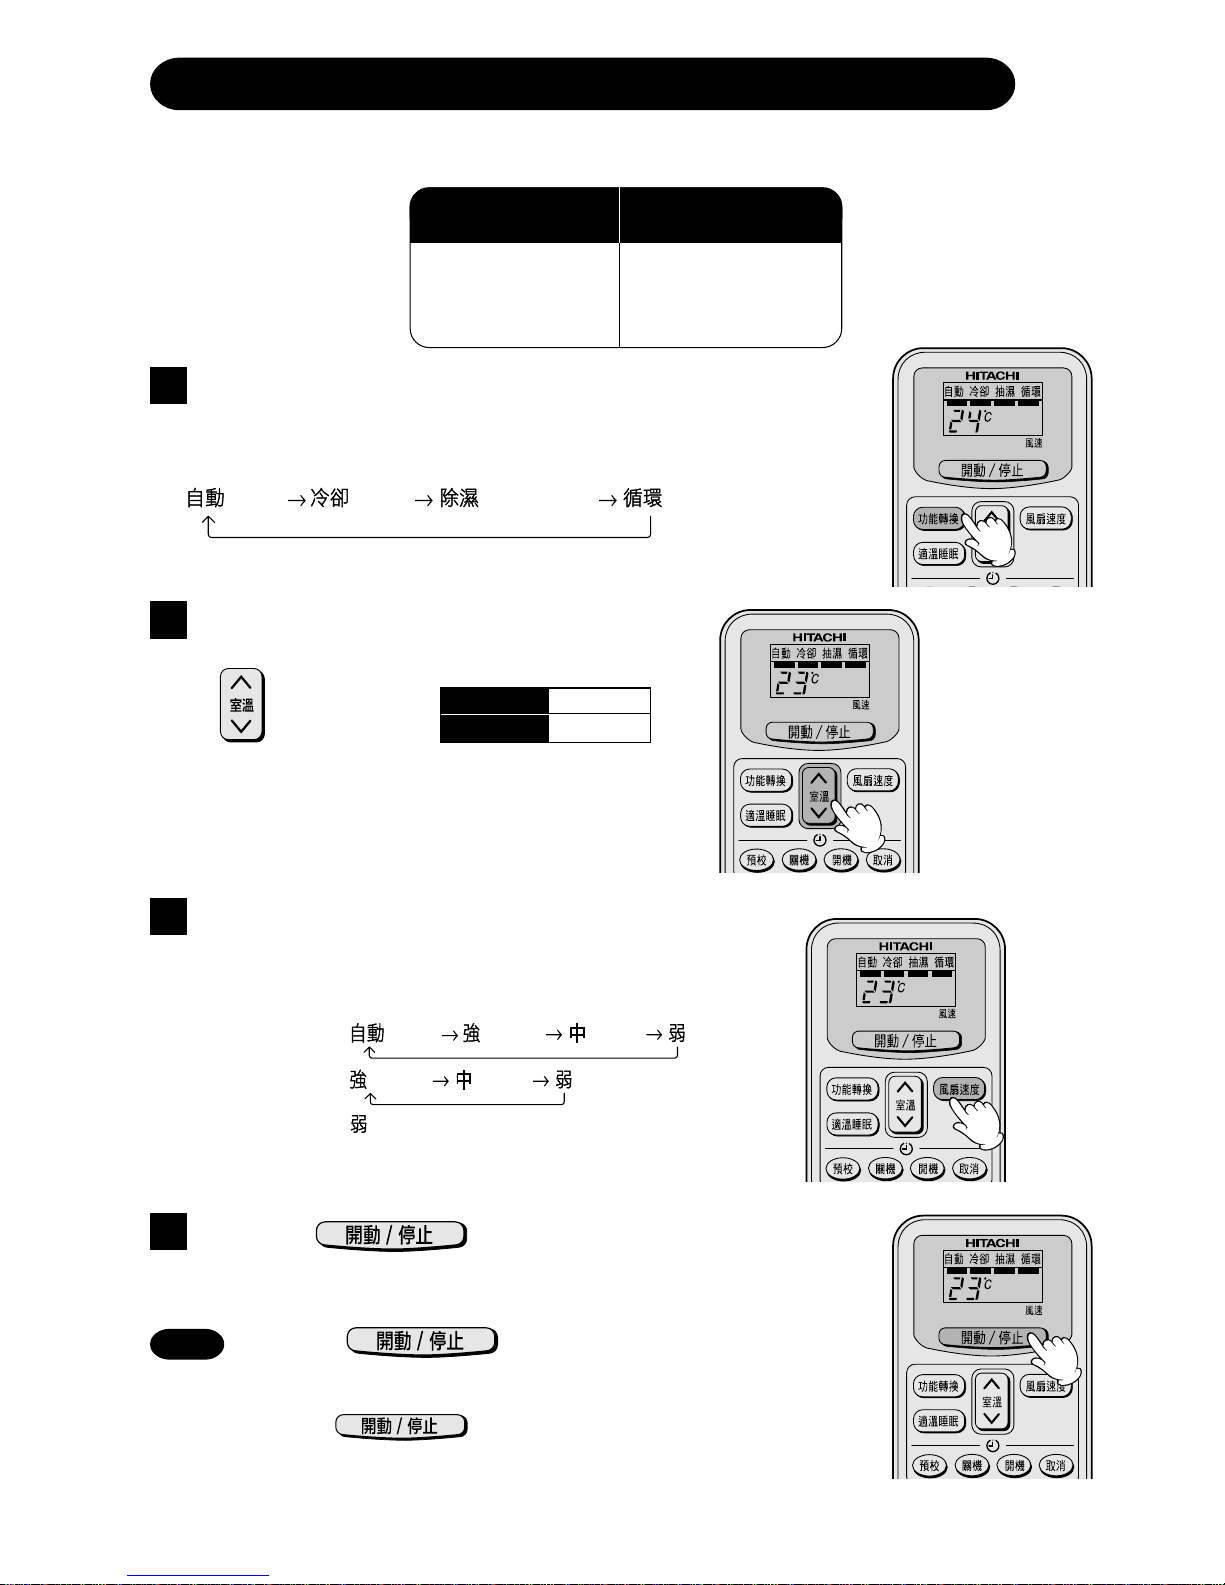
手動操作〔冷卻 ● 除濕 ● 循環〕
■ 以手動設定操作模式,室溫及風扇速度時,請在以下條件下使用。
除 濕 冷 卻
室溫攝氏 室外溫度攝氏
16 度以上 22 ∼ 24 度
操作模式選擇
● 每次按下此鈕時,操作模式將按照以下次序改變。
1
室溫設定
2 上
2 下
● 當設定溫度高於現在溫度時,冷卻操作
將不會進行。
2
風扇速度設定
●
每次按下此鈕時,風扇速度將按照以下次序改變。
● 冷 卻
::
::
:
● 循 環
::
::
:
●
除 濕 :
3
按下 鈕
● “嗶”一聲開始操作。
按下 鈕
●
各項設定狀態全被儲存在遙控器的記憶中,所以下次
操作時只需按下
鈕
即可。
4
停止
■ 建議室溫
除 濕 16~26℃
冷 卻 25~28℃
Page 25

– 25 –
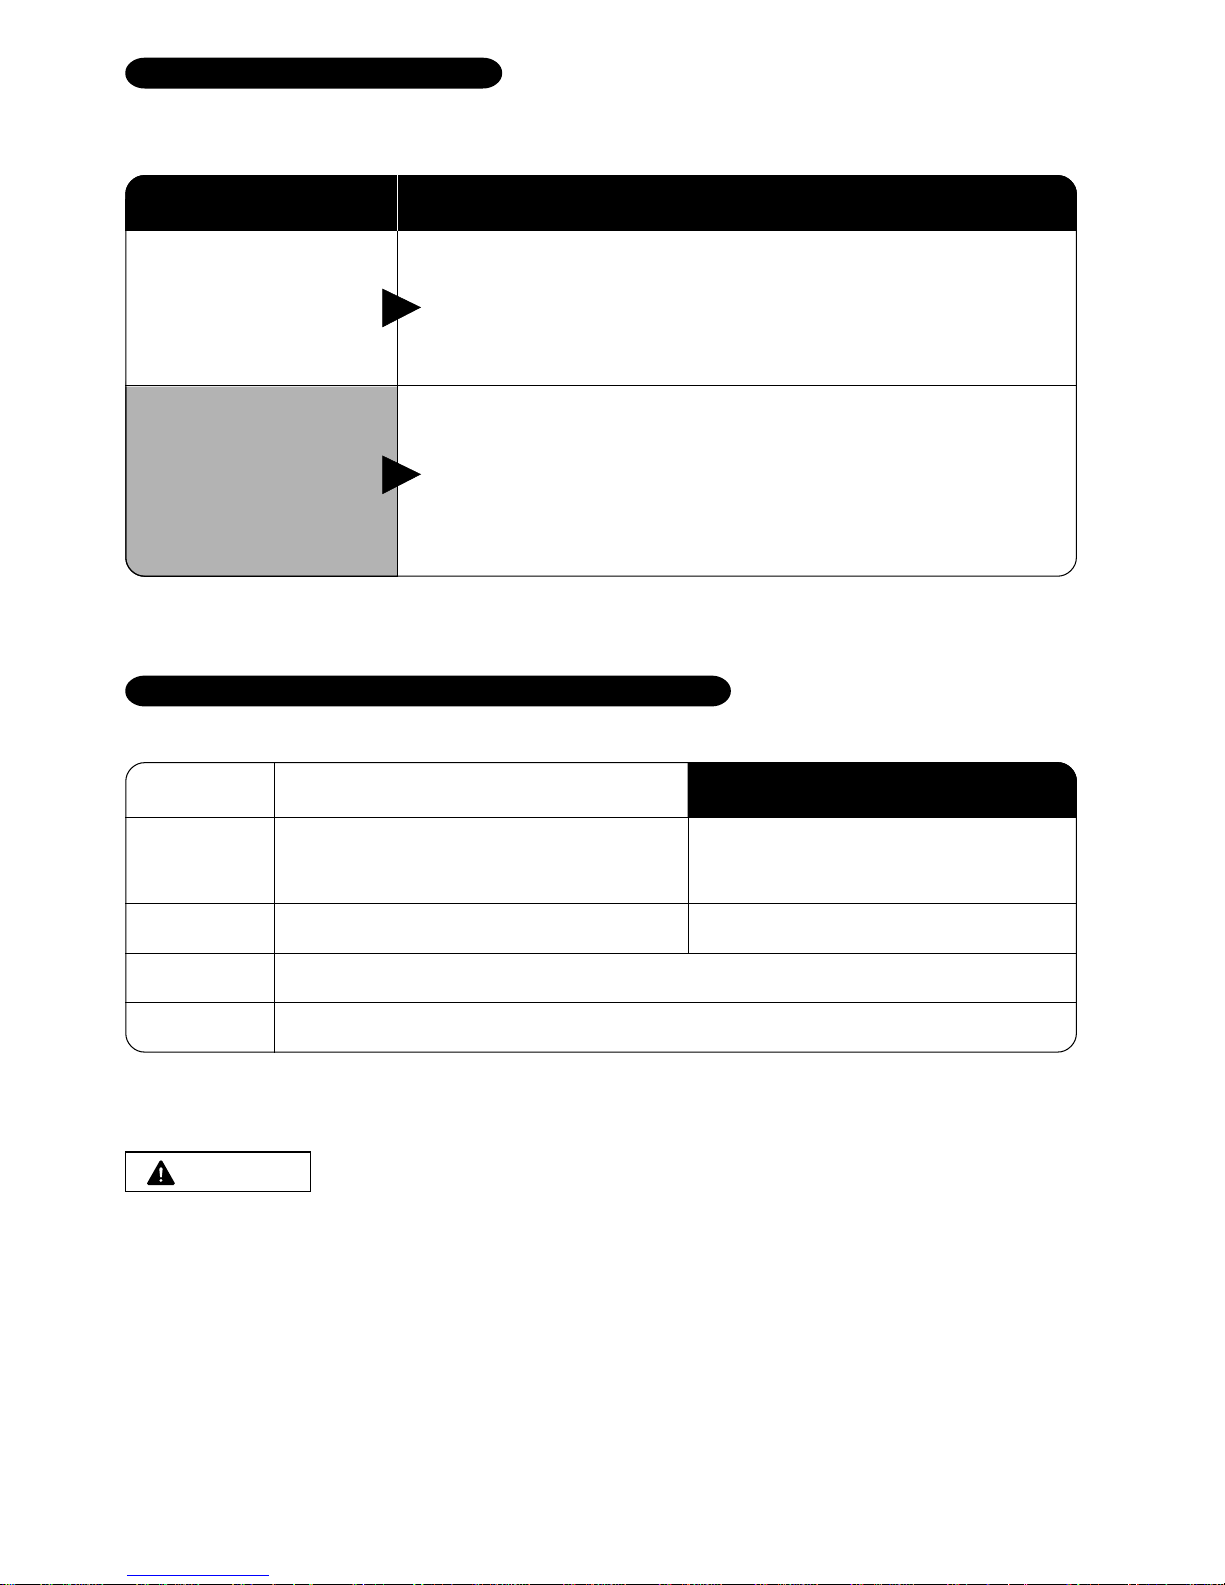
■ 除濕條件
● 操作條件是視設定溫度而定。
設定溫度 操作條件
低於室溫
高於室溫
冷氣機將開始除濕,使室溫降低到預設水平。
當室溫降低到設定溫度以下時,操作就停止及
當它高於設定溫度時,操作將再開始。
無論設定溫度如何,將室溫設定稍低於實際的
室溫而開始除濕操作。(當室溫低於攝氏 16 度
時,設定溫度將是攝氏 16度。)
當室溫降低到設定溫度以下時,操作就停止及
當它高於設定溫度時,操作將再開始。
■ 風扇速度模式及操作條件
循 環 冷 卻
“自動” 不能使用
開始操作時是強,達到預設
溫度時轉換為中
“強” 最高速度以使室溫分佈 快速冷卻以供經濟操作
“中” 安 靜
“安靜” 超級安靜
注意
● 在高濕(室內超過 80%)情況下持續操作時,將造成少許露水在出風口柵格形成。
Page 26

– 26 –
關機時間設定
● 使用 鈕選擇關機時間。
● 每按下此鈕時,時間將按照以下次序轉
換。
0.5小時間隔 1小時間隔
● 持續按下次鈕時,調節值將轉換得更
快。
按下
鈕
● 信號接收“嗶”一聲開始預校關機時間。
● (關機)標誌停止閃亮而開始發亮。
1
關機時間預校
2
開機時間設定
● 使用 鈕選擇開機時間。
● 在開始設定時,時間是設在 6 小時。
● 設定時間將按照以下次序轉換。
0.5小時間隔 1小時間隔
● 持續按下次鈕時,調節值將轉換得更
快。
按下
鈕
● 信號接收“嗶”一聲開始預校開機時間。
● (開機)標誌停止閃亮而開始發亮。
1
2
開機時間預校
1
按下 鈕
● 時間設定已儲存在遙控器的記憶中,所
以下次想用同樣的設定時,只需按下
鈕即可。
取消時間預校
■ 在設定時間停止操作。
■ 開機及關機時間均可。
時間預校
■ 為在設定時間達到設定溫度
而開始操作(開始時間將視
室溫及設定溫度而有所不
同)。
Page 27

– 27 –
不能用遙控器操作時請用暫時開關作開
動或停止操作。
按下暫時開關時機器以前次所設定的模
式開動。〔用非導電小棒(例:牙籤)〕
如用暫時開關開動機器的話,斷開了電
源而再開動時機器就以自動模式開動。
暫時開關
不要使用冷氣機時請將電源開關設定於“OFF”(斷開)的位置。
電源開關
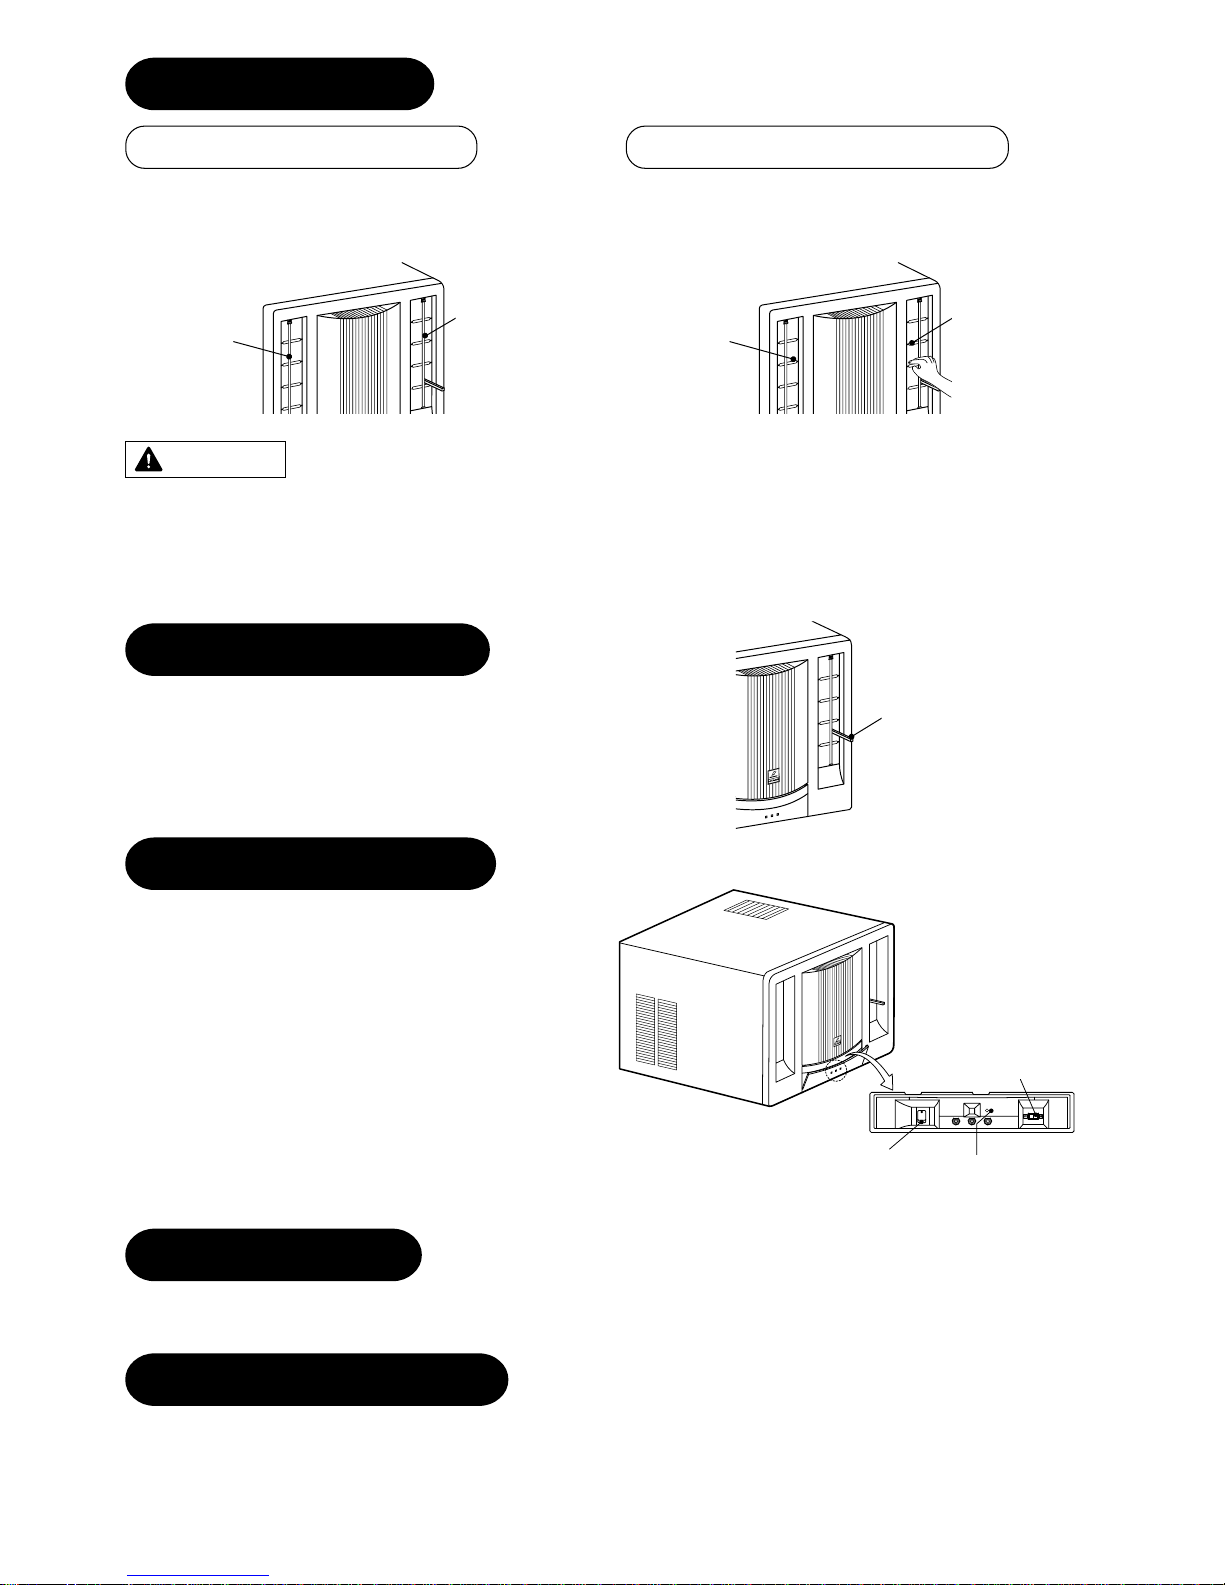
風向調整板
水平風向調整板
水平調整板兩邊的吹出口可將風向設於上、
下或直面排風。
垂直風向調整板
垂直調整板兩邊的吹出口可調置於自動掃
蕩或靜止狀態
,
將風向設於右、左或直面
排風。
垂直風向
調整板
垂直風向
調整板
水平風向
調整板
水平風向
調整板
注 意
為了避免露水滴在調整板上,請勿長時間在冷卻操作下把水平調整板調得太低或者把
垂直調整板向左右極端擺動。
況且,不能用手或其他物件去調垂直風向調整板的位置。
排氣桿
把排氣桿設在開(拉出),以便循環室內
空氣。在冷卻操作及颱風時,排氣桿應
設在(推進)關。
排氣桿
電源開關
暫時開關
自動搖擺開關
自動搖擺
● 當自動搖擺鈕被調到‘ON’時,垂直調整板將自動游移左右則輪流排掃出舒適的涼風。
● 只要自動搖擺鈕被調到‘OFF’時,垂直調整板將會停留在任何位置。
Page 28

– 28 –
空氣濾清器
操作注意
溫度及濕度
避免在室外氣溫低於攝氏 21度(華氏 70度)時,使用此冷氣機作為冷卻操作。建
議操作濕度為 80% 以下,長時間在 80%(室內)濕度以上操作,將造成少許露水在
出風口柵格形成。
噪音
在穩靜操作期間,或當停止運轉時,有時會聽見冷凍劑流動的微小聲音和風扇罩受
熱或受冷時所發出的微小摩擦聲。但這些都是正常的現象。
在蒸發器上凝結的水將收集在底盤裡,冷凝器的風扇將水帶上並噴向冷凝器。這將
造成“噴射”的正常水聲。
異味
冷氣機有時會發出異味,特別是在開機初時及高潮濕的環境下,但這並非不正常的
現象,而是因為煙,食物,化妝品等所發出的異味附著在上面的緣故。所以在長期
停用後而再想使用時,最好清理空氣隔濾網和蒸發器部份以減少臭味。
安裝濾清器前必須要停止操作。
1. 打開吸氣柵
2. 拿掉普通隔濾網 3. 安裝空氣濾清器在框架
內
4. 裝回普通隔濾網及關上
吸氣柵
用吸塵機或清水將空氣濾清器清洗,它可被再用多達二十次。
空氣濾清器應每個月或當灰塵累積時清洗。如果使用過期,僅有可能失去除臭功能。
每 3 ∼ 6 個月更換濾清器一次或視施用需求而定以達到最佳功效。
空氣濾清器型號為 <SPX-CFH8W>,更換時請使用此型號向經銷店購買。
空氣濾清器
鉤
Page 29

– 29 –
冷氣和房間的熱源
注意
房間如果有超過冷氣能力的熱源(如房間有多人進入,使用
熱器具等),將無法達到所設定的室溫。
停電後
長時間不使用時
有打雷之虞時
警告
有打雷之虞時,為了保護機械而需停止運轉,請把電源插頭
拔起來。
換氣
室溫設定要適當
裝置窗簾或百葉窗
停電後再來電時,因保護回路的作用,機器還是在停止的狀
態,需再開始運轉時,請重新按“開動/停止”鈕。(無線遙控
型)
機器長時間不使用時,請將電源開關按在“關”處。若按在“開”
時,雖然不運轉,亦會消耗掉使用於控制回路的電力(約
10W)。(無線遙控型)
為了嬰兒及小孩,
請注意室溫調節
濾網請不要忘記清洗
濾網的網目塞住會影響風
量,減弱冷氣效果,為了不
浪費電力,請
每隔 2 週務必
清洗一次。
行動不便的嬰兒、小孩、老
年人等使用冷氣機時,
請注意室內溫度及
風向的調節。
時間預校的有效活用
晚上用“開關時間預校”再配
合早上的睡醒時間,可得到
快適的溫度,請有效活用時
間預校。(無線
遙控型)
開動
停電後
停止
最佳的使用方法
警告
過冷對健康不好
且會浪費電力。
可隔絕從窗
戶進來的熱
源。
注意
房間不要關閉太久,請偶爾
打開窗戶,換新
鮮空氣。
顧客須知
Page 30

– 30 –
若空氣隔濾網沾滿灰塵,吹出風量將減少而造成冷卻功能減低,及增大操作噪音。請確
保每 20天清理隔濾網一次。
1 在吸氣柵兩邊的下端一拉,然後稍微提起吸
氣柵直至將吸氣柵取出。
2 提起空氣隔濾網下端後把它拿出。
3 用吸塵機清除網上的灰塵。若隔濾網太過骯
髒,用少許清潔劑清洗及用水完全洗淨,用柔
軟布弄乾,不可接觸高溫或受陽光直曬。
4 把隔濾網裝回在上端及下端的架鉤上。
5 把吸氣柵上端向前面蓋繫上,再輕輕把吸氣柵
下端左右一按以關上吸氣柵。
維修保養
注意
清掃之前請務必關掉操作開關及拔掉電源插頭,以確保安全。
空氣隔濾網
注意
● 不可用 40℃以上的水來清洗。
● 在隔濾網拿掉下,不可操作冷氣機。
吸氣柵
鉤
Page 31

– 31 –
請用柔軟乾布擦抹前面蓋。如果它過度骯髒,請用沾以溫水及中性洗潔劑的軟布擦抹,
然後用柔軟的乾布完全抹乾。
吸氣柵也可拆出來清洗。請按照下例方法拆出吸氣柵。
1 在吸氣柵下端左右角一拉
後放開。
2 稍微提起吸氣柵。
3 稍微在吸氣柵上端的架鉤
向內一推後拆出它。
前面蓋和吸氣柵
注意
請勿用 5 0 ℃以上的熱水、化學劑或刷子來清洗前面蓋及吸氣柵,因為它們將會損壞塑
膠表面。
要求服務之前
在要求修理或服務之前,請先檢查下列各點。如果故障依舊,則請洽詢維修服務中心。
問題 原因
無法運行 1 電源軟線是否鬆了或插頭沒插好?
2 保險絲是否熔斷或斷電器是否跳掣?
3 電壓是否正常?
4 電源開關是否設在“OFF”的位置?
冷卻效果不佳 1 空氣隔濾網是否太髒?
清洗隔濾網後裝回它。
2 設定溫度是否適當?
3 陽光是否直射在冷凝器上?
4 室外的空氣流通是否受阻?
請保留 900mm(3 尺)的空間在冷氣機的後部。
5 房間或窗口是否開著或是否室內有其他熱源?
6 排氣蓋是否開著?
注意
如果電源軟線損壞,必須使用由製造商或其服務店所特別預備及提供之軟線。
Page 32

– 32 –
安裝方法
安裝前請拆除裝運用的部件及向經銷店諮詢有關安裝的需要。
地點
● 選擇一個能夠承受冷氣機的重量且不會增加操作噪音和震動的地點。
● 選擇一個沒有陽光直射在冷氣機的位置,建議地點是北、東面。
● 選擇一個通風良好的位置以增加冷氣效率。
● 選擇一個在空氣吹出口或吸入口附近沒有遮擋物的地點。
注意
● 安裝用部件應是高耐蝕性材料,特別是當冷氣機安裝在靠近海邊或溫泉附近時。
● 會漏出可燃性氣體的地方切勿安裝冷氣機。
● 用螺絲將機箱鎖緊。否則可能有冷氣機跌下的危險。
● 請確保按照所提供的尺寸來安裝。否則可能發生滴水現象。
80mm
4
9
4
m
m
357m
m
200m
m
100mm
150mm
900mm
5mm
266mm
1200mm
200mm
200mm
-5~5mm
牆壁
室內
室外
牆壁
或圍牆
地面
側視圖
背面圖
螺絲
Page 33

– 33 –
電源
● 請檢查電線及插座的電流容量,插座應只供冷氣機專用,不可與其他家庭電器共
用。一切電路必須依照有關地方標準電線路要求。
● 冷氣機應接地以避免發生觸電危險。
● 冷氣機電源插頭應緊牢地插入電源插座。
● 請使用以下的保險絲。
定額電壓 50Hz 220-240V
適用電壓範圍 50Hz 198-264V
前面蓋取出方法
請按照下列方法拆出前面蓋。
1 在吸氣柵下端左右角一拉及放開。
2 取出隔濾網。
3 拆出兩粒鎖住前面蓋的螺絲。
4 從下端取出前面蓋。
注意
注意:本冷氣機必須接地線。
1 拆出四粒在旁邊和後邊鎖住底盤
及機箱的螺絲。
2 用把柄將機體拉出。
安置後請將密封材料填入底盤和機箱
底板之間以防止遇到颱風時雨水滲
入,然後用螺絲和夾具將機箱固定並
裝回前面蓋。
冷氣機拉出方法
密封材料
把柄
95mm
RA-08JDF2
RA-10JDF2
15A 時間延遲保險絲
Page 34

– 34 –
結露排水管
這冷氣機運用 “快速扇噴射環”專為潑結露在結露器以達到最高冷卻效率所設計,因
此而發出潑水聲。
如果潑水聲讓你感到不適,請
依照
以下步驟利用
戶外排水方式,但效率將會減低。
1 把底盤的膠塞子除去。
2 用兩枚螺絲(供給)把排水盤鎖在機箱上。
3 將排水盤連接於排水管(排水管可在本地購
買以滿足各要求。排水管內徑應 13mm 或半
寸左右。)
4 將機體置放回機箱裡。
排水管
膠塞子
螺絲
排水盤
機箱
排水盤
電源軟線排列
若要將電源軟線從機體左邊取出,請在裝
回前面蓋後請依照右圖把電源軟線排好。
電源軟線
前面蓋
(內側圖)
指示
底盤
30mm
以上
當無法在左右兩旁用螺絲鎖緊機箱時,請使用固定板(在塑膠袋裡與絕緣墊子一
起附上的“L”形鐵片)將機箱與位置於冷氣機前面的底盤固定。
請依照以下步驟裝上固定板:
1 取出將塑膠環及電器箱鎖緊在底盤的螺絲。
2 將固定板安裝在機箱的長方形洞口內。
3 用螺絲將塑膠環、固定板及電器箱再鎖緊在
底盤。
固定板
TEMPERATURE
TEST
COOLER
1
2
3
4
5
6
7
機箱
電氣箱
控制板
固定板
底盤
塑膠環
Page 35

– 35 –
安裝工作檢查表
項目 檢查項目 簽名(蓋章)
1
已拆卸了裝運用部件嗎?
請校對前面蓋的注意表。
2 安裝後冷氣機前後左右的高低是否正常?
3 安裝強度是否足夠?
4 冷氣機有否接地了?
5 機器有否固定於機箱上?
6
有否作了測試運轉?
有否不正常現象﹖
This indication is effective for Russian Federation only.
Настоящее положение действительно только для Российской Федерации.
“В соответствии со статьей 5, пунктом 2 “Закона о защите прав потребителей” для условий зксплуатаци
и в Российской Федерации на бытовой кондиционер устанавливается cледующий срок – 7 лет c момента
изготовления изделия.
Условия:
Настоящий срок службы распространяется на те злементы и части изделия, которые необходимы для его
нормального функционирования при выполнении следующих условий:
●
Изделие надлежащим образом установлено и используется в соответствии с инструкцией по
зксплуатации и/или установке.
●
Ремонт и техническое обслуживание изделия осуществляется в авторизованном сервисном центре.
Recommended temperature range for safety testing should be as below:
Cold side : Dry bulb 21 - 35°C
Wet bulb 15 - 23°C
Hot side : Dry bulb 21 - 43°C
Wet bulb 15 - 26°C
注意
在開始操作自動風擺功能前,請將右邊的垂直風向調整板轉到最右邊後開動風
擺開關,以便檢查垂直風向板的轉動。
異聲會在調整垂直風向調整板時發出, 但不會影嚮自動掃蕩功能。
在使用自動風擺時,如果垂直風向板角度有改變,請再用以上方法調整風向
板。
下雨時,雨水會掉落在室外機內。當冷氣機開始操作(雨後)大約 10 分鐘內,
將會有異聲從室外機發出。這並不會影響冷氣機的性能與操作。
Page 36

– 36 –
<737W>
 Loading...