

Projector
Contents of package
PJ-TX100
PJ-TX100W/E/U
User's Manual - Quick Guide
Thank you for purchasing this projector.
WARNING ►Before using, read the "User's Manual - Safety Guide" and
these manuals to ensure correct usage through understanding. After reading,
store them in a safe place for future reference.
NOTE • The information in this manual is subject to chance without notice.
• The manufacture assumes no responsibility for any errors that may appear in this
manual.
• The reproductiob, transmission or use of this document or contents is not
permitted without express written authority.
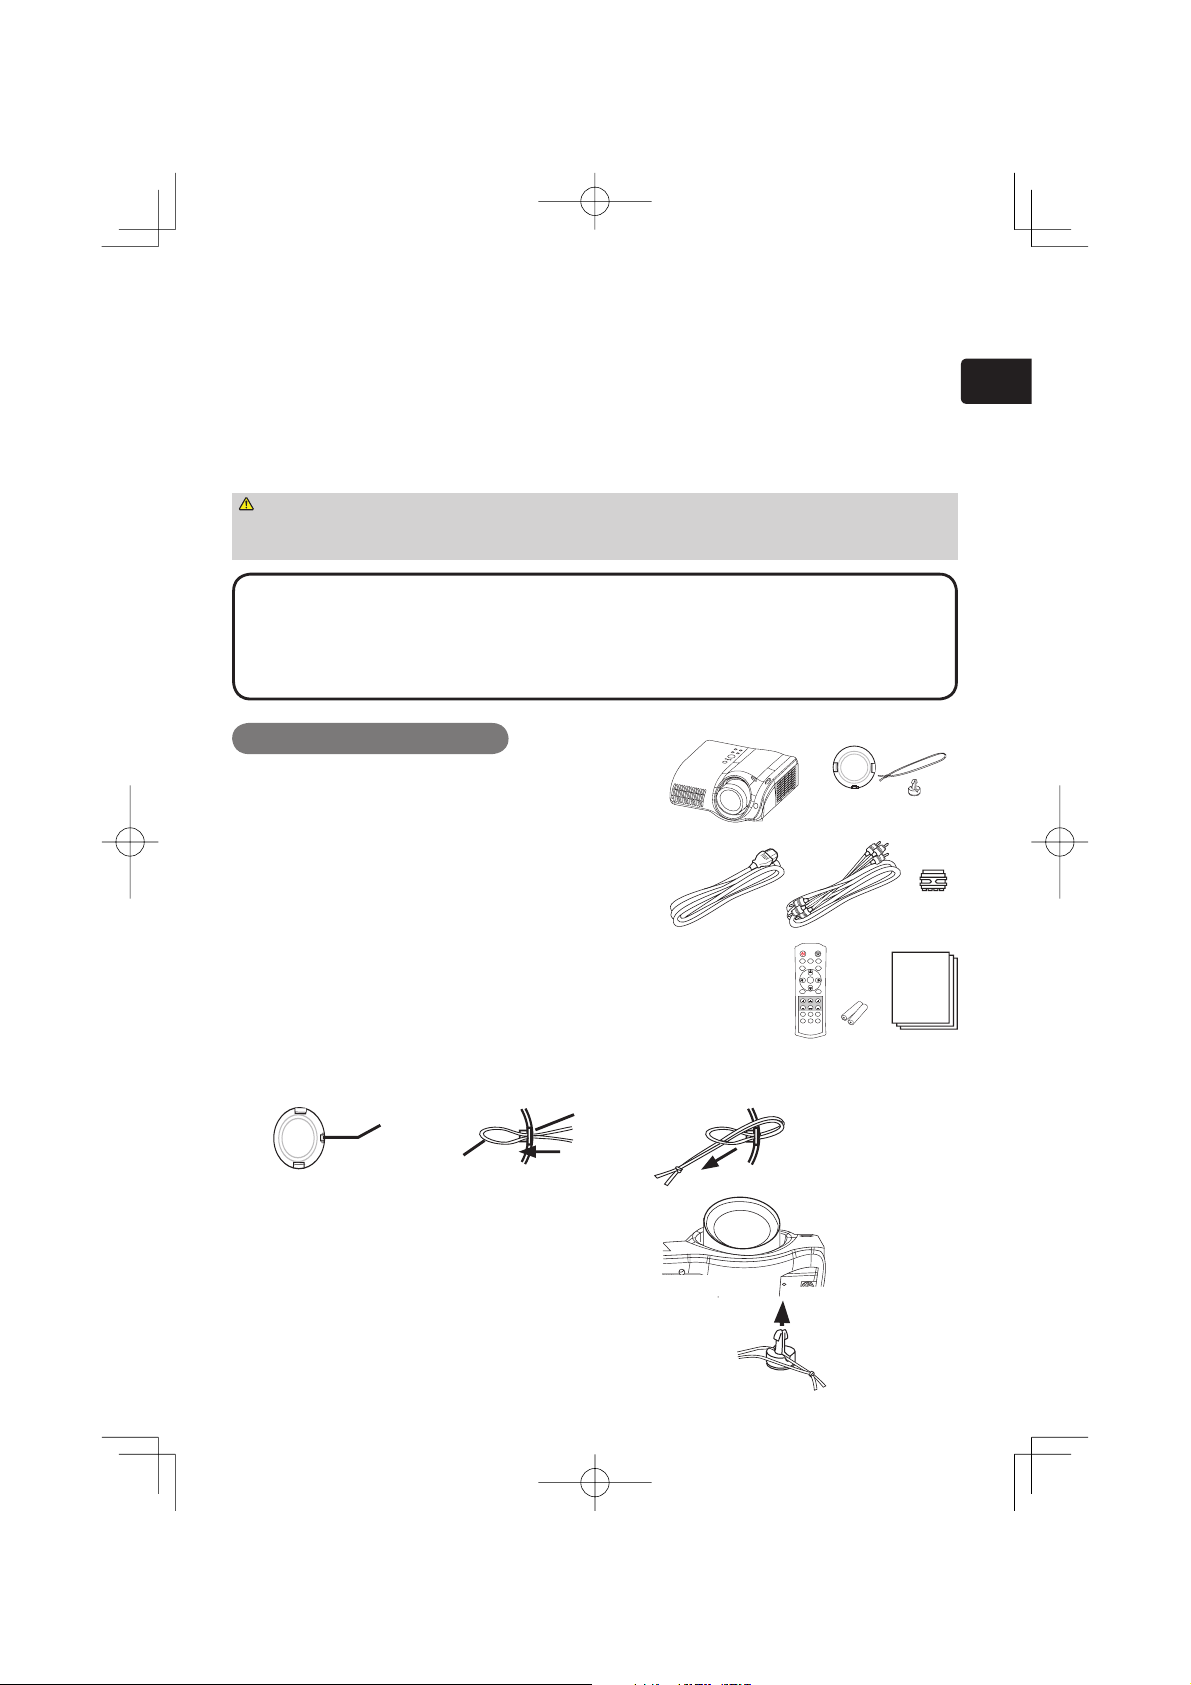
Contents of package
(1) Projector
(2) Lens cover, Rivet and Strap
(3) Power cord
PJ-TX100W: 3 cords (US, UK, Europe)
PJ-TX100E: 2 cords (UK, Europe)
PJ-TX100U: 1 cord (US)
(4) Component video cable
(5) (PJ-TX100E only) SCART adapter
(6) Remote control and 2 AAA batteries
(7) User's manual
Safety guide, Quick guide (this) and Operating Guide
(1)
(3)
POWER LIGHT
OPT BLK
ASPECT
MENU
BRIGHT CONTRAST COLOR
DVI PC
COMPO
ENGLISH
(2)
(4)
MODE
MEMORY
IRIS
ENTER
(6)
RESET
AUTO
S-VIDEO
VIDEO
(5)
(7)
Fastening the lens cover
Fix the strap to the strap ring of lens cover.
1.
Strap ring Strap ring
Strap
Put the strap into the groove on rivet.
2.
Push the rivet into the strap hole.
3.
Bottom side
Strap hole
1
Arrangement
Adjusting the projector's elevator
Arrangement / Adjusting the projector's elevator
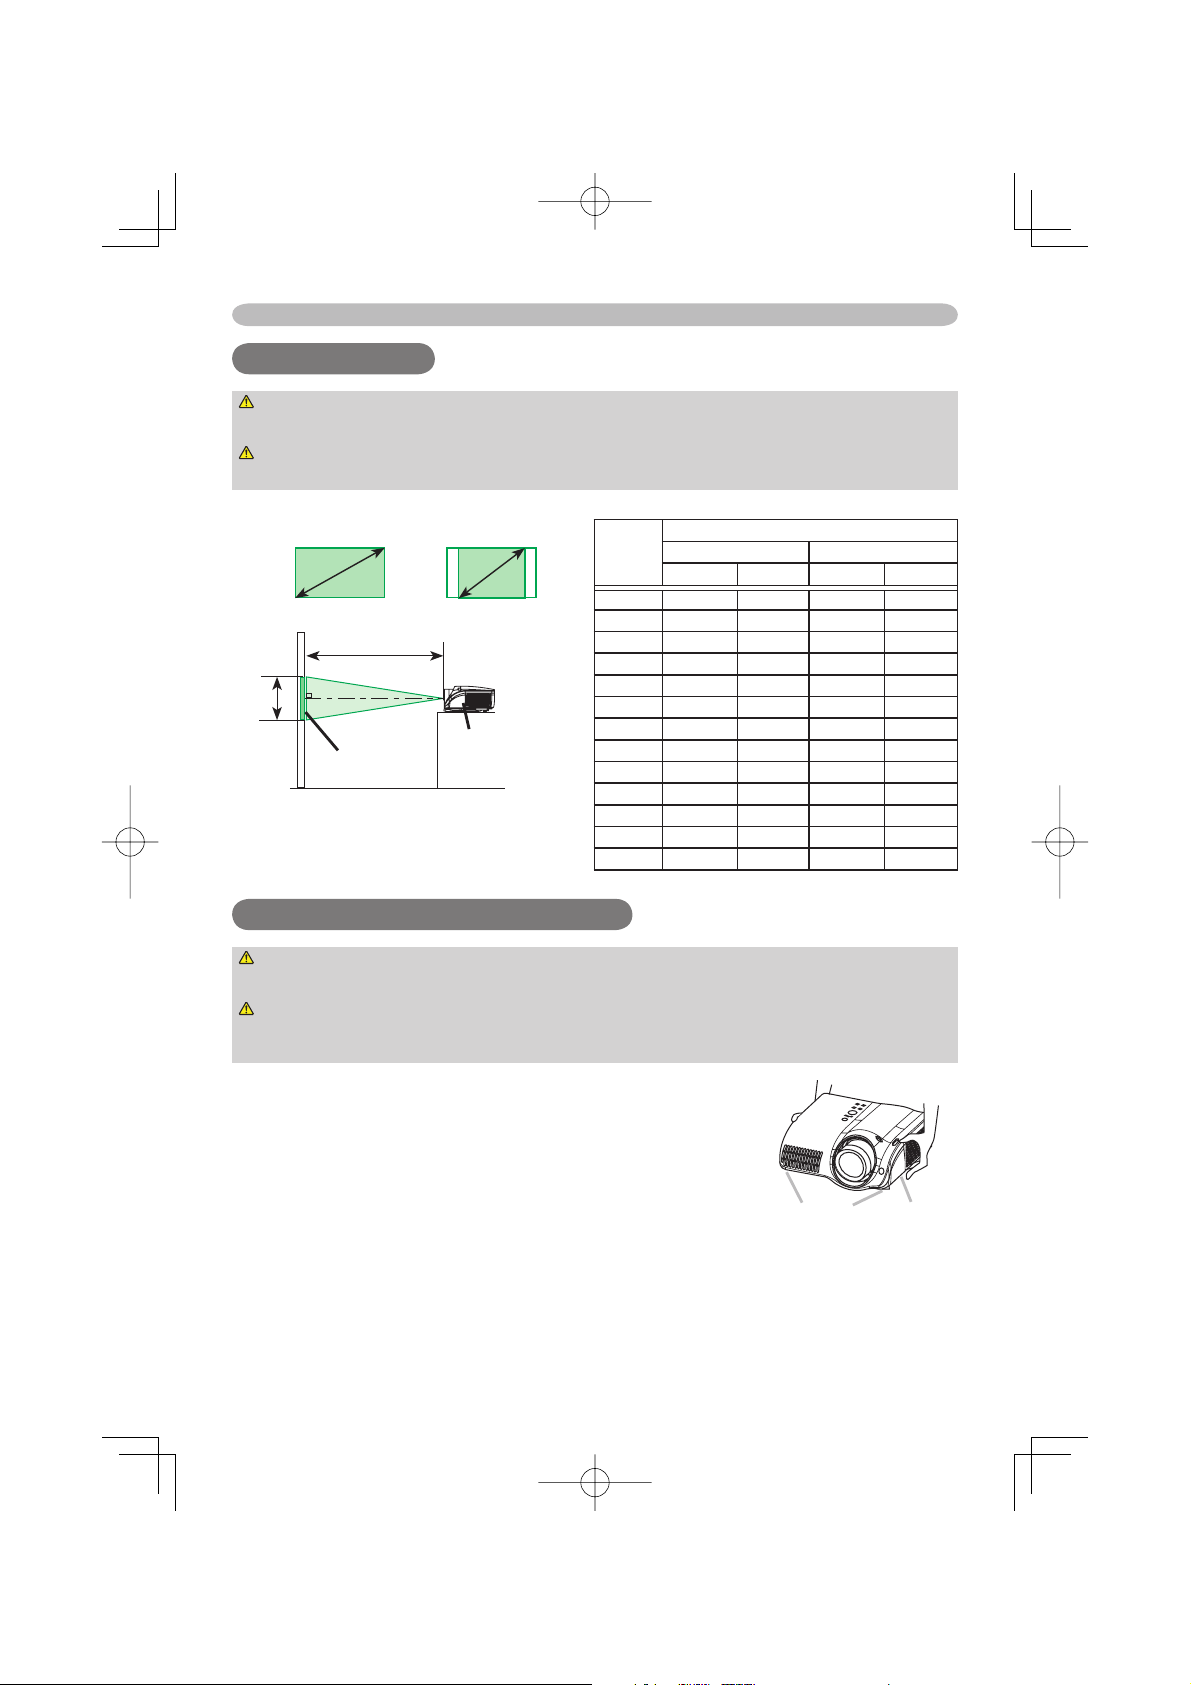
Arrangement
WARNING ►Install the projector in a suitable environment according to
instrictions of the "User's Manual - Safety Guide".
CAUTION ►This projector has some intake vents also on the bottom. Avoid
blocking vents. Put nothing that is sucked or sticks to the bottom of projector.
(calculated for a full size screen, ±10%)
Screen size
16:9 4:3
a
Projector
Screen
Screen
size
[inch
(m)]
30 (0.8) 32 (0.8) 52 (1.3) 39 (1.0) 65 (1.6)
40 (1.0) 43 (1.1) 70 (1.8) 53 (1.4) 87 (2.2)
50 (1.3) 54 (1.4) 89 (2.3) 67 (1.7) 109 (2.8)
60 (1.5) 66 (1.7) 107 (2.7) 81 (2.1) 131 (3.3)
70 (1.8) 77 (2.0) 125 (3.2) 95 (2.4) 153 (3.9)
80 (2.0) 89 (2.2) 143 (3.6) 109 (2.8) 175 (4.5)
90 (2.3) 100 (2.5) 161 (4.1) 122 (3.1) 198 (5.0)
100 (2.5) 111 (2.8) 179 (4.6) 136 (3.5) 220 (5.6)
120 (3.0) 134 (3.4) 215 (5.5) 164 (4.2) 264 (6.7)
150 (3.8) 168 (4.3) 270 (6.9) 206 (5.2) 330 (8.4)
200 (5.1) 225 (5.7) 360 (9.2) 275 (7.0) 441 (11.2)
250 (6.4) 281 (7.1) 451(11.5) 344 (8.7) 552 (14.0)
300 (7.6) 338 (8.6) 541(13.8) 413(10.5) 663(16.8)
a: Projection distance [inch (m)]
16:9 4:3
min. max. min. max.
Adjusting the projector's elevator
WARNING ►Do not touch about the lens and ventilation openings during
use or immediately after use to prevent a burn.
CAUTION ►To prevent damaging the projector and injuring yourself, always
hold the projector whenever using the elevator buttons to adjust the elevator
feet.
Press and hold in the elevator buttons.
1.
Raise or lower the projector to the desired
2.
height and the release the elevator buttons.
When you release the elevator buttons, the elevator
feet will lock into position.
As necessary, you can also fi nely adjust the height
3.
of the projector by twisting the elevator feet by
hand.
2
Elevator
feet
Elevator
button
Connecting your devices
Connecting your devices
S-video cable
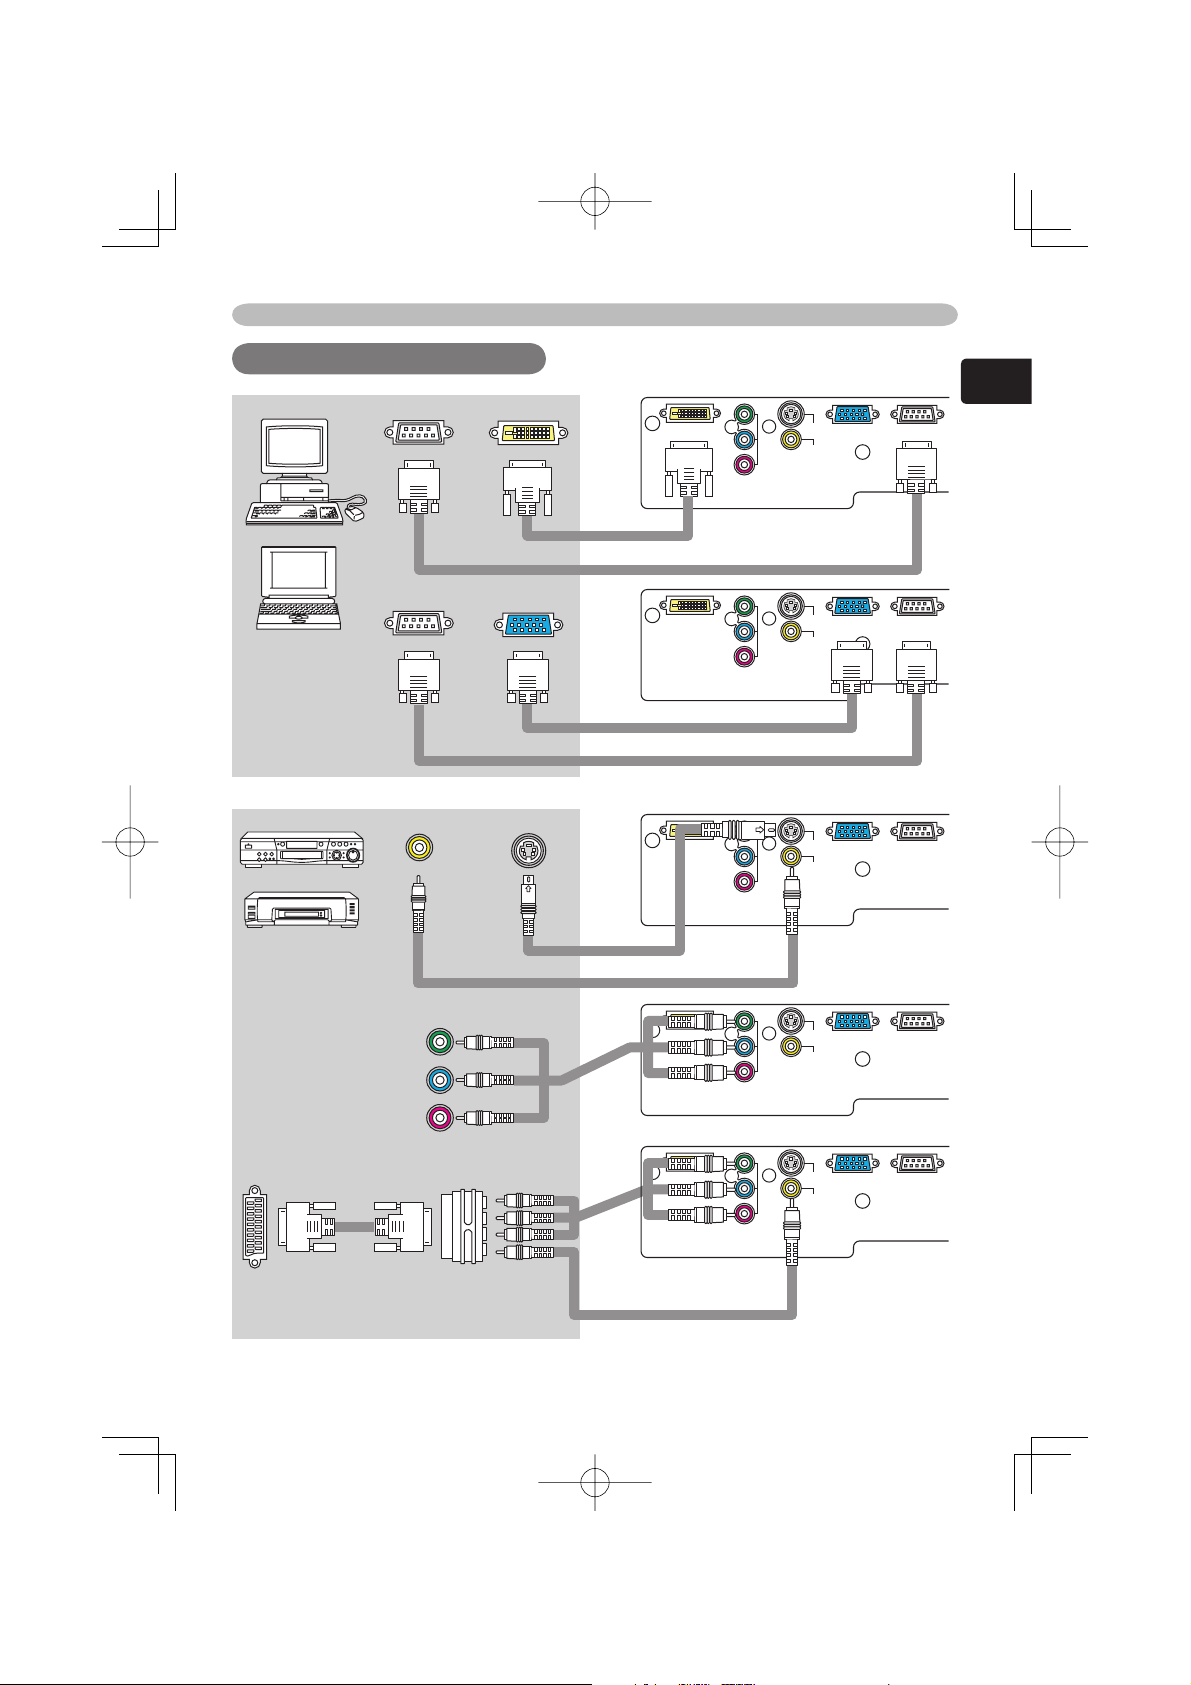
Connecting your devices
RS-232C DVI out
RS-232C RGB out
Video out S-video out
DVI-D
DVI cable
RS-232C cable
DVI-D
RGB cable
RS-232C cable
DVI-D
S-video cable
VIideo cable
Y
C
B/PB
CR/P
COMPONENT VIDEO
Y
C
B/PB
CR/P
COMPONENT VIDEO
Y
B/PB
C
CR/P
COMPONENT VIDEO
S-VIDEO
COMPUTER CONTROL
VIDEO
R
S-VIDEO
COMPUTER CONTROL
VIDEO
R
S-VIDEO
COMPUTER CONTROL
VIDEO
R
ENGLISH
SCART RGB out
SCART cable
Component video out
SCART adapter
DVI-D
Component cable
DVI-D
Component cable
Video cable
Y
B/PB
C
CR/P
COMPONENT VIDEO
Y
B/PB
C
CR/P
COMPONENT VIDEO
S-VIDEO
COMPUTER CONTROL
VIDEO
R
S-VIDEO
COMPUTER CONTROL
VIDEO
R
3
 Loading...