

Page 1
PDV302E
Instruction Manual
Bedienungsanleitung
Mode d’emploi
Manuale d’istruzioni
Manual de instrucciones
Before operating please read all these instructions thoroughly
Vor der Bedienung des Ger tes lesen Sie bitte sorgf ltig diese Anleitung
Veuillez lire attentivement toutes les instructions avant d’utiliser l’appareil
Leggere attentamente le istruzioni prima di usare l’apparecchio
Lea estas instrucciones compltamente antes de utilizar el reproductor
ää
Page 2

SOME DOS AND DON’TS ON THE SAFE USE OF EQUIPMENT
This equipment has been designed and manufactured to meet international safety standards but, like any electrical
equipment, care must be taken if you are to obtain the best results and safety is to be assured.
**************
DO read the operating instructions before you attempt to use the equipment.
DO ensure that all electrical connections (including the mains plug, extension leads and inter-connections between
the pieces of equipment) are properly made and in accordance with the manufacturer’s instructions.Switch off
and withdraw the mains plug before making or changing connections.
DO consult your dealer if you are ever in doubt about the installation, operation or safety of your equipment.
DO be careful with glass panels or doors on equipment.
DO route the mains lead so that it is not likely to be walked on, crushed, chafed, or subjected to excessive wear
and tear or heat.
DON’T remove any fixed cover as this may expose dangerous voltages.
DON’T obstruct the ventilation openings of the equipment with items such as newspapers, tablecloths, curtains, etc.
Overheating will cause damage and shorten the life of the equipment.
DON’T allow electrical equipment to be exposed to dripping or splashing, or objects filled with liquids, such as vases,
to be placed on the equipment.
DON’T place hot objects or naked flame sources such as lighted candles or nightlights on, or close to equipment. High
temperatures can melt plastic and lead to fires.
DON’T use makeshift stands and NEVER fix legs with wood screws - to ensure complete safety always fit the
manufacturer’s approved stand or legs with the fixings provided according to the instructions.
DON’T use equipment such as personal stereos or radios so that you are distracted from the requirements of traffic
safety. It is illegal to watch television whilst driving.
DON’T listen to headphones at high volume, as such use can permanently damage your hearing.
DON’T leave equipment switched on when it is unattended unless it is specifically stated that it is designed for
unattended operation or has a stand-by mode. Switch off using the switch on the equipment and make sure
that your family know how to do this. Special arrangements may need to be made for infirm or handicapped
people.
DON’T continue to operate the equipment if you are in any doubt about it working normally, or if it is damaged in any
way - switch off, withdraw the mains plug and consult your dealer.
ABOVE ALL
— NEVER let anyone especially children push anything into holes, slots or any other opening in the case -
this could result in a fatal electrical shock;
— NEVER guess or take chances with electrical equipment of any kind
— it is better to be safe than sorry!
**************
**************
Page 3

CONTENTS
CONTENTS / ACCESSORY CHECK LIST / IMPORTANT --------------------------------------------------------------------------- GB1
SAFETY --------------------------------------------------------------------------------------------------------------------------------------- GB2-GB3
PLAYER ZONES ----------------------------------------------------------------------------------------------------------------------------------- GB3
INSTALLATION ------------------------------------------------------------------------------------------------------------------------------------- GB3
CONNECTIONS ------------------------------------------------------------------------------------------------------------------------- GB4 - GB5
MAIN UNIT ------------------------------------------------------------------------------------------------------------------------------------------ GB6
REMOTE CONTROLS --------------------------------------------------------------------------------------------------------------------------- GB7
BASIC SET-UP ------------------------------------------------------------------------------------------------------------------------------------- GB8
SYSTEM SET-UP ------------------------------------------------------------------------------------------------------------------------GB9 -GB10
BASIC OPERATION -------------------------------------------------------------------------------------------------------------------- GB10-GB11
CD / DVD / VCD / MP3-CD -----------------------------------------------------------------------------------------------------------------GB12
DISC NOTES -------------------------------------------------------------------------------------------------------------------------------------GB13
TROUBLE SHOOTING GUIDE-------------------------------------------------------------------------------------------------------------- GB14
TECHNICAL SPECIFICATIONS ------------------------------------------------------------------------------------------------------------ GB15
ACCESSORY CHECK LIST
After unpacking for the first time, please check the contents of your DVD player as listed below :
1. Instruction manual
2. Portable DVD player main unit
3. Remote control
4. AC / DC power adaptor
5. AV cable
6. Car power adaptor
7. Rechargeable battery pack for main unit ( Lithium-lon )
IMPORTANT
Since CD circuitry may cause interference to other radio tuners nearby, switch this unit off when not in use or move
it away from the affected radio tuner.
NOTE :
This digital apparatus does not exceed the Class A / Class B ( whichever is applicable ) limits for radio noise emissions
from digital apparatus as set out in the Radio Interference Regulations of Industry Canada. These limits are designed
to provide reasonable protection against harmful interference in a residential installation. This equipment generates
uses and can radiate radio frequency energy and if not installed and used in accordance with the instruction, may
cause harmful interference to radio communications. However, there is no guarantee that interference will not occur in
a particular installation. If this equipment does cause harmful interference to radio or television, which can be
determined by turning the equipment off and the user is encouraged to try to correct the interference by one or more
of the following measures :
• Reorient or relocate the receiving antenna.
• Increase the separation between the equipment and receiver.
• Connect the equipment into an outlet on a circuit different from that to which the receiver is connected.
• Consult the dealer or an experienced radio / TV technician for help.
GB-1
Page 4
SAFETY
WARNING :
TO REDUCE THE RISK OF FIRE OR ELECTRIC SHOCK, DO NOT EXPOSE THIS APPLIANCE TO RAIN OR
MOISTURE. DANGEROUS HIGH VOLTAGES ARE PRESENT INSIDE THE ENCLOSURE. DO NOT OPEN THE
CABINET. REFER SERVICING TO QUALIFIED PERSONNEL ONLY.
“ The apparatus shall not be exposed to dripping or splashing and that no objects filled with liquids, such as vases, shall
be placed on the apparatus. “
LASER :This Digital Video Disc Player employs a Laser System.
To ensure proper use of this product, please read this owner’s manual carefully and retain for future reference.
Should the unit require maintenance, contact the qualified service personnel.
Use of controls, adjustments or the performance of procedures other than those specified may result in
hazardous radiation exposure.
To prevent direct exposure to laser beam, do not try to open the enclosure.
Visible and invisible laser radiation when open and interlocks defeated.
DO NOT STARE INTO BEAM
WARNING :
To reduce the risk of fire or electric shock, do not expose this appliance to rain or moisture.
CAUTION :
Use of controls or adjustments or performance of procedures other than those specified
may result in hazardous radiation exposure.
CAUTION
RISK OF ELECTRIC SHOCK DO NOT OPEN
T
o reduce the risk of electric shock, do not remove cover ( or back ).
No user serviceable parts inside. Refer servicing to qualified service personnel.
The lightning flash witjh arrowhead symbol, with in an equilateral triangle,
is intended to alert user to the presence of uninsulated “ dangerous
voltage “ within the products enclosure that may be of sufficient
magnitude to constitute a risk of electric shock to persons.
The exclamation point within an equilateral triangle is intended to alert
the user to the pesence of important operating and maintenance
( servicing ) instruction in the literature accompanying the appliance.
CAUTION
INVISIBLE LASER RADIATION WHEN OPEN AND INTERLOCK
FAILED OR DEFEATED
AVOID DIRECT EXPOSURE TO LASER BEAM.
CAUTION : PLEASE READ AND OBSERVE ALL WARNINGS AND INSTRUCTIONS GIVEN IN THIS
OWNER’S MANUAL AND THOSE MARKED ON THE UNIT. KEEP THESE INSTRUCTIONS. RETAIN THIS
BOOKLET FOR FUTURE REFERENCE.
This set has been designed and manufactured to assure personal safety. Improper use can result in electric shock or
fire hazard. The safeguards incorporated in this unit will protect you if you observe the following procedures for
installation, use and servicing. This unit does not contain any parts that can be repaired by the user.
GB-2
Page 5

SAFETY
SAFETY
DO NOT REMOVE THE CABINET COVER, OR YOU MAY BE EXPOSED TO DANGEROUS VOLTAGE. REFER
SERVICING TO QUALIFIED SERVICE PERSONNEL ONLY.
1. Read these instructions.
After unpacking this product, read the owner manual
carefully.
2. Keep these instructions.
Retain this booklet for future reference.
3. Heed all warnings.
4. Follow all the operating and other instructions.
5. Do not use this apparatus near water.
6. Clean only with a damp cloth.
7. Do not block any of the ventilation openings. Install in
accordance with the manufacturer’s instructions.
8. Do not install near any heat sources such as radiators,
heat registers, stoves, or other apparatus (including
amplifiers) that produce heat.
9. Protect the power cord from being walked on or pinched
particularly at plugs, convenience receptacles and the
point where they exit from the apparatus.
10. Only use attachments/accessories
specified by the manufacturer.
11. Use only with a cart, stand, tripod, bracket or table
specified by the manufacturer, or sold with the apparatus. When a cart is used, use caution when moving
the cart/apparatus combination to avoid injury from
tip-over.
12. Unplug this apparatus during lightning storms or when
unused for long periods of time.
13. Refer all servicing to qualified service personnel.
Servicing is required when the apparatus has been
damaged in any way, such as when the power-supply
cord or plug is damaged, liquid has been spilled or
objects have fallen into the apparatus, the apparatus
has been exposed to rain or moisture, does not operate
normally, or has been dropped.
14. Disc Tray
Keep your fingers well clear of the disc tray as it is
closing. It may cause serious personal injury.
15. Burden
Do not place a heavy object on, or step on the product.
The object may fall, causing serious personal injury
and serious damage to the product.
16. Disc
Do not use a cracked, deformed, or repaired disc.
These discs are easily broken and may cause serious
personal injury and product malfunction.
17. Damage Requiring Service
Unplug this product from the wall refer servicing to
qualified service personnel under the following conditions:
a) When the power-supply cord or plug is damaged.
b) If liquid has been spilled, or objects have fallen into the
product.
c) If the product has been exposed to rain or water.
d) If the product does not operate normally by following
the operating instructions. Adjust only those controls
that are covered by the operating instructions.Improper
adjustment of other controls may result in damage
and will often require extensive work by a qualified
technician to restore the product to its nor mal operation.
e) If the product has been dropped or damaged in any
way.
f ) When the product exhibits a distinct change in per-
formance - this indicates a need for service.
18. Servicing
Do not attempt to service this product yourself as opening
or removing covers may expose you to dangerous voltage
or other hazards. Refer all servicing to qualified service
personnel.
19. Replacement Parts
When replacement parts are required, be sure the service technician has used replacement parts specified
by the manufacturer or have the same characteristics
as the original part. Unauthorized substitutions may
result in fire, electric shock, or other hazards.
20. Safety Check
Upon completion of any service or repairs to this product, ask the service technician to perform safety
checks to determine that the product is in proper operating condition.
21. AC mains disconnect
The mains plug is used as the disconnect device and it shall
remain readily operable. To be completely disconnected the
power input, the mains plug of the apparatus shall be disconnected from the mains completely.
Since the mains plug is used as disconnect device and
signal lamp of unit would be used as an indication of Power
On, if the signal lamp turn to Off, the apparatus is completely disconnected from the mains.
Notice : See the marking on the bottom of cabinet.
PLA YER ZONES
For the purpose of distribution of DVD Discs, the workd has been separated into 6 zones. The zone your player is
intended for is indicated on the “ Zone Label “. This should be the same as the label on discs available in your region.
If you have any difficulties in playing a disc, make sure that the disc is for the same zone as your player.
INSTALLATION
Install your DVD player on a stable flat surface. The unit should be situated with enough space around it so that proper
heat ventilation is assured. Allow 20cm clearance from the rear and the top of the unit, and 10 cm from each side.
Caution : Do not install this equipment in confined space with poor ventilation.
This product incorporates copyright protection technology that is protected by U.S. patents and other intellectual property
rights. Use of this copyright protection technology must be authorized by Macrovision, and is intended for home and other
limited viewing uses only unless otherwise authorized by Macrovision. Reverse engineering or disassembly is prohibited.
Apparatus Claims of U.S. Patent Nos. 4,631,603, 4,577,216,
4,819,098 ; 4,907,093 and 6,516,132 licensed for limited viewing uses only.
Manufactured under license from Dolby Laboratories. “Dolby” and
the double-D symbol are trademarks of Dolby Laboratories.
Consumers should note that not all high definition television sets
GB-3
Page 6
CONNECTIONS
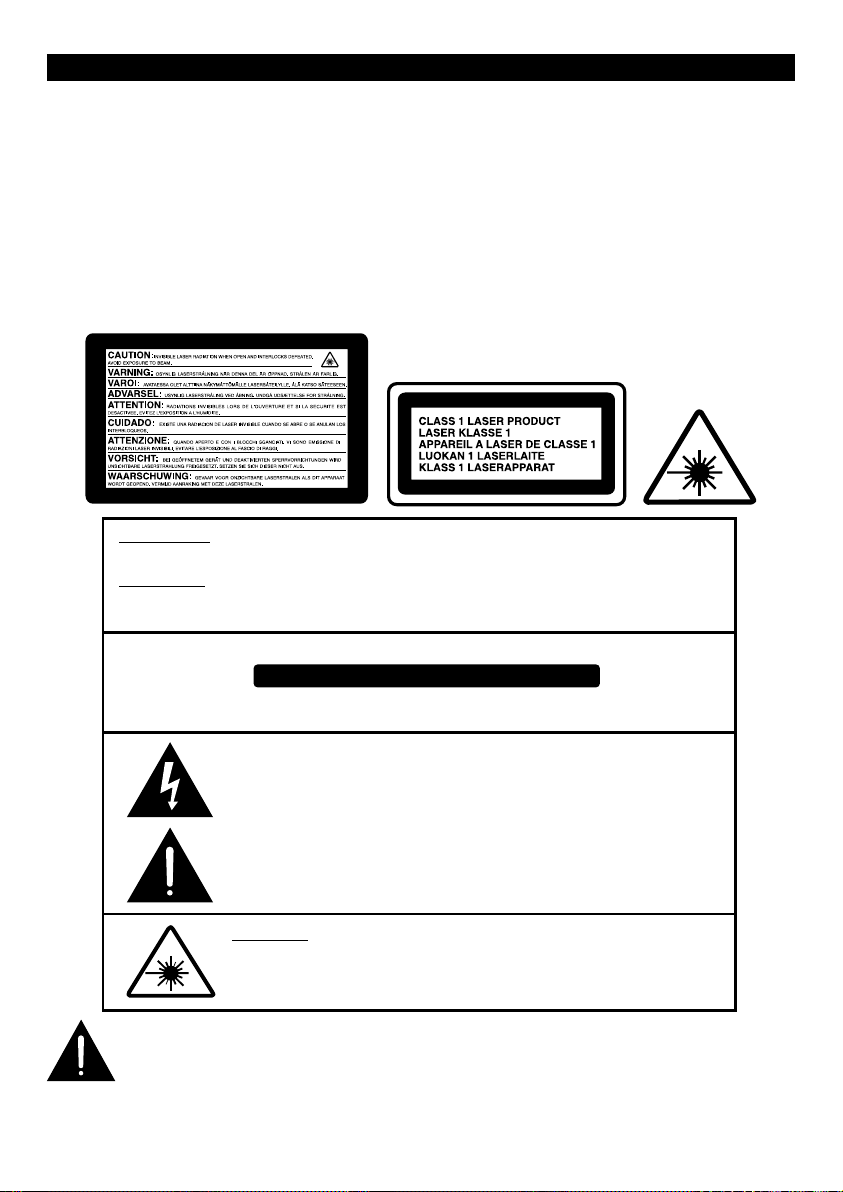
1. Connecting to TV
Connect the Audio ( Red / White ) and Video ( Yellow ) cable to Audio Out jacks on your DVD Player, and to the
corresponding Audio Input jacks on your TV.
TV
VOLUME A/V
Video out
( Yellow )
OPTICALOUT
IN
OUT
DC IN 12V
AUDIO
VIDEOS-VIDEO
Audio out
( Black )
LR
AudioVideo
A /V Cable
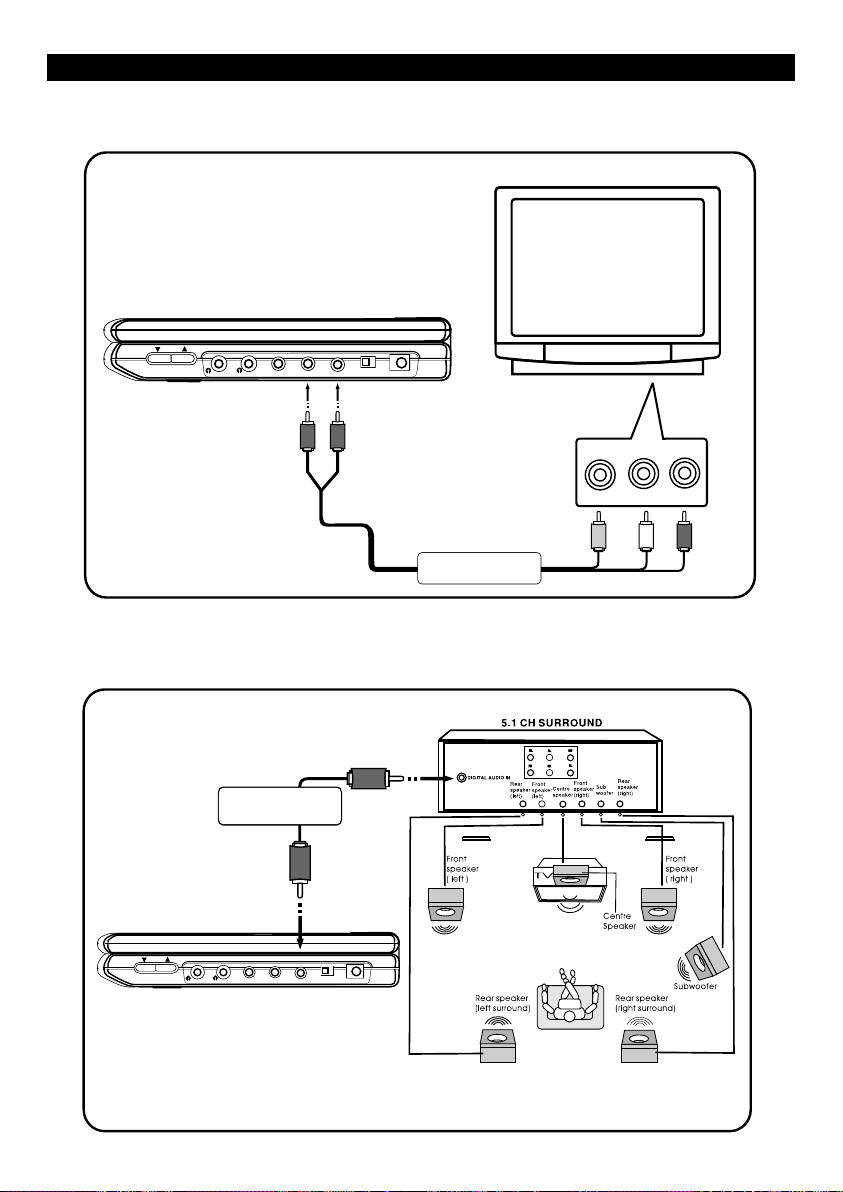
2. Connecting to an Amplifier with Dolby Digital Decoder
The DVD player can be connected to an AV amplifier with Dolby Digital decoder via the Digital Optical Cable
( optional extra ).
Optical Cable
(Optional Extra)
Optical Out
VOLUME A/V
OPTICALOUT
AUDIO
VIDEOS-VIDEO
IN
OUT
DC IN 12V
( CABLES OPTIONAL EXTRA )
GB-4
Page 7

CONNECTIONS
3. Connecting Using S-Video Cable ( optional extra )
TV
VOLUME A/V
OPTICALOUT
IN
OUT
DC IN 12V
AUDIO
VIDEOS-VIDEO
S-Video Cable
()Optional Extra
4. Connection for in car use
Use the Car Power Adaptor for power when using the DVD player in a car.
1.Plug the adaptor into the car cigarette lighter.
2. Plug the pin into the DC jack on the unit.
S-Video
LR
AudioVideo
OPTICALOUT
A/V
IN
OUT
DC IN 12V
AUDIO
VIDEOS-VIDEO
To Car Power Adaptor
To DC IN Jack
GB-5
Page 8

MAIN UNIT
7
4
5
3
1
6
8
9
2
20
1. Play / – Turn the player on ; start disc playback; pause disc playback in playing mode.
2. To open the disc door.
3. STOP / – Stops disc playback; hold for over 2 seconds to enter stand-by mode.
4.
– To skip to the next track, and next chapter ( only while playing )
– To skip to the beginning / previous track, and the beginning / previous chapter ( only while playing )
5.
6. Menu – In DVD mode, press for Menu setup for DVD Title ( if available ).
7. Reverse – To reverse the screen display up side down.
8. Navigation Keys – Select Menu items
9. OK – Press to confirm the selected function.
10. Volume
11. Phone Jack – To listen to stereo sound with headphone ( not included ).
12. S-V ideo – Connects to S-Video input on your TV.
13. Video
Video out – Connects to the Video input on your TV. ( A/V Switch set at “ Out “ )
Vide o in – Connects to the Video out of external video source. ( A/V Switch set at “ In “ )
14. Audio
Audio Out – Connects to the Audio input on your TV/External amplifier system. ( A/V Switch set at “ Out “ )
Audio In – Connects to the Line out of external audio source. ( A/V Switch set at “ In “ )
15. A/V Switch – Selects to analog Audio and Video In / Out function.
16. DC Power In – Connects to DC power source in
17. IR – Infrared sensor for remote control.
18. Power LED – Blink when low battery.
19. Charge LED – Blink when charging.
20. Speakers
21. Top Cabinet OPEN button
/ – Adjust volume up / down.
GB-6
21 17 19
18
16
15
14
13
12
11
10
Page 9

REMOTE CONTROL
a
1. Power – Turns the DVD player ON or OFF.
2. Setup – Accesses the DVD player setup menu.
3. Menu – In DVD mode, press for menu setup for DVD title
4. Title – Press to go to the title menu at DVD mode.
5. Subtitle – When a DVD is playing, press to select a
6. Angle – Press to change angle selection in DVD mode
7. Audio – Press to select various audio languages
8. Repeat – Press to repeat a Chapter, Track Title,
9. A-B – Press to mark a segment to repeat between A and B.
10. Zoom – Press to select the zoom ratio.
11. Volume +/- – To adjust the volume.
12. Mute – To mute or unmade all audio outputs.
13.
14.
15. Skip - – Skip to previous chapter, track, title.
16.
17. Navigation Keys – Use the arrow buttons to move through
18.
19. Display – Press for detailed information on the disc
20.
21. II Pause – Press to pause playback.
22. Slow – Press to start slow forward or slow rewind.
23. Goto – Press to select the desired title, chapter or time
24. 0-9 – Press to input information such as chapter
( if available ).
subtitle language or to turn subtitle off.
( if available ).
( if available ).
or All content.
Reverse – Press to search backward.
Forward – Press to search forward.
Skip + – Skip to next chapter, track, title.
the on-screen menu and info display.
/ OK – Press to select the highlighted items.
Press to start playback.
playing.
Stop – Press to stop playback.
search.
numbers, track number, or to make selections
on some menu screens.
13
17
15
19
20
24
4
3
/
1
2
5
6
8
9
11
7
12
10
14
17
18
16
21
22
23
GB-7
Page 10

BASIC SET-UP
Preparing the Remote Control
1. Remove the plastic protecting sheet before use.
2. Operation angle : about + / - 30 degree in each the direction of the front of the IR sensor.
3. Plug the AC / DC adapter into a household mains power outlet.
Usage of Adapter
1. The player is supplied with an AC/DC adapter.
2. Connect the AC/DC adapter to the DC power in jack at the side of the DVD player.
3. Plug the AC/DC adapter into a household mains power outlet.
VOLUME A/V
OPTICALOUT
IN
OUT
DCIN 12V
AUDIO
VIDEOS-VIDEO
To AC mains
power source
AC / DC Adapter and Player
Install / Detach the Battery Pack
1. Follow the illustrations to install the battery pack.
2. Press the release button at the right side of battery pack, follow the direction to uninstall the battery pack from the
unit.
Battery Pack
move battery
Battery Pack
Main Unit
Install
move battery
Battery Pack
Battery Pack
Main Unit
release thebutton
Uninstall
Battery Pack Install / Uninstall
Using the Rechargeable Li-ion Battery Pack
1. Connect the AC/DC adapter lead to the unit and plug the AC adapter into a mains socket.
2. Switch off the unit by pressing and holding the STOP button for 2 seconds.
3. The battery will start to charging automatically, at this moment, the charging LED will blink.
4. When the charge LED stops blinking, charging is completed.
Notes :
1. Charge the battery pack before using it for the first time. Charge time is normally between 3~4 hours. Battery pack
should be fully charged before use.
2. Charge only with the supplied AC/DC adapter.
3. Do not charge for more than 4 hours as it could reduce service life.
4. When playing the unit in conjunction with the battery pack and the green power LED blinks, this indicates that battery
power is low and the battery should be recharged.
5. When the battery pack is being charged, the CHARGE LED will blink, when charging is completed, the LED will be
constantly illuminated.
6. When the unit is simultaneously connected to the battery pack and AC adapter, the unit will automatically select the
AC adapter as its power source.
7. Remove the battery pack to avoid leakage if you do not use your set for more than one month.
Playback Preparation / Quick Operation Guide
1. Connecting to power ( AC/DC adapter, external DC power source through Cigarette connector cable or with attached
battery pack ).
2. Lift the main cover up ( display screen ), and open the disc cover by pressing the OPEN knob.
3. Load the disc and close the door lid.
4. Press the “ PLAY ‘ key to switch on the power.
5. Adjust the volume to your desired level.
GB-8
Page 11

TV Display
Angle Mark
OSD Lang
SPDIF Output
Captions
Screen Saver
Last Memory
LB
On
Eng
On
Off
General Set-up Page
Go To General Setup Page
Dual Mono
Dynamic
Dolby Digital Set-up Page
SYSTEM SET-UP
Access the GENERAL SET-UP by pressing the “ SET-UP “ key on the remote control.
1. TV Display
NORMAL / PS – If you want the movie to fill the entire screen of your
TV.
NORMAL / LB – If you want to see movies in their original aspect ratio.
The movie might appear with black bars at the top and
bottom of the screen.
Wide – If your DVD player is connected to a widescreen TV.
2. Angle Mark
The function only works for disc having scenes recorded at different angles.
ON/ OFF – With this switched on you will be notified if alternative viewing angles are available.
3. OSD Language
The languages menu enables you to set preferred language options for the DVD player’s menu system, disc menus,
the dialog ( audio ) of titles, and the subtitles.
4. SPDIF Output
This item is used to set the format of digital audio. ‘ SPDIF OFF ‘ turns off the digital audio ; ‘ SPDIF / RAW ‘ outputs
the original. For example, if the disc being played is Dolby Digital, then the digital audio output is also Dolby Digital.
Select ‘ SPDIF / PCM ‘ when you connect with a 2 channel digital stereo amplifier.
5. Captions
Activate the captions feature by selecting ON, and deactivate this feature by selecting OFF.
6. Screen Saver
When activated the screen saver automatically works if there has been no operation for a period of time.
7. Last Memory
Last memory allows playback at the point where the disc was stopped.
Access SPEAKER SET-UP page by pressing the “ SET-UP “ and “ “ keys on
the remote control.
1.Downmix
Speaker Set-up Page
Downmix
Select LT/RT in downmix, then the player will output mixed audio in a way
prescribed by Dolby. Select STEREO, then the player will output a stereo
sound. Select OFF, no audio output from the player.
Access DOLBY DIGITAL SET-UP page by pressing the “ SET-UP “ and “ “
keys on the remote control.
1. Dual Mono
The function is used to set the output mode of channel L/R, stereo and mixed
sound.
2.Dynamic
This feature compresses the dynamic range of a disc’s soundtrack.
GB-9
Page 12

SYSTEM SET-UP
Sharpness
Brightness
Contrast
LOW
00
00
Video Set-up Page
Access VIDEO SET-UP page by pressing the “ SET-UP “ and “ “ keys on the
remote control.
1. Sharpness
Adjust the sharpness level of the screen display.
2. Brightness
Use to increase or decrease the screen brightness.
3. Contrast
Adjust the contrast level of the screen display.
Access PREFERENCE SET-UP page by pressing the “ SET-UP “ and “
keys on the remote control.
1.TV Type
Select the TV Video output format to match your TV.
2.Audio
You can set your language preference for movies you play in your DVD
player – the language in which you’ll hear the dialogue you’re playing a movie.
3.Subtitle
“
Preference Set-up Page
TV Type
Audio
Subtitle
Disc menu
Parental
Password
Default
NTSC
ENG
ENG
ENG
You can set your language preference for the subtitles you see on the screen
while playing a disc.
4.Disc Menu
You can set your language preference for disc menus, a disc’s menu is separated from the DVD player menu.
5.Parental
You can set up ratings limits and lock your player in order to control the type of content people watch on your DVD
player. Depending on the disc, you can replace or lock out violent scenes, or lock out playback of the disc altogether.
Access parental control on the sub-menu by pressing direction keys on the remote control, and then press the OK
button, An interactive menu will appear.
6.Password
You can enter the password to change the parental control level. You can change the defaulted password “ 6789 “ to
your desired password if the player is locked.
7.Default
Reset all the settings.
BASIC OPERATION
Loading and removing a disc
1. Hold the display and operating section securely and lift the display.
2. Press the main unit’s OPEN button to open the door lid.
3. Press the disc down on to the centre spindle until a click is heard.
4. Push the lid to close.
Power on and Start to Playback
1. Press the PLAY button, the set will switch on automatically and start to play the disc.
2. For some discs, a menu appears. For video CDs, playing the disc according to the instruction on the disc’s menu
screens is called PBC ( playback control ) playback.
3. For DVD with menu screens or video CDs with playback control ( PBC ), a menu screen appears.
4. DVD – Use the direction keys to select the items, then press the OK button.
5. Video CD – Select by pressing the number buttons, It is also possible to play a disc without displaying the menu
6. Once you have inserted a disc in the player, some discs will automatically display the main menu on the screen, To
play, make sure the playing movie menu selection is selected and press the PLAY button.
You can also use the numeric buttons on the remote control to select the menu items.
screen.
GB-10
Page 13

BASIC OPERATION
Play /Pause ( ) – Press PLAY / PAUSE button on the main unit to power on and start playing the disc.
OK – Confirm selections on a menu screen.
Play/OK (Remote Control)
Pause (Remote Control) II – Pause playback of disc.
Stop (
Skip Next
Skip Previous
Reverse – Press this button to reverse the screen display up side down.
Menu – Display the root menu that is stored on the DVD disc.
Direction keys – In menu mode, use these as cursor buttons to select highlighted items.
( Up
Set-up (Remote Control) – Display the general, audio, video step menu for the player.
Title (Remote Control) – Display the title menu that is stored in DVD disc.
Subtitle (Remote Control) – Press the SUBTITLE button to select your desired language.
Angle (Remote Control) – Press the ANGLE button to view angle on multi-angle DVD disc.
Audio (Remote Control) – Changing of the audio soundtrack on multi-audio soundtrack DVD disc.
Repeat (Remote Control) – Repeats the title, chapter, track that is playing.
A-B (Remote Control) – Lets you define a specific segment on the disc that you want to repeat.
Zoom (Remote Control) – Allows the picture to be increased or decreased in size.
Volume Up / Down – Press VOLUME +/- button to increase or decrease the volume level.
Volume +/- (Remote Control) – Press VOLUME +/- button to increase or decrease the volume level.
Mute (Remote Control) – To mute / unmake the speakers and headphones outputs.
F. Search (Remote Control)
B.Search (Remote Control)
Display (Remote Control) – Press the DISPLAY button during playback to display the contents of the current disc
Goto (Remote Control) – Press GOTO button, the screen will display the title, chapter or time, then you can use
Slow (Remote Control) – Repeatedly pressing the button will slow play the disc at various speeds both back
0~9 (Remote Control) – Press to input information such as chapter number, track numbers, or to make
) – Press STOP button on the main unit and hold for 2 seconds to stand-by mode of the unit.
/ Down / Left / Right )
– Press the PLAY / PAUSE button to pause and resume normal playback.
/OK – Press to start or resume playback a disc.
– Confirm selections on a menu screen.
– Each time you press the PAUSE button the picture advance one frame.
– Stop playing a disc.
– To resume playback at the position where the disc was stopped, press the PLAY button.
– Press to skip to next track.
– While you are playing a disc, press the
next chapter or track.
– Press to skip to the previous track.
– While you are playing a disc, press the
track and automatically start playing it.
– Press direction buttons or numeric buttons to select the title of disc option you wish
to play.
– Press the PLAY button to start playback.
– You can set your language preference for the subitile you see on the screen while
playing a disc.
– This function is only available if a disc is a multi-angle recorded disc.
– To turn off the repeat feature, press this button repeatedly until Repeat off appears.
– Press A-B button at the start of the required passage, then press A-B button again at
the end of the passage.
– To revert to normal playing, press A-B button again.
– While in zoom mode use direction keys to move around to different positions on the
picture.
– When mute is activated, press the VOLUME keys to release the mute function.
– When mute is activated, press the VOLUME keys to release the mute function.
– When mute is activated, press the VOLUME keys to release the mute function.
– The mute feature will also be deactivated when the unit is powered on.
– Press during play. Each time the button is pressed, the speed of rapid forward
changes according to the disc.
– Press during play. Each time the button is pressed, the speed of rapid reverse
changes according to the disc.
on the screen.
number buttons to select any one of them.
wards and forwards ; this is indicated on the screen.
selections on some menu screens.
GB-11
button to move to the beginning of the
button to move the previous chapter of
Page 14

CD / DVD / VCD / MP3-CD
Adjusting the TV system
Before viewing the Video Disc DVD or VCD, ensure that the set is switched to corresponding
PAL or NTSC system of your TV set. If your TV set is a Multi-System TV, we suggest that it is set at AUTO mode.
Loading a disc
1. Press OPEN, the door lid will open.
2. Load a disc with the label side facing up.
3. Close the door lid, the system will play the disc from track 1 automatically.
Playing a DVD disc
1. Press to start playback in disc stop mode.
2. To interrupt playback, press again during disc playback.
3. Skip forward, or skip backward a chapter by pressing
or previous chapter.
4. Press / to search a passage fast forward or reverse.
5. During fast forward or backward, press
6. In playback mode, press GOTO and then enter the desired TITLE or CHAPTER number by number key, finally press
OK key to confirm your selection.
7. Pressing the SLOW key in playback mode will enable you to watch your desired disc in slow motion. Press the
SLOW key repeatedly for different speeds.
8. Press STOP
resume playback from the point where it was stopped. If STOP
go to stop mode. When is pressed the disc will start from the beginning of the disc.
once, the player will go to Resume Stop mode. In this condition press the key and the film will
the disc will resume normal playback.
Playing a VCD disc
1. Press to start playback in disc stop mode.
2. To interrupt playback, press again during disc playback.
3. Skip forward, or skip backward a chapter by pressing
previous chapter.
4. During fast forward or backward, press
5. Pressing the SLOW key in playback mode will enable you to watch your desired disc in slow motion. Press the
SLOW key repeatedly for different speeds. “
6. Press STOP
Notes :
- In “ PBC ON “ mode, you could use number keys to select the desired chapter for playback directly.
- To toggle “ PBC ON “ or “ PBC OFF “ , press TITLE button on the remote control.
key to stop playback.
the disc will resume normal playback.
Playing a CD, CD-G disc
1. Press to start playback in disc stop mode.
2. To interrupt playback, press again during disc playback.
3. To stop playback, press STOP.
Selecting a desired track / passage
- Skip forward, or Skip Backward a track by pressing / , each press will jump to the beginning of the next or
previous chapter. Or use number key, and press OK key to select a desired track directly.
- Press / to search a passage fast Forward or Reverse. ( not support for CD-G )
- During fast forward or backward, press
Notes :
- If a CD-G disc is played, some pictures from the disc will be displayed on the TV as a Slide Show for watching.
Playing an MP3
- Load an MP-3 CD format music disc.
- The system will play the MP-3 disc from track 1 of Album 1 automatically.
- On the screen, the disc menu is displayed.
Selecting a desired album and a desired track
1. In stop mode, press arrow key UP or DOWN to set desired Album and press OK key to confirm the selection and
start to playback.
2. Press
3. Press
4. To stop playback, press STOP
For JPEG Picture CD playback ( up to 5Mb pixels )
After a JPEG picture file is detected by the system, press arrow key UP / DOWN to set desired Album and press OK
key to confirm the selection and start to playback.
1. Press
2. Press arrow key UP
Notes :
- To ensure good system performance, wait until the disc tray completely reads the disc before proceeding.
- For MP-3 CD, the disc reading time may exceed 10 seconds due to the large number of songs compiled into one disc.
/ repeatedly to select a desired track from the current Album.
/ to search a passage fast forward or reverse.
/ repeatedly to select a desired track from the current Album.
,DOWN , LEFT or RIGHT to rotate the picture from the current position.
the disc will resume normal playback.
.
/ , each press will jump to the beginning of the next
is pressed again in Resume mode, the player will
/ , each press will jump to the beginning of the next or
GB-12
Page 15

DISC NOTES
Disc formats supported by this player
• DVD-VIDEO
• COMPACT DISC DIGITAL AUDIO
• CD - R/RW
• MP3
• VCD 2.0
Discs which cannot be played with this player
• DVD-ROM
• DVD-RAM
• CDV
Do not touch
the underside
of the disc
Do not bend
Wipe the disc from center
toward the outside edge
Handling and Cleaning
• Dirt, dust, scratches and warping disc will cause
misoperation.
• Do not place stickers or make scratches on discs.
• Do not warp discs.
• A disc should always be kept in its case when not in use
to prevent from damaging.
• Do not place discs in the following places :
1. Direct sunlight
2. Dirty, dusty and damp areas
3. Near car heaters
4. On the seats or dashboard
Disc Cleaning
Use a dry soft cloth to wipe the surface. If the disc
is quite dirty, use a soft cloth slightly moistened
with isopropyl alcohol. Never use solvents such as
benzine, thinner or conventional record cleaners as
they may mar the surface of the disc.
Label Side Up
Preparing New Discs with Rough Spots
A new disc many have rough edges on its inside and
outside edges. If a disc with rough edges is used, the
proper setting will not be performed and the player will not
play the disc. Therefore, remove the rough edges in
advance by using a ball point pen or pencil as shown on
the right.
To remove the rough edges, press the side of the pen or
pencil against the inside and outside edges of the disc.
TROUBLE SHOOTING GUIDE
Rough spots on
outside edge
Ball point pen
or pencil
GB-13
Rough spots
on inside edge
Page 16

If it appears that your DVD-Video player is faulty, first consult this checklist. It may be that something simple has
been overlooked.
Under no circumstances should you try to repair yourself. Only qualified service personnel can remove the
cover or service this player.
NO POWER
• Check if power plug is properly connected.
• Check if there is power at the AC outlet by plugging in another appliance.
NO PICTURE ( When connected to TV )
• Check if the TV is connected and switched on.
• Select the correct AV input on the TV.
• Check the video connection.
• Check channel selector is set to AV on the TV ( See your TV manual for instructions ).
DISTORTED PICTURE
• Check the disc for fingerprints and clean with soft cloth, wiping from centre to edge.
• Sometimes a small amount of picture distortion may appear. This is not a malfunction.
COMPLETELY DISTORTED PICTURE ( When Connected to TV )
• The disc is not formatted to the TV-set used ( PAL / NTSC ).
NO COLOR IN PICTURE ( When Connected to TV )
• The disc is not formatted to the TV-set used ( PAL / NTSC ).
• Ensure DVD Player is not connected through VCR.
DISC CAN’T BE PLAYED
• Ensure the disc is label side up.
• Clean the disc.
• Check if the disc is defective by trying another disc.
NO SOUND
• Check audio connections.
• Make sure the sound setup of DVD disc is correct.
NO RETURN TO START-UP SCREEN WHEN DISC IS REMOVED
• Check to see if the program requires another disc to be loaded.
• Reset by unplugging the player from the power supply, then connect the power supply again.
THE PLAYER DOES NOT RESPOND TO THE REMOTE CONTROL
• Aim the remote control directly at the sensor on the front of the player.
• Avoid all obstacles which may interfere with the signal path.
• Inspect or replace the batteries.
NO AUDIO AT DIGITAL OUTPUT
• Check the digital connections.
• Check the Digital Out menu to make sure that the digital output is correctly set.
• Check if the audio format of the selected audio language matches your receiver capabilities.
BUTTONS DO NOT WORK
• Unplug the player from power outlet and reconnect after a few seconds.
YOU HAVE FORGOTTEN THE PASSWORD
• The defaulted password is ” 6789 “ .
GB-14
Page 17

TECHNICAL SPECIFICATIONS
Power supply AC adapter : AC 230V ~ 50Hz
Power Consumption 25W
Screen Display 7” / 16:9 TFT panel
Discs Played DVD-Video, CD-DA, CD-R/RW, MP3, JPEG, VCD 2.0
Video Formats PAL / NTSC
Audio out Analog audio out : 1V @ 10K ohm load
Frequency Response 20Hz ~ 20KHz +/- 3dB
Video out Compositive video 1.0Vp-p 75 ohm
Input Analog audio / Compositive video
DC source : DC 12V / 2000mA ( center positive )
Battery Rechargable Li-ion battery : 7.4V / 4000mA
Dimension Main unit : ( 202 x 153 x 27.3 ) mm
Weight ( without battery ) Approx. 730gm
Recharging time : approx. 3 hours
Playback time : approx. 150 mins ( TFT = on )
approx. 240 mins ( TFT = off )
Battery pack : ( 197 x 82 x 27 ) mm
Design and specifications are subject to change without notice
GB-15
Page 18

Hitachi Home & Life Solutions, Inc.
Hitachi Atago Building,
No.15-12, Nishi Shimbashi, 2-chome,
Minato-ku, Tokyo, 105-8410 Japan
Tel: 03 3502 2111
HITACHI EUROPE L TD.
Digital Media Group
Whitebrook Park
Lower Cookham Road
Maidenhead
Berkshire SL6 8YA
UNITED KINGDOM
Tel: 01628 643000
Fax: 01628 643400
Email: consumer-service@hitachi-eu.com
HITACHI EUROPE GmbH
Munich Office
Dornacher Strasse 3
D-85622 Feldkirchen bei München
GERMANY
Tel: 089-991 80-0
Fax: 089 - 991 80 -224
Hotline: 0180 - 551 25 51 (12ct/min.)
Email: HSE-DUS.Service@Hitachi-eu.com
HIT ACHI EUROPE SRL
Via T. Gulli n.39
20147 MILAN
ITALY
Tel: 02 487861
Fax: 02 48786381
Email: csgswe@hitachi-eu.com
HITACHI EUROPE S.A.S
Lyon Office
B.P. 45, 69671 Bron Cedex
FRANCE
Tel: 04 72 14 29 70
Fax: 04 72 14 29 99
Email: france.consommateur@hitachi-eu.com
HITACHI EUROPE S.A.
364, Kifissias Ave. & 1, Delfon Str.
152 33 Chalandri
Athens
GREECE
Tel: 1-6837200
Fax: 1-6835694
Email: service.hellas@hitachi-eu.com
HITACHI EUROPE S.A.
Gran Via Carlos III, 86 Planta 5
Edificios Trade-Torre Este
08028 Barcelona
SPAIN
Tel: 93 409 2550
Fax: 93 491 3513
Email: rplan@hitachi-eu.com
a
HIT ACHI EUROPE AB
Box 77
S-164 94 KISTA
SWEDEN
Tel: 08 562 711 00
Fax: 08 562 711 11
Servizio Clienti
Tel. 02 38073415
Email: customerservice.italy@hitachi-eu.com
HITACHI EUROPE LTD.
Norwegian Branch Office
Strandveien 18
1366 Dysaker
NORWAY
Tel: 02205 9060
Fax: 02205 9061
Email csgnor@hitachi-eu.com
HITACHI EUROPE L TD.
Benelux Branche Office
Bergensesteenweg 421
1600 Sint-Pieters-Leeuw
BELGIUM
TEL : 0032/2 363 99 01
FAX: 0032/2 363 99 00
Email : info@hitachi.be
www.hitachi-consumer-eu.com
 Loading...