

Page 1
Instruction and safety manual
Manuel d'instructions et de sécurité
Instrucciones y manual de seguridad
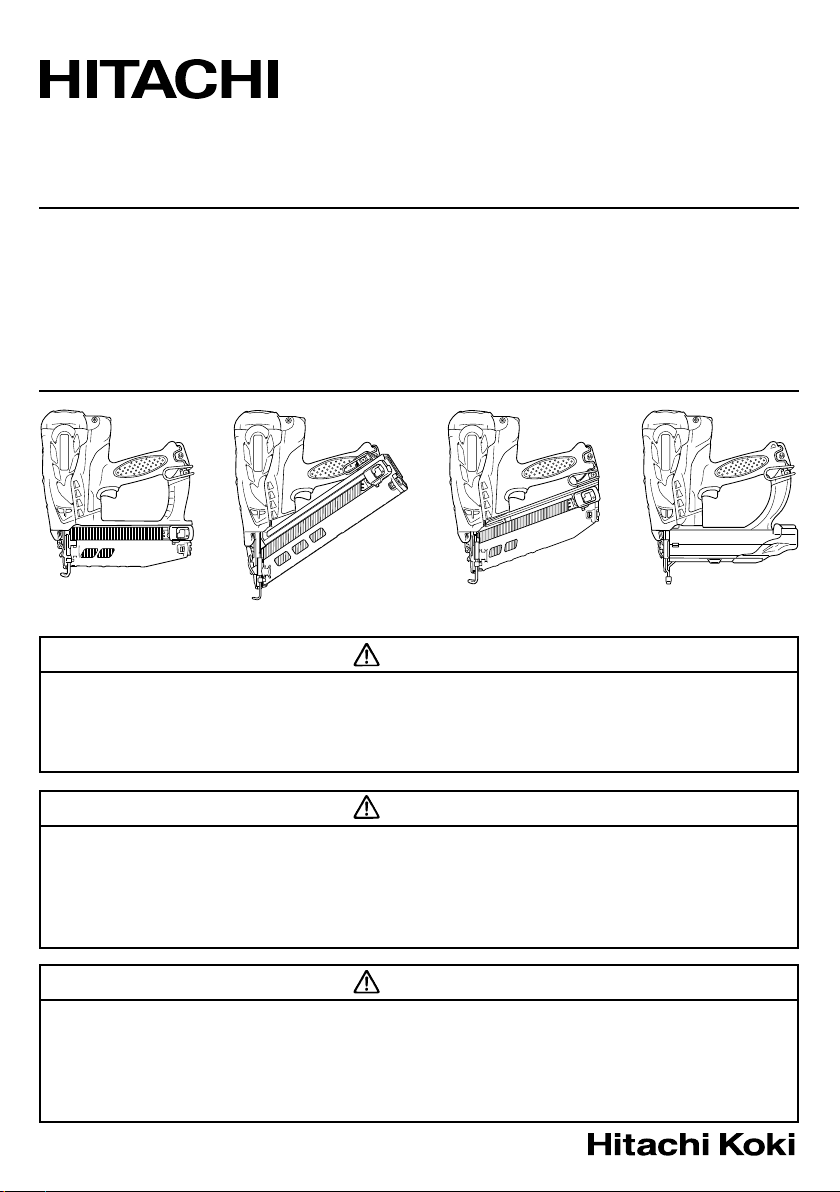
Gas Finish Nailer
NT 65GS • NT 65GA • NT 65GB
Model
Modèle
Modelo
NT 50GS
NT65GS NT65GA NT65GB NT50GS
Cloueur gaz de finition
Clavadora a gas de acabados
Gas Brad Nailer
Cloueuse à essence avec
Clavadora a gas de brads
DANGER
Improper use of this Nailer can result in death or serious injury!
This Manual contains important information about product safety.
Read and understand this Manual before operating the Nailer.
Never allow anyone who has not reviewed this manual.
clous à tête perdue
DANGER
Une utilisation incorrecte et sans respecter la sécurité de ce cloueur risque d’entraîner
la mort ou des blessures graves !
Ce manuel renferme des instructions importantes sur la sécurité de l’outil.
Lire et bien assimiler ce manuel avant d’utiliser le cloueur.
Ne jamais laisser les personnes n'ayant pas étutdié le manuel utiliser l'outil.
PELIGRO
¡La utilización inadecuada e insegura de este clavador puede resultar en lesiones serias
o en la muerte!
Este manual contiene información importante sobre la seguridad del producto.
Lea y entienda este manual antes de utilizar el clavador.
No deje manejar esta herramienta a nadie que no haya leído este manual.
Page 2
English
CONTENTS
Page
IMPORTANT INFORMATION ......................... 4
DEFINITIONS OF SIGNAL WORDS ............... 4
EXPLANATION OF THE NAILING ACTION OF
THE HITACHI NAILER ............................... 4
SAFETY
IMPORTANT SAFETY INSTRUCTIONS FOR
USING NAILERS ....................................... 5
IMPORTANT SAFETY INSTRUCTIONS FOR
FUEL CELL.................................................9
IMPORTANT SAFETY INSTRUCTIONS FOR
BATTERY CHARGER .............................. 10
IMPORTANT SAFETY INSTRUCTIONS FOR
USE OF THE BATTERY AND BATTERY
CHARGER ................................................ 11
PRECAUTIONS WHEN USING THE BATTERY
CHARGER WITH A DC 12V IN-CAR
POWER SOURCE .....................................11
DISPOSAL OF THE EXHAUSTED BATTERY 12
EMPLOYER’S RESPONSIBILITIES ............... 12
OPERATION
NAME OF PARTS .......................................... 13
SPECIFICATIONS .......................................... 15
NAIL SELECTION .......................................... 16
ACCESSORIES .............................................. 18
Page
STANDARD ACCESSORIES ..................... 18
OPTIONAL ACCESSORIES ....................... 18
APPLICATIONS ............................................. 18
CHARGING METHOD ................................... 18
BEFORE OPERATION ................................... 20
WORKING ENVIRONMENT ......................21
COLD WEATHER CARE ............................ 21
PREPARING THE FUEL CELL ................... 21
PREPARING THE BATTERY ...................... 22
TESTING THE NAILER .............................. 22
LOADING NAILS ....................................... 24
NAILER OPERATION .................................... 26
METHODS OF OPERATION ...................... 27
ADJUSTING THE NAILING DEPTH .......... 28
USING THE HOOK .................................... 28
USING THE NOSE CAP ............................ 29
CLEARING A JAM .....................................29
MAINTENANCE
MAINTENANCE AND INSPECTION ............. 31
SERVICE AND REPAIRS ............................... 32
PARTS LIST ................................................. 104
Français
TABLE DE MATIERES
Page
INFORMATION IMPORTANTE .....................35
DEFINITION DES MOTS DE
SIGNALISATION ..................................... 35
EXPLICATION DE L’ACTION DE CLOUAGE
DU CLOUEUR HITACHI .......................... 35
SECURITE
CONSIGNES DE SECURITE IMPORTANTES
POUR L’UTILISATION DU CLOUEUR .... 36
CONSIGNES DE SÉCURITÉ IMPORTANTES
À L’ÉGARD DE LA PILE À
COMBUSTIBLE ....................................... 41
CONSIGNES DE SÉCURITÉ IMPORTANTES
POUR LE CHARGEUR DE BATTERIE.....42
CONSIGNES DE SÉCURITÉ IMPORTANTES
POUR L’UTILISATION DE LA BATTERIE
ET DU CHARGEUR DE BATTERIE ......... 43
PRÉCAUTIONS À RESPECTER LORS DE
L’UTILISATION DU CHARGEUR DE
BATTERIE AVEC UNE SOURCE
D’ALIMENTATION 12 V CC
EMBARQUÉE .......................................... 44
MISE AU REBUT D’UNE BATTERIE USÉE .. 44
RESPONSABILITES DE L’EMPLOYEUR ...... 44
UTILISATION
NOM DES PIÈCES .........................................46
SPECIFICATIONS .......................................... 48
SELECTION DES CLOUS .............................. 49
Page
ACCESSOIRES .......................................... 51
ACCESSOIRES STANDARD ..................... 51
ACCESSOIRES EN OPTION ...................... 51
APPLICATIONS ............................................. 51
MÉTHODE DE RECHARGE ........................... 51
AVANT L’UTILISATION ................................ 54
ENVIRONNEMENT DE TRAVAIL .............. 54
ENTRETIEN PAR TEMPS FROID .............. 54
PRÉPARATION DE LA PILE À
COMBUSTIBLE ................................... 54
PRÉPARATION DE LA PILE ...................... 55
ESSAI DU CLOUEUR ................................ 55
CHARGEMENT DES CLOUS .................... 58
UTILISATION DU CLOUEUR ........................60
MÉTHODES D’UTILISATION ....................61
RÉGLAGE DE LA PROFONDEUR DE
CLOUAGE ............................................ 61
EMPLOI DU CROCHET .............................. 62
UTILISATION DU CAPUCHON DE BEC ..... 63
ÉLIMINATION D’UN BLOCAGE ............... 63
ENTRETIEN
ENTRETIEN ET INSPECTION ....................... 65
ENTRETIEN ET REPARATIONS ................... 67
LISTE DES PIECES ...................................... 104
Page 3

Español
Página
INFORMACIÓN IMPORTANTE ..................... 70
DEFINICIÓN DE LAS PALABRAS CLAVE .... 70
EXPLICACIÓN LA ACCIÓN DE CLAVADO
DEL CLAVADOR HITACHI ...................... 70
SEGURIDAD
INSTRUCCIONES IMPORTANTES DE
SEGURIDAD PARA LA UTILIZACIÓN
DEL CLAVADOR......................................71
INTRUCCIONES DE SEGURIDAD
IMPORTANTES PARA LA CÉLULA DE
COMBUSTIBLE ....................................... 75
INSTRUCCIONES IMPORTANTES DE
SEGURIDAD PARA EL CARGADOR
DE BATERÍAS..........................................76
INSTRUCCIONES IMPORTANTES DE
SEGURIDAD PARA LA BATERÍA Y EL
CARGADOR DE BATERÍAS .................... 77
PRECAUCIONES A LA HORA DE UTILIZAR
EL CARGADOR DE LA BATERÍA CON
UNA FUENTE ELÉCTRICA DE COCHE
DE 12V CA ............................................... 78
ELIMINACIÓN DE LAS BATERÍAS
AGOTADAS.............................................78
RESPONSABILIDADES DEL EMPRESARIO ....
OPERACIÓN
NOMBRE DE LAS PIEZAS ............................ 80
ESPECIFICACIONES ..................................... 82
SELECCIÓN DE CLAVOS .............................. 83
ÍNDICE
79
ACCESORIOS ................................................ 85
Página
ACCESORIOS ESTÁNDAR ....................... 85
ACCESORIOS OPCIONALES .................... 85
APLICACIONES ............................................. 85
MÉTODO DE CARGA ....................................85
ANTES DE LA OPERACIÓN .......................... 88
ENTORNO DE TRABAJO ..........................88
CUIDADOS PARA CLIMAS FRÍOS ........... 88
PREPARACIÓN DE LA CÉLULA DE
COMBUSTIBLE ................................... 88
PREPARACIÓN DE LA BATERÍA .............. 89
PRUEBA DEL CLAVADOR ........................ 89
CARGA DE CLAVOS ................................. 92
OPERACIÓN DEL CLAVADOR ...................... 93
MÉTODOS DE OPERACIÓN ..................... 95
AJUSTE DE LA PROFUNDIDAD DE
CLAVADO ............................................ 95
USO DEL GANCHO ...................................96
UTILIZACIÓN DE LA TAPA PARA EL
MORRO................................................97
EN CASO DE ATASCO .............................. 97
MANTENIMIENTO
MANTENIMIENTO E INSPECCIÓN ..............99
SERVICIO Y REPARACIONES .................... 101
LISTA DE PIEZAS ........................................ 104
Page 4

English
IMPORTANT INFORMATION
Read and understand tool labels and all of the operating
instructions, safety precautions and warnings in this manual
before operating or maintaining this nailer.
Failure to follow warnings could result in DEATH or SERIOUS
INJURY.
Most accidents that result from the operation and maintenance of Nailers are caused by
the failure to observe basic safety rules or precautions. An accident can often be avoided
by recognizing a potentially hazardous situation before it occurs, and by observing
appropriate safety procedures.
Basic safety precautions are outlined in the “SAFETY” section of this Manual and in the
sections which contain the operation and maintenance instructions.
Hazards that must be avoided to prevent bodily injury or machine damage are identified
by DANGERS and WARNINGS on the Nailer and in this Manual.
Never use this Nailer for applications other than those specified in this Manual.
DEFINITIONS OF SIGNAL WORDS
DANGER indicates an imminently hazardous situation which, if not avoided, will result
in death or serious injury.
WARNING indicates a potentially hazardous situation which, if not avoided, could result
in death or serious injury.
CAUTION indicates a potentially hazardous situation which, if not avoided, may result in
minor or moderate injury, or may cause machine damage.
NOTE emphasizes essential information.
EXPLANATION OF THE NAILING ACTION OF THE HITACHI NAILER
䡬 This tool has a FULL SEQUENTIAL ACTUATION MECHANISM.
First, press the push lever against the workpiece; next, pull the trigger to drive the nail.
Follow the same sequence to continue driving nails.
4
Page 5
English
SAFETY
IMPORTANT SAFETY INSTRUCTIONS FOR USING NAILERS
READ ALL INSTRUCTIONS
This Nailer is powered by internal combustion device. This Nailer shall
only be used with dispensers for combustible gas which are listed in
this instruction manual.
DANGER
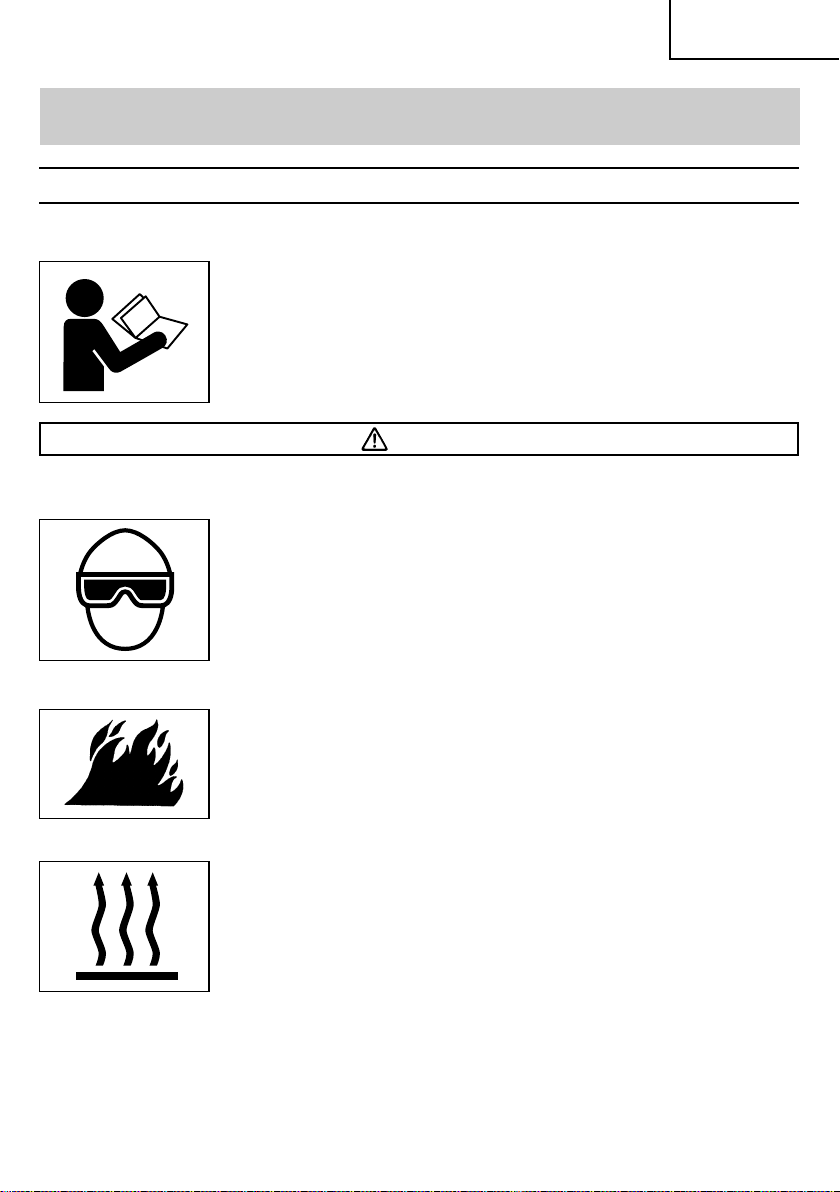
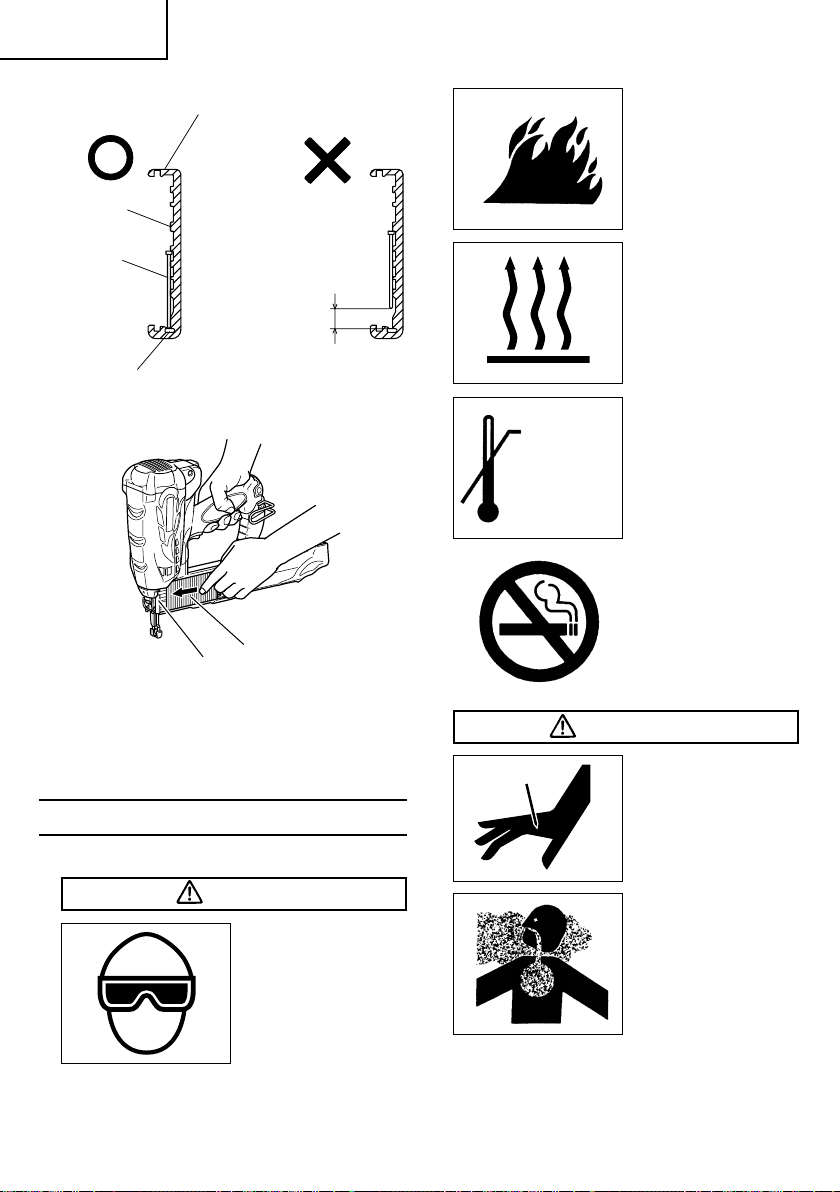
1. OPERATORS AND OTHERS IN WORK AREA MUST WEAR SAFETY GLASSES WITH SIDE
SHIELDS.
When operating the Nailer, always wear safety glasses with side
shields, and make sure others in work area wear safety glasses, too.
Safety glasses must conform to the requirements of American National
Standards Institute, ANSI Z87.1 and provide protection against flying
particles both from the front and side.
The employer must enforce the use of safety glasses by the Nailer
operator and others in work area.
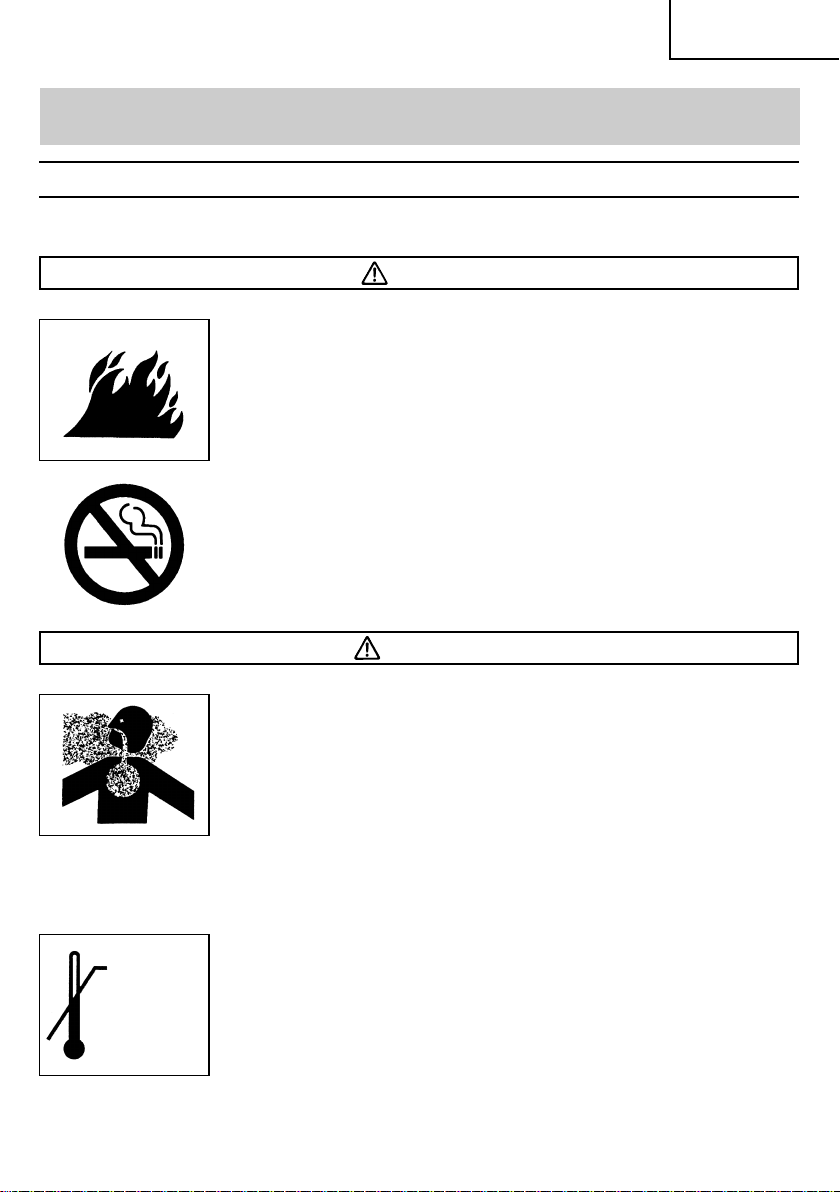
2. NEVER USE IN PRESENCE OF FLAMMABLE LIQUIDS OR GASES.
This Nailer must not be used in a combustible environment or in
presence of flammable liquids or gases, e.g. lacquer, paint, benzine,
thinner or gasoline.
This Nailer produces hot exhaust gases that may ignite flammable
materials and produces sparks during operation.
3. DO NOT TOUCH AROUND THE EXHAUST OUTLET.
This Nailer produces hot exhaust gases that may flammable materials.
The push lever and nose will become hot and get heated up after
prolonged or rapid use.
Do not touch with bare hands.
5
Page 6
English
SAFETY — Continued
DANGER
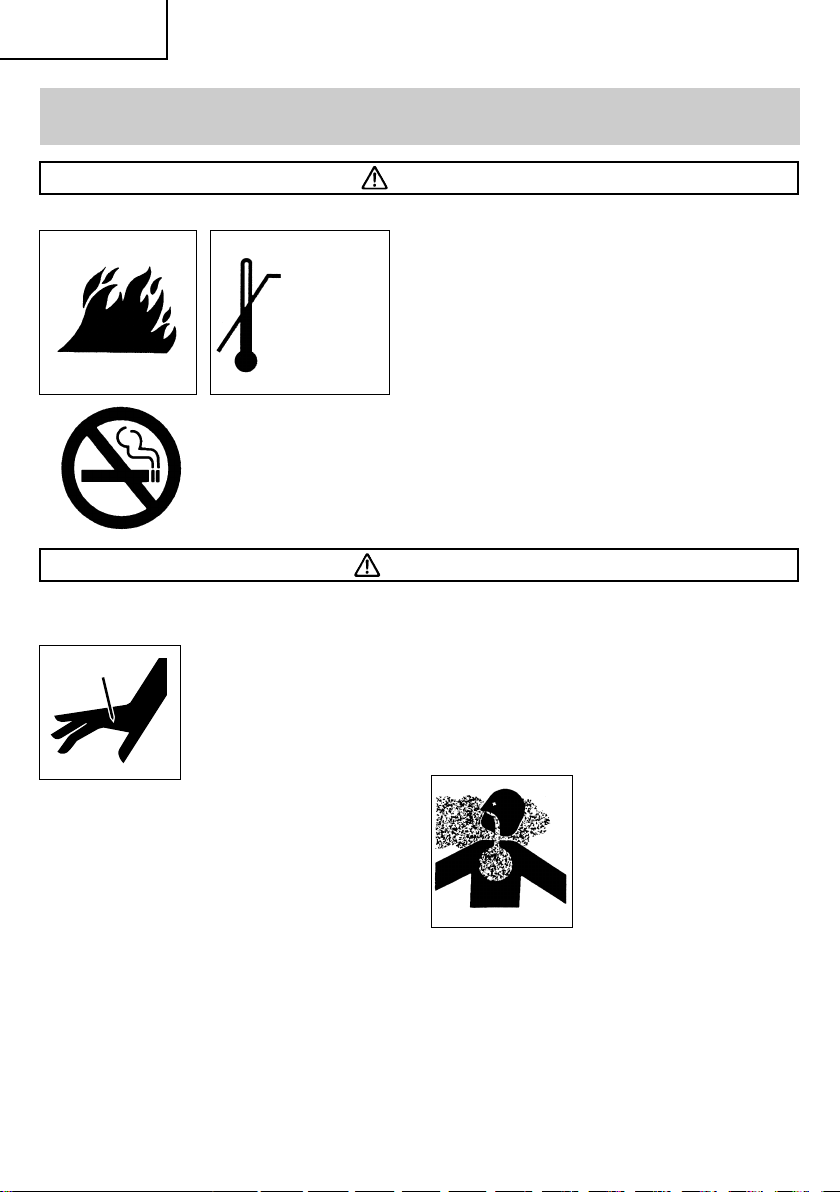
4. EXPLOSION AND FIRE HAZARD.
120°F MAX
(50°C)
Fuel cell and/or battery may burst, releasing flammable gas.
Do not pierce or burn the container, even after use.
Do not incinerate, refill, reclaim or recycle the fuel cell.
Do not spray to a naked flame or any incandescent material.
Keep away from ignition sources – No smoking.
Keep out of the reach of children.
WARNING
5. NEVER POINT TOOL AT YOURSELF OR
OTHERS IN WORK AREA.
Always assume the Nailer
contains fasteners.
Never point the Nailer at
yourself toward yourself
or others, whether it
contains fasteners or not.
If fasteners are mistakenly
driven, it can lead to severe injuries.
Never engage in horseplay with the
Nailer.
Respect the Nailer as a working
implement.
6. KEEP FINGERS AWAY FROM TRIGGER
WHEN NOT DRIVING FASTENERS TO
AVOID ACCIDENTAL FIRING.
Never carry the Nailer with finger on
trigger since you could drive a fastener
unintentionally and injure yourself or
someone else.
Always carry the Nailer by the handle
only.
The fuel cell is an aerosol dispensers with
flammable contents.
Pressured container and the propellant will
remain in the fuel cell.
Failure to follow instructions may result in
explosion or fire.
Keep the Nailer, fuel cells and battery away from
sunshine and from temperature exceeding
120° F (50°C).
7. ALWAYS WEAR EAR AND HEAD
PROTECTION.
Always wear ear protection to protect
your ears from loud noise.
Always wear head protection to protect
your head from flying objects.
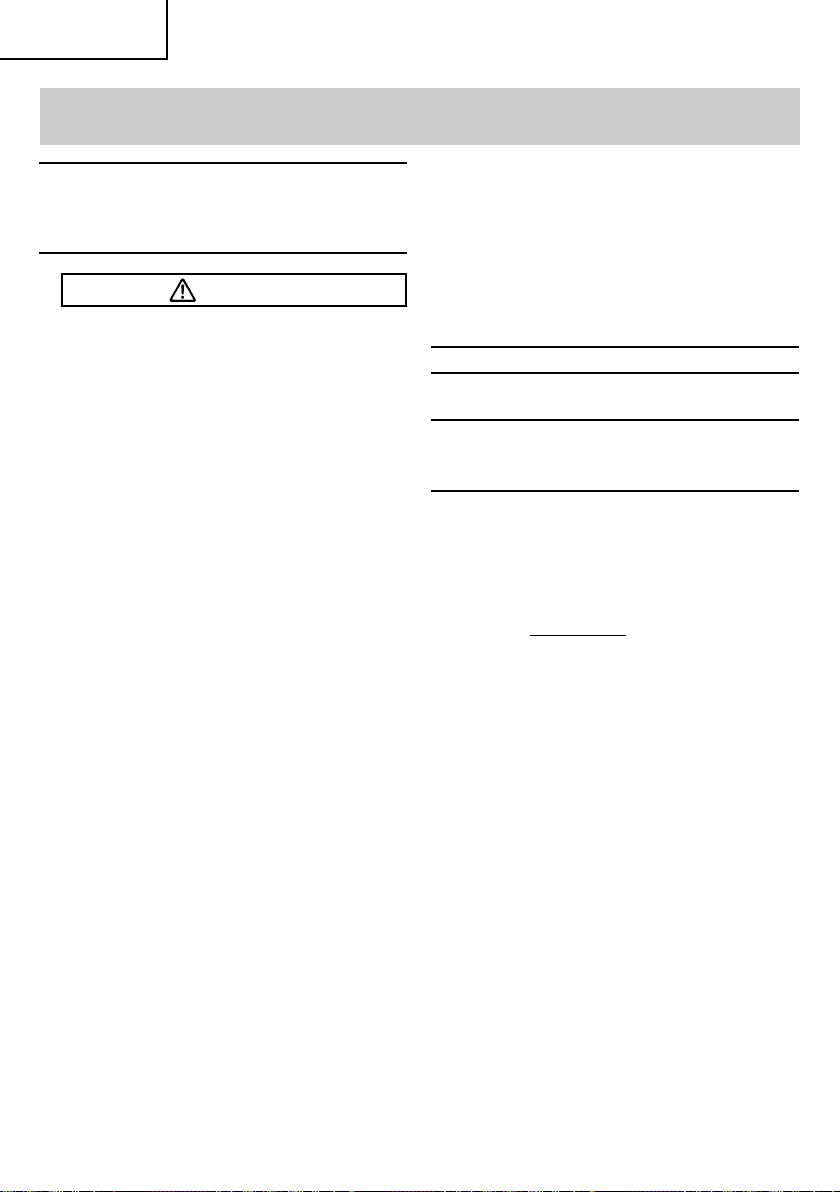
8. USE OUTSIDE OR WELL-VENTILATED
AREAS.
This Nailer exhausts
carbon monoxide which
are a danger to health
when inhaled.
This Nailer shall not be
used in enclosed or poorly
ventilated areas.
Do not inhale.
9. OPERATE WITHIN PROPER
TEMPERATURE RANGE.
The operating environment for this
device is between 32°F (0°C) and 104°F
(40°C) so ensure use within this
temperature range.
The device may fail to operate below
32°F (0°C) or above 104°F (40°C).
6
Page 7
SAFETY — Continued
WARNING
English
10. STORE NAILER PROPERLY WITH FUEL
CELL AND BATTERY REMOVED.
120°F MAX
(50°C)
Keep the Nailer, fuel cell and battery out
of direct sunlight and out of in a vehicle.
Keep out of reach of children. Look the
storage area.
11. KEEP WORK AREA CLEAN.
Cluttered areas invite injuries. Clear all
work areas of unnecessary tools, debris,
furniture, etc.
12. KEEP VISITORS AWAY.
Do not let visitors handle the Nailer.
All visitors should be kept safely away
from work area.
13. DRESS PROPERLY.
Do not wear loose clothing or jewelry as
they can be caught in moving parts.
Rubber gloves and nonskid footwear are
recommended when working outdoors.
Wear protective hair covering to contain
long hair.
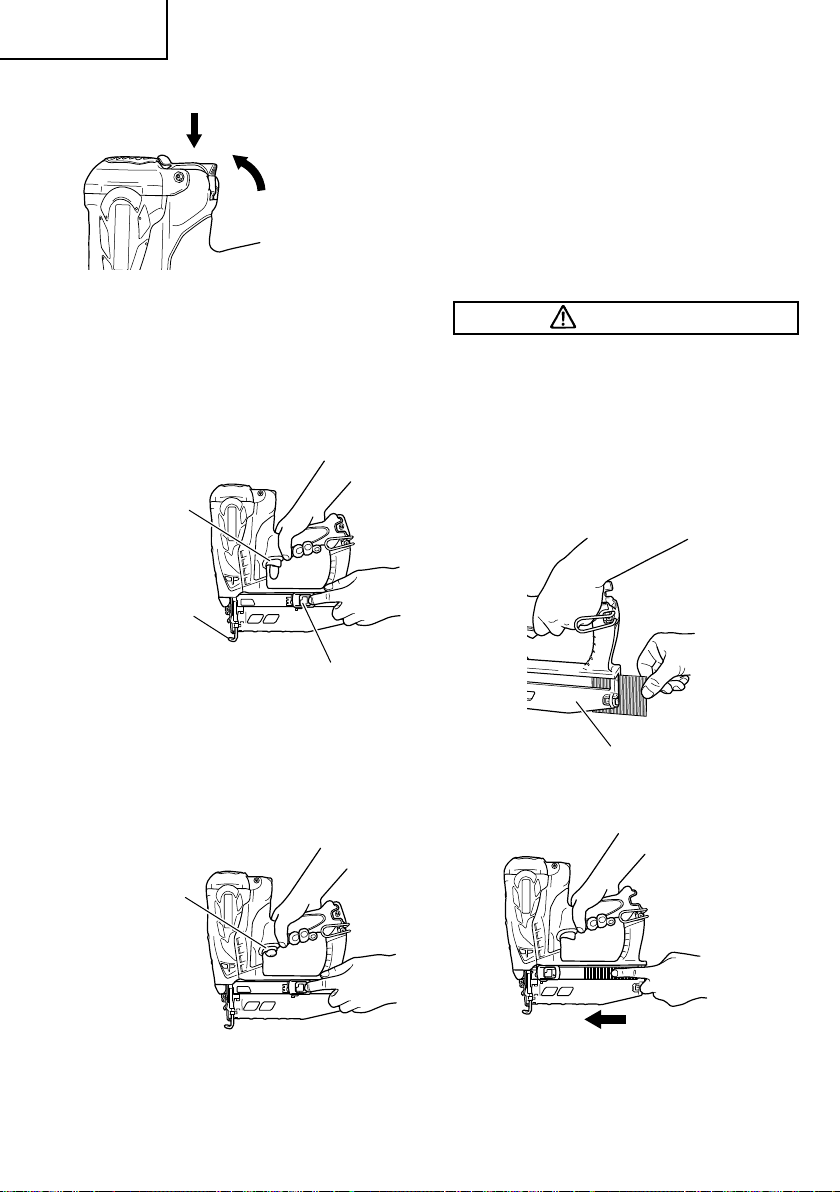
14. CHECK PUSH LEVER BEFORE USE.
The Push Lever and Chamber operate in
conjunction for this device.
Remove fuel cell and battery, and then
make sure the push lever operates
properly. (The push lever may be called
“Safety”.) Never use the Nailer unless the
push lever is operating properly,
otherwise the Nailer could drive a
fastener unexpectedly. Do not tamper
with or remove the push lever, otherwise
the push lever becomes inoperable.
Pull the Feeder knob with the device
facing upward and press down the Push
lever then confirm that the Push lever
securely returns to its original position.
When not in use, the
Nailer, fuel cell and
battery should be
store in tool case and
in a dry place.
Store indoors at
temperature below
120°F (50°C).
The Push lever operation becomes
especially heavy in low temperatures and
drive operations may not function.
15. KEEP ALL SCREWS AND COVERS
TIGHTLY IN PLACE.
Keep all screws and covers tightly
mounted. Check their condition
periodically.
Never use the Nailer if parts are missing
or damaged.
16. DO NOT LOAD FASTENERS WITH
TRIGGER OR PUSH LEVER DEPRESSED.
When loading fasteners into the Nailer,
1) do not depress the trigger;
2) do not depress the push lever; and
3) keep the Nailer pointed downward.
17. KEEP FACE, HANDS AND FEET AWAY
FROM FIRING HEAD DURING USE.
Never place your face, hands or feet
closer than 8 inches (200 mm) from the
firing head.
A serious injury can result if the fasteners
are deflected by the workpiece, or are
driven away from the point of entry.
18. PLACE NAILER PROPERLY ON
WORKPIECE.
Do not drive fasteners on top of other
fasteners or with the Nailer at too steep
of an angle; the fasteners can ricochet
and hurt someone.
19. DO NOT DRIVE FASTENERS INTO THIN
BOARDS OR NEAR CORNERS AND
EDGES OF WORKPIECE.
The fasteners can be driven through or
away from the workpiece and hit
someone.
20. NEVER DRIVE FASTENERS FROM BOTH
SIDES OF A WALL AT THE SAME TIME.
The fasteners can be driven into and
through the wall and hit a person on the
opposite side.
7
Page 8

English
SAFETY — Continued
WARNING
21. CHECK FOR LIVE WIRES.
Avoid the risk of severe electrical shock
by checking for live electrical wires that
may be hidden by walls, floors or ceilings.
Turn off the breaker switch to ensure
there are no live wires.
22. DO NOT OVERREACH.
Keep proper footing and balance at all
times.
23. NEVER USE NAILER WHICH IS DEFECTIVE
OR OPERATING ABNORMALLY.
If the Nailer appears to be operating
unusually, making strange noises, or
otherwise appears defective, stop using
it immediately and arrange for repairs by
a Hitachi authorized service center.
24. TAKE FUEL CELL AND BATTERY OUT OF
NAILER WHEN:
1) doing maintenance and inspection;
2) clearing a jam;
3) it is not in use;
4) leaving work area;
5) moving it to another location; and
6) handing it to another person.
Never attempt to clear a jam or repair the
Nailer unless you have taken fuel cell and
battery out of the Nailer and removed all
remaining fasteners from the Nailer.
The Nailer should never be left
unattended since people who are not
familiar with the Nailer might handle it
and injure the themselves.
25. STAY ALERT.
Watch what you are doing. Use common
sense.
Do not operate the Nailer when you are
tired.
The Nailer should never be used by you
if you are under the influence of alcohol,
drugs or medication that makes you
drowsy.
26. HANDLE NAILER CORRECTLY.
Operate the Nailer according to this
Manual.
Never allow the Nailer to be operated by
children, individuals unfamiliar with its
operation or unauthorized personnel.
27. NEVER USE NAILER FOR APPLICATIONS
OTHER THAN THOSE SPECIFIED IN THIS
MANUAL.
28. HANDLE NAILER CAREFULLY.
Do not drop the Nailer or strike the Nailer
against hard surfaces; and do not scratch
or engrave signs on the Nailer. Handle
the Nailer carefully.
29. MAINTAIN NAILER WITH CARE.
Keep the Nailer clean and lubricated for
better and safer performance.
30. USE ONLY PARTS, ACCESSORIES OR
FASTENERS SUPPLIED OR
RECOMMENDED BY HITACHI.
Unauthorized parts, accessories, or
fasteners may void your warranty and
can lead to malfunction and resulting
injuries.
Only service personnel trained by Hitachi,
distributor or employer shall repair the
Nailer.
31. NEVER MODIFY OR ALTER A NAILER.
Doing so may cause it to malfunction and
personal injuries may result.
8
Page 9
SAFETY — Continued
IMPORTANT SAFETY INSTRUCTIONS FOR FUEL CELL
READ ALL INSTRUCTIONS
DANGER
Fuel cell, fuel and propellant are flammable under pressure.
Explosion / Fire Hazard
Failure to follow all instructions may result in fire and explosion
when handling dispensers for combustible gas for the purpose
of storage, transportation, inserting into and taking out of the tool
and disposal.
Do not smoke when handling the fuel cell.
English
120°F MAX
(50 °C)
WARNING
Do not inhale its contents.
In case of being inhaled ; the person affected should be taken
into the open air and brought into a comfortable position.
Expanding gases cause low temperatures.
Fluid gases might cause injuries when getting in touch with skin or
eyes.
In case of contact with skin ; wash the contact surface carefully
with warm water and soap and apply a skin cream when dry.
In case of contact with eyes ; rinse the open eyes under running
water.
Contact a doctor if necessary.
Store in well-ventilated area.
Do not store above 120°F (50°C) (e.g. direct sunlight or in a vehicle).
Do not expose to an open flame and sparks.
Do not puncture or open the fuel cell.
Do not refill, reclaim or recycle the fuel cell.
Dispose of according to local regulations for aerosol products.
Do not dispose of fuel cell with other scrap for recycling.
Keep out of reach of children.
9
Page 10
English
SAFETY — Continued
IMPORTANT SAFETY
INSTRUCTIONS FOR BATTERY
CHARGER
WARNING
Death or serious bodily injury could result
from improper or unsafe use of battery
chargers.
To avoid these risks, follow these basic
safety instructions:
READ ALL INSTRUCTIONS
1. This manual contains important safety
and operating instructions for battery
charger Model UC3SML.
2. Before using battery charger, read all
instructions and cautionary markings on
(1) battery charger, (2) battery, and (3)
product using battery.
3. To reduce risk of injury, charge HITACHI
rechargeable battery type EBM315. Other
type of batteries may burst causing
personal injury and damage.
4. Do not expose battery charger to rain or
snow.
5. Use of an attachment not recommended
or sold by the battery charger
manufacturer may result in a risk of fire,
electric shock, or injury to persons.
6. To reduce risk of damage to electric plug
and cord, pull by plug when
disconnecting battery charger.
7. Make sure cord is located so that it will
not be stepped on, tripped over, or
otherwise subjected to damage or stress.
8. An extension cord should not be used
unless absolutely necessary. Use of
improper extension cord could result in
a risk of fire and electric shock.
If extension cord must be used make
sure:
a. That blades of extension cord are the
same number, size, and shape as
those of plug on battery charger;
b. That extension cord is properly wired
and in good electrical condition; and
c. That wire size is large enough for AC
ampere rating of battery charger as
specified in Table 1.
RECOMMENDED MINIMUM AWG SIZE FOR
EXTENSION CORDS FOR BATTERY CHARGERS
AC Input Rating Amperes*AWG Size of Cord
Equal to or but less Length of Cord, Feet (Meter)
greater than than 25 (7.5) 50 (15) 100 (30) 150 (45)
021818 18 16
231818 16 14
341818 16 14
* If the input rating of a battery charger is
given in watts rather than in amperes, the
corresponding ampere rating is to be
determined by dividing the wattage
rating by the voltage rating – for example:
9. Do not operate battery charger with
damaged cord or plug-replace them
immediately.
10. Do not operate battery charger if it has
received a sharp blow, been dropped, or
otherwise damaged in any way; take it
to a qualified serviceman.
11. Do not disassemble battery charger; take
it to a qualified serviceman when service
or repair is required. Incorrect reassembly
may result in a risk of electric shock or fire.
12. To reduce risk of electric shock, unplug
charger from receptacle before attempting
any maintenance or cleaning. Removing
the battery will not reduce this risk.
13. This battery charger might be attached
to HITACHI battery operated tools as a
standard accessory. In this case, please
confirm Instruction Manual of the
HITACHI battery operated tools before
using the battery charger.
Table 1
1,250 watts
125 volts
=
10 amperes
10
Page 11
SAFETY — Continued
English
IMPORTANT SAFETY
INSTRUCTIONS FOR USE OF
THE BATTERY AND BATTERY
CHARGER
You must charge the battery before you use
the Nailer. Before using the model UC3SML
battery charger, be sure to read all
instructions and cautionary statements on it,
the battery and in this manual.
REMEMBER: USE ONLY HITACHI BATTERY
TYPE EBM315. OTHER TYPES OF BATTERIES
MAY BURST AND CAUSE INJURY!
Follow these instructions to avoid the risk of
injury:
WARNING
䢇 Improper use of the battery or battery
charger can lead to serious injury. To
avoid these injuries:
1. NEVER disassemble the battery.
2. NEVER incinerate the battery, even if
it is damaged or is completely
worn out. The battery can
explode in a fire.
3. NEVER short-circuit the battery.
4. NEVER insert any objects into the
battery charger’s air vents.
Electric shock or damage to
the battery charger may result.
5. NEVER charge outdoors. Keep the
battery away from direct
sunlight and use only where
there is low humidity and good
ventilation.
6. NEVER charge when the temperature
is below 50°F (10°C) or above
104°F (40°C).
7. NEVER connect two battery chargers
together.
8. NEVER insert foreign objects into the
hole for the battery or the
battery charger.
9. NEVER use a booster transformer
when charging.
10. NEVER use an engine generator or DC
power to charge.
11. NEVER store the battery or battery
charger in places where the
temperature may reach or
exceed 104°F (40°C).
12. ALWAYS operate charger on standard
household electrical power
(120 volts). Using the charger
on any other voltage may
overheat and damage the
charger.
13. ALWAYS wait at least 15 minutes
between charges to avoid
overheating the charger.
14. ALWAYS disconnect the power cord
from its receptacle when the
charger is not in use.
PRECAUTIONS WHEN USING
THE BATTERY CHARGER WITH
A DC 12V IN-CAR POWER
SOURCE
1. Use the battery charger correctly.
Do not use the battery charger other than
with a DC 12V in-car power source. The
battery charger is solely for use on minusgrounded vehicles. Make sure that the
minus pole of the car battery is connected
to the car body.
2. Keep your attention focused on driving
the car.
If you use the battery charger while
driving, fasten the battery charger in
place so that it does not move
inadvertently and distract your attention
from driving. Do not place the battery
charger or battery under the driver’s seat,
irrespective of whether it is charging or
not, as it may get under the brake pedal
or the cable may get wrapped around the
driver’s feet and cause an accident.
3. Do not manipulate the battery charger or
battery while driving as this may cause
an accident.
11
Page 12

English
SAFETY — Continued
4. Do not leave the battery charger or
battery within reach of children as this
may result in an accident.
5. Be use to use the cable provided.
Using a different cable could result in a
fire or accident due to overheating.
6. Do not place the battery charger on a
blanket-type car seat cover or car mat
during charging as this may result in a
fire or accident due to overheating.
7. Do no expose the battery charger to
direct sunlight during charging as this
may result in a fire.
8. Do not leave the vehicle unattended
during charging.
DISPOSAL OF THE EXHAUSTED
BATTERY
WARNING
䢇 Do not dispose of the exhausted
battery. The battery must explode if it
is incinerated. The product that you
have purchased contains a
rechargeable battery. The battery is
recyclable. At the end of it’s useful life,
under various state and local laws, it
may be illegal to dispose of this battery
into the municipal waste stream.
Check with your local solid waste
officials for details in your area for
recycling options or proper disposal.
EMPLOYER’S RESPONSIBILITIES
1. Ensure that this MANUAL is available to
operators and personnel performing
maintenance.
2. Ensure that Nailers are used only when
operators and others in work area are
wearing EYE PROTECTOR.
3. Enforce the use of EYE PROTECTOR by
operators and others in work area.
4. Keep Nailers in safe working order.
5. Maintain Nailers properly.
6. Ensure that Nailers which require repair
are not further used before repair.
SAVE THESE INSTRUCTIONS
AND
MAKE THEM AVAILABLE TO
OTHER USERS
AND
OWNERS OF THIS TOOL!
12
Page 13
OPERATION
English
NOTE:
The information contained in this Manual is designed to assist you in the safe
operation of the Nailer.
Some illustrations in this Manual may show details or attachments that differ
from those on your own Nailer.
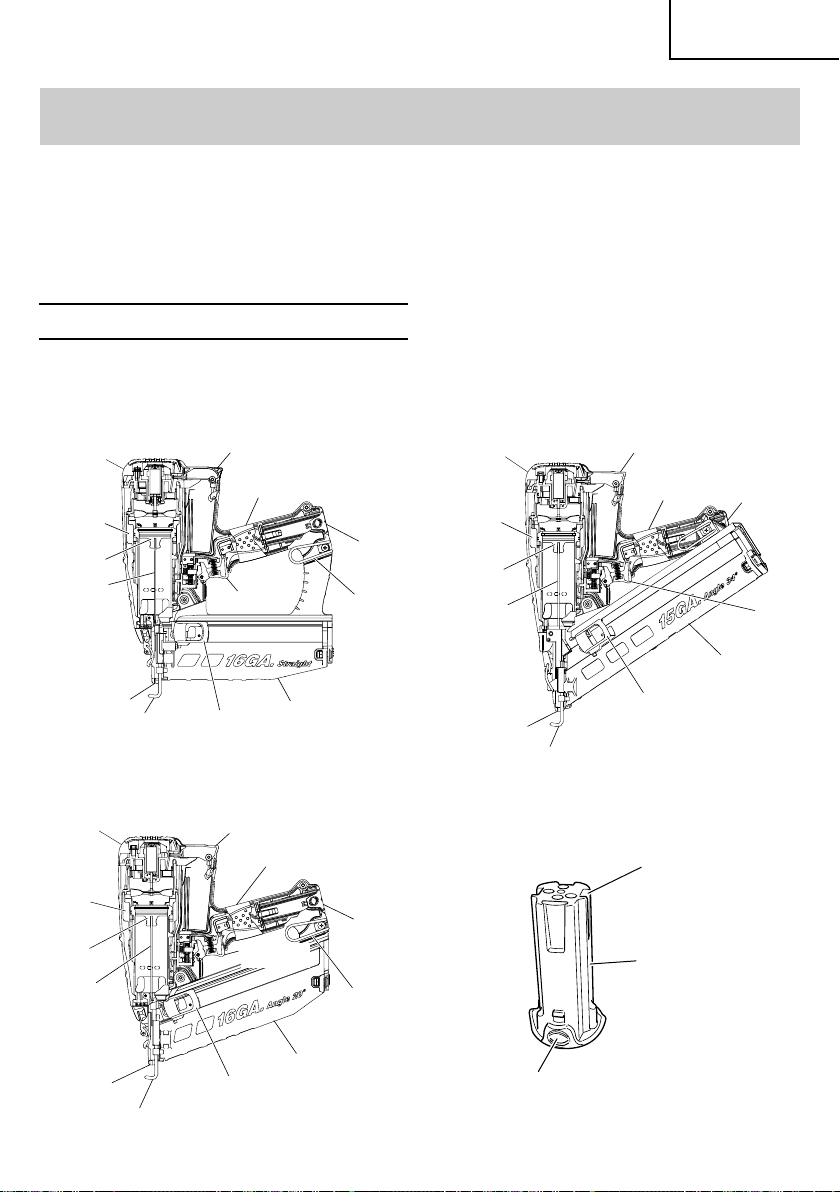
NAME OF PARTS
1. Gas Finish Nailer
<NT65GS>
Top cover
Chamber
Piston
Driver
blade
Firing head
(outlet)
Push lever
<NT65GB>
Actuator
Trigger
Nail feeder (B)
Handle
Battery
Hook
Magazine
<NT65GA>
Top cover
Chamber
Piston
Driver
blade
Firing head
(outlet)
Push lever
Actuator
Handle
Magazine
Nail feeder (B)
Battery
Trigger
Top cover
Chamber
Piston
Driver
blade
Firing head
(outlet)
Push lever
Actuator
Handle
Trigger
Magazine
Nail feeder (B)
䡬 Battery (EMB315)
Terminal hole
Battery
Nameplate
Hook
Battery release button
13
Page 14
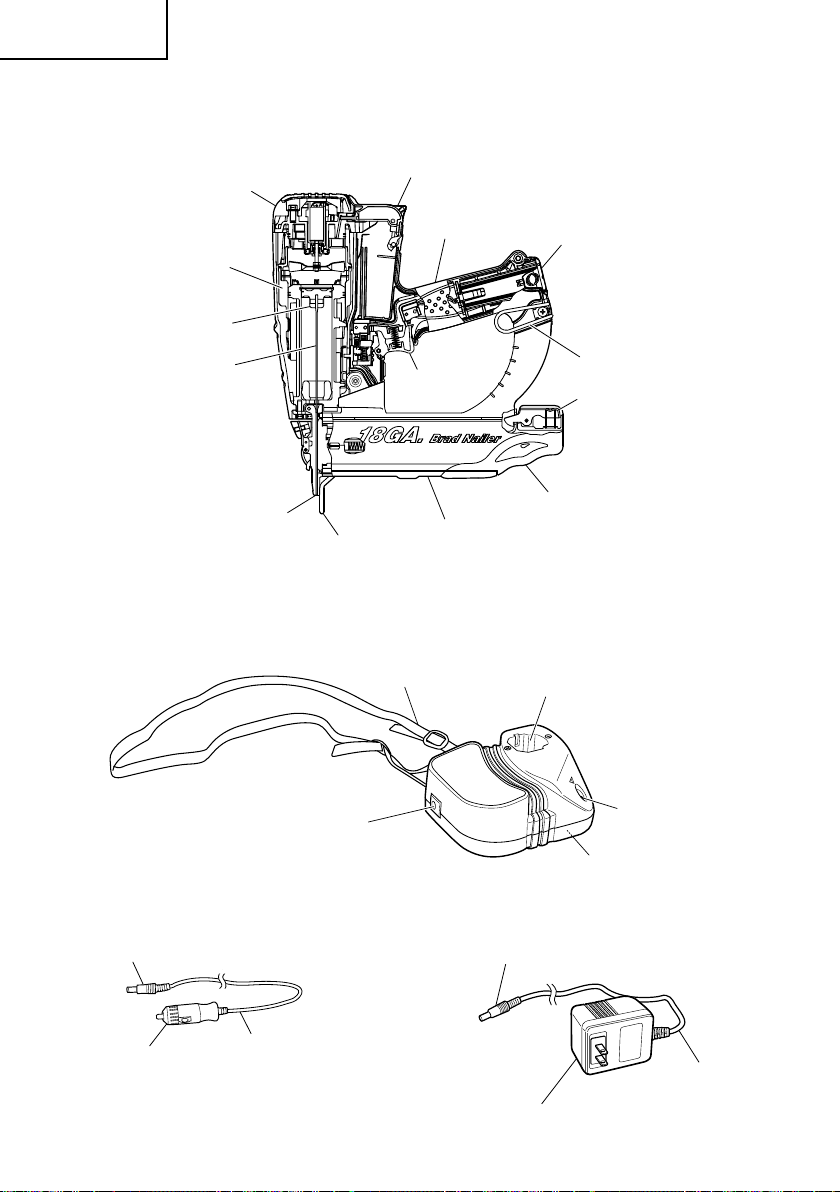
English
2. Gas Brad Nailer
<NT50GS>
Top cover
Actuator
Chamber
Piston
Driver
blade
Firing head
(outlet)
3. Battery Charger (UC3SML)
Push lever
Trigger
Strap
Handle
Magazine
Battery
Hook
Stop lever
Magazine cover
Battery installation hole
Charger
connecting plug
Cigarette lighter
connecting plug
14
Connecting socket
Cord
Pilot lamp
Nameplate
(on the bottom side)
Charger
connecting plug
Cord
AC adapter
Page 15

English
SPECIFICATIONS
1. Gas Finish Nailer
Model NT65GS NT65GB NT65GA
Dimensions
Length × Height × Width
Weight 3.7 lbs. (1.7 kg) 4.2 lbs. (1.9 kg)
Includes battery and fuel cell 4.0 lbs. (1.8 kg) 4.4 lbs. (2.0 kg)
Nail capacity 100 nails (2 strips) 100 nails (1 strip)
Cycle rate
Battery
Fuel Cell Type No. 728-981……sold separately
2. Gas Brad Nailer
Model NT50GS
Dimensions 10-5/8" × 11-1/8" × 3-3/8"
Length × Height × Width (270 mm × 281 mm × 85 mm)
Weight 3.7 lbs. (1.7 kg)
Includes battery and fuel cell 4.0 lbs. (1.8 kg)
Nail capacity 100 nails (1 strip)
Cycle rate
Battery
Fuel Cell Type No. 728-981……sold separately
10-1/4" × 11" × 3-3/8" 10-5/8" × 11-1/8" × 3-3/8" 12" × 12" × 5"
(260 mm × 278 mm × 85 mm) (268 mm × 282 mm × 85 mm) (307 mm × 305 mm × 126 mm)
Intermittent: 2 nails per second 1 nail per second
Continuous: 1,000 nails per hour Continuous:
EBM315 (1.5 Ah)
Li-ion battery, 3.6 V
Intermittent:
900 nails per hour
Intermittent: 2 nails per second
Continuous: 1,000 nails per hour
EBM315 (1.5 Ah)
Li-ion battery, 3.6 V
3. Battery Charger (UC3SML)
Input power source DC 12V
Charging time Approx. 60 minutes ................................... EBM315
Charging voltage ........................................ DC 3.6 V
Charger
Charging current ........................................ DC 1.5 A
Weight 0.4 lbs (0.2 kg)
NOTE: The charging time may vary according to temperature and power source voltage.
15
Page 16
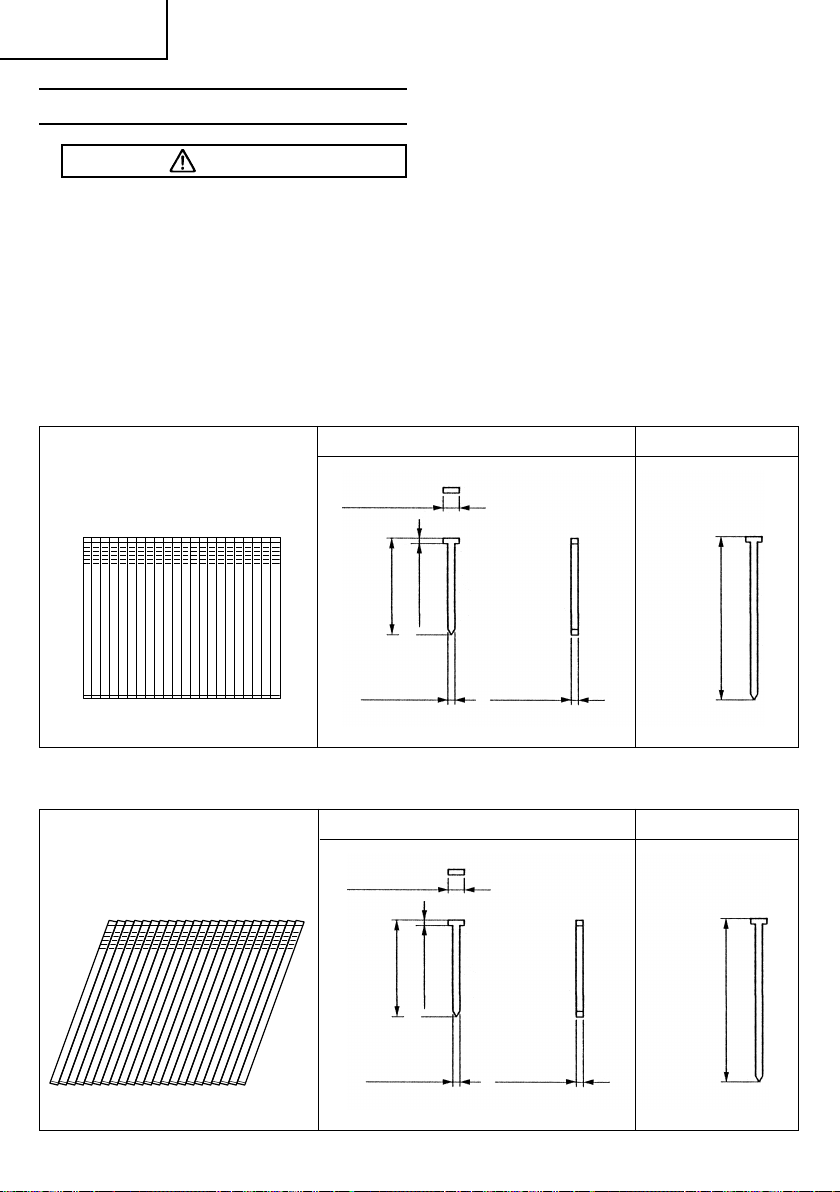
English
NAIL SELECTION
WARNING
䢇 Be sure to use only the genuine
HITACHI nails for the NT65GS,
NT65GB, NT65GA or the NT50GS. The
use of any other nails can result in tool
malfunction and/or nail breakdown,
leading to serious injuries.
Only nails shown in the Table below can be
driven with this Nailer.
Dimensions of nails
<NT65GS>
16 Gauge finish nails
(straight)
.110" (2.8mm)
1" (25mm)
.055"
(1.4mm)
Min.
.051" (1.3mm)
(1.65mm)
.065"
Max.
2-1/2" (65mm)
<NT65GB>
16 Gauge finish nails
(Angle: 20°)
16
.110" (2.8mm)
1-1/4" (32mm)
.051" (1.3mm)
.055"
(1.4mm)
Min.
.065"
(1.65mm)
Max.
2-1/2" (65mm)
Page 17
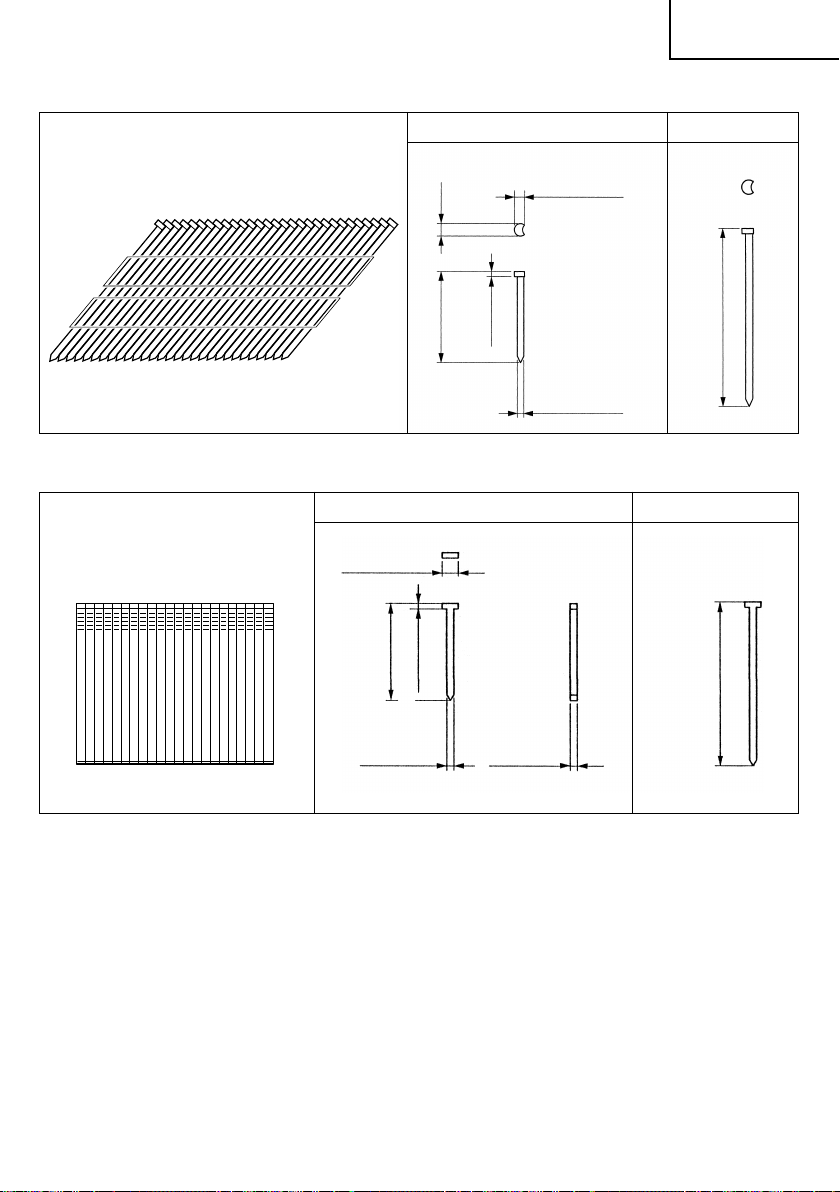
<NT65GA>
15 Gauge finish nails
<NT50GS>
18 Gauge brad nails
(straight)
(Angle: 34°)
.075" (1.9mm)
Min.
.12"
(3.0mm)
.045"
(1.1mm)
1-1/4" (32mm)
Min.
English
Max.
.095" (2.4mm)
2-1/2" (65mm)
.072" (1.8mm)
Max.
5/8" (16mm)
.043" (1.1mm)
.039"
(1mm)
.049"
2" (50mm)
(1.25mm)
17
Page 18
English
ACCESSORIES
DANGER
䢇 Accessories other than those shown
below can lead to malfunction and
resulting injuries.
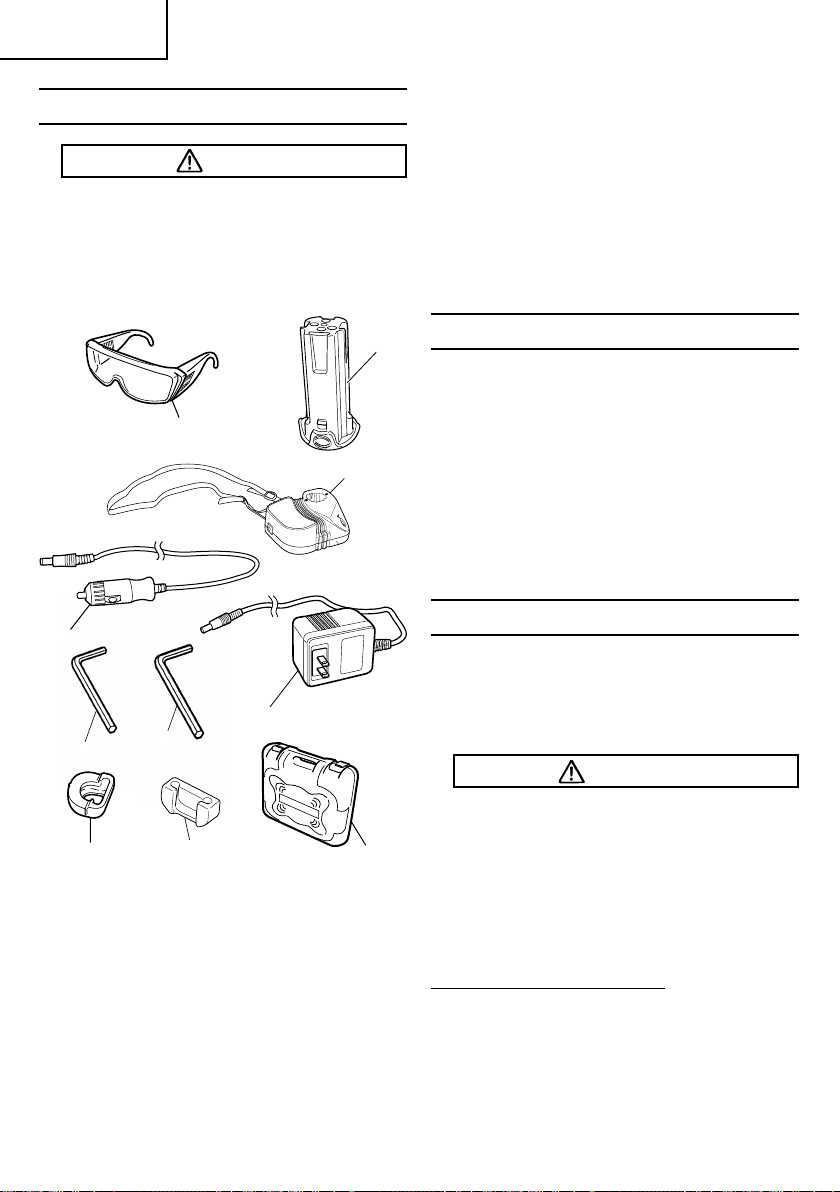
STANDARD ACCESSORIES
2
1
3
4
5
6
8
1 Safety glasses ....................................... 1
2 Battery ................................................... 1
3 Charger ..................................................1
4 Cigarette lighter connecting plug ........ 1
5 AC adapter ............................................ 1
6 Allen wrench for M4 screw ..................1
7 Allen wrench for M5 screw ..................1
8 Nose cap (mounted on tool)
(except NT50GS) ................................... 1
9 Nose cap (mounted on tool)
(only NT50GS) ...................................... 1
0 Case ....................................................... 1
7
9
0
OPTIONAL ACCESSORIES
sold separately
䡬 Fuel Cell (Code No. 728-981)
䡬 Lubricant oil (Code No. 885-546, No. 728-
986)
䡬 Degreaser/cleaner (Code No. 728-985)
NOTE: Accessories are subject to change
without any obligation on the part
of HITACHI.
APPLICATIONS
<NT65GS, NT50GA, NT50GB>
䡬 Nailing as finishing process for areas
around the doors, windows as well as
edgings.
䡬 Securing the bottom of drawers. Making
various cases and cabinets.
<NT50GS>
䡬 Cabinet and picture frame assembly,
furniture trim.
䡬 On-site and mobile home trim and
molding.
CHARGING METHOD
NOTE: Before plugging into the receptacle,
make sure the following points.
䡬 The power source voltage is stated
on the nameplate.
䡬 The cord is not damaged.
WARNING
䢇 Do not charge at voltage higher than
indicated on the nameplate.
If charged at voltage higher than
indicated on the nameplate, the
charger will burn up.
1. Insert the charger connecting plug into
the connecting socket of the charger.
2. Connect to the power source.
When using the AC adapter
Insert the AC adapter into the receptacle.
18
Page 19
English
WARNING
䢇 Do not use the
electrical cord if
damaged. Have it
repaired
immediately.
When using the cigarette lighter connecting
plug
䡬 Secure the battery charger in place in the
car.
Use the strap supplied with the battery
charger to fasten the battery charger in
place and prevent it from moving
inadvertently.
WARNING
䢇 Do not place the battery charger or
battery under the driver’s seat. Secure
the battery charger in place to prevent
it from moving inadvertently as this
may lead to an accident.
䡬 Insert the cigarette lighter connecting
plug into the cigarette lighter socket.
If the plug is loose and falls out of the
cigarette lighter socket, repair the socket.
As the socket may be faulty, you are
recommended to contact your local car
dealer. Continued use of the socket may
result in an accident due to overheating.
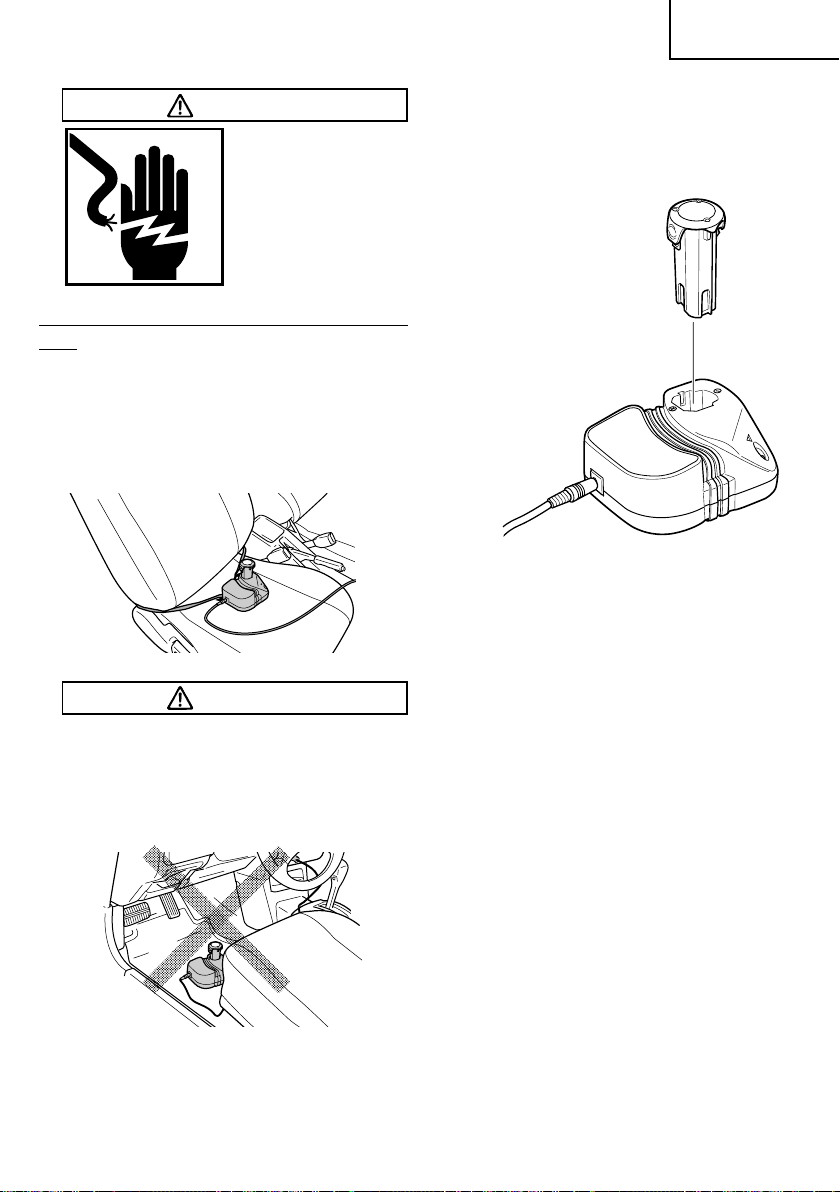
3. Insert the battery to the battery charger.
4. Charging
䡬 When the battery is connected to the
battery charger, charging will commence
and the pilot lamp will light on.
NOTE: If the pilot lamp does not light, pull
out the plug from the receptacle and
check if the battery is properly
mounted.
䡬 When the battery is fully charged, the
pilot lamp will go out.
NOTE: The battery charging time becomes
longer when a temperature is low or
the voltage of the power source is too
low.
When the pilot lamp does not go off
even if more than four hour has
passed after start of the charging,
stop the charging and contact your
HITACHI AUTHORIZED SERVICE
CENTER.
䡬 Regarding the temperature of the
rechargeable battery.
The temperatures for rechargeable
batteries are as shown in the table below,
and batteries that have become hot
should be cooled for a while before being
recharged.
19
Page 20

English
Table 2
Rechargeable
batteries
EBM315
䡬 Regarding recharging time
Table 3 shows the recharging time
required according to the type of battery.
Table 3
Battery
voltage (V)
3.6 EBM315 60 min.
NOTE: The recharging time may vary
5. Disconnect battery charger from the
6. Remove the battery from the battery
according to the ambient
temperature and the power supply
voltage.
receptacle or cigarette lighter socket.
CAUTION
䢇 Do not pull the plug out of the
receptacle by pulling on the cord.
Make sure to grasp the plug when
removing from receptacle to avoid
damaging cord.
charger.
Supporting the battery charger with
hand, pull out the battery from the battery
charger.
Do not leave the battery charger or
battery in the car.
Regarding electric discharge in case of
new batteries, etc.
As the internal chemical substance of
new batteries and batteries that have not
been used for an extended period is not
activated, the electric discharge might be
low when using them the first and second
time. This is a temporary phenomenon,
and normal time required for recharging
will be restored by recharging the
batteries 2 – 3 times.
Temperature at which the
battery can be recharged
32°F — 122°F (0°C — 50°C)
Recharging time (approx. min.) at 20°C
Battery capacity (Ah)
1.5 Ah
How to make the batteries perform
longer.
䡬 Recharge the batteries before they
become completely exhausted.
When you feel that the power of the tool
becomes weaker, stop using the tool and
recharge its battery. If you continue to use
the tool and exhaust the electric current,
the battery may be damaged and its life
will become shorter.
䡬 Avoid recharging at high temperatures.
A rechargeable battery will be hot
immediately after use. If such a battery
is recharged immediately after use, its
internal chemical substance will
deteriorate, and the battery life will be
shortened. Leave the battery and
recharge it after it has cooled for a while.
CAUTION
䢇 When the battery charger has been
continuously used, the battery
charger will be heated, thus
constituting the cause of the failures.
Once the charging has been
completed, give 15 minutes rest until
the next charging.
䢇 If the battery is recharged when it is
warm due to battery use or exposure
to sunlight, the pilot lamp may not
light.
The battery will not be recharged. In
such a case, let the battery cool before
charging.
䢇 If the battery charger does not work
while the battery is mounted
correctly, it is probable that the
battery or charger is malfunctioning.
Take it to your authorized Service
Center.
BEFORE OPERATION
Read section titled “SAFETY” (pages 5 – 12).
Make sure of the followings before
operation.
20
Page 21

English
WORKING ENVIRONMENT
WARNING
䢇 No flammable
gas, liquid or other
flammable objects
at worksite.
䢇 Use outside or
well–ventilated
areas.
Do not inhale.
䢇 Keep the Nailer,
120°F MAX
(50°C)
fuel cell and
battery away from
sunshine and
from temperature
exceeding 120°F
(50°C).
䢇 Keep away from
ignition sources.
No smoking.
䢇 Clear the area of
children or
unauthorized
personnel.
COLD WEATHER CARE
䡬 Do not store the Nailer, fuel cell and
battery in a cold weather environment.
Keep the Nailer, fuel cell and battery in a
warm area until beginning the work.
䡬 If the Nailer, fuel cell and battery are
already cold, bring it in a warm area and
allow the Nailer to warm up before use.
Observe temperature limit of max. 120°F
(50°C).
Do not expose to an open flame and
sparks!
CAUTION
䢇 This Nailer may not drive completely
below when; at low temperature fuel
cell loose the required propellant
force, at high temperature fuel cell
overdose.
䢇 Do not use the Nailer in the rain or
where excessive moisture is present.
䢇 This Nailer is not recommended for
use at altitudes above 5,000 feet
(1,500 m), or in temperature below
30°F (0°C).
PREPARING THE FUEL CELL
Read section titled “SAFTY, IMPORTANT
SAFETY INSTRUCTIONS FOR FUEL CELL”
(page 9).
DANGER
䢇 The fuel cell is
flammable.
䢇 Keep away from
ignition sources.
䢇 Do not spray to a
naked flame or
any incandescent
material.
䢇 Do not smoke
when handling
fuel cell.
䢇 Keep stem of fuel
cell away from
face or skin.
Expanding gases
cause low
temperatures. Do
not contact with
gases.
䢇 Do not inhale.
䢇 Keep out of reach
of children.
CAUTION
䢇 If the gas leaks from the metering
valve or the gas cartridge after
attached the metering valve, replace
with the new metering valve.
䢇 Do not attempt to reuse the metering
valve.
Replace with the new metering valve.
To attach the metering valve to a fuel cell:
(1) Separate the metering
valve and the cap from
the gas cartridge.
21
Page 22
English
(2) Press forward (stem
side) and downward on
the front side of the
metering valve.
(3) Press downward on the
rear of the metering
valve until it seals.
Check the metering valve:
Press the metering valve stem on fuel cell
two or three times against a stationary
object and release.
If gas is not dispersed, fuel cell is empty.
Replace it.
Observe Safety Regulations.
The fuel cell is now ready to insert into the
Nailer.
PREPARING THE BATTERY
Read section titled “SAFETY, IMPORTANT
SAFETY INSTRUCTIONS FOR BATTERY
CHARGER” (page 10).
You must charge the battery before use.
The charging method of battery is shown in
page 18 - 20.
The machine employs a preventive
mechanism for unloaded operation.
The machine enters a state where the push
lever cannot be pushed up. This takes place
when the magazine is not loaded with nails
or when the remaining number of nails
becomes less than 6 or 9.
CAUTION
䢇 Use caution not to throw the push
lever tip onto wood.
Before actually beginning the nailing work,
test the Nailer by using the checklist below.
Conduct the tests in the following order.
If abnormal operation occurs, stop using the
Nailer and contact a Hitachi authorized
service center immediately.
(1) REMOVE ALL NAILS, FUEL CELL AND
BATTERY FROM NAILER.
䡺 ALL SCREWS MUST BE TIGHTENED.
䡺 THE PUSH LEVER AND TRIGGER
MUST MOVE SMOOTHLY with
pulling back the nail feeder (B).
(NT50GS: Unnecessary to pulling
back nail feeder)
Trigger
TESTING THE NAILER
DANGER
䢇 Operators and
others in work
area MUST wear
safety glasses
with side shields
which conforms
to ANSI Z87.1
specifications.
WARNING
䢇 Never use Nailer unless push lever is
operating properly.
22
Push lever
Nail feeder (B)
(2) Installing the battery.
Do not operate the push lever or trigger
while installing the battery.
Make sure the battery indicator light is
flashing green.
If the battery indicator light is flashing
red, the battery doesn’t have enough
power and it needs to be charged.
Page 23
Insert
English
2 Insert the fuel cell into nailer.
Fuel cell
Pull out
Handle
Battery
Battery
release button
BATTERY INDICATOR LIGHT
Flashing GREEN: Enough power
remaining (The light
turns steady during
operation).
Flashing RED: Insufficient power
remaining (The light turns
steady during operation).
OFF: The battery is extremely empty.
Charge the battery.
Battery indicator
light
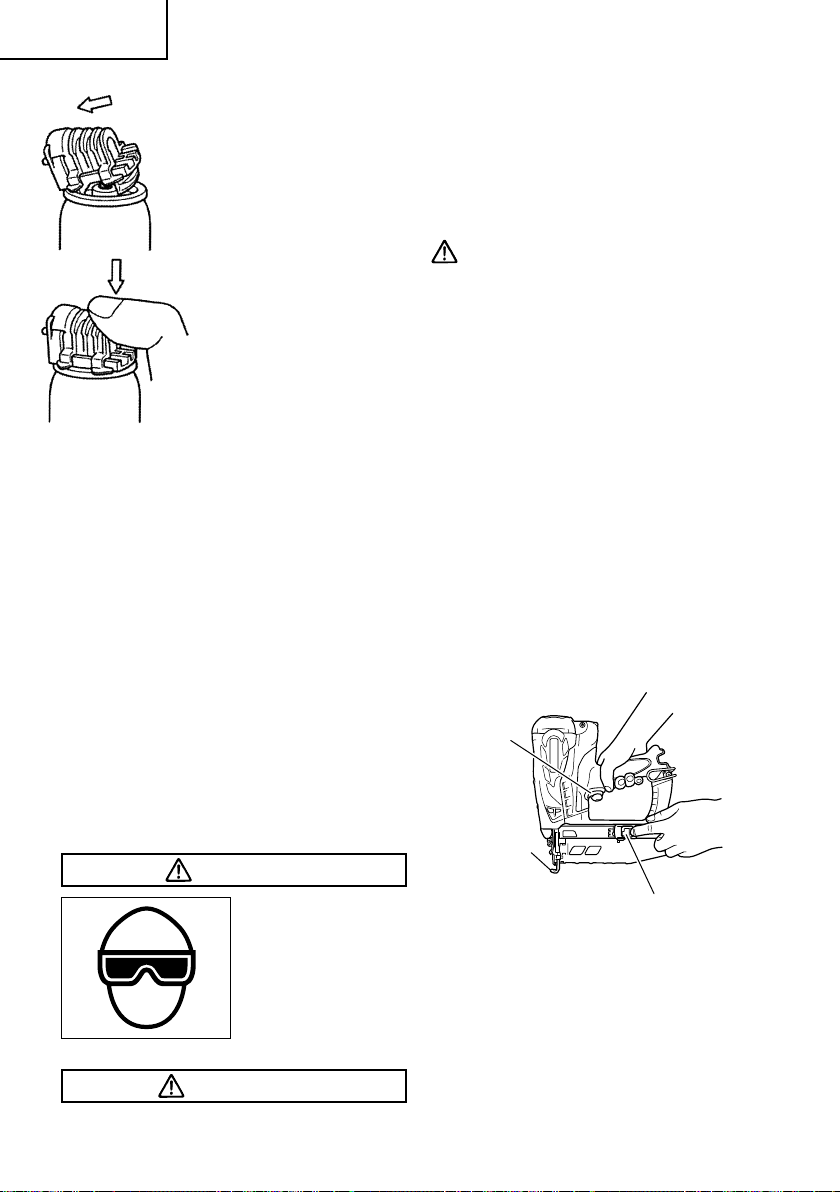
(3) INSERT FUEL CELL INTO NAILER.
1 Push up and pull out the actuator.
2. Pull out
3 Insert the stem of fuel cell into the hole
of adaptor.
Adapter
Stem
Fuel cell
Adapter
Stem
Fuel cell
NOTE: Insert a loose adapter according to
the instructions in the figure.
Insert into the hole
Adapter
1. Push up
23
Page 24
English
4 Close the actuator.
2. Push down
1. Swing back
(4) Remove the finger from the trigger and
press the push lever against the
workpiece with pulling back the nail
feeder (B). (NT50GS: Unnecessary to
pulling back nail feeder)
䡺 THE NAILER MUST NOT OPERATE.
Do not pull trigger
Depress push lever
(7) If no abnormal operation is observed, you
may load nails in the Nailer.
Drive nails into the workpiece that is the
same type to be used in the actual
application.
䡺 THE NAILER MUST OPERATE
PROPERLY.
LOADING NAILS
WARNING
䢇 When loading nails into Nailer,
1) do not pull trigger;
2) do not depress push lever; and
3) keep Nailer pointed downward.
<NT65GS, NT65GA, NT65GB>
2–Action Nail Feeding!
(1) Insert nail strip into the back of the
magazine.
Nail feeder (B)
(5) Separate the push lever from the
workpiece.
Next, point the nailer downward, pull the
trigger and then wait in that position for
5 seconds or longer.
䡺 THE NAILER MUST NOT OPERATE.
Pull trigger
(6) Without touching the trigger, depress the
push lever against the workpiece.
Pull the trigger.
䡺 THE NAILER MUST OPERATE.
24
Magazine
(2) Slide the nail strip forward in the
magazine.
Page 25

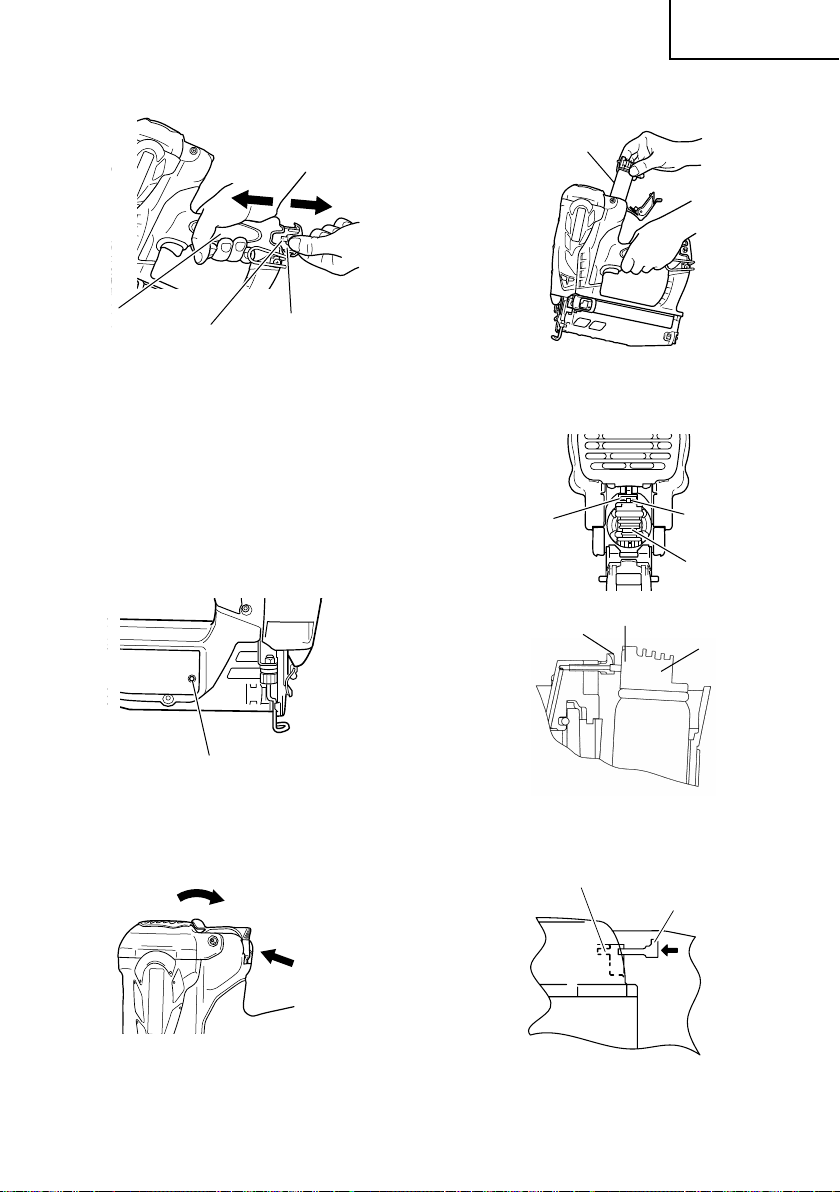
(3) Push the nail feeder (A) to engage the nail
feeder (B) to the nail strip.
English
3
Nail feeder (B)
Nail feeder (A)
NOTE:
䢇 Quietly push the nail feeder (A) and nail
feeder (B) against the nail.
If the nail feeder (A) and nail feeder (B)
are released from backward the
magazine and bumped against the nail,
the connecting adhesive of the nail can
be damaged.
䢇 Use nail strip of more than 10 nails.
䢇 Use an unbroken nail strip with nails of
all the same length.
The Nailer is now ready to operate.
Removing the nails:
1 Pull the nail feeder (B) backward.
2 Return the nail feeder (B) forward quietly
while pushing the nail feeder (A).
3 Pull out nails from the back of the
magazine.
1
Nails
<NT50GS>
(1) Lightly press the stop lever and gently
pull out the magazine cover.
Press
Pull out
Magazine cover
Stop lever
(2) Set nail strip into the magazine and keep
the points of nails in contact with Groove.
Nail strip
Magazine
Groove
2
Nail feeder (B)
Nail feeder (A)
NOTE:
䢇 The nails shown in page 17 can be loaded
onto the side guide groove of the
magazine without any adjustment.
Always keep the points of nails in contact
with Groove.
25
Page 26
English
Magazine
Side guide
groove
Nail
Gap
Groove
(3) Slide the nail strip into the blade guide.
Nail strip
Blade guide
120°F MAX
(50°C)
䢇 Never use in
presence of
flammable
liquids or gases.
䢇 Do not touch
around the
exhaust outlet
with bare hands.
The push lever
and nose will
become hot and
get heated up
after prolonged
or rapid use.
䢇 Explosion and fire
hazard.
Keep away from
sunshine and
from temperature
exceeding 120°F
(50°C).
䢇 Keep away from
ignition source.
䢇 No smoking.
(4) Confirm that nail strip is placed with side
guide grooves and Groove properly, then
push the magazine cover forward to be
latched.
NAILER OPERATION
Read section titled “SAFETY”(pages 5 – 12).
DANGER
䢇 Operators and
others in work
area MUST wear
safety glasses
with side shields
which conforms
to ANSI Z87.1
specifications.
26
WARNING
䢇 NEVER point tool
at yourself or
others in work
area.
䢇 Keep fingers
AWAY from
trigger when not
driving nails to
avoid accidental
firing.
䢇 Use outside or
well–ventilated
area.
䢇 Do not inhale its
contents.
Page 27
English
䢇 Do not use the
electrical cord if
damaged.
Have it repaired
immediately.
䢇 Never place your
face, hands or
feet closer than 8
inches (200 mm)
from firing head
when using.
䢇 Do not drive nails on the top of other
nails or with Nailer at too steep of an
angle; nails can ricochet and hurt
someone.
䢇 Do not drive nails into thin boards or
near corners and edges of workpiece.
Nails can be driven through or away
from workpiece and hit someone.
䢇 Never drive nails from both sides of a
wall at the same time. Nails can be
driven into and through the wall and
hit a person on the opposite side.
䢇 Never use Nailer which is defective or
operating abnormally.
䢇 Do not use Nailer as hammer.
䢇 Disconnect battery and fuel cell from
Nailer when:
1) it is not in use;
2) leaving work area;
3) moving it to another location; and
4) handing it to another person.
䢇 Be careful of unwanted fastener.
If pulling the trigger more when not
driving nail at the temperature below
30°F (0°C), an wanted fastener will be
driven.
This Nailer is equipped with a FULL
SEQUENTIAL ACTUATION MECHANISM.
Explanation of FULL SEQUENTIAL
ACTUATION MECHANISM nailing operation;
First, press the push lever against the
workpiece;
next, pull the trigger to drive a nail.
NT65GS, NT65GA, NT65GB employ a
preventive mechanism for unloaded
operation.
NT65GS, NT65GA, NT65GB enter a state
where the push lever cannot be pushed up.
This takes place when the magazine is not
loaded with nails or when the remaining
number of nails becomes less than 6 or 9.
CAUTION
䢇 Use caution not to throw the push
lever tip onto wood when the push
lever cannot be pushed up.
METHODS OF OPERATION
CAUTION
䢇 Squeeze the push lever when drive a
nail, otherwise the piston can not
return correctly.
䢇 Make sure the nailing depth when the
temperature is above 104°F (40°C) or
below 32°F (0°C).
䢇 Using the tool for an extended period
may lead to oil around the exhaust
outlet or nose, resulting in spattering.
To ensure that the material to be
nailed stays clean, wipe off any oil
that gets on the tool.
This Nailer is equipped with the push lever
and does not operate unless the push lever
is depressed (upward position).
It is intermittent operation (Trigger fire) only.
1 Position the nail outlet on the
workpiece with finger off the trigger.
2 Depress the push lever firmly until
it is completely depressed.
3 Pull and squeeze the trigger to drive
a nail.
4 Remove finger from the trigger.
To continue nailing in a separate
location, move the nailer along the
wood, repeating steps 1 - 4 as
required.
3
2
Push lever
Trigger
27
Page 28
English
ADJUSTING THE NAILING
DEPTH
To assure that each nail penetrates to the
same depth, be sure that the Nailer is always
held firmly against the workpiece.
If nails are driven too deep or shallow into
the workpiece, adjust the nailing in the
following order.
1 Remove the fuel cell and the battery from
the Nailer.
Fuel cell
Battery
2 If nails are driven too deep, turn the
adjuster to the shallow side.
Adjustments are in half-turn increments.
5 Remove the fuel cell and the battery from
the Nailer.
6 Choose a suitable position for adjuster.
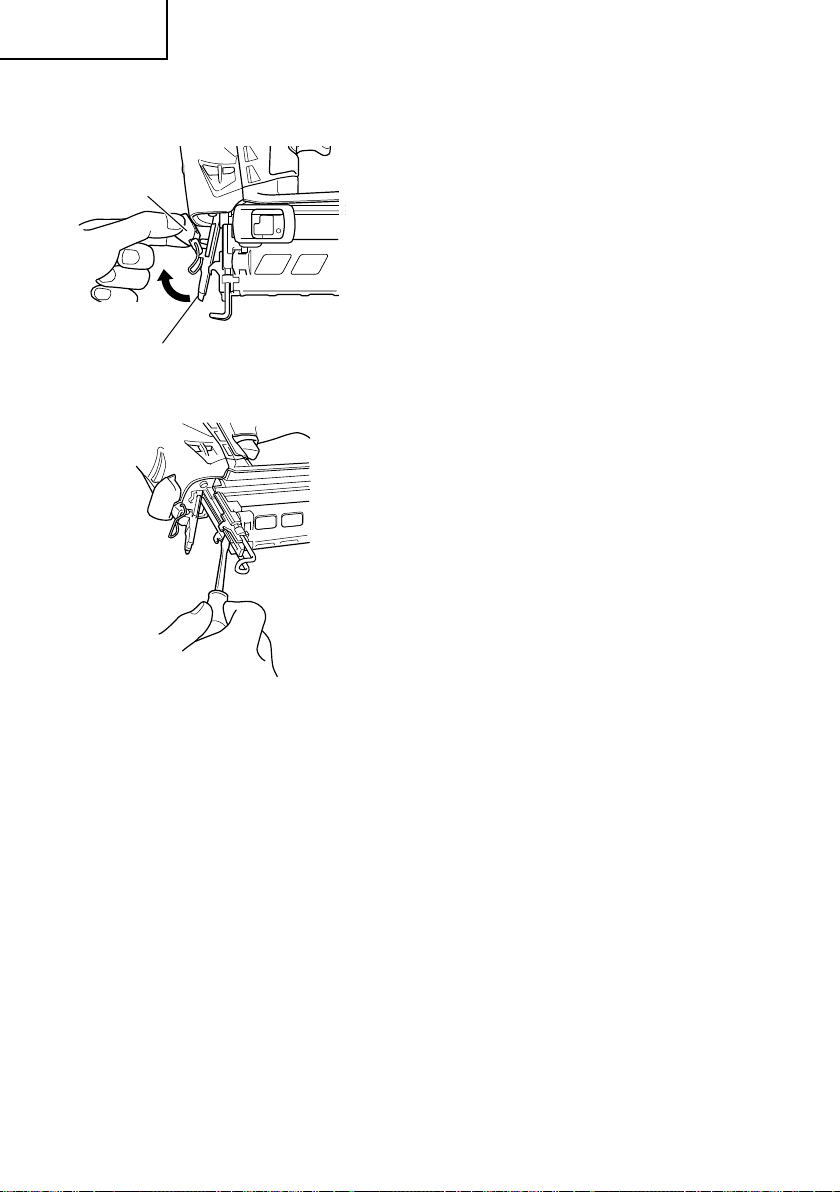
USING THE HOOK
CAUTION
䢇 If the tool falls, there is a risk that
malfunction and/or physical damage
can occur.
It is recommended that you also use
fall–preventing wires, etc.
䢇 Incomplete installation of the hook
may result in bodily injury when used.
Hook can be installed on the left or right side.
(1) Securely hold the main unit and
remove the screw using a screwdriver.
2
Too Deep
2
Too Shallow
If nails are driven too shallow, turn the
adjuster to the deep side.
3 Stop turning the adjuster when a suitable
position is reached for a nailing test.
4 Connect the fuel cell and the battery to
the Nailer.
ALWAYS WEAR SAFETY GLASSES.
Perform a nailing test.
28
Turn Adjuster
Turn Adjuster
Flush
Flush
(2) Remove the hook and hook plate.
(3) Install the hook on the other side and
securely fasten with screw.
Page 29

USING THE NOSE CAP
WARNING
䢇 When attaching or detaching the nose
cap, be sure to remove your finger
from the trigger and remove the fuel
cell and the battery from the nailer.
If you like to protect the surface of workpiece
against scratches or markings made by the
push lever, attach the accessory nose cap to
the push lever.
1 Remove the fuel cell and the battery from
the nailer.
2 Put the nose cap to the toe of the push
lever.
3 The nose cap is marked to indicate the
exit point of the nail, making alignment
easier.
4 When not using the nose cap, secure in
the storage compartment located on the
reverse side of the magazine.
Nose Cap
English
Nose Cap
Magazine
NT65GS, NT65GA, NT65GB
Push Lever
Nose Cap
Nose Cap
Magazine
NT50GS
NOTE:
䢇 The nose cap may reduce nailing depth
due to its thickness. Re-adjustment of
nailing depth is required.
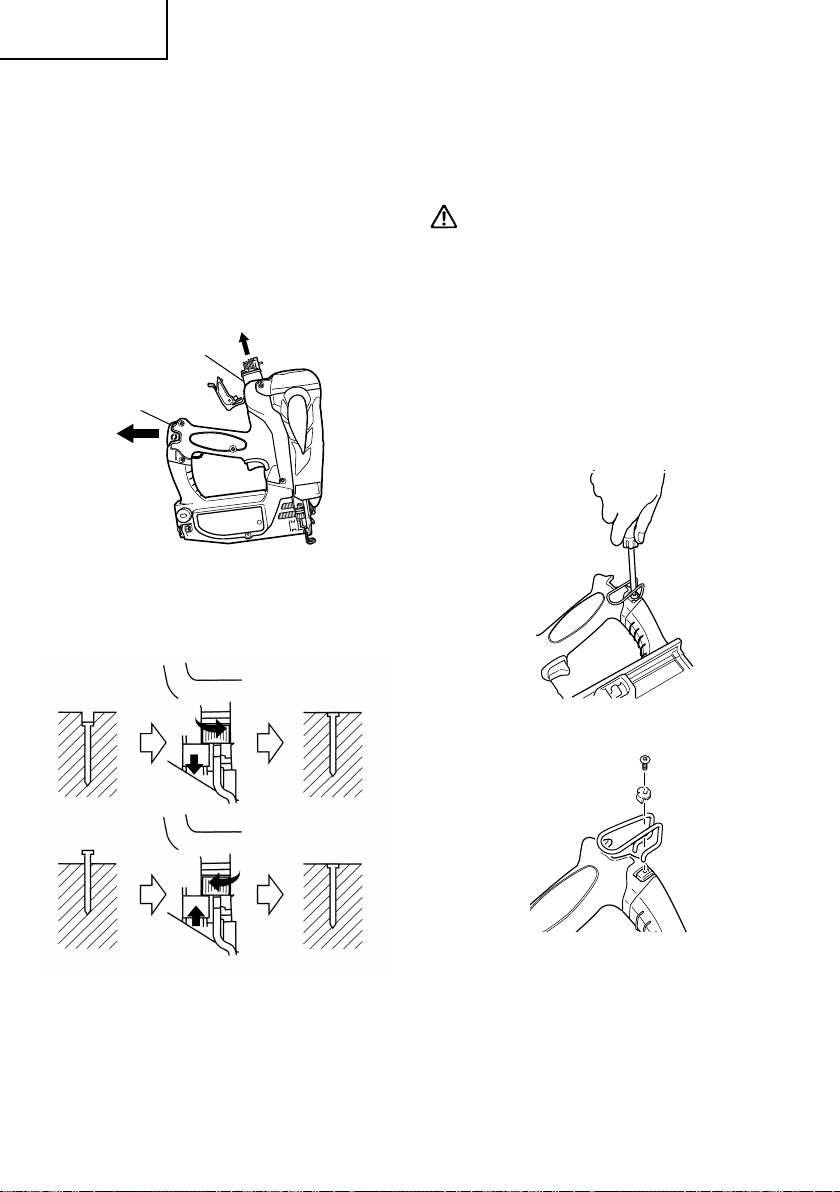
CLEARING A JAM
If nails are jammed in firing head, remove it,
and adjust the nailing in the following order.
2
Push Lever
CAUTION
䢇 Remove the fuel cell and the battery
from the Nailer.
1 Remove the fuel cell and the battery from
the Nailer.
2 Remove all nails.
29
Page 30
English
3 Release the lock lever and open guide
plate.
Lock lever
3
Guide Plate
4 Remove the jammed nail with a slotted-
head screwdriver.
5 Close guide plate and latch.
NOTE:
䢇 In case of frequent jam, contact a Hitachi
authorized service center.
30
Page 31

MAINTENANCE
English
NOTE:
The information contained in this Manual is designed to assist you in the safe
maintenance of the Nailer.
Some illustrations in this Manual may show details or attachments that differ
from those on your own Nailer.
MAINTENANCE AND
INSPECTION
<Nailer>
Read section titled “SAFETY” (pages 5 – 12).
DANGER
䢇 Never use and
test in presence
of flammable
liquids or gases.
䢇 Keep away from
ignition source.
䢇 No smoking.
WARNING
䢇 Remove fuel cell, battery and all nails
from Nailer when:
1) doing maintenance and inspection;
and
2) clearing a jam.
1. Inspecting the magazine
1 REMOVE FUEL CELL and BATTERY.
2 Clean the magazine. Remove dust and
wooden chips which may have
accumulated in the magazine. Lubricate
it with Hitachi Gas tool lubricant.
Cloth
CAUTION
䢇 Check that the nail feeder slides
smoothly by pulling it with finger.
If not smooth, nails can be driven at an
irregular angle and hurt someone.
2. Storing
DANGER
䢇 Store Nailer
properly with fuel
cell and battery
removed.
䢇 The fuel cell is an
aerosol
dispensers with
flammable
contents.
120°F MAX
(50°C)
䢇 When not in use,
the Nailer, fuel
cell and battery
should be stored
in tool case and in
a dry place.
䢇 Store indoors at
temperature
below 120°F
(50°C).
31
Page 32

English
䡬 When not in use for an extended period,
apply a thin coat of the lubricant to the
steel parts to avoid rust.
䡬 Do not store the Nailer, fuel cell and
battery in a cold weather environment.
Keep them in a warm area.
䡬 When not in use, the Nailer, fuel cell and
battery should be stored in a warm and
dry place.
Keep it out of reach of children.
3. WARNING LABEL
Change the WARNING LABEL if missing
or damaged.
A new WARNING LABEL is available from
a Hitachi authorized service center.
Warning label
4. Maintenance chart (See page 33)
5. Operator troubleshooting (See pages
33 – 34)
6. Service parts list
CAUTION
䢇 Repair, modification and inspection of
Hitachi Power Tools must be carried out
by a Hitachi Authorized Service Center.
This Parts List will be helpful if
presented with the tool to the Hitachi
Authorized Service Center when
requesting repair or other maintenance.
In the operation and maintenance of
power tools, the safety regulations and
standards prescribed in each country
must be observed.
MODIFICATIONS:
Hitachi Power Tools are constantly being
improved and modified to incorporate the
latest technological advancements.
Accordingly, some parts may be changed
without prior notice.
<Battery charger>
1. Check the Screws
Loose screws are dangerous. Regularly
inspect them and make sure they are
tight.
CAUTION
䢇 Using this battery charger with
loosened screws is extremely
dangerous.
2. Check for Dust
Dust may be removed with a soft cloth
or a cloth dampened with soapy water.
Do not use bleach, chlorine, gasoline or
thinner, for they may damage the
plastics.
3. Fuse replacement of cigarette lighter
connecting plug
CAUTION
䢇 For continued protection against risk
of fire, replace only with same type
and ratings of fuse in cigarette lighter
connecting plug.
4. Storage
Storing in a place below 104°F (40°C) and
out of the reach of children.
250V, 6A, DC
SERVICE AND REPAIRS
WARNING
䢇 Only service personnel trained by
Hitachi, distributor or employer shall
repair the Nailer.
䢇 Use only parts supplied or
recommended by Hitachi for repair.
All quality Nailers will eventually require
servicing or replacement of parts because
of wear from normal use.
NOTE:
Specifications are subject to change
without any obligation on the part of
HITACHI.
32
Page 33

English
Maintenance chart
ACTION WHY HOW
Clean magazine and feeder Prevent a jam. Blow clean daily.
mechanism.
Keep push lever working Promote operator safety and Blow clean daily.
properly. efficient Nailer operation.
Operator troubleshooting
PROBLEM CHECK METHOD CORRECTION
Nailer operates, Check for a jam. Clear a jam.
but no nail is driven.
Skipping nails. Check for proper nails. Use only recommended nails.
Intermittent feed.
Nails jam. Check for proper nails. Use only recommended nails.
Driven nail is bent.
The operation of the Push lever bent?
push lever not smooth.
Check function of nail feeder Clean and lubricate.
per page 31.
Ribbon spring weakened or Replace ribbon spring.
damaged?
Check for proper nails. Use only recommended nails.
Check if the driver blade Push the driver blade with a
piston is down or not. slotted-head screwdriver, and
put back the piston to the
highest position.
Check function of nail feeder Clean and lubricate.
per page 31.
Ribbon spring weakened or Replace ribbon spring.
damaged?
Nail feeder (B) worn or Replace nail feeder (B).
damaged?
Check for returning of piston. Pull the trigger all the way.
Too low temperature, warm
up fuel cell under 120°F (50°C).
Check for moving of piston
smoothly.
Contact Hitachi for replacement.
Replace piston ring.
Replace piston.
Replace cylinder piston ring.
Driver blade worn?
Contact Hitachi for replacement.
Nail feeder (B) worn or Replace nail feeder (B).
damaged?
Contact Hitachi for replacement.
Check push lever’s moving
Contact Hitachi for replacement.
track, debris?
33
Page 34

English
PROBLEM CHECK METHOD CORRECTION
Fan is working, light Check for returning of piston. Push the push lever all the way.
indicator shows GREEN
yet it doesn’t drive a nail
or operation unstable.
Check fuel cell, insufficient?
Check spark plug wire,
worn out?
Check spark plug, grease
or debris?
Check filter, clogged? Clean as instructed on the
Fan does not operate Magazine empty. Load more nails in the
when push lever is magazine.
pressed.
Note the color of the light If red: charge the battery.
indicator. If green: Contact Hitachi for
Unable to charge battery. ––––––––––
Too low temperature, warm
up fuel cell under 120°F (50°C).
Exchange it with a new fuel cell.
Contact Hitachi for replacement.
Contact Hitachi for replacement.
maintenance sheet.
replacement.
Check the electrical cord.
34
Page 35

Français
INFORMATION IMPORTANTE
Lire et bien assimiler toutes les étiquettes de l’outil ainsi que
toutes les instructions de fonctionnement, les consignes de
sécurité et les avertissements de ce mode d’emploi avant d’utiliser
ou d’entretenir ce cloueur.
Le non respect des avertissements pourrait entraîner la MORT
ou des BLESSURES GRAVES.
La plupart des accidents résultant de l’utilisation ou de l’entretien des cloueurs sont dus
au non respect de certaines consignes et précautions de sécurité élémentaires. Un accident
peut souvent être évité en reconnaissant une situation potentiellement dangereuse avant
qu’elle ne se produise, et en respectant les procédures de sécurité applicables.
Les consignes de sécurité élémentaires sont données dans la section “SECURITE” du
manuel et dans les sections relatives aux instructions d’utilisation et d’entretien.
Les dangers à éviter pour empêcher tout risque de blessures ou de dommage de l’outil
sont identifiés par les mots DANGER et AVERTISSEMENT, sur le cloueur et dans ce manuel.
Ne jamais utiliser ce cloueur pour des applications autres que celles qui sont spécifiées
dans ce manuel.
DEFINITION DES MOTS DE SIGNALISATION
DANGER indique une situation imminente dangereuse qui, si elle n’est pas évitée,
entraînera la mort ou des blessures graves.
AVERTISSEMENT indique une situation potentiellement dangereuse qui, si elle n’est
pas évitée, risque d’entraîner la mort ou des blessures graves.
ATTENTION indique une situation potentiellement dangereuse qui, si elle n’est pas
évitée, risque d’entraîner des blessures légères ou modérées, ou
d’endommager l’outil.
REMARQUE met en relief les informations essentielles.
EXPLICATION DE L’ACTION DE CLOUAGE DU CLOUEUR HITACHI
䡬 Cet outil dispose d’un MÉCANISME DE DÉCLENCHEMENT SÉQUENTIEL COMPLET.
Appuyer tout d’abord le levier-poussoir contre la pièce, puis tirer sur la gâchette pour
enfoncer le clou. Procéder de la même façon pour continuer à enfoncer des clous.
35
Page 36

Français
SECURITE
CONSIGNES DE SECURITE IMPORTANTES
POUR L’UTILISATION DU CLOUEUR
LIRE TOUTES CES INSTRUCTIONS
Ce cloueur est alimenté par un dispositif à combustion interne. Il ne
doit être utilisé qu’avec les distributeurs de gaz combustible
mentionnés dans le présent mode d’emploi.
DANGER
1. LES OPÉRATEURS ET LES AUTRES PERSONNES DANS L’AIRE DE TRAVAIL DOIVENT
PORTER DES LUNETTES DE PROTECTION AVEC VISIÈRES LATÉRALES.
Quand on utilise le cloueur, toujours porter des lunettes de protection
avec visières latérales, et veiller à ce que les autres personnes dans la
zone de travail en portent également.
Les lunettes de protection devront respecter les exigences de l’ANSI
(American National Standards Institute) Z87.1 et assurer la protection
contre les projections de particules arrivant par l’avant et par le côté.
L’employeur doit veiller à ce que la personne qui utilise le cloueur et
les autres personnes dans l’aire de travail portent des lunettes de
protection.
2. NE JAMAIS UTILISER EN PRÉSENCE DE LIQUIDES OU DE GAZ INFLAMMABLES.
3. NE PAS TOUCHER LES ENVIRONS DE LA SORTIE D’ÉCHAPPEMENT.
36
Ce cloueur ne doit pas servir dans un milieu combustible ou en
présence de liquides ou de gaz inflammables, p. ex. de la laque, de la
peinture, du benzène, du diluant ou de l’essence.
En cours de fonctionnement, le cloueur produit des gaz d’échappement
chauds et des étincelles qui peuvent enflammer les matériaux.
Ce cloueur produit des gaz d’échappement chauds qui peuvent
enflammer les matériaux.
Le bras de contact et le bec s’échauffent lors d’un usage prolongé ou
rapide.
Ne pas toucher avec les mains nues.
Page 37

SECURITE — suite
DANGER
Français
4. DANGER D’EXPLOSION ET D’INCENDIE.
120°F MAX
(50°C)
La pile à combustible ou la pile pourrait éclater et libérer un gaz
inflammable.
Il ne faut ni percer, ni brûler le contenant, même après usage.
Ne pas incinérer, remplir, récupérer ou recycler la pile à combustible.
Ne pas diffuser en direction d’une flamme nue ou d’une matière
incandescente quelconque.
Garder à l’écart des sources d’inflammation — ne pas fumer.
Ranger hors de portée des enfants.
La pile à combustible est un générateur d’aérosol
au contenu inflammable.
Le contenant sous pression et le propulseur
doivent demeurer dans la pile à combustible.
Le non-respect des instructions peut provoquer
une explosion ou un incendie.
Garder le cloueur, la pile à combustible et la pile
à l’abri des rayons du soleil et des températures
supérieures à 120°F (50°C).
AVERTISSEMENT
5. NE JAMAIS DIRIGER L’OUTIL VERS SOI
NI VERS QUELQU’UN D’AUTRE DANS
L’AIRE DE TRAVAIL.
Si l’on enfonce des clous par erreur, cela
risque de provoquer des blessures
graves.
Ne jamais s’amuser avec le cloueur.
Le cloueur est un instrument de travail.
Le respecter.
6. NE PAS APPROCHER LES DOIGTS DE LA
GÂCHETTE QUAND ON N’EFFECTUE
PAS DE CLOUAGE POUR ÉVITER TOUT
RISQUE DE DÉCLENCHEMENT
ACCIDENTEL.
Toujours supposer que le
cloueur renferme des
clous.
Ne jamais diriger le
cloueur vers soi ni vers
quelqu’un d’autre, qu’il
renferme des clous ou
non.
Ne jamais transporter l’outil avec le doigt
sur la gâchette, car on risquerait
d’enfoncer accidentellement un clou et
de se blesser ou de blesser quelqu’un
d’autre.
Toujours transporter le cloueur
exclusivement par sa poignée.
7. TOUJOURS PORTER DES PROTECTIONS
ANTI-BRUIT ET UN CASQUE.
Toujours porter des protections anti-bruit
pour ne pas s’endommager l’ouïe.
Toujours porter un casque pour se
protéger la tête contre les projectiles.
8. UTILISER À L’EXTÉRIEUR OU DANS DES
LIEUX BIEN VENTILÉS.
Ce cloueur rejette du
monoxyde de carbone,
nocif par inhalation.
Le cloueur ne doit pas
servir dans des espaces
clos ou mal ventilés.
Ne pas inhaler.
37
Page 38

Français
SECURITE — suite
AVERTISSEMENT
9. FAIRE FONCTIONNER DANS LA PLAGE
DE TEMPÉRATURE APPROPRIÉE.
L’environnement de fonctionnement de
cet appareil se situe entre 32°F (0°C) et
104°F (40°C); veiller à l’utiliser dans cet
intervalle de températures.
L’appareil est susceptible de mal
fonctionner à une température inférieure
à 32°F (0°C) ou supérieure à 104°F (40°C).
10. RANGER LE CLOUEUR
CORRECTEMENT, AVEC LA PILE À
COMBUSTIBLE ET LA PILE SORTIES.
120°F MAX
(50°C)
dépasse pas 120°F (50°C).
Garder le cloueur, la pile à combustible
et la pile à l’abri des rayons directs du
soleil et non dans un véhicule.
Ranger hors de portée des enfants.
Verrouiller la zone de rangement.
11. MAINTENIR L’AIRE DE TRAVAIL
PROPRE.
Une aire encombrée invite les blessures.
Enlever tous les outils inutiles, débris,
meubles, etc. de l’aire de travail.
12. ELOIGNER LES VISITEURS.
Ne pas laisser les visiteurs manipuler le
cloueur.
Tous les visiteurs devront rester en
dehors de l’aire de travail.
13. PORTER UN HABILLEMENT APPROPRIE.
Ne porter ni vêtements lâches ni bijoux
qui pourraient se prendre dans les pièces
en mouvement.
Porter des gants de caoutchouc et des
chaussures solides si l’on travaille
dehors.
Si l’on a les cheveux longs, les maintenir
serrés dans un couvre-chef.
38
Lorsqu’ils ne servent
pas, ranger le cloueur,
la pile à combustible
et la pile dans une
boîte à outils et dans
un endroit sec.
Ranger à l’intérieur, là
où la température ne
14. VERIFIER LE LEVIER-POUSSOIR AVANT
L’UTILISATION.
Le levier poussoir et la chambre
fonctionnent ensemble dans cet appareil.
Sortir la pile à combustible et la pile, puis
s’assurer que le bras de contact
fonctionne correctement. (Le levierpoussoir est parfois appelé “sécurité”.)
Ne jamais utiliser le cloueur si le levierpoussoir ne fonctionne pas correctement.
Un clou pourrait s’enfoncer
accidentellement. Ne pas toucher au
levier-poussoir ni le retirer, car il pourrait
ne plus fonctionner.
Tirer le bouton de l’alimenteur avec
l’appareil positionné vers le haut et
appuyer sur le levier poussoir, puis
confirmer que le levier poussoir revient
bien en position originale.
Le fonctionnement du levier poussoir
devient particulièrement ardu à raisons
de températures basses et les opérations
sont susceptibles de ne pas fonctionner.
15. VEILLER A CE QUE TOUTES LES VIS ET
LES COUVERCLES SOIENT EN PLACE ET
BIEN SERRES.
Veiller à ce que les vis et les couvercles
soient solidement fixés. Les vérifier
périodiquement.
Ne jamais utiliser le cloueur si des pièces
manquent ou sont endommagées.
16. NE PAS CHARGER DE CLOUS SI LA
GACHETTE OU LE LEVIER-POUSSOIR
SONT ENFONCES.
Quand on charge des clous dans le
cloueur,
1) ne pas appuyer sur la gâchette ;
2) ne pas actionner le levier-poussoir ; et
3) diriger le cloueur vers le bas.
Page 39

SECURITE — suite
AVERTISSEMENT
Français
17. TENIR LE VISAGE, LES MAINS ET LES
PIEDS ÉLOIGNÉS DE LA TÊTE DE
CLOUAGE PENDANT L’UTILISATION.
Ne jamais approcher le visage, les mains
ou les pieds à moins de 8 po (200 mm)
de la tête de clouage.
Il y a risque de blessures graves si les
clous sont déviés par la pièce ou qu’ils
sont déportés au-delà du point d’entrée.
18. PLACER LE CLOUEUR CORRECTEMENT
SUR LA PIECE.
Ne pas enfoncer de clous sur d’autres
clous ni avec le cloueur à un angle trop
aigu ; les clous pourraient ricocher et
blesser quelqu’un.
19. NE PAS ENFONCER DE CLOUS DANS
DES PLANCHES MINCES NI PRES DES
COINS ET DES BORDS DE LA PIECE.
Les clous pourraient traverser la pièce ou
s’enfoncer ailleurs que dans la pièce et
blesser quelqu’un.
20. NE JAMAIS ENFONCER DE CLOUS DES
DEUX COTES D’UN MUR EN MEME
TEMPS.
Les clous pourraient traverser le mur et
blesser quelqu’un de l’autre côté.
21. VERIFIER S’IL Y A DES FILS SOUS
TENSION.
Pour éviter tout risque d’électrocution
grave, vérifier s’il y a des fils sous tension
dissimulés dans le mur, le plancher ou le
plafond. Couper le disjoncteur pour
s’assurer qu’il n’y a pas de fils sous
tension.
22. NE PAS TROP SE PENCHER.
Conserver une bonne assise et un bon
équilibre à tout moment.
23. NE JAMAIS UTILISER UN CLOUEUR
DEFECTUEUX OU QUI NE FONCTIONNE
PAS NORMALEMENT.
Si le cloueur semble ne pas fonctionner
comme d’habitude, qu’il fait des bruits
bizarres ou qu’il semble défectueux,
cesser immédiatement de l’utiliser et le
faire réparer par un service après-vente
Hitachi agréé.
24. SORTIR LA PILE À COMBUSTIBLE ET LA
PILE DU CLOUEUR QUAND:
1) on entretient ou inspecte le cloueur ;
2) on retire des clous coincés ;
3) on ne s’en sert pas ;
4) on quitte l’aire de travail ;
5) on le transporte dans un autre endroit ; et
6) on le passe à quelqu’un d’autre.
Ne jamais essayer de retirer des clous
coincés ou de réparer le cloueur à moins
d’avoir extrait la pile à combustible et la
pile du cloueur, ainsi que tous les clous
restants.
Ne jamais s’éloigner du cloueur car des
personnes non familiarisées avec son
fonctionnement pourraient le manipuler
et se blesser.
25. RESTER SUR SES GARDES.
Regarder ce que l’on fait. Faire preuve de
bon sens. Ne pas utiliser le cloueur
lorsqu’on est fatigué.
Ne jamais utiliser le cloueur si l’on est
sous l’influence de médicaments,
d’alcool ou de toute autre substance
soporifique.
26. MANIPULER LE CLOUEUR
CORRECTEMENT.
Utiliser le cloueur en suivant les
instructions du manuel.
Ne jamais permettre que le cloueur soit
utilisé par des enfants, des personnes
non familiarisées avec son
fonctionnement ou des personnes non
autorisées.
27. NE JAMAIS UTILISER LE CLOUEUR
POUR DES APPLICATIONS AUTRES QUE
CELLES QUI SONT SPECIFIEES DANS CE
MANUEL.
39
Page 40

Français
SECURITE — suite
AVERTISSEMENT
28. MANIPULER LE CLOUEUR AVEC
PRECAUTION.
Ne pas faire tomber le cloueur ni le
heurter contre des surfaces dures et ne
pas le rayer ni graver des inscriptions
dessus. Manipuler le cloueur avec
précaution.
29. ENTRETENIR SOIGNEUSEMENT LE
CLOUEUR.
Veiller à ce que le cloueur soit toujours
propre et graissé pour obtenir un
fonctionnement optimal et en toute
sécurité.
30. UTILISER EXCLUSIVEMENT DES
PIECES, ACCESSOIRES OU CLOUS
FOURNIS OU RECOMMANDES PAR
HITACHI.
Des pièces, accessoires ou clous non
autorisés pourraient annuler la garantie,
entraîner un mauvais fonctionnement et
provoquer des blessures.
Les réparations du cloueur seront
confiées exclusivement au personnel
d’entretien formé par Hitachi, au
distributeur ou à l’employeur.
31. NE JAMAIS MODIFIER NI ALTÉRER UN
CLOUEUR.
Cela pourrait provoquer un mauvais
fonctionnement et entraîner des
blessures physiques.
40
Page 41

SECURITE — suite
CONSIGNES DE SÉCURITÉ IMPORTANTES
À L’ÉGARD DE LA PILE À COMBUSTIBLE
LIRE TOUTES CES INSTRUCTIONS
DANGER
La pile à combustible, le combustible et le propulseur sont
inflammables sous pression.
Danger d’explosion / d’incendie
Un non-respect de toutes les instructions peut occasionner un
incendie et une explosion lorsqu’on manipule des distributeurs
de gaz combustible en vue de les stocker, de les transporter, de
les insérer dans l’outil, de les en sortir et de les éliminer.
Ne pas fumer pendant qu’on manipule la pile à combustible.
Français
120°F MAX
(50 °C)
AVERTISSEMENT
Ne pas inhaler le contenu.
En cas d’inhalation, il faut emmener la personne touchée au
grand air et la mettre dans une position confortable.
Les gaz en expansion causent de basses températures.
Les gaz fluides peuvent blesser au contact de la peau ou des yeux.
En cas de contact cutané, laver soigneusement la surface de
contact à l’eau chaude et au savon, sécher, puis appliquer une
crème pour la peau.
En cas de contact oculaire, rincer les yeux ouverts à l’eau
courante.
Contacter un médecin si nécessaire.
Ranger dans un lieu bien ventilé.
Ne pas ranger à plus de 120°F (50°C) (p. ex. à la lumière directe du
soleil ou dans un véhicule).
Ne pas exposer à une flamme nue et à des étincelles.
Ne pas perforer ou ouvrir la pile à combustible.
Ne pas remplir, récupérer ou recycler la pile à combustible.
Éliminer en conformité avec la réglementation locale sur les produits
aérosol.
Ne pas jeter la pile à combustible avec d’autres déchets à recycler.
Ranger hors de portée des enfants.
41
Page 42

Français
SECURITE — suite
CONSIGNES DE SÉCURITÉ
IMPORTANTES
POUR LE CHARGEUR DE
BATTERIE
AVERTISSEMENT
Une utilisation incorrecte ou dangereuse des
chargeurs de batterie peut entraîner la mort
ou des blessures graves:
LIRE TOUT CE MODE D'EMPLOI
1. Ce manuel renferme des instructions de
sécurité et de fonctionnement
importantes pour les chargeurs de
batterie modèles UC3SML.
2. Avant d’utiliser le chargeur de batterie,
lire toutes les étiquettes d’instruction et
de précaution apposées sur (1) le
chargeur de batterie, (2) la batterie, et (3)
le produit utilisant la batterie.
3. Pour réduire tout risque de blessures,
recharger des batteries rechargeables
HITACHI type EBM315. Les autres types
de batterie pourraient exploser et
provoquer des blessures ou des
dommages.
4. Ne pas exposer le chargeur à la pluie ni
à la neige.
5. L’utilisation d’un accessoire non
recommandé ou non vendu par le
fabricant du chargeur de batterie risque
de provoquer un feu, une décharge
électrique ou des blessures.
6. Pour réduire tout risque de dommage de
la fiche et du cordon électrique,
débrancher le cordon du chargeur en
tirant sur la fiche.
7. Vérifier que le cordon est placé de façon
que personne ne puisse marcher dessus,
se prendre les pieds dedans, ni
l’endommager ou le soumettre à des
contraintes.
8. Ne pas utiliser de cordon de rallonge si
cela n’est pas absolument nécessaire.
L’utilisation d’un cordon de rallonge
incorrect pourrait entraîner un feu ou une
décharge électrique. Si l’on doit utiliser
un cordon de rallonge, s’assurer que:
a. Les broches de la rallonge ont les
mêmes numéro, taille et forme que
celles de la fiche du chargeur ;
b. Le cordon de rallonge est
correctement raccordé et en bon état
électrique ;
c. Le calibre du fil doit être au moins
suffisant pour l’intensité nominale CA
(ampères) du chargeur de batterie
spécifiées dans le tableau ci-dessous.
CALIBRE MINIMUM RECOMMANDÉ POUR LES
DES CHARGEURS DE BATTERIE
Intensité nominale
d’entrée CA (ampères)
Egal ou mais non
supérieur à inférieur à
021818 18 16
231818 16 14
341818 16 14
* Si l’intensité nominale d’entrée du
chargeur de batterie est donnée en watts
et non en ampères, calculer la capacité
en ampères correspondante en divisant
la capacité en ampères par la capacité de
tension, par exemple:
9. Ne pas utiliser le chargeur si son cordon
ou sa fiche sont endommagés - Le
remplacer immédiatement.
10. Ne pas utiliser le chargeur s’il a reçu un
coup, s’il est tombé ou endommagé de
toute autre manière. L’apporter à un
réparateur qualifié.
Tableau 1
CORDONS DE RALLONGE
*
25 (7.5) 50 (15) 100 (30) 150 (45)
1,250 watts
125 volts
Calibre du cordon
Longueur de cordon
en pieds (mètres)
=
10 ampères
42
Page 43

SECURITE — suite
Français
11. Ne pas démonter le chargeur ni le produit
qui reçoit la batterie; si un entretien ou
des réparations sont nécessaires, les
apporter à un réparateur qualifié. Un
remontage incorrect pourrait provoquer
une décharge électrique ou un feu.
12. Pour réduire tout risque de décharge
électrique, débrancher le chargeur de la
prise secteur avant tout entretien ou
nettoyage. Il ne suffit pas de sortir la
batterie.
13. Ce chargeur de batterie pourra être fixé
comme accessoire standard sur les outils
HITACHI alimentés sur batterie. Dans ce
cas, vérifier le mode d’emploi de l’outil
HITACHI alimenté sur batterie avant
d’utiliser le chargeur de batterie.
CONSIGNES DE SÉCURITÉ
IMPORTANTES POUR
L’UTILISATION DE LA
BATTERIE ET DU CHARGEUR
DE BATTERIE
Pour utiliser le cloueur, il faut d’abord
charger la pile. Avant d’utiliser les chargeurs
de batterie modèles UC3SML, bien lire toutes
les instructions et les précautions spécifiées
sur le chargeur, sur la borne de la batterie et
dans ce manuel.
BIEN NOTER: UTILISER EXCLUSIVEMENT
DES PILES HITACHI DE TYPE EBM315
L’UTILISATION D’AUTRES TYPES DE
BATTERIES RISQUE DE PROVOQUER UNE
EXPLOSION ET DE CAUSER DES
BLESSURES!
Pour éviter tout risque de blessure, observer
les consignes suivantes:
AVERTISSEMENT
䢇 Une utilisation incorrecte de la batterie
ou du chargeur de batterie risque de
provoquer des blessures. Pour éviter
tout risque de blessure:
1. NE JAMAIS démonter la batterie.
2. NE JAMAIS jeter la batterie au feu,
même si elle est
endommagée ou
complètement usée. La
batterie risque d’exploser au
feu.
3. NE JAMAIS court-circuiter la batterie.
4. NE JAMAIS insérer d’objets dans les
ouïes d’aération du
chargeur. Il pourrait en
résulter un choc électrique
ou des dommages du
chargeur.
5. NE JAMAIS effectuer la recharge à
l’extérieur. Eloigner la
batterie des rayons directs
du soleil et utiliser
exclusivement dans des
endroits à faible humidité et
bien aérés.
6. NE JAMAIS effectuer la recharge si la
température est inférieure à
50°F (10°C) ou supérieure à
104°F (40°C).
7. NE JAMAIS raccorder deux chargeurs
de batterie ensemble.
8. NE JAMAIS insérer de corps étrangers
dans l’orifice de la batterie
ou du chargeur de batterie.
9. NE JAMAIS utiliser de transformateurélévateur pour la recharge.
10. NE JAMAIS utiliser de générateur de
moteur ni d’alimentation CC
pour la recharge.
11. NE JAMAIS ranger la batterie ni le
chargeur de batterie dans
un lieu où la température
peut atteindre ou dépasser
104°F (40°C).
12. TOUJOURS alimenter le chargeur sur
une prise secteur
domestique standard (120
volts). L’utilisation du
chargeur à une autre
tension peut entraîner une
surchauffe et endommager
le chargeur.
43
Page 44

Français
SECURITE — suite
13. TOUJOURS attendre au moins 15
minutes entre deux
recharges pour éviter toute
surchauffe du chargeur.
14. TOUJOURS débrancher le cordon
d’alimentation de la prise
secteur lorsqu’on ne se sert
pas du chargeur.
PRÉCAUTIONS À RESPECTER
LORS DE L’UTILISATION DU
CHARGEUR DE BATTERIE AVEC
UNE SOURCE
D’ALIMENTATION 12 V CC
EMBARQUÉE
1. Utilisez correctement le chargeur de
batterie.
Utilisez uniquement une source
d’alimentation 12 V CC embarquée pour
le chargeur de batterie.
Le chargeur de batterie doit uniquement
être utilisé dans les véhicules à masse
négative. Vérifiez que la borne négative
de la batterie du véhicule est relié à la
carrosserie.
2. Restez toujours concentré sur la route.
Si vous utilisez le chargeur de batterie
alors que vous êtes au volant, fixez le
chargeur de batterie de manière à ce qu’il
ne puisse pas bouger à l’improviste en
vous distrayant. Ne placez pas la batterie
ou son chargeur sous le siège du
conducteur, même si aucun chargement
est en cours. L’appareil risque de glisser
sous la pédale de frein, ou le câble risque
de s’entortiller autour des pieds du
conducteur, risquant ainsi de provoquer
un accident.
3. Ne manipulez pas la batterie ou son
chargeur lorsque vous êtes au volant :
vous risquez de provoquer un accident.
4. Ne laissez pas la batterie ou son chargeur
à portée des enfants ; ceci pourrait
entraîner une situation dangereuse.
5. Utilisez uniquement le câble fourni.
L’utilisation d’un câble différent peut
entraîner une surchauffe pouvant aboutir
à un incendie ou un accident.
6. Pendant le chargement, ne placez pas le
chargeur de batterie sur une housse de
siège de type couverture ou sur un tapis
de sol : la surchauffe risque d’entraîner
un incendie ou un accident.
7. N’exposez pas le chargeur de batterie à
la lumière directe du soleil pendant le
chargement, sous peine de provoquer un
incendie.
8. Ne laissez pas le véhicule sans
surveillance pendant le chargement.
MISE AU REBUT D’UNE
BATTERIE USÉE
AVERTISSEMENT
䢇 Ne pas jeter la batterie usée aux
ordures ménagères. La batterie risque
d’exploser si elle est incinérée.
L’appareil que vous avez acheté
renferme une batterie rechargeable. La
batterie est recyclable. Lorsqu’elle a
atteint sa limite de service, selon les
lois des états et les lois locales, il peut
être illégal de jeter cette batterie aux
ordures ménagères. Vérifier auprès de
son service de ramassage d’ordures les
options de recyclage et la procédure
correcte de mise au rebut.
RESPONSABILITES DE
L’EMPLOYEUR
1. Veiller à ce que ce MANUEL reste à la
disposition des personnes qui doivent
utiliser ou entretenir le cloueur.
2. Veiller à ce que les cloueurs soient utilisés
exclusivement lorsque les opérateurs et
les autres personnes présentes dans
l’aire de travail portent des LUNETTES
DE PROTECTION.
44
Page 45

SECURITE — suite
3. Obliger les opérateurs et les autres
personnes présentes dans l’aire de travail
à porter des LUNETTES DE
PROTECTION.
4. Maintenir les cloueurs en bon ordre de
marche.
5. Entretenir les cloueurs correctement.
6. Veiller à ce que les cloueurs qui ont
besoin d’être réparés ne soient plus
utilisés avant d’être réparés.
CONSERVER CES INSTRUCTIONS
LES METTRE A LA DISPOSITION
DES AUTRES UTILISATEURS
Français
ET
ET
PROPRIETAIRES DE CET OUTIL!
45
Page 46

Français
UTILISATION
REMARQUE :
Les informations contenues dans ce manuel ont pour but d’aider l’opérateur à
utiliser le cloueur en toute sécurité.
Certaines des illustrations du manuel peuvent montrer des détails ou des
accessoires qui diffèrent de ceux de votre cloueur.
NOM DES PIÈCES
1. Cloueur gaz de finition
<NT65GS>
Couvercle supérieur
Bombage
P
iston
Lame
d’entraînement
Tête de
clouage
(sortie)
Bras de
contact
Actionneur
Poignée
Détente
Alimenteur
de clous (B)
Magasin
Batterie
Crochet
<NT65GA>
Couvercle supérieur
Bombage
P
iston
Lame
d’entraînement
Tête de
clouage
(sortie)
Bras de contact
Actionneur
Poignée
Magasin
Alimenteur
de clous (B)
Batterie
Détente
<NT65GB>
Couvercle
supérieur
Bombage
P
iston
Lame
d’entraînement
Tête de
clouage
(sortie)
Bras de contact
46
Actionneur
Poignée
Détente
Alimenteur
de clous (B)
䡬 Batterie (EBM315)
Orifice de prise
Batterie
Plaque
signalétique
Crochet
Magasin
Bouton de libération de la batterie
Page 47

2. Cloueuse à essence avec clous à tête perdue
<NT50GS>
Actionneur
Couvercle supérieur
Français
Bombage
P
iston
Lame d’entraînement
Tête de
clouage (sortie)
Bras de
contact
3. Chargeur de batterie (UC3SML)
Détente
Sangle
Poignée
Batterie
Crochet
Bras d’arr
Couvercle de magasin
Magasin
Orifice d’installation de la batterie
êt
Fiche de connexion du chargeur
Cordon
Fiche de connexion de
l’allume-cigare
Prise
Lampe témoin
Plaque signalétique
(sur le côté inférieur)
Fiche de connexion du chargeur
Cordon
Adaptateur CA
47
Page 48

Français
SPECIFICATIONS
1. Cloueur gaz de finition
Modèle NT65GS NT65GB NT65GA
Dimensions 10-1/4" × 11" × 3-3/8" 10-5/8" × 11-1/8" × 3-3/8" 12" × 12" × 5"
Longueur × Hauteur × Largeur
Poids 3.7 lbs. (1.7 kg) 4.2 lbs. (1.9 kg)
Comprend une batterie et
une pile à combustible
Contenance de clous 100 clous (2 bandes) 100 clous (1 bande)
Vitesse du cycle
Batterie
Pile à combustible Type No. 728-981……vendue séparément
2. Cloueuse à essence avec clous à tête perdue
Modèle NT50GS
Dimensions 10-5/8" × 11-1/8" × 3-3/8"
Longueur × Hauteur × Largeur (270 mm × 281 mm × 85 mm)
Poids 3.7 lbs. (1.7 kg)
Comprend une batterie et une
pile à combustible
Contenance de clous 100 clous (1 bande)
Vitesse du cycle
Batterie
Pile à combustible Type No. 728-981……vendue séparément
(260 mm × 278 mm × 85 mm) (268 mm × 282 mm × 85 mm) (307 mm × 305 mm × 126 mm)
4.0 lbs. (1.8 kg) 4.4 lbs. (2.0 kg)
Intermittent: 2 clous par seconde
Continu: 1,000 clous par heure
EBM315 ( 1.5 Ah )
Batterie Li-ion, 3.6 V
Intermittent: 1 clou par seconde
Continu: 900 clous par heure
4.0 lbs. (1.8 kg)
Intermittent: 2 clous par seconde
Continu: 1,000 clous par heure
EBM315 (1.5 Ah)
Batterie Li-ion, 3.6 V
3. Chargeur de batterie (UC3SML)
Input power source 12V CC
Durée de recharge Environ. 60 minutes ................................... EBM315
Tension de charge ..................................... CC 3.6 V
Chargeur
Courant de charge ..................................... CC 1.5 A
Poids 0.4 lbs (0.2 kg)
REMARQUE: La durée de recharge peut varier en fonction de la température et de la
tension de la source d’alimentation.
48
Page 49

Français
SELECTION DES CLOUS
AVERTISSEMENT
䢇 Bien utiliser exclusivement les clous
HITACHI d’origine avec le NT65GS,
NT65GB, NT65GA ou le NT50GS.
L’utilisation d’autres clous risque de
provoquer un mauvais fonctionnement
de l’outil et/ou une rupture des clous,
et d’entraîner des blessures.
Dimensions des clous
<NT65GS>
Clous de finition de calibre
16 (Droit)
.110" (2.8mm)
1" (25mm)
.051" (1.3mm)
.055"
(1.4mm)
Seuls les clous indiqués dans le tableau cidessous pourront être utilisés avec ce
cloueur.
Min.
.065"
(1.65mm)
Max.
2-1/2" (65mm)
<NT65GB>
Clous de finition de calibre 16
(Angle : 20°)
.110" (2.8mm)
1-1/4" (32mm)
.051" (1.3mm)
.055"
(1.4mm)
Min.
.065"
(1.65mm)
Max.
2-1/2" (65mm)
49
Page 50

Français
<NT65GA>
Clous de finition de calibre 15
(Angle : 34°)
<NT50GS>
18 clous à tête perdue
(Droit)
.075" (1.9mm)
Min.
.12"
(3.0mm)
.045"
(1.1mm)
1-1/4" (32mm)
Min.
Max.
.095" (2.4mm)
2-1/2" (65mm)
.072" (1.8mm)
Max.
5/8" (16mm)
.043" (1.1mm)
.039"
(1mm)
50
.049"
(1.25mm)
2" (50mm)
Page 51

Français
ACCESSOIRES
DANGER
䢇 Les accessoires autres que ceux
indiqués ci-dessous risquent de mal
fonctionner et de provoquer des
blessures.
ACCESSOIRES STANDARD
1
3
4
5
6
7
ACCESSOIRES EN OPTION
vendus séparément
䡬 Pile à combustible (Code No. 728-981)
䡬 Huile de lubrification (Code No. 885-546,
No. 728-986)
䡬 Dégraisseur / Nettoyant (Code No. 728-
985)
REMARQUE: Les accessoires sont sujets à
modification sans préavis et
sans aucune obligation de la
part de HITACHI.
2
APPLICATIONS
<NT65GS, NT50GA, NT50GB>
䡬 Clouage de finition autour des portes, des
fenêtres et des bordures.
䡬 Fixation du fond de tiroirs. Fabrication de
divers boîtiers et armoires.
<NT50GS>
䡬 Ensemble d‘armoire et de cadre photo,
ornements de mobilier.
䡬 Ornements et moulures de roulotte et
caravane tractée.
MÉTHODE DE RECHARGE
REMARQUE: Avant de brancher le
chargeur dans la prise,
vérifier les points suivants :
䡬 La tension de la source
d’alimentation est indiquée
sur la plaque signalétique.
䡬 Le cordon n’est pas
endommagé.
8
1 Lunettes de sécurité ............................. 1
2 Batterie .................................................. 1
3 Chargeur ................................................1
4 Prise d’allume-cigare ............................1
5 Adaptateur de courant ......................... 1
6 Clé Allen pour vis M4 ...........................1
7 Clé Allen pour vis M5 ...........................1
8 Capuchon de bec (monté sur l'outil)
(sauf NT50GS) ....................................... 1
9 Capuchon de bec (montée sur l'outil)
(seulement NT50GS) ............................1
0 Boîte .......................................................1
9
0
AVERTISSEMENT
䢇 Ne pas effectuer de recharge à une
tension supérieure à la tension
indiquée sur la plaque signalétique.
Cela brûlerait le chargeur.
1. Insérez la prise de raccordement du
chargeur dans la prise du chargeur.
2. Branchez à l’alimentation.
En cas d’utilisation d’un adaptateur secteur
Branchez l’adaptateur secteur dans la
prise de courant.
51
Page 52

Français
AVERTISSEMENT
䢇 Ne pas utiliser le
cordon électrique
s’il est
endommagé.
Le faire réparer
immédiatement.
En cas d’utilisation de la prise de l’allume–
cigare
䡬 Fixez correctement le chargeur de
batterie dans le véhicule.
Utilisez la sangle fournie avec le chargeur
de batterie pour le fixer et éviter tout
mouvement inopiné.
AVERTISSEMENT
䢇 Ne placez pas la batterie ou son
chargeur sous le siège du conducteur.
Fixez correctement le chargeur de
batterie pour éviter tout mouvement
inopiné risquant de provoquer un
accident.
䡬 Insérez la fiche de connexion de l’allume-
cigare dans la prise de l’allume-cigare.
Si la fiche est mal fixée et ne reste pas en
place dans la prise de l’allume-cigare,
réparez-la. La prise risquant d’être
52
défectueuse, nous vous conseillons de
contacter votre concessionnaire. La
poursuite de l’utilisation de la prise peut
entraîner une surchauffe risquant de
provoquer un accident.
3. Insérer la batterie dans le chargeur de
batterie.
4. Recharge
䡬 Quand la batterie est raccordée au
chargeur de batterie, la recharge
commence et la lampe témoin s’allume.
REMARQUE: Si la lampe ne s’allume,
débrancher la fiche de la prise
et vérifier si la batterie est
insérée correctement.
䡬 Quand la batterie est rechargée à fond,
la lampe témoin ne s’allume.
REMARQUE: Le temps de recharge de la
batterie devient plus long si la
température est basse ou que
la tension d’alimentation est
trop faible.
Si la lampe témoin ne s’éteint
pas bien qu’il se soit écoulé
plus de quatre heures après
le début de la recharge,
arrêter la recharge et
consulter son SERVICE
APRES-VENTE HITACHI
AGREE.
䡬 Température admissible d’une batterie
rechargeable
Page 53

Français
La température admissible des batteries
rechargeables est indiquée dans le
tableau ci-dessous, et les batteries qui ont
chauffé devront être laissées à refroidir
pendant quelque temps avant de pouvoir
être rechargées.
Tableau 2
Batteries
rechargeables
EBM315
䡬 Durée de recharge
Le Tableau 3 montre le temps de
recharge nécessaire en fonction du type
de batterie.
Temps de recharge (en minutes approx.) à 20°C
Tension de
la batterie (V)
3.6 EBM315 60 min.
REMARQUE: Le temps de recharge peut
5. Débranchement du chargeur de batterie
à partir du réceptacle ou de la fiche de
l’allume-cigare.
ATTENTION
䢇 Ne pas débrancher la fiche de la prise
en tirant sur le cordon.
Pour éviter tout dommage lorsqu’on
débranche la fiche de la prise, bien
tenir la fiche proprement dite.
6. Retirer la batterie du chargeur de batterie.
Sortir la batterie du chargeur tout en la
soutenant de la main.
Ne laissez pas le chargeur de batterie ou
la batterie dans votre véhicule.
En ce qui concerne le courant de
décharge d’une batterie neuve
Etant donnée que les substances
chimiques internes sont restées inactives
dans le cas des batteries neuves ou des
Température à laquelle la
batterie
peut être rechargée
32°F — 122°F (0°C — 50°C)
Tableau 3
Capacité de la batterie (Ah)
1.5 Ah
varier en fonction de la
température ambiante et de la
tension d’alimentation.
batteries qui sont restées longtemps
inutilisées, le courant de décharge risque
d’être très faible lors des première et
deuxième utilisations. Ce phénomène est
temporaire et le temps de recharge
normal sera rétabli quand les batteries
auront été rechargées 2 ou 3 fois.
Comment prolonger la durée de vie des
batteries
䡬 Recharger les batteries avant qu’elles ne
soient complètement épuisées.
Quand la puissance de l’outil utilisé
faiblit, l’éteindre et recharger la batterie.
Si l’outil continue d’être utilisé jusqu’à
épuisement du courant électrique, la
batterie risque d’être endommagée et sa
durée de vie se raccourcira.
䡬 Eviter d’effectuer la recharge sous des
températures élevées.
Une batterie est toujours chaude
immédiatement après son utilisation. Si
la batterie est rechargée immédiatement
après utilisation, les substances
chimiques internes risquent de se
détériorer et la durée de vie de la batterie
se raccourcira. Laisser la batterie refroidir
un moment avant de l’utiliser.
ATTENTION
䢇 Si le chargeur a fonctionné pendant
longtemps de suite, il sera chaud, ce
qui risque de provoquer des pannes.
Lorsque la recharge est terminée,
laisser le chargeur refroidir pendant
environ 15 secondes avant de passer
à la recharge suivante.
䢇 Si l’on recharge la batterie lorsqu’elle
est chaude, soit parce qu’elle vient de
fonctionner, soit parce qu’elle est en
plein soleil, il se peut que la lampe
témoin ne s’allume pas.
La batterie ne se rechargera pas. Dans
ce cas, laisser la batterie refroidir
avant de la recharger.
䢇 Si le chargeur de batterie ne
fonctionne pas alors que la batterie
est installée correctement, il s’agit
probablement d’une anomalie de la
batterie ou du chargeur. Les porter au
service après-vente agréé.
53
Page 54

Français
AVANT L’UTILISATION
Lire la section intitulée “SECURITE” (pages
36 – 45).
Bien vérifier les points suivants avant de
travailler.
ENVIRONNEMENT DE TRAVAIL
AVERTISSEMENT
䢇 Pas de gaz ou
liquides
inflammables, ni
aucun autre objet
inflammable sur le
chantier.
䢇 Utiliser à
l’extérieur ou dans
des lieux bien
120°F MAX
(50°C)
ventilés.
Ne pas inhaler.
䢇 Garder le cloueur,
la pile à
combustible et la
pile à l’abri des
rayons du soleil et
des températures
supérieures à
120°F (50°C).
䢇 Garder à l’écart
des sources
d’inflammation.
Ne pas fumer.
䢇 Evacuer les
enfants et les
personnes non
autorisées de
l’aire de travail.
ENTRETIEN PAR TEMPS FROID
䡬 Ne pas ranger le cloueur, la pile à
combustible et la pile dans un milieu
exposé au temps froid. Garder le cloueur,
la pile à combustible et la pile dans un
endroit chaud jusqu’au début des
travaux.
䡬 Si le cloueur, la pile à combustible et la
pile sont déjà froids, les prendre dans un
endroit chaud et laisser le cloueur
réchauffer avant usage. Respecter la
54
limite de température de 120°F (50°C)
maximum.
Ne pas exposer à une flamme nue et à
des étincelles!
ATTENTION
䢇 Ce cloueur est susceptible de mal
fonctionner: à basse température, car
la pile à combustible perd la force de
propulsion nécessaire; à haute
température, car la pile à combustible
est surmenée.
䢇 Ne pas employer le cloueur à la pluie
ou en présence d’humidité excessive.
䢇 Il n’est pas recommandé d’utiliser ce
cloueur à des altitudes de plus de
5,000 pi (1,500 m) ou à des
températures sous 30°F (0°C).
PRÉPARATION DE LA PILE À
COMBUSTIBLE
Lire la section intitulée “SÉCURITÉ,
CONSIGNES DE SÉCURITÉ IMPORTANTES
À L’ÉGARD DE LA PILE À COMBUSTIBLE”
(page 41).
DANGER
䢇 La pile à
combustible est
inflammable.
䢇 Garder à l’écart
des sources
d’inflammation.
䢇 Ne pas diffuser en
direction d’une
flamme nue ou
d’une matière
incandescente
quelconque.
䢇 Ne pas fumer
pendant qu’on
manipule la pile à
combustible.
Page 55

Français
䢇 Tenir la base de la pile à combustible à
distance du visage ou de la peau. Les gaz
en expansion causent de basses
températures. Ne pas entrer en contact
avec les gaz.
䢇 Ne pas inhaler.
䢇 Ranger hors de portée des enfants.
ATTENTION
䢇 Si du gaz fuit par la buse de dosage
ou par la cartouche de gaz après la
fixation de la buse de dosage,
remplacer par une nouvelle buse de
dosage.
䢇 Ne pas tenter de réutiliser la buse de
dosage.
Remplacer la buse de dosage par une
nouvelle.
Pour fixer la buse de dosage sur une pile à
combustible:
(1) Séparer la buse de
dosage et son chapeau
de la cartouche de gaz.
(2) Presser vers l’avant
(côté tige) et vers le bas
du côté avant de la buse
de dosage.
(3) Presser vers le bas à
l’arrière de la buse de
dosage jusqu’à
l’obtention d’un raccord
étanche.
Tester la buse de dosage:
Presser la tige de buse de dosage sur la
pile à combustible deux ou trois fois
contre un objet stationnaire et relâcher.
Si aucun gaz ne se disperse, la pile à
combustible est épuisée. Remplacer.
Observer les règlements de sécurité.
La pile à combustible est maintenant prête
à insérer dans le cloueur.
PRÉPARATION DE LA PILE
Lire la section intitulée “SÉCURITÉ,
CONSIGNES DE SÉCURITÉ IMPORTANTES
POUR LE CHARGEUR DE BATTERIE” (page
42).
Il faut charger la batterie avant usage.
Le mode de chargement des batteries est
indiqué aux pages 51 - 53.
ESSAI DU CLOUEUR
DANGER
䢇 Les opérateurs et
les autres
personnes dans
l’aire de travail
DOIVENT porter
des lunettes de
protection avec
visières latérales
respectant les
exigences ANSI
Z87.1.
AVERTISSEMENT
䢇 Ne jamais utiliser le cloueur si le levier-
poussoir ne fonctionne pas
correctement.
La machine dispose d’un mécanisme pour
prévenir le fonctionnement sans charge.
La machine passe dans un état où le bras de
contact ne peut être soulevé. Cela se produit
quand le magasin ne contient pas de clous
ou que le nombre de clous restants est
inférieur à 6 ou 9.
ATTENTION
䢇 Prendre soin de ne pas cogner le bout
du bras de contact contre du bois.
55
Page 56

Français
Avant de commencer le travail proprement
dit, faire un essai de clouage en vérifiant les
points ci-dessous. Effectuer les essais dans
l’ordre indiqué.
S’il se produit un fonctionnement anormal,
cesser immédiatement d’utiliser le cloueur
et contacter un service après-vente agréé
Hitachi.
Insérer
Tirer vers
l’extérieur
(1) SORTIR TOUS LES CLOUS, LA PILE À
COMBUSTIBLE ET LA PILE DU
CLOUEUR.
䡺 TOUTES LES VIS DOIVENT ETRE
SERREES A FOND.
䡺 LE BRAS DE CONTACT ET LA
DÉTENTE DOIVENT SE DÉPLACER
EN DOUCEUR SI L’ON TIRE
L’ALIMENTEUR DE CLOUS.
(NT50GS: inutile pour tirer
l'alimenteur de clous)
Détente
Bras de
contact
Alimenteur de clous (B)
(2) Installation de la batterie.
Ne pas actionner le bras de contact ou la
détente pendant l’installation de la
batterie.
S’assurer que le témoin de la pile clignote
en vert.
Si le témoin de la batterie clignote en
rouge, c’est que la batterie manque de
puissance et qu’elle a besoin d’être
rechargée.
Poignée
Batterie
Bouton de libération
de la batterie
TÉMOIN DE LA PILE
Clignote en VERT: Il reste assez de
puissance (la lumière
du témoin devient
fixe en cours de
marche).
Clignote en ROUGE: Il ne reste pas assez
de puissance (la
lumière du témoin
devient fixe en
cours de marche).
Éteint: La batterie est très faible. Charger
la batterie.
Témoin de la batterie
(3) INSÉRER LA PILE À COMBUSTIBLE
DANS LE CLOUEUR.
1 Soulever et sortir l’actionneur.
2. Sortir
1. Soulever
56
Page 57

Français
2 Insérer la pile à combustible dans le
cloueur.
Pile à combustible
3 Insérer la base de la pile à combustible
dans le trou de l’adaptateur.
Adaptateur
Base
Pile à
combustible
Adaptateur
Base
Pile à
combustible
4 Fermer l’actionneur.
2. Abaisser
1. Basculer
en arrière
(4) Retirer le doigt de la gâchette et appuyer
le levier contre la pièce de travail en tirant
l’alimenteur de clous vers l’arrière.
(NT50GS: inutile pour tirer l'alimenteur
de clous)
䡺 LE CLOUEUR NE DOIT PAS
FONCTIONNER.
Ne pas tirer sur
la gâchette
Actionner le
levier-pousssoir
Alimenteur de clous (B)
REMARQUE: Insérer un adaptateur non
vissé conformément aux
instructions sur la figure.
Insérer dans le trou
Adaptateur
(5) Eloigner le levier-poussoir de la pièce.
Ensuite, diriger le cloueur en position
abaissée, tirer sur la gâchette et attendre
pendant au moins 5 secondes dans cette
position.
䡺 LE CLOUEUR NE DOIT PAS
FONCTIONNER.
Tirer sur la
gâchette
57
Page 58

Français
(6) Sans toucher la gâchette, appuyer le
levier-poussoir contre la pièce.
Tirer sur la gâchette.
䡺 LE CLOUEUR DOIT FONCTIONNER.
(7) Si l’on ne remarque aucun
fonctionnement anormal, on pourra
mettre des clous dans le cloueur.
Enfoncer les clous dans un matériau du
même type que celui du travail
proprement dit.
䡺 LE CLOUEUR DOIT FONCTIONNER
CORRECTEMENT.
CHARGEMENT DES CLOUS
AVERTISSEMENT
䢇 Lors du chargement des clous dans le
cloueur,
1) ne pas tirer la gâchette;
2) ne pas actionner le levier-poussoir ; et
3) diriger le cloueur vers le bas.
<NT65GS, NT65GA, NT65GB>
Approvisionnement en deux pas!
(1) Insérer la recharge de clous dans le dos
du magasin.
Magasin
(2) Faire coulisser la bande de clous vers
l'avant dans le magasin.
(3) Pousser l’alimenteur de clous (A) pour
engager la bande de clous (B) dans ce
dernier.
Alimenteur de
clous (B)
REMARQUE :
䢇 Pousser doucement l’alimenteur de clous
(A) et l’alimenteur de clous (B) contre le
clou.
Si le distributeur de clous (A) et
l’alimenteur de clous (B) se dégagent de
l’arrière du magasin et frappent le clou,
la ligature collante du clou risque d’être
endommagée.
䢇 Utiliser une recharge de clous de plus de
10 clous.
䢇 Utiliser une bande de clous intacte dont
tous les clous sont de longueur égale.
Alimenteur de clous (A)
Le cloueur est maintenant prêt à fonctionner.
Retirer les clous :
1 Tirer l’alimenteur de clous (B) vers
l’arrière.
2 Ramener doucement l’alimenteur de
clous (B) vers l’avant tout en poussant
l’alimenteur de clous (A).
58
Page 59

Français
3 Extraire les clous de l’arrière du magasin.
1
2
Alimenteur de
clous (B)
Alimenteur de
clous (A)
3
Clous
<NT50GS>
(1) Appuyer légèrement sur le bras d’arrêt
et extraire délicatement le couvercle de
magasin.
(2) Mettre la recharge de clous dans le
magasin en veillant à ce que la pointe de
clous touche la rainure.
Recharge
de clous
Rainure
Magasin
REMARQUE :
䢇 Les clous représentés à la page 50
peuvent être chargés sur l’encoche guide
latérale du magasin sans réglage.
Toujours veiller à ce que les clous
touchent la rainure.
Magasin
Encoche
guide
latérale
Clou
Couvercle de magasin
Appuyer
Bras d’arrêt
Tirer
Ecart
Rainure
(3) Glisser la recharge de clous dans le guide
de lame.
Recharge de clous
Guide de lame
59
Page 60

Français
(4) Vérifier que la recharge de clous est
placée avec les rainures latérales et la
rainure disposés comme il convient, puis
pousser le couvercle de magasin vers
l’avant pour qu’il se verrouille.
UTILISATION DU CLOUEUR
Lire la section intitulée “SECURITE” (pages
36 – 45).
DANGER
䢇 Les opérateurs et
les autres
personnes dans
l’aire de travail
DOIVENT porter
des lunettes de
protection avec
visières latérales
respectant les
exigences ANSI
Z87.1.
䢇 Ne jamais utiliser
en présence de
liquides ou de gaz
inflammables.
䢇 Ne pas toucher
les environs de la
sortie
d’échappement
avec les mains
nues.
Le bras de
contact et le bec
s’échauffent lors
120°F MAX
(50°C)
d’un usage
prolongé ou
rapide.
䢇 Danger
d’explosion et
d’incendie Garder
à l’abri des rayons
du soleil et des
températures
supérieures à
120°F (50°C).
䢇 Garder à l’écart
des sources
d’inflammation.
䢇 Ne pas fumer.
AVERTISSEMENT
䢇 NE JAMAIS
diriger l’outil vers
soi ni vers
quelqu’un d’autre
dans l’aire de
travail.
䢇 Toujours
ÉLOIGNER le
doigt de la
gâchette quand
on n’effectue pas
de clouage afin
d’éviter tout
risque de
déclenchement
accidentel.
䢇 Utiliser à
l’extérieur ou
dans un lieu bien
ventilé.
䢇 Ne pas inhaler le
contenu.
䢇 Ne pas utiliser le cordon électrique s’il
est endommagé.
Le faire réparer immédiatement.
䢇 Ne jamais approcher le visage, les
mains ou les pieds à moins de 8 po (200
mm) de la tête de clouage pendant
usage.
䢇 Ne pas enfoncer de clous sur d’autres
clous ni avec le cloueur à un angle trop
aigu ; les clous risquent de faire
ricochet et de blesser quelqu'un.
䢇 Ne pas enfoncer de clous dans des
planches minces ni près des coins et
des bords de la pièce. Les clous
pourraient traverser la pièce ou
s’enfoncer ailleurs que dans la pièce et
blesser quelqu’un.
䢇 Ne jamais enfoncer de clous des deux
côtés d’un mur en même temps. Les
clous pourraient traverser le mur et
blesser quelqu’un de l’autre côté.
䢇 Ne jamais utiliser le cloueur s’il est
défectueux ou qu’il ne fonctionne pas
normalement.
䢇 Ne pas se servir du cloueur comme
d’un marteau.
60
Page 61

Français
䢇 Débrancher la pile et la pile à
combustible du cloueur quand :
1) on ne s’en sert pas ;
2) on quitte l’aire de travail ;
3) on le transporte dans un autre
endroit ; et
4) on le passe à quelqu’un d’autre.
䢇 Attention aux clous indésirables.
Si l’on presse de nouveau la détente
et que l’on ne cloue pas à une
température sous 30°F (0°C), un clou
superflu sera enfoncé.
Ce cloueur est muni d’un MÉCANISME DE
DÉCLENCHEMENT SÉQUENTIEL COMPLET.
Explication du clouage par MÉCANISME DE
DÉCLENCHEMENT SÉQUENTIEL COMPLET;
Appuyer tout d’abord le bras de contact
contre la pièce à usiner;
presser ensuite la détente pour enfoncer
un clou.
NT65GS, NT65GA, NT65GB dispose d’un
mécanisme pour prévenir le fonctionnement
sans charge.
NT65GS, NT65GA, NT65GB passe dans un
état où le bras de contact ne peut être
soulevé. Cela se produit quand le magasin
ne contient pas de clous ou que le nombre
de clous restants est inférieur à 6 ou 9.
ATTENTION
䢇 Prendre soin de ne pas cogner le bout
du bras de contact contre du bois
tandis que le bras ne peut pas être
soulevé.
MÉTHODES D’UTILISATION
ATTENTION
䢇 Bien presser sur le levier-poussoir
pour enfoncer un clou, sinon le piston
ne revient pas correctement.
䢇 Vérifier la profondeur de clouage
quand la température est supérieure
à 104°F (40°C) ou inférieure à 32°F
(0°C).
䢇 L’utilisation prolongée de l’outil peut
entraîner la présence d’huile autour
de l’orifice ou du tuyau de décharge.
Pour garantir la propreté du matériau
à clouer, essuyez toute trace d’huile
sur l’outil.
Le cloueur est équipé d’un levier-poussoir
et il ne fonctionne pas tant que le levierpoussoir n’est pas enfoncé (position
supérieure).
N’offre que le fonctionnement intermittent
(déclenchement par détente).
1 Placer l’orifice de sortie des clous
sur la pièce en enlevant le doigt de
la gâchette.
2 Actionner fermement le levier-
poussoir jusqu’à ce qu’il soit
complètement enfoncé.
3 Bien presser la détente pour
enfoncer un clou.
4 Retirer le doigt de la gâchette.
Pour continuer à clouer à un autre
endroit, déplacer le cloueur le long du
bois en recommençant les opérations 1
à 4 selon les besoins.
3
2
Bras de contact
Détente
RÉGLAGE DE LA PROFONDEUR
DE CLOUAGE
Pour que chaque clou pénètre à la même
profondeur, s’assurer de toujours tenir
fermement le cloueur contre la pièce à
usiner.
Si les clous sont trop ou pas assez enfoncés
dans la pièce à usiner, régler le clouage dans
la séquence suivante.
61
Page 62

Français
1 Sortir la pile à combustible et la batterie
du cloueur.
Pile à combustible
Batterie
2 Si les clous s’enfoncent trop
profondément, tourner l’ajusteur sur le
côté peu profond.
Les réglages s’effectuent par paliers d’un
demi-tour.
2
Trop profond
2
Pas assez profond
Tourner l’ajusteur.
Tourner l’ajusteur.
A ras
A ras
EMPLOI DU CROCHET
ATTENTION
䢇 Si l’outil tombe, cela risque de
provoquer un mauvais
fonctionnement, des dégâts matériels
ou les deux. Il est recommandé
d’utiliser également des fils
métalliques de prévention des chutes,
etc.
䢇 Une installation incomplète du
crochet peut entraîner des blessures
physiques lors de l’utilisation.
Le crochet peut être installé sur le côté
gauche ou droit.
(1) Tenir fermement la section principale
et retirer la vis à l’aide d’un tournevis
ou d’une pièce de monnaie.
Si les clous ne s’enfoncent pas assez
profondément, tourner l’ajusteur sur le
côté profond.
3 Cesser de tourner l’ajusteur quand on a
trouvé la position qui convient lors de
l’essai de clouage.
4 Brancher la pile à combustible et la
batterie dans le cloueur.
TOUJOURS PORTER DES LUNETTES DE
PROTECTION.
Effectuer un essai de clouage.
5 Sortir la pile à combustible et la batterie
du cloueur.
6 Choisir une position de réglage adéquate.
62
(2) Retirer le crochet et la plaque du
crochet.
(3) Fixer le crochet de l’autre côté et serrer
à fond avec la vis.
Page 63

UTILISATION DU CAPUCHON
DE BEC
AVERTISSEMENT
䢇 Lors de la fixation ou du retrait du
capuchon de bec, s'assurer de retirer
son doigt de la gâchette et sortir la
pile à combustible et la batterie du
cloueur.
Pour protéger la surface de le pièce de toute
éraflure et de toutes les marques laissées par
le levier-poussoir, fixer le capuchon de bec
sur le levier-poussoir.
1 Sortir la pile à combustible et la batterie
du cloueur.
2 Placer le capuchon de bec sur le sabot
du levier-poussoir.
3 Le capuchon de la buse est identifié de
manière à indiquer le point de projection
du clou, ce qui permet d’effectuer plus
facilement l’alignement.
4 Lorsqu'on ne se sert pas du capuchon
avant, le ranger dans le compartiment de
rangement situé sur le dessous du
magasin.
Français
Chapchon
de bec
NT65GS, NT65GA, NT65GB
Chapchon
de bec
Magasin
REMARQUE :
䢇 Du fait de son épaisseur, le capuchon de
bec peut réduire la profondeur de
clouare. Re-régler la profondeur de
clouage.
Magasin
Lever-poussoir
Chapuchon
de bec
NT50GS
Chapuchon
de bec
2
Leverpoussoir
ÉLIMINATION D’UN BLOCAGE
Si un clou se coince dans la tête de clouage,
on le dégage et on règle le clouage par la
démarche suivante.
ATTENTION
䢇 Sortir la pile à combustible et la
batterie du cloueur.
63
Page 64

Français
1 Sortir la pile à combustible et la batterie
du cloueur.
2 Retirer tous les clous.
3 Libérer le levier de verrouillage et ouvrir
la plaque de guidage.
Levier de
verrouillage
3
Plaque de guildage
4 Retirer le clou coincé avec untournevis
pour écrou à fente.
5 Refermer la plaque de guidage et le
cliquet d'arrêt.
REMARQUE :
䢇 Si les clous se coincent fréquemment,
contacter un service après-vente Hitachi
agréé.
64
Page 65

ENTRETIEN
Français
REMARQUE :
Les informations contenues dans ce manuel ont pour but d’aider l’opérateur à
utiliser le cloueur en toute sécurité.
Certaines des illustrations du manuel peuvent montrer des détails ou des
accessoires qui diffèrent de ceux de votre cloueur.
ENTRETIEN ET INSPECTION
<Cloueuse>
Lire la section intitulée “SECURITE” (pages
36 – 45).
DANGER
䢇 Ne jamais utiliser
ou tester en
présence de
liquides ou de gaz
inflammables.
䢇 Garder à l’écart
des sources
d’inflammation.
䢇 Ne pas fumer.
Tissu
ATTENTION
䢇 Vérifier que l’alimenteur de clous se
déplace en souplesse en le poussant du
doigt.
S’il ne se déplace pas en souplesse, les
clous risquent de s’enfoncer à un angle
irrégulier et de blesser quelqu’un.
2. Remisage
AVERTISSEMENT
䢇 Sortir la pile à combustible, la batterie
et tous les clous du cloueur quand :
1) on entretient ou on inspecte le
cloueur ; et
2) on retire des clous coincés.
1. Inspection du magasin
1 EXTRAIRE LA PILE À COMBUSTIBLE ET
LA BATTERIE.
2 Nettoyer le magasin. Ôter la poussière
et les copeaux de bois pouvant s’être
accumulés dans le magasin.
Lubrifier avec le lubrifiant pour outils à
gaz Hitachi.
DANGER
䢇 Ranger le cloueur
correctement,
avec la pile à
combustible et la
pile sorties.
䢇 La pile à
combustible est
un générateur
d’aérosol au
120°F MAX
(50°C)
batterie dans une boîte à outils et dans
un endroit sec.
contenu
inflammable.
䢇 Lorsqu’ils ne
servent pas,
ranger le cloueur,
la pile à
combustible et la
65
Page 66

Français
䢇 Ranger à l’intérieur, là où la
température ne dépasse pas 120°F
(50°C).
䡬 Si l’on ne se sert pas du cloueur pendant
un certain temps, enduire ses pièces en
acier d’une mince couche de graisse pour
éviter toute corrosion.
䡬 Ne pas ranger le cloueur, la pile à
combustible et la pile dans un milieu
exposé au temps froid.
Les conserver dans un endroit chaud.
䡬 Lorsqu’ils ne servent pas, ranger le
cloueur, la pile à combustible et la
batterie dans un endroit chaud et sec.
Ranger hors de portée des enfants.
3. ETIQUETTE D’AVERTISSEMENT
Remplacer l’ETIQUETTE
D’AVERTISSEMENT si elle manque ou
qu’elle est endommagée.
Se procurer une nouvelle ETIQUETTE
D’AVERTISSEMENT auprès d’un service
après-vente Hitachi agréé.
Lors de l’utilisation et de l’entretien d’un
outil électrique, respecter les
règlements et les normes de sécurité en
vigueur dans le pays en question.
MODIFICATIONS:
Les outils électriques Hitachi sont
constamment améliorés et modifiés afin
d’incorporer les tous derniers progrès
technologiques.
En conséquence, il est possible que certaines
pièces soient modifiées sans avis préalable.
<Charger de batterie>
1. Vérifier les vis.
Des vis mal serrées sont dangereuses.
Les inspecter régulièrement et vérifier
qu’elles sont serrées à fond.
ATTENTION
䢇 Il serait extrêmement dangereux
d’utiliser ce chargeur de batterie avec
des vis mal serrées.
2. Vérifier s’il y a de la poussière.
Enlever la poussière avec un chiffon doux
ou un chiffon humecté d’eau savonneuse.
Ne pas utiliser de décolorant, chlorure,
essence ou diluant, car ces produits
pourraient endommager le plastique.
3. Remplacement du fusible de la fiche de
connexion de l'allume-cigare
Etiquette
d’avertissement
4. Tableau d’entretien (voir page 68)
5. Guide de dépannage de l’opérateur
(voir page 68 – 69)
6. Liste des pièces de rechange
ATTENTION
䢇 Les réparations, modifications et
inspections des outils électriques
Hitachi doivent être confiées à un
service après-vente Hitachi agréé.
Il sera utile de présenter cette liste de
pièces au service après-vente Hitachi
agréé lorsqu’on apporte un outil
nécessitant des réparations ou tout
autre entretien.
66
ATTENTION
䢇 Pour éviter tout risque d'incendie, le
fusible de la fiche de connexion de
l'allume-cigare doit uniquement être
remplacé par un fusible du même
calibre:
4. Rangement
Ranger dans un lieu dont la température
est inférieure à 104°F (40°C), et hors de
portée des enfants.
250V, 6A, DC
Page 67

ENTRETIEN ET REPARATIONS
AVERTISSEMENT
䢇 Les réparations du cloueur seront
confiées exclusivement au personnel
d’entretien formé par Hitachi, au
distributeur ou à l’employeur.
䢇 Pour les réparations, utiliser
exclusivement des pièces fournies ou
recommandées par Hitachi.
Du fait de l’usure normale, les cloueurs de
qualité finissent toujours par avoir besoin
d’un entretien ou d’un remplacement de
pièce.
REMARQUE:
Les spécifications sont sujettes à
modification sans préavis et sans aucune
obligation de la part de HITACHI.
Français
67
Page 68

Français
Tableau d’entretien
ACTION POURQUOI COMMENT
Nettoyer le magasin et le Eviter que les clous ne se Nettoyer en soufflant
mécanisme de l’alimenteur coincent. de l’air tous les jours.
de clous.
Veiller à ce que le levier- Assurer la sécurité de Nettoyer en soufflant de
poussoir fonctionne l’opérateur et un l’air tous les jours.
toujours correctement. fonctionnement efficace
Guide de dépannage de l’opérateur
PROBLEME VERIFICATION CORRECTION
Le cloueur fonctionne, Vérifier si un clou est coincé. Dégager le clou.
mais les clous ne
s’enfoncent pas.
Certains clous Vérifier si l’on utilise Utiliser uniquement les clous
sont sautés. les bons clous. recommandés.
Alimentation
intermittente.
68
du cloueur.
Vérifier le fonctionnement de Nettoyer et graisser.
l’alimenteur de clous à la page 65.
Le ressort à ruban est-il distendu Remplacer le ressort à ruban.
ou endommagé ?
Vérifier si l’on utilise les Utiliser uniquement les clous.
bons clous. recommandés.
Vérifier si le piston à lame Pousser la lame
d’entraînement est baissé ou d’entraînement avec un
non. tournevis à lame plate et
remettre le piston dans sa
position la plus élevée.
Vérifier le fonctionnement de Nettoyer et graisser.
l’alimenteur de clous à la page 65.
Le ressort à ruban est-il Remplacer le ressort à ruban.
distendu ou endommagé ?
L’alimenteur de clous (B) est-il Remplacer l’alimenteur
usé ou endommagé ? de clous (B).
Vérifier le retour du piston. Presser la détente jusqu’au
fond.
Température trop basse,
réchauffer la pile à
combustible à moins de 120°F
(50°C).
Vérifier que le piston se
déplace en douceur.
Contacter Hitachi pour
le remplacement.
Remplacer le segment
de piston.
Remplacer le piston.
Remplacer le joint torique du
segment de piston.
Page 69

Français
PROBLEME VERIFICATION CORRECTION
Des clous se coincent. Vérifier si l’on utilise les Utiliser uniquement les clous
Les clous enfoncés bons clous. recommandés.
sont tordus.
Le bras de contact ne Bras de contact tordu?
fonctionne pas
avec souplesse.
Le ventilateur marche, Vérifier le retour du piston. Pousser à fond sur le levierle témoin est VERT, poussoir.
mais l’appareil ne cloue
pas ou son
fonctionnement est
instable.
Le ventilateur ne Magasin vide. Charger des clous dans le
fonctionne pas sur magasin.
pression du bras de
contact.
Impossible de charger
la batterie.
La lame d’entraînement
Contacter Hitachi pour le
est-elle usée ? remplacement.
L’alimenteur de clous Remplacer l’alimenteur
(B) est-il usé ou endommagé ? de clous (B).
Contacter Hitachi pour le
remplacement.
Débris dans la coulisse
Contacter Hitachi pour
du bras de contact? le remplacement.
Température trop basse,
réchauffer la pile
à combustible à moins de 120°F
(50°C).
Pile à combustible trop faible?
Fil à bougie usé?
Remplacer par une nouvelle.
Contacter Hitachi pour le
remplacement.
Graisse ou débris autour
Contacter Hitachi pour le
de la bougie? remplacement.
Filtre colmaté? Nettoyer selon les directives
de la fiche d’entretien.
Noter la couleur du témoin. Si rouge: charger la pile.
Si vert: Contacter Hitachi pour
obtenir un remplacement.
––––––––––
Vérifier le cordon électrique.
69
Page 70

Español
INFORMACIÓN IMPORTANTE
Lea y comprenda el significado de las etiquetas de la herramienta
y todas las instrucciones de funcionamiento, las precauciones
de seguridad y las advertencias de este manual antes de realizar
la operación o el mantenimiento de este clavador.
La negligencia en la observación de las advertencias puede
producir la MUERTE o LESIONES DE GRAVEDAD.
La mayoría de los accidentes ocurridos al utilizar o mantener este clavador se deben a la
falta de tener en cuenta las normas de seguridad y precauciones básicas. Los accidentes
podrán evitarse en muchos casos dándose cuenta de una situación peligrosa antes de que
se produzca, y sigviendo fielmente los procedimientos de seguridad apropiados.
Las precauciones básicas de seguridad se describen en la sección “SEGURIDAD” de este
manual, y en las secciones que contienen las instrucciones sobre operación y
mantenimiento.
Los riesgos que habrá que eludir para evitar lesiones o el daño de la máquina se identifican
mediante PELIGRO y ADVERTENCIA en el clavador y en este manual.
No utilice nunca este clavador para aplicaciones que no sean las especificadas en este
manual.
DEFINICIÓN DE LAS PALABRAS CLAVE
PELIGRO indica una situación inminentemente peligrosa que, si no se evita, puede
resultar en lesiones serias o en la muerte.
ADVERTENCIA indica una situación potencialmente peligrosa que, si no se evita, puede
resultar en lesiones serias o en la muerte.
PRECAUCIÓN indica una situación potencialmente peligrosa que, si no se evita, puede
resultar en lesiones menores, o en el daño de la máquina.
NOTA enfatiza información esencial.
EXPLICACIÓN LA ACCIÓN DE CLAVADO DEL CLAVADOR HITACHI
䡬 Esta herramienta es un MECANISMO DE ACTUACIÓN SECUENCIAL COMPLETO.
En primer lugar, presione la palanca de empuje contra la pieza de trabajo y, a
continuación, jale el gatillo para introducir el clavo. Realice la misma secuencia para
seguir clavando.
70
Page 71

Español
SEGURIDAD
INSTRUCCIONES IMPORTANTES DE SEGURIDAD
PARA LA UTILIZACIÓN DEL CLAVADOR
LEA TODAS LAS INSTRUCCIONES
Esta Clavadora funciona con un dispositivo de combustión interno. La
clavadora sólo deberá utilizarse con lo dispensadores de gas
combustible enumerados en este manual de instrucciones.
PELIGRO
1. LOS OPERADORES Y DEMÁS PERSONAS QUE SE ENCUENTREN EN EL ÁREA DE
TRABAJO DEBEN USAR GAFAS PROTECTORAS CON BLINDAJES LATERALES.
Antes de utilizar el clavador, utilice siempre gafas protectoras con
blindajes laterales, y asegúrese de que también sea utilizada por todas
las personas que se encuentren en el área de trabajo.
Las gafas protectoras deberán estar de acuerdo con los requisitos del
Instituto de Normas Nacionales Americanas, ANSI Z87.1 y proporcionar
protección contra las partículas despedidas desde la parte frontal y
posterior.
El empresario deberá hacer que el operador del clavador y demás
personas que se encuentren en el área de trabajo utilicen en todo
momento gafas protectoras.
2. NO LA UTILICE NUNCA CERCA DE LÍQUIDOS O GASES INFLAMABLES.
No se deberá utilizar la Clavadora en un entorno donde haya
combustibles ni cerca de líquidos o gases inflamables como lacas,
pinturas, bencinas, disolventes o gasolina.
La Clavadora emite gases calientes que podrían prender los materiales
inflamables y también despide chispas al utilizarla.
3. NO TOQUE LA ZONA QUE RODEA A LA SALIDA DE ESCAPE.
La Clavadora emite gases calientes que pueden inflamar ciertos
materiales.
La palanca de empuje y la parte delantera se calientan por el uso
prolongado o rápido.
No toque estas partes con las manos descubiertas.
71
Page 72

Español
SEGURIDAD — Continuación
PELIGRO
4. PELIGRO DE FUEGO Y EXPLOSIONES.
120°F MAX
(50°C)
La célula de combustible o la batería podrían quemarse, liberando así
gases inflamables.
No perfore ni queme el contenedor, incluso después de haber utilizado.
No incinere, rellene, recupere ni recicle la célula de combustible.
No lo pulverice sobre una llama o material incandescente.
Manténgase alejado de fuentes de encendido. Prohibido fumar.
Manténgase fuera del alcance de los niños.
ADVERTENCIA
5. NO DIRIJA NUNCA LA HERRAMIENTA
HACIA SÍ MISMO O HACIA OTRAS
PERSONAS DEL ÁREA DE TRABAJO.
Piense siempre que el
clavador puede tener
clavos cargados.
No dirija nunca el clavador
hacia sí mismo o hacia
otras personas,
independientemente de
que contenga o no clavos.
Si utilizase los clavos incorrectamente,
podrían producirse lesiones serias.
No juegue nunca con el clavador.
Trate el clavador como herramienta de
trabajo.
6. PARA EVITAR UN DISPARO ACCIDENTAL,
MANTENGA SUS DEMOS ALEJADOS DEL
DISPARADOR CUANDO NO SE ESTÁN
METIENDO LOS SUJETADORES.
No transporte nunca el clavador con el
dedo en el gatillo, porque podría lanzar
un clavo y lesionarse usted mismo o a
otra persona.
Transporte siempre el clavador por la
empuñadura.
72
La célula de combustible es un dispensador de
aerosol con contenido inflamable.
El contenedor a presión y el propelente
permanecen en la célula de combustible.
El incumplimiento de las instrucciones puede
provocar un incendio o una explosión.
Mantenga la clavadora, las células de combustible
y la batería lejos de la luz directa del sol y de
temperaturas superiores a los 120°F (50°C).
7. UTILICE SIEMPRE PROTECTORES PARA
LOS OÍDOS Y LA CABEZA.
Utilice siempre protectores para los oídos
contra el ruido fuerte.
Utilice siempre un protector para la cabeza
contra los objetos que puedan salir
disparados.
8. UTILIZAR EN EXTERIO O EN ZONAS
BIEN VENTILADAS.
La Clavadora emite
monóxido de carbono que
puede ser nocivo para la
salud al inhalarlo.
No se deberá utilizar la
Clavadora en zonas
cerradas o zonas mal
ventiladas.
No inhalar.
9. UTILIZAR DENTRO DE LOS LÍMITES DE
TEMPERATURA ADECUADOS.
El entorno operativo para este dispositivo
es de 32°F (0°C) a 104°F (40°C), por lo que
debe utilizarlo dentro de este rango de
temperatura.
El dispositivo puede fallar por debajo de
32°F (0°C) y por encima de 104°F (40°C).
Page 73

SEGURIDAD — Continuación
ADVERTENCIA
Español
10. GUARDE LA CLAVADORA
CORRECTAMENTE: RETIRE LA CÉLULA
DE COMBUSTIBLE Y LA BATERÍA.
Mientras no la utilice,
120°F MAX
(50°C)
inferior a 120°F (50°C).
Mantenga la Clavadora, la célula de
combustible y la pila alejadas de la luz
directa del sol y no las guarde en un
vehículo.
Manténgase fuera del alcance de los
niños. Controle la zona de
almacenamiento.
11. MANTENGA EL ÁREA DE TRABAJO LIMPIA.
Las áreas desordenadas pueden
provocar lesiones. Limpie bien el área de
trabajo, apartando herramientas
innecesarias, residuos, muebles, etc.
12. MANTENGA A LOS VISITANTES
ALEJADOS.
No permita que los visitantes toquen el
clavador.
Todos los visitantes deberán permanecer
alejados del área de trabajo.
13. VÍSTASE ADECUADAMENTE.
No utilice ropa floja ni joyas, ya que
podrían pillarse en las partes móviles.
Para trabajar en exteriores se recomienda
utilizar guantes de goma y calzado no
deslizable.
Si tiene el pelo largo, utilice un protector
para recogérselo.
14. COMPRUEBE LA PALANCA DE EMPUJE
ANTES DE LA UTILIZACIÓN.
La palanca de impulso y la cámara
funcionan juntos para este dispositivo.
Retire la célula de combustible y la atería
y cerciórese de que la palanca de empuje
guarde la célula de
combustible y la pila
en una caja de
herramientas en un
lugar seco.
Guárdela en interior a
una temperatura
funciona adecuadamente. (La palanca de
empuje puede denominarse
“Seguridad”.) No utilice nunca el
clavador a menos que la palanca de
empuje funcione adecuadamente, ya que
de lo contrario el clavador podría disparar
inesperadamente un clavo. No cambie ni
quite la palanca de empuje.
Tire del botón del alimentador con el
dispositivo colocado hacia arriba y pulse
la palanca de impulso. Compruebe que
la palanca de impulso vuelve a su
posición original.
El funcionamiento de la palanca de
impulso se muestra especialmente
pesado con bajas temperaturas y puede
que las operaciones de propulsión no
funcionen.
15. MANTENGA TODOS LOS TORNILLOS Y
CUBIERTAS BIEN APRETADAS EN SU
LUGAR.
Mantenga todos los tornillos y cubiertas
firmemente apretados. Compruebe
periódicamente su condición.
No utilice nunca el clavador si hay piezas
perdidas o dañadas.
16. NO CARGUE CLAVOS CON EL GATILLO
O LA PALANCA DE EMPUJE
PRESIONADA.
Al cargar los clavos en la Clavadora,
1) no apriete el gatillo;
2) no presione la palanca de empuje; ni
3) mantenga el clavador apuntado hacia
abajo.
17. MANTENGA EL ROSTRO, LAS MANOS
Y PIES ALEJADOS DEL CABEZAL DE
DISPARO MIENTRAS LO ESTÉ
UTILIZANDO.
No coloque el rostro, las manos ni pies a
una distancia inferior a 8 pulgadas (200
mm) del cabezal de disparo.
Si la pieza de trabajo desvía los clavos o
si éstos salen del punto de introducción
puede sufrir lesiones serias.
73
Page 74

Español
SEGURIDAD — Continuación
ADVERTENCIA
18. COLOQUE EL CLAVADOR
ADECUADAMENTE SOBRE LA PIEZA DE
TRABAJO.
No clave un clavo sobre otro, ni con el
clavador con un ángulo demasiado
agudo, ya que los clavos podrían rebotar
y herir a alguien.
19. NO CLAVE EN PANELES FINOS, NI
CERCA DE LAS ESQUINAS NI LOS
BORDES DE LA PIEZA DE TRABAJO.
Los clavos podrían atravesar la pieza de
trabajo y herir a alguien.
20. NO CLAVE NUNCA CLAVOS DESDE
AMBOS LADOS DE UNA PARED AL
MISMO TIEMPO.
Los clavos podrían traspasar el panel y
lesionar a la persona que se encuentra
en el lado opuesto.
21. COMPRUEBE SI HAY CABLES ACTIVOS.
Evite el riesgo de descargas eléctricas
comprobando si hay cables activos
escondidos en paredes, suelos, o techos.
Abra el disyuntor para asegurarse de que
no queden cables activos.
22. NO SE EXTRALIMITE.
Mantenga en todo momento un buen
equilibrio.
23. NO UTILICE NUNCA UN CLAVADOR
DEFECTUOSO O QUE FUNCIONE
INCORRECTAMENTE.
Si el clavador parece funcionar
anormalmente, si produce ruidos
extraños, etc., deje de utilizarlo
inmediatamente y solicite su reparación
a un centro de servicio autorizado por
Hitachi.
24. RETIRE LA CÉLULA DE COMBUSTIBLE Y
LA BATERÍA DE LA CLAVADORA
CUANDO:
1) realice trabajos de mantenimiento e
inspección;
2) tenga que desatascarlo;
3) no vaya a utilizarlo;
4) abandone el área de trabajo;
5) lo traslade a otro lugar; y
6) vaya a entregárselo a otra persona.
No intente desatascar ni reparar la
Clavadora sin antes retirar la célula de
combustible, la pila y los clavos de la
Clavadora.
No deje nunca el clavador desatendido,
porque personas no familiarizadas con
él podrían utilizarlo y sufrir lesiones.
25. PERMANEZCA ALERTA.
Tenga en cuenta lo que esté haciendo.
Utilice el sentido común.
No utilice el clavador cuando esté
cansado. No utilice nunca el clavador si
se encuentra bajo la influencia del
alcohol, drogas, o medicinas que le
produzcan somnolencia.
26. MANEJE CORRECTAMENTE EL
CLAVADOR.
Maneje el clavador de acuerdo con las
instrucciones de este manual.
No permita nunca que los niños,
personas no familiarizadas o no
autorizadas, toquen el clavador.
27. NO UTILICE NUNCA EL CLAVADOR
PARA APLICACIONES QUE NO SEAN
LAS ESPECIFICADAS EN ESTE MANUAL.
28. MANEJE EL CLAVADOR CON CUIDADO.
No deje caer la Clavadora ni la golpee
contra superficies duras; no arañe ni
grabe signos en la Clavadora. Maneje la
Clavadora con cuidado.
29. MANTENGA EL CLAVADOR CON
CUIDADO.
Mantenga el clavador limpio y lubricado
para que rinda al máximo y con la mayor
seguridad.
30.UTILICE SOLAMENTE LAS PIEZAS,
ACCESORIOS, Y CLAVOS QUE
SUMINISTRE O RECOMIENDE HITACHI.
Las piezas, accesorios, o clavos no
autorizados pueden anular la garantía y
74
Page 75

SEGURIDAD — Continuación
ADVERTENCIA
Español
provocar el mal funcionamiento, lo que
podría resultar en lesiones.
El clavador solamente deberá ser
reparado por Hitachi, un distribuidor, o
el empresario.
INTRUCCIONES DE SEGURIDAD IMPORTANTES
PARA LA CÉLULA DE COMBUSTIBLE
LEA TODAS LAS INSTRUCCIONES
PELIGRO
La célula de combustible, el combustible y el propelente son
inflamables bajo presión.
Peligro de fuego o explosión
El incumplimiento de las instrucciones puede provocar un incendio
o explosión al manejar los dispensadores de gas combustible para
su almacenamiento, transporte, inserción y extracción de la
herramienta y para deshacerse de éstos.
No fume mientras manipule la célula de combustible.
31. NO MODIFIQUE NI ALTERE NUNCA EL
CLAVADOR.
Si lo hicese podría funcionar mal y
provocar lesiones.
ADVERTENCIA
No inhale su contenido.
En caso de inhalación, se deberá trasladar a la persona afectada al
aire libre y deberá colocarse en una posición cómoda.
Los gases de expansión provocan bajas temperaturas.
Los gases líquidos pueden provocar lesiones al entrar en contacto
con la piel o los ojos.
En caso de contacto con la piel, lave la superficie de contacto con
cuidado con agua caliente y jabón y, una vez seca, aplique una crema
hidratante.
En caso de contacto con los ojos, abra los ojos bajo el agua corriente
para aclararlos.
Si es necesario, póngase en contacto con un médico.
75
Page 76

Español
SEGURIDAD — Continuación
ADVERTENCIA
Guárdela en un lugar bien ventilado.
120°F MAX
(50 °C)
No la almacene a temperaturas superiores a 120°F (50°C) (p. ej. a luz
directa del sol o en un vehículo).
No la exponga a las llamas ni chispas.
No perfore ni abra la célula de combustible.
No rellene, recupere ni recicle la célula de combustible.
Deshágase de ella conforme a la normativa local sobre productos
aerosoles.
No ponga la célula de combustible junto a otros materiales para
reciclaje.
Manténgase fuera del alcance de los niños.
INSTRUCCIONES
IMPORTANTES DE SEGURIDAD
PARA EL CARGADOR DE
BATERÍAS
ADVERTENCIA
La utilización inadecuada del cargador de
baterías puede resultar en lesiones serias o
en la muerte.
Para evitar estos riesgos, siga las
instrucciones de seguridad ofrecidas a
continuación:
LEA TODAS LAS
INSTRUCCIONES
1. Este manual contiene importantes
instrucciones de seguridad y de
funcionamiento para el cargador de
baterías modelo UC3SML.
2. Antes de utilizar el cargador de baterías,
lea todas las instrucciones y tenga en
cuenta las marcas de precaución de (1)
el cargador de baterías, (2) la batería, y
(3) el producto que utiliza la batería.
3. Para reducir el riesgo de lesiones, cargue
baterías recargables HITACHI EBM315.
Otros tipos de baterías podrían explotar
causando lesiones y daños.
4. No exponga el cargador de baterías a la
lluvia ni a la nieve.
5. La utilización de un accesorio no
recomendado o vendido por el fabricante
del cargador de baterías puede resultar
en el riesgo de incendios, en descargas
eléctricas, o en lesiones.
6. Para reducir el riesgo de dañar el cable y
el enchufe, para desconectar el cable del
cargador de baterías, tire del enchufe.
7. Cerciórese de que el cable quede situado
donde no pueda pisarse, donde nadie
pueda tropezar con él, y donde no pueda
recibir daños.
8. A menos que sea absolutamente
necesario, no deberá utilizarse un cable
prolongador. La utilización de un cable
prolongador inadecuado podría resultar
en el riesgo de incendios y descargas
eléctricas.
Cuando tenga que utilizar un cable
prolongador, cerciórese de que:
a. El enchufe del cable prolongador sea
igual en tamaño y forma que el del
cargador de baterías;
b. El cable prolongador esté
adecuadamente conectado y en
buenas condiciones eléctricas; y
c. Que el calibre del cable sea suficiente
para el amperaje de CA del cargador
de baterías, como se especifica en la
Tabla 1.
76
Page 77

SEGURIDAD — Continuación
Español
CALIBRE (AWG) MÍNIMO RECOMENDADO PARA
CABLES PROLONGADORES PARA EL
CARGADOR DE BATERÍAS
Amperaje nominal
de entrada de CA*
Igual o pero Longitud del cable, Pies (metros)
superior a inferior a 25 (7.5) 50 (15) 100 (30) 150 (45)
021818 18 16
231818 16 14
341818 16 14
* Si la entrada nominal del cargador de
baterías se indica en vatios en vez de
amperios, el amperaje nominal
correspondiente se determinará
dividiendo el vataje por la tensión, por
ejemplo:
9. No utilice el cargador de baterías con un
cable o un enchufe dañado. Si están
dañados, reemplácelos inmediatamente.
10. No utilice el cargador de baterías si ha
recibido un golpe, si ha caído, o si está
dañado de alguna otra forma. Llévelo a
un técnico cualificado.
11. No desarme el cargador de baterías.
Cuando necesite reparación, llévelo a un
técnico cualificado. El reensamblaje
incorrecto podría resultar en el riesgo de
incendios o descargas eléctricas.
12. Para reducir el riesgo de descargas
eléctricas, desenchufe el cargador del
tomacorriente antes de intentar realizar
cualquier operación de mantenimiento o
de limpiarlo. La extracción de la batería
no reducirá este riesgo.
13. Este cargador de baterías puede utilizarse
con herramientas alimentadas con
batería HITACHI como accesorio
estándar. En este caso, antes de utilizarlo,
lea los manuales de instrucciones de las
herramientas alimentadas con batería
HITACHI.
Tabla 1
1,250 vatios
125 voltios
Calibre (AWG) del cable
=
10 amperios
INSTRUCCIONES
IMPORTANTES DE SEGURIDAD
PARA LA BATERÍA Y EL
CARGADOR DE BATERÍAS
Recuerde que debe cargar la batería antes
de utilizar la Clavadora. Antes de utilizar el
cargador de baterías UC3SML, asegúrese de
leer atentamente todas las instrucciones y
precauciones que figuran en las mismas, en
el terminal de la batería y en este manual.
RECUERDE: UTILICE ÚNICAMENTE
BATERÍAS HITACHI TIPO EBM315. OTROS
TIPOS DE BATERÍAS PODRÁN EXPLOTAR Y
PRODUCIR LESIONES.
Para evitar el riesgo de lesiones, siga las
instrucciones ofrecidas a continuación:
ADVERTENCIA
䢇 La utilización inadecuada de la batería
o del cargador de baterías puede
conducir a lesiones serias. Para evitar
estas lesiones:
1. NUNCA desarme la batería.
2. NUNCA incinere la batería, aunque
esté dañada o completamente
agotada. La batería podría
explotar en el fuego.
3. NUNCA cortocircuite la batería.
4. NUNCA inserte ningún objeto en las
ranuras de ventilación del
cargador. Si lo hiciese podría
recibir descargas eléctricas o
dañar el cargador de baterías.
5. NUNCA cargue en exteriores.
Mantenga la batería alejada de
la luz solar directa, y utilícela
solamente donde haya poca
humedad y una buena
ventilación.
6. NUNCA cargue cuando la temperatura
sea inferior a 50°F (10°C) o
superior a 104°F (40°C).
7. NUNCA conecte dos cargadores de
baterías juntos.
77
Page 78

Español
SEGURIDAD — Continuación
8. NUNCA inserte objetos extraños en el
orificio para la batería ni en el
cargador de baterías.
9. NUNCA utilice un transformador
elevador para cargar.
10. NUNCA utilice un motogenerador ni
tensión de CC para cargar.
11. NUNCA guarde la batería ni el
cargador de baterías en
lugares en los que la
temperatura pueda alcanzar o
sobrepasar 104°F (40°C).
12. SIEMPRE utilice el cargador con un
tomacorriente (120 voltios). La
utilización de un cargador con
cualquier otra tensión podría
hacer que éste se recalentase
y dañase.
13. SIEMPRE espere 15 minutos por lo
menos entre las cargas para
evitar que el cargador se
recaliente.
14. SIEMPRE desconecte el cable de
alimentación del
tomacorriente cuando no vaya
a utilizar el cargador.
PRECAUCIONES A LA HORA DE
UTILIZAR EL CARGADOR DE LA
BATERÍA CON UNA FUENTE
ELÉCTRICA DE COCHE DE 12V CA
1. Utilice el cargador de la batería
correctamente.
Utilice el cargador de la batería sólo con
la fuente eléctrica de coche de 12V CA.
El cargador de la batería sólo debe
utilizarse en vehículos conectados a tierra
con polo negativo. Asegúrese de que el
polo negativo de la batería del coche está
conectado al chasis del coche.
2. Centre su atención en la conducción del
coche.
Si utiliza el cargador de la batería
mientras conduce, fije el cargador de la
batería, de forma que no se mueva de
repente y distraiga su atención de la
conducción. No coloque el cargador de
la batería o la batería debajo del asiento
del conductor, independientemente de si
está cargándose o no, ya que podría
caerse debajo del pedal del freno o el
cable podría enrollarse alrededor de los
pies del conductor y provocar un
accidente.
3. No manipule el cargador de la batería o
la batería cuando conduzca, ya que
podría producirse un accidente.
4. No permita que los niños cojan el
cargador de la batería o la batería, ya que
podría producirse un accidente.
5. Asegúrese de utilizar el cable
proporcionado.
Si se utiliza un cable diferente, podría
producirse un incendio o un accidente
por recalentamiento.
6. No coloque el cargador de la batería
sobre una funda de asiento de coche tipo
manta o la esterilla del coche durante la
carga, ya que podría producirse un
incendio por recalentamiento.
7. No exponga el cargador de la batería a
la luz directa del sol durante la carga, ya
que podría producirse un incendio.
8. No deje el vehículo sólo durante la carga.
ELIMINACIÓN DE LAS
BATERÍAS AGOTADAS
ADVERTENCIA
䢇 No tire las baterías agotadas. Las
baterías pueden explotar si se
incineran. El producto que ha adquirido
contiene una batería. La batería es
reciclable. Cuando se agote su
duración útil, de acuerdo con las leyes
estatales y locales, puede ser ilegal
tirar esta batería a la basura, Solicite a
las autoridades locales los detalles
sobre las opciones de reciclado o de la
forma de deshacerse apropiadamente
de la batería.
78
Page 79

SEGURIDAD — Continuación
Español
RESPONSABILIDADES DEL
EMPRESARIO
1. Asegúrese de que este MANUAL esté al
alcance de los operadores y del personal
de mantenimiento.
2. Asegúrese de que el clavador se utilice
solamente cuando el operador y demás
personas que se encuentren en el área
de trabajo estén utilizando GAFAS
PROTECTORAS PARA LOS OJOS.
3. Recalque que el operador y las demás
personas que se encuentren en el área
de trabajo necesitan utilizar GAFAS
PROTECTORAS PARA LOS OJOS.
4. Mantenga el clavador en un orden de
funcionamiento seguro.
5. Mantenga adecuadamente el clavador.
6. Si un clavador necesita reparación, no lo
utilice.
¡GUARDE ESTAS INSTRUCCIONES
Y
PÓNGALAS A DISPOSICIÓN DE
OTROS USUARIOS
Y
PROPIETARIOS DE ESTA
HERRAMIENTA!
79
Page 80

Español
OPERACIÓN
NOTA:
La información contenida en este manual ha sido diseñada para ayudarle a
utilizar con seguridad este clavador.
Algunas de las ilustraciones de este manual pueden mostrar detalles o accesorios
diferentes a los de su propio clavador.
NOMBRE DE LAS PIEZAS
1. Clavadora a gas de acabados
<NT65GS>
Cubierta
superior
Cámara
Pistón
Cuchilla
impulsora
Cabezal
disparador
(salida)
Palanca de
empuje
<NT65GB>
Cubierta superior
Actuador
Asidero
Gatillo
Alimentador
de clavos (B)
Actuador
Cargador
Batería
Gancho
<NT65GA>
Cubierta superior
Cámara
Pistón
Cuchilla
impulsora
Cabezal
disparador
(salida)
䡬 Batería (EBM315)
Palanca de empuje
Actuador
Asidero
Alimentador
de clavos (B)
Batería
Gancho
Cargador
Cámara
Pistón
Cuchilla
impulsora
Cabezal
disparador
(salida)
80
Palanca de
empuje
Asidero
Gatillo
Cargador
Alimentador
de clavos (B)
Orificio de terminal
Batería
Placa de
caracteristicas
Gancho
Botón de liberación de la batería
Page 81

2. Clavadora a gas de brads
<NT50GS>
Cubierta
superior
Cámara
Pistón
Actuador
Asidero
Español
Batería
Cuchilla
impulsora
Cabezal
disparador
(salida)
Palanca de
empuje
3. Cargador de la batería (UC3SML)
Toma de conexión
Enchufe de conexión del
cargador
Gancho
Gatillo
Palanca de paro
Cubierta de cargador
Cargador
Cinta
Orificio de instalación de la batería
Placa de características
(en la parte inferior)
Enchufe de conexión del cargador
Lámpara piloto
Enchufe de conexión
del encendedor
Cable
Cable
Adaptador de CA
81
Page 82

Español
ESPECIFICACIONES
1. Clavadora a gas de acabados
Modelo NT65GS NT65GB NT65GA
Dimensiones
Longitud × Altura × Anchura
Peso 3.7 libras (1.7 kg) 4.2 libras (1.9 kg)
Incluye batería y célula de
combustible
Capacidad de clavos 100 clavos (2 ristras) 100 clavos (1 ristra)
Velocidad de ciclo
Batería
Célula de combustible Tipo nº 728-981……de venta por separado
2. Clavadora a gas de brads
Modelo NT50GS
Dimensiones 10-5/8" × 11-1/8" × 3-3/8"
Longitud × Altura × Anchura (270 mm × 281 mm × 85 mm)
Peso 3.7 libras (1.7 kg)
Incluye batería y célula de combustible
Capacidad de clavos 100 clavos (1 ristra)
Velocidad de ciclo
Batería
Célula de combustible Tipo nº 728-981……de venta por separado
10-1/4" × 11" × 3-3/8" 10-5/8" × 11-1/8" × 3-3/8" 12"×12"×5"
(260 mm × 278 mm × 85 mm) (268 mm × 282 mm × 85 mm) (307 mm × 305 mm × 126 mm)
4.0 libras (1.8 kg) 4.4 libras (2.0 kg)
Intermitente: 2 clavos por segundo 1 clavo por segundo
Continuo: 1000 clavos por hora Continuo:
EBM315 (1.5 Ah)
Batería Li-ion, 3.6 V
Intermitente:
900 clavos por hora
4.0 libras (1.8 kg)
Intermitente: 2 clavos por segundo
Continuo: 1000 clavos por hora
EBM315 (1.5 Ah)
Batería Li-ion, 3.6 V
3. Cargador de baterías (UC3SML)
Fuente de alimentación de entrada
12V CC
Tiempo de carga Aprox. 60 minutos ..................................... EBM315
Tensión de carga ........................................ 3.6 V CC
Cargador
Corriente de carga ..................................... 1.5 A CC
Peso 0.4 libras (0.2 kg)
NOTA: El tiempo de carga pueda variar de acuerdo con la temperatura y la tensión de la
fuente de alimentación.
82
Page 83

SELECCIÓN DE CLAVOS
ADVERTENCIA
䢇 Asegúrese de usar únicamente clavos
legítimos Hitachi para el NT65GS,
NT65GB, NT65GA o el NT50GS. El uso
de otros clavos puede producir un fallo
de funcionamiento de la herramienta y/
o la rotura del clavo, lo que provocaría a
su vez lesiones de gravedad.
Con este clavador solamente podrán
utilizarse los clavos indicados en la tabla
siguiente.
Dimensiones de los clavos
<NT65GS>
Clavos de acabado de calibre 16
(Recto)
.110" (2.8mm)
Min.
Español
Max.
<NT65GB>
Clavos de acabado de calibre 16
(Ángulo: 20°)
1" (25mm)
.051" (1.3mm)
.055"
(1.4mm)
.110" (2.8mm)
1-1/4" (32mm)
.051" (1.3mm)
.055"
(1.4mm)
Min.
.065"
(1.65mm)
.065"
(1.65mm)
2-1/2" (65mm)
Max.
2-1/2" (65mm)
83
Page 84

Español
<NT65GA>
Clavos de acabado de calibre 15
(Ángulo: 34°)
<NT50GS>
Clavos de brads calibre 18
(Recto)
.075" (1.9mm)
Min.
.12"
(3.0mm)
.045"
(1.1mm)
1-1/4" (32mm)
Min.
Max.
.095" (2.4mm)
2-1/2" (65mm)
.072" (1.8mm)
Max.
5/8" (16mm)
.043" (1.1mm)
.039"
(1mm)
84
.049"
(1.25mm)
2" (50mm)
Page 85

Español
ACCESORIOS
PELIGRO
䢇 Los accesorios que no sean los
mostrados a continuación pueden
provocar el mal funcionamiento del
clavador y resultar en lesiones.
ACCESORIOS ESTÁNDAR
2
1
3
4
5
6
8
1 Gafas protectoras ................................. 1
2 Batería ................................................... 1
3 Cargador ................................................1
4 Conector de mechero ...........................1
5 Adaptador de CA .................................. 1
6 Llave Allen para tornillo M4 ................ 1
7 Llave Allen para tornillo M5 ................ 1
8 Tapa para el morro (montada en
la herramienta) (salvo NT50GS) ..........1
9 Tapa para el morro (montada en la
herramienta) (solamente NT50GS) .....1
0 Estuche ..................................................1
7
9
0
ACCESORIOS OPCIONALES
vendido aparte
䡬 Célula de combustible (N° de código 728-
981)
䡬 Aceite lubricante (N° de código 885-546, N°
728-986)
䡬 Desengrasante / limpiador (N° de código
728-985)
NOTA: Los accesorios están sujetos a
cambios sin ninguna obligación por
parte de HITACHI.
APLICACIONES
<NT65GS, NT50GA, NT50GB>
䡬 El clavado como proceso de terminación
en áreas periféricas de puertas, ventanas
y también para el rebordeado.
䡬 Reforzar el fondo de cajones.
Construcción de distintos tipos de cajas
y armarios.
<NT50GS>
䡬 Ensamblaje de armarios, marcos, y
arreglo de muebles.
䡬 Arreglo y moldura de casas fijas y
móviles.
MÉTODO DE CARGA
NOTA: Antes de enchufar el cargador en
1. Introduzca el enchufe de conexión del
2. Conecte a la fuente de alimentación.
Cuando se utilice el adaptador de CA
un tomacorriente, tenga en cuenta
los puntos siguientes:
䡬 La tensión de la fuente de
alimentación está indicada en la
placa de características.
䡬 El cable no deberá estar dañado.
ADVERTENCIA
䢇 No cargue con una tensión superior a
la indicada en la placa de
características. Si cargase con una
tensión superior a la indicada en la
placa de características, el cargador se
quemaría.
cargador en la toma de conexión del
cargador.
Enchufe el adaptador de CA en la salida
de alimentación.
85
Page 86

Español
ADVERTENCIA
䢇 No utilice el
cargador si su
cable está
dañado. Haga
que se lo reparen
inmediatamente.
Cuando se utilice el enchufe de conexión del
encendedor
䡬 Fije el cargador de batería en su lugar en
el coche.
Utilice la cinta suministrada con el
cargador de la batería para fijar el
cargador de la batería en su lugar y evitar
que se mueva de repente.
ADVERTENCIA
䢇 No coloque el cargador de la batería o
la batería debajo del asiento del
conductor. Fije el cargador de la batería
en su lugar para evitar que se mueva
de repente, ya que podría producirse
un accidente.
䡬 Introduzca el encendedor conectando el
enchufe en la toma del encendedor.
Si el enchufe se suelta y se cae de la toma
del encendedor, repare la toma. Como la
toma puede estar defectuosa, es
recomendable que se ponga en contacto
con su distribuidor local de coches. Si se
sigue utilizando la toma podría
producirse un accidente por
recalentamiento.
3. Inserte la batería en el cargador de
baterías.
4. Carga
䡬 Cuando inserte la batería en el cargador
de baterías, se iniciará la carga, y la
lámpara piloto se encenderá.
NOTA: Si la lámpara piloto no se encende,
desconecte el enchufe del
tomacorriente y compruebe si la
batería está correctamente insertada.
䡬 Cuando la batería se haya cargado
completamente, la lámpara no se
encende.
NOTA: El tiempo de carga de la batería
disminuye a bajas temperaturas o
cuando el voltaje de la fuente de
alimentación es muy bajo.
Cuando la lámpara piloto no se
apague a pesar de que hayan
transcurrido más de cuatro horas
desde que comenzó la carga,
interrumpa la carga y póngase en
contacto con el CENTRO DE
SERVICIO AUTORIZADO DE
HITACHI.
86
Page 87

Español
䡬 Temperatura de la batería
La temperatura de la batería se muestra
en la tabla siguiente, y si la batería se
calentado, habrá que dejar que se enfríe
durante cierto tiempo antes de
recargarla.
Tabla 2
Batería
EBM315
䡬 Tiempo de carga
En la Tabla 3 se muestra el tiempo de
recarga requerido de acuerdo con el tipo
de batería.
Tabla 3
Tensión de
la batería (V)
3.6 EBM315 60 min.
NOTA: El tiempo de recarga puede variar de
5. Desconectar el cargador de la batería del
6. Extraiga la batería del cargador de
acuerdo con la temperatura
ambiental y la tensión de la fuente
de alimentación.
receptáculo o de la toma del encendedor.
PRECAUCIÓN
䢇 No desconecte el cable del
tomacorriente tirando delmismo.
Cerciórese de tirar del enchufe para
desconectarlo del tomacorriente a fin
de evitar dañar el cable.
baterías.
Sujetando el cargador de baterías con
una mano, extraiga la batería del mismo.
No deje el cargador de la batería o la
batería en el coche.
Descarga eléctrica en caso de baterías
nuevas, etc.
Como la substancia química interna de
las baterías nuevas o las que no se hayan
utilizado durante mucho tiempo no está
Temperatura a la que podrá
recargarse la batería
32°F — 122°F (0°C — 50°C)
Tiempo de recarga (min. aprox.) a 20°C
Capacidad de la batería (Ah)
1.5 Ah
activada, la descarga eléctrica puede ser
inferior cuando se utilicen por primera y
segunda vez. Este fenómeno es temporal,
y el tiempo normal requerido para la
recarga se restablecerá recargando las
baterías 2 – 3 veces.
Forma de hacer que las baterías duren
más
䡬 Recarque las baterías antes de que se
hayan agotado completamente.
Si siente que la potencia de la
herramienta eléctrica se debilita, deje de
utilizarla y recargue su batería. Si
continuase utilizando la herramienta
hasta agotar la capacidad de la batería,
ésta podría dañarse y su duración útil
podría acortarse.
䡬 Evite realizar la recarga a altas
temperaturas
Una batería se calentará inmediatamente
después de haberla utilizado. Si
recargase tal batería inmediatamente
después de haberla utilizado, su
substancia química interna se
deterioraría, y la duración útil de la
batería se acortaría. Deje la batería y
recárguela después de que se haya
enfriado durante cierto tiempo.
PRECAUCIÓN
䢇 Si utiliza continuamente el cargador
de baterías, éste se calentará, lo que
puede causar averías. Después de
haber finalizado la carga, espere 15
minutos antes de realizar la carga
siguiente.
䢇 Si recarga una batería caliente o
expuesta al sol, la lámpara piloto
puede no encenderse.
La batería no se cargará. En tal caso,
deje que la batería se enfríe antes de
cargarla.
䢇 Si el cargador de batería no funciona
aunque la batería esté correctamente
insertada, es probable que la batería
o que el cargador de baterías esté
funcionando mal. Llévelos a un centro
de reparaciones autorizado.
87
Page 88

Español
ANTES DE LA OPERACIÓN
Lea la sección titulada “SEGURIDAD” (páginas
71 – 79).
Antes de la utilización, cerciórese de lo
siguiente.
ENTORNO DE TRABAJO
ADVERTENCIA
䢇 En el lugar de
trabajo no deberá
haber gases,
líquidos, ni demás
objetos
inflamables.
䢇 Utilice la
herramienta al
aire libre o en
120°F MAX
(50°C)
䢇 No permita que en el área de trabajo
haya niños ni demás personas no
autorizadas.
lugares bien
ventilados.
No inhalar.
䢇 Mantenga la
clavadora, las
células de
combustible y la
batería lejos de la
luz directa del sol
y de temperaturas
superiores a los
120°F (50°C).
䢇 Manténgase
alejada de fuentes
de ignición.
No fumar.
CUIDADOS PARA CLIMAS FRÍOS
䡬 No guarde la Clavadora, la célula de
combustible ni la pila en lugares fríos.
Guarde la Clavadora, la célula de
combustible y la batería en un lugar
cálido hasta que empiece a trabajar.
䡬 Si la Clavadora, la célula de combustible
o la batería están frías, llévelas a un lugar
caliente y deje que se calienten antes de
utilizarlas. Recuerde que la temperatura
máxima es de 120°F (50°C).
¡No la exponga a las llamas ni chispas!
88
PRECAUCIÓN
䢇 Es posible que la Clavadora no penetre
completamente en los siguientes casos:
a t˚ùperaturas bajas, la célula de
combustible pierde la fuerza propelente
necesaria; a temperaturas altas, la
célula de combustible sufre una
sobredosis.
䢇 No utilice la Clavadora bajo la lluvia ni
si hay exceso de humedad.
䢇 No se recomienda utilizar la Clavadora
a altitudes superiores a los 1,500 m
(5,000 pies) ni a temperaturas inferiores
a 30°F (0°C).
PREPARACIÓN DE LA CÉLULA
DE COMBUSTIBLE
Consulte la sección “SEGURIDAD,
INSTRUCCIONES IMPORTANTES DE
SEGURIDAD PARA LA CÉLULA DE
COMBUSTIBLE” (página 75).
PELIGRO
䢇 La célula de
combustible es
inflamable.
䢇 Manténgase
alejada de fuentes
de ignición.
䢇 No la pulverice
sobre una llama o
material
incandescente.
䢇 No fume mientras
manipule la célula
de combustible.
䢇 Mantenga el
vapor de la célula
de combustible
lejos del rostro o la
piel. Los gases de
expansión
provocan bajas
temperaturas. No
entre en contacto
䢇 No inhalar.
䢇 Manténgase fuera del alcance de los
niños.
con los gases.
Page 89

Español
PRECAUCIÓN
䢇 Si sale gas de la válvula reguladora o
del cartucho de gas una vez colocada
la válvula reguladora, sustituya la
válvula.
䢇 No intente volver a utilizar la válvula
reguladora.
Cámbiela por una válvula reguladora
nueva.
Para instalar la válvula reguladora a la célula
de combustible:
(1) Separe la válvula
reguladora y el tapón del
cartucho de gas.
(2) Presione hacia delante
(lado vástago) y hacia
abajo en la parte
delantera de la válvula
reguladora.
(3) Presione hacia abajo en
la parte posterior de la
válvula reguladora hasta
que quede sellada.
Cumpla la normativa de seguridad.
La célula de combustible está lista para ser
insertada en la Clavadora.
PREPARACIÓN DE LA BATERÍA
Consulte la sección “SEGURIDAD,
INSTRUCCIONES IMPORTANTES DE
SEGURIDAD PARA EL CARGADOR DE
BATERÍAS” (páginas 76).
Deberá cargar la batería antes de utilizarla.
En la página 19 - 21 se indica cómo cargarla.
PRUEBA DEL CLAVADOR
PELIGRO
䢇 Los operadores y
demás personas
que se
encuentren en el
área de trabajo
DEBEN usar
gafas protectoras
con blindajes
laterales que
cumplan con las
especificaciones
ANSI Z87.1.
ADVERTENCIA
䢇 No utilice nunca el clavador a menos
que la palanca de empuje funcione
adecuadamente.
Esta máquina emplea un mecanismo para
evitar que se utilice sin estar cargada.
Así, este mecanismo impide accionar la
palanca de empuje. Este mecanismo se
activa si el almacén no está cargado con
clavos o cuando el número de clavos es
inferior a 6 ó 9.
Para comprobar la válvula reguladora:
Presione el vástago de la válvula
reguladora de la célula de combustible dos
o tres veces contra un objeto que no esté
en movimiento y suéltelo.
Si no sale gas, la célula de combustible está
vacía. Cámbiela.
PRECAUCIÓN
䢇 Tenca cuidado de no golpear la punta
de la palanca de empuje contra la
madera.
Antes de comenzar el trabajo, pruebe el
clavador utilizando la lista de comprobaciones
siguiente. Realice las comprobaciones en el
orden indicado.
89
Page 90

Español
Si se produce alguna operación anormal, deje
de utilizar el clavador y póngase
inmediatamente en contacto con un centro de
reparaciones autorizado por Hitachi.
(1) RETIRE LOS CLAVOS, LA CÉLULA DE
COMBUSTIBLE Y LA BATERÍA DE LA
CLAVADORA.
䡺 TODOS LOS TORNILLOS DEBERÁN
ESTAR APRETADOS.
䡺 LA PALANCA DE EMPUJE Y EL
GATILLO DEBEN MOVERSE
SUAVEMENTE al accionar el
alimentador de clavos (B). (NT50GS:
no es necesario volver a poner el
alimentador de clavos)
Gatillo
Palanca
de empuje
Alimentador de clavos (B)
(2) Instalación de la batería.
No accione la palanca de empuje ni el
gatillo al instalar la batería.
Asegúrese de que el piloto indicador
luminoso de la batería parpadea en verde.
Si el piloto indicador luminoso de la batería
parpadea en rojo, significa que no está
totalmente cargada.
PILOTO INDICADOR LUMINOSO DE LA
BATERÍA
Parpadea en VERDE: cargada (la luz se
queda fija durante el
funcionamiento).
Parpadea en ROJO: no está totalmente
cargada (la luz se
queda fija durante el
funcionamiento).
OFF: La batería está totalmente vacía.
Cargue la batería.
Indicador luminoso de la batería
(3) CÓMO INSERTAR LA CÉLULA DE
COMBUSTIBLE EN LA CLAVADORA.
1 Empuje y tire del actuador.
2. Tire hacia afuera
1. Empuje hacia
arriba
2 Inserte la célula de combustible en la
Clavadora.
Célula de combustible
90
Asidero
Insertar
Botón de
Sacar
Batería
liberación de la batería
Page 91

Español
3 Inserte el vástago de la célula de
combustible en el orificio del adaptador.
Adaptador
Vástago
Célula de
combustible
Adaptador
Vástago
Célula de
combustible
NOTA: Inserte un adaptador flojo de acuerdo
con las instrucciones dadas en la
figura.
Inserte en el orificio
Adaptador
䡺 EL CLAVADOR NO DEBERÁ
FUNCIONAR.
No empuje el gatillo
Apriete la palanca
de empuje
Alimentador de clavos (B)
(5) Retire el dedo del gatillo y presione la
palanca de empuje contra la pieza de
trabajo.
Seguidamente, dirija el clavador hacia
abajo, jale el gatillo y espere en esa
posición durante 5 segundos o más.
䡺 EL CLAVADOR NO DEBERÁ
FUNCIONAR.
Empuje el
gatillo
4 Cierre el actuador.
2. Empuje hacia abajo
1. Vuelva a
balancearlo
(4) Retire el dedo del gatillo y pulse la
palanca de empuje contra la pieza de
trabajo, al tiempo que tira hacia atrás del
alimentador de clavos (B). (NT50GS: no
es necesario volver a poner el
alimentador de clavos)
(6) Sin tocar el gatillo, presione la palanca
de empuje contra la pieza de trabajo.
Tire del gatillo.
䡺 EL CLAVADOR NO DEBERÁ
FUNCIONAR.
(7) Si no observa nada anormal, cargue
clavos en el clavador.
Clave en la pieza de trabajo los mismos
clavos que vaya a utilizar en la aplicación
real.
䡺 EL CLAVADOR DEBERÁ
FUNCIONAR ADECUADAMENTE.
91
Page 92

Español
CARGA DE CLAVOS
ADVERTENCIA
䢇 Cuando cargue los clavos en el
clavador,
1) no tire del gatillo;
2) no apriete la palanca de empuje; y
3) mantenga el clavador apuntando
hacia abajo.
<NT65GS, NT65GA, NT65GB>
2 Acción de alimentación de clavos!
(1) Inserte la tira de clavos en la parte trasera
del cargador.
Cargador
(2) Deslice la tira de clavos hacia el cargador.
Alimentador de
clavos (B)
NOTA:
䢇 Empuje con cuidado el alimentador de
clavos (A) y el alimentador de clavos (B)
contra el clavo.
Si el alimentador de clavos (A) y el
alimentador de clavos (B) salen hacia
atrás del almacén y chocan contra el
clavo, se puede dañar el adhesivo del
clavo.
䢇 Utilice una ristra de clavos que tenga más
de 10 clavos.
䢇 Utilice una correa de clavos que no esté
rota y que tenga clavos de la misma
longitud.
El clavador habrá quedado listo para
funcionar.
Alimentador de
clavos (A)
(3) Empuje el alimentador de clavos (A) para
acoplar el alimentador de clavos (B) en
la ristra de clavos.
92
Extraiga los clavos:
1 Tire del alimentador de clavos (B) hacia
atrás.
2 Vuelva a echar hacia delante el
alimentador de clavos (B) con cuidado al
tiempo que empuja el alimentador de
clavos (A).
3 Retire los clavos del fondo del almacén.
1
2
Alimentador de
clavos (B)
Alimentador de
clavos (A)
Page 93

Clavos
Español
Cargador
Goía lateral
Ranura
Punta
3
Separación
<NT50GS>
(1) Presione levemente la palanca de paro y
quite cuidadosamente la tapa del
depósito.
Prensa
Sacar
Cubierta de
cargador
(2) Coloque la ristra de puntas en el cargador
y mantenga los extremos de las puntas
en contacto con la ranura.
Ristra de
puntas
Cargador
NOTA:
䢇 Las puntas mostradas en la página 84
podrán cargarse en la ranura de la guía
lateral del cargador sin ningún ajuste.
Mantenga siempre los extremos de las
puntas en contacto con la ranura.
Palanca de paro
Ranura
Ranura
(3) Deslice la ristra de puntas dentro de la
guía de la cuchilla.
Ristra de
Guía de
cuchilla
(4) Confirme si la ristra de puntas está
colocada en las ranura lateral, y después
empuje la cubierta del cargador hacia
adelante hasta que quede enganchado.
puntas
OPERACIÓN DEL CLAVADOR
Lea la sección titulada “SEGURIDAD”
(páginas 71 – 79).
PELIGRO
䢇 Los operadores y
demás personas
que se
encuentren en el
área de trabajo
DEBEN usar
gafas protectoras
con blindajes
laterales que
93
Page 94

Español
cumplan con las
especificaciones
ANSI Z87.1.
䢇 No la utilice nunca
cerca de líquidos o
gases inflamables.
䢇 No toque la zona
que rodea a la
salida con las
manos
descubiertas.
La palanca de
empuje y la parte
delantera se
calientan por el
uso prolongado o
120°F MAX
(50°C)
rápido.
䢇 Peligro de
incendio y
explosión.
Mantenga la
herramienta
alejada de la luz
directa del sol y
de temperaturas
superiores a los
120°F (50°C).
䢇 Manténgase
alejada de fuentes
de ignición.
䢇 No fumar.
ADVERTENCIA
䢇 No dirija NUNCA
la herramienta
hacia sí mismo o
hacia otras
personas del área
de trabajo.
䢇 Para evitar un
disparo
accidental,
mantenga los
dedos ALEJADOS
del gatillo
disparador
cuando no se esté
usando la
herramienta.
94
䢇 No utilice el cable de alimentación si
está dañado.
Llévelo a reparar de inmediato.
䢇 No coloque lo rostro, las manos ni los
pies a una distancia inferior a 8 pulgadas
(200 mm) del cabezal de disparo
mientras lo utiliza.
䢇 No introduzca los clavos sobre la cabeza
de otros clavos, ni con el clavador a un
ángulo demasiado agudo, ya que los
clavos podrían rebotar y herir a alguien.
䢇 No clave clavos en paneles finos ni cerca
de esquinas ni bordes de la pieza de
trabajo.
Los clavos podrían traspasar la pieza de
trabajo y lesionar a alguien.
䢇 No clave nunca clavos desde ambos
lados de una pared al mismo tiempo. Los
clavos podrían traspasar la pared y
lesionar a la persona de la otra parte.
䢇 No utilice nunca un clavador defectuoso
o que funcione anormalmente.
䢇 No utilice el clavador a modo de martillo
normal.
䢇 Desconecte la batería y la célula de
combustible de la Clavadora cuando:
1) no vaya a utilizarlo;
2) vaya a abandonar el área de trabajo;
3) vaya a trasladarse a otro lugar; y
4) vaya a entregárselo a otra persona.
䢇 Tenga cuidado para que no se
produzca un uso accidental.
Si acciona el gatillo sin clavar a una
temperatura inferior a 30°F (0°C), se
producirá un disparo accidental.
Esta Clavadora cuenta con un MECANISMO
DE ACTUACIÓN SECUENCIAL COMPLETO.
Explicación del funcionamiento de clavado
con MECANISMO DE ACTUACIÓN
SECUENCIAL COMPLETO;
En primer lugar, empuje la palanca contra
la pieza de trabajo;
a continuación, accione el gatillo para
disparar un clavo.
䢇 Utilice la
herramienta al
aire libre o en
lugares bien
ventilados.
䢇 No inhale su
contenido.
Page 95

NT65GS, NT65GA, NT65GB emplea un
mecanismo para evitar que se utilice sin
estar cargada.
Así, NT65GS, NT65GA, NT65GB impide
accionar la palanca de empuje. Este
mecanismo se activa si el almacén no está
cargado con clavos o cuando el número de
clavos es inferior a 6 ó 9.
PRECAUCIÓN
䢇 Tenca cuidado de no empujar la punta
de la palanca de empuje contra la
madera cuando la palanca esté
bloqueada.
MÉTODOS DE OPERACIÓN
PRECAUCIÓN
䢇 Apriete la palanca de empuje para
disparar el clavo, de lo contrario
puede que el pistón no retroceda
correctamente.
䢇 Asegúrese de disparar los clavos en
profundidad con temperaturas
superiores a 104°F (40°C) o inferiores
a 32°F (0°C).
䢇 Si se utiliza la herramienta durante un
periodo de tiempo prolongado podría
quedarse aceite alrededor de la salida
de humos o manguera, causando
salpicaduras.
Para garantizar que el material a
clavar está limpio, limpie el aceite que
se queda en la herramienta.
Este clavador está equipado con una palanca
de empuje, y no funcionará a menos que ésta
esté presionada (posición hacia arriba).
Español
3
2
Palanca de empuje
Gatillo
AJUSTE DE LA PROFUNDIDAD
DE CLAVADO
Para asegurarse de que todos los clavos
penetran a la misma profundidad, asegúrese
de sujetar la Clavadora firmemente contra
la pieza de trabajo.
Si los clavos se disparan a demasiada
profundidad o quedan en la superficie,
ajuste el disparo como sigue.
1 Retire la célula de combustible y la pila
de la clavadora.
Célula de
combustible
Batería
Sólo funcionamiento intermitente (con
disparador).
1 Coloque la salida de los clavos sobre
la pieza de trabajo con el dedo fuera
del gatillo.
2 Presione a fondo la palanca de
empuje.
3 Tire del gatillo para disparar un
clavo.
4 Separe el dedo del gatillo.
Para continuar clavando en un lugar
separado, mueva el clavador a lo largo
de la madera, repitiendo los pasos 1 -
4, según se requiera.
95
Page 96

Español
2 Si las clavos penetran demasiado, gire
el ajustador hacia la parte de menor
profundidad.
2
Demasiada
profundidad
2
Poca
profundidad
El ajuste se insertan demasiado poco,
gire el regulador hacia la parte de mayor
profundidad.
3 Deje de girar el ajustador cuando alcance
la posición apropiada realizando una
prueba de clavado.
4 Inserte la célula de combustible y la pila
en la clavadora.
UTILICE SIEMPRE GAFAS DE
SEGURIDAD.
Realice una prueba.
5 Retire la célula de combustible y la pila
de la clavadora.
6 Seleccione una posición adecuada para
el ajuste.
Gire el ajustador.
Gire el ajustador.
A ras
A ras
(1) Sujete firmemente la unidad principal
y saque el tornilo usando un
destornillador.
(2)Saque el gancho y la placa de gancho.
(3) Instale el gancho en el otro lateral y
asegure firmemente con el tornillo.
USO DEL GANCHO
PRECAUCIÓN
䢇 Si se cae la herramienta, existe el
riesgo de que se estropee o provoque
lesiones personales.
Se recomienda utilizar cables para
evitar que se caiga, etc.
䢇 La instalación incompleta del gancho
puede provocar lesiones corporales
durante el uso.
El gancho puede instalarse a la izquierda o
derecha.
96
Page 97

UTILIZACIÓN DE LA TAPA
PARA EL MORRO
ADVERTENCIA
䢇 Al fijar remover la tapa del morro,
asegúrese de retirar su dedo del
disparador y retire la célula de
combustible y la pila de la clavadora.
Si desea proteger la superficie de la pieza
de trabajo contra rascaduras o marcas de la
palanca de empuje, instale la tapa para el
morro accesoria en dicha palanca.
1 Retire la célula de combustible y la pila
de la clavadora.
2 Coloque la tapa para el morro en el talón
de la palanca de empuje.
3 La tapa para el morro está marcada para
indicar el punto de salida de la clavo,
facilitando así la alineación.
4 Si no se utiliza la tapa de la nariz,
asegúrela en el compartimiento provisto
en el lado trasero del cargador.
Tapa para
el morro
Español
Palanca de empuje
Tapa para el morro
Tapa para
el morro
Cargador
NT50GS
NOTA:
䢇 La tapa para el morro puede reducir la
profundidad de penetración de los clavos
debido a su grosor. Cuando haya
instalado la tapa, reajuste la profundidad
de penetración de los clavos.
2
Tapa para
el morro
NT65GS, NT65GA, NT65GB
Palanca de
empuje
Cargador
EN CASO DE ATASCO
Si los clavos se atascan en el cabezal de
disparo, ajuste el disparo en el orden
siguiente.
PRECAUCIÓN
䢇 Retire la célula de combustible y la
pila de la clavadora.
1 Retire la célula de combustible y la pila
de la clavadora.
2 Extraiga todos los clavos.
3 Suelte la palanca de bloqueo y abra la
placa de guía.
97
Page 98

Español
Palanca de
bloqueo
3
Placa guia
4 Extraiga el clavo atascado con un
destornillador de clavo plana.
5 Cierre la placa de guía y el enganche.
NOTA:
䢇 En caso de atasco frecuente, póngase en
contacto con un centro de servicio
autorizado por Hitachi.
98
Page 99

MANTENIMIENTO
Español
NOTA:
La información contenida en este manual ha sido diseñada para ayudarle a
mantener con seguridad este clavador.
Algunas ilustraciones de este manual pueden mostrar detalles o dispositivos
diferentes a los de su propio clavador.
MANTENIMIENTO E
INSPECCIÓN
<Clavadora>
Lea la sección titulada “SEGURIDAD”
(páginas 71 – 79).
PELIGRO
䢇 No la utilice ni la
pruebe nunca
cerca de líquidos o
gases inflamables.
䢇 Manténgase
alejada de fuentes
de ignición.
䢇 No fumar.
Paño
PRECAUCIÓN
䢇 Compruebe si el alimentador de clavos
se desliza suavemente al empujarlo con
el dedo.
Si no lo hiciese, los clavos podrían
clavarse con un ángulo irregular y
lesionar a alguien.
2. Almacenamiento
ADVERTENCIA
䢇 Retire la célula de combustible, la pila
y los clavos de la clavadora cuando:
1) realizar trabajos de mantenimiento
e inspección; y
2) desatascar el clavador.
1. Inspección del cargador
1 RETIRE LA CÉLULA DE COMBUSTIBLE Y
LA PILA.
2 Limpie el almacén. Si el alimentador de
clavos (B) y el pomo de alimentación
salen hacia atrás del almacén y chocan
contra el clavo, se puede dañar el
adhesivo del clavo. Lubrique la
herramienta con un lubricante para
herramientas de gas de Hitachi.
PELIGRO
120°F MAX
(50°C)
䢇 Guarde la
clavadora
correctamente:
retire la célula de
combustible y la
batería.
䢇 La célula de
combustible es
un dispensador
de aerosol con
contenido
inflamable.
99
Page 100

Español
䢇 Mientras no la utilice, guarde la célula
de combustible y la pila en una caja de
herramientas en un lugar seco.
䢇 Guárdela en interior a una temperatura
inferior a 120°F (50°C).
䡬 Cuando no vaya a utilizar el clavador
durante mucho tiempo, aplique una capa
fina de lubricante a las piezas de acero
para evitar que se oxiden.
䡬 No guarde la Clavadora, la célula de
combustible ni la pila en lugares fríos.
Guarde las piezas en un lugar cálido.
䡬 Mientras no la utilice, guarde la célula de
combustible y la pila en un lugar seco y
cálido.
Manténgase fuera del alcance de los
niños.
3. ETIQUETA DE PRECAUCIÓN
Si la ETIQUETA DE PRECAUCIÓN se
pierde o daña, cámbiela por otra.
Solicite la nueva ETIQUETA DE
PRECAUCIÓN a un centro de
reparaciones autorizado por Hitachi.
Etiqueta de
precaución
Hitachi para solicitar la reparación o
cualquier otro tipo de mantenimiento.
En el manejo y el mantenimiento de las
herramientas eléctricas, se deberán
observar las normas y reglamentos
vigentes en cada país.
MODIFICACIONES:
Hitachi Power Tools introduce
constantemente mejoras y modificaciones
para incorporar los últimos avances
tecnológicos.
Por consiguiente, algunas partes pueden ser
modificadas sin previo aviso.
<Cargador de baterías>
1. Comprobación de los tornillos
Los tornillos son peligrosos.
Inspecciónelos regularmente y cerciórese
de que estén bien apretados.
PRECAUCIÓN
䢇 La utilización del cargador de baterías
con tornillos flojos es
extremadamente peligrosa.
2. Comprobación del polvo
El polvo podrá eliminarse con un paño
suave y seco o ligeramente humedecido
en agua jabonosa.
No utilice lejía, cloro, gasolina, ni diluidor
de pintura, porque podrían dañar el
plástico.
3. Sustitución del fusible del enchufe de
conexión al encendedor
4. Tabla de mantenimiento (Consulte la
página 102.)
5. Solución de problemas por parte del
operador (Consulte las página 102 - 103.)
6. Lista de repuestos
PRECAUCIÓN
䢇 La reparación, modificación e
inspección de las herramientas
eléctricas Hitachi deben ser realizadas
por un Centro de Servicio Autorizado de
Hitachi.
Esta lista de repuestos será de utilidad
si es presentada junto con la heramienta
al Centro de Servicio Autorizado de
100
PRECAUCIÓN
䢇 Para contar con protección
continuada contra el riesgo de
incendios, sustituya el fusible del
enchufe de conexión al encendedor
sólo por fusibles del mismo tipo y
potencia.
4. Almacenamiento
Guarde la herramienta en un lugar con
menos de 104°F (40°C) y fuera del alcance
de niños.
250V, 6A, CC
 Loading...