

Instruction and safety manual
Manuel d'instructions et de sécurité
Instrucciones y manual de seguridad
Model
Modèle
Modelo
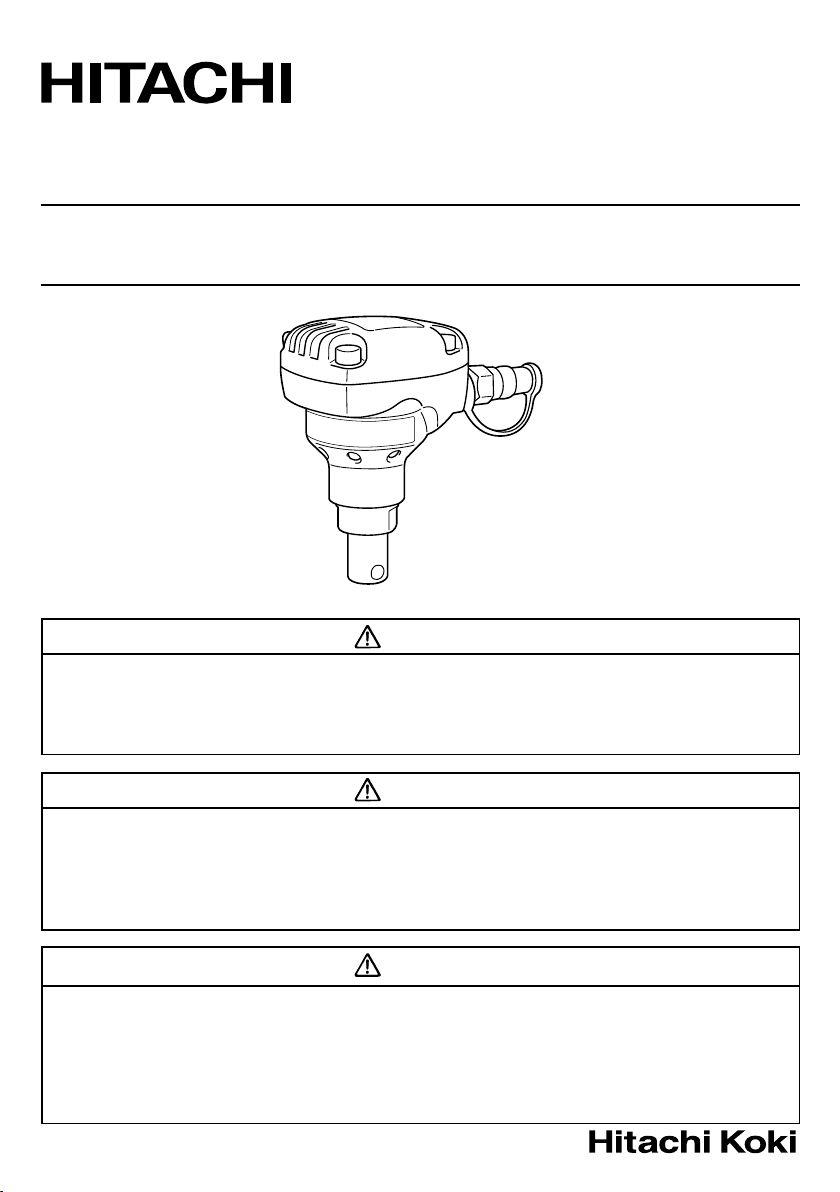
NH 90AB
Mini Bulk Nailer
Mini cloueuse à impact
Mini clavadora para clavos sueltos
DANGER
Improper use of this Nailer can result in death or serious injury!
This Manual contains important information about product safety.
Read and understand this Manual before operating the Nailer.
Keep this Manual available for others before they use the Nailer.
Never allow anyone who has not reviewed this manual.
DANGER
Une utilisation incorrecte et sans respecter la sécurité de ce cloueur risque d’entraîner
la mort ou des blessures graves !
Ce manuel renferme des instructions importantes sur la sécurité de l’outil.
Lire et bien assimiler ce manuel avant d’utiliser la cloueur.
Conserver ce manuel à l'intention des autres utilisateurs de la cloueur.
Ne jamais laisser les personnes n'ayant pas étutdié le manuel utiliser l'outil.
PELIGRO
¡La utilización inadecuada e insegura de este clavador puede resultar en lesiones serias
o en la muerte!
Este manual contiene información importante sobre la seguridad del producto.
Lea y entienda este manual antes de utilizar el clavador.
Guarde este manual a mano para que puedan consultarlo otras personas antes de
utilizar el clavador.
No deje manejar esta herramienta a nadie que no haya leído este manual.
English
CONTENTS
Page
IMPORTANT INFORMATION ......................... 3
DEFINITIONS OF SIGNAL WORDS ............... 3
SAFETY
IMPORTANT SAFETY INSTRUCTIONS
FOR USING NAILERS ............................... 4
EMPLOYER’S RESPONSIBILITIES ................. 7
OPERATION
NAME OF PARTS ............................................8
SPECIFICATIONS ............................................ 8
NAIL SELECTION ............................................ 9
ACCESSORIES .............................................. 10
STANDARD ACCESSORIES ..................... 10
OPTIONAL ACCESSORIES ....................... 10
APPLICATIONS ............................................. 10
Page
BEFORE OPERATION ................................... 10
WORKING ENVIRONMENT ......................10
AIR SUPPLY ............................................... 10
LUBRICATION ........................................... 11
COLD WEATHER CARE ............................ 11
TESTING THE NAILER .............................. 12
ADJUSTING AIR PRESSURE ................... 12
NAILER OPERATION .................................... 12
METHODS OF OPERATION ...................... 13
MAINTENANCE
MAINTENANCE AND INSPECTION ............. 15
SERVICE AND REPAIRS ............................... 16
PARTS LIST ................................................... 52
Français
TABLE DE MATIERES
Page
INFORMATION IMPORTANTE .....................18
DEFINITION DES MOTS DE SIGNALISATION...
SECURITE
CONSIGNES DE SECURITE IMPORTANTES
POUR L’UTILISATION DU CLOUEUR ... 19
RESPONSABILITES DE L’EMPLOYEUR ...... 23
UTILISATION
NOM DES PIECES .........................................24
SPECIFICATIONS .......................................... 24
SELECTION DES CLOUS ..............................25
ACCESSOIRES .............................................. 26
ACCESSOIRES STANDARD ..................... 26
ACCESSOIRES EN OPTION ...................... 26
Español
18
ÍNDICE
Página
INFORMACIÓN IMPORTANTE ..................... 35
DEFINICIÓN DE LAS PALABRAS CLAVE .... 35
SEGURIDAD
INSTRUCCIONES IMPORTANTES DE SEGURIDAD
PARA LA UTILIZACIÓN DEL CLAVADOR ........
RESPONSABILIDADES DEL EMPRESARIO ..
OPERACIÓN
NOMENCLATURA ........................................ 41
ESPECIFICACIONES ..................................... 41
SELECCIÓN DE CLAVOS ..............................42
ACCESSORIOS .............................................. 43
ACCESORIOS ESTÁNDAR ....................... 43
ACCESORIOS OPCIONALES .................... 43
36
40
APPLICATIONS ............................................. 26
Page
AVANT L’UTILISATION ................................ 26
ENVIRONNEMENT DE TRAVAIL .............. 26
ALIMENTATION D’AIR ............................. 26
GRAISSAGE .............................................. 27
ENTRETIEN PAR TEMPS FROID .............. 28
ESSAI DU CLOUEUR ................................ 28
RÉGLAGE DE LA PRESSION D’AIR ......... 29
UTILISATION DU CLOUEUR ........................ 29
MÉTHODES D’UTILISATION .................... 29
ENTRETIEN
ENTRETIEN ET INSPECTION ....................... 32
ENTRETIEN ET REPARATIONS ................... 33
LISTE DES PIECES ........................................ 52
Página
APLICACIONES ............................................. 43
ANTES DE LA OPERACIÓN .......................... 43
ENTORNO DE TRABAJO ..........................43
SUMINISTRO DE AIRE ............................. 43
LUBRICACIÓN ........................................... 44
CUIDADOS PARA CLIMAS FRÍOS ........... 45
PRUEBA DEL CLAVADOR ........................ 45
AJUSTE DE LA PRESIÓN DE AIRE .......... 46
OPERACIÓN DEL CLAVADOR ...................... 46
MÉTODOS DE OPERACIÓN ..................... 46
MANTENIMIENTO
MANTENIMIENTO E INSPECCIÓN .............. 49
SERVICIO Y REPARACIONES ...................... 50
LISTA DE PIEZAS .......................................... 52
English
IMPORTANT INFORMATION
Read and understand tool labels and all of the operating instructions,
safety precautions and warnings in this manual before operating or
maintaining this nailer.
Failure to follow warnings could result in DEATH or SERIOUS INJURY.
Most accidents that result from the operation and maintenance of Nailers are caused by
the failure to observe basic safety rules or precautions. An accident can often be avoided
by recognizing a potentially hazardous situation before it occurs, and by observing
appropriate safety procedures.
Basic safety precautions are outlined in the “SAFETY” section of this Manual and in the
sections which contain the operation and maintenance instructions.
Hazards that must be avoided to prevent bodily injury or machine damage are identified
by DANGERS and WARNINGS on the Nailer and in this Manual.
Never use this Nailer for applications other than those specified in this Manual.
DEFINITIONS OF SIGNAL WORDS
DANGER indicates an imminently hazardous situation which, if not avoided, will result
in death or serious injury.
WARNING indicates a potentially hazardous situation which, if not avoided, could result
in death or serious injury.
CAUTION indicates a potentially hazardous situation which, if not avoided, may result in
minor or moderate injury, or may cause machine damage.
NOTE emphasizes essential information.
— 3 —
English
SAFETY
IMPORTANT SAFETY INSTRUCTIONS
FOR USING NAILERS
READ ALL INSTRUCTIONS
DANGER
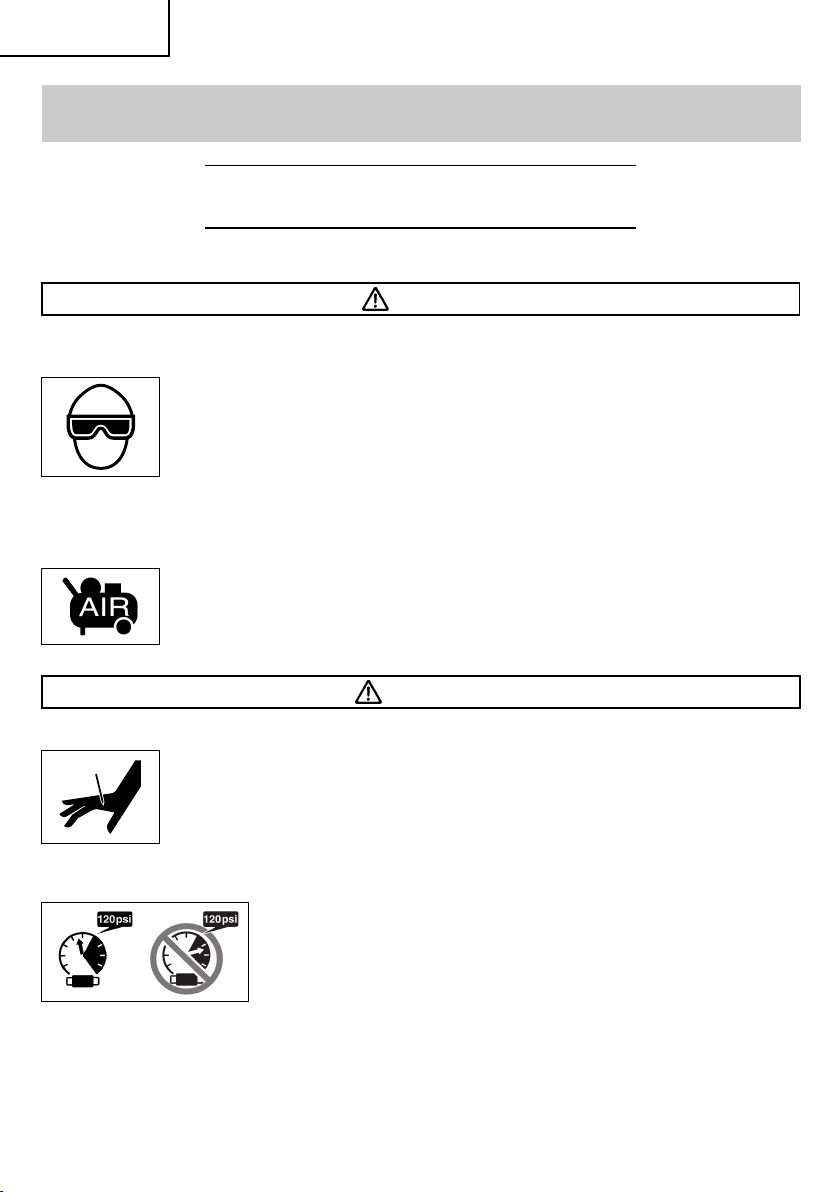
1. OPERATORS AND OTHERS IN WORK AREA MUST WEAR SAFETY GLASSES WITH SIDE
SHIELDS.
2. NEVER USE OXYGEN OR OTHER BOTTLED GASSES. EXPLOSION MAY OCCUR.
When operating the Nailer, always wear safety glasses with side shields,
and make sure others in work area wear safety glasses, too.
Safety glasses must conform to the requirements of American National
Standards Institute, ANSI Z87.1 and provide protection against flying particles
both from the front and side.
The employer must enforce the use of safety glasses by the Nailer operator
and others in work area.
Never use oxygen, combustible gases or any other bottled gases as a power
source for the Nailer.
Use of the above gases is dangerous, as the Nailer will explode.
Use only clean, dry, regulated compressed air.
WARNING
3. NEVER POINT TOOL AT YOURSELF OR OTHERS IN WORK AREA.
4. DO NOT EXCEED 120 psi. (8.3 bar 8.5 kgf/cm
Always assume the Nailer contains fasteners.
Never point the Nailer at yourself toward yourself or others, whether it
contains fasteners or not.
If fasteners are mistakenly driven, it can lead to severe injuries.
Never engage in horseplay with the Nailer.
Respect the Nailer as a working implement.
2
Do not exceed maximum recommended air pressure 120 psi (8.3
bar 8.5 kgf/cm
Never connect the Nailer to pressure which potentially exceeds
200 psi (13.7 bar 14 kgf/cm
2
).
— 4 —
)
2
) as the Nailer can burst.

SAFETY — Continued
WARNING
English
5. ALWAYS WEAR EAR AND HEAD
PROTECTION.
Always wear ear protection to protect
your ears from loud noise.
Always wear head protection to protect
your head from flying objects.
6. STORE NAILER PROPERLY.
When not in use, the Nailer should be
stored in a dry place. Keep out of reach
of children. Lock the storage area.
7. KEEP WORK AREA CLEAN.
Cluttered areas invite injuries. Clear all
work areas of unnecessary tools, debris,
furniture, etc.
8. NEVER USE IN PRESENCE OF
FLAMMABLE LIQUIDS OR GASES.
The Nailer produces sparks during
operation.
Never use the Nailer in sites containing
lacquer, paint, benzine, thinner, gasoline,
gases, adhesive agents, and other
materials which are combustible or
explosive.
9. KEEP VISITORS AWAY.
Do not let visitors handle the Nailer.
All visitors should be kept safely away
from work area.
10. DRESS PROPERLY.
Do not wear loose clothing or jewelry as
they can be caught in moving parts.
Rubber gloves and nonskid footwear are
recommended when working outdoors.
Wear protective hair covering to contain
long hair.
11. NEVER USE NON RELIEVING COUPLER
ON NAILER.
If a non relieving coupler is used on the
Nailer, the Nailer can remain charged
with air after disconnecting and thus will
be able to drive a fastener even after
disconnecting.
The Nailer and air hose must have a hose
coupling such that all pressure is
removed from the Nailer when the
coupling joint is disconnected.
12. CONNECT AIR HOSE BEFORE NAIL
LOADING AND CHECK THE
FOLLOWINGS.
Check for air leakage and abnormal noise.
Use of the Nailer in an abnormal
condition may cause accidents or injuries.
If any abnormality is detected, ask your
dealer or HITACHI authorized service
center for repair.
13. KEEP ALL SCREWS AND COVERS
TIGHTLY IN PLACE.
Keep all screws and covers tightly
mounted. Check their condition
periodically.
Never use the Nailer if parts are missing
or damaged.
14. KEEP FACE, HANDS AND FEET AWAY
FROM FIRING HEAD AT ALL TIMES.
Never place your face, hands or feet near
the firing head.
15. PLACE NAILER PROPERLY ON
WORKPIECE.
Do not drive fasteners on top of other
fasteners or with the Nailer at too steep
of an angle; the fasteners can ricochet
and hurt someone.
16. BE CAREFUL OF NAILER REPULSION.
When a nail is shot against a hard
material, the Nailer may bounce back. Do
not bring your face close to it.
17. DO NOT DRIVE FASTENERS INTO THIN
BOARDS OR NEAR CORNERS AND
EDGES OF WORKPIECE.
The fasteners can be driven through or
away from the workpiece and hit
someone.
— 5 —
English
SAFETY — Continued
WARNING
18. NEVER DRIVE FASTENERS FROM BOTH
SIDES OF A WALL AT THE SAME TIME.
The fasteners can be driven into and
through the wall and hit a person on the
opposite side.
19. CHECK FOR LIVE WIRES.
Avoid the risk of severe electrical shock
by checking for live electrical wires that
may be hidden by walls, floors or ceilings.
Turn off the breaker switch to ensure
there are no live wires.
20. NEVER CARRY NAILER BY HOSE.
21. DO NOT OVERREACH.
Keep proper footing and balance at all
times.
22. NEVER USE NAILER WHICH IS DEFECTIVE
OR OPERATING ABNORMALLY.
If the Nailer appears to be operating
unusually, making strange noises, or
otherwise appears defective, stop using
it immediately and arrange for repairs by
a Hitachi authorized service center.
23. DISCONNECT AIR HOSE FROM NAILER
WHEN:
1) doing maintenance and inspection;
2) clearing a jam;
3) it is not in use;
4) leaving work area;
5) moving it to another location; and
6) handing it to another person.
Never attempt to clear a jam or repair the
Nailer unless you have disconnected air
hose from the Nailer and removed all
remaining fasteners from the Nailer.
The Nailer should never be left
unattended since people who are not
familiar with the Nailer might handle it
and injure the themselves.
24. STAY ALERT.
Watch what you are doing. Use common
sense.
Do not operate the Nailer when you are
tired.
The Nailer should never be used by you
if you are under the influence of alcohol,
drugs or medication that makes you
drowsy.
25. HANDLE NAILER CORRECTLY.
Operate the Nailer according to this
Manual.
Never allow the Nailer to be operated by
children, individuals unfamiliar with its
operation or unauthorized personnel.
26. NEVER USE NAILER FOR APPLICATIONS
OTHER THAN THOSE SPECIFIED IN THIS
MANUAL.
27. HANDLE NAILER CAREFULLY.
Because of high air pressure in the Nailer,
cracks in the surface are dangerous.
To avoid this, do not drop the Nailer or
strike the Nailer against hard surfaces;
and do not scratch or engrave signs on
the Nailer. Handle the Nailer carefully.
28. MAINTAIN NAILER WITH CARE.
Keep the Nailer clean and lubricated for
better and safer performance.
29. USE ONLY PARTS, ACCESSORIES OR
FASTENERS SUPPLIED OR
RECOMMENDED BY HITACHI.
Unauthorized parts, accessories, or
fasteners may void your warranty and
can lead to malfunction and resulting
injuries.
Only service personnel trained by Hitachi,
distributor or employer shall repair the
Nailer.
30. NEVER MODIFY OR ALTER A NAILER.
Doing so may cause it to malfunction and
personal injuries may result.
31. CHECK THE ROD MOVEMENT BEFORE
USE.
Without connecting an air hose, check if
the rod moves steadily by pressing the
rod tip against a material such as of
wood.
— 6 —
SAFETY — Continued
WARNING
English
If the rod movement is improper, a nail
may come off during use, which may
result in injury.
32. BE AWARE OF FOLLOWINGS WHEN
CONNECTING AIR HOSE.
Make sure there is no nail in the rod.
Otherwise, a nail may be shot mistakenly,
which may result in injury.
Keep the nail outlet pointed downward
and make sure to keep your body, hands
and feet away from the firing head.
Do not place the rod tip on a table or floor.
33. USE DEDICATED NAILS.
Do not use any other nails because they
may result in injury or malfunction of this
Nailer.
34. LOAD NAIL CAREFULLY.
When loading a nail in the rod, hold the
nail shaft instead of the tip.
Otherwise, when the Nailer operates
mistakenly and injuries as nailing a finger
may result.
EMPLOYER’S RESPONSIBILITIES
When loading a nail in the rod, make sure
it does not press the tip of the driver unit.
If the nail is inserted to the rod
excessively, it may press the tip of the
driver unit. By this, the Nailer may
operate mistakenly, which may result in
injury.
35. BE AWARE OF FOLLOWINGS WHEN
SHOOTING NAIL HOLDING WITH
FINGERS.
Shoot the nail by placing the nail tip at a
target first, and then inserting the rod to
the nail head.
If the nail tip is not placed firmly or the
nail head is firstly inserted to the rod,
injuries may result when the nail bounces
back or is shot mistakenly.
36. AVOID LONG TIME NAILING
OPERATION.
Make sure to finish nailing in as short a
time as possible. Also, avoid continuous
operation and allow adequate downtime
between operations.
1. Ensure that this MANUAL is available to
operators and personnel performing
maintenance.
2. Ensure that Nailers are used only when
operators and others in work area are
wearing EYE PROTECTOR.
SAVE THIS MANUAL AND
KEEP IT AVAILABLE FOR OTHERS!
— 7 —
3. Enforce the use of EYE PROTECTOR by
operators and others in work area.
4. Keep Nailers in safe working order.
5. Maintain Nailers properly.
6. Ensure that Nailers which require repair
are not further used before repair.

English
OPERATION
NOTE:
The information contained in this Manual is designed to assist you in the safe
operation of the Nailer.
Some illustrations in this Manual may show details or attachments that differ
from those on your own Nailer.
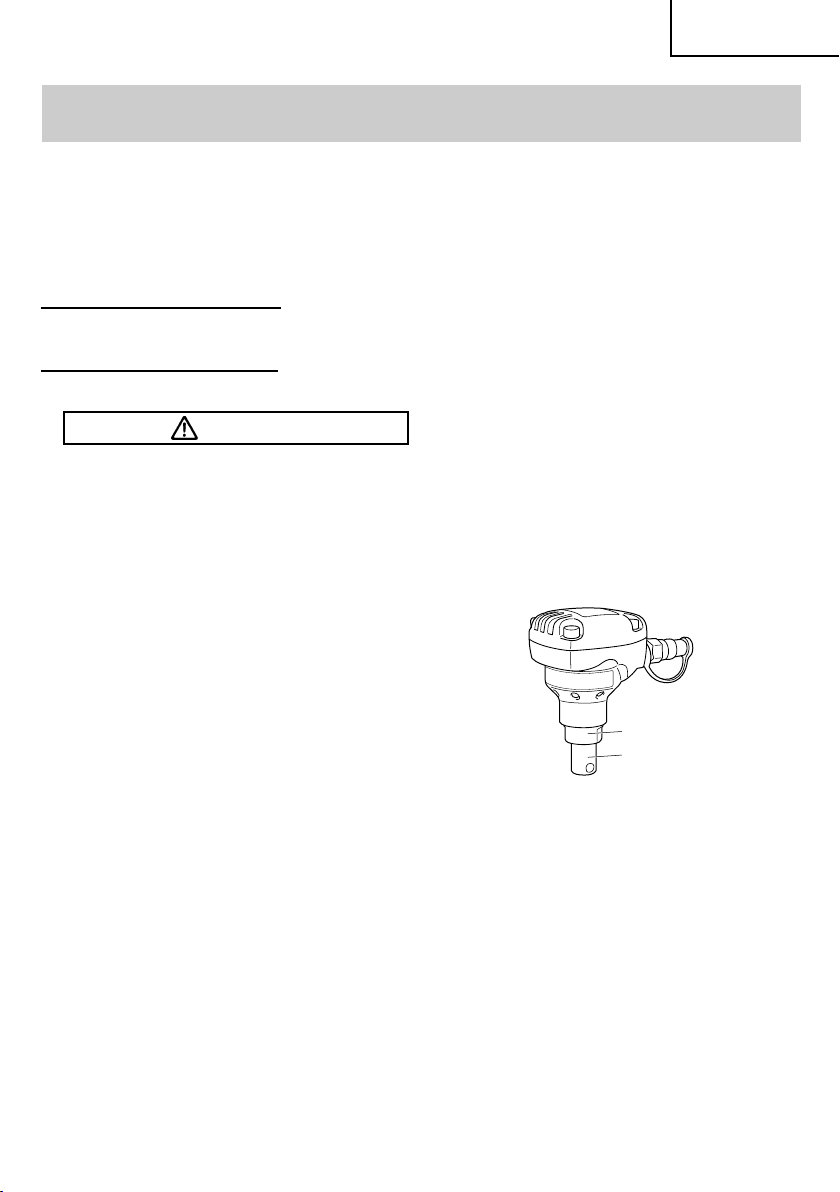
NAME OF PARTS
Firing Head (Outlet)
O-Ring
Driver unit
Cap
Gun Body
Air Plug
Deep impact socket
Rod
Magnet
Dust Cover
SPECIFICATIONS
Operating pressure 70 – 120 psi (4.9 – 8.3 bar 5 – 8.5 kgf/cm2)
Dimensions 2-45/64" × 2-13/64" × 4-3/32"
Length × Height × Width (69 mm × 104 mm × 56 mm)
Weight 1.1 lbs (0.5 kg)
3
.113 ft
Air consumption
/cycle at 100 psi, .148
(3.2 ltr/cycle at 7 kgf/cm
— 8 —
" × 3"
2
)
Common Nail

NAIL SELECTION
Use nails in following sizes for this Nailer.
Min. Max.
.250"
(6.4 mm)
2" (50 mm)
English
.344"
(9 mm)
.099"
(2.5 mm)
Head Dia. Shak Dia. Length
Common Nails
.266"± 0.027 .113"± 0.004 2.00"± 0.062
.266"± 0.027 .113"± 0.004 2.25"± 0.062
.281"± 0.028 .131"± 0.004 2.50"± 0.062
.281"± 0.028 .131"± 0.004 2.50"± 0.062
.312"± 0.031 .148"± 0.004 3.00"± 0.093
.312"± 0.031 .148"± 0.004 3.25"± 0.093
.344"± 0.034 .162"± 0.004 3.50"± 0.093
Head Dia. Shak Dia. Length
.266"± 0.027 .099"± 0.004 2.00"± 0.062
.266"± 0.027 .099"± 0.004 2.25"± 0.062
.297"± 0.030 .113"± 0.004 2.50"± 0.062
.297"± 0.030 .113"± 0.004 2.50"± 0.062
.312"± 0.031 .128"± 0.004 3.00"± 0.093
.312"± 0.031 .128"± 0.004 3.25"± 0.093
.344"± 0.034 .135"± 0.004 3.50"± 0.093
Box Nails
WARNING
䢇 Do not use nails in any other sizes.
They may damage the guide or be shot in a slanting direction.
䢇 Do not use hardened nails.
3.5" (90 mm)
.162"
(4.1 mm)
Sinker Nails
Head Dia. Shak Dia. Length
.250"± 0.025 .099"± 0.004 2.125"± 0.062
.266"± 0.027 .113"± 0.004 2.375"± 0.062
.281"± 0.028 .120"± 0.004 2.875"± 0.093
.312"± 0.031 .135"± 0.004 3.125"± 0.093
.344"± 0.034 .148"± 0.004 3.250"± 0.093
— 9 —

English
ACCESSORIES
WARNING
䢇 Accessories other than those shown
below can lead to malfunction and
resulting injuries.
STANDARD ACCESSORIES
1
1 Eye protection 1
OPTIONAL ACCESSORIES
... sold separately
䡬 Pneumatic Tool Lubricant
1 oz. (30 cc) oil feeder (Code No. 877153)
4 oz. (120 cc) oil feeder(Code No. 874042)
1 quart (1 ltr) can (Code No. 876212)
NOTE: Accessories are subject to change
without any obligation on the part of
HITACHI.
APPLICATIONS
䡬 Wooden materials in general
constructions, fittings, wood decks,
frameworks, and renovations
BEFORE OPERATION
Read section titled “SAFETY” (pages 4 – 7).
Make sure of the followings before operation.
WORKING ENVIRONMENT
WARNING
䢇 No flammable gas, liquid or other
flammable objects at worksite.
䢇 Clear the area of children or
unauthorized personnel.
— 10 —
AIR SUPPLY
DANGER
䢇 NEVER use
oxygen or other
bottled gases.
Explosion may
occur.
WARNING
䢇 Never connect Nailer to pressure
which potentially exceeds 200 psi (13.7
bar 14 kgf/cm
䢇 Never use non relieving coupler on
Nailer.
1. Power source
䡬 Use only clean, dry, regulated
compressed air as a power source for this
Nailer.
䡬 Air compressors used to supply
compressed air to this Nailer must
comply with the requirements of the
latest version of ANSI Standard B 19.3
“Safety Standard For Compressors For
Process Industries”.
䡬 Moisture or oil in the air compressor may
accelerate wear and corrosion in the
Nailer.
Drain daily.
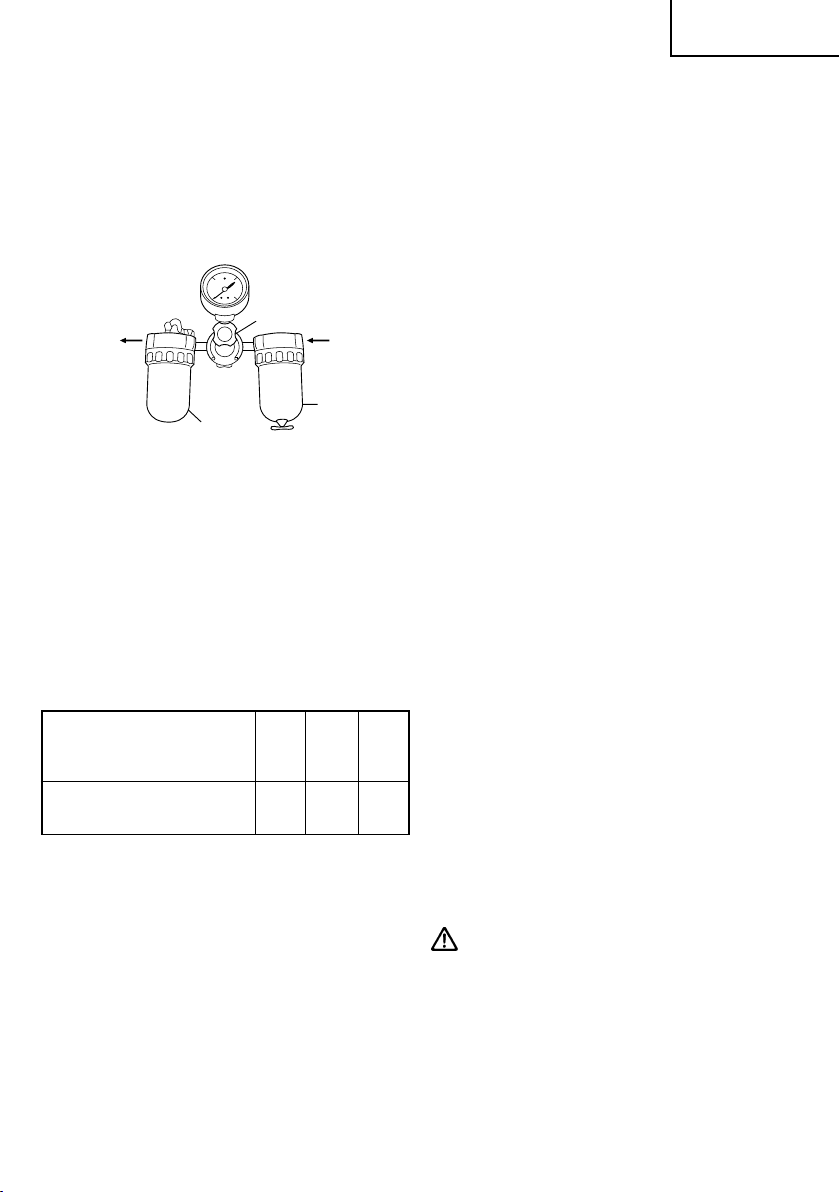
2. Filter-Regulator-Lubricator
䡬 Use a regulator with a pressure range of
0 – 120 psi (0 – 8.3 bar 0 – 8.5 kgf/cm
䡬 Filter-regulator-lubricator units supply an
optimum condition for the Nailer and
extend the Nailer life.
These units should always be used.
Filter .............. The filter removes
Regulator ...... The regulator controls the
2
).
2
moisture and dirt mixed in
compressed air.
Drain daily unless fitted
with an automatic drain.
Keep the filter clean by
regular maintenance.
operating pressure for
safe operation of the
Nailer.
Inspect the regulator
before operation to be
sure it operates properly.
).
English
Lubricator ..... The lubricator supplies an
oil mist to the Nailer.
Inspect the lubricator
before operation to be
sure the supply of
lubricant is adequate.
Use Hitachi pneumatic
tool lubricant.
Regulator
Nailer Side
Compressor
Side
Filter
Lubricator
3. Air hose
Air hose must have a minimum working
pressure rating of 150 psi (10.4 bar 10.6
kgf/cm
2
) or 150% of the maximum
pressure produced in the system,
whichever is higher.
4. Air consumption
Using the Air consumption table and the
Air compressor size formula, find a
correct compressor size.
Air consumption table
Operating
pressure
Air ft
psi 80 90 100
(bar) (5.5) (6.2) (6.9)
(kgf/cm
2
) (5.6) (6.3) (7)
3
/cycle .113 .113 .113
consumption (ltr/cycle) (3.2) (3.2) (3.2)
Air compressor size formula
Amount of air required
=number of Nailers
× average nails driven each minute
per Nailer
× air consumption at given air
pressure
× safety factor (always 1.2)
Example: 2 Nailers (NH90AB)operating
at 100 psi driving 2 nails per
minute
Amount of air required
=2 × 2 × 1.134 (3.2) × 1.2
=5.4 CFM (ft
3
/min) (15.4 ltr/min)
After making the calculations as shown
above, you should find a compressor
providing 5.4 CFM of air that is required.
LUBRICATION
It is important that the Nailer be properly
lubricated.
Without proper lubrication, the Nailer will not
work properly and parts will wear
prematurely.
䡬 Use Hitachi pneumatic tool lubricant.
Do not use detergent oil or additives.
These lubricants will harm the O-rings
and other rubber parts. This will cause
the Nailer to malfunction.
䡬 Filter-regulator-lubricator units should
always be used.
Keep the lubricator filled with Hitachi
pneumatic tool lubricant.
䡬 If a lubricator is not available, supply 10
drops min. of Hitachi pneumatic tool
lubricant into the air plug on the Nailer
every 100 shots.
COLD WEATHER CARE
䡬 Do not store the Nailer in a cold weather
environment.
Keep the Nailer in a warm area until
beginning the work.
䡬 If the Nailer is already cold, bring it in a
warm area and allow the Nailer to warm
up before use.
1 Reduce the air pressure to 64 psi (4.4
bar 4.5 kgf/cm
2 Remove nail from the Nailer.
3 Connect the air hose and free-fire
(blank-fire) the Nailer.
The lowered air pressure will be
enough to free-fire the Nailer.
Slow speed operation tends to warm
up the moving part.
CAUTION
䢇 Do not free-fire the Nailer at high
pressure.
2
).
— 11 —

English
TESTING THE NAILER
DANGER
䢇 Operators and others in
work area MUST wear
safety glapsses with
side shields which
conforms to ANSI Z87.1
specifications.
WARNING
䢇 Never use Nailer unless rod lever is
operating properly.
Before actually beginning the nailing work,
test the Nailer by using the checklist below.
Conduct the tests in the following order.
If abnormal operation occurs, stop using the
Nailer and contact a Hitachi authorized
service center immediately.
(1) DISCONNECT AIR HOSE FROM NAILER.
REMOVE NAIL FROM NAILER.
䡺 ALL SCREWS MUST BE TIGHTENED.
If any screws are loose, tighten them.
䡺 THE NAILER MUST NOT OPERATE.
There may be operation noises once or
twice when connecting an air hose, but
it is a normal phenomenon.
ADJUSTING AIR PRESSURE
WARNING
䢇 Do not exceed 120 psi (8.3 bars 8.5 kgf/
2
).
cm
Adjust the air pressure at recommended
operating pressure 70 – 120 psi (4.9 – 8.3 bar
5 – 8.5 kgf/cm
nails and the hardness of workpiece.
The correct air pressure is the lowest
pressure which will do the job. Using the
Nailer at a higher than required air pressure
unnecessarily over stresses the Nailer.
2
) according to the length of
(2) Adjust the air pressure to 70 psi (4.9 bars
5 kgf/cm
Connect the air hose.
Do not load nail in the Nailer.
Do not place the rod tip on a table or floor.
Do not point the firing head at yourself
and others in work area.
䡺 THE NAILER MUST NOT LEAK AIR.
Hold the Nailer downward.
2
).
— 12 —
NAILER OPERATION
Read section titled “SAFETY”(pages 4 – 7).
DANGER
䢇 Operators and others in
work area MUST wear
safety glasses with side
shields which conforms
to ANSI Z87.1
specifications.
English
WARNING
䢇 NEVER point tool at
yourself or others in
work area.
䢇 Never place your face,
hands or feet near firing
head when using.
䢇 Do not drive nails on top of other nails
or with Nailer at too steep of an angle;
nails can ricochet and hurt someone.
䢇 Do not drive nails into thin boards or
near corners and edges of workpiece.
Nails can be driven through or away
from workpiece and hit someone.
䢇 Never drive nails from both sides of a
wall at the same time. Nails can be
driven into and through the wall and
hit a person on the opposite side.
䢇 Never use Nailer which is defective or
operating abnormally.
䢇 Do not use Nailer as hammer.
䢇 Disconnect air hose from Nailer when:
1) it is not in use;
2) leaving work area;
3) moving it to another location; and
4) handing it to another person.
䢇 Oil may be leaked from the exhaust
outlet of the Nailer while in use due to
its structural characteristic.
METHODS OF OPERATION
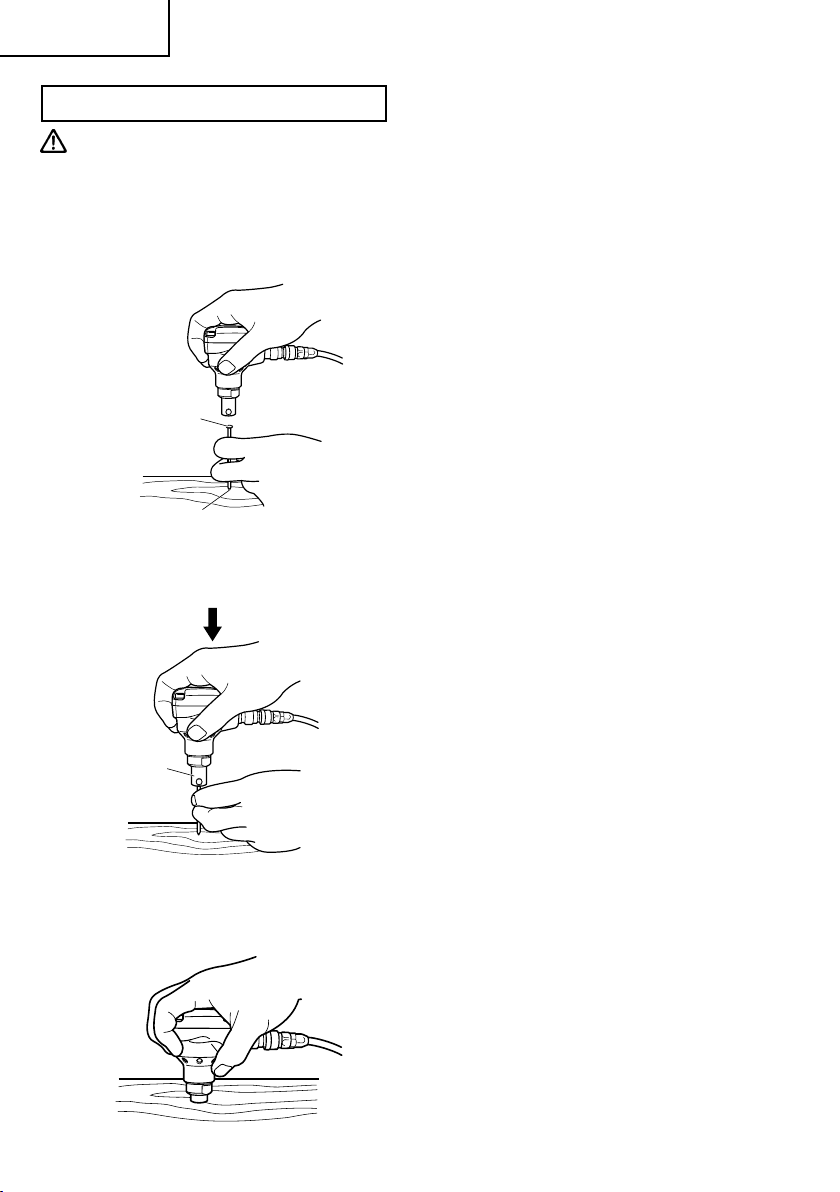
1. How to shoot a nail
Shooting by holding a nail with the
magnet
WARNING
䢇 When loading a nail in the rod, hold
the nail shaft instead of the tip.
䢇 When loading a nail in the rod, make
sure it does not press the tip of the
driver unit.
䢇 When loading a nail in the rod, do not
place your fingers or hands below the
tip of a nail.
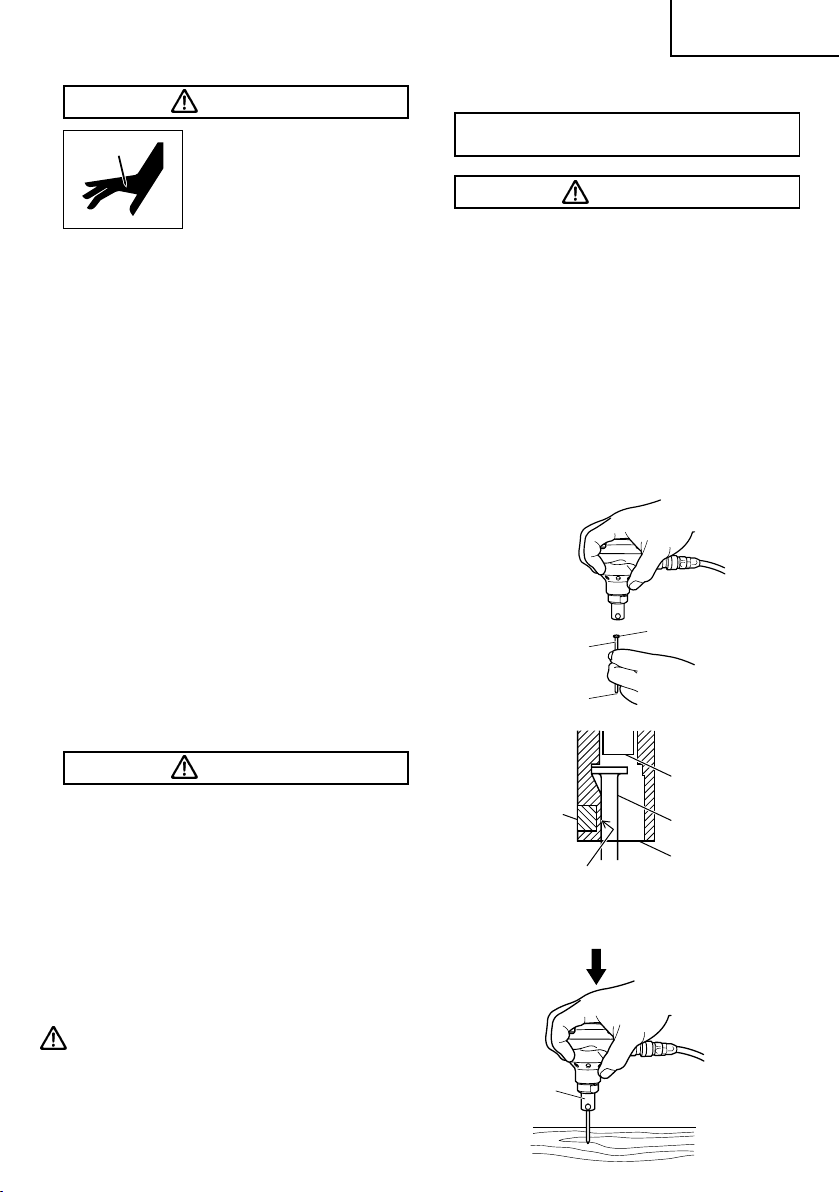
A Nail can be shot by holding it with the
magnet.
(1) Hold the nail shaft lightly with fingers and
insert the nail head to the rod.
Magnetically hold the nail near the
magnet.
Nail shaft
Nail tip
Nail head
WARNING
䢇 Make sure to wear safety glasses
during operation.
䢇 Exercise due caution to ensure safety
of others in work area during
operation.
䢇 Do not point the firing head at yourself
and others in work area.
䢇 Keep your body, hands and feet away
from the firing head during operation.
䢇 Do not use the Nailer head or body as
a hammer.
CAUTION
䢇 When the Nailer is used at a low
temperature, its operation may slow
down.
— 13 —
Driver unit
Magnet
Magnetized
area
(2) Place the nail tip at a target and press the
Nailer to shoot the nail.
Rod
Nail
Rod
press
English
Shooting by holding a nail with fingers.
CAUTION
䢇 When shooting a nail holding it with
fingers, place the nail tip at a target
first, and then insert the rod to the nail
head.
(1) Holding the nail shaft lightly, place the
nail tip at a target.
Nail head
Nail tip
(2) Insert the nail head to the rod and press
the Nailer lightly to shoot the nail to the
extent that it becomes stable.
press
Rod
2. Efficient work
(1) The Nailer may take a long time to shoot
a nail when the operating pressure is low,
or hard timber or long nails are used. In
such cases, it is advisable to set the
operating air pressure to 100 – 20 psi (6.8
– 8.3 bar, 7 – 8.5 kgf/cm
2
) for efficient
work.
(2) When the Nailer is pressed firmly or used
continuously, it may become inoperative
due to decreased pressure of the air
compressor. In such cases, wait until the
air compressor’s pressure increases
sufficiently to use the Nailer.
3. Precautions on idle shooting
NOTE:
䢇 ”Idle shooting” means that the Nailer is
pressed and operated even though no
nail is shot or the Nailer continues to be
pressed and operated even after a nail is
shot. If idle shooting is continued, each
part of the Nailer may be affected. Take
extra care not to do idle shooting.
䢇 After nailing:
1) disconnect air hose from the Nailer;
2) remove nail from the Nailer;
3) supply 10 drops min. of Hitachi
pneumatic tool lubricant into the air
plug on the Nailer; and
4) open the petcock on the air
compressor tank to drain any
moisture.
(3) After the nail is stabilized to some extent,
release the fingers from it and press the
Nailer to make the nail head completely
flat.
— 14 —
MAINTENANCE
English
NOTE:
The information contained in this Manual is designed to assist you in the safe
maintenance of the Nailer.
Some illustrations in this Manual may show details or attachments that differ
from those on your own Nailer.
MAINTENANCE AND
INSPECTION
Read section titled “SAFETY” (pages 4 – 7).
WARNING
䢇 Disconnect air hose and remove nail
from Nailer when:
1) doing maintenance and inspection;
and
2) clearing a jam.
䢇 Without connecting the air hose, check
if the rod moves steadily by pressing
the rod tip against a material such as
of wood.
1. Inspection of mounting screws
Periodically inspect the mounting screws
of each part for looseness.
If any screw is loose, retighten it.
If the Nailer is used with any screw
loosen, this may cause an accident such
as injury.
2. Prevention of dirt and dust
䡬 To prevent dirt or dust from entering the
inside, wipe the opening clean before
connecting the air hose.
䡬 When performing lubrication before and
after work, be sure to use clean oil. Dirt
or dust in oil may block the air supply
hole or damage the sliding part.
䡬 When not in use, attach the dust cover to
the air plug to prevent the entry of dirt
and duct into the Nailer.
3. Rod inspection
Clean and lubricate the sliding part of the
rod sometimes.
Check if the rod moves smoothly by
pressing the Nailer against a material
such as of wood.
— 15 —
Lubrication prevents the rod from rusting
as well as makes the rod movement
smoothly.
When iron powders or the like adheres
to the magnetized area within the rod, the
power to magnetically hold a nail may
be reduced. Wipe the area clean with a
cloth or adhesive tape sometimes.
Also, clean the iron powder on the
magnet outside the rod with cloth or
adhesive tape sometimes.
It makes the rod operation smooth.
loosen, this may cause an accident such
as injury.
Deep impact socket
Rod
4. Storing
䡬 Before inserting a dust cover to an air
plug, drain the Nailer fully by turning it
upside down.
䡬 When not in use for an extended period,
apply a thin coat of the lubricant to the
steel parts to avoid rust.
䡬 Do not store the Nailer in a cold weather
environment.
Keep the Nailer in a warm area.
䡬 When not in use, the Nailer should be
stored in a warm and dry place.
Keep out of reach children.
English
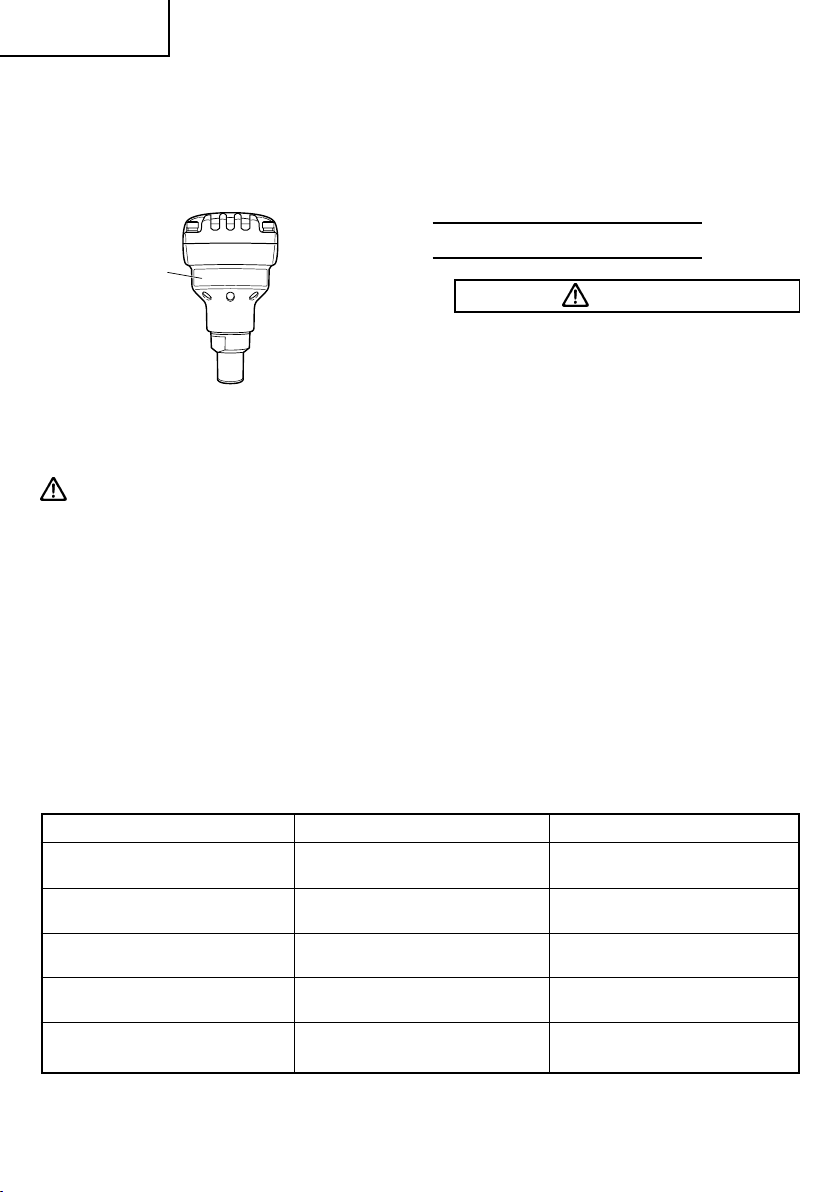
5. WARNING LABEL
Change the WARNING LABEL if missing
or damaged.
A new WARNING LABEL is available from
a Hitachi authorized service center.
Warning
label
6. Maintenance chart (See page 16)
7. Operator troubleshooting (See page 17)
8. Service parts list
CAUTION
䢇 Repair, modification and inspection of
Hitachi Power Tools must be carried out
by a Hitachi Authorized Service Center.
This Parts List will be helpful if presented
with the tool to the Hitachi Authorized
Service Center when requesting repair
or other maintenance. In the operation
and maintenance of power tools, the
safety regulations and standards
prescribed in each country must be
observed.
MODIFICATIONS:
Hitachi Power Tools are constantly being
improved and modified to incorporate the
latest technological advancements.
Accordingly, some parts may be changed
without prior notice.
SERVICE AND REPAIRS
WARNING
䢇 Only service personnel trained by
Hitachi, distributor or employer shall
repair the Nailer.
䢇 Use only parts supplied or
recommended by Hitachi for repair.
All quality Nailers will eventually require
servicing or replacement of parts because
of wear from normal use.
NOTE:
Specifications are subject to change
without any obligation on the part of
HITACHI.
Maintenance chart
ACTION WHY HOW
Drain air line filter daily. Prevent accumulation of Open manual petcock.
Keep lubricator filled. Keep the Nailer lubricated. Fill with Hitachi pneumatic
Keep rod working Promote operator efficient Blow clean daily.
properly. Nailer operation.
Lubricate the Nailer after Extend the Nailer life. Supply 10 drops min. of
nailing. lubricant into the Nailer.
Drain air compressor. Keep the Nailer operated Open petcock on air
moisture and dirt.
tool lubricant.
properly. compressor tank.
— 16 —

English
Operator troubleshooting
Most minor problems can be resolved quickly and easily using the table below.
If problems persist, contact a Hitachi authorized service center for assistance.
PROBLEM CHECK METHOD CORRECTION
Nailer operates, Check for a jam. Clear a jam per page 15.
but no nail is driven.
Weak drive. Check air pressure. Increase air pressure. (Do not
Slow to cycle. exceed 120 psi (8.3 bars,
Drives too deep. Check air pressure. Reduce air pressure.
Nails jam. Check for proper nails. Use only recommended nails.
Driven nail is bent.
Drives properly during Check inside diameter of air Use larger air hose.
normal operation, hose.
but does not drive fully
at faster nailing speeds.
Check for proper nails. Use only recommended
––––––––––
Driver unit worn? Contact Hitachi for
O – ring worn or damaged?
Driver unit worn? Contact Hitachi for
nails.
8.5 kgf/cm2))
Use Hitachi pneumatic tool
lubricant.
replacement.
(Adjust 70 – 120 psi
(4.9 – 8.3 bar 5 – 8.5 kgf/cm2))
replacement.
— 17 —

Français
INFORMATION IMPORTANTE
Lire et bien assimiler toutes les étiquettes de l’outil ainsi que toutes les
instructions de fonctionnement, les consignes de sécurité et les
avertissements de ce mode d’emploi avant d’utiliser ou d’entretenir ce
cloueur.
Le non respect des avertissements pourrait entraîner la MORT ou des
BLESSURES GRAVES.
La plupart des accidents résultant de l’utilisation ou de l’entretien des cloueurs sont dus
au non respect de certaines consignes et précautions de sécurité élémentaires. Un accident
peut souvent être évité en reconnaissant une situation potentiellement dangereuse avant
qu’elle ne se produise, et en respectant les procédures de sécurité applicables.
Les consignes de sécurité élémentaires sont données dans la section “SECURITE” du
manuel et dans les sections relatives aux instructions d’utilisation et d’entretien.
Les dangers à éviter pour empêcher tout risque de blessures ou de dommage de l’outil
sont identifiés par les mots DANGER et AVERTISSEMENT, sur le cloueur et dans ce manuel.
Ne jamais utiliser ce cloueur pour des applications autres que celles qui sont spécifiées
dans ce manuel.
DEFINITION DES MOTS DE SIGNALISATION
DANGER indique une situation imminente dangereuse qui, si elle n’est pas évitée,
entraînera la mort ou des blessures graves.
AVERTISSEMENT indique une situation potentiellement dangereuse qui, si elle n’est
pas évitée, risque d’entraîner la mort ou des blessures graves.
ATTENTION indique une situation potentiellement dangereuse qui, si elle n’est pas
évitée, risque d’entraîner des blessures légères ou modérées, ou
d’endommager l’outil.
REMARQUE met en relief les informations essentielles.
— 18 —

Français
SECURITE
CONSIGNES DE SECURITE IMPORTANTES
POUR L’UTILISATION DU CLOUEUR
LIRE TOUTES CES INSTRUCTIONS
DANGER
1. LES OPÉRATEURS ET LES AUTRES PERSONNES DANS L’AIRE DE TRAVAIL DOIVENT
PORTER DES LUNETTES DE PROTECTION AVEC VISIÈRES LATÉRALES.
2. NE JAMAIS UTILISER D’OXYGÈNE NI AUCUN AUTRE GAZ EN BOUTEILLE. IL POURRAIT
SE PRODUIRE UNE EXPLOSION.
Quand on utilise le cloueur, toujours porter des lunettes de protection avec
visières latérales, et veiller à ce que les autres personnes dans la zone de
travail en portent également.
Les lunettes de protection devront respecter les exigences de l’ANSI
(American National Standards Institute) Z87.1 et assurer la protection contre
les projections de particules arrivant par l’avant et par le côté.
L’employeur doit veiller à ce que la personne qui utilise le cloueur et les
autres personnes dans l’aire de travail portent des lunettes de protection.
Ne jamais utiliser d’oxygène, de gaz combustibles ni aucun autre gaz en
bouteille comme source d’alimentation du cloueur.
L’utilisation de ces gaz serait dangereuse, car le cloueur exploserait.
Utiliser exclusivement de l’air comprimé propre, sec et régulé.
AVERTISSEMENT
3. NE JAMAIS DIRIGER L’OUTIL VERS SOI NI VERS QUELQU’UN D’AUTRE DANS L’AIRE
DE TRAVAIL.
4. NE PAS DEPASSER 120 psi. (8.3 bars 8.5 kgf/cm
Toujours supposer que le cloueur renferme des clous.
Ne jamais diriger le cloueur vers soi ni vers quelqu’un d’autre, qu’il renferme
des clous ou non.
Si l’on enfonce des clous par erreur, cela risque de provoquer des blessures
graves.
Ne jamais s’amuser avec le cloueur.
Le cloueur est un instrument de travail. Le respecter.
2
Ne pas dépasser la pression d’air maximale recommandée de 120
psi (8.3 bars 8.5 kgf/cm
Ne jamais raccorder le cloueur à une pression susceptible de
dépasser 200 psi (13.7 bars 14 kgf/cm
exploser.
— 19 —
)
2
).
2
) car le cloueur pourrait

Français
SECURITE — suite
AVERTISSEMENT
5. TOUJOURS PORTER DES PROTECTIONS
ANTI-BRUIT ET UN CASQUE.
Toujours porter des protections anti-bruit
pour ne pas s’endommager l’ouïe.
Toujours porter un casque pour se
protéger la tête contre les projectiles.
6. RANGER LE CLOUEUR CORRECTEMENT.
Quand on ne s’en sert pas, ranger le
cloueur dans un endroit sec. Le ranger
hors de portée des enfants. Verrouiller la
zone de rangement.
7. MAINTENIR L’AIRE DE TRAVAIL PROPRE.
Une aire encombrée invite les blessures.
Enlever tous les outils inutiles, débris,
meubles, etc. de l’aire de travail.
8. NE JAMAIS UTILISER EN PRESENCE DE
LIQUIDES OU DE GAZ INFLAMMABLES.
Le cloueur provoque des étincelles quand
il fonctionne.
Ne jamais utiliser le cloueur dans un
endroit renfermant de la laque, de la
peinture, de la benzine, du diluant, de
l’essence, des gaz, des agents adhésifs
ni aucune autre matière combustible ou
explosive.
9. ELOIGNER LES VISITEURS.
Ne pas laisser les visiteurs manipuler le
cloueur.
Tous les visiteurs devront rester en
dehors de l’aire de travail.
10. PORTER UN HABILLEMENT APPROPRIE.
Ne porter ni vêtements lâches ni bijoux
qui pourraient se prendre dans les pièces
en mouvement.
Porter des gants de caoutchouc et des
chaussures solides si l’on travaille
dehors.
Si l’on a les cheveux longs, les maintenir
serrés dans un couvre-chef.
11. NE JAMAIS UTILISER DE COUPLEUR
NON DEGAGEANT SUR LE CLOUEUR.
Si l’on utilise un coupleur non dégageant
sur le cloueur, le cloueur risque de rester
— 20 —
chargé d’air après le débranchement, et
donc d’enfoncer un clou même après
qu’il est débranché.
Le cloueur et le tuyau d’air doivent avoir
un coupleur de tuyau tel que toute la
pression soit évacuée du cloueur quand
on débranche le joint de couplage.
12. RACCORDER LE TUYAU D'AIR AVANT
DE CHARGER UN CLOU ET VERIFIER LES
POINTS SUIVANTS
S'assurer de l’absence de fuite d’air et de
bruit anormal.
L’utilisation du cloueur dans des
conditions anormales peut entraîner des
accidents ou des blessures. Pour toute
anomalie constatée, s’adresser au
représentant local de la marque ou à un
service aprés-vente Hitachi agréé pour la
réparation.
13. VEILLER A CE QUE TOUTES LES VIS ET
LES COUVERCLES SOIENT EN PLACE ET
BIEN SERRES.
Veiller à ce que les vis et les couvercles
soient solidement fixés. Les vérifier
périodiquement.
Ne jamais utiliser le cloueur si des pièces
manquent ou sont endommagées.
14. TENIR TOUJOURS ELOIGNER, LA TETE,
LES MAINS ET LES PIEDS DE LA TETE
DE CLOUAGE.
Ne jamais approcher la tête, les mains ni
les pieds de la tête de clouage.
15. PLACER LE CLOUEUR CORRECTEMENT
SUR LA PIECE.
Ne pas enfoncer de clous sur d’autres
clous ni avec le cloueur à un angle trop
aigu ; les clous pourraient ricocher et
blesser quelqu’un.
16. PRENDRE GARDE A LA REACTION DU
CLOUEUR.
Lorsqu’un clou est enfoncé dans un
matériau dur, le cloueur peut rebondir.
Ne pas exposer le visage à proximité
immédiate du cloueur.

SECURITE — suite
AVERTISSEMENT
Français
17. NE PAS ENFONCER DE CLOUS DANS
DES PLANCHES MINCES NI PRES DES
COINS ET DES BORDS DE LA PIECE.
Les clous pourraient traverser la pièce ou
s’enfoncer ailleurs que dans la pièce et
blesser quelqu’un.
18. NE JAMAIS ENFONCER DE CLOUS DES
DEUX COTES D’UN MUR EN MEME
TEMPS.
Les clous pourraient traverser le mur et
blesser quelqu’un de l’autre côté.
19. VERIFIER S’IL Y A DES FILS SOUS
TENSION.
Pour éviter tout risque d’électrocution
grave, vérifier s’il y a des fils sous tension
dissimulés dans le mur, le plancher ou le
plafond. Couper le disjoncteur pour
s’assurer qu’il n’y a pas de fils sous
tension.
20. NE PAS TRANSPORTER LE CLOUEUR
PAR LE TUYAU.
21. NE PAS TROP SE PENCHER.
Conserver une bonne assise et un bon
équilibre à tout moment.
22. NE JAMAIS UTILISER UN CLOUEUR
DEFECTUEUX OU QUI NE FONCTIONNE
PAS NORMALEMENT.
Si le cloueur semble ne pas fonctionner
comme d’habitude, qu’il fait des bruits
bizarres ou qu’il semble défectueux,
cesser immédiatement de l’utiliser et le
faire réparer par un service après-vente
Hitachi agréé.
23. DEBRANCHER LE TUYAU D’AIR DU
CLOUEUR QUAND :
1) on entretient ou inspecte le cloueur ;
2) on retire des clous coincés ;
3) on ne s’en sert pas ;
4) on quitte l’aire de travail ;
5) on le transporte dans un autre endroit ;
et
6) on le passe à quelqu’un d’autre.
Ne jamais retirer des clous coincés ni
réparer le cloueur si le tuyau d’air n’est
pas débranché du cloueur et que les clous
restants ne sont pas tous retirés du
cloueur.
Ne jamais s’éloigner du cloueur car des
personnes non familiarisées avec son
fonctionnement pourraient le manipuler
et se blesser.
24. RESTER SUR SES GARDES.
Regarder ce que l’on fait. Faire preuve de
bon sens. Ne pas utiliser le cloueur
lorsqu’on est fatigué.
Ne jamais utiliser le cloueur si l’on est
sous l’influence de médicaments,
d’alcool ou de toute autre substance
soporifique.
25. MANIPULER LE CLOUEUR
CORRECTEMENT.
Utiliser le cloueur en suivant les
instructions du manuel.
Ne jamais permettre que le cloueur soit
utilisé par des enfants, des personnes
non familiarisées avec son
fonctionnement ou des personnes non
autorisées.
26. NE JAMAIS UTILISER LE CLOUEUR
POUR DES APPLICATIONS AUTRES QUE
CELLES QUI SONT SPECIFIEES DANS CE
MANUEL.
27. MANIPULER LE CLOUEUR AVEC
PRECAUTION.
A cause de la pression d’air élevée à
l’intérieur du cloueur, les fissures en
surface sont dangereuses.
Pour éviter tout risque, ne pas faire
tomber le cloueur ni le heurter contre des
surfaces dures ; et ne pas le rayer ni
graver des inscriptions dessus.
Manipuler le cloueur avec précaution.
— 21 —

Français
SECURITE — suite
AVERTISSEMENT
28. ENTRETENIR SOIGNEUSEMENT LE
CLOUEUR.
Veiller à ce que le cloueur soit toujours
propre et graissé pour obtenir un
fonctionnement optimal et en toute
sécurité.
29. UTILISER EXCLUSIVEMENT DES PIECES,
ACCESSOIRES OU CLOUS FOURNIS OU
RECOMMANDES PAR HITACHI.
Des pièces, accessoires ou clous non
autorisés pourraient annuler la garantie,
entraîner un mauvais fonctionnement et
provoquer des blessures.
Les réparations du cloueur seront
confiées exclusivement au personnel
d’entretien formé par Hitachi, au
distributeur ou à l’employeur.
30. NE JAMAIS MODIFIER NI ALTÉRER UN
CLOUEUR.
Cela pourrait provoquer un mauvais
fonctionnement et entraîner des
blessures physiques.
31. VERIFIER LE MOUVEMENT DE LA TIGE
AVANT UTILISATION.
Sans raccorder le tuyau d’air, vérifier que
le mouvement de la tige s’effectue de
manière régulière en appuyant la pointe
de la tige contre un matériau tel que du
bois.
Si le mouvement de la tige est irrégulier,
un clou risque de se détacher en cours
d’utilisation et d'entraîner une blessure.
32. PRENDRE LES PRECAUTIONS
SUIVANTES POUR LE RACCORDEMENT
DU TUYAU D'AIR
S'assurer de l’absence de clou dans la
tige.
Sinon, un clou peut être enfoncé par
inadvertance et occasionner une
blessure.
Positionner l'orifice de sortie des clous
vers le bas et veiller à se tenir à l’écart
(corps, mains et pieds) de la tête de
clouage.
Ne pas poser la pointe de la tige sur une
table ou sur le sol.
33. UTILISER LES CLOUS SPECIFIES.
Ne pas utiliser d’autres types de clous qui
risqueraient d’entraîner des blessures ou
un dysfonctionnement du cloueur.
34. CHARGER LES CLOUS AVEC
PRECAUTION.
Pour charger un clou dans la tige, le tenir
par le corps plutôt que par la pointe.
Sinon, si le cloueur vient à s’enclencher
par inadvertance, des blessures peuvent
être occasionnées en se clouant un doigt.
En chargeant un clou dans la tige,
s’assurer qu’il n’exerce pas de pression
sur l'extrémité de l’entraîneur.
Si un clou est enfoncé exagérément dans
la tige, il risque d’exercer une pression
sur l’extrémité de l’entraîneur et
provoquer un déclenchement accidentel
du cloueur, et entraîner des blessures.
35. PRENDRE LES PRECAUTIONS
SUIVANTES POUR ENFONCER UN CLOU
EN LE TENANT AVEC LES DOIGTS :
Enfoncer le clou en positionnant tout
d'abord sa pointe sur une cible puis en
insérant la tige dans la tête du clou.
Si la pointe du clou n’est pas positionnée
fermement ou si la tête du clou est
insérée dans la tige en premier, des
blessures peuvent être occasionnées par
un rebond du clou ou un clouage
accidentel.
36. EVITER DE CLOUER PENDANT DES
PERIODES DE TEMPS PROLONGEES.
S'assurer de clouer le moins longtemps
possible. Eviter également de clouer en
continu et prévoir des temps d'arrêt
pendant les opérations de clouage.
— 22 —

SECURITE — suite
RESPONSABILITES DE L’EMPLOYEUR
Français
1. Veiller à ce que ce MANUEL reste à la
disposition des personnes qui doivent
utiliser ou entretenir le cloueur.
2. Veiller à ce que les cloueurs soient utilisés
exclusivement lorsque les opérateurs et
les autres personnes présentes dans
l’aire de travail portent des LUNETTES
DE PROTECTION.
CONSERVER CE MANUEL ET LE
METTRE A LA DISPOSITION DES
UTILISATEURS !
3. Obliger les opérateurs et les autres
personnes présentes dans l’aire de travail
à porter des LUNETTES DE
PROTECTION.
4. Maintenir les cloueurs en bon ordre de
marche.
5. Entretenir les cloueurs correctement.
6. Veiller à ce que les cloueurs qui ont
besoin d’être réparés ne soient plus
utilisés avant d’être réparés.
— 23 —

Français
UTILISATION
REMARQUE :
Les informations contenues dans ce manuel ont pour but d’aider l’opérateur à
utiliser le cloueur en toute sécurité.
Certaines des illustrations du manuel peuvent montrer des détails ou des
accessoires qui diffèrent de ceux de votre cloueur.
NOM DES PIECES
Joint torique
Entraîneur
Tête de clouage (sortie)
Capuchon
Corps de pistolet
Bouchon d’air
Cache-poussière
Douille à percussion
longue portée
Tige
Aimant
SPECIFICATIONS
Pression d’utilisation 70 – 120 psi (4.9 – 8.3 bar 5 – 8.5 kgf/cm2)
Dimensions 2-45/64" × 2-13/64" × 4-3/32"
Longueur × Hauteur × Largeur
Poids 1.1 lbs (0.5 kg)
Consommation d’air
.113 ft
(3.2 l/cycle à 7 kgf/cm
— 24 —
(69 mm × 104 mm × 56 mm)
3
/cycle à 100 psi, .148"×3"- Clou ordinaire
2
)

SELECTION DES CLOUS
Utiliser des clous aux dimensions suivantes avec ce cloueur.
Min. Max.
.250"
(6.4 mm)
2" (50 mm)
Français
.344"
(9 mm)
.099"
(2.5 mm)
Diamètre de tête Diamètre de tige
Longueur
.266"± 0.027 .113"± 0.004 2.00"± 0.062
.266"± 0.027 .113"± 0.004 2.25"± 0.062
.281"± 0.028 .131"± 0.004 2.50"± 0.062
.281"± 0.028 .131"± 0.004 2.50"± 0.062
.312"± 0.031 .148"± 0.004 3.00"± 0.093
.312"± 0.031 .148"± 0.004 3.25"± 0.093
.344"± 0.034 .162"± 0.004 3.50"± 0.093
Clous ordinaires
Diamètre de tête Diamètre de tige
.266"± 0.027 .099"± 0.004 2.00"± 0.062
.266"± 0.027 .099"± 0.004 2.25"± 0.062
.297"± 0.030 .113"± 0.004 2.50"± 0.062
.297"± 0.030 .113"± 0.004 2.50"± 0.062
.312"± 0.031 .128"± 0.004 3.00"± 0.093
.312"± 0.031 .128"± 0.004 3.25"± 0.093
.344"± 0.034 .135"± 0.004 3.50"± 0.093
Clous à tête plate
Longueur
AVERTISSEMENT
䢇 Ne pas utiliser de clous avec d’autres dimensions.
Ils pourraient endommager le guide ou être enfoncés en biais.
䢇 Ne pas utiliser de clous en acier trempé.
3.5" (90 mm)
.162"
(4.1 mm)
Clous à tête fraisée
Diamètre de tête Diamètre de tige
Longueur
.250"± 0.025 .099"± 0.004 2.125"± 0.062
.266"± 0.027 .113"± 0.004 2.375"± 0.062
.281"± 0.028 .120"± 0.004 2.875"± 0.093
.312"± 0.031 .135"± 0.004 3.125"± 0.093
.344"± 0.034 .148"± 0.004 3.250"± 0.093
— 25 —

Français
ACCESSOIRES
AVERTISSEMENT
䢇 Les accessoires autres que ceux
indiqués ci-dessous risquent de mal
fonctionner et de provoquer des
blessures.
ACCESSOIRES STANDARD
1
1 Lunettes de protection 1
ACCESSOIRES EN OPTION
... vendus séparément
䡬 Huile de machine pneumatique
Alimenteur d’huile 1 oz (30 cc)
(Code No. 877153)
Alimenteur d’huile 4 oz (120 cc)
(Code No. 874042)
Alimenteur d’huile 1 quart (1 l)
(Code No. 876212)
REMARQUE : Les accessoires sont sujets à
modification sans préavis et
sans aucune obligation de la
part de HITACHI.
APPLICATIONS
䡬 Matériaux en bois dans les constructions
générales, accessoires, terrasses en bois,
charpentes et rénovations.
AVANT L’UTILISATION
Lire la section intitulée “SECURITE” (pages
19 – 23).
Bien vérifier les points suivants avant de
travailler.
ENVIRONNEMENT DE TRAVAIL
AVERTISSEMENT
䢇 Pas de gaz ou liquides inflammables,
ni aucun autre objet inflammable sur
le chantier.
䢇 Evacuer les enfants et les personnes
non autorisées de l’aire de travail.
ALIMENTATION D’AIR
DANGER
䢇 NE JAMAIS
utiliser d’oxygène
ni aucun autre
gaz en bouteille. Il
pourrait se
produire une
explosion.
AVERTISSEMENT
䢇 Ne jamais raccorder le cloueur à une
pression qui risque de dépasser 200 psi
(13.7 bar 14 kgf/cm
䢇 Ne jamais utiliser de coupleur non
dégageant sur le cloueur.
1. Alimentation
䡬 Utiliser exclusivement de l’air comprimé
propre, sec et régulé avec ce cloueur.
䡬 Les compresseurs d’air utilisés pour
alimenter l’air comprimé au cloueur
devront respecter les exigences ANSI
B19.3 “Normes de sécurité pour les
compresseurs des industries de
transformation”.
䡬 L’humidité ou l’huile dans le
compresseur d’air peuvent accélérer
l’usure et la corrosion du cloueur.
Purger tous les jours.
2. Filtre-régulateur-lubrificateur
䡬 Utiliser un régulateur d’une pression
comprise entre 0 – 120 psi (0 – 8.3 bars 0
– 8.5 kgf/cm
䡬 Les unités filtre-régulateur-lubrificateur
procureront les conditions optimales du
cloueur et accroîtront sa durée de service.
Toujours les utiliser.
2
).
2
).
— 26 —

Français
Filtre .............. Le filtre enlève l’humidité et
la saleté mélangées à l’air
comprimé.
Purger tous les jours, sauf
si l’outil possède une purge
automatique.
Nettoyer régulièrement le
filtre.
Régulateur .... Le régulateur contrôle la
pression de
fonctionnement afin
d’assurer la sécurité du
cloueur.
Inspecter le régulateur
avant le travail pour
s’assurer qu’il fonctionne
correctement.
Lubrificateur ... Le lubrificateur alimente de
l’huile vaporisée au
cloueur.
Inspecter le lubrificateur
avant le travail pour
s’assurer que l’alimentation
d’huile est adéquate.
Utiliser une huile de
machine pneumatique
Hitachi.
Régulateur
Côté
cloueur
Côté
compresseur
Filtre
Lubrificateur
3. Tuyau d’air
Le tuyau d’air doit avoir une pression de
travail minimum de 150 psi (10.4 bars
10.6 kgf/cm
2
) ou 150% de la pression
maximum produite par le système, à
savoir la plus élevée.
4. Consommation d’air
Sélectionner la taille du compresseur en
se reportant au tableau de consommation
d’air et aux formules de taille du
compresseur.
Tableau de consommation d’air
Pression de
fonctionnement
Consommation
d’air
psi 80 90 100
(bar) (5.5) (6.2) (6.9)
(kgf/cm2) (5.6) (6.3) (7)
ft3/cycle .113 .113 .113
(l/cycle) (3.2) (3.2) (3.2)
Formules de taille du compresseur d’air
Quantité d’air requise
= nombre de clous
× clous moyens enfoncés par minute
par le cloueur
× consommation d’air à une pression
donnée
× facteur de sécurité (toujours 1.2)
Exemple : 2 cloueurs (NH90AB)
fonctionnant à 100 psi et
enfonçant 2 clous par minute
Quantité d’air requise
=2 × 2 × 1.134 (3.2) × 1.2
=5.4 CFM (ft
3
/min) (15.4 l/mn)
Effectuer le calcul ci-dessus pour obtenir
un compresseur fournissant les 5.4 CFM
d’air nécessaires.
GRAISSAGE
Il est essentiel que le cloueur soit graissé
correctement. Si le cloueur est mal graissé,
il ne fonctionnera pas correctement et les
pièces s’useront prématurément.
䡬 Utiliser une huile de machine Hitachi.
Ne pas utiliser d’huile détergente ni
d’additifs. Ces lubrifiants
endommageraient les joints toriques et
les autres pièces en caoutchouc. Cela
provoquerait un mauvais
fonctionnement du cloueur.
䡬 Toujours utiliser des unités filtre-
régulateur-lubrificateur.
Veiller à ce que le régulateur soit toujours
plein d’huile de machine pneumatique
Hitachi.
䡬 Si l'on ne posséde pas de lubrificateur,
mettre 10 gouttes par minimum d'huile
de machine pneumatique Hitachi dans
le bouchon d'air sur le cloueur tous les
100 clouages.
— 27 —

Français
ENTRETIEN PAR TEMPS FROID
䡬 Ne pas ranger le cloueur dans un
environnement froid. Le laisser dans un
endroit chaud jusqu’à ce que l’on soit prêt
à travailler.
䡬 Si le cloueur est déjà froid, l’amener dans
un endroit chaud et le laisser réchauffer
avant de l’utiliser.
1 Réduire la pression d’air à 64 psi (4.4
bars 4.5 kgf/cm
2 Sortir le clou du cloueur.
3 Raccorder le tuyau d’air et faire un
essai de clouage (clouage à blanc).
La pression d’air inférieure sera
suffisante pour le clouage à blanc.
Les opérations à vitesse lente ont
tendance à chauffer les pièces mobiles.
2
).
ATTENTION
䢇 Ne pas faire un essai de clouage à blanc
à haute pression.
ESSAI DU CLOUEUR
DANGER
䢇 Les opérateurs et les
autres personnes dans
l’aire de travail
DOIVENT porter des
lunettes de protection
avec visières latérales
respectant les
exigences ANSI Z87.1.
AVERTISSEMENT
䢇 Ne jamais utiliser le cloueur si le tige
ne fonctionne pas correctement.
䡺 TOUTES LES VIS DOIVENT ETRE
SERREES A FOND.
Si certaines vis sont relâchées, les
revisser.
(2) Régler la pression d’air sur 70 psi (4.9
bars 5 kgf/cm
Raccorder le tuyau d’air.
Ne pas mettre de clou dans le cloueur.
Ne pas poser la pointe de la tige sur une
table ou sur le sol.
Ne pas diriger la tête de clouage vers soimême ou vers autrui dans la zone
d’intervention.
䡺 LE CLOUEUR NE DOIT PAS AVOIR DE
FUITE D’AIR.
Tenir le cloueur vers le bas.
䡺 LE CLOUEUR NE DOIT PAS
FONCTIONNER.
Un bruit d’enclenchement peut être perçu
une ou deux fois de suite en raccordant le
tuyau d’air, mais cela ne constitue pas une
anomalie.
2
).
Avant de commencer le travail proprement dit,
faire un essai de clouage en vérifiant les points
ci-dessous. Effectuer les essais dans l’ordre
indiqué.
S’il se produit un fonctionnement anormal,
cesser immédiatement d’utiliser le cloueur et
contacter un service après-vente agréé Hitachi.
(1) DEBRANCHER LE TUYAU D’AIR DU
CLOUEUR.
SORTIR LE CLOU DU CLOUEUR.
— 28 —

Français
RÉGLAGE DE LA PRESSION
D’AIR
AVERTISSEMENT
䢇 Ne pas dépasser 120 psi (8.3 bars 8.5
kgf/cm
Régler la pression d’air à la pression de travail
recommandée de 70 – 120 psi (4.9 – 8.3 bars
5 – 8.5 kgf/cm
des clous et de la dureté du matériau.
La pression d’air correcte est la pression la
plus basse capable d’effectuer le travail.
L’utilisation d’une pression d’air supérieure
à la pression nécessaire fatiguera inutilement
le cloueur.
2
).
2
) en fonction de la longueur
UTILISATION DU CLOUEUR
Lire la section intitulée “SECURITE” (pages
19 – 23).
DANGER
䢇 Les opérateurs et les
autres personnes dans
l’aire de travail DOIVENT
porter des lunettes de
protection avec visières
latérales respectant les
exigences ANSI Z87.1.
AVERTISSEMENT
䢇 NE JAMAIS diriger l’outil
vers soi ni vers
quelqu’un d’autre dans
l’aire de travail.
䢇 Ne jamais approcher la tête, les mains
ni les pieds de la tête de clouage.
䢇 Ne pas enfoncer de clous sur d’autres
clous ni avec le cloueur à un angle trop
aigu ; les clous risquent de faire ricochet
et de blesser quelqu'un.
䢇 Ne pas enfoncer de clous dans des
planches minces ni près des coins et des
bords de la pièce. Les clous pourraient
traverser la pièce ou s’enfoncer ailleurs
que dans la pièce et blesser quelqu’un.
䢇 Ne jamais enfoncer de clous des deux
côtés d’un mur en même temps. Les
clous pourraient traverser le mur et
blesser quelqu’un de l’autre côté.
䢇 Ne jamais utiliser le cloueur s’il est
défectueux ou qu’il ne fonctionne pas
normalement.
䢇 Ne pas se servir du cloueur comme d’un
marteau.
䢇 Débrancher le tuyau d’air du cloueur
quand :
1) on ne s’en sert pas ;
2) on quitte l’aire de travail ;
3) on le transporte dans un autre
endroit ; et
4) on le passe à quelqu’un d’autre.
䢇 L’huile peut fuire à partir de l'orifice de
refoulement du cloueur en cours
d’utilisation du fait de ses
caractéristiques structurelles.
MÉTHODES D’UTILISATION
Le cloueur est équipé d’un levier-poussoir
et il ne fonctionne pas tant que le levierpoussoir n’est pas enfoncé (position
supérieure).
Il y a deux façons d’enfoncer des clous avec
le cloueur.
AVERTISSEMENT
䢇 Veiller à porter des lunettes de
protection au cours des opérations.
䢇 Procéder avec précaution pour garantir
la sécurité d’autrui dans la zone
d’intervention au cours des opérations.
䢇 Ne pas diriger la tête de clouage vers
soi-même ou vers autrui dans la zone
d’intervention.
䢇 Ne pas approcher le corps, les mains
et les pieds de la tête de clouage en
cours d’intervention.
䢇 Ne pas utiliser la tête ou le corps du
cloueur comme marteau.
— 29 —

Français
ATTENTION
䢇 Lorsque le cloueur est utilisé à basse
température, son fonctionnement peut
être ralenti.
1. Comment clouer :
Clouage en maintenant un clou avec
l’aimant.
AVERTISSEMENT
䢇 Pour charger un clou dans la tige, le
tenir par le corps plutôt que par la
pointe.
䢇 En chargeant un clou dans la tige,
s’assurer qu’il n’exerce pas de pression
sur l'extrémité de l’entraîneur.
䢇 Lors du chargement d’un clou dans la
tige, ne pas exposer les doigts ni les
mains en dessous de la pointe du clou.
Un clou peut être enfoncé en le maintenant
avec l’aimant.
(1) Saisir le clou par son corps avec les
doigts et insérer la tête du clou sur la tige.
Approcher le clou de l’aimant pour
assurer son maintien magnétique.
Appuyer
Tige
Clouage en tenant un clou avec les doigts.
ATTENTION
䢇 Pour enfoncer un clou en le tenant avec
les doigts, positionner sa pointe sur une
cible en premier puis insérer la tige sur
la tête du clou.
(1) Positionner la pointe du clou sur la cible
en le saisissant par son corps.
Tête de clou
Corps de clou
Pointe de clou
Aimant
Zone magnétisée
(2) Positionner la pointe du clou sur une cible
et appuyer sur la gâchette du cloueur
pour enfoncer le clou.
Tête de clou
Entraîneur
Clou
Tige
— 30 —
Pointe de clou
(2) Insérer la tête du clou sur la tige puis
appuyer légèrement sur la gâchettte du
cloueur pour enfoncer le clou de façon à
le stabiliser dans un premier temps.
Appuyer
Tige

Français
(3) Une fois le clou stabilisé, le relâcher puis
appuyer sur la gâchette du cloueur pour
l'enfoncer complètement de façon à ce
que sa tête affleure à la surface.
2. Efficacite de clouage
(1) Le cloueur peut nécessiter un certain
temps pour enfoncer un clou lorsque la
pression de service est basse ou le bois
est dur ou si des clous longs sont utilisés.
Dans ce cas, il est conseillé de prévoir une
pression pneumatique de service de 100
- 120 psi (6.8 - 8.3 bars. 7 - 8.5 kgf/cm
pour assurer l’efficacité de clouage.
(2) Lorsque la gâchette du cloueur est
pressée fermement ou si le cloueur est
utilisé en continu, il peut devenir
inefficace du fait d’une diminution de la
pression du compresseur. Dans ce cas,
patienter jusqu’à ce que la pression du
compresseur augmente suffisamment
pour pouvoir utiliser le cloueur.
䢇 Après le clouage :
1) débrancher le tuyau d’air du cloueur ;
2) sortir le clou du cloueur;
3) mettre 10 gouttes par minimum
d’huile de machine pneumatique
Hitachi dans le bouchon d’air du
cloueur ; et
4) ouvrir le robinet de purge du réservoir
du compresseur d’air pour purger toute
l’humidité.
2
)
3. Precautions pour le fonctionnement a
vide
REMARQUE:
䢇 Le « fonctionnement à vide » signifie que
le cloueur est actionné sans qu'aucun
clou ne soit enfoncé ou la gâchette
continue à être pressée après avoir avoir
enfoncé un clou. Si le cloueur continue à
être actionné dans ces conditions, cela
peut contribuer à le détériorer. Faire tout
particulièrement attention de ne pas faire
fonctionner le cloueur à vide.
— 31 —

Français
ENTRETIEN
REMARQUE :
Les informations contenues dans ce manuel ont pour but d’aider l’opérateur à
utiliser le cloueur en toute sécurité.
Certaines des illustrations du manuel peuvent montrer des détails ou des
accessoires qui diffèrent de ceux de votre cloueur.
ENTRETIEN ET INSPECTION
Lire la section intitulée “SECURITE” (pages
19– 23).
AVERTISSEMENT
䢇 Débrancher le tuyau d’air et sortir le
clou du cloueur quand :
1) on entretient ou on inspecte le
cloueur ; et
2) on retire des clous coincés.
䢇 Sans raccorder le tuyau d’air, vérifier
que le mouvement de la tige s’effectue
de manière régulière en appuyant la
pointe de la tige contre un matériau
tel que du bois.
1. Vérification des vis d'assemblage
Vérifier à intervalles réguliers les vis
d’assemblage des pièces pour s’assurer
qu’elles ne sont pas desserrées.
Resserrer toute vis desserrée.
Si le cloueur est utilisé avec une de ses
vis desserrée, cela peut occasionner un
accident avec des blessures.
2. Protection contre la saleté et la poussière
䡬 Pour emêcher la saleté ou la poussière
de s’immiscer à l’intérieur, nettoyer
l’orifice avant de brancher le tuyau d’air.
䡬 Pour effectuer la lubrification avant et
après utilisation, veiller à utiliser de l’huile
propre. Des impuretés dans l’huile
peuvent boucher l’orifice d’alimentation
en air ou endommager la partie
coulissante.
䡬 Lorsque le cloueur n’est pas utilisé,
équiper le bouchon d’air du cachepoussière pour éviter toute pénétration
de saleté et de poussière à l’intérieur du
cloueur.
— 32 —
3. Vérification de la tige
Nettoyer et lubrifier la partie coulissante
de la tige de temps à autre.
Vérifier que la tige se déplace de façon
régulière en pressant le cloueur contre un
matériau tel que du bois.
La lubrification empêche non seulement
la tige de rouiller mais elle garantit
également la régularité de son
mouvement.
En présence d'un dépôt de poudre
métallique au niveau de la zone
magnétisée à l’intérieur de la tige, le
champ magnétique destiné à maintenir
les clous peut se trouver réduit. Nettoyer
de temps à autre cette zone avec un
chiffon ou du ruban adhésif.
Supprimer également la poudre
métallique sur l’aimant à l’extérieur de la
tige avec un chiffon ou du ruban adhésif
pour assurer la régularité du mouvement
de la tige.
Douille à percussion
longue portée
Tige
4. Remisage
䡬 Avant de monter le cache-poussière sur
le bouchon d'air, purger complètement
le cloueur en le retournant.

Français
䡬 Si l’on ne se sert pas du cloueur pendant
un certain temps, enduire ses pièces en
acier d’une mince couche de graisse pour
éviter toute corrosion.
䡬 Ne pas remiser le cloueur dans un
environnement froid. Le laisser dans un
endroit chaud.
䡬 Lorsqu’on ne se sert pas du cloueur, le
remiser dans un endroit chaud et sec.
Le ranger hors de portée des enfants.
5. ETIQUETTE D’AVERTISSEMENT
Remplacer l’ETIQUETTE
D’AVERTISSEMENT si elle manque ou
qu’elle est endommagée.
Se procurer une nouvelle ETIQUETTE
D’AVERTISSEMENT auprès d’un service
après-vente Hitachi agréé.
Etiquette
d’avertissement
6. Tableau d’entretien (voir page 34)
7. Guide de dépannage de l’opérateur
(voir page 34)
8. Liste des pièces de rechange
MODIFICATIONS :
Les outils électriques Hitachi sont
constamment améliorés et modifiés afin
d’incorporer les tous derniers progrès
technologiques.
En conséquence, il est possible que certaines
pièces soient modifiées sans avis préalable.
ENTRETIEN ET REPARATIONS
AVERTISSEMENT
䢇 Les réparations du cloueur seront
confiées exclusivement au personnel
d’entretien formé par Hitachi, au
distributeur ou à l’employeur.
䢇 Pour les réparations, utiliser
exclusivement des pièces fournies ou
recommandées par Hitachi.
Du fait de l’usure normale, les cloueurs de
qualité finissent toujours par avoir besoin
d’un entretien ou d’un remplacement de
pièce.
REMARQUE :
Les spécifications sont sujettes à
modification sans préavis et sans aucune
obligation de la part de HITACHI.
ATTENTION
䢇 Les réparations, modifications et
inspections des outils électriques Hitachi
doivent être confiées à un service aprèsvente Hitachi agréé.
Il sera utile de présenter cette liste de
pièces au service après-vente Hitachi
agréé lorsqu’on apporte un outil
nécessitant des réparations ou tout
autre entretien.
Lors de l’utilisation et de l’entretien d’un
outil électrique, respecter les règlements
et les normes de sécurité en vigueur
dans le pays en question.
— 33 —

Français
Tableau d’entretien
ACTION
Purger le filtre de la ligne
d’air tous les jours.
Veiller à ce que le
lubrificateur soit toujours
plein.
Veiller à ce que le tige
fonctionne toujours
correctement.
Graisser le cloueur après
l’utilisation.
Purger le compresseur d’air.
Guide de dépannage de l’opérateur
En suivant le tableau ci-dessous, la plupart des problèmes mineurs pourront être corrigés
rapidement et en toute facilité.
Si le problème persiste, contacter un service après-vente Hitachi agréé.
Eviter l’accumulation
d’humidité et de poussière.
Maintenir le cloueur bien
graissé.
l’opérateur et un
fonctionnement efficace du
cloueur.
Rallonger la durée de
service du cloueur.
Maintenir le cloueur en bon
ordre de marche.
POURQUOI
Ouvrir le robinet de purge
manuel.
Remplir d’huile de machine
pneumatique Hitachi.
Nettoyer en soufflant de
l’air tous les jours.
Mettre 10 gouttes par
minimum de graisse dans
le cloueur.
Ouvrir le robinet de purge
du réservoir du
compresseur d’air.
COMMENT
PROBLEME
Le cloueur fonctionne,
mais les clous ne
s’enfoncent pas.
Entraînement faible.
Cycle lent.
Les clous s’enfoncent
trop profondément.
Des clous se coincent.
Les clous enfoncés
sont tordus.
Les clous s’enfoncent
bien normalement,
mais pas
complètement à des
vitesses supérieures.
VERIFICATION
Ouvrir le guide-clous.
Vérifier si un clou est coincé.
Vérifier si l’on utilise les bons
clous.
Vérifier la pression d’air.
––––––––––
L'unité d'entraîneur est-elle
usée ?
Le Joint torique est-ill usé ou
endommagé ?
Vérifier la pression d’air.
Vérifier si l’on utilise les bons
clous.
L'unité d'entraîneur est-elle
usée ?
Vérifier le diamètre intérieur du
tuyau d’air.
— 34 —
CORRECTION
Dégager le clou coincé page
32.
Utiliser uniquement les clous.
recommandés.
Augmenter la pression d’air.
(Ne pas dépasser 120 psi (8.3
bars, 8.5 kgf/cm2))
Utiliser une huile de machine
pneumatique Hitachi.
Contacter Hitachi pour le
remplacement.
Réduire la pression d'air
(Régler sur 70 – 120 psi. (4.9 –
8.3 bars 5 – 8.5 kgf/cm2))
Utiliser uniquement les clous
recommandés.
Contacter Hitachi pour le
remplacement.
Utiliser un tuyau d’air plus
large.

Español
INFORMACIÓN IMPORTANTE
Lea y comprenda el significado de las etiquetas de la herramienta y todas
las instrucciones de funcionamiento, las precauciones de seguridad y
las advertencias de este manual antes de realizar la operación o el
mantenimiento de este clavador.
La negligencia en la observación de las advertencias puede producir la
MUERTE o LESIONES DE GRAVEDAD.
La mayoría de los accidentes ocurridos al utilizar o mantener este clavador se deben a la
falta de tener en cuenta las normas de seguridad y precauciones básicas. Los accidentes
podrán evitarse en muchos casos dándose cuenta de una situación peligrosa antes de que
se produzca, y sigviendo fielmente los procedimientos de seguridad apropiados.
Las precauciones básicas de seguridad se describen en la sección “SEGURIDAD” de este
manual, y en las secciones que contienen las instrucciones sobre operación y
mantenimiento.
Los riesgos que habrá que eludir para evitar lesiones o el daño de la máquina se identifican
mediante PELIGRO y ADVERTENCIA en el clavador y en este manual.
No utilice nunca este clavador para aplicaciones que no sean las especificadas en este
manual.
DEFINICIÓN DE LAS PALABRAS CLAVE
PELIGRO indica una situación inminentemente peligrosa que, si no se evita, puede resultar
en lesiones serias o en la muerte.
ADVERTENCIA indica una situación potencialmente peligrosa que, si no se evita, puede
resultar en lesiones serias o en la muerte.
PRECAUCIÓN indica una situación potencialmente peligrosa que, si no se evita, puede
resultar en lesiones menores, o en el daño de la máquina.
NOTA enfatiza información esencial.
— 35 —

Español
SEGURIDAD
INSTRUCCIONES IMPORTANTES DE SEGURIDAD
PARA LA UTILIZACIÓN DEL CLAVADOR
LEA TODAS LAS INSTRUCCIONES
DANGER
1. LOS OPERADORES Y DEMÁS PERSONAS QUE SE ENCUENTREN EN EL ÁREA DE
TRABAJO DEBEN USAR GAFAS PROTECTORAS CON BLINDAJES LATERALES.
2. NO UTILICE NUNCA OXÍGENO NI OTROS GASES EMBOTELLADOS. PODRÍA PRODUCIR
EXPLOSIÓN.
Antes de utilizar el clavador, utilice siempre gafas protectoras con blindajes
laterales, y asegúrese de que también sea utilizada por todas las personas
que se encuentren en el área de trabajo.
Las gafas protectoras deberán estar de acuerdo con los requisitos del Instituto
de Normas Nacionales Americanas, ANSI Z87.1 y proporcionar protección
contra las partículas despedidas desde la parte frontal y posterior.
El empresario deberá hacer que el operador del clavador y demás personas
que se encuentren en el área de trabajo utilicen en todo momento gafas
protectoras.
No utilice nunca bombonas de oxígeno, gases combustibles, etc. como fuente
de propulsión de este clavador.
La utilización de estos gases, o de otros gases embotellados, es peligrosa,
ya que el clavador podría explotar.
Utilice solamente aire comprimido limpio, seco, y regulado.
ADVERTENCIA
3. NO DIRIJA NUNCA LA HERRAMIENTA HACIA SÍ MISMO O HACIA OTRAS PERSONAS
DEL ÁREA DE TRABAJO.
Piense siempre que el clavador puede tener clavos cargados.
No dirija nunca el clavador hacia sí mismo o hacia otras personas,
independientemente de que contenga o no clavos.
Si utilizase los clavos incorrectamente, podrían producirse lesiones serias.
No juegue nunca con el clavador.
Trate el clavador como herramienta de trabajo.
2
4. NO SOBREPASE 120 psi. (8.3 barias 8.5 kgf/cm
No sobrepase nunca la presión de aire máxima recomendada de
120 psi (8.3 barias 8.5 kgf/cm
No conecte nunca el clavador a una presión que pueda sobrepasar
potencialmente 200 psi (13.7 barias 14 kgf/cm
podría explotar.
— 36 —
)
2
).
2
) ya que el clavador

SEGURIDAD — Continuación
ADVERTENCIA
Español
5. UTILICE SIEMPRE PROTECTORES PARA
LOS OÍDOS Y LA CABEZA.
Utilice siempre protectores para los oídos
contra el ruido fuerte.
Utilice siempre un protector para la
cabeza contra los objetos que puedan
salir disparados.
6. GUARDE ADECUADAMENTE EL
CLAVADOR.
Cuando no vaya a utilizar el clavador,
guárdelo en un lugar seco. Manténgalo
alejado de los niños. Cierre con llave el
lugar de almacenamiento.
7. MANTENGA EL ÁREA DE TRABAJO
LIMPIA.
Las áreas desordenadas pueden
provocar lesiones. Limpie bien el área de
trabajo, apartando herramientas
innecesarias, residuos, muebles, etc.
8. NO UTILICE EL CLAVADOR CERCA DE
LÍQUIDOS INFLAMABLES NI DE GASES.
El clavador produce chispas durante la
operación.
No utilice nunca el clavador en lugares
en los que haya laca, pintura, bencina,
diluidor de pintura, gasolina, gases,
productos adhesivos, ni demás
materiales combustibles o explosivos.
9. MANTENGA A LOS VISITANTES
ALEJADOS.
No permita que los visitantes toquen el
clavador.
Todos los visitantes deberán permanecer
alejados del área de trabajo.
10. VÍSTASE ADECUADAMENTE.
No utilice ropa floja ni joyas, ya que
podrían pillarse en las partes móviles.
Para trabajar en exteriores se recomienda
utilizar guantes de goma y calzado no
deslizable. Si tiene el pelo largo, utilice
un protector para recogérselo.
11. NO UTILICE NUNCA UN ACOPLADOR
SIN DESCARGA CON EL CLAVADOR.
Si utilizase un acoplador sin descarga con
el clavador, éste podría permanecer
cargado con aire después de haberlo
desconectado y, por lo tanto, disparar
clavador incluso después de haberlo
desconectado.
El clavador y la manguera de aire deben
tener un acoplamiento de manguera que
permita descargar toda la presión de aire
del clavador cuando se desconecta la
junta de acoplamiento.
12. CONECTE LA MANGUERA DE AIRE
ANTES DE CARGAR LOS CLAVOS Y
COMPRUEBE LO SIGUIENTE.
Compruebe si existen fugas de aire o
ruidos anormales.
La utilización del clavador de manera
inadecuada puede causar accidentes y
heridas. Si se detecta alguna anomalía,
solicite la reparación a su proveedor o a
un centro de reparaciones autorizado por
Hitachi.
13. MANTENGA TODOS LOS TORNILLOS Y
CUBIERTAS BIEN APRETADAS EN SU
LUGAR.
Mantenga todos los tornillos y cubiertas
firmemente apretados. Compruebe
periódicamente su condición.
No utilice nunca el clavador si hay piezas
perdidas o dañadas.
14. MANTENGA PERMANENTEMENTE LA
CARA, LAS MANOS Y LOS PIES
ALEJADOS DE LA CABEZA DE DISPARO.
No acerque nunca su cara, manos o pies
a la cabeza de disparo.
15. COLOQUE EL CLAVADOR
ADECUADAMENTE SOBRE LA PIEZA DE
TRABAJO.
No clave un clavo sobre otro, ni con el
clavador con un ángulo demasiado
agudo, ya que los clavos podrían rebotar
y herir a alguien.
— 37 —

Español
SEGURIDAD — Continuación
ADVERTENCIA
16. TENGA CUIDADO CON EL RETROCESO
DEL CLAVADOR.
Cuando se dispara un clavo contra un
material duro, el clavador podría rebotar
hacia detrás. No acerque demasiado su
cara.
17. NO CLAVE EN PANELES FINOS, NI
CERCA DE LAS ESQUINAS NI LOS
BORDES DE LA PIEZA DE TRABAJO.
Los clavos podrían atravesar la pieza de
trabajo y herir a alguien.
18. NO CLAVE NUNCA CLAVOS DESDE
AMBOS LADOS DE UNA PARED AL
MISMO TIEMPO.
Los clavos podrían traspasar el panel y
lesionar a la persona que se encuentra
en el lado opuesto.
19. COMPRUEBE SI HAY CABLES ACTIVOS.
Evite el riesgo de descargas eléctricas
comprobando si hay cables activos
escondidos en paredes, suelos, o techos.
Abra el disyuntor para asegurarse de que
no queden cables activos.
20. NO TRANSPORTE NUNCA EL
CLAVADOR POR EL MORRO.
21. NO SE EXTRALIMITE.
Mantenga en todo momento un buen
equilibrio.
22. NO UTILICE NUNCA UN CLAVADOR
DEFECTUOSO O QUE FUNCIONE
INCORRECTAMENTE.
Si el clavador parece funcionar
anormalmente, si produce ruidos
extraños, etc., deje de utilizarlo
inmediatamente y solicite su reparación
a un centro de servicio autorizado por
Hitachi.
23. DESCONECTE LA MANGUERA DE AIRE
DEL CLAVADOR CUANDO:
1) realice trabajos de mantenimiento e
inspección,
2) tenga que desatascarlo,
3) no vaya a utilizarlo,
4) abandone el área de trabajo,
5) lo traslade a otro lugar, y
6) vaya a entregárselo a otra persona.
No intente nunca desatascar ni reparar
el clavador sin haber desconectado
primero la manguera de aire del mismo,
y sin haberle quitado todos los clavos.
No deje nunca el clavador desatendido,
porque personas no familiarizadas con
él podrían utilizarlo y sufrir lesiones.
24. PERMANEZCA ALERTA.
Tenga en cuenta lo que esté haciendo.
Utilice el sentido común. No utilice el
clavador cuando esté cansado. No utilice
nunca el clavador si se encuentra bajo la
influencia del alcohol, drogas, o
medicinas que le produzcan
somnolencia.
25. MANEJE CORRECTAMENTE EL
CLAVADOR.
Maneje el clavador de acuerdo con las
instrucciones de este manual.
No permita nunca que los niños,
personas no familiarizadas o no
autorizadas, toquen el clavador.
26. NO UTILICE NUNCA EL CLAVADOR
PARA APLICACIONES QUE NO SEAN
LAS ESPECIFICADAS EN ESTE MANUAL.
27. MANEJE EL CLAVADOR CON CUIDADO.
Debido a la alta presión de aire del
clavador, las rajas en su superficie
pueden resultar peligrosas.
Para evitar esto, no deje caer el clavador
ni lo golpee contra superficies duras, y
no grabe nada en el mismo. Maneje
cuidadosamente el clavador.
28. MANTENGA EL CLAVADOR CON
CUIDADO.
Mantenga el clavador limpio y lubricado
para que rinda al máximo y con la mayor
seguridad.
— 38 —

SEGURIDAD — Continuación
ADVERTENCIA
Español
29. UTILICE SOLAMENTE LAS PIEZAS,
ACCESORIOS, Y CLAVOS QUE
SUMINISTRE O RECOMIENDE HITACHI.
Las piezas, accesorios, o clavos no
autorizados pueden anular la garantía y
provocar el mal funcionamiento, lo que
podría resultar en lesiones.
El clavador solamente deberá ser
reparado por Hitachi, un distribuidor, o
el empresario.
30. NO MODIFIQUE NI ALTERE NUNCA EL
CLAVADOR.
Si lo hicese podría funcionar mal y
provocar lesiones.
31. COMPRUEBE EL MOVIMIENTO DE LA
VARILLA ANTES DE SU UTILIZACIÓN.
Sin conectar la manguera de aire,
compruebe si la varilla se mueve de
manera regular empujando la punta de
la varilla contra un material como la
madera.
Si el movimiento de la varilla es irregular
durante la utilización podría saltar algún
clavo, lo que podría causar accidentes.
32. TENGA EN CUENTA LO SIGUIENTE AL
CONECTAR LA MANGUERA DE AIRE.
Asegúrese de que no hay ningún clavo
en la varilla.
De lo contrario se podría disparar un
clavo accidentalmente y causar heridas.
Dirija la salida de los clavos hacia abajo
y asegúrese de mantener su cuerpo,
manos y pies alejados de la cabeza de
salida de los clavos.
No coloque la punta de la varilla sobre
una mesa o en el suelo.
33. UTILICE CLAVOS ESPECÍFICOS.
No utilice ningún otro tipo de clavos ya
que podrían ocasionar heridas o un mal
funcionamiento del clavador.
34. CARGUE LOS CLAVOS CON CUIDADO.
Cuando cargue un clavo en la varilla,
sujete el clavo por el cuerpo y no por la
punta.
— 39 —
De lo contrario, si el clavador se acciona
accidentalmente se podrían producir
heridas como clavarse un dedo.
Cuando cargue un clavo en la varilla,
asegúrese de no empujar la punta del
impulsor.
Si el clavo se inserta muy adentro, podría
presionar la punta del impulsor. De este
modo, el clavador podría accionarse
accidentalmente y causar heridas.
35. TENGA EN CUENTA LO SIGUIENTE
CUANDO DISPARE CLAVOS
SUJETÁNDOLOS CON LOS DEDOS.
Dispare el clavo colocando primero la
punta del clavo en el punto deseado e
introduciendo después la varilla en la
cabeza del clavo.
Si la punta del clavo no se coloca de
manera firme o se inserta primero en la
varilla pueden provocarse heridas si el
clavo rebota hacia atrás o se dispara
accidentalmente.
36. EVITE ESTAR CLAVANDO DURANTE UN
TIEMPO PROLONGADO.
Asegúrese de que tarda el menor tiempo
posible en acabar de clavar. Además,
evite un manejo prolongado y programe
descansos entre las operaciones.

Español
SEGURIDAD — Continuación
RESPONSABILIDADES DEL EMPRESARIO
1. Asegúrese de que este MANUAL esté al
alcance de los operadores y del personal
de mantenimiento.
2. Asegúrese de que el clavador se utilice
solamente cuando el operador y demás
personas que se encuentren en el área
de trabajo estén utilizando GAFAS
PROTECTORAS PARA LOS OJOS.
¡GUARDE ESTE MANUAL
AL ALCANCE DE TODOS LOS
USUARIOS!
3. Recalque que el operador y las demás
personas que se encuentren en el área
de trabajo necesitan utilizar GAFAS
PROTECTORAS PARA LOS OJOS.
4. Mantenga el clavador en un orden de
funcionamiento seguro.
5. Mantenga adecuadamente el clavador.
6. Si un clavador necesita reparación, no lo
utilice.
— 40 —

NOTA:
La información contenida en este manual ha sido diseñada para ayudarle a
utilizar con seguridad este clavador.
Algunas de las ilustraciones de este manual pueden mostrar detalles o
accesorios diferentes a los de su propio clavador.
NOMENCLATURA
Español
OPERACIÓN
Tapa
Junta tórica
Impulsor
Cabeza de salida
de las clavos
Cuerpo
de la pistola
Toma de aire
Cubierta antipolvo
Cubo de impacto profundo
Varilla
Imán
ESPECIFICACIONES
Presión de operación 70 – 120 psi (4.9 – 8.3 barias 5 – 8.5 kgf/cm2)
Dimensiones 2-45/64" × 2-13/64" × 4-3/32"
Longitud × Altura × Anchura (69 mm × 104 mm × 56 mm)
Peso 1.1 libras (0.5 kg)
Consumo de aire .113 pies3/ciclo a 100 psi, .148" × 3" Clavo normal
(3.2 litros/ciclo a 7 kgf/cm
2
)
— 41 —

Español
SELECCIÓN DE CLAVOS
Para este clavador, utilice clavos de los siguientes tamaños.
Min. Max.
.250"
(6.4 mm)
2" (50 mm)
.344"
(9 mm)
.099"
3.5" (90 mm)
(2.5 mm)
Diám. cabeza Diám. cuerpo
Longitud
.266"± 0.027 .113"± 0.004 2.00"± 0.062
.266"± 0.027 .113"± 0.004 2.25"± 0.062
.281"± 0.028 .131"± 0.004 2.50"± 0.062
.281"± 0.028 .131"± 0.004 2.50"± 0.062
.312"± 0.031 .148"± 0.004 3.00"± 0.093
.312"± 0.031 .148"± 0.004 3.25"± 0.093
.344"± 0.034 .162"± 0.004 3.50"± 0.093
Clavos normales
Diám. cabeza Diám. cuerpo
.266"± 0.027 .099"± 0.004 2.00"± 0.062
.266"± 0.027 .099"± 0.004 2.25"± 0.062
.297"± 0.030 .113"± 0.004 2.50"± 0.062
.297"± 0.030 .113"± 0.004 2.50"± 0.062
.312"± 0.031 .128"± 0.004 3.00"± 0.093
.312"± 0.031 .128"± 0.004 3.25"± 0.093
.344"± 0.034 .135"± 0.004 3.50"± 0.093
Clavos de cajonero
Longitud
ADVERTENCIA
No utilice clavos de otros tamaños.
Podrían dañar la guía o no ser disparados completamente rectos.
No utilice clavos de acero templado.
.162"
(4.1 mm)
Clavos revestidos
Diám. cabeza Diám. cuerpo
Longitud
.250"± 0.025 .099"± 0.004 2.125"± 0.062
.266"± 0.027 .113"± 0.004 2.375"± 0.062
.281"± 0.028 .120"± 0.004 2.875"± 0.093
.312"± 0.031 .135"± 0.004 3.125"± 0.093
.344"± 0.034 .148"± 0.004 3.250"± 0.093
— 42 —

Español
ACCESSORIOS
ADVERTENCIA
Los accesorios que no sean los
mostrados a continuación pueden
provocar el mal funcionamiento del
clavador y resultar en lesiones.
ACCESORIOS ESTÁNDAR
1
1
Gafas protectoras para los ojos
1
ACCESORIOS OPCIONALES
Lubricante para herramientas neumáticas
Aceitador de 1 onzas (30 cc)
Aceitador de 4 onzas (120 cc)
Lata de 1 cuarto de galón (1 litro)
NOTA: Los accesorios están sujetos a
cambios sin ninguna obligación por
parte de HITACHI.
... vendido a parte
(Núm. de código 877153)
(Núm. de código 874042)
(Núm. de código 876212)
APLICACIONES
Madera para la construcción en general,
revestimientos, plataformas de madera,
estructuras y renovaciones.
ANTES DE LA OPERACIÓN
Lea la sección titulada “SEGURIDAD”
(páginas 36 – 40).
ENTORNO DE TRABAJO
ADVERTENCIA
En el lugar de trabajo no deberá haber
gases, líquidos, ni demás objetos
inflamables.
No permita que en el área de trabajo
haya niños ni demás personas no
autorizadas.
SUMINISTRO DE AIRE
PELIGRO
No utilice
NUNCA oxígeno
ni otros gases
embotellados.
Podría producirse
una explosión.
ADVERTENCIA
No conecte nunca el clavador a una
presión que pueda sobrepasar
potencialmente 200 psi (13.7 barias
14 kgf/cm
No utilice nunca un acoplador sin
descarga con el clavador.
1. Fuente de propulsión
Utilice solamente aire comprimido
limpio, seco, y regulado como fuente de
propulsión para este clavador.
Los compresores de aire para suministrar
aire comprimido a este clavador deberán
cumplir los requisitos de la última versión
de la norma B 19.3 ANSI “Normas de
Seguridad para Compresores para
Industrias de Procesos”.
La humedad o el aceite en el compresor
de aire puede acelerar el desgaste y la
corrosión del clavador.
Drénelo diariamente.
2
).
Antes de la utilización, cerciórese de lo
siguiente.
— 43 —

Español
2. Filtro-Regulador-Lubricador
Utilice un regulador con una presión de
0 – 120 psi (0 – 8.3 barias 0 – 8.5 kgf/cm
2
Las unidades de filtro-regulador-
lubricador ofrecen la condición óptima
para el clavador y prolongan su duración
útil.
Estas unidades deberán utilizarse
siempre.
Filtro .............. El filtro elimina la
humedad y la suciedad del
aire comprimido.
Drene diariamente el
clavador a menos que
tenga instalado un
dispositivo de drenado
automático.
Mantenga limpio el filtro
realizando regularmente
su mantenimiento.
Regulador ..... El regulador controla la
presión de operación para
poder utilizar con
seguridad el clavador.
Inspeccione el regulador
antes de la operación a fin
de asegurarse de que
funcione adecuadamente.
Lubricador .... El lubricador rocía aceite al
clavador.
Inspeccione el lubricador
antes de utilizarlo para
comprobar si el
suministro de lubricante
es adecuado.
Utilice lubricante para
herramientas neumáticas
Hitachi.
Regulador
Lado del
clavador
Lado del
compresor
Filtro
Lubricator
3. Manguera de aire
La manguera de aire deberá poder resistir
una presión mínima de 150 psi (10.4
barias 10.6 kgf/cm
2
) o el 150% de la
presión máxima producida en el sistema,
el valor que más alto sea.
).
4. Consumo de aire
Utilizando la tabla de consumo de aire y
la fórmula de tamaño del compresor de
aire, busque el tamaño de compresor
correcto.
Tabla de consumo de aire
Presión de
operación
Consumo pies
de aire
psi 80 90 100
(barias) (5.5) (6.2) (6.9)
(kgf/cm
(litros/ciclo)
2
) (5.6) (6.3) (7)
3
/ciclo .113 .113 .113
(3.2) (3.2) (3.2)
Fórmula de tamaño del compresor
Cantidad de aire requerida
= número de clavadores
× promedio de clavos clavadas cada
minuto por clavador
× consumo de aire a la presión dada
× factor de seguridad (siempre 1.2)
Ejemplo: 2 clavadores (NH90AB)
funcionando a 100 psi para
clavar 2 clavos por minuto
Cantidad de aire requerida
= 2 × 2 × 1.134 (3.2) × 1.2
= 5.4 CFM (pies
3
/min) (15.4 litros/min)
Después de haber realizado los cálculos
indicados arriba, tendrá que buscar un
compresor que proporcione 5.4 CFM de
aire, que es el valor requerido.
LUBRICACIÓN
Es muy importante que el clavador esté
adecuadamente lubricado. Sin la lubricación
apropiada, el clavador no trabajará
correctamente y las piezas se desgastarán
prematuramente.
Utilice lubricante para herramientas
neumáticas Hitachi.
No utilice aceite detergente ni aditivos.
Estos lubricantes dañarían las juntas
tóricas y demás piezas de caucho. Esto
haría que el clavador funcionase mal.
Habrá que utilizar siempre unidades de
filtro-regulador-lubricador.
Mantenga el lubricador lleno con
lubricante para herramientas neumáticas
Hitachi.
— 44 —

Español
Si no se posee un lubricador, aplique 10
gotas como mínimo del lubricante de
herramientas neumáticas Hitachi en la
entrada de aire del clavador cada 100
disparos.
CUIDADOS PARA CLIMAS
FRÍOS
No guarde el clavador en un lugar frío.
Déjelo en un lugar cálido antes de
comenzar a trabajar.
Si el clavador está frío, póngalo en un
lugar cálido y deje que se caliente antes
de utilizarlo.
1 Reduzca la presión de aire a 64 psi (4.4
barias 4.5 kgf/cm
2 Quite los clavos del clavador.
3 Conecte la manguera de aire y dispare
(disparo en vacío) el clavador.
La reducción de la presión de aire será
suficiente para disparar en vacío el
clavador.
La operación a baja velocidad tiende
a calentar las partes móviles.
2
).
PRECAUCIÓN
No dispare en vacío el clavador a alta
presión.
PRUEBA DEL CLAVADOR
PELIGRO
Los operadores y demás
personas que se
encuentren en el área de
trabajo DEBEN usar gafas
protectoras con blindajes
laterales que cumplan con
las especificaciones ANSI
Z87.1.
ADVERTENCIA
No utilice nunca el clavador a menos
que la varilla funcione adecuadamente.
Antes de comenzar el trabajo, pruebe el
clavador utilizando la lista de
comprobaciones siguiente. Realice las
comprobaciones en el orden indicado.
Si se produce alguna operación anormal,
deje de utilizar el clavador y póngase
inmediatamente en contacto con un centro
de reparaciones autorizado por Hitachi.
(1) DESCONECTE LA MANGUERA DE AIRE
DEL CLAVADOR.
QUITE LOS CLAVOS DEL CLAVADOR.
TODOS LOS TORNILLOS DEBERÁN
ESTAR APRETADOS.
Si hay algún tornillo flojo, apriételo.
(2) Ajuste la presión del aire a 70 psi (4.9
barias 5 kgf/cm
Conecte la manguera de aire.
No cargue clavos en el clavador.
No coloque la punta de la varilla sobre
una mesa o en el suelo.
No apunte con la cabeza de salida hacia
sí mismo ni hacia otros en el área de
trabajo.
EL CLAVADOR NO DEBERÁ TENER
FUGAS DE AIRE.
Sujete el clavador hacia abajo.
EL CLAVADOR NO DEBERÁ
FUNCIONAR.
Podrían producirse ruidos en el
funcionamiento una o dos veces al
conectar la manguera de aire pero se
trata de un fenómeno normal.
2
).
— 45 —

Español
AJUSTE DE LA PRESIÓN DE AIRE
ADVERTENCIA
No sobrepase 120 psi (8.3 barias 8.5
kgf/cm
Ajuste la presión del aire al valor
recomendado, 70 – 120 psi (4.9 – 8.3 barias
5 – 8.5 kgf/cm
de las puntas y la dureza de la pieza de
trabajo.
La presión de aire correcta es la más baja
con la que pueda realizarse el trabajo. La
utilización del clavador con una presión de
aire más alta de la requerida lo forzará
innecesariamente.
2
).
2
) de acuerdo con la longitud
OPERACIÓN DEL CLAVADOR
Lea la sección titulada “SEGURIDAD”
(páginas 36 – 40).
PELIGRO
Los operadores y
demás personas que se
encuentren en el área
de trabajo DEBEN usar
gafas protectoras con
blindajes laterales que
cumplan con las
especificaciones ANSI
Z87.1.
No introduzca los clavos sobre la
cabeza de otros clavos, ni con el
clavador a un ángulo demasiado
agudo, ya que los clavos podrían
rebotar y herir a alguien.
Para evitar el doble disparo o la
expulsión inesperado de un clavo
debido al rebote del clavador.
1) no empuje el clavador con
demasiada fuerza contra la pieza de
trabajo,
2) separe el clavador de la pieza de
trabajo utilizando el coletazo,
3) suelte el gatillo rápidamente
después del disparo.
No clave clavos en paneles finos ni
cerca de esquinas ni bordes de la pieza
de trabajo.
Los clavos podrían traspasar la pieza
de trabajo y lesionar a alguien.
No clave nunca clavos desde ambos
lados de una pared al mismo tiempo.
Los clavos podrían traspasar la pared
y lesionar a la persona de la otra parte.
No utilice nunca un clavador
defectuoso o que funcione
anormalmente.
No utilice el clavador a modo de
martillo normal.
Desconecte la manguera de aire del
clavador cuando:
1) no vaya a utilizarlo,
2) vaya a abandonar el área de
trabajo,
3) vaya a trasladarse a otro lugar, y
4) vaya a entregárselo a otra persona.
Es posible que cuando está en uso, el
clavador presente una fuga de aceite
por el orificio de escape, debido a su
característica estructural.
MÉTODOS DE OPERACIÓN
ADVERTENCIA
No dirija NUNCA la
herramienta hacia sí
mismo o hacia otras
personas del área de
trabajo.
No acerque su cara, manos ni pies a la
cabeza de disparo durante el uso.
— 46 —
ADVERTENCIA
Asegúrese de llevar gafas de seguridad
durante su utilización.
Tome las medidas necesarias para
garantizar la seguridad de los demás
en el área de trabajo durante su
utilización.

No apunte con la cabeza de salida hacia
sí mismo ni hacia otros en el área de
trabajo.
Mantenga su cuerpo, manos y pies
alejados de la cabeza de salida durante
su utilización.
No utilice la cabeza de salida o el
cuerpo como un martillo.
PRECAUCIÓN
Si utiliza el clavador a bajas
temperaturas podría funcionar más
lento.
1. Cómo disparar un clavo
Disparar sujetando un clavo con el imán.
ADVERTENCIA
Cuando cargue un clavo en la varilla,
sujete el clavo por el cuerpo y no por
la punta.
Cuando cargue un clavo en la varilla,
asegúrese de no empujar la punta del
impulsor.
No coloque los dedos o manos debajo
de las puntas de los clavos al
introducirlos en el cargador.
Se puede disparar un clavo sujetándolo con
el imán.
(1) Sujete ligeramente el cuerpo del clavo
con los dedos e introduzca la cabeza del
clavo en la varilla. Mantenga el clavo
cerca del imán con ayuda de éste tal.
Español
Impulsor
Imán
Área magnetizada
(2) Coloque la punta del clavo en el punto
deseado y apriete el clavador para
disparar el clavo.
Pulsar
Varilla
Disparar sujetando un clavo con los dedos.
Clavo
Varilla
PRECAUCIÓN
Si dispara un clavo sujetándolo con los
dedos, coloque primero la punta del
clavo en el punto deseado y después
introduzca la varilla en la cabeza del
clavo.
(1) Sujetar ligeramente el cuerpo del clavo
y colocar la punta en el punto deseado.
Cuerpo del clavo
Punta del clavo
Cabeza del clavo
Cabeza del clavo
Punta del clavo
— 47 —

Español
(2) Introduzca la cabeza del clavo en la varilla
y empuje el clavador ligeramente hasta
que el clavo quede estable.
Pulsar
Varilla
(3) Después de que el clavo haya quedado
fijo, suelte los dedos y presione el
clavador para hacer que el clavo quede
completamente plano.
3. Precauciones acerca de disparar en vacío
NOTA:
Disparar en vacío” significa apretar y
hacer funcionar el clavador incluso
cuando no se dispara ningún clavo o
cuando se sigue apretando y haciendo
funcionar después de que haya
disparado un clavo. Si se sigue
disparando en vacío se podrían ver
afectadas las piezas del clavador. Ponga
mucha atención a no disparar en vacío.
Después de haber clavado los clavos:
1) desconecte la manguera de aire del
clavador,
2) extraiga los clavos del clavador,
3) aplique 10 gotas como mínimo de
lubricante para herramientas
neumáticas Hitachi a la entrada de
aire del clavador, y
4) abra la llave de escape del depósito
del compresor de aire para drenar la
humedad que pueda existir.
2. Rendimiento eficiente
(1) El clavador podría tardar mucho en
disparar un clavo si la presión de
funcionamiento es baja, la madera es
dura o se utilizan clavos largos. En estos
casos, se aconseja fijar la presión del aire
entre 100 – 120 psi (6.8 – 8.3 bares; 7 –
8.5 kgf/cm
2
) para un rendimiento
eficiente. work.
(2) Cuando se aprieta el clavador muy fuerte
o se usa repetidamente, puede dejar de
funcionar debido a la disminución de la
presión del compresor de aire. En estos
casos, espere a que la presión del
compresor aumente lo suficiente para
usar el clavador.
— 48 —

MANTENIMIENTO
Español
NOTA:
La información contenida en este manual ha sido diseñada para ayudarle a
mantener con seguridad este clavador.
Algunas ilustraciones de este manual pueden mostrar detalles o dispositivos
diferentes a los de su propio clavador.
MANTENIMIENTO E INSPECCIÓN
Lea la sección titulada “SEGURIDAD”
(páginas 36 – 40).
ADVERTENCIA
Desconecte la manguera y extraiga los
clavos del clavador antes de:
1) realizar trabajos de mantenimiento
e inspección, y
2) desatascar el clavador.
Sin conectar la manguera de aire,
compruebe si la varilla se mueve de
manera regular empujando la punta de
la varilla contra un material como la
madera.
1. Inspección de los tornillos de montaje
Inspeccione regularmente la correcta
sujeción los tornillos de montaje.
Si hay algún tornillo suelto, vuelva a
apretarlo.
Si usa el clavador con algún tornillo
suelto podría provocar heridas
accidentalmente.
2. Prevención del polvo y la suciedad
Para evitar que el polvo o la suciedad se
introduzcan en el interior, limpie frotando
la apertura antes de conectar la
manguera de aire.
Si lubrica la máquina antes y después de
usarla, asegúrese de usar aceite limpio.
Un aceite con polvo o suciedad podría
bloquear el suministro de aire o dañar la
parte deslizante.
Si no va a usarlo, coloque la cubierta
antipolvo a la entrada de aire para evitar
la entrada de polvo y suciedad en el
clavador.
3. Inspección de la varilla
Limpie y lubrique la parte deslizante de
la varilla de vez en cuando (figura 13).
Compruebe si la varilla se mueve con
suavidad empujando el clavador contra
un material como la madera.
La lubricación evita que la varilla se oxide
además de permitir un movimiento
suave.
Si las virutas metálicas o algo similar se
adhiere a la parte magnetizada con la
varilla, la fuerza del imán para sujetar un
clavo podría verse disminuida. De vez en
cuando, limpie el área frotando con un
paño o con cinta adhesiva.
Además, limpie las virutas de hierro por
fuera de la varilla con un paño o con cinta
adhesiva. De esta manera la varilla
funcionará suavemente.
Cubo de impacto
profundo
Varilla
4. Almacenamiento
Antes de colocar la cubierta antipolvo en
la entrada de aire, drene completamente
el clavador colocando boca abajo.
Cuando no vaya a utilizar el clavador
durante mucho tiempo, aplique una capa
fina de lubricante a las piezas de acero
para evitar que se oxiden.
No guarde el clavador en un lugar frío.
Guarde el clavador en un lugar cálido.
— 49 —

Español
Cuando no vaya a utilizar el clavador,
deberá guardarlo en un lugar cálido y
fresco.
Mantenga el clavador fuera del alcance
de los niños.
5. ETIQUETA DE PRECAUCIÓN
Si la ETIQUETA DE PRECAUCIÓN se
pierde o daña, cámbiela por otra.
Solicite la nueva ETIQUETA DE
PRECAUCIÓN a un centro de
reparaciones autorizado por Hitachi.
Etiqueta de
precaución
6. Tabla de mantenimiento (Consulte la
página 51.)
7. Solución de problemas por parte del
operador (Consulte la página 51.)
8. Lista de repuestos
SERVICIO Y REPARACIONES
ADVERTENCIA
Este clavador solamente deberá
repararlo personal entrenado por
Hitachi, un distribuidor, o el
empresario.
Para la reparación, utilice solamente
las piezas suministradas o
recomendadas por Hitachi.
Todos los clavadores de calidad requerirán
el servicio de mantenimiento o de reemplazo
de piezas debido al desgaste con la
utilización normal.
NOTA:
Las especificaciones están sujetas a
cambio sin previo aviso sin ninguna
obligación por parte de HITACHI.
PRECAUCIÓN
La reparación, modificación e inspección
de las herramientas eléctricas Hitachi
deben ser realizadas por un Centro de
Servicio Autorizado de Hitachi.
Esta lista de repuestos será de utilidad
si es presentada junto con la heramienta
al Centro de Servicio Autorizado de
Hitachi para solicitar la reparación o
cualquier otro tipo de mantenimiento.
En el manejo y el mantenimiento de las
herramientas eléctricas, se deberán
observar las normas y reglamentos
vigentes en cada país.
MODIFICACIONES:
Hitachi Power Tools introduce
constantemente mejoras y modificaciones
para incorporar los últimos avances
tecnológicos.
Por consiguiente, algunas partes pueden ser
modificadas sin previo aviso.
— 50 —

Tabla de mantenimiento
Español
ACCIÓN
Drenaje diario del filtro de
la línea de aire.
Mantenimiento del
lubricador lleno.
Mantenimiento de la
varilla en perfectas
condiciones.
Lubricación del clavador
después de haberlo
utilizado.
Drenaje del compresor de
aire.
Solución de problemas por parte del operador
La mayoría de los problemas sin importancia podrán resolverse fácilmente utilizando
la tabla siguiente.
Si el problema persiste, póngase en contacto con un centro de reparaciones
autorizado por Hitachi.
PROBLEMA
El clavador
funciona pero no
clava los clavos.
Poca fuerza.
Reciclado lento.
Los clavos penetran
demasiado.
Clavos atascados.
Los clavos se
clavan doblados.
El funcionamiento es
normal, pero no es posible
clavar a gran velocidad.
Compruebe si está atascado.
Compruebe si los clavos son los
apropiados.
Compruebe la presión de aire.
¿Está gastada la unidad impulsora?
¿Está gastada o dañada la junta
tórica?
Compruebe la presión de aire.
Compruebe si los clavos son los
apropiados.
¿Está gastada la unidad impulsora?
Compruebe el diámetro interior de
la manguera de aire.
Evitar la acumulación de
humedad y suciedad.
Mantener el clavador
lubricado.
Operador y la operación
eficaz del clavador.
Prolongar la duración del
clavador.
Mantener el clavador en
buenas condiciones de
operación.
MÉTHODO DE COMPROBACIÓN
––––––––––
PARA
Abra la llave de escape
manual.
Rellene con lubricante para
herramientas neumáticas
Hitachi.
Sople diariamente.
Aplique10 gotas como
mínimo de lubricante a
clavador.
Abra la llave de llave de
escape.
Desatásquelo de acuerdo con
la página 47.
Utilice solamente los clavos
recomendados.
Aumente la presión de aire.
(No sobrepase 120 psi (8.3
barias, 8.5 kgf/cm2).)
Utilice lubricante para
herramientas neumáticas Hitachi.
Solicite otra de reemplazo a
Hitachi.
Reduzca la presión de aire.
(Ajústela a 70 – 120 psi. (4.9 –
8.3 barias 5 – 8.5 kgf/cm2))
Utilice solamente los clavos
recomendados.
Póngase en contacto con
Hitachi para reemplazarla.
Utilice otra manguera de aire
de mayor diámetro.
CÓMO
SOLUCIÓN
— 51 —

1
2
3
4
5
3
6
7
8
9
7
10
11
15
16
17
18
12
19
13
20
14
21
— 52 —

I
TEM
NO.
1 BOLT 4
2 CAP 1
3O - RING 2
4 COLLAR 1
5 CYLINDER CAP SEAL 1
6 CYLINDER SPACER 1
7O - RING 2
8 SEAL 1
9 CYLINDER 1
10 O - RING 1
11 O - RING 1
12 DRIVER UNIT 1
13 BUMPER 1
14 MAGNET 1
15 DUSTY COVER 1
16 AIR PLUG 1
17 GUN BODY 1
18 WAVE WASHER 1
19 SPRING 1
20 ROD 1
21 DEEP IMPACT SOCKET 1
PART NAME Q’TY
— 53 —

— 54 —

— 55 —

Issued by
Hitachi Koki U.S.A., Ltd.
Hitachi Koki Co., Ltd.
Shinagawa Intercity Tower A, 15-1, Konan 2-chome,
Minato-ku, Tokyo 108-6020, Japan
Distributed by
3950 Steve Reynolds Blvd.
Norcross, GA 30093
Hitachi Koki Canada Co.
450 Export Blvd. Unit B,
Mississauga ON L5T 2A4
909
Code No. C99186161
Printed in Taiwan
 Loading...