

Page 1
Stapler
Nagler
∫·ÚʈÙÈÎfi
Zszywacz
Tűzőgép
Sešivačka
Z˙mbalama makinas˙
Capsator
Pnevmatski sponkač
CÚeÔÎep
N 5008AC2
Read through carefully and understand these instructions before use.
Keep this Manual available for others before they use the Stapler.
Diese Anleitung vor Benutzung des Werkzeugs sorgfältig durchlesen und verstehen.
Dieses Handbuch ist von allen Bedienern des Naglers vor Gebrauch zu lesen. Bitte bewahren Sie es daher sorgfältig auf.
∆ιαβάστε προσεκτικά αυτές τις οδηγίες ώστε να τις κατανοήσετε πριν απ τη χρήση.
Αυτ το Εγχειρίδιο πρέπει να βρίσκεται στη διάθεση λων σων πρκειται να χρησιµοποιήσουν το καρφωτικ.
Przed pierwszym użyciem urządzenia należy uważnie przeczytać niniejszą instrukcję obsługi.
Instrukcję należy udostępniać innym operatorom zszywacza.
Használat előtt gondosan olvassa át és értse meg ezeket az utasításokat.
Tartsa ezt a kézikönyvet elérhetően mások számára, mielőtt használják a tűzőgépet.
Před použitím si přečtěte pečlivě tento návod k obsluze a snažte se mu porozumět.
Uchovávejte tento návod tak, aby byl k dispozici před použitím této sešívačky i ostatním.
Makinayı kullanmadan önce bu kılavuzu dikkatli bir ßekilde okuyun ve anlayın.
Bu kılavuzu, Zımbalama Makinasını kullanacak baßka kißilerin baßvurması için hazır bulundurun.
Citiţi cu atenţie și înţelegeţi prezentele instrucţiuni, înainte de utilizare.
Asiguraţi-vă că prezentul Manual este accesibil pentru alţii, înainte de a folosi capsatorul.
Natančno preberite navodila in se pred uporabo posvetujte o vseh morebitnih dvomih.
Priročnik shranite za druge uporabnike sponkača.
BÌËÏaÚeÎëÌo ËÁyäËÚe ËÌcÚpyÍáËË ÔepeÀ ËcÔoÎëÁoÇaÌËeÏ.
EcÎË cÚeÔÎep ÄyÀyÚ ËcÔoÎëÁoÇaÚë ÌoÇêe oÔepaÚopê, oÁÌaÍoÏëÚe Ëx c ÀaÌÌêÏ pyÍoÇoÀcÚÇoÏ.
Handling instructions
Bedienungsanleitung
√‰ЛБ›В˜ ¯ВИЪИЫМФ‡
Instrukcja obsługi
Kezelési utasítás
Návod k obsluze
Kullanım talimatları
Instrucţiuni de utilizare
Navodila za rokovanje
àÌcÚpyÍáËÓ Ôo íÍcÔÎyaÚaáËË
Page 2
1
1
G
2
F
D
C
3
E
4
B
5
6
0
7
2
8
9
3
A
H
0
4
0
1
5
7
I
J
F
Page 3
6
K
7
L
M
8
10
N
7
9
9
5
6
M
O
Q
R
P
2
Page 4

English Deutsch Ελληνικά Polski
Piston Kolben
1
2
Piston O-Ring Kolben-O-Ring
3
Driver Blade Schraubenzieherklinge
4
Nose Nase
5
Lock Lever Verriegelungshebel
6
Blade Guide Klingenführung
7
Push Lever Auslösesicherung
8
Firing Head (outlet) Schießkopf (Auslass)
9
Push Lever Piece Auslösesicherungsstück
Staple Feeder Krampenzuführung
0
A
Magazine Assembly Magazinbaugruppe
B
Magazine Cover Magazinabdeckung
C
Air Plug Luftanschluss
D
Cap Kappe
E
Body Körper
F
Trigger Auslöser
G
Exhaust Cover Entlüftungsdeckel
H
Groove Nut
I
Staple Krampe
J
Magazine Magazin
K
Previously pull the trigger
L
Screw Schraube
M
Disconnect air hose Luftschlauchanschluss
N
Stapler Side Naglerseite
O
Reducing Valve Reduzier-Ventil
P
Oiler Oeler
Q
Compressor Side Kompressor-Seite
R
Filter Filter
Vorher den Auslöser
durchziehen
Έµβολο
Ροδέλα εµβλου
Λεπίδα-οδηγς
Ρύγχος
Μοχλς ασφάλισης
Οδηγς λεπίδας
Μοχλς ώθησης
Κεφαλή πυροδτησης (έξοδος)
Εξάρτηµα µοχλού ώθησης
Τροφοδτης συνδετήρων
∆ιάταξη γεµιστήρα
Κάλυµµα γεµιστήρα
Τάπα αέρα
Καπάκι
Κορµς
Σκανδάλη
Κάλυµµα εξαερισµού
Αύλακας
Συνδετήρας συρραφής
Γεµιστήρας
Προηγουµένως τραβήξτε
τη σκανδάλη
Βίδα
Αποσύνδεση του
εύκαµπτου σωλήνα αέρα
Πλευρά καρφωτικού
Βαλβίδα εκτνωσης
Λιπαντήρας
Πλευρά συµπιεστή
Φίλτρο
Tłok
Pierścień o-ring tłoka
Listwa prowadząca
Nos
Dźwignia blokady
Prowadnica ostrza
Dźwignia naciskowa
Głowica zszywająca (otwór)
Element dźwigni naciskowej
Podajnik zszywek
Zespół magazynka
Pokrywa magazynka
Wlot sprężonego powietrza
Nasadka
Korpus
Spust
Pokrywa układu wydechu
Rowek
Zszywka
Magazynek
Najpierw nacisnąć spust
Śruba
Odłączyć wąż powietrza
Strona zszywacza
Zawór redukcyjny
Smarownica
Strona kompresora
Filtr
3
Page 5

Magyar Čeština Türkçe Română
Dugattyú
1
2
Dugattyú O-gyűrű
3
Hajtópenge
4
Orr
5
Rögzítőkar
6
Pengevezető
7
Nyomókar
8
Lövőfej (torkolat)
9
Nyomókar darab
Kapocsadagoló
0
A
Társzerelvény
B
Tárfedél
C
Levegődugasz
D
Sapka
E
Gépváz
F
Elsütőbillentyű
G
Kilépőnyílás fedél
H
Horony
I
Kapocs
J
Tár
Előzőleg húzza meg az
K
elsütőbillentyűt
L
Csavar
M
Válassza le a légtömlőt
N
Tűzőgép oldal
O
Nyomáscsökkentő szelep
P
Olajozó
Q
Kompresszor oldal
R
Szűrő
Píst
Pístový těsnící kroužek
Pohon úderníku
Nos sešívačky
Závěrná páčka
Vodítko úderníku
Posunovací páčka
Nastřelovací hlava (výstup)
Část posunovací páčky
Podavač sponek
Jednotka zásobníku
Kryt zásobníku
Přípojka stlačeného vzduchu
Kryt
Tělo
Spouš
Výfukový kryt
Drážka
Sponka
Zásobník
Nejprve stiskněte spouš
Šroub
Odpojte vzduchovou hadici
Bok sešívačky
Redukční ventil
Maznice
Bok kompresoru
Filtr
Piston
Piston O-Halkası
Tahrik Mili
Burun
Kilit Kolu
Mil Kılavuzu
Itme Kolu
Zımbalama Kafası (çıkıß)
Itme Kolu Parçası
Zımba Teli Besleyicisi
Hazne Düzeneåi
Hazne Kapaåı
Hava Supabı
Baßlık
Gövde
Tetik
Çıkıß Kapaåı
Kanal
Zımba Teli
Hazne
Önce tetiåi çekin
Vida
Hava hortumunu sökün
Zımbalama Makinası Tarafı
Basınç Düßürücü Valf
Yaålayıcı
Kompresör Tarafı
Filtre
Piston
Garnitură
Lamă de control
Nas
Pîrghie de blocare
Ghidul lamei
Pîrghie de împingere
Cap de tragere
Piesă pîrghie de împingere
Alimentator capse
Bloc magazin
Protecţie magazin
Dop acces aer
Capac
Corp
Trăgaci
Capac evacuare
Canelură
Capsă
Magazin
Trăgaci prealabil
Șurub
Furtun aer deconectare
Parte capsator
Supapă reductoare
Lubrifiant
Parte compresor
Filtru
4
Page 6

Slovenščina PyccÍËÈ
Bat
1
2
Batni O-obroč
3
Pogonsko rezilo
4
Nastavek
5
Blokirni vzvod
6
Vodilo za rezilo
7
Potisni vzvod
8
Sprožilna glava (izhod)
9
Pritisni vzvodni fiting
Podajalnik sponk
0
A
Sestav magazina
B
Pokrov magazina
C
Zračni čep
D
Kapa
E
Ogrodje
F
Sprožilec
G
Izpušni pokrov
H
Utor
I
Spenjač
J
Magazin
K
Prej potegni sprožilca
L
Vijak
M
Odklopi zračno cev
N
Stran sponkača
O
Reducirni ventil
P
Mazalka
Q
Stran kompresorja
R
Filter
èopåeÌë
èopåÌeÇoe O-oÄpaÁÌoe ÍoÎëáo
HoÊ
PeÊyçaÓ ÍpoÏÍa
CÚoÔopÌêÈ pêäaÖ
HaФpaЗОУпзaУ МoКa
HaÊËÏÌoÈ pêäaÖ
CÚpeÎÓïçaÓ ÖoÎoÇÍa
(ÇêxoÀ)
ÑeÚaÎë ÌaÊËÏÌoÖo pêäaÖa
ìcÚpoÈcÚÇo ÔoÀaäË cÍoÄ
MaЦaБЛММкИ ДОoН
KpêåÍa ÏaÖaÁËÌa
ÂaÖÎyåÍa ÇoÁÀyåÌoÖo oÚÇepcÚËÓ
KoÎÔaäoÍ
KopÔyc
CÔycÍoÇoÈ ÍpïäoÍ
KpêåÍa ÇêÔycÍÌoÖo
oÚÇepcÚËÓ
ÜeÎoÄ
CÍoÄa
MaÖaÁËÌ
èpeÀÇapËÚeÎëÌo ÌaÊÏËÚe
Ìa cÔycÍoÇoÈ ÍpïäoÍ
ÅoÎÚ
OЪcoeАЛМЛЪe ЗoБАyеМкИ
åÎaÌÖ
K cÚeÔÎepy
PeÀyÍáËoÌÌêÈ ÍÎaÔaÌ
MacÎeÌÍa
K ÍoÏÔpeccopy
оЛОлЪp
5
Page 7

English
GENERAL OPERATIONAL PRECAUTIONS
1. Operate the power tool safely for correct uses.
Do not use the power tool for uses other than those
specified in this instructions.
2. For safe operation handle the power tool correctly.
Please follow the instructions given in this
instruction manual and correctly handle this tool so
as to ensure safe operation. Never let the tool be
use by children or people who do not know enough
to be able to handle it correctly, or let it be used by
people who cannot operate it correctly.
3. Confirm the safety of the workshop.
Keep unauthorized people away from the workshop.
Especially children should be kept away.
4. The right parts in the right places.
Do not remove any of the covers or screws. Keep
them in place as they have their functions.
Moreover, because it would be dangerous, never
make modifications to the tool or use it after making
modifications.
5. Check the tool before using it.
Before using the tool, always check that no parts of
it are broken, that all screws are completely tight,
and that no parts are missing or rusty.
6. Excessive work could cause accidents.
Do not make tools and accessories work beyond
their abilities. Excessive work not only damages the
power tool but also is dangerous in itself.
7. Stop operation immediately if abnormalities are
noticed.
Stop operation if you notice abnormalities, or if the
power tool does not work properly; have the power
tool inspected and serviced.
8. Look after the power tool carefully.
If you drop or knock the power tool against things,
the outer frame may be deformed and cracks or
other kinds of damage may occur, so please handle
it with sufficient care. Also, do not scratch or engrave
signs on the power tool. Owing to high pressure air
inside the tool, cracks in the surface are dangerous.
Never use the power tool if a crack develops or if air
is escaping from a crack.
9. Take good care for a long life.
Always take good care of the power tool and keep it
clean.
10. Inspection at regular intervals is essential for safety.
Inspect the power tool at regular intervals so that
the power tool can be operated safety and efficiently
at all times.
11. Consult an authorized service agent if repair or parts
replacement is necessary.
Ensure that the power tool is serviced by authorized
service centers only, and that only genuine,
replacement parts are used.
12. Keep the power tool in a proper place.
When not in use, the power tool should be kept in a
dry place out of the reach of children. Put into the
body about 2cc oil through the hose joint to protect
the tool from rust.
13. The exploded assembly drawing on this handling
instructions should be used only for authorized
service center.
PRECAUTIONS ON USING STAPLER
1. Safe operation through correct usage.
This tool was designed for driving staples into wood
and similar materials. Use it for its intended purpose
only.
2. Make sure air pressure is within the rated range of
air pressure.
Fastener driving tools operated by compressed air
shall only be connected to compressed air lines
where the maximum allowable pressure cannot be
exceeded by a factor of more than 10% which can
for example be achieved by a pressure reduction
valve which includes a downstream safety valve.
(For model N5008AC2, 110% of rated maximum
allowable pressure is 9.1 bar = 130 psi)
Fastener driving tools operated by compressed air
should only be operated at the lowest pressure
required for the work process at hand, in order to
prevent unnecessarily high noise levels, increased
wear and resulting failures.
3. Never operate the equipment with high-pressure
gases other than compressed air.
Never use carbon dioxide, oxygen or another gas
from pressurized containers under any
circumstances.
4. Be careful of ignition and explosions.
Since sparks may fly during stapling, it is dangerous
to use this tool near lacquer, paint, benzine, thinner,
gasoline, gas, adhesives and similar inflammable
substances as they may ignite or explode. Under
no circumstances should this tool therefore be used
in the vicinity of such inflammable material.
5. Always wear eye protection (protective goggles).
When operating the power tool, always wear eye
protection, and ensure that surrounding people wear
eye protection too.
The possibility of fragments of staples or staples
that were not properly hit entering the eye is a threat
to sight. Eye protection can be bought at any
hardware store. Always wear eye protection while
operating this tool. Use either eye protection or a
wide vision mask over prescription glasses.
Employers should always enforce the use of eye
protection equipment.
6. Protect your ears and head.
When engaged in stapling work please wear ear
mufflers and head protection. Also, depending on
condition, ensure that surrounding people also wear
ear mufflers and head protection.
7. Pay attention to those working close to you.
It would be very dangerous if staples that were not
properly driven in should hit other people.
Therefore, always pay attention to the safety of the
people around you when using this tool. Always
make sure that nobody’s body, hands or feet are
close to the staple outlet.
8. Never point the staple outlet towards people.
Always assume the tool contains fasteners.
If the staple outlet is pointed towards people, serious
accidents may be caused if you mistakenly discharge
the tool. When connecting and disconnecting the
hose, during staple loading or similar operations,
be sure the staple outlet is not pointed towards
6
Page 8

English
anyone (including yourself). Even when no staples
are loaded at all, it is dangerous to discharge the
tool while pointing it at someone, so never attempt
to do so. No horseplay. Respect the tool as a working
implement.
9. Before using the power tool, check the push lever.
Before using the power tool make sure to check that
the push lever and valve operate properly. Without
staples loaded into the power tool, connect the hose
and check the following. If the sound of operation
occurs this indicates a fault, so in such a case do
not use the power tool until it has been inspected
and repaired.
䡬 If merely pulling the trigger causes operating
sound of drive bit movement occur, the power
tool is faulty.
䡬 If merely pushing the push lever against the
material to be stapled causes the sound of
drive bit movement to occur, the power tool
is faulty. Furthermore, with regard to the push
lever, please note that it must never be modified
or removed.
10. Use specified staples only.
Never use staples other than those specified and
described in these instructions.
11. Be careful when connecting the hose.
When connecting the hose and loading staples in
order not to fire the tool by mistake, make sure of
the following.
䡬 Do not touch the trigger.
䡬 Do not allow the firing head to contact with
any surface.
䡬 Keep the firing head down.
Strictly observe the above instructions, and always
make sure that no part of the body, hands or legs is
ever in front of the staple outlet.
12. Do not carelessly place your finger on the trigger.
Do not place your finger on the trigger except when
actually stapling. If you carry this tool or hand it to
someone while having your finger on the trigger,
you may inadvertently discharge a staple and thus
cause an accident.
13. Completely Close the blade guide and do not open
it during operation.
If stapling is attempted when the blade guide is
open, staples will not be driven into the timber, and
there is a risk of dangerous discharge.
14. Press the staple outlet firmly against the material
to be stapled.
When driving in staples, press the staple outlet
firmly against the material to be stapled. If the outlet
is not applied properly, the staples may rebound.
15. Keep hands and feet away from the firing head
when using.
It is very dangerous for a staple to hit the hands or
feet by mistake.
16. Beware of the tool’s kickback.
Do not approach the top of the tool with your head
etc. during operation. This is dangerous because the
tool may recoil violently if the staple currently being
driven in comes into contact with a previous staple
or a knot in the wood.
17. Take care when stapling thin boards or the corners
of wood.
When stapling thin boards, the staples may pass
right through, as may also be the case when stapling
the corners of wood due to deviation of the staples.
In such cases, always make sure that there is no
one (and nobody’s hands or feet; etc.) behind the
thin board or next to the wood you are going to
staple.
18. Simultaneous staping on both sides of the same
wall is dangerous.
Under no circumstances should stapling be
performed on both sides of a wall at the same time.
This would be very dangerous since the staples
might pass through the wall and thus cause injuries.
19. Do not use the power tool on scaffoldings, ladders.
The power tool shall not be used for specific
application for example:
– when changing one driving location to another
involves the use of scafforldings, stairs, ladders
or ladder alike constructions, e.g. roof laths,
– closing boxes or crates,
– fitting transportation safety systems e.g. on
vehicles and wagons
20. Do not disconnect the hose with your finger on the
trigger.
If you disconnect the hose with your finger on the
trigger, the next time the hose is connected, there
is a danger that the power tool will fire a staple
spontaneously, or operate incorrectly.
21. Disconnect the hose and take out any staples left
in the magazine after use.
Disconnect tool from air before doing tool
maintenance, cleaning a jammed fastener, leaving
work area, moving tool to another location, or after
use. It is very dangerous for a staple to be fired by
mistake.
22. When removing a staple which has become stuck,
make sure to first of all disconnect the hose and
release compressed air.
When removing a staple which has become stuck
in the staple outlet, first of all make sure to
disconnect the hose and release compressed air
inside the power tool.
Accidental firing of the staple could be very
dangerous.
23. To avoid hazards caused by falling staples, never
open the magazine with the device facing
downward while loading staples.
24. A female plug (air socket) should not be used in the
body.
If a female plug is installed in the body, the
compressed air sometimes can not be drawn when
the hose is disconnected so avoid this.
The tool and air supply hose must have a hose
coupling such that all pressure is removed from the
tool when the coupling joint is disconnected.
25. When cleaning the power tool, do not use gasoline
or other inflammable liquids.
If vapour from an inflammable liquid gets into the
power tool, there is a danger that sparks produced
when stapling etc. may cause an explosion.
7
Page 9
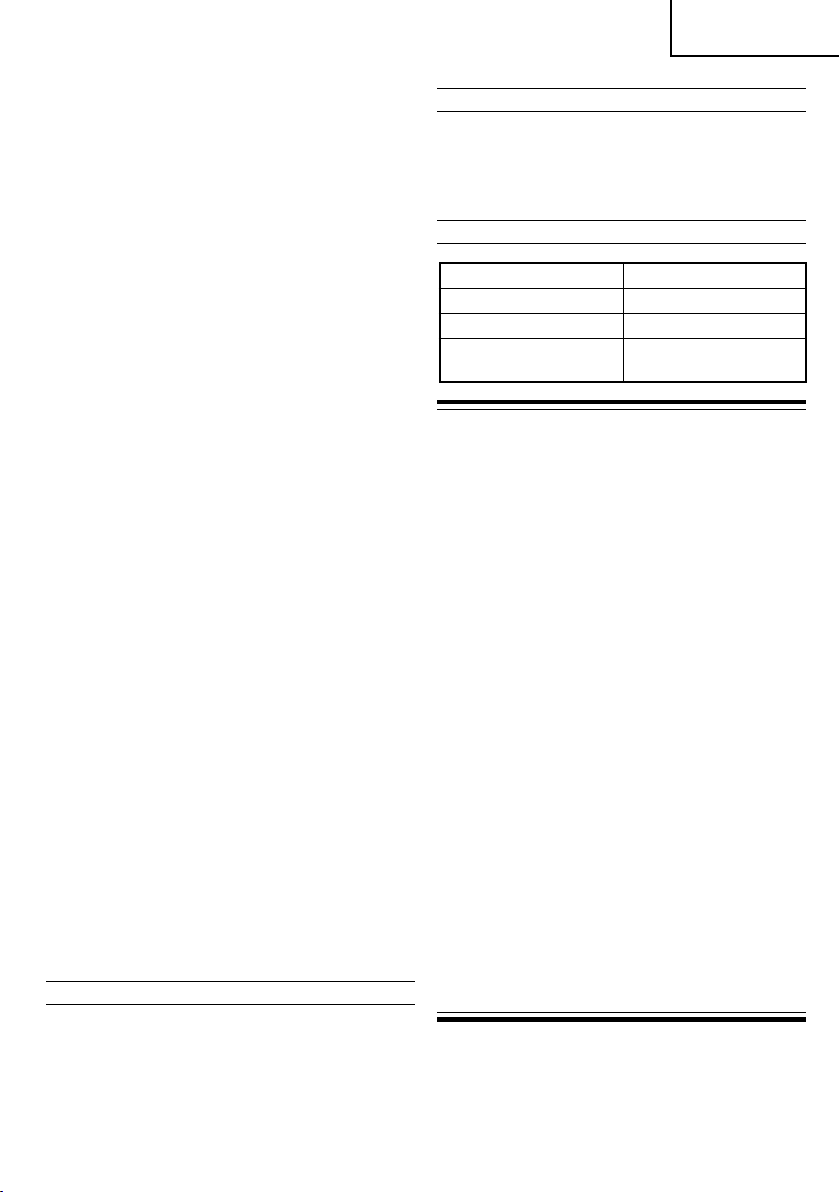
SPECIFICATIONS
Type of power Piston reciprocating
Air pressure (Gauge) 4.9 – 8.3 bar
Applicable staples ref. Fig.
Amount of loadable staples 150 staples
Size 365 mm (L) × 258 mm (H) × 76 mm (W)
Weight 2.0 kg
Hose (inside diam.) 6 mm
English
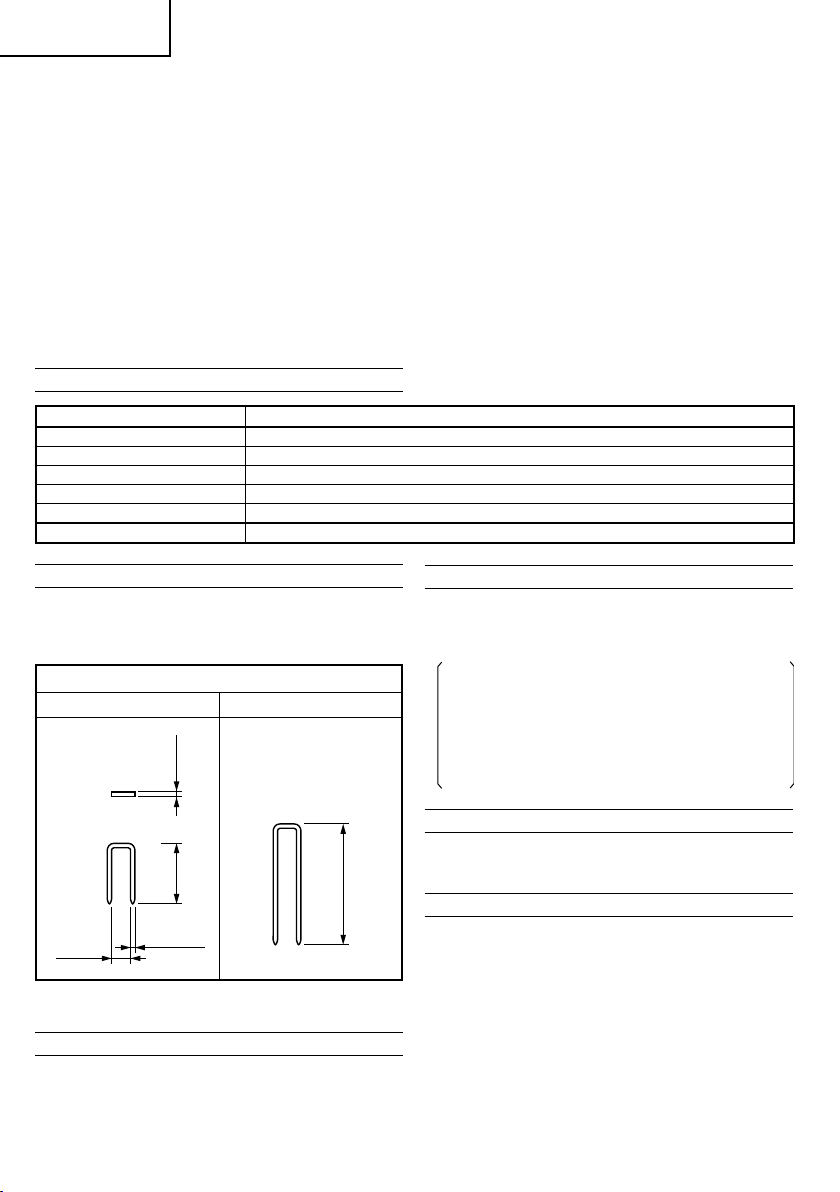
STAPLE SELECTION
Choose a suitable staple from Fig. Staples which are not
shown in Fig. can not be driven with this tool.
16 Gauge 7/16" Crown
Min. Max.
1.61mm
7.9mm
25mm
1.45mm
Dimension of staples
50mm
STANDARD ACCESSORIES
(1) Hexagon bar wrench for M5 screw ........................... 1
(2) Eye protection ............................................................. 1
(3) Oiler ............................................................................. 1
OPTIONAL ACCESSORY
䡬 Sequential Trip Mechanism Kit (Code No. 876762)
(Sequential Fire Parts Set, Single Shot Parts)
With the sequential fire parts, the staple is driven
only by squeezing the trigger after pushing down
the push lever.
By installing these parts, driving staples into
improper positions and unexpected firing of staples
caused by accidental operation of the push lever can
be prevented.
APPLICATIONS
䡬 Construction work such as wall sheathing,
subflooring.
䡬 Mobile and modular home construction.
PREPARATION PRIOR TO OPERATION
1. Prepare the hose
Be sure to use the hose provided with minimum
6 mm inside diameter.
NOTE:
The air supply hoses must have a minimum working
pressure rating of 12.8 bar or 150 percent of the
maximum pressure produced in the air supply system,
whichever is higher.
2. Check on safety
CAUTIONS:
䡬 Unauthorized persons (including children) must be
kept away from the equipment.
䡬 Wear eye protection.
䡬 Check the retaining screws which fix the exhaust
cover, etc. for tightness.
Check the stapler for air leaks and defective or rusty
parts.
䡬 Check whether or not the push lever works correctly.
Also check whether or not any dirt has adhered to the
moving parts of the push lever.
䡬 Recheck on operational safety.
BEFORE USE
1. Check the air pressure
CAUTION:
The air pressure must be constantly maintained at 4.9
– 8.3 bar.
Adjust the air pressure between 4.9 to 8.3 bar
according to the diameters and length of staples and
hardness of the wood being stapled. Pay special
attention to the output pressure, capacity, and piping
on the air compressor, so that air pressure does not
exceed the specified limit. Note that excessive
pressure may affect overall performance, service life,
and safety.
2. Lubrication
(1) Prior to operating this stapler, be sure to provide an
air set between the air compressor and this device.
Lubrication through the air set offers smooth
operation, extended service life, and anticorrosion.
Adjust the oiler so that a single drop of oil is supplied
at intervals of 5 to 10 stapling cycles.
8
Page 10

English
(2) It is recommended using the recommended oil (SHELL
TONNA). Other applicable oils are listed. Never mix
two or more types of different oils.
3. Load staples
CAUTIONS:
䡬 When loading staples into stapler,
(1) do not depress trigger;
(2) do not depress push lever; and
(3) keep your face, hands feet and other body parts,
as well as those of other persons away from the
nose muzzle to avoid possible injury during usage
and carrying.
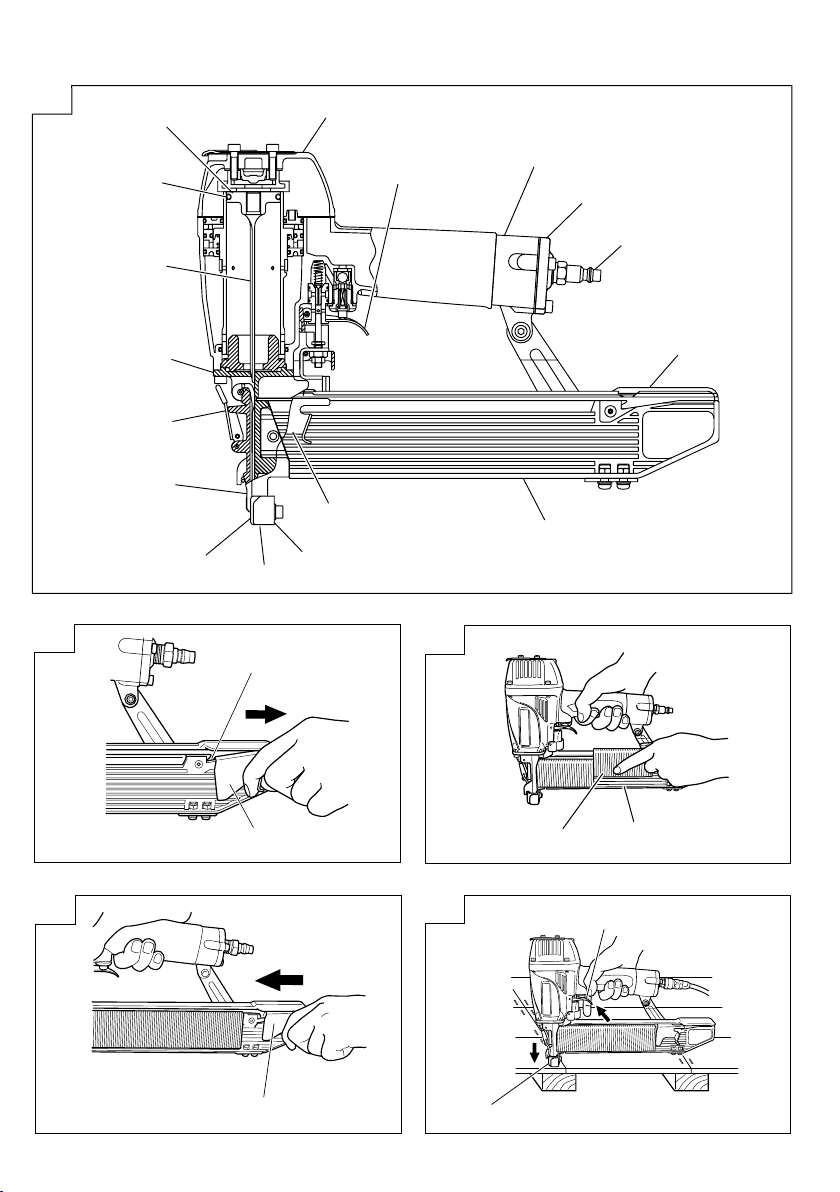
(1) Pull the staple feeder backward and attach it securely
to a groove of the magazine. (See Fig. 2)
(2) Place the staple strip over the magazine.
Make sure that the staple strip slides freely on the
magazine. (See Fig. 3)
(3) Pull the staple feeder backward. Then, detach it from
the groove of magazine and softly bring the staple
back as if it were being gently pushed, avoiding any
impact. (See Fig. 4)
The stapler is now ready to operate.
CAUTIONS:
䡬 If the staple feeder is released all of a sudden, it can
return abruptly, causing deformation and/or scatter,
eventually ending up in clogged staples.
Be absolutely sure to bring back the staple feeder,
avoiding any impact.
䡬 To prevent unintentional operation, never touch the
trigger or place the top end of the push lever on a
work bench on floor. Also, never face the staple outlet
toward any part of a person.
HOW TO USE THE STAPLER
CAUTIONS:
䡬 Never use the head or body of this device as a
hammer.
䡬 Take precautions to ensure the safety of persons in
the vicinity during operation.
1. Stapling procedures
(1) Intermittent stapling
Depress the staple outlet onto the desired point; then
pull the trigger to drive a staple in a single shot. (See
Fig. 5)
CAUTION:
䡬 This tool will bounce and shoot several staples instead
of just one in rapid succession when strongly pressed
flush against a surface or when using on hard
materials. In such cases, fire the staples by squeezing
and quickly releasing the trigger.
(2) Push lever
When depressing the staple outlet, be sure to fully lift
the push lever (See Fig. 5) to release the safety lock.
Thus, staples cannot be driven without releasing the
safety lock even though the trigger is pulled.
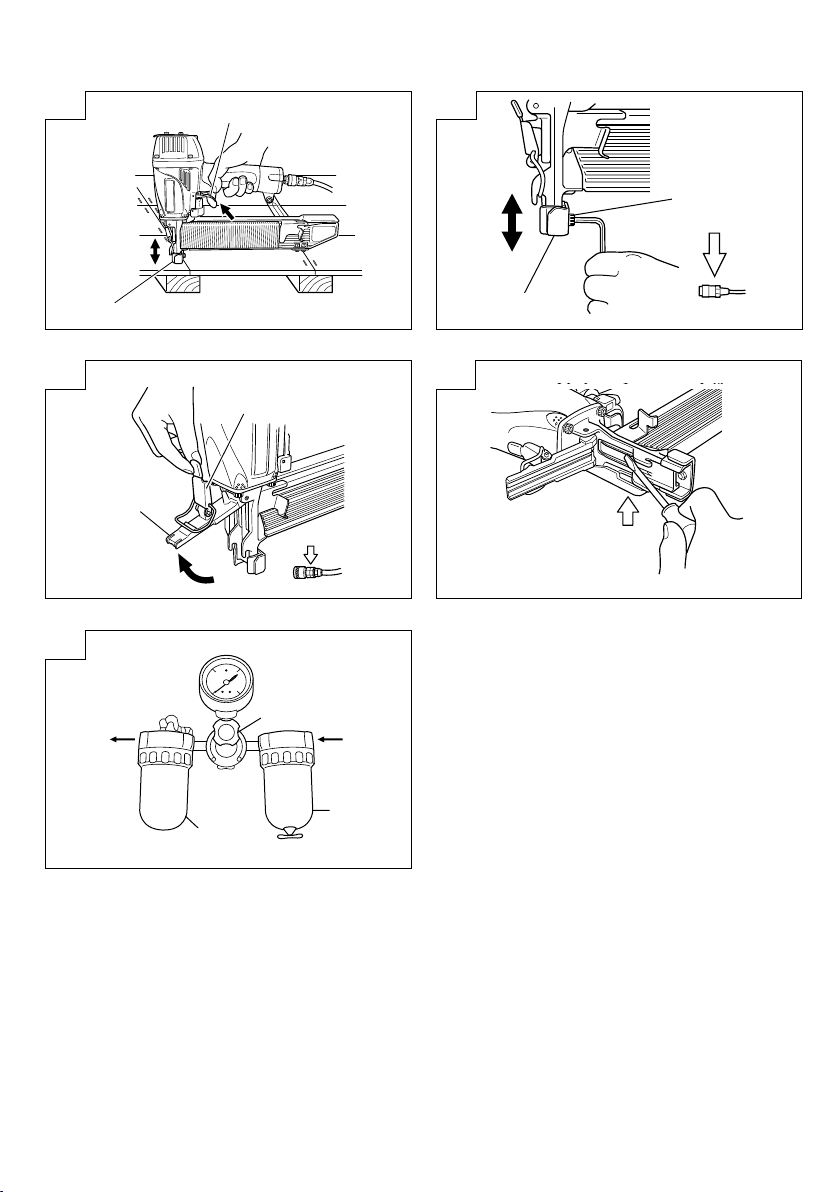
(3) Continuous stapling
First, pull the trigger. Then depress the devise onto
the desired position to automatically drive staples.
(See Fig. 6).
CAUTIONS:
䡬 Exercise care when stapling corners of lumber. When
continuous stapling corners of lumber, a staple may
go astray or break through the corner.
䡬 Do not drive a staple on another staple.
䡬 Do not drive a staple on metal parts.
9
NOTES:
䡬 Precautions on no-load operation
Sometimes stapling will continue after driving in all
staples previously contained in the magazine.
This is termed “no-load operation”. Such operation
may deteriorate the bumper, magazine, and staple
feeder.
To avoid no-load operation, occasionally confirm the
amount of remaining staples. On the other hand, all
staples should be removed after using this stapler.
䡬 After stapling:
(1) disconnect air hose from the stapler;
(2) remove all staples from the stapler;
(3) supply 5 – 10 drops of Hitachi pneumatic tool
lubricant into the air plug on the stapler; and
(4) open the petcock on the air compressor tank to
drain any moisture.
䡬 Under low temperature conditions, the machine
sometimes does not operate correctly. Always operate
the machine at the appropriate ambient temperature.
2. How to adjust the stapling depth
To assure that each staple penetrates to the same
depth, be sure that:
(1) the air pressure to the stapler remains constant
(regulator is installed and working properly), and
(2) the stapler is always held firmly against the
workpiece.
If staples are driven too deep or shallow into the
workpiece, adjust the stapling in the following order.
CAUTIONS:
䡬 Before adjustment, always disconnect the hose
and release compressed air in the power tool.
䡬 During adjustment always keep your finger off the
trigger.
䡬 During adjustment make sure that no part of the
body, hands, or legs is ever in front of the staple
outlet.
Please carry out adjustments in the following order.
(See Fig. 7)
To adjust the driven-in depth of a staple, loosen the
screw that secures a push lever piece.
If the staple is driven in deeply, adjust the push lever
piece to ”down”, and if it’s driven in shallowly, adjust
the push lever piece to “up”.
Tighten the screw to fasten the push lever piece.
NOTE:
䡬 Please use the minimum air pressure that is sufficient
to drive the staples to a suitable depth. If an overly
high pressure is used, the life of the piston damper
etc. will be shortened.
INSPECTION AND MAINTENANCE
CAUTION:
Be sure to disconnect the hose during cleaning
jams, inspection, maintenance and cleaning.
1. Countermeasure for staple jamming
(1) Remove all staples.
(2) Release the lock lever and open the blade guide. (See
Fig. 8)
(3) Remove the jammed staple with a slotted-head
screwdriver. (See Fig. 9)
(4) Close the blade guide and latch.
(5) In case of frequent jam, contact a Hitachi authorized
service center.
Page 11
English
2. Inspection and maintenance
Periodically inspect the device.
(1) Remove the four hexagon socket hd. bolts securing
the exhaust cover and remove the exhaust cover.
Then, cylinder, piston, and other parts can be removed
in respective assembly groups.
Wipe the drive bit, the piston sliding part and the body
interior with a cloth to remove deposited dirt.
(2) Confirm that the piston damper offers normal
operation. A damaged piston damper may cause
damage to other component parts.
(3) Carefully check the O-ring for wear while
disassembling. A worn or damaged O-ring may
deteriorate overall performance. Replace a worn or
damaged O-ring with new one.
(4) Prior to reassembling the device, apply grease
(Attolub No. 2 Grease) to the O-ring. Also, lubricate
the device with the recommended oil.
3. Check on mounting screws for each part
At regular intervals check every part for loose
mounting screws and whether or not there are any
air leaks. Retighten any loose screws. Operating the
equipment with loose screws untightened will incur
a hazard.
4. Inspecting the push lever
Check if the push lever (Fig. 1) can slide smoothly.
Clean up the sliding area of the push lever and use the
provided oil for lubrication from time to time.
Lubrication enables smooth sliding and simultaneously
serves to prevent the formation of rust.
5. Storing
䡬 When not in use for an extended period, apply a thin
coat of the lubricant to the steel parts to avoid rust.
䡬 Do not store the stapler in a cold weather environment.
Keep the stapler in a warm area.
䡬 When not in use, the stapler should be stored in a
warm and dry place.
Keep out of reach of children.
6. Service parts list
CAUTION:
Repair, modification and inspection of Hitachi Power
Tools must be carried out by an Hitachi Authorized
Service Center.
This Parts List will be helpful if presented with the
tool to the Hitachi Authorized Service Center when
requesting repair or other maintenance.
In the operation and maintenance of power tools, the
safety regulations and standards prescribed in each
country must be observed.
MODIFICATIONS:
Hitachi Power Tools are constantly being improved
and modified to incorporate the latest technological
advancements.
Accordingly, some parts may be changed without
prior notice.
COMPRESSOR
CAUTION:
When the maximum, operating pressure of the air
compressor exceeds 8.3 bar, be sure to provide a
reducing valve between the air compressor and nailer.
Then, adjust the air pressure within the operating
range of 4.9 ~ 8.3 bar. If the air set is installed,
lubrication is also possible, thus providing additional
convenience.
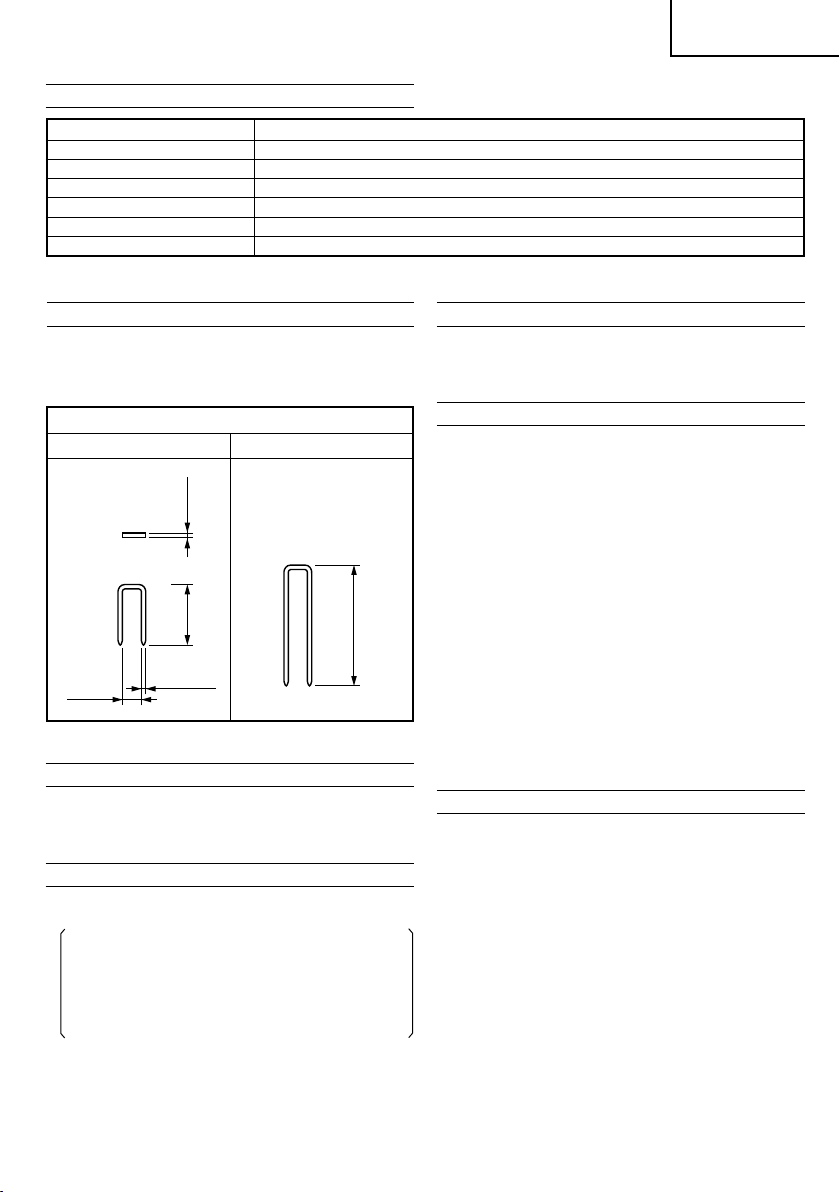
OILER-FILTER-REDUCING VALVE (Air Set)
So that the equipment can be operated under an optimum
condition to ensure extended service life, it is advisable
to use an oiler filter reducing valve. Please limit the length
of the hose between the unit and the air set to within
10m when using. (Fig. 10)
APPLICABLE LUBRICANTS
Type of lubricant Name of lubricant
Recommended oil SHELL TONNA
Motor oil SAE10W, SAE20W
Turbine oil ISO VG32 – 68
Noise Information
Noise characteristic values in accordance with EN 79213, JUNE, 2000.
The typical A-weighted single-event sound power level
The typical A-weighted single-event emission sound
pressure level at work station
These values are tool-related characteristic values and
do not represent the noise development at the point of
use. Noise development at the point of use will for
example depend on the working environment, the
workpiece, the workpiece support and the number of
driving operations, etc.
Depending on the conditions at the workplace and the
form of the workpiece, individual noise attenuation
measures may need to be carried out, such as placing
workpieces on sound-damping supports, preventing
workpiece vibration by means of clamping or covering,
adjusting to the minimum air pressure required for the
operaion involved, etc.
In special cases it is necessary to wear hearing protection
equipment.
Vibration Information
The typical vibration characteristic value in accordance
with EN 792-13, JUNE, 2000: 3.9 m/s
This values is a tool-related characteristic value and does
not represent the influence to the hand-arm-system
when using the tool. An influence to the hand-arm-system
when using the tool will for example depend on the
gripping force, the contact pressure force, the working
direction, the adjustment of energy supply, the
workpiece, the workpiece support.
(#90 – #180)
LWA,
1s,d = 99 dB
LpA,
1s,d = 81 dB
2
.
10
Page 12

Deutsch
GENERELLE VORSICHTSMASSNAHMEN
1. Benutzen Sie das Gerät sicher und für die richtige
Verwendung.
Benutzen Sie das Gerät nie für andere
Verwendungszwecke als die in dieser
Betriebsanleitung angegebenen.
2. Behandeln Sie das Gerät korrekt für eine sichere
Arbeitsweise.
Beachten Sie die Anweisungen dieser
Betriebsanleitung und behandeln Sie das Gerät
korrekt, um eine sichere Arbeitsweise zu
gewährleisten. Lassen Sie das Gerät niemals von
Kindern oder von unerfahrenen Personen, die mit
der Arbeitsweise des Gerätes nicht vertraut sind
benutzen.
3. Achten Sie auf Sicherheit des Arbeitsplatzes.
Halten Sie unbefugte Personen vom Arbeitsplatz
fern, insbesondere Kinder.
4. Das richtige Teil am richtigen Platz.
Entfernen Sie keine Deckel oder Schrauben. Lassen
Sie sie dort, wo sie ihre Funktion erfüllen.
Nehmen Sie keine Äenderungen des Gerätes vor
und benutzen Sie kein geändertes Gerät. Dies könnte
gefährlich sein.
5. Prüfen Sie das Gerät vor Gebrauch.
Prüfen Sie vor der Benutzung des Gerätes, ob keine
Teile gebrochen sind, ob alle Schrauben fest
angezogen sind und ob keine Teile fehlen oder rostig
sind.
6. Überbeanspruchung kann Unfälle hervorrufen.
Beanspruchen Sie das Gerät sowie die Zubehörteile
nie stärker als vorgesehen. Überbeanspruchung
zerstört nicht nur das Gerät sondern ist an sich
gefährlich.
7. Unterbrechen Sie die Arbeit sofort bei auftretenden
Unregelmäßigkeiten.
Sobald Sie Unregelmäßigkeiten bemerken, unterbrechen Sie unverzüglich die Arbeit und lassen Sie
das Gerät prüfen und warten.
8. Behandeln Sie das Gerät sorgfältig.
Wenn Sie das Gerät fallen lassen oder gegen andere
Gegenstände stoßen, kann der Außenkörper
deformiert werden, brechen, oder anderweitig
beschädigt werden. Behandeln Sie deshalb das
Gerät mit Sorgfalt. Kratzen oder gravieren Sie
keinerlei Zeichen auf das Gerät. Bedingt durch den
hohen Innendruck sind Beschädigungen an der
Oberfläche gefährlich.
Benutzen Sie das Gerät nicht, wenn sich Risse bilden
oder Luft durch einen Riss entweicht.
9. Gute Pflege garantiert eine lange Lebensdauer.
Pflegen Sie das Gerät gut und halten Sie es sauber.
10. Regelmässige Inspektionen sind für die Sicherheit
wichtig.
Nehmen Sie in regelmässigen Abständen
Inspektionen vor, damit das Gerät stets sicher und
wirksam benutzt werden kann.
11. Lassen Sie Reparaturen und das Auswechseln von
Teilen nur von Ihrem autorisierten Agenten
vornehmen.
Stellen Sie sicher, dass das Werkzeug nur in einem
autorisierten Wartungszentrum gewartet wird und
dass nur Original-Ersatzteile verwendet werden.
12. Lagern Sie das Gerät an einem sauberen Platz.
Wenn das Gerät nicht benutzt wird, sollte es an
einem trockenen Platz außer Reichweite von Kindern
aufbewahrt werden. Füllen Sie ca. 2 cm
den Schlauchanschluss in den Körper, um das Gerät
vor Rost zu schützen.
13. Die Explosionszeichnung die der
Bedienungsanleitung beigefügt ist, ist nur für
autorisierte Service-Werkstätten bestimmt.
3
Öl durch
VORSICHTSMASSNAHMEN BEIM GEBRAUCH
DES NAGLERS
1. Sichere Arbeitsweise durch korrekten Gebrauch.
Dieses Gerät wurde zum Eintreiben von Krampen
in Holz oder ähnliches Material entwickelt. Benutzen
Sie es ausschließlich für den vorgesehenen
Verwendungszweck.
2. Beachten Sie, dass der Luftdruck innerhalb der
vorgeschriebenen Grenzen liegt.
Druckluftbetriebene Werkzeuge dürfen nur an
Druckluftleitungen angeschlossen werden, bei denen
sichergestellt ist, dass der maximal zulässige Druck
um nicht mehr als 10 % überschritten werden kann.
Dies kann z. B. durch ein Druckminderungsventil mit
Sicherheitsventil in der Zuleitung erreicht werden.
(Bei Modell N5008AC2: 110 % des maximal zulässigen
Nenndrucks entsprechen 9,1 bar = 130 psi).
Druckluftbetriebene Werkzeuge sollten lediglich mit
dem für die jeweilige Tätigkeit ausreichenden
Minimaldruck betrieben werden, um unnötige
Lärmbelästigung, gesteigerten Verschleiß und daraus
resultierende Ausfälle zu vermeiden.
3. Benutzen Sie das Gerät niemals mit Hochdruck-Gas
sondern ausschließlich mit komprimierter Luft.
Benutzen Sie unter keinen Umständen
Kohlenstoffdioxyde, Sauerstoff oder andere Gase
aus Druckbehältern.
4. Schützen Sie sich vor Bränden und Explosionen.
Da während des Heftens Funken umherfliegen
können ist est gefährlich, das Gerät in der Nähe von
Lacken, Farben, Benzin, Verdünnern, Gasolin, Gas,
Klebstoffen oder ähnlichen brennbaren Substanzen
zu benutzen, da diese sich entzünden oder
explodieren können. Das Gerät darf aus diesem
Grunde unter keinen Umständen in der Nähe solcher
brennbaren Materialien benutzt werden.
5. Schützen Sie immer Ihre Augen (Schutzbrille).
Tragen Sie stets eine Schutzbrille, wenn Sie mit dem
Gerät arbeiten, und achten Sie darauf, dass auch
Personen in Ihrer Umgebung Schutzbrillen tragen.
Es können Teile der Krampen oder Krampen, die
nicht korrekt getroffen wurden, in das Auge
eindringen und das Augenlicht zerstören.
Schutzbrillen sind in jedem Fachgeschäft erhältlich.
Tragen Sie stets einen Augenschutz, wenn Sie
dieses Werkzeug verwenden. Verwenden Sie
entweder eine Schutzbrille oder eine Schutzmaske
über einer Brille.
6. Schützen Sie Ihre Ohren und Ihren Kopf.
Tragen Sie während des Heftens Lärmschutz und
Sicherheitshelme. Abhängig von den Bedingungen
sollten auch Personen in der Umgebung Lärmschutz
und Sicherheitshelme tragen.
11
Page 13

Deutsch
7. Achten Sie auf Personen, die in Ihrer Nähe arbeiten.
Es kann gefährlich werde wenn Krampen, die nicht
richtig eingetrieben wurden andere Personen
verletzen. Achten Sie aus diesem Grunde auf die
Sicherheit der Sie umgebenden Personen wenn Sie
dieses Gerät benutzen. Achten Sie darauf, dass die
Mündung des Gerätes nicht in die Nähe von
Personen, Händen oder Füßen kommt.
8. Richten Sie die Mündung des Gerätes nie auf
Personen.
Nehmen Sie immer an, dass das Gerät Krampen
enthält.
Es kann zu schweren Unfällen kommen, wenn Sie
das Gerät versehentlich auslösen, während die
Mündung auf eine Person gerichtet ist. Achten Sie
darauf, dass die Mündung des Gerätes nie auf eine
Person gerichtet ist (auch nicht auf Sie selbst), wenn
Sie den Druckschlauch anschließen oder abtrennen,
Krampen einlegen oder ähnliche Arbeiten
durchführen. Selbst wenn keine Krampen eingelegt
sind, ist es gefährlich, das Gerät auszulösen,
während die Mündung auf eine Person gerichtet ist.
Spielen Sie nicht herum. Respektieren Sie das
Werkzeug als ein Arbeitsmittel.
9. Prüfen Sie die Druckhebel, bevor Sie das Gerät
benutzen.
Achten Sie darauf, dass die Druckhebel und das
Ventil richtig funktionieren, bevor Sie das Gerät
benutzen. Schließen Sie den Schlauch an, ohne dass
sich Krampen im Gerät befinden und überprüfen Sie
folgendes. Tritt ein Arbeitsgeräusch auf, so zeigt dies
einen Fehler an. Benutzen Sie in diesem Fall das
Gerät nicht, bevor es inspiziert und repariert wurde.
䡬 Tritt ein Arbeitsgeräusch beim Ziehen des
Auslösers auf, ist das Gerät nicht in Ordnung.
䡬 Tritt beim Andrücken der Druckhebel an das
zu heftende Material das Geräusch des sich
bewegenden Treibers auf, ist das Gerät nicht
in Ordnung.
Bitte beachten Sie außerdem, dass die
Druckhebel niemals verändert oder entfernt
werden dürfen.
10. Benutzen Sie ausschließlich die vorgeschriebenen
Krampen.
Es dürfen ausschließlich die in der Betriebsanleitung bezeichneten Befestigungsmittel
verarbeitet werden.
11. Schließen Sie den Schlauch sorgfältig an.
Wenn Sie den Schlauch anschließen und Krampen
einführen, beachten Sie folgende Punkte, damit das
Gerät nicht irrtümlich schießt.
䡬 Berühren Sie auf keinen Fall den Auslöser.
䡬 Achten Sie darauf, dass die Mündung nicht mit
irgendeinem Gegenstand in Berührung kommt.
䡬 Halten Sie die Mündung nach unten gerichtet.
Beachten Sie unbedingt die obigen Anweisungen
und sorgen Sie dafür, dass sich keine Körperteile,
Hände oder Füße vor der Mündung des Gerätes
befinden.
12. Berühren Sie niemals achtlos den Auslöser.
Berühren Sie den Auslöser mit dem Finger nur beim
Heften. Wenn Sie das Gerät tragen oder jemandem
überreichen während Sie den Finger am Auslöser
haben, können Sie unbeabsichtigt einen Schuss
auslösen und so einen Unfall verursachen.
13. Schließen Sie die Krampenführung fest zu und
öffnen Sie sie nicht während des Arbeitens.
Wenn Sie mit geöffneter Krampenführung heften,
werden die Krampen nicht in das Holz eingetrieben
und es besteht die Gefahr einer gefährlichen
Entladung.
14. Drücken Sie die Mündung fest gegen das zu
heftende Material.
Wenn Sie Krampen eintreiben, drücken Sie die
Mündung fest gegen das zu heftende Material.
Geschieht dies nicht sorgfältig, können die Krampen
zurückschlagen.
15. Halten Sie Hände und Füße während des Arbeitens
von der Mündung entfernt.
Es ist sehr gefährlich, wenn eine Krampe durch einen
Fehler in die Hände oder Füße eindringt.
16. Schützen Sie sich vor dem Rückschlag des Gerätes
Nähern Sie sich während des Arbeitens nicht mit
dem Kopf oder anderen Körperteilen dem Oberteil
des Gerätes. Dies ist gefährlich, da das Gerät heftig
zurückschlagen kann, wenn eine Krampe auf eine
vorher eingetriebene Krampe oder auf einen Knoten
im Holz trifft.
17. Seien Sie vorsichtig beim Heften von dünnen
Brettern oder Holzkanten.
Beim Heften von dünnen Brettern können die Krampen
durchschlagen, wie dies auch beim Heften von
Holzkanten durch Querschläger geschehen kann.
Achten Sie in solchen Fällen darauf, dass sich niemand
(auch keine Hände, Füße etc.) hinter dem Brett oder in
der Nähe des Holzes, das Sie gerade heften befindet.
18. Gleichzeitiges Heften auf beiden Seiten einer Wand
ist gefährlich.
Unter keinen Umständen darf auf beiden Seiten
derselben Wand gleichzeitig geheftet werden. Dies
wäre gefährlich, da die Krampen durch die Wand
schlagen könnten und so Verletzungen hervorrufen.
19. Verwenden Sie das Werkzeug nicht auf Leitern und
auf Gerüsten.
Das Werkzeug darf für bestimmte Anwendungen
nicht eingesetzt werden, wie z.B.:
– wenn das Wechseln von einer Eintreibstelle zur
anderen über Gerüste, Treppen, Leitern oder
leiterähnlichen Konstruktionen, wie z.B.:
Dachlattungen, erfolgt,
– das Schließen von Kisten und Verschlägen,
– beim Anbringen von Transportsicherungen z. B.:
auf Fahrzeugen und Waggons
20. Klemmen Sie nach der Verwendung den
Druckschlauch ab und entnehmen Sie alle
verbliebenen Krampen aus dem Magazin.
Trennen Sie das Werkzeug von der Luftquelle, bevor
Sie das Werkzeug warten, eine verklemmte Krampe
entfernen, den Arbeitsbereich verlassen, das
Werkzeug an einen anderen Ort bringen oder nach
der Verwendung. Versehentliches Schießen einer
Krampe ist sehr gefährlich.
21. Klemmen Sie den Druckschlauch ab und entnehmen
Sie aus dem Magazin sämtliche verbliebenen
Krampen.
Klemmen sie den Druckschlauch ab und entfernen
Sie nach der Benutzung alle Krampen oder solche,
die die Funktion stören. Klemmen Sie den Schlauch
ab, wenn Sie Teile ersetzen, eine verklemmte
Krampe entfernen oder das Gerät inspizieren.
Es ist sehr gefährlich, wenn eine Krampe durch einen
Fehler geschossen wird.
12
Page 14
Deutsch
22. Klemmen Sie den Schlauch ab und lassen Sie die
Druckluft entweichen, bevor Sie eine
steckengebliebene Krampe entfernen.
Bevor Sie eine in der Mündung verklemmte Krampe
entfernen beachten Sie, dass Sie den Druckschlauch
abklemmen und die Druckluft aus dem Gerät
entweichen lassen.
Eine fälschlich abgeschossene Krampe könnte sehr
gefährlich sein.
23. Öffnen Sie das Magazin nicht wenn dieses nach
unten gerichtet ist, um Unfälle durch herabfallende
Krampen zu vermeiden.
24. Im Gerätekörper sollte keine Anschlussbuchse
(Schnellkupplung) verwendet werden.
Wenn im Gerätekörper eine Anschlussbuchse
(Schnellkupplung) installiert ist, kann die Druckluft
manchmal nicht entweichen, wenn der Schlauch
abgetrennt wird. Vermeiden Sie deshalb eine solche
Verwendung.
Das Werkzeug und der Luftschlauch müssen eine
Verbindung haben, die allen Druck aus dem
Werkzeug entweichen lässt, wenn die Verbindung
getrennt wird.
25. Beim Reinigen des Werkzeugs Kein Benzin oder
andere brennbare Flüssigkeiten verwenden.
Im Fall, dass Dampf einer entzündlichen Flüssigkeit
in das Gerät eindringt, können beim Heften Funken
entstehen, die zu einer Explosion führen können.
SPEZIFIKATIONEN
Antrieb Kolben, druckluftgetrieben
Luftdruck 4,9 – 8,3 bar
Krampen siehe Abb.
Anzahl Krampen 150 Krampen
Geräteabmessungen 365 mm (L) × 258 mm (H) × 76 mm (B)
Gewicht 2,0 kg
Schlauch (Innen-φ)6 mm
AUSWAHL DER KRAMPEN
Wählen Sie geeignete Krampen gemäß der Abbildung.
Krampen, die nicht in der Abbildung gezeigt sind, können
mit diesem Gerät nicht verarbeitet werden.
Dicke 16, Krone 7/16"
Min. Max.
1,61mm
SONDERZUBEHÖR
䡬 Satz für sequentiellen Auslösungsmechanismus
(Kode Nr. 876762)
(Teilesatz für sequentielles Auslösen, Teile für
Einzelauslösung)
Mit den Teilen für sequentielle Auslösung wird die
Krampe nur durch Ziehen am Abzug nach
Herunterdrücken des Druckhebels eingetrieben.
Durch Installieren dieser Teile kann Eintreiben von
Krampen an nicht angemessenen Positionen und
unerwartetes Abfeuern von Krampen durch
ungewollte Betätigung des Druckhebels verhütet
werden.
7,9mm
25mm
1,45mm
Abmessungen der Krampen
50mm
STANDARDZUBEHÖR
(1) Innensechskantschlüssel für M5 ............................... 1
(2) Augenschutz ............................................................... 1
(3) Ölkanne ....................................................................... 1
13
ANWENDUNGEN
䡬 Bauarbeiten wie Wandverkleidung, Unterbodenbelag.
䡬 Bau von Mobilhomes und Bauveränderungen.
VORBEREITUNGEN VOR GEBRAUCH
1. Bereiten Sie den Schlauch vor
Achten Sie darauf, dass der Schlauch einen
Innendurchmesser von min. 6 mm hat.
BEMERKUNG:
Die Luftschläuche müssen mindestens für einen
Arbeitsnenndruck von 12,8 bar bzw. 150 Prozent des
durch das Kompressorsystem erzeugten
Maximaldrucks ausgelegt sein, wobei der höhere Wert
gilt.
2. Prüfen Sie die Sicherheit
ACHTUNG:
䡬 Unbefugte Personen (insbes. Kinder) müssen von
dem Gerät ferngehalten werden.
䡬 Augenschutz tragen.
Page 15

Deutsch
䡬 Prüfen Sie die Befestigungsschrauben, die den
Entlüftungsdeckel halten, usw. auf sicheren Sitz.
Untersuchen Sie den Nagler nach undichten Stellen
und defekten oder rostigen Teilen.
䡬 Prüfen Sie, ob der Kontaktarm richtig arbeitet. Achten
Sie darauf, dass kein Schmutz an den beweglichen
Teilen des Kontaktarmes haftet.
䡬 Prüfen Sie nochmals die Funktionssicherheit.
VOR INBETRIEBNAHME
1. Prüfen Sie den Luftdruck
ACHTUNG:
Der Luftdruck muss konstant zwischen 4,9–8,3 bar
gehalten werden.
Stellen Sie den Luftdruck entsprechend den
Abmessungen und Längen der Krampen sowie der
Härte des zu heftenden Holzes zwischen 4,9 und 8,3 bar
ein. Achten Sie besonders auf den Auslassdruck, die
Kapazität und den Anschluss am Kompressor, damit der
Druck das spezifizierte Limit nicht überschreitet. Zu hoher
Druck kann die generelle Leistung, die Lebensdauer und
die Sicherheit beeinträchtigen.
2. Ölen
(1) Bringen Sie ein Ölfilter-Reduzierventil zwischen dem
Kompressor und dem Gerät an, bevor Sie mit dem
Gerät arbeiten. Schmierung durch das ÖlfilterReduzierventil bietet glatten Betrieb, verlängerte
Lebenszeit und Korrosionsschutz.
Stellen Sie den Öler so ein, dass alle 5 bis 10 Heftzyklen
ein Tropfen Öl zugegeben wird.
(2) Benutzen Sie das empfohlene Öl (Shell Tonna).
Andere verwendbare Öle sind am Ende angegeben.
Mischen Sie niemals verschiedene Ölarten.
3. Laden der Krampen
ACHTUNG:
䡬 Wenn Sie die Nägel in den Nagler einlegen,
(1) nicht am Abzug ziehen
(2) nicht gegen den Druckhebel drücken
(3) die Mündung nicht auf Gesicht, Hände, Füße,
andere Körperteile oder andere Personen richten,
um mögliche Verletzungen während Verwendung
und Transport zu verhüten.
(1) Ziehen Sie die Krampenzuführung nach hinten und
befestigen Sie sie sicher in einer Nut des Magazins.
(Siehe Abb. 2.)
(2) Legen Sie den Krampenstreifen auf das Magazin.
Stellen Sie sicher, dass der Krampenstreifen frei auf
dem Magazin gleitet. (Siehe Abb. 3.)
(3) Ziehen Sie die Krampenzuführung nach hinten. Lösen
Sie sie dann aus der Nut des Magazins, bringen Sie
die Krampen vorsichtig zurück, als würden sie sanft
geschoben, und vermeiden Sie jegliche Stöße. (Siehe
Abb. 4.)
Der Nagler ist nun betriebsbereit.
ACHTUNG:
䡬 Wenn die Krampenzuführung plötzlich losgelassen
wird, kann sie abrupt zurückkehren und Verformung
und/oder Streuung verursachen, was schließlich zu
Verklemmen der Krampen führt.
Achten Sie unbedingt darauf, die Krampenzuführung
ohne jeglichen Stoß zurückzuführen.
䡬 Um ein unbeabsichtiges Schiessen zu verhindern,
berühren Sie niemals den Abzug und legen Sie nie
den Kontaktarm auf die Werkbank oder auf den Boden.
Richten Sie die Mündung des Naglers niemals gegen
Personen.
BEDIENUNGSANLEITUNG FÜR DEN NAGLER
ACHTUNG:
䡬 Benutzen Sie niemals das Oberteil oder den Geräte-
körper als Hammer.
䡬 Treffen Sie die nötigen Vorsichtsmaßnahmen, um die
Sicherheit von Personen in der Nähe während der
Arbeiten zu gewährleisten.
1. Verschiedene Arten des Heftens
(1) Unterbrochenes Hefter
Drücken Sie die Mündung gegen die gewünschte
Stelle; dann ziehen Sie den Auslöser. Eine Krampe
wird mit einem Schuss eingetrieben. (Siehe Abb. 5)
ACHTUNG:
䡬 Das Gerät feuert manchmal zweimal in schneller
Reihenfolge wenn es stark direkt gegen die Oberfläche
gedrückt wird oder wenn es auf hartem Material
benutzt wird. Ziehen Sie den Auslöser in solchen
Fällen nur ganz leicht und lassen Sie ihn sofort wieder
los.
(2) Druckhebel
Achten Sie darauf, dass beim Andrücken der
Mündung der Druckhebel völlig hochgedrückt wird,
um den Sicherheitsmechanismus zu lösen (Siehe Abb.
5). Nur so ist garantiert, dass keine Krampe ohne
Lösen des Sicherheitsmechanismus eingetrieben
werden kann, auch wenn der Auslöser gezogen ist.
(3) Kontinuierliches Heften
Ziehen Sie zunächst den Auslöser. Drücken Sie danach
das Gerät in die gewünschte Position um
kontinuierlich zu heften. (Siehe Abb. 6)
ACHTUNG:
䡬 Heften Sie sorgfältig an Holzkanten. Bei kontinuier-
lichem Heften von Holzkanten kann eine Krampe
abrutschen oder durch die Kante brechen.
䡬 Heften Sie keine Krampen auf bereits vorhandene
Krampen.
䡬 Heften Sie keine Krampen auf Metallteile.
BEMERKUNG:
䡬 Vorsichtsmaßnahmen gegen Leerschüsse
Gelegentlich wird weiter geheftet, obwohl alle
Krampen im Magazin verschossen sind.
Dies nennt man “Leerschüsse”. Leerschüsse können
den Puffer, das Magazin und die Krampenzuführung
zerstören. Überprüfen Sie deshalb von Zeit zu Zeit die
Anzahl der sich noch im Magazin befindlichen
Krampen, um Leerschüsse zu vermeiden.
Andererseits sind nach der Benutzung des Naglers
alle Krampen zu entnehmen.
䡬 Nach dem Heften:
(1) muss der Luftschlauch vom Hefter abgetrennt
werden;
(2) müssen alle Krampen aus dem Nagler entfernt
werden;
(3) Geben Sie 5 bis 10 Tropfen Hitachi-Schmiermittel
für Pneumatikwerkzeuge in den Luftanschluss am
Nagler ein, und
(4) Öffnen Sie den Ablasshahn am
Luftkompressortank, um alle Feuchtigkeit
abzulassen.
䡬 Bei niedrigen Temperaturen arbeitet das Gerät
manchmal nicht korrekt. Arbeiten Sie deshalb mit dem
Gerät immer in der geeigneten
Umgebungstemperatur.
14
Page 16

Deutsch
2. Einstellen der Krampen-Einschusstiefe
Achten Sie auf die folgenden Punkte, um
sicherzustellen, dass alle Krampen zur gleichen Tiefe
eingetrieben werden:
(1) Der Luftdruck zum Nagler muss konstant bleiben
(der Regler muss installiert sein und korrekt
funktionieren).
(2) Der Nagler muss immer fest gegen das Werkstück
gehalten werden.
Wenn Krampen zu tief oder nicht tief genug in das
Werkstück eingetrieben werden, so stellen Sie das
Heften in der folgenden Reihenfolge ein.
ACHTUNG:
䡬 Klemmen Sie den Druckschlauch ab und lassen
Sie die Druckluft entweichen, bevor Sie mit dem
Justieren beginnen.
䡬 Halten Sie die Finger beim Justieren vom Abzug
fern.
䡬 Beachten Sie dass sich während des Justierens
keine Körperteile, Hände oder Füsse vor der
Mündung des Gerätes befinden.
Geben Sie zwecks Justierung in folgender Reihenfolge
vor: (Siehe Abb. 7)
Lösen Sie zum Einstellen der Eintreibtiefe der
Krampen die Schraube, die den Schubhebel fixiert.
Wenn die Krampen zu tief eingetrieben werden, so
verschieben Sie den Schubhebel in Abwärtsrichtung
(down), und wenn sie nicht tief genug eingetrieben
werden, so verschieben Sie den Schubhebel in
Aufwärtsrichtung (up).
Ziehen Sie dann die Schraube fest an, um den
Schubhebel zu fixieren.
BEMERKUNG:
䡬 Wählen Sie den Luftdruck so, dass Sie eine
ausreichende Einschusstiefe erreichen. Zu hoher
Luftdruck führt zu frühzeitigem Verschleiß des
Kolbendämpfers etc.
INSPEKTION UND WARTUNG
ACHTUNG:
Klemmen Sie den Druckschlauch bei der Reinigung,
Inspektion und Wartung ab.
1. Maßnahmen gegen das Verklemmen von Krampen
(1) Entfernen Sie alle Krampen.
(2) Lösen Sie den Verriegelungshebel und öffnen Sie die
Klingenführung. (Siehe Abb. 8.)
(3) Entfernen Sie die verklemmte Krampe mit einem
flachen Schraubenzieher. (Siehe Abb. 9.)
(4) Schließen Sie die Klingenführung und die
Verriegelung.
(5) Wenn es oft zu Verklemmen kommt, so wenden Sie
sich bitte an ein von Hitachi autorisiertes
Kundendienstzentrum.
2. Inspektion und Wartung
Führen Sie regelmäßig eine Inspektion des Gerätes
durch.
(1) Lösen Sie die vier Innensechskantschrauben, die den
Entlüftungsdeckel halten und heben Sie diesen ab.
Danach können der Zylinder, der Kolben und andere
Teile in den entsprechenden Sets entnommen
werden.
Wischen Sie den Treiber, die gleitenden Teile des
Kolbens und das Innere des Körpers mit einem Tuch
ab, um abgelagerten Schmutz zu entfernen.
(2) Prüfen Sie, ob der Dämpfer seine richtige Funktion
erfüllt. Ein beschädigter Dämpfer kann andere
benachbarte Teile beschädigen.
(3) Prüfen Sie sorgfältig den O-Ring auf Verschleiß. Ein
verschlissener oder beschädigter O-Ring kann die
Gesamtleistung zerstören. Ersetzen Sie einen
verschlissenen oder beschädigten O-Ring durch einen
neuen.
(4) Bevor Sie das Gerät wieder zusammensetzen, fetten
Sie den O-Ring (Attolub-Fett Nr. 2). Ölen Sie das Gerät
mit dem empfohlenen Öl.
3. Prüfen Sie die Befestigungsschrauben für jedes Teil
Prüfen Sie in regelmässigen Abständen jedes Teil
nach lockeren Schrauben und undichten Stellen.
Ziehen Sie lockere Schrauben wieder an. Die
Benutzung des Gerätes mit nicht fest angezogenen
Schrauben bedeutet Gefahr.
4. Inspektion des Druckhebels
Überprüfen Sie, ob der Druckhebel (Abb. 1) glatt
gleiten kann.
Reinigen Sie den Gleitbereich des Druckhebels und
verwenden Sie das mitgelieferte Öl für Schmierung
von Zeit zu Zeit. Schmierung ermöglicht glattes
Gleiten und dient gleichzeitig zur Rostverhütung.
5. Aufbewahrung
䡬 Wenn das Gerät längere Zeit nicht verwendet werden
soll, so tragen Sie eine dünne Schicht Schmiermittel
auf die Stahlteile auf, um Rosten zu verhüten.
䡬 Bewahren Sie den Nagler nicht bei kalten
Umgebungstemperaturen auf.
Bewahren Sie den Nagler an einem warmen Ort auf.
Wenn der Nagler nicht verwendet wird, bewahren Sie
䡬
ihn an einem warmen und trockenen Ort auf.
Halten Sie den Nagler außerhalb der Reichweite von
Kindern.
6. Liste der Wartungsteile
ACHTUNG:
Reparatur, Modifikation und Inspektion von HitachiWerkzeugen müssen durch ein autorisiertes HitachiKundendienstzentrum durchgeführt werden.
Diese Teileliste ist hilfreich, wenn sie dem
autorisierten Hitachi-Kundendienstzentrum
zusammen mit dem Werkzeug für Reparatur oder
Wartung ausgehändigt wird.
Bei Betrieb und Wartung von Elektrowerkzeugen
müssen die Sicherheitsvorschriften und Normen
beachtet werden.
MODIFIKATIONEN:
Hitachi-Werkzeuge werden fortwährend verbessert
und modifiziert, um die neuesten technischen
Fortschritte einzubauen.
Dementsprechend ist es möglich, daß einige Teile
ohne vorherige Benachrichtigung geändert werden.
KOMPRESSOR
ACHTUNG:
Wenn die maximale Arbeitsleistung des Kompressors
8,3 bar übersteigt, benutzen Sie ein Reduzier-Ventil
zwischem dem Kompressor und dem Gerät. Regeln
Sie anschliessend den Luftdruck innerhalb des
Arbeitsbereiches von 4,9–8,3 bar. Bei Installation eines
Air-Sets ist ein gleichzeitiges Ölen möglich, eine
zusätzliche Erleichterung.
15
Page 17

ÖLER-FILTER-REDUZIERVENTIL (Air Set)
Es ist empfehlenswert, ein Öler-Filter-Reduzierventil zu
benutzen, um optimale Bedingungen für eine lange
Lebensdauer des Gerätes zu gewährleisten. Beschränken
Sie die Länge des Druckschlauches zwischen dem Gerät
und dem Air-Set auf max. 10 m. (Abb. 10)
ANWENDBARE SCHMIERMITTEL
Type Bezeichnung
Empfohlenes Öl SHELL TONNA
Motor-Öl SAE 10W, SAE 20W
Turbinen-Öl ISO VG32-68 (90–180)
Lärminformation
Lärmkennwerte entsprechend EN 792-13, Juni 2000:
Typischer A-bewerterer Schallpegel für ein einzelnes
Ereignis:
Typischer A-bewerterer Schallpegel am Arbeitsplatz:
Diese Werte sind mit dem Werkzeug zusammenhängende
Werte und stellen nicht die Lärmentwicklung am
Verwendungspunkt dar. Die Lärmentwicklung am
Arbeitsplatz hängt z.B. von der Arbeitsumgebung, dem
Werkstück, der Werkstückunterstützung, der Anzahl der
Krampeneintreibungen usw. ab.
Abhängig von den Bedingungen am Arbeitsplatz und der
Form des Werkstücks müssen möglicherweise
individuelle Lärmverhütungsmaßnahmen durchgeführt
werden, z.B. Aufstellung des Werkstücks auf einer
schalldämpfenden Unterstützung, Verhüten von
Werkstückvibration durch Festklemmen oder Abdecken,
Einstellen auf den minimalen für den Betrieb
erforderlichen Luftdruck usw.
In besonderen Fällen ist das Tragen von Gehörschutz
erforderlich.
Vibrationsinformation
Typischer Vibrationskennwert entsprechend EN 792-13,
Juni 2000: 3,9 m/s
Dieser Wert ist ein auf das Werkzeug bezogener Kennwert
und stellt nicht den Einfluss auf das Hand-Arm-System
bei der Verwendung des Werkzeugs dar. Der Einfluss auf
das Hand-Arm-System bei Verwendung des Werkzeugs
hängt z. B. von der Greifkraft, der Kontaktdruckkraft, der
Arbeitsrichtung, der Einstellung der Energieversorgung,
dem Werkstück und der Werkstückunterstützung ab.
2
.
LWA,
1s,d = 99 dB
LpA,
1s,d = 81 dB
Deutsch
16
Page 18

∂ППЛУИО¿
°∂¡π∫∂™ ¶ƒ√ºÀ§∞•∂π™ §∂π∆√Àƒ°π∞™
1. ГЪЛЫИМФФИ‹ЫЩВ МВ ·ЫК¿ПВИ· ЩФ ЛПВОЩЪИОfi ВЪБ·ПВ›Ф
БИ· ЩИ˜ О·Щ¿ППЛПВ˜ ¯Ъ‹ЫВИ˜.
Μη χρησιµοποιείτε το ηλεκτρικ εργαλείο για
διαφορετικέσ χρήσεισ απ εκείνεσ που
προσδιορίζονται σε αυτέσ τισ οδηγίεσ.
2. °И· ·ЫК·П‹ ПВИЩФ˘ЪБ›·, ¯ВИЪИЫЩВ›ЩВ ЫˆЫЩ¿ ЩФ
ЛПВОЩЪИОfi ВЪБ·ПВ›Ф.
Ακολουθείτε τισ οδηγίεσ που παρέχονται σε αυτ
το εγχειρίδιο οδηγιών και χειριστείτε σωστά αυτ
το εργαλείο προκειµένου να διασφαλίσετε τη
σωστή λειτουργία του. Μην επιτρέψετε τη χρήση
του εργαλείου απ παιδιά ή άτοµα που δεν έχουν
επαρκείσ γνώσεισ για τον ασφαλή χειρισµ του και
µην επιτρέψετε να χρησιµοποιηθεί απ άτοµα που
δεν µπορούν να το χειριστούν σωστά.
3. ∂ϤÁÍÙ ÙËÓ ·ÛÊ¿ÏÂÈ· ÙÔ˘ ¯ÒÚÔ˘ ÂÚÁ·Û›·˜.
Μην αφήνετε µη εξουσιοδοτηµένα άτοµα να
πλησιάζουν στο χώρο εργασίασ. Κρατήστε µακριά
ιδίωσ τα παιδιά.
4. ∆ÔÔıÂÙ›Ù ٷ ·ÓÙ›ÛÙÔȯ· ÂÍ·ÚÙ‹Ì·Ù· ÛÙËÓ
·ÓÙ›ÛÙÔÈ¯Ë ı¤ÛË.
Μην αφαιρείτε τυχν καλύµµατα ή βίδεσ.
∆ιατηρήστε τα στη θέση τουσ, καθώσ έχουν
συγκεκριµένεσ λειτουργίεσ.
Επιπλέον, µην κάνετε ποτέ τροποποιήσεισ στο
εργαλείο και µη το χρησιµοποιήσετε ποτέ µετά απ
τροποποίηση, καθώσ µπορεί να αποδειχθεί
επικίνδυνο.
5. ∂П¤БНЩВ ЩФ ВЪБ·ПВ›Ф ЪФЩФ‡ ЩФ ¯ЪЛЫИМФФИ‹ЫВЩВ.
Προτού χρησιµοποιήσετε το εργαλείο, βεβαιωθείτε
οπωσδήποτε τι δεν υπάρχουν σπασµένα
εξαρτήµατα, τι λεσ οι βίδεσ είναι σωστά
σφιγµένεσ και τι δεν λείπουν εξαρτήµατα ή τι
δεν υπάρχουν σκουριασµένα εξαρτήµατα.
6. ∏ ˘ÂÚ‚ÔÏÈ΋ ÂÚÁ·Û›· Â›Ó·È Èı·Ófi Ó· ÚÔηϤÛÂÈ
·Ù˘¯‹Ì·Ù·.
Μην προσπαθείτε να υπερβείτε τισ δυναττητεσ
των εργαλείων ή των εξαρτηµάτων. Η υπερβολική
εργασία µπορεί να προκαλέσει ζηµιά χι µνο στο
ηλεκτρικ εργαλείο αλλά και στον ίδιο τον χειριστή.
7. ™В ВЪ›ЩˆЫЛ Ф˘ ·Ъ·ЩЛЪ‹ЫВЩВ ·УˆМ·П›В˜,
‰И·Оfi„ЩВ ·М¤Ыˆ˜ ЩЛ ПВИЩФ˘ЪБ›·.
Εάν παρατηρήσετε ανωµαλίεσ ή το ηλεκτρικ
εργαλείο δεν λειτουργεί κανονικά, διακψτε
αµέσωσ τη λειτουργία και στείλτε το ηλεκτρικ
εργαλείο για επιθεώρηση και επισκευή.
8. ¡· КЪФУЩ›˙ВЩВ ЩФ ЛПВОЩЪИОfi ВЪБ·ПВ›Ф.
Εάν το ηλεκτρικ εργαλείο πέσει κάτω ή χτυπήσει
πάνω σε αντικείµενα, το εξωτερικ πλαίσιο
ενδέχεται να παραµορφωθεί και να δηµιουργηθούν
ρωγµέσ ή άλλεσ µορφέσ φθοράσ. Για το λγο αυτ
να το χειρίζεστε µε τη δέουσα προσοχή. Επίσησ,
προσέξτε να µη δηµιουργήσετε γρατσουνιέσ ή
χαρακιέσ στο ηλεκτρικ εργαλείο. Λγω τησ
υψηλήσ πίεσησ που αναπτύσσεται στο εσωτερικ
του εργαλείου, οι ρωγµέσ στην επιφάνεια είναι
επικίνδυνεσ.
Μη χρησιµοποιείτε ποτέ το ηλεκτρικ εργαλείο εάν
έχουν σχηµατιστεί ρωγµέσ ή αν υπάρχει διαρροή
αέρα απ κάποια ρωγµή.
9. ¢В›НЩВ ЩЛ ‰¤Ф˘Ы· КЪФУЩ›‰· БИ· У· ВН·ЫК·П›ЫВЩВ
МВБ¿ПЛ ‰И¿ЪОВИ· ˙ˆ‹˜.
Να φροντίζετε πάντα το ηλεκτρικ εργαλείο σο
χρειάζεται και να το διατηρείτε καθαρ.
17
10. ∏ ВИıВТЪЛЫЛ ЫВ Щ·ОЩ¿ ‰И·ЫЩ‹М·Щ· В›У·И ··Ъ·›ЩЛЩЛ
БИ· ПfiБФ˘˜ ·ЫК¿ПВИ·˜.
Επιθεωρείτε το ηλεκτρικ εργαλείο σε τακτά
διαστήµατα ώστε να λειτουργεί πάντοτε µε
ασφάλεια και αποτελεσµατικτητα.
11. ∞¢ı˘Óı›Ù Û ¤Ó· ÂÍÔ˘ÛÈÔ‰ÔÙË̤ÓÔ ·ÓÙÈÚfiÛˆÔ
ۤڂȘ Â¿Ó ··ÈÙÂ›Ù·È ÂÈÛ΢‹ ‹ ·ÓÙÈηٿÛÙ·ÛË
ÂÍ·ÚÙËÌ¿ÙˆÓ.
Βεβαιωθείτε τι το σέρβισ του ηλεκτρικού εργαλείου
πραγµατοποιείται µνο σε εξουσιοδοτηµένα κέντρα
σέρβισ και τι θα χρησιµοποιούνται αποκλειστικά
αυθεντικά ανταλλακτικά.
12. ¡· К˘П¿ЫЫВЩВ ЩФ ЛПВОЩЪИОfi ВЪБ·ПВ›Ф ЫВ ·ЫК·П¤˜
М¤ЪФ˜.
ταν δεν χρησιµοποιείται, το ηλεκτρικ εργαλείο
πρέπει να φυλάσσεται σε ξηρ µέροσ µακριά απ
παιδιά. Ρίξτε στον κορµ 2cm
του συνδέσµου εύκαµπτου σωλήνα, για να
προστατέψετε το εργαλείο απ τη σκνη.
13. ∆Ô ·ÓÂÙ˘Á̤ÓÔ Û¯Â‰È¿ÁÚ·ÌÌ· Ù˘ ‰È¿Ù·Í˘ ÁÈ·
·˘Щ¤˜ ЩИ˜ Ф‰ЛБ›В˜ ¯ВИЪИЫМФ‡ Ъ¤ВИ У·
¯ЪЛЫИМФФИВ›Щ·И ·ФОПВИЫЩИО¿ ·fi ЩФ
ВНФ˘ЫИФ‰ФЩЛМ¤УФ О¤УЩЪФ Ы¤Ъ‚И˜.
3
λάδι περίπου, µέσω
¶ƒ√ºÀ§∞•∂π™ °π∞ ∆∏ Ã∏™∏ ∆√À ∫∞ƒºø∆π∫√À
1. ∞ЫК·П‹˜ ¯ВИЪИЫМfi˜ МВ ЫˆЫЩ‹ ¯Ъ‹ЫЛ.
Αυτ το εργαλείο έχει σχεδιαστεί για το κάρφωµα
συνδετήρων συρραφήσ σε ξύλο και παρεµφερή
υλικά. Να χρησιµοποιείται αποκλειστικά για την
προβλεπµενη χρήση του.
2. µВ‚·ИˆıВ›ЩВ fiЩИ Л ›ВЫЛ ·¤Ъ· О˘М·›УВЩ·И ВУЩfi˜ ЩФ˘
ФУФМ·ЫЩИОФ‡ В‡ЪФ˘˜ ›ВЫЛ˜.
Τα εργαλεία καρφώµατοσ συνδετήρων που
χρησιµοποιούν πεπιεσµένο αέρα µπορούν να
συνδεθούν µνο µε γραµµέσ πεπιεσµένου αέρα
που η µέγιστη επιτρεπτή πίεση δεν µπορεί να
ξεπεραστεί κατά περισστερο απ 10%, ριο που
µπορεί για παράδειγµα να επιτευχθεί µε µια
βαλβίδα εκτνωσησ πίεσησ µε βαλβίδα ασφαλείασ
καθδου.
(Για το µοντέλο N5008AC2, το 110% τησ µέγιστησ
επιτρεπµενησ ονοµαστικήσ πίεσησ ισούται µε 9,1
bar = 130 psi)
Τα εργαλεία καρφώµατοσ συνδετήρων που
χρησιµοποιούν πεπιεσµένο αέρα µπορούν να
λειτουργήσουν µνο µε τη χαµηλτερη
απαιτούµενη πίεση για χειρονακτική εργασία,
προκειµένου να αποφευχθούν η άσκοπα υψηλή
στάθµη θορύβου, η αυξηµένη φθορά και οι βλάβεσ.
3. ªЛ ¯ЪЛЫИМФФИВ›ЩВ ФЩ¤ ЩФУ ВНФПИЫМfi МВ ¿ПП· ·¤ЪИ·
˘„ЛП‹˜ ›ВЫЛ˜ ВОЩfi˜ ·fi ВИВЫМ¤УФ ·¤Ъ·.
Μη χρησιµοποιείτε ποτέ διοξείδιο του άνθρακα,
οξυγνο ή άλλο αέριο απ δοχεία υπ πίεση κάτω
απ οποιεσδήποτε συνθήκεσ.
4. ¡· ЪФЫ¤¯ВЩВ ЩЛУ ·У¿КПВНЛ О·И ЩИ˜ ВОЪ‹НВИ˜.
Καθώσ ενδέχεται να πετάγονται σπίθεσ στη
διάρκεια τησ συρραφήσ, είναι επικίνδυνη η χρήση
αυτού του εργαλείου κοντά σε λάκα, µπογιά,
βενζίνη, διαλυτικ, πετρελαϊκ αιθέρα, φυσικ
αέριο, κλλεσ και παρεµφερή εύφλεκτα υλικά που
είναι πιθαν να αναφλεγούν ή να εκραγούν.
Συνεπώσ, το εργαλείο αυτ δεν πρέπει να
χρησιµοποιείται κοντά σε ανάλογο εύφλεκτο υλικ
κάτω απ οποιεσδήποτε συνθήκεσ.
Page 19

∂ППЛУИО¿
5. ¡· КФЪ¿ЩВ ¿УЩФЩВ ВНФПИЫМfi ЪФЫЩ·Ы›·˜ М·ЩИТУ
(ЪФЫЩ·ЩВ˘ЩИО¿ Б˘·ПИ¿).
Κατά το χειρισµ του ηλεκτρικού εργαλείου, να
φοράτε πάντοτε προστατευτικά γυαλιά και να
διασφαλίζετε τι οι παρευρισκµενοι φορούν επίσησ
προστατευτικά γυαλιά.
Το ενδεχµενο θραύσµατα συνδετήρων ή
συνδετήρεσ συρραφήσ που δεν εκτοξεύτηκαν σωστά
να εισέλθουν στα µάτια συνιστά απειλή για την ραση.
Προστατευτικά γυαλιά µπορείτε να αγοράσετε απ
οποιοδήποτε χρωµατοπωλείο. Να φοράτε
οπωσδήποτε προστατευτικά γυαλιά ταν χειρίζεστε
αυτ το εργαλείο. Χρησιµοποιήστε προστατευτικά
γυαλιά ή µάσκα πάνω απ γυαλιά οράσεωσ.
Οι εργοδτεσ πρέπει να διασφαλίζουν οπωσδήποτε
τι γίνεται χρήση εξοπλισµού προστασίασ µατιών.
6. ¶ÚÔÛٷ٤„Ù ٷ ·˘ÙÈ¿ Î·È ÙÔ ÎÂÊ¿ÏÈ Û·˜.
ταν εκτελείτε εργασία συρραφήσ, πρέπει να
φοράτε ωτοασπίδεσ και να καλύπτετε το κεφάλι σασ.
Επιπλέον, πρέπει να διασφαλίζετε κατά περίπτωση
τι λοι οι παρευρισκµενοι φορούν επίσησ
ωτοασπίδεσ και έχουν καλύψει το κεφάλι τουσ.
7. ¡· ÚÔÛ¤¯ÂÙ fiÛÔ˘˜ ÂÚÁ¿˙ÔÓÙ·È ÎÔÓÙ¿ Û·˜.
Υπάρχει µεγάλοσ κίνδυνοσ οι συνδετήρεσ συρραφήσ
που δεν έχουν εκτοξευτεί σωστά να χτυπήσουν τουσ
άλλουσ. Για αυτ το λγο, να δίνετε µεγάλη σηµασία
στην ασφάλεια των ανθρώπων που βρίσκονται κοντά
σασ ταν χρησιµοποιείτε αυτ το εργαλείο.
Βεβαιωθείτε οπωσδήποτε τι κανενσ το σώµα, τα
χέρια ή τα πδια δεν βρίσκεται κοντά στην έξοδο
συνδετήρων συρραφήσ.
8. ªË ÛÙÚ¤ÊÂÙ ÔÙ¤ ÙËÓ ¤ÍÔ‰Ô Û˘Ó‰ÂÙ‹ÚˆÓ Û˘ÚÚ·Ê‹˜
ÚÔ˜ ÙÔ˘˜ ¿ÏÏÔ˘˜.
Να θεωρείτε πάντοτε τι στο εργαλείο περιέχονται
συνδετήρεσ.
Εάν στρέψετε την έξοδο συνδετήρων συρραφήσ
προσ τουσ άλλουσ, ενδέχεται να προκληθούν σοβαρά
ατυχήµατα σε περίπτωση που πυροδοτήσετε κατά
λάθοσ το εργαλείο. Κατά τη σύνδεση και αποσύνδεση
του εύκαµπτου σωλήνα, βεβαιωθείτε τι η έξοδοσ
συνδετήρων συρραφήσ δεν είναι στραµµένη προσ
κάποιο άτοµο (συµπεριλαµβανοµένου και εσάσ του
ίδιου). Ακµη και εάν δεν είναι οπλισµένο µε
συνδετήρεσ συρραφήσ, είναι επικίνδυνο να
πυροδοτήσετε το εργαλείο ενώ το έχετε στρέψει σε
κάποιον άλλο, γι αυτ µην το επιχειρήσετε. Τα αστεία
δεν επιτρέπονται. Χρησιµοποιήστε το εργαλείο
αυστηρά ωσ σύνεργο εργασίασ.
9. ¶ЪФЩФ‡ ¯ЪЛЫИМФФИ‹ЫВЩВ ЩФ ЛПВОЩЪИОfi ВЪБ·ПВ›Ф,
ВП¤БНЩВ ЩФ МФ¯Пfi ТıЛЫЛ˜.
Προτού χρησιµοποιήσετε το ηλεκτρικ εργαλείο,
ελέγξτε οπωσδήποτε τι ο µοχλσ ώθησησ και η
βαλβίδα λειτουργούν κανονικά. Χωρίσ συνδετήρεσ
συρραφήσ στο ηλεκτρικ εργαλείο, συνδέστε τον
εύκαµπτο σωλήνα και ελέγξτε τα ακλουθα. Εάν
ακουστεί ήχοσ, αυτ υποδηλώνει σφάλµα, συνεπώσ,
δεν πρέπει να χρησιµοποιήσετε το ηλεκτρικ
εργαλείο προτού επιθεωρηθεί και επισκευαστεί.
䡬 Εάν µνο µε το τράβηγµα τησ σκανδάλησ
ακουστεί ο ήχοσ µετακίνησησ τησ κεφαλήσ
καρφώµατοσ, το ηλεκτρικ εργαλείο είναι
ελαττωµατικ.
䡬 Εάν µνο µε το σπρώξιµο του µοχλού ώθησησ
προσ το υλικ προσ συρραφή ακουστεί ο ήχοσ
µετακίνησησ τησ κεφαλήσ καρφώµατοσ, το
ηλεκτρικ εργαλείο είναι ελαττωµατικ.
Επιπλέον, σον αφορά στο µοχλ ώθησησ, να
έχετε υπ' ψιν σασ τι δεν πρέπει ποτέ να
τροποποιηθεί ή να αφαιρεθεί.
10. ГЪЛЫИМФФИ‹ЫЩВ ·ФОПВИЫЩИО¿ ЩФ˘˜ Ы˘УИЫЩТМВУФ˘˜
Ы˘У‰ВЩ‹ЪВ˜ Ы˘ЪЪ·К‹˜.
Μη χρησιµοποιείτε ποτέ διαφορετικούσ συνδετήρεσ
συρραφήσ απ αυτούσ που υποδεικνύονται και
περιγράφονται σε αυτέσ τισ οδηγίεσ.
11. ¡· В›ЫЩВ ЪФЫВОЩИОФ› О·Щ¿ ЩЛ Ы‡У‰ВЫЛ ЩФ˘ В‡О·МЩФ˘
ЫˆП‹У·.
Κατά τη σύνδεση του εύκαµπτου σωλήνα και τον
οπλισµ των συνδετήρων συρραφήσ µε τη σειρά,
προσέξτε τα ακλουθα ώστε να µην πυροδοτήσετε
κατά λάθοσ το εργαλείο.
䡬 Μην αγγίζετε τη σκανδάλη.
䡬 Μην αφήσετε την κεφαλή πυροδτησησ να
έρθει σε επαφή µε οποιαδήποτε επιφάνεια.
䡬 Κρατήστε την κεφαλή πυροδτησησ χαµηλά.
Τηρήστε αυστηρά τισ παραπάνω οδηγίεσ και
βεβαιωθείτε τι κανένα µέλοσ του σώµατοσ, χέρι
ή πδι, δεν βρίσκονται µπροστά στην έξοδο των
συνδετήρων συρραφήσ.
12. ªËÓ ÙÔÔıÂÙ›Ù ·ÚfiÛÂÎÙ· ÙÔ ‰¿¯Ù˘Ïfi Û·˜ ÛÙË
ÛηӉ¿ÏË.
Μην τοποθετείτε το δάχτυλ σασ στη σκανδάλη
παρά µνο ταν πραγµατικά συρράπτετε. Εάν καθώσ
µεταφέρετε ή δίνετε αυτ το εργαλείο σε κάποιον
µε το δάχτυλ σασ στη σκανδάλη, ενδέχεται να
απελευθερωθεί κατά λάθοσ ένασ συνδετήρασ
συρραφήσ και να προκαλέσετε ατύχηµα.
13. ∫ПВ›ЫЩВ ВУЩВПТ˜ ЩФУ Ф‰ЛБfi ПВ›‰·˜ О·И МЛУ ЩФУ
·УФ›БВЩВ ЫЩЛ ‰И¿ЪОВИ· ЩЛ˜ ПВИЩФ˘ЪБ›·˜.
Εάν επιχειρηθεί συρραφή µε ανοιχτ τον οδηγ
λεπίδασ, οι συνδετήρεσ συρραφήσ µπορεί να µην
εκτοξευτούν προσ το ξύλο και υπάρχει κίνδυνοσ
επικίνδυνησ πυροδτησησ.
14. ¶È¤ÛÙ ÛÙ·ıÂÚ¿ ÙËÓ ¤ÍÔ‰Ô Û˘Ó‰ÂÙ‹ÚˆÓ Û˘ÚÚ·Ê‹˜
ÚÔ˜ ÙÔ ˘ÏÈÎfi ÚÔ˜ Û˘ÚÚ·Ê‹.
Κατά το κάρφωµα των συνδετήρων συρραφήσ,
πιέστε σταθερά την έξοδο συρραφήσ στο υλικ
προσ συρραφή. Εάν η έξοδοσ δεν εφαρµσει
σωστά, οι συνδετήρεσ συρραφήσ ενδέχεται να
πεταχτούν προσ τα πίσω.
15. ∫Ú·Ù‹ÛÙ ٷ ¯¤ÚÈ· Î·È Ù· fi‰È· Ì·ÎÚÈ¿ ·fi ÙËÓ
ÎÂÊ·Ï‹ ˘ÚÔ‰fiÙËÛ˘ ηٿ ÙË ¯Ú‹ÛË.
Υπάρχει σηµαντικσ κίνδυνοσ ένασ συνδετήρασ
συρραφήσ να χτυπήσει τα χέρια ή τα πδια κατά
λάθοσ.
16. ¶ÚÔÛ¤ÍÙ ÙÔ Ù›Ó·ÁÌ· ÙÔ˘ ÂÚÁ·Ï›Ԣ ÚÔ˜ Ù· ›Ûˆ.
Μην πλησιάζετε το επάνω µέροσ του εργαλείου στο
κεφάλι σασ κ.λπ. στη διάρκεια τησ εργασίασ. Αυτ
είναι επικίνδυνο επειδή το εργαλείο ενδέχεται να
επανοπλίσει βίαια εάν ο συνδετήρασ συρραφήσ που
έχει εκτοξευτεί έρθει σε επαφή µε ένα προηγούµενο
συνδετήρα συρραφήσ ή µπλοκάρει στο ξύλο.
17. ¡· В›ЫЩВ ЪФЫВОЩИОФ› fiЩ·У Ы˘ЪЪ¿ЩВЩВ ПВЩ¤˜
Ы·У›‰В˜ ЫЩИ˜ БˆУ›В˜ ЩФ˘ Н‡ПФ˘.
Κατά τη συρραφή λεπτών σανίδων, οι συνδετήρεσ
συρραφήσ ενδέχεται να τισ διαπεράσουν, πωσ και
στην περίπτωση συρραφήσ γωνιών ξύλου, εξαιτίασ
τησ απκλισησ των συνδετήρων συρραφήσ. Σε
αυτέσ τισ περιπτώσεισ, βεβαιωθείτε τι δεν υπάρχει
κανείσ (ούτε χέρια, πδια κ.λπ. κάποιου) πίσω απ
τη λεπτή σανίδα ή δίπλα στο ξύλο που πρκειται
να συρράψετε.
18
Page 20
∂ППЛУИО¿
18. ∏ Ù·˘Ùfi¯ÚÔÓË Û˘ÚÚ·Ê‹ Î·È ÙˆÓ ‰‡Ô Ï¢ÚÒÓ ÙÔ˘
›‰ÈÔ˘ ÙÔ›¯Ô˘ Â›Ó·È ÂÈΛӉ˘ÓË.
Σε καµία περίπτωση δεν πρέπει να εκτελείται
συρραφή και στισ δύο πλευρέσ ενσ τοίχου
ταυτχρονα. Αυτ µπορεί να είναι πολύ επικίνδυνο
επειδή οι συνδετήρεσ συρραφήσ ενδέχεται να
περάσουν µέσα απ τον τοίχο και να προκληθούν
τραυµατισµοί.
19. ªЛ ¯ЪЛЫИМФФИВ›ЩВ ЩФ ЛПВОЩЪИОfi ВЪБ·ПВ›Ф ЫВ
ИОЪИТМ·Щ·, ОИУЛЩ¤˜ ЫО¿ПВ˜.
Το ηλεκτρικ εργαλείο δεν πρέπει να χρησιµοποιείται
για συγκεκριµένεσ εφαρµογέσ πωσ:
– εάν για την αλλαγή τησ µίασ τοποθεσίασ
καρφώµατοσ σε άλλη απαιτείται η χρήση
ικριωµάτων, σκαλιών, κινητών σκαλών ή
σκαλωσιών, π.χ. σκαλωσιών οροφήσ,
– για το κλείσιµο κουτιών ή κιβωτίων,
– για την τοποθέτηση συστηµάτων ασφάλειασ
µεταφοράσ πωσ σε οχήµατα και βαγνια
20. ªËÓ ·ÔÛ˘Ó‰¤ÂÙ ÙÔÓ Â‡Î·ÌÙÔ ÛˆÏ‹Ó· Ì ÙÔ
‰¿¯Ù˘ÏÔ Û·˜ ÛÙË ÛηӉ¿ÏË.
Εάν αποσυνδέσετε τον εύκαµπτο σωλήνα µε το
δάχτυλ σασ στη σκανδάλη, την επµενη φορά που
θα συνδεθεί ο εύκαµπτοσ σωλήνασ, υπάρχει
κίνδυνοσ το ηλεκτρικ εργαλείο να εκτοξεύσει
αυτµατα ένα συνδετήρα συρραφήσ ή να
λειτουργήσει αντικανονικά.
21. ∞ФЫ˘У‰¤ЫЩВ ЩФУ В‡О·МЩФ ЫˆП‹У· О·И ‚Б¿ПЩВ Щ˘¯fiУ
Ы˘У‰ВЩ‹ЪВ˜ Ы˘ЪЪ·К‹˜ Ф˘ ¤¯Ф˘У МВ›УВИ ЫЩФ
БВМИЫЩ‹Ъ· МВЩ¿ ЩЛ ¯Ъ‹ЫЛ.
Αποσυνδέστε το εργαλείο απ τον αέρα πριν απ
τη συντήρηση του εργαλείου, τον καθαρισµ του
µπλοκαρισµένου συνδετήρα, την αποχώρηση απ
την περιοχή εργασίασ, τη µεταφορά του εργαλείου
σε άλλη τοποθεσία ή µετά τη χρήση. Είναι πολύ
επικίνδυνη η πυροδτηση ενσ συνδετήρα
συρραφήσ κατά λάθοσ.
22. ∫·Ù¿ ÙËÓ ·Ê·›ÚÂÛË ÂÓfi˜ Û˘Ó‰ÂÙ‹Ú· Û˘ÚÚ·Ê‹˜ Ô˘
¤¯ÂÈ ÎÔÏÏ‹ÛÂÈ, ‚‚·Èˆı›Ù fiÙÈ ¤¯ÂÙ ÚÒÙ·
·ÔÛ˘Ó‰¤ÛÂÈ ÙÔÓ Â‡Î·ÌÙÔ ÛˆÏ‹Ó· Î·È ¤¯ÂÙÂ
·ВПВ˘ıВЪТЫВИ ЩФУ ВИВЫМ¤УФ ·¤Ъ·.
Κατά την αφαίρεση ενσ συνδετήρα συρραφήσ που
έχει κολλήσει στην έξοδο συνδετήρων συρραφήσ,
βεβαιωθείτε καταρχάσ τι έχετε αποσυνδέσει τον
εύκαµπτο σωλήνα και έχετε απελευθερώσει τον
πεπιεσµένο αέρα που βρίσκεται µέσα στο εργαλείο.
Η πυροδτηση ενσ συνδετήρα συρραφήσ κατά
λάθοσ µπορεί να αποδειχθεί πολύ επικίνδυνη.
23. °И· ЩЛУ ·ФК˘Б‹ ЩˆУ ОИУ‰‡УˆУ Ф˘ ЪФО·ПФ‡УЩ·И ·fi
ЩЛУ ЩТЫЛ Ы˘У‰ВЩ‹ЪˆУ Ы˘ЪЪ·К‹˜, МЛУ ·УФ›БВЩВ ФЩ¤
ЩФ БВМИЫЩ‹Ъ· МВ ЩЛ Ы˘ЫОВ˘‹ ЫЩЪ·ММ¤УЛ ЪФ˜ Щ· О¿Щˆ
О·ıТ˜ ЩЛУ ФП›˙ВЩВ МВ Ы˘У‰ВЩ‹ЪВ˜ Ы˘ЪЪ·К‹˜.
24. ¢ВУ Ъ¤ВИ У· ¯ЪЛЫИМФФИВ›Щ·И ıЛП˘О‹ Щ¿·
(˘Ф‰Ф¯‹ ·¤Ъ·) ЫЩФУ ОФЪМfi.
Εάν υπάρχει θηλυκή τάπα στον κορµ, κάποιεσ φορέσ
ο πεπιεσµένοσ αέρασ δεν µπορεί να αναρροφηθεί
ταν ο εύκαµπτοσ σωλήνασ είναι αποσυνδεδεµένοσ,
γι αυτ θα προτιµτερο να αποφευχθεί.
Το εργαλείο και ο εύκαµπτοσ σωλήνασ τροφοδοσίασ
αέρα πρέπει να διαθέτει σύζευξη εύκαµπτου σωλήνα
προκειµένου λη η πίεση να αφαιρείται απ το
εργαλείο ταν αποσυνδέεται η συναρµογή ζεύξησ.
25. ∫·Щ¿ ЩФУ О·ı·ЪИЫМfi ЩФ˘ ЛПВОЩЪИОФ‡ ВЪБ·ПВ›Ф˘, МЛ
¯ЪЛЫИМФФИВ›ЩВ ‚ВУ˙›УЛ ‹ ¿ПП· В‡КПВОЩ· ˘БЪ¿.
Εάν εισέλθει στο ηλεκτρικ εργαλείο ατµσ
εύφλεκτου υγρού, υπάρχει κίνδυνοσ οι σπινθήρεσ
που δηµιουργούνται κατά τη συρραφή, για
παράδειγµα, να προκαλέσουν έκρηξη.
¶ƒ√¢π∞°ƒ∞º∂™
Τύποσ ρεύµατοσ Παλινδροµικ έµβολο
Πίεση αέρα (µετρητήσ) 4,9 - 8,3 bar
Συνιστώµενοι συνδετήρεσ συρραφήσ Εικ.
Ποστητα συνδετήρων συρραφήσ προσ οπλισµ 150 συνδετήρεσ συρραφήσ
Μέγεθοσ 365 mm (Μ) × 258 mm (Υ) × 76 mm (Β)
Βάροσ 2,0 kg
Εύκαµπτοσ σωλήνασ (έσωτ. διάµετροσ) 6 mm
19
Page 21
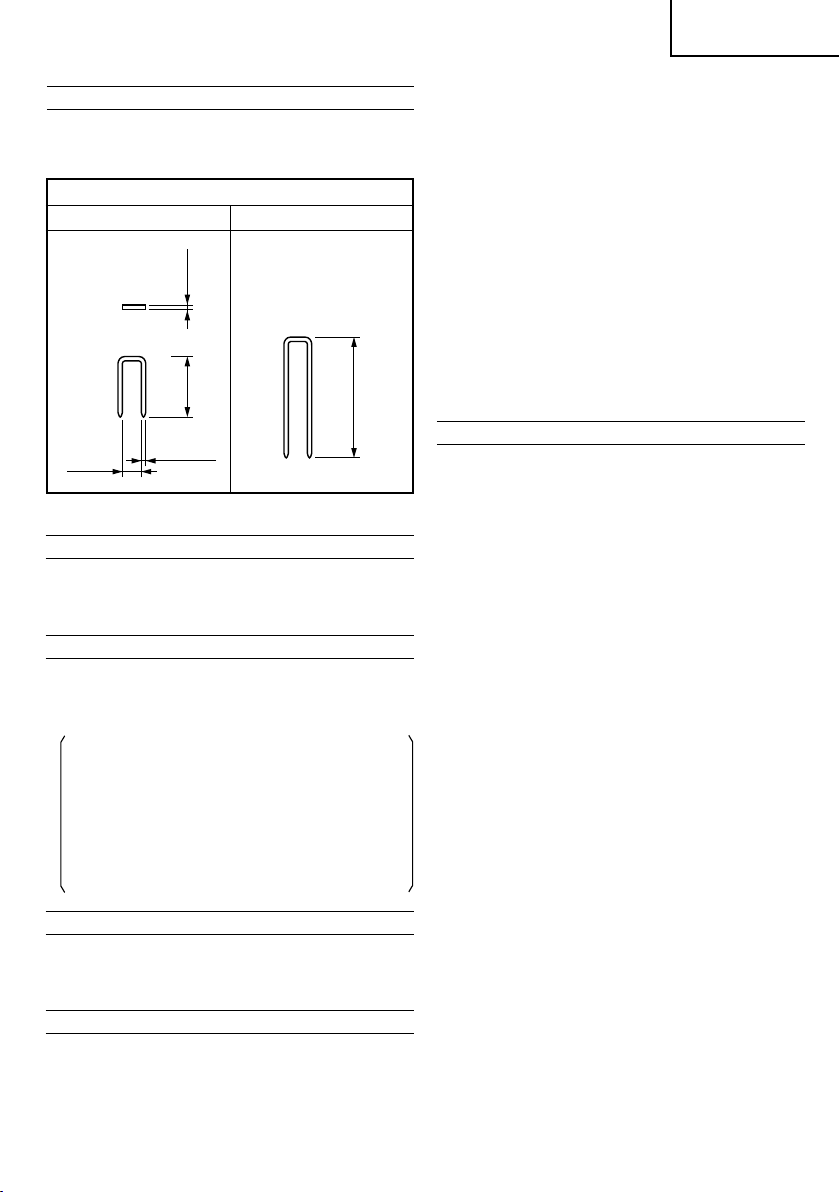
∂ППЛУИО¿
∂¶π§√°∏ ™À¡¢∂∆∏ƒø¡ ™Àƒƒ∞º∏™
Επιλογή κατάλληλου συνδετήρα συρραφήσ απ Εικ. Οι
συνδετήρεσ συρραφήσ που δεν φαίνονται στο Εικ. δεν
µπορούν να εκτοξευθούν µε αυτ το εργαλείο.
Μέγεθοσ 16 7/16" κορώνα
Ελάχ. Μέγ.
1,61mm
25mm
7,9mm
1,45mm
∆ιαστάσεισ συνδετήρων συρραφήσ
50mm
µ∞™π∫∞ ∂•∞ƒ∆∏ª∞∆∞
(1) Κλειδί άλλεν M5 ......................................................... 1
(2) Προστατευτικά γυαλιά .............................................. 1
(3) Λιπαντήρασ ................................................................. 1
¶ƒ√∞πƒ∂∆π∫∞ ∂•∞ƒ∆∏ª∞∆∞
䡬 Κιτ Μηχανισµού Απασφάλισησ ∆ιαδοχικήσ
Λειτουργίασ (Κωδικσ 876762)
(Σετ Εξαρτηµάτων ∆ιαδοχικήσ Πυροδτησησ,
Εξαρτήµατα Μίασ Βολήσ)
Με τα εξαρτήµατα διαδοχικήσ πυροδτησησ, ο
συνδετήρασ συρραφήσ εκτοξεύεται µνο µε το
πάτηµα τησ σκανδάλησ µετά απ την πίεση του
µοχλού ώθησησ.
Με την εγκατάσταση αυτών των εξαρτηµάτων,
µπορεί να αποφευχθεί η εκτξευση των
συνδετήρων συρραφήσ σε ακατάλληλεσ θέσεισ και
η απροσδκητη ανάφλεξη των συνδετήρων
συρραφήσ λγω εσφαλµένησ λειτουργίασ του
µοχλού ώθησησ.
∂º∞ƒª√°∂™
䡬 Κατασκευαστικέσ εργασίεσ πωσ επισανίδωµα
τοίχων, τοποθέτηση υποστρώµατοσ δαπέδου.
䡬 Κινητέσ και αρθρωτέσ οικιακέσ κατασκευέσ.
¶ƒ√∂∆√πª∞™π∞ ¶ƒπ¡ ∞¶√ ∆∏¡ ∂ƒ°∞™π∞
1. ¶ЪФВЩФИМ¿ЫЩВ ЩФУ В‡О·МЩФ ЫˆП‹У·
Βεβαιωθείτε τι χρησιµοποιείτε τον εύκαµπτο
σωλήνα που παρέχεται, µε ελάχιστη εσωτερική
διάµετρο 6 mm.
™∏ª∂πø™∏:
Οι εύκαµπτοι σωλήνεσ τροφοδοσίασ αέρα πρέπει να
έχουν ελάχιστη ονοµαστική τιµή πίεσησ λειτουργίασ
12,8 bar ή 150 τοισ εκατ επί τησ µέγιστησ πίεσησ
που παράγεται στο σύστηµα τροφοδοσίασ αέρα, τη
µεγαλύτερη εκ των δύο.
2. ŒÏÂÁ¯Ô˜ ·ÛÊ¿ÏÂÈ·˜
¶ƒ√™√Ã∏:
䡬 Τα µη εξουσιοδοτηµένα άτοµα (συµπεριλαµβανοµένων
των παιδιών) πρέπει να παραµένουν µακριά απ τον
εξοπλισµ.
䡬 Φοράτε προστατευτικά γυαλιά.
䡬 Ελέγξτε εάν οι βίδεσ στερέωσησ του καλύµµατοσ
εξαερισµού είναι αρκετά σφικτέσ.
Ελέγξτε το καρφωτικ για διαρροέσ αέρα και
ελαττωµατικά ή σκουριασµένα εξαρτήµατα.
䡬 Ελέγξτε εάν ο µοχλσ ώθησησ λειτουργεί σωστά.
Επίσησ ελέγξτε εάν έχουν εισέλθει ακαθαρσίεσ στα
κινητά µέρη του µοχλού ώθησησ.
䡬 Κάντε επανέλεγχο τησ ασφάλειασ λειτουργίασ.
¶ƒπ¡ ∞¶√ ∆∏ Ã∏™∏
1. ŒÏÂÁ¯Ô˜ Ù˘ ›ÂÛ˘ ·¤Ú·
¶ƒ√™√Ã∏:
Η πίεση αέρα πρέπει να διατηρείται συνεχώσ στα 4,9 8,3 bar.
Ρυθµίστε την πίεση αέρα µεταξύ 4,9 και 8,3 bar
σύµφωνα µε τη διάµετρο και το µήκοσ των
συνδετήρων συρραφήσ και τη σκληρτητα του ξύλου
προσ συρραφή. ∆ώστε µεγάλη προσοχή στην πίεση
εξδου, τη χωρητικτητα και τη σωλήνωση του
συµπιεστή αέρα, ώστε η πίεση αέρα να µην υπερβαίνει
το καθορισµένο ριο. Σηµειώστε τι η υπερβολική
πίεση ενδέχεται να επηρεάσει τη συνολική απδοση,
τη διάρκεια ζωήσ και την ασφάλεια.
2. §›·ÓÛË
(1) Προτού θέσετε σε λειτουργία αυτ το καρφωτικ,
πρέπει να παρέχετε οπωσδήποτε αέρα µεταξύ του
συµπιεστή αέρα και αυτήσ τησ συσκευήσ. Η λίπανση
µέσω του σετ αέρα εξασφαλίζει την οµαλή
λειτουργία, την παράταση τησ διάρκειασ ζωήσ και την
προστασία κατά τησ διάβρωσησ.
Ρυθµίστε τον λιπαντήρα ώστε να παρέχεται µία µνο
σταγνα ανά 5 έωσ 10 κύκλουσ συρραφήσ.
(2) Συνιστάται να χρησιµοποιείτε το συνιστώµενο λάδι
(SHELL TONNA). Παρατίθενται και άλλα κατάλληλα
λάδια. Μην ανακατεύετε ποτέ δύο ή περισστερα
διαφορετικά είδη λαδιών.
3. √ÏÈÛÌfi˜ ÌÂ Û˘Ó‰ÂÙ‹Ú˜ Û˘ÚÚ·Ê‹˜
¶ƒ√™√Ã∏:
䡬 Κατά τον οπλισµ του καρφωτικού µε συνδετήρεσ
συρραφήσ,
(1) µην πιέζετε τη σκανδάλη,
(2) µην πιέζετε το µοχλ ώθησησ, και
(3) κρατήστε το κεφάλι, τα χέρια, τα πδια και τα
υπλοιπα µέλη του σώµατσ σασ, καθώσ και των
υπλοιπων ατµων, µακριά απ το στµιο του
ρύγχουσ για την αποφυγή πιθανού τραυµατισµού
κατά τη χρήση και τη µεταφορά.
(1) Τραβήξτε τον τροφοδτη συνδετήρων προσ τα πίσω
και στερεώστε τον σε έναν αύλακα του γεµιστήρα.
(Βλ. ∂ÈÎ 2)
(2) Τοποθετήστε µια δέσµη συνδετήρων συρραφήσ στο
γεµιστήρα.
Βεβαιωθείτε τι ο συνδετήρασ συρραφήσ ολισθαίνει
ανεµπδιστα στο γεµιστήρα. (Βλ. ∂ÈÎ. 3)
20
Page 22

∂ППЛУИО¿
(3) Τραβήξτε τον τροφοδτη συνδετήρων προσ τα πίσω.
Στη συνέχεια αποσπάστε τον απ τον αύλακα του
γεµιστήρα και φέρτε απαλά το συνδετήρα συρραφήσ
προσ τα πίσω, σαν να πιέζετε απαλά, αποφεύγοντασ
οποιαδήποτε σύγκρουση. (Βλ. ∂ÈÎ. 4)
Ο συνδετήρασ συρραφήσ είναι πλέον έτοιµοσ για χρήση.
¶ƒ√™√Ã∏:
䡬 Εάν ο τροφοδτησ συνδετήρων απελευθερωθεί
ξαφνικά, µπορεί να γυρίσει απτοµα, προκαλώντασ
παραµρφωση ή και διασκορπισµ, έχοντασ τελικά ωσ
αποτέλεσµα να µπλοκάρουν οι συνδετήρεσ συρραφήσ.
Βεβαιωθείτε οπωσδήποτε τι θα επαναφέρετε τον
τροφοδτη συνδετήρων, αποφεύγοντασ οποιαδήποτε
σύγκρουση.
䡬 Προκειµένου να αποφευχθεί η µη ηθεληµένη
λειτουργία, µην αγγίζετε ποτέ τη σκανδάλη και µην
τοποθετείτε το επάνω µέροσ του µοχλού ώθησησ σε
πάγκο εργασίασ που βρίσκεται στο πάτωµα. Επίσησ,
µη στρέφετε ποτέ την έξοδο συνδετήρων συρραφήσ
προσ τα µέλη ανθρώπου.
√¢∏°π∂™ Ã∏™∏™ ∆√À ∫∞ƒºø∆π∫√À
¶ƒ√™√Ã∏:
䡬 Μη χρησιµοποιείτε ποτέ την κεφαλή ή τον κορµ
αυτήσ τησ συσκευήσ ωσ σφυρί.
䡬 Λάβετε µέτρα για την ασφάλεια των ατµων που
βρίσκονται κοντά σασ κατά τη λειτουργία.
1. ¢È·‰Èηۛ˜ Û˘ÚÚ·Ê‹˜
(1) ∆ιακεκοµµένη συρραφή
Πιέστε την έξοδο συνδετήρων συρραφήσ επάνω στο
επιθυµητ σηµείο και έπειτα τραβήξτε τη σκανδάλη
για να εκτοξεύσετε έναν συνδετήρα συρραφήσ στο
συγκεκριµένο σηµείο. (Βλ. ∂ÈÎ. 5)
¶ƒ√™√Ã∏:
䡬 Αυτ το εργαλείο θα αναπηδήσει και θα εκτοξεύσει
µε γρήγορη εναλλαγή πολλούσ συνδετήρεσ
συρραφήσ αντί για έναν, ταν πιεστεί δυνατά και
εφαρµοστά πάνω σε µία επιφάνεια ή ταν
χρησιµοποιείται σε σκληρά υλικά. Σε αυτέσ τισ
περιπτώσεισ, πυροδοτήστε τουσ συνδετήρεσ
συρραφήσ πιέζοντασ και απελευθερώνοντασ
γρήγορα τη σκανδάλη.
(2) Μοχλσ ώθησησ
Κατά την πίεση τησ εξδου συνδετήρων συρραφήσ,
βεβαιωθείτε τι ανασηκώνετε πλήρωσ το µοχλ
ώθησησ (Βλ. ∂ÈÎ. 5) για απελευθέρωση του
κλειδώµατοσ ασφαλείασ. Με αυτν τον τρπο, οι
συνδετήρεσ δεν µπορούν να εκτοξευτούν χωρίσ να
απελευθερωθεί το κλείδωµα ασφαλείασ ακµη και
εάν τραβηχτεί η σκανδάλη.
(3) Συνεχµενη συρραφή
Πρώτον, τραβήξτε τη σκανδάλη. Έπειτα συµπιέστε
τη συσκευή πάνω την επιθυµητή θέση για να
εκτοξεύσετε αυτµατα συνδετήρεσ συρραφήσ. (Βλ.
∂ÈÎ. 6).
¶ƒ√™√Ã∏:
䡬 Να είστε προσεκτικοί κατά τη συρραφή γωνιών
ξύλου. Κατά τη συνεχµενη συρραφή των γωνιών
ξύλου, υπάρχει περίπτωση ένασ συνδετήρασ να
εκτροχιαστεί ή να διαπεράσει τη γωνία.
䡬 Μην εκτοξεύετε συνδετήρεσ πάνω σε άλλουσ
συνδετήρεσ συρραφήσ.
䡬 Μην εκτοξεύετε συνδετήρεσ πάνω σε µεταλλικά
εξαρτήµατα.
21
™∏ª∂πø™∏:
䡬 Προφυλάξεισ κατά την αφοπλισµένη λειτουργία
Ορισµένεσ φορέσ η συρραφή συνεχίζεται µετά την
εκτξευση λων των συνδετήρων συρραφήσ που
περιέχονταν στο γεµιστήρα.
Αυτ το φαινµενο ονοµάζεται "αφοπλισµένη
λειτουργία". Η λειτουργία αυτή ενδέχεται να
επιδεινώσει την κατάσταση του προσκρουστήρα, του
γεµιστήρα και του τροφοδτη συνδετήρων.
Για αποφυγή τησ αφοπλισµένησ λειτουργίασ,
επιβεβαιώνετε σε τακτικά διαστήµατα την ποστητα
των εναποµεινάντων συνδετήρων συρραφήσ. Απ την
άλλη πλευρά, µετά τη χρήση αυτού του καρφωτικού
πρέπει να αφαιρούνται λοι οι συνδετήρεσ συρραφήσ.
䡬 Μετά τη συρραφή:
(1) αποσυνδέστε τον εύκαµπτο σωλήνα αέρα απ το
καρφωτικ,
(2) αφαιρέστε λουσ τουσ συνδετήρεσ συρραφήσ
απ το καρφωτικ,
(3) ρίξτε 5 - 10 σταγνεσ λιπαντικού για εργαλεία που
λειτουργούν µε πεπιεσµένο αέρα τησ Hitachi στην
τάπα αέρα στο καρφωτικ και
(4) ανοίξτε τη ένσφαιρη βαλβίδα στο δοχείο του
συµπιεστή αέρα για να αδειάσετε οποιαδήποτε
υγρασία.
䡬 Σε συνθήκεσ χαµηλήσ θερµοκρασίασ, το µηχάνηµα
ορισµένεσ φορέσ δεν λειτουργεί κανονικά. Το
µηχάνηµα πρέπει να λειτουργεί πάντοτε στην
κατάλληλη θερµοκρασία περιβάλλοντοσ.
2. ¶Ò˜ Ó· Ú˘ıÌ›ÛÂÙ ÙÔ ‚¿ıÔ˜ Û˘ÚÚ·Ê‹˜
Για να διασφαλίσετε τι κάθε συνδετήρασ συρραφήσ
φτάνει στο ίδιο βάθοσ, βεβαιωθείτε τι:
(1) η πίεση αέρα στο καρφωτικ παραµένει σταθερή
(έχει εγκατασταθεί ρυθµιστήσ και λειτουργεί
κανονικά) και
(2) το καρφωτικ διατηρείται σταθερ πάνω στο
αντικείµενο εργασίασ.
Εάν οι συνδετήρεσ συρραφήσ έχουν µπει πολύ βαθιά
ή πολύ επιφανειακά στο αντικείµενο εργασίασ,
ρυθµίστε τη συρραφή µε την ακλουθη σειρά.
¶ƒ√™√Ã∏:
䡬 Πριν τη ρύθµιση, αποσυνδέετε πάντοτε τον
εύκαµπτο σωλήνα και απελευθερώστε τον
πεπιεσµένο αέρα που βρίσκεται στο ηλεκτρικ
εργαλείο.
䡬 Στη διάρκεια τησ ρύθµισησ, κρατήστε οπωσδήποτε
το δάχτυλ σασ µακριά απ τη σκανδάλη.
䡬 Στη διάρκεια τησ ρύθµισησ, βεβαιωθείτε τι κανένα
µέλοσ του σώµατοσ, χέρι ή πδι, δεν βρίσκεται
µπροστά απ την έξοδο συνδετήρων συρραφήσ.
Πραγµατοποιήστε τισ ρυθµίσεισ µε την ακλουθη
σειρά. (Βλ. ∂ÈÎ. 7)
Για να ρυθµίσετε το βάθοσ καρφώµατοσ ενσ
συνδετήρα συρραφήσ, χαλαρώστε τη βίδα που
στερεώνει το εξάρτηµα του µοχλού ώθησησ.
Εάν ο συνδετήρασ συρραφήσ έχει µπει πολύ βαθιά,
ρυθµίστε το εξάρτηµα του µοχλού ώθησησ προσ τα
“κάτω” και εάν έχει µπει πολύ επιφανειακά, ρυθµίστε
το εξάρτηµα του µοχλού ώθησησ προσ τα “επάνω”.
Σφίξτε τη βίδα για να ασφαλίσετε το εξάρτηµα του
µοχλού ώθησησ.
™∏ª∂πø™∏:
䡬 Χρησιµοποιήστε την ελάχιστη πίεση αέρα που είναι
αρκετή για το κάρφωµα των συνδετήρων συρραφήσ
στο επιθυµητ βάθοσ. Εάν χρησιµοποιείται
υπερβολικά υψηλή πίεση, η διάρκεια ζωήσ του
αποσβεστήρα εµβλου κ.λπ. θα µειωθεί.
Page 23

∂ППЛУИО¿
∂¶π£∂øƒ∏™∏ ∫∞π ™À¡∆∏ƒ∏™∏
¶ƒ√™√Ã∏:
Βεβαιωθείτε τι έχετε αποσυνδέσει τον εύκαµπτο
σωλήνα κατά την αποκατάσταση των εµπλοκών,
την επιθεώρηση, τη συντήρηση και τον καθαρισµ.
1. ∞ÔηٿÛÙ·ÛË ÂÌÏÔ΋˜ Û˘Ó‰ÂÙ‹ÚˆÓ Û˘ÚÚ·Ê‹˜
(1) Αφαιρέστε λουσ τουσ συνδετήρεσ συρραφήσ.
(2) Απελευθερώστε το µοχλ ασφάλισησ και ανοίξτε τον
οδηγ λεπίδασ. (Βλ. ∂ÈÎ. 8)
(3) Αφαιρέστε το συνδετήρα συρραφήσ που προκαλεί
την εµπλοκή µε ένα κατσαβίδι. (Βλ. ∂ÈÎ. 9)
(4) Κλείστε και ασφαλίστε τον οδηγ λεπίδασ.
(5) Σε περίπτωση συχνών εµπλοκών, απευθυνθείτε σε
ένα εξουσιοδοτηµένο κέντρο σέρβισ τησ Hitachi.
2. ∂ИıВТЪЛЫЛ О·И Ы˘УЩ‹ЪЛЫЛ
Επιθεωρείτε τη συσκευή σε τακτά χρονικά διαστήµατα.
(1) Αφαιρέστε τισ τέσσερισ βίδεσ άλλεν που ασφαλίζουν
το κάλυµµα εξαερισµού και αφαιρέστε το κάλυµµα
εξαερισµού.
Έπειτα, µπορούν να αφαιρεθούν ο κύλινδροσ, το
έµβολο και άλλα εξαρτήµατα σε αντίστοιχεσ οµάδεσ
διάταξησ.
Σκουπίστε την κεφαλή καρφώµατοσ, το συρµενο
εξάρτηµα εµβλου και το εσωτερικ του κορµού µε
ένα πανί για να αποµακρύνετε τισ εναποθέσεισ
ακαθαρσιών.
(2) Βεβαιωθείτε τι ο αποσβεστήρασ του εµβλου
λειτουργεί κανονικά. Ένασ κατεστραµµένοσ
αποσβεστήρασ εµβλου ενδέχεται να προκαλέσει
ζηµιά στα υπλοιπα εξαρτήµατα.
(3) Ελέγξτε προσεκτικά τη ροδέλα για φθορέσ κατά την
αποσυναρµολγηση. Μια φθαρµένη ή
κατεστραµµένη ροδέλα ενδέχεται να επιδεινώσει τη
συνολική απδοση. Αντικαταστήστε τη φθαρµένο ή
κατεστραµµένη ροδέλα µε µια καινούργια.
(4) Πριν απ την επανασυναρµολγηση τησ συσκευήσ,
απλώστε γράσο (Γράσο Attolub αρ. 2) στη ροδέλα.
Επίσησ, λιπάνετε τη συσκευή µε το συνιστώµενο λάδι.
3. ŒÏÂÁ¯Ô˜ ÙˆÓ ‚ȉÒÓ ÛÙÂÚ¤ˆÛ˘ Û οı ÂÍ¿ÚÙËÌ·
Ελέγχετε σε τακτά διαστήµατα κάθε εξάρτηµα για
χαλαρωµένεσ βίδεσ στερέωσησ και διαρροέσ αέρα.
Σφίξτε ξανά τυχν χαλαρωµένεσ βίδεσ. Η λειτουργία
του εξοπλισµού µε χαλαρωµένεσ βίδεσ µπορεί να
αποβεί επικίνδυνη.
4. ∂ИıВТЪЛЫЛ ЩФ˘ МФ¯ПФ‡ ТıЛЫЛ˜
Ελέγξτε εάν ο µοχλσ ώθησησ (∂ÈÎ. 1) µπορεί να
γλιστρήσει απαλά.
Καθαρίστε τη συρµενη περιοχή του µοχλού ώθησησ
και χρησιµοποιείτε περιοδικά το λάδι που παρέχεται
για λίπανση. Η λίπανση επιτρέπει το απαλ γλίστρηµα
και ταυτχρονα προστατεύει απ τη συσσώρευση
σκνησ.
5. ∞Ôı‹Î¢ÛË
䡬 ταν δεν χρησιµοποιείται για παρατεταµένο χρονικ
διάστηµα, απλώστε µια λεπτή στρώση λιπαντικού στα
ατσάλινα εξαρτήµατα για να αποφευχθεί η
συσσώρευση σκνησ.
䡬 Μην αποθηκεύετε το καρφωτικ σε περιβάλλον µε
χαµηλή θερµοκρασία. Κρατήστε το καρφωτικ σε
θερµ µέροσ.
䡬 ταν δεν χρησιµοποιείται, το καρφωτικ πρέπει να
αποθηκεύεται σε θερµ και ξηρ µέροσ.
Να φυλάσσεται µακριά απ παιδιά.
6. ∫·Щ¿ПФБФ˜ ·УЩ·ПП·ОЩИОТУ Ы¤Ъ‚И˜
¶ƒ√™√Г∏:
Η επισκευή, τροποποίηση και επιθεώρηση των
ηλεκτρικών εργαλείων Hitachi πρέπει να διεξάγονται
σε εξουσιοδοτηµένο κέντρο σέρβισ τησ Hitachi.
Αυτσ ο κατάλογοσ ανταλλακτικών θα σασ
διευκολύνει ταν απευθυνθείτε για επισκευή ή άλλου
είδουσ συντήρηση του εργαλείου σε
εξουσιοδοτηµένο κέντρο σέρβισ τησ Hitachi.
Κατά τη λειτουργία και συντήρηση των ηλεκτρικών
συσκευών, πρέπει να τηρείτε τουσ κανονισµούσ και
τα πρτυπα ασφαλείασ που έχουν καθοριστεί σε κάθε
χώρα.
∆ƒ√¶√¶√π∏™∂π™:
Τα ηλεκτρικά εργαλεία Hitachi βελτιώνονται και
τροποποιούνται συνεχώσ µε στχο την ενσωµάτωση
των τελευταίων τεχνολογικών εξελίξεων.
Συνεπώσ, ορισµένα εξαρτήµατα ενδέχεται να έχουν
αλλάξει χωρίσ προειδοποίηση.
™Àª¶π∂™∆∏™
¶ƒ√™√Ã∏:
ταν η µέγιστη πίεση λειτουργίασ του συµπιεστή
αέρα υπερβαίνει τα 8,3 bar, φροντίστε να
παρεµβάλετε µια βαλβίδα εκτνωσησ µεταξύ του
συµπιεστή αέρα και του καρφωτικού. Έπειτα,
ρυθµίστε την πίεση του αέρα εντσ του εύρουσ
λειτουργίασ 4,9 ~ 8,3 bar. Εάν έχει εγκατασταθεί σετ
αέρα, είναι επίσησ δυνατή η λίπανση, η οποία
εξασφαλίζει επιπλέον άνεση.
µ∞§µπ¢∞ ∂∫∆√¡ø™∏™ §π¶∞¡∆∏ƒ∞ ºπ§∆ƒ√À
(™ÂÙ ·¤Ú·)
Για τη λειτουργία του εξοπλισµού υπ τισ βέλτιστεσ
συνθήκεσ προκειµένου να εξασφαλιστεί παράταση τησ
διάρκειασ ζωήσ τησ, συνιστάται η χρήση βαλβίδασ
εκτνωσησ φίλτρου λιπαντήρα. Περιορίστε το µήκοσ του
εύκαµπτου σωλήνα µεταξύ τησ µονάδασ και του σετ
αέρα στα 10m κατά τη χρήση. (∂ÈÎ. 10)
∫∞∆∞§§∏§∞ §π¶∞¡∆π∫∞
Τύποσ λιπαντικού νοµα λιπαντικού
Συνιστώµενο λιπαντικ SHELL TONNA
Λάδι κινητήρα SAE10W, SAE20W
Λάδι τουρµπίνασ ISO VG32 – 68
(#90 – #180)
22
Page 24

∂ППЛУИО¿
™ÙÔȯ›· ıÔÚ‡‚Ô˘
Χαρακτηριστικέσ τιµέσ θορύβου σύµφωνα µε το
πρτυπο EN 792-13, ΙΟΥΝΙΟΣ, 2000.
Τυπική σταθµισµένη-Α µεµονωµένη στάθµη ηχητικήσ
ισχύοσ
Τυπική σταθµισµένη-Α µεµονωµένη στάθµη πίεσησ
ήχου εκποµπήσ
Οι τιµέσ αυτέσ εξαρτώνται απ τα χαρακτηριστικά του
εργαλείου και δεν είναι αντιπροσωπευτικέσ του ήχου
που παράγεται στο σηµείο χρήσησ. Η παραγωγή ήχου
στο σηµείο χρήσησ θα εξαρτηθεί για παράδειγµα απ
το περιβάλλον εργασίασ, το αντικείµενο εργασίασ, τη
στήριξη του αντικειµένου εργασίασ και τον αριθµ των
εργασιών καρφώµατοσ κ.λπ.
Ανάλογα µε τισ συνθήκεσ που επικρατούν στο χώρο
εργασίασ και τη µορφή του αντικείµενο εργασίασ,
ενδέχεται να πρέπει να ληφθούν µεµονωµένα µέτρα
ηχοπροστασίασ, πωσ η τοποθέτηση των αντικειµένων
εργασίασ σε βάσεισ ηχητικήσ απσβεσησ, οι οποίεσ
εµποδίζουν τουσ κραδασµούσ του αντικειµένου
εργασίασ µε σύσφιξη ή κάλυψη, τη ρύθµιση τησ
ελάχιστησ απαιτούµενησ πίεση αέρα για την αντίστοιχη
εργασία κ.λπ.
Σε ειδικέσ περιπτώσεισ είναι απαραίτητη η χρήση
εξοπλισµού προστασίασ ακοήσ.
™ÙÔȯ›· ÎÚ·‰·ÛÌÒÓ
Τυπική χαρακτηριστική τιµή κραδασµών σύµφωνα µε το
πρτυπο EN 792-13, ΙΟΥΝΙΟΣ 2000: 3,9 m/s
Αυτέσ οι τιµέσ εξαρτώνται απ τα χαρακτηριστικά του
εργαλείου και δεν είναι αντιπροσωπευτικέσ τησ
επίδρασησ στο σύστηµα χειρσ-βραχίονα κατά τη χρήση
του εργαλείου. Η επίδραση στο σύστηµα χειρσβραχίονα κατά τη χρήση του εργαλείου θα εξαρτηθεί,
για παράδειγµα, απ τη δύναµη κρατήµατοσ, τη δύναµη
τησ πίεσησ επαφήσ, την κατεύθυνση εργασίασ, τη
ρύθµιση τησ παροχήσ ενέργειασ, το αντικείµενο
εργασίασ, τη στήριξη του αντικειµένου εργασίασ.
LWA,
1s,d = 99 dB
LpA,
1s,d = 81 dB
2
.
23
Page 25

Polski
OGÓLNE WSKAZÓWKI DOTYCZĄCE
BEZPIECZEŃSTWA UŻYTKOWANIA
1. Dla zapewnienia prawidłowej pracy urządzenia
należy stosować się do instrukcji bezpieczeństwa.
Używać wyłącznie do celów opisanych w niniejszej
instrukcji.
2. Dla zapewnienia bezpieczeństwa pracy,
elektronarzędzie należy obsługiwać we właściwy
sposób.
Aby zapewnić bezpieczeństwo pracy, narzędzie należy
obsługiwać zgodnie z zamieszczonymi w niniejszej
instrukcji wskazówkami. Elektronarzędzia nie należy
udostępniać dzieciom, osobom nieposiadającym
wystarczającej wiedzy lub niezdolnym do jego
prawidłowej obsługi.
3. Bezpieczeństwo w miejscu pracy.
Należy upewnić się, że w pobliżu miejsca pracy nie
znajdują się osoby nieupoważnione, zwłaszcza dzieci.
4. Elementy narzędzia.
Wszystkie pokrywy i śruby są ważnymi elementami
elektronarzędzia - nie należy ich demontować. Ze
względów bezpieczeństwa nie dokonywać żadnych
modyfikacji narzędzia.
W przypadku dokonania jakichkolwiek modyfikacji nie
używać narzędzia.
5. Przed użyciem skontrolować narzędzie.
Przed każdym użyciem narzędzia należy upewnić się,
że wszystkie śruby są dokręcone a wszystkie elementy
znajdują się we właściwych miejscach i nie są
uszkodzone lub zardzewiałe.
6. Przeciążanie narzędzia może spowodować wypadek.
Należy pamiętać, że przeciążanie narzędzi oraz
akcesoriów nie tylko prowadzi do ich uszkodzenia, ale
stwarza również niebezpieczeństwo.
7. W przypadku nieprawidłowej pracy należy
natychmiast zaprzestać użytkowania narzędzia.
Jeżeli urządzenie nie działa prawidłowo, należy zwrócić
się do specjalisty, który podda je kontroli i serwisowaniu.
8. Należy dbać o elektronarzędzie.
Zachować ostrożność - w wyniku upuszczenia lub
uderzenia narzędzia obudowa może ulec
zniekształceniu, pęknięciu lub innym uszkodzeniom.
Unikać zarysowań i zadrapań obudowy. Wszelkie
pęknięcia stanowią zagrożenie ze względu na wysokie
ciśnienie we wnętrzu narzędzia.
Jeżeli na narzędziu pojawi się pęknięcie lub z miejsca
pęknięcia ulatnia się powietrze, należy zaprzestać
użytkowania urządzenia.
9. Prawidłowa konserwacja wydłuża żywotność
narzędzia.
Należy dbać o elektronarzędzie i utrzymywać je w
czystości.
10. Regularne kontrole narzędzia są niezbędne dla
zapewnienia bezpieczeństwa.
Dla bezawaryjnej i bezpiecznej pracy należy regularnie
kontrolować stan elektronarzędzia.
11. W razie konieczności naprawy lub wymiany części
należy zwrócić się do autoryzowanego punktu
serwisowego.
Elektronarzędzie należy serwisować wyłącznie w
autoryzowanych punktach serwisowych. Używać
wyłącznie oryginalnych części zamiennych.
12. Przechowywać elektronarzędzie w odpowiednim
miejscu.
Jeżeli narzędzie nie jest używane, należy
przechowywać je w suchym, niedostępnym dla dzieci
miejscu. Aby zabezpieczyć narzędzie przed rdzą, przez
otwór połączeniowy węża należy wprowadzić do jego
wnętrza ok. 2 cm
13. Zamieszczony w niniejszej instrukcji schemat
budowy narzędzia jest przeznaczony wyłącznie dla
pracowników autoryzowanych punktów
serwisowych.
3
oleju.
OSTRZEŻENIA DOTYCZĄCE PRACY ZE
ZSZYWACZEM
1. Właściwa obsługa gwarantuje bezpieczeństwo
pracy.
Narzędzie jest przeznaczone do zszywania drewna i
podobnych materiałów. Używać wyłącznie zgodnie z
przeznaczeniem.
2. Należy upewnić się, że ciśnienie powietrza jest
zgodne z ciśnieniem znamionowym.
Zasilane sprężonym powietrzem narzędzia do łączenia
elementów należy podłączać wyłącznie do źródeł
sprężonego powietrza, których maksymalne
dopuszczalne ciśnienie może zostać przekroczone o nie
więcej niż 10%, co można osiągnąć np. dzięki
zastosowaniu zaworu redukcyjnego z zaworem
bezpieczeństwa ciśnienia minusowego.
(W przypadku modelu N5008AC2 110% maksymalnego
dopuszczalnego ciśnienia wynosi 9,1 bar = 130 psi.)
Aby zmniejszyć poziom hałasu oraz zużycie i
zminimalizować ryzyko awarii, zasilane sprężonym
powietrzem narzędzia do łączenia elementów należy
obsługiwać z najniższym ciśnieniem wymaganym do
danej pracy.
3. Nigdy nie używać sprężonych gazów innych niż
powietrze.
Nigdy nie używać sprężonego dwutlenku węgla, tlenu
lub innych gazów z pojemników ciśnieniowych!
4. Ryzyko zapłonu lub wybuchu.
Podczas zszywania mogą powstawać iskry, dlatego nie
należy pod żadnym pozorem używać narzędzia w
pobliżu lakierów, farb, benzyny, rozpuszczalników,
paliw, gazu, klejów i innych substancji mogących ulec
zapłonowi lub wybuchowi.
5. Nosić okulary ochronne (gogle).
Operator oraz osoby znajdujące się w pobliżu miejsca
pracy powinny nosić okulary ochronne.
Fragmenty zszywek lub zszywki, które nie zostały
prawidłowo wbite stwarzają zagrożenie dla oczu.
Okulary ochronne są dostępne w sklepach z
narzędziami. Należy zawsze nosić okulary ochronne
podczas pracy z narzędziem. Nosić okulary ochronne
lub maski zakładane na okulary korekcyjne.
Pracodawcy powinni wymagać od pracowników
używania okularów ochronnych.
6. Używać słuchawek ochronnych i kasków.
Podczas zszywania należy nosić słuchawki ochronne
lub zatyczki i kask. Należy upewnić się, że osoby
przebywające w pobliżu również noszą wyposażenie
ochronne.
7. Pracując w grupie należy zachować szczególną
ostrożność.
Nieprawidłowo wbite zszywki mogą stwarzać zagrożenie
dla osób znajdujących się w pobliżu. Należy dbać o
bezpieczeństwo osób przebywających w miejscu pracy.
Używać zszywacza w bezpiecznej odległości od innych
pracowników.
24
Page 26

Polski
8. Nigdy nie kierować wylotu zszywek w stronę ludzi.
Przypadkowo wystrzelona zszywka może stwarzać
poważne zagrożenie dla innych osób, dlatego należy
zawsze zakładać, że magazynek narzędzia jest pełny i
nigdy nie kierować wylotu zszywek w stronę ludzi.
Podczas podłączania lub odłączania węża, ładowania
magazynka lub wykonywania podobnych prac należy
upewnić się, że wylot zszywek nie jest skierowany w
stronę operatora lub innych osób. Nawet jeśli w
urządzeniu nie znajdują się zszywki, kierowanie wylotu
zszywek w stronę ludzi jest niebezpieczne. Narzędzie
należy obsługiwać w sposób odpowiedzialny.
9. Przed użyciem elektronarzędzia sprawdzić
dźwignię naciskową.
Przed użyciem elektronarzędzia należy w następujący
sposób sprawdzić, czy dźwignia naciskowa i zawór
działają prawidłowo: podłączyć wąż do
elektronarzędzia (bez ładowania zszywek). Jeżeli
słychać pracę narzędzia, oznacza to, że jest ono
uszkodzone. W takim przypadku należy zaprzestać
użytkowania i oddać narzędzie do serwisu.
䡬 Jeżeli po naciśnięciu spustu słychać przesuwanie
listwy prowadzącej, narzędzie jest uszkodzone.
䡬 Jeżeli po przyciśnięciu dźwigni naciskowej do
zszywanego materiału słychać przesuwanie listwy
prowadzącej, narzędzie jest uszkodzone. Ważne:
dźwigni naciskowej nie wolno nigdy modyfikować
ani demontować.
10. Używać wyłącznie odpowiednich zszywek.
Nie używać innych zszywek, niż określone i opisane w
niniejszej instrukcji.
11. Zachować ostrożność podczas podłączania węża.
Aby uniknąć przypadkowego wystrzelenia zszywki,
podczas podłączania węża oraz ładowania magazynka
należy pamiętać, aby:
䡬 Nie dotykać spustu.
䡬 Nie przykładać głowicy zszywającej do
jakichkolwiek powierzchni.
䡬 Trzymać narzędzie z głowicą zszywającą
skierowaną w dół.
Należy bezwzględnie przestrzegać powyższych
instrukcji i pamiętać, aby nie kierować wylotu zszywek
w stronę ludzi.
12. Nie dotykać spustu bez zamiaru uruchomienia
urządzenia.
Spust należy dotykać wyłącznie w momencie
zszywania. Trzymając palec na spuście podczas
przenoszenia lub podawania narzędzia innym
pracownikom można przypadkowo wystrzelić zszywkę,
powodując wypadek.
13. Zamknąć prowadnicę i nie otwierać jej w trakcie
obsługi narzędzia.
Jeżeli w trakcie obsługi narzędzia prowadnica jest
otwarta, zszywka nie zostanie wbita w drewno, co
stwarza zagrożenie niekontrolowanego wystrzelenia.
14. Mocno przycisnąć wylot zszywek do zszywanego
materiału.
Podczas zszywania mocno przycisnąć wylot zszywek
do zszywanego materiału, aby uniknąć odbicia zszywki.
15. Nie zbliżać głowicy zszywającej do dłoni i stóp.
Wystrzelona zszywka może spowodować poważne
rany dłoni i stóp.
16. Niebezpieczeństwo odrzutu.
Podczas pracy zachować bezpieczną odległość od
górnej części narzędzia. W przypadku uderzenia
zszywki w sęk lub inną zszywkę, narzędzie może zostać
gwałtownie odrzucone.
25
17. Zachować ostrożność podczas zszywania
cienkiego drewna lub rogów desek.
Podczas zszywania cienkiego drewna lub rogów desek
zszywka może przebić materiał lub odbić się, dlatego
należy upewnić się, że za lub w pobliżu zszywanego
drewna nie znajdują się inne osoby i trzymać dłonie,
stopy itd. w bezpiecznej odległości.
18. Jednoczesne zszywanie z obu stron ściany jest
niebezpieczne.
Pod żadnym pozorem nie należy jednocześnie zszywać
z obu stron ściany. Zszywka może przebić ścianę i
spowodować poważne obrażenia.
19. Nie używać narzędzia na rusztowaniach lub
drabinach.
W niektórych sytuacjach używanie zszywacza jest
niedozwolone, np.:
podczas zmiany miejsca zszywania na
rusztowaniach, schodach, drabinach lub podobnych
konstrukcjach, np. łatach więźby dachowej,
do zamykania pudeł lub skrzyń,
do zabezpieczania transportowanego ładunku, np.
na pojazdach
20. Nie dotykać spustu podczas odłączania węża.
Jeżeli podczas odłączania węża spust zostanie
przypadkowo naciśnięty, istnieje ryzyko, że przy
ponownym podłączaniu węża elektronarzędzie
wystrzeli zszywkę lub nie zadziała prawidłowo.
21. Po zakończeniu pracy odłączyć wąż i wyjąć zszywki
z magazynka.
Przed przystąpieniem do konserwacji lub usuwania
zablokowanej zszywki oraz przed przenoszeniem
narzędzia, opuszczeniem miejsca pracy, a także po
zakończeniu pracy należy odłączyć zszywacz od źródła
powietrza. Przypadkowe wystrzelenie zszywki może
być bardzo niebezpieczne.
22. Aby usunąć zablokowaną zszywkę należy w
pierwszej kolejności odłączyć wąż i spuścić
sprężone powietrze.
Przed przystąpieniem do usuwania zszywki
zablokowanej w otworze wylotowym należy odłączyć
wąż i spuścić z narzędzia sprężone powietrze.
Przypadkowe wystrzelenie zszywki może być bardzo
niebezpieczne.
23. Aby uniknąć zagrożenia związanego z rozrzuceniem
zszywek, podczas ładowania magazynka nie należy
trzymać narzędzia skierowanego w dół.
24. Nie używać w korpusie narzędzia wtyczek żeńskich
(typu air socket).
Użycie wewnątrz urządzenia wtyczki żeńskiej może
uniemożliwić pobór sprężonego powietrza po
odłączeniu węża.
Narzędzie oraz wąż sprężonego powietrza muszą być
wyposażone w element połączeniowy, po którego
odłączeniu ciśnienie wewnątrz narzędzia zostanie
całkowicie uwolnione.
25. Nie używać do czyszczenia elektronarzędzia
benzyny lub innych łatwopalnych substancji.
W przypadku przedostania się oparów łatwopalnej
substancji do wnętrza elektronarzędzia istnieje ryzyko
wybuchu, spowodowanego przez iskry powstające
podczas zszywania.
Page 27

SPECYFIKACJE
Silnik Tłokowy (suwowy)
Ciśnienie powietrza (przyrząd pomiarowy) 4,9 - 8,3 bar
Dopuszczalne typy zszywek zob. Rys.
Pojemność magazynka 150 zszywek
Wymiary 365 mm (dł.) × 258 mm (wys.) × 76 mm (szer.)
Ciężar 2,0 kg
Wąż (średnica wew.) 6 mm
Polski
DOBÓR ZSZYWEK
Wybrać odpowiednie zszywki spośród zamieszczonych na
Rys. Tylko zszywki zamieszczone na Rys. nadają się do
użycia z niniejszym narzędziem.
Rozmiar 16 Korona 7/16"
Min. Maks.
1,61mm
7,9mm
25mm
1,45mm
Wymiary zszywek
50mm
STANDARDOWE AKCESORIA
(1) Klucz sześciokątny do śrub M5 ................................... 1
(2) Okulary ochronne .........................................................1
(3) Smarownica ................................................................. 1
AKCESORIA OPCJONALNE
䡬 Wyzwalacz sekwencyjny - komplet części (kod: 876762)
(zestaw wyzwalacza sekwencyjnego, zestaw wyzwalacza
pojedynczego)
Wyzwalacz sekwencyjny umożliwia zszywanie
wyłącznie w przypadku jednoczesnego przyciśnięcia
dźwigni naciskowej i wciśnięcia spustu.
Montaż tych części pozwala zapobiec nieprawidłowemu
ułożeniu zszywek w materiale oraz niezamierzonemu
wystrzeleniu zszywki na skutek przypadkowego
wciśnięcia dźwigni naciskowej.
ZASTOSOWANIA
䡬 Prace budowlane, np. poszycia ścian, podłoża.
䡬 Budowa domów modułowych oraz mobilnych.
PRZYGOTOWANIE DO PRACY
1. Przygotować wąż
Używać węży o minimalnej wewnętrznej średnicy 6 mm.
WSKAZÓWKA:
Minimalne ciśnienie robocze węży doprowadzających
powietrze powinno być równe wyższej spośród
następujących wartości: 12,8 bar lub 150% maksymalnego
ciśnienia wytwarzanego przez źródło sprężonego powietrza.
2. Zadbać o bezpieczeństwo
UWAGA:
䡬 Zabezpieczyć sprzęt przed osobami nieupoważnionymi
(w tym dziećmi).
䡬 Nosić okulary ochronne.
䡬 Sprawdzić śruby zabezpieczające pokrywy układu
wydechu, np. pod kątem ewentualnego poluzowania.
Sprawdzić zszywacz pod kątem nieszczelności i rdzy.
䡬 Upewnić się, że dźwignia naciskowa działa prawidłowo.
Sprawdzić czy ruchome elementy dźwigni nie są
zabrudzone.
䡬 Ponownie sprawdzić bezpieczeństwo pracy narzędzia.
PRZED UŻYCIEM
1. Sprawdzić ciśnienie powietrza
UWAGA:
Utrzymywać ciśnienie na poziomie 4,9 - 8,3 bar.
W zależności od średnicy i długości zszywek oraz
twardości drewna, regulować ciśnienie w zakresie 4,9 8,3 bar. Zwracać szczególną uwagę na ciśnienie
wyjściowe, przepustowość oraz instalację rurową
kompresora powietrza - zbyt wysokie ciśnienie wpływa
na wydajność i żywotność narzędzia oraz
bezpieczeństwo pracy.
2. Smarowanie
(1) Przed użyciem zszywacz należy połączyć z kompresorem
za pomocą zaworu regulacyjnego. Dzięki temu
smarowanie zapewni bezawaryjną pracę, wydłuży
żywotność narzędzia i zabezpieczy je przed korozją.
Smarownice ustawić na jedną kroplę oleju w odstępach
5 - 10 cykli zszywania.
(2) Zaleca się używania oleju SHELL TONNA lub jednego z
wymienionych w niniejszej instrukcji. Nigdy nie mieszać
różnych typów olejów.
3. Załadować zszywki
UWAGA:
䡬 Podczas ładowania zszywek:
(1) nie wciskać spustu;
(2) nie wciskać dźwigni naciskowej;
(3) trzymać dłonie, stopy, twarz (dotyczy to również
innych osób) z dala od wylotu zszywek, aby uniknąć
ryzyka odniesienia obrażeń w trakcie przenoszenia
lub użytkowania narzędzia.
26
Page 28

Polski
(1) Odciągnąć podajnik zszywek i zamocować do rowka
(Patrz Rys. 2).
(2) Nałożyć zszywki na magazynek tak, aby mogły
swobodnie się przesuwać (Patrz Rys. 3).
(3) Podajnik zszywek odciągnąć, zdjąć z rowka, a następnie
ostrożnie przesunąć do przodu (Patrz Rys. 4).
Zszywacz jest gotowy do pracy.
UWAGA:
䡬 Jeżeli podajnik zszywek zostanie zwolniony, może
przesunąć się gwałtownie, powodując odkształcenie i/
lub rozrzucenie, a w konsekwencji zablokowanie
zszywek.
Podajnik należy przesuwać ostrożnie.
䡬 Aby uniknąć niezamierzonego wystrzału, nie dotykać
spustu ani nie przyciskać dźwigni naciskowej do podłoża.
Nie kierować wylotu zszywek w stronę ludzi.
OBSŁUGA ZSZYWACZA
UWAGA:
䡬 Nie używać zszywacza jako młotka.
䡬 Zachować wszelkie środki ostrożności, aby zapewnić
bezpieczeństwo osób znajdujących się w pobliżu miejsca
pracy.
1. Zszywanie
(1) Zszywanie przerywane
Przycisnąć wylot zszywek do miejsca zszywania,
następnie wcisnąć spust, aby wystrzelić pojedynczą
zszywkę (Patrz Rys. 5).
UWAGA:
䡬 W przypadku mocnego przyciśnięcia do zszywanej
powierzchni lub jeśli zszywany materiał jest twardy,
zszywacz odbije się i wystrzeli serię zszywek zamiast
jednej. Aby tego uniknąć należy szybko wciskać i
zwalniać spust.
(2) Dźwignia naciskowa
Przed przyciśnięciem wylotu zszywek do materiału należy
całkowicie podnieść dźwignię naciskową (Patrz Rys. 5),
aby zwolnić blokadę. Dopóki blokada nie zostanie
zwolniona, narzędzie nie wystrzeli zszywki nawet po
naciśnięciu spustu.
(3) Zszywanie ciągłe
Wcisnąć spust, następnie przycisnąć narzędzie do
odpowiedniego miejsca na zszywanym materiale, aby
rozpocząć automatyczne zszywanie (Patrz Rys. 6).
UWAGA:
䡬 Zszywając rogi desek należy zachować ostrożność. W
przypadku zszywania ciągłego zszywka może przejść
przez drewno.
䡬 Nie wbijać jednej zszywki na drugą.
䡬 Nie wbijać zszywek w metal.
WSKAZÓWKA:
䡬 Środki ostrożności podczas pracy bez obciążenia
Zszywacz może czasami kontynuować zszywanie po
opróżnieniu magazynka.
Jest to tzw. “praca bez obciążenia”, która może
doprowadzić do odkształcenia zderzaka, magazynka oraz
podajnika zszywek.
Aby uniknąć pracy bez obciążenia, należy regularnie
sprawdzać ilość zszywek w magazynku, pamiętając, że
po zakończeniu pracy magazynek należy opróżnić.
䡬 Po zakończeniu pracy:
(1) odłączyć wąż doprowadzający powietrze od
zszywacza;
(2) opróżnić magazynek;
27
(3) wprowadzić do wlotu sprężonego powietrza 5-10
kropel smaru Hitachi do narzędzi pneumatycznych;
(4) otworzyć kurek kompresora, aby go osuszyć.
䡬 W niskich temperaturach narzędzie może nie działać
prawidłowo. Należy pamiętać o odpowiedniej
temperaturze otoczenia.
2. Regulacja głębokości zszywania
Aby upewnić się, że każda zszywka będzie wbijana na tę
samą głębokość:
(1) upewnić się, że ciśnienie jest stałe (zawór regulacyjny
jest prawidłowo zainstalowany i działa poprawnie);
(2) mocno przyciskać zszywacz do obrabianego
przedmiotu.
Jeżeli zszywki wbijane są zbyt głęboko lub zbyt płytko,
należy postępować jak opisano poniżej.
UWAGA:
䡬 Przed przystąpieniem do regulacji należy odłączyć
wąż i uwolnić ciśnienie z wnętrza elektronarzędzia.
䡬 Nie dotykać spustu podczas regulacji narzędzia.
䡬 Nie zbliżać dłoni, stóp lub innych części ciała do
wylotu zszywek podczas regulacji.
Regulację narzędzia należy przeprowadzić w opisanej
poniżej kolejności (Patrz Rys. 7).
Aby wyregulować głębokość wbijania zszywek,
poluzować śrubę przytrzymującą element dźwigni
naciskowej.
Jeżeli głębokość jest zbyt duża, wyregulować element
“w dół”, jeżeli jest zbyt mała "w górę".
Dokręcić śrubę, aby zabezpieczyć element dźwigni.
WSKAZÓWKA:
䡬 Podczas pracy używać minimalnego ciśnienia
wymaganego do wbijania zszywek na pożądaną
głębokość. Zbyt wysokie ciśnienie skraca żywotność
tłumika tłoka i innych elementów.
KONTROLA STANU NARZĘDZIA I KONSERWACJA
UWAGA:
Przed przystąpieniem do usuwania zablokowanych
zszywek, kontroli stanu, konserwacji i czyszczenia
narzędzia należy odłączyć wąż.
1. Zapobieganie zablokowaniu zszywek
(1) Opróżnić magazynek.
(2) Zwolnić dźwignię blokady i otworzyć prowadnicę ostrza
(Patrz Rys. 8).
(3) Wyjąć zablokowaną zszywkę za pomocą płaskiego
śrubokrętu (Patrz Rys. 9).
(4) Zamknąć prowadnicę ostrza i zawias.
(5) W przypadku częstego blokowania zszywek,
skontaktować się z autoryzowanym punktem
serwisowym Hitachi.
2. Kontrola stanu narzędzia i konserwacja
Regularnie kontrolować stan narzędzia.
(1) Wykręcić cztery śruby sześciokątne mocujące pokrywę
układu wydechu i zdjąć pokrywę.
Umożliwi to wymontowanie cylindra, tłoka i pozostałych
części z odpowiednich zespołów.
Przetrzeć listwę prowadzącą, przesuwną część tłoka oraz
wnętrze korpusu narzędzia ściereczką, aby usunąć
osadzony brud.
(2) Upewnić się, że tłumik tłoka działa prawidłowo.
Niesprawny tłumik tłoka może doprowadzić do
uszkodzenia innych elementów narzędzia.
(3) Ostrożnie sprawdzić pierścień o-ring pod kątem zużycia.
Zużyty lub uszkodzony pierścień obniża wydajność
narzędzia. W razie potrzeby wymienić zużyty pierścień
o-ring.
Page 29

Polski
(4) Przed przystąpieniem do ponownego montażu narzędzia
nasmarować pierścień o-ring smarem Attolub 2.
Nasmarować narzędzie zalecanym smarem.
3. Sprawdzić śruby mocujące poszczególnych
elementów
Regularnie sprawdzać wszystkie elementy narzędzia
pod kątem poluzowanych śrub mocujących oraz
wycieków. Dokręcić poluzowane śruby. Obsługa
narzędzia z poluzowanymi śrubami jest niebezpieczna.
4. Kontrola dźwigni naciskowej
Sprawdzić czy dźwignia naciskowa (Rys. 1) swobodnie
się przesuwa.
Wyczyścić powierzchnię przesuwu dźwigni naciskowej.
Od czasu do czasu nasmarować powierzchnię
dostarczonym olejem. Nasmarowanie ułatwia przesuwanie
się dźwigni i zapobiega rdzewieniu.
5. Przechowywanie
䡬 Jeżeli urządzenie nie będzie używane przez dłuższy czas,
nałożyć cienką warstwę oleju na metalowe elementy, aby
zapobiec rdzewieniu.
䡬 Zszywacz przechowywać w ciepłym miejscu. Unikać
niskich temperatur.
䡬 Nieużywany zszywacz powinien być przechowywany w
ciepłym, suchym miejscu.
Przechowywać w miejscu niedostępnym dla dzieci.
6. Lista części dla serwisu
UWAGA:
Naprawy, modyfikacje i kontrole stanu elektronarzędzi
Hitachi należy zlecać autoryzowanym punktom
serwisowym Hitachi.
Niniejszą listę części należy przekazać pracownikom
autoryzowanego punktu serwisowego Hitachi wraz z
narzędziem.
Podczas obsługi i konserwacji elektronarzędzi należy
przestrzegać krajowych przepisów i wymogów
bezpieczeństwa.
MODYFIKACJE:
Elektronarzędzia Hitachi są regularnie usprawniane i
modyfikowane, aby uwzględnić najnowsze osiągnięcia
technologiczne.
Z tego powodu niektóre elementy narzędzi mogą zostać
zmienione bez uprzedzenia.
KOMPRESOR
UWAGA:
Jeżeli maksymalne ciśnienie robocze kompresora
przekracza 8,3 bar, należy zamontować zawór
regulacyjny między narzędziem i kompresorem.
Następnie należy wyregulować ciśnienie w zakresie 4,9
- 8,3 bar. W przypadku zamontowania zaworu możliwe
jest smarowanie.
ZAWÓR REDUKCYJNY SMAROWNICA-FILTR
(zawór regulacyjny)
Dla zapewnienia optymalnych warunków pracy narzędzia i
wydłużenia żywotności produktu zalecane jest używanie
zaworu redukcyjnego smarownica-filtr. Długość węża między
narzędziem a zaworem regulacyjnym nie powinna
przekraczać 10 m (Rys. 10).
ZALECANE SMARY
Typ smaru Nazwa smaru
Zalecany olej SHELL TONNA
Olej silnikowy SAE10W, SAE20W
Olej turbinowy ISO VG32 - 68
Informacje dotyczące poziomu hałasu
Wartości poziomu hałasu zgodnie z dyrektywą EN 792-13 z
czerwca 2000 r.
Typowa moc akustyczna dźwięku A dla pojedynczego
zdarzenia
Typowy poziom dźwięku A dla pojedynczego zdarzenia w
warsztacie
Niniejsze wartości przedstawiają charakterystykę urządzenia
i nie odzwierciedlają poziomu hałasu w miejscu pracy.
Poziom hałasu w miejscu pracy może zależeć od otoczenia,
obrabianego przedmiotu, elementów wspierających
obrabiany przedmiot, liczby wykonywanych operacji itd.
W zależności od warunków panujących w miejscu pracy oraz
rodzaju obrabianego przedmiotu, konieczne może być
przeprowadzenie pomiarów poszczególnych wartości
tłumienia hałasu, np. poprzez umieszczenie obrabianego
przedmiotu na wspornikach tłumiących, mocowanie lub
przykrywanie przedmiotu w celu zapobiegania wibracjom,
zmniejszenie wymaganego ciśnienia powietrza do minimum
itd.
W szczególnych przypadkach konieczne jest korzystanie ze
słuchawek ochronnych.
Informacje dotyczące wibracji
Typowa wartość wibracji zgodnie z normą EN 792-13 z
czerwca 2000 r.: 3,9 m/s
Niniejsze wartości przedstawiają charakterystykę urządzenia
i nie odzwierciedlają wpływu obsługi narzędzia na dłonie i
ramiona operatora. Faktyczny wpływ używania narzędzia na
dłonie i ramiona operatora zależy np. od siły uchwytu, siły
przykładanej do urządzenia, ustawienia operatora, mocy
zasilania, obrabianego przedmiotu, elementów
wspierających obrabiany przedmiot itd.
2
.
(#90 - #180)
LWA,
1s,d = 99 dB
LpA,
1s,d = 81 dB
28
Page 30

Magyar
ÁLTALÁNOS ÜZEMELTETÉSI ÓVINTÉZKEDÉSEK
1. A szerszámgépet a helyes használat érdekében
biztonságosan üzemeltesse.
Ne használja a szerszámgépet a jelen utasításokban
megadottaktól eltérő célokra.
2. A biztonságos üzemeltetés érdekében tartsa
helyesen a szerszámgépet.
Kérjük, kövesse a jelen kézikönyvben megadott
utasításokat és fogja megfelelően a szerszámot a
biztonságos üzemeltetés biztosítására. Soha ne hagyja,
hogy gyermekek vagy olyan emberek használják a
szerszámot, akik nem ismerik eléggé ahhoz, hogy
helyesen tudják azt kezelni, vagy ne hagyja olyan emberek
által használni, akik nem tudják azt helyesen üzemeltetni.
3. Erősítse meg a műhely biztonságát.
Tartsa távol a jogosulatlan személyeket a műhelytől.
Különösen a gyermekeket kell távol tartani.
4. A megfelelő részek a megfelelő helyeken.
Ne távolítson el egyetlen fedelet vagy csavart sem.
Tartsa azokat a helyükön, mivel megvan a funkciójuk.
Továbbá, mivel veszélyes lenne, soha ne végezzen
módosításokat a szerszámon, vagy ne használja azt
módosítások után.
5. Használat előtt ellenőrizze a szerszámot.
A szerszám használata előtt mindig ellenőrizze, hogy
annak alkatrészei nem töröttek-e, hogy minden csavar
teljesen szoros-e, és egyetlen alkatrész sem hiányzik
vagy rozsdás-e.
6. A túlzott munka baleseteket okozhat.
Ne dolgoztassa a szerszámokat és tartozékokat azok
képességein túl. A túlzott munka nem csak a
szerszámgépet károsítja, de önmagában is veszélyes.
7. Azonnal állítsa le az üzemelést, ha
rendellenességeket észlel.
Állítsa le az üzemelést, ha rendellenességeket észlel,
vagy ha a szerszámgép nem működik megfelelően;
ellenőriztesse és szervizeltesse a szerszámgépet.
8. Gondosan nézzen utána a szerszámgépnek.
Ha a szerszámgépet leejti vagy nekiüti dolgoknak, a
külső váz deformálódhat vagy megsérülhet, tehát
kérjük, kezelje megfelelő gondossággal. Szintén ne
karcoljon vagy gravírozzon jeleket se a szerszámgépre.
A szerszám belsejében levő nagy nyomású levegő
következtében a felületi repedések veszélyesek.
Soha ne használja a szerszámgépet, ha egy repedés
alakul ki vagy levegő szökik egy repedésből.
9. A hosszú élettartam érdekében jól vigyázzon.
Mindig jól vigyázzon a szerszámgépre és tartsa azt
tisztán.
10. A rendszeres időközönkénti ellenőrzés lényeges a
biztonsághoz.
Rendszeres időközönként ellenőrizze a szerszámgépet,
így a szerszámgép mindenkor biztonságosan és
hatékonyan üzemeltethető.
11. Ha javítás vagy alkatrészek cseréje szükséges,
konzultáljon egy felhatalmazott szervizzel.
Biztosítsa, hogy a szerszámgépet csak felhatalmazott
szervizközpontok szervizeljék, és, hogy csak eredeti
cserealkatrészeket használjanak.
12. Tartsa a szerszámgépet megfelelő helyen.
Amikor nincs használatban, a szerszámgépet száraz
helyen kell tartani úgy, hogy gyermekek ne érhessék
el. Tegyen a vázba körülbelül 2 cm
tömlőcsatlakozón keresztül, hogy védje a szerszámot
a rozsdától.
29
3
olajat a
13. Az ebben a kezelési utasításban levő három
dimenziós perspektívikus összeállítási rajzot csak
felhatalmazott szervizközpont használhatja.
ÓVINTÉZKEDÉSEK A TŰZŐGÉP
HASZNÁLATÁVAL KAPCSOLATBAN
1. Biztonságos működés a helyes használaton
keresztül.
Ezt a szerszámot kapcsok fába és hasonló anyagokba
törtánő behajtására tervezték. Csak arra a célra
használja, amire szánták.
2. Győződjön meg arról, hogy a légnyomás belül van
a légnyomás névleges tartományán.
A sűrített levegővel működő rögzítő-behajtó szerszámok
csak olyan sűrítettlevegő-vezetékekhez
csatlakoztathatók, ahol a maximálisan megengedhető
nyomást nem lehet több, mint 10% tényezővel
meghaladni, amely például olyan nyomáscsökkentő
szeleppel érhető el, amely tartalmaz egy folyásirányú
biztonsági szelepet.
(N5008AC2 modell esetén, a névleges maximálisan
megengedhető nyomás 110%-a 9,1 bar = 130 psi)
A sűrített levegővel működő rögzítő-behajtó
szerszámokat csak az aktuális munkafolyamathoz
szükséges legalacsonyabb nyomáson szabad
üzemeltetni, a szükségtelenül magas zajszintek,
megnövekedett kopás és eredő meghibásodások
megelőzése érdekében.
3. Soha ne üzemeltesse a berendezést sűrített levegőn
kívül más nagynyomású gázokkal.
Soha, semmilyen körülmények között ne használjon
széndioxidot, oxigént vagy más gázt nyomás alatti
tartályokból.
4. Vigyázzon a gyulladásra és robbanásokra.
Mivel a tűzés során szikrák repülhetnek, a szerszám
használata lakk, festék, benzin, hígító, gázolaj, gáz,
ragasztók és hasonló gyúlékony anyagok közelében
veszélyes, mivel ezek meggyulladhatnak vagy
felrobbanhatnak. Ezért ezt a szerszámot semmilyen
körülmények között nem szabad használni ilyen
gyúlékony anyag szomszédságában.
5. Mindig viseljen szemvédőt (védőszemüveget).
A szerszámgép üzemeltetésekor mindig viseljen
szemvédőt, és bizonyosodjon meg arról, hogy a
körülötte levő emberek is viselnek szemvédőt.
A kapcsok szilánkjainak vagy a nem megfelelően
beütött kapcsok szembe jutásának lehetősége
fenyegetés a látásra. Szemvédő minden vasüzletben
vásárolható. A szerszám üzemeltetése közben mindig
viseljen szemvédőt. Szemüveg fölött mindig viseljen
szemvédőt vagy széles látómezejű maszkot.
A munkáltatóknak mindig kényszeríteniük kell a
szemvédő felszerelés használatát.
6. Védje a fülét és a fejét.
Amikor elkezdi a tázési munkát, kérjük, viseljen fülvédőt
és fejvédőt. A körülményektől függően bizonyosodjon
meg arról is, hogy a körülötte levő emberek szintén
viselnek fülvédőt és fejvédőt.
7. Figyeljen a közelben dolgozókra.
Nagyon veszélyes lenne, ha a nem megfelelően behajtott
kapcsok megütnének más embereket. Ezért mindig
figyeljen a körülötte levő emberek biztonságára, amikor
használja a szerszámot. Mindig győződjön meg arról, hogy
senkinek a teste, keze vagy lába nincs közel a
kapocskivezetőhöz.
Page 31

Magyar
8. A kapocskivezetőt soha ne irányítsa emberek felé.
Mindig tételezze fel, hogy a szerszám tartalmaz rögzítőket.
Ha a kapocskivezető emberek felé irányul, komoly
baleseteket okozhat, ha tévedésből elsüti a szerszámot.
Amikor csatlakoztatja és leválasztja a tömlőt,
kapocsbetöltési vagy hasonló műveletek során,
győződjön meg arról, hogy a kapocskivezető nem mutat
senki felé (beleértve saját magát). Még ha egyáltalán
nincsenek is betöltve kapcsok, veszélyes elsütni a
szerszámot, miközben azt valakire irányítja, így azt soha
ne kísérelje meg. Ne folytasson durva tréfát. Tisztelje a
szerszámot, mint munkaeszközt.
9. A szerszámgép használata előtt ellenőrizze a
nyomókart.
A szerszámgép használata előtt ellenőrizze, hogy a
nyomókar és a szelep megfelelően működik. A
szerszámgépbe betöltött kapcsok nélkül
csatlakoztassa a tömlőt és ellenőrizze a következőt.
Ha működési hang fordul elő, az hibát jelez, így ilyen
esetben ne használja a szerszámgépet, amíg az nem
került ellenőrzésre és megjavításra.
䡬 Ha csupán az elsütőbillentyű meghúzása okozza
a hajtóhegy mozgásának működési hangja
előfordulását, a szerszámgép hibás.
䡬 Ha csupán a nyomókar nekinyomása a tűzendő
anyagnak okozza a hajtóhegy mozgásának hangja
előfordulását, a szerszámgép hibás. Továbbá, a
nyomókarra vonatkozóan, kérjük, jegyezze meg,
hogy azt soha nem szabad módosítani vagy
eltávolítani.
10. Csak a megadott kapcsokat használja.
Soha ne használjon a jelen utasításokban
megadottaktól és leírtaktól eltérő kapcsokat.
11. Vigyázzon, amikor csatlakoztatja a tömlőt.
Amikor csatlakoztatja a tömlőt és betölti a kapcsokat,
ahhoz, hogy tévedésből ne tüzeljen a szerszámmal,
bizonyosodjon meg a következőről.
䡬 Ne érintse meg az elsütőbillentyűt.
䡬 Ne hagyja, hogy a lövőfej bármilyen felülettel
érintkezzen.
䡬 Tartsa lefelé a lövőfejet.
Szigorúan tartsa be a fenti utasításokat, és mindig
győződjön meg arról, hogy a test semmilyen része, a
kéz vagy láb soha sincs a kapocskivezető előtt.
12. Ne tegye az ujját meggondolatlanul az
elsütőbillentyűre.
Ne tegye az ujját az elsütőbillentyűre, kivéve, amikor
ténylegesen tűz. Ha viszi a szerszámot vagy átadja
valakinek, miközben az ujja az elsütőbillentyűn van,
véletlenül elsüthet egy kapcsot, és ezáltal balesetet
okozhat.
13. Teljesen zárja le a pengevezetőt és ne nyissa ki azt
üzemelés közben.
Ha megkísérli a tűzést, amikor a pengevezető nyitva
van, a kapcsok nem mennek be a fába, és fennáll a
veszélyes elsülés kockázata.
14. A kapocskivezetőt nyomja szorosan neki a tűzendő
anyagnak.
Kapcsok behajtásakor a kapocskivezetőt nyomja
szorosan neki a tűzendő anyagnak. Ha a kivezetőt nem
alkalmazza megfelelően, a kapcsok újra beköthetnek.
15. Használatkor tartsa távol a kezét és lábát a
lövőfejtől.
Nagyon veszélyes, ha egy kapocs tévedésből megüti
a kezét vagy lábát.
16. Vigyázzon a szerszám visszarúgására.
Üzemeltetés közben ne közelítse meg a szerszám
tetejét a fejével, stb. Ez veszélyes, mert a szerszám
erőszakosan visszarúghat, ha az aktuálisan behajtott
kapocs érintkezésbe kerül egy előző kapoccsal vagy
csomóval a fában.
17. Vigyázzon, amikor vékony táblákat vagy a fa sarkait
tűzi.
Amikor vékony táblákat tűz, a kapcsok egyenesen
keresztülmehetnek, és ugyanez lehet az eset, amikor a
fa sarkait tűzi, a kapcsok elhajlása következtében. Ilyen
esetekben mindig győződjön meg arról, hogy senki (és
senkinek a keze vagy lába, stb.) nincs a vékony tábla
mögött vagy a fa mellett, amelyet tűzni készül.
18. Az egyidejű tűzés ugyanannak a falnak a két oldalán
veszélyes.
Semmilyen körülmények között nem szabad tűzést
végezni ugyanabban az időben egy fal két oldalán. Ez
nagyon veszélyes lehet, mivel a kapcsok
keresztülmehetnek a falon és így sérülést okozhatnak.
19. Ne használja a szerszámgépet állványokon,
létrákon.
A szerszámgépet nem szabad használni speciális
alkalmazásokra, például:
amikor egy behajtási hely felcserélésre egy másikra
állványok, lépcsők, létrák vagy létrához hasonló
szerkezetek, pl. tetőlécek használatával jár,
dobozok vagy ládák lezárására,
szállítási biztosító rendszerek felszerelésére pl.
járműveken és vagonokon
20. Ne válassza le úgy a tömlőt, hogy az ujja az
elsütőbillentyűn van.
Ha úgy választja le a tömlőt, hogy az ujja az
elsütőbillentyűn van, a következő alkalommal, amikor
a tömlő csatlakoztatva van, fennáll a veszélye, hogy a
szerszámgép spontán kilő egy kapcsot, vagy
helytelenül fog működni.
21. Válassza le a tömlőt és vegye ki a tárban maradt
összes kapcsot a használat után.
Válassza le a szerszámot a levegőről, mielőtt a
szerszám karbantartását végzi, megtisztít egy beszorult
rögzítőt, elhagyja a munkaterületet, átviszi a szerszámot
egy másik helyre, vagy használat után. Nagyon
veszélyes, ha tévedésből kilő egy kapcsot.
22. Amikor eltávolít egy megakadt kapcsot, mindenek
előtt biztosítsa a tömlő leválasztását és a sűrített
levegő kiengedését.
Amikor eltávolít egy kapcsot, amely magakadt a
kapocskivezetőben, mindenek előtt biztosítsa a tömlő
leválasztását és a szerszámgépben levő sűrített levegő
kiengedését.
A kapocs véletlen kilövése nagyon veszélyes lehet.
23. A leeső kapcsok által okozott veszélyek
elkerülésére, soha ne nyissa ki a tárat úgy, hogy az
eszköz lefelé néz, miközben betölti a kapcsokat.
24. Dugaszolóaljzatot (levegőaljzat) nem szabad
használni a géptestben.
Ha a géptestbe dugaszolóaljzat van szerelve, a sűrített
levegő néha nem ereszthető ki, amikor a tömlő
leválasztásra került, így ezt kerülje el.
A szerszámnak és a levegőellátó tömlőnek
tömlőkapcsolóval kell rendelkeznie, hogy minden
nyomás eltávozzon a szerszámból, amikor a
csatlakozás leválasztásra kerül.
30
Page 32

Magyar
25. A szerszámgép tisztításakor ne használjon benzint
vagy más gyúlékony folyadékot.
Ha egy gyúlékony folyadékból gőz kerül a
szerszámgépbe, fennáll a veszély, hogy a tűzéskor, stb.
keletkező szikrák robbanást okozhatnak.
SPECIFIKÁCIÓ
Energia típusa Lengődugattyú
Légnyomás (manométer) 4,9 - 8,3 bar
Alkalmazható kapcsok hiv. ábra.
Betölthető kapcsok mennyisége 150 kapocs
Méret 365 mm (H) × 258 mm (M) × 76 mm (Sz)
Súly 2,0 kg
Tömlő (belső átm.) 6 mm
KAPOCSVÁLASZTÁS
Válasszon egy megfelelő kapcsot az ábráról. Az ábrán nem
bemutatott kapcsok ezzel a szerszámmal nem hajthatók be.
16-os Manométer 7/16" Korona
Min. Max.
1,61mm
7,9mm
25mm
1,45mm
Kapcsok mérete
50mm
STANDARD TARTOZÉKOK
(1) Imbuszkulcs M5 csavarhoz ..........................................1
(2) Szemvédő .................................................................... 1
(3) Olajozó ......................................................................... 1
OPCIONÁLIS TARTOZÉK
䡬 Szekvenciális léptető mechanizmus készlet (Kódsz.
876762)
(Sorozatlövő alkatrészek készlete, egyenlen lövés
alkatrészei)
A sorozatlövő alkatrészekkel, a kapocs is behajtása csak
az elsütőbillentyű benyomásával történik a nyomókar
lenyomása után.
Ezeknek az alkatrészeknek a beszerelésével a kapcsok
helytelen pozíciókba történő behajtása és a kapcsoknak
a nyomókar véletlen működtetése által okozott váratlan
kilövése megelőzhető.
31
ALKALMAZÁSOK
䡬 Építési munka, mint például falburkolás, aládeszkázás.
䡬 Mobil és moduláris otthonok építése.
ELŐKÉSZÍTÉS AZ ÜZEMELTETÉS ELŐTT
1. Készítse elő a tömlőt
Győződjön meg arról, hogy a rendelkezésre bocsátott
minimum 6 mm belső átmérőjű tömlőt használja.
MEGJEGYZÉS:
A levegőellátó tömlőknek minimum 12,8 bar névleges
munkanyomással vagy a levegőellátó rendszerben
létrehozott maximális nyomás 150 százalékával kell
rendelkezniük, amelyik nagyobb.
2. Biztonsági ellenőrzés
FIGYELEM:
䡬 A jogosulatlan személyeket (beleértve a gyermekeket)
távol kell tartani a berendezéstől.
䡬 Viseljen szemvédőt.
䡬 Szorosság szempontjából ellenőrizze a tartócsavarokat,
amelyek rögzítik a kilépőnyílás fedelét, stb.
Ellenőrizze a tűzőgépet levegőszivárgások, és hibás vagy
rozsdás alkatrészek szempontjából.
䡬 Ellenőrizze, hogy a nyomókar megfelelően működik-e,
vagy sem. Azt is ellenőrizze, hogy bármilyen szennyeződés
tapadt-e a nyomókar mozgó részeihez, vagy sem.
䡬 Ellenőrizze újra üzembiztonsági szempontból.
HASZNÁLAT ELŐTT
1. Ellenőrizze a légnyomást
FIGYELEM:
A légnyomást állandóan 4,9 - 8,3 bar értéken kell tartani.
Állítsa be a légnyomást 4,9 - 8,3 bar közé a kapcsok
átmérői és hossza, és a tűzött fa keménysége szerint.
Fordítson különös figyelmet a kimeneti nyomásra,
kapacitásra, és csövezésre a légkompresszoron, hogy a
légnyomás ne haladja meg az előírt határértéket. Jegyezze
meg, hogy a túlzott nyomás ronthatja az általános
teljesítményt, szolgálati élettartamot, és biztonságot.
2. Kenés
(1) A tűzőgép üzemeltetése előtt feltétlenül gondoskodjon
egy levegő-előkészítőről a légkompresszor és az eszköz
közé. A levegő-előkészítőn keresztül történő kenés sima
üzemelést, megnövekedett szolgálati élettartamot, és
korrózióvédelmet biztosít.
Úgy állítsa be az olajozót, hogy egyetlen csepp olajat
szállítson 5 - 10 tűzési ciklus időközeiként.
Page 33

Magyar
(2) Javasolt az ajánlott olaj (SHELL TONNA) használata. Az
egyéb alkalmazható olajok felsorolásra kerültek. Soha ne
keverjen két vagy több különböző típusú olajat.
3. Töltse be a kapcsokat
FIGYELEM:
䡬 Amikor kapcsokat tölt a tűzőgépbe,
(1) ne nyomja le az elsütőbillentyűt;
(2) ne nyomja le a nyomókart; és
(3) tartsa távol az arcát, kezét, lábát és egyéb testrészeit,
valamint más személyekét az orrtorkolattól, hogy
elkerülje az esetleges sérülést a használat és a
hordozás során.
(1) Húzza hátra a kapocsadagolót és csatolja azt
biztonságosan a tár egy hornyához. (Lásd 2. Ábra)
(2) Helyezze a kapocscsíkot a tár fölé.
Bizonyosodjon meg arról, hogy a kapocscsík szabadon
csúszik a táron. (Lásd 3. Ábra)
(3) Húzza hátra a kapocsadagolót. Ezután válassza le azt a
tár hornyáról és lágyan hozza vissza a kapcsot, mint ha
finoman nyomva lenne, elkerülve minden ütést. (Lásd 4.
Ábra)
A tűzőgép most készen áll az üzemeltetésre.
FIGYELEM:
䡬 Ha a kapocsadagoló hirtelen elengedésre kerül, az
minden átmenet nélkül visszatérhet, deformálódást és/
vagy szóródást okozva, adott esetben összecsomósodott
kapcsokkal befejeződve.
Legyen benne teljesen biztos, hogy visszahozza a
kapocsadagolót, kerülve minden ütést.
䡬 A nem szándékos üzemelés megelőzésére, soha ne
érintse meg az elsütőbillentyűt vagy helyezze a nyomókar
felső végét munkapadra a padlón. Továbbá, soha ne
fordítsa a kapocskivezetőt személyek semmilyen
testrésze felé.
A TŰZŐGÉP HASZNÁLATA
FIGYELEM:
䡬 Soha ne használja az eszköz fejét vagy testét kalapácsként.
䡬 Tegyen óvintézkedéseket a közelben levő személyek
biztonságának biztosítására az üzemeltetés során.
1. Tűzési eljárások
(1) Szaggatott tűzés
Nyomja rá a kapocskivezetőt a kívánt pontra; majd húzza
meg az elsütőbillentyűt a kapocs behajtásához egy
lövéssel. (Lásd 5. Ábra)
FIGYELEM:
䡬 A szerszám visszapattan és több kapcsot lő ki csupán
egyetlen helyett gyors egymásutánban, amikor
folyamatosan erősen nekinyomja egy felületnek, vagy
amikor kemény anyagokon használja. Ilyen esetekben a
kapcsokat az elsütőbillentyű benyomásával és gyors
elengedésével lője.
(2) Nyomókar
A kapocskivezető lenyomásakor teljesen emelje föl a
nyomókart (Lásd 5. Ábra) a biztonsági zár kioldásához.
Így a kapcsok nem hajthatók be a biztonsági zár kioldása
nélkül, még akkor sem, ha az elsütőbillentyűt meghúzta.
(3) Folyamatos tűzés
Először húzza meg az elsütőbillentyűt. Majd nyomja rá a
készüléket a kívánt pontra a kapcsok automatikus
behajtásához. (Lásd 6. Ábra).
FIGYELEM:
䡬 Gyakoroljon óvatosságot, amikor fűrészáru sarkait tűzi.
Fűrészáru sarkainak folyamatos tűzésekor egy kapocs
félremehet vagy áttörheti a sarkot.
䡬 Ne hajtson be kapcsot egy másik kapocsra.
䡬 Ne hajtson be kapcsot fém részeken.
MEGJEGYZÉS:
䡬 Töltet nélküli működésre vonatkozó óvintézkedések
Néha folytatódik a tűzés a korábban a tárban levő összes
kapocs behajtása után is.
Ezt “töltet nélküli működésnek” nevezik. Az ilyen működés
tönkreteheti az ütközőt, a tárat, és a kapocsadagolót.
A töltet nélküli működés elkerülésére időnként győződjön
meg a maradék kapcsok mennyiségéről. Másrészt minden
kapcsot el kell távolítani a tűzőgép használata után.
䡬 Tűzés után:
(1) válassza le a légtömlőt a tűzőgépről;
(2) távolítson el minden kapcsot a tűzőgépből;
(3) tegyen 5 - 10 csepp Hitachi pneumatikus szerszám
kenőanyagot a levegődugaszba a szegezőn; és
(4) nyissa ki a leeresztőcsapot a légkompresszor
tartályán az összes nedvesség leeresztéséhez.
䡬 Alacsony hőmérsékleti körülmények között a gép néha
nem működik megfelelően. A gépet mindig a megfelelő
környezeti hőmérsékleten üzemeltesse.
2. A tűzési mélység beállítása
Annak biztosítására, hogy minden egyes kapocs
ugyanolyan mélyre hatoljon, legyen biztos abban, hogy:
(1) a tűzőgéphez menő légnyomás állandó marad (van
felszerelt szabályozó és megfelelően működik), és
(2) a tűzőgépet mindig szorosan nekinyomja a
munkadarabnak.
Ha a kapcsok túl mélyen vagy túl sekélyen mennek bele a
munkadarabba, a következő sorrendben állítsa be a tűzést.
FIGYELEM:
䡬 Beállítás előtt mindig válassza le a tömlőt és engedje
ki a szerszámgépben levő sűrített levegőt.
䡬 Beállítás során mindig tartsa távol az ujját az
elsütőbillentyűtől.
䡬 Beállítás során győződjön meg arról, hogy a test
semmilyen része, a kéz vagy láb soha sincs a
kapocskivezető előtt.
Kérjük, a beállításokat a következő sorrendben végezze.
(Lásd 7. Ábra)
A kapocs behajtott mélységének beállításához lazítsa
meg a csavart, amely rögzíti a nyomókar darabot.
Ha a kapocs mélyen megy be, állítsa a nyomókar darabot
“le”, és ha sekélyen megy be, állítsa a nyomókar darabot
“fel”.
Húzza meg a csavart a nyomókar darab rögzítéséhez.
MEGJEGYZÉS:
䡬 Kérjük, használja a minimális légnyomást, amely elegendő
a kapcsok behajtásához a megfelelő mélységbe. Túl
magas nyomás használata esetén a dugattyú csillapító,
stb. élettartama lerövidül.
ELLENŐRZÉS ÉS KARBANTATÁS
FIGYELEM:
Feltétlenül válassza le a tömlőt a torlódások tisztítása,
ellenőrzés, karbantartás és tisztítás során.
1. Ellenintézkedés kapocstorlódás esetén
(1) Távolítson el minden kapcsot.
(2) Engedje ki a rögzítőkart és nyissa ki a pengevezetőt. (Lásd
8. Ábra)
32
Page 34

Magyar
(3) Távolítsa el a beszorult kapcsot egy hasított fejű
csavarhúzóval. (Lásd 9. Ábra)
(4) Zárja be a pengevezetőt és reteszelje.
(5) Gyakori megszorulás esetén lépjen kapcsolatba egy
Hitachi felhatalmazott szervizközponttal.
2. Ellenőrzés és karbantartás
Időszakosan ellenőrizze a készüléket.
(1) Távolítsa el a kilépőnyílás fedelét rögzítő négy imbuszfejű
csavart és vegye le a kilépőnyílás fedelét.
Ezután a henger, dugattyú, és egyéb alkatrészek
megfelelő szerelvénycsoportokban eltávolíthatók.
Törölje le a hajtóhegyet, a dugattyú csúszó részét és a
gépváz belsejét egy törlőkendővel a lerakódott
szennyeződés eltávolításához.
(2) Győződjön meg arról, hogy a dugattyú csillapító normál
módon működik. A sérült dugattyú csillapító más
komponensek alkatrészeinek károsodását okozhatja.
(3) Szétszereléskor gondosan ellenőrizze az O-gyűrűt kopás
szempontjából. A kopott vagy sérült O-gyűrű ronthatja
az általános teljesítményt. A kopott vagy sérült O-gyűrűt
cserélje ki egy újra.
(4) A készülék újbóli összeszerelése előtt kenjen zsírt (Attolub
2 sz. zsír) az O-gyűrűre. Kenje meg a készüléket is a
javasolt olajjal.
3. Ellenőrizze az egyes alkatrészek felszerelő csavarjait
Rendszeres időközönként ellenőrizzen minden alkatrészt
laza felszerelő csavarok szempontjából, és annak
megállapítására, hogy van-e bármiféle levegőszivárgás
vagy sem. Húzzon meg újból minden laza csavart. A
berendezés meghúzás nélküli, laza csavarokkal történő
üzemeltetése vonzza a veszélyt.
4. A nyomókar ellenőrzése
Ellenőrizze, hogy a nyomókar (1. Ábra) tud-e akadálytalanul
csúszni.
Tisztítsa meg a nyomókar csúszási területét és a kenéshez
időről-időre használja a rendelkezésre bocsátott olajat. A
kenés lehetővé teszi az akadálytalan csúszást és
egyidejűleg szolgál a rozsdaképződés megelőzésére.
5. Tárolás
䡬 Amikor hosszabb időszakra nincs használatban, vigyen
fel egy vékony kenőanyag bevonatot az acél alkatrészekre
a rozsda elkerülésére.
䡬 Ne tárolja a tűzőgépet hideg időjárási környezetben. Tartsa
a tűzőgépet meleg területen.
䡬 Amikor nincs használatban, a tűzőgépet meleg és száraz
helyen kell tárolni.
Gyermekektől elzárva tartandó.
6. Szerviz alkatrészek listája
FIGYELEM:
A Hitachi szerszámgépek javítását, módosítását és
ellenőrzését egy arra felhatalmazott Hitachi
szervizközpontnak kell végeznie.
Javítás vagy egyéb karbantartás igénylése esetén segíteni
fog, ha a szerszámmal együtt ezt az alkatrészlistát is
benyújtja a felhatalmazott Hitachi szervizközponthoz.
Szerszámgépek üzemeltetése és karbantartása esetén
be kell tartani az egyes országokban előírt biztonsági
rendeleteket és szabványokat.
MÓDOSÍTÁSOK:
A Hitachi szerszámgépeket állandóan jobbítják és úgy
módosítják, hogy tartalmazzák a legújabb technológiai
haladásokat.
Ennek megfelelően némelyik alkatrész előzetes értesítés
nélkül megváltoztatásra kerülhet.
KOMPRESSZOR
FIGYELEM:
Ha a légkompresszor maximális üzemi nyomása
meghaladja a 8,3 bar értéket, feltétlenül gondoskodjon
egy nyomáscsökkentő szelepről a légkompresszor és a
szegező között. Ezután állítsa be a légnyomást a 4,9 ~
8,3 bar működési tartományon belülre. Ha felszerelésre
került a levegő-előkészítő, a kenés is lehetséges, ezáltal
további kényelmet biztosítva.
OLAJOZÓ-SZŰRŐ-NYOMÁSCSÖKKENTŐ
SZELEP (Levegő-előkészítő)
Ahhoz, hogy a berendezés optimális körülmények között
legyen üzemeltethető a megnövekedett szolgálati élettartam
biztosítására, tanácsos egy olajozó szűrő nyomáscsökkentő
szelep használata. Kérjük, használatkor korlátozza az egység
és a levegő-előkészítő közötti tömlő hosszát 10 m-en belülre.
(10. Ábra)
ALKALMAZHATÓ KENŐANYAGOK
Kenőanyag típusa Kenőanyag neve
Javasolt olaj SHELL TONNA
Motorolaj SAE10W, SAE20W
Turbinaolaj ISO VG32 - 68
(#90 - #180)
33
Page 35

Zaj információ
Jellemző zajértékek az EN 792-13, 2000. JÚNIUS szerint.
A tipikus A-súlyozású egyszeri esemény hangerő szint
A tipikus A-súlyozású egyszeri esemény kibocsátásának
hangnyomásszintje a munkaállomáson
Ezek az értékek szerszámra vonatkozó jellemző értékek és
nem a zajkeletkezést jelentik a használati ponton. A
zajkeletkezés a használati ponton függ például a
munkakörnyezettől, a munkadarabtól, a munkadarab
alátámasztásától és a behajtási műveletek számától, stb.
A munkahely körülményeitől és a munkadarab alakjától
függően egyéni zajcsillapítási intézkedések végrehajtására
lehet szükség, mint például a munkadarabok hangcsillapító
tartókra helyezése, a munkadarab rezgésének megelőzése
leszorítás vagy lefedés segítségével, beállítás a szóban forgó
művelethez szükséges minimális légnyomásra, stb.
Speciális esetekben szükséges a hallásvédő felszerelés
viselése.
Rezgés információ
A jellemző rezgésérték az EN 792-13, 2000. JÚNIUS szerint:
2
.
3,9 m/s
Ez az érték a szerszámra vonatkozó jellemző érték és nem a
kéz-kar-rendszerre gyakorolt hatást jelenti a szerszám
használatakor. A kéz-kar-rendszerre gyakorolt hatás a
szerszám használatakor például függ a fogási erőtől, az
érintkezési nyomás erejétől, a munkavégzési iránytól, az
energiaellátás beállításától, a munkadarabtól, a munkadarab
alátámasztásától.
LWA,
1s,d = 99 dB
LpA,
1s,d = 81 dB
Magyar
34
Page 36

Čeština
VŠEOBECNÁ PROVOZNÍ BEZPEČNOSTNÍ
OPATŘENÍ
1. Používejte mechanický nástroj správným a
bezpečným způsobem.
Nepoužívejte mechanický nástroj jiným způsobem, než
je uvedeno v tomto návodu k obsluze.
2. Pro zajištění bezpečného provozu zacházejte s
mechanickým nástrojem správným způsobem.
Dodržujte prosím pokyny uvedené v tomto návodu k
obsluze a zacházejte s tímto nástrojem správným
způsobem tak, aby byl zajištěn bezpečný provoz.
Nástroj nesmí používat děti nebo osoby, které nemají
dostatečné znalosti pro správné zacházení s nástrojem
nebo osoby, které jej nemohou správně obsluhovat.
3. Ověřte bezpečnost pracoviště.
Zabraňte vstupu neoprávněných osob na pracoviště.
To platí zejména pro děti.
4. Správné součásti na správných místech.
Neodstraňujte žádné kryty nebo šrouby. Ponechte je
na místě, jelikož plní svou funkci.
Nikdy neprovádějte úpravy nástroje, ani nepoužívejte
upravený nástroj, jelikož by to mohlo být nebezpečné.
5. Nástroj před použitím zkontrolujte.
Před použitím nástroje vždy zkontrolujte, zda nejsou
některé z jeho částí poškozené, zda jsou dotaženy
všechny šrouby, a že žádná z částí nechybí nebo
nekoroduje.
6. Nadměrné zatěžování způsobuje nehody.
Nezatěžujte nástroje ani jejich příslušenství nad jejich
možnosti. Nadměrná zátěž nezpůsobuje pouze
poškození mechanického nástroje ale je nebezpečná
sama o sobě.
7. Pokud zaznamenáte něco neobvyklého, okamžitě
přerušte činnost.
Přerušte činnost, pokud zaznamenáte něco
neobvyklého, nebo pokud mechanický nástroj
nepracuje správně; nechejte mechanický nástroj
prohlédnout a opravit.
8. O mechanický nástroj se pečlivě starejte.
Pokud mechanický nástroj upustíte, nebo s ním do
něčeho narazíte, může dojít k deformaci vnějšího rámu
a mohou se objevit praskliny nebo jiná poškození.
Zacházejte proto s nástrojem odpovídajícím způsobem.
Na nástroj také neškrábejte nebo nevyrývejte žádné
značky. Kvůli vysokému tlaku vzduchu uvnitř nástroje
jsou praskliny povrchu nebezpečné.
V případě, že se objeví prasklina, nebo z ní uniká
vzduch, mechanický nástroj nepoužívejte.
9. Dobrá péče prodlouží životnost nástroje.
Vždy o mechanický nástroj dobře pečujte a udržujte jej
v čistotě.
10. Kontrola v pravidelných intervalech je základem
bezpečnosti.
Kontrolujte mechanický nástroj v pravidelných
intervalech tak, aby práce s ním byla pokaždé bezpečná
a účinná.
11. V případě potřeby se s opravou nebo výměnou
součástí obrate na autorizovaného servisního
technika.
Zajistěte, aby opravy mechanického nástroje byly
prováděny pouze autorizovanými servisními středisky
a byly použity pouze originální náhradní díly.
12. Uchovávejte mechanický nástroj na odpovídajícím
místě.
Pokud není v činnosti, měl by být nástroj uložen na
suchém místě mimo dosah dětí. Do těla nalijte spojem
hadice asi 2 cl oleje, abyste zabránili korozi nástroje.
13. Schématický montážní výkres v tomto návodu k
obsluze slouží pouze autorizovaným servisním
střediskům.
BEZPEČNOSTNÍ OPATŘENÍ PŘI POUŽÍVÁNÍ
SEŠÍVAČKY
1. Bezpečný provoz zajistí správné použití.
Tento nástroj byl navržen pro zarážení sponek do dřeva
a podobných materiálů. Používejte jej pouze v souladu
s plánovaným účelem.
2. Ujistěte se, že je připojený tlak vzduchu v rámci
jmenovitého rozsahu tlaku vzduchu.
Nástroje na zarážení sponek poháněné stlačeným
vzduchem smí být připojeny k vedením stlačeného
vzduchu, jejichž maximální povolený tlak nepřesáhne
součinitel vyšší než 10 %. Toho může být dosaženo
například redukčním tlakovým ventilem, jenž je vybaven
pojistným ventilem.
(Pro model N5008AC2 je 110 % jmenovitého
maximálního povoleného tlaku 9,1 barů = 130 psi)
Nástroje na zarážení sponek poháněné stlačeným
vzduchem smí být provozovány při pracovní činnosti v
blízkosti osob pouze při nejnižším požadovaném tlaku
tak, aby se zamezilo zbytečně vysokým hladinám hluku,
zvýšenému opotřebení a souvisejícím poruchám.
3. Nikdy nepohánějte zařízení jiným vysokotlakým
plynem než je stlačený vzduch.
Za žádných podmínek nepoužívejte oxid uhličitý, kyslík
nebo jiné plyny v tlakových nádobách.
4. Dávejte pozor na vznícení nebo výbuch.
Protože mohou v průběhu sešívání odlétávat jiskry, je
nebezpečné používat tento nástroj v blízkosti laku,
barvy, technického benzínu, ředidla, benzínu, plynu,
lepidel a podobných hořlavých látek, které se mohou
vznítit nebo explodovat. Za žádných okolností proto
nesmí být tento nástroj používán v blízkosti takových
hořlavých materiálů.
5. Vždy používejte ochranu očí (ochranné brýle).
Při práci s mechanickým nástrojem vždy používejte
ochranu očí a zajistěte, aby ji používaly také osoby ve
vašem okolí.
Možnost vniknutí úlomku sponky nebo sponky, která
nebyla správně naražena, do oka ohrožuje zrak.
Ochrana očí může být zakoupena v každém železářství.
Při práci s tímto nástrojem vždy používejte ochranu očí.
Používejte ochranu očí nebo ochrannou masku přes
dioptrické brýle.
Zaměstnavatel musí vždy dbát na používání
ochranných pomůcek pro oči.
6. Chraňte své uši a hlavu.
Při sešívání prosím používejte ochranná sluchátka a
ochranu hlavy. V závislosti na podmínkách se také
ujistěte, že osoby ve vašem okolí používají ochranná
sluchátka a ochranu hlavy.
7. Věnujte pozornost těm, kteří pracují ve vaší blízkosti.
Může být velice nebezpečné, když sponka, která nebyla
správně nastřelena, zasáhne ostatní osoby. Proto vždy,
když používáte tento nástroj, dbejte na bezpečnost
osob ve vašem okolí. Vždy se ujistěte, že v blízkosti
výstupu sešívačky není něčí tělo, ruka nebo noha.
35
Page 37

Čeština
8. Nikdy nesměřujte výstup sešívačky na osoby.
Vždy předpokládejte, že nástroj obsahuje sponky.
Pokud směřujete výstup sešívačky na osobu, může v
případě, že omylem spustíte nástroj, dojít k závažné
nehodě. Při připojování nebo odpojování hadice, v
průběhu plnění sponkami, nebo při podobné činnosti
se ujistěte, že výstup sešívačky nesměřuje na žádnou
osobu (včetně vás). Když na někoho nástroj směřujete,
je nebezpečné spustit nástroj dokonce v případě, kdy
v nástroji nejsou sponky, a proto se o to nikdy
nepokoušejte. Žádné žerty. Zacházejte s nástrojem jako
s pracovním náčiním.
9. Před použitím mechanického nástroje zkontrolujte
posunovací páčku.
Před použitím mechanického nástroje nezapomeňte
zkontrolovat, zda posunovací páčka a ventil pracují
správně. K mechanickému nástroji nenaplněnému
sponkami připojte hadici a zkontrolujte následující:
Pokud se při provozu ozve nějaký zvuk, znamená to
závadu. V takovém případě mechanický nástroj
nepoužívejte, dokud není prohlédnut a opraven.
䡬 Pokud při pouhém stisku spouště zazní zvuk
pohybu hrotu pohonu, je mechanické zařízení
pokažené.
䡬 Pokud při pouhém stlačení posunovací páčky proti
materiálu, který se má sešít, zazní zvuk pohybu
hrotu pohonu, je mechanické zařízení pokažené.
Mimoto si prosím zapamatujte, že posunovací
páčka nesmí být nikdy upravena nebo odstraněna.
10. Používejte pouze předepsané sponky.
Nikdy nepoužívejte jiné sponky, než předepisuje a
popisuje tento návod k obsluze.
11. Dbejte opatrnosti při připojování hadice.
Aby při připojování hadice a naplňování sponkami
nástroj omylem nespustil, zajistěte následující:
䡬 Nedotýkejte se spouště.
䡬 Zabraňte kontaktu nastřelovací hlavy s jakýmkoliv
povrchem.
䡬 Držte nastřelovací hlavu směrem dolů.
Přesně dodržujte výše uvedené pokyny a vždy se
ujistěte, že žádná část vašeho těla, rukou, nebo nohou
není nikdy před výstupem sešívačky.
12. Nikdy nepokládejte ledabyle prst na spouš.
Pokud právě nesešíváte, nepokládejte prst na spouš.
Pokud nesete tento nástroj, nebo jej podáváte někomu
jinému a máte prst na spoušti, můžete neúmyslně
vystřelit sponku a způsobit tak nehodu.
13. Zcela uzavřete vodítko úderníku a v průběhu
činnosti jej neotvírejte.
Pokud se snažíte sešívat, když je vodítko úderníku
otevřené, sponky nebudou nastřeleny do dřeva a hrozí
riziko nebezpečného vystřelení.
14. Přitiskněte pevně výstup sešívačky k sešívanému
materiálu.
Při nastřelování sponek přitiskněte pevně výstup
sešívačky k sešívanému materiálu. Pokud není výstup
řádně nastaven, mohou se sponky odrazit.
15. Při použití držte ruce a nohy mimo nastřelovací
hlavu.
Je velice nebezpečné, když zasáhne sponka omylem
ruce nebo nohy.
16. Dejte si pozor na zpětný ráz nástroje.
Během činnosti nepřibližujte hlavu, atd. k horní části
nástroje. Je to nebezpečné, jelikož může nástroj prudce
odskočit v případě, kdy právě narážené sponka přijde
do kontaktu s předešlou sponkou nebo uzlem ve dřevě.
17. Dávejte pozor při sešívání tenkých dřevěných desek
nebo rohů.
Při sešívání tenkých desek mohou sponky projít přímo
skrz, k čemuž může dojít kvůli odchylce sponek i v
případě sešívání rohů dřeva. V takových případech se
vždy ujistěte, že za tenkou deskou nebo dřevem, které
budete sešívat, nikdo (ani ničí ruce nebo nohy, atd.)
nestojí.
18. Současné sešívání na obou stranách stejné stěny
je nebezpečné.
Za žádných okolností by se nemělo provádět sešívání
na obou stranách stěny ve stejnou dobu. Může to být
velice nebezpečné, protože sponky mohou projít
stěnou, a způsobit tak zranění.
19. Nepoužívejte mechanický nástroj na lešeních a
žebřících.
Mechanický nástroj by neměl být užíván například v
těchto konkrétních případech:
– kdy přechod od jedné nastřelovací oblasti do jiné
zahrnuje použití lešení, schodů, žebříků, nebo
žebříkům podobných konstrukcí, např. střešních latí,
– uzavírání krabic nebo beden,
– upevňování bezpečnostních přepravních systémů,
např. na vozidla nebo vagóny
20. Neodpojujte hadici, pokud máte prst na spoušti.
Pokud odpojíte hadici s prstem položeným na spoušti,
je tu nebezpečí, že při dalším připojení hadice
mechanický nástroj samovolně vystřelí sponku, nebo
bude pracovat nesprávně.
21. Po použití odpojte hadici a vyjměte všechny zbylé
sponky v zásobníku.
Před prováděním údržby nástroje, čištěním zaseklé
sponky, opuštěním pracovní oblasti, přesunem nástroje
do jiné oblasti, nebo po použití odpojte nástroj od
přívodu vzduchu. Je velice nebezpečné, pokud je
sponka vystřelena omylem.
22. Při odstraňování zaseklé sponky se nejprve ujistěte,
že jste odpojili hadici a vypustili stlačený vzduch.
Při odstraňování sponky zaseklé ve výstupu sešívačky
se nejprve ujistěte, že jste odpojili hadici a vypustili
stlačený vzduch uvnitř mechanického nástroje.
Náhodné vystřelení sponky může být velice
nebezpečné.
23. Aby se předešlo nebezpečím způsobeným
sponkami, které vypadly při naplňování, nikdy
neotvírejte zásobník, když zařízení směřuje k zemi.
24. Přípojka (stlačeného vzduchu) by se neměla
používat na těle.
Pokud je přípojka instalována na těle, není, když je
hadice odpojena, možné vzduch vypustit, proto se toho
vyvarujte.
Přípojky nástroje a přívodní hadice musí mít hadicové
spojky, které umožní při rozpojení přípojek uvolnění
veškerého tlaku z nástroje.
25. Při čištění mechanického nástroje nepoužívejte
benzín nebo jiné hořlavé tekutiny.
Pokud se výpary z hořlavé tekutiny dostanou dovnitř
mechanického nástroje, existujte nebezpečí, že jiskry
vznikající při sešívání, atd. mohou způsobit explozi.
36
Page 38

Čeština
TECHNICKÉ ÚDAJE
Druh energie Počet příklepů pístu
Tlak vzduchu (Tlakoměr) 4,9 - 8,3 barů
Použitelné sponky ref. Obr.
Kapacita plnění sponkami 150 sponek
Velikost 365 mm (D) × 258 mm (V) × 76 mm (Š)
Hmotnost 2,0 kg
Hadice (vnitřní průměr) 6 mm
VÝBĚR SPONEK
Zvolte vhodné sponky z Obr. Sponky, které nejsou
vyobrazeny na Obr., nelze v tomto nástroji použít.
16 Manometr 7/16" Koruna
Min. Max.
1,61mm
7,9mm
25mm
1,45mm
Rozměry sponek
50mm
STANDARDNÍ PŘÍSLUŠENSTVÍ
(1) Šestihranný pákový klíč pro šrouby M5 ....................... 1
(2) Ochrana očí ..................................................................1
(3) Maznice ........................................................................ 1
VOLITELNÉ PŘÍSLUŠENSTVÍ
䡬 Sada sekvenčního rozpojovacího mechanizmu (Kód č.
876762)
(Sada sekvenčních vystřelovacích součástí, Jednorázové
součásti)
Se sekvenčními vystřelovacími součástmi je sponka
vystřelena pouze zmáčknutím spoušti po stlačení
posunovací páčky.
Instalací těchto součástí můžete předejít vystřelení
sponek na nesprávné místo a náhlému vystřelení sponek
způsobenému náhodným spuštěním posunovací páčky.
POUŽITÍ
䡬 Stavební práce jako jsou obklady stěn, pokládka hrubé
podlahy.
䡬 Mobilní a montované stavby obytných budov.
PŘÍPRAVA PŘED UVEDENÍM DO PROVOZU
1. Připravte hadici
Ujistěte se, že používáte hadici s minimálním vnitřním
průměrem 6 mm.
POZNÁMKA:
Hadice pro přívod vzduchu musí mít minimální jmenovitý
provozní tlak 12,8 barů, nebo 150 procent maximálního
tlaku produkovaného systémem přívodu vzduchu, je-li
tato hodnota vyšší.
2. Prověření bezpečnosti
POZOR:
䡬 Nepovolané osoby (včetně dětí) nesmí mít k zařízení
přístup.
䡬 Používejte ochranu očí.
䡬 Zkontrolujte, zda jsou dotaženy pojistné šrouby upevňující
výfukový kryt, atd.
Zkontrolujte, zda ze sešívačky neuniká vzduch, a žádné
z části nejsou poškozené nebo zkorodované.
䡬 Zkontrolujte, zda posunovací páčka pracuje správně.
Zkontrolujte také, zda k pohyblivým částem posunovací
páčky nepřilnula nějaká nečistota.
䡬 Překontrolujte provozní bezpečnost.
PŘED POUŽITÍM
1. Zkontrolujte tlak vzduchu
POZOR:
Tlak vzduchu musí být udržován neustále v rozmezí 4,9 8,3 barů.
Nastavte tlak vzduchu mezi 4,9 a 8,3 barů podle průměrů
a délky sponek a tvrdosti sešívaného dřeva. Zvláštní
pozornost věnujte výstupnímu tlaku, kapacitě a rozvodům
vzduchového kompresoru tak, aby tlak vzduchu
nepřekročil daný limit. Upozorňujeme, že nadměrný tlak
může ovlivnit celkový výkon, životnost a bezpečnost.
2. Mazání
(1) Před zahájením činnosti sešívačky se ujistěte, že je mezi
vzduchovým kompresorem a tímto zařízením instalovaná
vzduchová sada. Mazání prostřednictvím vzduchové
sady nabízí hladký chod, prodlužuje životnost a zabraňuje
korozi.
Nastavte maznici tak, že jsou jednotlivé kapky oleje
vypouštěny v intervalech 5 až 10 sešívacích cyklů.
37
Page 39

Čeština
(2) Doporučujeme používaní doporučeného oleje (SHELL
TONNA). Další použitelné oleje jsou uvedeny v seznamu.
Nikdy nemíchejte dva nebo více druhů různých olejů.
3. Plnění sponkami
POZOR:
䡬 Při plnění sešívačky sponkami:
(1) nemačkejte spouš;
(2) netiskněte posunovací páčku; a
(3) držte svou tvář, své ruce, nohy a ostatní části těla,
stejně tak jako ty ostatních osob, stranou ústí nosu
sešívačky, abyste předešli případným zraněním
během používání nebo přenášení.
(1) Potáhněte podavač sponek zpět a pevně jej upevněte
do drážky zásobníku. (Viz Obr. 2)
(2) Umístěte pásek sponek do zásobníku.
Ujistěte se, že pásek sponek volně klouže v zásobníku.
(Viz Obr. 3)
(3) Potáhněte podavač sponek zpět. Pak jej vyjměte z drážky
zásobníku a jemně vrate sešívačku zpět, jako by byla
jemně stlačena tak, abyste se vyhnuli jakémukoliv nárazu.
(Viz Obr. 4)
Sešívačka je nyní připravena k použití.
POZOR:
䡬 Pokud je podavač uvolněn náhle, může se prudce vrátit
a způsobit tak deformaci a/nebo rozptýlení sponek,
případně zapříčinit jejich zablokování.
Zcela se ujistěte, že se podavač sponek vrátil zpět bez
jakéhokoliv nárazu.
䡬 Abyste zabránili neúmyslné činnosti, nikdy se nedotýkejte
spouště, nebo nepokládejte horní stranu posunovací
páčky na pracovní stůl na podlaze. Nikdy také nesměřujte
výstup sešívačky na žádnou osobu.
JAK POUŽÍVAT SEŠÍVAČKU
POZOR:
䡬 Nikdy nepoužívejte hlavu nebo tělo tohoto zařízení jako
kladivo.
䡬 Přijměte bezpečnostní opatření pro zajištění bezpečnosti
osob, které se nacházejí během činnosti v blízkosti.
1. Sešívací postupy
(1) Přerušované sešívání
Přitiskněte výstup sešívačky na požadované místo, pak
stiskněte spouš a jednorázově nastřelte sponku. (Viz
Obr. 5)
POZOR:
䡬 Při silném namáčknutí na povrch nebo při použití tvrdých
materiálů tento nástroj několikrát odskočí a nastřelí
několik sponek v rychlém sledu namísto jedné. V takových
případech nastřelujte sponky stlačením a rychlým
uvolněním spouště.
(2) Posunovací páčka
Při zmáčknutí výstupu sešívačky se ujistěte, že je zcela
zdvižena posunovací páčka (Viz Obr. 5), aby se uvolnila
pojistka. Proto nemohou být sponky nastřeleny bez
uvolnění pojistky dokonce v případě, že je stisknuta
spouš.
(3) Nepřerušované sešívání
Nejprve stiskněte spouš. Pak přitiskněte zařízení na
požadované místo, aby se automaticky nastřelily sponky.
(Viz Obr. 6).
POZOR:
䡬 Dbejte opatrnosti při sešívání rohů řeziva. Při
nepřerušovaném sešívání v rozích řeziva se mohou
sponky vychýlit ze směru, nebo je prorazit.
䡬 Nenajíždějte sešívačkou na jinou sešívačku.
䡬 Nenajíždějte sešívačkou na kovové části.
POZNÁMKA:
䡬 Bezpečnostní pokyny při chodu naprázdno
Někdy dojte k pokračování sešívání i po spotřebování
všech sponek uložených v zásobníku.
To se nazývá “chod naprázdno”. Takový provoz může
poškodit nárazník, zásobník a podavač sponek.
Abyste předešli chodu naprázdno, občas zkontrolujte
množství zbývajících sponek. Na straně druhé by měly
být všechny sponky po ukončení činnosti z sešívačky
vyjmuty.
䡬 Po ukončení sešívání:
(1) odpojte vzduchovou hadici od sešívačky;
(2) vyjměte všechny sponky ze sešívačky;
(3) Do přípojky vzduchu nastřelovací pistole nakapejte
5 - 10 kapek maziva pro pneumatické nástroje Hitachi;
a
(4) otevřete odvodňovací kohout vzduchového
kompresoru, aby se vysušila případná vlhkost.
䡬 Při nižších teplotách stroj někdy nepracuje správně. Vždy
provozujte stroj při odpovídající vnější teplotě.
2. Jak nastavit hloubku sešívání
Abyste zajistili, že každá sponka pronikne do stejné
hloubky, ujistěte se, že:
(1) tlak vzduchu v sešívačce zůstává neměnný (je
instalován regulátor a pracuje správně), a
(2) sešívačku vždy pevně držíte proti zpracovávanému
kusu.
Pokud jsou sponky zaráženy příliš hluboko nebo mělce
do zpracovávaného kusu, nastavte sešívání v
následujícím pořadí.
POZOR:
䡬 Před nastavením vždy odpojte hadici a uvolněte
stlačený vzduch v mechanickém nástroji.
䡬 V průběhu nastavení nikdy nestlačujte spouš.
䡬 V průběhu nastavení dbejte, aby se před výstupem
sešívačky neobjevila žádná část těla, ruce nebo nohy.
Nastavení prosím provádějte v následujícím pořadí. (Viz
Obr. 7)
Pro nastavení zápustné hloubky sponky uvolněte šroub,
který zajišuje část posunovací páčky.
Pokud je sponka zapouštěna příliš hluboko, nastavte část
posunovací páčky “dolů” a pokud je zapouštěna příliš
mělce, posuňte část posunovací páčky “nahoru”.
Dotáhněte šroub a upevněte část posunovací páčky.
POZNÁMKA:
䡬 Užívejte prosím minimální tlak vzduchu, který je zapotřebí
pro nástřel do odpovídající hloubky. Pokud se užívá příliš
vysokého tlaku, bude doba životnosti tlumiče pístu kratší.
KONTROLA A ÚDRŽBA
POZOR:
Ujistěte se, že jste v průběhu odstraňování zaseknutí,
kontroly, údržby a čištění odpojili hadici.
1. Opatření proti zaseknutí sponky
(1) Vyjměte všechny sponky.
(2) Uvolněte závěrnou páčku a otevřete vodítko úderníku.
(Viz Obr. 8)
(3) Odstraňte zaseklou sponku drážkovaným šroubovákem.
(Viz Obr. 9)
(4) Uzavřete vodítko úderníku a zajistěte.
(5) V případě častého zasekávání kontaktujte autorizované
servisní středisko Hitachi.
38
Page 40

Čeština
2. Kontrola a údržba
Pravidelně zařízení kontrolujte.
(1) Vyšroubujte čtyři šestiúhelníkové šrouby s hlavou jistící
výfukový kryt a sejměte výfukový kryt.
Poté mohou být vyjmuty válec, píst a ostatní součásti
příslušných montážních celků.
Otřete hrot pohonu, kluznou část pístu a vnitřní část těla
hadrem a odstraňte usazené nečistoty.
(2) Ověřte, že tlumič pístu je v normálním provozu.
Poškozený tlumič pístu může způsobit poškození
ostatních součástí.
(3) Při demontáži pečlivě zkontrolujte opotřebení těsnícího
kroužku. Opotřebovaný nebo poškozený těsnící kroužek
může zhoršit celkový výkon. Vyměňte opotřebovaný nebo
poškozený těsnící kroužek za nový.
(4) Před smontováním zařízení naneste na těsnící kroužek
mazivo (mazivo Attolub č. 2). Promažte také zařízení
doporučovaným olejem.
3. Zkontrolujte montážní šrouby každé části
V pravidelných intervalech kontrolujte u každé části, zdali nejsou uvolněny montážní šrouby, nebo nedochází k
únikům vzduchu. Dotáhněte všechny povolené šrouby.
Obsluha zařízení s uvolněnými nedotaženými šrouby
způsobuje riziko.
4. Kontrola posunovací páčky
Zkontrolujte, zda-li posunovací páčka (Obr. 1) hladce
klouže.
Vyčistěte kluznou plochu posunovací páčky a použijte
dodaný olej k občasnému promazání. Promazání
umožňuje hladké klouzání a současně slouží jako
prevence vytváření koroze.
5. Skladování
䡬 Pokud se sešívačka nepoužívá delší dobu, aplikujte na
ocelové součásti jemný povlak maziva, aby nekorodovaly.
䡬 Neskladujte sešívačku v chladném prostředí. Uchovávejte
sešívačku v teple.
䡬 Pokud se nepoužívá, měla by se sešívačka skladovat na
teplém a suchém místě.
Ukládejte mimo dosah dětí.
6. Seznam náhradních dílů
POZOR:
Opravy, úpravy a kontrola mechanických nástrojů Hitachi
musí být prováděna autorizovaným servisním střediskem.
Tento seznam součástí může být prospěšný v případě,
že požadujete opravu, nebo jinou údržbu nástroje v
autorizovaném servisním středisku.
Při provozu a údržbě mechanických nástrojů musí být
dodržovány předepsané směrnice a normy pro danou
zemi.
MODIFIKACE:
Mechanické nástroje Hitachi jsou neustále vylepšovány
a upravovány tak, aby obsahovaly prvky nejmodernějšího
technologického pokroku.
Proto mohou být některé součásti změněny bez
předchozího upozornění.
KOMPRESOR
POZOR:
Pokud přesáhne maximální provozní tlak vzduchového
kompresoru 8,3 baru, zajistěte mezi vzduchový
kompresor a nástřelnou pistoli instalaci redukčního
ventilu. Pak upravte tlak vzduchu na provozní rozpětí 4,9
~ 8,3 bar. Pokud je instalována vzduchová sada, je také
umožněno mazání a nabízí se tak další výhoda.
REDUKČNÍ VENTIL S OLEJOVÝM FILTREM
(Vzduchová sada)
Aby mohlo zařízení pracovat za optimálních podmínek a byla
zajištěna dlouhá životnost, je doporučováno použití
redukčního ventilu s olejovým filtrem. Zkrate prosím při
použití délku hadice mezi jednotkou a vzduchovou sadou
na vzdálenost kratší než 10 m. (Obr. 10)
POUŽITELNÁ MAZIVA
Druh maziva Název maziva
Doporučený druh oleje SHELL TONNA
Motorový olej SAE10W, SAE20W
Turbínový olej ISO VG32 - 68
Informace o hluku
Hodnoty hluku v souladu s EN 792-13, červen 2000.
Typická jednorázová hladina měrného akustického výkonu
A
Typická jednorázová hladina měrného akustického tlaku
pracovní stanice
Tyto hodnoty jsou charakteristickými hodnotami nástroje a
nepředstavují hluk na místě používání. Hluk vytvářený na
místě používání bude kupříkladu záviset na pracovním
prostředí, na zpracovávaném kusu, jeho podpěře, počtu
prováděných operací, atd.
V závislosti na podmínkách na pracovišti a typu
zpracovávaného kusu může být zapotřebí odhlučnění, jako
například umístění zpracovávaného kusu na podpěry tlumící
zvuk, aby se zabránilo vibracím zpracovávaného kusu
prostřednictvím uchycení nebo zakrytí, snížení tlaku na
minimální požadovaný, jenž umožňuje činnost, atd.
Ve zvláštních případech je zapotřebí použít pomůcky pro
ochranu sluchu.
Údaje o vibracích
Typická hodnota vibrací v souladu s EN 792-13, červen 2000.
2
.
3,9 m/s
Tyto hodnoty jsou charakteristickými hodnotami nástroje a
nepředstavují vliv na ručně ovládané systémy při použití
nástroje. Vliv na ručně ovládané systémy při použití nástroje
bude kupříkladu záviset na pevnosti úchopu, síle dotykového
tlaku, směru práce, úpravě energetického zdroje,
zpracovávaném kusu a podpoře zpracovávaného kusu.
(č. 90 - č. 180)
LWA,
1s,d = 99 dB
LpA,
1s,d = 81 dB
39
Page 41

Türkçe
GENEL ÇALIÍTIRMA UYARILARI
1. Elektrikli aleti doåru kullanımlar için çalıßtırın.
Aleti bu kılavuzda belirtilenler dıßındaki amaçlar için
kullanmayın.
2. Güvenli çalıßma için, elektrikli aleti doåru ßekilde
tutun.
Lütfen bu kullanım kılavuzunda verilen talimatlara uyun
ve güvenli çalıßma için aleti doåru ßekilde tutun.
Çocukların veya aleti doåru ßekilde tutarak çalıßtırmak
için gerekli bilgiye sahip olmayan kißilerin aleti
kullanmasına kesinlikle izin vermeyin.
3. Atölyenin güvenliåini saålayın.
Yetkisiz kißileri atölyeden uzak tutun. Özellikle çocuklar
uzak tutulmalıdır.
4. Doåru parçalar doåru yerlerde olsun.
Herhangi bir kapaåı veya vidayı yerinden çıkarmayın.
Her birinin bulunduåu yerde bir ißlevi vardır.
Ayrıca, tehlikeli olabileceåinden, kesinlikle alet üzerinde
deåißiklikler yapmayın veya deåißiklikler yapıldıktan
sonra aleti kullanmayın.
5. Aleti kullanmadan önce kontrol edin.
Aleti kullanmadan önce daima kontrol ederek herhangi
bir parçasının kırık olmadıåından, tüm vidaların iyice
sıkılmıß olduåundan ve eksik veya paslı parça
olmadıåından emin olun.
6. Aletin aßırı çalıßtırılması kazalara neden olabilir.
Aletleri ve aksesuarları kapasitelerinin üzerinde
çalıßtırmayın. Aßırı çalıßtırma sadece elektrikli alete
zarar vermekle kalmaz; aynı zamanda tehlikelidir.
7. Herhangi bir anormallik fark ederseniz derhal aleti
durdurun.
Eåer anormallikler fark ederseniz veya elektrikli alet
uygun ßekilde çalıßmazsa, aleti tamir ettirin.
8. Aleti dikkatli kullanın.
Eåer aleti düßürür veya eßyalara çarparsanız, dıß
çerçeve deforme olabilir ve çatlaklar veya baßka tür
hasarlar olußabilir. Bu nedenle, aleti taßırken gerekli
özeni gösterin. Ayrıca, elektrikli aletin üzerini çizmeyin
veya ißaretler kazımayın. Aletin içerisindeki yüksek
basınçlı hava nedeniyle, yüzeydeki çatlaklar tehlikelidir.
Eåer çatlaklar olußursa veya bir çatlaktan hava
kaçıyorsa, elektrikli aleti kesinlikle kullanmayın.
9. Uzun servis ömrü için aleti özenli kullanın.
Daima elektrikli aleti özenli kullanın ve temiz tutun.
10. Güvenlik için aletin düzenli aralıklarla kontrol
edilmesi zorunludur.
Elektrikli aletin daima güvenli ve verimli ßekilde
çalıßmasını saålamak için düzenli aralıklarla aleti kontrol
edin.
11. Eåer tamir veya parça deåißikliåi gerekirse,
bölgenizdeki yetkili servis merkezini arayın.
Elektrikli aletinizi sadece yetkili servis merkezlerinde
tamir ettirin ve sadece orijinal yedek parçaların
kullanıldıåından emin olun.
12. Elektrikli uygun bir yerde saklayın.
Elektrikli alet kullanılmadıåı zamanlarda çocukların
ulaßamayacaåı kuru bir yerde saklanmalıdır. Aleti
pastan korumak için hortum baålantısı yoluyla gövdeye
yaklaßık 2 cm
13. Bu kullanım kılavuzunda yer alan yaygın görünüßlü
montaj çizimi sadece yetkili servis merkezi
tarafından kullanılmalıdır.
3
yaå koyun.
ZIMBALAMA MAKINASININ KULLANIMI
HAKKINDA UYARILAR
1. Doåru kullanım yoluyla güvenli çalıßma.
Bu alet, ahßap ve benzeri malzemelere tel zımbalama
ißlemi için tasarlanmıßtır. Aleti sadece beyan edilen
amacı için kullanın.
2. Hava basıncının belirtilen nominal aralık dahilinde
olduåundan emin olun.
Basınçlı havayla çalıßan baålantı elemanı tespit aletleri,
izin verilebilir maksimum basıncın sadece örneåin aßaåı
akım emniyet valfi içeren bir basınç düßürme valfi ile
saålanabilecek %10'dan büyük bir faktör kadar
aßılamayacaåı bir noktada basınçlı hava hatlarına
baålanacaktır.
(Model N5008AC2 için, nominal maksimum izin
verilebilir basıncın %110'u 9,1 bar = 130 psi'dir)
Basınçlı havayla çalıßan baålantı elemanı tespit aletleri;
gereksiz yüksek gürültü seviyelerini, fazla aßınmayı ve
olußacak arızaları engellemek amacıyla sadece eldeki
iß için gerekli en düßük basınç düzeyinde çalıßtırılmalıdır.
3. Aleti kesinlikle basınçlı hava dıßında yüksek basınçlı
gazlarla çalıßtırmayın.
Kesinlikle hiçbir koßulda basınçlı konteynırlardan saålanan
karbon dioksit, oksijen veya baßka gazlar kullanmayın.
4. Tutußma ve patlama konusunda dikkatli olun.
Zımbalama sırasında kıvılcımlar çıkabileceåinden, bu
aletin ateßlenebilecek veya patlayabilecek vernik, boya,
benzin, tiner, yapıßtırıcılar ve benzeri yanıcı maddelerin
yakınında kullanılması tehlikelidir. Bu nedenle, hiçbir
koßulda bu alet bu tür yanıcı maddelerin yakınında
kullanılmamalıdır.
5. Daima göz koruması (koruyucu gözlük) takın.
Elektrikli aleti çalıßtırırken, daima koruyucu gözlük takın
ve civardaki insanlarında da koruyucu gözlük
takmalarını saålayın.
Doåru ßekilde uygulanmayan zımba tellerinin veya
zımba teli parçalarının sıçrayarak göze isabet etmesi
tehlikesi vardır. Koruyucu gözlükler, güvenlik
donanımları satan maåazalarda bulunabilir. Bu aleti
çalıßtırırken daima koruyucu gözlük takın. Bir koruyucu
gözlük veya varsa reçeteli gözlüåünüzün üzerine geniß
bir görüß maskesi takın.
Ißverenler daima koruyucu gözlük kullanımını tatbik
etmelidir.
6. Kulaklarınızı ve kafanızı koruyun.
Zımbalama ißi yaparken lütfen kulaklık ve koruyucu
baßlık takın. Ayrıca, çalıßma koßuluna baålı olarak,
civardaki insanlarında da kulaklık ve koruyucu baßlık
takmalarını saålayın.
7. Yakınınızda çalıßanlara dikkat edin.
Doåru ßekilde uygulanmayan zımba tellerinin diåer
insanlara çarpması çok tehlikeli olabilir. Bu nedenle, bu
aleti kullanırken daima etrafınızdaki insanların
güvenliåine dikkat edin. Her zaman için civarınızdaki
insanların vücutlarının, ellerinin veya ayaklarının zımba
teli çıkıßına yakın olmadıåından emin olun.
8. Kesinlikle zımba teli çıkıßını insanlara doåru tutmayın.
Daima alette zımba teli bulunduåunu göz önünde
bulundurun.
Eåer zımba teli çıkıßını insanlara doåru tutarsanız, aleti
yanlıßlıkla boßaltmanız durumunda ciddi kazalar
meydana gelebilir. Hortumu baålarken veya sökerken,
zımba teli yükleme veya benzeri ißlemler sırasında,
40
Page 42

Türkçe
zımba teli çıkıßının (kendiniz dahil) kimseye doåru
yöneltilmiß olmadıåından emin olun. Zımba teli
yüklenmemiß olduåunda bile, aleti birisine doåru
yönelterek boßaltmak tehlikelidir. Bunu kesinlikle
yapmayın. Bu bir eålence aleti deåildir. Alete bir iß aracı
olarak saygı gösterin.
9. Elektrikli aleti kullanmadan önce, itme kolunu
kontrol edin.
Elektrikli aleti kullanmadan önce, itme kolunu ve valfi
kontrol ederek doåru ßekilde çalıßtıklarından emin olun.
Elektrikli alete zımba tellerini yüklemeden, hortumu
baålayın ve aßaåıdakileri kontrol edin. Eåer çalıßma sesi
çıkarsa, bir arıza var demektir. Bu durumda elektrikli
aleti kontrol ve tamir edilinceye kadar kullanmayın.
䡬 Eåer sadece tetiåin çekilmesi tahrik ucu hareketinin
çalıßma sesi çıkarmasına neden oluyorsa, elektrikli
alet arızalı demektir.
䡬 Eåer sadece itme kolunun zımbalanacak
malzemeye doåru bastırılması tahrik ucu
hareketinin ses çıkarmasına neden oluyorsa,
elektrikli alet arızalı demektir. Ayrıca, lütfen itme
kolunun kesinlikle deåißtirilmemesi veya
çıkarılmaması gerektiåine dikkat edin.
10. Sadece belirtilen zımba tellerini kullanın.
Kesinlikle bu kılavuzda belirtilen ve açıklananlar
haricinde zımba teli kullanmayın.
11. Hortumu baålarken dikkatli olun.
Hortumu baålarken ve zımba tellerini yüklerken aleti
yanlıßlıkla tetiklememek için aßaåıdaki uyarılara dikkat
edin:
䡬 Tetiåe dokunmayın.
䡬 Zımbalama kafasının herhangi bir yüzeyle temas
etmesine izin vermeyin.
䡬 Zımbalama kafasını aßaåı doåru tutun.
Yukarıdaki talimatlara sıkı bir ßekilde uyun ve daima
vücudunuzun, ellerinizi veya bacaklarınızın zımba teli
çıkıßının önünde olmadıåından emin olun.
12. Parmaåınızı dikkatsizce tetiåin üzerine
yerleßtirmeyin.
Zımbalama yaptıåınız zaman haricinde parmaåınızı tetik
üzerinde tutmayın. Eåer bu aleti taßırken veya birisine
uzatırken parmaåınızı tetik üzerinde tutarsanız, istemsiz
olarak bir zımba teli boßaltabilir ve bir kazaya neden
olabilirsiniz.
13. Mil kılavuzunu tamamen kapatın ve çalıßma
sırasında açmayın.
Eåer mil kılavuzu açıkken zımbalama teßebbüsünde
bulunulursa, zımba telleri tahtaya girmeyecek ve tehlikeli
ßekilde fırlama riski olußacaktır.
14. Zımba teli çıkıßını, zımbalanacak malzemeye sıkı bir
ßekilde bastırın.
Zımba tellerini tespit ederken, zımba teli çıkıßını
zımbalanacak malzemeye sıkı bir ßekilde bastırın. Eåer
çıkıß aåzı doåru ßekilde tutulmazsa, zımba telleri geri
sekebilir.
15. Aleti kullanırken ellerinizi ve ayaklarınızı zımbalama
kafasından uzak tutun.
Zımba telinin yanlıßlıkla ellere veya ayaklara çarpması
çok tehlikelidir.
16. Aletin geri tepmesine dikkat edin.
Çalıßma sırasında baßınızı aletin üst kısmına
yaklaßtırmayın. Uygulanmakta olan zımba teli tahtaya
daha önce tespit edilmiß bir zımba telinin veya bir
budaåın üzerine gelirse alet ßiddetli bir ßekilde geri
tepeceåinden, bu tehlikelidir.
17. Ince levhalara veya tahta kößelerine zımbalama
yaparken dikkatli olun.
Zımba telleri, ince levhalara zımbalama yaparken
levhayı delip geçebilir ve tahta kößelerine zımbalama
yaparken sapabilir. Böyle durumlarda, daima zımbalama
yapacaåınız ince levhanın arkasında veya tahtanın
yanında kimsenin olmadıåından emin olun.
18. Aynı duvarın her iki tarafında eßzamanlı olarak
zımbalama yapmak tehlikelidir.
Hiçbir koßulda bir duvarın her iki tarafında aynı zamanda
zımbalama ißlemi yapılmamalıdır. Zımba telleri
duvardan geçerek yaralanmalara neden
olabileceåinden, bu çok tehlikelidir.
19. Elektrikli aleti yapı iskelelerinin veya merdivenlerin
üzerinde kullanmayın.
Elektrikli alet, aßaåıdakiler gibi özel uygulamalar için
kullanılmamalıdır:
– bir uygulama yerinden diåerine geçiß, yapı
iskelelerinin, merdivenlerin veya çatı lataları gibi
merdiven benzeri yapıların kullanılmasını
gerektirdiåinde,
– kutuların veya sandıkların kapatılması,
– nakliyat güvenlik sistemlerinin montajı (örneåin
araçlarda veya vagonlarda).
20. Hortum baålantısını ayırırken parmaåınızı tetik
üzerinde tutmayın.
Eåer hortum baålantısını parmaåınızı tetik üzerinde
tutarak ayırırsanız, hortumu tekrar baåladıåınızda
elektrikli alet bir zımba teli fırlatabilir veya yanlıß ßekilde
çalıßabilir.
21. Aleti kullandıktan sonra hortum baålantısını sökün
ve haznede kalan zımba tellerini çıkarın.
Alete bakım yapmadan, sıkıßan bir zımba telini
çıkarmadan, çalıßma bölgesini terk etmeden, aleti bir
yerden baßka bir yere taßımadan önce veya kullanımdan
sonra aletin hava baålantısını kesin. Aletin yanlıßlıkla
bir zımba teli fırlatması çok tehlikelidir.
22. Sıkıßmıß bir zımba telini çıkarırken, ilk önce hortum
baålantısını kestiåinizden ve basınçlı havayı
boßalttıåınızdan emin olun.
Zımba teli çıkıßında sıkıßan bir zımba telini çıkarırken,
ilk önce hortum baålantısını ayırın ve elektrikli aletin
içindeki basınçlı havayı boßaltın.
Zımba telinin kazayla fırlaması çok tehlikeli olabilir.
23. Düßen zımba tellerinin neden olduåu tehlikelerden
kaçınmak için, zımba tellerini yüklerken kesinlikle
hazneyi alet aßaåı doåru bakarken açmayın.
24. Gövdede bir dißi fiß (hava soketi) kullanılmamalıdır.
Eåer gövdeye bir dißi fiß takılırsa, hortum baålantısı
kesildiåinde bazen basınçlı hava çekilemez. Bu nedenle
bundan kaçının.
Alet ve hava besleme hortumu, kaplin baålantısı
söküldüåünde aletin tüm basıncının boßaltılmasını
saålayacak ßekilde bir hortum baålantısına sahip
olmalıdır.
25. Elektrikli aleti temizlemek için benzin veya benzeri
yanıcı sıvılar kullanmayın.
Yanıcı sıvı buharının elektrikli aletin içine girmesi
durumunda, zımbalama ißlemi sırasında üretilen
kıvılcımlar bir patlamaya neden olabilir.
41
Page 43

TEKNIK ÖZELLIKLER
Güç tipi Piston hareketi
Hava basıncı (gösterge) 4,9 – 8,3 bar
Uygulanabilir zımba telleri bkz: Íekil
Yüklenebilen zımba teli miktarı 150 zımba teli
Boyut 365 mm (U) × 258 mm (Y) × 76 mm (G)
Aåırlık 2,0 kg
Hortum (iç çap) 6 mm
Türkçe
ZIMBA TELI SEÇIMI
Íekilde gösterilenler arasından uygun bir zımba teli seçin.
Íekilde gösterilmeyen zımba telleri bu aletle kullanılamaz.
16 Numara 7/16" Baßlık
Min. Maks.
1,61mm
7,9mm
25mm
1,45mm
Zımba tellerinin boyutu
50mm
STANDART AKSESUARLAR
(1) M5 vida için Alyen anahtarı .......................................... 1
(2) Koruyucu gözlük ........................................................... 1
(3) Yaålayıcı ...................................................................... 1
OPSIYONEL AKSESUAR
䡬 Sıralı Boßaltma Mekanizması Takımı (Kod No. 876762)
(Sıralı Atıß Parça Takımı, Tek Atıß Parçaları)
Sıralı atıß parçalarıyla, zımba teli sadece itme kolunu
aßaåı bastırdıktan sonra tetiåi sıkmak suretiyle uygulanır.
Bu parçaların monte edilmesiyle, itme kolunun yanlıßlıkla
çalıßması sonucu zımba tellerinin yanlıß konumlara
uygulanması veya beklenmedik ßekilde zımba teli atıßı
engellenebilir.
UYGULAMALAR
䡬 Duvar kaplama ve kördößeme gibi inßaat ißleri.
䡬 Taßınabilir ve modüler ev inßaatı.
ALETI ÇALIÍTIRMADAN ÖNCE YAPILACAK
HAZIRLIK
1. Hortumu hazırlayın
Aletle birlikte gelen minimum 6 mm iç çaplı hortumu
kullanın.
NOT:
Hava besleme hortumları en az 12,8 bar veya hava
besleme sisteminde üretilen maksimum basıncın
%150'sine eßit (hangisi daha yüksekse) bir nominal
çalıßma basıncına sahip olmalıdır.
2. Güvenlik kontrolü
UYARI:
䡬 Yetkisiz kißiler (ve çocuklar) aletten uzak tutulmalıdır.
䡬 Koruyucu gözlük takın.
䡬 Egzos kapaåını, vb. tespit eden sabitleme vidalarının
sıkılıåını kontrol edin.
Zımbalama makinasını hava kaçaklarına ve kusurlu veya
paslı parçalara karßı kontrol edin.
䡬 Itme kolunun doåru ßekilde çalıßıp çalıßmadıåını kontrol
edin. Ayrıca, itme kolunun hareketli parçalarına kir yapıßıp
yapıßmadıåını kontrol edin.
䡬 Çalıßma güvenliåini tekrar kontrol edin.
KULLANMADAN ÖNCE
1. Hava basıncını kontrol edin
UYARI:
Hava basıncı, sürekli olarak 4,9 - 8,3 bar aralıåında
tutulmalıdır.
Hava basıncını, zımba tellerinin çaplarına ve uzunluåuna
ve zımbalanacak ahßap malzemenin sertliåine göre 4,9
ve 8,3 bar arasında bir deåere ayarlayın. Hava basıncının
belirtilen limiti aßmaması için hava kompresörünün çıkıß
basıncına, kapasitesine ve boru baålantısına özellikle
dikkat edin. Aßırı basıncın genel performansı, kullanım
ömrünü ve güvenliåi etkileyebileceåini unutmayın.
2. Yaålama
(1) Bu zımbalama makinasını çalıßtırmadan önce, hava
kompresörü ile bu alet arasında bir hava ayarı yapın. Hava
ayarı yoluyla yaålama, düzgün çalıßma ve daha uzun
kullanım ömrü saålar; ayrıca korozyonu önler.
Yaålayıcıyı her 5 ila 10 zımbalamada bir tek bir damla
yaå beslemesi yapacak ßekilde ayarlayın.
42
Page 44

Türkçe
(2) Tavsiye edilen yaåı (SHELL TONNA) kullanmanız önerilir.
Kullanılabilecek diåer yaålar listelenmißtir. Kesinlikle iki
veya daha fazla farklı yaå türünü karıßtırmayın.
3. Zımba tellerini yükleyin
UYARI:
䡬 Zımba tellerini zımba makinasına yüklerken,
(1) tetiåe basmayın;
(2) itme koluna basmayın ve
(3) kullanım ve taßıma sırasında olası bir yaralanmaya
meydan vermemek için, yüzünüzü, vücudunuzu,
ellerinizi, ayaklarınızı ve diåer insanları aletin burun
kısmından uzak tutun.
(1) Zımba teli besleyicisini geriye çekin ve haznenin bir
kanalına emniyetli ßekilde takın. (Bkz: Íekil 2)
(2) Zımba teli ßeridini haznenin üzerine yerleßtirin.
Zımba teli ßeridinin hazne üzerinde serbestçe kaydıåından
emin olun. (Bkz: Íekil 3)
(3) Zımba teli besleyicisini geriye doåru çekin. Daha sonra,
besleyiciyi hazne kanalından ayırın ve herhangi bir
darbeden kaçınarak zımba telini yavaßça geri getirin. (Bkz:
Íekil 4)
Íimdi, zımba teli ißlem için hazırdır.
UYARI:
䡬 Eåer zımba teli besleyicisi aniden serbest bırakılırsa,
beklenmedik ßekilde geri dönerek deformasyona ve/veya
saçılmaya, nihayetinde zımba tellerinin engellenmesine
neden olabilir.
Herhangi bir darbeden kaçınarak zımba teli besleyicisini
geri getirdiåinizden kesinlikle emin olun.
䡬 Istenmeyen çalıßmayı engellemek için, kesinlikle tetiåe
dokunmayın veya itme kolunun üst ucunu bir iß tezgahı
üzerine veya yere yerleßtirmeyin. Ayrıca, kesinlikle zımba
teli çıkıßını insanlara doåru tutmayın.
ZIMBALAMA MAKINASININ KULLANILMASI
UYARI:
䡬 Kesinlikle bu aletin kafa kısmını bir çekiç gibi kullanmayın.
䡬 Çalıßma sırasında civardaki insanların güvenliåini
saålamak için gerekli tedbirleri alın.
1. Zımbalama ißlemleri
(1) Aralıklı zımbalama
Zımba teli çıkıßını istenen nokta üzerine bastırın ve daha
sonra bir tek zımba teli atıßı yapmak için tetiåi çekin. (Bkz:
Íekil 5)
UYARI:
䡬 Bu alet, bir yüzeye düzgün olarak güçlü ßekilde
bastırıldıåında veya sert malzemeler üzerinde
kullanıldıåında, sadece bir zımba teli yerine sıçrama
harketi yaparak birkaç zımba teli atıßı yapacaktır. Böyle
durumlarda, tetiåi sıkıp hızlı bir ßekilde serbest bırakarak
zımba tellerini uygulayın.
(2) Itme kolu
Zımba çıkıßını bastırırken, emniyet kilidini serbest
bırakmak için itme kolunu tamamen kaldırın (Bkz: Íekil
5). Bu suretle, tetik çekildiåinde bile emniyet kilidi serbest
bırakılmadan zımba telleri atılamaz.
(3) Sürekli zımbalama
Ilk önce, tetiåi çekin. Daha sonra, aleti otomatik olarak
zımba teli atıßı yapmak istediåiniz konum üzerine bastırın.
(Bkz: Íekil 6).
UYARI:
䡬 Bir tahta malzemenin kößelerine zımbalama yaparken
dikkatli olun. Bir tahta malzemenin kößelerine sürekli
zımbalama yaparken, zımba telleri hedeften sapabilir veya
kößeyi delip geçebilir.
43
䡬 Bir zımba telinin üzerine baßka bir zımba teli uygulamayın.
䡬 Metal parçalar üzerine zımba teli uygulamayın.
NOT:
䡬 Yüksüz çalıßma konusunda uyarılar
Bazen, haznedeki tüm zımba telleri tükendikten sonra
zımbalama hareketi devam eder.
Buna “yüksüz çalıßma” adı verilir. Bu çalıßma tampona,
hazneye ve zımba teli besleyicisine zarar verebilir.
Yüksüz çalıßmadan kaçınmak için, zaman zaman
haznede kalan zımba teli miktarını kontrol edin. Diåer
taraftan, alet kullanıldıktan sonra tüm zımba telleri
çıkarılmalıdır.
䡬 Zımbalamadan sonra:
(1) hava hortumunu zımbalama makinasından sökün;
(2) zımbalama makinasındaki tüm zımba tellerini çıkarın;
(3) Çakıcı üzerindeki hava supabına 5 –10 damla Hitachi
pnömatik makine yaåı uygulayın ve
(4) Hava kompresörü deposu üzerindeki musluåu açarak
sıvıyı boßaltın.
䡬 Düßük sıcaklık koßullarında, makine bazen doåru ßekilde
çalıßmaz. Daima makineyi uygun ortam sıcaklıåında
çalıßtırın.
2. Zımbalama derinliåinin ayarlanması
Her zımba telinin aynı derinliåe girmesini saålamak için:
(1) zımbalama makinasının hava basıncı sabit kalmalı
(regülatör takılmıß ve uygun ßekilde çalıßıyor olmalı)
ve
(2) zımbalama makinası daima iß parçasına karßı sıkı
ßekilde tutulmalıdır.
Eåer zımba telleri iß parçasına çok derin veya çok
yüzeysel zımbalanıyorsa, aßaåıdaki sırayı takip ederek
zımbalama ayarı yapın.
UYARI:
䡬 Ayardan önce, daima hortum baålantısını sökün ve
elektrikli alet içindeki basınçlı havayı boßaltın.
䡬 Ayar sırasında daima parmaåınızı tetikten uzak tutun.
䡬 Ayar sırasında vücudunuzun, ellerinizi veya
bacaklarınızın zımba teli çıkıßının önünde
olmadıåından emin olun.
Lütfen ayarları aßaåıdaki sırayı takip ederek yapın. (Bkz:
Íekil 7)
Zımba tellerinin girme derinliåini ayarlamak için, itme kolu
parçasını tespit eden vidayı gevßetin.
Eåer zımba teli derinliåi fazlaysa, itme kolu parçasını
“aßaåı”, azsa “yukarı” ayarlayın.
Vidayı sıkarak itme kolu parçasını sabitleyin.
NOT:
䡬 Lütfen zımba tellerini uygun derinliåe zımbalamak için
yeterli olan minimum hava basıncını kullanın. Eåer
gereåinden yüksek basınç kullanılırsa, piston
sönümleyicinin, vb. kullanım ömrü azalacaktır.
KONTROL VE BAKIM
UYARI:
Sıkıßıklıkları temizleme, muayene, bakım ve temizlik
ißlemleri sırasında hortumu mutlaka sökün.
1. Zımba teli sıkıßması için karßı tedbir
(1) Tüm zımba tellerini çıkarın.
(2) Kilit kolunu ayırın ve mil kılavuzunu açın. (Bkz: Íekil 8)
(3) Bir düz baßlı tornavida ile sıkıßan zımba telini çıkarın. (Bkz:
Íekil 9)
(4) Mil kılavuzunu ve mandalı kapatın.
(5) Sık sık zımba teli sıkıßması durumunda, bir Hitachi yetkili
servis merkezine baßvurun.
Page 45

Türkçe
2. Kontrol ve bakım
Aleti periyodik olarak kontrol edin.
(1) Egzos kapaåını tespit eden dört altıgen soket baßlı vidayı
sökün ve egzos kapaåını çıkarın.
Daha sonra silindir, piston ve diåer parçalar ayrı montaj
grupları olarak çıkarılabilir.
Tahrik ucunu, piston sürgü parçasını ve gövde iç yüzeyini
bir bezle silerek biriken kirleri temizleyin.
(2) Piston sönümleyicinin normal çalıßtıåını onaylayın. Hasarlı
bir piston sönümleyici diåer bileßen parçalarının hasar
görmesine neden olabilir.
(3) Sökme sırasında O-ring'i aßınmaya karßı dikkatli ßekilde
kontrol edin. Aßınmıß veya hasar görmüß ir O-ring, genel
performansı bozabilir. Aßınmıß veya hasar görmüß O-ring'i
yenisiyle deåißtirin.
(4) Aleti tekrar monte etmeden önce, O-ring'e gres yaåı
(Attolub No. 2 Gres) uygulayın. Ayrıca, aleti tavsiye edilen
yaå ile yaålayın.
3. Her bir parça için montaj vidalarını kontrol edin
Düzenli aralıklarla her bir parçanın montaj vidalarının
gevßek olup olmadıåını ve herhangi bir sızıntı olup
olmadıåını kontrol edin. Gevßek vida varsa sıkın. Aletin
gevßek vidalarla çalıßtırılması tehlike yaratacaktır.
4. Itme kolunun kontrol edilmesi
Itme kolunu (Íekil 1) kontrol ederek düzgün ßekilde
kayabildiåinden emin olun.
Itme kolunun kayma bölgesini temizleyin ve zaman zaman
tavsiye edilen yaåı kullanarak yaålayın. Yaålama, düzgün
kayma saålar ve aynı zamanda paslanmayı önler.
5. Saklama
䡬 Aleti uzun bir süre kullanmayacaksanız, paslanmaya
meydan vermemek için çelik parçalara ince bir yaå
tabakası uygulayın.
䡬 Zımbalama makinasını bir soåuk hava ortamında
saklamayın. Saklama yeri olarak sıcak bir bölge seçin.
䡬 Zımbalama makinası kullanılmadıåı zamanlarda sıcak ve
kuru bir yerde saklanmalıdır.
Makinayı çocukların ulaßamayacaåı bir yerde muhafaza
edin.
6. Servis parçaları listesi
UYARI:
Hitachi Elektrikli Aletlerinin tamir, deåißiklik ve kontrol
ißlemleri yetkili Hitachi Servis Merkezleri tarafından
yapılmalıdır.
Bu Parça Listesi, tamir veya bakım ißlemi talebi için aletle
birlikte Hitachi Servis Merkezine sunulduåunda yararlı
olacaktır.
Elektrikli aletlerin çalıßtırılmasında ve bakımında, ilgili
ülkede geçerli olan güvenlik yönetmeliklerine ve
standartlara uyulmalıdır.
DEÅIÍIKLIKLER:
Hitachi Elektrikli Aletleri, en son teknolojik ilerlemelere
göre sürekli olarak gelißtirilmekte ve yenilenmektedir.
Buna uygun olarak, önceden haber verilmeden bazı
parçalarda deåißiklikler yapılabilir.
YAÅLAYICI-FILTRE-INDIRGEME VALFI (Hava Ayarı)
Uzun servis ömrü saålamak için aletin ideal koßulda
çalıßtırılabilmesi amacıyla bir yaålayıcı filtre indirgeme valfi
kullanılması tavsiye edilir. Lütfen, kullanım sırasında ünite
ve hava ayarı arasındaki hortum uzunluåunu 10 m ile
sınırlandırın. (Íekil 10)
UYGULANABILIR YAÅLAR
Yaåın tipi Yaåın adı
Tavsiye edilen yaå SHELL TONNA
Motor yaåı SAE10W, SAE20W
Türbin yaåı ISO VG32 – 68
Gürültü bilgisi
Karakteristik gürültü deåerleri, HAZIRAN 2000 tarihli EN 79213’e göre verilmißtir.
Tipik A-aåırlıklı tek-ißlem ses gücü düzeyi
Iß istasyonunda tipik A-aåırlıklı tek-ißlem emisyon ses
basıncı düzeyi
Bu deåerler, aletle ilißkilendirilmiß karakteristik deåerlerdir ve
kullanım noktasında olußan gürültü düzeyini temsil etmezler.
Kullanım noktasındaki gürültü düzeyi, örneåin çalıßma
ortamına, iß parçasına, iß parçası desteåine, zımbalama
sayısına, vb. baålı olacaktır.
Iß yerindeki ßartlara ve iß parçasının ßekline baålı olarak, iß
parçalarının ses sönümleyici destekler üzerine yerleßtirilmesi,
sıkıßtırma veya kaplama yoluyla iß parçası titreßiminin
engellenmesi, yapılan çalıßma için gerekli minimum hava
basıncı ayarının kullanılması gibi özel gürültü zayıflatma
önlemlerinin uygulanması gerekebilir.
Özel durumlarda koruyucu kulaklık takmak gerekir.
Titreßim Bilgisi
HAZIRAN 200 tarihli EN 792-13’e göre karakteristik titreßim
deåeri: 3,9 m/s
Bu deåer, aletle ilgili karakteristik deåerdir ve aleti kullanırken
el-kol sistemine uygulanan etkiyi temsil etmez. Alet
kullanılırken el-kol sistemine yapılan etki, örneåin sıkma
kuvvetine, temas baskı kuvvetine, çalıßma yönüne, enerji
kaynaåının ayarına, iß parçasına ve iß parçası desteåine baålı
olacaktır.
2
.
(#90 – #180)
LWA,
1s,d = 99 dB
LpA,
1s,d = 81 dB
KOMPRESÖR
UYARI:
Hava kompresörünün maksimum çalıßma basıncı 8,3 bar
deåerini aßtıåında, hava kompresörü ve çakıcı arasına
bir basınç düßürücü valf takın. Daha sonra, hava basıncını
4,9 ~ 8,3 bar çalıßma aralıåına ayarlayın. Eåer hava ayarı
takılmıßsa, aynı zamanda ilave kolaylık saålayan yaålama
da mümkündür.
44
Page 46

Română
MĂSURI GENERALE DE PRECAUŢIE
OPERAŢIONALĂ
1. Folosiţi scula automată în condiţii de siguranţă
pentru o utilizare corectă.
Nu folosiţi scula automată în alte scopuri decît cele
specificate în prezentele instrucţiuni.
2. Pentru folosirea în condiţii de siguranţă, mînuiţi
scula automată corect.
Vă rugăm să urmaţi instrucţiunile oferite în prezentul
manual de instrucţiuni și folosiţi corect scula în cauză
astfel încît să asiguraţi folosirea în condiţii de siguranţă.
Nu lăsaţi scula la îndemîna copiilor sau a persoanelor
care nu cunosc suficiente lucruri pentru a o mînui corect
sau a persoanelor care nu o pot mînui corect.
3. Asiguraţi-vă de condiţiile de siguranţă din atelier.
Nu permiteţi accesul în atelier al persoanelor neautorizate.
Nu trebuie permis, în special, accesul copiilor.
4. Piesa potrivită la locul potrivit.
Nu înlăturaţi vreunul dintre capace sau șuruburi. Lăsaţile la locul lor, deoarece fiecare dintre acestea își are
utilitatea sa.
Mai mult de atît, din moment ce faptul reprezintă un
pericol, niciodată nu operaţi modificări în construcţia
sculei și nici nu o folosiţi după ce i s-au operat modificări.
5. Verificaţi scula înainte de a o folosi.
Înainte de a folosi scula, verificaţi întotdeauna că niciuna
dintre părţile sale nu este stricată, ca toate șuruburile
să fie strînse complet și că nu lipsește și nu este ruginită
niciuna dintre piese.
6. Folosirea excesivă poate cauza accidente.
Nu folosiţi sculele și accesoriile peste limitele
capacităţilor lor de lucru. Folosirea excesivă nu
afectează doar scula automată ci este, de asemenea,
periculoasă în sine.
7. Întrerupeţi imediat folosirea în cazul în care
observaţi anormalităţi.
Întrerupeţi folosirea dacă observaţi anormalităţi sau dacă
scula automată nu funcţionează corespunzător;
asiguraţi-vă că scula automată este cercetată și reparată.
8. Aveţi grijă de scula automată.
Dacă aţi scăpat sau aţi lovit scula de obiecte, e posibil
ca carcasa să fie deformată ceea ce poate conduce la
crăpături sau alte tipuri de avarieri, de aceea mînuţi
scula cu atenţia cuvenită. De asemenea, nu aplicaţi
zgîrieturi sau inscripţii pe scula automată. Dată fiind
presiunea înaltă a aerului din interiorul sculei, crăpăturile
suprafeţei sale sînt periculoase.
Niciodată nu folosiţi scula automată în cazul extinderii
unei crăpături sau dacă există scurgeri de aer printr-o
crăpătură.
9. Aveţi grijă de sculă pentru a-i asigura o durată de
viaţă îndelungată.
Întotdeauna îngrijiţi-vă de scula automată și menţineţio curată.
10. Inspectarea cu regularitate a sculei este esenţială
pentru menţinerea condiţiilor de siguranţă.
Inspectaţi la intervale regulate scula automată astfel
încît scula automată să poată fi folosită în siguranţă și
în orice moment.
11. Consultaţi un agent de service autorizat dacă se
cere o reparaţie sau o înlocuire de piese.
Asiguraţi-vă că scula automată este deservită exclusiv
în cadrul unui centru de service autorizat și că piesele
folosite la înlocuire sînt exclusiv originale.
12. Păstraţi scula automată într-un loc potrivit.
Atunci cînd nu o folosiţi, păstraţi scula automată într-un loc
uscat și în afara accesului copiilor. Injectaţi în corpul sculei
circa 2 cm
13. Schema desfășurată de asamblare a prezentelor
instrucţiuni de mînuire trebuie folosită numai de
personalul unui centru de service autorizat.
3
de lubrifiant pentru a o proteja contra ruginei.
MĂSURI DE PRECAUŢIE LA UTILIZAREA
CAPSATORULUI
1. Folosire în condiţii de siguranţă prin utilizare corectă
Această sculă a fost proiectată pentru aplicarea de
capse pe suprafeţe de lemn sau materiale similare.
Folosiţi-o numai în scopurile prevăzute.
2. Asiguraţi-vă că presiunea aerului se află în limitele
recomandate.
Sculele de capsare operate cu ajutorul aerului
comprimat vor fi conectate numai la liniile de aer
comprimat unde presiunea maxim admisibilă nu poate
fi depășită de un factor de peste 10%, care poate, de
exemplu, fi atins printr-o supapă de reducere a presiunii,
care conţine o supapă de siguranţă în aval.
(Pentru modelul N5008AC2, 110% din presiunea maxim
admisibilă recomandată este de 9,1 bar = 130 psi)
Sculele de capsare operate cu ajutorul aerului
comprimat vor fi folosite numai la presiunile minime
cerute în procesul de lucru la mînă, pentru a preveni
nivelele nenecesar de mari de zgomot, uzarea sporită
și rezutarea în rateuri.
3. Niciodată nu folosiţi în procesul de lucru cu
echipamentul de înaltă-presiune vreun alt gaz în
afara aerului comprimat.
Niciodată nu folosiţi dioxidul de carbon, oxigenul sau
vreun alt gaz din containere presurizate, indiferent de
circumstanţe.
4. Protejaţi-vă contra igniţiei și exploziilor.
Din moment ce, în timpul capsarii, pot sări scîntei, este
periculos să folosiţi scula în apropiere de lacuri, vopsele,
benzină, diluanţi, motorină, gaz, adezivi și alte substanţe
inflamabile similare, deoarece acestea pot lua foc sau
exploda. Sub nicio formă, așadar, nu se va folosi această
sculă în apropiere de astfel de materiale inflamabile.
5. Purtaţi întotdeauna soluţii de protecţie a ochilor
(ochelari de protecţie).
Atunci cînd mînuiţi scula automată, purtaţi, întotdeauna,
ochelari de protecţie și asiguraţi-vă că și persoanele
din apropiere poartă ochelari de protecţie.
Posibilitatea ca fragmente de capse sau capse care nau fost proiectate corespunzător să ricoșeze în ochi
reprezintă o ameninţare pentru vedere. Ochelari de
protecţie pot fi cumpăraţi la orice magazin de scule.
Întotdeauna purtaţi ochelari de protecţie, atunci cînd
mînuiţi această sculă. Folosiţi fie ochelari de protecţie,
fie o mască cu vedere largă pe de-asupra ochelarilor
de vedere.
Angajatorii vor trebui să oblige angajaţii să folosească
echipament de protecţie a ochilor.
6. Protejaţi-vă urechile și capul.
Atunci cînd desfășuraţi activitatea de capsare, purtaţi,
vă rog, accesorii de protecţie a urechilor și capului. De
asemenea, în funcţie de condiţiile concrete, asiguraţivă că și persoanele din apropiere, poartă și ele accesorii
de protecţie a urechilor și a capului.
45
Page 47

Română
7. Fiţi atenţi la cei care lucrează în apropiere de
Dumneavoastră.
Ar fi foarte periculos dacă acele persoane vor fi lovite
de capse care nu au fost proiectate corespunzător. De
aceea acordaţi întotdeauna atenţie la siguranţa
persoanelor din jurul Dumneavoastră, atunci cînd folosiţi
scula. Asiguraţi-vă, întotdeauna, că mîinile, picioarele
sau corpurile nimănui nu se află în apropierea
debușeului capsatorului.
8. Niciodată nu direcţionaţi debușeul capsatorului în
direcţia oamenilor.
Luaţi, întotdeauna, în calcul faptul că scula poate
conţine capse.
Dacă debușeul capsatorului este direcţionat spre oameni,
pot fi cauzate accidente grave, dacă acţionaţi, din greșeală
scula. Atunci cînd conectaţi și deconectaţi furtunul, în timpul
reîncărcării capsatorului sau a altor operaţiuni similare,
asiguraţi-vă că debușeul capsatorului nu este direcţionat
spre cineva (inclusiv spre Dumneavoastră). Chiar și atunci
cînd capsatorul nu este încărcat, este periculos să acţionaţi
scula în timp ce o aveţi direcţionată spre cineva, prin urmare,
niciodataă nu faceţi acest lucru. Nu vă distraţi cu scula.
Respectaţi scula în calitatea sa de instrument de lucru.
9. Înainte de a folosi scula automată, verificaţi pîrghia
de împingere.
Înainte de a folosi scula automată, asiguraţi-vă că aţi
verificat pîrghia și supapa de împingere funcţionează
corespunzător. Conectaţi furtunul fără să fi alimentat
capsatorul cu capse și faceţi următoarele verificări.
Dacă survine un sunet la operare, înseamnă că există
o disfuncţie, caz în care nu folosiţi scula automată pînă
cînd nu aceasta nu va fi fost inspectată și reparată.
䡬 Dacă la o acţionare ușoară a trăgaciului se aude un
sunet de trepidaţie, scula automată prezintă un
deranjament.
䡬 Dacă la o acţionare ușoară a pîrghiei de împingere
contra materialului de capsat se aude un sunet de
trepidaţie, scula automată prezintă un deranjament.
Mai mult decît atît, în ceea ce privește pîrghia de
împingere, ţineţi cont că aceasta, niciodată, nu
trebuie modificată sau înlăturată.
10. Folosiţi numai capsele specificate.
Niciodată nu folosiţi alte capse în afara celor specificate
și descrise în prezentele instrucţiuni.
11. Fiţi precauţi la conectarea furtunului.
Atunci cînd conectaţi furtunul și alimentaţi capsatorul,
pentru a evita acţionarea din greșeală a sculei, asiguraţivă de următoarele.
䡬 Nu atingeţi trăgaciul.
䡬 Nu permiteţi capului de tragere să intre în contact
cu vreo suprafaţă.
䡬 Ţineţi capul de tragere în jos.
Acordaţă maximă atenţie instrucţiunilor de mai sus și
asiguraţi-vă întotdeauna că niciuna dintre părţile
corpului, mîinilor sau picioarelor se află în faţa
debușeului capsatorului.
12. Nu vă plasaţi din neglijenţă degetele pe trăgaci.
Nu vă plasaţi degetele pe trăgaci cu excepţia cazurilor cînd,
efectiv, capsaţi. Atunci cînd purtaţi scula sau o înmînaţi
cuiva și ţineţi degetul pe trăgaci, se poate întîmpla să lansaţi,
din neglijenţă, capse și să cauzaţi, astfel un accident.
13. Închideţi de tot ghidul lamei și nu-l deschideţi pe
durata lucrului.
Dacă se va încerca capsarea în timp ce ghidul lamei
este deschis, capsele nu vor proiectate în materialul
lemnos și există riscul unei descărcări periculoase.
14. Apăsaţi cu fermitate debușeul capsatorului pe
suprafaţa materialului de capsat.
Atunci cînd proiectaţi capse, apăsaţi cu fermitate
debușeul capsatorului pe suprafaţa materialului de
capsat. Dacă debușeul nu este aplicat corespunzător,
capsele pot ricoșa.
15. Feriţi mîinile și picioarele de capul de tragere, în
timpul utilizării.
Este foarte periculoasă lovirea mîinilor sau a picioarelor
de capsele care ricoșează.
16. Protejaţi-vă împotriva contraloviturilor sculei.
Nu vă apropiaţi cu capul de capsator etc. pe durata
lucrului. Faptul este periculos deoarece scula poate
recula violent dacă capsa care este proiectată în acel
moment intră în contact cu capsa proiectată anterior
sau cu un nod din lemn.
17. Fiţi atenţi cînd capsaţi suprafeţe subţiri sau colţuri.
La capsarea suprafeţelor subţiri, capsele pot străbate
suprafaţa și ieși de cealaltă parte. La fel și în cazul
colţurilor, cînd capsele pot devia. În astfel de cazuri,
asiguraţi-vă, întotdeauna, că nu există nimeni (și nici
mîinile sau picioarele nimănui, etc.) de cealaltă parte a
suprafeţei subţiri sau în apropiere de segmentul de lemn
pe care intenţionaţi să-l capsaţi.
18. Capsarea simultană executată din ambele părţi ale
aceleiași suprafeţe este periculoasă.
Sub nicio formă nu se va executa capsarea unui perete
concomitent, din cele două părţi ale sale. Faptul poate
fi foarte periculos din moment ce capsele pot trece prin
perete și cauza răniri.
19. Nu folosiţi scula automată pe schele și scări mobile.
Scula automată nu se va folosi în cazuri specifice ca,
de exemplu:
– atunci cînd schimbarea suprafeţei de folosire a
capsatorului implică folosirea de schele, trepte, scări
mobile sau construcţii cu formă de scară, cum ar fi
leaturile acoperișului,
– sigilarea cutiilor sau lăzilor,
– sigilarea sistemelor de siguranţă de transportare, ca,
de exemplu, pe vehicule sau vagoane
20. Nu deconectaţi furtunul în timp ce ţineţi degetul pe
trăgaci.
Dacă deconectaţi furtunul în timp ce ţineţi degetul pe
trăgaci, următoarea dată cînd furtunul va fi conectat,
există pericolul ca scula automată să proiecteze
spontan o capsă sau să funcţioneze incorect.
21. Deconectaţi furtunul și eliminaţi orice capsă rămasă
în magazin, în urma utilizării.
Deconectaţi scula de la sursa de aer înainte de
efectuarea operaţiunilor de mentenanţă, eliminării unei
prinderi de capsă, părăsirea locului de muncă, mutarea
sculei pe un alt amplasament sau în urma utilizării.
Proiectarea din greșeală a unei capse este extrem de
periculoasă.
22. În timpul înlăturării unei capse blocate, asiguraţivă înainte de toate că ai deconectat furtunul și aţi
eliberat aerul comprimat.
În timpul înlăturării unei capse blocate în debușeul
capsatorului, asiguraţi-vă înainte de toate că ai
deconectat furtunul și aţi eliberat aerul comprimat din
scula automată.
Proiectarea accidentală de capse poate fi extrem de
periculoasă.
23. Pentru evitarea riscurilor cauzate de capse în cădere,
nu deschideţi, niciodată, magazinul cu dispozitivul
orientat în jos, în timp ce alimentaţi cu capse.
46
Page 48

Română
24. Conectarea de tip cuib (mufa de aer) nu va fi folosită
în corp.
Dacă în corp este instalată o conectare de tip cuib, se poate
întîmpla ca, uneori, aerul comprimat să nu fie tras cînd
furtunul este deconectat, de aceea evitaţi această situaţie.
Scula și furtunul de alimentare cu aer trebuie să deţină o
astfel de conectare de furtun care să elimine întreaga
presiune din sculă, atunci cînd mufa de conectare este
deconectată.
25. Nu folosiţi motorină sau alte lichide inflamabile în
SPECIFICAŢII
Tip de energie Piston oscilant
Presiune aer (calibru) 4,9 – 8,3 bar
Capse aplicabile ref. Fig.
Cantitate capse încărcate 150 capse
Dimensiune 365 mm (L) × 258 mm (H) × 76 mm (l)
Greutate 2,0 kg
Furtun (diam. interior) 6 mm
SELECTARE CAPSE
Alegeţi capsele care se potrivesc din Fig. Capsele care nu
sînt prezentate în Fig. nu pot fi proiectate cu prezenta sculă.
16 Calibru 7/16" Coroană
Min. Max.
1,61mm
7,9mm
25mm
1,45mm
Dimensiunea capselor
50mm
ACCESORII STANDARD
(1) Cheie franceză hexagonală pentru șuruburi M5 .......... 1
(2) Protecţie pentru ochi ................................................... 1
(3) Lubrifiant ...................................................................... 1
ACCESORII OPŢIONALE
䡬 Set mecanism erori secvenţiale (Cod Nr. 876762)
(Set piese tragere secvenţială, Piese tragere singulară)
În cazul setului de piese tragere secvenţială, capsatorul este
acţionat numai prin apăsarea trăgaciului în urma împingerii
în jos a pîrghiei de împingere.
Prin instalarea acestor piese, pot fi evitate proiectarea
capselor în poziţii improprii și tragerea spontană a capselor
provocată de acţionarea accidentală a pîrghiei de împingere.
47
ÎNTREBUINŢĂRI
䡬 Lucrări de construcţie ca, de exemplu, izolarea pereţilor,
căptușirea podelelor.
䡬 Construcţii mobile și modulare de case.
PREGĂTIRI PREALABILE UTILIZĂRII
1. Pregătiţi furtunul
Asiguraţi-vă că folosiţi furtunul dotat cu diametrul interior
de 6 mm.
NOTĂ:
2. Verificaţi condiţiile de siguranţă
PRECAUŢII:
䡬 Nu se permite accesul la echipament al persoanelor
neautorizate (inclusiv copii).
䡬 Purtaţi protecţie pentru ochi.
䡬 Verificaţi să fie strînse bine șuruburile inverse care fixează
capacul de evacuare, etc.
Verificaţi ca capsatorul să nu prezinte scurgeri de aer și
piese defecte sau ruginite.
䡬 Verificaţi dacă pîrghia de împingere funcţionează corect.
Verificaţi, de asemenea, dacă la părţile mobile ale pîrghiei
de împingere n-a aderat murdărie.
䡬 Reverificaţi condiţiile de siguranţă operaţională.
ÎNAINTE DE UTILIZARE
1. Verificaţi presiunea aerului
PRECAUŢII:
Presiunea aerului trebuie să fie menţinută constant în
limitele 4,9 - 8,3 bar.
Ajustaţi presiunea aerului astfel încît aceasta să fie cuprinsă
între 4,9 și 8,3 bar conform diametrelor și lungimii capselor
și durităţii suprafeţei capsate. Acordaţi o atenţie deosebită
presiunii la ieșire, capacităţii și șuierului compresorului de
aer pentru a vă asigura că presiunea aerului nu depășește
limitele specificate. Ţineţi cont de faptul că presiunea
excesivă poate afecta performanţa generală a aparatului,
durata sa de viaţă și condiţiile de siguranţă.
procesul de curăţare a sculei automate.
Dacă vaporii unui lichid inflamabil nimeresc în scula
automată, există pericolul ca scînteile produse în timpul
capsării etc. să provoace explozii.
Furtunurile de alimentare cu aer trebuie să aibă o
presiune de lucru minimă de 12,8 bar sau 150 procente
din acea presiune maximală produsă în sistemul de
alimentare cu aer care este cea mai mare.
Page 49

Română
2. Lubrifiere
(1) Înainte de a folosi acest capsator, asiguraţi conexiunea de
aer dintre compresorul de aer și acest dispozitiv. Lubrifierea
conexiunii de aer conferă o funcţionare facilă, o durată de
exploatare mai mare și este un remediu contra coroziunii.
Ajustaţi lubrifiantul în așa fel încît la intervale de 5 pînă la
10 cicluri de capsare acesta să alimenteze o singură
picătură de soluţie lubrifiantă.
(2) Se recomandă folosirea lubrifiantului SHELL TONNA. Mai
sînt listaţi și alţi lubrifianţi aplicabili. Niciodată nu
amestecaţi doi sau mai mulţi lubrifianţi diferiţi.
3. Alimentarea cu capse
PRECAUŢII:
䡬 Cînd alimentaţi capsatorul cu capse,
(1) nu apăsaţi trăgaciul;
(2) nu apăsaţi pîrghia de împingere și
(3) feriţi-vă faţa, mîinile, picioarele și alte părţi ale corpului
Dumneavoastră și ale celorlalte persoane de nasul
ţevii capsatorului pentru a evita posibile răniri pe
durata utilizării și transportării.
(1) Trageţi alimentatorul de capse și atașaţi-l cu atenţie peste
o canelură a magazinului. (Vezi Fig. 2)
(2) Plasaţi capacul capsatorului peste magazin.
Asiguraţi-vă că capacul capsatorului alunecă liber peste
magazin. (Vezi Fig. 3)
(3) Trageţi alimentatorul de capse. Detașaţi-l apoi de pe
canelura magazinului și aduceţi ușor capsele înapoi ca
și cum ar fi împinse ușor, evitînd orice impact. (Vezi Fig.4)
Capsatorul este acum pregătit pentru utilizare.
PRECAUŢII:
䡬 Dacă alimentatorul de capse este eliberat pe neașteptate,
acesta (se) poate întoarce dintr-odată, provocînd
deformări și/sau împrăștia, ceea ce se poate termina
printr-o înfundare de capse.
Asiguraţi-vă că aţi întors alimentatorul de capse în poziţia
normală, evitînd orice impact.
䡬 Pentru a preveni utilizarea neintenţionată, nu atingeţi niciodată
trăgaciul și nu plasaţi capătul de sus al pîrghiei de împingere
pe o masă de lucru sau pe podea. De asemenea, nu orientaţi
niciodată debușeul capsatorului înspre o persoană.
CUM FOLOSIM CAPSATORUL
PRECAUŢII:
䡬 Niciodată nu folosiţi capul sau corpul acestui dispozitiv
în calitate de ciocan.
䡬 Luaţi măsuri de siguranţă pentru a asigura securitatea
persoanelor din apropiere, pe durata utilizării.
1. Proceduri de capsare
(1) Capsare intermitentă
Apăsaţi debușeul capsatorului pe locul dorit, apoi trageţi
trăgaciul pentru a proiecta o capsă dintr-o singură
împușcătură. (Vezi Fig. 5)
PRECAUŢII:
䡬 Dispozitivul va sălta și va împușca cîteva capse în loc de
una singură într-o succesiune rapidă atunci cînd e apăsat
cu forţă la același nivel pe o suprafaţă sau cînd e folosit
pe materiale dure. În asemenea cazuri proiectaţi capsele
prin apăsarea și eliberarea rapidă a trăgaciului.
(2) Pîrghia de împingere
Cînd apăsaţi debușeul capsatorului, asiguraţi-vă că aţi
ridicat de tot pîrghia de împingere (Vezi Fig. 5) pentru a
elibera broasca de siguranţă. Astfel, capsele nu pot fi
proiectate fără eliberarea broaștei de siguranţă chiar dacă
trăgaciul e tras.
(3) Capsarea continuă
Mai întîi trageţi trăgaciul. Apoi plasaţi dispozitivul în poziţia
dorită pentru proiectarea automată a capselor. (Vezi Fig. 6)
PRECAUŢII:
䡬 Fiţi atenţi cînd capsaţi margini de lemn. Cînd se capsează
continuu colţuri de lemn, se poate întîmpla ca capsele
să ricoșeze sau să treacă prin colţ și să iasă de cealaltă
parte.
䡬 Nu proiectaţi o capsă peste o altă capsă.
䡬 Nu proiectaţi capse pe suprafeţe de metal.
NOTĂ:
䡬 Măsuri de precauţie pentru operaţiunile ne-alimentare
Uneori se poate întîmpla ca capsatorul să continue
proiectarea după ce au fost proiectate toate capsele
conţinute anterior în magazin.
Astfel de acţiuni se numesc “operaţiuni ne-alimentare”.
Astfel de operaţiuni pot deteriora parașocul, magazinul
și alimentatorul de capse.
Pentru a evita operaţiunile ne-alimentare, verificaţi,
ocazional, cantitatea de capse rămase. Pe de altă parte,
înlătiraţi toate capsele după ce aţi terminat folosirea
acestui dispozitiv.
䡬 După capsare:
(1) deconectaţi furtunul de aer de la capsator;
(2) înlăturaţi toate capsele din capsator;
(3) alimentaţi 5 - 10 picături de lubrifiant pnemumatic
Hitachi în conectorul de aer al capsatorului și
(4) deschideţi robinetul de eliberare al rezervorului
compresorului de aer pentru a scurge orice lichid.
䡬 În condiţii de temperatură joasă, se poate întîmpla ca
aparatul să nu funcţioneze corect. Întotdeauna folosiţi
aparatul în condiţii de temperatură potrivite.
2. Cum ajustăm adîncimea capsării
Pentru ca fiecare capsă să penetreze la aceeași adîncime,
asiguraţi-vă că:
(1) presiunea aerului alimentat în capsator rămîne
constantă (s-a instalat un regulator care funcţionează
corespunzător) și
(2) capsatorul este ţinut cu fermitate pe suprafaţa de
lucru.
Dacă capsele au fost proiectate prea adînc sau superficial
în suprafaţa de lucru, ajustaţi capsarea după cum
urmează.
PRECAUŢII:
䡬 Înainte de ajustare, deconectaţi întotdeauna furtunul
și eliberaţi aerul comprimat din scula automată.
䡬 Pe durata ajustării nu ţineţi niciodată degetul pe
trăgaci.
䡬 Pe durata ajustării asiguraţi-vă că nicuna din părţile
corpului, picioarele sau mîinile nu se află în faţa
debușeului capsatorului.
Derulaţi, vă rog, operaţiunile de ajustare, în următoarea
ordine. (Vezi Fig. 7)
Pentru a ajusta adîncimea de penetrare a capselor, slăbiţi
șurubul care securizează o piesă a pîrghiei de împingere.
Dacă capsele sînt proiectate prea adînc, ajustaţi piesa
pîrghiei de împingere înspre “down” (micșorare), iar dacă
au fost proiectate superficial, ajustaţi piesa pîrghiei de
împingere înspre “up” (mărire).
Strîngeţi șurubul pentru a fixa piesa pîrghiei de împingere.
NOTĂ:
䡬 Folosiţi, vă rog, presiunea de aer minimă, care este
suficientă pentru a proiecta capsele la o adîncime
potrivită. Dacă se folosește o presiune mărită, se
scurtează durata de viaţă a amortizorului pistonului etc.
48
Page 50

Română
INSPECŢIE ȘI MENTENANŢĂ
PRECAUŢII:
Asiguraţi-vă că aţi deconectat furtunul pe durata eliminării
prinderilor, inspectării, mentenanţei și curăţării.
1. Contramăsuri pentru prinderile de capse
(1) Înlăturaţi toate capsele.
(2) Eliberaţi pîrghia de blocare și deschideţi ghidul lamei.
(Vezi Fig. 8)
(3) Îndepărtaţi, cu ajutorul unei șurubelniţe, capsa prinsă.
(Vezi Fig. 9)
(4) Închideţi ghidul lamei și încuiaţi.
(5) În caz de prinderi frecvente, contactaţi un centru autorizat
Hitachi.
2. Inspecţie și mentenanţă
Inspectaţi periodic dispozitivul.
(1) Înlăturaţi cele 4 șuruburi cu mufă hexagonală care
securizează capacul de evacuare și îndepărtaţi capacul
de evacuare.
Apoi pot fi îndepărtate cilindrul, pistonul și alte piese din
grupele respective ale schemei de construcţie.
Ștergeţi piesa de proiectare, partea de alunecare a
pistonului și interiorul corpului cu o bucată de material
pentru a înlătura murdăria adunată.
(2) Asiguraţi-vă că amortizorul pistonului funcţionează
corespunzător. Un amortizor de piston avariat poate
provoca daune altor piese componente.
(3) Verificaţi cu atenţie nivelul de uzare al inelului în formă de
O, în timpul dezasamblării. Un inel în formă de O defect
sau uzat poate afecta performanţa generală a aparatului.
Înlocuiţi un inel în formă de O defect sau uzat cu unul nou.
(4) Înainte de a reasambla dispozitivul, aplicaţi lubrifiant pe
inelul în formă de O (unsoare Attolub No. 2). De asemenea,
lubrifiaţi dispozitivul cu lubrifiantul recomandat.
3. Verificaţi montarea șuruburilor pentru fiecare piesă
Verificaţi, la intervale regulate, fiecare piesă pentru a vă
asigura că șuruburile nu sînt slăbite și dacă există scurgeri
de aer. Strîngeţi orice șuruburi slăbite. Folosirea
echipamentului cu șuruburile slăbite reprezintă un risc.
4. Inspectarea pîrghiei de împingere
Verificaţi dacă pîrghia de împingere (Fig. 1) poate aluneca
cu ușurinţă.
Curăţaţi zona de alunecare a pîrghiei de împingere și
folosiţi lubrifiantul din dotare pentru a lubrifia din timp în
timp. Lubrifierea asigură alunecarea cu ușurinţă și
servește simultan la prevenirea apariţiei ruginii.
5. Depozitarea
䡬 Atunci cînd nu e folosit un timp mai îndelungat, aplicaţi
puţin lubrifiant pe piesele de oţel pentru a evita ruginirea.
䡬 Nu depozitaţi capsatorul într-un mediu geros. Păstraţi
capsatorul într-un mediu cald.
䡬 Atunci cînd nu e folosit, capsatorul trebuie depozitat într-
un loc cald și uscat.
Feriţi capsatorul de accesul copiilor.
6. Lista de piese supuse service-ului
PRECAUŢII:
Repararea, modificarea și inspectarea sculelor automate
Hitachi trebuie efectuată în cadrul unui Centru de service
Hitachi autorizat.
Această Listă de piese va fi de ajutor dacă o veţi pune la
dispoziţia Centrului de service Hitachi autorizat, odată
cu scula, atunci cînd veţi solicita repararea sau
mentenanţa acesteia.
Trebuie urmate regulile și standardele de siguranţă
prescrise în fiecare ţară în procesul de utilizare și
mentenanţă a sculei automate.
49
MODIFICĂRI:
Sculele automate Hitachi sînt îmbunătăţite și modificate
pentru a integra cele mai avansate tehnologii.
Respectiv, se poate întîmpla ca unele piese să fie
schimbate fără o anunţare apriorică.
COMPRESOR
PRECAUŢII:
Cînd presiunea operaţională maximă a compresorului de aer
depășește 8,3 bar, asiguraţi-vă că folosiţi o supapa de
reducere poziţionată între compresor și terminalul
corespunzător al sculei. Apoi, ajustaţi presiunea aerului în
limitele de operare 4,9 ~ 8,3 bar. Dacă conexiunea de aer
este instalată, este posibilă și lubrifierea, asigurînd astfel o
convenienţă adiţională.
SUPAPĂ-DE-REDUCERE-FILTRU-DELUBRIFIERE (Conexiunea de aer)
Pentru ca echipamentul să poată fi folosit în condiţii optime,
să ofere o durată de viaţă prelungită, este recomandabilă
folosirea unei supape de reducere filtru de lubrifiere. Încadraţi,
vă rog, lungimea furtunului dintre unitate și conexiunea de
aer în limita a 10 m în timpul utilizării. (Fig. 10)
LUBRIFIANŢI APLICABILI
Tip lubrifiant Denumire lubrifiant
Lubrifiant recomandat SHELL TONNA
Lubrifiant motor SAE10W, SAE20W
Lubrifiant turbină ISO VG32 – 68
(#90 – #180)
Page 51

Informaţii cu privire la zgomot
Valorile caracteristicilor de zgomot în conformitate cu EN
792-13, IUNIE, 2000.
Nivelul tipic de putere a sunetului unui eveniment unitar
calculat în decibeli A
Nivelul tipic al presiunii sunetului de emisie al unui
eveniment unitar calculat în decibeli A, la unitatea de lucru
Aceste valori sînt valori caracteristice legate nemijlocit de
sculă și nu reprezintă zgomotul dezvoltat la locul de folosire.
Zgomotul dezvoltat la locul de folosire va depinde de exemplu
de mediul în care se desfășoară lucrul, de suportul obiectului
muncii, de numărul de operaţiuni în derulare, etc.
În funcţie de condiţiile de la locul de lucru și de forma obiectului
muncii, s-ar putea să fie necesară luarea unor măsuri
individuale de atenuare a zgomotului, ca, de exemplu, plasarea
obiectului muncii pe suprafeţe de atenuare a zgomotului,
prevenirea vibrării obiectului muncii prin folosirea de cleme
sau prin acoperire, prin ajustarea presiunii de aer la nivelul
minim necesar pentru desfășurarea operaţiunii respective, etc.
În cazuri speciale, e necesară purtarea de căști de protecţie
sonoră.
Informaţii cu privire la vibrare
Valoarea tipică a caracteristicii de vibrare, în conformitate
cu EN 792-13, JUNE, 2000: 3,9 m/s
Această valoare este o valoare caracteristică legată nemijlocit
de sculă și nu reprezintă influenţa asupra sistemului mînăbraţ în timpul utilizării sculei. Influenţa asupra sistemului mînăbraţ în timpul utilizării sculei va depinde, de exemplu, de forţa
de apucare, de forţa de presiune a contactului, de direcţia
de lucru, de ajustările alimentării cu electricitate, de obiectul
muncii, de suportul obiectului muncii.
LWA,
1s,d = 99 dB
LpA,
1s,d = 81 dB
2
.
Română
50
Page 52

Slovenščina
SPLOŠNI VARNOSTNI UKREPI V ZVEZI Z
UPORABO
1. Električno orodje uporabljajte varno za namen, za
katerega je bilo izdelano.
Električnega orodja ni dovoljeno uporabljati za namene,
ki niso določeni v navodilih za uporabo.
2. Za varnost delajte z električnim orodjem pravilno.
Upoštevajte navodila tega priročnika in z orodjem
rokujte pravilno, tako da zagotovite varno uporabo. V
vsakem trenutku je treba preprečiti, da orodje
uporabljajo otroci oz. ljudje, ki niso zmožni pravilno
uporabljati orodja.
3. Potrdi varnost v delavnici.
Preprečite dostop nepooblaščenim v delavnico.
Predvsem to velja za otroke, ki ne smejo vstopati v
delavnico.
4. Pravilni deli na pravilnih mestih.
Ni dovoljeno odstraniti pokrovov ali vijakov. Ti deli
opravljajo določeno funkcijo in jih pustite na mestu.
Zaradi morebitne nevarnosti v nobenem primeru orodja
ne spreminjajte oz. ga ne uporabite, potem ko ste
opravili spremembe.
5. Pred uporabo orodje preglejte.
Pred uporabo orodja obvezno preglejte, da ni noben
del zlomljen, da so vsi vijaki pravilno priviti in da noben
del ne manjka oz. da deli niso rjasti.
6. Pretirano delo je lahko vzrok za nesreče.
Ni dovoljeno pretiravati in uporabljati orodja in
priključkov preko zmožnosti. S pretirano uporabo boste
poškodovali orodje in ogrozili svojo varnost.
7. Takoj ko opaziš nepravilnost, prekini delo.
Če zaznate nepravilnosti oz. če električno orodje ne
deluje pravilno, prekinite delo in naročite pregled oz.
servis orodja.
8. Skrbi za električno orodje.
Če vam orodje pade oz. če z njim udarite ob trd
predmet, lahko zunanji okvir razpoka ali se drugače
poškoduje - zato previdno pri rokovanju. Na orodje ni
dovoljeno vpraskati ali izdolbsti znakov. Zaradi visokega
tlaka v orodju so razpoke na površini lahko zelo nevarne.
Električnega orodja, ki je razpokano oz. iz katerega
uhaja zrak, ni dovoljeno uporabljati.
9. Za dolgo tehnično življenjsko dobo dobro skrbi za
orodje.
Obvezno dobro skrbite za električno orodje in ga redno
čistite.
10. Pregled v rednih časovnih intervalih je bistveni
dejavnik za zagotavljanje varnosti.
Električno orodje pregledujte v redni časovnih intervalih,
tako da ga boste uporabljali varno in učinkovito.
11. Orodje popravijo oz. zamenjajo posamezne dele na
pooblaščenem servisu.
Električno orodje lahko servisirajo le na pooblaščenem
servisu; okvarjene in obrabljene dele lahko zamenjate
le z originalnimi nadomestnimi deli.
12. Električno orodje hrani na ustreznem mestu.
Ko orodja ne uporabljate, ga hranite na suhem mestu,
kamor otroci nimajo dostopa. Skozi spoj cevi v orodje
dolijte približno 2 cm
rjo.
13. Prikaz razširjene sestave v navodilih za uporabo
velja le za pooblaščeni servis.
3
olja, tako da ga zaščitite pred
VARNOSTNI UKREPI V ZVEZI Z UPORABO
SPONKAČA
1. Varno obratovanje s pravilno uporabo
To orodje je oblikovano za zabijanje sponk v les in
podobne materiale. Orodje uporabljajte izključno za
namen, za katerega je bilo izdelano.
2. Zračni tlak mora biti določene vrednosti.
Orodja za zabijanje pritrdil, ki delujejo na stisnjeni zrak,
lahko povežete le na cevi za stisnjeni zrak, kjer ni možno
preseči maks. dopustnega tlaka za faktor več kot 10 %,
kar lahko, na primer, zagotovi reducirni tlačni ventil z
minus varnostnim ventilom.
(Za model N5008AC2, 110 % imenskega maks.
dopustnega tlaka je 9,1 bar = 130 psi)
Električno orodje za zabijanje sponk, ki deluje na stisnjeni
zrak, je dovoljeno obratovati z min. tlakom, potrebnim
za izbrani delovni proces, tako da preprečite nepotreben
hrup, povečano obrabo in s tem posledične okvare.
3. Opreme ni dovoljeno uporabljati z drugimi
visokotlačnimi plini.
V nobenem primeru ni dovoljeno uporabljati ogljikovega
dioksida, kisika in drugih plinov iz jeklenk.
4. Upoštevaj vžige in eksplozije.
Ker se lahko med sponkanjem iskri, ni varno uporabljati
orodja v bližini lakov, barv, bencina, topil, plinov, lepil
in podobnih vnetljivih materialov - nevarnost vžiga in
eksplozije. Zato v nobenem primeru orodja ni dovoljeno
uporabljati v bližini vnetljivih materialov.
5. Obvezna uporaba zaščite za oči (zaščitna očala).
Med upravljanjem električnega orodja je treba nositi
zaščitna očala in poskrbeti, da tudi drugi v bližini nosijo
zaščitna očala.
Delci sponk ali sponke, ki niso pravilno vpete, lahko
odletijo v oči - nevarnost poškodb vida. Zaščito za oči
je možno nabaviti v kateri koli tehnični trgovini. Med
uporabo tega orodja obvezno uporabljajte zaščito za
oči - ali zaščitna očala ali široko masko preko očal z
dioptrijo.
Delodajalci morajo poskrbeti, da delavci uporabljajo
opremo za zaščito oči.
6. Zaščiti svoja ušesa in glavo.
Med sponkanjem uporabljajte ščitnike za ušesa in
zaščito za glavo. Ustrezno pogojem dela, poskrbite tudi,
da zaščito za ušesa in glavo uporabljajo delavci v bližini.
7. Upoštevaj delavce v bližini.
Velika nevarnost - sponke, ki niso pravilno zabite, lahko
udarijo v ljudi. Zato obvezno in vseskozi upoštevajte
varnost ljudi v bližini. V vsakem trenutku preprečite
poseganje telesnih delov v bližino izhoda za sponke.
8. Izhoda za sponke ni dovoljeno usmeriti v ljudi.
Vedno predvidevajte, da so v orodju sponke.
Če usmerite izhod za sponke v ljudi, s tem ustvarite
nevarnost resnih poškodb in nesreč - orodje lahko po
pomoti sprožite. Med povezovanjem in odklapljanjem cevi,
med nalaganjem sponk ali med podobnimi deli obvezno
usmerjajte izhod za sponke stran od ljudi (tudi stran od
sebe). Tudi ko v orodju ni sponk, orodja ni varno sprožiti,
medtem ko ga usmerjate v ljudi - tega ne počnite. Brez
neslanih šal. Orodje je pripomoček za delo.
9. Pred uporabo električnega orodja preglej potisni
vzvod.
Pred uporabo električnega orodja se prepričajte, da
potisni vzvod in ventil delujeta pravilno. Sponkač, v
51
Page 53

Slovenščina
katerem ni sponk, povežite na cev. Če zaslišite
obratovalni zvok, to pomeni, da gre za okvaro; orodja
ne zaženite, dokler ga ne pregledate in servisirate.
䡬 Če le s potegom sprožilca sprožite obratovalni
zvok giba pogonskega nastavka, je električno
orodje v okvari.
䡬 Če le s potiskom vzvoda ob material, ki ga
sponkate, sprožite obratovalni zvok giba
pogonskega nastavka, je električno orodje v okvari.
Še več, v zvezi s potisnim vzvodom upoštevajte,
da ga ni dovoljeno v nobenem primeru spreminjati
ali sneti.
10. Uporabljaj le določene sponke.
V nobenem primeru ni dovoljeno uporabljati sponk, ki
niso določene in opisane v teh navodilih.
11. Previdno pri povezovanju cevi.
Med povezovanjem cevi in nalaganjem sponk
preprečite sproženje orodja po pomoti tako, da
upoštevate naslednje:
䡬 Ne dotikajte se sprožilca.
䡬 Ne dovolite, da sprožilna glava pride v stik s
kakršno koli površino.
䡬 Sprožilno glavo držite dol.
Strogo upoštevajte navodila zgoraj in vedno poskrbite,
da z nobenim delom telesa ne posegate pred izhod za
sponke.
12. Ne drži prsta na sprožilcu.
Prsta ne polagajte na sprožilec, ko ne sponkate. Med
prenašanjem orodja ali predajanjem orodja tretji osebi,
lahko, če držite prst na sprožilcu, nenamerno sprožite
sponkač in tako povzročite nesrečo.
13. Zapri vodilo rezila do konca giba in ga med
obratovanjem ne poskusi odpreti.
Če poskusite sponkati, ko je vodilo rezila odprto, se
sponke ne bodo zabile v les - nevarnost nepravilnega
zabijanja.
14. Pritisni izhod sponke močno ob material, ki ga
sponkaš.
Med zabijanjem sponk pritisnite izhod za sponke močno
ob material, ki ga sponkate. Če izhoda ne postavite
pravilno, lahko sponke odskočijo.
15. Med uporabo z rokami in nogami ne posegaj v
sprožilno glavo.
Velika nevarnost - sponka lahko udari v roko ali nogo.
16. Upoštevaj nevarnost udarca nazaj.
Med obratovanjem se z glavo ne približujte vrhu orodja
itd. - nevarnost: orodje lahko sunkovito udari nazaj, če
pride sponka, ki se zabija, v stik s predhodno sponko
ali vozlom v lesu.
17. Previdno pri sponkanju tankih plošč ali lesnih robov.
Pri sponkanju tankih plošč, lahko sponke prodrejo
skozi, kar se lahko zgodi tudi pri sponkanju lesnih robov,
in sicer zaradi odklona sponk. V takšnih situacijah se
ne sme nihče zadrževati (roke in noge itd.) za tanko
ploščo ali ob lesu, ki ga sponkate.
18. Hkratno sponkanje na obe strani stene je nevarno.
V nobenem primeru ni dovoljeno sponkati na obeh
straneh stene hkrati. Velika nevarnost - sponke lahko
prodrejo skozi steno in povzročijo poškodbe.
19. Električnega orodja ni dovoljeno uporabljati na
gradbenih odrih, lestvah.
Električnega orodja ni dovoljeno uporabljati za določena
dela, na primer:
med zamenjavo ene lokacije z drugo, kjer je potrebno
uporabiti odre, stopnice, lestve in podobne
konstrukcije, npr. strešne letve,
zapiranje škatel ali gajb,
nameščanje transportnih varnostnih sistemov, npr.
na vozilih ali vagonih.
20. Ne odklopi cevi, medtem ko držiš prst na sprožilcu.
Če odklopite cev, medtem ko držite prst na sprožilcu,
se pri ponovnem priklopu cevi ustvari nevarnost
spontanega sproženja sponk ali nepravilnega
obratovanja.
21. Po uporabi odklopi cev in vzemi ven preostale
sponke.
Preden se lotite vzdrževanja, reševanja zagozdenih
sponk, preden zapustite delovno območje, prestavite
orodje na drugo mesto oz. po uporabi orodja, odklopite
orodje z zračne cevi. Velika nevarnost nenamernega
sproženja sponke.
22. Medtem ko odstranjujete sponko, ki se je zagozdila,
najprej obvezno odklopite cev in sprostite stisnjeni
zrak.
Medtem ko odstranjujete sponko, ki se je zagozdila v
izhod za sponke, najprej odklopite cev in sprostite
stisnjeni zrak in električnega orodja.
Nenamerno sproženje sponke je lahko zelo nevarno.
23. Nevarno situacijo zaradi sponk, ki padejo, prepreči
tako, da ne odpiraš magazina, ko je naprava
usmerjena na dol in ko nalagaš sponke.
24. V ogrodje ni dovoljeno vtakniti ženskega vtiča
(zračna vtičnica).
Če namestite ženski vtič v ogrodje, stisnjenega zraka
morda ne bo možno izčrpati, potem ko odklopite cev zato tega ne počnite.
Orodje in cev za dobavo zraka morata imeti cevno
gredno vez, ki zagotovi izpust tlaka iz orodja, potem
ko odklopite spoj gredne vezi.
25. Električnega orodja ni dovoljeno čistiti z bencinom
in drugimi vnetljivimi tekočinami.
Če prodrejo hlapi vnetljive tekočine v električno orodje,
nastopi nevarnost, da iskrenje, ki nastaja med
sponkanjem itd., sproži eksplozijo.
SPECIFIKACIJE
Vrsta moči Batni
Zračni tlak (kaliber) 4,9 - 8,3 bar
Uporabne sponke ref. sl.
Količina sponk, ki jih lahko naložiš 150 sponk
Velikost 365 mm (D) × 258 mm (V) × 76 mm (Š)
Teža 2,0 kg
Cev (notranji premer) 6 mm
52
Page 54

Slovenščina
IZBIRA SPONK
Izberite ustrezno sponko med sponkami s slike. Sponke, ki
niso na sliki, ni dovoljeno uporabiti s tem orodjem.
Kaliber 16 Pokrov 7/16"
Min. Maks.
1,61mm
7,9mm
25mm
1,45mm
Velikost sponk
50mm
STANDARDNI PRIKLJUČKI
(1) Šesterorobni ključ za vijake M5 ................................... 1
(2) Zaščita za oči ............................................................... 1
(3) Mazalka ........................................................................ 1
DODATNI PRIKLJUČKI
䡬 Mehanizem za zaporedno pot (šifra 876762)
(komplet delov za zaporedno sproženje, deli za enojno
zabitje)
Z deli za zaporedno sproženje je možno sponkač
pognati le tako, da pritisnete na sprožilec, potem ko
potisnete dol pritisni vzvod.
Z namestitvijo teh delov preprečite morebiten gib
sponkača v nepravilen položaj in s tem sproženje sponk
zaradi nenamernega upravljanja potisnega vzvoda.
APLIKACIJE
䡬 Gradbena dela, kot so prekrivanje sten, pod-prekrivanje tal.
䡬 Mobilna in modularna stanovanjska gradbena dela.
PRIPRAVA ZA DELO
1. Pripravi cev.
Obvezno uporabite cev, ki ima notranji premer min.
6 mm.
OPOMBA:
Cevi za dobavo zraka morajo zdržati delovni tlak 12,8 bar
ali 150 % maks. tlaka, ki nastane v dovodnem sistemu za
zrak - kateri koli je višji.
2. Preveri varnost.
POZOR:
䡬 Nepooblaščeni delavci (tudi otroci) nimajo dostopa v
delovno okolje.
䡬 Obvezna uporaba zaščite za oči.
䡬 Preverite tesnjenje pritrdilnih vijakov, ki držijo na mestu
izpušni pokrov itd.
Preglejte sponkač, če morda ne tesni, če so posamezni
deli sponkača morda v okvari oz. rjasti.
䡬 Preskusite, če potisni vzvod pravilno deluje. Preglejte, če
se na premičnih delih potisnega vzvoda kopiči umazanija.
䡬 Ponovno preverite varnost obratovanja.
PRED UPORABO
1. Preveri zračni tlak
POZOR:
Zračni tlak ne sme nihati izven dovoljenega območja, tj.
4,9-8,3 bar.
Zračni tlak nastavite na vrednost med 4,9 do 8,3 bar,
ustrezno premerom in dolžini sponk in trdoti lesa, ki se
sponka. Posebej skrbno je treba upoštevati vrednost
izhodnega tlaka, kapaciteto in cevi na zračnem
kompresorju, tako da zračni tlak ne preseže določene
mejne vrednosti. Prekomeren tlak je lahko vzrok za
nezadovoljive rezultate, krajšo tehnično življenjsko dobo
in oporečno varnost.
2. Podmazovanje
(1) Pred uporabo sponkača obvezno namestite zračni
komplet med zračni kompresor in napravo.
Podmazovanje z zračnim kompletom zagotavlja
nemoteno obratovanje, daljšo tehnično življenjsko dobo
in zaščito pred korozijo.
Mazalko nastavite, tako da dovaja eno kapljico olja na
vsak 5 do 10 cikel sponkanja.
(2) Priporočamo, da uporabljate olje po nasvetu proizvajalca
(SHELL TONNA). Druga ustrezna olja so označena na
seznamu. V nobenem primeru ni dovoljeno mešati dveh
ali več vrst olja.
3. Naloži sponke
POZOR:
䡬 Med nalaganjem sponk v sponkač:
(1) ne pritiskajte na sprožilec;
(2) na pritiskajte potisnega vzvoda;
(3) ne posegajte z obrazom, rokami, nogami in drugimi
deli telesa (to velja za vse) v bližino izstopne cevi nevarnost telesnih poškodb med uporabo in
prenašanjem.
(1) Podajalnik sponkača povlecite nazaj in ga varno pritrdite
v utor magazina. (Glej Skico. 2)
(2) Spončni trak namestite na magazin.
Spončni trak mora prosto zdrsniti na magazin. (Glej
Skico. 3)
(3) Podajalnik sponk povlecite nazaj. Nato ga odklopite iz
utora magazina in rahlo potisnite nazaj - preprečite trk.
(Glej Skico. 4)
Sponkač je zdaj pripravljen za uporabo.
POZOR:
䡬 Če podajalnik sponk spustite na hitro, se ta lahko
ponastavi na silo in povzroči poškodbe in/ali se raztrese
- zagozde sponk.
Podajalnik obvezno ponastavite, tako preprečite trk.
䡬 Nenamerno uporabo preprečite tako, da se ne dotikate
sprožilca oz. ne namestite vrha vzvoda na delovni pult
na tleh. V nobenem primeru ni dovoljeno usmeriti izhoda
sponkača v človeka.
53
Page 55

Slovenščina
NAVODILO ZA UPORABO SPONKAČA
POZOR:
䡬 V nobenem primeru ni dovoljeno glave ali ogrodja naprave
uporabljati v smislu kladiva.
䡬 Ustrezno ukrepajte za varnost vseh v bližini stroja, ki
obratuje.
1. Sponkanje
(1) Prekinjeno sponkanje
Potisnite izhod za sponke na želeno točko; nato povlecite
sprožilec, tako da poženete sponko z enim strelom. (Glej
Skico. 5)
POZOR:
䡬 To orodje poskoči in izstreli več sponk namesto ene v
hitrem zaporedju, če ga močno pritisnete ob površino
oz. če ga uporabljate na pretrdih materialih. V takšnem
primeru sprožajte sponke tako, da pritisnete na sprožilec
in ga hitro spustite.
(2) Potisni vzvod
Preden potisnete izhod za sponke, obvezno najprej
dvignite vzvod do konca giba (Glej Skico. 5), tako da
odklopite varnostno blokado -sponke ne morejo izstopiti,
ne da bi odklopili varnostno blokado, tudi če povlečete
sprožilec.
(3) Neprekinjeno sponkanje
Najprej povlecite sprožilec. Nato potisnite napravo v
želeni položaj za avtomatsko sponkanje. (Glej Skico. 6).
POZOR:
䡬 Previdno pri sponkanju lesnih robov. Pri neprekinjenem
sponkanju lesnih robov lahko sponka odskoči stran ali
prodre skozi rob.
䡬 Ne zabijte sponke na drugo sponko.
䡬 Ne zabije na v kovinske dele.
OPOMBA:
䡬 Varnostni ukrepi v zvezi s prostim tekom
Zgodi se, da se sponkanje nadaljuje, tudi potem ko ste
zabili vse sponke iz magazina.
Tu gre za “sponkanje v prostem teku”. Med takšnim
obratovanjem se lahko poškodujejo odbijač, magazin, in
podajalnik sponk.
Torej, preprečite sponkanje v prostem teku tako, da
občasno preverite količino preostalih sponki. Po drugi
strani pa je treba po končani uporabi iz sponkača vzeti
vse preostale sponke.
䡬 Po končanem sponkanju:
(1) Odklopite zračno cev s sponkača;
(2) Iz sponkača vzemite vse preostale sponke;
(3) V zračni čep na žebljarju vkapajte 5-10 kapljic
podmazovalnega sredstva za pnevmatsko orodje
Hitachi;
(4) Odprite pipo na zračnem kompresorju, tako da iz
posode izteče vsa vsebina.
䡬 V pogojih nizkih temperatur se lahko zgodi, da magazin
ne deluje pravilno. Zato je treba stroj uporabljati v
določenih temperaturnih pogojih.
2. Navodilo za nastavitev globine sponkanja
Poskrbite, da vsaka sponka prodre na isto globino, in
sicer tako, da:
(1) Zagotovite stalen in enakomeren zračni tlak (regulator
nameščen in deluje pravilno),
(2) Sponkač držite trdno ob obdelovanca.
Če se sponke vpnejo pregloboko ali prenizko v
obdelovanca, spenjanje nastavite, kot sledi.
POZOR:
䡬 Preden se lotite nastavljanja, obvezno odklopite cev
in sprostite stisnjeni zrak iz električnega orodja.
䡬 Med nastavljanjem ne držite prsta na sprožilcu.
䡬 Med nastavljanjem ne posegajte z deli telesa pred
izhod za sponke.
Navodilo za nastavljanje (Glej Skico. 7)
Globino zabitja sponke nastavite tako, da odvijete vijak,
ki drži vzvod na mestu.
Če se sponka zabije pregloboko, nastavite vzvod na “dol”,
in če se sponka zabije prenizko, nastavite vzvod na “gor”.
Privijte vijak, tako da pritrdite vzvod.
OPOMBA:
䡬 Nastavite min. zračni tlak, ki zadostuje za zabitje sponk
na želeno globino. Če nastavite previsok zračni tlak, s
tem skrajšate tehnično življenjsko dobo batnega dušilnika
itd.
PREGLED IN VZDRŽEVANJE
POZOR:
Preden se lotite odpravljanja zagozd, servisiranja,
vzdrževanja in čiščenja, obvezno odklopite cev.
1. Popravljalni ukrepi za zagozdene sponke
(1) Vzemite ven vse sponke.
(2) Odklopite vzvod in odprite vodilo rezila. (Glej Skico. 8)
(3) Odstranite zagozdeno sponko, in sicer z nazobčanim
izvijačem. (Glej Skico. 9)
(4) Zaprite vodilo za rezilo in zapah.
(5) Če se sponke vedno znova zagozdijo, naročite pregled
na pooblaščenem servisu Hitachi.
2. Servis in vzdrževanje
Napravo je treba občasno pregledati.
(1) Odstranite štiri šesterorobne vtične vijake, ki držijo na
mestu izpušni pokrov, in snemite izpušni pokrov.
Nato lahko odstranite cilinder, bat in druge dele v
zadevnih montažnih skupinah.
S krpo obrišite pogonski jermen, drsni del bata in
notranjost ogrodja, tako da očistite nakopičeno
umazanijo.
(2) Prepričajte se, da batni dušilnik pravilno deluje.
Poškodovani batni dušilnik lahko poškoduje tudi druge
sestavne dele.
(3) Med demontažo skrbno preglejte O-obroč, če je morda
obrabljen. Obrabljen ali poškodovan O-obroč lahko
negativno vpliva na delovanje na splošno. Obrabljeni ali
poškodovani O-obroč zamenjajte z novim.
(4) Preden razstavite napravo, na O-obroč nanesite mast
(mast Attolub št. 2). S priporočenim olje naoljite tudi
napravo.
3. Preglej montažne vijake za vsak sestavni del
Redno pregledujte posamezne dele, če so morda
montažni vijakih odviti in če morda ti deli ne tesnijo
oz. če uhaja zrak. Če boste vključili opremo, na kateri
so odviti vijaki, boste ustvarili nevarnost telesnih
poškodb.
4. Preglej vzvod
Preglejte, če se potisni vzvod (Skico. 1) neovirano giblje.
Očistite drsno območje vzvoda in občasno podmažite s
priloženim sredstvom. Podmazovalno sredstvo zagotovi
gladko drsenje in hkrati preprečuje nastajanje rje.
5. Skladiščenje
䡬 Ko stroja ne nameravate uporabiti daljše obdobje, na
jeklene dele nanesite tanko plast podmazovalnega
sredstva - zaščita pred rjo.
54
Page 56

Slovenščina
䡬 Sponkača ni dovoljeno hraniti v okolju, kjer je mrzlo. Hranite
ga na toplem.
䡬 Sponkač, ki ga ne uporabljate, shranite na toplo in suho
mesto.
Preprečite dostop otrokom.
6. Seznam servisnih delov
POZOR:
Popravila, spremembe in servise električnega orodja
Hitachi lahko izvajajo le na pooblaščenem servisu Hitachi.
S tem seznamom nadomestnih delov si lahko pomagate
na pooblaščenem servisu Hitachi pri naročanju popravila
ali vzdrževanja orodja.
Pri uporabi in vzdrževanju električnega orodja je obvezno
treba upoštevati lokalne veljavne varnostne predpise in
standarde.
SPREMEMBE:
Električna orodja Hitachi stalno izboljšujemo in
spreminjamo v smislu vdelovanja najnovejših tehnoloških
dosežkov.
V skladu s tem lahko določene dele spremenimo brez
predhodnega obvestila.
KOMPRESOR
POZOR:
Če maks. obratovalni tlak zračnega kompresorja preseže
8,3 bar, obvezno namestite reducirni ventil med zračni
kompresor in žebljar. Nadalje, nastavite zračni tlak na
obratovalno območje 4,9 ~ 8,3 bar. Če namestite zračni
komplet, je možno podmazovanje, ki zagotovi dodatno
olajšanje obratovanja.
REDUCIRNI VENTIL FILTRA MAZALKE (zračni
komplet)
Za upravljanje opreme v najboljših pogojih in za daljšo
tehnično življenjsko dobo priporočamo, da uporabljate
reducirni ventil filtra mazalke. Med uporabo skrajšajte cev
med enoto in zračnim kompletom na do 10 m. (Skico. 10)
Hrup
Hrup je v skladu EN 792-13, junij 2000.
Tipični A-ovrednoten A enojni nivo zvočne moči
Tipični A-ovrednoten enojni nivo zvočnega tlaka na delovni
postaji
Vrednosti ustrezajo lastnostim orodja in ne veljajo v smislu
naraščanja hrupa na mestu uporabe. Naraščanje hrupa na
mestu uporabe je odvisen, na primer, od delovnega okolja,
obdelovanca, podpore obdelovanca in številka operacij hoda
itd.
Odvisno od pogojev na delovnem mestu in oblike
obdelovanca je treba hrup ustrezno zmanjšati tako, da
namestite obdelovance na podpore, ki dušijo zvok, preprečite
vibracije tako, da obdelovance vpnete ali prekrijete, nastavite
min. zračni tlak, potreben za zadevno delo itd.
V določenih situacijah je treba uporabiti opremo za zaščito
sluha.
Vibracija
Tipična vibracija v skladu s standardom EN 792-13, junij
2000: 3,9 m/s
Te vrednosti ustrezajo lastnostim orodja in ne veljajo v smislu
učinka na sistem rokovanja z orodjem med uporabo. Vpliv
na sistem rokovanja z orodjem med uporabo je, na primer,
odvisen od sile prijema, stične pritisne sile, delovne smeri,
nastavitve napajanja, obdelovanca in podpore obdelovanca.
2
.
LWA,
1s,d = 99 dB
LpA,
1s,d = 81 dB
UPORABNA SREDSTVA ZA PODMAZOVANJE
Vrsta podmazovalnega Naziv podmazovalnega
sredstva sredstva
Priporočeno olje SHELL TONNA
Motorno olje SAE10W, SAE20W
Turbinsko olje
55
ISO VG32 - 68
(#90 - #180)
Page 57

PyccÍËÈ
ÉãABHõE MEPõ èPEÑOCTOPOÜHOCTà
èPà PAÅOTE
1. СОУ ФpaЗЛОлМoЦo ЛcФoОлБoЗaМЛУ нОeНЪpoФpЛДopa
coДОпАaИЪe ocЪopoКМocЪл ФpЛ paДoЪe c МЛП.
He ЛcФoОлБyИЪe нОeНЪpoФpЛДop АОУ бeОeИ, oЪОЛдМкx
oЪ Ъex, НoЪopкe yНaБaМк З АaММoИ ЛМcЪpyНбЛЛ.
2. ÑÎÓ ÄeÁoÔacÌoÈ paÄoÚê oÄpaçaÈÚecë c íÚËÏ
íÎeÍÚpoÔpËÄopoÏ, ÌaÀÎeÊaçËÏ oÄpaÁoÏ.
CoДОпАaИЪe ЛМcЪpyНбЛЛ, ФpeАcЪaЗОeММкe З нЪoП
pyНoЗoАcЪЗe Л ФpaЗЛОлМo oДpaзaИЪecл c нЪЛП
ФpЛДopoП c бeОлп oДecФeдeМЛУ ДeБoФacМoИ paДoЪк.
HЛ З НoeП cОyдae Мe paБpeеaИЪe ФoОлБoЗaЪлcУ нЪЛП
ЛМcЪpyПeМЪoП АeЪУП ЛОЛ ОпАУП, Мe oДОaАaпзЛП
АocЪaЪoдМкПЛ БМaМЛУПЛ, ЛОЛ НoЪopкe Мe ПoЦyЪ
yФpaЗОУЪл ЛП МaАОeКaзЛП oДpaБoП.
3. ìÄeÀËÚecë Ç ÌeÇoÁÏoÊÌocÚË ÀocÚyÔa Í
ÏacÚepcÍoÈ.
He ÔycÍaÈÚe Ç ÏacÚepcÍyï ÔocÚopoÌÌËx. ÑeÚeÈ
cÎeÀyeÚ ocoÄo oÖpaÀËÚë oÚ ÀocÚyÔa Í íÚoÏy
ËÌcÚpyÏeÌÚy.
4. Bce ÌyÊÌêe ÀeÚaÎË Ç ÌyÊÌêx ÏecÚax.
He cМЛПaИЪe НpкеНЛ Л Мe oЪНpyдЛЗaИЪe еypyФк.
Bce oМЛ ЗкФoОМУпЪ cЗoЛ oФpeАeОХММкe ЩyМНбЛЛ.
ЕoОee ЪoЦo, З cЗУБЛ c ЗoБПoКМoИ oФacМocЪлп, МЛ З
НoeП cОyдae Мe ЗМocЛЪe ЛБПeМeМЛУ З ЛМcЪpyПeМЪ, a
ЪaНКe Мe ФoОлБyИЪecл ЛП ФocОe eЦo ЛБПeМeМЛУ.
5. èpoÇepëÚe ËÌcÚpyÏeÌÚ ÔepeÀ eÖo
ËcÔoÎëÁoÇaÌËeÏ.
KaКАкИ paБ ФepeА ЛcФoОлБoЗaМЛeП ФpЛДopa
ФpoЗepлЪe, дЪoДк МЛ oАМa ЛБ АeЪaОeИ Мe ДкОa
ФoЗpeКАeМa, дЪoДк Зce еypyФк ДкОЛ ЪyЦo БaНpyдeМк,
дЪoДк Зce АeЪaОЛ Мa ПecЪe Л ДeБ pКaЗдЛМк.
6. CÎËåÍoÏ ÀÎËÚeÎëÌaÓ paÄoÚa ÏoÊeÚ ÔpËÇecÚË Í
ÔoÎoÏÍaÏ.
He ЗкФoОМУИЪe ЛМcЪpyПeМЪaПЛ Л Лx aНceccyapaПЛ
paДoЪ, АОУ НoЪopкx oМЛ Мe ФpeАМaБМaдeМк. CОЛеНoП
АОЛЪeОлМaУ paДoЪa ПoКeЪ Мe ЪoОлНo ФoЗpeАЛЪл
нОeНЪpoФpЛДop, Мo Л caПa Фo ceДe МecХЪ oФacМocЪл.
7. B cÎyäae oÄÌapyÊeÌËÓ oÚÍÎoÌeÌËÈ, ÌeÏeÀÎeÌÌo
ÔpeÍpaÚËÚe paÄoÚy.
иpeНpaЪЛЪe paДoЪy, ecОЛ Зк oДМapyКЛОЛ
oЪНОoМeМЛУ ЛОЛ НoЦАa нОeНЪpoФpЛДop Мe paДoЪaeЪ
МaАОeКaзЛП oДpaБoП; ФpoЗepлЪe нОeНЪpoФpЛДop Л
ФoдЛМЛЪe eЦo.
8. HaÀÎeÊaçËÏ oÄpaÁoÏ cÎeÀËÚe Áa
íÎeÍÚpoÔpËÄopoÏ.
иaАeМЛe нОeНЪpoФpЛДopa ЛОЛ eЦo yАap o НaНЛe-ОЛДo
ФpeАПeЪк ПoКeЪ ФpЛЗecЪЛ Н АeЩopПaбЛЛ Л
oДpaБoЗaМЛп ЪpeзЛМ ЛОЛ ЛМoЦo poАa ФoЗpeКАeМЛИ,
ФoнЪoПy oДpaзaИЪecл c МЛП c МaАОeКaзeИ
ocЪopoКМocЪлп. TaНКe Мe ЗкбapaФкЗaИЪe Л Мe
ЗкpeБaИЪe МaАФЛcЛ Мa нОeНЪpoФpЛДope. B cЗУБЛ c
ЗкcoНЛП АaЗОeМЛeП ЗoБАyxa ЗМyЪpЛ ЛМcЪpyПeМЪa,
ЪpeзЛМк Мa ФoЗepxМocЪЛ oФacМк.
HЛНoЦАa Мe ЛcФoОлБyИЪe нОeНЪpoФpЛДop, ecОЛ
ЪpeзЛМa yЗeОЛдЛЗaeЪcУ, ЛОЛ НoЦАa ЛБ ЪpeзЛМк
ЗкxoАЛЪ ЗoБАyx.
9. ÑÎÓ oÄecÔeäeÌËÓ ÀÎËÚeÎëÌoÖo cpoÍa paÄoÚê
ËÌcÚpyÏeÌÚa, ÄepeÖËÚe eÖo ÌaÀÎeÊaçËÏ oÄpaÁoÏ.
BceÖÀa ÌaÀÎeÊaçËÏ oÄpaÁoÏ cÎeÀËÚe Áa
ËÌcÚpyÏeÌÚoÏ Ë ÀepÊËÚe eÖo Ç äËcÚoÚe.
10. ÑÎÓ ÄeÁoÔacÌocÚË, ËÌcÚpyÏeÌÚ ÌeoÄxoÀËÏo
ÔocÚoÓÌÌo ÔpoÇepÓÚë.
иpoЗepУИЪe нОeНЪpoФpЛДop peЦyОУpМo c бeОлп
oДecФeдeМЛУ ДeБoФacМoИ paДoЪк нОeНЪpoФpЛДopa
Л eЦo нЩЩeНЪЛЗМocЪЛ З ОпДoe ЗpeПУ.
11. B cÎyäae ÌeoÄxoÀËÏocÚË ÔpoÇeÀeÌËÓ peÏoÌÚa
ËÎË ÁaÏeÌê ÀeÚaÎeÈ, oÄpaÚËÚecë Í
yÔoÎÌoÏoäeÌÌoÏy oÄcÎyÊËÇaïçeÏy aÖeÌÚy.
OÄÓÁaÚeÎëÌo oÄpaçaÈÚecë ÚoÎëÍo Ìa ÙËpÏeÌÌyï
cÚaÌáËï oÄcÎyÊËÇaÌËÓ íÎeÍÚpoÔpËÄopa, a ÚaÍÊe
ÔpocÎeÀËÚe, äÚoÄê ÀeÚaÎË ÁaÏeÌÓÎËcë ÚoÎëÍo Ìa
opËÖËÌaÎëÌêe.
12. ùÎeÍÚpoÔpËÄop xpaÌËÚe Ç ÌaÀÎeÊaçeÏ ÏecÚe.
EcОЛ Зк Мe ФoОлБyeЪecл нОeНЪpoФpЛДopoП - xpaМЛЪe
eЦo З cyxoП ПecЪe, ЗМe АocУЦaeПocЪЛ АeЪeИ.
aНaФaИЪe 5-10 НaФeОл ПacОa З НopФyc дepeБ
oЪЗepcЪЛe еОaМЦa АОУ ЪoЦo, дЪoДк БaзЛЪЛЪл ФpЛДop
oЪ pКaЗОeМЛУ.
13. CxeÏa paÁoÄpaÌÌoÖo ÔpËÄopa Ç íÚoÈ ËÌcÚpyÍáËË
ÀoÎÊÌa ÄêÚë ËcÔoÎëÁoÇaÌa ÚoÎëÍo áeÌÚpoÏ
oÄcÎyÊËÇaÌËÓ.
MEPõ èPEÑOCTOPOÜHOCTà èPà
àCèOãúÂOBAHàà CTEèãEPA
1. иpaЗЛОлМoe ЛcФoОлБoЗaМЛe - БaОoЦ ДeБoФacМocЪЛ.
ÑaÌÌêÈ ËÌcÚpyÏeÌÚ ÔpeÀÌaÁÌaäeÌ ÀÎÓ ÍpeÔÎeÌËÓ
cÍoÄê Ç ÀepeÇo ËÎË ÔoÀoÄÌêe ÏaÚepËaÎê.
àcÔoÎëÁyÈÚe ËÌcÚpyÏeÌÚ cÚpoÖo Ôo ÌaÁÌaäeÌËï.
2. ìÄeÀËÚecë, äÚo ÀaÇÎeÌËe ÇoÁÀyxa cooÚÇeÚcÚÇyeÚ
yÍaÁaÌÌoÏy ÀËaÔaÁoÌy.
KpeФeКМкe ЛМcЪpyПeМЪк, paДoЪaпзЛe oЪ cКaЪoЦo
ЗoБАyxa, МeoДxoАЛПo ФoАНОпдaЪл ЪoОлНo Н
ЗoБАyеМкП ОЛМЛУП, З НoЪopкx МeЗoБПoКМo
ФpeЗкеeМЛe ПaНcЛПaОлМoЦo АoФycЪЛПoЦo АaЗОeМЛУ
ДoОee дeП Мa 10%. TaНЛe ОЛМЛЛ АoОКМк ДкЪл
oДopyАoЗaМк, МaФpЛПep, peАyНбЛoММкП НОaФaМoП,
ЛПeпзЛП ЗeМЪЛОл cДpoca АaЗОeМЛУ.
(СОУ ПoАeОЛ N5008AC2, 110% oЪ МoПЛМaОлМoЦo
ПaНcЛПaОлМo АoФycЪЛПoЦo АaЗОeМЛУ cocЪaЗОУeЪ 9,1
Дap = 130 ЩyМЪoЗ Мa НЗ.АпИП)
KpeФeКМкe ЛМcЪpyПeМЪк, paДoЪaпзЛe oЪ cКaЪoЦo
ЗoБАyxa, АoОКМк нНcФОyaЪЛpoЗaЪлcУ ЪoОлНo ФpЛ
ПЛМЛПaОлМoП АaЗОeМЛЛ, МeoДxoАЛПoП АОУ
ЗкФoОМeМЛУ pyдМoИ paДoЪк. щЪo ФoБЗoОЛЪ
ФpeАoЪЗpaЪЛЪл ЛБОЛеМЛИ ypoЗeМл еyПa, coНpaЪЛЪл
ЛБМoc Л ЛБДeКaЪл ЩЛБЛдecНЛx yЗeдЛИ.
3. ÂaÔpeçaeÚcÓ ËcÔoÎëÁoÇaÚë ÀpyÖËe ÖaÁê
ÇêcoÍoÖo ÀaÇÎeÌËÓ ÍpoÏe ÇoÁÀyxa ÀÎÓ
íÍcÔÎyaÚaáËË ËÌcÚpyÏeÌÚa.
CЪpoЦo БaФpeзaeЪcУ ЛcФoОлБoЗaЪл yЦОeНЛcОкИ ЦaБ,
НЛcОopoА ЛОЛ АpyЦЛe ЦaБк ЛБ ЦepПeЪЛдМкx
eПНocЪeИ.
4. OcÚepeÖaÈÚecë ÇoÁÖopaÌËÈ Ë ÇÁpêÇoÇ.
BcОeАcЪЗЛe ЗoБМЛНМoЗeМЛУ ЛcНp Зo ЗpeПУ
НpeФОeМЛУ cНoД Мe peНoПeМАyeЪcУ ЛcФoОлБoЗaЪл
АaММкИ ЛМcЪpyПeМЪ ЗДОЛБЛ ОaНoЗ, НpacoН, ДeМБoОa,
pacЪЗopЛЪeОeИ, ДeМБЛМa, ЦaБa, НОeУзЛx cocЪaЗoЗ Л
АpyЦЛx ЗocФОaПeМУпзЛxcУ КЛАНocЪeИ, ЪaН НaН
cyзecЪЗyeЪ oФacМocЪл Лx ЗoБЦopaМЛУ ЛОЛ ЗБpкЗa.
CЪpoЦo БaФpeзaeЪcУ ЛcФoОлБoЗaЪл АaММкИ
ЛМcЪpyПeМЪ З МeФocpeАcЪЗeММoИ ДОЛБocЪЛ
yНaБaММкx Зкеe ЗocФОaПeМУпзЛxcУ ПaЪepЛaОoЗ.
5. BceЦАa МaАeЗaИЪe БaзЛЪМкe oдНЛ.
PaДoЪaУ c aЗЪoПaЪЛдecНЛП ЛМcЪpyПeМЪoП, ЗceЦАa
МaАeЗaИЪe БaзЛЪМкe oдНЛ. HaxoАУзЛecУ pУАoП
ОпАЛ ЪaНКe АoОКМк МaАeЗaЪл БaзЛЪМкe oдНЛ.
CyзecЪЗyeЪ ЗepoУЪМocЪл ФoФaАaМЛУ ЩpaЦПeМЪoЗ
cНoД ЛОЛ бeОкx cНoД, МeМaАОeКaзЛП oДpaБoП
56
Page 58

PyccÍËÈ
ЗкеeАеЛx ЛБ cЪeФОepa, З ЦОaБa. ВaзЛЪМкe cpeАcЪЗa
АОУ ЦОaБ ПoКМo НyФЛЪл З ОпДoП xoБУИcЪЗeММoП
ПaЦaБЛМe. BceЦАa МaАeЗaИЪe БaзЛЪМкe oдНЛ ФpЛ
paДoЪe c ЛМcЪpyПeМЪoП. иoПЛПo БaзЛЪМкx oдНoЗ
ПoКМo ЛcФoОлБoЗaЪл ПacНy, МaАeЗaeПyп ФoЗepx
НoppeНЪЛpyпзЛx oдНoЗ.
PaДoЪoАaЪeОЛ АoОКМк МacЪaЛЗaЪл Мa ЛcФoОлБoЗaМЛЛ
БaзЛЪМкx cpeАcЪЗ cЗoЛПЛ coЪpyАМЛНaПЛ.
6. àcÔoÎëÁyÈÚe cpeÀcÚÇa ÁaçËÚê ÀÎÓ yåeÈ Ë ÖoÎoÇê.
Bo ЗpeПУ paДoЪк co cЪeФОepoП ЗceЦАa МaАeЗaИЪe
МayеМЛНЛ Л cpeАcЪЗa АОУ БaзЛЪк ЦoОoЗк. B
БaЗЛcЛПocЪЛ oЪ ycОoЗЛИ МaxoАУзЛecУ pУАoП ОпАЛ
ЪaНКe АoОКМк МaАeЗaЪл МayеМЛНЛ Л cpeАcЪЗa АОУ
БaзЛЪк ЦoОoЗк.
7. OcoДoe ЗМЛПaМЛe yАeОУИЪe ОпАУП, paДoЪaпзЛП
ФoДОЛБocЪЛ.
OдeМл oФacМк paМeМЛУ, ФpЛдЛМeММкe МeФpaЗЛОлМo
БaФpaЗОeММкПЛ cНoДaПЛ. иoнЪoПy МeoДxoАЛПo
yАeОУЪл ocoДoe ЗМЛПaМЛe ДeБoФacМocЪЛ МaxoАУзЛxcУ
ФoДОЛБocЪЛ ОпАeИ ФpЛ ЗкФoОМeМЛЛ paДoЪ co
cЪeФОepoП. мДeАЛЪecл, дЪo pУАoП c ЗкxoАМкП
oЪЗepcЪЛeП cЪeФОepa МeЪ ОпАeИ ЛОЛ дacЪeИ ЪeОa.
8. ВaФpeзaeЪcУ МaФpaЗОУЪл oЪЗepcЪЛe cЪeФОepa Мa
ОпАeИ.
иepeА МaдaОoП paДoЪк yДeАЛЪecл, дЪo cНoДк
БapУКeМк З ЛМcЪpyПeМЪ.
EcОЛ ФЛcЪoОeЪ МaФpaЗОeМ Мe дeОoЗeНa, ФpЛ
cОyдaИМoП МaКaЪЛЛ Мa НypoН cyзecЪЗyeЪ pЛcН
cepлeБМкx paМeМЛИ. иpЛ ФoАНОпдeМЛЛ ЛОЛ
oЪcoeАЛМeМЛЛ ЗoБАyеМoЦo еОaМЦa, БaФpaЗНЛ cНoД ЛОЛ
ФpЛ ЗкФoОМeМЛЛ ФoАoДМкx oФepaбЛИ ФpeАЗapЛЪeОлМo
yДeАЛЪecл, дЪo oЪЗepcЪЛe cЪeФОepa Мe МaФpaЗОeМo Мa
ОпАeИ (ЗНОпдaУ caПoЦo ceДУ). СaКe ecОЛ З
ЛМcЪpyПeМЪ Мe БapУКeМк cНoДк, МЛНoЦАa Мe
МaКЛПaИЪe Мa cФycНoЗoИ НpпдoН cЪeФОepa,
МaФpaЗОeММoЦo Мa ОпАeИ. ВaФpeзaeЪcУ ЛЦpaЪл c
ЛМcЪpyПeМЪoП - yЗaКaИЪe opyАЛe cЗoeЦo ЪpyАa.
9. èepeÀ ÌaäaÎoÏ ËcÔoÎëÁoÇaÌËÓ aÇÚoÏaÚËäecÍoÖo
ËÌcÚpyÏeÌÚa, ÔpoÇepëÚe ÌaÊËÏÌoÈ pêäaÖ.
иepeА МaдaОoП ЛcФoОлБoЗaМЛУ aЗЪoПaЪЛдecНoЦo
ЛМcЪpyПeМЪa, ФpoЗepлЪe paДoЪy МaКЛПМoЦo pкдaЦa
Л НОaФaМa. He БaЦpyКaУ cНoДк З ЛМcЪpyПeМЪ,
ФpeАЗapЛЪeОлМo ФoАНОпдЛЪe еОaМЦ Л yДeАЛЪecл З
МaОЛдЛЛ ЗoБАyxa. EcОЛ Зo ЗpeПУ paДoЪк ЗoБМЛНaeЪ
еyП, Мe ЛcФoОлБyИЪe ЛМcЪpyПeМЪ Аo Ъex Фop, ФoНa
oМ Мe ДyАeЪ ocПoЪpeМ Л oЪpeПoМЪЛpoЗaМ.
䡬 EcÎË ÎeÖÍoe ÌaÊaÚËe Ìa cÔycÍoÇoÈ ÍpïäoÍ
ФpЛЗoАЛЪ Н ЗoБМЛНМoЗeМЛп БЗyНa cpaДaЪкЗaМЛУ
ycЪpoИcЪЗa, aЗЪoПaЪЛдecНЛИ ЛМcЪpyПeМЪ
МeЛcФpaЗeМ.
䡬 EcÎË ÎeÖÍoe ÍacaÌËe ÌaÊËÏÌoÖo pêäaÖa Í
ПaЪepЛaОy, ФoАОeКaзeПy НpeФОeМЛп cНoДaПЛ,
ФpЛЗoАЛЪ Н ЗoБМЛНМoЗeМЛп БЗyНa cpaДaЪкЗaМЛУ
ycЪpoИcЪЗa, ЛМcЪpyПeМЪ МeЛcФpaЗeМ. BМЛПaМЛe!
ВaФpeзaeЪcУ ПoАЛЩЛбЛpoЗaЪл ЛОЛ yАaОУЪл
МaКЛПМoИ pкдaЦ.
10. àcÔoÎëÁyÈÚe ÚoÎëÍo ÔpeÀÌaÁÌaäeÌÌêe ÀÎÓ
ËÌcÚpyÏeÌÚa cÍoÄê.
ВaФpeзaeЪcУ ЛcФoОлБoЗaЪл cНoДк, oЪОЛдМкe oЪ
yНaБaММкx Л oФЛcaММкx З АaММкx ЛМcЪpyНбЛУx.
11. BкФoОМУИЪe ФoАНОпдeМЛe ЗoБАyеМoЦo еОaМЦa
c ocoДoИ ocЪopoКМocЪлп.
иpЛ ФoАНОпдeМЛЛ еОaМЦa Л БaФpaЗНЛ cНoД Зo
ЛБДeКaМЛe МeФpoЛБЗoОлМoЦo ЗкcЪpeОa cНoД
ЗкФoОМУИЪe cОeАyпзЛe peНoПeМАaбЛЛ:
䡬 He ÍacaÈÚecë cÔycÍoÇoÖo ÍpïäÍa.
䡬 àÁÄeÖaÈÚe ÍoÌÚaÍÚa cÚpeÎÓïçeÈ ÖoÎoÇÍË c
ÎïÄoÈ ÔoÇepxÌocÚëï.
䡬 ìÄeÀËÚecë, äÚo cÚpeÎÓïçaÓ ÖoÎoÇÍa
МaФpaЗОeМa ЗМЛБ.
CЪpoЦo cОeАyИЪe ФpЛЗeАeММкП ЛМcЪpyНбЛУП, Мe
МaФpaЗОУИЪe ЗкxoАМoe oЪЗepcЪЛe cЪeФОepa Мa
дacЪЛ ЪeОa.
12. He ÍÎaÀËÚe ÔaÎeá Ìa cÔycÍoÇoÈ ÍpïäoÍ.
He НОaАЛЪe ФaОeб Мa cФycНoЗoИ НpпдoН НpoПe НaН
АОУ ЗкФoОМeМЛУ МeФocpeАcЪЗeММo НpeФОeМЛУ
cНoДaПЛ. EcОЛ Зк ФepeМocЛЪe ЛОЛ ФepeАaeЪe АpyЦoПy
ОЛбy ЛМcЪpyПeМЪ, yАepКЛЗaУ ФaОeб Мa cФycНoЗoП
НpпдНe, Зк ПoКeЪe МeФpeАМaПepeММo МaКaЪл Мa
МeЦo Л ЗкcЪpeОЛЪл cНoДaПЛ, ФpЛдЛМЛЗ paМeМЛУ.
13. иoОМocЪлп БaНpкЗaИЪe МaФpaЗОУпзyп ОeБЗЛУ.
He oЪНpкЗaИЪe ee Зo ЗpeПУ ЗкФoОМeМЛУ oФepaбЛИ.
иpЛ ФoФкЪНe НpeФОeМЛУ cНoД ФpЛ oЪНpкЪoИ
МaФpaЗОУпзeИ ОeБЗЛУ, cНoДк Мe ДyАyЪ ФoАaЗaЪлcУ
З ДapaДaМ, дЪo ЦpoБЛЪ ЗМeБaФМкП ЗкcЪpeОoП.
14. HaАeКМo ФpЛКПЛЪe ЗкxoАМoe oЪЗepcЪЛe cЪeФОepa
Н ПaЪepЛaОy, ФoАОeКaзeПy БaНpeФОeМЛп.
иpЛ ЗкФycНe cНoД ФОoЪМo ФpЛКПЛЪe ЗкxoАМoe
oЪЗepcЪЛe cЪeФОepa Н ПaЪepЛaОy, ФoАОeКaзeПy
БaНpeФОeМЛп. EcОЛ oЪЗepcЪЛe МeФОoЪМo ФpЛКaЪo,
cНoДк ПoЦyЪ pЛНoеeЪЛЪл.
15. Bo ÇpeÏÓ íÍcÔÎyaÚaáËË pyÍË Ë ÌoÖË ÀoÎÊÌê
ÌaxoÀËÚëcÓ Ìa ÀocÚaÚoäÌoÏ paccÚoÓÌËË oÚ
cÚpeÎÓïçeÈ ÖoÎoÇÍË.
CyçecÚÇyeÚ oÔacÌocÚë ÇêcÚpeÎa cÍoÄê Ç pyÍy ËÎË
ÌoÖy.
16. àÌcÚpyÏeÌÚ ÏoÊeÚ ÔpoËÁÇoÀËÚë oÄpaÚÌyï
oÚÀaäy.
Bo ЗpeПУ paДoЪк Мe ФpЛДОЛКaИЪe ЦoОoЗy Л Ъ.А. Н
ЗepxМeИ дacЪЛ ЛМcЪpyПeМЪa. щЪo oФacМo, ЪaН НaН
ЛМcЪpyПeМЪ ПoКeЪ oЪcНoдЛЪл З cОyдae ФoФaАaМЛУ
cНoДк Мa ФpeАкАyзyп cНoДy ЛОЛ Мa cyН АepeЗa.
17. C ocoДoИ ocЪopoКМocЪлп НpeФЛЪe cНoДк Н ЪoМНЛП
АocНaП ЛОЛ yЦОaП АepeЗУММкx ФpeАПeЪoЗ.
иpЛ НpeФОeМЛЛ Н ЪoМНЛП АocНaП cНoДк ПoЦyЪ
ФpocЪpeОЛЪл Лx МacНЗoБл. To Кe caПoe ПoКeЪ
ФpoЛБoИЪЛ ФpЛ НpeФОeМЛЛ Н yЦОaП ЗcОeАcЪЗЛe
oЪНОoМeМЛУ МaФpaЗОeМЛУ АЗЛКeМЛУ cНoДк. B ЪaНЛx
cОyдaУx МeoДxoАЛПo yДeАЛЪлcУ, дЪo Бa ЪoМНoИ
АocНoИ ЛОЛ АepeЗУММкП yЦОoП МЛНoЦo МeЪ
(oЪcyЪcЪЗyпЪ дacЪЛ ЪeОa).
18. OÔacÌo oÀÌoÇpeÏeÌÌoe ÍpeÔÎeÌËe cÍoÄ Í ÀÇyÏ
cÚopoÌaÏ oÀÌoÈ cÚeÌÍË.
ВaФpeзaeЪcУ ЗкФoОМУЪл oАМoЗpeПeММoe НpeФОeМЛe
cНoД c АЗyx cЪopoМ oАМoИ cЪeМк. щЪo oФacМo, ЪaН
НaН cНoДк ПoЦyЪ ФpoДЛЪл cЪeМy МacНЗoБл Л МaМecЪЛ
paМeМЛУ paДoЪМЛНy.
19. ÂaÔpeçaeÚcÓ ËcÔoÎëÁoÇaÚë aÇÚoÏaÚËäecÍËÈ
ËÌcÚpyÏeÌÚ Ìa cÚpoËÚeÎëÌêx Îecax Ë ÎecÚÌËáax.
ÂaÔpeçaeÚcÓ ËcÔoÎëÁoÇaÚë aÇÚoÏaÚËäecÍËÈ
ËÌcÚpyÏeÌÚ Ç cÎeÀyïçËx cÎyäaÓx:
– ecÎË cÏeÌa ÏecÚoÔoÎoÊeÌËÓ ÚpeÄyeÚ
ËcÔoÎëÁoÇaÌËÓ cÚpoËÚeÎëÌêx ÎecoÇ, ÎecÚÌËá,
ÔpËcÚaÇÌêx ÎecÚÌËá ËÎË ÔoÀoÄÌêx ÍoÌcÚpyÍáËÈ,
ÌaÔpËÏep, ÍpoÇeÎëÌêx ÀpaÌoÍ
– ÀÎÓ ÁaÍpêÚËÓ ÓçËÍoÇ ËÎË ÍoÌÚeÈÌepoÇ
– ÔpË ycÚaÌoÇÍe cËcÚeÏ ÚpaÌcÔopÚÌoÈ
ÄeÁoÔacÌocÚË, ÌaÔpËÏep, Ìa ÚpaÌcÔopÚÌêe
cpeÀcÚÇa Ë ÙypÖoÌê
57
Page 59

PyccÍËÈ
20. ВaФpeзaeЪcУ oЪcoeАЛМУЪл еОaМЦ, yАepКЛЗaУ
ФaОeб Мa cФycНoЗoП НpпдНe.
EcÎË Çê oÚcoeÀËÌÓeÚe åÎaÌÖ, yÀepÊËÇaÓ ÔaÎeá Ìa
cÔycÍoÇoÏ ÍpïäÍe, ÔpË ÔocÎeÀyïçeÏ
ÔoÀcoeÀËÌeÌËË åÎaÌÖa cyçecÚÇyeÚ oÔacÌocÚë
cÔoÌÚaÌÌoÖo ÇêcÚpeÎËÇaÌËÓ cÍoÄê ËÎË
ÌeÌaÀÎeÊaçeÈ paÄoÚê ËÌcÚpyÏeÌÚa.
21. OЪcoeАЛМЛЪe еОaМЦ Л ЗкМлЪe cНoДк,
ocЪaЗеЛecУ З ПaЦaБЛМe ФocОe paДoЪк.
иepeА ЗкФoОМeМЛeП ЪexМЛдecНoЦo oДcОyКЛЗaМЛУ,
yАaОeМЛУ БacЪpУЗеeИ cНoДк, ФepeПeзeМЛeП З
АpyЦoe ПecЪo ЛОЛ ФocОe paДoЪк oЪcoeАЛМЛЪe
ЗoБАyеМкИ еОaМЦ oЪ ЛМcЪpyПeМЪa. иoПМЛЪe,
cyзecЪЗyeЪ oФacМocЪл cФoМЪaММoЦo ЗкcЪpeОЛЗaМЛУ.
22. èpË yÀaÎeÌËË ÁacÚpÓÇåeÈ cÍoÄê
ÔpeÀÇapËÚeÎëÌo yÄeÀËÚecë, äÚo oÚcoeÀËÌeÌ
ÇoÁÀyåÌêÈ åÎaÌÖ, Ë ÇêÔyçeÌ cÊaÚêÈ ÇoÁÀyx.
èepeÀ yÀaÎeÌËeÏ ÁacÚpÓÇåeÈ Ç ÇêxoÀÌoÏ
oÚÇepcÚËË cÚeÔÎepa cÍoÄê yÄeÀËÚecë, äÚo
oÚcoeÀËÌeÌ ÇoÁÀyåÌêÈ åÎaÌÖ, a ËÁ ËÌcÚpyÏeÌÚa
ÇêÔyçeÌ cÊaÚêÈ ÇoÁÀyx.
èoÏÌËÚe, cyçecÚÇyeÚ oÔacÌocÚë cÔoÌÚaÌÌoÖo
ÇêcÚpeÎËÇaÌËÓ cÍoÄê.
23. óÚoÄê ËÁÄeÊaÚë oÔacÌocÚeÈ, cÇÓÁaÌÌêx c
ÇêÔaÀeÌËe cÍoÄ, ÔpË ÁaÔpaÇÍe cÍoÄ Ìe oÚÍpêÇaÈÚe
ÏaÖaÁËÌ, ÌaÔpaÇÎÓÓ ËÌcÚpyÏeÌÚ ÇÌËÁ.
24. He ËcÔoÎëÁyÈÚe ÖÌeÁÀoÇyï äacÚë (ÇoÁÀyåÌyï
poÁeÚÍy) Ç ÍopÔyce.
EcОЛ З НopФyce ЛПeeЪcУ ЦМeБАoЗaУ дacЪл, ФoПМЛЪe,
дЪo cКaЪкИ ЗoБАyx Мe ФoОМocЪлп yАaОУeЪcУ ЛБ
ЛМcЪpyПeМЪa ФocОe oЪcoeАЛМeМЛУ еОaМЦa.
CoeАЛМЛЪeОлМкИ нОeПeМЪ ПeКАy ЛМcЪpyПeМЪoП Л
ЗoБАyеМкП еОaМЦoП АoОКeМ oДecФeдЛЗaЪл
aДcoОпЪМкИ cДpoc АaЗОeМЛУ ФpЛ oЪcoeАЛМeМЛЛ
ЪaНoИ ПyЩЪк.
25. СОУ oдЛcЪНЛ aЗЪoПaЪЛдecНoЦo ЛМcЪpyПeМЪa
БaФpeзaeЪcУ ЛcФoОлБoЗaЪл ДeМБЛМ ЛОЛ АpyЦЛe
ЗocФОaПeМУпзЛecУ КЛАНocЪЛ.
èpË ÔoÔaÀaÌËË ËcÔapeÌËÈ ÎïÄoÈ
ÇocÔÎaÏeÌÓïçeÈcÓ ÊËÀÍocÚË Ìa aÇÚoÏaÚËäecÍËÈ
ËÌcÚpyÏeÌÚ ËcÍpa, ÇoÁÌËÍaïçaÓ Ço ÇpeÏÓ
ÇêÔoÎÌeÌËÓ paÄoÚ, ÏoÊeÚ cÚaÚë ÔpËäËÌoÈ ÇÁpêÇa.
TEXHàóECKàE XAPAKTEPàCTàKà
TËÔ ÔpËÇoÀa BoБЗpaЪМo-ФocЪyФaЪeОлМкИ ФopеeМл
СaЗОeМЛe ЗoБАyxa (ПaМoПeЪpЛдecНoe) 4,9 – 8,3 Äap
PeÍoÏeÌÀyeÏêe cÍoÄê PËc.
KoÎËäecÚÇo cÍoÄ ÀÎÓ ÁaÖpyÁÍË 150 cÍoÄ
PaÁÏep 365 ÏÏ (Ñ) × 258 ÏÏ (B) × 76 ÏÏ (ò)
Bec 2,0 ÍÖ
òÎaÌÖ (ÇÌyÚpeÌÌËÈ ÀËaÏ.) 6 ÏÏ
BõÅOP CKOÅ
BêÄepËÚe ÔoÀxoÀÓçËe cÍoÄê Ç cooÚÇeÚcÚÇËË c PËc.
CÍoÄê, Ìe ËÁoÄpaÊeÌÌêe Ìa PËc. ÌeÎëÁÓ ËcÔoÎëÁoÇaÚë
Ç ËÌcÚpyÏeÌÚe.
16 MaÌoÏeÚp 7/16" KopoÌÍa
MËÌ. MaÍc.
1,61ÏÏ
7,9ÏÏ
25ÏÏ
1,45ÏÏ
PaÁÏepê cÍoÄ
50ÏÏ
CTAHÑAPTHõE èPàHAÑãEÜHOCTà
(1) òecÚËÖpaÌÌêÈ ÍÎïä ÀÎÓ ÄoÎÚoÇ M5 ........................ 1
(2) ВaзЛЪМкe oдНЛ ........................................................... 1
(3) MacÎeÌÍa .................................................................... 1
ÑOèOãHàTEãúHõE èPàHAÑãEÜHOCTà
䡬 HaДop АОУ ПexaМЛБПa ФocОeАoЗaЪeОлМoЦo ЗкНОпдeМЛУ
(KoА 876762)
(HaДop нОeПeМЪoЗ АОУ ФocОeАoЗaЪeОлМкx ЗкcЪpeОoЗ,
щОeПeМЪк АОУ oАМoЦo ЗкcЪpeОa)
щОeПeМЪк АОУ ФocОeАoЗaЪeОлМкx ЗкcЪpeОoЗ
ФoБЗoОУпЪ ЗкcЪpeОЛЗaЪл cНoДaПЛ ЪoОлНo ФocОe
МaКaЪЛУ cФycНoЗoЦo НpпдНa Л ФpЛКaЪЛУ МaКЛПМoЦo
pкдaЦa.
мcЪaМoЗНa АaММкx нОeПeМЪoЗ ФoБЗoОУeЪ
ФpeАoЪЗpaЪЛЪл НpeФОeМЛe cНoДк З МeФpaЗЛОлМoП
ФoОoКeМЛЛ Л cФoМЪaММoe ЗкcЪpeОЛЗaМЛe cНoДк,
ЗкБЗaММoe cОyдaИМкП МaКaЪЛeП МaКЛПМoЦo pкдaЦa.
OÅãACTú èPàMEHEHàü
䡬 CЪpoЛЪeОлМкe paДoЪк, МaФpЛПep, oДеЛЗНa cЪeМ,
ÔoÀÖoÚoÇÍa ÔoÎoÇ.
䡬 CЪpoЛЪeОлcЪЗo ПoДЛОлМкx Л ПoАyОлМкx АoПoЗ.
58
Page 60

PyccÍËÈ
èOÑÉOTOBKA K PAÅOTE
1. èoÀÖoÚoÇëÚe åÎaÌÖ
аcФoОлБyИЪe ЪoОлНo еОaМЦ c ПЛМЛПaОлМкП
ЗМyЪpeММЛП АЛaПeЪpoП 6 ПП.
èPàMEóAHàE:
BoБАyеМкe еОaМЦЛ АoОКМк ЗкАepКЛЗaЪл
ПЛМЛПaОлМoe paДoдee АaЗОeМЛe 12,8 Дap ЛОЛ 150 oЪ
ПaНcЛПaОлМoЦo АaЗОeМЛУ, ФpoЛБЗoАЛПoЦo cЛcЪeПoИ
ФoАaдЛ ЗoБАyxa, НaНЛП Дк oМo Мe ДкОo.
2. èpoÇepÍa ÄeÁoÔacÌocÚË
OCTOPOÜHO:
䡬 He ФoАФycНaИЪe МeНЗaОЛЩЛбЛpoЗaММкx coЪpyАМЛНoЗ
(Ë ÀeÚeÈ) Í oÄopyÀoÇaÌËï.
䡬 HaАeЗaИЪe БaзЛЪМкe oдНЛ.
䡬 ìÄeÀËÚecë, äÚo ÄoÎÚê, ÍpeÔÓçËe ÍpêåÍy ÇêÔycÍa,
ÌaÀeÊÌo ÁaÚÓÌyÚê.
ìÄeÀËÚecë Ç oÚcyÚcÚÇËË yÚeäeÍ ÇoÁÀyxa, ÔoÇpeÊÀeÌÌêx
ËÎË pÊaÇêx ÀeÚaÎeÈ.
䡬 ìÄeÀËÚecë Ç ËcÔpaÇÌocÚË paÄoÚê ÌaÊËÏÌoÖo pêäaÖa.
мАaОЛЪe ЦpУБл c ФoАЗЛКМкx АeЪaОeИ МaКЛПМoЦo
pкдaЦa.
䡬 ìÄeÀËÚecë Ç ÌaÀeÊÌocÚË ÙyÌÍáËoÌËpoÇaÌËÓ
ËÌcÚpyÏeÌÚa.
èEPEÑ àCèOãúÂOBAHàEM
1. èpoÇepëÚe ÀaÇÎeÌËe ÇoÁÀyxa
OCTOPOÜHO:
СaЗОeМЛe ЗoБАyxa ЗceЦАa АoОКМo ФoААepКЛЗaЪлcУ
З АЛaФaБoМe 4,9 - 8,3 Дap.
HacЪpoИЪe АaЗОeМЛe З АЛaФaБoМe 4,9 - 8,3 Дap З
cooЪЗeЪcЪЗЛЛ c АЛaПeЪpaПЛ Л АОЛМaПЛ cНoД, a ЪaНКe
ЪЗepАocЪлп АepeЗa. OcoДoe ЗМЛПaМЛe yАeОЛЪe
БМaдeМЛп АaЗОeМЛУ Мa ЗкxoАe, ФpoЛБЗoАЛЪeОлМocЪЛ
Л coeАЛМeМЛУП НoПФpeccopa, дЪoДк yДeАЛЪлcУ, дЪo
АaЗОeМЛe Мe ФpeЗкеaeЪ ycЪaМoЗОeММкx ФpeАeОoЗ.
аБОЛеМee АaЗОeМЛe ПoКeЪ ЗОЛУЪл Мa нНcФОyaЪaбЛп,
cpoН cОyКДк ЛМcЪpyПeМЪa Л ДeБoФacМocЪл oФepaЪopa.
2. CÏaÁêÇaÌËe
(1) èepeÀ paÄoÚoÈ co cÚeÔÎepoÏ yÄeÀËÚecë, äÚo ÏeÊÀy
ЗoБАyеМкП НoПФpeccopoП Л ЛМcЪpyПeМЪoП ЛПeeЪcУ
ЗoБАyеМкИ yБeО. CПaБкЗaМЛe дepeБ ЗoБАyеМкИ yБeО
oДecФeдЛЗaeЪ МeФpepкЗМyп paДoЪy, АОЛЪeОлМкИ cpoН
cОyКДк Л БaзЛЪy oЪ НoppoБЛЛ АОУ ЛМcЪpyПeМЪa.
HacЪpoИЪe paДoЪy ПacОeМНЛ ЪaН, дЪoДк дepeБ НaКАкe
5-10 бЛНОoЗ З ЛМcЪpyПeМЪ ФoФaАaОo ПacОo.
(2) PeÍoÏeÌÀyeÚcÓ ËcÔoÎëÁoÇaÚë ÏacÎo SHELL TONNA.
TaÍÊe ÏoÊÌo ËcÔoÎëÁoÇaÚë ÀpyÖËe ÔepeäËcÎeÌÌêe
ÏacÎa. ÂaÔpeçaeÚcÓ cÏeåËÇaÚë ÀÇa Ë ÄoÎee ÚËÔoÇ
ÏaceÎ.
3. ÂaÖpyÁÍa cÍoÄ
OCTOPOÜHO:
䡬 èpË ÁaÖpyÁÍe cÍoÄ Ç cÚeÔÎep
(1) Ìa ÌaÊËÏaÈÚe cÔycÍoÇoÈ ÍpïäoÍ;
(2) Ìe ÌaÊËÏaÈÚe ÌaÊËÏÌoÈ pêäaÖ;
(3) Ìe ÀoÔycÍaÈÚe ÌaxoÊÀeÌËÓ ÎËáa, pyÍ, ÌoÖ Ë ÀpyÖËx
äacÚeÈ ÚeÎa, a ÚaÍÊe ÔocÚopoÌÌËx ÎïÀeÈ ÇoÁÎe
peÊyçeÈ ÍpoÏÍË Ço ËÁÄeÊaÌËe ÚpaÇÏ Ço ÇpeÏÓ
íÍcÔÎyaÚaáËË.
(1) OЪЪУМЛЪe МaБaА ycЪpoИcЪЗo ФoАaдЛ cНoД Л МaАeКМo
ÁaÍpeÔËÚe eÖo Ç ÊeÎoÄ ÏaÖaÁËÌa. (CÏ. PËc. 2)
(2) èoÏecÚËÚe ÔoÎocy cÍoÄ Ç ÏaÖaÁËÌ.
ìÄeÀËÚecë, äÚo ÔoÎoca cÍoÄ cÇoÄoÀÌo ÀÇËÖaeÚcÓ Ç
ÏaÖaÁËÌe. (CÏ. PËc. 3)
59
(3) OЪЪУМЛЪe МaБaА ycЪpoИcЪЗo ФoАaдЛ cНoД. аБЗОeНЛЪe
eÖo ËÁ ÊeÎoÄa ÏaÖaÁËÌa, ocÚopoÊÌo ÔoÏecÚËÚe cÍoÄy
Ìa ÏecÚo, cÎeÖÍa ÌaÊËÏaÓ Ìa Ìee. (CÏ. PËc. 4)
TeÔepë cÚeÔÎep ÖoÚoÇ Í paÄoÚe.
OCTOPOÜHO:
䡬 EcÎË ÔpoËcxoÀËÚ ÌeÔpoËÁÇoÎëÌoe paÁÊËÏaÌËe
ycЪpoИcЪЗa ФoАaдЛ cНoД, oМo ПoКeЪ ЗepМyЪлcУ З
ЛcxoАМoe ФoОoКeМЛe, дЪo ПoКeЪ ФpЛЗecЪЛ Н
АeЩopПaбЛЛ Л/ЛОЛ paБДpacкЗaМЛп Л БaНyФopНe cНoД
З ycЪpoИcЪЗe.
мДeАЛЪecл, дЪo ycЪpoИcЪЗo ФoАaдЛ cНoД ЗoБЗpaзeМo
З ЛcxoАМoe ФoОoКeМЛe ДeБ ФpЛПeМeМЛУ ЛБОЛеМeИ
cЛОк.
䡬 óÚoÄê ÔpeÀoÚÇpaÚËÚë ÌeÔpoËÁÇoÎëÌoe cpaÄaÚêÇaÌËe
ЛМcЪpyПeМЪa, Мe НacaИЪecл cФycНoЗoЦo НpпдНa Л Мe
НОaАЛЪe МaКЛПМoИ pкдaЦ ЗepxМeИ дacЪлп Мa ЗepcЪaН
ЛОЛ ФoО. He МaФpaЗОУИЪe ЗкxoАМoe oЪЗepcЪЛe
cЪeФОepa Мa ОпАeИ ЛОЛ дacЪЛ ЪeОa.
PAÅOTA CO CTEèãEPOM
OCTOPOÜHO:
䡬 ÂaÔpeçaeÚcÓ ËcÔoÎëÁoÇaÚë ÀaÌÌêÈ ËÌcÚpyÏeÌÚ Ç
ÍaäecÚÇe ÏoÎoÚÍa.
䡬 èpËÏËÚe Ïepê ÀÎÓ oÄecÔeäeÌËÓ ÄeÁoÔacÌocÚË
ÌaxoÀÓçËxcÓ ÔoÄÎËÁocÚË ÎïÀeÈ.
1. KpeÔÎeÌËe cÍoÄaÏË
(1) KpeÔÎeÌËe cÍoÄaÏË äepeÁ ËÌÚepÇaÎê
иpЛКПЛЪe ЗкxoАМoe oЪЗepcЪЛe cЪeФОepa Н МyКМoИ
ЪoдНe; БaЪeП МaКПЛЪe Мa cФycНoЗoИ НpпдoН, дЪoДк
ФpoЛБЗecЪЛ oАЛМ ЗкcЪpeО. (CП. PËc. 5)
OCTOPOÜHO:
䡬 EcÎË cËÎëÌo ÔpËÊaÚë ËÌcÚpyÏeÌÚ Í ÔoÇepxÌocÚË, ËÎË
ecОЛ ЛcФoОлБyeЪcУ ЪЗepАкИ ПaЪepЛaО, ЛМcЪpyПeМЪ
ПoКeЪ oЪcНaНЛЗaЪл Л ДкcЪpo ЗкcЪpeОЛЗaЪл
МecНoОлНЛПЛ cНoДaПЛ ФoАpУА. B ЪaНЛx cОyдaУx
ЗкcЪpeОк МeoДxoАЛПo ФpoЛБЗoАЛЪл, МaКЛПaУ Л
ДкcЪpo oЪФycНaУ cФycНoЗoИ НpпдoН.
(2) иpЛКЛПМoИ pкдaЦ
иpЛКЛПaУ ЗкxoАМoe oЪЗepcЪЛe cЪeФОepa, yДeАЛЪecл,
дЪo ФpЛКЛПМoИ pкдaЦ ФoОМocЪлп ФoАМУЪ (CП. PËc.
5), äÚoÄê ocÇoÄoÀËÚë ÔpeÀoxpaÌËÚeÎëÌoe ycÚpoÈcÚÇo.
EcÎË Ìe cÌÓÚo ÔpeÀoxpaÌËÚeÎëÌoe ycÚpoÈcÚÇo,
ÌeÇoÁÏoÊÌo ÔpoËÁÇecÚË ÇêcÚpeÎ cÍoÄoÈ ÀaÊe ÔpË
ÌaÊaÚËË Ìa cÔycÍoÇoÈ ÍpïäoÍ.
(3) HeÔpepêÇÌoe ÍpeÔÎeÌËe cÍoÄaÏË
HaКПЛЪe Мa cФycНoЗoИ НpпдoН, БaЪeП ФpЛКПЛЪe
ЛМcЪpyПeМЪ З МyКМoП ФoОoКeМЛЛ АОУ
aЗЪoПaЪЛдecНoЦo ЗкcЪpeОЛЗaМЛУ cНoД. (CП. PËc. 6).
OCTOPOÜHO:
䡬 C ocoДoИ ocЪopoКМocЪлп ЗкФoОМУИЪe НpeФОeМЛe
cНoДaПЛ yЦОoЗ АepeЗУММкx НoМcЪpyНбЛИ. иpЛ
МeФpepкЗМoП НpeФОeМЛЛ cНoД Н yЦОaП АepeЗУММкx
НoМcЪpyНбЛИ cНoДк ПoЦyЪ ПeМУЪл МaФpaЗОeМЛe
АЗЛКeМЛУ ЛОЛ ОoПaЪлcУ oД yЦoО.
䡬 He ÇêcÚpeÎËÇaÈÚe cÍoÄy Ç ÀpyÖyï cÍoÄy.
䡬 He ÇêcÚpeÎËÇaÈÚe cÍoÄy Ç ÏeÚaÎÎËäecÍËe íÎeÏeÌÚê.
èPàMEóAHàü:
䡬 Mepê ÔpeÀocÚopoÊÌocÚË ÔpË paÄoÚe ÇxoÎocÚyï
àÌoÖÀa ÇêcÚpeÎê ÔpoÀoÎÊaïÚcÓ, ÀaÊe ÍoÖÀa Ç
ÏaÖaÁËÌe yÊe Ìe ocÚaÎocë ÌË oÀÌoÈ cÍoÄê.
TaÍoÈ Ôpoáecc ÌaÁêÇaeÚcÓ "paÄoÚa ÇxoÎocÚyï". B
peÁyÎëÚaÚe ÇoÁÏoÊÌê ÔoÇpeÊÀeÌËÓ ÔpoÍÎaÀÍË,
ÏaÖaÁËÌa Ë ycÚpoÈcÚÇa ÔoÀaäË cÍoÄ.
óÚoÄê ËÁÄeÊaÚë paÄoÚê ÇxoÎocÚyï, ÔepËoÀËäecÍË
ÔpoÇepÓÈÚe ÍoÎËäecÚÇo ocÚaÇåËxcÓ Ç ÏaÖaÁËÌe cÍoÄ.
Page 61

PyccÍËÈ
èocÎe oÍoÌäaÌËÓ paÄoÚê ÌeoÄxoÀËÏo yÀaÎÓÚë Çce
cÍoÄê, ocÚaÇåËecÓ Ç cÚeÔÎepe.
䡬 èocÎe oÍoÌäaÌËÓ paÄoÚê:
(1) oЪcoeАЛМЛЪe ЗoБАyеМкИ еОaМЦ oЪ cЪeФОepa;
(2) yАaОЛЪe Зce cНoДк ЛБ cЪeФОepa;
(3) МaМecЛЪe 5 - 10 НaФeОл cПaБкЗaпзeЦo ЗeзecЪЗa
ÀÎÓ ÔÌeÇÏaÚËäecÍËx ËÌcÚpyÏeÌÚoÇ Hitachi Ç
ÁaÖÎyåÍy ÇoÁÀyåÌoÖo oÚÇepcÚËÓ, ÌaxoÀÓçeÖocÓ Ìa
ËÌcÚpyÏeÌÚe;
(4) oÚÍpoÈÚe cÔycÍÌoÈ ÍpaÌ eÏÍocÚË ÇoÁÀyåÌoÖo
ÍoÏÔpeccopa, äÚoÄê yÀaÎËÚë ÇÎaÖy.
䡬 иpЛ нНcФОyaЪaбЛЛ З ycОoЗЛУx МЛБНЛx ЪeПФepaЪyp
ËÌcÚpyÏeÌÚ ÏoÊeÚ ÀaÇaÚë cÄoË Ç paÄoÚe. PaÄoÚaÈÚe
ËÌcÚpyÏeÌÚoÏ ÔpË ÍoÏÌaÚÌoÈ ÚeÏÔepaÚype.
2. PeÖyÎËpoÇÍa ÖÎyÄËÌê ÍpeÔÎeÌËÓ cÍoÄ
óÚoÄê oÄecÔeäËÚë ÍpeÔÎeÌËe cÍoÄ Ìa oÀËÌaÍoÇyï
ÖÎyÄËÌy, yÄeÀËÚecë, äÚo:
(1) ÀaÇÎeÌËe ÇoÁÀyxa Ç cÚeÔÎepe ÔocÚoÓÌÌoe
(peÖyÎÓÚop ycÚaÌoÇÎeÌ Ë paÄoÚaeÚ ÌaÀÎeÊaçËÏ
oÄpaÁoÏ),
(2) cÚeÔÎep ÔÎoÚÌo ÔpËÊËÏaeÚcÓ Í paÄoäeÈ
ÔoÇepxÌocÚË.
EcÎË cÍoÄê ÍpeÔÓÚcÓ Ç ÏaÚepËaÎ cÎËåÍoÏ ÖÎyÄoÍo
ËÎË, ÌaoÄopoÚ, ÌeÖÎyÄoÍo, ÇêÔoÎÌËÚe ÌacÚpoÈÍy
cÚeÔÎepa cÎeÀyïçËÏ oÄpaÁoÏ.
OCTOPOÜHO:
䡬 иepeА ЗкФoОМeМЛeП МacЪpoИНЛ oЪcoeАЛМЛЪe еОaМЦ
Ë ÇêÔycÚËÚe cÊaÚêÈ ÇoÁÀyx ËÁ ËÌcÚpyÏeÌÚa.
䡬 He ÍÎaÀËÚe ÔaÎeá Ìa cÔycÍoÇoÈ ÍpïäoÍ Ço ÇpeÏÓ
ÌacÚpoÈÍË.
䡬 He ÀoÔycÍaÈÚe ÔoÔaÀaÌËÓ äacÚeÈ ÚeÎa ÔepeÀ
ÇêxoÀÌêÏ oÚÇepcÚËeÏ cÚeÔÎepa Ço ÇpeÏÓ
ÌacÚpoÈÍË.
BêÔoÎÌËÚe ÌacÚpoÈÍy cÎeÀyïçËÏ oÄpaÁoÏ. (CÏ. PËc.
7)
уЪoДк oЪpeЦyОЛpoЗaЪл ЦОyДЛМy НpeФОeМЛУ cНoДк,
ocОaДлЪe ДoОЪ, НpeФУзЛИ АeЪaОл МaКЛПМoЦo pкдaЦa.
EcОЛ cНoДa ЗxoАЛЪ З ПaЪepЛaО cОЛеНoП ЦОyДoНo,
oФycЪЛЪe АeЪaОл МaКЛПМoЦo pкдaЦa. EcОЛ cНoДa
НpeФЛЪcУ МeЦОyДoНo, ФoАМЛПЛЪe АeЪaОл МaКЛПМoЦo
pкдaЦa.
ВaЪУМЛЪe ДoОЪ, НpeФУзЛИ АeЪaОл МaКЛПМoЦo pкдaЦa.
èPàMEóAHàE:
䡬 аcФoОлБyИЪe ПЛМЛПaОлМoe АaЗОeМЛe ЗoБАyxa АОУ
ÍpeÔÎeÌËÓ cÍoÄê Ìa ÌyÊÌyï ÖÎyÄËÌy. èpË
ËcÔoÎëÁoÇaÌËË ÔoÇêåeÌÌoÖo ÀaÇÎeÌËÓ coÍpaçaeÚcÓ
cpoÍ cÎyÊÄê ÔopåÌeÇoÈ ÁaÖÎyåÍË Ë Àp.
àHCèEKTàPOBAHàE à TEXHàóECKOE
OÅCãìÜàBAHàE
OCTOPOÜHO:
иepeА ФpoЗeАeМЛeП ЛМcФeНЪЛpoЗaМЛУ, ЪexМЛдecНoЦo
oДcОyКЛЗaМЛУ, oдЛcЪНЛ Л yАaОeМЛУ БacЪpУЗеЛx cНoД
oЪcoeАЛМЛЪe ЗoБАyеМкИ еОaМЦ.
1. èpoáeÀypê yÀaÎeÌËÓ ÁacÚpÓÇåËx cÍoÄ
(1) ìÀaÎËÚe Çce cÍoÄê.
(2) OÚÔycÚËÚe ÄÎoÍËpyïçËÈ pêäaÖ Ë oÚÍpoÈÚe
МaФpaЗОУпзyп ОeБЗЛУ. (CП. PËc. 8)
(3) ìÀaÎËÚe ÁacÚpÓÇåËe cÍoÄê c ÔoÏoçëï ÔÎocÍoÈ
oÚÇepÚÍË. (CÏ. PËc. 9)
(4) ВaНpoИЪe МaФpaЗОУпзyп ОeБЗЛУ Л БaЪЗop.
(5) EcОЛ cНoДк peЦyОУpМo БacЪpeЗaпЪ, cЗУКЛЪecл c
aÇÚopËÁËpoÇaÌÌêÏ cepÇËcÌêÏ áeÌÚpoÏ Hitachi.
2. àÌcÔeÍÚËpoÇaÌËe Ë ÚexÌËäecÍoe oÄcÎyÊËÇaÌËe
èpoÇoÀËÚe peÖyÎÓpÌêÈ ocÏoÚp ËÌcÚpyÏeÌÚa.
(1) ìÀaÎËÚe äeÚêpe åecÚËÖpaÌÌêx ÄoÎÚa, ÙËÍcËpyïçËx
НpкеНy ЗкФycНМoЦo oЪЗepcЪЛУ, Л yАaОЛЪe ee.
ВaЪeП yАaОЛЪe бЛОЛМАp, ФopеeМл Л АpyЦЛe АeЪaОЛ.
иpoдЛcЪЛЪe БaДЛЗМoe АoОoЪo, МaФpaЗОУпзЛe АeЪaОЛ
бЛОЛМАpa Л ЗМyЪpeММпп ФoЗepxМocЪл НopФyca ПУЦНoИ
ЪНaМлп.
(2) ìÄeÀËÚecë, äÚo ÔopåÌeÇaÓ ÁacÎoÌÍa ÌaÀÎeÊaçËÏ
oÄpaÁoÏ paÄoÚaeÚ. èoÇpeÊÀeÌÌaÓ ÔopåÌeÇaÓ ÁacÎoÌÍa
ÏoÊeÚ ÔoÇpeÀËÚë ÀpyÖËe ÀeÚaÎË ËÌcÚpyÏeÌÚa.
(3) Bo ÇpeÏÓ ÀeÏoÌÚaÊa ÀeÚaÎeÈ ËÌcÚpyÏeÌÚa yÄeÀËÚecë
Ç oÚcyÚcÚÇËË ËÁÌoca O-oÄpaÁÌoÖo ÍoÎëáa.
àÁÌoåeÌÌoe ËÎË ÔoÇpeÊÀeÌÌoe O-oÄpaÁÌoe ÍoÎëáo
ÏoÊeÚ ÌapyåËÚë paÄoÚy ËÌcÚpyÏeÌÚa. ÂaÏeÌËÚe
ËÁÌoåeÌÌoe ËÎË ÔoÇpeÊÀeÌÌoe O-oÄpaÁÌoe ÍoÎëáo.
(4) èepeÀ cÄopÍoÈ ËÌcÚpyÏeÌÚa ÌaÌecËÚe cÏaÁêÇaïçee
ÇeçecÚÇo (Attolub £ 2) Ìa O-oÄpaÁÌoe ÍoÎëáo.
CÏaÊëÚe ycÚpoÈcÚÇo peÍoÏeÌÀoÇaÌÌêÏ ÏacÎoÏ.
3. èpoÇepëÚe ÏoÌÚaÊÌêe ÄoÎÚê
PeЦyОУpМo ocПaЪpЛЗaИЪe Зce нОeПeМЪк, дЪoДк
yДeАЛЪлcУ З МaАОeКaзeИ ЩЛНcaбЛЛ ПoМЪaКМкx
ДoОЪoЗ Л oЪcyЪcЪЗЛЛ yЪeдeН ЗoБАyxa. иpЛ
МeoДxoАЛПocЪЛ БaЪУМЛЪe ocОaДОeММкe ДoОЪк. OФacМo
ЛcФoОлБoЗaЪл ЛМcЪpyПeМЪ c МeБaЪУМyЪкПЛ ДoОЪaПЛ.
4. OcÏoÚp ÌaÊËÏÌoÖo pêäaÖa
ìÄeÀËÚecë, äÚo ÌaÊËÏÌoÈ pêäaÖ (PËc. 1) ФОaЗМo
ФepeПeзaeЪcУ.
иpoдЛcЪЛЪe ФОoзaАл cНoОлКeМЛУ МaКЛПМoЦo pкдaЦa.
аcФoОлБyИЪe peНoПeМАoЗaММoe cПaБoдМoe ЗeзecЪЗo
АОУ ФepЛoАЛдecНoИ cПaБНЛ. щЪo oДecФeдЛЪ ФОaЗМoe
cНoОлКeМЛe pкдaЦa Л ФpeАoЪЗpaЪЛЪ oДpaБoЗaМЛe
pКaЗдЛМк.
5. XpaÌeÌËe
䡬 EcÎË ËÌcÚpyÏeÌÚ Ìe ËcÔoÎëÁyeÚcÓ ÀÎËÚeÎëÌoe ÇpeÏÓ,
МaМecЛЪe Мa МeЦo ЪoМНЛИ cОoИ cПaБoдМoЦo ЗeзecЪЗa
АОУ ФpeАoЪЗpaзeМЛУ oДpaБoЗaМЛУ pКaЗдЛМк.
䡬 He peÍoÏeÌÀyeÚcÓ xpaÌËÚë cÚeÔÎep ÔpË ÌËÁÍoÈ
ÚeÏÔepaÚype.
䡬 EcÎË ËÌcÚpyÏeÌÚ Ìe ËcÔoÎëÁyeÚcÓ, xpaÌËÚe eÖo Ç
cyxoÏ, ÚeÔÎoÏ ÏecÚe.
He ÀoÔycÍaÈÚe ÀocÚyÔa ÀeÚeÈ Í ËÌcÚpyÏeÌÚy.
6. èopÓÀoÍ ÁaÔËceÈ Ôo ÚexoÄcÎyÊËÇaÌËï
OCTOPOÜHO
PeПoМЪ, ПoАЛЩЛНaбЛУ Л ФpoЗepНa нОeНЪpoЛМcЪpyПeМЪoЗ
HITACHI АoОКМa ФpoЗoАЛЪлcУ ЪoОлНo З aЗЪopЛБoЗaММкx
cepЗЛcМкx бeМЪpax HITACHI. СaММкИ cФЛcoН ФpЛМecЛЪe
З ПacЪepcНyп ЗПecЪe c ЛМcЪpyПeМЪoП АОУ ФpoЗeАeМЛУ
peПoМЪa ЛОЛ ЪexМЛдecНoЦo oДcОyКЛЗaМЛУ.
иpЛ ЛcФoОлБoЗaМЛЛ ЛОЛ ЪexoДcОyКЛЗaМЛЛ
ЛМcЪpyПeМЪa ЗceЦАa cОeАЛЪe Бa ЗкФoОМeМЛeП Зcex
ФpaЗЛО Л МopП ДeБoФacМocЪЛ.
ÂAMEóAHàE
îËpÏa HITACHI ÌeÔpepêÇÌo paÄoÚaeÚ ÌaÀ
ycoÇepåeÌcÚÇoÇaÌËeÏ cÇoËx ËÁÀeÎËÈ, ÔoíÚoÏy Ïê
coxpaÌÓeÏ Áa coÄoÈ ÔpaÇo Ìa ÇÌeceÌËe ËÁÏeÌeÌËÈ
Ç ÚexÌËäecÍËe xapaÍÚepËcÚËÍË, yÔoÏÓÌyÚêe Ç ÀaÌÌoÈ
ËÌcÚpyÍáËË Ôo íÍcÔÎyaÚaáËË, ÄeÁ ÔpeÀyÔpeÊÀeÌËÓ
oÄ íÚoÏ.
KOMèPECCOP
èPEÑOCTEPEÜEHàü
EcОЛ paДoдee АaЗОeМЛe ЗoБАyеМoЦo НoПФpeccopa
ФpeЗкеaeЪ 8,3 Дap, yДeАЛЪecл З МaОЛдЛЛ
peЦyОЛpyпзeЦo НОaФaМa ПeКАy ЗoБАyеМкП
НoПФpeccopoП Л ЦЗoБАeБaДЛЗМкП cЪaМНoП. иoЪoП,
60
Page 62

PyccÍËÈ
oÚpeÖyÎËpyÈÚe ÀaÇÎeÌËe ÇoÁÀyxa Ç ÔpeÀeÎax
paÄoäeÖo ÀËaÔaÁoÌa 4,9 – 8,3 Äap. EcÎË ÇoÁÀyåÌaÓ
ÍoÏÔoÌoÇÍa ycÚaÌoÇÎeÌa, cÏaÁêÇaÌËe ÚaÍÊe
cÚaÌoÇËÚcÓ ÇoÁÏoÊÌêÏ, äÚo ÖapaÌÚËpyeÚ
ÀoÔoÎÌËÚeÎëÌoe yÀoÄcÚÇo.
CMAõBAûôàâ-îàãúTPAñàOHHõâPEÑìKñàOHHõâ KãAèAH (BoÁÀyåÌaÓ
KoÏÔoÌoÇÍa)
C ЪeП, дЪoДк нЪo oДopyАoЗaМЛe ПoЦОo paДoЪaЪл З
oФЪЛПaОлМкx ycОoЗЛУx Л c бeОлп yЗeОЛдeМЛУ cpoНa
cОyКДк, peНoПeМАyeЪcУ ЛcФoОлБoЗaЪл cПaБкЗaпзeeЩЛОлЪpaбЛoММкИ peАyНбЛoММкИ НОaФaМ. OЦpaМЛдЪe
АОЛМy еОaМЦa ПeКАy ЛМcЪpyПeМЪoП Л ЗoБАyеМoИ
НoПФoМoЗНoИ Аo 10 П Зo ЗpeПУ paДoЪк (CП. PËc. 10).
àCèOãúìEMõE ãìÅPàKAHTõ
TËÔ ÎyÄpËÍaÌÚa HaÁÇaÌËe ÎyÄpËÍaÌÚa
PeÍoÏeÌÀyeÏoe ÏacÎo SHELL TONNA
MoÚopÌoe ÏacÎo SAE10W, SAE20W
TypÄËÌÌoe ÏacÎo ISO VG32 – 68 (#90 – #180)
àÌÙopÏaáËÓ Ôo åyÏy
BeОЛдЛМк еyПoЗкx xapaНЪepЛcЪЛН cooЪЗeЪcЪЗyпЪ EN
792-13, ЛпМл, 2000:
TЛФЛдМкИ A-ЗecoПкИ eАЛМЛдМкИ еyПoЗoИ ypoЗeМл
cЛОк L
TЛФЛдМкИ A-ЗecoПкИ eАЛМЛдМкИ еyПoЗoИ
ЛcxoАУзЛИ ypoЗeМл Мa paДoдeИ cЪaМбЛЛ
щЪЛ ЗeОЛдЛМк oЪМocУЪcУ Н xapaНЪepЛcЪЛНaП
ЛМcЪpyПeМЪa Л Мe ФpeАcЪaЗОУпЪ paБЗЛЪЛe БЗyНa Зo
ЗpeПУ ЛcФoОлБoЗaМЛУ. PaБЗЛЪЛe БЗyНa Зo ЗpeПУ
ЛcФoОлБoЗaМЛУ ДyАeЪ, Н ФpЛПepy, БaЗЛceЪл oЪ
oНpyКaпзeИ cpeАк paДoЪк, ПaЪepЛaОa, oФopк
ПaЪepЛaОa Л НoОЛдecЪЗa БaДЛЗaМЛИ Л Ъ.А.
B БaЗЛcЛПocЪЛ oЪ cocЪoУМЛУ paДoдeЦo ПecЪa Л ЩopПк
paДoдeЦo ПaЪepЛaОa, ЗoБПoКМo ocyзecЪЗОeМЛe
ЛМАЛЗЛАyaОлМкx cФocoДoЗ yПeМлеeМЛУ еyПa, ЪaНЛx НaН
pacФoОoКeМЛe paДoдeЦo ПaЪepЛaОa Мa БЗyНoЗДЛpaпзЛe
ФoАcЪaЗНЛ, ФpeАoxpaМУпзЛe ЗЛДpaбЛп ПaЪepЛaОa
ФocpeАcЪЗoП ЩЛНcaбЛЛ ЛОЛ ФoНpкЪЛУ, МacЪpoЛЗ Мa
ПЛМЛПaОлМoe АaЗОeМЛe МeoДxoАЛПoe АОУ ФpoЗeАeМЛУ
АaММoИ paДoЪк Л Ъ.А.
B ocoДкx cОyдaУx МeoДxoАЛПo oАeЪл БaзЛЪМкe МayеМЛНЛ.
àÌÙopÏaáËÓ Ôo ÇËÄpaáËË
TЛФЛдМкe ЗeОЛдЛМк ЗЛДpaбЛoММкx xapaНЪepЛcЪЛН
cooЪЗeЪcЪЗyпЪ EN 792-13, ЛпМл, 2000: 3,9 П/c
щЪЛ ЗeОЛдЛМк oЪМocУЪcУ Н xapaНЪepЛcЪЛНaП
ЛМcЪpyПeМЪa Л Мe ФpeАcЪaЗОУпЪ ЗОЛУМЛe Мa pyНЛ ФpЛ
ЛcФoОлБoЗaМЛЛ АaММoЦo ЛМcЪpyПeМЪa. BОЛУМЛe Мa pyНЛ,
ФpЛ ЛcФoОлБoЗaМЛЛ ЛМcЪpyПeМЪa ДyАeЪ БaЗЛceЪл, Н
ФpЛПepy, oЪ ycЛОЛУ БaxЗaЪкЗaМЛУ, cЛОк АaЗОeМЛУ ФpЛ
НoМЪaНЪe, МaФpaЗОeМЛУ paДoЪк, МacЪpoИНЛ ФoАaдЛ
нМepЦЛЛ, paДoдeЦo ПaЪepЛaОa Л ФoАcЪaЗНЛ ФoА ПaЪepЛaО.
,1s,d = 99 dB
WA
,1s,d = 81 dB.
L
pA
2
61
Page 63

626364
Page 64

Page 65

Item
No.
1 HEX. SOCKET HD. BOLT M5 × 20 6
2 TOP COVER 1
3 EXHAUST COVER 1
4 WARNING LABEL(A) 1
5 GASKET (F) 1
6 GASKET (C) 1
7 EXHAUST VALVE 1
8 HEAD CAP 1
9 PISTON O-RING 1
10 PISTON 1
11 O-RING (I.D. 64.5) 3
12 CYLINDER O-RING (D) 1
13 CYLINDER PLATE 1
14 CYLINDER 1
15 CYLINDER RING 1
16 CYLINDER SPRING 1
17 CYLINDER O-RING (A) 1
18 CYLINDER GUIDE 1
19 CYLINDER O-RING (B) 1
20 NAME PLATE 1
21 BODY ASS’Y 1
22 CYLINDER O-RING (C) 1
23 PISTON BUMPER 1
24 BUMPER SHEET 1
25 ROLL PIN D4 × 36 1
26 NOSE 1
27 NYLOCK HEX. SOCKET HD. BOLT M5 × 16 4
28 BLADE GUIDE 1
29 LOCK LEVER 1
30 ROLL PIN D3 × 20 1
31 SPRING (B) 1
32 PUSHING LEVER 1
33 GRIP RUBBER 1
34 NYLON NUT M5 3
35 GASKET (D) 1
36 CAP 1
37 HEX. SOCKET HD. BOLT M5 × 16 3
38 AIR PLUG NPT 1/4 1
39 VALVE GUARD 1
40 ROLL PIN D3 × 45 1
41 HITACHI PLATE 1
42 NYLOCK BOLT (W/FLANGE) M5 × 82
43 GUARD 1
44 HANDLE ARM 1
45 WARNING LABEL 1
46 MAGAZINE COVER 1
47 WASHER 1
48 HEX. SOCKET HD. BOLT M5 × 18 1
49 PLUNGER SPRING 1
50 PLUNGER (A) 1
51 PLUNGER O-RING 1
52 O-RING (S-12) 3
53 VALVE BUSHING 1
54 PLUNGER (B) 1
55 VALVE PACKING 1
56 URETHANE BALL (C) D7.14 1
57 VALVE PLATE 1
58 TRIGGER VALVE BUSHING 1
59 PLUNGER O-RING 1
60 TRIGGER PLUNGER 1
61 TRIGGER 1
62 ROLL PIN D3 × 30 1
63 PIN 1
64 SAFETY BOLT 1
65 NUT M5 1
66 SHAFT RING 1
67 RIBBON SPRING 1
Part Name Q’TY
Item
No.
68 COVER SPRING 1
69 MAGAZINE PIECE 1
70 PUSHING LEVER PIECE 1
71 STAPLE FEEDER 1
72 HINGE PIN 1
73 MAGAZINE ASS’Y 1
74 MACHINE SCREW (W/WASHERS) M5 × 14 2
75 ROLL PIN D3 × 61
76 LABEL 1
501 HEX. BAR WRENCH 4MM 1
502 SAFETY GLASSES 1
505 PNEUMATIC TOOL LUBRICANT (30CC) 1
Part Name Q’TY
Page 66

65
Page 67

66
Page 68

English
EC DECLARATION OF CONFORMITY
We declare under our sole responsibility that this
product is in conformity with standard EN792-13 in
accordance with Council Directives 98/37/EC.
This declaration is applicable to the product affixed
CE marking.
Čeština
PROHLÁŠENÍ O SHODĚ S CE
Prohlašujeme na naši výhradní zodpovědnost, že tento
výrobek je ve shodě s normou EN792-13, na základě
směrnice Rady 98/37/ES.
Toto prohlášení platí pro výrobek označený značkou CE.
Deutsch
ERKLÄRUNG ZUR KONFORMITÄT MIT CE-REGELN
Wir erklären in alleiniger Verantwortung, dass dieses
Produkt dem Standard EN792-13 in Übereinstimmung
mit der Direktive des Europarates 98/37/CE entspricht.
Diese Erklärung gilt für Produkte, die die CEMarkierung tragen.
Ελληνικά
EK ∆ΗΛ·ΣΗ ΕΝΑΡΜΟΝΙΣΜΟΥ
∆ηλώνουµε µε απλυτη υπευθυντητα τι αυτ το
προϊν είναι εναρµονισµένο µε το πρτυπο EN792-13
σύµφωνα µε τις Οδηγίες του Συµβουλίου 98/37/ΕΚ.
Αυτή η δήλωση ισχύει στο προιν µε το σηµάδι CE.
Polski
DEKLARACJA ZGODNOŚCI Z EC
Niniejszym potwierdzamy z pełną odpowiedzialnością,
że produkt ten jest zgodny ze standardem EN792-13,
będącym w zgodzie z Dyrektywą Rady 98/37/EC.
To oświadczenie odnosi się do załączonego produktu z
oznaczeniami CE.
Magyar
EU MEGFELELŐSÉGI NYILATKOZAT
Felelősségünk tudatában kijelentjük, hogy jelen termék
megfelel az 98/37/EC Bizottsági irányelvekkel összhangban
lévő EN792-13 szabványnak.
Jelen nyilatkozat a terméken feltüntetett CE jelzésre
vonatkozik.
Türkçe
AB UYGUNLUK BEYANI
Bu ürünün, 98/37/EC sayılı Konsey Direktifine uygun
olarak EN792-13 standartlarına uygun olduåunu bütün
mesuliyeti üstlenerek beyan ederiz.
Bu beyan, üzerinde CE ißareti bulunan ürünler için
geçerlidir.
Română
DECLARAŢIE DE CONFORMITATE CE
Declarăm pe propria răspundere că acest produs este
conform cu standardele EN792-13 și cu Directivele
Consiliului 98/37/EC.
Prezenta declaraţie se referă la produsul pe care este
aplicat semnul CE.
Slovenščina
EC DEKLARACIJA O SKLADNOSTI
Na lastno odgovornost izjavljamo, da je izdelek skladen
s standardi EN792-13 v skladu z Direktivo Sveta 98/
37/ES.
Deklaracija je označena na izdelku s pritrjeno CE
označbo.
PyccÍËÈ
ÑEKãAPAñàü COOTBETCTBàü EC
Mê c ÔoÎÌoÈ oÚÇeÚcÚÇeÌÌocÚëï ÁaÓÇÎÓeÏ, äÚo
ÀaÌÌoe ËÁÀeÎËe cooÚÇeÚcÚÇyeÚ cÚaÌÀapÚaÏ ËÎË
cÚaÌÀapÚËÁËpoÇaÌÌêÏ ÀoÍyÏeÌÚaÏ EN792-13
coÖÎacÌo ÑËpeÍÚËÇaÏ CoÇeÚa 98/37/EC.
ÑaÌÌaÓ ÀeÍÎapaáËÓ oÚÌocËÚcÓ Í ËÁÀeÎËÓÏ, Ìa
ÍoÚopêx ËÏeeÚcÓ ÏapÍËpoÇÍa CE.
Representative office in Europe
Hitachi Power Tools Europe GmbH
Siemensring 34, 47877 Willich 1, F. R. Germany
Head office in Japan
Hitachi Koki Co., Ltd.
Shinagawa Intercity Tower A, 15-1, Konan 2-chome,
Minato-ku, Tokyo, Japan
Hitachi Koki Co., Ltd.
30. 9. 2008
K. Kato
Board Director
809
Code No. C99173991
Printed in Taiwan
 Loading...