

Page 1
Instruction Manual
MP-EG10W
Hitachi America, LTD.
2000 Sierra Point Parkway
Brisbane, Ca 94005-1835
Hitachi Sales Corporation of Hawaii
3219 Koapaka St, Honolulu, HI 96819
T el. 808-836-3621
HITACHI (HSC) CANAD A INC.
6740 Campobello Road,
Mississauga, Ontario L5N 2L8
CANADA
T el. 905-821-4545
Thank you for buying a Hitachi product. Please take time to become familiar with
this manual and how it is set up. Keep it handy for future reference.
QR19122 © Hitachi, Ltd. 1998 Printed in Japan KY-Y(N)
Page 2

E11
Chapter 1
Introduction
This section gives you how to use your MP-EG10W efficiently, and
explains the overview of your MP-EG10W. Bef or e using it, r ead this
section thoroughly.
Features......................................................................................................................... 12
Operating Files.............................................................................................................. 14
PC Card.........................................................................................................................15
Names of Each Part....................................................................................................... 16
Viewing the On-Screen Display................................................................................... 17
Page 3
E12
Chapter 1
Introduction
_______________
A V ariety of Recor dings________________________________
One MP-EG10W allows you to record in three ways – moving picture (with audio), still picture, and still picture with audio. Your recordings are stored in PC card*3instead of videotape or film, as a video file*1and
audio file*2. Usual operation is similar to a usual camcoder.
Also, use the AV input cable (provided) to connect MP-EG10W to video equipment [VHS, 8 mm, LD (laser
disc), DVC (digital videocassette), DVD (digital video disc), etc.]; the MP-EG10W can input video from VCR,
TV receiver, etc. and record it.
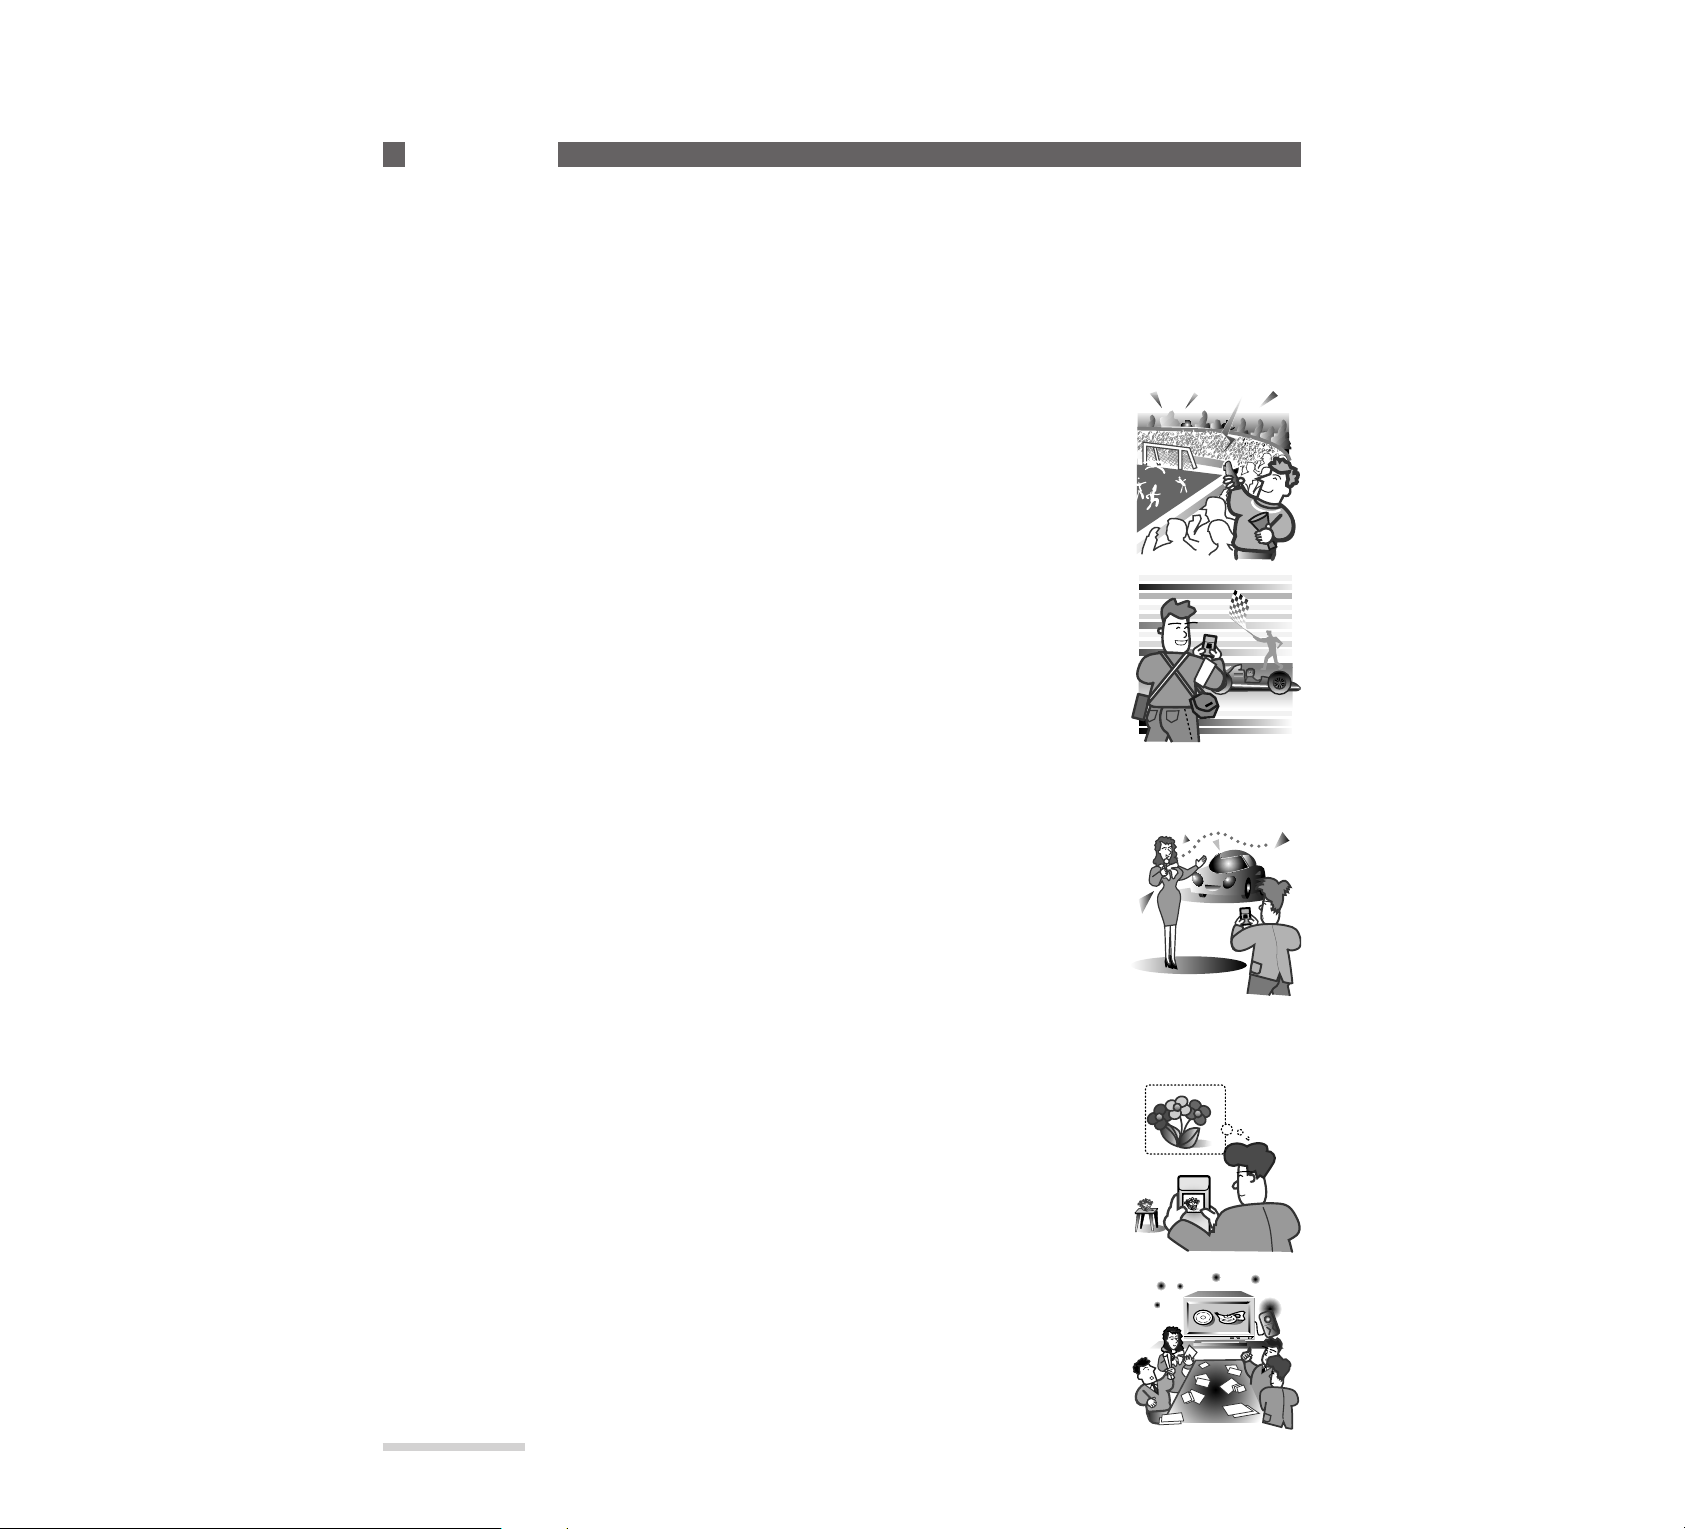
Recording moving pictures:
You can record joyful events and sports as you use a usual camcorder.
See “Recording Moving Pictures” on page 31.
See “Receiving Moving Pictures from Video Equipment” on page 81.
MPEG1 Format
JPEG Format
Recording a still picture or consecutive still pictures:
You can record a still picture just as you would use an ordinary still camera. If you
record moving subjects in consecutive still picture made, you will not miss a crucial
chance.
See “Recording Still Pictures” on page 33.
See “Recording Still Pictures at Intervals” on page 34.
See “Recording Consecutive Still Pictures” on page 35.
See “Receiving Still Pictures from Video Equipment” on page 82.
See “Receiving Still Pictures from Video Equipment at Intervals” on page 83.
Recording a still picture with audio:
You can add narration to a still picture for JPEG and MPEG Audio. This function is
useful if you want to attach voice to a still picture.
See “Recording Still Picture with Audio” on page 36.
See “Receiving Still Picture with Audio from Video Equipment” on page 84.
Playback to Vie w Recor dings in Various Wa ys_____________
Viewing on the LCD screen:
You can immediately see the video just recorded on the built-in 1.8” liquid crystal display (LCD) screen.
See “Playing Back Files” on page 46.
Viewing on a TV screen:
Connecting the MP-EG10W to TV, you can view recordings on TV.
See “Connecting to TV and Viewing Playback Pictures” on page 79.
Features
*1:MPEG 1 format, JPEG format
*2:MPEG Audio
*3:PC card (MP-HD260), exclusively for MP-EG10W
JPEG 1 MPEG Audio
Page 4

E13
_______________Chapter 1
Introduction
A V ariety of Uses _____________________________________
Presentation by using application software:
Microsoft®Office 97 (PowePoint®97, Word 97, Excel 97), Microsoft®Access etc.
For creating multimedia contents and materials for
Internet homepage or Intranet Lan:
Because being stored in file, it is easy to send files in a personal computer. This is most suitable for creating multimedia contents and materials for Internet home page. You can use the stored video file in a variety of joyful ways such as wallpaper for your computer.
See “Bundled Software” on page 89.
See “Installing Application Software for Windows®95/98” on page 91.
See “Installing Application Software for Macintosh” on page 91.
Playback and edit the files on your per sonal computer:
Transfer files to your computer (see page 87), and you can view them
with computer software and edit the files with the bundle software.
See “Personal Computers to which the MP-EG10W Can Be Connected”
on page 85.
See “Connecting to Your Personal Computer” on page 86.
See “Transferring Files to Your Personal Computer” on page 87.
See “Personal Computers to which Files Can Be Transferred Directly”
on page 87.
Printing:
You can print files with a generally available video printer, or retrieve
transferred files on your computer (see page 87) and print them with the
computer printer. Clearer prints are available with optional VY-60DA
digital video printer.
See “Optional Accessories” on page 118.
For gathering materials:
You can choose the recording mode to suit the material, such as recording moving subjects with a motion picture mode adding a narrative with
recording still picture when recording commodities, etc.
See “Recording Moving Pictures” on page 31.
See “Recording Still Picture with Audio” on page 36.
For presentation:
You can use the file management function, Media Navigation, to easily
arrange and edit files containing recording files by grouping, sorting,
etc. Also, edit files, using application software PowerPoint Converter
for Hitachi MPEG Camera for Windows®95 provided with the MPEG10W: results in a more impressive presentation. After arranging the
files, connect the MP-EG10W to a TV and execute auto play for presentation.
Page 5

E14
Chapter 1
Introduction
_______________
In PLAY mode, you can use the f ile management function, Media Navigation, which is provided with the MP-EG10W , to operate f iles. Here is a brief explanation of Media Navigation:
File and folder________________________________________
The MP-EG10W records moving pictures, still pictures and a still picture with audio, and stores each as gathering of
data. Gathering of data is referred to as a file.
Files are stored in a folder to be managed. Media Navigation provides six folders with numbers 0-5, and recorded file
is securely stored in any of the folders ( ). Folder 0 is referred to as “non-identified folder” and all recorded files
are stored in this folder temporarily.
Folders 1-5 have no files at first. You can use Folder 1-5 to arrange files.
* To move files to another folder, refer to “Transferring Files to Another Folder” ( see page 50).
Arranging files in folders with themes____________________
When you have decided the theme of each folder, move the file from non-identified folder (folder 0) to designated
folder and arrange (see page 50). Delete unnecessary files (see pages 52 and 53).
If you arrange files in folders this way, you can easily locate desired files.
Editing files for auto play ______________________________
The MP-EG10W can automatically play back files collected
in a folder in your designated order, like the program play
with a CD player. (See page 60) Collect a moving picture,
still picture and a still picture with audio in a folder under a
theme you want (see page 54), and sort them (see page 58).
Now, you can automatically play back the folder as a completed work.
Operating F iles
0
3
4
5
2
1 Fishing
Skiing
Flowers
.
.
.
.
.
etc.
* Folder names (fishing, Skiing, etc.) shown
in the above figure will not appear on the
Media Navigation screen.
Sort folders
according to themes.
Non-classified
folder
Moving picture file
Still picture file
Still picture file with audio
0
Seasons in
New York
Winter in New York
Fall in New York
Auto play
Summer in New York
Spring in New York
* Titles (Winter in New York, etc.) shown in
the above figure will not appear on the
Media Navigation screen.
The section “Using Media Navigation (Playback)” on page 41 will describe the method for
performing the above pr ocedures, etc., using Media Na vigation.
Page 6

E15
_______________Chapter 1
Introduction
What is a PC card?
The MP-EG10W stores video and audio data in a harddisk,
which is referred to as a PC card in this text.
Initializing PC card
Initialize the PC card by the following procedure before using it:
q Connect AC adapter to MP-EG10W (see page 22).
w Insert PC card into MP-EG10W (see page 23).
e Initialize the PC card (see page 103).
Maximum time and number of pictures PC card can store
The MP-HD260 can store:
Moving picture (FINE): approx. 20 minutes
Moving picture (STND): approx. 27 minutes
Still pictures: approx. 3,000 shots
Still picture with audio: approx. 1,000 shots with
each 10 sec. audio
PC Card
* The number of still pictures that can be stored may decrease
as their video scene contents become more complicated.
The recordable time of still picture with audio is the maximum time when one still picture and audio only are stored.
Use the above storable time and number of stills only as a
reference.
* MP-HD260 is already formated. It is not necessary to for-
mat.
Cautions When Using PC Card__________________________
For safety, be careful of the following:
Generally available PC cards:
Do not use PC cards other than the MP-HD260. We cannot guarantee their operation.
Handle PC card with care as follows to prevent
malfunctions or erasure of data :
• Do not bend the PC card, apply force, allow it to be
subject to shocks or drop it.
• Do not use or store in a place where static electricity
or magnetic or electric noise is likely to occur.
• Do not use or store where temperature and/or humidity are high, in a dusty p lace, or under highly corrosive environments.
• Be careful that no dust or foreign object enters
through the connector.
• Do not pull out the PC card, unplug the DC power
cord or remove battery during recording or playback.
The file being recorded will not be stored, or the
stored file could be destroyed.
Removing the PC card:
• Lay the unit on its back, with the LCD screen facing
up, then remove the PC card from the bottom. Do not
put the bottom face down to remove; you could drop
the PC card.
• When the unit is continuously used for a long time,
the PC card will generate heat and its temperature will
increase. For safety, the PC card eject lever is locked
when the temperature of PC card exceeds the specified one, and it cannot be removed. If the lever is
locked, set the CAM/OFF/PLAY switch to OFF and
wait for a while. After the temperature drops, the
lever will unlock, and you can remove the PC card.
• When the CAM/OFF/PLAY switch is set to CAM or
PLAY, the eject lever will not work. To remove the
card, check to see if the switch is set to OFF, with the
unit powered by the charged battery in it or the AC
adapter/charger connected to AC outlet.
• When the unit is powered by the AC adapter/charger,
do not unplug the DC cord from unit or AC
adapter/charger from AC outlet, with the
CAM/OFF/PLAY switch set to CAM or PLAY; you
cannot remove PC card. Before unplugging them,
make sure that the switch is set to OFF.
• When the PC card eject lever does not work because
the unit is not powered by the battery or AC
adapter/charger, turn on the unit, set the
CAM/OFF/PLAY switch to OFF and then unlock the
lever.
Stored data:
• It is recommended that you store valuable data in your
personal computer or other storage devices after each
recording.
• The recorded data may be erased when the PC card is
affected by electric noise or becomes faulty or is
repaired, or if you or your friends make a mistake in
using the unit. We cannot accept any responsibility of
compensating for dam ages due to erasure of recorded
data.
MP-HD260 PC card
CAUTION
• Do not bring PC card near fire or throw it into
fire; it may explode, causing injury or burns.
• Do not disassemble or modify the unit by yourself. This could cause fire or electric shock.
• To prevent damage by static electricity, touch
metal (door knob, windows frame, etc.) with
your hand to discharge it, before handling the
unit. Static electricity from the human body
could damage the unit.
Page 7
The CAM/OFF/VIDEO switch turns the MP-EG10W on and off, leaving the date/time feature unaffected. If
the unit is to be left unattended for a long period of time, turn the MPEG camera off.
WARNING: To prevent fire or shock hazard, do not
expose this unit to rain or moisture.
MP-EG10W and AC adapter/charger have the following caution marks.
Identifications of caution marks
This symbol warns the user that uninsulated voltage within the unit may have sufficient magnitude to cause electrical
shock. Therefore, it is dangerous to make
any kind of contact with any inside part of
this unit.
This symbol alerts the user that important
literature concerning the operation and
maintenance of this unit has been included. Therefore, it should be read carefully to avoid any problems.
CAUTION: TO REDUCE THE RISK OF
ELECTRIC SHOCK, DO NOT OPEN.
NO USER-SERVICEABLE PARTS INSIDE.
REFER SERVICING TO QUALIFIED SERVICE
PERSONNEL.
WARNING: TO PREVENT FIRE OR
ELECTRIC SHOCK, MATCH WIDE BLADE OF
PLUG TO WIDE SLOT, AND FULLY INSERT
PLUG.
For Your Safety
CAUTION
RISK OF ELECTRIC SHOCK
DO NOT OPEN.
WARNING: Many television programs and films are copyrighted. In certain circumstances, copy-right law may
apply to private in-home videotaping of copyrighted materials.
This Class B digital apparatus compiles with Canadian ICES-003.
The liquid crystal display (LCD) panel is made by highly precise technology. More than 99.99% of its picture elements (pixels) are effective, but some (less than 0.01%) may appear as colored bright dots. This does not indicate a
fault as the LCD panel stretches the limits of current technology.
Page 8

E1
Warning: This device complies with Part 15 of the FCC Rules. Operation is subject to the following two conditions: (1) This device may not cause harmful interference, and (2) this device must accept any interference
received, including interference that may cause undesired operation.
Note: This equipment has been tested and found to comply with the limits for a Class B digital device, pursuant
to Part 15 of the FCC Rules. These limits are designed to provide reasonable protection against harmful interference in a residential installation. This equipment generates, uses, and can radiate radio frequency energy and,
if not installed and used in accordance with the instructions, may cause harmful interference to radio communications. However, there is no guarantee that interference will not occur in a particular installation. If this equipment does cause harmful interference to radio or television reception, which can be determined by turning the
equipment off and on, the user is encouraged to try to correct by one or more of the following measures:
—Reorient or relocate the receiving antenna.
—Increase the separation between the equipment and receiver.
—Connect the equipment into an outlet on a circuit different from that to which the receiver is connected.
—Consult the dealer or an experienced radio/TV technician for help.
Caution to the user: Changes or modifications not expressly approved by the manufacture could void the
user’s authority to operate the equipment.
Microsoft®, Windows®, PowerPoint®and ActiveMovie™ are registered trademarks of Microsoft
Corporation.
Intel®, Pentium®and MMX®are registered trademarks of Intel Corporation.
SoftPEG is a registered trademarks of CompCore Multimedia Inc.
IBM®, IBM PC/AT®and PowerPC™ are registered trademark of International Business Machines
Corporation.
SoundBlaster is a registered trademark of Creative Technology Ltd.
MGI PhotoSuite SE is a registered trademark of MGI Software Corp.
AuthoringMaster is a product name of Mode Inc.
Acrobat is a registered trademark of Adobe Systems, Inc.
Other company names and product names listed are trademarks or brand names belonging to each
company.
Page 9
E2
IMPORTANT SAFEGU ARDS
In addition to the careful attention devoted to quality standards in the manufacture of your video product,
safety is a major factor in the design of every instrument. But, safety is your responsibility too.
This page lists important information that will help to assure your enjoyment and proper use of MPEG10Wand accessory equipment. Please read it carefully before operating your video product and keep it
in a handy place for future reference.
INSTALLATION
1 Read and Follow Instructions — All the safety
and operating instructions should be read before the
video product is operated. Follow-all operating and use
instructions.
2 Retain Instructions — The safety and operating
instructions should be retained for future reference.
3 Heed Warnings — Comply with all warnings on
the video product and in the operating instructions.
4 Polarized Plug — This video product is equipped
with a polarized alternating — current line plug (a plug
having one blade wider than the other). This plug will fit
into the power outlet only one way. This is safety feature. If you are unable to insert the plug fully into the
outlet, try reversing the plug. If the plug should still fail
to fit, contact your electrician to replace your obsolete
outlet. To prevent electric shock do not use this polarized plug with an extension cord,
receptacle or other outlet unless the
blades can be fully inserted without
blade exposure. If you need an extension, use a polarized cord.
5 Power Sources — This video product should be
operated only from the type of power source indicated on
the marking label. If you are not sure of the type of
power supply to your home. consult your video dealer or
local power company. For video products intended to
operate from battery power, or other sources, refer to the
operating instructions.
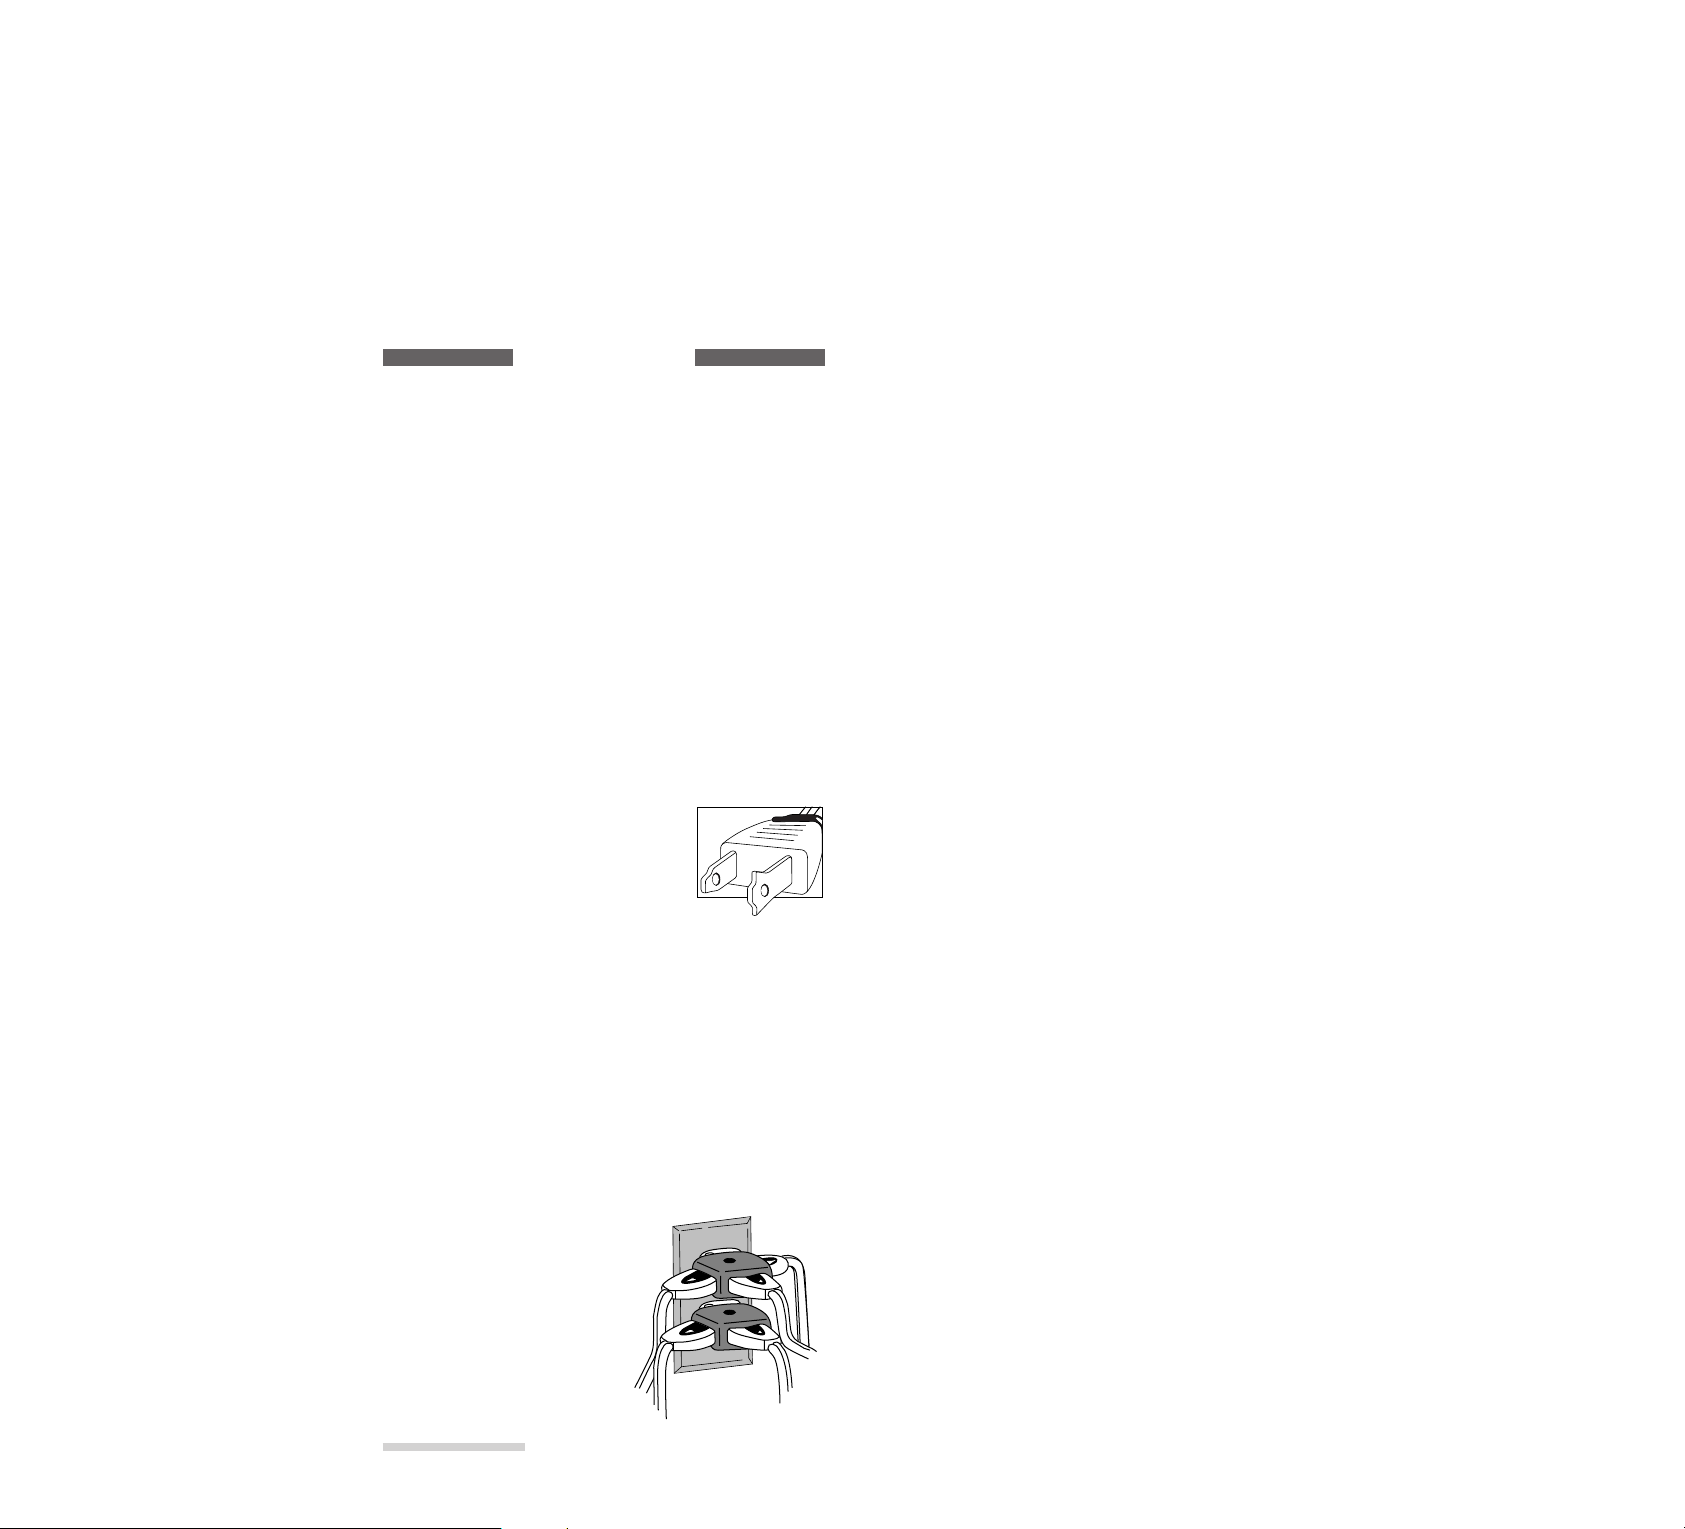
6 Overloading — Do not overload wall outlets and
extension cords as this can result in a risk of fire or electric shock. Overloaded AC outlets and extension cords
are dangerous, and so are frayed power cords, damaged
or cracked wire insulation and
broken plugs. They may result
in a shock or fire hazard.
Periodically examine the cord
and have it replaced by your
service technician if appearance indicates damage or deteriorated insulation.
7 Power — Cord Protection – Power-supply cords
should be routed so that they are not likely to be walked
on or pinched by items placed upon or against them, paying particular attention to cords at plugs, convenience
receptacles, and the point where they exit from the appliance.
8 Ventilation — Slots and openings in the cabinet are
provided for ventilation to ensure reliable operation of
the video product and to protect it from overheating.
These openings must not be blocked or covered. The
openings should never be blocked by placing the video
product on a bed, sofa, rug, or other similar surface. This
video product should never be placed near or over a radiator or heat register. This video product should not be
placed in a built-in installation such as a bookcase or
rack unless proper ventilation is provided or the video
product manufacturer’s instructions have been followed.
9 Attachments — Do not use attachments unless
recommended by the video product manufacturer as they
may cause hazards.
Caution: Maintain electrical safety. Powerline operated equipment or accessories connected to this unit
should bear the UL listing mark or CSA certification
mark on the accessory itself and should not have been
modified so as to defeat the safety features. This will
help avoid any potential hazard from electric shock or
fire. If in doubt, contact qualified service personnel.
10 Water and Moisture — Do not use this video
product near water -for example, near a bath tub, wash
bowl, kitchen sink, or laundry tub, in a wet basement, or
near a swimming pool, and the like.
11 Accessories — Do not place this video product on
an unstable cart, stand, tripod, bracket, or table. The
video product may fall, causing serious injury to a child
or adult, and serious damage to the appliance. Use only
with a cart, stand, tripod, bracket, or table recommended
by the manufacturer, or sold with the video product. Any
mounting of the product should follow the manufacturer’s instructions, and should use a mounting accessory
recommended by the manufacturer.
Page 10
E3
USE
14 Cleaning — Unplug this video product from the
wall outlet before cleaning. Do not use liquid cleaners or
aerosol cleaners. Use a damp cloth for cleaning.
15 Object and Liquid Entry — Never push objects
of any kind into this video product through openings as
they may touch dangerous voltage points or short-out
parts that could result in a fire or electric shock. Never
spill liquid of any kind on the video product.
11AAn appliance and cart combination should be moved with care.
Quick stops, excessive force, and
uneven surfaces may cause the appliance and cart combination to overturn.
12 Outdoor Antenna Grounding — If an outside
antenna or cable system is connected to the video product, be sure the antenna or cable system is grounded so as
to provide some protection against voltage surges and
built-up static charges. Section 810 of the National
Electrical Code, ANSI/NFPA No. 70, provides information with respect to proper grounding of the mast and
supporting structure, grounding of the lead-in wire to an
antenna discharge unit, size of grounding conductors,
location of antenna-discharge unit, connection to
grounding electrodes, and requirements for the grounding electrode. See example below.
EXAMPLE OF ANTENNA GROUNDING
13 Power Lines — An outside antenna system should
not be located in the vicinity of overhead power lines or
other electric light or power circuits, or where it can fall
into such power lines or circuits. When installing an outside antenna system, extreme care should be taken to
keep from touching or approaching such power lines or
circuits as contact with them might be fatal. Installing an
outdoor antenna can be hazardous and should be left to a
professional antenna installer.
ANTENNA LEAD IN WIRE
GROUND CLAMP
ANTENNA DISCHARGE UNIT
(NEC SECTION 810-20)
GROUNDING CONDUCTORS
(NEC SECTION 810-21)
ELECTRIC SERVICE EQUIPMENT
GROUND CLAMPS
POWER SERVICE GROUNDING ELECTRODE
SYSTEM (NEC ART 250,PART H)
NEC – NATIONAL ELECTRICAL CODE
16 Lightning — For added protection for this video
product during a lightning storm, or when it is left unattended and unused for long periods of time, unplug it
from the wall outlet and disconnect the antenna or cablesystem. This will prevent damage to the video product
due to lightning and power-line surges.
SERVICE
17 Servicing — Do not attempt to service this video
product yourself as opening or removing covers may
expose you to dangerous voltage or other hazards. Refer
all servicing to qualified service personnel.
18 Conditions Requiring Service — Unplug this
video product from the wall outlet and refer servicing to
qualified service personnel under the following conditions.
a. When the power — supply cord or plug is damaged.
b. If liquid has been spilled, or objects have fallen into
the video product.
c. If the video product has been exposed to rain or water.
d. If the video product does not operate normally by fol-
lowing the operating instructions. Adjust only those
controls that are covered by the operating instructions.
Improper adjustment of other controls may result in
damage and will often require extensive work by a
qualified technician to restore the video product to its
normal operation.
e. If the video product has been dropped or the cabinet
has been damaged.
f. When the video product exhibits a distinct change in
performance — this indicates a need for service!
19 Replacement Parts — When replacement parts
are required, have the service technician verify that the
replacements he uses have the same safety characteristics as the original parts. Use of replacements specified
by the video product manufacturer can prevent fire,
electric shock or other hazards.
20 Safety Check — Upon completion of any service
or repairs to this video product, ask the service technician to perform safety checks recommended by the
manufacturer to determine that the video product is in
safe operating condition.
21 Heat — The product should be situated away from
heat sources such as radiators, heat registers, stoves, or
other products (including amplifiers) that produce heat.
Page 11

E4
IMPORTANT SAFETY INSTRUCTIONS
FOR A C AD APTER/CHARGER
1. Save these Instructions - This page contains important safety and operating instructions for AC
Adapter/Charger Model MP-AC1A.
2. Before using AC Adapter/Charger, read all instructions and cautionary markings on (1) AC
Adapter/Charger, (2) battery and (3) product using
battery.
3. Also read all instructions on pages 2 and 3.
4. Caution — To reduce risk of injury, charge only
rechargeable battery, MP-BP1A.
Other types of batteries may burst causing personal
injury and damage.
5. Do not expose charger to rain or snow.
6. Use of an attachment nor recommended or sold by
the battery charger manufacturer may result in a risk
of fire, electric shock, or injury to persons.
7. To reduce risk of damage to electric plug and cord,
pull by plug rather than cord when disconnecting
charger.
8. Make sure cord is located so that it will not be
stepped on, tripped over, or otherwise subjected to
damage or stress.
9. Do not operate charger with damaged cord or plug replace them immediately.
10.An extension cord should not be used unless
absolutely necessary.
Use of improper extension cord could result in a risk
of fire and electric shock. If extension cord must be
used, make sure:
A.The pins on plug of extension cord are the same
number, size, and shape as those of plug on
charger.
B. That extension cord is properly wired and in good
electrical condition; and
C. That wire size should be met below:
Minimum Length of extension cord (feet)
AWG size
18 Equal to or less than 100
16 Equal to or less than 150
11. Do not operate charger if it has received a sharp
blow, been dropped, or otherwise damaged in any
way; take it to a qualified serviceman.
12.Do not disassemble charger: take it to a qualified serviceman when service or repair is required. Incorrect
reassembly may result in a risk of electric shock or
fire.
13. To reduce risk of electric shock, unplug charger from
outlet before attempting any maintenance or cleaning.
Page 12

E5
To guide you, we’ve included f ollo wing eight chapters.
• Chapter 1, “Introduction”, gives you how to use your MP-EG10W efficiently, and explains the overview of your
MP-EG10W.
• Chapter 2, “Set-up”, explains how to set up your MP-EG10W for recording.
• Chapter 3, “Recording”, explains how to record moving pictures, still pictures, etc. Read thoroughly before starting to record.
• Chapter 4, “Using Media Navigation (Playback)”, explains how to play back recorded pictures and sound, and
search for files you want to play back, and how to use Media Navigation for arranging recorded files, editing folder for auto play, etc.
• Chapter 5, “Using the MP-EG10W with Other Equipment”, explains how to use the MP-EG10W with a TV, video
or a personal computer.
• Chapter 6, “Bundled Application Software” this section explains on installation and simplified instructions on use
of software stored on the CD-ROM provided with the MP-EG10W. Read this section when you edit or modify files
on computer.
• Chapter 7, “Menu Settings”, explains how to operate the on-screen menu for desired settings.
• Chapter 8, “Subsidiary Information”, shows various information, including what to do when you are in trouble.
Refer to each item as needed.
We want this manual to be as helpful as possible, so it includes two easy ways to find the
information you need:
• A quick index for the information you use most often (this page).
• A detailed table of contents directing you to specific information quickly (page 9).
Get to know your MP-EG10W by using this manual, and get to know Hitachi. We appreciate your business.
Quick Index
Charging Battery Pack .............................................................. 20
Recording Moving Pictures....................................................... 31
Playing Back the File Just Recorded........................................ 40
Connecting to TV and Viewing Playback Pictures .................... 68
Connecting to Your Personal Computer ................................... 70
• The MPEG1 standard is used for the MP-EG10W to handle moving pictures. The playback picture will be slightly
rougher, but this does not indicate a fault.
• The MP-EG10W mechanism is configured so the PC card cannot be removed when hot. Wait until it cools down
to remove.
• Do not set the CAM/OFF/PLAY switch to OFF when the ACCESS indicator is flashing.
• Be sure to set the CAM/OFF/PLAY switch to OFF once before switching it between CAM (REC) and PLAY.
Registration and more information: http://www.mpegcam.net
Read This F irst
Page 13

E6
Any problems that occur as a result of any of the f ollowing conditions will not be cov ered by
our warranty .
Handle the LCD screen with care:
• Do not apply force to the screen surface, as this could
cause cracks, scratches or unevenness in display. Any
unevenness in display will disappear on its own when
power is turned off, and then on again after a brief
wait.
• Do not place the MP-EG10W with its LCD screen
down.
Do not allow dust or sand to enter the unit!
• Store the batteries in a place beyond the reach of children.
• Be careful that no sand splashes on the unit when
using it on a beach. This could cause malfunctions.
• Be careful that no dust or sand enters the unit when
using it outdoors on windy days. This could cause
malfunctions.
• Do not place the unit directly on sand, as this could
cause malfunctions.
Do not point directly at the sun:
• Handle the unit with care so that sunlight does not
enter the lens directly. This could cause malfunctions.
• Do not leave the unit with the LCD screen exposed to
direct sunlight. This could cause malfunctions.
Do not wipe unit case with benzene or thinner:
• The coating of case could peel off or the case could
deteriorate.
• Use chemical cleaning cloth, following the instructions for use.
Do not use the unit near an operating radio or
TV:
Noise could appear on the TV screen or noise could enter
the radio sound.
Do not use unit in extremely hot or cold places:
• Be sure not to leave the MP-EG10W in a place where
the temperature exceeds 140°F(60°C), or the pickup
device may be damaged.
• Normal recording or playback may not be possible if
you use it at temperatures over 104°F (40°C) or under
32°F (0°C).
Do not apply shocks:
• Take care that you do not strike the unit against anything or drop it. This could cause malfunctions.
• When you are using the unit on the provided stand, do
not depress unit with force from top, as the stand
could break.
• Do not expose the unit to shocks during recording, or
the file being recorded will not be stored.
Do not use the unit near strong radio waves or
magnetism:
Do not use the unit near objects generating radio waves
or electric appliances with motors. This could cause
malfunctions.
Do not use the unit for a long uninterrupted
period of time:
This unit is designed and produced for home-use recording and playback. Do not use it for a long time continuously as a surveillance camera/monitor, as this could
cause malfunctions. If you use it for a prolonged time,
the temperature at unit surface will rise, but this does not
indicate a fault.
No water!
This unit does not have a water-resistant structure. Be
careful that it is not exposed to rain or water splash. This
could cause malfunctions.
Also read the instructions attached with optional accessories.
When you use optional accessories with this unit, follow
the cautions on them and the instruction manuals
attached.
Loading Batteries
Note: Replace the battery with 3V micro lithium cells
such as Maxell CR2025 or its equivalent.
Note: Dispose of battery safely in accordance with local
laws. Do not dispose of in fire.
Note: Do not short circuit the battery.
Note: Do not take apart the battery.
Note: Do not hold the battery with the metallic tweez-
ers.
Note: Do not re-charge the battery.
Note: Keep the battery in a dark, cool, dry place.
Cautions When Using
WARNING: KEEP THE BATTERY AWAY
FROM CHILDREN AND PETS.
IF SWALLOWED CONSULT A
PHYSICIAN IMMEDIATELY FOR
EMERGENCY TREATMENT.
Page 14

E7
Compensation for recorded contents:
If the unit or PC card becomes faulty during use and no recording is possible on PC card or playback from it,
we will no t be responsible for compensation for your lost recordings.
Make a trial recording before recording important events:
If recorded data is erased because the unit malfunctions, the data cannot be restored.
Copyrights:
You cannot use recordings of copyrighted materials for purposes other than for your private enjoyment, without permission of their rightful owner.
Be careful of Moisture Condensation ____________________
Condensation:
When a heater is used in your room in a cold season, windowpanes will be frosted. This is because vapor in air
indoors is cooled rapidly and moisture is formed. This is referred to as condensation.
Condensation occurs:
When you move unit from a cold place to a warm place abruptly, such as when you enter a lodge from a ski
slope; When you place the unit in a room in which heating has just begun or in a place where cool air strikes
unit directly; When you move the unit outside from a cooled room or vehicle in a hot season.
When condensation occurs:
Leave unit in a place as dry as possible for about one hour before using it.
When moisture condenses on the lens, a clear picture cannot be recorded. Start recording after condensation of
the lens has been removed.
Before Using
Page 15
E8
Make sure you ha v e f ollowing :
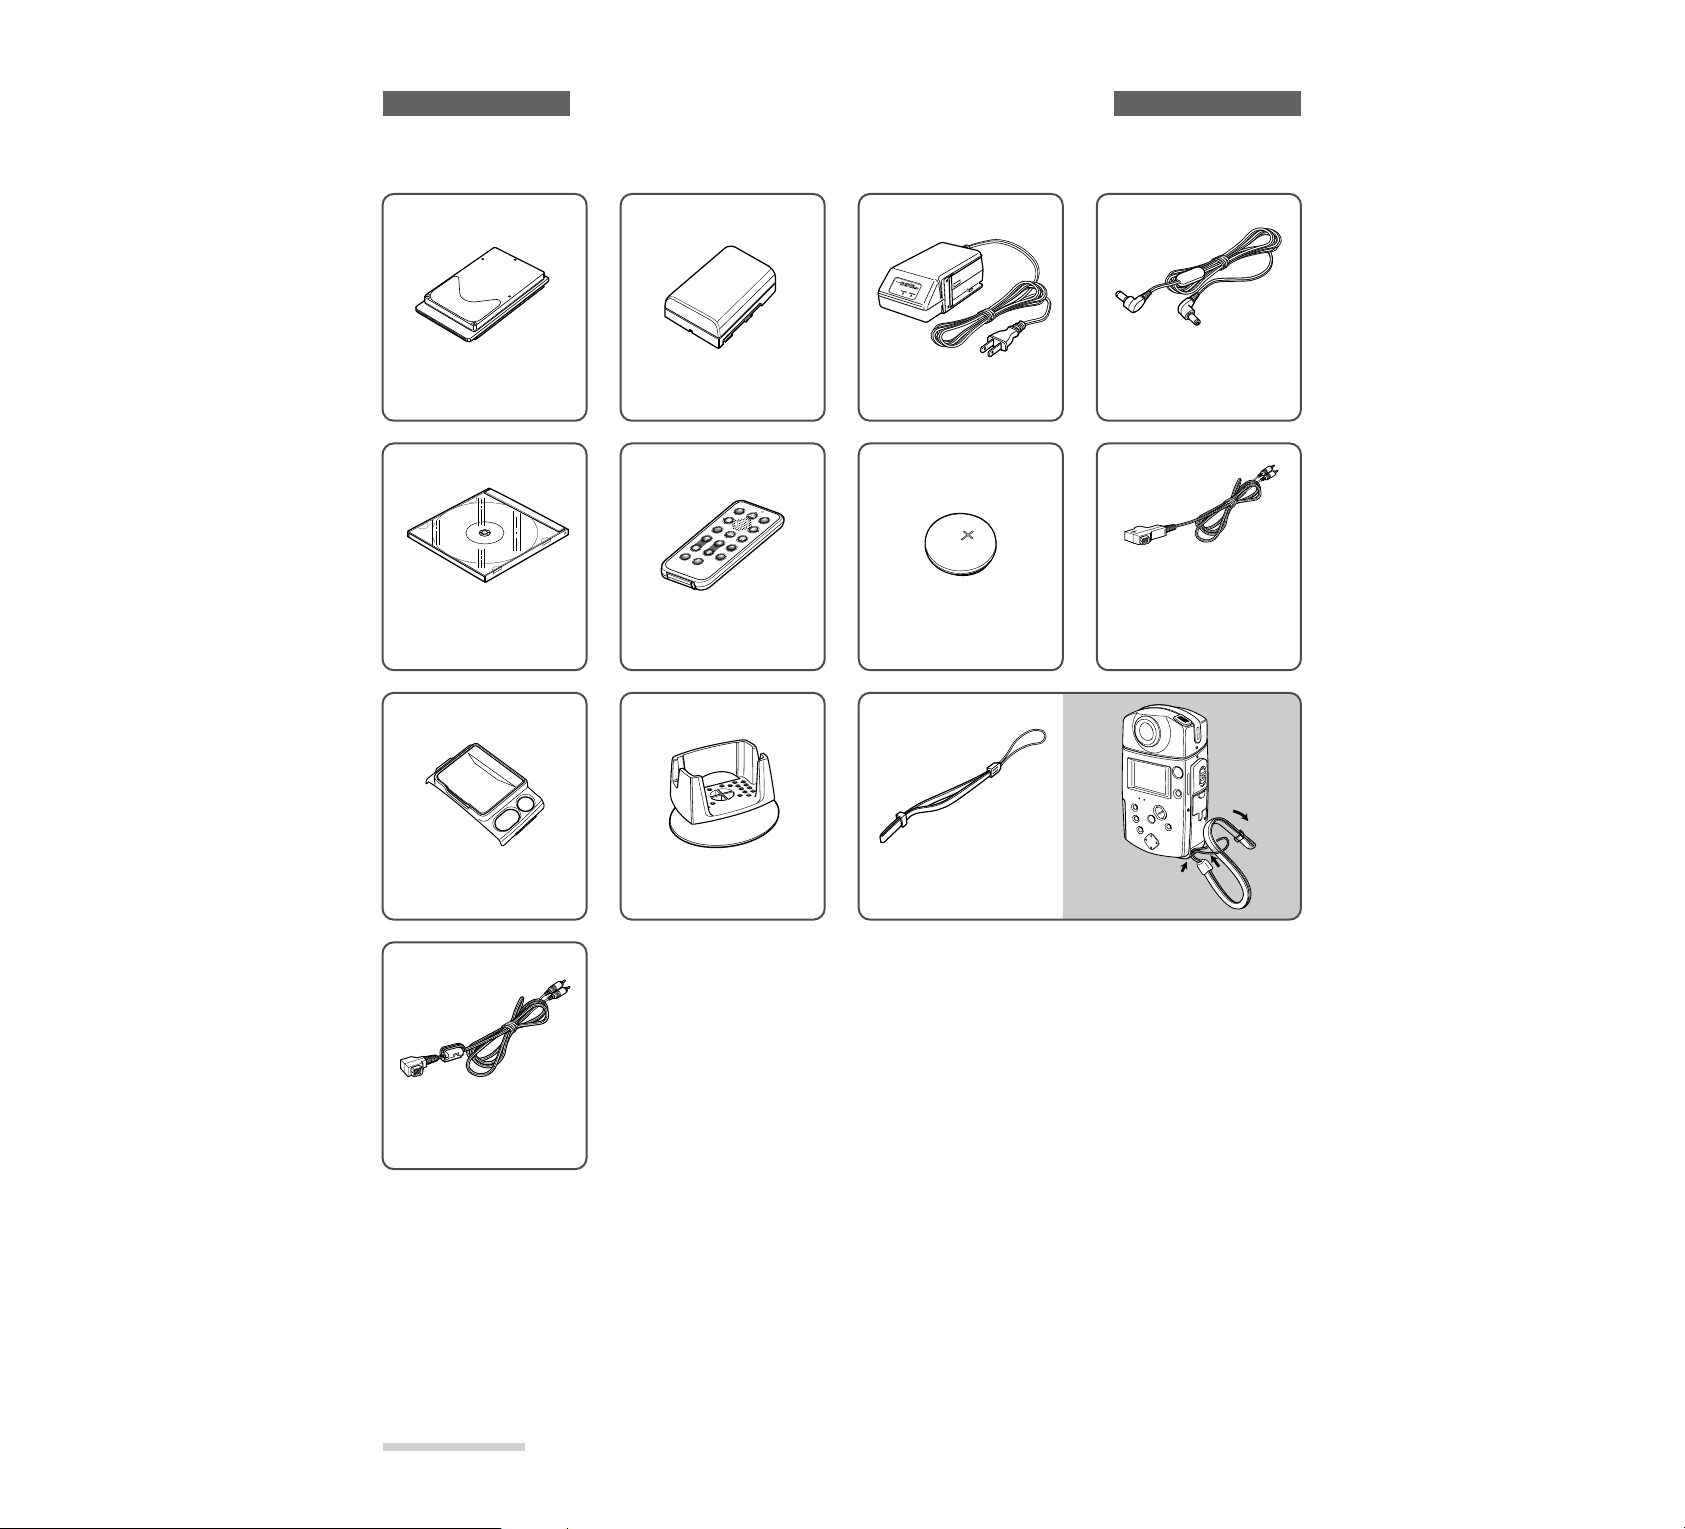
Checking the Provided Accessories
PC Card
(MP-HD260)
A 260MB hard disk. This
stores video and audio data.
Battery pack 3 2
(MP-BP1A)
The portable power supply
of the MP-EG10W. Charge
before use. (See page 20)
AC adapter/charger
(MP-AC1A)
To charge battery pack, etc.
(See page 20)
DC power cord
Connect this to the AC
adapter/charger to power the
MP-EG10W from AC outlet.
(See page 22)
CD-ROM
Stores various applications,
etc.
Remote control
(MP-RM10W)
(See page 27)
Lithium battery
for remote control (CR2025)
AV input cable
Use this cable to connect
MP-EG10W to video
equipment: It has a connector
to which an AV output cable
can be connected (see page
80).
Sunshade for LCD screen
Attach this to the MPEG10W so that you can see
the LCD screen easily.
AV output cable
To connect to TV (see page
79).
Stand
Used when connecting the
MP-EG10W to another
device and operating it.
Wrist strap
Attach to the MP-EG10W to
hold it as shown in the figure
at right.
hhsfsdhf;a;;af
hhsfsdhf;f
hhsfs
Page 16

E9
For Your Safety
IMPORTANT SAFEGUARDS............................................................................................ 2
IMPORTANT SAFETY INSTRUCTIONS FOR AC ADAPTER/CHARGER....................... 4
Read This First................................................................................................................... 5
Cautions When Using........................................................................................................ 6
Before Using ...................................................................................................................... 7
Checking the Provided Accessories .................................................................................. 8
CONTENTS TABLE........................................................................................................... 9
Chapter 1 Introduction.................................................................................. 11
Features .......................................................................................................................................... 12
Operating Files ................................................................................................................................ 14
PC Card........................................................................................................................................... 15
Names of Each Part ........................................................................................................................ 16
Viewing the On-Screen Display....................................................................................................... 17
Chapter 2 Set-up............................................................................................ 19
Charging Battery Pack..................................................................................................................... 20
Loading the Battery Pack ................................................................................................................ 21
Using Power Supply from AC Outlet ...............................................................................................22
Loading the PC Card....................................................................................................................... 23
Setting the Date and Time............................................................................................................... 24
Inserting Battery into the Remote Control .......................................................................................27
Tips for Skillful Use of the PC Card ................................................................................................. 28
Chapter 3 Recording..................................................................................... 29
Rotating the Camera Block and Attaching the Sunshade ............................................................... 30
Recording Moving Pictures.............................................................................................................. 31
Recording Still Pictures ................................................................................................................... 33
Recording Still Pictures at Intervals................................................................................................. 34
Recording Consecutive Still Pictures............................................................................................... 35
Recording a Still Picture with Audio................................................................................................. 36
Macro recording................................................................................................................................37
Recording with backlight corrected...................................................................................................38
Recording Image of Your Portrait Using the Remote Control.......................................................... 39
Chapter 4 Using Media Navigation (Playback)........................................... 41
Starting Media Navigation ............................................................................................................... 42
On-Screen Display and Basic Operation of Media Navigation........................................................ 43
Playing Back Files ........................................................................................................................... 46
Playback Using the Remote Control................................................................................................ 48
Dividing Moving Pictures................................................................................................................. 49
Transferring Files to Another Folder (MOVE menu item)................................................................ 50
Deleting the File............................................................................................................................... 54
Deleting All Files in Folder............................................................................................................... 56
Protecting Files (CHG LOCK menu item)........................................................................................ 57
Sorting Files (CHG ORD menu item) .............................................................................................. 60
Copying Files (COPY menu item) ................................................................................................... 62
Contents Table
Page 17

E10
Auto Play of Desired Files ............................................................................................................... 65
Playing Files Repeatedly (REPEAT)...............................................................................................67
Locating Starts of A Series of Files and Playing Them (SLIDE)...................................................... 69
Cheking Free Memory Area of PC Card (REMAIN)........................................................................ 72
Switching Thumbnail Display On or Off...........................................................................................73
Correcting File Recording Date/Time(CHG TIME menu item) ........................................................ 74
Moving to Setting (SET UP menu item) ...........................................................................................77
Chapter 5 Using the MP-EG10W with Other Equipment............................ 78
Connecting to TV and Viewing Playback Pictures........................................................................... 79
Connecting to Video Equipment...................................................................................................... 80
Receiving Moving Pictures from Video Equipment.......................................................................... 81
Receiving Still Pictures from Video Equipment ............................................................................... 82
Receiving Still Pictures from Video Equipment at Intervals............................................................. 83
Receiving Still with Audio from Video Equipment............................................................................ 84
Receiving Audio fromExternal Microphone ..................................................................................... 85
Personal Computers to which the MP-EG10W Can Be Connected................................................ 85
Connecting to Your Personal Computer.......................................................................................... 86
Personal Computers to which Files Can Be Transferred Directly ................................................... 87
Transferring Files to Your Personal Computer................................................................................ 87
Chapter 6 Bundled Application Software.................................................... 88
Bundled Software............................................................................................................................ 89
Installing Software for Windows®95/98........................................................................................... 91
Installing Software for Macintosh..................................................................................................... 91
Chapter 7 Menu Settings .............................................................................. 93
Switching the Image Quality Mode of Moving Pictures ................................................................... 94
Setting Recording Interval (INTERVAL).......................................................................................... 96
Switching Auto Power Off Setting (ENERGY SAVE ON)................................................................ 98
Switching ON-Screen Display On and Off (DISPLAY ON/OFF) ..................................................... 99
Switching Off LCD Monitor (LCD).................................................................................................. 100
Adjusting Picture on LCD Monitor (PICTURE ADJ) ...................................................................... 101
Initializing the PC Card.................................................................................................................. 103
Chapter 8 Subsidiary Information.............................................................. 105
Tips on Battery Pack...................................................................................................................... 106
Cleaning ........................................................................................................................................ 108
When Trouble Messages Appear.................................................................................................. 108
Troubleshooting Guide.................................................................................................................. 109
Terminology................................................................................................................................... 114
Index.............................................................................................................................................. 115
Major Specifications ...................................................................................................................... 116
Accessories Add Excitement......................................................................................................... 118
Contents Table
______________________
Page 18

E16
Chapter 1
Introduction
_______________
Names of Each P art
Front View Rear View
Microphone
Infrared receiver
B. LIGHT
DEL·DIV button
ZOOM/VOL button
REC
PAUSE ll button
Tripod mounting
threaded socket
Lid of PC card insertion slot
ACCESS indicator
MACRO/SHIFT
button
MENU button
POWER
indicator
LCD monitor
Lens
REC MODE/
THUMBNAIL
button
CAM/OFF/PLAY
power switch
AV input and output/
PC cable connection
terminal
(behind the lid)
Camera block
STOP PLAY
F.SEARCH
R.SEARCH
MACRO/
SHIFT
STOP
REC/
PAUSE
PLAY
R.SEARCH
ZOOM VOL
DISPLAY
MENU
REC MODE/
THUMBNAIL
B.LIGHT/
DEL· DIV
F.SEARCH
Rubber grips
External microphone
input jack
F. SEARCH button
PLAY button
B.LIGHT
DEL·DIV button
REC MODE/
THUMBNAIL
button
ZOOM button
DISPLAY button
DC power cord
connection terminal
(behind the lid)
Screw retaining lid of
C card insertion slot
Speaker
BATT. EJECT button
Battery compartment lid
Bottom View
Remote Control
VOL button
MENU button
STOP button
R.SEARCH
button
REC/PAUSE
button
MACRO/SHIFT
button
Page 19

E19
Chapter 2
Set-up
This section explains how to set up your MP-EG10W for recording.
Before y ou start to r ecord, be sure to r ead the section thor oughly.
Charging battery pack................................................................................................... 20
Loading the battery pack............................................................................................... 21
Using power supply from AC outlet............................................................................. 22
Loading the PC card ..................................................................................................... 23
Setting the date and time............................................................................................... 24
Inserting battery into the remote control....................................................................... 27
Tips for skillful use of the PC card ............................................................................... 28
Page 20

E29
Chapter 3
Recording
This section explains how to record moving pictures, still pictures,
etc. Read thoroughly befor e starting to record.
Rotating the camera block and attaching the sunshade ................................................ 30
Recording moving pictures........................................................................................... 31
Recording still pictures................................................................................................. 33
Recording still pictures at intervals .............................................................................. 34
Recording consecutive still pictures............................................................................. 35
Recording a still picture with audio.............................................................................. 36
Macro recording............................................................................................................ 37
Recording with backlight corrected.............................................................................. 38
Recording image of your portrait using the remote control.......................................... 39
Do not expose the MP-EG10W to shocks during recording. The file
being recorded will not be stored.
Page 21
E36
Chapter 3
Recording
________________
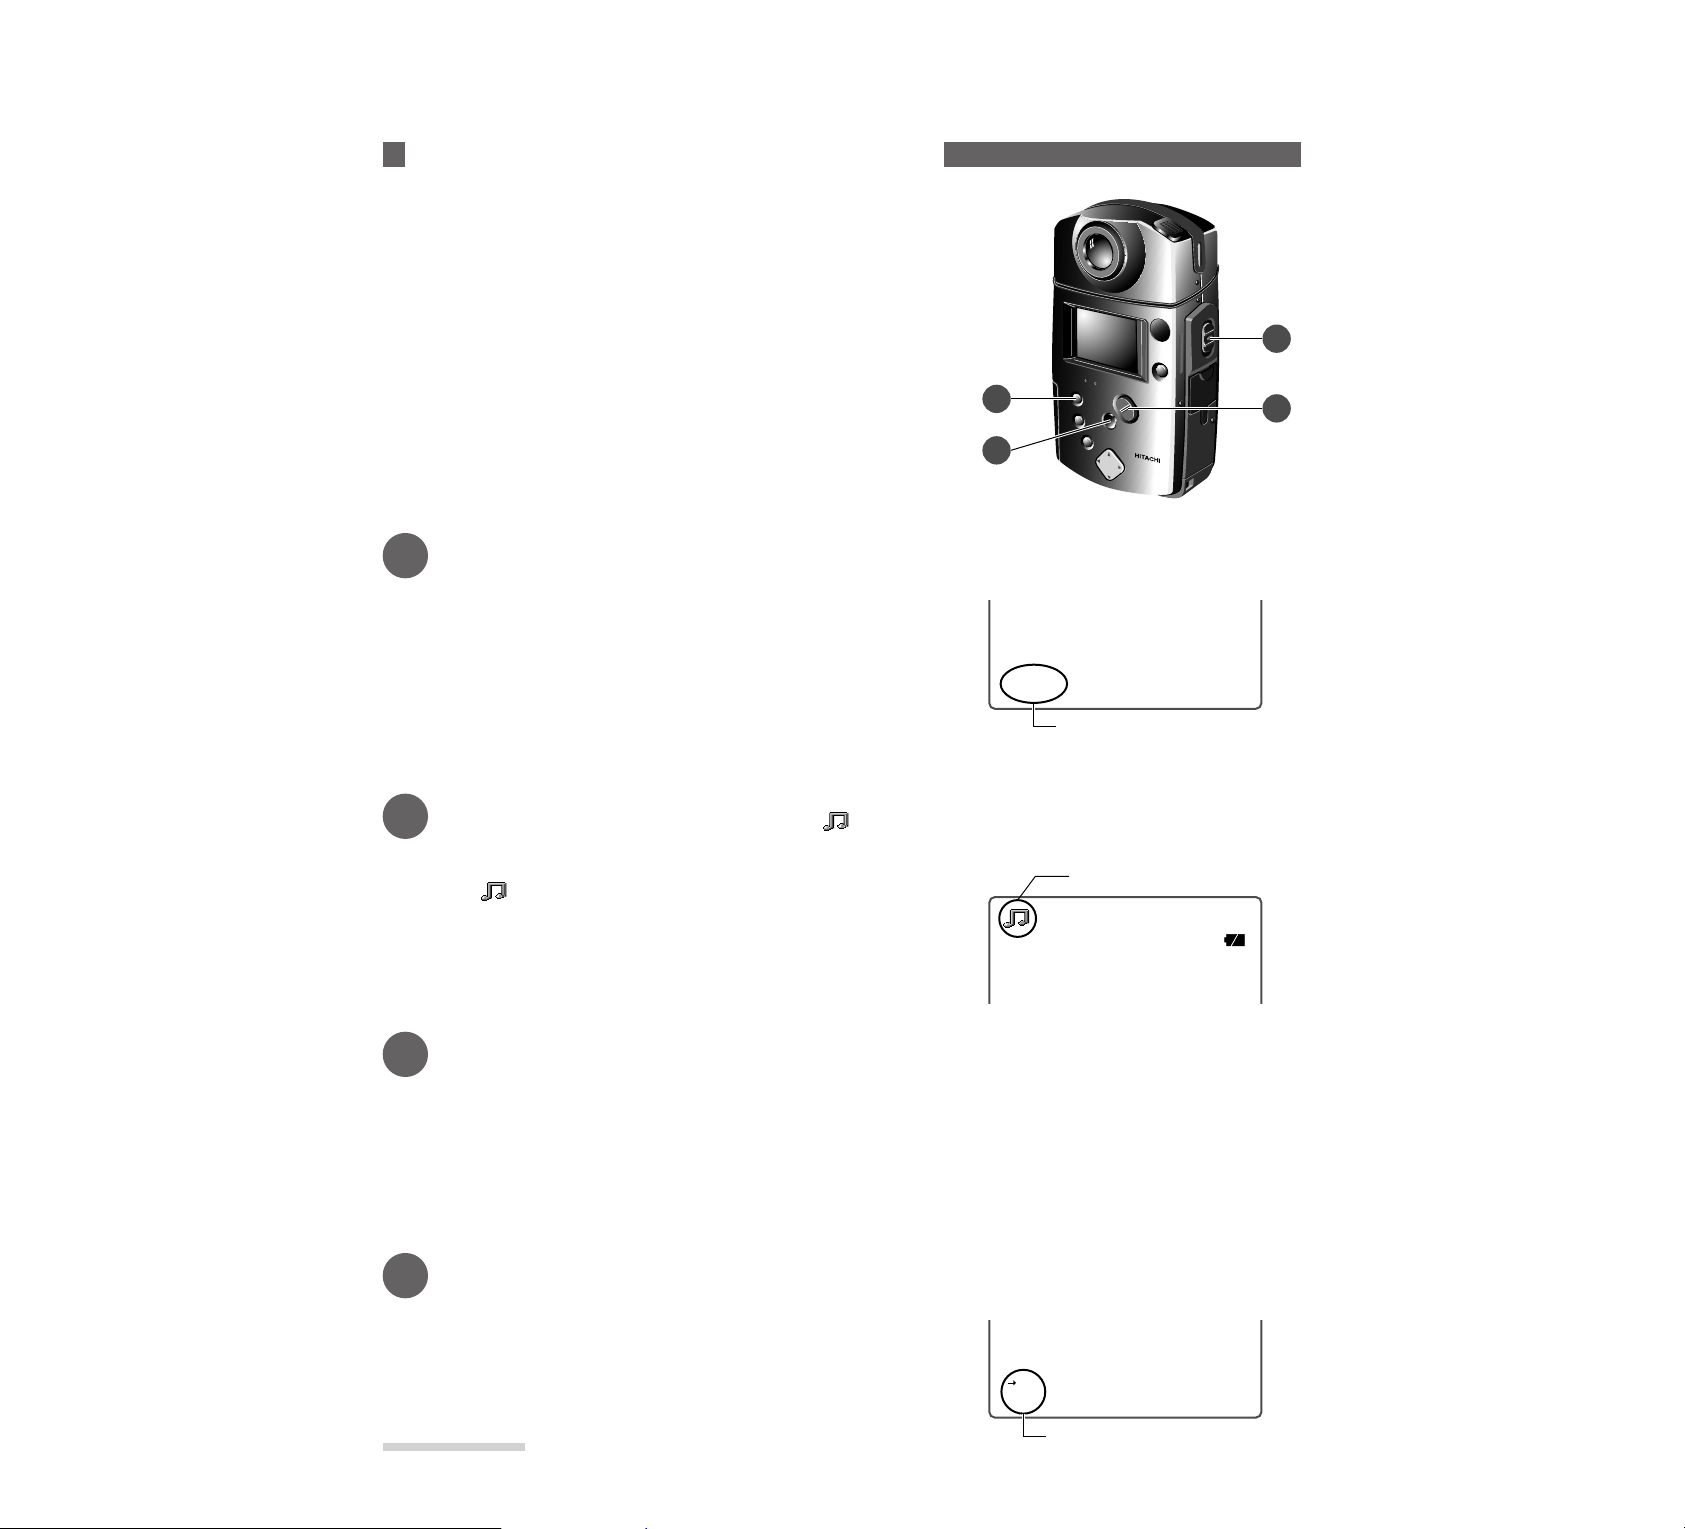
Recording a Still Picture with Audio
The MP-EG10W can record a still picture, followed by
recording of audio.
* Still picture with audio files recorded by the MP-EG10W cannot be
played back by the MP-EG1A.
* All files recorded by the MP-EG10W are saved once in “folder 0”
(see page 14): You cannot designate another folder in advance.
1
Set the CAM/OFF/PLAY switch to CAM.
Hold down the red button at the center of the switch and set the
switch to CAM. The image from the lens will appear on the
LCD monitor, and the MP-EG10W will enter the record pause
mode ("PAUSE" will appear).
2
Set the record mode indicator to “ ”.
Press the REC MODE/THUMBNAIL button repeatedly until
the “ ” still with audio record mode indicator appears on the
LCD monitor.
3
Adjust the image size of subject.
Press the ZOOM/VOL button to adjust the image size of subject. Pressing T (tele) magnifies the image, and
pressing W (wide) makes it smaller.
Press the MACRO/SHIFT button when you want a closeup on a subject for recording (see page 37).
* See “Zooming” for details of zoom.
* When the ZOOM/VOL button is pressed, the zoom bar will appear on the left end of the LCD monitor.
4
Start recording.
Press the REC button. The still image at the moment the button
is pressed will be recorded. After the recorded picture appears
on the screen, audio can also be recorded.
When the REC button is pressed again, recording of the file will
end.
3
1
2
5
PAUSE
10/24/1998
11:30AM
Indicates that the MP-EG10W
is in the record pause mode.
0:00:00
REM 0:15
Record Mode Indicator
REC
10/24/1998
11:30AM
RED color
Page 22

E41
Chapter 4
Using Media Navigation (Playback)
This section explains how to use Media Navigation for playing or
arranging recorded files, editing folder for auto play, etc. Also, see
“Operating Files” on page 14.
Starting Media Navigation............................................................................................ 42
On-screen display and basic operation of Media Navigation....................................... 43
Playing back files.......................................................................................................... 46
Playback using the remote control................................................................................ 48
Dividing moving pictures............................................................................................. 49
Transferring files to another folder (MOVE menu item) ............................................. 50
Deleting the file............................................................................................................. 54
Deleting all files in folder ............................................................................................. 56
Protecting files (CHG LOCK menu item).................................................................... 57
Sorting files (CHG ORD menu item)........................................................................... 60
Copying files (COPY menu item) ................................................................................ 62
Auto play of desired files.............................................................................................. 65
Playing files repeatedly (REPEAT).............................................................................. 67
Locating starts of a series of files and playing them (SLIDE)...................................... 69
Checking free memory area of PC card (REMAIN) .................................................... 72
Switching thumbnail display on or off ......................................................................... 73
Correcting file recording date/time(CHG TIME menu item)....................................... 74
Moving to setting (SET UP menu item)....................................................................... 77
Page 23

E50
Chapter 4
Using Media Navigation (Playback)
______
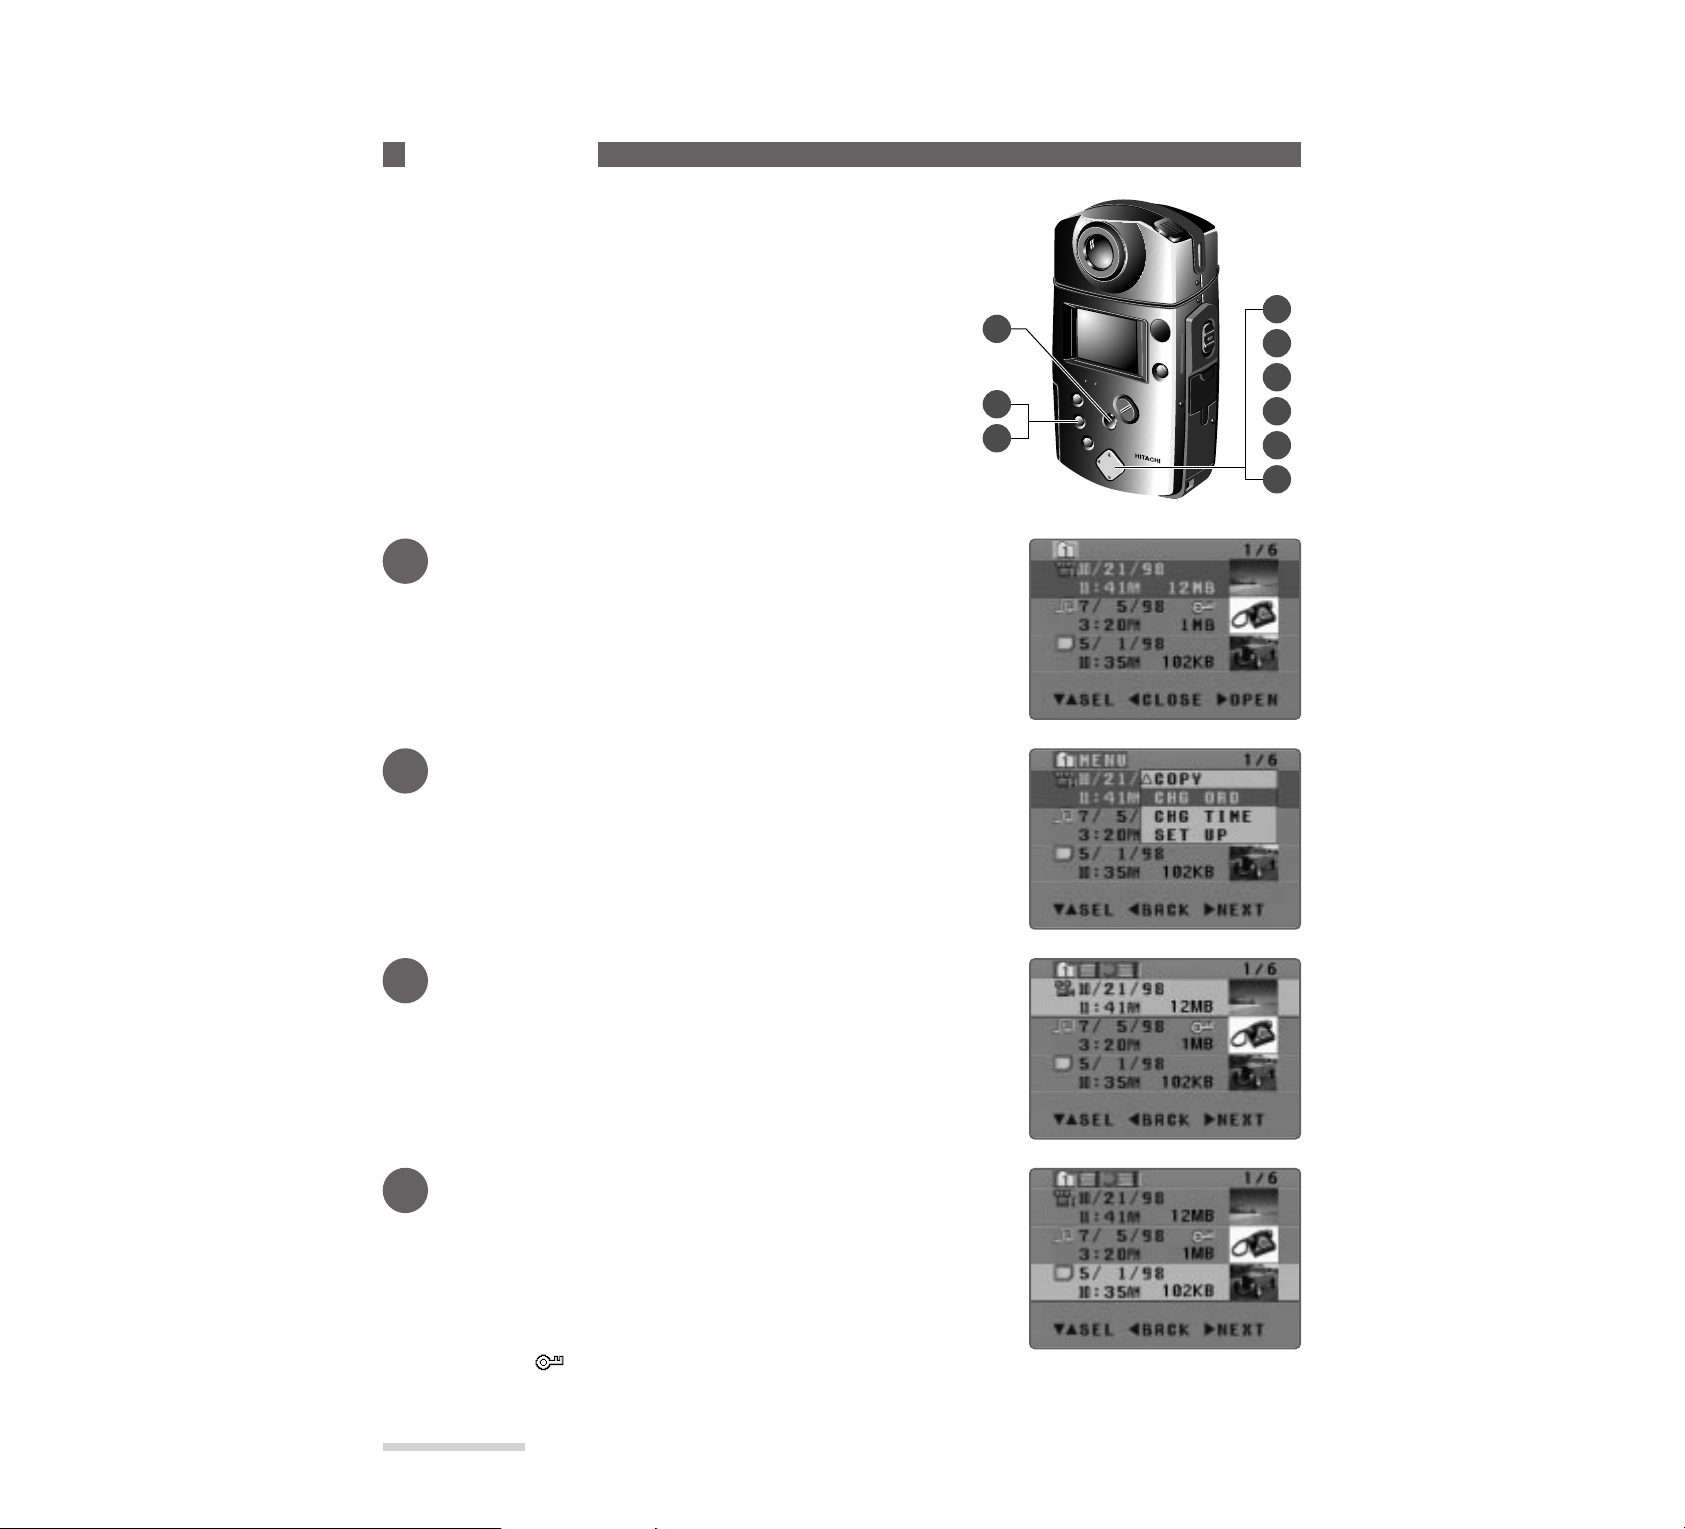
Transf erring Files to Another Folder (MOVE menu item)
You can transfer the files in a non-identified folder (folder 0) to folders 1- 5 and gather files
for auto play. There are two ways of transferring files: all files in folder or specified files in
folder.
5
6
1
3
6
4
1
1
Display the menu and select MO VE.
Press the MENU button to display the menu, and press ▼ to
select MOVE.
2
Display the screen for transfer.
Press s.
The menu will disappear and the screen for transfer will appear.
* To stop transfer, press t.
3
Select the folder you want to transfer.
Press ▼ or ▲ to select the file you want to transfer.
You can select multiple folders by pressing the MACRO/SHIFT
button (see page 43).
To transfer all files in folder to another f older ______________
* Using the MACRO/SHIFT button allows you to transfer all files in
multiple folders at a time.
Page 24
E60
Chapter 4
Using Media Navigation (Playback)
______
Sorting files
You can rearrange files in a folder: to move a file you
frequently play to the top of file list, change the display
order in a folder for auto play, etc.
* Start Media Navigation (see page 42) and display the FOLDER
select screen to start.
* You can also use the remote control to operate.
* Using the MACRO/SHIFT button allows you to change the display
order of multiple files at one time.
8
2
7
4
8
6
5
1
3
1
Display the file select screen.
Press ▼or ▲with the FOLDER select screen to select the folder containing files whose display order you want to change, and
then press s.
The file select screen will appear.
2
Display the menu and select CHG ORD.
Press the MENU button to display the menu, and press ▲ to
select CHG ORD.
3
Display the screen for changing display
order of files.
Press s.
The menu will disappear and the screen for changing display
order of files will appear.
To stop changing display order, press t.
4
Select the file whose display order you want
to change.
Press ▼ or ▲ to select the file whose display order you want to
change.
You can select multiple files by pressing the MACRO/SHIFT
button (see page 45).
* You can also change the display order for files with lock
symbol ( ).
Page 25

E67
______Chapter 4
Using Media Navigation (Playback)
Playing F iles Repeatedly (REPEAT)
You can repeatedly play back files. There are two ways of repeat play: all files in folder or
specified files in f older.
2
4
3
1
1
Select a folder .
Press ▼ and ▲ to select the folder whose files you want to
repeat automatically.
* You can select multiple folders by pressing the MACRO/
SHIFT button (see page 43).
2
Display the menu and select REPEAT.
Press the MENU button to display the menu, and press ▼ to
select REPEAT.
3
Start repeat play .
Press s.
All files in the selected folder will be played, starting from the file at the end of list.
If multiple folders are selected, the folder with the highest number will be played first and then the others in
order to the lowest number.
When playback of all files is finished, it will be repeated from the start.
* You can change the oder of files in a folder. (See “Sorting Files
” on page 60.)
4
Finish repeat play.
Press t. Repeat play will finish, and the FOLDER select screen will be restored.
Repeat play of all files in folder__________________________
* Start Media Navigation (see page 42) and display the FOLDER
select screen to start.
* You can also use the remote control to operate.
* Using the MACRO/SHIFT button allows repeat play of all files in
multiple folders.
Page 26
E72
Chapter 4
Using Media Navigation (Playback)
______
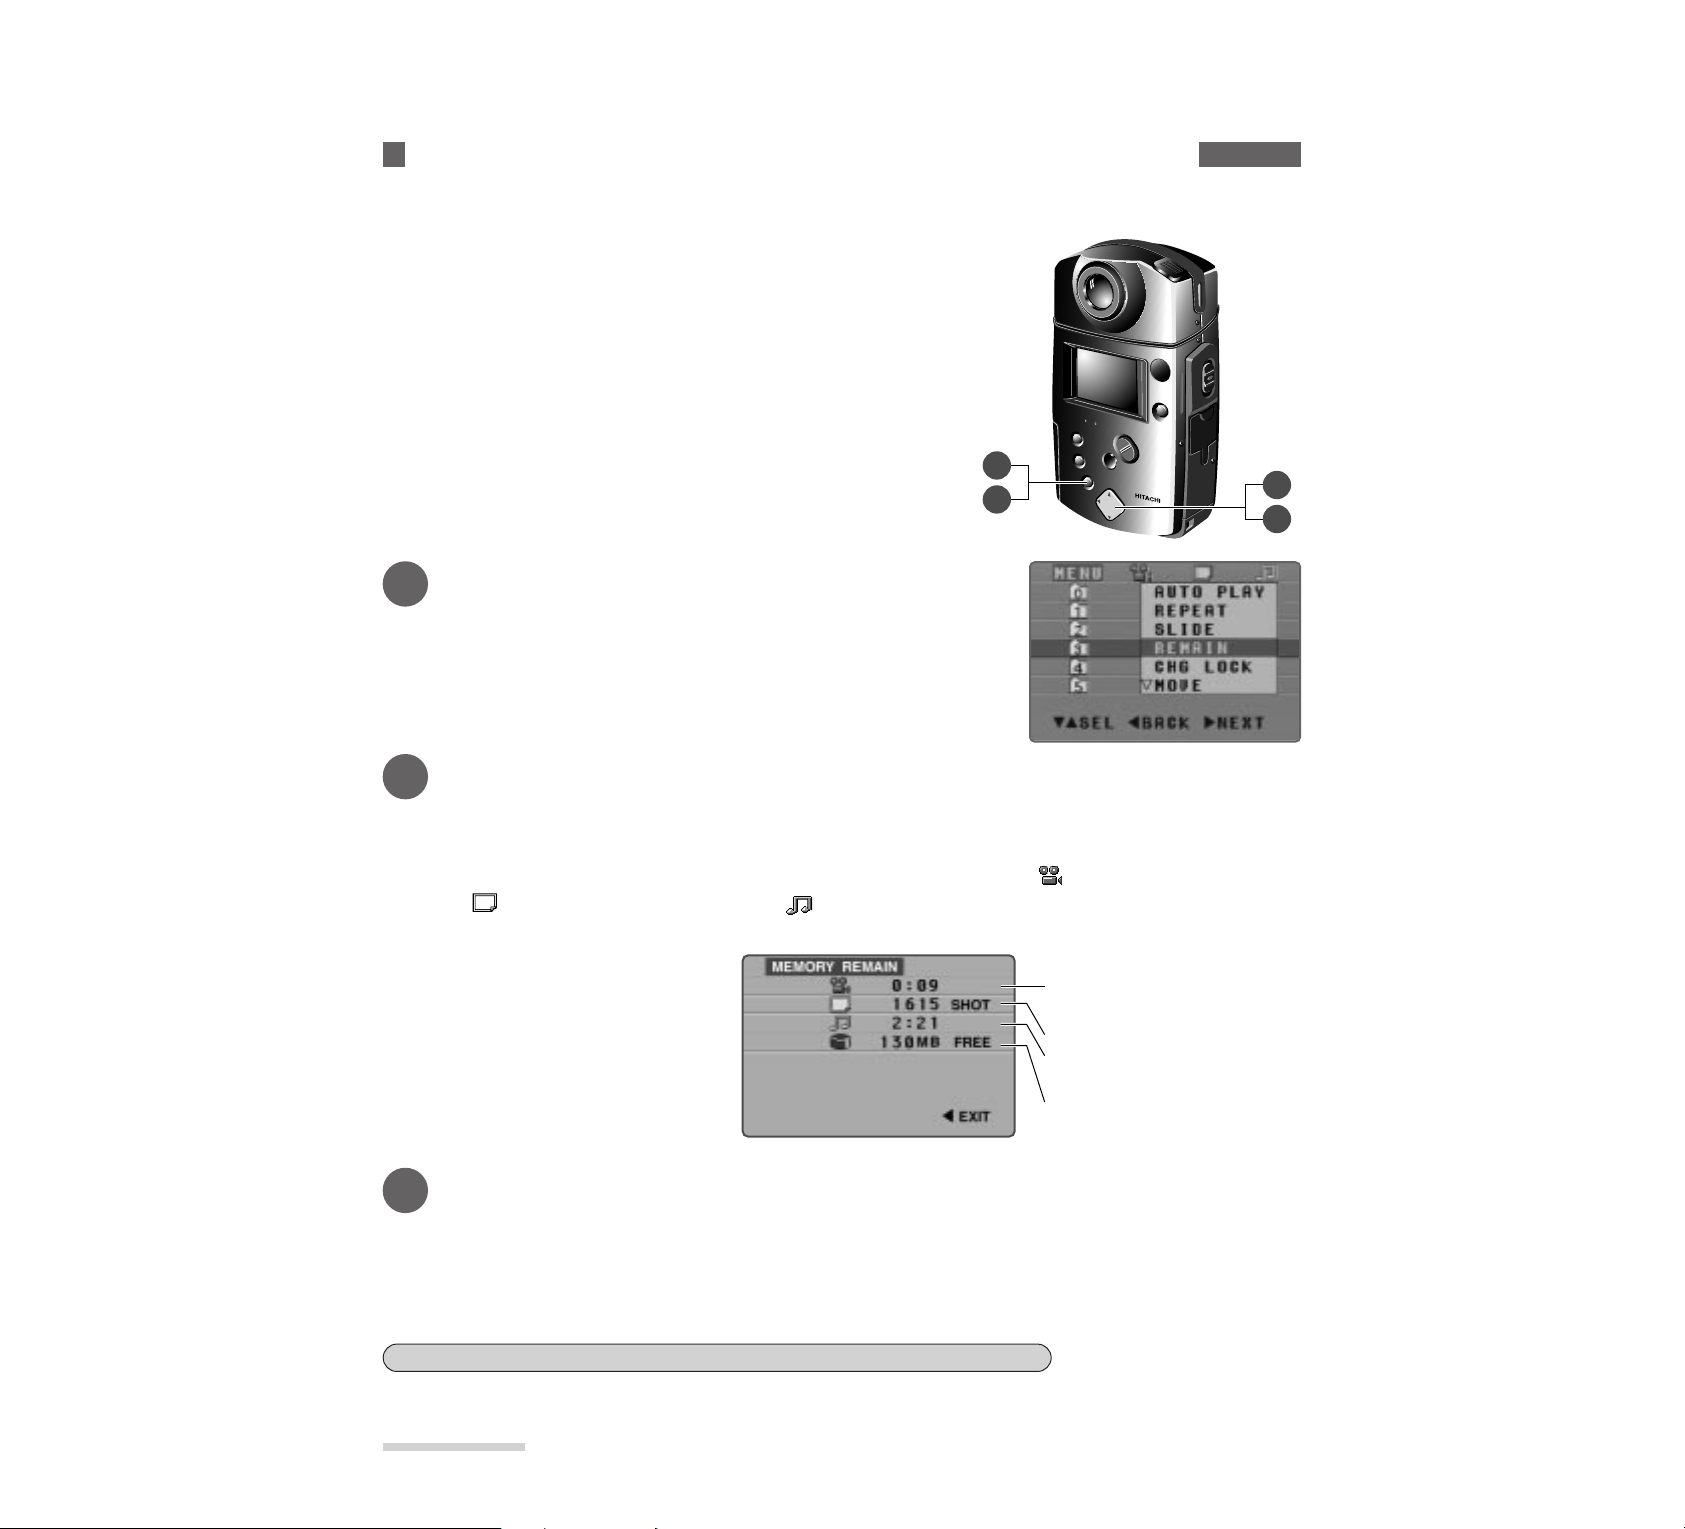
Checking F ree Memory Area of PC Card (REMAIN)
Check the remaining free memory area of PC card before you start to record. You can do
this by the following procedur e:
1
3
3
2
1
Display the menu and select REMAIN.
Press the MENU button to display the menu, and press ▼ to
select REMAIN.
3
Exit the REMAIN screen.
Press the t button or MENU button.
Pressing t exits the REMAIN screen and restores the menu (screen in step 1).
Pressing MENU exits the REMAIN screen and restores the FOLDER select screen.
2
Display the screen for remaining memory.
Press s.
The screen showing the remaining memory area will appear as shown below.
* The REMAIN screen shows the recordable time of moving pictures ( ), or number of still pictures
( ) or time of still picture with audio ( ), when you use only one of
3 kinds of record mode. Therefore, you cannot store all of these time lengths and numbers. Also, remember that the values displayed on
this screen are reference only and
may be different from actual ones.
* The remaining recordable time of
moving pictures is calculated, taking into account the currently
selected image quality mode.
* For still with audio, the recordable
time of audio-only files will be
* Start Media Navigation (see page 42) and display the FOLDER
select screen to start.
* You can also use the remote control to operate.
Moving picture recordable time
(hours and minutes)
Number of recordable still pictures
Still picture with audio recordable time
(hours and minutes)
Remaining free memory area of PC car
(MB)
Reviewing the remaining memory screen from the file select screen.
You can also review the remaining memory area of PC card when the file select screen is displayed. Press
the MENU with the file select screen. The menu in step 1 will appear. Select REMAIN and press s.
Page 27
E73
______Chapter 4
Using Media Navigation (Playback)
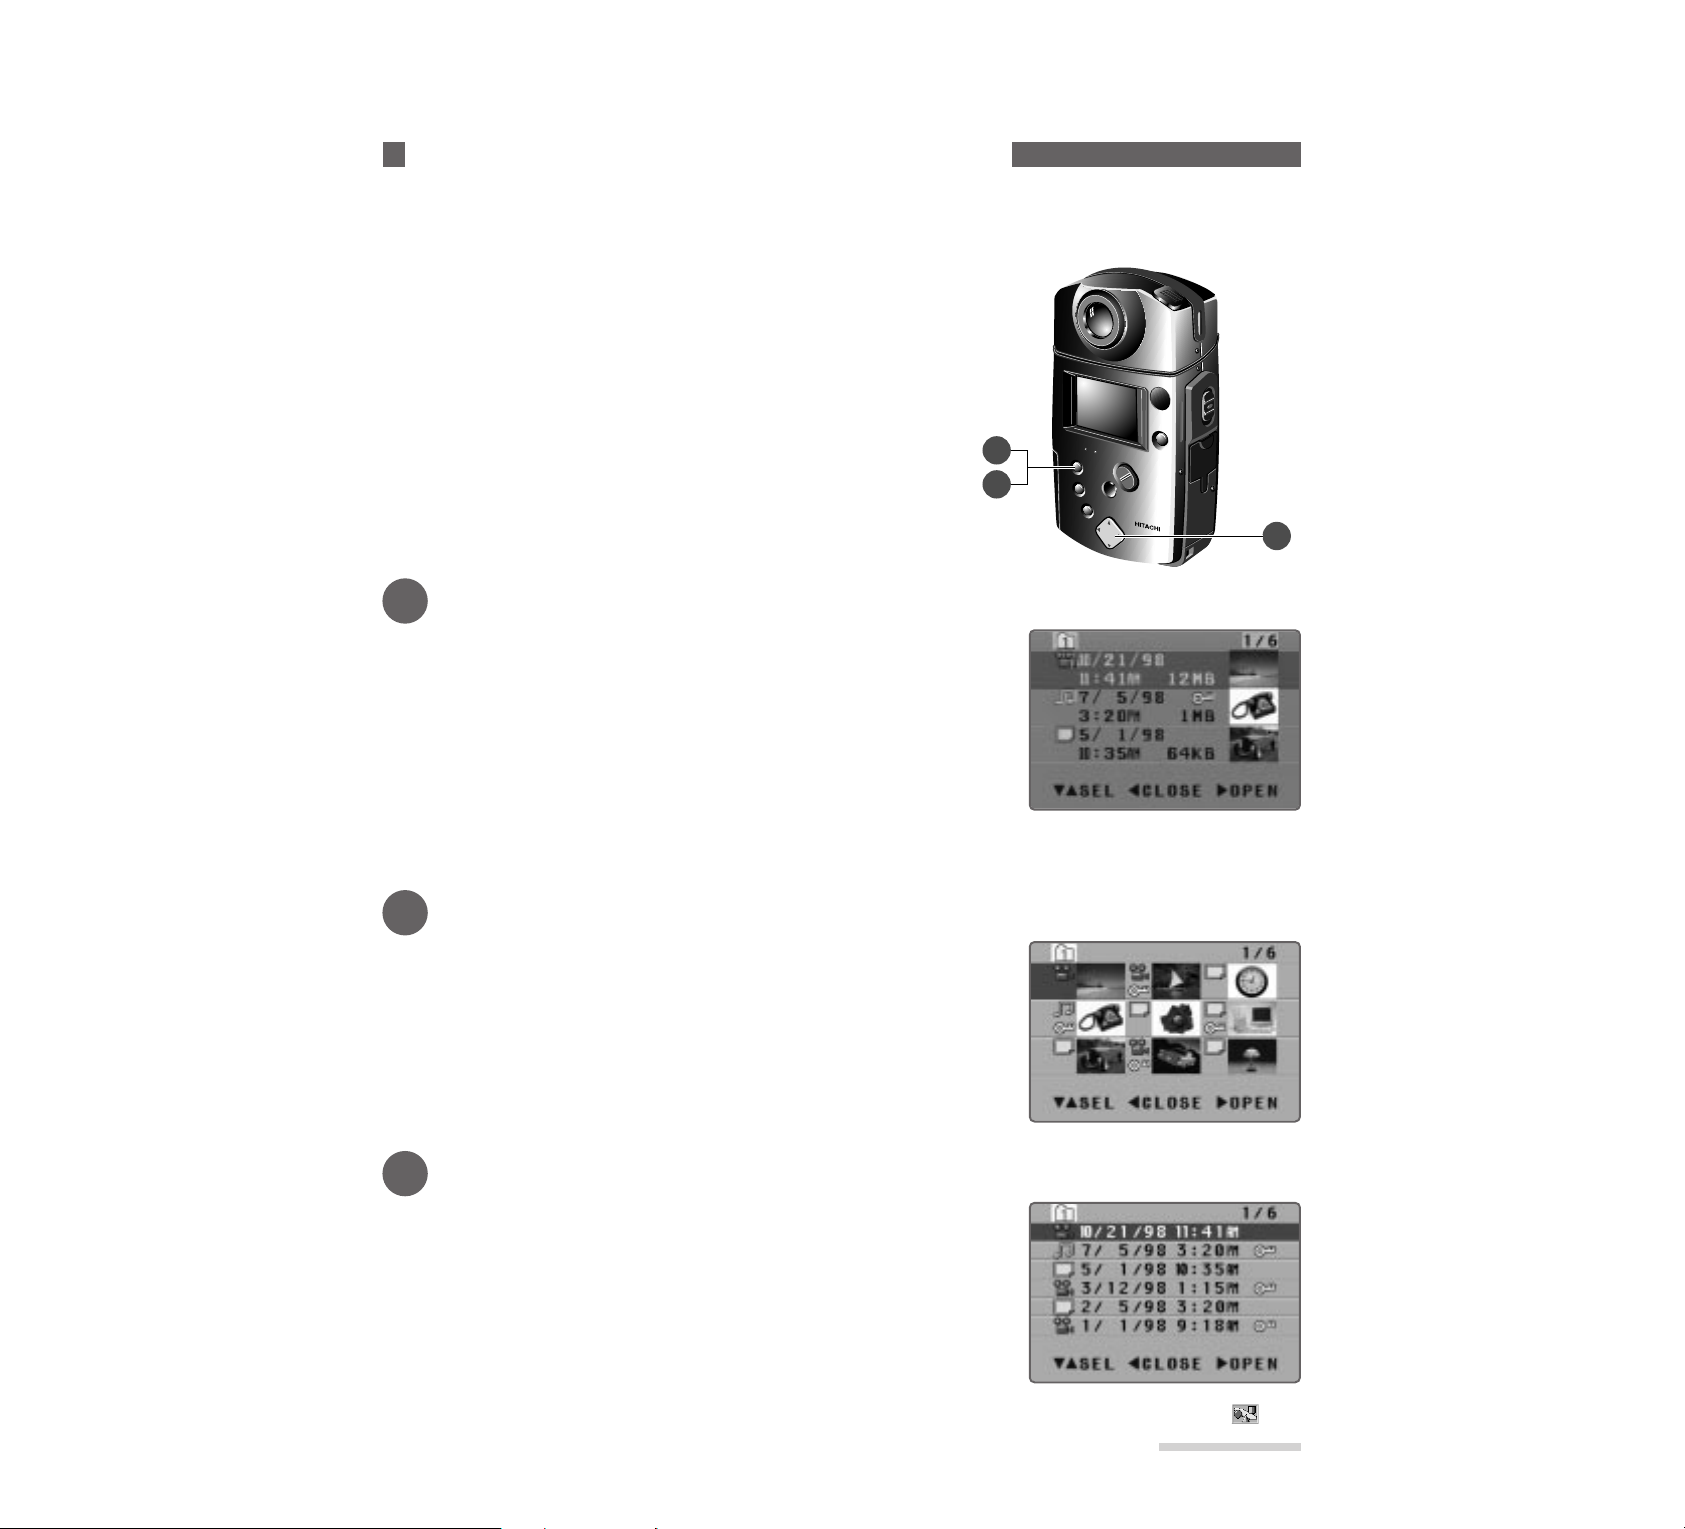
Switching Thumbnail Display On or Off
You can switch the thumbnail display on and off with the file select scr een. If thumbnail display is switched off, you can display six f iles on the scr een at a time.
1
2
3
1
Display the file select screen.
Press ▲ or ▼ with the FOLDER select screen to select a folder
with files, and press.
* It has been set at the factory that the three-thumbnail file
select screen will appear first, but subsequently, the file select
screen designated previously will appear.
* When Media Navigation is started immediately after record-
ing, the three-thumbnail file select screen will appear.
* Even if the folder is changed, the thumbnail display method will not change.
* When you switch off a thumbnail, no thumbnails will be displayed no matter which folders you select.
2
Display a 9-thumbnail file select screen.
Press the REC MODE/THUMBNAIL button, and a 9-thumbnail file select screen will appear.
* Start Media Navigation (see page 42) and display the FOLDER
select screen to start.
* You can also use the remote control to operate.
File select screen
(3-thumbnail display)
File select screen
(9-thumbnail display)
3
Display a file select screen without thumbnails.
Press the REC MODE/THUMBNAIL button again.
Thumbnails will disappear and six files will be displayed on one
screen. Pressing the button again switches on the thumbnails
display.
* You cannot switch on or off the thumbnail display while the
menu is displayed, a folder is being changed (see page 50), or
the recording date/time are being changed (see page 64).
If the thumbnail display is not possible with files recorded by equipment other than MP-EG10W, will
appear in place of thumbnails.
File select screen
(without thumbnails)
Page 28

E74
Chapter 4
Using Media Navigation (Playback)
______
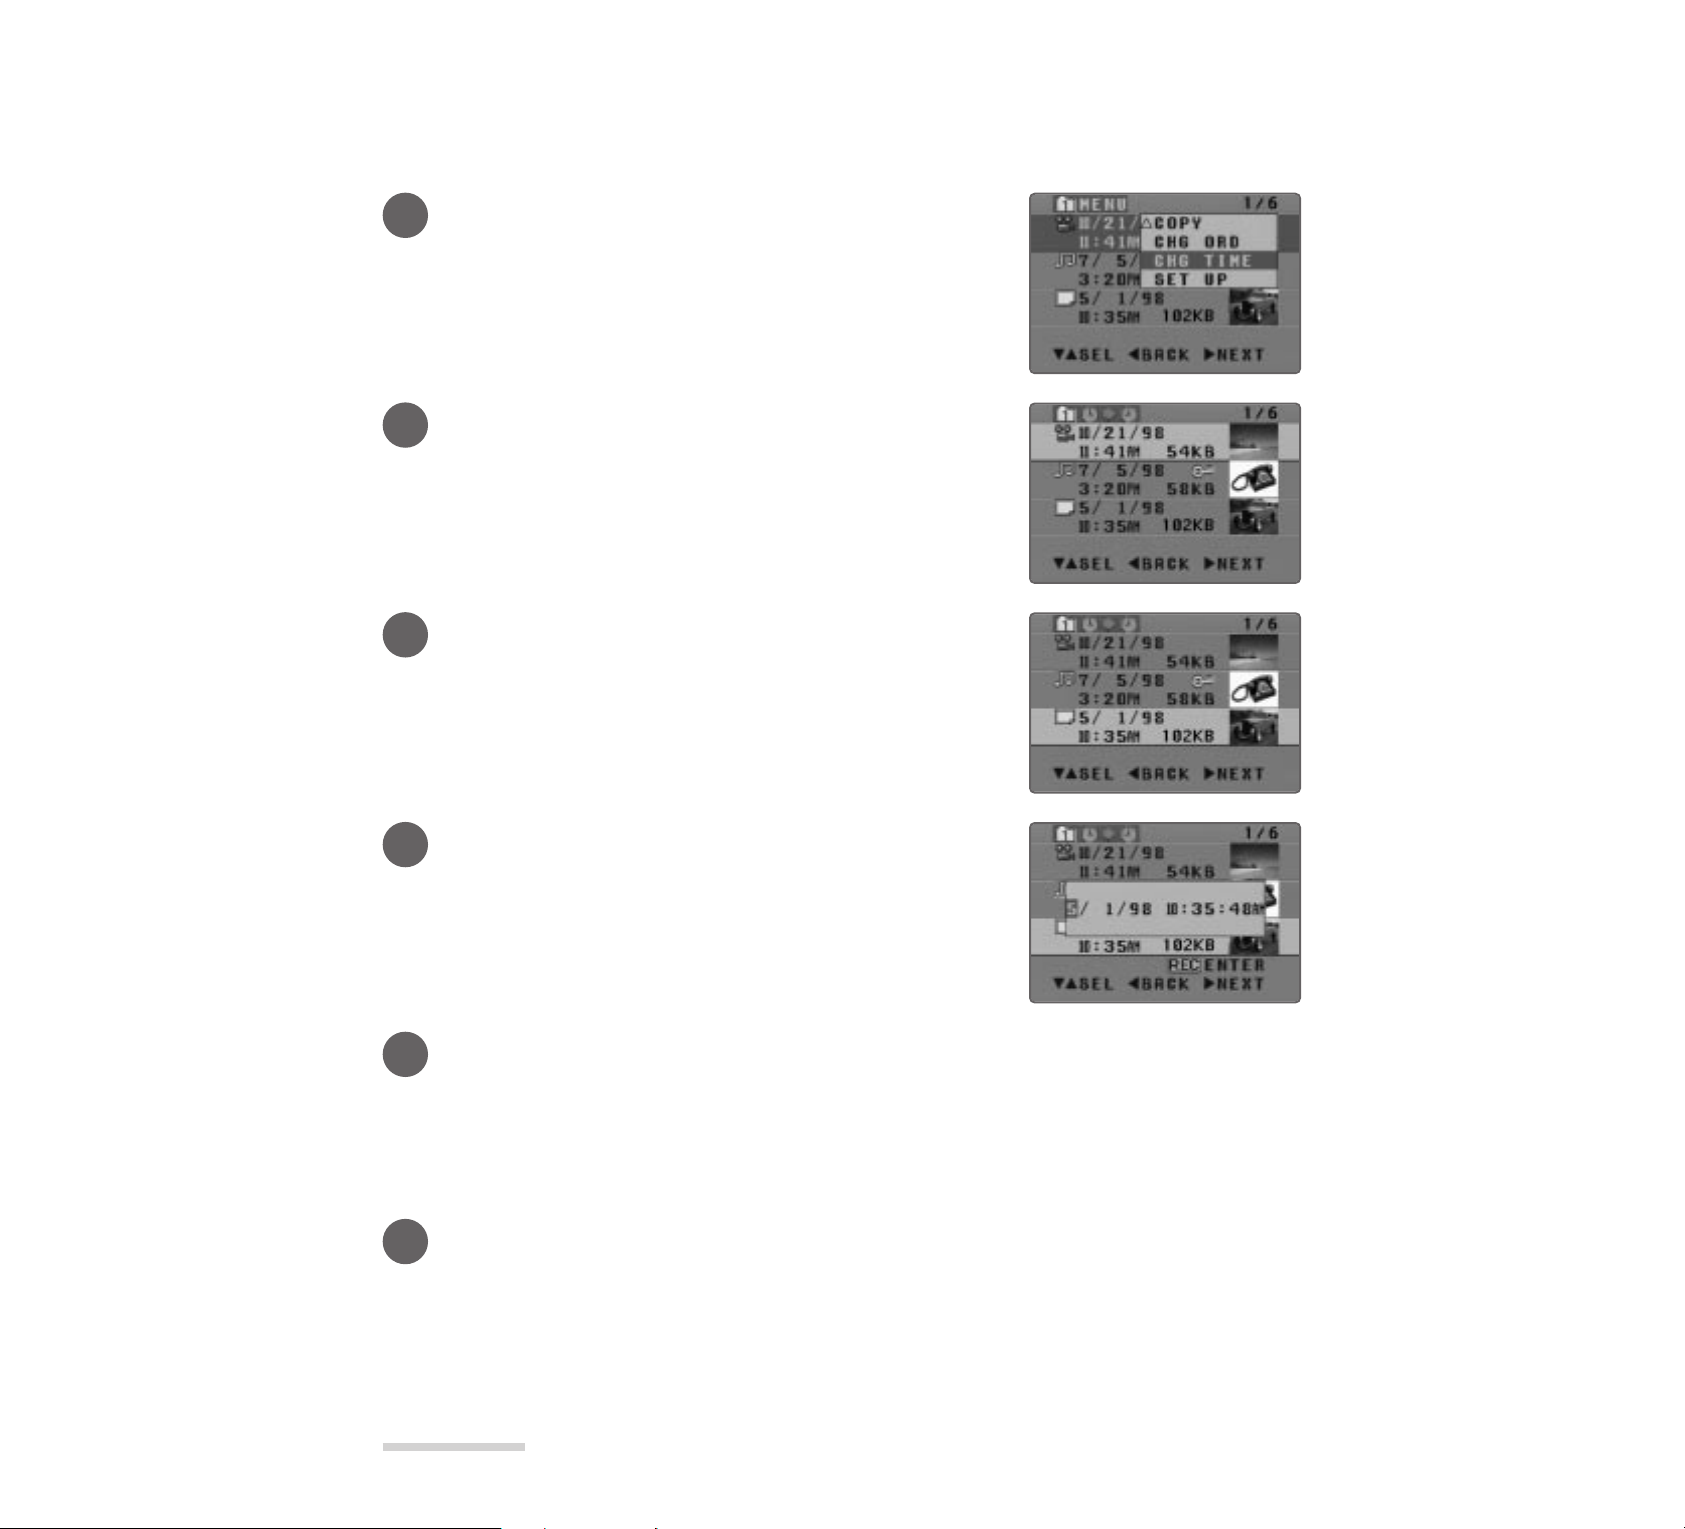
Correcting F ile Recording Date/T ime (CHG TIME menu item)
When the internal clock goes wrong because of consumption of the built-in battery, the date
and time on which you start to record will not be r ecorded correctly. In this case, charge the
built-in battery , corr ect the clock, and also correct the f ile recording date/time by the f ollowing procedure. There ar e two ways of changing the r ecording date/time: changing all files in
folder to the same date/time, or designating files in folder and changing their recording
date/time.
5
6
4
3
2
1
6
To change all files in folder to the same recor ding date/time: _
* Start Media Navigation (see page 42) and display the FOLDER
select screen to start.
* You can also use the remote control to operate.
* Using the MACRO/SHIFT button allows you to change all files in
multiple folders to the same recording date/time in one step.
1
Display the menu and select CHG TIME.
Press the MENU button to display the menu, and press ▼ to
select CHG TIME.
2
Display the screen for correcting the recording date/time.
Press s.
The menu will disappear and the screen for correcting the
recording data/time will appear.
3
Select the folder where you want to correct
the recording date/time.
Press ▼ or ▲ to select the file whose recording date/time you
want to correct, and then press s.
You can select multiple files by pressing the MACRO/SHIFT
button (see page 45).
Page 29

E75
______Chapter 4
Using Media Navigation (Playback)
4
Correct the recording date/time.
The number of year for the selected file in folder will be highlighted.
Press s or t to highlight the number you want to correct, and
then press ▲ or ▼ to increase or decrease it.
* The seconds display counts up or down in 2-seconds unit.
5
Enter the corrected date/time.
After correcting all the incorrect numbers, press the REC/PAUSE button.
You can continue to change file recording date/time by repeating steps 3-5.
* To cancel change or recording date/time, press the MENU button before pressing REC/PAUSE. The
recording date/time will not change, and recording date/time change menu will finish.
6
Exit the CHG TIME menu item.
Press the t button or menu button.
Press t exits the recording date/time correct menu item and restores the folder function setting menu (the
screen in step 1).
Pressing MENU exits the recording date/time correct menu item and restores the folder select screen.
6
5
4
3
1
2
6
To designate a file in folder and change its recording date/time: _______
* Start Media Navigation (see page 42) and display the FOLDER
select screen to start.
* You can also use the remote control to operate.
* Using the MACRO/SHIFT button allows you to change multiple
files to the same recording date/time in one step.
1
Display the file select screen.
Press ▼ or ▲ with the FOLDER select screen to select the
folder containing the file where you want to correct the recording date/time, and then press s.
The file select screen will appear.
Page 30
E76
Chapter 4
Using Media Navigation (Playback)
______
2
Display the menu and select CHG TIME.
Press the MENU button to display the menu, and press ▼ to
select CHG TIME.
3
Display the screen for correcting the recording date/time.
Press s.
The menu will disappear and the screen for correcting the
recording date/time will appear.
4
Select the file where you want to correct the
recording date/time.
Press ▼ or ▲ to select the file whose recording date/time you
want to correct, and then press s.
You can select multiple files by pressing the MACRO/SHIFT
button (see page 45).
5
Correct the recording date/time.
The month displayed in the selected file will be highlighted.
Press s or t to highlight the number you want to correct, and
then press ▼ or ▲ to increase or decrease it.
* The seconds display counts up or down in 2-second units.
6
Enter the corrected date/time.
After correcting all the incorrect numbers, press the REC/PAUSE button.
You can continue to change file recording date/time by repeating steps 4 - 7.
* To cancel change of recording date/time, press the MENU button before pressing REC/PAUSE. The
recording date/time will not change, and recording date/time change menu will finish.
7
Exit the CHG TIME menu item.
Press the t button or MENU button.
Press t exits the recording date/time correct menu item and restores the file function setting menu (the screen
in step 2).
Pressing MENU exits the recording date/time correct menu item and restores the file select screen (shown in
step1).
Page 31

E77
______Chapter 4
Using Media Navigation (Playback)
Moving to Setting
You can move to the screen f or setting up during f ile playback or Media Na vigation.
1
3
2
1
1
Display the menu and select SET UP.
Press the MENU button to display the menu, and press ▼ to
select SET UP.
* Pressing MENU during file playback will also display the
SET UP screen.
SET UP
Is NITIAL
SDI PLAY
DON
ON
LC
CP
SEL ENTER MENU EXIT
ITUREADJ
2
Select the setting item you want to modify.
The following setting items can be modified:
• MPEG MODE (FINE/STND)
• DATE
• ENERGY SAVE
• DISPLAY
• LCD
• PICTURE ADJ
3
Modify the setting.
See the following pages for ways to modify the settings.
• MPEG MODE (FINE/STND) (See page 94)
• DATE (See page 24)
• ENERGY SAVE (See page 98)
• DISPLAY (See page 99)
• LCD (See page 100)
• PICTURE ADJ (See page 101)
* You can also use the remote control to operate.
Page 32

E68
Chapter 4
Using Media Navigation (Playback)
______
1
Select a folder .
Press ▼ and ▲ with the FOLDER select screen to select the
folder containing the files for repeat, and then press s.
The file select screen will appear.
2
Select a file.
Use ▲ or ▼ to select the file for repeat play.
You can select multiple files by pressing the MACRO/SHIFT
button (see page 45).
3
Display the menu.
Press the MENU button to display the menu, and press ▼ to
select REPEAT.
4
Start repeat play .
Press ▲ to select REPEAT, and press s.
The selected file will be repeatedly played back.
If multiple files are selected, repeat play will be started from the file at the end of list.
To designate files in folder f or repeat play_________________
* Start Media Navigation (see page 42) and display the FOLDER
select screen to start.
* You can also use the remote control to operate.
* Using the MACRO/SHIFT button allows repeat play of multiple
files at one time.
5
Finish repeat play.
Press t. Repeat play will finishe, and the FOLDER select screen will be restored.
Page 33

E69
______Chapter 4
Using Media Navigation (Playback)
Locating Starts of a Series of F iles and Playing Them (SLIDE)
You can project slides of files (locate beginnings of a series of files) in folder. There are two
ways of projecting slides: all files in the f older or specif ied f iles in the f older.
2
5
4
3
1
1
Select a folder .
Use ▼ or ▲ to select the folder in whose files you want to project slides.
* You can select multiple folders by pressing the MACRO/
SHIFT button (see page 43).
2
Display the menu and select SLIDE.
Press the menu button to display the menu, and press ▼ to select
SLIDE.
To project slides of all files in f older______________________
* Start Media Navigation (see page 42) and display the FOLDER
select screen to start.
* You can also use the remote control to operate.
* Using MACRO/SHIFT button allows you to project slides of all files
in multiple folders.
3
Project slide of first file.
Press s. The files in the selected folder will be played from the
file at the end of list.
Moving pictures: The first picture of file will appear and freeze.
Press s again, and pictures and sound will
play. When playback reaches the end, the last
picture of the file will appear and freeze.
Still picture: Will appear instantaneously.
Still with audio: The still picture will appear. Press s again, and the sound will also play back.
If you have selected multiple folders, files will be played on slides from the highest folder number.
* You can charge the order of files in a folder. (See “Sorting Files on page 60.)
* Picture search, frame advance or frame back is not possible during projection of slides from files.
* No on-screen display will appear on projected slides.
Page 34

E70
Chapter 4
Using Media Navigation (Playback)
______
4
Project slide of next file.
Press ▲.
The next file will be played.
* Press ▼to return to the previous file (only when MP-EG10W
stops at the start of file for moving pictures and still with
audio).
5
Finish projecting slides of files.
Press t. (Press t twice for moving pictures and still with audio.)
Projecting slides will finish, and the FOLDER select screen will be restored.
3
7
6
5
2
1
4
1
Select a folder .
Use ▼ or ▲ to select the folder in whose files you want to project slides, and then press s.
The file select screen will appear.
2
Select files to project slides.
Use ▼ or ▲ to select the file you want to project slide.
You can select multiple files by pressing the MACRO/SHIFT
button (see page 45).
To specify files in folder and pr oject their slides____________
* Using the MACRO/SHIFT button allows you to project slides of
multiple files at one time.
Page 35

E71
______Chapter 4
Using Media Navigation (Playback)
3
Display the menu and select SLIDE.
Press the MENU button to display the menu, and press ▼ to
select SLIDE.
4
Project slide of first file.
Press s.
The selected files will be played from the bottom of list.
Moving pictures: The first picture of file will appear and freeze.
Press s again, and pictures and sound will
play. When playback reaches the end, the last
picture of the file will appear and freeze.
Still picture: Will appear instantaneously.
Still with audio: The still picture will appear. Press s again,
and the sound will also play back.
* You can change the order of files in a folder. (See “Sorting
Files on page 60.)
* Picture search, frame advance or frame back is not possible
during projection of slides from files.
* No on-screen display will appear on projected slides.
5
Project slide of next file.
Press ▲.
The next file will be played.
* Press ▼to return to the previous file (only when MP-EG10W
stops at the start of file for moving pictures and still with
audio).
6
Finish projecting slides of files.
Press t. (Press t twice for moving pictures and still with audio.)
Projecting slides will finish, and the file select screen will be restored.
Page 36

E61
______Chapter 4
Using Media Navigation (Playback)
5
Display the screen for selecting the location
where you want to move the file.
Press s.
The screen will change to that for deciding the location where
the file is to be moved.
6
Move the file to your designated location.
Use ▼ or ▲ to select the location where the files are to be displayed.
The files will move under the designated file.
Each time ▼ or ▲ is pressed, the designated files will be highlighted in sequence.
7
Execute the change of the file display order.
Press the REC/PAUSE button.
The change of display order has been decided. You can continue to change the display order of other files by
repeating steps 4-7.
8
Exit the CHG ORD menu item.
Press the t button or MENU button.
Pressing t exits the display order change menu item and restores the file function setting menu (the screen in
step 2).
Pressing MENU exits the display order change menu item and restores the file select screen (shown in step 1).
Page 37

E62
Chapter 4
Using Media Navigation (Playback)
______
Copying F iles
You can copy files to another f older. There are two ways of copying files: all files in f older or
specified files in f older.
5
6
1
4
6
2
3
1
Display the menu and select COPY.
Press the MENU button to display the menu, and press ▼ to
select COPY.
2
Display the screen for copying.
Press s.
The menu will disappear and the screen for copying will appear.
* To stop copying, press t.
3
Select the folder you want to copy.
Use ▼or ▲to select the folder you want to copy, and then press
s.
You can select multiple folders by pressing the MACRO/SHIFT
button (see page 43).
To copy all files in f older _______________________________
* Start Media Navigation (see page 42) and diaplsy the FOLDER
select screen to start.
* Note that files cannot be copied to the same folder.
* You can also use the remote control to operate.
* Using the MACRO/SHIFT button allows you to copy all files in
multiple folders at one time.
Page 38

E63
______Chapter 4
Using Media Navigation (Playback)
4
Designate the folder to which copy is to be
made.
Press ▼or ▲to change the folder number to which copy is to be
made.
5
Start copying.
Press the REC/PAUSE button.
All files will be copied to the designated folder, and the screen for copying (the screen in step 2) will be
restored.
* To stop copying, press t before pressing REC/PAUSE. Copying will be canceled, and the screen for copy-
ing (the screen in step 2) will be restored.
6
Finish copying.
Press the t button or MENU button.
xxxx
* If PC card does not have enough free memory:
If copied files cannot be saved because free memory on PC card is insufficient, message “THERE IS NOT
ENOUGH SPACE. CAN NOT COPY FILE.” will appear. In this case, delete unnecessary files (see page
54) to increase free memory space, and then copy again.
6
7
2
4
7
5
1
3
1
Display the file select screen.
Use ▼ or ▲ to select the folder that has files you want to copy,
and then press s.
The file select screen will appear.
To designate files in folder and copy them:________________
* Start Media Navigation (see page 42) and display the FOLDER
select screen to start.
* Note that files cannot be copied to the same folder.
* You can also use the remote control to operate.
* Using the MACRO/SHIFT button allows you to copy multiple files
at one time.
Page 39

E64
Chapter 4
Using Media Navigation (Playback)
______
2
Display the menu and select COPY.
Press the MENU button to display the menu, and press ▼ to
select COPY.
3
Display the screen for copying.
Press s.
The menu will disappear and the screen for copying will appear.
* To stop copying, press t.
4
Select the files you want to copy.
Use ▼ or ▲ to select the file you want to copy, and then press
s.
You can select multiple files by pressing the MACRO/SHIFT
button (see page 45).
* Locked files can also be copied.
5
Designate the folder to which copy is to be
made.
Press ▼or ▲to change the folder number to which copy is to be
made.
6
Start copying.
Press the REC/PAUSE button.
The files will be copied, and the screen for copying (the screen in step 3) will be restored.
* To stop copying, press t before pressing REC/PAUSE. Copying will be canceled, and the screen for copy-
ing will be restored.
7
Finish copying.
If t is pressed, copying will finish, and the file function select screen (the screen in step 2) will be restored.
If MENU is pressed, copying will finish, and the file select screen (the screen in step 1) will be restored.
* If PC card does not have enough free memory:
If copied files cannot be saved because free memory on PC card is insufficient, message “THERE IS NOT
ENOUGH SPACE. CAN NOT COPY FILE.” will appear. In this case, delete unnecessary files (see page
54) to increase free memory space, and then copy again.
Page 40

E65
______Chapter 4
Using Media Navigation (Playback)
Auto Play of Desired Files
You can automatically play desired files in sequence after gathering them in one folder.
There are two ways of auto play: playing all f iles in a f older or only specif ied f iles in it.
* Still pictures are displayed for about three seconds during auto play, and the next file will follow.
2
3
1
1
Select a folder .
Press ▲ and ▼ to select the folder whose files you want to play
automatically.
2
Display the menu and select A UT O PLAY .
Press MENU to display the menu.
Make sure that AUTO PLAY is highlighted.
3
Start auto play .
Press s.
The files in the selected folder will be played in sequence, starting from the file at the end of list. When auto
play of all files is finished, the FOLDER select screen will be restored.
If multiple folders are specified, the folder with the highest number will be played first and then the others in
order to the lowest number.
* You can change the order of files in a folder. (See “Sorting Files” on page 60.)
Auto pla y of all files in a folder __________________________
* Start Media Navigation (see page 42) and display the FOLDER
select screen to start.
* You can also use the remote control to operate.
* Using the MACRO/SHIFT button allows sequential auto play of all
files in multiple folders, starting from the file at the end of list.
To cancel auto play midway
Press s.
Auto play will be interrupted and the FOLDER select screen will be restored.
Page 41

E66
Chapter 4
Using Media Navigation (Playback)
______
3
4
2
1
1
Select a folder .
Press ▲ or ▼ with the FOLDER select screen to select the folder containing the files for auto play, and then press.
The file select screen will appear.
2
Select the file.
Use ▲ or ▼ to select the file for auto play.
You can select multiple files by pressing the MACRO/SHIFT
button (see page 45).
3
Display the menu and select A UT O PLAY .
Press the MENU button to display the menu.
Make sure that AUTO PLAY is highlighted.
4
Start auto play .
Press s.
Auto play will start from the selected file, which will be followed by files listed above this one in sequence. When auto
play of the top file in the list is finished or press t, the file select
screen will be restored.
Auto pla y specifying files in folder_______________________
You can specify a file in the folder and start auto play
from that file, f ollowed by all f iles listed abo ve that f ile.
* Start Media Navigation (see page 42) and display the FOLDER
select screen to start.
* See “Sorting Files” on page 60 when you want to rearrange files in a
folder.
* You can also use the remote control to operate.
* Using the MACRO/SHIFT button allows auto play of multiple files
at one time.
Page 42

E51
______Chapter 4
Using Media Navigation (Playback)
6
7
2
4
7
5
1
3
5
Execute the transfer .
Press the REC/PAUSE button.
Transfer will be executed and the screen for transfer (the screen in step 2) will be restored. The transferred files
have now been stored in the selected folder.
Repeat steps 3-5 to continue to transfer files between folders.
* To stop transfer, press t before pressing REC/PAUSE. The transfer will be canceled, and the screen for
transfer (the screen in step 2) will be restored.
6
Finish the transfer .
Press the t or MENU button.
If t is pressed, the transfer will finish, and the folder function select screen (the screen in step 1) will be
restored.
If MENU is pressed, the transfer will finish, and the FOLDER select screen will be restored.
* The display order of transferred files will not change. When multiple folders have been selected, files will
be arranged in the numeric order of folders.
To specify files in folder and transfer them to another f older _
* Start Media Navigation (see page 42) and display the FOLDER
select screen to start.
* You can also use the remote control to operate.
* Using the MACRO/SHIFT button allows you to transfer multiple
files at a time.
4
Designate the folder to which you want to
transfer files.
Press ▲ or ▼ to select the number of folder to which you are to
transfer files.
Page 43

E52
Chapter 4
Using Media Navigation (Playback)
______
1
Display the file select screen.
Press ▲ or ▼ in the FOLDER select screen to select the folder
containing the file you want to transfer, and then press s.
The file select screen will appear.
2
Display the menu and select MO VE.
Press the MENU button to display the menu, and press ▼ to
select MOVE.
3
Display the screen for transfer.
Press s.
The menu will disappear and the MOVE screen will appear.
* To stop transfer, press t.
4
Select the file you want to transfer .
Use ▲ or ▼ to select the files you want to transfer, and then
press s.
Press the MACRO/SHIFT button to select multiple files (see
page 45).
* You can also change the folder for files with a lock symbol
().
5
Designate the folder to which you want to
transfer files.
Press ▲ or ▼ to select the number of folder to which you are to
transfer files.
Page 44

E53
______Chapter 4
Using Media Navigation (Playback)
6
Execute the transfer .
Press the REC/PAUSE button.
The transfer has been decided and the screen for selecting the file to transfer (the screen in step 4) will be
restored. The transferred file has now disappeared from this select screen.
You can continue to change folders of other files by repeating steps 4-6.
* If the folder is empty after all the files are transferred, the message “no file” will appear.
* To cancel the file transfer, press the t button before pressing REC/PAUSE. The transfer will be canceled
and the file select screen to transfer (the screen in step 4) will be restored.
7
Exit the MOVE menu item.
Press the MENU button.
The folder change will end and the file select screen (the screen in step 1) will be restored.
* A transferred file will be displayed at the top of the list of the folder to which the file has been transferred.
Page 45

E54
Chapter 4
Using Media Navigation (Playback)
______
Deleting the F ile
It is recommended that you delete as many unnecessary files as possible to expand the free
memory area of PC card.
There are two ways of deleting the file-deletion while playing back the file and deletion by
selecting the file.
* You can also use the remote control to delete files.
* If you repeat recording and deleting of a large file, interference may enter the recorded moving pictures. It is rec-
ommended that you create backup copy earlier and initialize the PC card (see page 84).
1
2
1
Play back the file and press the
B.LIGHT/DEL·DIV button.
When you press the B.LIGHT/DEL·DIV button during playback, the MP-EG10W will enter the pause mode, and the Screen
for Deleting Files will appear.
* Locked files cannot be deleted: Unlock the files before delet-
ing them (see page 57).
* To cancel deletion, press the t button.
2
Execute deletion.
Press the REC/PAUSE button.
The file being displayed will be deleted and the file select screen
will be restored.
Deleting a file being played bac k:________________________
* Take great care when deleting files, since the files you have deleted
once cannot be restored.
Page 46

E55
______Chapter 4
Using Media Navigation (Playback)
3
4
2
1
1
Display the file select screen.
Press ▼ or ▲ with the FOLDER select screen to select the
folder containing the file you want to delete, and then press s.
The file select screen will appear.
2
Select the file to be deleted.
Press ▼ or ▲ to select the file you want to delete.
You can select multiple files by pressing the MACRO/SHIFT
button (see page 45).
* You cannot delete a file with the lock symbol (see page 57).
3
Display the screen for deleting files.
Press the B.LIGHT/DEL·DIV button.
The screen for deleting files will appear, and message
“DELETE FILE(S)” will appear.
* To cancel deletion, press the t button.
4
Execute deletion.
Press the REC/PAUSE button (or the START/STOP button on the remote control).
The selected file will be deleted and the screen in step 2 will be restored.
* Locked files will remain without being deleted. See “Protecting Files” on page 57.
* To delete another file, perform steps 2–4 again.
* If the folder is empty after all the files are deleted, message “no files” will appear. When you press the t
button in this case, the FOLDER select screen will be restored.
Select the file and deleting it: ___________________________
* Start Media Navigation (see page 42) and display the FOLDER
select screen to start.
* Using MACRO/SHIFT button allows you to delete multiple files at
one time.
Page 47

E56
Chapter 4
Using Media Navigation (Playback)
______
Deleting All F iles in Folder
You can delete all files in a f older at one time.
* It is recommended that you use AC power supply.
* Start Media Navigation (see page 42) and display the FOLDER select screen to start.
* Take great care when deleting files, since the files you have deleted once cannot be restored.
* You can also use the remote control to operate.
* Using the MACRO/SHIFT button allows you to delete all files in multiple folders at one time.
1
3
2
1
Select a folder .
Press ▼ and ▲ to select the folder you want to clear.
You can select multiple folders by pressing the MACRO/SHIFT
button (see page 43).
2
Press the B.LIGHT/DEL·DIV button.
The message “DELETE FOLD(S)” will appear.
* To cancel deletion, press the t button or DELETE button.
3
Execute deletion.
Press the REC/PAUSE button and deletion will be executed.
When deletion is completed, the FOLDER select screen will be restored.
* All files which have been locked will remain. See page 57 to unlock the protection of file.
* Make sure you want to delete all files in the folder before pressing the REC/PAUSE button.
Page 48

E57
______Chapter 4
Using Media Navigation (Playback)
Protecting F iles (CHG LOCK menu item)
You can lock files to protect them from accidental deletion. The protected file can be
unlocked by the same procedure as locking . There ar e two ways of locking or unlocking files:
all files in folder or specif ied f iles in f older.
5
1
3
5
4
2
1
Display the menu and select CHG LOCK.
Press the MENU button to display the menu, and press ▼ to
select CHG LOCK.
2
Display the CHG LOCK setting screen.
Press s.
The menu will diappear and the CHG LOCK setting screen will
appear.
* To stop locking or unlocking, press t.
3
Select the folder in which you want to loc k or
unlock all files.
Use ▼ or ▲ to select the folder in which you want to lock or
unlock all files, and then press t.
You can select multiple folders by pressing the MACRO/SHIFT
button (see page 43).
To lock or unloc k all files in folder:_______________________
* Using the MACRO/SHIFT button allows you to lock or unlock all
files in multiple folders at one time.
Page 49

E58
Chapter 4
Using Media Navigation (Playback)
______
4
Lock or unlock files.
Press ▼ or ▲ to lock or unlock the files.
Pressing the REC/PAUSE button will lock or unlock all files.
Perform steps 3 and 4 to lock or unlock all files in other folders.
5
Exit the CHG LOCK menu item.
Press the t button or MENU button.
Pressing t exits the CHG LOCK setting and restores the folder function setting menu (the screen in step 1).
Pressing MENU exits the CHG LOCK setting and restores the folder select screen.
6
2
3
6
5
4
1
1
Display the file select screen.
Press ▼ or ▲ with the FOLDER select screen to select the
folder containing the file you want to lock, and then press.
The file select screen will appear.
2
Display the menu and select CHG LOCK.
Press the MENU button to display the menu, and press ▼ to
select CHG LOCK.
To specify files in folder and loc k or unlock them: __________
* Start Media Navigation (see page 42) and display the FOLDER
select screen to start.
* You can also use the remote control to operate.
* Using the MACRO/SHIFT button allows you to lock or unlock mul-
tiple files at one time.
Page 50

E59
______Chapter 4
Using Media Navigation (Playback)
3
Display the CHG LOCK setting screen.
Press s.
The menu will disappear and the CHG LOCK setting screen
will appear.
* To stop locking or unlocking, press t.
4
Select the files you want to lock or unlock.
Use ▲ or ▼ to select the folder in which you want to lock or
unlock all files, and then press s.
You can select multiple files by pressing the MACRO/SHIFT
button (see page 45).
5
Lock or unlock the files.
Press ▼ or ▲ to lock or unlock the files.
Pressing the REC/PAUSE button will lock or unlock the files.
You will be able to lock or unlock another file by performing
steps 4 - 5.
6
Exit the CHG LOCK menu item.
Press the t button or MENU button.
Pressing t exits the CHG LOCK setting and restores the file
function setting menu (the screen in step 2).
Pressing MENU exits the CHG LOCK setting and restores the
file select screen (shown in step 1).
Page 51

E42
Chapter 4
Using Media Navigation (Playback)
______
Starting Media Navigation
The following describes how to start Media Navigation
used for management of recorded files (see page 14).
Always start Media Navigation befor e performing each
operation.
CAM/OFF/PLAY
switch
Starting Media Navigation.
Hold down the red button at the center of the switch and set the switch to PLAY. Media Navigation will automatically start, and the FOLDER select screen or file select screen will appear.
Exiting Media Navigation.
Set the CAM/OFF/PLAY switch to OFF.
In the following text, the explanation will be started from the FOLDER
select screen.
* If the file select screen is displayed, press t button to return to the
FOLDER select screen.
FOLDER Select Screen
File Select Screen (with thumbnails)
Page 52
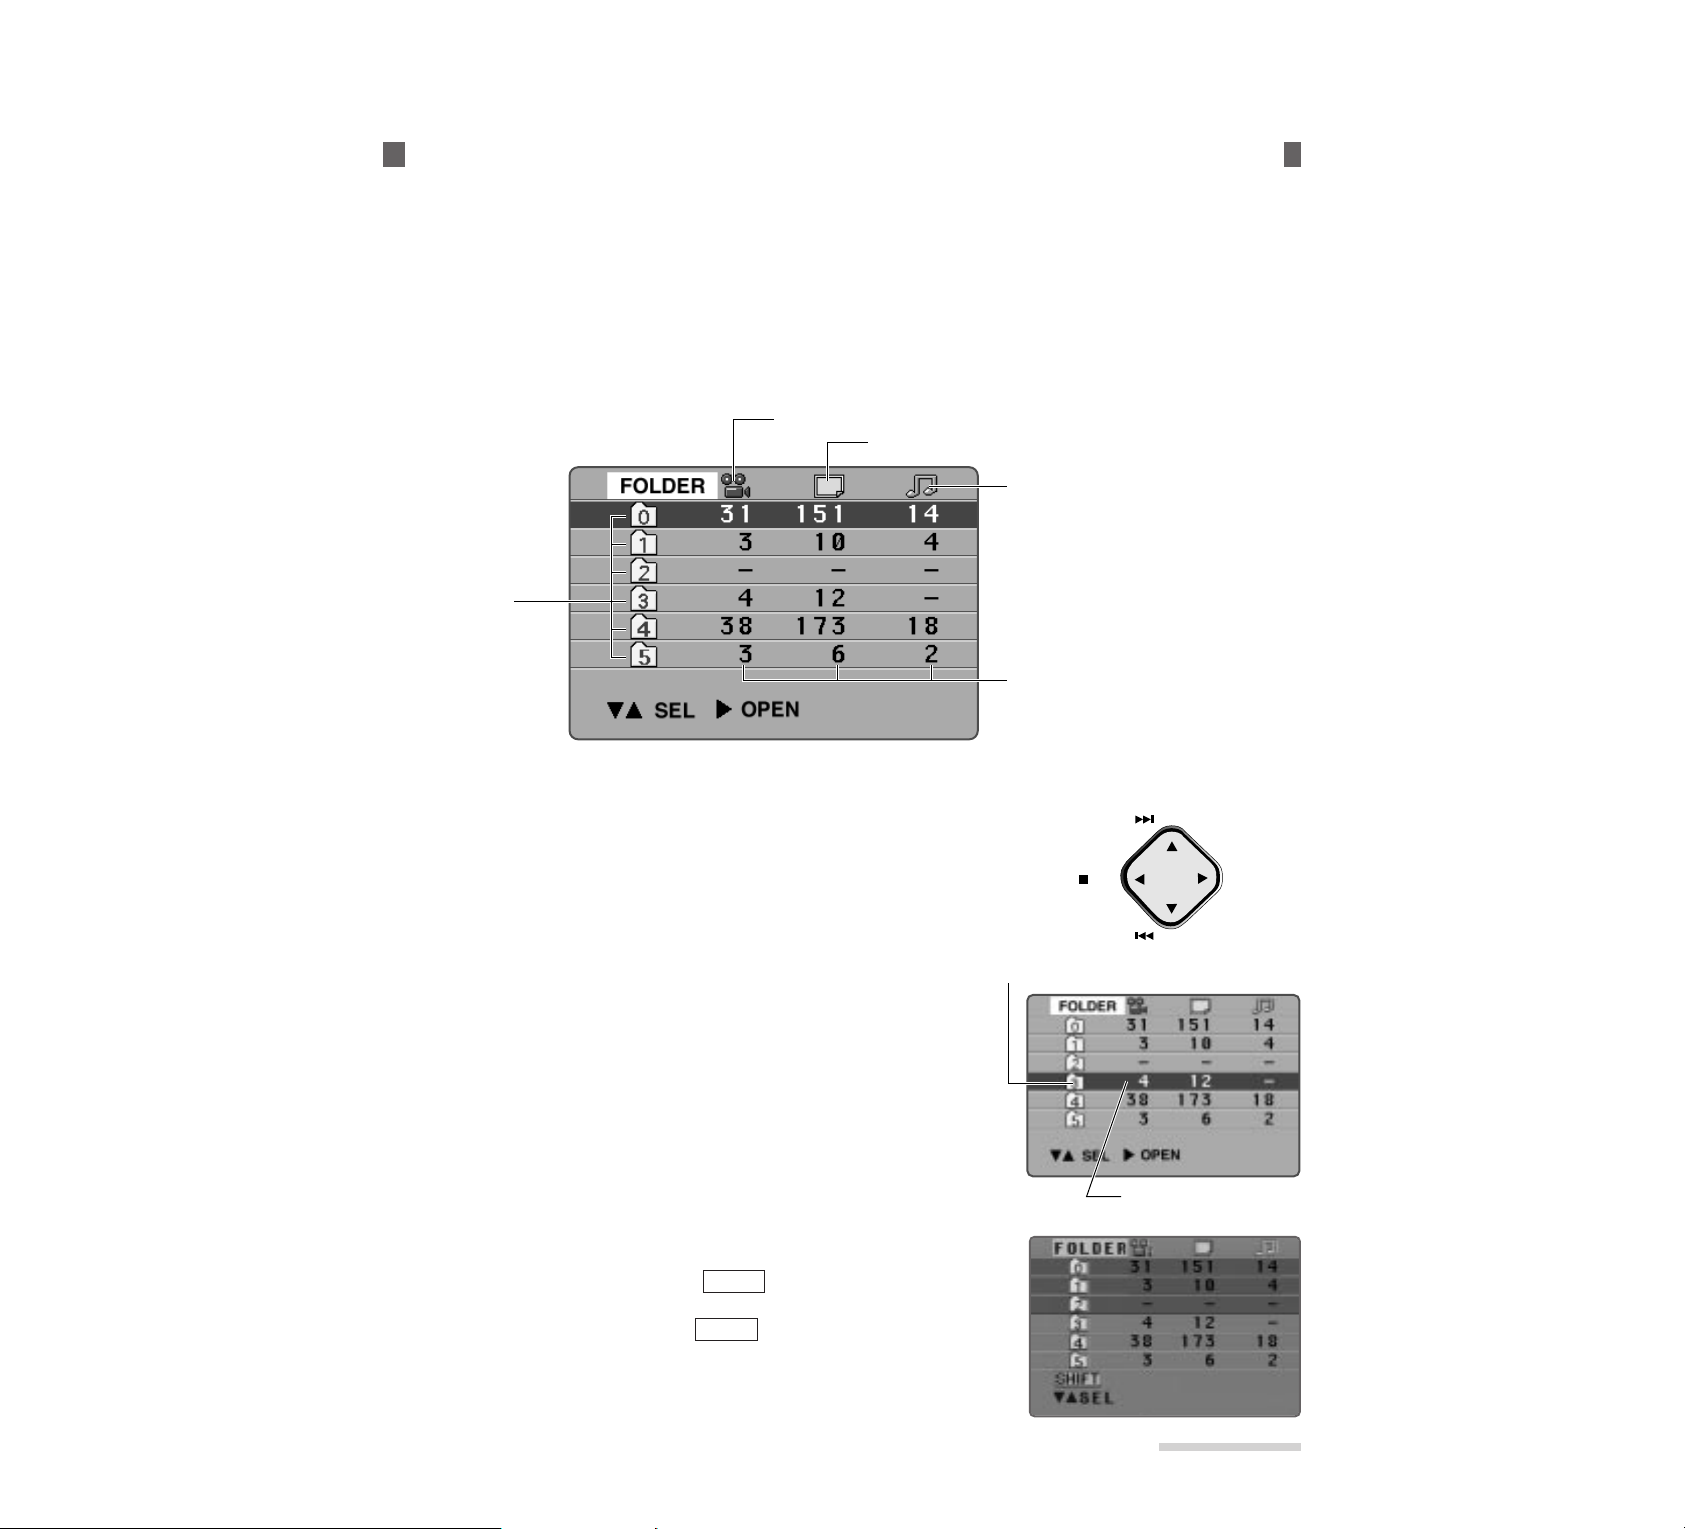
E43
______Chapter 4
Using Media Navigation (Playback)
On-Screen Display and Basic Operation of Media Navigation.
There are two basic screens for Media Navigation - the FOLDER select screen, which displays file number list in folders, and the file select screen, which displays a list of files.
Following are details of the displays on these scr eens and the basic operation methods.
Details of display on FOLDER select screen_______________
This screen allows you to select a folder which contains files you want to operate. After selecting a folder, you can go
on for auto play, repeat, slide, free (remaining) memory, lock/unlock, transfer, copy, deletion, etc.
Basic operation on folder select screen __________________
Use the buttons shown below corresponding to ▼, ▲, s and t in the
following text. You can use the remote control to operate in the same
way.
▼: R.SEARCH button s: PLAY button
▲: F.SEARCH button t: STOP button
T o select a f older:
Press ▲ or ▼ to move the highlighted section up or down and select a
folder.
T o select m ultiple f olders:
Press the MACRO/SHIFT button so that appears at bottom left
of the screen, and then press the ▲ or ▼ button to select folders.
Press MACRO/SHIFT again to release .
SHIFT
SHIFT
FOLDER Select Screen
Folder (0-5)
Symbol showing a moving picture file
Symbol showing a still picture file
Symbol showing a still picture with audio
**You can see six folders and the
number of files in each folder on this
screen.
The recorded files are stored in folder
0 (non-identified folder).
File numbers of moving picture, still
picture and still-with-audio files in each
folder
STOP PLAY
Folder being selected
F.SEARCH
R.SEARCH
Highlighted section
Page 53

E44
Chapter 4
Using Media Navigation (Playback)
______
T o open the f older:
Press s to open the selected folder, and the file select screen will
appear (see page 48).
* If you have selected multiple folders, you cannot open them.
T o displa y the menu:
Press the MENU button, and the menu for operating folders will appear.
You can switch the menu by pressing the ▲ or ▼button. To switch off
the menu, press the button again.
* A menu item displayed in gray text cannot be operated.
Details of display on File select screen ___________________
This screen allows you to select files, and operate them for playback, deletion, auto play, repeat, slide, free (remaining) memory, lock/unlock, transfer, copy, sort, changing recorded date/time, etc.
Basic operation on file select screen_____________________
Use the buttons shown below corresponding to ▼, ▲, s and t in the
following text. You can use the remote control to operate in the same
way.
▼: R.SEARCH button s: PLAY button
▲: F.SEARCH button t: STOP button
File Select Screen
(with thumbnails)
Date/time when recording of the file was started
Symbol of file
type, moving
picture or still
picture with
audio or still
picture
Number of page being currently displayed
Total number of pages contained
in this folder
Capacity of files
Lock symbol showing inhibition of deletion
Thumbnail
Number of
folder which
is currently open
* See “Switching Thumbnail Display On or Off” on page 63.
STOP PLAY
F.SEARCH
R.SEARCH
Page 54

E45
______Chapter 4
Using Media Navigation (Playback)
T o select a file:
Press ▼ or ▲ to move the highlighted section up or down and select a
file. When the folder contains more files than can be displayed on one
screen, hold ▼ or ▲ the next screen will appear.
Higlighted sectionSelected file
T o select m ultiple files:
Press the MACRO/SHIFT button so that appears at bottom left
of the screen, and then press the ▼ or ▲ button to select files.
Press MACRO/SHIFT again to release .
SHIFT
SHIFT
T o pla y:
Press s.
Moving pictures: The first picture of file will appear and freeze. Press s again, and pictures and sound will play.
When playback reaches the end, the last picture of the file will appear and freeze.
Still picture: Will appear instantaneously.
Still with audio: The still picture will appear, but sound will stop. Press s again, and the sound will also play back.
* If you have selected multiple files, they cannot be played back.
* Auto play allows playback of multiple files (see page XX).
T o return to the FOLDER select screen:
Press t, and the folder select screen will be restored.
T o displa y the menu:
Press the MENU button, and the menu for operating files will appear.
You can switch the menu by pressing the ▼ or ▲button. To switch off
the menu, press the MENU button again.
* A menu item displayed in gray text cannot be operated.
Page 55

E46
Chapter 4
Using Media Navigation (Playback)
______
Playing Back F iles
Operate the following to play back recorded f iles:
* Start Media Navigation (see page 42) and display the FOLDER
select screen to start.
* You can also use the remote control to operate.
3
4
1
2
1
Display the file select screen.
Press ▼ or ▲ with the FOLDER select screen to select the
folder containing the file you want to play back, and then press
s.
The file select screen will appear.
2
Select the file to be played back.
Press ▼ or ▲ to select the file you want to play back and highlight it.
* If you have selected multiple files, they cannot be played
back.
* Auto play allows playback of multiple files (see page 65).
3
Display the file to be played bac k.
Press s.
Moving pictures: The first picture of file will appear and freeze. Press s again, and pictures and sound will
play.
Still picture: Will appear instantaneously.
Still with audio: The still picture will appear, but sound will stop.
* The displayed date and time during playback are fixed at those on which you started recording. The date and
time will not change even as picture playback progresses.
4
Play back the file
Press s.
Pictures and sound will play.
Moving pictures: The pictures and sound will play. When playback reaches the end, the last picture of the file
will appear and freeze.
Still with audio: The sound will also play back.
Page 56

E47
______Chapter 4
Using Media Navigation (Playback)
Adjusting the volume
When you hear the sound from the built-in speaker, use the ZOOM/VOL button to adjust the volume.
Pressing 1 increases the volume, and pressing – decreases the volume, When this button is pressed, the
volume bar will appear on the left end of the LCD monitor.
* When you connect the MP-EG10W to a TV, be sure to adjust the volume on the TV.
Visual search and frame advance
During visual search and frame advance, you can play moving pictures in the forward or reverse direction.
• Visual search
Forward: Hold down ▲ during playback of moving pictures. File will play forward at a speed approx.
three times the normal play speed, and the last picture of the file will freeze. No audio.
Reverse: Hold down ▼ during playback of moving pictures. File will play in reverse at a speed approx.
three times the normal play speed, and the first picture of the file will freeze. No audio.
• Frame advance
Forward: Press ▲ during play pause of moving pictures, and the file will play in the frame advance
mode. Holding down ▲ will advance frames continuously and stop at the last picture of the
file. No audio.
Reverse: Press ▼ during play pause of moving pictures, and the file will play in the frame back mode.
Holding down ▼ will move back frames continuously and stop at the first picture of the file. No
audio.
Pausing
Press the REC/PAUSE button to pause the playback of moving pictures or a still picture with audio. Press
the REC/PAUSE button again to resume playback.
Audio search
To search for sound of still picture with audio.
Forward: Hold down ▲ during playback of still picture with audio. The sound will be cued and stop at
the end of the file.
Reverse: Hold down ▼ during playback of moving pictures or still picture with audio. The sound will be
reviewed and stop at the beginning of the file.
To select files in the same folder next
Press ▲ or ▼ during file playback (in case of moving picture or still with audio file: stop at the beginning of
file), and the start pictures of each file will appear in sequence. Perform step 3 and after repeatedly.
To select files in another folder next
Press t (in case of moving picture or still with audio file: press t twice), and the file select screen will be
restored. Perform step 2 and after repeatedly.
• If “FILE ERROR” appears:
If you attempt to play back a file that the MP-EG10W cannot play back, the message “FILE ERROR” will
appear. In this case, the MP-EG10W operation may be malfunctioning. Delete the file to prevent future
malfunction.
Page 57

E48
Chapter 4
Using Media Navigation (Playback)
______
Playback Using the Remote Control
You can use the remote control to operate playback.
* Insert the lithium battery into the remote control in advance. (See
page 27)
1
1
Set the CAM/OFF/PLAY switch to PLAY.
Hold down the red button at the center of the switch and set the
switch to PLAY. The Media Navigation screen will appear.
2
Use the remote control to operate playback.
Point the remote control at the MP-EG10W’s infrared receiver
and perform playback operation (see pages 40-41).
* Be careful that strong light does not strike the infrared re-
ceiver. The remote control distance may be extremely small
or no operation can be done.
Infrared receiver
Within 4 m (Approx. 13 feet)
for indoor recording
Buttons on the remote control
The following shows the buttons on the remote control used.
MACRO/
SHIFT
STOP
REC/
PAUSE
PLAY
R.SEARCH
ZOOM VOL
DISPLAY
MENU
REC MODE/
THUMBNAIL
B.LIGHT/
DEL· DIV
F.SEARCH
F.SEARCH :
Press this in the stop mode to display
the start pictures of each file in sequence.
PLAY :
To play pictures and sound.
DISPLAY:
To turn on or off the on-screen display
(characters and symbols). (See page 99)
B.LIGHT/DEL·DIV:
To delete displayed files (see page 54).
Or to divide moving pictures being played
back (see page 49).
MENU:
To display menu (see pages 44 and 45).
Or to switch to setting screen during file playback
(see page 77).
REC MODE/THUMBNAIL:
To switch thumbnails (see page 73).
STOP:
To start or stop recording.
REC/PAUSE:
Press during playback to stop pictures and
sound temporarily.
R.SEARCH :
Press this in the stop mode to display the start
pictures of each file in reverse order.
VOL button:
To increse (▲) or decrease (▼) the volume
MACRO/SHIFT:
To select multiple folders or
multiple files (See pages 43 and 45).
Or to enter the division mode (See page 49).
Page 58

E49
______Chapter 4
Using Media Navigation (Playback)
REC
PAUSE ll
Dividing Moving Pictures
To divide a moving picture f ile: This is useful when you
edit a moving picture file by dividing an unnecessary
portion and deleting it.
* File once divided cannot be reconnected.
* Only moving picture files can be divided.
* Start Media Navigation (see page 42), play moving pictures, and
then start to divide the file.
* Locked moving picture files cannot be divided: Unlock the files
before dividing them (see page 57).
* You can also use the remote control to operate.
4
1
3
2
1
Pause the file at the division point.
To pause playback, press the REC/PAUSE button during playback of moving pictures.
2
Press the MACR O/SHIFT button.
SHIFT will appear at bottom left of the screen.
3
Display the screen for division.
Press the B.LIGHT/DEL・DIV button. A message for making
sure of file division will appear.
* To stop division, press t.
4
Execute the division.
Press the REC/PAUSE button. The file will be divided, and the
file select screen will be restored. The divided latter half file will
be placed in the original file position in the list, and the former
half file will be placed under it.
* Files of less than 3 seconds cannot be divided. If a file of 3
seconds or more is to be divided and the time of either divided file becomes less than 1.5 seconds, the file will be divided
at the 1.5-second point.
* If the PC card is full, no file can be divided.
Page 59

E37
________________Chapter 3
Recording
Macro Recording
You can focus on a subject as near as 8 cm and r ecord it.
1
Set the CAM/OFF/PLAY switch to CAM.
Hold down the red button at the center of the switch and set the
switch to CAM. The image from the lens will appear on the
LCD monitor, and the MP-EG10W will enter the record pause
mode (“PAUSE” will appear).
2
Set to the macro recording mode.
Press the MACRO/SHIFT button.
will appear under the zoom bar on the left of display, and the
MP-EG10W will switch to macro recording.
Pressing MACRO/SHIFT again will release macro recording.
* Be sure to press the MACRO/SHIFT button to release macro
recording: Pressing the ZOOM/VOL button will not release
macro recording.
* The zoom bar will not disappear until macro recording is
released.
M
3
Bring a subject into focus.
Observing the LCD screen, adjust the distance to the subject so
that it is seen clearest.
4
Switch the record mode indicator .
Press the REC MODE/THUMBNAIL button to select moving
pictures, still pictures, consecutive still pictures, or still picture
with audio. For subsequent procedure, see instructions shown in
each record mode (on pages 31-36).
1
2
PAUSE FINE
10/24/1998
11:30AM
Indicates that the MP-EG10W
is in the record pause mode.
0:00:00
PAUSE FINE
REM 0:15
10/24/1998
11:30AM
Macro recording
T
W
M
Page 60

E38
Chapter 3
Recording
________________
Recording with Backlight Corrected
If subject is darker than background, use the backlight
correction function.
1
Set the CAM/OFF/PLAY switch to CAM.
Hold down the red button at the center of the switch and set the
switch to CAM. The image from the lens will appear on the
LCD monitor, and the MP-EG10W will enter the record pause
mode (“PAUSE” will appear).
2
Set to the backlight correction mode.
Press the B.LIGHT/DIV.DEL button.
“ ” will appear on the screen and backlight will be corrected.
Pressing B.LIGHT/DIV.DEL or turning power off will release
backlight correction.
3
Switch the record mode indicator .
Press the REC MODE/THUMBNAIL button to select moving
pictures, still pictures, consecutive still pictures, or still picture
with audio. For subsequent procedure, see instructions shown in
each record mode (on pages 31-36).
1
2
PAUSE FINE
10/24/1998
11:30AM
Indicates that the MP-EG10W
is in the record pause mode.
0:00:00
PAUSE FINE
REM 0:15
10/24/1998
11:30AM
Backlight corrector
Page 61

E39
________________Chapter 3
Recording
Place the MP-EG10W on the stand and turn the camera block so the lens faces you. You can
record yourself using the r emote control.
Recording Image of Your Portrait Using the Remote Control
Remote control
(MP-RM10W)
Stand
1
Turn the camera block.
Turn the camera block so the lens faces the same direction as the
LCD monitor does.
Place the stand in a flat, stable position, and install the MPEG10W on the stand as shown in the figure.
* Select a place where there are no obstacles between you and
the MP-EG10W. If there is an obstacle between the remote
control and MP-EG10W's infrared receiver, you cannot operate the MP-EG10W with the remote control.
* Be sure to select a stable installation place. Installing the
MP-EG10W in an unstable place is dangerous.
* You can use a generally available tripod for a still camera
instead of the stand.
* The stand can be tilted, but cannot be rotated. Do not force to
turn it.
Hold down the red button at the center of the switch and set the switch to CAM. Viewing the LCD monitor
screen, adjust the angle of the stand.
2
Install the MP-EG10W .
3
Set the CAM/OFF/PLAY switch to CAM and adjust the angle.
Point the remote control at the MP-EG10W’s infrared receiver
to operate.
* A lithium battery must be inserted into the remote control
(see page 27).
* Be careful that strong light does not strike the infrared re-
ceiver. The remote control distance may be extremely small
or no operation can be done.
4
Use the remote control to record.
Camera block
Infrared receiver
Within 4 m (Approx. 13 feet)
for indoor recording
Page 62

E40
Chapter 3
Recording
________________
Buttons on the remote control
The following shows the buttons on the remote control used for recording, and their functions:
MACRO/
SHIFT
STOP
REC/
PAUSE
PLAY
R.SEARCH
ZOOM VOL
DISPLAY
MENU
REC MODE/
THUMBNAIL
B.LIGHT/
DEL· DIV
F.SEARCH
B.LIGHT/DIV.DEL:
To switch backlight correction
on and off (see page 38).
ZOOM:
To adjust zoom.
DISPLAY:
To turn on or off the on-screen
display (characters and symbols).
(See page 80)
MENU:
To display menu (see page XX).
REC MODE/THUMBNAIL:
To switch the record mode.
START/STOP:
To start or stop recording.
This corresponds to the REC
button on the MP-EG10W.
MACRO/SHIFT:
To switch macro recording
on and off (see page 37).
Page 63

E30
Chapter 3
Recording
________________
The camera block is turned to record an image of yourself when the MP-EG10W has been
shipped. Rotate it before r ecording subjects other than y ourself.
If the LCD screen is difficult to see during shooting outdoors, etc., attach the sunshade (provided) to the LCD screen.
Rotating the camera block
Hold the camera block at both sides and turn it clockwise, with the lens
facing forward.
* The camera block cannot be turned over limit. Do not use force,
since it could cause malfunctions.
When you want to record yourself or house the MP-EG1A in its carrying case, turn the camera block counterclockwise so that the lens faces
you.
* Take care that you do not touch the lens when holding the camera
block.
Attaching the sunshade
Align the convex sections on both sides of sunshade with the concave
sections on the MP-EG10W, and fit in the sunshade.
To open the sunshade: To close the sunshade:
When not using, fold the segments
as shown in the figure be right.
Rotating the Camera Block and Attaching the Sunshade
Camera block
Detaching the sunshade
Close the sunshade and release the concave side on the left as shown in
the figure be right to detach it.
Page 64

E31
________________Chapter 3
Recording
The MP-EG10W records moving pictures and audio.
* The illustrations used in the following text may be dif-
ferent from the actual pictures.
* Moving picture files recorded by the MP-EG10W
cannot be played back by the MP-EG1A.
* All files recorded by the MP-EG10W are saved once
in “folder 0” (see page 14): You cannot designate
another folder in advance.
Recording Moving Pictures
1
Set the CAM/OFF/PLAY switch to CAM.
Hold down the red button at the center of the switch and set the
switch to CAM. The image from the lens will appear on the
LCD monitor, and the MP-EG10W will enter the record pause
mode ("PAUSE" will appear).
2
Check that the " " record mode indicator
appears.
If the " " moving picture record mode indicator does not
appear, press the REC MODE/THUMBNAIL button repeatedly until it does.
3
Adjust the image size of subject.
Press the ZOOM/VOL button to adjust the image size of subject. Pressing T (tele) magnifies the image, and
pressing W (wide) makes it smaller.
Press the MACRO/SHIFT button when you want a closeup on a subject for recording (see page 37).
* When the ZOOM/VOL button is pressed, the zoom bar will appear on the left end of the LCD monitor.
3
6
1
2
5
0:00:00
PAUSE FINE
REM 0:15
10/24/1998
11:30AM
Zoom Bar
Zooming
The MP-EG10W can zoom in on a subject and enlarge it up to 6
times, 3 times the optical zoom multiplied by 2 times the digital
zoom. When the MP-EG10W enters the digital zoom area, the
zoom bar will change from white to yellow in the LCD monitor,
and the picture will be slightly rough in this area.
PAUSE FINE
10/24/1998
11:30AM
Indicates that the MP-EG10W
is in the record pause mode.
0:00:00
REM 0:15
Record Mode Indicator
Page 65

REC FINE
10/24/1998
11:30AM
Change color to RED
E32
Chapter 3
Recording
________________
4
Check the image quality mode.
The quality of image to be recorded depends on
the setting of this mode: Switch the image quality
mode between FINE and STND.
* The maximum recording time of PC card
depends on whether you choose image quality
mode FINE or STND (see page 94).
* See “Switching image quality mode of moving
pictures” (See page 94).
5
Record.
Press the REC/PAUSE button, the "REC" indicator will appear.
Recording will start. When the REC button is
pressed again, recording of the file will end.
Sound is always recorded with moving pictures:
You cannot record pictures without sound.
During recording, the "REC" indicator lights
(RED Color), and "→ " indicates in the LCD
monitor. When recording is finished, it will
change to "PAUSE" (GREEN color).
6
Set the CAM/OFF/PLAY switch to
OFF.
After recording is finished, set the switch to OFF to turn power off.
Do not turn power off when the ACCESS indicator is flashing: This could destroy the stored
data.
Be sure you first set the switch to OFF even if you want to set it to PLAY immediately. If you
don't, the MP-EG10W could malfunction.
Minimum distance recording
The MP-EG10W can record a subject as close as 28 cm(11.2 in.). If you want a greater closeup on a subject, select macro recording (see page 37). You can bring a subject as close as 8 cm into focus with macro
recording.
Auto power off (ENERGY SAVE ON)
The MP-EG10W has an “auto power off (in 5 minutes)” function to prevent battery from going dead. When
the recording pause mode (during recording) or playback stop mode (during playback) or playback pause
mode (during playback, except for auto play, repeat play) or start Media Navigation (during playback) continues for 5 minutes or more, the MP-EG10W will turn off automatically. Press the PLAY or REC button on
the MP-EG10W to turn the MP-EG10W on again. The original operation mode will be restored.
You can disable the auto power off function. See "Switching Auto Power Off Setting" on page 78 for details.
0:00:00
PAUSE FINE
REM 0:15
10/24/1998
11:30AM
Image quality mode
Page 66

E33
________________Chapter 3
Recording
Recording Still Pictures
* If a still picture has been recorded, the remaining number of storable
still pictures (REM) which appears in the on-screen display may not
decrease. See “Remaining number indicator of storable still pictures” on page 35.
* All files recorded by the MP-EG10W are saved once in “folder 0”
(see page 14): You cannot designate another folder in advance.
1
Set the CAM/OFF/PLAY switch to CAM.
Hold down the red button at the center of the switch and set the
switch to CAM. The image from the lens will appear on the
LCD monitor, and the MP-EG10W will enter the record pause
mode ("PAUSE" will appear).
2
Set the record mode indicator to “ ”.
Press the REC MODE/THUMBNAIL button repeatedly until
the “ ” still picture record mode indicator appears on the
LCD monitor.
3
Check that the interval indicator is off.
If "INTERVAL" appears on the monitor, interval recording will
be made at the displayed "INTERVAL".
4
Adjust the image size of subject.
Press the ZOOM/VOL button to adjust the image size of subject. Pressing T (tele) magnifies the image, and
pressing W (wide) makes it smaller.
Press the MACRO/SHIFT button when you want a closeup on a subject for recording (see page 37).
* See "Zooming" on page 31 for details of zoom.
* When the ZOOM/VOL button is pressed, the zoom bar will appear on the left end of the LCD monitor.
5
Record.
Press the REC/PAUSE button to start recording. The REC indicator will appear.
The image at the moment the button is pressed will be recorded
as a still picture.
* The shutter speed varies from 1/4 to 1/800 second automati-
cally, according to the brightness of subject. If the subject is
dim, the shutter speed will be a maximum of 1/4 second, so
be careful of camera movement.
4
1
2
5
PAUSE
10/24/1998
11:30AM
Indicates that the MP-EG10W
is in the record pause mode.
REM 2000
Check that “INTERVAL”
is not displayed.
REC
10/24/1998
11:30AM
RED color
REM 2000
Record Mode Indicator
Page 67

E34
Chapter 3
Recording
________________
Recording Still Pictures at Intervals
If the interval recording has been set (see page 96), you
can automatically record still pictures at a specified
interval.
* Check the free memory area on PC card and battery remaining level.
* It is recommended that you use AC power supply.
* All files recorded by the MP-EG10W are saved once in “folder 0”
(see page 14): You cannot designate another folder in advance.
1
Set the CAM/OFF/PLAY switch to CAM.
Hold down the red button at the center of the switch and set the
switch to CAM. The image from the lens will appear on the
LCD monitor, and the MP-EG10W will enter the record pause
mode ("PAUSE" will appear).
2
Set the record mode indicator to “ ”.
Press the REC MODE/THUMBNAIL button repeatedly until
the “ ” still picture record mode indicator appears on the
LCD monitor.
3
Check the interval.
Check that the INTERVAL setting time (30 seconds, 1 minute
or 5 minutes) appears in the on-screen display.
If "INTERVAL" does not appear, a MP-EG10W will not operate interval (see page 33).
* See "Setting Recording Interval" on page 96 for switching the interval.
5
Record.
Press the REC/PAUSE button to start recording.
The image at the moment the button is pressed will be recorded
as a still picture, and the interval counter will count down. Each time the interval counter is reset to 0, still pictures will be recorded automatically.
Pressing the REC/PAUSE button again stops interval recording.
* When the CAM/OFF/PLAY switch is set to OFF, the interval recording will be released.
4
Adjust the image size of subject.
Press the ZOOM/VOL button to adjust the image size of subject. Pressing T (tele) magnifies the image, and
pressing W (wide) makes it smaller.
Press the MACRO/SHIFT button when you want a closeup on a subject for recording (see page 37).
* See "Zooming" on page 31 for details of zoom.
* When the ZOOM/VOL button is pressed, the zoom bar will appear on the left end of the LCD monitor.
4
1
2
5
PAUSE
10/24/1998
11:30AM
Indicates that the MP-EG10W
is in the record pause mode.
INTERVAL
0:30
REM 2000
Record Mode Indicator
INTERVAL
0:30
REM 2000
30-second interval
REC
10/24/1998
11:30AM
RED color
Page 68
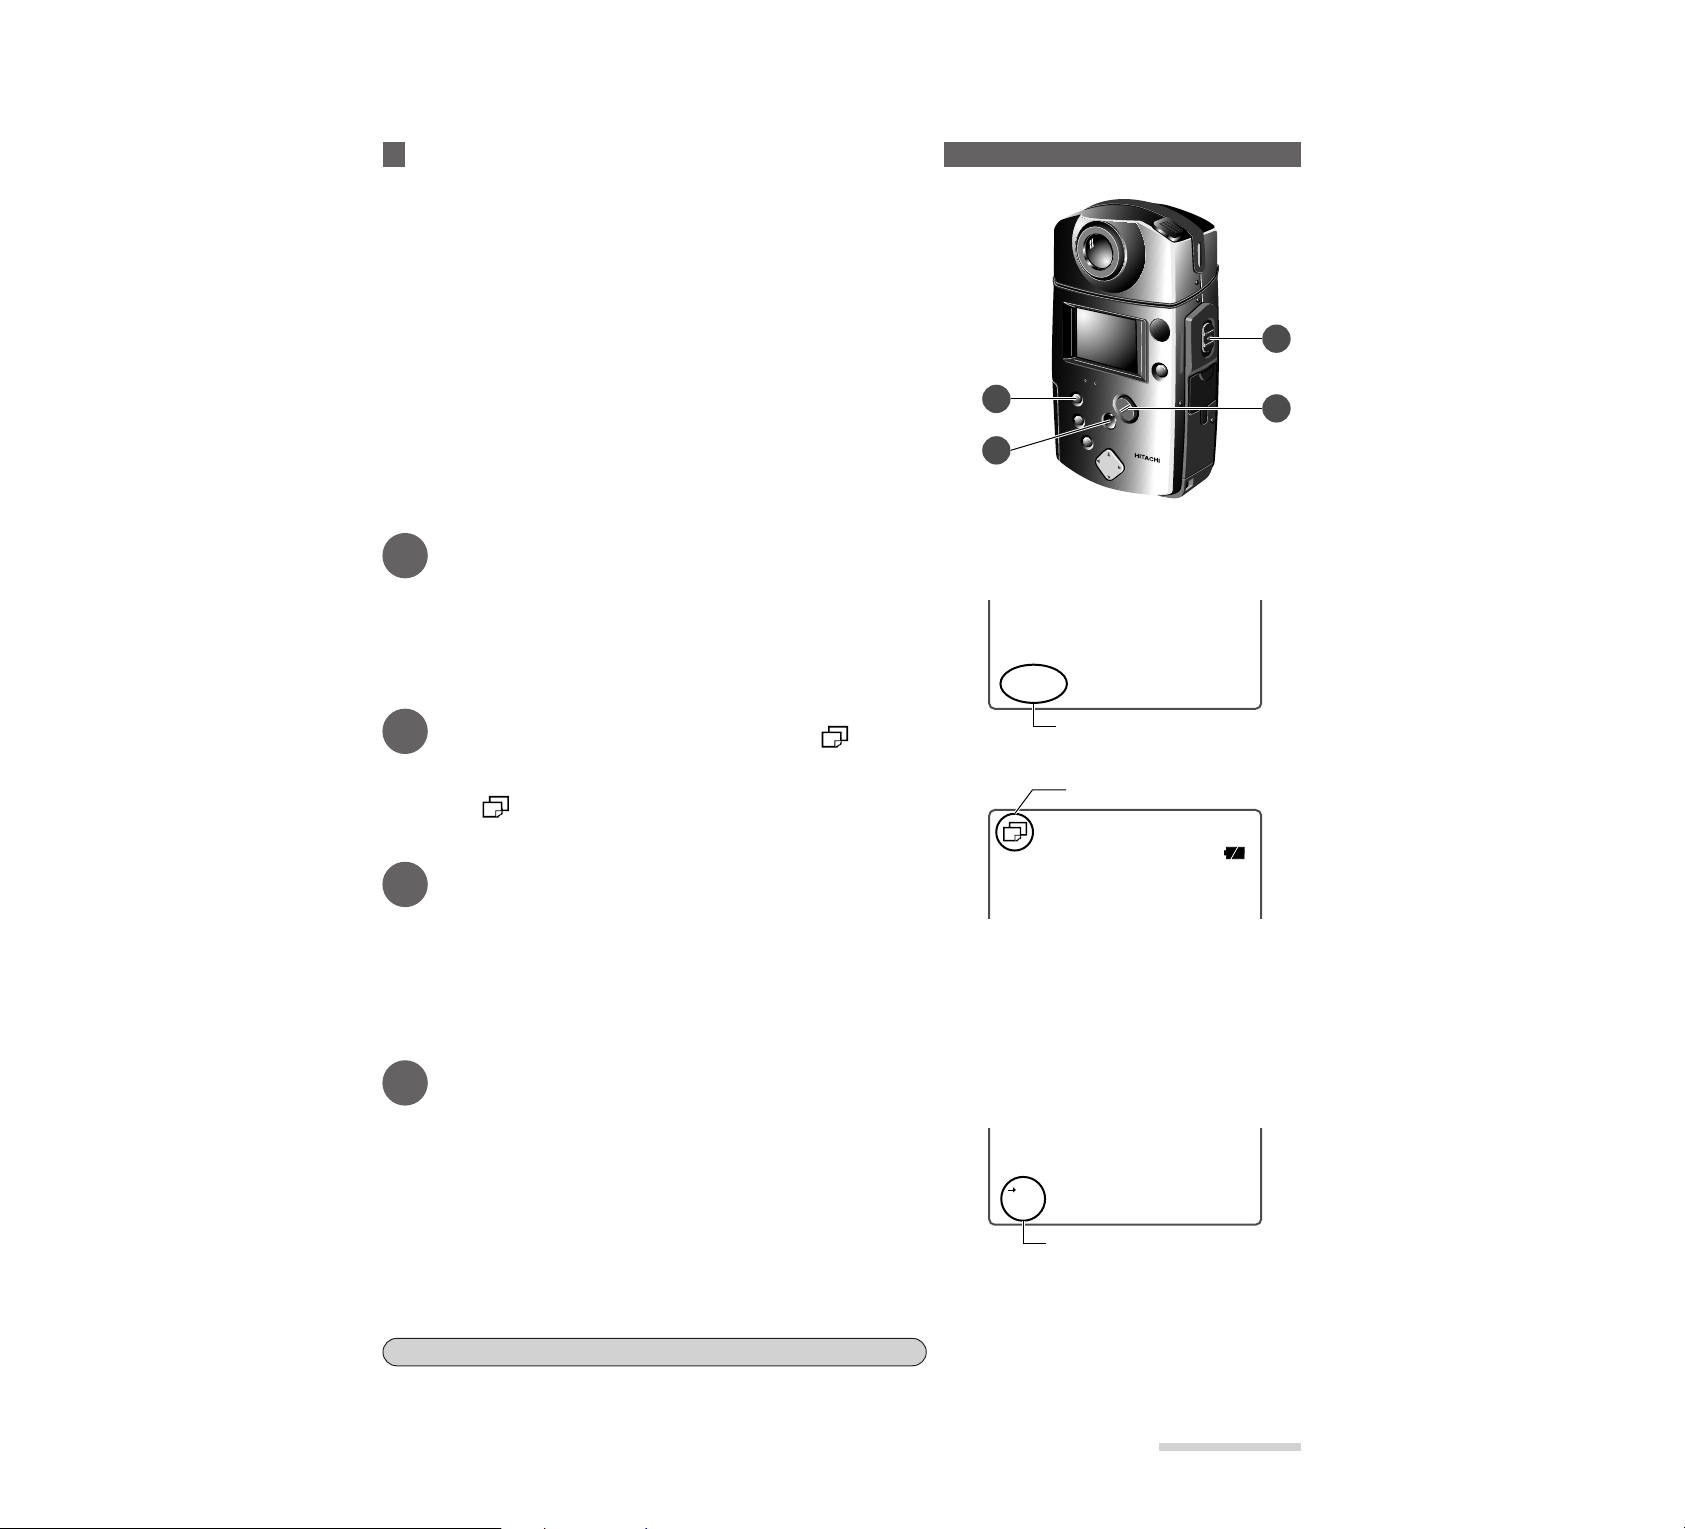
E35
________________Chapter 3
Recording
Recording Consecutive Still Pictures
This record mode allows you to automatically record
five consecutiv e still pictures at a speed of about two pictures per second.
* If the brightness of subject changes abruptly during consecutive
recording, it could result in overexposure or underexposure.
* All files recorded by the MP-EG10W are saved once in “folder 0”
(see page 14): You cannot designate another folder in advance.
1
Set the CAM/OFF/PLAY switch to CAM.
Hold down the red button at the center of the switch and set the
switch to CAM. The image from the lens will appear on the
LCD monitor, and the MP-EG10W will enter the record pause
mode ("PAUSE" will appear).
2
Set the record mode indicator to “ ”.
Press the REC MODE/THUMBNAIL button repeatedly until
the “ ” consecutive record mode indicator appears on the
LCD monitor.
3
Adjust the image size of subject.
Press the ZOOM/VOL button to adjust the image size of subject. Pressing T (tele) magnifies the image, and
pressing W (wide) makes it smaller.
Press the MACRO/SHIFT button when you want a closeup on a subject for recording (see page 37).
* See “Zooming” on page 31 for details of zoom.
* When the ZOOM/VOL button is pressed, the zoom bar will appear on the left en d of the LCD monitor.
4
Record.
Hold down the REC/PAUSE button.
Five consecutive still pictures will be recorded at a speed of
about two pictures per second, after which recording will stop.
If you release the REC/PAUSE button during consecutive
recording, recording will stop at the moment you release the button.
* If you are recording a dark scene or a subject with complicat-
ed patterns, the consecutive recording speed may be one pic-
3
1
2
5
PAUSE
10/24/1998
11:30AM
Indicates that the MP-EG10W
is in the record pause mode.
INTERVAL
0:30
REM 2000
Record Mode Indicator
REC
10/24/1998
11:30AM
RED color
Remaining number indicator of storable still pictures:
If a still picture whose size is little has been recorded, the remaining number indicator may not change.
Please understand in advance that this does not indicate a fault.
Page 69

E20
Chapter 2
Set-up
___________________
The battery pack is the portable power supply of the MP-EG10W. Charge befor e use.
When the battery remaining level indicator flashes white, you need to re-charge the battery pack. See “Removing
the battery pack” instruction (on page 21 ). A fully charged battery pack powers the MP-EG10W for about 40 minutes.
Charging Battery P ack
Caution: Be sure to use the specified MP-
AC1A AC adapter/charger to charge
the battery pack.
If you use AC adapter/chargers other
than the MP-AC1A, heat generation,
damage, fire, leakage of liquid, etc.
could result.
1
Plug the AC adapter/charger into
an AC outlet.
The red POWER indicator will light.
Note: Charging is not possible if the DC power
cord is plugged into the AC adapter/charger.
2
Attach the battery pack.
The green CHARGE indicator will light and
charging will start. Continue charging the battery
pack until the indicator goes out. Charging will
be finished in about 100 minutes. After charging
is finished, unplug the AC adapter/charger from
the AC outlet, and then remove the battery pack
from the AC adapter/charger.
Skillful use of battery pack
See “Tips on Battery Pack” on page 106.
POWER indicator CHARGE indicator
Battery pack
(MP-BP1A)
AC adapter/charger
(MP-AC1A)
Page 70

Lever
E21
___________________Chapter 2
Set-up
Load the battery pack in the MP-EG10W by the following procedur e:
Loading the Battery P ack
1
Open the battery compartment lid.
Press the BATT. EJECT button downward. The
battery compartment lid will open.
BATT. EJECT button
Battery compartment lid
2
Load the battery pack.
Load the battery pack in the direction of the arrow
until it is fixed securely.
3
Close the battery compartment lid.
* If the battery pack is not inserted correctly, the
lid will not close completely. If this happens,
re-insert the battery pack correctly.
Removing the battery pack
Press the BATT. EJECT button downward to open
the lid and push the lever in the direction of the
arrow. The battery pack will be ejected by spring
force.
* Do not drop the battery pack when removing it; this
could result in malfunction.
* Do not remove the battery pack during recording or
playback. If it is removed during recording, file will
not be recorded.
Page 71

E22
Chapter 2
Set-up
___________________
You can also use power supply from any AC outlet.
Using P o w er Supply from AC Outlet
Caution: Be sure to use the specified MP-
AC1A AC adapter/charger to use
power supply from AC outlet.
If you use AC adapter/chargers other
than the MP-AC1A, fire or electric
shock could result.
2
Connect the other end of the DC
power cord to the DC output jack
of the AC adapter/char ger .
3
Plug the AC adapter/charger into
an AC outlet.
The red POWER indicator will light.
If the POWER indicator does not light:
If the POWER indicator of the AC adapter/charger
does not light, unplug the AC adapter/charger from
the AC outlet. Wait about 30 seconds, and try again
to plug it into the AC outlet. If the POWER indicator
still does not light, it is possible that the AC
adapter/charger is faulty. Unplug the AC
adapter/charger from the AC outlet and consult the
store where you purchased the MP-EG10W.
After use, close the lid for DC power cord connection
terminal, referring to the figure below.
Push the projection in the direction
of the arrow to close the lid.
1
Set the CAM/OFF/PLAY switch to OFF, and connect one end of the DC power
cord to the DC IN jack of the MP-EG10W.
The red POWER indicator will light.
AC adapter/charger
(MP-AC1A)
DC power cord
DC power cord
AC ADAPTOR
CHARGE
POWER
Core section
POWER indicator
Page 72

E23
___________________Chapter 2
Set-up
Set the CAM/OFF/PLAY switch to OFF before inserting or r emoving the PC card.
* Do not use PC cards other than that specified (MP-HD260).
* Do not attempt to attach an adhesive tag, etc. to the PC card to remove it easily. If the PC card is removed while the
MP-EG10W is operating, it could result in malfunction.
Loading the PC Card
1
Open the lid of the PC card insertion slot.
Loosen the screw and remove the lid.
Screw
Lid
2
Insert the PC card.
With the card surface up, insert the PC card until
it is fixed securely into the slot.
3
Close the lid of the PC card slot.
Attach the lid over the slot and screw up.
(Use fingers to screw up when you close the lid of
the PC card slot.)
Eject lever
Removing the PC card
Set the CAM/OFF/PLAY switch to OFF and loosen
the screw to remove the lid. Lay the MP-EG10W on
its side in a horizontal place and push the eject
lever. The PC card will be removed.
* Be careful not to drop the PC card as this could dam-
age it.
When the eject lever does not move:
See “Troubleshooting Guide” on page 91, or check the following two items:
• If the CAM/OFF/PLAY switch is set to CAM or PLAY, the eject lever will not move. Set this to OFF, power
the MP-EG10W from a charged battery pack or AC outlet, and then push the eject lever.
• If the PC card becomes hot after the MP-EG10W is used for a long time, the eject lever will not work even
if the CAM/OFF/PLAY switch is set to OFF, for safety reasons. In this case, leave the MP-EG10W as it
is for 10-20 minutes to cool the PC card. When the temperature is low enough, the eject lever can be
operated.
Page 73

E24
Chapter 2
Set-up
___________________
The recorded video/audio data management will be performed with the date and time y ou set
when you started to record.
Use the following procedure to set the MP-EG10W’s internal clock to the current date and
time correctly:
* You can also use the remote control to set the date and time.
Setting the Date and Time
1
Set the CAM/OFF/PLAY switch to CAM.
Hold the red button at the center of switch, and then set the
switch to CAM.
2
Press the MENU button.
The SET UP menu will appear on the LCD monitor.
The INITIAL parameter will be displayed in green.
* The menu does not appear during recording.
3
Display the INITIAL SET screen.
Press the s (PLAY) button.
The INITIAL SET screen will appear.
1
5
7
6
4
3
8
2
SET UP
Is NITIAL
SDI PLAY
DON
ON
LC
CP
SEL ENTER MENU EXIT
ITUREADJ
Rs EC SET UP
INITIAL SET
TDA E
EONEN
II
SEL ENTER MENU EXIT
NTIALI
YRG SAVE
ZE CARD
Initial Setting Screen
Page 74

E25
___________________Chapter 2
Set-up
4
Select DATE.
Press the ▼ (R.SEARCH) button to select DATE.
RsEC SET UP
INITIAL SET
TDA E
EONEN
II
SEL ENTER MENU EXIT
NTIALI
YRG SAVE
ZE CARD
6
Display the DATE SET screen.
Press the s (PLAY) button.
The DATE SET screen will appear.
7
Set the correct date and time.
Press the s (PLAY) or t (STOP) button until the digit you want to set flashes, then press the ▲ (F.SEARCH)
or ▼ (R.SEARCH) button to increase or decrease the number.
8
Finish the date/time setting.
Press the MENU button.
The date/time setting will be completed and the DATE SET menu will disappear, after which the original picture will be restored.
As soon as MENU is pressed, the clock will start counting from the set date and time.
DAT E SE T
SEL ENTER MENU EXIT
1/ 19981/
100AM2:
Date Setting Screen
5
Select the date/time display system.
Press ▼ or ▲ to select display system for USA (M/D/YY) or
Europe (D/M/YY).
DAT E SE T
SEL ENTER MENU EXIT
s DM/ /D/YY
D/ /M/ Y Y
Page 75

E26
Chapter 2
Set-up
___________________
Charging the MP-EG10W’s built-in battery:
The MP-EG10W incorporates a battery to power the memory which stores the date/time and various settings. This built-in battery will discharge after about two months, even if the MP-EG10W is not used. When
the battery will discharge, “—/—/—” will flash in the date/time digits. If you record in this state, the file will
be stored with the “—/—/—” date/time display, and the settings entered in various setting menus (see pages
93 - 103) will also be cleared and reset to the initial status, when you purchased the MP-EG10W.
To avoid loosing entered data, charge the built-in battery once about every two months.
Use one of the following two ways to charge the battery:
• Connect the AC adapter/charger to the MP-EG10W, and leave the MP-EG10W for about 24 hours with
the CAM/OFF/PLAY switch set to OFF.
• Load a charged battery pack and leave the MP-EG10W for about 24 hours with the CAM/OFF/PLAY
switch set to OFF.
If the date and time are incorrect:
When the incorrect recording date and time appear on the screen, charge the built-in battery by the procedure above, and correct the date and time on the DATE SET screen.
If the recording date and time are displayed incorrectly, the video data will be stored with the incorrect date
and time. To correct the date/time data, see “Correcting File Recording Date/Time” on page 64.
Page 76

E27
___________________Chapter 2
Set-up
WARNING: KEEP THE BATTERY AWAY
FROM CHILDREN AND PETS.
IF SWALLOWED, CONSULT A
PHYSICIAN IMMEDIATELY FOR
EMERGENCY TREATMENT.
Note: Replace remote control battery with
3V micro lithium battery, such as
Maxell CR2025 or its equivalent.
Cautions:
• Dispose of battery safely in accordance with
local laws. Do not dispose of in fire.
• Do not short circuit the battery.
• Do not take the battery apart.
• Do not hold the battery with metallic tweezers.
• Do not re-charge the battery.
Note: Keep the battery in a dark, cool, dry place.
Insert the provided CR2025 lithium battery into the remote contr ol.
Inserting Battery into the Remote Control
Remote control
(MP-RM10W)
Lithium battery
for remote control (CR2025)
hhsfsdhf;a;;af
hhsfsdhf;f
hhsfs
1
Pull out the battery holder.
Push the tab in the direction of the arrow and hold
it, then pull out the battery holder.
2
Insert the battery with the (1 ) terminal up.
3
Replace the battery holder.
Tab
hhsfsdhf;a;;af
hhsfsdhf;f
hhsfs
Battery holder
Life of lithium battery
The life of the lithium battery is about one year.
Page 77

E28
Chapter 2
Set-up
___________________
Use the PC card efficiently.
The PC card to be used with the MP-EG10W corresponds to film of a still camera or videotape of a camcorder, but it
is a more expensive medium when compared with film and videotape. If the PC card is used as a storage for video and
audio files, you will need a lot of PC cards, and this is not economical.
Instead, it is recommended that you transfer necessary files to the harddisk of your computer or other storage devices
and store them. After transferring files, edit the files and delete the files from the PC card for new recording.
* To store data in your computer, see “Connecting to your personal computer” on page 86.
Watch the PC car d’s free memory area.
It is recommended that you occasionally check the free memory area of PC card, especially when you start to record.
If you notice that the free memory will be insufficient for scheduled recording, delete unnecessary files to increase the
free memory area.
* To check the free memory area: See “Checking free memory area of PC card” on page 72.
* To delete unnecessary files: See “Deleting the file” on page 54.
Tips f or Skillful Use of the PC Card
Page 78
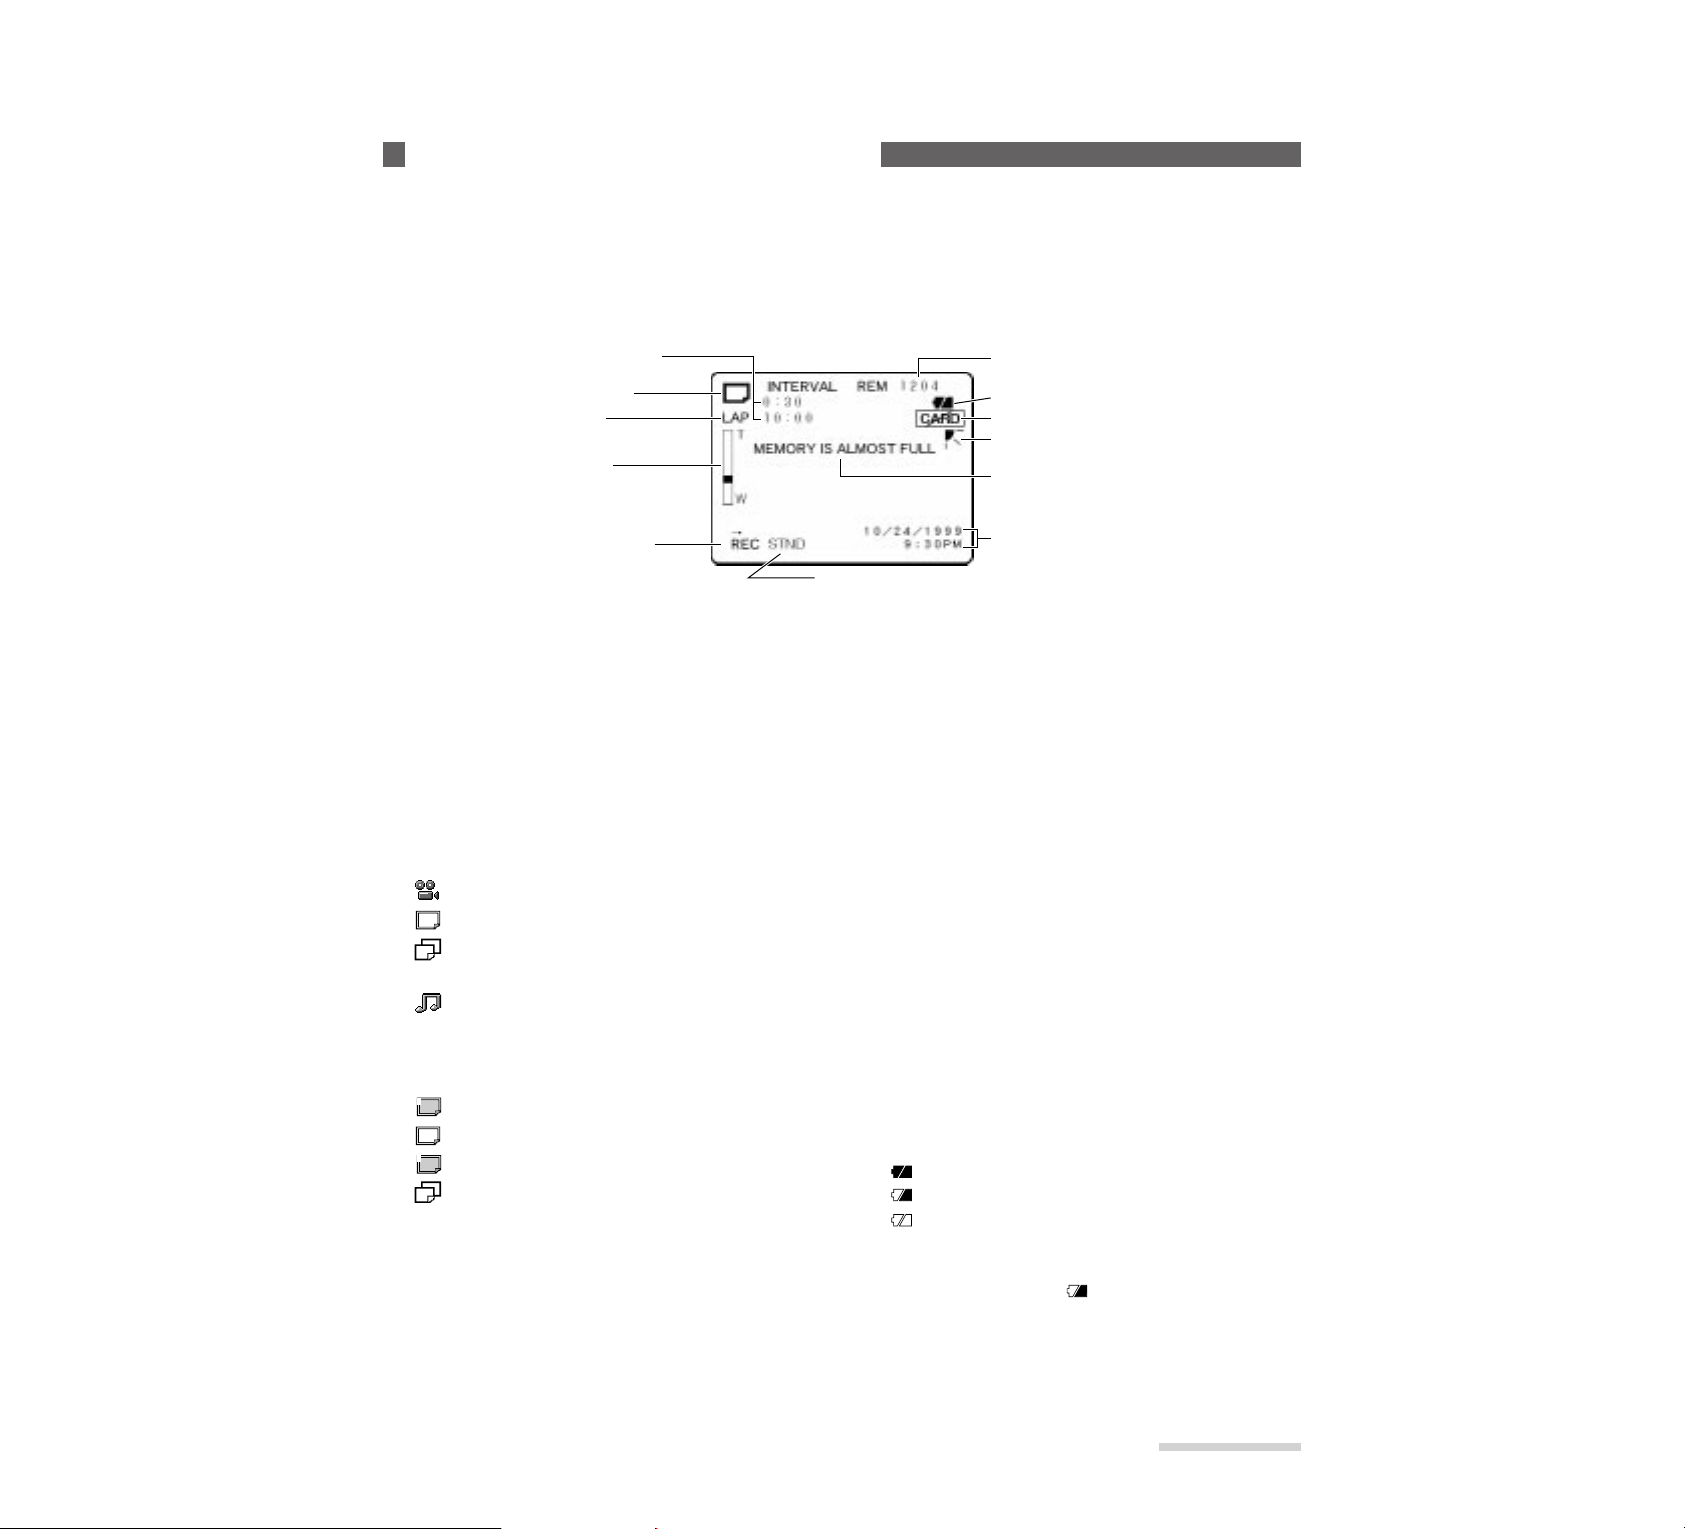
E17
_______________Chapter 1
Introduction
Various types of information appear on the LCD monitor. Here are meaning of each indication and how to interpret them.
* Note that all the following indication do not indicate at the same time.
* Although a color text appears on the built-in LCD monitor, a white text appears on the TV screen.
q INTERVAL: Appears during still picture recording
mode if the interval has been set (see page 46). This
indicates the interval at which still pictures are
recorded and can be set to 30 seconds, 1 minute or 5
minutes (see page 34). If this indicator does not
appear, normal still picture recording will be
engaged.
w Record mode: This indicates the current recording
file type that which can be switched by pressing the
REC MODE/THUMBNAIL button. You can select
one of four modes:
: Moving picture (MPEG1 Format)
: Still picture (JPEG Format)
: Consecutive recording of still pictures
(JPEG Format, 2 pictures/sec. and 5 shots)
: Still picture with audio
(JPEG Format and MPEG Audio)
When still pictures are input from external equipment:
: Still picture (2-field input) appears, instead of
.
: Still picture (1-field input) appears, instead of
. (See pages 82 and 83)
e Lap time: This appears when you select moving
pictures or still picture with audio, and indicates the
elapsed time since the REC button was pressed.
r Zoom bar: This appears when the ZOOM/VOL
button is pressed during recording, and indicates the
zoom setting among 10 settings from W (wide) to T
(tele), and M (macro). The magnification in the optical zoom range is shown in white, that in the digital
zoom range in yellow, and that in the macro range in
purple.
1
2
If zoom is pressed, the zoom bar will be displayed for
three seconds even when the indicator “OFF”
appears in the on-screen display (see page 100).
t Operating mode: This indicates what mode the
MP-EG10W is in currently - recording, playback,
etc. - with letters and symbols. See “Operating Mode
Indicators” (on page 18) for details.
y Image quality mode: This indicates the type of
record mode when recording moving pictures: FINE
or STND.
Equipment has been set to STND at the factory, but
can be set to FINE. (See page 94)
u Current date/time: The current date and time
appear during recording. If incorrect date and time
appear, correct them (see page 24).
i Message: Appears as required.
o Backlight corrector: This appears when your are
recording subject with backlight corrected. (See page
38)
!0 PC card alarm: This appears when a PC card is not
inserted or non-usable card is inserted.
!1 Battery remaining level : This indicates the battery
remaining level with graphics.
: Full charge (lights white)
: Middle level (lights white)
: Low level (flashes white)
Charge the battery in the low level (see page 20).
Connecting the AC adapter/charger causes the middle indicator to light. ( )
!2 PC card free memory area: This indicates the
free memory area on PC card for recording in terms
of recording time left or the number of recordable
still pictures.
V iewing the On-Screen Display
[REC MODE]
On-Screen Display during Recording
w Record mode
q Interval
e Lap time
r Zoom bar
t Operating mode
y Image quality mode
u Current date/time
o Backlight corrector
!0 PC card alarm
!1 Battery remaining level
i Message
!2 PC card free memory area
Page 79
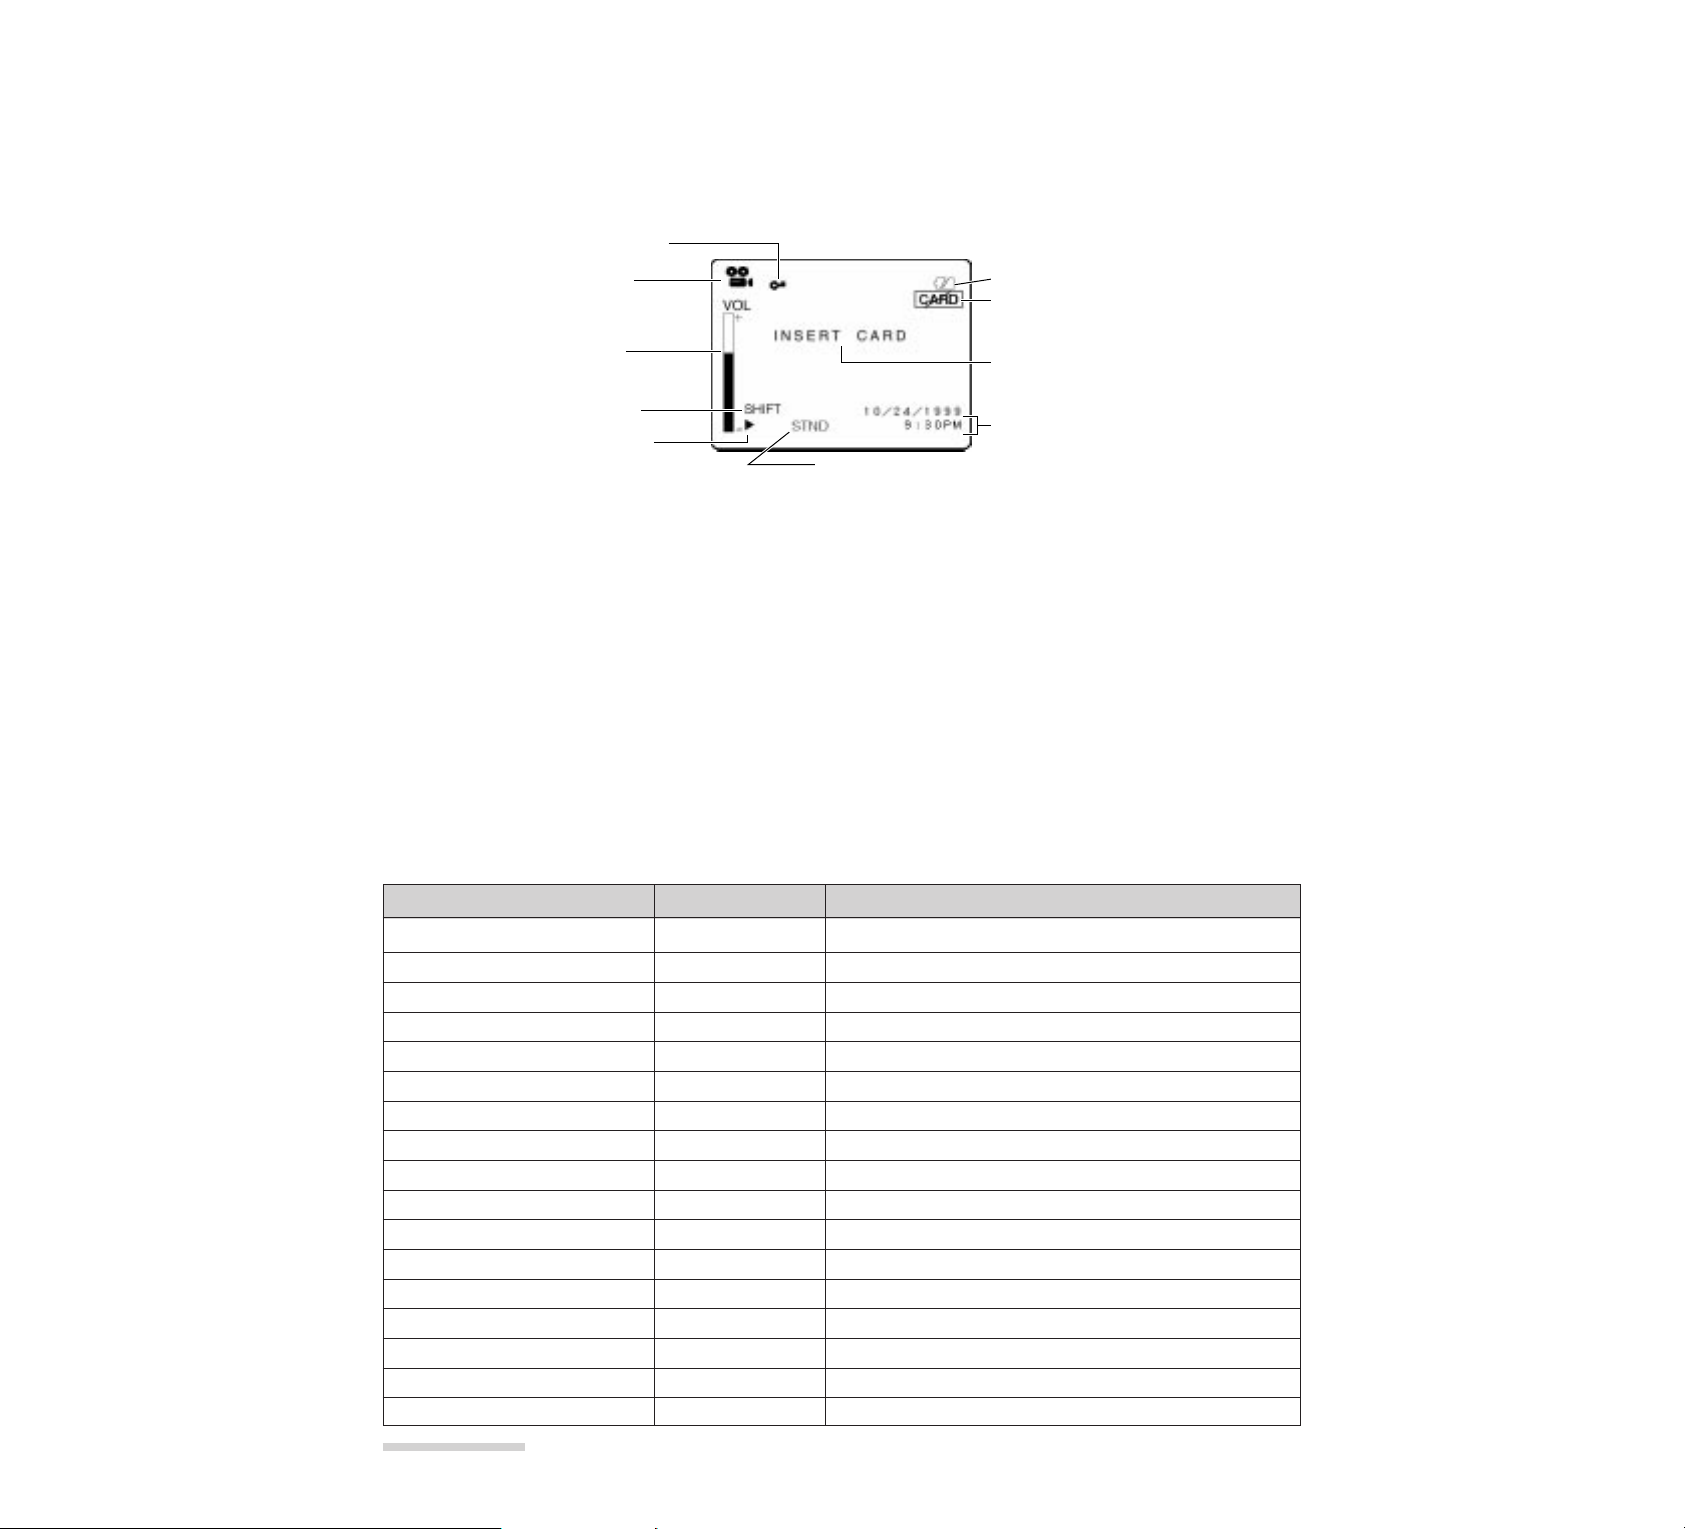
E18
Chapter 1
Introduction
_______________
q File lock: Appears when the file being played back
is set to the inhibit state of deletion (see page 57).
w Record mode: This indicates the type of file
which is being played back.
e Volume bar: Appears when the ZOOM/VOL but-
ton is pressed during playback and indicates the current volume level.
r Shift indicator: This appears when the
MACRO/SHIFT button is pressed to divide moving
picture files (see page 49). SHIFT appears even if
DISPLAY “OFF” is specified with the menu (see
page 100).
u Recording date/time: This indicates the record-
ing date/time of the file being played back. The displayed date/time cannot be updated during playback.
!0 Battery remaining level: During playback this
appears only in the low level graphic flashes.
* See “Operating Mode Indicators” below for indicator
t , “On-screen display during recording” on page 17
for indicators y , i and o .
[PLAY MODE]
On-Screen Display during Recording
w Record mode
q File lock
e Volume bar
r Shift indicator
t Operating mode
y Image quality mode
u Current date/time
o PC card alarm
!0 Battery remaining level
i Message
* Note that all the follwing indications do not light at the same time.
* Although a color text appears on the built-in LCD monitor, a white text appears on the TV screen.
Operating Mode Indicators _____________________________
The operating modes are displayed with the f ollowing letters and symbols and in colors, indicating the MP-EG10W operations:
Letters/symbols indicated
R→EC
REC ll
lls
tll
s
AUTO s
AUTO ll
ll
sl
lt
■
REPEAT
REPEAT ll
lls
tll
ss
tt
Color
Red
Green
Green
Green
Green
Green
Green
Green
Green
Green
Green
Green
Green
Green
Green
Green
Green
Operation
Recording (shooting)
Recording pause
Pause at start of file
Pause at end of file
Playback (disappears after 5 seconds)
Auto play
Auto play pause (disappears after 5 seconds)
Pause during play, frame advance play, frame back play
Location of start: Forward search
Location of start: Reverse search
Stop (disappears after 5 seconds)
Repeat play (disappears after 5 seconds)
Repeat play pause (disappears after 5 seconds)
Frame advance play
Frame back play
Forward picture search
Reverse picture search
 Loading...