

Page 1
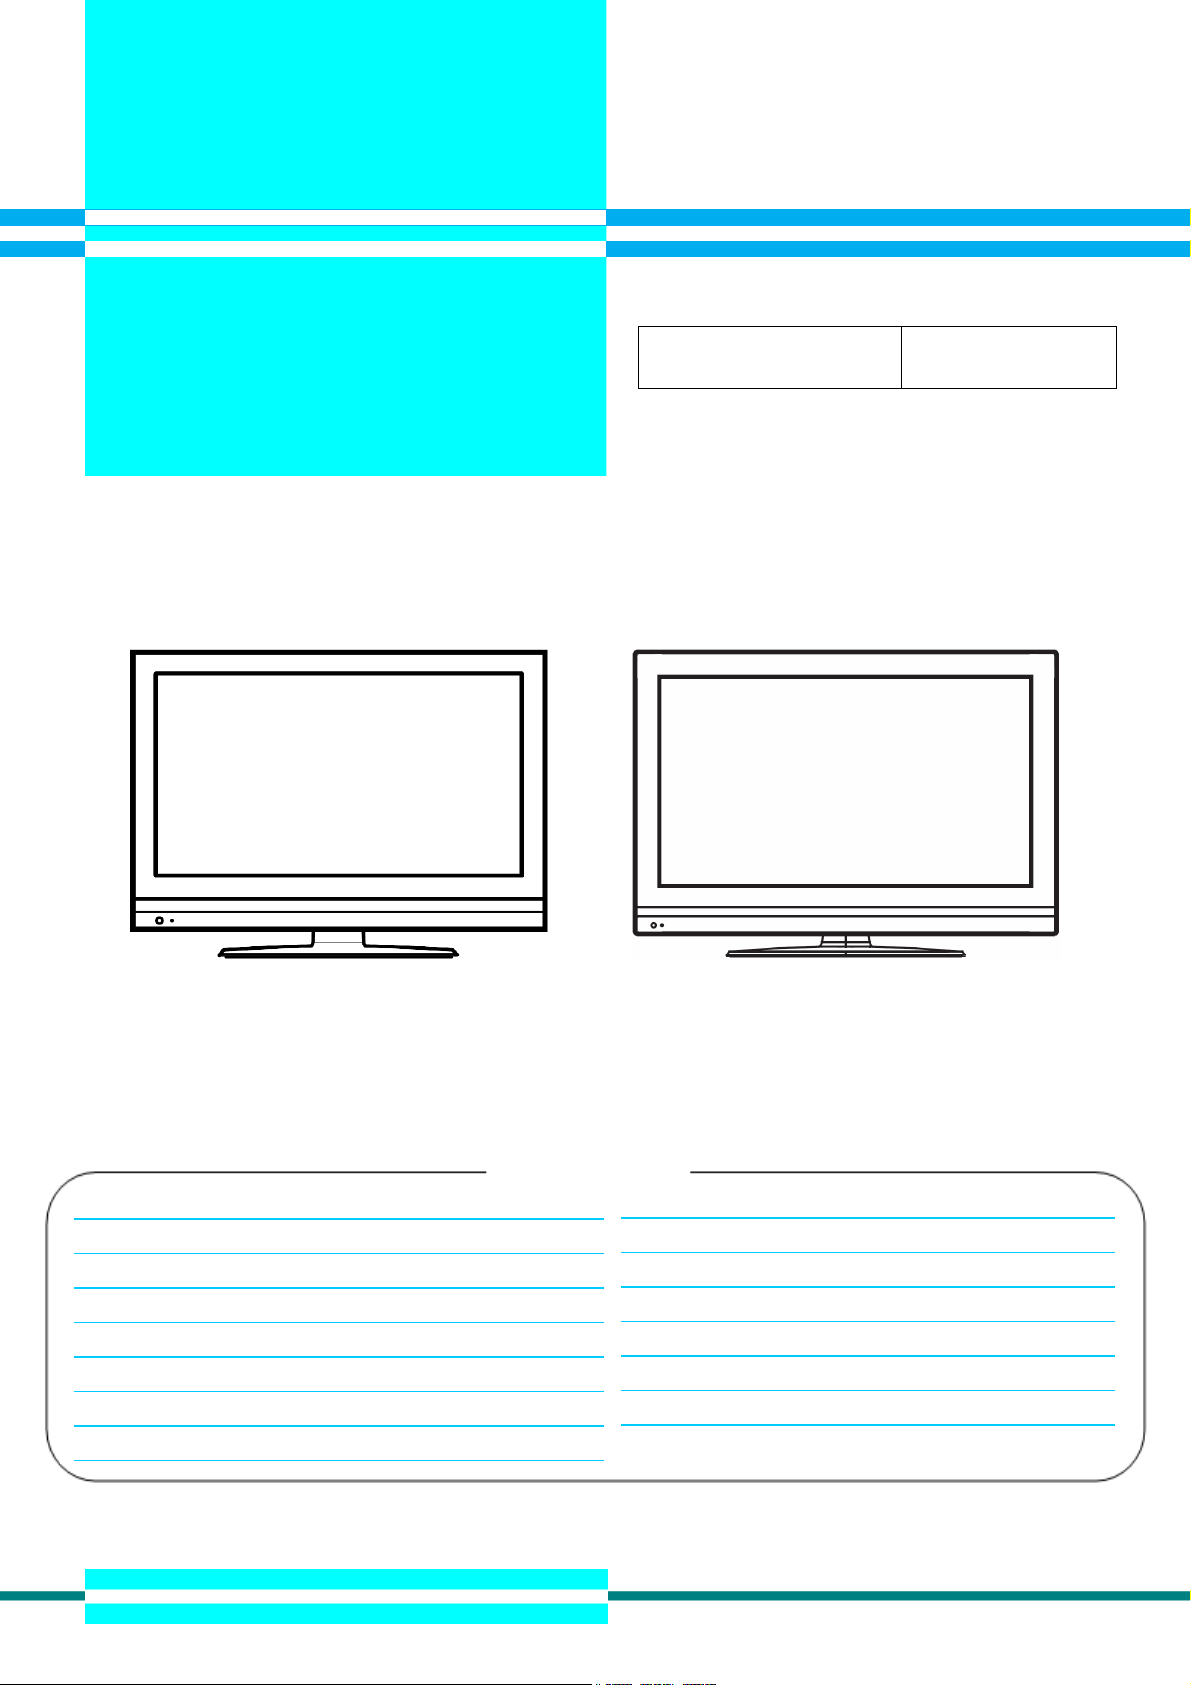
L26-H03B
L26-H03W
L32-H03B
L32-H03W
LCD TV 2009-3
HITACHI
Caution: Be sure to read this manual before servicing. To ensure safety from fire, electric shock, injury, harmful
radiation and materials, various measures are provided in this LCD TV. Be sure to read cautionary items described
in the manual before servicing. These servicing instructions are for use by qualified service personnel only. To
reduce the risk of electric shock, do not perform any servicing other than that described in the operating instructions
unless you are qualified to do so.
L26-H03B/ L26-H03W L32-H03B/ L32-H03W
1. Summary
VHF1ch ~ 12ch, UHF13ch ~ 62ch, CATV (C13 ~ C63), Digital BS 110 degree CS digital and terrestrial digital (CATV
support pass-through, except for one-segment broadcasting)
Table of Contents
1. Summary………..........……..........................……….........1
2. Features…….………..........................................……......4
3. Dimensions……..……………………………………………5
4. General Specification................................…………........6
5. Service points…………….…………….……………..........7
6. Adjustment……………..………..…….………..….…….....8
7. Troubleshooting………...……………………….…….......17
9. Block Diagram.....……………..………….………......27
10. Connection Diagram……….………….……..……..28
11. Wiring Diagram.………..………………....…….......29
12. PCB Layout……………………………....……….....31
13. Exploded View…………………..……….................38
14. Service Parts List…...............................................40
15. Different Parts List.………………..……………......48
8. Self Diagnosis Function…..……………...……….....26
HITACHI
Page 2

L26-H03B/ L26-H03W/ L32-H03B/ L32-H03W
Caution for Safety
Please read this page before repair the TV.
The following safety precautions are designed to help you stay safe and prevent accidents during the repair work.
2
Page 3

L26-H03B/ L26-H03W/ L32-H03B/ L32-H03W
3
Page 4

L26-H03B/ L26-H03W/ L32-H03B/ L32-H03W
2. Features
● Enhanced definition LCD display panel
L26-H03B/L26-H03W
This specification applies to the 26.0 inch Color TFT-LCD Module T260XW02 VQ. This LCD module has a TFT
active matrix type liquid crystal panel 1366x768 pixels, and diagonal size of 26.0 inch. This module supports
1366x768 XGA-WIDE mode (Non-interlace).
Each pixel is divided into Red, Green and Blue sub-pixels or dots which are arranged in vertical stripes. Gray scale
or the brightness of the sub-pixel color is determined with a 8-bit gray scale signal for each dot.
The T260XW02 VQ has been designed to apply the 8-bit 1 channel LVDS interface method. It is intended to support
displays where high brightness, wide viewing angle, high color saturation, and high color depth are very important.
The T260XW02 VQ model is RoHS verified which can be distinguished on panel label.
L32-H03B/L32-H03W
This specification applies to the 31.51 inch Color TFT-LCD Module T315XW02 VS. This LCD module has a TFT
active matrix type liquid crystal panel 1366x768 pixels, and diagonal size of 31.51 inch. This module supports
1366x768 XGA-WIDE mode (Non-interlace).
Each pixel is divided into Red, Green and Blue sub-pixels or dots which are arranged in vertical stripes. Gray scale
or the brightness of the sub-pixel color is determined with a 8-bit gray scale signal for each dot.
The T315XW02 VS has been designed to apply the 8-bit 1 channel LVDS interface method. It is intended to support
displays where high brightness, wide viewing angle, high color saturation, and high color depth are very important.
The T315XW02 VS model is RoHS verified which can be distinguished on panel label.
● Easy-to-use remote control and on-screen display system
The included remote control operates all TV functions. Furthermore, the on-screen display system shows the status
of the control settings in an easy-to-view fashion.
● Power saving system
When connected to a VESA DPMS-compliant PC, the TV cuts its power consumption while idle.
4
Page 5
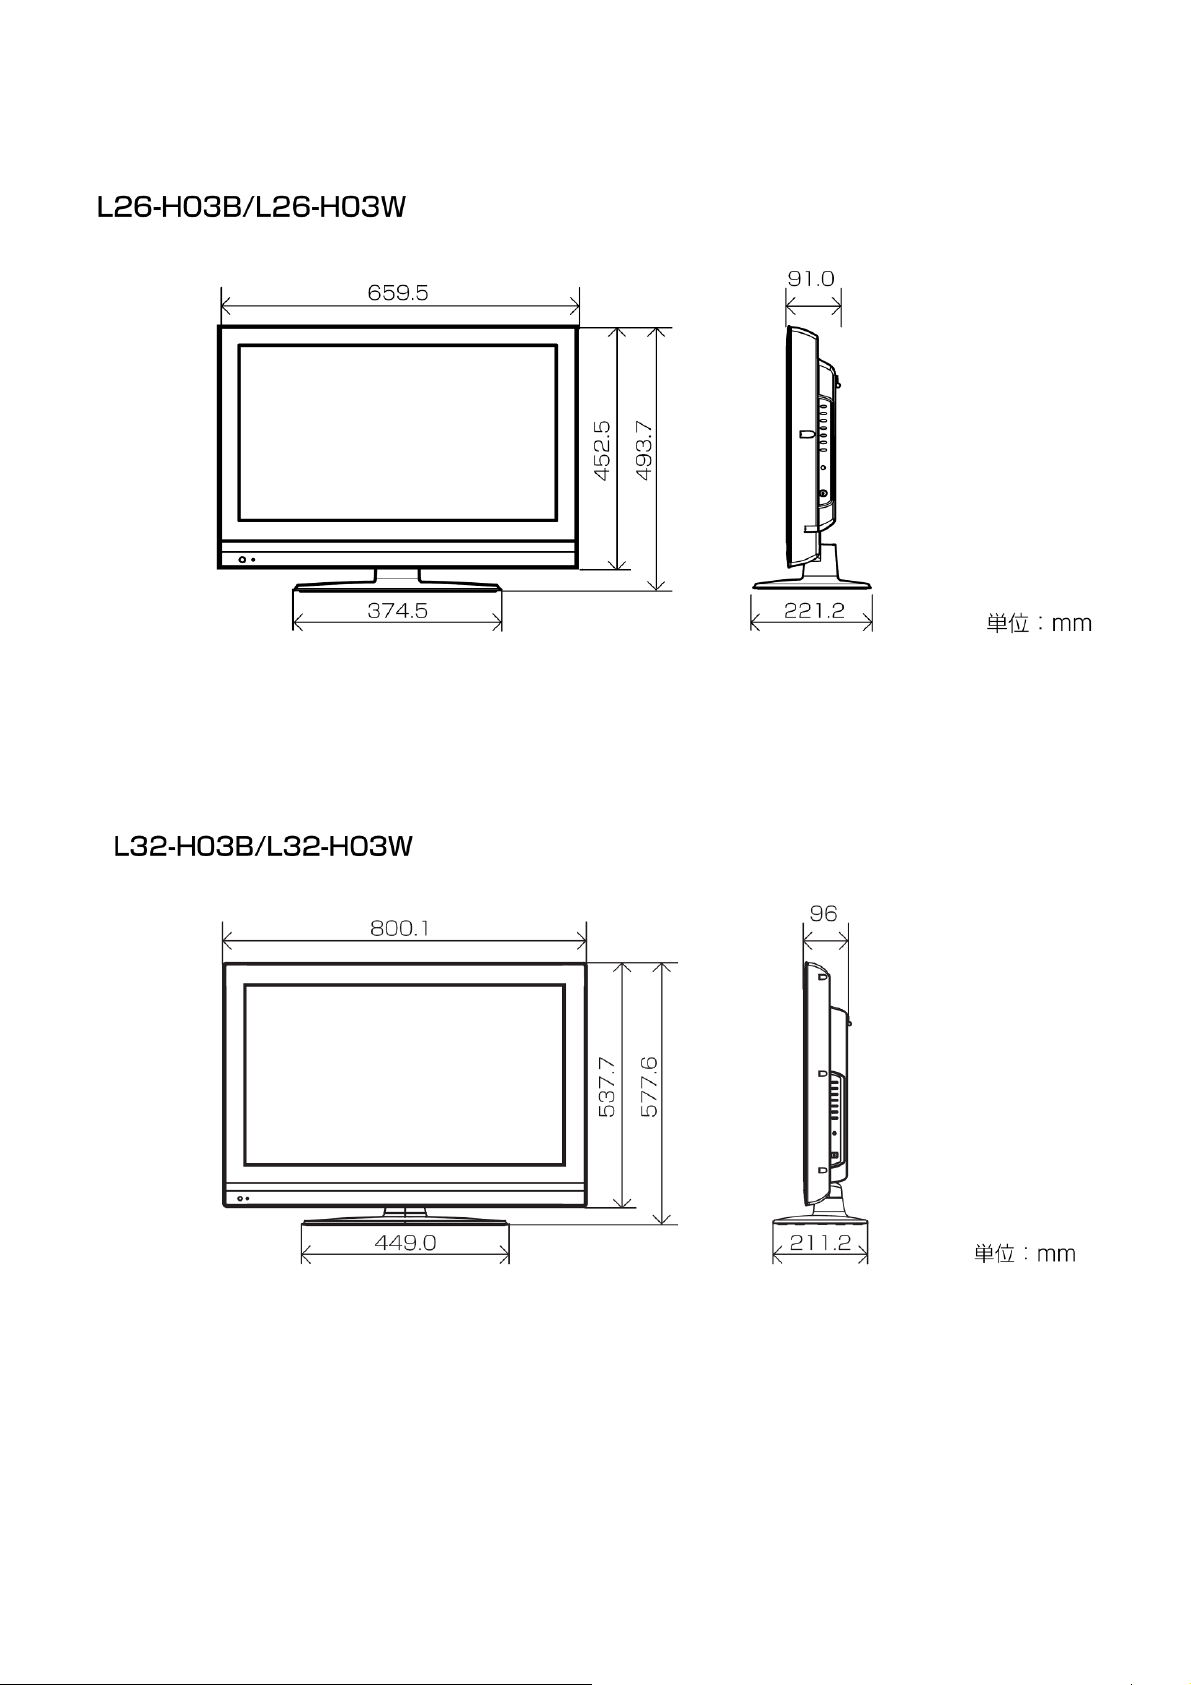
3. Dimensions
L26-H03B/ L26-H03W/ L32-H03B/ L32-H03W
5
Page 6

L26-H03B/ L26-H03W/ L32-H03B/ L32-H03W
4. General Specification
6
Page 7
L26-H03B/ L26-H03W/ L32-H03B/ L32-H03W
5. Service points
Lead-free solder
This product uses lead-free solder (unleaded) to help protect the environment. Please read these instructions
before attempting any soldering work.
1) Lead-free solder indicator
Printed circuit boards using lead-free solder are engraved with an
2) Properties of lead-free solder
The melting point of lead-free solder is 40-50 ℃ higher than leaded solder.
3) Servicing solder
Solder with an alloy composition of Sn-3.0Ag-0.5Cu or Sn-0.7Cu is recommended. Although servicing with
leaded solder is possible, there are a few precautions that have to be taken. (Not taking these precautions
may cause the solder to not harden properly, and lead to consequent malfunctions.)
label.
Precautions when using leaded solder
● Remove all lead-free solder from soldered joints when replacing components.
● If leaded solder should be added to existing lead free joints, mix in the leaded solder thoroughly after the
lead-free solder has been completely melted (do not apply the soldering iron without solder).
4) Servicing soldering iron
A soldering iron with a temperature setting capability (temperature control function) is recommended.
The melting point of lead-free solder is higher than leaded solder. Use a soldering iron that maintains a high
stable temperature (large heat capacity), and that allows temperature adjustment according to the part being
serviced, to avoid poor servicing performance.
Recommended soldering iron:
● Soldering iron with temperature control function (temperature range: 320-450℃)
7
Page 8
L26-H03B/ L26-H03W/ L32-H03B/ L32-H03W
6. Adjustment
6.1 White Balance Adjustment
Approximately 2 hours should be allowed for warm up before proceeding white balance adjustment.
Before White balance adjustment, you must set the color analyzer CA210.
6.1.1 Calibration
1. Receive XGA 60Hz 100% white signal by PC input.
2. Select PC input by R/C Input Select button.
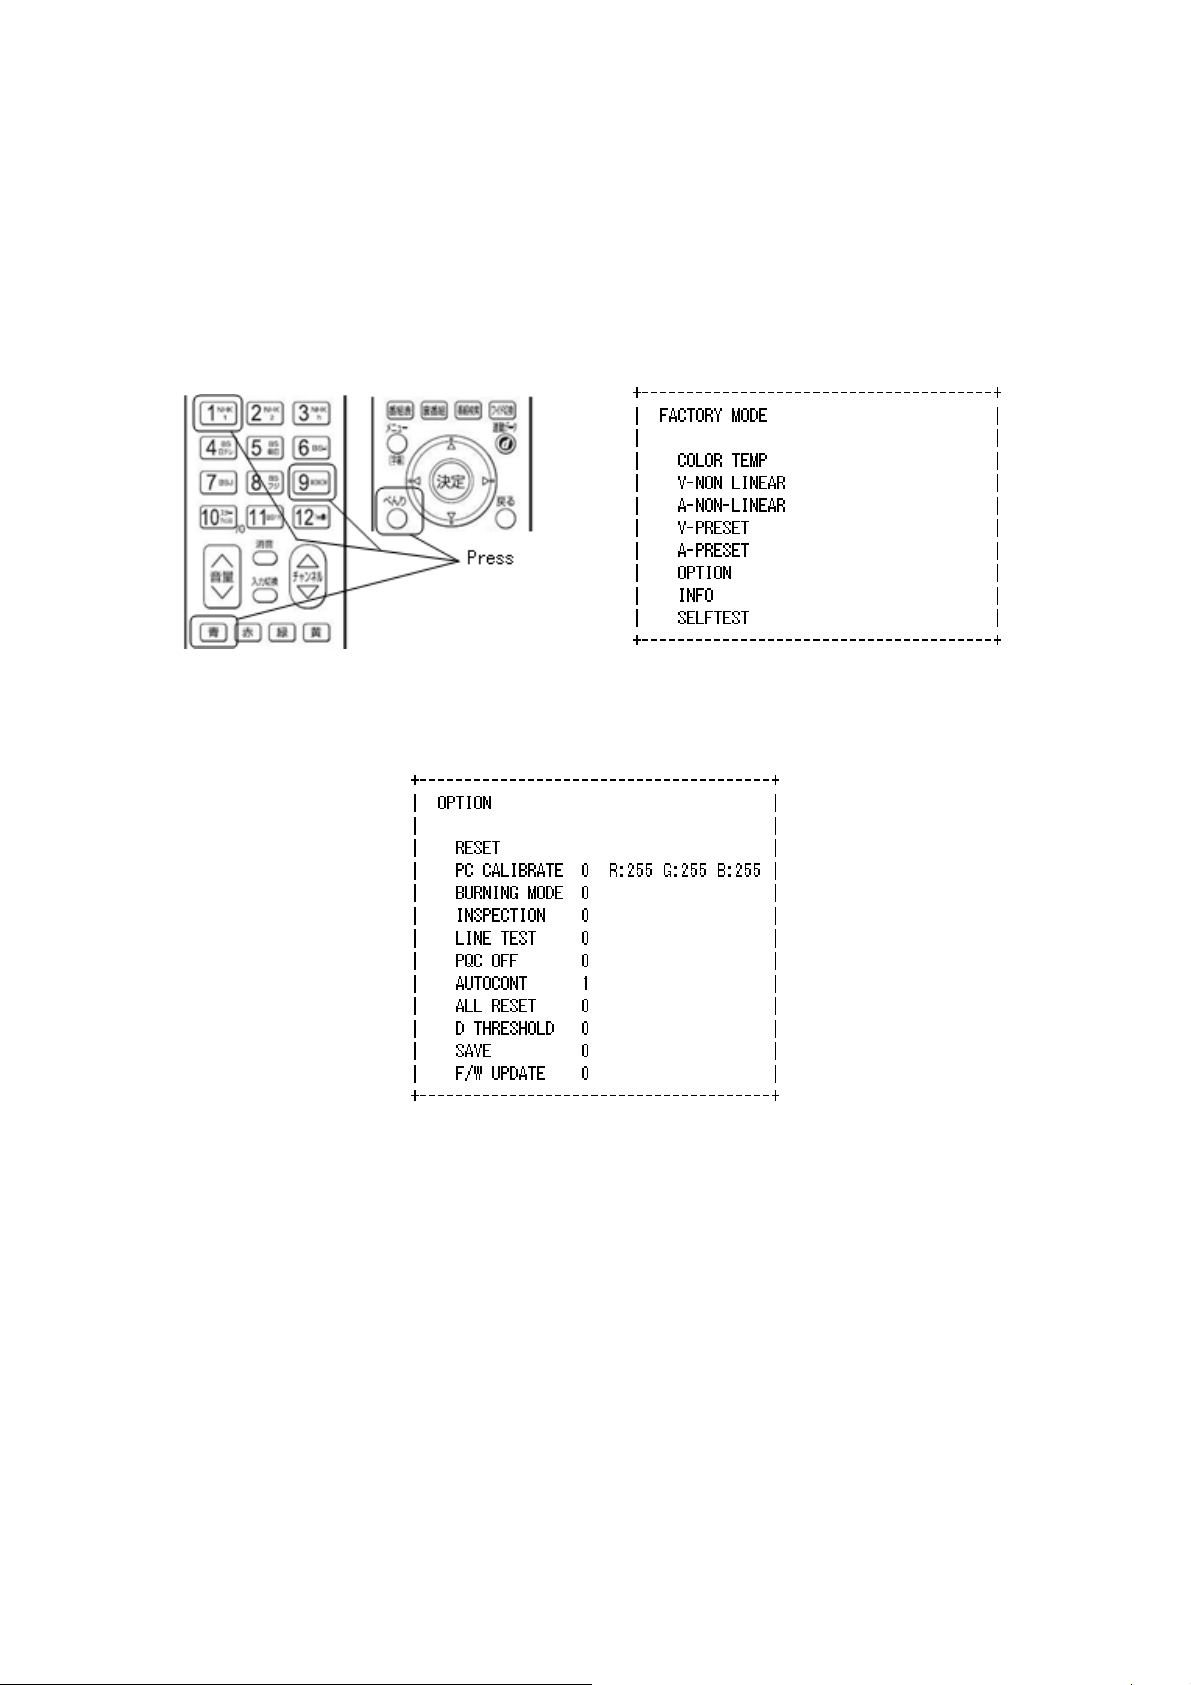
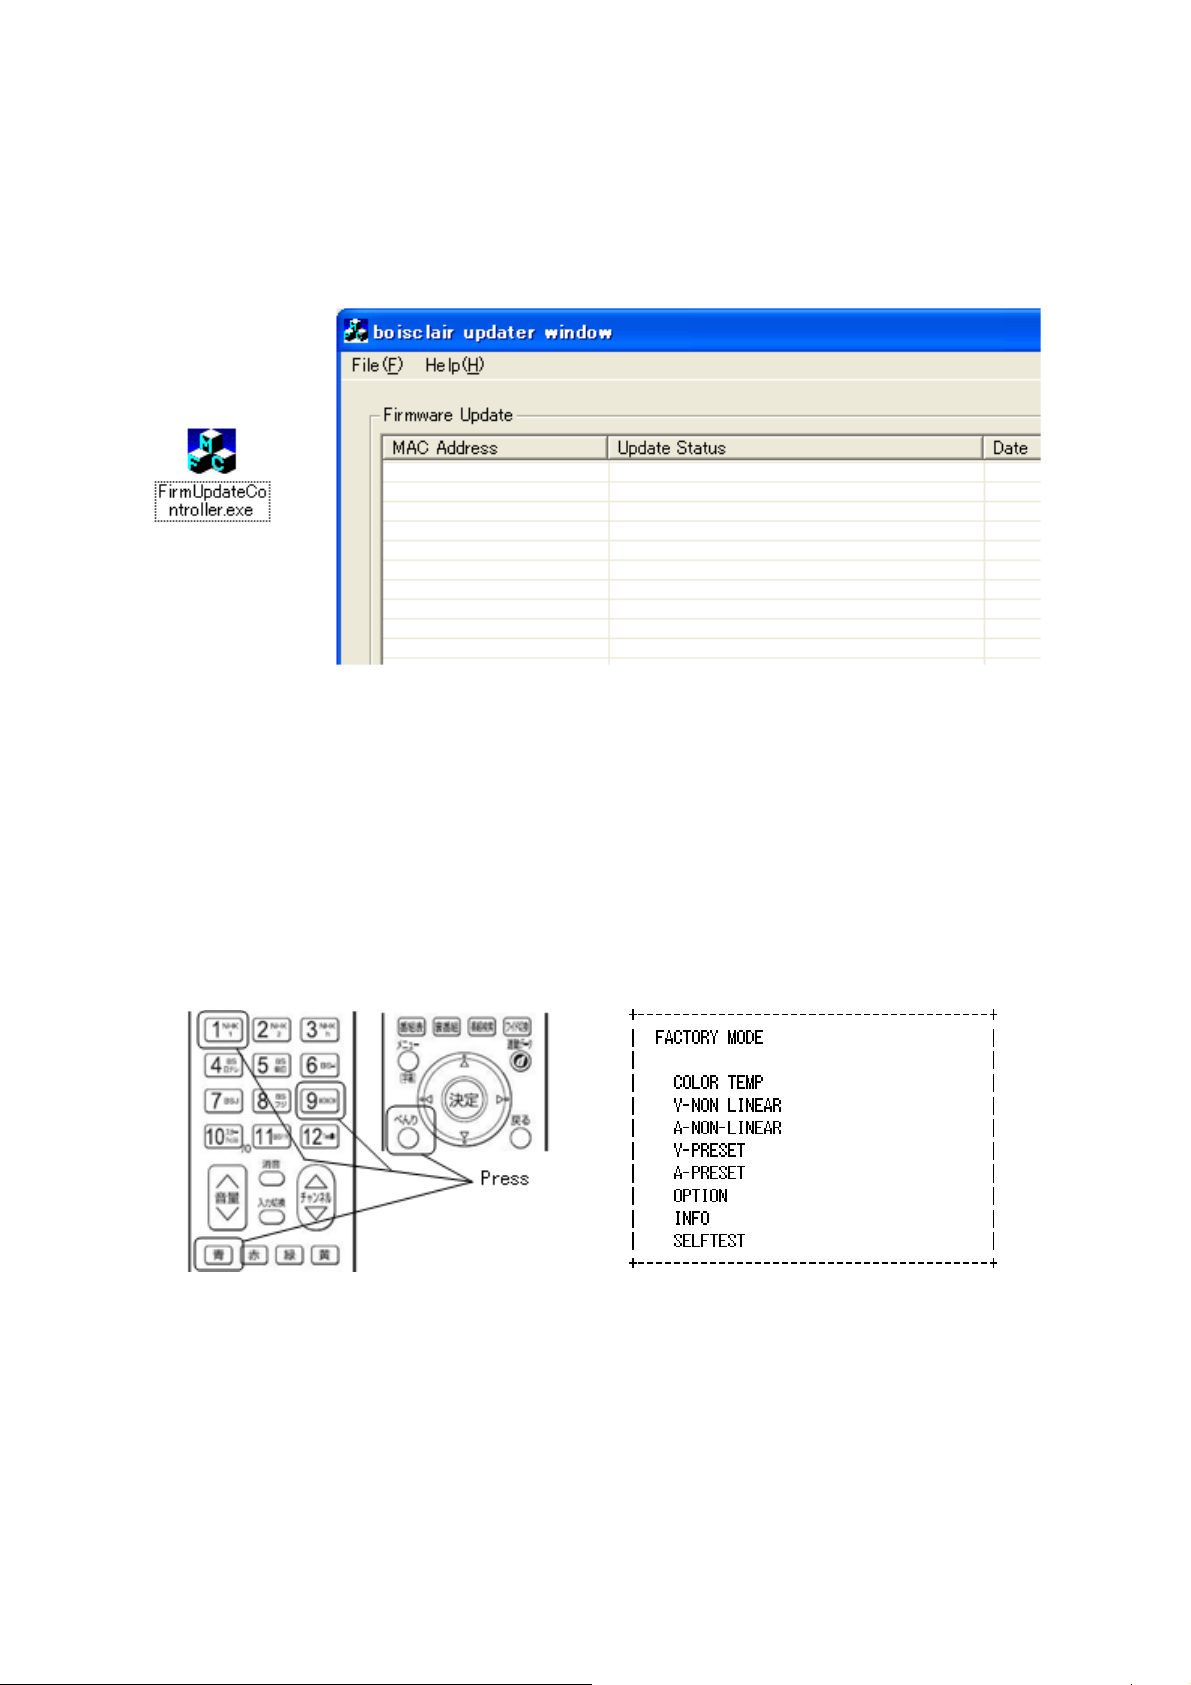
3. Enter FACTORY MODE by R/C [べんり][青][9][1][1][1] (as picture 1, picture 2)
Picture 1 Remote Controller Picture 2 FACTORY MODE Menu
4. Choose "OPTION" by R/C [上/下] button.
Then press R/C [決定] button. -> Enter to OPTION menu. (as picture 3)
Picture 3 OPTION Menu
5. Choose "PC CALIBRATE" by R/C [上/下] button.
Then press R/C [右] button. -> Value changes 0 to 1 (red letter).
Then press R/C [決定]. -> PC CALIBRATE executed, and value returns to 0.
6. Press R/C [もどる] -> Return to FACTORY MODE menu.
6.1.2 Color Temperature Adjustment
1. Set picture mode "スーパー" by Menu.
1.1 Exit FATORY MODE by [メニュー] button.
1.2 Enter the "トップメニュー" by R/C [メニュー] button. Then forward to "映像設定" - "画質設定". ("画質設定"
menu indicated.)
1.3 Confirm that "対象コンテンツ" is set to "共通".
1.4 Set "映像モード" to "スーパー". Then exit "トップメニュー" by [メニュー] button.
1.5 Re-enter FACTORY MODE. (see 6.1.1 item 3.)
8
Page 9
L26-H03B/ L26-H03W/ L32-H03B/ L32-H03W
2. Choose "PQCOFF" by R/C [上/下] button. Then choose value "1" by R/C [左/右] button, then press [決定].
3. Choose "SAVE" by R/C [上/下] button. Then choose value "1" by R/C [左/右] button, then press [決定]. (After
this, value returns to "0" automatically.)
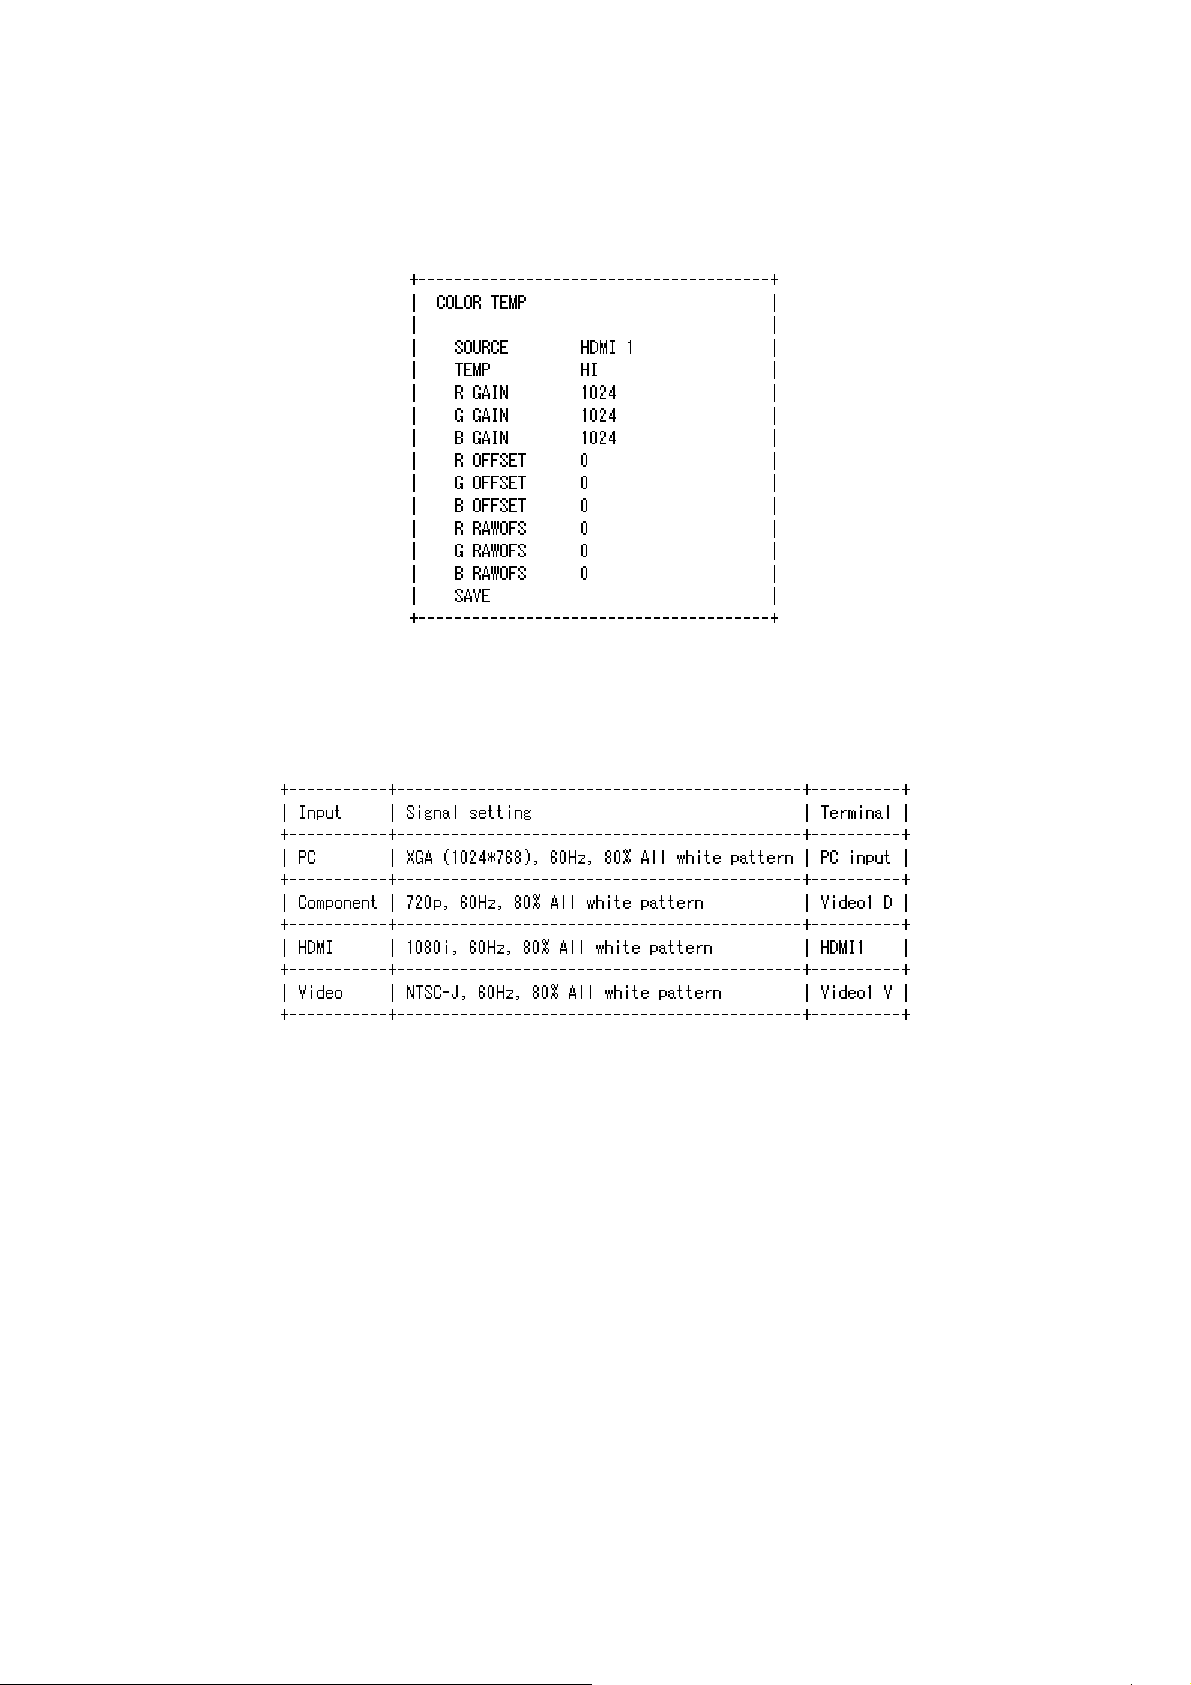
4. Return to "FACTORY MODE" by R/C [もどる] button. Then choose "COLOR TEMP" by R/C [上/下] button.
(Enter COLOR TEMP menu.)
Picture 4 COLOR TEMP Menu
5. Color Temp. adjustment (HI)
5.1 Choose "TEMP" by R/C [上/下] button. Then choose value "HI" by R/C [左/右] button, then press [決定].
5.2 Input signal from specified terminal as shown below.
Table 1 Signal setting for adjustment of Color temperature
5.3 Choose "SOURCE" by R/C [上/下] button. Then choose the input from
the Input names (see below) in "SOURCE" by R/C [左/右] button.
Input names: PC (to adjust PC input)
D (to adjust Component input)
HDMI1 (to adjust HDMI input)
CVBS1 (to adjust Video input)
Input names indicated by red letters.
Then press R/C [決定] button. -> Change to selected input.
5.4 Adjust Color temperature of HI.
Do not change B GAIN (keep the value 1024), change R GAIN and G GAIN, to meet the specified x and y value:
x = 0.266 +/-0.005, y = 0.270 +/-0.005.
5.5 After adjusting, write down the R GAIN, G GAIN, B GAIN value to paper as memo. Then calculate Gb and Bb as
shown below
Rb = [R GAIN] / [R/GAIN] * 1024 = 1024 (Always)
Gb = [G GAIN] / [R/GAIN] * 1024 = ____ (Calculated)
9
Page 10

L26-H03B/ L26-H03W/ L32-H03B/ L32-H03W
Bb = [B GAIN] / [R/GAIN] * 1024 = ____ (Calculated)
5.6 Change R GAIN value to Rb, G GAIN value to Gb, B GAIN value to Bb.
5.7 To adjust color temp of another input, change input name and input signal, then repeat 5.1 to 5.6.
6. Set picture mode "スタンダード" by Menu.
6.1 Exit FATORY MODE by [メニュー] button.
6.2 Enter the "トップメニュー" by R/C [メニュー] button. Then forward to "映像設定" - "画質設定". ("画質設定"
menu indicated.)
6.3 Confirm that "対象コンテンツ" is set to "共通".
6.4 Set "映像モード" to "スタンダード". Then exit "トップメニュー" by [メニュー] button.
6.5 Re-enter FACTORY MODE. (see 6.1.1 item 3.)
7. Color Temp. adjustment (MID)
7.1 Choose "TEMP" by R/C [上/下] button. Then choose value "MID" by R/C [左/右] button, then press [決定].
7.2 Input signal from specified terminal as shown in 5.2.
7.3 Choose "SOURCE" by R/C [上/下] button. Then choose the input from the input names in "SOURCE" by R/C
[左/右] button. Then press R/C [決定] button. -> Change to selected input.
7.4 Adjust Color temperature of MID.
Do not change R GAIN (keep the value 1024), change G GAIN and B GAIN, to meet the specified x and y value:
x = 0.285 +/-0.005, y = 0.293 +/-0.005.
7.5 To adjust color temp of another input, change input name and input signal, then repeat 7.1 to 7.4.
8. Color Temp. adjustment (LOW)
8.1 Choose "TEMP" by R/C [上/下] button. Then choose value "LOW" by R/C [左/右] button, then press [決定].
8.2 Input signal from specified terminal as shown in 5.2.
8.3 Choose "SOURCE" by R/C [上/下] button. Then choose the input from the input names in "SOURCE" by R/C
[左/右] button. Then press R/C [決定] button. -> Change to selected input.
8.4 Adjust Color temperature of LOW.
Do not change R GAIN (keep the value 1024), change G GAIN and B GAIN, to meet the specified x and y value:
x = 0.314 +/-0.005, y = 0.316 +/-0.005.
8.5 To adjust color temp of another input, change input name and input signal, then repeat 8.1 to 8.3.
9. Choose "SAVE" by R/C [上/下] button. Then choose value "1" by R/C [左/右] button, then press [決定].
(After this, value returns to "0" automatically.)
10. Choose "PQCOFF" by R/C [上/下] button. Then choose value "0" by R/C [左/右] button, then press [決定].
10
Page 11
L26-H03B/ L26-H03W/ L32-H03B/ L32-H03W
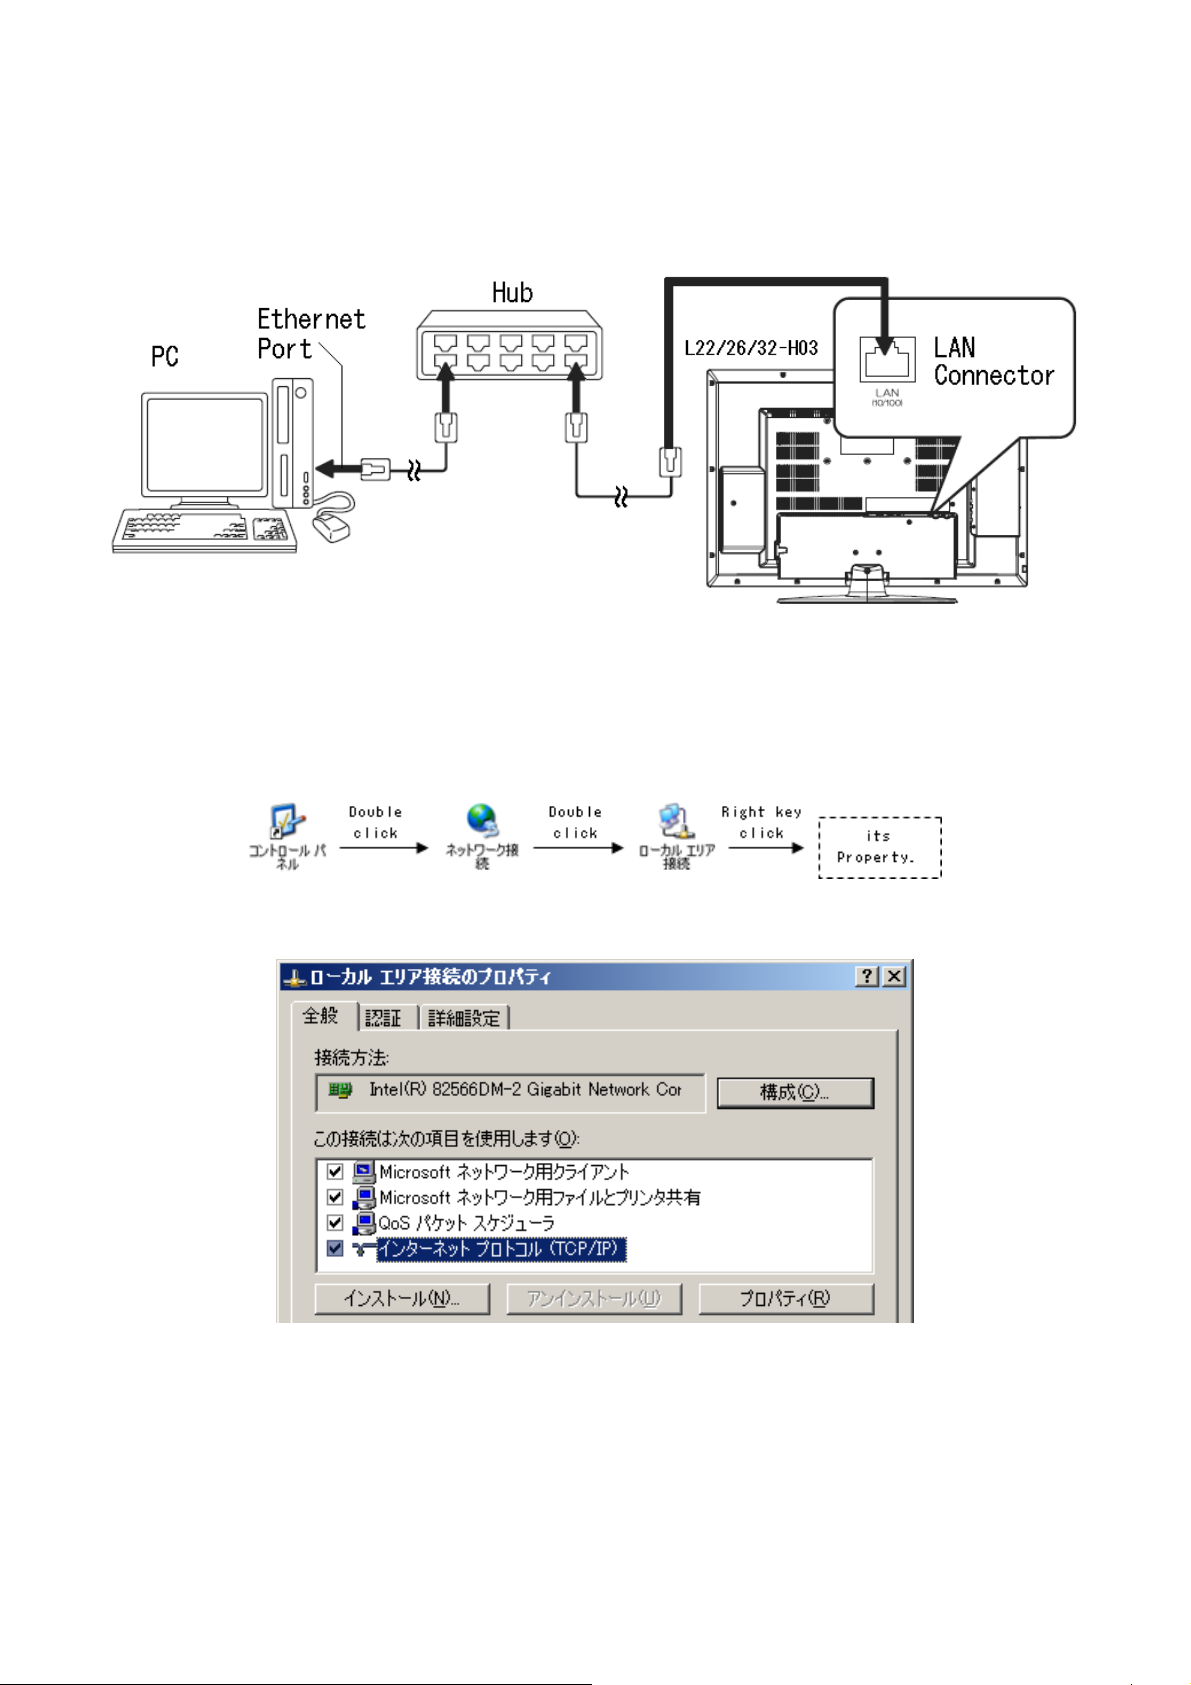
6.2 Firmware update
1. Preparation (as picture 5)
1) Connect to 1 port of Hub from Ethernet port of PC with Ethernet cable(straight type).
2) Connect to another port of Hub from LAN connector of L22/26/32-H03 with Ethernet cable (straight type).
Caution: Do not connect other PC.
Picture 5 How to Setup (example)
2. Settings
1) If the update tool "Boisclair updater window" is not installed, install it. ( Please see Page17)
2) Open the "Control Panel" - "Network" - "Local Area Network", and open its Property. (as picture 6)
Picture 6 Open Property
3) Choose "Internet Protocol" and open its Property as shown below.
4) Set IP address and Subnet mask as below;
IP address: 192.168.0.1
Subnet mask: 255.255.255.0
Picture 7 Property
11
Page 12
L26-H03B/ L26-H03W/ L32-H03B/ L32-H03W
Picture 8 Internet protocol (TCP/IP) setting
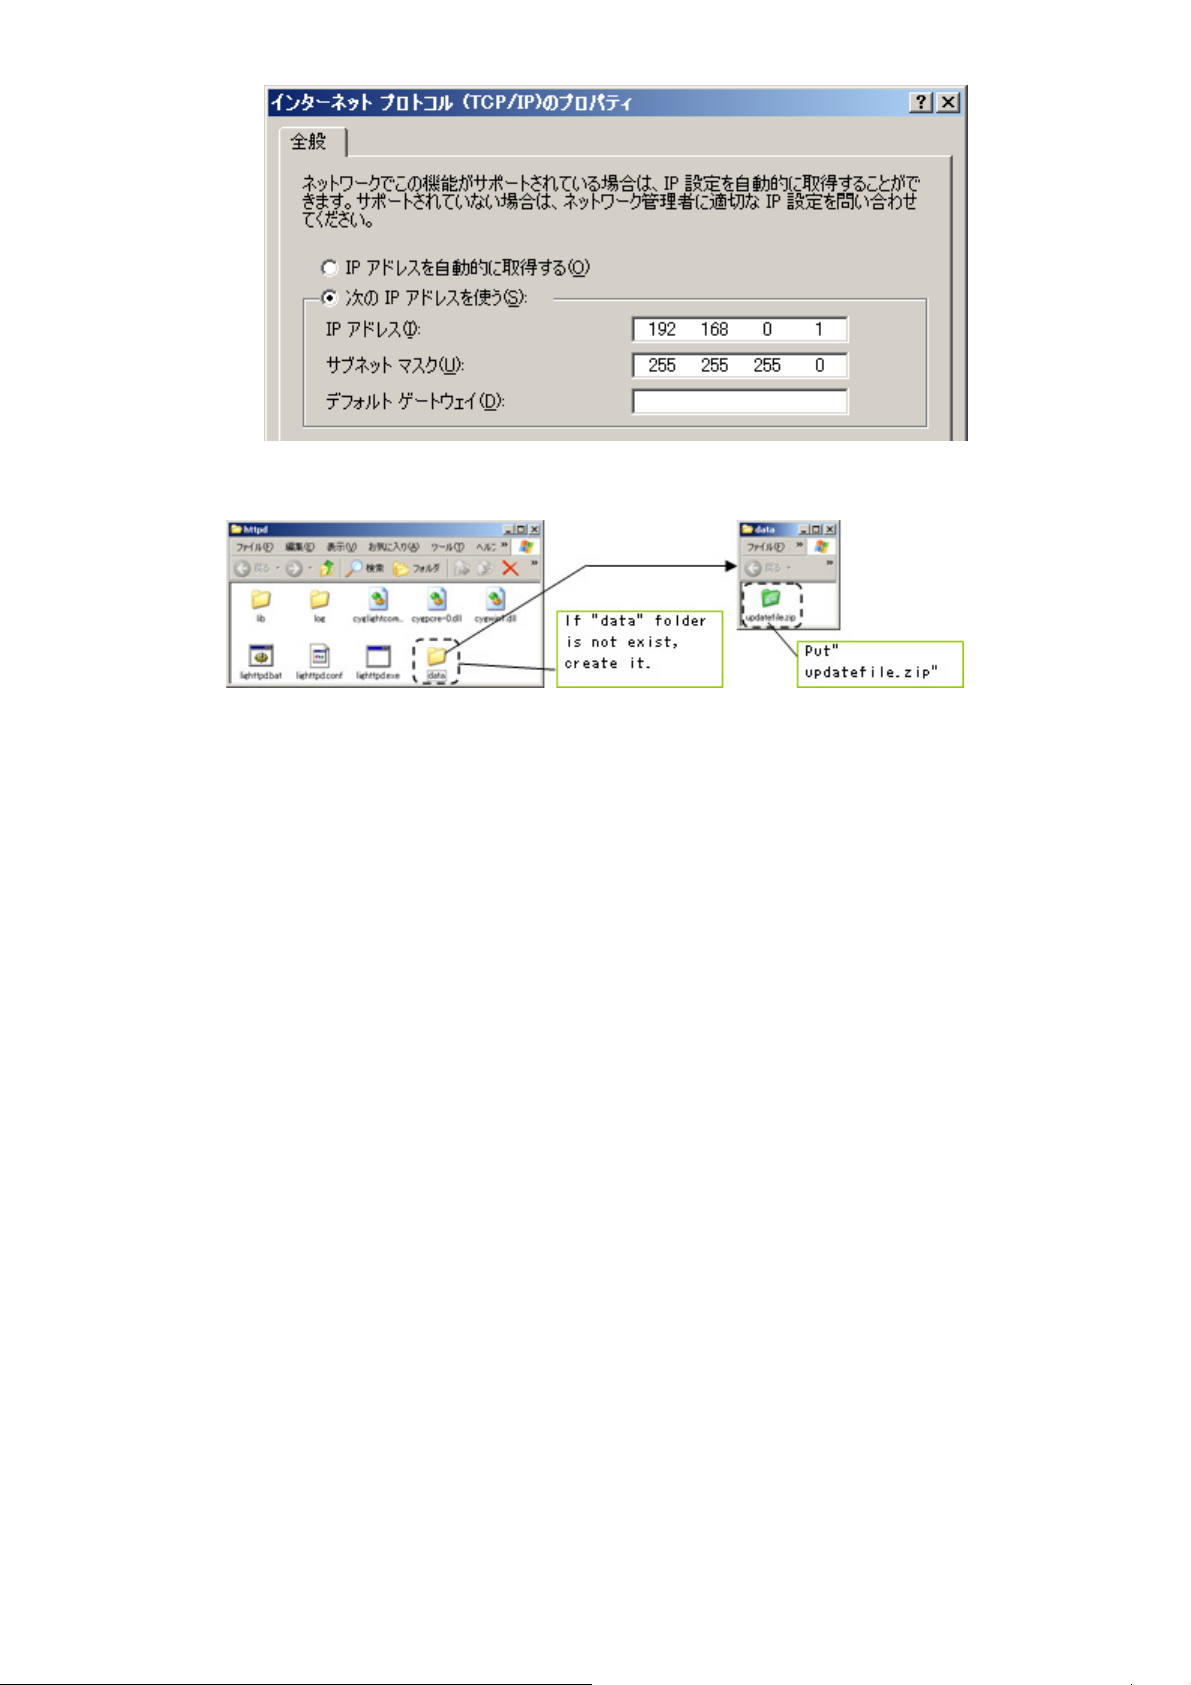
5) Put "updatefile.zip"(datas for FW update) into "FirmUpdateTool_XXX\httpd\data". (as picture 9)
Picture 9
Note: To avoid the data damage of "updatefile.zip" file, it is recommended that once delete the previous
"updatefile.zip" file, then put new "updatefile.zip" file.
6) Other PC setting
① Disable "system standby" and "HardDisk power off".
② Disable "screen saver".
12
Page 13
L26-H03B/ L26-H03W/ L32-H03B/ L32-H03W
3. Execute FW Update
1) Start PC.
2) Turn on TV
3) Execute FirmUpdateTool.exe
When Windows firewall is valid, the dialog is displayer at the first start, click in "Unblock", then "boisclair updater
window" is displayed.
Picture 10 FirmUpdateTool.exe Icon and Update Tool Image
In case that "boisclair updater window isn't displayed, Please confirm as shown below.
- Please confirm that Hub is turned on, and Link indicator of Hub blinks.
- Please confirm that PC network setting is correct.
- Please confirm that the Hub is connected to PC and TV correctly and firmly.
- Please confirm that "updatefile.zip" exists in the folder "FirmUpdateTool_XXX\httpd\data".
- Please confirm that other network applications (ex. Skype, MSN, etc) aren't working.
- If not improved, please use other PCs and try again.
4) Enter FACTORY MODE by R/C [べんり][青][1][1][1][9]
Picture 11 Remote Controller Picture 12 FACTORY MODE Menu
5) Choose "OPTION" by R/C [上/下] button.
Then press R/C [決定] button. -> Enter to OPTION menu.
13
Page 14
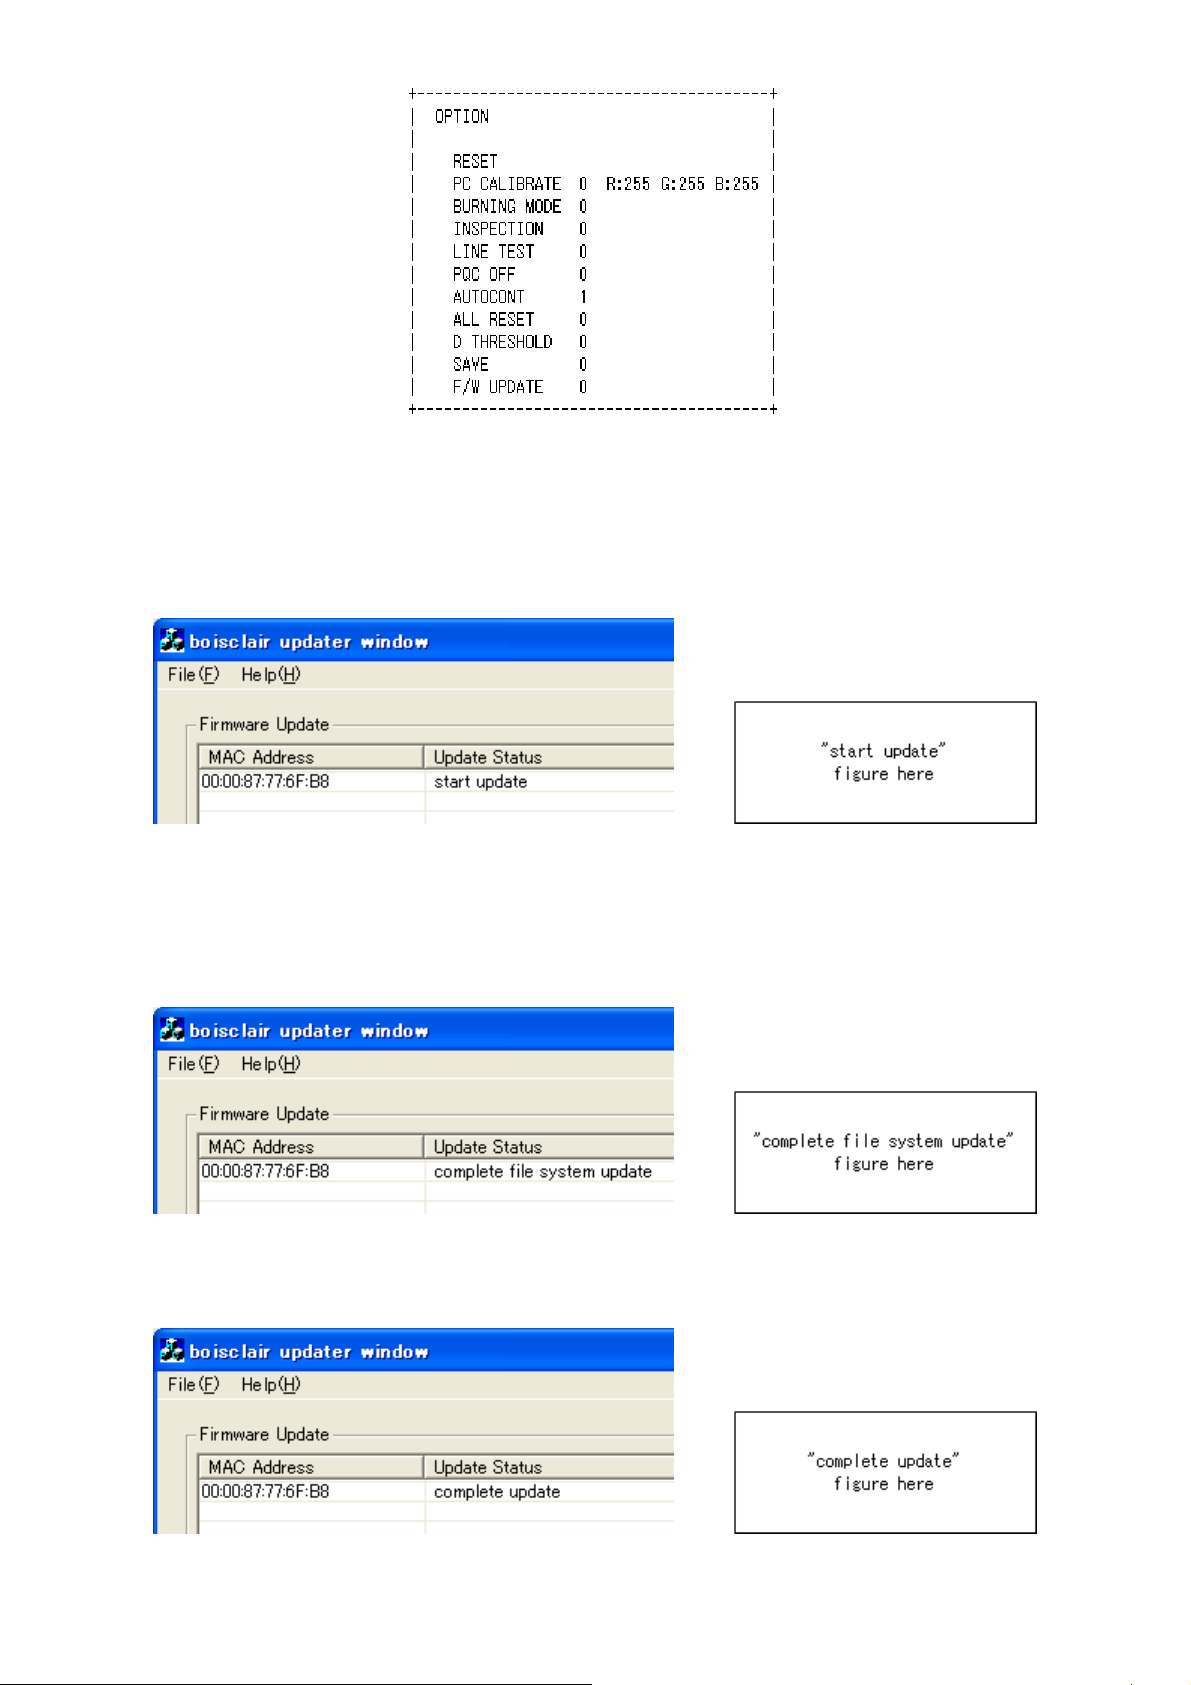
L26-H03B/ L26-H03W/ L32-H03B/ L32-H03W
Picture 13 OPTION Menu
6) Choose "F/W UPDATE" by R/C [上/下] button.
Then press R/C [右] button. -> Value changes 0 to 1 (red letter).
Then press R/C [決定]. -> F/W UPDATE started.
7) "Start update" message displayed on boisclair updater window.
Picture 14 "start update"
In case that "start update" comment not displayed.
- Please confirm that the Hub controller is connected to Main Board with Ethernet cable correctly and firmly.
- Please confirm that PC network setting is correct.
8) After a few minutes, "complete file system update" message displayed.
Picture 15 "complete file system update"
9) After "complete update" message displayed, please turn main power switch off TV, and close "boisclair updater
window". -> FW update has finished.
Picture 16 "complete update"
14
Page 15
L26-H03B/ L26-H03W/ L32-H03B/ L32-H03W
In case that after 10 minutes "complete file system update" or "complete update" message not displayed.
- Please confirm that Hub is turned on, and Link indicator of Hub blinks. If not, please close "boisclair updater
window" and repeat from Item 3.
10) Disconnect the Ethernet cable from TV, then turn Main power switch off.
In case that "failed file system update" message displayed.
- There is some possibility that updatefile.zip is broken. Close "boisclair updater window", and repeat from Item 5.
4. Confirm F/W Version
1) Just after F/W updated, after turn Main power switch on, "はじめて設定" is displayed. Follow the steps to exit "は
じめて設定" as shown below.
(1) "STEP 1 はじめて設定を行います" is indicated. Confirm "次へ" is high light, then press [決定] button.
(2) "STEP 2 お住まいの地方/都道府県域の選択" is indicated. Press R/C [右] button, confirm [次へ] is high light,
then press [決定] button.
(3) "STEP 3 チャンネル設定方法の選択(地上アナログ放送)" is indicated. Press R/C [上/下] button, confirm "自
動設定" is high light, then press R/C [決定] button.
(4) "STEP 5 リモコンボタン割り当て(地上アナログ放送)" is indicated. Press R/C [右] Confirm "次へ" is high light,
then press R/C [決定] button.
(5) "STEP 6 地上デジタル放送の設定" is indicated. Press R/C [上/下] button, confirm "いいえ" is high light, then
press R/C [決定] button.
(6) "地上デジタル放送を視聴する場合は、各種設定から地上デジタル 放送の設定を行ってください" is indicated.
Confirm "次へ" is high light, then press R/C [決定] button.
(7) "STEP 10 BS/CSデジタル放送のコンバーター電源を設定します" is indicated. Press R/C [右] Confirm "次へ"
is high light, then press R/C [決定] button.
(8) "STEP 11 郵便番号の設定" is indicated. Press R/C [下] Confirm"次へ" is high light, then press R/C [決定] button.
(9) "STEP 12 電話回線テスト" is indicated. Press R/C [上/下] button, confirm "いいえ" is high light, then press R/C
[決定] button.
(10) "STEP 13 はじめて設定完了" is indicated. Confirm "設定完了" is high light, then press R/C [決定] button.
(11) TV starts in Terrestrial Analog TV mode.
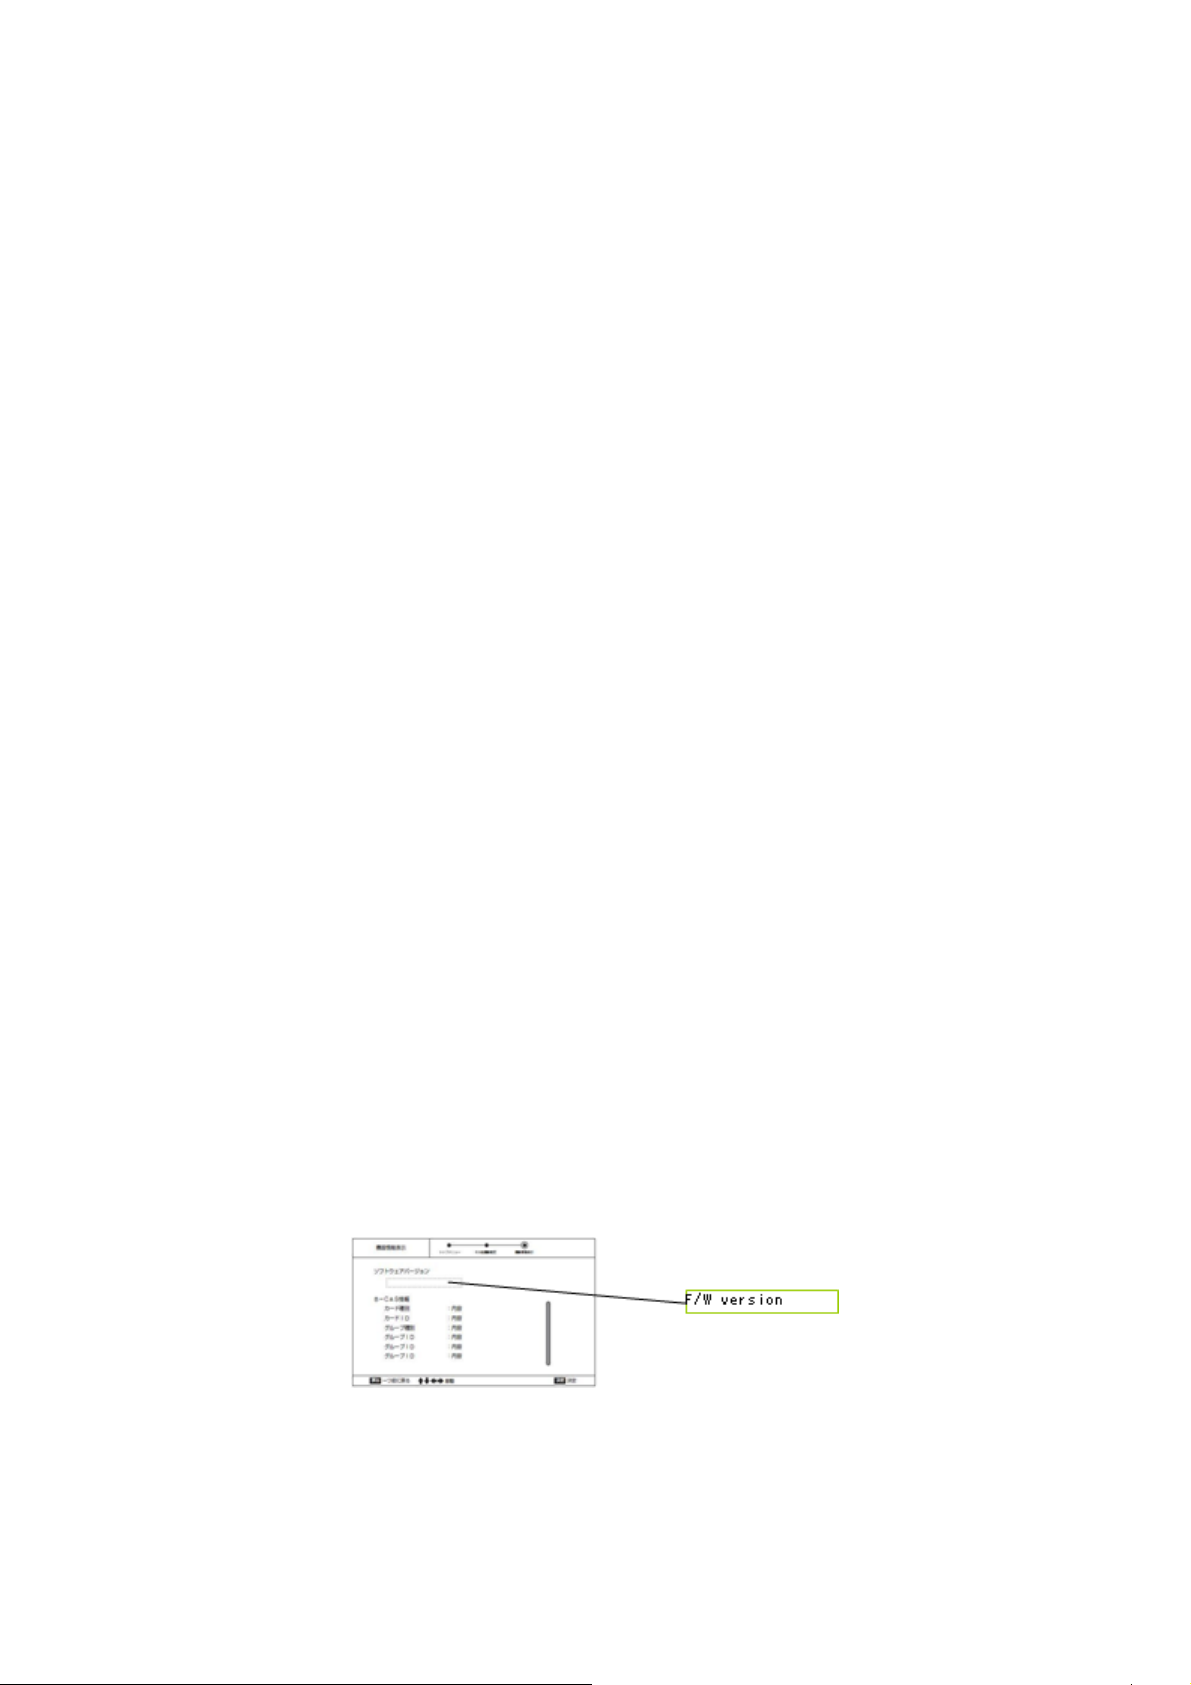
2) Confirm F/W version by following as shown below.
(1) Press R/C "メニュー" button, then "トップメニュー" is displayed. Forward [その他機器設定] - [機器情報表示].
Then confirm the F/W version indicated near [ソフトウェアバージョン] indication.
(2) Press R/C "メニューボタン", then exit F/W version confirmation.
15
Page 16

L26-H03B/ L26-H03W/ L32-H03B/ L32-H03W
5. Execute All Reset.
1) Enter FACTORY MODE by R/C [べんり][青][1][1][1][9]
2) Choose "OPTION" by R/C [上/下] button. Then press R/C [決定] button. -> Enter to OPTION menu.
3) Choose "ALL RESET" by R/C [上/下] button. Then press R/C [右] button. -> Value changes 0 to 1 (red letter).
Then press R/C [決定]. -> ALL RESET executed, then TV re-starts and "はじめて設定" is displayed.
4) Turn R/C power off, then turn Main power switch off.
* How to install firmware update tool.
1. Put the "FirmUpdateTool_xxx.zip" into the optional folder. (The name and root pass of this folder don't include
Chinese characters or Japanese characters, named with only alphabet.)
2. Decompress "FirmUpdateTool_xxx.zip" into the optional folder. "FirmUpdateTool_xxx" folder is created.
3. Confirm the folders and file are exist in the "FirmUpdateTool_xxx" folder
Folders: dhcpd, httpd, log
File: FirmUpdateController.exe
16
Page 17

L26-H03B/ L26-H03W/ L32-H03B/ L32-H03W
7. Troubleshooting
1). No Picture, No Sound
First, confirm the status of Stand-by / On lamp (LED), then survey by following the flowchart as shown below.
17
Page 18

L26-H03B/ L26-H03W/ L32-H03B/ L32-H03W
18
Page 19

L26-H03B/ L26-H03W/ L32-H03B/ L32-H03W
2). No Picture, Picture failed (Color failed, Dark picture, Beat noise, etc.)
First, confirm the connection of all connectors between PCB's, then survey by following the flowchart as shown
below.
19
Page 20

L26-H03B/ L26-H03W/ L32-H03B/ L32-H03W
3). No Sound, Sound failed (Loading interrupt, Noise, etc.)
First, confirm the connection of all connectors between PCB's and speakers, then survey by following the flowchart
as shown below.
20
Page 21

L26-H03B/ L26-H03W/ L32-H03B/ L32-H03W
21
Page 22

L26-H03B/ L26-H03W/ L32-H03B/ L32-H03W
4). Network terminal (LAN) communication failure
22
Page 23

L26-H03B/ L26-H03W/ L32-H03B/ L32-H03W
23
Page 24

L26-H03B/ L26-H03W/ L32-H03B/ L32-H03W
5). Telephone line, when Execution the "Simplified connection test", "Cannot
connect" is indicated.
24
Page 25

L26-H03B/ L26-H03W/ L32-H03B/ L32-H03W
25
Page 26

L26-H03B/ L26-H03W/ L32-H03B/ L32-H03W
8. Self Diagnosis Function
26
Page 27

9. Block Diagram
L26-H03B/ L26-H03W/ L32-H03B/ L32-H03W
27
Page 28

10. Connection Diagram
L26-H03B/ L26-H03W/ L32-H03B/ L32-H03W
28
Page 29

11. Wiring Diagram
L26-H03B/L26-H03W
L26-H03B/ L26-H03W/ L32-H03B/ L32-H03W
29
Page 30

L32-H03B/L32-H03W
L26-H03B/ L26-H03W/ L32-H03B/ L32-H03W
30
Page 31

12. PCB Layout
IO Board
715G3356 I Top
L26-H03B/ L26-H03W/ L32-H03B/ L32-H03W
BD201 C3
C201 C3
C202 B2
C203 A3
C204 C5
C205 C5
C206 B2
C207 A2
C208 A2
C209 A1
C210 B2
C211 C2
C212 C2
C213 C2
C214 C2
C215 C2
C216 B3
C217 C3
C218 B3
C219 C2
C220 B3
C221 B3
C222 C3
C223 C2
C224 C3
C225 C3
C226 C3
C227 C3
C228 C3
C229 C2
CN201 D2
CN202 A3
CN203 D5
CN204 D5
CN205 A2
CN206 D3
CN207 B1
CN208 A4
CN209 D4
CN210 D3
CN211 A3
D201 D5
D202 D5
D203 C4
D204 C4
D205 C4
D206 C4
FB201 C5
L201 C4
L202 D5
L203 D3
L204 D5
L205 C3
L206 C4
L207 C4
L208 C4
L209 C4
L210 C4
Q201 B3
Q202 B3
Q203 B3
Q204 B4
Q205 C3
R201 B3
R202 B2
R203 C4
R204 C2
R205 C4
R206 A2
R207 A2
R208 A2
R209 A2
R210 A2
R211 C4
R212 C4
R213 A2
R214 A2
R215 A2
R216 B2
R217 A2
R218 A2
R219 C4
R220 C4
R221 C4
R222 C4
R223 B3
R224 B3
R225 B3
R226 B3
R227 B3
R228 B3
R229 B3
R230 B3
R231 C3
R232 C3
R233 B3
R234 B3
R235 B2
R236 B3
R237 C3
R238 C3
R239 C3
R240 C3
R241 B3
R242 C3
R243 B3
R246 A2
U201 C2
U202 B2
U203 B3
U204 C3
X201 C2
ZD201 B3
ZD202 D4
ZD203 C3
ZD204 C4
ZD205 C4
31
Page 32

715G3356 I Bottom
L26-H03B/ L26-H03W/ L32-H03B/ L32-H03W
32
Page 33

IR Board
715G3357 1 Top
L26-H03B/ L26-H03W/ L32-H03B/ L32-H03W
CN001 A2
CN002 A1
GND1 A2
LED001 B2
U002 B2
715G3357 1 Bottom
C001 A2
C002 A2
C003 B1
D001 A1
FB001 B1
R001 B2
R002 B2
R003 A2
R005 A1
R006 B1
R007 A2
R008 B2
R009 A1
R011 A2
R012 B2
R013 B2
U001 A1
33
Page 34

Adapter Board
715G3031 1 3 Top
L26-H03B/ L26-H03W/ L32-H03B/ L32-H03W
BD901 C1
C901 E1
C902 E1
C903 D1
C904 D1
C905 C1
C906 A1
C907 D2
C909 B1
C916 E2
C917 F2
C921 F2
C923 D2
C926 E3
C928 E4
C9308 A3
C9309 A4
C939 A1
C9401 C3
C9409 D4
C941 C2
C9412 D3
C943 C4
C944 B4
C946 C3
C947 C4
C950 C3
C951 B2
C952 D3
C953 D2
C963 A4
C9901 F1
C9902 E1
C9903 F3
CN901 F1
CN921 B4
CN923 C4
CN924 E4
D902 C2
D903 C2
D908 C2
D914 A3
D918 A4
D920 A3
D931 E2
D932 F2
D933 F2
D934 F2
D935 E3
D937 D3
D938 D4
D939 D4
D9400 D4
D951 B2
D952 A2
D9522 B1
D955 B3
D956 B3
D957 C3
D960 E3
D961 D4
D962 D4
F902 F1
F913 C4
F914 C4
FB901 E2
G901 F1
G902 A1
IC911 A3
IC932 E3
IC933 F4
IC934 F3
IC952 A3
IC953 A3
J901 D1
J902 D2
J903 E2
J904 B1
J905 B1
J906 A1
J907 A1
J908 A1
J909 F2
J910 E2
J911 E2
J912 F3
J913 A3
J914 C3
J915 F3
J916 F3
J917 F3
J918 E4
J919 E4
J920 D4
J921 D4
J922 C4
J923 B4
J924 A4
J925 A4
J926 A4
J927 A4
J928 A4
J929 E4
J930 E2
J931 B2
J932 B2
J933 C4
J934 B4
J935 C4
J937 D3
J938 B4
L901 E1
L902 D1
L903 C1
L906 C2
L931 C4
L932 E4
L9400 D4
L971 C4
NR901 E1
NR902 F2
Q901 C2
Q931 E2
Q932 F3
Q951 B2
Q952 A2
Q981 F4
R915 C2
R9241 B4
R926 E2
R937 D3
R9382 A4
R9407 D3
R965 A2
R983 B4
R9922 D2
R9924 C2
RV902 F1
T931 E3
T951 B3
ZD904 A3
ZD910 B1
ZD9111 F2
ZD931 C4
ZD932 C4
ZD933 F3
ZD934 F4
ZD9344 D4
ZD9345 D4
ZD9402 D3
ZD950 A1
34
Page 35

715G3031 1 3 Bottom
L26-H03B/ L26-H03W/ L32-H03B/ L32-H03W
C910 B1
C911 B1
C9111 E2
C912 B1
C913 B2
C914 B2
C915 F2
C918 E2
C919 E2
C920 F2
C922 F2
C924 E4
C925 E4
C929 E4
C930 F4
C931 F3
C932 A1
C933 A1
C934 A2
C935 A1
C936 A2
C937 A2
C940 A1
C9400 D3
C9402 D3
C9403 D3
C9404 D3
C9405 D3
C9406 D4
C9407 D3
C9408 C4
C9410 D3
C9411 D3
C9413 D4
C942 A1
C945 B4
C948 A3
C949 A3
C960 A4
C976 C4
C979 F2
C980 F4
C981 F4
C982 E4
C9905 B1
C998 A3
D9401 D4
IC901 B1
IC910 A4
IC931 E2
IC9400 D3
IC951 A2
JP901 A3
JP902 F2
JP903 A1
JP904 A2
Q908 A3
Q9111 E2
Q933 E3
Q934 F3
Q9400 D3
Q980 E4
R901 D1
R902 D1
R903 D1
R905 B2
R906 B2
R907 B2
R908 B2
R909 B1
R910 B2
R911 B2
R9111 E2
R9112 E2
R9113 E2
R9114 E2
R9115 E2
R9116 E2
R9117 E2
R9118 E2
R9119 F2
R912 B2
R913 B2
R916 C2
R917 C2
R918 C2
R919 C2
R920 E2
R921 E2
R922 F2
R923 E2
R924 F2
R925 E3
R927 E2
R928 E2
R929 E2
R931 F3
R932 E2
R933 E2
R934 F2
R935 F2
R936 F2
R9363 A3
R9366 A3
R9377 A3
R938 E3
R9380 A4
R9381 A4
R939 E3
R940 E3
R9400 C4
R9401 D3
R9402 D3
R9403 D4
R9404 D3
R9405 C3
R9406 D3
R9408 D4
R9409 D4
R941 E3
R9410 C3
R9411 C4
R942 F3
R943 E3
R944 F4
R945 E4
R946 F4
R947 D4
R948 F4
R949 F3
R950 F4
R953 B2
R954 B2
R955 B2
R956 B2
R957 A2
R958 A1
R959 A1
R960 B2
R961 A2
R962 A2
R963 A2
R964 A2
R966 A1
R967 A1
R968 E4
R970 A3
R971 A3
R972 A3
R973 A3
R974 B4
R975 B4
R976 C4
R977 F3
R978 A4
R979 A4
R980 F4
R981 F4
R982 F4
R984 A4
R985 B4
R986 B4
R987 B4
R9901 E3
R991 A2
R992 A2
R993 E2
R994 A3
R995 A3
R996 A3
R997 A3
R998 A3
35
Page 36

Power Switch Board
715G3354 1 Top
L26-H03B/ L26-H03W/ L32-H03B/ L32-H03W
715G3354 1 Bottom
36
Page 37

Key Board
715G3363 1 Top
715G3363 1 Bottom
L26-H03B/ L26-H03W/ L32-H03B/ L32-H03W
CN100 A2
CN101 A1
GND1 A1
SW100 A3
SW101 A4
SW102 A4
SW103 A4
SW104 A3
SW105 A3
SW106 A2
C100 A2
D100 A2
D101 A2
D102 A2
D103 A2
R100 A2
R101 A2
R102 A2
R103 A4
R104 A4
R105 A4
R106 A3
R107 A3
R108 A3
R109 A2
37
Page 38

13. Exploded View
L26-H03B/ L26-H03W
L26-H03B/ L26-H03W/ L32-H03B/ L32-H03W
38
Page 39

L32-H03B/ L32-H03W
L26-H03B/ L26-H03W/ L32-H03B/ L32-H03W
39
Page 40

L26-H03B/ L26-H03W/ L32-H03B/ L32-H03W
14. Service Parts List
L26-H03B E26RA4NJ2WHTN
Location Part No. Description Quantity Remark
017G MB512HIT MAIN BOARD FOR HITACHI E26R 1.000
049G 51 1A ERADICATOR 2.200
050G 500 1 CABLE TIE 3.000
052G 1150 C INSULATING TAPE 35.000
052G 1186 SMALL TAPE 10.000
052G 2191 A PAPER TAPE 12.000
089G401A18NHTA POWER CORD 1890MM 1.000
095G8014 6D 62 HARNESS 6P-6P 500MM 1.000
095G801830X182 LVDS CABLE 30P-30P 260MM 1.000
095G8021 4D 5 HARNESS 3P-4P 120MM 1.000
095T8013 4D 58 HARNESS 4P 450MM 1.000
095T801316D 2 HARNESS 16P-12P+8P 260MM 1.000
095T8014 8D 80 HARNESS 8P-5P+3P 500MM 1.000
095T801412D 88 HARNESS 12P-8P+4P 150MM 1.000
095T801414D133 HARNESS 14P-14P 300MM 1.000
095T801414D136 HARNESS 14P-14P 320MM 1.000
095T801416D 83 HARNESS 16P-16P 300MM 1.000
095T8022 8D 1 HARNESS 8P-8P 150MM 1.000
098TRACG4NJHTK HITACHI-ASSIGNED REMOTE CONTROL 1.000
0D1G 930 4120 SCREW 1.000
0D1G 930 4120 SCREW 2.000
0D1G 930 4120 SCREW 2.000
0D1G 930 4120 SCREW 2.000
0D1G1730 8120 SCREW 1.000
0D1G1730 8120 SCREW 1.000
0D1G1730 8120 SCREW 1.000
0D1G1730 8120 SCREW 1.000
0D1G1730 8120 SCREW 1.000
0D1G1730 8120 SCREW 1.000
0D1G1730 8120 SCREW 2.000
0D1G1730 8120 SCREW 2.000
0D1G1730 8120 SCREW 4.000
0D1G1730 8120 SCREW 2.000
0D1G1730 8120 SCREW 2.000
0D1G1730 8120 SCREW 2.000
0D1G1730 8120 SCREW 2.000
0D1G1730 8120 SCREW 2.000
0M1G 130 6120 SCREW M3X6 3.000
0M1G 940 6120 SCREW (M4X6) 1.000
0M1G 940 6120 SCREW (M4X6) 1.000
0M1G 940 6120 SCREW (M4X6) 2.000
0M1G 940 6120 SCREW (M4X6) 2.000
0M1G 940 6120 SCREW (M4X6) 2.000
0M1G 940 6120 SCREW (M4X6) 2.000
0M1G 940 6120 SCREW (M4X6) 2.000
0M1G 940 6120 SCREW (M4X6) 2.000
40
Page 41

L26-H03B/ L26-H03W/ L32-H03B/ L32-H03W
0M1G 940 6120 SCREW (M4X6) 2.000
0M1G 940 10120 SCREW 1.000
0M1G1140 6120 SCREW 1.000
0M1G1140 6120 SCREW 1.000
0Q1G 930 8120 SCREW 1.000
0Q1G 940 12120 SCREW 2.000
0Q1G 940 12120 SCREW 2.000
0Q1G 940 12120 SCREW 12.000
705TQ933E01 PLASTIC ASS`Y 1.000
0Q1G 930 8120 SCREW 2.000
A33T0567 VT 1A0100 BUTTON FUNCTION 1.000
A33T0568 VTA1A0118 COVER_FUNC 1.000
KEPF9QA1 KEY BOARD 1.000
GND1 095G 900631 WIRE HARNESS 1.000
715G3363 1 KEY BOARD PCB 1.000
Q52G6025 15255 INSULATING SHEET 1.000
705TQ934E02 REAR COVER ASS'Y 1.000
A34T1112 VT 1A0130 REAR COVER TV26W-9HITA 1.000
Q12G7039 1 VESA RUBBER 1.000
Q15T0257101 BKT-VESA-BTM 3.000
705TQ934E04 BEZEL 09 HITACHI ASS'Y 1.000
A34T1111ADTA1L0130 BEZEL TV26W-9HITA-1 1.000
Q36G 812 1 SPEAKER MESH 1.000
Q36T 600 18134 NONWOVEN FABRIC 1.000
Q36T 600 31 2 NONWOVEN FABRIC 1.000
Q36T 600 31 3 NONWOVEN FABRIC 2.000
Q36T 600 37 28 GP NONWOVEN FABRIC 2.000
705TQ934E05 STAND ASS'Y 1.000
0Q1G 130 6120 SCREW (T3X6) 6.000
A34T0560ADT 1L0100 STAND TV26W-9HITA 1.000
A34T0561ADT 1L0100 BASE TV26W-9HITA 1.000
AM1G1740 10125 SCREW 3.000
Q12G6300 25 1 RUBBER FOOT 6.000 2nd source
Q12T6083 1 RUBBER FOOT 2.000 2nd source
Q15T0306201 09 26"HITACHI TV 1.000
Q37T0132011 HINGE 1.000
750TVU260W2Q12N000 PANEL T260XW02 VQ00 SZ AUO 1.000
A15T0568101 BKT-HOLD_TOP 1.000
A15T0569101 BKT-HOLD_BOTTOM 1.000
A15T0570201 BKT_IO 1.000
A15T0571101 BKT-HOLDER_RIGHT 1.000
A15T0572101 BKT-SUPPORT-LEFT 1.000
A15T0573101 BKT-SUPPORT-RIGHT 1.000
A15T0574101 BKT-WALL-MOUNTING 1.000
A15T0575101 BKT-AC-INLET 1.000
A15T0641101 BKT-HOLD_LEFT 1.000
A15T0642101 BKT_STAND_SUPPORT 1.000
A33T0565 1 1C0100 LENS_FUNC 1.000
A33T0569 VT 1A0200 BUTTOM_POWER 1.000
A33T0590 ED 1C0130 LENS_IR 1.000
A85T0142101 SHIELD_COVER 1.000
41
Page 42

L26-H03B/ L26-H03W/ L32-H03B/ L32-H03W
ADTV82412AAD ADAPTER BOARD 1.000
040G 45762412B CBPC LABEL 1.000
705TQ857019 Q951/Q952 ASS'Y 1.000
0M1G1730 8120 SCREW 2.000
705TQ857020 Q931 ASS'Y 1.000
0M1G1730 8120 SCREW 1.000
705TQ861008 NR901 ASS'Y 1.000
Q09T 203 8 PIN FOR NR901 2.000
705TQ884008 F902 ASS'Y 1.000
705TQ893030 BD901 ASS'Y 1.000
0M1G1730 10120 SCREW 42A9930016 1.000
705TQ893031 Q901/D902 ASS'Y 1.000
0M1G1730 8120 SCREW 1.000
0M1G1730 10120 SCREW 42A9930016 1.000
Q12G 372 8 SILICON 1.000
705TQ893032 D935 ASS'Y 1.000
0M1G1730 8120 SCREW 1.000
705TQ893033 D957 ASS'Y 1.000
0M1G1730 8120 SCREW 1.000
705TQ893034 D955/D956 ASS'Y 1.000
0M1G1730 8120 SCREW 2.000
Q90G0002 1 HEAT SINK 1.000
715G3031 1 3 ADAPTER BOARD PCB 1.000
Q51G 6 4509 GLUE_RTV 2.000
071FPC28201 14 MAGNETIC CORE DMR40 EC29G A634 1.000
071FPC35201 01 MAGNETIC CORE JR2KBF1 EC35 A556 1.000
IOPF8QA1 IOPF BOARD 1.000
040G 45762412B CBPC LABEL 1.000
CN201 088G 353 9FXSH D-SUB CONN 9PIN F 1.000
715G3356 I IOPF BOARD PCB 1.000
IRPF9QA1 IR BOARD 1.000
GND1 095G 900631 WIRE HARNESS 1.000
096G 29 6 GP SHRINK TUBE UL/CSA FOR LED001 8.000
Q11G5053 1 STRING FOR LED001 1.000
715G3357 1 IR BOARD PCB 1.000
PTPF8AA6 POWER SWITCH BOARD 1.000
715G3354 1 POWER SWITCH BOARD PCB 1.000
Q02T7020 1 STEEL_BOSS 2.000
Q11G5054 1 CABLE CLAMP 1.000
Q11G5054 1 CABLE CLAMP 1.000
Q11G6039 2 WIRE HOLDER 1.000
Q11T6039 2 WIRE HOLDER 1.000
Q36T 600 37 2 GP HEMIRON 2.000
Q36T 600 37 28 GP NONWOVEN FABRIC 5.000
Q44GE031101 EPS CUSHION 1.000
Q44GE031201 EPS CUSHION 1.000
Q44GE031301 EPS CUSHION 1.000
Q44GE031401 EPS 1.000
Q44GE031624 1A CARTON 1.000
Q45G 77 5 PE PACKING 500.000
Q45G 99626 37 PE BAG 1.000
42
Page 43

L26-H03B/ L26-H03W/ L32-H03B/ L32-H03W
Q45T 99609 76 MH EPE COVER FOR MONITOR 1.000
Q45T 99609 88 MH EPE COVER FOR BASE 1.000
Q52G 1211825 AL TAPE 1.000
Q52T6025 15208 GP INSULATING SHEET 1.000
017G DW 24HIT HITACHI-CONSIGN B-CAS 1.000
092GB1TX1A23GA HITACHI-ASSIGNED BATTERY 1.5V R6P 2.000
0Q1T 940 30 47 CR3 SCREW 3.000
Q41G7830779 5A 1ST STEP GUIDE 1.000
0Q1G 930 8120 SCREW 3.000
Q34T0583 VT 1A0100 COVER_BCAS 1.000
Q36T 600 37 26 GP NONWOVEN FABRIC 1.000
Q40G0002779 6B SIDE LABEL 1.000
Q52G 1211823 AL TAPE 1.000
078T 522 1 Y SPEAKER 6 OHM 12W 160X40MM 2.000
0Q1G 940 10120 SCREW 1.000
Q11GP001 1 CABLE CLAMP 1.000
Q12G7040 2 HITACHI RUBBER FOR 26" 4.000
Q45G 76 28NV2 R PE BAG FOR CLAMP 1.000
Q45T 88525T24 PE BAG 1.000
43
Page 44

L26-H03B/ L26-H03W/ L32-H03B/ L32-H03W
L32-H03B E32RA4NJ2WHTN
Location Part No. Description Quantity Remark
001T6021 1 SCREW 4.000
017G DW 24HIT HITACHI-CONSIGN B-CAS 1.000
017G MB513HIT MAIN BOARD FOR HITACHI E32R 1.000
049G 51 1A ERADICATOR 2.220
050G 500 1 CABLE TIE 1.000
052G 1186 SMALL TAPE 10.000
052G 2191 A PAPER TAPE 12.000
078T 522 1 Y SPEAKER 6 OHM 12W 160X40MM 2.000
089G401A18N HT POWER CORD 1870MM 1.000
092GB1TX1A23GA HITACHI-ASSIGNED BATTERY 1.5V R6P 2.000
095G801830X182 LVDS CABLE 30P-30P 260MM 1.000
095G8021 4D 7 HARNESS 3P-4P 180MM 1.000
095T8013 4D 59 HARNESS 4P 950MM 1.000
095T801316D 2 HARNESS 16P-12P+8P 260MM 1.000
095T8014 6D 61 HARNESS 6P-6P 900MM 1.000
095T8014 8D 81 HARNESS 8P-5P+3P 900MM 1.000
095T801412D 88 HARNESS 12P-8P+4P 150MM 1.000
095T801414D133 HARNESS 14P-14P 300MM 1.000
095T801414D137 HARNESS 14P-14P 450MM 1.000
095T801416D 83 HARNESS 16P-16P 300MM 1.000
095T8022 8D 1 HARNESS 8P-8P 150MM 1.000
098TRACG4NJHTK HITACHI-ASSIGNED REMOTE CONTROL 1.000
0D1G 930 4120 SCREW 2.000
0D1G 930 4120 SCREW 2.000
0D1G 930 4120 SCREW 4.000
0D1G1730 8120 SCREW 7.000
0D1G1730 8120 SCREW 1.000
0D1G1730 8120 SCREW 2.000
0D1G1730 8120 SCREW 2.000
0D1G1730 8120 SCREW 1.000
0D1G1730 8120 SCREW 1.000
0D1G1730 8120 SCREW 2.000
0D1G1730 8120 SCREW 2.000
0D1G1730 8120 SCREW 3.000
0D1G1730 8120 SCREW 6.000
0M1G 130 6120 SCREW M3X6 3.000
0M1G 940 6120 SCREW (M4X6) 2.000
0M1G 940 6120 SCREW (M4X6) 1.000
0M1G 940 6120 SCREW (M4X6) 1.000
0M1G 940 6120 SCREW (M4X6) 1.000
0M1G 940 6120 SCREW (M4X6) 2.000
0M1G 940 6120 SCREW (M4X6) 2.000
0M1G 940 6120 SCREW (M4X6) 2.000
0M1G 940 6120 SCREW (M4X6) 4.000
0M1G 940 6120 SCREW (M4X6) 5.000
0M1G 940 6120 SCREW (M4X6) 8.000
0M1G 940 10120 SCREW 1.000
0M1G1140 6120 SCREW 1.000
44
Page 45

L26-H03B/ L26-H03W/ L32-H03B/ L32-H03W
0Q1G 930 8120 SCREW 3.000
0Q1G 930 8120 SCREW 1.000
0Q1G 930 8120 SCREW 1.000
0Q1G 930 8120 SCREW 1.000
0Q1G 940 12120 SCREW 2.000
0Q1G 940 12120 SCREW 2.000
0Q1G 940 12120 SCREW 2.000
0Q1G 940 12120 SCREW 13.000
0Q1G 940 14 47 CR3 SCREW 4.000
705TQ933J04 PLASTIC ASS'Y 32 1.000
0Q1G 930 8120 SCREW 2.000
A33T0567 VT 1A0100 BUTTON FUNCTION 1.000
A33T0568 VTA1A0118 COVER_FUNC 1.000
Q52G6025 15255 INSULATING SHEET 1.000
705TQ934J13 BEZEL ASS'Y 32 1.000
A34T1113ADTA1L0130 BEZEL TV32W-9HITA-1 1.000
Q35T0056BBV 1L0100 DECO 1.000
Q36G 813 1 SPEAKER MESH 1.000
Q36T 600 36 9 GP NONWOVEN FABRIC 1.000
Q36T 600 37 23 GP NONWOVEN FABRIC 9.000
Q36T 600 37 32 GP NONWOVEN FABRIC 1.000
705TQ934J14 REAR COVER ASSY 32 1.000
A34T1114 VT 1A0130 REAR COVER 1.000
Q12G7039 1 VESA RUBBER 1.000
Q15T0257101 BKT-VESA-BTM 3.000
Q36T 600 31 5 NONWOVEN FABRIC 1.000
Q36T 600 37 28 GP NONWOVEN FABRIC 1.000
705TQ934J15 STAND ASS'Y 32 1.000
0Q1G 130 6120 SCREW (T3X6) 4.000
A15T0384301 BKT-BASE-PLATE-A1-BIG 1.000
A34T0521ADT 1L0130 BASE 1.000
Q12G6300 25 RUBBER FOOT 6.000 2nd source
Q12G6300 25 1 RUBBER FOOT 2.000 2nd source
Q37T0131011 HINGE 1.000
750TVU315W2S12N000 PANEL T315XW02 VS00 SZ AUO 1.000
A15T0570101 BKT_IO 1.000
A15T0576102 MAINFRAME 1.000
A15T0577101 BRACKET_STAND 1.000
A15T0578101 BRACKET_STAND_SUPPORT 1.000
A15T0579101 BRACKET_PLATE 2.000
A15T0581101 BRACKET_WALL_MOUNTING 1.000
A15T0582101 BRACKET_SUPPORT_LEFT 1.000
A15T0583101 BRACKET_SUPPORT_RIGHT 1.000
A15T0692101 BKT_HOLD_LEFT 1.000
A15T0693101 BKT_HOLD_RIGHT 1.000
A33T0565 1 1C0100 LENS_FUNC 1.000
A33T0569 VT 1A0200 BUTTOM_POWER 1.000
A33T0573 VT 1A0100 COVER_STAND_TOP 1.000
A33T0590 ED 1C0130 LENS_IR 1.000
A85T0142201 SHIELD_COVER 1.000
ADTV82412AAD ADAPTER BOARD 1.000
45
Page 46

L26-H03B/ L26-H03W/ L32-H03B/ L32-H03W
040G 45762412B CBPC LABEL 1.000
705TQ857019 Q951/Q952 ASS'Y 1.000
0M1G1730 8120 SCREW 2.000
705TQ857020 Q931 ASS'Y 1.000
0M1G1730 8120 SCREW 1.000
705TQ861008 NR901 ASS'Y 1.000
Q09T 203 8 PIN FOR NR901 2.000
705TQ884008 F902 ASS'Y 1.000
705TQ893030 BD901 ASS'Y 1.000
0M1G1730 10120 SCREW 42A9930016 1.000
705TQ893031 Q901/D902 ASS'Y 1.000
0M1G1730 8120 SCREW 1.000
0M1G1730 10120 SCREW 42A9930016 1.000
Q12G 372 8 SILICON 1.000
705TQ893032 D935 ASS'Y 1.000
0M1G1730 8120 SCREW 1.000
705TQ893033 D957 ASS'Y 1.000
0M1G1730 8120 SCREW 1.000
705TQ893034 D955/D956 ASS'Y 1.000
0M1G1730 8120 SCREW 2.000
Q90G0002 1 HEAT SINK 1.000
715G3031 1 3 ADAPTER BOARD PCB 1.000
Q51G 6 4509 GLUE_RTV 2.000
071FPC28201 14 MAGNETIC CORE DMR40 EC29G A634 1.000
071FPC35201 01 MAGNETIC CORE JR2KBF1 EC35 A556 1.000
AM1G1740 10125 SCREW 3.000
IOPF8QA1 IOPF BOARD 1.000
040G 45762412B CBPC LABEL 1.000
CN201 088G 353 9FXSH D-SUB CONN 9PIN F 1.000
715G3356 I IOPF BOARD PCB 1.000
IRPF9QB1 IR BOARD 1.000
096G 29 6 GP SHRINK TUBE UL/CSA FOR LED001 8.000
Q11G5053 1 STRING FOR LED001 1.000
715G3357 1 IR BOARD PCB 1.000
KEPF9QB1 KEY BOARD 1.000
GND1 095G 900576 WIRE HARNESS 1.000
715G3363 1 KEY BOARD PCB 1.000
PTPF8AA6 POWER SWITCH BOARD 1.000
715G3354 1 POWER SWITCH BOARD PCB 1.000
Q01G6070 1 SCREW 4.000
Q02T7020 1 STEEL_BOSS 2.000
Q11G5054 1 CABLE CLAMP 1.000
Q11G6039 2 WIRE HOLDER 1.000
Q11GP001 1 CABLE CLAMP 1.000
Q34T0583 VT 1A0100 COVER_BCAS 1.000
Q36T 600 18113 CLOTH_GRIDDING 1.000
Q36T 600 31 5 NONWOVEN FABRIC 2.000
Q36T 600 37 13 GP NONWOVEN FABRIC 2.000
Q36T 600 37 23 GP NONWOVEN FABRIC 2.000
Q36T 600 37 26 GP NONWOVEN FABRIC 1.000
Q36T 600 37 28 GP NONWOVEN FABRIC 2.000
46
Page 47

L26-H03B/ L26-H03W/ L32-H03B/ L32-H03W
Q40G0002779 6B SIDE LABEL 1.000
Q44GJ036101 EPS CUSHION 1.000
Q44GJ036201 EPS CUSHION 1.000
Q44GJ036301 EPS CUSHION 1.000
Q44GJ036401 EPS CUSHION 1.000
Q44GJ036624 1A 32" TV CARTON 1.000
Q44T3231 21 35 EVA WASHER 1.000
Q45G 77 5 PE PACKING 550.000
Q45G 99626 37 PE BAG 1.000
Q45T 99609 87 MH EPE COVER FOR MONITOR 1.000
Q45T 99609 88 MH EPE COVER FOR BASE 1.000
Q52G 1211823 AL TAPE 1.000
Q52G 1211825 AL TAPE 1.000
Q52G6025 15256 INSULATING SHEET 1.000
Q52T 1150522 TAPE_INSULATING 35.000
Q41G7830779 5A 1ST STEP GUIDE 1.000
Q45G 76 28NV2 R PE BAG FOR CLAMP 1.000
Q12G7040 3 HITACHI RUBBER FOR 26" 2.000
Q12G7040 4 HITACHI RUBBER FOR 26" 2.000
Q44T3121510559 GP EVA WASHER 1.000
Q36T 600 31 5 NONWOVEN FABRIC 4.000
Q36T 600 37 19 GP NONWOVEN FABRIC 1.000
0Q1G 930 8120 SCREW 1.000
Q45T 88525T24 PE BAG 1.000
0M1G1140 6120 SCREW 1.000
0Q1G 940 10120 SCREW 1.000
Q36T 600 31 7 NONWOVEN FABRIC 1.000
47
Page 48

L26-H03B/ L26-H03W/ L32-H03B/ L32-H03W
15. Different Parts List
Diversity of L26-H03W compared with L26-H03B
Diversity of E26RA4NJ2WHCN compared with E26RA4NJ2WHTN
Location Part No. Description quantity
705TQ934E01 BEZEL 09 HITACHI ASS'Y 1.000
A34T1111AFDA1L0130 BEZEL TV26W-HITACHI 1.000
Q36T 600 31 1 NONWOVEN FABRIC 1.000
705TQ934E03 STAND ASS`Y HITACHI 1.000
A34T0560AFD 1L0100 STAND 1.000
A34T0561AFD 1L0100 BASE 1.000
AM1T1740 10120 SCREW 3.000
Diversity of L32-H03W compared with L32-H03B
Diversity of E32RA4NJ2WHCN compared with E32RA4NJ2WHTN
Location Part No. Description quantity
705TQ933J01 PLASTIC ASS'Y 32 1.000
705TQ934J07 BEZEL ASS'Y 32 1.000
A34T1113AFDA1L0130 BEZEL TV32W-9HITA-1 1.000
705TQ934J08 REAR COVER ASSY 32 1.000
705TQ934J09 STAND ASS'Y 32 1.000
A34T0521AFD 1L0130 BASE 1.000
Q37T0131012 HINGE 1.000
48
Page 49

Accessories
L26-H03B/ L26-H03W/ L32-H03B/ L32-H03W
49
 Loading...