

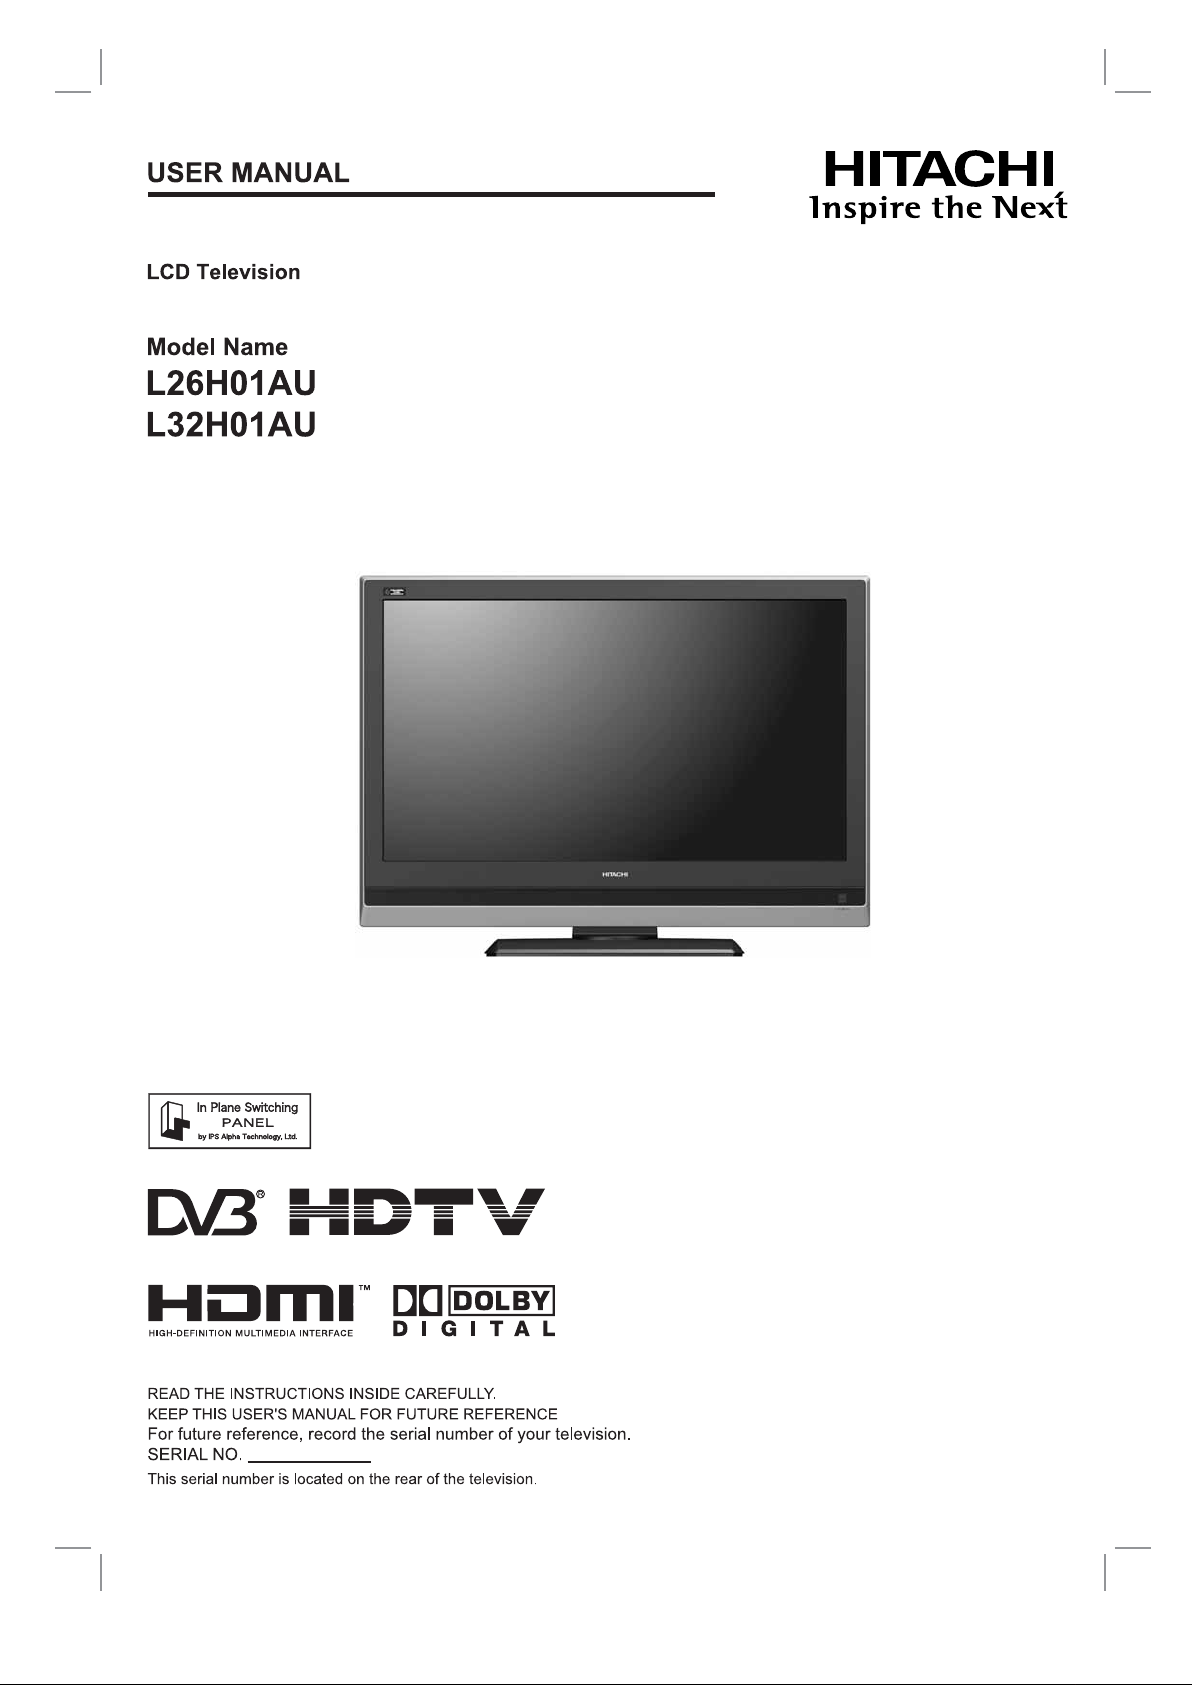
Page 1
Page 2

USER MANUAL
Thank you for purchasing the HITACHI LCD Television.
Please read this user manual carefully before operating
this product.
To ensure proper operation, please read and follow ALL
the instructions, especially the "IMPORTANT SAFETY
INSTRUCTIONS" and "SAFETY PRECAUTIONS".
Please keep this user manual for future reference.
Page 3

CONTENTS
R
ECAUTION
IMPORTANT SAFETY INSTRUCTIONS ............... 01
INSTRUCTIONS................................................... 02
About This Manual........................................................... 02
Trademark Credits ........................................................... 02
About Software ................................................................ 02
Features .......................................................................... 02
SAFETY PR
S ...................................... 03
About the Symbols........................................................... 03
Cleaning and Maintenance .............................................. 06
ABOUT LCD PANEL............................................. 07
Other Common Characteristics of LCD Panel ................. 07
QUICK START GUIDE.......................................... 08
1. Supplied Accessories (including option) ...................... 08
2. Connection .................................................................. 08
3. Insert the batteries into the remote control .................. 09
4. Removing the Protective Sheet ................................... 09
5. Switch On .................................................................... 09
6. Auto Tuning ................................................................. 09
COMPONENT NAMES.......................................... 10
Main Unit ......................................................................... 10
Remote Control................................................................ 11
PREPARATION .................................................... 12
Remote Control Batteries Installation .............................. 12
Handling the Remote Control .......................................... 12
Caution When Moving the Main Unit ............................... 12
Safety Precaution on Main Unit Installation ..................... 13
Anti-Tumble Measures..................................................... 13
CONNECTION...................................................... 14
Terminal Positions ........................................................... 14
Connecting Procedure ..................................................... 14
BASIC OPERATION ............................................. 19
POWER On/Off................................................................ 19
Volume UP/DOWN .......................................................... 20
Mute................................................................................. 20
Input Switching to DTT/TVʿʳAV1~4, HDMI and RGB ....... 20
Input Signal Screen Display............................................. 21
TV SETUP OPERATION ....................................... 22
How to use the On-Screen Display (OSD) system ..........22
Main Menu List ................................................................23
Setup Menu (TV mode) ...................................................24
Channel Selections..........................................................26
Picture Setting .................................................................27
Audio Setting ...................................................................29
Timer Menu .....................................................................30
Audio Switching (TV) ....................................................... 31
PC Adjustment Setting ....................................................32
Analog Teletext................................................................34
DIGITAL TERRESTRIAL TELEVISION (DTT)
OPERATION ......................................................... 36
How to use the On-Screen Display (OSD) system........... 36
DTT Main Menu List.........................................................36
Installing Channels...........................................................37
Restoring Channels..........................................................37
Channel Selections ..........................................................38
Making Favorite List ......................................................... 39
Information Banner...........................................................39
Digital Teletext .................................................................40
Electronic Program Guide (EPG) .....................................40
Subtitle .............................................................................41
Parental Guidance ...........................................................41
Audio Language (MPEG/Dolby®Digital) .........................41
Digital Audio Output .........................................................41
Change Pin ......................................................................42
Local Time .......................................................................42
Checking DTT System Information ..................................42
Jump to TV Setup Menu ..................................................42
FUNCTION ...........................................................43
Size Switching .................................................................43
Picture Freezing...............................................................44
Power Save Mode............................................................45
TROUBLESHOOTING ........................................... 46
When Following Messages Appear on the Screen .......... 46
Symptom and Check List................................................. 46
PRODUCT SPECIFICATIONS ...............................49
Signal Input...................................................................... 50
Recommended Signal List ...............................................51
IMPORTANT SAFETY INSTRUCTIONS
Ⴠ
Read this instruction thoroughly.
Ⴠ
Retain this instruction for future reference.
Ⴠ
Heed all warnings and cautions to prevent possible danger.
Ⴠ
Follow all instructions. Improper handling could cause personal injury and/or serious damage to the unit that may shorten its
service time.
Ⴠ
Do not block any ventilation openings.
Ⴠ
Install the product in accordance with the manufacture’s instructions.
Ⴠ
Before calling for the technical support or service technician, read “TROUBLESHOOTING” (
symptoms when problems occur during installation or operation of the product.
Ⴠ
If serious problems happen (such as smoke or an abnormal odor from the unit), turn off the Main Power, unplug the Power Cord,
and then, contact your local dealer immediately.
1
~48)) to determine the
46
Page 4

INSTRUCTIONS
Thank you for purchasing the HITACHI LCD Television. We hope that you will enjoy the great performance with this product.
This LCD Television has been designed to meet the International standards. However, it could cause personal injuries
and property damage if improperly handled. In order to prevent potential danger and obtain maximum benefit from your
set, please observe the following instructions when installing, operating, and cleaning the product.
Keep this manual for future reference, and record the serial number of your set in the space provided on the front cover
page of this manual.
About This Manual
Ⴠ
The information in this manual is subject to change without notice.
Ⴠ
This manual has been created with extra care. In case that you have any comments or questions regarding this manual,
please contact your local dealer or our Customer Service Center.
Ⴠ
Before operating this set, please fully understand the prerequisite such as specifications or constraints of the
hardware and software. We are not responsible and have no liability for any loss, damage or injury as a result of
misuse.
Ⴠ
Reproduction, copying, use, modification, and/or transmission in whole or in part of this manual are prohibited without any
prior written permissionˁ
Ⴠ
All other products and company names used in this manual are trademarks or registered trademarks of their respective
owners.
Traademar k Cre
Ⴠ
VGA and XGA are trademarks of International Business Machines Corporation.
Ⴠ
VESA is a registered trademark of the Video Electronics Standard Association.
Ⴠ
HDMI, the HDMI logo and High-Definition Multimedia Interface are trademarks or registered trademarks of HDMI
dits
Licensing LLC.
Ⴠ
DVB is registered trademark of the DVB Project.
Ⴠ
Manufactured under license from Dolby Laboratories.
“Dolby” and the double-D symbol are trademarks of Dolby Laboratories.
Even if no special notation has been made of company or product trademarks, these trademarks have been fully respected.
About Software
You may not alter, decompile, disassemble, decrypt, or otherwise reverse- engineer the Software installed in this
product, which are prohibited by law.
Features
Ⴠ
Large-screen and high-definition LCD panel.
Ⴠ
Enjoy high resolution display with 1366 (H) x 768 (V) pixels.
Ⴠ
Improved Digital signal processor.
Ⴠ
High quality sound with deeper, richer and dynamic bass tones.
Ⴠ
Accept more digital input devices with HDMI terminals.
Ⴠ
Great diversity of connecting terminals to cover wide range of audio-visual equipment.
Ⴠ
Enjoy the image from PC with large, high-definition LCD screen.
Ⴠ
Easy-to-use On-Screen Display system operating with remote control.
Ⴠ
Low power consumption with power saving feature.
Ⴠ
Swivel feature. (for L32H01AU)
2
Page 5
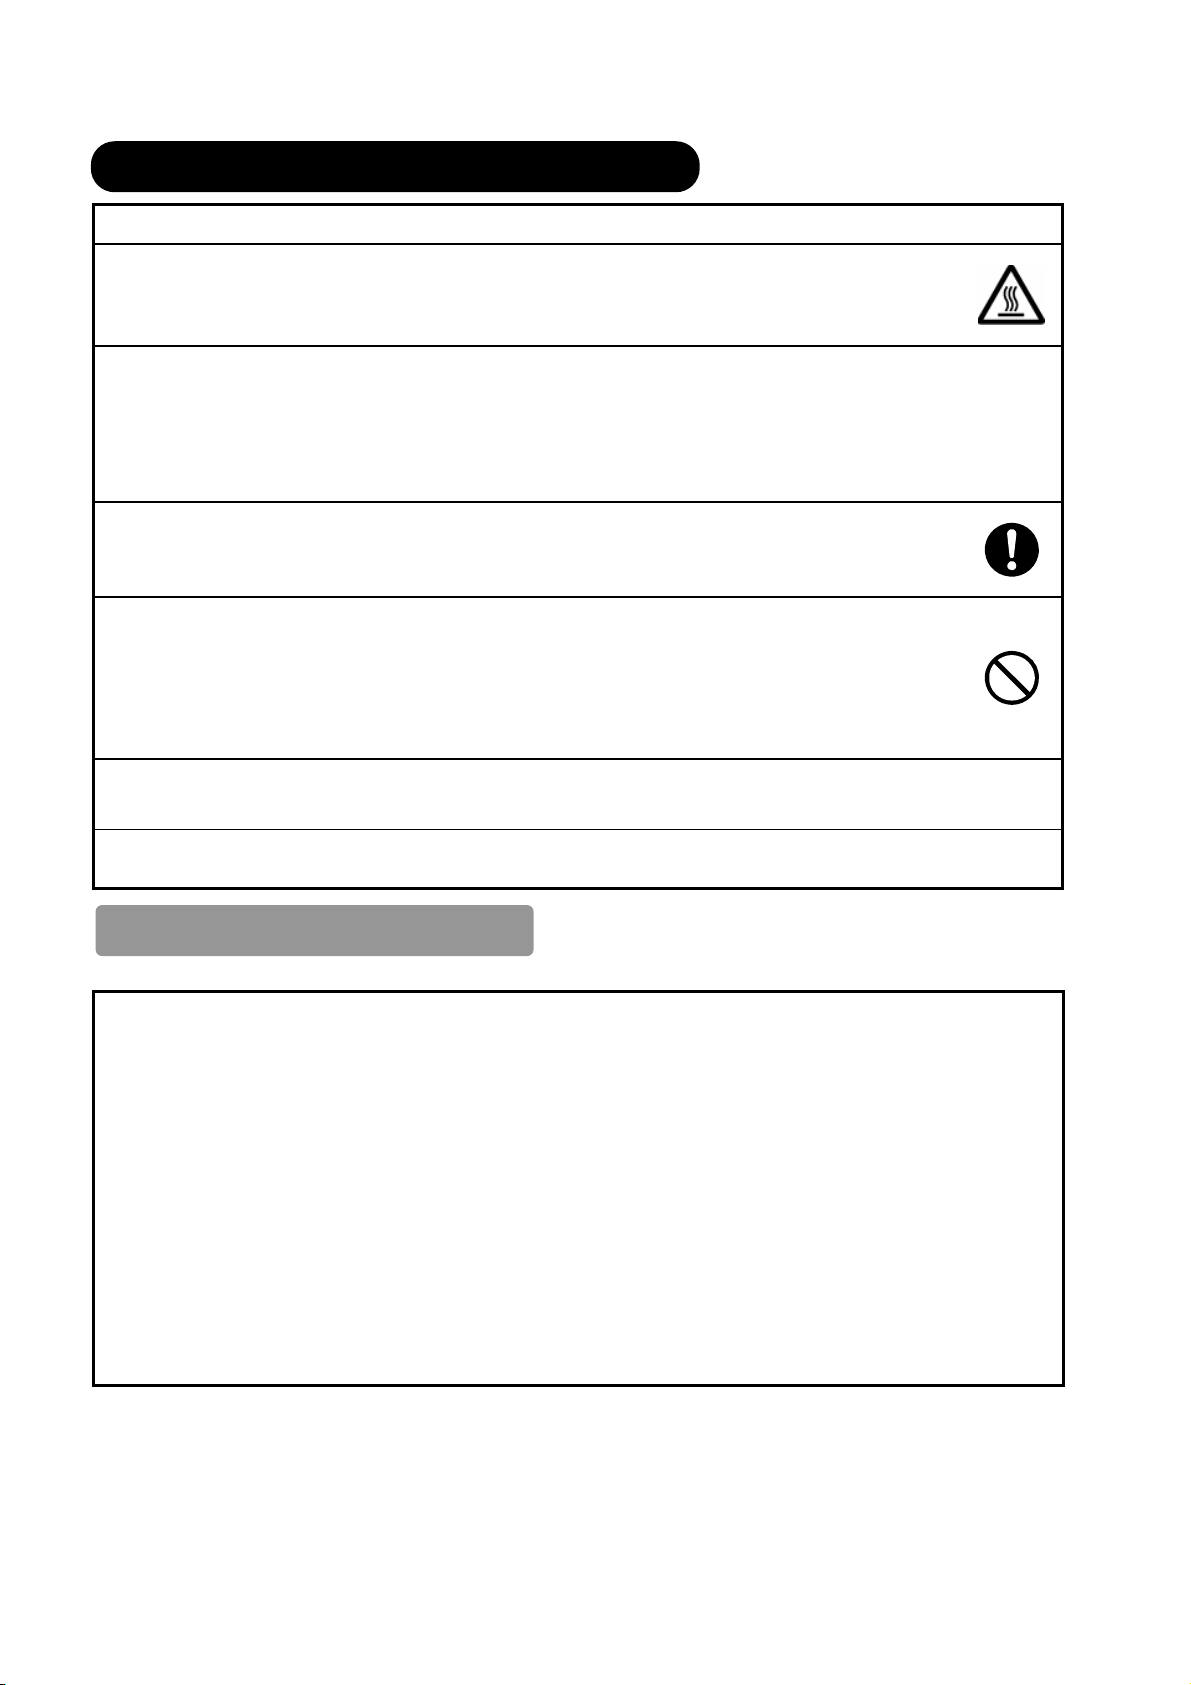
SAFETY PRRECAUTION
For your safety, please read the following precautions carefully before using this product. Improper use would cause serious personal
injuries and/or damage to your property or this product.
S
About the Symbols
The following are the symbols used in this manual and affixed on the unit itself. Please fully understand the meanings of the symbols
before reading the precautions in this section.
WARNING
CAUTION
The triangle with illustration is intended to alert the users that there are possibilities of fire, explosion, or high
temperature if the product is handled improperly.
Each illustration within the triangle specifies the contents in detail. (The figure on the left is an example.)
The circle with diagonal line and illustration indicates a prohibited action. (the symbol at the left indicates that
disassembly is prohibited.)
This symbol indicates a compulsory action.
The contents will be clearly indicated in an illustration or nearby. (the symbol at the left indicates that the power
plug should be disconnected from the power outlet).
Never ignore the instruction. There are risks of serious injuries or possible death to the user.
Do not ignore the instruction. There are possibilities of personal injuries and/or property damage.
!Other Symbols
WARNING
There is a risk of fire, electric shock, or serious injury.
Unplug the power cord immediately when serious problems occur.
Serious problems such as
Ⴠ Smoke, abnormal odor or sound comes out from the product.
Ⴠ No picture, no sound or distorted picture on the display.
Ⴠ Foreign objects (such as water, metals etc) get inside the unit.
Do not continue using the product under these abnormal conditions.
Unplug the power cord, and contact your dealer immediately.
For your safety, never try to repair the product by yourself.
Disconnect the
plug from the
power outlet.
Do not insert liquids or any foreign objects (such as metals or flammable items) inside the unit.
Ⴠ In case it happens, unplug the power cord, and contact your dealer immediately.
Ⴠ Use special caution when younger children are around the unit.
Do not remove cover, or modify the product.
Ⴠ High-voltage components are installed inside of the unit. Removing covers can expose you to
high voltage, electrical shock, and other dangerous conditions.
Ⴠ Contact your local dealer to perform servicing such as inspection, adjustment, or repair work.
3
Do not
disassemble.
Page 6
SAFETY PRECAUTIONS (continued)
!
WARNING
There is a risk of fire, electric shock, or serious injury.
Install the unit at a proper area where it does not expose anyone to any danger.
Ⴠ
If you hit against the edge of the unit, you may be injured.
Do not place any objects on top of the unit.
Objects such as
Ⴠ
Liquid containers (vase, fish tank, flowerpot, cosmetics or liquid medicine).
Ⴠ
If water or any liquid spill onto the unit, it may cause short-circuit and result in fire or electrical shock.
Ⴠ
In case that it happens, unplug the power cord, and contact your dealer immediately.
Ⴠ
Do not place anything heavy on top of the unit.
Ⴠ
Do not climb on or hang from the unit.
Ⴠ
Do not let your pets get on top of the unit.
Do not install the unit in an unsuitable place.
Ⴠ
It could cause a malfunction or in extreme cases danger of electric shock. Places where high
moisture is likely such as bathrooms or shower rooms, close to windows, or outside where rain,
snow or other inclement conditions could occur should be avoided. Please also avoid installing
the unit in a position where fumes from a Hot Spring could come into contact with it.
Unplug this unit during lightning stor m.
Ⴠ
To reduce the risk of electrical shock, do not touch the product when starts lightning.
Do not do anything that may damage the power cord.
Ⴠ
Do not damage, modify, twist, forcibly bend, heat, or pull excessively the power cord.
Ⴠ
Do not place heavy objects (including the unit itself) on top of the power cord.
Ⴠ
If the power cord is damaged, contact your dealer for repairs or exchange.
Use only with designated power supply voltage.
Ⴠ
To prevent the risk of fire and electrical shock, operate this product only with the power supply voltage
indicated on the unit.!
Beware not to drop or have any impact on the unit.
Ⴠ
Take extra care while moving the unit.
Ⴠ
The LCD panel is made of glass. In case that it breaks, you may be injured by the broken pieces.
Ⴠ
In case that you drop the unit or the cabinet is damaged, turn off the Main Power, unplug the power cord and
contact your local dealer immediately.
Ⴠ
Continuing use of the product with above conditions may cause fire or electrical shock.
Clean dust or metals on or around the blade of the power plug regularly.
Ⴠ Continuing use of the product with above condition may cause fire or electrical shock.
Ⴠ Always unplug the power cord first, and clean the blade with dry cloth.
Disconnect the
plug from the
power outlet.
Do not place the unit on an unstable surface.
Unstable places such as
Ⴠ
Tilted place or shaky rack, table, stand or trolley.
Ⴠ
If the unit falls down, it could cause personal injury.
4
Page 7
SAFETY PRECAUTIONS (continued)
CAUTION
Do not cover or block any ventilation holes on the product.
The unit would overheat, and it could cause fire or damage the product which may shorten its service life.
Ɣ
Install the product in accordance with the instructions in this manual.
Ɣ
Do not place the unit with ventilation side down.
Ɣ
Do not install the unit on the carpet or bedclothes.
Ɣ
Do not cover the television with table cloth etc.
Be sure to ground the ear th cable correctly.
Ɣ
Especially when you use power cord adapter, be sure to connect the earth cable to the ground terminal.
Incorrect connection would cause fire or electrical shock.
Ɣ
For your safety, always make sure to unplug the power cord before connect or disconnect the earth cable.
Follow the Anti-tumble measures in this manual.
Ɣ
If the television tumbles over, there is a risk of personal injury and possible death. Also, it would damage the
product seriously.
Do not install the unit near the medical devices.
Ɣ
To prevent malfunction of the medical devices, do not use this product and the medical devices in the same
room.
Do not place a CRT-based television near the speakers of the LCD Television.
Ɣ
It could cause the partial discoloration or blurring of the image on the CRT-based television.
Supply connect
the ground wire.
Disconnect all of the external connection cables and detach the anti-tumble measures
before moving the unit.
Ɣ
It may cause fire, electrical shock, or personal injuries.
Connect the power plug securely.
Ɣ
Improper connection will cause overheating and may result in fire.
Ɣ
Do not touch the blades of the plug while connecting it to the wall socket. It could cause electrical shock.
Ɣ If the plug is not fitted for the wall socket, contact your dearly for replacement.
Do not handle the power cord with wet hands.
Ɣ
It could result in electrical shock.
Do not pull the cord when you unplug the power cord.
Ɣ
It may damage the cord and could result in fire or electrical shock.
Ɣ
Hold the plug when disconnecting it.
Unplug the power cord when you do not intend to use the product for long periods of time.
Handle the batteries properly.
Ɣ
Improper or incorrect use of the batteries may cause corrosion or battery leakage, which could cause fire,
personal injury or damage to the property.
Ɣ
Use only the types of the batteries which are indicated in this manual.
Ɣ
Do not install new batteries with used ones.
Ɣ
Install the batteries correctly by following the polarity (+ and -) indications on the battery compartment.
Ɣ
Do not dispose the used batteries as domestic waste. Dispose them in accordance with the local regulations.
Adjust the headphone volume properly.
Ɣ
Excessive sound pressure from headphones might cause hearing loss.
5
Page 8
SAFETY PRECAUTIONS (continued)
!
PRECAUTIONS
Do not install the unit at areas where it will be subjected to high temperatures.
It could damage the cabinet or parts of the product.
Ɣ
Do not install near any heat sources such as radiator, heat registers, stoves, or other apparatus that produce heat.
Ɣ
Keep the unit out of direct sunlight. It could increase the temperature of the unit and cause malfunction.
Viewing Advice
Ɣ
The lighting of the environment in which the product is used should be appropriate. Too bright / dark environments are not good
for your eyes.
Ɣ
Take time to relax your eyes occasionally.
Ɣ
When you use this product, view from a distance equal to 3 to 7 times the height of the screen. This is the best viewing distance
in order to protect your eyes against eyestrain.
Ɣ
Adjust the volume in appropriate level, especially during the night.
When transporting this product
Ɣ
When the product needs to be transported due to moving or repair, use the carton box and buffer material that
come with this product.
Ɣ
Do not transport this product on its side. It could damage the panel glass or degrade the phosphors of the panel.
Keep radio away from the unit while in use.
The unit is designed to meet the international EMI standards due to prevent radio interference. However, the unit
may generate noise in the radio.
Ɣ
If the noise is heard on the radio, please try the following actions.
Ƶ
Adjust the direction of the radio antenna in order not to receive the interference from the unit.
Ƶ
Keep the radio away from the unit.
Ƶ
Use coaxial cable for the antenna.
About the infrared communication devices
Ɣ
The infrared communication devices such as cordless microphone or cordless headphone may not operate properly around
the unit. It is because of the communication failure. Please note that this is not malfunction.
When you dispose this product at the end of its life, follow the regulations in your residential area.
Ɣ
For more information, contact the local authority or the dealer where you purchased the product.
Cleaning and Maintenance
Please make sure to unplug the power cord before cleaning the unit.
How to clean the LCD panel of the unit.
Ɣ
The panel surface is specially- coated to reduce the reflection and cut infrared radiation; thus, wipe the panel with a lint-free
and dry cloth in order to prevent damage to the coating.
Ɣ
Do not use a chemical cloth or cleaner. Depending on the ingredients, it may cause discoloration and damage on the coating.
Ɣ
Do not wipe with a hard cloth or rub hard. It may damage the coating.
Ɣ
In case of the greasy dirt such as fingerprint, wipe with a lint-free cloth moistened by a diluted neutral detergent solution, and
then wipe with a soft and dry cloth.
Ɣ
Do not use a spray cleaner. It could remove the coating or cause malfunction by entering inside of the unit.
How to clean the cabinet of the unit.
Ɣ
The following may cause crack, deformation, and paint peeling.
Ƶ
Do not wipe the cabinet with benzene, thinner, and other chemical products.
Ƶ
Do not spray volatile solutions such as insecticide over the cabinet.
Ƶ
Do not leave the cabinet in prolonged contact with plastic or rubber materials.
Ɣ
Do not use a chemical cloth, cleaner or wax. Depending on the ingredients, it may cause crack and deformation.
Ɣ
Use a lint-free cloth to clean the cabinet and control panel of the unit. In case of the heavy dirt, wipe with a soft cloth moistened
by a diluted neutral detergent solution, and then wipe with a soft and dry cloth.
Ɣ
Never use the following detergents. It could cause crack, discoloration, and scratch.
Ƶ
Acid/ alkaline detergent, alcoholic detergent, abrasive cleaner, powder soap, OA cleaner, car wax, glass cleaner, etc.
6
Page 9

ABOUT LCD PANEL
Other Common Characteristics of LCD Panel
The following are the common phenomena when operating LCD Panel due to its structural reason. Please
note that they are not malfunctions.
ŏ
Defective Spots on Panel
The LCD panel is manufactured with high-precision technology. However, there might be some spots that
are not emitted, brighter than the others, or in different colors, etc.
ŏ
Surface on Panel
The LCD panel displays images by blinking the fluorescent lamps internally. This could raise the temperature
of the display surface.
In addition, do not impact strongly on the surface of the panel because LCD panel is made with fine
processing glass.
ŏ
Residual image
When a still image or menu is displayed on the screen for a short time (about a minute) and then switches
to another image, it may leave an “after-image” on the screen.
The residual image will disappear on its own.
ŏ
The Usage under the Low Temperature Environment
Because of the structural characteristics of the LCD panel, the response speed of the LCD panel becomes
slower when the ambient temperature around the television becomes too low. In some cases, it may cause
the residual image.
The residual image will disappear on its own as the temperature goes up and back to normal.
7
Page 10
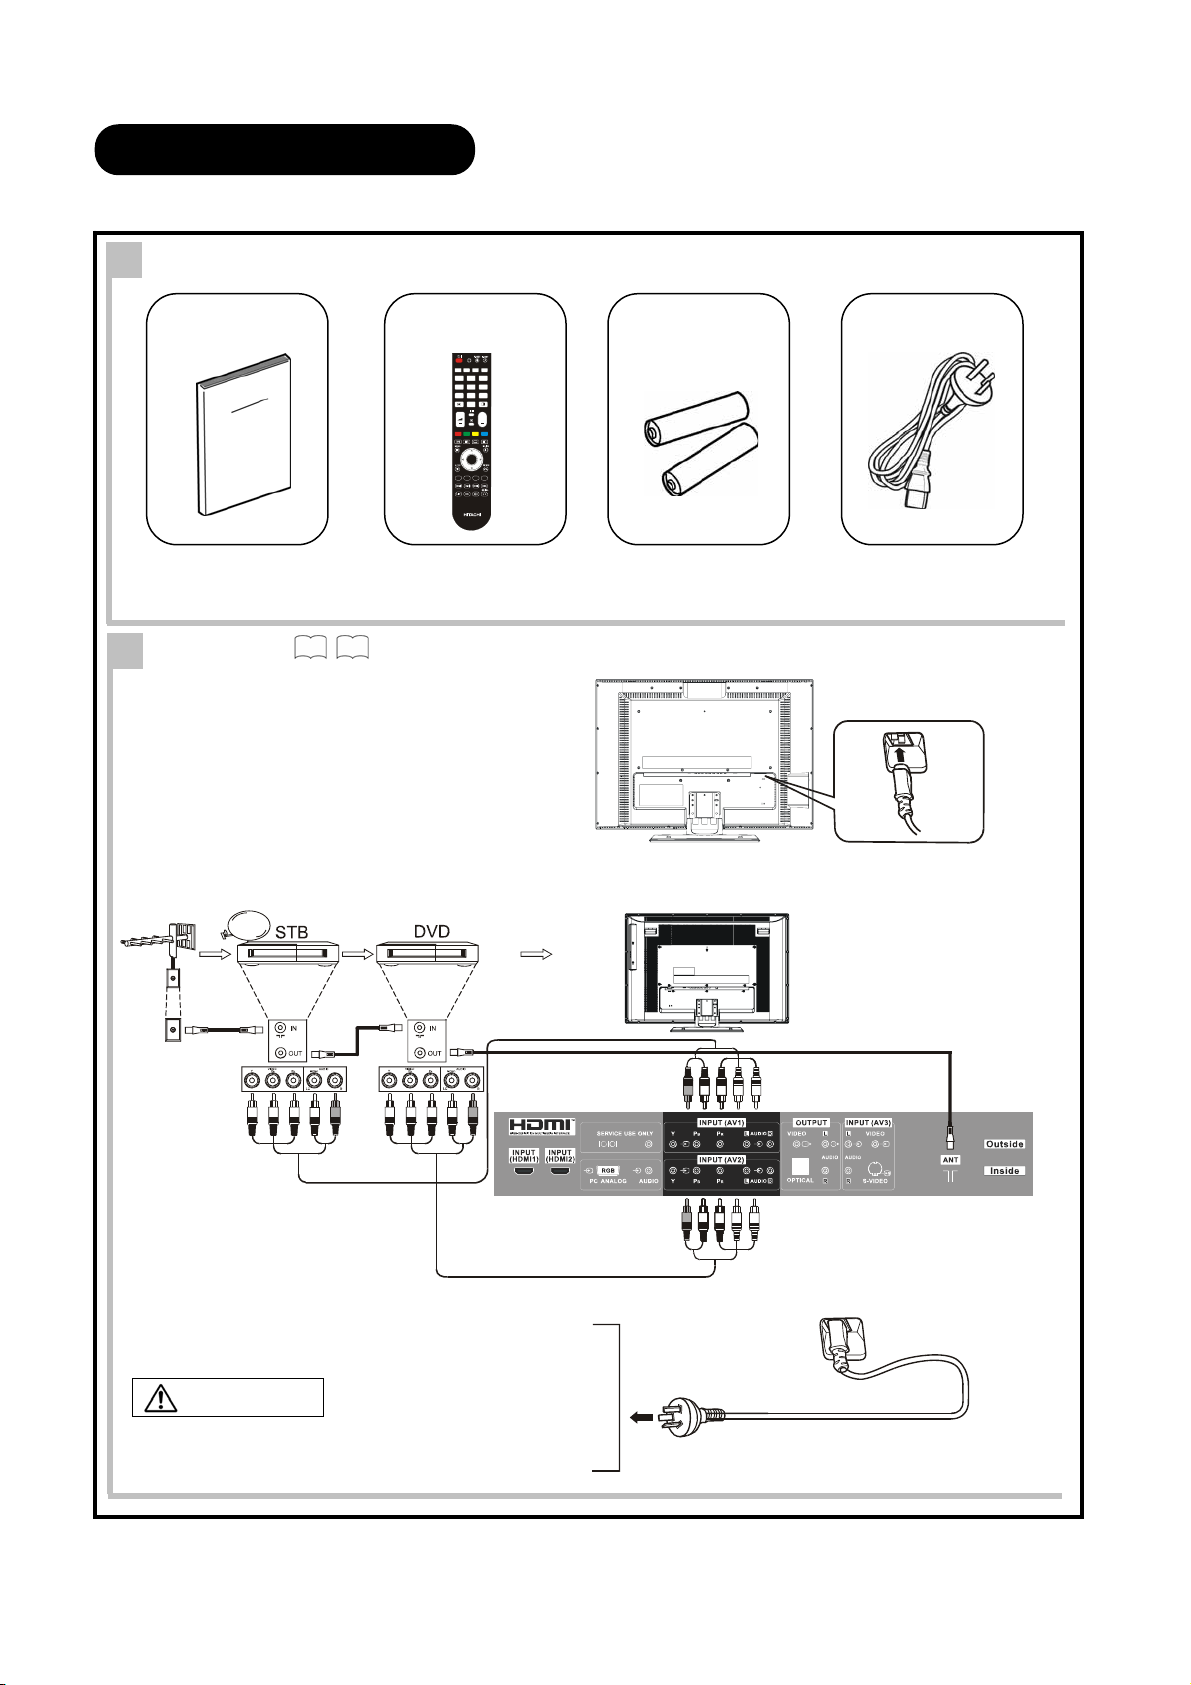
QUICK START GUIDE
1. Supplied Accessories (including option)
AV1AV2AV4A
2.Connection
For more information on connecting and using your TV, please be sure to read all instructions in this user manual.
User Manual
Remote Control
i
+
TV DTT AV TEXT
123
456
789
0
++
P
?
OK
V3
CLE-994
*The type of power plug provided may be different from this drawing for some countries.
AA size batteries
X2
Power Cord*
14~20
Connect the power cord to the rear panel.
ཱ Connect to the aerial lead and external equipment.
Example: Connecting aerial lead through DVD/STB.
(example:L32H01AU)
ི Connect the plug into the wall socket after all
other connections are completed.
CAUTION
Ɣ Ensure that both ends of power cord are easily
accessible.
8
Page 11
QUICK START GUIDE (continued)
3. Insert the batteries into the
remote control…
4. Removing the Protective Sheet
5. Switch On…
6. Auto Tuning …
and
12
Before using the TV, remove the protective sheet
from the cabinet.
Press either Power On/ Off switch on
the unit or Power On/ Off button on the
remote control.
Ɣ The color of the indicating lamp turns
from Red to Green.
19
24
Main Power
switch
37
The protective sheet
Sub Powerswitch
Sub Power button
!!!!!!
When you turn ON the TV for the first time, a message show up to lead to
the DTT channel installation.
DTT
The message “Database is Empty Press MENU for installation”
appears.
ཱ Press button to access DTT main menu.
ི Select “Installation” form DTT main menu and press button.
ཱི The password box will appear as”
password.
”, and enter “0000” as your initial
ུ Select one of the scanning methods from “Manual scan”,” Quick
scan”, or “Auto scan.”
TV
Then, go to with TV channel installation.
Press button to access TV Main Menu.
ཱ Select “Setup” from Main Menu.
ི Select “Auto scan.” From “Setup” menu and press button.
ཱི Select “Search” to turn the local channels automatically.
NOTE
Ɣ
If you want to change the setting after completing this first time setup, press
button and set up individually. Refer to
23 ,24
and
25
Database is Empty
Press MENU for Installation
TV Setup Password
Edit channels
Parental guidance
Installation
General settings
System
< DTT Main Menu >
Picture
Audio
Timer
Setup
Select OK Set
<TV Main Menu>
Setup
Auto Tuning
Manual Tuning
Fine Tuning
Sort
Teletext Language
Select OK Set Return
!
9
Page 12
COMPONENT NAMES
Main Unit
Front Panel
ᐴ
ᐳ
ᐱ
Rear Panel
L26H01AU
ᐰ
ཱ
ᐲ
L32H01AU
ᐰ
ᐭ Cabinet
ᐮ Panel
ᐯ Remote Control Receiver
ᐰ Indicating Lamp
ᐱ Speaker
ᐲ Desktop Stand
ᐳ Main Power Switch (on the left side)
ᐯ
ᐴ Sub Power Switch (on the top side)
ᐰ
ི
ཱ
!
ᐭ Side Input
ᐮ Power Cord Socket
ᐯ Terminal Board (External Device Connection)
ᐰ Control Panel (see below for details)
Please refer to
14 ~18
for the detailed information for the connections.
Control Panel (including Top Input)
5
6
3
7
4
2
1
ᐭ Sub Power button
ᐮ Menu button
ᐯ Channel Up/ S button
ᐰ Channel Down/ T button
ᐱ Volume Up
ᐲ Volume Down
ᐳ Input Select /OK button
/f button
/ebutton
ི
ཱ
!
10
Page 13
COMPONENT NAMES (continued)
Remote Control
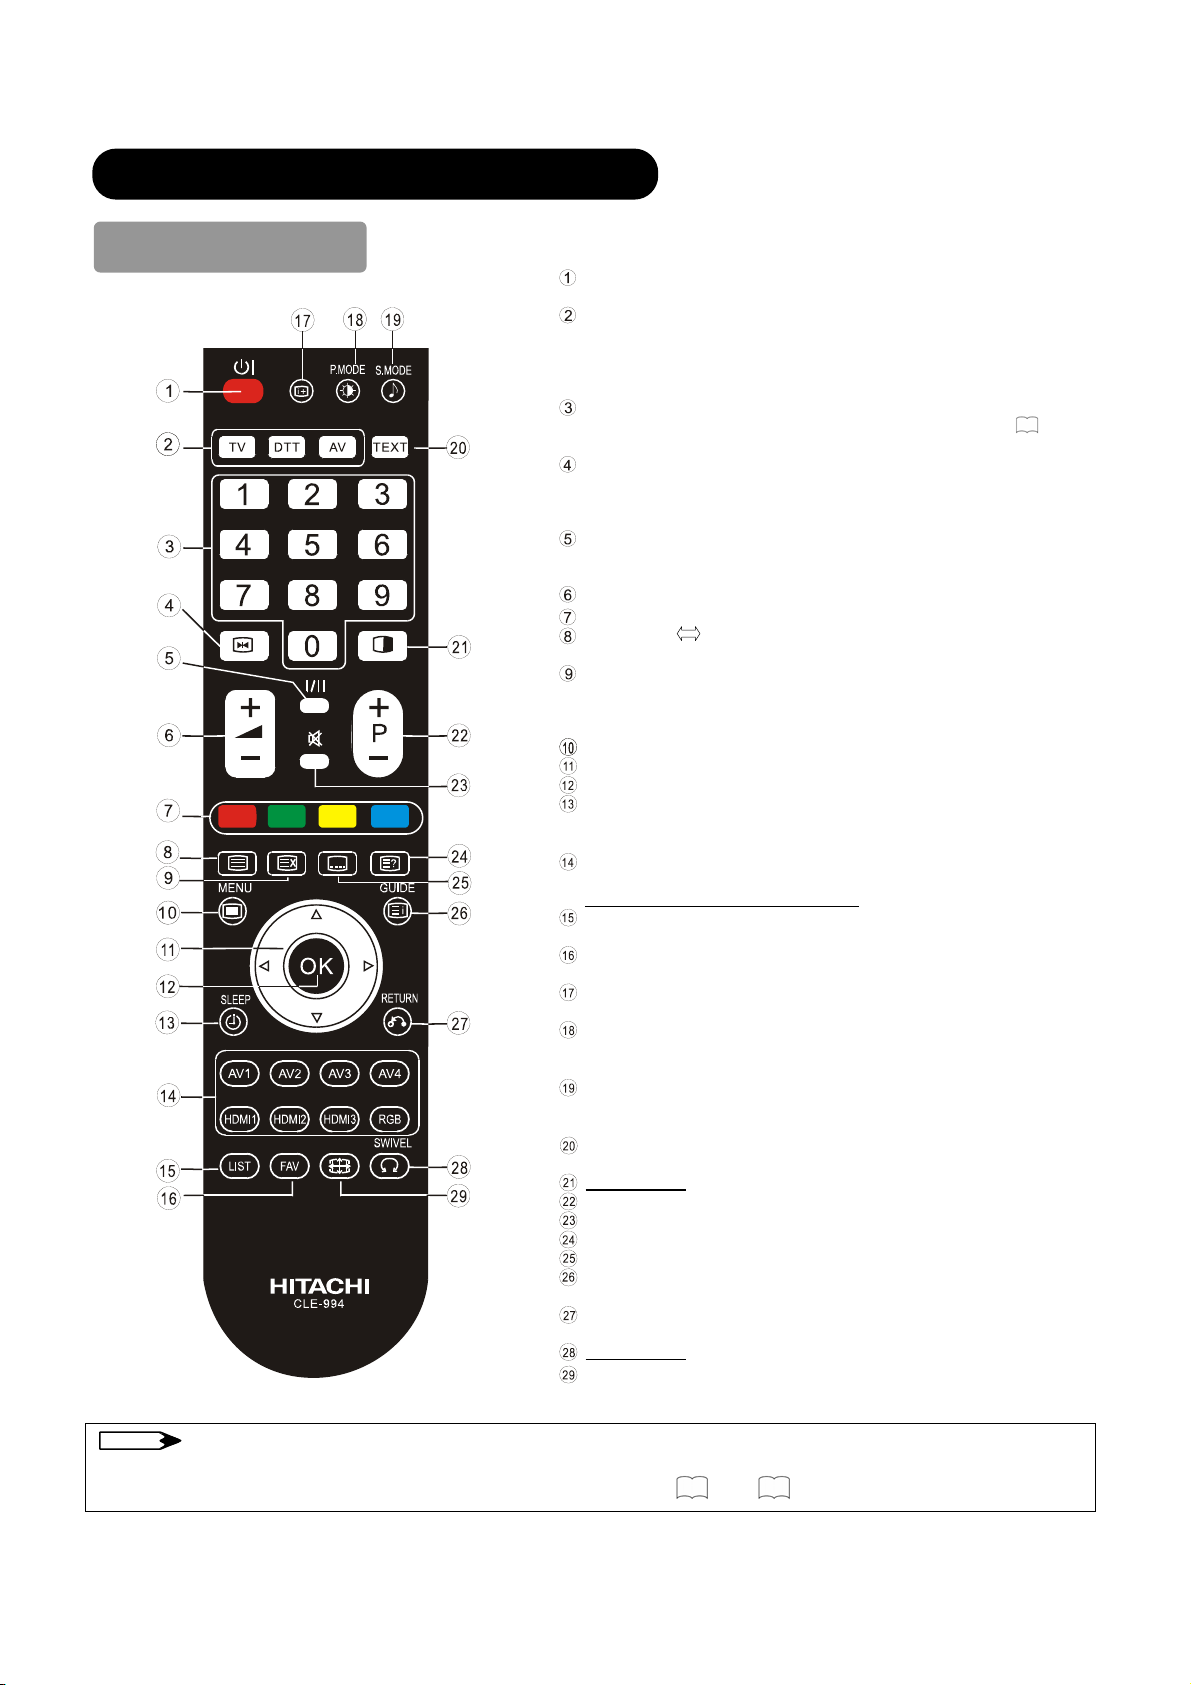
Sub Power
Press this button to switch TV On or Off standby.
Device Select (TV/DTT/AV)
Press these buttons to select the device (TV/DTT/AV) to be controlled
by this remote control.
The selected button will light up to display the selected mode.Normally,
select “DTT”.
Program Select [Page Select]
Press these buttons to select a TV program directly.Refer to
details.
Freeze [Hold]
Press this button to change the picture to freeze mode.
Press it again to return to normal picture. (Also, it holds the page in
teletext mode.)
CHI/II
This is exclusively for TV audio A2/NICAM mode.
Also,press this button to select Audio Language in DTT mode.
Volume Up/Down
[Color]
TV/Text [TV!Text]
This switches between the TV mode and the Teletext mode.
Time [Cancel]
Press this button to display the time when receiving an analog TV
program. The time is not displayed if the recevied signal does not have
any time information.
Menu [Back Light]
Cursor
OK
Off Timer
This automatically sets the power to standby mode when the selected
time period has elapsed. (0ĺ30ĺ60ĺ90ĺ120min.)
Input Select/DVD Control
Press these buttons to change input mode.
HDMI2, HDMI3 input are not available.
Program List
It displays program list in DTT mode.
Favorite List
It displays favorite list in DTT mode.
Recall
Press this button shows the input signal status.
Picture Mode
Picture mode can be changed each time pressed in the following
sequence. DynamicĺNaturalĺCinema
Sound Mode
Sound mode can be changed each time pressed in the following
sequence. MovieĺMusicĺSpeechĺFavorite.
Text
Press to activate and to exit from Teletext.
Not Available
Channel Up/Down[Page select]
Mute
[Reveal]
[Subtitle]
Guide [Index]
It displays EPG screen in DTT mode
Return
You can use this to return to the previous menu.
Not Available
Picture Size [Zoom]
Press this button to change picture size.
26
for
NOTE
Some buttons are only for Teletext mode, and other buttons have different functions in Teletext mode from the use of TV
mode. Those buttons are indicated by [ ]. Refer to "Analog Teletext" on
34
and
35
.
11
Page 14
PREPARATION
1.
2.
A
A
A
Remote Control Batteries Installation Handling the Remote Control
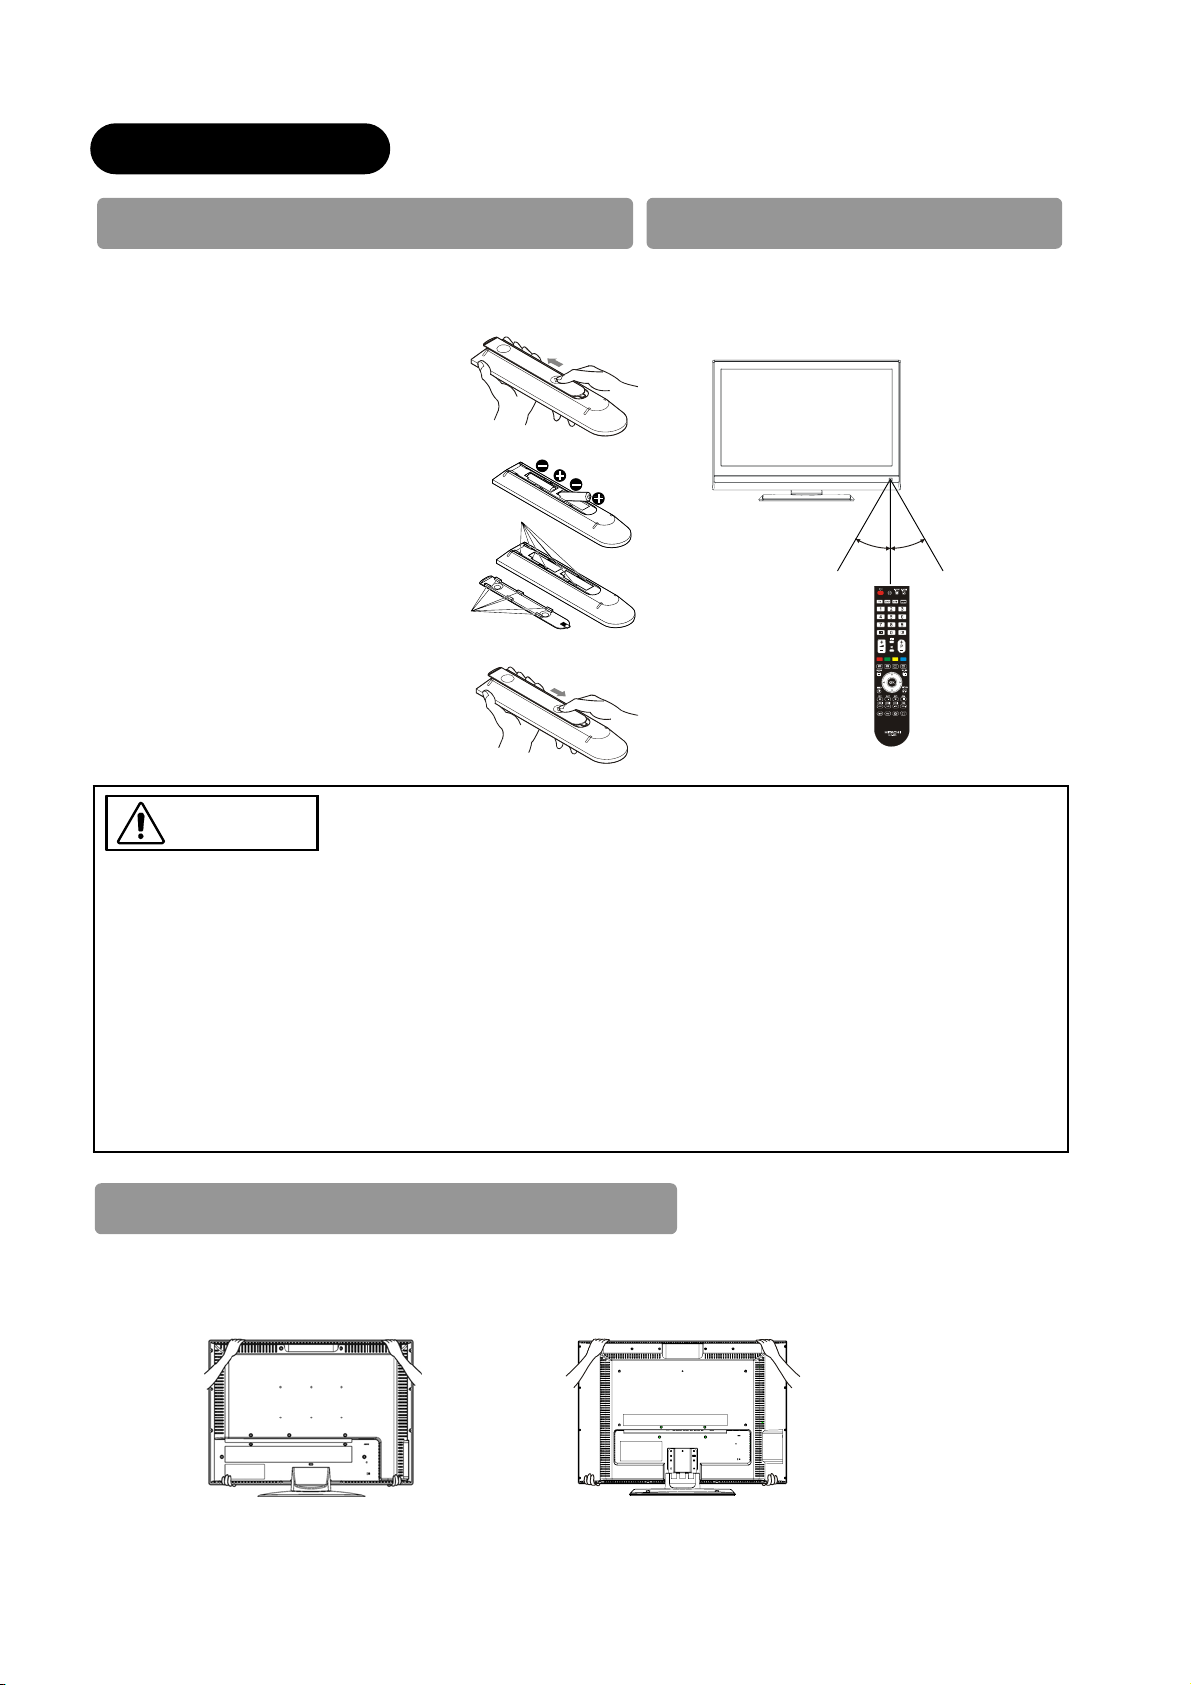
This remote control operates on 2 “AA” batteries.
Open the battery compartment cover
Ɣ Slide open the battery compartment
cover on the backside in the direction of
an arrow, and remove the cover.!
Installing the batteries
Ɣ Install 2 “AA” batteries (included) making
sure the polarities match the indication
inside the compartment.
Projecting parts
Holes
3. Close the battery compartment cover
Ɣ Make sure of the positions to fit the
projecting parts in!the holes, and slide
the!compartment cover in the!direction
of an arrow till it!clicks shut.
CAUTION
Use the remote control within about 5m from front
of the unit’s remote-control sensor and within 30
degrees on both sides.
Within 30 degrees
bout 3m
Within 30 degrees
bout 3m
bout 5m
It could cause corrosion or battery leakage and may result in physical injury and/or
property damage including fire.
Ⴠ Never mix used and new batteries in the device.
Ⴠ Replace all the batteries in a device at the same time.
Ⴠ Remove the batteries if the remote control is not going to be used for an extended period of time.
To avoid possible failure, read the following instructions and handle the remote control
properly.
Ɣ
Do not drop or have an impact on the remote control.
Ɣ
Do not spill water or any liquid on the remote control.
Ɣ
Do not place the remote control on the wet object.
Ɣ
Do not place the remote control under the direct sunlight or near sources of excessive heat.
Caution When Moving the Main Unit
As this product is heavy, whenever it is moved, two people are required to transport it safely.
When moving the unit, hold it by the top and bottom frame of the LCD screen. (See the figures below for details.)
L26H01AU L32H01AU
12
Page 15
PREPARATION (continued)
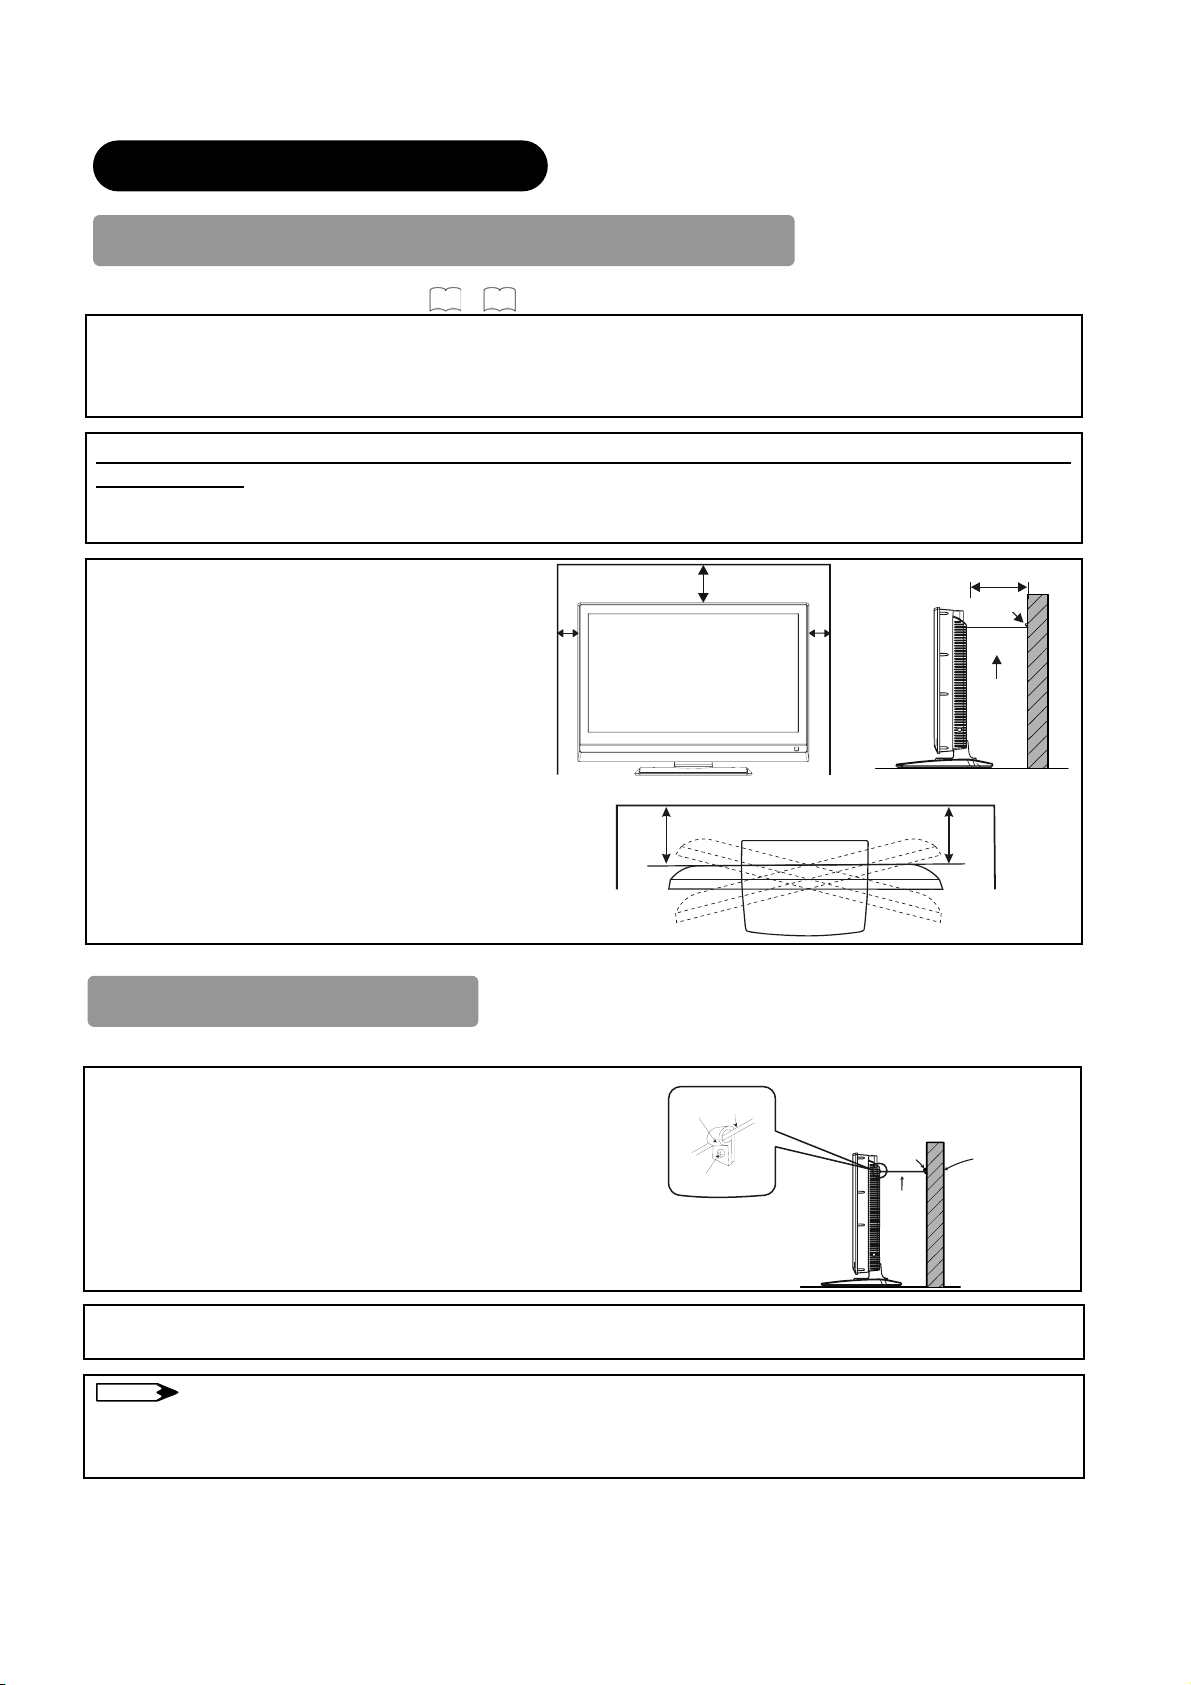
Safety Precaution on Main Unit Installation
Read SAFETY PRECAUTIONS (3to6) carefully besides this page.
When installing the main unit, be sure to use the specified mount units in order to obtain maximum performance and
maintain the safety.
We assume no responsibility or liability for personal injuries or property damages caused by use of other mount units or
improper installation.
As for the installation instruction, please read each user manual of the mount units: for Desktop Setup, Wall Mounting, and
Ceiling Mounting.
In case of using Wall or Ceiling Mounting unit, contac your local dealer, ask the specified installation specialist to set up.
Never attempt to install it by yourself. It could cause injuries or damages
Please leave adequate space around this television
10cm
or more
30cm
or more
in order to avoid increasing the internal temperature.
Make sure not to block any ventilation holes.
Do not install the television in the small space such
as inside the rack, closet or the box.
Leave more than 10cm of clearance from each side
of television and 30cm from the top of television to
wall.
Without Swivel function: Leave at least 10cm of
clearance behind rear unit.
With Swivel functrion: Leave at least 35cm of
clearance to obtain the maximum performance of
Swivel Function. (for L32H01AU)
Anti-Tumble Measures
Install in a stable place and implement safety measure against overturning.
Securing to a wall or pillar
Using a commercially available cord, chain and clamp,
secure the set to a firm wall or pillar.
Hook
Screw
Cord or
Chain
10cm
or more
Clamp
Cord
or
Chain
10cm or more
Clamp
Cord
or
Chain
!
Wall or Pillar
Securing to ceiling
Using a commercially available cord, chain, and clamp secure the set to a ceiling.
NOTE
Ɣ
For more information regarding the mounting of the unit, please contact your dealer.
Ɣ
Please install the unit at a proper area where it does not expose anyone to the danger of hitting themselves (for example
their hands, head or face, etc) against the edge of the unit and cause personal injury.
13
Page 16
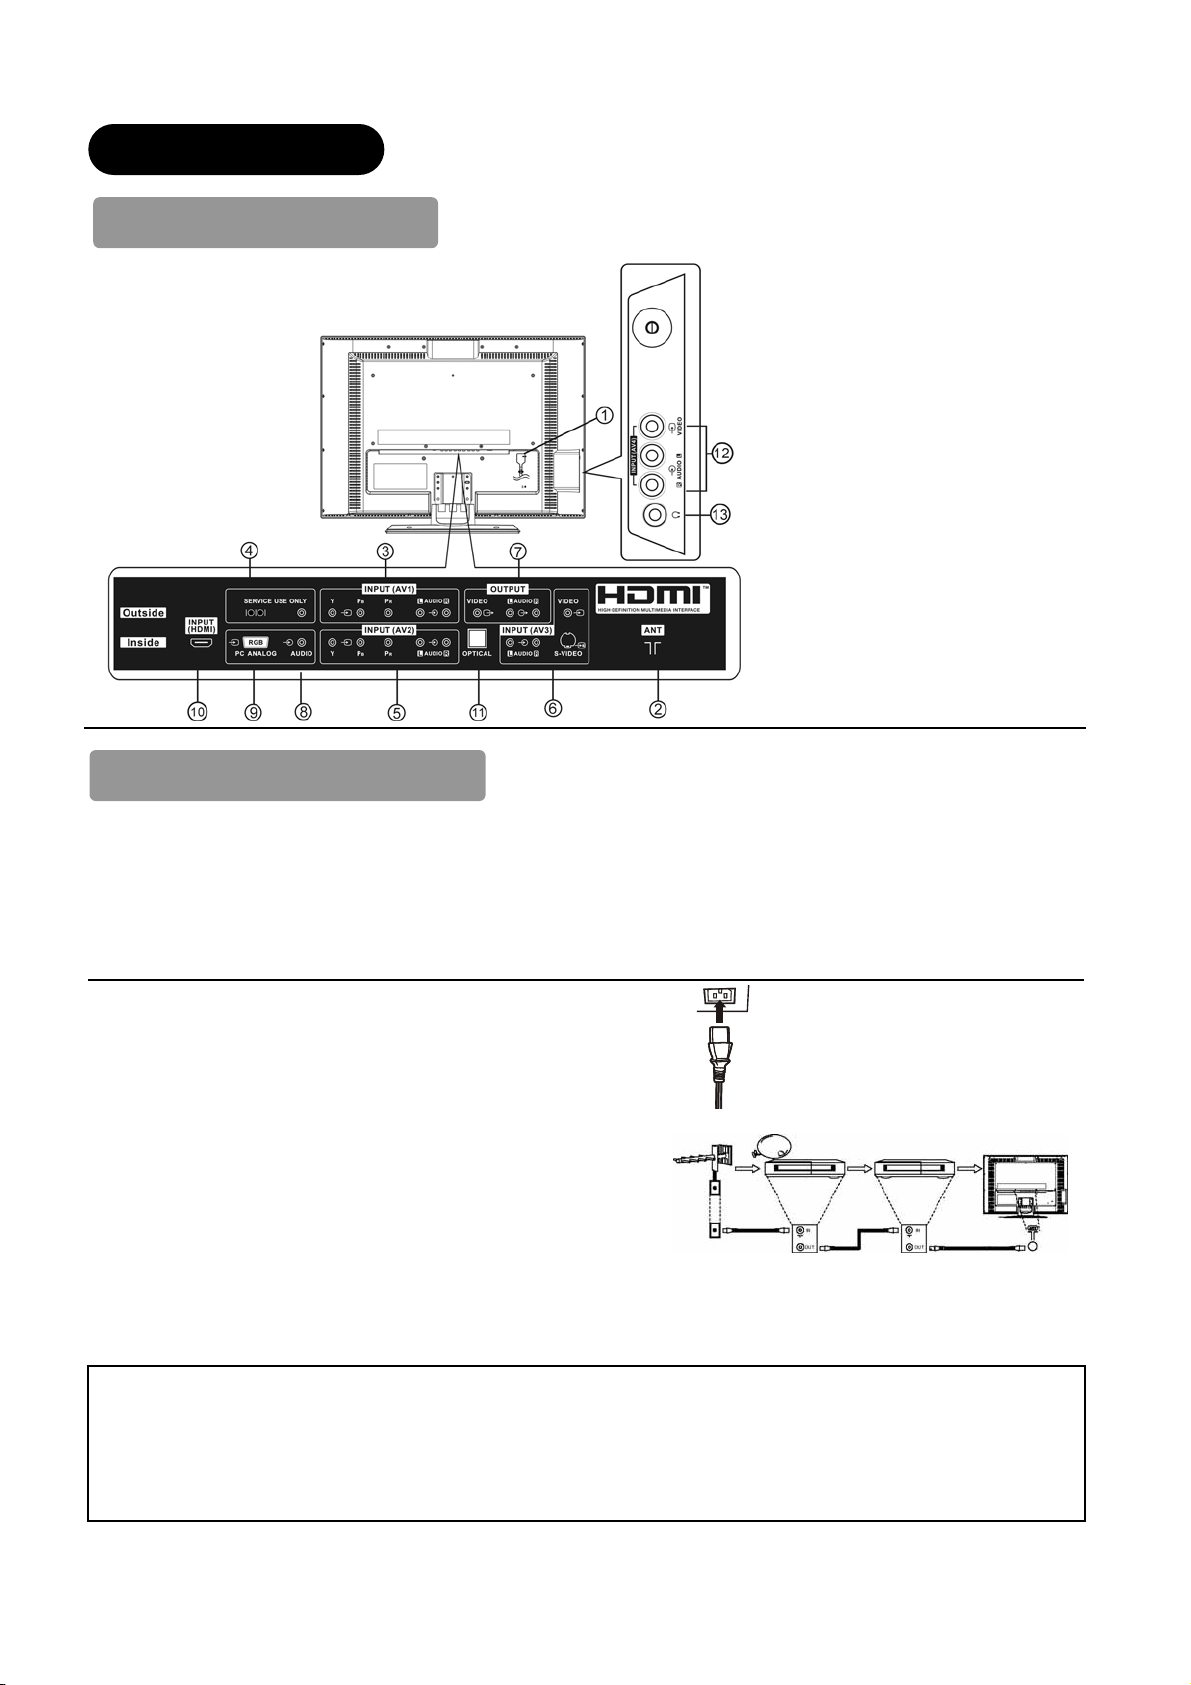
CONNECTION
Terminal Positions
(example: L32H01AU)
Rear
ᐭ Power Cord Socket
ᐮ Aerial Socket
ᐯ AV1
ᐰ Service Use Only
ᐱ AV2
ᐲ AV3
ᐳ Monitor Out
ᐴ PC(RGB)/HDMI Analog Audio Input
ᐵ PC Connection Terminal (D-Sub 15
pin)
ᐶ HDMI
ᐷ Optical Out (Digital Audio)
Side
ᐸ AV4
ᐹ Headphone Terminal
Connecting Procedure
This unit is ready for various kinds of connections. Make a connection in the following steps. Be sure to unplug the power
cord from the wall socket first, when connecting external equipment.
1. Connect Power Cord to the rear panel.
2. Connect Aerial Lead.
3. Connect your external equipment (if any) to the unit.
4. Connect the power plug to the wall socket.
1. Connecting Power Cord to Rear Panel.
Connect power cord to the television.
* Make sure not to connect the power plug to the wall socket until all
connections are completed.
2. Connecting Aerial Lead.
There are two ways to connect aerial lead.
ᐭ When you do not have any other external equipment
Connect the aerial lead directly into the socket at rear panel.
ᐮ When you have one or more external devices to connect:
1. Use RF cable to connect between each equipment and aerial.
2. Connect the Aerial Lead to an equipment ”In” socket marked
3. Connect the RF cable from the equipment “Out” to the other
equipment “In”.
4. Then, connect from the equipment ”Out” to “ANT” on the LCD
screen socket.
STB
[Example: Connecting Antenna through STB
and VCR.]
VCR
Precautions when connecting the aerial
Ɣ Please use a coaxial cable which is free from interference to connect the aerial. Avoid using a parallel flat feeder wire as
interference may occur, causing reception to be unstable and stripe noise to appear on the screen.
Ɣ Avoid using indoor aerial as this may be affected by interference. Please use CATV net or outdoor aerial.
Ɣ For safety, install an external aerial conforming to AS1417.1( Applicable for Australia only)
Ɣ If there are noise in the picture of VHF-Low band channel, please use the double-shielded cable (not provided) for RF
LEADS to reduce the noise.
14
Page 17
CONNECTION (continued)
p
Connecting Procedure (continued)
3. Connecting to External Equipment
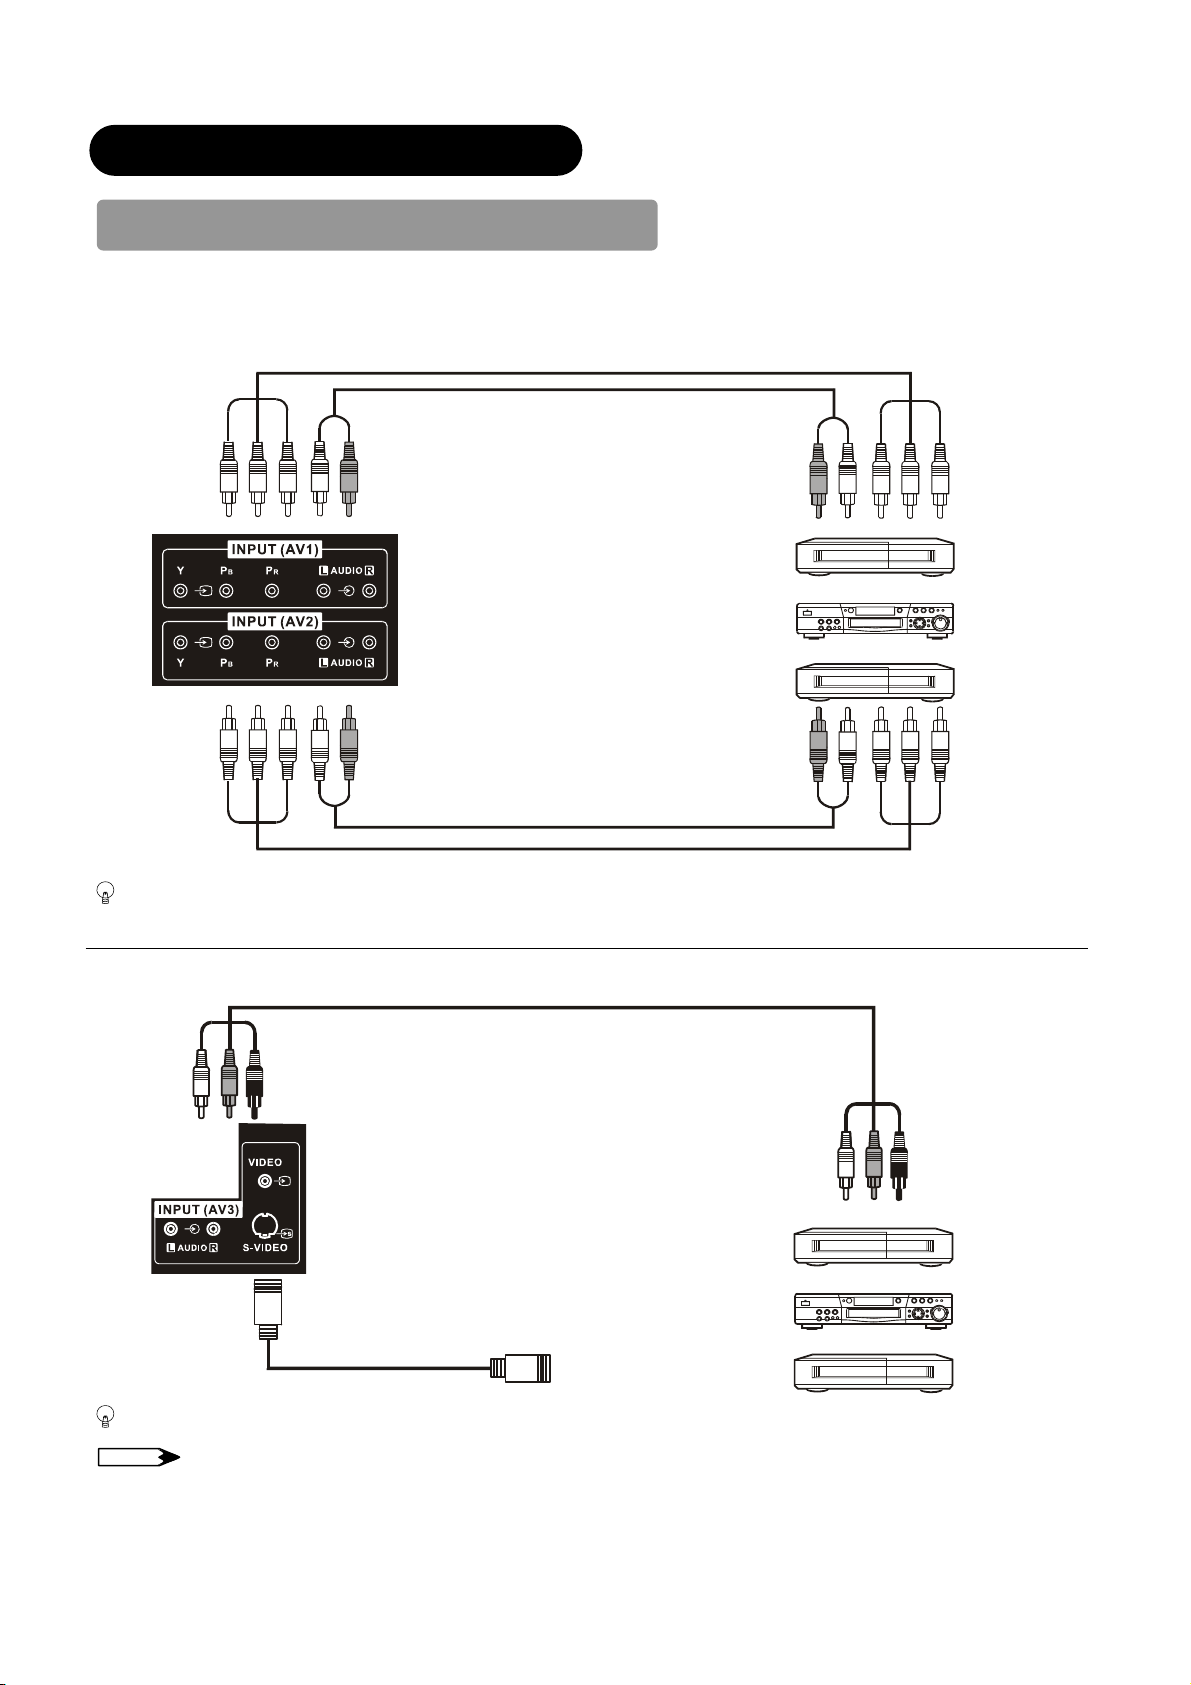
Ɣ Terminals on Rear
AV1 and AV2 can be connected to the equipment with Component output.
IN
DVD player / recorder
Set-To
If your external device has a Component terminal, COMPONENT / AUDIO connection is recommended for higher quality
picture.
AV3 can be connected to the equipment with S-Video output and Composite output.
OUT
VCR
[Example]
Box
IN
OUT
VCR
[Example]
DVD player / recorder
Set-Top Box
If your external device has a S-Video terminal, S-Video connection is recommended for higher quality picture.
NOTE
Ɣ
If both S-video and Composite Video input terminals of AV3 are connected at the same time,
15
S-Video
will have its priority.
Page 18

CONNECTION (continued)
Connecting Procedure (continued)
Monitor Out can be used to display same image and sound as main unit on another television.
When this output terminal is connected to an external television with a 75 Ohm terminal, the same image and sound from
composite (AV3, AV4), or DTT/TV signal can be displayed to the external television.
[Example]
[Example]
IN
OUT
NOTE
Ɣ Video output is not available from component, RGB, or HDMI input.
PC connection terminal (D-sub 15 pin) +PC(RGB)/HDMI Analog Audio Input terminal connected to PC, which allows
Analog RGB signal.
Monitor
Mini stereo plug
IN
or
HDMI terminals can be connected to the devices with HDMI output .
If the external device has DVI output, this can be available with HDMI-DVI cable. In case of using the HDMI-DVI cable,
connect analog audio signal to PC (RGB)/HDMI Analog Audio Input terminal.
IN
Information
HDMI (High Definition Multimedia Interface) is next-generation multimedia I/O interface. Only one cable is used to transmit
all video/audio/control signals, which creates easy connection.
Moreover, those digital signals can produce high quality data without any degradation.
You are provided with one HDMI terminals, one of the most remarkable features.
If your external device has a HDMI terminal, HDMI connection is recommended for higher quality picture and sound.
OUT
OUT
[Example]
[Example]
VCR
DVD player / recorder
Set-Top Box
16
Page 19

CONNECTION (continued)
Connecting Procedure (continued)
NOTE
Ɣ About PC (RGB)/HDMI analog audio input terminal
This terminal can be used in one of the following cases only.
The external device is connected to the PC (RGB) terminal of the TV.
ཱ 7KH DVI output of an external device is connected to the HDMI terminal using the HDMI-DVI cable.
HDMI Terminal
Make sure that the video and audio terminals are connected to the same external device.
About the out put format of an external device, refer to “Recomment Signal List” on
PC (RGB) / Audio Input Terminal
51-52
/
Ɣ Terminals on Side
Since the following terminals are located on the side, it is very convenient to use the extra device on a temporary basis after
done the connections on the rear panel.
AV4 can be connected to the equipment with a composite output.
IN
AV4
Headphone
OUT
[Example]
VCR
Camcorder
DVD Player / recorder
Home video game
(Mini Stereo Plug)
The audio from the speaker will be muted when connecting the headphone to this terminal.
Optical Out (Digital Audio) terminal can be connected to an audio amplifier with Optical Audio input.
OUT IN
NOTE
Ⴠ This output is DTT output but not monitor output.
17
[Example]
Stereo System Amplifier
Page 20

CONNECTION (continued)
!
Connecting Procedure (continued)
4. Connecting the plug into the wall socket
Connect the power cord after completing all other connections.
(The type of plug is different from this drawing for some countries.)
CAUTION
Ɣ
Use only the power cord provided.
Ɣ
Do not use a power supply voltage other than that indicated (AC110-240V, 50/60Hz). It may cause fire or electric
shock.
Ɣ
For the LCD panel, a three-core power cord with a ground terminal is used for efficiency protection. Always be sure to
connect the power cord to a three-pronged grounded outlet and make sure that the cord is properly grounded. If you
use a power source converter plug, use an outlet with a ground terminal and screw down the ground line.
Ɣ
Ensure that both ends of power cord are easily accessible.
Ɣ
If you have to change the power cord, please use the certified power cord that meets your region’s safety standard.
Information
How to secure the power cord and cables
z
Step 1. Secure the power cord
After connecting power cord to the rear panel, secure the power cord with the clamp.
Clamp for power cord
(example: L32H01AU)
Step 2. Secure all cables
Secure all cables together with power cord by using large clamp.
(example: L32H01AU) Large clamp
NOTE
Ɣ When you secure the cables, please be careful not to tighten too much.
18
Page 21

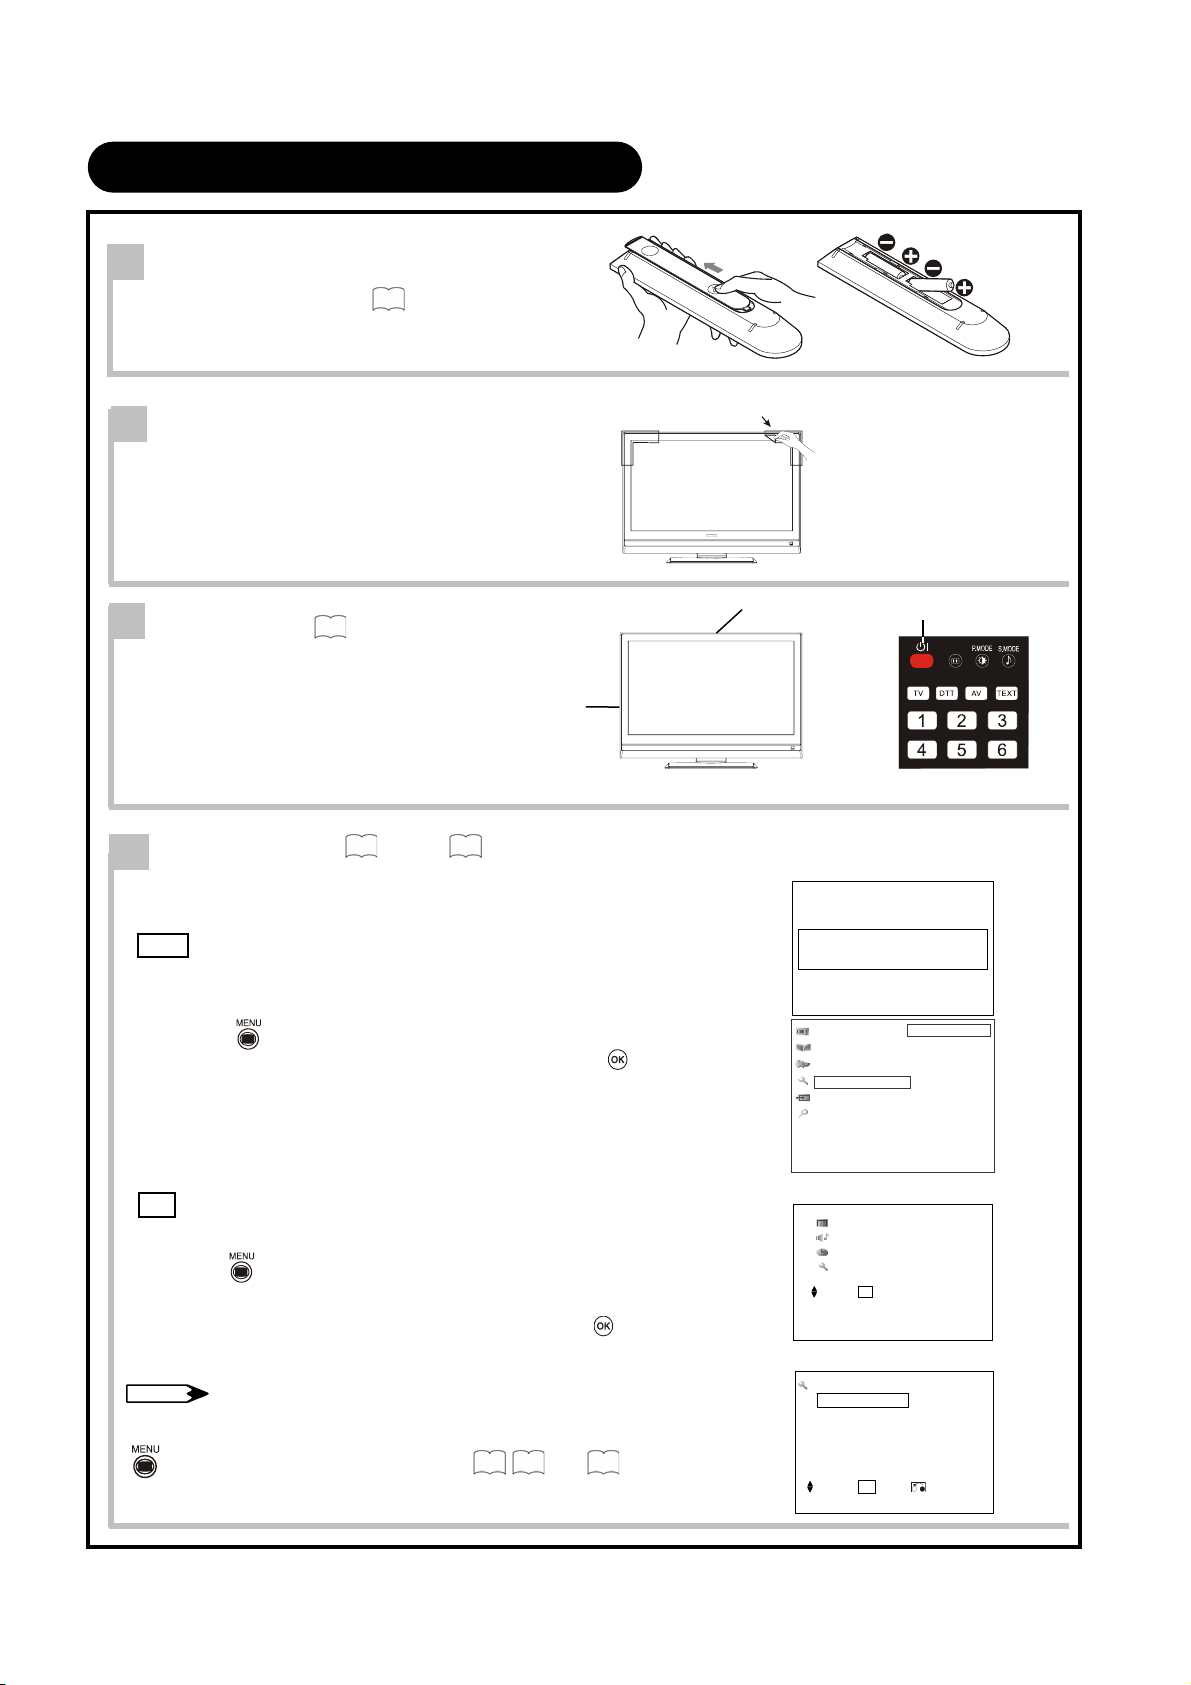
BASIC OPERATION
POWER On/Off
Now, turn On the main power of the unit.
Ⴠ To turn On the power of the television
1. Press the Main Power switch on the television.
Ɣ
The Indicating Lamp will illuminate in Red (Standby mode).
2. Press either Sub Power button on the control panel or Sub Power
button on the remote control.
Ɣ
The color of the Indicating Lamp turns into Green, and the
image will display on the screen.
Main Power switch
Ⴠ To turn Off the power of the television
1. Press either Sub Power button on the control panel or Sub Power
button on the remote control.
Ɣ
The image disappears from the screen and the Indicating Lamp
turns into Red (Standby mode).
2. Press Main Power switch to completely turn Off the power of the
unit.
Sub Power button
Sub Power button
The Indicating Lamp Status
Indicating Lamp Status Power Status Power Switch Status
Off Off Main power ĺ Off
Red Standby mode
Green On
Orange Power Save mode
Main power ĺ On
Sub Power button ĺ Off
Main power ĺ On
Sub Power button ĺ On
Main power ĺ On
Sub Power button ĺ On
Indicating Lamp
NOTE
Ɣ
If the image does not appear on the screen at all, or have any problem, see TROUBLESHOOTING on 46~48. It
may help you to solve the problems.
Ɣ
You can turn ON the power only by pressing the Sub Power button during the Standby mode.
Ɣ
Do not switch the power On/Off repeatedly in a short period of time. It could cause malfunction.
Ɣ
To avoid sudden surges of electricity when the power comes back on, unplug the power cord before you leave if there is
a power cut during use of the unit.
19
Page 22

BASIC OPERATION (continued)
AV1AV2AV4A
Volume UP/DOWN
1. To increase the sound volume, press button on the
remote control, or Volume Up button on the control panel.
Ɣ
The Volume Indicator value on the screen will shift right.
2. To decrease the sound volume, press
button on the
remote control or Volume Down button on the control panel.
Ɣ
The Volume Indicator value on the screen will shift left.
Mute
1. To mute the sound, press button on the remote control.
Ɣ
The sound of the unit is temporarily turned Off.
Ɣ
The color of the Volume indicator will turn into magenta while
muting the volume.
2. To turn the sound back, press
button on either remote control or the control panel.
NOTE
Ɣ
You can decrease the volume by pressing button while the
sound is muted.
button again, or Volume Up
Volume
Up / Down
button
Volume Up / Down button
Mute 26
The Volume indicator
Mute button
Input Switching to DTT/TVʿʳAV1~4, HDMIʳand RGB
By pressing Input Select button, you can switch the input.
Ⴠ
To watch actual broadcast, press Input Select button on the
control panel, the numeric buttons, DTT/TV button or Channel
Up / Down button on the remote control.
Ⴠ
To display the image outputting from the external equipment
connected to each terminal ( DTT/TV, AV1~4, HDMI and RGB),
select corresponding mode.
1. Press Input Select buttons on the remote control.
(Use “
AV
” button to switch between DTT and TV mode.)
2. The Input modes can be also switched by using Input Select
button on the control panel.
Each time this button is pressed, the screen displays
corresponding mode by following order.
DTT TV AV1 AV2
RGB HDMI AV4 AV3
3. To go to TV mode, press Channel Up/Down buttons on remote
control or Program UP/Down on the control panel.
Also, you can use the numeric buttons or TV / DTT button on
the remote control.
Input Select
TV DTT AV TEXT
12
456
789
0
++
OK
Channel Up / Down
AV button
3
P
Channel Up/Down
buttons
?
Input Select
V3
buttons
20
Page 23

BASIC OPERATION (continued)
•
ź
AV1AV2AV4A
Input Signal Screen Display
The input signal status and off timer staturs can be displayed on the screen by
pressing the button of the remote control.
• The display in DTT mode will appear when changing the channels.
38
(Refer to
The display will go out in approximately 5 seconds.
39
,
)
DTT
Program name
Channel number
Signal Type
Rating
Channel name
06-0072
SD
C
ABCDE
Now
- - : - - - - : - -
- - - - -
- - : - -
Broadcasting time
Start time
End time
Program progress indicator
TV
TV position
1
ABCDE
Name
Sound mode
Off-timer
-- Min.
OFF
VIDEO
AV1
Compone nt
Input mode
Signal mode
i
+
TV DTT AV TEXT
12
3
456
789
0
++
P
?
OK
V3
CLE-994
Recall
button
Off-timer
RGB
Off-timer
-- Min.
OFF
RGB
H: 48.4 kHz
V: 60.1 Hz
-- Min.
OFF
Input Mode
Input horizontal frequency
Input vertical frequency
`
21
Page 24

TV SETUP OPERATION
A
How to use the On-Screen Display (OSD) system
With the On-Screen Display system, you can access the various kinds of the features and functions in this product.
• Basic Operation
1. Press button on the remote control or Menu button on the
control panel of the unit. The Main Menu is displayed on the
screen as shown on the right.
Picture
udio
Timer
Setup
2. To select the item, press buttons.
The selected item will be highlighted in Yellow.
3. Press
button to set your selection.
The selected menu page will be displayed on the screen.
4. Use buttons to choose the item on the MENU page.
Press
5. Use
Press
6. To exit from the menu, press
NOTE
button to set your selection.
buttons to adjust the item values or choose options.
button to set your selection.
button.
Ⴠ The OSD menu screen will be closed automatically when no
operation has been made for about 30 seconds.
Ⴠ If the item in menu is shown in gray, it means that it cannot be
selected or adjusted.
!
!
Menu
button
Select OK Set
<Main Menu>
!
!
!
!
!
!
Menu button
22
Page 25

TV SETUP OPERATION (continued)
Main Menu List
Menu Page Menu Page
Picture Mode 27 Perfect Volume 29
Picture(TV/AV)
Picture(TV/A
V
Contrast 27 TV Speakers 29
Brightness 27
Color 27 Timer Off Timer 30
Sharpness 27 Mode 24
Tint 27
Color Temperature 27 Position 24
Back Light 27 Frequency 24
Reset 27 Name 24
Black Enhancement 28 Sound System 24
DNR 28 Color System 25
MPEG NR 28 Skip 25
Film Mode 28
3D Comb Filter 28 Fine Tuning 25
Picture Size 28 Sort 25
Reset 28
Contrast 33 Video Power Save 45
Brightness 33
Audio
Setup(TV)
Setup(AV)
Reset 29
Auto Tuning
Manual Tuning
Teletext Language 34
Reset
Search 24
Anteena Att. 25
ņ
Picture(RGB)
Audio
Color Temperature 33 Auto Adjust 32
Back Light 33 Image Position 32
Reset 33 Horizontal Clock 32
Audio Mode 29 Clock Phase 32
Treble 29 Reset 32
Bass 29 Frequency Display 32
Balance 29
Matrix Surround 29
Dynamic Bass 29
Setup(RGB)
WXGA 32
23
Page 26

TV SETUP OPERATION (continued)
Setup Menu (TV mode)
You can install channels and make the various settings related channels.
1. Press
2. Select “ Setup ” menu and press
3. Select the preferred menu item and press
Auto Tuning
button.
button.
button.
Selected Items Setup hint
Position
Mode
Direct
Search
Position
Searches every channel. Store the channels in order of
tuning.(1~125)
Searches available channel. Store the channels in fixed number
according to broadcasting standard. The channel number 1~12
and 21~69 are displayed as C, and the channel number
101~146 are displayed as S.
Tune the local channels automatically.
Press!
Press channel up (+) down (-) buttons to input position number
(1~125) or channel number (C** or S** ).
!button to start searching.
Setup
Auto Tuning
Manual Tuning
Fine Tuning
Sort
Teletext Language
Select OK Set Return
Search the frequency by using button when Auto Tuning
Mode is set to [position].
Frequency
When Auto Tuning Mode is set to [Direct], this function is not
available (grayed out).
1. Move the cursor to the first digit and select the letters with
buttons.
Manual
Tuning
NOTE
When you turn ON the television for the first time, your television is at “the original factory setting” and may not be able to
display the image normally on the TV screen. Please select Auto Tuning to set the TV channel.
Name
Sound System
Auto
D/K
B/G
2. Move to the next digit with
3. Press
letters.
• The selectable letters are as follows: “0”~“9”, “A”~“Z”, “ ”
(blank), “+”, “- “, “.” (Period) and “?”.
M
Select [Auto] normally.
In case that sound is not output correctly, select the other modes
depending on the received signal.
I
button again when you finish inputting all the
button.
24
Page 27

TV SETUP OPERATION (continued)
Setup Menu (TV mode) (continued)
With this menu, you can access various kinds of features relating to TV channel settings.
Setup
Auto Tuning
Manual Tuning
Fine Tuning
Sort
Teletext Language
Select OK Set Return
Selected Items Setup hint
Auto
Manual Tuning
Fine Tuning
Sort
Color System
Skip
Anteena Att.
-56~+56
NTSC 4.43
SECAM
PAL
NTSC 3.58
Off
On
Off
On
Select [Auto] normally.
In case that color is not displayed correctly, select the
other modes depending on the received signal.
It allows you to skip unregistered channels automatically
when you use channel up (P+) down (P-) buttons to select
channels.
This function will automatically skip unavailable
channels when set to on.
The noise on the screen or interference could be reduced
in case that the receiving field strength are too strong.
• The selection on this item is applied to all the channels.
X: Increase the frequency data for the main tuner.
W: Decrease the frequency data for the main tuner.
You can change the order of channels as follows.
1. Move the cursor to the channel row you want to change
order and then, press
2. The color of the letters on the designated line will be
turned into yellow bracket and with [ ].
3. Move the designated row by using buttons.
4. Press button to fix the position.
• This function is not available (grayed out) when the Auto
Tuning Mode is set to [Direct].
button.
25
Page 28

TV SETUP OPERATION (continued)
Channel Selections
There are 2 ways to select the channels: stepping through the
channel, and selecting by number.
Stepping through the Channel
Press Channel Up/Down button to switch the next or previous channel on the list.
Channel Up/ Down button
Channel
Up/Down button
Selecting by Number
Enter the number of acquired channel by using numeric buttons on the remote control.
The selectable channel number and method differ depending on the modes
(“Position” or “Direct”) of Auto-tuning. See
for the details.
24
ŏ If you have tuned channels with "Position" mode:
The position number of 0~125, of which you have tuned with "Position" mode, can be selected by using numeric buttons on
the remote control.
ŏ If you have tuned channels with "Direct" mode:
Input the number "001~012 (displayed as C1~C12) or 021~069 (displayed as C21~C69) or 101~146 (displayed as
S1~S46)" by using numeric button on the remote control.
26
Page 29

TV SETUP OPERATION (continued)
Picture Setting
You can make specific adjustments for the picture based on your preference.
1. Press button.
2. Select “Picture” menu and press button.
3. Select the preferred menu item and press
(By pressing ź button at the bottom of each menu page, the next Picture menu will appear on the screen.)
NOTE
Please see
about picture setting of PC
32
Page 1 Page 2!
button.
Selected Items Setup hint
Picture Mode
Contrast*
Brightness*
Color*
Sharpness*
Tint*
Color
Temperature*
Back Light
Picture
Picture Mode
Contrast
Brightness
Color
Sharpness
Tint
Color Temperature
Back Light
Reset
Select OK Set Return
Dynamic
Natural
Cinema
-31~+31
-31~+31
-31~+31
-15~+15
You can make the better selection from 3 modes
Depending on the lighting condition and intended use.
Dynamic : Suitable for the brighter conditions.
Natural
Cinema
This adjusts the contrast to meet the lighting environment by using button.
With this function, black is adjusted to change the overall brightness by using
button.
It can adjust color density based on your preference by using button
Preferred sharpness can be adjusted by pressing
button for softer image or button for sharper image.
Pressing
-31~+31
button weakens red and enhances Yellow.
The setup hint is adjusting for the realistic skin color.
This is not available by PC mode when receiving RGB signal.
Cool
Normal
Warm
You can select from 3 settings (default): Cool, Normal, Warm depending on the
color condition with
You can adjust the setting in “User” item.
User
High
Middle
Adjust the brightness of the Back Light for the maximum visibility.
Low
Dynmaic
+31
0
0
0
0
Cool
High
Reset
Picture
Black Enhancement
DNR
MPEG NR
Film Mode
3D Comb Filter
Picture Size
Reset
Select OK Set Return
Off
Off
Off
Off
Off
1
Reset
: Suitable for the normal lighting condition.
: Suitable for watching movie.
button enhances red and weakens Yellow, while pressing
buttons.
Reset
Each item on this menu screen can be restored to the original factory settings by
pressing
button.
Information
The setting of the items indicated by “
You can enjoy different setting depending on the selected input such as VCR in AV3.
” can be stored for each of inputs and picture modes (Dynamic/Natural/Cinema).
*
27
Page 30

TV SETUP OPERATION (continued)
Picture Setting (continued)
Selected Items Setup hint
Off
Black Enhancement
DNR
MPEG NR*
Low
Middle
High
Off
Low
Middle
High
Off
Low
High
Adjusts the black level compensation.
The noise on the screen or interference could be reduced, especially at
the area of weak electric field.
This is a noise reduction system for MPEG picture signal.
(ex. against mosquito noise and block noise)
Off
Film Mode
On
Off
3D Comb Filter
On
Picture Size
Reset
Information
The settings of the item indicated by “
NOTE About “Film Mode”
Ⴠ The image might not look natural depending on the image contents.
Phenomena such as
When switching the subtitles of a film or images, the image displays fine horizontal streak lines.
ཱ When switching the scenes such as commercial and animation, the image displays fine horizontal streak line.
ི When displaying a ticker or subtitle, the text on the image becomes rough ( aliasing).
ཱི When watching the image form AV input which is connected to any external equipment, the OSD of external
equipment displays fine horizontal streak lines.
These phenomena occur due to the method of converting the image.
Please note that this is not malfunction.
In case that it is disturbing, please set to Off.
In addition, the effect of this menu might vary depending on the size setting (See
Also, this might not be ineffective depending on the scene of image.
” can be automatically stored depending on the signal mode.
*
This helps to make the moving image smooth.
On: Automatically identify if it is the movie film and faithfully reproduces
the original film images.
Off: Set to Off if the image does not look natural.
This is available only when receiving PAL/ NTSC 3.58 composite signal.
This reduces the dot and color blurring in minute scales so that it can
reproduce purer color.
Select [1] it will display the original picture completely. If the images
1
from TV signal (especially CATV) has blacken gap in Panoramic mode,
and select [2], it will make up for the gap. But when display is no
available in “Cinema” size. This function only works for TV, Composite,
2
Component and HDMI input.
Each item on this menu screen can be restored to the original factory
settings by pressing
button.
43
)
28
Page 31

TV SETUP OPERATION (continued)
A
ese
Audio Setting
You can adjust and customize the audio condition as you like.
1. Press
2. Select “ Audio” menu and press button.
3. Select the preferred menu item and press
button.
button.
Selected Items Setup hint
Movie
udio
Audio Mode
Treb le
Bass
Balance
Matrix Surround
Dynamic Bass
Perfect Volume
TV Speakers
R
t
Select OK Set Return
Favorite
0
0
L
0
Off
Off
Off
On
Reset
R
Audio Mode
Treble
Bass
Balance
Matrix Surround
Dynamic Bass
Perfect Volume
TV Speakers
Reset
Music
Speech
You can select the most suitable sound condition from these 4 items.
You can adjust any value you preferred in “Favorite” item.
Favorite
-15~+15 Adjust the Treble of the sound.
-15~+15
Adjust the Bass of the sound.
Adjust the balance of the sound comes out from right and left side of
-10~+10
the speakers.
(Notice: When Matrix Surround is enabled, adjusting the Balance will
not completely mute any one speaker.)
Off
On
Off
On
Off
The surround sound is mixed to left and right in order to create the
illusion of virtual surround speakers.
(Recommendation: when the Matrix Surround is on, ensure the
Balance is set to "0" for optimum surround sound effect.)
Dynamic Bass gives you the enhanced bass sound. Low frequency
signals can be boosted while the output signal amplitude is measured.
Automatically adjusts audio input levels to stay within a safe volume
range. For example, when the input sound is too loud, the volume is
On
Off
On
automatically decreased.
This needs to be switched to Off when you want to listen to audio
from external equipment.
It is normally set to On when you operate the set using the built in
speakers.
Each item on this menu screen can be restored to the original factory
settings by pressing
button.
29
Page 32

TV SETUP OPERATION (continued)
Timer Menu
This allows your television to turn Off (Standby mode) at set time automatically, which you may find useful.
Timer
Off Timer
Off Timer
ŻŹ Adjust Return
Selected Items Setup hint
- - Min.
30Min.
60Min.
90Min.
This function automatically sets the power to Standby
mode when the selected time period has elapsed.
- - Min.
120Min.
Information
One minute before the time you set, the screen will display “Time off within one minute".
30
Page 33

TV SETUP OPERATION (continued)
Audio Switching (TV)
NICAM / Sound Multiplex (including A2) (TV mode)
You can make optimum use of available audio by pressing I/II button of remote control. Audio can be switched only if
receiving NICAM and sound multiplex signals; otherwise, pressing this button will have no effect, such as when only
mono sound is received.
These can be divided into two main categories: Bilingual/Dual Sound broadcast and Stereo broadcast.
Bilingual/Dual Sound broadcast
Bilingual broadcast is the broadcast available on the main and sub languages, while dual sound broadcast is available on
the primary and secondary sounds; for example, some sports programs contain broadcast commentary on a game as
primary sound, and a commentary about a team as the secondary.
When bilingual program is received, sound mode display appears in yellow as shown. Also, when receiving NICAM signals,
NICAM display will appear.
Each time I/II button is pressed, the display is switched in the sequence of following.
Sound multiplex signal received
NICAM signal received
ˮ˜˰ʳ
NICAM
[I]…Main language/Primary Sound
[II]...Sub language/Secondary Sound
ź…force mono: This selects main language or primary sound.
Yellow
ˮ˜˰ʳ
Yel l o w
NICAM
Ye ll o w
ˮ˜˜˰ ϰ
Yellow
ˮ˜˜˰ ϰ
Stereo broadcast
With stereo broadcast, you can enjoy different sound from either side.
When a stereo program is received, sound mode display will appear in red as shown.
Also, when receiving NICAM signals, NICAM display will appear.
Press I/II button to switch between stereo and mono sound.
Sound multiplex signal received
Green
Red
ϰ
Green
Green
NICAM signal received
Green
ϰ
NOTE
…Stereo
ϰ…...Force Mono
NICAM
Red
Ⴠ Please select ź (force mono) in case of poor reception, noise, poor stereo sound due to signal condition so that you can
receive a clear mono sound.
Ⴠ ϯrepresents the Mono broadcast.
31
Page 34

TV SETUP OPERATION (continued)
PC Adjustment Setting
You can adjust the display condition such as position adjustment and color setting while connecting to the PC and being
RGB mode. See
for the PC connection.
16
From Setup Menu (RGB)
1. Press button.
2. Select “ Setup” menu and press
3. Select the preferred menu item and press
Selected Items Setup hint
Auto Adjust
Image Position*
button.
button.
Setup
Auto Adjust
Image Position
Horizontal Clock
Clock Phase
Reset
Frequency Display
WXGA
Select Return Exit
Ź
Ź
+4
21
Reset
Off
Off
Adjust Horizontal Position, Vertical Position, Horizontal
Clock, and Clock Phase automatically.
• Press
or ൘ button to start auto adjustment as needed.
The message “Auto Adjust” is displayed.
• Depending on the type of the signal, there is a possibility that
the display may not be adjusted in its optimum condition with
this function. In that case, please adjust each item manually.
• Press
button and button to adjust the horizontal
and vertical display positions.
(For example: When user connect PC terminal to LCD TV set.
PC Display card provide timing is 1024x768 60Hz that
Horizontal range: -100~+100 and Vertical range: -22~+22.)
Horizontal Clock*
-31~+31
Minimize the vertical stripes on the screen.
Minimize the blurring of the letters and stripes on horizontal
Clock Phase*
0~+63
row.
• Make sure to adjust Horizontal Clock first before adjusting
Clock Phase.
Reset
Off
Frequency Display
Each item on this menu screen can be restored to the
original factory settings by pressing
button.
Select whether indicating the PC signal frequency information
on Input Signal Screen Display or not.
On
Off
• This function is available only for WXGA signal.
1280x768WXGA
• Refer to “Recommended Signal List” on
1360x768
Information
The setting of the items indicated by “*” can be automatically stored depending on the signal mode.
52
.
32
Page 35

TV SETUP OPERATION (continued)
PC Adjustment Setting (continued)
From Picture Menu (RGB)
1. Press button.
2. Select “ Picture” menu and press
3. Select the preferred menu item and press
Selected Items Setup hint
button.
button.
Picture
Contrast
Brightness
Color Temperature
Back Light
Reset
Select OK Set Return
+31
0
Cool
High
Reset
Contrast
Brightness
-31~+31
-31~+31
This adjusts the contrast to meet the lighting environment by using
button.
With this function, black is adjusted to change the overall
brightness by using button..
Cool
Color Temperature
Normal
Warm
You can select from 3 settings (default): Cool, Normal, Warm
depending on the color condition with
buttons.
You can adjust the setting in “User” item.
User
High
Back Light
Middle
Adjust the brightness of the Back Light for the maximum visibility.
Low
Reset
Each item on this menu screen can be restored to the
original factory settings by pressing
button.
Information
There is a useful function to automatically store the setting on menu in almost every item so that you do not have to reset
every time.
33
Page 36

TV SETUP OPERATION (continued)
Analog Teletext
What is “ Teletext”
Teletext is the written information services provided by each TV channel.
Most TV channels provide information via Teletext such as:
Ⴠ TV program schedule
Page number
11:37:56
Ⴠ Weather forecasts
Ⴠ Sports results
Ⴠ Newsflash
Select Teletext Language
1. Press button.
2. Select “Setup” menu and press
3. Select ”Teletext Language” and press
Selected Items Setup hint
Teletext Language
button.
button.
Link Page
Green
Red
Setup
Auto Tuning
Manual Tuning
Fine Tuning
Sort
Teletext Language
Select OK Set Return
Yellow
Blue
Select Teletext Language from 5 different categories
(West Europe, East Europe, Russian, Arabic and Farsi)
According to the area.
West Europe : Asian countries where the Teletext
Is broadcasting in English such as
Singapore, Australia, and Malaysia
East Europe
Russian
Arabic
Farsi
: Poland, Sweden, Hungary
: Russia
: Arab countries
: Iran
34
Page 37

TV SETUP OPERATION (continued)
Analog Teletext (continued)
How to Operate the Teletext
You can display the Teletext simply by pressing the remote control buttons.
Operation Press
TV DTT AV TEXT
12
3
To activate Teletext mode.*
To exit from the Teletext mode.
To move to the next or previous page.
To jump to the indicated page. ( Enter 3 digits.)
To change Teletext picture size.
To display Index page.
To adjust Back Light of the image.
To access Subtitle service directly (if the channel has the Subtitle
service broadcasting).*
To display Hidden text.
Ex. The answers of the Quiz or the Game page.
Press again to close the revealed answer.
To return to actual broadcast temporarily while searching for the
Teletext page you request.
When the search is done, the designated page # will be displayed
on the upper left of the screen.
Press again to return to Teletext page.
To access the link pages which are displayed at the bottom of the
page.
(Select the buttons corresponding to the colors of the letters on
screen.)
[TV Text]
[Page Select]
~
[Page Select]
[Zoom]
[Index]
[Back Light]
[Subtitle]
[Reveal]
[Cancel]
[Color]
456
789
0
++
P
?
OK
AV1
AV3
AV2 AV4
To hold the text picture.
This is not available in the following conditions.
*
Ⴠ &RORUV\VWHP176&176&3$/3$/0
Ⴠ 1RLQSXWVLJQDO
Information
Ⴠ Each time the button is pressed, the Teletext pages size will be change in single screen.
Ⴠ Some Teletext pages do not display Link Pages at the bottom of the screen. Press button to display them.
NOTE
Ɣ Teletext function is different between Analog and Digital. Refer to
35
40
[Hold]
about Digital Teletext.
Page 38

DIGITAL TERRESTRIAL TELEVISION (DTT) OPERATION
How to use the On-Screen Display (OSD) system
With the On-Screen Display system, you can access the various kinds of the features and functions.
Ⴠ Basic Operation
1. Press button on the remote control or Menu button on the
control panel of the unit. The DTT Main Menu is displayed on
the screen as shown on the right.
2. To select the item, press buttons.
The selected item will be highlighted.
3. Press
button to set your selection.
The selected menu page will be displayed on the screen.
4. Use
buttons to choose the item on the MENU page.
Press button to set your selection.
5. Use buttons to adjust the item values or choose options.
Press button to set your selection.
6. To exit from the menu, press
NOTE
Ⴠ The OSD menu screen will be closed automatically when no
button.
operation has been made for about 30 seconds.
Ⴠ During DTT input, the part of OSD might not be displayed in 4:3
mode. To display fully, select the
button. (Refer to
46
)
!
other display size with
TV Setup
Edit channels
Parental guidance
Installation
General settings
System
(DTT Main Menu)
Menu
button
DTT Main Menu List
Check the reference page for details.
Menu Function Page
TV Setup
This jumps to the TV main menu containing Analog
TV functions, such as Picture menu and Audio menu.
Edit channels You can set a list of favorite channels.
Parental guidance This blocks programs with the selected rating.
Installation This searches the available channels.
Manual scan
Search by its channel number, frequency,
bandwidth, or priority.
Quick scan Search by the resident area.
Auto scan Automatically search one by one.
Restore default Restore the channel setting.
General settings
Option setup Set up the display time of information banner.
Change pin Change the Password.
Local time Set up the local time.
Subtitle setting Enable or disable the subtitle.
Audio setting
Select optical digital audio output between PCM and
Dolby® digital.
System This displays the current DTT system information.
42
39
41
37
37
37
37
37
39
39
42
42
41
41
42
36
Page 39

DIGITAL TERRESTRIAL TELEVISION (DTT) OPERATION (continued)
Installing Channels
You can search available channels in any of the following 3 methods.
1. Press
2. Select “Installation”, on the DTT main menu with
button on the remote control in DTT mode.
buttons and press button.
3. The password is required to enter the Installation menu. The initial password is 0000.
4. You can select either of the followings by pressing
x
Manual scan:
Searches by individual settings manually.
button.
The box shown on the right appears. Fill out the following 4 items as needed.
Channel
num
Use buttons or numeric button to enter the number.
(Ch2-Ch69) *In case of tuning Ch9A, select Ch2
(Frequency: 205.5MHz.).
Frequency Use numeric button to enter the frequency.
Bandwidth
Priority
Select either 7MHz or 8MHz by using buttons. Set to
7MHz normally.
Select High or Low by using buttons. Set to High
normally.
Then, press button on “Start scan” of “Manual scan” column. If it finds a
channel, “Success” shows up. If not, “Timeout error” is displayed.
x
Quick scan:
Searches channels of the selected area.
The list of the area shows up. Select one of those with buttons and press
button.
NOTE
x If you are uncertain about the area, please select “Auto scan” method or contact
the local dealer in your area.
Installation
Manual scan
Quick scan
Auto scan
Restore default
Installation
Manual scan
Quick scan
Auto scan
Restore default
Press Ÿźto select city.
Channel num 6
Frequency 177500KHz
Bandwidth 7 MHz
Priority High
Manual scan Start scan
Adelaide
Brisbane
Melbourne
Perth
Sydney
Batchelor
Canberra
Darwin
x
Auto scan:
Searches every channel.
The message “Auto scan will take more than 10 minutes. Do you want to
continue?”
Select “Yes” and press
button to precede it.
Restoring Channels
This restores the all channel settings.
1. Press
2
. Select
3
. The password is required to enter the Installation menu. The initial password is 0000.
4. Select “Restore default” and press button. The message “All setting
would be lost” appears. Select “Yes” and press button.
NOTE
x
The password will return to the default setting when activating “Restore
default”/
37
button on the remote control in DTT mode.
“Installation”
, on the DTT main menu with buttons and press button.
Installation
Manual scan
Quick scan
Auto scan
Restore default
Installation
Manual scan
Quick scan
Auto scan
Restore default
Auto scan will take more
than 10 minutes.
Do you want to continue?
Yes E xi t
All setting would be lost.
Yes E xi t
Page 40

DIGITAL TERRESTRIAL TELEVISION (DTT) OPERATION (continued)
g
Channel Selections
There are 4 ways to select the channels: stepping through the channel, selecting by number, selecting from the
program/favorite list, and using the Electronic Program Guide (EPG).
Stepping through the Channel
Press Channel Up/Down button to switch the next or previous channel on the list. Information banner is displayed every
time channel is switched.
Refer to
Selecting from the Program / Favorite List
x
Program List:
All tuned channel is selectable from Program List.
1. Press
2. Use buttons to select and press button. Then it jumps to the selected
channel.
x
Favorite List:
Your favorite channels can be selected from Favorite List.
1. Press
Each time pressed, it switches to Favorite list 1, Favorite list 2 and off.
about the information banner.
39
button on the remote control to show up the Program List.
button on the remote control to show up the Favorite List.
Program list
06-0007 7 Channel 1
06-0070 7 Channel 2
06-0071 7 Channel 3
06-0072 7 Channel A
06-0073 7 Channel B
06-0077 7 Channel Digital
Favorite list 1
06-0007 7 Channel 1
2. Use
buttons to select and press button. Then it jumps to the selected
channel.
About how to set the channel in Favorite list, please refer to 39.
Selecting by Number
Enter the number (the last 4 digits) based on the list by using numeric buttons on
the remote control. An empty information banner shows up with the entered
number. Channel is switched if the number is valid. If the entered number is not
valid for one of the setup channels, it automatically selects the closest channel.
Using the Electronic Program Guide (EPG)
The EPG screen displays a list of the stored channel along with the program
information. You can select a channel from the EPG channel List.
1. Press
2. Use buttons to select and press button. Then it jumps to the selected
channel.
3. Press
Refer to
button to access EPG screen.
button or button again to return to normal screen.
40
about Electronic Program Guide for details.
0007
Electronic Program Guide
Pa
e 1/1 Monday 19 March 2007
06-0070 Seven HD Digital
22:00 – 23:00 Movie News
23:00 – 00:00 Sports News
ˁPrev Day ˁNext Day ˁPrec Page ˁNext Page OK Reserve
Sports News 23:00 – 00:00
Highlights and features on today’s
sports in the world.
- - - - -
- - : - - - - : - -
- - : - -
38
Page 41

DIGITAL TERRESTRIAL TELEVISION (DTT) OPERATION (continued)
Making Favorite List
The “Edit channels” menu allows you to select your favorite channels and make a Favorite List in order to access easily to
the channel you watch most often.
1. Press
press
button on the remote control and select “Edit channels” and
button.
2. Use buttons to select the channel, and button to select Fav. 1 or
Fav. 2.
Edit channels
CH No. CH name Fav.1 Fav.2
06-0007 7 Channel 1
06-0070 7 Channel 2
06-0071 7 Channel 3
06-0072 7 Channel A
06-0073 7 Channel B
06-0077 7 Channel Digital
3. Press
button to set up as Fav. List. The Ɔ mark will show up, which
means as favorite channel. Pressing button again on the mark will
cancel the setting.
You can display favorite list by pressing button. (Refer to
38
.*
Information Banner
x
Display information by changing channel
Whenever a channel is switched, the TV displays the banner containing the
brief channel information(name of channel and program, etc.)
x
Display information by changing channel
The TV displays not only brief information but also program description.
Each time
Brief Channel Information Æ Current Program Description Æ
Next Program Description Æ Normal Screen
x
Set up the display time
The display time of information banner can be set up from 1 to 20 sec.
button is pressed, it displays information by following order.
Press ŸźŻŹto select. Then press [OK].
Now
06-0072
SDʳ C
7 Channel A
General settings
Option setup
Change pin
Local time
Subtitle setting
Press ŻŹto select. Then press [OK].
IT’S ACADEMIC
05 : 00 05 : 30
Information box timeout
05 : 02
6 sec
1. Press
2. Select “General settings” and press
3. Select “Option setup” and press
button on the remote control.
button.
button.
4. The box shows up, and selects the display time by using buttons.
NOTE
x
When you select “0 sec” for “Information box timeout”, the information
banner will not show up.
39
Page 42

DIGITAL TERRESTRIAL TELEVISION (DTT) OPERATION (continued)
g
Digital Teletext
Teletext can provide various information with text on the screen.
Press
button to access. Press it again to return to the normal screen.
Operation Press
To activate Teletext mode.
To exit from the Teletext mode.
[TV Text]
To move to the next or previous page
[Page Select]
To jump to the indicated page.
~
[Page Select]
To access Subtitle service directly ( if the
channel has the Subtitle service broadcasting).
NOTE
x See
how to operate at Analog teletext.
34
[Subtitle]
x The service of digital broadcasting signal varies depending on the area.
x When you press the color buttons along with the direction on the screen, you
can access the linked pages.
Electronic Program Guide (EPG)
The EPG screen displays a list of the stored channels along with information.
This provides the information for 7 days.
P100 Austext 100 Tue 14 Mar 16:04:58
AUSTEXT MAIN INDEX
COPYRIGHT INFORMATION ON 104
INDEX
MAIN INDEX. . . .100
BUSINESS . . . . .113
NEWS . . . . . . . . .160
WEATHER . . . . . 300
TAB SERVICE . . 500
GENERAL INFO. 600
TV PROGRAMS. 650
CAPTIONS . . . . .801
MAKEAUSTEXT YOUR FIRST CHOICE
FOR LOCAL NEWS
NATIONAL NEWS INDEX PAGE 120
INFORMATION
GENERAL INDEX. . . . . . . . . .600
HOROSCOPES. . . . . . . . . . . 606
SCI/TECH NEWS. . . . . . . . . . 677
SHOWBIZ NEWS. . . . . . . . . . 683
TEST PAGES. . . . . . . . . . . . . 690
1. Press
button to display EPG screen.
2. You can adjust the EPG screen with the following remote control keys.
Button Select a channel/program, Display information
Select a program from the list.
Ⴠ
7KHSLFWXUHRIVHOHFWHGSURJUDPLVGLVSOD\HGDWORZHUULJKWVFUHHQ
Ⴠ
7KHGHWDLOHGLQIRUPDWLRQRIVHOHFWHGSURJUDPLVGLVSOD\HGDWORZHUOHIWVFUHHQ
Select a channel.
Ⴠ
7KHSLFWXUHRIVHOHFWHGSURJUDPLVGLVSOD\HGDWORZHUULJKWVFUHHQ
Ⴠ
7KHGHWDLOHGLQIRUPDWLRQRIVHOHFWHGSURJUDPLVGLVSOD\HGDWORZHUOHIWVFUHHQ
Red/Green Select date. (up to 7 days)
Yellow/Blue Move to the next or previous page if more than on e page.
Button Peserve a program
Set the view timer by pressing button on the selected item.
Ⴠ ˅ PDUNZLOOEHGLVSOD\HG
Ⴠ 8SWRLWHPVFDQEHVHOHFWHG
$PHVVDJHDSSHDUVZKHQWKHGHVLUHGSURJUDPLVDERXWWR
Ⴠ
VWDUWZKLOH\RXDUHZDWFKLQJDQRWKHUFKDQQHO
Ⴠ 3UHVV EXWWRQWRFDQFHOWKHUHVHUYDWLRQ
3. Press button or button to return to the normal screen.
NOTE
x Not all channels broadcast all program information data. Some channels do
not provide program name and details. In that case, only channel name are
displayed.
Electronic Program Guide
Pa
e 1/1 Monday 19 March 2007
06-0070 Seven HD Digital
22:00 – 23:00 M ovie News
23:00 – 00:00 Sports News
ˁPrev Day ˁNext Day ˁPrec Page ˁNext Page OK Reserve
Sports News 23:00 – 00:00
Highlights and features on today’s
sports in the world.
NOTE
x The message appears only during
DTT mode. ( Please note that this
does not appear in TV, AV, RGB,
and HDMI mode.)
x This setting will be canceled once
turns Off the TV.
40
Page 43

DIGITAL TERRESTRIAL TELEVISION (DTT) OPERATION (continued)
p
p
Subtitle
The enables (disable) the subtitle if available as your useful tool.
1. Press
2. Select ”General settings” and press
3. Select ”Subtitle settings” and press
4. With
button to display DTT main menu.
button.
button.
buttons select “Enable” and press button.
General settings
Option setup
Change pin
Local time
Subtitle setting
Auto setti ng
Press ŻŹto select. Then press [OK].
Subtitle On
Auto subtitle
Enable
Disable
You can also activate the subtitle by pressing
button on the remote control.
“Subtitles On” or “Subtitles Off” will appears on the upper left corner.
NOTE
x Once Turing TV off, “Auto subtitle” returns to “Disable”.
Parental Guidance
Any channel can be locked so that it cannot be selected for viewing without 4
digits pin code.
1. Press
2. Select “Parental guidance” and press
3. The password is required to enter. (The initial password is 0000.)
4. With buttons, select the rating and press button.
After this protection, when encounter the channel blocked, the message show up
and the password is required to view the channel.
Audio Language (MPEG/Dolby
The available Audio language (MPEG/Dolby
1. Press button on the remote control in DTT mode.
2. The available audio language
button on the remote control.
(MPEG/Dolby
button.
p
Digital)
Digital) can be selected.
Digital)
appears.
Parental guidance
Parental Guidance Control is activated
for this program. select another
channel or enter password to overwrite.
Password
Now
06-0070
-ʳ C
7 Channel 2
Audio language
English (MPEG)
English (Dolby Digital)
Child lock
No Block
Block G and above
Block PG and above
Block M and above
Block MA and above
Block AV and above
Block R and above
Block All
IT’S ACADEMIC
05 : 00 05 : 30
05 : 01
3. With
buttons, select the audio language and press button.
Digital Audio Output
This enables you to select the optical digital audio output between PCM and
Dolbyp digital.
1. Press button to display DTT main menu.
2. Select “General setting” and press
3. Select “Audio setting” and
4. With
NOTE
button, select either “PCM” or “Dolby Digital” and press button.
button.
x In case that MPEG audio is selected by using I/II button, or the broadcasting
program has only MPEG audio, it outputs only PCM audio even if “Dolby Digital”
is selected in “Audio setting” menu.
x
If DolbypDigital audio is selected by using I/II button, you can select either
“Dolby Digital” or “PCM” from “Audio setting” menu.
41
button.
General settings
Option setup
Change pin
Local time
Subtitle setting
Auto setting
Press ŻŹto select. Then press [OK].
Digital output
PCM
Dolby Digital
Page 44

DIGITAL TERRESTRIAL TELEVISION (DTT) OPERATION (continued)
A
Change Pin
To use the locks effectively, do change the pin number from the default setting,
which should be known and remembered only by you. The default setting is
0000.
1. Press
2. Select “General setting” and press
3. Select “Change pin” and
button on the remote control.
button.
button.
4. The box appears to fill out the old and new password, and the confirmation
of the new password.
5. Use the numeric number to enter.
NOTE
x In case that you forget your password, please refer to Troubleshooting on
Local Time
Make sure to select your resident area to set up the correct local time.
1. Press button on the remote control.
2. Select “General setting” and press button.
3. Select “Local time” and button.
4. With
buttons, select the area and press button.
General settings
Option setup
Change pin
Local time
Subtitle setting
48
General settings
Option setup
Change pin
Local time
Subtitle setting
Audio setting
Press ŻŹto select. Then press [OK].
Old password
New password
Confirm new password
Current time zone
Greenwich mean time
Adelaide, Aust.
Brisbane, Aust.
Canberra, Aust.
Darwin, Aust.
Melbourne, Aust.
Perth, Aust.
Sydney, Aust.
Tasmania, Aust.
Checking DTT System Information
This can display current DTT system information.
1. Press
2. Select “System” and press
button on the remote control.
button.
3. Pressing button on “Status” shows up System information.
(H/W version, S/W version, and Release time)
Jump to TV Setup Menu
“TV Setup” menu can be accessed from the DTT main menu.
It jumps to the TV main menu containing Analog TV function, such as Picture
menu and Audio menu.
Refer to
23
~
34
regarding the setting form the details.
System
Status
System information. Press [Return] to return.
System information
H/W Version : H2-DT640HD
S/W Version : 1.2.0
Release time : JUL 27 2007 21:06:23
*The above is an example
Picture
udio
Timer
Setup
Select OK Set
42
Page 45

FUNCTION
Size Switching
Each time button of the remote control is pressed, the screen
display size is switched in sequence, and the status will be displayed
at the bottom of the screen.
TV/AV signal input
ŏ
Display Size
Watching standard Definition Picture(480i,480p,576i,576p)
DTT/TV/AV1/AV2/AV3/AV4 /HDMI
4:3
Panoramic
Cinema
Full
You can display the image at optimum condition by selecting display size depending on the current output image as
shown below.
Picture Size
Input Signal
Display
Screen
Display Size To display suitable screen as follows.
When Watching Standard Definition Picture (TV, 480i, 480p, 576i, 576p)
4:3
Play a 4:3 image on screen faithfully. Blanking
occurs on both sides.
Play a 4:3 image which enlarges horizontal and
(4:3 Signal)
Panoramic
vertical size of the middle in equal scales, and
displays both sides appearing much wider.
Play a 21:9 image in 4:3 frame (Cinema size)
Cinema
(Cinema)
Full
expanding vertically.
*In some case, slight blanking may remain at the top
and bottom.
Play a 4:3 image faithfully in the standard vertical
size and horizontally squeezed.
(Squeeze)
Information
Aspect ratio represents horizontal: vertical ratio on screen.
Watching High Definition Picture(720p, 1080i, 1080p (HDMI only))
9
DTT/AV1,2/HDMI: Only Full mode signal output.
NOTE
Ⴠ
The size will fix as Full mode and not change when receiving High Definition Picture (720p, 1080i, 1080p (HDMI only)).
Ⴠ
If the images from High Difinition Picture has blacken gap and select Picture Size [ 2 ], it will make up for the gap. Refer to
16
16(or 21)
3
9
4
28
.
CAUTION
Using a wide-screen television
Ⴠ
This television has a screen mode selection feature. If an incompatible screen mode is selected to play certain
software, such as a TV program, the image would appear different form the original. Take this into consideration
when making screen mode choices.
Ⴠ
Use of the wide feature displaying enlarged pictures in coffee shops, hotel and other establishments for commercial
or public viewing purposes could infringe on the copyright holder’s right protected by Copyright Law.
Ⴠ
When a normal 4:3 image (not wide screen) is displayed over the entire screen in the Panoramic mode, the
peripheral image may disappear partly and/or appear distorted in some cases. Use 4:3 mode to view the image
reflecting original intention.
43
Page 46

FUNCTION (continued)
Size Switching (continued)
RGB signal input
You can select a suitable size depending on the resolution.
Full 4:3
Display Area Selection Diagram
Resolution Full 4:3
640 x 400 (VGA)
640 x 480 (VGA)
800 x 600 (SVGA)
1024 x 768 (XGA)
1280 x 768 (WXGA)
1280 x 1024 (SXGA)
1360 x 768 (WXGA)
Picture Freezing
By pressing button, you can change to freeze mode
easily anytime you like. Press it again to return to normal
picture.
FREEZE button
i
+
TV DTT AV TEXT
12
3
456
789
0
44
Page 47

FUNCTION (continued)
Power Save Mode
When the AV input is selected
You are provided the function to save power consumption when no signal is detected in AV input. Set to On in “Video
Power Save” from Function Menu, which leads to the power save mode in AV1 /AV2 /AV3 /AV4 /HDMI and the Standby
mode in other AV input. Please see the table below for details.
1. Press
2. Select “Setup” menu and press
button.
button.
3. Select ”Video Power Save” and press
button.
Video Power Save
Off
On
Setup
Video Power Save Off
Reset
Select OK Set Return
When no signal is detected
When signal is input during
on in “Video Power Save”
Condition Indicating Lamp
AV1~ AV2 ,
AV3~ AV4 ,
HDMI
Returning to operating status
Ɣ
Press the Input Select button of the control panel or the remote control to restart the television.
Power Save* Orange Turns On automatically
*Power Save that only control Back Light On/Off.
When the RGB input is selected
When this unit is connected to a VESA DPMS computer, the Power Save mode (Operation mode: Off) can be set
to be activated automatically when the computer is not being used to reduce power consumption by this unit.
RGB sync
signal
Horizontal
Vertical
PC signal
Operation mode
Indicating lamp
Returning to operating status
Ɣ
Operate the personal computer, then input computer’s H. sync, V. sync or press the Sub Power button of the control panel
or the remote control to restart the television.
Yes N o Yes No
Yes Ye s N o N o
Active
(normal display)
Blank (no display)
On Off
Lights green Lights orange
45
Page 48

TROUBLESHOOTING
Before calling service technician, check the following tables first. If the problem is not be solved with the suggested
procedures, contact your local dealer. For your safety, NEVER try to repair the product by yourself.
When Following Messages Appear on the Screen
Message Condition / Action Page
Power Save
This indicates it is in Power Save mode. (in RGB mode)
The indicating lamp lights in orange.
The unit cannot detect any signals from any input terminals.
Ɣ
Check if the cable is connected correctly and firmly.
No Sync. Signal
Auto Adjust
Ɣ
Check if the power of the external equipment is ON.
Ɣ
Check if the input selection matches the connection terminal.
Ɣ
Check if the PC is in Power Save mode or not.
This indicates that it is in the process of auto adjusting.
(in PC input mode)
The unit receives unsupported signals.
Ɣ
Invalid Mode
Not Available
Check if the cable is connected correctly and firmly.
Ɣ
Check if the input signal is compatible with the specification of the television.
This shows when the selected operation is not available.
Weak signal
Ɣ
Bad or No signal
Check aerial lead if it is disconnected/damaged/misaligned. (in DTT mode)
Ɣ
Check with your dealer if it is out of signal area or not. (in DTT mode)
Database is Empty
Symptom and Check List
45
14
~
32
49,51
52
19
Symptoms Check list Page
No picture – no sound
Snowy picture-poor sound
Multiple images-normal
sound
Intermittent interference
Normal picture, but no
sound
Ɣ
Check the Indicating lamp status (Off, Red, Green, or Orange).
Ɣ
Check the connection of the Power Cord and/or other cables.
Ɣ
Check if the Main Power of the unit or external equipment is
ON.
Ɣ
Check if the TV mode is selected.
Ɣ
Check if the TV is in “Standby mode” or “Power Save mode”.
Ɣ
Adjust the values in “Picture menu” and “Audio menu”.
Ɣ
Check the aerial connection and direction.
Ɣ
The TV station may have broadcast difficulties.
Ɣ
Try another channel.
Ɣ
Check the aerial connection and direction.
Ɣ
Fine tuning the TV.
Ɣ
Check the connection of the external equipment.
Ɣ
The TV station may have broadcast difficulties. Try another
channel.
Ɣ
Check if the source of interference is shielded well.
Ɣ
Remove those kinds of electrical devices away from the TV.
Ɣ
Check the volume level.
Ɣ
Check if the button has been press or not.
Ɣ
Make sure that the headphone is NOT connected.
Ɣ
Check the connection of the external equipment.
14
~
45
14
14,25
15
~
20
20
17
46
Page 49

TROUBLESHOOTING (continued)
Symptom and Check List (continued)
Symptoms Check list
Ɣ
No picture – normal sound
Ɣ
The remote control does not
work.
Ɣ
Normal picture but no
color-normal sound
Ɣ
Image is paused.
Ɣ
No picture
The Indicating lamp ĺ Off
Ɣ
No picture
The Indicating lamp ĺ Orange
It means that the unit is in
“Power Save Mode”.
Ɣ
Check the value level of “Brightness” and “Contrast” in “Picture
Menu”.
Ɣ
Check if the batteries are installed correctly.
Ɣ
The batteries might be exhausted. Replace them with new ones.
Ɣ
Remove all the obstructions in front of the sensor window on the
unit.
Ɣ
Check if the buttons of the control panel can work.
Ɣ
Check the connection of the external equipment.
Ɣ
Check the “Color” in “Picture Menu”.
Ɣ
Check if the TV is in freeze mode by pressing button.
Ɣ
Check if the Power Cord is plugged into the socket firmly.
Ɣ
Check if the Main Power is ON.
Ɣ
Check if all the cables of the external equipment are connected
correctly and firmly.
Ɣ
Check if the power of the external equipment is ON.
Ɣ
Check if the TV/AV mode has been selected correctly.
Ɣ
Check if the PC is in Power Save mode or not.
Ɣ
Refer to “Power Save mode” and “When following messages
appears on the screen”
Page
27
11,12
14
~
27
~
44
10
14,18
45
19
28
,
Ɣ
No picture
The indicating lamp ĺ Green
Ɣ
The top of the television and
surface of the panel heat up.
Ɣ
Image cannot be displayed in
the correct position.
Ɣ
When the VCR is in special
playback features (Fast forward
or Rewind), the screen gets
dark and cannot see the image
at all.
Ɣ
Some screen display size
cannot be switched.
Ɣ
Cannot be displayed the image
from HDMI
Ɣ
The image and audio are
mismatched when in RGB or
HDMI mode.
Ɣ
Check if the signal cable is connected correctly and firmly.
Ɣ
Adjust the level of Brightness and Contrast lower.
Ɣ
It may happen when you use the unit for long hours. Turn off the
Main Power of the unit for a while. Please note that this is not all
function.
Ɣ
Press Recall button to check if the input signal of the displayed
image is compatible with the specification of the television.
Ɣ
It could happen when the VCR is connected to Component output,
such as 480i. This is not malfunction.
Ɣ
Try Composite output or S-video output and check the picture again.
Ɣ
Check the signal status by pressing the button on the remote
control. The available screen display size is different depending on
the current signal status.
Ɣ
Check if the cables are connected correctly.
Ɣ
Check the output format of the equipment.
Ɣ
(Please refer to “Connecting Procedure” and “Recommended Signal
List”.)
Ɣ
Check if the PC (RGB)/HDMI analog audio input terminal is
connected to the same external device.
14
~
19
21,49
21
43,44
16
49
~
16,17
18
51
47
Page 50

TROUBLESHOOTING (continued)
Symptom and Check List (continued)
Symptoms Check list
Ɣ
The image on the screen is moving in an
oblique direction.
(PC input mode only)
Ɣ
The coarse horizontal stripes could be
seen in full-display mode.
(PC input mode only)
Ɣ
The part of the image is lacking.
(PC input mode only)
Ɣ
The horizontal stripes are moving
vertically with flickering screen.
(PC input mode only)
Ɣ
When the characters are displayed on the
whole screen, the vertical stripes appear
and some of the characters are blurred.
(PC input mode only)
Ɣ
When the letter string is displayed in
full-screen, all of the characters
on the
screen is blurred.
(PC input mode only)
Ɣ
When the small patterns are displayed on
the screen, the entire screen is flickering.
(PC input mode only)
AAAAA
abcdefgABCDEFGabcd
abcdefgABCDEFGabcd
abcdefgABCDEFGabcd
abcdefgABCDEFGabcd
Ɣ
Adjust “Horizontal Clock” and “Clock
Phase”.
Ɣ
Adjust “Horizontal clock”.
Ɣ
Try “Auto Adjust”.
Ɣ
Check the Signal status of the PC by
pressing Recall button
on the remote
control.
Ɣ
Try “Auto Adjust”.
Ɣ
If the display condition is not improved with
Auto Adjust, adjust “Horizontal Clock”.
Ɣ
Try “Auto Adjust”.
Ɣ
If the condition is not improved with Auto
Adjust, adjust “Clock Phase” till you get
clearest image.
Ɣ
Try “Auto Adjust”.
Ɣ
If the condition is not improved with Auto
Adjust, adjust “Clock Phase” till you get
flicker-free display.
Page
32
32
32
32
32
32
32
Ɣ
Image cannot be displayed in the correct position.
(PC input mode only)
Ɣ
No Picture or sound is output. (DTT mode only)
Ɣ
Forgotten password. (DTT mode only)
Ɣ
Due to the bad reception, block noise (DTT mode only)
Ɣ
Local time displays incorrectly.
(DTT mode only)
Ɣ
Press button to check if input signal of
the displayed image is compatible with the
specification of the television.
Ɣ
It might occur because it is tuned to digital
teletext channel.
Ɣ
Return to another channel.
Ɣ
Press and hold down [Yellow],
[Blue] and
buttons on the remote
control simultaneously for over 3 seconds
so that the password returns to the default
setting (0000).
Ɣ
Check the aerial system to improve signal
quality.
Ɣ
Check if you select correct area in “Local
time” from “General setting”.
49,52
40
42
14
42
48
Page 51

PRODUCT SPECIFICATIONS
SPECIFICATION
Approx. 26inches:
Display dimensions
Panel
Resolution 1366(H) x 768 (V) pixels
Net dimensions
Net weight
Ambient
conditions
Power supply AC110 - 240V, 50/60Hz
Power consumption/at standby 105W/< 2W 144W/< 2W
Audio output speaker total 14 W speaker total 20 W
(VIDEO input)
Input terminals
Input signals
Output signals
(RF input)
Temperature Operating: 5°C to 35°C, Storage: 0°C to 40°C
Relative humidity Operating: 20% to 80%, Storage: 20% to 90% (non-condensing)
(576 (H) × 324 (V)mm diagonal
660.5mm)
including Stand:
663(W)x509(H)x262(D)mm
excluding Stand:
663(W)x470(H)x124(D)mm
including Stand: 13 kg
excluding Stand: 12.4kg
AV1
AV3
AV4 : composite video input terminal (RCA)
HDMI: HDMI input terminal
Composite video : PAL, SECAM, NTSC3.58, NTSC4.43, PAL60
Component video: 480i, 576i, 480p, 576p, 720p/50, 720p/60, 1080i/50, 1080i/60
HDMI: 480i, 576i, 480p, 576p,720p/50, 720p/60,1080i/50,1080i/60,1080p/50,
OUTPUT (MONITOR): composite video monitor-output terminal (RCA)
OUTPUT (MONITOR): L/R audio monitor- output terminal (RCA)
OUTPUT (HEADPHONE): L/R audio monitor- output terminal (Mini-pin)
OPTICAL OUT (Digital Audio) : PCM, Dolby® Digital
L26H01AU
Approx. 32inches:
(698 (H) × 392 (V)mm
diagonal 801mm)
Including Stand:
790(W)x602(H)x365(D)mm
Excluding Stand:
790(W)x550(H)x122(D)mm
including Optional Stand: 20.1 kg
excluding Optional Stand: 16 kg
Ⴠ
AV2: component video input terminal (RCA)
L/R audio input terminal (RCA)
: composite video input terminal (RCA)
S video input terminal
L/R audio input terminal (RCA)
L/R audio input terminal (RCA)
1080p/60, 1080p/24
L32H01AU
Input terminal / Receiving range ANT: 75 Unbalanced / 44~870MHz
PAL B/G, H , I ,D/K
RF Video System
(RGB input)
Input terminals
Input signals 0.7 V, analog RGB (Recommended Signal)
Sync signals H/V separate, TTL level [2k]
Ⴠ The television takes at least 30 minutes to attain the status of optimal picture quality.
1
This analog audio input terminal can be used for PC (RGB) or HDMI(DVI) only.
*
49
SECAM B/G , D/K , K1
NTSC-M
DVB-T
Analog RGB input terminal (D-sub 15-pin)
Audio input terminal (3.5mm Stereo Mini Jack)
*
1
Page 52

PRODUCT SPECIFICATIONS (continued)
Signal Input
S-input connector pin specifications
Pin Input signal
1 Y
2 Y-GND
3 C
4 C-GND
Frame GND
HDMI connector Input pin specifications
Pin Input signal Pin Input signal
1 T.M.D.S. Data2+ 11 TMDS Clock Shield
2 T.M.D.S. Data2 12 TMDS Clock -
3 T.M.D.S. Data2- 13 CEC
4 T.M.D.S. Data1+ 14 Reserved (N.C.)
5 T.M.D.S. Data1 15 SCL
6 T.M.D.S. Data1- 16 SDA
7 T.M.D.S. Data0+ 17 DDC/CEC Ground
8 T.M.D.S. Data0 18 +5V Power
9 T.M.D.S. Data0- 19 Hot Plug Detect
10 T.M.D.S. Clock+
RGB terminal (D-sub 15-pin connector)
Pin Input signal
1 R
2 G
3 B
4 No connection
5 No connection
6 R.GND
7 G.GND
8 B.GND
9 No connection
10 GND
11 No connection
12 [SDA]
13 H. sync
14 V.sync.
15 [SCL]
When different kinds of input signals are
simultaneously input to the television via a graphics
board or the like, the television only support H/V
separate sync signal.
50
Page 53

PRODUCT SPECIFICATIONS (continued)
Recommended Signal List
With Component Video INPUT
Signal mode
No
Signal
name
1 576i 720(1440) x 576 50.00 15.63 27.00 EIA-861D
2 480i 720(1440) x 480 59.94 15.73 27.00 EIA-861D
3 576p 720 x 576 50.00 31.25 27.00 EIA-861D
4 480p 720 x 480 59.94 31.47 27.00 EIA-861D
5 1080i/50 1920 x 1080 50.00 28.13 74.25 EIA-861D
6 1080i/60 1920 x 1080 60.00 33.75 74.25 EIA-861D
7 720p/50 1280 x 720 50.00 37.50 74.25 EIA-861D
8 720p/60 1280 x 720 60.00 45.00 74.25 EIA-861D
Resolution
Vertical
frequency
(Hz)
Horizontal
frequency
(kHz)
Dot clock
frequency
(MHz)
Remarks
With HDMI INPUT
No
Signal
name
Signal mode
Resolution
Vertical
frequency
(Hz)
Horizontal
frequency
(kHz)
Dot clock
frequency
(MHz)
Remarks
1 VGA 640 x 480 59.94 31.47 25.18 EIA-861D
2 576i 720(1440) x 576 50.00 15.63 27.00 EIA-861D
3 480i 720(1440) x 480 59.94 15.73 27.00 EIA-861D
4 576p 720 x 576 50.00 31.25 27.00 EIA-861D
5 480p 720 x 480 59.94 31.47 27.00 EIA-861D
6 1080i/50 1920 x 1080 50.00 28.13 74.25 EIA-861D
7 1080i/60 1920 x 1080 60.00 33.75 74.25 EIA-861D
8 720p/50 1280 x 720 50.00 37.50 74.25 EIA-861D
9 720p/60 1280 x 720 60.00 45.00 74.25 EIA-861D
10 1080p/50 1920 x 1080 50.00 56.25 148.50 EIA-861D
11 1080p/60 1920 x 1080 60.00 67.50 148.50 EIA-861D
12 1080p/24 1920 x 1080 24.00 27.00 74.25 EIA-861D
51
Page 54

PRODUCT SPECIFICATIONS (continued)
Recommended Signal List (continued)
With RGB input
Signal mode
No
Signal
name
1 640 x 400 70.09 31.47 25.18
2
3 800 x 600 60.32 37.88 40.00
4 1024 x 768 60.00 48.36 65.00
5
6 1280 x 768 59.88 47.78 79.50
7
Ⴠ
The type of video board or connecting cable used may not allow for correct displays adjustment of Horizontal Position,
Vertical Position, Horizontal Clock and Clock Phase.
Ⴠ
The unit differentiates the signal modes according to the horizontal and vertical frequencies and the horizontal and
vertical sync signal polarities. Note that different signals having all these elements alike may be handled as the same
signal.
Ⴠ
Displaying images with more than 768 lines of vertical resolution a Full display (compressed display) can result in the
interpolation of stripes.
VGA
VESA
VESA
Resolution
640 x 480 59.94 31.47 25.18
1280 x 1024 60.02 63.98 108.00
1360 x 768 60.02 47.71 85.50
Vertical
frequency
(Hz)
Horizontal
frequency
(kHz)
Dot clock
frequency
(MHz)
Remarks
52
 Loading...