

Page 1

INSTRUCTION MANUAL
FOR
MODEL L-2100 PUMP
Copyright
Hitachi High-Technologies Corporation 2002. All rights reserved. Printed in Japan. Part No. 890-9101
Page 2

PREFACE
Thank you very much for purchasing Hitachi Model L-2100/2130
pump, which has been specifically designed for automatic
analysis in a liquid chromatograph system.
The Model L-2100/2130 pump is intended for use by persons
having a basic knowledge of chemical analysis.
Remember that improper use of analytical instruments,
chemicals or samples would result not only in wrong analytical
data but also in consequences adverse to safety.
Carefully read this instruction manual before attempting
operation. For proper use of the pump, please acquaint yourself
with it.
ABOUT THIS MANUAL
The operating procedures and maintenance/checkup instructions
for the L-2100/2130 pump are described in this manual.
First of all, read "IMPORTANT" and "SAFETY SUMMARY" at the
beginning of this manual for ensuring safety in operation of the
pump.
If installation of the pump is not yet completed, refer to Section 2.
Before attempting operation, read through Sections 3 and 4 to
become acquainted with the structure of the instrument and its
basic operations.
- 1 -
Page 3

- 2 -
Page 4

IMPORTANT
Precautions on Electromagnetic Wave Interference
1. Possible Electromagnetic Wave Interference Caused by This Instrument
Where this instrument is used in a residential area or an
adjacent area thereto, it may cause interference to radio and
television reception.
To prevent this, use the specified system connection cables in
strict accordance with the instruction manual. The instrument is
designed to minimize possible electromagnetic wave
interference caused by it if the specified cables are connected
properly.
However, there is no guarantee that electromagnetic wave
interference will not be caused by the instrument.
If the instrument does cause interference to radio or television
reception, which can be determined by turning the instrument off
and on, the user is encouraged to try to correct the interference
by one or more of the following measures:
Reorient the antenna of the radio/television receiver.
•
Increase separation between the instrument and the radio/TV
•
receiver.
Connect the instrument to an outlet on a circuit different from
•
that to which the radio/TV receiver is connected.
2. Possible Electromagnetic Wave Interference Affecting This Instrument
Where this instrument is used near an intense electromagnetic
source, interference noise may be given to the instrument to
incur an adverse effect on its performance or functionality.
To present this, use the specified system connection cables in
strict accordance with the instruction manual. The instrument is
designed to minimize possible electromagnetic wave
interference affecting it if the specified cables are connected
properly.
However, there is no guarantee that electromagnetic wave
interference will not occur in the instrument. If the instrument
does incur electromagnetic wave interference, which can be
determined by turning on and off possible sources of
electromagnetic interference nearby, the user is encouraged to
try to correct the interference by one or more of the following
measures:
- 3 -
Page 5

Warranty on Product
Reorient the instrument.
•
Increase separation between the instrument and possible
•
sources of electromagnetic interference.
Connect the instrument to an outlet on a circuit different from
•
that to which possible sources of electromagnetic interference
are connected.
Check that any other device connected with the instrument is
•
not affected by electromagnetic interference.
The Model L-2100 pump is warranted to be free from defects in
material or workmanship under normal use within the product
specifications indicated in this manual and under conditions
given below. This warranty is void if the instrument is not used
according to the instruction manual.
(1) Scope of Warranty
Any parts which prove to be defective in design or
workmanship during the warranty period will be repaired,
adjusted or replaced without charge. A substitute part may
be used for repair, or replacement with an equivalent
product may be made instead of repair. Such system
components as a personal computer and printer to be
updated frequently for improvement may not be available in
original versions at the time of replacement. Note that this
warranty does not apply to the instrument if modified by the
user or resold without permission from the manufacturer,
consumable parts, and any failure of lifetime-expired parts.
(2) Warranty Period
One year from the date of initial installation
(3) Availability of Technical Support Service
Technical support service for this instrument is available
within regular working hours on workdays specified by
Hitachi High-Technologies Corporation.
- 4 -
Page 6

(4) Limitations and Exclusions on Warranty
Note that the following cases are excluded from the scope
of this warranty.
(a) Failure due to operation at a place not meeting the
installation requirements specified by Hitachi HighTechnologies Corporation.
(b) Failure due to power supply voltage/frequency other
than specified by Hitachi High-Technologies
Corporation or due to abnormality in power supply.
(c) Corrosion or deterioration of the tubing due to
impurities contained in reagent, gas, air or cooling
water supplied by the user.
(d) Corrosion of the electric circuits or deterioration of the
optical elements due to highly corrosive atmospheric
gas.
(e) Failure due to use of hardware, software or spare parts
other than specified by Hitachi High-Technologies
Corporation.
(f) Failure due to improper handling or maintenance by
the user.
(g) Failure due to maintenance or repair by a service
agent not approved or authorized by Hitachi HighTechnologies Corporation.
(h) After disposal of this instrument, or after its resale
without Hitachi High-Technologies Corporation
approval.
(i) Failure due to relocation or transport after initial
installation.
(j) Failure due to disassembly, modification or relocation
not approved by Hitachi High-Technologies
Corporation.
(k) Consumables, and failure of parts that have reached
the end of specified useful life.
(l) Failure of parts excluded from the warranty in the
instruction manual or other documents.
(m) Failure due to acts of God, including fire, earthquake,
storm, flood, lightning, social disturbance, riot, crime,
insurrection, war (declared or undeclared), radioactive
pollution, contamination with harmful substance, etc.
(n) Failure of the hardware, or damage to the system
software, application software, data or hard disk due to
computer virus infection.
- 5 -
Page 7

(o) Failure of the personal computer connected with the
instrument, or damage to the system software,
application software, data or hard disk due to power
interruption or momentary power voltage drop caused
by lightning.
(p) Failure of the personal computer connected with the
instrument, or damage to the system software,
application software, data or hard disk due to
disconnection of main power to the personal computer
without taking the specified normal shutdown
procedure.
(5) Disclaimer of Warranty
THE MANUFACTURER MAKES NO WARRANTIES,
EITHER EXPRESS OR IMPLIED, EXCEPT AS PROVIDED
HEREIN, INCLUDING WITHOUT LIMITATION THEREOF,
WARRANTIES AS TO MARKETABILITY,
MERCHANTABILITY, FOR A PARTICULAR PURPOSE
OR USE, OR AGAINST INFRINGEMENT OF ANY
PATENT. IN NO EVENT SHALL THE MANUFACTURER
BE LIABLE FOR ANY DIRECT, INCIDENTAL OR
CONSEQUENTIAL DAMAGES OF ANY NATURE, OR
LOSSES OR EXPENSES RESULTING FROM ANY
DEFECTIVE PRODUCT OR THE USE OF ANY PRODUCT.
NO ORAL OR WRITTEN INFORMATION OR ADVICE
GIVEN BY THE MANUFACTURER, ITS DEALERS,
DISTRIBUTORS, AGENTS OR EMPLOYEES SHALL
CREATE A WARRANTY OR IN ANY WAY INCREASE
THE SCOPE OF THIS WARRANTY.
(6) Warranty Card
The warranty card will not be reissued. Keep it in a safe
place.
Installation, Relocation and After-sale Technical Service
Installation of the instrument shall be carried out by or under
supervision of qualified service personnel of the manufacturer or
its authorized service agent.
Before installation of the instrument, the customer is requested
to prepare necessary utilities referring to this manual.
When relocation of the instrument becomes necessary after
initial installation (delivery), please notify your local Hitachi HighTechnologies sales representative or service office.
- 6 -
Page 8

Technical Seminars and Training for Customers
For the customers to acquire in-depth understanding of the
analytical instruments, technical seminars and customer training
courses are available at Hitachi High-Technologies Corporation
or your site. For further information, contact your local Hitachi
High-Technologies Corporation sales representative.
(The technical seminars and customer training courses are
available on a chargeable basis.)
Other Precautions
1. Handling of Chemicals and Samples
(1) The user is responsible for following relevant legal
standards and regulations in the handling, storage and
discarding of chemicals and samples used in analytical
operations of the instrument.
(2) Reagents, standard solutions and accuracy-control
samples shall be handled, stored and discarded as
instructed by the respective suppliers.
2. Notice on This Instruction Manual
(1) The information contained in this manual is subject to
change without notice for product improvement.
(2) This manual is copyrighted by Hitachi High-Technologies
Corporation with all rights reserved.
(3) No part of this manual may be reproduced or transmitted in
any form or by any means without the express written
permission of Hitachi High-Technologies Corporation.
- 7 -
Page 9
1
1.1 Isocratic System
1.1
1. OUTLINE
The liquid chromatograph system consists of a pump for feeding
an eluent, a sample introducing section (autosampler, manual
injector) for injecting a sample, a column for chromatographic
separation of the injected sample, a column oven for maintaining
the column at a constant temperature, and a detector section for
detecting a signal of a separated component of the sample.
In addition, a degasser for deaerating an eluent, a gradient
device for varying a mixing ratio of eluents with time, and other
optional devices are incorporated in the system.
The isocratic system has a simple configuration in which singlesolvent analysis is performed.
Washing solution
Degasser
Column
Eluent
System power supply unit
Model L-2400 UV detector
Model L-2300 column oven
Model L-2200 autosampler
Model L-2100/2130 pump
Drain
1 -
Page 10

2
1.1 Isocratic System
(1) An eluent is fed by the pump through the degasser.
(2) A sample is injected from the autosampler.
(3) The injected sample is separated through the column which
is maintained at a constant temperature by the column
oven.
(4) Each component separated from the sample is then
detected as a signal by the detector.
1 -
Page 11
3
1.2 Low-Pressure Gradient System
pressure
In the low-pressure gradient system, two or more solvents are
mixed in its low-pressure section from which a liquid feed is
performed by a single pump. The composition of an eluent is
made to vary with time in chromatographic separation.
Washing solution
Mixer
Degasser
(1) Each of plural eluents is fed from the degasser to the low-
pressure unit.
(2) In the low-pressure unit, the eluents are mixed at a pre-
specified ratio.
(3) Through the mixer, the mixture eluent is delivered.
(4) A sample is injected by the autosampler.
(5) The injected sample is separated through the column which
is maintained at a constant temperature by the column
oven.
(6) Each component separated from the sample is detected as
a signal by the detector.
Column
1.2
Eluent
System power supply unit
Model L-2400 UV detector
Model L-2300 column oven
Model L-2200 autosampler
Lowgradient unit
Model L-2100/2130 pump
Drain
1 -
Page 12
4
1.3 High-Pressure Gradient System
2130 pump
1.3 High-Pressure Gradient System
In the high-pressure gradient system, two or more solvents are
fed by respective pumps and mixed in the high-pressure section
for liquid delivery.
System power
supply unit
Model L-2100/
2130 pump
Model L-2100/
Degasser
Washing
solution
Mixer
(1) From the degasser, each of plural eluents is applied to the
(2) The plural eluents are fed at a flow rate corresponding to a
(3) The plural eluents thus fed are mixed in the high-pressure
(4) A sample is injected by the autosampler.
(5) The injected sample is separated through the column which
(6) Each component separated from the sample is detected as
Eluent
pump.
pre-specified mixing ratio.
gradient section. Through the mixer, the mixture eluent is
delivered.
is maintained at a constant temperature by the column
oven.
a signal by the detector.
Column
Model L-2400
UV detector
Model L-2300
column oven
Model L-2200
autosampler
Drain
1 -
Page 13
1
2.1 Unpacking
2.1
2. INSTALLATION
CAUTION
Beware of heavy objects!
This instrument is as heavy as 15 kg.
When carrying this instrument, exercise care not to incur injury
by dropping it off accidentally. Be sure to hold the front and
rear parts of the instrument securely when moving it.
Carefully unpack the shipping case, take out module units and
standard accessories, and place them on a sturdy, level desk or
bench.
NOTICE:
Installation of this instrument shall be carried out by
or under supervision of qualified service personnel
of Hitachi High-Technologies Corporation or its
authorized service agent.
Before installation of this instrument, the customer
shall make preparations for satisfying the
installation requirements in accordance with this
manual.
When relocation of this instrument becomes
necessary after initial installation (delivery), please
notify your local Hitachi High-Technologies sales
representative or service office.
2 -
Page 14

2
2.2 Installation Place
2.2 Installation Place
When selecting an installation place for this instrument, be sure
to check the following conditions:
(1) Operating Ambient Temperature
4 to 35 °C
Temperature variations during measurement should be
minimized. Take sufficient care to prevent dew
condensation.
(2) Operating Ambient Humidity
45 to 85% RH
(3) Atmosphere
(a) Well ventilated.
(b) Free from acidic or alkaline gases that could corrode
metals significantly.
(c) Free from vapors of solvents (e.g., benzene, thinner)
that could affect the paint coating on the instrument.
(4) Other Requirements
(a) Not exposed to direct sunlight.
Exposure to direct sunlight could result in deteriorated
performance or discoloration of the instrument.
Avoid installing the instrument near a window of the
laboratory room.
(b) Not exposed to drafts directly.
(c) Free from intense vibrations and shocks.
(d) Apart from a heat source such as a gas burner,
electric heater, or oven.
(e) Apart from a strong magnetism source such as an
electronic welder, high-frequency electronic furnace, or
voltage transformer.
2 -
Page 15

3
(f) Free from an amount of dust and dirt.
Contamination with dust and dirt could deteriorate the
performance of the instrument.
(g) No abrupt fluctuations in power voltage.
Fluctuations in power voltage could cause noise in
analytical data.
(h) Do not connect the instrument to a power line used by
an electric device that is not equipped with a noise
suppressor circuit (e.g., stirrer, vibrator).
2.2
2 -
Page 16
4
2.3 Items to be Prepared by the User
2.3 Items to be Prepared by the User
2.3.1 Power Supply
(1) Power voltage : 100 to 240 V AC
(2) Frequency : 50 or 60 Hz
(3) Power
consumption : 500 VA or more in total system
(4) Grounding : Grounding connection of Electric
Fluctuation.......Within ±10% with respect
to rated voltage
Fluctuation.......Within ±0.5 Hz with respect
to rated frequency
Provide power supply sufficient for
combinational use with other devices.
Installation Technical Standard Class 3 or
higher should be provided.
WARNING
Ground Properly to Prevent Electric Shock Hazard!
Be sure to use the power cable supplied with the
•
instrument. Use of a different power cable could result in
an electric shock hazard.
This instrument is of a "plug-connected type" specified in
•
European Norm EN61010-1, so connect the power cable to
a grounded three-wire outlet.
If a grounded three-wire outlet is not available, the power
•
cable may be connected to a two-wire outlet through an
adapter plug. In this case, be sure to provide proper
grounding connection as required.
2 -
Page 17
5
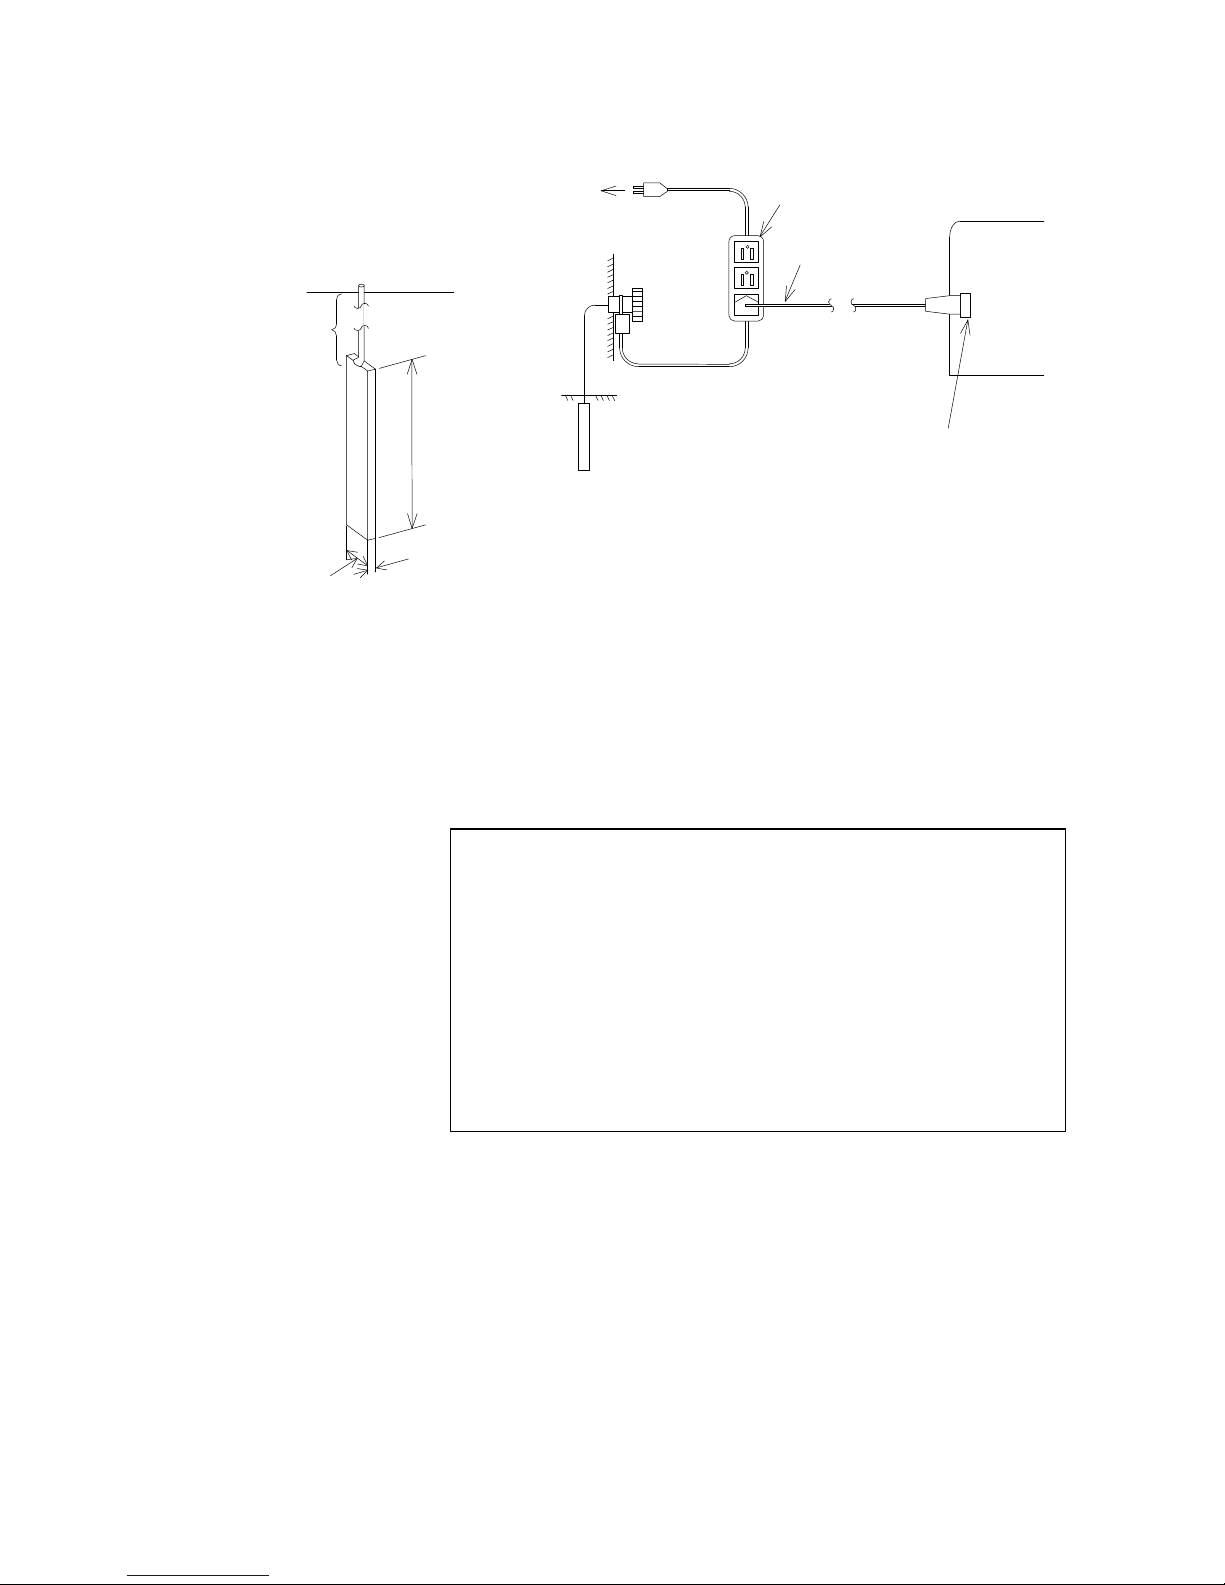
2.3.2
Ground resistance:
Less than 100 ohms
More than
750 mm
under ground
300 mm
Copper plate
2 mm
10 mm
2.3.2 Installation Space
Power outlet
Table tap with
ground cable
Ground
terminal
Power cord
L-2100/2130
Ground
Ground wire
(green)
Connector
For installation of this system, it is required to provide a space of
at least 640 mm (width) × 550 mm (depth). Prepare a sturdy,
level desk or bench capable of supporting a weight load of at
least 150 kg. On the rear of the main unit, allow at least
100 mm of clearance.
NOTICE
2.4 Checking the Contents
After unpacking, check the contents of each case against the
packing list attached to it.
: Installation of the instrument shall be carried out by
or under supervision of qualified service personnel
of the manufacturer or its authorized service agent.
Before installation of the instrument, the customer
is requested to prepare necessary utilities referring
to this manual.
When relocation of the instrument becomes
necessary after initial installation (delivery), please
notify your local Hitachi High-Technologies sales
representative or service office.
2 -
Page 18
6
2.5 Assembly
2.5 Assembling
2.5.1 Power Supply
Unit
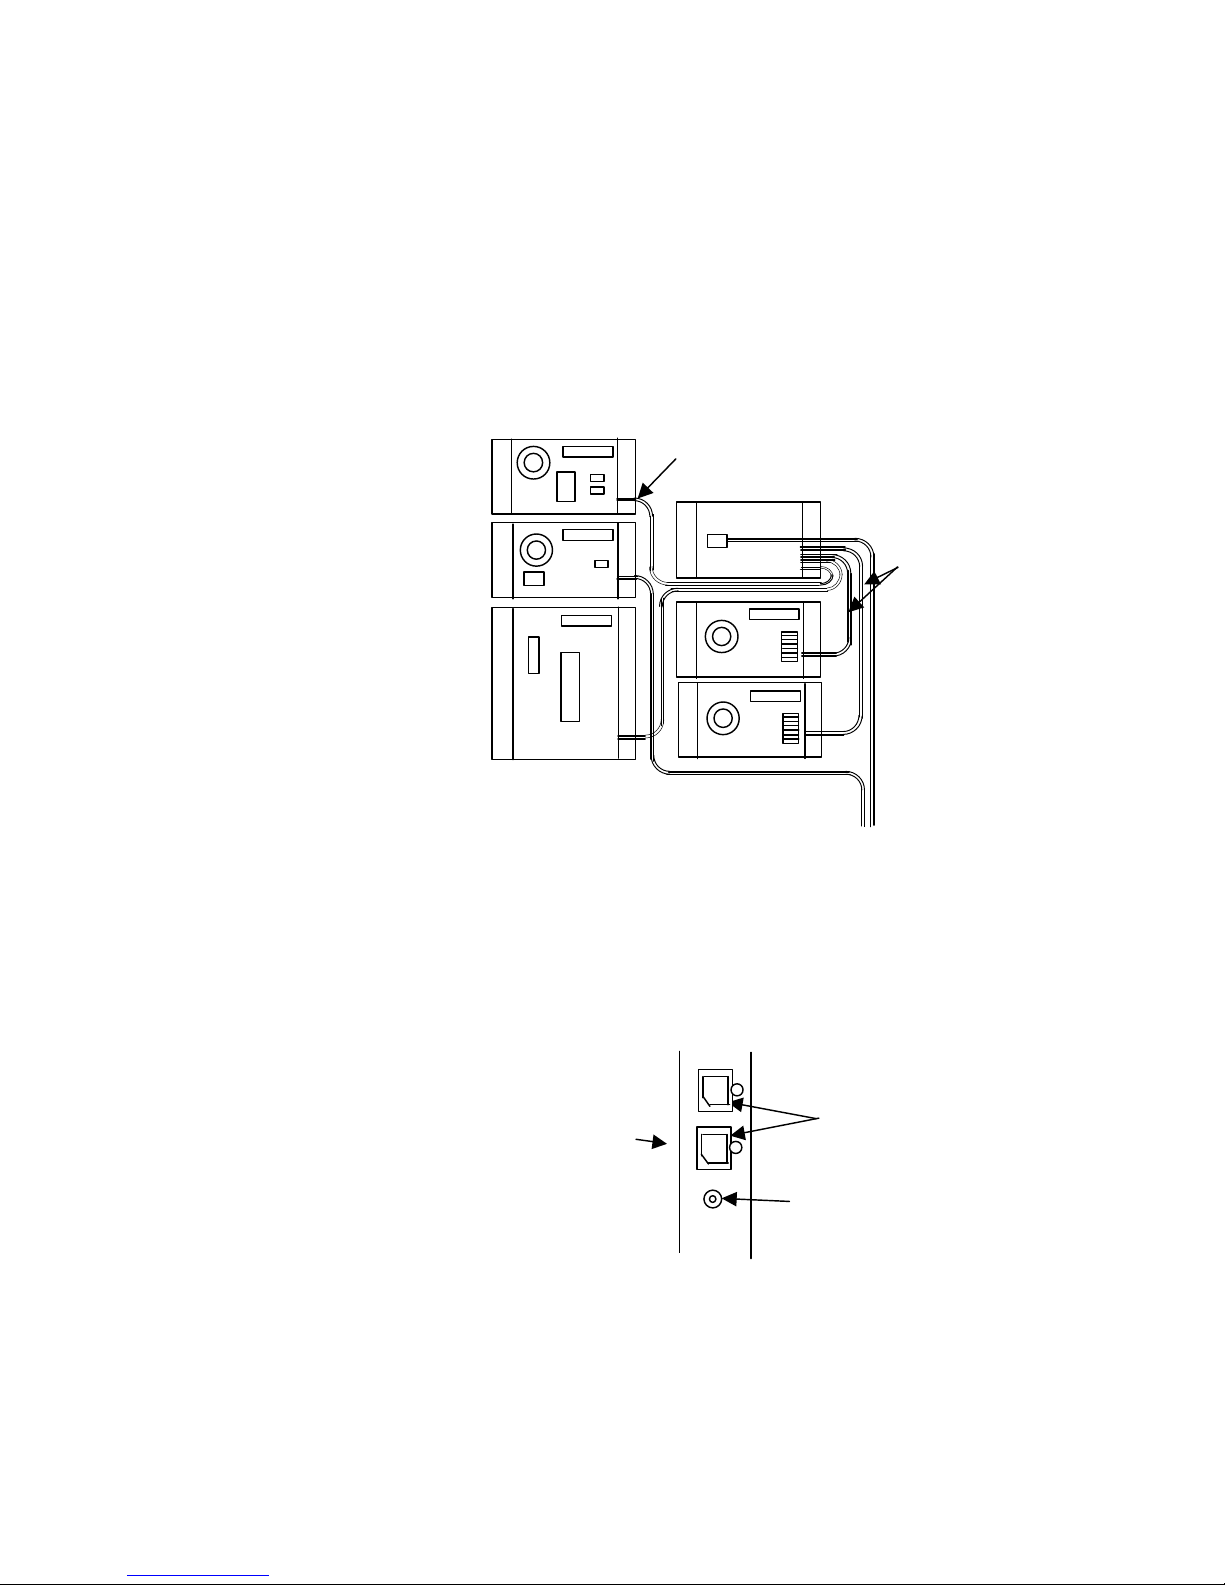
The L-2000 Series system is provided with a system power
supply unit which is capable of connecting two pumps, one
autosampler, and one detector. The column oven has its own
power cord. In an instance where provision of a single system
power supply unit is insufficient for the use of two detectors, use
an AC adapter suitable for each instrument (50 W AC adapter
for the pump/autosampler, 100 W AC adapter for the detector).
The power cable from the system power supply unit and the AC
adapter power cable should be connected to the power
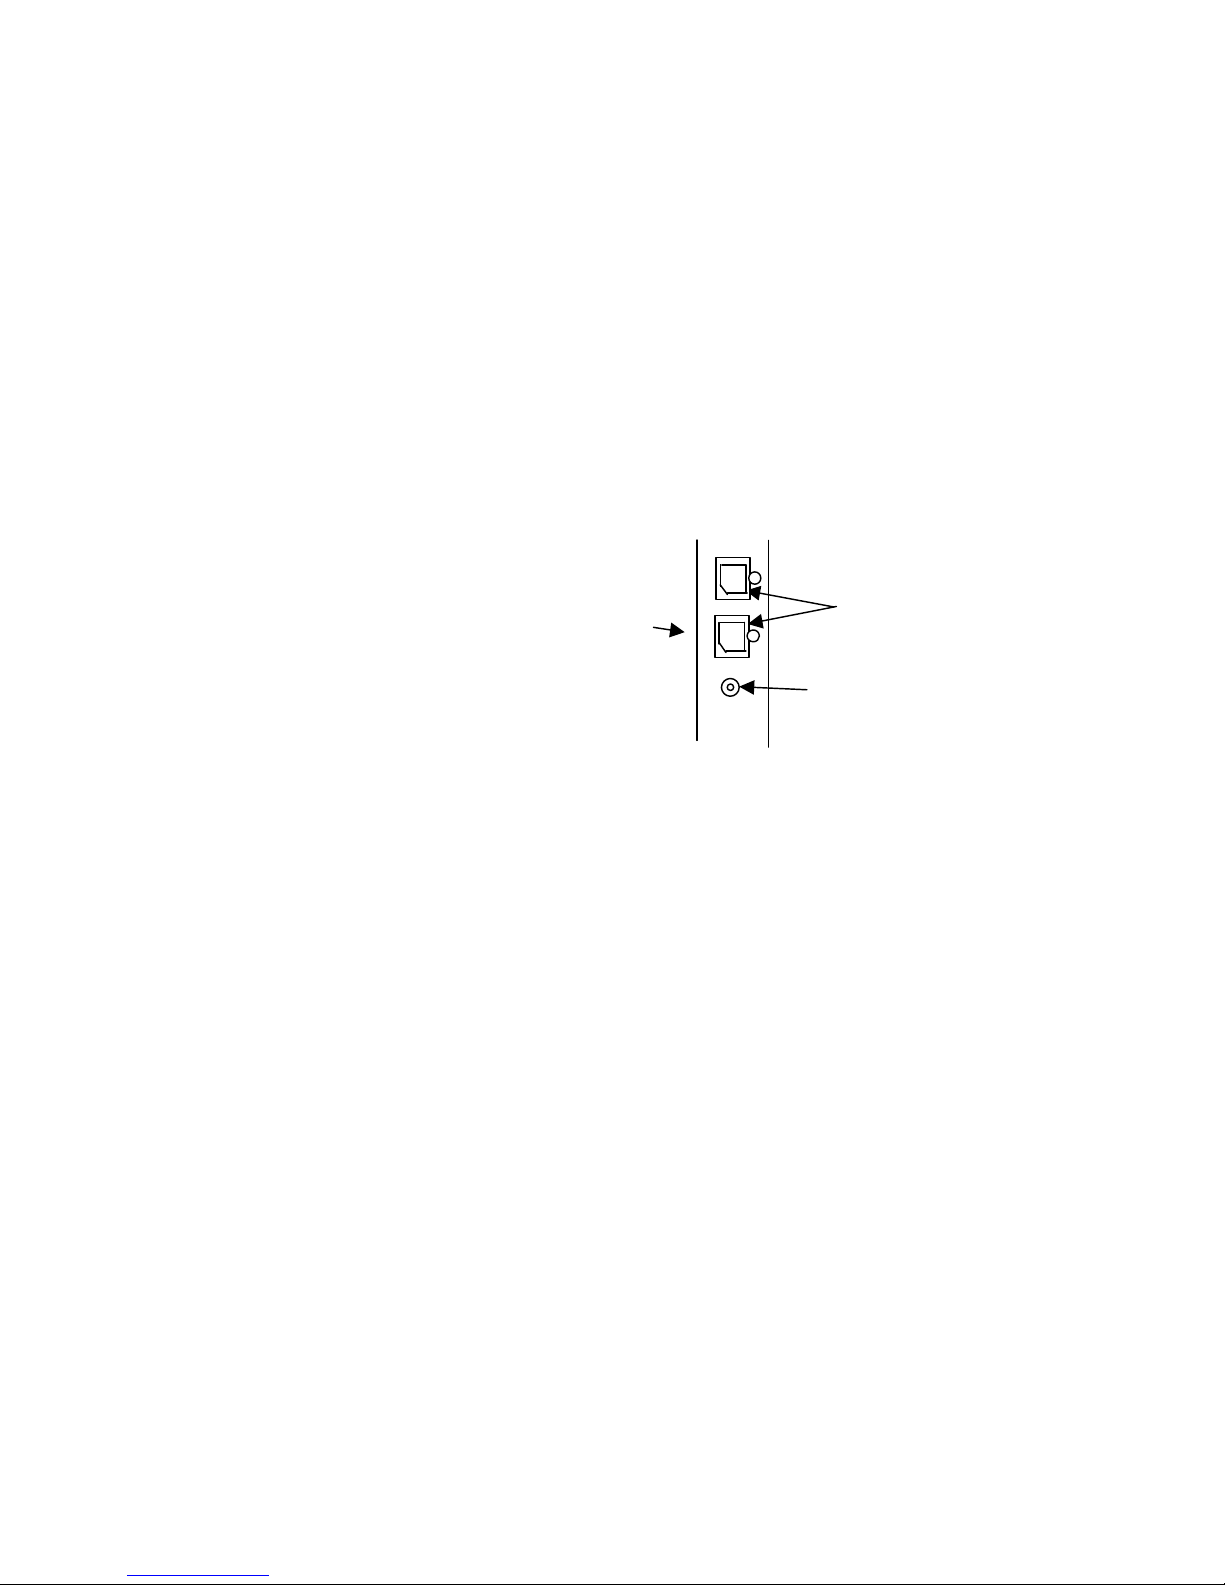
connector equipped on the left rear side of the instrument.
Rear of
instrument
e-Line connector
Power connector
2 -
Page 19
7
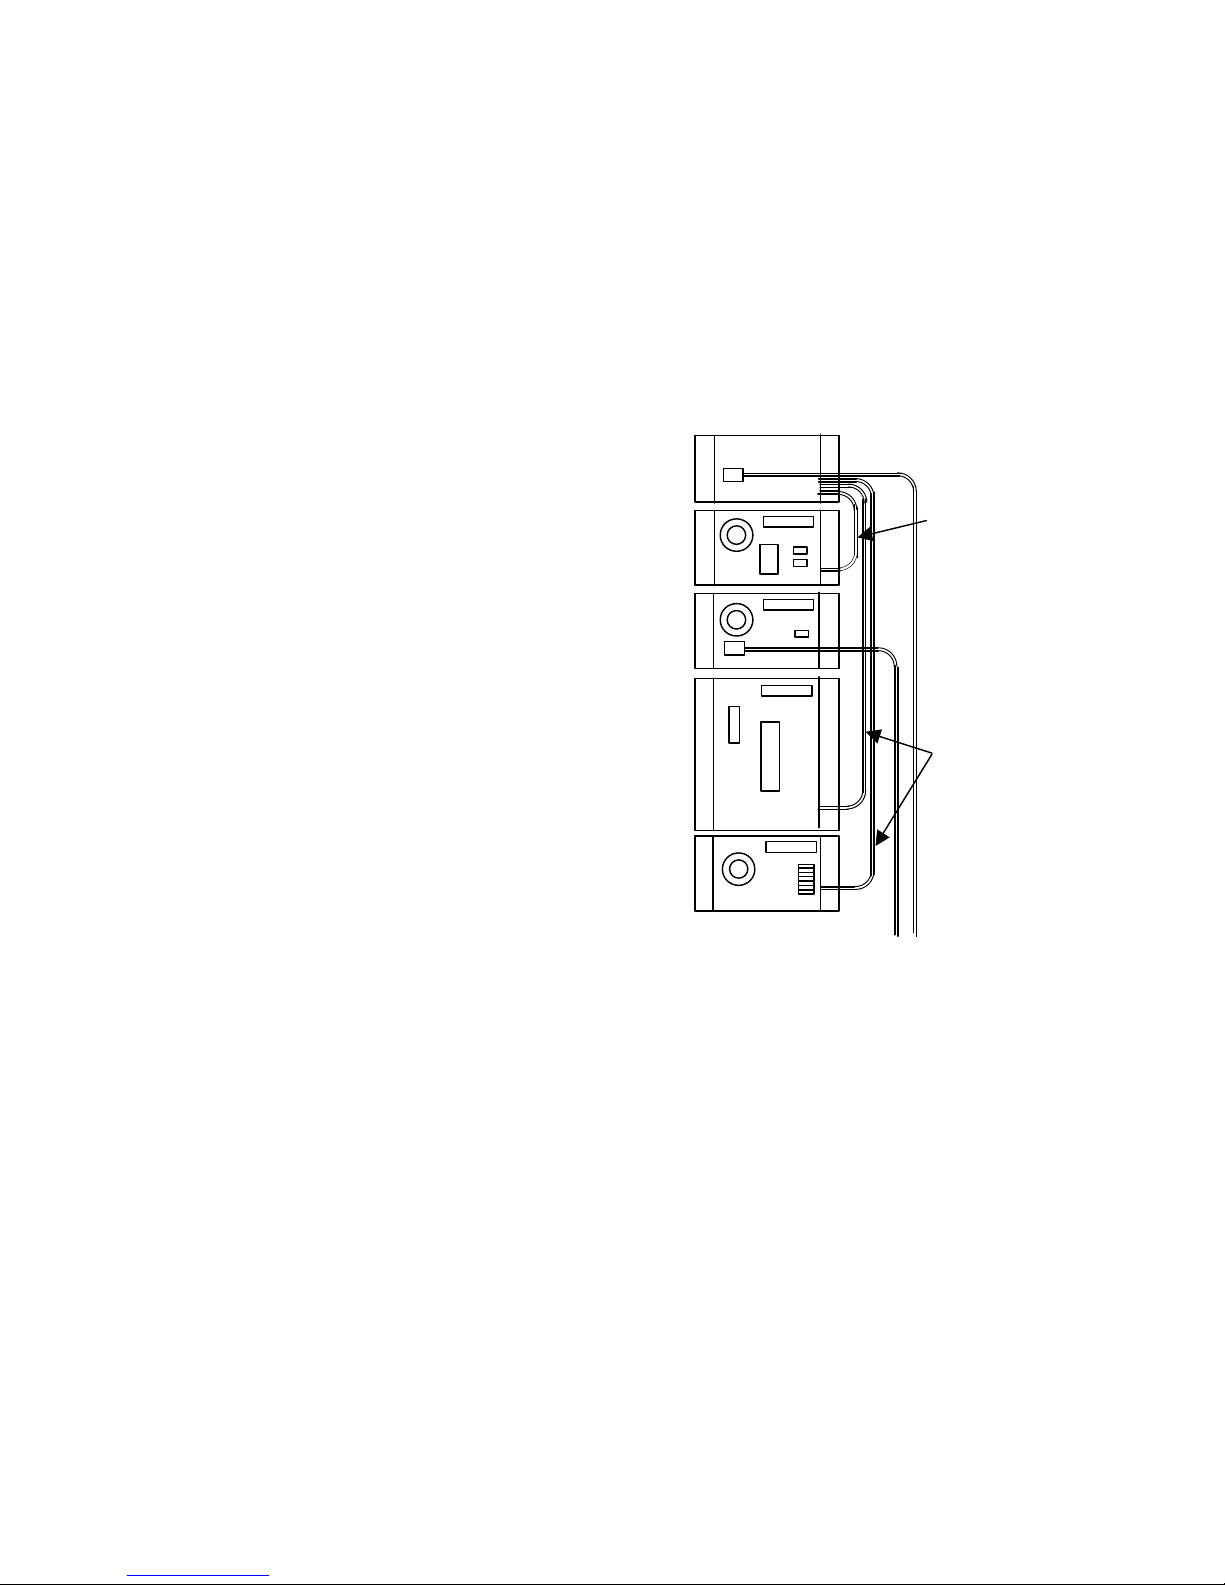
(1) Isocratic System/Low-Pressure Gradient System
pump
To AC power
source
Connect the power cables of the system power supply unit
and column oven to AC power source. For the L-2100/
2130 pump and L-2100 pump, connect the 50 W cable
from the system power supply unit to the instrument power
connector. For the L-2400 UV detector, connect the 100
W cable from the system power supply unit to the
instrument power connector.
System power
supply nit
Model L-2400 UV
detector
100 W cable
Model L-2300
column oven
Model L-2100
pump
50 W cable
Model L-2100/2130
2.5.2
2 -
Page 20
8
source
2.5 Assembly
Model L-2400
UV detector
L-2300 column oven
Model L-2100
pump
2.5.3 Wiring
Arrangement
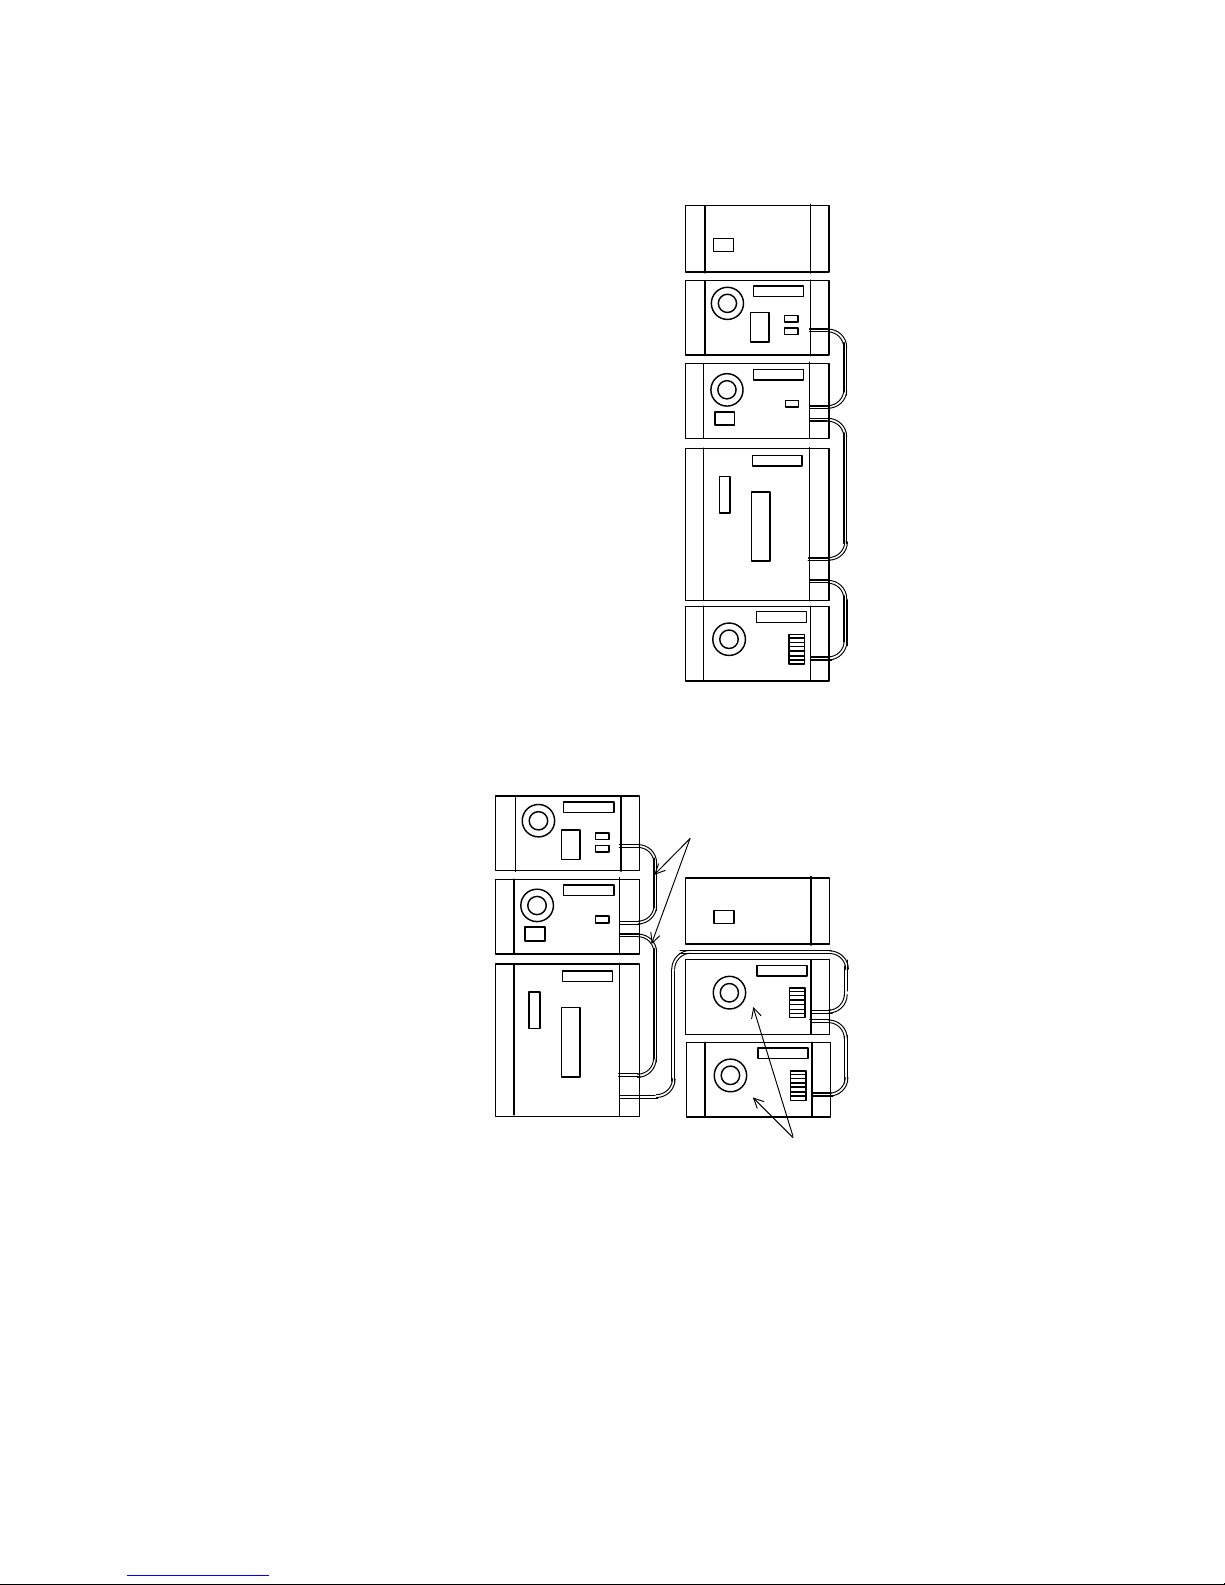
(2) High-Pressure Gradient System
Connect the power cables of the system power supply unit
and column oven to AC power source. For the L-2100/
2130 pump and L-2100 pump, connect the 50 W cable
from the system power supply unit to the instrument power
connector. For the L-2400 UV detector, connect the 100
W cable from the system power supply unit to the
instrument power connector.
100 W cable
System power supply unit
50 W cable
Model L-2100/
2130 pump
Model L-2100/
2130 pump
To AC power
In the L-2000 Series, connect the e-Line cable to the e-Line
connector equipped on the left rear of each instrument for
instrument-to-instrument wiring connection.
Rear of
instrument
e-Line connector
Power connector
2 -
Page 21
9
2100 pump
Model L-2300 column oven
2100 pump
ctor
Model L-2400 UV dete
Model L-2300 column oven
Model L-
(1) Isocratic System/Low-Pressure Gradient System
System power supply unit
Model L-2400 UV detector
e-Line cable
Model L-
e-Line cable
Model L-2100/2130 pump
e-Line cable
(2) High-Pressure Gradient System
e-Line cable
System power
supply unit
e-Line cable
e-Line cable
Model L-2100/
2130 pump
2.5.3
2 -
Page 22
Run tubes from the pump to the autosampler,
Run inlet tubing to the pump and waste
2.5 Assembly
2.5.4 Piping
Arrangement
In the L-2000 Series, provide inlet tubing to the pump and waste
solution tubing through the right piping section of the drain
reservoir. Provide tubing from the pump to the autosampler,
column and detector through the center piping section of the
drain reservoir.
Drain reservoir
Center Piping Section
column and detector.
Right Piping Section
solution tubing.
2 - 10
Page 23

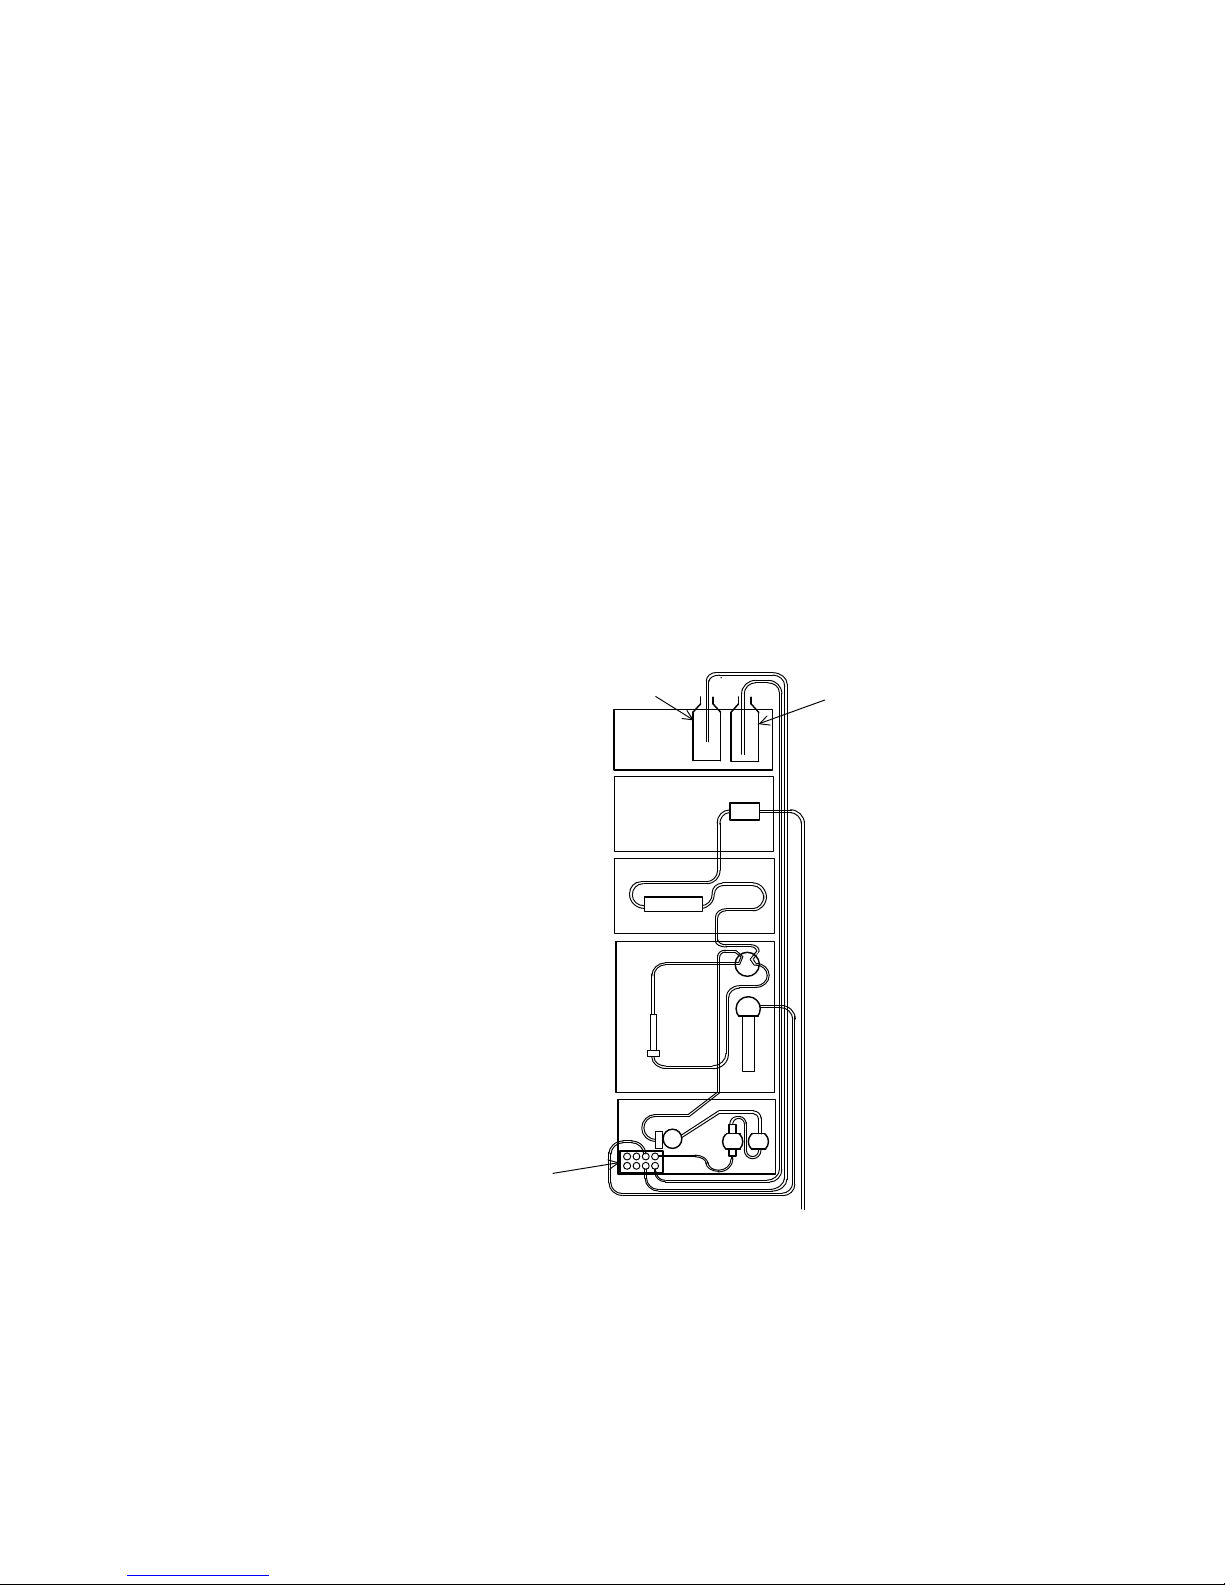
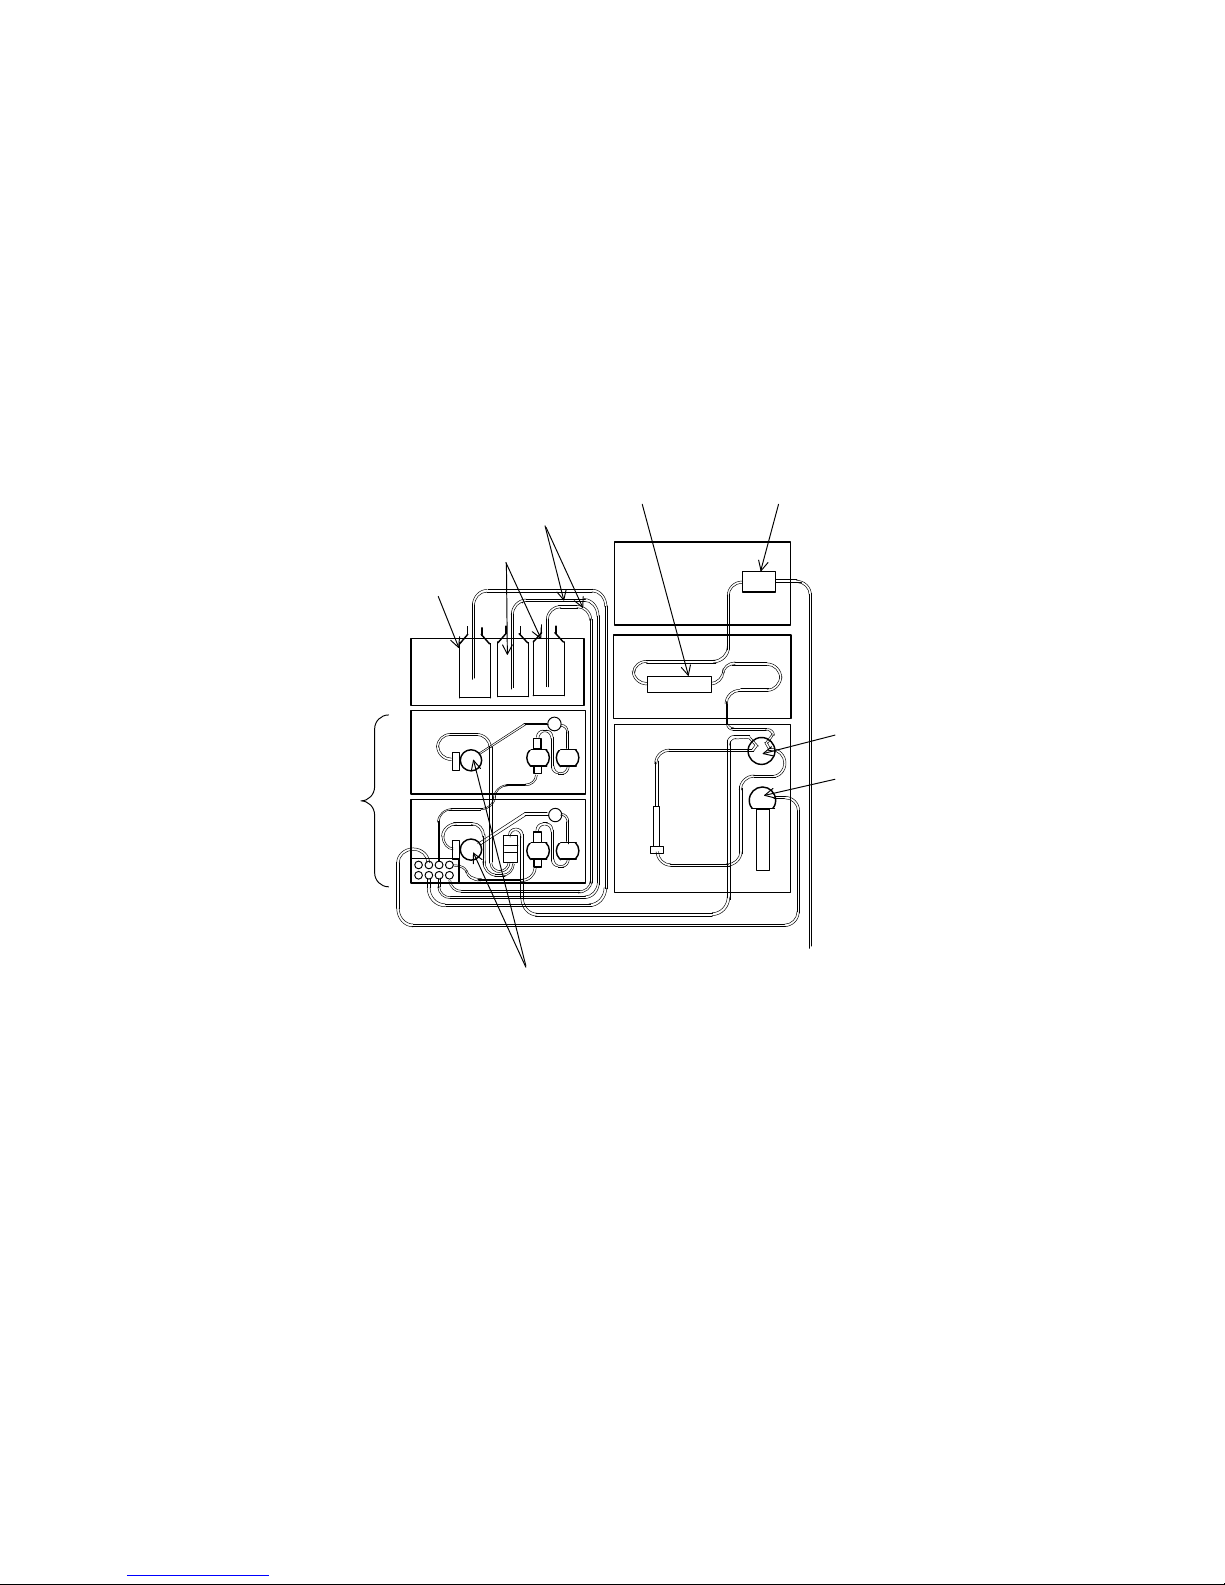
(1) Isocratic System
2100 pump
2100/2130 pump
Connect the inlet tube of eluent to the IN port of the
degasser. Connect the OUT port of the degasser to the
inlet of the pump. Connect the drain valve of the pump to
port 1 of the injection valve of the autosampler.
Connect port 2 of the injection valve to the column inlet.
Connect the column outlet to the inlet tube of the detector
cell. For washing solution, provide connection to port 1 of
the syringe valve of the autosampler through the degasser.
Washing solution
Model L-2400 UV detector
Model L-2300 column oven
Model L-
Model L-
Degasser
Drain valve
Eluent
Inlet tube
Detector cell
Column
Injection valve
Syringe valve
Drain
2.5.4
2 - 11
Page 24

2100 pump
2.5 Assembly
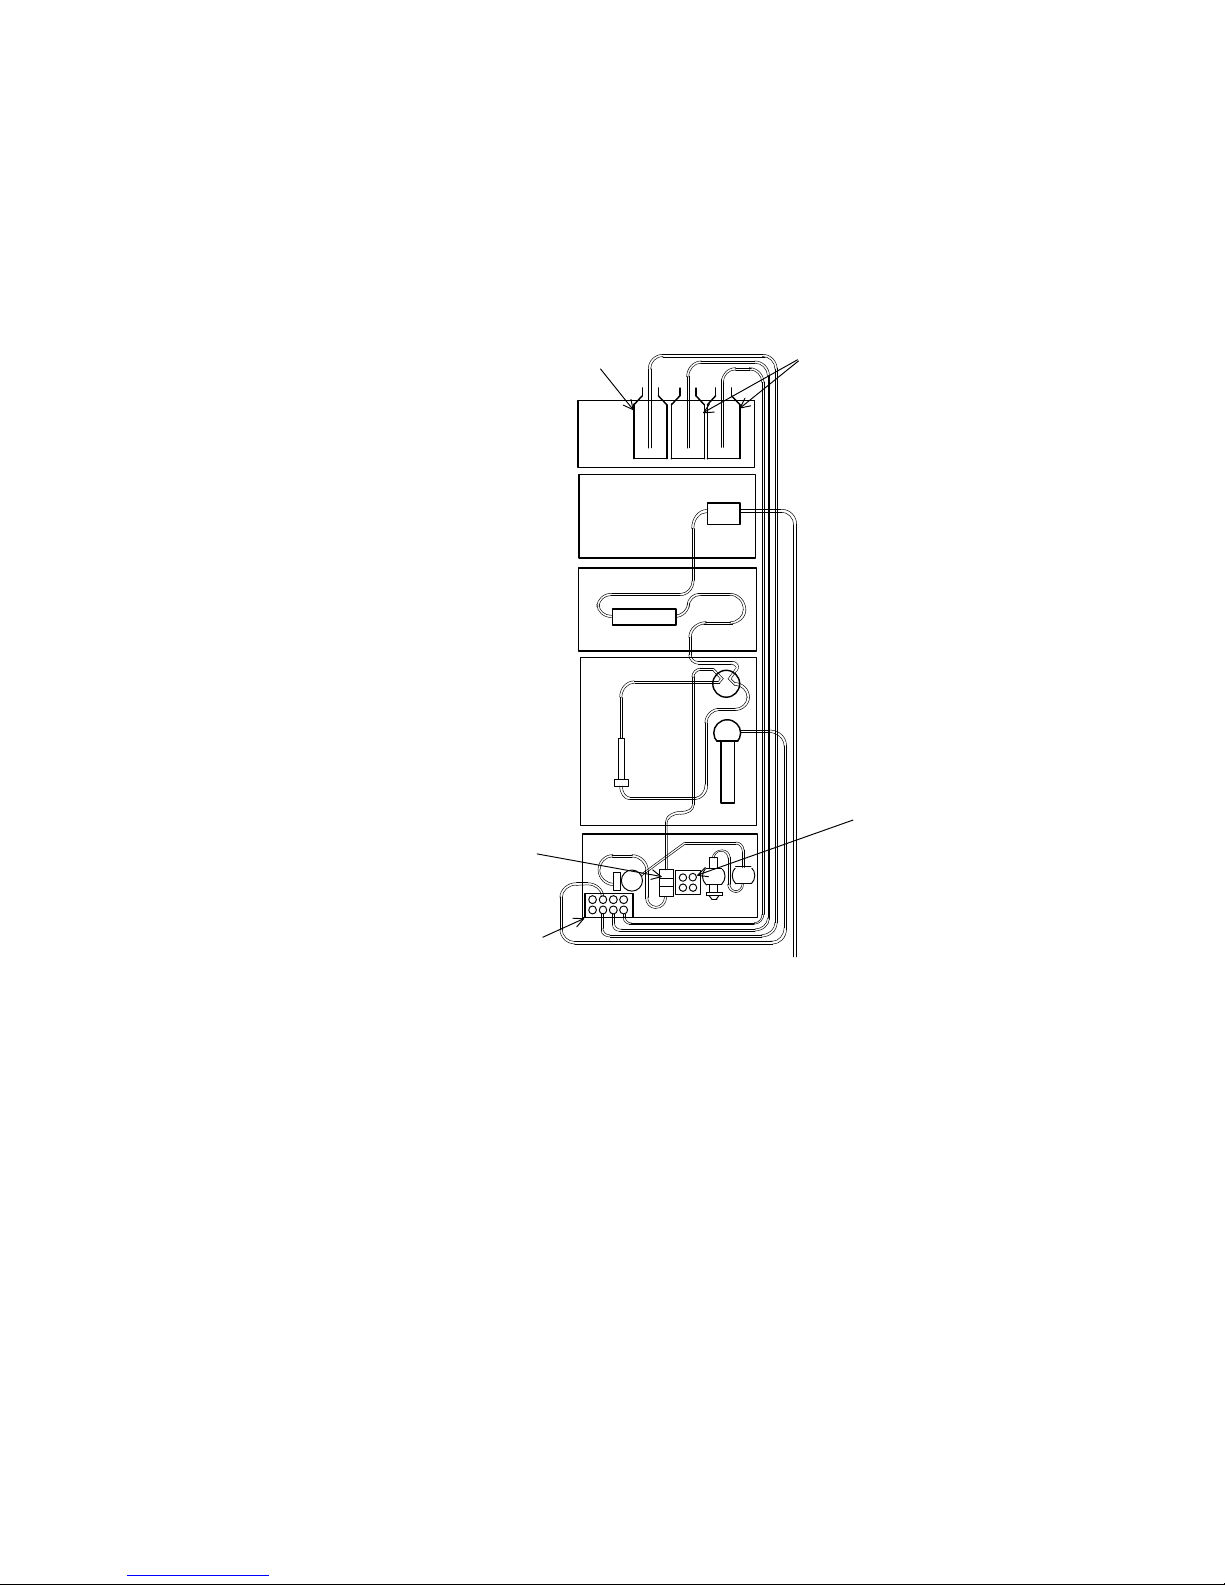
(2) Low-Pressure Gradient System
Connect the inlet tube of eluent to the IN port of the
degasser. Connect the OUT port of the degasser to the IN
port of the proportioning valve. Connect the OUT port of
the proportioning valve to the four-way joint.
Connect the mixer of the pump to port 1 of the injection
valve of the autosampler. Connect port 2 of the injection
valve to the column inlet. Connect the column outlet to the
inlet tube of the detector cell. For washing solution,
provide connection to port 1 of the syringe valve of the
autosampler through the degasser.
Washing solution
system power supply unit
Model L-2400 UV detector
Model L-2300 column oven
Model L-
Drain valve
L-2100/2130 pump
Degasser
Mixer
Proportioning valve
Eluent
Inlet tube
Detector cell
Column
Injection valve
Syringe valve
Drain
Four-way joint
2 - 12
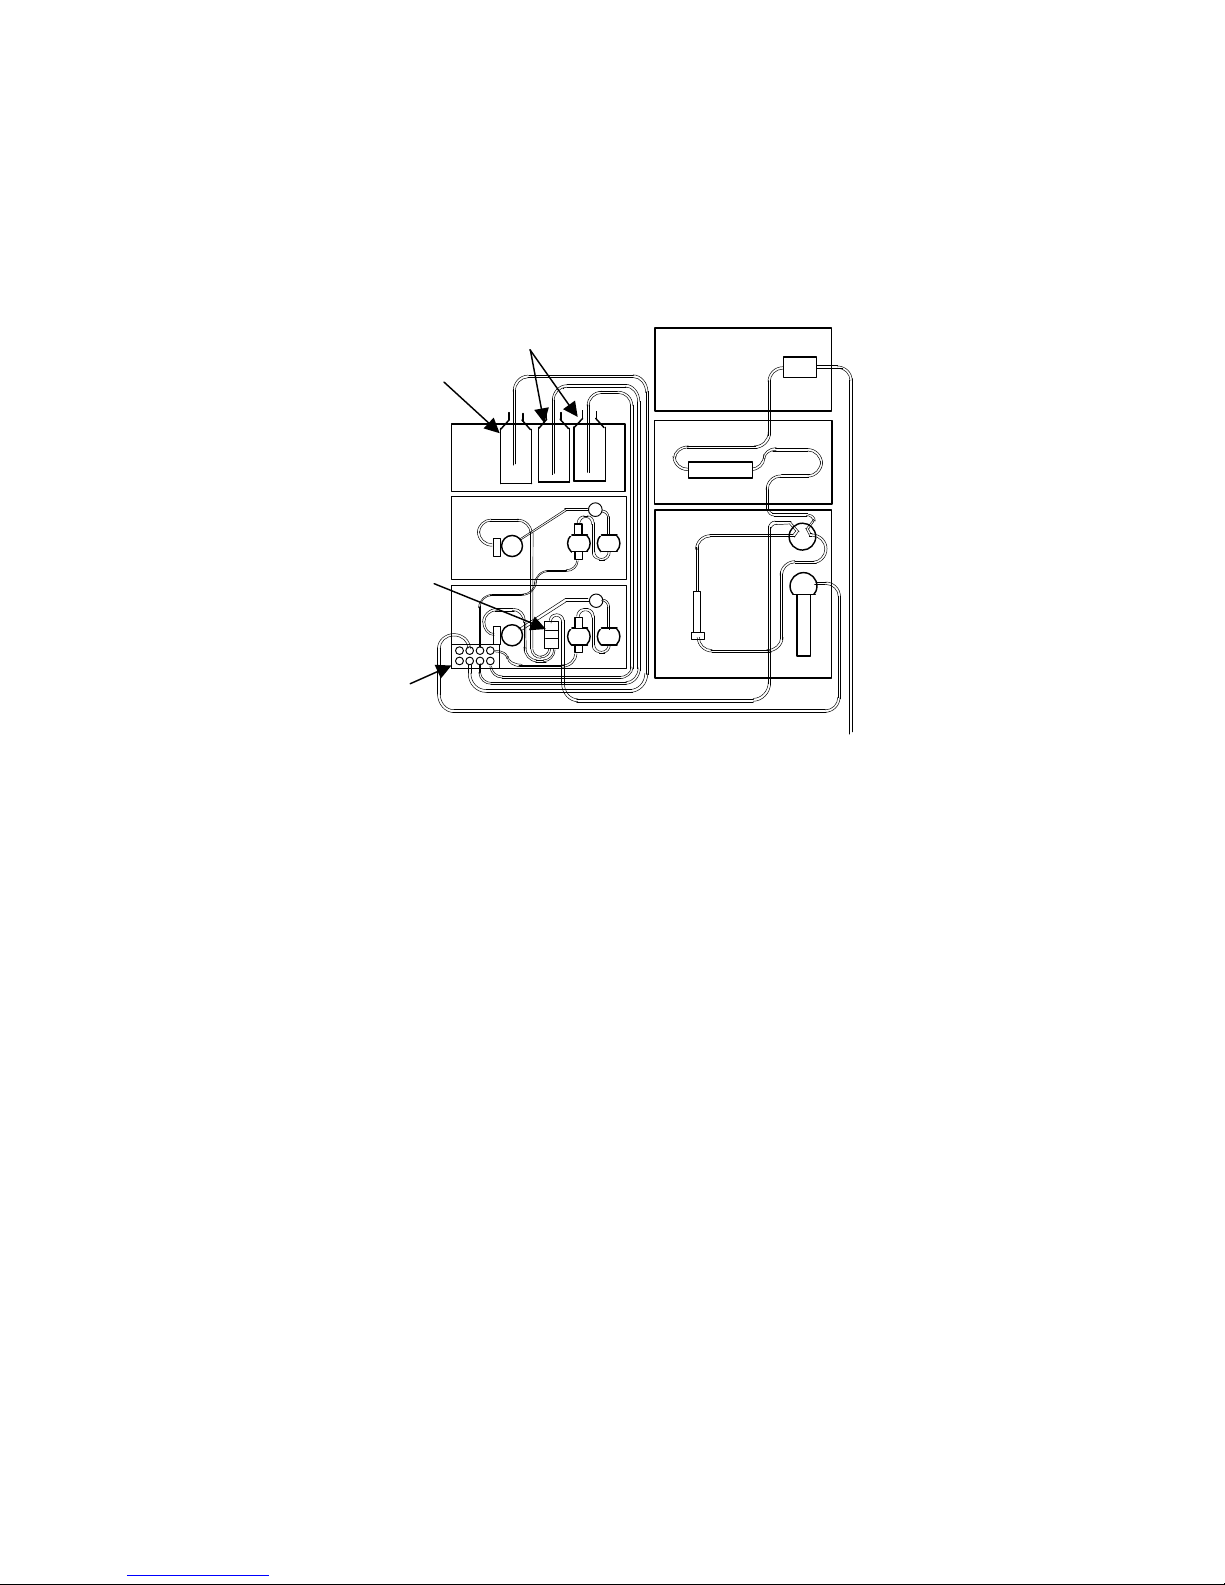
Page 25
System power supply
Washing solution
unit
Model L-2100/
2130 pump
2.5.5 Module Unit
Operating
Procedure
2.5.5
(3) High-Pressure Gradient System
Connect the inlet tube of eluent to the IN port of the
degasser. Connect the OUT port of the degasser to the IN
port of the pump. Connect the drain valve of the pump to
the mixer. Connect the mixer of the pump to port 1 of the
injection valve of the autosampler. Connect port 2 of the
injection valve to the column inlet. Connect the column
outlet to the inlet tube of the detector cell.
For washing solution, provide connection to port 1 of the
syringe valve of the autosampler through the degasser.
Inlet tube
Eluent
Column
Detector cell
Model L-2400 UV detector
Model L-2300 column oven
Injection valve
Syringe valve
Model L-2100 pump
Drain valve
Drain
Where the chromato data station is not used for controlling
operations, each module can be operated using the optional UI
pad.
This section describes how to use the UI pad for operations.
The UI pad is provided with common control keys available for
different modules and unique control keys for particular modules.
The functions of the common control keys are mentioned below.
2 - 13
Page 26
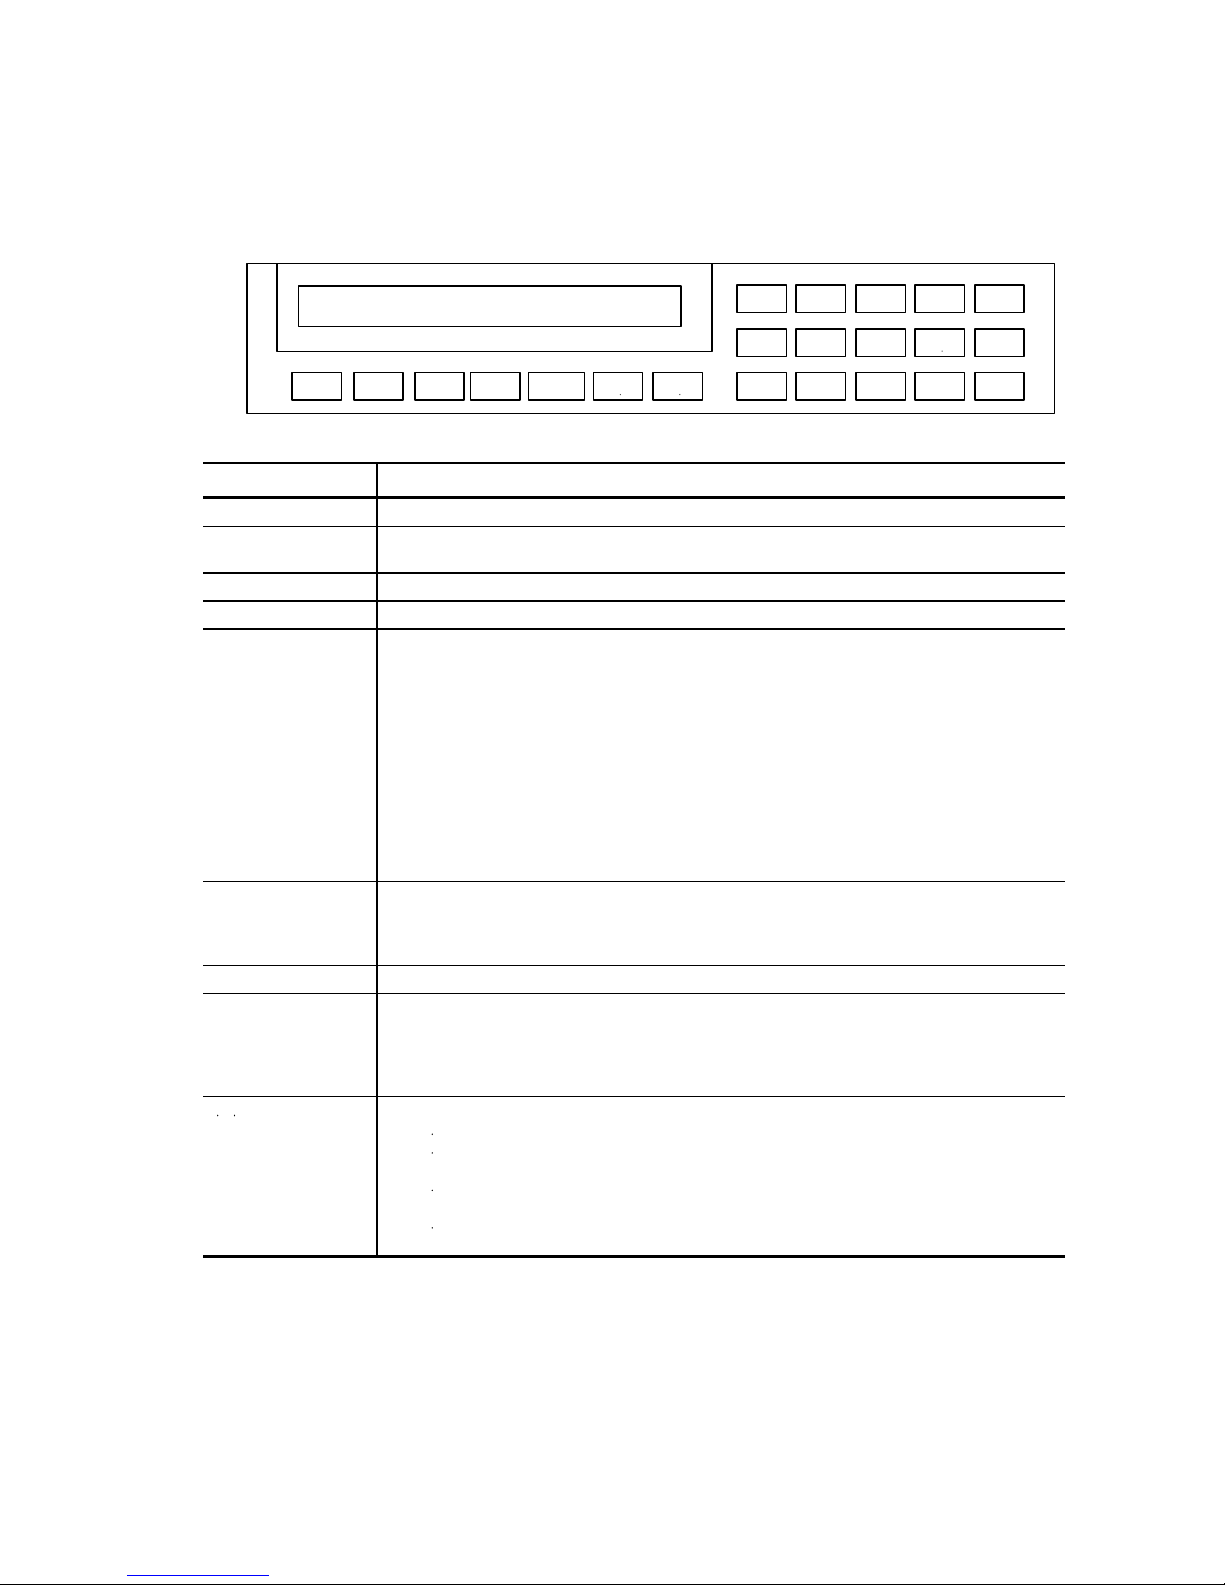
SET UP
2.5 Assembly
(1) Using the UI Pad
(a) Functions of common control keys
INSERT
PROG GLP UTLTY
7 8 9 0
4 5 6
1 2 3
LOCK OFF
ESC
DEL
CL ENT
Key Designation
UTLTY Starts instrument parameter setting.
GLP Starts GLP function setting. Available for displaying a logbook of component
parts of each module, triggering a reset, and locking the UI pad keys.
PROG Starts program editing.
ESC Returns control to the monitor window.
DEL Deletes a cursor-pointed step.
This key is effective only in program editing.
When the cursor is positioned on the TIME input part, pressing the DEL key
removes a step pointed by the cursor. When the cursor is positioned on
another input part, pressing the DEL key removes an item pointed by the cursor.
Pressing the ESC key on a window where "-" is indicated returns control to the
monitor window, causing cancellation of a DEL key action.
• Pump/detector time program
When the DEL key is pressed, "-" is indicated. This deletion can then be
defined by pressing the ENT key.
• Autosampler sequential program
When the DEL key is pressed, the relevant step number is deleted and "-" is
indicated. This deletion can then be defined by pressing the ENT key.
CL Clears an input numeric value during input (after a numeric value or the decimal
point is entered; before the
ENT
The cursor is indicated at the top of the input part. The previous input value is
presented as a preset value.
ENT Defines the current entry of a parameter.
INSERT Use this key in program editing.
• Pump/detector
A new line is presented following the last line of the current program.
• Autosampler
A new step is inserted.
,
(Arrows)
(1) Monitor window
key : Goes to the next window.
•
key : Goes back to the previous window.
•
(2) Program editing
key : The next line is presented. Pressing this key at the last line
•
causes the first line to appear in a circular fashion.
key : The previous line is presented. Pressing this key at the first
•
line causes the last line to appear in a circular fashion.
Function
key is pressed).
2 - 14
Page 27
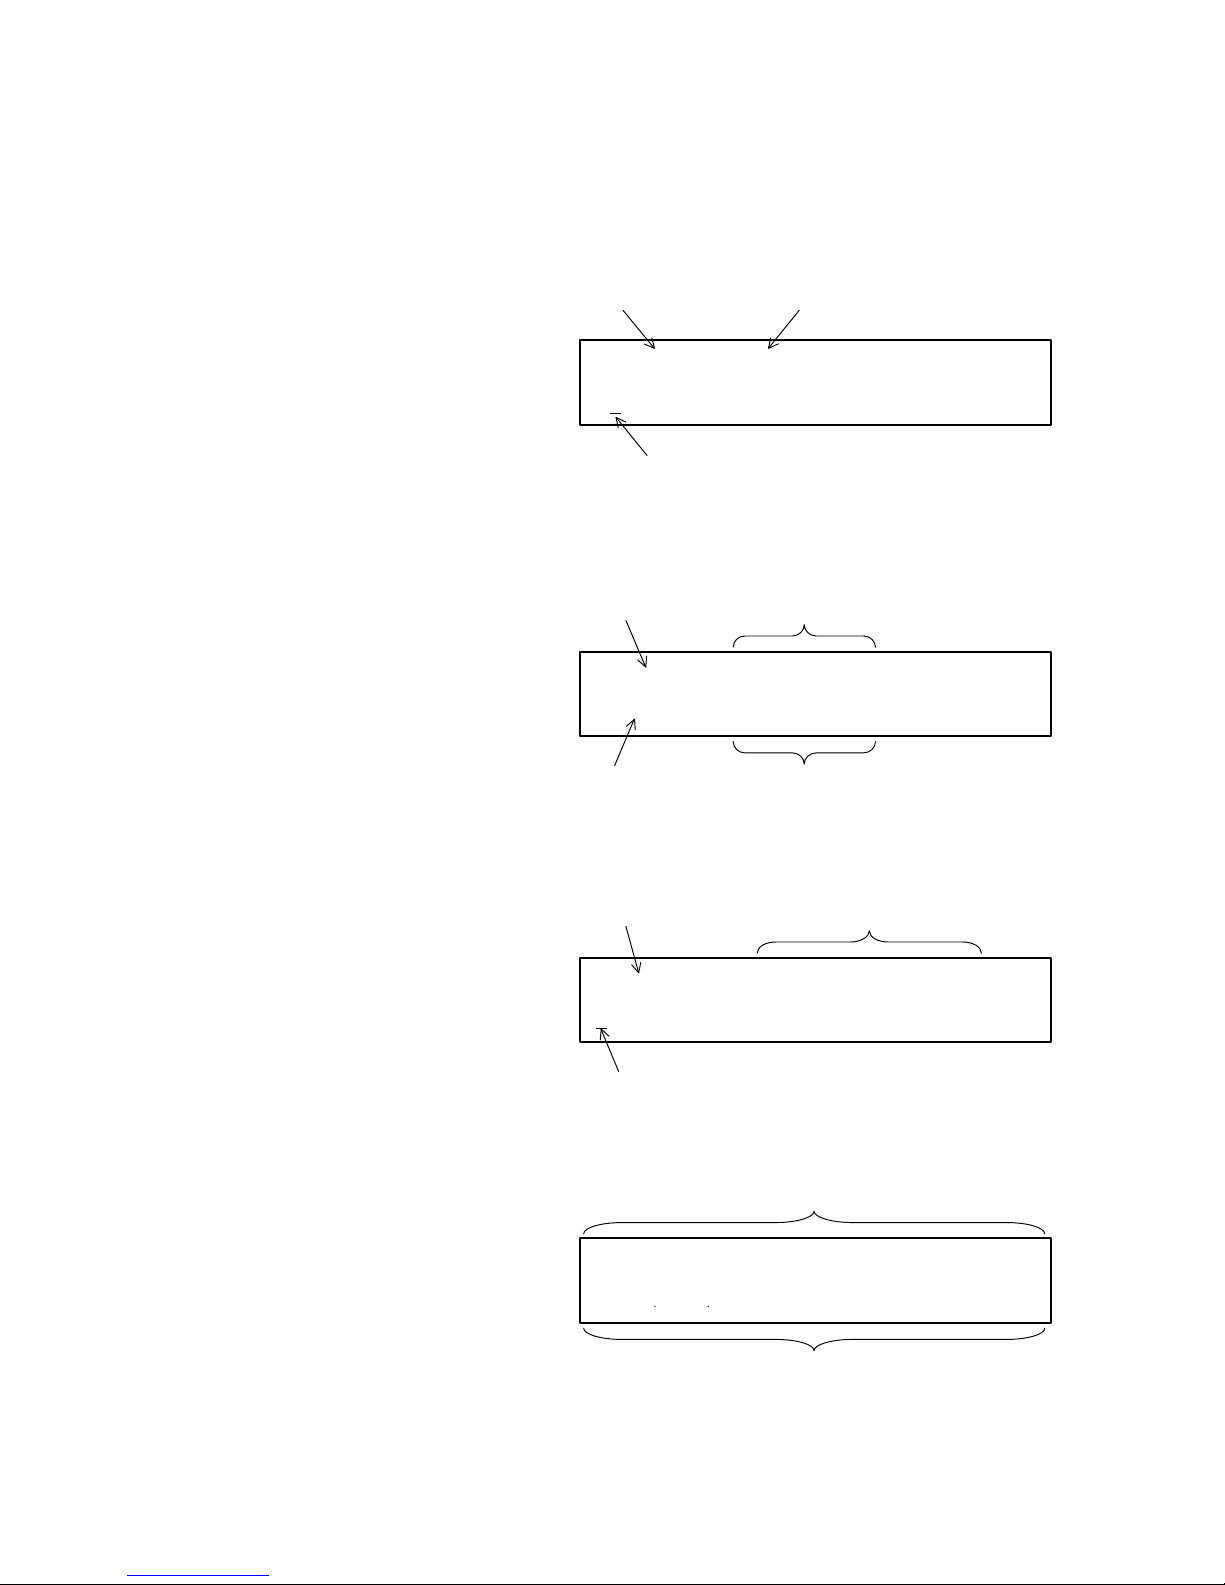
(b) Contents on screen
The parameter input window and the program setup
window are described below.
1) Input of a single numeric value:
Parameter name Input range
PROGRAM No. (1 - 9)
1
Input part
2) Input of plural numeric values
Parameter name
Input item
LAMP CHANGE (MM, DD, YYYY)
<1 - 12>
Input range Input part
3) Selection of a numeric value:
Parameter name
Selectable items
TIME CONSTANT (0.1s = 1, 0.5s = 2, 2.0s = 3,
3 4.0s = 4, 8.0s = 5)
Input part
4) Program setup window:
Input item
NO. R.NO VIALS INJ.VOL INJ/VIAL S.TIME
1 1 80 50 1 10.0
Input part
2.5.5
2 - 15
Page 28

2.5 Assembly
(c) Numeric Value Input Procedure
1) The cursor is indicated at the top of the input part.
The previous numeric value is presented in the
input part.
2) Numeric and decimal point key inputs are
accepted in each allowable range.
3) To define an input numeric value, press the ENT
key. The cursor will then move to the next item.
If an erroneous numeric value is input, the cursor
is brought back to the top of the input part with
the input numeric value displayed. In this state,
you are prompted to enter a correct numeric value.
Pressing the ESC key brings you back to the
initial window (monitor window).
If the ESC key is pressed during numeric key
input, the parameter being entered is discarded
(the previous numeric value is set).
NOTICE:
At power-on, a default number is indicated in each
item selection part.
Pressing the CL key in the input part clears its contents.
The cursor is then brought back to the top of the input part.
In program editing, pressing the DEL key in the input part
removes an item pointed by the cursor.
If the ESC key is pressed in the course of setting plural
parameters, the items preceding the press of the ESC key
remain intact.
2 - 16
Page 29

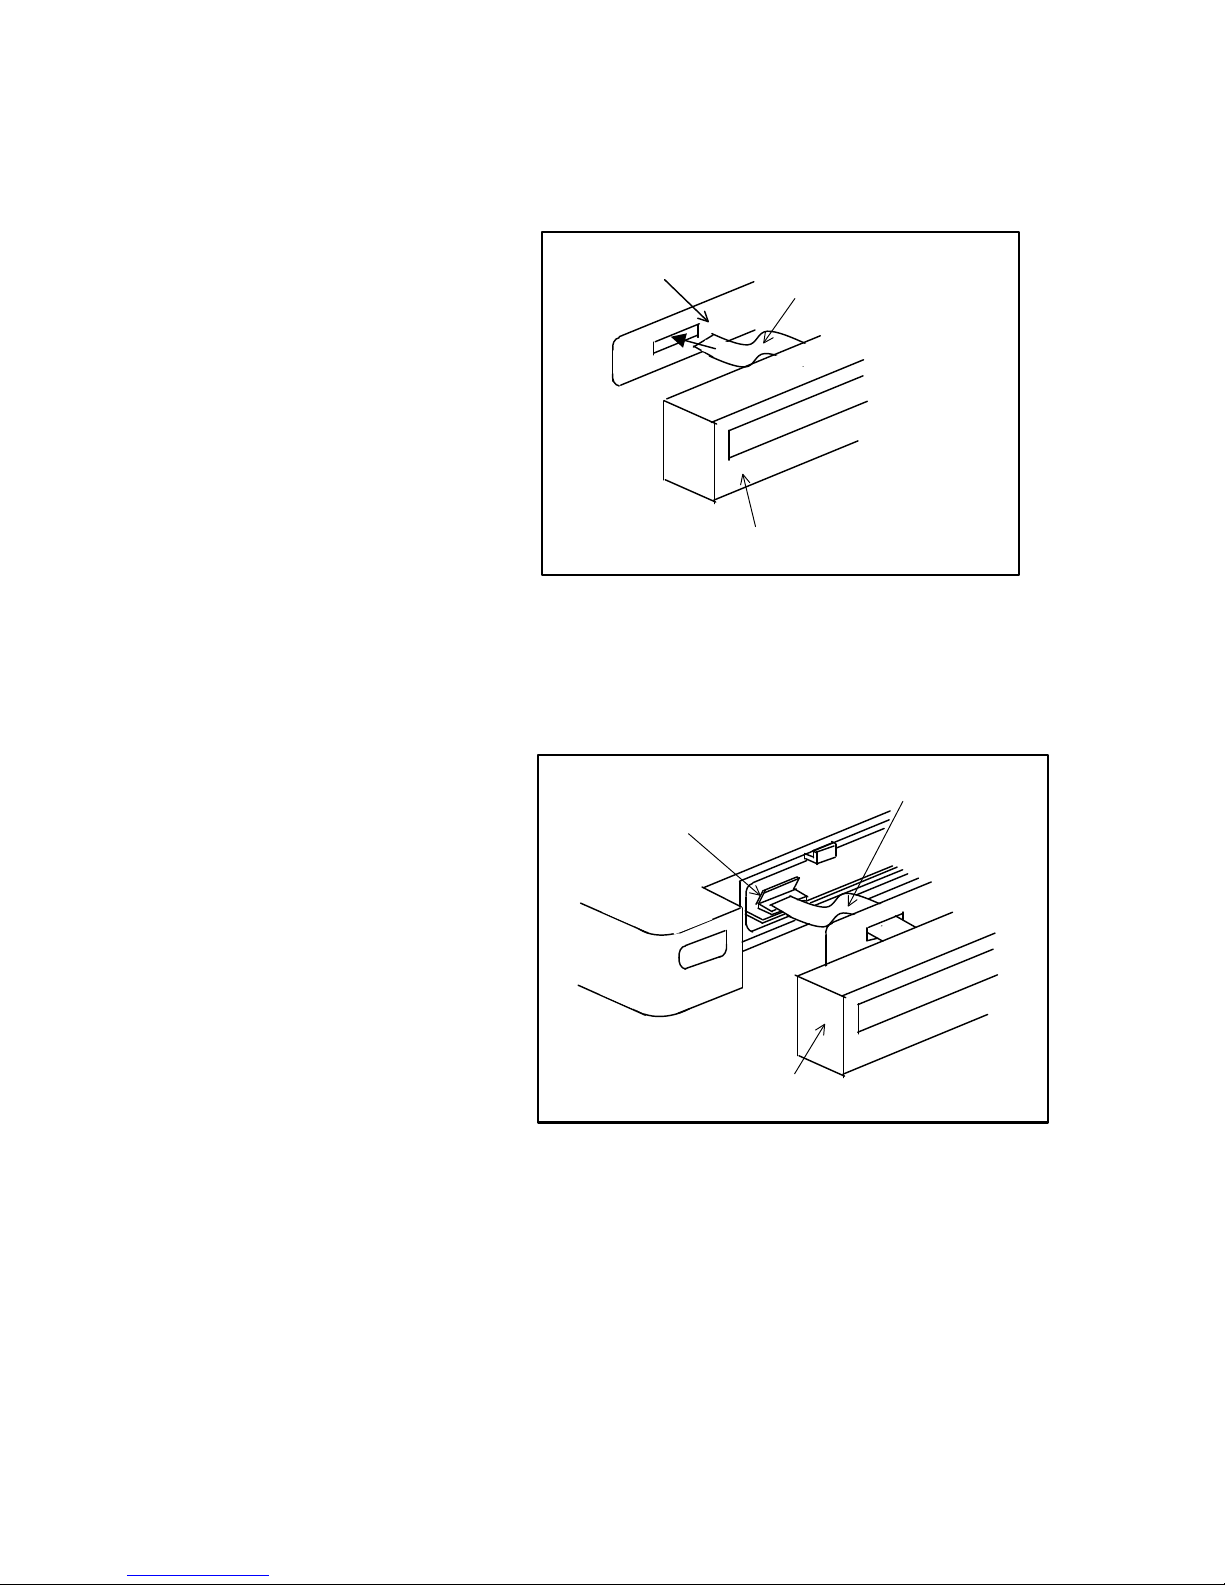
(2) Mounting the UI Pad
(a) Remove the front panel from the instrument.
Front panel
(b) Remove the metal lid from the instrument.
Meal cover
2.5.5
2 - 17
Page 30
2.5 Assembly
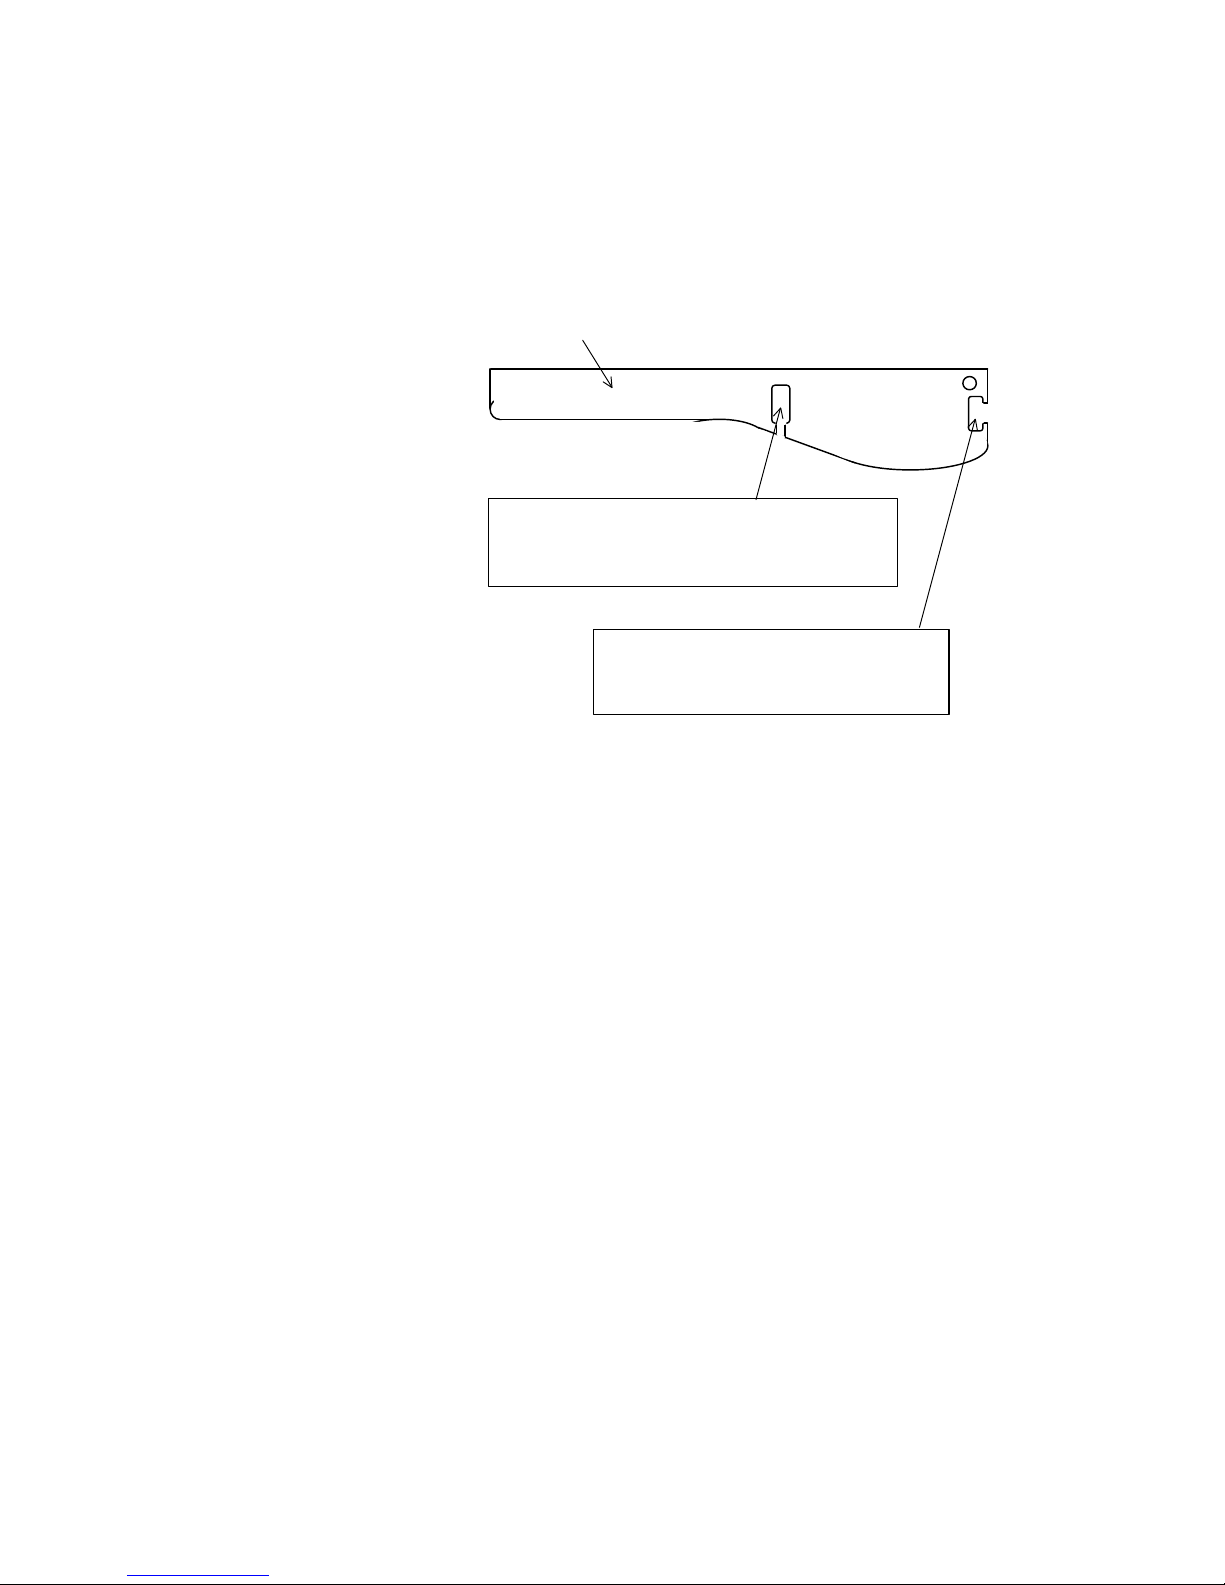
(c) Run the flexible tube of the UI pad through the metal
lid.
Metal cover
Flexible tube
UI pad
(d) Turn up the lid of the connector, and insert the flexible
tube of the UI pad as far as it will go.
Connector
Flexible tube
UI pad
2 - 18
Page 31

2.5.5
(e) Turn down the connector lid, and mount the UI pad.
Connector
Flexible tube
UI pad
(f) Attach the metal lid dedicated for the UI pad.
Flexible tube
Metal cover
UI pad
2 - 19
Page 32

2.5 Assembly
(g) Set the of the UI pad to the of the instrument.
Tab
UI pad
(h) Mount the front panel dedicated for the UI pad on the
instrument.
Front panel
2 - 20
Page 33

2.5.6
2.5.6 Instrument-toInstrument
Fastening
The wiring cover is provided on the rear of each instrument.
Instrument-to-instrument fastening can be made by shifting each
wiring cover as shown below.
(1) Remove the retaining screws, and detach the wiring cover.
Wiring cover
Retaining
screw
(2) Shift the mounting position of each wiring cover.
Wiring cover
Retaining
screw
2 - 21
Page 34

1
3.1 The Instrument Keypad
3.1.1 Name and
Function of Each
Part
LED
Main switch
3. FUNCTION
Right door
Drain Valve
Main switch : Turns on/off power supply.
•
Doors : Two doors are provided.
•
Drain Valve : This valve is opened for purging the system.
•
Leak sensor : Detects fluid leakage.
•
UI-PAD : A keypad required for operating the pump
•
LED : There are 4 LEDs, and each LED lights in a
•
A (green, orange) Green : POWER ON as the pump A
B (green, orange) Green : POWER ON as the pump B
PURGE (green) Green : Under purge
PROG. RUN (green) Green : Under the time program
Left door
Drain
Leak sensor
Fig. 3-1 Front View
independently (available at option).
specific color for the determined indication.
Name (color) LED Status
Orange : Pump A error
Orange : Pump B error
running
3 -
Page 35

2
3.1.1
Wiring covers
Ground terminals
Pump can start by an
external signal.
I/F board mounting
space
Pump can stop by an
external signal.
Pressure value is output
to the exterior (Approx.
49 MPa)/1 V.
Wiring covers
Fig. 3-2 Rear View
Wiring covers : Upon detaching the left-side cover (as
viewed from the front), the e-Line
connector used for connection between
L-2000 series units appears.
These wiring covers are also usable as
retaining plates for other units of the
L-2000 series.
Ground terminals : Three terminals for grounding the
instrument. I/F board mounting
IF board space : Space for mounting the I/F board required
for connecting the PC (data station) and
HPLC system.
3 -
Page 36

3
Contents of
CLOSE
1 s CLOSE
OPEN
Classification
Output
Input
Table 3-1 Name and Function of Each Terminal at Rear Panel
Name Function
TIMER
(1 to 4)
PRESS
OUT
PUMP
ON IN
PUMP
OFF IN
Contact
turns
on/off
according
to coded
setting in
EVENT of
the
program.
Pressure
value is
output to
the
exterior.
Pump ON
from
external
system.
Pump OFF
from
external
system.
Signal
• Timer
ON: CLOSE
OFF: OPEN
• Pulse
OPEN
0 to 1 V DC
OPEN ∗
50 ms
or longer
Contents of
Processing
The ON/OFF
signal can
output to
each TIMER by
specifying an
ON/OFF EVENT
code at a
desired time
of a time
program.
1-second
CLOSE signal
can output at
each TIMER by
specifying
pulse EVENT
code at a
desired time
of a time
program.
Maximum current connectable: 10 mA
• TIMER No. and Event code
TIMER
No.
•
Pump can be stopped by specifying
00 for EVENT, and buzzer can be
rung by specifying 92.
1) Becomes OFF when the pulse is
output in the ON status.
2) OFF has priority over ON.
3) Contact output specification of
each terminal
Voltage ... 30 V DC max.
Current ... 100 mA max.
• 1 V = Approx. 49 MPa
∗ Edge jugement
OFF ON
1 10 11 12
2 20 21 22
3 30 31 32
4 40 41 42
(Approx. 7106 psi)
Remarks
Signal
3.10
Pulse
3 -
Page 37

4
SET UP
PUMP
A B
C D
3.1.2 Part Name and
Function of UI
Pad (option)
PURGE
(1) Operation Keys
Each key on the UI pad (option) type operation panel is
explained here.
INSERT INITIAL
PROG GLP UTLTY
START
STOP
7 8 9 0 ESC
4 5 6
1 2 3
MANUAL
CL ENT
LOCK OFF
DEL
PUMP
ON/OFF
PURGE Starts/stops purging the flow path.
UTLTY
/
SET UP
GLP Used for confidence-level reporting.
PROG Selects, generates, edits, or deletes a pump program.
, Scroll up and down display.
START Starts the time program. You can activate the start key
STOP Stops the time program.
MANUAL Used for manual operation selection display and
ESC
/
LOCK
OFF
A,B,C,D If you are in manual status and you press the [A]
INITIAL Puts the systems to the initial setting of program
Starts/stops operation of the pump. Pressing this key
starts the pump.
Then, pressing it again stops the pump.
For specifying a purging flow rate, use the UTILITY
function.
The upper pressure limit (PRESS MAX) is set at 2.9
MPa (30 kgf/cm2), and the lower pressure limit
(PRESS MIN) is set at 0 MPa (0 kgf/cm2).
Pressing this key again stops the purging operation.
1.Used to display/set up auxiliary function conditions
(UTILITY).
• Pressure zero-point correction
• Purge flow rate setting
• Pressure unit assignment
2.For pump mode selection.
The low-pressure gradient mode, high-pressure
gradient mode, and single-liquid feed mode are
available (SET UP).
only when the pump is at the initial mode.
setting (mobile phase mixing ratio, FLOW, P-MAX, PMIN, %B, %C, %D).
1. Pressing this key brings you from the numeric value
input state (input state in each mode) back to the
MONITOR screen.
2. For key unlocking.
key %A is set immediately to 100. [B], [C], and [D]
keys provide the same function.
whose no. is selected by [PROG] key (time program: 0
minutes)
3 -
Page 38

5
CL Used for erasure of data under input. Also usable for
DEL Used for deleting a step in a sequential program.
ENT Inputs a numeral.
erasure of an error message at occurrence of an error.
NOTE: If a mistake is made during operation, press the
ESC key. In almost all cases, the initial status
returns when pressing this key.
(2) Monitor Screen
The UI pad is provided with an LCD monitor on which
instrument status can be indicated. The screen which
indicates instrument status is called a monitor screen.
Operation method of the monitor screen and example
indications on it are shown below.
(a) 1st monitor screen
This screen mainly indicates information about the
pump main frame.
TIME %A %B %C %D FLOW P RESS [ --]
0.0 100 0 0 0 0.000 0.0 1
Indication Description
TIME
%A
%B
%C
%D
FLOW
PRESS
[--]
Elapsed time of analytical program execution
Mixing ratio of liquid A
Mixing ratio of liquid B
Mixing ratio of liquid C
Mixing ratio of liquid D
Pump flow rate
Pump pressure
Pump status indication
Since two-liquid low-pressure gradient operation is performed in
this system, %C and %D are always zero.
The status indications at the upper right of the
MONITOR screen are as follows:
[GR] The gradient program is in execution.
3 -
Page 39

6
[IN] Waiting for execution of analysis. A liquid is being fed.
[--] Waiting for execution of analysis. The pump is being
stopped.
[MN] The MANUAL mode is selected.
[PG] The purging operation is under execution.
[LK] The keyboard of the operation panel is locked.
(b) 2nd monitor screen
P-UNIT P.MAX P.MIN [--]
MPa 20.0 0.0 1
Indication Description
P-UNIT Indicates a unit of pressure. In this system, MPa is
P. MAX Indicates a specified upper limit of pressure. If
P. MIN Indicates a specified lower limit of pressure. If
indicated.
pressure exceeds the specified upper limit, the pump
is forced to stop.
pressure decreases below the specified lower limit,
the pump is forced to stop.
(c) 3rd monitor screen
EVENT 1 2 3 4 PUMP FLUSH [--]
OFF OFF OFF OFF A(Micro) OFF 1
Indication Description
EVENT Indicates a state of the EVENT terminals 1 to 4. ‘ON’
PUMP Indicates a pump station number. In pump station
FLUSH Always indicated as ‘OFF’ in this system.
represents that the contact is closed, and ‘OFF’
represents that the contact is open.
number assignment, PUMP A, PUMP B or PUMP C
can be specified.
3 -
Page 40

7
(c) Changeover of monitor screen
The monitor screen transition is as follows. If the link program
function is OFF, the 4th monitor screen will not appear.
1) 1st MONITOR screen
TIME %A %B %C %D FLOW PRESS [--]
0.0 100 0 0 0 0.000 0.0 1
2) 2nd MONITOR screen
P-UNIT P.MAX P.MIN [ --]
MPa 20.0 0.0 1
3) 3rd MONITOR screen
EVENT 1 2 3 4 PUMP FLUSH [--]
OFF OFF OFF OFF A (Micro) OFF 1
4) 4th MONITOR screen
LINK PROG STEP CYCLE [ --]
O N 1 1/99 1
or
ESCAPE
3 -
Page 41

8
3.2 Operation Status
Fig. 3-3 is a flow chart that shows the transition of operational
status. ( indicates depression of a key.)
<Turning on power>
(does not function unless the pump is on)
START/STOP
INITIAL
INIT
START/STOP
MANUAL
SET
MANUAL
RUN
MANUAL
SET
INITIAL : Programming mode status in which
system waits for start.
MANUAL : Operation is made under constant
conditions without using program.
RUN : Gradient mode is executed.
Fig. 3-3 Operational Status Transition
3 -
Page 42

9
3.3 Specifications
(1) L-2100
(a) Liquid feed system:
Dual plunger type reciprocating pump( Tandem Type)
(b) Maximum operating pressure:
39.2 MPa
(c) Flow rate range
0.001 to 2.499 mL/min
(d) Pressure limit range
0 - 39.2 MPa
(e) Delivery volume of No.1 plunger stroke
25 uL/stroke
(f) Flow accuracy (at constant room temperature of
20 for water)
+/- 2 uL/min (0.005 - 0.050 mL/min, 1.0 - 39.2 MPa)
+/- 2 % (0.051 – 2.000 mL/min, 1.0 - 39.2 MPa)
+/- 4 % (2.000 - 2.499 mL/min, 1.0 - 39.2 MPa)
(g) Flow precision
0.075% RSD or 0.02min SD, whichever is greater,
based on retention time using L-2200 autosampler
(Flow 0.2 mL/min at constant room temperature of
20 for water )
(h) Pressure display accuracy
+/- 5%
(i) Constant pressure liquid feed
2.0 to 39.2 MPa (Flow range 0 to 1.25 mL/min)
(j) Material of wetted parts
SUS 316, ruby, sapphire, ceramic, PTFE,
carbon-impregnated PTFE
(k) Display data using UI-Pad (Option):
Parameters
Gradient monitor Elapsed time, mixing ratio, flow rate,
pressure, timer value, etc.
(l) Pump control mode:
Single-Liquid delivery mode
Low pressure gradient mode
High pressure gradient mode
(m) Contact input/output terminals:
Event timer; 4 channels
(n) Communication:
e-Line
OUTPUT: BUSY
INPUT: 1) GRADIENT START IN
2) ERROR IN
(o)Pressure zero adjustment:
3 -
Page 43

Possible
(p) Ambient temperature :
4 to 35°C (condensation unallowable)
(q) Humidity:
45 to 85% RH
(r) Power supply:
24V DC, 21.A
(s) Dimensions:
260(W) × 500(D) × 235(H) mm
(t) Weight:
About 15 kg
(2) L-2130
(a) Liquid feed system:
Dual plunger type reciprocating pump( Tandem Type)
(b) Maximum operating pressure:
39.2 MPa
(c) Flow rate range
0.001 to 9.999 mL/min
(d) Pressure limit range
0 - 39.2 MPa
(e) Delivery volume of No.1 plunger stroke
25 uL/stroke
(f) Flow accuracy (at constant room temperature of
20 for water)
+/- 2 uL/min (0.01 - 0.10 mL/min, 1.0 - 39.2 MPa)
+/- 2 % (0.101 – 5.000 mL/min, 1.0 - 39.2 MPa)
+/- 2 % (5.001 – 8.000 mL/min, 1.0 – 19.6 MPa)
+/- 4 % (8.001 - 9.999 mL/min, 2.0 – 19.6 MPa)
(g) Flow precision
0.075% RSD or 0.02min SD, whichever is greater,
based on retention time using L-2200 autosampler
(Flow 1.0mL/min at constant room temperature of
20 for water )
(h) Pressure display accuracy
+/- 5%
(i) Constant pressure liquid feed
2.0 to 39.2 MPa (Flow range 0 to 5.0 mL/min)
(j) Material of wetted parts
SUS 316, ruby, sapphire, ceramic, PTFE,
carbon-impregnated PTFE
(k) Display data using UI-Pad (Option):
Parameters
Gradient monitor Elapsed time, mixing ratio, flow rate,
pressure, timer value, etc.
3 - 10
Page 44

(l) Pump control mode:
Single-Liquid delivery mode
Low pressure gradient mode
High pressure gradient mode
(m) Contact input/output terminals:
Event timer; 4 channels
(n) Communication:
e-Line
OUTPUT: BUSY
INPUT: 1) GRADIENT START IN
2) ERROR IN
(o)Pressure zero adjustment:
Possible
(p) Ambient temperature :
4 to 35°C (condensation unallowable)
(q) Humidity:
45 to 85% RH
(r) Power supply:
24V DC, 21.A
(s) Dimensions:
260(W) × 500(D) × 235(H) mm
(t) Weight:
About 15 kg
3 - 11
Page 45

1
4. OPERATION
The method of pump operation using the optional UI pad is
described here.
4.1 Preparatory Operations
Explained here is the operating method for using the L-2130
pump.
4.1.1 Setting of Pump Mode
This section shows how to set the pump in the single-liquid
delivery mode (FLOW mode).
NOTICE: Once this setting is made, it is memorized and need not
be made each time.
<POWER ON> + [(SETUP) UTILITY]
When pressing the [POWER] and [(SETUP) UTILITY]
keys simultaneously, the pump mode setting screen
appears. It may be necessary to continue pressing
[(SETUP) UTILITY] until the setting screen appears.
SETUP PUMP MODE CONTRAST S.NO.
A LOW 4 02AB-111
[ENTER]
SETUP ITEMS PUMP=1 CONTRAST =2
[1][ENTER]
PUMP A=1 B=2
[1][ENTER]
4 -
Page 46

2
GR MODE LOW HIGH V. HIGH
4 FLOW 4
[4][ENTER] LOW: Low pressure gradient mode
HIGH: High pressure gradient mode
V.HIGH: High pressure gradient with
solenoid valves mode
SETUP PUMP MODE CONTRAST S.NO.
A FLOW 4 02AB-111
FLOW: Isocratic mode
<POWER OFF>
Turn the power off once.
<POWER ON>
Turn the power on again.
TIME FLOW PRESS [ ]
0.0 1.000 0.0 1
4 -
Page 47

3
4.1.2 Programming Operation
This section discusses the programming of the FLOW mode.
An example is given where upper pressure limit is 20.0 MPa,
lower pressure limit is 0 MPa, analysis time is 0 min, flow rate is
1.0 mL/ min.
PROGRAM No. = 1
PRESSURE VALUE : MAX MIN MPa
TIME FLOW EVENT
(min) (ml/min) 1 2 3 4
0.0 1.000 12 22 32 42
Monitor screen
If manual setting screen is displayed, press INITIAL to
obtain the programming mode.
PROG
Program generation is started.
SET PROGRAM: No. [--]
<1-9> 1
Input program No. Valid program numbers are from 1 to
9.
MODIFY=0, NEW=1 [--]
0
Generates a new program or modifies an existing
program.
20.0 0.0
4 -
Page 48

4
PRESSURE: MAX MIN [--]
20.0 0.0 1
Input the upper and lower limit pressure values.
TIME FLOW EVENT [--]
0.0 1.000 1
Input time, flow rate and event. Up to 4 entries can be
made per step for event. Input an event to be
executed within the entered time.
TIME FLOW EVENT [--]
1
A new input screen will appear, so enter time, flow
rate and event.
[ ESCAPE ]
Monitor screen
NOTICE: A maximum of 99 steps can be entered for program
Nos. 1 to 9.
NOTICE: The entered program is saved. When power is turned on
next time, the initial screen (TIME=0) of the program used just before
power was turned off will appear.
4 -
Page 49

5
when power is turned off. Conditions must be set each time power
4.1.3 Manual Operation
This is used for supplying liquid under constant conditions
without using a program.
(1)Constant Flow Rate Mode
This section explains the setting of liquid delivery system at
constant flow rate. An example is given where flow rate at 1.0
mL/min, upper pressure limit at 15.0 MPa and lower pressure
limit at 0 MPa.
Monitor screen
MANUAL
MANUAL: FLOW=1, PRESS=2 [MN]
CONSTANT FLOW: FLOW MAX MIN [MN]
CONSTANT FLOW: FLOW PRESS [MN]
Monitor screen
NOTICE: The set conditions for manual operation will be erased
1
Select the constant flow rate mode.
1.000 15.0 0.0
Input the flow rate, and the upper and lower limit pressure
values.
0.000 0.0
The monitor screen will apper.
is turned on.
4 -
Page 50

6
power is turned off. Conditions must be set each time power is turned
(2)Constant Pressure Mode
This section explains the setting of liquid delivery system at
constant pressure. An example is given where initial flow rate is
1.0 mL/min, at a pressure of 15.0 MPa.
Monitor screen
MANUAL
MANUAL: FLOW=1, PRESS=2 [MN]
2
Select the constant pressure mode.
CONSTANT PRESS: INITIAL FLOW PRESS [MN]
1.000 15.0
Input the flow rate, and the pressure values.
CONSTANT FLOW: FLOW PRESS [MN]
0.000 0.0
The monitor screen will apper.
Monitor screen
Before stating the pump, check that the pressure level is 0 Mpa.
NOTICE: The liquid delivery will not start unless the starting pressure
is 0 MPa
NOTICE:
The set conditions for manual operation will be erased when
on.
4 -
Page 51

7
4.2 Measuring Operation
Ignition of Flammable Chemicals!
Beware of ignition hazard when using flammable chemicals such
•
as organic solvents.
Always check the following conditions. If an abnormality is
•
found, stop operation immediately.
Leakage of solvent or waste solution
•
Leakage of solvent inside the instrument
•
Inadequate ventilation of the laboratory room
•
This instrument is not explosion-proof. Although aqueous
•
solvents or organic solvents having an ignition point of 70°C or
higher are usable, do not use organic solvents having an ignition
point below 70°C.
When using flammable chemicals, be careful about possible
•
ignition due to static electricity. Particularly when using nonconductive chemicals, employ a conductive vessel made of metal
or the like and provide grounding connection correctly.
WARNING
WARNING
Explosion of Vapor from Flammable Chemicals!
If a flammable chemical such as organic solvent leaks from the
•
flow path of the instrument and its vapor concentration exceeds
the explosion limit, it may cause spontaneous combustion with
dangerously explosive results.
When using a flammable and readily volatile chemical, be sure to
•
check for leakage from the instrument flow path and ventilate the
laboratory room adequately.
4 -
Page 52

8
4.2.1 Basics of Operation
When the settings are all finished, carry out operation in the
following procedure.
(1) Make sure the pump, column, detector and data
processor are properly connected.
(2) Set the mobile phase and waste solution bottle in place.
(3) Start the pump and wait until the flow path is filled with
the mobile phase.
(4) Warm up the pump, column and detector and wait until
the baseline stabilizes.
(5) Inject a sample.
(6) When analysis is finished, turn the power off and dispose
of the waste solution.
NOTICE: Before connecting a new column, make sure the flow
path is filled with mobile phase so that air won’t enter the
column.
NOTICE: The whirring sound of the pump during operation
varies depending on such operating conditions as flow rate and
pressure. Although the whirring sound may become larger
anywhere in the high-pressure range, it is not a symptom of
abnormality.
4 -
Page 53

9
4.2.2 Analyzing Operation
(1) SET PROGRAM allows the generation of a maximum of 9 programs.
You can execute any of the programs selected or generated via the SET PROGRAM.
For a gradient analysis, implement the following procedure.
(a) Select [INITIAL] , and select or generate a program for eluent.
(b) Turn on each pump.
(c) Start the program.
(2) Contents of SET PROGRAM
For the SET PROGRAM, enter the upper limit pressure level, lower limit pressure
level, mixing ratio, flow rate, and event.
PROG No.=1
PRESSURE MAIN MAX MIN (MPa)
20.0 0
(a)
TIME FLOW EVENT
0.0 1.000
10.0 1.000 11 21 31 41
10.1 1.000
20.0 1.000
(b) 25.0 10 20 30 40
30.0 2.000
30.1 1.000
40.0 1.000 00 92
Fig. 3-4 Example of Program
(a) For EVENT, up to 4 event codes are settable at each time point. It is
possible to generate contact outputs at each EVENT terminal at the same
time. You can also obtain an internal action, such as a pump stop and the
ringing of a buzzer.
Example) EVENT= 1 - 1 - ENTER - 2 - 1 - ENTER
4 -
Page 54

3.9
(b) In case that an event setting is desired independent of FLOW , only the event
code showed be entered. Press ENTER to skip all the entries you do not
want until you reach event column.
In the SET PROGRAM mode, the interpolation of mixing ratio, flow rate, etc. that
occurs in a time program is as follows.
Parameter Flow Rate
Interpolation Linear
TN T
N+1
TN, T
: Preset time
N+1
NOTICE: For generating a stepwise gradient program, utilize T
- TN = 0.1.
N+1
4 - 10
Page 55

(1) New Generation of a Program
This section shows the generation of a new program.
SET PROG (SET PROG No.) ENTER
(MODIFY=0, NEW=1) 1 ENTER
(MAX) ENTER (MIN) ENTER
(TIME) Set time (Ti) ENTER
(FLOW) Set flow rate (Fi) ENTER
(EVENT) Event code (E1i) ENTER
Event code (E2i) ENTER
Event code (E3i) ENTER
Event code (E4i) ENTER
3 4
Upper limit pressure
level
5
6
7
7
7
7
8 Repeat steps 5 to 7 until you define all programs lines.
9 To terminate the program generation press [ESC]
2
1
No. of program to be
generated (m)
Lower limit pressure
level
4 - 11
Page 56

1 Program number can be from 1 to 9.
2 When you want to define a new program, enter 1.
As a result, you will delete the previous program.
For modifying the contents of program, enter 0.
3 If pump pressure rises beyond the level set here, the pump automatically stops.
4 If pump pressure falls below the level set here, the pump automatically stops.
5 The set time can be from 0.0 to 600.0.
6 Flow rate valid entries are from 0.00 to 2.499 (L-2100). Flow rate valid entries are
from 0.00 to 9.999 (L-2130).
7 Input the event code. At the set time point, you can stop the pump, generate an
audible signal, markers, timers, etc. When properly interfaced, these signals can
be output to an external system. No display will show on the screen unless an
event is set.
8 Repeat steps 5 to 7 until you complete the program and then press [ESC] .
9 Program generation will be terminated and the monitor screen will reappear.
For confirming the input conditions, check the parameters at each time point by using
keys.
4 - 12
Page 57

2) Deletion of Program
(
How to delete a program is shown next.
SET PROG (SET PROG No.)
ENTER (MODIFY=0, NEW=1) 1 ENTER ESCAPE
1
No. of program to be
deleted (m)
2 3
(3) Deletion of Step
How to delete one step in a program is shown next.
SET PROG (SET PROG No.)
1
ENTER (MODIFY=0, NEW=1) No. of program containing step to be
deleted (m)
2 3
0 ENTER (MAX) ENTER (MIN)
4 5 6 7
Lower limit pressure
level
ENTER DELETE ENTER ESCAPE
Upper limit pressure
level
4 - 13
Page 58

1 Program number can be from 1 to 9.
2 The contents of the existing program will be deleted.
3 The monitor screen reappears.
1 Program number can be from 1 to 9.
2 For editing, input 0. For generating a new program, input 1.
3 If pump pressure rises beyond the level set here, the pump automatically stops.
4 If pump pressure falls below the level set here, the pump automatically stops.
.
5 Press the key until the step you want to delete appears on the screen. If display
advances beyond that step, press the
key.
6 Press the [DEL] key when the cursor is on the TIME line want to delete.
7 To finish editing, press the [ESC] key. The display should then return to the
monitor screen.
4 - 14
Page 59

(4) Addition of Step
SET PROG (SET PROG No.) ENTER
(MODIFY=0, NEW=1) 0 ENTER
(MAX) ENTER (MIN) ENTER
(TIME) Time point of step added (Ti) ENTER
(FLOW) Set flow rate (Fi) ENTER
(EVENT) Event code (E1i) ENTER
Event code (E2i) ENTER
Event code (E3i) ENTER
Event code (E4i) ENTER
3 4
Upper limit pressure
level
5
6
7
7
7
7
2
1
No. of program for adding
a step (m)
Lower limit pressure
level
4 - 15
Page 60

1 Program number can be from 1 to 9.
2 For editing, input 0. For generating a new program, input 1.
3 If pump pressure rises beyond the level set here, the pump automatically stops.
.
4 If pump pressure falls below the level set here, the pump automatically stops. The
.
5 Input the time point of the step you want to add.
6 Flow rate valid entries are from 0.00 to 2.499 (L-2100). Flow rate valid entries are
from 0.00 to 9.999 (L-2130).
7 Input the event code. At the set time point, you can stop the pump, generate an
audible signal, markers, times, etc. When properly interfaced, these signals can be
output to an external system. No display will show on the screen unless an event is
set.
4 - 16
Page 61

(5) Correction of Step
Step correction method is explained here.
SET PROG (SET PROG No.)
1
ENTER No. of program containing step to be
deleted (m)
(MODIFY=0, NEW=1) 0 ENTER
(MAX) ENTER (MIN) ENTER
5
(TIME) Time point of step added (Ti) ENTER
(FLOW) Set flow rate (Fi) ENTER
(EVENT) Event code (E1i) ENTER
Event code (E2i) ENTER
Event code (E3i) ENTER
Event code (E4i) ENTER
3 4
Upper limit pressure
level
6
7
8
8
8
8
2
Lower limit pressure
level
4 - 17
Page 62

1 Program number can be from 1 to 9.
2 For correction, input 0. For generating a new program, input 1.
3 If pump pressure rises beyond the level set here, the pump automatically stops. ]
4 . If pump pressure falls below the level set here, the pump automatically stops.
5 Press the key until the step to be corrected appears on the screen. If the display
advances beyond that step, press the key.
6 When a correction is unnecessary, press the ENTER key only. The allowable
input range is 0.00 to 2.499.
7 When a correction is unnecessary, press the ENTER key. Valid flow is from 0.00
to 2.499(L-2100). Valid flow is from 0.00 to 9.999(L-2130).
8 Enter the event code. When a correction is unnecessary, press the ENTER key.
4 - 18
Page 63

(6) Deletion of Parameter
The parameter deletion method is shown next.
SET PROG (SET PROG No.)
ENTER No. of program containing parameter to
be deleted (m)
(MODIFY=0, NEW=1) 0 ENTER
(MAX) ENTER (MIN) ENTER
5 1 6 7
ENTER DELETE ENTER
3 4
Upper limit pressure
level
2
Lower limit pressure
level
4 - 19
Page 64

1 Program number can be from 1 to 9.
2 For correction, input 0. For generating program, input 1.
3 If pump pressure rises beyond the level set here, the pump automatically stops.
4 If pump pressure falls below the level set here, the pump automatically stops.
5 Press the key until the step to be corrected appears on the screen. If display
advances beyond that step, press the
key.
6 Move the cursor to the parameter to be deleted.
7 To delete the parameter, press the DELETE key and then press ENTER key.
4 - 20
Page 65

4.3 Setting of Utility Functions
Utility functions such as zero adjustment of pump pressure, selection of pump pressure unit
and column flushing are settable as follows.
4.3.1 Pressure Zero Adjustment
You do not need to perform a pressure zero adjustment every day. The zero point may
change due to a secular change of the pressure sensor, etc. Check the pressure zero point
once a month. If it has drifted, then stop the pump, open the drain valve and carry out the
following operation.
Monitor screen
UTLTY
UTILITY CONDITION=1 UNIT=2 FLUSH=
1 EVENT 4 LINK= OTHERS=6
Select CONDITION .
CONDITION SET Z-ADJ=1 MOTOR-CTRL=2
1 PURGE=3, CALIBRATION=4
Select Z-ADJ (PRESS ZERO ADJUST).
PRESS ZERO ADJUST: YES=1, NO=0 [--]
(OPEN DRAIN VALVE) 0
Open the drain valve, and then enter 1.
Monitor screen
PRESS indication becomes “0” and the pressure zero adjustment is finished.
4 - 21
Page 66

Pump Motor Control Method
4.3.2
Automatic flow rate control method (STANDARD) and constant flow rate control method
(FIX) are available as pump motor control methods.
Monitor screen
UTLTY
UTILITY CONDITION=1 UNIT=2 FLUSH=
EVENT 4 LINK= OTHERS=6
Select CONDITION .
CONDITION SET Z-ADJ=1 MOTOR-CTRL=2
2 PURGE=3, CALIBRATION=4
Select MOTOR-CTRL (MOTOR CONTROL).
MOTOR CONTROL: STANDARD=1, FIX=2 [--]
1
STANDARD
Monitor screen
MOTOR CONTROL is set to STANDARD.
FIX
FIX STEP AREA
<0, 30-300> 100
Enter a FIX STEP AREA.
Input range is 0, and from 30 to 300.
Monitor screen
NOTICE: Select “STANDARD” for Model L-2100/2130 pump.
4 - 22
Page 67

4.3.3 Purge Flow Rate
Set a flow rate when executing purge.
Monitor screen
UTLTY
UTILITY CONDITION=1 UNIT=2 FLUSH=
1 EVENT 4 LINK= OTHERS=6
Select CONDITION.
CONDITION SET Z-ADJ=1 MOTOR-CTRL=2
2 PURGE=3, CALIBRATION=4
Select PURGE.
PURGE FLOW: FLOW [--]
<0.001-2.499> 2.499
Enter a purge flow rate.
Monitor screen
Pressing the Purge key in PUMP ON status activates purging at the set flow rate. Pressing
the Purge key again during purge will reset the purge function. During purge, the upper
pressure limit is set at 2.9 MPa (30 kgf/cm2) and the lower pressure limit at
0 MPa (0 kgf/cm2).
4 - 23
Page 68

4.3.4 Flow Calibration
Set a parameter of flow rate calibration.
Monitor screen
UTLTY
UTILITY CONDITION=1 UNIT=2 FLUSH=
1 EVENT 4 LINK= OTHERS=6
Select CONDITION.
CONDITION SET Z-ADJ=1 MOTOR-CTRL=2
4 PURGE=3, CALIBRATION=4
Select CALIBRATION.
CALIBRATION FLOW=1PRESS=2
Select FLOW.
FLOW CALIB. 0.97 – 1.03
1.000
Enter a parameter o flow rate calibration
Monitor screen
.
4 - 24
Page 69

4.3.5 Pressure Calibration
Set a parameter of pressure calibration.
Monitor screen
UTLTY
UTILITY CONDITION=1 UNIT=2 FLUSH=
EVENT 4 LINK=5 OTHERS=6
Select CONDITION.
CONDITION SET Z-ADJ=1 MOTOR-CTRL=2
4 PURGE=3, CALIBRATION=4
Select CALIBRATION.
CALIBRATION FLOW=1PRESS=2
2
Select PRESS.
FLOW CALIB. 0.900 – 1.100
1.000
Enter a parameter of pressure calibration
Monitor screen
.
4 - 25
Page 70

4.3.6 Pressure Unit
Pump pressure unit is selectable from bar, psi, kgf/cm2 and MPa.
Monitor screen
UTLTY
UTILITY CONDITION=1 UNIT=2 FLUSH=
2 EVENT 4 LINK= OTHERS=6
Select UNIT.
PRESS UNIT: <bar=1, psi=2, kgf/cm2=3, [--]
<1-4> 1 MPa=4>
Select pressure unit.
Monitor screen
Pressure indication unit is set to selected one.
The set pressure unit is retained in memory even after turning off power supply. The
relationship among selectable pressure units is listed below.
bar psi kgf/cm
2
MPa
10.0 145 10.2 1.00
4 - 26
Page 71

4.3.7 Column Flushing
Automatic pump stop and/or column flushing after completion of analysis is settable.
By setting for column flushing, the flushing will be done automatically after the end of
analysis. When a salt solution has been used for analysis, for example, elution of the salt
component can be prevented by flushing the column with water.
An example is given where the column is flushed for 30 minutes with 100% liquid C 15
minutes after the end of analysis.
Monitor screen
UTLTY
UTILITY CONDITION=1 UNIT=2 FLUSH=
4 EVENT 4 LINK= OTHERS=6
Select FLUSH.
PUMP AUTO STOP: YES=1, NO=0 [--]
1
Select YES (PUMP AUTO STOP).
COLUMN FLUSH: YES=1, NO=0 [--]
0
[YES]
SET DELAY TIME: TIME (min) [--]
<1.0-600.0> 600.0
Input the time point of pump stop after completion of
analysis.
Monitor screen
4 - 27
Page 72

FLUSH MODE: PARAM.=1, PROG.(NO.9)=2 [--]
1
Enter “1” for column flushing under constant conditions, or “2” for column flushing
using a gradient.
[PARAM]
SET DELAY TIME: TIME (min) [--]
<1.0-600.0> 600.0
Input the time period from the end of analysis to the
start of column flushing.
COLUMN FLUSH: FLOW [--]
1.000
Input column flushing conditions (flow rate).
FLUSHING TIME: TIME (min) [--]
<1.0-600.0> 30.0
Column flushing time can be input within 1.0 to 600.0
min.
Monitor screen
[NO]
Monitor screen
When the time for column flushing arrives, the flushing is
executed according to No.9 program.
NOTICE: The program for column flushing is fixed at No. 9.
Upon selecting column flushing, program No. 9 is
automatically set for flushing.
When column flushing is set, program No. 9 is not
usable as a gradient program. But program No. 9 is
usable with a link program.
The pump is stopped automatically when program
No. 9 ends.
4 - 28
Page 73

Following is the relation between delay time and column flush.
Analysis 1
Analysis 2
Analysis 3
Analysis n
∗
Analysis 1
Analysis 2
Analysis 3
Analysis n
∗
Analysis 1
Analysis 2
Analysis 3
Analysis n
∗
Delay time Column flush
Gradient end
(1) With AUTO STOP at YES
(a) When YES is selected for COLUMN FLUSH
Stabilizing time
“n” indicates number of analyses specified with autosampler, etc.
∗
Stabilizing time is the time from the end of one analysis until the start of the
next analysis.
Column flushing starts when delay time has ended.
(b) When NO is selected for COLUMN FLUSH
Stabilizing time
“n” indicates number of analyses specified with autosampler, etc.
∗
Stabilizing time is the time from the end of one analysis until the start of the
next analysis. The pump stops when delay time has ended.
(2) With AUTO STOP at NO
“n” indicates number of analyses specified with autosampler, etc.
∗
Stabilizing time
The pump remains in liquid delivery status.
Delay time COLUMN FLUSH
Pump stop
Pump stop
Delay time
Pump remains in
liquid delivery status.
4 - 29
Page 74

4.3.8 Event Signal Code
The event should be executed manually. The event function works upon input of an event
code. It is used for starting an external device, for stopping the pump, for sounding the
buzzer, etc.
Also, if a pressure limiter error occurs, a signal can be output at event code No. 4.
Monitor screen
UTLTY
UTILITY CONDITION=1 UNIT=2 FLUSH=
4 EVENT 4 LINK= OTHERS=6
Select EVENT.
EVENT SET: PRESS LIMIT=1, EVENT CODE=2, [--]
1
[PRESS LIMIT]
PRESS LIMIT: NONE=0, PULSE=1, LEVEL=2 [--]
<0-2> 1 (EVENT NO. 4)
Enter the desired code. If a pressure limit error is
detected, an event signal is output at EVENT No. 4.
Monitor screen
SET EVENT CODE: [--]
<0-92>
Input event code.
Monitor screen
4 - 30
Page 75

Event codes and related operations are explained below.
Contact
Contact
Signal
marker
Control Item Event Code Remarks
Timer
1
2
3
4
Action
10
20
30
40
opens.
Start
point
turns
off.
11
21
31
41
Start
point
closes.
Signal
turns on.
Open
12
22
32
42
1 s
Close
1st digit:
Timer no.
2nd digit:
Action pattern
Contact closes for 1 sec.
∗
∗
Pump 00 Pump stops
Buzzer 92 Buzzer sounds for 5 sec
4 - 31
Page 76

4.3.9 Error In Signal
Monitor screen
UTLTY
UTILITY CONDITION=1 UNIT=2 FLUSH=
6 EVENT 4 LINK= OTHERS=6
Select OTHERS.
OTHERS ERROR IN=1LEAK SENSOR =2
1
Select ERROR IN.
ERROR IN SIGNAL DISABLE=0PUMP OFF=1
1
DISABLE: The pump is not used ERROR signal to stop the unit in e-Line
PUMP OFF: The pump stops the flow when it received the ERROR signal
Monitor screen
in e-Line
4 - 32
Page 77

4.3.10 Leak Sensor
Monitor screen
UTLTY
UTILITY CONDITION=1 UNIT=2 FLUSH=
6 EVENT 4 LINK= OTHERS=6
Select OTHERS.
OTHERS ERROR IN=1LEAK SENSOR =2
2
Select LEAK SENSOR.
LEAK SENSOR OFF=0 ON=1
0
Select “ON” for using the leak sensor or “OFF” for avoiding its
use
Monitor screen
4 - 33
Page 78

4.4 Setting of GLP Functions
Explained here are the confidence functions such as logbook display and resetteng.
4.4.1 Logbook
Logbook can be displayed or reset.
(1) Logbook Display
Logbook can be displayed in the following procedure.
Monitor screen
GLP
GLP: LOGBOOK=1, PRESS M.=2, [--]
1 KEY LOCK=3
Select LOGBOOK
LOG BOOK: REPORT=1, RESET=2, [--]
1
Select REPORT for displaying logbook or RESET for resetting the logbook.
REOPORT
LOGBOOK/REPORT [--]
SOLVENT=99999 1 (2 25 2002)
Total flow after replacement of the pump seal will be
displayed. Pump seal replacement date (month, day,
year) is indicated in parentheses.
ESC
Monitor screen
4 - 34
Page 79

RESET
LOGBOOK/RESET: [--]
(MM, DD, YYYY) 2 25 2002
Logbook is reset.
NOTICE: Input the date of pump seal replacement.
Input is allowed in the order of month (M),
day (D) and year (Y).
Upon resetting, total flow value is reduced to
0 and the integration of flow starts. Unless
the ENTER key is pressed after entry of
all date values, resetting does not become
effective.
Even when the year is the same as the
displayed one, you should enter all values
and then press the ENTER key.
Monitor screen
4 - 35
Page 80

4.4.2 Pressure Monitor
The number of double-speed section errors in each measurement can be indicated.
A double-speed section error indicates that the pressure did not return to the reference level
(previous pressure) even after double-speed control (an increase of pump motor speed) was
effected to compensate for a pressure drop. This may be caused by formation of air
bubbles in the flow path.
Monitor screen
GLP`
GLP: LOGBOOK=1, PRESSURE M.=2, [--]
2 KEY LOCK=
Select PRESSURE M.
PRESSURE MONITOR [--]
9999 TIMES
Display the number of double-speed section errors.
ESC
Monitor screen
Resetting occurs on the following occasions.
On input of [PUMP ON] or [PUMP OFF]
•
On activation of contact
•
On start of gradient elution
•
On reception of start signal from integrator in D-line configuration
•
On external start of pump
•
On input of [PURGE ON] or [PURGE OFF]
•
4 - 36
Page 81

4.4.3 Key Lock
Keyboard keys can be locked.
Monitor screen
GLP
GLP: LOGBOOK=1, PRESSURE M.=2, [--]
3 KEY LOCK=3
Select KEY LOCK.
KEY LOCK: YES=1, NO=0
1
Locks the keys on the operation panel in order to prevent undesired key entries.
Monitor screen
(LOCK OFF)
ESC
Key lock can be released by the [ ESCAPE (LOCK OFF) ] key.
Monitor screen
3.8.3
4 - 37
Page 82

1
5. MAINTENANCE
5.1 Checking the Performance and Specifications
Performance checking method is explained here.
5.1.1 Items to be
Prepared for
Performance
Check
The following items are required for performance check.
(1) Component Units of Liquid Chromatography System
Pump (Hitachi L-2100/2130 or equivalent)
•
Detector (Hitachi L-2400 or equivalent)
•
Data processing unit
•
Waste liquid bottle
•
: If deaeration of detergent is inadequate, full
NOTE
performance may not be provided. In this
case, deaerate the detergent sufficiently of
connect it through a degasser.
(2) Items for Performance Check
Prepare the following items for performance check.
Load resistance coil
•
A coiled stainless tube with an inner diameter of
0.25 mm and a length of 10 m
60% methanol in about 1000 mL
•
A mixture of methanol 60% and distilled water 40% in
volume. This should be prepared separately.
Distilled water in about 500 mL
•
(3) Performance Check Parts Attached to Model L-2200
Autosampler
Standard sample
•
60% methanol solution of methylparaben
(Methylparaben 6 mg in methanol 60 mL + distilled
water 40 mL)
Sample vial, cap, septum
•
Standard rack
•
5 -
Page 83

2
(Injection valve)
Waste liquid
5.1 Checking the Performance and Specifications
5.1.2 Preparing the
System for
Operation
(1) Figure 5-1 shows how to connect the units for performance
check. According to this figure, carry out tubing.
Before energizing the system, ensure that the tubing
between the autosampler and pump/detector is properly
connected.
Detector (wavelength 250 nm, time constant 0.1 s)
Load resistance coil
stainless pipe 0.1 mm i.d. × 10 m long(L-2100)
stainless pipe 0.25 mm i.d. × 10 m long(L-2130)
Autosampler
bottle
(2) Connect the e-Line cable among the autosampler, detector
and pump.
(3) Check if the drain tube is properly connected to the waste
liquid bottle. The waste liquid bottle must be at a lower
position than the autosampler.
Pump
Waste liquid
bottle
(Syringe valve)
Eluent Detergent
Fig. 5-1 Flow Path Diagram
5 -
Page 84

3
5.1.2
(4) Prepare other units to be connected to the autosampler as
described in the respective instruction manuals.
(5) Put the drain tube from the detector into the exclusive
detector waste liquid bottle. If this tube is put into other
waste liquid bottle such as for the Model L-2200
autosampler, baseline fluctuation may be caused due to
unstable back pressure.
(6) After confirmation of the above steps, connect the eluent to
the pump, and the detergent to the autosampler. Be sure
to use the eluent and detergent of the same production lot.
(7) Start the pump to fill each flow path in the pump and
autosampler with liquid.
(8) After the eluent has reached the injection valve of
autosampler, turn on the autosampler power supply. If the
injection valve is switched over when no liquid is [INITIAL],
the valve seal may be damaged. To prevent this, be sure
to start the pump earlier.
The autosampler will go through the [INITIAL]ialization
sequence, and then the [INITIAL]ial screen will appear.
5 -
Page 85

4
5.1.3 Checking the
Flow rate
stability
(11) Set the pump flow rate to 0.2mL/min L-2100 .
Set the pump flow rate to 1.0mL/min L-2130.
(12) Set the detector wavelength to 250 nm. Set the detector
time constant to 0.1 s.
(13) Set the following conditions in the data processing unit.
SAMPLE PERIOD : 100 ms
STOP TIME : 3 min
Check the reproducibility of the injection volume in the following
procedure.
(1) Press the PROG key and set the following conditions.
TIME FLOW EVENT [--]
0.0 1.000 1
Setting can be completed by pressing the ESC key.
(2) Prepare 60% methanol for the eluent and detergent.
Wait until the pump, detector, etc. are warmed up and the
baseline stabilizes.
(3) Place a vial containing at least 1 mL of standard sample in
rack position No. 1 and set the rack in the autosampler.
(5) Press the START key of autosampler to start analysis.
The analysis is carried out 6 times. The operating
conditions during analysis are indicated on the display.
Ensure beforehand that the room temperature will not
change suddenly during analysis.
(6) Data Check
Determine the coefficient of variation (RSD) of peak area
by the following calculations.
n
xi
Mean value
Standard deviation
x
SD
1i∑=
=
n
n
∑
1i
=
=
2
)xxi(
−
1n
−
5 -
Page 86

5
RSD of variation
x
RSD
SD
(%)100×=
xi: Area value due to each injection,
n: Number of injections
Make sure the RSD value is 0.075% or less. However,
this value represents the reproducibility of not the pump
alone but the entire chromatographic system.
Therefore, the value varies with each stability of the
autosampler and detector, accuracy of the data processing
unit and its processing parameters.
5 -
Page 87

6
5.2 Periodic Maintenance
column will contaminate
sample is apt to remain
drift, but shortens the
Perform period maintenance and inspection according to Table 5-1. This prevents
problems and ensures that your system meets specifications.
Table 5-1 Period Maintenance and Inspection
Check Location Procedure Remarks
1. Small particles
(dust) are often
present in the
solvents.
Solvent
filter
2. The column is
expensive.
Wash the solvent filter
with an ultrasonic cleaner
every 4 months.
Clean the solvent bottle
every 2 days.
Ensure that you are using
the correct solvent when
refilling the solvent
bottle.
1) Do not stop the pump
just after completion
of an analysis!
The pump must be kept
running for 30
minutes after
completion of an
analysis.
2) Do not introduce a
sample containing
particles!
Ensure that the sample
contains no particles
or impurities.
3) Periodically clean
the column!
Components left in the
it.
Intrusion of particles
into the pump causes
increase and/or unstable
pressure and flow and
composition problems will
occur.
• Part of a complex
in the column.
This not only causes
poor stability or
column life.
• Particles present in
the sample plug the
column filters.
Pressure will increases
abnormally. Impurities
in the sample also
contaminate the column.
Impurities cause
erroneous data.
• Occasionally clean the
column by injecting a
large amount (1 to
3 mL) of solvent.
The injection of the
solvent will dissolve
the sample residues.
Cleaning of the column
insures good separation
and stability.
5 -
Page 88

7
Check Location Procedure Remarks
of the drain
main component of a
tion
fluctuations, a failure
3. The flow path
filter
valve is easily
contaminated.
Wash the filters with an
ultrasonic cleaner every
4 months.
The filters prevent
wornout fragments of the
pump seal from flowing
into the column. If the
filter is contaminated,
the pressure increases
abnormally.
4. The pump is the
high speed liquid
chromatograph.
1) The pump seal is a
consumable part!
Be sure to replace
the seals
periodically.
2) The high pressure
pump must be kept
clean!
Clean the pump every
month.
For cleaning, just
pass isopropanol
through the pump for
30 minutes.
3) The high pressure
pump does not func
properly when
there are bubbles.
Before exchanging the
solvent bottle or
adding solvent into
the bottle, be sure
to turn off the pump.
• Deterioration of the
seal causes leaks.
Leaks lead to poor
baseline stability and
data reproducibility.
The net result of leaks
is degradation of
reliability in
measurement.
• Contamination of the
check valve, which is
the critical part in a
high pressure pump,
causes pressure
in the pressure rise or
easy adhesion of air
bubbles.
• Air bubbles in the pump
cause pressure to
fluctuate or fail to
rise.
5 -
Page 89

8
5.4 Troubleshooting
NOTICE:
If the pump should become faulty, contact the dealer
from whom you purchased the pump. Repair must be left
to personnel who have undergone Hitachi HighTechnologies Corporation technical training since
potential hazards are involved.
5.4.1 Error Messages and Proper Measures
WARNING
Beware of Electric Shock!
Before removing the pump cover for parts replacement, etc., make
sure to turn OFF the power switch and disconnect the power cord
from the receptacle.
(1) If an abnormality occurs on the Model L-2130 pump, an
error message appears on the LCD (Liquid Crystal Display).
Error displays result from either the detection of a fault
during the self-diagnostics at power up (upon
[INITIAL]ialization), or from a problem which occurs
during operation.
Fig. 5-1 shows error detecting functions and the error
messages.
5 -
Page 90

9
Operation Function Error message
Power ON [INITIAL]ialization
ROM ERROR
RAM ERROR
EPROM ERROR
MOTOR [INITIAL]IALIZE
Power ON Pump operation
PRESSURE MAX LIMIT ERROR
PRESSURE MIN LIMIT ERROR
EXTERNAL STOP!
Error
generating
condition
NO
Error
generating
condition
NO
YES
ERROR
E-LINE ERROR
YES
Fig. 5-1 Error Generation and Error Messages
5 -
Page 91

(2) Each unit [INITIAL]ializes immediately after its power is
Upper pressure limit
Lower pressure limit
turned on. If a problem occurs, an error message displays
in the LCD. If a problem develops during an analysis, an
error message will also appear in the LCD. Use the CL
key to erase the error messages. Unless the cause of an
error is eliminated, the same error message will display
again.
For units other than the Model L-2100/2130, check the
corresponding instruction manuals.
Table 5-2 Model L-2130 Error Messages
No.
1 e-LINE ERROR Error in
2 ROM ERROR Contents of ROM are
3 RAM ERROR The result of RAM
4 EPROM ERROR Contents of EPROM
5 PRESSURE MAX LIMIT
6 PRESSURE MIN LIMIT
7 MOTOR
8 EXTERNAL STOP! The pump is stopped
Screen Display Contents of Error Measure
This error can be cleared
temporarily through the CL
key. Reconnection is not
possible until you turn the
power on in both the master
and the slave stations.
Turn the power off and then on
again. If the same error
occurs, notify the service
personnel.
Turn the power off and then on
again. If the same error
occurs, notify the service
personnel.
Turn the power off and then on
again. If the same error
occurs, notify the service
personnel.
Check the flow for leaks or
clogging.
Check the flow for leaks or
clogging.
Turn the power off and then on
again. If the same error
occurs, notify the service
personnel.
To clear the error message,
press the CL key.
ERROR
ERROR
[INITIAL]IALIZE
ERROR
communication via
the e-line
abnormal.
check is abnormal.
are abnormal.
exceeded (∗1)
exceeded
Motor rotation is
abnormal.
by the emergency
stop contact of
E-Line.
7.1
(∗1): PRESSURE MAX LIMIT ERROR also appears when the pressure exceed the
internal pressure limit. The limit is changed automatically related
to the flow rate. The internal pressure limit is 20 MPa for 0 to 15
mL/min, 15 MPa for 15.01 to 25 mL/min, and 12 MPa for 25.01 to 30
mL/min.
5 - 10
Page 92

5.4.2 Troubleshooting
Set the programming mode
setting of the other
Table 5-3 offers a guideline for the troubleshooting of the pump. Refer to this table
first, if a problem occurs.
Table 5-3 Model L-2100/2130 Troubleshooting
No.
1 Input mode cannot be
set by pressing
PROG key.
2 Pump does not start
when pressing the
PUMP ON/OFF key.
3 Gradient delivery
does not start when
pressing the
START/STOP key.
4 Purging cannot be set
or canceled by
pressing the PURGE
key.
5 After appearance of
the Initialization
screen when the power
switch has been
turned on, the E-Line
connection wait
screen remains on the
screen. The display
does not change over
to the monitor
screen.
Symptom Cause Measure
The monitor screen is
not in the programming
mode.
Flow is set at 0. Set the flow through the
1) Display is other
than the monitor
screen.
2) The programming mode
is not set.
Display is other than
the monitor screen.
Numerical input is
awaited.
1) The E-Line cable is
not connected.
2) In the E-Line
configuration, the
other unit connected
is not energized.
by pressing the
[INITIAL] key.
[PROG] of the MANUAL
function.
1) Call the monitor
screen by pressing
the ESCAPE key.
2) Set the programming
mode by pressing the
[INITIAL] key.
Call the monitor screen
by pressing the ESCAPE
key.
1) Connect the E-Line
cable.
2) Turn on the E-Line
unit.
NOTICE:
The whirring sound of the pump during operation varies
depending on such operating conditions as flow rate
and pressure. Although the whirring sound may become
larger anywhere in the high-pressure range, it is not
a symptom of abnormality.
5 - 11
Page 93

1
6. PARTS REPLACEMENT
(on discharge
6.1 Consumables and Spare Parts
The following table lists part numbers, names, shapes, specifications, etc. of replacement
parts. These parts are necessary to keep the system in optimum operation condition. Use
this when ordering parts. Normal life indicates the lifetime of the part when supplying
methanol at a rate of 1.0 mL/min and pressure of 19.6 MPa.
Part No.
890-1130 Seal for L-
655-1080 Seal for L-
885-2920 Seal
Name Shape and Specifications Position Used
2100
2130
Pump head 640h
Pump head 640h
Drain valve 1920h
Normal
Life
890-1128 Plunger for
L-2100
890-1125 Plunger for
L-2130
890-1206 Check valve
valve) for L2100
890-1205 Check valve
(on suction
valve) for L2100
Pump head —
Pump head —
Pump head
If check valve
doesn't work
properly, clean.
If this doesn't
solve the
problem, replace
the valve.
—
6 -
25 mm
Page 94

2
810-1005 Check valve
(on discharge
1/16 inch (1.57 mm)
1/16 inch (1.57 mm)
/16 inch (1.57 mm)
880-1345
valve) for L2130
810-1004 Check valve
(on suction
valve) for L2130
810-1031 Flow path
filter
810-1128 Packing
Discharge valve
Packing (B)
810-1344
Check valve
810-1325
Packing (A)
810-1345
Check valve
810-1325
Packing (A)
Valve holder
25 mm
Suction valve
Filter
638-1423
Packing
638-1422
Pump head
—
If check valve
doesn't work
properly, clean.
If this doesn't
solve the
problem, replace
the valve.
Drain valve 1920h
Drain valve 1000 L
6.2 Flow Path Tubing Parts
Part No. Name Shape and Specifications Position Used
L329235 SUS push screw
(M6)
11
655-1458 SUS push screw S
9.6
655-1459 SUS push screw M
13.5
M6
No. 10 32 UNF
No. 10 32 UNF
OD SUS pipe
OD SUS pipe,
Rheodyne injector
1
OD SUS pipe,
Rheodyne injector
6 -
Page 95

3
810-1310 PCTFE push screw
(3.2 ID)
810-1311 PCTFE push screw
(2.2 ID)
13.5
M8
M6
3 mm OD PTFE tube
2 mm OD PTFE tube
810-1312 PCTFE push screw
(2.1 ID)
638-1099 SUS ferrule
(SUS 316)
1/16 inch
L369053 PCTFE ferrule
1/16 inch
F275108 PTFE tube
14
No. 10 32 UNF
10.5
3.9
3.9
0.25 mm ID × 1.57 mm OD ×
10 m
2 mm OD PTFE tube
1/16 inch OD SUS
pipe
1/16 inch PTFE tube
Inlet tube for UV
detector
6 -
Page 96

4
(cont’d)
alve
Part No. Name Shape and Specifications Position Used
F275144 PTFE tube
0.33 mm ID × 1.57 mm OD ×
10 m
• Outlet tube for
UV detector
• UV detector back
pressure tube for
high pressure
gradient elution
Reaction coil for
•
reaction LC
F275112 PTFE tube
0.5 mm ID × 1.5 mm OD × 10 m • For tubing
connection with
reaction pump
• Inlet/outlet tube
for collecting
cell
F275114 PTFE tube
1.0 mm ID × 2.0 mm OD × 10 m
Connecting tube
between
proportioning v
and pump
638-1140 PTFE tube
634-1976 Stainless steel
pipe
1.5 mm ID × 3.0 mm OD × 10 m
0.25 mm ID × 1.57 mm OD ×
5 m
Solvent suction
tube for pump
• Pipe for high
pressure gradient
elution
• Pipe for between
injector and
column
634-1977 Stainless steel
pipe
638-2185 Stainless steel
pipe
633-1263 Nipple (made of
SUS)
0.5 mm ID × 1.57 mm OD ×
10 m
0.8 mm ID × 1.57 mm OD × 4 m
M6
Inlet/outlet pipe
for dynamic mixer
Internal pipe in
pump, drain pipe
1/16 - 1/16 pipe
M6
connection
885-1602 Nipple (made of
SUS)
No. 10
32 UNF
6 -
28
21.5
No. 10
32 UNF
Same as above
Page 97

5
(cont’d)
Part No. Name Shape and Specifications Position Used
885-1601 Nipple (made of
SUS)
885-2179 Nipple (made of
Daiflon)
M6
No. 10
32 UNF
No. 10
32 UNF
24
No. 10
32 UNF
21.5
Same as above
Same as above
6 -
Page 98

 Loading...