

Page 1
Instruction Manual
15.4”/19” Widescreen LCD TV With Intergrated Digital Tuner
HIT15WDVB
HIT19WDVB
GB
Page 2

Safety Warnings
SOME DO’S AND DON’TS ON THE SAFE USE OF EQUIPMENT
This equipment has been designed and manufactured to meet international safety standards but,
like any electrical equipment, care must be taken if you are to obtain the best results and safety
is to be assured.
-------------------------------------------------------------------------------------------------------------------------------
DO read the operating instructions before you attempt to use the equipment.
DO ensure that all electrical connections (including the mains plug, extension leads and inter-
connections between the pieces of equipment) are properly made and in accordance with the
manufacturer’s instructions. Switch off and withdraw the mains plug before making or changing
connections.
DO consult your dealer if you are ever in doubt about the installation, operation or safety of your
equipment.
-------------------------------------------------------------------------------------------------------------------------------
PreparationInstalling the LCD TVUsing The FeaturesTroubleshootingSpecifications
Introducing the LCD TV
DON’T remove any fixed cover as this may expose dangerous voltages.
DON’T obstruct the ventilation openings of the equipment with items such as newspapers,
tablecloths, curtains, etc. Overheating will cause damage and shorten the life of the equipment.
DON’T allow electrical equipment to be exposed to dripping or splashing, or objects filled with
liquids, such as vases, to be placed on the equipment.
DON’T place hot objects or naked flame sources such as lighted candles or nightlights on, or
close to equipment. High temperatures can melt plastic and lead to fires.
DON’T use equipment such as personal stereos or radios so that you are distracted from the
requirements of traffic safety.
DON’T listen to headphones at high volume, as such use can permanently damage your
hearing.
DON’T leave equipment switched on when it is unattended unless it is specifically stated that it is
designed for unattended operation. Switch off using the switch on the equipment and make sure
that your family knows how to do this. Special arrangements may need to be made for infirm or
handicapped people.
DON’T continue to operate the equipment if you are in any doubt about it working normally, or if
it is damaged in any way - switch off, withdraw the mains plug and consult your dealer.
ABOVE ALL
NEVER let anyone especially children push anything into holes, slots or any other opening in the
case - this could result in a fatal electric shock
NEVER guess or take chances with electrical equipment of any kind…it is better to be safe than
sorry!
Using The DTV Features
Note: This product is exclusively available through Dixons Stores Group. In the unlikely event of
a problem with your product please return to the store where your purchase was made.
1
Page 3

Preparation
Safety Warnings
Introducing the LCD TV
Installing the LCD TV
Using The Features
Using The DTV Features
Troubleshooting
Power Source
The TV set should be operated only from a
220-240 V AC, 50Hz outlet. Ensure that you
select the correct voltage setting for your
convenience.
Power Cord
Do not place the set, a piece of furniture, etc.
on the power cord (mains lead) or pinch the
cord. Handle the power cord by the plug. Do
not unplug the appliance by pulling from the
power cord and never touch the power cord
with wet hands as this could cause a shout
circuit or electric shock. Never make a knot in
the cord or tie it with other cords. The power
cords should be placed in such a way that they
are not likely to be stepped on. A damaged
power cord can cause fire or give you an
electric shock. When it is damaged and needs
to be replaced, it should be done by qualified
personnel.
Moisture and Water
Do not use this device in a humid and damp
place (avoid the bathroom, the sink in the
kitchen, and near the washing machine). Do
not expose this device to rain or water, as this
may be dangerous and do not place objects
filled with liquids, such as flower vases, on top.
Avoid from dripping or splashing.
If any solid object or liquid falls into the cabinet,
unplug the TV and have it checked by qualified
personnel before operating it any further.
Cleaning
Before cleaning, unplug the TV set from the wall
outlet. Do not use liquid or aerosol cleaners.
Use soft and dry cloth.
an electric heater. Ensure that no open flame
sources, such as lighted candles, are placed
on top of the TV. Batteries should not be
exposed to excessive heat such as sunshine,
fire or the like.
Lightning
In case of storm and lightning or when going
on holiday, disconnect the power cord from the
wall outlet.
Replacement Parts
When replacement parts are required, make
sure that the service technician has used
replacement parts, which are specified by the
manufacturer or have the same specifications
as the original one. Unauthorized substitutions
may result in fire, electrical shock or other
hazards.
Servicing
Please refer all servicing to qualified personnel.
Do not remove the cover yourself as this may
result in an electric shock.
Waste Disposal
Instructions for waste disposal:
z
Packaging and packaging aids are recyclable
and should principally be recycled. Packaging
materials, such as foil bags, must be kept away
from children.
z
Batteries, including those, which are heavy
metal-free, should not be disposed of with
household waste. Please dispose of used
battery in an environment friendly manner.
Find out about the legal regulations, which
apply in your area.
Ventilation
The slots and openings on the TV set are
intended for ventilation and to ensure reliable
operation. To prevent overheating, these
openings must not be blocked or covered in
anyway.
Specifications
Heat and Flames
The set should not be placed near to open
flames and sources of intense heat such as
2
z
The cold cathode fluorescent lamp in LCD
PANEL cotains a small amount of mercury;
please follow the local laws or regulations for
disposal.
Disconnecting the Device
The mains plug is used to disconnect TV set
from the mains and therefore it must remain
readily operable.
Page 4

Contents
Preparation .................................................................................................................................1
Safety Instructions ........................................................................................................................ 1
Chapter 1 Introducing The LCD TV ..................................................................................... 3
Package Contents ..................................................................................................................... 3
Setting Your LCD TV .................................................................................................................. 4
Your LCD TV ............................................................................................................................... 5
Remote Control...............................................................................................................................8
Chapter 2 Installing The LCD TV ...................................................................................... 10
Connecting a TV Cable or an Anterial ...................................................................................... 10
Connecting a DVD Player .................................................................................................... 14
Connecting a VCR & Video Camera ........................................................................................... 15
Connecting a TV Cable Box or Satellite Receiver ................................................................... 16
Connecting an Audio Receiver ............................................................................................ 17
HDMI ......................................................................................................................................... 18
PreparationInstalling the LCD TVUsing The FeaturesTroubleshootingSpecifications
Introducing the LCD TV
Chapter 3 Using The Features .............................................................................................19
Basic Operation ......................................................................................................................... 19
OSD Menu Operation ................................................................................................................ 20
The Video Settings ..................................................................................................................... 21
The Audio Settings ..................................................................................................................... 21
The Setup Settings .................................................................................................................... 22
The Preferences Settings .......................................................................................................... 23
The Screen Settings .................................................................................................................. 23
Chapter 4 Using The DTV Features ............................................................................... 24
Troubleshooting .................................................................................................................... 34
Specifications .................................................................................................................. 35
Using The DTV Features
3
Page 5
Preparation
Chapter 1 Introducing The LCD TV
Introducing the LCD TV
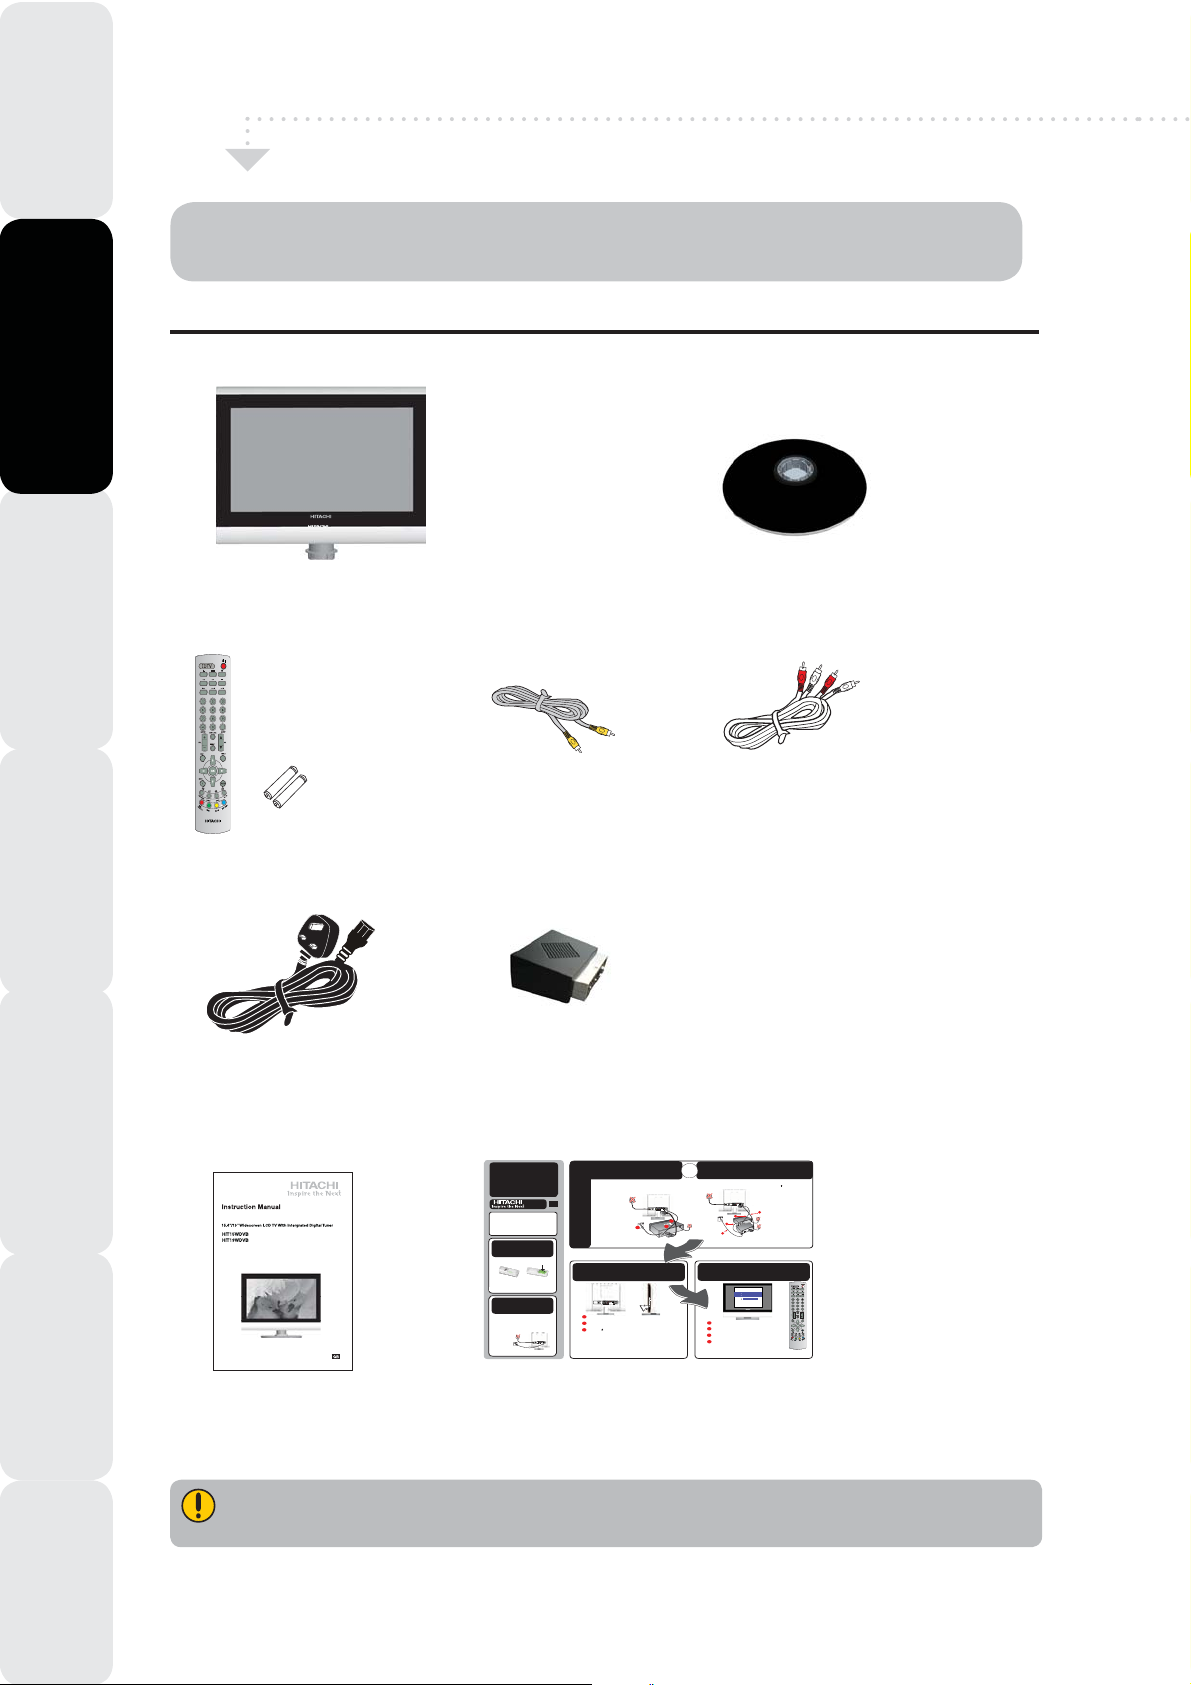
PACKAGE CONTENTS
; LCD TV
Installing the LCD TV
;Remote Control/
Using The Features Troubleshooting Specifications
Once you open the box, make sure all of the following contents are included. If you’re missing any
items, please contact your dealer.
;Bottom Stand
VIDEO Cable
AAA Batteries x 2
-
-
+
+
RCT-1522
( P.N.:845-045-LM9XB-THITH )
;
( P.N.:621-151-2000H ) ( P.N.:621-151-60002H )
; AUDIO Cable
Using The DTV Features
;Power Cord
;SCART Adapter
(P.N.: 412-SCA-0001H)
(For special and high quality SCART cable (with a bigger
(P.N.:600-151-5000-LJH)
;User’s Manual
( P.N.:002-U03-HITA-BH )
adapter head), please use the supplied SCART Adapter to
fit snugly into the SCART socket at the rare panel. )
; Quick Start Guide
Quick
Start
Guide
PLEASENOTE:
Byusing a SCART lead (not supplied) you can improve
thequality of playback and sound. Remember you must
stillhave the aerial lead (not supplied) connected. If you
areusing a SCART lead you should not have to tune
yourTV to your video, instead select the SCART channel
bypressing the TV/SCART button on the remote control.
Insert batteries into
Remote Control
1
Use 2 x AAA size batteries.
Connect aerial
2
Donot connect the TV to the mains supply until
youhave completed all the connections.
zIfyou just want
Connect one end of the aerial lead to the aerial
toconnect your
socket on the wall and the other end of the lead to
TVto an aerial
the appropriate socket on the back of your TV.
connect it as shown
Now go to stage 4.
opposite.
zIfyou want to
connectyour TV
toa VCR
go to stage 3a.
zIfyou want to
connectyour TV
toa VCR and
aSatellite/Cable
box then
go to stage 3b.
Connecting to a VCR
3a
HIT15WDVB
HIT19WDVB
GB
Other connections
4
A
B
C
VHF/UHF IN
AC IN 100-240V
AC POWER
50/60Hz
SWITCH
PCAUDIO IN
Donot connect the TV to the mains supply until you have completed all the connections.
A
If you have a SCART lead, connect one
end of the lead to the SCART socket on
your VCR and connect the other end to
theSCART socket marked SCART on the
back of your TV.
B
Connect one end of the RF
AC IN 100-240V
AC POWER
50/60Hz
SWITCH
lead to the aerial socket on
your TV and the other end to
the socket marked RFOUT
on the back of your VCR.
C
Connect your aerial lead
to the socket marked RF
IN on the back of your
C
VCR.
Nowgo to stage 4.
Switch on
VHF/UHF IN
VHF/UHF IN
AC IN 100-240V
AC POWER
AC IN 100-240V
AC POWER
50/60Hz
SWITCH
50/60Hz
SWITCH
PCAUDIO IN
PCAUDIO IN
Plug your TV and any other equipment that you have connected into the mains.
Press the ACSWITCH on the back of your TV to switch on your TV's power.
Then press the
screen.
Note:
z
z
INPUT
button on the right side view of your TV to switch on your TV. The screen will be blue
It is recommended to complete the VCR channel set up before the TV tuning process.
Connect your VCR to the TV and the antenna, then switch it on. Insert a pre-recorded tape and press
PLAY. This can help you to easily find the VCR channel as it will play the pre-recorded tape.
Before you start up the TV tuning process, the Satellite/Cable channel set up are recommended to
complete prior to the TV tuning process.
Connect your Satellite/Cablebox to the TV and the antenna, and then switch it on. Select a channel
that you will easily recognise. This can help you to easily find the satellite/cable channel since the TV will
play that selected channel.
VHF/UHF IN
PCAUDIO IN
B
( P.N.:002-S06-HITA-AH )
OR
A
Connecting to a VCR and
a Satellite/Cable box
3b
VHF/UHF IN
AC IN 100-240V
AC POWER
50/60Hz
SWITCH
PCAUDIO IN
A
VCR
B
Satellite/Cable
Box
C
Select & Start the APS menu
5
Country UK
Start APS
Is aerial plugged in
Press OK to start APS
Press MENU to exit APS
Turn on the TV. The main menu will appear automatically (as shown above).
A
Press źŸto select Country, then press OK to enter menu option.
B
Press ŻŹto select country as you wish, press OK to exit the current menu.
C
Press źŸto select the StartAPS, then press OK to start the channel tuning. Your TV
D
will now automatically start to tune in all available channels, including your VCR and
Satellite / Cable channel if you connected a VCR or Satellite / Cable box. Pleasebe
patient,the tuning process may take a few minutes.
Note: Press OK to exit when the tuning process is finished.
A
Connect one end of an RF lead to the aerial
socket marked on your TV and the other end
to the socket marked RFOUT on the back of
your VCR.
B
Connect one end of another RF lead to the
aerial socket marked RFIN on your VCR and
the other end to the socket marked RFOUT on
the back of your Satellite/Cable box.
C
Connect your aerial lead to the socket marked
D
RFIN on the back of your Satellite/Cable box.
D
If you have SCART leads connect one end to
the socket marked SCART on the back of your
TV, and connect the other end to the SCART
socket on the back of your VCR.
Nowgo to stage 4.
Region Confirm
OK: Start Searching
These items are all you need to set up and operate the LCD TV in its basic configuration.
Make sure all of the following contents are included. If there are any missing item, please return this
product to the original place of purchase.
4
Page 6
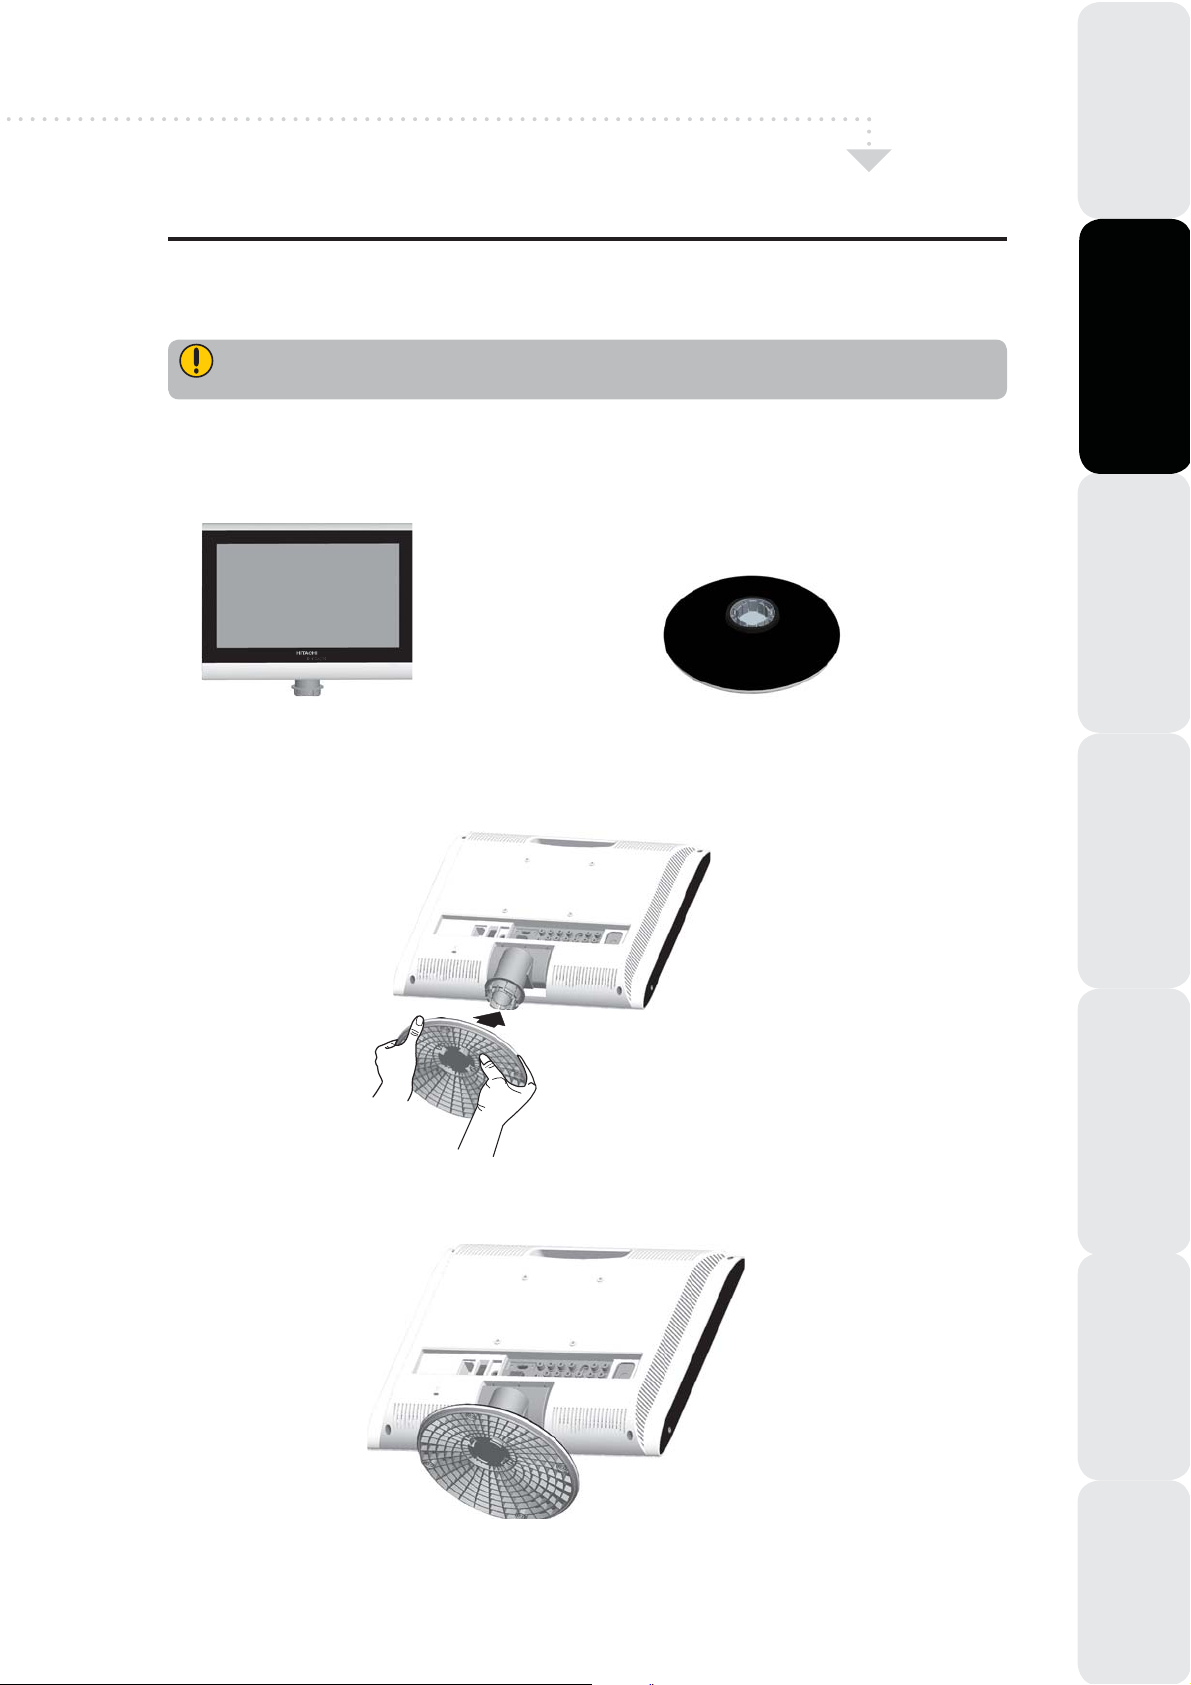
Setting Your LCD TV
How to install the TV Stand
If you prefer to mount your new TV on a wall instead of attaching it to the stand, please reference the
instructions included in the wall mounting kit ( not included ).
Ensure the TV stand is still attached with the bottom foam packaging material in the package.
PreparationInstalling the LCD TVUsing The FeaturesTroubleshootingSpecifications
Read all instructions before continuing with the stand installation.
a. Open the box, and make sure all necessary parts are in the box. The package contains:
LCD TV
b. Cover an even stable surface with a soft cloth. Place the LCD TV unit face-down on the cloth. Fit the
stand onto the bottom of the LCD TV unit as shown:
STAND
Introducing the LCD TV
c. Then push until stand into the LCD TV’s stand socket.
Using The DTV Features
5
Page 7
Preparation
Your LCD TV
Introducing the LCD TV
Installing the LCD TV
How to setup the TV
1
( refer to page 13 ).
2
3
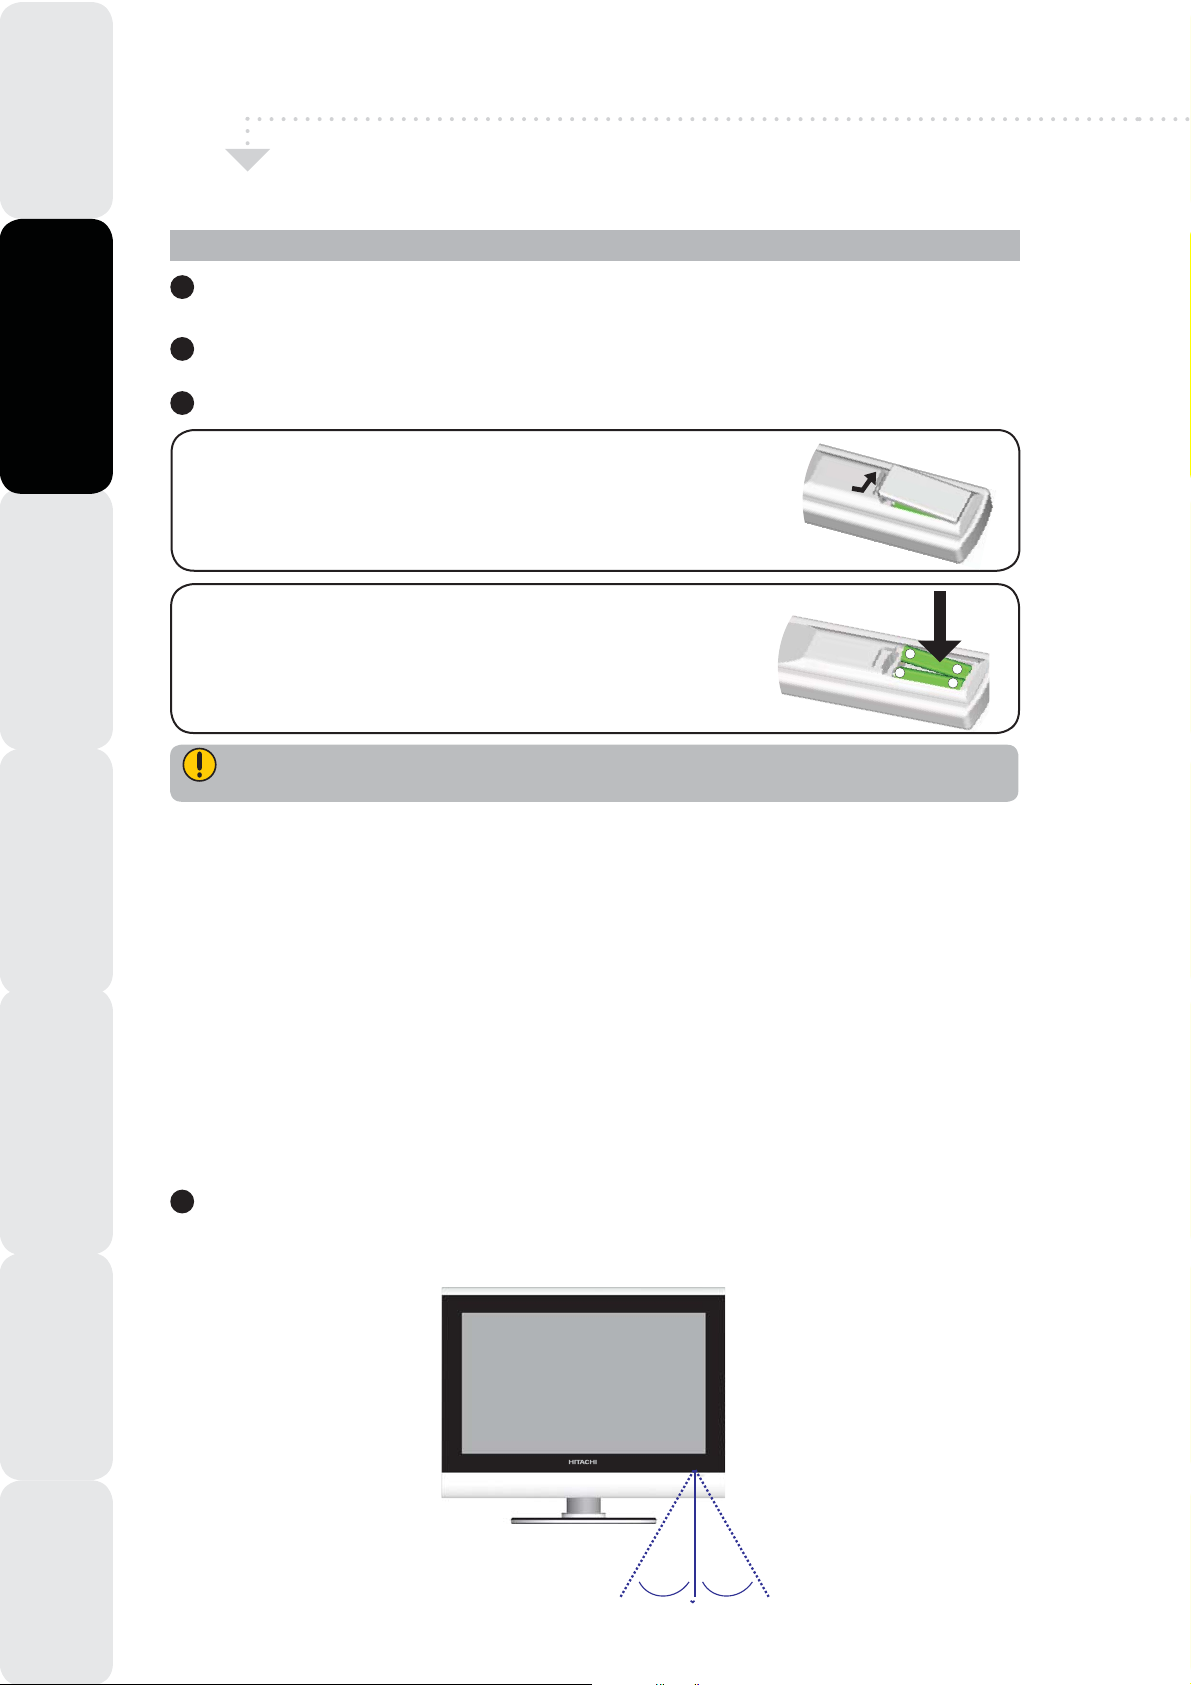
Step1 Press and lift the back cover up to open the battery
compartment of the remote control.
Step2 Insert two AAA size batteries. Make sure to match the ( + )
and ( - ) ends of the batteries with the ( + ) and ( - )
ends indicated in the battery compartment.
Snap the cover back into place.
Using The Features Troubleshooting Specifications
Use an antenna cable to connect the VHF / UHF signal to the LCD TV’s ANT. terminal
Connect the AC power cord at the back of the TV and connect the power cord to wall outlet.
Insert the 2 batteries supplied in remote control.
Do not use caustic cleaners ( porcelain, stainless steel, toilet, or oven cleaner etc. ) on the remote,
as it may suffer damage.
Using The DTV Features
Handling the Remote Control
ƒ It could cause corrosion or battery leak age and may result in physical injury and/or property
damage including fire.
ƒ Never mix used and new batteries in the device.
ƒ Replace all the batteries in a device at the same time.
ƒ Remove the batteries if the remote control is not going to be used for an extended period of time.
ƒ To avoid possible failure, read the following instructions and handle the remote control property.
ƒ Do not drop or cause impact to the remote control.
ƒ Do not spill water or any liquid on the remote control.
ƒ Do not place the remote control on a wet object.
ƒ Do not place the remote control under the direct sunlight or near sources of excessive heat.
NOTE: Remove the battery from remote control handset when it is not to be used for a long period.
Otherwise it can be damaged due to leakage of battery.
4
Connect other an external A/V device
Effective range
Your remote control can be activated from up to the LCD TV 5m away, if points directly in
front of the device.
( refer to page 14-17 ).
5M
30
O
O
30
6
Page 8
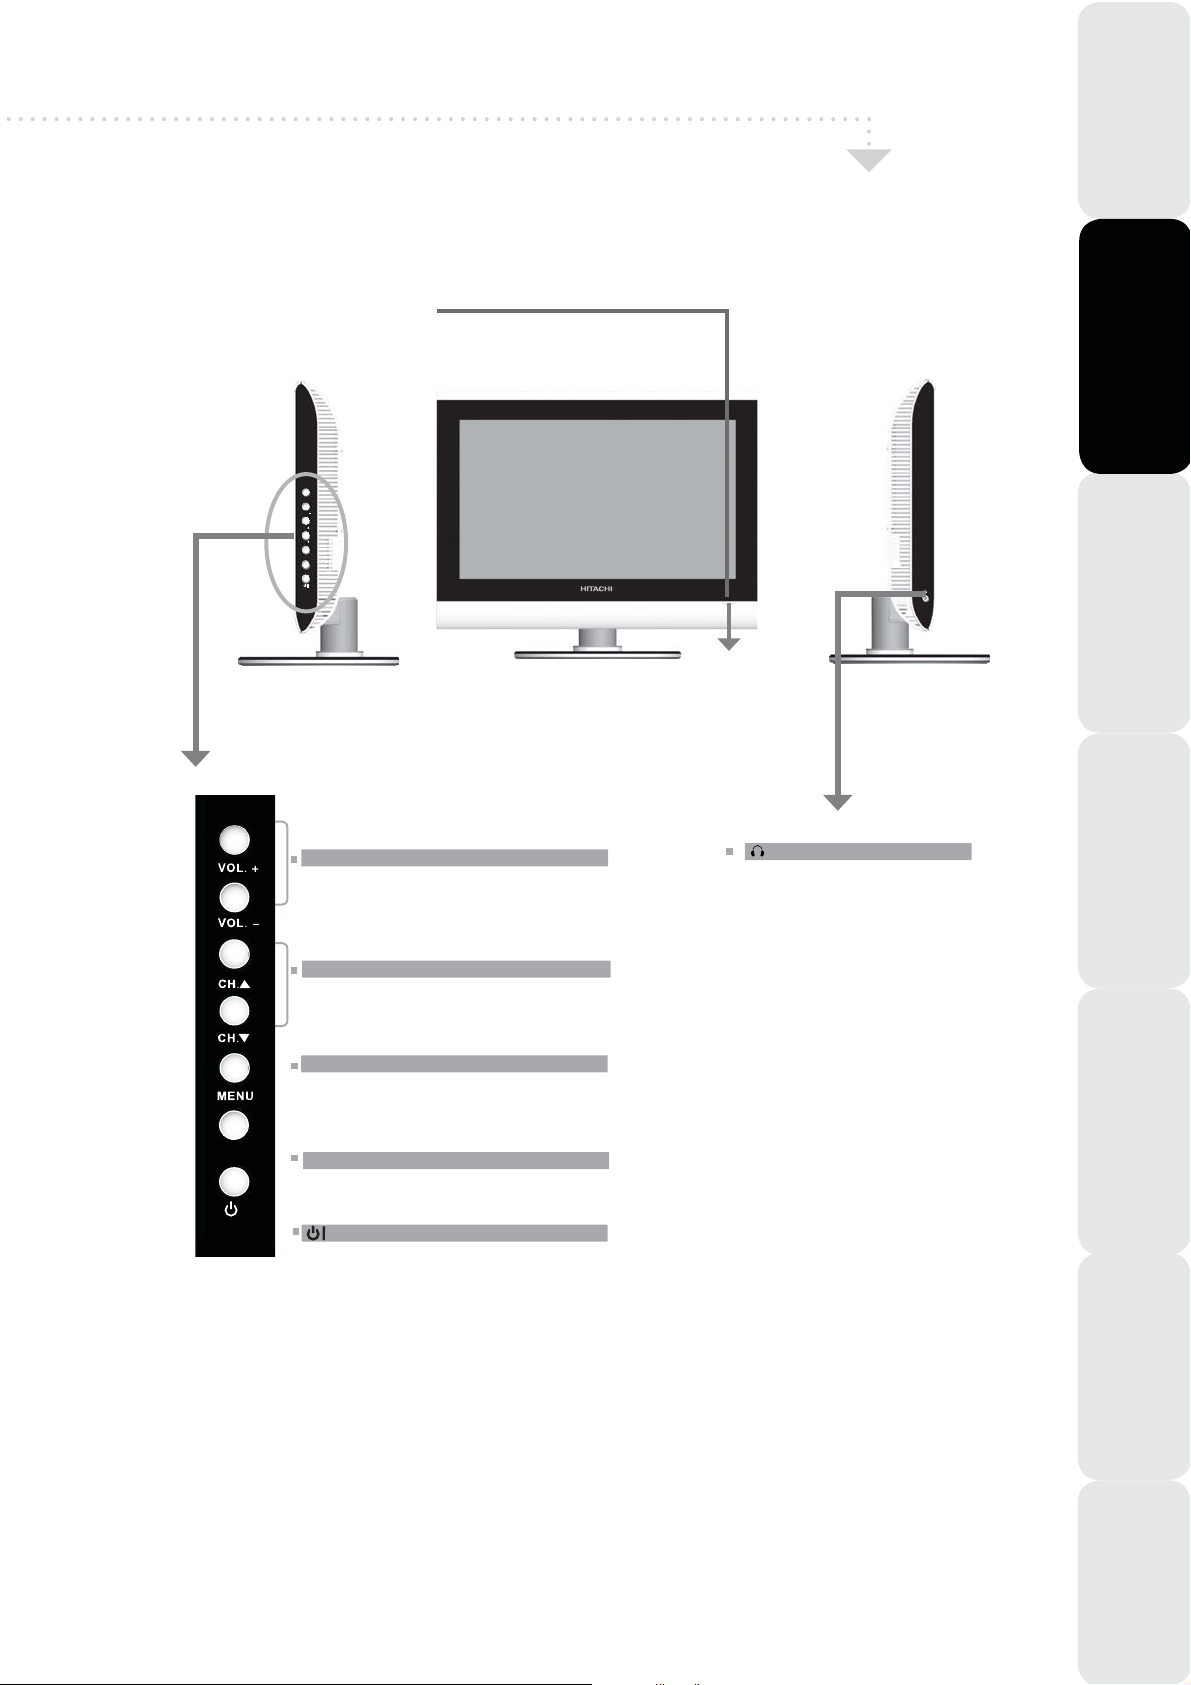
Front / Right Side View
LED
The LED light indicates when the
LCD TV is activated.
VOL.+
VOL.
CH.
CH.
MENU
INPUT
Your LCD TV
PreparationInstalling the LCD TVUsing The FeaturesTroubleshootingSpecifications
Introducing the LCD TV
INPUT
VOL. + / -
Adjust the volume up and down.
Select the main-menu item and
change values for items when in the
OSD mode.
CH.
Ÿź
Scan up and down through channels.
Select sub-menu item when in the
OSD mode.
MENU
Press once to display the OSD ( on
screen display ), press again to turn
the OSD off.
INPUT
Choose from different input signal
sources.
Turn the LCD TV on and into standby
mode.
IR
Infrared
Receiver
Connect to the external earphone
for private listening.
Using The DTV Features
7
Page 9
Preparation
Your LCD TV
Introducing the LCD TV
Installing the LCD TV
AC IN 100-240V
Using The Features Troubleshooting Specifications
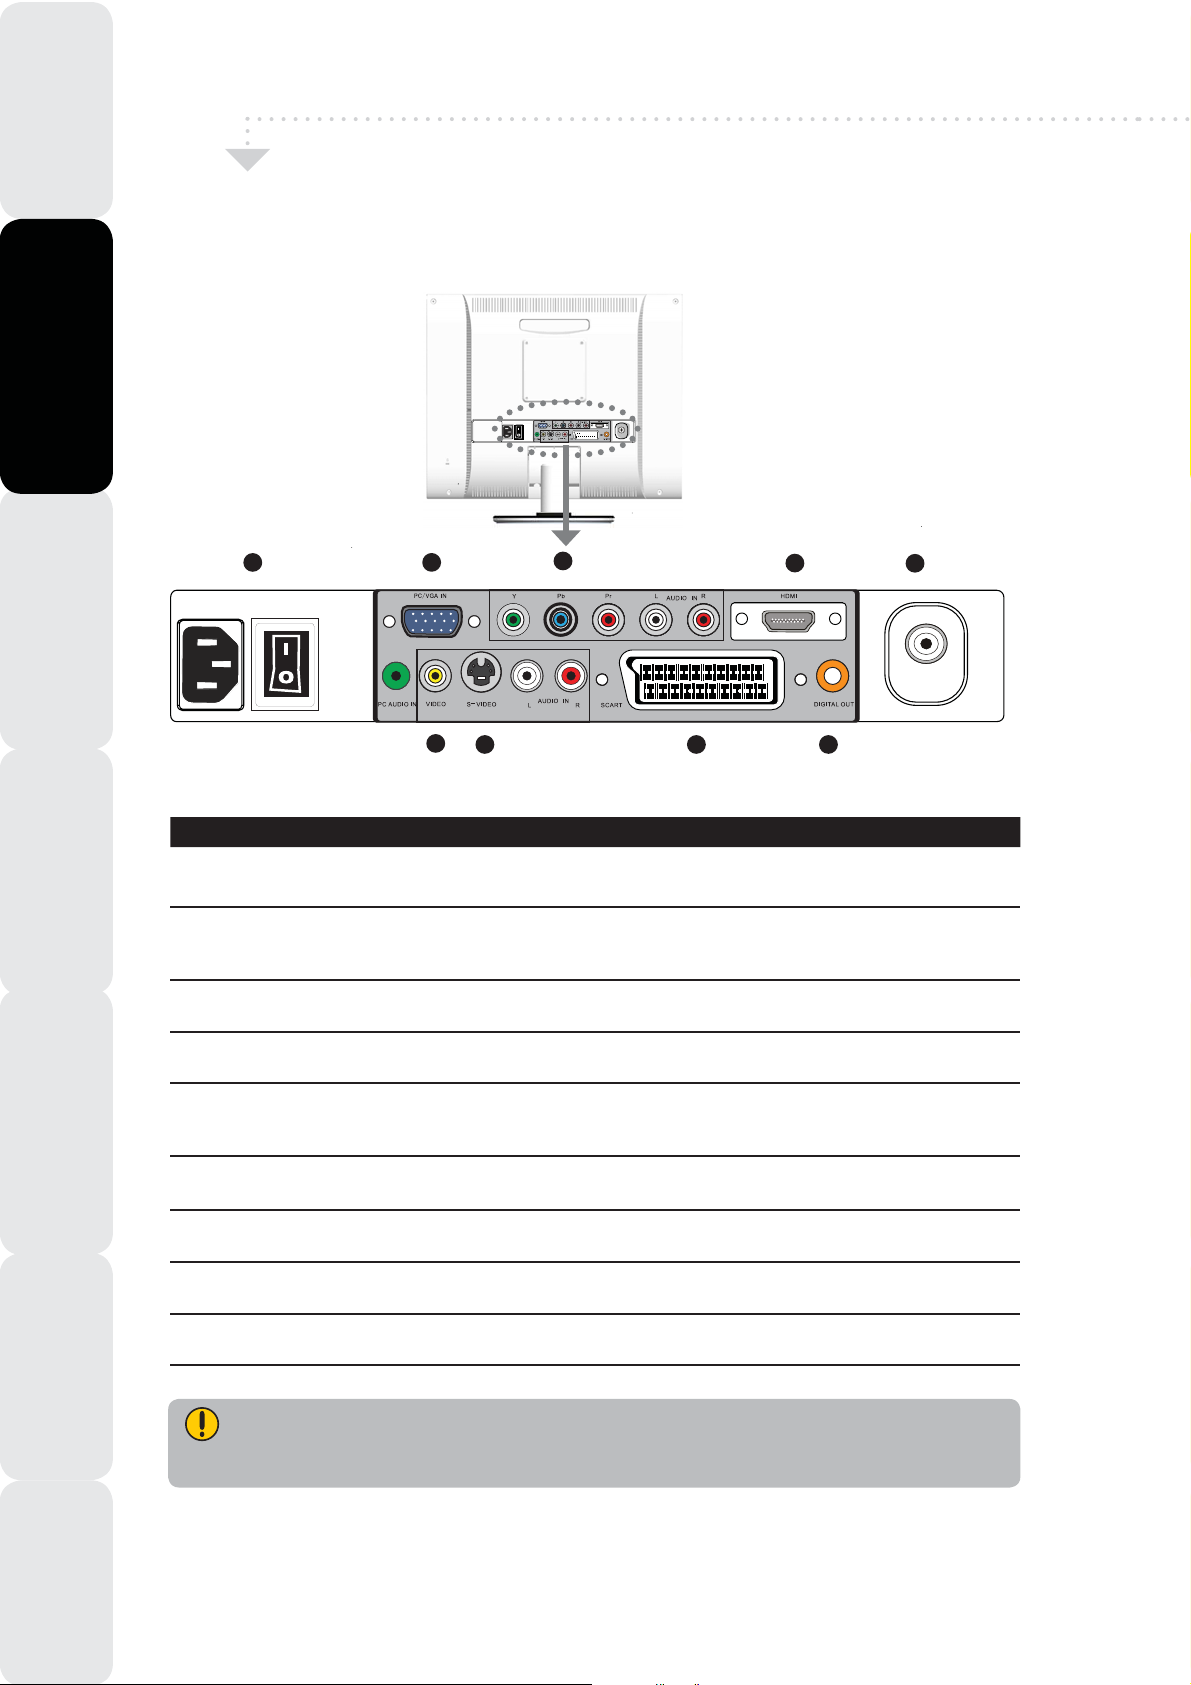
Rear View and Jacks
1
AC POWER
50/60Hz
SWITCH
PCAUDIO IN
AC IN 100-240V
AC POWER
50/60Hz
SWITCH
PCAUDIO IN
6
4
3
VHF/UHF IN
5
2 8
7
9
VHF/UHF IN
Using The DTV Features
ITEM
1 AC IN/Power Switch
2 AV1
SCART
3 AV2
S-VIDEO/AUDIO( L/R )
4 AV3
VIDEO/AUDIO( L/R )
5 AV4
Y, Pb, Pr/AUDIO
( L/R )
6 AV5
VGA IN/PC AUDIO IN
7 AV6
HDMI IN
8 DIGITAL OUT
9 RF/ANT.
VHF/UHF IN
DESCRIPTION
Connect the AC power cord to this socket. Make sure that this
switch is in the ON position.
Connect to external equipment with SCART socket. This SCART
input allows audio and CVBS / YC / RGB+CVBS, RGB, S-VIDEO
from an external device to be shown on your TV.
Connect to the S- VIDEO output sockets and Audio output sockets
on your video equipment.
Connect to the composite A /V output sockets on your video
equipment.
Connect to the component ( Y, Pb, Pr ) video sockets and audio
( L/R ) sockets of your DVD player, HDTV, or video equipment.
Connect to a PC or other devices with a VGA interface.
Connect to devices with a HDMI interface.
Connect to digital out socket on external digital audio equipment.
(Only for DVB-T Input Source)
Connect to the VHF/UHF aerial or cable.
S-VIDEO and Video have a common audio input, if both devices are being used at the same time
audio from both will be heard at same time. Only switch on the required device to stop the mixing
of audio.
8
Page 10
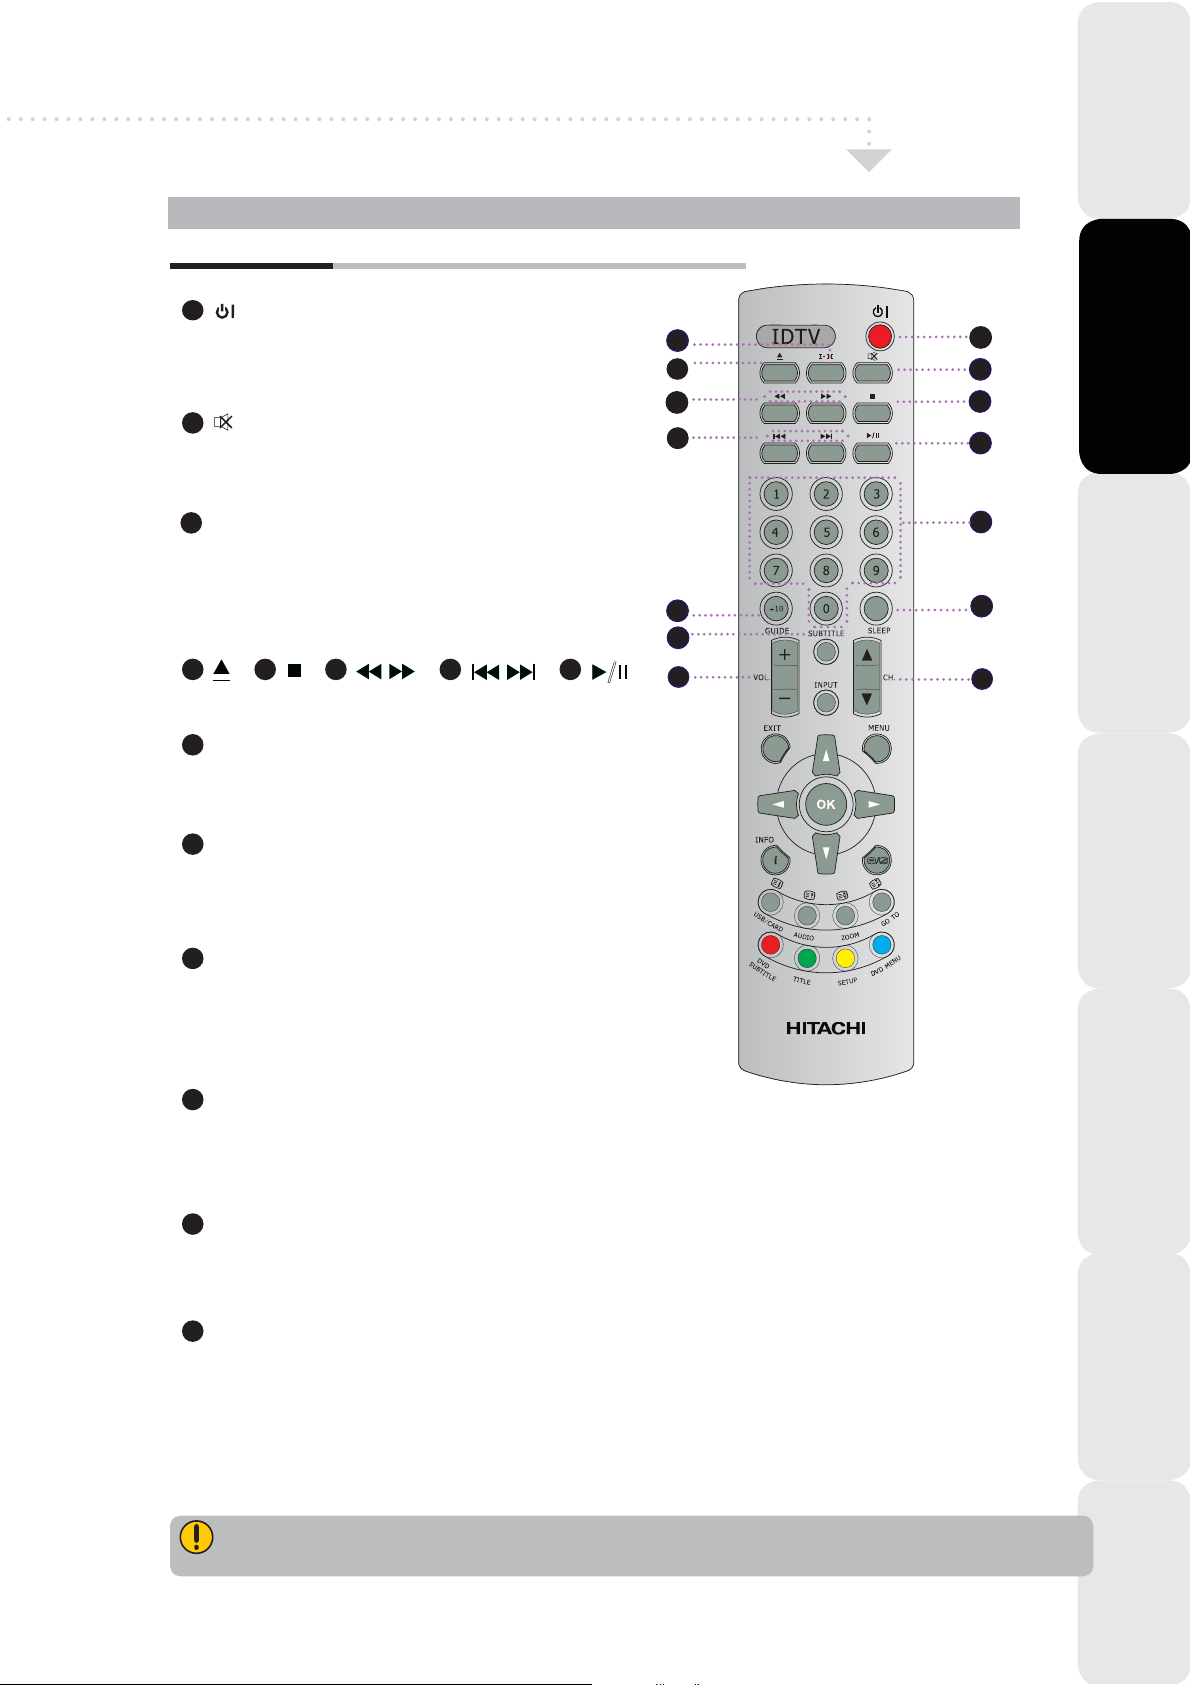
Your Remote Control
RCT-1522
1
Turn the LCD TV on and into standby
mode.
2
Mute and restore your LCD TV sound.
Your Remote Control
3
4
6
7
1
2
5
8
PreparationInstalling the LCD TVUsing The FeaturesTroubleshootingSpecifications
Introducing the LCD TV
3
I-II
Cycle through the TV Sound options:
MONO / DUAL / STEREO.
This function is not available for this model.
4 5 6
9
0-9
Select and switch to a channel by using 0-9 buttons.
GUIDE / +10
10
In DTV mode, press GUIDE button to display the
Electronic Program Guide.
11
SLEEP
Cycle through the LCD TV sleep timer:
60 minutes.
12
SUBTITLE
Press the SUBTITLE button to display the subtitle
which is broadcast with the program on the screen.
7 8
OFF, 15, 30, or
9
10
12
/
13
11
14
13
VOL. +/-
Increase and decrease volume.
14
CH. Ÿ/ź
Change the channels up and down.
Not all region supports DVD-please check with your program service provider.
Using The DTV Features
9
Page 11
Preparation
Introducing the LCD TV
Installing the LCD TV
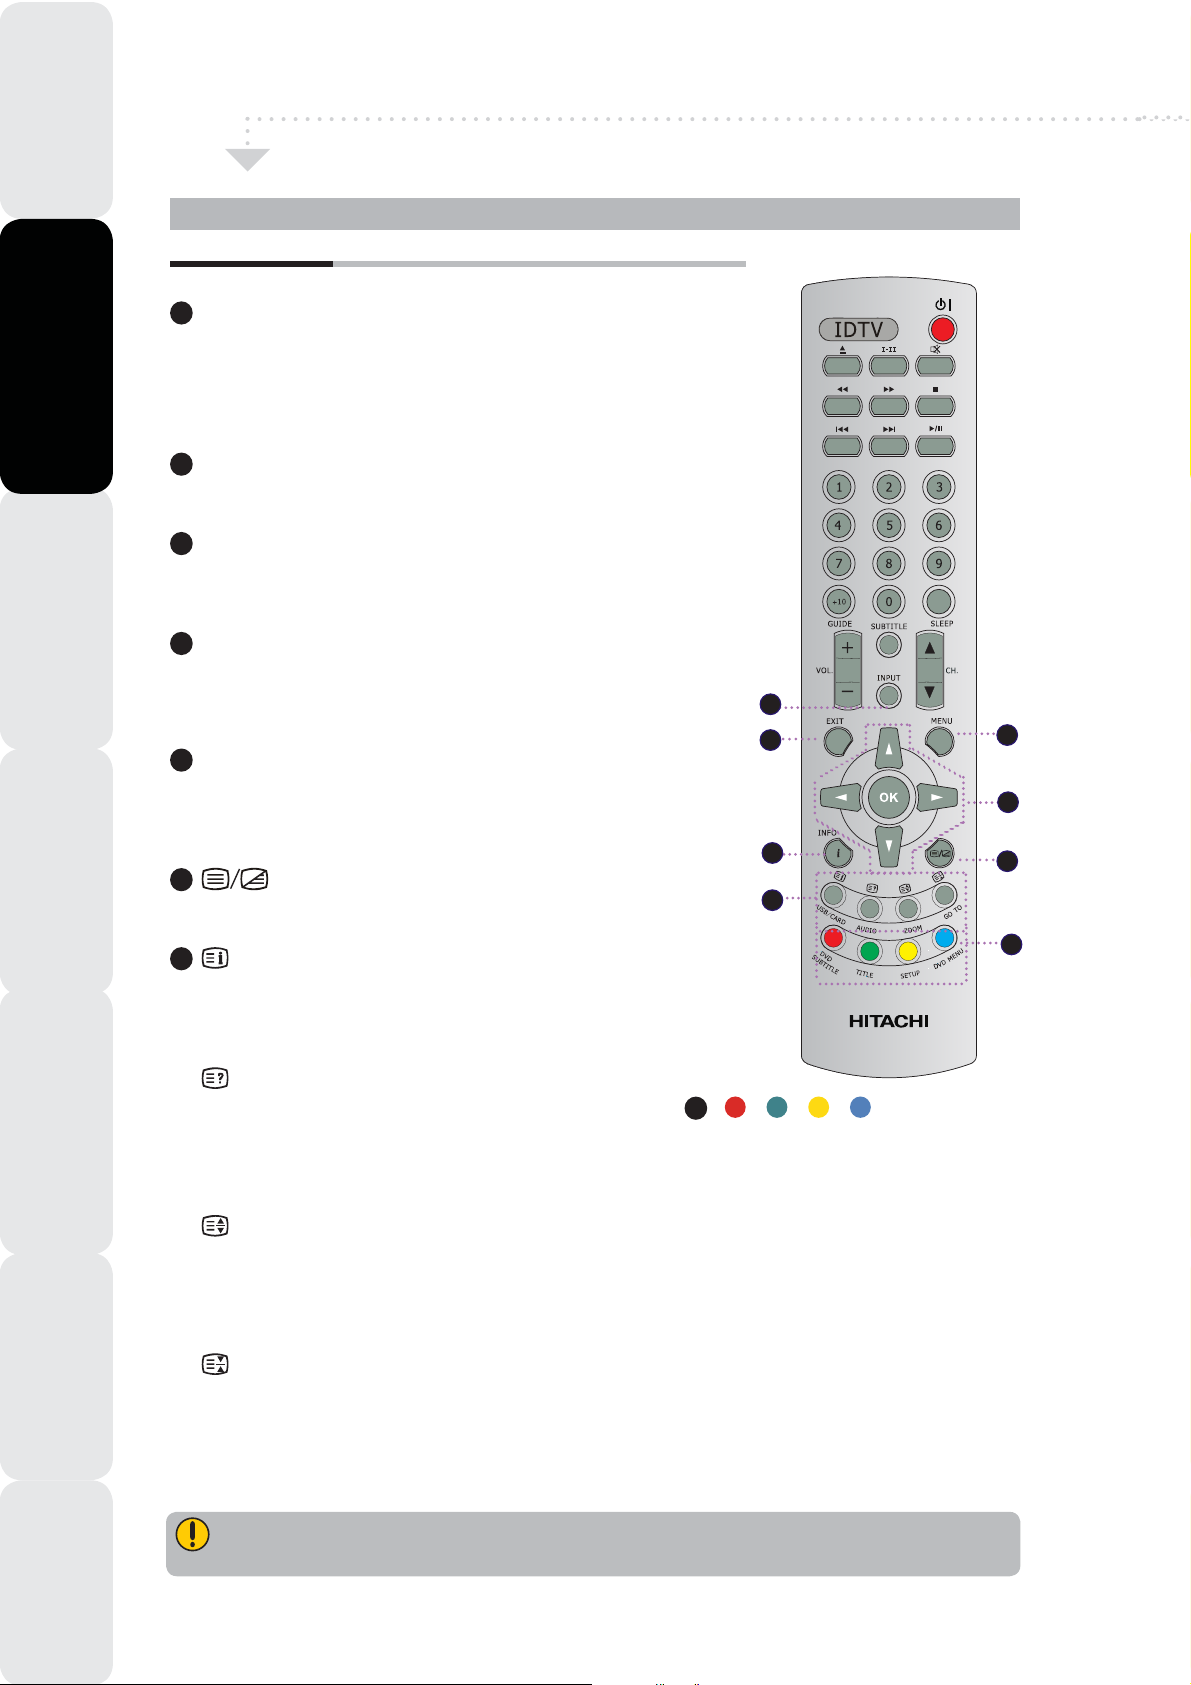
Your Remote Control
Your Remote Control
INPUT
15
Display the source list, useŸźbuttons to select the signal
sources: TV / AV1 ( SCART ) / AV2 ( S-VIDEO ) / AV3
(CVBS) / AV4 ( Y,Pb,Pr ) / AV5 ( VGA ) / AV6 ( HDMI ) / DTV.
16
EXIT
Exit the OSD menu. ( On Screen Display ).
17
MENU
Display the OSD menu on the screen.
18
Using The Features Troubleshooting Specifications
19
20
21
Using The DTV Features
ŸźŻŹ
Allow you to move, select a variety of information
such as the current channel and the input source.
INFO
Press once to display a variety of information such
as the current channel and the input source.
Turn Teletext On / Mix / Off.
Display the main index in Teletext mode.
* USB/CARD - This function is not available for this model.
Reveal hidden information such as the answer
to a quiz in Teletext mode.
* AUDIO - This function is not available for this model.
Display the top, bottom or all of page to easily read in
Teletext mode.
* ZOOM - This function is not available for this model.
OK
15
16
19
21
RCT-1522
22
Access the TELETEXT items
or corresponding pages.
The coloured buttons are used to
access interactive modes when
using Digital / Freeview TV channels.
17
18
20
22
10
Freeze a multi-page passage on screen in Teletext mode.
* GO TO - This function is not available for this model.
The DVD, Card Reader, and USB Memory Disk function buttons on the remote control are not
available for this model.
Page 12
Chapter 2 Installing The LCD TV
Refer to the owner’s manual of any external equipment for connection procedures.
When connecting any external equipment, do not connect any AC power cords to wall outlets until all other
connections are completed.
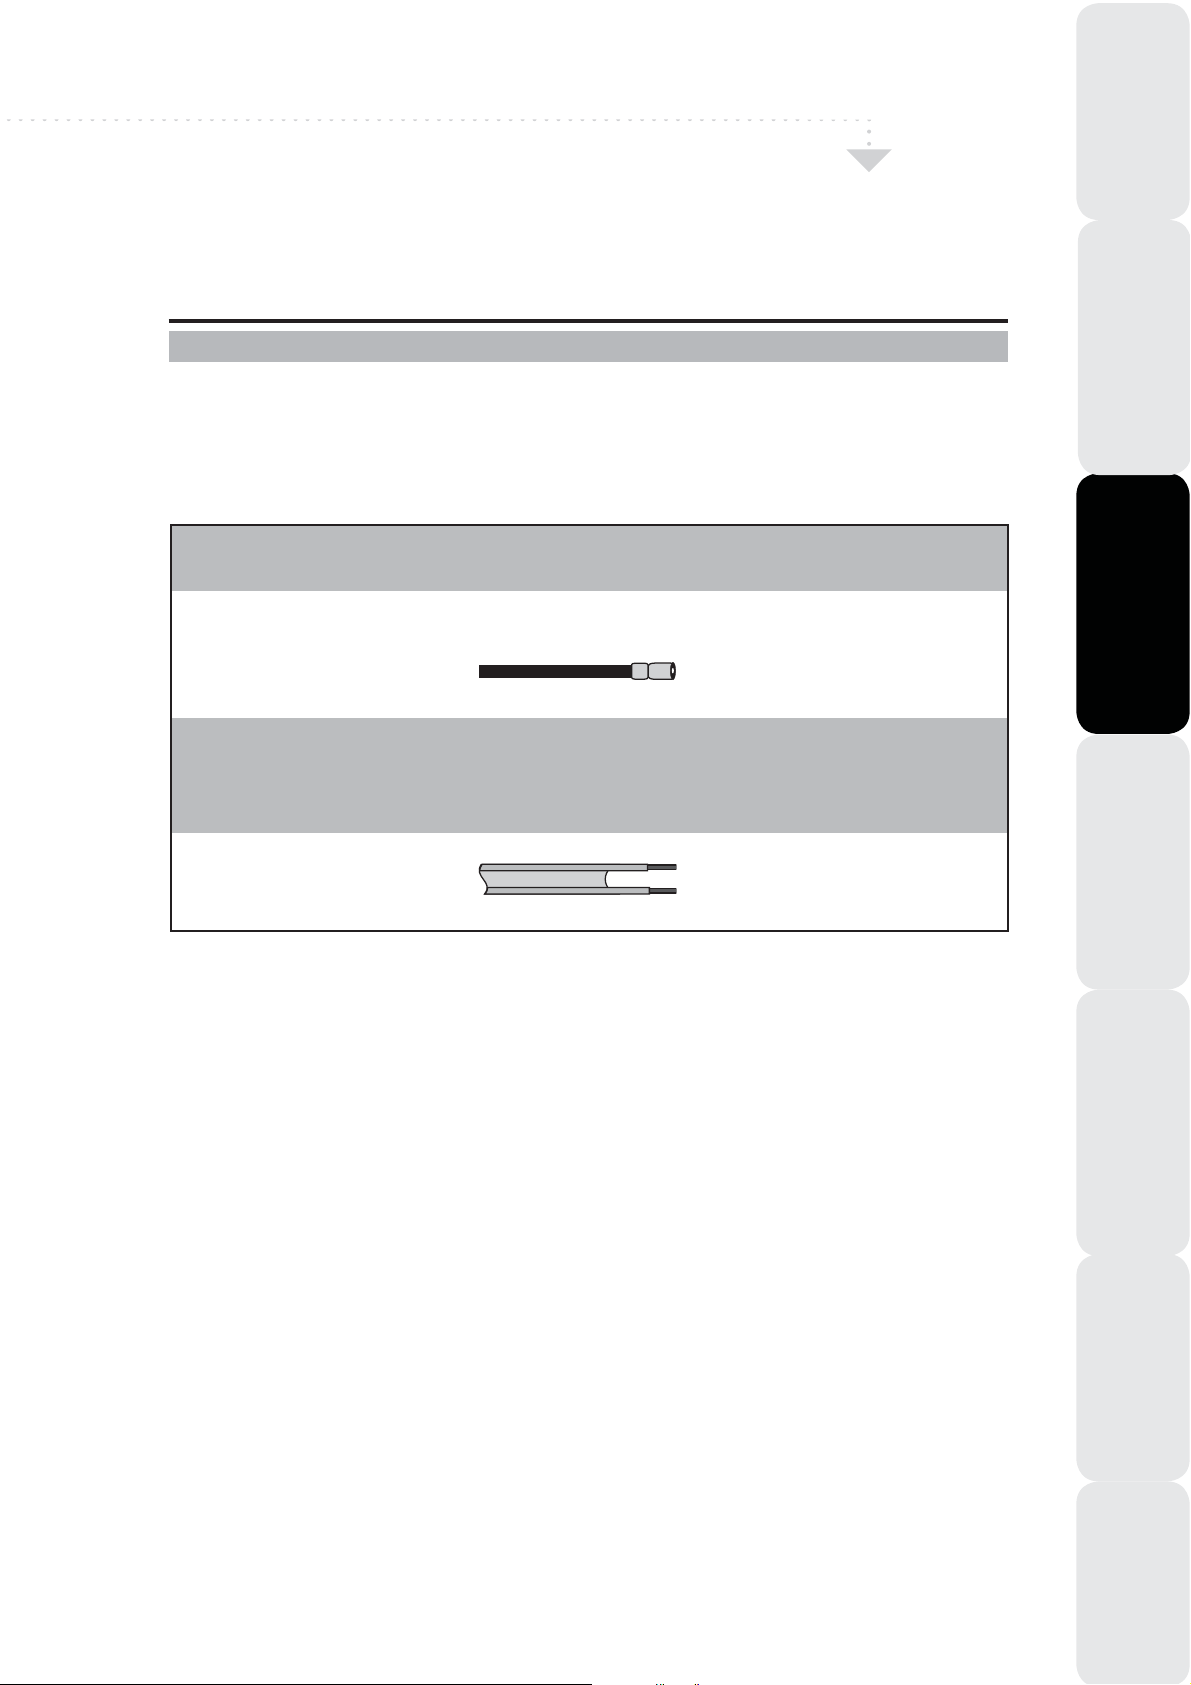
CONNECTING A TV CABLE OR AN ANTENNA
Antenna Connection
The antenna requirement for good colour TV reception is more important than those for a black & white TV
reception. For this reason, a good quality outdoor antenna is strongly recommended.
The following is a brief explanation of the type of connection that is provided with the various antenna
systems.
Ŷ A 75-ohm system is generally a round cable ( not included ) with IEC-type connector that can easily be
attached to a terminal without tools.
IEC-type connector
PreparationInstalling the LCD TVUsing The FeaturesTroubleshootingSpecifications
Introducing the LCD TV
75-ohm coaxial cable ( round )
ŶA 300-ohm system is a flat twin-lead cable (not included ) that can be attached to a 75-ohm terminal
through a 300-75-ohm adapter ( not included ).
300-ohm twin-lead cable ( flat )
Using The DTV Features
11
Page 13
Preparation Installing the LCD TV
Connecting a TV Cable or an Antenna
Introducing the LCD TV
Using The Features
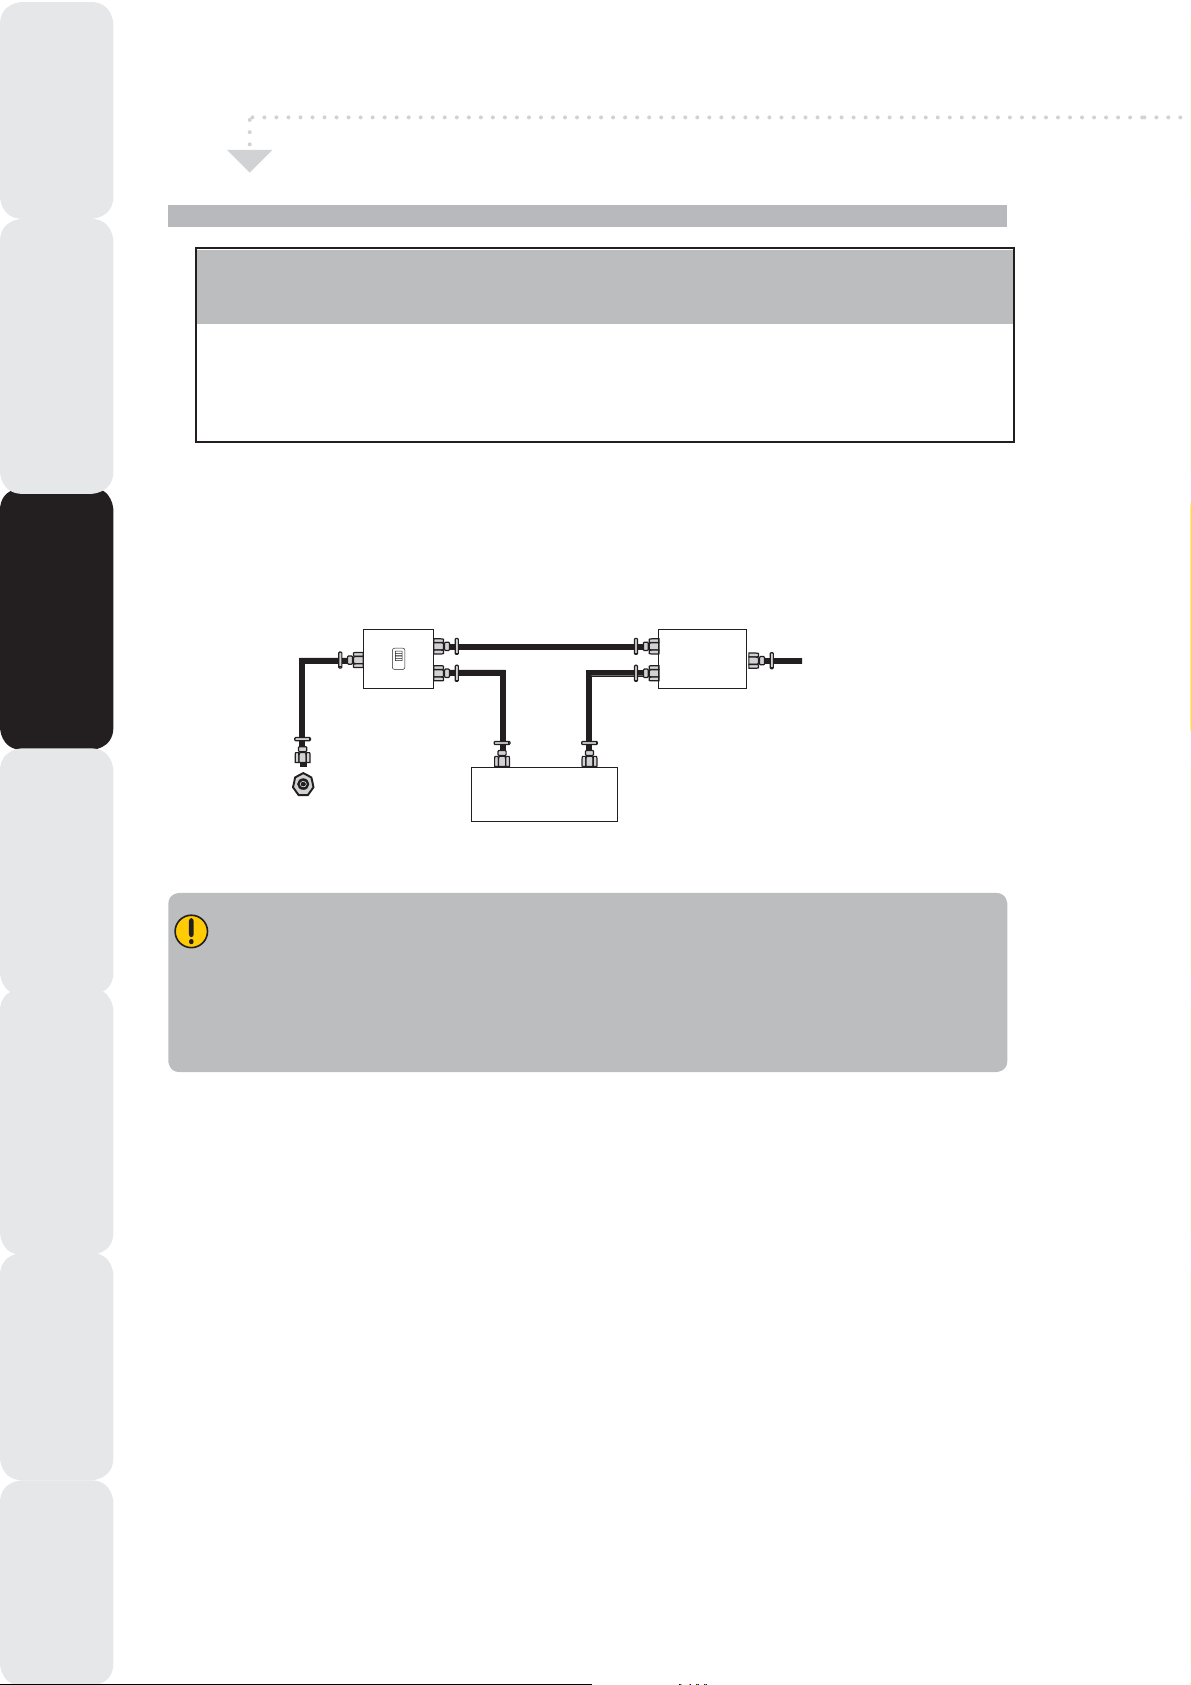
Cable TV ( CATV ) Connection
Ŷ A 75-ohm coaxial cable connector is built into the set for easy hookup.
When connecting the 75-ohm coaxial cable to the set, connect the 75-ohm cable into the
ANT. terminal.
Ŷ Some cable TV companies offer premium pay channels. Since the signals of these
premium pay channels are scrambled, a cable TV converter/descrambler is generally
provided to the subscriber by the cable TV company.
This converter/descrambler is necessary for normal viewing of scrambled channels. ( Set your TV to
channel 3 or 4, typically one of these channels is used. If this is unknown, consult your cable TV company. )
For more specific instructions on installing cable TV, consult your cable TV company. One possible method
of connecting the converter/descrambler provided by your cable TV company is shown in the diagram
below.
RF switch
( not included )
2-set signal
splitter
(not included)
Cable TV Line
VHF / UHF IN
OUT
A
IN
B
Cable TV converter/
descrambler
( not included )
Using The DTV Features
Troubleshooting Specifications
ŶThe RF switch ( not included ) is required to provide two inputs ( A and B ). Setting the RF
switch to position A allows viewing of all unscrambled channels by using the TV channel keys.
ŶSetting the RF switch to position B allows viewing of all scrambled channels via the converter /
descrambler by using the converter channel keys.
12
Page 14

Connecting a TV Cable or an Antenna
The STANDBY button on the right side view of LCD TV and also on the remote control is only used
for powering up and switching the TV to standby mode, it does not disconnect the device from the mains
supply.
To completely disconnect the main voltage, please switch off the power switch on the rear of the TV, or
remove the power plug from the socket.
INPUT
PreparationInstalling the LCD TVUsing The FeaturesTroubleshootingSpecifications
Introducing the LCD TV
Unplug from a
wall outlet
Make sure the power switch
is switc hed off
STANDBY
AC IN 100-240V
AC POWER
50/60Hz
SWITCH
PCAUDIO IN
VHF/UHF IN
Using The DTV Features
13
Page 15

Preparation Installing the LCD TV
Connecting a TV Cable or an Antenna
Introducing the LCD TV
Using The Features
Refer to the owner’s manual of the external equipment to be connected. When connecting external
equipment, do not connect any AC power cords to wall outlets until you have completed all the
connections.
Basic Connection: Connecting an aerial
Make sure the power switch
is switc hed off
Unplug from a
wall outlet
VHF/UHF IN
TV Aerial
Aerial/75-ohm coaxial input
Connects the supplied
mains cable to thi s socket .
AC IN 100-240V
AC POWER
50/60Hz
SWITCH
PCAUDIO IN
n
o
Using The DTV Features
p
q
Troubleshooting Specifications
5
Connect your existing TV aerial to the Aerial input socket on the TV.
The Aerial input socket can be connected with the ATV / DTV Aerial.
Insert the supplied mains cable to the mains socket located on the rear of the TV.
Connect the other end of this cable to a 3-pin mains socket.
Connect all AC power sources before turning on the power switch at the back of the TV.
Press the STANDBY
button on your remote to turn on your LCD TV.
a. After connecting an aerial to your LCD TV and connecting the mains cable to the
TV and mains socket, turn the POWER SWITCH of rear TV on, a red light will show
on the front panel of the TV.
b. Press the STANDBY
button, the red light will change to green and the First Time
Installation screen will show:
1. Make sure an aerial is fitted then press OK button on the remote to start the Auto
Programme Scan ( APS ).
2. In a short while you will see the TV programmes briefly as each channel is received and
stored in the memory. When APS is completed, BBC1 will show, press CH. Ÿź buttons
to view the other channels stored.
c. To power off press the STANDBY
button, the green light will change to red.
Press the INPUT button and choose TV or DTV mode then press OK to select.
If you encounter problems receiving digital signals this may be due to having an inadequate aerial (you may
have an old “Analogue” aerial). A replacement “Digital” aerial will be required, contact your local aerial
installer for further information.
14
Page 16

Connecting a DVD Player
Rear View of TV
PreparationInstalling the LCD TVUsing The FeaturesTroubleshootingSpecifications
AC IN 100-240V
AC POWER
50/60Hz
SWITCH
PCAUDIO IN
Audi
o
Audio
V
ideo
(L)
(R)
A
Video/Aud ioC able
METHOD A ( AV3 )
n
Use an A/V cable to connect the VCR’s/ VIDEO camera’s composite output sockets to your
B
C
DVD PLAYER
VHF/UHF IN
bPrP
D
LCD TV.
Introducing the LCD TV
METHOD B ( AV2 )
Use an Audio cable to connect the DVD’s audio output sockets to your LCD TV.
Use a S-Video cable to connect your LCD TV and DVD player.
METHOD C ( AV1 )
Use a SCART cable to connect the DVD’s SCART socket to the LCD TV’s SCART socket.
METHOD D ( AV4 )
Use a Component cable to connect the ( Y Pb Pr ) sockets on the DVD player to your LCD TV.
Use an audio cable to connect the DVD’s audio sockets to your LCD TV.
Connect all power sources before turning on the power switch of the LCD TV
o
or other connected equipments.
Press the STANDBY
p
To watch DVD, press the INPUT button to select AV1, AV2, AV3, or AV4.
q
button to turn on your LCD TV.
Using The DTV Features
15
Page 17

Preparation Installing the LCD TV
Connecting a VCR & Video Camera
Introducing the LCD TV
Using The Features
AC IN 100-240V
50/60Hz
AC POWER
SWITCH
PCAUDIO IN
V
Rear View of TV
o
Audi
Audio
ideo
(L)
(R)
A
Video/Aud ioC able
VIDEO CAMERA
VHF/UHF IN
B
C
VCR PLAYER
n
Using The DTV Features
o
p
q
Troubleshooting Specifications
5
METHOD A ( AV3 )
Use an A/V cable to connect the VCR’s / VIDEO CAMERA’s composite output sockets to your
LCD TV.
METHOD B ( AV2 )
Use an Audio cable to connect the VIDEO CAMERA’s audio output sockets to your LCD TV.
Use a S-Video cable to connect your LCD TV and Video camera.
METHOD C ( AV1 )
Use a SCART cable to connect the VCR’s SCART socket to the LCD TV’s SCART socket.
Connect all power sources before turning on the power switch of the LCD TV or other connected
equipments.
Press the STANDBY
button to turn on your LCD TV.
To watch video camera, press the INPUT button to select AV2 or AV3.
To watch VCR, press the INPUT button to select AV1 or AV3 .
Not all VIDEO CAMERA have the ability to connect to a TV. Please check your video camera
user guide for compatibility.
16
Page 18

Connecting a TV Cable Box or Satellite Receiver
Rear View of TV
PreparationInstalling the LCD TVUsing The FeaturesTroubleshootingSpecifications
AC IN 100-240V
n
AC POWER
50/60Hz
SWITCH
PCAUDIO IN
o
Audi
Audio
V
ideo
(L)
SATELLITE ANTENNA
CABLE
(R)
A
Video/Audi oCab le
SATELLITE RECEIVER
B
C
GACABLE
V
D
TV CABEL BOX
Pr
Pb
E
Method A ( AV3 ) :
Use an A/V cable to connect the TV Cable Box’s composite output sockets to your LCD TV.
VHF/UHF IN
F
HDMICABLE
Method B ( AV2 ) :
Use an Audio cable to connect the TV Cable Box’s audio output sockets to your LCD TV.
Use a S-Video cable to connect your LCD TV and TV Cable Box.
Method C ( AV5 ) :
Use a VGA 15 pins cable to connect the TV Cable Box’s RGB output sockets to your LCD TV.
Use a 3.5 mm socket to RCA adapter cable for connecting audio.
Method D ( AV1 ) :
Use a SCART cable to connect the TV Cable Box’s SCART socket to the LCD TV’s SCART
socket.
Method E ( AV4 ) :
Use a Component cable to connect the Y / Pb / Pr sockets on the TV Cable Box to your LCD TV.
Use an Audio cable to connect TV cable box’s audio output sockets to LCD TV.
Method F ( AV6 ) :
Use a HDMI cable to connect the Satellite Receiver HDMI connector to your LCD TV.
Introducing the LCD TV
Using The DTV Features
Connect all power sources before turning on the power switch of the LCD TV or
o
other connected equipments.
Press the STANDBY button to turn on your LCD TV.
p
To watch TV cable box, press the INPUT button to select AV1, AV2, AV3, AV4, or AV5.
q
To watch programs satellite receiver, press the INPUT button repeatedly to select AV6 .
5
17
Page 19

Preparation Installing the LCD TV
Connecting an Audio Receiver
Introducing the LCD TV
Using The Features
For better sound quality, you may want to play the LCD TV audio through your stereo system.
Rear View of TV
AC IN 100-240V
50/60Hz
AC POWER
SWITCH
PCAUDIO IN
Digital out Cable
VHF/UHF IN
n
Using The DTV Features
o
p
Troubleshooting Specifications
Use an audio cable to connect the audio receiver’s audio LINE-IN sockets to LCD TV’s DIGITAL
OUT sockets (Only for DVB-T Input Source).
Connect all power sources before turning on the power switch of the LCD TV or other connected
equipments.
Press the STANDBY
button to turn on your LCD TV.
18
Page 20

HDMI
This TV can accept High-Definition Multimedia Interface ( HDMI ).
This TV SET supports HDCP ( High-Bandwidth Digital Content Protection ) Protocol for TV SET (
480p, 576p, 720p, 1080i ) modes.
When you connect to the output of an HD ready player ( DVD Player, Set Top Box or PC ) switch to
the AV6 ( HDMI ) function and the TV will automatically detect the resolution used by the HDMI source.
To get the best picture quality, adjust the DVD Player or Set Top Box output resolution to 1280 x 720p.
To get the best picture quality, adjust the PC graphics card to 1024 x 768, 60Hz.
How to connect
If Source Devices have HDMI Output , connect to the HDMI socket located at the rear of the
TV using the HDMI Cable supplied with your external device. ( HDMI sends Digital Video and
Audio with one cable. )
Cable sample
PreparationInstalling the LCD TVUsing The FeaturesTroubleshootingSpecifications
Introducing the LCD TV
HDMI Cable
(not supplied with the product)
Using The DTV Features
19
Page 21

Preparation Installing the LCD TV Using The Features Troubleshooting Specifications
Chapter 3 Using The Features
Introducing the LCD TV
BASIC OPERATION
Tuning in the TV channels
After connecting an aerial to your LCD TV and connecting the mains cable to the TV and 100-240 V
AC mains socket, turn the POWER SWITCH of rear TV on, a red light will show on the front centre
panel of the TV.
Press the STANDBY button, the red light will change to green and the First Time Installation
screen will show:
1. Make sure an aerial is fitted then press OK button on the remote to start the Auto
Programme Scan ( APS ).
OK: Start Searching
2. In a short while you will see the TV programmes briefly as each channel is received and
stored in the memory. When APS is completed, BBC1 digital TV will show, press the
CH. Ÿź buttons to view the other channels stored. To view analogue TV, press INPUT
button and use the Ÿź arrow buttons to select TV, then press the OK button. Change
channels by pressing the CH. Ÿź buttons.
To power off press the STANDBY button, the green light will change to red.
Using The DTV Features
Selecting a Source
Press the INPUT button to display the function required ( TV/AV ). Using the arrow buttons
on the remote highlight the function required and press the OK button to select the function.
Select TV Channel
Press the CH. Ÿź buttons on the remote control and the CH. Ÿźbuttons on the LCD TV to
change the TV channels.
You can directly select the TV channel required by pressing 1, 2, or 3 etc on the remote
button pad.
Adjusting the Volume
Press the VOL. +/- buttons on the remote control or the VOL. +/- buttons on the LCD TV to adjust
the volume.
To Mute the Sound
Press MUTE and the sound cuts off.
To turn mute off, press the MUTE button again, or simply press the VOL. +/- buttons.
Sleep Timer
Press the SLEEP button continuously to select the sleep timer or turn the sleep timer from the
OFF, 15, 30, 60 minutes; when the LCD TV has reached the set time, it will automatically turn off.
If the TV has no input signal, it will automatically power down to standby after 15 minutes
.
20
Page 22

1 The main menu provides access to the following menus:
Video
Audio
Setup
Adjust picture setting such as Picture
Mode, Contrast, Brightness, Colour,
Tint(NTSC), Sharpness, and Advanced.
Adjust Volume and Balance.
Adjust Colour Standard, Sound Standard,
APS, Manual Search, and Channel Setup.
OSD Menu Operation
PreparationInstalling the LCD TVUsing The FeaturesTroubleshootingSpecifications
Preferences
Screen
(VGA)
DTV ( Digital
TV )
2 Press the MENU button on the remote control. The main menu will appear on the screen.
3 UseŻŹbuttons to highlight your main menu option, then press OK button to enter your selected option.
Use Ÿź
item. Press the EXIT button to exit menu.
Adjust preferences such as OSD, Blue
Screen, Childlock, Sleep Timer, OSD Timer,
and OSD Reset.
Adjust screen such as Horizontal Size,
Horizontal Position, Vertical Position, Phase,
and Auto Sync.
The DTV menu provide four sub-menus as
following: Edit Favourite List, Configuration,
Parental Control, EPG ( Electronic
Programme Guide ), with which you can set
the DTV as you wish.
buttons to highlight an option of the sub-menu. Use ŻŹ buttons to change the value of the
VIDEO
Use this Video setting menu to adjust the picture quality which best corresponds to your viewing
requirements. The Video Menu includes the following options:
OPTION DESCRIPTION
Picture Mode
Contrast
Brightness
Colour
Custom: Select for user’s settings.
The items of video can be adjusted when
the picture mode is for user’s settings
except advanced item.
Standard: Select for standard picture
settings. Recommended for home
entertainment
Vivid: Select for enhanced picture contrast
and sharpness.
Mild: Select for mild picture settings.
Adjust the difference between the
brightness and darkness regions of the
picture.
Adjust to increase or decrease the
brightness.
Allow to adjust the colour from 0 to 100.
.
Introducing the LCD TV
Using The DTV Features
Tint ( NTSC )
Sharpness
Allow you to adjust the colour tint of the
picture. ( Only for NTSC )
Adjust to sharpen or soften the picture.
21
Page 23

Preparation Installing the LCD TV Using The Features Troubleshooting Specifications
OSD Menu Operation
Introducing the LCD TV
Using The DTV Features
VIDEO
Colour Temp
OPTION DESCRIPTION
Video
Advanced
Display Allow you to select
Mode the display mode to
be Wide, 4:3, Original,
or Zoom. (Only under the
TV / SCART / S-Video /
Video /DTV source)
DCE Allow you to adjust the
(Dynamic Contrast
Enhancement) to be Off,
Low, Mid, or High.
Blue Stretch Allow you to turn on or off
the Blue Stretch by
choosing YES or NO.
Choose YES to increase
the blue colour intensity of
the picture. Choose NO to
keep the default blue
colour intensity.
Green
Stretch
Colour Temp Allow you to adjust the
Allow you to turn on or off
the Green Stretch by
choosing YES or NO.
Choose YES to increase
the green colour intensity
of the picture. Choose NO
to keep the default green
colour intensity.
Colour Temperature to be
Cool, Warm, or Standard.
AUDIO
Use this AUDIO setting menu to adjust the Volume and Balance to your listening requirements.
OPTION DESCRIPTION
Volume
Balance
22
Preset the volume to a given setting.
Adjust the balance of the left or right speaker.
Page 24

OSD Menu Operation
SETUP (Analogue TV)
Setup menu is only available when viewing Analogue TV. Use this Setup menu to select Colour Standard,
Sound Standard, APS, Manual Search, Channel Setup. Use the Ÿź buttons to highlight the required
setting. Press OK button to select the function. Use ŻŹ buttons to adjust the settings. Press OK button to
save the adjustment.
OPTION DESCRIPTION
Setup
APS
Manual Search
Channel Setup
Colour
Standard
Sound
Standard
Allow you to select the colour standard :
AUTO / PAL/ SECAM (For TV mode and
PAL is for the UK region.)
AUTO/NTSC M/PAL/SECAM/NTSC443/
PAL60 (For AV1, AV2, and AV3)
Allow you to select the sound standard :
DK, BG, I, and L, L’.
DK PAL D / K, SECAM D / K
( East Europe / China )
BG PAL B / G, SECAM B / G
( Europe / East Europe / Asia /
New Zealand / M.East / Africa
/ Australia )
I PAL I ( U.K. / Ireland / Hong
Kong / South Africa)
L/L’ SECAM L / L’ ( This feature is
not available for this model. )
PreparationInstalling the LCD TVUsing The FeaturesTroubleshootingSpecifications
Introducing the LCD TV
Setup
Channel Setup
Finetune
Save
APS
Manual Search
Channel Setup
Start APS
Press OK button to start Auto Search and
auto sort process.
Note: Auto Sort will only operate in the UK.
Country
Allow you to select the country: Austria,
Belgium, Switzerland, Czech Rep.,
Germany, Denmark, Spain, France,
Finland, UK, Greece, Hungary, Italy,
Norway, Netherlands, Portugal, Poland,
Sweden, Slovenia, Slovakia, Turkey, and
Others.
Allow you to adjust the manual search by
hand if signal is too weak or picture is
blurry.
Press theŹbutton to select Sort, Delete,
Skip, Finetune, and Save.
Sort Allow you to manually sort the
stored programme
Delete Allow you to delete the stored
programme.
Skip Allow you to skip the stored
programme.
Finetune Allow you to finetune the
stored programme.
.
Using The DTV Features
Save Allow you to save the setup.
23
Page 25

Preparation Installing the LCD TV Using The Features Troubleshooting Specifications
OSD Menu Operation
Introducing the LCD TV
PREFERENCES
Use this Preferences setting menu to set up some features: OSD, Blue Screen, Childlock, Sleep Timer,
OSD Timer, and OSD Reset.
OPTION DESCRIPTION
OSD
Blue Screen
Childlock
Sleep Timer
OSD Timer
OSD Reset
Language : Allow you to select the OSD
to be English / French / Italian / Danish /
Finnish / Swedish / Greek / Polish /
Czech / Hungarian / Norwegian.
Transparency : Allow you to adjust
transparency from 0 to 15.
Allow you to select the blue screen to
be off or on.
Allow you to select the childlock to be
yes or no. ( Default password is 0000.
Golden password is 3796(For Analogue
TV only).)
Change Pin: Allow you to change the 4digit password.
Allow you to select the sleep timer to be
Off, 15 min, 30 min, or 60 min.
Allow selection of the display time of the
on-screen menu: 5s, 10s, 15s, 20s, and
25s.
Allow you to restore the factory settings
.
Using The DTV Features
SCREEN( Only for VGA )
Auto Sync
OPTION DESCRIPTION
Horizontal
Size
Horizontal
Position
Vertical
Position
Phase
Auto Sync
Allow you to adjust the Horizontal Size
from 0 to 100.
Allow you to adjust the Horizontal
Position of the picture.
Allow you to adjust the Vertical Position
of the picture.
Allow you to improve focus clarity and
image stability.
Allow to auto synchronize VGA signal.
24
Page 26

Chapter 4 Using The DTV Features
Cr eate a favo urite list
Mod ify a fav ourite list
Dele te a fav ourite list
OK EXIT
Edit favorite list
DTV SERVICES
If you set DTV as your input source, but your local area does not have digital signal, the TV will
display the DTV menu only. To leave the DTV menu, press VOL +/- buttons and then the INPUT
button, you will then allow to choose the External Input in the Navigator menu.
OPTION DESCRIPTION
Edit Favourite
List
Configuration
Press
Create, modify or delete a favourite
channel list.
Channel
Installation
Allow to do the
Channel Installation
automatically and
manually, and to detect
new channels.
User
Settings
Set the Audio and
Subtitle language
under User Settings.
System
Parameters
Allow to do System
Upgrade, to view the
System Information,
and to reset Factory
default setting.
Signal
Information
Allow to view the
signal quality of the
selected channel.
PreparationInstalling the LCD TVUsing The FeaturesTroubleshootingSpecifications
Introducing the LCD TV
Parental Control
Enable or Disable the menu protection
system and allows the PIN code to be
changed.
EPG
(Electronic
Program Guide)
Allow to view the 7-day programs
forecast, and set the reminder for the
favorite programs.
EDIT FAVOURITE LIST
Highlight the Edit Favourite List option, then press OK button to enter the menu, then you can create,
modify, and delete a favourite channel list. There are three options in the menu.
Confirm
CREATE A FAVOURITE LIST
Highlight the Create a Favourite List option, press OK button, then the menu and the quarter-screen image
will display on the screen. Once you enter the Create a Favourite List menu, a new channel list will be
created. You can create four favourite lists at most.
Using The DTV Features
25
Page 27

Preparation
1
2
3
4
5
6
BBC ONE
CBBC Channel
BBC TWO
FAV 1
BBC THREE
BBC NEWS 24
BBCi
Modify a f avourite list
Lock
Sk ip Sk ip A dd AllSort Mov e
Exit Screen
EXIT
Using The DTV Features
Introducing the LCD TV
Installing the LCD TV
You can lock or unlock the selected channel by pressing the RED button. By pressing the GREEN button
you can skip the channel. If you want to add back the skipped channel, press the GREEN button again. If
you want to skip or add all, first press the BLUE button to skip all, then press the RED button to confirm. To
add back all skipped channels, press the BLUE button again and press the GREEN button to confirm. The
locked channels will have a lock icon (RED button) against the channel name; The added channels will
have an add icon (tick) against the channel name.
MODIFY A FAVOURITE LIST
You can modify the favourite list which you have created. The list named “TV/RADIO” is the default favourite
channel list, and it cannot be modified or deleted. The rest are your created favourite list. Select a favourite
list, then press OK button to modify the list.
Using The Features Troubleshooting Specifications
Modify a f avourite list
Create a f avour ite li st
Lo ck Sk ip Sk ip A dd A llSort Mov e
TV R ADI O
FAV1
FAV2
1
2
3
4
5
6
FAV 1
BBC ONE
BBC TWO
BBC THREE
CBBC Channel
BBC NEWS 24
BBCi
EXIT
Exit Screen
Using The DTV Features
OK
EXIT
(Note: Parental control should be activated to enable channel lock.)
By pressing the YELLOW button you can sort the channels in the list. Press the RED button to sort the
channels alphabetically or press the BLUE button to sort the channels manually. If you want to lock the
channel, press the YELLOW button to lock the selected channel. Press the YELLOW button again to
unlock the locked channel. If you have locked several channels, the locked channels will be placed at the
bottom of the Channel list in alphabetical order.
Modify a f avourite list
FAV 1
1
BBC ONE
2
BBC TWO
3
BBC THREE
4
CBBC Channel
5
BBC NEWS 24
6
BBCi
Alphabetical
sort
EXIT
sort
Cancel operation
MoveLock Unlock
26
Page 28

Using The DTV Features
When you have completed the edit, press the EXIT button to leave the Modify a Favourite list menu. The
pop-up menu will ask whether you want to save the changes you have made. Use the ŻŹbuttons to
highlight YES option, and press the OK button to save the changes. ( Note: You can only edit four
favourite channel lists at most. )
EXIT
OK
Once the channel is locked, you must enter the PIN Code that is previously set in the Parental Control
menu in order to display the channel again. Otherwise, the menu will pop-up and request to enter the
PIN-code again.
PreparationInstalling the LCD TVUsing The FeaturesTroubleshootingSpecifications
Introducing the LCD TV
Enter PIN code
On the programe screen, press the OK button to display the FAV menu. For the four FAV menus, the
skipped channel name will not be shown unless you add it in the Create/Modify a Favorite List again.
FAV2
1 BBC ONE
BBC THREE
3
BBC NEWS
4
BBCi
24
TH
OK
EXIT
DELETE A FAVOURITE LIST
Use the Ÿź buttons to highlight the list name which you want to delete, then press the OK button to
delete the favourite list, the pop-up menu will ask you to confirm or cancel the delete operation.
( Note: You can only delete the list you created and not the default favourite channel list.)
Using The DTV Features
Delete a favourite list
You ar e g oing to rem ove th e fav ourite lis t
press OK to confirm.
EXIT OK
27
Page 29

Preparation
Full scan channels installation
Chan nel s found 6:
CBBC Chann el
BBCi
BBC N EWS 24
BBC TH REE
BBC TW O
BBC O NE
Scanning in pr ogress
Signal quality
EXIT
Introducing the LCD TV
Installing the LCD TV
Using The DTV Features
CONFIGURATION
Highlight the Configuration option in the DTV menu, then press OK button to enter the selected option. The
Configuration menu will display as display as following:
Configuration
Channel Installati on
User Setti ngs
System Parameters
Si gnal Informati on
CHANNEL INSTALLATION
Use these options (Channel Installation (auto), Channel Installation (manual), and New Detected
Channels) if you have moved to another location or want to rescan for new channels.
Using The Features Troubleshooting Specifications
Using The DTV Features
CHANNEL INSTALLATION (AUTO)
If you want the TV to do auto search for the channels, use the Ÿźbuttons to highlight the Channel
Installation (auto) and press OK button to confirm. You can choose the installation type by using theŻŹ
buttons. Press the OK button to start the installation process. If you choose ‘Add’, the new channels will be
added in the channel list. If you choose ‘New’, the new channels will replace the previous channels in the
channel list
Confirm
OK
EXIT
OK
EXIT
.
Channel Installation
Installation type
28
Add
OK
EXIT
Page 30

Using The DTV Features
CHANNEL INSTALLATION (MANUAL)
If you want to install the channels by yourself, use the Ÿźbuttons to highlight the Channel Installation
(manual) option, and press OK button to install manually. First, you should choose the installation type,
then you will see the following menu.
PIN code change
Channel Installation (manual)
PreparationInstalling the LCD TVUsing The FeaturesTroubleshootingSpecifications
Cha nnel
Quality
22
OK
EXIT
Use the ŻŹ buttons to choose the channel, the bar graph of signal quality will indicate whether
the channel is likely to be found. You should choose the channel of which the signal quality bar is high,
then press the OK button to scan the channel.
NEW DETECTED CHANNELS
Use the Ÿźbuttons to hightlight New Detected Channels in the Channel Installation menu, press OK
button to confirm. The TV will start searching the programes, and the programe names will be listed and
started. Once the scanning is completed, the message “ Installation completed. Please wait...” will
display on the screen.
Full scan chann els ins talla tion
Channels found 6:
CBBC Channel
BBCi
BBC N EWS 24
BBC TH REE
BBC TW O
BBC O NE
Scanning in pr ogress
Signal quality
Ch ann el Ins tal lati on
Ins tallation comp leted
Please wait
Introducing the LCD TV
EXIT
If after the TV scanning, the TV still found none, the message “Installation failed, please wait...” will display
on the screen.
Full scan ch ann els i nstallation
Channels found: 0
Scanning in prgress
Signal quality
EXIT
Channel Installation
Ins tallation failed
Please wait
Using The DTV Features
29
Page 31

Preparation
System Upgra de
Syste m P ara m eters
System Informati on
Fa ct or y Re se t
OK
EXIT
Introducing the LCD TV
Installing the LCD TV
Using The DTV Features
After you added the new channel, use the Ÿź buttons to highlight the New Detected Channels menu and
press OK button to confirm. It will display the following menu. The New Detected Channels menu shows
the channels that you add in the channel list recently. The type icon of the program is displayed against
the channel name.
EXIT
USER SETTING
Use the Ÿźbuttons to highlight the User Settings option in the Configuration menu, then press the OK
button to display the User Settings menu.
Using The Features Troubleshooting Specifications
AUDIO LANGUAGE
This function allows you to select which language you will hear when switching to a channel that has
Using The DTV Features
multiple language soundtracks. Use the ŻŹbuttons to choose among the language options, and
press the OK button to confirm.
SUBTITLE LANGUAGE
This function allows you to select the desired subtitle language whenever the subtitle information is
available. Use ŻŹ buttons to choose among the language options, and press the OK button to confirm.
SYSTEM PARAMETERS
Use the Ÿźbuttons to highlight System Parameters in the Configuration menu, then press the
OK button to display the System Parameters menu.
Configuration
Chan nel Inst allat ion
User Setti ngs
System Parameters
Si gnal Information
OK
EXIT
30
Configuration
Channel I nstallati on
User Settings
System Parameters
Si gnal Informati on
OK
EXIT
Page 32

Using The DTV Features
DTV
Warning all se tting s includ ing
previously stared TV channels will be erased
Do you want to proceed "
Re in stallat ion c onfirmation
-
Ye s
OK
EXIT
System Upgrade
Configura tionConfigura tionConfigura tion
D o y ou wa nt to upgrade your software?
Yes
EXIT
EXIT OK
SYSTEM UPGRADE
Highlight the System Upgrade option in the System Parameter menu, and press OK button to display
the System Upgrade menu. Use ŻŹbuttons to choose YES/NO for software upgrade, press OK button
to confirm or EXIT button to exit the menu screen.
System Parameters
System Upgra de
System Informati on
Fa ct or y Re se t
OK
EXIT
SYSTEM INFORMATION
Highlight the System Information option in the System Parameter menu, and press OK button to display
the System Information menu. You can view the system information in this menu; however, you can
modify nothing in this menu. Press OK button to exit from the menu.
PreparationInstalling the LCD TVUsing The FeaturesTroubleshootingSpecifications
Introducing the LCD TV
Syste m Para m e ters
System Upgr ade
System Informat ion
Factory Reset
OK
EXIT
ConfigurationSystem Information
Devic e
Soft w are vers ion
Hardwar e Model
Hardwar e Releas e
Hardware Version
iDTV5105 Plug in
UK_20070403
ST5105
ST5105
V2 1
OK
FACTORY RESET
Hightlight the Factory Reset option in the System Parameter menu, and press OK button to display the
Re-installation Confirmation menu. This function allows you to reset the DTV configuration back to factory
default setting. Use the ŻŹ buttons to hightlight the YES/NO option, and press OK button to confirm.
System Param eters
System Upgr ade
System Informat ion
Fa ct or y Re se t
Using The DTV Features
OK
EXIT
31
Page 33

Preparation
Introducing the LCD TV
Using The DTV Features
SIGNAL INFORMATION
Highlight the Signal Information option in the Configuration menu, press OK button to display the Signal
Information menu. Cycle through the channel options by pressing the ŻŹbuttons on the remote control.
The bar graph of signal quality will give a good indication on whether the selected channel is likely to be
found. If the signal quality bar is high, then the digital frequency and digital channel are llikely to be found
as well.
Installing the LCD TV
PARENTAL CONTROL
Highlight the Parental Control option in the DTV menu, then press OK button to enter the selected option.
Using The Features Troubleshooting Specifications
The Parental Control menu will display as following:
Configuration
Channel Installation
User Settings
System Para mete rs
Si gnal Informati on
Signal Information
DTV
DTV
DTV
DTV
DTV
EXIT
OK
EXIT
Configuration
Configuration
Configuration
User Settings
ConfigurationConfigurationConfiguration
Parental Control
Loacl Time offset
Parental Control
Audi o la nguage
Subtitle language
Receiver lock
Subtitle dis play
Configuration Menu
Dolby Digital
Channel lock
Opacity Level
Antenna Power
Maturity level
Enabled
Yes
Yes
Yes
None
Using The DTV Features
Confirm
PIN code change
OK
EXIT
Highlight the Parental Control option in the Parental Control menu and use the ŻŹbuttons to choose the
Enable or Disable option. Set this option to enable, and the following items (eg. Receiver Lock,
Configuration Menu, Channel Lock, and Maturity Level) can be altered.
RECEIVER LOCK
Use the ŻŹbuttons to choose between YES and NO. If you choose YES option and press OK button to
confirm, you will need to enter the PIN CODE before you can see the DTV program again.
(Note: The default PIN Code is 0000. If you forget the PIN CODE, please press RED RED, GREEN GREEN,
YELLOW YELLOW, BLUE BLUE buttons for super code.)
Pare nta l Co ntrol
Parent al Contr ol
Receiver lock
Conf igurati on Menu
Channe l loc k
Maturity level
PIN code change
Enabled
Yes
Yes
Yes
None
OK
EXIT
receiver
EXIT
32
Page 34

Using The DTV Features
CONFIGURATION MENU
Use the ŻŹbuttons to choose between YES and NO. If you choose the YES option, you will need to enter
the PIN CODE before re-entering the Configuration menu.
DTV
DTV
DTV
DTV
DTV
Configuration
Configuration
Configuration
User Settings
ConfigurationConfigu rationConfiguration
Parenta l Co ntrol
Loacl Time offset
Parent al Contr ol
Audio language
Subtitle language
Receiver lock
Subtit le di spl ay
Conf igurati on Menu
Dolby Digital
Channe l loc k
Opaci ty Level
Ant enna Pow er
Maturity level
Enabled
Yes
Yes
Yes
None
PreparationInstalling the LCD TVUsing The FeaturesTroubleshootingSpecifications
PIN code change
OK
EXIT
CHANNEL LOCK
Use the ŻŹbuttons to choose between YES and NO. If you choose the YES option, the channels you
locked in the edit channel list menu cannot be displayed until you enter the PIN CODE.
DTV
DTV
DTV
DTV
DTV
Configuration
Configuration
Configuration
User Settings
ConfigurationConfigu rationConfiguration
Parenta l Co ntrol
Loacl Time offset
Parent al Contr ol
Audio language
Subtitle language
Receiver lock
Subtit le di spl ay
Conf igurati on Menu
Dolby Digital
Channe l loc k
Opaci ty Level
Ant enna Pow er
Maturity level
PIN code change
Enabled
Yes
Yes
Yes
None
OK
EXIT
MATURITY LEVEL
There are 18 levels total, and you can choose this option from 1 to 18. For example, 15: If the
channels broadcast material that is not suitable for viewers under 15 years old, you must enter the
PIN CODE before you can view them ( Please refer to the broadcast channel for the program’s
maturity level information). If you choose NONE, you can view all the maturity levels programs, and
there is no need to enter PIN code.
DTV
DTV
DTV
DTV
DTV
Configuration
Configuration
Configuration
Use r S ettings
ConfigurationConfigurationConfiguration
Parental Control
Loacl Time offset
Parental Control
Audio l anguage
Subtitle language
Receiver lock
Subtitle dis play
Conf igurati on Menu
Dolby Digital
Channe l loc k
Opacity Level
Antenna Power
Maturity level
Enabled
Yes
Yes
Yes
None
Introducing the LCD TV
PIN code change
OK
EXIT
PIN CODE CHANGE
Press OK button to exit the Parental Control menu and save these alteration. Press EXIT button to exit the
Parental Control menu without saving these alteration.
DTV
DTV
DTV
DTV
DTV
Configuration
Configuration
Configuration
Use r S ettings
ConfigurationConfigurationConfiguration
Parental Control
Loacl Time offset
Parent al Contr ol
Audio l anguage
Subtitle language
Receiver lock
Subtitle dis play
Conf igurati on Menu
Dolby Digital
Channe l loc k
Opacity Level
Antenna Power
Maturity level
PIN code change
Enabled
Yes
Yes
Yes
None
OK
EXIT
Using The DTV Features
33
Page 35

Preparation
Using The DTV Features
Press the RED button will to pop-up the PIN code change menu. Enter the previous code by using the 0-9
Introducing the LCD TV
Installing the LCD TV
Using The Features Troubleshooting Specifications
buttons on the remote control, then enter the new code twice to confirm. This menu will disappear. Press EXIT
to quit without saving the new code.
EPG
EPG ( Electronic Programme Guide ) menu can be accessed by pressing GUIDE button, and can be
quitted by pressing GUIDE button again. Highlight the EPG option in the DTV menu, then press OK button
to enter the EPG menu. Press the EXIT button to exit the EPG menu.
Confirm
EXIT
Configuration
Configuration
Configuration
Use r Se ttings
Configuration
Configuration
Configuration
Configuration
Use r Se ttings
Configuration
Tuesday 2 7 09
Tuesday 2 7 09
19 35 Diaguno sis Murder
19 35 Diaguno sis Murder
20 20 BBC N ews
20 20 BBC N ews
20 25 ChuckleVision
20 25 ChuckleVision
20 40 Pitt and Vampire
20 40 Pitt and Vampire
21 00 Mona the Vampire
21 00 Mona the Vampire
21 15 Mona the Vampire
21 15 Mona the Vampire
21 35 The Crust
21 35 The Crust
22 00 Byker Grave
22 00 Byker Grave
22 25 Newsround
22 25 Newsround
REMINDER
REMINDER
1 BBC ONEGUIDE
1 BBC ONEGUIDE
Diagnasis Murder
Diagnasis Murder
19 35 20 20
19 35 20 20
This is the Last Day of the
This is the Last Day of the
Rest of My Li fe A new
Rest of My Li fe A new
physician is causing a stir
physician is causing a stir
at Community General
at Community General
when she assists in a
when she assists in a
term inally ill pa tient s
term inally ill pa tient s
OTHER DAYSiDETAIL S
i
DTV
DTV
DTV
DTV
DTV
DTV
DTV
DTV
DTV
DTV
2.
2.
2.
2.
2.
2.2.2.
2.
EXIT
EXIT
EXIT
EXIT
EXIT
EXIT
Using The DTV Features
Current program is displayed in the quarter-screen image window. Use the Ÿźbuttons to change
channels and view the programmes’ brief description. There is a 7-day EPG, you can see the channel lists
by pressing the ŻŹbuttons. The brief description of the highlighted channel is shown under the image
window, and you can see the extended description by pressing the INFO or OK button. Press either one of
these buttons again to close the window.
DTV
DTV
DTV
DTV
DTV
DTV
DTV
DTV
DTV
DTV
Configuration
Configuration
Configuration
Use r Se ttings
Configuration 1 BBC ONEGUIDE
Configuration
Configuration
Configuration
Use r Se ttings
Configuration 1 BBC ONEGUIDE
Diag nos is Mu rder
14 35 15 20
Th is is t he Last Day of th e R est of My Life A n ew
physician is causing a stir at Community General
wh en sh e ass ists in a t ermin ally ill pat ient s s uic ide
>@
again st th e w ish es of Dr S loan S
DETAIL S
i
Use the Ÿźbuttons to highlight the program name you want to watch but have not broadcasted. Press
the RED button to set reminder for the right program, and the reminder icon (RED button) will appear
against the program name. Press the RED button again to remove the reminder icon.
DTV
DTV
DTV
DTV
DTV
DTV
DTV
DTV
DTV
DTV
Configuration
Configuration
Configuration
Use r Se ttings
Configuration
Configuration
Configuration
Configuration
Use r Se ttings
Configuration
Tuesday 2 7 09
Tuesday 2 7 09
19 35 Diagunosis Murder
19 35 Diagunosis Murder
20 20 BBC N ews
20 20 BBC N ews
20 25 ChuckleVision
20 25 ChuckleVision
20 40 Pitt and Vampire
20 40 Pitt and Vampire
21 00 Mona the Vampire
21 00 Mona the Vampire
21 15 Mona the Vampire
21 15 Mona the Vampire
21 35 The Crust
21 35 The Crust
22 00 Byker Grave
22 00 Byker Grave
22 25 Newsround
22 25 Newsround
REMINDER
1BBCONEGUIDE
1BBCONEG U I D E
OTHER DAYSiDETAIL S
Diagnasis Murder
Diagnasis Murder
19 35 20 20
19 35 20 20
This is the Last Da y of the
This is the Last Da y of the
Rest of My Li fe A new
Rest of My Li fe A new
physician is causing a stir
physician is causing a stir
at Community General
at Community General
when she assists in a
when she assists in a
term inally ill pa tient s
term inally ill pa tient s
2.
2.2.2.2.2.
EXIT2.EXIT2.EXIT
EXITEXIT
EXIT
When the program you set reminder for begins, a pop-up menu will ask you if you want to watch the
program while you are watching another channel.
34
Page 36

Troubleshooting
Before consulting service personnel, check the following chart for a possible cause of problem
and for a possible solution.
TV will not turn on
Make sure the power cord is plugged in.
n
The batteries in the remote control may be exhausted.
o
Replace new and same brand batteries.
p
No picture, no sound
Check the interface cable between TV and antenna / cable TV.
n
Press the STANDBY button on the remote.
o
Press the INPUT button repeatedly on the remote to select the
p
connected video sources.
Poor picture, sound OK
Check the interface cable between TV and antenna / cable TV.
n
Try another channel, the station may have broadcast difficulties.
o
Adjust the Brightness / Contrast options in the VIDEO Menu.
p
PreparationInstalling the LCD TVUsing The FeaturesTroubleshootingSpecifications
Introducing the LCD TV
Picture OK, poor sound
Sound may be muted. Press the button on the remote.
n
Press the VOL.+ button to increase the volume.
o
Audio noise
Move any infrared equipment away from the TV.
n
Using The DTV Features
35
Page 37

Preparation
Specifications
Introducing the LCD TV
Installing the LCD TV
Using The Features
KEY FEATURES
Various Audio/Video terminals for external equipment connection
ƒ 1 set of composite A / V input terminals
ƒ 1 SCART input terminals
ƒ 1 set of component Video input terminals
ƒ 1 VGA / Audio input terminal
ƒ 1 HDMI / Audio input terminals
ƒ 1 Headphone terminal
High Definition Multimedia Interface ( HDMI )
ƒ High Definition Multimedia Interface ( HDMI ) is a small, user-friendly interconnect that can carry up
to 5 Gbps of combined video and audio in a single cable. This system eliminates the cost, complexity
and confusion of multiple cables used to connect current A/V systems.
HDTV Component Video Inputs
ƒ Offers the best video quality for DVD ( 480p and 576p ) and digital set-top-box ( HD1080i, 720p )
connections.
WSS ( Wide Screen Scale ) Function
ƒ This function can automatically convert and display any aspect ration ( 4:3 / Wide ) TV broadcast
signal.
Using The DTV Features
Troubleshooting
Built-in ATV and DTV Tuners
ƒ The built-in DTV tuner allows the reception of DVB-T broadcasting without the addition of a set-top
box.
Specifications
36
Page 38

Specifications
DISPLAY MODES
The screen resolution has been optimized during production for the display modes listed below.
If the signal from the system equals the standard signal mode, the screen adjusts automatically. If the
signal from the system is not equal to the standard signal mode, adjust the screen resolution by referring
to your Video Card’s user guide, otherwise there may be no video.
Y Pb Pr Mode
Horizontal pixels x Vertical Scan Line Vertical Frequency(Hz) Aspect Ratio
480P: 720 x 480
480I: 720 x 480 16:10 (Wide), 4:3
576P: 720 x 576
576I: 720 x 576 16:10 (Wide), 4:3
720P: 1280 x 720
1080I: 1920 x 1080
60
50
50 16:10 (Wide), 4:3
60 16:10 (Wide), 4:3
50 16:10 (Wide), 4:3
60 16:10 (Wide), 4:3
VGA Mode (For 19”)
This unit may not support some VGA resolutions due to to the VGA source output signal. In certain extreme cases, the unit will
only display a black or blue screen. If this happens, please change to another resolution or vertical frequency and tr y again.
For best performance the Vertical Line Frequency should be set to 60Hz.
Horizontal pixels x Vertical Scan Line Vertical Frequency(Hz) Aspect Ratio
60 16:10 (Wide), 4:3
640 x 480
800 x 600
1024 x 768
72 16:10 (Wide), 4:3
75 16:10 (Wide), 4:3
60 16:10 (Wide), 4:3
72 16:10 (Wide), 4:3
75 16:10 (Wide), 4:3
60 16:10 (Wide), 4:3
70 16:10 (Wide), 4:3
75 16:10 (Wide), 4:3
16:10 (Wide), 4:3
16:10 (Wide), 4:3
Preparation
Introducing the LCD TV
Installing the LCD TV
Using The FeaturesTroubleshootingSpecifications
VGA Mode (For 15.4”)
Horizontal pixels x Vertical Scan Line Vertical Frequency(Hz) Aspect Ratio
640 x 480 60 16:10 (Wide), 4:3
800 x 600 60 16:10 (Wide), 4:3
1024 x 768
60 16:10 (Wide), 4:3
70 16:10 (Wide), 4:3
HDMI Mode
Horizontal pixels X Vertical Scan Line Vertical Frequency(Hz) Aspect Ratio
480P: 720 x 480 60 16:10 (Wide)
576P: 720 x 576 50 16:10 (Wide)
720P: 1280 x 720
1080I: 1920 x 1080
50 16:10 (Wide)
60 16:10 (Wide)
50
60 16:10 (Wide)
16:10 (Wide)
Features
Using The DTV
37
Page 39

Preparation
Specifications
MODE HIT15WDVB HIT19WDVB
Introducing the LCD TV
Installing the LCD TV
Using The Features
Panel System 15.4 inch LCD panel 19 inch LCD panel
Display Resolution 1280 pixels ( horizontal ) x 800 pixels
( vertical )
Television System PAL- I PAL- I
Brightness 250 cd/m
Contrast Ratio 400:1 850:1
Inputs / Output
SCART
HDMI
VGA
PC Audio In
Video In
2
11
11
11
11
11
1440 pixels ( horizontal ) x 900
pixels
( vertical )
350 cd/m
2
Using The DTV Features
Troubleshooting
S-video In
Earphone
Y Pb Pr
Digital Out
ANT In
Speaker Power 3 W+3 W 3 W+3 W
Power Source ( MAX )
Dimension ( W x D x H )
Weight ( Net )
Features and specifications are subject to change without notice.
100-240 V~, 50/60 Hz, 50 W 100-240 V~, 50/60 Hz, 60 W
286.6 x 180 x 352.2mm 458.4 x 200 x 412.25mm
11
11
11
11
11
3.5 Kg 5.5 Kg
Specifications
38
Page 40

Connecting to a VCR and
PCAUDIO IN
AC IN 100-240V
50/60Hz
AC POWER
SWITCH
VHF/UHF IN
Region Confirm
Country UK
Start APS
OK: Start Searching
Is aerial plugged in
Press OK to start APS
Press MENU to exit APS
Quick
Start
Guide
HIT15WDVB
HIT19WDVB
PLEASE NOTE:
By using a SCART lead (not supplied) you can improve
the quality of playback and sound. Remember you must
still have the aerial lead (not supplied) connected. If you
are using a SCART lead you should not have to tune
your TV to your video, instead select the SCART channel
by pressing the TV/SCART button on the remote control.
GB
3a
A If you have a SCART lead, connect one
end of the lead to the SCART socket on
your VCR and connect the other end to
the SCART socket marked SCART on the
back of your TV.
B Connect one end of the RF
C Connect your aerial lead
to the socket marked RF
IN on the back of your
VCR.
Now go to stage 4.
Connecting to a VCR
Do not connect the TV to the mains supply until you have completed all the connections.
lead to the aerial socket on
your TV and the other end to
the socket marked RF OUT
on the back of your VCR.
C
OR
a Satellite/Cable box
3b
A Connect one end of an RF lead to the aerial
socket marked on your TV and the other end
to the socket marked RF OUT on the back of
your VCR.
B Connect one end of another RF lead to the
aerial socket marked RF IN on your VCR and
the other end to the socket marked RF OUT on
the back of your Satellite/Cable box.
AC IN 100-240V
AC POWER
50/60Hz
SWITCH
PCAUDIO IN
VHF/UHF IN
B
A
C
B
A
VCR
Satellite/Cable
Box
C Connect your aerial lead to the socket marked
D
RF IN on the back of your Satellite/Cable box.
D If you have SCART leads connect one end to
the socket marked SCART on the back of your
TV, and connect the other end to the SCART
socket on the back of your VCR.
Now go to stage 4.
1
Insert batteries into
Remote Control
Use 2 x AAA size batteries.
Other connections
4
Switch on
Select & Start the APS menu
5
Connect aerial
2
Do not connect the TV to the mains supply until
you have completed all the connections.
z If you just want
to connect your
TV to an aerial
connect it as shown
opposite.
z If you want to
connect your TV
to a VCR
go to stage 3a.
z If you want to
connect your TV
to a VCR and
a Satellite/Cable
box then
go to stage 3b.
Connect one end of the aerial lead to the aerial
socket on the wall and the other end of the lead to
the appropriate socket on the back of your TV.
Now go to stage 4.
VHF/UHF IN
AC IN 100-240V
AC POWER
AC IN 100-240V
AC POWER
50/60Hz
SWITCH
50/60Hz
SWITCH
PCAUDIO IN
PCAUDIO IN
Plug your TV and any other equipment that you have connected into the mains.
A
Press the AC SWITCH on the back of your TV to switch on your TV's power.
B
C
Then press the
screen.
Note:
z It is recommended to complete the VCR channel set up before the TV tuning process.
AC IN 100-240V
AC POWER
50/60Hz
SWITCH
PCAUDIO IN
VHF/UHF IN
Connect your VCR to the TV and the antenna, then switch it on. Insert a pre-recorded tape and press
PLAY. This can help you to easily find the VCR channel as it will play the pre-recorded tape.
z Before you start up the TV tuning process, the Satellite/Cable channel set up are recommended to
complete prior to the TV tuning process.
Connect your Satellite/Cable box to the TV and the antenna, and then switch it on. Select a channel
that you will easily recognise. This can help you to easily find the satellite/cable channel since the TV will
play that selected channel.
button on the right side view of your TV to switch on your TV. The screen will be blue
VHF/UHF IN
INPUT
Turn on the TV. The main menu will appear automatically (as shown above).
A
Press ɹɷto select Country, then press OK to enter menu option.
B
Press ɺɸto select country as you wish, press OK to exit the current menu.
C
Press ɹɷto select the Start APS, then press OK to start the channel tuning. Your TV
D
will now automatically start to tune in all available channels, including your VCR and
Satellite / Cable channel if you connected a VCR or Satellite / Cable box. Please be
patient, the tuning process may take a few minutes.
Note: Press OK to exit when the tuning process is finished.
RCT-1522
Page 41

Sorting a channel
RCT-1522
Skipping a channel
Checklist...
6
Press the MENU button on the remote control to enter the menu option.
A
B
Press ɺɸ to select SETUP.
Pressɹɷto select CHANNEL SETUP, press OK to enter CHANNEL
C
SETUP.
Press ɹɷ to select SORT, press OK to display the menu (as shown above).
D
E
Press ɹɷ to select the channel, press OK to sort the channel.
RCT-1522
7
A
B
C
Press the MENU button on the remote control to return to the CHANNEL
SETUP.
Press ɹɷ to select the SKIP, press OK to enter menu option.
Press ɹɷ to select the channel, press OK to skip the selected channel.
You should have...
zPut the two AAA size batteries in your remote
control.
zConnected your TV to an aerial or VCR and/or
VCR Satellite/Cable box.
zSwitched on your TV and any other connected
equipment.
zTuned in all available channels.
Channel 1 .............. BBC1
Channel 2 .............. BBC2
Channel 3 .............. ITV
Channel 4 .............. CH4
Channel 5 .............. CH5
Channel 6 .............. Satellite/Cable
Channel 7 .............. VCR
8
Deleting a channel
Press the MENU button on the remote control to return to the CHANNEL
A
SETUP.
Press ɹɷ to select the delete, press OK to enter menu option.
B
Press ɹɷ to select the channel, press OK to be deleted.
C
RCT-1522
9
A
B
DTV Scan channel
Full sca n ch a nn e ls in sta lla tio n
Channels found 0
Scanning in progr ess
Signal quality
EXIT
When the APS process has finished, The DTV scan channel menu will appear (as
shown above).
The TV will automatically search and sort the channel.
Your TV is now fully tuned in, and ready to watch.
Note: If you encounter problems receiving digital signals this may be due to having
an inadequate aerial (you may have an old “Analogue” aerial). A replacement
“Digital” aerial will be required, contact your local aerial installer for further
information.
RCT-1522
Basic functions
1 After connecting the aerial to your LCD TV and connecting the mains cable to
the TV and mains socket, press AC SWITCH on the rear panel of the TV.
2 A red LED indicator will show on the front panel of the TV.
3 Press the STANDBY button, and the red LED indicator will change to
green.
4 To power off, press the STANDBY button again, and the green LED
indicator will change to red.
In the interests of safety and to avoid unnecessary energy
consumption, never leave your TV in standby while unattended for
long periods of time, eg. overnight, while on holiday or while out
of the house.
Changing channels
Press the NUMBER buttons to go directly to a channel e.g. press the number 1
button to go to channel 1. For a channel number above 9, for instance, channel 12
press the number 1 button quickly followed by the number 2 button.
To move up and down the channels in order press the CH.ɷ or CH.ɹ button.
Adjusting the volume
Press the VOL.+ button to increase the volume. Press the VOL. - button to decrease
the volume.
Selecting Teletext
Press the button to select Teletext. Press button again to select MIX. This will
let you read the Teletext and still see the picture on your TV. The third time that you
press the button, text will clear from the screen.
This symbol on the product or in the instructions means that your
electrical and electronic equipment should be disposed at the
end of its life separately from your household waste. There are
separate collection systems for recycling in the EU.
For more information, please contact the local authority or your
retailer where you purchased the product.
Page 42

This symbol on the product or in the instructions means that your electrical and electronic equipment should be disposed
at the end of its life separately from your household waste. There are separate collection systems for recycling in the EU.
For more information, please contact the local authority or your retailer where you purchased the product.
Visit Partmaster.co.uk today for the easiest way to buy electrical spares and accessories.
With over 1 million spares and accessories in stock we can deliver direct to your door the very next day.
Visit www.partmaster.co.uk
or call
0870 6001 338
(UK customers only)
Calls charged at National Rate.
NOTE:
For a replacement Remote Control for this product, please quote part number 845-045-LM9XB-THITH
For a replacement Power cord for this product, please quote part number 600-151-5000-LJH
For a replacement SCART Adapter for this product, please quote part number 412-SCA-0001H
For a replacement Video cables for this product, please quote part number 621-151-2000H
For a replacement Audio cables for this product, please quote part number 621-151-60002H
NOTE:
This product is exclusively available through Dixons Stores Group. In the unlikely event of a problem with your product
please return to the store where your purchase was made.
For product help or out of guarantee support:
Dixons customers please call: 08701 54 55 60
Currys customers please call: 08701 54 55 70
(All calls charged at national rates)
 Loading...