

Page 1
Disc Grinder
手提圓盤電磨機
Máy mài góc
PDA-100K • G 10SK3
Handling instructions
使用說明書
Hướng dẫn sử dụng
Read through carefully and understand these instructions before use.
使用前務請詳加閱讀
Đọc kỹ và hiểu rõ các hướng dẫn này trước khi sử dụng.
Page 2
12
1
2
8
3
9
4
15°~30°
5
6
%
7
*
0
(
AB
3
1
!
8
4
9
$
5
@
#
^
7
&
0
5
1
2
8
6
)
4
5
w
0
7 8
2
q
12mm
21
5mm
e
r
Page 3

English
1
Wrench
2
Wheel nut
3
Depressed center wheels
4
Wheel washer
5
Spindle
6
Notched part
7
Wheel guard
8
Tighten
9
Convex side
0
Lock pin
!
Washer nut
@
Sanding disc
#
Rubber pad
$
Washer
%
Guide base
^
Guide piece
&
Set plate (A)
*
Screwdriver
(
Screw
)
Diamond wheel
q
Wing bolt
Adjust the cutting depth by loosening
w
the wing bolt.
e
Wear limit
r
No. of carbon brush
中國語
扳手
砂輪螺帽
砂輪
輪墊圈
主軸
槽口部分
砂輪保護裝置
緊
凸面
鎖定銷
墊片螺帽
砂盤
橡膠墊圈
襯墊
導軌基座
導軌片
支架板 (A)
螺絲刀
螺絲釘
金剛石輪
蝶形螺栓
利用放鬆蝶形螺栓來調節切削深度
磨損極限
碳刷號
Tiếng Việt
Chìa vặn đai ốc
Khớp nối bánh mài
Bánh mài lõm giữa
Vòng đệm bánh mài
Cần trục
Phần khía rãnh
Ốp chắn bánh mài
Siết chặt
Mặt lồi
Chốt hãm
Khớp nối vòng đệm
Đĩa mài
Miếng
đệm cao su
Vòng đệm
Bệ dẫn
Tấm dẫn
Tấm kim loại cố định (A)
Tuốc nơ vít
Đinh ốc
Bánh mài kim cương
Bu lông có tai
Điều chỉnh độ sâu vết cắt bằng cách
nới lỏng bu lông có tai.
Giới hạn mài mòn
Mã số chổi than
3
Page 4

English
GENERAL POWER TOOL SAFETY WARNINGS
WARNING
Read all safety warnings and all instructions.
Failure to follow the warnings and instructions may result in
electric shock, fi re and/or serious injury.
Save all warnings and instructions for future reference.
The term “power tool” in the warnings refers to your mainsoperated (corded) power tool or battery-operated (cordless)
power tool.
1) Work area safety
a) Keep work area clean and well lit.
Cluttered or dark areas invite accidents.
b) Do not operate power tools in explosive
atmospheres, such as in the presence of
fl ammable liquids, gases or dust.
Power tools create sparks which may ignite the dust
or fumes.
c) Keep children and bystanders away while
operating a power tool.
Distractions can cause you to lose control.
2) Electrical safety
a) Power tool plugs must match the outlet.
Never modify the plug in any way.
Do not use any adapter plugs with earthed
(grounded) power tools.
Unmodifi ed plugs and matching outlets will reduce
risk of electric shock.
b) Avoid body contact with earthed or grounded
surfaces, such as pipes, radiators, ranges and
refrigerators.
There is an increased risk of electric shock if your
body is earthed or grounded.
c) Do not expose power tools to rain or wet
conditions.
Water entering a power tool will increase the risk of
electric shock.
d) Do not abuse the cord. Never use the cord for
carrying, pulling or unplugging the power tool.
Keep cord away from heat, oil, sharp edges or
moving parts.
Damaged or entangled cords increase the risk of
electric shock.
e) When operating a power tool outdoors, use an
extension cord suitable for outdoor use.
Use of a cord suitable for outdoor use reduces the
risk of electric shock.
f) If operating a power tool in a damp location
is unavoidable, use a residual current device
(RCD) protected supply.
Use of an RCD reduces the risk of electric shock.
3) Personal safety
a) Stay alert, watch what you are doing and use
common sense when operating a power tool.
Do not use a power tool while you are tired
or under the infl uence of drugs, alcohol or
medication.
A moment of inattention while operating power tools
may result in serious personal injury.
b) Use personal protective equipment. Always
wear eye protection.
Protective equipment such as dust mask, non-skid
safety shoes, hard hat, or hearing protection used for
appropriate conditions will reduce personal injuries.
c) Prevent unintentional starting. Ensure the
switch is in the off position before connecting to
power source and/or battery pack, picking up or
carrying the tool.
4
Carrying power tools with your fi nger on the switch or
energising power tools that have the switch on invites
accidents.
d) Remove any adjusting key or wrench before
turning the power tool on.
A wrench or a key left attached to a rotating part of the
power tool may result in personal injury.
e) Do not overreach. Keep proper footing and
balance at all times.
This enables better control of the power tool in
unexpected situations.
f) Dress properly. Do not wear loose clothing or
jewellery. Keep your hair, clothing and gloves
away from moving parts.
Loose clothes, jewellery or long hair can be caught in
moving parts.
g) If devices are provided for the connection of
dust extraction and collection facilities, ensure
these are connected and properly used.
Use of dust collection can reduce dust-related
hazards.
4) Power tool use and care
a) Do not force the power tool. Use the correct
power tool for your application.
The correct power tool will do the job better and safer
at the rate for which it was designed.
b) Do not use the power tool if the switch does not
turn it on and off .
Any power tool that cannot be controlled with the
switch is dangerous and must be repaired.
c) Disconnect the plug from the power source and/
or the battery pack from the power tool before
making any adjustments, changing accessories,
or storing power tools.
Such preventive safety measures reduce the risk of
starting the power tool accidentally.
d) Store idle power tools out of the reach of children
and do not allow persons unfamiliar with the
power tool or these instructions to operate the
power tool.
Power tools are dangerous in the hands of untrained
users.
e) Maintain power tools. Check for misalignment or
binding of moving parts, breakage of parts and
any other condition that may aff ect the power
toolʼs operation.
If damaged, have the power tool repaired before
use.
Many accidents are caused by poorly maintained
power tools.
f) Keep cutting tools sharp and clean.
Properly maintained cutting tools with sharp cutting
edges are less likely to bind and are easier to control.
g) Use the power tool, accessories and tool bits
etc. in accordance with these instructions,
taking into account the working conditions and
the work to be performed.
Use of the power tool for operations diff erent from
those intended could result in a hazardous situation.
5) Service
a) Have your power tool serviced by a qualifi ed
repair person using only identical replacement
parts.
This will ensure that the safety of the power tool is
maintained.
PRECAUTION
Keep children and infi rm persons away.
When not in use, tools should be stored out of reach of
children and infi rm persons.
Page 5

English
SAFETY WARNINGS COMMON FOR GRINDING
OR ABRASIVE CUTTING-OFF OPERATIONS
a) This power tool is intended to function as a grinder
or cut-off tool. Read all safety warnings, instructions,
illustrations and specifi cations provided with this
power tool.
Failure to follow all instructions listed below may result in
electric shock, fi re and/or serious injury.
b) Operations such as sanding, wire brushing or
polishing are not recommended to be performed
with this power tool.
Operations for which the power tool was not designed
may create a hazard and cause personal injury.
c) Do not use accessories which are not specifi cally
designed and recommended by the tool
manufacturer.
Just because the accessory can be attached to your
power tool, it does not assure safe operation.
d) The rated speed of the accessory must be at least
equal to the maximum speed marked on the power
tool.
Accessories running faster than their rated speed can
break and fl y apart.
e) The outside diameter and the thickness of your
accessory must be within the capacity rating of your
power tool.
Incorrectly sized accessories cannot be adequately
guarded or controlled.
f) Threaded mounting of accessories must match the
grinder spindle thread. For accessories mounted by
fl anges, the arbour hole of accessory must fi t the
locating diameter of the fl ange.
Accessories that do not match the mounting hardware of
the power tool will run out of balance, vibrate excessively
and may cause loss of control.
g) Do not use a damaged accessory. Before each use
inspect the accessory such as abrasive wheels for
chips and cracks, backing pad for cracks, tear or
excess wear, wire brush for loose or cracked wires.
If power tool or accessory is dropped, inspect for
damage or install an undamaged accessory. After
inspecting and installing an accessory, position
yourself and bystanders away from the plane of
the rotating accessory and run the power tool at
maximum no-load speed for one minute.
Damaged accessories will normally break apart during
this test time.
h) Wear personal protective equipment. Depending
on application, use face shield, safety goggles or
safety glasses. As appropriate, wear dust mask,
hearing protectors, gloves and workshop apron
capable of stopping small abrasive or workpiece
fragments.
The eye protection must be capable of stopping fl ying
debris generated by various operations. The dust mask
or respirator must be capable of fi ltrating particles
generated by your operation. Prolonged exposure to high
intensity noise may cause hearing loss.
i) Keep bystanders a safe distance away from work
area. Anyone entering the work area must wear
personal protective equipment.
Fragments of workpiece or of a broken accessory may
fl y away and cause injury beyond immediate area of
operation.
j) Hold the power tool by insulated gripping surfaces
only, when performing an operation where the
cutting accessory may contact hidden wiring or its
own cord.
Cutting accessory contacting a “live” wire may make
exposed metal parts of the power tool “live” and could
give the operator an electric shock.
k) Position the cord clear of the spinning accessory.
If you lose control, the cord may be cut or snagged
and your hand or arm may be pulled into the spinning
accessory.
l) Never lay the power tool down until the accessory
has come to a complete stop.
The spinning accessory may grab the surface and pull
the power tool out of your control.
m) Do not run the power tool while carrying it at your
side.
Accidental contact with the spinning accessory could
snag your clothing, pulling the accessory into your body.
n) Regularly clean the power tool’s air vents.
The motor’s fan will draw the dust inside the housing and
excessive accumulation of powdered metal may cause
electrical hazards.
o) Do not operate the power tool near fl ammable
materials.
Sparks could ignite these materials.
p) Do not use accessories that require liquid coolants.
Using water or other liquid coolants may result in
electrocution or shock.
KICKBACK AND RELATED WARNINGS
Kickback is a sudden reaction to a pinched or snagged
rotating wheel, backing pad, brush or any other accessory.
Pinching or snagging causes rapid stalling of the rotating
accessory which in turn causes the uncontrolled power tool
to be forced in the direction opposite of the accessory’s
rotation at the point of the binding.
For example, if an abrasive wheel is snagged or pinched by
the workpiece, the edge of the wheel that is entering into the
pinch point can dig into the surface of the material causing
the wheel to climb out or kick out. The wheel may either jump
toward or away from the operator, depending on direction of
the wheel’s movement at the point of pinching.
Abrasive wheels may also break under these conditions.
Kickback is the result of power tool misuse and/or incorrect
operating procedures or conditions and can be avoided by
taking proper precautions as given below.
a) Maintain a fi rm grip on the power tool and position
your body and arm to allow you to resist kickback
forces. Always use auxiliary handle, if provided, for
maximum control over kickback or torque reaction
during start-up.
The operator can control torque reactions or kickback
forces, if proper precautions are taken.
b) Never place your hand near the rotating accessory.
Accessory may kickback over your hand.
c) Do not position your body in the area where power
tool will move if kickback occurs.
Kickback will propel the tool in direction opposite to the
wheel’s movement at the point of snagging.
d) Use special care when working corners, sharp edges
etc. Avoid bouncing and snagging the accessory.
Corners, sharp edges or bouncing have a tendency to
snag the rotating accessory and cause loss of control or
kickback.
e) Do not attach a saw chain woodcarving blade or
toothed saw blade.
Such blades create frequent kickback and loss of control.
5
Page 6

English
SAFETY WARNINGS SPECIFIC FOR GRINDING
AND ABRASIVE CUTTING-OFF OPERATIONS
a) Use only wheel types that are recommended for
your power tool and the specifi c guard designed for
the selected wheel.
Wheels for which the power tool was not designed
cannot be adequately guarded and are unsafe.
b) The grinding surface of centre depressed wheels
must be mounted below the plane of the guard lip.
An improperly mounted wheel that projects through the
plane of the guard lip cannot be adequately protected.
c) The guard must be securely attached to the power
tool and positioned for maximum safety, so the least
amount of wheel is exposed towards the operator.
The guard helps to protect the operator from broken
wheel fragments, accidental contact with wheel and
sparks that could ignite clothing.
d) Wheels must be used only for recommended
applications. For example: do not grind with the
side of cut-off wheel.
Abrasive cut-off wheels are intended for peripheral
grinding, side forces applied to these wheels may cause
them to shatter.
e) Always use undamaged wheel fl anges that are of
correct size and shape for your selected wheel.
Proper wheel fl anges support the wheel thus reducing
the possibility of wheel breakage. Flanges for cut-off
wheels may be diff erent from grinding wheel fl anges.
f)
Do not use worn down wheels from larger power tools.
Wheel intended for larger power tool is not suitable for
the higher speed of a smaller tool and may burst.
ADDITIONAL SAFETY WARNINGS SPECIFIC
FOR ABRASIVE CUTTING-OFF OPERATIONS
a) Do not “jam” the cut-off wheel or apply excessive
pressure. Do not attempt to make an excessive
depth of cut.
Overstressing the wheel increases the loading and
susceptibility to twisting or binding of the wheel in the cut
and the possibility of kickback or wheel breakage.
b) Do not position your body in line with and behind
the rotating wheel.
When the wheel, at the point of operation, is moving
away from your body, the possible kickback may propel
the spinning wheel and the power tool directly at you.
c) When wheel is binding or when interrupting a cut
for any reason, switch off the power tool and hold
the power tool motionless until the wheel comes to
a complete stop. Never attempt to remove the cutoff wheel from the cut while the wheel is in motion
otherwise kickback may occur.
Investigate and take corrective action to eliminate the
cause of wheel binding.
d) Do not restart the cutting operation in the workpiece.
Let the wheel reach full speed and carefully reenter
the cut.
The wheel may bind, walk up or kickback if the power tool
is restarted in the workpiece.
e) Support panels or any oversized workpiece to
minimize the risk of wheel pinching and kickback.
Large workpieces tend to sag under their own weight.
Supports must be placed under the workpiece near the
line of cut and near the edge of the workpiece on both
sides of the wheel.
f) Use extra caution when making a “pocket cut” into
existing walls or other blind areas.
The protruding wheel may cut gas or water pipes,
electrical wiring or objects that can cause kickback.
6
GENERAL SAFETY INSTRUCTIONS FOR
GRINDERS
– Check that speed marked on the wheel is equal to or
greater than the rated speed of the grinder;
– Ensure that the wheel dimensions are compatible with
the grinder;
– Abrasive wheels shall be stored and handled with care in
accordance with manufacturer’s instructions;
– Inspect the grinding wheel before use, do not use
chipped, cracked or otherwise defective products;
– Ensure that mounted wheels and points are fi tted in
accordance with the manufacturer’s instructions;
– Ensure that blotters are used when they are provided
with the bonded abrasive product and when they are
required;
– Ensure that the abrasive product is correctly mounted
and tightened before use and run the tool at no-load for
30 seconds in a safe position, stop immediately if there
is considerable vibration or if other defects are detected.
If this condition occurs, check the machine to determine
the cause;
– If a guard is equipped with the tool never use the tool
without such a guard;
– When using a abrasive cutting wheel, be sure to remove
the standard accessory wheel guard and attach the
wheel guard with side guard (sold separately);
– Do not use separate reducing bushings or adapters to
adapt large hole abrasive wheels;
– For tools intended to be fi tted with threaded hole wheel,
ensure that the thread in the wheel is long enough to
accept the spindle length;
– Check that the work piece is properly supported;
– Do not use cutting off wheel for side grinding;
– Ensure that sparks resulting from use do not create
a hazard e.g. do not hit persons, or ignite fl ammable
substances;
– Ensure that ventilation openings are kept clear when
working in dusty conditions, if it should become
necessary to clear dust, fi rst disconnect the tool from
the mains supply (use non metallic objects) and avoid
damaging internal parts;
– Always use eye and ear protection. Other personal
protective equipment such as dust mask, gloves, helmet
and apron should be worn;
– Pay attention to the wheel that continues to rotate after
the tool is switched off .
ADDITIONAL SAFETY WARNINGS
1. Ensure that the depressed center wheel to be utilized is
the correct type and free of cracks or surface defects.
Also ensure that the depressed center wheel is properly
mounted and the wheel nut is securely tightened.
2. To prolong the life of the machine and ensure a fi rst
class fi nish, it is important that the machine should not
be overloaded by applying too much pressure. In most
applications, the weight of the machine alone is suffi cient
for eff ective grinding. Too much pressure will result in
reduced rotational speed, inferior surface fi nish, and
overloading which could reduce the life of the machine.
3. The wheel continues to rotate after the tool is switched off .
After switching off the machine, do not put it down until the
depressed center wheel has come to a complete stop.
Apart from avoiding serious accidents, this precaution
will reduce the amount of dust and swarf sucked into the
machine.
4. When the machine is not use, the power source should
be disconnected.
Page 7

5. RCD
The use of a residual current device with a rated residual
current of 30 mA or less at all times is recommended.
SPECIFICATIONS
Model PDA-100K G10SK3
Power Source (by areas)
Power Input
*1
No-load speed 12,000/min
Wheel size Max. Peripheral Speed: 72 m/s (4300 m/min)
external dia. 100 mm
thickness 4 mm, 6 mm
hole dia. 16 mm
*2
Weight
*1
Be sure to check the nameplate on product as it is subject to change by areas.
*2
Only main body.
*1
(110V, 220V, 230V, 240V) 50/60 Hz (110V, 220V, 230V) 50/60 Hz
705 W
1.5 kg 1.4 kg
English
STANDARD ACCESSORIES
(1) Depressed center wheel ...............................................1
(Resinoid Wheel)
external dia. 100 mm
thickness 4 mm
hole dia. 16 mm
(2) Wrench .........................................................................1
Standard accessories are subject to change without notice.
OPTIONAL ACCESSORIES . . . . sold separately
CAUTION
Always operate the grinder with the wheel guard
attached.
1. 100mm Sanding Disc Set
Washer Nut
In case when only a relatively small metal surface area is
to be polished and it is desired to give it a particularly fi ne
fi nish, this is used for preliminary polishing of the metal
surface before applying point, for removing rust, and for
removing point when a new test is to be applied.
There are eleven diff erent kinds of sanding discs, having
grains of #16, #20, #24, #30, #36, #40, #50, #60, #80,
#100, #120. When placing your order, please specify the
grain of the disc desired.
2. Diamond Wheel Set
This is used for cutting and scribing of concrete, stone,
tile etc.
Diamond Wheel
Segment
Type
Optional accessories are subject to change without notice.
Sanding Disc
Rubber Pad
Washer
Guide Base Ass’y
APPLICATIONS
○ Removal of casting fi n and fi nishing of various types of
steel, bronze and aluminum materials and castings.
○ Grinding of welded sections or sections cut by means of
a cutting torch.
○ Grinding of brick, marble, etc.
○ Cutting and scribing of concrete, stone, tile, (use the
diamond wheel)
PRIOR TO OPERATION
1. Power source
Ensure that the power source to be utilized conforms
to the power requirements specifi ed on the product
nameplate.
2. Power switch
Ensure that the power switch is in the OFF position. If
the plug is connected to a receptacle while the power
switch is in the ON position, the power tool will start
operating immediately, which could cause a serious
accident.
3. Extension cord
When the work area is removed from the power source,
use an extension cord of suffi cient thickness and rated
capacity. The extension cord should be kept as short as
practicable.
4. Confi rming condition of the environment
Confi rm that the work site is placed under appropriate
conditions conforming to prescribed precautions.
When grinding a thin steel plate, depending upon the
state of the workbench, a loud noise will be created due
to resounding noise from the steel plate being ground. To
eliminate unwanted noise in this instance, place a rubber
mat beneath the material to be ground.
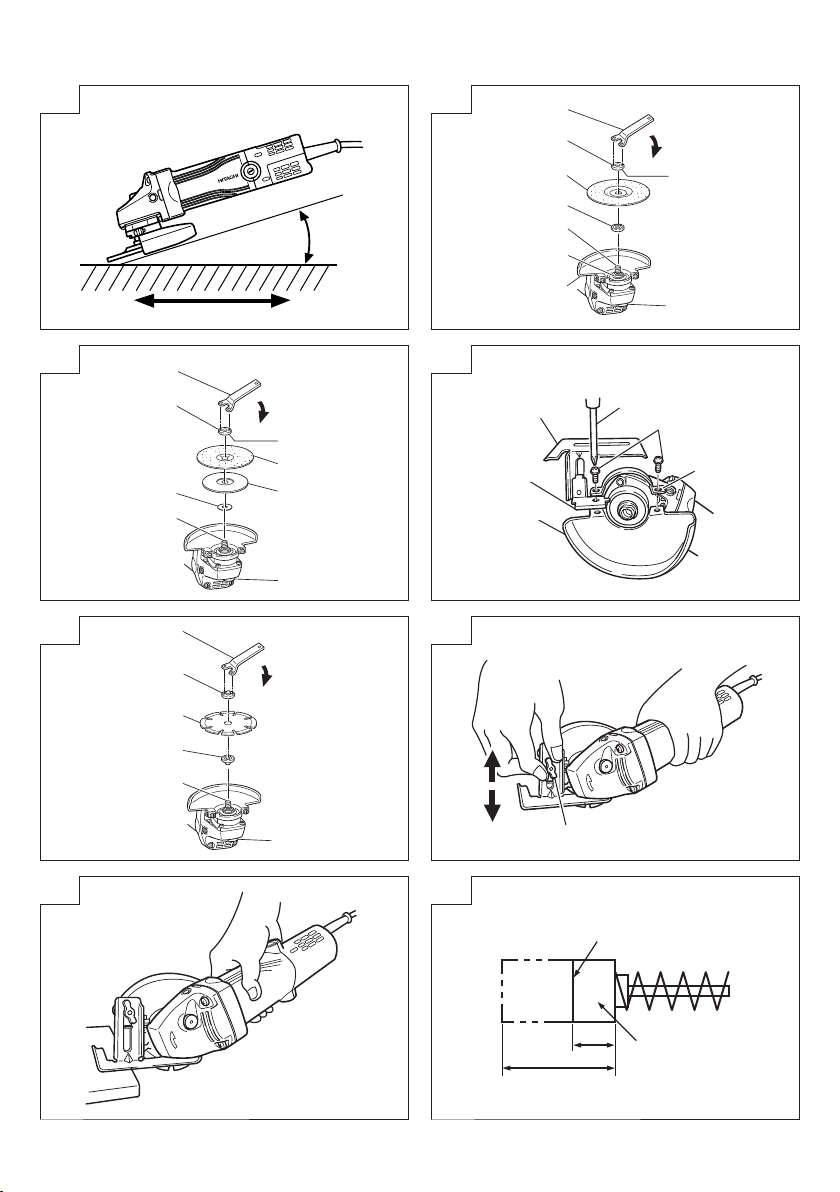
5. Mounting the wheel guard
Be sure to mount the wheel guard at an angle that will
protect the operator’s body from injury by a broken wheel
piece.
6. Confi rm the lock pin
Confi rm that the lock pin is disengaged by pushing lock
pin two or three times before switching the power tool on.
7
Page 8

English
7. Confi rming and mounting the depressed center
wheel.
Thoroughly check that a specifi ed depressed center
wheel is free of cracks and splits is mounted.
Confi rm that the depressed center wheel is mounted
under the specifi ed condition and is fi rmly clamped.
For details, refer to the item “Assembling and
Disassembling the depressed center wheel.”
8. Apply a trial run
To start grinding work without checking for possible
cracks and splits in the depressed center wheel is very
dangerous. Prior to start of grinding, direct the grinder
in a direction where no one is present, and apply a trial
run without fail to confi rm that the grinder displays no
abnormalities.
Duration of the trial run is as follows:
When depressed center wheels is replaced
............................................... 3 minutes or more
When starting daily work ................1 minute or more
PRACTICAL GRINDER APPLICATIONS
1. Since grinding by utilizing only the grinder’s own weight
is feasible, the grinder should never be pressed forcibly
against the plane to be ground Hold the grinder lightly so
that it only slightly contacts the plane to be ground.
Heavy pressure will reduce the revolving speed and
such deteriorate the fi nished surface, and phenomena as
overload will lead to burning out of the motor.
2. Do not utilize the grinder entire surface when grinding.
Use only its peripheral surface by tilting the wheel at an
angle of 15-30°, as shown in Fig. 1.
3. When a grinder equipped with a new depressed center
wheel is pushed forward (direction A), the wheel edge
may occasionally cut into the material to be ground.
Always pull it backward (direction B) in this instance.
However, once the depressed center wheel angle has
been adequately abraded, both forward and backward
operations are permissible.
4. The provided depressed center wheel (resinoid wheel) is
rated as Class A grain and #36 grain size.
Accordingly, its range of applications cover a wide
variety, proving to be most suitable for heavy grinding
of general steel materials. Since the wheel grain size
is rather coarse, creating a fi ne-surfaced fi nish is very
diffi cult.
In this instance, hold the grinder lightly as through trying
to lift it, and apply grinding slowly at a constant low
speed. Whereby a fi ne fi nish similar to that accomplished
with a fi ne-grain depressed center wheel is obtainable.
5. Switching on the grinder
The switch can be turned ON by turning its lever ON side,
or turn OFF by turning its lever to the OFF side.
6. Precaution after use
Do not lay the grinder down immediately after use in a
place where there are many shavings and much dirt and
dust until it has completely stopped revolving.
CAUTION
○ Shock to the main body can be the cause of cracks or
splits in the depressed center wheel. Be especially careful
to avoid sudden shocks when using the equipment.
If the main unit is accidentally bumped or dropped, make
a careful check for cracks or splits on the depressed
center wheel before further use.
○ Do not press the lock pin when the equipment is turning.
Also, do not turn on the switch when the lock pin is
pressed down.
ASSEMBLING AND DISASSEMBLING
THE DEPRESSED CENTER WHEEL (Fig. 2)
CAUTION
Be sure to switch power OFF and disconnect the
attachment plug from the power receptacle to avoid
serious trouble.
(1) Turn the equipment upsidedown so that the spindle will
be facing up.
(2) Mount the wheel washer onto the spindle.
(3) Mount the protuberance of the depressed center wheel
onto the wheel washer.
(4) Mount the convex side of the wheel nut onto the
depressed center wheel, and screw the wheel nut onto
the spindle.
(5) As shown in Fig. 2 push in the lock pin to prevent rotation
of the spindle. Then, secure the depressed center wheel
by tightening the wheel nut with the wrench.
CAUTION: Confi rm that the depressed center wheel is
○ Disassembling of the depressed center wheel is the
mounted fi rmly.
Confi rm that the lock pin is disengaged by
pushing lock pin two or three times before
switching the power tool on.
reverse of assembling.
HOW TO INSTALL THE OPTIONAL
ACCESSORIES
CAUTION
○ Be sure to switch power OFF and disconnect the plug
from the power receptacle to avoid serious trouble. When
utilizing the optional accessories, keep the wheel guard
attached and wear protective glasses.
○ Do not use the optional accessories which exceed
the designated external diameter designated in the
paragraph.
1. Mounting the 100 mm Sanding Disc. (see Fig. 3)
NOTE
Do not use the wheel washer and wheel nut of the
depressed center wheel.
(1) Mount the washer, rubber pad and sanding disc onto the
spindle.
(2) Screw from the washer nut onto the spindle.
(3) As shown in Fig. 3, push in the lock pin to prevent
rotation of the spindle. Then, secure the sanding disc by
tightening the wheel nut with the wrench.
2. Mounting the Diamond Wheel
CAUTION
When utilizing the diamond wheel, pay particular
attention to the following points.
(1) Utilize the correct size diamond wheel (external dia.
105 mm, internal dia. 20 mm)
(2) Do not apply cooling water or grinding fl uid while utilizing
the diamond wheel.
(3) Hold the tool fi rmly to control the tendency of the tool to
be repelled by the material during cutting operation.
(4) Ensure that the cutting depth is kept within 2-5 mm to
prevent over-heating damage to the motor. Use with
moderate cutting speed, and do not apply excessive
pressure on the workpiece.
○ Mounting the Guide Base Assembly. (Fig. 4)
(1) Loosen the two small screws on the wheel guard.
(2) Insert the guide piece between the wheel guard and set
plate (A), and tighten one of the small screws. Ensure
that the guide will not move.
(3) Set the angle of the wheel guard to a suitable position
for operation, and securely tighten the remaining small
screw to fi x the wheel guard in position.
8
Page 9

English
○ Mounting the Diamond Wheel. (Fig. 5)
NOTE
Mounting of the diamond wheel on the spindle is
illustrated in Fig. 5. Note that the wheel washer is
reversed from ordinary usage with depressed center
wheel.
(1) Mount the wheel washer and diamond wheel onto the
spindle.
(2) Mount the concave side of the wheel nut onto the
diamond wheel, and screw the wheel nut onto the
spindle.
(3) As shown in Fig. 5 push in the lock pin to prevent rotation
of the spindle. Then, secure the diamond wheel by
tightening the wheel nut with the wrench.
MAINTENANCE AND INSPECTION
1. Inspecting the depressed center wheel
Ensure that the depressed center wheel is free of cracks
and surface defects.
Replace the depressed center wheel when it has been
worn out to about 60mm in external diameter.
2. Inspecting the mounting screws
Regularly inspect all mounting screws and ensure that
they are properly tightened. Should any of the screws
be loose, retighten them immediately. Failure to do so
could result in serious hazard.
3. Maintenance of the motor
The motor unit winding is the very “heart” of the power
tool. Exercise due care to ensure the winding does not
become damaged and/or wet with oil or water.
4. Inspecting the carbon brushes (Fig. 8)
The motor employs carbon brushes which are
consumable parts. Since an excessively worn carbon
brush can result in motor trouble, replace the carbon
brush with a new one having the same carbon brush No.
shown in the fi gure when it becomes worn to or near the
“wear limit”. In addition, always keep carbon brushes
clean and ensure that they slide freely within the brush
holders.
5. Replacing carbon brushes
Disassemble the brush caps with a slotted-head
screwdriver. The carbon brushes can then be easily
removed.
6. If the supply cord of this tool damaged, it must be
replaced by a specially prepared cord available through
the service organization.
7. Service parts list
A: Item No.
B: Code No.
C: No. Used
D: Remarks
CAUTION
Repair, modifi cation and inspection of Hitachi Power
Tools must be carried out by a Hitachi Authorized Service
Center.
This Parts List will be helpful if presented with the tool to
the Hitachi Authorized Service Center when requesting
repair or other maintenance.
In the operation and maintenance of power tools, the
safety regulations and standards prescribed in each
country must be observed.
MODIFICATION
Hitachi Power Tools are constantly being improved
and modifi ed to incorporate the latest technological
advancements.
Accordingly, some parts (i.e. code numbers and/or
design) may be changed without prior notice.
NOTE
Due HITACHI’s continuing program of research and
development, the specifi cations herein are subject to change
without prior notice.
9
Page 10

中國語
一般安全規則
警告
閱讀所有安全警告說明
未遵守警告與說明可能導致電擊、火災及或其他嚴
重傷害。
請妥善保存所有警告與說明,以供未來參考之用。
「電動工具」一詞在警告中,係指電源操作(有線)
之電動工具或電池操作(無線)之電動工具。
1) 工作場所安全
a) 保持工作場所清潔及明亮。
雜亂或昏暗的區域容易發生意外。
b) 勿在易產生爆炸之環境中操作,譬如有易燃液
體、瓦斯或粉塵存在之處。
電動工具產生火花會引燃粉塵或煙氣。
c) 當操作電動工具時,保持兒童及過往人員遠
離。
分神會讓你失去控制。
2) 電氣安全
a) 電動工具插頭必須與插座配合,絕不可以任何
方法修改插頭,且不得使用任何轉接插頭於有
接地之電動工具。
不修改插頭及所結合之插座可減少電擊。
b) 避免身體接觸到接地面諸如管子、散熱器、爐
灶及冰箱。
如果你的身體接地或搭地,會增加電擊的危
險。
c) 勿讓電動工具淋雨或曝露在潮濕的環境下。
電動工具進水會增加電繫的危險。
d) 勿濫用電源線。絕勿使用電源線去纏繞、拖拉
電動工具或拔插頭,保持電源線遠離熱氣、油
氣、尖角或可動零件。
損壞或纏繞的電源線會增加電繫之危險。
e) 電動工具在室外操作時要使用一適合室外用的
延長線。
使用合適之室外用延長線會減少電擊的危險。
f) 若無法避免在潮濕地區操作電動工具,請使用
以殘餘電流裝置 (RCD) 保護的電源。
使用 RCD 可降低觸電危險。
3) 人員安全
a) 保持機警,注意你正在做什麼,並運用普通常
識操作電動工具。
當你感到疲勞或受藥品、酒精或醫療影響時,
勿操作電動工具。
操作中瞬間的不注意可能造成人員嚴重的傷
害。
10
b) 使用個人防護裝備,經常配戴安全眼鏡。
配戴防塵口罩、防滑安全鞋、硬帽等防護裝
備,或在適當情況下使用聽覺防護,可減少人
員傷害。
c) 防止意外啟動。在連接電源及或電池組、拿
起或攜帶工具前,請確認開關是在「off」(關
閉)的位置。
以手指放在開關握持電動工具,或在電動工具
的開關於“on”的狀況下插上插頭,都會導致
意外發生。
d) 在將電動工具啟動前,先卸下任何調整用鑰匙
或扳手。
扳手或鑰匙遺留在電動工具的轉動部位時,可
能導致人員傷害。
e) 身體勿過度伸張,任何時間要保持站穩及平
衡。
以便在不預期的狀態下,能對電動工具有較好
的控制。
f) 衣著要合宜,別穿太鬆的衣服或戴首飾。
保持你的頭髮、衣服及手套遠離轉動部位。
寬鬆的衣服、手飾及長髮會被捲入轉動部位。
g) 如果裝置要用於粉塵抽取及集塵設施,要確保
其連接及正當使用。
使用集塵裝置可減少與灰塵相關的危險。
4) 電動工具之使用及注意事項
a) 勿強力使用電動工具,使用正確之電動工具為
你所需。
正確使用電動工具會依其設計條件使工作做得
更好更安全。
b) 如果開關不能轉至開及關的位置,勿使用電動
工具。
任何電動工具不能被開關所控制是危險的,必
須要修理。
c) 進行任何調整、更換配件或收存電動工具時,
必須將插頭與電源分開,且或將電池組從電
動工具中取出。
此種預防安全措施可減少意外開啟電動機之危
險。
d) 收存停用之電動工具,遠離兒童,且不容許不
熟悉電動工具或未瞭解操作電動工具說明書的
人操作電動工具。
在未受過訓練的人手裡,電動工具極為危險。
e) 保養電動工具,檢核是否有可動零件錯誤的結
合或卡住、零件破裂及可能影響電動工具操作
的任何其他情形。
電動工具如果損壞,在使用前要修好。
許多意外皆肇因於不良的保養。
f) 保持切割工具銳利清潔。
適當的保養切割工具,保持銳利之切削鋒口,
可減少卡住並容易控制。
Page 11

中國語
g) 按照說明書使用電動工具、配件及刀具時,必
須考量工作條件及所執行之工作。
若未依照這些使用說明操作電動工具時,可能
造成相關之危害情況。
5) 維修
a) 讓你的電動工具由合格修理人員僅使用相同的
維修零件更換。
如此可確保電動工具的安全得以維持。
注意事項
不可讓孩童和體弱人士靠近工作場所。
應將不使用的工具存放在孩童和體弱人士伸手不及的
地方。
砂磨或砂磨切割操作的通用安
全警告
a) 該電動工具是用於實現砂輪機或切斷工具功能
的。閱讀隨該電動工具提供的所有安全警告、說
明、圖解和規定。
不瞭解以下所列所有說明將導致電擊、著火和/或
嚴重傷害。
b) 不推薦用該電動工具進行諸如砂光、刷光、拋光
或切斷等操作。
電動工具不按指定的功能去操作,可能會發生危
險和引起人身傷害。
c) 不使用非工具製造商推薦和專門設計的附件。
否則該附件可能被裝到你的電動工具上,而它不
能保證安全操作。
d) 附件的額定速度必須至少等於電動工具上標出的
最大速度。
附件以比其額定速度大的速度運轉會發生爆裂和
飛濺。
e) 附件的外徑和厚度必須在電動工具額定能力範圍
之內。
不正確的附件尺寸不能得到充分防護或控制。
f) 安裝配件的螺紋必須與電磨機主軸螺紋相配。對
於以法蘭安裝的配件,配件的軸孔必須符合法蘭
的定位直徑。
與電動工具的安裝硬體不相配的配件會失去平
衡,劇烈振動,並可能導致失去控制。
g) 不要使用損壞的附。在每次使用前要檢查附件,
例如砂輪是否有碎片和裂縫,靠背墊是否有的裂
縫、撕裂或過度磨損,鋼絲刷是否鬆動或金屬絲
是否斷裂。如果電動工具或附件跌落了,檢查是
否有損壞或安裝沒有損壞的附件。檢查和安裝附
件後,讓自己和旁觀者的位置遠離旋轉附件的平
面,並以電動工具最大空載速度運行1min。
損壞的附件通常在該試驗時會碎裂。
h) 戴上防護用品。根據適用情況,使用面罩、安全
護目鏡或安全眼鏡。適用時,戴上防塵面具、聽
力保護器、手套和能擋小磨料或工件碎片的工作
圍裙。
眼防護罩必須擋住各種操作產生的飛屑。防塵面
具或口罩必須能過濾操作產生的顆粒。長期暴露
在高強度雜訊中會引起失聰。
i) 讓旁觀者與工作區域保持一安全距離。任何進入
工作區域的人必須戴上防護用品。
工件或破損附件的碎片可能會飛出並引起緊靠著
操作區域的旁觀者的傷害。
j) 進行操作時若切割配件可能接觸到暗線或其自身
的電線,請握著電動工具的絕緣手柄表面。
接觸到「通電」電線的切割配件可能使電動工具
的金屬零件「通電」,而造成操作人員觸電。
k) 使軟線遠離旋轉的附件。
如果控制不當,軟線可能被切斷或纏繞,並使得
你的手或手臂可能被捲入旋轉附件中。
l) 直到附件完全停止運動才放下電動工具。
旋轉的附件可能會抓住表面並拉動電動工具而讓
你失去對工具的控制。
m) 當攜帶電動工具時不要開動它。
意外地觸及旋轉附件可能會纏繞你的衣服而使附
件傷害身體。
n) 經常清理電動工具的通風口。
電動機風扇會將灰塵吸進機殼,過多的金屬粉末
沈積會導致電氣危險。
o) 不要在易燃材料附件操作電動工具。
火星可能會點燃這些材料。
p) 不要使用需用冷卻液的附件。
用水或其他冷卻液可能會導致電腐蝕或電擊。
反彈和相關警告
反彈是因卡住或纏繞住的旋轉砂輪、靠背墊、鋼絲刷
或其他附件而產生的突然反作用力。卡住或纏繞會引
起旋轉附件的迅速堵轉,隨之使失控的電動工具在卡
住點產生與附件旋轉方向相反的運動。
例如,如果砂輪被工件纏繞或卡住,伸入卡住點的砂
輪邊緣可能會進入材料表面而引起砂輪爬出或反彈。
砂輪可能飛向或飛離操作者,這取決於砂輪在卡住點
的運動方向。
在此條件下砂輪也可能碎裂。
反彈是電動工具誤用和/或不正確操作工序或條件的
結果,可以通過採取以下給出的適當預防措施得以避
免。
a) 保持緊握電動工具,使你的身體和手臂處於正確
狀態以抵抗反彈力。 如有輔助手柄,則要一直使
用,以便最大限度控制住起動時的反彈力或反力
矩。
11
Page 12

中國語
如採取合適的預防措施,操作者就可以控制反力
矩或反彈力。
b) 絕不能將手靠近旋轉附件。
附件可能會反彈碰到手。
c) 不要站在發生反彈時電動工具可能移動到的地
方。
反彈將在纏繞點驅使工具逆砂輪運動方向運動。
d) 當在尖角、銳邊等處作業時要特別小心。避免附
件的彈跳和纏繞。
尖角、銳邊和彈跳具有纏繞旋轉附件的趨勢並引
起反彈的失控。
e) 不要附裝上鋸鏈、木雕刀片或帶齒鋸片。
這些鋸片會產生頻繁的反彈和失控。
對磨削和砂磨切割操作的專用
安全警告
a) 只使用所推薦的砂輪型號和為選用砂輪專門設計
的護罩。
不是為電動工具設計的砂輪不能充分得到防護,
是不安全的。
b) 去壓中心輪的磨削表面必須安裝在護刃器唇的平
面下方。
突出護刃器唇平面,未妥善安裝的砂輪,無法得
到適當的保護。
c) 護罩必須牢固地裝在電動工具上,且放置得最具
安全性,只有最小的砂輪部分暴露在操作人面
前。
護罩有助於保護操作者免於碰觸到損壞的砂輪碎
片,可能點燃衣物的火花,以及與砂輪的意外接
觸。
d) 砂輪只用作推薦的用途。例如:不要用切割砂輪
的側面進行磨削。
施加到砂輪側面的力可能會使其碎裂。
e) 始終為所選砂輪選用未損壞的、有恰當規格和形
狀的砂輪法蘭盤。
合適的砂輪法蘭盤支承砂輪可以減小砂輪破裂的
可能性。切割砂輪的法蘭盤可以不同於砂輪法蘭
盤。
f) 不要使用從大規格電動工具上用剩的磨損砂輪。
用於大規格電動工具上的砂輪不適於較小規格工
具的高速工況並可能會爆裂。
對砂輪切割操作的附加專用安
全警告
a) 不要“夾”住切割砂輪或施加過大的壓力。不要
試圖做過深的切割。
給砂輪施加過應力增加了砂輪在切割時的負載,
容易纏繞或卡住,增加了反彈或砂輪爆裂的可能
性。
12
b) 身體不要對著旋轉砂輪,也不要站在其後。
當把砂輪從操作者身邊的操作點移開時,可能的
反彈會使旋轉砂輪和電動工具朝你推來。
c) 當砂輪被卡住或無論任何原因而中斷切割時,關
掉電動工具並握住工具不要動,直到砂輪完全停
止。決不要試圖當砂輪仍然運轉時使切割砂輪脫
離切割,否則會發生反彈。
調查並採取校正措施以消除砂輪卡住的原因。
d) 不能在工件上重新起動切割操作。讓砂輪達到全
速後再小心地重新進入切割。
如果電動工具在工件上重新起動,砂輪可能會卡
住、爬出或反彈。
e) 支撐面板或過大工件,使砂輪受夾住或產生反衝
作用力的風險降到最低。
大工件由於其自身重量,容易趨於下陷。支撐座
必須置於工件下方的砂輪兩側,靠近鋸切路徑與
工件邊緣。
f) 在進行牆壁或其他隱蔽區域之局部鋸切時請格外
小心。
凸出的砂輪可能會鋸切到瓦斯管、水管、電線或
足以產生反衝作用力的物體。
角磨機的一般安全說明
— 確認砂輪上所標示的轉速等於或大於角磨機的額
定轉速;
— 確保砂輪尺寸與角磨機相符;
— 須按照廠家的使用說明書小心存放和使用磨輪;
— 使用前檢查砂輪,不要使用破損、有裂縫或有其
他缺陷的產品;
— 確保所安裝的砂輪和節點已按照廠家的使用說明
固定;
— 確保使用隨研磨產品附帶的吸油紙或在需要時使
用吸油紙;
— 在使用前確保已正確安裝並擰緊研磨產品,並在
安全場所在空載狀態下運轉30秒鐘,若有較大的
振動或察覺到其他缺陷,則應立即停止運轉。遇
此情況時,檢查電動工具以究明原因;
— 若電動工具配備保護裝置,切勿在未使用此保護
裝置時使用電動工具;
— 使用砂輪切割片時,務必先拆下屬於標準配件的
砂輪護板,再裝上附帶側邊護板的砂輪護板 (需
另購);
— 請勿將獨立的減速軸襯或接頭,以便使用大孔砂
輪;
— 有關要用螺紋孔砂輪來安裝的工具,確保砂輪的
螺紋足夠長,以適合軸長;
— 檢查工件已被正確固定;
— 請勿使用切斷砂輪進行側面研磨;
— 確保使用時產生的火花不會引起危險,例如不要
濺在身體上或點燃易燃物;
Page 13

中國語
— 在多塵的條件下工作時,確保通風口暢通無堵塞
現象。如果需要清除灰塵,首先使電動工具斷開
電源(使用非金屬物品)並避免損壞內部零件;
— 始終採用視力和聽力保護。必須使用其他個人保
護裝置,如口罩、手套、頭盔和圍裙等。
— 在切斷本電動工具的電源之後,砂輪仍會繼續旋
轉一段時間,請注意此事項。
附加安全警告
1. 確認要使用的砂輪是正確類型,無裂縫或表面缺
陷。同時也要確保砂輪安裝妥當,砂輪螺母已牢
固擰緊。
若吸墨紙與磨俱產品同捆時,務必使用吸墨紙,
並在需要時使用。
2. 本機不可施加過大壓力使其過載,以延長使用壽
命並確保加工品質。在大部份的用法中,機器本
身的重量即夠研磨。加壓過大將導致轉速降低、
表面加工不良以及過載,從而縮短機器壽命。
3. 在關閉本電動工具的電源之後,砂輪仍會繼續旋
轉一段時間。
關掉機器之後,需等手提圓盤電磨機完全停止才
能放下,以免造成嚴重事故,而且還可減少吸入
機器的塵埃與切削量。
4. 未使用本電動工具時,請斷開電源。
5. RCD
使用殘餘電流裝置時,建議採 30 mA 以下的額定
殘餘電流。
規 格
型式 PDA-100K G10SK3
電壓(按地區)*
輸入功率*
額定輸出功率 400 W
無負荷速度 12000轉/分
砂輪尺寸 最高周速: 72 m/秒(4300 m/分)
外徑 100 mm
厚度 4 mm, 6 mm
穴徑 16 mm
2
重量 *
1
*
當須改變地區時應檢查產品上的銘牌
*2 僅限於本體
1
1
(110V, 220V, 230V, 240V) 50/60Hz (110V, 220V, 230V) 50/60Hz
705 W
1.5 kg 1.4 kg
標 準 附 件
(1) 砂輪(人造的樹脂黏結的砂輪)...................... 1
外徑 100 mm
厚度 4 mm
穴徑 16 mm
(2) 扳手 ................................................................1
標準附件可能不預先通告而徑予更改。
選購附件(分開銷售)
注意
一定要在有砂輪防護件時操作圓盤電磨機
1. 裝 100mm 的砂盤
墊片螺帽
在對相當小的金屬表面區拋光並期望得到特別細
的拋光時,常用這種砂盤作相應突端的預拋光,
以便去掉鐵鏽以及去除添增新製費的端點有 11
種砂盤,它們分別具有的粒度是 #16,#20,
#24,#30,#36,#40,#50,#60,
#80,#100,#120,當你提出要求時,請詳細
說明所希望的砂盤的粒度。
砂盤
橡膠墊圈
襯墊
13
Page 14

中國語
2. 金剛石砂輪裝置
這常用於對混凝土,石頭及瓷磚,瓦片等的切割
和畫痕。
弓形分割型
選購附件可能不預先通告而徑予更改。
導軌基座組件金剛石輪
用 途
○
用於去除鑄品毛刺,飛邊等物及拋光各種型號的
鋼,青銅,鋁及鑄造品。
○
研磨焊接部分或研磨用焊接切割的部分。
○
研磨磚塊,大理石等等。
○
研磨和切割混凝土,石頭,瓦片(用金剛輪)。
作 業 之 前
1. 電源
確認所使用的電源與工具銘牌上標示的規格是否
相符。
2. 電源開關
確認電源開關是否切斷。若電源開關接通,則插
頭插入電源插座時電動工具將出其不意地立刻轉
動,從而招致嚴重事故。
3. 延伸線纜
若作業場所移到離開電源的地點,應使用厚度足
夠、額定電容的延伸線纜,並且要盡可能地短
些。
4. 確認環境條件
確認工作場地安排在符合規定措施的條件下。
當研磨薄鋼板時,因工作臺的狀態會產生很大的
噪音,它是因為研磨鋼板引起的。為了消除這種
有害的噪音可在被研磨的材料下放一塊橡皮墊。
5. 砂輪保護的安裝
務請以一個角度安裝輪保護裝置,它將保護操作
者的身體免受碎輪片的損傷。
6. 檢查鎖定銷
在打開電源開關之前掀兩、三下鎖定銷,檢查鎖
定銷是否被釋放。
7. 砂輪的檢查和安裝
仔細檢查所安裝的砂輪確無破損和裂縫。
確認所安裝的砂輪在規定的條件下牢固地被夾持。
詳細參閱“砂輪的裝卸”一項。
8. 試行運轉
不檢查砂輪上是否存在著破損和裂縫就開始研
磨,將非常危險。所以在開始正式研磨之前使該
圓盤電磨機在無人的情況下試行運轉,如果沒有
問題,就表明此圓盤電磨機沒有異常。
試運轉的持續時間如下︰
當更換砂輪時 .................................3 分鐘以上
當開始日常工作前 ..........................1 分鐘以上
實用手提圓盤電磨機的應用
1. 因為只用圓盤電磨機本身的重量研磨是切實可行
的,千萬不要把圓盤電磨機強壓在被研磨的表面
上,輕輕地握住圓盤電磨機以使它輕輕地和磨削
面接觸。
重的壓力將降低旋轉速度並會磨損拋光表面,所
引起的過負荷現象將導致馬達燒毀。
2. 研磨時不要利用圓盤電磨機的整個表面,如圖 1
所示使砂輪傾斜 15°∼30°,只利用它的周邊表
面。
3. 當用新砂輪裝備的圓盤電磨機向前推行時(方向
A),可能偶爾地切進所研磨的材料,這時要立
即拉它後退(方向 B)。
然而,一旦輪子的棱角被磨損,前進和後退都
可以。
4. 若提供的砂輪(人造樹脂黏結的砂輪)的額定粒
度級是 A,粒度尺寸是#36。
因此,它的應用範圍涉及面很廣,事實証明它最
適合於普通鋼材的重研磨。因為這類鋼材的粒度
大小相當粗糙要產生一個細的表面拋光是很困難
的。
在本例中輕輕地握住圓盤電磨機,提起它,慢慢
地用一恆定的低速進行研磨,借此,可以得到與
用細粒度砂輪時得到的細研磨相類似。
5. 圓盤電磨機的開關
開關是積桿手柄式的,按它的 ON 端,開關就被
接通,按它的 OFF 端,開關就會斷開。
6. 使用後的注意事項
使用後在完全停止轉動前,不要把圓盤電磨機立
刻放在有許多細屑和污物和灰塵的地方。
注意
○
本機受到衝擊時,會導致砂輪的破裂或發生裂
痕。因此,在使用本機時,請留意勿使它受到
衝擊。
在使用本機前,不小心碰到或掉下本機時,請
充分地檢查一下砂輪是否有破裂或裂痕。
○
本機在旋轉時,請勿按下鎖定銷。如鎖定銷被
按下的話,則請勿按下開關。
14
Page 15

砂輪的裝卸(圖 2)
注意
確認開關已斷開並且從電源插座中拔去電源插頭
以避免嚴重事故。
(1) 把裝置倒置使主軸朝上。
(2) 把墊片裝到主軸上。
(3) 給砂輪的隆起部配裝砂輪墊圈。
(4) 把砂輪螺帽的凸面裝到砂輪上並且把螺帽擰到主
軸上。
(5) 如圖 2 所示,撳下鎖定銷防止主軸轉動。用扳手
擰緊砂輪螺帽卡緊磨輪。
注意
確認砂輪安裝是否牢固。
確認鎖定銷被解除鎖定;可在打開電源開關之前
通過撳二、三次鎖定銷進行檢查。
○
砂輪的拆卸和裝配相反。
中國語
○
安裝導軌基座組件(圖 4)
(1) 在砂輪導軌上鬆開兩個小的螺絲釘。
(2) 在輪導軌和支架板 (A) 之間插入導軌片,並且上
緊兩個螺絲釘中的一個,保証導軌將不會運動。
(3) 以一角度把砂輪導軌放到適合於操作的位置,並
安全地擰緊另一個留下的小螺絲釘把砂輪保護固
定在所定的位置。
○
安裝金剛石輪(圖 5)
注
如圖 5 所示在主軸上安裝金剛石輪,要注意輪墊
圈和砂輪螺帽,它與砂輪的普通用法相反。
(1) 把輪墊圈和金剛石砂輪安裝到主軸。
(2) 把輪螺帽的凸面安裝到金剛石輪上,並把輪螺帽
旋進主軸。
(3) 如圖 5 所示,撳下鎖定銷防止主軸轉動。用扳手
擰緊砂輪螺帽卡緊金剛石輪。
維 護 和 檢 查
安裝配選部件的方法
注意
○
確認電源開關已斷開並且電源插頭沒有接在電
源插座上以避免嚴重事故,當使用配選附件
時,要保証裝上砂輪保護罩並且戴上眼鏡。
○
不得使用其外徑超過記載在選購附件上的外徑
的砂盤。
1. 安裝100mm的砂盤(參看圖 3)
注
不得利用砂輪的輪墊圈和輪螺帽。
(1) 配上墊圖,橡皮襯墊及砂盤到主軸上。
(2) 旋墊圈螺帽到主軸。
(3) 如圖 3 所示,撳下鎖定銷防止主軸轉動。用扳手
擰緊砂輪螺帽卡緊砂盤。
2. 安裝金剛石輪
注意
利用金剛石輪時,要特別注意以下幾點。
(1) 使用正確尺寸的金剛石輪(外徑 105mm;內徑
20mm)
(2) 使用金剛石輪時不要加涼水或且磨削液。
(3) 在切削操作中要牢固地握住工具來控制被材料抵
制的工具的傾斜度。
(4) 可使切削深度保持在 2∼5mm 以防過熱損壞馬
達。使用適中的切削速度以及不要在工具上施加
過多的壓力。
1. 檢查砂輪
檢查砂輪確無破裂和表面缺隱。
當砂輪外徑被磨損 60mm 時要更換砂輪。
2. 檢查安裝螺絲
要經常檢查安裝螺絲是否緊固妥善。若發現螺絲鬆
了,應立即重新扭緊,否則會導致嚴重的事故。
3. 電動機的維護
電動機繞線是電動工具的心臟部。應仔細檢查有
無損傷,是否被油液或水沾濕。
4. 檢查碳刷(圖 8)
馬達使用碳刷,它是消耗部品,因為使用過久的
碳刷將會導致馬達故障,用具有相同碳刷號的新
碳刷去更換舊的,碳刷編號用數字表示碳刷何時
用舊或接近於磨損極限以外,要經常保持碳刷清
潔以及保證它在刷握裡能自由滑動。
5. 更換碳刷
用無頭螺絲刀卸下碳刷蓋、然後可以很容易地取
下碳刷。
6. 如果此電動工具的電源線破損,務必用維修部提
供的專用電源線更換
7. 維修部件目錄
A: 項目號碼
B: 代碼號碼
C: 所使用號碼
D: 備註
15
Page 16

中國語
注意
日立電動工具的修理、維護和檢查必須由日立所認
可的維修中心進行。
當尋求修理或其他維護時,將本部件目錄與工具一
起提交給日立所認可的維修中心會對您有所幫助。
在操作和維護電動工具中,必須遵守各國的安全規
則和標准規定。
改進
日立電動工具隨時都在進行改進以適應最新的技
術進步。
因此,有些部件(如,代碼號碼和或設計)可
能未預先通知而進行改進。
註
為求改進,本手冊所載規格可能不預先通告而徑予
更改。
16
Page 17

Tiếng Việt
CÁC NGUYÊN TẮC AN TOÀN CHUNG
CẢNH BÁO!
Hãy đọc tất cả các cảnh báo an toàn và tất cả các hướng
dẫn.
Việc không tuân theo các cảnh báo và hướng dẫn có thể
dẫn đến bị điện giật, cháy và/hoặc bị thương nghiêm trọng.
Giữ lại tất cả các cảnh báo và hướng dẫn để tham khảo
trong tương lai.
Thuật ngữ "dụng cụ điện" có trong các cảnh báo đề cập đến
dụng cụ
điện (có dây) điều khiển bằng tay hoặc dụng cụ
điện (không dây) vận hành bằng pin.
1) Khu vực làm việc an toàn
a) Giữ khu vực làm việc sạch và đủ ánh sáng.
Khu vực làm việc tối tăm và bừa bộn dễ gây tai nạn.
b) Không vận hành dụng dụ điện trong khu vực
dễ cháy nổ, chẳng hạn như nơi có chất lỏng dễ
cháy, khí đốt hoặc bụi khói.
Các dụng d
bén lửa.
c) Không để trẻ em và những người không phận sự
đứng gần khi vận hành dụng dụ điện.
Sự phân tâm có thể khiến bạn mất kiểm soát.
2) An toàn về điện
a) Phích cắm dụng cụ điện phải phù hợp với ổ cắm.
Không bao giờ được cải biến phích cắm dưới
mọi hình th
hợp với dụng cụ điện nối đất (tiếp đất).
Phích cắm nguyên bản và ổ cắm điện đúng loại sẽ
giảm nguy cơ bị điện giật.
b) Tránh để cơ thể tiếp xúc với các bề mặt nối đất
hoặc tiếp đất như đường ống, lò sưởi, bếp ga và
tủ
Có nhiều nguy cơ bị điện giật nếu cơ thể bạn nối
hoặc tiếp đất.
c) Không để các dụng cụ điện tiếp xúc với nước
mưa hoặc ẩm ướt.
Nước thấm vào dụng cụ điện sẽ làm tăng nguy cơ bị
điện giật.
d) Không được lạm dụng dây dẫn điện. Không bao
giờ
Để dây cách xa nơi có nhiệt độ cao, trơn trượt,
vật sắc cạnh hoặc bộ phận chuyển động.
Dây bị hư hỏng hoặc rối sẽ làm tăng nguy cơ bị điện
giật.
e) Khi vận hành dụng cụ điện ở ngoài trời, hãy sử
dụng dây nối thích hợp cho việc sử dụng ngoài
tr
ời.
Sử dụng dây nối ngoài trời thích hợp làm giảm nguy
cơ bị điện giật.
f) Nếu không thể tránh khỏi việc vận hành dụng cụ
điện ở một nơi ẩm thấp, thì hãy sử dụng thiết bị
dòng điện dư (RCD) được cung cấp để bảo vệ.
Việc sử dụng một RCD làm giảm nguy cơ bị điện
giậ
3) An toàn cá nhân
a) Luôn cảnh giác, quan sát những gì bạn đang làm
và phán đoán theo kinh nghiệm khi vận hành
dụng dụ điện.Không được sử dụng dụng cụ điện
khi mệt mỏi hoặc dưới ảnh hưởng của rượu, ma
túy hoặc dược phẩm.
Một thoáng mất tập trung khi vận hành dụng cụ điện
có thể dẫn đến chấn thương cá nhân nghiêm trọng.
ụ điện tạo tia lửa nên có thể làm bụi khói
ức. Không được sử dụng phích tiếp
lạnh.
nắm dây để xách, kéo hoặc rút dụng cụ điện.
t.
b) Sử dụng thiế
kính bảo vệ mắt.
Thiết bị bảo vệ như mặt nạ ngăn bụi, giày an toàn
chống trượt, nón bảo hộ lao động, hoặc thiết bị bảo
vệ thính giác được sử dụng trong các điều kiện thích
hợp sẽ làm giảm các thương tích cá nhân.
c) Ngăn chặn việc vô tình mở máy. Đảm bảo rằng
công tắc đang ở vị
nguồn điện và/hoặc bộ nguồn pin, thu gom hoặc
mang vác công cụ.
Việc mang vác các công cụ điện khi ngón tay của
bạn đặt trên công tắc hoặc tiếp điện cho các công cụ
điện khiến cho công tắc bật lên sẽ dẫn đến các tai
nạn.
d) Tháo mọi khóa điều chỉnh hoặc chìa vặn đai ốc ra
trước khi bật dụng cụ
Chìa vặn đai ốc hoặc chìa khóa còn cắm trên một bộ
phận quay của dụng dụ điện có thể gây thương tích
cá nhân.
e) Không với tay quá xa. Luôn luôn đứng vững và
cân bằng.
Điều này giúp kiểm soát dụng cụ điện trong tình
huống bất ngờ tốt hơn.
f) Trang phục phù hợp. Không mặc quần áo rộng
lùng thùng hoặc đeo trang sức. Giữ tóc, quần áo
và găng tay tránh xa các bộ ph
Quần áo rộng lùng thùng, đồ trang sức hoặc tóc dài
có thể bị cuốn vào các bộ phận chuyển động.
g) Nếu có các thiết bị đi kèm để nối máy hút bụi và
các phụ tùng chọn lọc khác, hãy đảm bảo các
thiết bị này được nối và sử dụng đúng cách.
Việc sử dụng các thiết bị này có thể làm giảm độc hại
do bụi gây ra.
4) Sử dụng và bả
a) Không được ép máy hoạt động quá mức. Sử
dụng đúng loại dụng cụ điện phù hợp với công
việc của bạn.
Dụng cụ điện đúng chủng loại sẽ hoàn thành công
việc tốt và an toàn hơn theo đúng tiêu chí mà máy
được thiết kế.
b) Không sử dụng dụng cụ điện nếu công tắc
không tắt hoặ
Bất kỳ dụng cụ điện nào không thể điều khiển được
bằng công tắc đều rất nguy hiểm và phải được sửa
chữa.
c) Luôn rút phích cắm ra khỏi nguồn điện và/hoặc
bộ nguồn pin khỏi các công cụ điện trước khi
thực hiện bất kỳ điều chỉnh, thay đổi phụ tùng,
hoặc cất giữ
Những biện pháp ngăn ngừa như vậy giúp giảm
nguy cơ dụng cụ điện khởi động bất ngờ.
d) Cất giữ dụng cụ điện không sử dụng ngoài tầm
tay trẻ em và không được cho người chưa quen
sử dụng dụng cụ điện hoặc chưa đọc hướng dẫn
sử dụng này vận hành d
Dụng cụ điện rất nguy hiểm khi ở trong tay người
chưa được đào tạo cách sử dụng.
e) Bảo dưỡng dụng cụ điện. Kiểm tra đảm bảo các
bộ phận chuyển động không bị xê dịch hoặc mắc
kẹt, các bộ phận không bị rạn nứt và kiểm tra các
điều kiện khác có thể ảnh hưởng
vận hành máy. Nếu bị hư hỏng, phải sửa chữa
dụng cụ điện trước khi sử dụng.
Nhiều tai nạn xảy ra do bảo quản dụng dụ điện kém.
f) Giữ các dụng cụ cắt sắc bén và sạch sẽ.
Dụng cụ cắt có cạnh cắt bén được bảo quản đúng
cách sẽ ít khi bị kẹt và dễ điều khiể
t bị bảo vệ cá nhân. Luôn luôn đeo
trí tắt trước khi kết nối đến
điện.
ận chuyển động.
o dưỡng dụng cụ điện
c bật được.
dụng cụ điện nào.
ụng cụ điện.
đến quá trình
n hơn.
17
Page 18

Tiếng Việt
g) Sử dụng dụng cụ điện, các phụ tùng và đầu cài,
v.v…đúng theo những chỉ dẫn này, lưu ý đến các
điều kiện làm việc và công việc phải thực hiện.
Vận hành dụng cụ điện khác với mục đích thiết kế có
thể dẫn đến các tình huống nguy hiểm.
5) Bảo dưỡng
a) Đem dụng cụ điện của bạn đến thợ
chuyên nghiệp để bảo dưỡng, chỉ sử dụng các
phụ tùng đúng chủng loại để thay thế.
Điều này giúp đảm bảo duy trì tính năng an toàn của
dụng cụ điện.
PHÒNG NGỪA
Giữ trẻ em và những người không phận sự tránh xa
dụng cụ.
Khi không sử dụng, các dụng cụ điện phải được cất giữ
tránh xa tầm tay trẻ
em và người không phận sự.
sửa chữa
CẢNH BÁO AN TOÀN CHUNG CHO QUÁ TRÌNH
VẬN HÀNH MÁY MÀI HOẶC MÁY MÀI CẮT
a) Dụng cụ điện này được chế tạo với chức năng như
dụng cụ mài hoặc cắt. Đọc kỹ tất cả cảnh báo an
toàn, hướng dẫn, minh họa và thông số kỹ thuật
kèm theo dụng cụ điện này.
Việc không tuân theo mọi hướng dẫn được liệt kê bên
dưới có thể gây điện giật, cháy, và/hoặc chấn thương
nghiêm trọng.
b) Không được sử
động như chà nhám, đánh bóng bằng bàn chổi sắt
hoặc đánh bóng.
Các hoạt động vốn không thuộc chức năng thiết kế c ủa
dụng cụ có thể gây nguy hiểm và dẫn đến chấn thương
cá nhân.
c) Không sử dụng các phụ tùng không được thiết kế
chuyên biệt và không được nhà sản xuất dụng cụ
khuyên dùng.
Phụ tùng cho dù có thể lắp khít vào d
không có nghĩa là nó sẽ hoạt động an toàn.
d) Tốc độ danh định của phụ tùng phải bằng hoặc lớn
hơn tốc độ tối đa ghi trên dụng cụ điện.
Phụ tùng có thể bị vỡ và văng xa nếu chạy nhanh hơn
tốc độ danh định của chúng.
e) Đường kính ngoài và độ dày của phụ tùng phải nằm
trong giới hạn công su
Phụ tùng có kích thước không đúng có thể sẽ không
được bảo vệ và kiểm soát thích đáng.
f) Lắp ráp ren của phụ tùng phải khớp với đường ren
trục chính máy mài. Đối với những phụ tùng được
lắp ráp bằng mặt bích, lỗ trục chính của phụ tùng
phải vừa khít với đường kính vị trí mặt bích.
Các phụ tùng có lỗ trục chính không khớp với phầ
cứng lắp ráp của dụng cụ điện sẽ khiến dụng cụ mất
cân bằng, rung quá mức và có thể gây mất kiểm soát.
g) Không sử dụng phụ tùng đã hỏng. Trước mỗi lần sử
dụng phải kiểm tra lại phụ tùng, chẳng hạn như xem
bánh mài có mảnh vụn và vết nứt không, tấm đỡ có
vết nứt, rách hay mòn quá mức không, chổi kim loại
có bị lỏ
cụ điện hay phụ tùng, hãy kiểm tra xem máy có bị
hư hỏng không, hoặc lắp phụ tùng còn nguyên vào.
Sau khi kiểm tra và lắp ráp phụ tùng, bạn và những
người xung quanh nên tránh xa mặt phẳng quay của
phụ tùng và bật máy ở tốc độ không tải tối đa trong
vòng một phút.
Phụ tùng hư hỏng thường bị vỡ thành từng mảnh trong
thời gian c hạy thử này.
dụng dụng cụ điện này cho các hoạt
ụng cụ điện cũng
ất của dụng cụ điện.
ng hoặc bị đứt dây không. Nếu làm rớt dụng
h) Mặc thiết bị bảo hộ cá nhân. Tùy thuộc vào từng loại
công việc mà sử dụng mặt nạ, kính bảo hộ hoặc kính
an toàn. Khi cần, nên mang mặt nạ chống bụi, miếng
bảo vệ tai, găng tay và tấm chắn có khả năng ngăn
chặn các mảnh vụn gia công hoặc bột mài nhỏ.
Dụng cụ bảo vệ mắt phải có khả năng ngăn mảnh vỡ
bay ra t
ừ nhiều loại hoạt động khác nhau. Mặt nạ hoặc
khẩu trang chống bụi phải có khả năng lọc các hạt nhỏ
phát sinh từ quá trình vận hành. Tiếp xúc lâu với tiếng
ồn ở cường độ cao có thể gây mất thính lực.
i) Giữ những người không phận sự tránh xa khu vực
làm việc với khoảng cách an toàn. Bất kỳ ai vào khu
vực làm việc đều phải mặc thiết bị bảo h
Những mảnh vỡ của phôi gia công hoặc phụ tùng bị bể
có thể văng xa và gây chấn thương bên ngoài khu vực
vận hành tr ực tiếp.
j) Chỉ cầm dụng cụ điện bằng bề mặt kẹp cách điện khi
thực hiện thao tác ở những điểm mà phụ kiện cắt có
thể tiếp xúc với hệ thống dây điện ngầm hoặc dây
c
ủa dụng cụ.
Phụ kiện cắt tiếp xúc với dây dẫn “có điện” có thể khiến
các bộ phận kim loại hở ra của dụng cụ điện trở thành
"có điện" và làm cho người vận hành bị điện giật.
k) Đặt dây tránh xa phụ tùng đang quay.
Nếu bạn mất ki ểm soát, dây sẽ có thể bị cắt hoặc
vướng vào, và tay hoặc cánh tay của bạn sẽ
phụ tùng đang quay.
l) Không bao giờ đặt dụng cụ điện xuống cho đến khi
phụ tùng ngừng hoạt động hẳn.
Phụ tùng đang quay có thể găm vào bề mặt và kéo
dụng cụ điện ra khỏi tầm kiểm soát của bạn.
m) Không bật dụng cụ điện khi bạn đang cầm bên
người.
Vô tình chạm vào phụ tùng đang quay có thể làm quần
áo bị
vướng vào, kéo phụ tùng về người bạn.
n) Thường xuyên làm sạch lỗ thông gió của dụng cụ
điện.
Quạt của động cơ sẽ hút bụi vào bên trong vỏ máy và việc
tích tụ quá nhiều bột kim loại có thể gây tại nạn về điện.
o) Không vận hành dụng cụ gần các vật liệu dễ cháy.
Tia lửa điện có thể bắt vào các vật liệu này gây cháy.
p) Không sử dụng các phụ tùng cần có chất làm mát
dạng lỏng.
Sử dụng nước hoặc chất làm mát dạng lỏng khác có
thể gây giật điện hoặc sốc.
ộ cá nhân.
LỰC GIẬT LÙI VÀ CẢNH BÁO LIÊN QUAN
Lực giật lùi là phản ứng bất ngờ do bánh mài, tấm đỡ, chổi
hoặc bất kỳ phụ tùng khác đang quay bị kẹt hoặc vướng.
Phụ tùng đang quay bị kẹt hoặc vướng có thể ngừng đột
ngột, việc này sẽ làm cho dụng cụ điện vốn đã mất kiểm
n
soát bị bật về hướng ngược với hướng quay của phụ tùng
tạ
i điểm bị kẹt.
Ví dụ, nếu bánh mài bị vướng hoặc kẹt vào phôi gia công,
cạnh của bánh mài đang ở chỗ kẹt có thể cắm vào bề mặt
vật liệu làm cho bánh mài nảy lên hoặc văng ra. Bánh mài có
thể nảy ra xa hoặc hướng về người vận hành, tùy vào hướng
chuyển động của bánh mài tại điểm bị kẹt. Bánh mài cũng
có thể bị vỡ trong những đi
Lực giật lùi xảy ra do sử dụng sai dụng cụ và/hoặc quy trình
hoặc điều kiện vận hành không chính xác và có thể tránh
được bằng cách thực hiện các biện pháp phòng ngừa thích
hợp liệt kê bên dưới.
a) Cầm chắc dụng đụ điện và định vị cơ thể cũng như
cánh tay sao cho có thể cản được lực giật lùi. Luôn
sử dụng tay cầm phụ, nếu có, để
giật lùi hoặc phản lực mô men xoắn khi khởi động.
ều kiện này.
kiểm soát tối đa lực
bị kéo vào
18
Page 19

Tiếng Việt
Người vận hành có thể kiểm soát phản lực mô men
xoắn hoặc lực giật lùi nếu thực hi ện các biện pháp
phòng ngừa thích hợp.
b) Không bao giờ đặt tay gần phụ tùng đang quay.
Phụ tùng có thể giật lùi về tay bạn.
c) Không đứng trong khu vực mà dụng cụ điện sẽ
chuyển động nếu xảy ra lực giật lùi.
Lực giật lùi sẽ đẩy dụng cụ theo hướng ngượ
hướng chuyển động của bánh mài tại điểm bị kẹt.
d) Đặc biệt chú ý khi làm việc với các góc, cạnh sắt,
v.v... Tránh làm nảy và kẹt phụ tùng.
Các góc, cạnh sắt hoặc gờ nổi có xu hướng làm kẹt
phụ tùng đang quay và gây mất kiểm soát hoặc tạo lực
giật lùi.
e) Không lắp lưỡi cưa xích, dao khắc gỗ hoặc lưỡi cưa
có răng.
Những lưỡi này thườ
mấy kiểm soát.
ng xuyên tạo ra lực giật lùi và gây
c với
CẢNH BÁO AN TOÀN DÀNH RIÊNG CHO HOẠT
ĐỘNG MÀI VÀ MÀI CẮT ĐỨT
a) Chỉ sử dụng loại bánh mài được khuyên dùng cho
dụng cụ của bạn và tấm chắn bảo vệ riêng được
thiết kế cho bánh mài đã chọn.
Bánh mài không được thiết kế chuyên biệt cho dụng cụ
điện này sẽ không được bảo vệ thích đáng và không an
toàn.
b) Bề mặt mài của bánh mài lõm giữa phải được lắp ráp
sau mặt phẳng miệng ốp chắn.
Bánh mài được lắp ráp không đúng cách nhô lên mặ
phẳng miệng ốp chắn có thể không được bảo vệ thích
đáng.
c) Tấm chắn bảo vệ phải được lắp khít vào dụng cụ
điện và định vị để đảm bảo an toàn cao nhất, sao cho
phần tấm chắn lộ ra ngoài hướng về người vận hành
là nhỏ nhất.
Tấm chắn giúp bảo vệ người vận hành khỏi bị mảnh
vụn của bánh mài b
xúc với máy mài và tia lửa có thể làm quần áo bén lửa.
d) Chỉ sử dụng bánh mài cho các ứng dụng được
khuyến nghị. Ví dụ: không mài bằng cạnh của bánh
mài cắt.
Bánh mài c ắt được sử dụng cho mục đích mài cạnh
biên, các lực bên tác dụng vào những bánh mài này có
thể làm cho bánh mài bị vỡ.
e) Luôn sử dụng mặt bích bánh mài còn tốt, kích thước
và hình dạng phù hợp với bánh mài mà bạn đã chọn.
Mặt bích bánh mài phù hợp sẽ đỡ được bánh mài, do
đó làm giảm nguy cơ làm vỡ bánh mài. Mặt bích dành
cho bánh mài cắt có thể khác với mặt bích bánh mài
nhẵn.
f) Không sử dụng bánh mài đã mòn của các dụng cụ
điện lớn hơn.
Bánh mài dùng cho các dụng cụ điện lớn hơn không
thích hợp với tốc độ cao hơn của dụng cụ nhỏ hơn và
có thể bị vỡ.
ể vỡ văng trúng, tránh vô tình tiếp
CẢNH BÁO AN TOÀN BỔ SUNG DÀNH RIÊNG
CHO CÁC HOẠT ĐỘNG MÀI CẮT
a) Không “kẹp chặt” bánh mài cắt hoặc tác dụng lực
quá lớn. Không cố tạo ra vết cắt quá sâu.
Ấn bánh mài quá mạnh sẽ tăng lực tải và dễ làm xoắn
hoặc kẹt bánh mài vào vết cắt, cũng như có thể gây ra
lực giật lùi hoặc vỡ bánh mài.
b) Không đứng phía sau hoặc thẳng hàng với bánh mài
đang quay.
Khi bánh mài đang quay dịch chuyển ra xa bạn, lực giật
lùi tiềm ẩn có thể đẩy bánh mài đang quay và dụng cụ
điện hướng thẳng vào bạn.
c) Khi bánh mài bị kẹt hoặc khi ngừng cắt vì lý do nào
đó, hãy ngắt điện dụng cụ và giữ máy đứng yên đến
khi bánh mài ngừng hoàn toàn. Không cố rút bánh
mài cắt ra khỏi vết cắt khi bánh mài còn đang quay,
nếu không sẽ làm phát sinh lực gi
Kiểm tra và tiến hành khắc phục để loại bỏ nguyên
nhân gây kẹt bánh mài.
d) Không bắt đầu lại hoạt động cắt trên phôi gia công.
Hãy đợi bánh mài đạt tốc độ tối đa và cẩn thận đặt
lại vào vết cắt.
Bánh mài có thể bị kẹt, nảy lên hoặc giật lùi nếu khởi
động lại dụng cụ điện ngay trên phôi gia công.
e) Chống đỡ các bảng điện hoặc b
quá cỡ nào để giảm thiểu nguy cơ thắt lại hoặc phản
ứng xấu của bánh xe.
Những vật gia công lớn có xu hướng lún xuống dưới
trọng lượng của chúng. Các vật chống đỡ phải được
đặt bên dưới vật gia c ông gần đường cắt và gần rìa của
vật gia công ở cả hai phía c ủa bánh xe.
f) Hãy sử dụng cảnh báo bổ sung khi thực hiện một
"rãnh cắt" lên những bức tường hiện có hoặc các
khu vực không thấy được khác.
Bánh xe nhô ra có thể cắt đường ống khí hoặc nước,
dây điện hoặc các vật có thể gây ra phản ứng mạnh
mẽ.
t
CẢNH BÁO AN TOÀN CHUNG DÀNH CHO MÁY
ật lùi.
ất kỳ vật gia công
MÀI
– Kiểm tra để đảm bảo tốc độ ghi trên bánh mài bằng hoặc
lớn hơn tốc độ danh định của máy mài;
– Đảm bảo rằng kích thước bánh mài tương thích với máy
mài;
– Bánh mài nhám phải được cất giữ và xử lý cẩn thận theo
hướng dẫn của nhà sản xuất;
– Kiểm tra bánh mài nhẵn trước khi sử dụng, không dùng
các sản phẩm mẻ, nứt hoặc có khiếm khuyết khác;
– Đảm bảo r
ráp đúng hướng dẫn của nhà sản xuất;
– Đảm bảo sẽ sử dụng các bản đệm nếu chúng được
cung cấp kèm theo sản phẩm mài gắn kết và khi cần
thiết;
– Đảm bảo sản phẩm mài được lắp ráp và siết chặt đúng
cách trước khi sử dụng và chạy máy không tải khoảng
30 giây ở khu vực an toàn, ngừng máy ngay nếu th
máy rung đáng kể hoặc phát hiện khiếm khuyết gì khác.
Nếu xảy ra tình trạng trên, hãy kiểm tra dụng cụ để xác
định nguyên nhân;
– Nếu dụng cụ được trang bị tấm chắn bảo vệ thì không
bao giờ được vận hành dụng cụ thiếu tấm chắn bảo vệ;
– Khi sử dụng bánh mài cắt, hãy kiểm tra để đảm bảo đã
tháo tấm bảo vệ bánh mài tiêu chuẩn ra và lắp bánh mài
cùng t
– Không được sử dụng ống nối hoặc đầu nối tiếp chuyển
riêng để lắp với bánh mài nhám lỗ lớn.
– Đối với các dụng cụ được thiết kế sao cho khớp với
bánh mài lỗ ren, hãy đảm bảo sao cho ren của bánh mài
đủ dài để tương thích với chiều dài cần trục;
– Kiểm tra đảm bảo phôi gia công được đỡ đúng cách;
– Không sử dụ
– Đảm bảo rằng tia lửa điện phát ra do sử dụng dụng cụ
không gây nguy hiểm, ví dụ như không bắn vào người,
không bắt lửa với các chất dễ cháy;
ằng bánh mài lắp ráp và các tiếp điểm được
ấm bảo vệ phụ vào (được bán riêng) ;
ng bánh cắt để mài biên;
ấy
19
Page 20

Tiếng Việt
– Đảm bảo rằng các lỗ thông gió luôn sạch sẽ khi làm việc
trong điều kiện bụi bẩn, nếu cần lau sạch bụi, trước tiên
phải ngắt dụng cụ khỏi nguồn điện chính (sử dụng vật
phi kim) và tránh làm hỏng các bộ phận bên trong;
– Luôn đeo bảo vệ mắt và tai. Phải mang các thiết bị bảo
hộ cá nhân như mặt nạ chống bụi, găng tay, mũ bả
hiểm và tấm chắn;
– Cẩn thận chú ý các bánh mài vẫn đang quay sau khi đã
tắt dụng cụ.
CÁC CẢNH BÁO AN TOÀN BỔ SUNG
1. Đảm bảo rằng bánh mài lõm giữa sử dụng là dạng
chuẩn và không bị rạn nứt hoặc có tì vết trên bề mặt.
Cũng cần phải đảm bảo rằng bánh mài lõm giữa được
lắp vào chính xác và khớp nối bánh mài được siết chặt
hoàn toàn.
2. Để kéo dài tuổi thọ của máy và đảm bảo sản phẩm mài
có chất lượng tốt, điều quan trọng là giữ cho máy không
bị quá tải do tác dụ
dụng, riêng trọng lượng của máy là đủ để mài hiệu quả.
Lực tác động quá lớn sẽ dẫn đến tốc độ xoay giảm, bề
mặt mài xấu và quá tải, những hiện tượng này có thể
o
làm giảm tuổi thọ của máy.
3. Bánh mài vẫn tiếp tục xoay sau khi tắt dụng cụ điện.
Sau khi tắt dụng cụ, không được đặt máy xu
khi bánh mài lõm giữa ngừng xoay hẳn. Ngoài việc tránh
các tai nạn nghiêm trọng, thao tác phòng ngừa này sẽ
giảm lượng bụi và và mảnh vỡ kẹt vào thiết bị.
4. Khi không sử dụng thiết bị, tháo nguồn điện ra khỏi máy.
5. RCD
Khuyến khích sử dụng thiết bị dòng điện dư với thiết bị
có dòng điện ở mức 30mA hoặc ít hơn.
ng lực quá lớn. Trong hầu hết ứng
THÔNG SỐ KỸ THUẬT
Mẫu PDA-100K G10SK3
*1
Nguồn điện (theo khu vực)
Công suất
*1
Tốc độ không tải 12.000/phút
Kích thước bánh mài Tốc độ ngoại vi tối đa: 72 m/s (4.300 m/phút)
đường kính ngoài 100 mm
độ dày 4 mm, 6 mm
đường kính lỗ. 16 mm
Trọng lượng
*1
Lưu ý luôn kiểm tra nhãn mác trên sản phẩm vì thông số này có thể thay đổi theo khu vực.
*2
Chỉ tính thân máy.
*2
CÁC PHỤ TÙNG TIÊU CHUẨN
(1) Bánh mài lõm giữa........................................................1
(Bánh mài gắn nhựa)
đường kính ngoài. 100 mm
độ dày 4 mm
đường kính lỗ. 16 mm
(2) Chìa vặn đai ốc ............................................................1
Phụ tùng tiêu chuẩn có thể thay đổi mà không báo trước.
(110V, 220V, 230V, 240V) 50/60 Hz (110V, 220V, 230V) 50/60 Hz
705 W
1,5 kg 1,4 kg
Có 11 loại đĩa mài khác nhau, với các loại hạt #16, #20,
#24, #30, #36, #40, #50, #60, #80, #100, #120. Khi đặt
hàng, hãy xác định cụ thể loại hạt của đĩa mài mà bạn
muốn mua.
2. Bộ bánh mài kim cương
Bộ này được sử dụng để cắt và vạch dấu bê tông, đá,
gạch, v.v...
Bánh mài kim cương
ống cho đến
Bệ dẫn Ass’y
CÁC PHỤ TÙNG TÙY CHỌN . . . . . . . . bán riêng
CẢNH BÁO
Chỉ vận hành máy mài khi đã lắp ốp chắn bánh mài.
1. Bộ đĩa mài 100mm
Khớp nối vòng đệm
Trong trường hợp chỉ cần đánh bóng một bề mặt kim
loại tương đối mỏng và yêu cầu sản phẩm sau khi đánh
bóng phải có độ trơn nhẵn nhất định, bộ đĩa mài này
được sử dụng để đánh bóng sơ bộ bề mặt kim loại trước
khi mài đầu nhọn, để loại bỏ rỉ sét, và để mài đầu nhọn
nếu một thử nghiệm m
20
Đĩa mài
Miếng đệm cao su
ới được áp dụng.
Vòng đệm
Loại vành lót
Các phụ tùng tùy chọn có thể thay đổi mà không báo trước.
ỨNG DỤNG
○ Để mài gờ của vật đúc và đánh bóng nhiều loại vật liệu
thép, đồng, nhôm và vật đúc.
○ Mài các bộ phận đã hàn hoặc cắt các bộ phận bằng cách
dùng mỏ cắt.
○ Đá mài gạch, đá cẩm thạch, v.v...
○ Cắt và vạch dấu bê tông, đá, gạch, (sử dụng bánh mài
kim cương)
Page 21

Tiếng Việt
TRƯỚC KHI VẬN HÀNH
1. Nguồn điệne
Đảm bảo rằng nguồn điện sử dụng phù hợp với yêu cầu
nguồn điện có trên nhãn mác sản phẩm.
2. Công tắc điện
Đảm bảo rằng công tắc điện nằm ở vị trí OFF. Nếu nối
phích cắm với ổ cắm trong khi công tắc điện ở vị trí ON,
dụng cụ điện sẽ b
thể gây tai nạn nghiêm trọng.
3. Dây nối dài
Khi khu vực làm việc ở cách xa nguồn điện, sử dụng một
dây nối đủ dày và điện dung phù hợp. Kéo dây nối càng
ngắn càng tốt.
4. Kiểm tra điều kiện môi trường
Xác nhận địa điểm làm việc được đặt trong điều kiện
thích hợp tuân thủ đúng các biện pháp phòng ngừ
quy định.
Khi mài một tấm thép mỏng, tùy thuộc vào trạng thái của
bàn gia công, sẽ tạo ra tiếng động lớn do tiếng ồn vang
dội từ các tấm thép được mài. Để loại bỏ tiếng ồn không
mong muốn trong trường hợp này, đặt một tấm thảm
cao su bên dưới vật liệu cần mài.
5. Lắp ốp chắn bánh mài
Hãy đảm bảo đã gắn ốp chắn bánh mài vào góc có thể
bảo v
ệ cơ thể người vận hành để tránh bị chấn thương
do mảnh bánh mài bị vỡ văng trúng.
6. Kiểm tra chốt hãm
Xác nhận rằng chốt hãm không bị vướng bằng cách đẩy
chốt hãm hai ba lần trước khi bật công tắc dụng cụ điện.
7. Kiểm tra và lắp bánh mài lõm giữa.
Kiểm tra kỹ để chắc chắn đã lắp một bánh mài lõm giữa
không bị rạn hoặc n
Xác nhận rằng bánh mài lõm giữa được lắp đúng điều
kiện quy định và được kẹp chặt.
Để biết thêm chi tiết, tham khảo mục "Lắp ráp và tháo rời
bánh mài lõm giữa."
8. Tiến hành chạy thử
Bắt đầu mài khi chưa kiểm tra các vết rạn và nứt của
bánh mài lõm giữa là rất nguy hiểm. Trước khi bắt đầu
mài, đem máy mài đến một nơi trống trải, và tiến hành
ch
ạy thử để xác định rằng máy mài không có biểu hiện
gì bất thường.
Thời gian tiến hành chạy thử như sau:
Khi đã thay thế bánh mài lõm giữa ...... tối thiểu 3 phút
Khi bắt đầu công việc hàng ngày ........ tối thiểu 1 phút
ắt đầu hoạt động ngay lập tức và có
a theo
ứt.
ỨNG DỤNG THỰC TIỄN CỦA MÁY MÀI
1. Vì việc tận dụng trọng lượng của chính máy mài để gia
công là hoàn toàn khả thi, do đó không bao giờ được
dùng lực ép máy mài vào mặt phẳng cần mài. Giữ máy
nhẹ nhàng sao cho nó chỉ chạm nhẹ vào bề mặt cần
mài. Lực ép mạnh sẽ làm giảm tốc độ quay và làm hư
hỏng nghiêm trọng bề mặt sản phẩm, và các hiện tượng
như quá tải sẽ dẫn đến cháy động cơ.
2.
Không sử dụng toàn bộ bề mặt máy mài để gia công.
Chỉ sử dụng mặt ngoại vi của nó bằng cách nghiêng
bánh mài một góc 15-30°, như Hình 1.
3. Khi đẩy máy mài được trang bị bánh mài lõm giữa mới
về phía trước (hướng A), cạnh bánh mài đôi khi có thể
cắt vào vật liệu cần mài.
Trong trường hợp này, luôn luôn kéo máy về phía sau
(hướng B).
Tuy nhiên, khi góc bánh mài lõm giữa đã mòn vừa đủ, có
thể đẩy về cả hai hướng phía trước và phía sau.
4. Các bánh mài lõm giữa kèm theo máy (bánh mài gắn
nhựa) được xếp vào loại hạt A và có kích thước #36.
Do đó, phạm vi ứng dụng của bánh mài này rất đa dạng,
miễn là phù hợp nhất với việc mài mạnh các vật liệu thép
nói chung. Vì kích thước hạt bánh mài khá lớn, nên việc
tạo ra một bề mặt trơn nhẵn là khá khó khăn.
Trong trường hợp này, giữ máy mài nhẹ rồi từ đó cố
gắng để nâng máy lên, và tiến hành mài t
thấp không đổi.
Nhờ đó có thể tạo ra sản phẩm trơn nhẵn giống như sử
dụng bánh mài lõm giữa hạt mịn.
5. Công tắc trên máy mài
BẬT công tắc bằng cách đẩy cần gạt qua phía ON, hoặc
TẮT bằng cách đẩy cần gạt qua phía OFF.
6. Phòng ngừa sau khi sử dụng
Không được đặt máy mài xuống nơi có nhiều mảnh vụn
và nhiều b
máy đã hoàn toàn ngừng quay.
CẢNH BÁO
○ Thân máy có có bị giật mạnh do các vết rạn hoặc nứt
trong bánh mài lõm giữa. Hãy đặc biệt cẩn thận để tránh
bị giật mạnh bất ngờ khi sử dụng thiết bị.
Nếu các bộ phận chính là vô tình va đập hay rơi xuống,
hãy kiểm tra cẩn thận các vết nứt hoặc rạn trên bánh mài
lõm giữa trước khi s
○ Không được kéo chốt hãm khi thiết bị đang chạy.
Tương tự, không được bật công tắc khi chốt hãm bị kéo
xuống.
ụi bẩn ngay sau khi sử dụng ở cho đến khi
ử dụng tiếp.
ừ từ với tốc độ
LẮP RÁP VÀ THÁO RỜI BÁNH MÀI LÕM GIỮA
(Hình 2)
CẢNH BÁO
Hãy chắc chắn là đã TẮT công tắc nguồn và tháo phích
cắm ra khỏi ổ cắm điện để tránh gây nguy hiểm nghiêm
trọng.
(1) Đặt úp thiết bị xuống sao cho cần trục hướng lên trên.
(2) Lắp vòng đệm bánh mài vào cần trục.
(3) Lắp phần lồi của bánh mài lõm giữa vào vòng đệm bánh
mài.
(4) Lắp mặt lồi của khớp nối bánh mài vào bánh mài lõm
giữa, và siết chặt khớp nối bánh mài vào cần trụ
(5) Như trong Hình 2, đẩy chốt hãm để tránh cần trục bị
xoay. Sau đó, đảm bảo an toàn cho bánh mài lõm giữa
bằng cách siết chặt khớp nối bánh mài bằng một cái
chìa vặn đai ốc.
CHÚ Ý: Kiểm tra đảm bảo bánh mài lõm giữa đã được vặn
chặt.Xác nhận rằng chốt hãm không bị vướng bằng
cách đẩy chốt hãm hai ba lần trước khi bật công
tắc dụng cụ điệ
○ Tháo rời bánh mài lõm giữa theo trình tự ngược với
lắp ráp.
n
c.
LẮP RÁP CÁC PHỤ TÙNG TÙY CHỌN
CẢNH BÁO
○ Hãy chắc chắn là đã TẮT công tắc nguồn và tháo dây
cắm ra khỏi ổ cắm điện để tránh gây nguy hiểm nghiêm
trọng. Khi sử dụng các phụ tùng tùy chọn, đảm bảo ốp
chắn bánh mài đã được lắp vào và đeo kính bảo vệ.
○ Không sử dụng các phụ tùng tùy chọn vượt quá đường
kính ngoài theo quy định.
1. Lắp đĩa mài 100mm. (Xem Hình 3)
CHÚ Ý
Không sử dụng vòng đệm bánh mài và khớp nối bánh
mài c
ủa bánh mài lõm giữa.
(1) Lắp vòng đệm, miếng đệm cao su và đĩa mài vào cần
trục.
21
Page 22

Tiếng Việt
(2) Siết chặt khớp nối vòng đệm vào cần trục.
(3) Như trong Hình 3, đẩy chốt hãm để tránh cần trục bị
xoay. Sau đó, đảm bảo an toàn cho bánh mài bằng cách
siết chặt khớp nối bánh mài bằng một cái chìa vặn đai
ốc.
2. Lắp bánh mài kim cương
CẢNH BÁO
Khi sử dụng bánh mài kim cương, đặc biệt chú ý các
điểm sau đây.
(1) Sử dụng bánh mài kim cương có kích thước đúng
(đường kính ngoài 105 mm, đường kính trong 20 mm)
(2) Không dùng nướ
dụng bánh mài kim cương.
(3) Giữ vững dụng cụ để kiểm soát xu hướng dụng cụ bị
giật lùi trong lúc cắt.
(4) Đảm bảo rằng độ sâu của vết cắt nằm trong giới hạn từ
2-5 mm để tránh động cơ bị đốt nóng quá mức. Sử dụng
tốc độ cắt vừa phải, và không dùng lực đè quá mạnh vào
vật cầ
○ Lắp bộ phận đế dẫn (Hình 4)
(1) Nới lỏng hai đinh ốc nhỏ trên ốp chắn bánh mài.
(2) Chèn tấm dẫn vào giữa ốp chắn bánh mài và đĩa kim loại
(3) Đặt góc của ốp chắn bánh mài ở vị trí thích hợp cho quá
○ Lắp bánh mài kim cương. (Hình 5)
CHÚ Ý
Lắp bánh mài kim cương vào cần trục như minh họa
(1) Lắp vòng đệm bánh mài và bánh mài kim cương vào cần
(2) Lắp mặt lõm của khớp nối bánh mài lên bánh mài kim
(3) Như trong Hình 5, đẩ
n gia công.
giữ cố định (A), và siết chặt một trong hai đinh ốc nhỏ.
Kiểm tra đảm bảo thanh dẫn không dịch chuyển.
trình vận hành, và siết chặt đinh ốc nh
ốp chắn bánh mài vào đúng vị trí.
trong Hình 5. Lưu ý rằng vòng đệm bánh mài nằm
ngược so với thông thường khi lắp vào bánh mài lõm
giữa.
trục.
cương, và siết chặt đinh ốc bánh mài vào cần trục.
xoay. Sau đó, đảm bảo an toàn cho bánh mài kim cương
bằng cách siết chặt khớp nối bánh mài bằng một cái
chìa vặn đai ốc.
c mát hoặc dung dịch nghiền khi sử
ỏ còn lại để đưa
y chốt hãm để tránh cần trục bị
6. Nếu dây nguồn của dụng cụ này bị hỏng, phải thay mới
bằng một dây chuyên biệt có sẵn ở các tổ chức dịch vụ.
7. Danh sách phụ tùng bảo dưỡng
A: Số linh kiện
B: Mã số
C: Số đã sử dụng
D: Ghi chú
CẢNH BÁO
Sửa chữa, biến cải và kiểm tra Dụng cụ đ
được thực hiện bởi một Trung tâm Dịch vụ Ủy quyền
của Hitachi.
Cung cấp Danh sách phụ tùng kèm theo dụng cụ cho
Trung tâm dịch vụ ủy quyền Hitachi là rất hữu ích khi yêu
cầu sửa chữa hoặc bảo dưỡng.
Trong khi vận hành và bảo trì dụng cụ điện, phải tuân
theo các nguyên tắc an toàn và tiêu chuẩn quy định của
từng quốc gia.
SỬA ĐỔI
Dụng cụ
sửa đổi để thích hợp với các tiến bộ kỹ thuật mới nhất.
Theo đó, một số bộ phận có thể được thay đổi mà không
cần thông báo trước.
CHÚ Ý
Do chương trình nghiên cứu và phát triển liên tục của
Hitachi, các thông số kỹ thuật nêu trong tài liệu này có thể
thay đổi mà không thông báo trước.
điện Hitachi không ngừng được cải thiện và
iện Hitachi phải
BẢO DƯỠNG VÀ KIỂM TRA
1. Kiểm tra bánh mài lõm giữa
Đảm bảo rằng bánh mài lõm giữa không bị rạn nứt hoặc
có tỳ vết trên bề mặt.
Thay thế bánh mài lõm giữa khi đã bị mài mòn chỉ còn
khoảng 60mm tính theo đường kính ngoài.
2. Kiểm tra các đinh ốc đã lắp
Thường xuyên kiểm tra tất cả các đinh ốc đã lắp và
đảm bảo rằng chúng được siết chặt. Nếu có bất kỳ đinh
ốc nào bị n
làm như vậy có thể gây nguy hiểm nghiêm trọng.
3. Bảo dưỡng động cơ
Cuộn dây động cơ là "trái tim" của dụng cụ điện. Kiểm
tra và bảo dưỡng để đảm bảo cuộn dây không bị hư
hỏng và/hoặc ẩm ướt do dính dầu nhớt hoặc nước.
4. Kiểm tra chổi than (Hình 8)
Động cơ sử d
có thể bị mài mòn. Vì một chổi than bị mài mòn quá mức
có thể dẫn đến sự cố động cơ, do đó nên thay chổi than
cũ bằng một cái mới có cùng mã số như trong hình khi
cái cũ đã mòn bằng hoặc gần bằng “giới hạn mài mòn”.
Ngoài ra, luôn giữ chổi than sạch và đảm bảo là chúng
di chuyển tự do trong giá đỡ chổi than.
5. Thay mới chổi than
Tháo nắ
có thể dễ dàng tháo các chổi than.
22
ới lỏng, siết chặt lại ngay lập tức. Nếu không
ụng các chổi than, đây là những bộ phận
p chổi than bằng một tuốc nơ vít có rãnh. Sau đó
Page 23

PDA-100K
A B C D
1 949-242 4 M5 × 22
2 949-454 1 M5
3 301-944 1
4 316-484 1 "3, 18"
5 301-941 1 M7
6 317-820 1
7 628-VVC 1 628VVC2PS2-L
8 316-480 1
9 1 360-567C 1 110V
9 2 360-567E 1 220V-240V
10 319-898 1
11 320-677 2 D4 × 70
12 1 340-514C 1 110V
12 2 340-514E 1 220V-230V
12 3 340-514G 1
12 4 340-514F 1 240V
13 313-775 1
14 626-VVM 1 626VVC2PS2L
15 309-929 1
16 316-487 1
17 316-486 1
18 301-943 1
19 317-821 1
20 997-263 2 M4 × 10
21 316-490 1
22 620-1VV 1 6201VVCMPS2L
23 301-946 1
24 316-489 1
25 307-127 4 M4 × 12
26 302-047 1
27 316-485 1
28 301-945 1
29 308-386 2 M5 × 16
220V-230V
"KOR"
G10SK3
A B C D
1 937-807 4 D5 × 25
2 301-944 1
3 316-484 1 "2, 17"
4 301-941 1 M7
5 317-820 1
6 628-VVC 1 626VVC2PS2-L
7 316-480 1
8 1 360-567C 1 110V
8 2 360-567E 1 220V-240V
9 319-898 1
10 982-021 2 D4 × 70
11 1 340-514C 1 110V
11 2 340-514E 1 220V-230V
12 313-775 1
13 626-VVM 1 626VVC2PS2L
14 319-093 1
15 316-487 1
16 316-486 1
17 301-943 1
18 317-821 1
19 997-263 2 M4 × 10
20 316-490 1
21 620-1VV 1 6201VVCMPS2L
22 301-946 1
23 316-489 1
24 307-127 4 M4 × 12
25 302-047 1
26 316-485 1
27 301-945 1
28 308-386 2 M5 × 16
29 301-949 1
30 301-948 1 "28, 29"
31 320-497 1
32 316-820 1
100MM × 4T
A36Q
A B C D
30 301-949 1
31 301-948 1 "29, 30"
32 320-497 1
33 316-820 1
34 314-437 1
35 317-819 1 "16, 19"
36 -------------- 1
37 320-675 1 "15"
38 -------------- 1
39 -------------- 1
40 302-086 1 D4 × 20
41 306-664 1 D4 × 40
42 936-551 2
43 999-021 2
44 313-777 2
45 314-354 1
46 980-063 1
47 938-307 1
48 959-140 1
49 1 994-273 1 "TPE"
49 2 930-039 1 "KOR"
50 -------------- 1
51 304-035 1 D4 × 25
52 305-499 2 M3.5 × 6
53 955-509 1
54 980-063 1
55 953-327 1
56 937-631 1
57 984-450 2 D4 × 16
58 -------------- 1
501 313-933 1
A B C D
33 314-437 1
34 317-819 1 "5, 18"
35 -------------- 1
36 320-666 1 "14"
37 -------------- 1
38 320-668 1
39 302-086 1 D4 × 20
40 306-664 1 D4 × 40
41 936-551 2
42 999-021 2
43 313-777 2
44 314-854 1
45 980-063 1
46 938-307 1
47 959-140 1
48 1 994-273 1 "TPE"
48 2 930-039 1 "KOR"
49 320-667 1
50 304-035 1 D4 × 25
51 305-499 2 M3.5 × 2
52 955-509 1
53 980-063 1
54 953-327 1
55 937-631 1
56 984-750 2 D4x16
57 -------------- 1
501 313-933 1
100MM × 4T
A36Q
23
Page 24

Code No. C99126833 M
Printed in Malaysia
508
 Loading...