

Page 1

Instruction Manual
DZ-HV1079E
Page 2

Contents
Section 1 Getting to Know Your Camera ............................................ 3
Section 2 Getting Started .....................................................................6
Section 3 Enjoying the Record Mode ................................................. 8
Section 4 Enjoying the Playback Mode ............................................ 20
Section 5 Setting Your Camera ........................................................ 27
Section 6 Viewing Pictures and Movies on TV ................................ 31
Section 7 Viewing Pictures and Movies on PC ................................ 32
Section 8 Burning the Recorded Clip into a DVD ............................ 33
Section 9 Uploading Video Files to YouTube/Internet ..................... 36
Section 10 Video File Converter ..........................................................41
Section 11 Specications and System Requirements ...................... 43
Section 12 Troubleshooting ................................................................ 45
Page 3

Section 1
Getting to Know Your Camera
Overview
The camera with 10 Mega Pixel sensor can take H.264 movies. By way of using H.264 technology, more
videos can be taken within certain amount of memory. High quality images with up to 16 mega-pixels
can also be delivered smoothly. With a color LCD monitor, users can compose images and examine
them easily.
The camera features 3” LCD touch panel which is an ideal platform for you to operate your camera. The
menu options are accessible with your nger. With the touch panel, you can select the options directly
and quickly.
The camera also features movie recording at an HD resolution of 1920x1080. You can also connect it
to an HDTV via an HDMI cable, and easily playback the recorded high-denition videos on the wide
screen HDTV.
Moreover, the camera has an advanced uploading feature. With the exclusive built-in Internet Direct
application, you can upload the videos captured by the camera to Internet more effortlessly.
ISO sensitivity and color balance can either be adjusted automatically or changed manually. A 10x digital
zoom helps you to control over the movies and pictures you take.
The varied effect options, such as Time Lapse and Slow Motion, make recording more fun.
The built-in memory allows you to take pictures and to record movies without a memory card. The
memory card slot allows users to increase the storage capacity.
Hitachi cannot compensate for any damages caused when recording is not made normally or
recorded contents cannot be played back because of a defect in the digital camera device or
memory card. Hitachi cannot be responsible for your recorded video and audio.
If you or a third party make a mistake when handling this digital camera device or memory card,
etc., the recorded contents may be lost. Hitachi cannot be responsible for compensation for
damage due to loss of recorded contents.
Note
Partial memory of the built-in memory is used for the camera’s Firmware code.
Standard Accessories
Unpack the package and make sure all standard accessories listed are included:
Camera•
USB Cable•
AV Cable•
HDMI Cable•
Adaptor•
Lithium-ion Rechargeable Battery•
Quick Guide•
CD-ROM (Software and User’s Manual)•
Cloth Bag•
Lens Cover Set (Lens cover and Strap)•
EN
3
Page 4

4
EN
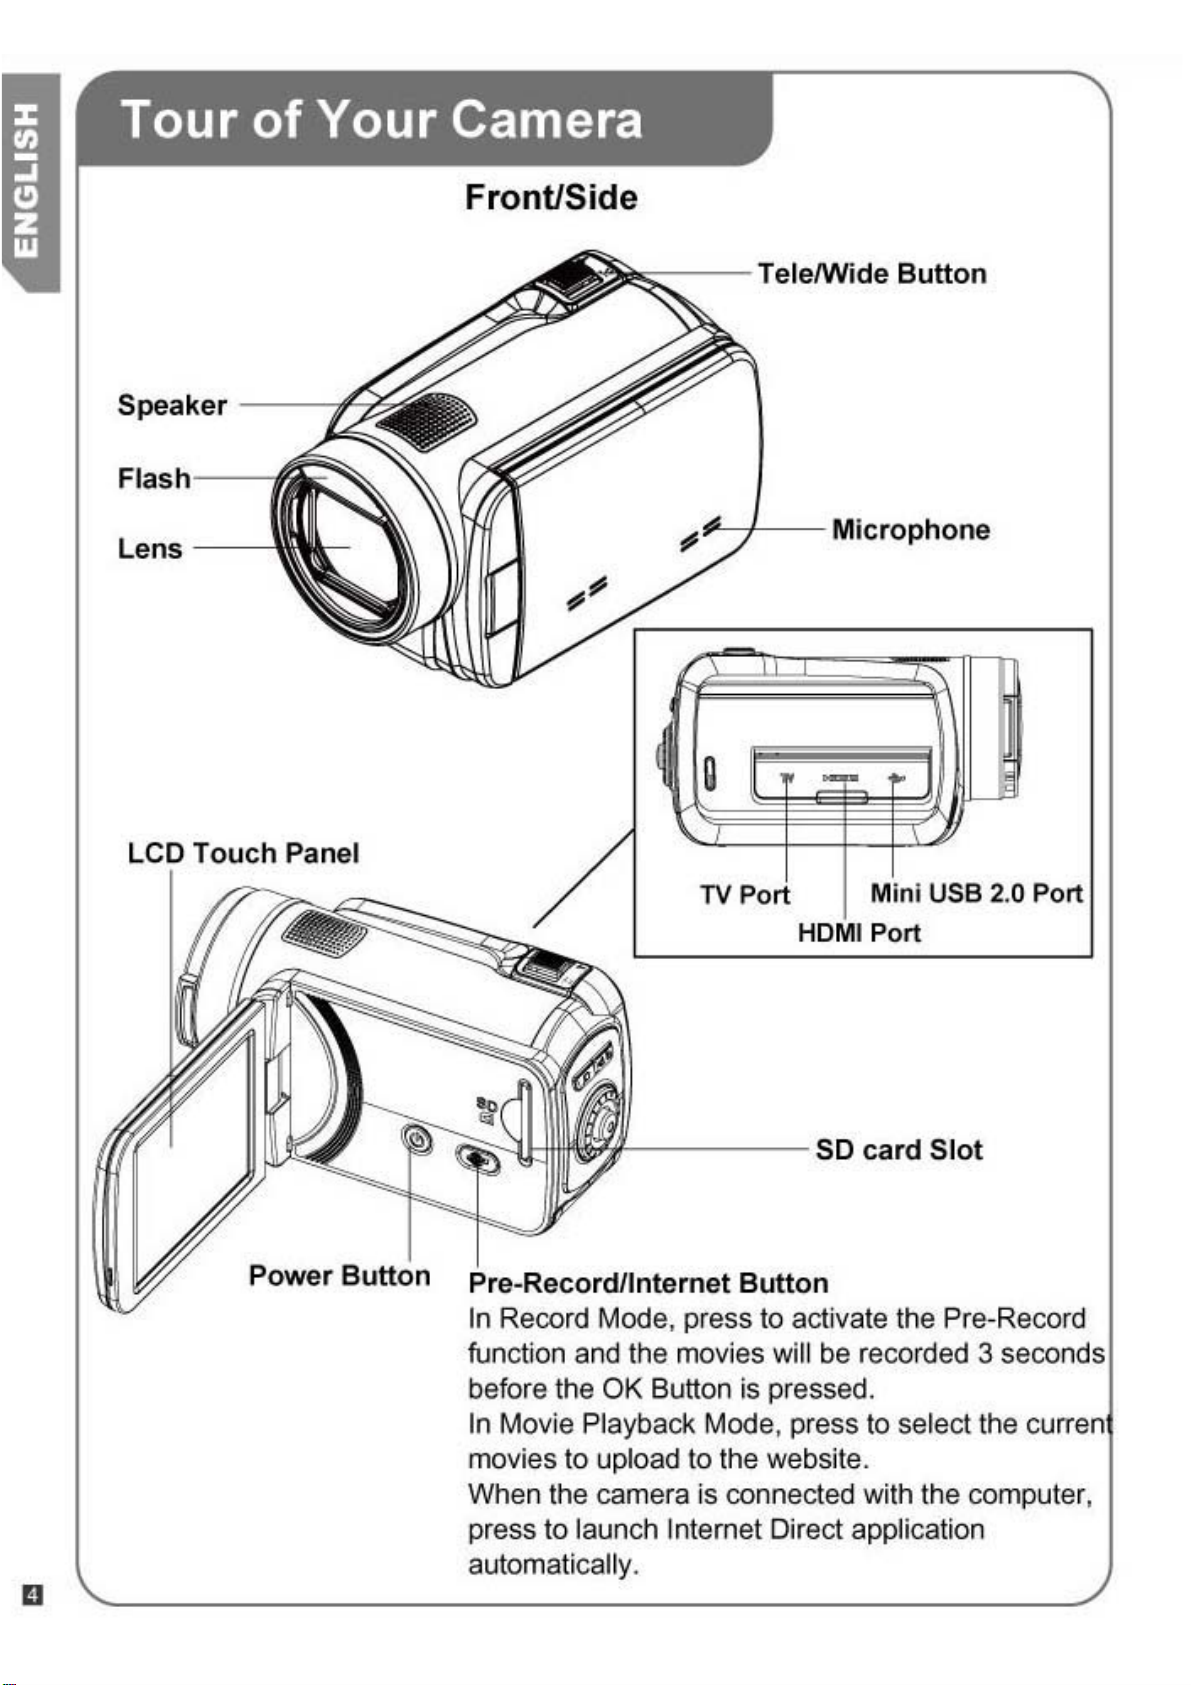
Front View
Flash
Tele/Wide Button
Speaker
Lens
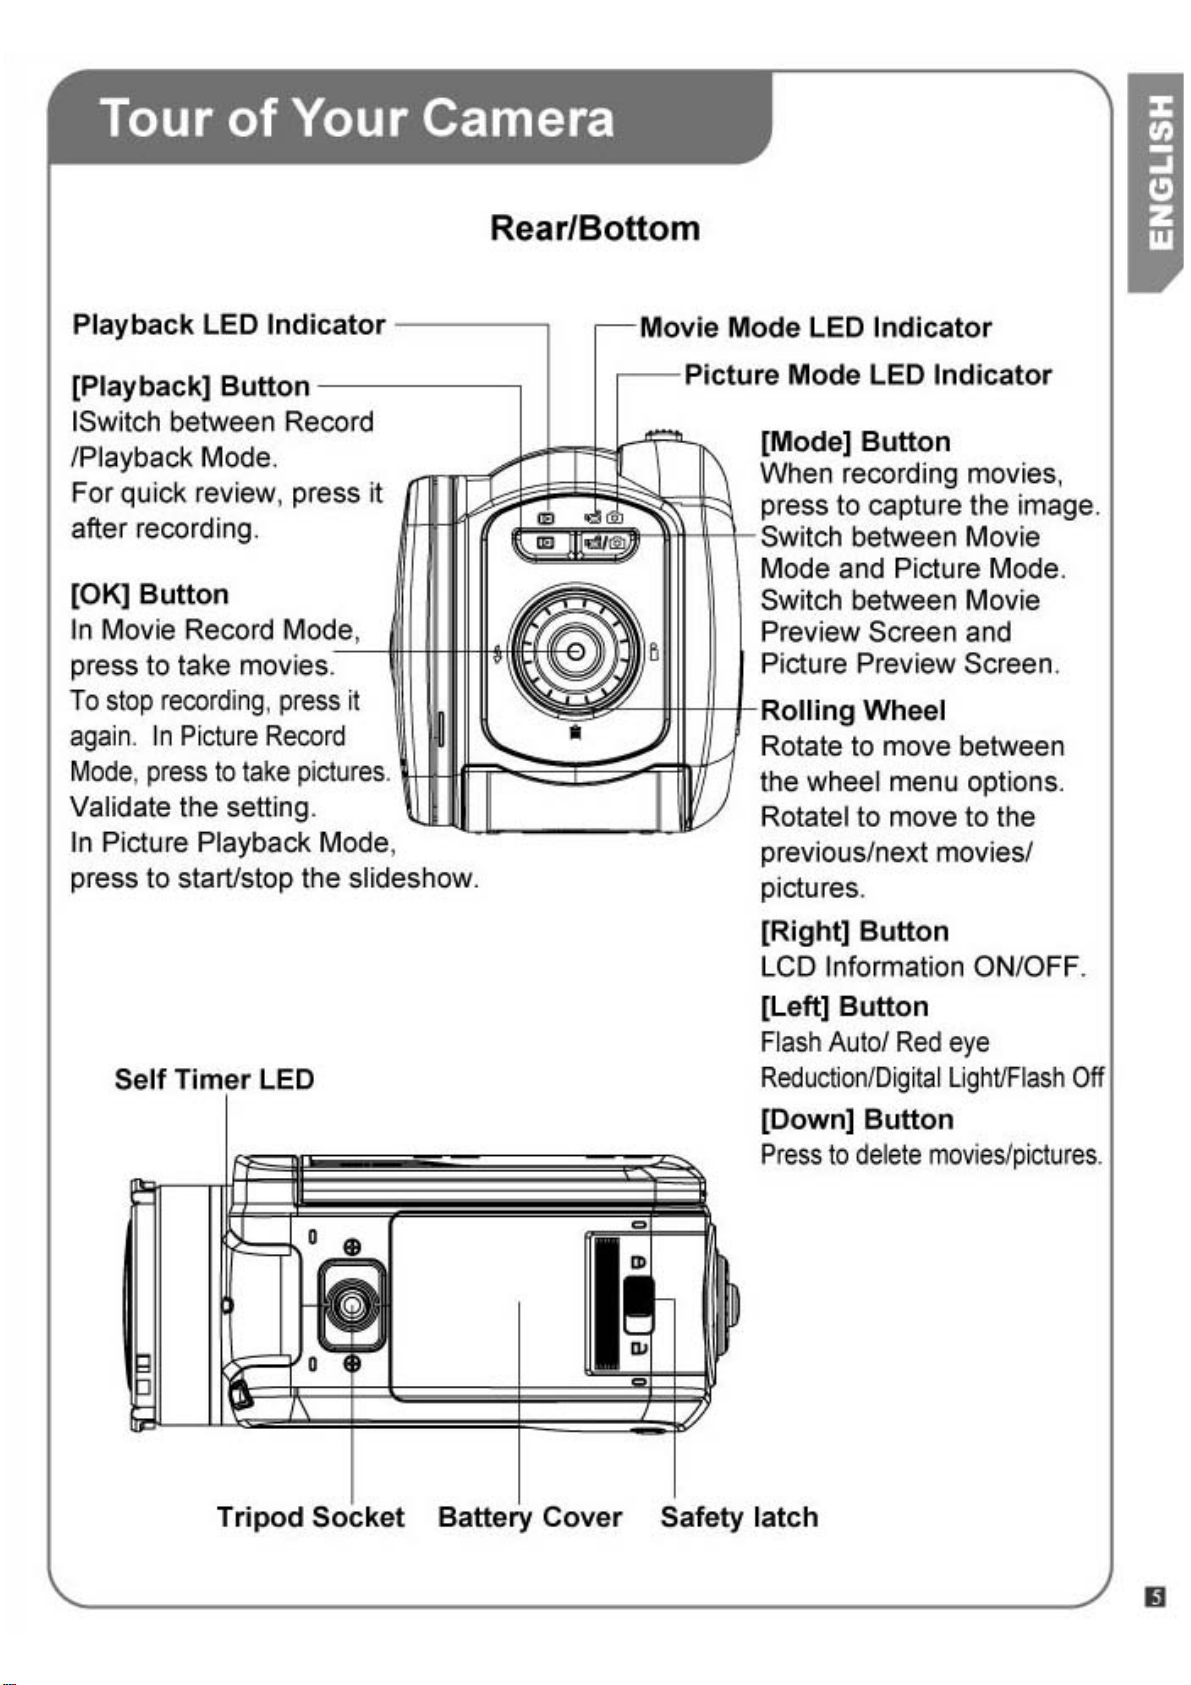
Rear View
Playback Button
Playback LED Indicator
Microphone
Movie Mode LED Indicator
Picture Mode LED Indicator
Mode Button
Rolling Wheel
OK Button
Page 5

5
EN
Side View
SD card Slot
Bottom View
Power Button
LCD Touch Panel
TV Port
HDMI Port
Pre -Record/Internet Button
Mini USB 2.0 Port
Self Timer LED
Safety latch
Battery Cover
Tripod Socket
Page 6

6
EN
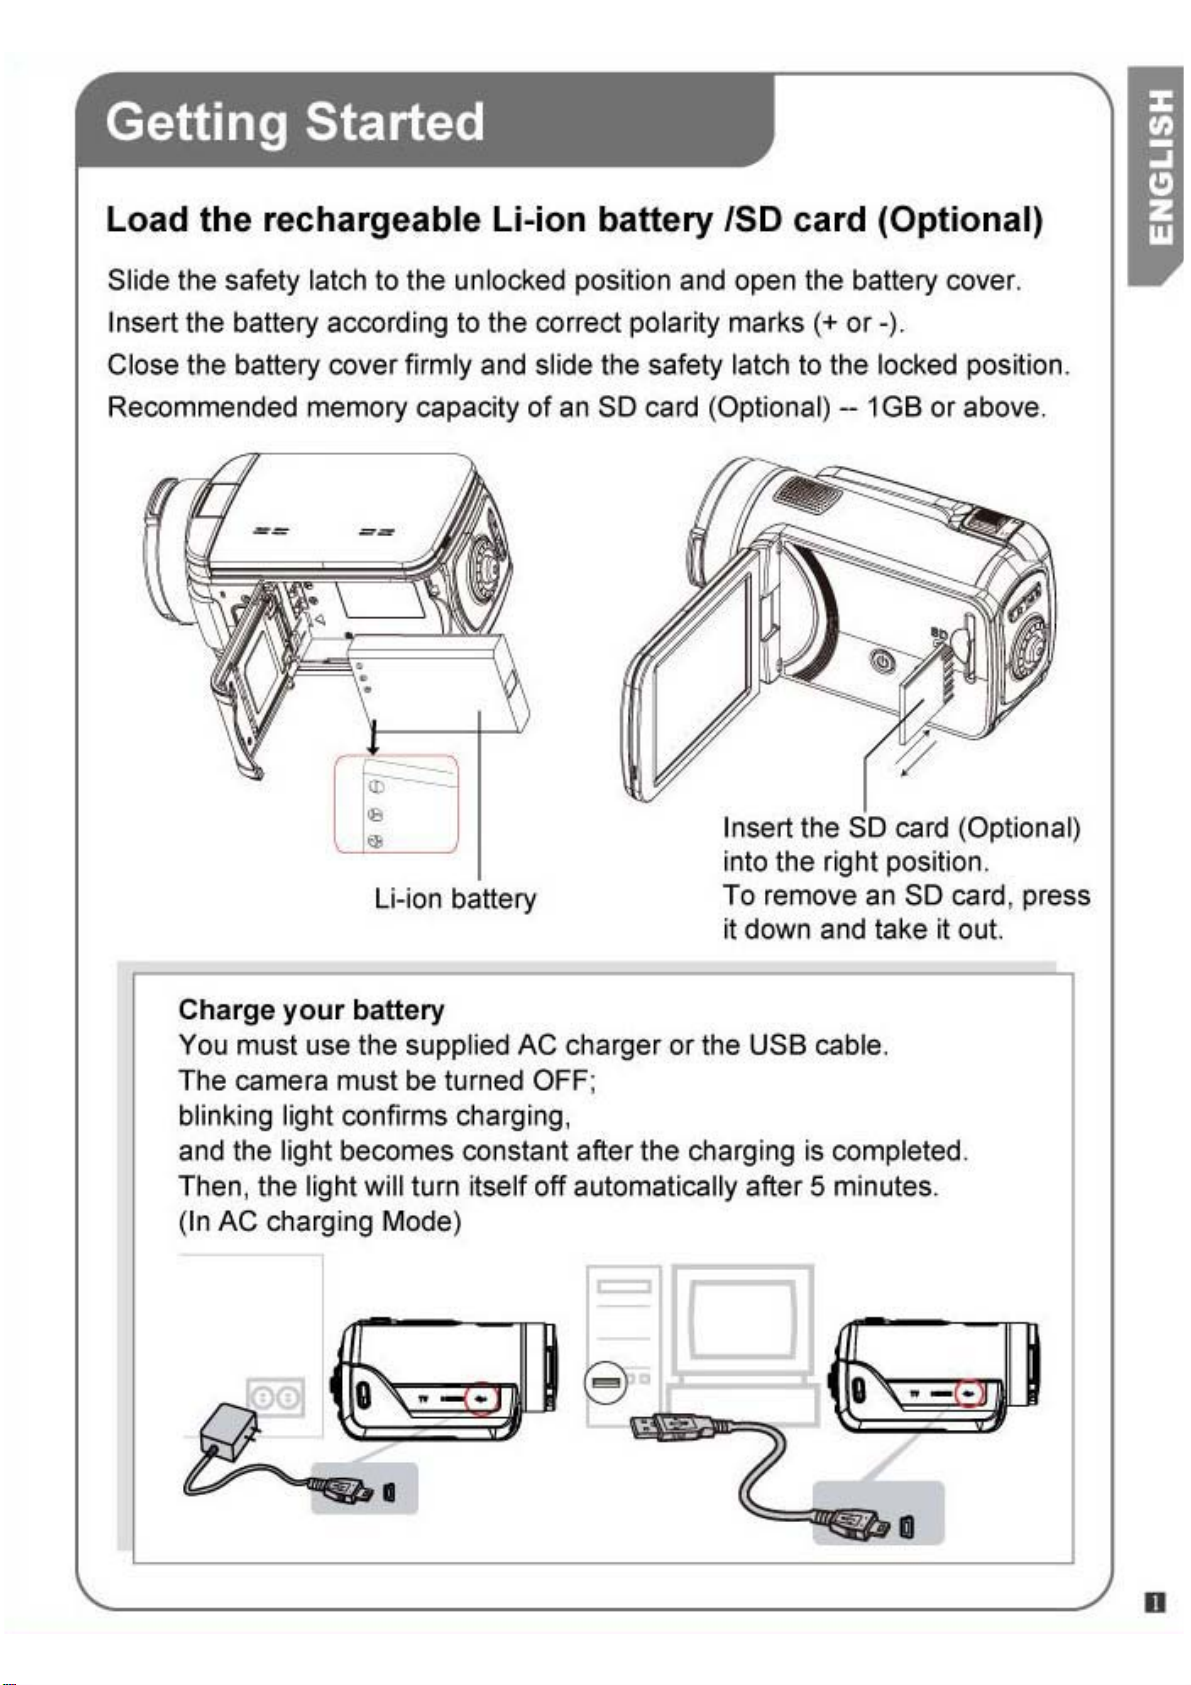
Loading the Battery
Before using the camera, users must load the Lithium-ion
rechargeable battery come within the package.
Slide the safety latch to the unlocked position and open 1.
the battery cover.
Insert the battery according to the correct polarity marks 2.
( + or -).
Close the battery cover rmly, and slide the safety latch 3.
to the locked position.
Section 2
Getting Started
Inserting and Removing an SD Card (Optional)
The camera comes with an internal memory which allows
you to store pictures and movies. You can expand the
memory capacity by using an optional SD/SDHC memory
card.
Insert the memory card into the slot. Please refer to the 1.
gure on the right side.
To remove an installed SD card, press the card inwards 2.
to release it.
When the card pops out, gently remove it from its slot.3.
Recommended memory capacity: 1GB or above.4.
Note
When a memory card is tted, movies/pictures are saved on the card rather than on the built-in •
memory.
Protecting Data on an SD Card: SD Card is read-•
only when it is locked. No pictures or movies can be
recorded when the SD card is locked. Make sure the
lock is on the writeable position before recording any
media.
Writeable
position
Write-Protected
Position
Page 7

7
EN
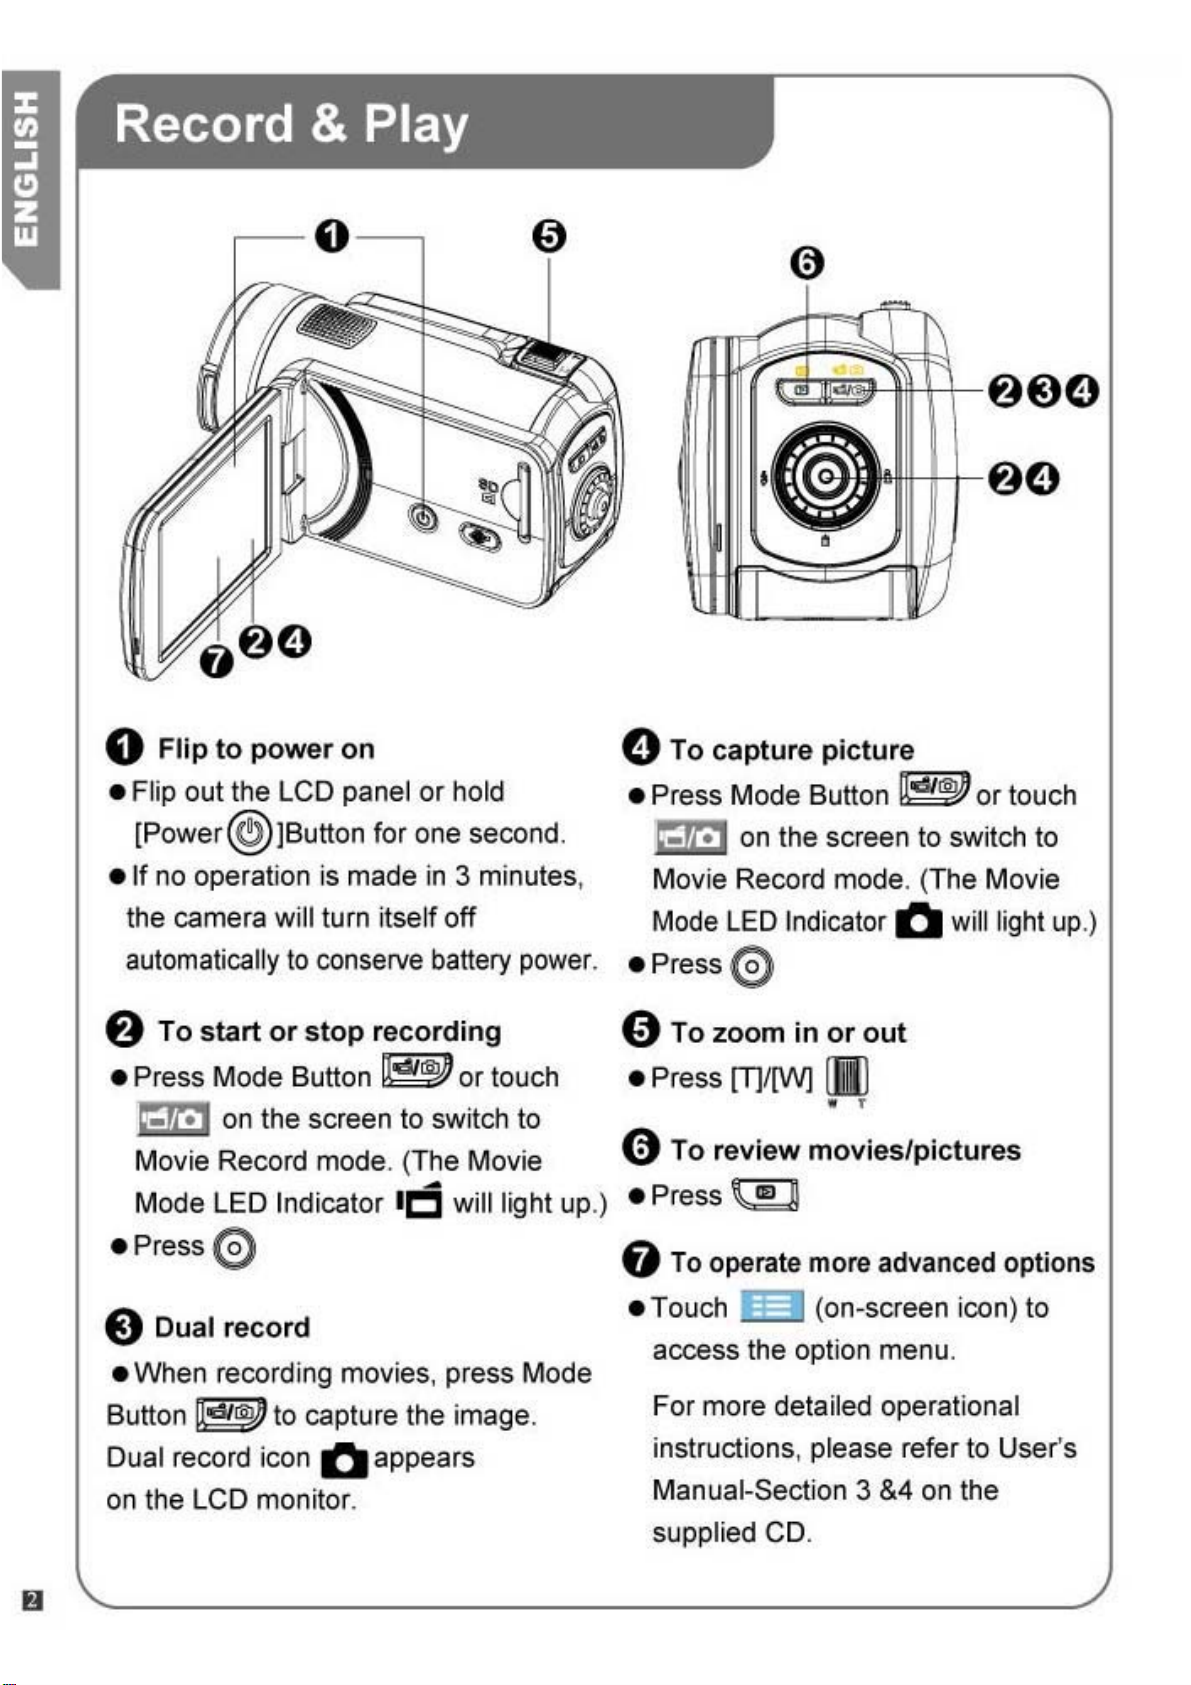
Turning the Camera On and Getting Started
To turn on the camera: •
Flip out the LCD panel; the camera will turn on automatically.1.
Or press Power Button for one second to turn it on.2.
To record movies: Press • Mode Button or touch
mode .(The Movie Mode LED Indicator will light up.) Press OK Button to record movies.
To take a picture: Press • Mode Button or touch
mode. (The Picture Mode LED Indicator will light up.) Press OK Button halfway down until the
focusing frame turns from white to green. Then, press it fully down to take pictures.
Focusing Frame: White Focusing Frame: Green
To take a picture during movie recording: When recording movies, press • Mode Button (
the image. The Dual record icon( ) appears on the LCD monitor.
on the screen to switch to the Movie Record
on the screen to switch to the Picture Record
) to capture
To view stored movies and pictures: Press Playback Button or • press
to the Playback mode. (The Playback LED Indicator will light up.) Press Mode Button or touch
on the screen to switch between Movie Preview Screen and Picture Preview Screen.
on the screen to switch
Turning the Camera Off
To turn off the camera: You can either press the Power Button for one second, or you can place the •
LCD panel back to its original position.
Page 8

8
EN
Button Function
Section 3
Enjoying the Record Mode
Rolling Wheel: Rotate to move between the wheel menu
options.
Right Button: LCD Information ON/OFF. In Record menu,
press to switch to the submenu.
Left Button: Flash Auto/Red-Eye-Reduction/Digital Light/
Flash OFF. In Record menu, press to return to the main
menu.
Up Button: Move between the option items.
Down Button: Delete the current or all movies/pictures.
Move between the option items.
OK Button:
Validate the setting.1.
In Movie Record Mode, press to take movies. To stop 2.
recording, press it again.
In Picture Record Mode, press to take pictures.3.
Tele Button : Zoom In
Wide Button : Zoom out
Playback Button:
Switch between Record / Playback Mode.1.
For quick review, press it after recording.2.
In Record menu, press to exit.3.
Mode Button:
Switch between Movie Mode and Picture Mode.1.
When recording movies, press t2. o capture the image.
Power Button: Press down for one second to turn on or turn
off the camera.
Pre-Record/Internet Button:In Record Mode, press
to activate the function that the movies are recorded 3 seconds
before the OK Button is pressed.
Page 9

9
EN
LCD Monitor Information
The indicators shown below may display on LCD when movies and pictures are recorded:
Movie Resolution
FHD (1080i 60)
(1)
Picture Resolution
(2)
(3)
FHD (1080p 30)
HD (720p 60)
HD (720p 30)
VGA (4:3)
Slow Motion (Record movies at 320x240 resolution.)
High (16 MP)
Standard (10 MP)
Low (3 MP)
Recording time of the movie that can still be taken at current
resolution
Number of images that can still be taken at current resolution
Self-timer enabled
Dual Record
(4)
(5)
Stabilization
Pre-Record Mode
Time Lapse
Page 10

10
EN
(6)
Scene
Skin
Night
Backlight
(7)
(8)
(9)
(10)
(11)
(12)
(13)
Macro Position Focusing
Manual White Balance
Motion Detection
Zoom meter:
1X~100X (10X Optical zoom and 10X Digital zoom)
Record Menu
Playback Mode
Movie/Picture Record Mode
Movie Mode
Digital Light
Picture Mode
(14)
(15)
(16)
Flash Auto
Red Eye Reduction
Digital Light
Flash Off
SD Card Inserted
Battery: full power
Battery: medium power
Battery: low power
Battery: empty power
DC power mode
Note
Scene: B/W / Classic / Negative effect can be previewed immediately without indicator on the
LCD.
Page 11

11
EN
Movie Recording
In Movie Record Mode (The • Movie Mode LED Indicator lights up), press OK Button to start
recording. When a movie is being recorded, a time indicator will display on the LCD monitor. To stop
recording, press OK Button again.
Optional function•
Dual record: press 1. Mode Button (
on the LCD monitor.
Press Playback Button to view the recorded movies.•
Five resolution settings are available: •
Video Quality
FHD (1080i 60)
FHD (1080p 30)
HD (720p 60)
HD (720p 30)
VGA (4:3)
) to capture the image. The Dual record icon( ) appears
Note
The image resolution captured during movies recording is the same as the • video resolution.
Theashcannotbeusedwhencapturingimageduringmoviesrecording.•
Using the Pre-Record Function
The Pre-record function ensures that you will not miss any critical recording opportunities, The movies •
are recorded 3 seconds before the OK Button is pressed.
To use the Pre-Record function:•
Press the Pre-Record Button (1.
LCD monitor.
Aim the camera at the subject and position it securely.2.
Press the OK Button to start recording. (The camera records 3 seconds before you actually press 3.
the OK Button.)
To use the function again, set it again.•
Note
Time Lapse function can not be used when the Pre-Record function is activated.•
) in Record Mode. The Pre-Record icon( ) appears on the
Page 12

12
EN
Picture Recording
In Picture Record Mode (The • Picture Mode LED Indicator lights up), press OK Button halfway
down until the focusing frame turns from white to green. Then, press it fully down to take a picture.
Press Playback Button to view the picture.•
Three resolution settings are available: •
Image Quality
High Quality:16 Mega Pixels
Standard Quality:10 Mega Pixels
Low Quality:3 Mega Pixels
Using Flash or Digital Light Function
This camera has three ash settings and one setting to allow you to extend the brightness of the •
objects that are dark or in the shadow. Using Left Button to change the settings.
Flash Auto ( 1.
general photography. (Picture Recording Only)
Red Eye2. Reduction(
Only)
Digital Light 3. (
the objects will be brighter and clearer.
Flash Off ( 4.
images in a place where ash photography is prohibited, or when the subject is distant (beyond
the range of the ash). (Picture Recording Only)
): The ash res automatically according to light conditions. Use this mode for
): The pre-ash will re to reduce the red-eye effect. (Picture Recording
): To extend the dynamic range for backlight and high contrast sense so that
): The ash will not re under any circumstances. Use this mode when taking
Note
Theashwillbedisabledautomaticallywhenthebatterypowerislow( ).
Using Zoom Function
The zoom magnies images when recording movies or taking pictures.•
To zoom in/out, press the Tele/Wide Button.1.
It can be set from 1X~100X (10X Optical zoom and 10X Digital zoom).2.
Page 13

13
EN
Options for Record Menu
Movie Record Mode Menu
Movie Resolution White Balance Scene Effect
FHD (1080i 60)•
FHD (1080p 30)•
HD (720p 60)•
HD (720p 30)•
VGA (4:3)•
Auto•
Daylight•
Fluorescent •
Tungsten•
Auto•
Skin•
Night•
Backlight•
B/W • (Black/White)
Classic•
Negative•
Stabilization•
Macro Mode•
Motion Detect. •
(Motion Detection)
Slow Motion •
Time Lapse•
Picture Record Mode Menu
Picture Resolution White Balance Scene Effect
High (16MP)•
Std (10MP)•
Low (3MP)•
Auto•
Daylight•
Fluorescent •
Tungsten•
Auto•
Skin•
Night•
Backlight•
B/W • (Black/White)
Classic•
Negative•
Self-Timer•
Macro Mode•
ISO•
Operations for Record Mode
Operation Screen
Touch 1.
menu will show on the screen.
Scroll2. the wheel menu on the screen lightly with
your nger to move between the options, which are
Resolution, Scene, Effect, White Balance, and Setting.
Submenu will pop up while stopping on each option.3.
Touch to select the specic option you want to adjust, 4.
then touch [OK] to validate the setting.
Or touch the Return icon ( 5.
change.
Touch 6.
pages.
(on-screen icon) in Record Mode. The wheel
) to exit without any
/ on the screen to change between the
Page 14

14
EN
Movie Resolution
Five resolution settings are available.
FHD(1080i 60):• Record movies at 1920x1080i 60 resolution.
FHD(1080p 30)• : Record movies at 1920x1080p 30 resolution.
HD(720p 60):• Record movies at 1280x720p 60 resolution.
HD(720p 30):• Record movies at 1280x720p 30 resolution.
VGA(4:3):• Record movies at 640x480p 30 resolution.
Operation Display Screen
In Movie Record Mode, touch 1.
icon) to show the wheel menu.
Scroll and stop on [Resolution]. The submenu of 2.
Resolution pops up.
Touch the desired option. 3.
Touch [OK] to validate the setting.4.
(on-screen
Picture Resolution
Three resolution settings are available.
High(16MP): • Shoot pictures at 4608x3456, 16MP quality.
Std(10MP)• (Standard): Shoot pictures at 3644x2748, 10MP quality.
Low(3MP):• Shoot pictures at 2048 x 1536, 3MP quality.
Operation Display Screen
In 1. Picture Record Mode, touch
icon) to show the wheel menu.
Scroll and stop on [Resolution]. The submenu of 2.
Resolution pops up.
Touch the desired option. 3.
Touch [OK] to validate the setting.4.
(on-screen
Page 15

15
EN
White Balance
The camera adjusts the color balance of images automatically. Three manual white balance settings are
available:
Auto: • The camera automatically adjusts white balance.
Daylight: • Under outdoor condition.
Fluorescent: • Under uorescent light condition.
Tungsten: • Under tungsten light condition.
Operation Display Screen
In Movie/Picture Record Mode, touch 1.
screen icon) to show the wheel menu.
Scroll and stop on [White Balance]. The submenu 2.
of White Balance pops up.
Touch the desired option. 3.
Touch [OK] to validate the setting.4.
(on-
Scene
You can select the mode according to the scene condition.
Auto: • Shoot without any special effect on the image.
Skin: • Shoot with an effect that makes skin tones more natural.
Night• : Use Night Mode for night scenes or low light conditions.
Backlight:• You can take shots when the bright light is behind the subject.
B/W • (Black/White): The image is converted to black-and-white.
Classic: • The image is converted to a sepia look.
Negative: • The image is converted as the negative of the normal
Operation Display Screen
In 1. Movie/Picture Record Mode, touch
screen icon) to show the wheel menu.
Scroll and stop on [Scene]. The submenu of 2.
Scene pops up.
Touch the desired option. 3.
Touch [OK] to validate the setting.4.
(on-
Note
Toavoidblurrypictures,placethecameraonaat,steadysurface,oruseatripodwhentaking
shots in the Night Mode.
Page 16

16
EN
Movie Effect
Operation Display Screen
In Movie Record Mode, touch 1.
icon) to show the wheel menu.
Scroll and stop on [Effect]. The submenu of 2.
Effect pops up.
Touch the desired Effect option to enter its option 3.
screen.
The Movie Effect submenu contains 5 options-- 4.
Stabilization, Macro Mode, Motion Detection,
Slow Motion, and Time Lapse --for you to adjust
the camera’s settings.
(on-screen
Stabilization
Record with an effect of reducing camera shake to result in more stable videos.
Operation Display Screen
In the Effect submenu, touch [Stabilization] to 1.
enter the option screen.
Touch the desired option. 2.
Touch [OK] to validate the setting.3.
Note
Stabilizationdoesn’tapplyonFHD(1080i60).
Macro Mode
Auto:• The camera adjusts the focus automatically.
Macro• ( ): The camera adjusts the focus with priority on close- up objects. Shoot in Macro mode
when the objects are located in 1 cm~Innite (setting to the Wide side)/60 cm~Innite (setting to the
Tele side).
Operation Display Screen
In the Effect submenu, touch [Macro Mode] to 1.
enter the option screen.
Touch the desired option. 2.
Touch [OK] to validate the setting.3.
Page 17
17
EN
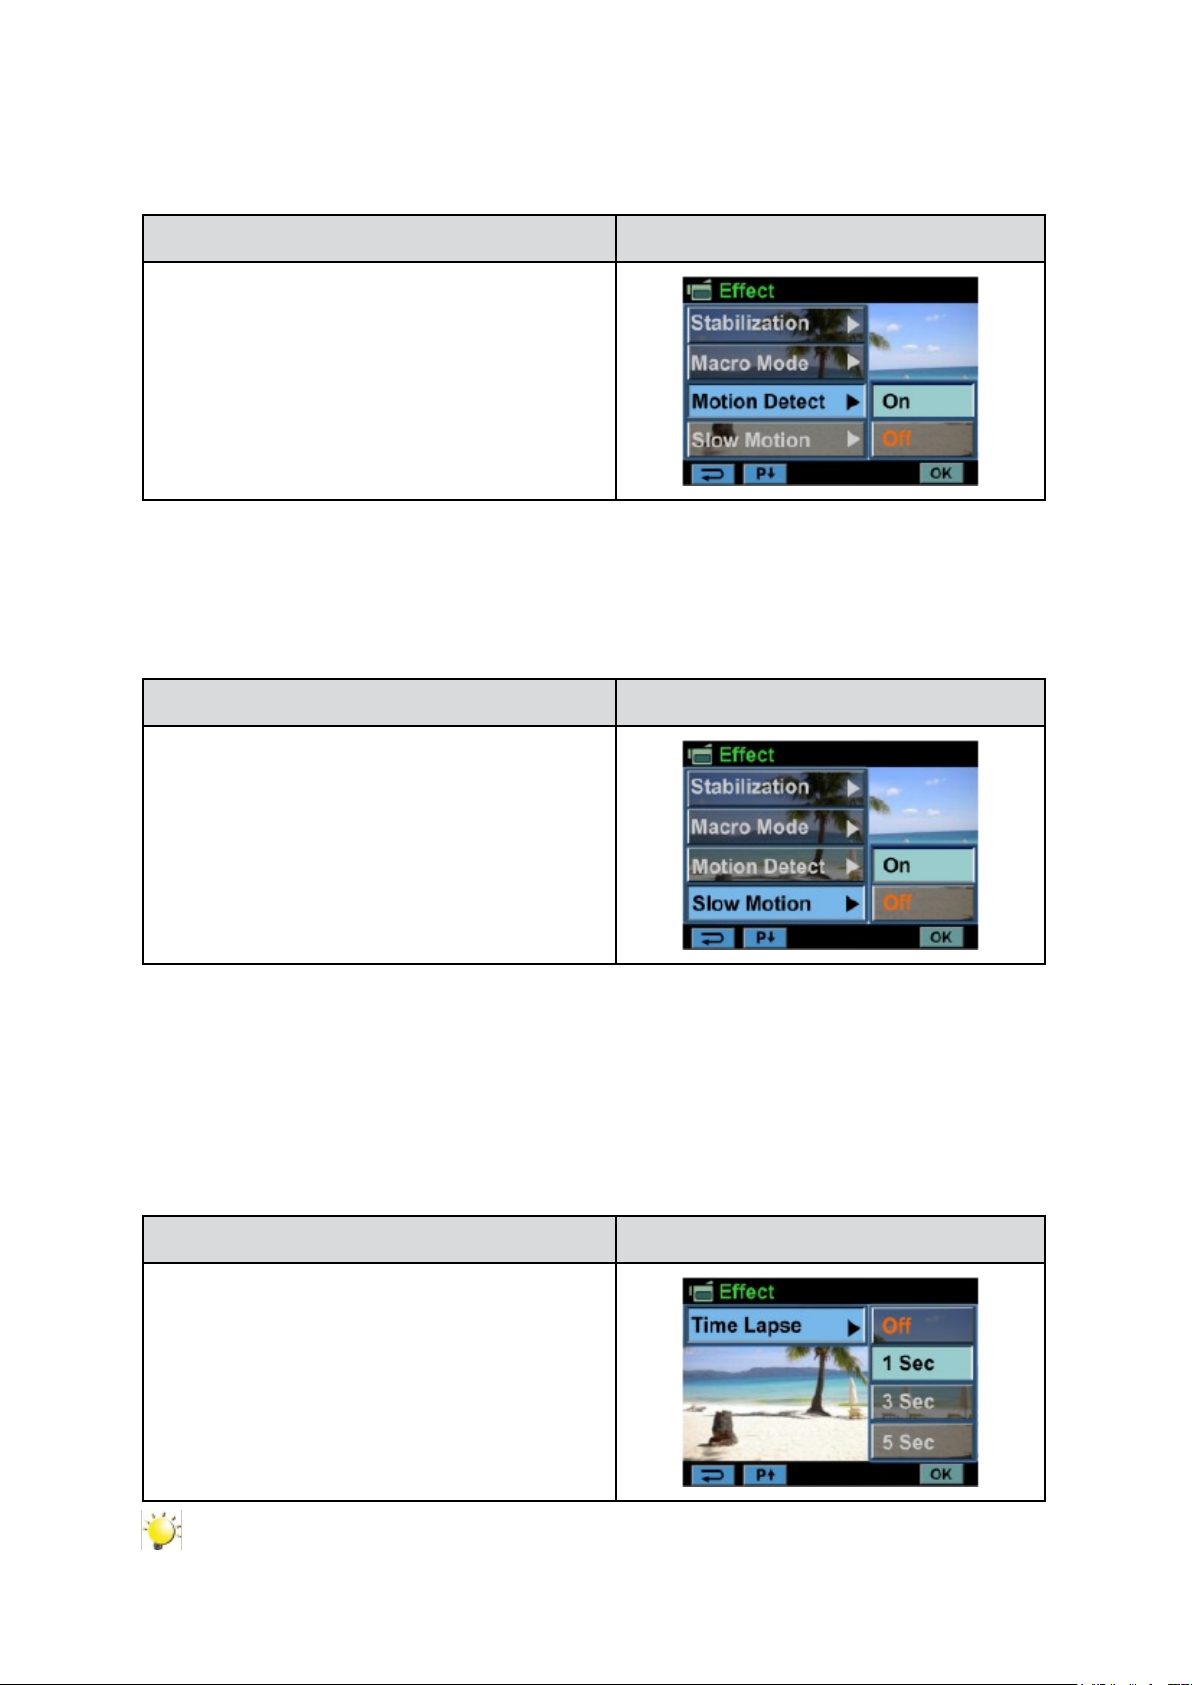
Motion Detection
Record videos automatically when the camera detects a movement.
Operation Display Screen
In the Effect submenu, touch [1. Motion Detect.] to
enter the option screen.
Touch the desired option. 2.
Touch [OK] to validate the setting.3.
Camera will start to record video automatically if 4.
it detects a movement. Stop recording if it does
not detect a movement.
Slow Motion
Record videos with slow motion effect. When the video is played, the playback time will be longer than
the actual recording time.
Operation Display Screen
In the Effect submenu, touch [Slow Motion] to 1.
enter the option screen.
Touch the desired option. 2.
Touch [OK] to validate the setting.3.
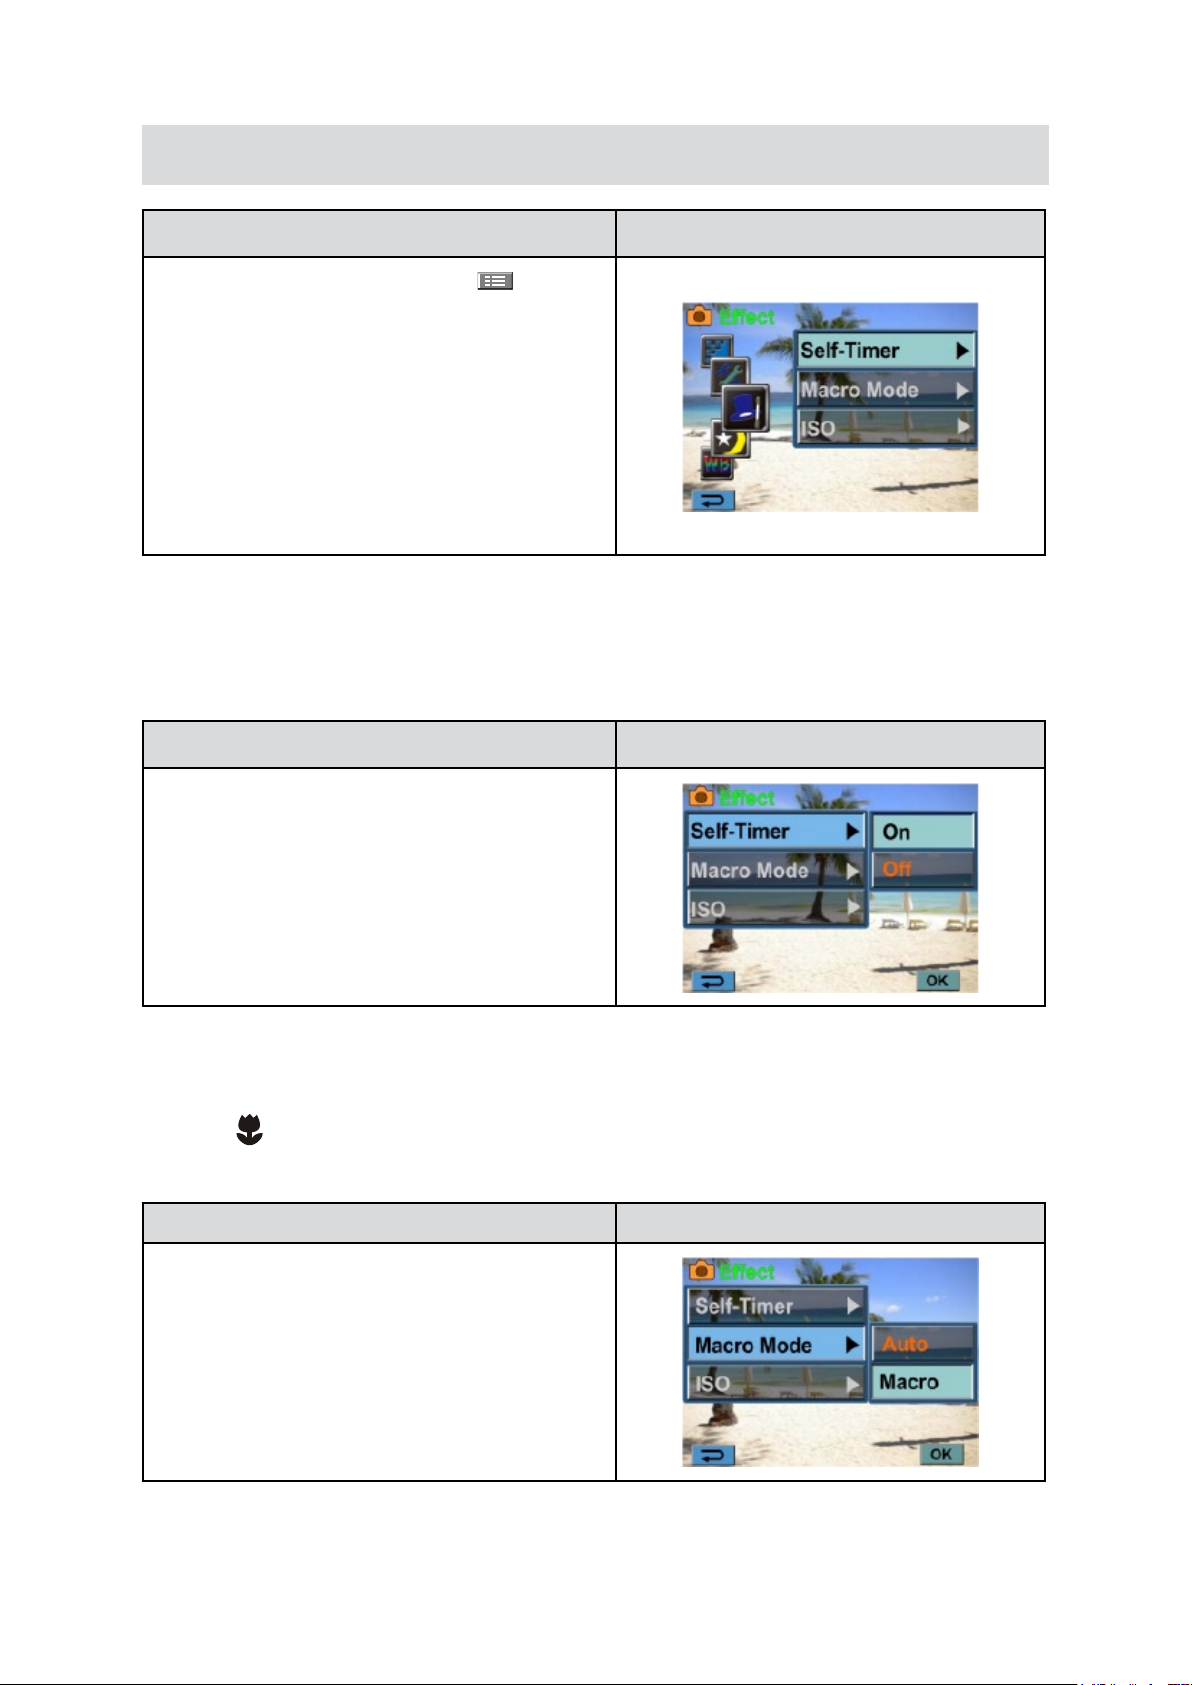
Time Lapse
Record still images at specic intervals you can set and play them as one movie le.
Off:• Disable Time Lapse.
1 Sec.:• Record one frame per second.
3 Sec.• : Record one frame every 3 seconds.
5 Sec.:• Record one frame every 5 seconds.
Operation Display Screen
In the Effect submenu, touch [1. Time Lapse] to
enter the option screen.
Touch the desired option. 2.
Touch [OK] to validate the setting.3.
Note
Stabilization function can not be used when Time Lapse function is activated.•
Page 18
18
EN
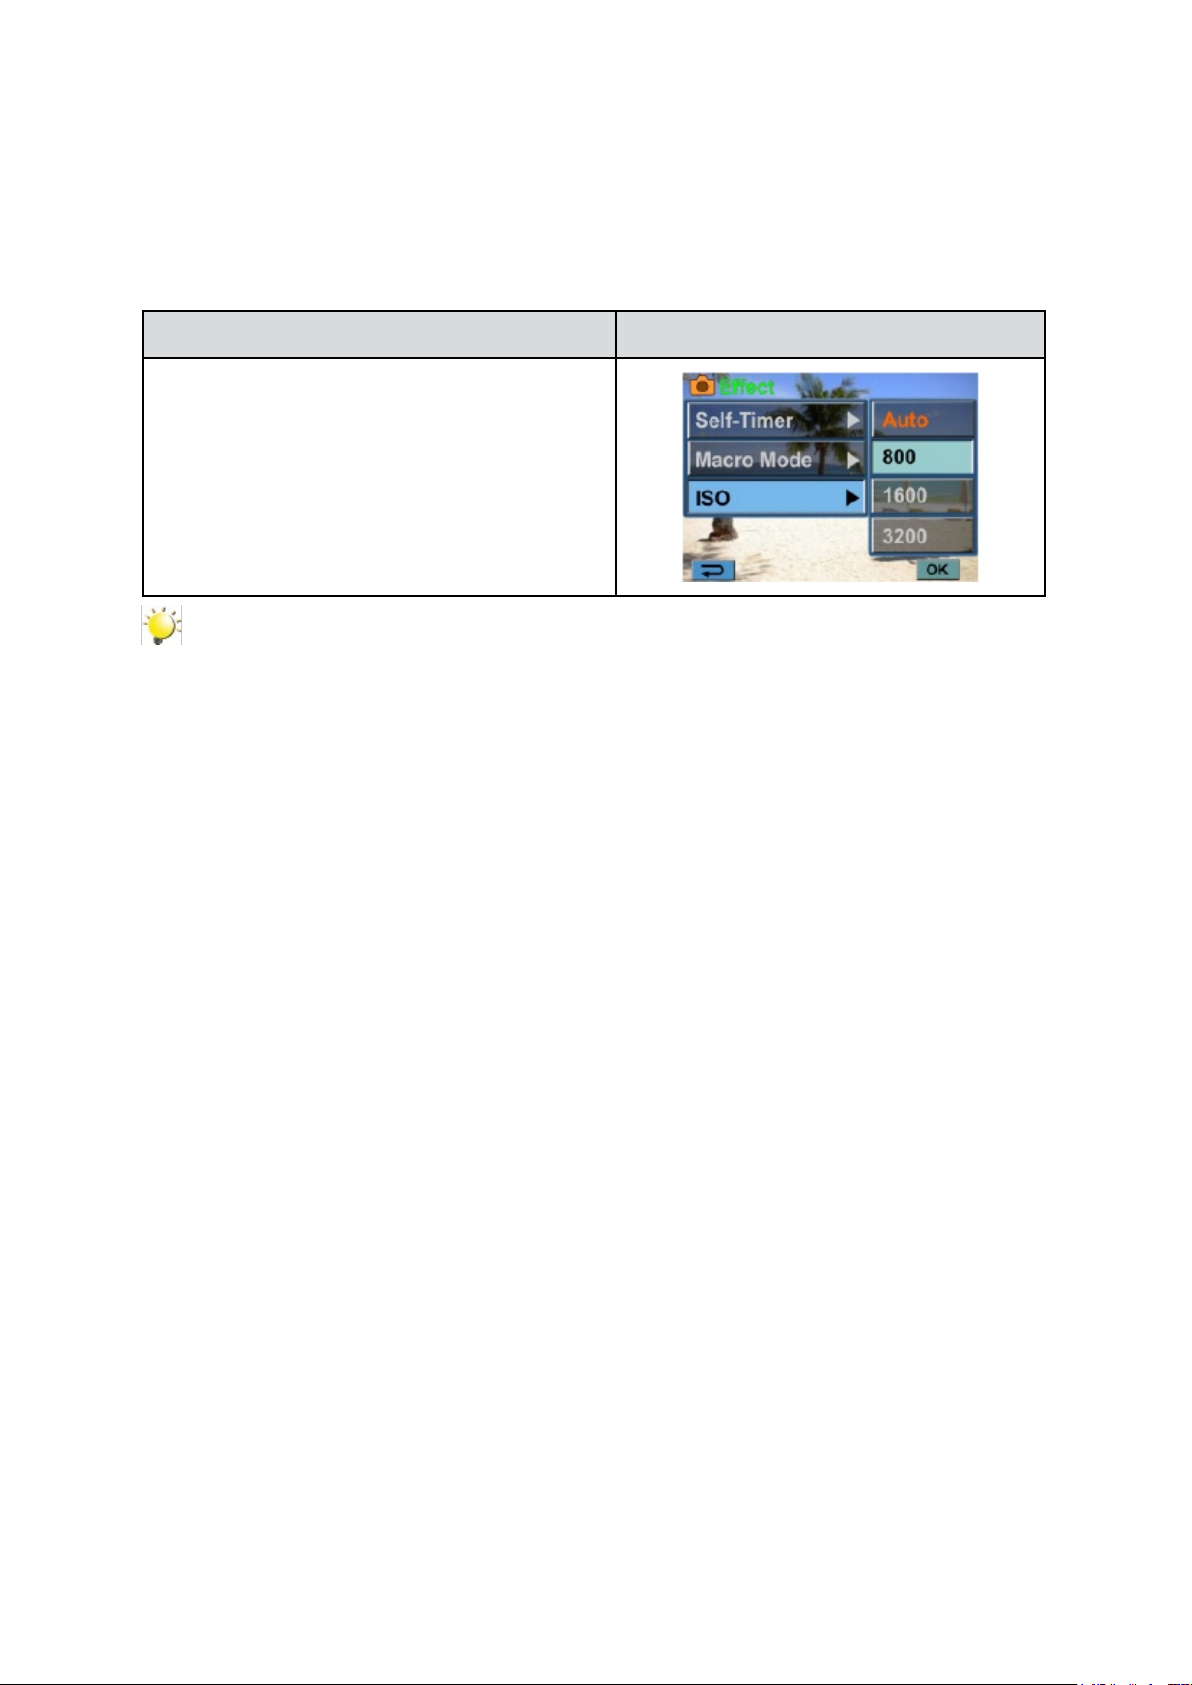
Picture Effect
Operation Display Screen
In Picture Record Mode, touch 1.
icon) to show the wheel menu.
Scroll and stop on [Effect]. The submenu of 2.
Effect pops up.
Touch the desired Effect option to enter its option 3.
screen.
The Picture4. Effect submenu contains 3 options
--Self Timer, Macro Mode, and ISO-- for you to
adjust the camera’s setting.
(on-screen
Self-Timer
The self-timer allows you to take pictures with a ten-second time delay. The self-timer light on the front
of the camera will also blink. The speed of blinking will increase just before the picture is taken.
Operation Display Screen
In the Effect submenu, touch [1. Self-Timer] to
enter the option screen.
Touch the desired option. 2.
Touch [OK] to validate the setting.3.
Macro Mode
Auto: The camera adjusts the focus automatically. •
Macro• ( ): The camera adjusts the focus with priority on close- up objects. Shoot in Macro mode
when the objects are located in 1 cm~Innite (setting to the Wide side)/60 cm~Innite (setting to the
Tele side).
Operation Display Screen
In Effect submenu, 1. touch [Macro Mode] to enter
the option screen.
Touch the desired option. 2.
Touch [OK] to validate the setting.3.
Page 19
19
EN
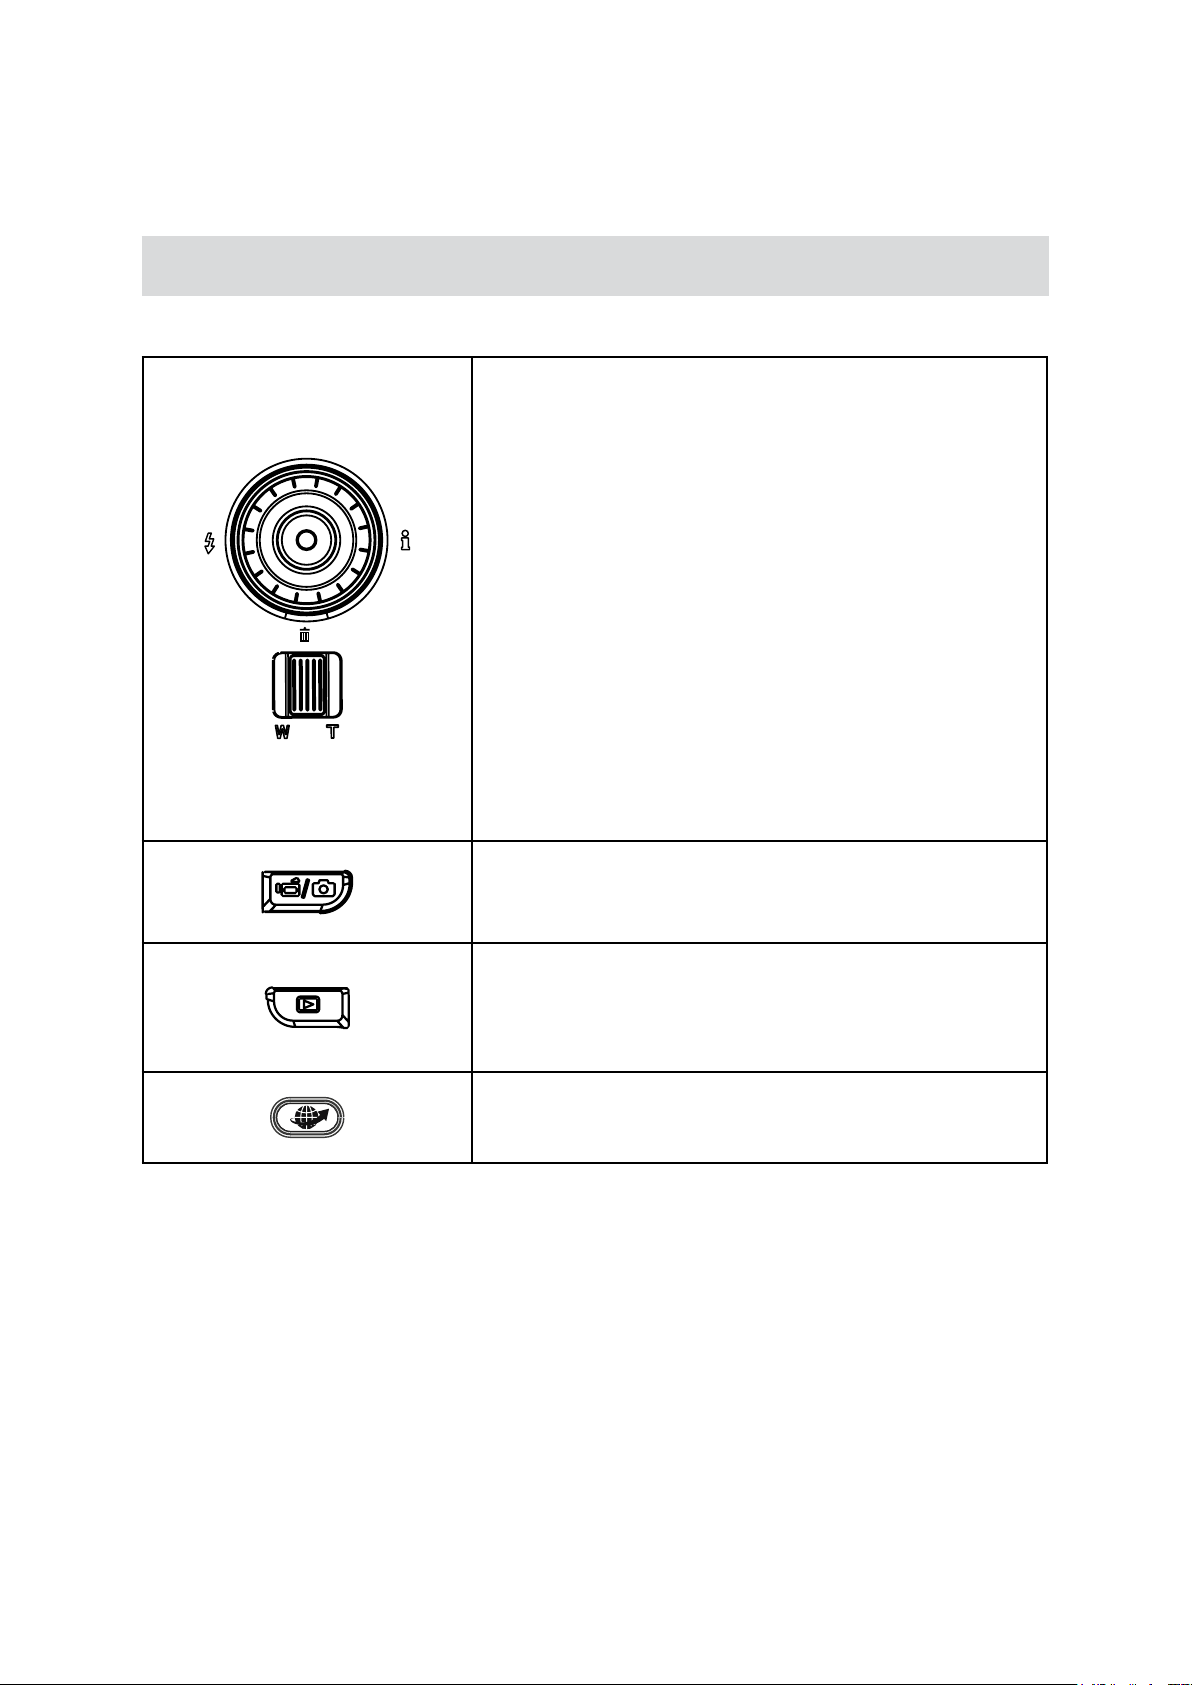
ISO
The camera adjusts the ISO sensitivity of its images automatically. Three manual ISO sensitivity settings
are available. (800/1600/3200) The larger the number is, the higher the ISO sensitivity is set to. Select
a small number to shoot a smoother image. Select a large number to shoot an image in a dark location
or to shoot a subject moving at high speed.
Operation Display Screen
In the Effect submenu, 1. touch [ISO] to enter the
option screen.
Touch the desired option. 2.
Touch [OK] to validate the setting.3.
Note
The image may become noisy when the ISO number is large.
Page 20
20
EN
Section 4
Enjoying the
Button Function
The Buttons have the following functions in Playback Mode.
Rolling Wheel: Rotate to move to the previous/next movie/
picture.
Right Button: LCD Information ON/OFF; Fast forward.
Left Button: Fast rewind.
Down Button: Delete the current movie/picture or all movies/
pictures.
OK Button:
Enter Movie/Picture Playback Mode.1.
Validate the setting. 2.
In Picture Playback Mode, press to start/stop the 3.
slideshow.
Playback Mode
Tele Button : Zoom In
Wide Button : Zoom out
Mode Button:
Switch between Movie Preview Screen and Picture Preview 1.
Screen.
Playback Button:
Switch between Record /Playback Mode.1.
Return to the previous screen.2.
Pre-Record/ Internet Button: In Movie Playback Mode, press
to select the current movie to upload to Internet.
Page 21
21
EN
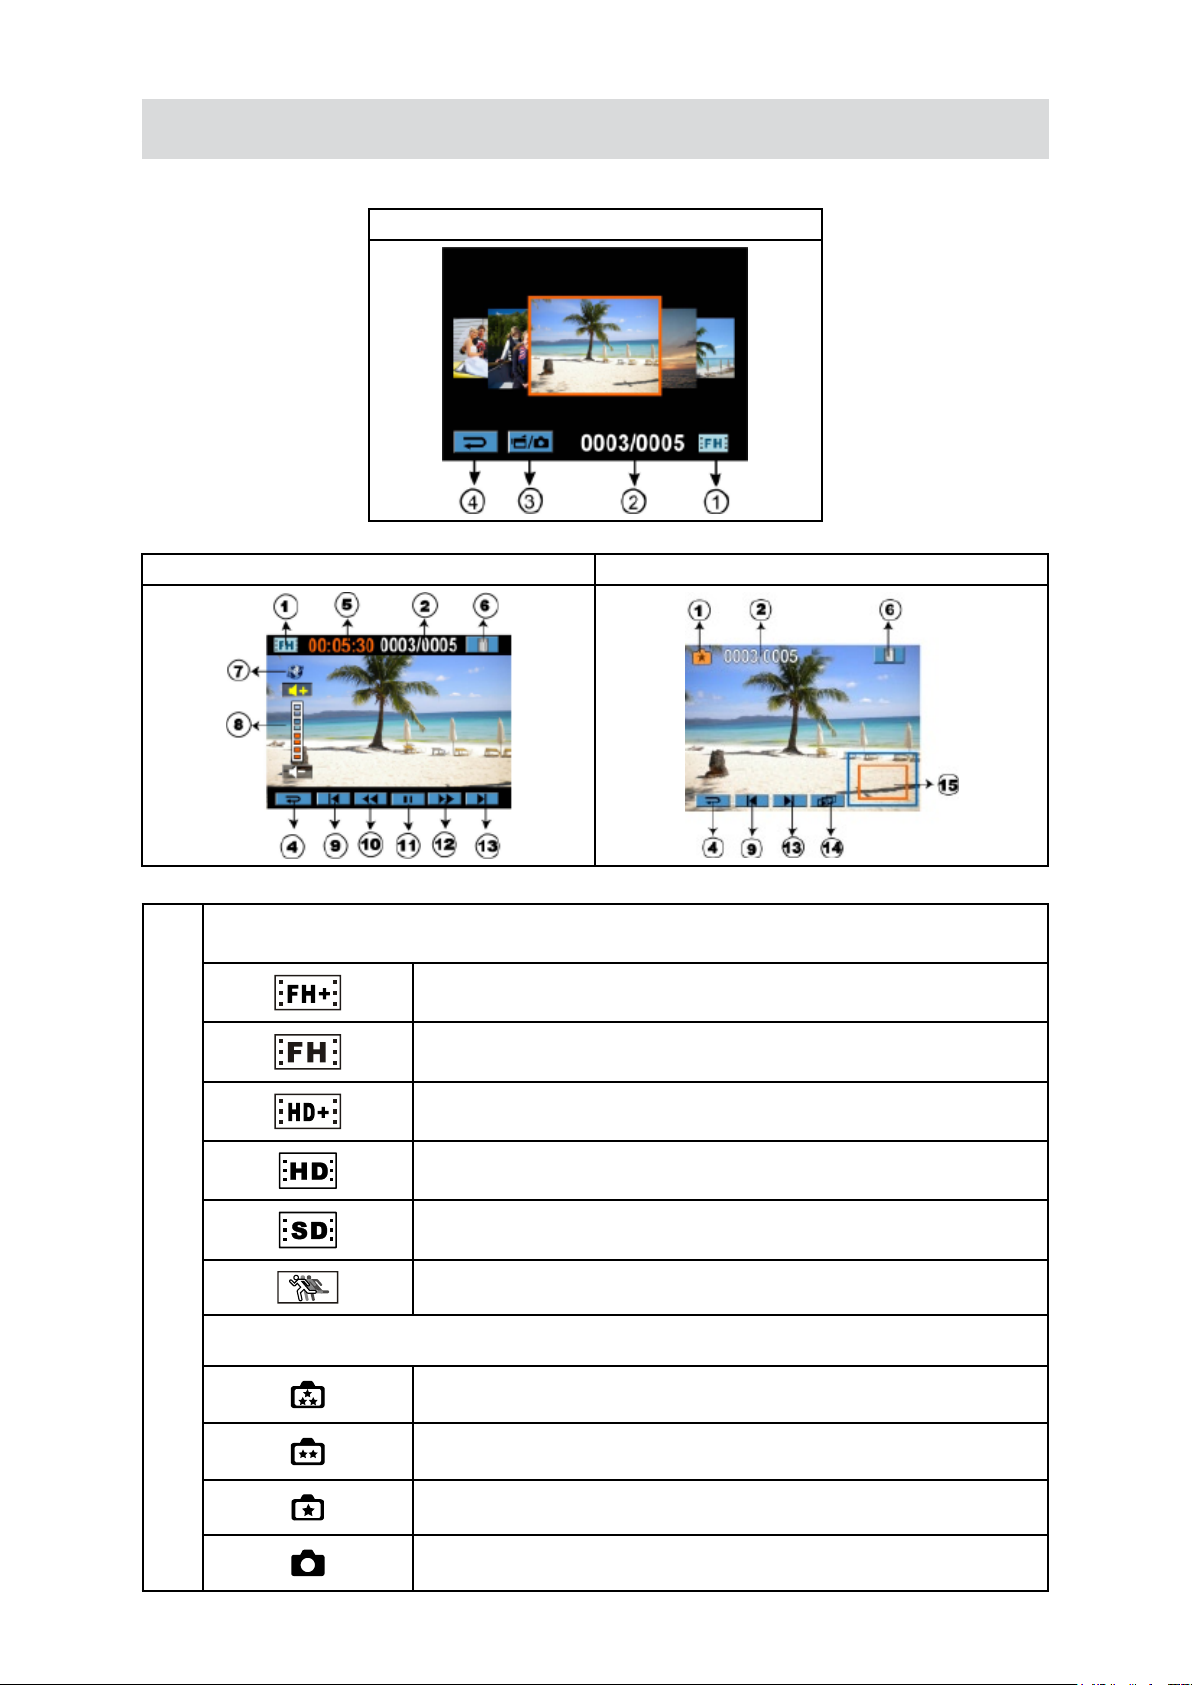
LCD Monitor Information
Indicators on the LCD screen while in Playback Mode:
Playback Preview Screen
Movie Playback Mode Picture Playback Mode
Movie Resolution
(1)
Picture Resolution
FHD (1080i 60)
FHD (1080p 30)
HD (720p 60)
HD (720p 30)
VGA (4:3)
Slow Motion (320x240)
High (16 MP)
Standard (10MP)
Low (3MP)
Dual Record (The image resolution captured during movies recording
is the same as the video resolution.)
Page 22
22
EN
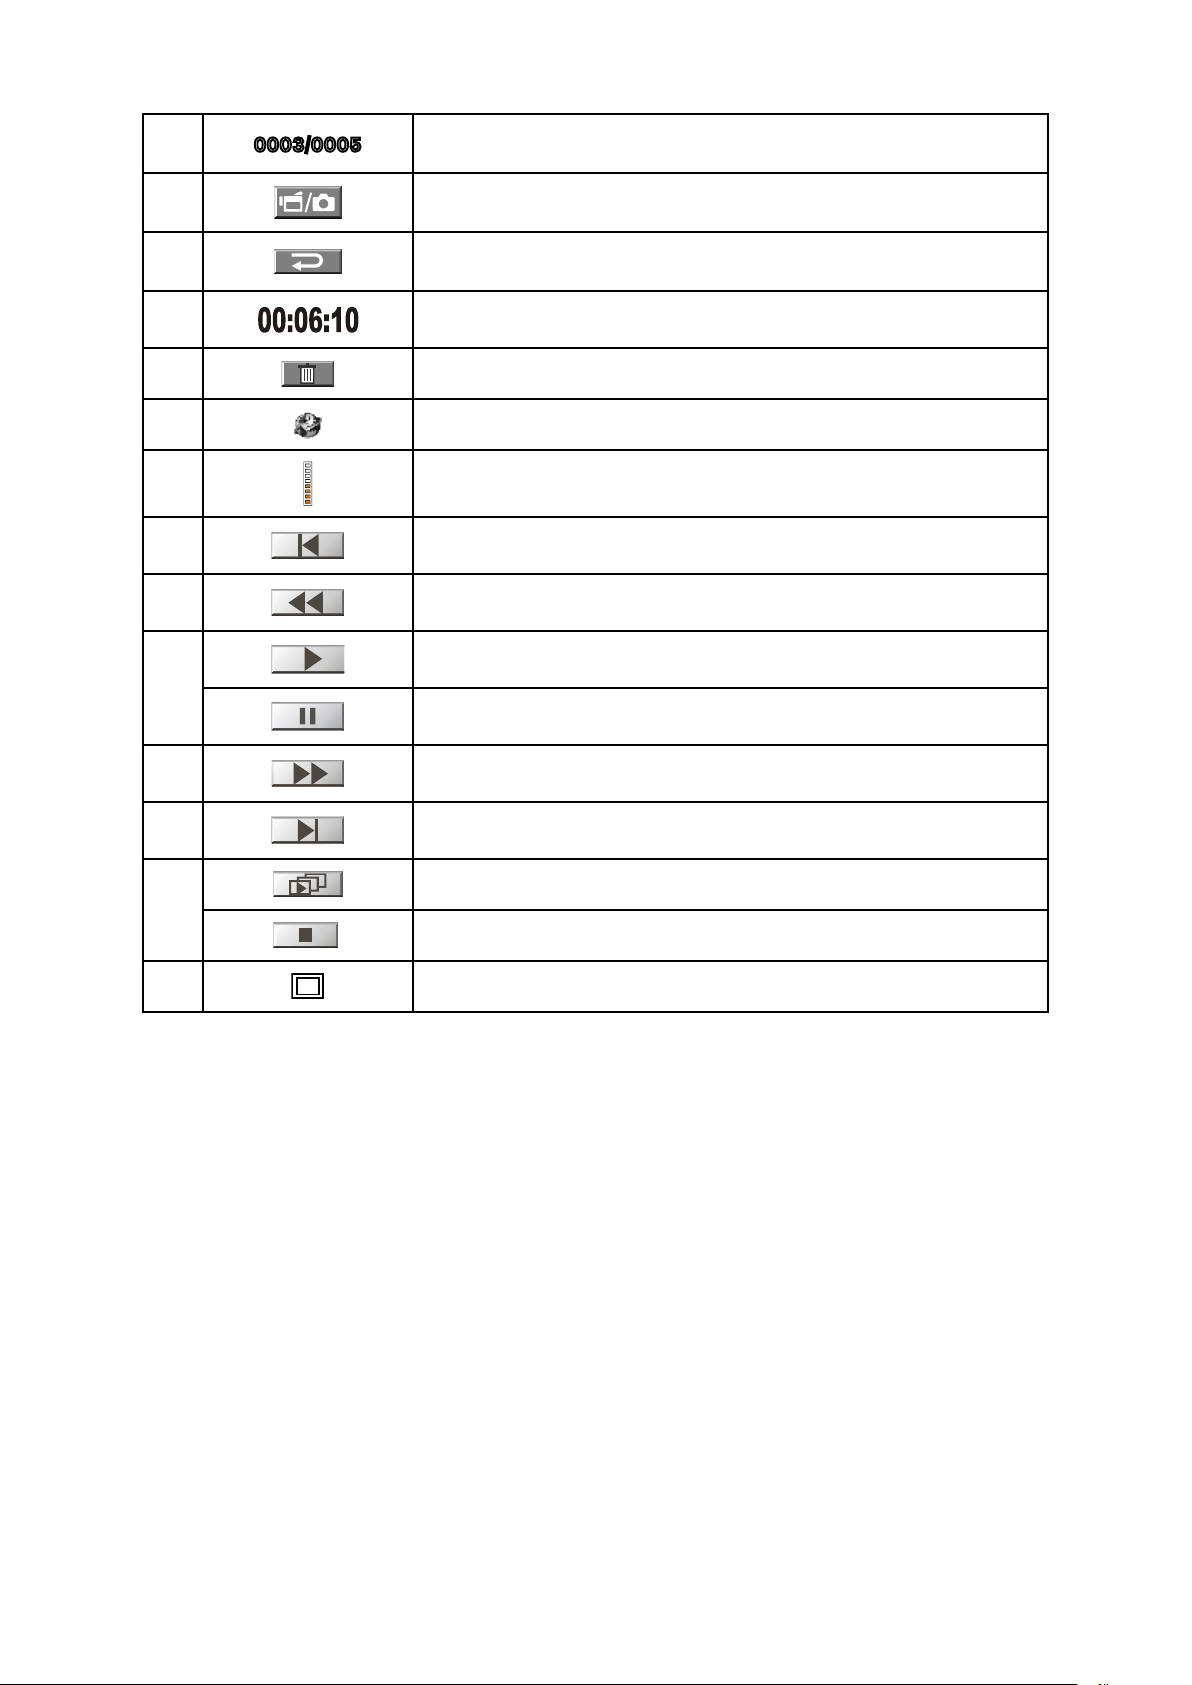
(2)
0003/0005
Current number/ Total number of picture/movie.
(3)
(4)
(5)
(6)
(7)
(8)
(9)
(10)
(11)
(12)
Movie/Picture Preview Screen On
Return to the previous screen/ Switch to Record Mode
Movie playback time counter
Delete
Upload selected movies to Internet
Volume
Previous movie/picture
Movies fast rewind
Movies Play
Movies Pause
Movies fast forward
(13)
(14)
(15)
Next movie/picture
Slideshow
Slideshow stop
Magnication Indicator
Page 23
23
EN
Operations for Playback Mode
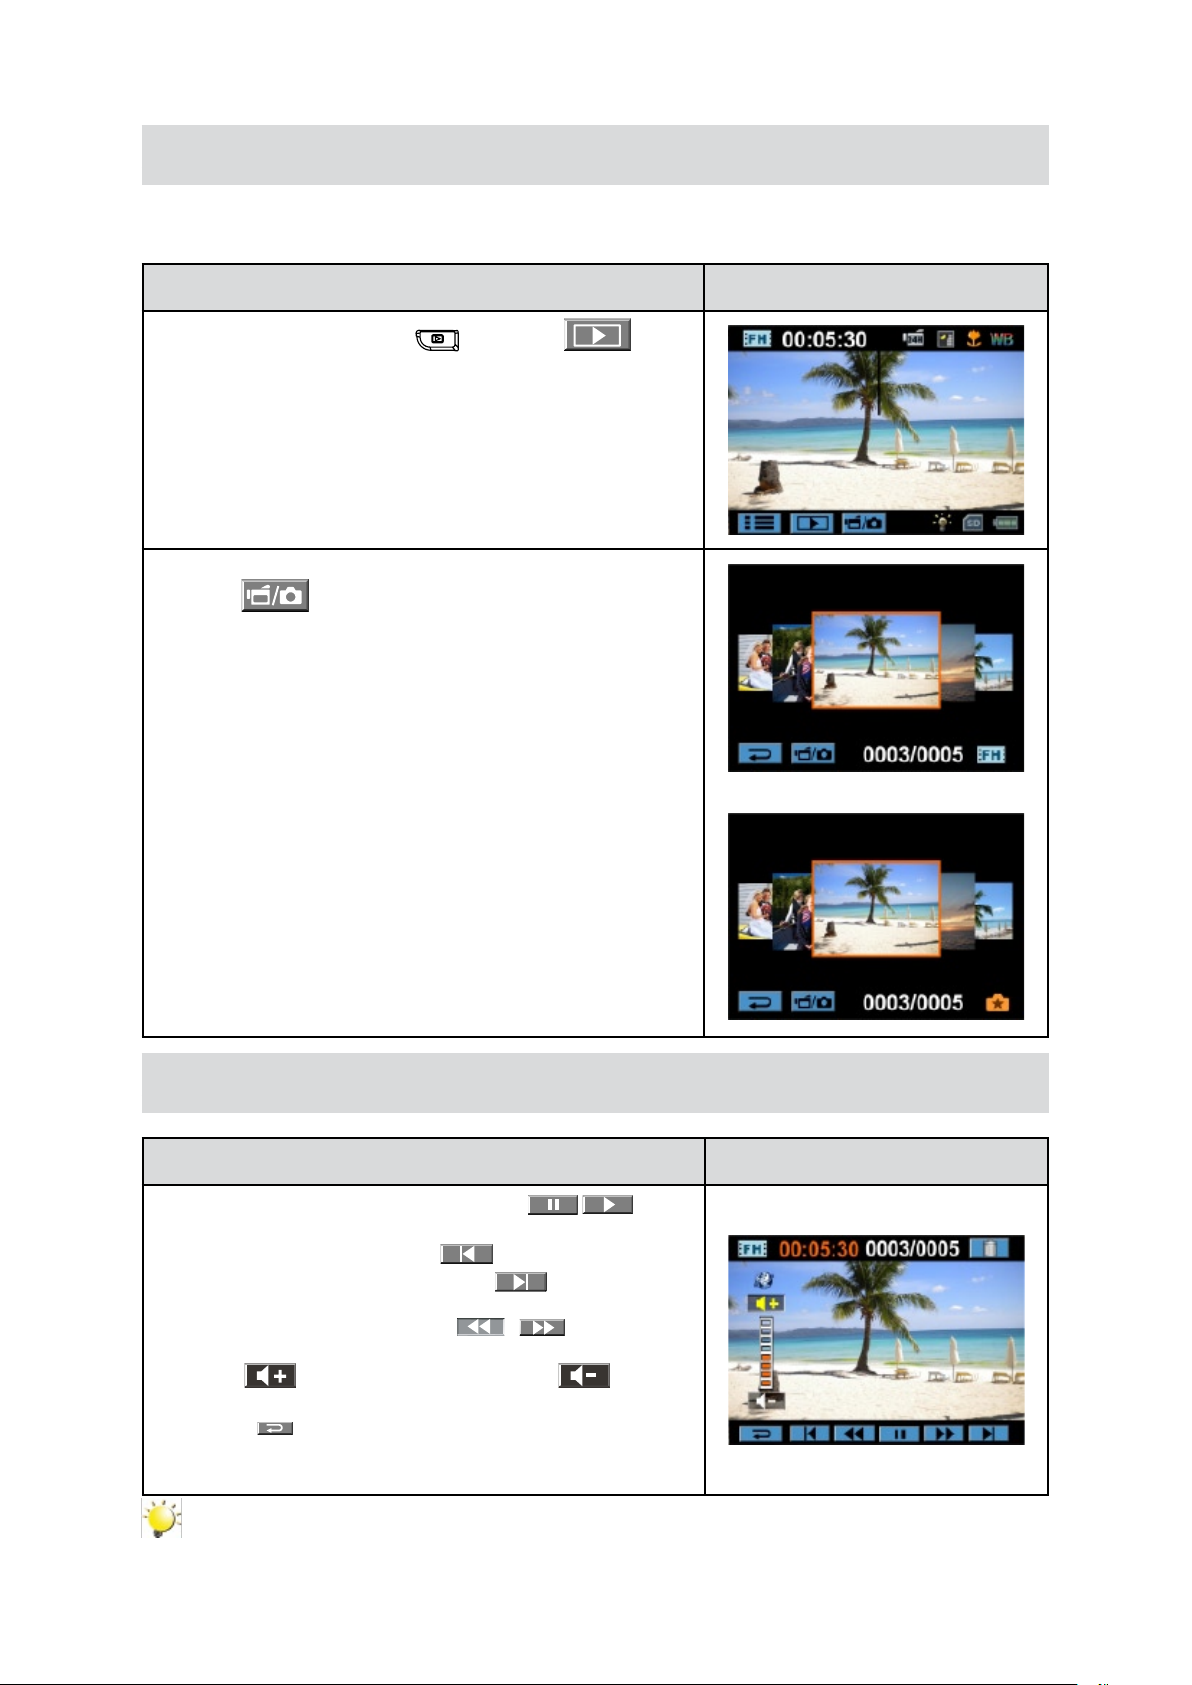
The Playback Mode is for viewing and managing movies and pictures on the built-in memory or on an
SD Card.
Operation Display Screen
Press Playback Button ( 1.
screen to switch to the Playback mode.
In the Playback preview screen, 2. press Mode Button or
touch on the screen to switch between the Movie
mode and the Picture mode.
Sweep to the left to go to the previous picture/movie; 3.
sweep to the right to go to the next picture/movie.
Touch on the picture/movie to go to Picture/Movie Playback 4.
Mode.
) or press on the
Movie Playback
Operation Display Screen
When in Movie Playback mode, touch 1.
or pause the movies.
Sweep to the left or touch 2.
movie; sweep to the right or touch to go to the next
movie.
While playing movies, touch 3.
forward.
Touch 4.
the volume.
Touch ( 5.
Press Internet Button to select the existing movies to 6.
upload to Internet.
to increase the volume; touch to reduce
) to exit.
to go to the previous
/ to fast rewind/
Note
When the LCD is idle for a few seconds, the playback function icons will disappear
automatically.
/ to play
Page 24
24
EN
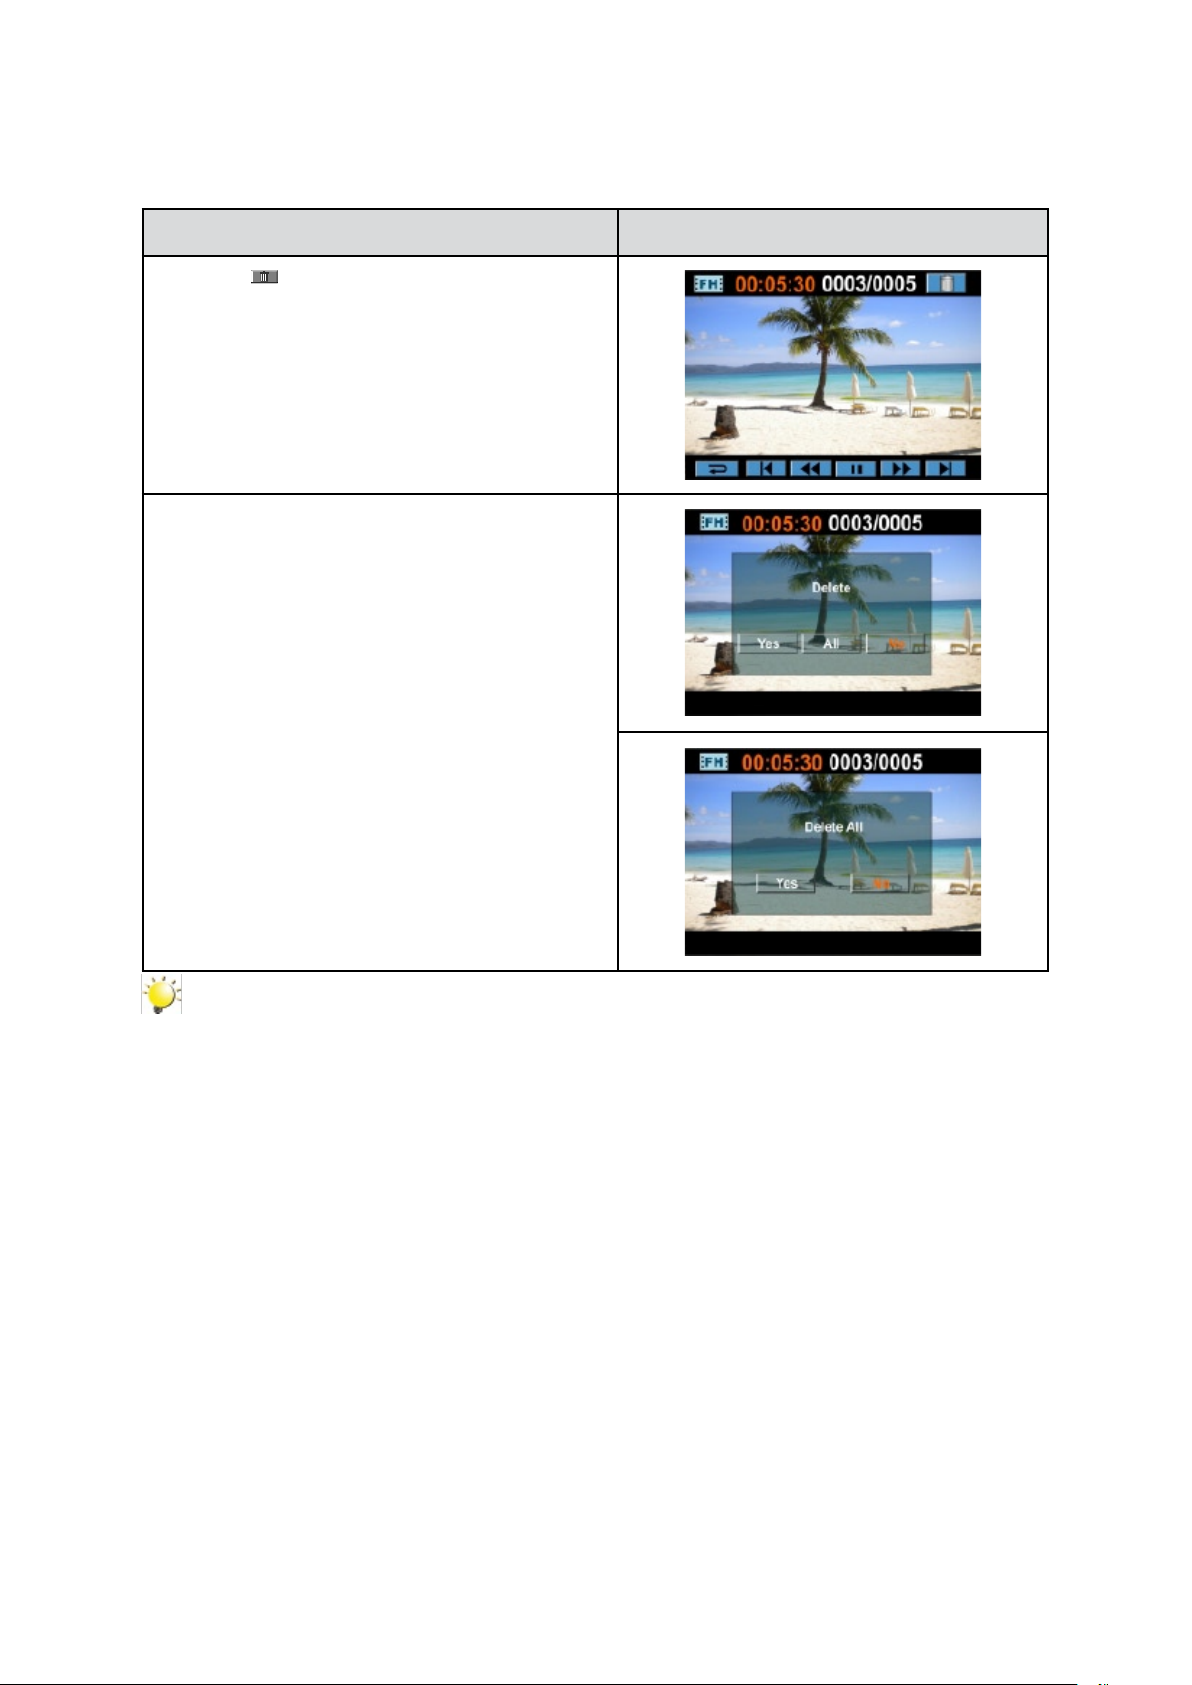
Delete Movies
Operation Display Screen
T1. ouch
Touch [Yes] to delete the current movie or [No] 2.
to cancel the operation and to exit; touch [All] to
delete all movies.
Before all movies are about to be deleted, a 3.
conrmation screen will appear; touch [Yes] to
execute the operation and [No] to cancel the
operation.
to go to the Delete option screen.
Note
If a memory card has been inserted, you can only delete those movies stored on the card. •
Movies on a written-protected memory card cannot be deleted.•
Page 25
25
EN
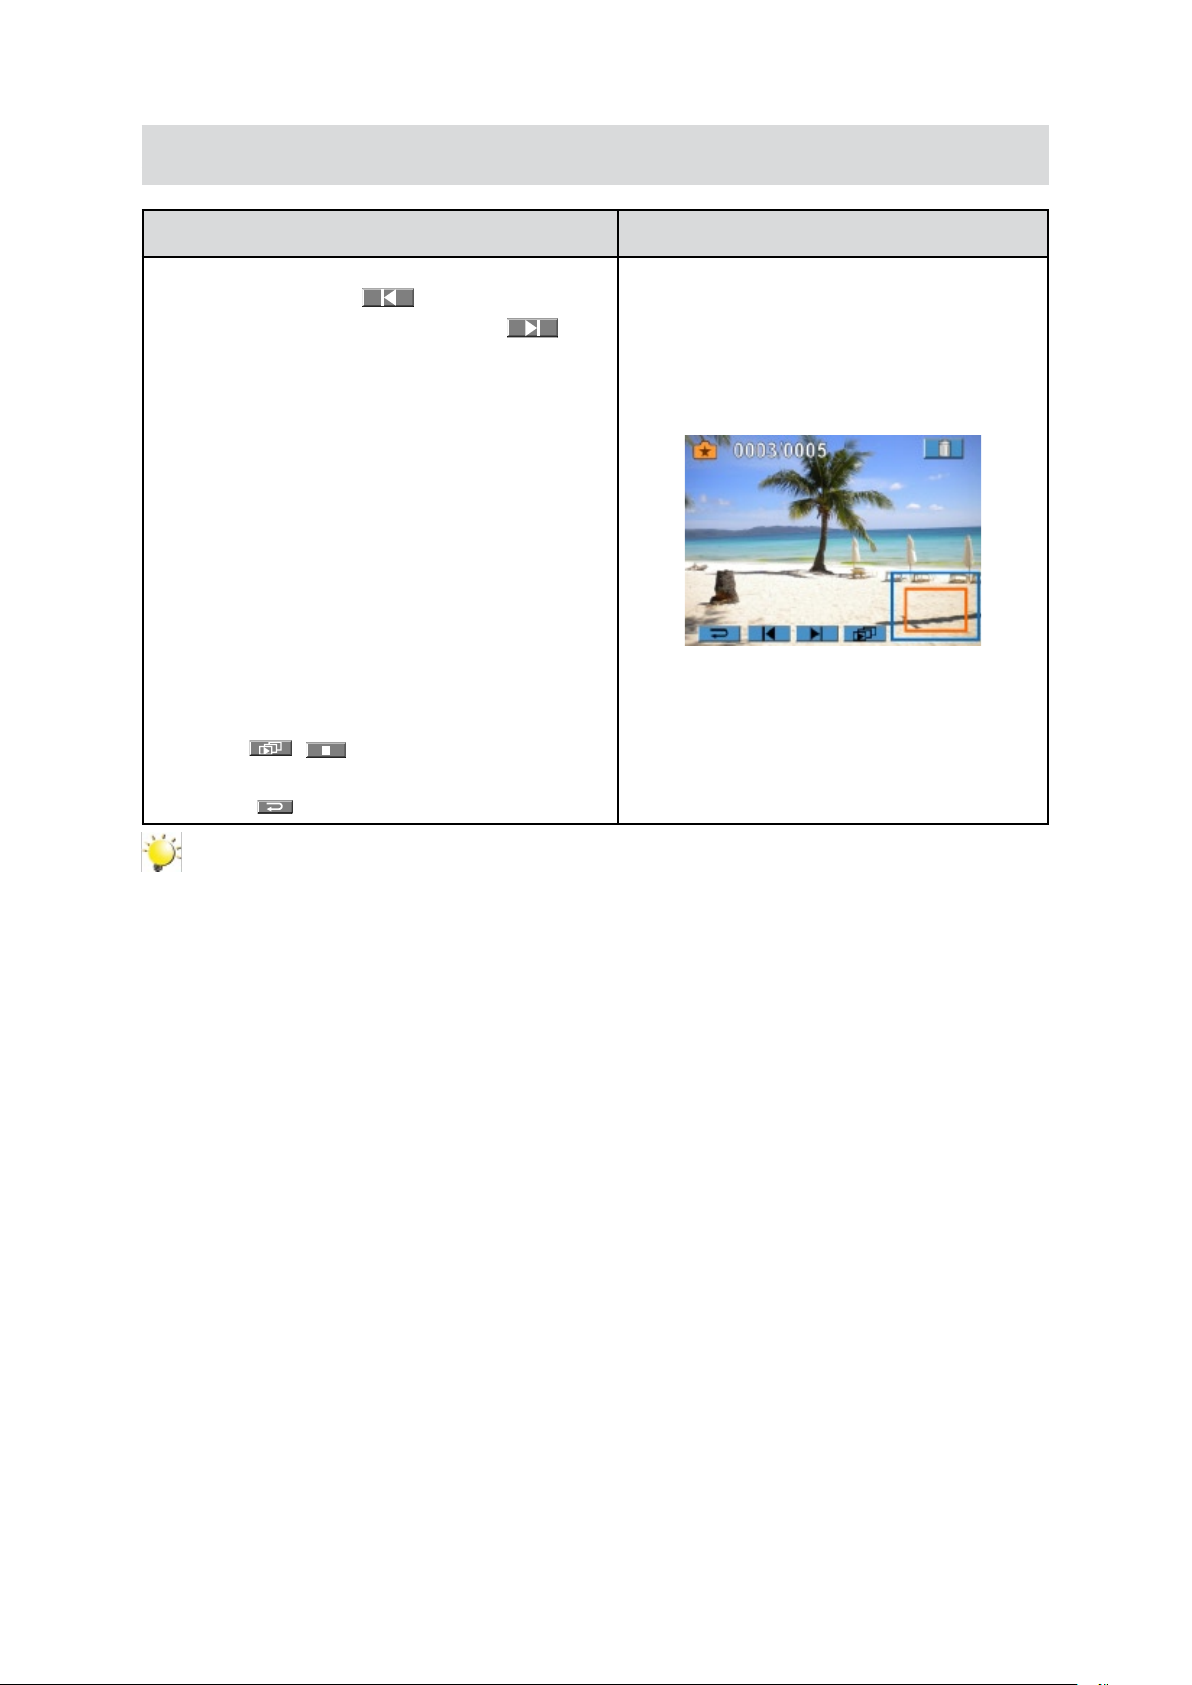
Picture Playback
Operation Display Screen
When in the Picture Playback mode,1. sweep
to the left or touch
picture; sweep to the right or touch to go
to the next picture.
While the picture is selected, press on the 2.
screen as well as go up to enter Magnication
Mode.( The magnication Indicator appears on
the screen)
In the Magnication Mode, sweep to the top to 3.
zoom in or to the bottom to zoom out.
To navigate the magnied picture, press on 4.
the screen and move as well. (The inner
Magnication Indicator turns red)
Press OK Button or sweep to the bottom to exit 5.
the magnication mode.
to go to the previous
Touch 6.
show.
Touch ( 7.
/ to start or to stop the slide
)to exit.
Note
When the LCD is idle for a few seconds, the slideshow function icons will disappear
automatically.
Page 26
26
EN
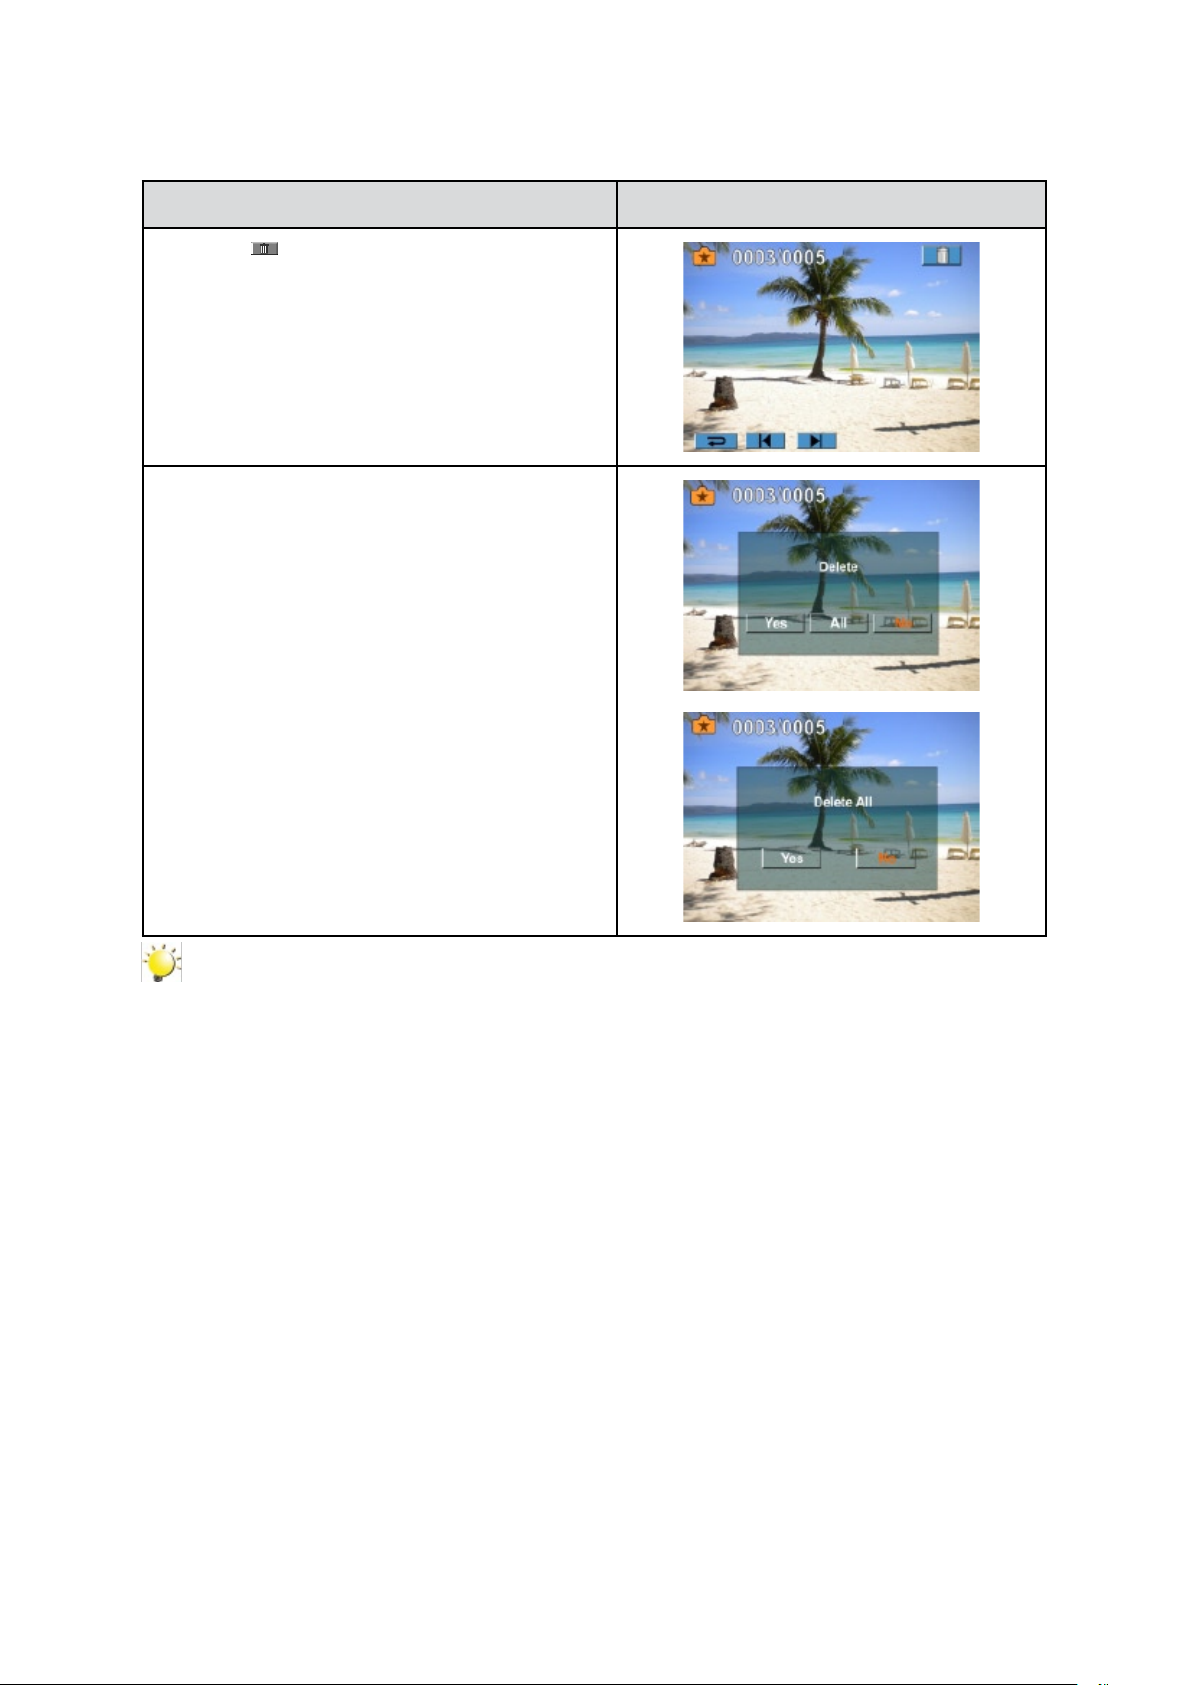
Delete Picture
Operation Display Screen
Touch 1.
Touch [Yes] to delete the current picture or [No] 2.
to cancel the operation and to exit; touch [All] to
delete all pictures.
Before all pictures are deleted, a conrmation 3.
screen will appear; touch [Yes] to execute the
operation and [No] to cancel the operation.
to go to the Delete option screen.
Note
If a memory card has been inserted, you can only delete those pictures stored on the card. •
Pictures on a written-protected memory card cannot be deleted.•
Page 27
27
EN
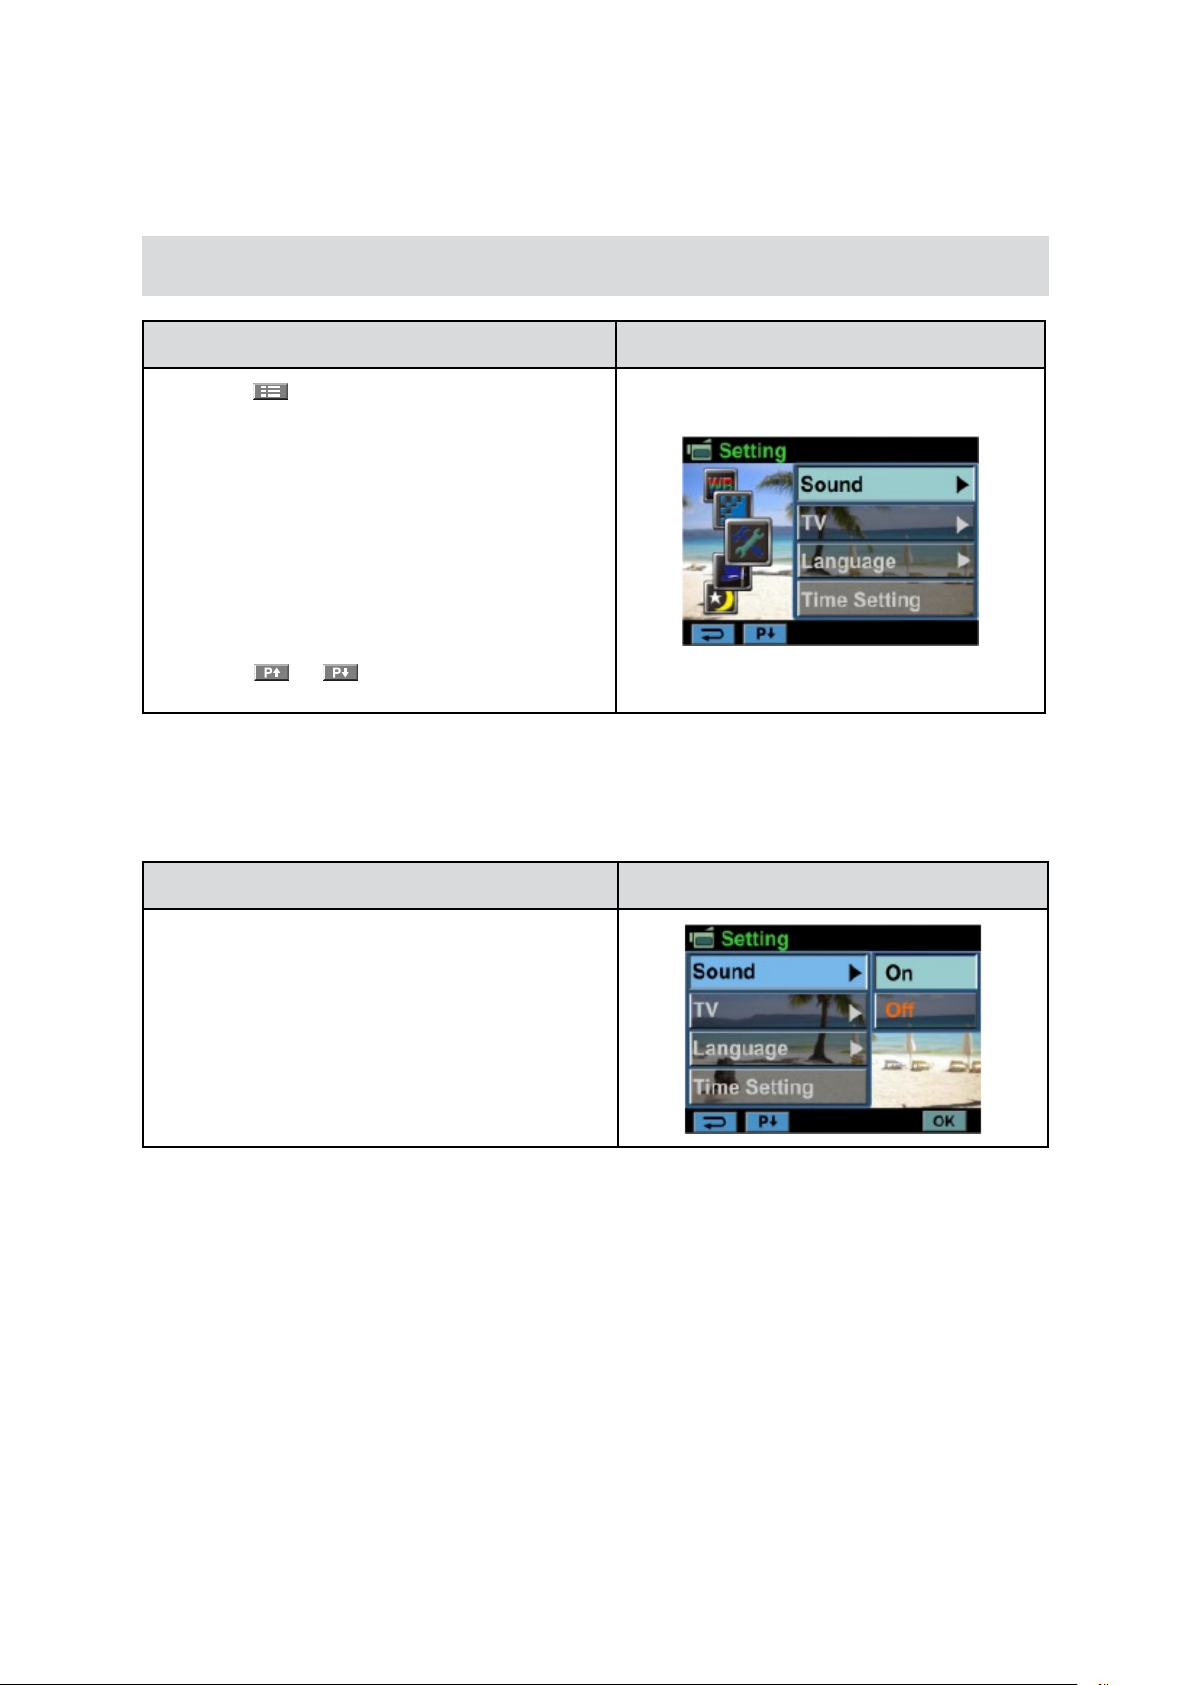
Setting Menu
Section 5
Setting Your Camera
Operation Display Screen
Touch 1.
Mode. The Record menu wheel will show on the
screen.
Scroll and stop on [Setting]. The submenu of 2.
Setting pops up.
The Setting submenu contains 6 options for 3.
conguring your camera setup. They are Sound
(operation sound), TV, Language, Time Setting,
Format, and Default Setting.
Touch 4.
between the pages.
(on-screen icon) when in Record
/ on the screen to change
Sound
Enable or disable the keypad tone and the operation sound.
Operation Display Screen
In the 1. Setting submenu, touch [Sound] to enter
the option screen.
Touch the desired option. 2.
Touch [OK] to validate the setting.3.
Page 28
28
EN
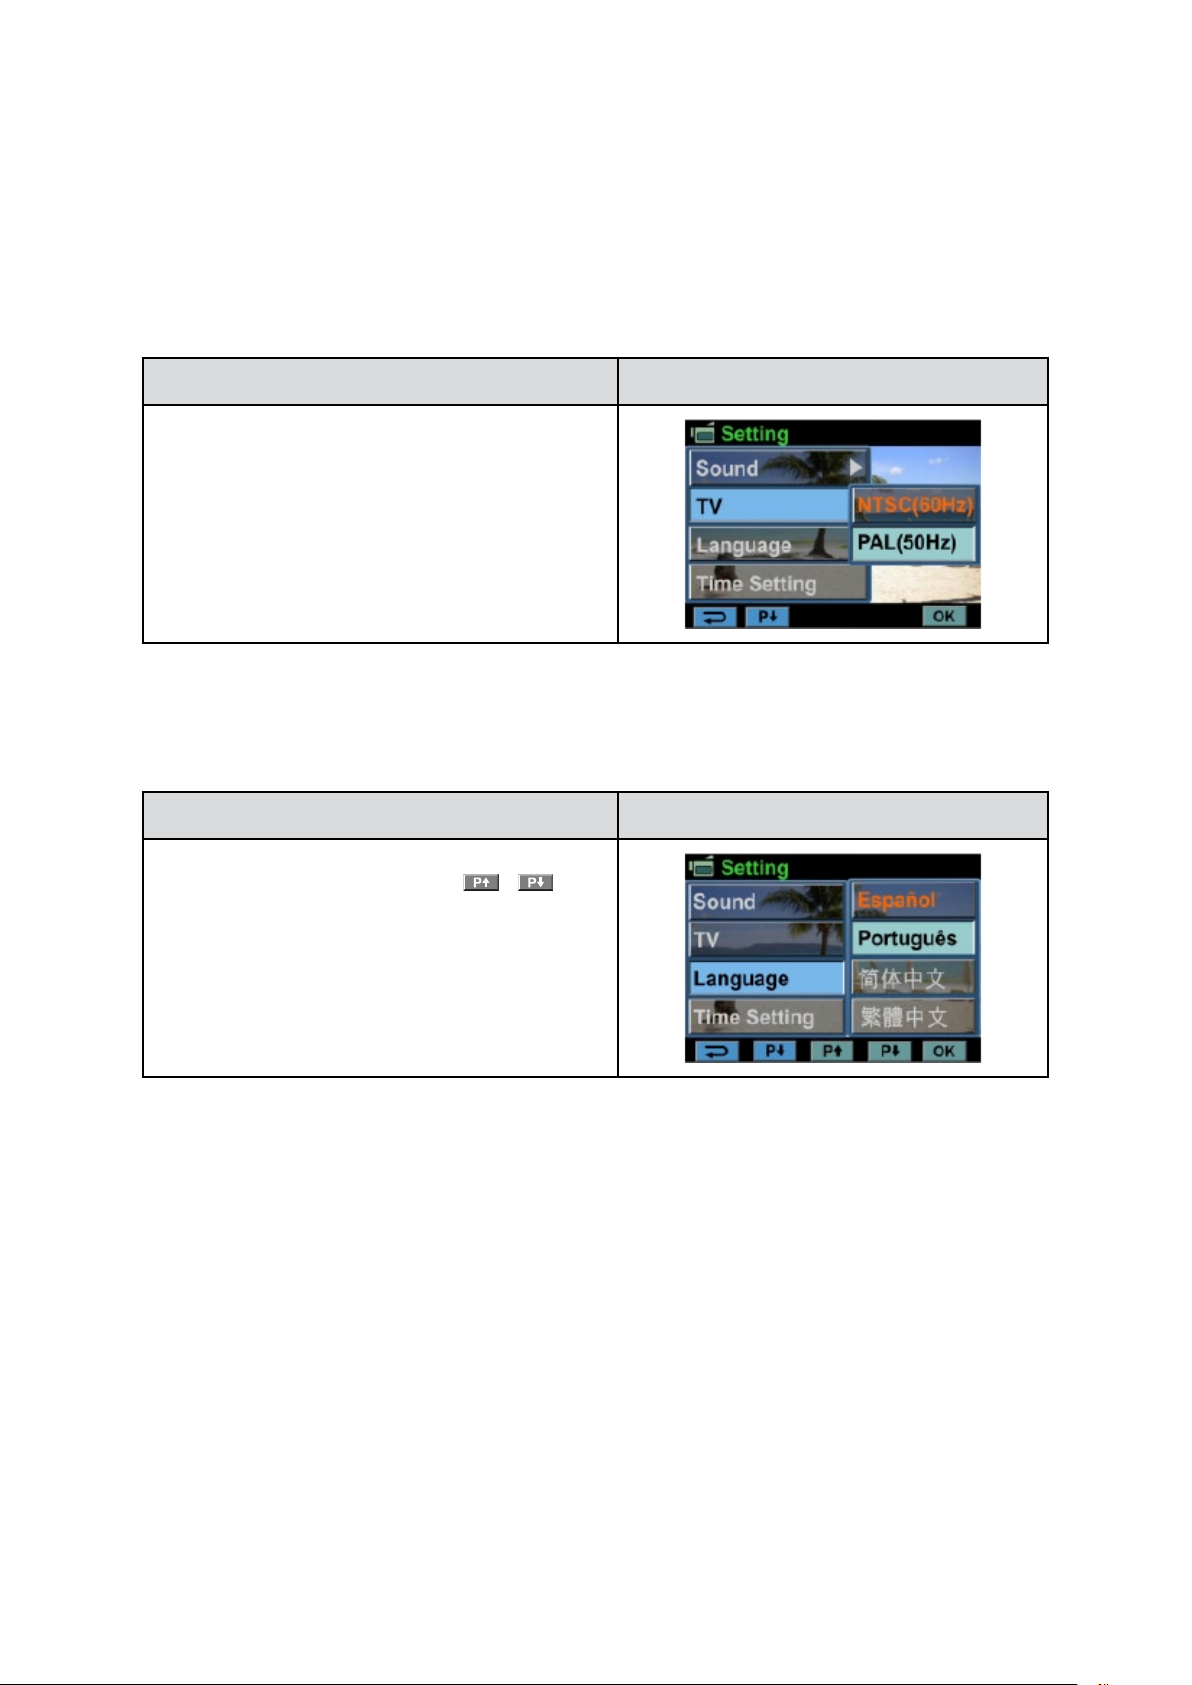
TV
Ensure that the appropriate TV standard of your area is selected – either NTSC or PAL.
Wrong TV system setting may cause image ickers.
NTSC(60Hz): • USA, Canada, Japan, South Korea and Taiwan, etc.
PAL(50Hz): • UK, Europe, China, Australia, Singapore and Hong Kong, etc.
Operation Display Screen
In the 1. Setting submenu, touch [TV] to enter the
option screen.
Touch the desired option. 2.
Touch [OK] to validate the setting.3.
Language
Use this option to select the language of the user interface.
Operation Display Screen
In the 1. Setting submenu, touch [Language] to
enter the option screen.Touch
screen to change between the pages.
Touch the desired option. 2.
Touch [OK] to validate the setting.3.
/ on the
Page 29
29
EN
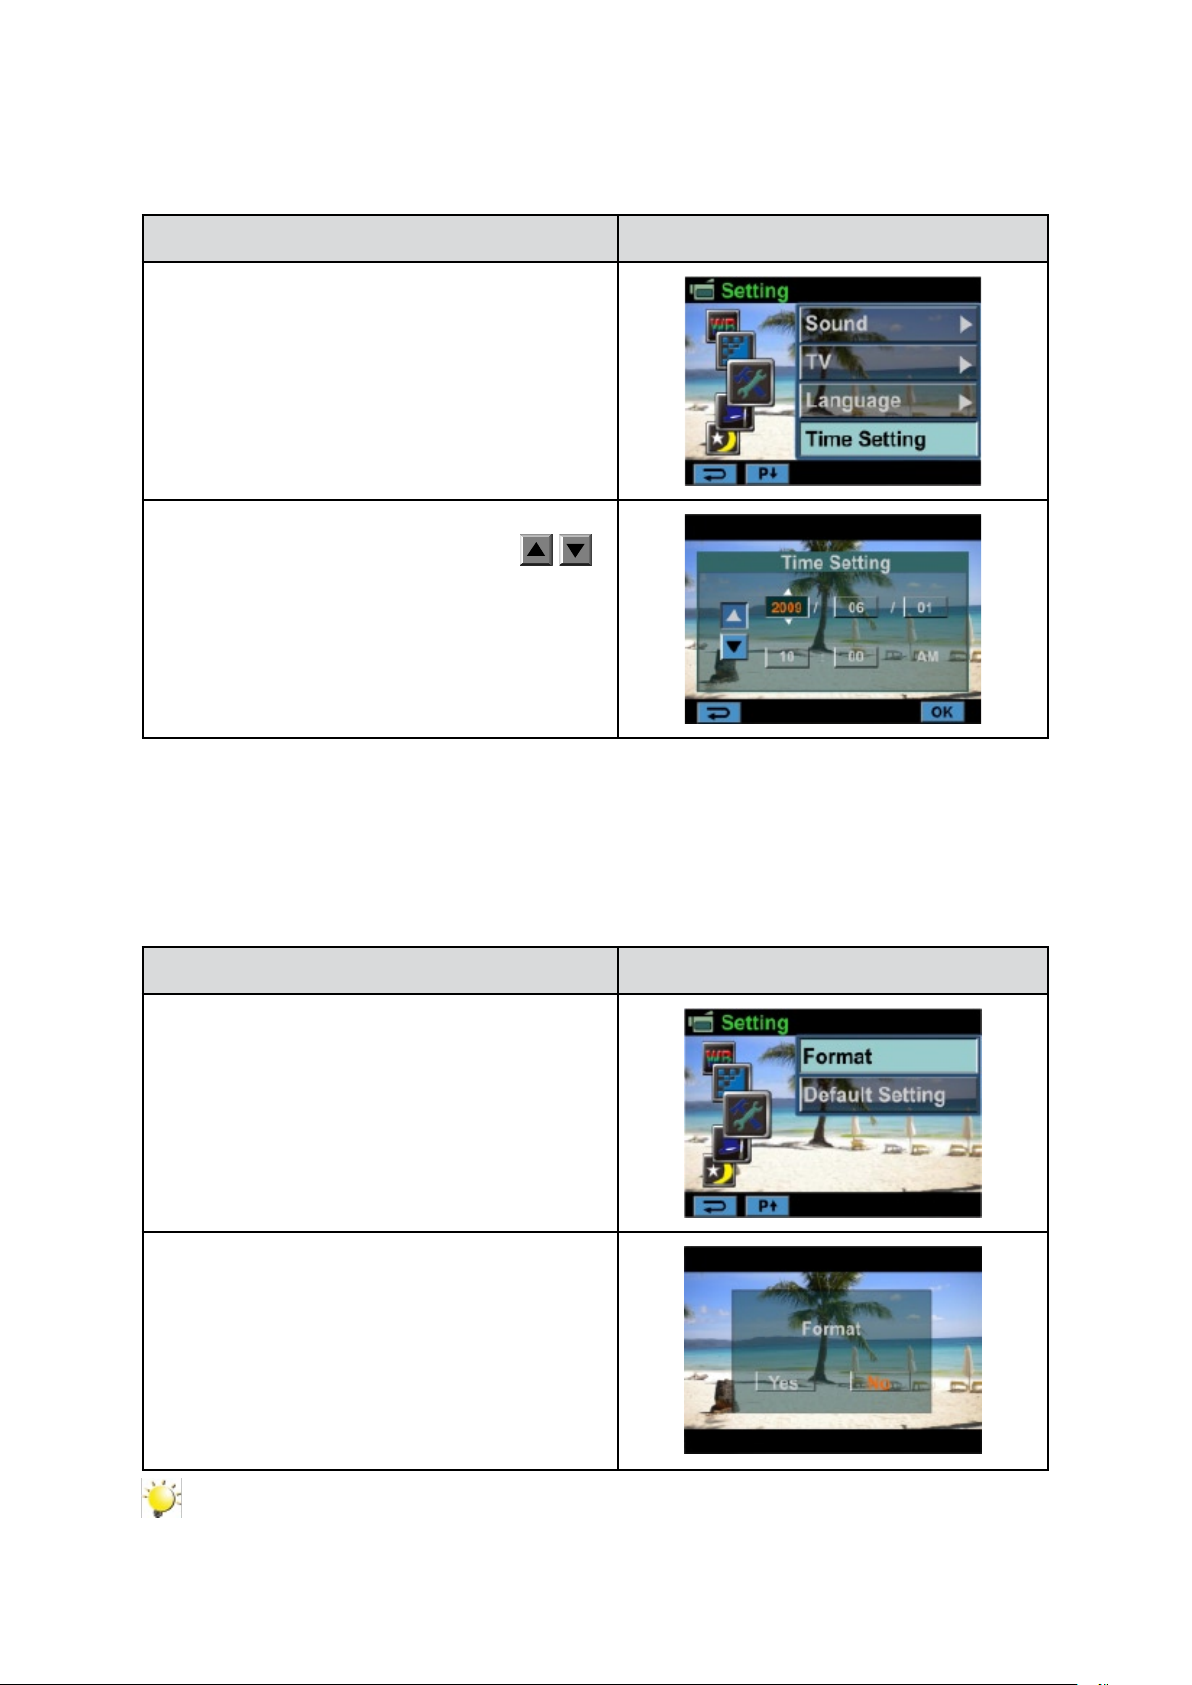
Time Setting
Operation Display Screen
In the Setting submenu, touch [Time Setting] on 1.
the screen to go to the Time Setting menu.
Touch Year, Month, Day, Hour, or Minute to set.2.
Adjust the numeric value by touching 3.
Touch [OK] to validate the settings. 4.
/ .
Format
Yes: Format the built-in memory ( When there is no SD card in the camera ) / SD Card (When there is
an SD card in the camera).
No: Do not format the built-in memory ( When there is no SD card in the camera ) / SD Card (When
there is an SD card in the camera).
Operation Display Screen
In the Setting submenu, 1. touch [Format] on the
screen to go to the format conrmation screen
Touch [Yes] to execute the operation and [No] to 2.
cancel the operation.
Note
All the data will be erased if the SD card is formatted. Make sure all the data are copied to your
PC before formatting the SD card.
Page 30
30
EN
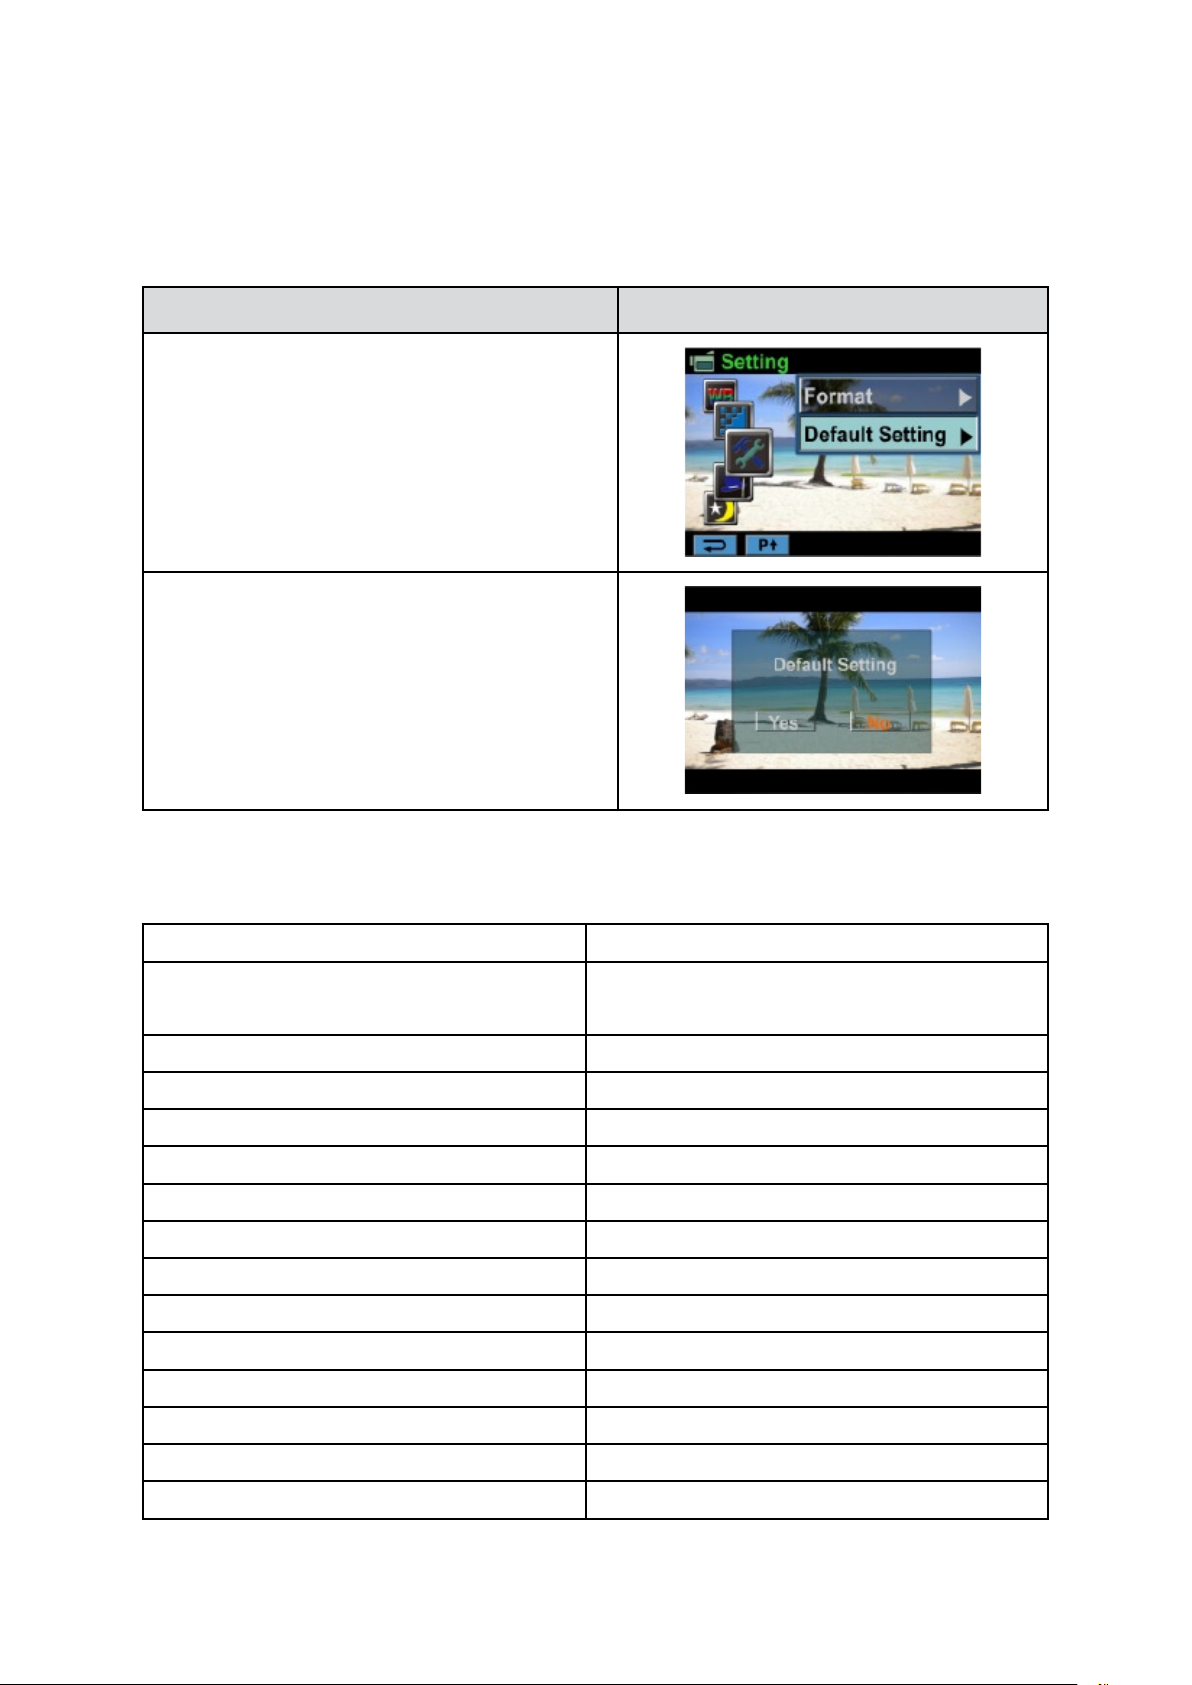
Default Setting
To restore the default factory setting, select this option.
Operation Display Screen
In the Setting submenu, touch [Default Setting] 1.
on the screen to go to the Default Setting
conrmation screen.
Touch [Yes] to execute the operation and [No] to 2.
cancel the operation.
The following table indicates the camera’s default settings
Setting Default Factory Setting
Resolution FHD (1080i 60) for Movie
Std (10MP) for Picture
Scene Auto
Stabilization Off
Macro Mode Auto
Motion Detection Off
Slow Motion Off
Time Lapse Off
White Balance Auto
Self Timer Off
ISO Auto
Sound On
TV Depends on shipping area
Language Depends on shipping area
Volume Level 6
Page 31
31
EN
(16:9)
( 4 : 3 )
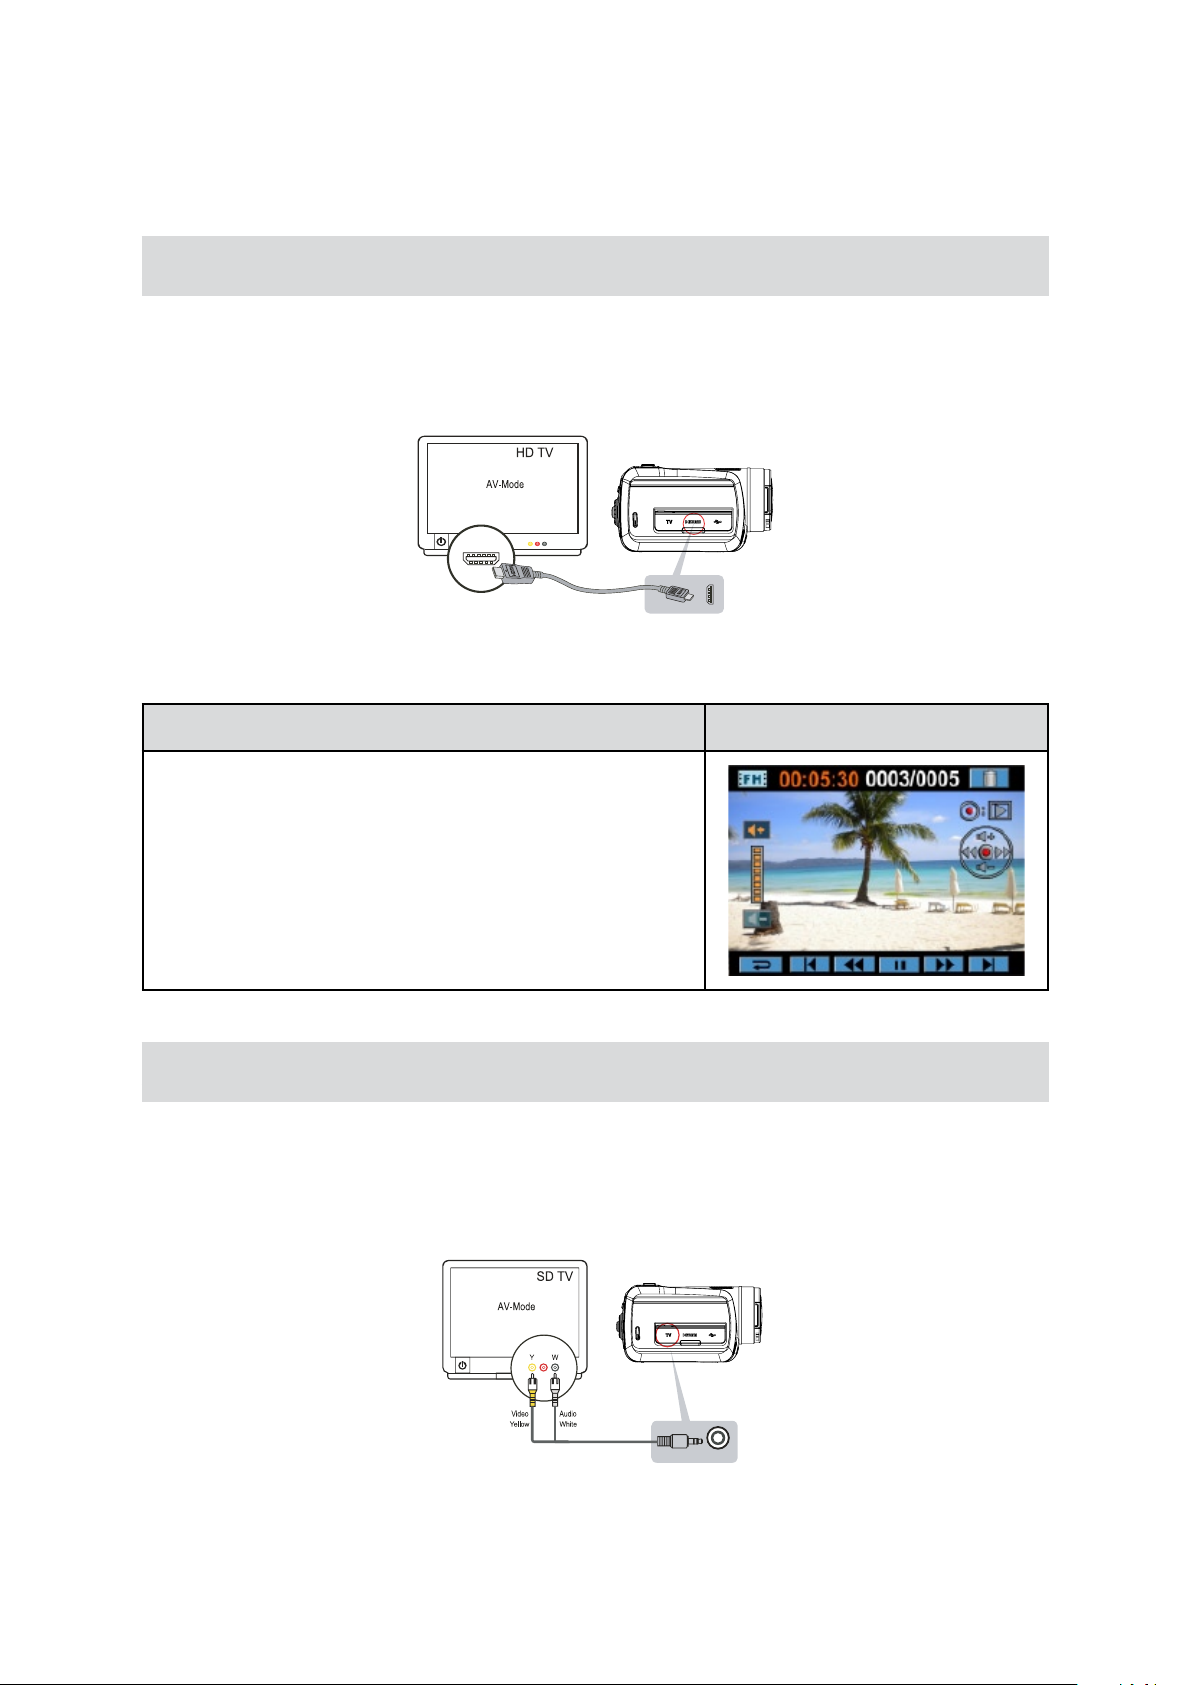
Viewing Pictures and Movies on TV
Connecting to a High-Denition 16:9(Wide) TV
Connect the HDMI cable to your camera’s HDMI Out port.1.
Connect the other end of the cable to a television.2.
Set the video input source of your TV to “ HDMI.”3.
Use the buttons to view the stored pictures and movies on the TV. 4.
Section 6
Operation On TV
Press OK Button to play movies and press it again to 1.
pause.
While playing movies, press Right/Left Buttons to fast 2.
forward/rewind and then release the button to stop.
Use Up/Down Buttons to adjust the volume.3.
In the Picture Playback mode, use Tele Button to magnify 4.
the picture. To navigate the magnied picture, use
Direction Buttons to navigate the magnied picture. Press
OK Button to exit the magnication mode.
Connecting to a non-high-denition 4:3 TV
Connect one end of the AV cable to your camera’s AV out port.1.
Connect the other end of the cable to a television.2.
Use direction button to view stored pictures and movie on a TV. 3.
Page 32

32
EN
Section 7
Viewing Pictures and Movies on PC
Installing Bundled Software
The CD-ROM supplied with this camera contains 3 pieces of software.
ArcSoft MediaImpression • is a user-friendly application that helps you managing your media, burning
your video into DVD, and uploading your videos to YouTube easily.
ArcSoft MediaConverter is a powerful application that converts multiple video formats into compatible •
format with your camera.
Adobe Reader• is a popular program that you need to have installed to read the User’s Manual. Many
computer users will nd they already have this software installed on their computer.
To install the bundled software:
Insert the CD-ROM into your computer’s CD-ROM drive. The autorun screen appears.1.
Click “2. Install Application Software”. Follow the on-screen instructions to complete the installation.
Note
The detailed information can be found in online help of all the bundled software.•
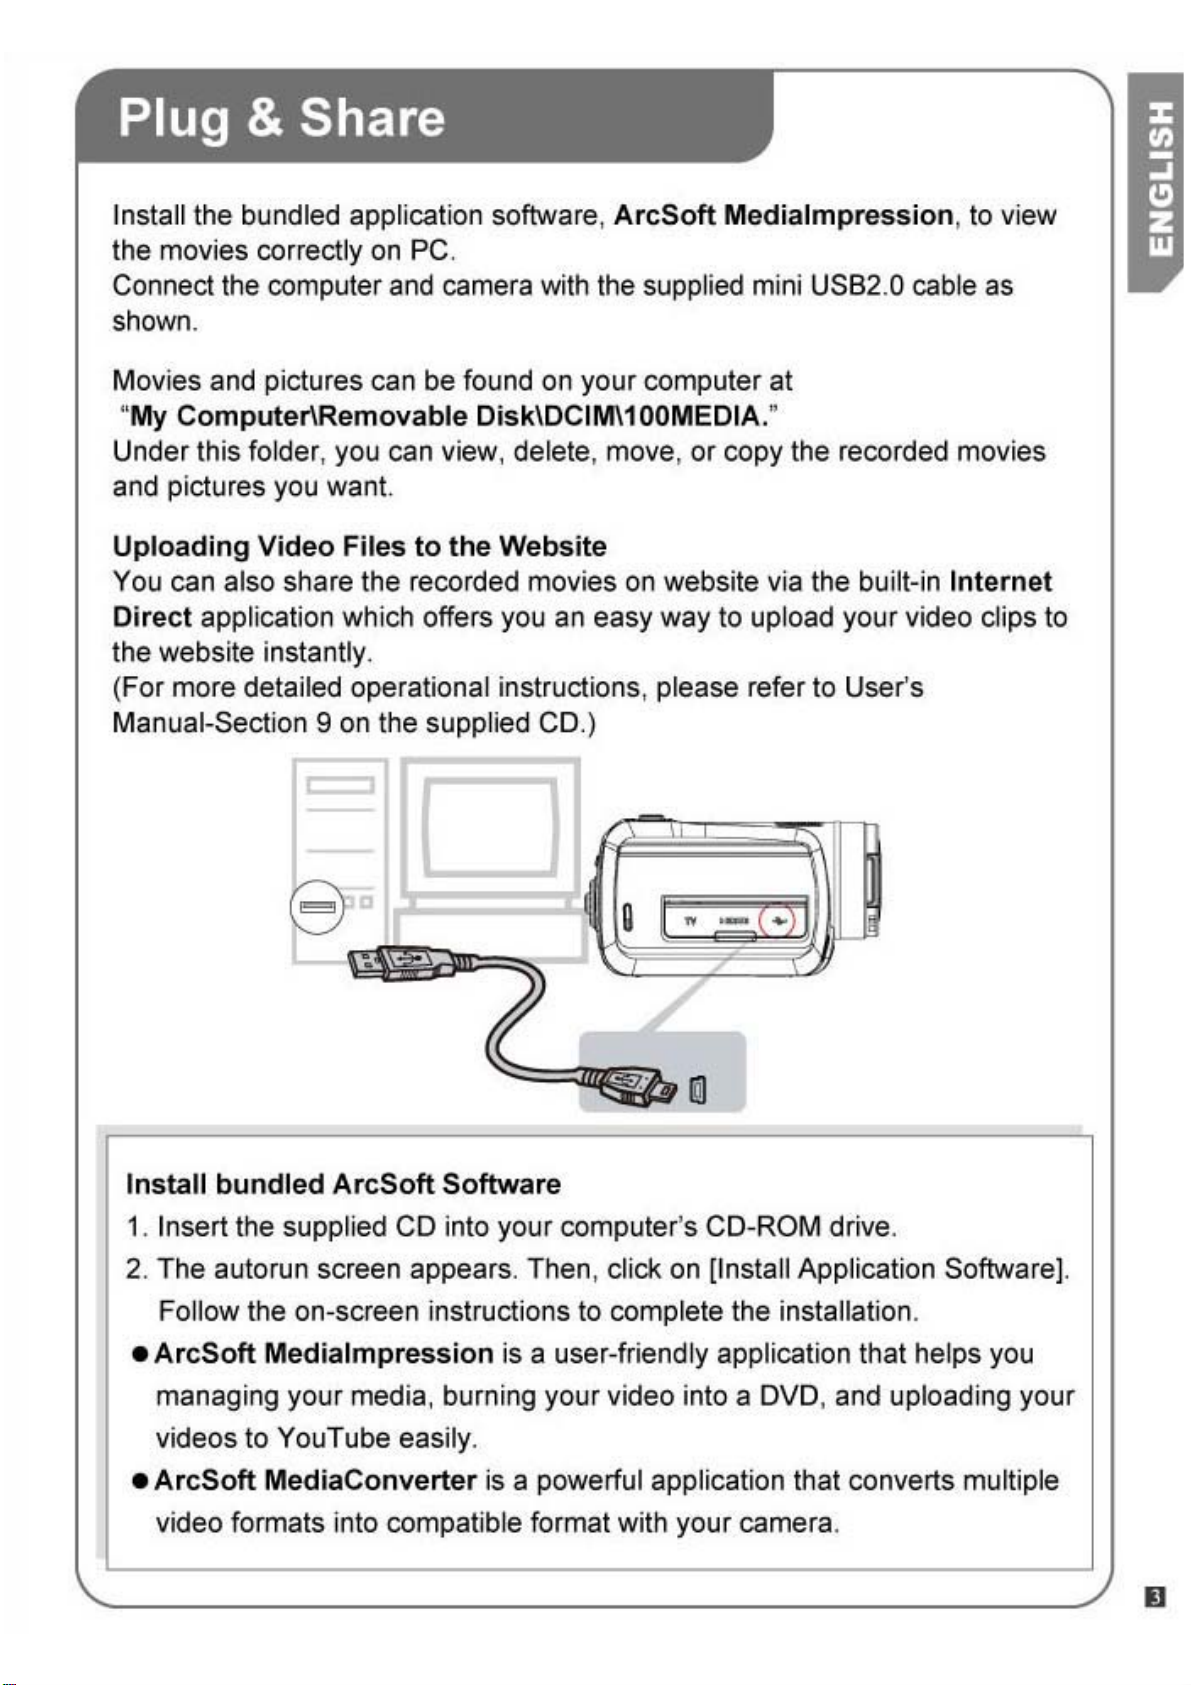
Transferring Pictures or Movies to a Computer
You can transfer pictures or movies stored on your camera to a computer and send them in e-mails to
friends or post them on the websites.
To do this you should:
Connect the computer and camera with the supplied mini USB 2.0 cable. The LED will light up and 1.
blink.
After the LED stops blinking, movies and pictures can be found on your computer at “My Computer\2.
Removable Disk\DCIM\100MEDIA”.
Under this folder, you can view, delete, move, or copy any movie/picture you want.3.
Use the bundled ArcSoft application software to edit the movies or pictures.4.
Page 33
33
EN
Section 8
Burning the Recorded Clip into a DVD
The bundled software CD contains ArcSoft MediaImpression which can be used to burn movie clips onto
a DVD. You can share this DVD movie with your family or friends by using a regular DVD player.
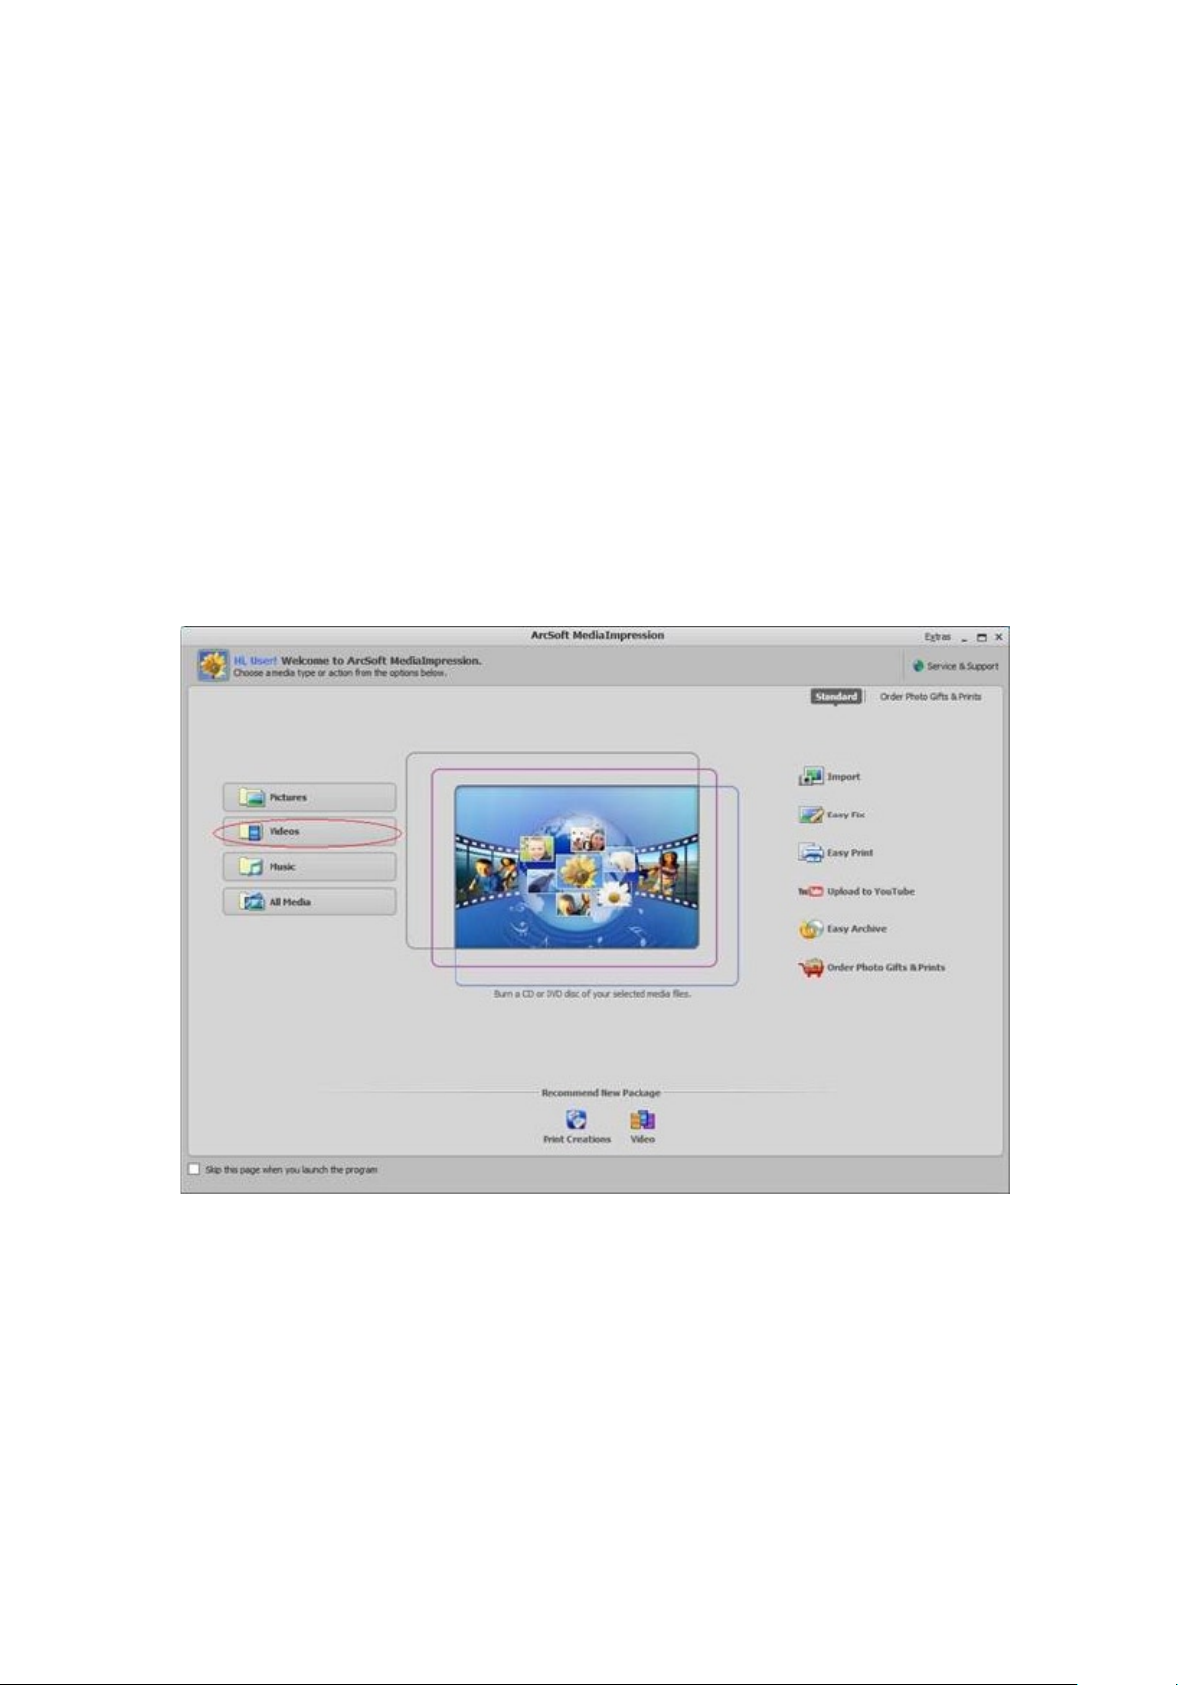
To create a DVD:
Install ArcSoft MediaImpression (Refer to Section 7).1.
Click on Windows [ Start ] 2. g[ (All) Programs ] g[ ArcSoft MediaImpression ].
The ArcSoft MediaImpression main screen will appear on your desktop.3.
Click on [ Videos ] .4.
Page 34
34
EN
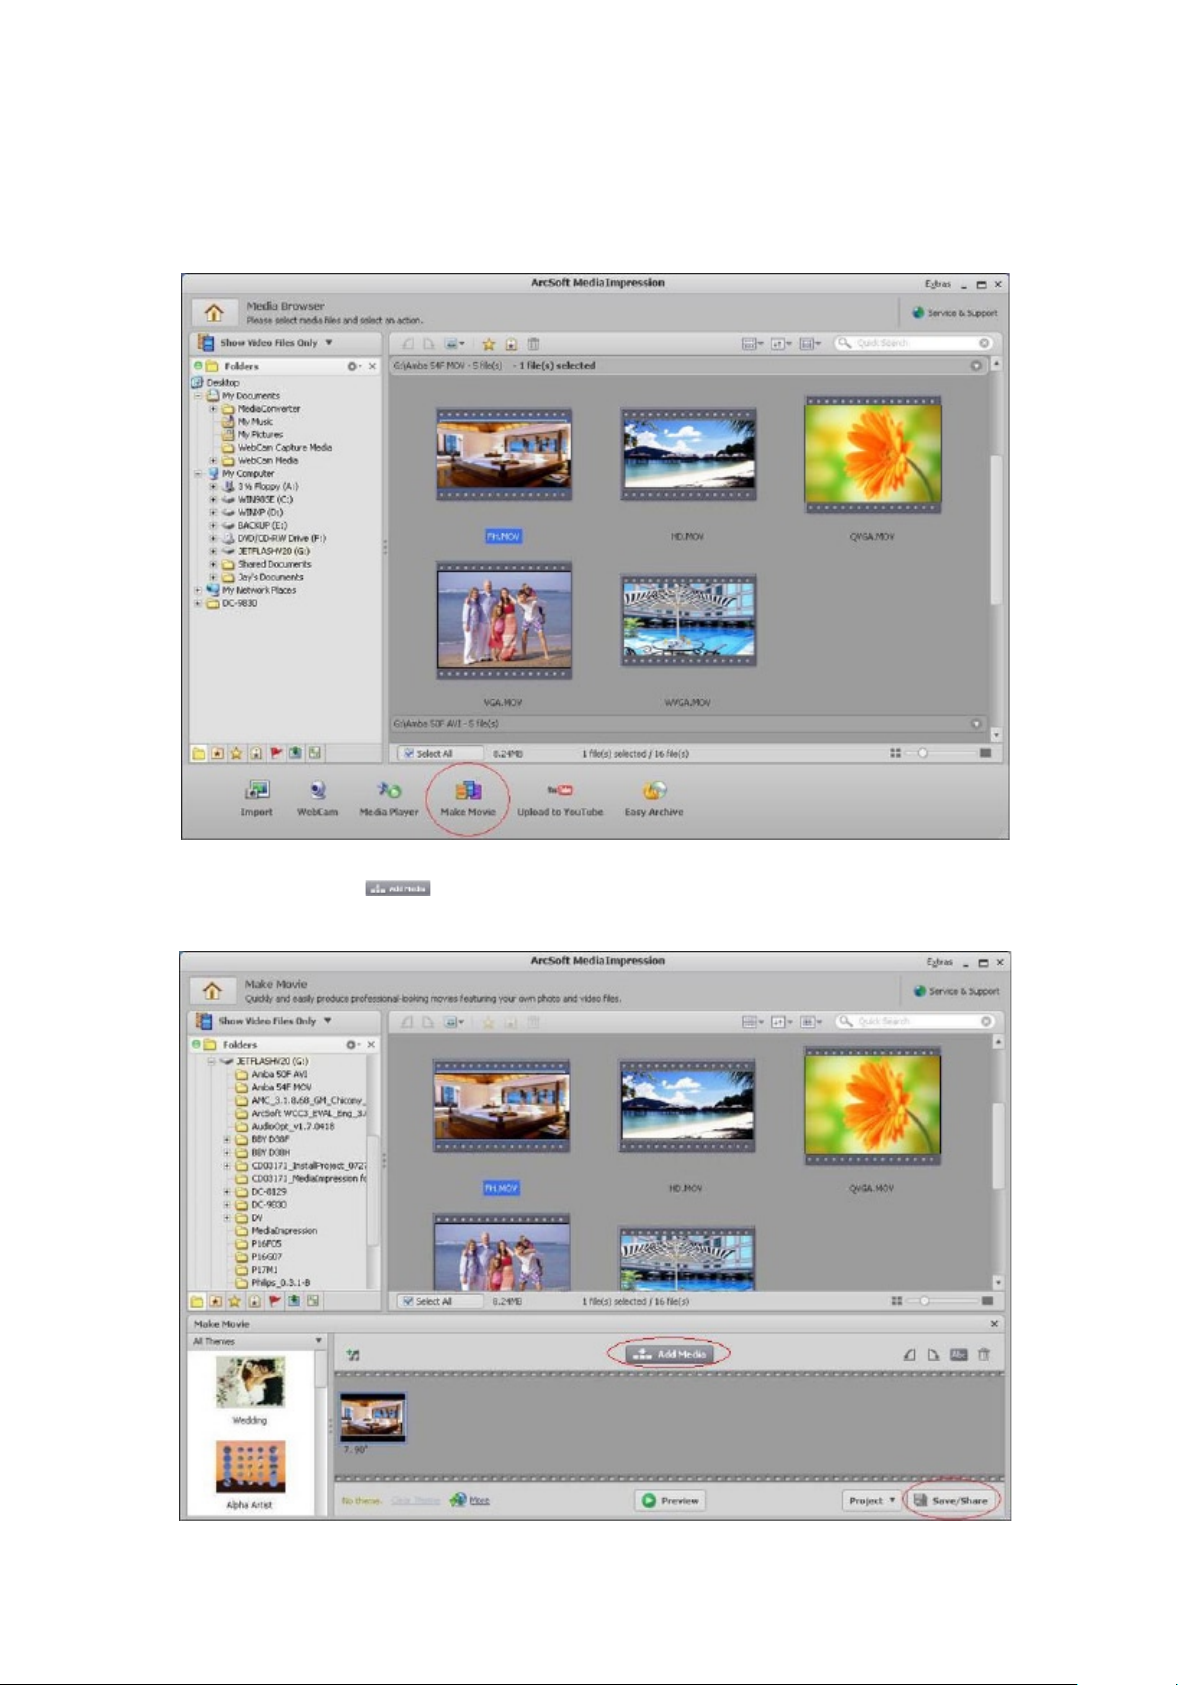
The operation screen will appear:5.
Select the folder that contains the video les you want to burn.•
Select the les in the display area. •
Click on [Make Movie] at the bottom menu.•
Click on [Add Media] ( 6. ) to add the les into slide.
Click on [Save/Share].7.
Page 35
35
EN
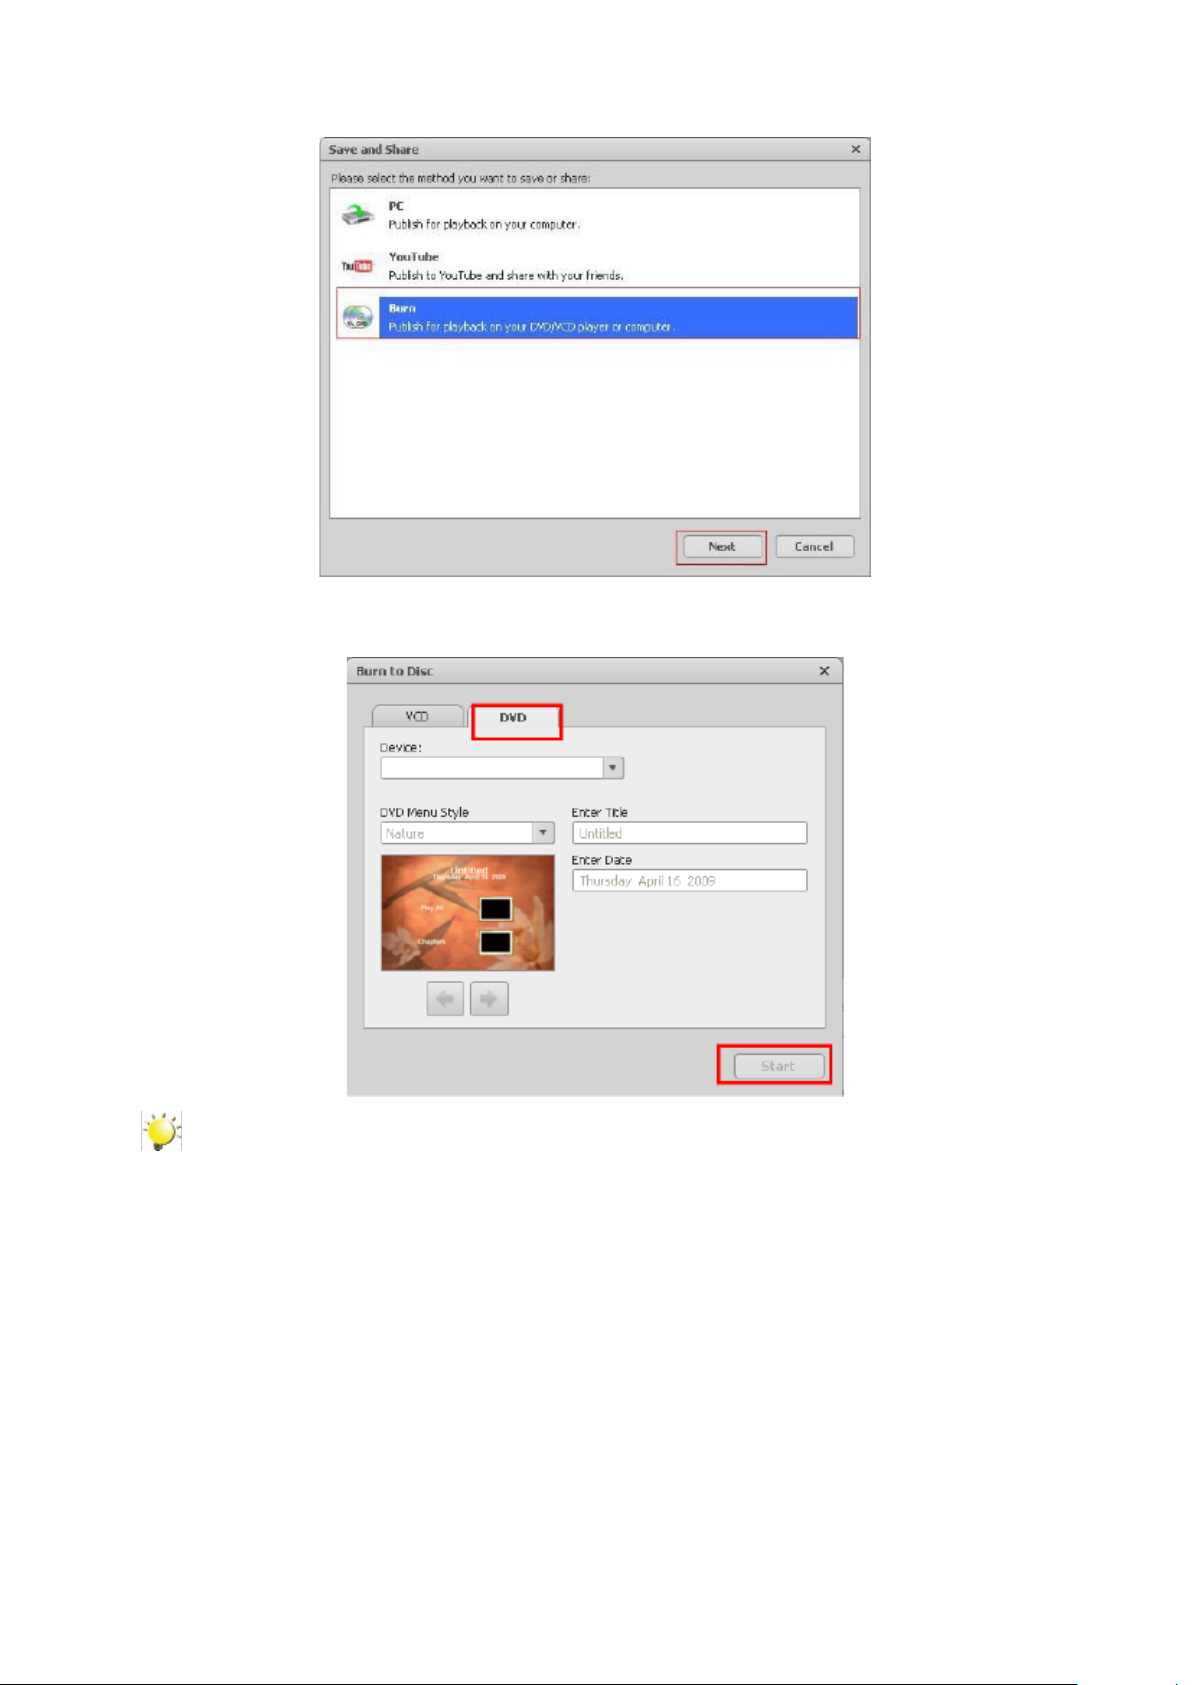
Select [ Burn ] and click on [ Next ] to proceed.8.
Click on [ Start ] to start the VCD/DVD burning.9.
Note
Please insert a blank, writable VCD or DVD into the CD/DVD Writer before clicking on [Start].
Page 36
36
EN
Section 9
Uploading Video Files to Internet
The built-in Internet Direct application offers you an easy way to upload your video clips to Internet
instantly. It helps you share them with your family and friends on the website. Also, the bundled software,
ArcSoft MediaImpression, can be used to upload your video clips to Internet.
9.1 Internet Direct
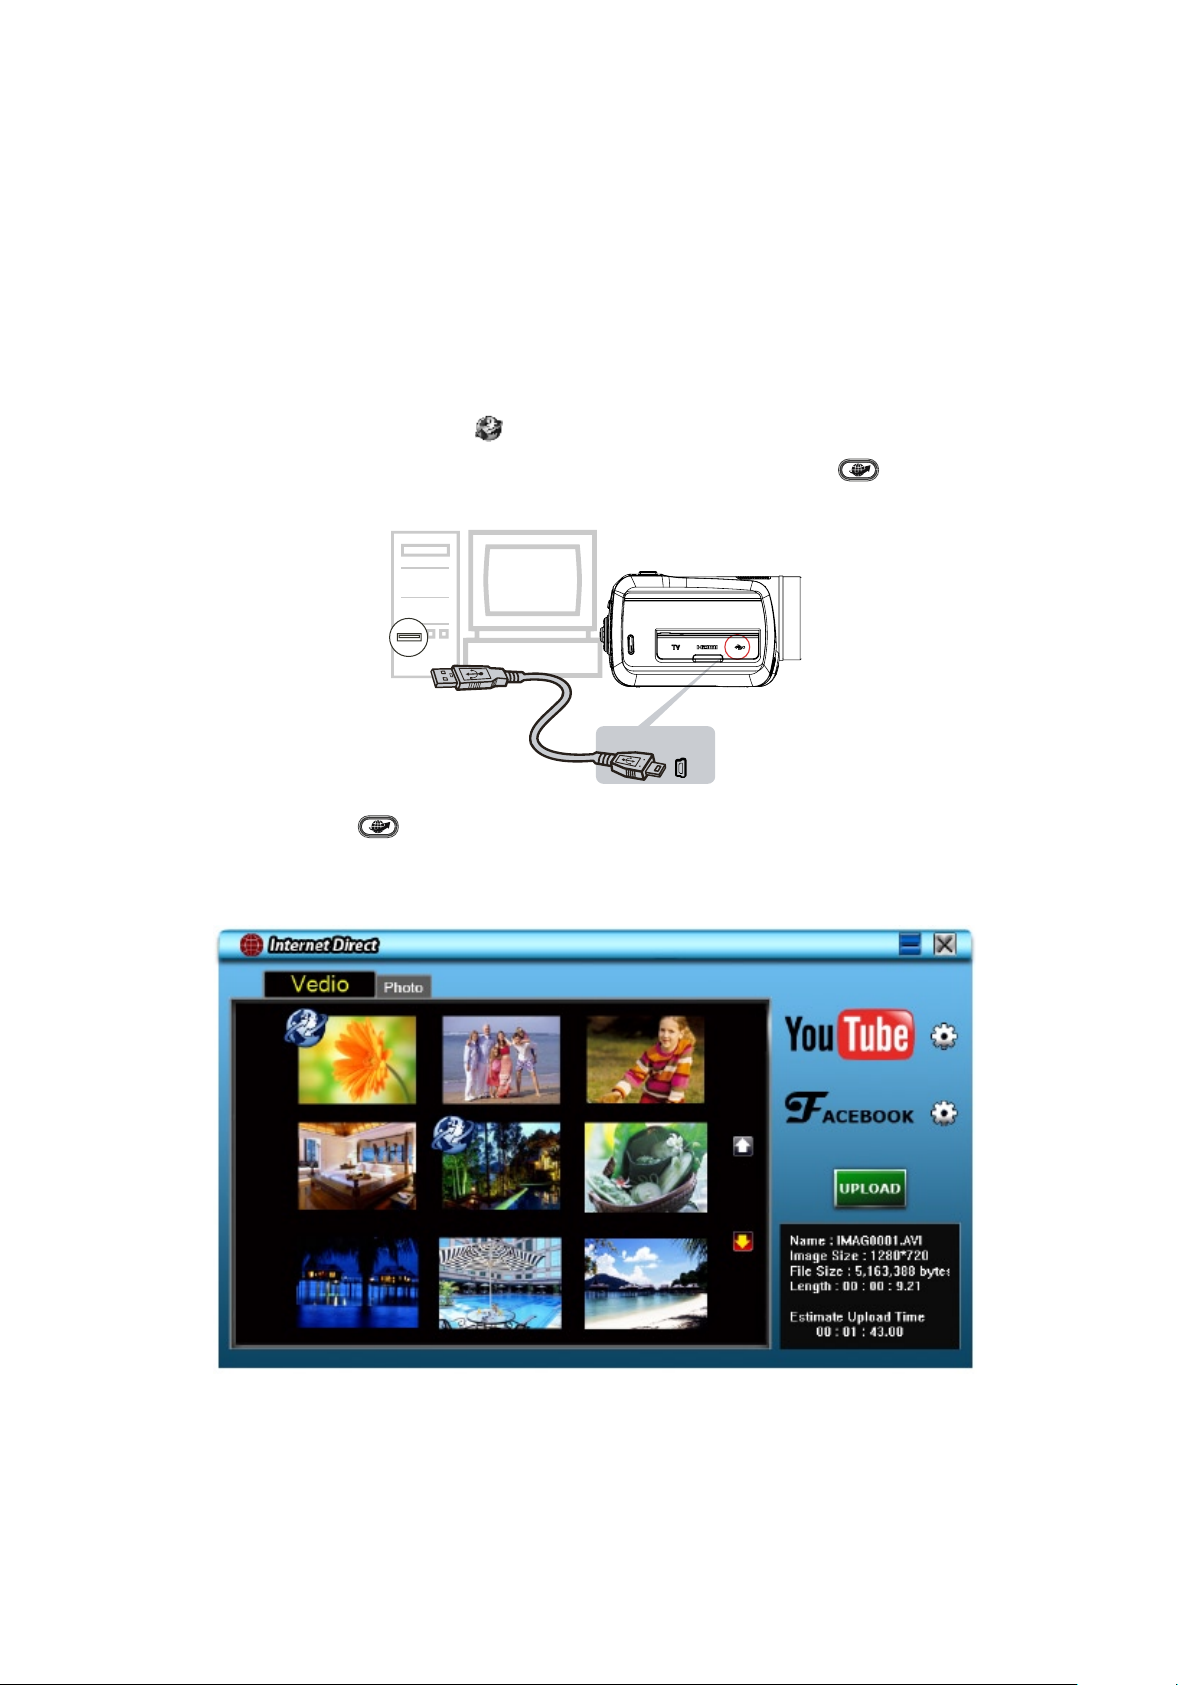
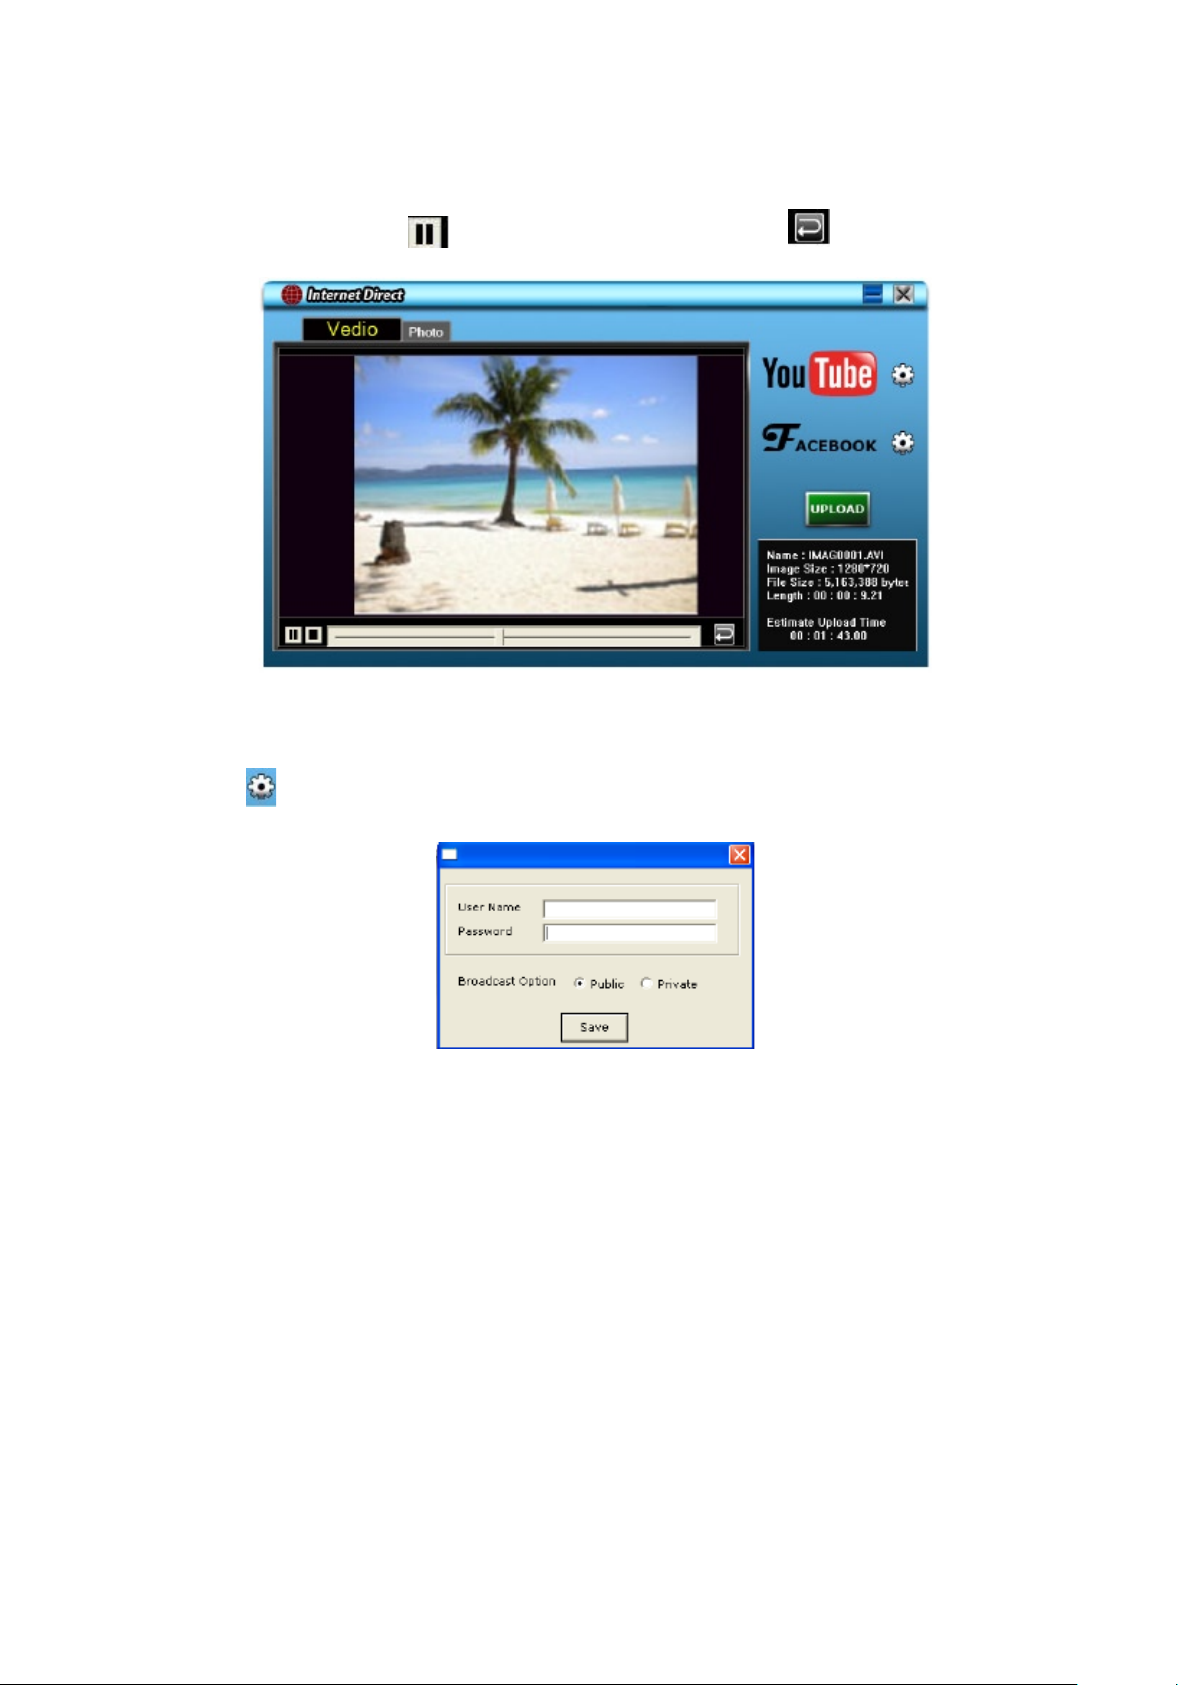
To upload video les marked with
Select the video clips 1. in Movie Playback Mode by pressing Internet Button
Connect the camera to your computer by using the supplied USB cable.2.
Press Internet Button 3. on the camera to launch the Internet Direct application automatically.
(Before the computer launches Internet Direct, you have to install the application included in the CD
rst.)
to Internet:
.
Page 37
37
EN
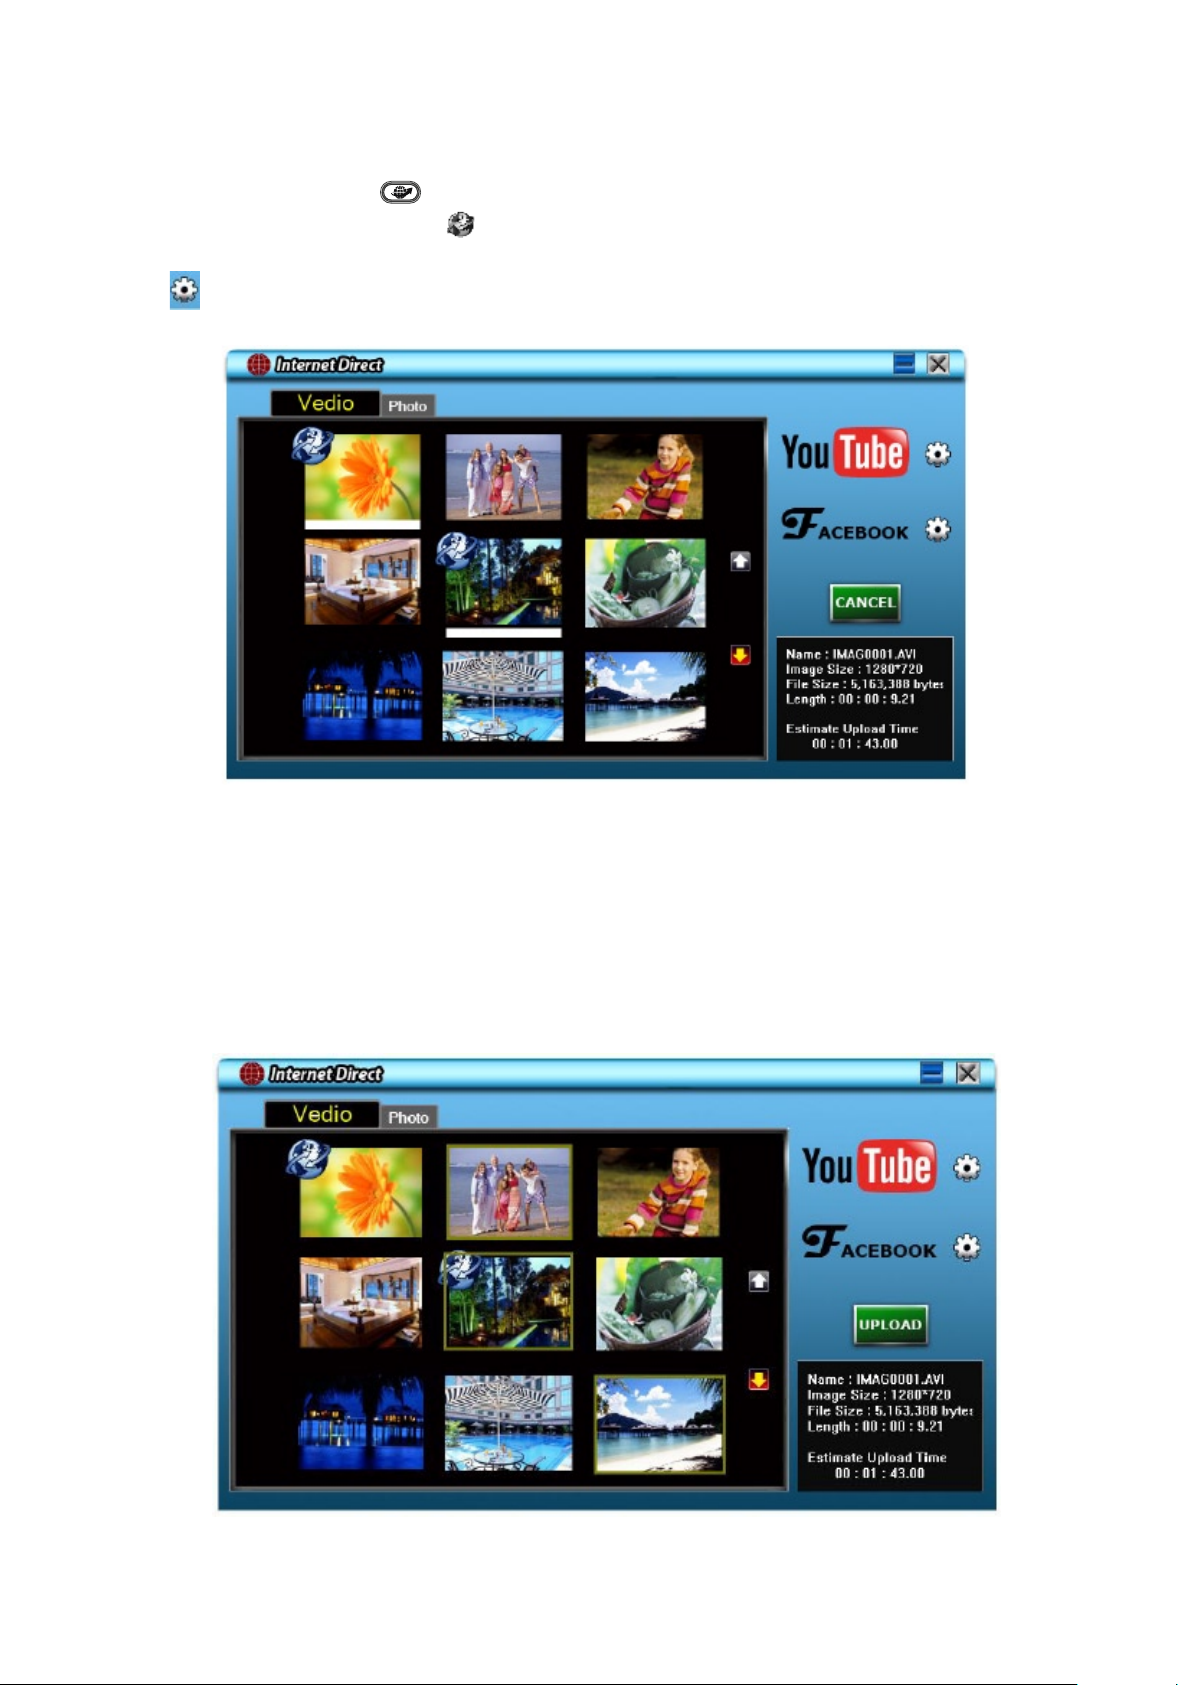
Upload video clips:4.
1. Choose the website you want to upload.
2. Press Internet Button
3. The videos clips marked with
to ll in your account information before uploading or you can ll in the information rstly by click on
)
4. Click on “ CANCEL” to stop uploading.
on the camera again.
will be uploaded to the website automatically. (You may be asked
To upload video les selected manually to Internet:
Follow the step 2 and 3 on page 36.1.
On the thumbnail screen, click on the up/down icon to change the pages. Click on the video clips 2.
you want to upload.
Choose the website you want to upload.3.
Click on “ UPLOAD” to start uploading.4.
Page 38
38
EN
To playback the video le:
1.Double click on the video clip on the thumbnail screen.
2.Click on the Play/Pause icon
preview screen.
To setup your account information for the website:
1. Click on
to go to the setup screen.
to play/pause. Click on the Return icon to return to the thumbnail
2. Fill in your account information in the blanks. Then click on “Save”.
(If you do not have a account, please sign up on the website rst.)
Page 39
39
EN
9.2 ArcSoft MediaImpression
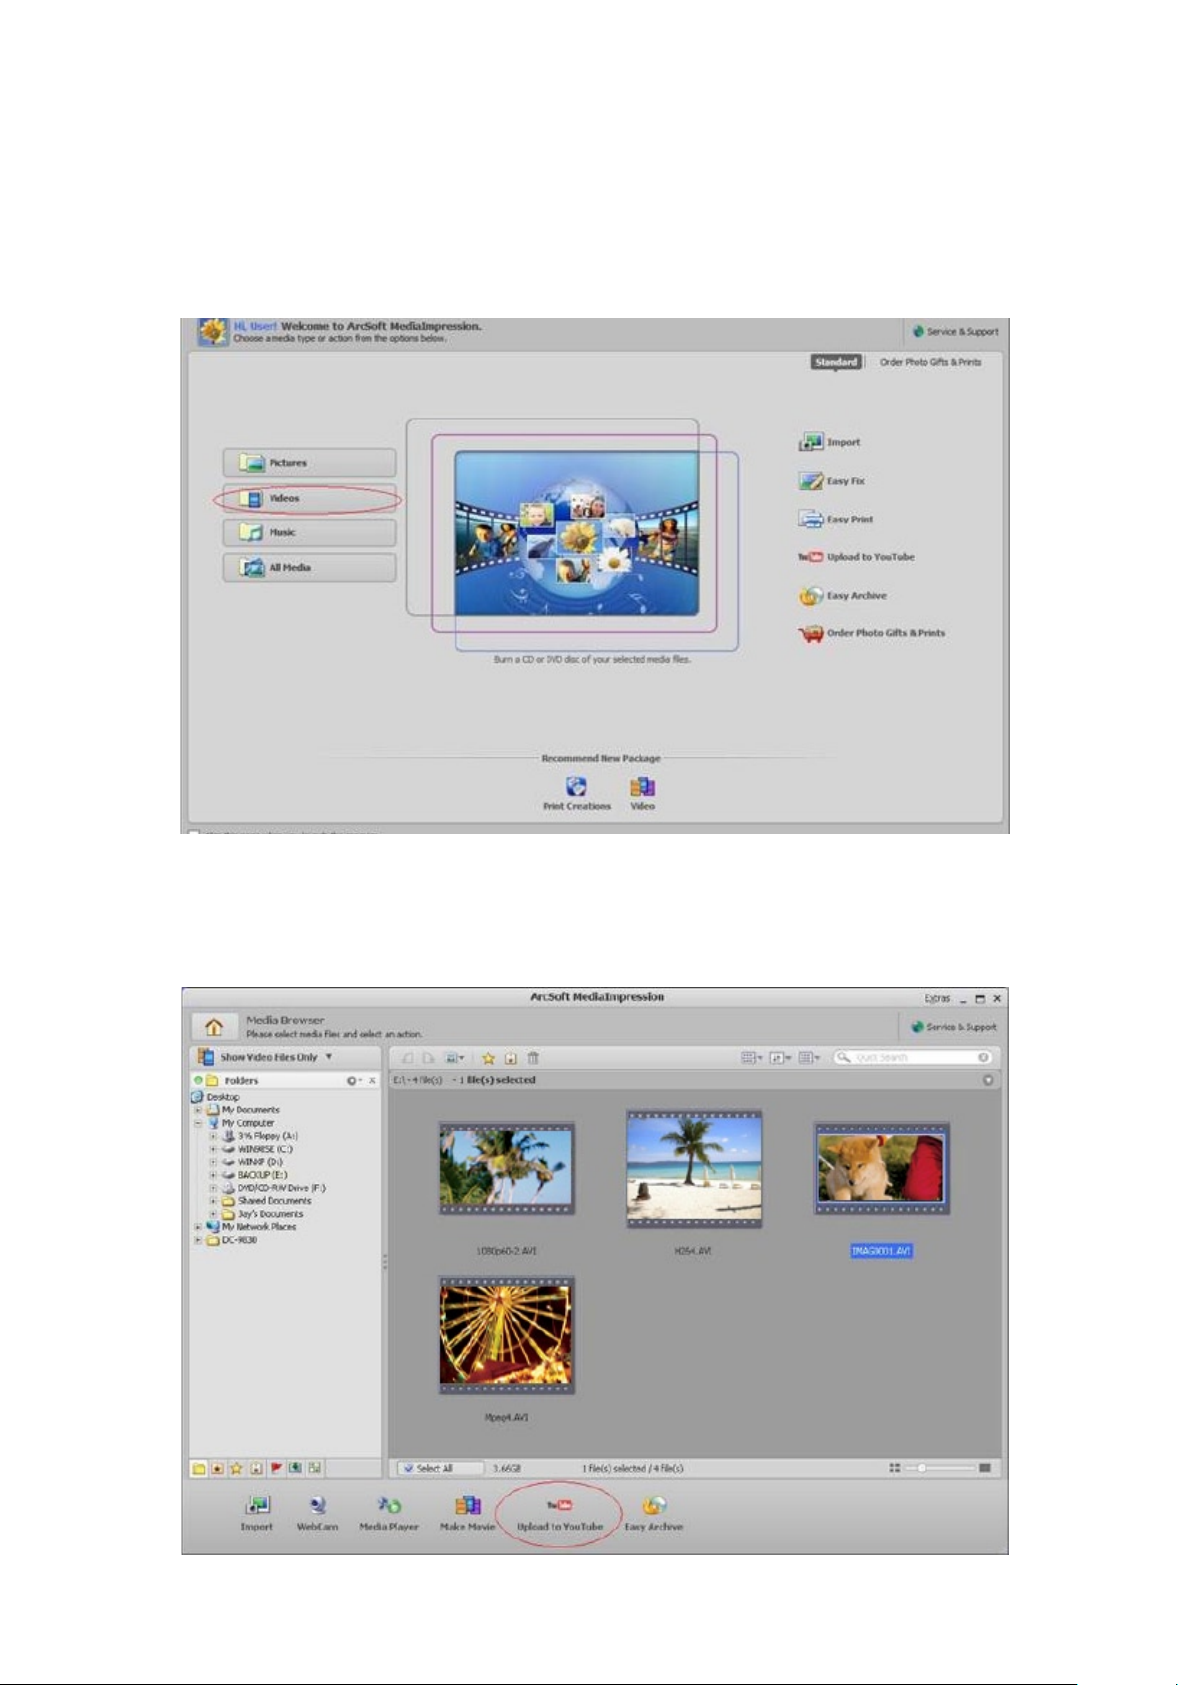
To upload video les to YouTube:
Install ArcSoft MediaImpression (Refer to Section 7).1.
Click on Windows [ Start ] 2. g[ (All) Programs ] g[ ArcSoft MediaImpression ].
The ArcSoft MediaImpression main screen will appear on your desktop.3.
Click on [ Videos ] .4.
The operation screen will appear:5.
Select the folder that contains the video les you want to upload.•
Select the les in the display area. •
Click on [Upload to YouTube] at the bottom menu.•
Page 40
40
EN
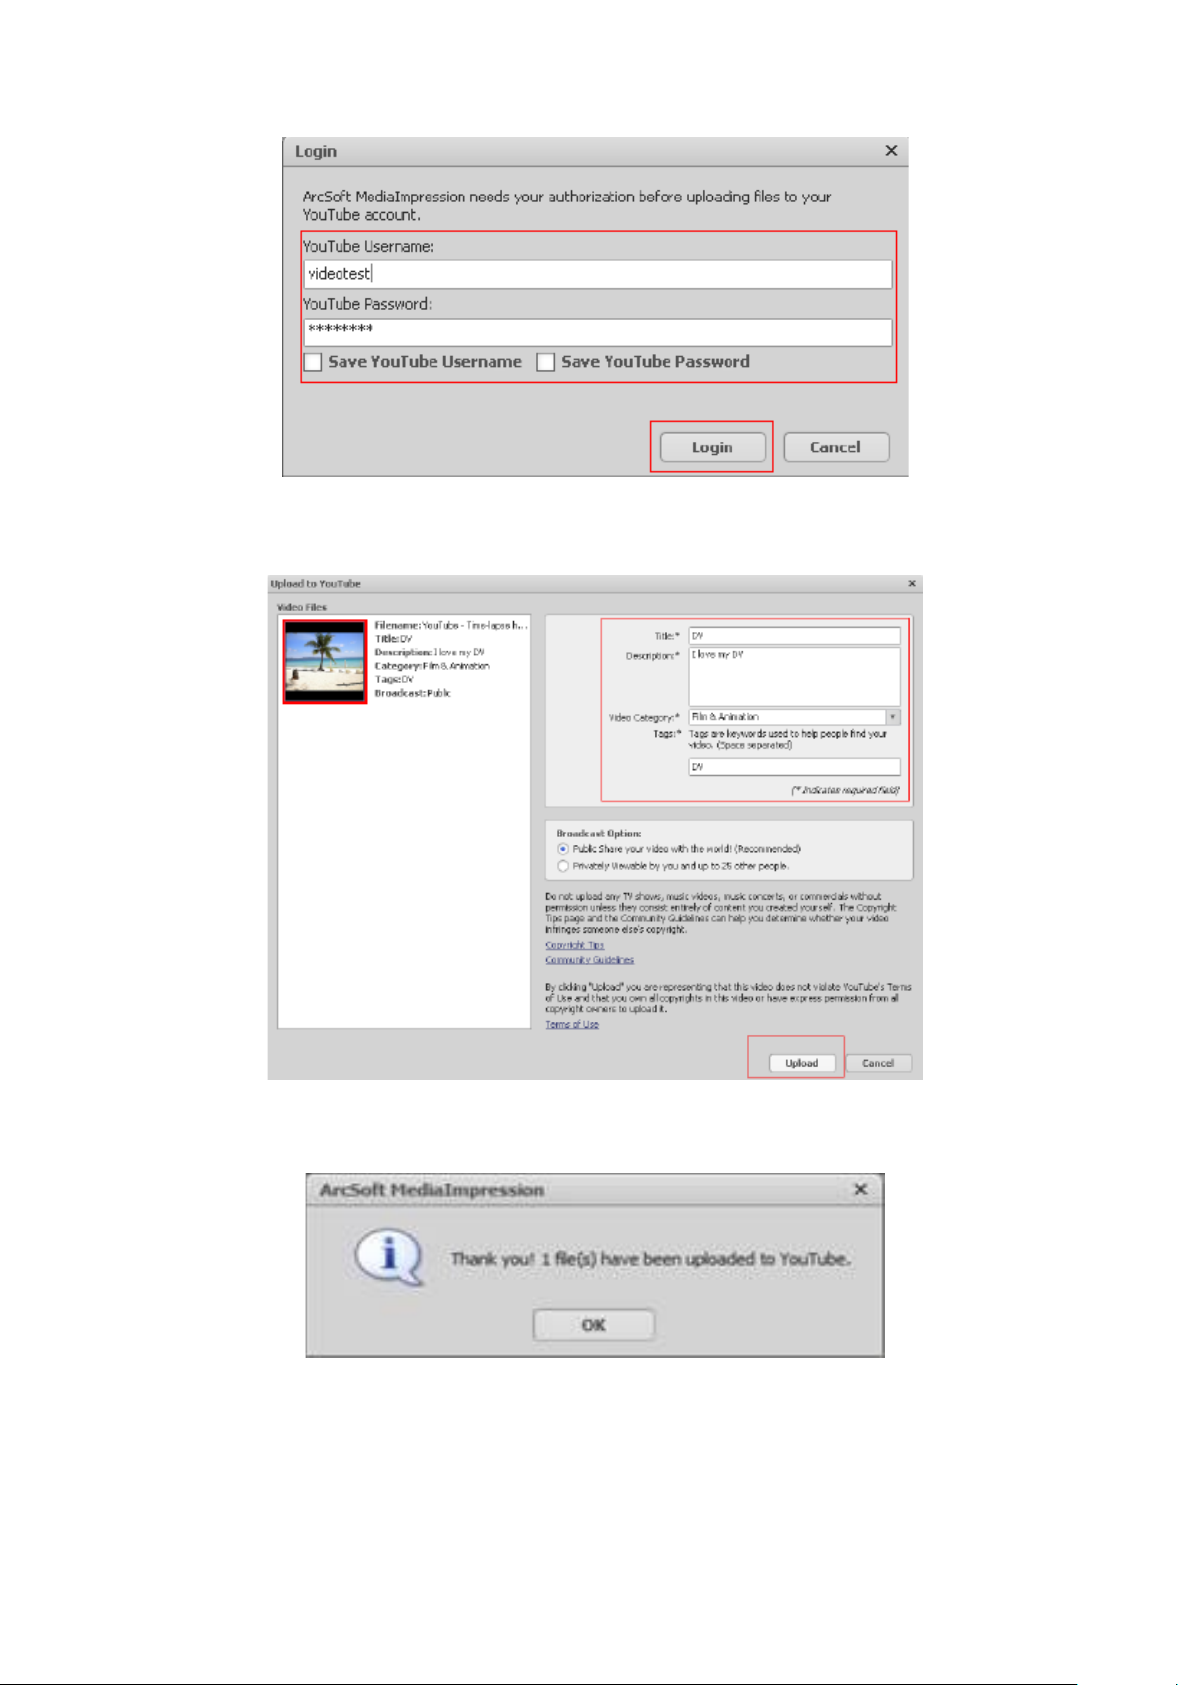
Fill in your YouTube account information in the blanks, and then click on [Login]6.
Fill in the information of the video clips in the blanks, and then click on [Upload] 7.
Page 41
41
EN
Section 10
Video File Converter
The bundled software CD contains ArcSoft MediaConverter that features video le converter to convert
multiple video formats into compatible format with your camera. In this way, you can convert various
video les formats and playback your favorite movies on your camera.
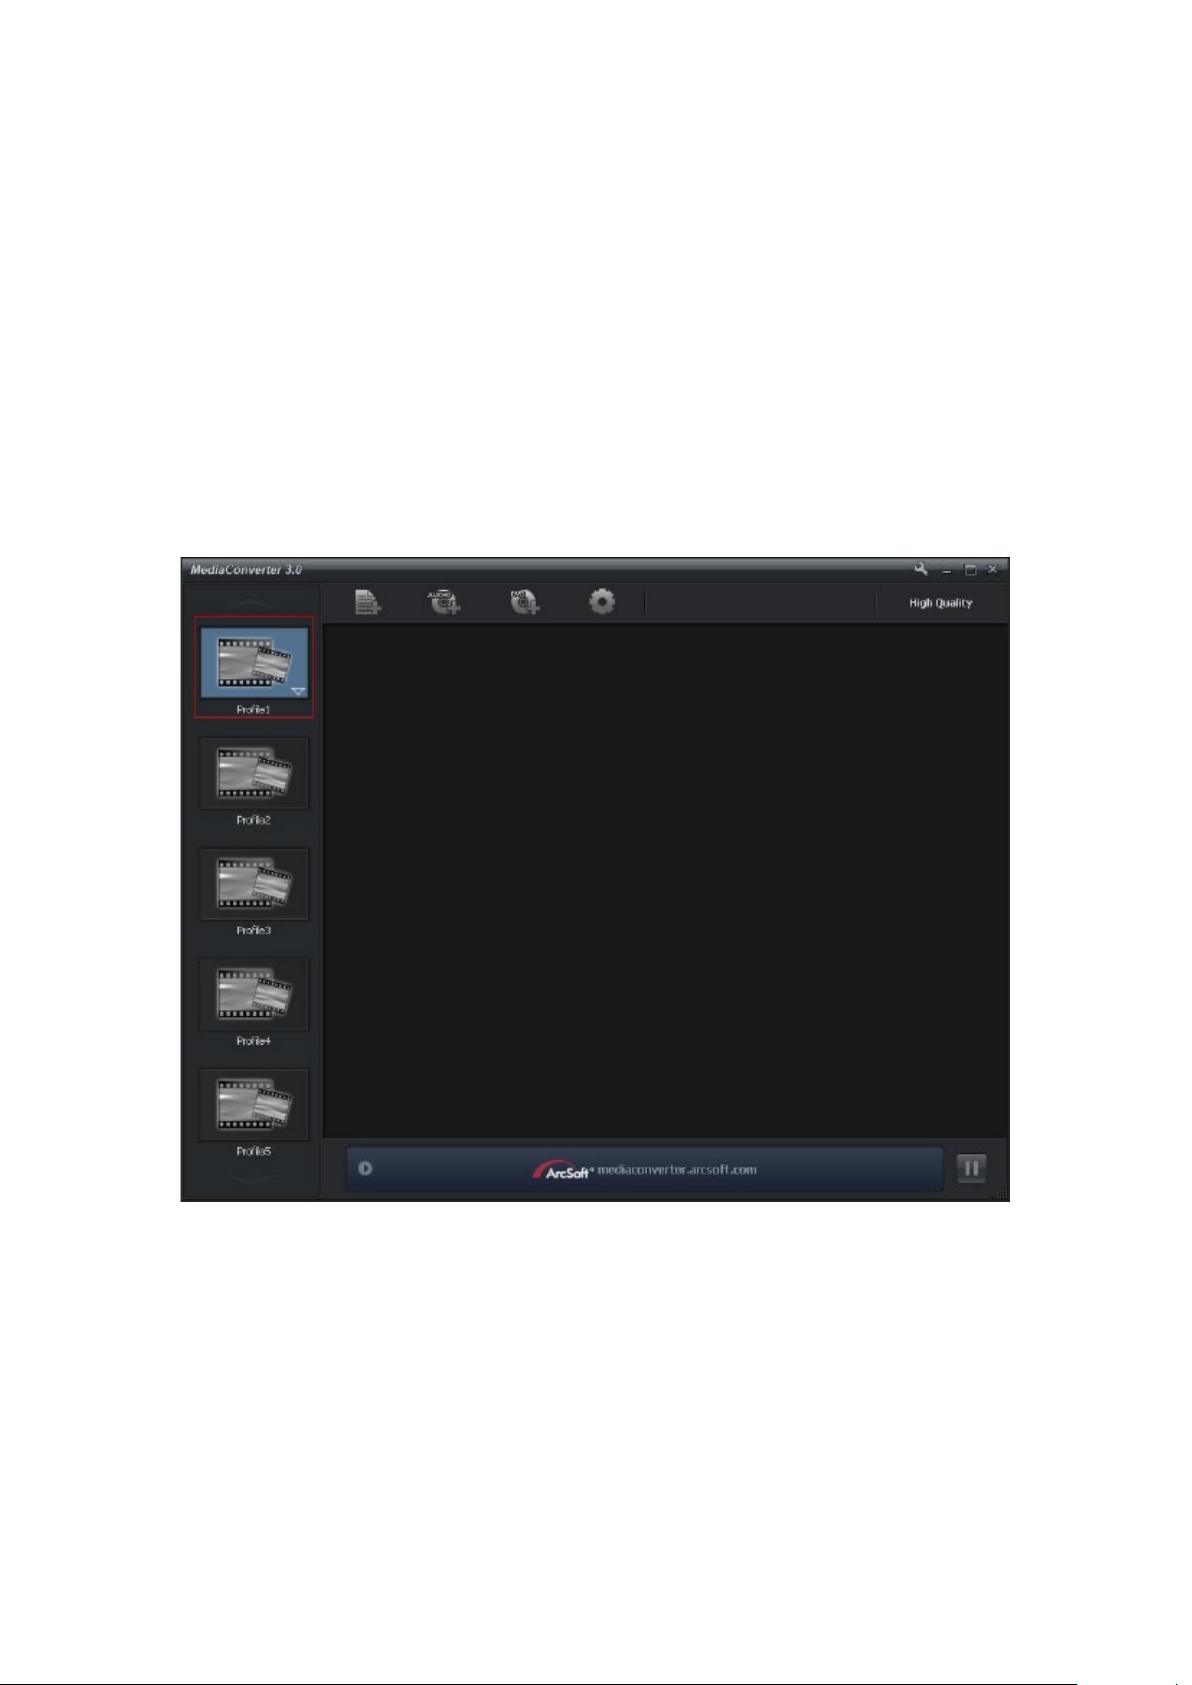
To convert a video le:
Install ArcSoft MediaConverter ( Refer to section 7).1.
Click on Windows [ Start ] 2. g[ (All) Programs ] g[ ArcSoft MediaConverter ].
The ArcSoft MediaConverter main screen will appear on your desktop.3.
Select [ Prole 1 ].4.
Page 42
42
EN
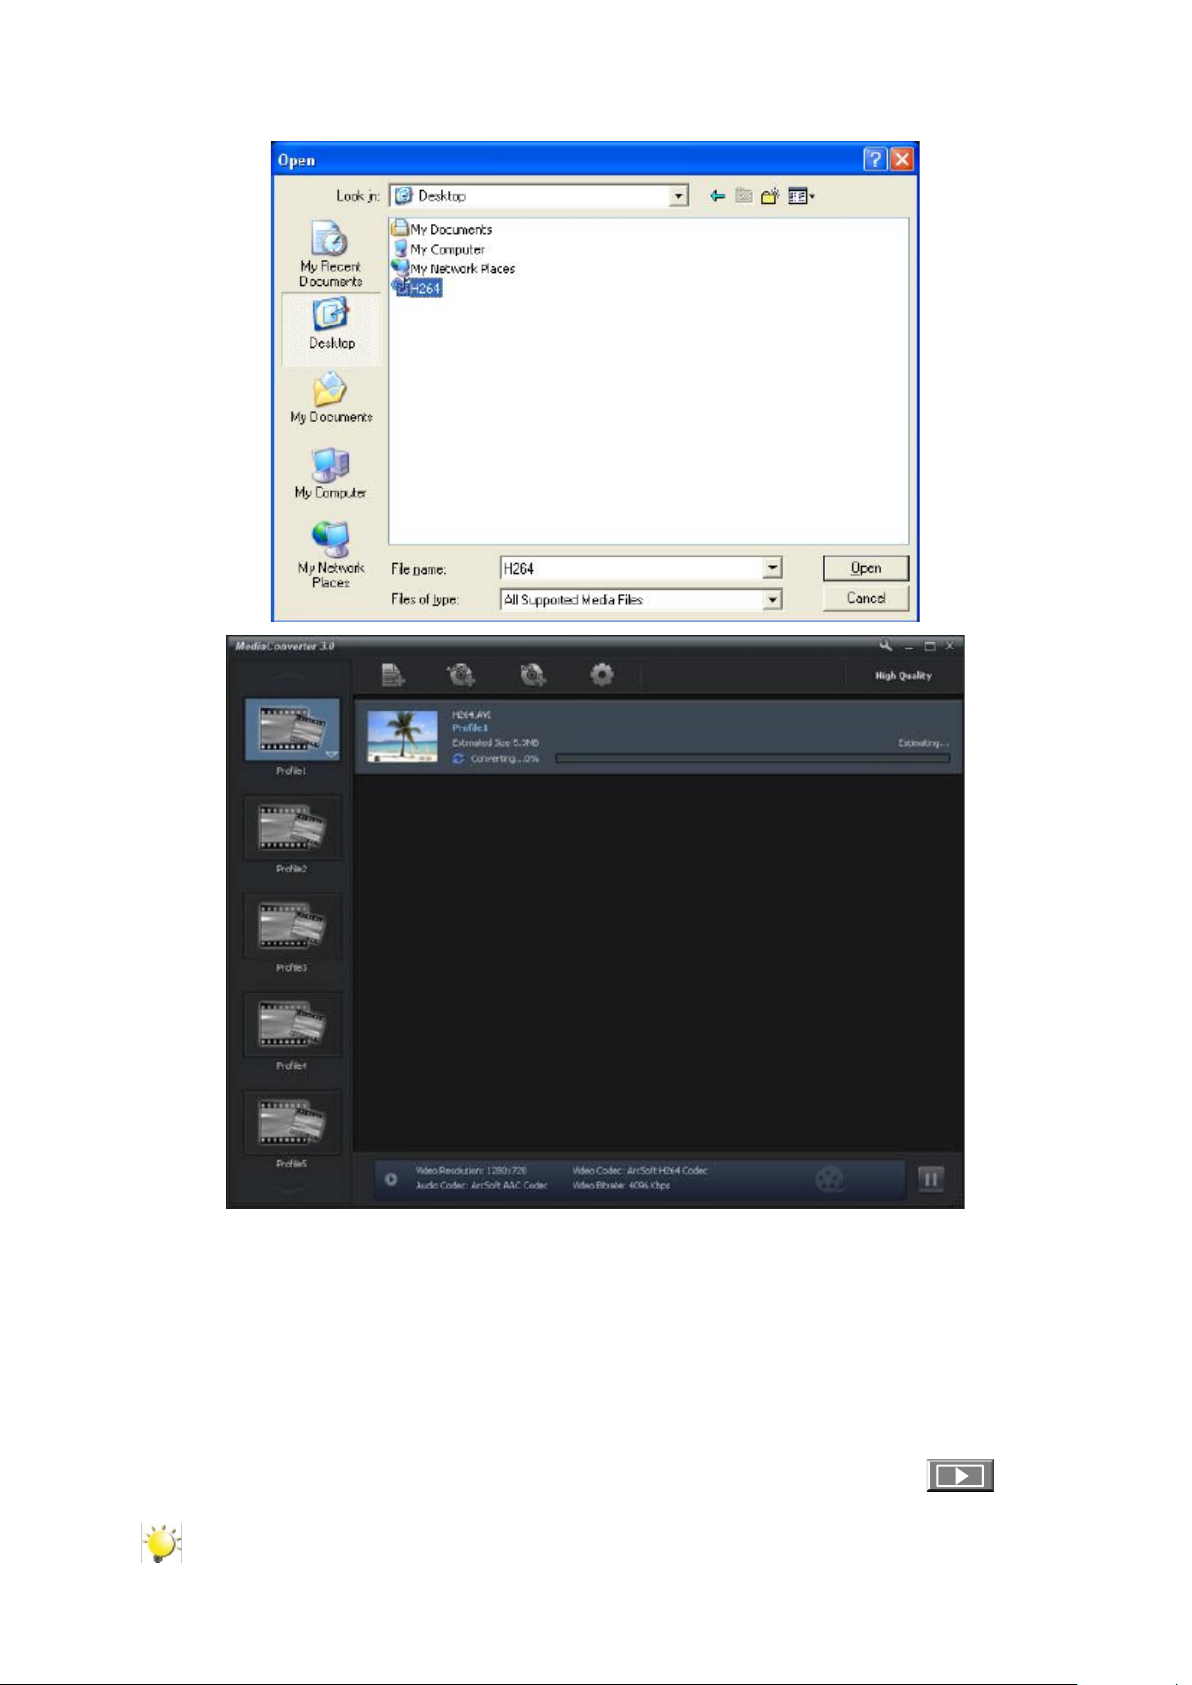
Select the video le you want to convert. Then, click on [Open] to convert the le.5.
The converted les will be renamed “ IMAG0001.avi”, “ IMAG0002.avi”,and so on. 6.
Rename the converted le to “ IMAGXXXX. avi” before transferring the converted le to your 7.
camera. (XXXX should be a four gures,e.g. 0001 to 9999) (Please note that the converted le
names can not be the same as the ones having existed in your camera, otherwise the video les in
your camera may be overwritten.)
Connect your camera to PC and copy the converted videos to “My Computer\Removable Disk\ 8.
DCIM\100MEDIA” in your camera.(Under the circumstances of within an SD card in the camera and
OS of the computer is Windows XP.)
After transferring the converted videos to the camera, 9. Press Playback Button or press on
the screen to enjoy your favorite movies.
Note
“ My Computer\Removable Disk” would be different based on OS recognition.
Page 43

43
EN
Section 11
Specications and System Requirements
Specication
Image sensor 10 Mega pixel CMOS sensor
Operation modes Movie record, Picture record
Lens f=5.95~59.5mm F2.0~2.8
Focus range Macro mode: wide:1cm~Innite, tele:60cm~Innite
Auto mode: wide:10 cm~Innite, tele:100 cm~Innite
Zoom 1X~100X (10X Optical zoom and 10X Digital zoom)
Shutter Electronic
LCD monitor 3” touch LCD
Storage media Built-in 128MB memory (partial memory is used for rmware code);
SD/SDHC card slot support (up to 32GB)
Image resolution High: 4608x3456 (16M pixels)
Standard: 3644x2748 (10M pixels)
Low: 2048x1536 (3M pixels)
Movie resolution FHD(1080i 60): 1920X1080i (60fps)
FHD(1080p 30):1920X1080p (30fps)
HD (720p 60): 1208X720p (60fps)
HD(720p 30): 1208X720p (30fps)
VGA(4:3): 640X480p (30fps)
White balance Auto/Manual (Daylight, Fluorescent, Tungsten)
ISO Auto/800/1600/3200
Self-timer 10 seconds delay
Flash Flash Auto/Red-Eye-Reduction/Digital Light/Flash Off
File format Picture: JPG
Movie: AVI
Image play Single image/Slideshow
PC interface Mini USB 2.0 port
TV out NTSC/PAL selectable, HDMI (up to 1080i 60)
Battery Lithium-ion rechargeable battery
Dimension 67.5(H) * 62.3(W) * 122(L) mm
Weight 270 g (without battery)
Page 44

44
EN
System requirements
Microsoft Windows XP/Vista/7•
Intel Pentium 4 2.4GHz or above•
512 MB RAM•
CD-ROM Drive•
1 GB free HDD space•
Available USB port•
16-bit Color Display•
Note
The LCD screen is manufactured using extremely high-precision technology, so over 99.99% of
thepixels areoperational foreffectiveuse.However,sometinyblackand/orbrightdots(white,
red, blue or green) may appear on the LCD screen. These dots are a normal result of the
manufacturing process, and do not affect the recording.
Page 45

45
EN
Section 12
Troubleshooting
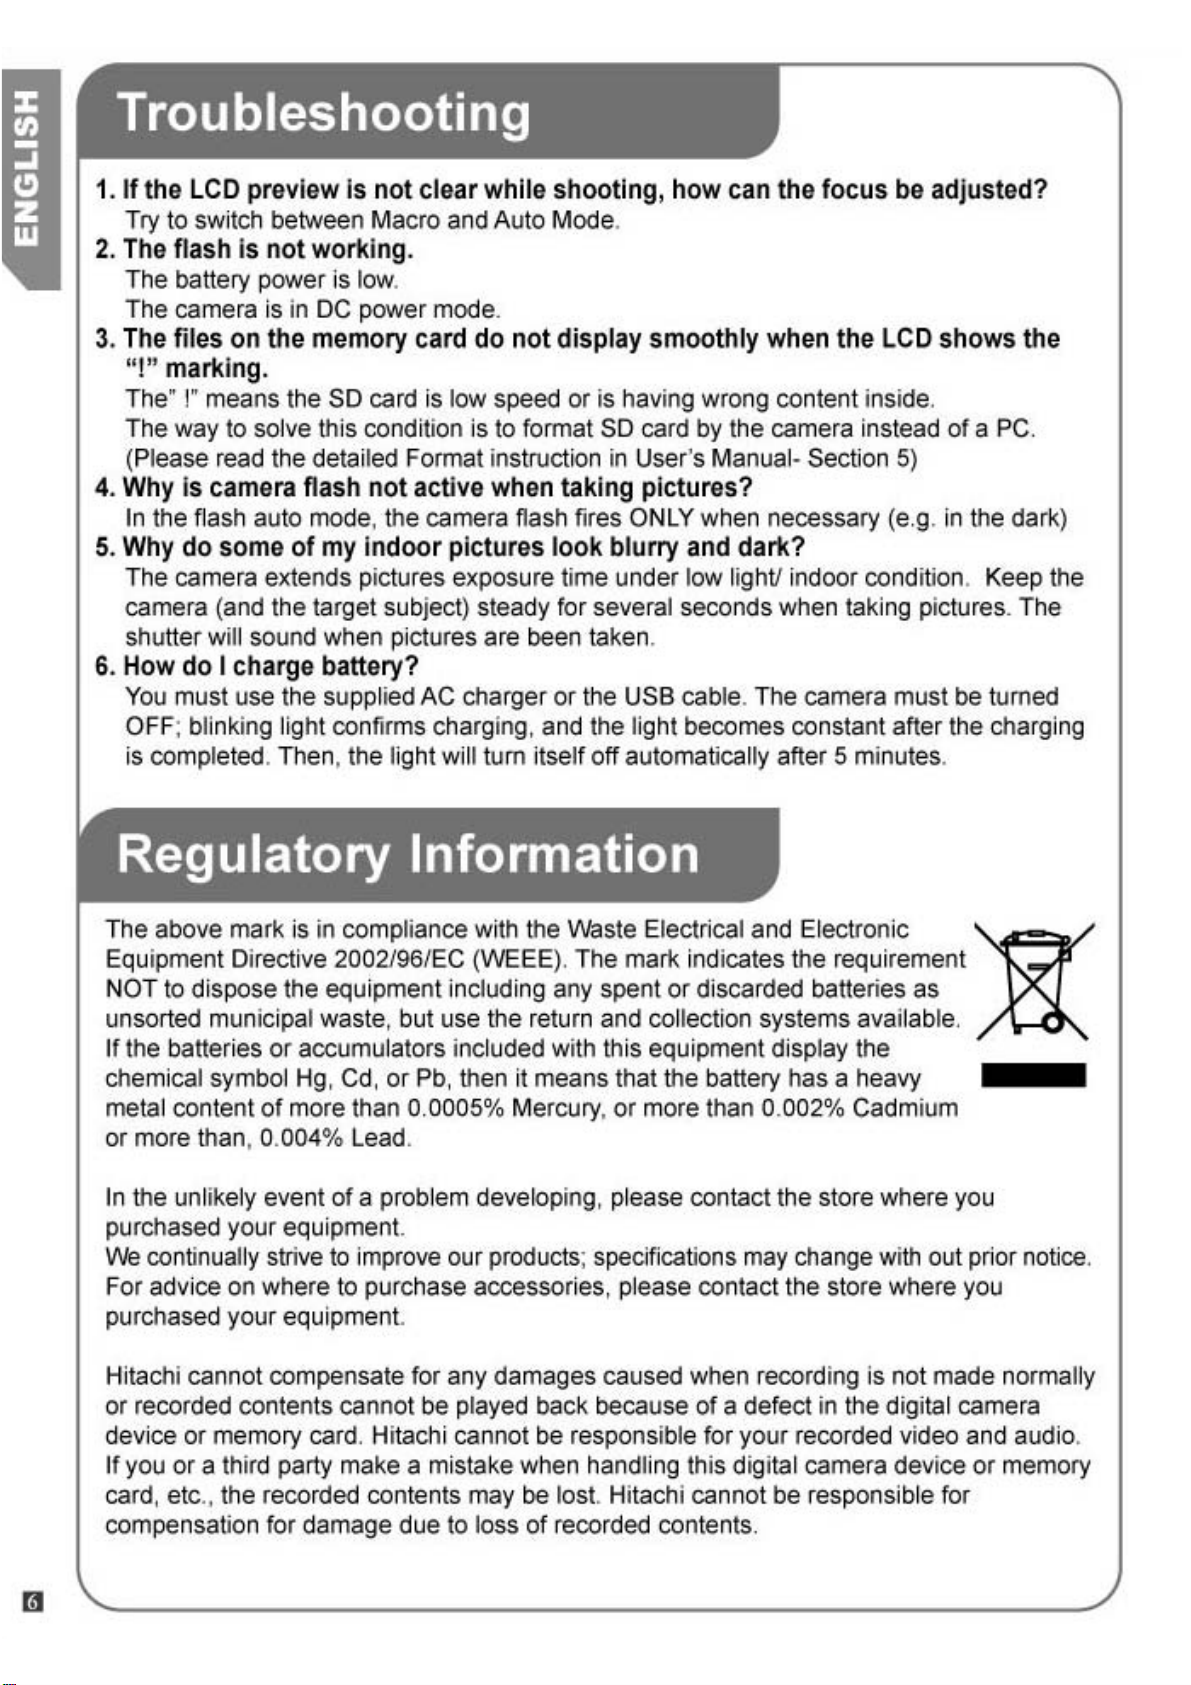
Troubleshooting
If the LCD preview is not clear while shooting, how can the focus be adjusted?1.
Try to switch between Macro and Auto Mode.
The ash is not working.2.
The battery power is low.
The camera is in DC power mode.
The les on the memory card do not display smoothly when the LCD shows the “!” marking.3.
The “!” means the SD card is low speed or is having wrong content inside. The way to solve this
condition is to format SD card by the camera instead of a PC (Please refer to the detailed Format
instruction in Section 5).
Why is camera ash not active when taking pictures?4.
In the ash auto mode, the camera ash res ONLY when necessary (e.g. in the dark).
Why do some of my indoor pictures look blurry and dark?5.
The camera extends picture exposure time under low light/ indoor condition. Keep the camera (and
the target subject) steady for several seconds when taking pictures. The shutter will sound when
pictures are being taken.
How do I charge battery?6.
You must use the supplied AC charger or the USB cable.
The camera must be turned OFF; blinking light conrms charging, and the light becomes constant
when the charging has been completed. Then, the light will turn itself off automatically after 5 minutes.
(In AC charging Mode).
Regulatory Information
The above mark is in compliance with the Waste Electrical and Electronic Equipment Directive 2002/96/
EC (WEEE). The mark indicates the requirement NOT to dispose the equipment including any spent or
discarded batteries as unsorted municipal waste, but use the return and collection systems available. If
the batteries or accumulators included with this equipment display the chemical symbol Hg, Cd, or Pb,
then it means that the battery has a heavy metal content of more than 0.0005% Mercury, or more than
0.002% Cadmium or more than, 0.004% Lead.
Page 46

In the unlikely event of a problem developing, please contact the store where you purchased your
equipment.
We continually strive to improve our products; specications may change with out prior notice.
For advice on where to purchase accessories, please contact the store where you purchased
your equipment.
46
EN
Page 47

DZ-HV1079E Warranty
Hitachi Europe Ltd.
If there is something about your appliance which you do not understand and you live in the UK, you can
phone our helpline during normal hours on: 0844 8009595. (COMET HELPLINE)
If Something doesn’t seem to work
Calls are charged at standard rates.
Guarantor: Comet Group plc
Comet House Three Rivers Court
Rickmansworth, Hertfordshire,
WD3 1FX
Page 48
Page 49
Page 50
Page 51
Page 52
Page 53
 Loading...