

Page 1
Quick Operation
(English)
DZ-HS903
DZ-HS803
DZ-HS903
DZ-HS803
Page 2
Quick Operation (English)
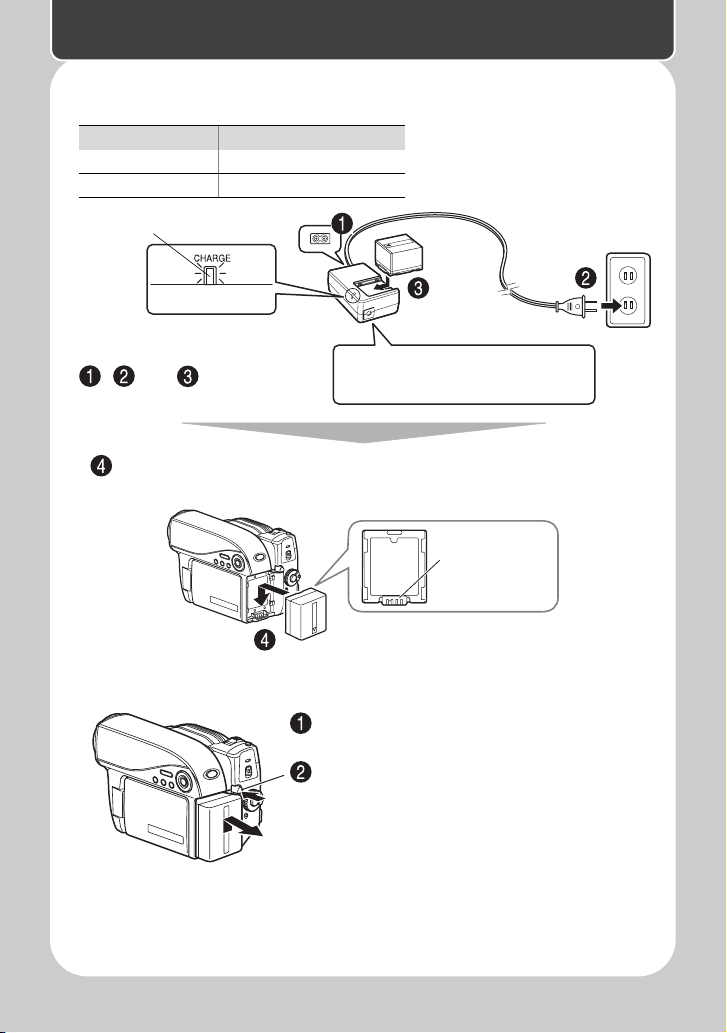
Setting up the battery pack
Charging status CHARGE indicator
During charge Lit
Charge complete Unlit
CHARGE
indicator
If the CHARGE indicator does not
Quick Operation (English)
light, check that the connections
( , , and ) are firmly made.
After charging is complete, attach the battery pack to the camcorder.
Note
Charging will not occur if the DC
power cord is connected.
Terminal at
bottom
Removing the battery pack
Always turn the power off before
disconnecting the power supply.
While pressing and holding the PUSH
switch, slide the battery pack upward,
then remove it.
• Be careful not to drop the battery pack
while detaching it.
1
Page 3
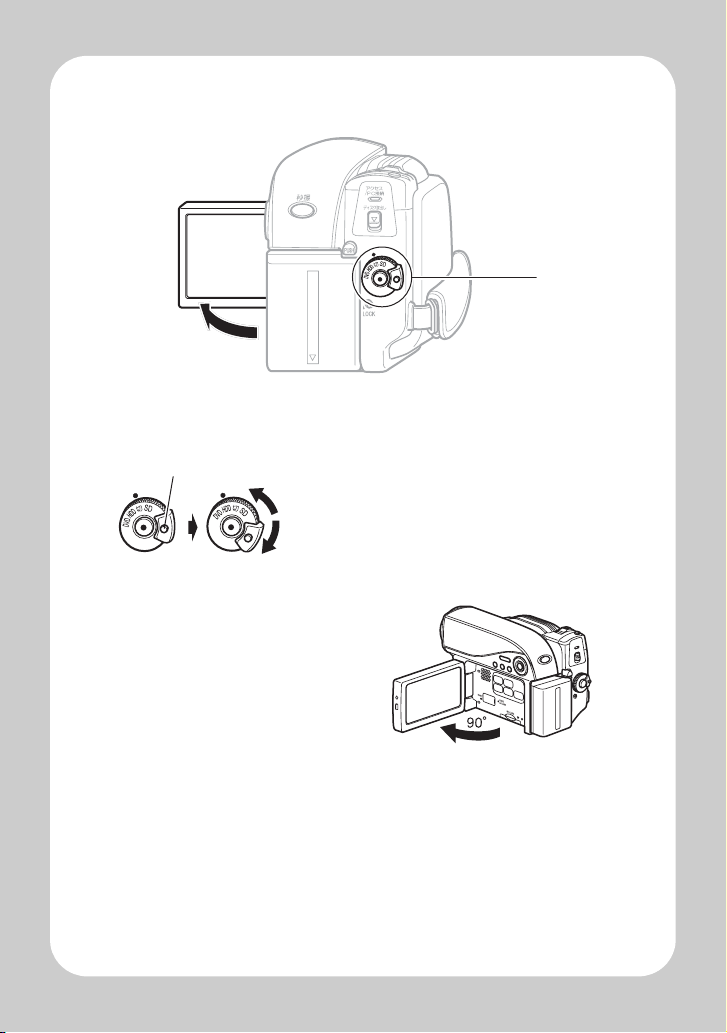
Turning on th e Power
2
1 Turn on the power.
Press and hold the lock button, and turn the power switch to the
desired mode.
2 Open the LCD
monitor.
1
Quick Operation (English)
2
Page 4
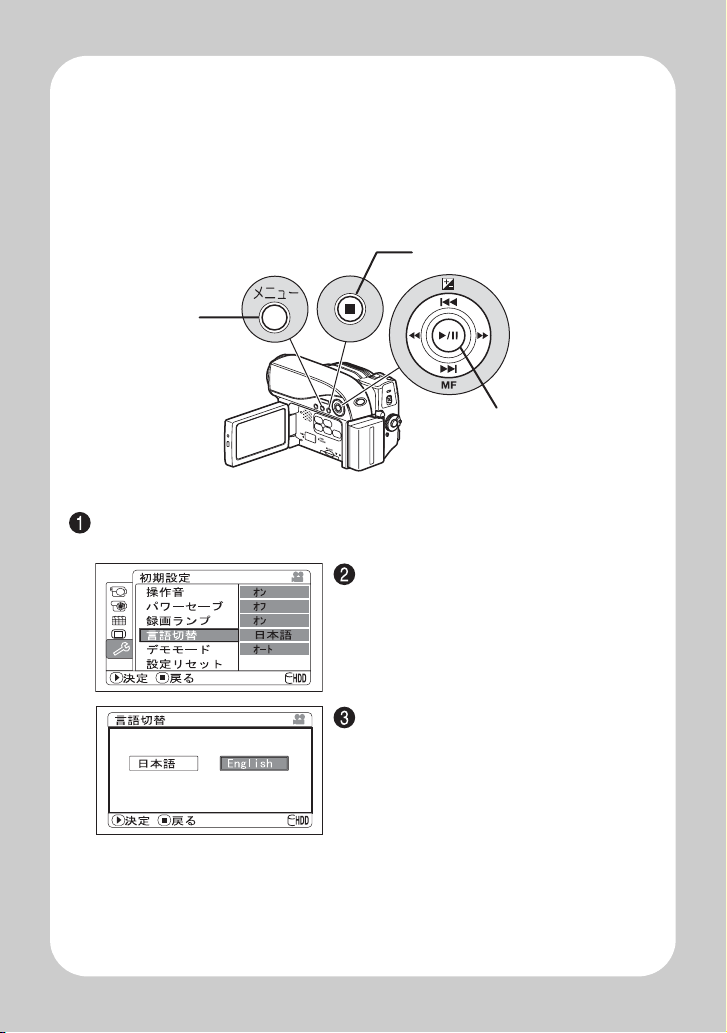
Changing the display language
(LANGUAGE)
You can change the language used on screens and menus.
The following shows how to change from Japanese to English.
C (Cancel/Stop button)
Quick Operation (English)
Menu button
A (Confirmation button)
Press the menu button, then select " 初期設定 " by pressing
Then, press c (or the confirmation button).
Press e or c while the screen on the
left is displayed.
The " 言語切替 " screen appears.
Select "English" and press A .
The display language switches to
English.
f/e.
3
Page 5
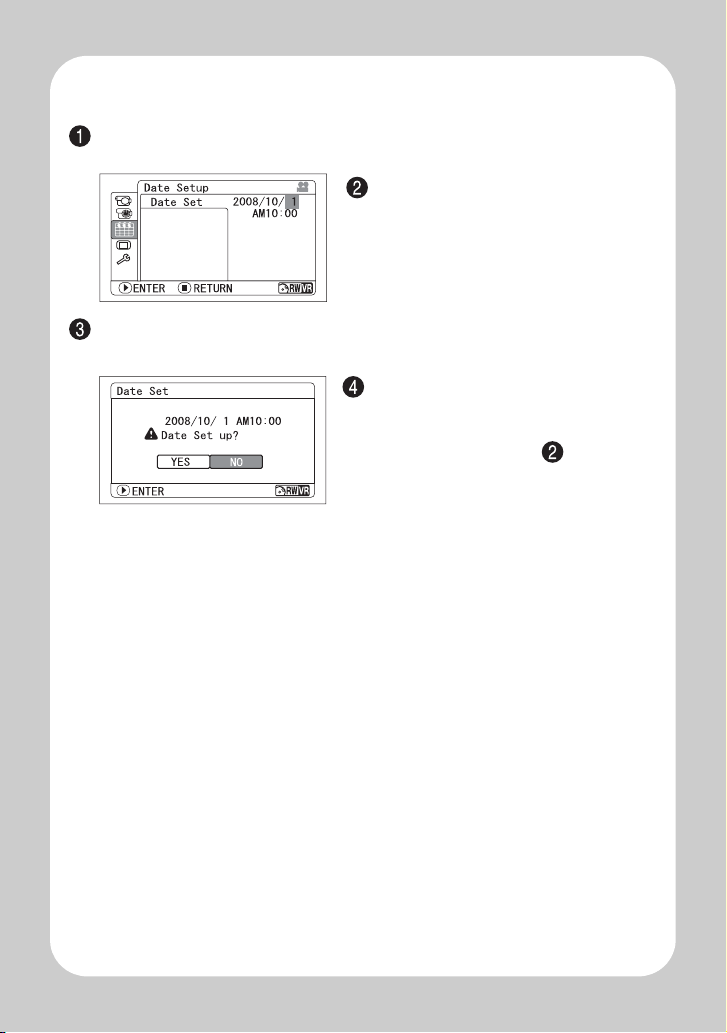
Setting the Date and Time
Press the menu button, then select "Date Setup" by pressing f/e.
Then, press c to select "Date Set" and press c again.
Select each item by pressing d/c
and set the correct value by pressing
f/e.
• Repeat this step until year, month,
date, hour, minute, and AM/PM are
correctly set.
Press the confirmation button.
The confirmation screen appears.
Press d to select "YES", then press
the confirmation button to confirm.
• If you select “No” and press
screen returns to step .
e, the
Quick Operation (English)
4
Page 6
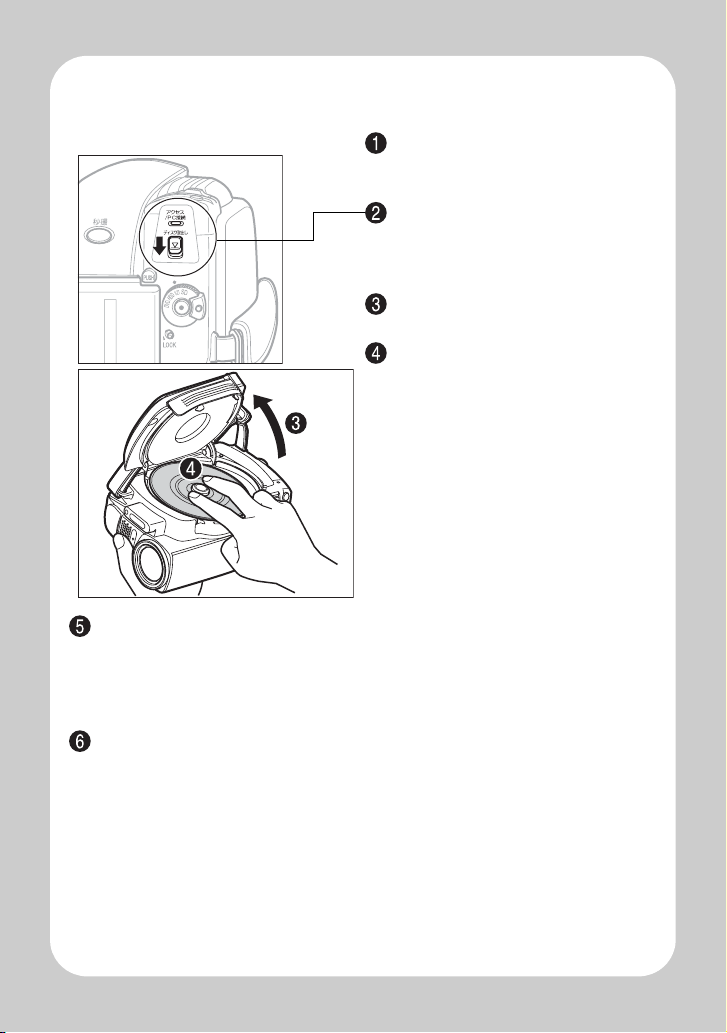
Inserting a DVD
Attach the charged battery pack to
the camcorder, or connect the
camcorder to a power outlet.
Turn the power switch to " 切 ",
then press down the disc eject
switch until the access/PC indicator
lights, then release.
After several seconds, the lid pops
Quick Operation (English)
Close the lid.
After the lid is closed all the way, the camcorder will attempt to recognize the
DVD. During this recognition process, the access/PC indicator flashes. While
this is happening, do not remove the power source, shake the camcorder, or
subject it to impact.
When you insert a new DVD-RW/+RW and the message which prompts you
to format the disc appears, format the disc (p.6).
You can record on a DVD-RAM/DVD-R without formating.
open. Open it fully with your hand.
Place the recording surface of the
DVD face down, then push down
on the center of the DVD until it
clicks into place.
• For single-sided discs, the side
opposite the label is the recording
surface.
• To record on the other side for
double-sided discs, remove the
disc (p.6), flip it over, and then
reload it.
5
Page 7
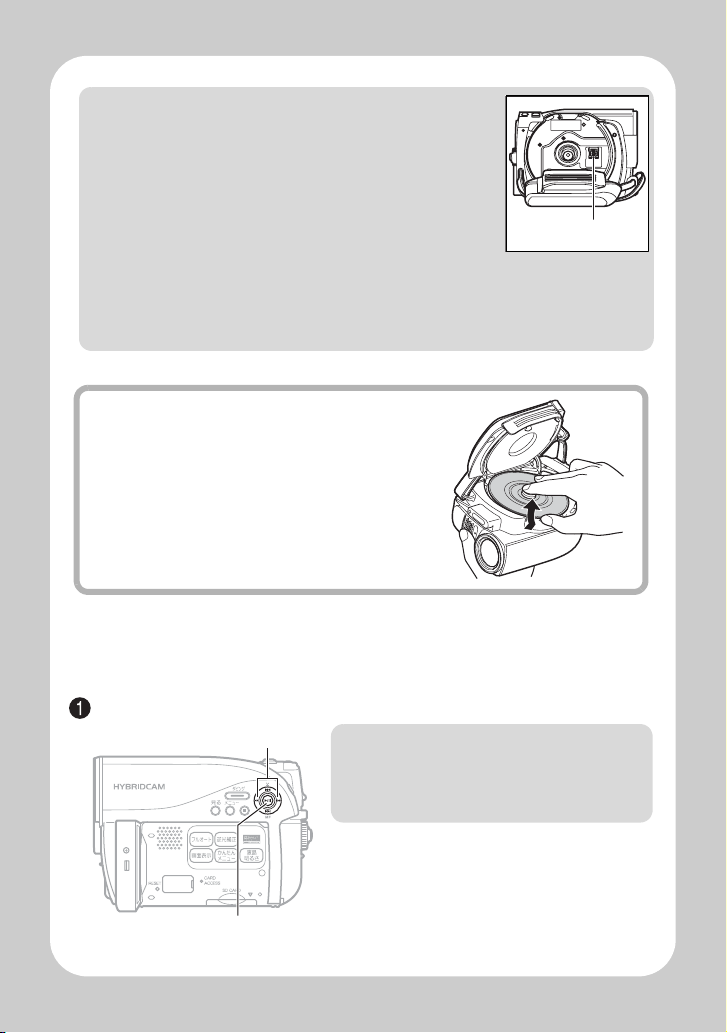
Notes
• The disc mechanism may be quite hot immediately after
use. Do not touch the metallic areas.
• Do not peer into the pickup. Doing so may cause
damage to your eyesight.
• To prevent malfunction, never do any of the following:
– touch the laser pickup
– insert a disc that is not compatible with the camcorder
– close the lid before setting the disc securely into place
• The power automatically turns off if the lid is left open for approx. 3 minutes.
• The lid will not open if the camcorder is not connected to a power source.
Pickup
Removing the DVD
Pressing slightly on the center hub with a
finger, grip the edge of the disc with your
thumb and lift the disc out as shown.
When loading a new DVD-RW/+RW
The disc must be formatted before it can be used for recording. When the disc is
loaded, the format confirmation screen will appear in the LCD monitor.
Open the LCD monitor (p.2).
d / c
Note
Be careful that the power is not
accidentally cut off while formatting,
otherwise, the disc will become unusable.
Quick Operation (English)
A
6
Page 8
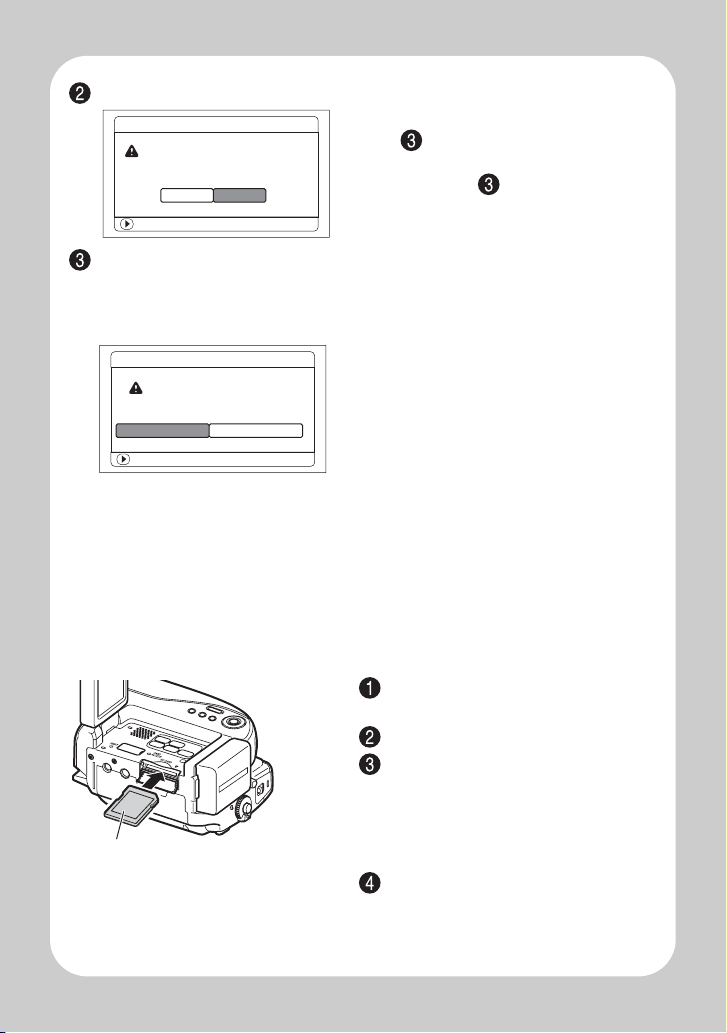
Select "YES" by pressing d, then press the confirmation button.
Format DVD
All data will be deleted.
Format the DVD now?
YES
ENTER
NO
• When using a DVD-RW, proceed to
step .
• When using a +RW, formatting will
start. Skip step .
(When using a DVD-RW)
The recording format selection screen appears.
Select “VR Mode” or “VF Mode” by pressing d
Quick Operation (English)
confirmation button.
Format DVD
DVD Format.
Select record format.
VR Mode
ENTER
VF Mode
VR Mode
After recording, you can perform various
editing functions, such as choosing or
deleting scenes. You can play back the
disc in a device that supports an 8cm
DVD-RW (VR Mode) after finalizing the
/
c, then press the
disc.
VF (Video) Mode
Although editing cannot be done on the
camcorder, you can play back the disc on
other DVD devices after finalizing the disc.
Inserting and Removing Card
Pay attention to the orientation
of the card.
The terminals should face away
from the LCD monitor.
7
Always turn off the power before
inserting a card.
Open the cover.
Push the card in until it clicks into
place.
(To remove the card, push it in
slightly and release. The card will
pop up, and you can remove it.)
Always close the cover.
Page 9
HDD RAM
+RW
-RW (VF)
-RW (VR) R
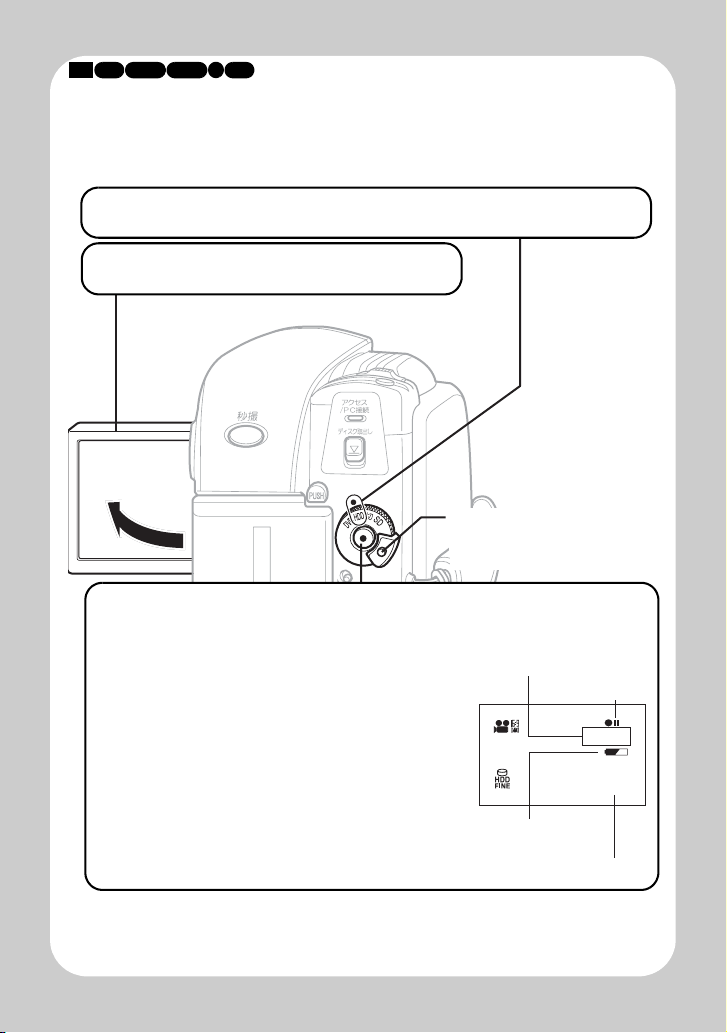
Recording Movies
You can choose either HDD or DVD to record movies.
1 Turn the power switch to "HDD" or "DVD".
2 Open the LCD monitor.
Press and hold the lock
button to turn the power
switch.
Quick Operation (English)
3 Press the record button.
"m" (recording pause) in the LCD
・
monitor will change to "n" and
recording will begin.
The recording indicator beneath the lens
will also light up red.
To pause recording, press the record
・
button again. The elapsed recording
time will reset to "0:00:00".
To resume recording, press the record
・
button again.
Elapsed recording time
(hrs : mins : secs)
Remaining space on
HDD/DVD/Card
m/n
0:00:00
REM
31MIN
AM10:00
2008/10/1
Remaining battery
level
Current time
8
Page 10
CARD
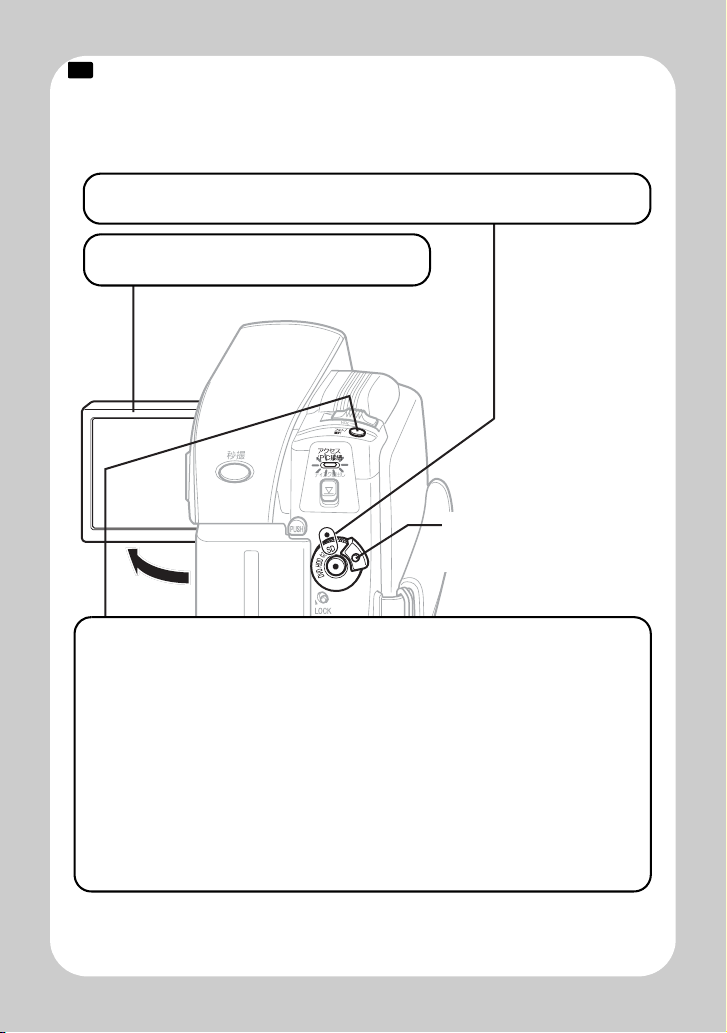
Recording Still Pictures
Still pictures are recorded on an SD memory Card.
1 Turn the power switch to "SD".
2 Open the LCD monitor.
Quick Operation (English)
Press and hold the lock
button to turn the power
switch.
3 Press the "フォト/選択" (photo) button
halfway down.
A subject in the center of the screen will be focused. When focus is
locked, the green "m"in the LCD monitor will turn purple.
4 Fully press the "フォト / 選択 " (photo)
button.
The image will be recorded. After a few seconds, the image shot will
be displayed for about three seconds. You can shoot the next photo
when "m" changes back to green.
9
Page 11
Playback
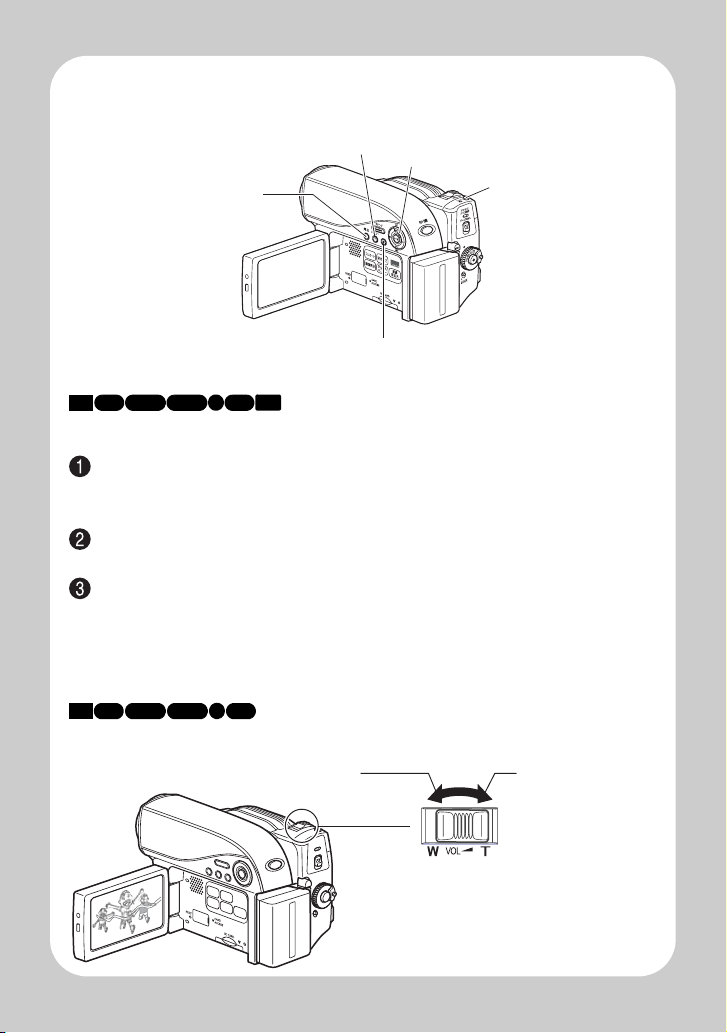
A (Confirmation/Play/Pause)
button / f / e / d / c
Photo/Select button
C (Stop/Cancel) button
"見 る" (Disc Navigation)
button
-RW (VF)
-RW (VR) R
HDD RAM
+RW
Menu button
CARD
Choosing and playing back a scene
Press the "見る" button while the media you want to play back is in
recording pause mode.
The scenes thumbnails appear on the disc navigation screen.
Choose a scene by pressing f/e (up/down, previous page/following
page) and d/c (left/right).
Press A.
The chosen scene is played back.
• To promptly return to the disc navigation screen, press C or the "見 る "
button. To return to recording pause mode, press C or the "見 る " button
again.
-RW (VR) R-RW (VF)
HDD RAM
+RW
Quick Operation (English)
Adjusting speaker volume during movie playback
Decreases the volume
Increases the
volume
10
Page 12
Useful
Recording
Techn i ques
-RW (VF)
-RW (VR) R
HDD RAM
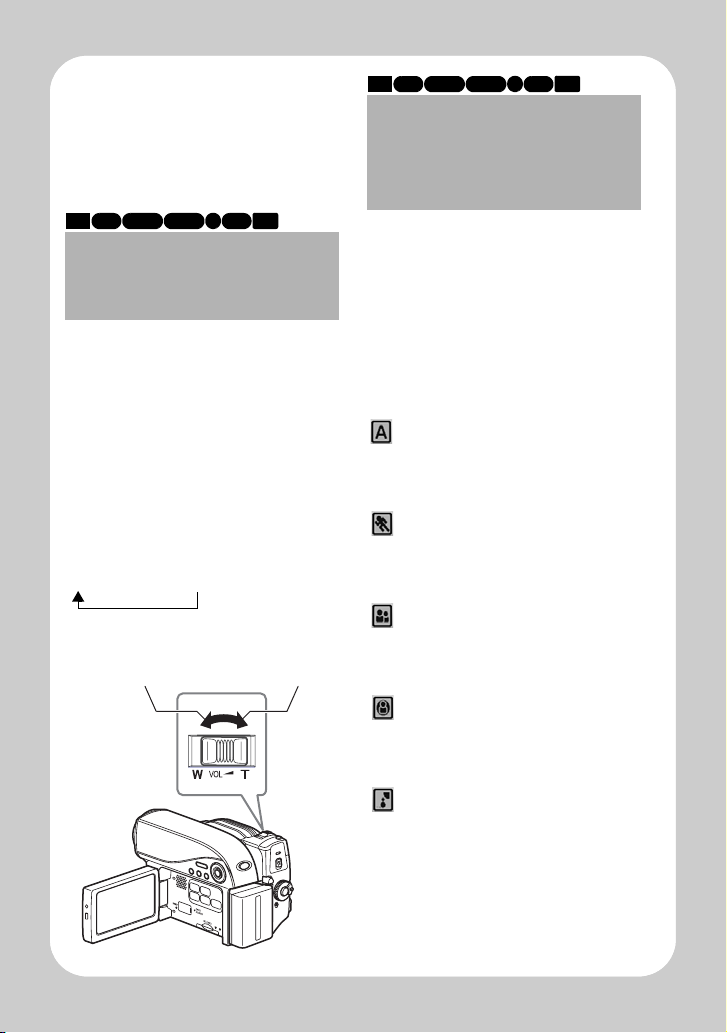
Magnified Recording
(Optical Zoom and
Digital Zoom)
Quick Operation (English)
The zoom lever allows you to choose
a range of magnifications from wideangle to telephoto zooming.
Tilt the lever slightly to zoom slowly
and tilt the lever greatly to zoom
rapidly.Optical zooming up to ten
times is the maximum telephoto
magnification.
If you activate the digital zoom, the
maximum telephoto magnification
will be 240 ×.
off → 40 × → 240 ×
W:Wide-angle
(Shooting over
a wide range)
+RW
CARD
T:Telephoto
(Magnifies
shooting)
-RW (VR) R-RW (VF) CARD
HDD RAM
+RW
Selecting a Shooting
Mode to Match the
Conditions
(Program AE)
The camcorder automatically gauges
the subject and surrounding
conditions and determines the
optimal settings for recording (Auto).
You can also select a shooting mode
that may better suit the situation.
Shooting mode
Auto
The camcorder automatically
detects the subject and surrounding
conditions for optimum recording.
Sports
Reduces blurring when
recording rapidly moving subjects
such as a golf or tennis game.
Portrait
Makes the subject, such as a
person or pet, stand out from a blurred
background.
Spotlight
Prevents over exposure of the
subject in strong light, such as on
stage, etc.
Sand&Snow
Prevents underexposure of the
subject in very bright conditions, such
as the seaside, or on a ski slope.
11
Page 13
Low Light
Allows you to record in dark
places with limited light.
Selecting a shooting
mode
During record pause, press the
1
menu button.
Select "Camera Functions
2
Setup" "Program AE"
a shooting mode.
Press A to confirm, then the
menu button to end.
The selected shooting mode
(other than Auto) appears in the
3
LCD monitor.
• The shooting mode is retained
in memory even when the
power is turned off.
Notes
• When shooting in dark places,
after-images may appear if the
subject is moving or if camera
shake occurs. Use a tripod for
best results.
• If “Sports” mode is used under
fluorescent light, the LCD
monitor may flicker. Use “Auto”
mode in this case.
-RW (VR) R-RW (VF) CARD
HDD RAM
+RW
Restoring all the
Shooting Settings to
Default (Full Auto)
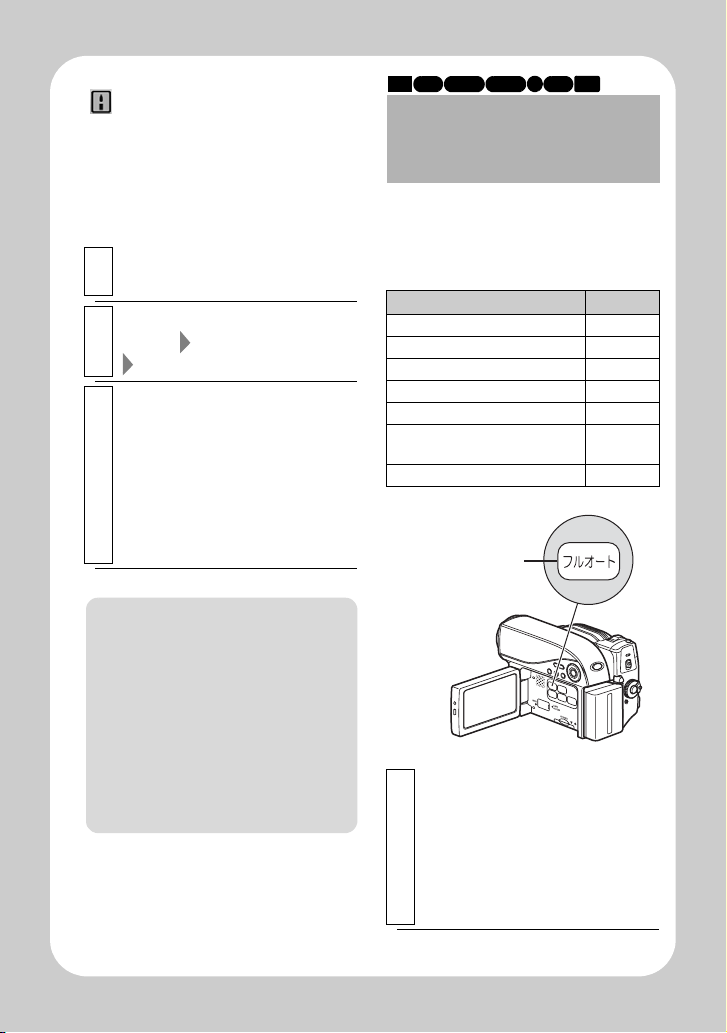
You can reset the following manually
adjusted shooting settings to their
defaults with the press of a single
button.
Function Default
Focus Auto
Exposure Auto
BLC (Backlight) Off
Program AE (shooting mode) Auto
White Balance Auto
EIS (Electronic Image
Stabilizer)
Microphone Filter Off
Full Auto button
During record pause or
recording, press the Full Auto
button.
1
“FULL AUTO” appears in the
LCD monitor for a moment and
the settings return to their
defaults.
On
Quick Operation (English)
12
 Loading...