

Page 1
DZ-BD7HA/DZ-BD70A Instruction Manual
Instruction Manual
(English)
HITACHI Camcorder PC Software Support Center
URL http://dvdcam-pc.support.hitachi.ca/
Support Center phone numbers for software provided:
PIXELA CORPORATION
+1-800-458-4029 (Toll-free)
+1-213-341-0163
URL:http://www.pixela.co.jp/oem/hitachi/e/index.html
HITACHI AMERICA, LTD.
UBIQUITOUS PLATFORM SYSTEMS
900 Hitachi Way
Chula Vista, CA 91914-3556
Service Hotline: 1-800-HITACHI
(1-800-448-2244)
DZ-BD7HA
DZ-BD70A
DZ-BD7HA
(Hybrid BD Camcorder)
DZ-BD70A
(BD Camcorder)
Introduction
HDD/BD/DVD/Cards
Battery Pack
Let’s Get Started
Recording — Viewing
Various Recording
Techniques
Dubbing on BD/DVD
(DZ-BD7HA)
Editing
Viewing on the
Other Devices
Connecting to
your PC
Additional
Information
QR69892 ©Hitachi, Ltd. 2007
Hitachi, Ltd. Japan
This manual was printed
with soy based ink.
Printed on recycled paper
Printed in Japan ON-K (I)
Thank you for purchasing this Hitachi Camcorder.
Please read this Instruction Manual to understand its proper use.
Regarding the differences between the DZ-BD70A and the DZ-BD7HA, please first refer to
"How to Read this Instruction Manual" (p.10).
Before opening the CD-ROM included with this product, please read p.176.
After reading the Instruction Manual, store it safely.
The Instruction Manual contains illustrations of the DZ-BD70A and 7HA on the cover page only.
Page 2

Important Information
For Your Safety
The power switch turns the camcorder on and off, leaving the date/time feature unaffected. If the
camcorder is to be left unattended for a long period of time, turn it off.
The DVD video camera/recorder and AC adapter/charger have the following caution marks.
WARNING: TO PREVENT FIRE OR SHOCK HAZARD, DO NOT
EXPOSE THIS UNIT TO RAIN OR MOISTURE.
WARNING: TO PREVENT FIRE OR SHOCK HAZARD, USE THE
RECOMMENDED ACCESSORIES ONLY.
WARNING: TO PREVENT FIRE OR SHOCK HAZARD,
BE SURE TO USE THE SPECIFIED AC ADAPTER/
CHARGER (DZ-ACS3).
The camcorder and AC adapter/charger
have the following caution marks.
CAUTION
RISK OF ELECTRIC SHOCK
DO NOT OPEN
CAUTION: TO REDUCE THE RISK OF
ELECTRIC SHOCK, DO NOT OPEN.
NO USER-SERVICEABLE PARTS INSIDE.
REFER SERVICING TO QUALIFIED
SERVICE PERSONNEL.
Precautions
WARNING: Many television programs and
films are copyrighted. In certain circumstances,
copy-right law may apply to private in-home
videotaping of copyrighted materials.
The liquid crystal display (LCD) panel is
made by highly precise technology. More
than 99.99% of its picture elements (pixels)
are effective, but some (less than 0.01%)
may appear as colored bright dots. This
does not indicate a fault as the LCD panel
stretches the limits of current technology.
Identifications of caution marks
This symbol warns the user that
uninsulated voltage within the unit
may have sufficient magnitude to
cause electric shock. Therefore, it is
dangerous to make any kind of
contact with any inside part of this
unit.
This symbol alerts the user that
important literature concerning the
operation and maintenance of this
unit has been included. Therefore, it
should be read carefully to avoid any
problems.
CLASS 1
LASER PRODUCT
CAUTION
This product contains a laser diode of
higher class than 1. To ensure continued
safety, do not remove any covers or attempt
to gain access to the inside of the product.
Refer all servicing to qualified personnel.
Avoid using and storing the battery pack in
places subject to direct sunlight, high
temperatures, or near a flame source.
2
Page 3

Warning: This device complies with Part 15 of the FCC Rules. Operation is subject to
the following two conditions: (1) This device may not cause harmful interference, and
(2) this device must accept any interference received, including interference that may
cause undesired operation.
Note: This equipment has been tested and found to comply with the limits for a Class B
digital device, pursuant to Part 15 of the FCC Rules. These limits are designed to
provide reasonable protection against harmful interference in a residential installation.
This equipment generates, uses, and can radiate radio frequency energy and, if not
installed and used in accordance with the instructions, may cause harmful interference
to radio communications. However, there is no guarantee that interference will not occur
in a particular installation. If this equipment does cause harmful interference to radio or
television reception, which can be determined by turning the equipment off and on, the
user is encouraged to try to correct by one or more of the following measures:
• Reorient or relocate the receiving antenna.
• Increase the separation between the equipment and receiver.
• Connect the equipment into an outlet on a circuit different from that to which the
receiver is connected.
• Consult the dealer or an experienced radio/TV technician for help.
Caution to the user: Changes or modifications not expressly approved by the
manufacturer void the user’s authority to operate the equipment.
Microsoft®, Windows® and Windows® XP are registered trademarks of Microsoft
Corporation.
Windows Vista™ is either a registered trademark or trademark of Microsoft Corporation.
®
Intel
and Pentium® Processor are registered trademarks of Intel Corporation.
®
Core is a trademark of Intel Corporation.
Intel
Macintosh is a trademark of Apple, Inc.
®
IBM
and PC/AT® are registered trademarks of International Business Machines
Corporation.
Manufactured under license from Dolby Laboratories.
“Dolby” and the double-D symbol are trademarks of Dolby Laboratories.
HDMI, the HDMI logo, and High-Definition Multimedia Interface are trademarks and
registered trademarks of HDMI Licensing LLC.
Other company names and product names listed are trademarks or brand names
belonging to each individual company.
SD logo is a trademark.
Blu-ray disc and Blu-ray disc logo are trademarks.
3
Page 4

IMPORTANT SAFETY INSTRUCTIONS
In addition to the careful attention devoted to quality standards in the manufacture of your camcorder,
safety is a major factor in the design of every instrument. But, safety is your responsibility too. This
page lists important information that will help to assure your enjoyment and proper use of the
camcorder and accessory equipment.
1 Read these instructions.
2 Store these instructions for convenient accessibility.
3 Heed all warnings.
4 Observe all instructions.
5 Do not use the camcorder near water.
6 Clean the camcorder using only a dry cloth.
7 Do not block any ventilation openings. The camcorder should not be placed in excessive heat
invironment.
8 Do not place the camcorder near heat sources such as radiators, heat-registering areas, stoves, or
other heat-generating apparatus (including amplifiers).
9 Protect the power cable and cord from being walked on or pinched, particularly at the plugs,
power outlets, and at connection points to the camcorder.
10 Only use the attachments and accessories specified by the manufacturer.
11 Unplug the camcorder during lightning storms or when unused for long periods of time.
12 Refer all servicing to qualified servicing personnel. Servicing will be required when the
camcorder is damaged in any way, such as if the power cable, cord, or plug is damaged, liquid is
spilled or foreign objects fall into the camcorder, the camcorder is exposed to rain or moisture,
does not operate normally, or is dropped.
13 Do not drip or splash liquids onto the camcorder or place the camcorder near objects filled
with liquid such as vases.
Use the equipment (AC adapter/charger) near a power outlet with easy accessibility.
14
4
Page 5

Table of Contents
Important Information ............................ 2
For Your Safety ...................................... 2
Precautions .............................................. 2
IMPORTANT SAFETY
INSTRUCTIONS ............................... 4
Detaching the DC power cord/battery pack from
the camcorder ..........................................37
Efficient Use of the Battery ..........................38
Recording 39
Introduction 7
This camcorder makes all of the following
possible! ..........................................................7
Choosing a disc to suit your purpose ..............8
How to Read this Instruction Manual .................10
Before Using the Product
- Be sure to read this information - ...............12
Checking Provided Accessories .........................13
Names of Parts ....................................................14
How to Open and Use the LCD Monitor ...........19
Recording/Playing Using the Viewfinder ..........20
Let’s Get Started 21
Preparing ............................................................21
Setting up the battery pack ............................21
Turning on the Power
Changing the display language .....................22
Setting the date and time ...............................23
Recording Movies to a BD .................................24
Recording Movies to the HDD (DZ-BD7HA) ...25
Recording Stills to an SD card ...........................26
Playing Recorded Movies/Stills
Deleting Recorded Movies/Stills
................................... 22
......................... 27
....................... 28
Recording Movies ..............................................39
Using the Quick Start function .....................40
Information Display During Recording ........42
Recording Still Pictures ......................................45
Viewing 47
Playback (Watching Your Recordings) ..............47
Playing back the last recorded scene ............47
Deleting the last recorded scene ...................48
Choosing and playing back a scene ..............48
Choosing and playing back multiple scenes .49
Jumping to the designated scene ...................50
Adjusting speaker volume during movie
playback ...................................................52
Information Display During Playback ..........52
Simple functions you can use during playback
or playback pause ....................................54
Playing still pictures on a card automatically
(Slide Show) ...........................................55
Capturing a still picture from a movie
(PHOTO Capture) ....................................56
Playing back scenes repeatedly
(Repeat Play) ...........................................56
Functions and Characteristics of
HDD/BD/DVD/Cards 29
About HDD/BD/DVD ...................................30
About cards ...................................................32
Cautions for discs and cards ..........................32
Inserting a BD or DVD .................................33
When loading a new
BD-RE/BD-R/DVD-RW .........................35
Battery Pack 36
CHARGE lamp status and charging time .....36
Continuous recording time with a fully charged
battery ......................................................36
Connecting the camcorder to a wall outlet ....37
Various Recording Techniques 57
How to Operate the Menu ..................................57
Menu (While Recording) ....................................58
How to use the LCD/EVF setup and
initial setup ..............................................60
About the demonstration function ................61
Magnified Recording (Optical Zoom and Digital
Zoom) ............................................................62
Recording at Close Range (Macro Recording) ..63
Using the Separately-Sold Lenses to Increase the
Wide-Angle or Telephoto Effect ..................64
Adjusting the Focus Manually (Manual Focus) .65
Adjusting the Brightness of the Image
(Exposure) .....................................................66
Compensating for Backlight
(Backlight Compensation) ............................67
5
Page 6

Selecting a Recording Mode to Match the
Conditions (Program AE) ............................. 68
Recording Dark Subjects Using the LCD Monitor
Light (Assist Light) ...................................... 69
Adjusting the Color (White Balance) ................ 70
Setting the white balance manually (Set) ..... 71
Using the Electronic Image Stabilizer (EIS) ..... 72
Displaying Recording Guidelines
(Auxiliary Line) ............................................ 72
Reducing Wind Noise During Recording .......... 73
Restoring all the Recording Settings to Default
(Full Auto) .................................................... 73
Using the Flash .................................................. 74
Turning Off the Recording Indicator Beneath the
Lens .............................................................. 75
Changing the Movie Quality ............................. 76
Using the Self-Timer ......................................... 77
Using an External Microphone .......................... 78
Dubbing on BD/DVD (DZ-BD7HA) 79
Displaying Information Using the Menu Screen
(Detail) ....................................................... 103
Formatting the HDD/BD/DVD/CARD
(Format HDD/Disc/Card) ........................... 104
Protecting the HDD/BD/DVD
(Protect HDD/Disc) .................................... 105
Checking the Remaining Recording Capacity on
the Medium ................................................ 106
Viewing on the Other Devices 107
Connecting to Your TV for Viewing ............... 107
Connecting to a TV .................................... 107
Adjusting the camcorder’s output settings
according to your TV ............................ 109
Viewing on Other Players/Recorders .............. 111
Before Playing Back a BD/DVD on Another BD/
DVD Recorder/Player (Finalizing) ............ 111
Finalizing a Disc .............................................. 113
Unfinalizing a Disc .......................................... 114
First Dubbing (“New”) ...................................... 82
Dubbing All Scenes Recorded on the Same Day
(“Date”) ........................................................ 83
Dubbing All Scenes Recorded on the HDD
(“All”) ........................................................... 84
Dubbing Scenes Selected (“Select”) .................. 85
Displaying only Dubbed or Not Dubbed Scenes
(Category) ..................................................... 87
Clearing the dub marks on Thumbnails
(MARK OFF) ............................................... 87
Editing 88
Menu Items for the Disc Navigation ................. 89
Menu flows for the disc navigation .............. 91
Choosing Scenes by Date .................................. 93
Switching to the display arranged by date
(Date) ...................................................... 93
Playlist ............................................................... 94
What is “Playlist”? ....................................... 94
Creating a new Playlist (Create Playlist) ...... 95
Displaying a desired Playlist (Playlist) ........ 96
Adding scenes to a Playlist (Edit) ................ 96
Deleting scenes from Playlist (Edit) ............. 97
Arranging the order of scenes in the Playlist
(Edit) ....................................................... 98
Deleting a Playlist (Delete) .......................... 98
Deleting Scenes (Edit - Delete) ......................... 99
Dividing a Movie (Edit - Divide) ...................... 99
Combining Multiple Scenes (Edit -Combine) . 100
Adding Special Effects (Edit -Fade) ................ 101
Go To ............................................................... 102
Jumping to the Top/End (Go To) ............... 102
Locking Scenes on a Card (Lock) ................... 102
Connecting to your PC 115
Software installation ................................... 117
Connecting the camcorder to your PC ....... 119
Removing a medium while the camcorder is
being connected to the PC .................... 120
Using a built-in disc drive of your PC to read a
disc recorded on the camcorder ............ 121
Before terminating PC connection (removing
the PC connection cable) and changing the
power switch setting ............................. 121
Using ImageMixer 3 HD Edition for BDCAM 122
Uninstalling the software ........................... 129
Precautions When Connecting to a PC ............ 130
Additional Information 131
Optional Accessories ....................................... 131
Error Messages ................................................ 132
Troubleshooting ............................................... 140
Cautions on Use of this Product
- Be sure to read this information - ............ 150
System Reset .................................................... 156
End User License Agreements for Operating
system Software ......................................... 157
Major Specifications ........................................ 167
Glossary ........................................................... 171
Index ................................................................ 173
6
Page 7
Introduction
f
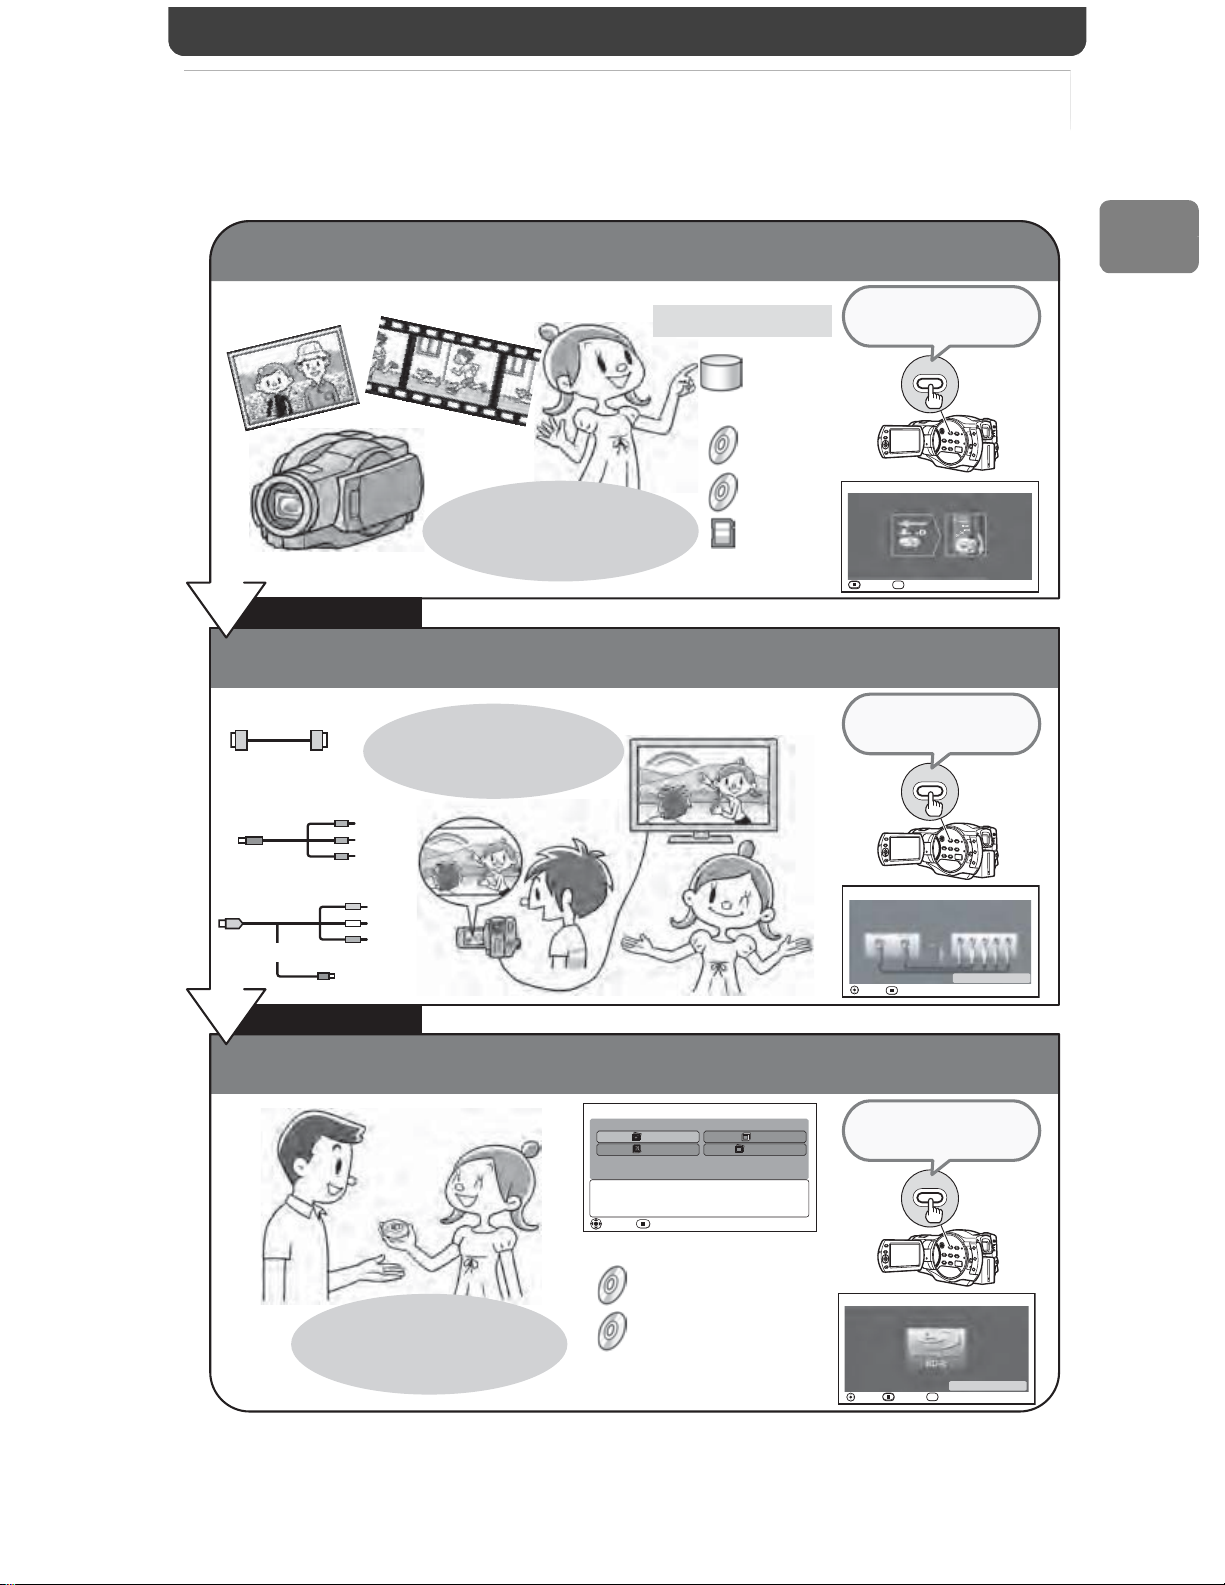
This camcorder makes all of the following
possible!
Introduction
Record movies and stills with this one device!
Stills Movies
Various media
HDD
Press to solve
your questions.
GUIDE
(DZ-BD7HA)
BD
Interactive Guide - Mode switch
Set the switch as shown.
Insert a BD.
Screen will disappear if switch is moved.
GUIDE
RETURN
EXIT
You can easily figure out
“what” can be recorded
“to which medium”.
DVD
SD card
After recording
View on large screen by hooking up the camcorder to a TV!
HDMI
Component
-Cable
You can easily figure
out which cable should
be used.
View on the TV
Press to solve
your questions.
GUIDE
AV Cable
S Cable
View on the
LCD monitor
Interactive Guide - TV Connection
Connect the component-cable
to the input jack of the TV.
Camera TV
ENTER
RETURN
Set
After Watching
Store the recordings! Create a gift disc! Select a disc easily!
Disc selection is simple!
Dubbing Menu
New
Date
Dubbing the scene which isn't
dubbed in HDD.
EXIT
ENTER
Select
(DZ-BD7HA)
BD-RE/BD-R
DVD-RAM/
DVD-RW/
DVD-R
All
Press to solve
your questions.
GUIDE
Interactive Guide - Disc
Insert a BD-R disc.
Check features
ENTER
GUIDE
EXITRETURN
7
Page 8
Introduction
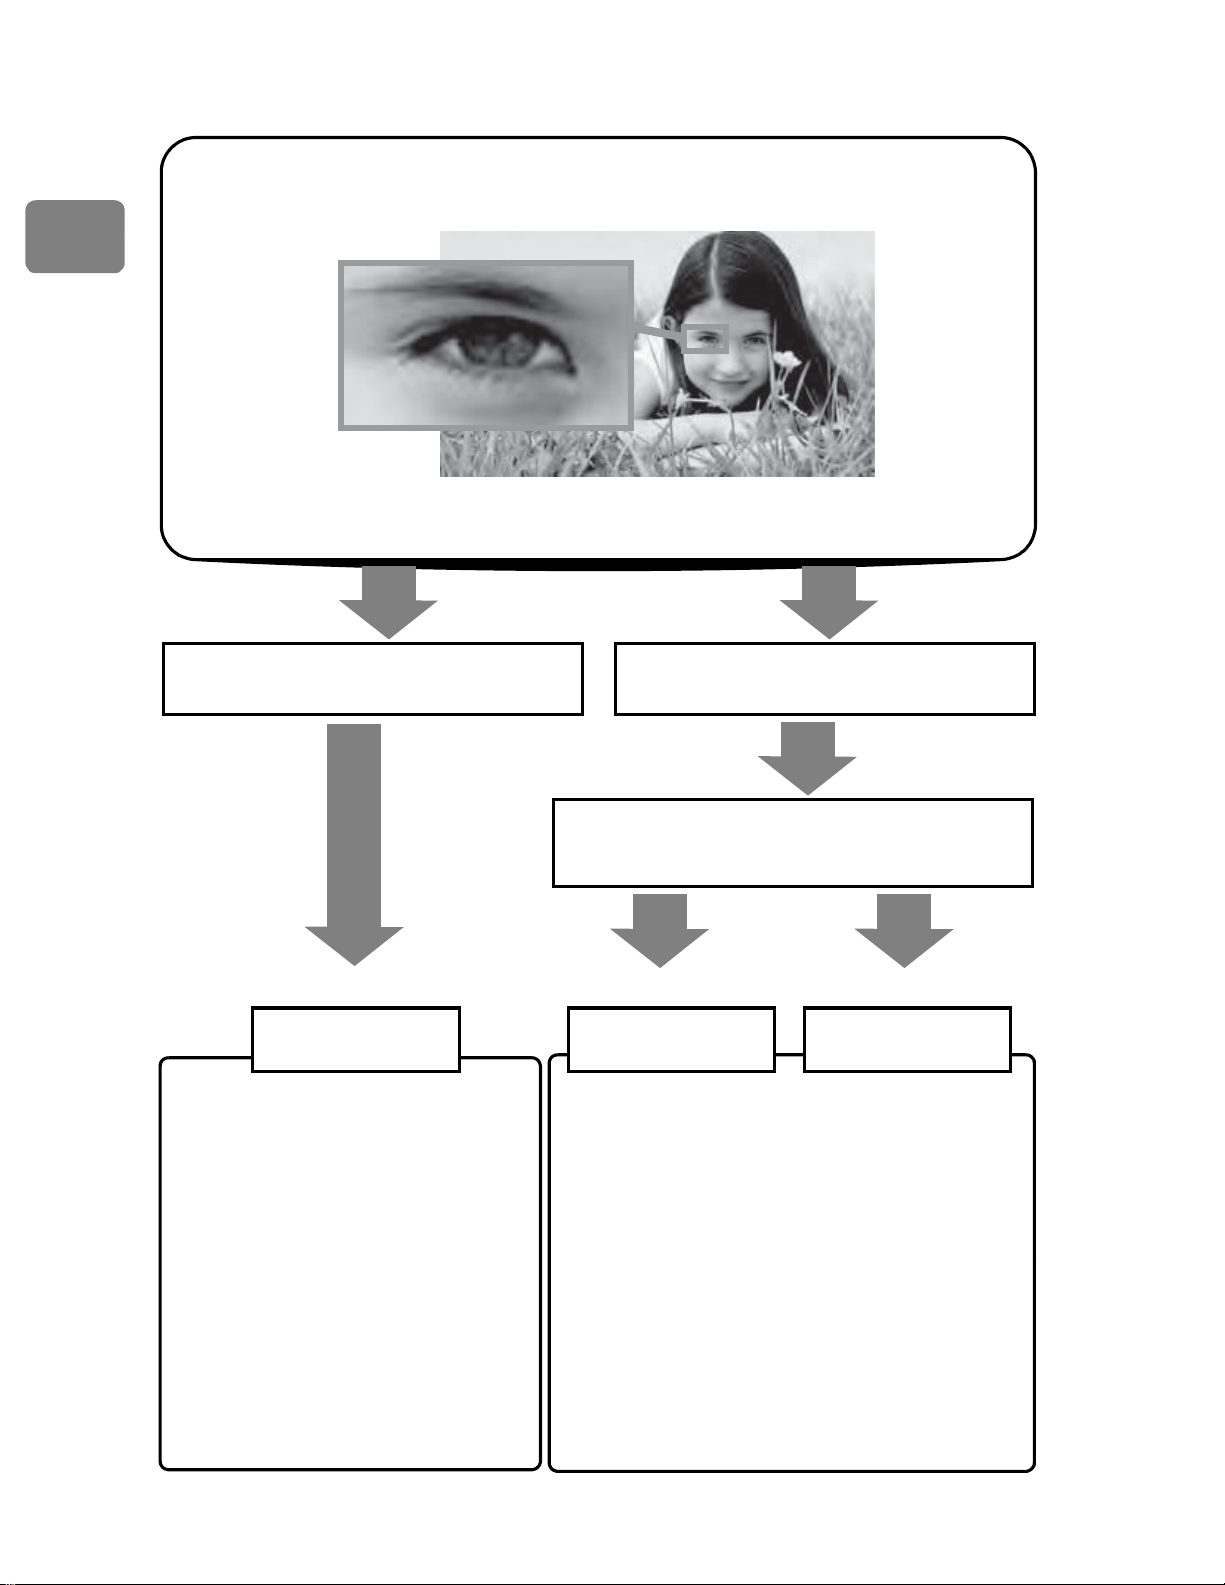
Choosing a disc to suit your purpose
Recording/Dubbing
HD (High Definition—Hi-Vision) image quality
Image resolution: about six times higher
than the SD (Standard Definition) image quality
Recording
(DZ-BD7HA)
Recording to the HDD
Re-recordable
HDD
• HD recording over extended
periods is possible.
• You can delete/edit the images
on HDD using this camcorder.
• After recording or editing, the
images recorded on HDD can
be dubbed to BDs. Image
degradation from dubbing will
not occur.
• After recording or editing, the
images recorded on HDD can
also be dubbed to DVDs (image
quality will be standard (SD)).
Recording
Dubbing
(DZ-BD7HA)
Recording to Blu-ray disc (BD)
Do you want to delete or edit images
using this camcorder?
NOYES
Re-recordable
BD-RE
• One hour length 1920 × 1080 Full Hi-
Vision movie can be recorded onto
one single BD.
• Playable on 8 cm BD-RE/BD-R
compatible devices.
* For details, refer to the standards stated in
"Recording format" (p.168).
One-time recording
BD-R
8
Page 9

Introduction
Recording/Dubbing
SD (Standard Definition) image quality
Do you want to delete/edit images
using this camcorder?
Re-recordable
DVD-RAM
Playable on devices that are
compatible with 8 cm DVD-RAM
or 8 cm DVD-RW (VR mode)
accordingly.
* For details, refer to the standards
stated in "Recording format" (p.168).
DVD-RW
(VR mode)
Do you want to play the disc
on a DVD player/recorder?
Do you want to reuse the disc?
YES
Re-recordable
DVD-RW
(VF mode)
Playable on most other DVD
players/recorders once they are
finalized after recording.
* For details, refer to the standards
stated in "Recording format" (p.168).
NO
One-time
recording
DVD-R
9
Page 10

Introduction
How to Read this Instruction Manual
(/'/&/%
The Instruction Manual is intended for the DZ-BD7HA and DZ-BD70A models.
The DZ-BD7HA can record to HDD (hard disk), BDs, and DVDs.
The DZ-BD70A can record to BDs and DVDs.
DZ-BD7HA
DZ-BD70A
The particular functions of each model will be indicated next to
the icons shown at left.
If you purchased the DZ-BD70A, please disregard the descriptions
relating to the HDD.
About joystick operation and symbols
Move the joystick up or down, left or right to select menu items and scenes
(movies and stills). Press down on the center of the joystick to confirm a
selection.
Operations Descriptions used in this manual
up/down/left/right
Press up/down, left/right
to select.
Confirmation button
Press down on the center
to confirm.
z For more information, see "How to Operate the Menu" (p.57).
10
Page 11
11
Introduction
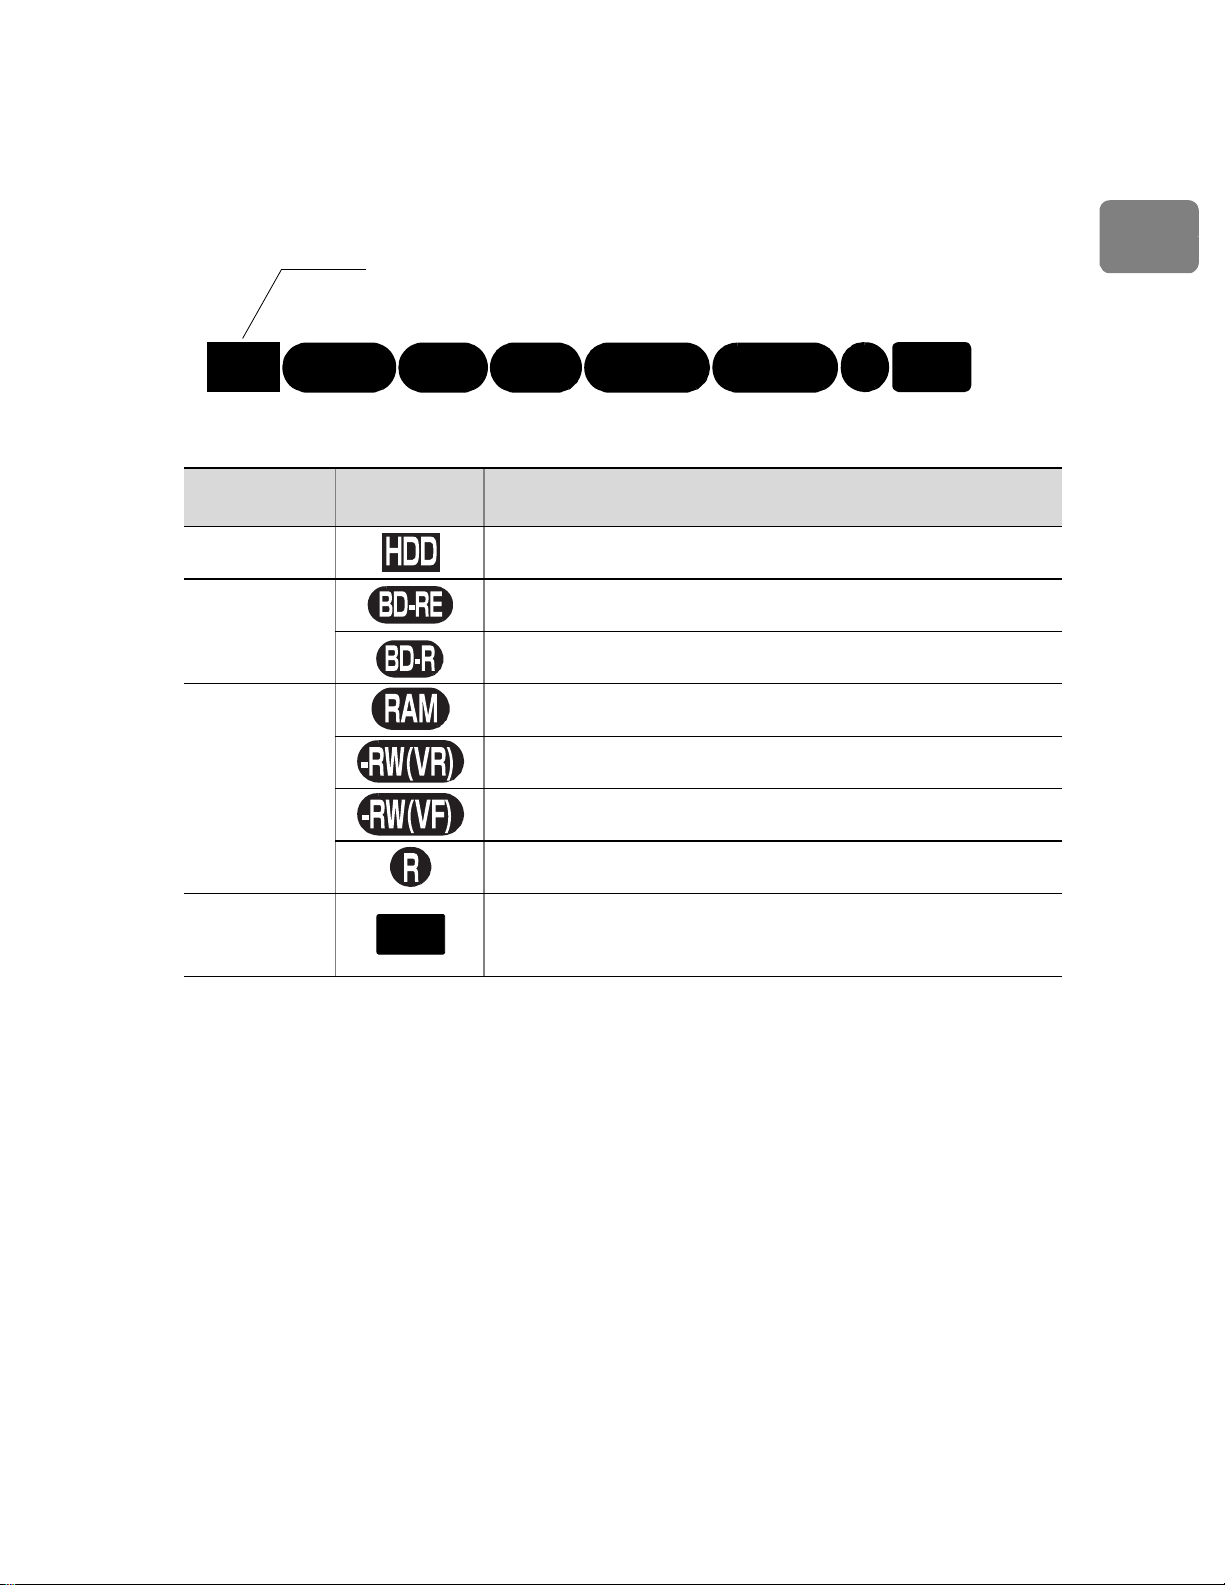
About media descriptions
The camcorder functions available vary depending on the media (HDD/BD/
DVD/Card) used. Refer to the icon headings shown below to determine whether
the function explained complies with the media in use.
Displays in the Instruction Manual
The display messages are omitted in this manual. Please use the LCD display or
viewfinder of your camcorder to check the messages.
HDD
BD-R
RAM
-RW (VR) R
-RW (VF)
BD-RE
CARD
Collective
term
Icon Media
HDD Built-in hard disk drive (HDD) (DZ-BD7HA)
BD
BD-RE (Rewritable Blu-ray disc)
BD-R (Non-rewritable Blu-ray disc)
DVD
DVD-RAM
DVD-RW (VR mode)
DVD-RW (VF (Video) mode)
DVD-R
Card
SD memory card
miniSD memory card (exclusive adapter required)
microSD memory card (exclusive adapter required)
CARD
* DZ-BD70A does not have an HDD. If you purchased this
model, please disregard the HDD icon (p.10).
Page 12

Introduction
Before Using the Product
- Be sure to read this information -
Conduct test recording.
• Before recording important shots, always conduct test recording to confirm that images
are normally recorded.
For correct recording
• Do not touch the recording surface of a disc.
• Check that a disc recording surface is not dirty or
scratched.
• If the recording surface is dirty, wipe it clean using a
soft cloth.
Caution on disc loading
• Never touch the pickup.
Caution on vibrations and impacts
• While the ACCESS/PC indicator (p.14) is lit, do not
subject the camcorder to strong vibrations or impacts.
Caution should be particularly observed while the indicator
remains lit for a while after the end of recording.
About BD/DVD
• We recommend using Hitachi Maxell brand discs. The
compatibility of the discs with this camcorder is
confirmed.
• If there is concern that the camcorder may be subjected to large vibrations or impact
during transport, remove the BD/DVD and protect the camcorder using soft protective
materials.
Using BD/DVD with other equipment
• We cannot guarantee that playback is possible on all types of recorders/players.
• Playback may not be possible depending on the model of the playback device or
recording status of the disc.
• When a BD-R/DVD-RW/DVD-R recorded with this camcorder is used on another
device, always finalize the disc (p.113) using the camcorder in advance.
Hitachi will not compensate for recorded images.
• Hitachi cannot compensate for any damages caused when recording is not made
normally or recorded contents cannot be played back because of a defect in the
camcorder, disc or card. Also, Hitachi cannot be responsible for your recorded video
and audio.
• If you or a third party make a mistake when handling this camcorder, disc, card, etc.,
the recorded contents may be lost. We cannot be responsible for compensation for
damage due to loss of recorded contents.
• In the event that your camcorder is sent for repair, whether repair is successful or not,
recorded content may be lost. Hitachi cannot be held responsible for any lost data.
Copyright
• Be aware that recording is restricted for some demonstrations, performances and
exhibitions, even for personal enjoyment.
Use a soft cloth and gently
wipe the disc surface from
the inner to the outer region.
pickup
12
Page 13

13
Introduction
Make sure the following accessories are included in the package.
Checking Provided Accessories
Battery pack (DZ-BP14S)
Portable power supply for your
new Hitachi Camcorder. Be
sure to fully charge the battery
before use.
AC adapter/charger
(DZ-ACS3)
Use to power the camcorder
from an AC power outlet, and
to charge the battery.
DC power cord
To power the camcorder from
an AC outlet, use this cord to
connect the AC adapter/
charger to the camcorder.
Remote control
(DZ-RM4W)
Use to control the camcorder
from a distance.
Lithium battery (CR2032)
To power the remote control.
WARNING
Keep this battery away from
children. If swallowed, consult
a physician immediately for
emergency treatment.
Power cable
Connects the AC adapter/
charger to the AC outlet.
AV/S cable
Use this cable to view images
from the camcorder on a TV.
Or output the images and
sound to another video
recording device.
Component cable
Use this cable when a
component terminal is
equipped on your TV. Use the
AV/S cable for audio output.
Software CD-ROM and
PC connection cable
Install the software on the CDROM onto your PC, then
connect the camcorder to the
PC using the PC connection
cable.
Disc cleaning cloth
You can use this cloth to clean
your discs.
8 cm BD-RE single sided
disc
Use to record the movies on.
Page 14

Introduction
Names of Parts
Viewfinder side
14
MENU button (p.23)
SELECT button (p.47)
Joystick (p.27)
(stop/cancel) button (p.47)
Viewfinder (p.20)
Diopter control (p.20)
SD CARD indicator (p.26)
BD/DVD indicator (p.24)
HDD indicator (DZ-BD7HA)
(p.25)
PHOTO button (p.26)
Movie/Stills switch (p.24)
ACCESS/PC indicator (p.12)
Battery platform (p.21)
BATT (battery eject) switch
(p.37)
Record button (p.24)
DISC EJECT switch (p.24)
Power switch/Lock button (p.22)
Hand strap (p.18)
BD/DVD compartment (p.24)
MIC jack (p.78)
Page 15
Introduction
LCD monitor side (when the LCD monitor is opened
90°), and bottom
Bottom
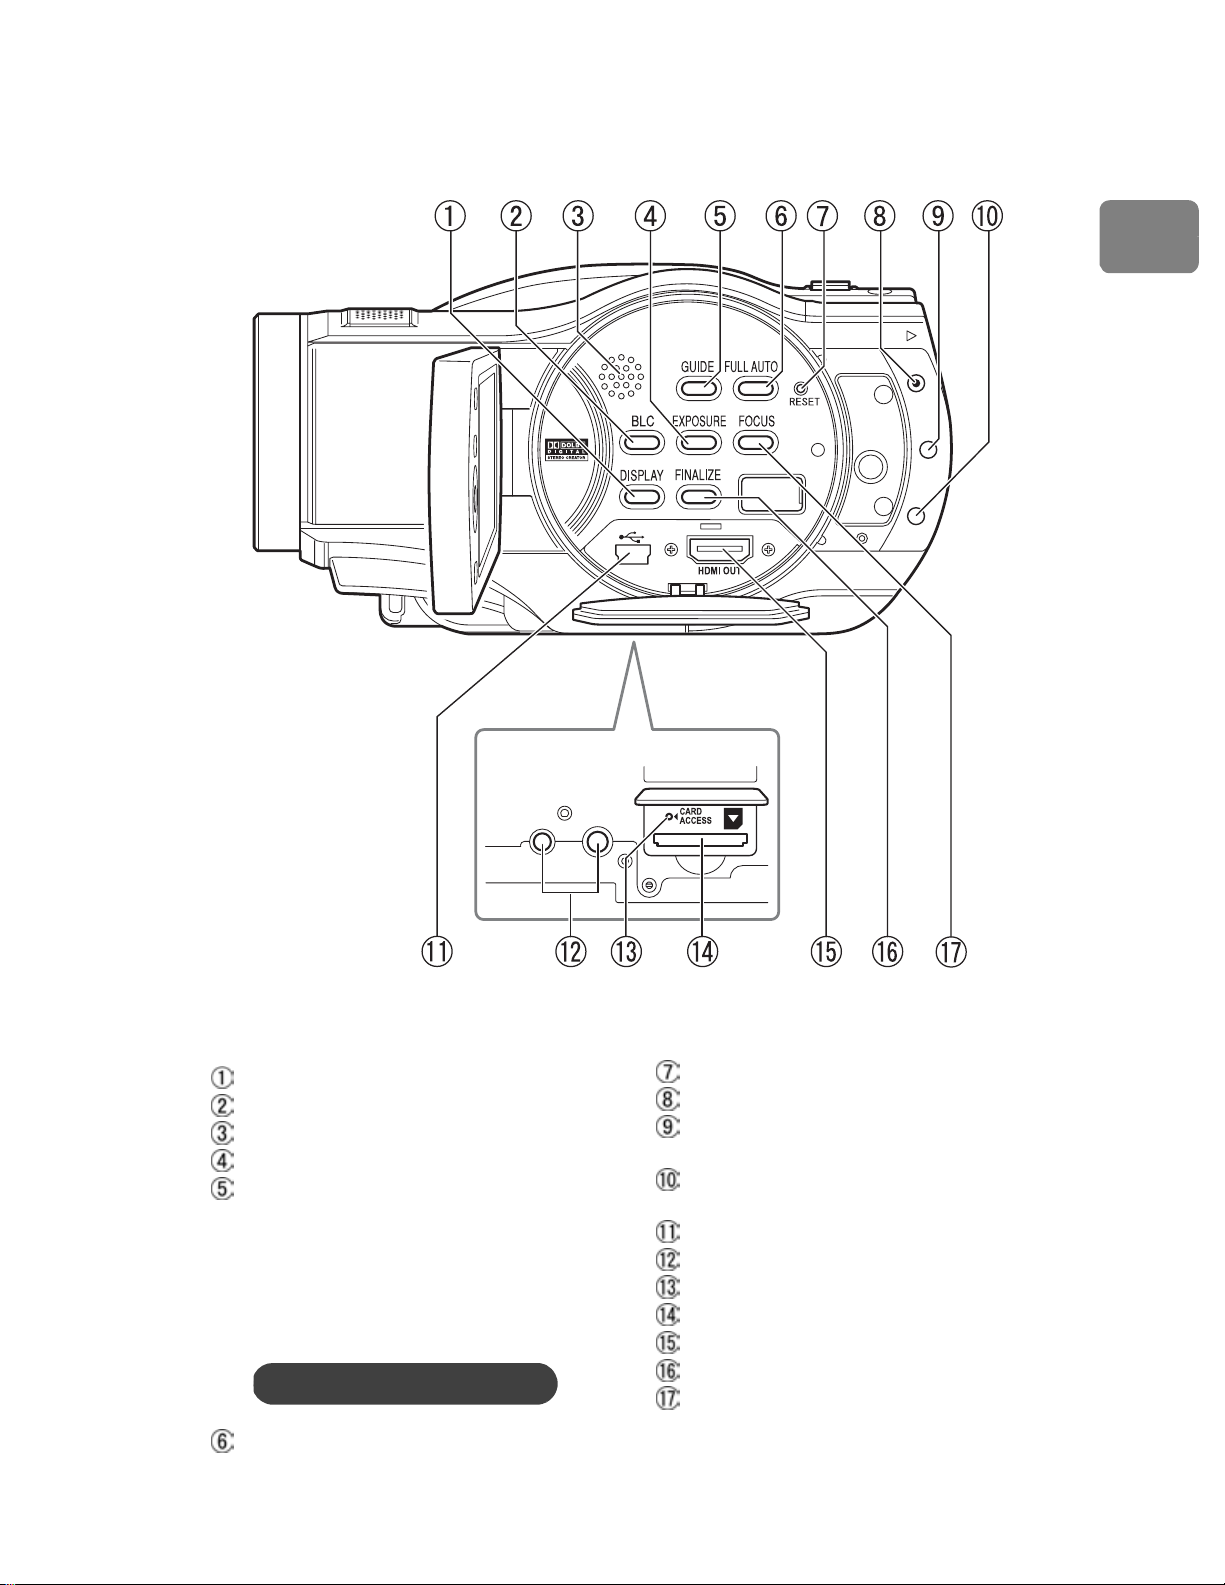
DISPLAY button (p.42)
BLC button (p.67)
Speaker
EXPOSURE button (p.66)
GUIDE button (p.7)
This button can help you choose a
disc, connect the camcorder to your
TV, and so on. The sections in the
Instruction Manual for which this
button can be used are indicated by
a pop-up icon like the one below.
Use the GUIDE button for help!
RESET button (p.156)
QUICK START button (p.40)
DISC NAVIGATION button
(p.27)
DUBBING button (DZ-BD7HA)
(p.82)
PC connection terminal (p.119)
Tripod receptacle
CARD ACCESS indicator
SD card slot (p.26)
HDMI OUT terminal (p.107)
FINALIZE button (p.114)
FOCUS button (p.65)
FULL AUTO button (p.73)
15
Page 16

Introduction
Lens side
16
Automatic lens cover
The lens cover automatically opens
when the power is turned on,
revealing the optical 10x zoom lens.
Lens hood
Stereo microphone
Do not block the microphone with
your hand during recording.
Zoom lever (p.52, 62, 65)
Accessory shoe
Flash (p.74)
Light receiving sensor
Used to control flash amount.
Do not block the light receiving
sensor with your hand when
recording still pictures.
Recording indicator (p.40)
Remote control receiver/Infrared
sensor
COMPONENT output terminal
(p.108)
A/V OUT terminal (p.108)
LCD monitor (color wide-screen)
Page 17

17
Introduction
Remote control
Inserting the supplied lithium battery into the
remote control
PHOTO
REC
DISPLAY
DIGITAL
ZOOM
MENU
SELECT
DELETE
DISC
NAVIGATION
ZOOM
PHOTO button (p.26)
REC button (p.24)
MENU button (p.23)
SELECT button (p.47)
& (reverse search) button (p.27,
54)
DELETE button (p.99)
DISC NAVIGATION button
(p.27)
DISPLAY button (p.42)
ZOOM T button (p.62)
DIGITAL ZOOM button (p.62)
ZOOM W button (p.62)
( (reverse skip) button (p.27,
54)
% (forward search) button
(p.27, 54)
Confirmation button (p.27, 54)
(stop/cancel) button (p.47)
' (forward skip) button (p.27,
54)
While inserting a thin
tipped instrument
(paperclip, etc.) into the
hole marked PUSH,
swing the battery holder
arm out.
Insert the lithium
battery with the
positive (+) terminal
facing down.
Slide the cover to
close it.
* For instructions on handling batteries, see p.18.
Battery holder
Page 18

Introduction
Warning
Flip the cover.
Flip the belt.
Replace the belt.
Replace the cover.
BATTERY MAY EXPLODE IF NOT HANDLED PROPERLY. DO NOT
RECHARGE, DISASSEMBLE, OR DISPOSE OF IN FIRE.
Note
Replace the battery with a Hitachi Maxell, Sony, Panasonic, Sanyo, Toshiba
CR2032, or Duracell DL2032. Use of another battery may present a risk of
fire or explosion.
Adjusting the hand strap
Fasten the hand strap according to the procedure in the diagram.
18
Page 19
Introduction
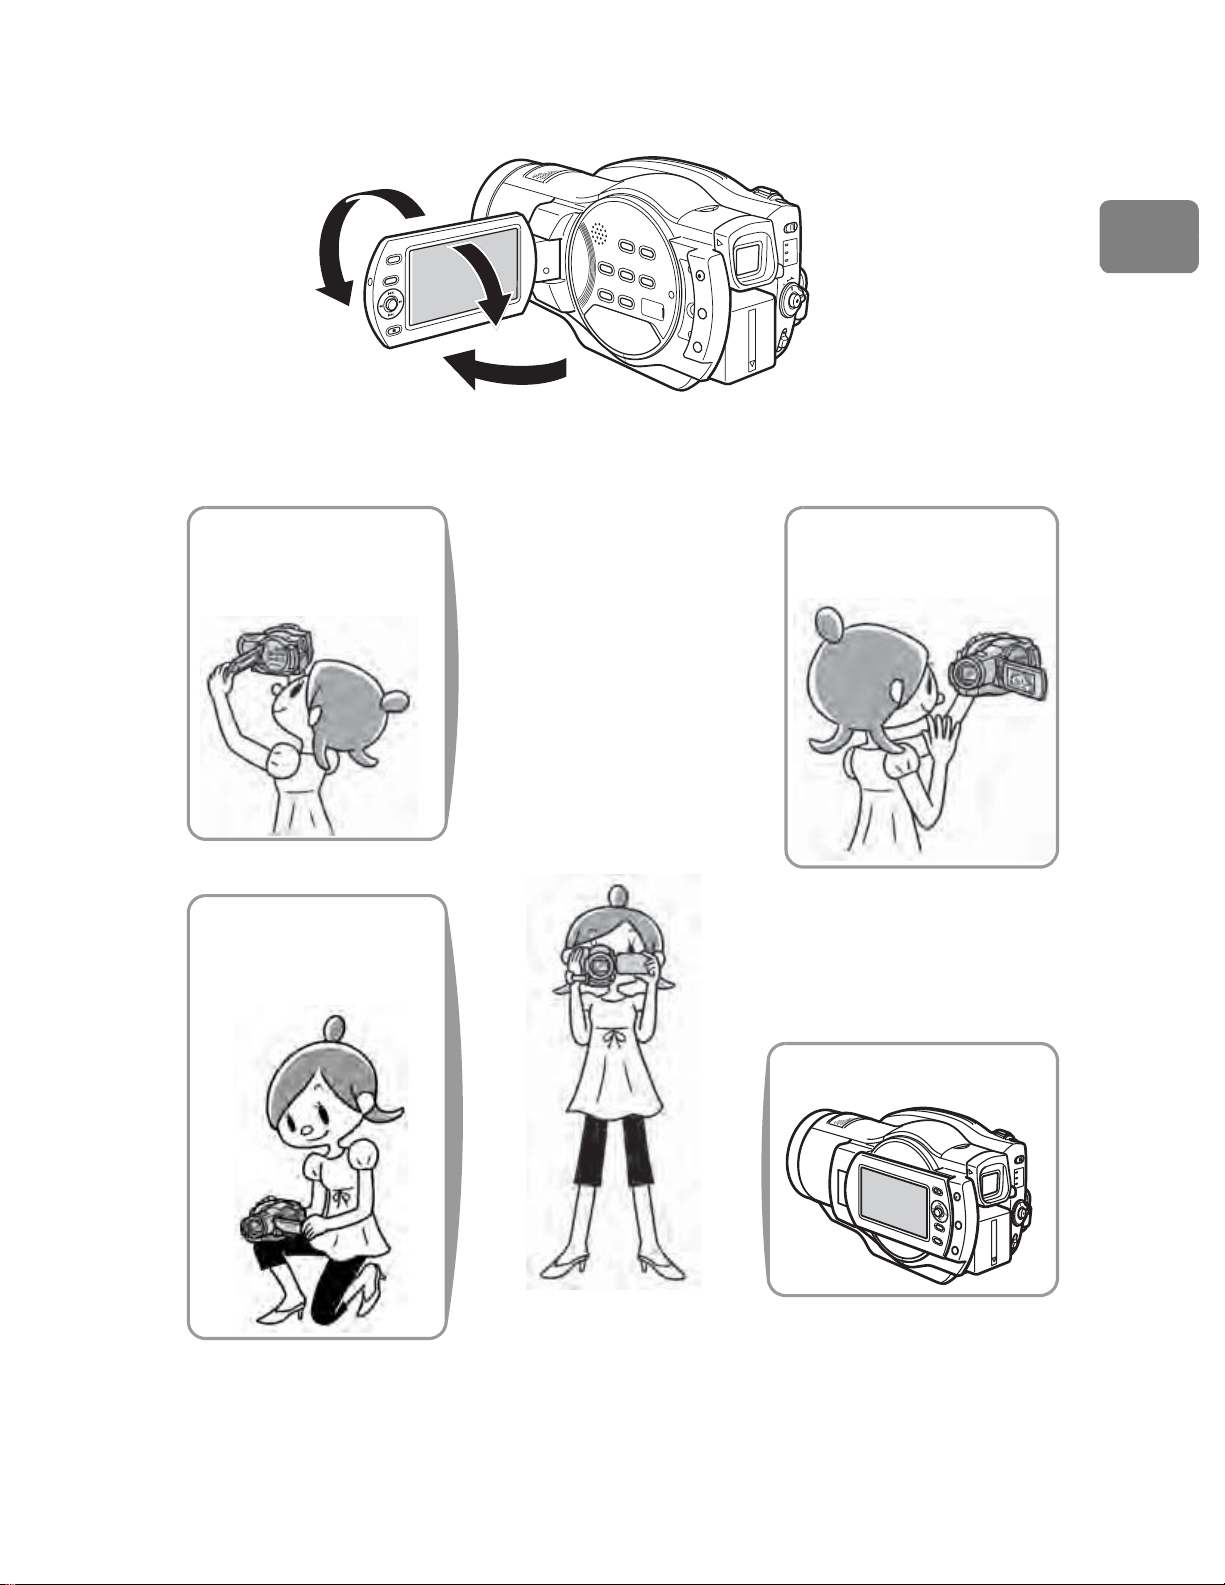
How to Open and Use the LCD Monitor
180°
90°
90°
You can use the LCD monitor as follows.
Recording high
places above your
line of sight
Hold the camcorder with
both hands and tuck your
elbows to your chest or
sides, and move the
camcorder at a gentle pace.
This will allow you to
record effectively without
blurring.
Basic posture
To record yourself
(p.20)
Effortlessly record
small children or pets
at their line of sight
When playing back, etc.
• For LCD/EVF settings, see p.58–60. For instructions on how to operate the
menu, see p.57.
• Using the viewfinder is convenient when it is difficult to see using the LCD
monitor while recording in bright outdoor conditions (p.20).
19
Page 20

Introduction
About the LCD monitor display when recording
Recording/Playing Using the Viewfinder
Pull out the viewfinder until it clicks.
Slide the diopter control knob to adjust the
focus to suit yo
ur eyesight.
yourself (the lens and LCD monitor are facing you)
• The LCD monitor displays a mirror image of the subject.
• You can check the image in the viewfinder. (You can also set the viewfinder
to “On” at all times, regardless of the orientation of the LCD monitor (p.57–
60).)
• The remaining battery charge indicator will only appear when battery power is
almost gone. The battery charge indicator flashes red in this case.
• A warning message will not be displayed (p.132). When any of the following
icons light in the LCD monitor, you can confirm the warning message by
rotating the LCD monitor 180° back to its normal orientation.
• When the LCD monitor is in this position, you can also use the LCD monitor
as a light source when recording in dark locations (Assist Light, p.69).
You can use the viewfinder when the LCD monitor is closed or during mirror
image recording.
To set the viewfinder to “On” at all times regardless of the orientation of the LCD
monitor, or to adjust the brightness or color density, see "How to use the LCD/
EVF setup and initial setup" (p.60).
How to use the viewfinder
Note
Focusing will not be correct unless the viewfinder is pulled fully out.
20
Page 21
Let’s Get Started
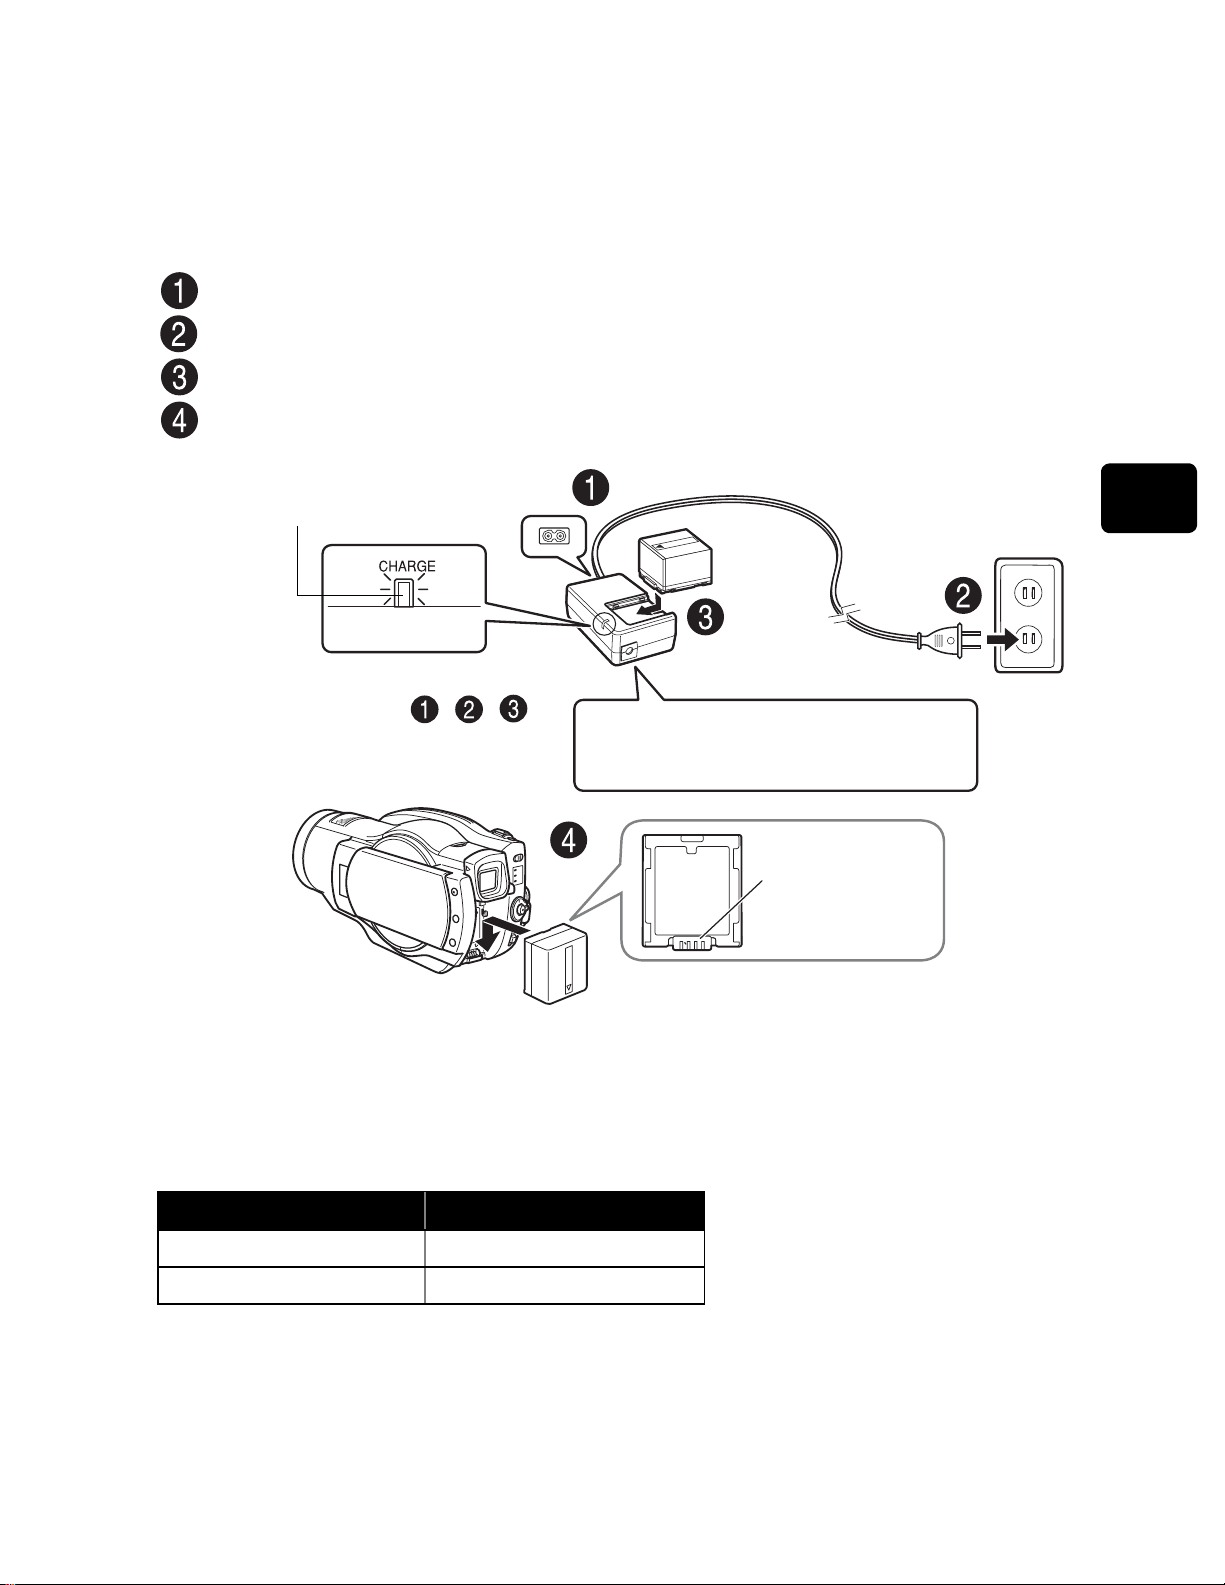
Connect the power cable to the AC adapter/charger.
Plug in the power cable to a wall outlet.
Attach the battery pack to the AC adapter/charger.
Attach the battery pack to the camcorder.
Let’s Get Started
Preparing
Setting up the battery pack
CHARGE indicator
If the CHARGE indicator does not light,
check that the connections ( , , )
are firmly connected.
Note
Charging will not occur if the DC power
cord is connected.
Terminal at
bottom
z Charge status of the battery pack
The CHARGE indicator of the AC adapter/charger allows you to check on the
charge status of the battery pack.
Charge Status CHARGE indicator
During charge lit
Charge complete Unlit
21
Page 22

Let’s Get Started
Turning on the Power
1 Turn on the power.
2 Open the LCD monitor.
Press
, then select “Initial Setup” using the joystick.
Select “Language” using the joystick
.
1
2
Choose the desired language using the
joystick, then press the confirmation button.
Press and hold the lock
button, and turn the
power switch to “ON”.
90°
Changing the display language
You can change the language used on screens and menus as follows.
MENU
Initial Setup
Beep
Power Save
Record LED
Language
Demo mode
Reset
22
Page 23

Let’s Get Started
Setting the date and time
Set the month, date, year, hour, minute, and
AM/PM using the joystick, and then press the
confirmatio
n button.
The set time and date appear in the LCD
monitor.
Open the LCD monitor
(p.19).
Press
.
Select “Date Setup”, then
“Date Set” using the joystick.
(For instructions on how to use
the joyst
ick, see p.27.)
MENU
Date Setup
10 / 1 / 2007 10 : 00 AM
ENTER
CHANGE
MOVE
RETURN
The confirmation button (press firmly)
23
Page 24
Let’s Get Started
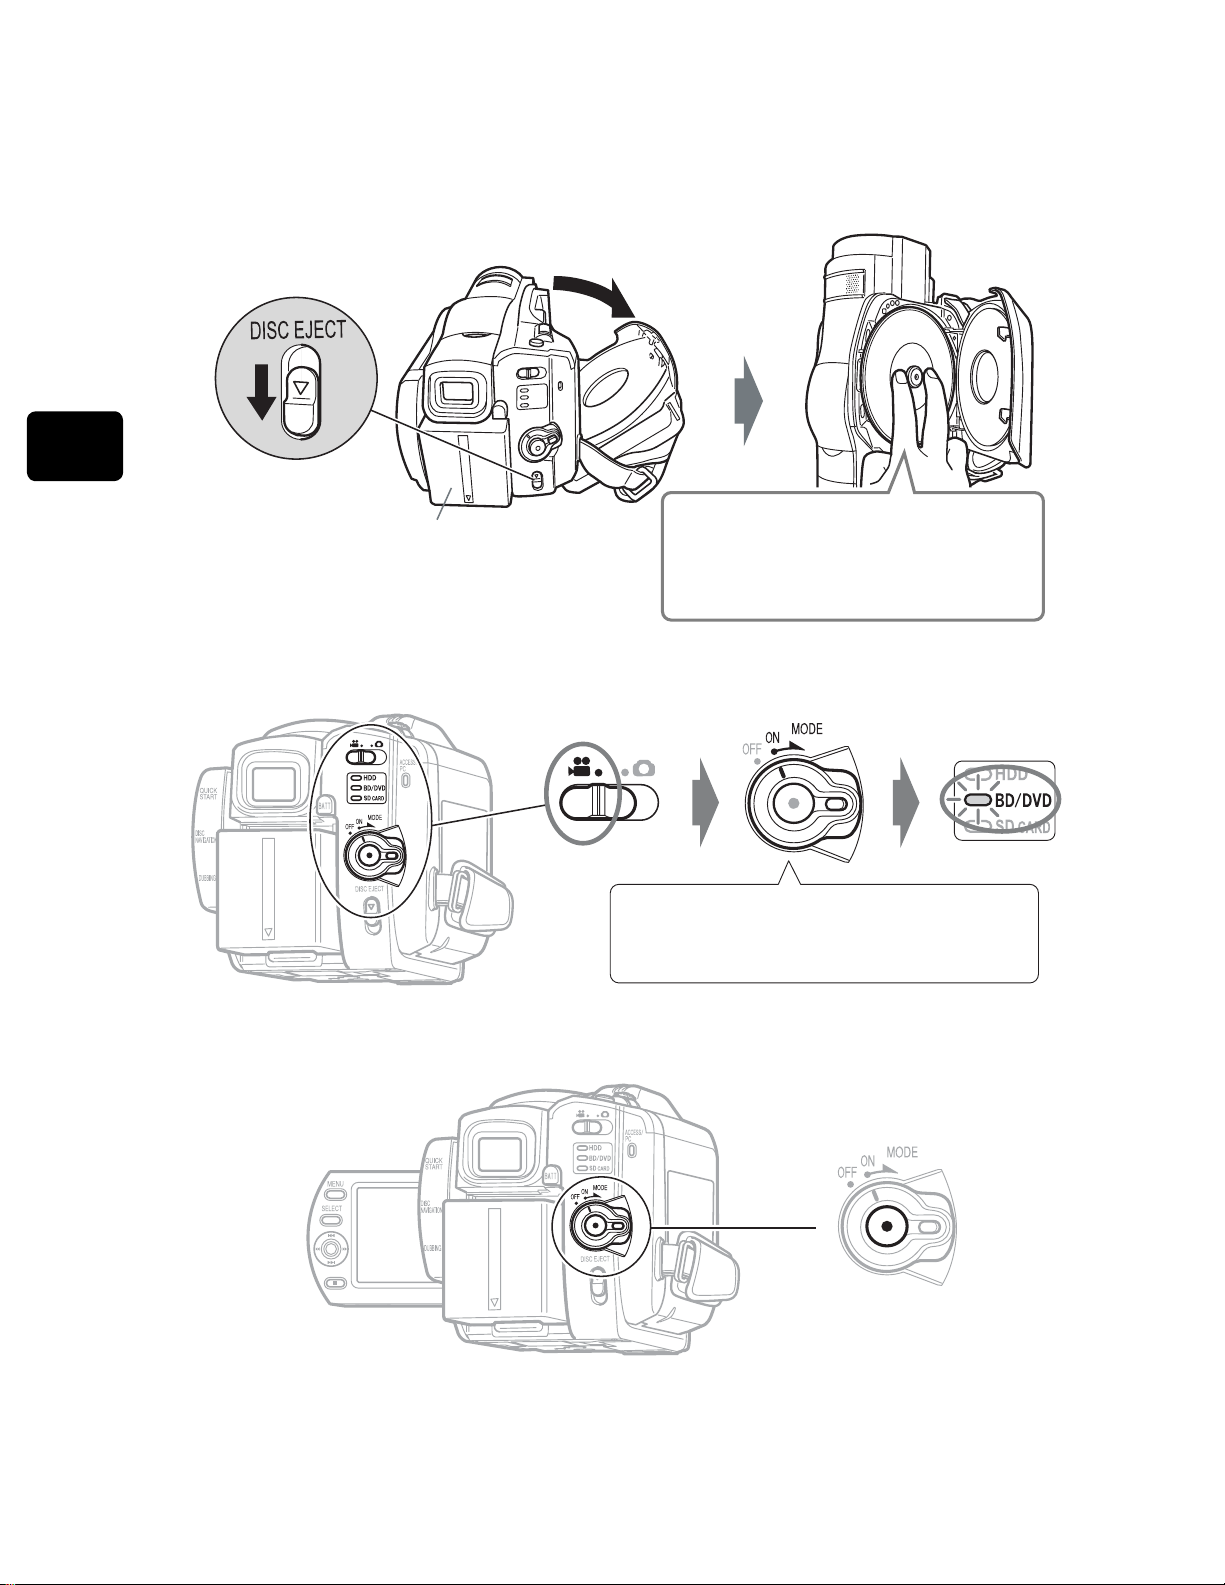
Recording Movies to a BD
1 Insert a BD.
2 Turn the power switch to “ON”.
3 Press the record button.
Attach the charged battery pack.
Place the recording surface of the BD
face down. (For a single-sided disc,
the side opposite the label is the
recording surface.)
Turn the power switch to “MODE”
until the BD/DVD indicator lights.
(DZ-BD7HA)
24
Recording begins.
To pause recording, press the record button again.
Page 25

Let’s Get Started
Recording Movies to the HDD
1 Turn the power switch to “ON”.
2 Press the record button.
(DZ-BD7HA)
Recording begins.
Turn the power switch to “MODE”
until the HDD indicator lights.
To pause recording, press the record button again.
25
Page 26

Let’s Get Started
Recording Stills to an SD card
1 Insert an SD card.
2 Turn the power switch to “ON”.
3 Press
.
Press
halfway down so that a subject in the center of the screen is focused.
Fully press
to record.
Single press of the
button of the remote control enables focusing and
recording at the same time.
Pay attention to the orientation of the card.
The terminals should face away from the
LCD monitor.
For usable card types, see p.32.
26
PHOTO
PHOTO
PHOTO
PHOTO
Page 27
Let’s Get Started
Playing Recorded Movies/Stills
1 Press
.
2 Choose a scene (movie/still), then press the
confirmation button.
1
2
DISC NAVIGATION
Disc Navigation
All Scenes
10/ 1/2007
PLAY EXIT
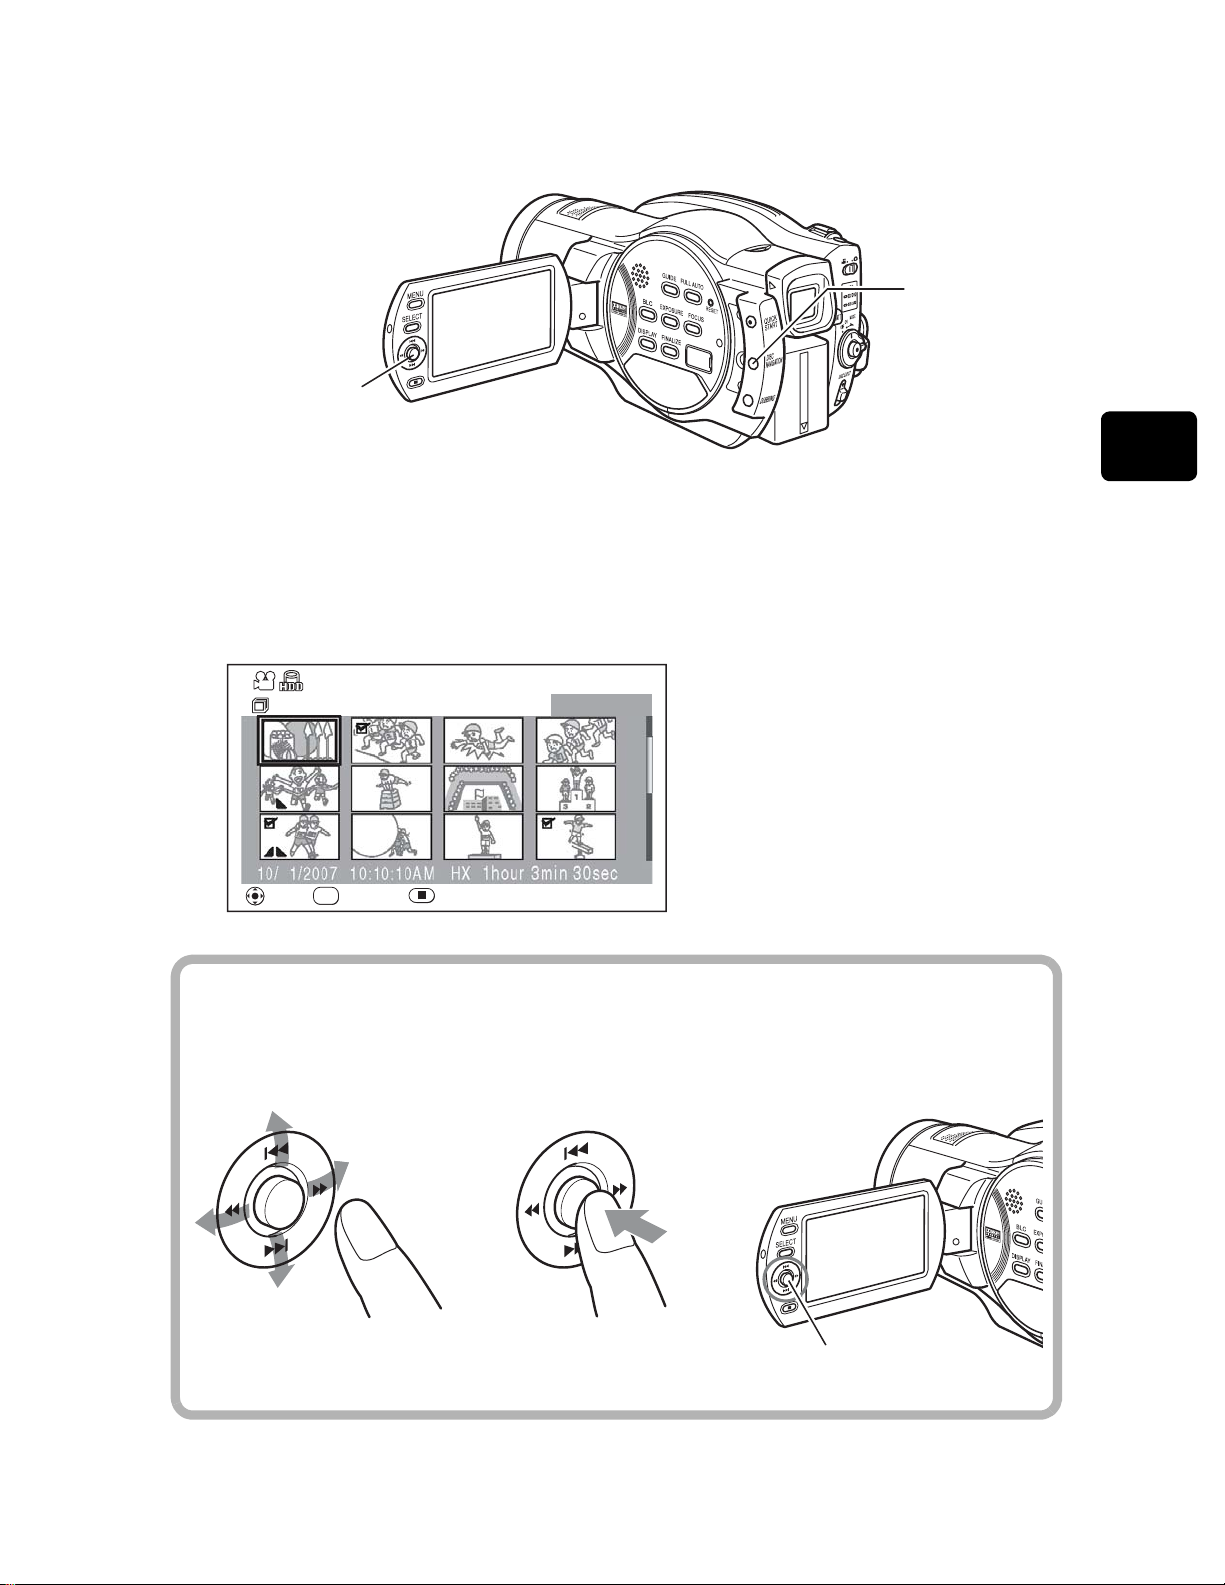
Hint
To select an item or scene (movie or still), move the joystick up, down, left,
or right. To confirm a selection, press the confirmation button (press down on
the center of the joystick).
10:10:10AM HX
SEL
SELECT
1hour 3min 30sec
0010/0027
The chosen scene is played.
Select
by pressing up/down, left/
right
See p.110 for the instructions on viewing the recordings on your TV screen.
Confirm
by pressing down on
the center
Joystick
27
Page 28

Let’s Get Started
Deleting Recorded Movies/Stills
1 Press
.
2 Select a scene you want to delete, then press
.
3 Select “Scene” “Edit” “Delete”, and then press
the confirmation button.
4 Select “Yes”, then press the confirmation button.
1
2
3
You can choose multiple scenes by
selecting another scene and
pressing
.
DISC NAVIGATION
Disc Navigation
All Scenes
0010/0027
SELECT
MENU
10/ 1/2007
PLAY EXIT
10:10:10AM HX
SEL
SELECT
1hour 3min 30sec
Delete Scene
10/ 1/2007 10:10:10AM
Scene No.1 HX
Delete scene?
YES NO
ENTER
CHECK SCENE
RETURN
The selected scene is deleted.
y
Scenes on BD-R/DVD-RW (VF
mode)/DVD-R discs cannot be
deleted.
28
Page 29

Functions and Characteristics of HDD/BD/DVD/Cards
Functions and Characteristics of HDD/BD/DVD/Cards
The following table lists the storage media (discs and cards) and available
functions that can be used with this camcorder.
Media
Function
BD DVD
●: Functions available
—: Not available
Recording HD (Hi-Vision)
quality movies (p.39)
Recording SD quality
movies
(p.39)
Built-in
HDD
-RE -R -RAM
-RW
(VR
mode)
-RW
(VF
mode)
-R
●●●—— ———
———●● ●●—
SD
card
Recording stills (p.45) — — — — — — — ●
Deleting recordings
(p.99)
●●— ●● ——●
Editing recordings (p.88) ●●— ●● ———
Playing on other BD/
DVD players/recorders
— ●
*1
●
*1 *2
●
*1
●
*1 *2
●
*2
●
*2
—
(p.111)
Initializing and reusing
(p.104)
●●— ●● ●— ●
Making additional
recordings after a disc is
●
*3
●
*3
— ●
*3
●●*4— ●
*3
finalized (p.114)
Copying recordings onto
a PC (p.115)
Making HD (Hi-Vision)
quality discs using a PC
Making SD quality discs
using a PC
*
1 Not playable on some devices.
Playback is possible using a device which complies with the medium type.
*
2 Must be finalized. Not playable on some devices.
*
3 As finalizing is unnecessary (cannot be performed), additional recordings are possible at any time.
*
4 To make additional recordings, the finalized disc must be unfinalized.
*
5 The provided software is used.
*
6 Finalize the disc to edit on a PC.
*
7 A BD menu is not created.
*
8 A DVD-VR disc can be created.
*
9 A DVD video disc can be created.
*5
●
— ●
*5
●
*5 *7●*5 *7
●
*5 *6
———●
●
*5
●
*5 *6
*5 *6●*5 *6
●
●
—— ———
*5 *8●*5 *8
*5 *9●*5 *9
●
—
29
Page 30

Functions and Characteristics of HDD/BD/DVD/Cards
About HDD/BD/DVD
Usable discs and their logos Function
HDD
(DZ-BD7HA)
BD-RE Ver. 2.1 7.5GB 2x
(8 cm)
BD-R Ver. 1.1 7.5GB 2x
(8 cm)
DVD-RAM Ver. 2.1 (8 cm)
DVD-RW 2x Ver. 1.1 (8 cm)
DVD-R for General Ver. 2.0
(8 cm)
Allows extensive high-definition movie recordings
(approx. 4 hours in HX mode).
Allows editing and deleting scenes.
A rewritable disc on which high-definition movies
can be repeatedly recorded.
You can delete/edit the recorded movies.
A non-rewritable disc on which a high-definition
movie can be recorded once. The recorded movie
cannot be deleted or edited.
Allows editing and deleting scenes.
Allows editing and deleting scenes using the
camcorder in VR mode. Does not allow editing or
deleting scenes using the camcorder in VF mode,
but provides higher compatibility with other DVD
players.
Provides compatibility with most DVD players.
Does not allow editing and deleting scenes.
BD-R Ver. 1.2 7.5GB 2x (8 cm) disc which is not an LTH type can be used.
* The versions in the above chart refer to physical standard versions of discs.
30
Page 31

Functions and Characteristics of HDD/BD/DVD/Cards
Notes
• Hitachi Maxell single sided discs (HG type in the case of DVDs) have
been confirmed to be compatible with this camcorder and are
recommended. Take care not to dirty (including fingerprints) or scratch
the surface of the discs when handling.
When using a double-sided disc, take great care with handling it. Using
non-Hitachi Maxell discs may not allow the camcorder to deliver optimum
performance.
• DVD housed in a square cartridge/caddy case or a round DVD holder
cannot be used as is. The DVD must be removed from its case/holder
before it can be used.
Note on BD-R/DVD-R
This camcorder writes control data to a disc in order to automatically make
recording adjustments when first recording after:
• a disc is inserted, and
• the power is turned on while the disc is in the camcorder.
If there is not enough space on the control area of a disc, recording may not
be possible even if the data space for recording movies is not full. To prevent
this, avoid performing operations described above more than 99 times per
disc.
Unusable Discs
Dual layer BD and DVD discs, BD-R LTH type discs (Dye type), +RW, +R,
and HD-DVD.
31
Page 32

Functions and Characteristics of HDD/BD/DVD/Cards
About cards
z
Usable card and logo Function
SD memory card Allows taking still pictures.
Card Handling
• Do not use cards other than those specified.
• Be sure to perform trial recording before recording important
images.
• Do not touch the card terminal or allow it to touch metal.
• Do not paste anything other than the designated label in the label
area.
• Do not subject cards to impact, bending, or dropping.
• Do not disassemble or modify a card.
• Do not expose cards to water.
• Do not use or store cards in the following places:
− Where the temperature is high, such as in a vehicle in the sun or near a heater
− Where humidity is high, or in a dusty place
• When the erasure prevention
switch is locked, recording,
deletion, and editing are not
allowed. Only playback is
possible.
Erasure prevention
switch
Terminal
Locked status
Notes
• SD memory cards can be used on this camcorder.
• When using an exclusive adapter, a miniSD memory card and micro SD
memory card can be used in the same way as an SD memory card. No
SDHC card or multimedia card can be used.
Cautions for discs and cards
To prevent data loss or damage:
• Do not remove the battery and card while reading or writing data.
• Do not use the camcorder in a place subject to static electricity or electrical noise.
• Do not leave a disc unused in the camcorder for an extended period of long time.
32
Page 33

Functions and Characteristics of HDD/BD/DVD/Cards
Inserting a BD or DVD
Close the lid.
When a new BD-RE, BD-R, or DVD-RW is inserted, see p.35.
Attach the charged battery pack to the
camcorder or connect the camcorder to a
wall outlet.
Turn the p
ower switch to “OFF”.
Then, press down the DISC EJECT switch
until the ACCESS/PC indicator lights, then
release.
After several seconds, the lid pops open.
Open it fully with your hand.
Place the recording surface of
the BD/DVD
face down, then push down on the center
of the BD/DVD until it clicks into place.
• For single-sided discs, the side
opposite the label is the recording
surface.
• To record on the other side for
double-sided discs, remove the disc
(p.34), flip it over, and reload it.
The ACCESS/PC indicator flashes. During this process, do not remove the
power source, shake, or subject the camcorder to impacts.
33
Page 34

Functions and Characteristics of HDD/BD/DVD/Cards
Removing the disc
Pressing slightly on the center hub with
a finger, grip the edge of the disc by your
thumb and lift the disc out as shown.
Notes
• The disc mechanism will be very hot immediately after use. Do not touch
the metallic areas.
• Do not peer into the pickup. Doing so may cause
damage to your eyesight.
• To prevent malfunction, never do any of the
following:
– touch the pickup
– insert a disc that is not compatible with the
camcorder (p.30, 31)
– close the lid before setting the disc securely into place
• The power automatically turns off if the lid is left open for approx. three
minutes.
• The lid will not open if the camcorder is not connected to a power source.
Pickup
34
Page 35

Functions and Characteristics of HDD/BD/DVD/Cards
When loading a new BD-RE/BD-R/DVD-RW
Open the LCD monitor.
Select “YES” by pressing &, then press the confirmation button.
(When using a DVD
-RW)
&
%
The disc must be formatted before it can be used for recording. When the disc is
loaded, the format confirmation screen will appear in the LCD monitor. Format
the disc according to the procedure below.
The confirmation button
Note
Be careful that the power is not
accidentally cut off during formatting.
Otherwise, the disc will become unusable.
Format Disc
Disc is not formatted.
Format the Disc now?
YES NO
ENTER
RETURN
When using a BD-RE/BD-R
Formatting will start. Skip step .
When using a DVD-RW
Proceed to step .
The recording format selection screen appears.
Select “VR Mode” or “VF Mode” by pressing
confirmation button.
Format Disc
Disc format.
Select record format.
VR Mode VF Mode
ENTER
RETURN
VR Mode
After recording, you can perform various
editing functions such as choosing and
deleting scenes. You can play back the
disc in a device which supports 8 cm
DVD-RW (VR Mode) after finalizing the
disc.
VF Mode (Video mode)
Although editing cannot be done on the
camcorder, you can play back the disc on
other DVD devices after finalizing the
disc.
/
, then press the
35
Page 36

Battery Pack
Battery Pack
CHARGE lamp status and charging time
Lights Charging
Goes out
Blinks See “Troubleshooting” (p.140).
Charge
Complete
Approx. charging time
(at approx. 77°F (25°C))
DZ-BP14S (supplied)
DZ-BP14SW (separately sold)
165 mins
Continuous recording time with a fully charged
battery
Use the following table to estimate continuous recording times (minutes) using a
fully charged battery pack.
Continuous recording Normal use*
Battery
type
DZ-BP14S (supplied)
DZ-BP14SW
(separately sold)
Monitor type Viewfinder LCD monitor Viewfinder LCD monitor
Recording
media
HDD*
100 90 95 80 50 45 45 40
2
BD/
DVD
HDD*
2
BD/
DVD
HDD*
2
BD/
DVD
HDD*
1
BD/
2
DVD
*1 Recordable time when zoom, focus, and switch changes are operated.
*2 For DZ-BD7HA only.
Notes
• In low temperature environments, recording time will be shortened.
• The times indicated in the table are estimates, and will change depending
on actual recording conditions.
36
Page 37

Battery Pack
Connecting the camcorder to a wall outlet
To wall outlet
Connect to the AC adapter/charger.
Connect to the AC adapter/
charger.
Power cable
Connect to the
camcorder.
DC power cord
Always turn the power off before disconnecting
the power supply.
While pressing and holding
, slide the
DC connector or battery pack upward, then
remove it.
Notes
• The battery pack will not be charged while the DC power cord is connected
to the AC adapter/charger even if the battery pack is attached to the AC
adapter/charger.
• The AC adapter/charger can be used around the world. An AC plug adapter
is required in some foreign countries. If you need one, purchase it from
your local electronics distributor.
AC 200-240V
AC Plug Adapter (not supplied)
Detaching the DC power cord/battery pack from
the camcorder
• Be careful not to drop the battery pack
while detaching it.
BATT
37
Page 38

Battery Pack
Efficient Use of the Battery
• The battery will slightly discharge even if it is detached from the camcorder.
• If the battery is left attached to the camcorder, it will consume a slight amount
of power. Therefore, it is recommended that you charge the battery a day
before using the camcorder.
When you intend not to use the camcorder for an extended period
of time
It is recommended that you fully charge the battery at least once a year, attach it to the
camcorder, turn it on and fully deplete the battery charge, then remove the battery and
store it in a cool place again.
Battery life
The battery life varies greatly depending on the ambient environment and how
often the camcorder is used. If the usable time of the camcorder with a fully
charged battery is noticeably short, the battery should be replaced. Purchase a
new one.
Power Save function
To save power, do not leave the camcorder in recording pause mode for too long.
Even during recording pause, battery power is consumed at about the same level
as during recording.
By turning the power save function On, the camcorder will automatically turn off
if left idle for approximately five minutes in recording pause mode. For power
save function, see "How to use the LCD/EVF setup and initial setup" (p.60).
38
Page 39

Recording
HDD
BD-R
RAM
-RW (VR) R
-RW (VF)
BD-RE
Slide the Movie/Stills switch to “ ”.
Open the LCD monitor.
Turn the power switch to “ON”.
The BD/DVD indicator lights and the camcorder enters recording pause mode.
• Switch to “OFF”, to turn o
ff.
Press and hold the lock
button, and turn the power
switch to “ON”.
Turn the power switch to “ON”.
The HDD indicator lights and the camcorder enters recording pause mode.
Movies will be recorded to the HDD.
To switch between HDD and BD/DVD, turn the
power switch to “MODE” and release it.
The power switch will return to “ON” automatically. Each time you turn the
switch to “MODE”, the acti
ve function will alternate as follows:
HDD indicator lights BD/DVD indicator lights.
• Switch to “OFF”, to turn off.
Recording
DZ-BD7HA
DZ-BD70A
1
2
Recording Movies
: You can choose either HDD or BD/DVD to record movies.
: You can record movies to BD/DVD.
4
Record button
(See next page.)
3
3
DZ-BD7HA
DZ-BD70A
39
Page 40

Recording
4
Press the record button.
• “/” (recording pause) in the LCD monitor
will change to “
0” and recording will
begin.
The recording indicator beneath the lens
(p.16) will also light red.
• To pause recording, press the r
ecord button
again. The elapsed recording time will be reset
to “0:00:00”.
• To resume recording, press
the record button
again.
//0
Elapsed recording time
(hrs : mins : secs)
Remaining space on
HDD/BD/DVD/Card
10:00AM
Remaining
battery level
Current time
Using the Quick Start
function
If you press QUICK START, the
camcorder enters sleep mode and will
keep battery consumption to a minimum
(approx. half of the power consumed
during recording) and you can restore recording pause mode quickly (about one
second) by pressing QUICK START again.
During sleep mode, the QUICK START button lights blue.
Just press
QUICK START.
40
Page 41

Recording
Hints
• You can switch the camcorder to stills recording mode by sliding the
”
movie/stills switch to “
• For details on screen displays during recording, see p.42.
• You can change the movie recording quality 1.
• If you cannot record movies, the camcorder does not operate, or it takes too
long for recording to start, see “Troubleshooting” (p.140).
• About Sleep Mode
– You can also return to recording pause mode from sleep mode by
pressing the record button (press again to start recording) or changing the
media.
– When you return to recording pause mode from sleep mode, the zoom
position (approx. 1×), manual focus, exposure, and backlight
compensation will return to their default settings (p.62, 65–67).
– Regardless of the power save setting (p.60), the camcorder power will
automatically turn off if standby in sleep mode continues for approx. 30
minutes. In this case, first turn the power switch to “OFF”, then back to
“ON”.
(p.45) even while the power is on.
• If the automatic lens cover has stopped opening halfway, turn the power
switch to “OFF”, then turn it to “ON” again.
Notes
• The ACCESS/PC indicator is flashing for a while even after you finish
recording. While the ACCESS/PC indicator is flashing, do not turn off the
power or shake the camcorder. Doing so may cause an error in the recorded
data and you may not be able to play back the data (p.153).
• The minimum recording time for movies is about three seconds (even if you
press the record button before three recording seconds have elapsed).
• It may not be possible to deactivate the protection on a BD/DVD which was
protected using another device. In this case, use that same device to
deactivate the protection.
41
Page 42

Recording
Information Display During Recording
Switching the display mode
Various information will appear in the LCD monitor or the viewfinder during
recording. You can choose simple display or detailed (all information) display by
pressing DISPLAY repeatedly.
If you leave the camcorder idle for approx. one minute, the information display will
disappear. To make the display reappear, press
.
On-Screen Information
See the next page for details.
Recording mode
Current medium
(HDD/BD/DVD/Card)
Program AE
White Balance
Backlight
Compensation
Electronic Image
Stabilizer (EIS)
Movie Quality
Full Auto (p.73)/
Warnings/Messages
Zoom
Exposure
Manual Focus
Self-Timer
Flash
MIC. Filter
HDMI audio output
Recording status
Movie recording time
Remaining space on
HDD/BD/DVD/Card
0:00:00
REM 53MIN
HDD access...
10:00AM
10/ 1/2007
Remaining battery level
Current time/date
42
* The above display is for explanation and different from the actual display.
Page 43

Recording
Recording mode (p.24, 25, 26)
Program AE (p.68)
: Movie (HDD/BD/DVD)
: Stills (Card)
Current medium and its status (p.29)
(HDD/BD/DVD/Card)
: HDD
: Protected HDD
:BD-RE
: Protected BD-RE
:BD-R
: Finalized BD-R
: DVD-RAM
: Protected DVD-RAM
: DVD-RW (VR mode)
: Protected DVD-RW (VR mode)
: Finalized DVD-RW (VR mode)
: Protected Finalized DVD-RW
(VR mode)
: DVD-RW (VF mode)
: Finalized DVD-RW (VF mode)
: DVD-R
No icon : Auto
:Portrait
: Spotlight
: Sand & Snow
: Low Light
White Balance (p.70)
No icon : Auto
:Set
: Outdoors
: Indoor 1
: Indoor 2
Backlight Compensation (p.67)
No icon : Off
:On
Electronic Image Stabilizer (EIS)
(when using HDD/BD/DVD)
No icon : Off
:On
HD movie recording quality (p.76)
(when using HDD/BD)
: Finalized DVD-R
*1
No medium icon
: DVD-R finalized using a device
: SD memory card
: Locked SD memory card
(finalized using this camcorder)
other than the DZ-BD7HA/
DZ-BD70A.
DVD-R recorded using a
HITACHI camcorder marketed
before the DZ-BD7HA/
DZ-BD70A
*2
HX
HF
HS
SD movie recording quality (p.76)
(when using DVD)
SX
SF
: High quality
: Standard quality
: Extended recording
: High quality
: Standard quality
43
Page 44

Recording
Zoom (p.62)
Digital zoom Off
: No audio signals are output.
Remaining battery level
Full
Recording status
Almost empty
Digital zoom: 40x
(when using HDD/BD/DVD)
Digital zoom: 500x
(when using HDD/BD/DVD)
Exposure
No gauge : Auto
: Manual
Manual Focus
No gauge : Auto
: Manual
Self-Timer (when using Card)
No icon : Off
:On
(Ten-second countdown)
Flash (p.74)
(when using Card)
No icon : Auto
: Flash On
: Flash Off
MIC. Filter
No icon : Off
:On
HDMI audio output (p.108)
In case of the HDMI connection, audio signals
are output only while playback.
No icon : Audio signals are output.
*1 The icon of a disc which is recorded on a
*2 No icon appears when:
*3 No icon appears when:
*4 No remaining time or number will be
*5 Recording times are estimates and will
*6 The number of recordable stills is
REC
No icon
Remaining space on HDD/BD/DVD/Card
REM XX HOUR XX MIN
REM XX*6: Number of remaining
device other than the
DZ-BD70A and can playable but not
recordable on the DZ-BD7HA
DZ-BD70A lights orange.
• no disc or card is inserted.
• an unusable disc or card is inserted.
• no disc or card is inserted.
• a disc not formatted is loaded.
• the HDD is protected or a protected disc
or locked card is loaded.
• the HDD, disc, or card has no remaining
space.
displayed when a protected disc or locked
card, or a finalized BD-R/DVD-RW (VF
mode)/DVD-R disc is inserted.
change depending on recording conditions.
approximate. Depending on the recording
conditions, the number may not decrease.
: Recording
: Recording pause (lit green)
/Focus is locked (lit purple when
using Card (recording stills))
*3
*5
: Remaining recordable time
during movie recording (HDD/
BD/DVD)
recordable still images during
stills recording (Card)
DZ-BD7HA/
*4
44
Page 45

Recording
CARD
Slide the Movie/Stills switch to “ ”.
Open the LCD monitor.
Press
halfway down.
A subject in the center of the screen will be focused. When focus is locked, the
green “/” in the LCD
monitor will turn purple.
Fully press
.
The image will be recorded. After a few seconds, the recorded image will be
displayed for about three
seconds. You can record the next photo when “/”
changes back to green.
Turn the power switch to “ON”.
The SD CARD indicator lights.
• Switch to “OFF”, to turn off.
Press and hold the lock
button, and turn the power
switch to “ON”.
Recording Still Pictures
Still pictures are recorded on an SD Card.
1
2
3
4
5
.
Using the Quick Start function
See p.40
PHOTO
PHOTO
45
Page 46

Recording
Hints
• You can switch the camcorder to movie recording mode by sliding the
”
movie/stills switch to “
• For details on screen displays during recording, see p.42.
• If you want to compose a shot in which the subject is not centered, first
press PHOTO halfway with the subject centered in the monitor. Next, with
the button pressed halfway, compose your shot and fully press PHOTO.
• If the camcorder has difficulty focusing, adjust the focus manually (p.65).
• Although it is possible to fully press PHOTO in a single action without
pressing it halfway, the image may be out of focus.
• You can check the card capacity and number of remaining recordable
pictures (p.170).
• If you are unable to record still pictures, see “Troubleshooting” (p.140).
• About Sleep Mode
– You can also return to recording pause mode from sleep mode by
pressing PHOTO. To record, you need to press PHOTO again.
– When you return to pause mode from sleep mode, the zoom position
(p.39) even while the power is on.
(approx. 1×), manual focus, exposure, and backlight compensation will
return to their default settings (p.62, 65–67).
– Regardless of the power save setting (p.60), the camcorder power will
automatically turn off if standby in sleep mode continues for
approximately 30 minutes. In this case, first turn the power switch to
“OFF”, then back to “ON”.
• If the automatic lens cover has stopped opening halfway, turn the power
switch to “OFF”, then turn it to “ON” again.
Notes
• After recording, do not turn off the power until “/” lights green in the
LCD monitor. Doing so may cause an error in the recorded data and you
may not be able to play back the data (p.153).
• The recorded image may be blurred if camera shake occurs.
• Hold the camcorder with both hands and tuck your elbows to your chest or
sides for best recording results.
• When recording with digital zoom, use a tripod for best results.
• The recorded image may differ slightly from the image in the LCD monitor
or viewfinder.
46
Page 47

Viewing
If the camcorder is not in recording pause mode, set the camcorder to recording pause
mode for the me
dium you want to play back (p.39, p.45).
Press the confirmation button.
(/'/&/%
HDD
BD-R
RAM
-RW (VR) R
-RW (VF)
BD-RE
CARD
Viewing
Playback
(Watching Your Recordings)
Recorded movies and still pictures are referred to as “scenes”. For movies, a scene
is one continuous uninterrupted recording, and for still images, a scene is one still
picture.
Open the LCD monitor before starting playback.
DISC NAVIGATION
MENU
SELECT
(stop/cancel)
/Confirmation
Playing back the last recorded scene
You can play back the last recorded scene right away.
The scene recorded last will play back.
When playing back a movie, playback is paused after the final frame and “+”
(playback pause icon at the final frame) appears. If this condition continues for more
than five minutes, the camcorder will automatically return to recording pause mode.
To promptly return to recording pause mode, press
.
47
Page 48

Viewing
Play back the last recorded scene (see p.47).
Press
. then select “Edit” by pressing '/(.
Select “Edit”
“Delete Scene”, then press the confirmation button
.
Press
while the media you want to play back is in recording
pause mode.
HDD RAM
-RW (VR)
BD-RE
CARD
Select “YES” by pressing &, then press
the confirmation button.
HDD
BD-R
RAM
-RW (VR) R-RW (VF)
BD-RE
CARD
Deleting the last recorded scene
MENU
Delete Scene
Delete scene?
YES NO
The scene will be deleted.
• To cancel deletion, select “NO” and
RETURN
ENTER
press the confirmation button or
simply press
• After deleting or canceling deletion,
the camcorder will return to
recording pause mode.
Choosing and playing back a scene
DISC NAVIGATION
The scenes thumbnails appear on the disc navigation screen.
.
Movie/Stills Current medium
Disc Navigation
All Scenes
10/ 1/2007
PLAY DESELECT ALL
10:10:10AM HX
Select[ 1
]
0001/0027
1hour 3min 30sec
Operation guide
Currently selected scene
The number of currently
selected scenes (p.49).
Current scene number
/Total number of scenes
Date separator line
Bar graph
48
Page 49

Viewing
Choose a scene by pressing (/' (up/down, previous page/following page) and
&/% (left/right).
Press the confirmation button.
+
+
Select a scene by pressing &/%/(/',
then press
.
Repeat this step to choose the next scene.
Press and hold
until the cursor frame
becomes blue.
Choose a final scene by pressing
&/%/(/',
then press the confirmation button to confirm the
setting.
HDD
BD-R
RAM
-RW (VR) R
-RW (VF)
BD-RE
CARD
• Holding down the button will increase the scene selection speed. Use the
“Current scene number/Total number of scenes” display and the bar graph as
reference.
The chosen scene is played back.
Playback is paused at the final frame of the last scene, and “
icon at the final frame)
appears. When this condition continues for longer than
”
(playback pause
five minutes, the display will automatically return to the disc navigation screen.
• To promptly return to the disc navigation screen
, press or DISC
NAVIGATION.
To return to recording pause mode
• If you press the confirmation button while “
, press the confirmation button.
” is displayed, playback starts
from the first scene.
Choosing and playing back multiple scenes
After step of “Choosing and playing back a scene” (p.48), perform procedures
according to your purpose from the table below. When you have finished choosing
scenes, press the confirmation button to begin playing them back.
• You can utilize more than one method in the table below when choosing scenes.
• You can choose up to 999 scenes.
• The color of the frame(s) may change depending on your operations as follows:
– Yellow: indicates your current position (cursor frame)
– Red: indicates scenes already chosen
– Blue: indicates the range of consecutive scenes being selected
– 2-color frame: includes the meaning of both colors
Select multiple scenes
individually
SELECT
Using the current scene as
your starting point, select
multiple previous or
succeeding consecutive
scenes
SELECT
49
Page 50

Viewing
Press
after step of “Choosing and playing back a scene” (p.48)—while a
scene is played back.
Select “Go To” by pressing (/', then press %.
Select “Top”, “End”, or “Specify” by pressing (/', then
press the confirmation
button to confirm.
Select all scenes from the
Press
, select “Scene” by pressing
%,
then select “Select” by pressing
(/'.
Press
% or the confirmation button.
After choosing the desired option by pressing (
', press the confirmation button to confirm the
setting.
Press .
Move the cursor frame (yellow) to a selected scene (red)
you want to cancel and press SELECT.
Press .
HDD
BD-R
RAM
-RW (VR) R
-RW (VF)
BD-RE
CARD
first scene to the current
scene. (Menu option:
Start– Current)
Select all scenes from the
current scene to the final
scene. (Menu option:
MENU
/
Current– End)
Select all scenes on the
media. (Menu option: All)
Cancel operations while
selecting the range (while a
blue frame is displayed)
Cancel selected scenes
individually
Cancel all scenes selected
Jumping to the designated scene
MENU
The menu appears.
Top: Goes to the beginning, then pauses playback.
End: Goes to the end, then pauses playback.
Specify: Goes to the specified point, then pauses playback.
See next page on how to specify a point.
50
Page 51

Viewing
z Jumping to a specified point
1
Select “Specify” in step in
“Jumping to the designated scene”
(p.50), then press the confirmation
bu
tton.
2
Select the desired point by time by
pressing
(
/
'
/
&
/
%
.
3
Press the confirmation button.
to
The specify screen will appear.
The camcorder will go to the
specified point and enter playback
pause mode.
• To start playback, press the
confirmation button again.
Total recording time of
all selected scenes
Position of currently
played back image
Go To
CURRENT
Go To
TOPENTER
Cursor
Cursor position
(: To select the beginning
': To select the end
& / % once:
To move the cursor one
minute back or forward
for HDD (ten seconds for
BD/DVD, one still for
card)
Press and hold & / %:
To move the cursor in ten
minutes increments for
HDD (one minute for BD/
DVD, ten stills for card)
END RETURN
Hints
• To cancel the “Go To” procedure
midway, press before going to
the specified point.
• With a card, the number of stills
will appear at the “Top”, “Current”,
“End”, and “Go To” indicators.
Note
The cursor position is a rough
estimate. The cursor may not move
at even intervals.
Go To
CURRENT
Go To
TOPENTER RETURN
END
(When the start of the
selected scene is selected)
51
Page 52

Viewing
Notes
HDD
BD-R
RAM
-RW (VR) R
-RW (VF)
BD-RE
• When you play a still image from a card, “Playback.” appears. If the image
file is very large (high resolution, etc.), it will take more time to display.
• The disc navigation screen automatically appears if:
– the HDD/BD/DVD is protected.
– a finalized BD-R/DVD-RW (VF mode)/DVD-R is loaded.
– a DVD-RW (VF mode)/DVD-R recorded on a Hitachi DVD camcorder
other than this model is loaded.
• It may require more time to start playing back if many scenes are chosen.
Adjusting speaker volume during movie playback
Decreases the volume
Increases the volume
Information Display During Playback
Various types of information on recording will be superimposed on the playback
image you are viewing.
The display mode switched in the following way each time you press DISPLAY.
52
No display
0:00:00
0006
006
Playback information display
9:30AM
10/ 1/2007
Recording date/time
Page 53

Viewing
$
%
&
'
(
)
*
,
+
When using
HDD/BD/DVD
Current medium
(HDD/BD/DVD)*
Movie/Stills
Playback condition
(All Scenes, Date, Playlist)
When using
Card
SD memory card
Movie/Stills
3
1
*
Date/Playlist No.*
Scene No.
Repeat play*
Scene No.
2
Lock*
4
File name
4
Counter
Slide Show*
Playback
operation*
4
Playback
operation*
5
5
*1 Playlist, Date, or All
Scenes
*2 Not displayed while playing All Scenes.
*3 See “Current medium and its status
(p.29) (HDD/BD/DVD/Card)” on p.43.
*4 Appears when set (see p.55, 56, 102).
*5 There are following playback operations:
: Standard playback
: Playback pause
: Forward search playback
: Reverse search playback
: Forward skip playback
: Reverse skip playback
: Forward frame advance
: Reverse frame back
: Forward slow playback
: Reverse slow playback
For instructions on how to operate, see
the following pages.
“
” appears after the first still or the first
frame of the first movie is played when
playing reverse.
” appears after the last still or the last
“
frame of the last movie is played when
playing forward.
53
Page 54

Viewing
Simple functions you
%
&
'
(
(
'
'
(
HDD
BD-R
RAM
-RW (VR) R-RW (VF)
BD-RE
%
&
%
&
'
(
HDD
BD-R
RAM
-RW (VR) R
-RW (VF)
BD-RE
can use during
playback or playback
pause
Movies
(during playback pause)
The following functions will operate
during playback pause in the same
way as during playback. However, if
the button is released, playback will
Movies
return to playback pause.
(during playback)
• Fast-forward/Reverse
Functions Press
Pause
The confirmation button
Fastforward/
Reverse
Skip
forward/
backward
• If you press
seconds from the beginning of a
scene, playback starts from the
beginning of the previous scene.
• If you press
scene is playing back, playback is
paused at the final frame of the last
scene.
Continuous
skipping
(Forward)/
(Reverse) and hold
(Forward)/
(Reverse)
within a few
while the last
(Forward)/
(Reverse) and hold
• Skipping
• Continuous skipping
The following functions only operate
during playback pause.
Functions Press
Frame by
frame
playback
(forward/
reverse)
(Forward)/
(Reverse)
• No sound will be heard.
• Frames are advanced in intervals
of approx. 0.03 seconds and
reversed in intervals of approx.
0.5 seconds.
Slow
playback
(Forward/
Reverse)
(Forward)/
(Reverse) and hold
54
• No sound will be heard.
• Slow playback advances in
intervals of approx. 0.03 seconds
and reverses in intervals of
approx. 0.5 seconds.
Continuou
s skipping
(Forward)/
(Reverse) and hold
Skips forward/backward
continuously to the start of each
scene. Release the button at the
scene you wish to watch.
Page 55

Viewing
Press
on the disc navigation
screen (p.48).
Select “Playback Setting” by pressing
(/', then press %.
Select
“Slide Show” and press % to
select “On”.
Press
to make the menu
disappear and select a still picture
(scene) from the disc navigation
screen.
'/%
(/&
'/%
(/&
Notes
CARD
CARD
• If the temperature inside the
camcorder gets too high, the
camcorder may fail to function
normally. Turn off the power and
wait awhile before turning the
power back on.
• In slow playback, images with
fast-moving subjects may appear
blurred.
Playing still pictures
on a card
automatically
(Slide Show)
When you play back when the slide
show is On, still pictures are played
one after the other.
If the playback range of scenes has
been specified, the slide show plays
back this specified range of scenes.
Still pictures
(during card playback)
Reminder: For still images, a “scene”
is one still image, a photograph.
Functions Press
Playing
previous or
later scenes
(stills)
Each time you press
shown. If you continue pressing,
stills are played back successively
until you release the button, or the
last/first scene is reached.
• For automatic playback for still
pictures, use the slide show
, the next or previous still is
(Forward)/
(Reverse)
or
MENU
MENU
The slide show begins.
function.
55
Page 56

Viewing
Press
or
at the
frame you want to capture during
movie playback or playback pause.
Select “Edit” by pressing (/',
then press %.
If “PHOTO Capture” is not selected,
select it by pressing
(/', then
press the confirmation button.
Press & to select “YES”, then press
the confirmation button t
o confirm.
Press
on the disc navigation
screen (p.48).
Select “Others” by pressing (/
', then press %.
Select “Repeat Pl
ay” by pressing
(/', then press %.
Select “On” by pressing (/',
then press the confirmation button to
c
onfirm the setting.
Press
to return to the disc
navigation screen.
Press the confirmation button to
begin playback.
HDD
BD-R
RAM
-RW (VR) R
-RW (VF)
BD-RE
HDD
BD-R
RAM
-RW (VR) R
-RW (VF)
BD-RE
Capturing a still
picture from a movie
(PHOTO Capture)
You can capture and record an image
displayed during movie playback as a
photo (approx. 2,070,000 pixels
(HDD/BD)/approx. 230,000 pixels
(DVD)), on a card.
PHOTO
• If you press PHOTO, go to step
. If you press MENU,
proceed to the next step.
• To cancel capturing, either press
the confirmation button while
“NO” is selected or press
• After capturing is complete or
canceled, the screen will return
to playback pause.
MENU
Playing back scenes
repeatedly
(Repeat Play)
When this function is On, all scenes
will play back from the first scene to
the last scene repeatedly.
If a range of scenes (or just one scene)
is specified (p.49), playback of the
specified scenes will be repeated.
MENU
MENU
• To quit playback, press
.
(“Repeat Play” remains “On”.)
• “Repeat Play” will be set to
“Off” if:
– you repeat the steps and
select “Off” instead of “On”
in step
.
56
– turn off the power
– remove the BD/DVD
• Repeat playback will not
function when you play the last
scene when the camcorder is in
recording pause mode.
Page 57

Various Recording Techniques
How to Operate the Menu
1
Press
.
2
Select “Camera Functions Setup”
“White Balance” a white balance mode
3
Press the confirmation button to confirm, then
MENU to end.
“Camera Functions Setup”
“White Balance”
a white balance mode
Various Recording Techniques
MENU
Example:
The title of the selected icon
on the left appears at the top.
MENU
Press up/down
to move the
cursor up or
down.
Camera Functions Setup
Program AE
White Balance
EIS
Digital Zoom
MIC.Filter
Auxiliary Line
ENTER EXIT
Initial Setupu
Beep
Power Save
Record LED
Language
Demo Mode
Reset
ENTER EXIT
Press right or down on the center
to move the cursor to the right.
On
Off
On
English
Auto
Camera Functions Setup
Program AE
White Balance
EIS
Digital Zoom
MIC.Filter
Auxiliary Line
ENTER RETURN
Auto
Auto
On
40x
Off
Off
Current settings appear first.
After selecting one of the setup
items, its options appear.
To cancel/exit and return to the
previous stage
To go back left in the menu
* To quit without changing the setting,
press MENU before pressing the
confirmation button.
These operations work
almost the same way.
57
Page 58

Various Recording Techniques
Menu (While Recording)
indicates the function can also be set from
Movie menu
the stills menu.
Menu items (1st level) Menu items (2nd level)
Camera Functions Setup
Record Functions Setup
Output Functions Setup
LCD/EVF Setup
Date Setup
Program AE p.68
White Balance p.70
EIS p.72
Digital Zoom p.62
MIC. Filter p.73
Auxiliary Line p.72
HD Video Mode
(when the HDD or a BD is used)
SD Video Mode
(when a DVD is used)
Component Output p.109
LCD/EVF Adjust p.60
EVF Display p.60
Date Set p.23
Date Mode p.61
See
p.76
Initial Setup
Beep p.60
Power Save p.60
Record LED p.60
Language p.60
Demo Mode p.60
Reset p.60
58
Page 59

Various Recording Techniques
Stills menu
indicates the function can also be set from
the movie menu.
Menu items (1st level) Menu items (2nd level)
Program AE p.68
White Balance p.70
Camera Functions Setup
Flash p.74
Auxiliary Line p.72
Record Functions Setup Self Timer p.77
Output Functions Setup Component Output p.109
LCD/EVF Adjust p.60
LCD/EVF Setup
EVF Display p.60
Date Set p.23
Date Setup
Date Mode p.61
Beep p.60
Power Save p.60
Record LED p.60
Initial Setup
Language p.60
Demo Mode p.60
See
Reset p.60
59
Page 60

Various Recording Techniques
How to use the LCD/EVF setup and initial setup
Menu items Explanation of functions
LCD
Brightness
LCD/EVF Adjust*
EVF Display
LCD/EVF Setup
Beep
Power Save
Record LED p.75 On
Initial Setup
Language You can select the display language. English
Demo Mode p.61 Auto
Reset Returns all menu settings to default. –
EVF Brightness
Color Level
If set to “On”, images always appear in the
viewfinder regardless of the orientation of the
LCD monitor.
Select “Off” to turn off the beeps that sound
when any button is pressed.
When set to “On”, the camcorder power will
automatically turn off if it is left idle for
approx. five minutes during recording pause
mode.
When set to “Off”, the camcorder does not
turn off automatically except while in sleep
mode.
Adjusts the brightness of the
LCD monitor.
Adjusts the brightness of the
viewfinder.
Adjusts the color density of
the LCD monitor and
viewfinder.
Initial
Value
–
–
–
Auto
On
Off
* The viewfinder is always On while “LCD/EVF Adjust” is being set regardless of the
setting of “EVF Display”.
Setting the Date and Time
See “Setting the date and time” (p.23) for setting procedures.
Note
The camcorder is equipped with a built-in rechargeable battery to retain the
date and time in memory. If the built-in battery is depleted, the date and time
will need to be reset. Periodically (once every six months) recharge the
internal battery by connecting the camcorder to a wall outlet or attaching a
charged battery pack to the camcorder while leaving the camcorder turned off
for 24 hours.
60
Page 61

Various Recording Techniques
Changing the date format
Press MENU.
Select “Date Setup” “Date Mode” one of the date formats
Press the confirmation button, the
n press
to exit the setup.
Press MENU.
Select “Initial Setup” “Demo Mode” one of the following settings:
Press the confirmation button.
You can change the date format to “D/M/Y” or “Y/M/D”.
(Selecting “D/M/Y” will change the clock to 24 hour style.)
MENU
About the demonstration function
At time of purchase of this camcorder, this function is set to “Auto”.
A demonstration starts automatically when you connect the AC adapter/
charger to the camcorder as a power source and leave the camcorder idle
for more than approx. ten minutes, after turning on the power and set the
camcorder to:
• HDD (DZ-BD7HA), or
• the medium (BD/DVD or SD memory card) which is not inserted in the
camcorder.
To cancel the demonstration, press any one of the camcorder buttons.
Changing the demo mode setting or watching
the demonstration now
Auto: See above.
Off: Turns off the demonstration function.
Start: The demonstration will start right away. If you cancel the
demonstration, the prior setting will be restored (“AUTO” or “OFF”).
Notes
• If a battery pack is connected to the camcorder as a power source, the
demonstration will not begin even if “Demo Mode” is set to “Auto”.
• The demonstration function does not work when the camcorder is connected
to a PC.
61
Page 62

Various Recording Techniques
Magnified Recording
(Optical Zoom and
Digital Zoom)
HDD
BD-R
RAM
-RW (VR) R
-RW (VF)
BD-RE
CARD
1
During recording pause, press
.
2
Select “Camera Functions Setup”
“Digital Zoom” a digital zoom
option
3
Press the confirmation button to
confirm, then press
to end
the menu.
The zoom lever allows you to choose
a range of magnifications from wideangle to telephoto zooming.
Optical zooming up to ten times is the
maximum telephoto magnification.
When using a card (recording stills),
only optical zoom works.
40x
When the optical zoom exceeds ten
magnifications, the digital zoom
starts working automatically. The
maximum telephoto zoom value is
40x magnification. The zoom bar
appears as follows.
Digital range
Maximum
Current zoom
position
optical zoom
W:Wide-angle
(Recording over
a wide range)
T:Telephoto
(Magnifies
recording)
Maximum zoom values will depend
on the “Digital Zoom” settings in the
Menu as follows.
Digital zoom options
Off
500x
The maximum telephoto zoom is
500x magnification. The zoom bar
appears as follows.
Digital range
Maximum
Current zoom
position
optical zoom
Setting the digital zoom
MENU
When the zoom is used, the following
optical zoom bar appears in the LCD
monitor.
Maximum
Current zoom position
optical zoom
62
MENU
• The “Digital Zoom” setting is
retained in memory even when
the power is turned off.
Page 63

Various Recording Techniques
Hint
Recording at Close
Range
(Macro Recording)
1
During recording pause or recording,
point the camcorder at the subject
and push the zoom lever towar
d the
W side until the wide-angle is
maximized.
HDD
BD-R
RAM
-RW (VR) R
-RW (VF)
BD-RE
CARD
You can also use the remote
control for changing the maximum
digital value. Each press of
DIGITAL ZOOM switches the
“Digital Zoom” setting as follows;
“
Off” → “40x” → “500x”
Notes
• When operating the zoom lever,
the focus may blur for a moment.
• When digital zoom is added, the
image quality will become
coarser.
• When using a card (recording
stills), the digital zoom cannot be
set.
When you record a small subject at
close range, you can bring the lens
surface as close as approx. 0.8 inch (2
cm) to the subject. This will allow you
to enlarge the subject to cover the
entire screen.
Recording at close range
• Recording up close may
require more lighting. If the
screen is dark, direct a light
source at the subject.
Note
Although the zoom can be used, the
focus may become blurred
depending on the distance to the
subject.
63
Page 64

Various Recording Techniques
Using the SeparatelySold Lenses to
Increase the WideAngle or Telephoto
Effect
1
Remove the lens cap from the
conversion lens and attach the
conversion lens to the camcorder
HDD
BD-R
RAM
-RW (VR) R
-RW (VF)
BD-RE
CARD
Notes
• If you attach the DZ-TL43
conversion lens, the focusing
range at the T (telephoto) side
will be from approx. 9.84 feet (3
m) to infinity.
• When the tele-conversion lens or
Use the tele-conversion lens (DZTL43 (separately-sold) to increase the
telephoto effect, and the wideconversion lens DZ-WL43
(separately-sold) to increase the
wide-angle effect.
If you choose another model, make
sure the filter diameter is 43mm and
the screw pitch 0.75mm.
Attaching the separately
sold lenses
Conversion lens
wide-conversion lens is used, the
white balance may not function
depending on recording
conditions. (Normally, the white
balance will be automatically
adjusted.) In this event, adjust the
white balance manually (p.71).
• When you zoom while the
conversion lens is attached, the
four corners of the screen may
become a little dark or scratchy at
the W (Wide) side. (The four
corners may not be evenly dark.)
• When changing lenses, be careful
not to drop the camcorder.
• Attaching a conversion lens will
prevent you from using the flash.
Turn the “Flash” setting to “Off”
(p.74).
64
• Some commercially sold
conversion lens may not be
compatible with this camcorder.
Page 65

Various Recording Techniques
I
Adjusting the Focus
Manually
(Manual Focus)
HDD
BD-R
RAM
-RW (VR) R
-RW (VF)
BD-RE
CARD
1
During recording pause or recording,
press
.
2
Push the zoom lever toward the T
(telephoto) side to magnify the
subject.
3
Adjust the focus by pressing &/
%.
If it is difficult to adjust the focus
automatically, you can adjust it
manually (Manual Focus). (See also
“Difficult auto focus conditions”
(p.66).)
Focusing range
• T (telephoto) side:
Approx. 3.2 feet (1 m) from the lens
surface to infinity.
• W (wide-angle) side:
Approx. 13/16″ (2 cm) from the
lens surface to infinity.
How to focus manually
FOCUS
The Focus icon appears in the
LCD monitor.
Manual focus icon
• Focusing switches between
Manual Focus and Auto Focus
each time the FOCUS button is
pressed. The icon is displayed
only during manual focusing.
• When the power is turned off,
the camcorder returns to auto
focus.
• To manually adjust the focus,
always magnify the subject as
in step 2. When the focus is
adjusted for wide-angle
zooming, the focus may
become blurred if you switch
to telephoto zooming.
Hint
If you wish to adjust exposure
while focusing manually, press
EXPOSURE. The exposure bar
lights in orange. To return to
manual focusing, press FOCUS.
65
Page 66

Various Recording Techniques
Difficult auto focus
Adjusting the exposure
manually
Adjusting the
Brightness of the
Image (Exposure)
HDD
BD-R
RAM
-RW (VR) R
-RW (VF)
BD-RE
CARD
conditions
Subjects are not
in the center of
the frame
Subjects that
are both near
and far
Normally, the exposure is
automatically adjusted. However,
depending on the recording
conditions, the exposure can be
adjusted manually.
Subjects lit by a
neon sign or spot
light which glares
or emits strong
light
Subjects moving
rapidly
Subjects behind
glass covered
with water
droplets or dirt
Subjects with
minimal
variation in
brightness such
as a white wall
Dark subjects Night views
66
Page 67

Various Recording Techniques
1
During recording pause or recording,
press
.
2
Adjust the exposure by pressing &/
%.
Compensating for
Backlight (Backlight
Compensation)
HDD
BD-R
RAM
-RW (VR) R
-RW (VF)
BD-RE
CARD
EXPOSURE
The exposure bar appears in the
LCD monitor.
When the subject is lit from the rear,
this function will compensate for
lighting so that the subject is not too
dark.
Exposure Bar
• Each time you press
EXPOSURE, exposure
adjustment switches between
manual adjustment and
automatic adjustment. The
exposure bar appears only
during manual adjustment.
• When the power is turned off,
exposure adjustment returns to
automatic adjustment.
Hint
If you wish to adjust focus
manually while adjusting
exposure, press FOCUS. The
Compensating for
backlight
manual focus icon lights in orange.
To return to exposure adjustment,
press EXPOSURE.
67
Page 68

Various Recording Techniques
1
During recording pause or recording,
press
.
Selecting a Recording
Mode to Match the
Conditions
(Program AE)
HDD
BD-R
RAM
-RW (VR) R
-RW (VF)
BD-RE
CARD
BLC
The backlight compensation
icon appears in the LCD
monitor.
The camcorder automatically gauges
the subject and surrounding
conditions and determines the
optimal settings for recording (during
Backlight compensation icon
• Each time you press BLC, the
backlight setting turns On or
Off. The backlight
compensation icon appears
only when this function is On.
• When the power is turned off,
the backlight compensation
setting returns to Off.
Auto). However, you can also select a
recording mode that better suits the
situation for even clearer images.
Recording mode
Auto (No icon appears.)
Portrait
Makes the subject, such as a
person or pet, stand out from a
blurred background.
Spotlight
Prevents overexposure of the
subject in strong light, such as
at a wedding or on stage.
Sand&Snow
Prevents underexposure of the
subject in very bright
conditions, such as at the beach or on
a ski slope.
Low Light
Allows you to record in dark
places with limited light.
You can use the LCD monitor as a
light source to record the scene by
turning the LCD monitor 180° (Assist
Light).
68
Page 69

Various Recording Techniques
Selecting a recording
1
During recording pause, press
.
2
Select “Camera Functions Setup”
“Program AE” a recording mode
3
Press the confirmation button to
confirm, then
to end.
Recording Dark
Subjects Using the
LCD Monitor Light
(Assist Light)
1
Repeat steps 1 to 3 on the left
column to select “Low Light” for
recording mode in step 2.
2
Rotate the LCD monitor 180° so that
it faces the same direction as the
lens.
HDD
BD-R
RAM
-RW (VR) R
-RW (VF)
BD-RE
CARD
mode
MENU
MENU
The selected recording mode
(other than Auto) appears in the
LCD monitor (p.42).
• The recording mode is retained
in memory even when the
power is turned off.
You can use the LCD monitor as a
light source which allows you to
record a subject up to 3.2 feet (1 m)
away even in a dark place.
To check images, use the viewfinder
(p.20).
Note
When recording in dark places,
after-images may appear if the
subject is moving or if camera
shake occurs. Use a tripod for best
results.
The LCD monitor will light
white.
Note
Moving subjects or camera shake
may cause after-images to appear.
Use a tripod for best results.
69
Page 70

Various Recording Techniques
Adjusting the Color
(White Balance)
HDD
BD-R
RAM
-RW (VR) R
-RW (VF)
BD-RE
CARD
1
During recording pause, press
.
2
Select “Camera Functions Setup”
“White Balance” a white balance
mode
3
Press the confirmation button to
confirm, then
to end.
Light is required when recording
subjects. While the naked eye
perceives colors as they are, images
recorded by a camera may appear
redder or bluer than they actually are.
To record white colored subjects as
white images, adjust the white
balance.
The camcorder normally adjusts the
color automatically (during Auto).
Change the white balance setting
according to the recording conditions.
White balance mode
Selecting a white
balance mode
MENU
MENU
The selected white balance mode
(other than Auto) will appear on
the screen (p.42).
• The white balance mode is
retained in memory even when
the power is turned off.
Auto (No icon appears.)
Set
When recording sunsets and
sunrises, recording in shade,
and recording a stage lit with a spot
light, you can manually adjust white
balance to match the light source or
situation.
Outdoors
To record in fine weather.
Indoor 1
To record under incandescent
light, halogen light or soft
fluorescent light.
Indoor 2
To record under bright
fluorescent light
Note
Do not block the infrared sensor
with your hand or other things to
obtain a good cast for your
recording.
Infrared sensor
70
Page 71

Various Recording Techniques
Setting the white
1
Point the camcorder at the white
object so that it fills the screen.
2
During recording pause, press
.
3
Select “Camera Functions Setup”
“White Balance” “Set”
4
Press the confirmation button.
5
Press the confirmation button again,
and continue holding the button
down until
stops flashing and
lights steadily.
6
Press to end, or to redo, repeat
step 5.
balance manually
(Set)
Prepare a white object such a thick
sheet of white paper that is not
translucent.
Thick white
paper
• The white balance setting
selected in “Set” is retained in
memory until the setting is
changed again.
• In order to accurately adjust
the color, readjust the settings
in “Set” each time the
recording conditions change.
If the power is turned off while
white balance is in “Set”
mode, “ ” flashes in the
LCD monitor the next time the
power is turned on to remind
you. As the previous setting is
retained in memory, redo the
settings if needed.
MENU
“ ” flashes in the LCD
monitor.
“”
The white balance setting is
complete.
Notes
• It may be difficult to perform this
setting in dark places. Also if the
zoom bar is positioned in the
digital range (p.62), you may not
be able to set the white balance. If
white balance settings cannot be
accomplished, “ ” will
continue to flash. Return the
zoom to the optical range and
redo the settings in a bright
environment.
• If the “Set” settings are not
completed within a few moments,
the camcorder returns to
recording pause mode and “ ”
flashes in the LCD monitor. Redo
the settings from step 1.
71
Page 72

Various Recording Techniques
Using the Electronic
Image Stabilizer (EIS)
1
During recording pause, press
.
2
Select “Camera Functions Setup”
“EIS” “On”/“Off”
3
Press the confirmation button to
confirm, then
to end.
HDD
BD-R
RAM
-RW (VR) R
-RW (VF)
BD-RE
Displaying Recording
Guidelines
(Auxiliary Line)
1
During recording pause, press
.
2
Select “Camera Functions Setup”
“Auxiliary Line” “On”/“Off”
3
Press the confirmation button to
confirm, then
to end.
HDD
BD-R
RAM
-RW (VR) R
-RW (VF)
BD-RE
CARD
We recommend you stabilize the
camcorder using both hands and
EIS corrects for fuzziness in an image
when you zoom in on a subject.
We recommend turning EIS Off when
you position the camcorder on a table
or use a tripod when recording.
Turning EIS Off/On
MENU
When the function is turned On,
“ ” appears in the LCD
monitor (p.42).
MENU
support your arms against your
body when recording.
• EIS may not function correctly
when a tele-conversion lens or
wide-conversion lens is used.
• When using a card (recording
stills), EIS cannot be set.
• Subjects may be distorted or blur
while EIS is On due to the nature
of the image sensor (CMOS
sensor), which is not a
malfunction. Also refer to
“Troubleshooting” (p.140).
• EIS is retained in memory
Notes
• When EIS is active, there will be
• Even if EIS is turned On, the
even when the power is turned
off.
• If “Off” is selected, be sure to
return the setting to “On”
afterwards, if you do not
normally use a tripod, etc.
a slight divergence between the
actual camera movement and the
on-screen movement.
camera movement may not be
corrected if the movement is too
excessive.
You can display recording guidelines
to help compose your shots.
Turning recording
guidelines On/Off
MENU
When “On” is selected, vertical
and horizontal guidelines appear
in the LCD monitor.
MENU
72
Page 73

Various Recording Techniques
Reducing Wind Noise
During Recording
1
During recording pause, press
.
2
Select “Camera Functions Setup”
“MIC. Filter” “On”/“Off”
3
Press the confirmation button to
confirm, then
to end.
HDD
BD-R
RAM
-RW (VR) R
-RW (VF)
BD-RE
Restoring all the
Recording Settings to
Default (Full Auto)
1
During recording pause or recording,
press
.
HDD
BD-R
RAM
-RW (VR) R
-RW (VF)
BD-RE
CARD
When recording sound from the builtin microphone, you can reduce wind
noise in the recording when the MIC.
filter is On. Lower frequencies noise
is eliminated and the target sound
becomes clearer.
Turning the MIC. filter
On/Off
MENU
You can reset the following manually
adjusted recording settings to their
defaults with the press of a single
button.
Function Default See
Focus Auto p.65
Exposure Auto p.66
BLC (Backlight) Off p.67
Program AE
(recording mode)
White Balance Auto p.70
EIS (Electronic
Image Stabilizer)
MIC. Filter Off p.73
Auto p.68
On p.72
MENU
When the function is turned On,
“ ” appears in the LCD
monitor (p.42).
• The MIC. filter setting is
retained in memory even when
the power is turned off.
• If you set this function to
“On”, it is recommended to set
the function to “Off” after
recording before turning off
the power unless you always
intend to use this function.
Note
The MIC. filter does not work if you
are using an external microphone
(p.78).
Setting the recording
settings to full auto
FULL AUTO
“FULL AUTO” appears in the
LCD monitor for a while and the
settings are reset to their default
settings.
73
Page 74

Various Recording Techniques
Using the Flash
1
During recording pause, press
.
2
Select “Camera Functions Setup”
“Flash” a flash mode
CARD
3
Press the confirmation button to
confirm, then
to end.
As shutter speed will slow down
when still photos are recorded in dim
lighting, camera shake may easily
occur. We recommend you use a flash
in this case.
Normally, the flash fires
automatically depending on the
recording conditions (during Auto).
You can also set the flash to On
(always fires) or Off (does not fire).
Flash mode
MENU
• To check where the flash icon
appears in the LCD monitor,
see (p.42).
• The flash setting is retained in
memory even when the power
is turned off.
• If “Off” or “On” is selected,
and you do not plan to record
with that flash mode all the
time, we recommend you
return the setting to “Auto”
after recording and before
turning off the power.
Auto
The flash fires only when necessary.
When the flash is needed, “ ”
appears in the LCD monitor when you
press PHOTO halfway, and then the
flash fires when you press PHOTO
all the way.
On
“ ” is displayed in the LCD
monitor all the time. The flash always
fires when you fully press PHOTO.
Off
“ ” is always displayed in the
LCD monitor and the flash will not
fire.
Hints
• There may be cases when the
recorded pictures are out-offocus in dark places even if the
flash is used. We recommend
you shine a light on the subject
for recording in dark places.
• “ ” flashes in the LCD
monitor while the flash is
recharging and the flash will
not fire.
• When recording stills up close,
set “Flash” setting to “Off”. If
the subject is too close, image
smearing may occur.
Selecting a flash mode
MENU
74
Notes
• When a conversion lens is
attached, the flash cannot be
used. Adjust the “Flash” setting
to “Off”.
Page 75

Various Recording Techniques
• Although the flash range differs
Turning Off the
Recording Indicator
Beneath the Lens
1
During recording pause, press
.
2
Select “Initial Setup” “Record
LED” “Off”/”On”
3
Press the confirmation button to
confirm, then
to end.
HDD
BD-R
RAM
-RW (VR) R
-RW (VF)
BD-RE
according to the subject, as a
reference, its range is about 3.2–
8.2 feet (1–2.5 m) in dark places.
• Although the amount of light
emitted will automatically be
adjusted at time of emission, the
flash may not be sufficiently
adjusted if the distance to the
subject is too distant or too near.
• In bright or backlit conditions, it
may be difficult to derive the full
effect of the flash.
The recording indicator beneath the
lens lights red while recording to
indicate that you are recording.
You can turn the indicator off when
recording through reflective objects
such as glass or a fish tank, etc., so its
reflection is not recorded.
• When recording consecutive
shots using the flash, the flash
may not fire or the amount of
light emitted may not be
sufficiently adjusted. After using
the flash to record, it is
recommended that you wait for a
while and then press PHOTO to
record again.
• Do not emit the flash close up in
front of a person’s eyes. Doing so
may cause eyesight damage.
Particularly when recording
infants using the flash, record at a
distance greater than 3.2 feet (1
m) away.
• Do not fire the flash at the driver/
rider of a moving vehicle or
Turning Off/On the
recording indicator
MENU
MENU
• The recording indicator setting
is not displayed in the onscreen information.
• Even if the recording indicator
is set to “Off”, it will still light
while the self-timer is counting
down (p.77).
bicycle, etc. Doing so will
temporary blind the driver and
may result in accident.
• Do not use the flash in locations
where flammable or combustible
gas is present. Doing so may
cause the gas to ignite or explode.
75
Page 76

Various Recording Techniques
Changing the Movie
Quality
HDD
BD-R
RAM
-RW (VR) R
-RW (VF)
BD-RE
1
During recording pause, press
.
2
Select “Record Functions Setup”
“HD Video Mode” (When HDD or
BD)/”SD Video Mode” (When DVD)
a movie quality option
Select “Record Functions Setup”
“HD Video Mode” (When BD)/”SD
Video Mode” (Wh
en DVD)
a movie quality option
DVD Movie Quality
(SD Video Mode) and
Recording Time
You can change the movie recording
quality to make high quality
recordings or lower the quality to
record over longer periods of time.
HD: High Definition
SD: Standard Definition
HDD Movie Quality
SD
Video
Mode
SX*
SF FINE Approx. 30 mins.
*1 Of one side of a disc if a double-sided
disc is used.
*2 In high temperature environments,
the image quality may be degraded to
an SF equivalent.
2
Explana-
tion
XTRA Approx. 20 mins.
Recording
time*
1
(HD Video Mode) and
Switching Movie Quality
Recording Time
(DZ-BD7HA)
HD
Video
Mode
HX* High Approx. 4 hrs.
HF STD Approx. 5 hrs.
HS
* In high temperature environments, the
image quality may be degraded to an
HF equivalent.
Explana-
tion
Extended
recording
Recording time
Approx. 8 hrs.
BD Movie Quality
(HD Video Mode) and
MENU
DZ-BD7HA
DZ-BD70A
Recording Time
HD
Video
Mode
HX*
HF STD Approx. 80 mins.
HS
*1 Of one side of a disc if a double-sided
disc is used.
*2 In high temperature environments,
the image quality may be degraded to
an HF equivalent.
Explana-
2
Extended
recording
Recording
tion
High Approx. 60 mins.
Approx. 120 mins.
time*
1
76
Page 77

Various Recording Techniques
3
Press the confirmation button to
confirm, then
to end.
Using the Self-Timer
1
During still picture recording pause,
press
.
2
Select “Record Functions Setup”
“Self Timer” “On”
3
Press the confirmation button to
confirm, then
to exit the
menu.
4
Press
halfway to adjust the
focus, then press it all the way down.
CARD
MENU
The selected movie quality will be
displayed in the LCD monitor
(p.42).
• The movie quality setting is
retained in memory even if the
power is turned off.
• When a BD is loaded in the
camcorder, and the BD is replaced
with another BD, the movie
quality setting will not change.
• When a DVD is loaded in the
camcorder, and the DVD is
replaced with another DVD or a
double-sided DVD is reversed, the
movie quality setting will not
change.
You can use the self-timer to record
still photos.
The self-timer is set and “<10”
appears in the LCD monitor
MENU
MENU
(p.42)
.
• When a DVD is replaced with a
BD, the movie quality will be
changed to the most recent BD
setting (and vice versa).
PHOTO
A countdown starts. In the LCD
monitor, the countdown is
shown as follows: “
…. The photo will be recorded
about 10 seconds later.
During countdown, the
recording indicator on the lens
side also flashes.
• To cancel the countdown and
<
return to “
PHOTO or
• The self-timer operates every
time PHOTO is fully pressed
and will not be set to “Off”
until the following is
conducted:
10”, press
<
.
10”, “<9”,
– Set the self-timer to “Off” in
the menu.
– Turn off the power.
– Switch to movie recording.
77
Page 78

Various Recording Techniques
Using an External
Microphone
HDD
BD-R
RAM
-RW (VR) R
-RW (VF)
BD-RE
You can obtain clearer recording
sounds by connecting a commercially
sold external microphone to the
camcorder’s MIC connector.
Note
When connecting a microphone,
open the cover as in the “Correct”
example.
Correct
To MIC
jack
Incorrect
• Only microphones with plug-in
power can be used.
• Non plug-in power microphones
are unusable.
• Before recording, be sure to switch
on the external microphone.
• When the external microphone is
connected, the internal microphone
does not operate.
78
Page 79

Dubbing on BD/DVD (DZ-BD7HA)
HDD
Dubbing on BD/DVD (DZ-BD7HA)
This camcorder allows you to choose
from four options when dubbing images
recorded on HDD to a BD/DVD.
Dubbing options
•“New”
Among the scenes recorded to the
HDD, scenes which have not yet been
dubbed to BD/DVD are dubbed in
order from the first scene.
•“Date”
Dubs all scenes recorded on the HDD
on the same date to a BD/DVD,
beginning with the first scene.
•“All”
Time required for
dubbing
Required time estimates for dubbing
scenes approx. 60 minutes long are as
follows:
Disc type
HD/SD
Video Mode
HX
HF
HS
SX/SF
BD DVD
Approx. 30
mins.
Approx. 22
mins.
Approx. 15
mins.
—
Approx. 120
—
—
—
mins.
Dubs all scenes recorded on the HDD
to a BD/DVD, beginning with the first
scene.
• “Select”
You can select your favorite scenes
from all those recorded on the HDD,
for dubbing.
Discs and picture quality
for dubbing
• Dubbing to a BD disc
You can dub scenes in the original
recorded quality.
• Dubbing to a DVD disc
• HD quality is converted to SD
quality before dubbing of scenes.
• The quality mode can be selected
When the dubbing is not
completed on one disc
If the data cannot be stored into a
single BD/DVD, dubbing can be
conducted in one of the two following
ways.
• With auto divide
The scene capacity is automatically
calculated and dubbed as much as
possible into a single disc. This means
that the disc may end with only part of
the scene dubbed.
When dubbing to BD with HX
Video Mode
Scene 1 Scene 2
50 mins.
10
mins.
50 mins.
when dubbing.
Disc 1
Disc 2
10 minutes will remain.
79
Page 80

Dubbing on BD/DVD (DZ-BD7HA)
After dubbing to one disc, follow the
screen message to continue dubbing
the remaining scenes or time on the
next disc. The screen message to
continue dubbing on the next disc will
reappear, until dubbing is complete.
• No auto divide
The maximum number of scenes for
one disc will be dubbed.
HDD/BD/DVD/Card" (p.169).
z In “No auto divide” mode, dubbing
will not be possible if the length of
a scene or scenes to be dubbed
exceeds the storage capacity for a
single BD/DVD. Switch the mode
to “With auto divide”, or divide the
scene (p.99) before dubbing.
When dubbing to a BD with HX
VIDEO Mode
Scene 1 Scene 2
50 mins. 60 mins.
Hints for dubbing
z The maximum number of scenes
that can be dubbed will vary
depending on the BD/DVD used
(p.170).
z Dub marks “ ” appear for the
thumbnails of the scenes which
have already been dubbed.
Disc 1
10 minutes will remain.
Disc 2
Before you begin
z Prepare a recordable disc (p.30).
z Be sure to use the AC adapter/
charger to power the camcorder
during dubbing. Dubbing is not
possible with a battery connected.
z If power is turned off and dubbing
is interrupted midway, proper
dubbing will not be possible.
z During a single dubbing, dubbing
to both BD and DVD discs is not
possible. To dub to multiple discs,
prepare either multiple BD or
multiple DVD discs.
z For details on the recording time
for a scene that can be dubbed on
one disc, see "Storage capacity of
80
Page 81

81
Dubbing on BD/DVD (DZ-BD7HA)
About the playlist (p.94)
for dubbing
z With this camcorder, the scenes on
the HDD will be dubbed to a BD/
DVD in the order they are
displayed on HDD Disc
Navigation screen. To dub the
scenes in a different order, create a
playlist in which the scenes are
registered in the desired order of
dubbing (p.95), and then execute
dubbing.
z If you combine scenes with
different recording dates on a
playlist, and dub the combined
scene to a DVD-RAM/DVD-RW
(VR mode) disc, the scenes will be
dubbed separately for each date.
However, if a combined scene is
subsequently divided, the scenes
may not be dubbed separately for
each date.
About edited scenes such as
divided
(p.99)
, combined
(p.100)
, and faded
(p.101)
z If you divide a scene using the
“Edit” function, and then dub both
the divided scenes to a DVD, the
scene will be dubbed as one scene,
without the division.
z If you dub scenes combined using
the “Edit” function to a DVD-RW
(VF mode)/DVD-R, the two scenes
immediately before the
combination (sometimes more than
two scenes) will be dubbed.
z The fade effect on edited scenes on
the HDD will not be reflected in
the scenes if they are dubbed on a
BD-R/DVD-RW (VF mode)/
DVD-R.
Notes on dubbing
z A BD-R/DVD-RW/DVD-R
dubbed on this camcorder will not
be automatically finalized. To play
it back on a BD/DVD player/
recorder, be sure to finalize it on
this camcorder first.
z The time shown during dubbing is
approximate. If the number of
scenes on the HDD is too large, or
the temperature of the camcorder
becomes too high, the required
recording time may be longer than
the time indicated on the screen.
z Please note that Hitachi will not
accept any responsibility for
compensation for loss of data, or
direct or indirect damage if
dubbing is not performed normally
due to a fault in this camcorder.
z We recommend first confirming
that the dubbed disc can be played
back normally before deleting
scenes on the HDD dubbed.
Page 82

Dubbing on BD/DVD (DZ-BD7HA)
First Dubbing (“New”)
1
Connect the AC adapter/charger to
the camcorder (p.37).
2
Turn the power switch to “MODE”
until the HDD indicator lights (p.25).
3
Press
.
4
Select “New”, then press the
confirmation button.
5
Select “BD” or “DVD”, then press the
confirmation button.
6
Choose a disc for dubbing and insert
it into the camcorder (p.33).
7
Select “With auto divide” or “No
auto divide”, then press the
confirmation button.
8
Select “Execute“, then press the
confirmation button.
9
When another disc is needed to
continue dubbing, a message screen
requesting another blank disc
appea
rs. Replace a disc with a new
one.
10
After the dubbing is complete, the
confirmation screen whether or not
you delete the dubbed scenes
ap
pears.
11
Remove the disc.
This option allows you to dub scenes
which were recorded to the HDD and
have not yet been dubbed to BD/DVD.
• If a DVD is loaded, specify the
Video Mode (“SX” or “SF”).
• If more than one disc is needed,
go to step 7.
• If one disc is sufficient, then go
to step 8.
The confirmation screen appears.
Dubbing starts.
• Dubbing is not possible if a
battery pack is used as a power
source.
DUBBING
The dubbing menu appears.
Dubbing Menu
New
Date
Dubbing the scene which isn't
dubbed in HDD.
ENTER
EXIT
All
Select
• If you wish to erase the dubbed
scenes, select “Yes”.
• If you wish to leave them on the
HDD, select “No”.
• Or press to end.
82
Page 83

83
Dubbing on BD/DVD (DZ-BD7HA)
This option allows you to collectively
dub all scenes recorded on the HDD
on the same day.
Dubbing All Scenes
Recorded on the Same
Day (“Date”)
1
Connect the AC adapter/charger to
the camcorder (p.37).
• Dubbing is not possible if a
battery pack is used as a power
source.
2
Turn the power switch to “MODE”
until the HDD indicator lights (p.25).
3
Press
DUBBING
.
The Dubbing Menu appears.
Hints
• You can also display the
Dubbing Menu from the Disc
Navigation screen. Press DISC
NAVIGATION, press MENU,
select “Scene” “Dubbing”
“Dubbing Menu”, and then press
the confirmation button.
• If you want to use “New”
dubbing for a dubbed scene,
clear the dub marks (p.87).
• If you wish to quit dubbing
while dubbing, press
.
The confirmation message
appears. Select “Yes” and press
the confirmation button to quit
dubbing.
4
Select “Date”, then press the
confirmation button.
The “Select Date” screen
appears.
5
Select a date for dubbing, then press
the confirmation button.
6
Select “BD” or “DVD”, then press
the confirmation button.
7
Choose a disc for dubbing and insert
it into the camcorder (p.33).
• If a DVD is loaded, specify the
Video Mode (“SX” or “SF”).
• If more than one disc is
needed, go to step 8.
• If one disc is sufficient, then
go to step 9.
8
Select “With auto divide” or “No
auto divide”, then press the
confirmation button.
The confirmation screen
appears.
9
Select “Execute“, then press the
confirmation button.
Dubbing starts.
10
When another disc is needed to
continue dubbing, a message screen
requesting another blank disc
appea
rs. Replace a disc with a new
one.
Total Scenes
001 9/ 1 / 2007
9/ 4 / 2007
9/12 / 2007
10/11 / 2007
11/ 1 / 2007
15min25sec
003 1
1hour55min37sec004 3
55min36sec
005 12
006 38
5min27sec
32min45sec
002 10
20
1hour 1min 6sec
RETURNENTER
9/ 3 / 2007
Select Date
Page 84

Dubbing on BD/DVD (DZ-BD7HA)
11
After the dubbing is complete, the
confirmation screen whether or not
you delete the dubbed scenes
ap
pears.
12
Remove the disc.
Dubbing All Scenes
Recorded on the HDD
(“All”)
1
Connect the AC adapter/charger to
the camcorder (p.37).
2
Turn the power switch to “MODE”
until the HDD indicator lights (p.25).
3
Press
.
4
Select “All”, then press the
confirmation button.
5
Select “BD” or “DVD”, then press the
confirmation button.
6
Choose a disc for dubbing and insert
it into the camcorder (p.33).
7
Select “With auto divide” or “No
auto divide”, then press the
confirmation button.
• If you wish to erase the dubbed
scenes, select “Yes”.
• If you wish to leave them on
the HDD, select “No”.
You can dub all scenes recorded on
the HDD from the beginning in
sequence.
• Or press to end.
Hints
• You can also display the
Dubbing Menu from the Disc
Navigation screen. Press DISC
NAVIGATION, press MENU,
select “Scene” “Dubbing”
“Dubbing Menu”, and then press
the confirmation button.
• If you wish to quit dubbing
while dubbing, press
The confirmation message
appears. Select “Yes” and press
the confirmation button to quit
dubbing.
.
• Dubbing is not possible if a
battery pack is used as a power
source.
DUBBING
The Dubbing Menu appears.
The “Dubbing(All)” screen
appears.
84
• If a DVD is loaded, specify the
Video Mode (“SX” or “SF”).
• If more than one disc is needed,
go to step 7.
• If one disc is sufficient, then go
to step 8.
The confirmation screen appears.
Page 85

85
Dubbing on BD/DVD (DZ-BD7HA)
You can select your favorite scenes
from all those recorded on the HDD,
for dubbing.
8
Select “Execute“, then press the
confirmation button.
Dubbing starts.
9
When another disc is needed to
continue dubbing, a message screen
requesting another blank disc
appea
rs. Replace a disc with a new
one.
10
After the dubbing is complete, the
confirmation screen whether or not
you delete the dubbed scenes
ap
pears.
• If you wish to erase the dubbed
scenes, select “Yes”.
• If you wish to leave them on the
HDD, select “No”.
11
Remove the disc.
• Or press to end.
Hints
• You can also display the
Dubbing Menu from the Disc
Navigation screen. Press DISC
NAVIGATION, press MENU,
select “Scene” “Dubbing”
“Dubbing Menu”, and then press
the confirmation button.
• If you wish to quit dubbing
while dubbing, press
.
The confirmation message
appears. Select “Yes” and press
the confirmation button to quit
dubbing.
Dubbing Scenes
Selected (“Select”)
1
Connect the AC adapter/charger to
the camcorder (p.37).
• Dubbing is not possible if a
battery pack is used as a power
source.
2
Turn the power switch to “MODE”
until the HDD indicator lights (p.25).
3
Press
DUBBING
.
The Dubbing Menu appears.
4
Select “Select”, then press the
confirmation button.
5
Select “BD” or “DVD”, then press the
confirmation button.
6
Choose a disc for dubbing and insert
it into the camcorder (p.33).
• If a DVD is loaded, specify the
Video Mode (“SX” or “SF”).
7
Select “With auto divide” or “No auto
divide”, then press the confirmation
button.
The confirmation screen appears.
Page 86

Dubbing on BD/DVD (DZ-BD7HA)
8
Select a scene for dubbing by pressing
, then press the
confirmation button.
9
Select “Execute“, then press the
confirmation button.
10
When another disc is needed to
continue dubbing, a message screen
requesting another blank disc
appea
rs. Replace a disc with a new
one.
11
After the dubbing is complete, the
confirmation screen whether or not
you delete the dubbed scenes
ap
pears.
12
Remove the disc.
SELECT
Dubbing(Select)
All Scenes
10/ 1/2007
ENTER RETURN
10:10:10AM HX
SEL
SELECT
1hour 3min 30sec
0010/0027
Hints
• You can also display the
Dubbing Menu from the Disc
Navigation screen. Press DISC
NAVIGATION, press MENU,
select “Scene” “Dubbing”
“Dubbing Menu”, and then press
the confirmation button.
• If you wish to quit dubbing
.
Dubbing starts.
while dubbing, press
The confirmation message
appears. Select “Yes” and press
the confirmation button to quit
dubbing.
• If you wish to erase the dubbed
scenes, select “Yes”.
• If you wish to leave them on the
HDD, select “No”.
• Or press to end.
86
Page 87

87
Dubbing on BD/DVD (DZ-BD7HA)
You can display all scenes recorded
on the HDD according to their dubbed
status.
Category Settings
“All”
All scenes will be displayed in
chronological order of recording
regardless of whether they have been
dubbed or not.
“Dubbed”
Only scenes with the “ ” dub
mark will be displayed in
chronological order of recording.
“Un Dubbed”
Only scenes without the “ ” dub
mark will be displayed in
chronological order of recording.
To set “Category”
You can use “New” dubbing again by
clearing the dub mark “ ”.
Displaying only Dubbed or
Not Dubbed Scenes
(Category)
1
Press
DISC NAVIGATION
, then
press
MENU
.
2
Select “Others” “Category”
a Category option
3
Press the confirmation button, then
press
MENU
to end.
• The Category setting will return
to “All” if you exit the DISC
NAVIGATION screen.
Clearing the dub marks
on Thumbnails
(MARK OFF)
1
Press
DISC NAVIGATION
.
2
Choose a scene for which you want to
clear the dub mark, then press
SELECT
, then press
MENU
.
•You can also choose multiple
scenes (p.49).
3
Select “Scene” “Dubbing”
“Mark Off”, then press the
confirmation button.
• The confirmation screen
appears.
4
Select “YES”, then press the
confirmation button.
5
Press to end.
RETURN
Mark Off
Cancel dubbed mark?
ENTER
YES NO
CHECK SCENE
Page 88

Editing
Editing
By using the DISC NAVIGATION
and MENU buttons, you can also edit
recorded scenes. The following edit
functions are available on the
camcorder.
Convenient playback
The following are the functions that
enable you to play back the scenes as
if they were edited without changing
the original data.
z Date (p.93)
You can play back scenes by
specifying the desired recording date.
The scenes are played sequentially
from the earliest one of the date.
z Playlist (p.94)
z Information Display (p.103)
You can choose a scene and check its
recording date and time, image quality
(for movie), length (for movie), and
settings.
z Lock (p.102)
To avoid accidental deletion, you can
choose stills and lock them. (You can
also select all stills and lock them all.)
z Format (p.102)
You can erase all data from the
selected medium.
You can create a playlist by gathering
your favorite scenes to play back.
You can also delete or add scenes on
the created playlist.
z Fade (p.101)
You can add fading to the beginning or
ending of a scene. You can select from
three types of fading effects.
Editing the original data
z Deleting scenes (p.99)
z Dividing a movie (p.99)
z Combing multiple movies
(p.100)
Other editing
z Go To (p.102)
You can jump to the first or last scene
among all scenes on the selected
medium.
88
Page 89

Editing
Menu Items for the Disc Navigation
Function
HDD
BD DVD
Card
Contents Page
-RE
-R
-RAM
-RW (VR mode)
-RW (VF mode)
-R
S
After pressing
Editing zz zz
Scene lock z
Information
display
Creating a
playlist
MENU
on the disc navigation screen, you can use following functions.
zzzzzzzz
zz zz
You can delete unnecessary
*1
scenes, combine scenes, or
divide one scene.
You can lock any scene so that
it will not be deleted by
mistake.
You can display information
on one scene or multiple
scenes, such as image quality,
recording time, etc.
You can create an original
movie by changing the
playback order of scenes.
p.99
p.102
p.103
p.95
Initialization zz zzz z
Protection zz zz
Unprotection zz zz
Remaining
display
(Capacity)
Finalization zz
Unfinalization z
zzzzzzzz
*2
zz
You can delete all data
recorded on the HDD/BD/
DVD/Card.
You can protect the HDD or a
disc to prevent deletion or
editing by mistake.
You can cancel the protection.
The remaining recordable
movie time or number of
recordable stills is displayed.
You can use this camcorder to
finalize any BD-R/DVD-RW/
DVD-R disc recorded on it so
that the disc can be viewed on
another compatible BD/DVD
player or device.
You can unfinalize a DVDRW (VF mode) that was
finalized on this camcorder so
that additional videos can be
recorded on the disc.
p.104
p.105
p.105
p.106
p.113
p.114
89
Page 90

Editing
Function
HDD
BD DVD
Card
Contents Page
-RE
-R
-RAM
-RW (VR mode)
-RW (VF mode)
-R
Repeat play zzzzzzz
Slide show z
You can play back scenes
repeatedly.
You can play back stills in
succession.
*1 Only deletion is possible
*2 Additional recording can be made on a finalized DVD-RW (VR mode).
p.56
p.55
90
Page 91

91
Editing
Menu flows for the disc navigation
After pressing
MENU
on the disc navigation screen, the menu screen appears. The menu
varies depending on the medium as shown below.
To operate the menu, use
&/%/(/'
. See "How to Operate the Menu" (p.57).
z When using HDD (DZ-BD7HA)/BD-RE/DVD-RAM/DVD-RW (VR mode)
a
Scene Edit Delete
(p.99)
Divide
(p.99)
Combine
(p.100)
Fade
(p.101)
Create Playlist*
1
(p.95)
Move*
2
Dubbing
(p.79)
(HDD only)
Dubbing Menu
Mark Off
(p.87)
Detail
(p.103)
Go To
(p.102)
Top
End
Select
(p.49)
Start → Current
Current
→
End
All
Date/Playlist
Select
All Scenes
Date
(p.93)
Playlist
(p.96)
*1 This menu item does not appear while
playlist is displayed.
*2 This menu item appears only while
playlist is displayed.
HDD Setting/
Disc Setting
(BD/DVD)
Finalize Disc
(p.111)
(DVD-RW only)
Format HDD/Disc
(p.104)
Protect HDD/Disc
(p.105)
Unprotect HDD/Disc
(p.105)
Capacity
(p.106)
Update Control Info.
(p.144)
Full Format
(p.155)
(HDD only)
Others Repeat Play
(p.56)
On
Off
Category
(p.87)
(HDD only)
All
Dubbed
Un Dubbed
Page 92

Editing
z When using BD-R/DVD-RW (VF (Video) mode)/DVD-R
Scene Detail
Date Select All Scenes
Go To
(p.102)
Select
(p.93)
Date
(p.103)
(p.49)
z When using a card
Scene Delete
Lock
(p.99)
(p.102)
Top
End
Start → Current
→
Current
All
Set
Cancel
End
Disc Setting
(BD/DVD)
Others Repeat Play
Date Select All Scenes
Card Setting Format Card
Finalize Disc
Unfinalize Disc
(DVD-RW only)
Format Disc
(DVD-RW only)
Capacity
(p.56)
Date
(p.106)
(p.93)
(p.111)
(p.114)
(p.104)
On
Off
(p.104)
Detail
Go To
(p.102)
(p.103)
Top
End
Playback
Setting
Capacity
Slide Show
(p.55)
(p.106)
On
Off
Select
(p.49)
Start → Current
→
Current
All
End
92
Page 93

93
Editing
Switching to the
display arranged by
date (Date)
Choosing Scenes by Date
HDD
BD-R
RAM
-RW (VR) R
-RW (VF)
BD-RE
CARD
Plays back in the order
from the earliest
recorded scene
Recorded on October 20
1
Press
DISC NAVIGATION
, then
press
MENU
.
2
Select “Date/Playlist Select” (or “Date
Select” in case of BD-R/DVD-RW (VF
mode)/DVD-R/Card) “Date”,
then
press the confirmation button.
The “Select Date” screen appears.
3
Select the date you want to watch,
then press the confirmation button.
The disc navigation screen of the
selected program will appear.
Date/Playlist Select
All Scenes
Date
Playlist
ENTER RETURN
Total Scenes
001 9/ 1 / 2007
9/ 4 / 2007
9/12 / 2007
10/11 / 2007
11/ 1 / 2007
15min25sec 20
003 1
004 3
55min36sec
005 27
006 38
1hour30min20sec
1hour40min32sec
002 10
1hour 1min 6sec
1hour55min36sec
RETURNENTER
Date Select
9/ 3 / 2007
SELECT
Disc Navigation
10/ 1/2007
PLAY EXIT
10/ 1/2007
001/0027
10:10:10AM HX
40MIN 30SEC
SEL
Hints
•Pressing on the “Date Select”
screen will restore the disc
navigation screen.
• If you recorded movies in
different Video Mode settings on
the same day, or load a disc
recorded on another device into
the camcorder, the displayed
scenes may not necessarily be a
collection of recordings made on
the same date.
Page 94

Editing
Playlist
HDD RAM
-RW (VR)
BD-RE
What is “Playlist”?
A Playlist is a compilation of scenes from various programs. You can create a
Playlist on this camcorder by gathering your favorite scenes.
Since a Playlist is not created by copying data, very little HDD/disc space is
required to make one. Note, likewise, that deleting scenes from a Playlist will
not increase the remaining HDD/disc capacity for recording.
10/1/2007 11/1/2007
Playlist 1 created
Up to 99 playlists can be created, and
up to 999 scenes can be included in
each playlist.
94
Page 95

95
Editing
Creating a new
Playlist
(Create Playlist)
1
Press
DISC NAVIGATION
.
2
Select the scenes to be included in the
playlist, then press
MENU
.
• You can also select multiple
scenes at the same time (p.49).
3
Select “Edit” “Create Playlist”,
then press the confirmation button.
The “Create Playlist” screen will
appear.
4
To proceed, select “Yes”, then press
the confirmation button.
When creation is complete, the
created playlist will appear on the
Disc Navigation Playlist screen.
Hints
• The scenes that make up a
playlist are not actually copied,
but are linked from their original
data. Deleting a scene from a
playlist will not delete the
original data (scenes) from the
HDD or disc. Likewise, editing
scenes on a playlist will not
affect the original data (scenes).
• If a scene has the fade setting, or
a dub mark “ ”, that
information will also be added to
the playlist.
• You can add other scenes or
remove unnecessary scenes to/
from the created playlist (see
p.96–p.97).
• A number will be included in the
playlist title, as in “Playlist 1”,
“Playlist 2”.
Notes
• If free space available on the
HDD/disc is insufficient, creation
of a new playlist may not be
possible. Delete unnecessary
scenes.
• Choose movies recorded in the
same HD Video Mode setting
(p.76) to include them in a
playlist. Otherwise, a playlist
cannot be created.
Page 96

Editing
Displaying a desired
1
Press
, then
press
.
2
Select “Date/Playlist Select”
“Playlist”, then press the confirmation
button.
3
Select the playlist you want to display,
then press the confirmation button.
1
Press
, then
press
.
2
Select “Date/Playlist Select”
“Playlist”, then press the confirmation
button.
3
Select the playlist you want to edit,
then press the confirmation button.
4
Press
, then select “Playlist”
“Edit”, then press the confirmation
button.
5
Choose a scene you wish to add by
pressing
&/%
, then press the
confirmation button.
Adding scenes to a
Playlist (Playlist)
After selecting the desired playlist, the
disc navigation screen will appear.
DISC NAVIGATION
MENU
Playlist (Edit)
DISC NAVIGATION
MENU
The “Select Playlist” screen
appears.
The “Select Playlist” screen
appears.
The disc navigation screen of the
selected playlist will be displayed.
The targeted playlist screen
appears.
MENU
Hint
To return the disc navigation
screen to let it show all recorded
scenes, select “Date/Playlist
The scenes that can be added are
displayed in the upper row, and the
playlist to be edited appears in the
lower row.
Select” “All Scenes”.
Editing a playlist
z
The procedures for editing playlists
are the same as for scenes. Refer to the
following pages for scene dubbing/
editing to apply the same procedures
to dub/edit a playlist.
Dubbing ............................p.79
Dividing a scene ...............p.99
Deleting scene ..................p.99
Combining scenes ............p.100
Arranging order of scenes p.98
(only on playlist)
Adding fade ......................p.101
Edit Playlist - Select Add Scene
All Scenes
10:10:10AM HX10/ 1/2007
Playlist 01
SEL
SELECT
• You can also choose multiple
scenes (p.49).
40
DELETE MODE EXITENTER
0001/0004
MIN
96
Page 97

97
Editing
Deleting scenes from
Playlist (Edit)
6
Choose the desired insertion position
by pressing
&/%
.
7
Press the confirmation button.
• Repeat steps 5 and 6 to add other
scenes.
8
Press .
The confirmation screen whether
to end appears.
Edit Playlist - Select Insert Point
Playlist 01
All Scenes
003/005
ADD RETURN
Scene to be
added
Insertion
position
Hint
Pressing in the middle of adding
scenes will display the exit
confirmation screen. Select “Yes”
to exit. Select “No” to restore the
“Edit Playlist” screen.
Note
You cannot add movies recorded in
different HD Video Mode settings
(p.76).
1
Press
DISC NAVIGATION
, then
press
MENU
.
2
Perform steps 2–4 in "Adding scenes
to a Playlist (Edit)" (p.96).
3
Press
'
to move the cursor to the
lower row, then choose a scene you
wish to delete by pressing
&/%
.
• You can also choose multiple
scenes (p.49).
4
Press the confirmation button.
• Repeat step 3 to delete other
scenes.
5
Press .
The confirmation screen whether
to end appears.
Page 98

Editing
Arranging the order of
1
Press
, then
press
.
2
Select “Date/Playlist Select”
“Playlist”, then press the confirmation
button.
3
Select the playlist you want to edit,
then press the confirmation button.
4
Select the scene you want to move,
then press
.
5
Select “Scene” “Edit” “Move”,
then press the confirmation button.
6
Select the position where you wish to
move the scene, then press the
confirmation button.
7
Select “Yes”, then press the
confirmation button.
1
Press
, then
press
.
2
Select “Date/Playlist Select”
“Playlist”, then press the confirmation
button.
3
Select the playlist you wan to delete,
then press the confirmation button.
4
Press
, then select “Playlist”
“Delete”, then press the
confirmation button.
Deleting a Playlist
scenes in the Playlist
(Edit)
DISC NAVIGATION
MENU
The “Select Playlist” screen
appears.
The targeted playlist screen
appears.
You can also select multiple
scenes (p.49).
The “Move Scene” screen appears.
MENU
The confirmation screen appears.
The scenes of the playlist are
rearranged and the screen returns
to the playlist screen.
• Select “No” to quit the move.
(Delete)
Even if you delete a playlist, the
original scenes stored on the HDD/
disc will not be deleted.
DISC NAVIGATION
Hint
If any playlist is deleted, the
number of playlists will
automatically be revised. (For
example, if the No.2 playlist is
deleted, the No.3 playlist will
become the No.2 playlist, etc.)
MENU
The “Select Playlist” screen
appears.
The targeted playlist screen
appears.
MENU
After deletion, the disc navigation
screen will be restored.
• To quit deletion, press
of the confirmation button.
instead
98
Page 99

99
Editing
You can delete unnecessary scenes.
You can divide a scene into two parts.
To delete an unnecessary portion of a
scene, first divide the scene at the
point where you want to end or start
saving, and then delete the
unnecessary portion.
Deleting Scenes
(Edit - Delete)
1
Press
DISC NAVIGATION
.
2
Select the scene you want to delete,
then press
MENU
.
• You can also choose multiple
scenes (p.49).
3
y
For a card
Select “Scene” “Delete”, then
press the confirmation button.
y
For others
Select “Scene” “Edit”
“Delete”, then press the
confirmation button.
The confirmation screen appears.
4
Select “Yes”, then press the
confirmation button.
The selected scene will be deleted,
then the display returns to the disc
navigation screen.
HDD RAM
-RW (VR)
BD-RE
CARD
Hints
• You can also delete a scene by
pressing DELETE on the
remote control after placing the
cursor on the scene you want to
delete on the disc navigation
screen.
• To delete an unwanted part of a
scene on HDD/BD-RE/DVDRAM/DVD-RW (VR mode)
disc, divide the scene first, then
delete the unnecessary part.
Dividing a Movie
(Edit - Divide)
1
Press
DISC NAVIGATION
.
2
Select the scene you want to divide,
then press
MENU
.
3
Select “Scene” “Edit”
“Divide”, then press the confirmation
button.
The selected scene is played.
4
When you reach the desired point of
division, press
SELECT
.
The confirmation screen appears.
Notes
• If the time of the deleted scenes
(stills) is quite short, the
remaining free space of the HDD/
BD/DVD/card may not show any
increase in the HDD/disc or card
remaining space indicator.
• The locked scenes on a card
cannot be deleted (p.102).
• If you delete all data on the HDD/
BD/DVD/card, formatting the
HDD/BD/DVD/card is
recommended (p.104).
HDD RAM
-RW (VR)
BD-RE
Page 100

Editing
5
Select “Yes”, then press the
confirmation button.
Combining Multiple
Scenes
(Edit -Combine)
1
Press
.
2
Select the scenes you want to combine,
then press
.
3
Select “Scene” “Edit”
“Combine”, then press the confirmation
button.
4
Select “Yes”, then press the
confirmation button.
HDD RAM
-RW (VR)
BD-RE
The selected scene will be divided,
then the display will return to the
disc navigation screen.
• Select “No” to quit division. The
playback pause screen will
appear. Press
Hints
• Search and frame advance (p.54)
are useful when designating
division points.
• If a fade has been added to the
original scene, the “IN” effect
will be added to the first half of
the scene, and the “OUT” effect,
to the latter half (p.101).
• Combining scenes that were
divided will restore the original
scene.
Notes
• Frame by frame and slow
forward/reverse playback while
dividing scenes will forward or
reverse a movie in increments of
0.5 seconds.
to quit.
If you have recorded numerous short
scenes, combining them can be
convenient.
Be sure to select consecutive multiple
scenes. When using the HDD,
combining scenes is possible only if
“Category: All” is specified (p.87).
Stills cannot be combined.
• Choose more than one scene
• You cannot proceed to next step
The confirmation screen appears.
DISC NAVIGATION
MENU
(p.49).
if you have chosen only one
scene.
• If the division point is at the start
or end of a scene, a message
indicating this appears and
division cannot be made.
• A movie scene of 0.5 seconds or
less cannot be divided.
• If free space available on the
HDD/BD/DVD is insufficient,
division will not be possible.
Delete unnecessary scenes.
• If you divide a scene with the dub
mark “ ”, the dub marks will
appear on both divided scenes.
100
The scenes are combined.
The display returns to the disc
navigation screen.
Hint
With fade effects, the “IN” effect
of the first scene in the selected
range and the “OUT” effect of the
last scene will be attached to the
combined scene.
 Loading...