

Page 1
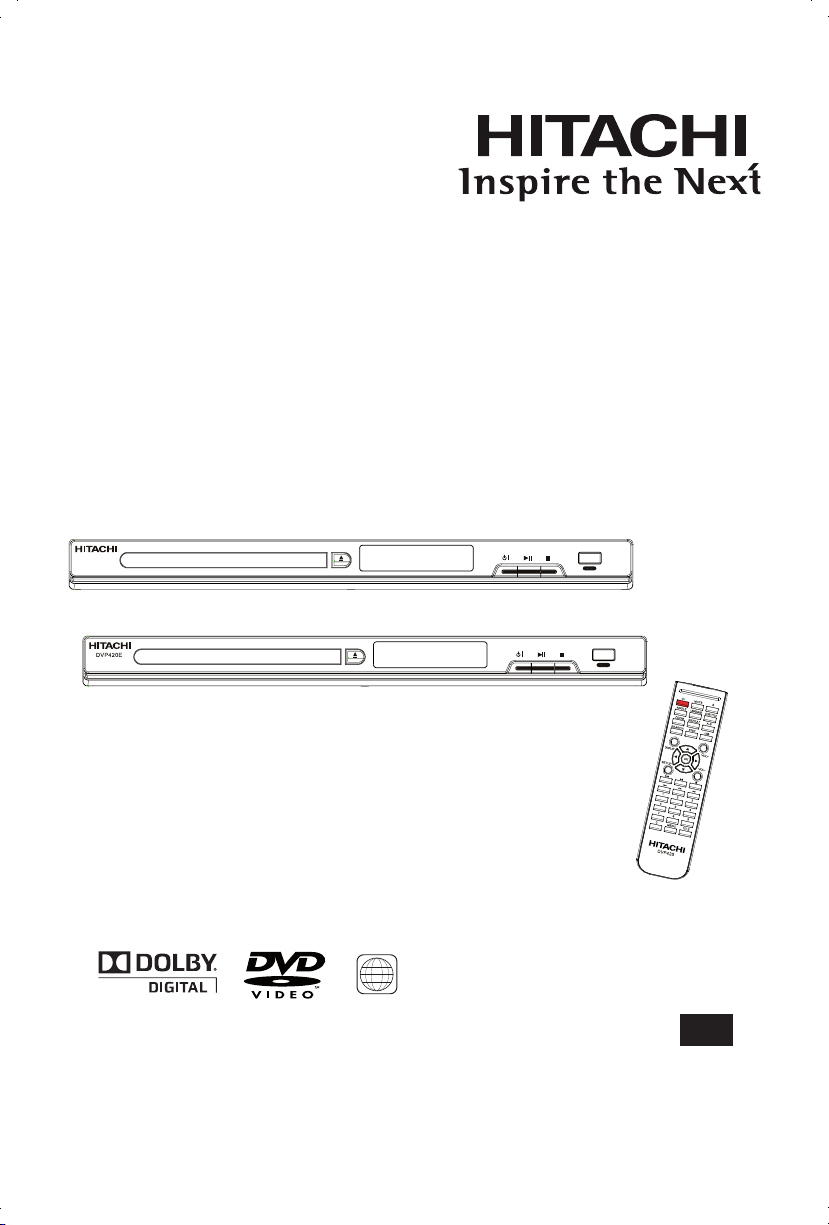
Instruction Manual
DVD Player
Model No:
DVP420UK / DVP420E
GB
Before connecting, operating or adjusting this product, please
read these instructions completely. Please keep this manual for
future reference.
2
DVP420UK
Page 2
GB-2
Safety Information and
Tabl e of C on te nt
Product Introduction and
Setting the Player
Playable Disc / Supportive Formats
Playback Functions
System Set-up
Troubleshooting and
Specification
Important
Notice
Safety Information and Precaution
CAUTION!
THIS PRODUCT UTILIZES A LASER.
USE OF CONTROLS OR ADJUSTMENTS OR PERFORMANCE
OF PROCEDURES OTHER THAN THOSE SPECIFIED HEREIN
MAY RESULT IN HAZARDOUS RADIATION
EXPOSURE.
DO NOT OPEN COVERS AND DO NOT REPAIR YOURSELF.
REFER SERVICING TO QUALIFIED PERSONNEL.
WARNING:
TO REDUCE THE RISK OF FIRE, ELECTRIC
SHOCK OR PRODUCT DAMAGE, DO NOT
EXPOSE THIS APPARATUS TO RAIN, MOISTURE, DRIPPING
OR SPLASHING AND THAT NO OBJECTS FILLED WITH
LIQUIDS, SUCH AS VASES, SHALL BE PLACED ON THE
APPARATUS.
CAUTION: TO REDUCE THE RISK OF ELECTRIC SHOCK, DO
NOT REMOVE SCREWS. NO USER-SERVICEABLE PARTS
INSIDE.
REFER SERVICING TO QUALIFIED SERVICE PERSONNEL.
The lightning flash with arrowhead symbol, within an equilateral
triangle, is intended to alert the user to the presence of uninsulated
“dangerous voltage” within the product’s enclosure that may be of
sufficient magnitude to constitute a rush of electric shock to
persons.
The exclamation point within an equilateral triangle is intended to
alert the user to the presence of important operating and maintenance
(servicing) instructions in the literature accompanying the appliance.
CAUTION!
DO NOT INSTALL OR PLACE THIS UNIT IN A BOOKCASE,
BUILT-IN CABINET OR IN ANOTHER CONFINED SPACE.
ENSURE THE UNIT IS WELL VENTILATED. TO PREVENT RISK
OF ELECTRIC SHOCK OR FIRE HAZARD DUE TO
OVERHEATING, ENSURE THAT CURTAINS AND ANY OTHER
MATERIAL DO NOT OBSTRUCT THE VENTILATION VENTS.
Before moving the unit, ensure the disc tray is empty.
Failure to do so will risk severely damaging the disc and the unit.
Do not place the unit on
amplifiers or equipment that
may become hot.
The heat can damage the unit.
Read these operating instructions carefully before using the unit.
Follow the safety instructions on the unit and the applicable
safety instructions listed below. Keep these operating
instructions handy for future reference.
1) Read these instructions.
2) Keep these instructions.
3) Heed all warnings.
4) Follow all instructions.
5) Do not use this apparatus near water.
6) Clean only with dry cloth.
7) Do not block any ventilation openings. Install in accordance
with the manufacturer’s instructions.
8) Do not install near any heat sources such as radiators, heat
registers, stoves, or other apparatus (including amplifiers) that
produce heat.
9) Protect the power cord from being walked on or pinched
particularly at plugs, convenience receptacles, and the point
where they exit from the apparatus.
10) Only use attachments/accessories specified by the
manufacturer.
11) Use only with the cart, stand, tripod,
bracket, or table specified by the manufacturer,
or sold with the apparatus. When a cart is
used, use caution when moving the cart/
apparatus combination to avoid injury from
tip-over.
12) Unplug this apparatus during lightning storms
or when unused for long periods of time.
13) Refer all servicing to qualified service personnel. Servicing
is required when the apparatus has been damaged in any way,
such as power-supply cord or plug is damaged, liquid has been
spilled or objects have fallen into the apparatus, the apparatus
has been exposed to rain or moisture, does not operate normally,
or has been dropped.
Class 1 Laser Product
Use of controls, adjustments or performance of procedures
other than those specified herein may result in hazardous
radiation exposure.
Caution!
This product utilizes a laser. Use of Controls or Adjustments or
performance of procedures other than those specified herein
may result in hazardous radiation exposure. Do not open cover
and do not repair yourself. Refer servicing to qualified
personnel.
CAUTION
RISK OF ELECTRIC SHOCK
DO NOT OPEN
CLASS 1
LASER PRODUCT
Page 3

GB-3
Safety Information and
Tabl e of C on te nt
Product Introduction and
Setting the Player
System Set-up
Troubleshooting and
Specification
Important
Notice
Playable Disc / Supportive Formats
Playback Functions
Safety Information and Precaution
IMPORTANT!
The mains lead on this equipment may be supplied with a
moulded plug incorporating a fuse, the value of which is
indicated on the pin face of the plug. Should the fuse need to be
replaced, an ASTA or BSI approved BS 1362 fuse must be used
of the same rating. If the fuse cover is detachable never use the
plug with the cover omitted. If a replacement fuse cover is
required, ensure it is of the same colour as that visible on the
pin face of the plug. Fuse covers are available from your
dealer.
DO NOT cut off the mains plug from this equipment. If the plug
fitted is not suitable for the power points in your home or the
cable is too short to reach a power point, then obtain an
appropriate safety approved extension lead or consult your
dealer.
Should it be necessary to change the mains plug, this must be
carried out by a competent person, preferably a qualified
electrician.
If there is no alternative to cutting off the mains plug, ensure that
you dispose of it immediately, having first removed the fuse, to
avoid a possible shock hazard by inadvertent connection to the
mains supply.
IMPORTANT!
The wires in this mains lead are coloured in accordance with the
following code:
Blue : NEUTRAL
Brown : LIVE
As these colours may not correspond to the coloured markings
identifying the terminals in your plug, proceed as follows:
The wire coloured BLUE must be connected to the terminal
marked with the letter N or coloured BLUE or BLACK. The wire
coloured BROWN must be connected to the terminal marked
with the letter L or coloured BROWN or RED.
On no account connect either of these wires to the terminal
marked E or by the earth symbol E or coloured green or
green and yellow.
Alternatively, this equipment may be supplied with a rewireable
plug already fitted, which may be removed if not suitable and an
alternative fitted in accordance with the preceding instructions.
SOME DOS AND DON’TS ON THE SAFE
USE OF EQUIPMENT
This equipment has been designed and manufactured to meet
international safety standards but, like any electrical
equipment, care must be taken if you are to obtain the best
results and safety is to be assured.
*****************************************************************
DO read the operating instructions before you attempt to use
the equipment.
DO ensure that all electrical connections (including the mains
plug, extension leads and inter-connections between the
pieces of equipment) are properly made and in accordance
with the manufacturer’s instructions. Switch off and withdraw
the mains plug before making or changing connections.
DO consult your dealer if you are ever in doubt about the
installation, operation or safety of your equipment.
DO be careful with glass panels or doors on equipment.
DO route the mains lead so that it is not likely to be walked on,
crushed, chafed, or subjected to excessive wear and tear or
heat.
*****************************************************************
DON’T remove any xed cover as this may expose dangerous
voltages.
DON’T obstruct the ventilation openings of the equipment with
items such as newspapers, tablecloths, curtains, etc.
Overheating will cause damage and shorten the life of the
equipment.
DON’T allow electrical equipment to be exposed to dripping or
splashing, or objects lled with liquids, such as vases, to be
placed on the equipment.
DON’T place hot objects or naked ame sources such as
lighted candles or nightlights on, or close to equipment. High
temperatures can melt plastic and lead to res.
DON’T use makeshift stands and NEVER x legs with wood
screws - to ensure
complete safety always t the manufacturer’s approved stand
or legs with the xings
provided according to the instructions.
DON’T use equipment such as personal stereos or radios so
that you are distracted from
the requirements of trafc safety. It is illegal to watch television
whilst driving.
DON’T listen to headphones at high volume, as such use can
permanently damage your
hearing.
DON’T leave equipment switched on when it is unattended
unless it is specically stated
that it is designed for unattended operation or has a stand-by
mode. Switch off using the
switch on the equipment and make sure that your family know
how to do this. Special
arrangements may need to be made for inrm or handicapped
people.
DON’T continue to operate the equipment if you are in any
doubt about it working
normally, or if it is damaged in any way - switch off, withdraw
the mains plug and consult
your dealer.
ABOVE ALL
¬¬--- NEVER let anyone especially children push anything into
holes, slots or any other opening in the case - this could result
in a fatal electrical shock;
--- NEVER guess or take chances with electrical equipment of
any kind
--- it is better to be safe than sorry!
Page 4
GB-4
Safety Information and
Tabl e of C on te nt
Product Introduction and
Setting the Player
Playable Disc / Supportive Formats
Playback Functions
System Set-up
Troubleshooting and
Specification
Important
Notice
Safety Information and Precaution
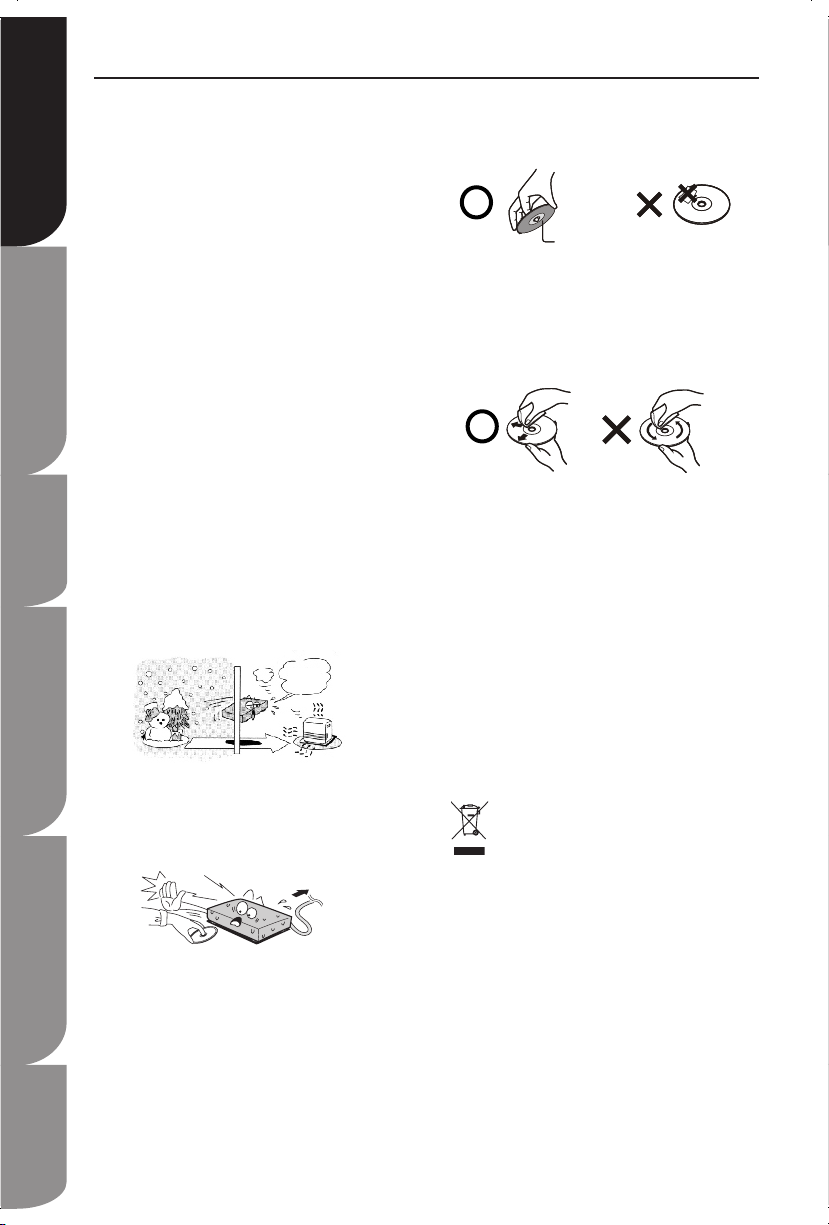
NOTES on HANDLING
The top and rear panels of the unit may become warm •
after a long period of use. This is not a malfunction.
When the unit is not in use, be sure to remove the disc •
and turn off the power.
If you do not use the unit for a long period of time, the •
unit may not function properly in the future. Turn on and
use the unit occasionally.
Do not place foreign objects on the tray.•
LOCATION
Do not locate the unit in places such as:
Near heating devices or in an enclosed vehicle.•
High temperature (40°C or higher) or high humidity •
(90% or higher).
Dirty places.•
Avoid direct exposure to sunlight.•
ELECTRICAL DISTURBANCE
When you place this unit near a TV, radio or VCR, the playback
picture may become poor and the sound may be distorted. In
this case, place the unit away from the TV, radio or VCR.
NOTES ON MOISTURE CONDENSATION
The pickup may suffer from condensation under the following
situations.
When you bring the unit directly from a cold place to a •
warm place.
When you use the unit in a room where you just turned •
on the heater, or a place where the cold air from the air
conditioner directly hits the unit.
During the summer, when you use the unit in a hot and •
humid place just after you move the unit from an air
conditioned room.
The room is vaporous or damp.•
If condensation exists, the unit will not operate properly. Remove
the disc, connect the power cord of the unit to the wall outlet,
turn on the unit, and leave it for two or three hours. After two or
three hours, the unit will have warmed up and evaporated any
moisture. Keep the unit connecting to the wall outlet will ensure
moisture condensation will seldom occur.
ON HANDLING DISCS
Do not touch the playback side of the disc.•
Do not attach paper or tape to disc.
ON CLEANING DISCS
Fingerprints and dust on the disc cause picture and •
sound deterioration. Wipe the disc from the centre
outwards with a soft cloth. Always keep the disc
clean.
If you cannot wipe off the dust with a soft cloth, wipe •
the disc lightly with a slightly moistened soft cloth
and finish with a dry cloth.
Do not use any type of solvent such as thinner, •
benzine, commercially available cleaners or
antistatic spray for vinyl. It may damage the disc.
ON STORING DISCS
Do not store discs in a place subject to direct •
sunlight or near heat source.
Do not store discs in a place subject to moisture •
and dust such as bathroom or near a humidifier.
Store discs vertically in a case. Stacking or placing •
object on discs outside or their case may cause
warping.
The mark is in compliance with the Waste Electrical
and Electronic Equipment Directive 2002/96/EC
(WEEE). The mark indicates the requirement NOT to
dispose the equipment including any spent or
discarded batteries as unsorted municipal waste, but use
the return and collection systems available. If the batteries
or accumulators included with this equipment, display the
chemical symbol Hg, Cd, or Pb, then it means that the
battery has a heavy metal content of more than 0.0005%
Mercury, or more than 0.002% Cadmium or more than,
0.004% Lead.
Notes for battery disposal
Your product contains batteries covered by the European
Directive 2006/66/EC, which cannot be disposed of with
normal household waste. Please inform yourself about the
local rules on separate collection of batteries. The correct
disposal of batteries helps prevent potentially negative
consequences on the environment and human health.
Example of moisture
condensation
Optical pick-up
lens
Wait!
Wall outlet
Wait!!
Wall Outlet
It’s too
warm!
Playback side
Page 5

GB-5
Safety Information and
Tabl e of C on te nt
Product Introduction and
Setting the Player
System Set-up
Troubleshooting and
Specification
Important
Notice
Playable Disc / Supportive Formats
Playback Functions
Table of Contents
Safety Information and Precaution 2-4
Table of Contents 5
Key Features of your DVD Players 6
Package Contents 7
Functions and Controls 8-9
Front View 8
Rear View 9
Remote Control 10-11
Setting up the DVD Player 12-13
Connections 12-13
System Setup 14-19
General Setup 14-16
Language Menu 16-17
Audio Menu 17-18
Video Menu 18-19
Playback Functions for Video (DVD/VCD/SVCD/CD) 20-22
Playback Functions for JPEG/ KODAK Picture CD/ MPEG4 23
Playback Functions with USB Flash Drive 24
Troubleshooting 25
Technical Specication 26-27
Important Notices 28
Page 6
GB-6
Safety Information and
Tabl e of C on te nt
Product Introduction and
Setting the Player
System Set-up
Troubleshooting and
Specification
Important
Notice
Playable Disc / Supportive Formats
Playback Functions
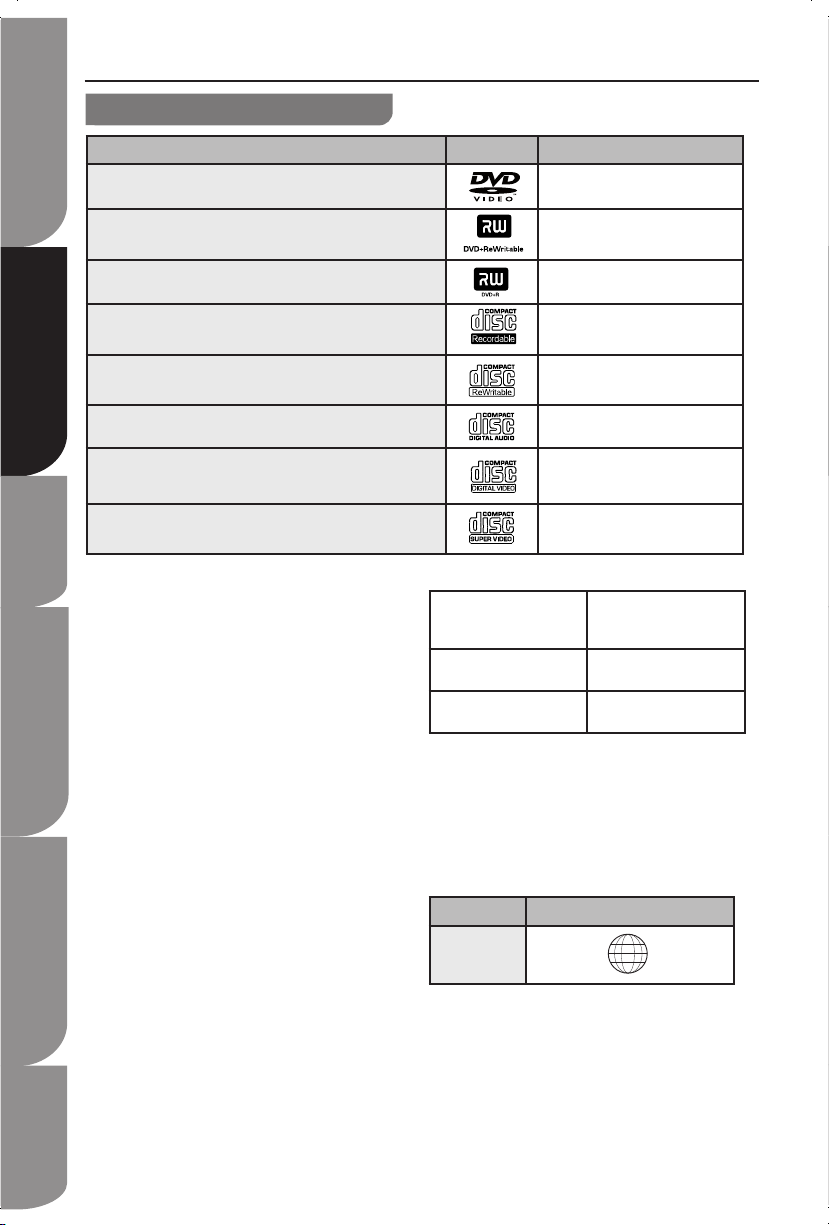
Key Features of your new DVD Player
Compatible Disc Types
Disc Types Disc Logo Recorded Content
DVD-VIDEO (Digital Versatile Disc)
AUDIO + VIDEO
DVD±RW (Audio/Video format or JPEG files)
AUDIO + VIDEO + JPEG
DVD±R (DVD Recordable - Audio/Video format or JPEG files)
AUDIO + VIDEO + JPEG
CD-R (CD Recordable - Audio/Video format or JPEG files)
AUDIO + VIDEO + JPEG
CD-RW (CD-Rewritable - Audio/Video format or JPEG files)
AUDIO + VIDEO + JPEG
AUDIO-CD (Compact Disc Digital Audio)
AUDIO
VIDEO-CD (Formats 1.0, 1.1, 2.0)
VIDEO
Super VIDEO-CD
VIDEO
Supported Formats
JPEG •
The file extensions has to be .jpg and not . »
jpeg
Pictures encoding must comply with JPEF/ »
ISO format.
This DVD player can only display »
DCF-standard still pictures or JPEG pictures
such as TIFF.
For MPEG-4 files:•
This player supports XVID encoding as »
MPEG-4 files. This player only support XVID
encoded file with .avi file extension.
To play back XVID files on this player, record »
them on a CD-R/RW disc or put them on
USB drive, and play it back.
Some recorded files may not be able to be »
played back depending on file characteristics,
the kinds of digital still/video cameras, or
recording conditions.
Some MPEG-4 files created on a personal »
computer may not be played back. Check the
video and audio codec used when creating
those file.
TIPS:
Maximum 100 sessions for CD and 10 •
multi border for DVD are supported.
Only finalised discs of DVD-R and •
DVD-RW multi-border can be supported.
Both finalised and un-finalised discs of •
DVD+R and DVD+RW multi-border are not
supported.
Both disc and USB device cannot be played
DVD Video with a region
number other than “2” or
“ALL”.
HD DVD
DVD-RAM 3.9 GB DVD-R Disc for
Authoring
MP3, AVI and DivX DVD-ROM/ PD/ MV-Disc,
etc
Region Code
Both the DVD player and the discs are coded by
region. These regional codes must match in order
to play the disc. If the codes do not match, the disc
will not play.
The Region Number for this DVD player is
described on the rear panel of the DVD player.
Disc Type DVD-VIDEO
Region code
2
Page 7
GB-7
Safety Information and
Tabl e of C on te nt
Product Introduction and
Setting the Player
System Set-up
Troubleshooting and
Specification
Important
Notice
Playable Disc / Supportive Formats
Playback Functions
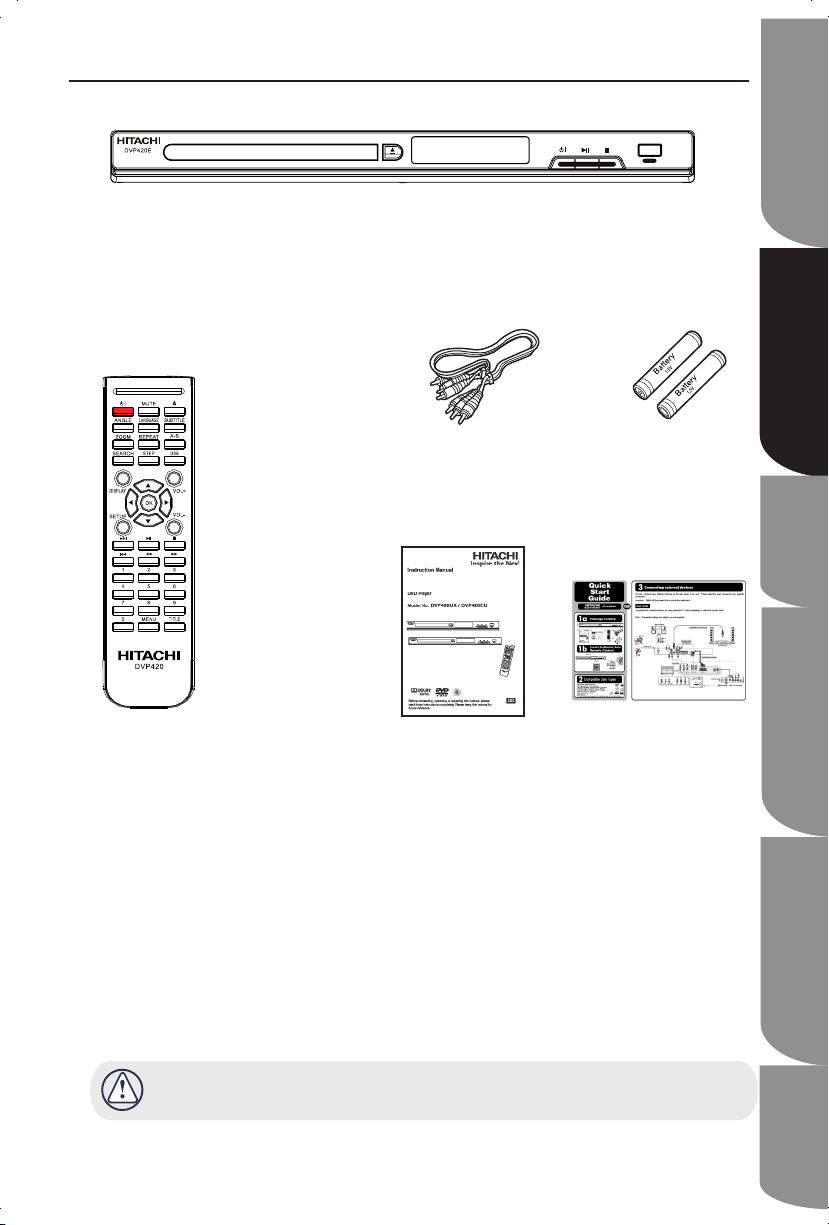
Package Content
Remote Control
(PN#06-RC-2100-A0043)
DVD Player
Composite (Video)
Audio L/R cable
(PN#41-UH1500-0KK8D)
Batteries for
Remote Control
(AAA size)
(PN#49_382380_BAT)
Instruction Manual
(PN# 72-TD1101-UK0B1)
Quick Start
Guide
(PN# 72-TD1101-QUKB1)
Check for the supplied accessories below.
Make sure all of the above contents are included. If there are any missing item, please return this
product to the original place of purchase.
Page 8
GB-8
Safety Information and
Tabl e of C on te nt
Product Introduction and
Setting the Player
System Set-up
Troubleshooting and
Specification
Important
Notice
Playable Disc / Supportive Formats
Playback Functions
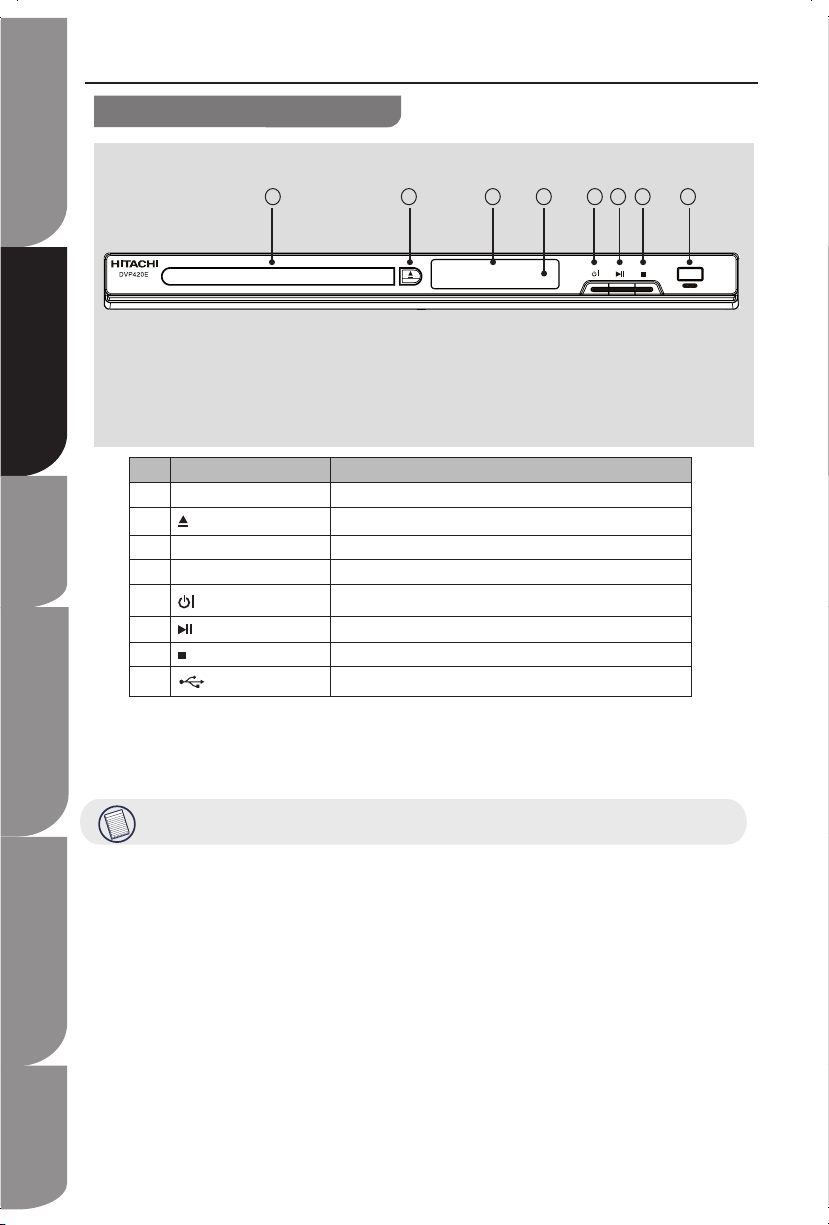
Front panel
Functions and Controls
This player has auto shutdown function, and it will shut down after 15 minutes idle time.
NO Control Function
1 Disc tray Loads a disc into the disc drive.
2
OPEN/CLOSE
Opens and closes the disc tray.
3 Front panel display Show information about the current status of this unit
4 Remote sensor Receives infrared signals from the remote control.
5
STANDBY/ ON button
Turns the power on or restores the unit to the standby mode.
6
PLAY/ PAUSE
Starts playback/Stops playback momentarily.
7 STOP Stops playback.
8
USB Socket
Allows connection to the USB Flash Drive..
1 2 3 4
5 6 7 8
Page 9
GB-9
Safety Information and
Tabl e of C on te nt
Product Introduction and
Setting the Player
System Set-up
Troubleshooting and
Specification
Important
Notice
Playable Disc / Supportive Formats
Playback Functions
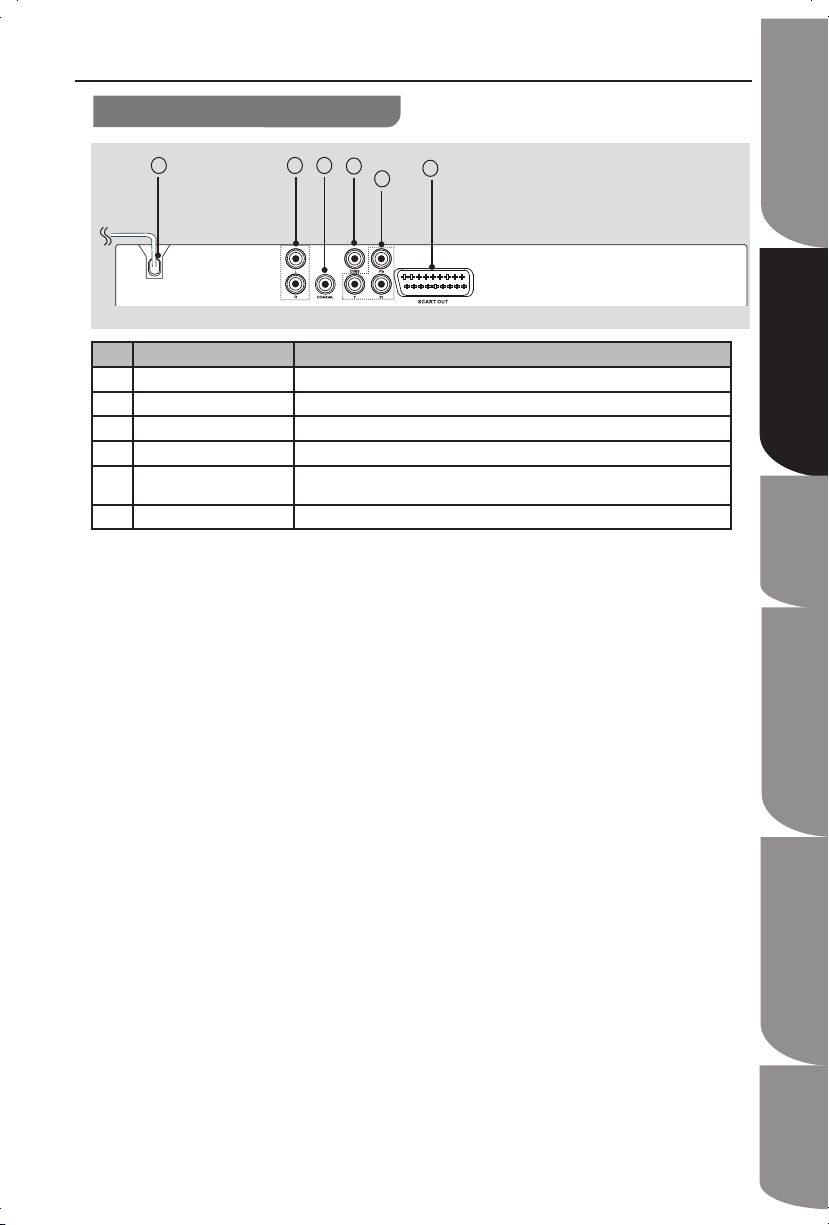
Rear panel
Functions and Controls
110-240V~
50/60Hz
1 2 3
4
5
6
To wall outlet
NO Control Function
1 AC Power Cord Connects the supplied power cord to the wall outlet.
2 AUDIO OUT sockets (L/ R) Output audio signals when connecting the audio (L/R) cable.
3 COAXIAL socket Output digital audio signals when connecting the coaxial digital cable.
4 CVBS (TV OUT) Connects to CVBS Video Input of a TV.
5 COMPONENT VIDEO OUTPUT
sockets
Outputs video signals to a connected TV or monitor.
Connects to a TV or monitor equipped with component video sockets.
6 SCART Connect to a TV or monitor equipped with composit video input terminal.
Page 10
GB-10
Safety Information and
Tabl e of C on te nt
Product Introduction and
Setting the Player
System Set-up
Troubleshooting and
Specification
Important
Notice
Playable Disc / Supportive Formats
Playback Functions
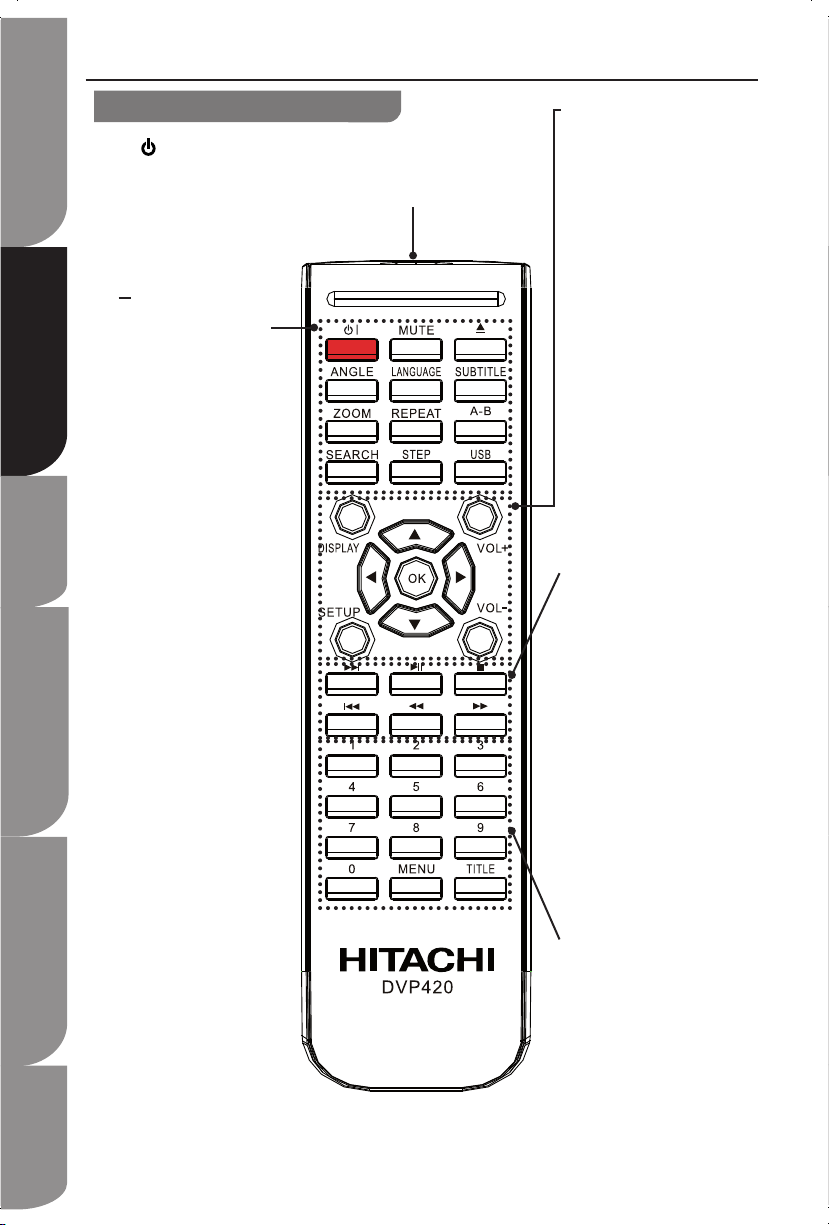
Remote control
Remote control
IR sensor
Remote control sensor
I Standby button
To switch the DVD platyer
to STANDBY mode or
POWER ON.
MUTE button
To mute and restore your
DVD sound output.
OPEN/CLOSE button
To open or close the DVD
disc tray.
ANGLE button
To switch/ change the
camera angle during
playback.(If it is avaiable in
the DVD features.)
LANGUAGE button
To switch between different
audio languages (If it is
avaiable in the DVD
features.)
SUBTITLE button
To switch between different
subtitle languages.
(Available languages
depend on the DVD
features).
ZOOM button
To enlarge the picture on
the TV.
REPEAT button
To select between different
repeat modes - REPEAT I,
REPEAT DIR, REPEAT ALL
and OFF.
A-B button
To repeat playback between
2 particular points on a
disc.
SEARCH button
To search and start
playback from selected
point on the disc.
STEP button
To play and move the
playback forward frame by
frame.
USB button
Press this button to access
the data in the USB flash
drive,
DISPLAY button
To display a list of disc
information that is available in
the current disc.
SETUP button
Press this button to display
the SetUp Menu of the DVD.
VOL+/VOL- button
To increase and decrease
volume.
NAVIGATION CURSOR
buttons
Press to navigate within the
SetUp Menu.
/- to move up and down
in SetUp Menu; allow slow
forward and backward during
playback.
/- to move left and right in
SetUp Menu; start the forward
and reverse search during
playback.
OK button
To confirm selection.
I button
To skip to next title, chapter or
track.
II button
To start or pause the
playback.
button
To stop the playback.
I button
To return back to previous
title, chapter or track.
button
To fast reverse during
playback.
button
To fast forward during
playback.
0-9 buttons
To select the numberic items
in a menu.
MENU button
To enter or exit the disc
contents menu.
To switch on or off the
playback control mode (for
VCD version 2.0 only).
TITLE button
To go back to previous menu
or show title menu.
Page 11

GB-11
Safety Information and
Tabl e of C on te nt
Product Introduction and
Setting the Player
System Set-up
Troubleshooting and
Specification
Important
Notice
Playable Disc / Supportive Formats
Playback Functions
Loading batteries
Press and lift the back cover up to open the 1.
battery compartment of the remote control.
Insert two AAA size batteries. Make sure to 2.
match the (+) and ( - ) ends of the batteries
with the (+) and ( - ) ends indicated in the
battery compartment. To close the battery
compartment cover, slide the cover in the
direction of an arrow till it clicks shut.
Do not use caustic cleaners (porcelain, •
stainless steel, toilet, or oven cleaner etc.) on
the unit and remote
control, as they may be damaged.
Remove the battery from remote control •
handset when it is not to be used for a
long period. Otherwise, it can be
damaged due to battery leakage.
Handling the Remote Control
Improper use could cause corrosion or •
battery leakage and may result in physical
injury and/or property damage including fire.
Never mix used and new batteries in the •
device.
Replace all the batteries in a device at the •
same time.
Remove the batteries if the remote control is •
not going to be used for an extended period
of time.
To avoid possible failure, read the following •
instructions and handle the remote control
properly.
Do not drop or cause impact to the remote •
control.
Do not spill water or any liquid on the •
remote control.
Do not place the remote control on a wet •
object.
Do not place the remote control under the •
direct sunlight or near sources of excessive
heat.
Effective Range
Your remote control can be activated from up to
the unit 6m away when pointed
directly at the receiver.
Remote Control
Within about 6 m
IR
Operating range
Page 12

GB-12
Safety Information and
Tabl e of C on te nt
Product Introduction and
Setting the Player
System Set-up
Troubleshooting and
Specification
Important
Notice
Playable Disc / Supportive Formats
Playback Functions
Setting up the DVD Player
Connections
TV
110-240V~
50/60Hz
CO
Audio Cable
Component cable
(not included)
White Red Blue Green
(Audio)Red
SCART Cable (not included)
RF IN
Coaxial Audio Cable (not included)
Audio Receiver
VIDEO IN
Y
(Video)Yellow
Y
SCART IN
TO WALL OUTLET
For EU
model
For UK
model
Y
Stereo System
AUDIO
IN
RF
Antenna
OR
CVBS - Composite Video Connection
Use the composite video cable (yellow) to 1.
connect the DVD player’s CVBS socket to
the VIDEO INPUT socket (which can be
labelled as A/V IN, VIDEO IN, COMPOSITE
or BASEBAND) on the rear panel of the TV.
To hear the audio sound of your DVD 2.
player through your TV, connect the audio
cable (white and yellow) to AUDIO OUT (L/
R) sockets of the DVD player to the
corresponding AUDIO IN sockets on the
TV.
YPbPr - Component Video Connection
With a Progressive Scan television and using
YPbPr video connection, you can view your DVD
video with Progressive Scan Video Quality.
Use the component video cables (red/blue/1.
green) to connect the DVD player’s YPbPr
sockets respectively. YPbPr video cables
are not supplied with this package.
To hear the audio sound of your DVD 2.
player through your TV, connect the audio
cable (white and yellow) to AUDIO OUT (L/
R) sockets of the DVD player to the
corresponding AUDIO IN sockets on the
TV.
NOTE: Proceed to Progressive Scan SetUp.
Do not place the unit on amplifiers or equipment that may become hot. The heat can damage the unit.•
Do not connect through the video cassette recorder. Due to copy guard protection, the picture may not display •
properly.
Turn off all equipment before connection and read the appropriate operating instructions.•
Connect the terminals of the same colour.•
Connect the AC mains lead last.•
SCART - SCART Video and Audio Connection
Use the SCART cable and connect between 1.
DVD player’s SCART OUT and TV’s SCART
IN. SCART cable is not supplied with this
package.
If your DVD player will not be connected to 2.
the stereo system or AV receiver to hear
better sound quality, SCART connection is
sufficient for both audio and video
connections between the DVD player and TV.
Stereo System Audio Connection
Select one of the video connections (CVBS 1.
Video IN or Component Video IN) depending
on your TV.
Use the audio cables (white/red) to connect 2.
AUDIO OUT (L/R) socket of the DVD player to
AUDIO IN on the Stereo System.
Digital AV Receiver Connection
Select one of the video connections (CVBS 1.
Video IN or Component Video IN) depending
on your TV.
Use the coaxial cable to connect COAXIAL 2.
socket of the DVD player to DIGITAL AUDIO
IN socket of the Audio Receiver.
Page 13

GB-13
Safety Information and
Tabl e of C on te nt
Product Introduction and
Setting the Player
System Set-up
Troubleshooting and
Specification
Important
Notice
Playable Disc / Supportive Formats
Playback Functions
Setting up the DVD Player
Connections
USB Flash Drive Connection
Connect the USB flash drive directly to the USB
socket at the front panel of the unit.
Power Connection
After all external audio and video devices are •
connected properly, plug the AC power cord
to the wall outlet.
Never make or change any connections when •
the unit / external devices are connected to
the wall outlet.
When the unit is power on and there is no •
disc in it, the display panel will show to
indicate there is no disc in the DVD player.
Page 14

Safety Information and
Tabl e of C on te nt
Product Introduction and
Setting the Player
System Set-up
Troubleshooting and
Specification
Important
Notice
GB-14
Playable Disc / Supportive Formats
Playback Functions
System Set-up
Finding the DVD Video Viewing Channel
Press 1. I STANDBY button on the DVD
player or the remote control to turn on the
unit.
Turn on the TV and set it to the correct 2.
VIDEO IN channel. Refer to the Instruction
Manual of your TV.
Now, you should see the blue DVD 3.
background screen.
If you are using other external audio 4.
equipment (for example stereo system or
audio receiver), please turn the volume
low and select the appropriate input
source for the DVD audio output. Refer to
your audio equipment’s Instruction
Manual for details.
TIPS:
Usually these channels are between the •
lowest and highest channels and may be
called FRONT, A/V IN, VIDEO. See your
TV’s manual for more details.
Or, you may go to channel 1 on your TV, •
then press the Channel down button
repeatedly until you see the Video In
channel.
Or, the TV remote control may have a •
button or turn that chooses different video
modes.
Or, set the TV to channel 3 or 4 if you are •
using an RF modulator.
Setting up the Progressive Scan
The progressive scan display twice the number
of frames per seconds than interlaced scanning
(common in ordinary TV system).
With nearly double the number of lines,
progressive scan offers higher picture resolution
and quality.
Before you start...
Ensure you have connected this DVD •
player to a progressive scan TV with
YPbPr cable.
Ensure you have completed the basic •
installation and set up.
Press 1. I STANDBY button on the DVD
and TV to power on.
Select the correct Video Input channel. 2.
(i.e. you should see the blue DVD
background screen.)
Press SETUP button on your DVD remote 3.
control.
Press 4. ▲▼ buttons repeatedly to select
VIDEO, then press ► button.
TV SYSTEM
SCREEN SAVER
VIDEO
TV TYPE
PASSWORD
RATING
DEFAULT
INTERLACE-YUV
TV-RGB
P-SCAN YPBPR
Select P-SCAN YPBPR, and press OK 5.
button to confirm. The following menu will
appear on the TV.
Press 6. ◄ to highlight OK and press OK
button again to confirm.
Turn on your TV progressive scan mode. 7.
Refer to the Instruction Manual of your
TV.
Now you will see the following menu on 8.
the TV screen.
Press 9. ◄ to highlight OK and press OK
button to confirm.
The Progressive Scan set up is now completed.
To deactivate this feature, wait for 15 seconds
for the auto recovery or turn off the progressive
scan feature on both the DVD player and your
TV.
NOTE: There are some progressive scan TVs
and High-Definition TVs that are not fully
compatible with this unit, resulting in the
unnatural picture when playing back a
DVD VIDEO disc in the progressive scan
mode.
In such a case, turn off the progressive
scan feature on both the DVD player and
your TV.
General Set-up
Page 15

Safety Information and
Tabl e of C on te nt
Product Introduction and
Setting the Player
System Set-up
Troubleshooting and
Specification
Important
Notice
GB-15
Playable Disc / Supportive Formats
Playback Functions
System Set-up
Selecting the Matching Colour System
In order for the disc to play, the colour system
of the DVD player, disc and TV should match.
TV SYSTEM NTSC
SCREEN SAVER PAL
VIDEO AUTO
TV TYPE
PASSWORD
RATING
DEFAULT
Press the SETUP button.1.
Press 2. ▲▼ buttons to select TV SYSTEM,
and press ► button.
Use 3. ▲▼ buttons to select the following
options: NTSC, PAL and AUTO.
Select your preferred tion and press OK 4.
button to confirm.
CHANGING PAL TO NTSC:
1. ENSURE THAT YOUR TV
SUPPORTS NTSC STANDARD.
2. IF THERE IS DISTORTED
PICTURE DISPLAY ON THE TV
WAIT 15S FOR AUTO RECOVERY.
OK NO
Screen Saver Function
Select ON to display the screen saver with a
moving DVD logo appears on a dark screen
when the disc playback is stopped, paused, or
you have not used the player nor its remote for
more than 5 minutes while its power is still on.
Select OFF to turn off the screen saver function.
Video Setup
Press the SETUP button.1.
Press 2. ▲▼ buttons to select VIDEO, and
and press ► button.
Use 3. ▲▼ buttons to select the following
options: INTERLACE-YUV, TV-RGB and
P-SCAN YPBPR.
INTERLACE-YUV - Performs interlaced
scanning and it is common in standard TV
system. The playback will be scanned on
alternate rows only. Use the component
video cable (YPbPr) to connect the player
to the TV and set both the TV and the
DVD player to INTERLACE-YUV or
INTERLACE-YPBPR.
TV-RGB - It is the default setting of the
DVD player. Through SCART to send RGB
signal, which red, green, blue lights are
added together in various ways to
reproduce a broad array of colours.
Connects the SCART cable from the DVD
player to the TV and set the TV in SCART
mode and the DVD player in TV-RGB.
P-SCAN YPBPR - Performs progressive
scanning to display or transmitting the
playback in which all the lines of each
frame are drawing sequence. Use
component video cables (YPbPr) to
connect the player to the TV and set both
the player and the TV to progressive scan.
For detail setting of progressive scanning,
refer to Setting up the Progressive Scan.
Press OK button to confirm.4.
NOTE: YUV is the same as YPBPR.
TV Type
In order to display the playback in the correct
size format, both the DVD player and the TV
should select the same display size format.
Press the SETUP button.1.
Press 2. ▲▼ buttons to select TV TYPE,
and press ► button.
Use 3. ▲▼ buttons to select the following
options: 4:3PS, 4:3LB and 16:9.
TV SYSTEM
SCREEN SAVER
VIDEO
TV TYPE
PASSWORD
RATING
DEFAULT
4:3PS
4:3LB
16:9
4:3PS - Selects this if you have a
standard TV and want both sides of the
picture to be trimmed or fomatted to fit
your TV screen.
Page 16

Safety Information and
Tabl e of C on te nt
Product Introduction and
Setting the Player
System Set-up
Troubleshooting and
Specification
Important
Notice
GB-16
Playable Disc / Supportive Formats
Playback Functions
System Set-up
Language Menu
Setting the Language
You may select your language options depending
on your country or region.
On-Screen Display (OSD) Languages
OSD LANGUAGE
AUDIO LANG
SUBTITLE LANG
DISC MENU
ENGLISH
DANSK
SUOMI
NORSK
SVENSKA
4:3LB - Selects this if you have a standard
TV and want to display upper and lower
bands with a wide-screen picture display.
16:9 - Selects this if you have a
wide-screen TV.
Press OK button to confirm.4.
Setting up the Password
The Parental Control can be set up to the DVD
player to block video and to change password.
A 4-digit password will be required to play a
prohibited disc.
Press the SETUP button.1.
Press 2. ▲▼ buttons to select PASSWORD,
and press OK button.
You will see a lock icon and be prompted 3.
to enter your 4-digit password. Suggest to
use “0000” as your initial password if you
are doing this for the first time.
Press OK button to confirm.4.
Now, the lock icon will be unlock. You 5.
may now enter your preferred password,
e.g. “1111”. Press OK button to confirm.
If the disc is locked and the system prompts
you to enter the password.
Use the numeric buttons (0-9) to enter 1.
your password, i.e. “1111” to unlock.
In case you forgot your password, the default
password is “0000”.
To change your password, you will need to
unlock the system by entering your password
or the default password “0000”.
Once the lock icon is unlocked, you need 2.
to enter the your new 4-digit password,
e.g. “2222” and press OK to confirm and
reset your password.
Alternatively, you can set the RATING to 8 3.
ADULT, which allows the DVD player to
play all discs without restriction.
Setting the Rating System
This feature allows you to selectively playing the
discs. The rating levels are from 1 to 8 and are
country dependent. You can prohibit the playing
of certain discs that are not suitable for your
children, or you can have certain disc played
with alternative scenes.
Unlock the disc by entering the 4-digit 1.
password you have set in PASSWORD
setup before you can access the RATING
menu.
Press the SETUP button.2.
Press 3. ▲▼ buttons to select RATING, and
press ► button.
Use 4. ▲▼ buttons to select the rating level
for the disc inserted and press OK.
To disable the parental control and allow 5.
to play all discs, select 8 ADULT.
Use the numeric buttons (0-9) to enter the 6.
4-digit password again.
The DVD discs that rated above the selected
level will not be played unless you enter the
4-digit password.
TIPS:
The following disc types will not be affected by
the Parental Control feature:-
Discs that are not coded by the disc •
manufactuer.
Discs that are not coded by the disc •
manufactuer despite they have printed the
movie rating on the disc cover.
VCD, SVCD and CD as they have no rating •
level indication
Most copied DVD discs or illegal DVDs.•
Reset to Facotry Default Settings
DEFAULT function will reset all options and
your personal settings back to the factory
default settings, except your password for
rating.
Press the SETUP button.1.
Press 2. ▲▼ buttons to select DEFAULT,
then press ► button to select RESTORE.
Press OK button to confirm.3.
Page 17

Safety Information and
Tabl e of C on te nt
Product Introduction and
Setting the Player
System Set-up
Troubleshooting and
Specification
Important
Notice
GB-17
Playable Disc / Supportive Formats
Playback Functions
System Set-up
Press SETUP button on your DVD remote 1.
control.
Press 2. ◄ ► buttons to display the
Language Setup menu.
Press 3. ▲▼ buttons to highlight OSD
LANGUAGE, and press ► button to drop
down the language list.
Press 4. ▲▼ buttons to select your
preferred language and press OK to
confirm.
NOTE: Default language is English.
Audio, Subtitle and Disc Menu Languages
This feature allows you to choose the preferred
language of your soundtrack and DVD video. If
the preferred language is not available on the
disc, the DVD player will automatically use the
DVD disc’s default language.
OSD LANGUAGE
AUDIO LANG
SUBTITLE LANG
DISC MENU
ENGLISH
DANISH
FINNISH
NORWEGIAN
SWEDISH
FRENCH
SPANISH
PORTUGUESE
Press SETUP button on your DVD remote 1.
control.
Press 2. ◄ ► buttons to display the
Language Setup menu.
Press 3. ▲▼ buttons to highlight AUDIO
LANG for changing disc soundtrack
language; to highlight SUBTITLE LANG for
changing the subtitle language; to
highlight DISC MENU for changing the
language of the disc menu.
Press 4. ▲▼ buttons to select a language
and press OK to confirm.
Repeat steps 3 and 4 for setting to other 5.
language.
NOTE: The available language options depend
on your disc.
Audio Menu
Press SETUP button on your DVD remote 1.
control.
Press 2. ◄ ► buttons to display the Audio
Setup menu.
Press 3. ▲▼ buttons to highligh AUDIO
OUT, DOWN SAMPLE, DOWNMIX or
DYNAMIC RANGE.
Audio Out
After you highlight AUDIO OUT, press 1. ►
button to drop down the options: SPDIF
OFF, SPFIF RAW and SPDIF PCM.
SPDIF OFF - Outputs analog audio to TV
or amplifier.
SPDIF RAW - Selects this if the connected
device has a built-in multichannel decoder
that supports one of the multichannel
audio formats (e.g. Dolby Digital,
MPEG-2).
SPDIF PCM - Selects this if the connected
device is not capable of decoding
multichannel audio. The DVD player will
then covert the Dolby Digital and MPEG-2
multichannel signals to PCM (Pulse Code
Modulation).
Press 2. ▲▼ button to select one of the
above options, then press OK button to
confirm.
Down Sample
After you highlight DOWN SAMPLE, press 1.
► button to drop down the options: 48K
and 96K.
48K - Playback a disc record at the
sampling rate of 48kHz.
96K - Playback a disc recorded at the
sampling rate of 96kHz. This rate can only
be achieved in Stereo-Class (Flat) mode.
Press 2. ▲▼ button to select one of the
above options, then press OK button to
confirm.
Page 18

Safety Information and
Tabl e of C on te nt
Product Introduction and
Setting the Player
System Set-up
Troubleshooting and
Specification
Important
Notice
GB-18
Playable Disc / Supportive Formats
Playback Functions
System Set-up
Downmix
After you highlight DOWNMIX, press 1. ►
button to drop down the options: LT/RT
and STEREO.
AUDIO OUT
DOWN SAMPLE
DOWNMIX
DYNAMIC RANGE
LT/RT
STEREO
LT/RT - Selects this option if your DVD
player is connected to a Dolby decoder.
STEREO - Selects this option to change
channel output to stereo which delivers
sound from only the two front speakers.
Press 2. ▲▼ button to select one of the
above options, then press OK button to
confirm.
Dynamic Range
This mode optimises the playback sound. High
volume outputs will be softened and low
volume outputs will be enhanced to an audible
level. This feature is only applicable for DVD
video discs with Dolby Digital mode.
After you highlight DYNAMIC RANGE, 1.
press ► button to drop down the
options: FULL and OFF.
AUDIO OUT
DOWN SAMPLE
DOWNMIX
DYNAMIC RANGE
FULL
6/8
4/8
2/8
OFF
FULL - Highlight and turn on this mode
and you can choose 6/8, 4/8 and 2/8. The
lowest possible sound can be on the scale
of 6, 4 or 2, and the highest possible
sound will be on the scale of 8.
Video Menu
OFF - Highlight and turn off this mode
and you can enjoy the surround effect.
Press 1. ▲▼ button to select one of the
above options, then press OK button to
confirm.Press SETUP button on your
DVD remote control.
Press 2. ◄ ► buttons to display the Video
Setup menu.
Press 3. ▲▼ buttons to highligh
BRIGHTNESS, CONTRAST, HUE and
SATURATION.
BRIGHTNESS
CONTRAST
HUE
SATURATION
Brightness
After you highlight BRIGHTNESS, press 1.
► button to display a menu for you to
adjust the brightness of the picture.
Press 2. ▲▼ button to adjust to your
preferred level.
Press OK to confirm.3.
Contrast
After you highlight CONTRAST, press 1. ►
button to display a menu for you to adjust
the contrast of the picture.
Press 2. ▲▼ button to adjust to your
preferred level.
Press OK to confirm.3.
Hue
After you highlight HUE, press 1. ► button
to display a menu for you to adjust the
lightness/colourness of the picture.
Press 2. ▲▼ button to adjust to your
preferred level.
Press OK to confirm.3.
Page 19

Safety Information and
Tabl e of C on te nt
Product Introduction and
Setting the Player
System Set-up
Troubleshooting and
Specification
Important
Notice
GB-19
Playable Disc / Supportive Formats
Playback Functions
System Set-up
Saturation
After you highlight SATURATION, press 1.
► button to display a menu for you to
adjust the difference of colour against the
brightness of the picture.
Press 2. ▲▼ button to adjust to your
preferred level.
Press OK to confirm.3.
Page 20

Safety Information and
Tabl e of C on te nt
Product Introduction and
Setting the Player
System Set-up
Troubleshooting and
Specification
Important
Notice
GB-20
Playable Disc / Supportive Formats
Playback Functions
Playback Functions for Video (DVD/VCD/ SVCD/CD)
Basic Playback
After the TV is turn on and the correct 1.
programme number for the DVD player
(e.g. ‘EXT’, ‘0’ or ‘AV’)
Press 2. I STANDBY button on the DVD
player or the remote control to turn on the
unit.
Press 3.
OPEN/CLOSE button to open the
disc tray.
Place your disc into the disc tray with label 4.
facing up and press OPEN/CLOSE
button again to close the disc tray. *For
double-sided disc, load the side which you
want to play facing up.
The DVD playback will start automatically. 5.
If not, press PLAY/PAUSE ►II button to
start the playback.
If a disc menu appears on the TV, •
refer to “Using the Disc Menu.”
If the child lock is activated for the •
inserted disc, you have to enter your
4-digit password in order to play the
disc.
TIPS:
Do not overturn the DVD player while disc •
loading, playing or ejecting.
Do not close the disc tray manually even if •
the power switched is off.
Pause Playback
During playback, press PLAY/PAUSE 1. ►II
button to pause playback and display a
still picture, However, the sound will be
muted.
To resume normal playback, press PLAY/2.
PAUSE ►II button again .
Stop Playback
Fast Forward and Fast Reverse
Previous and Next
During playback, press STOP button to stop
the playback.
During playback, press 1. or button
once or more to do fast reverse or forward
with different speed: 2X, 4X, 8X, 20X.
Sound will be muted during the process.
To resume normal playback, press PLAY/2.
PAUSE ►II button.
Press PREV 1. I / NEXT I button to
go to the previous or next title, chapter or
track.
Press DISPLAY to display the disc 2.
information text line for the title, chapter
or track. For example: 00/08.
Zooming In
Press ZOOM button to repeatedly to 1.
display the picture with different scales.
Use ▲▼ ◄ ► buttons to navigate the
enlarged picture. The playback will
continue.
Press ZOOM button repeatedly to zoom 2.
out and return to its original size.
Resume playback
Resume playback of the last 5 viewed discs is
possible, even if the disc has been ejected,
standby or power off. Auto resume is active for
DVD, VCD, CD, SVCD types of discs.
Load one of the last 5 discs.1.
The message “Resume” will appear on 2.
the TV screen for the first 10 seconds.
Press PREV 3. I to start playback from
the beginning. Playback will then restart
from the first title (for DVD) or the
beginning of the title/track (for VCD,
SVCD, CDDA).
To remove the message from the TV 4.
screen, press DISPLAY button.
Navigate in the Disc Menu
Depending on the disc, a menu may appear on
the TV screen once you load in the disc.
To select a playback feature or item:-
Use 1. ▲▼ ◄ ► button to navigate or
numeric buttons (0-9) on the remote
control to select. Press OK button to
confirm and start the playback.
To access or remove the menu:-
Press MENU button on the remote control.2.
Page 21

Safety Information and
Tabl e of C on te nt
Product Introduction and
Setting the Player
System Set-up
Troubleshooting and
Specification
Important
Notice
GB-21
Playable Disc / Supportive Formats
Playback Functions
Playback Functions for Video (DVD/VCD/ SVCD/CD)
Angle
Press ANGLE button repeatedly to switch
between different camera angles that are
available in the disc.
Some discs have multiple camera angles, audio
languages and subtitle languages, and you can
change them during playback.
Audio Languages
For DVD
Press LANGUAGE button repeatedly to switch
between different audio languages that are
available in the disc.
For VCD
Press LANGUAGE button to select available
audio channels provided by the disc (LEFT,
RIGHT, MIX, STEREO).
Subtitle Languages
Press SUBTITLE button repeatedly to switch
between different subtitle languages that are
available in the disc.
Frame-by-Frame
Press PLAY/PAUSE 1. ►II button and then
STEP button to advance in the playback
frame by frame ahead.
Press PLAY/PAUSE 2. ►II button again to
resume normal playback.
Repeat
Press REPEAT button repeatedly to select
different repeat modes.
For DVD
Repeat Chapter (currently playing chapter)•
Repeat Title (currently playing title)•
Off (cancel)•
For VCD, Audio CD, JPEG
Repeat I (currently playing track)•
Repeat All (repeatedly playing all tracks)•
Off (cancel)•
TIP:
For VCD, repeat playback is not possible if •
the PBC mode is switched on. PBC mode
stands for Playback Control mode.
For Repeating a Section within a Title/Chapter/
Track (A-B Repeat)
Repeat a section between points A and B within
a title, chapter or track.
Press A-B button to choose your starting 1.
point A.
Press A-B button again to choose your 2.
ending point B.
The section between point A and B will 3.
now repeat continuously.
Press A-B button the third time to cancel 4.
and exit.
Display the Disc Playback Information
To display the disc information (such as current
title, chapter, time number, current playing time
on the disc) without interrupting the disc
playback.
Display
To display the disc information (such as current
title, chapter, time number, current playing time
on the disc) without interrupting the disc
playback, follow the steps below:-
During playback, press DISPLAY button 1.
repeatedly on the remote control. A list of
available current disc information will
appear on the TV screen.
Press SEARCH, then use 2. ◄ ► buttons to
select an option.
Enter hours, minutes, and seconds in the 3.
order from left to right in the time edit box
using the numeric buttons (0-9)
Playback will start at the chosen time or 4.
the selected title, chapter or track.
For DVD
Displays the total available title and •
chapters in the disc and enable to select a
chapter for viewing. For example:
{TT XX/03 CH XXX/010}
Displays the total available title in the disc •
and enable to select the hour, minute, and
second of the title. For example:
{ XX:XX:XX}
For SVCD or VCD
Enable to select any parts within the disc. •
For example: { XX:XX:XX}
Enable to select any tracks. For example: •
{TRK XX/XX}
Page 22

Safety Information and
Tabl e of C on te nt
Product Introduction and
Setting the Player
System Set-up
Troubleshooting and
Specification
Important
Notice
GB-22
Playable Disc / Supportive Formats
Playback Functions
Playback Functions for Video (DVD/VCD/ SVCD/CD)
Search
Press SEARCH button, and then press 1.
▲▼ buttons to select {Title}/ {Chapter}/
{Time}.
Use the Numeric buttons (0-9) to input a 2.
valid number.
Press OK button to confirm the selection.3.
The playback will skip to the chosen title/4.
chapter/time.
Playback Control (PBC)
For VCD with Playback Control (OBC) feature
version 2.0 only.
Press MENU button to switch bettwen 1.
PCB ON and PBC OFF.
If PBC is on , the disc menu (if available in 2.
the VCD) will appear on the TV screen.
Use the PREV 3. I / NEXT I button to
turn to previous or next page. You can
also use the numeric buttons (0-9) to
select a play option.
To skip the Index Menu and play directly 4.
from the beginning, press MENU button
on the remote control to turn the PBC
feature off.
Page 23

Safety Information and
Tabl e of C on te nt
Product Introduction and
Setting the Player
System Set-up
Troubleshooting and
Specification
Important
Notice
GB-23
Playable Disc / Supportive Formats
Playback Functions
Playback Functions for JPEG/Kodak Picture CD/MPEG4
After the TV is turn on and the correct
programme number for the VIDEO IN channel is
set, load the picture disc (Kodak Picture CD,
JPEG, MPEG4)
For Kodak Picture CD, the slide show will •
automatically begin.
For JPEG/MPEG4 disc, the picture or •
movie menu will appear on the TV screen.
Press PLAY/PAUSE ►II button to start the
slide show or movie clip playback.
General Playback
Load a MPEG4/ JPEG Picture CD disc to 1.
the unit.
Press 2. ▲▼ buttons to select the folder
and press OK to open the folder. Then
press ► button. You will the following
display on the TV screen.
Press 3. ▲▼ buttons or use numeric
buttons (0-9) to highlight a picture file.
Press PLAY/PAUSE • ►II button to
select and confirm. Playback will
start from the selected file to the end
of the folder.
If you press OK button instead to •
select and confirm, the playback will
play the selected file only.
To play Kodak Picture CD, press STOP or 4.
TITLE to go to thumbnail previous mode.
Use 5. ▲▼ ◄ ► button to highlight the
photo icon and press OK button to
confirm.
Playback Previous/Next Picture
To select another track/ file in the current 1.
folder, press PREV I / NEXT I
button.
Press PLAY/PAUSE 2. ►II button repeatedly
to pause and resume playback.
Repeat Picture Playback
Press REPEAT continuously to access different
Repeating Play Mode.
REPEAT I - Keep the same JPEG image •
still on the TV screen or repeatedly play an
MPEFG file.
REPEAT DIR - Play all files in the selected •
folder repeatedly.
REPEAT A - Play all files in the disc.•
OFF - Turn off the REPEAT mode.•
Zoom In Picture (JPEG)
Press ZOOM repeatedly during playback to 1.
display the picture with different scales.
Use 2. ▲▼ ◄ ► button to view the
zoomed picture.
Multiple Angles Playback (JPEG)
Press ▲▼ ◄ ► buttons to rotate the picture
on the TV screen during playback.
To flip the picture vertically by 180°, press •
▲▼ buttons.
To rotate the picture in anti-clockwise •
direction by 90°, press ◄ button.
To rotate the picture in clockwise direction •
by 90°, press ► button.
TIP:
Some JPEG discs may not be played due to the
configuration and characteristics of the discs or
condition of the recording.
Page 24

Safety Information and
Tabl e of C on te nt
Product Introduction and
Setting the Player
System Set-up
Troubleshooting and
Specification
Important
Notice
GB-24
Playable Disc / Supportive Formats
Playback Functions
Playback Functions with USB Flash Drive
You can play or view the data files, for example
JPEG file, in the USB flash drive. However, you
may not edit nor copy the data files.
In order to view the data files, the USB flash
drive must first connect to the USB socket at the
front panel of the DVD player.
NOTE:
The player can support the USB2.0 FULL •
SPEED and 40G in memory capacity as
maximum.
Only support maximum 11 characters for •
folder name and 9 characters for file
name. If the the folder and file names
together exceeed 20 characters, the DVD
will display rollingly in the information bar.
After the USB flash drive is detected by the 1.
DVD player, a message will appear on the
TV screen.
Press the USB button on the remote 2.
control to access the data files in the drive.
Press 3. ▲▼ buttons to select the desired
file and press OK button to start the
playback.
For multi-partitions within the flash drive, 4.
press USB button repeatedly to toggle
between the different partitions.
When you want to stop the playback, 5.
simply press the STOP button to stop.
Then, press the USB button on the remote 6.
control to exit from the menu and switch
back to disc mode.
Now, you may remove the USB flash drive 7.
safely.
TIPS:
The USB socket does not support the •
connection of other USB devices except a
USB flash drive.
The DVD units can only support up to a •
maximum of 131 folders and 10000 files.
Copy protected files will not be playable in •
this unit.
Page 25

Safety Information and
Tabl e of C on te nt
Product Introduction and
Setting the Player
System Set-up
Troubleshooting and
Specification
Important
Notice
GB-25
Playable Disc / Supportive Formats
Playback Functions
Troubleshooting
PROBLEM SOLUTION
No operation can be performed
with the remote control.
Check the batteries in the remote control. They may need replacing.•
Operate the remote control at a distance of no more than 6m.•
Removes batteries and hold down one or more buttons for several •
minutes to drain the microprocessor inside the remote control to reset
it. Reinstall batteries and try to operate the remote control again.
Disc does not play.
Ensure that the disc is installed with the label side facing up.•
Check the region number of the DVD.•
Disc Menu does not appear.
Check if the disc has a Menu.•
No power
Press STANDBY button on the DVD or on the Remote Control to turn •
on the unit.
make sure the AC outlet has power.•
The picture is distorted or turn
in black and white colour
during playback.
The disc does not match with the TV color system standard (PAL/•
NTSC).
The disc is dirty. Clean the disc.•
Sometimes a small amount of picture distortion may appear. This is •
not a malfunction of the unit.
To deactivate the Progressive Scan Function manually.•
Turn off your TV Progressive Scan Mode (or set to Interlace »
mode)
Press »
OPEN/CLOSE button to open the DVD player disc
tray.
Press the vocal. »
The screen aspect ratio cannot
be changed.
The Screen Aspect Ratio is fixed on your DVDs.•
Depending on the TV, it may not be possible to change the Screen •
Aspect Ratio.
This is not a problem with the player.•
No audio.
Make sure you have selected the correct Digital Output in the Audio •
Options Menu.
Not able to select some items
in the setup/ system menu.
Press STOP button twice before selecting the setup/system menu.•
Depending on the disc availability, some menu items cannot be •
selected.
The DVD player does not start
the playback.
Insert a readable dics with the playback side facing down.•
Check the disc type, colour system (PAL/NTSC) and region code.•
Check for any scratches or smudges on the disc.•
Press SETUP button to turn off the setup menu .•
Enter the password in order to change the parental rating level or to •
unlock the disc for playback.
Moisture may have condensed inside the system. Remove the disc •
and leave the system turned on for about an hour.
Disconnect the power cord from the power outlet for a few minutes. •
Reconnect the power cord and try to operate again as usual.
Picture freezes momentaily
during playback.
Check the disc for fingerprint or scratches, and clean with a soft cloth •
wiping from centre to edge.
Unable to select Progressive
Scan ON/OFF
Check that the output of the video signal is turn to {YPbPr}.•
Page 26

Safety Information and
Tabl e of C on te nt
Product Introduction and
Setting the Player
System Set-up
Troubleshooting and
Specification
Important
Notice
GB-26
Playable Disc / Supportive Formats
Playback Functions
Technical Specifications
TV Standard (PAL/50Hz) (NTSC/60Hz)
Number of lines 625 525
Playback Multistandard (PAL/NTSC)
Video Performance
Video DAC 12bit 108Hz
YPbPr 0.7Vpp - 75ohm
Video output 1Vpp - 75ohm
VIDEO Format
Digital MPEG 2 for DVD, SVCD
Compression MPEG 1 for VCD
DVD 50Hz 60Hz
Horizontal resolution 720 pixels 720 pixels
Vertical resolution 576 pixels 480 pixels
VCD 50Hz 60Hz
Horizontal resolution 352 pixels 352 pixels
Vertical resolution 288 lines 240 lines
Audio Format
Digital MPEG/AC-3 Compressed Digital
PCM 16, 20, 24 bits
fs, 44.1, 48.96kHz
Analog Sound Stereo
Dobly Surround Compatible Downmix from Dolby Digital Multi-Channel Sound
Page 27

Safety Information and
Tabl e of C on te nt
Product Introduction and
Setting the Player
System Set-up
Troubleshooting and
Specification
Important
Notice
GB-27
Playable Disc / Supportive Formats
Playback Functions
Technical Specifications
Audio Performance
DA Convertter 24-bit 192kHz
DVD fs 96kHz 4Hz-44kHz
fs 48kHz 4Hz-22lkHz
SVCD fs 48kHz 4Hz-22kHz
fs 44.1kHz 4Hz-20kHz
CD/VCD fs 44.1kHz 4Hz-20kHz
Signal-Noise (lkHz) > 90 dB
Dynamic Range (lkHz) > 80 dB
Crosstalk (lkHz) > 70 dB
Distortion/ Noise (lkHz) > 65 dB
Connections
YPbPr Output Cinch 3x
Video Ouput Cinch (Yellow)
Audio Output (L+R) Cinch (White and Red)
Digital Output 1 Coaxial
IEC60958 for CDDA/LPCM
IEC61937 for MPEG1/2
USB Full Speed 2.0
Cabinet
Dimensions (w x h x d) 360 x 38 x 209 (in mm)
Weight Approximately 1.37kg
Power Consumption
Power Supply Rating 110V-240V, 50/60Hz
Power Consumption < 12W
Power Consumption in Standby mode < 1W
Specifications subject to change without prior notice
Page 28

Safety Information and
Tabl e of C on te nt
Product Introduction and
Setting the Player
System Set-up
Troubleshooting and
Specification
Important
Notice
GB-28
Playable Disc / Supportive Formats
Playback Functions
Important Notices
Compliance and Compatibility Notice
NOT ALL discs are compatible
Subject to the restrictions described below and
those noted throughout this Manual, including the
Disc Type and Characteristics section of this
Manual, disc types that can be played are: prerecorded commercial DVD-Video, and
Audio CD discs; DVD-RW / DVD-R discs; and CDRW/CD-R discs.
Discs other than the above cannot and/or is not
intended to be played by this player. And some of
the above discs may not play due to one or more
reasons provided below.
Hitachi cannot assure that this player will play every
disc bearing the DVD-Video, DVD-RW / DVD-R and
CD-RW/CD-R logos, and this player may not
respond to all operating commands or operate all
features of every disc. These and other disc
compatibility and player
operation issues with new and existing format discs
are possible because:
- not all new and existing disc format versions are
supported by this player;
- new and existing disc formats may be revised,
changed, updated, improved and/or supplemented;
- some discs are produced in a manner that allows
specific or limited operation and feature during
playback;
- some features may be optional, additional features
may have been added after the production of this
player or certain available features may be subject
to delayed availability;
- some discs bearing the DVD-Video, DVD-RW/
DVD-R and CD-RW/CD-R logos may still be
non-standardized discs;
- some discs may not be played depending on their
physical state or recording conditions;
- problems and errors can occur during the creation
of DVD software and/or the manufacture of discs;
- this player operates differently than a standard
DVD player or other AV equipment; and/or
If you encounter disc compatibility or player
operation problems, please contact Techguy.
For additional information on playback restrictions
and disc compatibility, refer to the Precautions,
Before Reading the User’s Manual, Disc Types and
Characteristics, and Before Playing sections of this
Manual.
Manufactured under license from Dolby
Laboratories. “Dolby” and the double-D symbol are
trademarks of Dolby Laboratories.
.
Page 29

Safety Information and
Tabl e of C on te nt
Product Introduction and
Setting the Player
System Set-up
Troubleshooting and
Specification
Important
Notice
GB-29
Playable Disc / Supportive Formats
Playback Functions
Visit Partmaster.co.uk today for the easiest way to buy electrical spares and accessories.
With over 1 million spares and accessories available we can deliver direct to your door the
very next day.
Visit www.partmaster.co.uk
or call
0870 6001 338
(UK customers only)
Calls charged at National Rate.
For a replacement of the accessories, you may quote their respective part number and order via our Partmaster.
Remote Control 06-RC2100-A0043
Composite (Video) and
Audio (L/R)Cable
41-UH1500-0KK8D
Instruction Manual 72-TD1101-UK0B1
Quick Start Guide 72-TD1101-QUKB1
Batteries for Remote Control (2x AAA) 49-382380-BAT
For product help or out of guarantee support: Dixons customers please call: 08701 54 55 60
Currys customers please call: 08701 54 55 70
(All calls charged at national rates)
This product is exclusively available through Dixons Stores Group. In the unlikely event of a problem
with your product please return to the store where your purchase was made.
Page 30

Quick
110-240V~
50/60Hz
Within about 6 m
IR
Operating range
Instruction Manual
DVD Player
Model No:
DVP420UK / DVP420EU
GB
Before connecting, operating or adjusting this product, please
read these instructions completely. Please keep this manual for
future reference.
2
DVP420UK
Connecting external devices
3
1a
Start
Guide
DV-P420UK/EU
Package Content
IR Sensor and
GB
You can connect many different devices to the rear panel of the unit. Please read the user manual for your specific
connection.
Important: Switch off the power before connecting equipment.
REAR PANEL
To operate the connected device, you may press INPUT button repeatedly to select the correct mode.
Note : Connecting cables and adaptor are not supplied.
Stereo System
Coaxial Audio Cable (not included)
AUDIO
IN
Component cable
For EU
model
TO WALL OUTLET
(not included)
Audio Receiver
CO
1b
Remote Control
Use 2xAAA size
batteries.
Match the polarity
which indicated in
the battery
compartment.
Compatible Disc Types
2
DVD Video disc (digital Versatile Disc)
DVD±RW (Audio/Video format or JPEG files)
DVD±R (DVD Recordable - Audio/Video format or JPEG files)
CD-R (CD Recordable - Audio/Video format or JPEG files)
CD-RW (CD-Rewriteable - Audio/Video format or JPEG files)
AUDIO-CD (Compact Disc Digital Audio)
VIDEO-CD (Formats 1.0, 1.1, 2.0)
Super VIDEO-CD
*For further information about the supportive file formats and disc types, refer to the Instruction Manual.
For UK
model
Audio Cable
+
+
(Audio)Red
TV
Y
(Video)Yellow
White Red Blue Green
Y
SCART Cable (not included)
Y
VIDEO IN
SCART IN
RF
Antenna
OR
RF IN
TO WALL OUTLET
Y
VIDE O
IN
AUDIO IN
R L
CH3 CH 4
TO TVINT IN
Back of RF modulator
Page 31

4
Zooming In
Press ZOOM button to repeatedly to 1.
display the picture with different scales.
Use ▲▼ ◄ ► buttons to navigate the
enlarged picture. The playback will
continue.
Press ZOOM button repeatedly to zoom 2.
out and return to its original size.
Angle
Press ANGLE button repeatedly to switch
between different camera angles that are
available in the disc.
Subtitle Languages
Press SUBTITLE button repeatedly to switch
between different subtitle languages that are
available in the disc.
Audio Languages
For DVD
Press LANGUAGE button repeatedly to switch
between different audio languages that are
available in the disc.
For VCD
Press LANGUAGE button to select available
audio channels provided by the disc (LEFT,
RIGHT, MIX, STEREO).
Repeat
Press REPEAT button repeatedly to select
different repeat modes.
For DVD
Repeat Chapter (currently playing chapter)•
Repeat Title (currently playing title)•
Off (cancel)•
For VCD, Audio CD, JPEG
Repeat I (currently playing track)•
Repeat All (repeatedly playing all tracks)•
Off (cancel)•
TIP:
For VCD, repeat playback is not possible if •
the PBC mode is switched on. PBC mode
stands for Playback Control mode.
For Repeating a Section within a Title/Chapter/
Track (A-B Repeat)
Repeat a section between points A and B within
a title, chapter or track.
Press A-B button to choose your starting 1.
point A.
Press A-B button again to choose your 2.
ending point B.
The section between point A and B will 3.
now repeat continuously.
Press A-B button the third time to cancel 4.
and exit.
IR sensor
Remote control sensor
Basic Playback
After the TV is turn on and the correct 1.
programme number for the DVD player
(e.g. ‘EXT’, ‘0’ or ‘AV’)
Press 2.
I STANDBY button on the DVD
player or the remote control to turn on the
unit.
Press 3.
OPEN/CLOSE button to open the
disc tray.
Place your disc into the disc tray with label 4.
facing up and press OPEN/CLOSE
button again to close the disc tray. *For
double-sided disc, load the side which you
want to play facing up.
The DVD playback will start automatically. 5.
If not, press PLAY/PAUSE ►II button to
start the playback.
If a disc menu appears on the TV, •
refer to “Using the Disc Menu.”
If the child lock is activated for the •
inserted disc, you have to enter your
4-digit password in order to play the
disc.
TIPS:
Do not overturn the DVD player while disc •
loading, playing or ejecting.
Do not close the disc tray manually even if •
the power switched is off.
Pause Playback
During playback, press PLAY/PAUSE 1. ►II
button to pause playback and display a
still picture, However, the sound will be
muted.
To resume normal playback, press PLAY/2.
PAUSE ►II button again .
Stop Playback
Fast Forward and Fast Reverse
During playback, press STOP button to stop
the playback.
During playback, press 1. or button
once or more to do fast reverse or forward
with different speed: 2X, 4X, 8X, 20X.
Sound will be muted during the process.
To resume normal playback, press PLAY/2.
PAUSE ►II button.
Previous and Next
Press PREV 1. I / NEXT I button to
go to the previous or next title, chapter or
track.
Press DISPLAY to display the disc 2.
information text line for the title, chapter
or track. For example: 00/08.
Resume playback
Resume playback of the last 5 viewed discs is
possible, even if the disc has been ejected,
standby or power off. Auto resume is active for
DVD, VCD, CD, SVCD types of discs.
Load one of the last 5 discs.1.
The message “Resume” will appear on 2.
the TV screen for the first 10 seconds.
Press PREV 3.
I to start playback from
the beginning. Playback will then restart
from the first title (for DVD) or the
beginning of the title/track (for VCD,
SVCD, CDDA).
To remove the message from the TV 4.
screen, press DISPLAY button.
Display the Disc Playback Information
To display the disc information (such as current
title, chapter, time number, current playing time
on the disc) without interrupting the disc
playback.
Display
To display the disc information (such as current
title, chapter, time number, current playing time
on the disc) without interrupting the disc
playback, follow the steps below:-
During playback, press DISPLAY button 1.
repeatedly on the remote control. A list of
available current disc information will
appear on the TV screen.
Press SEARCH, then use 2. ◄ ► buttons to
select an option.
Enter hours, minutes, and seconds in the 3.
order from left to right in the time edit box
using the numeric buttons (0-9)
Playback will start at the chosen time or 4.
the selected title, chapter or track.
For DVD
Displays the total available title and •
chapters in the disc and enable to select a
chapter for viewing. For example:
{TT XX/03 CH XXX/010}
Displays the total available title in the disc •
and enable to select the hour, minute, and
second of the title. For example:
{
XX:XX:XX}
For SVCD or VCD
Enable to select any parts within the disc. •
For example: {
XX:XX:XX}
Enable to select any tracks. For example: •
{TRK XX/XX}
Search
Press SEARCH button, and then press 1.
▲▼ buttons to select {Title}/ {Chapter}/
{Time}.
Use the Numeric buttons (0-9) to input a 2.
valid number.
Press OK button to confirm the selection.3.
The playback will skip to the chosen title/4.
chapter/time.
Playback Control (PBC)
For VCD with Playback Control (OBC) feature
version 2.0 only.
Press MENU button to switch bettwen 1.
PCB ON and PBC OFF.
If PBC is on , the disc menu (if available in 2.
the VCD) will appear on the TV screen.
Use the PREV 3.
I / NEXT I button to
turn to previous or next page. You can
also use the numeric buttons (0-9) to
select a play option.
To skip the Index Menu and play directly 4.
from the beginning, press MENU button
on the remote control to turn the PBC
feature off.
Remote Control
DISPLAY button
To display a list of disc
I Standby button
To switch the DVD platyer
to STANDBY mode or
POWER ON.
To mute and restore your
To open or close the DVD
playback.(If it is avaiable in
To switch between different
audio languages (If it is
To switch between different
To enlarge the picture on
To select between different
repeat modes - REPEAT I,
REPEAT DIR, REPEAT ALL
To repeat playback between
2 particular points on a
playback from selected
playback forward frame by
Press this button to access
the data in the USB flash
In the interests of safety and to avoid unnecessary energy consumption,
never leave your DVD in standby while unattended for long periods of
time, e.g. while on holiday or while out of the house.
MUTE button
DVD sound output.
OPEN/CLOSE button
disc tray.
ANGLE button
To switch/ change the
camera angle during
the DVD features.)
LANGUAGE button
avaiable in the DVD
(Available languages
depend on the DVD
To search and start
To play and move the
features.)
SUBTITLE button
subtitle languages.
features).
ZOOM button
the TV.
REPEAT button
and OFF.
A-B button
disc.
SEARCH button
point on the disc.
STEP button
frame.
USB button
drive,
This symbol on the product or in the instructions means that your
electrical and electronic equipment should be disposed at the end
of its life separately from your household waste. There are separate
collection systems for recycling in the EU.
For more information, please contact the local authority or your
retailer where you purchased the product.
Notes for battery disposal
Your product contains batteries covered by the European Directive
2006/66/EC, which cannot be disposed of with normal household
waste. Please inform yourself about the local rules on separate
collection of batteries. The correct disposal of batteries helps
prevent potentially negative consequences on the environment and
human health.
information that is available in
the current disc.
SETUP button
Press this button to display
the SetUp Menu of the DVD.
VOL+/VOL- button
To increase and decrease
volume.
NAVIGATION CURSOR
buttons
Press to navigate within the
SetUp Menu.
/- to move up and down
in SetUp Menu; allow slow
forward and backward during
playback.
/- to move left and right in
SetUp Menu; start the forward
and reverse search during
playback.
OK button
To confirm selection.
I button
To skip to next title, chapter or
track.
II button
To start or pause the
playback.
button
To stop the playback.
I button
To return back to previous
title, chapter or track.
button
To fast reverse during
playback.
button
To fast forward during
playback.
0-9 buttons
To select the numberic items
in a menu.
MENU button
To enter or exit the disc
contents menu.
To switch on or off the
playback control mode (for
VCD version 2.0 only).
TITLE button
To go back to previous menu
or show title menu.
Checklist...
Basic Operation (Disc)
5
You should have...
• Put the two AAA size batteries in your remote control.
• Connected your DVD to your TV and other external AV devices.
• Switched on your DVD, TV and other external AV appliances.
• Place your disc to the DVD disc tray and load the disc.
Basic Operation (Disc)
5
 Loading...