

Page 1
MICRO HIFI SYSTEM
with NXT technology
MICROSISTEMA HIFI
con technología NXT
CX-V3
Instruction manual
Manual de instrucciones
Before operating, please read all these instructions thoroughly
Lea completamente estas instrucciones antes de oner en funcionamiento el aparato.
CX V3 English 14/3/06, 9:481
Page 2

2
DECLARATION OF CONFORMITY
We declare under our sole responsibility that this product, to which this declaration relates, is in
conformity with the following standards:
EN60065, EN55013, EN55020, EN61000-3-2 and EN61000-3-3.
Following the provisions of 73/23/EEC, 89/336/EEC and 93/68/EEC Directives.
DECLARACIÓN DE CONFORMIDAD
Declaramos bajo nuestra única responsabilidad que este producto, con el que esta declaración se
relaciona, está en conformidad con las siguientes normas:
EN60065, EN55013, EN55020, EN61000-3-2 Y EN61000-3-3.
Siguiendo las condiciones de las Directivas 73/23/EEC, 89/336/EEC y 93/68/EEC.
LOCATION OF EXPLANATORY LABELS
LOCALIZACION DE ETIQUETAS EXPLICATIVAS
CAUTION:
This product contains a low-power laser
device. To ensure continued safety, do not
remove any cover or attempt to gain
acessto the inside of the products. Refer all
servicing to qualified personnel.
PRECAUCION:
Este producto contiene un aparato laser de
baja energia. Para asegurar una seguridad
continua, no saque la cubierta o intente
obtener acceso al interior de los productos.
Refiera todo el servicio al personal
cualificado.
DANGER
INVISIBLE LASER RADIATION WHEN OPEN AND INTERLOCK FAILED OR
DEFEATED. AVOID DIRECT EXPOSURE TO LASER BEAM.
PELIGRO
RADIACION LASER INVISIBLE CUANDO ESTA ABIERTO Y EL CIERRE FALLA O ESTA
DAÑADO. EVITE EXPONERSE DIRECTAMENTE AL RAYO LASER.
LASER SAFETY
This unit employs an optical laser beam system in the CD mechanism, designed with built -in
safeguards. Do not attempt to disassemble, refer to qualified service personnel.
Exposure to this invisible laser light beam may be harmful to the human eye.
THIS IS A CLASS-1 LASER PRODUCT. USE OF CONTROLS, OR ADJUSTMENTS OR PROCEDURES OTHER
THAN THOSE SPECIFIED HEREIN, MAY RESULT IN HAZARDOUS LASER LIGHT BEAM EXPOSURE.
LASER DE SEGURIDAD
Esta unidad usa un sistema de rayo laser óptico en el mecanismo del CD, diseñado con un sistema
de seguridad incorporado. No intente desarmarlo, refiera su servicio a personal cualificado. La
exposición al rayo de luz laser puede ser dañina para el ojo humano.
ESTE ES UN PRODUCTO LASER DE LA CLASE-1.
EL USO DE LOS CONTROLES, AJUSTES O PROCEDIMIENTOS QUE NO SEAN LOS ESPECIFICADOS
PODRIAN RESULTAR EN UNA EXPOSICION PELIGROSA A LA LUZ DEL RAYO LASER.
CX V3 English 14/3/06, 9:482
Page 3
3
WARNING
To prevent fire or shock hazard, do not expose this appliance to rain or moisture.
The apparatus should not be exposed to dripping or splashing and that no objects
filled with liquids, such as vases, shall be placed on the apparatus.
The ventilation should not be impeded by covering the ventilation openings with items,
such as newspapers, table-cloths, curtains, etc.
No naked flame sources, such as lighted candles, should be placed on the apparatus.
The main plug is used as the disconnect device, the disconnect device shall remain
readily operate.
ADVERTENCIA
Para evitar incendio o shock eléctrico, no exponga la unidad a la lluvia o la humedad.
El aparato no deberá exponerse a goteras ni salpicaduras y no se deberán colocar
objetos que contengan líquidos, tales como floreros, sobre la unidad.
No se deberá impedir la ventilación: no cubrir las aberturas de ventilación con
manteles, cortinas, etc.
No se deberán colocar objetos con llama descubierta, tal como velas encendidas,
sobre la unidad.
El enchufe principal se utiliza como dispositivo de desconexión y deberá permanecer
listo para operar.
Este equipo debe ubicarse cerca del tomacorriente y este debe estar fácilmente
accesible.
• CONNECTING THE POWER
• CONECTAR LA ALIMENTACIÓN
Unwind the AC power cord fully and connect it to any convenient household AC
outlet. This system is designed to operate on 230-240V~ 50Hz AC power only.
Connecting this system to any other power supply may cause damage to the unit
and is unsafe.
Extienda el cable de alimentación AC por completo y conéctelo a una salida AC
que sea conveniente. Este sistema está diseñado para operar solo con
alimentación AC 220-240V~ 50Hz. Si lo conecta con otra alimentación puede
dañar la unidad y no es seguro.
Note: • When the unit will not be used for a long period. Disconnect AC power
cord from AC outlet.
• Be usre to use it near the wall outlet. If a malfunction occurs, disconnect
the plug from the wall outlet at once.
• When the plug is plugged in, the apparatus is not completely
disconnected from the mains, even when the power is turned off.
Nota: • Cuando no se utilizará la unidad por un período prolongado, desconecte
el cable de alimentación AC de la salida AC.
• Asegúrese de utilizarla cerca de la salida de la pared. Si funciona mal,
desconecte el enchufe de la salida de la pared inmediatamente.
• Cuando la unidad está enchufada, el aparato no está completamente
desconectado de la red eléctrica, incluso si la unidad está apagada.
CX V3 English 14/3/06, 9:483
Page 4
4
• USING THE REMOTE CONTROL
• UTILIZAR EL CONTROL REMOTO
1.The remote is required to operate the timer and most of the other functions on
the unit.
El control remoto se necesita para operar el cronómetro y la mayoría de las
demás funciones de la unidad.
2.To use the remote, point it at the REMOTE SENSOR on the unit to control from
your listening position.
Para utilizar el control remoto, apúntelo al SENSOR REMOTO de la unidad para
controlarla desde su posición de audición.
Note: • Even if the remote is in range, operation may be compromised by obstacles
between the remote and unit.
• If the remote is operated near other units which generate infrared rays, or if
other remote control devices using infrared rays are used near the unit, the
remote may operate incorrectly. Conversely, this remote may make other
units operated incorrectly.
Nota: • Incluso si el control remoto se encuentra dentro del alcance, el funcionamiento
se puede ver comprometido por obstáculos entre el control remoto y la unidad.
• Si el control remoto se utiliza cerca de otras unidades que generan rayos
infrarrojos, o si se utilizan otros dispositivos de control remoto que genera
rayos infrarrojos cerca de la unidad, es posible que el control remoto no
funcione correctamente. A la inversa, este control remoto puede hacer que
otras unidades funcionen de manera incorrecta.
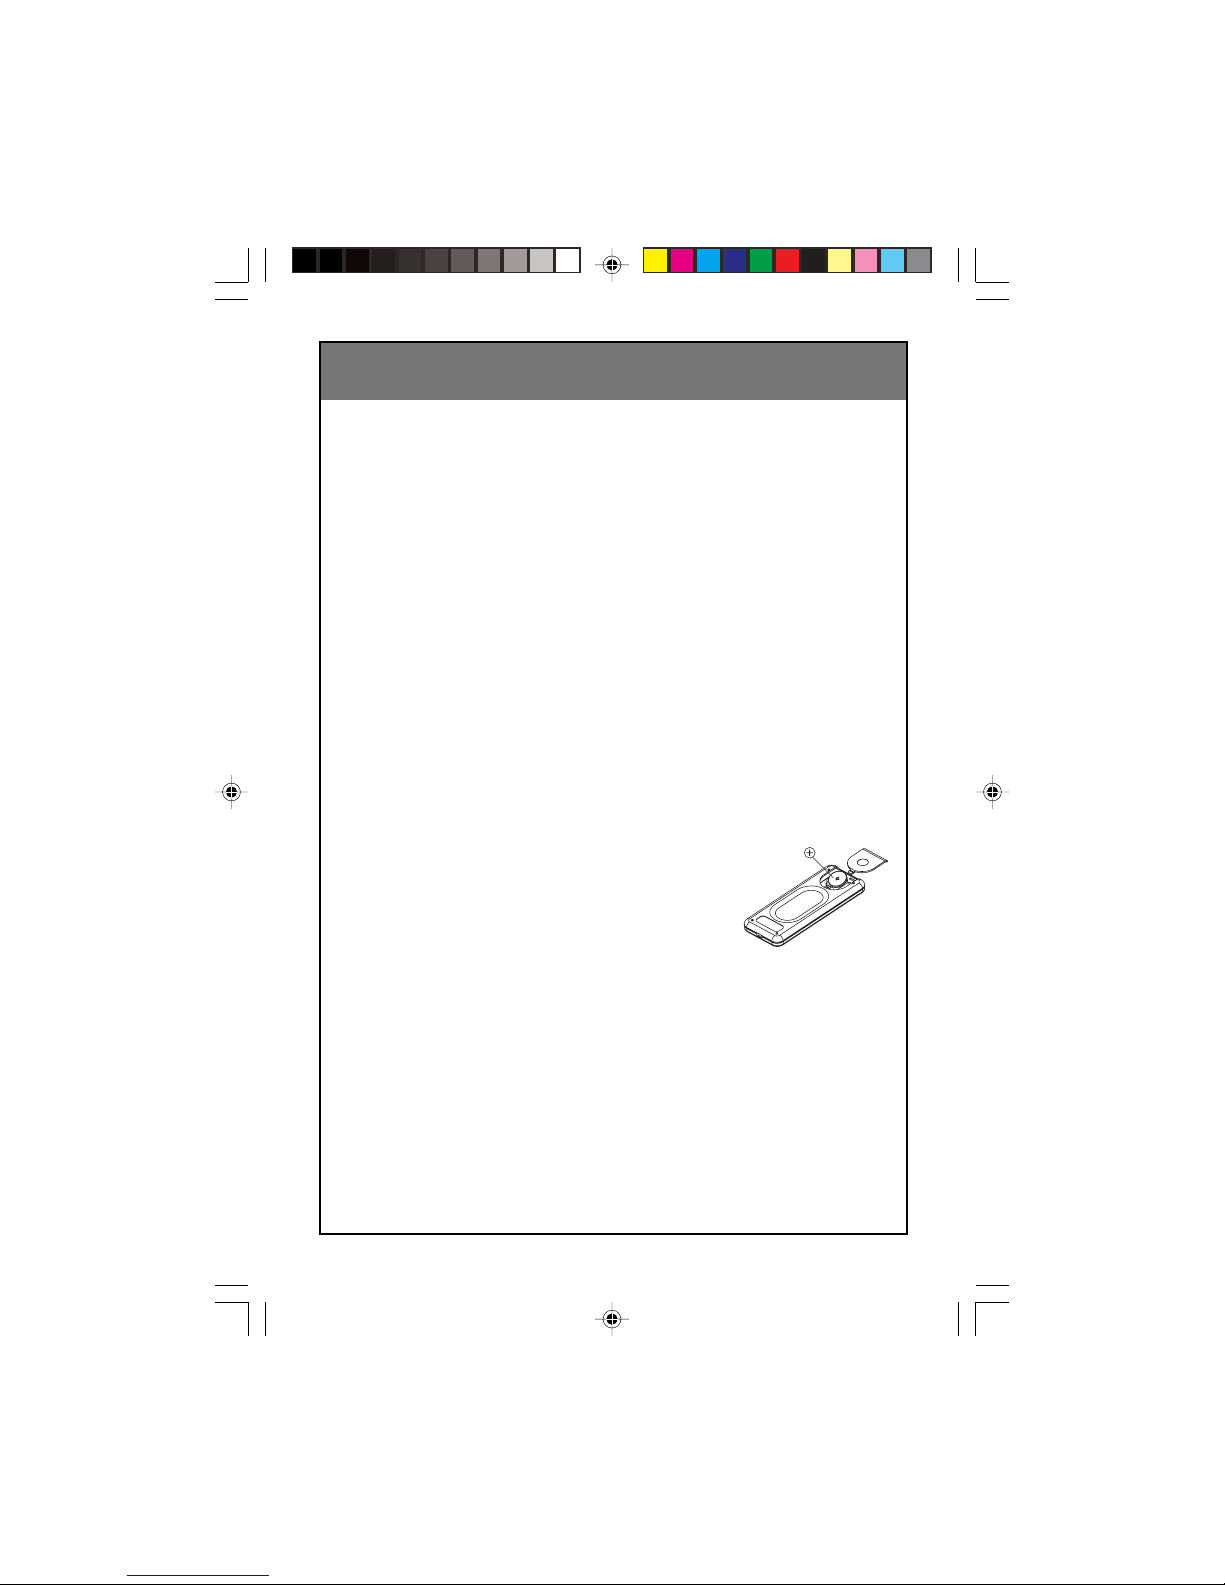
Battery Insertion
Insert the CR2032 button cell battery, ensuring the positive
(+) side faces up.
Instalar las pilas en el control remoto
Inserte la pila CR2032, asegurándose que el lado positivo
(+) se encuentre hacia arriba.
Note: • When the remote is not going to be used for more than 30days, remove
the battery to prevent it from leaking. If it is leaks, wipe away the liquid
inside the battery compartment and replace with a new battery.
• Make sure that you dispose the old battery in accordance with local
environmental laws.
Nota: • Cuando no se va a utilizar el control remoto por 30 días, retire la pila para
evitar pérdidas. Si pierde, limpie el líquido dentro del compartimiento de
las pilas y coloque una nueva pila.
• Asegúrese de que deseche la pila vieja de acuerdo con las leyes locales
de medio ambiente.
• Existe peligro de explosión de la pila si se reemplaza incorrectamente.
• Reemplace solo por el mismo tipo ó equivalente.
CX V3 English 14/3/06, 9:484
Page 5
5
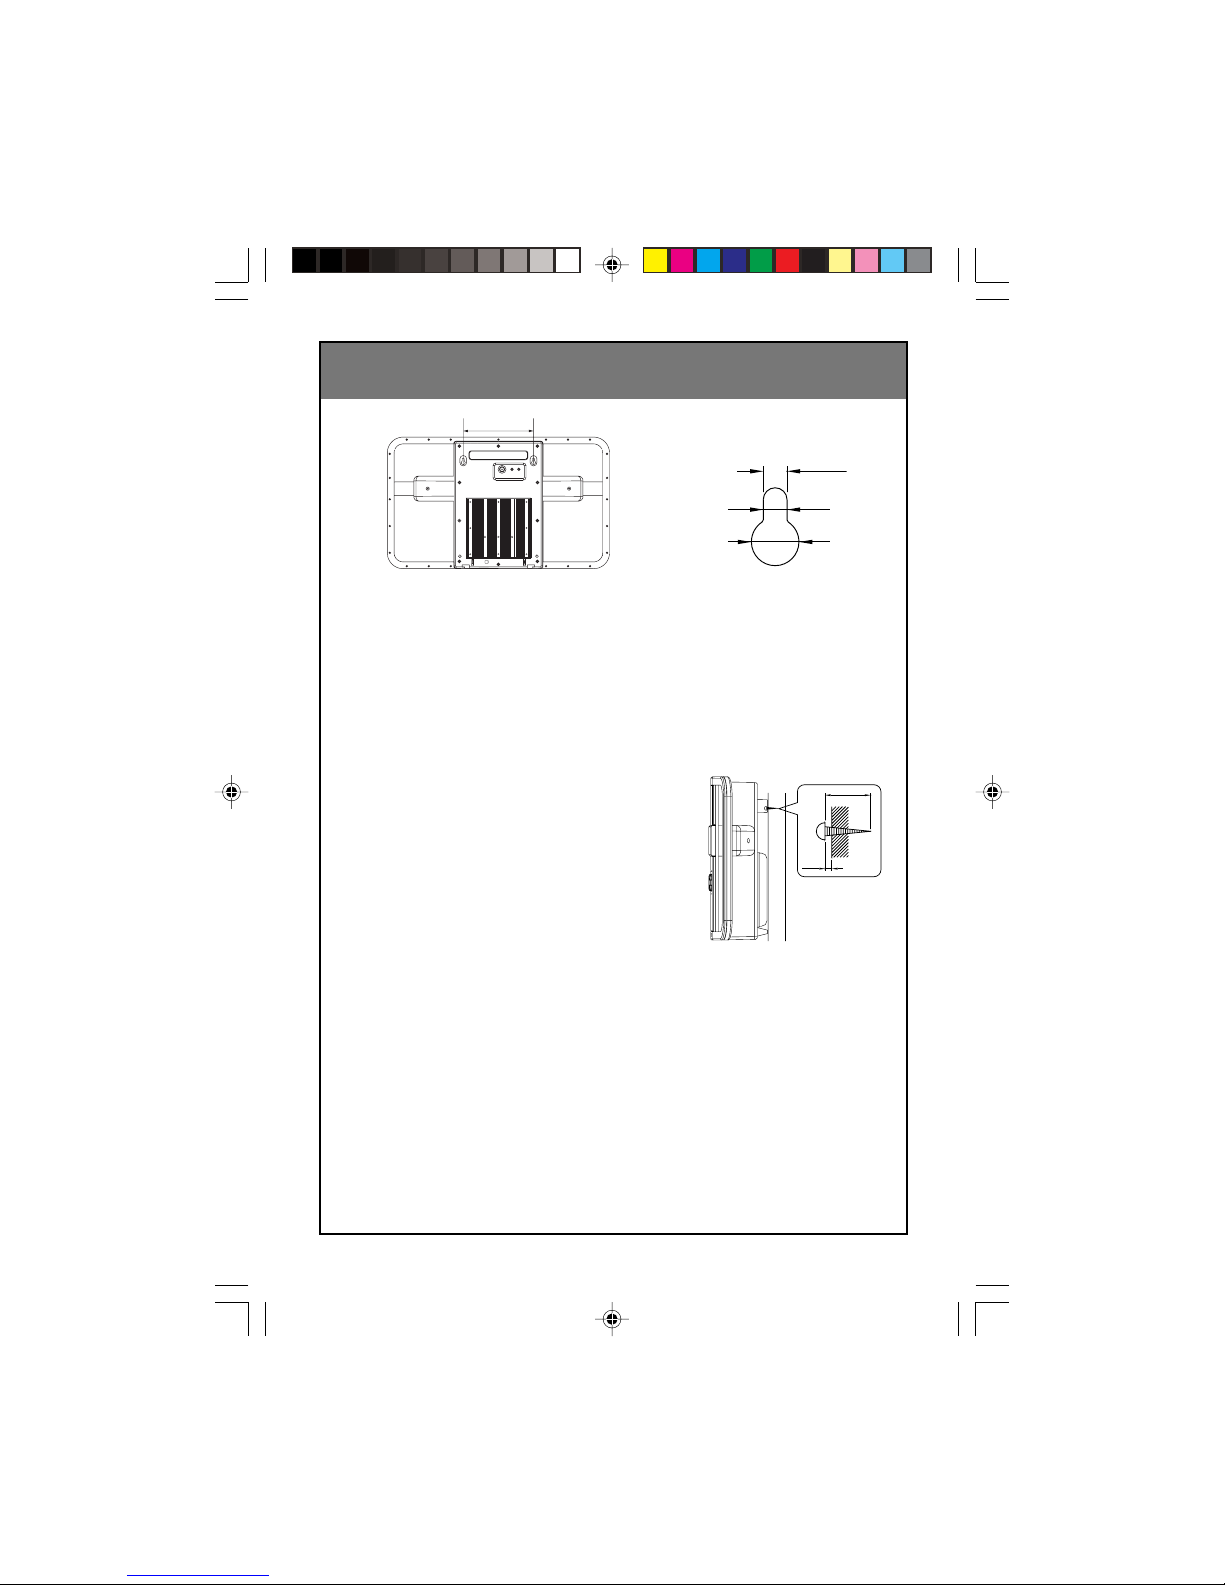
• MOUNTING THE SYSTEM TO THE WALL
• MONTAR EL SISTEMA EN LA PARED
The supplied paper pattern helps you properly align the system.
El patrón de papel suministrado le ayudará a alinear de manera adecuada el sistema.
1. Mark where to fasten the screws on the wall.
Marque donde ajustar los tornillos a la pared.
Note: Wall mounting screws are not supplied with this system. Use screws that are suitable
for the wall material and the hold size as illustrated here. (see fig 1)
Nota:Los tornillos para montaje no se proveen con el sistema. Utilice tornillos
adecuados para el material de la pared y el tamaño de agarradera que se
muestra en este manual (ver figura 1).
2.Drive the screws into the wall, leaving about 1/2
inch extended.
Inserte los tornillos en la pared, dejando alrededor
de 1⁄2 pulgada extendido.
3. Hang the system onto the protruding screws.
Ensure that the screws securely connect with the
narrow part of the holes.
Cuelgue el sistema en los tornillos sobresalidos.
Asegúrese de que los tornillos están insertados
correctamente en la parte angosta de los agujeros.
Note:The wall onto which the system is attached should be capable of supporting
33lbs. per screw.
Confirm that all screws are fastened tightly and are properly fitted into the holes.
Nota:Asegúrese de que los tornillos estén bien ajustados y que están insertados
de manera correcta en los agujeros.
155mm
4.5mm
fig. 1
20mm
3mm
CX V3 English 14/3/06, 9:485
Page 6
6
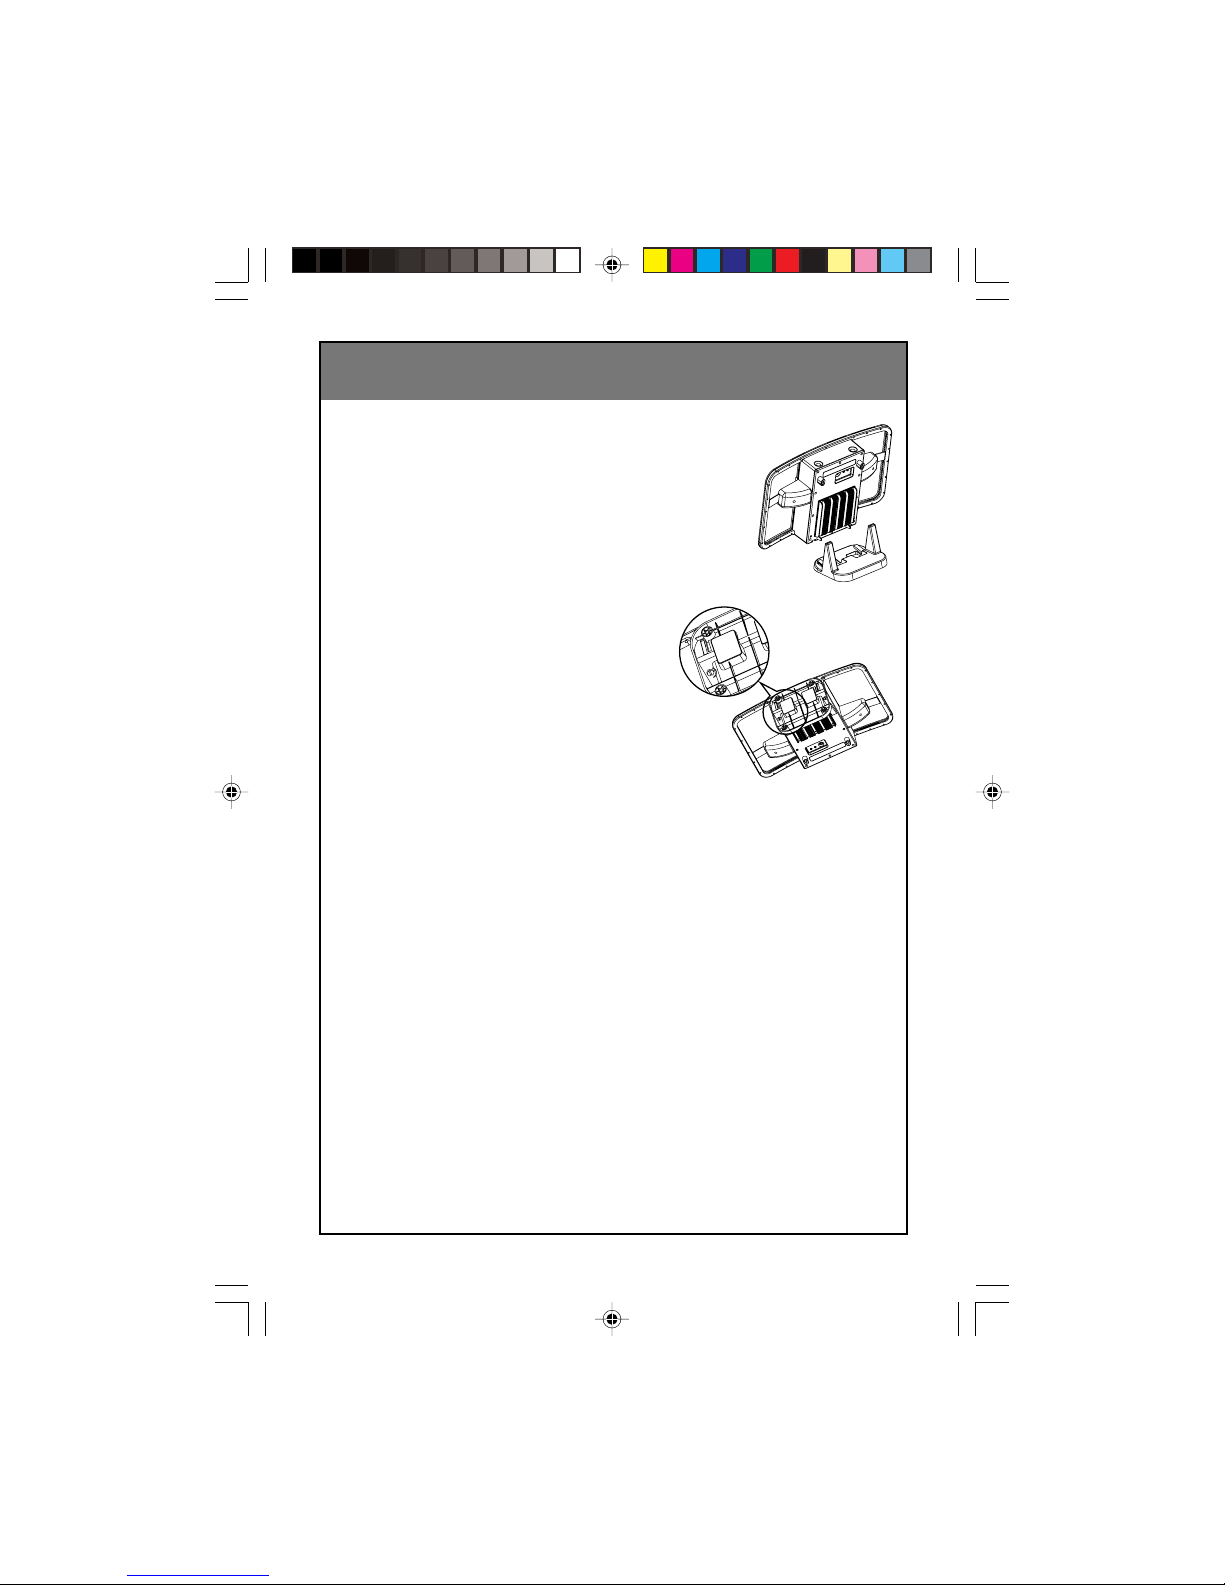
• MOUNTING THE SYSTEM TO ITS BASE
• MONTAR EL SISTEMA EN SU BASE
1. Align the grooves on the underside of the unit with
the guides located on the base. See fig. 2.
Alinee las ranuras de la parte inferior de la unidad
con las guías ubicadas en la base. Ver fig. 2.
2. Slide the unit onto the base.
Deslice la unidad en la base.
3. Tighten the two screws underneath the base
to firmly hold the unit in place.
See fig. 3.
Ajuste los dos tornillos debajo de la base
para colocar la unidad en su lugar de
manera firme. Ver fig. 3.
Removing the System from Its base
Retirar el sistema de la unidad
1. Loosen the two screws underneath the base.
Afloje los dos tornillos debajo de la base.
2. Slide the unit from the base.
Deslice la unidad hacia afuera de la base.
fig. 2
fig. 3
CX V3 English 14/3/06, 9:486
Page 7
7
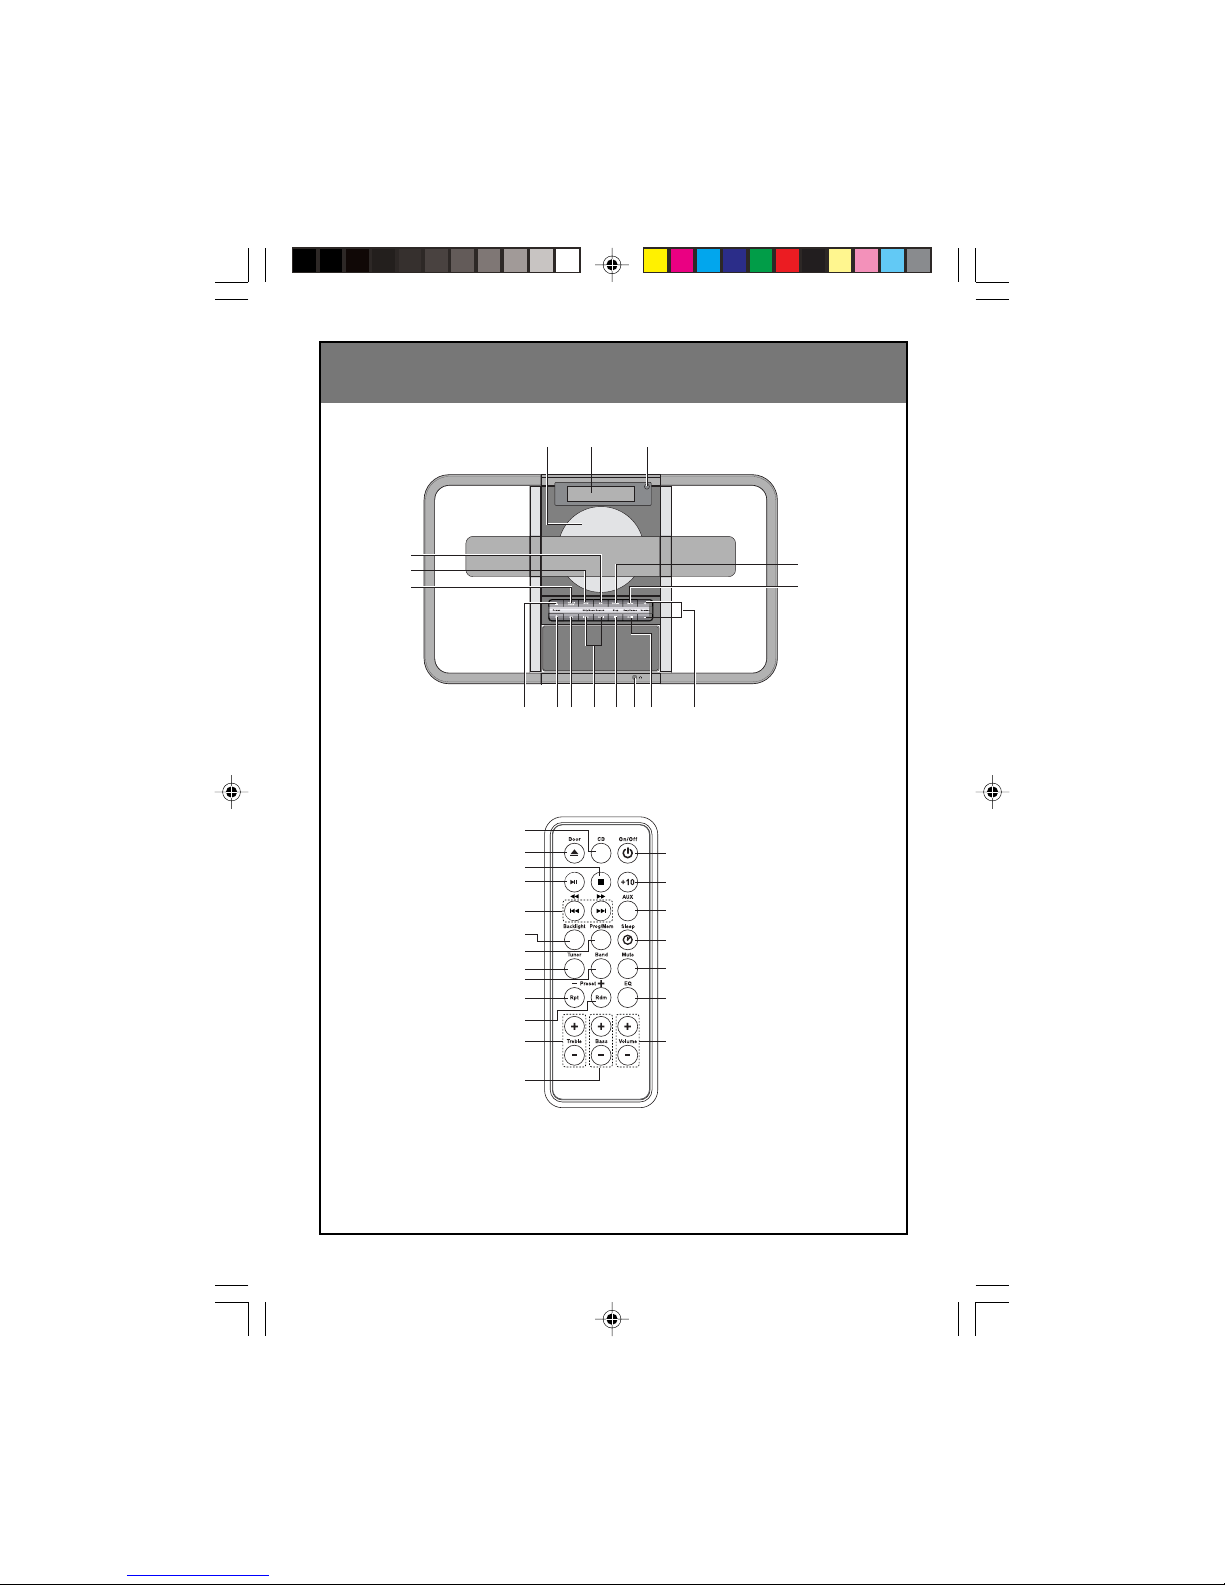
• KEY TO ILLUSTRATIONS
• CLAVE DE LAS ILUSTRACIONES
1
2
3
4
5
6
14
15
16
17
18
19
20
7
8
9
10
11
12
13
4
5
6
78910111213 14
15
16
123
REMOTE CONTROL
CONTROL REMOTO
CX V3 English 14/3/06, 9:487
Page 8
8
English
PRECAUTIONS
• When the set is not going to be used for a long time, unplug the AC lead and remove the
batteries.
• If a CD player is being operated while you are receiving a radio broadcast, you may hear a
noise with the broadcast. If so, turn the operative switch of the CD player [OFF].
• Do not leave exhausted batteries in the compartment as they will leak and cause corrosion
and damage.
• Never open the covers or touch the inside or insert a metal object. Any of these operations
could cause an electric shock or a fault.
• When thunder starts, unplug the power cord from the AC outlet. If the set is being used
outdoors, shorten the antenna and stop using the set.
• Shorten the antenna when carrying the set: If the set is carried with the antenna extended, it
could break.
• Do not expose the unit to direct sunlight, extreme heat, and high humidity, or place it near
heat sources, the sea, or in a sandy or dusty place.
• Do not clean the cabinet of the set with strong detergents or solvents as these could damage
the surface finish.
• We discourage the use of C-120 cassette tapes as they tend to break or jam the device.
• The apparatus shall not be exposed to dripping or splashing.
• Discs, which can be played on this player, have the following mark on them:
• Do not move the set suddenly from a very cold room into a warm room. When a chilled CD
player is moved suddenly to a warm location, moisture condensation may form on the pick-up
lens, preventing proper operation. In this case, wait 1 to 2 hours before resuming play.
• During playback, if the CD player is subjected to a sudden shock or jolt, some noise may be
produced, this is not a malfunction.
• Do not place any objects in the disc compartment, it may cause damage to the mechanism.
• Whenever moving the set, first, be sure to remove the disc from it. If the player is moved with
the disc loaded, the disc may be damaged.
• Do not store discs in high temperature, high-humidity locations. The discs may develop
warps and become unable to play. Also, discs with moisture on them may be unplayable.
Wipe any moisture off with a soft, dry cloth, and be sure discs are fully dry before using.
• Handle the discs carefully so that fingerprints and dust do not adhere to the surfaces of the
discs. To clean off, use a soft cloth. Do not use a hard cloth since these will mark the disc.
• If you switch on or off a fluorescent lamp which is placed near the set, you may hear some
interference noise; this is not a malfunction.
• Please do not use compact discs with cellophone tapes or with labels attached, or those CD
with pealed off stains, such as rental CD. If such discs were used on a CD player, they may
get trapped inside the unit and cause malfunction.
• CD’s with special shapes (heart-shaped CD’s, octagonal CD’s etc.) cannot be played on this
set. Attempting to do so may damage the set. Do not use such CD’s:
IMPORTANT NOTICE
ALWAYS PRESS STOP BUTTON AND WAIT FOR THE DISC TO STOP ROTATING
BEFORE OPEN THE CD DOOR AND TO REMOVE THE DISC. OPEN THE CD DOOR
WHILE IT IS STILL ROTATING MAY DAMAGE THE DISC.
CX V3 English 14/3/06, 9:488
Page 9
9
English
1. Remote Sensor
- Point the remote at this position for effective remote use.
2. Display
- Shows information regarding the status of the disc or the radio station that is
currently being played.
3. CD Compartment
- Holds CD disc.
4. EQ
- Selects equalizer mode (Classical, Flat, Rock and Pop status).
5. AUX
- Switches to Auxiliary mode
6. TUNER/BAND
- Switches to Radio's MW or FM mode.
7. DOOR ( )
- Opens and closes CD compartment.
8. On/Off ( )
- Switches the unit on and off.
9. CD
- Switches to CD/MP3/WMA mode.
10. SKIP/SCAN SEARCH ( / )
- Skip / search backwards or forwards through a disc or track in CD/MP3/WMA
mode, or certain radio stations in Tuner mode. Press and hold for faster
advance or reverse.
11. STOP ( )
- Stops disc play or clears program setting. The total number of tracks and the
total playing time (CDDA disc) appears on the display panel to indicate that the
player is in stop mode.
12. Earphone Jack ( )
- Connects to the headphones.
13. PLAY/PAUSE ( / )
- Plays and pause a disc in CD mode.
14. VOLUME + / –
- Adjusts the sound level.
15. BASS
- Adjust low frequencies.
16. TREBLE
- Adjusts high frequencies.
KEY TO ILLUSTRATIONS (See Page 7)
CX V3 English 14/3/06, 9:489
Page 10

10
English
Remote Control
1. CD button - Switches to CD mode.
2. OPEN ( ) button - Opens and closes CD compartment.
3. STOP ( ) button
- Stops disc play, and the total playing time (CDDA
disc) appears on the display panel to indicate the
player is in stop mode.
4. PLAY / PAUSE ( / ) button
- Play and pause a disc in CD mode.
5. SKIP/SERACH BACKWARD or FORWARD
( / ) buttons
- Skips backwards or forwards through a disc or
track in CD mode;
- Skips backwards or forwards through radio
stations in Tuner mode;
- Or skips through hours and minutes in Clock
mode.
- Press and hold for faster advance or reverse.
6. BACKLIGHT button
- Turns the backlight on and off on the display.
7. PROG/MEM button
- Programs CD play sequence in CD mode or sets radio stations.
8. TUNER button - Switches to Radio mode.
9. BAND button - Switches to MW/FM mode.
10. RPT/PRESET – button
- Acts as a repeat function in CD mode; or scans backwards preset stations in
Radio mode.
11. RDM/PRESET + button
- Plays an entire disc in random order in CD mode; or scans forward preset stations
in Radio mode.
12. TREBLE +/– button - Adjusts Treble.
13. BASS +/– button - Adjusts Bass.
14. On/Off ( ) - Switches the unit into standby.
15. +10 button
- Cycles forward by 10 tracks in a disc containing a large number of CDDA, MP3 or
WMA audio files during play mode.
16. AUX button - Switches to Auxiliary mode.
17. SLEEP ( ) button
- Selects the sleeping time option in sleep mode; programs the clock when power is
off and set 12hours/24hours display.
18. MUTE button - Toggle mute/unmute.
19. EQ button - Selects equalizer mode (Classical, Flat, Rock and Pop)
20. VOLUME +/– button - Adjusts sound level.
CX V3 English 14/3/06, 9:4810
Page 11

11
English
FUNCTION AND FEATURES
CD OPERATION
Loading a CD
1. Press CD button.
Note: "NO DISC" appears on the display if no CD is inside.
2. Press DOOR button to open the compartment door. "OPEN" appears on the display.
3. Place your desired CD into the tray with the label facing outwards.
4. Press DOOR button to close compartment door. "CLOSE" first appears on the LCD
display and "READING" appears soon afterward.
5. The display has a "CD" indicator if the disc is a standard CDDA format audio CD. If
the disc contains MP3, WMA files then MP3 or WMA indicators are displayed.
Note:
• Once the CD door is opened and then closed, the pick-up head automatically searches
for a CD. Once the disc is found, the display shows its total number of tracks and
total playing time. However, if no CD can be found, the pick-up head stops and the
display shows "NO DISC".
Playing CDDA, CD_MP3 and CD_WMA discs
Please note : The unit can take up to 15 seconds to read an MP3 or WMA disc.
1. After a CD is loaded, press PLAY/PAUSE ( / ) to play a CD. The display shows
the track number and playing time.
2. Press / button to skip backwards or forwards to a desired track.
3. To stop CD play at any time, press STOP ( ).
Note:
• Press and hold or to search within a track.
• To temporarily stop CD play, press PLAY/PAUSE ( / ). The playing time flashes
on the display. Press PLAY/PAUSE ( / ) again to resume play.
• Play stops automatically after all tracks have been played. The display shows the
CD's total number of tracks and the playing time.
Playing Tracks in Random Order
1. Press RDM button of remote control to plays all songs on the disc in random order,
"RANDOM" appears on the display.
2. Press RDM button again to exit this function. The disc continues playing to the end,
but in the correct order. The "RANDOM" disappears.
CX V3 English 14/3/06, 9:4811
Page 12

12
English
Repeat Play
Repeating one Track
1. Press or to select a desired track.
2. Press RPT button of remote control until "REPEAT 1" appears on the display. The
selected track plays repeatedly.
Note:
To cancel this function, press RPT until "REPEAT 1" disappears from the display.
Repeating the Disc
Press RPT until "REPEAT ALL" appears on the display.
Note:
To cancel this function, press RPT until "REPEAT ALL" disappears from the display.
Program Play
Programming Disc Play
This feature programs the order in which tracks are played.
1. After CD is loaded, ensure the CD is in stop mode.
2. Press PROG/MEM button of remote control, "PROGRAM" flashes and "00 P-01"
appears on the display.
3. Press or to locate a desired track.
4. Press PROG/MEN button to confirm. "00 P-02" appears on the display.
5. Repeat steps 3 and 4 to program other tracks for your desired sequence. Up to 40
tracks may be stored for programmed play.
6. Press PLAY/PAUSE ( / ) to play your programmed sequence.
Note:
• T o cancel Programmed Play mode before the sequence begins, you may either power
off the unit or open the door.
• When in Programmed Play mode, press PROG/MEM button to cancel the Programmed
Play mode, and the CD plays in normal Playback mode. If PROG/MEM button is
pressed again, you return to the already Programmed Play mode.
Editing Programmed Memory
1. While stopped in programmed play mode, press PROG/MEM button repeatedly until
the desired programed track is reached.
2.
Press
or
to select the track you want to replace the programmed track with.
3. Press PROG/MEM again to confirm.
4. Repeat steps 1- 3 to edit other programmed tracks.
Erasing Programmed Memory
1. While stopped in programmed play mode, press PROG/MEM button repeatedly until
you reach the desired programmed track you wish to erase.
2. Press or to select the track you want to erase, until the shown track selection
appears as "00" on the display.
3. Press PROG/MEM button to confirm.
4. Repeat steps 1 - 3 to erase other programmed tracks.
The programmed track will now be replaced by the track from the next location. The
last programmed location will become "00".
CX V3 English 14/3/06, 9:4812
Page 13

13
English
RADIO TUNER OPERATION
Listening to Radio
Please note :
Connect the pigtale aerial in the 75ohm Antenna socket on the back of the unit
1. Press TUNER/BAND button to select FM or MW mode. On the remote, press BAND
button to select FM or MW mode.
2. Press or to select a radio station.
Note:
• If you press or for less than three seconds each time, the receiving frequency
moves up or down incrementally.
• If you press and hold or for more than three seconds, the frequency continues
to increase automatically until a radio station is received.
3. Adjust to the desired sound and volume.
Note:
The last tuned station is retained and recalled when you turn the system on. The tuned
station is stored into memory even if power is disconnected or cut due to temporary power
failure.
Setting Radio Stations into Memory
You may store up to 20 FM stations and 20 MW stations in channel memory.
1. Press TUNER/BAND button to select FM or MW mode. On the remote, press BAND
button to select FM or MW mode.
2. Press or to select a radio station.
3. Press PROG/MEM button, "PROGRMW" flashs on the display.
4. Press "PRESET +" or "PRESET -" to select program channel.
5. Press PROG/MEM button to save into memory. If it has been previously set, the
former station is replaced.
6. Repeat steps 2 to 5 to store additional stations.
Playing Preset Stations
1. Press TUNER/BAND button to select FM or MW mode. On the remote, press BAND
button to select FM or MW mode.
2. Press PRESET +/– to select the desired preset channel.
Improving Reception
MW Reception
Reposition the unit to get better MW reception.
Note: Do not connect to an outside antenna.
FM Reception
1. Plug in supplied FM wire antenna to the FM antenna socket of this unit, fully unwind
the FM wire antenna and position it for best FM signal reception. OR
2. Connect a FM antenna cable (not supplied) from FM antenna socket of this unit to
your home FM antenna socket.
CX V3 English 14/3/06, 9:4813
Page 14

14
English
SETTING THE CLOCK
From the "Off" mode, the LCD displays the clock time.
1. Press and hold SLEEP button on the remote for five seconds, and the hour digits
begin to flash on the display.
2. Press and to set the hour.
3. Press SLEEP button to confirm. The hour stops flashing and the minutes digits begin
to flash.
4. Press and to set the minutes.
5. Press SLEEP button to confirm. The minutes stops flashing and the clock is set.
6. Press SLEEP button on the remote, the clock can be toggled between 12/24 hour
format.
Note:
• The clock displays in 12-hour or 24-hour mode.
• The clock can only be set when the power is off, and unit is in standby mode.
• Press BACKLIGHT button on the remote to illuminate the clock.
CONNECTING TO OTHER AUDIO EQUIPMENT
Caution: Turn off power and disconnect from the mains supply before connection.
• AUX IN - Connects to other audio equipment, including a VCR, video recorder, MP3
to provide sound output for other audio equipment.
• AUDIO OUT/LINE OUT - Connects to other audio equipment, including an Active
Subwoofer, TV or an amplifier, for alternative stereo sound. The other jack could be
refered to as CD or AUX on an amplifier; LINE IN on a TV; or AUDIO INPUT on an
amplifier.
Note : Refer to your audio equipment's guide to determine how the audio input or
output port is identified.
• FM Antenna -
1. Plug in supplied FM wire antenna to the FM antenna socket of this unit, fully unwind
the FM wire antenna and position it for best FM signal reception. OR
2. Connect a FM antenna cable (not supplied) from FM antenna socket of this unit to
your home FM antenna socket.
FM
Antenna
AuxInAudio
Out
Line
Out
CX V3 English 14/3/06, 9:4814
Page 15

15
English
ADJUSTING THE VOLUME
Changing the volume
You can adjust the volume on the unit or with the remote control.
Press VOLUME +/– until the desired volume is reached.
Adjusting Tone
Bass and Treble may be used to obtain a "flat" frequency response or a tone which suits
your individual listening preference. BASS adjusts low frequencies from -6 to +6. TREBLE
adjusts high frequencies from -6 to +6.
1. Press TREBLE or BASS on the system to select Bass or Treble mode.
2. Press +/– to adjust the level.
Note:
On the remote, you may also press BASS +/– or TREBLE +/– to adjust Bass or Treble.
Changing Sound Quality with EQ
During play, press EQ button repeatedly to select the preferred equalizer mode.
Note:
There are 4 preset EQ levels : Flat, Rock, Pop, Classic.
Muting Sound
1. Press MUTE button from remote unit to silence audio output. "MUTE" appears on
the display.
2. Press MUTE button again to cancel.
Using Sleep Feature
This feature shuts off the system and goes to Standby mode when selected sleep time
has passed.
• Press SLEEP button of remote control repeatedly to select the desired sleeping
time: 15, 30, 45 or 60 minutes. "SLEEP" flashes on the display as the time is selected.
Once the sleep time is selected, "SLEEP" appears on the display.
Using headphones (not supplied)
Plug your headphones into the headphones socket at the front of the unit.
Sound will switch from the speakers to the headphones. Never have the sound turned
up high when you have the headphones plugged in.
Warning : Listening to music at loud volumes can damage your hearing.
CX V3 English 14/3/06, 9:4815
Page 16

16
English
CARE AND MAINTENANCE
Please note : Disconnect the unit from the mains supply before cleaning.
System
Wipe the housing gently with a soft, dry cloth. If the unit is heavily stained or soiled, wipe
with a moistened cloth. To avoid damage, do not use any cleaning agents or abrasive
cleaners.
Speakers
Wipe the speakers gently with a clean, damp cloth. To avoid damage, do not use any
cleaning agents or abrasive cleaners.
CD Lens
When the lens gets dirty, malfunctions may occur. The lens should be cleaned using a
commercially available camera lens cleaner.
CD Compartment
• Do not put anything except a compact disc into compartment. Other objects can
damage the mechanism.
• Do not force compartment open.
• Keep compartment closed when not in use to prevent dirt and dust from settling inside.
• Never place multiple discs into compartment at the same time.
REMARKS AND NOTES
1. This unit supports MP3 bit rates from 32-320kbps and WMA bit rates from 48-192kbps
and plays CD-R and CD-RW discs.
2. The ISO9660 disc formats are supported.
3. MP3 files should be encoded at data rates of 128kbps and higher and WMA files
encoded at 64kbps and higher for optimal music quality.
4. MP3 files can include additional information (termed ID3 tags) about the music track
such as the song title and the artist's name. The unit will display the song title for the
MP3 files being played if this information has been incorporated into the MP3 music
filae. WMA files can also include information, termed metatags, similar to the ID3 tags
in MP3 audio files. The unit will display the song title if that information is stored in the
WMA file metatag.
RECOMMENDED WINDOWS MEDIA PLAYER SETTINGS ON YOUR PC
When using Microsoft Windows Media Player on your PC to encode your CD collections
to hard disc as WMA files, it is recommended that you do not tick the "Copy protect music"
box in the Windows Media Player Options menu. Music files purchased from on-line music
stores may only play if written to CD using Windows Media Player to burn the CDs.
Windows Media and the Windows logo are trademarks or registered trademarks of
Microsoft Corporation in the United States and/or other countries. WMA is a compression
format developed by Microsoft Corporation. It achieves the same sound quality as MP3
with a file size that is smaller than that of MP3.
CX V3 English 14/3/06, 9:4816
Page 17

17
English
TROUBLESHOOTING GUIDE
SYMPTON
No power even
when POWER is set
to 'ON'.
CD will not play
No sound
Sound skips
Humming Noise
CAUSE
Poor plug connection.
Disc is loaded upside
down.
Disc is dirty.
Disc code error.
Improper amplifier
operation.
Player is subject to
vibrations or physical
shock.
Laser lens is dirty.
Disc is dirty.
Loose cable
connections.
ACTION
Insert power plug firmly into AC
outlet.
Reload disc with label facing
towards the front.
Clean disc with a soft cloth. Wipe
in a straight motion from inside to
outside of the disc.
Reload disc and wait ten seconds,
then switch unit back on and retry.
Make sure that amplifier controls
are set properly. Check master
output level.
Change the installation location.
Clean using a quality laser lens
cleaner.
Clean disc.
Firmly connect all audio plugs.
CX V3 English 14/3/06, 9:4817
Page 18

18
English
SPECIFICATIONS
Supply Voltage : AC230V~ 50Hz
Power Consumption : 48W
Radio Frequency Range : FM 87.5 - 108 MHz
MW 531 - 1602 kHz
Power Output (Subwoofer) : Typical 10W RMS at 4ohm Speaker
(Speaker) : Typical 5W RMS at 8ohm Speaker
THD <10%
Dimension (with stand) : 19.2" (L) x 7.1" (W) x 12.1" (H)
(without stand) : 19.2" (L) x 3.7" (W) x 11.41" (H)
Net Weight : 9.04 Lbs (4.1kg)
We continually strive to improve our products, specifications may change without prior
notice.
CX V3 English 14/3/06, 9:4818
Page 19

19
Español
PRECAUCIONES
• Si el aparato no se va a usar por periodo de tiempo largo, desenchufarlo de la corriente y
quitar las pilas.
• Si un aparato CD se utiliza al mismo tiempo que se sintoniza una emisora de radio, es
posible que se oigan ruidos en la retrasmisión. Si es así, desconecte [OFF] el aparato CD
para suprimirlos.
• No dejar pilas gastadas en el compartimiento del aparato, porque pueden filtrar liquido y
ocasionar corrosuión y daños.
• Nunca abra las tapas o toque la parte interna o introduzca un objeto de metal. Cualquiera de
estas cosas podría causar una descarga eléctrica o una avería.
• Cuando hay truenos se debe desconectar el cable de alimentación de la salida CA. Si el
aparato está empleado al aire libre se debe acortar la antena y parar el uso del aparato.
• Acorte la antena cuando transporta el aparato. Si se mueve de un lado a otro con la antena
extendida, se puede romper.
• No permitir que la unidad quede bajo la influencia directa de fuerte sol, calor extremo o alta
humedad y no colocarla cerca de fuentes de calor, del mar o de lugares arenosos o
polvorientos.
• No limpiar el armazón del aparato con detergentes o disolventes fuertes, ya que pueden
dañar los acabados.
• Es desaconsejable el uso de cintas c-120, porque tienden a enredarse o a obturar el aparato.
• El aparato no se debe exponer a qoteo o salpicaduras.
• Los discos que se pueden escuchar en este aparato tienen el marbete siquiente:
• Nunca portar este aparato repentinamente de un luego muy frio en uno caltente. Cuando el
CD es pörtado repentínamente de un lugar frío en uno caliente, la humedad se condensa en
la lente del fonocaptor y. deteriora el funcionamiento del aparato. En este caso se debe
esperar de 1 a 2 hours antes de escuchar el disco.
• Cuando se escha si el disco es sacudido repentinamente hay un ruido que no significa pero
un funcionamiento defectivo del aparato.
• No se debe poner algún objeto en el compartimiento del disco, porque se puede dañar el
mecanismo.
• Si se debe trasladar el aparato, en premier lugar se debe remover el disco. Si el aparato es
traslado con el disco en posición, este disco puede dañarse.
• Nunca poner los discos en lugares muy cálidos u húmedos. Los discos pueden combarse de
modo que no pueden utilizarse. Los discos húmedos pueen hacerse inservibles. Remover
la humedad con un paño limpio y seco y cerciorarse de que los discos sean completamente
secos antes del empleo.
• Manipular los discos cuidadosamente de modo que la superficie no tenga polvo u huellas
digitales. Pare limpiar los discos, emplear un paño limpio y muelle. Nunca emplear un paño
rigido que puede arañar los discos.
• Cuando se pone u se corta la luz fluorescente del aparato si hay un ruido de interferencia,
esto no significa un funcionamiento defectivo del aparato.
• Por favor no use CDs que lleven pegado papel cello o pegatinas, o CDs cuya etiqueta este
despegada ya que podrian quedar atrapados dentro del compartimento y causar averias.
• Los CDs con formas especiales (de corazón, octogonales, etc.) no se pueden poner en este
equipo. El intentarlo podría averiar el equipo. No use ese tipo de CDs.
AVISO IMPORTANT
EPULSE SIEMPRE EL BOTÓN DE P ARADA Y ESPERE QUE EL DISCO DEJE DE GIRAR
ANTES DE ABRIR LA PUERTA DEL CD Y RETIRAR EL DISCO. SI SE ABRE LA PUERT A
DEL CD MIENTRAS EL DISCO TODA VÍA ESTÁ GIRANDO, SE PUEDE DAÑAR EL DISCO.
CX V3 English 14/3/06, 9:4819
Page 20

20
Español
CLAVE DE LAS ILUSTRACIONES (Ver la página 7)
1. Sensor Remoto
- Apunte el control remoto a este punto para un funcionamiento efectivo.
2. Visor
- Muestra información concerniente al estado del disco o la estación de radio que
se está escuchando.
3. Compartimiento del CD
- Contiene el CD.
4. EQ
- Selecciona el modo del ecualizador (Clásico, Chato, Rock y Pop)
5. AUX
- Pasa al modo Auxiliar.
6. TUNER/BAND
- Pasa al modo Radio MW o FM.
7. DOOR
- Abre y cierra el compartimiento del CD.
8. On/Off
- Enciende y apaga la unidad.
9. CD
- Pasa al modo CD/MP3/WMA.
10. SKIP/SCAN SEARCH
- Salta / Busca hacia atrás o adelante en el disco o pista en modo CD/MP3/WMA, o
ciertas estaciones de radio en el modo Radio. Pulse y mantenga para avanzar o
retroceder rápidamente.
11. ST OP
- Detiene la reproducción del disco o borra la configuración de programación. El
número total de pistas y el tiempo total de reproducción (disco CDDA) se
muestran en el visor para indicar que el reproductor está en modo detenido.
12. Earphone Jack
- Conecta los auriculares.
13. PLAY/PAUSE
- Reproduce y realiza una pausa en el disco en modo CD.
14. VOLUME + / –
- Ajusta el nivel de sonido.
15. BASS
- Ajusta las bajas frecuencias.
16. TREBLE
- Ajusta las frecuencias altas.
CX V3 English 14/3/06, 9:4820
Page 21

21
Español
Control Remoto
1. Botón CD
- Pasa al modo CD.
2. Botón OPEN
- Abre y cierra el compartimiento del CD.
3. Botón STOP
- Detiene la reproducción del disco o borra la configuración de programación. El
número total de pistas y el tiempo total de reproducción (disco CDDA) se
muestran en el visor para indicar que el reproductor está en modo detenido.
4. Botón PLAY / PAUSE
- Reproduce y realiza una pausa en el disco en modo CD.
5. Botones KIP/SEARCH BACKWARD o FORWARD
- Salta / Busca hacia atrás o adelante en el disco o pista en modo CD;
- Salta hacia adelante o hacia atrás estaciones de radio en el modo Radio;
- O salta horas o minutos en el modo Reloj.
- Pulse y mantenga presionado para avanzar o retroceder rápidamente.
6. Botón BACKLIGHT
- Enciende y apaga la luz de fondo del visor.
7. Botón PROG/MEM
- Programa la secuencia de reproducción del CD o configura las estaciones de
radio.
8. Botón TUNER - Pasa al modo Radio.
9. Botón BAND - Pasa al modo MW/FM.
10. Botón RPT/PRESET -
- Tiene función de repetición en el modo CD, o busca hacia atrás las estaciones
preestablecidas en el modo Radio.
11. Botón RDM/PRESET +
- Reproduce un disco complete al azar en modo CD, o buscar hacia adelante las
estaciones preestablecidas en el modo Radio.
12. Botón TREBLE +/– - Ajusta los agudos.
13. Botón BASS +/– - Ajusta los bajos.
14. On/Off - Coloca a la unidad en modo de espera.
15. Botón +10
- Pasa las pistas hacia adelante de a 10 en un disco que contiene un gran número
de archivos de audio CDDA, MP3 o WMA durante el modo de reproducción.
16. Botón AUX - Pasa al modo auxiliar.
17. Botón SLEEP
- Selecciona la opción de tiempo para que se apague la unidad; programa el reloj
cuando la unidad está apagada y configura el visor en el sistema de 12 horas /
24 horas.
18. Botón MUTE - Alterna entre el modo silencioso y el no silencioso.
19. Botón EQ - Selecciona el modo ecualizador (Clásico, Chato, Rock y Pop).
20. Botón VOLUME +/– - Ajuste el nivel de sonido.
CX V3 English 14/3/06, 9:4821
Page 22

22
Español
FUNCIONES Y CARACTERISTICAS
OPERACIÓN DEL CD
Insertar un CD
1. Pulse el botón CD.
Nota: Aparecerá la leyenda "NO DISC" en el visor si no hay CD dentro de la unidad.
2. Pulse el botón DOOR para abrir la tapa del compartimiento. Aparecerá la leyenda
“OPEN” en el visor.
3. Coloque el CD dentro de la bandeja con la superficie rotulada hacia afuera.
4. Pulse el botón DOOR para cerrar la tapa del compartimiento. Primero aparecerá la
leyenda "CLOSE" en el visor LCD y luego la leyenda “READING”.
5. El visor muestra el indicador “CD” si el disco es un CD de audio de formato CDDA
estándar. Si el disco contiene archivos MP3 o WMA, entonces se mostrarán los
indicadores MP3 o WMA.
Nota:
• Una vez que se abrió y luego se cerró la puerta del CD, el lector busca automáticamente
un CD. Una vez que se encontró el CD, el visor mostrará el número total de pistas y el
tiempo total de reproducción. Sin embargo, si no se encontró ningún CD, el lector se
detendrá y el visor mostrará la leyenda "NO DISC".
Reproducir discos CDDA, CD_MP3 y CD_WMA
Por favor, note lo siguiente: Le puede llevar a la unidad hasta 15 segundos para leer un
disco MP3 o WMA.
1. Después de que se insertó un CD, pulse el botón PLAY/PAUSE para reproducir el
CD. El visor mostrará el número de pista y el tiempo de reproducción.
2. Pulse el botón para saltar hacia adelante o hacia atrás a la pista deseada.
3. Para detener la reproducción del CD en cualquier momento, pulse el botón STOP .
Nota:
• Pulse y mantenga presionado o para buscar dentro de una misma pista.
• Para detener temporariamente la reproducción del CD, pulse el botón PLAY/PAUSE .
El tiempo de reproducción se muestra intermitente en el visor. Pulse el botón PLAY/
PAUSE otra vez para reanudar la reproducción.
• La reproducción se detendrá automáticamente después de que se han reproducido
todas las pistas. El visor mostrará el número total de pistas y el tiempo de reproducción
del CD.
Reproducir pistas al azar
1. Pulse el botón RDM en el control remoto para reproducir todas las canciones del
disco al azar. Se mostrará la leyenda “RANDOM” en el visor.
2. Pulse el botón RDM otra vez para salir de la función. El disco continuará
reproduciéndose hasta el final, pero en el orden correcto. La leyenda “RANDOM”
desaparecerá.
CX V3 English 14/3/06, 9:4822
Page 23

23
Español
Repetir la reproducción
Repetir una pista
1. Pulse o para seleccionar la pista deseada.
2. Pulse el botón RPT en el control remoto hasta que se muestre “REPEAT 1” en el
visor. La pista seleccionada se reproducirá repetidamente.
Nota: Para cancelar esta función, pulse el botón RPT hasta que “REPEAT 1” desaparezca
del visor.
Repetir el disco
Pulse el botón RPT hasta que se muestre "REPEAT ALL" en el visor.
Nota: Para cancelar esta función, pulse el botón RPT hasta que “REPEAT ALL” desaparezca
del visor.
Programar la reproducción
Programar la reproducción del disco
Esta función programa el orden en que se reproducirán las pistas.
1. Después de que se insertó el CD, asegúrese de que el CD está en modo detenido.
2. Pulse el botón PROG/MEM del control remoto y la leyenda “PROGRAM” se mostrará
intermitente y "00 P-01" aparecerá en el visor.
3. Pulse o para localizar la pista deseada.
4. Pulse el botón PROG/MEN para confirmar. "00 P-02" aparecerá en el visor.
5. Repita los pasos 3 y 4 para programar otras pistas con la secuencia deseada. Se
pueden almacenar hasta 40 pistas para la reproducción programada.
6. Pulse el botón PLAY/PAUSE para reproducir su secuencia programada.
Nota:
• Para cancelar el modo de Reproducción Programada antes de que comience la
secuencia, puede apagar la unidad o abrir la tapa del CD.
• Cuando se encuentra en el modo de Reproducción Programada, pulse el botón PROG/
MEM para cancelar el modo de Reproducción Programada y el CD se reproducirá en
modo de reproducción normal. Si pulsa el botón PROG/MEM otra vez, regresará al
modo de Reproducción ya Programada.
Editar la memoria programada
1. Estando en modo detenido, pulse el botón PROG/MEM repetidamente hasta que se
muestre la pista deseada.
2. Pulse o para seleccionar la pista que desea reemplazar por la pista programada.
3. Pulse el botón PROG/MEM otra vez para confirmar.
4. Repita los pasos 1-3 para editar otras pistas programadas.
Borrar la memoria programada
1. Estando en modo detenido, pulse el botón PROG/MEM repetidamente hasta que se
muestre la pista que desea borrar.
2. Pulse o para seleccionar la pista que desea borrar, hasta que la selección de pista
que se muestra aparezca como “00” en el visor.
3. Pulse el botón PROG/MEM otra vez para confirmar.
4. Repita los pasos 1-3 para borrar otras pistas programadas.
La pista programada será reemplazada por la pista de la siguiente ubicación. La última
ubicación programada será “00”.
CX V3 English 14/3/06, 9:4823
Page 24

24
Español
OPERACIÓN DEL SINTONIZADOR DE RADIO
Escuchar la radio
Por favor note lo siguiente: Conecte la antena en el toma de antena de 75ohm en la parte
posterior de la unidad.
1. Pulse el botón TUNER/BAND para seleccionar el modo FM o MW. En el control remoto,
pulse el botón BAND para seleccionar el modo FM o MW.
2. Pulse o para seleccionar una estación de radio.
Nota:
• Si pulsa o por menos de tres segundos cada vez, la frecuencia que se reciba ascenderá
o descenderá.
• Si pulsa y mantiene presionado o por más de tres segundos, la frecuencia continuará
incrementando automáticamente hasta que se reciba una estación de radio.
3. Ajuste el sonido y el volumen deseados.
Nota:
La última estación sintonizada se guardará y será la estación que se oiga cuando vuelva
a encender el sistema. La estación sintonizada se almacenará en la memoria incluso si
se desconecta la alimentación o se corta debido a un corte de energía temporario.
Configurar las estaciones de radio en la memoria
Puede almacenar hasta 20 estaciones FM y 20 estaciones MW en la memoria de canal.
1. Pulse el botón TUNER/BAND para seleccionar el modo FM o MW. En el control remoto,
pulse el botón BAND para seleccionar el modo FM o MW.
2. Pulse o para seleccionar una estación de radio.
3. Pulse el botón PROG/MEM, y la leyenda "PROGRMW" se mostrará intermitente en el
visor.
4. Pulse el botón "PRESET +" o "PRESET -" para seleccionar el canal de programación.
5. Pulse el botón PROG/MEM para guardarla en la memoria. Si ya se ha configurado
anteriormente, la estación anterior será reemplazada.
6. Repita los pasos 2 a 5 para guardar más estaciones de radio.
Escuchar las estaciones de radio preestablecidas
1. Pulse el botón TUNER/BAND para seleccionar el modo FM o MW. En el control remoto,
pulse el botón BAND para seleccionar el modo FM o MW.
2. Pulse PRESET +/– para seleccionar el canal preestablecido que desea.
Mejorar la recepción
Recepción MW
Reubique la unidad para obtener una mejor recepción MW.
Nota: No conecte una antena externa.
Recepción FM
1. Enchufe el cable de antena FM suministrado en el toma de antena FM de la unidad,
extiéndalo por completo y colóquelo de manera tal que obtenga la mejor recepción
FM. O
2. Conecte un cable de antena FM (no suministrado) desde el toma de antena FM de la
unidad hasta el toma de antena FM de su hogar.
CX V3 English 14/3/06, 9:4824
Page 25

25
Español
CONFIGURAR EL RELOJ
En el modo detenido, el visor LCD muestra la hora.
1. Pulse y mantenga presionado el botón SLEEP en el control remoto durante 5 segundos,
y los dígitos de la hora comenzar a parpadear en el visor.
2. Pulse y para configurar la hora.
3. Pulse el botón SLEEP para confirmar. La hora dejará de parpadear y comenzarán a
parpadear los minutos.
4. Pulse y para configurar los minutos.
5. Pulse el botón SLEEP para confirmar. Los minutos dejarán de parpadear y el reloj
estará configurado.
6. Pulse el botón SLEEP en el control remoto, el reloj podrá alternarse entre el formato
de 12 y 24 horas.
Nota:
• El reloj muestra el modo de 12 horas o de 24 horas.
• El reloj solo se puede configurar cuando la unidad está apagada, y la unidad se
encuentra en modo de espera.
• Pulse el botón BACKLIGHT en el control remoto para iluminar el reloj.
CONECTAR LA UNIDAD CON OTRO EQUIPO DE AUDIO
Precaución: Apague la unidad y desconéctela de la red eléctrica antes de la conexión.
• AUX IN – Conecte con otro equipo de audio, que incluye una videocasetera, una
videograbadora, MP3 para proporcionar salida de sonido a otro equipo de audio.
• AUDIO OUT/LINE OUT - Conecte con otro equipo de audio, que incluye un subwoofer
activo, una TV o un amplificador, para un sonido estéreo alternativo. El otro toma se
pueden considerar como CD o AUX en un amplificador; LINE IN en una TV ; o AUDIO
INPUT en un amplificador.
Nota : Consulte su guía del equipo de audio para determinar cómo se identifica la el
puerto de entrada o salida de audio.
• Antena FM -
1. Enchufe el cable de antena FM suministrado en el toma de antena FM de la unidad,
extiéndalo por completo y colóquelo de manera tal que obtenga la mejor recepción
FM. O
2. Conecte un cable de antena FM (no suministrado) desde el toma de antena FM de la
unidad hasta el toma de antena FM de su hogar.
FM
Antenna
AuxInAudio
Out
Line
Out
CX V3 English 14/3/06, 9:4825
Page 26

26
Español
AJUSTAR EL VOLUMEN
Cambiar el volumen
Puede ajustar el volumen desde la unidad o desde el control remoto.
Pulse el botón VOLUME +/– hasta que obtenga el volumen deseado.
Ajustar el tono
Los Bajos y los Agudos se pueden utilizar para obtener una respuesta de frecuencia
“chata” o un tono que se ajuste a su preferencia de audición. BASS ajusta las frecuencias
bajas desde -6 hasta +6. TREBLE ajusta las frecuencias altas desde -6 hasta +6.
1. Pulse el botón TREBLE o BASS en el sistema para seleccionar el modo de Bajos o
Agudos respectivamente.
2. Pulse +/– para ajustar el nivel.
Nota:
En el control remoto, puede pulsar también BASS +/– o TREBLE +/– para ajustar los
Bajos o los Agudos respectivamente.
Cambiar la calidad de sonido con el ecualizador
Durante la reproducción, pulse el botón EQ repetidamente para seleccionar el modo de
ecualizador preferido.
Nota:
Hay 4 niveles de ecualizador predeterminados: Flat, Rock, Pop, Classic.
Silenciar el sonido
1. Pulse el botón MUTE en el control remoto para silenciar la salida de audio. Se mostrará
la leyenda “MUTE” en el visor.
2. Pulse el botón MUTE otra vez para cancelar.
Utilizar la función de apagado programado (SLEEP)
Esta función apaga el sistema y lo coloca en modo de espera cuando llega a la hora de
apagado programado seleccionada con anterioridad.
• Pulse el botón SLEEP en el control remoto repetidamente para seleccionar el tiempo
de apagado programado deseado: 15, 30, 45 o 60 minutes. Se mostrará la leyenda
"SLEEP" en el visor a medida que se seleccionar el tiempo.
Una vez que se seleccionó el tiempo de apagado programado, se mostrará la leyenda
“SLEEP” en el visor.
Utilizar auriculares (no suministrados)
Enchufe sus auriculares en el toma de auriculares en la parte frontal de la unidad.
El sonido pasará de los altavoces a los auriculares. Nunca tenga el volumen alto cuando
enchufa los auriculares.
Advertencia: Escuchar música en un volumen elevado puede dañar su audición.
CX V3 English 14/3/06, 9:4826
Page 27

27
Español
CUIDADO Y MANTENIMIENTO
Por favor, note lo siguiente: Desconecte la unidad de la red eléctrica antes de limpiarla.
Sistema
Limpie la carcasa delicadamente con un paño suave y seco. Si la unidad está muy manchada o
sucia, limpie con un paño húmedo. Para evitar daños, no utilice agentes de limpieza ni limpiadores
abrasivos.
Altavoces
Limpie los altavoces delicadamente con un paño suave y seco. Para evitar daños, no utilice
agentes de limpieza ni limpiadores abrasivos.
Lente del CD
Cuando la lente se ensucia, puede funcionar mal. La lente debe limpiarse utilizando un limpiador
de lentes de cámara disponible en cualquier comercio.
Compartimiento del CD
• No coloque otra cosa que no sea un disco compacto dentro del compartimiento. Otros
objetos pueden dañar el mecanismo.
• No fuerce la tapa del CD para abrirla.
• Mantenga el compartimiento cerrado cuando no lo utilice para evitar que entre la suciedad
o el polvillo.
• Nunca coloque muchos discos dentro del compartimiento al mismo tiempo.
OBSERVACIONES Y NOTAS
OBSERVACIONES:
1. Esta unidad es compatible con las tasas de bits MP3 de 32-320kbps y las tasas de
bits WMA de 48-192kbps y reproduce discos CD-R y CD-RW.
2. Es compatible con los formatos de discos ISO9660.
3. Los archivos MP3 deberán codificarse a un tasa de datos de 128kbps y más y los
archivos WMA se deberán codificar a una tasa de 64kbps y más para obtener una
óptima calidad de sonido.
4.
Los archivos MP3 pueden incluir información adicional acerca de la pista de música
(conocida como etiquetas ID3), tales como el título de la canción y el nombre del artista.
La unidad mostrará el título de la canción para los archivos MP3 que se están reproduciendo
si dicha información está incorporada en el archivo de música MP3. Los archivos WMA
también pueden incluir información, conocida como metaetiquetas, similares a las etiquetas
ID3 en los archivos de audio MP3. la unidad mostrará el título de la canción si dicha
información está almacenada en la metaetiqueta del archivo WMA.
CONFIGURACIONES DEL WINDOWS MEDIA PLAYER REOMENDADAS PARA SU
Cuando utiliza el Windows Media Player de Microsoft en su PC para codificar las
colecciones de CD en un disco rígido como archivo WMA, se recomienda que no tilde la
opción “Copar música protegida” (Copy protected music) en el menú del Opciones del
Windows Media Placer. Los archivos de música adquiridos de tiendas de música online
solo se podrán reproducir si se graban en un CD utilizando el Windows Media Player.
Windows Media y el logo de Windows son marca registrada de Microsoft Corporation
en Estados Unidos de América y otros países. WMA es un formato de compresión
desarrollado por Microsoft Corporation. Obtiene la misma calidad de sonido que con
un archivo MP3 con un tamaño de archivo menor.
CX V3 English 14/3/06, 9:4827
Page 28

28
Español
ESPECIFICACIONES
Voltaje de alimentación: AC230V~ 50Hz
Consumo de energía: 48W
Amplitud de frecuencia de radio: FM 87.5 - 108 MHz
MW 531 - 1602 kHz
Salida de energía (Subwoofer): Típica 10W RMS en altavoz de 4ohm
(Altavoz): Típica 5W RMS en altavoz de 8ohm
THD ≤10%
Dimensiones (con base): 19,2" (L) x 7,1" (A) x 12,1" (Al)
(sin base): 19,2" (L) x 3,7" (A) x 11,41" (Al)
Peso neto: 4,1kg
Nos esforzamos continuamente para mejorar nuestros productos, las especificaciones
se pueden modificar sin previa notificación.
GUÍA DE SOLUCIÓN DE PROBLEMAS
SÍNTOMA
No enciende incluso
cuando se pulsa el
botón POWER
No se reproduce el
CD
No se oye el sonido
El sonido se
interrumpe
Se oye un zumbido
CAUSA
Mala conexión del enchufe
El disco está insertado al
revés
El disco está sucio
Error en el código de disco
Utilización incorrecta del
amplificador
El reproductor está
recibiendo vibraciones o
golpes físicos
La lente láser está sucia
El disco está sucio
Las conexiones del cable
están flojas
ACCIÓN
Inserte el enchufe de
alimentación de manera firme
en la salida AC
Vuelva a colocar el CD con la
superficie rotulada hacia el
frente
Limpie el disco con un paño
suave. Límpielo desde el centro
hacia fuera
Vuelva a colocar el disco y
espere diez segundos, luego
encienda la unidad otra vez y
vuelva a probar
Asegúrese de que los controles
del amplificador están bien
configurados. Verifique el nivel
de salida principal
Cambie el lugar de instalación
Límpiela utilizando un limpiado
de lentes láser de calidad
Limpie el disco
Conecte todos los enchufes de
audio de manera firme
CX V3 English 14/3/06, 9:4828
 Loading...