

Page 1
How to use your
HITACHI
Vacuum cleaner
MODEL:CV710
Page 2

2
1 2 3
4 5 6
7 8 9
CLICK
13 14 15
10 11 12
Page 3
3
16b
17
20 21 22
CLICK
23 24 25
26 27 28
29
16a
30 31
Page 4

HITACHI CV-710
OPERATING INSTRUCTIONS
I. SAFETY PRECAUTIONS
• Before putting the appliance into operation for the first time, please read this instruction
book and study the diagrams thoroughly. This instruction book should be retained for
future reference.
• Check that the voltage indicated on the rating label is the same as the
• voltage of your mains supply.
• The plug of the supply cord should be removed from the mains socket before
cleaning the appliance or undertaking maintenance operations.
• This appliance is intended for home use only.
• Your vacuum cleaner is not a toy. Do not allow children to play with the cleaner.
• Never put the hose or nozzle near your eyes or ears.
• Never operate the cleaner with wet hands or feet.
• Never leave the appliance running unattended.
• This vacuum cleaner is not intended for cleaning wet or damp flooring.
Water entering the motor unit can cause permanent damage, putting the cleaner out
of operation. This defect is not covered by guarantee.
• To avoid damage to the dust bag and cleaner mechanics, never use the cleaner to
remove sharp articles such as broken glass, hot, volatile or explosive materials such
as burning cigarette butts, matches, ashes or other smoking material. These are potential
fire hazards.
• If the cleaner is used to remove very fine particles such as fine sand, cement or similar
substances, the pores of the dust bag may become blocked, which will cause the air
throughput capacity of the filter to be diminished, resulting in poor performance of the
cleaner. If this situation occurs, please replace the dust bag and micro-filters, even
if the dust bag is only partly filled.
• If the supply cord is damaged, it must be replaced by the manufacturer or its service
agent or a similarly qualified person in order to avoid a hazard.
• Any blockages or obstructions to the suction inlet, rug, floor tool, extension pipe, hose
or the exhaust air outlet can cause loss of power and overheat the motor.
• The manufacturer shall not be held liable for any damage caused by incorrect use
of the cleaner
II. ACCESSORIES
Floor nozzle (figure 1)
Upholstery nozzle (figure 2)
Dusting brush (figure 3)
Crevice nozzle (figure 4)
Two part telescopic suction tubes (figure 7)
4
For trouble free operation of the
cleaner, only use genuine Hitachi
bags and micro-filters.
Page 5

III. OPERATING FEATURES OF THE VACUUM CLEANER
HITACHI CV-710
This cleaner incorporates the following features:
• dust bag full indicator
• reusable cloth bag
• four micro-filters (one inlet and three exhaust)
• carrying grip
• electronic speed control
• telescopic tubes
• optional double paper bag
PB4
IV. PREPARING THE VACUUM CLEANER FOR USE
Assemble the cleaner accessory parts as shown in figures 5,6 and 7. NB. To use the
dusting brush (figure 3), slide the upholstery nozzle (figure 2) into the slots on the back
of the dusting brush.
Fully extend the power cord and plug from the appliance to the mains. The cleaner can be
switched ON/OFF with the button showing
I/O (figure 8) The suction force can be altered
by turning the suction control on the suction hose (figure 9) and by the slide control
(figure 10). After you have finished cleaning, unplug the cleaner from the mains. To retract
the mains cord into the body of the cleaner, first hold the power plug in your hand then
press the button showing a plug (figure 11).
CAUTION: the power plug must be held when retracting the power cord to prevent
injury due to whiplash etc.
The cleaner can be held and carried by the carrying grips in the cleaner body (figure 27).
The cleaning accessories can be either disassembled or left assembled and hooked
on the cleaner side or bottom in the standby position (figures 28 & 29).
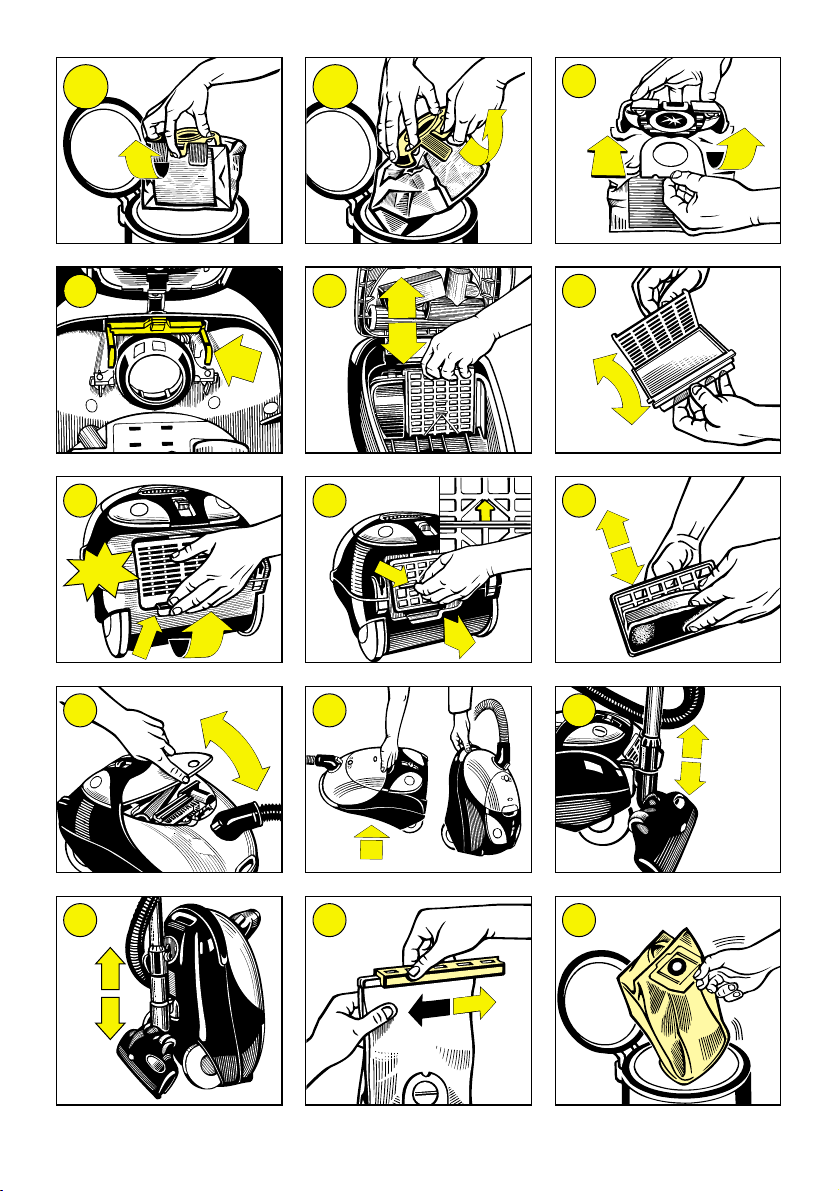
Full-bag indicator
Check the cleaning power by lifting the floor nozzle from the surface (with the power set to
maximum) and the suction control on the hose closed. Should the indicator light, the dust
bag must be replaced (figure 12).
Replacing the dust bag
After depressing the lid lock in the front of the lid (figure 13) , lift the lid to the open position
(figure 14). Remove the holder carrying the dust bag (figure 15). Remove the dust bag
from the dust bag holder by pulling the catch (figures 16a & 16b). Replace the dust bag in
the dust bag holder. Its curved edge with the recess in the dust bag face should fit against
the slot in the dust bag holder, so that the dust bag catch is engaged (figure 17). Following
the above dust bag removal procedure in the reverse order, install the dust bag holder
carrying the dust bag into the cleaner compartment and close the lid.
Important:
The safety catch (figure 20) does not allow the cleaner lid to be shut as long as there is no
paper bag installed.
Exchanging micro-filters
5
Page 6

Usually after five paper bags have been filled, the micro-filters must be exchanged for new
ones. To exchange the intake micro-filter, pull the grill holding the micro-filter upwards from
the dust bag compartment (figure 21). Open the grill cartridge and exchange the micro-filter
(figure 22). To exchange the exhaust micro-filters, press the lock in the cleaner grille
bottom, lift the grille and remove it from the cleaner (figure 23). Remove the filter cartridge
with the micro-filters (figure 24) and replace the filters with new ones (figure 25).
WARNING: Failure to replace the micro-filters regularly can result in cleaner
damage!
Please ensure that replacement micro-filters are installed as detailed
below:
Pre-motor micro-filter: The pre-motor micro-filter must be installed so that its green side
faces the cleaner compartment.
Reusable cloth dust bag
A reusable cloth dust bag is supplied as standard accessory. The cloth dust bag is
removed and reinstalled in exactly the same way as the paper dust bag.
To empty the dust bag, proceed as follows:
1. Remove the bag from the holder and the clamp bar by pulling to the side (Figure 30).
The cloth bag can be opened and the dust shaken and emptied. (Figure 31).
2. Reinstall the clamp bar by following the above procedure in the reverse order. Put the
bag back in its holder and install the bag and the holder in the cleaner.
Important precautions:
- never wash or dip the cloth dust bag in water
- never use a damaged cloth dust bag
- the safety catch (Figure 20) will not allow the cleaner lid to shut if no dust bag
(paper or cloth) has been installed
Exhaust micro-filter: The exhaust micro-filter must be installed in the grille cartridge, so
that green part of the element is visible from the grille. The second
green/white element should be installed behind the first green/white
element and the black carbon element should be installed behind
the two green/white elements. (The sequence of the filter elements
is as follows: grille, green/white, green/white, black carbon.)
Storing the cleaning accessories
The upholstery, crevice tools and brush can be stored in the storage compartment of the
cleaner under a separate lid (figure 26).
V. MAINTENANCE
Store the cleaner in a dry place and protect it from any heat source. Protect the cleaner
from exposure to the elements such as rain or sunshine. Clean the appliance surface with
a damp soft cloth and never use abrasive or corrosive cleaners.
6
Page 7

VI. THE ENVIRONMENT
As far as possible (taking into consideration component sizes) most of the components
have an indication of the materials utilised for manufacture and a recycling mark.
Once the cleaner is past its service life, please dispose of the cleaner via a recycling
network operated for this purpose.
Any repairs to this appliance should only be carried out by an authorised service
agent.
VII. SPECIFICATIONS
Voltage (V) 230-240
Rated power (W) 1200
Peak power (W) 1500
Insulation class II.
Noise level (dBA) 75
Air throughput (I/s) 45
Negative pressure (kPa) 25
Specifications are subject to change for performance improvement without notice.
This product conforms with directives 89/336/EEC and 73/23/EEC pertaining
to electromagnetic compatibility and safety.
7
Page 8

Hitachi, Ltd. Tokyo, Japan
International Sales Division
THE HITACHI ATAGO BUILDING,
No. 15 –12 Nishi Shinbashi, 2 – Chome,
Minato – Ku, Tokyo 105-8430, Japan.
Tel: 03 35022111
HITACHI EUROPE LTD,
Whitebrook Park
Lower Cookham Road
Maidenhead
Berkshire
SL6 8YA
UNITED KINGDOM
Tel: 01628 643000
Fax: 01628 643400
Email: consumer-service@hitachi-eu.com
HITACHI EUROPE GmbH
Munich Office
Dornacher Strasse 3
D-85622 Feldkirchen bei München
GERMANY
Tel: +49-89-991 80-0
Fax: +49- 89-991 80-224
Hotline: +49-180-551 25 51 (12ct/min)
Email: HSE-DUS.service@hitachi-eu.com
HITACHI EUROPE srl
Via Tommaso Gulli N.39, 20147
Milano, Italia
ITALY
Tel: +39 02 487861
Tel: +39 02 38073415 Servizio Clienti
Fax: +39 02 48786381/2
Email: customerservice.italy@hitachi-eu.com
HITACHI EUROPE S.A.S
Lyon Office
B.P. 45, 69671 BRON CEDEX
FRANCE
Tel: 04 72 14 29 70
Fax: 04 72 14 29 99
Email: france.consommateur@hitachi-eu.com
HITACH EUROPE AB
Egebækgård
Egebækvej 98
DK-2850 Nærum
DENMARK
Tel: +45 43 43 6050
Fax: +45 43 60 51
Email: csgnor@hitachi-eu.com
Hitachi Europe Ltd
Bergensesteenweg 421
1600 Sint- Pieters-Leeuw
BELGIUM
Tel: +32 2 363 99 01
Fax: +32 2 363 99 00
Email: sofie.van.bom@hitachi-eu.com
www.hitachidigitalmedia.com
HITACHI EUROPE S.A.
364 Kifissias Ave. & 1, Delfon Str.
152 33 Chalandri
Athens
GREECE
Tel: 1-6837200
Fax: 1-6835964
Email: service.hellas@hitachi-eu.com
HITACHI EUROPE S.A.
Gran Via Carlos III, 101- 1
08028 Barcelona
SPAIN
Tel: 93 409 2550
Fax: 93 491 3513
Email: atencion.cliente@hitachi-eu.com
HITACHI Europe AB
Box 77 S-164 94 Kista
SWEDEN
Tel: +46 (0) 8 562 711 00
Fax: +46 (0) 8 562 711 13
Email: csgswe@hitachi-eu.com
HITACHI EUROPE LTD (Norway) AB
STRANDVEIEN 18
1366 Lysaker
NORWAY
Tel: 67 5190 30
Fax: 67 5190 32
Email: csgnor@hitachi-eu.com
HITACHI EUROPE AB
Neopoli / Niemenkatu 73
FIN-15140 Lahti
FINLAND
Tel : +358 3 8858 271
Fax: +358 3 8858 272
Email: csgnor@hitachi-eu.com
HITACHI EUROPE LTD
Na Sychrove 975/8
101 27 Praha 10 – Bohdalec
CZECH REPUBLIC
Tel: +420 267 212 383
Fax: +420 267 212 385
Email: csgnor@hitachi-eu.com
 Loading...