

Page 1

CP2896TA / CP2996TA
BEDIENUNGSANLEITUNG
USER MANUAL
ISTRUZIONI PER L'USO
GEBRUIKSAANWIJZING
KULLANMA KILAVUZU
Page 2

Before installation
17
Your TV set is designed to give you the highest
performance combined with real ease of use - it's easy
to set up, easy to use, and easy to combine with other
devices. This booklet will guide you through the set-up
procedure, acquaint you with the many features,
provide tips on how to use the set, and tell you how to
connect external devices to it.
We wish you many pleasant hours with your new TV.
Contents
Installation, remote control unit 18
Daily use
Teletext
Timers and locks
Sound, picture, and display set-up
Tuning in programme channels
External devices
Technical data
20
22
24
25
27
28
32
Fitting and changing batteries
Remove the battery cover on the underside of the
remote control unit. Insert the batteries taking care to
observe the + and - markings indicated inside, then
close the cover.
Note! Do not throw the batteries away with the
household garbage, but take them to a special waste
disposal site.
2 x AAA
1,5 V
10 cm
10 cm
10 cm
For your safety
• Locate the TV on a firm, flat and stable surface (not on
carpeting).
• Do not lift the TV set by the frame around the picture
tube.
• Allow space for air to pass freely through ventilation
holes on the top, sides and bottom of the TV.
• Make sure the TV is at room temperature before
switching it on.
• Check that your mains electricity supply is suitable for
the TV, 210-240V at 50Hz.
• Unplug the receiver from the wall sockets during
thunderstorms or when the TV will not be used for a
long time.
• This TV is for indoor use only. Do not expose it to rain
or excessive moisture.
• Before cleaning your TV, switch it off and unplug it
from the wall sockets. Use a soft damp cloth and a mild
solution of washing-up liquid to clean the cabinet and
screen.
• Do not use petrol, thinners, alcohol, wax remover or
other solvents on the TV.
• Do not place anything on top of the TV.
• Do not place anything with liquid in it above or near the
TV - it could spill and cause electric shock or damage to
the TV.
• Do not allow any objects, such as hairpins or coins, to
get inside the TV.
• If liquid is spilt, or any objects get inside the TV,
disconnect it from the wall socket and have it checked
by authorised service personnel.
• Do not subject the mains lead to sharp bends, heat or
chemicals. If the mains lead is damaged, disconnect it
from the wall socket and have it checked by authorised
service personnel.
• Do not remove the back cover of the TV. This TV has no
user serviceable parts inside. Refer all servicing to
authorised service personnel.
• Some radio transmitters like GSM-phones can cause a
malfunction. Example: The receiver does not respond
to the remote control commands. Switch off the
receiver by using the mains switch, wait for about 10
seconds and switch the receiver on again.
• Do not remove the guarantee sticker from the back
cover of the receiver.
3P58 83041010-GB
Page 3
18
Installation
Connections
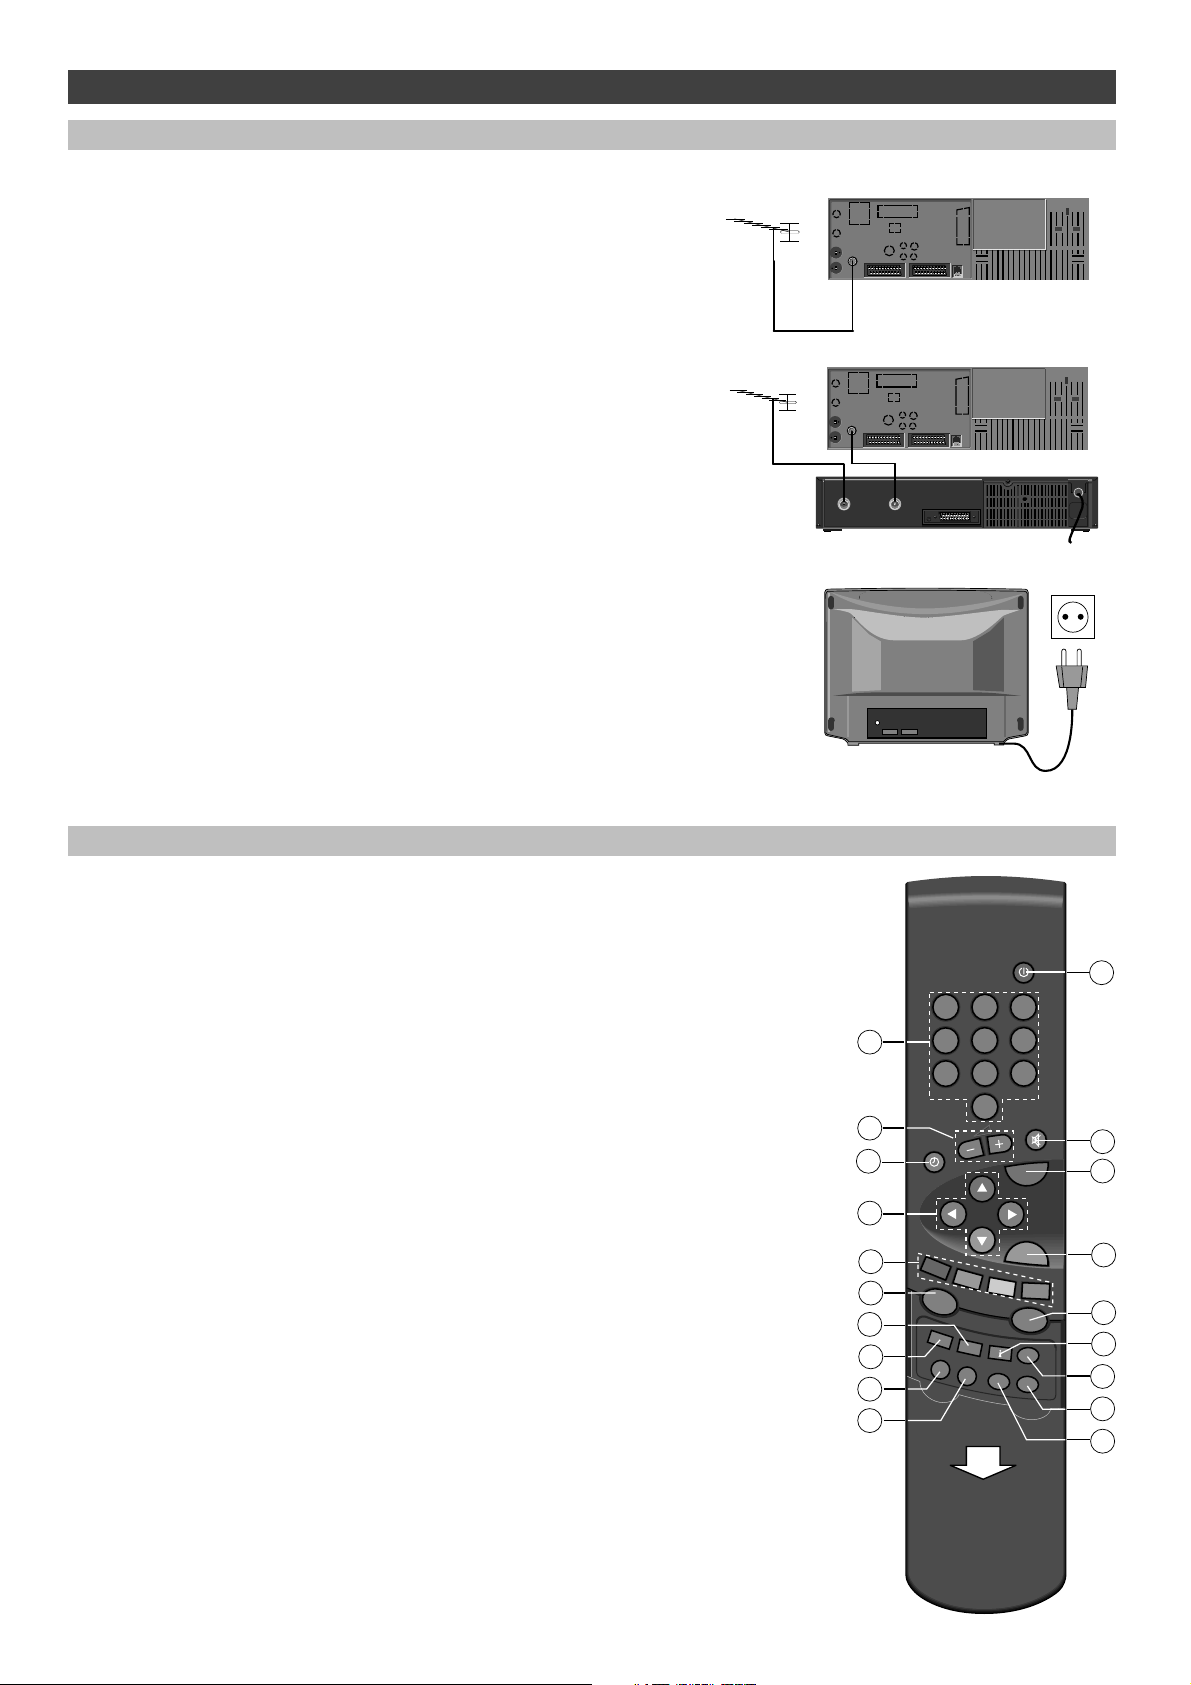
Connecting the aerial cable
Connect the aerial cable to the aerial connector on the rear panel of the
TV set. Use a high quality outdoor aerial to obtain the best programme
reception.
Connecting a video recorder to the TV set
If you are connecting a video recorder as well, connect the aerial cable
plug into the video recorder aerial input. Using the aerial cable supplied
with the video recorder, connect the recorder aerial output to the TV set
aerial input. Always follow the connections and operating instructions
provided with the video recorder.
If the TV set is supplied with an additional aerial cable, use this cable
between the TV set and the outdoor aerial socket. If you are connecting
a VCR to the TV set, use this cable between video recorder and the TV
set.
Connecting the mains plug
Connect the mains plug of the TV set to the electrical outlet after all
other installation connections have been done. The required AC mains
supply is 210-240 V (50Hz).
AERIAL
RF OUT/TV
For more information on connections, see the section
"External devices"
Remote control hand unit
1. Standby button - to switch off the TV set temporarily
2. Number buttons - to select a TV programme
3. Sound volume control
4. Sound mute button - to turn the sound on or off
5. Clock button - to display the current time (if a teletext service is
available)
6. TV button - to switch the TV set on from the stand-by mode or to
exit menus
7. Cursor buttons
8. OK button - to store changes
9. Colour buttons
10. NexTView - no function
11. TEXT button - to select teletext mode
12 ? button - no function
13 MENU button - to display the main menu
14 i button - to select the programme list
15 SIZE button - to change teletext size
16 VCR button - see the section "Remote control of external devices"
17 SAT button - see the section "Remote control of external devices"
18 STOP button - to freeze the picture temporarily
19 REC button - to lock a programme for recording to the video
up/down - step forward/backward
left/right - sound volume control
ZOOM (red) - to change picture format
SOUND (green) - to display sound controls
VISION (yellow) - to display picture controls
PIP (blue) - no function
Colour buttons are also used to make selections in the menus
BBBBuuuuttttttttoooonnnnssss llllooooccccaaaatttteeeedddd uuuunnnnddddeeeerrrr tttthhhheeee lllliiiidd
dd
(open the lid by pulling it down)
recorder
10
12
13
16
17
1
123
2
456
789
0
3
5
7
9
ZOOM
SOUND
NEX
TV
IEW
MENU
VCR
TV
OK
VISION
PIP
TEXT
?
SIZE
VCR
VCR
SAT
REC
STOP
4
6
8
11
14
15
18
19
3P58 83041010-GB
Page 4
_
_
,
Installation
First time installation
The Automatic Programming System (APSi) will automatically search
for and store TV programme channels. After the search, the TV set will
sort the programme channels into a factory preset order.
! First check that the aerial cable is properly connected.
________________________________________________________________________
1 Press the mains switch on the front panel.
________________________________________________________________________
2 Select the on screen language by pressing the
cursor button (up or down).
Confirm the selection by pressing the OK button.
____________________________________________________
3 Select the country in which the TV set is to be used
by pressing the cursor buttons.
Language
Select DANSK
your DEUTSCH
language ENGLISH
ESPAOL
Use buttons FRANAIS
ITALIANO
NEDERLANDS
NORSK
POLSKI
PORTUGUES
SUOMI
then SVENSKA
press » TRKE
19
Confirm the selection by pressing the OK button.
________________________________________________________________________
4 WAIT! The Tv set will show the tuning scale and channeol numbers
which have been found. Leave the TV set to complete tuning before
continuing. When the tuning scale shows 100%, all channels have been
located and stored in the preset order and the TV set will display a new
APSi menu.
In certain countries, (e.g. in Belgium and Netherlands) the Automatic
Channel Installation function (ACI) is used on cable networks to enable
fully automatic installation of programme channels including priority
and names. When the ACI function occurs an information menu will be
shown. If necessary, an additional menu, which includes a list of
preferences e.g. living area, will appear on the screen. To continue the
ACI function, enter the two digit code number which corresponds to
your preferences and press the OK button.
________________________________________________________________________
Country
Select
country AUSTRIA NORWAY
BELGIUM POLAND
Use buttons CZECH PORTUGAL
DENMARK SPAIN
FINLAND SWEDEN
FRANCE SWITZERLAND
GERMANY TURKEY
IRELAND UK
ITALY OTHER
then NETHERLANDS
press »
APSi
TV 1
Searching TV 2
for TV TV 3
programs TV 4
TV 5
Please wait TV 6
TV 7
TV 8
TV 9
TV 10
TV 11
TV 12
TV 13
TV 14
36%
5
To view a TV programme, press the TV button.
You can sort, name, and delete the programme list by following the
instructions given in the section "Editing the programme list". If you want
to tune and store more TV channels at a later date using the APSi feature
see the section "Tuning in programme channels".
3P58 83041010-GB
Page 5
_
_
_
20
Daily use
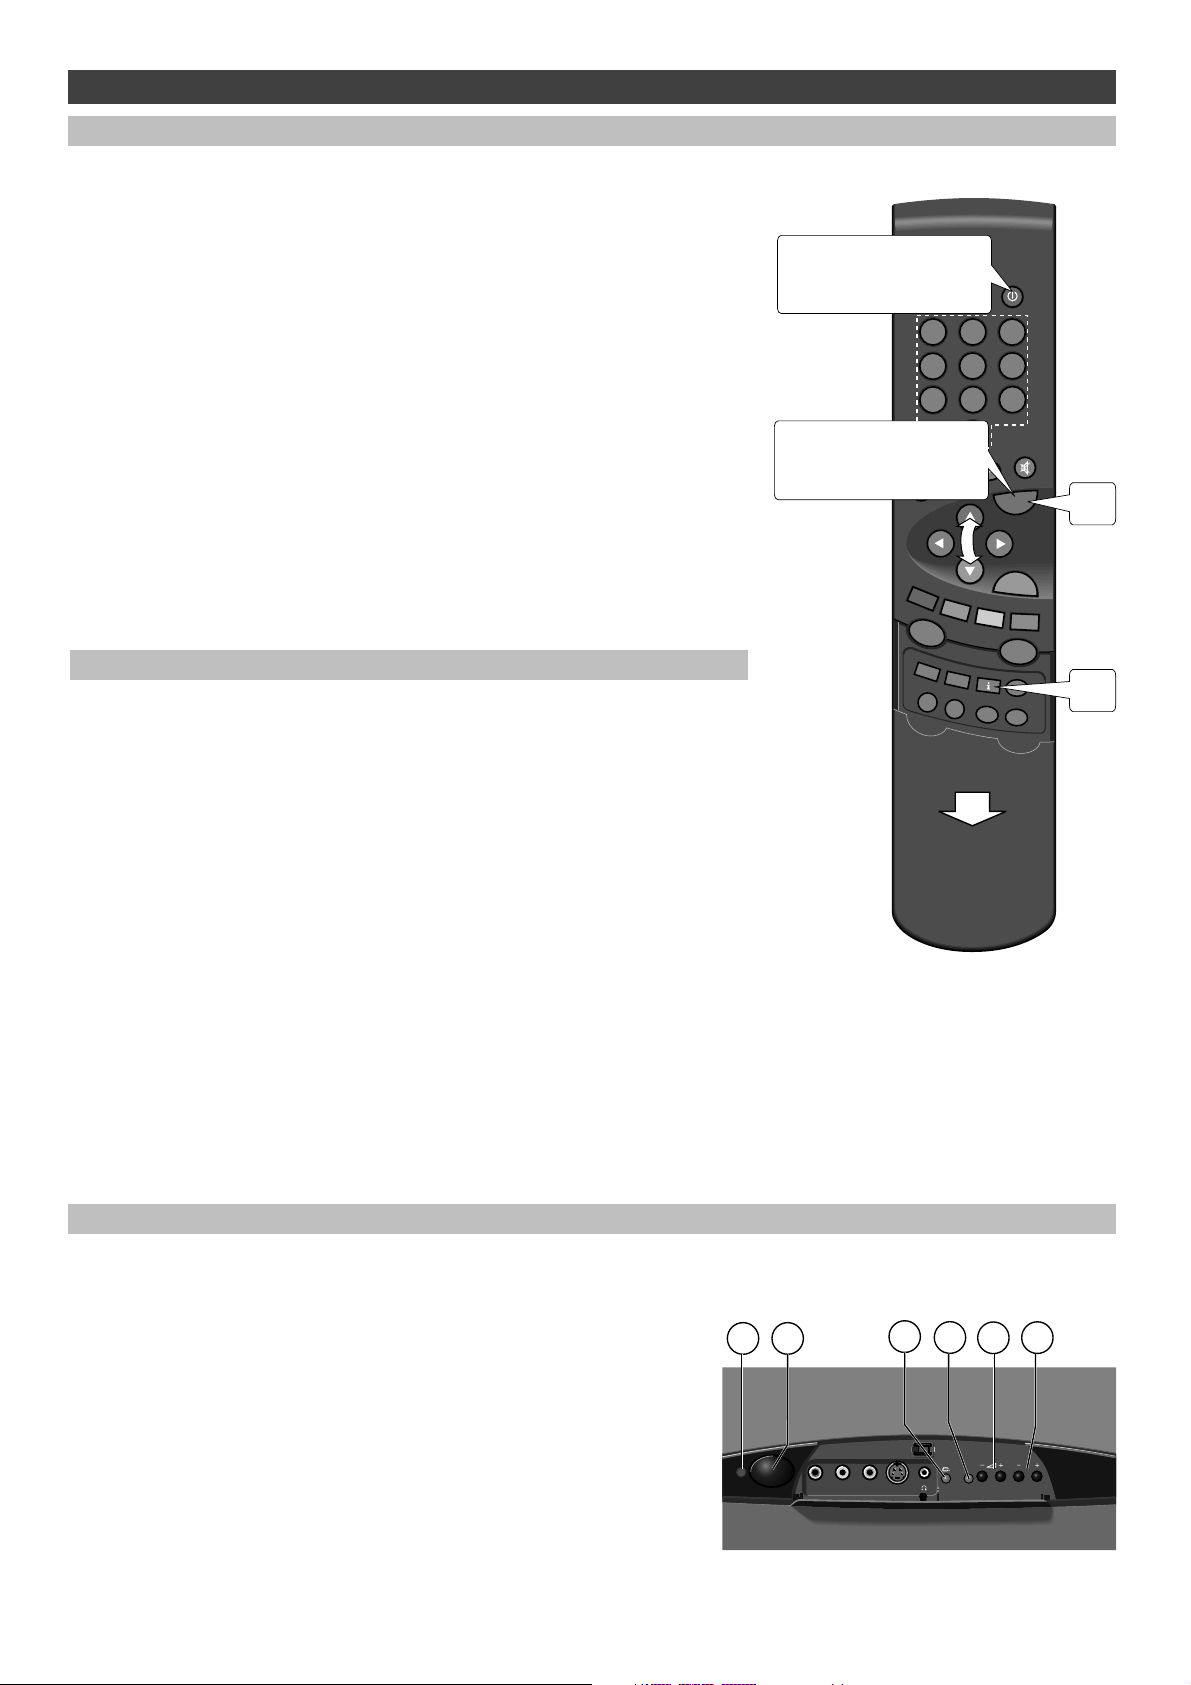
Switching on or off
To switch on
Press the mains switch on the front of the TV set. To switch on from the
stand-by mode, hold the TV button down until the TV switches on or
enter a number to select a programme directly.
To put on stand-by
Press the stand-by button to switch off the TV set to the stand-by mode.
The TV set will switch to the stand-by mode automatically if no
transmission is received for five minutes. For further information, see
the section "Switching the TV set to stand-by with a timer".
To switch off
Press the mains switch on the front panel to turn the TV set off.
If the TV set is not be used for a longer period of time, eg. overnight or
during the day, switch it off by pressing the mains switch. If the TV set
will not be used for an extended period of time, disconnect the mains
plug and the aerial cable from the wall socket.
To switch off
to stand-by
To switch on
from stand-by
123
456
789
0
TV
TV
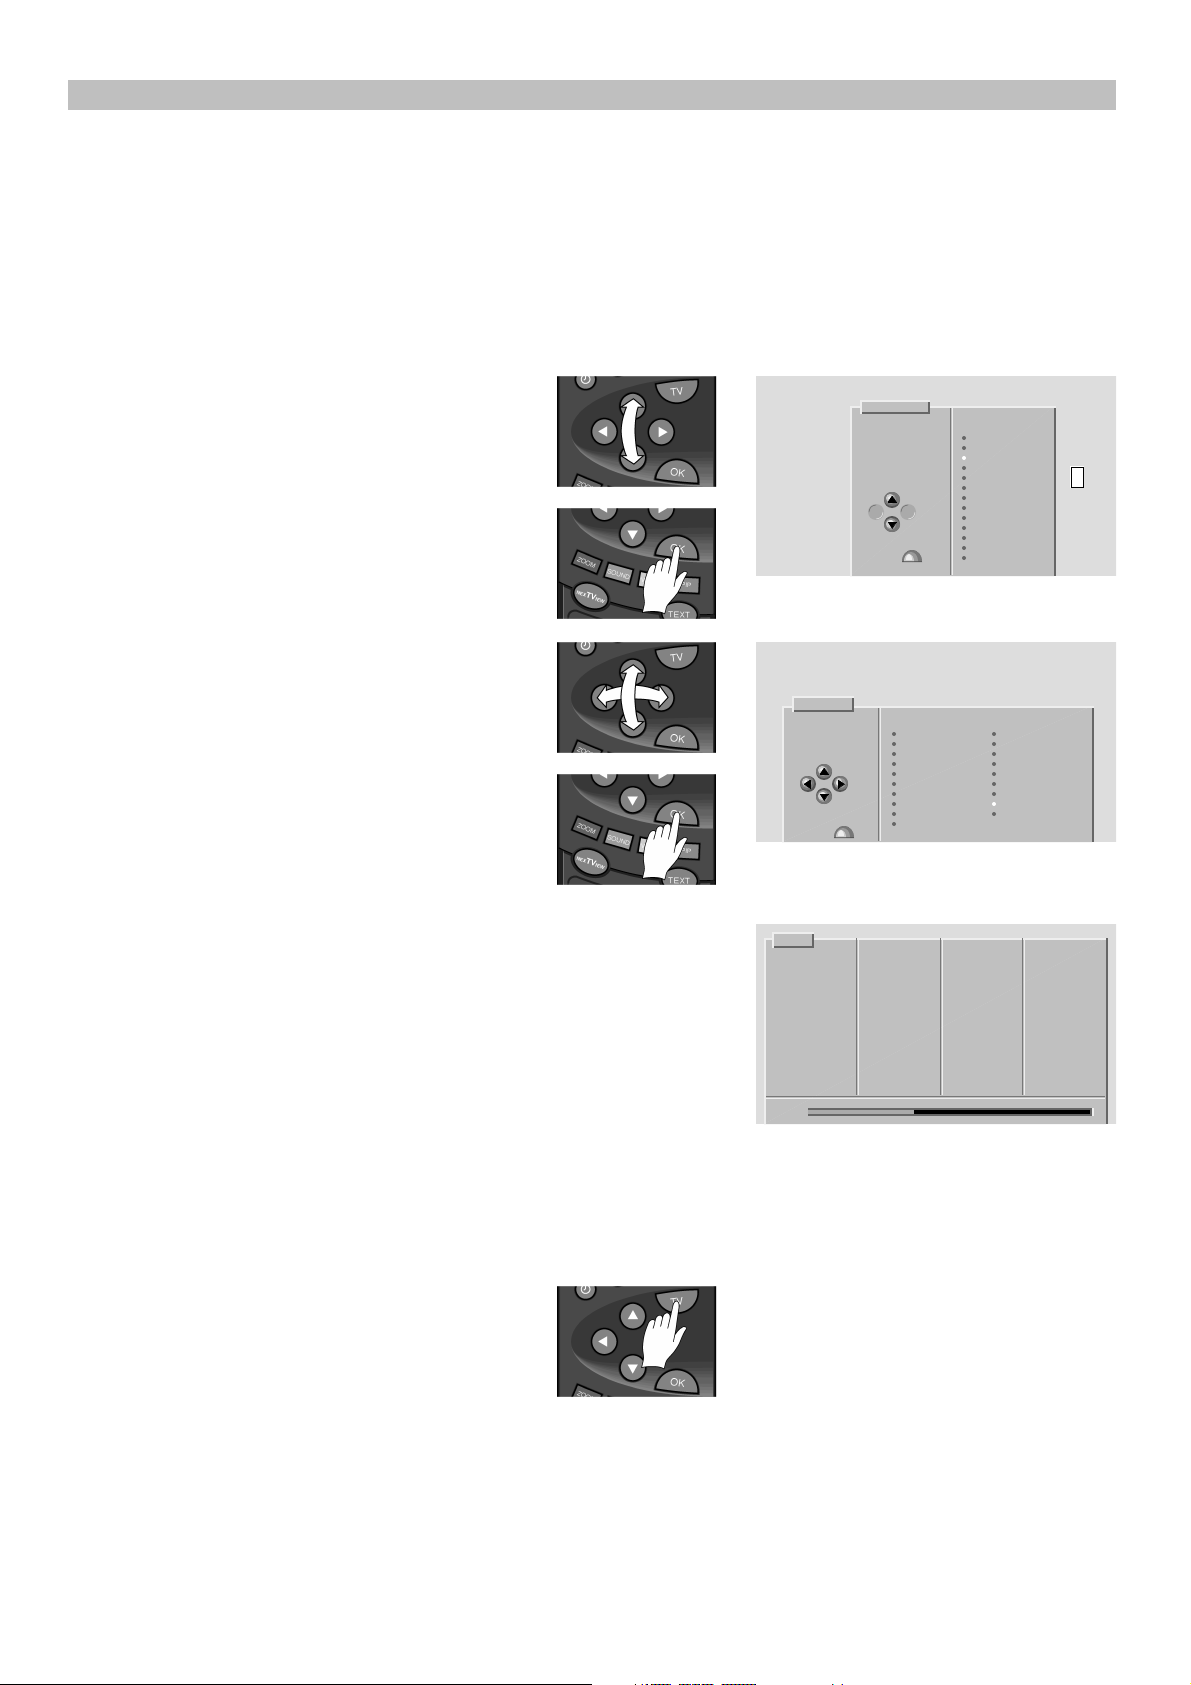
Selecting a TV programme
There are four alternative ways of selecting a TV programme.
A By entering a programme number
Enter a programme number with the number buttons.
________________________________________________________________________
B By stepping up and down
While you are watching a TV programme, select another programme by
pressing the cursor button up or down.
________________________________________________________________________
C By scrolling the programme list
When you keep the cursor button (up or down) depressed, a programme
list will appear on the screen. Let the list scroll until the programme you
want is selected.
________________________________________________________________________
D By choosing a programme from the Information menu
Select the Information menu by pressing the i button (under the lid) and
follow instructions given in the menu. To view the selected TV
programme, press the TV button.
ZOOM
NEX
MENU
OK
SOUND
VISION
VCR
VCR
REC
TEXT
SIZE
STOP
PIP
i
TV
IEW
?
VCR
SAT
Front panel controls
The local control unit is situated behind a flap on the lower
edge of the TV. The flap is opened by first pressing its top edge
inwards and then by tilting it down.
Local control push buttons and indicator lights are as follows:
1. Indicates power is switched on
2. Mains switch, to turn the TV set on or off
3. Lights up when remote control is being used or
copy function is activated
4. Indicates TV is iswitched on
5. Volume controls
6. Programme selection
The shape of the front panel may vary according to the model.
However, the functions remain the same. For information on
front panel connectors, see the section "External devices".
1
2
R AUDIO L VIDEO S-VIDEO
3
4
6
5
P
3P58 83041010-GB
Page 6

_
_
_
_
_
.
_
_
Daily use
Sound controls
Volume
Use the -/+ buttons or the cursor buttons (left and right).
Sound mute button ( V)
Press once to turn off the sound.
Press a second time to turn on all speakers.
If the audio out connectors (not in all models, see the section "External
devices") are in use, the second press turns on the sound from the audio
out connectors, and a third press turns on all speakers.
Sound
Audio
Sound channel
Tone
Separation
Store »
Sound
settings Equaliser Go back
STEREO
SOUND A
PREFERRED
21
Selecting the preset sound settings
There are four preset sound settings available in the Sound menu:
MUSIC, SPEECH, FLAT, and PREFERRED (adjustable).
1 Press the green button to select the Sound menu.
________________________________________________________________________
2 On the menu line "Tone" select the required setting by using the cursor
buttons (left or right).
________________________________________________________________________
3 Return to TV programme reception by pressing the TV button.
For further information, see the section "Sound and picture controls".
Picture controls
Selecting the preset picture settings
There are three preset picture settings available in the Vision menu:
EVENING, DAYLIGHT, and PREFERRED (adjustable).
1 Press the yellow button to select the Vision menu.
________________________________________________________________________
2 Select the required setting by pressing the cursor buttons (left or right).
________________________________________________________________________
- / +
ZOOM
SOUND
VISION
STOP
123
456
789
0
ZOOM
SOUND
MENU
VISION
TV
IEW
?
VCR
VCR
VCR
SAT
REC
NEX
TV
OK
TEXT
SIZE
STOP
TV
OK
PIP
3 Return to TV programme reception by pressing the TV button.
For further information, see the section "Sound and picture controls".
________________________________________________________________________
When the TV is switched on using the mains switch on the TV set front
panel, automatic degaussing (demagnetising) is done to maintain colour
purity.
Still picture
You can freeze and unfreeze the action in the picture by pressing the
STOP button (under the lid).
Picture format
Picture format (the width and hight ratio) selection is done automatically
Manual picture format selection (Zoom)
Manual selection may be necessary, for example, if you are using a VCR
Vision
Settings
Store »
Display Preferred
set-up settings Go back
PREFERRED
without automatic picture format switching.
1 Press the red button.
________________________________________________________________________
2 Change the picture format by using the cursor button (left or right).
When the LIFT display appears on the screen you can raise or lower the
picture by pressing the cursor button up or down (not in all models).
________________________________________________________________________
3 Return to TV programme reception by pressing the TV button.
Storing new picture format
If you want to store the changed picture format for the selected
programme channel, press the OK button.
3P58 83041010-GB
Zoom
CLASSIC (4:3)
Store »
Page 7

22
Additional features
Teletext
In addition to actual programmes, many TV channels
offer a teletext service. Teletext contents vary from one
channel to another, and a service typically covers news,
weather reports, sport etc.
Functions on the remote control unit
Cursor up/down To step through the teletext pages
left/right To step through the sub-pages *)
Coloured buttons To select favourite pages
0..9 To enter a teletext page number
TV To return to TV programme reception
TEXT To change to teletext reception / to show
favourite page options in teletext mode
Buttons located under the lid:
(The lid is opened by pulling it down)
MENU To display UPDATE, REVEAL, MIX and
STORE options
i To select teletext index page
SIZE Enlargement of text to double height
• 1st push shows the top half of the page
• 2nd push shows the bottom half of the
page
• 3rd push returns the picture to normal size
STOP Keeps the page on the screen
*) not available in all models, see "Sub-pages"
0..9
CURSOR
BUTTONS
COLOUR
BUTTONS
MENU
i
123
456
789
0
ZOOM
SOUND
NEX
MENU
VISION
TV
IEW
?
VCR
VCR
VCR
SAT
REC
TV
OK
TEXT
SIZE
STOP
TV
PIP
TEXT
SIZE
STOP
Reading teletext pages
1 Press the TEXT button to enter the teletext mode.
If the programme does not have a teletext
transmission, the message "No teletext transmission"
will be displayed on-screen.
________________________________________________________
2 Select the desired 3-digit teletext page number by
using the number buttons, e.g. 123.
________________________________________________________
3 Select a new page by pressing the cursor button (up or
down) or by entering a new page number.
________________________________________________________
4 Return to TV programme reception by pressing the TV
button.
Selecting favourite pages
You can store your preferred teletext pages as favourite
pages under up to 60 programme numbers. The stored
favourite pages can be selected directly using the
coloured buttons when the numbers of favourite pages
are shown on the bottom of the screen. When entering
the teletext mode, the teletext pages stored by the red
button will be recalled instantly (see "Storing favourite
pages").
Storing favourite pages
1 Select the programme number under which you want
to store favourite pages.
________________________________________________________
2 Press the TEXT button to enter the teletext mode.
________________________________________________________
3 Select a teletext page which you want to store as a
favourite page by using the number buttons.
________________________________________________________
4 Press the MENU button (located under the lid).
________________________________________________________
5 Press the blue button. The coloured fields on screen
begin to flash.
________________________________________________________
6 Store the selected teletext page by pressing one of the
coloured buttons.
________________________________________________________
7 You can programme a teletext page for each coloured
button by repeating steps 3 to 6.
________________________________________________________
8 Return to TV programme reception by pressing the TV
button.
Cancelling favourite pages
You can cancel a stored favourite page by storing the
page number 100 instead. If you don't want to use
favourite pages at all on some programme numbers,
remove the favourite page function by storing the page
number 100 on each coloured button.
3P58 83041010-GB
Page 8

Additional features
23
Sub-pages
Some teletext pages consist of several sub-pages. The
sub-pages are denoted for example by 123/02, which
means the second sub-page of the page 123.
Sub-pages are scrolled automatically at an interval set
by the TV station. You can keep the page on the screen
by pressing the STOP button.
In models with 512 page memory, you can select subpages also by pressing the cursor button (left or right).
If the sub-page number displayed on the screen is red,
either the sub-page is empty or the TV is waiting for the
transmission that includes that particular sub-page.
MIX function
When in the teletext reception mode, press the MENU
button (under the lid) followed by the yellow button.
Now a teletext page and a TV programme will be
displayed simultaneously (MIX).
Return to normal teletext reception by pressing the
TEXT button, or to TV programme reception by
pressing the TV button.
Update reception
When in teletext mode, select the required teletext page
and press the MENU button (under the lid) followed by
the red button. Now you can continue watching the TV
programme and when the page is updated, the title line
will appear on the screen. Press the TEXT button to
view the received page, and after reading press the red
button again to continue programme reception.
Return to normal TV reception by pressing the TV
button.
Note! During update reception it is not possible to
select another TV programme.
TOP teletext (available in Germany)
The TOP system provides menu-prompted guidance to
enable you to select text pages quickly and easily.
Using the TOP index page
During teletext reception select the TOP index page by
pressing the i button (under the lid). Select the required
subject area (in the left hand text field) or individual
subject (in the right hand text field) by using the cursor
buttons and confirm by pressing the OK button.
Using the coloured buttons
Use the blue button to select subject areas and the
yellow button to select individual subjects. You can
move forwards in the individual pages of a subject
using the green button and backwards with the red
button.
TOP-index
BERSICHT
AKTUELLES INDEX
SPORT IMPRESSUM
PROGRAMM
Select subject with the
cursor buttons, then press »
Selecting teletext programme settings
1 Press the MENU button (under the lid).
________________________________________________________
2 Select the option "Program settings" and confirm with
the OK button.
________________________________________________________
3 Select the required programme.
________________________________________________________
Hidden information
Hidden information (e.g. answers to quizzes) can be
revealed by pressing the MENU button (under the lid)
and then green button. The text disappears when the
green button is pressed again.
TELETEXT TELETEXT TELETEXT TELETEXT TELE
TEXT TELETEXT TELETEXT TELETEXT TELETEXT
TELETEXT TELETEXT TELETEXT TELETEXT TELE
TEXT TELETEXT TELETEXT TELETEXT TELETEXT
TELETEXT TELETEXT TELETEXT TELETEXT TELE
TEXT TELETEXT TELETEXT TELETEXT TELETEXT
TELETEXT TELETEXT TELETEXT TELETEXT TELE
TEXT TELETEXT TELETEXT TELETEXT TELETEXT
TELETEXT TELETEXT TELETEXT TELETEXT TELE
TEXT TELETEXT TELETEXT TELETEXT TELETEXT
TELETEXT TELETEXT TELETEXT TELETEXT TELE
TEXT TELETEXT TELETEXT TELETEXT TELETEXT
TELETEXT TELETEXT TELETEXT TELETEXT TELE
TEXT TELETEXT TELETEXT TELETEXT TELETEXT
TELETEXT TELETEXT TELETEXT TELETEXT TELE
TEXT TELETEXT TELETEXT TELETEXT TELETEXT
UPDATE REVEAL MIX STORE MENU
!
4 Follow instructions on the screen.
• Teletext character - To select the correct character set.
• Teletext subpages (only in models with 512 page
memory) - Select COLLECT to scroll sub-pages with
the cursor buttons. Select ROLLING to scroll sub-pages
automatically.
For information on other functions in this menu, see
the section "Programme settings".
These adjustments only affect the selected programme
number.
Program settings
Program no.
Volume
Picture
Noise reduction
Teletext character
Go back
1
LOW
W. EUROPE
3P58 83041010-GB
Page 9

24
_
_
_
_
_
_
_
Additional features
Switching the TV set to stand-by with a timer
1 Press the MENU button (located under the lid).
________________________________________________________________________
2 Select the option "Timers" and confirm with the OK button.
________________________________________________________________________
3 Select the required timer function and follow instructions on the screen.
Sleep Timer
You can select the time after which the TV set will switch off to stand-by.
If you want to cancel the timer, select OFF.
Off timer
Off timer switches the TV set off to the stand-by mode if no remote
control button has been pressed for 3 hours. If you select ON, "Off timer"
is activated every time you switch the TV set on. If you don't want to use
this function at all, select OFF and press the OK button.
Front panel lock
Timers
Sleep timer
Off timer
Go back Store »
1h 45min
OFF
When the front panel buttons are locked, the TV set can only be operated
using the remote control.
1 Press the MENU button (under the lid).
________________________________________________________________________
2 Select the option "Front panel lock" and press the OK button.
________________________________________________________________________
3 Press the cursor button to right to set the lock ON or OFF.
________________________________________________________________________
4 Store by pressing the OK button.
Parental lock
When a programme is locked, it cannot be viewed without entering a
code. The code is a 4-digit number, selected by the user when locking
the programme. Also access to the menus is denied when one of the
programmes is locked.
Locking a programme
1 Press the MENU button (under the lid).
________________________________________________________________________
2 Select the option "Locking" and press the OK button.
________________________________________________________________________
3 Select the required programme from the list with the cursor buttons.
Then follow the instructions on the screen.
After switching off, a locked programme cannot be selected without
entering the number code.
Viewing a locked programme
When you select a locked programme the TV set asks you to enter the 4digit code number to view it.
Panel lock
Front panel lock
Go back Store »
Locking
14 TV 14 31
Select A/V 15 TV 15 32
program E2 16 TV 16 33
E1 17 TV 17 34
1 TV 1 18 TV 18 35
2 TV 2 19 36
3 TV 3 20 37
· TV 4 21 38
Choose from 5 TV 5 22 39
alternatives 6 TV 6 23 40
below · TV 7 24 41
8 TV 8 25 42
9 TV 9 26 43
10 TV 10 27 44
11 TV 11 28 45
Store » 12 TV 12 29 46
13 TV 13 30 47
Unlock
Lock Unlock all Go back
· TV 1
ON
Cancelling the parental lock
Repeat the procedure described under the section "Locking a
programme". Select "Unlock" to cancel locking of selected programme
or select "Unlock all" to cancel all programme lockings. Store in memory
with the OK button.
3P58 83041010-GB
Page 10

25
Sound and picture controls
Sound set-up
Storing new sound settings
1 Press the green button to select the Sound menu.
________________________________________________________________________
2 Select the required option with the cursor buttons (up or down).
• Audio - Standard setting is STEREO. If there is noise, or the
transmission is weak, select MONO to improve sound quality.
• Sound channel - In case of a bilingual transmission select the sound
channel you require.
• Tone - See the section "Sound controls".
• Separation - To turn on or off the wider sound reproduction.
________________________________________________________________________
3 If you want to store the changed values in the memory, press the OK
button.
Adjustments in the options Audio, Sound channel and Tone only affect
the selected programme channel. Separation and Equaliser affect all
programme channels.
Adjusting bass and treble
1 Press the green button twice.
________________________________________________________________________
Sound
Audio
Sound channel
Tone
Separation
Store »
Sound
settings Equaliser Go back
Equaliser
STEREO
SOUND A
PREFERRED
+
-
100Hz 330Hz 1kHz 3kHz 10kHz
Go back Store »
2 Use the cursor buttons to adjust sound tone.
The lowest tones are adjusted in the the left columns and the higher
tones in the right columns. In each column, when the bar is below the
centre line, the selected tone is de-emphasized. The higher above the
centre line you move the bar, the more emphasis is given to that
particular tone.
________________________________________________________________________
3 If you want to store the changed values in the memory, press the OK
button.
Sound settings
1 Press the green button to select the Sound menu.
________________________________________________________________________
2 Press the red button to show the Sound settings menu.
________________________________________________________________________
3 Use the cursor buttons to adjust start-up volume or balance.
________________________________________________________________________
4 If you want to store the changed values in the memory, press the OK
button.
These adjustments affect all programme channels.
Sound settings
Starting volume
Balance
Go back Store »
3P58 83041010-GB
Page 11

26
_
_
_
_
_
Sound and picture controls
Picture set-up
Storing new preferred settings
Stored picture adjustments affect all programme channels.
1 Press the yellow button twice.
________________________________________________________________________
2 Adjust the required setting with the cursor buttons.
________________________________________________________________________
3 If you want to store the changes, press the OK button.
Changing display set-up and the menu language
1 Press the yellow button to select the Vision menu.
________________________________________________________________________
2 Press the red button to select the Display set-up menu.
________________________________________________________________________
3 Change the settings with the cursor buttons.
Preferred settings
Brightness
Contrast
Colour
Go back Store »
Vision
Settings
Store »
Display Preferred
set-up settings Go back
PREFERRED
Settings available in this menu:
• Program number - Permanent display of programme number.
• Volume bar - Display of volume bar.
• Menu language - Screen display language selection.
• Sharpness - Picture sharpness control.
• Tint - Colour temperature adjustment (red-blue balance).
• Picture tilt (not in all models) - The Earth's magnetic field may
influence the image orientation on large screen TV sets. You can
compensate for it with this function.
________________________________________________________________________
4 If you want to store the changes, press the OK button.
Programme settings
This function allows you to compensate for the difference in sound
volume and picture contrast between programme channels.
Noise reduction setting (not available in all models) allows individual
channel picture noise to be reduced to improve picture quality.
1 Press the MENU button (under the lid).
_________________________________________________________________________
2 Select "Program settings" by pressing the cursor button (up or down).
_________________________________________________________________________
3 Press the OK button.
_________________________________________________________________________
4 Select the required programme number by pressing the cursor buttons
(left or right) or the number buttons.
_________________________________________________________________________
Display set-up
Program number
Volume bar
Menu language
Sharpness
Tint
Go back Store »
Program settings
Program no.
Volume
Picture
Noise reduction
Teletext character
Go back
HIDE
SHOW
ENGLISH
1
LOW
W. EUROPE
5 Change the settings with the cursor buttons.
_________________________________________________________________________
6 If you want to store the changes, press the OK button.
Each programme channel must be adjusted separately.
Teletext functions are described in the section "Teletext".
3P58 83041010-GB
Page 12

_
_
_
_
_
_
_
_
_
S
27
Tuning in programme channels
Displaying the Tuning menu
All tuning options are selected from the Tuning menu.
1 Press the MENU button (under the lid).
________________________________________________________________________
2 Select the option "Tuning" by pressing the cursor buttons (up or down).
________________________________________________________________________
3 Confirm the selection by pressing the OK button.
________________________________________________________________________
4 Select the required alternative with the cursor buttons, then follow
instructions on the screen.
Automatic retuning
Select this option to delete previously tuned programme channels and
replace them with new ones. The TV set will sort programmes into the
factory preset order.
Add new programs
Select this option when you want to search for and store programme
channels that have not been tuned in previously.
Clear all programs
Select this option when you want to retune the TV set completely. The
TV set will repeat the steps described in the section "First time
installation".
________________________________________________________________________
Manual tuning
1 Repeat steps 1-3 above and select "Manual tuning".
________________________________________________________________________
CURSOR
BUTTONS
RED
BUTTON
MENU
123
456
789
0
ZOOM
SOUND
MENU
VISION
TV
IEW
?
VCR
VCR
VCR
SAT
REC
NEX
TV
OK
TEXT
SIZE
STOP
TV
OK
PIP
2 In the option "Program no", select the programme number with the
Tuning
cursor buttons (left or right).
________________________________________________________________________
3 Start the channel search by pressing the red button.
________________________________________________________________________
4 If the programme is not the one you require, press the red button again.
If the programme is not transmitted using the PAL BG standard
Automatic retuning
Add new programs
Manual tuning
External units
Copy tuning to VCR
Copy tuning from VCR
Clear all programs
Press »
Go back
(resulting in a picture with no colours or no sound), alter the "System"
setting (for multistandard sets only).
The other options available are:
• Name - Direct access to the Name menu.
• Channel - Channel number.
• Frequency - Channel frequency setting (fine tuning).
• System - Sound/colour system selection (for multistandard TV-sets
only).
• Decoder - Signal selection for external decoder (optional).
________________________________________________________________________
5 Store in memory by pressing the OK button.
________________________________________________________________________
6 Return to TV programme reception by pressing the TV button.
Manual tuning
Program no.
Name
Channel
Frequency
System
Decoder
Store »
Channel Decoder
search instruct. Go back
1
TV 1
118
280.2
BG
OFF
ystem selection:
(For multistandard TV sets only)
BG Western Europe, Near East,
North Africa
DK Eastern Europe
L France
UK The United Kingdom, Ireland,
Hong Kong
3P58 83041010-GB
Programme from a NTSC video recorder
can be viewed, if the video recorder is
connected to the TV set with a Scart
cable.
Page 13

_
_
28
Tuning in programme channels
Editing the programme list
The option "Sort programs" allows you to edit the programme list to suit
your own viewing preferences. You can also store a broadcast identifier
for each programme number to make the identification of an individual
programme channel easier, e.g. BBC1.
1 Press the MENU button (located under the lid).
________________________________________________________________________
2 Select the option "Sort programs" and confirm with the OK button.
________________________________________________________________________
3 Follow the instructions on the screen.
Sort programs
1 TV 1 17 TV 18 33
Select 2 TV 2 18 TV 19 34
program 3 TV 3 19 TV 20 35
4 TV 4 20 TV 21 36
5 TV 5 21 TV 22 37
6 TV 6 22 38
7 TV 7 23 39
8 TV 8 24 40
Choose from 9 TV 9 25 41
alternatives 10 TV 10 26 42
below 11 TV 11 27 43
12 TV 12 28 44
13 TV 13 29 45
14 TV 14 30 46
15 TV 15 31 47
16 TV 16 32 48
Move Delete Name Go back
1 TV 1
The options available are:
• Move - To reorder the programme channels.
• Delete - To delete a programme channel.
• Name - To give a name to individual programme channels.
External devices
Connectors
On the rear panel
The illustration shows how equipment should be connected to
your TV set. For the best sound and picture quality, we
recommend that you use the Scart connectors whenever
possible.
The Scart E2 connector is preset for VCR use. To change E2
settings for use with other equipment, see the section "Setting
up external devices".
Viewing a programme from external devices
Select the programme by pressing the 0 button (several times)
on the TV remote control.
The programmes, listed below, must be set up before they are
available. For information on setting up programmes for
external devices, see the section "Setting up external devices".
For connector Select programme number
Scart E1
Scart E2
Scart E3
AV
E1
E2 (preset for VCR)
E3 (not in all models)
A/V
Min 8 Ω
and 12 W
Scart E1 (black)
Satellite receiver
Scart E3
(orange)
VHS/RGB
E.g. satellite
receiver
VHS/RGB
Decoder
Games
Audio out
connectors
External audio
amplifier
Scart E2 (blue)
VHS/SVHS
Video recorder
DVD
= Connector is not available in all
models.
On the front panel
The connectors on the front panel are located behind a flap,
which opens by first pressing its upper edge inwards and then
tilting it down.
To change the headphone sound volume
When the headphones are connected, you can change
headphone sound volume by using the -/+ button. You can
silence the sound from the loudspeakers by pressing the sound
mute button (V).
A/V A/V
R AUDIO L VIDEO S-VIDEO
RCA
VHS
Mini-DIN + RCA
SVHS/Hi8
P
32-600
3,5 mm
3P58 83041010-GB
Page 14

_
_
_
External devices
Setting up external devices
If you are connecting a VHS video recorder to the Scart E2 connector,
the VCR is ready for use after connecting the cables.
If you are connecting a decoder, see also instructions in the section
"Connecting a decoder".
For other devices, the TV will display settings, which you need to
confirm by following the instructions below.
29
1 Connect the cables as shown in the illustrations in the section
"Connectors".
________________________________________________________________________
2 Switch on your TV and the device you are connecting.
________________________________________________________________________
3 Press the MENU button (located under the lid).
________________________________________________________________________
4 Select the option "Tuning" and confirm with the OK button.
________________________________________________________________________
5 Select the option "External units" and confirm with the OK button.
________________________________________________________________________
6 Press the red button (Add new unit).
________________________________________________________________________
7 Select the required device from the list and press the OK button.
________________________________________________________________________
8 Check that the device is connected to the connector that is mentioned in
the menu that appears on the screen. Confirm the selection by pressing
the OK button.
Your device is now ready for use.
Changing the input settings
You can change the input settings for any connector. This may be
necessary, for example, when you are connecting several devices or
when the input settings have been changed.
1 Repeat steps 1-5 above.
________________________________________________________________________
2 Select the required device from the list.
________________________________________________________________________
3 Press the green button to display the Change menu.
________________________________________________________________________
External units
E2 VCR
Select
unit
choose from
alternatives
below
Add new Change unit Remove
unit settings unit Go back
Add new unit
VCR
VCR (S-video) / DVD
VCR antenna input
Satellite
Camcorder
Camcorder (S-video)
Decoder
Game console
Computer
Press »
Go back
Change
Name
Connection
Mode
Unit type
Store »
Decoder
Info instruct. Go back
VCR
E2
VIDEO
VCR
4 Follow the instructions on the screen.
Copying tuning information to or from a VCR
If your VCR has the nexTView-link feature, you can copy tuning
information from the VCR to the TV set, or vice versa. The advantage is
having the same tuning information both on your TV and your VCR,
which reduces mistakes in recording programmes.
1 Press the MENU button (located under the lid).
________________________________________________________________________
2 Select the option "Tuning".
________________________________________________________________________
3 Select the desired copy function.
________________________________________________________________________
4 Press the OK button to start copying.
3P58 83041010-GB
Tuning
Automatic retuning
Add new programs
Manual tuning
External units
Copy tuning to VCR
Copy tuning from VCR
Clear all programs
Press »
Go back
Page 15

_
d
_
_
_
"
_
_
_
30
External devices
Recording a programme through the TV setRecording a programme through the TV set
You can record a satellite programme from an external satellite receiver
or copy a self made camera recording while watching it. Connect the
Video camera
video recorder to be used for recording to the blue Scart E2 connector. It
is not possible to record an SVHS programme through the TV set.
Scart
Example: Recording from a VHS video camera
Connect the video camera to the AV connectors on the TV set front
panel.
E2
1 Turn on the video camera. Select the A/V programme number by
pressing the 0 button (see “Setting up external devices”).
________________________________________________________________________
2 When the programme is shown on the TV, press the REC button (locate
Video recorder
SVHS
under the lid).
________________________________________________________________________
3 Activate the copy function by pressing the OK button.
________________________________________________________________________
4 Switch on the video recorder and turn it to the EXT or AV position
(recording from an external device). Start recording on the VCR.
The VCR symbol is shown on the screen during recording.
If you have locked a TV programme number to a video recorder it is not
possible to select any other TV programme number.
Cancelling the lock function
After recording, you need to cancel the lock function to be able to view
the TV programme.
1 Press the REC button (located under the lid).
________________________________________________________________________
2 Cancel the lock function by pressing the OK button.
Connecting a decoder
If you have a decoder that has an aerial cable connected to it, follow
instructions in the section "Setting up external devices". Select "Decoder
in step 7 (when the "Add new unit" menu is displayed).
If your decoder is connected to the TV set with a Scart cable only,
connect the decoder to the Scart E1 (or E3, not in all models) connector.
Then follow the steps below.
Connecting a decoder to a Scart connector
1 Select the required programme.
________________________________________________________________________
2 Press the MENU button (located under the lid).
________________________________________________________________________
3 Select the menu line "Tuning" and confirm with the OK button.
________________________________________________________________________
4 Select the menu line "Manual tuning" and confirm with the OK button.
________________________________________________________________________
_
5 Select the option "Decoder" and change it to D1, D2 (D3, D4) or OFF.
VCR record
Lock this program
to VCR (connector E2)
press »
Go back
VCR record
Unlock program from
VCR (connector E2)
press »
Go back
Manual tuning
Program no.
Name
Channel
Frequency
System
Decoder
Store »
Channel Decoder
search instruct. Go back
1
TV 1
118
280.2
BG
OFF
• If you are connecting to Scart E1:
Select D1 if both the picture and sound are scrambled.
Select D2 if only the picture is scrambled.
• If you are connecting to Scart E3 (not in all models):
Select D3 if both the picture and sound are scrambled.
Select D4 if only the picture is scrambled.
________________________________________________________________________
_
6 Store in memory by pressing the OK button.
3P58 83041010-GB
Page 16

External devices
Remote control of external devices
31
You can control several types of video recorders and satellite receivers
using the TV set remote control hand unit.
Programming the remote control unit
After inserting the batteries, the text "VCR mode not programmed" (or
"SAT mode not programmed") appears on the screen when you press
the VCR (or SAT) button. Simply follow the instructions on the screen to
enter the correct number.
Operating your VCR/DVD
For VCR hold the VCR button (under the lid) down and simultaneously
press the required function button. For DVD hold the button which is
programmed for DVD use (VCR or SAT) down and simultaneously press
the required function button. The list below is meant to be a guideline for
the most common functions.
U Switching on/off
0...9 Entering a programme number (VCR)
Cursor up/down Selecting a programme number (VCR)
Red Stop
Green Rewind
Yellow Fast forward
Blue Play
REC Recording (VCR)
STOP Pause (DVD)
Code
001
002
003
004
VCR
Akai
Finlux, Hitachi
Nokia, Luxor, Salora, Sanyo
Nokia, Finlux, Luxor, Salora,
Sharp
005
Finlux, Philips
Code Satellite receiver
001
002
003
004
005
Nokia, Finlux, Luxor, Salora
Finlux SR5800, SR5750
Finlux SR4200
Nokia, Luxor, Salora
Pace
Code DVD player
006 Akai
If your device does not respond to any of
the above code numbers, the remote
control unit cannot be used to control
your device.
Operating your satellite receiver
Hold the SAT button (under the lid) down and simultaneously press the
required function button. The list below is meant to be a guideline for the
most common functions
U Switching off (to stand-by)
0...9 Entering a programme number
Cursor up/down Selecting a programme number
Changing the operating code
You can change the VCR or satellite receiver operating code by
following these steps:
1. Remove the remote control batteries and press the TV button.
2. Insert the batteries.
3. Hold the VCR (or SAT) button down and press the ?-button followed
by the OK button.
4. Enter the code with the number buttons.
5. Follow instructions on the screen.
0..9
CURSOR
BUTTONS
COLOUR
BUTTONS
VCR
SAT
123
456
789
0
ZOOM
SOUND
MENU
VISION
TV
IEW
?
VCR
VCR
VCR
SAT
REC
NEX
TV
OK
TEXT
SIZE
STOP
TV
OK
PIP
TEXT
REC
STOP
3P58 83041010-GB
Page 17

32
Before you call a serviceman
Problem
After a power failure, thunderstorm, etc. a malfunction
may occur. Example: The receiver does not respond to
Solution
Switch off the receiver by using the mains switch, wait
for about 10 seconds and switch the receiver on again.
the remote control commands.
Regular vertical or diagonal lines are shown on the
screen.
Connect a double shielded aerial cable between the
aerial connector of the receiver and the aerial wall
socket.
The colour purity of the picture tube is poor. Switch off the TV set by using the mains switch and
allow it cool down for about 15 minutes. When the TV
set is switched on again, automatic degaussing of the
picture tube maintains the colour purity.
Permanent distortion on the screen (on its edges).
Move all devices causing strong magnetic fields, e.g.
additional loudspeakers farther away from the TV set.
Switch off the TV set by using the mains switch and
allow it cool down for about 15 minutes. When the TV
set is switched on again, automatic degaussing of the
picture tube maintains the picture format and colour
purity.
When selecting a programme number (not E
programme number), either a programme from a device
Check that the Decoder setting in the Manual tuning
menu is set to OFF.
connected to the Scart E1 connection is shown, or there
is no picture at all on the screen.
Some programme channels or menus cannot be
selected, or the message "Enter code number to open
lock" appears on the screen.
See instructions in the section "Parental lock". If you
have lost the code number, use the sequence 1-5-9-red
"ZOOM" button on the remote control unit to open the
lock.
Technical data
System PAL B, G
Mains power 210-240 V, 50 Hz
Power consumption 135 W (normal)
Power consumption in stand-by max. 0,2 W
Picture tube 28"/71 cm, 29"/74 cm
Frequency range 48.25 - 855.25 MHz
Programme memory locations 99
AV memory locations 3
Sound output 2 x 10 W
Connections on the front panel
Headphones 32...600 Ω, 3,5 mm
Audio/Video Audio in: 0 - 2 V
Connections on the rear panel
Audio/Video (Scart) Audio in: 0 - 2 V
Audio out 0 - 2 V
Ext. loudspeakers min. 10 W
Antenna 75 Ω, coaxial cable
NTSC 3.58/4.43 via Scart connector
/8 Ω
RMS
/1 kΩ
Video in: 1 V/75 Ω
Y/C in (SVHS)
Audio out: 0 - 2 V
Video in/out: 1 V/75 Ω
RGB in: 0,7 V/75 Ω (E1)
Y/C in (SVHS) (E2)
RMS
RMS
/1 kΩ
RMS
RMS
/10 kΩ (RCA)
/8 Ω
RMS
/10 kΩ
Specifications are subject to change.
3P58 83041010-GB
Page 18

Hitachi, Ltd. Tokyo, Japan
International Sales Division
THE HITACHI ATAGO BUILDING,
No. 15 –12 Nishi Shinbashi, 2 – Chome,
Minato – Ku, Tokyo 105-8430, Japan.
HITACHI EUROPE LTD,
Whitebrook Park
Lower Cookham Road
Maidenhead
Berkshire
SL6 8YA
UNITED KINGDOM
Tel: 01628 643000
Fax: 01628 643400
Email: consumer-service@hitachi-eu.com
HITACHI EUROPE GmbH
Munich Office
Dornacher Strasse 3
D-85622 Feldkirchen bei München
GERMANY
Tel: +49-89-991 80-0
Fax: +49-89-991 80-224
Hotline: +49-180-551 25 51 (12ct/min)
Email: HSE- DUS.service@hitachi-eu.com
HITACHI EUROPE srl
Via Tommaso Gulli N.39, 20147
Milano, Italia
ITALY
Tel: +39 02 487861
Tel: +39 02 38073415 Servizio Clienti
Fax: +39 02 48786381/2
Email: customerservice.italy@hitachi-eu.com
HITACHI EUROPE S.A.S
Lyon Office
B.P. 45, 69671 BRON CEDEX
FRANCE
Tel: 04 72 14 29 70
Fax: 04 72 14 29 99
Email: france.consommateur@hitachi-eu.com
HITACH EUROPE AB
Egebækgård
Egebækvej 98
DK-2850 Nærum
DENMARK
Tel: +45 43 43 6050
Fax: +45 43 60 51
Email: csgnor@hitachi-eu.com
Hitachi Europe Ltd
Bergensesteenweg 421
1600 Sint- Pieters-Leeuw
BELGIUM
Tel: +32 2 363 99 01
Fax: +32 2 363 99 00
Email: sofie.van.bom@hitachi-eu.com
www.hitachidigitalmedia.com
Tel: 03 35022111
HITACHI EUROPE S.A.
364 Kifissias Ave. & 1, Delfon Str.
152 33 Chalandri
Athens
GREECE
Tel: 1-6837200
Fax: 1-6835964
Email: service.hellas@hitachi-eu.com
HITACHI EUROPE S.A.
Gran Via Carlos III, 101- 1
08028 Barcelona
SPAIN
Tel: 93 409 2550
Fax: 93 491 3513
Email: atencion.cliente@hitachi-eu.com
HITACHI Europe AB
Box 77 S-164 94 Kista
SWEDEN
Tel: +46 (0) 8 562 711 00
Fax: +46 (0) 8 562 711 13
Email: csgswe@hitachi-eu.com
HITACHI EUROPE LTD (Norway) AB
STRANDVEIEN 18
1366 Lysaker
NORWAY
Tel: 67 5190 30
Fax: 67 5190 32
Email: csgnor@hitachi-eu.com
HITACHI EUROPE AB
Neopoli / Niemenkatu 73
FIN-15140 Lahti
FINLAND
Tel : +358 3 8858 271
Fax: +358 3 8858 272
Email: csgnor@hitachi-eu.com
HITACHI EUROPE LTD
Na Sychrove 975/8
101 27 Praha 10 – Bohdalec
CZECH REPUBLIC
Tel: +420 267 212 383
Fax: +420 267 212 385
Email: csgnor@hitachi-eu.com
 Loading...