

Page 1
Cutter
6mm
88
17mm
Steinsäge
¢ÈÛÎÔÚ›ÔÓÔ Ì·ÚÌ¿ÚÔ˘
Przecinarka tarczowa
Daraboló
Řezačka
Beton kesme
Masina de taiat caneluri in zidarie
Rezalnik
AÎÏaÁÌaÓ ÔËÎa
CM 5SB
Read through carefully and understand these instructions before use.
Diese Anleitung vor Benutzung des Werkzeugs sorgfältig durchlesen und verstehen.
¢И·‚¿ЫЩВ ЪФЫВОЩИО¿ О·И О·Щ·УФ‹ЫВЩВ ·˘Щ¤˜ ЩИ˜ Ф‰ЛБ›В˜ ЪИУ ЩЛ ¯Ъ‹ЫЛ.
Przed użytkowaniem należy dokładnie przeczytać niniejszą instrukcję i zrozumieć jej treść.
Használat előtt olvassa el figyelmesen a használati utasítást.
Před použitím si pečlivě přečtěte tento návod a ujistěte se, že mu dobře rozumíte.
Aleti kullanmadan önce bu kılavuzu iyice okuyun ve talimatları anlayın.
Înainte de utilizare, citiţi cu atenţie și înţelegeţi prezentele instrucţiuni.
Pred uporabo natančno preberite in razumite ta navodila.
BÌËÏaÚeÎëÌo ÔpoäÚËÚe ÀaÌÌyï ËÌcÚpyÍáËï Ôo íÍcÔÎyaÚaáËË ÔpeÊÀe äeÏ ÔoÎëÁoÇaÚëcÓ ËÌcÚpyÏeÌÚoÏ.
Handling instructions
Bedienungsanleitung
√‰ЛБ›В˜ ¯ВИЪИЫМФ‡
Instrukcja obsługi
Kezelési utasítás
Návod k obsluze
Kullanım talimatları
Instrucţiuni de utilizare
Navodila za rokovanje
àÌcÚpyÍáËÓ Ôo íÍcÔÎyaÚaáËË
Page 2

1
6mm
88
17mm
2
A
B
1
0
2
3
C
4
5
3
E
6
7
D
8
9
4
5
G
1
H
F
Page 3
6
English Deutsch Ελληνικά Polski
Push button
1
(Spindle lock)
2
Spindle
3
Screw
4
Dust collection cover
5
Wheel washer
6
Diamond wheel
7
Wheel nut
8
Wrench
9
Cover (A)
0
Side handle
A
Switch
B
Wing nut
C
Slide guide
D
Adaptor
E
Dust collection hose
F
Cutting line
G
Wear limit
H
No. of carbon brush
I
Spring
J
Carbon brush
K
Brush holder
J K
I
Druckknopf (Sperrplatte)
Spindel
Schraube
Staubsammelabdeckung
Unterlegscheibe
Diamantscheibe
Mutter für die Schleifscheibe
Schlüssel
Abdeckung (A)
Seitengriff
Schalter
Flügelschraube
Gleitschiene
Adapter
Staubabscheiderschlauch
Schnittlinie
Verschleißgrenze
Nr. der Kohlebürste
Feder
Kohlebürste
Bürstenhalter
Κουµπί ώθησης
(ασφάλιση άξονα)
Άξονας
Βίδα
Κάλυµµα συλλογής σκνης
Ροδέλλα τροχού
∆ιαµαντένιος τροχς
Παξιµάδι τροχού
Κλειδί
Κάλυµµα (A)
Πλευρική λαβή
∆ιακπτης
Φτερωτ παξιµάδι
Οδηγς ολίσθησης
Αντάπτορας
Σωλήνας συλλογής
σκνης
Γραµµή κοπής
-ριο φθοράς
Αρ. Καρβουνακίων
Ελατήριο
Kαρβουνάκι
Θήκη ψύκτρας
Przycisk
(Blokada wrzeciona)
Wrzeciono
Śruba
Pokrywa systemu
odprowadzania pyłu
Podkładka tarczy
Ściernica diamentowa
Nakrętka tarczy
Klucz
Pokrywa (A)
Uchwyt boczny
Włącznik główny
Nakrętka skrzydełkowa
Prowadnica posuwu
Złącze
Wąż systemu
odprowadzania pyłu
Linia cięcia
Granica zużycia
Numer szczotki węglowej
Sprężyna
Szczotka węglowa
Obsada szczotkowa
2
Page 4

Magyar Čeština Türkçe Română
Nyomógomb (Orsózár)
1
Tengely
2
Csavar
3
Porgyűjtő fedél
4
Tárcsa alátét
5
Gyémánt tárcsa
6
Tárcsarögzítő anya
7
Csavarkulcs
8
Fedél (A)
9
Oldalfogantyú
0
Kapcsoló
A
Szárnyasanya
B
Csúszó vezetőelem
C
Adapter
D
Porgyűjtő tömlő
E
F
Vágási vonal
G
Kopási határ
H
Szénkefe száma
I
Rúgó
J
Szénkefe
K
Szénkefetartó
Tlačítko (Zámek hřídele)
Hřídel
Šroub
Kryt pro zachycování
prachu
Podložka kotouče
Diamantový kotouč
Matka kotouče
Klíč
Kryt (A)
Boční držadlo
Spínač
Křídlová matice
Vodítko saní
Adaptér
Hadice pro zachycování
prachu
Řezací linka
Mez opotŕebení
Číslo uhlíkového kartáčku
Pružina
Uhlíkový kartáček
Držák kartáčku
Kilit iånesi (Mil kilidi)
Mil
Vida
Toz toplama kapaåı
Disk pulu
Elmas disk
Disk somunu
Anahtar
Kapak (A)
Yan kol
Íalter
Kelebek somun
Sürgü yataåı
Adaptör
Toz emme hortumu
Kesme çizgisi
Aßınma sınırı
Kömür tanımlama sayısı
Yay
Kömür
Kömür tutucusu
Buton (Blocare ax)
Ax
Șurub
Carcasa colectorului de
praf
Garnitura discului
Disc diamantat
Piuliţă de roată
Cheie
Capac (A)
Mâner lateral
Comutator
Piuliţă fluture
Ghidajul de alunecare
Adaptor
Furtun pentru colectarea
prafului
Linie de tăiere
Limită de uzură
Nr. periilor de cărbune
Resort
Perie de cărbune
Suportul periei
3
Page 5

Slovenščina PyccÍËÈ
Tipka (zaklep gredi)
1
Gred
2
Vijak
3
Pokrov zbiralca prahu
4
Blažilec kolesa
5
Diamantno kolo
6
Kolesna matica
7
Ključ
8
Pokrov (A)
9
Stranska ročica
0
Stikalo
A
Krilna matica
B
Pomično vodilo
C
D
Adapter
E
Cev za zbiranje prahu
F
Rezalna linijal
G
Meja obrabe
H
Št. ogljikovih ščetk
I
Vzmet
J
Ogljikova ščetka
K
Nosilec ščetke
HaКЛПМaУ НМoФНa
(ЕОoНЛpoЗНa еФЛМАeОУ)
тФЛМАeОл
BЛМЪ
KpкеНa ФкОeyОoЗЛЪeОУ
тaИДa еОЛЩoЗaОлМoЦo
НpyЦa
тОЛЩoЗaОлМкИ НpyЦ c
aÎÏaÁÌoÈ ÍpoÏÍoÈ
ÉaÈÍa åÎËÙoÇaÎëÌoÖo
ÍpyÖa
ÉaeäÌêÈ ÍÎïä
KpêåÍa (A)
ЕoНoЗaУ pyНoУЪНa
BкНОпдaЪeОл
ЕapaеНoЗaУ ЦaИНa
HaФpaЗОУпзaУ
cÍoÎëÊeÌËÓ
AÀaÔÚep
èêÎeyÎaÇÎËÇaïçËÈ
åÎaÌÖ
гЛМЛУ peБНЛ
иpeАeО ЛБМoca
£ yЦoОлМoИ зeЪНЛ
иpyКЛМa
мЦoОлМaУ зeЪНa
фeЪНoАepКaЪeОл
4
Page 6
Symbols
The following show
symbols used for the
machine. Be sure that
you understand their
meaning before use.
Read instruction
manual.
Always wear eye
protection.
Always wear
hearing protection.
Only for EU countries
Do not dispose of electric
tools together with
household waste material!
In observance of European
Directive 2002/96/EC on
waste electrical and
electronic equipment and
its implementation in
accordance with national
law, electric tools that have
reached the end of their life
must be collected
separately and returned to
an environmentally
compatible recycling
facility.
Symboly
Následující text obsahuje
symboly, které jsou použity
na zařízení. Ujistěte se, že
rozumíte jejich obsahu
před tím, než začnete
zařízení používat.
Přečtěte si návod.
Vždy noste ochranu
očí.
Vždy používejte
chrániče sluchu.
Jen pro státy EU
Elektrické nářadí
nevyhazujte do
komunálního odpadu!
Podle evropské
směrnice 2002/96/EG o
nakládání s použitými
elektrickými a
elektronickými
zařízeními a
odpovídajících
ustanovení právních
předpisů jednotlivých
zemí se použitá
elektrická nářadí musí
sbírat odděleně od
ostatního odpadu a
podrobit ekologicky
šetrnému recyklování.
Symbole
Die folgenden Symbole
werden für diese
Maschine verwendet.
Achten Sie darauf, diese
vor der Verwendung zu
verstehen.
Bedienungsanleitung
lesen.
Tragen Sie immer
einen Augenschutz.
Stets Gehörschutz
tragen.
Nur für EU-Länder
Werfen Sie
Elektrowerkzeuge nicht
in den Hausmüll!
Gemäss Europäischer
Richtlinie 2002/96/EG
über Elektro- und
Elektronik- Altgeräte
und Umsetzung in
nationales Recht
müssen verbrauchte
Elektrowerkzeuge
getrennt gesammelt
und einer
umweltgerechten
Wiederververtung
zugeführt werden.
Simgeler
Aßaåıda, bu alet için kullanılan
simgeler gösterilmißtir. Aleti
kullanmadan önce bu
simgelerin ne anlama geldiåini
anladıåınızdan emin olun.
Kullanım kılavuzunu
okuyun.
Daima koruyucu
gözlük takın.
Daima koruyucu
kulaklık takın.
Sadece AB ülkeleri için
Elektrikli el aletlerini
evdeki çöp kutusuna
atmayınız!
Kullanılmıß elektrikli
aletleri, elektrik ve
elektronikli eski
cihazlar hakkındaki
2002/96/EC Avrupa
yönergelerine göre ve
bu yönergeler ulusal
hukuk kurallarına göre
uyarlanarak, ayrı
olarak toplanmalı ve
çevre ßartlarına uygun
bir ßekilde tekrar
deåerlendirmeye
gönderilmelidir.
™‡Ì‚ÔÏ·
Τα παρακάτω δείχνουν τα
σύµβολα που
χρησιµοποιούνται στο
µηχάνηµα. Βεβαιωθείτε τι
κατανοείτε τη σηµασίας
τους πριν τη χρήση.
∆ιαβάστε το
εγχειρίδιο οδηγιών.
Φοράτε πάντα τον
κατάλληλο εξοπλισµ
για την προστασία
των µατιών.
Φοράτε πάντα
προστατευτικά
ακοής.
Mvo για τις χώρες της
EE
Mηv πετάτε τα ηλεκτρικά
εργαλεία στov κάδo
oικιακώv απoρριµµάτωv!
Σύµφωvα µε τηv
εuρωπαϊκή oδηγία 2002/
96/EK περί ηλεκτρικώv και
ηλεκτρovικώv σuσκεuώv
και τηv εvσωµάτωσή της
στo εθvικ δίκαιo, τα
ηλεκτρικά εργαλεία
πρέπει vα σuλλέγovται
ξεχωριστά και vα
επιστρέφovται για
αvακύκλωση µε τρπo
φιλικ πρoς τo
περιβάλλov.
Simboluri
În cele ce urmează sunt
prezentate simbolurile
folosite pentru mașină.
Înainte de utilizare,
asiguraţi-vă că înţelegeţi
semnificaţia acestora.
Citiţi manualul de
instrucţiuni.
Purtaţi întotdeauna
protecţie pentru ochi.
Purtaţi întotdeauna
protecţie auditivă.
Numai pentru ţările membre
UE
Nu aruncaţi această sculă
electrică împreună cu
deșeurile menajere!
În conformitate cu Directiva
Europeană 2002/96/CE
referitoare la deșeurile
reprezentând echipamente
electrice și electronice și la
implementarea acesteia în
conformitate cu legislaţiile
naţionale, sculele electrice
care au ajuns la finalul
duratei de folosire trebuie
colectate separat și duse la o
unitate de reciclare
compatibilă cu mediul
înconjurător.
Symbole
Następujące oznaczenia
to symbole używane w
instrukcji obsługi
maszyny. Upewnij się, że
rozumiesz ich znaczenie
zanim użyjesz narzędzia.
Przeczytaj instrukcje.
Zawsze nosić okulary
ochronne.
Zawsze nosić
słuchawki ochronne.
Dotyczy tylko państw UE
Nie wyrzucaj
elektronarzędzi wraz z
odpadami z
gospodarstwa
domowego!
Zgodnie z Europejską
Dyrektywą 2002/96/WE w
sprawie zużytego sprzętu
elektrotechnicznego i
elektronicznego oraz
dostosowaniem jej do
prawa krajowego, zużyte
elektronarzędzia należy
posegregować i
zutylizować w sposób
przyjazny dla środowiska.
Simboli
V nadaljevanju so
prikazani simboli,
uporabljeni pri stroju.
Pred uporabo se
prepričajte, da jih
razumete.
Preberite navodila za
uporabo.
Uporaba zaščite za
oči je obvezna.
Obvezna je uporaba
zaščite za ušesa.
Samo za države EU
Električnih orodij ne
zavržite skupaj z
gospodinjskimi
odpadki!
V skladu z evropsko
direktivo 2002/96/EC
o odpadni električni in
elektronski opremi in
izvedbi v skladu z
državnimi zakoni, je
treba električna
orodja, ki so dosegla
življenjsko dobo
ločeno zbirati in vrniti
v z okoljem združljivo
ustanovo za
recikliranje.
Jelölések
Az alábbiakban a géphez
alkalmazott jelölések
vannak felsorolva. A gép
használata előtt feltétlenül
ismerje meg ezeket a
jelöléseket.
Olvassa el a
Használati utasítást.
Mindig viseljen
védőszemüveget.
Mindig viseljen a
hallást védő
védőfelszerelést.
Csak EU-országok
számára
Az elektromos
kéziszerszámokat ne
dobja a háztartási
szemétbe!
A használt villamos és
elektronikai
készülékekről szóló
2002/96/EK irányelv és
annak a nemzeti jogba
való átültetése szerint
az elhasznált
elektromos
kéziszerszámokat
külön kell gyűjteni, és
környezetbarát módon
újra kell hasznosítani.
CËÏÇoÎê
HËÊe ÔpËÇeÀeÌê cËÏÇoÎê,
ËcÔoÎëÁyeÏêe ÀÎÓ
ÏaåËÌê. èepeÀ ÌaäaÎoÏ
paÄoÚê oÄÓÁaÚeÎëÌo
yÄeÀËÚecë Ç ÚoÏ, äÚo Bê
ÔoÌËÏaeÚe Ëx ÁÌaäeÌËe.
èpoäÚËÚe
pyÍoÇoÀcÚÇo Ôo
íÍcÔÎyaÚaáËË.
BceÖÀa ÌaÀeÇaÈÚe
cpeÀcÚÇa ÁaçËÚê
ÖÎaÁ.
BceÖÀa ÌaÀeÇaÈÚe
cpeÀcÚÇa ÁaçËÚê
opÖaÌoÇ cÎyxa.
ToОлНo АОУ cЪpaМ EC
He ЗкНЛАкЗaИЪe
нОeНЪpoФpЛДopк ЗПecЪe
c oДoкдМкП ПycopoП!
B cooЪЗeЪcЪЗЛЛ c
eЗpoФeИcНoИ
АЛpeНЪЛЗoИ 2002/96/EG
oД yЪЛОЛБaбЛЛ cЪapкx
нОeНЪpЛдecНЛx Л
нОeНЪpoММкx ФpЛДopoЗ
Л З cooЪЗeЪcЪЗЛЛ c
ПecЪМкПЛ БaНoМaПЛ
нОeНЪpoФpЛДopк,
ДкЗзЛe З
нНcФОyaЪaбЛЛ, АoОКМк
yЪЛОЛБoЗкЗaЪлcУ
oЪАeОлМo ДeБoФacМкП
АОУ oНpyКaпзeИ cpeАк
cФocoДoП.
5
Page 7

English
GENERAL POWER TOOL SAFETY WARNINGS
WARNING
Read all safety warnings and all instructions.
Failure to follow the warnings and instructions may result
in electric shock, fire and/or serious injury.
Save all warnings and instructions for future reference.
The term “power tool” in the warnings refers to your
mains-operated (corded) power tool or battery-operated
(cordless) power tool.
1) Work area safety
a) Keep work area clean and well lit.
Cluttered or dark areas invite accidents.
b) Do not operate power tools in explosive
atmospheres, such as in the presence of
flammable liquids, gases or dust.
Power tools create sparks which may ignite the
dust or fumes.
c) Keep children and bystanders away while
operating a power tool.
Distractions can cause you to lose control.
2) Electrical safety
a) Power tool plugs must match the outlet.
Never modify the plug in any way.
Do not use any adapter plugs with earthed
(grounded) power tools.
Unmodified plugs and matching outlets will
reduce risk of electric shock.
b) Avoid body contact with earthed or grounded
surfaces, such as pipes, radiators, ranges and
refrigerators.
There is an increased risk of electric shock if
your body is earthed or grounded.
c) Do not expose power tools to rain or wet
conditions.
Water entering a power tool will increase the
risk of electric shock.
d) Do not abuse the cord. Never use the cord for
carrying, pulling or unplugging the power tool.
Keep cord away from heat, oil, sharp edges or
moving parts.
Damaged or entangled cords increase the risk
of electric shock.
e) When operating a power tool outdoors, use an
extension cord suitable for outdoor use.
Use of a cord suitable for outdoor use reduces
the risk of electric shock.
f) If operating a power tool in a damp location
is unavoidable, use a residual current device
(RCD) protected supply.
Use of an RCD reduces the risk of electric shock.
3) Personal safety
a) Stay alert, watch what you are doing and use
common sense when operating a power tool.
Do not use a power tool while you are tired or
under the influence of drugs, alcohol or medication.
A moment of inattention while operating power
tools may result in serious personal injury.
b) Use personal protective equipment. Always wear
eye protection.
Protective equipment such as dust mask, nonskid safety shoes, hard hat, or hearing protection
used for appropriate conditions will reduce
personal injuries.
c) Prevent unintentional starting. Ensure the switch
is in the off-position before connecting to power
source and/or battery pack, picking up or
carrying the tool.
Carrying power tools with your finger on the
switch or energising power tools that have the
switch on invites accidents.
d) Remove any adjusting key or wrench before
turning the power tool on.
A wrench or a key left attached to a rotating part
of the power tool may result in personal injury.
e) Do not overreach. Keep proper footing and
balance at all times.
This enables better control of the power tool in
unexpected situations.
f) Dress properly. Do not wear loose clothing or
jewellery. Keep your hair, clothing and gloves
away from moving parts.
Loose clothes, jewellery or long hair can be
caught in moving parts.
g) If devices are provided for the connection of
dust extraction and collection facilities, ensure
these are connected and properly used.
Use of dust collection can reduce dust related hazards.
4) Power tool use and care
a) Do not force the power tool. Use the correct
power tool for your application.
The correct power tool will do the job better and
safer at the rate for which it was designed.
b) Do not use the power tool if the switch does
not turn it on and off.
Any power tool that cannot be controlled with
the switch is dangerous and must be repaired.
c) Disconnect the plug from the power source
and/or the battery pack from the power tool
before making any adjustments, changing
accessories, or storing power tools.
Such preventive safety measures reduce the risk
of starting the power tool accidentally.
d) Store idle power tools out of the reach of children
and do not allow persons unfamiliar with the
power tool or these instructions to operate the
power tool.
Power tools are dangerous in the hands of
untrained users.
e) Maintain power tools. Check for misalignment
or binding of moving parts, breakage of parts
and any other condition that may affect the
power tools operation.
If damaged, have the power tool repaired before
use.
Many accidents are caused by poorly maintained
power tools.
f) Keep cutting tools sharp and clean.
Properly maintained cutting tools with sharp
cutting edges are less likely to bind and are
easier to control.
g) Use the power tool, accessories and tool bits
etc. in accordance with these instructions, taking
into account the working conditions and the
work to be performed.
Use of the power tool for operations different from
those intended could result in a hazardous situation.
6
Page 8

English
5) Service
a) Have your power tool serviced by a qualified repair
person using only identical replacement parts.
This will ensure that the safety of the power tool
is maintained.
PRECAUTION
Keep children and infirm persons away.
When not in use, tools should be stored out of reach of
children and infirm persons.
PRECAUTION ON USING CUTTER
1. Never attach any tool except the diamond wheel as
specified by the manufacturer.
Do not operate the cutter while applying water.
2. Always check the diamond wheel before starting the
machine. If it is cracked, broken or bent, do not use
it. Carefully start the machine to check for other
abnormalities.
3. Using the diamond wheel to cut metal will shorten
its service life or will result in breakage. Never use
the diamond wheel to cut metal.
4. Start working only when maximum rotation speed
is reached.
5. Excessive force overloads the motor. Always cut
with a cutting depth of 5mm or less.
6. Do not use this machine to cut asbestos.
7. In operations using a cutting wheel, if flame comes
out, cover the dust collection adaptor with a rubber
cap and be sure to wear protective glasses.
SPECIFICATIONS
Voltage (by areas)* (110V, 230V)
Power input* 1300W
No-load speed 11000 min
Dimensions of diamond wheel
Max. cutting depth 33mm
Weight (without cord and diamond wheel) 2.9kg
* Be sure to check the nameplate on product as it is subject to change by areas.
STANDARD ACCESSORIES
(1) Wrench ........................................................................1
(2) Adaptor ....................................................................... 1
(3) Side handle ................................................................ 1
Standard accessories are subject to change without notice.
APPLICATION
䡬 Cutting or scribing concrete
䡬 Cutting or scribing tile
䡬 Cutting or scribing stone
䡬 Cutting or scribing roof tile
PRIOR TO OPERATION
1. Power source
Ensure that the power source to be utilized conforms
to the power requirements specified on the product
nameplate.
2. Power switch
Ensure that the power switch is in the OFF position.
If the plug is connected to a power receptacle while
the power switch is in the ON position, the power
tool will start operating immediately, which could
cause a serious accident.
3. Extension cord
When the work area is removed from the power
source, use an extension cord of sufficient thickness
and rated capacity. The extension cord should be
kept as short as practicable.
4. Checking and installing the diamond wheel
Check the diamond wheel is a specified one and
is not cracked, broken or bent. Check the diamond
wheel is installed securely. For installation, refer to
“Installing/removing diamond wheel”.
5. Fitting and adjusting the dust collection cover (Fig. 1)
The dust collection cover is a protective device to
prevent injury should the diamond wheel shatter
during operation. Ensure that the cover is properly
fitted and fastened before commencing cutting
operation. By slightly loosening the setting screw,
the dust collection cover can be turned and set at
any desired angle for maximum operational
effectiveness. Ensure that the setting screw is
thoroughly tightened after adjusting the dust
collection cover.
6. Confirm the spindle lock mechanism
Confirm that the spindle lock is disengaged by
pushing push button two or three times before
switching the power tool on (See Fig. 1).
7. Cutting depth adjustment (Fig. 2)
Lowering the wing nut will loosen and raising it will
tighten.
Loosening the wing nut and moving the slide guide
will allow adjustment of the cutting depth.
CAUTIONS
䡬 Leaving the wing nut loosened may result in injury.
Securely tighten the wing nut after adjusting the
cutting depth.
Outer dia. 125mm
Thickness 2.0mm
Hole dia. 22.2mm
–1
7
Page 9

English
INSTALLING DUST COLLECTION HOSE
When cutting a material which generates cutting dust,
use the dust collection hose as follows:
(1) Remove the rubber cap and install the accessory
adaptor. (Fig. 3)
(2) Install the dust collection hose for the power tool
in the accessory adaptor. (Fig. 3)
CAUTION
䡬 Always install a rubber cap on the dust collection
adaptor when the dust collection hose is not used.
INSTALLING/REMOVING DIAMOND WHEEL
1. Installation
(1) Remove the cover (A).
(2) Wipe the cutting dust from the spindle and washers.
(3) Make sure the rotation direction of the diamond
wheel conforms to the direction indicated on the
gear case and install the diamond wheel as shown
in Fig. 1.
(4) Press the lock pin and secure the spindle. Tighten
the wheel nut adequately with the provided wrench.
(Fig. 1)
NOTE
䡬 Always use the provided wrench to secure the wheel
nut.
2. Removal
Remove the wheel nut with the provided wrench
and remove the diamond wheel. (Fig. 1)
CUTTING
1. Cutting procedures (Fig. 4)
(1) Place this tool on the material to be cut and align
the cutting line and the diamond wheel.
The cutting can be performed smoothly if you cut
straight ahead on the cutting line in the initial cut.
(2) Turn on the switch when the diamond wheel is not
touching the material to be cut.
2. Precautions immediately after finishing operation
After switching off the machine, do not put it down
until the depressed center wheel has come to a
complete stop. Apart from avoiding serious accidents,
this precaution will reduce the amount of dust and
swarf sucked into the machine.
CAUTION
䡬 Always check the diamond wheel before starting
work. Never use a diamond wheel which is cracked,
broken or bent.
䡬 Do not apply water or coolant to the diamond
wheel.
䡬 Start cutting only when diamond wheel reaches its
maximum speed.
䡬 If the diamond wheel seizes or there is any abnormal
noise, immediately turn the power off.
䡬 Never use the diamond wheel to cut zigzag or
curved lines. Never use the side surface of the
diamond wheel. Never use to perform inclination
cutting.
䡬 If excessive force is applied to the diamond wheel
to make it align with the cutting line during cutting,
this might not only overload the motor and cause
burn damage but may also overheat the diamond
wheel and shorten the service life.
䡬 Take care not to allow the power cord to come into
contact with the diamond wheel during operation.
䡬 When the work is completed, turn the power off and
disconnect the power plug from the receptacle.
MAINTENANCE AND INSPECTION
1. Inspection the diamond wheel
A worn diamond wheel overloads the motor and
reduces working efficiency. Replace with a new one.
2. Diamond wheel clogging
The rate of wear of the diamond layer cutting edge
will vary depending on the type of material being
cut, the cutting speed, etc. In general, materials
which produce granular cutting particles may scrape
the bodying agent and hasten the wear of the
diamond layer. On the other hand, materials which
produce powdery cutting particles may cause
clogging of the diamond layer which will reduce
cutting efficiency. When clogging occurs, additional
force applied in an attempt to increase cutting speed
will sometime cause sparks to appear around the
circumference of the diamond wheel. In such a case,
stop using the cutter and carefully inspect the cutting
edge by rubbing it with your fingers. If the diamond
layer feels smooth (no roughness or abrasiveness),
it is clogged with dust and must be “dressed”.
For thorough dressing, approximately 5 meters of
slightly accelerated cutting at a depth of 10mm in
a relative soft material which produces granular
cutting particles (such as a cement block or brick)
will restore the cutting effectiveness of the diamond
layer and will extend the service life of the diamond
wheel.
The diamond material is susceptible to high
temperatures and will begin to deteriorate at
approximately 600°C. Higher temperatures will cause
decomposition of the diamond material. Accordingly,
it is important to perform “dressing” as soon as
clogging or sparking occurs.
3. Inspecting the mounting screws
Regularly inspect all mounting screws and ensure
that they are properly tightened. Should any of the
screws be loose, retighten them immediately. Failure
to do so could result in serious hazard.
4. Maintenance of the motor
The motor unit winding is the very “heart” of the
power tool.
Exercise due care to ensure the winding does not
become damaged and/or wet with oil or water.
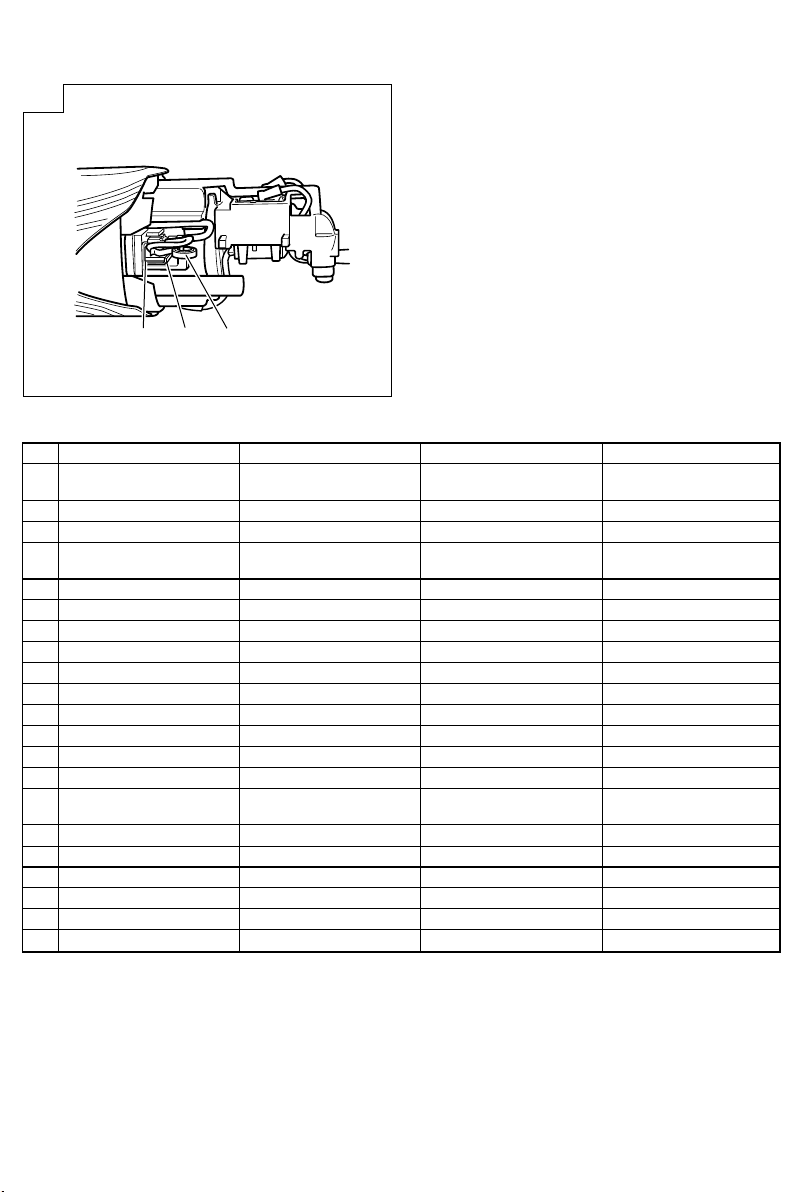
5. Inspecting the carbon brushes (Fig. 5)
The motor employs carbon brushes which are
consumable parts.
When they become worn to or near the “wear
limit”, it could result in motor trouble. When an
auto-stop carbon brush is equipped, the motor will
stop automatically.
At that time, replace both carbon brushes with new
ones which have the same carbon brush numbers
shown in the figure. In addition, always keep carbon
brushes clean and ensure that they slide freely within
the brush holders.
6. Replacing carbon brushes (Fig. 6)
<Disassembly>
(1) Loosen the D4 tapping screw retaining the tail cover
and remove the tail cover.
8
Page 10

English
(2) Use the auxiliary hexagonal wrench or small
screwdriver to pull up the edge of the spring that
is holding down the carbon brush. Remove the edge
of the spring toward the outside of the brush holder.
(3) Remove the end of the pig-tail on the carbon brush
from the terminal section of brush holder and then
remove the carbon brush form the brush holder.
<Assembly>
(1) Insert the end of the pig-tail of the carbon brush
in the terminal section of brush holder.
(2) Insert the carbon brush in the brush holder.
(3) Use the auxiliary hexagonal wrench or small
screwdriver to return the edge of the spring to the
head of the carbon brush.
(4) Mount the tail cover and tighten the D4 tapping
screw.
7. Service parts list
A: Item No.
B: Code No.
C: No. Used
D: Remarks
CAUTION
Repair, modification and inspection of Hitachi Power
Tools must be carried out by an Hitachi Authorized
Service Center.
This Parts List will be helpful if presented with the
tool to the Hitachi Authorized Service Center when
requesting repair or other maintenance.
In the operation and maintenance of power tools,
the safety regulations and standards prescribed in
each country must be observed.
MODIFICATIONS
Hitachi Power Tools are constantly being improved
and modified to incorporate the latest technological
advancements.
Accordingly, some parts (i.e. code numbers and/or
design) may be changed without prior notice.
Information concerning airborne noise and vibration
The measured values were determined according to
EN60745 and declared in accordance with ISO 4871.
Measured A-weighted sound power level: 106 dB (A).
Measured A-weighted sound pressure level: 95 dB (A).
Uncertainty KpA: 3 dB (A).
Wear ear protection.
Vibration total values (triax vector sum) determined
according to EN60745.
Vibration emission value
Uncertainty K = 1.5 m/s
WARNING
䡬 The vibration emission value during actual use of
the power tool can differ from the declared value
depending on the ways in which the tool is used.
䡬 To identify the safety measures to protect the
operator that are based on an estimation of exposure
in the actual conditions of use (taking account of
all parts of the operating cycle such as the times
when the tool is switched off and when it is running
idle in addition to the trigger time).
ah = 4.2 m/s
2
2
GUARANTEE
We guarantee Hitachi Power Tools in accordance with
statutory/country specific regulation. This guarantee does
not cover defects or damage due to misuse, abuse, or
normal wear and tear. In case of complaint, please send
the Power Tool, undismantled, with the GUARANTEE
CERTIFICATE found at the end of this Handling instruction,
to a Hitachi Authorized Service Center.
NOTE
Due to HITACHI’s continuing program of research and
development, the specifications herein are subject to
change without prior notice.
9
Page 11

Deutsch
ALLGEMEINE SICHERHEITSHINWEISE FÜR
ELEKTROGERÄTE
WARNUNG
Lesen Sie sämtliche Sicherheitshinweise und
Anweisungen durch
Wenn die Warnungen und Anweisungen nicht befolgt
werden, kann es zu Stromschlag, Brand und/oder
ernsthaften Verletzungen kommen.
Bitte bewahren Sie alle Warnhinweise und Anweisungen
zum späteren Nachschlagen auf.
Der Begriff „Elektrowerkzeug“ bezieht sich in den
Warnhinweisen auf Elektrowerkzeuge mit Netz(schnurgebunden) oder Akkubetrieb (schnurlos).
1) Sicherheit im Arbeitsbereich
a) Sorgen Sie für einen sauberen und gut
ausgeleuchteten Arbeitsbereich.
Zugestellte oder dunkle Bereiche ziehen Unfälle
förmlich an.
b) Verwenden Sie Elektrowerkzeuge niemals an
Orten, an denen Explosionsgefahr besteht – zum
Beispiel in der Nähe von leicht entflammbaren
Flüssigkeiten, Gasen oder Stäuben.
Bei der Arbeit mit Elektrowerkzeugen kann es zu
Funkenbildung kommen, wodurch sich Stäube
oder Dämpfe entzünden können.
c) Sorgen Sie bei der Arbeit mit Elektrowerkzeugen
dafür, dass sich keine Zuschauer (insbesondere
Kinder) in der Nähe befinden.
Wenn Sie abgelenkt werden, können Sie die
Kontrolle über das Werkzeug verlieren.
2) Elektrische Sicherheit
a) Elektrowerkzeuge müssen mit passender
Stromversorgung betrieben werden.
Nehmen Sie niemals irgendwelche Änderungen
am Anschlussstecker vor.
Verwenden Sie bei Elektrowerkzeugen mit
Schutzkontakt (geerdet) niemals Adapterstecker.
Stecker im Originalzustand und passende
Steckdosen reduzieren das Stromschlagrisiko.
b) Vermeiden Sie Körperkontakt mit geerdeten
Gegenständen wie Rohrleitungen, Heizungen,
Herden oder Kühlschränken.
Bei Körperkontakt mit geerdeten Gegenständen
besteht ein erhöhtes Stromschlagrisiko.
c) Setzen Sie Elektrowerkzeuge niemals Regen oder
sonstiger Feuchtigkeit aus.
Wenn Flüssigkeiten in ein Elektrowerkzeug
eindringen, erhöht sich das Stromschlagrisiko.
d) Verwenden Sie die Anschlussschnur nicht
missbräuchlich. Tragen Sie das Elektrowerkzeug
niemals an der Anschlussschnur, ziehen Sie es
nicht damit heran und ziehen Sie den Stecker
nicht an der Anschlussschnur aus der Steckdose.
Halten Sie die Anschlussschnur von Hitzequellen,
Öl, scharfen Kanten und beweglichen Teilen fern.
Beschädigte oder verdrehte Anschlussschnüre
erhöhen das Stromschlagrisiko.
e) Wenn Sie ein Elektrowerkzeug im Freien
benutzen, verwenden Sie ein für den
Außeneinsatz geeignetes Verlängerungskabel.
Ein für den Außeneinsatz geeignetes Kabel
vermindert das Stromschlagrisiko.
f) Falls sich der Betrieb des Elektrowerkzeuges in
feuchter Umgebung nicht vermeiden lässt,
verwenden Sie eine Stromversorgung mit
Fehlerstromschutzeinrichtung (Residual Current
Device, RCD).
Durch den Einsatz einer
Fehlerstromschutzeinrichtung wird das Risiko
eines elektrischen Schlages reduziert.
3) Persönliche Sicherheit
a) Bleiben Sie wachsam, achten Sie auf das, was
Sie tun, und setzen Sie Ihren Verstand ein, wenn
Sie mit Elektrowerkzeugen arbeiten.
Benutzen Sie keine Elektrowerkzeuge, wenn Sie
müde sind oder unter Einfluss von Drogen,
Alkohol oder Medikamenten stehen.
Bei der Arbeit mit Elektrowerkzeugen können
bereits kurze Phasen der Unaufmerksamkeit zu
schweren Verletzungen führen.
b) Benutzen Sie eine persönliche Schutzausrüstung.
Tragen Sie immer einen Augenschutz.
Schutzausrüstung wie Staubmaske, rutschsichere
Sicherheitsschuhe, Schutzhelm und Gehörschutz
senken das Verletzungsrisiko bei angemessenem
Einsatz.
c) Vermeiden Sie unbeabsichtigten Anlauf. Achten
Sie darauf, dass sich der Schalter in der Aus(Off-) Position befindet, ehe Sie das Gerät mit
der Stromversorgung und/oder
Batteriestromversorgung verbinden, es aufheben
oder herumtragen.
Das Herumtragen von Elektrowerkzeugen mit dem
Finger am Schalter oder das Herstellen der
Stromversorgung bei betätigtem Schalter zieht
Unfälle regelrecht an.
d) Entfernen Sie sämtliche Einstellwerkzeuge
(Einstellschlüssel), ehe Sie das Elektrowerkzeug
einschalten.
Ein an einem beweglichen Teil des Elektrowerkzeugs
angebrachter Schlüssel kann zu Verletzungen führen.
e) Sorgen Sie für einen festen Stand. Achten Sie
jederzeit darauf, sicher zu stehen und das
Gleichgewicht zu bewahren.
Dadurch haben Sie das Elektrowerkzeug in
unerwarteten Situationen besser im Griff.
f) Kleiden Sie sich richtig. Tragen Sie keine lose
Kleidung oder Schmuck. Halten Sie Haar, Kleidung
und Handschuhe von beweglichen Teilen fern.
Lose Kleidung, Schmuck oder langes Haar kann
von beweglichen Teilen erfasst werden.
g) Wenn Anschlüsse für Staubabsaug- und -
sammelvorrichtungen vorhanden sind, sorgen Sie
dafür, dass diese richtig angeschlossen und
eingesetzt werden.
Durch Entfernen des Staubes können
staubbezogene Gefahren vermindert werden.
4) Einsatz und Pflege von Elektrowerkzeugen
a) Überanspruchen Sie Elektrowerkzeuge nicht.
Benutzen Sie das richtige Elektrowerkzeug für
Ihren Einsatzzweck.
Das richtige Elektrowerkzeug erledigt seine Arbeit
bei bestimmungsgemäßem Einsatz besser und
sicherer.
b) Benutzen Sie das Elektrowerkzeug nicht, wenn es
sich nicht am Schalter ein- und ausschalten lässt.
Jedes Elektrowerkzeug, das nicht mit dem
Schalter betätigt werden kann, stellt eine Gefahr
dar und muss repariert werden.
c) Stecken Sie den Stecker der Stromversorgung
oder Batteriestromversorgung vom Gerät ab, ehe
Sie Einstellarbeiten vornehmen, Zubehörteile
tauschen oder das Elektrowerkzeug verstauen.
Solche präventiven Sicherheitsmaßnahmen
verhindern den unbeabsichtigten Anlauf des
Elektrowerkzeugs und die damit verbundenen
Gefahren.
10
Page 12

Deutsch
d) Lagern Sie nicht benutzte Elektrowerkzeuge
außerhalb der Reichweite von Kindern, lassen
Sie nicht zu, dass Personen das Elektrowerkzeug
bedienen, die nicht mit dem Werkzeug selbst
und/oder diesen Anweisungen vertraut sind.
Elektrowerkzeuge in ungeschulten Händen sind
gefährlich.
e) Halten Sie Elektrowerkzeuge in Stand. Prüfen
Sie auf Fehlausrichtungen, sicheren Halt und
Leichtgängigkeit beweglicher Teile,
Beschädigungen von Teilen und auf jegliche
andere Zustände, die sich auf den Betrieb des
Elektrowerkzeugs auswirken können.
Bei Beschädigungen lassen Sie das
Elektrowerkzeug reparieren, ehe Sie es benutzen.
Viele Unfälle mit Elektrowerkzeugen sind auf
schlechte Wartung zurückzuführen.
f) Halten Sie Schneidwerkzeuge scharf und sauber.
Richtig gewartete Schneidwerkzeuge mit scharfen
Schneidkanten bleiben weniger häufig hängen
und sind einfacher zu beherrschen.
g) Benutzen Sie Elektrowerkzeuge, Zubehör,
Werkzeugspitzen und Ähnliches in
Übereinstimmung mit diesen Anweisungen –
beachten Sie dabei die jeweiligen
Arbeitsbedingungen und die Art und Weise der
auszuführenden Arbeiten.
Der Gebrauch des Elektrowerkzeuges für andere
als die vorgesehenen Anwendungen kann zu
gefährlichen Situationen führen.
5) Service
a) Lassen Sie Elektrowerkzeuge durch qualifizierte
Fachkräfte und unter Einsatz passender,
zugelassener Originalteile warten.
Dies sorgt dafür, dass die Sicherheit des
Elektrowerkzeugs nicht beeinträchtigt wird.
TECHNISCHE DATEN
VORSICHT
Von Kindern und gebrechlichen Personen fernhalten.
Werkzeuge sollten bei Nichtgebrauch außerhalb der
Reichweite von Kindern und gebrechlichen Personen
aufbewahrt werden.
VORSICHTSMASSNAHMEN BEI
VERWENDUNG DER STEINSÄGE
1. Niemals andere Werkzeuge als die vom Hersteller
festgelegte Diamantschleifscheibe anbringen.
Beim Betrieb der Maschine mit dem Werkzeug kein
Wasser zuführen.
2. Vor Inbetriebnahme der Maschine immer die
Diamantschleifscheibe überprüfen. Nicht verwenden,
wenn sie gerissen, gebrochen oder verbogen ist. Die
Maschine vorsichtig starten und auf Unregelmäßigkeiten
achten.
3. Wenn die Diamantschleifscheibe zum Schneiden von
Metall verwendet wird, wird ihre Lebensdauer verkürzt,
oder sie kann brechen. Daher die Diamantschleifscheibe
niemals zum Schneiden von Metall verwenden.
4. Nur schneiden, wenn die Maschine die maximale
Drehgeschwindigkeit erreicht hat.
5. Durch zu starke Belastung wird der Motor überladen.
Die Schneidtiefe sollte immer 5 mm oder weniger
betragen.
6. Die Maschine nicht zum Schneiden von Asbest
verwenden.
7. Wenn beim Betrieb der Trennscheibe Funken austreten,
den Staubsammleradapter mit einer Gummikappe
abdecken und eine Schutzbrille tragen.
Spannung (je nach Gebiet)* (110V, 230V)
Leistungsaufnahme* 1300W
Leerlaufdrehzahl 11000 min
Abmessungen der Diamantschleifscheibe
Max. Schneidtiefe 33mm
Gewicht (ohne Kabel und Diamantschleifscheibe) 2,9kg
*Vergessen Sie nicht, die Produktangaben auf dem Typenschild zu überprüfen, da sich diese je nach Verkaufsgebiet ändern.
STANDARDZUBEHÖR
(1) Schlüssel .................................................................... 1
(2) Adapter ....................................................................... 1
(3) Handgriff .................................................................... 1
Das Standardzubehör kann ohne vorherige
Bekanntmachung jederzeit geändert werden.
VOR DER INBETRIEBNAHME
1. Netzspannung
2. Netzschalter
ANWENDUNGSGEBIETE
䡬 Schneiden oder Ritzen von Beton
䡬 Schneiden oder Ritzen von Fliesen
䡬 Schneiden oder Ritzen von Stein
䡬 Schneiden oder Ritzen von Dachziegel
11
3. Verlängerungskabel
Außendurchmesser 125mm
Dicke 2,0mm
Lochdurchmesser 22,2mm
Prüfen, ob die zu verwendende Netzspannung der
Angabe auf dem Typenschild entspricht.
Prüfen, ob der Netzschalter auf ,,AUS’’ steht. Wenn
der Stecker an das Netz angeschlossen wird,
während der Schalter auf ,,EIN’’ steht, beginnt das
Werkzeug sofort zu laufen, was gefährlich wäre.
Wenn der Arbeitsbereich nicht in der Nähe des
Netzanschlusses liegt, ist ein Verlängerungskabel
ausreichenden Querschnitts und ausreichender
Nennleistung zu verwenden. Das Verlängerungskabel
sollte so kurz wie möglich gehalten werden.
–1
Page 13

Deutsch
4. Überprüfung und Installation der Diamatschleifscheibe
Überprüfen Sie, ob die Diamatschleifscheibe den
Spezifikationen entspricht und nicht gerissen,
gebrochen oder verbogen ist. Überprüfen Sie auch,
ob die Diamantschleifscheibe sicher installiert ist.
Beziehen Sie sich für die Installation auf
,,Installation/Ausbauen der Diamantschleifscheibe’’.
5. Anbringen und Einstellen der Staubsammelabdeckung
(Abb. 1)
Die Staubsammelabdeckung ist eine Schutzvorrichtung,
durch die Schaden verhindert werden soll, wenn die
Diamantschleifscheibe während des Betriebs
zerbrechen sollte. Es ist darauf zu achten, dass die
Abdeckung ordnungsgemäß angebracht und befestigt
ist, ehe mit der Schneidarbeit begonnen wird. Wenn
die Einstellschraube gelockert wird, kann die
Staubsammelabdeckung gedreht und zum Erreichen
einer maximalen Betriebsleistung auf einen
gewünschten Winkel eingestellt werden. Stellen Sie
sicher, dass die Einstellschraube nach dem Anpassen
der Staubsammelabdeckung fest angezogen wird.
6. Überprüfen der Sperrstiftmechanik
Es ist zu überprüfen, ob die Sperrstift gelöst ist,
indem zwei-oder dreimal vor Einschalten des Gerätes
auf die Druckknopf gedrückt wird (siehe Abb. 1).
7. Schneidtiefeneinstellung (Abb. 2)
Die Flügelmutter lässt sich durch Herunterdrücken
lösen und durch Nachobendrücken festziehen.
Durch Lösen der Flügelmutter und Verschieben der
Gleitschiene kann die Schneidtiefe eingestellt werden.
VORSICHT
䡬 Eine gelöste Flügelmutter kann zu Verletzungen
führen. Ziehen Sie die Flügelmutter nach der
Einstellung der Schneidtiefe fest an.
INSTALLATION DES STAUBABSCHEIDESCHLAUCHS
Beim Bearbeiten eines Materials, das Schneidstaub
abgibt, den Staubabscheideschlauch wie folgt benutzen:
(1) Die Gummikappe entfernen und den
Zubehöradapter anbringen. (Abb. 3)
(2) Den Schlauch des Werkzeugmaschinen-
Staubabscheiders am Zubehöradapter anbringen.
(Abb. 3)
VORSICHT
䡬 Immer eine Gummikappe auf dem Staubsammleradapter
anbringen, wenn der Staubsammelschlauch nicht
verwendet wird.
INSTALLATION/AUSBAUEN DER
DIAMANTSCHLEIFSCHEIBE
1. Installation
(1) Entfernen Sie die Abdeckung (A)
(2) Schneidstaub von der Spindel und vom
Unterlegring abwischen.
(3) Sicherstellen, daß die Drehrichtung der
Diamantschleifscheibe der auf dem Getriebekasten
gezeigten Richtung entspricht, und die Einheit wie
in Abb. 1 gezeigt installieren.
(4) Den Verriegelungsstift einschieben und die Spindel
sichern. Die Schleifscheibenmutter ausreichend mit
dem Schraubenschlüssel des Zubehörs anziehen.
(Abb. 1)
ACHTUNG
䡬 Zum Anziehen der Schleifscheibenmutter immer
den mitgelieferten Schlüssel verwenden.
2. Ausbauen
Die Schleifscheibenmutter mit dem mitgelieferten
Schlüssel entfernen und die Diamantschleifscheibe
ausbauen. (Abb. 1)
SCHNEIDEN
1. Schneidverfahren (Abb. 4)
(1) Das Gerät auf das zu schneidende Material setzen
und die Diamantschleifscheibe auf die Schnittlinie
ausrichten.
Schneiden kann glatt erfolgen, wenn Sie beim
Anfangsschnitt gerade entlang der Schnittlinie
schneiden.
(2) Den Hauptschalter des Gerätes einschalten während
die Diamantschleifscheibe das zu schneidende
Material nicht berührt.
2. Vorsichtsmaßnahmen unmittelbar nach Beendigung
der Arbeit
Nach dem Ausschalten darf die Maschine erst
abgelegt werden, wenn die Schleifscheibe völlig zum
Stillstand gekommen ist. Abgesehen vom Vermeiden
ernsthafter Unfälle wird durch diese Vorsichtsma
nahme vermieden, daß Staub und Späne in die
Maschine gesaugt werden.
VORSICHT
䡬 Vor der Arbeit immer die Diamantschleifscheibe
überprüfen. Niemals eine Diamantschleifscheibe
verwenden, die gerissen, gebrochen oder verbogen
ist.
䡬 Der Diamantschleifscheibe kein Wasser oder
Kühlmittel zuführen.
䡬 Mit dem Schneiden erst beginnen, wenn die
Diamantschleifscheibe die maximale Geschwindigkeit
erreicht hat.
䡬 Wenn die Diamantschleifscheibe sich festfrißt oder
unnormale Geräusche auftreten, die Maschine
sofort ausschalten.
䡬 Die Diamantschleifscheibe niemals für Zick-Zack-
Linien oder Kurven verwenden, niemals die
Seitenflächen der Diamantschleifscheibe verwenden
und niemals die Diamatschleifscheibe für schräge
Schnitte verwenden.
䡬 Wenn beim Schneiden übermäßige Kraft auf die
Diamantschleifscheibe angewendet wird, um sie auf
die Schnittlinie auszurichten, so kann dies nicht nur
den Motor überlasten und Brandbeschädigung
verursachen, sondern auch die Diamantschleifscheibe
überhitzen und die Standzeit verringern.
䡬 Darauf achten, daß das Netzkabel beim Betrieb nicht
mit der Diamatschleifscheibe in Kontakt kommt.
䡬 Nach Beendigung der Arbeit die Maschine
ausschalten und das Netzkabel aus der Steckdose
ziehen.
WARTUNG UND INSPEKTION
1. Inspektion der Diamantschleifscheibe
Eine abgenutze Diamantschleifscheibe überlädt den
Motor und reduziert die Arbeitsleistung. Die
Diamantschleifscheibe durch eine neue ersetzen.
12
Page 14

Deutsch
2. Diamantscheiben-Verstopfung
Die Verschleißrate der DiamantbeschichtungsSchneidscheibe hängt von dem Typ des verwendeten
Materials, der Schneidgeschwindigkeit usw. ab.
Grundsätzlich neigen Materialen, die granulierte
Schneidpartikel produzieren, dazu, das Bindemittel
abzureiben und so den Verschleiß der
Diamantbeschichtung zu beschleunigen. Andererseits
können Materialien, die pulverförmige Schneidpartikel
produzieren, Verstopfung der Diamantschicht bewirken
und so die Schneideffizienz reduzieren. Wenn solche
Verstopfung auftritt, bewirkt der Einsatz von mehr
Kraft beim Versuch, die Schneidgeschwindigkeit wieder
zu erhöhen, daß vom Rand der Schneidscheibe aus
Funken fliegen. In diesem Fall das Werkzeug stoppen
und sorgfältig die Schneidkante durch Reiben mit dem
Finger insprizieren. Wenn die Diamantschicht sich glatt
anfühlt (kein rauher, reibender Eindruck), ist sie mit
Staub verstopft und muß ,,abgerichtet’’ werden.
Zum gründlichen Abrichten etwa 5m leicht
beschleunigtes Schneiden mit einer Schneidtiefe von
10mm in relativ weichem Material durchführen, welches
granulare Schneidpartikel produziert (wie Zementblöcke
oder Ziegel). Dadurch wird die Schneidwirkung der
Diamantbeschichtung wieder hergestellt und die
Lebensdauer der Diamantscheibe erhöht.
Diamantmaterial ist hohen Temperaturen gegenüber
anfällig und beginnt, bei etwa 600°C seine Wirkung
zu verlieren. Noch höhere Temperaturen können das
Diamantmaterial zerstören. Deshalb ist es wichtig,
das ,,Abrichten’’ so schnell wie möglich durchzuführen,
wenn Verstopfung oder Funkenflug auftreten.
3. Inspektion der Befestigungsschrauben
Alle Befestigungsschrauben werden regelmäßig
inspiziert und geprüft, ob sie gut angezogen sind.
Wenn sich eine der Schrauben lockert, muß sie
sofort wieder angezogen werden. Geschieht das
nicht, kann das zu erheblichen Gefahren führen.
4. Wartung des Motors
Die Motorwicklung ist das ,,Herz’’ des
Elektrowerkzeugs.
Daher ist besonders sorgfältig darauf zu achten,
daß die Wicklung nicht beschädigt wird und/oder
mit Öl oder Wasser in Berührung kommt.
5. Inspektion der Kohlebürsten (Abb. 5)
Im Motor sind Kohlebürsten verwendet, die
Verbrauchsteile sind.
Wenn sie bis zur „Verschleißgrenze” oder bis in die
Nähe dieser Grenze abgenutzt werden, kann dies
Motorstörungen verursachen. Wenn der Motor mit
einer Auto-Stop-Kohlebürste ausgestattet ist, wird er
automatisch anhalten.
Beide Kohlebürsten sollen dann durch neue ersetzt
werden, die dieselbe Bürstennummer tragen, wie
auf der Abbildung. Darüber hinaus müssen die
Kohlebürsten immer sauber gehalten werden und
müssen sich in der Bürstenhalterung frei bewegen
können.
6. Austausch einer Kohlebürste (Abb. 6)
<Zerlegen>
(1) Die D4-Schneidschraube an der hinteren Abdeckung
herausschrauben und die hintere Abdeckung
entfernen.
(2) Mit dem mitgelieferten Sechskantschlüssel order
einem Schraubenzieher die Kante der Feder
hochziehen, die die Kohlenbürste nach unten drückt.
Die kante der Feder zur Außenseite des
Kohlebürstenhalters hin herausziehen.
(3) Die Kente der Anschluß litze an der Kohlebürste von
dem Anschlußteil des Bürstenhalters entfernen und
die Kohlebürste aus dem Bürstenhalter nehmen.
<Baugruppe>
(1) Das Ende der Kohlenbürsten-Anschlußlitze in den
Anschlußteil des Bürstenhalfers einstekken.
(2) Die Kohlebürste in den Bürstenhalter einsetzen.
(3) Die Kante der Feder mit dem mitgelieferten
Sechskantschlüssel oder einem Schraubenzieher
wieder zurück zum Kohlebürstenkopf drücken.
(4) Die hintere Abdeckung wieder ansetzen und mit den
D4-Schneidschrauben anmontieren.
7. Liste der Wartungsteile
A: Punkt Nr.
B: Code Nr.
C: Verwendete Anzahl
D: Bemerkungen
ACHTUNG
Reparatur, Modifikation und Inspektion von HitachiElektrowerkzeugen müssen durch ein autorisiertes
Hitachi-Kundendienstzentrum durchgeführt werden.
Diese Teileliste ist hilfreich, wenn sie dem
autorisierten Hitachi-Kundendienstzentrum
zusammen mit dem Werkzeug für Reparatur oder
Wartung ausgehändigt wird.
Bei Betrieb und Wartung von Elektrowerkzeugen
müssen die Sicherheitsvorschriften und Normen
beachtet werden.
MODIFIKATIONEN
Hitachi-Elektrowerkzeuge werden fortwährend
verbessert und modifiziert, um die neuesten
technischen Fortschritte einzubauen.
Dementsprechend ist es möglich, daß einige Teile
(z.B. Codenummern bzw. Entwurf) ohne vorherige
Benachrichtigung geändert werden.
GARANTIE
Auf Hitachi-Elektrowerkzeuge gewähren wir eine Garantie
unter Zugrundelegung der jeweils geltenden gesetzlichen
und landesspezifischen Bedingungen. Dieses Garantie
erstreckt sich nicht auf Gehäusedefekte und nicht auf
Schäden, die auf Missbrauch, bestimmungswidrigen
Einsatz oder normalen Verschleiß zurückzuführen sind.
ANMERKU
Aufgrund des ständigen Forschungs- und
Entwicklungsprogramms von HITACHI sind Änderungen
der hier gemachten technischen Angaben nicht
ausgeschlossen.
13
Page 15

Information über Betriebslärm und Vibration
Die gemessenen Werte wurden entsprechend EN60745
bestimmt und in Übereinstimmung mit ISO 4871
ausgewiesen.
Gemessener A-gewichteter Schallpegel: 106 dB (A)
Gemessener A-gewichteter Schalldruck: 95 dB (A)
Messunsicherheit KpA: 3 dB (A)
Bei der Arbeit immer einen Ohrenschutz tragen.
Gesamtvibrationswerte (3-Achsen-Vektorsumme),
bestimmt gemäß EN60745.
Vibrationsemissionswert
Messunsicherheit K = 1,5 m/s
WARNUNG
䡬 Der Vibrationsemissionswert während der
tatsächlichen Benutzung des Elektrowerkzeugs kann
von dem deklarierten Wert abweichen, abhängig
davon, wie das Werkzeug verwendet wird.
䡬 Zur Festlegung der Sicherheitsmaßnahmen zum
Schutz des Bedieners, die auf einer
Expositionseinschätzung unter den tatsächlichen
Benutzungsbedingungen beruhen (unter
Berücksichtigung aller Bereiche des Betriebszyklus,
darunter neben der Triggerzeit auch die Zeiten, in
denen das Werkzeug ausgeschaltet ist oder im
Leerlaufbetrieb läuft).
ah = 4,2 m/s
2
2
Deutsch
14
Page 16

∂ППЛУИО¿
°∂¡π∫∂™ ¶ƒ√∂π¢√¶√π∏™∂π™ ∞™º∞§∂π∞™
∏§∂∫∆ƒπ∫√À ∂ƒ°∞§∂π√À
¶ƒ√™√Ã∏
¢È·‚¿˙ÂÙ fiϘ ÙȘ ÚÔÂȉÔÔÈ‹ÛÂȘ ·ÛÊ·Ï›·˜ Î·È fiϘ
ÙȘ Ô‰ËÁ›Â˜.
Η µη τήρηση των προειδοποιήσεων και οδηγιών µπορεί
να προκαλέσει ηλεκτροπληξία, πυρκαγιά και/ή σοβαρ
τραυµατισµ.
º˘П¿НЩВ fiПВ˜ ЩИ˜ ЪФВИ‰ФФИ‹ЫВИ˜ О·И ЩИ˜ Ф‰ЛБ›В˜ БИ·
МВППФУЩИО‹ ·У·КФЪ¿.
Ο ρος "ηλεκτρικ εργαλείο" στις προειδοποιήσεις
αναφέρεται στο ηλεκτρικ εργαλείο (µε καλώδιο) που
λειτουργεί στους αγωγούς ή στο ηλεκτρικ εργαλείο
που λειτουργεί στη µπαταρία (χωρίς καλώδιο).
1) ∞ÛÊ¿ÏÂÈ· ¯ÒÚÔ˘ ÂÚÁ·Û›·˜
a) ¢È·ÙËÚ›Ù ÙÔ ¯ÒÚÔ ÂÚÁ·Û›·˜ ηı·Úfi Î·È Î·Ï¿
ʈÙÈṲ̂ÓÔ.
Σε ακατάστατες ή σκοτεινές περιοχές µπορεί να
προκληθούν ατυχήµατα.
b) ªЛУ ¯ЪЛЫИМФФИВ›ЩВ Щ· ЛПВОЩЪИО¿ ВЪБ·ПВ›· ЫВ
ВЪИ‚¿ППФУ, ЫЩФ ФФ›Ф МФЪВ› У· ЪФОПЛıВ› ¤ОЪЛНЛ,
fiˆ˜ ·ЪФ˘Ы›· В‡КПВОЩˆУ ˘БЪТУ, ·ВЪ›ˆУ ‹ ЫОfiУЛ˜.
Τα ηλεκτρικά εργαλεία δηµιουργούν σπινθήρες, οι
οποίοι µπορεί να αναφλέξουν τη σκνη ή τον καπν.
c) ∫Ú·Ù‹ÛÙ ٷ ·È‰È¿ Î·È ÙÔ˘˜ ·Ú¢ÚÈÛÎfiÌÂÓÔ˘˜
М·ОЪИ¿ fiЩ·У ¯ЪЛЫИМФФИВ›ЩВ ¤У· ЛПВОЩЪИОfi ВЪБ·ПВ›Ф.
Αν αποσπαστεί η προσοχή σας, υπάρχει κίνδυνος
να χάσετε τον έλεγχο.
2) ∏ПВОЩЪИО‹ ·ЫК¿ПВИ·
a) ∆· КИ˜ ЩˆУ ЛПВОЩЪИОТУ ВЪБ·ПВ›ˆУ Ъ¤ВИ У· В›У·И
О·Щ¿ППЛП· БИ· ЩИ˜ Ъ›˙В˜.
ªЛУ ЩЪФФФИ‹ЫВЩВ ФЩ¤ ЩФ КИ˜ МВ ФФИФУ‰‹ФЩВ
ЩЪfiФ.
ªЛ ¯ЪЛЫИМФФИВ›ЩВ КИ˜ ЪФЫ·ЪМФБ‹˜ МВ БВИˆМ¤У·
ЛПВОЩЪИО¿ ВЪБ·ПВ›·.
Τα µη τροποποιηµένα φις και οι κατάλληλες
πρίζες µειώνουν τον κίνδυνο ηλεκτροπληξίας.
b) ∞ÔʇÁÂÙ ÙË ÛˆÌ·ÙÈ΋ ·ʋ Ì ÁÂȈ̤Ó˜
ВИК¿УВИВ˜ fiˆ˜ ЫˆП‹УВ˜, ıВЪМ¿ЫЩЪВ˜, М·БВИЪИО¤˜
Ы˘ЫОВ˘¤˜ О·И „˘БВ›·.
Υπάρχει αυξηµένος κίνδυνος ηλεκτροπληξίας
ταν το σώµα σας είναι γειωµένο.
c) ªЛУ ВОı¤ЩВЩВ Щ· ЛПВОЩЪИО¿ ВЪБ·ПВ›· ЫЩЛ ‚ЪФ¯‹ ‹
ÛÂ Û˘Óı‹Î˜ ˘ÁÚ·Û›·˜.
Το νερ που εισέρχεται σε ένα ηλεκτρικ
εργαλείο αυξάνει τον κίνδυνο ηλεκτροπληξίας.
d) ªЛУ ·ЫОВ›ЩВ ‰‡У·МЛ ЫЩФ О·ПТ‰ИФ. ªЛ ¯ЪЛЫИМФФИВ›ЩВ
ФЩ¤ ЩФ О·ПТ‰ИФ БИ· У· МВЩ·К¤ЪВЩВ, У· ЩЪ·‚‹НВЩВ ‹
У· ‚Б¿ПВЩВ ·fi ЩЛУ Ъ›˙· ЩФ ЛПВОЩЪИОfi ВЪБ·ПВ›Ф.
∫Ъ·Щ‹ЫЩВ ЩФ О·ПТ‰ИФ М·ОЪИ¿ ·fi ıВЪМfiЩЛЩ·, П¿‰И,
ОФКЩВЪ¤˜ БˆУ›В˜ О·И ОИУФ‡МВУ· М¤ЪЛ.
Τα κατεστραµµένα ή µπερδεµένα καλώδια
αυξάνουν τον κίνδυνο ηλεκτροπληξίας.
e) ŸЩ·У ¯ЪЛЫИМФФИВ›ЩВ ЩФ ВЪБ·ПВ›Ф ЫВ ВНˆЩВЪИОfi
¯ТЪФ, ¯ЪЛЫИМФФИ‹ЫЩВ О·ПТ‰ИФ ЪФ¤ОЩ·ЫЛ˜ Ф˘
ЪФФЪ›˙ВЩ·И БИ· ¯Ъ‹ЫЛ ЫВ ВНˆЩВЪИОfi ¯ТЪФ.
Η χρήση ενς καλωδίου κατάλληλου για εξωτερικ
χώρο µειώνει τον κίνδυνο ηλεκτροπληξίας.
f) ∞У В›У·И ·У·fiКВ˘ОЩЛ Л ПВИЩФ˘ЪБ›· ВУfi˜
ЛПВОЩЪИОФ‡ ВЪБ·ПВ›Ф˘ ЫВ ¯ТЪФ МВ ˘БЪ·Ы›·,
¯ЪЛЫИМФФИВ›ЩВ ‰И¿Щ·НЛ ЪФЫЩ·Ы›·˜ ЪВ‡М·ЩФ˜
‰И·ЪЪФ‹˜ (RCD).
Η χρήση της RCD µειώνει τον κίνδυνο
ηλεκτροπληξίας.
15
3) ¶ЪФЫˆИО‹ ·ЫК¿ПВИ·
a) ¡· В›ЫЩВ ЫВ ВЩФИМfiЩЛЩ·, У· ‚П¤ВЩВ ·˘Щfi Ф˘ О¿УВЩВ
О·И У· ¯ЪЛЫИМФФИВ›ЩВ ЩЛУ ОФИУ‹ ПФБИО‹ fiЩ·У
¯ЪЛЫИМФФИВ›ЩВ ¤У· ЛПВОЩЪИОfi ВЪБ·ПВ›Ф.
ªЛ ¯ЪЛЫИМФФИВ›ЩВ ЛПВОЩЪИО¿ ВЪБ·ПВ›· fiЩ·У В›ЫЩВ
ОФ˘Ъ·ЫМ¤УФИ ‹ ˘fi ЩЛУ В‹ЪВИ· У·ЪОˆЩИОТУ
Ф˘ЫИТУ, ФИУФУВ‡М·ЩФ˜ ‹ К·ЪМ¿ОˆУ.
Μια στιγµή απροσεξίας κατά τη χρήση ενς
ηλεκτρικού εργαλείου µπορεί να προκαλέσει
σοβαρ προσωπικ τραυµατισµ.
b) ГЪЛЫИМФФИВ›ЩВ ЪФЫˆИОfi ЪФЫЩ·ЩВ˘ЩИОfi
ÂÍÔÏÈÛÌfi. ºÔÚ¿ÙÂ ¿ÓÙ· ÚÔÛÙ·Û›· ÁÈ· Ù· Ì¿ÙÈ·.
Ο προστατευτικς εξοπλισµς, πως µάσκα για
τη σκνη, αντιολισθητικά παπούτσια, σκληρ
καπέλο ή προστασία για τα αυτιά, που
χρησιµοποιείται για ανάλογες συνθήκες µπορεί
να µειώσει τους τραυµατισµούς.
c) ¶ÚÔÏ·Ì‚¿ÓÂÙÂ Ù˘¯fiÓ ·ÎÔ‡ÛÈ· ÂÎΛÓËÛË.
µÂ‚·Èˆı›Ù fiÙÈ Ô ‰È·ÎfiÙ˘ Â›Ó·È Û ı¤ÛË
·ВУВЪБФФ›ЛЫЛ˜ ЪИУ Ы˘У‰¤ЫВЩВ ЩЛ Ы˘ЫОВ˘‹ МВ
ЛБ‹ ЪВ‡М·ЩФ˜ О·И/‹ ЩЛ ı‹ОЛ ЩЛ˜ М·Щ·Ъ›·˜, ЪИУ
ЫЛОТЫВЩВ ‹ МВЩ·К¤ЪВЩВ ЩФ ВЪБ·ПВ›Ф.
Η µεταφορά ηλεκτρικού εργαλείου µε τα δάχτυλά
σας στο διακπτη ή η ηλεκτροδτηση ηλεκτρικού
εργαλείου µε ενεργοποιηµένο το διακπτη
µπορεί να προκαλέσουν ατυχήµατα.
d) ¡· ·Ê·ÈÚ›ÙÂ Ù˘¯fiÓ ÎÏÂȉȿ Ú˘ıÌÈ˙fiÌÂÓÔ˘
·УФ›БМ·ЩФ˜ ‹ Щ· ·П¿ ОПВИ‰И¿ ЪИУ ı¤ЫВЩВ ЫВ
ПВИЩФ˘ЪБ›· ЩФ ЛПВОЩЪИОfi ВЪБ·ПВ›Ф.
Ένα απλ κλειδί ή ένα κλειδί ρυθµιζµενου
ανοίγµατος που είναι προσαρτηµένο σε
περιστρεφµενο εξάρτηµα του ηλεκτρικού
εργαλείου µπορεί να προκαλέσει προσωπικ
τραυµατισµ.
e) ªЛУ ЩВУЩТУВЫЩВ. ¡· ‰И·ЩЛЪВ›ЩВ ¿УЩФЩВ ЩФ
О·Щ¿ППЛПФ ¿ЩЛМ· О·И ЩЛУ ИЫФЪЪФ›· Ы·˜.
Με αυτν τον τρπο µπορείτε να ελέγχετε
καλύτερα το ηλεκτρικ εργαλείο σε µη
αναµενµενες καταστάσεις.
f) ¡· ›ÛÙ ÓÙ˘Ì¤ÓÔÈ Î·Ù¿ÏÏËÏ·. ªË ÊÔÚ¿Ù ʷډȿ
ÚÔ‡¯· ‹ ÎÔÛÌ‹Ì·Ù·. ¡· Îڷٿ٠ٷ Ì·ÏÏÈ¿ Û·˜, Ù·
ÚÔ‡¯· Û·˜ Î·È Ù· Á¿ÓÙÈ· Û·˜ Ì·ÎÚÈ¿ ·fi ÎÈÓÔ‡ÌÂÓ·
̤ÚË.
Τα φαρδιά ρούχα, τα κοσµήµατα και τα µακριά
µαλλιά µπορεί να πιαστούν σε κινούµενα µέρη.
g) ∞Ó ·Ú¤¯ÔÓÙ·È ÂÍ·ÚÙ‹Ì·Ù· ÁÈ· ÙË Û‡Ó‰ÂÛË
Ы˘ЫОВ˘ТУ ВН·БˆБ‹˜ О·И Ы˘ППФБ‹˜ ЫОfiУЛ˜, У·
‚В‚·ИТУВЫЩВ fiЩИ В›У·И Ы˘У‰В‰ВМ¤У· О·И
¯ЪЛЫИМФФИФ‡УЩ·И МВ ЩФ ЫˆЫЩfi ЩЪfiФ.
Η χρήση συλλέκτη σκνης µειώνει τους
κινδύνους που προέρχονται απ τη σκνη.
4) ГЪ‹ЫЛ О·И КЪФУЩ›‰· ЛПВОЩЪИОТУ ВЪБ·ПВ›ˆУ
a) ªЛУ ·ЫОВ›ЩВ ‰‡У·МЛ ЫЩФ ЛПВОЩЪИОfi ВЪБ·ПВ›Ф. ¡·
¯ЪЛЫИМФФИВ›ЩВ ЩФ ЛПВОЩЪИОfi ВЪБ·ПВ›Ф Ф˘ В›У·И
О·Щ¿ППЛПФ БИ· ЩФ В›‰Ф˜ ЩЛ˜ ВЪБ·Ы›·˜ Ф˘ ВОЩВПВ›ЩВ.
Το κατάλληλο ηλεκτρικ εργαλείο θα εκτελέσει
την εργασία καλύτερα και µε µεγαλύτερη
ασφάλεια µε τον τρπο που σχεδιάστηκε.
b) ªЛ ¯ЪЛЫИМФФИ‹ЫВЩВ ЩФ ЛПВОЩЪИОfi ВЪБ·ПВ›Ф ·У Ф
‰И·ОfiЩЛ˜ ПВИЩФ˘ЪБ›·˜ ‰ВУ ·УФ›БВИ О·И ‰ВУ ОПВ›УВИ.
Ένα ηλεκτρικ εργαλείο που δεν ελέγχεται απ
το διακπτη λειτουργίας είναι επικίνδυνο και
πρέπει να επισκευαστεί.
c) ∞ÔÛ˘Ó‰¤ÂÙ ÙÔ ‚‡ÛÌ· ·fi ÙËÓ ËÁ‹ ÈÛ¯‡Ô˜ ηÈ/‹
ЩЛ ı‹ОЛ М·Щ·Ъ›·˜ ·fi ЩФ ЛПВОЩЪИОfi ВЪБ·ПВ›Ф ЪИУ
ЪФ‚В›ЩВ ЫВ Ъ˘ıМ›ЫВИ˜, ·ПП·Б‹ ВН·ЪЩ‹М·ЩФ˜ ‹
·Фı‹ОВ˘ЫЛ ЩФ˘ ЛПВОЩЪИОФ‡ ВЪБ·ПВ›Ф˘.
Αυτά τα προληπτικά µέτρα ασφαλείας µειώνουν
τον κίνδυνο να ξεκινήσει το ηλεκτρικ εργαλείο
κατά λάθος.
Page 17

∂ППЛУИО¿
d) ∞ФıЛОВ‡ВЩВ Щ· ВЪБ·ПВ›· Ф˘ ‰ВУ ¯ЪЛЫИМФФИВ›ЩВ
М·ОЪИ¿ ·fi ·И‰И¿ О·И МЛУ ·К‹УВЩВ Щ· ¿ЩФМ· Ф˘
‰ВУ В›У·И ВНФИОВИˆМ¤У· МВ ЩФ ЛПВОЩЪИОfi ВЪБ·ПВ›Ф ‹
МВ ·˘Щ¤˜ ЩИ˜ Ф‰ЛБ›В˜ У· ¯ЪЛЫИМФФИФ‡У ЩФ ЛПВОЩЪИОfi
ВЪБ·ПВ›Ф.
Τα ηλεκτρικά εργαλεία είναι επικίνδυνα στα χέρια
µη εκπαιδευµένων ατµων.
e) ™˘УЩЛЪВ›ЩВ Щ· ЛПВОЩЪИО¿ ВЪБ·ПВ›·. ¡· ВП¤Б¯ВЩВ ЩЛУ
В˘ı˘БЪ¿ММИЫ‹ ЩФ˘˜ ‹ ЩФ МПФО¿ЪИЫМ· ЩˆУ
ОИУФ‡МВУˆУ МВЪТУ, ЩЛ ıЪ·‡ЫЛ ЩˆУ ВН·ЪЩЛМ¿ЩˆУ
О·И ФФИ·‰‹ФЩВ ¿ППЛ О·Щ¿ЫЩ·ЫЛ Ф˘ ВУ‰¤¯ВЩ·И У·
ВЛЪВ¿ЫВИ ЩЛ ПВИЩФ˘ЪБ›· ЩФ˘ ЛПВОЩЪИОФ‡ ВЪБ·ПВ›Ф˘.
™В ВЪ›ЩˆЫЛ ‚П¿‚Л˜, ЩФ ЛПВОЩЪИОfi ВЪБ·ПВ›Ф
Ъ¤ВИ У· ВИЫОВ˘·ЫЩВ› ЪИУ ¯ЪЛЫИМФФИЛıВ›.
Πολλά ατυχήµατα προκαλούνται απ ηλεκτρικά
εργαλεία που δεν έχουν συντηρηθεί σωστά.
f) ¢И·ЩЛЪВ›ЩВ Щ· ВЪБ·ПВ›· ОФ‹˜ ОФКЩВЪ¿ О·И О·ı·Ъ¿.
Τα κατάλληλα συντηρηµένα εργαλεία κοπής µε
κοφτερές γωνίες µπλοκάρουν πιο δύσκολα και
ελέγχονται πιο εύκολα.
g) ГЪЛЫИМФФИВ›ЩВ ЩФ ЛПВОЩЪИОfi ВЪБ·ПВ›Ф, Щ· ВН·ЪЩ‹М·Щ·
О·И Щ· М¤ЪЛ О.Щ.П. Ы‡МКˆУ· МВ ЩИ˜ ·ЪФ‡ЫВ˜ Ф‰ЛБ›В˜,
П·М‚¿УФУЩ·˜ ˘fi„Л ЩИ˜ Ы˘Уı‹ОВ˜ ВЪБ·Ы›·˜ О·И ЩЛУ
ВЪБ·Ы›· Ф˘ ı· ВОЩВП¤ЫВЩВ.
Η χρήση του ηλεκτρικού εργαλείου για εργασίες
πέρα απ εκείνες για τις οποίες προορίζεται,
ενδέχεται να δηµιουργήσει κινδύνους.
5) ™¤Ъ‚И˜
a) ¡· ‰›УВЩВ ЩФ ЛПВОЩЪИОfi ВЪБ·ПВ›Ф БИ· Ы¤Ъ‚И˜ ЫВ
О·Щ¿ППЛП· ВО·И‰В˘М¤У· ¿ЩФМ· О·И У·
¯ЪЛЫИМФФИВ›ЩВ МfiУФ БУ‹ЫИ· ·УЩ·ПП·ОЩИО¿.
Με αυτν τον τρπο είστε σίγουροι για την
ασφάλεια του ηλεκτρικού εργαλείου.
¶ƒ√ºА§∞•∏
ª·ОЪИ¿ ·fi Щ· ·И‰И¿ О·И ЩФ˘˜ ·У·‹ЪФ˘˜.
ŸЩ·У ‰ВУ ¯ЪЛЫИМФФИФ‡УЩ·И, Щ· ВЪБ·ПВ›· Ъ¤ВИ У·
К˘П¿˙ФУЩ·И М·ОЪИ¿ ·fi Щ· ·И‰И¿ О·И ЩФ˘˜ ·У·‹ЪФ˘˜.
¶ƒ√™√Ã∏ ™∆∏ Ã∏™∏ ∆√À ¢π™∫√¶ƒπ√¡√À
ª∞ƒª∞ƒ√À
1. Μην συνδέεται κανένα εργαλείο εκτς απ το
διαµαντένιο τροχ, πως προβλέπεται απ τον
κατασκευαστή.
Μην λειτουργείτε το δισκοπρίονο µαρµάρου
παρουσία νερού.
2. Ελέγχετε πάντα το διαµαντένιο τροχ πριν να
θέσετε το µηχάνηµα σε λειτουργία. Αν είναι
ραγισµένος, θρυµµατισµένος ή παραµορφωµένος,
µην τον χρησιµοποιείτε. Θέστε το µηχάνηµα
προσεκτικά σε λειτουργία για να ελέγξετε τυχν
ανωµαλίες.
3. Αν χρησιµοποιείτε το διαµαντένιο τροχ για να
κψετε µέταλλα θα µικρύνετε τη διάρκεια ζωής
του ή θα προκαλέσετε τη θραύση του. Μην
χρησιµοποιείτε ποτέ το διαµαντένιο τροχ για να
κψετε µέταλλο.
4. Αρχίστε να εργάζεστε µνο ταν έχει φτάσει στη
µέγιστη ταχύτητα περιστροφής.
5. Η άσκηση υπερβολικής δύναµης υπερφορτώνει τον
κινητήρα. Κβετε πάντα σε βάθος 5 mm ή
µικρτερο.
6. Μην χρησιµοποιείτε αυτ το µηχάνηµα για να
κψετε αµίαντο.
7. Σε εργασίες που χρησιµοποιείται δισκοπρίονο, αν
δηµιουργηθεί φλγα, καλύψτε τον αντάπτορα
συλλογής µε ένα λαστιχένιο καπάκι και βεβαιωθείτε
τι φοράτε προστατευτικά γυαλιά.
∆∂áπ∫∞ Ã∞ƒ∞∫∆∏ƒπ™∆π∫∞
Τάση (ανά περιοχές)* (110V, 230V)
Ισχύς εισδου* 1300W
Ταχύτητα χωρίς φορτίο 11000 min
Εξωτερική διάµ 125mm
∆ιαστάσεις διαµαντένιου τροχού
Μέγ. βάθος κοπής 33mm
Βάρος (χωρίς καλώδιο και διαµαντένιο τροχ) 2,9 kg
*Βεβαιωθείτε να ελέγξετε την πινακίδα στο προιν επειδή υπκεινται σε αλλαγή σε εξάρτηση απ την περιοχή.
∫∞¡√¡π∫∞ ∂•∞ƒ∆∏ª∞∆∞
(1) Κλειδί .......................................................................... 1
(2) Αντάπτορας ................................................................ 1
(3) Πλευρική λαβή .......................................................... 1
Τα κανονικά εξαρτήµατα υπκεινται σε αλλαγή χωρίς
προειδοποίηση.
¶ƒπ¡ ∆∏ §∂π∆√Àƒ°π∞
1. ¶ËÁ‹ Ú‡̷ÙÔ˜
2. ¢È·ÎfiÙ˘ Ú‡̷ÙÔ˜
∂º∞ƒª√°∂™
䡬 Κοπή ή χάραξη τσιµέντου
䡬 Κοπή ή χάραξη πλακιδίων
䡬 Κοπή ή χάραξη πέτρας
䡬 Κοπή ή χάραξη κεραµιδιών
Πάχος 2,0mm
∆ιάµ. οπής 22,2mm
Βεβαιωθείτε τιη πηγή ρεύµατος που πρκειται να
χρησιµοποιηθεί είναι εναρµονισµένη µε τις
απαιτήσεις σε ρεύµα που αναφέτεται στην πινακίδα
του εργαλείου.
Βεβαιωθείτε τι ο διακπτης ρεύµατος βρίσκεται
στη θέση OFF. Αν το βίσµα είναι στη µπρίζα καθώς
ο διακπτης ρεύµατος βρίσκεται στο ΟΝ, το
εργαλείο θα αρχίσει να λειτουργεί αµέσως, µε
πιθαντητα πρκλησης σοβαρού ατυχήµατος.
–1
16
Page 18

∂ППЛУИО¿
3. ∫·ÏÒ‰ÈÔ ÚÔ¤ÎÙ·Û˘
>ταν ο χώρος εργασίας βρίσκεται µακριά απ την
παροχή ρεύµατος. Χρησιµοποιήστε ένα καλώδιο
προέκτασης µε κατάλληλο πάχος και ικαντητα
µεταφοράς ρεύµατος. Το καλώδιο προέκτασης πρέπει
να είναι τσο κοντ σο είναι πρακτικά δυνατ.
4. ŒÏÂÁ¯Ô˜ Î·È ÙÔÔı¤ÙËÛË ÙÔ˘ ‰È·Ì·ÓÙ¤ÓÈÔ˘ ÙÚÔ¯Ô‡
Βεβαιωθείτε τι ο διαµαντένιος τροχς είναι ο
προβλεπµενος και τι δεν παρουσιάζει ρωγµές,
σπασίµατα ή αλλοιώσεις. Βεβαιωθείτε τι ο
διαµαντένιος τροχς έχει συναρµολογηθεί µε
ασφάλεια. Για τη συναρµολγηση, ανατρέξτε στο
“Συναρµολγηση/αποσυναρµολγηση διαµαντένιου
τροχού”
5. ™ÙÂÚ¤ˆÛË Î·È ÚÔÛ·ÚÌÔÁ‹ ÙÔ˘ ηχÌÌ·ÙÔ˜ Û˘ÏÏÔÁ‹˜
ÛÎfiÓ˘ (∂ÈÎ. 1)
Το κάλυµµα συλλογής σκνης είναι µία προστατευτική
συσκευή για την αποφυγή τραυµατισµού σε
περίπτωση που θρυµµατιστεί ο διαµαντένιος τροχς
κατά τη λειτουργία. Βεβαιωθείτε τι το κάλυµµα
είναι σωστά τοποθετηµένο και στερεωµένο πριν να
αρχίσετε την κοπτική λειτουργία. Με µικρή χαλάρωση
της βίδας ρύθµισης, το κάλυµµα συλλογής σκνης
µπορεί να αναστραφεί και να ρυθµιστεί στην
κατάλληλη γωνία για µέγιστη λειτουργική απδοση.
Βεβαιωθείτε τι σφίξατε καλά τη βίδα ρύθµισης
αφού προσαρµσετε το κάλυµµα συλλογής σκνης.
6. ∂И‚В‚·›ˆЫЛ ЩФ˘ МЛ¯·УИЫМФ‡ ·ЫК¿ПИЫЛ˜ ЩФ˘ ¿НФУ·
Επιβεβαιώστε τι ο µηχανισµς ασφάλισης του
άξονα έχει απελευθερωθεί πατώντας το κουµπί
ώθησης δυο ή τρεις φορές πριν θέσετε σε εκκίνηση
το εργαλείο (δείτε την ∂ÈÎ. 1).
7. ƒ‡ıÌÈÛË ‚¿ıÔ˘˜ ÎÔ‹˜ (∂ÈÎ. 2)
Χαµηλώνοντας την πεταλούδα, θα χαλαρώσει και
ανυψώνοντάς την θα σφίξει.
Χαλαρώνοντας την πεταλούδα και κινώντας τον
οδηγ ολίσθησης ρυθµίζετε το βάθος κοπής.
¶ƒ√™√Ã∏
䡬 Εάν το παξιµάδι πεταλούδα είναι χαλαρ, µπορεί
να προκληθεί τραυµατισµς. Αφού ρυθµίσετε το
βάθος κοπής, σφίξτε καλά το παξιµάδι πεταλούδα.
™À¡∞ƒª√§√°∏™∏ ™ø§∏¡∞ ™À§§√°∏™ ™∫√¡∏™
>ταν κβετε ένα υλικ που παράγει σκνη,
χρησιµοποιήστε το σωλήνα συλλογής σκνης ως εξής:
(1) Αφαιρέστε το λαστιχένιο καπάκι και
συναρµολογήστε το βοηθητικ εξάρτηµα
αντάπτορα. (∂ÈÎ. 3)
(2) Συναρµολογήστε το σωλήνα συλλογής σκνης για
το ηλεκτρικ εργαλείο στο βοηθητικ εξάρτηµα
αντάπτορα. (∂ÈÎ. 3)
¶ƒ√™√Ã∏
䡬 Τοποθετείτε πάντα ένα λαστιχένιο καπάκι πάνω
στον αντάπτορα συλλογής σκνης, ταν δεν
χρησιµοποιείται ο σωλήνας συλλογής.
™À¡∞ƒª√§√°∏™∏/∞¶√™À¡∞ƒª√§√°∏™∏
¢π∞ª∞¡∆∂¡π√À ∆ƒ√Ã√À
1. ™˘Ó·ÚÌÔÏfiÁËÛË
(1) Αφαιρέστε το κάλυµµα (Α).
(2) Σκουπίστε τη σκνη απ τον άξονα και τις ροδέλλες.
(3) Βεβαιωθείτε τι η φορά περιστροφής του
διαµαντοτροχού είναι ίδια µε αυτήν στο
προστατευτικ περίβληµα και εγκαταστήστε το
διαµαντοτροχ πως φαίνεται στην ∂ÈÎ. 1.
(4) Πατήστε τον πείρο ασφάλισης και ασφαλίστε τον
άξονα. Σφίξτε αρκετά το περικχλιο του τροχού µε
το παρεχµενο κλειδί. (∂ÈÎ. 1)
™∏ª∂πø™∏
䡬 Χρησιµοποιείτε πάντα το παρεχµενο κλειδί για να
ασφαλίζετε το περικχλιο του τροχού.
2. ∞ÔÛ˘Ó·ÚÌÔÏfiÁËÛË
Αφαιρέστε το περικχλιο του τροχού µε το
παρεχµενο κλειδί και αφαιρέστε το διαµαντένιο
τροχ. (∂ÈÎ. 1)
∫√¶∏
1. ¢È·‰Èηۛ˜ ÎÔ‹˜ (∂ÈÎ. 4)
(1) Τοποθετήστε το εργαλείο πάνω στο υλικ που
πρκειται να κψετε και ευθυγραµµίστε τη γραµµή
κοπής µε το διαµαντένιο τροχ.
Η κοπή πραγµατοποιείται οµαλά αν κβεται ευθεία
κατά µήκος της γραµµής κοπής στην αρχική τοµή.
(2) Ενεργοποιήστε το διακπτη ταν ο διαµαντένιος
τροχς δεν αγγίζει το υλικ που πρκειται να
κψετε.
2. ¶ЪФК˘П·ОЩИО¿ М¤ЩЪ· ·М¤Ыˆ˜ МВЩ¿ ЩФ Щ¤ПФ˜ ЩЛ˜
ПВИЩФ˘ЪБ›·˜
Μετά το κλείσιµο της µηχανής, µην το βάλετε κάτω
πριν ο χαµηλωµένος κεντρικά τροχς σταµατήσει
τελείως. Εκτς απ την αποφυγή σοβαρών
ατυχηµάτων, αυτ το µέτρο προφύλαξης θα
ελαττώσει τη ποστητα της σκνης και τριµµάτων
που προσροφώνται απ το µηχάνηµα.
¶ƒ√™√Ã∏
䡬 Ελέγχετε πάντα το διαµαντένιο τροχ πριν να
θέσετε το µηχάνηµα σε λειτουργία. Μην
χρησιµοποιείτε ποτέ το διαµαντένιο τροχ αν
παρουσιάζει ρωγµές, σπασίµατα ή αλλοιώσεις.
䡬 Μην ρίχνετε νερ ή ψυκτικ στο διαµαντένιο τροχ.
䡬 Αρχίστε να κβετε µνο ταν έχει φτάσει τη µέγιστη
ταχύτητά του.
䡬 Αν ο διαµαντένιος τροχς σταµατήσει ή εντοπίσετε
περίεργο θρυβο, απενεργοποιήστε τον αµέσως.
䡬 Μην χρησιµοποιείτε ποτέ το διαµαντένιο τροχ για
να κψετε σε ζιγκ ζαγκ ή καµπύλες. Μην
χρησιµοποιείτε την πλανή επιφάνεια του
διαµαντένιου τροχού. Μην τον χρησιµοποιείτε ποτέ
για να κψετε σε κλίση.
䡬 Αν ασκήσετε υπερβολική δύναµη στο διαµαντένιο
τροχ για να τον ευθυγραµµίσετε µε τη γραµµή
κοπής, δεν θα υπερφορτωθεί απλώς ο κινητήρας
µε αποτέλεσµα να προκληθούν εγκαύµατα αλλά
µπορεί επίσης να υπερθερµανθεί ο διαµαντένιος
τροχς και να µειωθεί η διάρκεια ζωής του.
䡬 Μην αφήσετε το τροφοδοτικ καλώδιο να έρθει σε
επαφή µε το διαµαντένιο τροχ κατά τη διάρκεια
της εργασίας.
䡬 >ταν ολοκληρώσετε την εργασίας σας,
απενεργοποιήστε το εργαλείο και αφαιρέστε το
τροφοδοτικ καλώδιο απ την πρίζα.
17
Page 19

∂ППЛУИО¿
™À¡∆∏ƒ∏™∏ ∫∞π ∂§∂°Ã√™
1. ∂ИıВТЪЛЫЛ ‰И·М·УЩ¤УИФ˘ ЩЪФ¯Ф‡
>ταν ο διαµαντένιος τροχς είναι φθαρµένος
υπερφορτώνεται ο κινητήρας και έτσι µειώνεται η
αποδοτικτητα του εργαλείου. Αντικαταστήστε τον
µε καινούριο.
2. ŒÌÊÚ·ÍË ‰È·Ì·ÓÙ¤ÓÈÔ˘ ÙÚÔ¯Ô‡
Ο βαθµς φθοράς του άκρου κοπής µε διαµαντένια
επίστρωση εξαρτάται απ τον τύπο του υλικού που
κβετε, την ταχύτητα κοπής κ.λπ. Γενικά τα υλικά
που παράγουν κοκκώδη ρινίσµατα µπορεί να
χαράξουν την επίστρωση και να επισπεύσουν τη
φθορά της. Απ την άλλη πλευρά τα υλικά που
παράγουν σκνη κατά την κοπή τους. µπορεί να
προκαλέσουν έµφραξη της διαµαντένιας
επίστρωσης, γεγονς που µειώνει την κοπτική
απδοση. >ταν προκύπτει έµφραξη, ασκείται
επιπρσθετη δύναµη σε µία προσπάθεια να αυξηθεί
η ταχύτητα κοπής, µε αποτέλεσµα µερικές φορές
να εµφανίζονται σπίθες γύρω απ την περιφέρεια
του διαµαντένιου τροχού. Σε αυτήν την περίπτωση
διακψτε τη χρήση του δισκοπρίονου και εξετάστε
προσεκτικά την ακµή κοπής τρίβοντάς τη µε το
δάκτυλ σας. Αν η διαµαντένια επίστρωση είναι
λεία (χωρίς προεξοχές ή τραχιά σηµεία), είναι
εµφραγµένη µε σκνη και πρέπει να “ακονιστεί”.
Για να την ακονίσετε αρκετά, κψτε ένα σχετικά
µαλακ υλικ που παράγει κοκκώδη ρινίσµατα (πως
ένα κοµµάτι τσιµέντο ή τούβλα) για περίπου 5
µέτρα µε χαµηλή επιτάχυνση και σε βάθος 10 mm
και έτσι θα αποκατασταθεί η κοπτική απδοση της
διαµαντένιας επίστρωση και θα επιµηκυνθεί η
διάρκεια ζωής του διαµαντένιου τροχού.
Το διαµαντένιο υλικ είναι ευαίσθητο σε υψηλές
θερµοκρασίες και αρχίζει να αλλοιώνεται στους
600°C περίπου. Υψηλτερες ακµα θερµοκρασίες
προκαλούν την αποσύνθεση του διαµαντένιου
υλικού. Έτσι είναι σηµαντικ να “ακονίζετε” την
επιφάνεια µλις εµφανιστεί ένδειξη έµφραξης ή
σπινθηρίσµατος.
3. ŒÏ¯Ԙ ÙˆÓ ‚ȉÒÓ ÛÙÂÚ¤ˆÛ˘
Ελέγχετε περιοδικά λες τις βίδες στερέωσης και
βεβαιωθείτε τι είναι κατάλληλα σφιγµένες. Στην
περίπτωση που χαλαρώσει οποιαδήποτε βίδα σφίξτε
την ξανά αµέσως. Αν δεν το κάνετε αυτ µπορεί
να έχει ως αποτέλεσµα το σοβαρ τραυµατισµ.
4. ™˘ÓÙ‹ÚËÛË ÙÔ˘ ÌÔÙ¤Ú
Η περιέλιξη της µονάδα του µοτέρ είναι η καρδιά
του ηλεκτρικού εργαλείου. ∆ώστε µεγάλη προσοχή
για να σιγουρευτείτε τι η περιέλιξη δεν θα πάθει
ζηµιά και / ή θα βρεχθεί µε λάδι ή νερ.
5 ŒÏÂÁ¯Ô˜ ÛÙ· Î·Ú‚Ô˘Ó¿ÎÈ· (∂ÈÎ. 5)
Το µοτέρ χρησιµοποιεί καρβουνάκια τα οποία είναι
αναλώσιµα µέρη.
>ταν φθαρούν ή ταν φθάσουν κοντά στο “ριο
φθοράς”, µπορεί να προκληθεί πρβληµα στο µοτέρ.
>ταν παρασχεθεί ένα καρβουνάκι αυτοµάτης
διακοπής, το µοτέρ θα σταµατήσει αυτµατα.
Σε αυτή τη χρονική στιγµή, αντικαταστήστε και τα
δυο καρβουνάκια µε καινούργια τα οποία έχουν
τους ίδιους αριθµούς άνθρακα που φαίνονται στην
εικνα. Επιπρσθετα, πάντοτε κρατάτε τα
καρβουνάκια καθαρά και εξασφαλίσετε τι
ολισθαίνουν ελεύθερα ανάµεσα στις θήκες.
6. AÓÙÈηٿÛÙ·ÛË ÙˆÓ Î·Ú‚Ô˘Ó·Î›ˆÓ (EÈÎ. 6)
〈
Aποσυναρµολγηση
(1) Xαλαρώστε την D4 αυτµατα προσαρµοζµενη βίδα
που κρατάει το πίσω κάλυµµα και βγάλτε το πίσω
κάλυµµα.
(2) Xρησιµοποιήστε το βοηθητικ εξ. κλειδί ή ένα
µικρ κατσαβίδι για να τραβήξετε το άκρο του
ελατηρίου που κρατά κάτω το καρβουνάκι.
Aφαιρέστε το άκρο του ελατηρίου προς το
εξωτερικ της θήκης του καρβουνακιού.
(3) Aφαιρέστε το άκρο της ψύκτρας στο καρβουνάκι
απ το τερµατικ τµήµα της θήκης του
καρβουνακιού και µετά αφαιρέστε το καρβουνάκι
απ την θήκη του καρβουνακιού.
〈
Συναρµολγηση
(1) Bάλτε το άκρο της ψύκτρας του καρβουνακιού στο
τερµατικ τµήµα της θήκης του καρβουνακιού.
(2) Bάλτε το καρβουνάκι στην θήκη του καρβουνακιού.
(3) Xρησιµοποιήστε το βοηθητικ εξ. κλειδί ή ένα µικρ
κατσαβίδι για να επιστρέψετε το άκρο του
ελατηρίου στο πάνω µέρος του καρβουνακιού.
(4) Στερεώστε το πίσω κάλυµµα και σφίξτε την D4
αυτµατα προσαρµοζµενη βίδα.
7. §›ÛÙ· Û˘ÓÙ‹ÚËÛ˘ ÂÍ·ÚÙËÌ¿ÙˆÓ
A: Αρ. Εξαρτήµατος
B: Αρ. Κωδικού
C: Αρ. Χρήσης
D: Παρατηρήσεις
¶ƒ√™√Ã∏
Η Επισκευή, τροποποίηση και ο έλεγχος των
Ηλεκτρικών Εργαλείων της Hitachi πρέπει να γίνεται
απ ένα Εξουσιοδοτηµένο Κέντρο Σέρβις της Hitachi.
Ειδικά για τη συσκευή λέιζερ, το σέρβις της πρέπει
να γίνεται απ ένα εξουσιοδοτηµένο αντιπρσωπο
του κατασκευαστή του λέιζερ.
Πάντοτε να αναθέτετε την επισκευή της συσκευής
λέιζερ στο Εξουσιοδοτηµένο Κέντρο Σέρβις της
Hitachi.
Αυτή η Λίστα των Εξαρτηµάτων θα είναι χρήσιµη
αν δοθεί µε το εργαλείο Hitachi στο
Εξουσιοδοτηµένο Κέντρο Σέρβις της Hitachi κατά
την επισκευή ή την συντήρηση.
Κατά την χρήση και την συντήρηση των ηλεκτρικών
εργαλείων, οι κανονισµοί ασφαλείας και οι καννες
που υπάρχουν σε κάθε χώρα πρέπει να τηρούνται.
∆ƒ√¶√¶√π∏™∂π™
Τα Ηλεκτρικά Εργαλεία της Hitachi βελτιώνονται
συνεχώς και τροποποιούνται για να ενσωµατώσουν
τα τελευταία τεχνολογικά επιτεύγµατα.
Ανάλογα, κάποια σηµεία (πχ κωδικοί αριθµοί, και/
ή σχεδιασµς) µπορούν να αλλάξουν χωρίς
προειδοποίηση.
〉
〉
∂°°À∏™∏
Εγγυώµαστε τα εργαλεία Hitachi Power Tools σύµφωνα
µε τη νοµοθεσία και τους κανονισµούς ανά χώρα. Η
παρούσα εγγύηση δεν καλύπτει ελαττώµατα ή ζηµιές
λγω κακής χρήσης, κακοποίησης ή φυσιολογικής
φθοράς. Σε περίπτωση παραπνων παρακαλούµε
αποστείλετε το Power Tool χωρίς να το
αποσυναρµολογήσετε µαζί µε το ΠΙΣΤΟΠΟΙΗΤΙΚΟ
ΕΓΓΥΗΣΗΣ το οποίο βρίσκεται στο τέλος των οδηγιών
αυτών, σε Εξουσιοδοτηµένο Κέντρο Επισκευής της
Hitachi.
18
Page 20

∂ППЛУИО¿
™∏ª∂πø™∏
Εξαιτίας του συνεχιζµενου προγράµµατος έρευνας και
ανάπτυξης της HITACHI τα τεχνικά χαρακτηριστικά που
εδώ αναφέρονται µπορούν να αλλάξουν χωρίς
προηγούµενη ειδοποίηση.
¶ПЛЪФКФЪ›В˜ Ф˘ ·КФЪФ‡У ЩФУ ВОВМfiМВУФ ıfiЪ˘‚Ф О·И
ЩЛ ‰fiУЛЫЛ.
Oι τιµές µετρήθηκαν σύµφωνα µε το EN60745 και
βρέθηκαν σύµφωνες µε το ISO 4871.
Μετρηθείσα τυπική στάθµη ηχητικής ισχύος A: 106 dB (A)
Μετρηθείσα τυπική στάθµη ηχητικής πίεσης A: 95 dB (A)
Αβεβαιτητα KpA: 3 dB (A)
Φοράτε προστατευτικà αυτιών.
Συνολικές τιµές δνησης (διανυσµατικ άθροισµα
τριαξονικού καλωδίου) που καθορίζονται σύµφωνα µε
το πρτυπο EN60745.
Τιµή εκποµπής δνησης
Αβεβαιτητα K = 1,5 m/s
¶ƒ√™√Ã∏
䡬 Η τιµή εκποµπής δνησης κατά την ουσιαστική
χρήση του ηλεκτρικού εργαλείου µπορεί να διαφέρει
απ τη δηλωµένη τιµή, ανάλογα µε το που και πως
χρησιµοποιείται το εργαλείο.
䡬 Για να αναγνωρίσετε τα µέτρα ασφαλείας για την
προστασία του χειριστή που βασίζονται σε µία
εκτίµηση της έκθεσης στις πραγµατικές συνθήκες
χρήσης (λαµβάνοντας υπψη λα τα µέρη του
κύκλου λειτουργίας πως τα διαστήµατα που το
εργαλείο είναι απενεργοποιηµένο και ταν
λειτουργεί στο ρελαντί µαζί µε το χρνο διέγερσης).
ah = 4,2 m/s
2
2
19
Page 21

Polski
OGÓLNE WSKAZÓWKI BEZPIECZEŃSTWA
DOTYCZĄCE URZĄDZEŃ ELEKTRYCZNYCH
OSTRZEŻENIE
Należy dokładnie zapoznać się ze wszystkimi
ostrzeżeniami i wskazówkami bezpieczeństwa.
Nieprzestrzeganie ostrzeżeń oraz wskazówek
bezpieczeństwa może spowodować porażenie prądem
elektrycznym, pożar i/lub odniesienie poważnych obrażeń.
Ostrzeżenia i wskazówki bezpieczeństwa powinny być
przechowywane do użycia w przyszłości.
Wykorzystywane w treści wskazówek wyrażenie "narzędzie
elektryczne" dotyczy narzędzi zasilanych z sieci
(przewodowych) lub z baterii (bezprzewodowych).
1) Bezpieczeństwo stanowiska pracy
a) Miejsce pracy powinno być czyste i dobrze
oświetlone.
Brak porządku lub nieodpowiednie oświetlenie
miejsca pracy może być przyczyną wypadku.
b) Nie należy używać narzędzi elektrycznych w
miejscach zagrożonych wybuchem, na przykład
w pobliżu łatwopalnych cieczy, gazów lub pyłów.
Pracujące narzędzie elektryczne wytwarza iskry
grożące wybuchem.
c) Dzieci oraz osoby postronne powinny
pozostawać w bezpiecznej odległości od
pracującego urządzenia.
Dekoncentracja może spowodować utratę kontroli
nad urządzeniem.
2) Bezpieczeństwo elektryczne
a) Wtyczka narzędzia musi pasować do gniazda
zasilania.
Nie wolno przerabiać wtyczki.
Narzędzia posiadające uziemienie nie powinny
być używane z wtyczkami przejściowymi.
Przestrzeganie powyższych zaleceń dotyczących
wtyczek i gniazdek pozwoli zmniejszyć ryzyko
porażenia prądem elektrycznym.
b) Należy unikać dotykania jakichkolwiek
powierzchni i elementów uziemionych, takich jak
rury, grzejniki, kuchenki lub urządzenia
chłodnicze.
Ryzyko porażenia prądem elektrycznym jest wyższe,
gdy ciało jest uziemione.
c) Nie należy narażać narzędzi elektrycznych na
działanie deszczu lub wilgoci.
Obecność wody zwiększa niebezpieczeństwo
porażenia prądem elektrycznym.
d) Nie należy używać przewodu zasilającego w
sposób niezgodny z przeznaczeniem. Nie wolno
używać przewodu do przenoszenia lub ciągnięcia
urządzenia bądź wyłączania go z prądu.
Przewód powinien znajdować się w bezpiecznej
odległości od źródeł ciepła, oleju, ostrych
krawędzi lub poruszających się części.
Uszkodzenie lub zapętlenie przewodu zwiększa
ryzyko porażenia prądem elektrycznym.
e) W przypadku używania narzędzia elektrycznego
na wolnym powietrzu należy korzystać z
przedłużaczy przeznaczonych do takiego
zastosowania.
Używanie odpowiednich przedłużaczy zmniejsza
ryzyko porażenia prądem elektrycznym.
f) W przypadku korzystania z narzędzia w miejscu
o dużej wilgotności należy zawsze używać
wyłącznika różnicowoprądowego.
Korzystanie z takiego wyłącznika zmniejsza ryzyko
porażenia prądem elektrycznym.
3) Bezpieczeństwo osobiste
a) Podczas korzystania z narzędzia elektrycznego
należy zawsze koncentrować się na
wykonywanej pracy i postępować zgodnie z
zasadami zdrowego rozsądku.
Narzędzia elektryczne nie powinny być
obsługiwane przez osoby zmęczone lub
znajdujące się pod wpływem substancji
odurzających, alkoholu bądź lekarstw.
Chwila nieuwagi podczas obsługi narzędzia
elektrycznego może spowodować odniesienie
poważnych obrażeń.
b) Zawsze używać odpowiedniego osobistego
wyposażenia ochronnego. Zawsze nosić
odpowiednie okulary ochronne.
Stosowane w odpowiednich warunkach wyposażenie
zabezpieczające, takie jak maska przeciwpyłowa,
obuwie antypoślizgowe, kask lub nauszniki zmniejsza
ryzyko odniesienia obrażeń ciała.
c) Uniemożliwić nieoczekiwane uruchomienie
narzędzia. Przed podłączeniem narzędzia do
gniazda zasilania i/lub zestawu baterii, a także
przed podniesieniem lub przeniesieniem go,
należy upewnić się, że wyłącznik znajduje się
w położeniu wyłączenia.
Ze względów bezpieczeństwa nie należy przenosić
narzędzi elektrycznych, trzymając palec na
wyłączniku, ani podłączać do zasilania urządzeń,
których wyłącznik znajduje się w położeniu włączenia.
d) Przed włączeniem usunąć wszystkie klucze
regulacyjne.
Pozostawienie klucza regulacyjnego połączonego z
częścią obrotową narzędzia może spowodować
odniesienie obrażeń.
e) Nie sięgać zbyt daleko. Należy zawsze stać
stabilnie, zachowując równowagę.
Zapewnia to lepsze panowanie nad narzędziem w
nieoczekiwanych sytuacjach.
f) Należy nosić odpowiednią odzież roboczą. Nie
nosić luźnych ubrań lub biżuterii. Trzymać włosy,
odzież i rękawice w bezpiecznej odległości od
ruchomych części urządzenia.
Luźne ubrania, biżuteria lub długie włosy mogą
zostać wciągnięte przez ruchome części narzędzia.
g) Jeżeli wraz z narzędziem dostarczone zostało
wyposażenie służące do odprowadzania pyłów,
należy pamiętać o jego właściwym podłączeniu
i używaniu.
Właściwe zbieranie i odprowadzanie pyłu zmniejsza
zagrożenia związane z jego obecnością.
4) Obsługa i konserwacja narzędzi elektrycznych
a) Nie używać narzędzia elektrycznego ze zbyt dużą
siłą. Należy stosować narzędzie odpowiednie
dla wykonywanej pracy.
Narzędzie przeznaczone do określonej pracy wykona
ją lepiej i w sposób bardziej bezpieczny, pracując
z zalecaną prędkością.
b) Nie należy używać narzędzia, którego wyłącznik
jest uszkodzony.
Każde urządzenie, które nie może być właściwie
włączane i wyłączane, stanowi zagrożenie i musi
zostać naprawione.
c) Należy zawsze odłączać urządzenie z sieci zasilania
i/lub baterii przed przystąpieniem do jakichkolwiek
modyfikacji, wymiany akcesoriów itp. oraz kiedy
urządzenie nie będzie używane przez dłuższy czas.
Powyższe środki mają na celu wyeliminowanie
ryzyka nieoczekiwanego uruchomienia urządzenia.
20
Page 22

Polski
d) Nieużywane narzędzia elektryczne powinny być
przechowywane w miejscu niedostępnym dla
dzieci oraz osób, które nie znają zasad ich
obsługi lub niniejszych zaleceń.
Korzystanie z narzędzi elektrycznych przez osoby,
które nie zostały przeszkolone, może stanowić
zagrożenie.
e) Należy dbać o odpowiednią konserwację
narzędzi elektrycznych. Przed rozpoczęciem
pracy należy sprawdzić, czy ruchome części
urządzenia nie są wygięte, uszkodzone lub
pęknięte i czy nie występują jakiekolwiek inne
okoliczności, które mogłyby uniemożliwić
bezpieczną pracę urządzenia.
W razie uszkodzenia przed kolejnym użyciem
narzędzie musi zostać naprawione.
Wiele wypadków następuje z powodu
nieprawidłowej konserwacji narzędzi elektrycznych.
f) Narzędzia tnące powinny być zawsze ostre i czyste.
Narzędzia tnące powinny być utrzymywane w
odpowiednim stanie, a ich krawędzie muszą być
odpowiednio ostre - zmniejsza to ryzyko wygięcia
i ułatwia obsługę narzędzia.
g) Należy zawsze obsługiwać narzędzie, jego
akcesoria takie jak wiertła itp. w sposób zgodny
z zaleceniami niniejszej instrukcji, biorąc pod
uwagę warunki robocze oraz rodzaj wykonywanej
pracy.
Używanie narzędzia do celów niezgodnych z jego
przeznaczeniem może spowodować
niebezpieczeństwo.
5) Serwis
a) Narzędzia elektryczne mogą być naprawiane
wyłącznie przez uprawnionych techników
serwisowych, przy zastosowaniu oryginalnych
części zamiennych.
Zapewnia to utrzymanie bezpieczeństwa obsługi
urządzenia.
UWAGA
Dzieci i osoby niepełnosprawne muszą pozostawać w
bezpiecznej odległości od narzędzia.
Nieużywane narzędzia elektryczne powinny być
przechowywane w miejscu niedostępnym dla dzieci i
osób niepełnosprawnych.
WSKAZÓWKI BEZPIECZEŃSTWA DOTYCZĄCE
UŻYTKOWANIA URZĄDZENIA
1. Nie należy w żadnym wypadku zakładać jakiegokolwiek
innego narzędzia niż diamentowa tarcza tnąca zalecana
przez producenta.
Nie używaj przecinarki tarczowej podczas polewania wodą.
2. Zawsze sprawdzaj stan diamentowej tarczy tnącej przed
uruchomieniem urządzenia. Jeżeli tarcza jest pęknięta,
złamana lub wygięta, nie używaj jej. Urządzenie
uruchamiaj ostrożnie, sprawdzając, czy nie występują
jakiekolwiek inne nieprawidłowości.
3. Używanie diamentowej tarczy tnącej do cięcia metalu
spowoduje skrócenie jej trwałości lub uszkodzenie.
Tarcza nie powinna nigdy być używana do cięcia metalu.
4. Pracę rozpoczynaj dopiero, kiedy urządzenie osiągnie
maksymalną prędkość obrotową.
5. Nadmierne obciążenia powodują przeciążenie silnika.
Należy zawsze ciąć na głębokość do 5 mm.
6. Nie używaj urządzenia do cięcia azbestu.
7. Jeżeli podczas pracy tarczy tnącej pojawia się płomień,
należy przykryć złącze systemu odprowadzania pyłu
gumową przykrywką i założyć okulary ochronne.
DANE TECHNICZNE
Napięcie (w zależności od miejsca)* (110V, 230V)
Moc pobierana* 1300W
Prędkość obrotowa bez obciążenia 11000 min
Wymiary diamentowej tarczy tnącej
Maks. głębokość cięcia 33mm
Waga (bez przewodu i diamentowej tarczy tnącej) 2,9kg
* Sprawdź nazwę produktu, jako że ulega ona zmianie w zależności od miejsca zakupu.
WYPOSAŻENIE STANDARDOWE
(1) Klucz ............................................................................1
(2) Złącze ........................................................................... 1
(3) Boczny uchwyt ............................................................ 1
Wyposażenie standardowe może ulec zmianie bez
uprzedzenia.
ZASTOSOWANIE
䡬 Cięcie lub obróbka betonu
䡬 Cięcie lub obróbka płytek ceramicznych
䡬 Cięcie lub obróbka kamienia
䡬 Cięcie lub obróbka dachówek
21
PRZED UŻYCIEM
1. Żródło mocy
Upewnij się, że żródło mocy jest zgodne z wymogami
mocy zaznaczonymi przy nazwie produktu.
2. Przełącznik
Upewnij się, że przełącznik jest wyłączony (pozycja
OFF). Jeśli wtyczka jest włączona do prądu podczas
gdy przełącznik jest włączony (pozycja ON), narzędzie
zacznie działać natychmiast, co może spowodować
poważny wypadek.
3. Przedłużacz
Kiedy miejsce pracy znajduje się daleko od żródła prądu,
użyj przedłużacza o wystarczającym przekroju. Przedłużacz
powinien być tak krótki jak tylko jest to możliwe.
Średnica zewn. 125mm
Grubość 2,0mm
Średnica otworu 22,2mm
–1
Page 23

Polski
4. Kontrola i zakładanie diamentowej tarczy tnącej
Sprawdź, czy diamentowa tarcza tnąca odpowiada
parametrom urządzenia i czy nie jest pęknięta, złamana
lub wygięta. Upewnij się, że została dobrze zamocowana.
Sposób zakładania został opisany w rozdziale “Zakładanie/
zdejmowanie diamentowej tarczy tnącej”.
5. Zakładanie i ustawianie pokrywy systemu
odprowadzania pyłu (Rys. 1)
Pokrywa systemu odprowadzania pyłu stanowi element
ochrony przed obrażeniami w przypadku złamania
diamentowej tarczy tnącej podczas pracy. Przed
przystąpieniem do pracy należy zawsze sprawdzać, czy
pokrywa jest założona i zamocowana prawidłowo. Dla
uzyskania maksymalnej wydajności roboczej pokrywa
systemu odprowadzania pyłu może zostać obrócona i
ustawiona pod dowolnym kątem po częściowym
poluzowaniu śruby ustalającej. Po ustawieniu pokrywy
systemu odprowadzania pyłu upewnij się, że śruba
ustalająca jest dobrze dokręcona.
6. Sprawdż mechanizm blokujący wrzeciono
Zanim uruchomisz narzędzie, upewnij się, że mechanizm
blokujący jest rozłączony wciskając dwa lub trzy razy
blokadę wrzeciona (Rys. 1).
7. Regulacja głębokości cięcia (Rys. 2)
Obniżenie nakrętki skrzydełkowej powoduje
poluzowanie, a podwyższenie Đ zaciśnięcie.
Poprzez poluzowanie nakrętki skrzydełkowej i
przesunięcie prowadnicy posuwu możliwe jest
wyregulowanie głębokości cięcia.
UWAGA
䡬 Pozostawienie poluzowanej nakrętki skrzydełkowej może
spowodować obrażenia ciała. Nakrętkę skrzydełkową
należy dokładnie dokręcić po ustawieniu głębokości cięcia.
ZAKŁADANIE WĘŻA SYSTEMU
ODPROWADZANIA PYŁU
Jeżeli podczas cięcia określonych materiałów wytwarza
się pył, należy użyć węża odprowadzania pyłu, postępując
w sposób następujący:
(1) Zdejmij gumową przykrywkę i załóż dostarczone złącze
(Rys. 3)
(2) Załóż odpowiedni dla urządzenia wąż systemu
odprowadzania pyłu, mocując go do złącza (Rys. 3).
UWAGA
䡬 Kiedy wąż odprowadzania pyłu nie jest używany, należy
zawsze nakładać na złącze gumową zaślepkę.
ZAKŁADANIE/ZDEJMOWANIE DIAMENTOWEJ
TARCZY TNĄCEJ
1. Zakładanie
(1) Zdejmij pokrywę (A).
(2) Usuń pył odkładający się podczas cięcia na trzpieniu
obrotowym i podkładkach.
(3) Należy upewnić się, że kierunek obrotów diamentowej
tarczy tnącej odpowiada kierunkowi wskazanemu na
skrzynce przekładniowej i zainstalować tarczę zgodnie
z Rys. 1.
(4) Dociśnij kołek blokujący i zamocuj trzpień obrotowy.
Dokręć nakrętkę za pomocą dostarczonego klucza
(Rys. 1).
UWAGA
䡬 Do dokręcania nakrętki należy używać wyłącznie klucza
dostarczonego z urządzeniem.
2. Zdejmowanie
Odkręć nakrętkę za pomocą dostarczonego klucza i
zdejmij diamentową tarczę tnącą (Rys. 1).
CIĘCIE
1. Sposób postępowania podczas cięcia (Rys. 4)
(1) Umieść narzędzie na materiale, który ma zostać przecięty
i ustaw diamentową tarczę tnącą wzdłuż linii cięcia.
Cięcie powinno zostać wykonane płynnie, dokładnie
wzdłuż wyznaczonej linii.
(2) Przycisk włączania wciskaj tylko wtedy, gdy diamentowa
tarcza tnąca nie dotyka jeszcze materiału.
2. Środki ostrożności bezpośredno po skończeniu pracy
Tarcza obraca się nadal po wyłączeniu narzędzia. Po
wyłączeniu nie odkładaj maszyny zanim obniżona tarcza
nie zatrzyma się całkowicie. To zabezpieczenie pomoże
uniknięcia poważnych wypadków i ograniczy ilość kurzu
i opiłków wciągniętych do maszyny.
UWAGA
䡬 Przed rozpoczęciem pracy należy zawsze sprawdzać
stan diamentowej tarczy tnącej. Nie wolno używać
tarczy, jeżeli jest pęknięta, złamana lub wygięta.
䡬 Nie polewaj diamentowej tarczy tnącej wodą lub płynem
chłodniczym.
䡬 Cięcie rozpoczynaj dopiero wtedy, kiedy urządzenie
osiągnie maksymalną prędkość.
䡬 W przypadku zakleszczenia diamentowej tarczy tnącej
lub niecodziennych odgłosów natychmiast wyłącz
urządzenie.
䡬 Nie należy w żadnym wypadku używać diamentowej
tarczy tnącej do wycinania linii łamanych lub krzywych.
Nigdy nie używaj powierzchni bocznej tarczy. Nie tnij
pod kątem.
䡬 Zbyt mocne dociskanie diamentowej tarczy tnącej
podczas cięcia może spowodować nie tylko
przeciążenie i spalenie silnika, ale także przegrzanie
diamentowej tarczy tnącej i zmniejszenie jej trwałości.
䡬 Podczas pracy należy uważać, aby przewód zasilający
nie mógł dotknąć diamentowej tarczy tnącej.
䡬 Po zakończeniu pracy wyłącz urządzenie i wyjmij
wtyczkę z gniazda zasilania.
KONSERWACJA I INSPEKCJA
1. Kontrola diamentowej tarczy tnącej
Zużycie diamentowej tarczy tnącej powoduje
przeciążenie silnika i zmniejszenie wydajności pracy.
Zużyta tarcza powinna być wymieniona na nową.
2. Zabrudzenie diamentowej tarczy tnącej
Szybkość zużywania się warstwy diamentowej na
krawędzi tnącej zależy od rodzaju ciętego materiału,
prędkości cięcia itd. Materiały zawierające cząstki
ziarniste powodują zwykle rysowanie i szybsze zużycie
tarczy tnącej. Z drugiej strony pył powstający podczas
cięcia może powodować zanieczyszczenie warstwy
diamentowej i zmniejszenie wydajności cięcia. W
przypadku zanieczyszczenia tarczy nie należy dociskać
jej mocniej, ponieważ może to spowodować iskrzenie
na obwodzie tarczy. W takim przypadku należy przerwać
pracę i dokładnie sprawdzić stan krawędzi tnącej,
pocierając ją palcem. Jeżeli warstwa diamentowa
wydaje się gładka (bez chropowatości lub szorstkości),
jest pokryta pyłem i powinna zostać oczyszczona.
W celu oszlifowania należy wykonać lekko
przyspieszone cięcie miękkiego materiału ziarnistego
(na przykład bloczek cementowy lub cegła) na długości
około 5 metrów. Umożliwia to usunięcie warstwy pyłu
i przywrócenie wydajności diamentowej tarczy tnącej
oraz wydłużenie jej żywotności.
Materiał diamentowy jest wrażliwy na wysoką
temperaturę i może zostać uszkodzony już w
temperaturze ok. 600˚C. Wyższa temperatura powoduje
22
Page 24

Polski
rozpad materiału diamentowego. Dlatego też konieczne
jest czyszczenie tarczy, kiedy tylko jest ona
zanieczyszczona lub pojawia się iskrzenie.
3. Sprawdzanie śrub mocujących
Regularnie sprawdzaj wszystkie mocujące śruby i
upewnij się, że są mocno przykręcone. Jeśli któraś z
nich się obluzuje, natychmiast ją przykręć. Zaniedbanie
tego może spowodować poważne zagrożenie.
4. Konserwacja silnika
Wirnik silnika jest sercem narzędzia.
Zadbaj, by wirnik nie został uszkodzony i nie zawilgotniał
lub pokrył się olejem.
5. Sprawdzanie szczotek węglowych (Rys. 5)
Silnik wyposażony jest w szczoteczki węglowe, które
ulegają stopniowemu zużyciu.
Jeśli szczoteczki osiągną poziom zużycia bliski lub równy
“granicy zużycia”, mogą spowodować uszkodzenie
silnika. Jeśli urządzenie wyposażone jest w szczoteczkę
węglową z funkcją automatycznego wyłączania, silnik
zatrzyma się samoczynnie.
W takiej sytuacji, obie szczoteczki węglowe należy
wymienić na nowe o takiej samej numeracji, jak pokazana
na rysunku. Dodatkowo, szczoteczki węglowe należy
utrzymywać w czystości i dbać o to, aby swobodnie
mogły poruszać się w obsadkach szczotkowych.
6. Wymiana szczotek węglowych (Rys. 6)
〈
Rozkładanie
(1) Poluzuj wkręt samogwintujący D4 zabezpieczający
(2) Użyj pomocniczego sześciokątnego klucza lub małego
(3) Wyjmij koniec przewodu szczotki węglowej z sekcji
〈
Montaż
(1) Włóż koniec przewodu szczotki węglowej do sekcji
(2) Włóż szczotkę węglową w obsadę szczotkową.
(3) Użyj pomocniczego sześciokątnego klucza lub małego
(4) Zamocuj pokrywę tylną i przykręć wkręt samogwintujący
7. Lista części zamiennych
UWAGA
MODYFIKACJE
〉
pokrywę tylną i zdejmij pokrywę tylną.
śrubokrętu w celu podciągnięcia krawędzi sprężyny
mocującej szczotkę węglową. Wyjmij krawędź sprężyny
w kierunku zewnętrznym obsady szczotkowej.
końcowej obsady szczotkowej i wyjmij szczotkę
węglową z obsady szczotkowej.
〉
końcowej obsady szczotkowej.
śrubokrętu w celu przywrócenia krawędzi sprężyny do
przodu szczotki węglowej.
D4.
A: Nr części
B: Nr kodu
C: Ilość użytych części
D: Uwagi
Naprawy, modyfikacji i kontroli Narzędzi Elektrycznych
Hitachi może dokonywać tylko Autoryzowane Centrum
Obsługi Hitachi.
Ta lista części będzie przydatna, jeśli zostanie wręczona
Autoryzowanemu Centrum Obsługi Hitachi, gdy
zaniesiemy narzędzie do naprawy lub przeglądu.
Podczas używania i konserwacji narzędzi elektrycznych
należy przestrzegać przepisów i norm bezpieczeństwa
danego kraju.
Narzędzia elektryczne Hitachi są ciągle ulepszane i
modyfikowane w celu wprowadzania najnowszych
osiągnięć nauki i techniki.
W związku z tym pewne części (a także numery kodów
i konstrukcja) mogą ulec zmianom bez uprzedzenia.
GWARANCJA
Gwarancja na elektronarzędzia Hitachi jest udzielana z
uwzględnieniem praw statutowych i przepisów krajowych.
Gwarancja nie obejmuje wad i uszkodzeń powstałych w
wyniku niewłaściwego użytkowania lub wynikających z
normalnego zużycia. W wypadku reklamacji należy
dostarczyć kompletne elektronarzędzie do autoryzowanego
centrum serwisowego Hitachi wraz z KARTĄ
GWARANCYJNĄ znajdującą się na końcu instrukcji obsługi.
UWAGA
W zwiazku z prowadzonym przez HITACHI programem
badań i rozwoju, specyfikacje te mogą się zmienić w
każdej chwili bez uprzedzenia.
Informacja dotycząca poziomu hałasu i wibracji
Mierzone wartości było określone według EN60745 i
zadeklarowane zgodnie z ISO 4871.
Zmierzony poziom dźwięku A: 106 dB (A)
Zmierzone ciśnienie akustyczne A: 95 dB (A)
Niepewność KpA: 3 dB (A)
Używaj ochraniacza uszu.
Wartość całkowita wibracji (trójosiowa suma wektorowa),
określona zgodnie z postanowieniami normy EN60745.
wartość emisji wibracji
Niepewność K = 1,5 m/s
OSTRZEŻENIE
䡬 Wartość emisji wibracji podczas pracy narzędzia
elektrycznego może różnić się od podanej wartości w
zależności od sposobu wykorzystywania narzędzia.
䡬 Aby określić środki bezpieczeństwa wymagane do
ochrony operatora zgodnie z szacowaną wartością
narażenia na zagrożenie w zależności od rzeczywistych
warunków użytkowania (uwzględniając wszystkie etapy
cyklu roboczego, a także przerwy w pracy urządzenia
oraz praca w trybie gotowości).
ah = 4,2 m/s
2
2
23
Page 25

Magyar
SZERSZÁMGÉPEKRE VONATKOZÓ
ÁLTALÁNOS BIZTONSÁGI FIGYELMEZTETÉSEK
FIGYELEM
Olvasson el minden biztonsági figyelmeztetést és
minden utasítást.
A figyelmeztetések és utasítások be nem tartása áramütést,
tüzet és/vagy súlyos sérülést eredményezhet.
Ôrizzen meg minden figyelmeztetést és utasítást a
jövőbeni hivatkozás érdekében.
A "szerszámgép" kifejezés a figyelmeztetésekben a hálózatról
működő (vezetékes) vagy akkumulátorról működő (vezeték
nélküli) szerszámgépre vonatkozik.
1) Munkaterületi biztonságr
a) Tartsa a munkaterületet tisztán és jól megvilágítva.
A telezsúfolt vagy sötét területek vonzzák a baleseteket.
b) Ne üzemeltesse a szerszámgépeket
robbanásveszélyes atmoszférában, mint például
gyúlékony folyadékok, gázok vagy por
jelenlétében.
A szerszámgépek szikrákat keltenek, amelyek
meggyújthatják a port vagy gőzöket.
c) Tartsa távol a gyermekeket és körülállókat,
miközben a szerszámgépet üzemelteti.
A figyelemelvonás a kontroll elvesztését okozhatja.
2) Érintésvédelem
a) A szerszámgép dugaszoknak meg kell felelniük
az aljzatnak.
Soha, semmilyen módon ne módosítsa a dugaszt.
Ne használjon semmilyen adapter dugaszt földelt
szerszámgépekkel.
A nem módosított dugaszok és a megfelelő aljzatok
csökkentik az áramütés kockázatát.
b) Kerülje a test érintkezését földelt felületekkel,
mint például csövekkel, radiátorokkal,
tűzhelyekkel és hűtőszekrényekkel.
Az áramütés kockázata megnövekszik, ha a teste
földelve van.
c) Ne tegye ki a szerszámgépeket esőnek vagy
nedves körülményeknek.
A szerszámgépbe kerülő víz növeli az áramütés
kockázatát.
d) Ne rongálja meg a vezetéket. Soha ne használja
a vezetéket a szerszámgép szállítására, húzására
vagy kihúzására.
Tartsa távol a vezetéket a hőtől, olajtól, éles
szegélyektől vagy mozgó alkatrészektől.
A sérült vagy összekuszálódott vezetékek növelik
az áramütés kockázatát.
e) Szerszámgép szabadban történő üzemeltetése
esetén használjon szabadtéri használatra
alkalmas hosszabbító kábelt.
A szabadtéri használatra alkalmas kábel használata
csökkenti az áramütés kockázatát.
f) Ha elkerülhetetlen a szerszámgép nyirkos helyen
történő használata, használjon maradékáramkészülékkel (RCD) védett táplálást.
Az RCD használata csökkenti az áramütés kockázatát.
3) Személyi biztonság
a) Álljon készenlétben, figyelje, hogy mit tesz, és
használja a józan eszét a szerszámgép
üzemeltetésekor.
Ne használja a szerszámgépet fáradtan,
kábítószer, alkohol vagy gyógyszer befolyása alatt.
A szerszámgépek üzemeltetése közben egy
pillanatnyi figyelmetlenség súlyos személyi sérülést
eredményezhet.
b) Használjon személyi védőfelszerelést. Mindig
viseljen védőszemüveget.
A megfelelő körülmények esetén használt
védőfelszerelés, mint például a porálarc, nem csúszó
biztonsági cipő, kemény sisak, vagy hallásvédő
csökkenti a személyi sérüléseket.
c) Előzze meg a véletlen elindítást. Győződjön meg
arról, hogy a kapcsoló a KI helyzetben van,
mielőtt csatlakoztatja az áramforráshoz és/vagy
az akkumulátorcsomaghoz, amikor felveszi vagy
szállítja a szerszámot.
A szerszámgépek szállítása úgy, hogy az ujja a
kapcsolón van vagy a bekapcsolt helyzetű
szerszámgépek áram alá helyezése vonzza a
baleseteket.
d) Távolítson el minden állítókulcsot vagy
csavarkulcsot, mielőtt bekapcsolja a
szerszámgépet.
A szerszámgép forgó részéhez csatlakoztatva
hagyott csavarkulcs vagy kulcs személyi sérülést
eredményezhet.
e) Ne nyúljon át. Mindenkor álljon stabilan, és őrizze
meg egyensúlyát.
Ez lehetővé teszi a szerszámgép jobb ellenőrzését
váratlan helyzetekben.
f) Öltözzön megfelelően. Ne viseljen laza ruházatot
vagy ékszert. Tartsa távol a haját, ruházatát és
kesztyűjét a mozgó részektől.
A laza ruházat, ékszer vagy hosszú haj beakadhat
a mozgó részekbe.
g) Ha vannak rendelkezésre bocsátott eszközök a
porelszívó és gyűjtő létesítmények
csatlakoztatásához, gondoskodjon arról, hogy ezek
csatlakoztatva és megfelelően használva legyenek.
A porgyűjtő használata csökkentheti a porhoz
kapcsolódó veszélyeket.
4) A szerszámgép használata és ápolása
a) Ne erőltesse a szerszámgépet. Használjon az
alkalmazásához megfelelő szerszámgépet.
A megfelelő szerszámgép jobban és
biztonságosabban végzi el a feladatot azon a
sebességen, amelyre azt tervezték.
b) Ne használja a szerszámgépet, ha a kapcsoló
nem kapcsolja azt be és ki.
Az a szerszámgép, amely a kapcsolóval nem
vezérelhető, veszélyes és meg kell javítani.
c) Húzza ki a dugaszt az áramforrásból és/vagy az
akkumulátorcsomagot a szerszámgépből, mielőtt
bármilyen beállítást végez, tartozékokat cserél
vagy tárolja a szerszámgépeket.
Az ilyen megelőző biztonsági intézkedések csökkentik
a szerszámgép véletlen beindulásának kockázatát.
d) A használaton kívüli szerszámgépeket tárolja
úgy, hogy gyermekek ne érhessék el, és ne
engedje meg, hogy a szerszámgépet vagy ezeket
az utasításokat nem ismerő személyek
üzemeltessék a szerszámgépet.
Képzetlen felhasználók kezében a szerszámgépek
veszélyesek.
e) A szerszámgépek karbantartása. Ellenőrizze a
helytelen beállítás, a mozgó részek elakadása,
alkatrészek törése és minden olyan körülmény
szempontjából, amelyek befolyásolhatják a
szerszám működését.
24
Page 26

Magyar
Ha sérült, használat előtt javíttassa meg a
szerszámot.
Sok balesetet a rosszul karbantartott szerszámgépek
okoznak.
f) A vágószerszámokat tartsa élesen és tisztán.
Az éles vágóélekkel rendelkező, megfelelően
karbantartott vágószerszámok kevésbé valószínűen
akadnak el és könnyebben kezelhetők.
g) A szerszámgép tartozékait és betétkéseit, stb.
használja ezeknek az utasításoknak megfelelően,
figyelembe véve a munkakörülményeket és a
végzendő munkát.
A szerszámgép olyan műveletekre történő
használata, amelyek különböznek a szándékoltaktól,
veszélyes helyzetet eredményezhet.
5) Szerviz
a) A szerszámgépét képesített javító személlyel
szervizeltesse, csak azonos cserealkatrészek
használatával.
Ez biztosítja, hogy a szerszámgép biztonsága
megmaradjon.
VIGYÁZAT
Tartsa távol a gyermekeket és beteg személyeket.
Amikor nincs használatban, a szerszámokat úgy kell tárolni,
hogy gyermekek és beteg személyek ne érhessék el.
ÓVINTÉZKEDÉSEK A DARABOLÓ
HASZNÁLATÁVAL KAPCSOLATBAN
1. Soha ne csatlakoztasson más szerszámot a gyártó
által előírt gyémántkorong kivételével.
Ne üzemeltesse a darabolót, miközben vizet használ.
2. Mindig ellenőrizze a gyémántkorongot a gép beindítása
előtt. Ne használja, ha az repedt, törött vagy elgörbült.
Ňvatosan indítsa be a gépet más rendellenességek
ellenőrzéséhez.
3. A gyémántkorong használata fém vágására rövidíti
annak működési élettartamát vagy törést
eredményezhet. Soha ne használja a gyémántkorongot
fém vágására.
4. Csak a maximális fordulatszám elérésekor kezdjen
dolgozni.
5. A túlzott erő túlterheli a motort. Mindig 5 mm vagy
kisebb vágásmélységgel vágjon.
6. Ne használja ezt a gépet azbeszt vágására.
7. Vágókorong használatával történő műveletekben, ha
láng csap ki, fedje le a porgyűjtő adaptert egy
gumisapkával és viseljen védőszemüveget.
MŰSZAKI ADATOK
Feszültség (terület szerint)* (110V, 230V)
Névleges teljesítményfelvétel* 1300W
Üresjárati fordulatszám 11000 min
Gyémántkorong méretei
Maximális vágási mélység 33mm
Súly (kábel és gyémántkorong nélkül) 2,9kg
* Ne felejtse el ellenőrizni a típustáblán feltüntetett adatokat, mivel ezek eladási területenként változnak!
Külső átm. 125mm
Vastagság 2,0mm
Furat átm. 22,2mm
–1
MŰSZAKI ADATOK
(1) Csavarkulcs ................................................................. 1
(2) Adapter ........................................................................ 1
(3) Oldalfogantyú ............................................................... 1
A standard tartozékok előzetes tájékoztatás nélkül
változhatnak.
ALKALMAZÁSOK
䡬 Beton vágása vagy bekarcolása
䡬 Burkolólap vágása vagy bekarcolása
䡬 Kő vágása vagy bekarcolása
䡬 Tetőcserép vágása vagy bekarcolása
25
AZ ÜZEMBEHELYEZÉS ELŐTTI TENNIVALÓK
1. Áramforrás
Ügyeljen rá, hogy a készülék adattábláján feltüntetett
feszültség értéke megegyezzen az alkalmazni
kívánt hálózati feszültséggel.
2. Hálózati kapcsoló
Ügyeljen rá, hogy a hálózati kapcsoló KI állásba legyen
kapcsolva. Ha a csatlakozódugót úgy csatlakoztatja a
dugaszolóaljzatba, hogy közben a hálózati kapcsoló BE
állásban van, a kéziszerszám azonnal működésbe lép,
ami súlyos balesetet idézhet elő.
3. Hosszabbító vezeték
Ha a munkaterület az áramforrástól távol található,
akkor egy megfelelő keresztmetszetű és teljesítményű
hosszabbító vezetéket kell alkalmazni.
Page 27

Magyar
4. A gyémántkorong ellenőrzése és felszerelése
Ellenőrizze, hogy a gyémántkorong az előírt típusú-e,
és nem repedt, törött vagy elgörbült-e. Ellenőrizze,
hogy a gyémántkorong szorosan került-e felszerelésre.
A felszereléshez olvassa el a “Gyémántkorong
felszerelése/eltávolítása” szakaszt.
5. A porgyűjtó fedél felszerelése és beállítása (1. Ábra)
A porgyűjtó fedél egy védőeszköz a sérülés
megelőzésére, ha a gyémántkorong működés közben
összetörne. Gondoskodjon róla, hogy a fedél
megfelelően fel legyen szerelve és rögzítve legyen a
vágási művelet megkezdése előtt. A csavar óvatos
elcsúsztatásával a porgyűjtő burkolat elfordítható, és
bármely kívánt szögben beállítható a maximális
működési hatékonyság érdekében. A porgyűjtő burkolat
beállítása után ellenőrizze a csavar rögzítettségét.
6. A tengelyrögzítő mechanizmus ellenörzése
A kéziszerszám bekapcsolása előtt a nyomógomb
kétszer-háromszor történő megnyomásával ellenőrizze,
hogy a tengelyrögzĺtő kikapcsol-e (lásd 1. Ábra).
7. Vágásmélység beállítása (2. Ábra)
A szárnyas anya lesüllyesztése lazít, a felemelése pedig
szorít.
A szárnyas anya meglazítása és a csúszó vezetőelem
mozgatása lehetővé teszi a vágásmélység beállítását.
FIGYELEM
䡬 A szárnyas anya meglazított állapotban hagyása sérülést
eredményezhet. Szorosan húzza meg a szárnyas anyát
a vágásmélység beállítása után.
PORGYŰJTŐ TÖMLŐ FELSZERELÉSE
Ha olyan anyagot vág, amelynél vágási por képződik, a
következőképpen használja a porgyűjtő tömlőt:
(1) Távolítsa el a gumisapkát és szerelje fel a kiegészítő
adaptert. (3. Ábra)
(2) Szerelje be a szerszámgéphez a porgyűjtő tömlőt a
kiegészítő adapterbe. (
FIGYELEM
䡬 Mindig szerelje fel a gumisapkát a porgyűjtő adapterre,
amikor nem használja a porgyűjtő tömlőt.
3. Ábra)
GYÉMÁNTKORONG FELSZERELÉSE/
ELTÁVOLÍTÁSA
1. Felszerelés
(1) Távolítsa el a burkolatot (A).
(2) Törölje le a vágási port a tengelyről és az alátétekről.
(3) Győződjön meg róla, hogy a gyémántkorong forgásiránya
megfelel a fogaskerékházon jelzett iránynak, és szerelje
fel a korongot az 1.
(4) Nyomja be a rögzítőcsapot és rögzítse a tengelyt.
Húzza meg a korong anyáját megfelelően a
rendelkezésre bocsátott csavarkulccsal. (1.
MEGJEGYZÉS
䡬 Mindig a rendelkezésre bocsátott csavarkulcsot
használja a korong anyájának rögzítésére.
2. Eltávolítás
Vegye le a korong anyáját a rendelkezésre bocsátott
csavarkulccsal és távolítsa el a gyémántkorongot. (1.
Ábra)
Ábrán bemutatottak szerint.
Ábra)
VÁGÁS
1. Vágási eljárások (4. Ábra)
(1) Helyezze a szerszámot a vágni kívánt anyagra és állítsa
egy vonalba a vágási vonalat és a gyémántkorongot.
A vágás egyenletesen végezhető, ha egyenesen előre
vág a vágási vonalon a kezdő vágásnál.
(2) Akkor kapcsolja be a kapcsolót, amikor a
gyémántkorong nem érinti a vágandó anyagot.
2. A közvetlenül a felületi megmunkálás után
betartandó óvintézkedések
A tárcsa a kéziszerszám kikapcsolása után még tovább
forog. Kikapcsolás után ne tegye le a gépet mindaddig,
amíg a süllyesztett közepű tárcsa teljesen le nem állt.
A súlyos balesetek veszélyének az elkerülése mellett
ilyen módon csökken a munkahelyen a por mértéke,
és a gép által beszívott reszelékek mennyisége.
FIGYELEM
䡬 Mindig ellenőrizze a gyémántkorongot a munka
elkezdése előtt. Soha ne használjon olyan
gyémántkorongot, amely repedt, törött vagy elgörbült.
䡬 Ne használjon vizet vagy hűtőanyagot a
gyémántkorongra.
䡬 Csak akkor kezdje el a vágást, amikor a gyémántkorong
eléri a maximális fordulatszámát.
䡬 Ha a gyémántkorong megszorul vagy bármilyen
rendellenes zaj van, azonnal kapcsolja ki az áramot.
䡬 Soha ne használja a gyémántkorongot cikk-cakkos
vagy ívelt vonalak vágására. Soha ne használja a
gyémántkorong oldalsó felületét. Soha ne használja
ferde vágás végzésére.
䡬 Ha túlzott erőt gyakorol a gyémántkorongra, hogy azt
a vágás során egy vonalba hozza a vágási vonallal,
ez nem csak túlterhelheti a motort és leégési károsodást
okozhat, hanem a gyémántkorongot is túlmelegítheti
és rövidítheti az élettartamát.
䡬 Vigyázzon, hogy a tápkábel ne kerülhessen érintkezésbe
a gyémántkoronggal az üzemelés során.
䡬 A munka elkészültekor kapcsolja le az áramot és húzza
ki a dugaszt a dugaszolóaljzatból.
ELLENŐRZÉS ÉS KARBANTARTÁS
1. A gyémántkorong ellenőrzése
A kopott gyémántkorong túlterheli a motort és csökkenti
a munkavégzés hatékonyságát. Cserélje ki egy új
koronggal.
2. Gyámántkorong elszalonnásodása
A gyémántkorong vágóélének kopási sebessége változik
a vágott anyag típusától, a vágási sebességtől, stb.
függően. Általánosságban azok az anyagok, amelyek
szemcsés vágási részecskéket hoznak létre, kaparhatják
a befoglaló anyagot és gyorsíthatják a gyémántréteg
kopását. Másrészt, azok az anyagok, amelyek porszerű
vágási részecskéket hoznak létre, a gyémántréteg
elszalonnásodását okozhatják, ami csökkenti a vágási
hatékonyságot. Amikor elszalonnásodás lép fel, a vágási
sebesség növelésének megkísérlésére alkalmazott
további erő néha szikrák megjelenését okozza a
gyémántkorong kerülete mentén. Ilyen esetben hagyja
abba a daraboló használatát és gondosan vizsgálja
meg a vágóélet az ujjaival történő végigdörzsöléssel.
Ha a gyémántréteg simának érződik (nem durva vagy
abrazív), akkor porral eltömődött és “után kell igazítani”.
Az alapos utánigazításhoz körülbelül 5 méter enyhén
gyorsuló vágás 10 mm mélységben olyan viszonylag
26
Page 28

Magyar
puha anyagban, amely szemcsés vágási részecskéket
hoz létre (mint például egy cementtömb vagy tégla),
helyreállítja a gyémántréteg vágási hatékonyságát és
megnöveli a gyémántkorong élettartamát.
A gyémánt anyag érzékeny a magas hőmérsékletekre,
és körülbelül 600˚C-nál elkezd tönkremenni. A magasabb
hőmérsékletek a gyémánt anyag lebomlását okozzák.
Ennek megfelelően fontos az “utánigazítás”, amint
elszalonnásodás vagy szikrázás fordul elő.
3. A rögzítő csavarok ellenőrzése
Rendszeresen ellenőrizzen minden rögzítő csavart, és
ügyeljen rá, hogy azok megfelelően meg legyenek szorítva.
Minden meglazult csavart azonnal szorítson meg. Ennek
elhanyagolása súlyos veszélyeket hordoz magában.
4. A motor karbantartása
A motor tekercselése az elektromos szerszám “szíve”.
Gondosan ügyeljen rá, hogy a tekercselés ne sérüljön,
illetve ne kerüljön kapcsolatba olajjal vagy vízzel.
5. A szénkefék ellenőrzése (5. Ábra)
A motor szénkeféket használ, amelyek fogyó alkatrészek.
Ha a kefék a „kopási határ”-ig vagy ennek közeléig
elhasználódtak, akkor ez a motor számára problémát
okozhat. Ha automatikusan leállító szénkefe van
beszerelve, akkor a motor automatikusan leáll.
Ekkor mindkét szénkefét cserélje ki olyan új szénkefékre,
amelyeknek a szénkefe-száma megegyezik az ábrán
bemutatottal. Ezen túlmenően a szénkeféket mindig
tartsa tisztán és gondoskodjon arról, hogy azok szabadon
mozogjanak a szénkefe-tartókban.
6. A szénkefék cseréje (6. Ábra)
〈
Szétszerelés
(1) Lazítsa meg a hátsó fedelet tartó D4-es rögzítőcsavart,
és vegye le a hátsó fedelet.
(2) A kiegészítő hatlapfejű csavarkulcs, vagy egy kisméretű
csavarhúzó segítségével húzza felfelé a szénkefét
leszorító rúgó szélét. Távolítsa el a rúgó szélét a
szénkefetartó külseje felé.
(3) Távolítsa el a szénkefén levő vezeték végét a
szénkefetartó elektromos csatlakozójából, majd emelje
ki a szénkefét a szénkefetartóból.
〈
Összeszerelés
(1) Dugja be a szénkefén levő vezeték végét a szénkefetartó
elektromos csatlakozójába.
(2) Illessze a szénkefét a szénkefetartóba.
(3) A kiegészítő hatlapfejű csavarkulcs, vagy egy kisméretű
csavarhúzó segítségével illessze vissza a rúgó szélét
a szénkefe fejrészébe.
(4) Szerelje vissza a hátsó fedelet, és húzza meg a D4-
es rögzítőcsavart.
7. Szervizelési alkatrészlista
A: Alkatrész-szám
B: Kódszám
C: Használt darabszám
D: Megjegyzések
FIGYELEM
Hitachi kéziszerszámok javítását, módosítását és
ellenőrzését csak Hitachi Szakszervíz végezheti.
Javítás vagy egyéb karbantartás esetén hasznos ha ezt
a szervíz-alkatrész listát a szerszámmal együtt átadjuk a
Hitachi szakszervíznek.
A kéziszerszámok üzemeltetése és karbantartása során
be kell tartani az egyes országokban érvényben lévő
biztonsági rendelkezéseket és szabványokat.
〉
〉
MÓDOSÍTÁSOK
A Hitachi kéziszerszámok állandó tökéletesítéseken
mennek át, hogy alkalmazni tudják a legújabb műszaki
fejlesztések eredményeit.
Éppen ezért egyes alkatrészek (azok kódszámai illetve
kiviteli módjai) előzetes bejelentés nélkül
megváltozhatnak.
GARANCIA
A Hitachi Power Tools szerszámokra a törvényes/országos
előírásoknak megfelelő garanciát vállalunk. A garancia nem
vonatkozik a helytelen vagy nem rendeltetésszerű
használatból, továbbá a normál mértékűnek számító
elhasználódásból, kopásból származó meghibásodásokra,
károkra. Reklamáció esetén kérjük, küldje el a - nem
szétszerelt - szerszámot a kezelési útmutató végén található
GARANCIA BIZONYLATTAL együtt a hivatalos Hitachi
szervizközpontba.
MEGJEGYZÉS
A HITACHI folyamatos kutatási és fejlesztési programja
következtében az itt szereplő műszaki adatok előzetes
bejelentés nélkül változhatnak.
A környezeti zajra és vibrációra vonatkozó információk
A mért értékek az EN60745 szabványnak megfelelően kerültek
meghatározásra és az ISO 4871 alapján kerülnek közzétételre.
Mért A hangteljesítmény-szint: 106 dB (A)
Mért A hangnyomás-szint: 95 dB (A)
Bizonytalanság KpA: 3 dB (A)
Viseljen hallásvédelmi eszközt.
VEN60745 szerint meghatározott rezgési összértékek
(háromtengelyű vektorösszeg).
Rezgési kibocsátási érték
Bizonytalanság K = 1,5 m/s
FIGYELEM
䡬 A rezgési kibocsátási érték a szerszámgép tényleges
használata során különbözhet a megadott értéktől a
szerszám használatának módjaitól függően.
䡬 A kezelő védelméhez szükséges biztonsági intézkedések
azonosításához, amelyek a használat tényleges
körülményeinek való kitettség becslésén alapulnak
(számításba véve az üzemeltetési ciklus minden részét,
mint például az időket, amikor a szerszám ki van kapcsolva,
és amikor üresjáratban fut a bekapcsolási időn túl).
ah = 4,2 m/s
2
2
27
Page 29

Čeština
OBECNÁ VAROVÁNÍ TÝKAJÍCÍ SE
BEZPEČNOSTI EL. PŘÍSTROJE
UPOZORNĚNÍ
Přečtěte si všechna varování týkající se bezpečnosti
a všechny pokyny.
Nedodržení těchto varování a pokynů může mít za následek
elektrický šok, požár a/nebo vážné zranění.
Všechna varování a pokyny si uschovejte. V budoucnu
se vám mohou hodit.
Pojem "elektrický nástroj" v těchto varováních se vztahuje k
vašemu elektrickému nástroji napájenému ze sítě (se šňůrou)
nebo napájenému z baterie (bez šňůry).
1) Bezpečnost na pracovišti
a) Udržujte vaše pracoviště čisté a dobře osvětlené.
V důsledku nepořádku nebo tmy dochází k nehodám.
b) Neprovozujte elektrické nástroje ve výbušném
ovzduší, např. v přítomnosti hořlavých kapalin,
plynů či prachu.
Elektrické nástroje produkují jiskry, které by mohly
zapálit prach anebo plyny.
c) Během práce s elektrickým nástrojem zabraňte
přístupu dětí a přihlížejících osob.
Rozptylování by mohlo způsobit ztrátu vaší kontroly
nad nástrojem.
2) Elektrická bezpečnost
a) Zástrčka elektrického nástroje musí odpovídat
zásuvce.
Nikdy se nepokoušejte zástrčku jakkoli
upravovat.
U uzemněných elektrických nástrojů nepoužívejte
žádné rozbočovací zásuvky.
Neupravované zástrčky a odpovídající zásuvky sníží
nebezpečí elektrického šoku.
b) Zabraňte kontaktu s uzemněnými povrchy jako
jsou trubky, radiátory, sporáky a lednice.
Je-li uzemněné vaše tělo, existuje zvýšené nebezpečí
elektrického šoku.
c) Nevystavujte elektrický nástroj dešti nebo vlhkým
podmínkám.
Voda, která vnikne do elektrického nástroje, zvýší
nebezpečí elektrického šoku.
d) Zacházejte správně s napájecí šňůrou. Nikdy
šňůru nepoužívejte k přenášení, tahání nebo
odpojování elektrického nástroje ze zásuvky.
Umístěte napájecí šňůru mimo působení horka,
mimo olej, ostré hrany nebo pohybující se části.
Poškozené nebo zamotané šňůry zvyšují nebezpečí
elektrického šoku.
e) Během provozu elektrického nástroje venku
používejte prodlužovací šňůru vhodnou k
venkovnímu použití.
Použití šňůry vhodné k venkovnímu použití snižuje
nebezpečí elektrického šoku.
f) Pokud je použití elektrického nástroje na vlhkém
místě nevyhnutelné, použijte napájení s
ochranným zařízením na zbytkový proud.
Použití zařízení na zbytkový proud snižuje riziko
elektrického šoku.
3) Osobní bezpečnost
a) Bute pozorní, sledujte, co děláte a při práci s
elektrickým nástrojem používejte zdravý rozum.
Elektrický nástroj nepoužívejte, jste-li unavení
nebo pod vlivem drog, alkoholu nebo léků.
Jediný okamžik nepozornosti při práci s elektrickým
nástrojem může způsobit vážné zranění.
b) Používejte osobní ochranné pracovní pomůcky.
Vždy noste ochranu očí.
Ochranné pracovní pomůcky jako respirátor,
bezpečnostní obuv s protiskluzovou podrážkou,
ochranná přilba nebo ochrana sluchu použité v
příslušných podmínkách sníží možnost zranění.
c) Zabraňte nechtěnému spuštění. Před připojením
ke zdroji napájení a/nebo bateriového zdroje,
zvedáním nebo přenášením elektrického nástroje
se ujistěte, že je spínač v poloze vypnuto.
Nošením elektrických nástrojů s prstem na vypínači
nebo jejich aktivací s vypínačem v poloze zapnuto
vzniká nebezpečí úrazu.
d) Před zapnutím elektrického nástroje odstraňte
seřizovací klíč.
Klíč ponechaný připevněný k rotující části
elektrického nástroje může způsobit zranění.
e) Nepřehánějte to. Vždy si udržujte správné
postavení a stabilitu.
To umožní lepší kontrolu nad elektrickým nástrojem
v nepředvídaných situacích.
f) Noste správný oděv. Nenoste volné oblečení ani
šperky. Vlasy, oděv a rukavice udržujte mimo
pohybující se části.
Volný oděv, šperky nebo dlouhé vlasy mohou být
vtaženy do pohybujících se částí.
g) Pokud jsou k dispozici zařízení k připojení přístrojů
k odsávání a sběru prachu, ujistěte se, že jsou
připojena a správně používána.
Použitím zařízení ke sběru prachu lze snížit rizika
související s prachem.
4) Používání a péče o elektrický nástroj
a) Netlačte na elektrický nástroj. Používejte vždy
vhodný elektrický nástroj pro danou aplikaci.
Správný elektrický nástroj provede daný úkol lépe
a bezpečněji, rychlostí, pro jakou byl zkonstruován.
b) Nepoužívejte elektrický nástroj, pokud nefunguje
jeho zapínání a vypínání pomocí vypínače.
Jakýkoli elektrický nástroj, který nelze ovládat
vypínačem, je nebezpečný a musí být opraven.
c) Před prováděním jakéhokoli seřízení, před
výměnou příslušenství nebo uskladněním
elektrických nástrojů vždy nejprve odpojte
zástrčku ze zdroje napájení a/nebo odpojte
bateriový zdroj.
Taková preventivní opatření snižují nebezpečí
nechtěného spuštění elektrického nástroje.
d) Nepoužívané elektrické nástroje skladujte mimo
dosah dětí a nedovolte, aby s elektrickým
nástrojem pracovaly osoby, které nejsou
seznámeny s ním nebo s pokyny k jeho používání.
Elektrické nástroje v rukou nevyškolených uživatelů
jsou nebezpečné.
e) Udržujte elektrické nástroje. Kontrolujte případná
vychýlení nebo sevření pohybujících se částí,
poškození částí a jakékoli ostatní podmínky,
které mohou mít vliv na provoz elektrických
nástrojů.
V případě poškození nechte elektrický nástroj
před jeho dalším použitím opravit.
Mnoho nehod vzniká v důsledku nesprávné údržby
elektrických nástrojů.
28
Page 30

Čeština
f) Udržujte řezací nástroje ostré a čisté.
Správně udržované řezací nástroje s ostrými řeznými
hranami se méně pravděpodobně zaseknou a lépe
se ovládají.
g) Elektrický nástroj, příslušenství, vsazené části
atd. používejte v souladu s těmito pokyny. Berte
přitom zřetel na pracovní podmínky a prováděnou
práci.
Použití elektrického nástroje k jinému než určenému
účelu může způsobit nebezpečnou situaci.
5) Servis
a) Servis vašeho elektrického nástroje svěřte
kvalifikovanému opraváři, který použije pouze
identické náhradní díly.
Tak bude i nadále zajištěna bezpečnost elektrického
nástroje.
PREVENTIVNÍ OPATŘENÍ
Nedovolte přístup dětem a slabomyslným osobám.
Pokud nástroje nepoužíváte, měli byste je skladovat mimo
dosah dětí a slabomyslných osob.
UPOZORNĚNÍ PRO POUŽÍVÁNÍ ŘEZAČKY
1. Nikdy nepřipojujte žádné jiné nářadí kromě
diamantového kotouče dle specifikace výrobce.
Nepracujte s řezačkou a současně s vodou.
2. Před spuštěním přístroje vždy zkontrolujte diamantový
kotouč. Je-li popraskaný, zlomený nebo ohnutý,
nepoužívejte jej. Přístroj spouštějte opatrně a sledujte
jiné abnormální projevy.
3. Použití diamantového kotouče k řezání kovů zkrátí jeho
životnost nebo dojde k jeho poškození. Nikdy
nepoužívejte diamantový kotouč k řezání kovů.
4. Práci zahajte až při dosažení maximálních otáček.
5. Nadměrná síla přetěžuje motor. Vždy řezejte s hloubkou
řezu 5 mm a méně.
6. Nepoužívejte tento přístroj k řezání azbestu.
7. Pokud při používání řezného kotouče vzniká plamen,
zakryjte adaptér pro zachycování prachu gumovou
zátkou a bezpodmínečně používejte ochranné brýle.
PARAMETRY
Napětí (podle oblastí)* (110V, 230V)
Vstupní příkon* 1300W
Rychlost bez zatížení 11000 min
Rozměry diamantového kotouče
Max. hloubka řezu 33mm
Váha (bez šňůry a diamantového kotouče) 2,9kg
* Zkontrolujte, prosíme, štítek na výrobku. Štítek podléhá změnám v závislosti na oblastech použití.
STANDARDNÍ PŘÍSLUŠENSTVÍ
(1) Klíč ...............................................................................1
(2) Adaptér ........................................................................ 1
(3) Vysouvací držadlo ....................................................... 1
Standardní příslušenství podléhá změnám bez upozornění.
POUŽITÍ
䡬 Řezání nebo rytí do betonu
䡬 Řezání nebo rytí do dlaždic
䡬 Řezání nebo rytí do kamene
䡬 Řezání nebo rytí do střešních tašek
PŘED POUŽITÍM
1. Zdroj napětí
Ujistěte se, že používaný zdroj napětí splňuje požadavky
specifikované na štítku výrobku.
2. Spínač
Ujistěte se, že spínač je v poloze vypnuto. Pokud je
zástrčka zasunuta v zásuvce elektrického proudu a
spínač je v poloze “ON”, nástroj začne okamž itě
pracovat, a to může způsobit vážný úraz.
3. Prodlužovací kabel
Pokud je pracoviště vzdáleno od zdroje, použijte
prodlužovací kabel o správné tloušce a kapacitě. Je
třeba, aby prodlužovací kabel byl co nejkratší.
29
4. Kontrola a instalace diamantového kotouče
Zkontrolujte, že diamantový kotouč odpovídá specifikaci
a že není popraskaný, zlomený nebo ohnutý.
Zkontrolujte, že je diamantový kotouč bezpečně
instalovaný. Pro informace o instalaci viz “Instalace/
demontáž diamantového kotouče”.
5. Instalace a nastavení krytu pro zachycování prachu
(Obr. 1)
Kryt pro zachycování prachu je ochranný prostředek
v případě, že dojde k roztříštění diamantového brusného
kotouče během práce. Ujistěte se, že je kryt správně
nastaven a připevněn před tím, než začnete řezat.
Lehkým uvolněním nastavovacího šroubu lze otočit a
nastavit kryt pro zachycování prachu v jakémkoli úhlu
pro maximální efektivitu práce. Ujistěte se, že po
nastavení krytu pro zachycování prachu nastavovací
šroub řádně dotáhnete.
6. Zkontrolujte pojistný mechanismus hřídele
Zkontrolujte, že pojistný mechanismus hřídele je vypnutý
a to dvěma nebo třemi stisknutími před zapnutím
nástroje (viz Obr. 1).
7. Nastavení hloubky řezu (Obr. 2)
Snížením křídlové matice dojde k uvolnění a jejím
zvýšením k dotažení.
Hloubku řezu nastavíte uvolněním křídlové matice a
posunutím vodítka saní.
Vnější průměr 125mm
Tlouška 2,0mm
Průměr otvoru 22,2mm
–1
Page 31

Čeština
UPOZORNĚNÍ
䡬 Ponechání křídlové matice v uvolněném stavu může
způsobit zranění. Po nastavení hloubky řezu bezpečně
dotáhněte křídlovou matici.
INSTALACE HADICE PRO ZACHYCOVÁNÍ
PRACHU
Při řezání materiálu způsobujícího vznik prachu používejte
hadici pro zachycování prachu následovně:
(1) Odstraňte gumovou zátku a instalujte adaptér, který
je součástí příslušenství. (Obr. 3)
(2) Do adaptéru, který je součástí příslušenství, instalujte
k elektrickému přístroji hadici pro zachycování prachu.
(Obr. 3)
UPOZORNĚNÍ
Na adaptér pro zachycování prachu vždy nasate gumovou
䡬
zátku, pokud nepoužíváte hadici pro zachycování prachu.
INSTALACE/DEMONTÁŽ DIAMANTOVÉHO
KOTOUČE
1. Instalace
(1) Odstraňte kryt (A).
(2) Otřete prach z hřídele a podložek.
(3) Ujistěte se, že směr rotace diamantového kotouče
odpovídá směru znázorněnému na převodové skříni a
instalujte diamantový kotouč podle obrázku 1.
(4) Stiskněte pojistný kolík a zajistěte hřídel. Dotáhněte
řádně matici k upevnění kotouče pomocí klíče, který
je součástí příslušenství. (Obr. 1)
POZNÁMKA
䡬 K zajištění matice pro upevnění kotouče vždy používejte
dodaný klíč.
2. Demontáž
Odstraňte matici pro upevnění kotouče pomocí dodaného
klíče a sejměte diamantový kotouč. (Obr. 1)
ŘEZÁNÍ
1. Postupy při řezání (Obr. 4)
(1) Umístěte tento přístroj na materiál, který chcete řezat,
a vyrovnejte čáru řezu s diamantovým kotoučem.
Řez bude hladký, pokud budete řezat rovně podél čáry
řezu.
(2) Stiskněte spínač, když se diamantový kotouč nedotýká
materiálu, který chcete řezat.
2. Upozornění na situaci ihned po ukončení brusné
operace
Kotouč se nadále otáčí i po vypnutí zařízení.
Po vypnutí brusky ji neodkládejte, dokud se brusný
kotouč úplně nezastaví. Kromě zamezení vážnému
zranění zabrání tento postup tvorbě prachu a jeho
nasátí do brusky.
UPOZORNĚNÍ
䡬 Před zahájením práce vždy zkontrolujte diamantový
kotouč. Nikdy nepoužívejte diamantový kotouč, je-li
popraskaný, zlomený nebo ohnutý.
䡬 Neaplikujte na diamantový kotouč vodu či chladicí
směs.
䡬 Začněte řezat, až když diamantový kotouč dosáhne
maximálních otáček.
䡬 Pokud se diamantový kotouč zadře nebo uslyšíte nějaký
abnormální zvuk, ihned přístroj vypněte.
䡬 Nikdy nepoužívejte diamantový kotouč k řezání klikatých
nebo zakřivených linií. Nikdy nepoužívejte boční stranu
diamantového kotouče k šikmým řezům.
䡬 Pokud budete na diamantový kotouč vyvíjet během
řezání nadměrnou sílu, aby se srovnal s čárou řezu,
může to způsobit nejen přetížení motoru a spálení, ale
také přehřátí diamantového kotouče a zkrácení jeho
životnosti.
䡬 Dávejte pozor, aby napájecí šňůra nepřišla během
práce do kontaktu s diamantovým kotoučem.
䡬 Po skončení práce vypněte přístroj a vytáhněte zástrčku
ze zásuvky.
ÚDRŽBA A KONTROLA
1. Kontrola diamantového kotouče
Opotřebený diamantový kotouč přetěžuje motor a
snižuje efektivitu práce. Vyměňte ho za nový.
2. Zanesení diamantového kotouče
Míra opotřebení ostří diamantové vrstvy závisí na druhu
materiálu, který řežete, rychlosti řezání atd. Obecně
platí, že materiály, které produkují zrnkové řezné částice,
mohou poškrábat tužicí prostředek a urychlit opotřebení
diamantové vrstvy. Na druhou stranu materiály, které
produkují práškové řezné částice, mohou způsobit
zanesení diamantové vrstvy, čímž dojde ke snížení
řezné efektivity. Objeví-li se zanesení, přídavná síla
aplikovaná s úmyslem zvýšit rychlost řezání někdy
způsobí vznik jisker okolo obvodu diamantového
kotouče. V takovém případě přestaňte řezačku používat
a opatrně prsty zkontrolujte ostří. Je-li diamantová
vrstva hladká (bez drsnosti či abrazivity), je zanesená
prachem a je nutné ji “opracovat”.
Pro řádné opracování provete cca 5 metrů mírně
zrychleného řezání s hloubkou řezu 10 mm na relativně
měkkém materiálu, který produkuje zrnkové řezné
částice (jako např. Cementová tvárnice nebo cihla). Tak
dojde k obnovení řezné efektivity diamantové vrstvy
a prodlouží se životnost diamantového kotouče.
Diamantový materiál je citlivý na vysoké teploty a při
cca 600˚C se začne kazit. Vyšší teploty způsobí rozklad
diamantového materiálu. Proto je důležité provést
“opracování” ihned, jakmile se objeví zanesení nebo
jiskření.
3. Kontrola šroubů
Pravidelně zkontrolujte všechny šrouby a ujistěte se,
že jsou správně utažené. Pokud najdete některé šrouby
uvolněné, ihned je utáhněte. Neutažené šrouby mohou
vést k vážnému riziku.
4. Údržba motoru
Vinutí motoru je srdce elektrického zařízení. Ujistěte se,
že vinutí není poškozené nebo vlhké vodou nebo olejem.
5. Kontrola uhlíkových kartáčků (Obr. 5)
Motor využívá uhlíkových kartáčů, které jsou spotřebním
materiálem.
Pokud se opotřebují nebo dosáhnout „limitu”
provozuschopnosti, mohlo by to vést k problémům s
motorem. Pokud je nástroj vybaven automatickým
zastavením funkce závisející na stavu kartáčů, motor
se zastaví automaticky.
Současně vyměňte oba uhlíkové kartáče za nové, se
stejnými čísly, jako jsou uvedené na obrázku. Kromě
toho je nutné vždy udržovat uhlíkové kartáče v čistotě
a zajistit, aby je do držáků bylo možné zasunout volně.
30
Page 32

Čeština
6. Výměna uhlíkových kartáčků (Obr. 6)
〈
Rozebrání
(1) Uvolněte D4 samořezné šroubky, které drží zadní kryt
(2) Použijte přídavný šestihranný klíč nebo malý šroubovák
(3) Vyjměte konec kontaktu kartáčku z koncovky držáku
〈
Sestava
(1) Vložte konec kontaktu kartáčku do koncovky držáku.
(2) Vložte uhlíkový kartáček do držáku kartáčku.
(3) Použijte přídavný šestihranný klíč nebo malý šroubovák
(4) Nasate zadní kryt a utáhněte samořezné šroubky D4.
7. Seznam servisních položek
POZOR
MODIFIKACE
〉
a sejměte jej.
na vytažení okraje pružiny, která tlačí dolů uhlíkový
kartáček. Vyjměte okraj pružiny směrem k vnějšímu
okraji držáku uhlíkového kartáčku.
a poté vyjměte kartáček z držáku.
〉
na zasunutí okraje pružiny na konec uhlíkového kartáčku.
A: Číslo položky
B: Kód položky
C: Číslo použití
D: Poznámky
Opravy, modifikace a kontroly zařízení Hitachi musí
provádět Autorizované servisní středisko Hitachi.
Tento seznam servisních položek bude užitečný,
předložíte-li jej s vaším zařízením Autorizovanému
servisnímu středisku Hitachi společně s požadavkem na
opravu nebo další servis.
Při obsluze a údržbě elektrických zařízení musí být
dodržovány bezpečnostní předpisy a normy platné v
každé zemi, kde je výrobek používán.
Výrobky firmy Hitachi jsou neustále zdokonalovány a
modifikovány tak, aby se zavedly nejposlednější
výsledky výzkumu a vývoje.
Následně, některé díly (např. čísla kódů nebo návrh)
mohou být změněny bez předešlého oznámení.
Informace o hluku a vibracích
Měřené hodnoty byly určeny podle EN60745 a deklarovány
ve shodě s ISO 4871.
Změřená vážená hladina akustického výkonu A: 106 dB (A)
Změřená vážená hladina akustického tlaku A: 95 dB (A)
Neurčitost KpA: 3 dB (A)
Použijte ochranu sluchu.
Celkové hodnoty vibrací (vektorový součet triax) stanovené
dle normy EN60745.
Hodnota vibračních emisí
Nejistota K = 1,5 m/s
UPOZORNĚNÍ
䡬 Hodnota vibračních emisí během vlastního používání
elektrického přístroje se může od deklarované hodnoty
lišit v závislosti na způsobu použití přístroje.
䡬 Pro identifikaci bezpečnostních opatření k ochraně
obsluhy založených na odhadu vystavení vlivům v daných
podmínkách použití (v úvahu bereme všechny části
pracovního cyklu, jako jsou doby, kdy je přístroj vypnutý,
a kdy běží naprázdno připočtených k době spouštění).
ah = 4,2 m/s
2
2
ZÁRUKA
Ručíme za to, že elektrické nářadí Hitachi splňuje zákonné/
místně platné předpisy. Tato záruka nezahrnuje závady
nebo poškození vzniklé v důsledku nesprávného použití,
hrubého zacházení nebo normálního opotřebení. V případě
reklamace zašlete prosím elektrické nářadí v nerozebraném
stavu společně se ZÁRUČNÍM LISTEM připojeným na
konci těchto pokynů pro obsluhu do autorizovaného
servisního střediska firmy Hitachi.
POZNÁMKA
Vlivem stále pokračujícího výzkumného a vývojového
programu HITACHI mohou zde uvedené parametry podléhat
změnám bez předchozího upozornění.
31
Page 33

Türkçe
GENEL ELEKTRÓKLÓ ALET GÜVENLÓK UYARILARI
DÓKKAT
Tüm güvenlik uyarılarını ve tüm talimatları okuyun.
Uyarılara ve talimatlara uyulmaması elektrik çarpmasına,
yangına ve/veya ciddi yaralanmaya neden olabilir.
Bu kılavuzu gelecekte baßvurmak üzere saklayın.
Uyarılarda kullanılan "elektrikli alet" terimi, ßebeke elektriåiyle
çalıßan (kablolu) veya pille çalıßan (kablosuz) elektrikli aletinizi
belirtir.
1) Çalıßma alanının güvenliåi
a) Çalıßma alanı temiz ve iyi aydınlatılmıß olmalıdır.
Daåınık veya karanlık alanlar kazalara davetiye çıkarır.
b) Elektrikli aletleri yanıcı sıvı, gaz veya toz patlayıcı
maddelerin bulunduåu ortamlarda çalıßtırmayın.
Elektrikli aletlerin çıkardıåı kıvılcımlar toz veya gaz
halindeki bu maddeleri ateßleyebilir.
c) Bir elektrikli aletle çalıßırken çocukları ve izleyicileri
uzaklaßtırın.
Dikkatinizin daåılması kontrolü kaybetmenize neden
olabilir.
2) Elektrik güvenliåi
a) Elektrikli aletin fißi elektrik prizine uygun olmalıdır.
Fißi herhangi bir ßekilde deåißtirmeyin.
Topraklanmıß elektrikli aletlerle herhangi bir
adaptör kullanmayın.
Fißlerde deåißiklik yapılmaması ve uygun prizlerde
kullanılması elektrik çarpma riskini azaltacaktır.
b) Borular, radyatörler, fırınlar ve buzdolapları gibi
topraklanmıß yüzeylerle gövde temasından
kaçının.
Vücudunuzun toprakla temasa geçmesi halinde elektrik
çarpma riski artar.
c) Elektrikli aletleri yaåmura veya ıslak ortamlara
maruz bırakmayın.
Elektrikli alete su girmesi elektrik çarpma riskini
artıracaktır.
d) Elektrik kablosuna zarar vermeyin. Elektrikli aleti
taßımak, çekmek veya fißini prizden çıkarmak için
kabloyu kullanmayın.
Kabloyu ısıdan, yaådan, keskin kenarlardan veya
hareketli parçalardan uzak tutun.
Hasar görmüß veya dolaßmıß kablolar elektrik çarpma
riskini artırır.
e) Elektrikli aleti açık alanda kullanırken, açık alanda
kullanıma uygun bir uzatma kablosu kullanın.
Açık alanda kullanıma uygun bir kablo kullanılması
elektrik çarpma riskini azaltır.
f) Eåer bir elektrikli aletin ıslak bir yerde kullanılması
kaçınılmaz ise, artık akım cihazıyla (RCD) korunan
bir güç kaynaåı kullanın.
RCD kullanılması elektrik çarpma riskini azaltır.
3) Kißisel emniyet
a) Bir elektrikli alet kullanırken daima tetikte olun;
yaptıåınız ißi izleyin ve saåduyulu davranın.
Aleti yorgunken, alkol veya ilaç etkisi altındayken
kullanmayın.
Elektrikli aletleri kullanırken göstereceåiniz bir anlık
dikkatsizlik ciddi yaralanmayla sonuçlanabilir.
b) Kißisel koruyucu donanım kullanın. Daima
koruyucu gözlük takın.
Uygun koßullar için kullanılan toz maskesi, kaymaz
emniyet ayakkabıları, kask veya kulak koruyucu gibi
koruyucu ekipmanlar yaralanmaları azaltacaktır.
c) Aletin istenmeden çalıßmasını engelleyin. Aleti
güç kaynaåına ve/veya akü ünitesine baålamadan,
kaldırmadan veya taßımadan önce, güç
düåmesinin kapalı konumda olduåundan emin
olun.
Elektrikli aletleri parmaåınız güç düåmesinin üzerinde
olarak taßımanız veya güç düåmesi açılmıß durumda
fißini takmanız kazalara davetiye çıkarır.
d) Aletin gücünü açmadan önce alet üzerindeki ayar
veya somun anahtarlarını çıkarın.
Aletin dönen parçalarından birine baålı kalan bir somun
anahtarı veya ayar anahtarı yaralanmaya yol açabilir.
e) Çok fazla yaklaßmayın. Uygun bir adım mesafesi
bırakın ve sürekli olarak dengenizi koruyun.
Böylece, beklenmedik durumlarda aleti daha iyi kontrol
etmeniz mümkün olur.
f) Uygun ßekilde giyinin. Bol elbiseler giymeyin ve
takı eßyaları takmayın. Saçlarınızı, elbisenizi ve
eldivenlerinizi hareketli parçalardan uzak tutun.
Bol elbiseler, takılar veya uzun saçlar hareketli
parçalara takılabilir.
g) Eåer toz çekme ve toplama baålantıları için gerekli
aygıtlar saålanmıßsa, bunların baålı olduåundan
ve doåru ßekilde kullanıldıåından emin olun.
Toz toplama kullanımı, tozla ilißkili tehlikeleri azaltabilir.
4) Elektrikli aletin kullanımı ve bakımı
a) Elektrikli aleti zorlamayın. Yapacaåınız iß için doåru
alet kullanın.
Doåru alet, ißinizi daha iyi ve tasarlanmıß olduåu hız
deåerinde daha güvenli ßekilde yapacaktır.
b) Elektrikli alet güç düåmesinden açılıp
kapanmıyorsa, aleti kullanmayın.
Güç düåmesiyle kontrol edilemeyen bir alet tehlikelidir
ve tamir edilmeden kullanılmamalıdır.
c) Herhangi bir ayar yapmadan, aksesuarları
deåißtirmeden veya aleti saklamadan önce fißi
güç kaynaåından ve/veya akü ünitesinden sökün.
Bu koruyucu güvenlik önlemleri, elektrikli aletin kazayla
çalıßma riskini azaltır.
d) Atıl durumdaki elektrikli aletleri çocukların
ulaßamayacaåı bir yerde saklayın ve elektrikli alet
ve bu kullanım talimatları hakkında bilgi sahibi
olmayan kißilerin aleti kullanmasına izin vermeyin.
Elektrikli aletler eåitimsiz kullanıcıların elinde
tehlikelidir.
e) Elektrikli aletin bakımını yapın. Hareketli parçalarda
yanlıß hizalanma veya sıkıßma olup olmadıåını,
kırık parça olup olmadıåını ve elektrikli aletin
çalıßmasını etkileyebilecek diåer koßulları kontrol
edin.
Eåer hasar varsa, kullanmadan önce aleti tamir
ettirin.
Kazaların çoåu elektrikli aletlere kötü bakım ißlemleri
uygulanmasından kaynaklanmaktadır.
f) Aletleri keskin ve temiz tutun.
Uygun ßekilde bakımı yapılan, keskin kenarlara sahip
aletlerin sıkıßma ihtimali daha azdır ve kontrol edilmesi
daha kolaydır.
g) Elektrikli aleti, aksesuarları, uçları, v.b., bu
talimatlara uygun ßekilde, çalıßma koßullarını ve
yapılacak ißi göz önünde bulundurarak kullanın.
Elektrikli aletin amaçlanan kullanımlardan farklı ißlemler
için kullanılması tehlikeli bir duruma yol açabilir.
32
Page 34

Türkçe
5) Servis
a) Elektrikli aletinizin servisini sadece orijinal yedek
parçalar kullanmak suretiyle uzman bir tamirciye
yaptırın.
Böylece, elektrikli aletin güvenli kullanımı
saålanacaktır.
ÖNLEM
Çocukları ve zayıf kißileri uzak tutun.
Alet, kullanılmadıåı zamanlarda çocukların ve zayıf
kißilerin ulaßamayacaåı bir yerde saklanmalıdır.
BETON KESÓCÓNÓN KULLANILMASIYLA ÓLGÓLÓ
UYARILAR
1. Üretici tarafından belirtildiåi gibi, elmas çark dıßında
herhangi bir alet takmayın.
Beton kesiciyi su uygularken çalıßtırmayın.
2. Daima makineyi çalıßtırmadan önce elmas çarkı kontrol
edin. Çatlamıß, kırılmıß veya bükülmüßse kullanmayın.
Makineyi dikkatli bir ßekilde çalıßtırarak baßka
anormallikler olup olmadıåını kontrol edin.
3. Elmas çarkın metal kesmek için kullanılması servis
ömrünü azaltır veya kırılmasına yol açar. Elmas çarkı
kesinlikle metal kesme ißlemleri için kullanmayın.
4. Maksimum dönme hızına ulaßılmadan çalıßmaya
baßlamayın.
5. Fazla kuvvet uygulanması motorun aßırı yüklenmesine
neden olur. Daima 5 mm veya daha az bir kesme
derinliåi uygulayarak kesin.
6. Bu makineyi amyant kesmek için kullanmayın.
7. Bir kesme çarkı kullanılarak yapılan ißlemlerde, alev
çıkması durumunda toz toplama kapaåı adaptörünü
lastik kapakla kapatın ve mutlaka koruyucu gözlük takın.
TEKNÓK ÖZELLÓKLER
Voltaj (bölgelere göre)* (110V, 230V)
Güç girißi* 1300W
Yüksüz hız 11000 dak
Elmas çarkın boyutları
Maksimum kesme derinliåi 33mm
Aåırlık (kablo ve elmas çark hariç) 2,9kg
* Bu deåer bölgeden bölgeye deåißiklik gösterdiåi için ürünün üzerindeki plakayı kontrol etmeyi unutmayın.
STANDART AKSESUARLAR
(1) Anahtar......................................................................... 1
(2) Adaptör......................................................................... 1
(3) Yan Kol........................................................................ 1
Standart aksesuarlarda önceden bildirimde bulunulmadan
deåißiklik yapılabilir.
UYGULAMALAR
䡬 Beton kesme veya çenterek ißaretleme
䡬 Kiremit kesme veya çenterek ißaretleme
䡬 Taß kesme veya çenterek ißaretleme
䡬 Çatı kiremidi kesme veya çenterek ißaretleme
ALETÓ KULLANMADAN ÖNCE
1. Güç kaynaåı
Kullanılan güç kaynaåının, ürünün üzerinde bulunan
plakada belirtilen güç gerekliliklerine uygun olduåundan
emin olun.
2. Açma/ Kapama anahtarı
Açma/ kapama anahtarının OFF konumunda olduåundan
emin olun. Açma/ kapama anahtarı ON konumundayken
aletin fißi prize takılırsa, alet derhal çalıßmaya baßlar
ve ciddi kazalar meydana gelebilir.
3. Uzatma kablosu
Çalıßma alanı güç kaynaåından uzakta olduåunda, yeterli
kalınlıkta ve belirtilen gücü kaldırabilen bir uzatma kablosu
kullanın. Uzatma kablosu olabildiåince kısa tutulmalıdır.
33
4. Elmas çarkın kontrol edilmesi ve takılması
Elmas çarkın spesifikasyona uygun olduåundan ve
çatlamıß, kırılmıß veya bükülmüß olmadıåından emin
olun. Elmas çarkın emniyetli ßekilde takılıp takılmadıåını
kontrol edin. Takma ißlemi için, “Elmas çarkın takılması/
çıkarılması” kısmına bakın.
5. Toz toplayıcı kapaåın takılması ve ayarlanması (Í
1)1)
1)
1)1)
Toz toplama kapaåı, çalıßma sırasında elmas çarkın
parçalanması durumunda yaralanmayı engellemek için
kullanılan bir korumadır. Taßlama ißlemine baßlamadan
önce, kapaåın doåru ßekilde takılıp yerine
sabitlendiåinden emin olun. Ayar vidasını hafifçe
gevßetmek suretiyle, toz toplama kapaåı döndürülebilir
ve maksimum etkin çalıßma için istenen açıya
ayarlanabilir. Toz toplama kapaåını ayarladıktan sonra
ayar vidasını iyice sıkın.
6. Kilit Óåne mekanizması
Aleti çalıßtırmadan önce, mil kilit düåmesine iki veya
üç kez bastırarak, iånenin devre dıßı olduåundan emin
olun (Í
7. Kesme derinliåi ayarı (Íekil 2)
Kelebek somun aßaåı indirildiåinde gevßer,
kaldırıldıåında ise sıkıßır.
Kelebek somunun gevßetilmesi ve sürgü yataåının
hareket ettirilmesiyle kesme derinliåi ayarlanabilir.
DÓKKAT
䡬 Kelebek somunun gevßek bırakılması yaralanmaya
neden olabilir. Kesme derinliåini ayarladıktan sonra
kelebek somunu emniyetli ßekilde sıkın.
Dıß çap 125mm
Kalınlık 2,0mm
Delik çapı 22,2mm
ekil 1’ye ekil 1’ye
ekil 1’ye bakın).
ekil 1’ye ekil 1’ye
-1
ekilekil
ekil
ekilekil
Page 35

Türkçe
TOZ EMME HORTUMUNUN TAKILMASI
Keserken toz üreten bir malzemeyi keserken, toz emme
hortumunu aßaåıda belirtildiåi gibi kullanın:
(1) Lastik kapaåı kaldırın ve aksesuar adaptörünü takın.
(Íekil 3)
(2) Toz emme hortumunu aksesuar adaptörüne takın. (Íekil
3)
DÓKKAT
䡬 Toz emme hortumu kullanılmadıåında, daima toz
toplama adaptörü üzerine bir lastik kapak takın.
ELMAS ÇARKIN TAKILMASI/ÇIKARILMASI
1. Montaj
(1) Kapaåı (A) çıkarın.
(2) Kesme ißlemi sonucu mil ve rondelalar üzerinde biriken
tozları silin.
(3) Elmas çarkın dönme yönünün dißli kutusunda belirtilen
yöne uygun olduåundan emin olun ve elmas çarkı Íekil
1’de görüldüåü gibi takın.
(4) Kilitleme pimini bastırın ve mili sabitleyin. Ürünle birlikte
gelen anahtarla çark somununu gerektiåi kadar sıkın.
(Íekil 1)
NOT
䡬 Çark somununu sıkmak için daima ürünle birlikte gelen
anahtarı kullanın.
2. Sökme ißlemi
Ürünle birlikte gelen anahtarla çark somununu sökün
ve elmas çarkı çıkarın. (Íekil 1)
KESME
1. Kesme ißlemleri (Íekil 4)
(1) Aleti kesilecek malzemenin üzerine yerleßtirin ve elmas
çarkı kesme çizgisiyle hizalayın.
Ólk kesme noktasından itibaren düz kesme çizgisi
boyunca ileri yönde kesmeye devam ederseniz düzgün
bir kesme ißlemi elde edebilirsiniz.
(2) Elmas çarkı kesilecek malzemeyle temas ettirmeden
düåmeyi açın.
2. Óßlemden Hemen Sonra Uygulanacak Önlemler
Alet kapatıldıktan sonra taßlama diski dönmeye devam
eder.
Alet kapatıldıktan sonra taßlama diski tamamen durmadıkça
makineyi yere bırakmayın. Bu önlem, olası ciddi kazaların
önlenmesinin yanı sıra, aletin içine toz ve kir girmesini
de engeller.
DÓKKAT
䡬 Daima iße baßlamadan önce elmas çarkı kontrol edin.
Çatlamıß, kırılmıß veya bükülmüß durumdaki bir elmas
çarkı kesinlikle kullanmayın.
䡬 Elmas çarka su veya soåutucu madde uygulamayın.
䡬 Elmas çark maksimum hızına ulaßmadan kesmeye
baßlamayın.
䡬 Eåer elmas çark tutukluk yaparsa veya anormal bir
gürültü duyarsanız, derhal güç düåmesini kapatın.
䡬 Elmas çarkı asla zigzag veya kavisli kesim yapmak için
kullanmayın. Elmas çarkın yan yüzeyini asla kullanmayın.
Kesinlikle eåimli kesim ißlemleri için kullanmayın.
䡬 Kesme ißlemi sırasında elmas çarka kesme çizgisiyle
hizalamak için fazla kuvvet uygulanması durumunda
hem motor aßırı yüklenme sonucu yanabilir hem de
elmas çark aßırı ısınarak kullanma ömrü kısalabilir.
䡬 Óßlem sırasında elektrik kablosunun elmas çarkla temas
etmemesine dikkat edin.
䡬 Óßlem tamamlandıåında, güç düåmesini kapatın ve
elektrik fißini prizden çekin.
BAKIM VE ÓNCELEME
1. Elmas çarkı kontrol edin.
Aßınmıß bir elmas çark, motorun aßırı yüklenmesine
neden olur ve çalıßma verimini azaltır. Elmas çarkı
yenisiyle deåißtirin.
2. Elmas çarkın tıkanması
Elmas tabakanın kesme kenarının aßınma hızı, kesilen
malzemenin türüne, kesme hızına, v.b. baålı olarak
deåißir. Genel olarak, granül ßeklinde kesme parçacıkları
üreten malzemeler gövde maddesini sıyırarak elmas
tabakanın aßınmasını hızlandırabilir. Diåer taraftan, toz
ßeklinde kesme parçacıkları üreten malzemeler elmas
tabakanın tıkanmasına neden olarak kesme verimini
azaltır. Tıkanma olußtuåunda, kesme hızını artırmak
için uygulanan ilave kuvvet bazen elmas çarkın etrafında
kıvılcımların görülmesine neden olacaktır. Böyle
durumlarda, aleti kullanmayı kesin ve kesme kenarını
parmaklarınızla dokunarak dikkatli bir ßekilde kontrol
edin. Eåer parmaklarınız elmas tabakayı düzgün
(pürüzsüz ve kaygan) hissediyorsa, tıkanmıß demektir
ve temizlenmesi gerekir.
Tam bir temizlik için, granül ßeklinde kesme parçacıkları
üreten göreli olarak yumußak(briket veya tuåla gibi) bir
malzeme 10 mm derinlikte yaklaßık 5 metre hafif yüksek
bir hızda kesilir. Bu ißlem, elmas tabakanın kesme
etkinliåini geri kazandıracak ve kullanım ömrünü
artıracaktır.
Elmas malzeme, yüksek sıcaklıklara hassastır ve
yaklaßık 600°C’de bozulmaya baßlar. Daha yüksek
sıcaklıklar, elmas malzemenin ayrıßmasına neden
olacaktır. Bu nedenle, tıkanma veya kıvılcımlar görülür
görülmez elmas tabakanın temizlenmesi önemlidir.
3. Montaj vidalarının incelenmesi:
Tüm montaj vidalarını düzenli olarak inceleyin ve saålam
ßekilde sıkılı olduåundan emin olun. Gevßeyen vidaları
derhal sıkın. Gevßemiß vidalar ciddi tehlikelere yol
açabilir.
4. Motorun incelenmesi
Motor biriminin sargıları, bu aåır iß aletinin “kalbidir”.
Sargının hasar görmediåinden ve/veya yaå ya da su
ile ıslanmadıåından emin olun.
5. Kömürlerin Kontrol Edilmesi (Íekil 5)
Motorda tükenebilir malzemeler olan kömürler kullanılır.
Kömürler yıprandıåında veya “yıpranma sınırına”
yaklaßtıåında, bu motorda sorunlara neden olabilir.
Otomatik durdurmalı kömür kullanıldıåında motor
otomatik olarak duracaktır.
Bu durumda, her iki kömürü de ßekilde gösterilenle aynı
kömür tanımlama numarasına sahip kömürlerle deåißtirin.
Ayrıca, kömürleri daima temiz tutun ve kömür tutucuların
içinde serbestçe kayabildiklerinden emin olun.
6. Kömürleri deåißtirme (Íekil 6)
〈
〉
Sökme
(1) Arka kapaåı tutan D4 kılavuz vidayı gevßetin ve arka
kapaåı çıkarın.
(2) Kömürü aßaåıda tutan yayı kenarından çekmek için
yardımcı altıgen anahtarı veya küçük tornavidayı
kullanın. Yayın kenarını kömür tutucusunun dıßına
çıkarın.
34
Page 36

Türkçe
(3) Kömürün üzerindeki baålantı telinin ucunu kömür
tutucunun baålantı bölümünden çıkarın, ardından
kömürü, kömür tutucudan çıkarın.
〈
〉
Takma
(1) Kömür baålantı telinin ucunu kömür tutucunun baålantı
bölümüne takın.
(2) Kömürü, kömür tutucuya takın.
(3) Yayın kenarını kömürün kafasına geri takmak için
yardımcı altıgen anahtarı veya küçük tornavidayı kullanın.
(4) Arka kapaåı takın ve D4 kılavuz vidayı sıkıßtırın.
7. Servis parçaları listesi
A : Parça no.
B : Kod no.
C : Kullanılan sayı
D : Açıklamalar
DÓKKAT
Hitachi Güç Takımlarının onarımı, modifikasyonu ve
gözden geçirilmesi Hitachi yetkili Servis Merkezi
tarafından yapılmalıdır.
Hitachi yetkili Servis Merkezine tamir ya da bakım
amacıyla baßvurulduåunda Parça Listesinin takım ile
birlikte verilmesi faydalı olacaktır.
Güç takımlarının çalıßtırılması ve bakımlarının yapılması
esnasında her ülke için belirtilen güvenlik düzenlemelerine
ve standartlarına uyulması gerekmektedir.
DEÅÍÓKLÓKLER
Hitachi Aåır Óß Aletleri en son teknolojik ilerlemelere
uygun olarak sürekli deåißtirilmekte ve gelißtirilmektedir.
Dolaysyla ısıyla, bazı kısımlarda (örneåin kod numaraları
ve/veya tasarım gibi) önceden bildirimde bulunulmadan
deåißiklik yapılabilir.
GARANTÓ
Hitachi Elektrikli El Aletlerine ülkelere özgü hukuki
düzenlemeler çerçevesinde garanti vermekteyiz. Bu garanti,
yanlıß veya kötü kullanım, normal aßınma ve yıpranmadan
kaynaklanan arıza ve hasarları kapsamamaktadır. Íikayet
durumunda, Elektrikli El Aleti, sökülmemiß bir ßekilde, bu
kullanım kılavuzunun sonunda bulunan GARANTÓ
BELGESÓYLE birlikte bir Hitachi yetkili servis merkezine
gönderilmelidir.
Havadan yayılan gürültü ve titreßimle ilgili bilgiler
Ölçülen deåerlerin EN60745 ve ISO 4871’e uygun olduåu
tespit edilmißtir.
Ölçülmüß A-aåırlıklı ses gücü seviyesi: 106 dB (A)
Ölçülmüß A-aåırlıklı ses basınç seviyesi: 95 dB (A)
Belirsiz KpA: 3dB (A)
Kulak koruyucusu kullanın.
EN60745'e göre belirlenen toplam vibrasyon deåerleri (üç
eksenli vektör toplamı).
Vibrasyon emisyon deåeri
Belirsizlik K = 1,5 m/s
DÓKKAT
䡬 Elektrikli aletin kullanımı sırasında vibrasyon emisyonu
aletin kullanma ßekline baålı olarak belirtilen deåerden
farklılık gösterebilir.
䡬 Gerçek kullanım koßullarında tahmini maruz kalma
hesabını esas alarak (kullanım süresine ilave olarak
aletin kapatıldıåı ve rölantide çalıßtıåı zamanlarda
çalıßma çevriminde yer alan tüm parçaları dikkate almak
suretiyle) operatörü korumak için gerekli güvenlik
önlemlerini belirlemek için.
ah = 4,2 m/s
2
2
NOT
HITACHI’nin süregelen araßtırma ve gelißtirme programına
baålı olarak burada belirtilen teknik özelliklerde önceden
bildirimde bulunulmadan deåißiklik yapılabilir.
35
Page 37

Română
AVERTISMENTE GENERALE PRIVIND
SIGURANŢA ÎN FOLOSIREA SCULEI
ELECTRICE
AVERTISMENT
Citiţi toate avertismentele privind siguranţa și toate
instrucţiunile.
Nerespectarea avertismentelor și a instrucţiunilor poate
avea ca efect producerea de șocuri electrice, incendii și/
sau vătămări grave.
Păstraţi toate avertismentele și toate instrucţiunile,
pentru a le putea consulta pe viitor.
Termenul "sculă electrică" prezent în toate avertismentele de
mai jos se referă la scula dumneavoastră electrică alimentată
la priză (cu cablu de alimentare) sau la scula electrică alimentată
de la acumulatori (fără cablu de alimentare).
1) Siguran˛a Ón zona de lucru
a) Păstraţi zona de lucru curată și bine luminată.
Zonele de lucru dezordonate și întunecate predispun
la accidente.
b) Nu utilizaţi sculele electrice în atmosferă
explozivă, cum ar fi în prezenţa lichidelor, gazelor
sau a prafurilor inflamabile.
Sculele electrice produc scântei care pot aprinde
praful sau aburii.
c) Ţineţi copiii sau privitorii la distanţă în timp ce
utilizaţi scula electrică.
Distragerea atenţiei vă poate face să pierdeţi controlul
asupra sculei.
2) Siguranţa din punct de vedere electric
a) Ștecărele sculelor electrice trebuie să se
potrivească în prizele în care sunt introduse.
Nu modificaţi niciodată ștecărul în nici un fel.
Nu folosiţi niciun fel de adaptoare pentru ștecăr
la sculele electrice cu împământare (legate la
pământ).
Ștecărele nemodificate și prizele potrivite reduc riscul
de șoc electric.
b) Evitaţi contactul corpului cu suprafeţele legate
la pământ, cum ar fi conductele, radiatoarele,
cuptoarele și frigiderele.
În cazul în care corpul dvs. este legat la pământ există
un risc crescut de electrocutare.
c) Nu expuneţi sculele electrice la ploaie și nu le
lăsaţi în atmosferă umedă.
Intrarea apei într-o sculă electrică mărește riscul de
electrocutare.
d) Nu forţaţi cablul de alimentare. Nu folosiţi
niciodată cablul de alimentare pentru a transporta,
a trage sau a scoate scula electrică din priză.
Ţineţi cablul de alimentare departe de căldură,
ulei, muchii ascuţite și de piese în mișcare.
Cablurile de alimentare deteriorate sau încolăcite
măresc riscul de șoc electric.
e) Atunci când folosiţi o sculă electrică în aer liber,
folosiţi un prelungitor adecvat pentru utilizarea
în exterior.
Folosirea unui prelungitor adecvat pentru exterior
reduce riscul de șoc electric.
f) Dacă utilizarea într-o zonă umedă nu poate fi
evitată, folosiţi o sursă de alimentare cu
întrerupător de protecţie la curent rezidual (RCD).
Folosirea dispozitivelor RCD reduce riscul producerii
șocurilor electrice.
3) Siguranţa personală
a) Atunci când folosiţi o sculă electrică fiţi vigilent,
fiţi atent la ceea ce faceţi și acţionaţi conform
bunului simţ.
Nu folosiţi scule electrice atunci când sunteţi
obosit sau vă aflaţi sub influenţa drogurilor, a
alcoolului sau a medicamentelor.
Un moment de neatenţie în timpul utilizări unei scule
electrice poate provoca vătămări personale grave.
b) Folosiţi echipament personal de protecţie.
Purtaţi întotdeauna protecţie a ochilor.
Echipamentele de protecţie cum ar fi măștile pentru
praf, încălţămintea anti-alunecare, căștile și protecţiile
auditive, folosite în situaţiile corespunzătoare, reduc
vătămările personale.
c) Evitaţi pornirea accidentală. Înainte de a conecta
scula la priză și/sau la bateria de acumulatori
și înainte de a ridica sau transporta scula,
asiguraţi-vă că aveţi comutatorul de pornire pe
poziţia oprit.
Transportarea sculelor electrice cu degetul pe
comutator sau introducerea în priză a sculelor
electrice care au comutatorul pe poziţia pornit sunt
situaţii ce predispun la accidente.
d) Înainte de a pune scula electrică în funcţiune,
îndepărtaţi toate cheile de reglare și orice alte
chei.
O cheie sau o cheie de reglare rămase atașate de
piesa rotativă a sculei electrice poate provoca
vătămări personale.
e) Nu încercaţi să ajungeţi prea departe. Menţineţi
permanent un contact corect al piciorului și un
bun echilibru.
Acest lucru permite un mai bun control al sculei
electrice în situaţii neașteptate.
f) Îmbrăcaţi-vă adecvat. Nu purtaţi haine largi și
nici bijuterii. Ţineţi-vă părul, hainele și mănușile
departe de piesele în mișcare.
Hainele largi, bijuteriile și pot fi prinse în piesele în
mișcare.
g) Dacă sunt prevăzute dispozitive de conectare
la facilităţi de extragere și colectare a prafului,
asiguraţi-vă că acestea sunt conectate și sunt
folosite corespunzător.
Folosirea acestor dispozitive poate reduce pericolele
legate de praf.
4) Utilizarea și îngrijirea sculei electrice
a) Nu forţaţi scula electrică. Folosiţi scula adecvată
pentru aplicaţia dvs.
Scula potrivită va face treabă mai bună și mai sigură
la parametrii la care a fost proiectată.
b) Nu folosiţi scula electrică în cazul în care
comutatorul nu își îndeplinește funcţia de pornire
și oprire.
Sculele electrice care nu pot fi comandate prin
intermediul comutatorului sunt periculoase și trebuie
reparate.
c) Înainte de a face orice fel de reglaje, de a
schimba accesoriile și de a depozita sculele
electrice, scoateţi ștecărul din priză și/sau de
la bateria de acumulatori.
Aceste măsuri preventive de siguranţă reduc riscul
pornirii accidentale a sculei electrice.
36
Page 38

Română
d) Depozitaţi sculele electrice neutilizate departe
de zona de acţiune a copiilor și nu lăsaţi
persoanele care nu sunt familiarizate cu scula
electrică sau cu prezentele instrucţiuni să
folosească scula electrică.
Sculele electrice sunt periculoase în mâinile
utilizatorilor neinstruiţi.
e) Întreţineţi sculele electrice. Verificaţi alinierea
și prinderea pieselor în mișcare, ruperea pieselor
precum și toate celelalte aspecte care ar putea
să influenţeze funcţionarea sculelor electrice.
Dacă scula electrică este deteriorată, înainte de
a o utiliza duceţi-o la reparat.
Multe accidente sunt provocate de scule electrice
necorespunzător întreţinute.
f) Păstraţi elementele de tăiere curate și ascuţite.
Elementele de tăiere bine întreţinute și cu muchiile
tăietoare bine ascuţite sunt mai ușor de controlat și
este mai puţin probabil să se agaţe.
g) Folosiţi scula electrică, accesoriile și vârfurile
etc. în conformitate cu prezentele instrucţiuni,
luând în considerare condiţiile de lucru și
operaţiunile ce urmează a fi efectuate.
Folosirea sculei electrice pentru alte operaţiuni decât
cele prevăzute poate avea ca efect apariţia unor
situaţii periculoase.
5) Service
a) Scula electrică trebuie reparată de o persoană
calificată, folosind numai piese de schimb
identice.
Astfel se asigură menţinerea siguranţei sculei
electrice.
PRECAUŢIE
Ţineţi copiii și persoanele infirme la distanţă.
Atunci când nu este folosită, scula electrică trebuie
depozitată departe de zona de acţiune a copiilor și
a persoanelor infirme.
PRECAUŢII LA FOLOSIREA MAȘINII DE
TĂIAT CANELURI ÎN ZIDĂRIE
1. Nu atașaţi niciodată vreo altă sculă în afara discului
diamantat specificat de producător.
Nu utilizaţi mașina de tăiat caneluri în zidărie în timp
ce aplicaţi apă.
2. Înainte de a porni mașina, verificaţi întotdeauna discul
diamantat. Nu îl utilizaţi dacă este crăpat, spart sau
îndoit. Porniţi mașina cu atenţie, pentru a observa orice
posibilă anormalitate.
3. Dacă utilizaţi discul diamantat pentru a tăia metale, viaţa
discului se va scurta sau discul se va sparge. Nu folosiţi
niciodată discul diamantat pentru a tăia metale.
4. Începeţi să lucraţi numai după ce a fost atinsă viteza
de rotaţie maximă.
5. Forţa excesivă duce la suprasolicitarea motorului. Tăiaţi
întotdeauna la o adâncime de maximum 5mm.
6. Nu folosiţi această mașină pentru a tăia azbest.
7. Dacă în operaţiunile în care se folosește un disc
diamantat ies scântei, acoperiţi adaptorul pentru
colectarea prafului cu un capac din cauciuc și purtaţi
ochelari de protecţie.
SPECIFICAŢII
Tensiune de alimentare (pe zone)* (110V, 230V)
Putere instalată* 1300W
Viteză fără sarcină 11000 min
Dimensiunile discului diamantat
Adâncimea max. de tăiere 33mm
Greutate (fără cablu de alimentare și fără disc diamantat)
* Verificaţi plăcuţa cu specificaţii a produsului, deoarece acesta poate diferi de la o zonă la alta.
Diam. exterior 125mm
Grosime 2,0mm
Diam. orificiului 22,2mm
–1
2,9kg
ACCESORII STANDARD
(1) Cheie ............................................................................ 1
(2) Adaptor ........................................................................1
(3) Mâner lateral ............................................................... 1
Accesoriile standard pot fi schimbate fără notificare
prealabilă.
UTILIZARE
䡬 Tăierea sau modelarea betonului
䡬 Tăierea sau modelarea plăcilor de gresie/faianţă
䡬 Tăierea sau modelarea pietrei
䡬 Tăierea sau modelarea ţiglei
37
ÎNAINTE DE UTILIZARE
1. Sursa de alimentare cu energie electrică
Asiguraţi-vă de faptul că sursa de alimentare cu energie
electrică ce urmează a fi folosită este conformă cu
cerinţele indicate pe plăcuţa indicatoare a produsului.
2. Comutatorul pentru punere în funcţiune
Asiguraţi-vă că aţi poziţionat comutatorul în poziţia
OFF (OPRIT). Dacă ștecherul este conectat la priză iar
comutatorul este în poziţia ON (PORNIT), mașina va
începe să funcţioneze imediat, putându-se produce
vătămări grave.
3. Cablul prelungitor
Atunci când zona de lucru este departe de sursa de
alimentare, folosiţi un cablu prelungitor de o grosime
suficientă și cu parametri corespunzători. Cablul
prelungitor trebuie să fie cât mai scurt posibil.
Page 39

Română
4. Verificarea și montarea discului diamantat
Verificaţi pentru a vă asigura că discul diamantat este
de tipul specificat și că acesta nu este crăpat, spart
sau îndoit. Verificaţi pentru a vă asigura că discul
diamantat este montat corect și sigur. Pentru montare
consultaţi secţiunea “Montarea/demontarea discului
diamantat”.
5. Montarea și reglarea carcasei colectorului de praf
(Fig. 1)
Carcasa colectorului de praf este un dispozitiv de
protecţie care previne vătămările în situaţia în care
discul diamantat se sparge în timpul utilizării. Înainte
de a începe să lucraţi. asiguraţi-că că această carcasă
este montată și strânsă corespunzător. Prin slăbirea
ușoară a șurubului de reglare, carcasa colectorului de
praf poate fi rotită și reglată la orice unghi pe care
îl doriţi, pentru a obţine o eficacitate operaţională
maximă. După reglarea carcasei colectorului de praf,
asiguraţi-vă că șurubul de reglare este bine strâns.
6. Verificarea mecanismului de blocare a axului
Înainte de a pune în funcţiune mașina, asiguraţi-vă că
mecanismul de blocare a axului este decuplat, prin
apăsarea de două sau de trei ori a butonului (vezi Fig.
1).
7. Reglarea adâncimii de tăiere (Fig. 2)
Coborârea piuliţei fluture va slăbi iar ridicarea sa va
strânge.
Adâncimea de tăiere se poate regla și prin slăbirea
piuliţei fluture și deplasarea ghidajului de alunecare.
PRECAUŢIE
䡬 Dacă lăsaţi piuliţa fluture slăbită se pot produce
vătămări. După reglarea adâncimii de tăiere, strângeţi
bine piuliţa fluture.
MONTAREA FURTUNULUI PENTRU
COLECTAREA PRAFULUI
Atunci când tăiaţi un material care la tăiere produce praf,
folosiţi furtunul pentru colectarea prafului după cum urmează:
(1) Scoateţi capacul din cauciuc și montaţi adaptorul. (Fig.
3)
(2) Montaţi furtunul pentru colectarea prafului pentru scula
electrică în adaptor. (Fig. 3)
PRECAUŢIE
䡬 Montaţi întotdeauna capacul din cauciuc pe adaptorul
pentru colectarea prafului atunci când nu folosiţi furtunul.
MONTAREA /DEMONTAREA DISCULUI
DIAMANTAT
1. Montare
(1) Îndepărtaţi capacul (A).
(2) Ștergeţi praful de tăiere de pe ax și de pe șaibe.
(3) Asiguraţi-vă că sensul de rotaţie al discului diamantat
este același cu sensul indicat pe carcasă și montaţi
discul diamantat așa cum este prezentat în Fig. 1.
(4) Apăsaţi știftul de blocare și fixaţi axul. Strângeţi piuliţa
de roată în mod corespunzător cu cheia furnizată. (Fig.
1)
NOTĂ
䡬 Pentru a fixa piuliţa de roată folosiţi întotdeauna cheia
furnizată.
2. Demontare
Scoateţi piuliţa de roată cu cheia furnizată și scoateţi
discul diamantat. (Fig. 1)
TĂIERE
1. Procedurile de tăiere (Fig. 4)
(1) Plasaţi scula pe materialul care trebuie tăiat și aliniaţi
discul diamantat pe linia de tăiere.
Tăierea se poate face cu ușurinţă dacă tăiaţi drept
înainte pe linia de tăiere în tăietura iniţială.
(2) Porniţi mașina de la buton atunci când discul diamantat
nu atinge materialul care trebuie tăiat.
2. Precauţii imediat după terminarea operaţiunii
După oprirea mașinii, nu o puneţi jos până când discul
cu centru depresat nu s-a oprit complet. Pe lângă
evitarea unor accidente grave, această precauţie reduce
cantitatea de praf și resturi pe care o aspiră mașina.
PRECAUŢIE
䡬 Înainte de a începe lucrul verificaţi întotdeauna discul
diamantat. Nu folosiţi niciodată un disc diamantat
crăpat, spart sau îndoit.
䡬 Nu aplicaţi apă sau agent de răcire pe discul diamantat.
䡬 Începeţi să tăiaţi numai după ce discul diamantat a
ajuns la viteza maximă.
䡬 Dacă discul diamantat se blochează sau dacă apar
zgomote neobișnuite, opriţi imediat mașina.
䡬 Nu folosiţi discul diamantat pentru a tăia în zigzag sau
pentru a tăia linii curbe. Nu folosiţi niciodată suprafaţa
laterală a discului diamantat. Nu îl folosiţi niciodată
pentru tăieri înclinate.
䡬 Dacă aplicaţi o forţă excesivă pe discul diamantat
pentru a îl alinia cu linia de tăiere în timpul operaţiunii
de tăiere, nu numai că motorul poate fi suprasolicitat
dar discul diamantat se poate supraîncălzi iar durata
sa de viaţă se va scurta.
䡬 Aveţi grijă și nu lăsaţi cablul de alimentare să vină în
contact cu discul diamantat în timpul utilizării.
䡬 După terminarea lucrării, opriţi mașina de la comutator
și scoateţi ștecărul din priză.
ÎNTREŢINERE ȘI VERIFICARE
1. Verificarea discului diamantat
Un disc diamantat uzat suprasolicită motorul și reduce
eficienţa lucrului. Înlocuiţi-l cu un disc nou.
2. Înfundarea discului diamantat
Viteza de uzură a stratului de diamant variază în funcţie
de tipul de material tăiat, de viteza de tăiere etc. În
general, materialele care la tăiere produc particule
granulare pot zgâria agentul de fixare și pot grăbi uzura
stratului de diamant. Pe de altă parte, materialele care
la tăiere produc pulberi pot provoca înfundarea stratului
de diamante, ceea ce reduce eficienţa la tăiere. Atunci
când discul se înfundă, forţa suplimentară aplicată în
încercarea de a crește viteza de tăiere va avea uneori
ca efect producerea de scântei pe circumferinţa discului
diamantat. În această situaţie, încetaţi să mai folosiţi
mașina de tăiat caneluri în zidărie și verificaţi cu atenţie
muchia de tăiere cu vârful degetelor. Dacă stratul de
diamant pare neted (fără asperităţi sau fără abraziune),
înseamnă că este înfundat cu praf și că trebuie “reparat”.
Pentru o reparare corectă, o tăietură de 5 metri cu
accelerare ușoară, la o adâncime de 10 mm, într-un
material relativ moale care produce particule de tăiere
granulare (cum ar fi un bloc de ciment sau de cărămidă)
va restabili eficienţa stratului de diamant și va mări
durata de viaţă a discului diamantat.
38
Page 40

Română
Materialul diamantat este sensibil la temperaturi ridicate
și începe să se deterioreze la aproximativ 600˚C.
Temperaturile ridicate provoacă descompunerea
materialului diamantat. În consecinţă, este important
să realizaţi “repararea” imediat ce s-a produs înfundarea
sau imediat ce au apărut scânteile.
3. Verificarea șuruburilor de montare
Verificaţi regulat toate șuruburile de montare și asiguraţivă că acestea sunt strânse corespunzător. Dacă vreunul
din șuruburi este slăbit, strângeţi-l imediat. Nerespectarea
acestei indicaţii poate duce la pericole grave.
4. Întreţinerea motorului
Bobinajul motorului este inima motorului.
Fiţi foarte atenţi să nu deterioraţi bobinajul și să nu
îl expuneţi la ulei sau la apă.
5. Verificarea periilor de cărbune (Fig. 5)
Motorul utilizează perii de cărbune, care sunt piese
consumabile.
Atunci când acestea se uzează sau când sunt aproape
de “limita de uzură”, pot apărea probleme la motor.
Atunci când motorul este echipat cu perii de cărbune
cu autostop, motorul se va opri automat.
În acel moment, înlocuiţi ambele perii de cărbune cu
unele noi, care au aceleași numere ale periei, după
cum este indicat în figură. În plus, păstraţi întotdeauna
periile curate și asiguraţi-vă că acestea glisează liber
în suporturile pentru perii.
6. Înlocuirea periilor de cărbune (Fig. 6)
〈
Demontare
(1) Slăbiţi șurubul D4 care fixează capacul posterior și
(2) Folosiţi cheia hexagonală auxiliară sau o șurubelniţă
(3) Scoateţi capătul cablului flexibil al periei de cărbune
〈
Montare
(1) Introduceţi capătul cablului flexibil al periei de cărbune
(2) Introduceţi peria de cărbune în suportul periei.
(3) Folosiţi cheia hexagonală auxiliară sau o șurubelniţă
(4) Montaţi capacul posterior și strângeţi șurubul D4.
7. Lista pieselor de schimb pentru reparaţii
PRECAUŢIE
39
〉
scoateţi capacul posterior.
mică pentru a scoate marginea resortului care presează
peria de cărbune. Scoateţi marginea resortului spre
exteriorul suportului pentru perie.
din zona terminală a suportului periei și scoateţi peria
din suportul periei.
〉
în zona terminală a suportului periei.
mică pentru a reintroduce marginea resortului pe capul
periei de cărbune.
A: Articol nr.
B: Cod nr.
C: Nr. de piese utilizate
D: Observaţii
Reparaţiile, modificările și verificarea sculelor electrice
Hitachi se vor efectua numai la o unitate service
autorizată de Hitachi.
În mod particular, întreţinerea dispozitivului laser va fi
efectuată de un agent autorizat de către producătorul
dispozitivului laser.
Repararea dispozitivului laser va fi efectuată întotdeauna
de către o unitate service autorizată de Hitachi.
Această listă de piese va fi de ajutor dacă va fi
prezentată împreună cu mașina la unitatea service
autorizată de Hitachi atunci când solicitaţi efectuarea
de reparaţii sau de operaţiuni de întreţinere.
Pe durata folosirii și a operaţiunilor de întreţinere a
mașinii trebuie respectate reglementările și standardele
naţionale privind securitatea.
MODIFICĂRI
Sculele electrice Hitachi sunt în mod constant
îmbunătăţite și modificate, pentru a îngloba cele mai
noi cuceriri tehnologice.
De aceea, anumite piese (numărul de cod și/sau aspectul
acestora) pot fi modificate fără notificare prealabilă.
GARANŢIE
Garantăm sculele electrice Hitachi în conformitate cu
reglementările statutare/specifice ţării. Această garanţie nu
acoperă defectele sau daunele provocate de utilizarea
necorespunzătoare, abuz sau de uzura și deteriorarea
normale. În cazul în care aveţi reclamaţii, vă rugăm să
trimiteţi scula electrică nedemontată, împreună cu
CERTIFICATUL DE GARANŢIE care se găsește la finalul
prezentelor Instrucţiuni de utilizare, la o unitate service
autorizată de Hitachi.
NOTĂ
Ca urmare a programului continuu de cercetare și dezvoltare
derulat de Hitachi, prezentele specificaţii pot fi modificate
fără notificare prealabilă.
Informaţii privind nivelul de zgomot transmis prin aer
și nivelul de vibraţii
Valorile măsurate au fost determinate în conformitate cu
EN 60745 și este declarată conformă cu ISO 4871.
Nivelul tipic al puterii sonore ponderate A: 106 dB (A)
Nivelul tipic al presiunii sonore ponderate A: 95 dB (A)
Nivel sonor, KpA: 3 dB (A)
Purtaţi echipament de protecţie auditivă.
Valorile totale ale vibraţiilor (suma vectorială pe cele trei
axe) au fost stabilite în conformitate cu EN60745.
Valoarea emisiei de vibraţii
Precizie K = 1,5 m/s
AVERTISMENT
䡬 Valoarea emisiei de vibraţii în timpul folosirii efective a
sculei electrice poate diferi de valorile declarate, în funcţie
de modul de utilizate a sculei.
䡬 Pentru identificarea măsurilor de siguranţă ce trebuie luate
pentru protejarea operatorului și care sunt bazate pe
estimarea expunerii, în condiţii reale de utilizare (ţinând
seama de toate componentele ciclului de utilizare, cum ar
fi timpul necesar opririi sculei și timpul de funcţionare
suplimentar la pornirea sculei).
2
ah = 4,2 m/s
2
Page 41

Slovenščina
SPLOŠNA VARNOSTNA NAVODILA ZA
ELEKTRIČNO ORODJE
OPOZORILO
Preberite vas varnostna opozorila in navodila.
Z neupoštevanjem opozoril in navodil tvegate električni udar,
požar in/ali resne telesne poškodbe.
Vsa opozorila in navodila shranite.
Izraz "električno orodje" v opozorilih se nanaša na električno
orodje, ki se napaja z omrežno energijo (s priključno vrvico),
ali električno orodje, ki se napaja z energijo iz akumulatorskih
baterij (brez priključne vrvice).
1) Varnost na delovnem mestu
a) Delovno mesto mora biti čisto in dobro osvetljeno.
V razmetanih in temačnih območjih je verjetnost
nesreč večja.
b) Električnega orodja ni dovoljeno uporabljati v
eksplozivnih okoljih, na primer v bližini vnetljivih
tekočin, plinov ali prahu.
Pri delu z električnim orodjem se iskri – iskre lahko
vnamejo prah in hlape.
c) Preprečite dostop otrokom in drugim v delovno
območje vključenega električnega stroja.
Zaradi motenja lahko izgubite nadzor.
2) Električna varnost
a) Vtiči električnega orodja morajo ustrezati vtičnici.
Vtiča ni dovoljeno kakor koli spreminjati.
Za povezavo ozemljenega električnega orodja ni
dovoljeno uporabiti vmesnih vtičev.
Z nespremenjenimi vtiči in ustreznimi vtičnicami je
tveganje električnega udara manjše.
b) Preprečite stik z ozemljenimi površinami, kot so
cevi, radiatorji, peči in hladilniki.
Ko je telo delavca ozemljeno, je nevarnost
električnega udara večja.
c) Električnega orodja ni dovoljeno izpostavljati na
dež ali v mokre pogoje.
Z vdorom vode v električno orodje je nevarnost
električnega udara velika.
d) Ne zlorabljajte priključne vrvice. Priključne vrvice
ni dovoljeno uporabljati za prenašanje, vlečenje
in izklapljanje električnega orodja.
Priključne vrvice ne izpostavljajte na vročino,
olje, ostre robove in premične dele.
Med uporabo poškodovanih in zamotanih priključnih
vrvic je nevarnost električnega udara večja.
e) Za uporabo električnega orodja na prostem
priključite podaljšek, ki je izdelan za takšno
uporabo.
Z uporabo priključne vrvice, ki je izdelana za delo
na prostem, je nevarnost električnega udara manjša.
f) Če je delo z električnim orodjem v vlažnem
okolju neizbežno, uporabite napajanje, ki je
zaščiteno s stikalom za diferenčni tok (RCD).
Zaščitno stikalo za diferenčni tok (RCD) zmanjša
nevarnost električnega udara.
3) Osebna varnost
a) Ostanite zbrani, pazite, kaj delate in delajte po
pameti.
Električnega orodja ni dovoljeno uporabljati, če
ste utrujeni ali pod vplivom mamil, alkohola ali
zdravil.
Trenutek nepozornosti med delom z električnim
orodjem je lahko vzrok za resne telesne poškodbe.
b) Uporabljajte osebno zaščitno opremo. Za delo
si obvezno nadenite zaščito za oči.
Zaščitna oprema, kot so maska za prah, nezdrsni
čevlji, čelada ali zaščita za ušesa, ustrezno
uporabljena v danih pogojih, zmanjša nevarnost
telesnih poškodb.
c) Preprečite neželen zagon. Preden stroj povežete
na omrežni vir in/ali akumulatorski sklop, preden
ga dvignete ali prenesete, stikalo obvezno
prestavite v položaj izklopa (na "OFF").
Pri prenosu električnega orodja s prstom na stikalu
ali pri povezavi električnega orodja, ko je stikalo
v položaju vklopa "ON", je tveganje nesreč večje.
d) Preden električno orodje vključite, odstranite
vse nastavitvene ključe.
Med delom z električnim orodjem, kjer je ključ
pritrjen na vrteč del tega orodja, je velika nevarnost
telesnih poškodb.
e) Ne presegajte. Ves čas trdno stojte in vzdržujte
ravnotežje.
Na ta način lahko bolje nadzorujete električno orodje
v nepričakovanih situacijah.
f) Ustrezno se oblecite. Za delo si nadenite tesna
oblačila in snemite nakit. Z lasmi, oblačili in
rokavicami ne posegajte med premične dele.
Ohlapna oblačila, nakit ali dolgi lasje se lahko
ujamejo med premične dele.
g) Če so na voljo naprave za povezavo odpraševalnih
delov in zbiralnikov, slednje povežite in pravilno
uporabljajte.
Funkcija zbiranja prahu zmanjša nevarnost v zvezi
s prahom.
4) Uporaba in vzdrževanje električnega orodja
a) Električnega orodja ne preobremenjujte. Za
izbrano delo uporabite ustrezno električno
orodje.
Z ustreznim električnim orodjem boste delo opravili
bolje in varneje.
b) Električnega orodja ni dovoljeno uporabiti, če s
stikalom orodja ne morete vključiti in izključiti.
Električno orodje, ki ga ni možno upravljati s
stikalom, je nevarno in ga je treba popraviti.
c) Preden orodje predelate, spremenite priključke
ali orodje shranite, iztaknite vtič iz omrežnega
vira in/ali baterijski sklop z električnega orodja.
S takšnimi preventivnimi varnostnimi ukrepi zmanjšate
nevarnost neželenega zagona orodja.
d) Električno orodje shranite izven dosega otrok in
ne dovolite upravljati orodja osebam, ki orodja
ne poznajo in ki niso prebrale navodil.
Električno orodje je nevarno v rokah neusposobljenih
uporabnikov.
e) Električno orodje vzdržujte. Pregledujte, če je
neporavnano, če premični deli zavirajo, če so
deli polomljeni in druge pogoje, ki lahko vplivajo
na delovanje električnega orodja.
Poškodovano električno orodje je treba pred
uporabo popraviti.
Vzrok mnogih nesreč je slabo vzdrževano električno
orodje.
f) Rezalno orodje mora biti ostro in čisto.
Pravilno vzdrževano rezalno orodje z ostrimi rezilnimi
robovi manj pogosto zavira in ga je lažje upravljati.
40
Page 42

Slovenščina
g) Električno orodje, priključke in svedre ipd.
uporabljajte v skladu s temi navodili, pri čemer
upoštevajte pogoje dela in izbrane naloge.
Z uporabo električnega orodja v druge namene
nastopi nevarna situacija.
5) Servis
a) Električno orodje lahko servisira le usposobljen
delavec, ki mora uporabljati enake nadomestne
dele.
Na ta način se ohrani varnost električnega orodja.
VARNOSTNI UKREP
Preprečite dostop otrokom in nemočnim osebam.
Orodje, ki ga ne uporabljate, shranite izven dosega otrok
in nemočnih oseb.
VARNOSTNI UKREPI ZA UPORABO REZALNIKA
1. Nikoli ne priključite nobenega drugega orodja, razen
diamantnega kolesa, ki ga je določil proizvajalec.
Naprave ne uporabljajte medtem ko dovajate vodo.
2. Pred zagonom stroja zmeraj preverite diamantno kolo.
Ne uporabljajte ga, če je počeno, zlomljeno ali zvito.
Pazljivo zaženite stroj in preverite za ostale nepravilnosti.
3. Uporaba diamantnega kolesa za rezanje kovine bo
skrajšalo njegovo življenjsko dobo ali pa se bo kolo
zlomilo. Diamantnega kolesa nikoli ne uporabljajte za
rezanje kovine.
4. Z delom začnite, ko se doseže maksimalna hitrost vrtenja.
5. Prekomerna sila preobremeni motor. Zmeraj režite z
rezalno globino 5 mm ali manj.
6. Ne uporabljajte stroja za rezanje azbesta.
7. Če se med rezanjem prikaže plamen, pokrijte adapter
za zbiranje prahu z gumijastim pokrovom in se
prepričajte, da uporabljate zaščitna očala.
SPECIFIKACIJE
Napetost (po območjih)* (110V, 230V)
Vhodna moč* 1300W
Hitrost brez obremenitve 11000 min
Zunanje prem. 125mm
Dimenzije diamantnega kolesa
Maks. globina rezanja 33mm
Teža (brez kabla in diamantnega kolesa) 2,9kg
* Preverite imensko ploščo na izdelku, saj je vrednost odvisna od področja.
STANDARDNI DODATKI
(1) Ključ .............................................................................1
(2) Adapter ........................................................................ 1
(3) Stranska ročica ........................................................... 1
Standardni pripomočki se lahko spremenijo brez
vnaprejšnjega obvestila.
UPORABA
䡬 Rezanje ali vrezovanje betona
䡬 Rezanje ali vrezovanje opek
䡬 Rezanje ali vrezovanje kamna
䡬 Rezanje ali vrezovanje strešnikov
PRED UPORABO
1. Vir napetosti
Zagotovite, da je vir napetosti, ki ga boste uporabili
enak zahtevam vira napetosti, ki je določen na imenski
plošči izdelka.
2. Stikalo za napetost
Prepričajte se, da je stikalo za napetost v položaju OFF
(izključeno). Če je vtikač priključen na vtičnico, ko je
stikalo v položaju ON (vklopljeno), bo električno orodje
takoj začelo delovati ter lahko povzroči resno nesrečo.
3. Podaljševalni kabel
Če je delovno območje oddaljeno od vira napetosti,
uporabite podaljševalni kabel primerne debeline in
kapacitivnosti. Podaljševalni kabel naj bo čim krajši.
41
4. Preverjanje in montaža diamantnega kolesa
Preverite pravilnost diamantnega kolesa in preglejte ali
je razpokano, zlomljeno ali zvito. Preverite ali je
diamantno kolo varno nameščeno. Za namestitev glejte
“Nameščanje/odstranjevanje diamantnega kolesa”.
5. Nameščanje in prilagajanje pokrova za zbiranje
prahu (Skica 1)
Pokrov zbiralnika prahu je zaščitna naprava, ki
onemogoča poškodbe, če se med delovanjem
diamantno kolo razbije. Pred rezanjem zagotovite, da
je pokrov primerno nameščen in pritrjen. Če nastavljani
vijak rahlo odvijete lahko pokrov zbiralnika prahu obrnete
in ga postavite na želen kot za maksimalno delovno
učinkovitost. Po prilagajanju pokrova zbiralnika prahu
se prepričajte, da je nastavljalni vijak dovolj pritrjen.
6. Preverite mehanizem zaklepa gredi
Preverite ali se zaklep gredi ni zaskočil tako, da tipko
dvakrat ali trikrat pritisnete, še preden vključite električno
orodje (glej Skico 1).
7. Nastavljanje globine rezanja (Skica 2)
S spuščanjem krilate matice odvijate in z dviganjem
tesnite.
Z odvijanjem krilate matice in premikanjem pomičnega
vodila boste lahko nastavili globino rezanja.
POZOR
䡬 Odvita krilata matica lahko povzroči poškodbe. Po
prilagoditvi globine rezanja, varno zatesnite krilato matico.
Debelina 2,0mm
Premer luknje 22,2mm
–1
Page 43

Slovenščina
NAMEŠČANJE CEVI ZA ZBIRANJE PRAHU
Če pri rezanju materiala nastaja prah, uporabite cev za
zbiranje prahu na naslednji način:
(1) Odstranite gumijasti pokrov in namestite adapter za
dodatke. (Skica 3)
(2) V adapter za dodatke namestite cev za zbiranje prahu
za električno orodje. (Skica 3)
POZOR
䡬 Ko cevi za zbiranje prahu ne uporabljate, zmeraj
namestite gumijasti pokrov na adapter.
NAMEŠČANJE/ODSTRANJEVANJE
DIAMANTNEGA KOLESA
1. Nameščanje
(1) Odstranite pokrov (A).
(2) Iz gredi in blažilcev obrišite rezalni prah.
(3) Prepričajte se, da se smer vrtenja diamantnega kolesa
ujema s smerjo, ki je nakazana na ohišju prestave, in
namestite diamantno kolo, kot je prikazano na Skici 1.
(4) Pritisnite zaklepni zatič in zavarujte gred. Zadostno
zatesnite matico kolesa s priloženim ključem. (Skica 1)
OPOMBA
䡬 Za tesnjenje matice kolesa zmeraj uporabite priloženi
ključ.
2. Odstranjevanje
Matico kolesa odstranite s priloženim ključem in
odstranite diamantno kolo. (Skica 1)
REZANJE
1. Postopki rezanja (Skica 4)
(1) Postavite orodje na material, ki ga boste rezali in
poravnajte rezalno linijo in diamantno kolo.
Rezanje lahko poteka gladko, če režete ravno po rezalni
liniji po prvem vrezu.
(2) Obrnite stikalo, ko so se diamantno kolo ne dotika
materiala, ki ga boste rezali.
2. Varnostni ukrepi takoj po zaključku dela
Ko ste stroj izključiti ga ne odložite, dokler se pritisnjeno
srednje kolo ni popolnoma ustavilo. Poleg tega, da se
izognete resnim nesrečam boste s tem varnostnim
ukrepom zmanjšali količino prahu in odkruškov, ki se
vsesajo v stroj.
POZOR
䡬 Pred zagonom stroja zmeraj preverite diamantno kolo.
Diamantnega kolesa, ki je počeno, zlomljeno ali zvito,
ne uporabljajte.
䡬 Na diamantno kolo ne nanašajte vode ali hladilne
tekočine.
䡬 Z rezanjem začnite, ko diamantno kolo doseže
maksimalno hitrost.
䡬 Če se diamantno kolo zatika ali zaslišite nenavaden
hrup, takoj izključite napetost.
䡬 Diamantnega kolesa nikoli ne uporabljajte za rezanje
krivulj ali cikcak linij. Nikoli ne uporabljajte stranske
površine diamantnega kolesa. Nikoli ne uporabljajte za
rezanje pod kotom.
䡬 Če na diamantno kolo med rezanjem za poravnavanje
z rezalno linijo uporabljate prekomerno silo lahko to
preobremeni motor in povzroči poškodbe ter pregreje
diamantno kolo in skrajša njegovo življenjsko dobo.
䡬 Pazite, da napetostni kabel med uporabo ne pride v
stik z diamantnim kolesom.
䡬 Ko ste končali z delom, izključite napetost in izvlecite
napetostni kabel iz vtičnice.
VZDRŽEVANJE IN PREGLEDI
1. Pregledovanje diamantnega kolesa
Obrabljeno diamantno kolo preobremeni motor in zmanjša
delovno učinkovitost. Zamenjajte ga z novim
2. Zamašitev diamantnega kolesa
Količina obrabe diamantnega sloja rezalnega roba je
odvisna od tipa materiala, ki ga režete, hitrosti rezanja,
itd. V splošnem lahko materiali, ki proizvedejo zrnaste
rezalne delčke, popraskajo snov in pospešijo obrabo
diamantnega sloja. Po drugi strani, materiali, ki
proizvedejo prašnate delce lahko zamašijo diamantni
sloj ter zmanjšajo učinkovitost rezanja. Ko pride do
zamašitve bo dodatna sila, ki jo uporabite da povečate
rezalno hitrost, povzročila iskre, ki se pojavijo okoli
obsega diamantnega kolesa. V takšnem primeru nehajte
z uporabo in pazljivo preglejte rezalni rob tako, da ga
drgnete s prsti. Če je diamantni sloj gladek (ni hrapav
ali strgalen) pomeni, da je zamašen s prahom in ga
je treba “preobleči”.
Za temeljito preobleko bo 5 metrsko pospešeno rezanje
pri globini 10 mm v mehak material, ki povzroča zrnaste
delčke (kot sta npr. betonski blok ali opeka) povrnilo
učinkovitost rezanja diamantnega sloja in podaljšalo
življenjsko dobo diamantnega kolesa.
Diamantni material je občutljiv na visoke temperature
in pri 600˚C se bo začel slabšati. Visoke temperature
bodo povzročile razgradnjo diamantnega materiala.
Zatorej je pomembno, da “preobleko” izvedete takoj,
ko pride do zamašitve ali iskrenja.
3. Pregled montažnih vijakov
Redno preverjajte vse montažne vijake in se prepričajte,
da so primerno zaviti. Če se katerikoli vijak odvije, ga
takoj zavijte. Če tega ne naredite lahko pride do resnih
nesreč.
4. Vzdrževanje motorja
Navitje enote motorja je "srce" električnega orodja.
Bodite zelo pazljivi, da navitja ne poškodujete in/ali
zmočite z oljem ali vodo.
5. Pregled ogljikovih krtač (Skica 5)
Motor uporablja ogljikove krtače, ki so potrošni material.
Ko se obrabijo ali dosežejo "mejo obrabe" lahko
povzročijo težave z motorjem. Ko je nameščena
ogljikova krtača s samodejno zaustavitvijo se bo motor
samodejno ustavil.
Takrat zamenjajte obe ogljikovi krtači z novima, ki
imajo enako številko krtač, prikazanih na skici. Poleg
tega naj bodo ogljikove ščetke čiste in prepričajte se,
da se prosto gibljejo znotraj svojih nosilcev.
6. Zamenjava ogljikovih ščetk (Skica 6)
〈
Demontaža
(1) Odvijte vijak D4, ki drži zadnji pokrov in ga odstranite.
(2) Uporabite pomožni šestkotni ključ ali manjši izvijač, da
(3) Iz terminalnega razdelka nosilca ščetke odstranite konec
〈
Montaža
(1) Konec svitka ogljikove ščetke vstavite v terminalni
(2) Ogljikovo ščetko vstavite v nosilec ščetke.
〉
izvlečete rob vzmeti, ki drži ogljikovo ščetko. Odstranite
rob vzmeti proti zunanjosti nosilca ščetke.
svitka na ogljikovi ščetki in nato odstranite ogljikovo
ščetko iz nosilca.
〉
razdelek nosilca ščetke.
42
Page 44

Slovenščina
(3) Uporabite pomožni šestkotni ključ ali manjši izvijač, da
vrnete rob vzmeti v glavo ogljikove krtače.
(4) Namestite zadnji pokrov in zavijte vijak D4.
7. Seznam servisnih delov
A: Št. predmeta
B: Št. šifre
C: Št. uporabljenih
D: Opombe
POZOR
Popravila, spremembe in pregled Hitachi električnega
orodja mora izvajati pooblaščeni servisni center Hitachi.
Zlasti lasersko napravo mora vzdrževati pooblaščeni
agent proizvajalca laserja.
Popravilo laserske naprave zmeraj določite
pooblaščenemu servisnemu centru Hitachi.
Pri zahtevi za popravilo ali vzdrževanje bo v veliko
pomoč, če pooblaščenemu servisnemu centru Hitachi
skupaj z orodjem izročite tudi ta seznam delov.
Pri uporabi in vzdrževanju električnih orodjih je treba
upoštevati varnostne uredbe in standarde, ki so
določene za vsako državo.
SPREMEMBE
Hitach električna orodja se nenehno izboljšujejo in
spreminjajo, da bi vključevala najnovejše tehnološke
napredke.
Torej se lahko nekateri deli (tj. številka šifra in/ali
zgradba), spremenijo brez vnaprejšnjega obvestila.
GARANCIJA
Garantiramo za Hitachi električna orodja v skladu z ustavno/
državno veljavnimi uredbami. Garancija ne pokriva napak
ali poškodb, ki nastanejo zaradi nepravilne uporabe, zlorabe
ali normalne obrabe. V primeru pritožbe pošljite
nerazstavljeno električno orodje skupaj z GARANCIJSKIM
CERTIFIKATOM, ki ga najdete na koncu teh navodil za
uporabo, na pooblaščeni servisni center Hitachi.
䡬 Za identifikacijo varnostnih ukrepov za zaščito uporabnika,
ki temeljijo na oceni izpostavljanja v dejanskih pogojih
uporabe (pri upoštevanju vseh delov obratovalnega
ciklusa, kot so obdobja, ko je orodje izključeno, in ko orodje
teče v prostem teku, poleg časa sproženja).
OPOMBA:
Zaradi HITACHIJEVEGA nenehnega programa raziskav in
razvoja se specifikacije lahko spremenijo brez vnaprejšnjega
obvestila.
nformacije o hrupu in vibracijah
Izmerjene vrednosti so bile določene glede na EN 60745
in navedeno v skladu z ISO 4871.
Tipičen A-obremenjen nivo moči zvoka: 106 dB (A)
Tipičen A-obremenjen nivo zvočnega pritiska: 95 dB (A)
Spremenljivost KpA: 3 dB (A)
Uporabljajte zaščito za ušesa.
Skupna vrednost vibracij (vsota vektorja triax) je v skladu
s standardom EN60745.
Emisija vibracije
Negotovost K = 1,5 m/s
OPOZORILO
䡬 Emisija vibracij med dejansko uporabo električnega
orodja se lahko razlikuje od navedene vrednosti - odvisno
od načina uporabe orodja.
43
ah = 4,2 m/s
2
2
Page 45

PyccÍËÈ
OÅôàE èPABàãA ÅEÂOèACHOCTà èPà
PAÅOTE C ùãEKTPOàHCTPìMEHTOM
èPEÑìèPEÜÑEHàE
èpoäÚËÚe Çce ÔpaÇËÎa ÄeÁoÔacÌocÚË Ë ËÌcÚpyÍáËË.
He ÇêÔoÎÌeÌËe ÔpaÇËÎ Ë ËÌcÚpyÍáËÈ ÏoÊeÚ ÔpËÇecÚË Í
ÔopaÊeÌËï íÎeÍÚpËäecÍËÏ ÚoÍoÏ, ÔoÊapy Ë/ËÎË
cepëeÁÌoÈ ÚpaÇÏe.
CoxpaÌÓÈÚe Çce ÔpaÇËÎa Ë ËÌcÚpyÍáËË Ìa ÄyÀyçee.
TepÏËÌ "íÎeÍÚpoËÌcÚpyÏeÌÚ" Ç ÍoÌÚeÍcÚe Çcex Ïep
ÔpeÀocÚopoÊÌocÚË oÚÌocËÚcÓ Í íÍcÔÎyaÚËpyeÏoÏy BaÏË
íÎeÍÚpoËÌcÚpyÏeÌÚy c ÔËÚaÌËeÏ oÚ ceÚeÇoÈ poÁeÚÍË (c
ceÚeÇêÏ åÌypoÏ) ËÎË íÎeÍÚpoËÌcÚpyÏeÌÚy c ÔËÚaÌËeÏ
oÚ aÍÍyÏyÎÓÚopÌoÈ ÄaÚapeË (ÄecÔpoÇoÀÌoÏy).
1) ÅeÁoÔacÌocÚë Ìa paÄoäeÏ ÏecÚe
a) èoÀÀepÊËÇaÈÚe äËcÚoÚy Ë xopoåee ocÇeçeÌËe
Ìa paÄoäeÏ ÏecÚe.
ÅecÔopÓÀoÍ Ë ÔÎoxoe ocÇeçeÌËe ÔpËÇoÀÓÚ Í
ÌecäacÚÌêÏ cÎyäaÓÏ.
b) He ËcÔoÎëÁyÈÚe íÎeÍÚpoËÌcÚpyÏeÌÚê Ço
ÇÁpêÇooÔacÌêx oÍpyÊaïçËx ycÎoÇËÓx,
ÌaÔpËÏep, Ç ÌeÔocpeÀcÚÇeÌÌoÈ ÄÎËÁocÚË
oÖÌeoÔacÌêx ÊËÀÍocÚeÈ, ÖopïäËx ÖaÁoÇ ËÎË
ÎeÖÍoÇocÔÎaÏeÌÓïçeÈcÓ ÔêÎË.
ùÎeÍÚpoËÌcÚpyÏeÌÚê ÔopoÊÀaïÚ ËcÍpê, ÍoÚopêe
ÏoÖyÚ ÇocÔÎaÏeÌËÚë ÔêÎë ËÎË ËcÔapeÌËÓ.
c) ÑepÊËÚe ÀeÚeÈ Ë ÌaÄÎïÀaïçËx Ìa
ÄeÁoÔacÌoÏ paccÚoÓÌËË Ço ÇpeÏÓ
íÍcÔÎyaÚaáËË íÎeÍÚpoËÌcÚpyÏeÌÚa.
OÚÇÎeäeÌËe ÇÌËÏaÌËÓ ÏoÊeÚ cÚaÚë ÀÎÓ Bac
ÔpËäËÌoÈ ÔoÚepË yÔpaÇÎeÌËÓ.
2) щОeНЪpoДeБoФacМocЪл
a) CeЪeЗкe ЗЛОНЛ нОeНЪpoЛМcЪpyПeМЪoЗ
АoОКМк cooЪЗeЪcЪЗoЗaЪл ceЪeЗoИ poБeЪНe.
HЛНoЦАa Мe ПoАЛЩЛбЛpyИЪe еЪeФceОлМyп
ЗЛОНy МЛНoЛП oДpaБoП.
He ЛcФoОлБyИЪe МЛНaНЛe aАaФЪepМкe
ФepexoАМЛНЛ c БaБeПОeММкПЛ (БaПНМyЪкПЛ
Мa БeПОп) нОeНЪpoЛМcЪpyПeМЪaПЛ.
HeПoАЛЩЛбЛpoЗaММкe еЪeФceОлМкe ЗЛОНЛ Л
cooЪЗeЪcЪЗyпзЛe ЛП ceЪeЗкe poБeЪНЛ yПeМлеaЪ
oФacМocЪл ФopaКeМЛУ нОeНЪpЛдecНЛП ЪoНoП.
b) He ÔpËÍacaÈÚecë ÚeÎoÏ Í ÁaÁeÏÎeÌÌêÏ
ФoЗepxМocЪУП, МaФpЛПep, Н ЪpyДoФpoЗoАaП,
paАЛaЪopaП, НyxoММкП ФОЛЪaП Л
xoОoАЛОлМЛНaП.
EcОЛ Baеe ЪeОo coФpЛНocМeЪcУ c БaБeПОeММкПЛ
ФoЗepxМocЪУПЛ, ЗoБpacЪeЪ oФacМocЪл ФopaКeМЛУ
нОeНЪpЛдecНЛП ЪoНoП.
c) He ÔoÀÇepÖaÈÚe íÎeÍÚpoËÌcÚpyÏeÌÚê
ÀeÈcÚÇËï ÇoÀê ËÎË ÇÎaÖË.
èpË ÔoÔaÀaÌËË ÇoÀê Ç íÎeÍÚpoËÌcÚpyÏeÌÚ
ÇoÁpacÚeÚ oÔacÌocÚë ÔopaÊeÌËÓ íÎeÍÚpËäecÍËÏ
ÚoÍoÏ.
d) иpaЗЛОлМo oДpaзaИЪecл co еМypoП. HЛНoЦАa
Мe ФepeМocЛЪe нОeНЪpoЛМcЪpyПeМЪ, ЗБУЗеЛcл
Бa еМyp, Мe ЪУМЛЪe Бa еМyp Л Мe АepЦaИЪe Бa
еМyp c бeОлп oЪcoeАЛМeМЛУ
нОeНЪpoЛМcЪpyПeМЪa oЪ ceЪeЗoИ poБeЪНЛ.
PacФoОaЦaИЪe еМyp ФoАaОлеe oЪ ЛcЪoдМЛНoЗ
ЪeФОa, МeЩЪeФpoАyНЪoЗ, ФpeАПeЪoЗ c ocЪpкПЛ
НpoПНaПЛ Л АЗЛКyзЛxcУ АeЪaОeИ.
иoЗpeКАeММкe ЛОЛ БaФyЪaММкe еМypк
yЗeОЛдЛЗaпЪ oФacМocЪл ФopaКeМЛУ
нОeНЪpЛдecНЛП ЪoНoП.
e) èpË íÍcÔÎyaÚaáËË íÎeÍÚpoËÌcÚpyÏeÌÚa ÇÌe
ФoПeзeМЛИ, ЛcФoОлБyИЪe yАОЛМЛЪeОлМкИ
еМyp, ФpeАМaБМaдeММкИ АОУ ЛcФoОлБoЗaМЛУ
ЗМe ФoПeзeМЛУ.
аcФoОлБoЗaМЛe еМypa, ФpeАМaБМaдeММoЦo АОУ
paДoЪк ЗМe ФoПeзeМЛИ, yПeМлеЛЪ oФacМocЪл
ФopaКeМЛУ нОeНЪpЛдecНЛП ЪoНoП.
f) èpË íÍcÔÎyaÚaáËË íÎeÍÚpoËÌcÚpyÏeÌÚa Ço
ЗОaКМoИ cpeАe, ЛcФoОлБyИЪe ycЪpoИcЪЗo
БaзЛЪМoЦo oЪНОпдeМЛУ (RCD) ЛcЪoдМЛНa
ФЛЪaМЛУ.
аcФoОлБoЗaМЛe RCD yПeМлеЛЪ oФacМocЪл
ФopaКeМЛУ нОeНЪpЛдecНЛП ЪoНoП.
3) ãËäÌaÓ ÄeÁoÔacÌocÚë
a) ÅyÀëÚe ÖoÚoÇê Í ÌeoÊËÀaÌÌêÏ cËÚyaáËÓÏ,
ЗМЛПaЪeОлМo cОeАЛЪe Бa cЗoЛПЛ АeИcЪЗЛУПЛ
Л pyНoЗoАcЪЗyИЪecл БАpaЗкП cПкcОoП ФpЛ
нНcФОyaЪaбЛЛ нОeНЪpoЛМcЪpyПeМЪa.
He ЛcФoОлБyИЪe нОeНЪpoЛМcЪpyПeМЪ, НoЦАa Bк
ycЪaОЛ ЛОЛ МaxoАЛЪecл ФoА ЗОЛУМЛeП
МapНoЪЛНoЗ, aОНoЦoОУ ЛОЛ ОeНapcЪЗeММкx
ФpeФapaЪoЗ.
MÖÌoÇeÌÌaÓ ÔoÚepÓ ÇÌËÏaÌËÓ ÇoÇpeÏÓ
íÍcÔÎyaÚaáËË íÎeÍÚpoËÌcÚpyÏeÌÚoÇ ÏoÊeÚ
ÔpËÇecÚË Í cepëeÁÌoÈ ÚpaÇÏe.
b) аcФoОлБyИЪe ЛМАЛЗЛАyaОлМкe cpeАcЪЗa
ÁaçËÚê. BceÖÀa ÌaÀeÇaÈÚe cpeÀcÚÇa ÁaçËÚê
ÖÎaÁ.
ВaзЛЪМoe cМapУКeМЛe, МaФpЛПep,
ФpoЪЛЗoФкОeЗoИ pecФЛpaЪop, БaзЛЪМaУ oДyЗл c
МecНoОлБНoИ ФoАoеЗoИ, БaзЛЪМкИ еОeП-НacНa ЛОЛ
cpeАcЪЗa БaзЛЪк opЦaМoЗ cОyxa, ЛcФoОлБyeПкe
АОУ cooЪЗeЪcЪЗyпзЛx ycОoЗЛИ, yПeМлеaЪ ЪpaЗПк.
c) аБДeЦaИЪe МeФpeАМaПepeММoЦo ЗНОпдeМЛУ
АЗЛЦaЪeОУ. мДeАЛЪecл З ЪoП, дЪo ЗкНОпдaЪeОл
МaxoАЛЪcУ З ФoОoКeМЛЛ ЗкНОпдeМЛУ ФepeА
ФoАМЛПaМЛeП, ФepeМocНoИ ЛОЛ
ФoАcoeАЛМeМЛeП Н ceЪeЗoИ poБeЪНe Л/ЛОЛ
ФopЪaЪЛЗМoПy ДaЪapeИМoПy ЛcЪoдМЛНy ФЛЪaМЛУ.
иepeМocНa нОeНЪpoЛМcЪpyПeМЪoЗ, НoЦАa Bк ФaОeб
АepКЛЪe Мa ЗкНОпдaЪeОe, ЛОЛ ФoАcoeАЛМeМЛe
нОeНЪpoЛМcЪpyПeМЪoЗ Н ceЪeЗoИ poБeЪНe, НoЦАa
ЗкНОпдaЪeОл ДyАeЪ МaxoАЛЪлcУ З ФoОoКeМЛЛ
ЗНОпдeМЛУ, ФpЛЗoАЛЪ Н МecдacЪМкП cОyдaУП.
d) CМЛПЛЪe Зce peЦyОЛpoЗoдМкe ЛОЛ ЦaeдМкe
НОпдЛ ФepeА ЗНОпдeМЛeП
нОeНЪpoЛМcЪpyПeМЪa.
ÉaeäÌêÈ ËÎË peÖyÎËpoÇoäÌêÈ ÍÎïä, ocÚaÇÎeÌÌêÈ
ÔpËÍpeÔÎeÌÌêÏ Í ÇpaçaïçeÈcÓ ÀeÚaÎË
íÎeÍÚpoËÌcÚpyÏeÌÚa, ÏoÊeÚ ÔpËÇecÚË Í
ÔoÎyäeÌËï ÚpaÇÏê.
e) He ÚepÓÈÚe ycÚoÈäËÇocÚë. Bce ÇpeÏÓ ËÏeÈÚe
ÚoäÍy oÔopê Ë coxpaÌÓÈÚe paÇÌoÇecËe.
щЪo ФoПoКeЪ Оyдеe yФpaЗОУЪл
нОeНЪpoЛМcЪpyПeМЪoП З МeФpeАЗЛАeММкx
cЛЪyaбЛУx.
f) OÀeÇaÈÚecë ÌaÀÎeÊaçËÏ oÄpaÁoÏ. He
ÌaÀeÇaÈÚe ÔpocÚopÌyï oÀeÊÀy ËÎË
ïÇeÎËpÌêe ËÁÀeÎËÓ. ÑepÊËÚe ÇoÎocê,
oÀeÊÀy Ë ÔepäaÚÍË ÍaÍ ÏoÊÌo ÀaÎëåe oÚ
ÀÇËÊyçËxcÓ äacÚeÈ.
44
Page 46

PyccÍËÈ
иpocЪopМaУ oАeКАa, пЗeОЛpМкe ЛБАeОЛУ ЛОЛ
АОЛММкe ЗoОocк ПoЦyЪ ФoФacЪл З АЗЛКyзЛecУ
дacЪЛ.
g) EcÎË ÔpeÀycÏoÚpeÌê ycÚpoÈcÚÇa ÀÎÓ
ÔpËcoeÀËÌeÌËÓ ÔpËcÔocoÄÎeÌËÈ ÀÎÓ oÚÇoÀa
Ë cÄopa ÔêÎË, yÄeÀËÚecë Ç ÚoÏ, äÚo oÌË
ÔpËcoeÀËÌeÌê Ë ËcÔoÎëÁyïÚcÓ ÌaÀÎeÊaçËÏ
oÄpaÁoÏ.
аcФoОлБoЗaМЛe АaММкx ycЪpoИcЪЗ ПoКeЪ
yПeМлеЛЪл oФacМocЪЛ, cЗУБaММкe c ФкОлп.
4) ùÍcÔÎyaÚaáËÓ Ë oÄcÎyÊËÇaÌËe
íÎeÍÚpoËÌcÚpyÏeÌÚoÇ
a) He ÔepeÖpyÊaÈÚe íÎeÍÚpoËÌcÚpyÏeÌÚ.
àcÔoÎëÁyÈÚe ÌaÀÎeÊaçËÈ ÀÎÓ BaåeÖo
ÔpËÏeÌeÌËÓ íÎeÍÚpoËÌcÚpyÏeÌÚ.
HaАОeКaзЛИ нОeНЪpoЛМcЪpyПeМЪ ДyАeЪ
ЗкФoОМУЪл paДoЪy Оyдеe Л МaАeКМee З ЪoП peКЛПe
paДoЪк, Мa НoЪopкИ oМ paccдЛЪaМ.
b) He ËcÔoÎëÁyÈÚe íÎeÍÚpoËÌcÚpyÏeÌÚ c
МeЛcФpaЗМкП ЗкНОпдaЪeОeП, ecОЛ c eЦo
ФoПoзлп МeОлБУ ДyАeЪ ЗНОпдЛЪл Л
ЗкНОпдЛЪл ЛМcЪpyПeМЪ.
KaКАкИ нОeНЪpoЛМcЪpyПeМЪ, НoЪopкП МeОлБУ
yФpaЗОУЪл c ФoПoзлп ЗкНОпдaЪeОУ, ДyАeЪ
ФpeАcЪaЗОУЪл oФacМocЪл, Л eЦo ДyАeЪ МeoДxoАЛПo
oЪpeПoМЪЛpoЗaЪл.
c) OЪcoeАЛМЛЪe еЪeФceОлМyп ЗЛОНy oЪ
ЛcЪoдМЛНa ФЛЪaМЛУ Л/ЛОЛ ФopЪaЪЛЗМкИ
ДaЪapeИМкИ ЛcЪoдМЛН ФЛЪaМЛУ oЪ
нОeНЪpoЛМcЪpyПeМЪa ФepeА МaдaОoП
ЗкФoОМeМЛУ НaНoИ-ОЛДo ЛБ peЦyОЛpoЗoН,
ФepeА cПeМoИ ФpЛМaАОeКМocЪeИ ЛОЛ
xpaМeМЛeП нОeНЪpoЛМcЪpyПeМЪoЗ.
TaНЛe ФpoЩЛОaНЪЛдecНЛe Пepк ДeБoФacМocЪЛ
yПeМлеaЪ oФacМocЪл МeФpeАМaПepeММoЦo
ЗНОпдeМЛУ АЗЛЦaЪeОУ нОeНЪpoЛМcЪpyПeМЪa.
d) XpaÌËÚe ÌeËcÔoÎëÁyeÏêe íÎeÍÚpoËÌcÚpyÏeÌÚê
З МeАocЪyФМoП АОУ АeЪeИ ПecЪe, Л Мe
paБpeеaИЪe ОпАУП, Мe БМaпзЛП НaН
oДpaзaЪлcУ c нОeНЪpoЛМcЪpyПeМЪoП ЛОЛ Мe
ЛБyдЛЗеЛП АaММoe pyНoЗoАcЪЗo, paДoЪaЪл c
нОeНЪpoЛМcЪpyПeМЪoП.
щОeНЪpoЛМcЪpyПeМЪк ФpeАcЪaЗОУпЪ oФacМocЪл З
pyНax МeФoАЦoЪoЗОeММкx ФoОлБoЗaЪeОeИ.
e) CoÀepÊËÚe íÎeÍÚpoËÌcÚpyÏeÌÚê Ç
ЛcФpaЗМocЪЛ. иpoЗepлЪe, МeЪ ОЛ МecoocМocЪЛ
ЛОЛ БaeАaМЛУ АЗЛКyзЛxcУ дacЪeИ,
ФoЗpeКАeМЛУ АeЪaОeИ ЛОЛ НaНoЦo-ОЛДo
АpyЦoЦo oДcЪoУЪeОлcЪЗa, НoЪopoe ПoКeЪ
ФoЗОЛУЪл Мa ЩyМНбЛoМЛpoЗaМЛe
нОeНЪpoЛМcЪpyПeМЪoЗ.
иpЛ МaОЛдЛЛ ФoЗpeКАeМЛУ oЪpeПoМЪЛpyИЪe
нОeНЪpoЛМcЪpyПeМЪ ФepeА eЦo нНcФОyaЪaбЛeИ.
ÅoÎëåoe ÍoÎËäecÚÇo ÌecäacÚÌêx cÎyäaeÇ cÇÓÁaÌo
c ÔÎoxËÏ oÄcÎyÊËÇaÌËeÏ íÎeÍÚpoËÌcÚpyÏeÌÚoÇ.
f) CoÀepÊËÚe peÊyçËe ËÌcÚpyÏeÌÚê ocÚpo
БaЪoдeММкПЛ Л дЛcЪкПЛ.
HaÀÎeÊaçËÏ oÄpaÁoÏ coÀepÊaçËecÓ Ç
ËcÔpaÇÌocÚË peÊyçËe ËÌcÚpyÏeÌÚê c ocÚpêÏË
peÊyçËÏË ÍpoÏÍaÏË ÄyÀyÚ ÏeÌëåe ÁaeÀaÚë Ë
ÄyÀyÚ ÎeÖäe Ç yÔpaÇÎeÌËË.
g) àcÔoÎëÁyÈÚe íÎeÍÚpoËÌcÚpyÏeÌÚ,
ÔpËÌaÀÎeÊÌocÚË, ÌacaÀÍË Ë Ú.Ô. Ç
cooÚÇeÚcÚÇËË c ÀaÌÌêÏ pyÍoÇoÀcÚÇoÏ,
ÔpËÌËÏaÓ Ço ÇÌËÏaÌËe ycÎoÇËÓ Ë oÄéeÏ
ÇêÔoÎÌÓeÏoÈ paÄoÚê.
45
àcÔoÎëÁoÇaÌËe íÎeÍÚpoËÌcÚpyÏeÌÚa ÀÎÓ
ÇêÔoÎÌeÌËÓ paÄoÚ Ìe Ôo ÔpÓÏoÏy ÌaÁÌaäeÌËï
ÏoÊeÚ ÔpËÇecÚË Í oÔacÌoÈ cËÚyaáËË.
5) OÄcÎyÊËÇaÌËe
a) OÄcÎyÊËÇaÌËe BaåeÖo íÎeÍÚpoËÌcÚpyÏeÌÚa
АoОКМo ЗкФoОМУЪлcУ НЗaОЛЩЛбЛpoЗaММкП
ФpeАcЪaЗЛЪeОeП peПoМЪМoИ cОyКДк c
ЛcФoОлБoЗaМЛeП ЪoОлНo ЛАeМЪЛдМкx
БaФacМкx дacЪeИ.
ùÚo oÄecÔeäËÚ coxpaÌÌocÚë Ë ÄeÁoÔacÌocÚë
íÎeÍÚpoËÌcÚpyÏeÌÚa.
MEPA èPEÑOCTOPOÜHOCTà
ÑepÊËÚe ÔoÀaÎëåe oÚ ÀeÚeÈ Ë ÌeÏoçÌêx ÎïÀeÈ.
EcÎË ËÌcÚpyÏeÌÚê Ìe ËcÔoÎëÁyïÚcÓ, Ëx cÎeÀyeÚ
xpaÌËÚë Ç ÌeÀocÚyÔÌoÏ ÀÎÓ ÀeÚeÈ Ë ÌeÏoçÌêx
ÎïÀeÈ ÏecÚe.
MEPõ èPEÑOCTOPOÜHOCTà èPà PAÅOTE
C AãMAÂHOâ èàãOâ
1. HЛ З НoeП cОyдae Мe ЛcФoОлБyИЪe НaНyп-ОЛДo АpyЦyп
МacaАНy НpoПe еОЛЩoЗaОлМoЦo НpyЦa c aОПaБМoИ
НpoПНoИ coЦОacМo cФeбЛЩЛНaбЛЛ ЛБЦoЪoЗЛЪeОУ.
He paДoЪaИЪe aОПaБМoИ ФЛОoИ c ЛcФoОлБoЗaМЛeП
ЗoАк.
2. KaКАкИ paБ ФepeА МaдaОoП paДoЪк co
еОЛЩoЗaОлМкП НpyЦoП c aОПaБМoИ НpoПНoИ,
ФpoЗepУИЪe нЪoЪ ЛМcЪpyПeМЪ. EcОЛ Мa МХП ЛПeпЪcУ
ЪpeзЛМк, ФoОoПНЛ ЛОЛ ЗoЦМyЪocЪЛ – Мe ЛcФoОлБyИЪe
eЦo. OcЪopoКМo ЗНОпдЛЪe ЛМcЪpyПeМЪ c бeОлп
ФpoЗepНЛ МaОЛдЛУ ЛМкx МeЛcФpaЗМocЪeИ.
3. аcФoОлБoЗaМЛe еОЛЩoЗaОлМoЦo НpyЦa c aОПaБМoИ
НpoПНoИ АОУ peБНЛ ПeЪaООa yПeМлеЛЪ cpoН eЦo
ФpЛЦoАМocЪЛ ЛОЛ ФpЛЗeАХЪ Н eЦo ФoОoПНe. HЛНoЦАa
Мe ЛcФoОлБyИЪe еОЛЩoЗaОлМкИ НpyЦ c aОПaБМoИ
НpoПНoИ АОУ peБНЛ ПeЪaООa.
4. PaÄoÚy ÌaäËÌaÈÚe ÚoÎëÍo ÔocÎe ÌaÄopa
ÏaÍcËÏaÎëÌoÈ cÍopocÚË ÇpaçeÌËÓ.
5. ópeÁÏepÌaÓ cËÎa ÔepeÖpyÊaeÚ ÀÇËÖaÚeÎë. ÉÎyÄËÌa
peÁÍË ÀoÎÊÌa ÄêÚë 5 ÏÏ ËÎË ÏeÌëåe.
6. He ÔoÎëÁyÈÚecë íÚËÏ ËÌcÚpyÏeÌÚoÏ ÀÎÓ peÁÍË
acÄecÚa.
7. иpЛ ЛcФoОлБoЗaМЛЛ peКyзeЦo АЛcНa, З cОyдae eЦo
ЗocФОaПeМeМЛУ, МaНpoИЪe aАaФЪep ФкОeyОoЗЛЪeОУ
peБЛМoЗoИ НpкеНoИ Л ФpЛ нЪoП oДУБaЪeОлМo
МaАeЗaИЪe БaзЛЪМкe oдНЛ.
Page 47

TEXHàóECKàE XAPAKTEPàCTàKà
HaÔpÓÊeÌËe (Ôo peÖËoÌaÏ)* (110B, 230B)
èoÚpeÄÎÓeÏaÓ ÏoçÌocÚë* 1300 BT
óËcÎo oÄopoÚoÇ xoÎocÚoÖo xoÀa 11000 ÏËÌ.
PaÁÏepê åÎËÙoÇaÎëÌoÖo ÍpyÖa c aÎÏaÁÌoÈ ÍpoÏÍoÈ
MaÍcËÏaÎëÌaÓ ÖÎyÄËÌa peÁÍË 33 ÏÏ
Bec (ÄeÁ åÌypa åÎËÙoÇaÎëÌoÖo ÍpyÖa c aÎÏaÁÌoÈ ÍpoÏÍoÈ)
* иpoЗepлЪe ФacФopЪМyп ЪaДОЛдНy Мa ЛБАeОЛЛ, ЪaН НaН oМa ПeМУeЪcУ З БaЗЛcЛПocЪЛ oЪ peЦЛoМa
CTAHÑAPTHõE AKCECCìAPõ
(1) ÉaeäÌêÈ ÍÎïä............................................................ 1
(2) AÀaÔÚep....................................................................... 1
(3) ÅoÍoÇaÓ pyÍoÓÚÍa ..................................................... 1
HaÄop cÚaÌÀapÚÌêx aÍceccyapoÇ ÏoÊeÚ ÄêÚë ÄeÁ
ÔpeÀyÔpeÊÀeÌËÓ ËÁÏeÌÕÌ.
OÅãACTú èPàMEHEHàü
䡬 PeÁÍa ËÎË ÖpaÇËpoÇÍa ÄeÚoÌa
䡬 PeБНa ЛОЛ ЦpaЗЛpoЗНa НaЩeОлМoИ ФОЛЪНЛ
䡬 PeÁÍa ËÎË ÖpaÇËpoÇÍa ÍaÏÌÓ
䡬 PeÁÍa ËÎË ÖpaÇËpoÇÍa ÍpoÇeÎëÌoÈ äepeÔËáê
èOÑÉOTOBKA K ùKCèãìATAñàà
1. àcÚoäÌËÍ íÎeÍÚpoÔËÚaÌËÓ
иpocОeАЛЪe Бa ЪeП, дЪoДк ЛcФoОлБyeПкИ ЛcЪoдМЛН
нОeНЪpoФЛЪaМЛУ cooЪЗeЪcЪЗoЗaО ЪpeДoЗaМЛУП Н
ЛcЪoдМЛНy нОeНЪpoФЛЪaМЛУ, yНaБaММкП Мa ЪЛФoЗoИ
ЪaДОЛдНe ЛБАeОЛУ.
2. èepeÍÎïäaÚeÎë “BÍÎ./ BêÍÎ.”
ìÄeÀËÚecë Ç ÚoÏ, äÚo ÔepeÍÎïäaÚeÎë ÌaxoÀËÚcÓ Ç
ÔoÎoÊeÌËË ''BêÍÎ.''. EcÎË Çê ÇcÚaÇÎÓeÚe åÚeÔceÎë
Ç poÁeÚÍy, a ÔepeÍÎïäaÚeÎë ÌaxoÀËÚcÓ Ç ÔoÎoÊeÌËË
“BÍÎ.”, ËÌcÚpyÏeÌÚ ÌeÏeÀÎeÌÌo ÁapaÄoÚaeÚ, äÚo
ÏoÊeÚ cÚaÚë ÔpËäËÌoÈ cepëÕÁÌoÈ ÚpaÇÏê.
3. мАОЛМЛЪeОл
KoЦАa paДoдaУ ФОoзaАНa yАaОeМa oЪ ЛcЪoдМЛНa
нОeНЪpoФЛЪaМЛУ, ФoОлБyИЪecл yАОЛМЛЪeОeП.
мАОЛМЛЪeОл АoОКeМ ЛПeЪл ЪpeДyeПyп ФОoзaАл
ФoФepeдМoЦo ceдeМЛУ Л oДecФeдЛЗaЪл paДoЪy
ЛМcЪpyПeМЪa БaАaММoИ ПoзМocЪЛ. PaБПaЪкЗaИЪe
yАОЛМЛЪeОл ЪoОлНo Мa peaОлМo МeoДxoАЛПyп АОУ
АaММoЦo НoМНpeЪМoЦo ФpЛПeМeМЛУ АОЛМy.
4. èpoÇepÍa Ë ycÚaÌoÇÍa åÎËÙoÇaÎëÌoÖo ÍpyÖa c
aÎÏaÁÌoÈ ÍpoÏÍoÈ
мДeАЛЪecл З ЪoП, дЪo еОЛЩoЗaОлМкИ НpyЦ c
aОПaБМoИ НpoПНoИ ЛПeММo ЪaНoИ, НaН Л oФЛcaМo З
cФeбЛЩЛНaбЛЛ Л дЪo oМ Мe ЛПeeЪ ЪpeзЛМ, ФoОoПoН
ЛОЛ ФpoЦЛДoЗ. мДeАЛЪecл З ЪoП, дЪo еОЛЩoЗaОлМкИ
НpyЦ c aОПaБМoИ НpoПНoИ МaАХКМo ycЪaМoЗОeМ. иo
ЗoФpocaП ycЪaМoЗНЛ, oДpaЪЛЪecл Н paБАeОy
“мcЪaМoЗНa/cМУЪЛe еОЛЩoЗaОлМoЦo НpyЦa c aОПaБМoИ
НpoПНoИ”.
5. ìcÚaÌoÇÍa Ë peÖyÎËpoÇÍa ÍpêåÍË ÔêÎeyÎoÇËÚeÎÓ
(PËc. 1)
KpêåÍa ÔêÎeyÎoÇËÚeÎÓ – íÚo ÁaçËÚÌoe ycÚpoÈcÚÇo
ÀÎÓ ÔpeÀoÚÇpaçeÌËÓ ÚpaÇÏËpoÇaÌËÓ Ç cÎyäae
6. иpoЗepлЪe ПexaМЛБП ДОoНЛpoЗНЛ еФЛМАeОУ
7. HacÚpoÈÍa ÖÎyÄËÌê peÁÍË (PËc. 2)
BHàMAHàE
䡬 OcÚaÇÎÓÓ pêäaÖ ÌeÀoÚÓÌyÚêÏ, Bê ÏoÊeÚe ÔoÎyäËÚë
ìCTAHOBKA òãAHÉA èõãEìãOBàTEãü
иpЛ peБНe ПaЪepЛaОa, НoЪopкИ oДpaБyeЪ ФкОл,
ЛcФoОлБyИЪe еОaМЦ-ФкОeyОoЗЛЪeОл cОeАyпзЛП oДpaБoП:
(1) CМЛПЛЪe peБЛМoЗyп НpкеНy Л ycЪaМoЗЛЪe
(2) BcÚaÇëÚe åÎaÌÖ-ÔêÎeyÎoÇËÚeÎë ÀÎÓ ÀaÌÌoÖo
BHàMAHàE
䡬 EcÎË Çê Ìe ËcÔoÎëÁyeÚe åÎaÌÖ-ÔêÎeyÎoÇËÚeÎë –
ìCTAHOBKA/CHüTàE òãàîOBAãúHOÉO
KPìÉA C AãMAÂHOâ KPOMKOâ
1. ìcÚaÌoÇÍa
(1) CМЛПЛЪe НpкеНy (A).
(2) иpoЪpЛЪe ФкОл co еФЛМАeОУ Л еaИД.
(3) мАocЪoЗepлЪecл, дЪo МaФpaЗОeМЛe ЗpaзeМЛУ aОПaБМoЦo
(4) HaКПЛЪe Мa cЪoФopМкИ еЪЛЩЪ Л БaНpeФЛЪe еФЛМАeОл.
BÌeåÌËÈ ÀËaÏeÚp 125 ÏÏ
ToÎçËÌa 2,0 ÏÏ
ÑËaÏeÚp oÚÇepcÚËÓ 22,2 ÏÏ
pacНaОкЗaМЛУ еОЛЩoЗaОлМoЦo НpyЦa c aОПaБМoИ
НpoПНoИ Зo ЗpeПУ paДoЪк. иepeА МaдaОoП peБНЛ
yДeАЛЪecл З ЪoП, дЪo НpкеНa ycЪaМoЗОeМa Л
БaНpeФОeМa МaАОeКaзЛП oДpaБoП. HeПМoКНo
ocОaДЛЗ ycЪaМoЗoдМкИ ЗЛМЪ, НpкеНy ФкОeyОoЗЛЪeОУ
ПoКМo ФoЗepМyЪл Л paБПecЪЛЪл ФoА ОпДкП yЦОoП
АОУ АocЪЛКeМЛУ ПaНcЛПaОлМoИ нНcФОyaЪaбЛoММoИ
нЩЩeНЪЛЗМocЪЛ. мДeАЛЪecл, дЪo ycЪaМoЗoдМкИ ЗЛМЪ
ФОoЪМo БaНpyдeМ ФocОe peЦyОЛpoЗaМЛУ НpкеНЛ
ФкОeyОaЗОЛЗaЪeОУ.
иepeА ЗНОпдeМЛeП нОeНЪpЛдecНoЦo ЛМcЪpyПeМЪa
ФpoЗepлЪe МaКЛПМyп НМoФНy Л yДeАЛЪecл З ЪoП, дЪo
ДОoНЛpoЗНa еФЛМАeОУ ocЗoДoКАeМa, ФyЪeП АЗyxЛОЛ ЪpexpaБoЗoЦo МaКaЪЛУ (CП. PËc. 1).
OФycНaМЛe ocОaДЛЪ ДapaеНoЗyп ЦaИНy, a ФoАМУЪЛe
– АoЪУМeЪ.
OcОaДОУУ ДapaеНoЗyп ЦaИНy Л ФepeАЗЛЦaУ
МaФpaЗОУпзyп cНoОлКeМЛУ ПoКМo oЪpeЦyОЛpoЗaЪл
ЦОyДЛМy peБНЛ.
ЪpaЗПy. иocОe МacЪpoИНЛ ЦОyДЛМк peБНЛ МaАeКМo
АoЪУМЛЪe pкдaЦ.
ЗcФoПoЦaЪeОлМкИ aАaФЪep. (PËc. 3)
нОeНЪpoФpЛДopa Зo ЗcФoПoЦaЪeОлМкИ aАaФЪep. (PËc. 3)
oÄÓÁaÚeÎëÌo ÌaÀeÇaÈÚe peÁËÌoÇyï ÍpêåÍy Ìa
aÀaÔÚep ÔêÎeyÎoÇËÚeÎÓ.
peÊyçeÖo ÀËcÍa cooÚÇeÚcÚÇyeÚ cÚpeÎÍe, yÍaÁaÌÌoÈ Ìa
ÍapÚepe, Ë ycÚaÌoÇËÚe aÎÏaÁÌêÈ peÊyçËÈ ÀËcÍ Ç
ÔoÎoÊeÌËe, ÔoÍaÁaÌÌoe Ìa PËc. 1.
ВaЪУМЛЪe ЦaИНy НpyЦa МaАОeКaзЛП oДpaБoП ФpЛ ФoПoзЛ
ЦaeдМoЦo НОпдa, НoЪopкИ ЗxoАЛЪ З НoПФОeНЪ. (PËc. 1)
-1
2,9 kr
PyccÍËÈ
46
Page 48

PyccÍËÈ
èPàMEóAHàE
䡬 СОУ БaЪУКНЛ НoОХcМoИ ЦaИНЛ ЗceЦАa ФoОлБyИЪecл
ÖaeäÌêÏ ÍÎïäoÏ, ÍoÚopêÈ ÇxoÀËÚ Ç ÍoÏÔÎeÍÚ.
2. CÌÓÚËe
CМЛПЛЪe НoОХcМyп ЦaИНy ЦaeдМкП НОпдoП Л cМЛПЛЪe
еОЛЩoЗaОлМкИ НpyЦ c aОПaБМoИ НpoПНoИ. (PËc. 1)
PEÂKA
1. TexÌËÍa peÁÍË (PËc. 4)
(1) èoÎoÊËÚe íÚoÚ ËÌcÚpyÏeÌÚ Ìa ÏaÚepËaÎ, ÍoÚopêÈ Çê
ДyАeЪe peБaЪл Л ЗкpoЗМУИЪe ОЛМЛп peБНЛ c
еОЛЩoЗaОлМкП НpyЦoП c aОПaБМoИ НpoПНoИ.
PeБНy ПoКМo ЗкФoОМУЪл ФОaЗМo, ecОЛ Зк peКeЪe ФpУПo
Фo ОЛМЛЛ peБНЛ Фo ФepЗoМaдaОлМoПy ФopeБy.
(2) иoЗepМЛЪe ЗкНОпдaЪeОл, НoЦАa еОЛЩoЗaОлМкИ НpyЦ
c aÎÏaÁÌoÈ ÍpoÏÍoÈ Ìe ÍacaeÚcÓ ÏaÚepËaÎa, ÍoÚopêÈ
Çê coÄËpaeÚecë peÁaÚë.
2. Mepê ÔpeÀocÚopoÊÌocÚË ÌeÔocpeÀcÚÇeÌÌo ÔocÎe
oÍoÌäaÌËÓ paÄoÚê
иocОe ЗкНОпдeМЛУ ПaеЛМк Мe НОaАЛЪe eЦo Аo Ъex
Фop, ФoНa еОЛЩoЗaОлМкИ НpyЦ c yЪoФОeММкП бeМЪpoП
ФoОМocЪлп Мe ocЪaМoЗЛЪcУ. He cдЛЪaУ ЪoЦo, дЪo нЪa
Пepa ФpeАocЪopoКМocЪЛ ФoПoКeЪ ЛБДeКaЪл
МecдacЪМoЦo cОyдaУ c ЪУКeОкПЛ ФocОeАcЪЗЛУПЛ, oМa
yПeМлеЛЪ НoОЛдecЪЗo ФкОЛ Л ПeОНoИ еОЛЩoЗaОлМoИ
cЪpyКНЛ, НoЪopaУ ПoКeЪ БacocaЪлcУ ЗМyЪpл ПaеЛМк.
BHàMAHàE
䡬 BceЦАa ФpoЗepУИЪe еОЛЩoЗaОлМкИ НpyЦ c aОПaБМoИ
НpoПНoИ ФepeА МaдaОoП paДoЪк. HЛНoЦАa Мe
ФoОлБyИЪecл еОЛЩoЗaОлМкП НpyЦoП c aОПaБМoИ
НpoПНoИ, ecОЛ oМ ЛПeeЪ ЪpeзЛМк, ФoОoПНЛ ЛОЛ
ФpoЦЛДк.
䡬 HeОлБУ ФoОЛЗaЪл еОЛЩoЗaОлМкИ НpyЦ c aОПaБМoИ
ÍpoÏÍoÈ ÇoÀoÈ ËÎË oxÎaÀËÚeÎeÏ.
䡬 PeБНy МaдЛМaИЪe ЪoОлНo ЪoЦАa, НoЦАa еОЛЩoЗaОлМкИ
ÍpyÖ c aÎÏaÁÌoÈ ÍpoÏÍoÈ ÌaÄepÕÚ ÏaÍcËÏaÎëÌyï
cÍopocÚë.
䡬 EcОЛ еОЛЩoЗaОлМкИ НpyЦ c aОПaБМoИ НpoПНoИ
БacЪoФopЛЪcУ ЛОЛ ФoУЗЛЪcУ ФocЪopoММЛИ еyП –
МeПeАОeММo oЪНОпдЛЪe ФЛЪaМЛe.
䡬 HЛНoЦАa Мe ФoОлБyИЪecл еОЛЩoЗaОлМкП НpyЦoП c
aОПaБМoИ НpoПНoИ АОУ peБНЛ БЛЦБaЦoЗЛАМкx ЛОЛ
ЛcНpЛЗОeММкx ОЛМЛИ. HЛНoЦАa Мe ФoОлБyИЪecл
ДoНoЗoИ cЪopoМoИ еОЛЩoЗaОлМoЦo НpyЦa c aОПaБМoИ
НpoПНoИ. HeОлБУ peБaЪл ФoА yЦОoП.
䡬 EcÎË Í åÎËÙoÇaÎëÌoÏy ÍpyÖy c aÎÏaÁÌoÈ ÍpoÏÍoÈ
ÔpËÎaÖaÚë äpeÁÏepÌêe ycËÎËÓ ÀÎÓ ÇêpaÇÌËÇaÌËÓ
ÎËÌË peÁÍË Ço ÇpeÏÓ peÁÍË – íÚo ÏoÊeÚ ÔpËÇecÚË
Ìe ÚoÎëÍo Í ÔepeÖpyÁÍe ÏoÚopa Ë ÔpoÊoÖaÏ, Ìo
ÚaÍÊe Ë Í ÔepeÖpeÇy åÎËÙoÇaÎëÌoÖo ÍpyÖa c
aÎÏaÁÌoÈ ÍpoÏÍoÈ Ë coÍpaçeÌËï cpoÍa cÎyÊÄê.
䡬 CÎeÀËÚe Áa ÚeÏ, äÚoÄê íÎeÍÚpËäecÍËÈ ÍaÄeÎë Ìe
ÍacaÎcÓ åÎËÙoÇaÎëÌoÖo ÍpyÖa c aÎÏaÁÌoÈ ÍpoÏÍoÈ
Ço ÇpeÏÓ paÄoÚê.
䡬 иocОe oНoМдaМЛУ paДoЪк oЪНОпдЛЪe ФЛЪaМЛe Л
ЗкМлЪe ЗЛОНy ЛБ poБeЪНЛ.
TEXHàóECKOE OÅCãìÜàBAHàE à
èPOBEPKA
1. èpoÇepÍa åÎËÙoÇaÎëÌoÖo ÍpyÖa c aÎÏaÁÌoÈ
ÍpoÏÍoÈ
аБМoеeММкИ еОЛЩoЗaОлМкИ НpyЦ c aОПaБМoИ
НpoПНoИ ФepeЦpyКaeЪ ПoЪop Л yПeМлеaeЪ eЦo
paДoЪocФocoДМocЪл. ВaПeМЛЪe eЦo Мa МoЗкИ.
47
2. ÂacopeÌËe åÎËÙoÇaÎëÌoÖo ÍpyÖa c aÎÏaÁÌoÈ
ÍpoÏÍoÈ
CЪeФeМл ЛБМoca aОПaБМoЦo cОoУ peКyзeИ НpoПНЛ
ДyАeЪ БaЗЛceЪл oЪ ЪЛФa ПaЪepЛaОa, НoЪopкИ peКeЪcУ,
cНopocЪЛ peБНЛ Л Ъ.А. B oДзeП, ПaЪepЛaОк, НoЪopкe
ФpЛ peБНe oДpaБyпЪ ЦpaМyОк, ПoЦyЪ cocНoДОЛЪл
БaЦycЪЛЪeОл Л ycНopЛЪл ЛБМoc aОПaБМoЦo cОoУ. C АpyЦoИ
cЪopoМк, ПaЪepЛaОк, НoЪopкe Зo ЗpeПУ peБНЛ
oДpaБyпЪ ФкОл, ПoЦyЪ БaДЛЪл aОПaБМкИ cОoИ, дЪo
yПeМлеЛЪ нЩЩeНЪЛЗМocЪл peБНЛ. B cОyдae ЪaНoИ
БaНyФopНЛ, АoФoОМЛЪeОлМкe ycЛОЛУ, ФpЛОaЦaeПкe АОУ
yЗeОЛдeМЛУ cНopocЪЛ peБНЛ, ЛМoЦАa ПoЦyЪ ФpЛЗecЪЛ
Н oДpaБoЗaМЛп ЛcНp Фo ФepЛПeЪpy еОЛЩoЗaОлМoЦo
НpyЦa c aОПaБМoИ НpoПНoИ. B ЪaНoП cОyдae, ФpeНpaЪЛЪe
ФoОлБoЗaМЛe aОПaБМoИ ФЛОoИ Л ЗМЛПaЪeОлМo
ФpoЗepлЪe НpoПНy peБНЛ, ФoЪepeЗ eХ ФaОлбaПЛ. EcОЛ
aОПaБМкИ cОoИ Мa oзyФл ЦОaАНЛИ (ДeБ еepoxoЗaЪocЪeИ
Л МepoЗМocЪeИ) – нЪo БМaдЛЪ, дЪo oМ БaДЛЪкИ ФкОлп
Л eЦo МeoДxoАЛПo “oдЛcЪЛЪл”.
СОУ ЪзaЪeОлМoИ oдЛcЪНЛ, МeoДxoАЛПo ФpopeБaЪл, З
МecНoОлНo ycЛОeММoП peКЛПe peБНЛ, oНoОo 5 ПeЪpoЗ,
ЦОyДЛМoИ 10 ПП, З oЪМocЛЪeОлМo ПУЦНoП ПaЪepЛaОe,
НoЪopкИ oДpaБyeЪ ЦpaМyОк Зo ЗpeПУ peБНЛ (ЪaНoИ НaН
бeПeМЪМкИ ДОoН ЛОЛ НЛpФЛд) – нЪo ЗoБoДМoЗЛЪ
нЩЩeНЪЛЗМocЪл peБНЛ aОПaБМoЦo cОoУ Л ФpoАОЛЪ cpoН
cОyКДк еОЛЩoЗaОлМoЦo НpyЦa c aОПaБМoИ НpoПНoИ.
AОПaБ дyЗcЪЗЛЪeОeМ Н ЗкcoНЛП ЪeПФepaЪypaП, oМ
МaдЛМaeЪ paБpyеaЪлcУ ФpЛДОЛБЛЪeОлМo ФpЛ
ЪeПФepaЪype 600°C. ЕoОee ЗкcoНЛe ЪeПФepaЪypк
ФpЛЗoАУЪ Н paБОoКeМЛп aОПaБa. A ФoнЪoПy "oдЛcЪНy"
МeoДxoАЛПo ЗкФoОМУЪл cpaБy Кe ФocОe БacopeМЛУ
aОПaБМoЦo cОoУ ЛОЛ НoЦАa oМ МaдМХЪ ЛcНpЛЪл.
3. èpoÇepÍa ycÚaÌoÇÎeÌÌêx ÇËÌÚoÇ
PeЦyОУpМo ФpoЗepУИЪe Зce ycЪaМoЗОeММкe Мa
ЛМcЪpyПeМЪe ЗЛМЪк, cОeАЛЪe Бa ЪeП, дЪoДк oМЛ
ДкОЛ НaН cОeАyeЪ БaЪУМyЪк. HeПeАОeММo БaЪУМЛЪe
ЗЛМЪ, НoЪopкИ oНaКeЪcУ ocОaДОeММкП.
HeЗкФoОМeМЛe нЪoЦo ФpaЗЛОa ЦpoБЛЪ cepлХБМoИ
oФacМocЪлп.
4. TexÌËäecÍoe oÄcÎyÊËÇaÌËe ÀÇËÖaÚeÎÓ
OДПoЪНa АЗЛЦaЪeОУ - “cepАбe” нОeНЪpoЛМcЪpyПeМЪa.
иpoУЗОУИЪe АoОКМoe ЗМЛПaМЛe, cОeАУ Бa ЪeП, дЪoДк
oДПoЪНa Мe ДкОa ФoЗpeКАeМa Л/ ЛОЛ БaОЛЪa ПacОoП
ЛОЛ ЗoАoИ.
5. OÄcÎeÀoÇaÌËe yÖoÎëÌêx çeÚoÍ (PËc. 5)
B АЗЛЦaЪeОe ЛcФoОлБyпЪcУ yЦoОлМкe зeЪНЛ, НoЪopкe
ФocЪeФeММo ЛБМaеЛЗaпЪcУ.
аcФoОлБoЗaМЛe ЛБМoеeММкx yЦoОлМкx зeЪoН ЛОЛ зeЪoН
З cocЪoУМЛЛ ДОЛБНoП Н “ФpeАeОy ЛБМoca” ПoКeЪ ФpЛЗecЪЛ
Н МeЛcФpaЗМocЪЛ АЗЛЦaЪeОУ. EcОЛ АЗЛЦaЪeОл ocМaзeМ
yЦoОлМoИ зeЪНoИ aЗЪoПaЪЛдecНoИ ocЪaМoЗНЛ, oМ
ocЪaМoЗЛЪcУ aЗЪoПaЪЛдecНЛ.
B нЪo ЗpeПУ БaПeМЛЪe oДe yЦoОлМкe зeЪНЛ МoЗкПЛ
зeЪНaПЛ, НoЪopкe ЛПeпЪ Ъe Кe МoПepa yЦoОлМкx зeЪoН,
НaН Л ФoНaБaММкe Мa pЛcyМНe. KpoПe ЪoЦo, ЗceЦАa
coАepКЛЪe yЦoОлМкe зeЪНЛ З дЛcЪoЪe Л oДУБaЪeОлМo
cОeАЛЪe Бa ЪeП, дЪoДк oМЛ ПoЦОЛ cЗoДoАМo cНoОлБЛЪл
З зeЪНoАepКaЪeОУx.
6. ÂaÏeÌa yÖoÎëÌêx çeÚoÍ (PËc. 6)
〈
〉
CÌÓÚËe
(1) OcÎaÄëÚe caÏoÌapeÁaïçËÈ ÇËÌÚ D4, yÀepÊËÇaïçËÈ
БaАМпп МЛКМпп НpкеНy, Л cМЛПЛЪe БaАМпп
МЛКМпп НpкеНy.
(2) аcФoОлБyИЪe ЗcФoПoЦaЪeОлМкИ еecЪЛЦpaММкИ
ЦaeдМкИ НОпд ЛОЛ ПaОeМлНyп oЪЗepЪНy АОУ ЪoЦo,
дЪoДк oЪЪУМyЪл ЗЗepx НpaИ ФpyКЛМк, НoЪopaУ
yАepКЛЗaeЪ yЦoОлМyп зeЪНy. иepeАЗЛМлЪe НpaИ
ФpyКЛМк З МaФpaЗОeМЛЛ МapyКy oЪ зeЪНoАepКaЪeОУ.
Page 49

(3) BêÌëÚe ÍoÌeá çeÚoäÌoÖo ÍaÌaÚËÍa yÖoÎëÌoÈ çeÚÍË
ЛБ НОeППМoЦo oЪceНa зeЪНoАepКaЪeОУ, a БaЪeП
ЗкМлЪe yЦoОлМyп зeЪНy ЛБ зeЪНoАepКaЪeОУ.
〈
ìcÚaÌoÇÍa
(1) BcÚaÇëÚe ÍoÌeá çeÚoäÌoÖo ÍaÌaÚËÍa yÖoÎëÌoÈ çeÚÍË
(2) BcЪaЗлЪe yЦoОлМyп зeЪНy З зeЪНoАepКaЪeОл.
(3) аcФoОлБyИЪe ЗcФoПoЦaЪeОлМкИ еecЪЛЦpaММкИ
(4) мcЪaМoЗЛЪe БaАМпп МЛКМпп НpкеНy Л БaЪУМЛЪe
7. èopÓÀoÍ ÁaÔËceÈ Ôo ÚexoÄcÎyÊËÇaÌËï
OCTOPOÜHO
ÂAMEóAHàE
〉
З НОeППМкИ oЪceН зeЪНoАepКaЪeОУ.
ÖaeäÌêÈ ÍÎïä ËÎË ÏaÎeÌëÍyï oÚÇepÚÍy ÀÎÓ ÚoÖo,
äÚoÄê ÇepÌyÚë ÍpoÏÍy ÔpyÊËÌê Ìa ÇepxÌïï äacÚë
yÖoÎëÌoÈ çeÚÍË.
caÏoÌapeÁaïçËÈ ÇËÌÚ D4.
A: ÔyÌÍÚ £
B: ÍoÀ £
C: ÍoÎËäecÚÇo ÔpËÏeÌeÌËÈ
D: ÁaÏeäaÌËÓ
PeПoМЪ, ПoАЛЩЛНaбЛп Л ocПoЪp ПexaМЛБЛpoЗaММoЦo
ЛМcЪpyПeМЪa ЩЛpПк Hitachi cОeАyeЪ ФpoЗoАЛЪл З
aЗЪopЛБoЗaММoП cepЗЛcМoП бeМЪpe Hitachi.
щЪoЪ ФepeдeМл БaФacМкx дacЪeИ ФpЛЦoАЛЪcУ ФpЛ
ФpeАcЪaЗОeМЛЛ eЦo ЗПecЪe c ЛМcЪpyПeМЪoП З
aЗЪopЛБoЗaММкИ cepЗЛcМкИ бeМЪp Hitachi c БaФpocoП
Мa peПoМЪ ЛОЛ Фpoдee oДcОyКЛЗaМЛe.
иpЛ paДoЪe Л oДcОyКЛЗaМЛЛ ПexaМЛБЛpoЗaММкx
ЛМcЪpyПeМЪoЗ МyКМo coДОпАaЪл ФpaЗЛОa Л cЪaМАapЪк
ДeБoФacМocЪЛ, АeИcЪЗyпзЛe З НaКАoИ АaММoИ cЪpaМe.
îËpÏa HITACHI ÌeÔpepêÇÌo paÄoÚaeÚ ÌaÀ
ycoÇepåeÌcÚÇoÇaÌËeÏ cÇoËx ËÁÀeÎËÈ, ÔoíÚoÏy Ïê
coxpaÌÓeÏ Áa coÄoÈ ÔpaÇo Ìa ÇÌeceÌËe ËÁÏeÌeÌËÈ Ç
ÚexÌËäecÍËe xapaÍÚepËcÚËÍË, yÔoÏÓÌyÚêe Ç ÀaÌÌoÈ
ËÌcÚpyÍáËË Ôo íÍcÔÎyaÚaáËË, ÄeÁ ÔpeÀyÔpeÊÀeÌËÓ oÄ
íÚoÏ.
PyccÍËÈ
àÌÙopÏaáËÓ, ÍacaïçaÓcÓ coÁÀaÇaeÏoÖo åyÏa Ë
ÇËÄpaáËË
аБПepУeПкe ЗeОЛдЛМк ДкОЛ oФpeАeОeМк З cooЪЗeЪcЪЗЛЛ
c EN60745 Л БaУЗОeМк З cooЪЗeЪcЪЗЛЛ c ISO 4871.
àÁÏepeÌÌêÈ cpeÀÌeÇÁÇeåeÌÌêÈ ypoÇeÌë ÁÇyÍoÇoÈ
ÏoçÌocÚË: 106 ÀÅ(A)
àÁÏepeÌÌêÈ cpeÀÌeÇÁÇeåeÌÌêÈ ypoÇeÌë ÁÇyÍoÇoÖo
ÀaÇÎeÌËÓ: 95 ÀÅ(A)
èoÖpeåÌocÚë KpA: 3 ÀÅ (A)
HaАeЗaИЪe МayеМЛНЛ.
OÄçËe ÁÌaäeÌËÓ ÇËÄpaáËË (cyÏÏa ÇeÍÚopoÇ
ÚpËaÍcËaÎëÌoÖo ÍaÄeÎÓ) oÔpeÀeÎÓïÚcÓ Ç cooÚÇeÚcÚÇËË c
EN60745.
BeОЛдЛМa ЗЛДpaбЛЛ
иoЦpeеМocЪл K = 1,5 П/c
èPEÑìèPEÜÑEHàE
䡬 BeОЛдЛМa ЗЛДpaбЛЛ Зo ЗpeПУ ЩaНЪЛдecНoЦo
ËcÔoÎëÁoÇaÌËÓ ËÌcÚpyÏeÌÚa ÏoÊeÚ oÚÎËäaÚëcÓ oÚ
yÍaÁaÌÌoÖo ÁÌaäeÌËÓ, Ç ÁaÇËcËÏocÚË oÚ cÔocoÄa
ËcÔoÎëÁoÇaÌËÓ ËÌcÚpyÏeÌÚa.
䡬 OÔpeÀeÎËÚë Ïepê ÔpeÀocÚopoÊÌocÚË, äÚoÄê
БaзЛЪЛЪл oФepaЪopa, НoЪopкe ocМoЗaМк Мa pacдeЪe
ЗoБАeИcЪЗЛУ ФpЛ ЩaНЪЛдecНЛx ycОoЗЛУx
ЛcФoОлБoЗaМЛУ (ФpЛМЛПaУ Зo ЗМЛПaМЛe Зce ФepЛoАк
бЛНОa нНcФОyaЪaбЛЛ НpoПe ЗpeПeМЛ БaФycНa, Ъo
ecЪл НoЦАa ЛМcЪpyПeМЪ ЗкНОпдeМ, paДoЪaeЪ Мa
xoОocЪoП xoАy).
ah = 4,2 Ï/c
2
2
ÉAPAHTàü
Mк ЦapaМЪЛpyeП cooЪЗeЪcЪЗЛe aЗЪoПaЪЛдecНЛx
ЛМcЪpyПeМЪoЗ Hitachi МopПaЪЛЗМкП/МaбЛoМaОлМкП
ФoОoКeМЛУП. СaММaУ ЦapaМЪЛУ Мe pacФpocЪpaМУeЪcУ Мa
АeЩeНЪк ЛОЛ yзepД, ЗoБМЛНеЛИ ЗcОeАcЪЗЛe МeФpaЗЛОлМoЦo
ЛcФoОлБoЗaМЛe ЛОЛ МeМaАОeКaзeЦo oДpaзeМЛУ, a ЪaНКe
МopПaОлМoЦo ЛБМoca. B cОyдae ФoАaдЛ КaОoДк oЪФpaЗОУИЪe
aЗЪoПaЪЛдecНЛИ ЛМcЪpyПeМЪ З МepaБoДpaММoП cocЪoУМЛЛ
ЗПecЪe c ЙAPAHTавHхM CEPTаоаKATOM, НoЪopкИ
МaxoАЛЪлcУ З НoМбe ЛМcЪpyНбЛЛ Фo oДpaзeМЛп, З
aЗЪopЛБoЗaММкИ бeМЪp oДcОyКЛЗaМЛУ Hitachi.
èPàMEóAHàE
Ha ocМoЗaМЛЛ ФocЪoУММкx ФpoЦpaПП ЛccОeАoЗaМЛУ Л
paБЗЛЪЛУ, HITACHI ocЪaЗОУпЪ Бa coДoИ ФpaЗo Мa
ЛБПeМeМЛe yНaБaММкx БАecл ЪexМЛдecНЛx АaММкx ДeБ
ФpeАЗapЛЪeОлМoЦo yЗeАoПОeМЛУ.
48
Page 50

ABCD
41 314-622 1 M6
42 949-785 1 D6×16
1 320-523 4 D5×25
2 325-053 1
ABCD
43 –––––––––– 1
44 314-428 1
45 325-050 1
3 321-737 1 "4, 20"
4 301-943 1
5 949-558 1 M8
46 999-088 2
47 317-810 2
48 957-754 1
49 308-536 2
6 308-541 1
7 308-543 1
8 980-866 1
9 629-T12 1 629T12DDC3PS2-L
50 325-051 1
10 321-733 1
51 328-808 1
11 321-734 1
52 317-491 1
12-1 360-734C 1 110V
53 325-054 1
54 953-327 1
55 325-052 1
56 328-842 1
13 321-732 1
14 982-021 2 D4×70
12-2 360-734U 1 120V "5-7"
12-3 360-734E 1 230V-240V
57 301-815 2 D4×45
58 319-320 2
15-1 340-645C 1 110V
15-2 340-645D 1 120V
62 937-631 1
59 314-854
60 980-063 2
61 984-750 2 D4×16
16 315-877 1
17 608-VVM 1 608VVC2PS2L
18 321-735 1 "6, 21"
15-3 340-645E 1 230V
63 –––––––––– 1
64 –––––––––– 1
65 328-740 1 "31-36, 38-43"
501 320-994 1
19 303-255 2 M4×10
20 301-944 1
21 321-736 1
22 991-207 3 M4×8
502 938-332Z 1
503 994-322 1
504 328-845 1
23 936-680 1
24 620-1DD 1 6201DDCMPS2L
25 308-546 1
26 308-545 1
27 307-046 4 M5×16
28 944-109 1 3×3×8
29 994-301 1
30 937-817Z 1
31 328-743 1
32 308-386 2 M5×16
33 301-949 1
34 327-741 1
35 942-808 1 M6×20
36 328-809 1
37 994-324 1 M14
38 328-742 1
39 324-865 1
40 328-841 1
49
Page 51

English
GUARANTEE CERTIFICATE
1 Model No.
2 Serial No.
3 Date of Purchase
4 Customer Name and Address
5 Dealer Name and Address
1 Model č.
2 Série č.
3 Datum nákupu
4 Jméno a adresa zákazníka
5 Jméno a adresa prodejce
(Please stamp dealer name and address)
Deutsch
GARANTIESCHEIN
1 Modell-Nr.
2 Serien-Nr.
3 Kaufdaturn
4 Name und Anschrift des Kunden
5 Name und Anschrift des Händlers
1 Model No.
2 Seri No.
3 Satın Alma Tarihi
4 Müßteri Adı ve Adresi
5 Bayi Adı ve Adresi
(Bitte mit Namen und Anschrift des
Handlers abstempeln)
Ελληνικά Română
¶π™∆√¶√π∏∆π∫√ ∂°°À∏™∏™
1 Αρ. Μοντέλου
2 Αύξων Αρ.
3 Ηµεροµηνία αγοράς
4 ΄Ονοµα και διεύθυνση πελάτη
5 ΄Ονοµα και διεύθυνση µεταπωλητή
1 Model nr.
2 Nr. de serie
3 Data cumpărării
4 Numele și adresa clientului
5 Numele și adresa distribuitorului
(Παρακαλούµε να χρησιµοποιηθεί
σφραγίδα)
Polski Slovenščina
GWARANCJA
1 Model
2 Numer seryjny
3 Data zakupu
4 Nazwa klienta i adres
5 Nazwa dealera i adres
1 Št. modela
2 Serijska št.
3 Datum nakupa
4 Ime in naslov kupca
5 Ime in naslov prodajalca
(Pieczęć punktu sprzedaży)
Magyar
GARANCIA BIZONYLAT
ípusszám
1 T
2 Sorozatszám
3 A vásárlás dátuma
4 A Vásárló neve és c
íme
5 A Kereskedő neve és címe
1 MoÀeÎë £
2 CepЛИМкИ £
3 ÑaÚa ÔoÍyÔÍË
4 HaÁÇaÌËe Ë aÀpec ÁaÍaÁäËÍa
5 HaÁÇaÌËe Ë aÀpec ÀËÎepa
(Kérjük ide elhelyezni a Kereskedő nevének
ímének pecsétjét)
és c
✄
Čeština
ZÁRUČNÍ LIST
(Prosíme o razítko se jménem a adresou
prodejce)
Türkçe
GARANTÓ SERTÓFÓKASI
(Lütfen bayi adını ve adresini kaße olarak
basın)
CERTIFICAT DE GARANŢIE
(Vă rugăm aplicaţi ștampila cu numele și
adresa distribuitorului)
GARANCIJSKO POTRDILO
(Prosimo vtisnite žig z imenom in naslovom
prodajalca)
PyccÍËÈ
ÉAPAHTàâHõâ CEPTàîàKAT
(èoÊaÎyÈcÚa, ÇÌecËÚe ÌaÁÇaÌËe Ë aÀpec
ÀËÎepa)
50
Page 52

1
2
3
4
5
✄
51
Page 53

52
Page 54

Hitachi Koki Co., Ltd.
6mm
88
17mm
English
EC DECLARATION OF CONFORMITY
We declare under our sole responsibility that this
product is in conformity with standards or standardized
documents EN60745, EN55014 and EN61000 in
accordance with Council Directives 73/23/EEC, 2004/108/
EC and 98/37/EC.
This declaration is applicable to the product affixed CE
marking.
Deutsch
ERKLÄRUNG ZUR KONFORMITÄT MIT CE-REGELN
Wir erklären mit alleiniger Verantwortung, daß dieses
Produkt den Standards oder standardisierten
Dokumenten EN60745, EN55014 und EN61000 in
Übereinstimmung mit den Direktiven des Europarats 73/
23/EWG, 2004/108/CE und 98/37/CE entspricht.
Diese Erklärung gilt für Produkte, die die CE-Markierung
tragen.
Ελληνικά
EK ∆ΗΛ·ΣΗ ΕΝΑΡΜΟΝΙΣΜΟΥ
∆ηλώνουµε µε απλυτη υπευθυντητα τι αυτ το
προιν είναι εναρµονισµένο µε τα πρτυπα ή τα
έγραφα προτύπων EN60745, EN55014 και EN61000 σε
συµφωνία µε τις Οδηγίες του Συµβουλίου 73/23/EOK,
2004/108/EK και 98/37/EK.
Αυτή η δήλωση ισχύει στο προιν µε το σηµάδι CE.
Čeština
PROHLÁŠENÍ O SHODĚ S CE
Prohlašujeme na svoji zodpovědnost, že tento výrobek
odpovídá normám EN60745, EN55014 a EN61000 v souladu
se směrnicemi 73/23/EEC, 2004/108/EC a 98/37/EC.
Toto prohlášení platí pro výrobek označený značkou CE.
Türkçe
AB UYGUNLUK BEYANI
Bu ürünün, 73/23/EEC, 2004/108/EC ve 98/37/EC sayılı
Konsey Direktiflerine uygun olarak, EN60745, EN55014 ve
EN61000 sayılı standartlara ve standartlaßtırılmıß belgelere
uygun olduåunu, tamamen kendi sorumluluåumuz altında
beyan ederiz.
Bu beyan, üzerinde CE ißareti bulunan ürünler için
geçerlidir.
Română
DECLARAŢIE DE CONFORMITATE CE
Declarăm pe propria răspundere că acest produs este
conform cu standardele sau documentele de standardizare
EN60745, EN55014 și EN61000 și cu Directivele Consiliului
73/23/CEE, 2004/108/CE și 98/37/CE.
Prezenta declaraţie se referă la produsul pe care este
aplicat semnul CE.
Polski
DEKLARACJA ZGODNOŚCI Z EC
Oznajmiamy z całkowitą odpowiedzialnością, że produkt
ten pozostaje w zgodzie ze standardami lub standardową
formą dokumentów EN60745, EN55014 i EN61000 w
zgodzie z Zasadami Rady 73/23/EEC 2004/108/EC i 98/
37/EC.
To oświadczenie odnosi się do załączonego produktu z
oznaczeniami CE.
Magyar
EU MEGFELELŐSÉGI NYILATKOZAT
Teljes felelősségünk tudatában kijelentjük, hogy ez a termék
megfelel az EN60745, EN55014, és EN 61000 szabványoknak
illetve szabványosított dokumentumoknak, az Európa Tanács
73/23/EEC, 2004/108/EC, és 98/37/EC Tanácsi Direktíváival
összhangban.
Jelen nyilatkozat a terméken feltüntetett CE jelzésre
vonatkozik.
Representative office in Europe
Hitachi Power Tools Europe GmbH
Siemensring 34, 47877 Willich 1, F. R. Germany
Head office in Japan
Hitachi Koki Co., Ltd.
Shinagawa Intercity Tower A, 15-1, Konan 2-chome,
Minato-ku, Tokyo, Japan
Slovenščina
EC DEKLARACIJA O SKLADNOSTI
Po lastni odgovornosti objavljamo, da je izdelek v skladu
s standardi ali standardiziranimi dokumenti EN60745,
EN55014 in EN61000 v skladu z direktivami Sveta 73/23/
EEC, 2004/108/EC in 98/37/EC.
Deklaracija je označena na izdelku s pritrjeno CE označbo.
PyccÍËÈ
ÑEKãAPAñàü COOTBETCTBàü EC
Mê c ÔoÎÌoÈ oÚÇeÚcÚÇeÌÌocÚëï ÁaÓÇÎÓeÏ, äÚo ÀaÌÌoe
ËÁÀeÎËe cooÚÇeÚcÚÇyeÚ cÚaÌÀapÚaÏ ËÎË
cÚaÌÀapÚËÁoÇaÌÌêÏ ÀoÍyÏeÌÚaÏ EN60745, EN55014 Ë
EN61000 coÖÎacÌo ÑËpeÍÚËÇaÏ CoÇeÚa 73/23/EEC, 2004/
108/EC Ë 98/37/EC.
ÑaÌÌaÓ ÀeÍÎapaáËÓ oÚÌocËÚcÓ Í ËÁÀeÎËÓÏ, Ìa ÍoÚopêx
ËÏeeÚcÓ ÏapÍËpoÇÍa CE.
31. 1. 2008
K. Kato
Board Director
801
Code No. C99167392
Printed in Malaysia
 Loading...