

Page 1

COLOUR MONITOR
FARBMONITOR
MONITOR EN COLOR
/
F
MONITOR A COLORI
MONITEUR COULEUR
17MVX
CM1785ME
,
USER MANUAL
/
BEDIENUNGSANLEITUNG
MANUAL DE USUARIO
MANUALE DI ISTRUZIONI
MODE D’EMPLOI
............................................................
........................................
..........................................
...........................................
........................................................
phgina
page 2
seite 12
20
Pag
26
page 36
Page 2

-
FEATURES
-
-
-
The following features are provided by the HITACHI Colour Monitor
-
-
CM1785ME.
Automatically scans between 30
and 100 Hz vertically.
Wide compatibility range of graphics standards, VGA, XGA,
Super VGA, Macintosh II Video Card, 1,024 x 768 non-interlaced and
1,280 x 1,024.
Maximum resolution of 1,280 x 1,024.
Flat screen non-glare (silica coated) CRT, Dynamic Focus circuit gives
the sharpest focus to minimize eye fatigue.
Large
17-inch
diagonal screen and
kHz
16-inch
and 64
viewing area.
kHz
horizontally, 50 Hz
8514/A,
2 CM1785ME User Manual
Page 3

Colour Monitor
Operating Guide
CONTENTS
CM1785ME
-
E
A
CAUTION
..........................................................................
4
OPERATION
LOCATION OF USER CONTROLS,
CONNECTIONS AND INDICATORS
INSTALLATION
COMPATIBILITY
SPECIFICATIONS
TRADEMARK ACKNOWLEDGMENT
IBM PC, PC/XT, PC/AT, Personal Systems/2, VGA, and 8514/A are registered
trademarks of International Business Machines Corporation.
Apple and Macintosh are registered trademarks of the Apple Computer, Inc.
Macintosh II Video Card is a trademark of Apple Computer, Inc..
............................................................
............................................................
..........................................................
..............................
7
9
10
11
CM1785ME User Manual 3
Page 4

(CAUTION)
NEVER REMOVE THE BACK COVER
Removal of the back cover MUST be carried out only by authorized
service personnel. This display monitor contains high voltage
components.
DO NOT USE IN HOSTILE ENVIRONMENTS
DO NOT expose this display monitor to rain or moisture to prevent
electric shock or fire hazard.
This unit is designed to be used in office or home. DO NOT
subject the unit to vibrations, dust, or corrosive gases.
KEEP IN A WELL VENTILATED PLACE
DO NOT cover this monitor or place anything against the top of
unit. Ventilation holes are provided on the top and bottom of the
cabinet to prevent the temperature from rising.
AVOID HEAT
Avoid placing the unit in direct sunshine or near a heating
appliance.
BE CAREFUL OF MAGNETIC FIELDS
DO NOT place a magnet, loud speaker system, floppy disk drive,
or anything which will generate magnetism near the unit. A
magnetic field may cause blurred
displayed pattern.
colours
or distortion of the
4 CM1785ME User Manual
Page 5
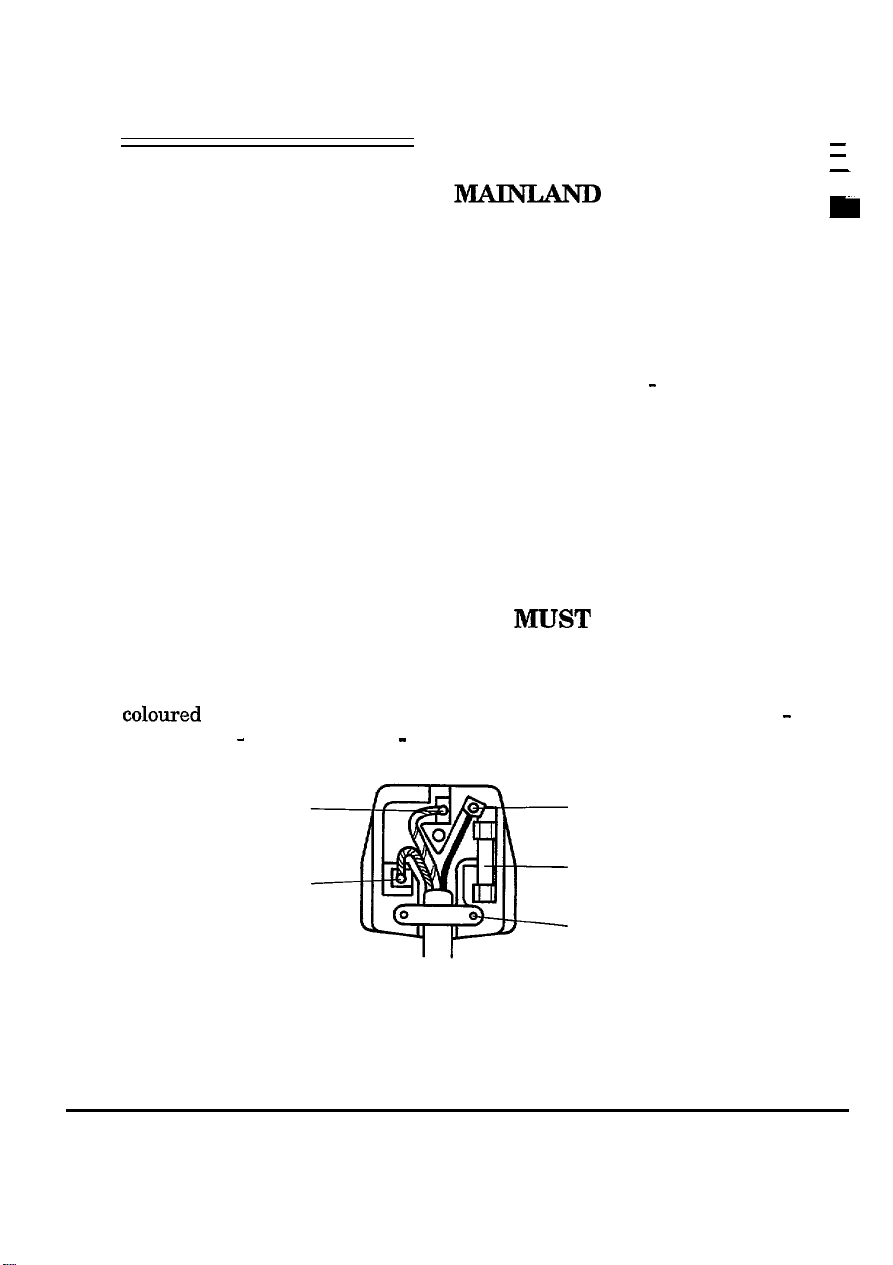
For U. K. Customers
THIS PRODUCT IS SUPPLIED WITH A TWO PIN
MAINS PLUG FOR USE IN MAINLAND
THE U. K. PLEASE REFER TO THE NOTES ON THIS
PAGE.
NOTE:
ELECTRICAL CONNECTION
Your monitor requires an electrical supply of 240 volts - 50 Hertz and
should be protected by a 5 amp fuse. Your equipment is supplied with a
plug incorporating a 5 amp fuse fitted to the mains lead. If the plug that
is fitted to the equipment is not suitable for your socket outlet, it must be
cut off and the appropriate plug fitted. The cut off plug should be disposed
of, do not insert it into a 13 amp socket to prevent the hazard of electric
shocks. With plugs not incorporating a fuse, the circuit must be protected
by a 5 amp fuse.
WARNING: THIS EQUIPMENT MUST BE EARTHED.
IMPORTANT
Your equipment is supplied with a mains lead, the wires of which are
coloured
Earth, Blue - Neutral, Brown - Live.
in accordance with the following code: Green and Yellow
EUROPE. FOR
-
-
-
-
Green & Yellow
to
Earth
Blue
to Neutral
Brown to
Fuse
Cord Clamp
Live
CM1 785ME User Manual 5
Page 6
-
-
-
il
As the
correspond with the markings identified with the terminals of your plug,
-
proceed as follows:
-
The wire which is coloured Green and Yellow must be connected to the
terminal in the plug which is marked with the letter E or by the symbol
or coloured Green or Green and Yellow.
The wire which is coloured Brown must be connected to the terminal
which is marked with the letter L or coloured Red.
The wire which is coloured Blue must be connected to the terminal which
is marked N or coloured Black.
The plug moulded on to the cord incorporates a fuse. For replacement,
use a 3 amp BS1362 fuse. Only ASTA approved fuses should be used.
The fuse cover/carrier must be refitted when changing the fuse. In the
event of losing the fuse cover/carrier, the plug must not be used until a
replacement has been obtained from your nearest electrical stockist and
fitted. The
on the insert in the base of the plug.
colours
colour
of the wires in your mains lead in this equipment may not
of the fuse cover/carrier is that of the coloured marks
6 CM1785ME User Manual
Page 7
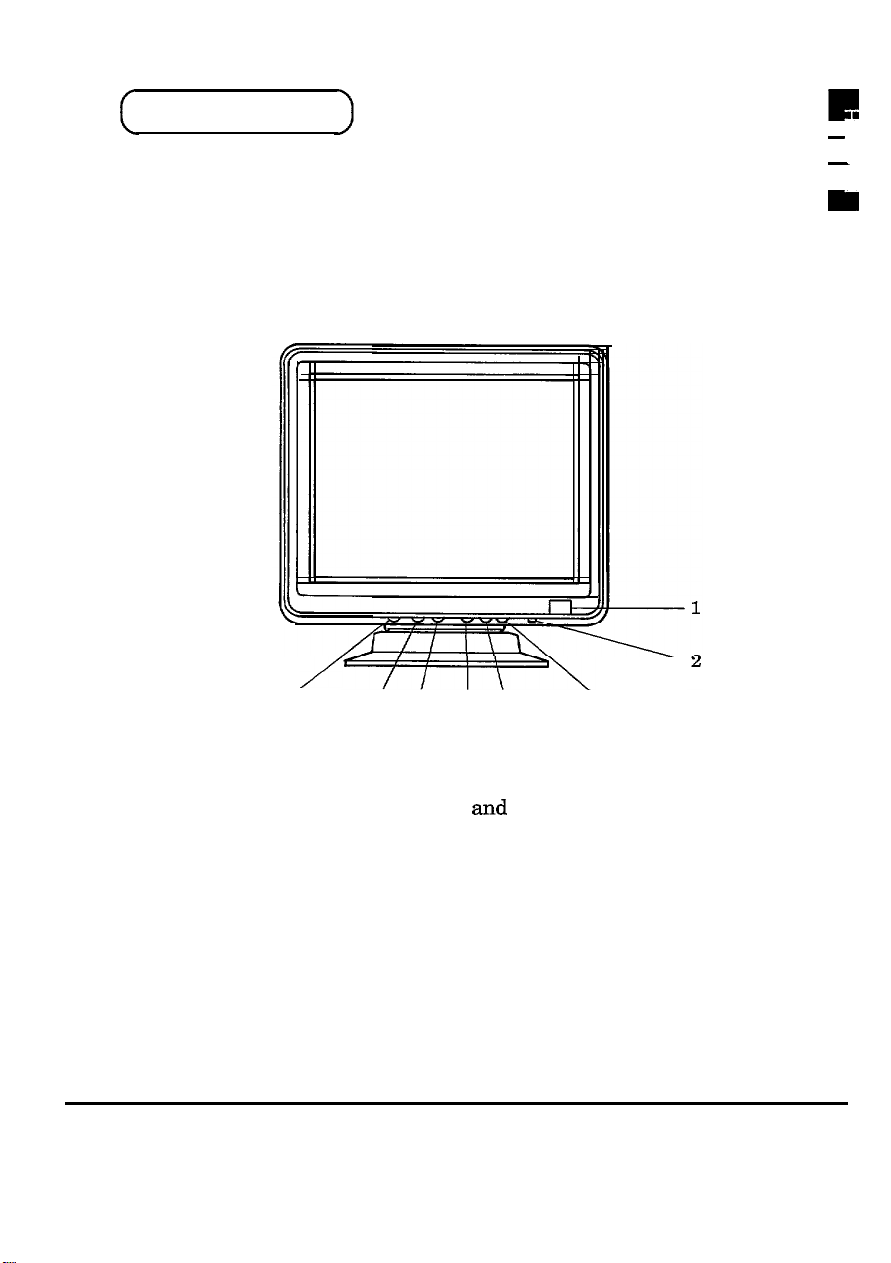
OPERATION
LOCATION OF USER CONTROLS, CONNECTIONS
AND INDICATORS
/
8
76 54
3
r
-
-
m
.
(FRONT VIEW)
1. Power Switch :
2. Degaussing Switch :
3. Contrast Control :
4. Brightness Control : Adjust back ground brightness
5. Horizontal Position : Adjust display location horizontally
6. Horizontal Size : Adjust horizontally display size
7. Vertical Size :
8. Vertical Position :
Power ON
Activate degaussing
Adjust foreground brightness
Adjust vertically display size
Adjust vertically display position
and
OFF
CM1 785ME User Manual 7
Page 8

\
7
-/
/
1
00000
9
:
10
(REAR VIEW)
9. AC Inlet:
10. BNC connectors : Red, Green and Blue video signals and optional
INSTALLATION
Follow these procedures for first time installation.
(1)
Make sure the Power Switch is off.
(2)
Connect power cord to the monitor then to wall outlet.
Use proper approved power cord . . .
The wall outlet shall be installed near the monitor and shall be
easily accessible.
Power cord connection
H/V sync or H sync and V sync shall be connected
here.
I ,
“j
H05W-F.
(3)
Connect signal cable(s).
Connect a set of BNC connectors.
8 CM1785ME User Manual
Page 9

BNC connectors :
Connect double shielded coaxial cables with BNC connector at the
monitor ends. This monitor has five (5) BNC input connectors,
however, number of cables required depends on the graphics board
sync signal output.
Sync on Green signal : Three (3) cables
(1)
H/V composite signal : Four
(2)
H, V separate signal : Five (5) cables
(3)
If the graphics board supplies more than one type of sync signal, use
less number of cables. See “COMPATIBILITY” section for details.
(4)
Turn monitor power on first, then computer.
(5)
Start Your System.
When display comes on adjust the screen size and location. Display
can be centered by H. (Horizontal) and V. (Vertical) position controls
on the front.
Display size may also be adjusted by H. and V. size controls. Do not
exceed 290 mm wide and 220 mm height as the monitor quality can
be reduced outside these dimensions.
Display location on the screen and the size may change when you
switch one application software to another one.
Brightness control shall be set so that the background raster is not
seen. Set Contrast control to a comfortable foreground brightness.
Adjust Tilt and Swivel to suit your eye level.
DO NOT use the monitor with a bright background light, direct
sunshine, or bright light into the screen area. These may increase
eye fatigue.
Use the Degaussing switch when you see impurity of colour in the
screen usually after turning on the monitor. This monitor will
automatically degauss after power on and this manual control NOT
usually necessary.
Pincushion distortion will occur when the H. size control is set to
maximum with certain signals. In this case, adjust the H. size
control and use it within the range where pincushion distortion
does not occur.
(4)
cables
CM1785ME User Manual 9
Page 10

-
-Y
-
-
COMPATIBILITY
-
-
-
CM1785ME is compatible with most of the analog output graphics boards
available for PC, PC/XT, PC/AT, P.S/2, Macintosh II series and
compatibles.
CONNECTION PIN ASSIGNMENT
BNC connectors
There are five (5) BNC connectors on the rear side of cabinet.
They are following order from the left to right.
(1) (2)
(3) (4)
(1) Red video
(2) Green video (Sync signal optional)
(3) Blue video
(4)
I-W
composite sync (or H sync)
(5)
v sync
You can use either one of the three sync signal types. Sync signal
type will be automatically selected by the monitor. Priority is (1) H
and V separate sync, (2) H/V composite sync, (3) Sync on Green
video. If all types of sync signal are fed into the monitor, monitor
works with (1). When monitor is working either (1) or (2) and type
(3) sync signal is also supplied, screen may be greenish. In this case
disconnect (1) and (2) sync signals and use the monitor with type (3)
sync signal.
I
c
o&o6
\
(5)
I
10 CM1 785ME User Manual
Page 11
(
SPECIFICATIONS
>
CRT
Input signal
Synchronization
Resolution
Video Band Width
Active Display Area
Misconvergence
Power Supply
Dimensions
17 (16 V) inches diagonal, 0.28 mm dot pitch,
Black matrix, Silica coated, Short persistence.
Video :0.7 Vpp, Analog
:
sync
Horizontal : 30-64
Vertical
Horizontal : Up to 1,280 dots
Vertical : Up to 1,024 lines
85 MHz
Horizontal : 290 mm
Vertical
Active display area is changed by the graphics
board standard.
Less than 0.5 mm
AC 200-240 V
410
Including Tilt & Swivel base.
Separate H, V or Composite H/V
TTL level or Sync on Green at 0.3 Vpp
kHz
: 50-100 Hz
: 220 mm
(W)
x 430
(H)
x 455
(D)
mm
Weight
Environmental
Conditions
When a signal with the horizontal sync frequency around
I
lower.
21 kg
Operation
Temperature: 5°C to 35°C -20°C to 60°C
Humidity :
30%to80%
64
kHz, the brightness becomes
Storage
10 % to 90 %
CM1785ME User Manual 11
 Loading...