

Page 1
Cordless Grass Trimmer
Akku-Rasentrimmer
Χλοοκόπτης μπαταρίας
Akumulatorowa kosiarka do trawy
Akkus fűszegélynyíró
Akku seřezávač trávy
Akülü çim kesme
Masina de cosit cu acumulatori
Baterijska kosa
Аккумуляторный триммер
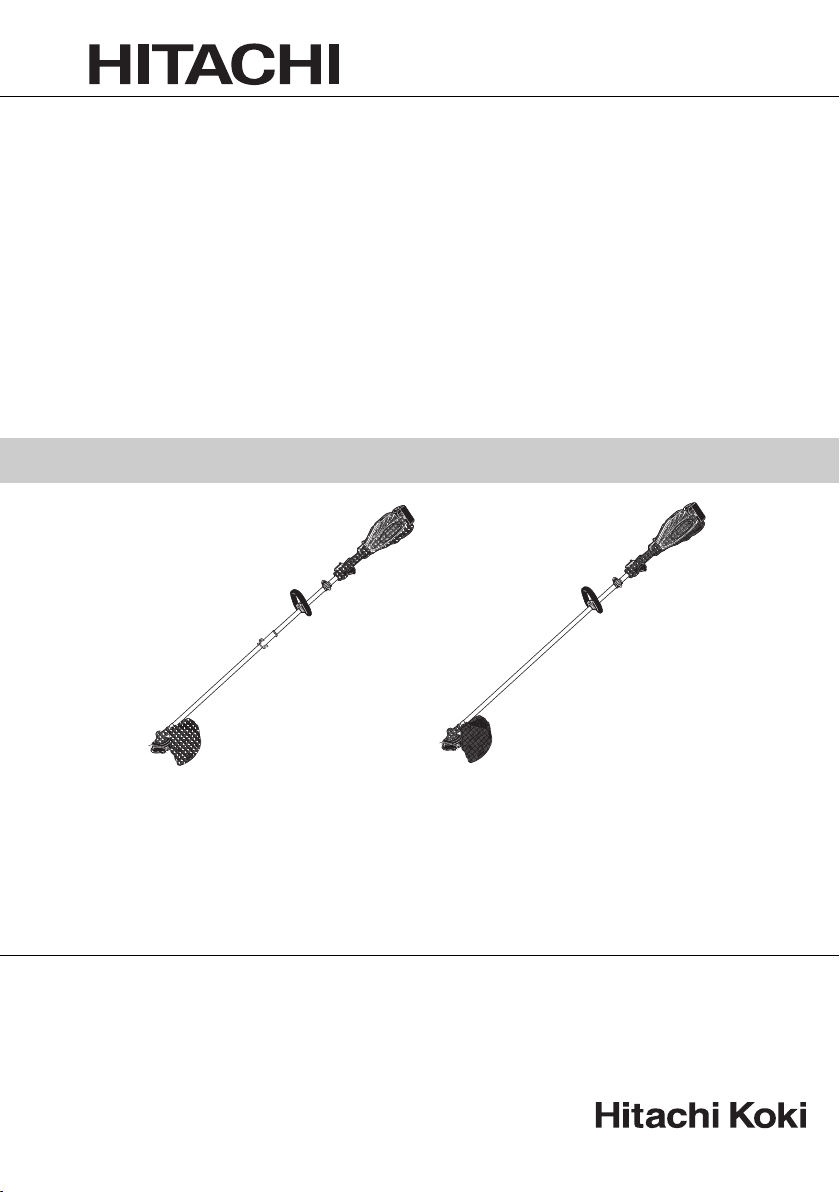
CG 18DL • CG 18DAL
CG18DL CG18DAL
Read through carefully and understand these instructions before use.
Diese Anleitung vor Benutzung des Werkzeugs sorgfältig durchlesen und verstehen.
Διαβάστε προσεκτικά και κατανοήσετε αυτές τις οδηγίες πριν τη χρήση.
Przed użytkowaniem należy dokładnie przeczytać niniejszą instrukcję i zrozumieć jej treść.
Használat előtt olvassa el fi gyelmesen a használati utasítást.
Před použitím si pečlivě přečtěte tento návod a ujistěte se, že mu dobře rozumíte.
Aleti kullanmadan önce bu kılavuzu iyice okuyun ve talimatları anlayın.
Înainte de utilizare, citiţi cu atenţie și înţelegeţi prezentele instrucţiuni.
Pred uporabo natančno preberite in razumite ta navodila.
Внимательно прочтите данную инструкцию по эксплуатации прежде чем пользоваться инструментом.
Handling instructions
Bedienungsanleitung
Οδηγίες χειρισμού
Instrukcja obsługi
Kezelési utasítás
Návod k obsluze
Kullanım talimatları
Instrucţiuni de utilizare
Navodila za rokovanje
Инструкция по эксплуатации
Page 2
123
5
3
1
4
7
2
1
1
2
6
456
8
START
BUTTON
^
%
@
#
$
0
!
9
789
*
q
&
e
r
t
!
w
w
u
y
(
i
)
10 11 12
k
l
2
a
%
o
!
p
s
4
p
d
4
j
w
h
g
f
Page 3
13 14 15
z
x
z
;
k
16 17 18
b
L
v
100 mm
19 20 21
z
n
100 mm
m
,
z
22 23 24
c
n
¡
v
z
/
.
b
z
150 m m
£
∞
™
¢
§
3
Page 4
25 26 27
*
ª
¶
•
28 29 30
º
¤
⁄
3 mm
11.5 mm
‹
4
Page 5

English Deutsch Ελληνικά Polski
Rechargeable battery Akkumulator
1
Latch Schnapper Μάνδαλο Zapadka
2
Push Drücken Σπρώξε Wcisnąć
3
Insert Einsatz Εισχωρήστε Włóż/wprowadź
4
Pull out Herausziehen Τρα β ή ξτε έξω Wyciągnij
5
Charger Ladegerät Φορτιστής Ładowarka
6
Pilot lamp Kontrollampe Δοκιμαστική λάμπα Lampka kontrolna
7
Line Leitung Γρα μμ ή Linia
8
Remaining battery
9
indicator switch
Remaining battery
0
indicator lamp
Main pipe Hauptrohr Κύριος σωλήνας Przewód główny
!
Locking hole Verriegelungsöff nung Τρύπα ασφάλισης Otwór blokady
@
Joint case Schäftungsgehäuse Περίβλημα ένωσης Obudowa złącza
#
Lock pin Spannstift Ασφαλιστική περόνη Kołek blokujący
$
Pull Ziehen Τρα β ή ξτε Uchwyt przesuwania
%
Handle knob Griff knopf Κουμπί χερουλιού Pokrętło uchwytu
^
Motor side Motorseite Πλευρά κινητήρα Strona silnika
&
Loop handle Bügelgriff
*
Handle fi xture Griff befestigung Στερε ωτικό χερουλιού Mocowanie uchwytu
(
M6 × 43 bolts M6 × 43-Schrauben Μπουλόνια M6 × 43 Śruby M6 × 43
)
M6 nuts M6-Muttern Παξιμάδια Μ6Nakrętki M6
q
Safety cover Sicherheitsabdeckung Κάλυμμα ασφαλείας Pokrywa zabezpieczająca
w
Cover guard Schutzvorrichtung Κάλυμμα προφυλακτήρα Osłona
e
Knife Messer Μαχαίρι Nóż
r
D4 tapping screw D4-Blechschraube D4 λαμαρινόβιδα Wkręt samogwintujący D4
t
Cover bracket Schutzhalter
y
M6 × 25 hex. socket
u
button bolts
Cover holder Abdeckungshalterung Στή ριγμα καλύμματος Uchwyt pokrywy
i
Hanger Einhängöse Αναρτήρας Wieszak
o
Bracket Halterung Στ ήριγμ α Wspornik
p
Quick-release belt Schnelllösegurt
a
Hook Haken Γάν τζο ς Haczyk
s
Quick-release bracket Schnelllösehalterung
d
Hexagonal bar wrench Sechskantinnenschlüssel Εξάγωνο κλειδί άλεν
f
Cutter holder Messerhalterung Στή ριγμα κόφτη Uchwyt noża
g
Winding protector Spulenschutz
h
Cutter holder cap Messerhaltekappe
j
Cutting head Schneidkopf Κεφαλή κοπής Głowica tnąca
k
Tighten Anziehen Σφίξτε Mocowanie
l
LadezustandAnzeigeschalter
LadezustandKontrollleuchte
M6 × 25-InnensechskantRundkopfschrauben
Επαναφορτιζόμενη
μπαταρία
Διακόπτης ένδειξης
υπόλοιπου φορτίου
μπαταρίας
Ενδεικτική λυχνία
υπόλοιπου φορτίου
μπαταρίας
Χερούλι σχήματος
βρόγχου
Υποστήριγμα
καλύμματος
Μπουλόνι εξαγ. κοίλης
κεφαλής M6 × 25
Ιμάντας γρήγορης
απελευθέρωσης
Στή ριγμα γρήγορης
απελευθέρωσης
Προστατευτικό
περιέλιξης
Καπάκι στηρίγματος
κόφτη
Akumulator
Przełącznik wakaźnika
pozostałej energii baterii
Lampka wakaźnika
pozostałej energii baterii
Uchwyt w kształcie pętli
Wspornik pokrywy
Śruby sześciokątne
M6 × 25
Śruba szybkomocująca
Wspornik
szybkomocujący
Klucz sześciokątny
Osłona zwoju
Pokrywka uchwytu noża
5
Page 6

English Deutsch Ελληνικά Polski
Tap Kl op fe n Χτυπήστε Zaczep
;
Nylon line Nylonfaden Νάιλον κλωστή Żyłka nylonowa
z
Guide ball Führungskugel Οδηγητική μπίλια Kulka prowadząca
x
Turning (Right) Drehen (nach rechts) Περιστροφή (Δεξιά) Obracanie (w prawo)
c
Cutting body cap Schneidkörperkappe Κάλυμμα στοιχείου κοπής Pokrywka korpusu noża
v
Locking tab Verriegelungslasche Γλωττίδα ασφάλισης Klapka blokująca
b
Spool Spule Μασούρι Szpula
n
Stopper hole Stopfenbohrung Ανασταλτική τρύπα Otwór mocujący
m
Eyelet Öse Οφθαλμίδιο Oczko
,
Cutting body Schneidkörper Στοιχε ίο κοπής Korpus noża
.
Long hole Schlitzloch Βαθιά τρύπα Otwór szeroki
/
Reel spring Spulenfeder Ελατήριο μασουριού Sprężyna bębna
¡
Start button Startknopf Κουμπί εκκίνησης Przycisk uruchamiania
™
Power lamp Betriebsleuchte Λαμπτήρας ρεύματος Lampka zasilania
£
Handle Gri
¢
Lock lever Verriegelungshebel Μοχλός κλειδώματος Dźwignia blokady
∞
Lever Hebel Μοχλός Dźwignia
§
Forward Vorwärts Εμπρός W przód
¶
Left side Linke Seite Αριστερή πλευρά Lewa strona
•
Wear limit Verschließgrenze Όριο φθοράς Ogranicznik zużycia
ª
Brush cap Motorsensenaufsatz Κάλυμμα ψήκτρας Pokrywka szczotki
º
Protrusion of carbon
⁄
brush
Nail of carbon brush Klaue der Kohlebürste
¤
Contact portion outside
‹
brush tube
ff Χερούλι Uchwyt
Krempe der Kohlebürste
Kontaktteil außerhalb
des Bürstenrohrs
Προεξοχή ψήκτρας
καρβουνακιού
Καρφί
καρβουνακιού
Τμή μ α επαφής έξω από
το σωλήνα της ψήκτρας
Wystająca część szczotki
węglowej
Końcówka szczotek
węglowych
Element kontaktowy na
zewnątrz komory szczotek
6
Page 7

Magyar Čeština Türkçe Română
Os tölthető akkumulátor Akumulátor Şarj edilebilir batarya Acumulator reîncărcabil
1
Retesz Zámek Mandal Element de blocare
2
Benyomni Stisknout İtin Împingeţi
3
Bedugni Zasunout Yerleştirin Introduceţi
4
Kihúzni Zatáhnout Çekin Trageţi
5
Tőltő Nadíječka Şarj Cihazı Încărcător
6
Jelzőlámpa Indikátor Kılavuz lamba Lampă pilot
7
Veze ték Čára Üçgen işareti Linie
8
Fennmaradó tőltés
9
kijelzőjének kapcsolója
Fennmaradó tőltét jelző
0
lámpa
Nyél Hlavní roura Ana boru Tija principală
!
Zárónyílás Blokovací otvor Kilitleme deli
@
Gömbcsukló Kloubové pouzdro Mafsal kutusu Carter de articulare
#
Csapszeg Upínací kolík Kilit pimi Ac de blocare
$
Húzás Tažení Çekin Împingeţi
%
Fogantyú gomb Knofl ík rukojeti Kol düğmesi Clapetă de ghidare
^
Motor oldal Strana motoru Motor tarafı Parte motor
&
Markolat Smyčková rukojeť Halka kol Mâner circular
*
Fogantyú rögzítése Připevnění rukojeti Kol tespit elemanı Siguranţă clapetă
(
M6 × 43 csavarok Šrouby M6 × 43 M6 × 43 cıvatalar Şuruburi M6 × 43
)
M6 anyák Matice M6 M6 somun Piuliţe M6
q
Biztonsági burkolat Bezpečnostní kryt Emniyet kapağı Capac de protecţie
w
Burkolatvédő Ochranné zařízení Kapak muhafazası Protecţie a capacului
e
Kés Řezný nástroj Bıçak Cuţit
r
D4 önmetsző csavar Samořezný šroub D4 D4 sac vidası Şurub cu fi letare D4
t
Burkolat bilincs Kryt úchytu Kapak braketi Suport capac
y
M6 × 25 hatlapfejű
u
csavarok
Burkolattartó Pojistný kryt Kapak tutucu Portcapac
i
Akasztó Závěsné poutko Askı Carabină
o
Bilincs Úchyt Braket Suport
p
Gyorskioldó szíj Rychlovypínací pás Hızlı ayı rma kayışı
a
Kampó Hák Kanca Cârlig
s
Gyorskioldó bilincs Rychlovypínací úchyt Hızlı ayırma braketi Suport mobil
d
Hatszögű imbuszkulcs Šestihranný klíč Alyen anahtarı Cheie hexagonală
f
Vágó tartója Držák řezné části Kesici tutucusu Suport cuţit
g
Letekeredés-védő Ochrana proti navíjení Sarma koruyucusu Protecţia bobinei
h
Vágótartó-sapka Kryt držáku řezné části Kesici tutucusu kapağı Capac portcuţit
j
Vágó fej Řezná hlava Kesme kafası Cap de tăiere
k
Megszorítás Utáhnout SıkınStrângeţi
l
Megérintés Poklepat Hafi fçe vurun Loviţi
;
Damil Nylonová struna Naylon ip Fir de nailon
z
Damilvezető Vodící koule Kılavuz bilye Bilă de ghidare
x
Fordulás (Jobbra) Otáčení (vpravo) Dönme (Sağa) Întoarcere (Dreapta)
c
Vágótest-sapka Víčko cívky sekací struny Kesici gövde başlığı Capac ansamblu de tăiere
v
Lezáró fül Zámková západka Kilitleme dili Buton de blocare
b
Orsó Cívka Makara Bobină
n
Vypínač indikátoru
zbývající energie baterie
Vypínač indikátoru
zbývající energie baterie
Imbusové šrouby M6 × 25
s kulatou hlavou
Kalan pil göstergesi
anahtarı
Kalan pil göstergesi
lambası
ğiOrifi ciu de blocare
M6 × 25 altıgen soket
başlı cıvatalar
Comutator indicator
acumulator rămas
Comutator indicator
acumulator rămas
Şuruburi hexagonale
M6 × 25
Curea cu decuplare
instantanee
7
Page 8

Magyar Čeština Türkçe Română
Megállító lyuk Otvor pro uchycení Durdurucu çentik
m
Fűzőlyuk Očko İplik kılavuz gözü Buclă
,
Vágó test Tělo cívky Kesme gövdesi Ansamblu de tăiere
.
Hosszú lyuk Výřez Uzun delik Orifi ciu lung
/
Tekercsrugó Pružina cívky Makara yayı Arc de bobină
¡
Indítógomb Spouštěcí tlačítko Çalıştırma düğmesi Buton de pornire
™
Bekapcsolást jelző lámpa Kontrolka zapnutí Güç lambası Lampă electrică
£
Fogantyú Rukojeť Tu ta ma k G hi da j
¢
Záró kar Zajišťovací páka Kilit kolu Manetă de blocare
∞
Kar Páka Kol Manetă
§
Előre Vpřed İleri Înainte
¶
Baloldal Levá strana Sol taraf Partea stângă
•
Megengedett kopás Mez opotřebení Aşınma sınırı Limită de uzur
ª
Kefe sapka Krytka kartáčů motoru Fırça kapağı Capac perie
º
A szénkefe kinyúlása
⁄
A szénkefe szöge
¤
Érintkező rész a szénkefe
‹
csövén kívül
Vodící lamely uhlíkového
kartáče
Cvoček uhlíkového
kartáčku
Dotyková část mimo
trubičku kartáčku
Karbon fırça çıkıntısı Extensie perie cărbune
Kömür çivisi Cuiul periei de cărbune
Kömür tüpünün dışındaki
temas bölümü
Orifi ciu dispozitiv de
oprire
Zonă de contact în afara
tubului periei
ă
8
Page 9

Slovenščina Pyccкий
Baterija, ki se polni
1
Zapah Фиксатор
2
Pritisnite Нажать
3
Vstavite Вставить
4
Izvlecite Вытащить
5
Polnilnik Зарядное устройство
6
Kontrolni svetlobni
7
indikator
Trikotna označba Белая линия
8
Stikalo indikatorja
preostale energije
9
baterije
Lučka indikatorja
preostale energije
0
baterije
Glavna cev Главная труба
!
Odprtina za zaskočko
@
Povezovalni tulec
#
Zaskočka Фиксатор
$
Potegnite Потянуть
%
Ročica z gumbom Го л ов к а рукоятки
^
Motorna stran К двигателю
&
Krožni roč
*
Pritrdilo ročaja Крепеж ручки
(
M6 × 43 vijaki Болты M6 × 43
)
M6 matice Гай к и M6
q
Varnostni pokrov Защитная крышка
w
Varovalo pokrova Щиток крышки
e
Nož Нож
r
D4 nastavitveni vijak Винт-саморез D4
t
Konzola pokrova Скоба крышки
y
M6 × 25 imbus vijaki
u
Nosilec pokrova Удерж иваю щая скоба
i
Nosilec Ушко
o
Konzola Скоба
p
Hitro odpenjalni jermen Ремень с защелкой
a
Kljuka Карабин
s
Hitro odpenjalno držalo Скоба-защелка
d
Šestkotni imbus ključ
f
Držalo noža Держатель ножа
g
Varovalo omota Кожух катушки
h
Pokrivalo držala noža
j
Rezalna glava Режущая головка
k
Zategnite Зажать
l
Potapkajte Ударит ь
;
Najlonska vrvica Нейлоновый шнур
z
aj Ручка-скоба
Аккумуляторная
батарея
Контрольная лампа
Переключатель
индикатора заряда
батареи
Световой индкатор
заряда батареи
Контровочное
отверстие
Соединительный
корпус
Болты с торцевой
шестиугольной
головкой M6 × 25
Шестиугольный
торцевой ключ
Колпачок держателя
ножа
Slovenščina Pyccкий
Vodilna krogla
x
Obrnite (desno) Вращение (вправо)
c
Pokrivalo rezalnega
v
telesa
Zaskočna spona Защелка
b
Tul ja va Катушка
n
Odprtina za silk Стопорное отверстие
m
Očesno vodilo Проушина
,
Rezalno telo Режущая головка
.
Špranja
/
Zvitek vzmeti Пружина катушки
¡
Gumb za zagon Кнопка ПУСК
™
Lučka za delovanje Лампа питания
£
Ročaj Рукоятка
¢
Zapiralni vzvod Запорный рычаг
∞
Vzvod Рычаг
§
Naprej Вперед
¶
Leva stran Левая сторона
•
Omejitev obrabe Предел износа
ª
Pokrov ščetke Колпачок
º
Rob grafi tne ščetke
⁄
Zob grafi tne krtačke
¤
Stični del zunaj cevi
‹
krtačke
Направляющий
шарик
Крышка режущей
головки
Продолговатое
отверстие
Выступ для угольной
щетки
Подпружиненный
контакт угольной
щетки
Участок контакта
снаружи щеточной
гильзы
щетки
9
Page 10
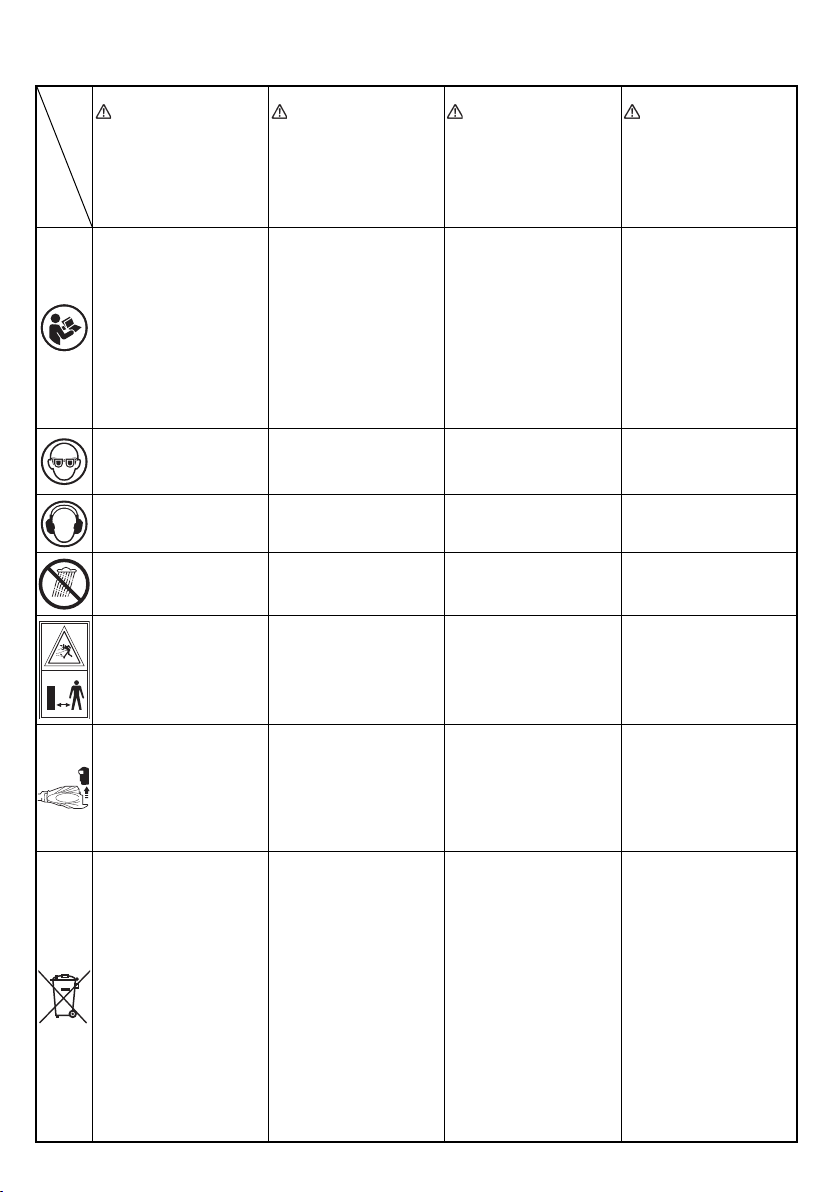
Symbols
WARNING
The following show
symbols used for the
machine. Be sure that you
understand their meaning
before use.
Read all safety warnings
and all instructions.
Failure to follow the
warnings and instructions
may result in electric
shock, fi re and/or serious
injury.
Always wear eye
protection.
Always wear hearing
protection.
Do not expose to moisture. Keiner Feuchtigkeit
Symbole
WAR NUNG
Die folgenden Symbole
werden für diese
Maschine verwendet.
Achten Sie darauf, diese
vor der Verwendung zu
verstehen.
Lesen Sie sämtliche
Sicherheitshinweise und
Anweisungen durch.
Wenn die Warnungen
und Anweisungen nicht
befolgt werden, kann es
zu Stromschlag, Brand
und/oder ernsthaften
Verletzungen kommen.
Tragen Sie immer einen
Augenschutz.
Stets Gehörschutz tragen.
aussetzen.
Σύμβολα
ΠΡΟΣΟΧΗ
Τα παρακάτω δείχνουν
τα σύμβολα που
χρησιμοποιούνται στο
μηχάνημα. Βεβαιωθείτε
ότι κατανοείτε τη
σημασίας τους πριν τη
χρήση.
Διαβάζετε όλες τις
προειδοποιήσεις
ασφαλείας και όλες τις
οδηγίες.
Η μη τήρηση των
προειδοποιήσεων και
οδηγιών μπορεί να
προκαλέσει
ηλεκτροπληξία, πυρκαγιά
και/ή σοβαρό τραυματισμό.
Φοράτε πάντα τον
κατάλληλο εξοπλισμό
για την προστασία των
ματιών.
Να φοράτε πάντοτε
προστατευτικά ακοής.
Μην το εκθέσετε στην
υγρασία.
Symbole
OSTRZEŻENIE
Następujące oznaczenia
to symbole używane w
instrukcji obsługi maszyny.
Upewnij się, że rozumiesz
ich znaczenie zanim
użyjesz narzędzia.
Należy dokładnie
zapoznać się
ze wszystkimi
ostrzeżeniami
i wskazówkami
bezpieczeństwa.
Nieprzestrzeganie
ostrzeżeń oraz wskazówek
bezpieczeństwa może
spowodować porażenie
prądem elektrycznym,
pożar i/lub odniesienie
poważnych obrażeń.
Zawsze nosić okulary
ochronne.
Należy zawsze nosić
ochronę słuchu.
Nie narażać urządzenia na
działanie wilgoci.
Achten Sie darauf, dass
Keep bystanders away.
Remove battery before
adjusting or cleaning
and before leaving the
machine unattended for
any period.
Only for EU countries
Do not dispose of electric
tools together with
household waste material!
In observance of European
Directive 2002/96/EC
on waste electrical and
electronic equipment
and its implementation in
accordance with national
law, electric tools that
have reached the end of
their life must be collected
separately and returned
to an environmentally
compatible recycling
facility.
10
keine unbeteiligten
Personen in der Nähe
sind.
Entfernen Sie die Batterie
vor dem Einstellen und
der Reinigung sowie
dann, wenn das Gerät
unbeaufsichtigt ist.
Nur für EU-Länder
Werfen Sie
Elektrowerkzeuge nicht in
den Hausmüll!
Gemäss Europäischer
Richtlinie 2002/96/
EG über Elektro- und
Elektronik- Altgeräte und
Umsetzung in nationales
Recht müssen verbrauchte
Elektrowerkzeuge
getrennt gesammelt und
einer umweltgerechaten
Wiederververtung
zugeführt werden.
Κρατήστε μακριά τους
παρευρισκόμενους.
Αφαιρέστε τη μπαταρία
πριν από τη ρύθμιση ή
τον καθαρισμό και πριν
αφήσετε το μηχάνημα
χωρίς επίβλεψη για
οποιαδήποτε χρονική
περίοδο.
Μόνο για τις χώρες της
ΕΕ
Μην πετάτε τα ηλεκτρικά
εργαλεία στον κάδο
οικιακών απορριμμάτων!
Σύμφωνα με την
ευρωπαϊκή οδηγία 2002/
96/ΕΚ περί ηλεκτρικών
και ηλεκτρονικών
συσκευών και την
ενσωμάτωσή της
στο εθνικό δίκαιο, τα
ηλεκτρικά εργαλεία
πρέπει να συλλέγονται
ξεχωριστά και να
επιστρέφονται για
ανακύκλωση με
τρόπο φιλικό προς
περιβάλλον.
Osoby postronne powinny
pozostawać w bezpiecznej
odległości.
Akumulator należy
zawsze wyjąć przed
przystąpieniem do
wykonywania regulacji lub
czyszczenia oraz kiedy
urządzenie nie będzie
wykorzystywane przez
dłuższy czas.
Dotyczy tylko państw UE
Nie wyrzucaj
elektronarzędzi wraz z
odpadami z gospodarstwa
domowego!
Zgodnie z Europejską
Dyrektywą 2002/96/WE w
sprawie zużytego sprzętu
elektrotechnicznego i
elektronicznego oraz
dostosowaniem jej
do prawa krajowego,
zużyte elektronarzędzia
należy posegregować
i zutylizować w sposób
przyjazny dla środowiska.
το
Page 11
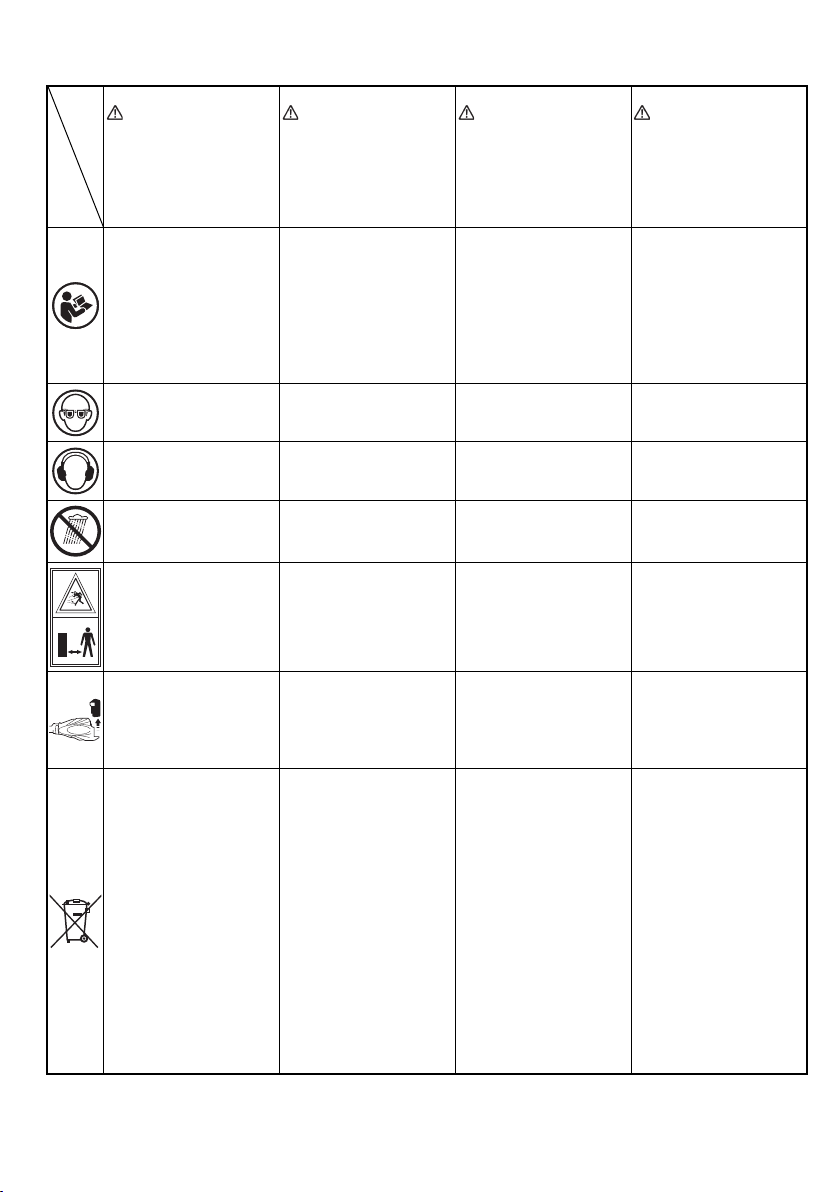
Jelölések
FIGYELEM
Az alábbiakban a géphez
alkalmazott jelölések
vannak felsorolva. A gép
használata előtt feltétlenül
ismerje meg ezeket a
jelöléseket.
Olvasson el minden
biztonsági fi gyelmeztetést
és minden utasítást.
A fi gyelmeztetések
és utasítások be nem
tartása áramütést, tüzet
és/vagy súlyos sérülést
eredményezhet.
Mindig viseljen
védőszemüveget.
Symboly
UPOZORNĚNÍ
Následující text obsahuje
symboly, které jsou
použity na zařízení.
Ujistěte se, že rozumíte
jejich obsahu před tím, než
začnete zařízení používat.
Přečtěte si všechna
varování týkající se
bezpečnosti a všechny
pokyny.
Nedodržení těchto
varování a pokynů může
mít za následek elektrický
šok, požár a/nebo vážné
zranění.
Vždy noste ochranu očí.
Simgeler
DİKKAT
Aşağıda, bu alet için
kullanılan simgeler
gösterilmiştir. Aleti
kullanmadan önce bu
simgelerin ne anlama
geldiğini anladığınızdan
emin olun.
Tüm güvenlik uyarılarını ve
tüm talimatları okuyun.
Uyarılara ve talimatlara
uyulmaması elektrik
çarpmasına, yangına ve/
veya ciddi yaralanmaya
neden olabilir.
Daima koruyucu gözlük
takın.
Simboluri
AVERTISMENT
În cele ce urmează sunt
prezentate simbolurile
folosite pentru mașină.
Înainte de utilizare,
asiguraţi-vă că înţelegeţi
semnifi caţia acestora.
Citiţi toate
avertismentele privind
siguranţa și toate
instrucţiunile.
Nerespectarea
avertismentelor și a
instrucţiunilor poate avea
ca efect producerea de
șocuri electrice, incendii
și/sau vătămări grave.
Purtaţi întotdeauna
protecţie pentru ochi.
Mindig viseljen fülvédőt.
Ne tegye ki a gépet
nedvességnek.
A bámészkodókat tartsa
távol a készüléktől.
Beállítás vagy tisztítás
előtt, illetve abban az
esetben, ha egy kis időre
felügyelet nélkül hagyja
a gépet, vegye ki az
akkumulátort.
Csak EU-országok
számára Az elektromos
kéziszerszámokat
ne dobja a háztartási
szemétbe!
A használt villamos és
elektronikai készülékekről
szóló 2002/96/EK irányelv
és annak a nemzeti jogba
való átültetése szerint az
elhasznált elektromos
kéziszerszámokat
külön kell gyűjteni, és
környezetbarát módon újra
kell hasznosítani.
Používejte vždy chrániče
uší.
Nevystavujte zařízení
vlhkosti.
Udržujte přítomné osoby v
bezpečné vzdálenosti.
Před nastavením
nebo čištěním a před
ponecháním stroje po
delší dobu bez dozoru
vyjměte baterie.
Jen pro státy EU Elektrické
nářadí nevyhazujte do
komunálního odpadu!
Podle evropské směrnice
2002/96/EG o nakládání
s použitými elektrickými a
elektronickými zařízeními
a odpovídajících
ustanovení právních
předpisů jednotlivých
zemí se použitá elektrická
nářadí musí sbírat
odděleně od ostatního
odpadu a podrobit
ekologicky šetrnému
recyklování.
Daima koruyucu kulaklık
takın.
Neme maruz bırakmayın. Nu expuneţi la umezeală.
İzleyicileri uzakta tutun.
Ayar veya temizlik
yapmadan önce ve
makineyi uzun bir süre
gözetimsiz bırakacaksanız,
aküyü çıkarın.
Sadece AB ülkeleri için
Elektrikli el aletlerini
evdeki çöp kutusuna
atmayınız!
Kullanılmı ş elektrikli
aletleri, elektrik ve
elektronikli eski cihazlar
hakkındaki 2002/96/EC
Avrupa yönergelerine
göre ve bu yönergeler
ulusal hukuk kurallarına
göre uyarlanarak, ayrı
olarak toplanmalı ve çevre
şartlarına uygun bir şekilde
tekrar değerlendirmeye
gönderilmelidir.
Purtaţi întotdeauna
protecţie auditivă.
Nu lăsaţi alte persoane să
se apropie.
Scoateţi bateria înainte
de reglare sau curăţare şi
înainte de a părăsi utilajul
pentru o perioadă de timp.
Numai pentru ţările
membre UE
Nu aruncaţi această sculă
electrică împreună cu
deșeurile menajere!
În conformitate cu
Directiva Europeană
2002/96/CE referitoare la
deșeurile reprezentând
echipamente electrice
și electronice și la
implementarea acesteia în
conformitate cu legislaţiile
naţionale, sculele electrice
care au ajuns la
duratei de folosire trebuie
colectate separat și duse
la o unitate de reciclare
compatibilă cu mediul
înconjurător.
fi nalul
11
Page 12
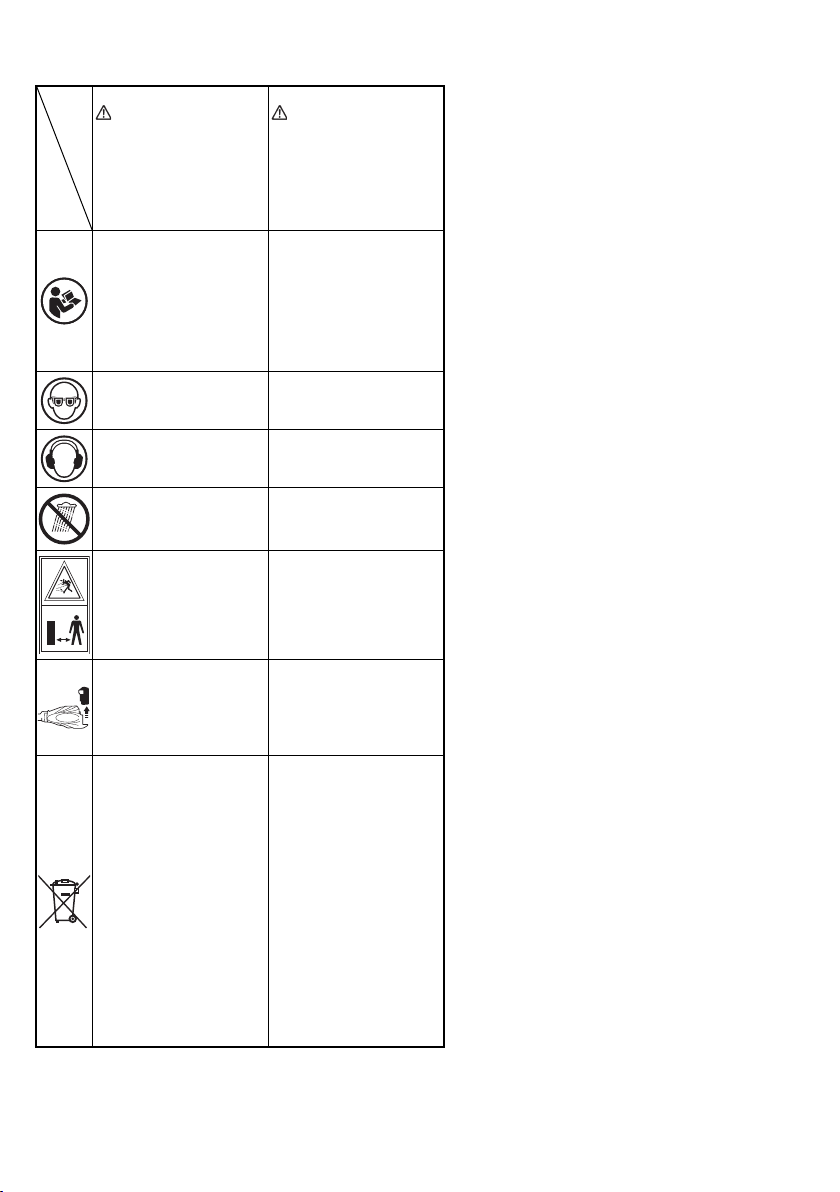
Simboli
OPOZORILO
V nadaljevanju so
prikazani simboli,
uporabljeni pri stroju. Pred
uporabo se prepričajte, da
jih razumete.
Preberite vas varnostna
opozorila in navodila.
Z neupoštevanjem
opozoril in navodil tvegate
električni udar, požar in/ali
resne telesne poškodbe.
Uporaba zaščite za oči je
obvezna.
Символы
ПРЕДУПРЕЖДЕНИЕ
Ниже приведены
символы, используемые
для машины. Перед
началом работы
обязательно убедитесь
в том, что Вы понимаете
их значение.
Прочтите все правила
безопасности и
инструкции.
Не выполнение правил
и инструкций может
привести к поражению
электрическим током,
пожару и/или серьезной
травме.
Всегда надевайте
средства защиты глаз.
Vedno uporabljajte zaščito
za ušesa.
Ne izpostavljajte vlagi. Не подвергать
V bližini stroja se naj ne
nahajo druge osebe.
Odstranite baterijo,
preden nastavljate, čistite
ali puščate stroj brez
nadzora.
Samo za države EU
Električnih orodij
ne zavržite skupaj z
gospodinjskimi odpadki!
V skladu z evropsko
direktivo 2002/96/EC
o odpadni električni
in elektronski opremi
in izvedbi v skladu z
državnimi zakoni, je treba
električna orodja, ki so
dosegla življenjsko dobo
ločeno zbirati in vrniti
v z okoljem združljivo
ustanovo za recikliranje.
Всегда пользуйтесь
средствами для защиты
органов слуха.
воздействию влаги.
Уда л ите посторонних из
рабочей зоны.
Перед проведением
регулировки и
триммера, а также перед
длительным хранением
триммера, удалите
аккумулятор.
Тол ь к о для стран
ЕС Не выкидывайте
электроприборы вместе
с обоычным мусором!
В соответствии
с европейской
директивой 2002/96/
ЕС об утилизации
старых электрических и
электронных приборов
и в соответствии с
местными законами
электроприборы,
бывщие в
эксплуатации, должны
утилизовываться
отдельно безопасным
для окружающей среды
способом.
12
Page 13

English
GENERAL POWER TOOL SAFETY WARNINGS
WARNING
Read all safety warnings and all instructions.
Failure to follow the warnings and instructions may result
in electric shock, fi re and/or serious injury.
Save all warnings and instructions for future
reference.
The term “power tool” in the warnings refers to your
mains-operated (corded) power tool or battery-operated
(cordless) power tool.
1) Work area safety
a) Keep work area clean and well lit.
Cluttered or dark areas invite accidents.
b) Do not operate power tools in explosive
atmospheres, such as in the presence of
fl ammable liquids, gases or dust.
Power tools create sparks which may ignite the
dust or fumes.
c) Keep
children and bystanders away while
operating a power tool.
Distractions can cause you to lose control.
2) Electrical safety
a) Power tool plugs must match the outlet.
Never modify the plug in any way.
Do not use any adapter plugs with earthed
(grou nded) power tools.
Unmodifi ed plugs and matching outlets will reduce
risk of electric shock.
b) Avoid body contact with earthed or grounded
surfaces, such as
refrigerators.
There is an increased risk of electric shock if your
body is earthed or grounded.
c) Do not expose power tools to rain or wet
conditions.
Water entering a power tool will increase the risk of
electric shock.
d) Do not abuse the cord. Never use the cord for
carrying, pulling or unplugging the power tool.
Keep cord away from heat, oil, sharp edges or
moving parts.
Damaged or entangled cords increase the risk of
electric shock.
e) When operating a
extension cord suitable for outdoor use.
Use of a cord suitable for outdoor use reduces the
risk of electric shock.
f) If operating a power tool in a damp location
is unavoidable, use a residual current device
(RCD) protected supply.
Use of an RCD reduces the risk of electric shock.
3) Personal safety
a) Stay alert, watch what you are doing and use
common sense when operating a power tool.
Do not use a power tool while you are tired
or under the infl uence of drugs, alcohol or
medication.
A moment of inattention while operating power
tools may result in serious personal injury.
b) Use personal protective equipment. Always
wear eye protection.
Protective equipment such as dust mask, non-skid
safety shoes, hard hat, or hearing protection used
for appropriate conditions will reduce personal
injuries.
pipes, radiators, ranges and
power tool outdoors, use an
c) Prevent unintentional starting. Ensure the
switch is in the off position before connecting
to power source and/or
up or carrying the tool.
Carrying power tools with your fi nger on the switch
or energising power tools that have the switch on
invites accidents.
d) Remove any adjusting key or wrench before
turning the power tool on.
A wrench or a key left attached to a rotating part of
the power tool may result in personal injury.
e) Do not overreach . Keep proper footing and
balance at all times.
This enables better control of the power tool in
unexpected situations.
f) Dress properly. Do not wear loose clothing or
jewellery. Keep your hair, clothing and
away from moving parts.
Loose clothes, jewellery or long hair can be caught
in moving parts.
g) If devices are provided for the connection of
dust extraction and collection facilities, ensure
these are connected and properly used.
Use of dust collection can reduce dust related
hazards.
4) Power tool use and care
a) Do not force the power tool. Use the correct
power tool for your application.
The correct power tool will do the job better and
safer at the rate for which it was designed.
b) Do
not use the power tool if the switch does
not turn it on and off .
Any power tool that cannot be controlled with the
switch is dangerous and must be repaired.
c) Disconnect the plug from the power source
and/or the battery pack from the power tool
before making any adjustments, changing
accessories, or storing power tools.
Such preventive safety measures reduce the risk of
starting the power tool accidentally.
d) Store idle power tools out
children and do not allow persons unfamiliar
with the power tool or these instructions to
operate the power tool.
Power tools are dangerous in the hands of
untrained users.
e) Maintain power tools. Check for misalignment
or binding of moving parts, breakage of parts
and any other condition that may aff ect the
power toolsʼ
If damaged, have the power tool repaired
before use.
Many accidents are caused by poorly maintained
power tools.
f) Kee p cutting tools sharp and clean.
Properly maintained cutting tools with sharp cutting
edges are less likely to bind and are easier to
control.
g) Use the power tool, accessories and tool bits
etc. in accordance with these instructions,
taking into account the working conditions
and the work to be performed.
Use of the power tool for operations diff erent
from those intended could result in a hazardous
situation.
operation.
battery pack, picking
gloves
of the reach of
13
Page 14

English
5) Battery tool use and care
a) Recharge only with the charger specifi ed by
the manufacturer.
A charger that is suitable for one type of battery
pack may create a risk of fi re when used with
another battery pack.
b) Use power tools only with specifi cally
designated battery packs.
Use of any other battery packs may create a risk of
injury and fi re.
c) When battery pack is not in use, keep it away
from other metal objects like paper clips,
coins,
keys, nails, screws, or other small metal
objects that can make a connection from one
terminal to another.
Shorting the battery terminals together may cause
burns or a fi re.
d) Under abusive conditions, liquid may be
ejected from the battery; avo id contact. If
contact accidentally occurs, fl ush with water. If
liquid contacts eyes, additionally seek medical
help.
Liquid ejected from the battery may cause irritation
or burns.
6) Service
a) Have your power tool serviced by a qualifi ed
repair person using only identical replacement
parts.
This will ensure that the safety of the power tool is
maintained.
PRECAUTION
Keep children and infi rm persons away.
When not in use, tools should be stored out of reach
of children and infi rm persons.
GRASS TRIMMER SAFETY WARNINGS
IMPORTANT
READ CAREFULLY BEFORE USE
KEEP FOR FUTURE REFERENCE
Safe operation practices
● Tr ain in g
a) Read the instructions carefully. Be familiar with the
controls and the proper use of the machine.
b) Never allow people unfamiliar with these instructions
or children to use the machine. Local regulations can
restrict the age of the operator.
c) Keep in mind that the operator or user is responsible
for accidents or hazards occurring to other people or
their property.
● Preparation
a) Never operate the machine while people, especially
children, or pets are nearby.
b) Wear eye protection and stout shoes at all times while
operating the machine.
● Operation
a) Use the machine only in daylight or good artifi cial light.
b) Never operate the machine with damaged guards or
shields or without guards or shields in place.
c) Switch on the motor only when the hands and feet are
away from the cutting means.
d) Always disconnect the machine from the power supply
(i.e. remove the plug from the mains or remove the
disabling device)
– whenever leaving the machine unattended;
– before clearing a blockage;
– before checking, cleaning or working on the
machine;
– after striking a foreign object;
– whenever the machine starts vibrating abnormally.
14
e) Take care against injury to feet and hands from the
cutting means.
f) Always ensure that the ventilation openings are kept
clear of debris.
● Maintenance and storage
a) Disconnect the machine from the power supply
(i.e. remove the plug from the mains or remove the
disabling device) before carrying out maintenance or
cleaning work.
b) Use only the manufacturer’s recommended
replacement parts and accessories.
c) Inspect and maintain the machine regularly. Have the
machine repaired only by an authorized repairer.
d) When not in use, store the machine out of the reach of
children.
PRECAUTIONS FOR CORDLESS GRASS
TRIMMER
WARNING
1. Exercise patience in all work with the tool. And dress
properly to keep warm.
2. Plan all work ahead to prevent accidents.
3. Do not operate the tool at night or under bad weather
conditions when visibility is poor. And do not operate
the tool when it is raining or right after it has been
raining.
Working on slippery ground could lead to an accident if
you lose your balance.
4. Inspect the cutting head before starting work.
Do not use the tool if the cutting head is cracked,
scarred or bent.
Make sure the cutting head is properly attached. A
cutting head that falls apart or comes loose during
operation could cause an accident.
5. Be sure to attach the safety cover and the shoulder belt
before starting work.
Operating the tool without these parts could lead to
injury.
6. Be sure to attach the loop handle before starting work.
Make sure it is not loose but properly attached before
starting work. Hold the loop handle fi rmly during work
and do not swing the tool around, but use the correct
posture and maintain your balance.
Losing your balance during work could lead to an
injury.
7. Take care when starting the motor.
Place the tool on level ground.
Do not operate the tool within 15 m of people or
animals.
Make sure that the cutting head does not come into
contact with the ground or trees and plants.
A careless start could lead to injury.
8. Do not secure the lock lever.
Accidentally pulling back the lever could lead to
unexpected injury.
9. Before leaving the tool, press the start button to turn it
off .
10. Operate the tool with care near electric cables, gas
pipes and similar installations.
11. Look out for and remove empty cans, wire, stones or
other obstacles before starting work. And do not work
near tree roots or rocks.
Working in such areas could damage the cutting head
or lead to injury.
12. Do not raise the rotation speed excessively.
Raise the speed gradually and not abruptly.
Adjust lever position to suit the work load.
Objects that fl y out of the tool could cause unexpected
injury.
Page 15

English
13. Never touch the cutting head during operation.
Also make sure it does not come into contact with your
hair, clothes, etc.
14. In the following situations, turn off the motor and check
that the cutting head has stopped rotating.
To move to another work area.
To remove rubbish or grass that has become stuck in
the tool.
To remove from the work area obstacles or the rubbish,
grass and chips generated by trimming.
To lay down the tool.
Doing this with the cutting head still rotating could lead
to unexpected accidents.
15. Do not use the tool within 15 m of another person.
When you work with someone else, maintain a
distance of more than 15 m.
Flying chips could lead to unexpected accidents.
When working on unstable surfaces like slopes,
make sure that your co-worker is not exposed to any
hazards.
Use whistles or other means for calling the attention of
your co-workers.
16. When grass and other objects become entangled in
the cutting head, turn off the motor and make sure the
cutting head has stopped rotating before removing
them.
Removing objects from the cutting head when it is still
rotating will lead to injury.
Continuing operation when foreign matter is stuck in
the cutting head may lead to damage.
17. If the tool is operating poorly and produces strange
noise or vibrations, turn off the motor immediately and
ask your dealer to have it inspected and repaired.
Continued use under these conditions could lead to
injury or tool damage.
18. If you drop or bump the tool, inspect it carefully to
check there is no damage, cracks or deformation.
Using a tool that is damaged, cracked or deformed
could result in injury.
19. Secure the tool during vehicle transport to ensure that
it lies still.
Failure to heed this warning may result in an accident.
CAUTION
1. Do not turn on the cutting head for cutting objects other
than grass. Do not operate the tool in water puddles
and make sure that soil does not come into contact
with the cutting head.
2. The tool contains precision parts and should not be
dropped, exposed to strong impact or water.
The tool could be damaged or malfunction.
3. When the tool is to be stored after use or be
transported, remove the cutting head.
4. Do not expose the tool to insecticide and other
chemicals.
Such chemicals could cause cracking and other
damage.
5. Replace warning labels with new labels when they
become diffi cult to recognize or illegible and when they
start to peel.
Ask your dealer to provide the warning labels.
PRECAUTIONS FOR BATTERY AND CHARGER
1. Always charge the battery at a temperature of 0°C –
40°C. A temperature of less than 0°C will result in over
charging which is dangerous. The battery cannot be
charged at a temperature higher than 40°C.
The most suitable temperature for charging is that of
20°C – 25°C.
2. When one charging is completed, leave the charger for
about 15 minutes before the next charging of battery.
Do not charge the battery more than 2 hours.
3. Do not allow foreign matter to enter the hole for
connecting the rechargeable battery.
4. Do not insert object into the air ventilation slots of the
charger.
Inserting metal objects or infl ammables into the
charger air ventilation slots will result in electrical
shock hazard or damaged charger.
5. Using an exhausted battery will damage the charger.
6. Bring the battery to the shop from which it was
purchased as soon as the post-charging battery life
becomes too short for practical use. Do not dispose of
the exhausted battery.
7. Never disassemble the rechargeable battery and
charger.
8. Never short-circuit the rechargeable battery. Shortcircuiting the battery will cause a great electric current
and overheat. It results in burn or damage to the
battery.
9. Do not dispose of the battery in fi re. If the battery is
burnt, it may explode.
CAUTION ON LITHIUM-ION BATTERY
To extend the lifetime, the lithium-ion battery equips with
the protection function to stop the output.
In the cases of 1 to 3 described below, when using this
product, even if you are pulling the switch, the motor may
stop. This is not the trouble but the result of protection
function.
1. When the battery power remaining runs out, the motor
stops.
In such case, charge it up immediately.
2. If the tool is overloaded, the motor may stop. In this
case, release the switch of tool and eliminate causes
of overloading. After that, you can use it again.
3. If the battery is overheated under overload work, the
battery power may stop.
In this case, stop using the battery and let the battery
cool. After that, you can use it again.
Furthermore, please heed the following warning and
caution.
WARNING
In order to prevent any battery leakage, heat generation,
smoke emission, explosion and ignition beforehand,
please be sure to heed the following precautions.
1. Make sure that swarf and dust do not collect on the
battery.
◯ During work make sure that swarf and dust do not fall
on the battery.
◯ Make sure that any swarf and dust falling on the power
tool during work do not collect on the battery.
◯ Do not store an unused battery in a location exposed
to swarf and dust.
◯ Before storing a battery, remove any swarf and dust
that may adhere to it and do not store it together with
metal parts (screws, nails, etc.).
2. Do not pierce battery with a sharp object such as a
nail, strike with a hammer, step on, throw or subject the
battery to severe physical shock.
3. Do not use an apparently damaged or deformed
battery.
4. Do not use the battery in reverse polarity.
5. Do not connect directly to an electrical outlets or car
cigarette lighter sockets.
6. Do not use the battery for a purpose other than those
specifi ed.
15
Page 16
English
7. If the battery charging fails to complete even when a
specifi ed recharging time has elapsed, immediately
stop further recharging.
8. Do not put or subject the battery to high temperatures
or high pressure such as into a microwave oven, dryer,
or high pressure container.
9. Keep away from fi re immediately when leakage or foul
odor are detected.
10. Do not use in a location where strong static electricity
generates.
11. If there is battery leakage, foul odor, heat generated,
discolored or deformed, or in any way appears
abnormal during use, recharging or storage,
immediately remove it from the equipment or battery
charger, and stop use.
CAUTION
1. If liquid leaking from the battery gets into your eyes,
do not rub your eyes and wash them well with fresh
clean water such as tap water and contact a doctor
immediately.
If left untreated, the liquid may cause eye-problems.
2. If liquid leaks onto your skin or clothes, wash well with
clean water such as tap water immediately.
There is a possibility that this can cause skin irritation.
3. If you fi nd rust, foul odor, overheating, discolor,
deformation, and/or other irregularities when using the
battery for the fi rst time, do not use and return it to your
supplier or vendor.
SPECIFICATIONS
POWER TOOL
Model CG18DL CG18DAL
Pole type Attachment type Straight type
Cutting capacity diameter 425 mm
Rotation direction Counterclockwise as seen from gear case
No-load speed 0–4500 min
Operating time on one charge *
(When supplied rechargeable battery is fully charged)
1
Battery BSL1830: Li-ion 18 V (3.0 Ah 10 cells)
Weight (without cutting head and shoulder belt) 5.4 kg 5.2 kg
*1 The data in the above table is provided only as an example. Since type of grass, knife sharpness, cutting head rpm,
ambient temperature, rechargeable battery characteristics, work methods, etc. can vary widely the above should only
be used as a rough guideline.
*2 Conditions: Outer diameter of nylon cord cutter 425 mm, switch set to full speed.
CHARGER
Model UC18YRSL
Charging voltage 14.4 V 18 V
Weight 0.6 kg
5 min*
-1
2
16
Page 17
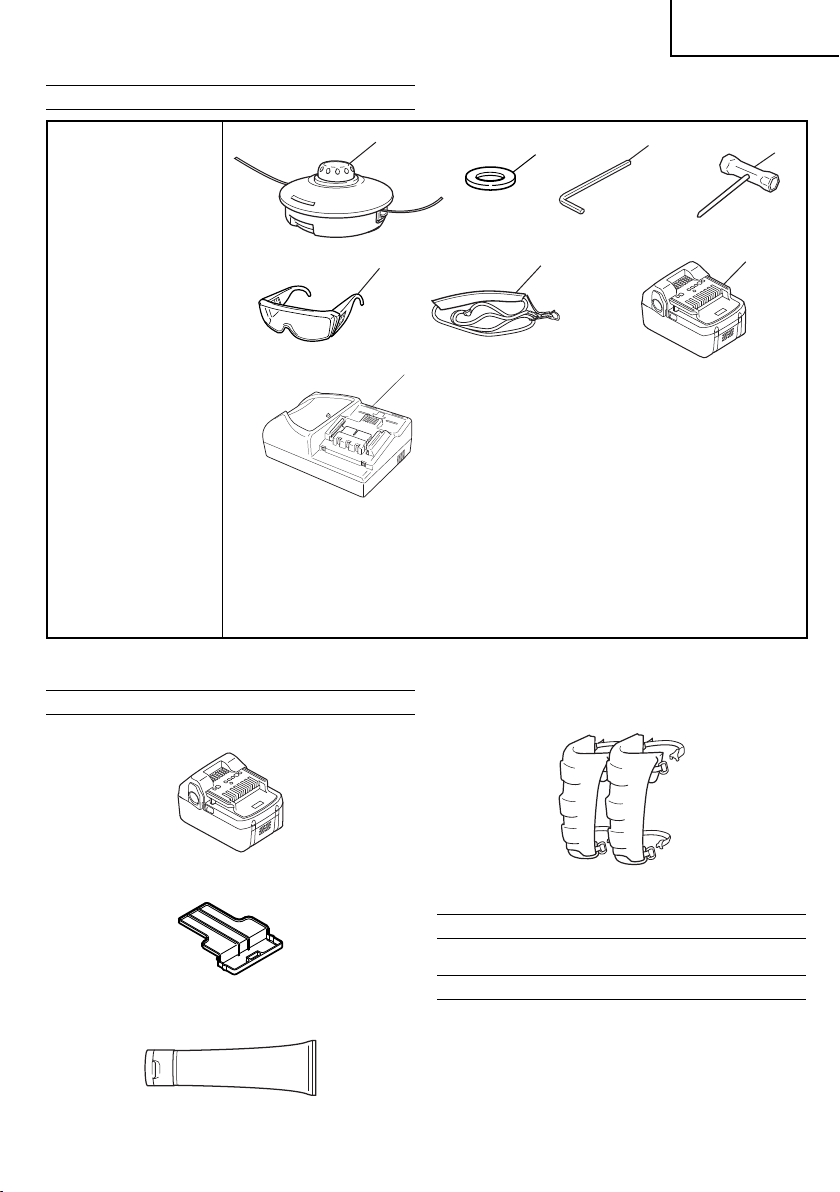
STANDARD ACCESSORIES
English
1
5
CG18DL
CG18DAL
(LSC)
1 Nylon head (Sure tap) ..................................................1
2 Winding protector ......................................................... 1
3 Hexagonal bar wrench 4 mm .......................................1
4 Box wrench (Hex. socket 17/19) ................................... 1
5 Protective glasses ........................................................1
6 Shoulder belt ................................................................1
7 Battery (BSL1830) ........................................................1
8 Charger (UC18YRSL) ...................................................1
Standard accessories are subject to change without notice.
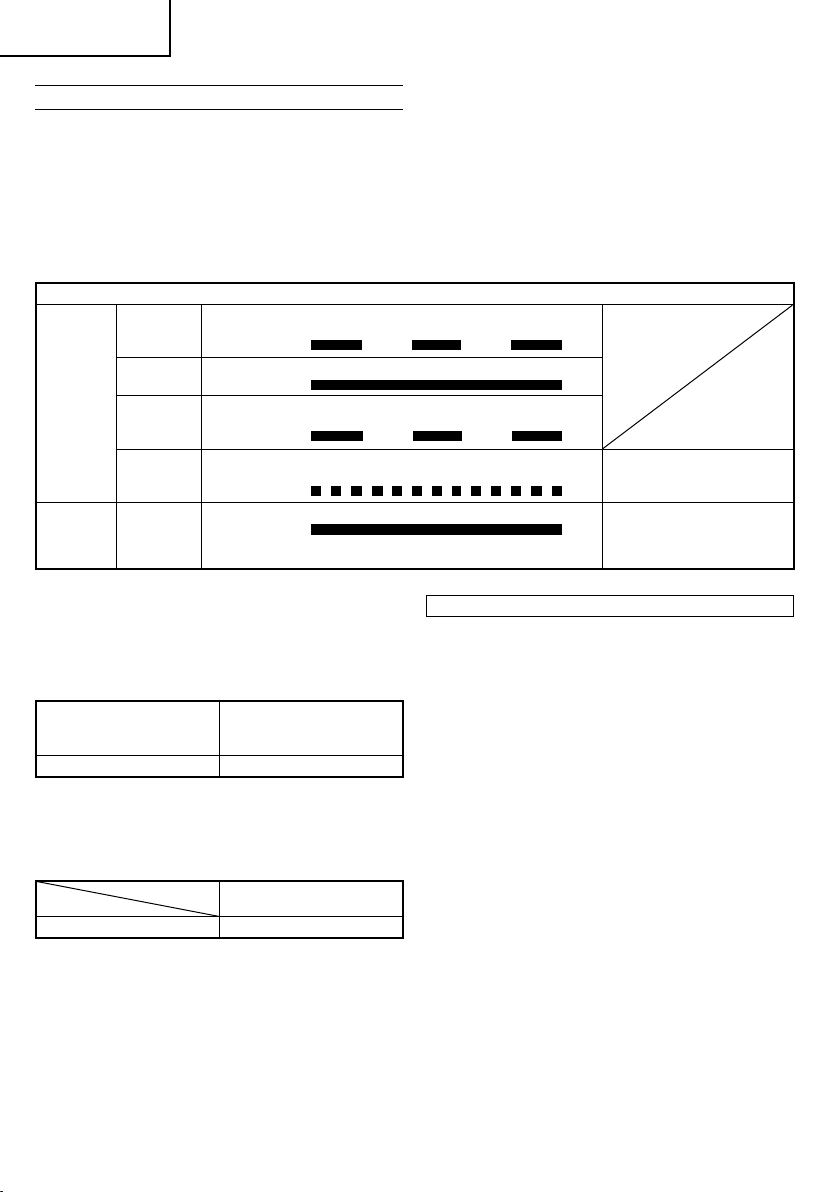
OPTIONAL ACCESSORI ES (sold separately)
1. Battery (BSL1830)
8
2
6
4. Shin guard (1 kit with 2 guards)
Protects feet from fl ying debris.
3
4
7
2. Battery cover
3. Grease (100 g tube)
Lubricate the gear case once every 50 hours of work.
Optional accessories are subject to change without notice.
APPLICATIONS
Trimming, scaling and mowing of weed.
BATTERY REMOVAL/INSTALLATION
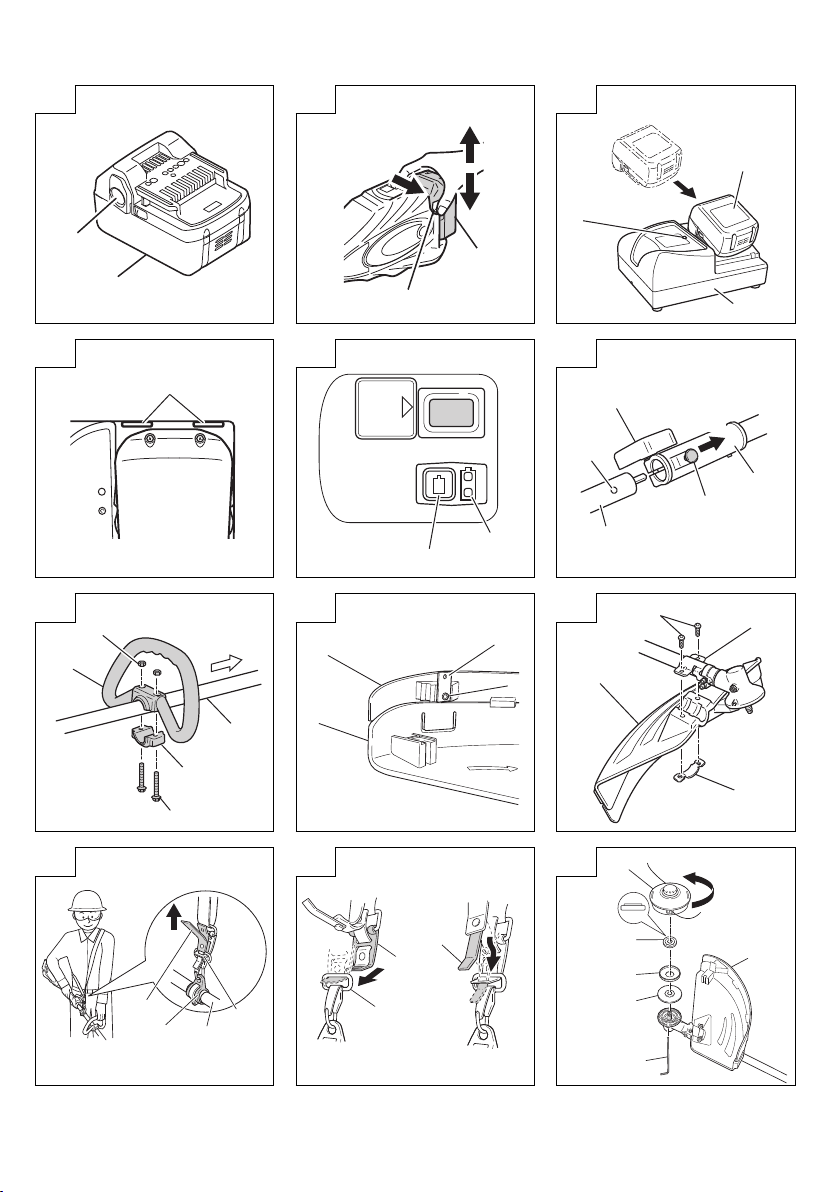
1. Battery removal
Hold the housing tightly and push the battery latches
to remove the battery (see Fig. 2).
CAUTION
Never short-circuit the battery.
2. Battery installation
Insert the battery while observing its polarities (see
Fig. 2).
17
Page 18
English
CHARGING
Before using the power tool, charge the battery as follows.
1. Connect the charger’s power cord to a receptacle.
When the power cord is connected, the charger’s pilot
lamp will blink in red. (At 1-second intervals)
2. Insert the battery into the charger.
Firmly insert the battery into the charger until the line is
visible, as shown in Fig. 3 and 4.
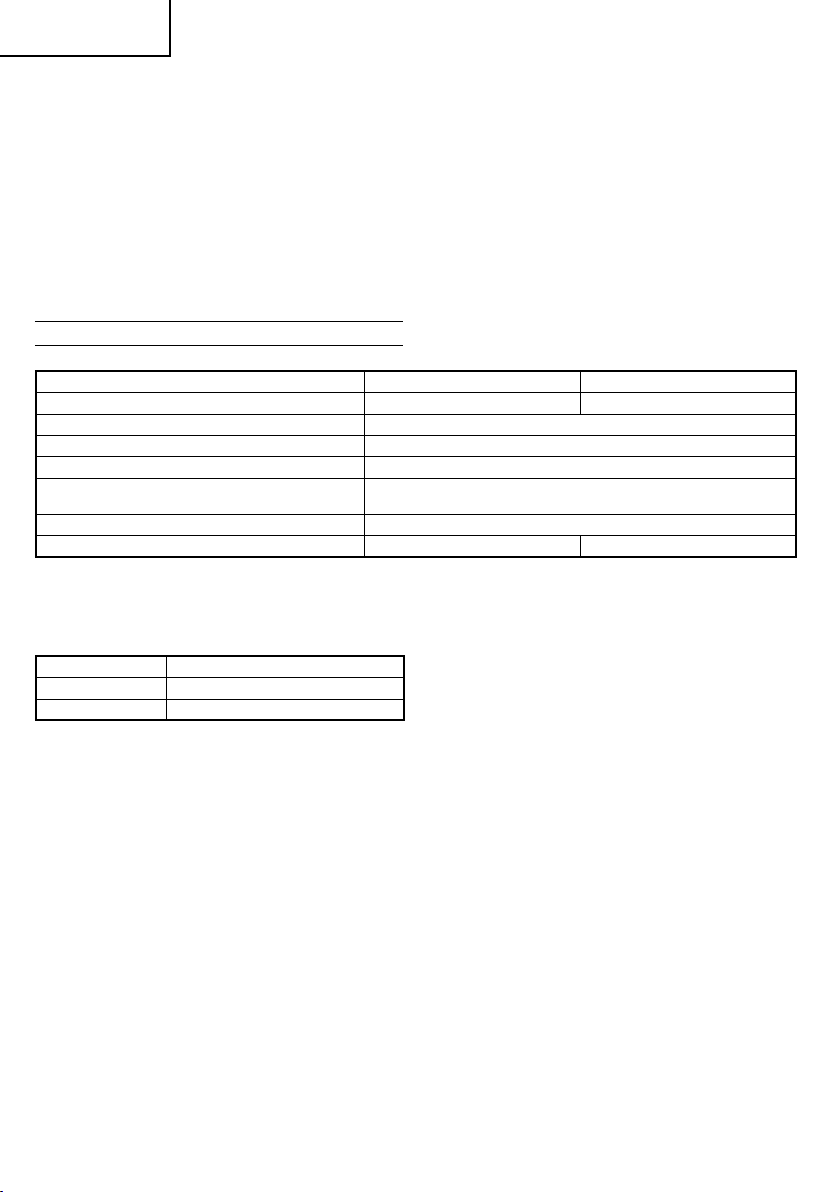
Table 1
Indications of the pilot lamp
The
pilot lamp
lights or
blinks in
red.
The
pilot lamp
lights in
green.
(2) Regarding the temperatures of the rechargeable
battery
The temperatures for rechargeable batteries are as
shown in Table 2, and batteries that have become hot
should be cooled for a while before being recharged.
Table 2 Recharging ranges of batteries
Rechargeable batteries
BSL1830 0°C – 50°C
(3) Regarding recharging time
Depending on the combination of the charger and
batteries, the charging time will become as shown in
Table 3.
Table 3 Charging time (At 20°C)
Battery
BSL1830 Approx. 45 min.
NOTE
The charging time may vary according to temperature
and power source voltage.
4. Disconnect the charger’s power cord from the
receptacle.
5. Hold the charger fi rmly and pull out the battery.
NOTE
After operation, pull out batteries from the charger fi rst,
and then keep the batteries properly.
Before
charging
While
charging
Charging
complete
Charging
impossible
Overheat
standby
Blinks Lights for 0.5 seconds. Does not light for 0.5
Lights Lights continuously
Blinks Lights for 0.5 seconds. Does not light for 0.5
Flickers Lights for 0.1 seconds. Does not light for 0.1
Lights Lights continuously
Charger
seconds. (off for 0.5 seconds)
seconds. (off for 0.5 seconds)
seconds. (off for 0.1 seconds)
Temperatures at
which the battery
can be recharged
UC18YRSL
3. Charging
When inserting a battery in the charger, charging will
commence and the pilot lamp will light continuously in
red.
When the battery becomes fully recharged, the pilot
lamp will blink in red. (At 1-second intervals) (See
Table 1)
(1) Pilot lamp indication
The indications of the pilot lamp will be as shown in
Table 1, according to the condition of the charger or
the rechargeable battery.
Malfunction in the
battery or the charger
Battery overheated.
Unable to charge
(Charging will commence
when battery cools).
How to make the batteries perform longer
(1) Recharge the batteries before they become completely
exhausted.
When you feel that the power of the tool becomes
weaker, stop using the tool and recharge its battery.
If you continue to use the tool and exhaust the electric
current, the battery may be damaged and its life will
become shorter.
(2) Avoid recharging at high temperatures.
A rechargeable battery will be hot immediately after
use. If such a battery is recharged immediately after
use, its internal chemical substance will deteriorate,
and the battery life will be shortened. Leave the battery
and recharge it after it has cooled for a while.
CAUTION
○ When the battery charger has been continuosly used,
the battery charger will be heated, thus constituting
the cause of the failures. Once the charging has
been completed, give 15 minutes rest until the next
charging.
○ If the battery is recharged when it is warm due to
battery use or exposure to sunlight, the pilot lamp map
light in green.
The battery will not be recharged. In such a case, let
the battery cool before charging.
○ When the pilot lamp fl ickers in red (at 0.2-second
intervals), check for and take out any foreign objects
in the charger’s battery installation hole. If there are
no foreign objects, it is probable that the battery or
charger is malfunctioning. Take it to your authorized
Service Center.
18
Page 19
English
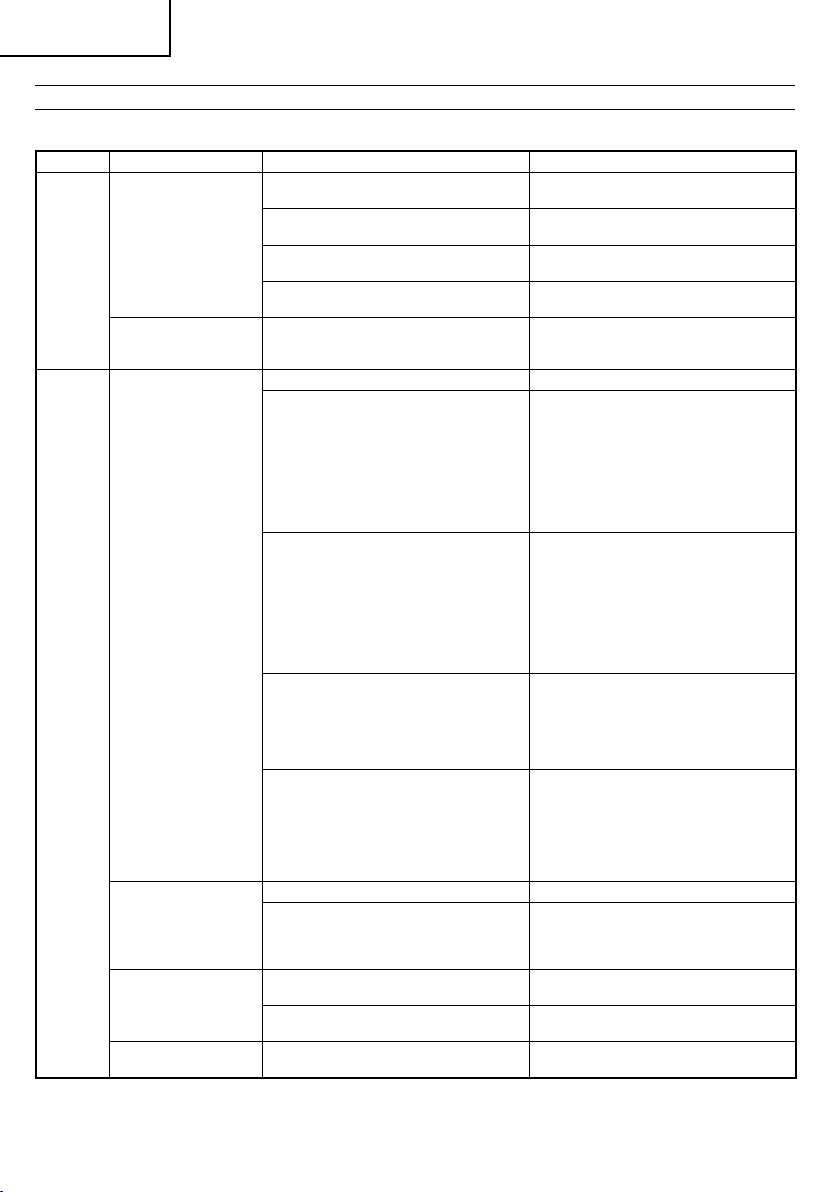
ABOUT REMAINING BATTERY INDICATOR
When pressing the remaining battery indicator switch, the
remaining battery indicator lamp lights and the battery
remaining power can be checked. (Fig. 5) When releasing
your fi nger from the remaining battery indicator switch,
the remaining battery indicator lamp goes off . The Table
4 shows the state of remaining battery indicator lamp and
the battery remaining power.
State of lamp Battery Remaining Power
As the remaining battery indicator shows somewhat
diff erently depending on ambient temperature and battery
characteristics, read it as a reference.
NOTE
○ Do not give a strong shock to the switch panel or break
it. It may lead to a trouble.
○ To save the battery power consumption, the remaining
battery indicator lamp lights while pressing the
remaining battery indicator switch.
Table 4
The battery remaining power is
enough.
The battery remaining power is a half.
The battery remaining power is nearly
empty.
Re-charge the battery soonest
possible.
PRIOR TO OPERATION
CAUTION
Pull out battery before doing any assembly.
1. Assembling attachments [CG18DL only] (Fig. 6)
(1) Insert the lock pin in the main pipe locking hole of
the trimmer attachment and make sure the main pipe
cannot come loose.
(2) Tighten the handle knob to fi rmly secure it.
2. Installing the loop handle (Fig. 7)
(1) Remove the M6 × 43 bolts (2).
(2) Install the loop handle on the main pipe so that it leans
against the motor.
(3) Place the handle fi xture at the lower end of the main
pipe and secure it fi rmly using M6 × 43 bolts (2) and
M6 nuts (2).
NOTE
Secure the loop handle in a location that provides a
good grip.
3. Installing safety cover (See Fig. 8 and 9)
WARNING
Be sure to install the safety cover in its designated
location.
Failure to heed this warning may result in injury from
fl ying stones.
NOTE
Use the supplied hexagonal bar wrench for installation.
(1) Use the supplied D4 tapping screw to install the knife
in the cover guard. (Fig. 8)
Attach the cover guard to the safety cover.
(2) Align the two holes in the cover bracket and the safety
cover and insert M6 × 25 hex. socket button bolts. (The
cover bracket is installed in the gear case.)
(3) Place the cover holder on the underside of the safety
cover and use the supplied Allen wrench to alternately
tighten the M6 × 25 hex. socket button bolts until they
are properly tightened.
CAUTION
Take care to avoid cutting yourself on the knife inside
the safety cover.
4. Installing the shoulder belt
WARNING
○ Be sure to attach the shoulder belt so that the grass
trimmer can be carried correctly.
○ If you get the feeling the tool is not operating normally,
turn off the motor immediately, remove the quick-
release bracket of the shoulder belt and remove the
tool.
CAUTION
○ If you do not support the tool when you pull the quick-
release belt, it may fall causing injury or damage.
Hold the main pipe with one hand while you pull with
the other hand.
○ Make sure the quick-release function operates
normally before you start working.
(1) Place the shoulder belt on the shoulder as shown
in Fig. 10 and engage it with the hanger on the tool.
Adjust the shoulder belt to suitable length.
(2) To remove the tool from the shoulder belt, support the
tool by holding the main pipe with one hand and use
the other hand to pull the quick-release belt as shown
in Fig. 10 to free it from the bracket.
(3) To strap on the tool, insert the bracket in the hook and
insert the quick-release bracket over the hook and into
the wide opening of the bracket. (Fig. 11)
Gently pull the shoulder belt to make sure that it is
properly attached.
CUTTING HEAD
1. Funct ion
The “SURE-TAP” Cutting Head
○ Automatically feeds more nylon cutting line when it is
tapped at low rpm (not greater than 4500 min
CAUTION
○ The cutting body cap must be securely attached to the
cutting body.
○ Check the cutting body, cutting body cap and other
components for cracks or other damage.
○ The cutting head must be securely mounted to the
unit’s gear case.
○ For outstanding performance and reliability, always
use HITACHI nylon cutting line. Never use wire or other
material which can become a dangerous missile.
○ If the Cutting Head does not feed cutting line properly,
check that the nylon line and all components are
properly installed. Contact HITACHI dealer if you need
assistance.
2. Installation (Fig. 12)
(1) Insert Hexagonal bar wrench into the hole of the gear
case in order to lock the cutter holder.
(2) Install cutter holder, winding protector, cutter holder
cap, cutting head on gear case of grass trimmer. The
mounting nut is left-hand-threaded. Turn clockwise to
loosen/counterclockwise to tighten.
3. Adjustment of line length
(1) Set the motor speed as low as possible and tap the
cutting head on the ground. Nylon line is drawn out
about, 30 mm by one tapping. (Fig. 13)
Also, you can extend nylon line with hands but the
motor must be completely stopped. (Fig. 14)
(2) Adjust nylon line to proper length 110 mm – 140 mm
before each operation.
(3) When nylon line is drawn out too long, rewind long
line outside by pushing and turning the guide ball with
hand. (Fig. 15)
-1
).
19
Page 20

English
4. Nylon line replacement
(1) Remove cutting body cap by fi rmly pushing inward the
locking tabs with your thumbs (Fig. 16).
(2) After removing cutting body cap, take out spool, and
discard the left line.
(3) Fold the new nylon line half unevenly. (Fig. 17)
(4) Hook the “U” bent end of the nylon line into the groove
on the center partition of the spool.
Wind both halves of the line on the spool in the same
direction, keeping each half of the line on its own side
of the partition. (Fig. 18)
(5) Push each line into stopper holes, leaving the loose
ends approx. 100 mm in length. (Fig. 19)
(6) Insert both loose ends of the line through the eyelet
when placing the spool in the cutting body cap. (Fig.
20)
NOTE
When placing spool in the cutting body cap, try to
line up stopper holes (3) with eyelet (4) for easier line
release later.
(7) Place reel spring into the spool. (Fig. 21)
(8) Place the cutting body over the cutting body cap so
that the locking tabs on the cutting body meet the long
holes on the cutting body. Then push the cutting body
cap securely until it clicks into place. (Fig. 21)
(9) Pull loose ends of line to release them from the stopper
holes. If the lines happen to come out too long (over
100 mm), rewind them to be approx. 100 mm by
pushing and turning guide ball. (Fig. 15)
(10)
The initial cutting line length should be approx. 150 mm
and should be equal on both sides. (Fig. 22)
OPERATION
Tri mm in g grass
WARNING
○ Do not operate the tool at night or under bad weather
conditions when visibility is poor.
○ Do not operate the tool when it is raining or right after it
has been raining.
○ Wear proper footwear to prevent slipping that could
cause you to lose your balance and fall.
○ Do not use the tool on steep slopes.
When trimming grass on slopes that are not so steep,
trim by moving towards the ridge.
○ Place the tool on the shoulder belt, place the right hand
on the handle and the left hand on the loop handle and
hold it fi rmly.
○ Take care not to move the cutting head too close to
your feet.
○ Do not raise the cutting head above your knee during
cutting.
○ Do not use the tool where the cutting head may come
into contact with stones, tree and other obstacles.
○ A cutting attachment can injure while it continues to
spin after the motor is stopped. When the unit is turned
off , make sure the cutting attachment has stopped
before the unit is set down.
○ Do not use the tool within 15 m of another person.
When you work with someone else, maintain a
distance of more than 15 m.
1. Insert the battery while observing its polarities
2. Tur n on the tool (Fig. 23)
○ Press the Start button on the housing, the power goes
on and the power lamp on the handle lights red.
○ Pressing the start button a second time turns the power
off and the red lamp on the handle goes off .
[Auto power off ]
When the power is turned on but the lever is not used
for one minute, the tool is automatically turned off . To
turn the tool on again, press the start button a second
time.
WARNING
Never leave the tool with the power on. This could
result in an accident.
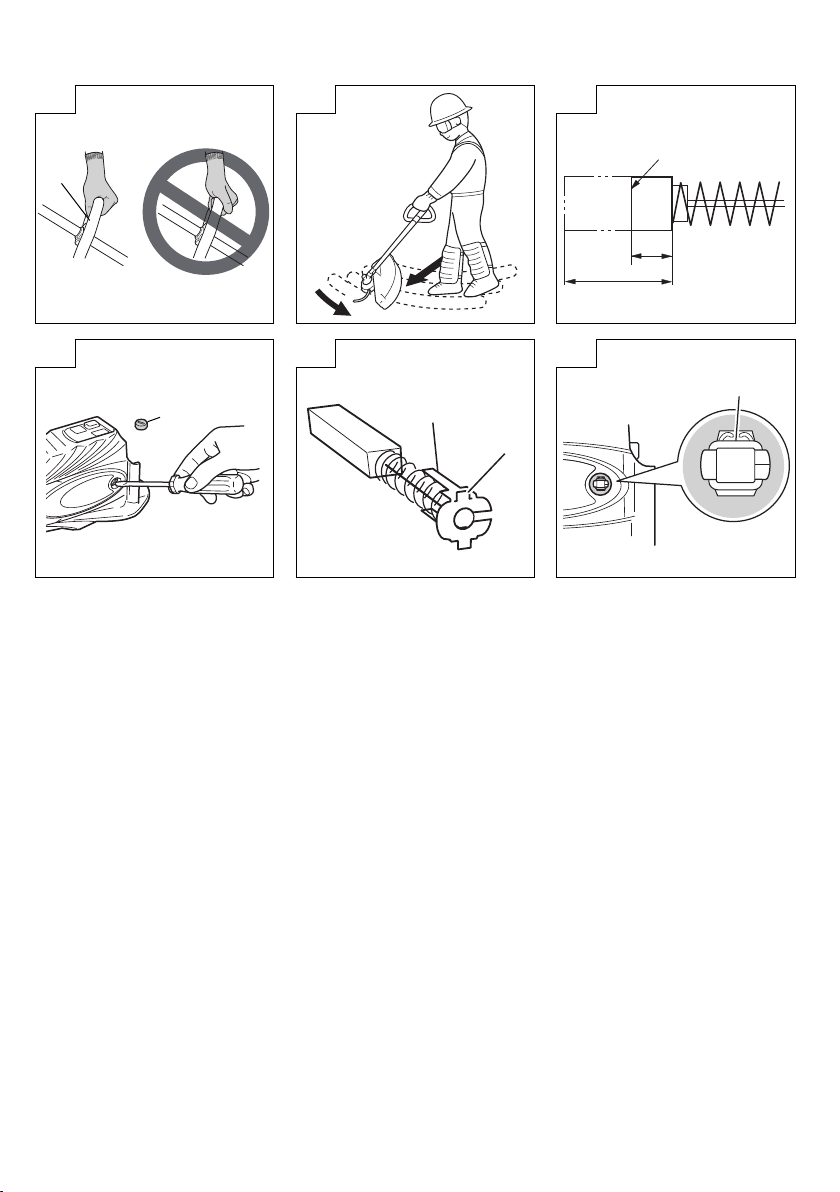
3. Tri mm in g grass
○ Grip the handle from above, press the lock lever and
pull the lever to start cutting head rotation. (Fig. 24)
○ Release the lever when you fi nish trimming and stop
the motor.
○ Place your thumb on the loop handle and grip the
handle with your other fi ngers. (Fig. 25)
○ Take a posture that makes it easy to move.
[Gras s trimming techniques]
○ When the motor is turning slowly, it is weak and grass
tends to get caught in the knife. When it turns too fast,
the vibrations and noise are loud and battery power
consumption goes up.
○ At excessive speed, the battery will wear down faster.
○ Do not swing the pipe, but use the hips to move the
cutting head horizontally from right to left in an arc
while going forward and use the left side of the cutting
head for cutting grass. (Fig. 26)
OPERATIONAL CAUTIONS
Continuous work
This tool comes with an over-heat protection circuit
that protects the electronic parts that control the
rechargeable battery. In continuous trimming work,
tool temperature will rise and eventually trigger the
over-heat protection circuit, which will shut down the
tool.
If this happens, let the tool cool for a length of time.
When the temperature drops, it will again become
possible to use the tool. When the rechargeable
battery has to be exchanged during continuous
operation, let the tool rest for about 15 minutes.
Speed switch
Equipped with an electronic circuit, this switch enables
step-less speed changes.
If the switch trigger is set too low (low rpm range) and
the motor is continuously overworked, the electronic
circuits will become hot and could break down.
Do only light work at low motor speeds.
MAINTENANCE AND INSPECTION
CAUTION
○ Pull out battery before doing any inspection or
maintenance.
1. Checking the condition of the cutting head
The cutting head should be checked regularly. If
worn or broken cutting head can slip or decrease the
effi ciency of the motor and burn it out.
Replace worn cutting head with new ones.
CAUTION
○ If you use a cutting head of which point is worn or
broken, it will be dangerous. So replace it with a new
one.
2. Check the Screws
Loose screws are dangerous. Regularly inspect them
and make sure they are tight.
CAUTION
○ Using this power tool with loosened screws is
extremely dangerous.
20
Page 21

English
3. Maintenance of the motor
The motor unit winding is the very “heart” of the power
tool.
Exercise due care to ensure the winding does not
become damaged and/or wet with oil or water.
4. Gear case lubrication
○ Maintenance interval
The gear case should be checked for lubrication after
each 50 hours of use.
○ Lubrication
Remove the cutting head. Clean any dirt and debris
from the area between the gear case. Remove the M6
bolt from the side of the gear case. While rotating the
attaching shaft, inject lithium-base bearing lube (P/N
682975) through the hole until the gear case is full.
Reinstall M6 bolt.
5. Inspecting the carbon brushes (Fig. 27)
The motor employs carbon brushes which are
consumable parts. Since and excessively worn carbon
brush can result in motor trouble, replace the carbon
brush with new ones when it becomes worn to or
near the “wear limit”. In addition, always keep carbon
brushes clean and ensure that they slide freely within
the brush holders.
NOTE
When replacing the carbon brush with a new one,
be sure to use the Hitachi Carbon Brush Code No.
999054.
6. Replacing carbon brushes
Take out the carbon brush by fi rst removing the brush
cap and then hooking the protrusion of the carbon
brush with a slotted head screw driver, etc., as shown
in Fig. 28.
When installing the carbon brush, choose the direction
so that the nail of the carbon brush (see Fig. 29) agrees
with the contact portion outside the brush tube. Then
push it in with a fi nger as illustrated in Fig. 30. Lastly,
install the brush cap.
CAUTION
○ Be absolutely sure to insert the nail of the carbon brush
into the contact portion outside the brush tube. (You
can insert whichever one of the two nails provided.)
○ Caution must be exercised since any error in this
operation can result in the deformed nail of the carbon
brush and may cause motor trouble at an early stage.
7. Cleaning of the outside
When the grass trimmer is stained, wipe with a soft dry
cloth or a cloth moistened with soapy water. Do not use
chloric solvents, gasoline or paint thinner, as they melt
plastics.
8. Storage
Store grass trimmer in a place in which the temperature
is less than 40°C and out of reach of children.
9. Service parts
CAUTION
Repair, modifi cation and inspection of Hitachi Power
Tools must be carried out by a Hitachi Authorized
Service Center.
This Parts List will be helpful if presented with the
tool to the Hitachi Authorized Service Center when
requesting repair or other maintenance. In the
operation and maintenance of power tools, the safety
regulations and standards prescribed in each country
must be observed.
MODIFICATIONS
Hitachi Power Tools are constantly being improved
and modifi ed to incorporate the latest technological
advancements.
Accordingly, some parts may be changed without prior
notice.
list
Important notice on the batteries for the Hitachi
cordless power tools
Please always use one of our designated genuine
batteries. We cannot guarantee the safety and
performance of our cordless power tool when used
with batteries other than these designated by us, or
when the battery is disassembled and modifi ed (such
as disassembly and replacement of cells or other
internal parts).
21
Page 22
English
TROUBLESHOOTING
Use the inspections in the table below if the tool does not operate normally. If this does not remedy the problem, consult
your dealer or the Hitachi Authorized Service Center.
Symptom Possible cause Remedy
Charger The Charge lamp
Tool Does not operate. The rechargeable battery is depleted. Charge the rechargeable battery.
does not go on.
The Charge lamp
does not go off after 4
hours of charging.
Goes on, but soon
stops.
Strong vibrations The loop handle is not properly attached
Strange noise from
the gear case
The power plug is not connected to an
AC outlet.
The battery is not properly connected to
the charger.
The battery or charger electrodes are
soiled.
The battery is extremely hot. Allow the battery to properly cool before
The battery or charger is faulty. Disconnect the power plug and consult
The rechargeable battery has not been
properly installed.
The power has not been turned on. Press the start button on the housing to
The lock lever was not pressed when
the lever was pulled back.
The tool pulls in large volumes of grass
that are caught between the safety
cover and the nylon head, the tool is
overloaded.
The rechargeable battery power is low. Charge the rechargeable battery.
The rechargeable battery is overheated. Stop using the rechargeable battery,
to the main pipe.
The safety cover is not been properly
attached to the main pipe.
The gear case has run out of grease. Lubricate using grease.
Connect the power plug to an AC outlet.
Insert the battery so that it is properly
seated in the charger.
Use a cotton swab or other tool to clean
the electrodes.
charging.
your dealer or the Hitachi Authorized
Service Center.
Remove the rechargeable battery
from the battery compartment in
the tool and check for and remove
any foreign matter. Also check the
battery electrodes for soiling, water
or other foreign matter. Use a cotton
swab for cleaning. Make sure that the
rechargeable battery is pressed in until
it clicks into place.
start the tool. This tool comes with an
auto power off function. The power is
automatically turned off if nobody pulls
the lever during a one minute period
after power on. To turn the tool on again,
press the start button a second time.
Pressing the start button a second time
turns the power off .
To prevent accidents from incorrect
operation, the lock lever must be
pressed while the lever is pulled back to
start the motor.
Hold the handle from above and press
the lock lever while pulling the handle.
This is the eff ect of a function that
protects the rechargeable battery by
turning off the motor when the tool is
exposed to an excessive load. Turn off
the tool and remove the cause of the
overload. Press the start button once
again to continue operation.
remove it from the tool and let it cool in
a well-ventilated location not exposed
to sunlight.
Secure properly.
Secure properly.
22
Page 23

GUARANTEE
We guarantee Hitachi Power Tools in accordance with
statutory/country specifi c regulation. This guarantee does
not cover defects or damage due to misuse, abuse, or
normal wear and tear. In case of complaint, please send
the Power Tool, undismantled, with the GUARANTEE
CERTIFICATE found at the end of this Handling instruction,
to a Hitachi Authorized Service Center.
NOTE
Due to HITACHI’s continuing program of research and
development, the specifi cations herein are subject to
change without prior notice.
Information concerning airborne noise and vibration
The measured values were determined according to
IEC60335 and declared in accordance with ISO 4871.
Measured A-weighted sound power level: 95 dB (A).
Measured A-weighted sound pressure level: 86 dB (A).
Uncertainty KpA: 3 dB (A).
Wear ear protection.
Vibration total values (triax vector sum) determined
according to IEC60335.
Vibration emission value
WARNING
◯ The vibration emission value during actual use of
the power tool can diff er from the declared value
depending on the ways in which the tool is used.
◯ To identify the safety measures to protect the operator
that are based on an estimation of exposure in the
actual conditions of use (taking account of all parts of
the operating cycle such as the times when the tool is
switched off and when it is running idle in addition to
the trigger time).
ah, w = 7.5 m/s
2
English
23
Page 24

Deutsch
ALLGEMEINE SICHERHEITSHINWEISE FÜR
ELEKTROGERÄTE
WAR NUNG
Lesen Sie sämtliche Sicherheitshinweise und
Anweisungen durch.
Wenn die Warnungen und Anweisungen nicht befolgt
werden, kann es zu Stromschlag, Brand und/oder
ernsthaften Verletzungen kommen.
Bitte bewahren Sie alle War nhinweis e und
Anweisungen zum späteren Nachschlagen auf.
er Begriff „Elektrowerkzeug” bezieht sich in den
Warnhinweisen auf Elektrowerkzeuge mit Netz(schnurgebunden) oder Akkubetrieb (schnurlos).
1) Sicherheit im Arbeitsbereich
a) Sorgen Sie für einen sauberen und gut
ausgeleuchteten Arbeitsbereich.
Zugestellte oder dunkle Bereiche ziehen Unfälle
förmlich an.
b) Verw ende n Sie Elektrowerkzeuge niemals
an Orten, an denen Explosionsgefahr
besteht – zum Beispiel in der
entfl ammbaren Flüssigkeiten, Gasen oder
Stäuben.
Bei der Arbeit mit Elektrowerkzeugen kann es zu
Funkenbildung kommen, wodurch sich Stäube
oder Dämpfe entzünden können.
c) Sorgen Sie bei der Arbeit mit
Elektrowerkzeugen dafür, dass sich keine
Zuschauer (insbesondere Kinder) in der Nähe
befi nden.
Wenn Sie abgelenkt werden, können Sie die
Kontrolle über das Werkzeug verlieren.
2) Elektrische Sicherheit
a) Elektrowerkzeuge müssen mit passender
Stromversorgung betrieben werden.
Nehmen Sie niemals irgendwelche
Änderungen am Anschlussstecker vor.
Ver wend en
mit Schutzkontakt (gee rdet) niemals
Adapterstecker.
Stecker im Originalzustand und passende
Steckdosen reduzieren das Stromschlagrisiko.
b) Verme iden Sie Kö rperkont akt mit geerdeten
Gegenständen wie Rohrleitungen, Heizungen,
Herden oder Kühlschränken .
Bei Körperkontakt mit geerdeten Gegenständen
besteht ein erhöhtes Stromschlagrisiko.
c) Setzen Sie Elektrowerkzeuge niemals Regen
oder sonstiger Feuchtigkeit aus.
Wenn Flüssigkeiten in ein Elektrowerkzeug
eindringen, erhöht sich das Stromschlagrisiko.
d) Ve rwen den Sie die Anschlussschnur
nicht missbräuchlich. Tr ag en Sie
das Elektrowerkzeug niemals an der
Anschlussschnur, ziehen Sie es
heran und ziehen Sie den Stecker nicht an der
Anschlussschnur aus der Steckdose.
Halten Sie die Anschlussschnur von
Hitzequellen, Öl, scharfen Kanten und
beweglichen Teil e n fern.
Beschädigte oder verdrehte Anschlussschnüre
erhöhen das Stromschlagrisiko.
e) Wenn Sie ein Elektrowerkzeug im Freien
benutzen, verwenden Sie ein für den
Außeneinsatz geeignetes Verlängerungskabel.
Ein für den Außeneinsatz geeignetes Kabel
vermindert das Stromschlagrisiko.
24
Sie bei Elektrowerkzeugen
Nähe von leicht
nicht damit
f) Falls sich der Betrieb des
in feuchter Umgebung nicht vermeiden lässt,
verwenden Sie eine Stromversorgung mit
Fehlerstromschutzeinrichtung (Resi dual
Current Device, RCD).
Durch den Einsatz einer
Fehlerstromschutzeinrichtung wird das Risiko
eines elektrischen Schlages reduziert.
3) Persönliche Sicherheit
a) Bleiben Sie wachsam, achten Sie auf das, was
Sie tun, und setzen Sie Ihren Vers tand ein,
wenn Sie mit Elektrowerkzeugen arbeiten.
Benutzen Sie keine Elektrowerkzeuge, wenn
Sie müde sind
Alkohol oder Medikamenten stehen.
Bei der Arbeit mit Elektrowerkzeugen können
bereits kurze Phasen der Unaufmerksamkeit zu
schweren Verletzungen führen.
b) Benutzen Sie eine persönliche
Schutzausrüstung. Tra ge n Sie immer einen
Augenschutz.
Schutzausrüstung wie Staubmaske, rutschsichere
Sicherheitsschuhe, Schutzhelm und Gehörschutz
senken das Verletzungsrisiko bei angemessenem
Einsatz.
c) Ver meid en Sie unbeabsichtigten Anlauf.
Achten Sie darauf, dass sich der Schalter
in der Aus- (O ff -) Position befi ndet, ehe Sie
das Gerät mit der Stromversorgung
oder Batteriestromversorgung verbinden, es
aufheben oder herumtragen.
Das Herumtragen von Elektrowerkzeugen mit
dem Finger am Schalter oder das Herstellen der
Stromversorgung bei betätigtem Schalter zieht
Unfälle regelrecht an.
d) Entfernen Sie sämtliche Einstellwerkzeuge
(Einstellschlüssel), ehe Sie das
Elektrowerkzeug einschalten.
Ein an einem beweglichen Teil des
Elektrowerkzeugs angebrachter Schlüssel kann zu
Verletzungen führen.
e) Sorgen Sie für einen festen Stand. Achten Sie
jederzeit darauf, sicher zu stehen und das
Gleichgewicht zu bewahren.
Dadurch haben Sie das Elektrowerkzeug in
unerwarteten Situationen besser im Griff .
f) Kleiden Sie sich richtig. Tra ge n Sie keine lose
Kleidung oder
Kleidung und Handschuhe von beweglichen
Tei le n fern.
Lose Kleidung, Schmuck oder langes Haar kann
von beweglichen Teilen erfasst werden.
g) Wenn Anschlüsse für Staubabsaug- und -
sammelvorrichtungen vorhanden sind, sorgen
Sie dafür, dass diese richtig angeschlossen
und eingesetzt werden.
Durch Entfernen des Staubes können
staubbezogene Gefahren vermindert werden.
4) Einsatz und Pfl ege von Elektrowerkzeugen
a) Überanspruchen Sie Elektrowerkzeuge nicht.
Benutzen Sie das richtige Elektrowerkzeug für
Ihren
Das richtige Elektrowerkzeug erledigt seine Arbeit bei
b) Benutzen Sie das Elektrowerkzeug nicht, wenn
Jedes Elektrowerkzeug, das nicht mit dem Schalter
Einsatzzweck.
bestimmungsgemäßem Einsatz besser und sicherer.
es sich nicht am Schalter ein- und ausschalten
lässt.
betätigt werden kann, stellt eine Gefahr dar und
muss repariert werden.
oder unter Einfl uss von Drogen,
Schmuck. Halten Sie Haar,
Elektrowerkzeuges
und/
Page 25

Deutsch
c) Stecken Sie den Stecker der Stromversorgung
oder Batteriestromversorgung vom Gerät
ab, ehe Sie Einstellarbeiten vornehmen,
Zubehörteile tauschen oder das
Elektrowerkzeug verstauen.
Solche präventiven Sicherheitsmaßnahmen
verhindern den unbeabsichtigten Anlauf des
Elektrowerkzeugs und die damit verbundenen
Gefahren.
d) Lagern Sie nicht benutzte Elektrowerkzeuge
außerhalb der Reichweite von Kindern,
lassen Sie nicht zu, dass Personen das
Elektrowerkzeug bedienen, die nicht mit
dem We rkzeug selbst und/oder diesen
Anweisungen vertraut sind.
Elektrowerkzeuge in ungeschulten Händen sind
gefährlich.
e) Halten Sie Elektrowerkzeuge in Stand. Prüfen
Sie auf Fehlausrichtungen, sicheren Halt
und Leichtgängigkeit beweglicher Tei le ,
Beschädigungen von Teil en und auf jegliche
andere Zustände, die sich auf den Betrieb des
Elektrowerkzeugs auswirken können.
Bei Beschädigungen lassen Sie das
Elektrowerkzeug reparieren, ehe Sie es
benutzen.
Viele Unfälle mit Elektrowerkzeugen sind auf
schlechte Wartung zurückzuführen.
f) Halten Sie
sauber.
Richtig gewartete Schneidwerkzeuge mit scharfen
Schneidkanten bleiben weniger häufi g hängen und
sind einfacher zu beherrschen.
g) Benutzen Sie Elektrowerkzeuge,
Zubehör, Werkzeugspitzen und Ähnliches
in Übereinstimmung mit diesen
Anweisungen – beachten Sie dabei die
jeweiligen Arbeitsbedingungen und die Art
und Weise der auszuführenden Arbeiten.
Der Gebrauch des Elektrowerkzeuges für andere
als die vorgesehenen Anwendungen kann zu
gefährlichen Situationen führen.
5) Verw endun g und Pfl ege der Batterie
a) Laden Sie das Gerät nur mit dem vom
Hersteller empfohlenen Ladegerät auf.
Ein Ladegerät für einen speziellen Batterietyp kann
bei Verwendung mit anderen Batterien zu Gefahren
führen.
b) Verw ende n Sie für das Gerät nur die speziell
empfohlenen Batterien.
Eine Verwendung von anderen Batterien kann zu
Verletzungen und Bränden führen.
c) Ist die Batterie nicht in Gebrauch, achten
Sie darauf, dass sie nicht mit metallischen
Gegenständen, beispielsweise Büroklammern,
Münzen, Schlüssel, Nägel, Schrauben in
Konta kt kommt, da diese Gegenstände einen
Kurzschlus s der Anschlüsse verursachen
könnten.
Ein Kurzschluss der Batterieanschlüsse kann zu
Verbrennungen oder Bränden führen.
d) Im Falle von Störungen, kann Flüssigkeit aus
der Batterie austreten. Verm eide n Sie in diesem
Fall jeglichen Kon takt. Sollten Sie dennoch mit
der Batterie in Berührung kommen, waschen
Sie die betroff ene Stelle gründlich mit Wasser
ab. Ist die Flüssigkeit ins Auge geraten, suchen
Sie einen Arzt auf.
Ausgetretene Batteriefl üssigkeiten können zu
Reizungen oder Verbrennungen führen.
Schneidwerkzeuge scharf und
6) Service
a) Lassen Sie Elektrowerkzeuge durch
qualifi zierte Fachkräfte und unter Einsatz
passender, zugelassener Originalteile warten.
Dies sorgt dafür, dass die Sicherheit des
Elektrowerkzeugs nicht beeinträchtigt wird.
VORSICHT
Von Kindern und gebrechlichen Personen fernhalten.
Werk zeuge sollten bei Nichtgebrauch außerhalb der
Reichweite von Kindern und gebrechlichen Personen
aufbewahrt werden.
RASENTRIMMER-SICHERHEITSHINWEISE
WICHTIG
VOR VERWENDUNG SORGFÄLTIG LESEN
FÜR KÜNFTIGE BEZUGNAHME AUFBEWAHR EN
Maßnahmen zur sicheren Bedienung
● Ver trau tmac hen
a) Lesen Sie die Anleitung sorgfältig durch. Machen
Sie sich mit den Steuerelementen und der korrekten
Bedienung des Geräts vertraut.
b) Gestatten Sie Personen, die nicht mit dieser Anleitung
vertraut sind oder Kindern nie die Bedienung des
Geräts. Das Mindestalter zur Bedienung des Geräts
kann durch örtliche Vorschriften festgelegt sein.
c) Bedenken Sie, dass der Bediener oder Benutzer
des Geräts für Unfälle oder Verletzungen anderer
Personen oder Beschädigung von deren Eigentum
verantwortlich ist.
● Vor bere itun g
a) Betätigen Sie das Gerät nie, wenn sich Personen,
insbesondere Kinder, oder Tiere in der Nähe befi nden.
b) Tragen Sie während der Bedienung des Geräts stets
Schutzbrille und festes Schuhwerk.
● Betrieb
a) Verwenden Sie das Gerät ausschließlich bei Tageslicht
oder ausreichender künstlicher Beleuchtung.
b) Betätigen Sie das Gerät nie mit beschädigten oder
nicht angebrachten Schutzvorrichtungen.
c) Schalten Sie den Motor nur ein, wenn sich Hände
und Füße nicht in der Nähe der Schneidevorrichtung
befi nden.
d) Unterbrechen Sie immer die Stromversorgung
des Geräts (d. h. ziehen Sie den Stecker aus
der Netzsteckdose oder entfernen Sie die
Sperrvorrichtung)
– wenn Sie das Gerät unbeaufsichtigt lassen;
– bevor Sie eingeklemmtes Material entfernen;
– bevor Sie das Gerät inspizieren, reinigen oder
Arbeiten am Gerät vornehmen;
– nach Kontakt mit einem Fremdkörper;
– wenn das Gerät ungewöhnlich stark zu vibrieren
beginnt.
e) Schützen Sie sich vor Verletzungen der Füße und
Hände durch die Schneidevorrichtung.
f) Vergewissern Sie sicher, dass die Lüftungsöff nungen
stets frei von Rückständen sind.
● War tung und Lagerung
a) Unterbrechen Sie immer die Stromversorgung
des Geräts (d. h. ziehen Sie den Stecker aus
der Netzsteckdose oder entfernen Sie die
Sperrvorrichtung), bevor Sie Wartungs- oder
Reinigungsarbeiten durchführen.
b) Verwenden Sie ausschließlich die durch den Hersteller
empfohlenen Ersatz- und Zubehörteile.
c) Führen Sie in regelmäßigen Abständen Inspektions-
und Wartungsarbeiten durch. Lassen Sie Reparaturen
des Ger äts ausschli eßlich durc h eine Vertrags werkstatt
durchführen.
25
Page 26

Deutsch
d) Bewahren Sie das Gerät, wenn es nicht verwendet
wird, außerhalb der Reichweite von Kindern auf.
Zudem ist darauf zu achten, dass er nicht mit Haar,
14. In den folgenden Situationen den Motor abstellen und
VORSICHTSMASSNAHMEN BEIM AKKURASENTRIMMER
WAR NUNG
1. Bei der Arbeit mit dem Gerät stets gelassen bleiben.
Zum Schutz vor Kälte angemessene Kleidung tragen.
2. Vorausschauend arbeiten, um Unfälle zu vermeiden.
3. Das Gerät nicht bei Nacht oder schlechten
Witterungsverhältnissen mit eingeschränkter Sicht
bedienen. Das Gerät zudem nicht bei Regen oder kurz
nach einem Regenschauer betätigen.
Arbeit auf rutschigem Untergrund kann zu Unfällen
führen, wenn Sie das Gleichgewicht verlieren.
4. Den Schneidkopf vor Inbetriebnahme des Geräts
inspizieren.
Das Gerät nicht verwenden, wenn der Schneidkopf
Risse, Schrammen oder Verbiegungen aufweist.
Es ist darauf zu achten, dass der Schneidkopf
ordnungsgemäß angebracht ist. Ein während der
Arbeit auseinanderfallender oder sich lösender
Schneidkopf kann zu Unfällen führen.
5. Vor Arbeitsbeginn sicherstellen, dass
Sicherheitsabdeckung und Schultergurt angebracht
sind.
Der Betrieb des Geräts ohne diese Komponenten kann
Verletzungen zur Folge haben.
6. Es ist darauf zu achten, dass der Bügelgriff vor
Arbeitsbeginn angebracht ist. Vor Inbetriebnahme
des Geräts sicherstellen, dass er nicht locker sitzt und
ordnungsgemäß angebracht ist. Das Gerät während
der Arbeit fest am Bügelgriff halten und das Gerät
nicht umherschwenken, sondern bei festem Stand die
korrekte Körperhaltung einnehmen.
Ein Gleichgewichtsverlust während der Arbeit kann zu
Verletzungen führen.
7. Beim Starten des Motors entsprechende Vorsicht
walten lassen.
Das Gerät auf ebenem Untergrund ablegen.
Bei der Betätigung des Geräts einen Mindestabstand
von 15 m zu anderen Personen oder Tieren einhalten.
Es ist darauf zu achten, dass der Schneidkopf nicht mit
dem Boden oder Bäumen und Pfl anzen in Berührung
kommt.
Ein unachtsames Starten des Geräts kann zu
Verletzungen führen.
8. Den Verriegelungshebel nicht fi xieren.
Ein versehentliches Zurückziehen des Hebels kann zu
Verletzungen führen.
9. Vor dem Verlassen des Geräts dieses durch
Betätigung des Startknopfs ausschalten.
10. Bei der Betätigung des Geräts in der Nähe
von Stromkabeln, Gasleitungen und ähnlichen
Installationen mit äußerster Vorsicht vorgehen.
11. Vor Arbeitsbeginn leere Dosen, Draht, Steine und
andere Hindernissen entfernen. Nicht in der Nähe
großer Wurzeln oder Felsen arbeiten.
Das Arbeiten in solchen Bereichen kann zur
Beschädigung des Schneidkopfes führen und
Verletzungen zur Folge haben.
12. Die Rotationsgeschwindigkeit nicht übermäßig
erhöhen.
Die Geschwindigkeit allmählich und nicht zu abrupt
erhöhen.
Die Hebelposition der Arbeitsbelastung anpassen.
Aus dem Gerät geschleuderte Gegenstände können
zu Verletzungen führen.
13. Den Schneidkopf während des Betriebs niemals
anfassen.
26
Um zu einem neuen Arbeitsbereich zu wechseln.
Um Fremdkörper oder Gras zu entfernen, die sich im
Um Hindernisse oder durch die Arbeit angefallene
Um das Gerät abzulegen.
Die Durchführung dieser Tätigkeiten bei rotierendem
15. Bei der Betätigung des Geräts einen Mindestabstand
Bei gemeinsamer Arbeit mit einer anderen Person
Hochgeschleuderte Späne können zu Unfällen führen.
Bei der Arbeit auf unebenen Untergründen wie an
Mitarbeiter mit Hilfe von Pfeifen oder anderen Mitteln
16. Wenn sich Gras oder andere Fremdkörper im
Das Entfernen von Fremdkörpern aus einem
Das Fortsetzen der Arbeit, wenn sich Fremdkörper im
17. Bei schwacher Geräteleistung oder seltsamen
Eine weitere Verwendung in diesem Zustand kann
18. Das Gerät nach versehentlichem Fallenlassen oder
Die Verwendung eines beschädigten, rissigen oder
19. Das Gerät beim Transport in einem Fahrzeug sichern,
Das Nichtbefolgen dieser Warnung kann zu Unfällen
VORSICHT
1. Den Schneidkopf ausschließlich zum Schneiden
2. Das Gerät enthält Präzisionsteile und sollte nicht
Anderenfalls können Schäden oder
3. Bei der Lagerung nach der Verwendung oder dem
4. Das Gerät nicht mit Insektenvernichtungsmitteln oder
Solche Chemikalien können zu Rissbildung und
5. Warnhinweise durch neue ersetzen, wenn sie
Warnhinweisetiketten erhalten Sie bei Ihrem
Kleidung etc. in Berührung kommt.
kontrollieren, ob der Schneidkopf aufgehört hat, sich
zu drehen.
Gerät verfangen haben.
Schnittabfälle, Grass oder Späne aus dem
Arbeitsbereich zu entfernen.
Schneidkopf kann zu Unfällen führen.
von 15 m zu anderen Personen einhalten.
einen Mindestabstand von mehr als 15 m einhalten.
Hängen ist darauf zu achten, dass die mit Ihnen
arbeitende Person keinen Gefahren ausgesetzt wird.
auf mögliche Gefahren aufmerksam machen.
Schneidkopf verfangen haben, den Motor abstellen
und sichergehen, dass sich der Schneidkopf nicht
mehr dreht, bevor diese entfernt werden.
rotierenden Schneidkopf führt zu Verletzungen.
Schneidkopf verfangen haben, kann zur Beschädigung
des Geräts führen.
Geräuschen oder Vibrationen des Geräts den Motor
sofort abstel len und das Gerät durch Ih ren Fachhändler
inspizieren und reparieren lassen.
zu Verletzungen oder der Beschädigung des Geräts
führen.
Anstoßen sorgfältig inspizieren, um sicherzustellen,
dass keine Schäden, Risse oder Verformungen
aufgetreten sind.
deformierten Geräts kann Verletzungen zur Folge
haben.
um ein Umherrutschen zu vermeiden.
führen.
von Gras verwenden. Das Gerät nicht in Pfützen
verwenden und sicherstellen, dass der Schneidkopf
nicht mit Erde in Berührung kommt.
fallengelassen oder heftigen Stößen oder Wasser
ausgesetzt werden.
Funktionsstörungen des Geräts auftreten.
Transport des Geräts den Schneidkopf entfernen.
anderen Chemikalien in Berührung bringen.
anderen Schäden führen.
undeutlich oder unlesbar werden oder sich abzulösen
beginnen.
Fachhändler.
Page 27

Deutsch
VORSICHTSMASSNAHMEN FÜR BATTERIE
UND LADEGERÄT
1. Die Batterie immer bei einer Temperatur von 0°C –
40°C laden. Laden bei einer Temperatur, die nied riger
als 0°C ist, wird gefährliche Überladung ver ursachen.
Die Batterie kann nicht bei einer Tem peratur über 40°C
geladen werden. Die beste Temperatur zum Laden
wäre von 20°C – 25°C.
2. Nach Beendung einer Ladung, lassen Sie das
Ladegerät ungefähr 15 Minuten ruhen bevor die
nächste Batterieladung unternommen wird.
Die Ladezeit der Batterie darf 2 Stunden nicht
überschreiten.
3. Keine Fremdkörper durch das Anschlußloch der
Batterie eindringen lassen.
4. Darauf achten, daß keine Gegenstände durch
Belüftungsschlitze des Aufl aders in das Gerät
eindringen.
Wenn Metallobjekte oder entzündliche Gegenstände
durch die Belüftungsschlitze des Aufl aders eindringen,
kann dies zu elektrischen Schlägen führen oder den
Aufl ader beschadigen.
5. Benutzung verbrauchter Batterie beschädigt den
Aufl ader.
6. Bringen Sie die Batterie zum Geschäft, wo Sie ihn
gekauft haben sobald die Lebensdauer der Batterie
abrinnt. Die erschöpfte Batterie nicht wegwerfen.
7. Niemals die Batterie und das Ladegerät auseinandernehmen.
8. Niemals die Batterie kurzschließen. Kurzschluß der
Batterie verursacht eine zu große Stromzufuhr und
überhitzung, wodurch Durch brennen oder Schaden
beider Batterie entsteht.
9. Die Batterie nicht ins Feuer werfen. Sie könnte dabei
explodieren.
WAR NUNG ZUM LITHIUM-IONEN-AKKU
Um die Lebensdauer des Lithium-Ionen-Akkus zu
verlängern, ist dieser mit einer Schutzfunktion zum
Stoppen der Leistungsabgabe ausgestattet.
In den unten beschriebenen Fällen 1 bis 3 kann bei der
Benutzung dieses Produkts der Motor abschalten, selbst
wenn Sie den Schalter drücken. Dies ist kein Defekt
sondern das Resultat der Schutzfunktion.
1. Wenn die verbleibende Akkuleistung nicht mehr
ausreicht, schaltet der Motor ab.
Laden Sie in einem solchen Fall den Akku umgehend
auf.
2. Wenn das Werkzeug überlastet ist, kann es zum
Abschalten des Motors kommen. Lassen Sie in diesem
Fall den Schalter des Geräts los und beseitigen Sie die
Ursache der Überlastung. Danach können Sie das
Gerät wieder verwenden.
3. Kommt es während des Betriebs zu einer Erhitzung der
Batterie, wird das Gerät unter Umständen angehalten.
Unterbrechen Sie in diesem Fall Ihre Arbeit und lassen
Sie die Batterie abkühlen. Anschließend können Sie
das Gerät wieder normal verwenden.
Bitte beachten Sie die folgenden Warnhinweise.
WAR NUNG
Zur Vermeidung einer ausgelaufenen Batterie, Er wärmung,
Rauchentwicklung, Explosionen und vorzeitiger Zündung
beachten Sie bitte die folgenden Vorsichtsmaßnahmen.
1. Stellen Sie sicher, dass sich Späne und Staub nicht
auf der Batterie ansammeln.
◯ Stellen Sie während der Arbeit sicher, dass Späne und
Staub nicht auf die Batterie fallen.
◯ Stellen Sie sicher, dass Staub und Späne, die während
der Bearbeitung auf das Elektrowerkzeug fallen, nicht
in die Batterie gelangen.
◯ Lagern Sie ungebrauchte Batterien nicht an Plätzen,
an denen Staub oder Späne anfallen.
◯ Vor dem Einlagern einer Batterie sind sämtlicher
Staub und Späne zu entfernen. Weiterhin ist zu
berücksichtigen, dass die Batterie nicht gemeinsam
mit Metallteilen (Schrauben, Nägel, usw.) zu lagern ist.
2. Achten Sie darauf, dass die Batterie nicht durch einen
spitzen Gegenstand, beispielsweise einen Nagel,
beschädigt wird. Vermeiden Sie Schläge mit dem
Hammer. Treten Sie nicht gegen die Batterie, werfen
Sie diese nicht, und vermeiden Sie Stöße.
3. Beschädigte oder verformte Batterien dürfen nicht
weiter verwendet werden.
4. Achten Sie auf den richtigen Anschluss der Pole.
5. Schließen Sie die Batterie nicht direkt an elektrische
Ausgänge oder Zigarettenanzünder im Auto an.
6. Verwenden Sie die Batterie nur für den angegebenen
Zweck.
7. Falls die Batterie nach Verstreichen der angegebenen
Ladezeit nicht vollständig aufgeladen ist, brechen Sie
den Ladevorgang unverzüglich ab.
8. Vermeiden Sie hohe Temperaturen und hohen
Druck, wie er beispielsweise in der Mikrowelle, einem
Trockner oder einem Hochdruckbehälter auftritt.
9. Wenn Sie ein Leck oder Rußgeruch feststellen,
vermeiden Sie jeglichen Kontakt mit Feuerstellen.
10. Vermeiden Sie eine Verwendung an Orten, an denen
starke statische Elektrizität erzeugt wird.
11. Werden ein Leck, Rußgeruch, Erwärmung,
Verfärbungen, Verformungen oder sonstige
Anomalitäten während der Verwendung, des Aufl adens
oder der Lagerung festgestellt, entfernen Sie die
Batterie unverzüglich vom Gerät oder dem Ladegerät
und beenden Sie die Anwendung.
VORSICHT
1. Tritt die auslaufende Flüssigkeit in Kontakt mit Ihren
Augen, reiben Sie diese nicht, sondern waschen Sie
sie mit sauberem (Leitungs-) Wasser gut aus und
suchen Sie unverzüglich einen Arzt auf.
Ohne sachgemäße Behandlung können
Augenverletzungen auftreten.
2. Wenn die ausgelaufene Flüssigkeit auf Haut oder
Kleidung triff t, waschen Sie diese unverzüglich mit
sauberem Wasser ab.
Es besteht die Gefahr von Hautreizungen.
3. Beim Auftreten von Rost, Rußgeruch, Erwärmung,
Verfärbungen, Verformungen oder sonstigen
Anomalitäten während der ersten Verwendung der
Batterie, ist diese nicht weiter zu verwenden. Bringen
Sie die Batterie zum Händler oder Verkäufer zurück.
27
Page 28
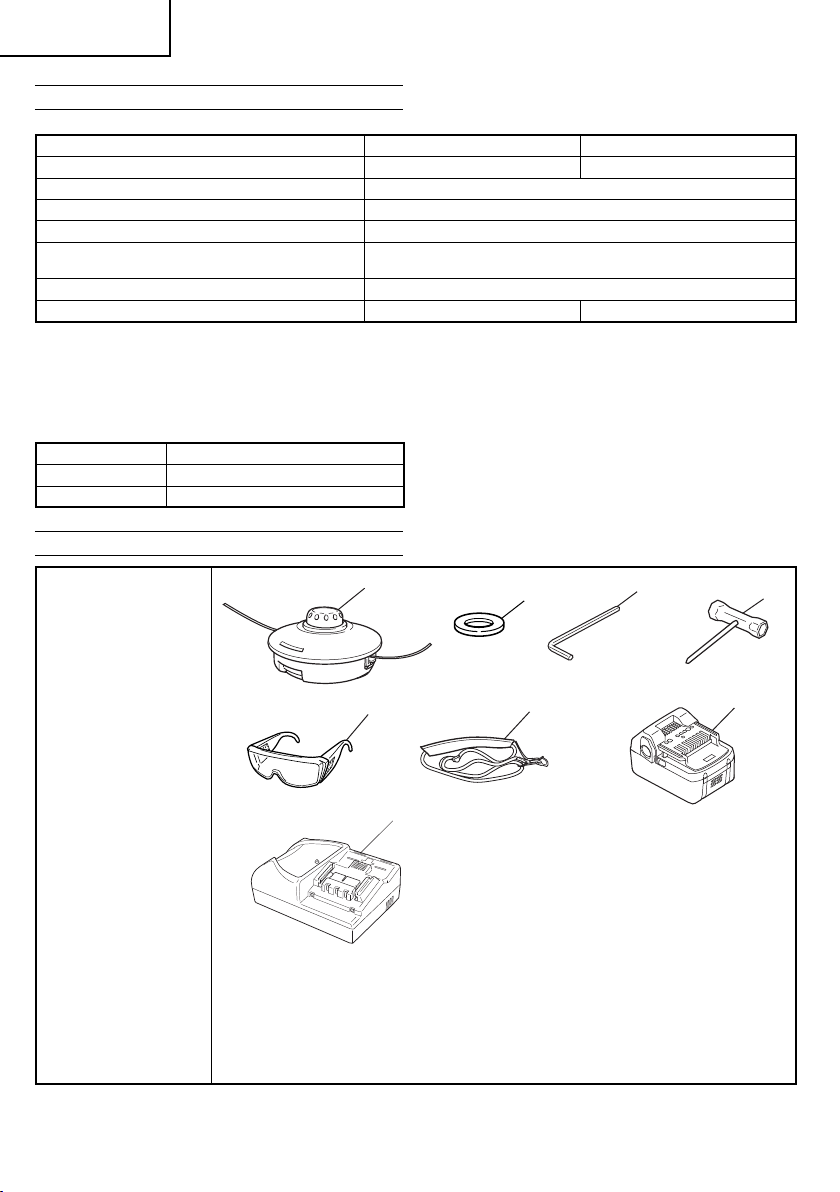
Deutsch
TECHNISCHE DATEN
ELEKTRO-WERKZEUG
Modell CG18DL CG18DAL
Stangentyp Vorsatzgerättyp Gerader Typ
Schneiddurchmesser 425 mm
Rotationsrichtung Vom Getriebegehäuse aus gesehen gegen den Uhrzeigersinn
Leerlaufdrehzahl 0–4500 min
Betriebszeit bei einer Akkuladung *
(Bei vollständiger Ladung des mitgelieferten Akkus)
Akkumulator BSL1830: Li-Ionen 18 V (3,0 Ah 10 Zellen)
Gewicht (ohne Schneidkopf und Schultergurt) 5,4 kg 5,2 kg
*1 Die in der obigen Tabelle angegebenen Daten dienen lediglich als Beispiel. Da Grasart, Messerschärfe, Drehzahl
des Schneidkopfs, Umgebungstemperatur, Eigenschaften des Akkumulators, Arbeitsmethoden etc. extrem variieren
können, sollten obige Angaben nur als grobe Richtlinie verwendet werden.
*2 Voraussetzungen: Außendurchmesser der Nylonfaden-Schneidvorrichtung 425 mm, Schalter auf maximale
Geschwindigkeit.
LADEGERÄT
Model UC18YRSL
Ladespannung 14,4 V 18 V
Gewicht 0,6 kg
1
STANDARDZUBEHÖR
5 min*
-1
2
1
5
CG18DL
CG18DAL
(LSC)
1 Nylonkopf (Sure Tap) ...................................................1
2 Spulenschutz ............................................................... 1
3 Sechskantinnenschlüssel 4 mm ..................................1
4 Ringschlüssel (Innensechskant 17/19) ........................ 1
5 Schutzbrille .................................................................. 1
6 Schultergurt ..................................................................1
7 Akkumulator (BSL1830) ...............................................1
8 Ladegerät (UC18YRSL) ...............................................1
Das Standardzubehör kann ohne vorherige Bekanntmachung jederzeit geändert werden.
28
8
2
6
3
4
7
Page 29

Deutsch
SONDERZUBEHÖR (se para t zu beziehen)
1. Batte rie (BSL1830)
2. Akkumulatorabdeckung
3. Schmierfett (100 g-Tube)
Getriebegehäuse alle 50 Betriebsstunden schmieren.
4. Schienbeinschützer (1 Satz mit 2 Schützern)
Schützt die Beine vor umherfl iegendem Schnittgut.
VERWENDUNG
Trimmen, Kürzen und Mähen von Gras.
HERAUSNEHMEN/EINSETZEN DER BATTERIE
1. Herausnehmen der Batterie
Das Gehäuse gut festhalten und auf die
Akkumulatorverriegelungen drücken, um den Akku zu
entfernen (siehe Abb. 2).
ACHTU NG
Die Kontakte des Batterie niemals kurzschließen.
2. Einsetzen des Batterie
Den Batterie unter Beachtung der richtigen Richtung in
das Gerät einsetzen (siehe Abb. 2).
LADEN
Vor Gebrauch des Elektrowerkzeugs den Akkumulator wie
folgt laden.
1. Den Netzstecker des Ladegerätes in eine
Steckdose einstecken.
Beim Anschluß des Ladegeräts an eine Netzsteckdose
blinkt das Kontrollampe in Rot auf. (In Sekundenabständen)
2. Eine Batterie in das Ladegerät einlegen.
Setzen Sie den Akkumulator so in das Ladegerät ein,
dass die Linie sichtbar ist, wie in Abb. 3 und 4 gezeigt.
3. Anzeigelämpchen
Beim Einlegen einer Batterie in das Ladegerät wird
der Ladevorgang fortgesetzt, und leuchtet das
Kontrollampe kontinuierlich in Rot auf.
Wenn die Batterie voll aufgelader ist, blinkt das
Kontrollampe in Rot. (In Sekundenabständen) (Seihe
Tafel 1)
(1) Anzeigelämpchen
Das Kontrollampe leuchtet auf, wie in Tafel 1 gezeigt,
entsprechend dem Zustand des verwendeten
Ladegeräts für die Akkubatterie.
Das Sonderzubehör kann ohne vorherige
Bekanntmachung jederzeit geändert werden.
Tafel 1
Anzeigen der Kontrollampe
Die
Bereitschaftsanzeige
leuchtet oder
blinkt rot.
Die
Bereitschaftsanzeige
leuchtet grün.
Vor dem
Laden
Beim Laden Leuchtet Leuchtet kontinuierlich
Laden
durchgeführt
Laden
unmöglich
Wegen
Überhitzung
angehalten
Blinkt Leuchtet für 0,5 Sekunden. Loscht für 0,5
Blinkt Leuchtet für 0,5 Sekunden. Loscht für 0,5
Flackert Leuchtet für 0,1 Sekunden. Loscht für 0,1
Leuchtet Leuchtet kontinuierlich
Sekunden. (Aus für 0,5 Sekunden)
Sekunden. (Aus für 0,5 Sekunden)
Sekunden. (Aus für 0,1 Sekunden)
Betriebsstörung in der
batterie oder im Ladegerät
Akku überhitzt.
Laden nicht möglich
(Ladevorgang wird nach
Abkühlen des Akkus
gestartet).
29
Page 30
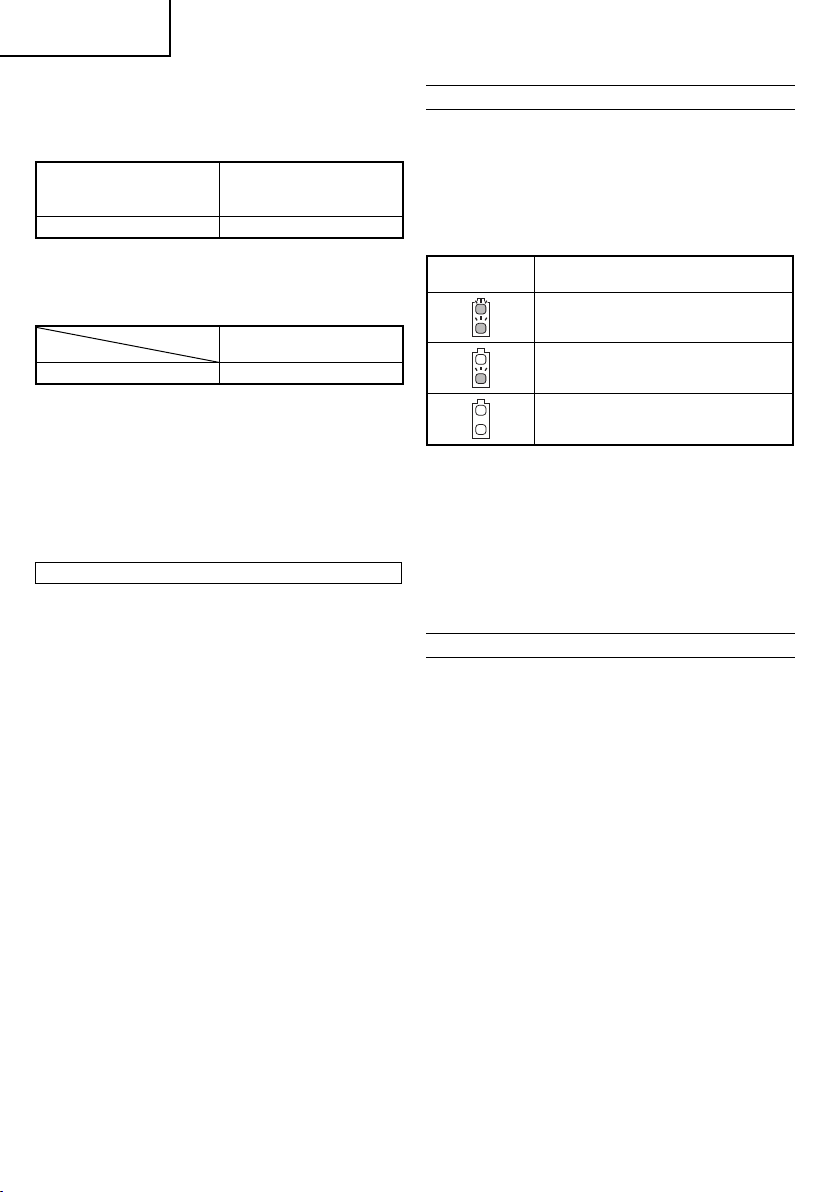
Deutsch
(2) Über die Temperatur der Akkubatterie
Die Temperaturen für Akkus sind in Tafel 2 gezeigt.
Erhitzte Batterien vor dem Laden abkühlen lassen.
Tafel 2 Aufl adebereiche für Batterie
Akkubatterien
BSL1830 0°C – 50°C
(3) Über die Aufl adezeit
Je nach Kombination von Ladegerät und Batterien wird
die Aufl adezeit wie in Tafel 3 gezeigt.
Tafel 3 Aufl adezeit (bei 20°C)
Batterie
BSL1830 Etwa. 45 min.
HINWEIS
Die Aufl adezeit kann je nach Temperatur und
Ladespannung unterschiedlich sein.
4. Den Netzstecker des Ladegeräts aus der
Steckdose ziehen.
5. Das Ladegerät festhalten und die Batterie
herausziehen.
HINWEIS
Nach dem Betrieb zuerst die Batterien aus
dem Ladegerät nehmen und dann die Batterien
angemessen aufbewahren.
Verl änge rung der Lebensdauer von Batterien
(1) Die Batterien aufl aden, bevor sie völlig erschöpft sind.
Wenn festgestellt wird, daß die Leistung des
Werkzeugs nachläßt, mit der Arbeit aufhören und die
Batterie aufl aden.
Wenn das Werkzeug weiter verwendet wird und
die Batterie völlig erschöpft wird, kann die Batterie
beschädigt und ihre Lebensdauer verkürzt werden.
(2) Nicht bei hohen Temperaturen aufl aden.
Eine Akkubatterie erhitzt sich bei der Verwendung.
Wenn solch eine Batterie sofort nach der Verwendung
aufgeladen wird, werden die Batteriechemikalien
beeinträchtigt, und die Batterielebensdauernimmt ab.
Die Batterie etwas stehen lassen und erst aufl aden,
wenn sie sich abgekühlt hat.
ACHTU NG
○ Wird das Akkuladegerät kontinuierlich eingesetzt,
überhitzt sich das Gerät, wodurch Schäden resultieren
können. Nach einem Ladevorgang das Gerät 15
Minuten bis zum nächsten Laden ruhen lassen.
○ Falls ein aufgrund von Einsatz oder
Sonneneinstrahlung erwärmter Akku an das Ladegerät
angeschlossen wird, leuchtet die grüne Anzeige u. U.
auf.
Der Akku wird dann nicht geladen. In solchen Fällen
den Akku vor dem Laden abkühlen lassen.
○ Wenn das Kontrollampe in schneller Folge in Rot
fl ackert (in 0,2-Sekunden-Abständen), nachsehen
ob Fremdkörper im Batteriefach sind und diese
ggf. herausnehmen. Wenn keine Fremdkörper
im Batteriefach sind, liegt wahr-scheinlich eine
Fehlfunktion bei der Batterie oder beim Ladegerät
vor. Die Teile vom autorisierten Kundendienst prüfen
lassen.
30
Ladegerät
Temperaturen, bei
denen die Batterie
geladen werden kann
UC18YRSL
ZUR RESTLADUNGSANZEIGE
Beim Drücken des Restladungsanzeigeschalters leuchtet
die Restladungsanzeigeleuchte auf und die verbleibende
Akkuladung kann abgelesen werden. (Abb. 5) Beim
Loslassen des Restladungsanzeigeschalters erlischt die
Restladungsanzeigeleuchte. In Tafel 4 sind der Status
der Restladungsanzeigeleuchte und die verbleibende
Akkuladung dargestellt.
Tafel 4
Status der
Leuchte
Die Restladungsanzeige kann abhängig von
Umgebungstemperatur und Akkueigenschaften etwas
variieren und sollte daher als Richtwert verstanden
werden.
HINWEIS
○ Starke Erschütterungen oder ein Zerbrechen der
Schalttafel ist zu vermeiden. Dies kann zu Störungen
führen.
○ Um den Akkuverbrauch zu speichern, drücken Sie
den Restladungsanzeigeschalter bei aufl euchtender
Restladungsanzeigeleuchte.
Verbleibende Akkuladung
Die verbleibende Akkuladung ist
ausreichend.
Es verbleibt die Hälfte der Akkuladung.
Der Akku ist fast leer.
Den Akku schnellstmöglich wieder
aufl aden.
VOR INBETRIEBNAHME
VORSICHT
Akku vor Anbringung von Komponenten entnehmen.
1. Vorsatzgeräte montieren [nur CG18DL] (Abb. 6)
(1) Den Spannstift in die Hauptrohrverriegelungsöff nung
des Trimmer-Vorsat zgeräts ein führen und si cherstell en,
dass sich das Rohr nicht lösen kann.
(2) Den Griff knopf fest anziehen, um ihn sicher zu fi xieren.
2. Anbringen des Bügelgriff s (Abb. 7)
(1) Die M6 × 43-Schrauben (2) entfernen.
(2) Den Bügelgriff so auf dem Hauptrohr anbringen, dass
er am Motor anliegt.
(3) Die Griff befestigung am unteren Ende des Hauptrohrs
anbringen und mit Hilfe der M6 × 43-Schrauben (2)
und M6-Muttern (2) sicher befestigen.
HINWEIS
Den Bügelgriff in einer Position befestigen, die eine
gute Handhabung ermöglicht.
3. Anbringen der Sicherheitsabdeckung (sie he Abb.
8 und 9)
WAR NUNG
Die Sicherheitsabdeckung unbedingt in der
vorgesehenen Position montieren.
Das Nichtbefolgen dieser Warnung kann zu
Verletzungen durch hochgeschleuderte Steine führen.
HINWEIS
Den mitgelieferten Sechskant-Imbusschlüssel für die
Montage verwenden.
(1) Die im Lieferumfang enthaltene D4-Blechschraube
zur Anbringung des Messers in der Schutzvorrichtung
verwenden. (Abb. 8)
Die Schutzvorrichtung an der Sicherheitsabdeckung
anbringen.
Page 31

Deutsch
(2) Die Bohrung im Schutzhalter mit der der
Sicherheitsabdeckung ausrichten und die M6 ×
25-Innensechskant-Rundkopfschrauben einführen.
(Der Schutzhalter wird im Getriebegehäuse
angebracht.)
(3) Die Abdeckungshalterung auf der Unterseite der
Sicherheitsabdeckung platzieren und die M6 ×
25-Innensechskant-Rundkopfschrauben mit Hilfe
des mitgelieferten Imbusschlüssels abwechselnd
anziehen, bis sie richtig festgezogen sind.
VORSICHT
Entsprechende Vorsicht walten lassen, um
Schnittverletzungen durch das Messer unter der
Sicherheitsabdeckung zu vermeiden.
4. Anbringen des Schultergurts
WAR NUNG
○ Sicherstellen, dass der Schultergurt angebracht ist,
sodass der Rasentrimmer ordnungsgemäß getragen
werden kann.
○ Bei Anzeichen von Betriebsstörungen des Geräts den
Motor sofort abstellen, die Schnelllösehalterung des
Schultergurts lösen und das Gerät entfernen.
VORSICHT
○ Wenn das Gerät beim Lösen des Schnelllösegurts
nicht gehalten wird, kann es zu Boden fallen und
Verletzungen oder Schäden verursachen.
Das Hauptrohr mit einer Hand halten und gleichzeitig
mit der anderen am Gurt ziehen.
○ Vor Arbeitsbeginn sicherstellen, dass die
Schnelllösefunktion ordnungsgemäß funktioniert.
(1) Den Schultergurt wie in Abb. 10 gezeigt über die
Schulter legen und mit der Einhängöse am Gerät
befestigen. Den Schultergurt auf die geeignete Länge
einstellen.
(2) Um das Gerät vom Schultergurt zu trennen, das
Gerät mit einer Hand am Hauptrohr halten und mit der
anderen, wie in Abb. 10 gezeigt, am Schnelllösegurt
ziehen, um ihn aus der Halterung zu befreien.
(3) Um das Gerät zu befestigen, die Halterung in den
Haken einführen und die Schnelllösehalterung über
dem Haken und in der breiten Öff nung der Halterung
anbringen. (Abb. 11)
Vorsichtig am Schultergurt ziehen, um sicherzustellen,
dass er ordnungsgemäß angebracht ist.
SCHNEIDKOPF
1. Funk tionsweis e
Der „SURE-TAP“-Schneidkopf
○ Stellt automatisch mehr Nylonschneidfaden zur
Verfügung, wenn der Schneidkopf bei niedriger
Drehzahl (maximal 4500 min
getippt wird .
VORSICHT
○ Die Schneidkörperkappe muss fest auf dem
Schneidkörper angebracht sein.
○ Schneidkörper, Schneidkörperkappe und andere
Komponenten auf Risse und andere Beschädigungen
überprüfen.
○ Der Schneidkopf muss fest auf das Getriebegehäuse
des Geräts montiert sein.
○ Stets Nylonschneidfaden von HITACHI verwenden,
um hervorragende Leistung und Zuverlässigkeit zu
gewährleisten. Niemals Draht oder andere Materialien
verwenden, die zu gefährlichen Geschossen werden
können.
○ Wenn die Bereitstellung des Schneidfadens durch
den Schneidkopf nicht ordnungsgemäß funktioniert,
sollte die korrekte Installation des Nylonfadens und
aller Komponenten überprüft werden. Sollten Sie
-1
) leicht auf den Boden
Hilfe benötigen, wenden Sie sich an den HITACHIFachhändler.
2. Montage (Abb. 12)
(1) Sechskantinnenschlüssel in die Bohrung des
Getriebegehäuses einführen, um die Messerhalterung
zu verriegeln.
(2) Messerhalterung, Spulenschutz, Messerhaltekappe
und Schneidkopf auf dem Getriebegehäuse des
Rasentrimmers montieren. Die Befestigungsmutter
ist mit einem Linksgewinde ausgestattet. Zum
Lösen im Uhrzeigersinn, zum Festziehe gegen den
Uhrzeigersinn drehen.
3. Anpassung der Fadenläng e
(1) Eine möglichst geringe Motordrehzahl wählen und
mit dem Schneidkopf auf den Boden tippen. Der
Nylonfaden verlängert sich bei jedem Tippen um ca.
30 mm. (Abb. 13)
Der Nylonfaden kann auch von Hand ausgezogen
werden, der Motor muss allerdings vollkommen zum
Stillstand gekommen sein. (Abb. 14)
(2) Den Nylonfaden vor jeder Verwendung des Geräts auf
die korrekte Länge von 110 mm – 140 mm einstellen.
(3) Wenn der Nylonfaden zu weit herausgezogen ist, den
langen Außenfaden durch Drücken und Drehen der
Führungskugel von Hand aufwickeln. (Abb. 15)
4. Auswechseln des Nylonfadens
(1) Schneidkörperkappe durch kräftiges Eindrücken der
Verriegelungslaschen mit den Daumen entfernen
(Abb. 16)
(2) Nach dem Entfernen der Schneidkörperkappe die
Spule herausnehmen und den linken Faden entsorgen.
(3) Den neuen Nylonfaden ungefähr auf die Hälfte
zusammenlegen. (Abb. 17)
(4) Die u-förmige Schlaufe des Nylonfadens in der
Führungsnut der Trennwand in der Spulenmitte
einhaken.
Beide Fadenhälften in derselben Richtung auf die
Spule aufwickeln und dabei jede Fadenhälfte auf ihrer
Seite der Trennwand halten. (Abb. 18)
(5) Jeden Faden in eine Stopfenbohrung drücken und
dabei lose Enden von ca. 100 mm Länge übrig lassen.
(Abb. 19)
(6) Beide losen Enden des Fadens durch die Öse führen
und die Spule in der Schneidkörperkappe platzieren.
(Abb. 20)
HINWEIS
Beim Platzieren der Spule in der Schneidkörperkappe
versuchen, die Stopfenbohrungen (3) mit der Öse
(4) auszurichten, um die spätere Fadenentnahme zu
erleichtern.
(7) Spulenfeder in der Spule platzieren. (Abb. 21)
(8) Schneidkörper so auf der Schneidkörperkappe
platzieren, dass die Verriegelungslaschen
am Schneidkörper auf den Schlitzlöchern des
Schneidkörpers liegen. Dann die Schneidkörperkappe
fest hineindrücken, bis sie mit einem Klickgeräusch
einrastet. (Abb. 21)
(9) An den losen Fadenenden ziehen, um sie aus den
Stopfenbohrungen zu lösen. Wenn versehentlich zu
lange Fadenstücke herausgezogen werden (mehr als
100 mm), die Fäden durch Drücken und Drehen der
Führungskugel bis auf ca. 100 mm aufwickeln. (Abb.
15)
(10)
Die anfängliche Schneidfadenlänge sollte bei ca.
150 mm liegen und auf beiden Seiten identisch sein.
(Abb. 22)
31
Page 32

Deutsch
BETRIEB
Rasen trimmen
WAR NUNG
○ Das Gerät nicht bei Nacht oder schlechten
Witterungsverhältnissen mit eingeschränkter Sicht
bedienen.
○ Das Gerät nicht bei Regen oder kurz nach einem
Regenschauer betätigen.
○ Geeignetes Schuhwerk tragen, um Ausrutschen zu
verhindern, was zum Verlust des Gleichgewichts und
einem Sturz führen kann.
○ Das Gerät nicht an steilen Hängen verwenden.
Gras an weniger steilen Hängen von unten nach oben
trimmen.
○ Das Gerät im Schultergurt befestigen, die rechte Hand
auf den Griff und die linke auf den Bügelgriff legen und
das Gerät fest halten.
○ Es ist darauf zu achten, immer ausreichend Abstand
zwischen Schneidkopf und Füßen zu halten.
○ Den Schneidkopf während der Arbeit nicht über
Kniehöhe anheben.
○ Das Gerät nicht an Stellen verwenden, an denen
der Schneidkopf mit Steinen, Bäumen und anderen
Hindernissen in Berührung kommen kann.
○ Die Schneidvorrichtung kann auch nach Abschalten
des Motors Verletzungen verursachen, solange sie
nicht zum Stillstand gekommen ist. Das Gerät nach
dem Ausschalten des Motors erst am Boden abstellen,
wenn das Schneidwerkzeug zum Stillstand gekommen
ist.
○ Bei der Betätigung des Geräts einen Mindestabstand
von 15 m zu anderen Personen einhalten. Bei
gemeinsamer Arbeit mit einer anderen Person einen
Mindestabstand von mehr als 15 m einhalten.
1. Den Akku unter Berücksichtigung der Polarität
einsetzen
2. Das Gerät einschalten (Abb. 23)
○ Beim Drücken des Startknopfs auf dem Gehäuse wird
das Gerät eingeschaltet und die Betriebsleuchte am
Griff leuchtet rot.
○ Durch nochmaliges Drücken des Startknopfs wird das
Gerät ausgeschaltet und die rote Leuchte am Griff
erlischt.
[Auto matis che Ausschaltfunk tion]
Wenn das Gerät eingeschaltet ist, der Hebel jedoch
mehr als eine Minute nicht betätigt wurde, schaltet
sich das Gerät automatisch aus. Um das Gerät wieder
einzuschalten, den Startknopf erneut drücken.
WAR NUNG
Das Gerät niemals eingeschaltet liegen lassen. Dies
kann zu Unfällen führen.
3. Rasen trimmen
○ Den Griff von oben greifen, den Verriegelungshebel
drücken und den Hebel ziehen, um die
Schneidkopfrotation zu starten. (Abb. 24)
○ Den Hebel nach Beenden der Trimmarbeiten loslassen
und den Motor ausschalten.
○
Den Daumen auf dem Bügelgriff platzieren und den
Griff mit den anderen Fingern umfassen. (Abb. 25)
○ Eine Körperhaltung einnehmen, die ungehinderte
Bewegung ermöglicht.
[Rasentrimmtechniken]
○ Bei niedriger Motordrehzahl ist der Motor schwach
und Grass verfängt sich leicht im Messer. Bei zu hoher
Motordrehzahl treten starke Vibrationen und eine hohe
Geräuschbelastung auf und der Akkuverbrauch steigt.
○ Eine zu hohe Motordrehzahl verkürzt die Lebensdauer
des Akkus.
○ Nicht das Rohr hin- und herschwingen sondern beim
Vorwärtsgehen mit Hilfe der Hüften den Schneidkopf
horizontal in einem Bogen von rechts nach links
bewegen und die linke Seite des Schneidkopfes zum
Schneiden von Gras verwenden. (Abb. 26)
WARNHINWEISE ZUM BETRIEB DES GERÄTS
Dauerbetrieb
Dieses Ge rät ist mit ei ner Überhi tzungss chutzsc haltung
zum Schutz der Elektronikkomponenten ausgestattet,
die den Akkumulator steuern. Bei länger anhaltender
Trimmarbeit steigt die Gerätetemperatur an, bis
schließlich die Überhitzungsschutzschaltung aktiviert
und das Gerät ausgeschaltet wird.
Falls dies geschieht, das Gerät eine Zeit lang abkühlen
lassen. Wenn das Gerät abgekühlt ist, kann es wieder
verwendet werden. Wenn ein Auswechseln des Akkus
während einer länger andauernden Betätigung des
Geräts erforderlich ist, das Gerät ca. 15 Minuten ruhen
lassen.
Geschwindigkeitsschalter
Dieser mit einer Elektronikschaltung
versehene Schalter ermöglicht stufenlose
Geschwindigkeitsänderungen.
Wenn der Schalterauslöseimpuls zu niedrig eingestellt
ist (niedriger Drehzahlbereich) und der Motor ständig
überlastet ist, können die Elektronikschaltungen
überhitzen und durchbrennen.
Bei niedriger Motordrehzahl nur leichte Arbeiten
verrichten.
WAR TUNG UND INSPEKTION
VORSICHT
○ Vor der Durchführung von Inspektions- oder
Wartungsarbeiten den Akku entfernen.
1. Den Zustand des Schneidkopfs kontrollieren
Der Schneidkopf sollte regelmäßig kontrolliert werden.
Ein abgenutzter oder gebrochener Schneidkopf kann
abrutschen oder die Motorleistung verringern und zu
Motorschäden führen.
Einen abgenutzten Schneidkopf durch einen neuen
ersetzen.
VORSICHT
○ Die Verwendung eines Schneidkopfs mit abgenutzter
oder gebrochener Spitze ist gefährlich. Daher sollte er
durch einen neuen ersetzt werden.
2. Schrauben kontrollieren
Lockere Schrauben stellen eine Gefahr dar. Sie
sollten daher regelmäßig kontrolliert und ihr fester Sitz
sichergestellt werden.
VORSICHT
○ Die Verwendung dieses Elektrowerkzeugs mit lockeren
Schrauben ist äußerst gefährlich.
3. War tung des Motors
Die Motorwicklung ist das „Herz“ dex
Elektrowerkzeugs. Daher ist besonders sorgfältig
darauf zu achten, daß die Wicklung nicht beschädigt
wird und/oder mit ÖI oder Wasser in Berührung
kommt.
4. Schmierung des Getriebegehäuses
○ Wartungsintervall
Die Schmierung des Getriebegehäuses sollte alle 50
Betriebsstunden kontrolliert werden.
○ Schmierung
Schneidkopf entfernen. Die
Getriebegehäusezwischenräume von Schmutz und
Fremdkörpern befreien. Die M6-Schraube aus der
32
Page 33

Deutsch
Getriebegehäuseseite entfernen. Die Verbindungswelle
drehen und gleichzeitig ein Lagerschmiermittel
auf Lithiumbasis (P/N 682975) durch die Öff nung
einspritzen, bis das Getriebegehäuse voll ist. Die M6Schraube wieder anbringen.
5. Inspektion der Kohlebürsten (Abb. 27)
Im Motor sind Kohlebürsten verwendet, die
Verbrauchsteile sind. Da übermäßig abgenutzte
Kohlebürsten Motorstörungen verursachen können,
ersetzen Sie die Kohlebürsten durch neue, wenn
sie bis zur „Verschleißgrenze“ oder in deren Nähe
abgenutzt worden sind. Darüber hinaus müssen die
Kohlebürsten immer sauber gehalten werden und
müssen sich in der Halterung frei bewegen können.
HINWEIS
Beim Ersetzen der Kohlebürste durch eine neue, eine
Hitachi-Kohlebürste mit der Kodenummer 999054
verwenden.
6. Austausch einer Kohleb ürste
Die Kohlebürste nach Abnehmen der Bürstenkappe
entfernen, indem die Krempe der Kohlebürste wie in
Abb. 28 gezeigt mit einem fl achen Schraubenzieher
o.ä. erfaßt wird.
Beim Installieren der Kohlebürste die Richtung so
wählen, dass die Klaue der Kohlebürste (siehe Abb.
29) mit der Kontaktfl äche außerhalb des Bürstenrohrs
übereinstimmt.
Dann die Bürste wie in Abb. 30 gezeigt mit dem
Finger einschieben und schließlich die Bürstenkappe
anbringen.
ACHTU NG
○ Stellen Sie unbedingt sicher, daß die Klaue der
Kohlebürste in den Kontaktteil außerhalb des
Bürstenrohrs eingeschoben wird. (Eine der beiden
vorhandenen Klauen muß eingeschoben werden.)
○ Vorsicht ist erforderlich, da Fehler bei dieser Tätigkeit
zu einer verformten Klaue der Kohlebürste und
frühzeitigen Motorstörungen führen können.
7. Außenreinigung
Wenn der Rasentrimmer schmutzig ist, mit einem
weichen trockenen Tuch oder einem mit Seifenwasser
befeuchteten Tuch abwischen. Kein Chlorsolvent,
Benzin oder Farbsolvent verwenden da sie plastisches
Material schmelzen.
8. Lagern
Den Rasentrimmer bei einer Temperatur von unter
40°C und außerhalb der Reichweite von Kindern
lagern.
9. Liste der Wartungsteile
ACHTU NG
Reparatur, Modifi kation und Inspektion von Hitachi-
Elektrowerkzeugen müssen durch ein autorisiertes
Hitachi-Kundendienstzentrum durchgeführt werden.
Diese Teileliste ist hilfreich, wenn sie dem autorisierten
Hitachi- Kundendienstzentrum zusammen mit dem
Werkzeug für Reparatur oder Wartung ausgehändigt
wird.
Bei Betrieb und Wartung von Elektrowerkzeugen
müssen die Sicherheitsvorschriften und Normen
beachtet werden.
MODIFIKATIONEN
Hitachi-Elektrowerkzeuge werden fortwährend
verbessert und modifi ziert, um die neuesten
technischen Fortschritte einzubauen.
Dementsprechend ist es möglich, daß einige Teile
ohne vorherige Benachrichtigung geändert werden.
Wichtiger Hinweis zu den Batterien für Akku-
Geräte von Hitachi
Verwenden Sie immer unsere angegebenen
Originalbatterien. Wir können die Sicherheit und die
Leistung unseres Akku-Gerätes nicht gewährleisten,
wenn andere als die von uns angegebenen Batterien
verwendet werden, oder wenn die Batterie zerlegt und
verändert wird (etwa durch Zerlegen und Ersetzung
von Zellen oder anderen innen gelegenen Teilen).
33
Page 34

Deutsch
FEHLERSUCHE UND -BESEITIGUNG
Führen Sie die in der folgenden Tabelle aufgeführten Inspektionen durch, wenn das Gerät nicht ordnungsgemäß
funktioniert. Kann das Problem dadurch nicht behoben werden, wenden Sie sich an Ihren Händler oder ein autorisiertes
Hitachi-Kundendienstzentrum.
Symptom Mögliche Ursache Abhilfe
Ladegerät
Gerät Funktioniert nicht. Der Akku ist leer. Den Akku wiederaufl aden.
Die Ladeleuchte
leuchtet nicht.
Die Ladeleuchte
erlischt nach 4
Stunden Ladezeit
nicht.
Der Netzstecker ist nicht mit einer
Wechselstromquelle verbunden.
Die Batterie ist nicht korrekt an das
Ladegerät angeschlossen.
Die Elektroden von Batterie oder
Ladegerät sind verschmutzt.
Die Batterie ist extrem heiß. Lassen Sie die Batterie vor dem
Batterie oder Ladegerät sind fehlerhaft. Ziehen Sie den Netzstecker und
Der Akku wurde nicht korrekt
eingesetzt.
Das Gerät wurde nicht eingeschaltet. Den Startknopf am Gerätegehäuse
Der Verriegelungshebel wurde beim
Zurückziehen des Hebels nicht
gedrückt.
Das Gerät zieht große Mengen
Gras ein, das sich zwischen der
Sicherheitsabdeckung und dem
Nylonkopf verfängt, das Gerät ist
überlastet.
Schließen Sie den Netzstecker an eine
Wechselstromquelle an.
Legen Sie die Batterie korrekt in das
Ladegerät ein.
Reinigen Sie die Elektroden mit einem
Wattebausch oder einem anderen
Hilfsmittel.
Aufl aden richtig abkühlen.
wenden Sie sich an Ihren Händler
oder ein autorisiertes HitachiKundendienstzentrum.
Den Akku aus dem Akkufach des Geräts
entfernen, beide auf Fremdkörper
untersuchen und diese gegebenenfalls
entfernen. Zudem die Elektroden des
Akkus auf Verschmutzung, Wasser
oder andere Fremdkörper untersuchen.
Zur Reinigung einen Wattebausch
verwenden. Es ist darauf zu achten,
dass der Akku im Akkufach einrastet.
drücken, um das Gerät zu
starten. Dieses Gerät ist mit einer
automatischen Ausschaltfunktion
ausgestattet. Das Gerät schaltet sich
automatisch aus, wenn der Hebel nach
dem Einschalten länger als eine Minute
nicht betätigt wird. Um das Gerät wieder
einzuschalten, den Startknopf erneut
drücken.
Durch erneutes Drücken des
Startknopfs wird das Gerät
ausgeschaltet.
Um Unfälle durch falsche
Handhabung zu vermeiden, muss der
Verriegelungshebel gedrückt gehalten
werden, während der Hebel zum Starten
des Motors zurückgezogen wird.
Den Griff von oben greifen, den
Verriegelungshebel gedrückt halten und
gleichzeitig den Hebel ziehen.
Das ist auf eine Akkuschutzfunktion
zurückzuführen, die den Motor
ausschaltet, wenn das Gerät
übermäßigen Belastungen ausgesetzt
wird. Das Gerät ausschalten und die
Ursache der Überlastung entfernen.
Den Startknopf erneut drücken, um mit
der Arbeit fortzufahren.
34
Page 35

Symptom Mögliche Ursache Abhilfe
Gerät Läuft an, stoppt aber
kurz darauf.
Starke Vibrationen Der Bügelgriff ist nicht korrekt am
Seltsame
Geräusche aus dem
Getriebegehäuse.
Die Akkuladung ist niedrig. Den Akku wiederaufl aden.
Der Akku ist überhitzt. Die Verwendung des Akkus
Hauptrohr angebracht.
Die Schutzvorrichtung ist nicht korrekt
am Hauptrohr angebracht.
Es befi ndet sich zu wenig Schmierfett im
Getriebegehäuse.
GARANTIE
Auf Hitachi-Elektrowerkzeuge gewähren wir eine Garantie
unter Zugrundelegung der jeweils geltenden gesetzlichen
und landesspezifi schen Bedingungen. Dieses Garantie
erstreckt sich nicht auf Gehäusedefekte und nicht auf
Schäden, die auf Missbrauch, bestimmungswidrigen
Einsatz oder normalen Verschleiß zurückzuführen
sind. Im Schadensfall senden Sie das nicht zerlegte
Elektrowerkzeug zusammen mit dem GARANTIESCHEIN,
den Sie am Ende der Bedienungsanleitung fi nden, an ein
von Hitachi autorisiertes Servicecenter.
HINWEIS
Aufgrund des ständigen Forschungs und Entwicklung
sprogramms von HITACHI sind änderungen der hierin
gemachten technischen Angaben vorbehalten.
Deutsch
unterbrechen, den Akku aus dem Gerät
entfernen und an einem gut belüfteten
Ort ohne direkte Sonneneinstrahlung
abkühlen lassen.
Korrekt befestigen.
Korrekt befestigen.
Mit Schmierfett schmieren.
Information über Betriebslärm und Vibration
Die gemessenen Werte wurden entsprechend IEC60335
bestimmt und in Übereinstimmung mit ISO 4871
ausgewiesen.
Gemessener A-gewichteter Schallpegel: 95 dB (A).
Gemessener A-gewichteter Schalldruck: 86 dB (A).
Messunsicherheit KpA: 3 dB (A).
Bei der Arbeit immer einen Ohrenschutz tragen.
Gesamtvibrationswerte (3-Achsen-Vektorsumme),
bestimmt gemäß IEC60335.
Vibrationsemissionswert ah, w = 7,5 m/s
WAR NUNG
◯ Der Vibrationsemissionswert während der
tatsächlichen Benutzung des Elektrowerkzeugs kann
von dem deklarierten Wert abweichen, abhängig
davon, wie das Werkzeug verwendet wird.
◯ Zur Fe stlegu ng der Sich erheit smaßnah men zum Sch utz
des Bedieners, die auf einer Expositionseinschätzung
unter den tatsächlichen Benutzungsbedingungen
beruhen (unter Berücksichtigung aller Bereiche des
Betriebszyklus, darunter neben der Triggerzeit auch
die Zeiten, in denen das Werkzeug ausgeschaltet ist
oder im Leerlaufbetrieb läuft).
2
35
Page 36

Ελληνικά
ΓΕΝΙΚΕΣ ΠΡΟΕΙΔΟΠΟΙΗΣΕΙΣ ΑΣΦΑΛΕΙΑΣ
ΗΛΕΚΤΡΙΚΟΥ ΕΡΓΑΛΕΙΟΥ
ΠΡΟΣΟΧΗ
Διαβάζετε όλες τις προειδοποιήσεις ασφαλείας και
όλες τις οδηγίες.
Η μη τήρηση των προειδοποιήσεων και οδηγιών μπορεί
να προκαλέσει ηλεκτροπληξία, πυρκαγιά και /ή σοβαρό
τραυματισμό.
Φυλάξτε όλες τις προειδοποιήσεις και τις οδηγίες
για μελλοντική αναφορά.
Ο όρος "ηλεκτρικό εργαλείο" στις προειδοποιήσεις
αναφέρεται στο ηλεκτρικό εργαλείο (με καλώδιο) που
λειτουργεί στους
λειτουργεί στη μπαταρία (χωρ ίς καλώδιο).
1) Ασφάλεια χώρου εργασίας
a) Διατηρείτε το χώρο εργασίας καθαρό και
καλά φωτισμένο.
Σε ακατάστατες ή σκοτεινές περιοχές μπορεί να
προκληθούν ατυχήματα.
b) Μην χρησιμοποιείτε τα ηλεκτρικά
εργαλεία σε περιβάλλον, στο οποίο μπορεί
να προκληθεί έκρηξη, όπως παρουσία
εύφλεκτων υγρών, αερίων ή σκόνης.
Τα ηλεκτρικά εργαλεία δημιουργούν σπινθήρες,
οι οποίοι μπορεί να αναφλέξουν τη σκόνη ή τον
καπνό.
c) Κρατήστε τα παιδιά και τους
παρευρισκόμενους μακριά όταν
χρησιμοποιείτε ένα ηλεκτρικό εργαλείο.
Αν αποσπαστεί η προσοχή σας, υπάρχει κίνδυνος
να χάσετ ε τον έλεγχο.
2) Ηλ άλεια
a) Τα φις
είναι κατάλληλα για τις πρίζες.
Μην τροποποιήσετε ποτέ το φις με
οποιονδήποτε τρόπο.
Μη χρησιμοποιείτε φις προσαρμογής με
γειωμένα ηλεκτρικά εργαλεία.
Τα μη τροποποιημένα φις και οι κατάλ ληλες
πρίζες μειώνουν τον κίνδυνο ηλεκτροπληξίας.
b) Αποφύγετε τη σωματική επαφή με
γειωμένες επιφάνειες όπως σωλήνες,
θερμάστρες, μαγειρικές συσκευές και
ψυγεία.
Υπάρχει αυξημένος κίνδυνος ηλεκτροπληξίας
όταν το σώμα σας είναι γειωμένο.
c) Μην εκθέτετε τα ηλεκτρικά εργαλεία στη
βροχή ή σε συνθήκες υγρασίας.
Το νερό που εισέρχεται σε ένα ηλεκτρικό εργαλείο
αυξάνει τον κίνδυνο ηλεκτροπληξίας.
d) Μην ασκείτε δύναμη στο καλώδιο. Μη
χρησιμοποιείτε ποτέ το
μεταφέρετε, να τραβήξετε ή να βγάλετε από
την πρίζα το ηλεκτρικό εργαλείο.
Κρατήστε το καλώδιο μακριά από θερμότητα,
λάδι, κοφτερές γωνίες και κινούμενα μέρη.
Τα κατεστραμμένα ή μπερδεμένα καλώδια
αυξάνουν τον κίνδυνο ηλεκτροπληξίας.
e) Όταν χρησιμοποιείτε το εργαλείο σε
εξωτερικό χώρο, χρησιμοποιήστε καλώδιο
προέκτασης
εξωτερικό χώρο.
Η χρήση ενός καλωδίου κατάλληλου για εξωτερικό
χώρο μειώνει τον κίνδυνο ηλεκτροπληξίας.
36
αγωγούς ή στο ηλεκτρικό εργαλείο που
των ηλεκτρικών εργαλείων πρέπει να
καλώδιο για να
που προορίζεται για χρήση σε
f) Αν είναι αναπόφευκτη η λειτουργία ενός
ηλεκτρικού εργαλείου σε χώρο με υγρασία,
χρησιμοποιείτε διάταξη προστασίας
ρεύματος διαρροής (RCD).
Η χρήση της RCD μειώνει τον κίνδυνο
ηλεκτροπληξίας.
3) Προσωπική ασφάλεια
a) Να
είστε σε ετοιμότητα, να βλέπετε αυτό
που κάνετε και να χρησιμοποιείτε την κοινή
λογική όταν χρησιμοποιείτε ένα ηλεκτρικό
εργαλείο.
Μη χρησιμοποιείτε ηλεκτρικά εργαλεία
όταν είστε κουρασμένοι ή υπό την επήρεια
ναρκωτικών ουσιών, οινοπνεύματος ή
φαρμάκων.
Μια στιγμή απροσεξίας κατά τη χρήση ενός
ηλεκτρικού εργαλείου μπορεί να προκαλέσει
σοβαρό προσωπικό
b) Χρησιμοποιείτε προσωπικό προστατευτικό
εξοπλισμό. Φοράτε πάντα προστασία για τα
μάτια.
Ο προστατευτικός εξοπλισμός, όπως μάσκα για τη
σκόνη, αντιολισθητικά παπούτσια, σκληρό καπέλο
ή προστασία για τα αυτιά, που χρησιμοποιείται
για ανάλογες συνθήκες μπορεί να μειώσει τους
τραυματισμούς.
c) Προλαμβάνετε τυχόν ακούσια εκκίνηση.
Βεβαιωθείτε ότι ο διακόπτης είναι
απενεργοποίησης πριν συνδέσετε τη
συσκευή με πηγή ρεύματος και/ή τη θήκη της
μπαταρίας, πριν σηκώσετε ή μεταφέρετε το
εργαλείο.
Η μεταφορά ηλεκτρικού εργαλείου με τα δάχτυλά
σας στο διακόπτη ή η ηλεκτροδότηση ηλεκτρικού
εργαλείου με ενεργοποιημένο το διακόπτη μπορεί
να προκαλέσουν ατυχήματα.
d) Να αφαιρείτε τυχόν
ανοίγματος ή τα απλά κλειδιά πριν θέσετε
σε λειτουργία το ηλεκτρικό εργαλείο.
Ένα απλό κλειδί ή ένα κλειδί ρυθμιζόμενου
ανοίγματος που είναι προσαρτημένο σε
περιστρεφόμενο εξάρτημα του ηλεκτρικού
εργαλείου μπορεί να προκαλέσει προσωπικό
τραυματισμό.
e) Μην τεντώνεστε. Να διατηρείτε πάντοτε το
κατάλληλο πάτημα και την ισορροπία σας.
Με αυτόν τον τρόπο μπορείτε να ελέγχετε
καλύτερα το ηλεκτρικό εργαλείο σε μη
αναμενόμενες καταστάσεις.
f) Να είστε ντυμένοι κατάλληλα. Μη φοράτε
φαρδιά ρούχα ή κοσμήματα. Να κρατάτε τα
μαλλιά σας, τα ρούχα σας και τα γάντια σας
μακριά από κινούμενα μέρη.
Τα φαρδιά ρούχα, τα κοσμήματα και τα
μαλλιά μπορεί να πιαστούν σε κινούμενα μέρη.
g) Αν παρέχονται εξαρτήματα για τη σύνδεση
συσκευών εξαγωγής και συλλογής σκόνης,
να βεβαιώνεστε ότι είναι συνδεδεμένα και
χρησιμοποιούνται με το σωστό τρόπο.
Η χρήση συλλέκτη σκόνης μειώνει τους κινδύνους
που προέρχονται από τη σκόνη.
4) Χρήση και φροντίδα ηλεκτρικών εργαλείων
a)
Μην ασκείτε δύναμη στο ηλεκτρικό
εργαλείο. Να χρησιμοποιείτε το ηλεκτρικό
εργαλείο που είναι κατάλληλο για το είδος
της εργασίας που εκτελείτε.
Το κατάλληλο ηλεκτρικό εργαλείο θα εκτελέσει
την εργασία καλύτερα και με μεγαλύτερη
ασφάλεια με τον τρόπο που σχεδιάστηκε.
τραυματισμό.
σε θέση
κλειδιά ρυθμιζόμενου
μακριά
Page 37

Ελληνικά
b) Μη χρησιμοποιήσετε το ηλεκτρικό εργαλείο
αν ο διακόπτης λειτουργίας δεν ανοίγει και
δεν κλείνει.
Ένα ηλεκτρικό εργαλείο που δεν ελέγχεται από
το διακόπτη λειτουργίας είναι επικίνδυνο και
πρέπει να επισκευαστεί.
c) Αποσυνδέετε το βύσμα από την πηγή ισχύος
και/ή τη θήκη μπαταρίας από το ηλεκτρικό
εργαλείο πριν προβείτε
αλλαγή εξαρτήματος ή αποθήκευση του
ηλεκτρικού εργαλείου.
Αυτά τα προληπτικά μέτρα ασφαλείας μειώνουν
τον κίνδυνο να ξεκινήσει το ηλεκτρικό εργαλείο
κατά λάθος.
d) Αποθηκεύετε τα εργαλεία που δεν
χρησιμοποιείτε μακριά από παιδιά και
μην αφήνετε τα άτομα που δεν είναι
εξοικειωμένα με το ηλεκτρικό εργαλείο ή
με αυτές
ηλεκτρικό εργαλείο.
Τα ηλεκτρικά εργαλεία είναι επικίνδυνα στα χέρια
μη εκπαιδευμένων ατόμων.
e) Συντηρείτε τα ηλεκτρικά εργαλεία. Να
ελέγχετε την ευθυγράμμισή τους ή το
μπλοκάρισμα των κινούμενων μερών, τη
θραύση των εξαρτημάτων και οποιαδήποτε
άλλη κατάσταση που ενδέχεται να
επηρεάσει τη λειτουργία του ηλεκτρικού
εργαλείου.
Σε περίπτωση βλάβης, το ηλεκτρικό
εργαλείο πρέπει να επισκευαστεί πριν
χρησιμοποιηθεί.
Πολλά ατυχήματα προκαλούνται από ηλεκτρικά
εργαλεία που δεν έχουν συντηρηθεί σωστά.
f) Διατηρείτε τα εργαλεία κοπής κοφτερά και
καθαρά.
Τα κατάλληλα συντηρημένα εργαλεία κοπής με
κοφτερές γωνίες μπλοκάρουν πιο δύσκολα και
ελέγχονται πιο εύκολα.
g) Χρησιμοποιείτε
εξαρτήματα και τα μέρη κ.τ.λ. σύμφωνα με
τις παρούσες οδηγίες, λαμβάνοντας υπόψη
τις συνθήκες εργασίας και την εργασία που
θα εκτελέσετε.
Η χρήση του ηλεκτρικού εργαλείου για εργασίες
πέρα από εκείνες για τις οποίες προορίζεται,
ενδέχεται να δημιουργήσει κινδύνους.
5) Εργαλείο μπαταρίας –
a) Η επαναφόρτιση να πραγματοποιείται μόνο
μέσω του φορτιστή που έχει καθοριστεί από
τον κατασκευαστή.
Ο φορτιστής που είναι κατάλληλος για ένα τύπο
μπαταρίας. ενδέχεται να προκαλέσει κίνδυνο
πυρκαγιάς όταν χρησιμοποιείται με άλλου τύπου
θήκη μπαταριών.
b) Χρησιμοποιήστε ηλεκτρικά εργαλεία μόνο με
τις ειδικά καθορισμένες θήκες μπαταριών.
Η χρήση οποιουδήποτε άλλου τύπου θήκης
μπαταριών ενδέχεται να προκαλέσει τραυματισμό
και πυρκαγιά.
c) Όταν η θήκη μπαταριών είναι εκτός χρήσης,
φυλάξτε την μακριά από άλλα μεταλλικά
αντικείμενα όπως συνδετήρες, νομίσματα,
κλειδιά, καρφιά, βίδες ή άλλα μικρού
μεγέθους μεταλλικά αντικείμενα που
μπορούν να πραγματοποιήσουν σύνδεση
από τον ένα
Αν τοποθετήσετε μαζί τους ακροδέκτες
μπαταριών ενδέχεται να προκληθούν εγκαύματα
ή πυρκαγιά.
τις οδηγίες να χρησιμοποιούν το
το ηλεκτρικό εργαλείο, τα
χρήση και φροντίδα
ακροδέκτη στον άλλο.
σε ρυθμίσεις,
d) Υπό καταχρηστικές συνθήκες, ενδέχεται
να εκτοξευτεί υγρό από την μπαταρία.
Αποφύγετε την επαφή.
Σε περίπτωση επαφής με το υγρό από
σφάλμα, ξεπλύνετε με νερό. Αν το υγρό
έρθει σε επαφή με τα μάτια, ξεπλύνετε με
νερό και ζητήστε ιατρική βοήθεια.
Το υγρό που εκτοξεύεται από την
να προκαλέσει ερεθισμό ή εγκαύματα.
6) Σέρβις
a) Να δίνετε το ηλεκτρικό εργαλείο για σέρβις
σε κατάλληλα εκπαιδευμένα άτομα και να
χρησιμοποιείτε μόνο γνήσια ανταλλακτικά.
Με αυτόν τον τρόπο είστε σίγουροι για την
ασφάλεια του ηλεκτρικού εργαλείου.
ΠΡΟΦΥΛΑΞΗ
Μακριά από τα παιδιά και τους αναπήρους.
Όταν δεν χρησιμοποιούνται, τα
να φυλάζονται μακριά από τα παιδιά και τους
αναπήρους.
μπαταρία μπορεί
εργαλεία πρέπει
ΠΡΟΕΙΔΟΠΟΙΗΣΕΙΣ ΑΣΦΑΛΕΙΑΣ ΧΛΟΟΚΟΠΤΗ
ΣΗΜΑΝΤΙΚΟ
ΔΙΑΒΑΣΤΕ ΠΡΟΣΕΚΤΙΚΑ ΠΡΙΝ ΑΠΟ ΤΗ ΧΡΗΣΗ
ΚΡΑΤΗΣΤΕ ΓΙΑ ΜΕΛΛΟΝΤΙΚΗ ΑΝΑΦΟΡΑ
Ασφαλείς πρακτικές λειτουργίας
● Εκπαίδευση
a) Διαβάστε προσεκτικά τις οδηγίες. Εξοικειωθείτε
με τα χειριστήρια και την σωστή χρήση του
μηχανήματος.
b) Ποτέ μην επιτρέψετε την χρήση του μηχανήματος
από παιδιά ή από άτομα που δεν γνωρίζουν αυτές τις
οδηγίες. Μπορεί να υπάρχει περιορισμός
την ηλικία του χρήστη από την τοπική νομοθεσία.
c) Έχετε κατά νου ότι ο χρήστης ή ο χειριστής είναι
υπεύθυνος για τα ατυχήματα ή τους κινδύνους που
προκαλούνται στα άλλα άτομα ή στην ιδιοκτησία
τους.
● Προετοιμασία
a) Ποτέ να μην χειρίζεστε το μηχάνημα όταν βρίσκονται
κοντά άλλα άτομα, ιδιαίτερα
b) Πάντοτε να φοράτε προστατευτικά ματιών και
ανθεκτικά παπούτσια όταν χειρίζεστε το μηχάνημα.
● Λειτουργία
a) Χρησιμοποιήστε το μηχάνημα μόνο κατά τη διάρκεια
της ημέρας ή όταν υπάρχει επαρκής τεχνητός
φωτισμός.
b) Ποτέ να μην χρησιμοποιήσετε το μηχάνημα με
φθαρμένα τα προστατευτικά ή τους προφυλακτήρες
ή χωρίς να βρίσκονται
προστατευτικά και οι προφυλακτήρες.
c) Ενεργοποιήστε τον κινητήρα μόνο όταν τα χέρια
και τα πόδια βρίσκονται μακριά από τα κοπτικά
εξαρτήματα.
d) Πάντοτε να αποσυνδέετε το μηχάνημα από την πηγή
ρεύματος (δηλ. αφαιρέστε το βύσμα από την πρίζα ή
αφαιρέστε τη συσκευή αδρανοποίησης)
– όποτε αφήνετε την συσκευή
– πριν από το ξεμπλοκάρισμα,
– πριν από τον έλεγχο, την συντήρηση ή την
εκτέλεση εργασίας πάνω στο μηχάνημα,
– μετά από το κτύπημα ενός ξένου αντικειμένου,
– όταν το μηχάνημα αρχίζει να πάλετε με αφύσικο
τρόπο.
e) Δώστε προσοχή ώστε να μην τραυματιστείτε στα
χέρια ή στα πόδια από τα
f) Πάντοτε να διασφαλίζετε ότι οι οπές εξαερισμού δεν
είναι μπλοκαρισμένες από θραύσματα.
παιδιά ή κατοικίδια ζώα.
στη θέση τους τα
χωρίς επίβλεψη,
κοπτικά εξαρτήματα.
όσον αφορά
37
Page 38

Ελληνικά
● Συντήρηση και αποθήκευση
a) Αποσυνδέσετε το μηχάνημα από την πηγή ρεύματος
(δηλ. αφαιρέστε το βύσμα από την πρίζα ή αφαιρέστε
τη συσκευή αδρανοποίησης) πριν εκτελέσετε τις
εργασίες συντήρησης ή καθαρισμού.
b) Χρησιμοποιήστε μόνο τα συνιστώμενα από τον
κατασκευαστή ανταλλακτικά και αξεσουάρ.
c) Επιθεωρείτε και συντηρείτε το μηχάνημα τακτικά.
Η επιδιόρθωση του
μόνο από ένα εξουσιοδοτημένο τεχνικό.
d) Όταν δεν βρίσκεται σε χρήση αποθηκεύετε το
μηχάνημα σε χώρο στον οποίο δεν έχουν πρόσβαση
τα παιδιά.
μηχανήματος πρέπει να γίνεται
ΠΡΟΦΥΛΑΞΕΙΣ ΓΙΑ ΤΟ ΧΛΟΟΚΟΠΤΗ
ΜΠΑΤΑΡΙΑΣ
ΠΡΟΕΙΔΟΠΟΙΗΣΗ
1. Να είστε υπομονετικοί κατά την διάρκεια όλων
των εργασιών με το εργαλείο. Και να ντύνεστε
κατάλληλα για να διατηρήστε ζεστοί.
2. Σχεδιάστε εκ των προτέρων όλες τις εργασίες για να
αποτρέψετε τα ατυχήματα.
3. Μην χειρίζεστε το εργαλείο την νύχτα ή κάτω
από κακές καιρικές συνθήκες όταν είναι χαμηλή η
ορατότητα
διάρκεια της βροχόπτωσης ή αμέσως μετά από τη
βροχόπτωση.
Αν εργάζεστε πάνω σε γλιστερό έδαφος μπορεί
να προκληθεί ατύχημα ή μπορεί να χάσετε την
ισορροπία σας.
4. Ελέγξτε την κεφαλή κοπής πριν το ξεκίνημα της
εργασίας.
Μην χρησιμοποιήσετε το εργαλείο όταν η κεφαλή
κοπής είναι ραγισμένη, έχει ξυστεί ή καμφθεί.
Σιγουρευτείτε ότι η κεφαλή κοπής είναι σωστά
τοποθετημένη. Αν η κεφαλή κοπής χαλάσει ή
ξεσφίξει κατά τη λειτουργία μπορεί να προκαλέσει
ατύχημα.
5. Φροντίστε να συνδέσετε το κάλυμμα ασφαλείας και
τον ιμάντα ώμου πριν την έναρξη της εργασίας.
Η λειτουργία του εργαλείου χωρίς
εξαρτήματα μπορεί να προκαλέσει τραυματισμό.
6. Φροντίστε να συνδέσετε το χερούλι που έχει σχήμα
βρόγχου πριν την έναρξη της εργασίας. Φροντίστε
ώστε να μην είναι ξεσφιγμένο αλλά να είναι σωστά
συνδεδεμένο πριν την έναρξη της εργασίας.
Κρατήστε γερά το χερούλι που έχει σχήμα βρόγχου
κατά την εργασία και μην
εργαλείο, αλλά χρησιμοποιήστε την σωστή στάση
του σώματος και διατηρήστε την ισορροπία σας.
Αν χάσετε την ισορροπία σας κατά την εργασία
μπορεί να προκληθεί τραυματισμός.
7. Δώστε προσοχή κατά την εκκίνηση του κινητήρα.
Τοποθετήστε το εργαλείο σε επίπεδο έδαφος.
Μην χειρίζεστε το εργαλείο όταν βρίσκονται
άτομα ή ζώα μέσα σε μια απόσταση 15 μέτρων.
Φροντίστε ώστε η κεφαλή κοπής να μην έρχεται σε
επαφή με το έδαφος ή δέντρα και φυτά.
Μια απρόσεκτη εκκίνηση μπορεί να οδηγήσει σε
τραυματισμό.
8. Μην κλειδώνετε τον μοχλό ασφάλισης.
Το ακούσιο τράβηγμα προς τα πίσω του μοχλού
μπορεί να
9. Πριν εγκαταλείψετε το εργαλείο, πατήστε το κουμπί
εκκίνησης για το απενεργοποιήσετε.
10. Να χειρίζεστε το εργαλείο με προσοχή κοντά σε
ηλεκτρικά καλώδια σωλήνες αερίων και παρόμοιες
εγκαταστάσεις.
38
. Και μην χειρίζεστε το εργαλείο κατά την
αυτά τα
στρέφετε γύρω-γύρω το
άλλα
προκαλέσει ένα απρόσμενο τραυματισμό.
11. Δώστε προσοχή και αφαιρέστε άδεια κουτιά,
καλώδια, πέτρες ή άλλα εμπόδια πριν ξεκινήσετε την
εργασία. Καθώς επίσης μην εργάζεστε
ρίζες δέντρων ή βράχων.
Αν εργάζεστε κοντά σε τέτοιες περιοχές μπορεί
να προκληθεί βλάβη στην κεφαλή κοπής ή
τραυματισμός.
12. Μην αυξήσετε υπερβολικά την ταχύτητα
περιστροφής.
Αυξήστε την ταχύτητα βαθμιαία και όχι απότομα.
Ρυθμίστε τον θέση του μοχλού ανάλογα με το φόρτο
εργασίας.
Αντικείμενα που πετάγονται από
μπορούν να προκαλέσουν ένα απρόσμενο
τραυματισμό.
13. Ποτέ να μην αγγίξετε την κεφαλή κοπής κατά τη
λειτουργία.
Επίσης φροντίστε να μην έρθει σε επαφή με τα
μαλλιά σας, τα ρούχα σας, κτλ.
14. Στις παρακάτω καταστάσεις, σβήστε το μοτέρ και
ελέγξτε ότι η κεφαλή κοπής έχει σταματήσει να
περιστρέφεται
Κατά την μετακίνηση σε μια άλλη περιοχή εργασίας.
Κατά την αφαίρεση σκουπιδιών ή χόρτων που έχουν
κολλήσει μέσα στο εργαλείο.
Κατά την αφαίρεση αντικειμένων ή σκουπιδιών από
την περιοχή εργασίας, χόρτων και αποκομμάτων που
δημιουργήθηκαν κατά το κόψιμο.
Κατά την εναπόθεση του εργαλείου στο έδαφος.
Αν τα κάνετε
περιστρέφεται μπορεί να προκληθούν απρόσμενοι
τραυματισμοί.
15. Μην χρησιμοποιήσετε το εργαλείο αν υπάρχει άλλο
άτομο μέσα σε ακτίνα 15 μέτρων.
Εάν εργάζεστε με κάποιο άλλο άτομο διατηρήστε μια
απόσταση μεταξύ σας μεγαλύτερη των 15 μέτρων.
Τα αποκόμματα που πετάγονται μπορούν να
προκαλέσουν απρόσμενο τραυματισμό.
Όταν εργάζεστε
παράδειγμα πλαγιές, φροντίστε ώστε ο συνεργάτης
σας να μην είναι εκτεθειμένος σε οποιοδήποτε
κίνδυνο.
Χρησιμοποιήστε σφυρίχτρες ή άλλα μέσα για να
προκαλέσετε την προσοχή των συνεργατών σας.
16. Όταν χόρτα ή άλλα αντικείμενα πλεχτούν μέσα στην
κεφαλή κοπής, απενεργοποιήστε τον κινητήρα και
βεβαιωθείτε ότι η κεφαλή
περιστρέφεται πριν τα αφαιρέσετε.
Αν αφαιρέσετε τα αντικείμενα από την κεφαλή
κοπής όταν αυτή περιστρέφεται θα προκληθεί
τραυματισμός.
Αν συνεχίσετε την λειτουργία με τα ξένα αντικείμενα
κολλημένα πάνω στην κεφαλή κοπής τότε μπορεί να
προκληθεί ζημιά.
17. Εάν το εργαλείο δεν λειτουργεί σωστά και παράγει
παράξενο
τον κινητήρα αμέσως και επικοινωνήστε με
τον αντιπρόσωπό σας για το επιθεωρήσει να το
επισκευάσει.
Η συνεχής χρήση κάτω από αυτές τις συνθήκες
μπορεί να οδηγήσει σε τραυματισμό ή σε βλάβη του
εργαλείου.
18. Εάν πέσει κάτω το εργαλείο ή το χτυπήσετε, ελέγξτε
το προσεκτικά
φθορά, ραγίσματα ή παραμόρφωση.
Η χρήση ενός εργαλείου που έχει υποστεί φθορά,
ράγισμα ή παραμόρφωση μπορεί να προκαλέσει
τραυματισμό.
19. Ασφαλίστε το εργαλείο κατά την μεταφορά του
πάνω σε όχημα ώστε να διασφαλιστεί ότι παραμένει
ακίνητο.
.
αυτά καθώς η κεφαλή κοπής
σε ασταθείς επιφάνειες όπως για
κοπής έχει σταματήσει να
ήχο ή δονείται, τότε απενεργοποιήστε
για να δείτε ότι δεν έχει υποστεί
κοντά στις
το εργαλείο
Page 39

Ελληνικά
Αν δεν δοθεί προσοχή σε αυτή την προειδοποίηση
μπορεί να προκληθεί ατύχημα.
ΠΡΟΕΙΔΟΠΟΙΗΣΗ
1. Μην ενεργοποιήσετε την κεφαλή κοπής για την
κοπή άλλων αντικειμένων εκτός από τα χόρτα. Μην
χρησιμοποιήσετε το εργαλείο μέσα σε λίμνες νερού
και φροντίστε ότι το έδαφος δεν έρχεται σε επαφή
με την κεφαλή κοπής.
2. Το εργαλείο
δεν θα πρέπει να πέσει κάτω, να εκτεθεί σε δυνατά
κτυπήματα ή στο νερό.
Το εργαλείο μπορεί να πάθει ζημιά ή να
δυσλειτουργήσει.
3. Εάν μετά την χρήση το εργαλείο πρόκειται να
αποθηκευτεί ή να μεταφερθεί, αφαιρέστε την
κεφαλή κοπής.
4. Μην εκθέσετε το εργαλείο σε εντομοκτόνα
άλλα χημικά.
Τέτο ια χημικά μπορεί να προκαλέσουν ρωγμές ή
άλλη φθορά.
5. Αντικαταστ ήσ τε τις προειδοποιητικές ετικέτες με
καινούργιες όταν καταστεί δύσκολη η αναγνώρισή
τους ή όταν γίνουν δυσανάγνωστες και όταν
αρχίζουν να αποκολλώνται.
Επικοινωνήστε με τον εμπορικό αντιπρόσωπο σας
για να σας παράσχει καινούργιες ετικέτες.
διαθέτει εξαρτήματα ακριβείας και
ή σε
ΠΡΟΦΥΛΑΚΤΙΚΑ ΜΕΤΡΑ ΓΙΑ ΤΗΝ ΜΠΑΤΑΡΙΑ
ΚΑΙ ΤΟ ΦΟΡΤΙΣΤΗ
1. Πάντοτε φορτίζετε την μπαταρία σε θερμοκρασία
ανάμεσα 0°C – 40°C.
Μια θερμοκρασία μικρότερη από 0°C θα προκαλέσει
την υπερφόρτιση που είναι επικίνδυνη. Η μπαταρία
δεν μπορεί να φορτιστεί σε θερμοκρασία μεγαλύτερη
από 40°C.
Η πιο κατάλληλη θερμοκρασία για φόρτιση είναι αυτή
των 20°C – 25°C.
2. Όταν η μια φόρτιση ολοκληρωθεί, αφήστε το
φορτιστή για 15 λεπτά πριν από
φόρτιση μπαταρίας.
Μην φορτίζετε την μπαταρία για περισσότερο από 2
ώρες.
3. Μην αφήσετε ξένα υλικά να μπουν στην τρύπα
σύνδεσης της επαναφορτιζόμενης μπαταρίας.
4. Μην βάλτε κανένα αντικείμενο μέσα στις τρύπες
εξαερισμού του φορτιστή.
Η είσοδος μεταλλικών αντικειμένων ή εύφλεκτων
υλικών στις τρύπες εξαερισμού του φορτιστή θα
προκαλέσει
καταστροφή του φορτιστή.
5. Η χρησιμοποίηση μια εξασθενημένης μπαταρίας θα
προκαλέσει βλάβη στο φορτιστή.
6. Πηγαίνετε την μπαταρία στο κατάστημα από το οποίο
την αγοράσατε όταν η διάρκεια ζωής της μπαταρίας
μετά από την φόρτιση έχει γίνει πολύ μικρή για
πρακτική χρήση. Μην πετάξετε την τελειωμένη
μπαταρία
7. Ποτέ μην αποσυναρμολογήσετε την
επαναφορτιζόμενη μπαταρία και το φορτιστή.
8. Ποτέ μην βραχυκυκλώσετε την επαναφορτιζόμενη
μπαταρία.
Το βραχυκύκλωμα της μπαταρίας θα προκαλέσει
ένα μεγάλο ηλεκτρικό ρεύμα και υπερθέρμανση.
Προκαλεί το κάψιμο ή την υπερθέρμανση της
μπαταρίας.
9. Μην πετάξετε την μπαταρία στη φωτιά.
Αν η μπαταρία καεί μπορεί να εκραγεί
τον κίνδυνο ηλεκτροπληξίας η την
.
την επόμενη
.
ΠΡΟΣΟΧΗ ΣΤΗΝ ΜΠΑΤΑΡΙΑ ΙΟΝΤΩΝ ΛΙΘΙΟΥ
Για την επέκταση του χρόνου διάρκειας της μπαταρίας
ιόντων λιθίου υπάρχει η λειτουργία προστασίας που
σταματά την ισχύς εξόδου. Στις περιπτώσεις 1 έως 3
περιγράφονται κατωτέρω, κατά τη χρήση του προϊόντος,
ακόμη και τραβάτε το διακόπτη ο κινητήρας ενδέχεται
να σταματήσει. Αυτό δεν είναι το πρόβλημα αλλά το
αποτέλεσμα της λειτουργίας προστασίας.
1.
Όταν η υπόλοιπη ισχύ της μπαταρίας που απομένει
τελειώσει, ο κινητήρας σταματάει.
Στην περίπτωσή αυτή θα πρέπει να τη φορτίσετε
αμέσως.
2. Εάν υπάρχει υπερφόρτιση του εργαλείου ο κινητήρας
ενδεχομένως να σταματήσει. Στην περίπτωση αυτή
απελευθερώστε το διακόπτη του εργαλείου και
εξαλείψετε την αιτία της υπερφόρτωσης. Έπειτα
από αυτό μπορείτε να
3. Αν η μπαταρία υπερθερμανθεί υπό το φόρτο
εργασίας, η ισχύς της μπαταρίας μπορεί να
σταματήσει.
Σε αυτήν την περίπτωση, διακόπτετε τη χρήση της
μπαταρίας και την αφήνετε να κρυώσει. Έπειτα
μπορείτε να την ξαναχρησιμοποιήσετε.
Παρακαλείστε, επίσης, να τηρείτε τις ακόλουθες
προειδοποιήσεις και προφυλάξεις.
ΠΡΟΕΙΔΟΠΟΙΗΣΗ
Για να αποφύγετε
παραγωγή θερμότητας, εκπομπή καπνού, έκρηξη
ή ανάφλεξη, πρέπει να τηρείτε τις ακόλουθες
προφυλάξεις.
1. Βεβαιωθείτε ότι δεν συσσωρεύεται σκόνη στη
μπαταρία.
○ Κατά την εργασία σας βεβαιωθείτε ότι δεν πέφτει
σκόνη στη μπαταρία.
○ Βεβαιωθείτε ότι τυχόν σκόνες που πέφτουν πάνω
στο ηλεκτρικό εργαλείο την ώρα που
αυτό, δεν συσσωρεύονται στη μπαταρία.
○ Μην αποθηκεύετε αχρησιμοποίητες μπαταρίες σε
σημείο εκτεθειμένο σε σκόνη.
○ Πριν να αποθηκεύσετε μία μπαταρία, απομακρύνετε
τυχόν σκόνες που πιθανόν να έχουν κολλήσει πάνω
της και μην την αποθηκεύετε μαζί με μεταλλικά μέρη
(βίδες, καρφιά, κ.λπ.).
2. Μην τρυπάτε τη μπαταρία με
όπως καρφιά, μην χτυπάτε με σφυρί, μην πατάτε ή
πετάτε τη μπαταρία. Προφυλάξτε την από ισχυρούς
κραδασμούς.
3. Μην χρησιμοποιείτε μία εμφανώς κατεστραμμένη ή
παραμορφωμένη μπαταρία.
4. Μην τοποθετείτε τη μπαταρία με λάθος τρόπο.
5. Μην συνδέετε απευθείας σε ηλεκτρική πρίζα ή στην
υποδοχή του αναπτήρα στα αυτοκίνητα.
6. Μην
χρησιμοποιείτε τη μπαταρία για χρήση άλλη
πέραν της προβλεπόμενης.
7. Σε περίπτωση που δεν ολοκληρώνεται επιτυχώς η
διαδικασία φόρτισης της μπαταρίας ακόμα και όταν
έχει περάσει ο καθορισμένος χρόνος επαναφόρτισης,
σταματήστε αμέσως οποιαδήποτε προσπάθεια
επαναφόρτισης.
8. Η μπαταρία δεν πρέπει να εκτίθεται σε υψηλή
θερμοκρασία ή υψηλή πίεση, όπως στην περίπτωση
φούρνου
μικροκυμάτων, ξηραντήρα ή δοχείου
υψηλής πίεσης.
9. Απομακρύνετε αμέσως από τη φωτιά σε περίπτωση
διαρροής ή δυσοσμίας.
10. Μην χρησιμοποιείτε σε περιβάλλον με έντονο
στατικό ηλεκτρισμό.
το χρησιμοποιήσετε πάλι.
τυχόν διαρροή της μπαταρίας,
εργάζεστε με
αιχμηρά αντικείμενα
39
Page 40

Ελληνικά
11. Σε περίπτωση διαρροής της μπαταρίας, δυσοσμίας,
παραγωγής θερμότητας, αποχρωματισμού
ή παραμόρφωσής της, ή σε περίπτωση που
παρατηρηθεί κάτι μη φυσιολογικό κατά τη διάρκεια
της χρήσης, της επαναφόρτισης ή της αποθήκευσης,
αφαιρέστε αμέσως από τον εξοπλισμό ή από
τον φορτιστή της μπαταρίας και σταματήστε να
χρησιμοποιείτε.
ΠΡΟΣΟΧΗ
1. Εάν διαρρεύσει υγρό από τη
σε επαφή με τα μάτια σας, μην τα τρίψετε, αλλά
ξεπλύνετέ τα πολύ καλά με καθαρό νερό όπως νερό
βρύσης, και επικοινωνήστε αμέσως με γιατρό.
Εάν όχι, το υγρό μπορεί να προκαλέσει προβλήματα
στα μάτια σας.
μπαταρία και έλθει
2. Εάν διαρρεύσει υγρό στο δέρμα ή τα ρούχα σας,
ξεπλύνετε
αμέσως.
Υπάρχει το ενδεχόμενο να ερεθιστεί το δέρμα.
3. Εάν διαπιστώσετε σκουριά, δυσοσμία, υπερθέρμανση,
αποχρωματισμό, παραμόρφωση, και /ή άλλες
ανωμαλίες κατά τη χρήση της μπαταρίας για πρώτη
φορά, μην την χρησιμοποιήσετε, αλλά επιστρέψετέ
την στον υπεύθυνο προμηθευτή ή πωλητή.
καλά με καθαρό νερό, όπως νερό βρύσης,
ΤΕΧΝΙΚΑ ΧΑΡΑΚΤΗΡΙΣΤΙΚΑ
ΗΛΕΚΤΡΙΚΟ ΕΡΓΑΛΕΙΟ
Moντέλο CG18DL CG18DAL
Τύπος κονταριού Τύπος προσαρτήματος Ευθύ τύπου
Διάμετρος ικανότητας κοπής 425 mm
Διεύθυνση περιστροφής Αριστερόστροφα από την όψη του κιβωτίου ταχυτήτων
Ταχ ύ τ η τ α χωρίς φορτίο 0–4500 min
Χρόνος λειτουργίας με μια φόρτιση *
(Όταν η παρεχόμενη επαναφορτιζόμενη μπαταρία
είναι πλήρως φορτισμένη)
1
Μπαταρία BSL1830: Ιόντων λιθίου 18 V (3,0 Ah 10 στοιχεία)
Βάρος (χωρίς την κεφαλή κοπής και τον ιμάντα
ώμου)
*1 Τα δεδομένα στον παραπάνω πίνακα παρέχονται μόνο ως παράδειγμα. Επειδή το είδος του χόρτου, η
αιχμηρότητα του μαχαιριού, οι σ.α.λ. της κεφαλής κοπής, η περιβαλλοντική θερμοκρασία, τα χαρακτηριστικά της
επαναφορτιζόμενης μπαταρίας, οι μέθοδοι εργασίας, κλπ
θα πρέπει να χρησιμοποιούνται μόνο ως μια γενική κατευθυντήρια γραμμή.
*2 Συνθήκες: Εξωτερική διάμετρος του κόφτη νάιλον καλωδίου 425 mm, διακόπτης τοποθετημένος στην πλήρη
ταχύτητα.
5,4 kg 5,2 kg
. μπορεί να διαφέρουν σε μεγάλο βαθμό, τα παραπάνω
Φορτιστησ
Μοντέλο UC18YRSL
Τάσ η φόρτισης 14,4 V 18 V
Βάρος 0,6 kg
5 min*
-1
2
40
Page 41

ΒΑΣΙΚΑ ΕΞΑΡΤΗΜΑΤΑ
Ελληνικά
1
5
CG18DL
CG18DAL
(LSC)
1 Νάιλον κεφαλή (Τάπ α ασφαλείας) ............................. 1
2 Προστατευτικό περιέλιξης .........................................1
3 Εξάγωνο κλειδί άλεν 4 mm .........................................1
4 Σωληνωτό κλειδί (Εξάγων υποδ. 17/19) ..................... 1
5 Προστατευτικά γυαλιά ................................................ 1
6 Ιμάντας ώμου ...............................................................1
7 Μπαταρία (BSL1830) ................................................... 1
8 Φορτιστής (UC18YRSL) ..............................................1
Τα βασικά εξαρτήματα υπόκεινται σε αλλαγή χωρίς προειδοποίηση.
ΠΡΟΑΙΡΕΤΙΚΑ ΕΞΑΡΤΗΜΑΤΑ (πωλούνται
ξεχωριστά)
1. Μπαταρία (BSL1830)
8
4. Προστατευτικό δέρματος (1 εξοπλισμός με 2
προστατευτικά)
Προστατεύει τα πόδια από τα ιπτάμενα αποκόμματα.
2
6
3
4
7
2. Κάλυμμα μπαταρίας
3. Γρ άσ ο (100 g σωληνάριο)
Γρ α σά ρε τ ε το κιβώτιο ταχυτήτων μια φορά κάθε 50
ώρες εργασίας.
Τα προαιρετικά εξαρτήματα υπόκεινται σε αλλαγή χωρίς
προειδοποίηση.
ΕΦΑΡΜΟΓΕΣ
Κλάδεμα, ξεχορτάριασμα και κοπή χόρτων.
ΑΦΑΙΡΕΣΗ ΚΑΙ ΤΟΠΟΘΕΤΗΣΗ ΜΠΑΤΑΡΙΑΣ
1. Αφαίρεση μπαταρίας
Κρατάτε το κάλυμμα σφικτά και σπρώξτε τα μάνταλα
της μπαταρίας για να αφαιρέσετε την μπαταρία
(δείτε Εικ. 2).
ΠΡΟΣΟΧΗ
Ποτέ μην βραχυκυκλώσετε τη μπαταρία.
2. Τοποθέτηση μπαταρίας
Βάλτε την μπαταρία λαμβάνοντας υπόψη την
πολικότητά της (δείτε Εικ. 2).
41
Page 42

Ελληνικά
ΦΟΡΤΙΣΗ
Πριν χρησιμοποιήσετε το ηλεκτρικό εργαλείο, φορτίστε
την μπαταρία ως ακο λούθως.
1. Συνδέστε το καλώδιο ρεύματος του φορτιστή
σε μια πηγή ου ρεύματος.
Όταν το καλώδιο ρεύματος έχει συνδεθεί,
η δοκιμαστική λάμπα του φ ορτιστή θα
αναβοσβήνει στο κόκκινο. (Κατά διαστήματα του 1
δευτερολέπτου)
2. Βάλτε την μπαταρία μέσα στο φορτιστή
Εισάγετε τη μπαταρία στο φορτιστή μέχρι να είναι
διακριτή η γραμμή, όπως φαίνεται στην Εικ. 3, 4.
Η λυχνία
πιλότος
ανάβει ή
αναβοσβήνει
με κόκκινο
χρώμα.
Η λυχνία
πιλότος
ανάβει με
πράσινο
χρώμα.
(2) Σχετικά με τη θερμοκρασία της επαναφορτιζόμενης
μπαταρίας
Οι θερμοκρασίες για τις επαναφορτιζόμενες
μπαταρίες είναι όπως φαίνο νται στον Πίνακα 2, και
οι μπαταρίες που έχουν ζεσταθεί πρέπει να κρυών
ουν για λίγο πριν επαναφορτιστούν.
Πίνακας 2
Επαναφορτιζόμενες
μπαταρίες
BSL1830 0°C – 50°C
(3) Αναφορι κά με το χρόνο επαναφόρτισης
Σε εζάρτηση από το συνδυασμό του φορτιστή και
των μπαταριών, ο χρόνος φόρτισης θα είναι αυτός
που δείχνεται στον Πίνακα 3.
Πίνακας 3 Χρόνος φόρτισης (Στους 20°C)
Μπαταρία
BSL1830 Approx. 45 min.
ΣΗΜΕΙΩΣΗ
Ο χρόνος φόρτισης ενδέχεται να διαφέρει ανάλογα
με τη θερμοκρασία και την τάση της πηγής
ρεύματος.
Πριν τη
φόρτιση
Κατά τη
φόρτιση
Ολοκλήρωσ η
φόρτισης
Φόρτιση
αδύνατη
Αναμένεται
υπερθέρμανση
μπαταρίας
Επαναφορτιζόμενα διαστήματα των μπαταριών
Φορτιστής
Αναβοσβήνει Ανάβει για 0,5 δευτερόλεπτα. Δεν ανάβει
Ανάβει Ανάβει συνεχώς
Αναβοσβήνει Ανάβει για 0,5 δευτερόλεπτα. Δεν ανάβει
Τρε μ ο παίζε ι Ανάβει για 0,1 δευτερόλεπτα. Δεν ανάβει
Ανάβει Ανάβει συνεχώς Υπερθέρμανση μπαταρίας.
θερμοκρασίες στις
οποίες η μπαταρία
μπορεί να φορτιστεί
UC18YRSL
.
Πίνακας 1
Ενδείζεις δοκιμαστικής λάμπας
για 0,5 δευτερόλεπτα. (κλειστό για 0,5
δευτερόλεπτα)
για 0,5 δευτερόλεπτα. (κλειστό για 0,5
δευτερόλεπτα)
για 0,1 δευτερόλεπτα. (κλειστό για 0,1
δευτερόλεπτα))
3. Φόρτιση
Όταν βάλετε την μπαταρία στο φορτιστή, η φόρτιση
θα αρχίσει και η δο κιμαστική λάμπα θα ανάβει
συνεχώς στο κόκκινο.
Όταν η μπαταρία φορτιστεί πλήρως, η δοκιμαστική
λάμπα θα αναβοσβήνει
διαστήματα του 1 δευτερολέπτου) (Δείτε Πίνακα 1)
(1) Ένδειζη πιλοτικής λάμπας
Οι ενδείζεις της πιλοτικής λάμπας θα είναι όπως
φαίνεται στον Πίνακα 1, σύμφωνα με την κατάσταση
του φορτιστή ή της επαναφορτιζόμενης μπαταρίας.
4. Αποσυνδέστε το ηλεκτρικό καλώδιο του
φορτιστή από την πηγή εναλλασσόμενου
ρεύματτος AC.
5. Κρατήστε το φορτιστή σταθερά και τραβήξτε
τη μπαταρία.
ΣΗΜΕΙΩΣΗ
Με τη λειτουργία, βγάλτε πρώτα έζω τις μπαταρίες
από το
φορτιστή, και φυλάζτε τις μπαταρίες
κατάλληλα.
Πώς να κάνετε τις μπαταρίες να αποδίδουν
περισσότερο χρόνο
(1) Επαναφορτίστε τις μπαταρίες πριν αδειάσουν
τελείως.
Όταν αισθανθείτε ότι η ισχύς του εργαλείου γίνεται
ασθενέστερη, σταματήστε τη χρήση του εργαλείου
και επαναφ ορτίστε τις μπαταρίες.
Αν συνεχίσετε να χρησιμοποιείτε το εργαλείο και
αδειάστε το ηλεκτρικό ρεύμα, η μπαταρία μπορεί να
πάθει
ζημιά και η ζωής της θα γίνει μικρότερη.
(2) Αποφύγετε την επαναφόρτιση σε υψηλές
θερμοκρασίες.
Μια επαναφορτιζόμενη μπαταρία θα είναι ζεστή
αμέσως μετά τη χρήση. Αν μια τέτοια μπαταρία
επαναφορτιστεί αμέσως μετά τη χρήση, το
εσωτερικό της χημικό στοιχείο θα φθαρεί και η
ζωή της μπαταρίας θα γίνει μικρότερη. Αφήστε
τη μπαταρία και επαναφορτίστε την μετά αφότου
κρυώσει για λίγο.
στο κόκκινο (Κατά
Δυσλειτουργία στην
μπαταρία ή στο φορτιστή
Αδυναμία μετατροπής (η
μετατρο πή θα είναι εφικτή
μόλις κρυώσει η μπαταρία).
42
Page 43

Ελληνικά
ΠΡΟΣΟΧΗ
○ Όταν ο φορτιστής της μπαταρίας χρησιμοποιείται
συνεχώς, θερμαίνεται και έτσι προκαλούνται βλάβες.
Μόλις ολο κληρωθεί η φόρτιση, αφήστε να περάσουν
15 λεπτά ως την επόμενη φόρτιση.
○ Αν η μπαταρία επαναφορτιστεί ενώ είναι ζεστή λόγω
χρήσης ή έκθεσης στο ηλιακό φως, η πιλοτική λάμπα
ανάβει πράσινη.
Η μπαταρία δεν
αυτή, αφήστε την μπαταρία να κρυώσει πριν την
φορτίσετε.
○ Όταν η δοκιμαστική λάμπα αναβοσβήνει στο κόκκινο
γρήγορα (σε διαστήματα 0,2 δευτερολέπτων),
ελέγζτε και βγάλτε έζω οποιοδήποτε ζένο
αντικείμενο υπάρχει στην τρύπα του φορτιστή στην
οποία γίνεται η εγκατάσταση της μπαταρίας. Αν
δεν υπάρχουν ζένα αντικείμενα, είναι πιθανό ότι
μπαταρία ή ο φορτιστής δυσλειτουργεί. Πηγαίνετε το
στον εζουσιοδοτημένο Αντιπρόσωπο του Σέρβις
επαναφορτίζεται. Στην περίπτωση
η
ΠΛΗΡΟΦΟΡΊΕΣ ΓΙΑ ΤΗΝ ΈΝΔΕΙΞΗ
ΥΠΌΛΟΙΠΟΥ ΦΟΡΤΊΟΥ ΤΗΣ ΜΠΑΤΑΡΊΑΣ
Όταν πιέζετε το διακόπτη ένδειξης υπόλοιπου φορτίου
μπαταρίας, ανάβει η ενδεικτική λυχνία υπόλοιπου
φορτίου μπαταρίας και μπορείτε να ελέγξετε το
υπόλοιπο φορτίο. (Εικ. 5)
Όταν ελευθερώσετε το διακόπτη ένδειξης υπόλοιπου
φορτίου μπαταρίας, η αντίστοιχη ενδεικτική λυχνία
σβήνει. Στον Πίνακας 4 παρουσιάζεται η κατάσταση της
ενδεικτικής λυχνίας υπόλοιπου φορτίου μπαταρίας και
το υπόλοιπο φορτίο της μπαταρίας.
Πίνακας 4
Κατάσταση
λυχνίας
Καθώς η ένδειξη του υπόλοιπου φορτίου της μπαταρίας
εμφανίζεται κάπως διαφορετική ανάλογα με τη
θερμοκρασία του περιβάλλοντος και τα χαρακτηριστικά
της μπαταρίας, μπορείτε να τη δείτε ως στοιχείο
αναφοράς.
ΣΗΜΕΙΩΣΗ
○ Μην χτυπάτε δυνατά τον πίνακα διακοπτών ή μην
τον σπάσετε. Μπορεί να προκληθεί βλάβη.
○ Γι α να εξοικονομήσετε το φορτίο της μπαταρίας
που καταναλώνεται, η ενδεικτική λυχνία υπόλοιπου
φορτίου της μπαταρίας ανάβει ενώ πατάτε
το διακόπτη ένδειξης υπόλοιπου φορτίου της
μπαταρίας.
Υπόλοιπο φορτίο της μπαταρίας
Το υπόλοιπο φορτίο της μπαταρίας
είναι αρκετό.
Το υπόλοιπο φορτίο της μπαταρίας
είναι στη μέση.
Το υπόλοιπο φορτίο της μπαταρίας
σχεδόν αδειάζει.
Επαναφορτίστε την μπαταρία το
συντομότερο δυνατό.
ΠΡΙΝ ΑΠΟ ΤΗ ΛΕΙΤΟΥΡΓΙΑ
ΠΡΟΕΙΔΟΠΟΙΗΣΗ
Τραβήξτ ε έξω τη μπαταρία πριν προχωρήστε σε
οποιαδήποτε συναρμολόγηση.
1. Συναρμολόγηση προσαρτημάτων [CG18DL μόνο]
(Εικ. 6)
(1) Εισάγετε τον ασφαλιστικό πείρο στην ασφαλιστική
τρύπα του κύριου σωλήνα του προσαρτήματος κοπής
και φροντίστε ότι ο κύριος σωλήνας δεν μπορεί να
ξεσφίξει.
(2) Σφίξτε το κουμπί της λαβής για να τον στερεώσετε
καλά.
2. Τοποθέτηση του χερουλιού σχήματος βρόγχου
(Εικ. 7)
(1) Αφαιρέστε τα μπουλόνια M6 × 43 (2).
(2) Τοποθετήστε το χερούλι σχήματος βρόγχου πάνω
στον κύριο σωλήνα έτσι ώστε να κλείνει προς τον
κινητήρα.
(3) Τοποθετήστε το στερεωτικό του χερουλιού στο
κατώτερο άκρο του κύριου σωλήνα και στερεώστε το
καλά χρησιμοποιώντας τα μπουλόνια M6 × 43 (2) και
τα
παξιμάδια M6 (2).
ΣΗΜΕΙΩΣΗ
Στερεώσ τε το χερούλι σχήματος βρόγχου σε μια
θέση όπου παρέχει μια καλή λαβή.
3. Εγκατάσταση του καλύμματος ασφαλείας
(Δείτε Εικ. 8 και 9)
ΠΡΟΕΙΔΟΠΟΙΗΣΗ
Φροντίστε να εγκαταστήσετε το κάλυμμα ασφαλείας
στην καθορισμένη του θέση.
Αν δεν δοθεί προσοχή σε αυτή την προειδοποίηση
μπορεί να προκληθεί τραυματισμός από πέτρες
πετάγονται.
ΣΗΜΕΙΩΣΗ
Χρησιμοποιήστε το παρεχόμενο εξάγωνο κλειδί άλεν
για την εγκατάσταση.
(1) Χρησιμοποιήστε τις λαμαρινόβιδες D4 για
την εγκατάσταση του μαχαιριού στο κάλυμμα
προφυλακτήρα. (Εικ. 8)
Συνδέστε το κάλυμμα προφυλακτήρα στο κάλυμμα
ασφαλείας.
(2) Ευθυγραμμίστε τις δυο τρύπες στο υποστήριγμα
καλύμματος και στο κάλυμμα ασφαλείας και εισάγετε
τα εξαγ. κοίλης
υποστήριγμα καλύμματος είναι εγκαταστημένο στο
κιβώτιο ταχυτήτων.)
(3) Τοποθετήστε το στήριγμα καλύμματος κάτω από
το κάλυμμα ασφαλείας και χρησιμοποιήστε το
παρεχόμενο κλειδί Άλεν για να σφίξετε με εναλλαγή
τα εξάγ. κοίλης κεφαλής μπουλόνια M6 × 25 έως
ότου να είναι κατάλληλα σφιγμένα.
ΠΡΟΕΙΔΟΠΟΙΗΣΗ
Δώστε προσοχή ώστε να μην σας κόψει το
στο εσωτερικό του καλύμματος ασφαλείας.
4. Εγκατάσταση του ιμάντα ώμου
ΠΡΟΕΙΔΟΠΟΙΗΣΗ
○ Φροντίστε να συνδέσετε τον ιμάντα ώμου έτσι
ώστε να μπορεί να γίνεται σωστά η μεταφορά του
χλοοκόπτη.
○ Εάν έχετε την αίσθηση ότι το εργαλείο δεν λειτουργεί
κανονικά, απενεργοποιήστε τον κινητήρα αμέσως,
αφαιρέστε το στήριγμα γρήγορης απελευθέρωσης
του ιμάντα
ΠΡΟΕΙΔΟΠΟΙΗΣΗ
○ Εάν δεν υποστηρίζετε το εργαλείο όταν τραβάτε
τον ιμάντα γρήγορης ελευθέρωσης, αυτό μπορεί να
πέσει προκαλώντας τραυματισμό ή ζημιά.
Κρατήστε τον κύριο σωλήνα με το ένα χέρι καθώς
τραβάτε με το άλλο χέρι.
○ Φροντίστε ότι η λειτουργία γρήγορης
απελευθέρωσης λειτουργεί φυσιολογικά πριν
ξεκινήσετε
(1) Τοπο θ ε τ ή σ τ ε τον ιμάντα ώμου στον ώμο όπως
εμφανίζεται στην Εικ. 10 και κρεμάστε τον από τον
αναρτήρα του εργαλείου. Προσαρμόστε τον ιμάντα
ώμου στο κατάλληλο μήκος.
κεφαλής μπουλόνια M6 × 25. (Το
ώμου και βγάλτε το εργαλείο.
την εργασία.
που
μαχαίρι
43
Page 44

Ελληνικά
(2) Για να αφαιρέσετε το εργαλείο από τον ιμάντα
ώμου, υποστηρίξτε το εργαλείο κρατώντας τον
κύριο σωλήνα με το ένα χέρι και χρησιμοποιήστε το
άλλο χέρι για να τραβήξετε τον ιμάντα γρήγορης
απελευθέρωσης όπως εμφανίζεται στην Εικ. 10 και
να τον ελευθερώσετε από το υποστήριγμα.
(3) Για να βάλετε το εργαλείο
το υποστήριγμα στο άγκιστρο και εισάγετε το
υποστήριγμα γρήγορης απελευθέρωσης πάνω
από το άγκιστρο και μέσα στο πλατύ άνοιγμα του
υποστηρίγματος. (Εικ. 11)
Με προσοχή τραβήξτε τον ιμάντα ώμου για να
διασφαλίσετε ότι έχει στερεωθεί κατάλληλα.
πάνω σας, εισάγετε
ΚΕΦΑΛΗ ΚΟΠΗΣ
1. Λειτουργία
Η κεφαλή Κοπής “SURE-TAP”
○ Τροφοδοτεί αυτόματα περισσότερη νάιλον κλωστή
κοπής όταν χρησιμοποιηθεί με χαμηλές στροφές ανά
λεπτό (όχι περισσότερες από 4500 min
ΠΡΟΕΙΔΟΠΟΙΗΣΗ
○ Το καπάκι του στοιχείου κοπής πρέπει να είναι καλά
συνδεδεμένο στο στοιχείο κοπής.
○ Ελέγξετε για ρωγμές ή άλλη ζημιά το στοιχείο
κοπής, το κάλυμμα του στοιχείου κοπής και τα άλλα
εξαρτήματα.
○ Η κεφαλή κοπής πρέπει να είναι στερεωμένη καλά
πάνω στο κιβώτιο ταχυτήτων της συσκευής.
○ Γι α
εξαίρετη απόδοση και αξιοπιστία, πάντοτε να
χρησιμοποιείτε τη νάιλον κλωστή κοπής HITACHI.
Ποτέ να μην χρησιμοποιήσετε σύρμα ή άλλο υλικό το
οποίο μπορεί να καταστεί ένα επικίνδυνο βλήμα.
○ Εάν η κεφαλή κοπής δεν τροφοδοτεί κατάλληλα
την κλωστή κοπής, ελέγξετε αν έχουν τοποθετηθεί
κατάλληλα η νάιλον κλωστή και όλα τα εξαρτήματα.
Επικοινωνήστε
χρειάζεστε βοήθεια.
2. Εγκατάσταση (Εικ. 12)
(1) Τοποθετήσετε ένα εξάγωνο κλειδί άλεν μέσα στην
τρύπα του κιβωτίου ταχυτήτων για να ασφαλίσετε το
στήριγμα του κόφτη.
(2) Εγκαταστήστε το στήριγμα του κόφτη, το
προστατευτικό περιέλιξης, το κάλυμμα του
στηρίγματος του κόφτη στο κιβώτιο ταχυτήτων
του χλοοκόπτη.
αριστερόστροφο σπείρωμα. Περιστρέψετε
δεξιόστροφα για να ξεσφίξετε/αριστερόστροφα για
να σφίξετε.
3. Ρύθμιση του μήκους της κλωστής
(1) Ρυθμίστε τη μηχανή σε όσο το δυνατόν χαμηλότερη
ταχύτητα και βάλτε την κεφαλή στο έδαφος. Η
νάιλον κλωστή μπορεί τραβηχτεί προς τα έξω κατά
30 χιλ. περίπου ανά κτύπημα. (Εικ.
Επίσης μπορείτε να επεκτείνετε τη νάιλον κλωστή
με τα χέρια ωστόσο όμως ο κινητήρας πρέπει να
είναι εντελώς σταματημένος. (Εικ. 14)
(2) Προσαρμόστε τη νάιλον κλωστή στο κατάλληλο
μήκος 110 – 140 χιλ. πριν από κάθε λειτουργία.
(3) Όταν τραβηχτεί η νάιλον κλωστή πολύ μακριά,
περιελίξτε την μακριά κλωστή που βρίσκεται έξω
περιστρέφοντας την οδηγητική μπίλια με το χέρι.
(Εικ. 15)
4. Αντικατάσταση του νάιλον νήματος
(1) Αφαιρέστε το κάλυμμα του στοιχείου κοπής
σπρώχνοντας γερά προς τα μέσα τις γλωτ τίδες
ασφάλισης με τους αντίχειρές σας(Εικ. 16).
(2) Αφότου αφαιρέσετε το κάλυμμα του στοιχείου κοπής,
βγάλτε το μασούρι, και απορρίψετε την αριστερή
κλωστή
44
με τον αντιπρόσωπο της HITACHI αν
Το παξιμάδι στερέωσης έχει
.
13)
-1
).
(3) Διπλώστε την καινούργια νάιλον κλωστή στο μέσον
άνισα. (Εικ. 17)
(4) Θηλυκώστε το καμπυλωτό "U" άκρο της νάιλον
κλωστής μέσα στην αυλάκωση στο κεντρικό
διαχωριστικό του μασουριού.
Περιελίξτε και τα δυο άκρα της κλωστής στο
μασούρι προς την ίδια κατεύθυνση, διατηρώντας το
κάθε μισό της κλωστής στην δική του πλευρά στο
διαχωριστικό. (Εικ. 18)
(5) Σπρώξτε την κάθε κλωστή μέσα στις ανασταλτικές
τρύπες, αφήνοντας ελεύθερα άκρα κατά 100 χιλ σε
μήκος περίπου. (Εικ. 19)
(6) Περάστε και τα δυο ελεύθερα άκρα της κλωστής
μέσα στο οφθαλμίδιο όταν τοποθετείτε το μασούρι
μέσα στο κάλυμμα του στοιχείου κοπής. (Εικ. 20)
ΣΗΜΕΙΩΣΗ
Κατά την εισαγωγή
κάλυμμα του στοιχείου κοπής, προσπαθήστε να
ευθυγραμμίσετε τις ανασταλτικές τρύπες (3) με το
οφθαλμίδιο (4) για ευκολότερη απελευθέρωση της
κλωστής αργότερα.
(7) Το π ο θετ ή σ τ ε το ελατήριο του μασουριού μέσα στο
μασούρι. (Εικ. 21)
(8) Τοποθετήστε το στοιχείο κοπής πάνω στο κάλυμμα
του έτσι ώστε οι γλωττίδες ασφάλισης του
καλύμματος στο
ταιριάζουν με τις τρύπες του στοιχείου κοπής. Στη
συνέχεια σπρώξετε το κάλυμμα του στοιχείου κοπής
γερά μέχρι να κάνει κλικ στη θέση του. (Εικ. 21)
(9) Τραβήξτ ε τα ελεύθερα άκρα της κλωστής για να τα
ελευθερώσετε από τις ανασταλτικές τρύπες. Εάν
οι κλωστές συμβεί να είναι
100 χιλ), περιτυλίξτε τις ώστε να γίνουν περίπου 100
χιλ πιέζοντας και περιστρέφοντας την οδηγητική
μπίλια. (Εικ. 15)
(10)
Το αρχικό μήκος της κλωστής κοπής πρέπει να είναι
περίπου 150 χιλ και θα πρέπει να είναι ίσο και στις
δυο πλευρές. (Εικ. 22)
του μασουριού μέσα στο
κάλυμμα του στοιχείου κοπής να
πολύ μακριές (πάνω από
ΛΕΙΤΟΥΡΓΙΑ
Κοπή χόρτων
ΠΡΟΕΙΔΟΠΟΙΗΣΗ
○ Μην χειρίζεστε το εργαλείο τη νύχτα ή κάτω από
κακές καιρικές συνθήκες όταν είναι χαμηλή η
ορατότητα.
○ Μην χειρίζεστε το εργαλείο κατά την διάρκεια της
βροχόπτωσης ή αμέσως μετά από τη βροχόπτωση.
○ Φοράτε κατάλληλα παπούτσια για να αποτρέψετε
το γλίστρημα το οποίο μπορεί να προκαλέσει την
απώλεια της ισορροπίας και την πτώση σας.
○ Μην χρησιμοποιήσετε το εργαλείο σε απότομες
πλαγιές.
Κατά την κοπή χόρτων πάνω σε πλαγιές που δεν
είναι πολύ απότομες, κόβετε μετακινούμενοι προς
την κορυφή.
○ Τοποθετήστε το εργαλείο στον ιμάντα ώμου, βάλτε
το δεξιό σας χέρι στο χερούλι και το αριστερό στη
λαβή με σχήματος βρόγχου και κρατήστε το καλά.
○ Προσέξτε ώστε να μην μετακινήσετε τον κεφαλή
κοπής πολύ κοντά στα πόδια σας.
○ Μην ανυψώσετε την κεφαλή κοπής πάνω από το
γόνατό σας κατά το κόψιμο.
○ Μην χρησιμοποιήσετε το εργαλείο εκεί που η κεφαλή
κοπής μπορεί να έρθει σε επαφή
και άλλα εμπόδια.
○ Το προσάρτημα κοπής μπορεί να προκαλέσει
τραυματισμό καθώς συνεχίζει να περιστρέφεται μετά
την απενεργοποίηση του κινητήρα. Όταν η συσκευή
είναι κλειστή, βεβαιωθείτε ότι το εξάρτημα κοπής
με πέτρες, δέντρο
Page 45

Ελληνικά
έχει σταματήσει να λειτουργεί πριν τοποθετήσετε τη
συσκευή κάτω.
○ Μην χρησιμοποιήσετε το εργαλείο αν υπάρχει άλλο
άτομο μέσα σε ακτίνα 15 μέτρων. Εάν εργάζεστε με
κάποιο άλλο άτομο διατηρήστε μια απόσταση μεταξύ
σας μεγαλύτερη των 15 μέτρων.
1. Εισάγετε την μπαταρία τοποθετώντας τους
πόλους στη σωστή θέση
2. Ενεργοποιήστε το εργαλείο (Εικ
○ Πιέστε το κουμπί εκκίνησης στο περίβλημα,
ενεργοποιείται η ισχύς και ο λαμπτήρας ρεύματος
στο χερούλι ανάβει στο κόκκινο χρώμα.
○ Πιέζοντας το κουμπί εκκίνησης για δεύτερη φορά
απενεργοποιείται η ισχύς και ο κόκκινος λαμπτήρας
σβήνει.
[Αυτόματη απενεργοποίηση ισχύος]
Όταν είναι ενεργοποιημένη η ισχύς αλλά ο μοχλός
δεν
χρησιμοποιηθεί για περισσότερο από ένα
λεπτό, το εργαλείο απενεργοποιείται αυτόματα. Γι α
να ενεργοποιήσετε το εργαλείο ξανά, πιέστε για
δεύτερη φορά το κουμπί εκκίνησης.
ΠΡΟΕΙΔΟΠΟΙΗΣΗ
Ποτέ να μην εγκαταλείψετε το εργαλείο
ενεργοποιημένο. Η ενέργεια αυτή μπορεί να
προκαλέσει ατύχημα.
3. Κοπή χόρτων
○ Πιάστε το χερούλι από πάνω, πιέστε τον μοχλό
ασφάλισης και
περιστροφή της κεφαλής κοπής. (Εικ. 24)
○ Ελευθερώστε το μοχλό όταν ολοκληρώσετε το
κόψιμο και σταματήστε τον κινητήρα.
○ Τοποθετήστε τον αντίχειρά σας στο χερούλι
σχήματος βρόγχου και πιάστε το χερούλι με τα άλλα
σας δάκτυλα. (Εικ. 25)
○ Πάρετε μια στάση
με ευκολία.
[Τεχνικές κοπής χόρτων]
○ Όταν το κινητήρας περιστρέφετε αργά, είναι
αδύνατος και τα χόρτα έχουν την τάση να
μπλέκονται μέσα στο μαχαίρι. Όταν περιστρέφεται
πολύ γρήγορα, οι δονήσεις και ο θόρυβος αυξάνονται
και μεγαλώνει η κατανάλωση του ρεύματος που
παρέχεται από τη μπαταρία.
○ Σε υπερβολική ταχύτητα, η μπαταρία θα εξαντληθεί
γρηγορότερα.
○ Μην ταλαντώνετε τον σωλήνα, αλλά χρησιμοποιήστε
τα πλαϊνά για να μετακινήσετε την κεφαλή κοπής
οριζόντια από δεξιά προς τα αριστερά σχηματίζοντας
τόξο καθώς προχωράτε προς τα εμπρός και
χρησιμοποιήστε την αριστερή πλευρά της κεφαλής
κοπής για την κοπή των χόρτων. (Εικ
τραβήξτε το μοχλό για να ξεκινήσει η
που σας βοηθά να μετακινηθείτε
. 23)
. 26)
ΣΗΜΕΙΑ ΠΡΟΣΟΧΗΣ ΚΑΤΑ ΤΗ ΛΕΙΤΟΥΡΓΙΑ
Συνεχής εργασία
Αυτό το εργαλείο είναι εφοδιασμένο με ένα
κύκλωμα προστασίας υπερφόρτισης που
προστατεύει τα ηλεκτρονικά μέρη που ελέγχουν
την επαναφορτιζόμενη μπαταρία. Κατά την συνεχή
εργασία κοπής, η θερμοκρασία του εργαλείου θα
αυξηθεί και τελικά θα ενεργοποιηθεί το κύκλωμα
προστασίας έναντι της υπερφόρτισης, το οποίο θα
απενεργοποιήσει το εργαλείο.
Εάν
συμβεί αυτό, αφήστε το εργαλείο να κρυώσει
για κάποιο χρονικό διάστημα. Όταν πέσει η
θερμοκρασία, τότε θα είναι πάλι εφικτή η χρήση
του εργαλείου. Εάν θα πρέπει να γίνει η αλλαγή της
επαναφορτιζόμενης μπαταρίας κατά την διάρκεια
της συνεχούς λειτουργίας, αφήστε το εργαλείο να
ξεκουραστεί για περίπου 15 λεπτά.
Διακόπτης ταχύτητας
Ο διακόπτης αυτός είναι εφοδιασμένος με ένα
ηλεκτρονικό κύκλωμα που επιτρέπει τις συνεχείς
μεταβολές της ταχύτητας.
Εάν η σκανδάλη διακόπτης ρυθμιστή σε πολύ
χαμηλό επίπεδο (χαμηλό εύρος σ.α.λ.) και ο
κινητήρας λειτουργεί συνεχώς με μεγάλο φόρτο, τα
ηλεκτρονικά κυκλώματα θα ζεσταθούν και μπορεί να
υποστούν βλάβη
Να εκτελείτε μόνο ελαφριές εργασίες στις χαμηλές
του κινητήρα.
.
ΣΥΝΤΗΡΗΣΗ ΚΑΙ ΕΛΕΓΧΟΣ
ΠΡΟΕΙΔΟΠΟΙΗΣΗ
○ Τραβήξτ ε έξω την μπαταρία πριν κάνετε τον
οποιονδήποτε έλεγχο ή συντήρηση.
1. Έλεγχος της κατάστασης της κεφαλής κοπής
Ο έλεγχος της κεφαλής κοπής πρέπει να γίνεται
τακτικά. Εάν η κεφαλή κοπής φθαρεί ή σπάσει μπορεί
να γλισ τρήσει ή να ελαττώσει την αποδοτικότητα του
κινητήρα και να τον κάψει.
Αντικατασ τήστε
καινούργια.
ΠΡΟΕΙΔΟΠΟΙΗΣΗ
○ Μπορεί να είναι επικίνδυνη η χρήση μιας κεφαλή
κοπής η οποία είναι φθαρμένη ή σπασμένη. Γι α αυτό
αντικαταστήστε την με μια καινούργια.
2. Έλεγχος των βιδών
Οι ξεσφιγμένες βίδες είναι επικίνδυνες. Επιθεωρήστε
τις τακτικά και φροντίστε να είναι σφιγμένες.
ΠΡΟΕΙΔΟΠΟΙΗΣΗ
○ Είναι εξαιρετικά
εργαλείου με ξεσφιγμένες τις βίδες.
3. Συντήρηση του μοτέρ
Η περιέλιξη στη μονάδα του μοτέρ είναι η “καρδιά”
του ηλεκτρικού εργαλείου.
Δώστε μεγάλη προσοχή για να διασφαλίσετε ότι η
περιέλιξη δεν θα πάθει ζημιά και / ή θα βραχεί με λάδι
ή νερό.
4. Λίπανση του
○ Χρονικό διάστημα συντήρησης
Θα πρέπει να γίνεται έλεγχος για την ανάγκη
λίπανσης στο κιβώτιο ταχυτήτων κάθε 50 ώρες
χρήσης.
○ Λίπανση
Αφαιρέστε την κεφαλή κοπής. Καθαρίστε όλη
τη βρωμιά και τα θραύσματα από την περιοχή
ανάμεσα στο κιβώτιο ταχυτήτων. Αφαιρέστε το
μπουλόνι Μ6 από το πλάι του κιβωτίου ταχυτήτων.
Περιστρέφοντας τον άξονα στερέωσης εκχύστε
λιπαντικό βασισμένο στο λίθιο (P/N 682975) μέσα
από την τρύπα έως ότου να γεμίσει το κιβώτιο
ταχυτήτων. Επανατοποθετήστε το μπουλόνι Μ6.
5. Ελεγχος στα καρβουνάκια (Εικ. 27)
Το μοτέρ χρησιμοποιεί καρβουνάκια τα οποία είναι
αναλώσιμα μέρη. Επειδή ένα υπερβολικό φθαρμέν ο
καρβουνάκι μπορεί να δημιουργήσει πρόβλημα στο
μοτέρ, αντικαταστήστε το καρβουνάκι με καιν ούργιο
όταν φθαρεί ή όταν φθάσει κοντά στο “όριο φθοράς”.
Επιπρόσθετα πάντοτε να κρατάτε τα καρβουνάκια
καθαρά και εξασφαλίστε ότι ολισθαίνουν ελεύθερα
μέσα στις θήκες.
ΣΗΜΕΙΩΣΗ
Όταν αντικαθιστάτε το καρβουνάκι με ένα
καινούργιο, βεβαιωθείτε να χρησιμοποιήσετε το
Καρβουνάκι της Hitachi με Αρ. Κωδικού 999054.
την φθαρμένη κεφαλή κοπής με μια
επικίνδυνη η χρήση του ηλεκτρικού
κιβωτίου ταχυτήτων
45
Page 46

Ελληνικά
6. Αντικατάσταση των καρβουνακιών
Βγάλτε το καρβουνάκι αφαιρώντας πρώτα το καπάκι
του καρβουνακιού και μετά γαντζώστε την προεξοχή
του καρβουνακιού με ένα κατσαβίδι για κεφαλές με
εγκοπές, κλπ., όπως φαίνεται στην Εικ. 28.
Κατά την τοποθέτηση της ψήκτρας του
καρβουνακιού, επιλέξτε την κατεύθυνση έτσι ώστε
το καρφί της ψήκτρας του
29) να συμφωνεί με την προεξοχή επαφής έξω από
το σωλήνα της ψήκτρας. Στη συνέχει σπρώξτε το
με το δάκτυλο όπως εμφανίζεται στην Εικ. 30. Στ ο
τέλος, τοποθετήστε το κάλυμμα της ψήκτρας.
ΠΡΟΣΟΧΗ
○ Να είστε απόλυτα σίγουροι ότι βάλατε το καρφί
του καρβουνακιού μέσα στο τμήμα
από το σωλήνα της ψήκτρας. (Μπορείτε να βάλετε
οποιοδήποτε από τα δυο καρφιά που παρέχονται.)
○ Προσοχή πρέπει να δοθεί επειδή το οποιοδήποτε
λάθος σε αυτή την εργασία μπορεί να προκαλέσει
την παραμόρφωση του καρφιού και ενδέχεται να
προκαλέσει πρόβλημα στο μοτέρ στο αρχικό στάδιο.
7. Καθαρισμός του εξωτερικού
Όταν το κρουστικό δραπανοκατσάβιδο είναι
λερωμένο, να το σκουπίζετε με ένα μαλακό στεγνό
πανί ή με ένα πανί μουσκεμένο σε σαπουνόνερο.
Μη χρησιμοποιείτε διαλύματα χλωρίνης, βενζίνη ή
διαλυτικό χρώματος, για να μην καταστραφούν τα
πλαστικά μέρη.
8. Αοθήκευση
Αποθηκεύετε το κρουστικό δραπανοκατσάβιδο σε
χώρο όπου η θερμοκρασία είναι μικρότερη από 40
και μακριά από την πρόσβαση παιδιών.
καρβουνακιού (δείτε Εικ.
επαφής έξω
゚C
9. Λίστα συντήρησης εξαρτημάτων
ΠΡΟΣΟΧΗ
Η Επισκευή, τροποποίηση και ο έλεγχος των
Ηλεκτρικών Εργαλείων της Hitachi πρέπει να
γίνεται από ένα Εξουσιοδοτημένο Κέντρο Σέρβις της
Hitachi.
Ειδικά για τη συσκευή λέιζερ, το σέρβις της πρέπει
να γίνεται από ένα εξουσιοδοτημένο αντιπρόσωπο
του κατασκευαστή του λέιζερ.
Πάντοτε να αναθέτετε την επισκευή της συσκευής
λέιζερ στο Εξουσιοδοτημένο Κέντρο Σέρβις της
Hitachi.
Αυτή η Λίστα των Εξαρτημάτων θα είναι χρήσιμη αν
δοθεί με το εργαλείο Hitachi στο Εξουσιοδοτημένο
Κέντρο Σέρβις της Hitachi κατά την επισκευή ή την
συντήρηση.
Κατά την χρήση και την συντήρηση των ηλεκτρικών
εργαλείων, οι κανονισμοί ασφαλείας
που υπάρχουν σε κάθε χώρα πρέπει να τηρούνται.
ΤΡΟΠΟΠΟΙΗΣΕΙΣ
Τα Ηλεκτρικά Εργαλεία της Hitachi βελτιώνονται
συνεχώς και τροποποιούνται για να ενσωματώσουν
τα τελευταία τεχνολογικά επιτεύγματα.
Ανά λογα, κάποια σημεία μπορούν να αλλάξουν χωρίς
προειδοποίηση.
Σημαντική ειδοποίηση για τις μπαταρίες στα
ηλεκτρικά εργαλεία της Hitachi χωρίς καλώδιο
Να χρησιμοποιείτε πάντα μία από τις καθορισμένες
γνήσιες μπαταρίες. Δεν μπορούμε να εγγυηθούμε
την ασφάλεια και την απόδοση του ηλεκτρικού μας
εργαλείου όταν χρησιμοποιείτε μπαταρίες που είναι
διαφορετικές από αυτές που έχουν σχεδιαστεί από
εμάς, ή όταν η μπαταρία
ή τροποποιημένη (λόγω αποσυναρμολόγησης ή
αντικατάστασης στοιχείων ή άλλων εσωτερικών
μερών).
είναι αποσυναρμολογημένη
και οι κανόνες
ΕΠΙΛΥΣΗ ΠΡΟΒΛΗΜΑΤΩΝ
Χρησιμοποιήστε τις επιθεωρήσεις του παρακάτω πίνακα εάν το εργαλείο δεν λειτουργεί φυσιολογικά. Εάν τα
παρακάτω δεν επιλύουν το πρόβλημα, επικοινωνήστε με την αντιπρόσωπο σας ή με το εξουσιοδοτημένο κέντρο
εξυπηρέτησης της Hitachi.
Σύμπτωμα Πιθανή αιτία Αποκατάσταση
Φορτιστής Ο λαμπτήρας
46
του φορτιστή
δεν ανάβει.
Ο λαμπτήρας
του φορτιστή
δεν σβήνει μετά
από 4 ώρες
φόρτισης.
Το βύσμα δεν είναι
συνδεδεμένο στην πρίζα
εναλλασσόμενου ρεύματος.
Η μπαταρία δεν είναι σωστά
συνδεδεμένη στο φορτιστή.
Τα ηλεκτρόδια της
μπαταρίας ή του φορτιστή
είναι
βρώμικα.
Η μπαταρία είναι υπερβολικά
θερμή.
Η μπαταρία ή ό φορτιστής
παρουσιάζει σφάλμα.
Συνδέστε το βύσμα στην πρίζα εναλλασσόμενου
ρεύματος.
Τοπ ο θ ε τ ή σ τ ε τη μπαταρία έτσι ώστε να κάθεται
σωστά μέσα στον φορτιστή.
Χρησιμοποιήστε μια μπατονέτα για να καθαρίσετε τα
ηλεκτρόδια.
Αφήστε τη μπαταρία να ψυχθεί κατάλληλα πριν τη
φόρτιση.
Αποσυνδέστε το βύσμα από την πρίζα και
επικοινωνήστε με τον αντιπρόσωπό
εξουσιοδοτημένο κέντρο εξυπηρέτησης της Hitachi.
σας ή με το
Page 47

Σύμπτωμα Πιθανή αιτία Αποκατάσταση
Εργαλείο Δεν λειτουργεί. Η επαναφορτιζόμενη
Λειτουργεί
αλλά γρήγορα
σταματά.
Ισχυρές
δονήσεις
Παράξενος
θόρυβος από
το κιβώτιο
ταχυτήτων
μπαταρία έχει αποφορτιστεί.
Η επαναφορτιζόμενη
μπαταρία δεν έχει
τοποθετηθεί κατάλληλα.
Η ισχύς δεν έχει
ενεργοποιηθεί.
Ο μοχλός ασφάλισης
πατήθηκε όταν ο μοχλός
τραβήχτηκε πίσω.
Το εργαλείο τραβά
ποσότητες χόρτων τα οποία
μπλέκονται μεταξύ του
καλύμματος ασφαλείας
και της νάιλον κεφαλής, το
εργαλείο υπερφορτώνεται.
Η ισχύς της
επαναφορτιζόμενης
μπαταρίας είναι χαμηλή.
Η επαναφορτιζόμενη
μπαταρία έχει
υπερθερμανθεί.
Το χερούλι σχήματος
βρόγχου δεν είναι
κατάλληλα τοποθετημένο
στον κύριο σωλήνα.
Το κάλυμμα ασφαλείας
δεν είναι κατάλληλα
τοποθετημένο στον κύριο
σωλήνα.
Έχει τελειώσει το γράσο στο
κιβώτιο ταχυτήτων.
μεγάλες
Φορτίστε την επαναφορτιζόμενη μπαταρία.
Αφαιρέστε την επαναφορτιζόμενη μπαταρία από το
χώρο τοποθέτησης της μπαταρίας του εργαλείου
και ελέγξτε για την ύπαρξη ξένων στοιχείων και
αν υπάρχουν αφαιρέστε τα. Επίσης ελέγξτε τα
ηλεκτρόδια της μπαταρίας για
νερού ή άλλων ξένων στοιχείων. Χρησιμοποιήστε
μια μπατονέτα για τον καθαρισμό. Φροντίστε ώστε
η επαναφορτιζόμενη μπαταρία να πατηθεί προς τα
μέσα έως ότου μπει στη θέση της κάνοντας ένα κλικ.
Πατήστε το κουμπί εκκίνησης στο περίβλημα για
να ξεκινήσει το εργαλείο. Σε αυτό
υπάρχει μια λειτουργία αυτόματης διακοπής. Η ισχύς
απενεργοποιείται αμέσως εάν δεν τραβήξει κάποιος
το μοχλό μέσα σε ένα λεπτό από την ενεργοποίηση.
Για να ενεργοποιήσετε το εργαλείο ξανά, πιέστε για
δεύτερη φορά το κουμπί εκκίνησης.
Πατώντας το κουμπί εκκίνησης για δεύτερη φορά
απενεργοποιείται η ισχύς.
Για την αποτροπή ατυχημάτων από την λανθασμένη
δεν
λειτουργία, ο μοχλός ασφάλισης πρέπει να πατηθεί
καθώς τραβιέται ο μοχλός προς τα πίσω για να
ξεκινήσει ο κινητήρας.
Κρατήστε το χερούλι από τα πάνω και πιέστε το
μοχλό ασφάλισης καθώς τραβάτε το χερούλι.
Αυτό είναι το αποτέλεσμα μιας λειτουργίας
που προστατεύει την επαναφορτιζόμενη
μπαταρία απενεργοποιώντας τον κινητήρα όταν
υπερφορτώνεται το εργαλείο. Απενεργοποιήστε το
εργαλείο και αφαιρέστε την αιτία της υπερφότισης.
Πιέστε το κουμπί εκκίνησης ακόμη μια
συνεχιστεί η λειτουργία.
Φορτίστε την επαναφορτιζόμενη μπαταρία.
Σταματήσ τε τη χρήση της επαναφορτιζόμενης
μπαταρίας, αφαιρέστε την από το εργαλείο και
αφήστε την να κρυώσει σε μια καλά αεριζόμενη
περιοχή η οποία δεν είναι
φως.
Στερε ώστε το κατάλληλα.
Στερε ώστε το κατάλληλα.
Λιπάνετε χρησιμοποιώντας γράσο.
την ύπαρξη βρωμιάς,
εκτεθειμένη στο ηλιακό
Ελληνικά
το εργαλείο
φορά για να
47
Page 48

Ελληνικά
ΕΓΓΥΗΣΗ
Εγγυώμαστε τα εργαλεία Hitachi Power Tools σύμφωνα
με τη νομοθεσία και τους κανονισμούς ανά χώρα.
Η παρούσα εγγύηση δεν καλύπτει ελαττώματα
ή ζημιές λόγω κακής χρήσης, κακοποίησης ή
φυσιολογικής φθοράς. Σε περίπτωση παραπόνων
παρακαλούμε αποστείλετε το Power Tool χωρίς να
το αποσυναρμολογήσετε μαζί με το ΠΙΣΤΟΠΟΙΗΤΙΚΟ
ΕΓΓΥΗΣΗΣ το οποίο βρίσκεται στο τέλος των οδηγιών
αυτών, σε
Hitachi.
ΣΗΜΕΙΩΣΗ
Εξαιτίας του συνεχιζόμενου προγράμματος έρευνας
και ανάπτυξης της HITACHI τα τεχνικά χαρακτηριστικά
που εδώ αναφέρονται μπορούν να αλλάξουν χωρίς
προηγούμενη ειδοποίηση.
Πληροφορίες που αφορούν τον εκπεμπόμενο
θόρυβο και τη δόνηση
Οι τιμές μετρήθηκαν σύμφωνα με το IEC60335 και
βρέθηκαν σύμφωνες με το ISO 4871.
Μετρηθείσα τυπική στάθμη ηχητικής ισχύος Α: 95 dB (A).
Μετρηθείσα τυπική στάθμη ηχητικής πίεσης Α: 86 dB (A).
Αβεβαιότητα ΚρΑ: 3 dB (A).
Φοράτε προστατευτικά αυτιών.
Συνολικές τιμές δόνησης (διανυσματικό άθροισμα
τριαξονικού καλωδίου) που καθορίζονται σύμφωνα με το
πρότυπο IEC60335.
Τιμ ή
Εξουσιοδοτημένο Κέντρο Επισκευής της
εκπομπής δόνησης ah, w = 7,5 m/s
2
ΠΡΟΣΟΧΗ
◯ Η τιμή εκπομπής δόνησης κατά την ουσιαστική
χρήση του ηλεκτρικού εργαλείου μπορεί να διαφέρει
από τη δηλωμένη τιμή, ανάλογα με το που και πως
χρησιμοποιείται το εργαλείο.
◯ Γι α να αναγνωρίσετε τα μέτρα ασφαλείας για την
προστασία του χειριστή που βασίζονται σε μία
εκτίμηση της έκθεσης στις πραγματικές συνθήκες
χρήσης (λαμβάνοντας υπόψη όλα τα μέρη του
κύκλου λειτουργίας όπως τα διαστήματα που
το εργαλείο είναι απενεργοποιημένο και όταν
λειτουργεί στο ρελαντί μαζί με το χρόνο διέγερσης).
48
Page 49

Polski
OGÓLNE WSKAZÓWKI BEZPIECZEŃSTWA
DOTYCZĄCE URZĄDZEŃ ELEKTRYCZNYCH
OSTRZEŻENIE
Należy dokładnie zapoznać się ze wszystkimi
ostrzeżeniami i wskazówkami bezpieczeństwa.
Nieprzestrzeganie ostrzeżeń oraz wskazówek
bezpieczeństwa może spowodować porażenie prądem
elektrycznym, pożar i/lub odniesienie poważnych obrażeń.
Ostrzeżenia i wskazówki bezpieczeństwa powinny
być przechowywane do użycia w przyszłości.
Wykorzystywane w treści wskazówek wyrażenie
“narzędzie elektryczne” dotyczy narzędzi zasilanych z
sieci (przewodowych) lub z baterii (bezprzewodowych).
1) Bezpieczeństwo stanowiska pracy
a) Miejsce pracy powinno być czyste i dobrze
oświetlone.
Brak porządku lub nieodpowiednie oświetlenie
miejsca pracy może być przyczyną wypadku.
b) Nie należy używać narzędzi elektrycznych
w miejscach zagrożonych wybuchem, na
przykład w pobliżu łatwopalnych cieczy,
gazów lub pyłów.
Pracujące narzędzie elektryczne wytwarza iskry
grożą
ce wybuchem.
c) Dzieci oraz osoby postronne powinny
pozostawać w bezpiecznej odległości od
pracującego urządzenia.
Dekoncentracja może spowodować utratę kontroli
nad urządzeniem.
2) Bezpieczeństwo elektryczne
a) Wtyczka narzędzia musi pasować do gniazda
zasilania.
Nie wolno przerabiać wtyczki.
Narzędzia posiadające uziemienie nie powinny
być używane
Przestrzeganie powyższych zaleceń dotyczących
wtyczek i gniazdek pozwoli zmniejszyć ryzyko
porażenia prądem elektrycznym.
b) Należy unikać dotykania jakichkolwiek
powierzchni i elementów uziemionych, takich
jak rury, grzejniki, kuchenki lub urządzenia
chłodnicze.
Ryzyko porażenia prądem elektrycznym jest
wyższe, gdy ciało jest uziemione.
c) Nie należy narażać narzędzi elektrycznych na
działanie deszczu lub
Obecność wody zwiększa niebezpieczeństwo
porażenia prądem elektrycznym.
d) Nie należy używać przewodu zasilającego
w sposób niezgodny z przeznaczeniem. Nie
wolno używać przewodu do przenoszenia lub
ciągnięcia urządzenia bądź wyłączania go z
prądu.
Przewód powinien znajdować się w
bezpiecznej odleg
oleju, ostrych krawędzi lub poruszających się
części.
Uszkodzenie lub zapętlenie przewodu zwiększa
ryzyko porażenia prądem elektrycznym.
e) W przypadku używania narzędzia
elektrycznego na wolnym powietrzu należy
korzystać z przedłu żaczy przeznaczonych do
takiego zastosowania.
Używanie odpowiednich przedłużaczy zmniejsza
ryzyko porażenia prądem elektrycznym.
z wtyczkami przejściowymi.
wilgoci.
łości od źródeł ciepła,
f) W przypadku korzystania z narzędzia w
miejscu o dużej wilgotności należy zawsze
używać wyłącznika różnicowoprądowego.
Korzystanie z takiego wyłącznika zmniejsza ryzyko
porażenia prądem elektrycznym.
3) Bezpieczeństwo osobiste
a) Podczas korz ystania z narzędzia
elektrycznego należy zawsze koncentrować
się na wykonywanej pracy i postępować
zgodnie z zasadami zdrowego rozsądku.
Narzędzia elektryczne nie powinny być
obsługiwane przez osoby zmęczone lub
znajdujące się pod wpływem substancji
odurzających, alkoholu bądź lekarstw.
Chwila nieuwagi podczas obsługi narzędzia
elektrycznego może spowodować odniesienie
poważnych obrażeń.
b) Zawsze używać odpowiedniego osobistego
wyposaż
odpowiednie okulary ochronne.
Stosowane w odpowiednich warunkach
wyposażenie zabezpieczające, takie jak maska
przeciwpyłowa, obuwie antypoślizgowe, kask lub
nauszniki zmniejsza ryzyko odniesienia obrażeń
ciała.
c) Uniemożliwić nieoczekiwane uruchomienie
narzędzia. Przed podłączeniem narzędzia do
gniazda zasilania i/lub zestawu baterii, a także
przed podniesieniem lub przeniesieniem go,
należy upewnić się, że wy
w położeniu wyłączenia.
Ze względów bezpieczeństwa nie należy przenosić
narzędzi elektrycznych, trzymając palec na
wyłączniku, ani podłączać do zasilania urządzeń,
których wyłącznik znajduje się w położeniu
włączenia.
d) Przed włączeniem usunąć wszystkie klucze
regulacyjne.
Pozostawienie klucza regulacyjnego połączonego
z częścią obrotową narzędzia może spowodować
odniesienie obrażeń.
e) Nie sięga
stabilnie, zachowując równowagę.
Zapewnia to lepsze panowanie nad narzędziem w
nieoczekiwanych sytuacjach.
f) Należy nosić odpowiednią odzież roboczą.
Nie nosić luźnych ubrań lub biżuterii. Tr z yma ć
włosy, odzież i rękawice w bezpiecznej
odległości od ruchomych części urzą
Luźne ubrania, biżuteria lub długie włosy mogą
zostać wciągnięte przez ruchome części narzędzia.
g) Jeżeli wraz z narzędziem dostarczone zostało
wyposażenie s łużące do odprowadzania
pyłów, należy pamiętać o jego właściwym
podłączeniu i używaniu.
Właściwe zbieranie i odprowadzanie pyłu
zmniejsza zagrożenia związane z jego obecno
4) Obsługa i konser wacja narzędzi elektrycznych
a) Nie używać narzędzia elektrycznego ze
zbyt dużą siłą. Należy stosować narzędzie
odpowiednie dla wykonywanej pracy.
Narzędzie przeznaczone do określonej pracy
wykona ją lepiej i w sposób bardziej bezpieczny,
pracując z zalecaną prędkością.
b) Nie należy używać narzędzia, którego
wyłącznik jest uszkodzony.
Każde urządzenie, które nie może być właściwie
włączane i wyłączane, stanowi zagrożenie i musi
zostać naprawione.
enia ochronnego. Zawsze nosić
łącznik znajduje się
ć zbyt daleko. Należy zawsze stać
dzenia.
ścią.
49
Page 50

Polski
c) Należy zawsze odłączać urządzenie z sieci
zasilania i/lub baterii przed przystąpieniem
do jakichkolwiek modyfi kacji, wymiany
akcesoriów itp. oraz kiedy urządzenie nie
będzie używane przez dłuższy czas.
Powyższe środki mają na celu wyeliminowanie
ryzyka nieoczekiwanego uruchomienia urządzenia.
d) Nieużywane narzędzia elektryczne powinny
być
przechowywane w miejscu niedostępnym
dla dzieci oraz osób, które nie znają zasad ich
obsługi lub niniejszych zaleceń.
Korzystanie z narzędzi elektrycznych przez osoby,
które nie zostały przeszkolone, może stanowić
zagrożenie.
e) Należy dbać o odpowiednią konserwację
narzędzi elektrycznych. Przed rozpoczęciem
pracy należy sprawdzić, czy ruchome części
urządzenia nie s ą wygięte, uszkodzone lub
pęknięte i czy nie występują jakiekolwiek inne
okoliczności, które mogłyby uniemożliwić
bezpieczną pracę urządzenia.
W razie uszkodzenia przed kolejnym użyciem
narzędzie musi zostać naprawione.
Wiele wypadków następuje z powodu
nieprawidłowej konserwacji narzędzi
elektrycznych.
f) Narzę
Narzędzia tnące powinny być utrzymywane w
g) Należy zawsze obsługiwać narzędzie, jego
Używanie narzędzia do celów niezgodnych
5) Obsługa i konserwacja narzędzia
akumulatorowego
a) Ładuj wyłącznie w ładowarkach wymienionych
Ładowarka przeznaczona do ładowania
b) Do zasilania elektronarzędzi używaj wyłącznie
Używanie innych zestawów akumulatorowych
c) Jeśli zestaw akumulatorowy nie jest używany,
Zwarcie elektrod akumulatora może doprowadzić
d)
Jeśli dojdzie do przypadkowego kontaktu z
Płyn wyciekający z akumulatora moż
50
dzia tnące powinny być zawsze ostre i
czyste.
odpowiednim stanie, a ich krawędzie muszą być
odpowiednio ostre - zmniejsza to ryzyko wygięcia
i ułatwia obsługę narzędzia.
akcesoria takie jak wiertła itp. w sposób
zgodny z zaleceniami niniejszej instrukcji,
biorąc pod uwagę warunki robocze
wykonywanej pracy.
z jego przeznaczeniem może spowodować
niebezpieczeństwo.
przez producenta.
konkretnego typu zestawów akumulatorowych
może spowodować pożar, jeśli zostanie
użyta do ładowania innego typu zestawów
akumulatorowych.
zatwierdzonych zestawów akumulatorowych.
mo
że spowodować obrażenia ciała lub pożar.
przechowuj go z dala od innych metalowych
przedmiotów, takich jak spinacze do
papieru, monety, klucze, gwoździe, śruby itp.
Przedmioty te mogą przewodzić prąd między
elektrodami zestawu akumulatorowego.
do poparzeń lub pożaru.
W skrajnie niesprzyjających warunkach może
dojść do wycieku płynu z akumulatora. Unikaj
kontak tu z płynem.
płynem, opłucz miejsce kontaktu wodą. W
przypadku kontaktu płynu z oczami, zgło ś się
do lekarza.
podrażnienia lub poparzenia.
oraz rodzaj
e spowodować
6) Serwis
a) Narzędzia elektryczne mogą być naprawiane
wyłącznie przez uprawnionych techników
serwisowych, przy zastosowaniu oryginalnych
części zamiennych.
Zapewnia to utrzymanie bezpieczeństwa obsługi
urządzenia.
UWAGA
Dzieci i osoby niepełnosprawne muszą pozostawać
w bezpiecznej odległości od narzędzia.
Nieużywane narzędzia elektryczne powinny być
przechowywane w
i osób niepełnosprawnych.
miejscu niedostępnym dla dzieci
OSTRZEŻENIA DOTYCZĄCE KOS IARK I DO
TRAWY
UWAGA
NALEŻY DOKŁADNIE PRZECZYTAĆ PRZED
PIERWSZYM UŻYCI EM
ZACHOWAĆ DO WYKORZYSTANIA W PRZYSZŁOŚCI
Bezpieczne praktyki robocze
● Szkolenie
a) Należy dokładnie przeczytać niniejsze instrukcje.
Zapoznać się z elementami sterowania i zasadami
prawidłowej obsługi urządzenia.
b) Osoby, które nie zapoznały się z niniejszą instrukcją
oraz dzieci nie mogą obsługiwać urządzenia.
Obowiązujące przepisy miejscowe mogą określać
minimalny wiek osób obsługujących urządzenie.
c) Należy pamięta
ponosi pełną odpowiedzialność za wypadki lub
niebezpieczeństwa dla osób trzecich i ich mienia.
● Przygotowanie
a) Nie należy korzystać z urządzenia, kiedy w pobliżu
znajdują się inne osoby, w szczególności dzieci lub też
zwierzęta.
b) Podczas obsługi urządzenia należy zawsze nosić
okulary ochronne i solidne obuwie.
● Obsługa
a) Należy korzystać z urządzenia jedynie podczas dnia
lub przy odpowiednio mocnym sztucznym oświetleniu.
b) Nie wolno korzystać z urządzenia, którego osłony
zabezpieczające lub pokrywy są uszkodzone bądź
zostały zdemontowane.
c) Włączać silnik jedynie, kiedy ręce i stopy użytkownika
znajdują się w bezpiecznej odległoś
tnących.
d) Należy zawsze odłączyć zasilanie urządzenia (tzn.
wyjąć wtyczkę z gniazdka sieciowego lub wyjąć
złącze) w następujących przypadkach:
– kiedy urządzenie jest pozostawiane bez nadzoru;
– przed usunięciem elementów, które spowodowały
zakleszczenie;
– przed przystąpieniem do jakichkolwiek czynności
dotyczących kontroli lub czyszczenia urządzenia;
– po mocnym urządzeniu w ciało obce;
– kiedy urządzenie zaczęło mocno drgać.
e) Należy zawsze pamiętać, że narzędzia tnące mogą
spowodować obrażenia stóp i rąk.
f) Należy systematycznie sprawdzać, czy osłony
wentylacyjne nie są zatkane.
● Kons erwacj a i przechowywanie
a) Należ
y zawsze odłączyć zasilanie urządzenia (tzn.
wyjąć wtyczkę z gniazdka sieciowego lub wyjąć
złącze) przed przystąpieniem do jakichkolwiek prac
konserwacyjnych lub czyszczenia urządzenia.
b) Należy stos ować wyłącznie zaleca ne przez produ centa
części zamienne i akcesoria.
ć, że operator lub użytkownik
ci od narzędzi
Page 51

Polski
c) W regularnych odstępach czasu należy kontrolować
i prowadzić konserwację urządzenia. Urządzenie
powinno być naprawiane wyłącznie przez
wykwalifi kowanych pracowników.
d) Kiedy urządzenie nie jest używane, powinno być
przechowywane w miejscu niedostępnym dla dzieci.
WSKAZÓWKI BEZPIECZEŃSTWA DOTYCZĄCE
BEZPRZEWODOWEJ KO SIAR KI DO TRAWY
OSTRZEŻENIE
1. Podczas pracy z urządzeniem należy zawsze
zachować cierpliwość. Nosić odpowiednią odzież, aby
zachować właściwą temperaturę ciała.
2. Odpowiednio planować prowadzone prace, aby
zapobiec możliwości wypadku.
3. Nie należy używać urządzenia w nocy lub w trudnych
warunkach atmosferycznych, kiedy widoczność jest
ograniczona. Nie używać urządzenia podczas opadów
lub bezpośrednio po deszczu.
Praca na śliskim podłożu może być przyczyną
wypadku spowodowanego utratą równowagi.
4. Przed rozpoczęciem prac należy sprawdzić głowicę
tnącą.
Nie używać urządzenia, je
popękana, uszkodzona lub wygięta.
Upewnić się, że głowica tnąca jest zamocowana
prawidłowo. Odpadnięcie lub poluzowanie głowicy
tnącej podczas pracy może być przyczyną wypadku.
5. Przed rozpoczęciem pracy należy upewnić się, że
pokrywa zabezpieczająca oraz pas na ramię są
prawidłowo założone.
Praca z urządzeniem bez tych części może być
przyczyną wypadku.
6. Przed rozpoczęciem pracy należy upewnić się,
że uchwyt w kształcie pętli jest założony. Ponadto
należy sprawdzić, czy uchwyt nie jest poluzowany,
lecz zamocowany prawidł
mocno trzymać uchwyt i prowadzić urządzenie ruchem
okrężnym, zachowując właściwą pozycję i równowagę.
Utrata równowagi podczas pracy może być przyczyną
obrażeń.
7. N ależy zachować ostrożność podczas uruchamiania
silnika.
Umieścić urządzenie na poziomym podłożu.
Nie używać urządzenia w odległości mniejszej, niż 15
m od osób lub zwierząt.
Upewnić się, że głowica tnąca nie dotyka ziemi, drzew
lub roślin.
Nieostrożne uruchomienie urządzenia może być
przyczyną obraż
8. Odblokować dźwignię blokady.
Przypadkowe pociągnięcie dźwigni blokady może być
przyczyną obrażeń.
9. Przed odłożeniem urządzenia należy wcisnąć przycisk
start, aby je wyłączyć.
10. Należy zachować szczególną ostrożność podczas
wykony wania prac w pobliżu przewodów elektrycznych
lub gazowych oraz podobnego rodzaju instalacji.
11. Dokładnie sprawdzić miejsce prac i usunąć wszelkiego
rodzaju puste opakowania, przewody, kamienie oraz
inne przeszkody. Nie pracować w pobliżu korzeni
drzew oraz skał.
Może to spowodować uszkodzenie głowicy tnącej lub
obrażenia ciała.
12. Nie należy nagle zwiększać prędkości obrotów.
Prę
dkość powinna być zwiększana stopniowo.
Umieścić dźwignię we właściwej pozycji,
odpowiadającej obciążeniu roboczemu.
eń.
żeli głowica tnąca jest
owo. Podczas pracy należy
Przedmioty odpryskujące szybko od urządzenia mogą
być przyczyną obrażeń.
13. Nie wolno dotykać głowicy tnącej podczas pracy.
Upewnić się, że głowica nie może dotknąć włosów
użytkownika, odzieży itp.
14. W sytuacjach wymienionych poniżej, należy wyłączyć
silnik i zaczekać, aż głowica tnąca przestanie się
obracać.
Przed przejściem w inne miejsce pracy.
Przed usunięciem trawy lub odpadów, które
zakleszczyły się
Przed przystąpieniem do usuwania z miejsca prac
jakichkolwiek odpadów, trawy i śmieci.
Przed odłożeniem urządzenia.
Wykonywanie powyższych czynności, kiedy głowica
tnąca wciąż się obraca, może być przyczyną
wypadków.
15. Nie używać urządzenia w odległości mniejszej, niż 15
m od innych osób.
Podczas pracy z innymi osobami, należy zawsze
zachować odległość wynoszącą co najmniej 15 m.
Odpryskujące przedmioty mogą prowadzić do nagłych
wypadków.
Podczas pracy na powierzchni niestabilnej lub
pochyłej należy upewnić się, że osoby współpracujące
nie są narażone na żadne zagrożenia.
Aby przyci
należy używać gwizdka lub podobnego rodzaju
przedmiotów.
16. Jeżeli trawa lub inne przedmioty spowodowały
zakleszczenie głowicy tnącej, przed przystąpieniem
do ich usuwania należy wyłączyć silnik i zaczekać do
całkowitego zatrzymania się głowicy tnącej.
Usuwanie jakichkolwiek przedmiotów, kiedy głowica
tnąca jeszcze się obraca może być przyczyną
obrażeń.
Kontynuowanie pracy, kiedy jakiekolwiek ciała obce
są zakleszczone w głowicy tnącej, może spowodować
uszkodzenie urządzenia.
17. Jeżeli urządzenie działa nieprawidłowo bądź
z nadmiernym hałasem lub drganiami, należ
natychmiast wyłączyć silnik i przekazać kosiarkę
sprzedawcy w celu jej sprawdzenia oraz naprawy.
Kontynuowanie pracy w powyższych warunkach może
być przyczyną obrażeń lub uszkodzenia urządzenia.
18. W razie upuszczenia na ziemię lub nagłego uderzenia
urządzenia, należy dokładnie sprawdzić, czy nie nosi
żadnych śladów uszkodzeń, pęknięcia lub deformacji.
Praca z urządzeniem noszącym ślady uszkodzeń,
pęknięć lub deformacji może być przyczyną obrażeń.
19. Podczas przewożenia urządzenia należy je
odpowiednio zamocować.
Brak przestrzegania powyższego zalecenia może być
przyczyną wypadku.
OSTROŻNIE
1. Nie należy u
jakichkolwiek innych elementów, niż trawa. Nie używać
urządzenia w moczarach i upewnić się, że ziemia nie
dostaje się do głowicy tnącej.
2. Urządzenie zawiera części precyzyjne i nie powinno
być upuszczane na ziemię lub narażane na nagłe
uderzenia bądź działanie wody.
Urządzenie może w ten sposób zostać uszkodzone.
3. Kiedy urząd zenie jest prze chowywa ne lub przewożone,
należy zdemontować głowicę tnącą.
4. Nie narażać urządzenia na działanie środków
owadobójczych i innych produktów chemicznych.
Produkty chemiczne mogą spowodować pęknięcie lub
inne uszkodzenia urządzenia.
w urządzeniu.
ągnąć uwagę i ostrze gać współpracowników,
y
żywać głowicy tnącej do koszenia
51
Page 52

Polski
5. Należy wymieniać etykiety ostrzegawcze na nowe,
kiedy są one nieczytelne lub zaczynają odpadać.
Nowe etykiety ostrzegawcze można otrzymać u
sprzedawcy urządzenia.
WSKAZÓWKI BEZPIECZEŃSTWA DOTYCZĄCE
AKUMULATORA I ŁADOWARKI
1. Zawsze ładuj akumulator w temperaturze od 0˚C
do 40˚C. Przy temperaturze poniżej 0˚C nastąpi
niebezpieczne rozładowanie. Akumulator nie może być
ładowany w temperaturze przekraczającej 40˚C.
Najbardziej odpowiednia do ładowania jest
temperatura od 20˚C do 25˚C.
2. Kiedy jeden cykl ładowania jest skończony, odstaw
ładowarkę na około 15 minut przed ponownym cyklem
ładowania akumulatora.
Nie należy ładować akumulatora przez czas dłuższy,
niż 2 godziny.
3. Nie dopuszczaj, by obce przedmioty mogły dostać się
do wnętrza otworu wsuwowego przeznaczonego dla
akumulatora.
4. Nie wkładaj przedmiotów w szczeliny wentylacyjne
ładowarki.
Wkładanie metalowych lub łatwopalnych przedmiotów
w szczeliny wentylacyjne ładowarki może spowodować
niebezpieczeństwo porażenia prądem lub zniszczenie
ładowarki.
5. Uż
ywanie rozładowanego akumulatora uszkodzi
ładowarkę.
6. Przynieś akumulator do sklepu w którym go nabyłeś,
jak tylko okres użytkowania akumulatora stanie się
zbyt krótki do praktycznego użytku. Nie wyrzucaj
wyczerpanego akumulatora do odpadów domowych.
7. Nigdy sam nie rozkładaj akumulatora i ładowarki.
8. Nie dopuszczaj do zwarcia w akumulatorze. Zwarcie
w akumulatorze spowoduje jego rozładowanie i
przegrzanie, oraz może spowodować przepalenie się
lub zniszczenie akumulatora.
9. Nie wrzucaj akumulatora do ognia gdyż grozi to
eksplozją.
UWAGI DOTYCZĄCE AKUMULATORA LI-ION
Aby wydłużyć czas eksploatacji akumulatora li-ion, jest
on wyposażony w funkcję wyłączania. W przypadkach
opisanych poniżej w punktach 1-3 silnik może zatrzymać
się w czasie użytkowania produktu, nawet jeżeli wyłącznik
jest wciśnięty. Nie jest to oznaką awarii, ale efekt działania
funkcji wyłączania.
1. Gdy akumulator się wyczerpie, silnik wyłączy się.
W takim przypadku należy go niezwłocznie
naładować.
2. Silnik wyłączy się w przypadku przeładowania
narzędzia. W takim przypadku należy zwolnić
przełącznik narzędzia i wyeliminować przyczynę
przeładowania. Po wyeliminowaniu szkodliwego
czynnika, można ponownie włączyć urządzenie.
3. Jeżeli w warunkach intensywnej pracy akumulator
się przegrzewa, moż
zasilania.
W takim wypadku należy zaprzestać używania
akumulatora i pozostawić go do ostygnięcia. Po
ostygnięciu akumulator nadaje się do dalszego
używania.
Dodatkowo należy stosować się do poniższych uwag i
ostrzeżeń.
e to powodować przerywanie
OSTRZEŻENIE
Aby zapobiec wyciekom, przegrzaniu, emisji dymu,
wybuchowi lub zapaleniu się akumulatora, należy
stosować się do wszystkich wymienionych poniżej
środków ostrożności
1. Należy upewnić się, że drobne wióry i pył nie gromadzą
się na akumulatorze.
○ Podczas pracy należy uważać, aby wióry i pył nie
osadzały się na akumulatorze.
○ Usuwać wióry i pył, które opadają na akumulator, aby
nie gromadziły si
○ Nie przechowywać nieużywanych akumulatorów w
pomieszczeniach silnie zapylonych.
○ Przed przechowywaniem akumulatora, należy
usunąć z niego wióry i pył. Nie należy przechowywać
akumulatora razem z częściami metalowymi (śruby,
gwoździe itp.).
2. Nie przekłuwaj akumulatora ostrymi przedmiotami,
takimi jak gwoździe, nie uderzaj młotkiem, nie
przygniataj, nie rzucaj ani nie poddawaj akumulatora
wstrząsom.
3. Nie używaj akumulatora, który nosi wyraźne ślady
uszkodzenia lub odkształcenia.
4. Nie umieszczaj akumulatora w urządzeniu w odwrotny
sposób.
5. Nie podłączaj akumulatora bezpośrednio do gniazda
sieci elektrycznej lub zapalniczki samochodowej.
6. Nie używaj akumulatora do celów innych, niż opisane.
7. J eśli ładowanie akumulatora nie powiedzie się, nawet
po upływie określonego czasu ładowania, natychmiast
przerwij ładowanie.
8. Nie poddawaj akumulatora działaniu wysokiej
temperatury lub wysokiego ciśnienia, np. poprzez
umieszczanie go w kuchence mikrofalowej, suszarce
lub pojemniku ciśnieniowym.
9. W przypadku pojawienia się wycieku lub
nieprzyjemnego zapachu upewnij się, że akumulator
znajduje si
10. Nie używaj akumulatora w miejscach, w których
występuje silna elektryczność statyczna.
11. Jeśli w trakcie użytkowania, ładowania lub
przechowywania akumulatora pojawi się nieprzyjemny
zapach, dojdzie do wycieku, nadmiernego nagrzania,
odbarwienia lub odkształcenia bądź jeśli pojawi
się jakakolwiek inna nieprawidłowość, akumulator
należy natychmiast wyjąć z urządzenia lub ładowarki i
zaprzestać jego użytkowania.
UWAGA
1. Jeśli płyn wyciekający z akumulatora dostanie się do
oczu, nie pocieraj podrażnionego miejsca. Dokładnie
przemyj oczy czystą wodą, np. z kranu, i niezwłocznie
skontaktuj się z lekarzem.
Jeśli płyn nie zostanie usunięty, może spowodować
uszkodzenie wzroku.
2. W przypadku kontaktu płynu z akumulatora ze skorą,
natychmiast dokładnie przemyj skórę czystą
z kranu.
Płyn z akumulatora może spowodować podrażnienie
skóry.
3. Jeśli w trakcie pierwszego użycia akumulator
nadmiernie się nagrzeje, pojawi się nieprzyjemny
zapach bądź jeśli wykryte zostaną ślady rdzy,
odbarwienia, odkształcenia lub inne nieprawidłowości,
należy zaprzestać jego użytkowania i zwrócić go do
dostawcy lub sprzedawcy.
ę na jego powierzchni.
ę z dala od źródeł ognia.
wodą, np.
52
Page 53

Polski
SPECYFIKACJE
URZĄDZENIE ELEKTRYCZNE
Model CG18DL CG18DAL
Typ drążka Typ akcesorium Typ prosty
Średnica koszenia 425 mm
Kierunek obrotów
Prędkość bez obciążenia 0–4500 min
Czas pracy po pojedynczym ładowaniu *
(kiedy akumulator dostarczony wraz z urządzeniem
został całkowicie naładowany)
Akumulator BSL1830: Litowo-jonowa 18 V (3,0 Ah 10 ogniw)
Ciężar (bez głowicy tnącej i pasa na ramię) 5,4 kg 5,2 kg
*1 Dane zamieszczone w poniższej tabeli są jedynie przykładowe. Czynniki takie, jak rodzaj trawy, ostrość noża,
prędkość obrotowa głowicy tnącej, temperatura otoczenia, parametry akumulatora, metoda pracy itd. mogą być
bardzo różne, dlatego też powyższe zalecenia ogólne posiadają jedynie znaczenie orientacyjne.
*2 Warunki: Średnica zewnętrzna ostrza z żyłką tnącą 425 mm, z ustawieniem pełnej prędkości.
Ładowarka
Model UC18YRSL
Napięcie ładowania 14,4 V 18 V
Waga 0,6 kg
1
AKCESORIA STANDARDOWE
W kierunku przeciwnym do ruchu wskazówek zegara, patrząc od
strony obudowy silnika
5 min*
-1
2
1
2
5
CG18DL
CG18DAL
(LSC)
1 Głowica z żyłką nylonową (typu Sure tap) ...................1
2 Osłona zwoju ................................................................1
3 Klucz sześciokątny 4 mm ............................................. 1
4 Klucz nasadowy (z gniazdem sześciokątnym 17/19) ..1
5 Przezroczyste osłony ochronne...................................1
6 Pas na ramię.................................................................1
7 Akumulator (BSL1830) ................................................. 1
8 Ładowarka (UC18YRSL) .............................................. 1
Akcesoria standardowe mogą ulec zmianie bez wcześniejszego zawiadomienia.
8
6
3
4
7
53
Page 54

Polski
AKCESORIA OPCJONALNE (sprz edaw ane
oddzielnie)
1. Akumu lator (BSL1830)
2. Pokrywka akumulatora
3. Smar (tubka 100 g)
Skrzynka przekładniowa powinna być smarowana co
50 godzin pracy.
4. Nagolennik (1 zestaw zawierający 2 nagolenniki)
Zabezpieczenie stóp przed odpryskami.
ZASTOSOWANIA
Przycinanie i koszenie chwastów.
WYMONTOWANIE I MONTAŻ AKUMULATORA
1. Wymontowanie akumulatora
Mocno trzymając obudowę, pociągnąć zatrzaski, aby
zwolnić akumulator (patrz Rys. 2).
UWAGA
Nigdy nie dopuszczaj do zwarcia w akumulatorze.
2. MONTAŻ AKUMULATORA
Wprowadź akumulator zwracając uwagę na właściwą
biegunowość (patrz Rys. 2).
ŁADOWANIE
Zanim użyjesz elektronarzędzia, naładuj akumulator
według następujących wskazówek.
1. Połącz przewód zasilania ładowarki do gniazda.
Po podłączeniu przewodu zasilania lampka
na ładowarce zacznie migać na czerwono. (W
1-sekundowych odstępach).
2. Wprowad ź akumulator do otworu wsuwowego
ładowarki.
Pewnie wkładaj baterię do ładowarki, aż będzie
widoczna linia pokazana na Rys. 3, 4.
3. Ładowanie
Po włożeniu akumulatora do ładowarki rozpocznie
się ładowanie, a lampka pilot będzie świecić ciągłym,
czerwonym
Po zakończeniu ładowania akumulatora lampka będzie
migać na czerwono. (W 1-sekundowych odstępach)
(Patrz na Tabelę nr. 1.)
(1) Wskazania lampki kontrolnej
Wskazania lampki kontrolnej są zilustrowane w
Tabeli nr. 1, w zależności od stanu ładowarki lub
akumulatora.
światłem.
Akcesoria opcjonalne mogą ulec zmianie bez
wcześniejszego zawiadomienia.
Tabela 1
Wskazania lampki kontrolnej
Lampka
zaświeci
lub zacznie
migać na
czerwono.
Lampka
zaświeci
na zielono.
54
Przed
ładowaniem
W trakcie
ładowania
Ładowanie
skończone
Ładowanie
jest
niemożliwe
Oczekiwanie
z powodu
przegrzania
Miga Pali się przez 0,5 sek. Nie pali się przez 0,5
Pali się Pozostaje zapalona
Miga Pali się przez 0,5 sek. Nie pali się przez 0,5
Migocze Pali się przez 0,1 sek. Nie pali się przez 0,1
Pali się Pozostaje zapalona Przegrzanie baterii.
sek. (Gaśnie na 0,5 sek.)
sek. (Gaśnie na 0,5 sek.)
sek. (Gaśnie na 0,1 sek.)
Wadliwe działanie
akumulatora lub ładowarki.
Ładowanie niemożliwe.
(Ładowanie rozpocznie
się po schłodzeniu
akumulatora)
Page 55

Polski
(2) Odnośnie temperatur akumulatora
Temperatury akumulatorów znajdują się w Tabeli
2. Przed rozpoczęciem ładowania należy ostudzić
nagrzane akumulatory.
Tabela nr. 2 Zasięgi ładowania akumulatorów
Akumulatory akumulatorów Temperatury ładowania
BSL1830 0°C – 50°C
(3) Odnośnie okresu ładowania
W zależności od kombinacji ładowarki i akumulatora
okres ładowania będzie taki, jak pokazuje Tabela nr. 3.
Tabela nr. 3 Okres ładowania (przy 20˚C)
Akumulator
BSL1830 Approx. 45 min.
WSKAZÓWK A
Okres ładowania może się zmieniać w zależności od
temperatury i napięcia źródła prądu.
4. Wyłącz wtyczkę przewodu ładowarki z gniazdka.
5. Mocno trzymając ładowarkę wyjmij akumulator z
otworu wsuwowego.
WSKAZÓWK A
Po naładowaniu należy najpierw wyjąć baterie z
ładowarki, a następnie schować je w odpowiednim
miejscu.
Jak przedłużyć żywotność akumulatora
(1) Ładuj akumulatory zanim zostaną całkowicie
wyczerpane.
Kiedy zorientujesz się że moc akumulatora zmniejszyła
się, przestań używać narzędzie i naładuj akumulator.
Jeśli będziesz dalej używał narzędzia i prąd się
wyczerpie, akumulator może zostać uszkodzony i
skróci się jego żywotność.
(2) Unikaj ładowania przy wysokich temperaturach.
Akumulator bezpośrednio po używaniu narzędzia
jest gorący. Jeśli akumulator jest ładowany od razu
po użyciu, pogarsza się jakość elektrolitu i skraca
żywotność akumulatora. Odstaw akumulator i naładuj
go dopiero gdy ostygnie.
UWAGA
○ Długotrwałe użytkowanie ładowarki spowoduje
jej nagrzanie, co może być przyczyną awarii. Po
zakończeniu ładowania odczekaj 15 minut przed
rozpoczęciem ładowania kolejnego akumulatora.
○ Jeśli ładowany akumulator jest nagrzany (w wyniku
użytkowania lub nasłonecznienia), może zaświecić
się zielone światło na pilocie. Akumulator nie będzie
ładowany. W takim przypadku należy poczekać, aż
akumulator ostygnie.
○ Kiedy zapali się czerwona migocząca lampka kontrolna
ładowarki (co 0,2 sek) sprawdź, czy do otworu
instalacyjnego ładowarki nie dostał się jakiś obcy
przedmiot i jeśli tak, usuń go. Jeśli nie ma tam obcego
przedmiotu, możliwe że akumulator lub ładowarka są
uszkodzone. Zanieś je do Autoryzowanego Centrum
Obs
Ładowarka
ługi.
UC18YRSL
INFORMACJE DOTYCZĄCE WSKAŹNIKA
POZOSTAŁEJ ENERGII BATERII
Naciśnięcie przełącznika wskaźnika pozostałej energii
baterii powoduje zaświecenie lampek wskaźnika baterii,
co umożliwia sprawdzenie ilości pozostałej energii (Rys.
5)
Po zdjęciu palca z przłącznika lampka wskaźnika
pozostałej energii baterii przestaje świecić. W Tabeli 4
przedstawiono stany lampek wskaźnika baterii i informacje
na temat pozostałej ilości energii.
Tabela nr. 4
Stan lampki Pozostała energia baterii
Pozostała wystarczająca ilość energii
baterii.
Pozostała połowa energii baterii.
Energia baterii została prawie
wyczerpana.
Należy jak najszybciej naładować
baterię.
Ponieważ działanie wskaźnika pozostalej energii baterii
może różnić się w zależności od temperatury otoczenia
i charakterystyki baterii, należy traktować go wyłącznie
referencyjnie.
UWAGA
○ Nie należy mocno potrząsać panelem przełączników
ani uderzać go. Może to doprowadzić do wystąpienia
problemów.
○ W celu zaoszczędzenia energii wskaźnik pozostałej
energii baterii świeci tylko po naciśnięciu jego
przełącznika.
PRZED ROZPOCZĘCIEM PRACY
OSTROŻNIE
Akmulator należy wyjąć przed przystąpieniem do
zakładania jakichkolwiek części.
1. Zakładanie akcesoriów [tylko model CG18DL]
(Rys. 6)
(1) Włożyć kołek blokujący do otworu blokowania drążka
głównego akcesorium tnącego i upewnić się, że drążek
nie może się poluzować.
(2) Dokręcić pokrętło uchwytu, aby zamocować.
2. Zakładanie uchwytu w kształcie pętli (Rys. 7)
(1) Od kręcić
(2) Założyć uchwyt w kształcie pętli na drążek główny w
(3) Założyć element mocujący uchwyt w dolnej części
UWAGA
Zamocować uchwyt w kształcie pętli w miejscu, w
3. Założyć pokrywę zabezpieczającą (patrz Rys. 8 i
OSTRZEŻENIE
Upewnić się, że pokrywa zabezpieczająca została
Brak przestrzegania powyższego zalecenia może być
UWAGA
Należy w tym celu posłużyć się dostarczonym w
(1) Za pomocą dostarczonego w zestawie wkrętu
Zamocować osłonę do pokrywy zabezpieczającej.
(2) Ustawić naprzeciwko siebie dwa otwory wspornika
śruby M6 × 43 (2).
taki sposób, aby przylegał do silnika.
drążka i zamocować go za pomocą śrub M6 × 43 (2)
oraz nakrętek M6 (2).
którym umożliwia prawidłowe trzymanie urządzenia.
9)
prawid
łowo zamocowana w odpowiednim miejscu.
przyczyną obrażeń, spowodowanych odpryskującymi
kamieniami.
zestawie kluczem sześciokątnym.
samogwintującego D4 zamocować nóż wewnątrz
osłony. (Rys. 8)
pokrywy oraz pokrywę i włożyć śruby sześciokątne
M6 × 25. (Wspornik pokrywy jest mocowany wewnątrz
osłony.)
55
Page 56

Polski
(3) Umieścić uchwyt pokrywy pod pokrywą ochronną i
posłużyć się dostarczonym w zestawie kluczem do
wkrętów sześciokątnych, aby naprzemiennie dokręcić
śruby M6 × 25 aż do oporu.
OSTROŻNIE
Należy uważać, aby nie skaleczyć się o ostrze
znajdujące się wewnątrz osłony.
4. Zakładanie pasa na ramię
OSTRZEŻENIE
○ Przed rozpoczęciem pracy należy zawsze założyć
pas na ramię, aby urządzenie mogło być przenoszone
prawidłowo.
○ Jeżeli urządzenie nie dzia
natychmiast wyłącznik silnik, zdemontować wspornik
szybkomocujący pasa na ramię i zdjąć narzędzie.
OSTROŻNIE
○ Jeżeli urz ądzenie nie jes t odpowiednio p odtrzymy wane
podczas zdejmowania pasa szybkomocującego, może
to być przyczyną obrażeń lub uszkodzeń.
Podczas zdejmowania pasa, należy przytrzymywać
drążek kosiarki drugą ręką.
○ Przed rozpoczęciem pracy należy upewnić się, że
funkcja szybkiego wyłączania działa prawidłowo.
(1) Umieścić pas na ramieniu w sposób pokazany na Rys.
10 i zamocować do urządzenia za pomocą wieszaka.
Wyregulować odpowiednią długość
(2) Aby zdjąć urządzenie z pasa na ramię, należy
przytrzymywać drążek jedną ręką, a drugą ręką zdjąć
pas z funkcją szybkiego wyłączania ze wspornika w
sposób pokazany na Rys. 10.
(3) Aby zamocować urządzenie na pasie, należy
włożyć wspornik do otworu haczyka, a następnie
przeprowadzić wspornik nad haczykiem i włożyć do
szerokiego otworu wspornika. (Rys. 11)
Delikatnie pociągnąć za pas, aby upewnić się, że jest
zamocowany prawidłowo.
ła prawidłowo, należy
pasa.
GŁOWICA TNĄCA
1. Funkcj a
Głowica tnąca typu “SURE-TAP”
○ Automatycznie podaje więcej żyłki nylonowej podczas
pracy z niską prędkością obrotową (nie większą, niż
4500 min
OSTROŻNIE
○ Pokrywka korpusu tnącego musi być odpowiednio
zamocowana na korpusie tnącym.
○ Sprawdzić korpus, pokrywkę i pozostałe komponenty
pod kątem ewentualnych pęknięć lub innych
uszkodzeń.
○ Głowica tnąca musi być prawidłowo zamocowana do
skrzynki przekładniowej urządzenia.
○ Dla zapewnienia odpowiedniej wydajności i
niezawodności pracy urządzenia, należy zawsze
używać jedynie nylonowych żyłek tnących HITACHI.
Nie wolno używać drutów ani żadnych innych
materiałów, które w razie zerwania mogą być
niebezpieczne.
○ Jeżeli głowica tnąca nie podaje żyłki prawidłowo,
należy sprawdzić
zostały założone prawidłowo. W razie potrzeby należy
skontaktować się ze sprzedawcą urządzeń HITACHI.
2. Instalacja (Rys. 12)
(1) Włożyć klucz sześciokątny do otworu skrzynki
przekładniowej, aby zablokować uchwyt ostrza
tnącego.
(2) Założyć uchwyt ostrza, osłonę zwoju, pokrywkę
uchwytu ostrza i głowicę tnącą na skrzynkę
przekładniową kosiarki. Nakrętka mocująca posiada
gwint lewy. Przekręcać w kierunku zgodnym z
56
-1
).
, czy żyłka nylonowa i inne elementy
ruchem wskazówek zegara, aby odkręcać nakrętkę/
przeciwnym do ruchu wskazówek zegara, aby ją
dokręcać.
3. Regulacja długości żyłki
(1) Ustawić jak najniższą prędkość silnika i opuścić
głowicę na ziemię. Po jednym uderzeniu,
wyprowadzane jest na zewnątrz około 30 mm żyłki.
(Rys. 13)
Można również wyciągnąć żyłkę nylonową ręcznie,
jednak silnik musi wówczas być wyłączony. (Rys. 14)
(2) Przed rozpoczęciem pracy należy zawsze ustawić
prawidłową długość żyłki, wynoszącą 110 – 140 mm.
(3) Jeżeli wyjęty został zbyt długi kawałek żyłki, należy
owinąć ją na zewnątrz, wciskając i obracając kulkę
prowadzącą. (Rys. 15)
4. Wymiana żyłki nylonowej
(1) Zdjąć pokrywkę korpusu ostrza, mocno wciskając
zaczepy blokujące kciukami (Rys. 16).
(2) Po zdjęciu pokrywki korpusu ostrza, wyjąć szpulę i
zwolnić żyłkę z lewej strony.
(3) Założ
yć nową żyłkę nylonową nierówno. (Rys. 17)
(4) Włożyć końcówkę żyłki nylonowej w kształcie “U” do
wyżłobienia w środkowej części szpuli.
Kiedy obie połówki żyłki na szpuli są skierowane w tę
samą stronę, należy przytrzymać każdą połówkę żyłki
po odpowiadającej jej stronie. (Rys. 18)
(5) Włożyć każdą część żyłki do otworów mocujących na
dł
ugość około 100 mm. (Rys. 19)
(6) Przełożyć obie luźne końcówki żyłki przez oczko,
umieszczając szpulę w pokrywce korpusu ostrza.
(Rys. 20)
UWAGA
Podczas umieszczania szpuli w pokrywce korpusu
ostrza, należy starać się wyrównać otwory mocujące
(3) z oczkiem (4), aby zwalnianie żyłki było później
łatwiejsze.
(7) Umieścić sprężynę bębna w szpuli. (Rys. 21)
(8) Umieścić korpus ostrza nad pokrywką korpusu,
aby położenie zatrzasków blokujących korpusu
odpowiadało otworom w korpusie. Następnie należy
zamocować pokrywkę korpusu ostrza, wciskając go
na miejsce. (
(9) Wyciągnąć luźne końcówki żyłki, aby zwolnić je z
otworów mocujących. Jeżeli kawałki żyłki są zbyt
długie (ponad 100 mm), należy nawinąć je, aby
uzyskać długość ok. 100 mm, wciskając i obracając
kulkę prowadzącą. (Rys. 15)
(10)
Początkowa długość żyłki tnącej powinna wynosić
ok. 150 mm i być równa po obu stronach. (Rys. 22)
Rys. 21)
OBSŁUGA
Kosze nie trawy
OSTRZEŻENIE
○ Nie należy używać urządzenia w nocy lub w trudnych
warunkach atmosferycznych, kiedy widoczność jest
ograniczona.
○ Nie używać urządzenia podczas opadów lub
bezpośrednio po deszczu.
○ Należy nosić odpowiednie obuwie, zabezpieczające
użytkownika przed poślizgnięciem się i upadkiem.
○ Nie należy używać urządzenia na powierzchniach
mocno pochyłych.
Podczas koszenia trawy na powierzchni pochyłej,
należy zawsze posuwać się w stronę grzbietu
pochyłości.
○ Założyć urządzenie na pas na ramię, umieścić prawą
rękę na uchwycie g
kształcie pętli i mocno przytrzymywać kosiarkę.
○ Uważać, aby głowica tnąca nie znajdowała się zbyt
blisko nóg użytkownika.
łównym, a lewą na uchwycie w
Page 57

Polski
○ Podczas pracy z urządzeniem nie należy nigdy
podnosić głowicy tnącej powyżej poziomu kolan.
○ Nie używać urządzenia w miejscach, w których
głowica tnąca może dotknąć kamieni, drzew lub innych
przeszkód.
○ Po wyłączeniu silnika, narzędzie tnące obraca się
jeszcze przez pewien czas, co może być przyczyną
obrażeń. Gdy urządzenie jest wyłączone, upewnić
się, czy wyposażenie tnące zatrzymało się przed
odłożeniem go.
○
Nie używać urządzenia w odległości mniejszej, niż 15 m
od innych osób. Podczas pracy z innymi osobami,
należy zawsze zachować odległość wynoszącą co
najmniej 15 m.
1. Podczas wkładania akumulatora należy pamiętać
o zachowaniu jej biegunowości
2. Włączanie urządzenia (Rys. 23)
○ Wcisnąć przycisk Start na obudowie – zasilanie
zostanie włączone, a lampka kontrolna na uchwycie
zaświeci się na czerwono.
○ Wciśnięcie przycisku Start po raz drugi powoduje
wyłączenie urządzenia - lampka kontrolna na uchwycie
zgaśnie.
[Wyłączanie automatyczne]
Przy włączonym zasilaniu, kiedy dźwignia nie jest
używana przed minutę, urządzenie wyłącza si
automatycznie. Aby ponownie włączyć urządzenie,
należy znowu wcisnąć przycisk Start.
OSTRZEŻENIE
Nie należy pozostawiać włączonego urządzenia bez
nadzoru. Może to być przyczyną wypadku.
3. Kosz enie trawy
○ Chwycić uchwyt, wcisnąć dźwignię blokującą i
pociągnąć dźwignię, aby uruchomić obroty głowicy
tnącej. (Rys. 24)
○ Po zakończeniu koszenia zwolnić dźwignię i wyłączyć
silnik.
○ Umieścić kciuk na uchwycie w kształcie pętli i mocno
trzymać uchwyt pozostał
○ Zachowywać pozycję umożliwiającą łatwe poruszanie
się.
[Metody koszenia trawy]
○ Kiedy silnik znajduje się na wolnych obrotach, cięcie
nie jest wystarczające i trawa owija się wokół noża.
Podczas pracy na bardzo wysokich obrotach, wibracje
i hałas są zbyt duże, a akumulator zużywa się szybko.
○ Przy zbyt dużej prędkości akumulator będzie zużywać
się szybciej.
○ Nie należy prowadzić drążka ruchem wahadłowym,
ale za pomocą bioder przesuwać głowicę tnącą
w poziomie, łukiem od prawej do lewej strony,
przesuwając się równocze
lewej strony głowicy tnącej do koszenia trawy. (Rys.
26)
ymi palcami. (Rys. 25)
śnie do przodu, używając
ę
WSKAZÓWKI BEZPIECZEŃSTWA DOTYCZĄCE
PRACY Z URZĄDZENIEM
Praca ciągła
Urządzenie jest dostarczane z obwodem
zabezpieczającym przed przegrzaniem elektroniczne
części sterujące pracą akumulatora. Podczas koszenia
bez przerwy, urządzenie nagrzewa się, co może w
niektórych przypadkach spowodować włączenie się
obwodu zabezpieczającego, który automatycznie
wyłączy kosiarkę.
W takim przypadku należy odczekać do schłodzenia
się urządzenia. Kiedy temperatura spadnie, będzie
można ponownie używać urządzenia. Jeżeli podczas
ciągłej pracy zaistnieje konieczność doładowania
akumulatora, należy wcześniej odczekać do
schłodzenia się urządzenia przez 15 minut.
Regulator prędkości
Urządzenie jest wyposażone w elektroniczny obwód
bezstopniowej, ciągłej regulacji prędkości.
Jeżeli ustawienie wartości granicznej jest zbyt niskie
(niska prędkość obrotowa), a silnik działa przez
dłuższy czas bez przerwy, obwody elektroniczne mogą
ulec przegrzaniu i uszkodzeniu.
Przy niskiej prędkości silnika należy wykonywać
jedynie lekkie prace.
KON SERWAC JA I KON TROL A
OSTROŻNIE
○ Przed przystąpieniem do jakichkolwiek prac
kontrolnych lub konserwacyjnych należy wyjąć
akumulator.
1. Sprawdzić stan głowicy tnącej
Głowica tnąca powinna być kontrolowana w
regularnych odstępach czasu. W przypadku zużycia
lub pęknięcia, głowica tnąca może ślizgać się,
powodując zmniejszenie wydajności pracy silnika lub
jego przepalenie.
Należy wymienić zużytą głowicę tnącą na nową.
OSTROŻNIE
○ Używanie głowicy tnącej, których końcówka jest zużyta
lub złamana może stanowi
Należy natychmiast wymienić głowicę tnącą na nową.
2. Sprawdzenie śrub
Poluzowane śruby mogą stanowić zagrożenie. Należy
więc w regularnych odstępach czasu sprawdzać, czy
śruby są dokręcone prawidłowo.
OSTROŻNIE
○ Używanie urządzenia z poluzowanymi śrubami jest
bardzo niebezpieczne.
3. Kons erwacj a silnika
Uzwojenie silnika stanowi kluczowy element
narzędzia.
Należy bardzo dokładnie pilnować, aby uzwojenie nie
zostało uszkodzone i/lub zmoczone wodą lub olejem.
4. Smarowanie skrzynki przekładniowej
○ Terminy wykonywania prac konserwacyjnych
Prawidłowe nasmarowanie skrzynki przekładniowej
powinny by
○ Smarowanie
Zdjąć głowicę tnącą. Usunąć jakiekolwiek
zanieczyszczenia z obszaru skrzynki przekładniowej.
Odkręcić śrubę M6 znajdującą się z boku skrzynki
przekładniowej. Obracając wałek akcesorium tnącego,
wprowadzać litowy smar do łożysk (P/N 682975)
przez otwór aż do chwili, kiedy skrzynka będzie pełna.
Ponownie dokręcić śrubę M6.
5. Sprawdzenie szczotek węglowych (Rys. 27)
Silnik wyposażony jest w zużywające się szczotki
węglowe. Nadmierne zużycie szczotek może
spowodować nieprawidłow
należy wymieniać szczotki na nowe, kiedy tylko są one
zużyte lub zbliżają się do “granicy zużycia”. Ponadto
szczotki powinny systematycznie być czyszczone –
należy sprawdzać, czy mogą one swobodnie ślizgać
się w uchwytach.
UWAGA
Szczotki węglowe mogą być wymieniane jedynie na
nowe szczotki węglowe fi rmy Hitachi, kod nr. 999054.
6. Wymiana szczotek węglowych
Wyjąć szczoteczki węglowe zdejmując najpierw
pokrywę i zaczepiając występ szczotki narzędziem
o ostrej końcówce (na przykład śrubokrętem) jak to
pokazano na Ryc. 28.
ć sprawdzane co 50 godzin pracy.
ć niebezpieczeństwo.
ą pracę silnika, dlatego też
57
Page 58

Polski
Podczas zakładania szczotki węglowej, należy wybrać
kierunek w taki sposób, aby występ szczotki węglowej
(patrz Rys. 29) pasował do elementu kontaktowego
na zewnątrz przewodu szczotki. Następnie należy
wcisnąć ją palcem w sposób pokazany na Rys. 30.
Na zakończenie należy ponownie założyć pokrywkę
szczotki.
UWAGA
○ Należy bezwzględnie upewnić się, że szczotka została
włożona we właściwym kierunku – jej końcówka
powinna przylegać do elementu kontaktowego poza
osłoną szczotki. (Można założyć jedną lub dwie
dostarczone końcówki.)
○ Należy zwróci
jakikolwiek błąd może spowodować zdeformowanie
końcówki szczotki i nieprawidłową pracę silnika.
7. Czyszczenie obudowy zewnętrznej
W przypadku zabrudzenia wkrętarki udarowej należy
ją przetrzeć miękką, suchą ściereczką lub ściereczką
zwilżoną wodą z mydłem. Nie wolno używać środków
na bazie chloru, benzyny ani rozpuszczalnika, gdyż
powodują one topienie się tworzywa sztucznego.
8. Przechow ywanie
Wkrętarkę udarową należy przechowywać w
temperaturze poniżej 40˚C, w miejscu niedostępnym
dla dzieci.
9. Lista części zamiennych
UWAGA
Naprawy, modyfi kacji i kontroli Narzędzi Elektrycznych
Hitachi może dokonywać tylko Autoryzowane Centrum
Obsługi Hitachi.
Ta li s ta cz ęści będzie przydatna, jeśli zostanie
wręczona Autoryzowanemu Centrum Obsługi Hitachi,
gdy zaniesiemy narzędzie do naprawy lub przeglądu.
Podczas używania i konserwacji narzędzi
elektrycznych należy przestrzegać przepisów i norm
bezpieczeństwa danego kraju.
MODYFIKACJE
Narzędzia elektryczne Hitachi są ciągle ulepszane
i modyfi kowane w celu wprowadzania najnowszych
osiągnięć nauki i techniki.
W związku z tym pewne części mogą ulec zmianom
bez uprzedzenia.
ć na to szczególną uwagę, gdyż
Ważna informacja dotycząca akumulatorów do
narzędzi bezprzewodowych Hitachi
Należy zawsze używać jednego z zalecanych
oryginalnych akumulatorów. Nie możemy
zagwarantować bezpieczeństwa i poprawności
działania naszych narzędzi bezprzewodowych, jeżeli
używane są akumulatory inne, niż zalecane lub gdy
akumulator zostanie rozmontowany i zmodyfi kowany
(np. demontaż i w y m i a n a o g n i w l u b i n n y c h
komponentów).
58
Page 59

Polski
ROZWIĄZYWANIE PROBLEMÓW
Jeżeli urządzenie nie działa prawidłowo, należy zapoznać się z informacjami zamieszczonymi w poniższej tabeli. Jeżeli
rozwiązanie problemu nadal nie jest możliwe, należy skontaktować się ze sprzedawcą lub autoryzowanym serwisem
naprawczym fi rmy Hitachi.
Symptom Możliwa przyczyna Rozwiązanie
Ładowarka
Narzędzie
Lampka kontrolna
ładowania nie świeci
się.
Lampka kontrolna
nie wyłącza się po
upływie 4 godzin
ładowania.
Nie działa. Akumulator jest wyładowany. Doładować akumulator.
Urządzenie
uruchamia się,
ale szybko jest
wyłączane.
Wtyczka zasilania nie została włożona
do gniazdka AC.
Akumulator nie jest prawidłowo
podłączony do ładowarki.
Elektrody akumulatora lub ładowarki są
zabrudzone.
Akumulator jest bardzo gorący. Przed rozpoczęciem ładowania
Akumulator lub ładowarka są
uszkodzone.
Akumulator nie jest założony
prawidłowo.
Zasilanie nie zostało włączone. Wcisnąć przycisk Start na obudowie,
Dźwignia blokująca nie została
wciśnięta po pociągnięciu dźwigni
głównej.
Urządzenie wciąga dużą ilość trawy,
która może zostać zakleszczona
pomiędzy pokrywą zabezpieczającą,
a głowicą żyłki nylonowej - może to
spowodować przegrzanie kosiarki.
Moc akumulatora jest niewystarczająca. Doładować akumulator.
Akumulator uległ przegrzaniu. Wyłączyć urządzenie, wyjąć akumulator
Włożyć wtyczkę zasilania do gniazdka
AC.
Włożyć akumulator do ładowarki w
prawidłowej pozycji.
Wyczyścić elektrody za pomocą wacika
bawełnianego lub innego podobnego
przedmiotu.
zaczekać do schłodzenia się
akumulatora.
Wyjąć wtyczkę z gniazdka zasilania i
skontaktowa
autoryzowanym serwisem naprawczym
fi rmy Hitachi.
Wyjąć akumulator z kieszeni w
urządzeniu, a następnie sprawdzić,
czy wewnątrz kieszeni nie znajdują
się żadne ciała obce. Sprawdzić
także, czy elektrody akumulatora
nie są zabrudzone oraz czy nie ma
śladów obecności wody lub innych
ciał obcych. Wyczyścić za pomocą
wacika bawełnianego. Upewnić się, że
akumulator jest włożony prawidłowo
- po jego wciśnięciu słychać będzie
charakterystyczny odgłos „kliknięcia”.
aby włą
jest wyposażone w funkcję wyłączania
automatycznego. Zasilanie wyłącza
się automatycznie, jeżeli dźwignia
nie została wciśnięta przez czas
przekraczający jedną minutę. Aby
ponownie włączyć urządzenie, należy
znowu wcisnąć przycisk Start.
Ponowne wciśnięcie przycisku Start
powoduje wyłączenie urządzenia.
Aby zapobiec wypadkom
spowodowanym nieprawidłową obsługą
urządzenia, w celu uruchomienia silnika
dźwignia blokująca musi być wci
kiedy pociągana jest dźwignia główna.
Przytrzymać uchwyt od góry i wcisnąć
dźwignię blokującą, pociągając uchwyt.
Urządzenie wyposażone jest w
funkcję zabezpieczenia akumulatora,
która wyłącza silnik, jeżeli kosiarka
jest przeciążona. Należy wyłączyć
urządzenie i usunąć przyczynę
przeciążenia. Wcisnąć ponownie
przycisk Start, aby wznowi
i zaczekać do jego schłodzenia w
dobrze wentylowanym miejscu,
osłoniętym przed działaniem promieni
słonecznych.
ć się ze sprzedawcą lub
czyć urządzenie. Urządzenie
śnięta,
ć pracę.
59
Page 60

Polski
Symptom Możliwa przyczyna Rozwiązanie
Narzędzie
GWARANCJA
Gwarancja na elektronarzędzia Hitachi jest udzielana
z uwzględnieniem praw statutowych i przepisów
krajowych. Gwarancja nie obejmuje wad i uszkodzeń
powstałych w wyniku niewłaściwego użytkowania
lub wynikających z normalnego zużycia. W wypadku
reklamacji należy dostarczyć kompletne elektronarzędzie
do autoryzowanego centrum serwisowego Hitachi wraz
z KARTĄ GWARANCYJNĄ znajdującą się na końcu
instrukcji obsługi.
WSKAZÓWK A
W zwiazku z prowadzonym przez HITACHI programem
badań i rozwoju, specyfi kacje te mogą się zmienić w
każdej chwili bez uprzedzenia.
Informacja dotycząca poziomu hałasu i wibracji
Mierzone wartości było określone według IEC60335 i
zadeklarowane zgodnie z ISO 4871
Zmierzony poziom dźwięku A: 95 dB (A).
Zmierzone ciśnienie akustyczne A: 86 dB (A).
Niepewność KpA: 3 dB (A).
Używaj ochraniacza uszu.
Wartość całkowita wibracji (trójosiowa suma wektorowa),
określona zgodnie z postanowieniami normy IEC60335.
Wartość emisji wibracji
Silne wibracje Uchwyt w kształcie pętli nie jest
Skrzynka
przekładowa działa
z niecodziennym
hałasem
ah, w = 7,5 m/s
prawidłowo zamocowany do drążka
urządzenia.
Pokrywa zabezpieczająca nie jest
prawidłowo zamocowana do drążka
urządzenia.
Brak smaru w skrzynce przekładniowej. Nasmarować za pomocą
2
Zamocować prawidłowo.
Zamocować prawidłowo.
odpowiedniego smaru.
OSTRZEŻENIE
◯ Wartość emisji wibracji podczas pracy narzędzia
elektrycznego może różnić się od podanej wartości w
zależności od sposobu wykorzystywania narzędzia.
◯ Aby określić środki bezpieczeństwa wymagane
do ochrony operatora zgodnie z szacowaną
wartością narażenia na zagrożenie w zależności od
rzeczywistych warunków użytkowania (uwzględniając
wszystkie etapy cyklu roboczego, a także przerwy w
pracy urządzenia oraz praca w trybie gotowości).
60
Page 61

Magyar
SZERSZÁMGÉPEKRE VONATKOZÓ
ÁLTALÁNOS BIZTONSÁGI FIGYELMEZTETÉSEK
FIGYELEM
Olvasson el minden biztonsági fi gyelmeztetést és
minden utasítást.
A fi gyelmeztetések és utasítások be nem tartása
áramütést, tüzet és/vagy súlyos sérülést eredményezhet.
Ôrizzen meg minden fi gyelmeztetést és utasítást a
jövőbeni hivatkozás érdekében.
A “szerszámgép” kifejezés a fi gyelmeztetésekben a
hálózatról működő (vezetékes) vagy akkumulátorról
működő (vezeték nélküli) szerszámgépre vonatkozik.
1) Munkaterületi biztonságr
a) Tar ts a a munkaterületet tisztán és jól
megvilágítva.
A telezsúfolt vagy sötét területek vonzzák a
baleseteket.
b) Ne üzemeltesse a szerszámgépeket
robbanásveszélyes atmoszférában, mint
például gyúlékony folyadékok,
jelenlétében.
A szerszámgépek szikrákat keltenek, amelyek
meggyújthatják a port vagy gőzöket.
c) Tar t sa távol a gyermekeket és körülállókat,
miközben a szerszámgépet üzemelteti.
A fi gyelemelvonás a kontroll elvesztését okozhatja.
2) Érintésvédelem
a) A szerszámgép dugaszoknak meg kell
felelniük az aljzatnak.
Soha, semmilyen módon ne módosítsa a
dugaszt.
Ne használjon semmilyen adapter dugaszt
földelt szerszámgépekkel.
A nem módosított dugaszok és a megfelelő aljzatok
csökkentik az áramütés kockázatát.
b) Kerülje a test érintkezését földelt felületekkel,
mint például csövekkel, radiátorokkal,
tűzhelyekkel és hűtőszekrényekkel.
Az áramütés kockázata megnövekszik, ha a teste
földelve van.
c) Ne tegye ki a szerszámgépeket esőnek vagy
nedves körülményeknek.
A szerszámgépbe kerülő víz növeli az áramütés
kockázatát.
d) Ne rongálja meg a vezetéket. Soha ne
használja a vezetéket a szerszámgép
szállítására, húzására vagy kihúzására.
Tar t sa távol a vezetéket a hőtől, olajtól, éles
szegélyekt
A sérült vagy összekuszálódott vezetékek növelik
az áramütés kockázatát.
e) Szerszámgép szabadban történő üzemeltetése
esetén használjon szabadtéri használatra
alkalmas hosszabbító kábelt.
A szabadtéri használatra alkalmas kábel használata
csökkenti az áramütés kockázatát.
f) Ha elkerülhetetlen a szerszámgép nyirkos
helyen történő használata, használjon
maradékáram-készülékkel (RCD) védett
táplálást.
Az RCD használata csökkenti az áramütés
kockázatát.
3) Személyi biztonság
a) Álljon készenlétben, fi gyelje, hogy mit tesz,
és használja a józan eszét a
üzemeltetésekor.
ől vagy mozgó alkatrészektől.
gázok vagy por
szerszámgép
Ne használja a szerszámgépet fáradtan,
kábítószer, alkohol vagy gyógyszer befolyása
alatt.
A szerszámgépek üzemeltetése közben egy
pillanatnyi fi gyelmetlenség súlyos személyi sérülést
eredményezhet.
b) Használjon személyi védőfelszerelést. Mindig
viseljen védőszemüveget.
A megfelelő körülmények esetén használt
védőfelszerelés, mint például a porálarc, nem
csúszó biztonsági cipő, kemény sisak, vagy
hallásvédő csökkenti a személyi sérüléseket.
c) Előzze meg a véletlen elindítást. Győződjön
meg arról, hogy a kapcsoló a KI helyzetben
van, miel
és/vagy az akkumulátorcsomaghoz, amikor
felveszi vagy szállítja a szerszámot.
A szerszámgépek szállítása úgy, hogy az ujja
a kapcsolón van vagy a bekapcsolt helyzetű
szerszámgépek áram alá helyezése vonzza a
baleseteket.
d) Tá volí tso n el minden állítókulcsot vagy
csavarkulcsot, mielőtt bekapcsolja a
szerszámgépet.
A szerszámgép forgó részéhez csatlakoztatva
hagyott csavarkulcs vagy kulcs személyi sérülést
eredményezhet.
e) Ne nyúljon át. Mindenkor álljon stabilan, és
őrizze meg egyensúlyát.
Ez lehetővé teszi a szerszámgép jobb ellenőrzését
váratlan helyzetekben.
f) Öltözzön megfelelően. Ne viseljen laza
ruházatot vagy
ruházatát és kesztyűjét a mozgó részektől.
A laza ruházat, ékszer vagy hosszú haj beakadhat
a mozgó részekbe.
g) Ha vannak rendelkezésre bocsátott eszközök
a porelszívó és gyűjtő létesítmények
csatlakoztatásához, gondoskodjon arról, hogy
ezek csatlakoztatva és megfelelően használva
legyenek.
A porgyűjtő használata csökkentheti a porhoz
kapcsolódó veszélyeket.
4) A szerszámgép használata és ápolása
a) Ne erőltesse a
alkalmazásához megfelelő szerszámgépet.
A megfelelő szerszámgép jobban és
biztonságosabban végzi el a feladatot azon a
sebességen, amelyre azt tervezték.
b) Ne használja a szerszámgépet, ha a kapcsoló
nem kapcsolja azt be és ki.
Az a szerszámgép, amely a kapcsolóval nem
vezérelhető, veszélyes és meg kell javítani.
c) Húzza ki a dugaszt az áramforrásból és/vagy
az akkumulátorcsomagot a szerszámgépből,
mielőtt bármilyen beállítást végez, tartozékokat
cserél vagy tárolja a szerszámgépeket.
Az ilyen megelőző biztonsági intézkedések
csökkentik a szerszámgép véletlen beindulásának
kockázatát.
d) A használaton kívüli szerszámgépeket tárolja
úgy, hogy gyermekek ne érhessék el, és ne
engedje meg, hogy a szerszámgépet vagy
ezeket az utasításokat nem ismerő személyek
üzemeltessék a szerszámgépet.
Képzetlen felhasználók kezében a szerszámgépek
veszélyesek.
őtt csatlakoztatja az áramforráshoz
ékszert. Tar ts a távol a haját,
szerszámgépet. Használjon az
61
Page 62

Magyar
e) A szerszámgépek karbantartása. Ellenőrizze a
helytelen beállítás, a mozgó részek elakadása,
alkatrészek törése és minden olyan körülmény
szempontjából, amelyek befolyásolhatják a
szerszám működését .
Ha sérült, használat előtt javíttassa meg a
szerszámot.
Sok balesetet a rosszul karbantartott
szerszámgépek okoznak.
f) A vágószerszámokat tartsa élesen és tisztán.
Az éles vágóélekkel rendelkező, megfelelően
karbantartott vágószerszámok kevésbé
valószínűen akadnak el és könnyebben kezelhetők.
g) A szerszámgép tartozékait
stb. használja ezeknek az utasításoknak
megfelelően, fi gyelembe véve a
munkakörülményeket és a végzendő munkát.
A szerszámgép olyan műveletekre történő
használata, amelyek különböznek a
szándékoltaktól, veszélyes helyzetet
eredményezhet.
5) Akkumulátoros szerszám használata és ápolása
a) Csak a gyártó által előírt töltővel töltse újra.
Az akkumulátor-köteg egy típusához alkalmas töltő
tűzveszélyt okozhat, ha egy másik akkumulátorköteggel használják.
b) A szerszámgépeket csak kifejezetten
arra rendeltetett akkumulátor-kötegekkel
használja.
Bármilyen más akkumulátor-köteg használata
sérülés- és tűzveszélyt okozhat.
c) Amikor az akkumulátor-köteg nincs
használatban, tartsa távol más fémtárgyaktól,
mint például iratkapcsoktól, érméktől,
kulcsoktól, szegektől, csavaroktól, vagy egyéb
kis fémtárgyaktól, amelyek összeköttetést
hozhatnak létre egyik csatlakozótól a
másikhoz.
Az akkumulátor csatlakozóinak rövidre zárása
égési sérüléseket vagy tüzet okozhat.
d) Helytelen körülmények között az akkumulátor
folyadékot bocsáthat ki; kerülje az érintkezést.
Ha vélet lenül érintkezés fordul el
öblítse le. Ha a folyadék a szemmel kerül
érintkezésbe, keressen orvosi segítséget is.
Az akkumulátorból kibocsátott folyadék irritációt
vagy égéseket okozhat.
6) Szerviz
a) A szerszámgépét képesített javító személlyel
szervizeltesse, csak azonos cserealkatrészek
használatával.
Ez biztosítja, hogy a szerszámgép biztonsága
megmaradjon.
VIGYÁZAT
Tar ts a távol a gyermekeket és beteg személyeket.
Amikor nincs használatban, a szerszámokat úgy
kell tárolni, hogy gyermekek és beteg személyek ne
érhessék
el.
és betétkéseit,
ő, vízzel
FŰNYÍRÓ BIZTONÁSÁGI FIGYELMEZTETÉSEI
FONTOS
HASZNÁLAT ELŐTT OLVASSA ÁT ALAPOSAN
ŐRIZZE MEG, KÉSŐBB IS SZÜKSÉGE LEHET RÁ
Biztonságos működéshez szükséges gyakorlatok
● Oktatás
a) Alaposan olvassa el az utasításokat. Ismerkedjen meg
a gép vezérlésével és megfelelő használatával.
62
b) Soha ne hagyja, hogy képzetlen emberek vagy
gyerekek használják a gépet. A helyi törvények is
szabályozhatják a használó életkorát.
c) Ne feledje, a gépet használó személy a felelős az
esetleges sérülésekért vagy károkért.
● Előkészítés
a) Soha ne használja a készüléket, ha emberek, főleg
gyerekek vagy háziállatok tartózkodnak a közelben.
b) A gép használata közben mindig viseljen szemvédőt
és kemény cipőt.
● Használat
a) A gépet csak napfénynél vagy jó mesterséges fénynél
használja.
b) A készüléket soha ne használja sérült biztonsági
elemekkel vagy védőlemezekkel, illetve azok nélkül.
c) Csak akkor kapcsolja be a motort, ha a kezei és lábai
nincsenek a vágórészek közelében.
d) A készüléket minden alkalommal áramtalanítsa, ha (pl.
húzza ki a dugót a konnektorból)
– azt fi gyelmen kívül hagyja;
– ha egy eltömődést kíván megtisztítani;
– ellenőrzi, tisztítja vagy javítja azt;
– eltalált vele egy idegen tárgyat;
– a gép rendkívüli módon elkezd vibrálni.
e) Vigyázzon, nehogy a vágófej megsebesítse a lábait
vagy kezeit.
f) Mindig biztosítsa, hogy a szellőzőnyílások ne legyenek
eltömődve.
● Karbantartás és tárolás
a) Karbantartási vagy tisztítási művelet végrehajtása
előtt a készüléket minden alkalommal áramtalanítsa
(pl. húzza ki a dugót a konnektorból vagy távolítsa el a
lekapcsoló eszközt).
b) Kizárólag a gyártó által javasolt cserealkatrészeket és
kiegészítőket használja.
c) Rendszeresen ellenőrizze a gépet és végezzen
karbantartást. A gépet csak engedéllyel rendelkező
szerelő javíthatja.
d) Ha nem használja a gépet, tárolja olyan helyen, ahol a
gyerekek nem férhetnek hozzá.
ÓVINTÉZKEDÉSEK A VEZETÉLNÉLKÜLI
FŰNYÍRÓHOZ
FIGYELMEZTETÉS
1. A szerszámmal közben történő munkavégzés esetén
mindig legyen türelmes. Mindig olyan ruhát vegyen fel,
mely melegen tartja.
2. A balesetek elkerülése érdekében minden munkát
tervezzen meg előre.
3. A készüléket ne használja éjszaka, vagy rossz
időjárási esetén, amikor rosszak a látási viszonyok. Ne
használja a gépet esőben vagy közvetlenül eső után.
A csúszós talajon történő munkavégzés balesethez
vezethet, ha elveszíti az egyensúlyát.
4. A munka elkezdése előtt vizsgálja meg a vágófejet.
Ne használja a gépet, ha a vágófej repedt vagy
meghajolt.
Győződjön meg róla, hogy a vágófej megfelelően
van-e csatlakoztatva. A munkavégzés közben széteső
vagy meglazuló vágófej balesetet okozhat.
5. A munka megkezdése előtt mindig csatlakoztassa a
biztonsági burkolatot és a vállszíjat.
A gép ezen alkatrészek nélkül történő használata
sérüléshez vezethet.
6. A munka megkezdése előtt mindig csatlakoztassa
a markolatot. A munka megkezdése előtt mindig
ellenőrizze, hogy nem laza-e, és megfelelően lett-e
csatlakoztatva. Munkavégzés közben mindig erősen
fogja a markolatot, és ne lóbálja a gépet. Az egyensúly
megtartásához mindig álljon megfelelő testtartásban.
Page 63

Magyar
Ha munkavégzés közben elveszti az egyensúlyát, az
sérüléshez vezethet.
7. A motor indítása közben fi gyeljen oda.
A gépet helyezze vízszintes talajra.
Ne használja a gépet, ha 15 méteres körzetben
tartózkodik valaki.
Győződjön meg róla, hogy a vágófej nem ér-e hozzá a
talajhoz, vagy fákhoz, vagy növényekhez.
A gondatlan indítás sérüléshez vezethet.
8. Ne zárja le záró kart.
A kar véletlen hátrahúzása váratlan sérülésekhez
vezethet.
9. Mielőtt otthagyná a gépet valahol, a kikapcsoláshoz
nyomja meg az indítógombot.
10. Elektromos kábelek, gázvezetékek vagy hasonló
eszközök környékén különös odafi gyeléssel
működtesse a gépet.
11. A munka megkezdése előtt vizsgálja meg a terepet
és keressen üres konzervdobozokat, vezetékeket,
köveket vagy egyéb akadályt jelentő tárgyakat. Ezen
felül, ne használja a gépet fák vagy sziklák tövénél.
Az ilyen területen történő munkavégzés kárt tehet a
vágófejben vagy sérüléshez vezethet.
12. A forgási sebességet ne növelje meg túlzott
mértékben.
A sebességet fokozatosan és ne hirtelen növelje.
A kar helyzetét a terhelésnek megfelelően módosítsa.
A gépből kirepülő tárgyak váratlan sérüléseket
okozhatnak.
13. Működés közben sose érintse meg a vágófejet.
Tegye meg a szükséges lépéseket, hogy a gép ne
érintkezhessen hajával, ruhájával, stb.
14. A következő helyzetekben kapcsolja ki a motort és
ellenőrizze, hogy a vágófej befejezte-e a pörgést.
Ha a gépet egy másik helyre viszi.
Ha el kívánja távolítani a gépbe szorult szemetet vagy
füvet.
Ha el kívánja takarítani a munkaterületről az
akadályokat vagy a fűnyírás közben keletkező
szemetet, füvet és forgácsot.
Ha le kívánja tenni az eszközt.
Ha a gépet úgy teszi le, hogy a vágófej forgásban
marad, az váratlan balesetekhez vezethet.
15. Ne használja a gépet, ha 15 méteres körzeten belül
más valaki is tartózkodik.
Ha közösen dolgozik valakivel, tartson 15 méter
távolságot tőle.
A repülő törmelékek váratlan sérüléseket okozhatnak.
Nem vízszintes területen dolgozva, mint pl. lejtő,
győződjön meg róla, hogy munkatársa nincs-e
bármilyen veszélynek kitéve.
Fütyüljön vagy más egyéb módon hívja fel magára a
munkatársa fi gyelmét.
16. Ha fű vagy egyéb tárgyak akadnak a vágófejbe,
kapcsolja le a motort, és mielőtt eltávolítaná ő
győződjön meg róla, hogy a vágófej megállt-e.
Ha ezeket a tárgyakat úgy próbálja meg eltávolítani,
hogy a vágófej forog, az sérüléshez vezethet.
Ha úgy folytatja a gép használatát, hogy az idegen
anyag be van szorulva a vágófejbe, az a gép
sérüléséhez vezethet.
17. Amennyiben a gép rosszul működik, vagy furcsa
hangot vagy rezgéseket hoz létre, azonnal kapcsolja
le a motort, majd a forgalmazóval vizsgáltassa be és
javíttassa meg.
Az ilyen feltételek mellett történő munkavégzés
sérüléshez vagy a gép meghibásodásához vezethet.
18. Ha leejti, vagy valaminek nekiüti a gépet, alaposan
vizsgálja meg, hogy nincsenek-e rajta sérülések,
repedések vagy egyéb deformáció.
ket,
A sérült, repedt vagy eldeformálódott géppel történő
munkavégzés sérüléshez vezethet.
19. Járműben történő szállítás közben rögzítse le a gépet.
A fi gyelmeztetés fi gyelmen kívül hagyása balesethez
vezethet.
FIGYELEM
1. A vágófej segítségével kizárólag füvet kíséreljen meg
vágni. A gépet ne használja tócsákban és biztosítsa,
hogy a vágófej ne lépjen kapcsolatba a talajjal.
2. A gép precíziós alkatrészeket tartalmaz, ezért nem
szabad leejteni, erős rázkódásnak vagy víznek kitenni.
A gép megsérülhet vagy meghibásodhat.
3. Ha a épet használat után tárolni vagy szállítani
szeretné, távolítsa el a vágófejet.
4. A gépet ne tegye ki rovarirtók vagy egyéb vegyszerek
hatásának.
Az ilyen vegyszerek következtében a gép
megrepedezhet, vagy egyéb módon sérülhet.
5. Cserélje ki a fi gyelmeztető címkéket újakra,
amennyiben azokat nehezen olvashatóvá válnak vagy
elkezdenek lejönni.
A fi gyelmeztető címkéket kérje a forgalmazótól.
AZ AKKUMULÁTORRAL ÉS A TÖLTŐVEL
KAPCSOLATOS ÓVINTÉZKEDÉSEK
1. Az akkumulátort mindig 0˚C és 40˚C közötti
hőmérsékleten töltse. A 0˚C alatt végzett töltés az
akkumulátor túltöltését okozhatja, ami veszélyes. Az
akkumulátor 40 ˚C feletti hőmérsékleten nem tölthető.
A legmegfelelőbb hőmérséklet a töltéshez 20˚C –
25˚C.
2. Ha befejezett egy töltést, hagyja az akkumulátortöltőt
kb. 15 percig állni, mielőtt másik töltésbe kezd.
Az akkumulátort ne töltse 2 óránál hosszabb ideig.
3. Ne engedje, hogy a tölthető akkumulátor
csatlakoztatására szolgáló nyílásba idegen anyag
kerüljön.
4. Ne dugjon semmiféle tárgyat az akkumulátortöltő
szellőzőnyílásaiba.
Az akkumulátortöltő szellőzőnyílásaiba dugott fém
vagy gyúlékony tárgyak elektromos áramütést, vagy
az akkumulátortöltő sérülését okozhatják.
5. Kimerült és tölthetetlenné vált akkumulátor használata
károsíthatja az akkumulátortöltőt.
6. Ha az akkumulátor töltés utáni élettartama annyira
lerövidül, hogy az gyakorlatilag használhatatlanná
válik, vigye vissza az akkumulátort abba a boltba, ahol
azt vásárolta. Ne dobja el a kimerült és tölthetetlenné
vált akkumulátort.
7. Soha ne szedje szét a tölthető akkumulátort és az
akkumulátortöltőt.
8. Soha ne zárja rövidre a tölthető akkumulátort. Az
akkumulátor rövidzárlata nagy áramerősséget és
magas hőmérsékletet eredményez. Ez égési sérülést,
illetve az akkumulátor sérülését okozza.
9. Ne dobja tűzbe a tölthető akkumulátort.
A tűzbe dobott tölthető akkumulátor felrobbanhat.
FIGYELMEZTETÉS A LÍTIUMION
AKKUMULÁTORRAL KAPCSOLATOSAN
Az élettartam meghosszabbításához a lítiumion
akkumulátor védelmi funkcióval van ellátva a működés
leállításához. Az alább leírt 1 – 3. esetben a termék
használatakor a motor leállhat, még ha húzza is a
kapcsolót. Ez nem meghibásodást jelez, hanem a védelmi
funkció eredménye.
1. Amikor az akkumulátorban lemerül a töltés, a motor
leáll.
Ilyen esetben haladéktalanul fel kell tölteni.
63
Page 64

Magyar
2. Ha az eszköz túl van terhelve, előfordulhat, hogy a
motor leáll. Ez esetben oldja a szerszám kapcsolóját
és hárítsa el a túlterhelés okát. Ezt követően a gépet
ismét használhatja.
3. Ha az akkumulátor a túlterhelt munka mellett
túlmelegszik, az akkumulátor árama megállhat.
Ebben az esetben hagyja abba az akkumulátor
használatát és hagyja lehűlni az akkumulátort. Ezután
ismét használhatja.
Kérjük, vegye fi gyelembe az alábbi fi gyelmeztetéseket és
biztonsági tudnivalókat.
FIGYELMEZTETÉS
Az akkumulátor szivárgásának, felforrósodásának, füst
képződésének, illetve a robbanás vagy tűz keletkezésének
megelőzése érdekében kérjük, tartsa be az alábbi
óvintézkedéseket.
1. Ügyeljen rá, hogy fémforgács és por ne gyülemeljen fel
az akkumulátoron.
○ Munka közben ügyeljen rá, hogy fémforgács és por ne
hulljon az akkumulátorra.
○ Ügyeljen rá, hogy a munka közben az elektromos
kéziszerszámra hulló fémforgács és por ne
gyülemeljen fel az akkumulátoron.
○ A használaton kívül akkumulátort ne tárolja
fémforgácsnak és pornak kitett helyen.
○ Az akkumulátor eltárolása előtt távolítsa el a rárakódott
fémforgácsot és port, és ne tárolja fém alkatrészekkel
együtt (csavarok, szögek, stb.).
2. Ne bontsa meg az akkumulátor burkolatát hegyes
tárggyal, például tűvel, ne üssön rá kalapáccsal,
ne álljon rá, ne ejtse le, és ne tegye ki erős fi zikai
behatásnak.
3. Ne használjon láthatóan sérült vagy deformálódott
akkumulátort.
4. Ne használja az akkumulátort fordított polaritással.
5. Ne csatlakoztassa az akkumulátort közvetlenül az
elektromos csatlakozóaljzathoz vagy szivargyújtócsatlakozóhoz.
6. Az akkumulátort kizárólag rendeltetése szerint
használja.
7. Azonnal állítsa le az akkumulátor töltését, ha a töltés
az előírt töltési idő után sem sikeres.
8. Ne tegye ki az akkumulátort magas hőmérsékletnek
vagy nyomásnak. Ne helyezze az akkumulátort
mikrohullámú sütőbe, szárítógépbe vagy nagynyomású
konténerbe.
9. Az akkumulátort tartsa tűztől távol, ha szivárgást vagy
áporodott szagot észlel.
10. Ne használja az akkumulátort erős statikus
elektromosság közelében.
11. Azonnal vegye ki az akkumulátort a készülékből
vagy a töltőből, és hagyja abba annak használatát,
ha szivárgást, áporodott szagot, felforrósodást,
elszíneződést vagy deformációt észlel.
FIGYELEM
1. Ha az akkumulátorból szivárgó sav szembe jutna,
semmiképpen ne dörzsölje, hanem öblítse ki folyó
vízzel, és azonnal forduljon or voshoz.
Kezelés nélkül a folyadék látáskárosodást okozhat.
2. Ha a folyadék bőrével vagy ruházatával érintkezik,
azonnal mossa le folyó vízzel.
A folyadék irritálhatja a b
3. Ne használja az akkumulátort, és vigye azt vissza
a kereskedőhöz, ha az első alkalommal való
használatkor rozsdásodást, áporodott szagot,
felforrósodást, elszíneződést, deformációt vagy egyéb
rendellenességet észlel.
őrt.
MŰSZAKI ADATOK
ELEKTROMOS SZERSZÁM
Típ us CG18D L CG18DAL
Nyél típusa Tartozék típusa Egyenes típus
Vágá si átmérő 425 mm
Forgásirány Az óramutató járásával megegyező irány
Terhelés nélküli sebesség 0–4500 perc
Működési idő egy feltöltéssel *
(Teljesen feltöltött újratölthető akkumulátor esetén)
1
5 perc*
Akkumulátor BSL1830: Li-ion 18 V (3,0 Ah 10 cellák)
Súly (Vágófej és vállszíj nélkül) 5,4 kg 5,2 kg
*1 A fenti táblázatban található adatok csak példaként szolgálnak. A fent leírt adatok a fű típusától, a kés élességétől, a
vágófej forgási sebességétől, a környezeti hőmérséklettől, az újratölthető akkumulátor jellemzőitől, a munkamenettől,
stb. függően nagymértékben eltérhetnek, így ezek az adatok csak referenciaként szolgálnak.
*2 Feltételek: A nejlon damilt tartalmazó vágórész külső átmérője 425 mm, a kapcsoló teljes sebességre van állítva.
Akkumulátortöltő
Modell UC18YRSL
Töltési feszültség 14,4 V 18 V
Súly 0,6 kg
-1
2
64
Page 65

SZABVÁNY KIEGÉSZÍTŐK
Magyar
1
5
CG18DL
CG18DAL
(LSC)
1 Nejlon fej (Sure tap) ...................................................... 1
2 Letekeredés-védő ........................................................ 1
3 Hatszögű csőkulcs 4 mm .............................................1
4 Csőkulcs (Hatlapú fej 17/19)......................................... 1
5 Védőszemüveg ............................................................1
6 Vállszíj .......................................................................... 1
7 Akkumulátor (BSL1830) ...............................................1
8 Töltő (UC18YRSL) ........................................................1
A szabvány kiegészítők minden külön fi gyelmeztetés nélkül módosulhatnak.
OPCIONÁLIS KIEGÉSZÍTŐK (külön értékesítve)
1. Akkumulátor (BSL1830)
8
4. Lábszárvédő (1 készlet 2 lábszárvédővel)
Megóvja a lábat a felcsapódó törmeléktől
2
6
3
4
7
2. Akkumulátor burkolat
3. Kenőzsír (100 g-os tubus)
Minden 50 óra üzemidő után kenje meg a
sebességváltóházat.
Az opcionális kiegészítők minden külön fi gyelmeztetés
nélkül módosulhatnak.
ALKALMAZÁSI TERÜLETEK
Gaz nyírása és vágása.
AZ AKKUMULÁTOR KIVÉTELE/BEHELYEZÉSE
1. Az akkumulátor kivétele
Az akkumulátor eltávolításához fogja erősen a házat,
és nyomja meg az akkumulátor zárakat (lásd 2. ábra).
FIGYELEM
Soha ne zárja rövidre az akkumulátort.
2. Az akkumulátor behelyezése
Illessze helyére az akkumulátort, a megfelelő
polaritásokat betartva (lásd 2. Ábra).
65
Page 66

Magyar
TÖLTÉS
A szerszámgép használata előtt töltse fel az akkumulátort
a következők szerint.
1. Csatlakoztassa az akkumulátortöltő tápkábelét a
dugaszolóaljzathoz.
Amikor a tápkábel csatlakoztatva van, a töltő
jelzőlámpája pirosan villog. (1 másodperces
időközöként).
2. Helyezze az akkumulátort az akkumulátortöltőbe.
Pontosan illessze az akkumulátort a töltőbe úgy, hogy
a bonal a 3, 4. Ábrán megfelelően látható legyen.
1. Táblázat
A jelzőlámpa jelzései
A jelzőfény
világit
vagy piros
fénnyel
villog.
A jelzőfény
zöld
színnel
világít.
(2) A tölthető akkumulátor hőmérsékletével kapcsolatos
megjegyzések
Az újratölthető akkumulátorok hőmérsékletét a 2.
Táblázat mutatja, a felforrósodott akkumulátorokat
újratöltés előtt egy kis ideig hűteni kell.
2. Táblázat Akkumulátorok töltési tartományai
Tölthető akkumulátorok
BSL1830 0°C – 50°C
(3) A töltési idővel kapcsolatos megjegyzések
Az akkumulátortöltő és az akkumulátor kombinációjától
függően a töltési idők a 3. Táblázatban szereplők
lesznek.
3. Táblázat Töltési idő (20˚C-on)
Akumulator
BSL1830 Kb. 45 perc
MEGJEGYZÉS
A töltési idő a hőmérséklettől és a hálózati feszültségtől
függően változhat.
4. Húzza ki a hálózati csatlakozózsinórt a
dugaszolóaljzatból.
5. Ta rt sa szilárdan kézben az akkumulátortöltőt, és
húzza ki belőle az akkumulátort.
MEGJEGYZÉS
Töltés után először húzza ki az akkumulátorokat
a töltőből, azután tartsa megfelelően az
akkumulátorokat.
66
Töltés előtt Villog Kigyullad 0,5 mp.-ig. Elalszik 0,5 mp.-ig
Töltés
közben
Töltés
befejeződött
Nem
lehetséges
a töltés
Túlmelegedési
készenlét
Ładowarka
Világít Folyamatosan világít
Villog Kigyullad 0,5 mp.-ig. Elalszik 0,5 mp.-ig
Világít Folyamatosan világít Az akkumulátor
Hőmérséklet, amelyen az
akkumulátor újra tölthető
(Nem világít 0,5 mp.-ig)
(Nem világít 0,5 mp.-ig)
Kigyullad 0,1 mp.-ig. Elalszik 0,1 mp.-ig
(Nem világít 0,1 mp.-ig)
UC18YRSL
3. Tölt és
Ha az akkumulátort behelyezi a töltőbe, a töltés
megkezdődik, és a jelzőlámpa piros fénnyel világít.
Amint az akkumulátor töltése befejeződött, a
jelzőlámpa piros fénnyel villot. (1 másodperces
időközönként) (Lásd az 1. Táblázatot).
(1) A jelzőlámpa jelzései
A jelzőlámpa jelzéseit az akkumulátortöltő illetve az
akkumulátor állapotának megfelelően az 1. Táblázat
tartalmazza.
Az akkumulátor vagy
az akkumulátortöltő
meghibásodott
túlmelegedett.
Nem lehet tölteni.
(A töltés akkor kezdődik,
amikor az akkumulátor lehűl)
Hogyan Èrhetı el, hogy az akkumul·torok tov·bb
tartsanak
(1) Az akkumulátorokat teljes lemerülésük előtt töltse fel.
Amikor érzi, hogy a kéziszerszám teljesítménye
gyengül, ne használja azt tovább, hanem töltse fel az
akkumulátort.
Amennyiben tovább használja a gyengülő erejő
szerszámot és teljesen lemeríti azt, az akkumulátor
megsérülhet és élettartama emiatt lerövidülhet.
(2) Kerülje a magas hőmérsékleten történő töltést
A tölthető akkumulátor közvetlenül használat után forró
lesz. Ha egy ilyen akkumulátort közvetlenül a használat
után tölteni kezd, akkor annak belső vegyi anyaga
bomlásnak indul, és az akkumulátor élettartama
lerövidül. Hagyja az akkumulátort hűlni egy darabig, és
csak akkor töltse fel, ha teljesen lehőlt.
FIGYELEM
○ Folyamatos használat során az akkumulátortöltő
felmelegszik, ez okozza a meghibásodásokat. Amikor
a töltés befejeződött, a következő töltésig várjon 15
percet.
○ Ha az akkumulátort használata vagy a nap sugárzása
miatt meleg állapotban tölti fel, az ellenőrző lámpa
zölden világíthat. Az akkumulátor nem töltődik fel.
Ilyen esetben hagyja, hogy az akkumulátor töltés előtt
lehűljön.
○ Ha a jelzőlámpa piros színnel villog (0,2 másodperces
időközönként), akkor ellenőrizze hogy nincs-e
valamilyen idegen tárgy az akkumulátortöltőnek az
akkumulátor behelyezésére szolgáló nyílásában, és
távolítsa el onnan az esetleges idegen tárgyakat. Ha
nincs a nyílásban idegen tárgy, akkor lehetséges,
hogy vagy az akkumulátor, vagy az akkumulátortöltő
meghibásodott. Vigye őket szakszervizbe.
Page 67

Magyar
A FENNMARADÓ TÖLTÉS ELLENŐRZÉSE
Amikor megnyomja a fennmaradó töltés kijelzőjének
kapcsolóját, a fennmaradó töltést jelző lámpa kigyullad,
és ellenőrizheti a fennmaradó töltést. (5. Ábrát) Amikor
felengedi a fennmaradó töltés kijelzőjének kapcsolóját,
a fennmaradó töltést jelző lámpa kialszik. A 4. Táblázat
mutatja a fennmaradó töltést jelző lámpa egyes jelzéseihez
tartozó fennmaradó töltést.
4. Táblázat
Lámpa jelzése Fennmaradó töltés
Elegendő töltés áll rendelkezésre.
A teljes kapacitás fele áll
rendelkezésre.
Az akkumulátor szinte teljesen
lemerült.
A lehető leghamarabb töltse újra.
A fennmaradó töltés jelzője csak tájékoztató jellegű, a
külső hőmérséklettől és az akkumulátor tulajdonságaitól
függően más-más értékeket jeleníthet meg.
MEGJEGYZÉS
○ Ne üssön rá erősen a kapcsolópanelre és ne törje el
azt, mert ebből problémák származhatnak.
○ Az akkumulátor terhelésének csökkentése érdekében
a fennmaradó töltést jelző lámpa csak a kapcsoló
megnyomása esetén világít.
HASZNÁLAT ELŐTT
FIGYELEM
A készülék összeszerelése előtt vegye ki az
akkumulátort.
1. Kiegészítők összeszerelése [kizárólag a CG18DL
esetén] (6. ábra)
(1) Helyezze a csapszeget a szegélyvágó nyelének
zárónyílásába, és győződjön meg róla, hogy a nyél
nem lazulhat-e meg.
(2) Szorítsa meg a fogantyú gombot.
2. Szerelje fel a markolatot (7. ábra)
(1) Távolítsa el az M6 x 43 csavarokat (2).
(2) Szerelje fel a markolatot a nyélre úgy, hogy az a motor
felé álljon.
(3) Helyezze a fogantyúrögzítőt a nyél alsó végére, majd
M6 × 43 csavarok (2) és M6 anyák (2) segítségével
csavarozza fel.
MEGJEGYZÉS
Olyan helyre rögzítse a markolatot, mely jó fogást
biztosít.
3. A védőborítás felszerelése (Lásd 8. és 9. ábra)
FIGYELMEZTETÉS
A védőborítást a meghatározott helyre szerelje fel.
A fi gyelmeztetés fi gyelmen kívül hagyása a felcsapódó
kövek következtében sérüléshez vezethet.
MEGJEGYZÉS
A felszereléshez a csomagban található hatlapú
csőkulcsot használja.
(1) A kés felszereléséhez használja a csomagban
található D4 önmetsző csavarokat. (8. ábra)
Csatlakoztassa a burkolatvédőt a biztonsági
burkolathoz.
(2) Illessze össze a bilincsen található két lyukat, majd
helyezzen be a lyukba M6 x 26 hatlapú csavarokat. (A
bilincs a sebességváltóházba van beszerelve)
(3) Helyezze a burkolattartót a biztonsági burkolat aljához,
és a csomagban található imbuszkulcs segítségével
felváltva húzza meg az M6 × 25 hatlapú csavarokat.
FIGYELEM
Vigyázzon, nehogy megvágja megát a késsel a
biztonsági burkolaton belül.
4. A vállszí j felszerelése
FIGYELMEZTETÉS
○ A vállszíjat úgy szerelje fel a gépre, hogy azt könnyű
legyen tartani.
○ Ha olyan érzése van, hogy a gép nem működik
megfelelően, azonnal állítsa le a motort, távolítsa el a
vállszíj gyorskioldó bilincsét és vegye le a gépet.
FIGYELEM
○ Ha a gyorskioldó csat kioldásakor nem tartja meg a
gépet, az leeshet és sérülést okozhat.
Egyik kezében tartsa a nyelet, míg a másik kezével
húzza.
○ A munkavégzés megkezdése lőtt győződjön meg róla,
hogy a gyorskioldó funkció megfelelően működik-e.
(1) A 10. ábrán látható módon vegye fel a vállszíjat és
akassza be a gépen található gyűrűbe. Állítsa be a
vállszíjat a megfelelő hosszra.
(2) A gép vállszíjról történő eltávolításához az egyik
kezével tartsa meg a nyelet, míg a másik kezével a 10.
ábrán látható módon meghúzza a gyorskioldó szíjat.
(3) A gép szíjra történő felszereléséhez helyezze a
bilincset a kampóra, majd helyezze a gyorskioldó
bilincset a kampóra és a bilincs széles nyílásába. (11.
ábra)
Húzza meg a vállszíjat, így meggyőződhet róla, hogy
az megfelelően csatlakoztatva van-e.
VÁGÓ FEJ
1. Funkci ó
A „SURE-TAP” vágófej
○ A vágófej alacsony fordulatszám (mem több, mint 4500
-1
perc
) esetén, a automatikusa adagolja a damilt.
FIGYELEM
○ A vágótest sapkáját erősen rögzíteni kell a
vágótesthez.
○ Ellenőrizze a vágótestet, a vágótest sapkáját és a többi
alkatrészt, hogy nincs-e rajtuk repedés vagy egyéb
sérülés.
○ A vágófejet erősen kell felszerelni a gép
sebességváltóházához.
○ A kimagasló teljesítmény és megbízhatóság érdekében
mindig eredeti, HITACHI damilt használjon. Soha ne
használjon vezetéket vagy olyan anyagokat, melyek
kicsapódás esetén veszélyesek lehetnek.
○ Amennyiben a vágófej nem adagolja megfelelően a
damilt, ellenőrizze, hogy a damil és a többi alkatrész
megfelelően van-e felszerelve. Ha segítségre van
szüksége, lépjen kapcsolatba a HITACHI-val.
2. Összeszerelés (12. ábra)
(1) A vágótartó lezárása érdekében helyezze a hatlapú
imbuszkulcsot a sebességváltó házon található
lyukba.
(2) Szerelje fel a vágótartót, a letekeredés-védőt,
a vágótartó sapkát, a vágófejet a szegélynyíró
sebességváltóházára. A csavaranya balmenetes. A
meglazításhoz tekerje jobbra/a megszorításhoz tekerje
balra.
3. A damil hosszának beállítása
(1) Állítsa a motor fordulatszámát a lehető
legalacsonyabbra, majd kopogtassa meg vágófejet
a földön. Egy nyomásra kb. 30 mm hosszú damil
tekerhető le. (13. ábra)
A damilt kézzel is kihúzhatja, de ehhez a motornak
teljesen le kell állnia. (14. ábra)
67
Page 68

Magyar
(2) Minden egyes használat előtt állítsa be a damilt a
megfelelő hosszúságra (110 – 140 mm).
(3) Amennyiben a damil túl hosszan lett kihúzva, az orsó
megnyomásával és elforgatásával visszahúzhatja a
hosszú részt. (15. ábra)
4. A damil cseréje
(1) A hüvelykujjaival erősen nyomja be a zárófüleket, és
távolítsa el a vágótestet (16. ábra).
(2) A vágótest sapka eltávolítása után, vegye ki az orsót
és tekerje fel a megmaradt damilt.
(3) Hajtsa félbe az új damilt. (17. ábra)
(4) A damil „U” alakú, meghajlított részét akassza be az
orsó közepén található vájatba.
A damil mindkét végét tekerje fel az orsóra ugyanabban
az irányban, miközben a damil mindkét fele a saját
oldalán marad. (18. ábra)
(5) Nyomja be az egyes damilokat a megállító lyukba, és
hagyjon kb. 100mm-t szabadon. (19. ábra)
(6) Az orsó vágótestbe történő behelyezésekor a damil
mindkét végét vezesse át a fűzőlyukon. (20. ábra)
MEGJEGYZÉS
Az orsó vágótest sapkába történő behelyezésekor,
a későbbi könnyebb kiengedés érdekében próbálja
meg egyvonalba állítani a megállító lyukakat (3) a
fűzőlyukkal.
(7) Helyezze a tekercsrugót az orsóba. (21. ábra)
(8) Helyezze a vágótestet a vágótest sapka fölé, így
a vágótesten található zárófülek hozzáérnek a
vágótesten lévő hosszú lyukakhoz. Akkor nyomja meg
a vágótestet, míg az be nem ugrik a helyére. (21. ábra)
(9) A damil végeit húzza meg, hogy azok kijöjjenek a
megállító lyukakból. Ha a damil túl hosszú lenne
(hosszabb, mint 100 mm), tekerje fel úgy, hogy kb. 100
mm maradjon. (15. ábra)
(10)
A kezdeti damilhossznak kb. 150 mm-nek kell lennie
továbbá mindkét oldalon ugyanolyan hosszúnak kell
lennie. (22. ábra)
MŰKÖD TETÉ S
Fűnyírás
FIGYELMEZTETÉS
○ A készüléket ne használja éjszaka, vagy rossz időjárási
esetén, amikor rosszak a látási viszonyok.
○ Ne használja a gépet esőben vagy közvetlenül eső
után.
○ A megcsúszás elkerülése érdekében viseljen
megfelelő lábbelit, mert megcsúszáskor elveszítheti
egyensúlyát és eleshet.
○ A gépet ne használja meredek lejtőkön.
Nem túlságosan meredek lejtőn történő fűnyírás
esetén felfelé haladjon a lejtőn.
○ A vállszíj segítségével vegye fel a gépet, jobb kezével
fogja a fogantyút, bal kezével pedig a markolatot, és
tartsa erősen.
○ Figyeljen oda, nehogy a vágófejet túl közel vigye a
lábához.
○ Fűnyírás közben ne emelje a gépet a térde fölé.
○ A gépet ne használja olyan helyeken, ahol kövek, fák
vagy egyéb akadályok találhatók.
○ Ha a motor megállítása után a váró szerelvény tovább
forog, az sérüléshez vezethet. Amikor az egységet
leállítja, lerakás előtt győződjön meg arról, hogy a vágó
szerelvény is leállt.
○ Ne használja a gépet, ha 15 méteres körzeten belül
más valaki is tartózkodik. Ha közösen dolgozik
valakivel, tartson 15 méter távolságot tőle.
1. Az akkumulátort úgy helyezze be, hogy közben
odafi gyel a polaritásra
68
2. A gép bekapcsolása (23. ábra)
○ Nyomja meg a gépen található Indítógombot, ekkor
a készülék bekapcsol és a fogantyún található lámpa
pirosan világít.
○ Az indítógomb ismételt megnyomása esetén a gép
lekapcsol és a piros fény kialszik.
[Auto matik us kikapcsolás]
Ha a készülék be van kapcsolva, de a kart egy
perce nem húzta meg senki, abban az esetben a
gép automatikusan lekapcsol. A készülék ismételt
bekapcsolásához nyomja meg újra a gombot.
FIGYELMEZTETÉS
Soha ne hagyja ott sehol az eszközt bekapcsolva. Ez
sérülést okozhat.
3. Fűnyírás
○ Felülről fogja meg a fogantyút, majd a vágófej
beindításához húzza meg a kart. (24. ábra)
○ A fűnyírás befejezéséhez és a motor leállításához
engedje vissza a kart.
○ Helyezze hüvelykujját a markolatra és a többi ujjával
markolja meg a fogantyút. (25. ábra)
○ Olyan testtartást vegyen fel, melyben könnyű mozogni.
[Fűnyírási technikák]
○ A motor túl lassan forog, a nyírás kevésbé hatékony
és a kés gyakrabban elakad a fűben. Túl gyors forgás
esetén rezgés és a hang túl hangos, továbbá megnő
az energiafogyasztás.
○ Túlzottan nagy sebesség esetén, az akkumulátor
hamarabb tönkremegy.
○ A vágófej jobbról balra történő mozgatás esetén ne
a nyelet, hanem csípőjét mozgassa, miközben egy
körívet ír le haladás közben. A fűnyíráshoz a vágófej
bal oldalát használja. (26. ábra)
VIGYÁZAT
Folyamatos munka
A készülék egy túlmelegedés-védővel kerül
forgalomba, mely megvédi azokat az elektromos
részeket, melyek az akkumulátort vezérlik. Folyamatos
fűnyírási tevékenység mellett, a gép hőmérséklete
folyamatosan emelkedik, mely végül bekapcsolja a
túlmelegedés-védőt, melynek következtében a gép
leáll.
Ha ez történne, hagyja, hogy a gép lehűljön. Ha a
hőmérséklet lecsökkent, a gépet ismét használhatja.
Ha folyamatos működés esetén az akkumulátor
cseréjére van szükség, hagyja a gépet 15 percig
pihenni.
Sebesség kapcsoló
Egy elektromos áramkörnek köszönhetően a kapcsoló
a sebesség fokozatos módosítását teszi lehetővé.
Ha a kapcsoló túl alacsonyra (fordulatszám tartomány)
van állítva, a gép folyamatosan túlterhelt állapotban
lesz, melynek következtében az elektromos áramkörök
túlmelegednek, mely a gép meghibásodásához
vezethet.
Alacsony sebesség mellett csak könnyebb munkákat
végezzen.
KARBANTARTÁS ÉS ELLENŐRZÉS
FIGYELEM
○ Az ellenőrzések vagy a karbantartási műveletek
elvégzése előtt vegye ki az akkumulátort.
1. Ellenőrizze a vágófej állapotát
A vágófejet gyakran kell ellenőriznie. A kopott vagy
sérült vágófej leeshet, vagy csökkenhet a motor
hatékonysága, melynek következtében leéghet.
A kopott vágófejet cserélje ki újra.
Page 69

Magyar
FIGYELEM
○ A kopott vagy sérült vágófej használata veszélyes.
Ilyenkor cserélje ki egy újra.
2. A csavarok ellenőrzése
A meglazult csavarok veszélyesek. Bizonyos
időközönként ellenőriz ze, ho gy a cs avarok kel lőképpen
meg vannak-e húzva.
FIGYELEM
○ A meglazult csavarokkal történő munkavégzés
rendkívül veszélyes.
3. A motor karbantartása
A motor részegység az elektromos szerszámgép
“szíve”.
Ügyelni kell arra, nehogy a motor tekercselése
megrongálódjon és/vagy olajjal, illetve vízzel
benedvesedjen.
4. A sebességváltóház kenése
○ Karbantartási intervallum
A sebességváltóházat minden 50 órányi működés után
ellenőrizze, hogy nem kell-e megkenni.
○ Kenés
Távolítsa el a vágófejet. Tisztítsa meg a
sebességváltóház körüli területet. Távolítsa el
az M6 csavart a sebességváltóház oldalából. A
csatlakozótengely forgatása közben, fecskendezzen
be lítium alapú kenőanyagot (P/N 682975) a lyukon
keresztül, míg a sebességváltóház meg nem telik.
Csavarja vissza az M6 csavart.
5. A szénkefék ellenőrzése (27. Ábra)
A motor belsejében fogyóeszköznek számító
szénkefék találhatók. Mivel a szénkefe túlzott kopása
a motor meghibásodását okozhatja, ezért azt ki kell
cserélni, ha túlzottan elkopik és a kopás mértéke eléri
vagy közelít az ún. “kopási határértékhez”. Ezen kívül
a szénkeféket mindig tisztán kell tartani, ügyelve arra,
hogy szabadon csússzanak a kefetartókon belül.
MEGJEGYZÉS
A szénkefe cseréjekor ügyeljen arra, hogy kizárólag
999054 kódszámú Hitachi szénkefét használjon.
6. A szénkefék cseréje
A szénkefét úgy húzza ki, hogy először eltávolítja a
kefesapkát, majd a 28. Ábrán megfelelően felakasztja
a szénkefe kidudorodását egy barázdált fejű
csavarhúzóval, stb.
A szénkefe felszerelésekor, a szénkefe (lásd 29.
irányát úgy válassza meg, hogy az Majd a 30. ábrán
látható módon nyomja meg az ujjával. Végül pedig
szerelje be a kefesapkát.
FIGYELEM
○ Feltétlenül dugja be a szénkefe szögét a szénkefe
csövén kívüli érintkező részbe (A két rendelkezésre
álló szög bármelyikét bedughatja).
○ Ezt a műveletet nagy körültekintéssel kell végezni,
hiszen bármilyen hiba esetén a szénkefe szöge
deformálódhat, a motor korai meghibásodását okozva.
7. A kéziszerszám külső tisztítása
Ha az ütvecsavarozó szennyeződött, törölje le lágy,
száraz ruha anyaggal, vagy benedvesített, szappanos
ruhaanyaggal. Ne használjon klóros oldatokat,
benzint vagy festékhígítót, mivel ezek szétmarhatják a
műanyagot.
8. Raktározás
Az ütvecsavarozót olyan helyen tárolja, ahol a
hőmérséklet alacsonyabb mint 40˚C, valamint tartsa
távol gyermekektől.
ábra)
9. Szervizelési alkatrészlista
FIGYELEM
Hitachi kéziszerszámok javítását, módosítását és
ellenőrzését csak Hitachi Szakszervíz végezheti.
Javítás vagy egyéb karbantartás esetén hasznos ha
ezt a szer víz-alkatrész listát a szerszámmal együtt
átadjuk a Hitachi szakszervíznek.
A kéziszerszámok üzemeltetése és karbantartása
során be kell tartani az egyes országokban érvényben
lévő biztonsági rendelkezéseket és szabványokat.
MÓDOSÍTÁSOK
A Hitachi kéziszerszámok állandó tökéletesítéseken
mennek át, hogy alkalmazni tudják a legújabb műszaki
fejlesztések eredményeit.
Éppen ezért egyes alkatrészek előzetes bejelentés
nélkül megváltozhatnak.
Fontos megjegyzés a Hitachi vezeték nélküli
elektromos szerszámok akkumulátoraihoz
Minden esetben eredeti akkumulátorokat alkalmazzon.
Ha nem általunk gyártott akkumulátort alkalmaz, vagy
ha szétszereli és módosítja az akkumulátort (mint
pl.: szétszerelés és cellák vagy más alkatrészek
cseréje), nem garantálható vezeték nélküli elektromos
szerszámaink biztonsága és teljesítménye.
69
Page 70

Magyar
HIBAELHÁRÍTÁS
Amennyiben a gép nem működik megfelelően, a lenti táblázat segítségével vizsgálja meg a gépet. Amennyiben ez nem
oldja meg a problémát, lépjen kapcsolatba a forgalmazóval vagy a Hitachi Szervizközpontjához.
Probléma Lehetséges ok Megoldás
Töltő A Töltő lámpája nem
A szerszám Nem működik. Az újratölthető akkumulátor lemerült. Töltse fel az akkumulátort.
kapcsol be.
A Töltő lámpája nem
kapcsol ki 4 órányi
töltés után.
A tápkábel nincs csatlakoztatva a
konnektorhoz.
Az akkumulátor nincs megfelelően
csatlakoztatva a töltőhöz.
Az akkumulátor vagy a töltő elektródái
koszosak.
Az akkumulátor rendkívül meleg. Töltés előtt hagyja megfelelően
Az akkumulátor vagy a töltő hibás. Húzza ki a tápkábelt, és lépjen
Az akkumulátor nem lett megfelelően
behelyezve.
Az áram nincs felkapcsolva. A gép elindításához nyomja meg az
A rögzítő kar nem lett behúzva, amikor a
kart hátrahúzta.
Nagy mennyiségű fű került a biztonsági
burkolat és a nejlon fej közé, a gép
túlterhelődött.
Csatlakoztassa a tápkábelt a hálózati
aljzathoz.
Helyezze be az akkumulátort úgy,
hogy az megfelelően csatlakozzon a
töltőhöz.
Egy pamut törlőruha vagy egyéb
eszköz segítségével tisztítsa meg az
elektródákat.
lehűlni az akkumulátort.
kapcsolatba a forgalmazóval vagy a
Hitachi Szervizközponttal.
Vegye ki az akkumulátort a
helyéről, és nézze meg, hogy nem
került-e idegen anyag a gépbe,
és amennyiben igen, távolítsa el
azt. Ellenőrizze továbbá, hogy
az akkumulátor elektródái nem
koszosak vagy vizesek-e, és
nem került-e be idegen anyag.
A tisztításhoz használjon pamut
törlőruhát. Győződjön meg róla, hogy
az akkumulátor egészen addig be
lett-e nyomva, amíg kattanó hangot
nem hall.
oldalán található indítógombot. A gép
automatikus lekapcsolás funkcióval
rendelkezik. Az áram automatikusan
lekapcsol, ha a bekapcsolás után a
kart egy percig nem húzza meg senki.
A készülék ismételt bekapcsolásához
nyomja meg újra a gombot.
Az indítógomb ismételt
megnyomásával kikapcsolhatja a
gépet.
A helytelen használatból eredő
balesetek elkerüléséhez, a motor
indításakor a záró karnak behúzva
kell lennie a kar meghúzásakor.
Felülről fogja meg a fogantyút, és a
fogantyú meghúzása közben nyomja
meg a záró kart.
Ez egy olyan funkció, mely az eszköz
túlterhelése esetén lekapcsolja a
motort az akkumulátor védelme
érdekében. Kapcsolja le a gépet,
majd távolítsa el az anyagot, mely
a túlterhelést okozza. A művelet
folytatásához nyomja meg ismét az
indítógombot.
70
Page 71

Probléma Lehetséges ok Megoldás
A szerszám Működik, de hamar
leáll.
Erős rezgések A markolat nincs megfelelően rögzítve
Furcsa hangot
hallatszik a
sebességváltóházból.
Az akkumulátor szintje alacsony. Töltse fel az akkumulátort.
Az újratölthető akkumulátor
túlmelegedett.
a nyélhez.
A biztonsági burkolat nincs megfelelően
rögzítve a nyélhez.
A sebességváltóházban kifogyott a zsír. Kenje meg.
GARANCIA
A Hitachi Power Tools szerszámokra a törvényes/országos
előírásoknak megfelelő garanciát vállalunk. A garancia
nem vonatkozik a helytelen vagy nem rendeltetésszerű
használatból, továbbá a normál mértékűnek számító
elhasználódásból, kopásból származó meghibásodások ra,
károkra. Reklamáció esetén kérjük, küldje el a - nem
szétszerelt - szerszámot a kezelési útmutató végén
található GARANCIA BIZONYLATTAL együtt a hivatalos
Hitachi szervizközpontba.
MEGJEGYZÉS
A HITACHI folyamatos kutatási és fejlesztési programja
következtében az itt szereplő műszaki adatok előzetes
bejelentés nélkül változhatnak.
Magyar
Hagyja abba az akkumulátor
használatát, távolítsa el az eszközből
és egy jól szellőző helyen, ahol nincs
kitéve közvetlen napsugárzásnak,
hagyja lehűlni.
Húzza meg.
Húzza meg.
A környezeti zajra és vibrációra von atkozó információk
A mért értékek az IEC60335 szabványnak megfelelően
kerültek meghatározásra és az ISO 4871 alapján kerülnek
közzétételre.
Mért A hangteljesítmény-szint: 95 dB (A)
Mért A hangnyomás-szint: 86 dB (A)
Bizonytalanság KpA: 3 dB (A)
Viseljen hallásvédelmi eszközt.
IEC60335 szerint meghatározott rezgési összértékek
(háromtengelyű vektorösszeg).
Rezgési kibocsátási érték ah, w = 7,5 m/s
FIGYELEM
○ A rezgési kibocsátási érték a szerszámgép tényleges
használata során különbözhet a megadott értéktől a
szerszám használatának módjaitól függően.
○ A kezelő védelméhez szükséges biztonsági
intézkedések azonosításához, amelyek a használat
tényleges körülményeinek való kitettség becslésén
alapulnak (számításba véve az üzemeltetési ciklus
minden részét, mint például az időket, amikor a
szerszám ki van kapcsolva, és amikor üresjáratban fut
a bekapcsolási időn túl).
2
71
Page 72

Čeština
OBECNÁ VARO VÁNÍ TÝKAJÍCÍ SE
BEZPEČNOSTI EL. PŘÍSTROJE
UPOZORNĚNÍ
Přečt ěte si všechna varování týkající se bezpečnosti
a všechny pokyny.
Nedodržení těchto varování a pokynů může mít za
následek elektrický šok, požár a/nebo vážné zranění.
Všech na varování a pokyny si uschovejte. V
budoucnu se vám mohou hodit.
Pojem “elektrický nástroj” v těchto varováních se vztahuje
k vašemu elektrickému nástroji napájenému ze sítě (se
šňůrou) nebo napájenému z baterie (bez šňůry).
1) Bezpečnost na pracovišti
a) Udržujte vaše pracoviště čisté a dobře
osvětlené.
V důsledku nepořádku nebo tmy dochází k
nehodám.
b) Neprovozujte elektrické nástroje ve výbušném
ovzduší , např. v přítomnosti hořlavých kapalin,
plynů či prachu.
Elektrické nástroje produkují jiskry, které by mohly
zapálit prach anebo plyny.
c) Během práce s elektrickým nástrojem zabraňte
přístupu dětí a přihlížejících osob.
Rozptylování by mohlo způsobit ztrátu vaší kontroly
nad nástrojem.
2) Elektrická bezpečnost
a) Zástrčka elektrického
zásuvce.
Nikdy se nepokoušejte zástrčku jakkoli
upravovat.
U uzemněných elektrických nástrojů
nepoužívejte žádné rozbočovací zásuvky.
Neupravované zástrčky a odpovídající zásuvky
sníží nebezpečí elektrického šoku.
b) Zabraňte kontaktu s uzemněnými povrchy jako
jsou trubky, radiátory, sporáky a lednice.
Je-li uzemněné vaše tělo, existuje zvýšené
nebezpečí elektrického šoku.
c) Nevystavujte elektrický nástroj dešti nebo
vlhkým podmínkám.
Voda, která vnikne do elektrického nástroje, zvýší
nebezpečí elektrického šoku.
d) Zacházejte správně s napájecí šňůrou. Nikdy
šňůru nepoužívejte k přenášení, tahání nebo
odpojování elektrického nástroje ze zásuvky.
Umístěte napájecí šňůru mimo p ůsobení
horka, mimo olej, ostré hrany nebo pohybující
se části.
Poškozené nebo zamotané šňůry zvyšu jí nebezpečí
elektrického šoku.
e) Během provozu elektrického nástroje venk u
používejte
venkovnímu použití.
Použití šňůry vhodné k venkovnímu použití snižuje
nebezpečí elektrického šoku.
f) Pokud je použití elektrického nástroje na
vlhkém místě nevyhnutelné, použijte napájení
s ochranným zařízením na zbytkový proud.
Použití zařízení na zbytkový proud snižuje riziko
elektrického šoku.
3) Osobní bezpečnost
a) Buďte pozorní, sledujte, co děláte a při práci
s elektrickým nástrojem používejte
rozum.
prodlužovací šňůru vhodnou k
nástroje musí odpovídat
zdravý
Elektrický nástroj nepoužívejte, jste-li unavení
nebo pod vlivem drog, alkoholu nebo léků.
Jediný okamžik nepozornosti při práci s elektrickým
nástrojem může způsobit vážné zranění.
b) Používejte osobní ochranné pracovní
pomůcky. Vždy noste ochranu očí.
Ochranné pracovní pomůcky jako respirátor,
bezpečnostní obuv s protiskluzovou podrážkou,
ochranná přilba nebo ochrana sluchu použité v
příslušných podmínkách sníží možnost zranění.
c) Zabraňte nechtěnému spuštění. Před
připojením
bateriového zdroje, zvedáním nebo
přenášením elektrického nástroje se ujistěte,
že je spínač v poloze vypnuto.
Nošením elektrických nástrojů s prstem na vypínači
nebo jejich aktivací s vypínačem v poloze zapnuto
vzniká nebezpečí úrazu.
d) Před zapnutím elektrického nástroje odstraňte
seřizovací klíč.
Klíč ponechaný připevněný k rotující části
elektrického nástroje může způsobit zranění.
e) Nepřehánějte
postavení a stabilitu.
To umožní lepší kontrolu nad elektrickým nástrojem
v nepředvídaných situacích.
f) Noste správný oděv. Nenoste volné oblečení
ani šperky. Vlasy, oděv a rukavice udržujte
mimo pohybující se části.
Volný oděv, šperky nebo dlouhé vlasy mohou být
vtaženy do pohybujících se částí.
g) Pokud jsou k dispozici zařízení k připojení
přístrojů k odsávání a sbě
se, že jsou připojena a správně používána.
Použitím zařízení ke sběru prachu lze snížit rizika
související s prachem.
4) Používání a péče o elektrický nástroj
a) Netlačte na elektrický nástroj. Používejte vždy
vhodný elektrický nástroj pro danou aplikaci.
Správný elektrický nástroj provede daný úkol lépe
a bezpečněji, rychlostí, pro jakou byl zkonstruován.
b) Nepoužívejte elektrický nástroj, pokud
nefunguje jeho zapínání a vypínání pomocí
vypínače.
Jakýkoli elektrický nástroj, který nelze ovládat
vypínačem, je nebezpečný a musí být opraven.
c) Před prováděním jakéhokoli seřízení, před
výměnou příslušenství nebo uskladněním
elektrických nástrojů vždy nejprve odpojte
zástrčku ze zdroje napájení a/nebo odpojte
bateriový zdroj.
Taková preve ntiv ní opat ření snižují nebezpečí
nechtěného spuštění elektrického nástroje.
d) Nepoužívané elektrické nástroje skladujte
mimo dosah dětí
elektrickým nástrojem pracovaly osoby, které
nejsou seznámeny s ním nebo s pokyny k jeho
používání.
Elektrické nástroje v rukou nevyškolených uživatelů
jsou nebezpečné.
e) Udržujte elektrické nástroje. Kon trolujt e
případná vychýlení nebo sevření pohybujících
se částí, poškození částí a jakékoli ostatní
podmínky, které mohou mít vliv na provoz
elektrických nástrojů
V případě poškození nechte elektrický nástroj
před jeho dalším použitím opravit.
Mnoho nehod vzniká v důsledku nesprávné údržby
elektrických nástrojů.
ke zdroji napájení a/nebo
to. Vždy si udržujte správné
ru prachu, ujistěte
a nedovolte, aby s
.
72
Page 73

Čeština
f) Udržujte řezací nástroje ostré a čisté.
Správně udržované řezací nástroje s ostrými
řeznými hranami se méně pravděpodobně
zaseknou a lépe se ovládají.
g) Elektrický nástroj, příslušenství, vsazené části
atd. používejte v souladu s těmito pokyny.
Berte přitom zřetel na pracovní podmínky a
prováděnou práci.
Použití elektrického nástroje k jinému než
určenému účelu může způsobit nebezpečnou
situaci.
5) Použití a
6) Servis
PREVENTIVNÍ OPATŘENÍ
Nedovolte přístup d
Pokud nástroje nepoužíváte, m ěli byste je skladovat
mimo dosah dětí a slabomyslných osob.
péče o přístroj na baterie
a) Dobíjejte pouze nabíječkou specifi kovanou
výrobcem.
Nabíječka, která je vhodná pro jeden typ
bateriového zdroje, může v případě použití s jiným
bateriovým zdrojem způsobit nebezpečí požáru.
b) Elektrické přístroje používejte výhradně se
specifi kovanými bateriovými zdroji.
Použitím jakéhokoli jiného bateriového zdroje může
vzniknout nebezpečí poranění a požáru.
c) Když bateriové zdroje nepoužíváte, udržujte
je mimo ostatní kovové p ředměty
kancelářské sponky, mince, klíče, hřebíky,
šroubky či jiné malé kovové předměty, které
mohou způsobit kontakt mezi oběma póly.
Vzájemné zkratování pólů baterie může způsobit
popáleniny nebo požár.
d) Při nevhodném zacházení může z baterie
vytékat kapalina; zamezte kontaktu s ní.
V případě náhodného
vodou. V případě konta ktu této kapaliny s
očima pak vyhledejte lékařskou pomoc.
Kapalina vytékající z baterie může způsobit
podráždění nebo popáleniny.
a) Servis vašeho elektrického nástroje svěřte
kvalifi kovanému opraváři, který použije pouze
identické náhradní díly.
Tak bude i nadále zajištěna bezpečnost
elektrického nástroje.
ětem a slabomyslným osobám.
kontaktu místo omyjte
jako jsou
BEZPEČNOSTNÍ UPOZORNĚNÍ K SEŘEZÁVAČI
TRÁVY
DŮLEŽITÉ
PŘED POUŽITÍM DŮKLADNĚ PŘEČTĚTE
PONECHTE K DALŠÍM U NAHLÉDNUTÍ
Pokyny pro bezpečný provoz
● Poučení
a) Přečtěte si pozorně instrukce. Obeznamte se s
ovládáním a náležitým používáním stroje.
b) Nedovolte nikdy, aby sekačku používaly děti anebo
osoby neobeznámené s těmito instrukcemi. V
každém státě je třeba respektovat zákony, které určují
minimální věk pro uživatele.
c) Pamatujte si, že jako obsluha nesete plnou
odpovědnost vůči jiným osobám, které se zdržují
v blízkém okolí pracovního prostoru, a za škody
způsobené na předmětech ve vlastnictví jiných osob.
● Příprava
a) Nikdy nepoužívejte stroj za přítomnosti osob,
především dětí nebo zvířat, v blízkosti seřezávač
e.
b) Během práce s přístrojem používejte vždy chrániče
zraku a uzavřenou obuv.
● Provoz
a) Stroj používejte pouze za denního světla nebo za velmi
dobrého umělého osvětlení.
b) Nepracujte se strojem při poškozených chráničích
nebo štítech nebo bez chráničů a ochranných štítů.
c) Zapněte motor pouze tehdy, jsou-li ruce a nohy v
bezpečné vzdálenosti od řezného zařízení.
d) Vždy vypněte stroj a vypojte jej ze sítě (t.j. vyjměte
zástrčku ze zásuvky nebo vypněte zařízení)
– pokaždé, když opouštíte stroj a necháváte jej bez
dozoru;
– před čištěním uvíznutého materiálu;
– před kontrolou, čištěním anebo jakoukoliv prací na
stroji;
– po nárazu na cizí předmět;
– kdykoli sekačka začne silně vibrovat.
e) Zabraňte, aby nedošlo k úrazu udržováním rukou a
nohou v bezpečné vzdálenosti od řezného zařízení.
f) Pokaždé se ujistěte, že nejsou nasávací otvory ucpány
zbytky.
● Údržba
a) Vypněte stroj a vypojte jej ze sítě (t.j. vyjměte zástrčku
b) Používejte pouze výrobcem doporučené náhradní díly
c) Pravidelně kontrolujte stroj a provádějte údržbu. Stroj
d) Pokud stroj nepoužíváte, skladujte jej mimo dosah
a skladování
ze zásuvky nebo vypněte zařízení) před prováděním
údržby nebo čisticích prací.
a příslušenství.
nechte opravit pouze oprávněným opravářem.
dětí.
BEZPEČNOSTNÍ OPATŘENÍ PRO AKKU
SEŘEZÁVAČ TRÁVY
VAR OVÁNÍ
1. Při práci s nástrojem nespěchejte. Řádně se oblékněte
pro udržení tepla.
2. Abyste předešli nehodám, naplánujte si práci dopředu.
3. Nepracujte s nástrojem v noci nebo za špatných
viditelných podmínek. Taktéž přístroj nepoužívejte za
deště nebo těsně po dešti.
Práce na kluzkém povrchu může vést při ztrátě
rovnováhy k nehodě.
4. Před začátkem práce zkontrolujte řeznou hlavu.
Nepoužívejte nástroj, je-li řezná hlava prasklá,
poškrábaná nebo ohnutá.
Ujistěte se, že je řezná hlava řádně připevněna.
Řezná hlava, která se rozpadne nebo povolí v průběhu
provozu může způsobit nehodu.
5. Před zahájením práce se ujistěte, že je připevněn
bezpečnostní kryt a bezpečnostní ramenní pás.
Provoz bez těchto součástí může vést k úrazu.
6. Před zahájením práce se ujistěte, že je př
smyčková rukojeť. Před začátkem práce zkontrolujte,
zda není povolena a zda je pevně připevněna. V
průběhu práce držte pevně smyčkovou rukojeť,
neohánějte se nástrojem, ale zaujměte správnou pozici
a udržujte rovnováhu.
Ztráta rovnováhy při práci může vést k úrazu.
7. Dbejte zvýšené opatrnosti při zapnutí motoru.
Umístěte nástroj na rovnou plochu.
Neprovozujte přístroj ve vzdálenosti 15 m od osob a
zvířat.
Zajistěte, aby řezná hlava nepřišla do styku se zemí,
stromy a rostlinami.
Neopatrné spuštění může vést k úrazu.
8. Nezajišťujte zajišťovací páku.
Náhodné zatažení zpět může vést k neočekávanému
úrazu.
ipevněna
73
Page 74

Čeština
9. Před opuštěním stroje stiskněte spouštěcí tlačítko pro
vypnutí zařízení.
10. V blízkosti elektrických kabelů, plynových vedení a
podobných zařízení dbejte opatrnosti při užívání stroje.
11. Před začátkem provozu vyhledejte a odstraňte
prázdné plechovky, dráty, kameny nebo jiné překážky.
Nepracujte v blízkosti kořenů stromů nebo kamení.
Práce na podobných místech může poškodit řeznou
hlavu nebo způsobit úraz.
12. Nezvyšujte nadměrně rychlost otáček.
Nezvyšujte rychlost náhle, ale postupně.
Nastavte polohu páky pro vhodné provozní zatížení.
Předměty, které odlétávají od stroje mohou způsobit
neočekávané zranění.
13. Nikdy se v průběhu činnosti nedotýkejte řezné hlavy.
Zajistěte, aby nedošlo ke kontaktu s vlasy, oblečením
atd.
14. V následujících případech vypněte motor a počkejte až
se řezná hlava přestane otáčet.
Při p
řechodu na jinou pracovní oblast.
Při odstranění smetí nebo trávy, která uvízla v nástroji.
Při odstraňování překážek nebo smetí z pracovní
oblasti nebo trávy a třísek vytvořené seřezáním.
Při pokládání nástroje.
Tot o po čínání s rotující řeznou hlavou může vést k
neočekávaným zraněním.
15. Nepoužívejte nástroj ve vzdálenosti do 15 m od
přítomné osoby.
Pracujete-li s někým jiným, udržujte bezpečnou
vzdálenost více než 15 m.
Letící třísky mohou způsobit nečekané úrazy.
Při práci na nestabilním povrchu jako jsou svahy
se ujistěte, že váš spolupracovník není vystaven
nebezpečí.
Používejte hvízdání nebo jiný prostředek pro
upozornění spolupracovníka.
16. Pokud se tráva a jiné předměty zamotají do řezné
hlavy, před jejich odstraněním vypněte motor a ujistěte
se, že řezná hlava se již neotáčí.
Odstraňování předmětů z řezné hlavy, která stále
rotuje, m
Pokračování v provozu, pokud se cizí tělesa zamotají
17. Pokud nástroj pracuje špatně a vydává zvláštní zvuky
Pokračování v provozu při těchto podmínkách může
18. Pokud upustíte nebo narazíte s nástrojem, důkladně
Používání poškozeného, prasklého nebo
19. Přístroj při přepravě zajistěte tak, aby pevně ležel.
Nedbalost těchto varování může způsobit úraz.
UPOZORNĚNÍ
1. Nepoužívejte řeznou hlavu k řezání jiných předmětů
2. Nástroj obsahuje jemné části a neměl by být vystaven
Nástroj může být poškozen nebo může špatně
3. Při uložení nástroje po jeho použití nebo při přepravě
4. Nevystavujte nástroj insekticidům nebo jiným
Chemikálie mohou způsobit rozpraskání a jiná
ůže způsobit zranění.
do řezné hlavy, může vést k poškození stroje.
nebo vibrace, vypněte okamžitě motor a požádejte
prodejce o kontrolu a opravu stroje.
vést ke zranění nebo k poškození nástroje.
zkontrolujte, zda nedošlo k poškození, prasknutí nebo
k deformaci stroje.
deformovaného nástroje, může způsobit zranění.
než je tráva. Nepoužívejte nástroj v kalužích a zajistěte,
aby se půda nedostala do kontaktu s řeznou hlavou.
upuštění, silným dopad
fungovat.
vyjměte řeznou hlavu.
chemikáliím.
poškození.
ům nebo vodě.
5. Pokud se stanou výstražné štítky špatně
rozeznatelnými nebo nečitelnými a pokud se začnou
odlupovat, nahraďte je novými.
Požádejte prodejce o poskytnutí výstražných štítků.
BEZPEČNOSTNÍ OPATŘENÍ PRO BATERIE A
NABÍJEČKU
1. Nabíjejte akumulátor při teplotách 0˚C – 40˚C. Nižší
teplota než 0˚C povede k přebití akumulátoru, a to je
nebezpečné. Akumulátor nelze nabíjet při teplotách
nad 40˚C. Nejvhodnější teploty pro nabíjení jsou mezi
20˚C – 25˚C.
2. Po skončení nabíjecího cyklu počkejte 15 minut, než
začnete nabíjet další akumulátor.
Nenabíjejte baterie déle než 2 hodiny.
3. Nedovolte, aby se do otvoru pro připojení akumulátoru
dostaly cizí předměty nebo materiál.
4. Nevkládejte předměty do větracích otvorů na
nabíječce.
Kov nebo hořlavý materiál ve větracích otvorech
způsobí nebezpečí zkratu a zničí nabíječku.
5. Používání vyčerpaného akumulátoru způsobí
poškození nabíječky.
6. Vraťte akumulátor do obchodu, kde jste ho zakoupili,
jakmile dosáhne konce životnosti. Neodhazujte použitý
akumulátor.
7. Nikdy nerozebírejte akumulátor nebo nabíječku.
8. Nikdy nezkratujte akumulátor. Zkrat akumulátoru
způsobí prudký nárůst elektrického proudu a přehřátí.
To vede ke spálení nebo poškození akumulátoru.
9. Nezahazujte akumulátor do ohně. Oheň způ
explozi.
sobí
UPOZORNĚNÍ PRO LITHIUM-IONOVÉ BATERIE
Z důvodu prodloužení životnosti je lithium-ionová
baterie vybavena ochrannou funkcí zastavení výkonu. V
případech 1 až 3 popsaných níže se může motor během
používání tohoto výrobku zastavit, přestože držíte spínač.
Nejedná se o závadu ale o výsledek ochranné funkce.
1. Jakmile dojde k vybití zbývající kapacity baterie, motor
se zastaví.
V takovém případě baterii okamžitě dobijte.
2. Pokud je nástroj přetížen, motor se může zastavit. V
takovém případě uvolněte spínač nástroje a odstraňte
příčinu přetížení. Potom můžete nástroj znovu
používat.
3. Je-li baterie přehřátá a přetížená, může se bateriový
pohon zastavit.
V tom případě přestaňte baterii používat a nechte ji
vychladnout. Poté ji můžete opět používat.
Dále prosím dbejte následujících varování a upozornění.
UPOZORNĚNÍ
Abyste předešli případnému úniku kapaliny z baterie,
vzniku tepla, emisím kouře, výbuchu a vznícení, dbejte
následujících bezpečnostních pokynů.
1. Ujistěte se, že se na akumulátoru neusazují piliny a
prach.
○ Během práce kontrolujte, že na akumulátor nepadají
piliny a prach.
○ Ujistěte se, že se piliny a prach padající během práce
na elektrický nástroj neusazují na akumulátoru.
○ Akumulátor, který nepoužíváte, neskladujte na místě
vystaveném pilinám a prachu.
○ Před uskladněním akumul átoru odstra ňte veškeré piliny
a prach, který na ní může být usazený, a neskladujte
ho společně s kovovými předměty (šroubky, hřebíky
atd.).
74
Page 75

Čeština
2. Nepropichujte baterii ostrým předmětem jako je
nehet, nebouchejte do ní kladivem, nestoupejte na
ni, neházejte jí ani ji nevystavujte závažným fyzickým
šokům.
3. Nepoužívejte viditelně poškozenou či deformovanou
baterii.
4. Nepoužívejte baterii s obrácenou polaritou.
5. Nepřipojujte ji přímo k elektrickému výstupu ani k
zásuvce cigaretového zapalovače v automobilu.
6. Nepoužívejte baterii k jinému než specifi kovanému
účelu.
7. Pokud se nabíjení baterie nedokončí, i když uvedená
doba nabíjení uplynula, ihned zastavte další nabíjení.
8. Nevystavujte baterii působení vysokých teplot nebo
vysokého tlaku, neumísťujte ji např. do mikrovlnné
trouby, sušičky nebo vysokotlakého zásobníku.
9. V případě zjištění úniku nebo zápachu okamžitě
umístěte z dosahu ohně.
10. Nepoužívejte v oblasti se silnou statickou elektřinou.
11. V případě úniku kapaliny z baterie, zápachu,
vznikajícího tepla, ztráty barvy, deformace nebo v
případě jakékoli abnormality během používání, nabíjení
nebo skladování baterii okamžitě vyjměte z přístroje či
nabíječky a přestaňte ji používat.
POZOR
1. Pokud se vám kapalina unikající z baterie dostane do
očí, netřete si je a dobře je vymyjte čistou vodou jako je
voda z vodovodu a ihned kontaktujte lékař
Bez ošetření může kapalina způsobit problémy se
zrakem.
2. Pokud se kapalina dostane do kontaktu s vaší
pokožkou či oděvem, ihned omyjte čistou vodou jako je
voda z vodovodu.
Kapalina může způsobit podráždění kůže.
3. Zjistíte-li při prvním použití baterie rez, zápach,
přehřátí, ztrátu barvy, deformaci a/nebo jinou
abnormalitu, nepoužívejte ji a vraťte ji vašemu
dodavateli či prodejci.
e.
SPECIFIKACE
ELEKTRICKÉ NÁŘADÍ
Model CG18DL CG18DAL
Typ tyčePřipojující typ Přímý typ
Průměr sekané plochy 425 mm
Směr otáčení Proti směru hodinových ručiček jak je vidět z převodovky
Otáčky při nulovém zatížení 0–4500 min
Provozní doba na jedno nabití *
(Pokud je dodaná dobíjecí baterie plně nabita)
1
Baterie BSL1830: Li-ion 18 V (3,0 Ah 10 článků)
Hmotnost (bez řezné hlavy a bezpečnostního
pásu)
*1 Údaje ve výše uvedené tabulce jsou uvedeny pouze jako příklad. Protože typ trávy, ostrost nože, otáčky řezné hlavy,
teplota okolí, vlastnosti dobíjecích baterií, pracovní metody atd., se mohou velice lišit, výše uvedené by mělo sloužit
jako hrubé vodítko.
*2 Podmínky: Vnější průměr řezného zařízení nylonového kordu 425 mm, spínač nastavte na plnou rychlost.
5,4 kg 5,2 kg
Nabíječka
Model UC18YRSL
Nabíjecí napětí 14,4 V 18 V
Hmotnost 0,6 kg
5 min*
-1
2
75
Page 76

Čeština
STANDARDNÍ PŘÍSLUŠENSTVÍ
1
5
CG18DL
CG18DAL
(LSC)
1 Nylonová hlava (Sure tap) ............................................1
2 Ochrana proti navíjení .................................................. 1
3 Šestihranný klíč tyče 4 mm ..........................................1
4 Nástrčkový klíč (vnitřní šestihran 17/19) ...................... 1
5 Ochranné brýle ............................................................1
6 Bezpečnostní ramenní pás ..........................................1
7 Baterie (BSL1830) ........................................................1
8 Nabíječka (UC18YRSL) ............................................... 1
Standardní příslušenství podléhají změnám bez předešlého upozornění.
VOLITELNÉ PŘÍSLUŠENSTVÍ (prodává se
samostatně)
1. Baterie (BSL1830)
8
4. Chránič holenní kosti (1 sada s 2 chrániči)
Chrání nohy před létajícími úlomky.
2
6
3
4
7
2. Kryt na baterie
3. Mazací tuk (100 g tuba)
Promažte převodovku po každých 50 hodinách
provozu.
76
Volitelná příslušenství podléhají změnám bez předešlého
upozornění.
POUŽITÍ
Sežezávání, krácení a kosení trávy.
VYJMUTÍ/VÝMĚNA AKUMULÁTORU
1. Vyjmutí akumulátoru
Držte pevně kryt motoru a stiskněte západku na
baterie pro vyjmutí baterií (viz Obr. 2).
POZOR
Nikdy nezkratujte akumulátor.
2. Instalace akumulátoru
Vložte akumulátor a dávejte přitom pozor na polaritu
(Viz. Obr. 2).
Page 77

Čeština
NABÍJENÍ
Před použitím elektrického nástroje nabijte akumulátor dle
níže uvedeného návodu.
1. Zapojte napájecí šňůru nabíječky do konektoru.
Po připojení napájecího kabelu se hlavní idikátor
nabíječky červeně rozbliká. (V jednosekundových
intervalech)
2. Vložte akumulátor do nabíječky.
Baterii pevně vložte do nabíječky, dokud nebude čára
viditelná, jak je zobrazeno na obr (Viz. Obr. 3, 4).
Tabulka 1
Signalizace indikátoru
Hlavní
indikátor
svítí nebo
bliká
čerbeně.
Hlavní
indikátor
svítí
zeleně.
(2) Teploty akumulátoru
eploty pro nabíjecí baterie jsou uvedeny v Tabulce 2.
Zahřáté baterie se musí nechat před nabíjením chvíli
vychladnout.
Tabulka 2 Rozmezí teplot, při kterých lze akumulátory
nabíjet
Akumulátory Rozmezí teplot pro nabíjení
BSL1830 0°C – 50°C
(3) Doba nabíjení
V závislosti na kombinaci akumulátoru a nabíječky je
doba nabíjení uvedena v Tabulce 3.
Tabulka 3 Doba nabíjení (při 20˚C).
Akumulátor
BSL1830 Asi 45 min.
POZNÁMKA
Doba nabíjení se může měnit podle teploty a napětí na
zdroji.
4. Odpojte nabíječku od zdroje elektrického proudu.
5. Pevně držte nabíječku a vytáhněte akumulátor.
POZNÁMKA
Po ukončení nabíjení nejdříve vyjměte akumulátory z
nabíječky a uložte je na bezpečném místě.
Jak zajistit delší trvanlivost akumulátorů
(1) Dobijte akumulátory před tím, než se plně vybijí.
Cítíte-li, že vrtačka ztrácí energii, přestaňte ji používat
a dobijte akumulátor. Pokud budete pokračovat v
používání akumulátoru, může dojít k jeho poškození a
jeho životnost se sníží.
Před
nabíjením
Během
nabíjení
Nabíjení
dokončeno
Nelze
nabíjet
Pohotovostní
režim při
přehřátí
Bliká Svítí 0,5 sekund. Vypne 0,5 sekund.
Svítí Svítí bez přestávky.
Bliká Svítí 0,5 sekund. Vypne 0,5 sekund.
Rychle bliká Svítí 0,1 sekundy. Vypne 0,1 sekundy.
Svítí Svítí bez přestávky. Baterie je přehřátá.
Nabíječka
(Vypne 0,5 sekund)
(Vypne 0,5 sekund)
(Vypne 0,1 sekund)
UC18YRSL
3. Nabíjení
Při vložení akumulátoru do navíječky se spustí a hlavní
indikátor začne svítit červerě.
Když je akumulátor zcela nabitý, hlavní indikátor se
nabíječky červeně rozbliká. (V jednosekundových
intervalech) (Viz. Tabulka 1)
(1) Indikátor
Indikátor bude signalizovat stav akumulátoru tak, jak je
uvedeno v Tabulce 1.
Závada na akumulátoru
nebo nabíječce.
Nelze nabíjet.
(Nabíjení bude pokračovat,
jakmile se baterie ochladí.)
(2) Nedobíjejte akumulátor při vysokých teplotách.
Okamžitě po použití je akumulátor horký. Pokud
je akumulátor nabíjen v takovém stavu, dojde k
dekompozici chemické náplně a životnost akumulátoru
se sníží. Než akumulátor nabijete, nechte jej před tím
vychladnout.
POZOR
○ Při nepřetržitém používání se nabíječka baterií
zahřeje, což bude příčinou závad. Jakmile je nabíjení
dokončeno, nechte nabíječku 15 minut v klidu před
dalším nabíjením.
○ Budete-li nabíjet baterii zahřátou v důsledku používání
nebo vystavení slunečnímu záření, může se rozsvítit
zelená kontrolka. Baterie se nebude nabíjet. Nechte
baterii před nabíjením vychladnout.
○ Pokud indikátor rychle bliká (v 0,2 sekundových
intervalech), zkontrolujte, zda se v instalačním otvoru
nabíječky nenachází nějaké předměty nebo nečistoty.
Odstraňte je. Pokud je otvor čistý, jde zřejmě o poruchu
akumulátoru nebo nabíječky. Kontaktujte autorizované
servisní středisko.
O INDIKÁTORU ZBÝVAJÍCÍ ENERGIE BATERIE
Při stisku vypínače indikátoru zbývající energie baterie
se indikátor rozsvítí a lze zkontrolovat zbývající energii
baterie. (Obr. 5)
Pokud stisk vypínače indikátoru zbývající energie baterie
povolíte, indikátor se vypne. Tabulka 4 ukazuje stav
indikátoru zbývající energii baterie a zbývající energie
baterie.
77
Page 78

Čeština
Tabulka 4
Stav indikátoru Zbývající energie baterie
Zbývající energie baterie je dostačující.
Zbývající energie baterie je poloviční.
Zbývající energie baterie je skoro
vyčerpána.
Dobijte baterii v nejbližší možné době.
Indikátor zbývající energie baterie může ukazovat lehce
odlišně v závislosti na teplotě a na charakteristice baterie,
proto jej použijte pouze pro orientaci.
POZNÁMKA
○ Chraňte panel vypínače před silnými údery. Mohlo by
dojít k poruše.
○ Z důvodu úspory energie svítí indikátor zbývající
energie baterie pouze, pokud je stisknut.
PŘED OBSLUHOU
UPOZORNĚNÍ
Před montáží vyjměte baterie.
1. Montáž příslušenství [pouze CG18DL] (Obr. 6)
(1) Vložte pojistný kolík do blokovacího otvoru hlavní roury
příslušenství seřezávače a zajistěte, aby se hlavní
roura nemohla uvolnit.
(2) K pevnému zajištění utáhněte knofl ík rukojeti.
2. Instalace smyčkové rukojeti (Obr. 7)
(1) Odmontujte M6 × 43 šrouby (2).
(2) Nasaďte smyčkovou rukojeť na hlavní rouru tak, aby se
nakláněla k motoru.
(3) Umístěte připevnění rukojeti na dolní konec hlavní
roury a pevně ji zajistěte pomocí šroubů M6 × 43 (2) a
závitů M6 (2).
POZNÁMKA
Zajistěte smyčkovou rukojeť v místě, kde je dobré
uchopení.
3. Nasazení bezpečnostního
VAR OVÁNÍ
Ujistěte se, že nasazujete bezpečnostní kryt na určené
místo.
Nedbalost těchto varování může vést ke zranění
způsobenému létajícími kameny.
POZNÁMKA
K instalaci použijte šestihranný klíč.
(1) Použijte dodávaný samořezný šroub D4 k instalaci
nože do ochranného zařízení. (Obr. 8)
Připojte ochranné zařízení k bezpečnostnímu krytu.
(2) Vyrovnejte navzájem 2 otvory v krytu sekacího
nástroje a jeho úchytu a vložte 2 imbusové šrouby M6
× 25. (Kryt úchytu je nainstalován v převodovce.)
(3) Umístěte pojistný kryt na spodní stranu
bezpečnostního krytu a použijte dodaný imbusový klíč
ke střídavému utahování imbusových šroubů M6 × 25
s kulatou hlavou dokud nejsou řádně utaženy.
UPOZORNĚNÍ
Dávejte pozor, abyste se nepořezali nožem umístěným
uvnitř bezpečnostního krytu.
4. Instalace bezpečnostního pásu
VAR OVÁNÍ
○ Ujistěte se, že je bezpečnostní pás nainstalován tak,
aby seřezávač trávy mohl být správně přenášen.
○ Pokud máte pocit, že nástroj nepracuje správně,
vypněte okamžitě motor,vyjměte rychlovypínací úchyt
bezpečnostního pásu a vypněte zařízení.
krytu (viz Obr. 8 a 9)
UPOZORNĚNÍ
○ Pokud nepodpíráte nástroj při vytahování
rychlovypínacího pásu, může dojít k úrazu nebo
poškození.
Jednou rukou držte hlavní rouru, druhou rukou
zatáhněte.
○ Před začátkem prací se ujistěte, že funkce
rychlovypnínání pracuje správně.
(1) Umístěte bezpečnostní pás na rameno tak, jak je
uvedeno na Obr. 10 a zahákněte jej za hák na přístroji.
Nastavte vhodnou délku bezpečnostního pásu.
(2) Pro sejmutí bezpečnostního pásu z přístroje podepřete
přístroj držením hlavní roury jednou rukou a pomocí
druhé ruky zatáhněte rychlovypínací pás jak je
uvedeno na Obr. 10 pro jeho uvolnění z úchytu.
(3) Pro utáhnutí pásu na přístroji připevněte úchyt k háku
a rychlovypínací úchyt přes hák do širokého otvoru
úchytu. (Obr. 11)
Jemně zatáhněte za bezpečnostní ramenní pás pro
ujištění, že je správně přivázán.
ŘEZNÁ HLAVA
1. Funkce
Řezná hlava “SURE-TAP”
○ Při stlačení v nízkých otáčkách (max. 4500 ot/min
automaticky vysouvá nylonová sekací struna.).
UPOZORNĚNÍ
○ Víčko cívky sekací struny musí být pevně připevněno k
tělu cívky.
○ Zkontrolujte tělo cívky, víčko cívky sekací struny a další
komponenty na praskliny nebo na další poškození.
○ Řezná hlava musí být bezpečně nasazena na
převodovku jednotky.
○ Pro nejlepší možný výkon a spolehlivost používejte
vždy nylonové sekací struny HITACHI. Nikdy
nepoužívejte dráty nebo jiné materiály, které se mohou
chovat jako neřízené střely.
○ Pokud řezná hlava neodvíjí správně řeznou strunu,
zkontrolujte, zda nylonová struna a všechny
komponenty jsou správně nainstalovány. Potřebujete-
li pomoc, obraťte se na obchodníka HITACHI.
2. Instalace (Obr. 12)
(1) Zastrčte šestihranný klíč do otvoru převodovky pro
zajištění držáku řezné části.
(2) Nainstalujte držák řezné části, ochranu proti
navíjení, kryt držáku řezné části a řeznou hlavu na
převodovce seřezávače trávy. Upevň
jsou s levochodými závity. Pro povolení otáčejte ve
směru hodinových ručiček/pro utažení proti směru
hodinových ručiček.
3. Nastavení délky struny
(1) Otáčky motoru nastavte na nejnižší možnou hodnotu
a poklepte řeznou hlavu o zem. Nylonová struna se
jedním poklepem protáhne o 30 mm. (Obr. 13)
Také lze prodloužit nylonovou strunu ručně, ale motor
musí být zcela zastaven. (Obr. 14)
(2) Před každou činností nastavte délku nylonové struny
na 110 mm – 140 mm.
(3) Pokud je nylonová struna příliš dlouhá, ručně přetočte
zpět dlouhou strunu zatlačením a otočením vodící
koule. (Obr. 15)
4. Výměna nylonové struny
(1) Západkové lamely jemně zatlačte prsty dovnitř a
sejměte kryt cívky se sekací strunou (Obr. 16).
(2) Po sejmutí víčka cívky sekací struny, vyjm
odtraňte levou strunu.
(3) Naviňte novou nylonovou strunu přibližně do poloviny.
(Obr. 17)
-1
) se
ovací matice
ěte cívku a
78
Page 79

Čeština
(4) Zahákněte ohnutý konec do tvaru “U” nylonové struny
do drážky ve středu cívky.
Naviňte obě poloviny struny na cívku stejným směrem,
ponechte každou polovinu struny na své straně příčky.
(Obr. 18)
(5) Prostrčte každou strunu otvorem pro uchycení,
otevřené konce ponechte dlouhé přibližně 100 mm.
(Obr. 19)
(6) Prostrčte oba volné konce struny skrz očko dokud se
cívka neumístí ve víčku cívky sekací struny. (Obr. 20)
POZNÁMKA
Když umístíte cívku do víčka cívky sekací struny,
zkuste srovnat otvory pro uchycení (3) pomocí očka (4)
pro snadnější pozdější uvolnění struny.
(7) Umístěte pružinu cívky do cívky. (Obr. 21)
(8) Umístěte tělo cívky přes víčko cívky sekací struny tak,
aby zámková západka na tělu cívky sedla do otvoru na
těle cívky. Poté opatrně zatlačte na víčko cívky sekací
struny dokud nezacvakne na své místo. (Obr. 21)
(9) Zatáhněte za volné konce struny pro jejich uvoln
otvoru pro uchycení. Pokud se stane, že jsou struny
příliš dlouhé, (delší než 100 mm), přetočte je zpět
zatlačením a otočením vodící koule na přibl. 100 mm.
(Obr. 15)
(10)
Počáteční délka sekací struny by měla být
přibl. 150 mm a měla by být stejná na obou stranách.
(Obr. 22)
ění z
PROVOZ
Seřezávání trávy
VAR OVÁNÍ
○ Nepracujte s nástrojem v noci nebo za špatných
viditelných podmínek.
○ Tak t éž přístroj nepoužívejte za deště nebo těsně po
dešti.
○ Noste správnou obuv, abyste zabránili uklouznutí,
které může způsobit ztrátu rovnováhy a následný pád.
○ Nepoužívejte nástroj na strmých svazích.
Při seřezávání trávy na svahu, který není příliš strmý,
seřezávejte pohybem zespoda nahoru.
○ Umístěte nástroj na bezpečnostní ramenní pás, pravou
ruku položte na rukojeť a levou ruku na smyčkovou
rukojeť a pevně je držte.
○ Dbejte na to, aby se řezná hlava nedostala do blízkosti
vašich nohou.
○ V průběhu řezání nezvedejte řeznou hlavu nad kolena.
○ Nepoužívejte nástroj na místech, na kterých může
řezná hlava přijít do styku s kameny, stromy a dalšími
předměty.
○ Řezná část může způsobit zranění pokud po vypnutí
motoru stále rotuje. Po vypnutí zařízení se před jeho
položením na zem ujistě
○ Nepoužívejte nástroj ve vzdálenosti do 15 m od
přítomné osoby. Pracujete-li s další osobou, udržujte
bezpečnou vzdálenost více než 15 m.
1. Vložte baterie správnou polaritou
2. Zapněte přístroj (Obr. 23)
○ Stiskněte spouštěcí tlačítko na krytu motoru, přístroj
se zapne a kontrolka zapnutí na rukojeti se rozsvítí
červeně.
○ Druhým stiskem spouštěcího tlačítka se přístroj vypne
a červené světlo na rukojeti zhasne.
[Automatické vypnutí]
Pokud je přístroj zapnutý, ale páka není používána
po dobu jedné minuty, přístroj se automaticky vypne.
Pro opětovné zapnutí přístroje stikněte opět spouštěcí
tlačítko.
VAR OVÁNÍ
Nikdy nenechávejte přístroj zapnutý. Může dojít k
poranění.
te, že se řezná část zastavila.
3. Seřezávání trávy
○ Shora uchopte rukojeť, stiskněte blokovací páčku a
zatáhněte páku pro spuštění otáčení řezné hlavy (Obr.
24)
○ Páčku uvolněte, pokud dokončujete seřezávání a
vypněte motor.
○ Položte palec na smyčkovou rukojeť a rukojeť uchopte
ostatními prsty. (Obr. 25)
○ Zaujměte pozici, která umožní jednoduchý pohyb.
[Techniky seřezávání trávy]
○ Při nízkých otáčkách motoru je motor slabý a tráva
má tendenci se zamotávat do nože. Pokud se otáčky
motoru otáčí moc rychle, vibrace a zvuky jsou hlasité a
spotřeba energie baterie stoupá.
○ Při nadměrné rychlosti se baterie r ychleji opotřebuje.
○ Netočte rourou, ale pomocí boků pohybujte řeznou
hlavou vodorovně zprava doleva do oblouku za
postupné chů
použijte k řezání trávy. (Obr. 26)
ze dopředu a levou stranu řezné hlavy
VAR OVÁN Í TÝKAJÍCÍ SE PROVOZU
Nepřetržitý provoz
Tento přístroj je vybaven obvodem ochrany proti
přehřátí přístroje, který chrání elektronické části
regulující dobíjecí baterii. Při nepřetržitém provozu
řezání stoupne teplota přístroje a posléze se spustí
obvod ochrany proti přehřátí, který přístroj vypne.
Pokud se tak stane, nechte přístroj po nějakou dobu
ochladit. Jakmile teplota klesne, je opět možné přístroj
používat. Pokud se v průběhu nepřetržitého provozu
musí vyměnit dobíjecí baterie, uveďte přístroj do klidu
po dobu 15 minut.
Otáčkový spínač
Je vybaven elektronickým obvodem, tento spínač
umožňuje změnit rychlost otáček.
Pokud je spouštěč nastaven příliš nízko (nízký rozsah
otáček) a motor je nepřetržitě přetížen, elektonický
obvod se zahřeje a může dojít k selhání.
Při nízkých otáčkách motoru provádějte pouze
nenáročné práce.
ÚDRŽBA A KONT ROL A
UPOZORNĚNÍ
○ Před prováděním údržby nebo kontroly vyjměte
baterie.
1. Kont rola stavu řezné hlavy
Řezná hlava by měla být kontrolována pravidelně.
Pokud je opotřebovaná nebo rozbitá, může sklouznout
nebo snížit výkonnost motoru a tím jej poškodit.
Vyměňte opotřebovanou řeznou hlavu za novou.
UPOZORNĚNÍ
○ Používání řezné hlavy s opotřebovaným nebo
poškozeným ostřím je nebezpečné. Nahraďte ji proto
novou.
2. Zkontrolujte šrouby
Povolené šrouby jsou nebezpečné. Pravidelně je
kontrolujte a ujistěte se, že jsou utažené.
UPOZORNĚNÍ
○ Používání tohoto elektrického nářadí s povolenými
šrouby je extrémně nebezpečné.
3. Údržba motoru
Vinutí jednotky motoru je vlastním „srdcem“ motorem
poháněného nástroje.
Věnujte náležitou péči kontrole toho, zda není vinutí
poškozené a/nebo navlhlé olejem nebo vodou.
4.
Mazání převodovk y
○ Interval údržby
Převodovka by měla být kontrolována na promazání po
každých 50 hodinách provozu.
79
Page 80

Čeština
○ Mazání
Vyjměte řeznou hlavu. Očistěte nečistoty a zbytky
z oblasti mezi převodovkou. Odšroubujte M6 šroub
ze strany převodovky. Při otáčení spojovací hřídelí,
vstříkněte otvorem ložiskový mazací olej na lithiové
bázi (P/N 682975) dokud není převodovka plná.
Zašroubujte šrouby M6.
5. Kont rola uhlíkových kartáčů (Obr. 27)
V motoru jsou použity uhlíkové kartáče, které podléhají
opotřebení. Protože nadměrně opotřebený uhlíkový
kartáč může způsobit špatný chod motoru, nahraďte
uhlíkový kartáč novým, jakmile se opotřebuje nebo se
přibližuje „mezi opotřebení“. Kromě toho vždy udržujte
uhlíkové kartáčky čisté a zajistěte, aby hladce klouzaly
v držácích kartáčků.
POZNÁMKA
Při výměně uhlíkového kartáče za nový se ujistě
používáte uhlíkový kartáč fi rmy Hitachi, kódové číslo
999054.
6. Výměna uhlíkových kartáčů
Vyjměte uhlíkový kartáč tím, že nejdříve odstraníte
kryt kartáče a potom zaháknete výběžek uhlíkového
kartáče pomocí šroubováku na hlavy šroubu s drážkou
atd., v souladu s Obr. 28.
Při instalaci uhlíkového kartáče zvolte směr tak, aby
se spáry uhlíkového kartáče (viz Obr. 29) shodovaly
s místem dotyku vně trubky kartáče. Poté zatlačte
prstem tak, jak je vykresleno na Obr. 30. Nakonec
nasaďte víko kartáče.
POZOR
○ Musíte si být naprosto jistí, že jste zasunuli cvoček
uhlíkového kartáče do kontaktní části vně trubičky
kartáče. (Můžete zasunout kterýkoli ze dvou
přiložených cvočků.)
○ Je nutno postupovat pečlivě, protože jakákoli chyba
v této operaci může způsobit deformaci uhlíkového
kartáče a vadný chod motoru v počáteční fázi.
7. Údržba povrchu
Pokud bude rázový utahovák znečištěný, otřete
jej kusem měkké a suché látky nebo pomocí látky
navlhčené v mýdlovém roztoku. Nepoužívejte chlorová
rozpouštědla, benzín ani ředidlo, jelikož tyto látky
rozpouštějí umělé hmoty.
8. Uložení
Rázový utahovák skladujte na místě s teplotou nižší
než 40˚C a mimo dosah dětí.
9. Seznam servisních položek
POZOR
Opravy, modifi kace a kontroly zařízení Hitachi musí
provádět Autorizované servisní středisko Hitachi.
Tento seznam servisních položek bude užitečný,
předložíte-li jej s vaším zařízením Autorizovanému
servisnímu středisku Hitachi společně s požadavkem
na opravu nebo další servis.
Při obsluze a údržbě elektrických zařízení musí být
dodržovány bezpečnostní předpisy a normy platné v
každé zemi, kde je výrobek používán.
MODIFIKACE
Výrobky fi rmy Hitachi jsou neustále zdokonalovány
a modi
fi kovány tak, aby se zavedly nejposlednější
výsledky výzkumu a vývoje.
Následně, některé díly mohou být změněny bez
předešlého oznámení.
te, že
Důležité upozornění týkající se baterií pro
elektrické akumulátorové nástroje
Používejte vždy jednu z námi specifi kovaných
originálních baterií. Nemůžeme zaručit bezpečnost
a výkonnost našeho elektrického akumulátorového
nástroje pokud jsou používány jiné, než námi
specifi kované baterie nebo pokud je baterie rozebrána
a změněna (jako např. rozebrání a nahrazení článku
baterie nebo jiných vnitřních řčástí).
80
Page 81

Čeština
ODSTRAŇOVÁNÍ PORUCH
Zkontrolujte dle nížeuvedené tabulky, zda přístroj nepracuje správně. Pokud se tím neodstraní problém, poraďte se svým
odborníkem nebo autorizovaným servisním střediskem Hitachi.
Příznak Možná příčina Odstranění závady
Nabíječka Kontrolka nabíjení
Přístroj Nepracuje. Dobíjecí baterie jsou vybité. Nabijte dobíjecí baterie.
nesvítí.
Kontrolka nabíjení
se nevypíná ani po 4
hpdinách nabíjení.
Rozjede se, ale brzy
se zastaví.
Silné vibrace Smyčková rukojeť není řádně
Převodovka vydává
zvláštní zvuky
Zástrčka není zapojena do
zásuvky.
Baterie není správně napojena
do nabíječky.
Elektrody baterií nebo
nabíječky jsou znečištěné.
Baterie jsou extrémně přehřáté. Před nabíjením nechte baterie řádně
Baterie nebo nabíječka jsou
vadné.
Dobíjecí baterie nebyly řádně
vloženy.
Není zapnutý proud. Stiskněte spouštěcí tlačítko na krytu motoru
Zajišťovací páka nebyla
stisknuta při zpětném tažení
páky.
Přístroj vtáhne velký objem
trávy, která byla zachycena
mezi bezpečnostním krytem
a nylonovou hlavou, přístroj je
přetížen.
Dobíjecí baterie jsou vybité. Nabijte dobíjecí baterie.
Dobíjecí baterie jsou přehráté. Přestaňte používat dobíjecí baterie, vyjměte je
připevněna k hlavní rouře.
Bezpeč
nostní kryt není řádně
připevněn k hlavní rouře.
Převodovka spotřebovala
mazivo.
Zapojte zástrčku do zásuvky.
Umístěte správně baterie do nabíječky.
Elektrody očistěte vatovým tampónem nebo
podobným předmětem.
vychladnout.
Odpojte přívod energie a obraťte se na vašeho
prodejce nebo autorizované servisní středisko
Hitachi.
Vyjměte dobíjecí baterie z přihrádky na baterie
přístroje, zkontrolujte je a odstraňte veškeré
neč
istoty. Zkontrolujte také, zda nejsou
elektrody baterie znečištěné, mokré nebo zda
neobsahují jiná cizí tělesa. K očištění použijte
vatové tampóny. Ujistěte se, že dobíjecí baterie
je zacvaknutá dovnitř.
pro spuštění přístroje. Tento přístroj je vybaven
funkcí automatického vypínání. Přístroj se
automaticky vypne, pokud nikdo nezatáhne
za páčku v průběhu jedné minuty po spuštění
přístroje. Pro opětovné zapnutí přístroje
stikněte opět spouštěcí tlačítko.
Druhým stiskem spouštěcího tlačítka se přístroj
vypne.
Pro zabránění nehodám vzniklých v důsledku
nesprávné činnosti musí být zajišťovací páka
stisknuta v průběhu spuštění motoru zpětným
tažením páky.
Držte rukojeť shora a stiskně
páku za současného tažení rukojeti.
To je účinek funkce, která chrání dobíjecí
baterii tím, že se motor při vystavení přístroje
nadměrnému přetížení vypne. Vypněte nástroj
a odstraňte příčinu přetížení. Stiskněte opět
spouštěcí tlačítko pro pokračování v provozu.
z nástroje a nechte ochladit na dobře větraném
místě, nevystavujte slunečnímu záření.
Řádně zajistěte.
Řádně zajistěte.
Namažte mazivem.
te zajišťovací
81
Page 82

Čeština
ZÁRUKA
Ručíme za to, že elektrické nářadí Hitachi splňuje
zákonné/místně platné předpisy. Tato záruka nezahrnuje
závady nebo poškození vzniklé v důsledku nesprávného
použití, hrubého zacházení nebo normálního opotřebení.
V případě reklamace zašlete prosím elektrické nářadí v
nerozebraném stavu společně se ZÁRUČNÍM LISTEM
připojeným na konci těchto pokynů pro obsluhu do
autorizovaného servisního střediska fi rmy Hitachi.
POZNÁMKA
Vlivem stále pokračujícího výzkumného a vývojového
programu HITACHI mohou zde uvedené parametry
podléhat změnám bez předchozího upozornění.
Informace o hluku a vibracích
Měřené hodnoty byly určeny podle IEC60335 a
deklarovány ve shodě s ISO 4871.
Změřená vážená hladina akustického výkonu Α: 95 dB (A).
Změřená vážená hladina akustického tlaku Α: 86 dB (A).
Neurčitost KpA: 3 dB (A)
Použijte ochranu sluchu.
Celkové hodnoty vibrací (vektorový součet triax)
stanovené dle normy IEC60335.
Hodnota vibračních emisí
ah, w = 7,5 m/s
2
UPOZORNĚNÍ
◯ Hodnota vibračních emisí během vlastního používání
elektrického přístroje se může od deklarované hodnoty
lišit v závislosti na způsobu použití přístroje.
◯ Pro identifi kaci bezpečnostních opatření k ochraně
obsluhy založených na odhadu vystavení vlivům v
daných podmínkách použití (v úvahu bereme všechny
části pracovního cyklu, jako jsou doby, kdy je přístroj
vypnutý, a kdy běží naprázdno připočtených k době
spouštění).
82
Page 83

Türkçe
GENEL ELEKTRİKLİ ALET GÜVENLİK
UYARILARI
DİKKAT
Tüm güvenlik uyarılarını ve tüm talimatları okuyun.
Uyarılara ve talimatlara uyulmaması elektrik çarpmasına,
yangına ve/veya ciddi yaralanmaya neden olabilir.
Bu kılavuzu gelecekte başvurmak üzere saklayın.
Uyarılarda kullanılan “elektrikli alet” terimi, şebeke
elektriğiyle çalışan (kablolu) veya pille çalışan (kablosuz)
elektrikli aletinizi belirtir.
1) Çalışma alanının güvenliği
a) Çalışma alanı temiz ve iyi aydınlatılm
olmalıdır.
Dağınık veya karanlık alanlar kazalara davetiye
çıkarır.
b) Elektrikli aletleri yanıcı sıvı, gaz veya toz
patlayıcı maddelerin bulunduğu ortamlarda
çalıştırmayın.
Elektrikli aletlerin çıkardığı kıvılcımlar toz veya gaz
halindeki bu maddeleri ateşleyebilir.
c) Bir elektrikli aletle çalışırken çocukları ve
izleyicileri uzaklaş
Dikkatinizin dağı lması kontrolü kaybetmenize
neden olabilir.
2) Elektrik güvenliği
a) Elektrikli aletin fi şi elektrik prizine uygun
olmalıdır.
Fişi herhangi bir şekilde değiştirmeyin.
To pr ak la nm ış elektrikli aletlerle herhangi bir
adaptör kullanmayın.
Fişlerde değişiklik yapılmaması ve uygun prizlerde
kullanılması elektrik çarpma riskini azaltacaktı r.
b) Borular, radyatörler, fı
gibi topraklanmış yüzeylerle gövde temasından
kaçının.
Vücudunuzun toprakla temasa geçmesi halinde
elektrik çarpma riski artar.
c) Elektrikli aletleri yağmura veya ıslak ortamlara
maruz bırakmayın.
Elektrikli alete su girmesi elektrik çarpma riskini
artıracaktır.
d) Elektrik kablosuna zarar vermeyin. Elektrikli
aleti taşımak, çekmek veya fi şini prizden
çıkarmak için kabloyu kullanmayın.
Kabloyu ı
veya hareketli parçalardan uzak tutun.
Hasar görmüş veya dolaşmış kablolar elektrik
çarpma riskini artı rır.
e) Elektrikli aleti açık alanda kullanırken, açık
alanda kullanıma uygun bir uzatma kablosu
kullanın.
Açık alanda kullanıma uygun bir kablo kullanılması
elektrik çarpma riskini azaltır.
f) Eğer bir elektrikli aletin ıslak bir yerde
kullanılması kaçınılmaz ise, artık akım cihazıyla
(RCD) korunan bir güç kaynağı kullanın.
RCD kullanılması elektrik çarpma riskini azaltır.
3) Kişisel emniyet
a) Bir elektrikli alet kullanırken daima tetikte olun;
yaptığınız işi izleyin ve sağduyulu davranın.
Aleti yorgunken, alkol veya
altındayken kullanmayın.
Elektrikli aletleri kullanırken göstereceğiniz bir anlı k
dikkatsizlik ciddi yaralanmayla sonuçlanabilir.
b) Kişisel koruyucu donanım kullanın. Daima
koruyucu gözlük takın.
tırın.
rınlar ve buzdolapları
sıdan, yağdan, keskin kenarlardan
ilaç etkisi
ış
Uygun koşullar için kullanılan toz maskesi, kaymaz
emniyet ayakkabıları, kask veya kulak koruyucu gibi
koruyucu ekipmanlar yaralanmaları azaltacaktır.
c) Aletin istenmeden çalışmasını engelleyin.
Aleti güç kaynağına ve/veya akü ünitesine
bağlamadan, kaldırmadan veya
önce, güç düğmesinin kapalı konumda
olduğundan emin olun.
Elektrikli aletleri parmağınız güç düğmesinin
üzerinde olarak taşımanız veya güç düğmesi
açılmış durumda fi şini takmanız kazalara davetiye
çıkarır.
d) Aletin gücünü açmadan önce alet üzerindeki
ayar veya somun anahtarlarını çıkarın.
Aletin dönen parçalarından birine bağlı kalan bir
somun anahtarı veya ayar anahtarı yaralanmaya yol
açabilir.
e)
Çok fazla yak laşmayın. Uygun bir adım
mesafesi bırakın ve sürekli olarak dengenizi
koruyun.
Böylece, beklenmedik durumlarda aleti daha iyi
kontrol etmeniz mümkün olur.
f) Uygun şekilde giyinin. Bol elbiseler giymeyin
ve takı eşyaları takmayın. Saçların ızı, elbisenizi
ve eldivenlerinizi hareketli parçalardan uzak
tutun.
Bol elbiseler, takılar veya uzun saçlar hareketli
parçalara takılabilir.
g) Eğer toz çekme
gerekli aygıtlar sağlanmışsa, bunların bağlı
olduğundan ve doğru şekilde kullanıldığından
emin olun.
Toz toplama kullanı mı, tozla ilişkili tehlikeleri
azaltabilir.
4) Elektrikli aletin kullanımı ve bakımı
a) Elektrikli aleti zorlamayın. Yapa ca ğınız iş
doğru alet kullanın.
Doğru alet, işinizi daha iyi ve tasarlanmış olduğu hız
değerinde daha güvenli şekilde yapacaktır.
b) Elektrikli alet güç düğmesinden açılıp
kapanmıyorsa , aleti kullanmayın.
Güç düğmesiyle kontrol edilemeyen bir alet
tehlikelidir ve tamir edilmeden kullanılmamalıdır.
c) Herhangi bir ayar yapmadan, aksesuarları
değiştirmeden veya aleti saklamadan önce
fi şi güç kayna
sökün.
Bu koruyucu güvenlik önlemleri, elektrikli aletin
kazayla çalışma riskini azaltır.
d) Atıl durumdaki elektrikli aletleri çocukların
ulaşamayacağı bir yerde saklayın ve elektrikli
alet ve bu kullanım talimatları hakkında bilgi
sahibi olmayan kişilerin aleti kullanmasına izin
vermeyin.
Elektrikli aletler eğitimsiz kullanıcıların elinde
tehlikelidir.
e) Elektrikli
parçalarda yanlış hizalanma veya sık ışma
olup olmadığını, kırık parça olup olmadığını
ve elektrikli aletin çalışmasını etkileyebilecek
diğer koşulları kontrol edin.
Eğer hasar varsa, kullanmadan önce aleti tamir
ettirin.
Kazaları n çoğu elektrikli aletlere kötü bakım
işlemleri uygulanmasından kaynaklanmaktadır.
f) Aletleri keskin ve temiz tutun.
Uygun şekilde bakımı yapı lan, keskin kenarlara
sahip aletlerin sıkı şma ihtimali daha azdır ve kontrol
edilmesi daha kolaydır.
ve toplama bağlantıları için
ğından ve/veya akü ünitesinden
aletin bakımını yapın. Hareketli
taşımadan
için
83
Page 84

Türkçe
g) Elektrikli aleti, aksesuarları, uçları, v.b. , bu
talimatlara uygun şekilde, çalışma koşullarını
ve yapılacak işi göz önünde bulundurarak
kullanın.
Elektrikli aletin amaçlanan kullanımlardan farklı
işlemler için kullanılması tehlikeli bir duruma yol
açabilir.
5) Akülü aletin kullanımı ve bakımı
a) Üniteyi sadece üretici tarafından belirtilen şarj
cihazıyla şarj edin.
Bir akü ünitesi tipi için uygun olan bir şarj cihazı
başka tipte bir akü ünitesiyle kullanıldığında yangın
riski yaratabilir.
b) Elektrikli aletleri sadece özellikle belirtilen akü
üniteleriyle kullanın.
Başka herhangi bir akü ünitesinin kullanılması
yaralanma veya yangın riski yaratabilir.
c) Akü ünitesini kullanılmadığı zamanlarda
ataşlardan, madeni paralardan, anahtarlardan,
çivilerden, vidalardan veya terminaller
arasında bağlantı oluşturabilecek diğer
metal nesnelerden uzak tutun.
Akü kutuplarının kısa devre olması yanıklara veya
yangına neden olabilir.
d) Ya nlış kullanım koşullarında aküden sıvı çıkışı
olabilir; temas etmekten kaçının.
Kazayla sıvıya temas edilmesi durumunda
suyla yıkayın. S ıvının gözlere temas etmesi
halinde,
Aküden fışkıran su tahriş veya yanıklara neden
6) Servis
a) Elektrikli aletinizin servisini sadece orijinal
Böylece, elektrikli aletin güvenli kullanımı
ÖNLEM
Çocukları ve zayıf kişileri uzak tutun.
Alet, kullanılmadığı zamanlarda çocukların ve zayı
kişilerin ulaşamayacağı bir yerde saklanmalıdır.
ayrıca bir doktora başvurun.
olabilir.
yedek parçalar kullanmak suretiyle uzman bir
tamirciye yaptırın.
sağlanacaktır.
küçük
f
ÇİM KESME GÜVENLİK UYARILARI
DİKKAT
KULLANMADAN ÖNCE DİKKATLE OKUYUN
GELECEKTE BAŞVURMAK ÜZERE SAKLAYIN
Güvenli çalıştırma uygulamaları
● Eğitim
a) Talimatları dikkatli bir şekilde okuyun. Makinenin
kontrollerini ve doğru kullanımını iyice öğrenin.
b) Bu bilgilere sahip olmayan kişilerin veya çocukların
makineyi kullanmasına kesinlikle izin vermeyin.
Bölgesel yönetmelikler, operatörün yaşı konusunda
sınırlandırmalar getirebilir.
c) Diğer insanların maruz kalacağı tehlikeli durumlar
ve kazalar ile maddi hasarlardan operatörün veya
kullanıcını n sorumlu olacağını unutmayın.
● Hazırlık
a) Makineyi yakınında insanlar ve özellikle çocuklar ve
evcil hayvanlar varken kesinlikle çalıştırmayın.
b) Makineyi çalıştı rırken daima emniyet gözlüğü ve
sağlam ayakkabılar giyin.
● Çalıştırma
a) Makineyi sadece gün ışığında veya iyi aydınlatma
koşulunda kullanın.
b) Makineyi kesinlikle hasarlı muhafazalarla veya
siperlerle veya muhafazalar veya siperler yerlerinde
olmadan çalıştırmayın.
84
c) Motoru, sadec e ellerin izi ve ayaklar ınızı kesici kısımdan
uzaklaştırdıktan sonra çalıştı rın.
d) Aşağıdaki durumlarda mutlaka makinenin güç kaynağı
bağlantısını sökün (yani, fi şini prizden çekin veya
devreden çıkarma aygıtını kaldırın):
– makineyi gözetimsiz bırakırken;
– bir tıkanıklığı açmaya çalışmadan önce;
– makine üzerinde kontrol, temizlik veya çalışma
yapmadan önce;
– bir yabancı nesneye çarptıktan sonra;
– makine anormal şekilde titreşim yapıyorsa.
e) Ayakları nızı ve ellerinizi kesici elemanla yaralamamaya
dikkat edin.
f) Daima havalandırma deliklerinin açık kalmasını
sağlayın.
● Bakım ve saklama
a) Bakım ve temizlik işlemlerini yapmadan önce mutlaka
makinenin güç kaynağı bağlantısını sökün (yani, fi şini
prizden çekin veya devreden çıkarma aygıtını kaldırın).
b) Sadece üreticinin tavsiye ettiği yedek parçaları ve
aksesuarları kullanın.
c) Makineyi düzenli olarak muayene edin ve bakım yapın.
Makineyi sadece yetkili bir tamirciye tamir ettirin.
d) Kullanmadı ğınızda, makineyi çocukların ulaşamayacağı
bir yerde saklayı n.
AKÜLÜ ÇİM KESME İÇİN UYARILAR
UYARI
1. Aletl e ya ptığınız tüm işlerde sabırlı olun. Üşümemek
için uygun şekilde giyinin.
2. Kazalara meydan vermemek için tüm işi önceden
planlayın.
3. Aleti gece veya görüş zayıfken kötü hava koşulları nda
çalıştırmayın. Aleti yağmur yağarken veya yağmur
yağdıktan hemen sonra çalıştırmayın.
Kaygan zemin üzerinde çalışma, dengenizi
kaybetmeniz halinde bir kazaya yol açabilir.
4. Çalışmaya başlamadan önce kesme kafasını kontrol
edin.
Kesme kafası çatlamış, yaralanmış veya bükülmüşse
aleti kullanmayın.
Kesme kafasının uygun şekilde takıldığ
Çalışma sırasında ayrılarak düşen veya gevşeyen bir
kesme kafası kazaya neden olabilir.
5. Çalışmaya başlamadan önce emniyet kapağını ve
omuz kayışını taktığınızdan emin olun.
Aletin bu parçalar olmadan çalıştırılması yaralanmaya
yol açabilir.
6. Çalışmaya başlamadan önce halka kolu taktığınızdan
emin olun. Çalışmaya başlamadan önce, gevşek
olmadığından ve doğru şekilde takıldığından emin
olun. Çalışma sırasında halka kolu sıkıca tutun ve aleti
etrafa sallamayın; doğru duruş şeklini ve dengenizi
bozmadan kullanın.
Çalışma sırasında dengenizin bozulması bir kaza
sonucu yaralanmanıza neden olabilir.
7. M otoru ç a lıştı rırken dikkatli olun.
Aleti düz bir zemin üzerine yerleştirin.
Aleti insanlara ve hayvanlara 15 m’den daha yakın
mesafede çalıştırmayın.
Kesme kafasının yerle veya ağaçlarla ve bitkilerle
temas etmediğinden emin olun.
Dikkatsiz bir başlatma, yaralanmanıza neden olabilir.
8. Kilit kolunu emniyete almayın.
Kolun kazara geriye çekilmesi beklenmedik
yaralanmaya neden olabilir.
9. Aleti terk etmeden önce, çalıştırma (start) düğmesine
basarak kapatın.
ından emin olun.
Page 85

Türkçe
10. Aleti elektrik kabloları nın, gaz borularının ve benzer
tesisatların yakınında çalıştırırken dikkatli olun.
11. Çalışmaya başlamadan önce boş teneke kutuları,
kablolar, taşlar vb. engeller olup olmadığını kontrol
ederek temizleyin. Ayrıca, ağaç köklerinin ve kayaların
yakınında çalı şmayın.
Böyle alanlarda çalışılması kesme kafası nın hasar
görmesine veya yaralanmaya neden olabilir.
12. Dönme hızını aşı rı şekilde artırmayın.
Hızı birdenbire değil kademeli olarak artırın.
Kol pozisyonunu i
Aletten fırlayan nesneler beklenmedik yaralanmaya
neden olabilir.
13. Çalışma sırasında kesme kafasına kesinlikle
dokunmayın.
Aynı zamanda, saçlarınıza, elbiselerinize, vb. temas
etmediğinden emin olun.
14. Aşağıdaki durumlarda, motoru kapatın ve kesme
kafasının dönmesinin durup durmadığını kontrol edin.
Başka bir çalışma alanına geçmek için.
Alete yapışan çöp veya çimleri çı karmak için.
Çalışma alanındaki engelleri veya kesme işleminin
ürettiği çöp, çim ve yongaları temizlemek için.
Aleti yere koymak için.
Bu işlemlerin kesme kafası dönmeye devam ederken
yapılması, beklenmedik kazalara sebebiyet verebilir.
15. Aleti başka bir kişiye 15 metreden daha yakın
mesafede kullanmayın.
Başka biriyle birlikte çalı
mesafe bırakın.
Fırlayan yontalar beklenmedik kazalara yol açabilir.
Bayır gibi de ngesiz yüzeyl erde çalışı rken, iş arkadaşınız
için herhangi bir tehlikeli durum yaratmadığı nızdan
emin olun.
İş arkadaşlarınızın dikkatini çekmek için düdük vb.
vasıtalar kullanın.
16. Kesme kafasına çim ve diğer nesneler toplandığında,
motoru kapatın ve kesme kafasının dönmesinin
durduğundan emin olduktan sonra bu nesneleri
temizleyin.
Kesme kafası dönmeye devam ederken nesnelerin
çıkarılması yaralanmaya yol açacaktır.
Kesme kafasına yabancı madde yapışmı ş olarak
çalışmaya devam edilmesi hasara yol açabilir.
17. Eğer aletin çal
titreşimler üretiyorsa, derhal motoru kapatın ve
satıcınızdan aleti kontrol ve tamir etmesini isteyin.
Bu koşullar altında sürekli kullanım, yaralanmaya veya
aletin hasar görmesine neden olabilir.
18. Eğer aleti düşürür veya çarparsanız; hasar, çatlak veya
deformasyon olup olmadığını dikkatli şekilde kontrol
edin.
Hasar görmüş, çatlamış veya deforme olmuş bir aletin
kullanılması yaralanmaya sebebiyet verebilir.
19. Araçta taşıma sırasında aleti emniyete alarak hareket
etmesini engelleyin.
Bu ikaza uyulmaması, bir kazaya sebebiyet verebilir.
UYARI
1. Çim haricinde nesneler kesmek için kesme kafasını
açmayın. Aleti su birikintileri içinde çalıştırmayın ve
toprağın kesme kafasına temas etmediğinden emin
olun.
2. Alet, düşürülmemesi, güçlü darbeye veya suya maruz
bırakılmamas
Bu hususlara dikkat edilmezse, alet hasar görebilir
veya arızalanabilir.
3. Alet kullanımdan sonra saklanacaksa veya
taşınacaksa, kesme kafasını çı karın.
4. Aleti böcek ilaçlarına veya başka kimyasal maddelere
maruz bırakmayın.
ş yüküne uygun olarak ayarlayın.
şırken, aranızda en az 15 m
ışması zayıfsa ve garip gürültü ve
ı gereken hassas parçalar içerir.
Bu maddeler çatlamaya neden olabilir veya alete başka
şekilde zarar verebilir.
5. Uyarı etiketleri zor fark edilir veya okunamaz hale
geldiğinde veya soyulmaya başladığında yeni
etiketlerle değiştirin.
Satıcını zdan sizin için uyarı etiketleri temin etmesini
isteyin.
AKÜ VE ŞARJ CİHAZI İÇİN UYARILAR
1. Batar yayı her zaman 0˚C – 40˚C sıcaklık aralığında
şarj edin. 0˚C sıcaklığın altında yapılan şarj işlemleri,
bataryanın aşırı şarj olmasına yol açarak tehlikeye
neden olabilir. Batarya 40˚C sıcaklığın üzerinde şarj
edilmemelidir.
Şarj işlemi için en uygun sıcaklık 20˚C – 25˚C
aralığındadır.
2. Şarj işlemi tamamlandıktan sonra, başka bir şarj
işlemine başlamadan önce şarj cihazını 15 dak ika
kadar dinlendirin.
Aküyü 2 saatten fazla
3. Şarj edilebilir bataryanın bağlanacağı deliğe yabancı
maddelerin girmesine izin vermeyin.
4. Şarj cihazının havalandırma yuvalarına hiçbir cisim
sokmayın.
Şarj cihazının havalandırma yuvalarına metal veya
yanıcı cisimlerin sokulması, elektrik çarpmasına veya
şarj cihazının hasar görmesine neden olabilir.
5. Tükenmiş bataryayı kullanmak, şarj cihazı nda hasara
neden olur.
6. Bataryanın şarj edildikten sonraki ömrü
kullanılmayacak kadar kısaldığında bataryayı aldığınız
yere geri götürün. Ömrü tükenen bataryaları imha
etmeyin.
7. Şarj edilebilir bataryayı ve şarj cihazı
8. Şarj edilebilir bataryayı asla kısa devre yapmayın.
Batarya kısa devre yapılırsa, çok yüksek elektrik akımı
ve aşırı ısınma durumu oluşur; bunun sonucu olarak
batarya yanabilir veya hasar görebilir.
9. Bataryayı ateşe atmayın.
Batarya yanarsa patlayabilir.
şarj etmeyin.
nı asla sökmeyin.
LITYUM-ION PILLE ILGILI UYARI
Çalışma ömrünü uzatmak için, lityum-iyon pilde çıkı şı
durduran bir koruma işlevi mevcuttur. Aşağıda açıklanan
1 ila 3 durumlarında, bu ürünü kullanırken anahtarı çekiyor
olsanız bile motor durabilir. Bu bir arıza değil koruma
işlevinin bir sonucudur.
1. Pil enerjisi tükendiğinde, motor durur.
Böyle bir durumda pili en kısa zamanda şarj edin.
2. Eğer araca fazla yüklenilmişse motor durabilir. Böyle
bir durumda aracın anahtarını serbest bırakın ve
aşırı yüklemenin sebeplerini ortadan kaldırın. Bunun
ardından aracı tekrar kullanabilirsiniz.
3. Eğer akü aşırı iş koşulunda fazla ısınmışsa, akü gücü
kesilebilir.
Bu durumda, aküyü kullanmayı keserek soğumas
bekleyin. Soğuduktan sonra, kullanmaya devam
edebilirsiniz.
Ayrıca, lütfen aşağıdaki uyarı ve ikazları dikkate alın.
DİKKAT
Herhangi bir batarya sızıntısına, ısı üretilmesine, duman
yayılmasına, patlamaya ve erken ateşlemeye meydan
vermemek için, lütfen aşağıdaki uyarıları dikkate alın:
1. Batarya üzerinde talaş ve toz birikmediğinden emin
olun.
○ Çalışma sırasında batarya üzerine talaş ve toz
dökülmediğinden emin olun.
ını
85
Page 86

Türkçe
○ Çalışma sırasında elektrikli alet üzerine dökülen talaş
ve tozun batarya üzernde birikmediğinden emin olun.
○ Kullanılmayan bir bataryayı talaşa ve toza maruz kalan
bir yerde saklamayın.
○ Bir bataryayı saklamadan önce, üzerine yapışabilecek
talaş ve tozu temizleyin ve metal parçalarla (vida, çivi,
v.b.) birlikte saklamayın.
2. Bataryayı çivi benzeri keskin nesnelerle delmeyin;
çekiçle vurmayın; üzerine basmayı n; atmayın ve
şiddetli fi ziksel darbeye maruz bırakmayın.
3. Açıkça hasarlı veya deforme olduğu görülen bataryayı
kullanmayın.
4. Bataryayı kutuplarını ters bağlayarak kullanmayı n.
5. Doğrudan elektrik prizlerine veya çakmak soketlerine
bağlamayın.
6. Bataryayı belirtilenler dışında herhangi bir amaç için
kullanmayın.
7. E ğer belirtilen ş
batarya tamamen şarj olmuyorsa, derhal şarj işlemini
durdurun.
8. Bataryayı mikrodalga fırın, kurutucu veya yüksek
basınçlı kaplar gibi ortamlardaki yüksek sıcaklık veya
basınçlara maruz bırakmayın.
arj etme süresi geçmesine rağmen
9. Sızıntı görülmesi veya kötü koku algılanması
durumunda derhal ateşten uzaklaştırın.
10. Güçlü statik elektrik üretilen bir yerde kullanmayın.
11. Eğer batarya sızıntısı, kötü koku, ısı üretilmesi, renk
solması veya deformasyon varsa veya kullanım, şarj
işlemi veya saklama sırasında herhangi bir şekilde
anormallik görülürse, derhal cihazdan veya batarya
şarj cihazından çıkarın ve kullanmayı kesin.
UYARI
1. Eğer bataryadan s
gözlerinizi ovuşturmayın; hemen temiz suyla iyice
yıkayın ve derhal bir doktora başvurun.
Bataryadan sızan bu sıvı, tedavi uygulanmaması
durumunda göz problemlerine neden olabilir.
2. Eğer sıvı cildinizle veya elbiselerinizle temas ederse,
derhal temiz suyla yıkayın.
Sıvı, cilt tahrişine neden olabilir.
3. Eğer bataryayı ilk defa kullandığınızda pas, kötü koku,
deformasyon ve/veya başka anormallikler saptarsanız,
bataryayı kullanmayın ve derhal tedarikçisine veya
satıcısına iade edin.
ızan sıvı gözlerinize kaçarsa,
TEKNİK ÖZELLİKLER
ELEKTRİKLİ ALET
Model CG18DL CG18DAL
Direk tipi Ataşman tipi Düz tip
Kesme kapasitesi çapı 425 mm
Dönme yönü Dişli muhafazasından bakıldığında ters saat yönü
Yüksüz hız0–4500 dk
Bir şarjla çalışma süresi *
(Aletle birlikte verilen şarj edilebilir pil tamamen şarj
edildiğinde)
1
Akü BSL1830: Li-iyon 18 V (3,0 Ah 10 hücre)
Ağırlık (kesme kafası ve omuz kayışı olmadan) 5,4 kg 5,2 kg
*1 Yukarıdaki veriler sadece bir örnek olarak verilmiştir. Çim tipi, bıçak keskinliği, kesme kafası devri, ortam sıcaklığı,
şarj edilebilir akü karakteristikleri, iş yöntemleri, vb. geniş ölçüde değişiklik gösterebileceğinden, yukarıdaki veriler
sadece kaba bir fi kir edinmek için kullanılmalıdır.
*2 Koşullar: Naylon ipli kesicinin dı ş çapı 425 mm’dir; ayarı tam hı za getirin.
Şarj cihazi
Model UC18YRSL
Şarj voltajı 14,4 V 18 V
Ağırlık0,6 kg
5 dk*
-1
2
86
Page 87

STANDART AKSESUARLAR
Türkçe
CG18DL
CG18DAL
(LSC)
1 Naylon başlık ................................................................ 1
2 Sarma koruyucusu .......................................................1
3 Alyen anahtarı 4 mm .................................................... 1
4 Lokma anahtarı (Altıgen soket 17/19) ........................... 1
5 Koruyucu gözlük ...........................................................1
6 Omuz kayışı .................................................................. 1
7 Akü (BSL1830) .............................................................1
8 Şarj cihazı (UC18YRSL) ...............................................1
Standart aksesuarlar haber vermeden değiştirilebilir.
OPSİYONEL AKSESUARLAR (ayrı olarak
satılır)
1. Akü (BSL1830)
1
5
2
6
8
4. Diz koruması (2’li takım)
Fırlayan parçalara karşı bacakları korur.
3
4
7
2. Batarya kapağı
3. Gres yağı (100 g tüp)
Dişli muhafazasını her 50 saatlik çalışmadan sonra
yağlayın.
Opsiyonel aksesuarlar haber vermeden değiştirilebilir.
UYGULAMALAR
Yabani otl arın kesilmesi, düzeltilmesi ve biçilmesi.
BATARYANIN ÇIKARILMASI/TAKILMASI
1. Bataryanın çıkarılması
Aküyü çı karmak için, muhafazayı sıkıca tutun ve akü
mandallarını itin (Şekil 2’ye bakın).
UYARI
Asla bataryayı kısa devre yapmayın.
2. Bataryanın takılması
Bataryayı kutup yönlerine dikkat ederek yerleştirin
(Şekil 2’ye bakın).
87
Page 88

Türkçe
ŞARJ ETME
Elektrikli aleti kullanmadan önce bataryayı aşağıdaki
şekilde şarj edin.
1. Sarj cihazının güç kablosunu yuvaya takın.
Güç kablosu bağlandığında şarj cihazının pilot lambası
kırmızı olarak yanıp söner. (1 saniyelik aralıklarda)
2. Bataryayı şarj makinasına takın
Çizgi görününceye kadar pili şarj cihazına sertçe
sokun, Şek. 3, 4’de gösterildiği gibi.
Tablo 1
Kılavuz lambanın bildirimi
Pilot lambası
kırmızı olarak
yanar veya
yanıp söner.
Pilot
lambası
yeşil
olarak
yanar.
(2) Şarj edilebilir bataryanın sıcaklığıyla ilgili olarak.
Yen iden şarj edilebilir piller için sıcaklıklar Tablo 2’de
gösterilmiştir, ısınan piller tekrar şarj edilmeden önce
bir süre soğumaya bırakılmalıdı r.
Tablo 2 Bataryaların şarj aralıkları
Şarj edilebilir bataryala
BSL1830 0°C – 50°C
(3) Şarj süresiyle ilgili olarak
Kullanılan şarj cihazı ve batarya kombinasyonları na
bağlı olarak şarj süreleri Tablo 3’te gösterildiği gibidir.
Tablo 3 Şarj süresi (20˚C sıcaklıkta)
Batarya
BSL1830 Yaklaşık 45 dakika
NOT
Şarj süreleri, sıcaklığa ve güç kaynağının voltajına göre
farklılık gösterebilir.
4. Şarj cihazının elektrik kablosunu prizden çekin.
5. Şarj cihazını sıkıca tutarak bataryayı çekerek
çıkarın.
NOT
Şarj işleminin ardından önce bataryaları şarj
cihazından çıkarıp, sonra gerektiği gibi muhafaza edin.
Şarj
öncesinde
Şarj
sırasında
Şarj
tamamlandığında
Şarj işlemi
gerçekleşmiyor
Aşırı ısınma
bekleme
modu
Şarj Cihazı
Yan ıp Söner 0,5 saniye yanar ve 0,5 saniye söner.
Yanar Sürekli yanar.
Yan ıp Söner 0,5 saniye yanar ve 0,5 saniye söner.
Hızla Yanıp
Söner
Yanar Sürekli yanar. Batarya aşırı ısınmı ş.
edilebileceği sıcaklık
(0,5 saniye kapalıdır)
(0,5 saniye kapalıdır)
0,1 saniye yanar ve 0,1 saniye söner.
(0,1 saniye kapalıdır)
Bataryaların şarj
aralığı
UC18YRSL
3. Şarj etme
Pili şarj cihazına taktığı
ve pilot lambası sürekli kırmız yanar.
Pil tamanen şarj olduğunda pilot lambası kırmız
olacaktır. (1 saniyelik aralıklarla) (Tablo 1’e bakın)
(1) Kılavuz lamba bildirimleri
Kılavuz lamba bildirimleri, şarj makinasının veya
şarj edilebilir bataryanın durumuna göre Tablo 1’de
gösterilmiştir.
Bataryaların ömrü nasıl uzatılır
(1) Batar yaları tamamen boşalmadan şarj edin.
Aletin gücünün zayıfl adığını hissederseniz, aleti
kullanmaya ara verin ve bataryalarını şarj edin. Eğer
aleti kullanmaya devam eder ve elektrik akımının
bitmesine neden olursanız, batarya hasar görebilir ve
ömrü kısalır.
(2) Yüksek sıcaklı klarda şarj etmekten kaçının.
Şarj edilebilir batarya kullanıldıktan hemen sonra
ısınmış olacaktır. Bat aryay ı kullanımdan hemen sonra
şarj ederseniz, içindeki kimyasal madde bozulur ve
bataryanın ömrü kısalır. Batar yayı bekletin ve bir süre
soğuduktan sonra ş
UYARI
○ Pil şarj aleti sürekli k ullanıldığında ısınacak ve sorunlara
neden olacaktır. Şarj etme işlemi tamamlandıktan
sonra bir sonraki şarj için alete 15 dakikalık bir
dinlenme süresi verin.
○ Şarj eti kullanım veya güneşle maruz kalma nedeniyle
ısınmış haldeyken pil yeniden şarj edilirse, pilot lamba
yeşil renkte yanabilir.
Pil şarj olmayacaktır. Böyle bir durumda şarj etmeden
önce pilin soğumasına zaman tanıyın.
○ Kılavuz lamba kırmızı renkte çok hızlı yanıp sönüyorsa
(0,2 saniyelik aralıklarla), bataryanın takıldığı delikte
yaşancı madde olup olmadığı
çıkarın. Yabancı madde yoksa, büyük olasılıkla batarya
veya şarj cihazı bozulmuştur. Bozulan ürünü Yetkili
Servis Merkezinize götürün.
nızda, şarj yüklenmeye başlar
Batarya veya şarj
makinasini bozulmuş.
Şarj yapılamıyor.
(Batarya soğuduğunda şarj
işlemi başlayacaktır)
arj edin.
nı kontrol edin; varsa
88
Page 89

Türkçe
KALAN PIL GÖSTERGESI HAKKINDA
Kalan pil göstergesi anahtarına basıldığında kalan pil
göstergesi lambası yanar ve pilin kalan gücü kontrol
edilebilir. (Şek. 5)
Kalan pil göstergesi anahtarından parmağınızı çektiğinizde
kalan pil göstergesi lambası söner. Tablo 4 kalan pil
göstergesi lambasının ve pil kalan gücünün durumunu
göstermektedir.
Lambanın
durumu
Kalan pil göstergesi, ortam ısısı ve pil özelliklerine bağlı
olarak bir miktar farklı gösterdiğinden bunu bir referans
olarak kabul edin.
NOT
○ Anahtar paneline çok fazla güç uygulamayın veya
kırmayın. Bu bir soruna yol açabilir.
○ Pil güç tüketiminden tasarruf etmek üzere kalan pil
gösterge lambası, kalan pil gösterge basıldı ğında
yanar.
Tablo 4
Kalan Pil Gücü
Kalan pil gücü yeterli.
Kalan pil gücü yarım.
Kalan pil gücü neredeyse yok.
En kısa sürede pili yeniden şarj edin.
ALETİ ÇALIŞTIRMADAN ÖNCE
UYARI
Herhangi bir takma işlemi yapmadan önce aküyü
çıkarın.
1. Yar dımcı donanımların takılması [sa dece CG18DL]
(Şekil 6)
(1) Kilitleme pimini kesici yardımcı donanımının ana boru
kilitleme deliğine takın ve ana borunun gevşeme riski
olmadığından emin olun.
(2) Kol düğmesini sıkmak suretiyle sı kı şekilde emniyete
alın.
2. Halka kolun takılması (Şekil 7)
(1) M6 × 43 cıvataları (2) sökün.
(2) Halka kolu, motora yaslanacak şekilde ana boru
üzerine takın.
(3) Kol tespit elemanını
ve M6 × 43 cıvataları (2) ve M6 somunları (2) kullanarak
sıkıca sabitleyin.
NOT
Halka kolu iyi bir kavrama sağlayan pozisyonda
sabitleyin.
3. Emniyet kapağının takılması (B kz: Şekil 8 ve 9)
UYARI
Emniyet kapağını belirlenen yere taktığınızdan emin
olun.
Bu ikaza uyulmaması, fırlayan taşlar nedeniyle
yaralanmaya sebebiyet verebilir.
NOT
Montaj için, aletle birlikte verilen alyen anahtarını
kullanın.
(1) Bıçağı kapak muhafazasına takmak için, aletle birlikte
verilen D4 sac vidasını kullanı n. (Şekil 8)
Kapak muhafazası nı
(2) Kapak braketindeki ve emniyet kapağındaki iki deliği
hizalayın ve M6 × 25 altı gen soket başlı cıvataları takın.
(Kapak braketi, dişli muhafazasına monte edilir.)
ana borunun alt ucuna yerleştirin
emniyet kapağına takın.
(3) Kapak tutucuyu emniyet kapağını n iç tarafına yerleştirin
ve M6 × 25 altıgen soket başlı cıvataları uygun sıkılığa
kadar sı rayla sıkmak için aletle birlikte gelen Alyen
anahtarını kullanın.
UYARI
Emniyet kapağının iç tarafındaki bıçakla kendinizi
yaralamamaya dikkat edin.
4. Omuz kayışının takılması
UYARI
○ Çim kesicinin doğru şekilde taşınabilmesi için omuz
kayışı takılmalıdır.
○ Eğer aletin normal şekilde çalışmadığını
derhal motoru durdurun, omuz kayışının hızlı ayırma
braketini kaldırın ve aleti çıkarın.
UYARI
○ Hızlı ayırma kayı şını çekerken aleti desteklemezseniz,
alet düşerek yaralanmaya veya hasara neden olabilir.
Ana boruyu bir elinizle çekerken diğer elinizle kavrayın.
○ Çalışmaya başlamadan önce hızlı ayırma
fonksiyonunun normal şekilde çalıştığından emin olun.
(1) Omuz kayışını Şekil 10’da görüldüğü gibi omzunuza
yerleştirin ve alet üzerindeki askı ya takın. Omuz
kayışını uygun uzunluğa ayarlayın.
(2) Aleti omuz kay
boruyu tutarak aleti destekleyin ve diğer elinizi hızlı
ayırma kayışını Şekil 10’da görüldüğü gibi braketten
kurtarmak için kullanın.
(3) Kayışı alete tutturmak için, braketi kancaya takın ve
hızlı ayırma braketini kancanın üzerine ve braketin
geniş açıklığına yerleştirin. (Şekil 11)
Omuz kayışını nazikçe çekerek doğru şekilde
takıldığından emin olun.
ışından çıkarmak için, bir elinizle ana
hissederseniz,
KESME KAFASI
1. Fonksiyon
“SURE-TAP” Kesme Kafası
○ Düşük devirde (maksimum 4500 dk
otomatik olarak daha fazla naylon kesme ipi besler.
UYARI
○ Kesici gövde başlığı, kesici gövdeye emniyetli şekilde
takılmalıdır.
○ Kesici gövdeyi, kesici gövde başlığını ve diğer
bileşenleri çatlaklara veya başka hasarlara karşı
kontrol edin.
○ Kesme kafası, ünitenin dişli muhafazasına emniyetli
şekilde monte edilmelidir.
○ Üstün performans ve güvenilirlik için daima HITACHI
naylon kesme ipi kullanın. Tehlikeli bir mermiye
dönüşebilecek tel veya başka malzemeleri kesinlikle
kullanmayın.
○ Eğer Kesme Kafası kesme ipini uygun şekilde
beslemezse, naylon ipin ve tüm bileşenlerin uygun
şekilde takılıp takılmadığını kontrol edin. Yardıma
ihtiyaç duyarsanız, HITACHI satıc
2. Montaj (Şekil 12)
(1) Kesici tutucusunu kilitlemek için Alyen anahtarını dişli
muhafazasının deliğine yerleştirin.
(2) Kesici tutucusunu, sarma koruyucusunu, kesici
tutucusu başlığını ve kesme kafasını çim kesicinin
dişli muhafazası üzerine monte edin. Montaj somunu,
sol yönlü dişe sahiptir. Gevşetmek için saat yönünde,
sıkmak için ters saat yönünde çevirin.
3. İp uzunluğunun ayarlanması
(1) Motor hızını mümkün olduğu kadar düşük ayarlayın ve
kesme kafasını yere indirerek hafi fçe vurun. Naylon
ip, bir uyarım hareketiyle yaklaşık 30 mm dışarı çekilir.
(Ş
ekil 13)
Naylon ipi ellerinizle de uzatabilirsiniz; fakat motor
tamamen durmuş olmalıdır. (Şekil 14)
-1
) uyarıldı ğında
ınızla irtibata geçin.
89
Page 90

Türkçe
(2) Her çalışmadan önce, naylon ipi 110 mm – 140 mm
arasında uygun uzunluğa ayarlayın.
(3) Naylon ip çok fazla çekilirse, bilyeli yatağı elinizle itmek
ve çevirmek suretiyle dışarıda kalan uzunluğu geri
sarın. (Şekil 15)
4. Naylon ipin değiştirilmesi
(1) Kilitleme dillerini başparmaklarınızla içeri doğru sıkıca
itmek suretiyle kesici gövde başlığı nı çıkarın (Şekil 16).
(2) Kesici gövde başlığını çıkardıktan sonra makarayı
çıkarın ve soldaki ipi atın.
(3) Yeni naylon ipi kabaca ikiye katlayın. (Şekil
(4) Naylon ipin bükülmüş “U” ucunu makaranın orta kısmı
üzerindeki oluğa oturtun.
Makara üzerinde ipin her bir yarısını bölüntünün
kendine ait tarafında tutmak suretiyle iki parçasını da
aynı yönde sarın. (Şekil 18)
(5) Her bir ipi, yaklaşık 100 mm uzunluğunda serbest uçlar
bırakarak durdurucu çentiklere bastırın. (Şekil 19)
(6) Makarayı kesici gövde başlığına yerleştirirken ipin her
iki serbest ucunu iplik kılavuz gözünden geçirin. (Şekil
20)
NOT
Makarayı kesici gövde başlığına yerleştirirken, daha
sonra ipi daha kolay serbest bırakmak için durdurucu
çentiklerle (3) iplik kılavuz gözünü (4) hizalamaya
çalışın.
(7) Makara yayını
(8) Kesici gövdeyi, kesici gövde üzerindeki kilitleme dilleri
kesici gövde üzerindeki uzun deliklere karşılık gelecek
şekilde kesici gövde başlığının üzerine yerleştirin.
Daha sonra, kesici gövde başlığını yerine oturuncaya
kadar emniyetli şekilde bastırın. (Şekil 21)
(9) İpin serbest uçlarını çekerek durdurucu çentiklerden
ayırın. Eğer ipler çok uzun (100 mm üzerinde)
çıkarsa, bilyeli yatağı bastırmak ve çevirmek suretiyle
uzunlukları yaklaşık 100 mm’ye düşünceye kadar geri
sarın. (Şekil 15)
(10)
İlk kesme ip uzunluğu yaklaşık 150 mm olmalı ve her iki
tarafta eşit olmalıdır. (Şekil 22)
makaranın içine yerleştirin. (Şekil 21)
17)
ÇALIŞTIRMA
Çim kesme
UYARI
○ Aleti gece veya görüş zayıfken kötü hava koşullarında
çalıştırmayın.
○ Aleti yağmur yağarken veya yağmur yağdıktan hemen
sonra çalıştırmayın.
○ Dengenizi kaybederek düşmenize neden olabilecek
kaymaya meydan vermemek için uygun ayakkabılar
giyin.
○ Aleti dik arazilerde kullanmayın.
Çok dik olmayan arazilerde çim keserken, sırta doğru
hareket ederek kesin.
○ Aleti omuz kayışına yerleştirin; sağ elinizi tutamak
üzerine, sol elinizi halka kol üzerine yerleştirin ve sıkıca
tutun.
○ Kesme kafasını ayakları nıza çok yaklaştırmamaya
dikkat edin.
○ Kesme işlemi sırasında kesme kafası
üzerine kaldırmayın.
○ Aleti, kesme kafasının taş, ağaç, vb. engellere temas
edebileceği yerlerde kullanmayı n.
○ Kesme parçası, motor durduktan sonra dönme
hareketine devam edeceğinden yaralanmaya
neden olabilir. Makineyi durdurduğunuzda, kesme
donanımının makine yere bırakılmadan önce durmuş
olması gereklidir.
90
nı dizinizin
○ Aleti başka bir kişiye 15 metreden daha yakın
mesafede kullanmayın. Başka biriyle birlikte çalışırken,
aranızda en az 15 m mesafe bırakın.
1. Aküyü, kutuplarına dikkat ederek yerleştirin
2. Aletin gücünü açın (Şekil 23)
○ Muhafaza üzerindeki Start (Çalıştır) düğmesine basın;
güç açılır ve tutamak üzerindeki güç lambası kırmızı
renkte yanar.
○ Çalıştır düğmesine ikinci defa basıldığında güç kapanır
ve tutamak üzerindeki kırmız
[Otomatik güç kapama]
Güç açıldığında, fakat kol bir dakika içinde
kullanılmadığında, aletin gücü otomatik olarak kapanır.
Aletin gücünü tekrar açmak için, çalıştır düğmesine bir
kez daha basın.
UYARI
Kesinlikle aleti gücü açık olarak terk etmeyin. Bu durum
bir kazaya neden olabilir.
3. Çim kesme
○ Kolu yukardan kavrayın; kilit kolunu bastırın ve kesme
kafasının dönmeye başlaması için kolu çekin. (Şekil
24)
○ Kesme işlemini bitirdiğinizde kolu serbest bırakın ve
motoru durdurun.
○ Başparmağını zı halka kol üzerine yerleştirin ve diğer
parmaklarınızla kolu kavrayın. (Şekil
○ Hareketi kolaylaştıracak şekilde duruşunuzu ayarlayın.
[Çim kesme teknikleri]
○ Motor yavaşça dönerken zayıftır ve çimler bıçağa
yakalanma eğilimi gösterir. Motor çok hızlı dönerken,
titreşim ve ses yükselir ve akü sarfi yatı artar.
○ Çok yüksek hızda akü daha çabuk boşalacaktır.
○ Boruyu sallamayın; ileri doğru hareket ederek ve
kalçalarınızı kullanarak kesme kafasını yatay olarak
sağdan sola bir yay şeklinde hareket ettirin ve çim
kesmek için kesme kafası nın sol tarafı nı kullanın. (Şekil
26)
ı lamba söner.
25)
ÇALIŞTIRMA UYARILARI
Sürekli iş
Bu alet, şarj edilebilir aküyü kontrol eden elektronik
parçaları koruyun bir aşırı ı sı koruma devresiyle
birlikte gelir. Sürekli kesme çalışmasında, alet sıcaklığı
yükselecek ve aşırı ısı koruma devresini tetikleyerek
aletin kapanmasına neden olacaktır.
Bu durum gerçekleşirse, aleti bir süre soğumaya
bırakın. Sıcaklık düştüğünde aleti tekrar
kullanabilirsiniz. Sürekli çalışma sırasında şarj edilebilir
akünün değiştirilmesi gerekirse, 15 dakika kadar aletin
dinlenmesini bekleyin.
Hız düğmesi
Bir elektronik devreye bağlanmış olan bu düğme
adımsız h
Eğer düğme tetiği çok düşük düzeye (düşük devir
aralığına) ayarlanırsa ve motor sürekli olarak aşırı
çalıştırılırsa, elektronik devreler ısınacaktır ve bu durum
arızaya neden olabilir.
Düşük motor hızlarınsa sadece hafi f işler yapın.
ız değişikliklerini mümkün kılar.
BAKIM VE MUAYENE
UYARI
○ Herhangi bir muayene veya bakım işlemi yapmadan
önce aküyü çıkarın.
1. Kesme kafasının durumunu kontrol edin
Kesme kafası düzenli olarak kontrol edilmelidir.
Aşınmış veya kırılmış kesme kafası, kayma veya
motorun verimini azaltma ve yakma riski taşıyorsa.
Aşınmı ş kesme kafasını yenisiyle değiştirin.
Page 91

Türkçe
UYARI
○ Ucu aşınmış veya kırılmış bir kesme kafası nın
kullanılması tehlikeli olacaktır. Bu nedenle, yenisiyle
değiştirilmelidir.
2. Vidaları kontrol edin
Gevşek vidalar tehlikelidir. Vidaları düzenli olarak
kontrol edin ve sıkı olduklarından emin olun.
UYARI
○ Bu elektrikli aletin gevşek vidalarla kullanılması son
derece tehlikelidir.
3. Motorun bakımı
Motorun sargısı aletin “kalbidir”.
Sargının hasar görmesi veya yağ ya da suyla
ıslanmaması için gerekli özeni gösterin.
4. Dişli muhafazanın yağlanması
○ Bakı
m aralığı
Dişli muhafazası, 50 saatlik kullanımdan sonra
yağlama için kontrol edilmelidir.
○ Yağlama
Kesme kafasını çıkarın. Dişli muhafazası arasındaki
bölgeyi kir ve döküntülerden temizleyin. Dişli
muhafazanın kenarındaki M6 cıvatayı dökün. Bağlama
milini döndürmek suretiyle, dişli muhafazası doluncaya
kadar delikten lidyum-bazlı yatak yağı (P/N 682975)
enjekte edin. M6 cıvatasını tekrar takın.
5. Kömü rlerin incelenmesi (Şekil 27)
Motorda sarf malzemesi olan kömürler kullanılır.
Aşırı yı pranmış kömürler motorda soruna yol
açabileceğinden kömürler yıprandığ
sınırına” yakın olduğunda kömürleri değiştirin. Ayrıca,
kömürleri daima temiz tutun ve kömür tutucuların içinde
serbestçe kayabildiklerinden emin olun.
NOT
Kömürü yenisiyle değiştirirken Hitachi Kömür Kod No.
999054'ü kullandığınızdan emin olun.
6. Kömü rlerin değiştirilmesi
Kömürü önce kömür kapağı nı çıkararak ve ardından
kömürün çıkıntı sını düz başlı bir tornavida vs. ile Şekil
28’de gösterildiği gibi iterek çı karın.
Karbon fırçayı takarken, karbon fırçanın iğnesi (bkz:
Şekil 29) fırça borusunun d
uygun olacak şekilde yönü seçin. Ardından, Şekil
30’da görüldüğü gibi parmağınızla içeri itin. Son olarak,
fırça kapağını takın.
UYARI
○ Kömürün çivisini kömür tüpünün dışındaki temas
kısmına taktığınızdan emin olun. (Sağlanan iki çividen
birini kullanabilirsiniz.)
○ Bu işlemde hata yapılması kömür çivisinin deforme
olmasına neden olarak motorda çok erken sorun
çıkmasına neden olacağından dikkatli olunmalıdır.
7. Aletin dışının temizlenmesi
Darbeli vidalama kirlendiğinde, yumuşak kuru bir bezle
veya sabunlu suda hafi f ıslat
kısımları eritebileceği için, klorlu çözgen, benzin veya
boya incelticisi (tiner) kullanmayın.
8. Muhafaza
Darbeli vidalamayı 40°C’den düşük sıcaklıkta ve
çocukların ulaşamayacağı bir yerde muhafaza edin.
9. Servis parçaları listesi
DİKKAT
Hitachi Güç Takımlarının onarımı, modifi kasyonu
ve gözden geçirilmesi Hitachi yetkili Servis Merkezi
tarafından yapılmalıdır.
Hitachi yetkili Servis Merkezine tamir ya da bakı m
amacıyla başvurulduğunda Parça Listesinin takım ile
birlikte verilmesi faydalı olacaktır.
Güç takımlarını n çalıştırılması ve bakımlar
yapılması esnasında her ülke için belirtilen güvenlik
düzenlemelerine ve standartlarına uyulması
gerekmektedir.
ında veya “aşınma
ışındaki temas kısmına
ılan bir bezle silin. Plastik
ının
DEĞŞİKLİKLER
Hitachi Ağır İş Aletleri en son teknolojik
ilerlemelere uygun olarak sürekli değiştirilmekte ve
geliştirilmektedir.
Dolaysyla ısıyla, bazı kısımlarda önceden bildirimde
bulunulmadan değişiklik yapılabilir.
Hitachi akülü el aletleri için batarya kullanım ı
hakkında önemli not
Daima belirlenmiş orijinal bataryalardan birini kullanın.
Tar af ımızca belirlenenler dışındaki bataryalarla
kullanılmaları durumunda, veya bataryanı n sökülmesi
ve modifi ye edilmesi (örneğin, hücrelerin veya diğer iç
parçaların sökülmesi veya değiştirilmesi) halinde akülü
el aletlerimizin emniyetini ve performansını garanti
edemiyoruz.
91
Page 92

Türkçe
SORUN GİDERME
Alet normal şekilde çalışmazsa, aşağıdaki tabloda belirtilen kontrolleri uygulayın. Bu kontroller sorunu çözmezse,
satıcınıza veya Hitachi Yetkili Servis Merkezine danışın.
Belirti Olası Nedeni Çözüm
Şarj
cihazı
Alet Çalışmıyor. Akü boşalmı ş.Aküyü şarj edin.
Şarj lambası
yanmıyor.
4 saatlik şarjdan
sonra şarj lambası
sönmüyor.
Çalışıyor, fakat
kısa süre içerisinde
duruyor.
Güçlü titreşimler Halka kol, ana boruya uygun
Dişli muhafazasından
gelen tuhaf sesler
Elektrik fi şi AC prize takılı değil. Elektrik fi şini bir AC prize takın.
Akü şarj cihazına doğru şekilde
bağlanmamış.
Akü veya şarj cihazı elektrotları
kirlenmiş.
Akü aşı rı sıcak. Şarj etmeden önce akünün uygun şekilde
Akü veya şarj cihaz
Akü doğru şekilde takılmamış. Aküyü aletin akü bölmesinden çı karın ve
Cihazın gücü açılmamış.Aleti çalıştırmak için, muhafaza üzerindeki
Kol geri çekildiğinde kilit koluna
bastırılmamış.
Alet, emniyet kapağı ve naylon
başlık arasında yakalanan büyük
miktarda çimi çekerek a
yüklenmiş.
Akü gücü zayıf. Aküyü şarj edin.
Akü aşı rı ısınmış. Aküyü kullanmayı kesin, aletten çıkarın
şekilde bağlanmamış.
Güvenlik kapağı, ana boruya
uygun şekilde takılmamış.
Dişli muhafazasında gres
kalmamış.
ı arızalı.Elektrik fi şini sökün ve satıcınıza veya Hitachi
şırı
Aküyü şarj cihazına uygun şekilde oturtarak
yerleştirin.
Pamuklu bez veya uygun bir alet kullanarak
elektrotları temizleyin.
soğumasını bekleyin.
Yetkili Servis Merkezine danışı n.
herhangi bir yabancı madde olup olmadığını
kontrol edin; varsa temizleyin. Ayrıca, akü
elektrotlarında kirlenme, su veya başka
yabancı madde olup olmadığını kontrol edin.
Temizlik için pamuklu bir bez kullanın. Aküyü
yerine kilitleninceye kadar bastırdığı nızdan
emin olun.
“Start” dü
ğmesine basın. Bu alet, otomatik güç
kapatma fonksiyonuna sahiptir. Güç açıldıktan
sonra bir dakika içerisinde kol çekilmezse güç
otomatik olarak kapatılır. Aletin gücünü tekrar
açmak için, çalıştır düğmesine bir kez daha
basın.
Start (Çalıştır) düğmesine ikinci defa
basıldığında güç kapanır.
Yan lış çalıştırmadan kaynaklanan kazaları
engellemek için, motoru çalıştırmak amacıyla
kol geri çekilirken kilit kolu bastırılmalıdır.
Kolu yukarıdan tutun ve kolu çekerken kilit
kolunu bastırı n.
Bu, alet aşırı yüke maruz kaldığında motoru
kapatmak suretiyle şarj edilebilir aküyü
koruyan fonksiyonun etkisidir. Aletin gücünü
kapatın ve aşırı yüklenme nedenini giderin.
Çalışmaya devam etmek için “Start” (Çalıştır)
düğmesine tekrar basın.
ve doğrudan güneş ışığı görmeyen, iyi
havalandırmalı bir yerde soğumaya bırakın.
Uygun şekilde sabitleyin.
Uygun şekilde sabitleyin.
Gres kullanarak yağlayın.
92
Page 93

GARANTİ
Hitachi Elektrikli El Aletlerine ülkelere özgü hukuki
düzenlemeler çerçevesinde garanti vermekteyiz. Bu
garanti, yanlış veya kötü kullanım, normal aşınma
ve yıpranmadan kaynaklanan arıza ve hasarları
kapsamamaktadır. Şikayet durumunda, Elektrikli El Aleti,
sökülmemiş bir şekilde, bu kullanım kılavuzunun sonunda
bulunan GARANTİ BELGESİYLE birlikte bir Hitachi yetkili
servis merkezine gönderilmelidir.
NOT
HITACHI’nin süregelen araştırma ve geliştirme programı na
bağlı olarak burada belirtilen teknik özelliklerde önceden
bildirimde bulunulmadan değişiklik yapılabilir.
Havadan yayılan gürültü ve titreşimle ilgili bilgiler
Ölçülen değerlerin IEC60335 ve ISO 4871’e uygun olduğu
tespit edilmiştir.
Ölçülmüş A-ağırlıklı ses gücü seviyesi: 95 dB (A)
Ölçülmüş A-ağırlıklı ses basınç seviyesi: 86 dB (A)
Belirsiz KpA: 3 dB (A)
Kulak koruyucusu kullanın.
IEC60335'e göre belirlenen toplam vibrasyon değerleri (üç
eksenli vektör toplamı).
Vibrasyon emisyon değeri
ah, w = 7,5 m/s
2
Türkçe
DİKKAT
◯ Elektrikli aletin kullanımı sırasında vibrasyon emisyonu
aletin kullanma şekline bağlı olarak belirtilen değerden
farklılık gösterebilir.
◯ Gerçek kullanım koşullarında tahmini maruz kalma
hesabını esas alarak (kullanım süresine ilave olarak
aletin kapatıldığı ve rölantide çalıştığı zamanlarda
çalışma çevriminde yer alan tüm parçaları dikkate
almak suretiyle) operatörü korumak için gerekli
güvenlik önlemlerini belirlemek için.
93
Page 94

Română
AVERTISMENTE GENERALE PRIVIND
SIGURANŢA ÎN FOLOSIREA SCULEI
ELECTRICE
AVERTISMENT
Citiţi toate avertismentele privind siguranţa și toate
instrucţiunile.
Nerespectarea avertismentelor și a instrucţiunilor poate
avea ca efect producerea de șocuri electrice, incendii și/
sau vătămări grave.
Păstraţi toate avertismentele și toate instrucţiunile,
pentru a le putea consulta pe viitor.
Ter menu l “scul ă electrică” prezent în toate avertismentele
de mai jos se referă la scula dumneavoastră electrică
alimentată la priză (cu cablu de alimentare) sau la scula
electrică alimentată de la acumulatori (fără cablu de
alimentare).
1)
Siguran˛a Ón zona de lucru
a) Păstraţi zona de lucru curată și bine luminată.
Zonele de lucru dezordonate și întunecate
predispun la accidente.
b) Nu utilizaţi sculele electrice în atmosferă
explozivă, cum ar fi în prezenţa lichidelor,
gazelor sau a prafurilor infl amabile.
Sculele electrice produc scântei care pot aprinde
praful sau aburii.
c) Ţineţi copiii sau privitorii
utilizaţi scula electrică.
Distragerea atenţiei vă poate face să pierdeţi
controlul asupra sculei.
2) Siguranţa din punct de vedere electric
a) Ștecărele sculelor electrice trebuie s ă se
potrivească în prizele în care sunt introduse.
Nu modifi caţi niciodată ștecărul în nici un
Nu folosiţi niciun fel de adaptoare pentru
ștecăr la sculele electrice cu împământare
(legate la pământ).
Ștecărele nemodifi cate și prizele potrivite reduc
riscul de șoc electric.
b) Evitaţi contactul corpului cu suprafeţele legate
la pământ, cum ar fi conductele, radiatoarele,
cuptoarele și frigiderele.
În cazul în care corpul dvs. este legat la pământ
există un risc crescut de electrocutare.
c)
Nu expuneţi sculele electrice la ploaie și nu le
lăsaţi în atmosferă umedă.
Intrarea apei într-o sculă electrică mărește riscul de
electrocutare.
d) Nu forţaţi cablul de alimentare. Nu folosiţi
niciodată cablul de alimentare pentru a
transporta, a trage sau a scoate scula electrică
din priz
Ţineţi cablul de alimentare departe de căldură,
Cablurile de alimentare deteriorate sau încolăcite
e) Atunci când folosiţi o sculă electrică în aer
Folosirea unui prelungitor adecvat pentru exterior
f) Dacă
Folosirea dispozitivelor RCD reduce riscul
94
ă.
ulei, muchii ascuţite și de piese în mișcare.
măresc riscul de șoc electric.
liber, folosiţi un prelungitor adecvat pentru
utilizarea în exterior.
reduce riscul de șoc electric.
utilizarea într- o zonă umedă nu poate
fi evitată, folosiţi o sursă de alimentare cu
întrerupător de protecţie la curent rezidual
(RCD).
producerii șocurilor electrice.
la distanţă în timp ce
fel.
3) Siguranţa personală
a) Atunci când folosiţi o sculă electrică fi ţi
vigilent, fi ţi atent la ceea
conform bunului simţ.
Nu folosiţi scule electrice atunci când sunteţi
obosit sau vă afl aţi sub infl uenţa drogurilor, a
alcoolului sau a medicamentelor.
Un moment de neatenţie în timpul utilizări unei
scule electrice poate provoca vătămări personale
grave.
b) Folosiţi echipament personal de
Purtaţi întotdeauna protecţie a ochilor.
Echipamentele de protecţie cum ar fi măștile
pentru praf, încălţămintea anti-alunecare,
căștile și protecţiile auditive, folosite în situaţiile
corespunzătoare, reduc vătămările personale.
c) Evit aţi pornirea accidentală. Înainte de
a conecta scula la priză și/sau la bateria
de acumulatori și înainte de a ridica sau
transporta scula,
comutatorul de pornire pe poziţia oprit.
Transportarea sculelor electrice cu degetul pe
comutator sau introducerea în priză a sculelor
electrice care au comutatorul pe poziţia pornit sunt
situaţii ce predispun la accidente.
d) Înainte de a pune scula electrică în funcţiune,
îndepărtaţi toate cheile de reglare și orice alte
chei.
O cheie sau o cheie de reglare rămase atașate
de piesa rotativă a sculei electrice poate provoca
vătămări personale.
e) Nu încerca
Menţineţi permanent un contact corect al
piciorului și un bun echilibru.
Acest lucru permite un mai bun control al sculei
electrice în situaţii neașteptate.
f) Îmbrăcaţi-vă adecvat. Nu purtaţi haine largi
și nici bijuterii. Ţineţi-vă părul, hainele și
mănușile departe
Hainele largi, bijuteriile și pot fi prinse în piesele în
mișcare.
g) Dacă sunt prevăzute dispozitive de conectare
la facilităţi de extragere și colectare a prafului,
asiguraţi-vă că acestea sunt conectate și sunt
folosite corespunzător.
Folosirea acestor dispozitive poate reduce
pericolele legate de praf.
4) Utilizarea și îngrijirea sculei electrice
a) Nu forţaţ
adecvată pentru aplicaţia dvs.
Scula potrivită va face treabă mai bună și mai
sigură la parametrii la care a fost proiectată.
b) Nu folosiţi scula electrică în cazul în care
comutatorul nu își îndeplinește funcţia de
pornire și oprire.
Sculele electrice care nu pot fi comandate prin
intermediul comutatorului sunt periculoase și
trebuie reparate.
c) Înainte de a face
schimba accesoriile și de a depozita sculele
electrice, scoateţi ștecărul din priză și/sau de
la bateria de acumulatori.
Aceste măsuri preventive de siguranţă reduc riscul
pornirii accidentale a sculei electrice.
d) Depozitaţi sculele electrice neutilizate departe
de zona de acţiune a copiilor și nu lăsaţi
persoanele
electrică sau cu prezentele instrucţiuni să
folosească scula electrică.
ţi s ă ajungeţi prea departe.
i scula electrică. Folosiţi scula
care nu sunt familiarizate cu scula
ce faceţi și acţionaţi
protecţie.
asiguraţi-vă că aveţi
de piesele în mișcare.
orice fel de reglaje, de a
Page 95

Română
Sculele electrice sunt periculoase în mâinile
utilizatorilor neinstruiţi.
e) Întreţineţi sculele electrice. Ve rifi caţi alinierea
și prinderea pieselor în mișcare, ruperea
pieselor precum și toate celelalte aspecte care
ar putea să infl uenţeze funcţionarea sculelor
electrice.
Dacă scula electrică este deteriorată, înainte
de a o utiliza
Multe accidente sunt provocate de scule electrice
necorespunzător întreţinute.
f) Păstraţi elementele de tăiere curate și
ascuţite.
Elementele de tăiere bine întreţinute și cu muchiile
tăietoare bine ascuţite sunt mai ușor de controlat și
este mai puţin probabil să se agaţe.
g) Folosiţi scula electrică, accesoriile și vârfurile
etc. în conformitate cu prezentele instrucţiuni,
luând în considerare
operaţiunile ce urmează a fi efectuate.
Folosirea sculei electrice pentru alte operaţiuni
decât cele prevăzute poate avea ca efect apariţia
unor situaţii periculoase.
5) Utilizarea și întreţinerea sculelor cu acumulatori
a) Încărcaţi numai cu încărcătorul indicat de
producător.
Un încărcător adecvat unui anumit tip de pachet
de acumulatori poate prezenta pericol de incendiu
dacă este folosit pentru încărcarea altui tip de
pachet de acumulatori.
b) Folosiţi sculele electrice exclusiv cu
pachete de acumulatori indicate.
Folosirea unui alt tip de pachet de acumulatori
poate provoca vătămări sau incendii.
c) Atunci când pachetul de acumulatori nu este
folosit, ţineţi-l departe de obiecte metalice
cum ar fi agrafe de birou, monede, chei, cuie,
șuruburi sau alte obiecte metalice mici care
ar putea realiza conectarea terminalelor
pachetului de acumulatori.
Scurtcircuitarea terminalelor acumulatorilor poate
provoca arsuri sau incendii.
d) În cazul exploatării abuzive, din acumulatori
poate ieși lichid; evit aţi contactul cu acest
lichid. În cazul unui contact accidental, spălaţi
cu apă. În cazul contactului cu ochii, consultaţi
un medic.
Lichidul care iese din acumulatori poate provoca
iritaţii sau arsuri.
6) Service
a) Scula electrică trebuie reparată de o persoană
califi cată, folosind numai piese de schimb
identice.
Astfel se asigură menţinerea siguranţei sculei
electrice.
PRECAUŢIE
Ţineţi copiii și persoanele infi rme la distanţă.
Atunci când nu este folosită, scula electrică trebuie
depozitată departe de zona de acţiune a copiilor și a
persoanelor infi rme.
duceţi- o la reparat.
condiţiile de lucru și
tipurile de
AVE RTI ZĂRI DE SIGURANŢĂ PRIVIND
MOTOCOSITOAREA
IMPORTANT
CITIŢI CU ATE NŢIE ÎNAINTE DE UTILIZARE
PĂSTRAŢI INSTRUCŢIUNILE PENTRU CONSULTĂRI
ULTERIOARE
Practici de exploatare în siguranţă
● Instruire
a) Citiţi cu atenţie instrucţiunile. Familiarizaţi-vă cu
comenzile şi cu utilizarea adecvată a maşinii.
b) Nu permiteţi persoanelor care nu cunosc aceste
instrucţiuni sau copiilor să utilizeze maşina.
Reglementările locale pot limita vârsta operatorului.
c) Reţineţi că operatorul sau utilizatorul este răspunzător
de accidentele sau pericolele la care sunt expuse alte
persoane sau bunurilor acestora.
● Pregătire
a) Nu utilizaţi niciodată maşina când în apropiere se afl ă
alte persoane, mai ales copii, sau animale.
b) Purtaţi ochelari de protecţie şi încălţăminte solidă pe
toată perioada exploatării maşinii.
● Exploatare
a) Utilizaţi maşina numai la lumina zilei sau cu o lumin
artifi cială bună.
b) Nu utilizaţi niciodată maşina cu dispozitivele de
protecţie sau apărătoarele deteriorate sau fără ca
acestea să fi e la locul lor.
c) Porniţi motorul numai dacă mâinile şi picioarele dvs.
nu se afl ă în apropierea elementelor de tăiere.
d) Deconectaţi întotdeauna maşina de la sursa de
curent (decuplaţi ştecherul de la reţea sau scoateţi
dispozitivul de deconectare)
– atunci când părăsiţi maşina;
– înainte de remedierea unui blocaj;
– înainte de a verifi ca, a curăţa sau lucra la maşină;
– după lovirea unui corp străin;
– dacă maşina începe să vibreze anormal.
e) Fiţi atenţi să nu vă răni
elementele de tăiere.
f) Asiguraţi-vă întotdeauna că orifi ciile de ventilaţie nu
prezintă resturi de iarbă.
● Întreţinere şi depozitare
a) Deconectaţi maşina de la sursa de curent (decuplaţi
ştecherul de la reţea sau scoateţi dispozitivul de
deconectare) înainte de a executa operaţiunile de
întreţinere sau de curăţare.
b) Utilizaţi numai piesele de schimb şi accesoriile
recomandate de producător.
c) Periodic, verifi caţi şi efectuaţi operaţiunile de
întreţinere. Reparaţi maşina numai la un atelier
autorizat.
d) Când nu este utilizată, depozitaţi maşina astfel încât
să nu se afl e la îndemâna copiilor.
ţi picioarele şi mâinile în
ă
PRECAUŢII PENTRU MOTOCOSITOAREA CU
ACUMULATORI
AVERTISMENT
1. Efectuaţi cu răbdare toate lucrările cu acest aparat. Şi
îmbrăcaţi-vă adecvat pentru a nu vă fi frig.
2. Planifi caţi dinainte toate operaţiunile pentru a preveni
accidentele.
3. Nu utilizaţi aparatul în timpul nopţii sau în condiţii
meteorologice nefavorabile, când vizibilitatea este
redusă. Nu utilizaţi aparatul când plouă sau imediat
după ploaie.
Utilizarea pe teren alunecos poate conduce la
accidente, dacă vă pierdeţi echilibrul.
4. Verifi caţi capul de tăiere înainte de a începe lucrul.
Nu utilizaţi aparatul în cazul în care capul de tăiere
este crăpat, deteriorat sau îndoit.
Asiguraţi-vă că modul de ataşare a capului de
tăiere este corect. Un cap de tăiere care cade sau
se desprinde în timpul exploatării poate provoca
accidente.
95
Page 96

Română
5. Ataşaţi capacul de protecţie şi hamul înainte de a
începe lucrul.
Utilizarea aparatului fără aceste componente poate
provoca rănirea persoanei.
6. Ataşaţi mânerul circular înainte de a începe lucrul.
Înainte de a începe lucrul, verifi caţi dacă acesta nu
este slăbit şi dacă este corespunzător ataşat. Pe
durata exploatării, ţineţi ferm mânerul circular, nu rotiţi
aparatul, menţineţi-vă în poziţia corectă şi păstraţi-vă
echilibrul.
Pierderea echilibrului în timpul lucrului poate provoca
rănirea persoanei.
7. F iţi atent când porniţi motorul.
Aşezaţi aparatul pe un teren plat.
Nu folosiţi maşina la o distanţă mai mică de 15 m de
alte persoane sau animale.
Nu permiteţi contactul capului de tăiere cu solul, cu
arbori sau plante.
O pornire neglijent
8. Nu asiguraţi maneta de blocare.
Tra gerea acc i denta l ă a manetei poate provoca rănirea
accidentală a persoanei.
9. Înainte de a lăsa aparatul, apăsaţi butonul de pornire
pentru a-l opri.
10. Fiţi atent când utilizaţi aparatul în aproprierea cablurilor
electrice, a conductelor de gaz şi a altor instalaţii
similare.
11. Fiţi atenţi la cutiile de tablă goale, sârme sau pietre
sau alte obstacole şi îndepărtaţi-le înainte de a începe
lucrul. Nu lucraţi pe lângă rădăcini de copaci sau
pietre.
Lucrul în astfel de zone poate conduce la deteriorarea
capului de tăiere sau la rănirea persoanei.
12. Nu creşteţi în mod excesiv viteza de rotaţie.
Creşteţi viteza treptat, nu brusc.
Reglaţi poziţia manetei pentru a corespunde sarcinii
de lucru.
Obiectele aruncate din aparat pot provoca rănirea
accidentală a persoanei.
13. Nu atingeţi niciodată capul de tăiere în timpul
exploatării aparatului.
De asemenea, asiguraţi-v
contact cu părul, hainele dvs. etc.
14. În următoarele situaţii, opriţi motorul şi verifi caţi dacă
capul de tăiere s-a oprit din rotaţie.
Când treceţi la altă zonă de lucru.
Când scoateţi resturile sau iarba blocate în aparat.
Când îndepărtaţi din aria de lucru obstacole, deşeuri
sau iarbă şi resturi generate de cosire.
Când depuneţi jos aparatul.
Dacă faceţi toate aceste operaţiuni cu capul de tăiere
în rotaţie, puteţi provoca accidente.
15. Nu utilizaţi aparatul la mai puţin de 15 m de alte
persoane.
Când lucraţi împreună cu o altă persoană, păstraţi o
distanţă de cel puţin 15 m.
Aşchiile desprinse pot provoca accidente.
Când lucraţi pe suprafeţe instabile precum pante,
asigura
ţi-vă că persoana care lucrează cu dvs. nu este
expusă niciunui pericol.
Folosiţi un fl uier sau alte mijloace pentru a atrage
atenţia celor care lucrează cu dvs.
16. Când în capul de tăiere se blochează iarbă sau alte
obiecte, opriţi motorul şi, înainte de a le desprinde,
asiguraţi-vă că acesta nu se mai roteşte.
Desprinderea obiectelor de capul de tăiere când
acesta se mai roteşte poate provoca rănirea
persoanei.
Continuarea exploatării cu capul de tăiere blocat de
corpuri străine poate provoca deteriorarea aparatului.
96
ă poate provoca rănirea persoanei.
ă că acesta nu intră în
17. Dacă aparatul funcţionează în mod nesatisfăcător
şi produce zgomote sau vibraţii neobişnuite, opriţi
imediat motorul şi cereţi distribuitorului să îl verifi ce şi
să îl repare.
Utilizarea continuă în aceste condiţii poate provoca
rănire sau deteriorarea aparatului.
18. Dacă aparatul este lăsat să cadă sau este supus la
şocuri, verifi caţi-l atent dacă nu prezintă deteriorări,
crăpături sau deformări.
Utilizarea unui aparat deteriorat, crăpat sau deformat
poate provoca rănirea persoanei.
19. Pentru a transporta aparatul în vehicul, asiguraţi
aparatul pentru a vă asigura că nu se poate deplasa în
timpul transportului.
Ignorarea acestui avertisment poate conduce la
accidente.
PRECAUŢIE
1. Nu p orn iţi capul de tăiere pentru a tăia alte obiecte
decât iarbă. Nu utilizaţi aparatul în b
că pământul nu intră în contact cu capul de tăiere.
2. Aparatul conţinând piese de precizie, nu trebuie lăsat
să cadă, nu trebuie expus la un impact puternic sau la
apă.
Aparatul poate fi deteriorat sau poate să funcţioneze
defectuos.
3. După utilizare, dacă aparatul trebuie depozitat sau
transportat, demontaţi capul de tăiere.
4. Nu expuneţi aparatul la insecticide sau alte produse
chimice.
Astfel de produse chimice pot provoca crăparea sau
alte avarii.
5. Înlocuiţi etichetele de avertizare cu etichete noi când
acestea devin greu de recunoscut sau ilizibile şi încep
să se desprindă.
Cereţi distribuitorului să vă furnizeze etichetele de
avertizare.
ălţi şi asiguraţi-vă
PRECAUŢII PRIVIND BATERIA ŞI
ÎNCĂRCĂTORUL
1. Schimbaţi întotdeauna acumulatorul la o temperatură
de 0˚C – 40˚C. O temperatură mai scăzută de 0˚C
va duce la supraîncărcare, ceea ce este periculos.
Acumulatorii nu pot fi încărcaţi la o temperatură mai
mare de 40˚C.
Temperatura optimă pentru încărcare este de 20˚C –
25˚C.
2. După terminarea încărcării, lăsaţi încărcătorul nefolosit
timp de 15 minute înainte de a încărca următorul
acumulator.
Nu încărcaţi bateria mai mult de 2 ore.
3. Nu lăsaţi materiale străine să intre în orifi ciul pentru
conectarea acumulatorului.
4. Nu introduceţi obiecte în fantele de ventilaţie ale
încărcătorului. Introducerea de obiecte metalice sau
infl amabile în fantele de ventilaţie ale încărcătorului
duce la apari
deteriorare a încărcătorului.
5. Utilizarea unui acumulator consumat duce la
deteriorarea încărcătorului.
6. Imediat ce constataţi că durata de utilizare după
încărcare devine prea scurtă pentru utilizări practice,
duceţi acumulatorul la magazinul de la care l-aţi
cumpărat. Nu aruncaţi acumulatorii consumaţi.
7. N u demont a ţi niciodată acumulatorul și nici
încărcătorul.
8. Nu scurtcircuitaţi acumulatorul. Scurtcircuitarea
acumulatorului produce un curent electric foarte mare
și produce supraîncălzirea acumulatorului. Rezultatul
este arderea sau deteriorarea acumulatorului.
ţia pericolului de electrocutare sau de
Page 97

Română
9. Nu aruncaţi acumulatorul în foc. Dacă acumulatorul
arde acesta poate exploda.
PRECAUŢII REFERITOARE LA
ACUMULATORUL LITIU-ION
Pentru prelungirea duratei de viaţă, acumulatorul litiu-ion
este echipat cu o protecţie pentru oprirea furnizării de
energie.
În situaţiile 1 la 3 descrise mai jos, atunci când folosiţi
aparatul, chiar dacă acţionaţi declanșatorul motorul se
poate opri. Aceasta nu este o defecţiune, ci un rezultat al
funcţiei de protecţie.
1. Atunci când acumulatorul este descărcat motorul se
oprește.
În această situaţie încărcaţi imediat acumulatorul.
2. În situaţia suprasolicitării aparatului motorul se poate
opri. În această situaţie, eliberaţi comutatorul și
îndepărtaţi cauza suprasolicitării. După aceasta, puteţi
folosi din nou aparatul.
3. În situaţia supraîncălzirii acumulatorului în timpul
lucrului, alimentarea aparatului de la acumulator se
poate întrerupe.
În această situaţie, încetaţi să mai utilizaţi acumulatorul
și lăsaţi-l să se răcească. După
din nou.
Mai mult, vă rugăm să acordaţi atenţie următoarelor
avertismente și indicaţii privind precauţia.
AVERTISMENT
Pentru a împiedica apariţia la acumulator a scurgerilor,
generării de căldură, emisiilor de fum, exploziei și
aprinderii, vă rugăm să respectaţi următoarele măsuri de
precauţie.
1. Asigu raţi-vă că pe acumulator nu se strânge șpan/
pilitură și nici praf.
○ În timpul lucrului, asiguraţi-vă că pe acumulator nu
cade șpan/pilitură și nici praf.
○ Asiguraţi-vă că șpanul/pilitura și praful care cad
pe scula electrică în timpul lucrului nu se strâng pe
acumulator.
○ Nu depozitaţi un acumulator nefolosit într-un loc expus
la șpan/pilitură și la praf.
○ Înainte de a depozita un acumulator, îndepărtaţi de pe
acesta toate urmele de șpan/pilitură și de praf și nu
depozitaţi acumulatorul împreună cu piese metalice
(șuruburi, cuie etc.).
2. Nu găuriţi acumulatorul cu obiecte ascuţite cum ar
fi cuiele, nu îl loviţi cu ciocanul, nu călcaţi pe el, nu îl
aruncaţi și nu îl supuneţi unor șocuri fi zice puternice.
3. Nu utilizaţi un acumulator care pare deteriorat sau care
este deformat.
4. Nu folosiţi acumulatorul cu polaritatea inversată.
5. Nu îl conectaţi direct la sursele de energie electrică
sau la brichetele electrice ale mașinilor.
6. Nu folosiţi acumulatorul în alte scopuri decât cele
indicate.
7. În cazul în care acumulatorul nu se încarcă după
trecerea timpului de încărcare specifi cat, încetaţi
imediat să îl mai încărcaţi.
8. Nu expuneţi acumulatorul la temperaturi sau presiuni
ridicate, de exemplu nu îl introduceţ
cu microunde, într-un uscător sau într-un container
presurizat.
9. Ţineţi-l departe de fl acără imediat ce observaţi
scurgeri sau mirosuri neplăcute.
10. Nu î l folosiţi în locuri în care se generează o puternică
electricitate statică.
11. În cazul în care observaţi la acumulator scurgeri,
mirosuri neplăcute, generare de căldură, decolorări
sau deformări, scoateţi-l imediat din echipament sau
din încărcător și încetaţi să îl mai utilizaţi.
aceasta, îl puteţi utiliza
i într-un cuptor
PRECAUŢIE
1. În cazul în care lichidul ce se scurge din acumulator
intră în contact cu ochii, nu vă frecaţi la ochi și spălaţi-i
bine cu apă proaspătă curată cum ar fi apa de la
robinet și consultaţi imediat un medic.
În cazul în care nu faceţi tratament, lichidul poate
provoca probleme oculare.
2. În cazul în care lichidul se scurge pe piele sau pe
haine, imediat spă
cum ar fi apa de la robinet.
Există posibilitatea ca acest lucru să provoace iritarea
pielii.
3. În cazul în care la prima utilizare a acumulatorului
detectaţi mirosuri neplăcute, supraîncălzire, dacă
observaţi rugină, decolorare, deformare și/sau
alte nereguli, nu folosiţi acumulatorul și înapoiaţi-l
furnizorului sau vânzătorului.
laţi bine cu apă proaspătă curată,
97
Page 98

Română
SPECIFICAŢII
APARAT ELECTRIC
Model CG18DL CG18DAL
Model cu suport Model cu accesorii Model normal
Diametru capacitate de tăiere 425 mm
Sens de rotaţie Sens contrar acelor de ceasornic văzut dinspre cutia de viteze
Viteză la mers în gol 0–4500 min
Durata de exploatare la o încărcare *
(Când acumulatorul reîncărcabil furnizat este complet
încărcat)
Acumulator BSL1830: Li-ion 18 V (3,0 Ah 10 celule)
Greutate (fără cap de tăiere şi ham) 5,4 kg 5,2 kg
*1 Datele din tabelul anterior sunt furnizate cu titlu ilustrativ. Întrucât tipul de iarbă, ascuţimea cuţitelor, rotaţiile pe minut
ale capului de tăiere, temperatura ambientală, caracteristicile acumulatorului reîncărcabil, metodele de lucru etc. pot
fi foarte diferite, cele de mai sus trebuie utilizate ca ghid aproximativ.
*2 Condiţii: Diametrul exterior al cuţitului cu cablu de nailon 425 mm, comutat la viteza maximă.
Încărcător
Model UC18YRSL
Tensiunea de încărcare 14,4 V 18 V
Greutate 0,6 kg
1
ACCESORII STANDARD
5 min*
-1
2
1
5
CG18DL
CG18DAL
(LSC)
1 Cap de nailon (cu lovire)...............................................1
2 Protecţia bobinei ..........................................................1
3 Cheie hexagonală 4 mm ..............................................1
4 Cheie cu mufă (locaş hexagonal 17/19) ....................... 1
5 Ochelari de protecţie .................................................... 1
6 Ham ..............................................................................1
7 Acumulator (BSL1830) ................................................. 1
8 Încărcător (UC18YRSL) ...............................................1
Accesoriile standard sunt supuse modifi cărilor fără notifi care prealabilă.
8
2
6
3
4
7
98
Page 99

Română
ACCESORII OPŢIONALE (vân dute separat)
1. Ac umulator (BSL1830)
2. Carcasă acumulator
3. Lubrifi ant (100 g tube)
Gresaţi cutia de viteze după fi ecare 50 ore de lucru.
4. Protecţie eclisă (1 trusă cu 2 protecţii)
Protejează picioarele de aşchiile desprinse.
APLICAŢII
Cositul, curăţarea şi tăierea buruienilor.
SCOATEREA/MONTAREA ACUMULATORULUI
1. Scoaterea acumulatorului
Ţineţi ferm de carcasă şi împingeţi elementele de
fi xare a acumulatorului pentru a-l scoate (vezi Fig. 2).
PRECAUŢIE
Nu scurtcircuitaţi niciodată acumulatorul.
2. Montarea acumulatorului
Introduceţi acumulatorul cu respectarea polarităţii (vezi
Fig. 2).
ÎNCĂRCARE
Înainte de a utiliza scula electrică, încărcaţi acumulatorii
după cum urmează.
1. Conectaţi cablul de alimentare al încărcătorului la
un conecror adecvat.
Atunci când cablul de alimentare este conectat, lampa
de ghidare a încărcătorului va clipi în culoarea roșie.
(la intervale de 1 secundă)
2. Introduceţi acumulatorul în încărcător
Introduceţi acumulatorul ferm în încărcător până când
va fi vizibilă linia, conform ilustraţiei din Fig. 3, 4.
3. Încărcarea
Atunci când introduceţi în încărcător un acumulator,
înc
ărcarea va fi iniţializată iar lampa de ghidare se va
aprinde în mod consrant în culeare roșie.
Atunci când acumulatorul se încarcă complet, lampa
de ghidare va clipi în culoare roșie. (La intervale de 1
secundă) (Vezi Tabelul 1)
(1) Indicaţiile lămpii indicatoare
Indicaţiile lămpii indicatoare sunt prezentate în Tabelul
1, conform stării încărcătorului sau a acumulatorului.
Accesoriile opţionale sunt supuse modifi cărilor fără
notifi care prealabilă.
Tabelul 1
Indicaţiile lămpii indicatoare
Lampa de
ghidare se
va aprinde
sau va clipi
în culoarea
roșie.
Lampa de
ghidare se
va aprinde
în culoarea
verde.
Înainte de
încărcare
În timpul
încărcării
La
încărcare
completă
Încărcarea
nu se poate
efectua
Așteptare
supraîncălzire
Luminează
intermitent
Luminează Luminează în mod continuu
Luminează
intermitent
Luminează
intermitent
la intervale
scurte
Luminează Luminează în mod continuu Acumulator supraîncălzit.
Luminează timp de 0,5 secunde.
Nu luminează timp de 0,5 secunde.
(stă stinsă timp de 0,5 secunde)
Luminează timp de 0,5 secunde.
Nu luminează timp de 0,5 secunde.
(stă stinsă timp de 0,5 secunde)
Luminează timp de 0,1 secunde.
Nu luminează timp de 0,1 secunde.
(stă stinsă timp de 0,1 secunde)
Defecţiune la acumulator
sau la încărcător
Nu se poate efectua
încărcarea.
(Încărcarea va începe după
răcirea acumulatorului)
99
Page 100

Română
(2) Referitor la temperatura acumulatorului
Temperaturile pentru acumulatori sunt prezentate în
Tabelul 2, iar acumulatorii care au devenit fi erbinţi
trebuie lăsaţi să se răcească înainte de a fi încărcaţi.
Tabulka 2 Domeniile de încărcare a acumulatorilor
Acumulatori
BSL1830 0°C – 50°C
(3) Referitor la timpul de încărcare
În funcţie de tipul de încărcător și de tipul
acumulatorilor, timpul de încărcare va fi cel prezentat
în Tabelul 3.
Tabelul 3 Timpul de încărcare (la 20°C)
Acumulator
BSL1830 Approx. 45 min.
NOTĂ
Timpul de încărcare poate varia în funcţie de
temperatură și de tensiunea sursei de alimentare.
4. Scoateţi din priză cablul de alimentare al
încărcătorului.
5. Ţineţi ferm încărcătorul și scoateţi acumulatorul.
NOTĂ
După încărcare, mai întâi scoateţi acumulatorii din
încărcător și apoi depozitaţi acumulatorii în mod
corespunzător.
Cum mărim durata de viaţă a acumulatorilor
(1) Încărcaţi acumulatorii înainte de descărcarea lor
completă.
Când observaţi că forţa sculei electrice slăbește,
încetaţi să o mai utilizaţi și încărcaţi acumulatorul.
În cazul în care continuaţi să folosiţi scula electrică
și acumulatorul se descarcă, acumulatorul se poate
deteriora iar durata sa de funcţionare se poate scurta.
(2) Evitaţi încărcarea la temperaturi ridicate.
Acumulatorii sunt fi erbinţi imediat după utilizare. Dacă
acești acumulatori sunt încărcaţi imediat după utilizare,
substanţele chimice din interior se pot deteriora iar
durata de viaţă a acumulatorului va scădea. Lăsaţi
acumulatorul să se răcească un timp înainte de
încărcare.
PRECAUŢIE
○ Atunci când încărcătorul a fost folosit în mod continuu,
acesta se poate încălzi, ceea ce poate duce la
defecţiuni. După fi nalizarea unei încărcări, faceţi o
pauză de aproximativ 15 minute înainte de a încărca
următorul acumulator.
○ Dacă acumulatorul este pus la încărcat atunci când
acesta este cald datorită utilizării sau datorită expunerii
pe o durată lungă la acţiunea razelor soarelui, lampa
indicatoare pentru supraîncălzire a încărcătorului va
lumina cu culoarea verde.
Acumulatorul nu va mai fi încărcat. În această situaţie,
lăsaţi mai întâi acumulatorul să se răcească și abia
apoi începeţi încărcarea.
○ Atunci când lampa indicatoare pentru supraîncă
luminează intermitent la intervale scurte cu culoarea
roșu (la intervale de 0,2 secunde), verifi caţi prezenţa
oricăror obiecte străine în orifi ciul pentru montarea
acumulatorului și, dacă acestea există, îndepărtaţi-le.
În cazul în care nu există obiecte străine, este probabil
ca acumulatorul sau încărcătorul să se fi defectat.
Duceţi-le la o unitate service autorizată.
100
Încărcător
Rozmezí teplot
pro nabíjení
UC18YRSL
lzire
DESPRE INDICATORUL DE NIVEL RĂMAS AL
ACUMULATORULUI
Atunci când apăsaţi comutatorul pentru indicatorul de nivel
rămas al acumulatorului, se va aprinde indicatorul de nivel
rămas al acumulatorului și va fi verifi cat nivelul de energie
rămas. (Fig. 5)
Atunci când îndepărtaţi degetul de pe comutatorul
indicatorului de nivel rămas al acumulatorului, indicatorul
nivelului rămas al acumulatorului se va stinge. Tabelul
4 prezintă situaţia indicatorului nivelului rămas al
acumulatorului și sarcina rămasă în acumulator.
Tabelul 4
Starea
indicatorului
Deoarece indicatorul nivelului rămas al acumulatorului
vă informează în mod diferit în funcţie temperatura
ambientală și de caracteristicile acumulatorului,
consultaţi-l ca referinţă.
NOTĂ
○ Nu bruscaţi panoul de control și feriţi-l de spargere.
Aceasta ar putea avea consecinţe nedorite.
○ Pentru a reduce consumul acumulatorului, indicatorul
nivelului rămas se va aprinde atunci când este apăsat
comutatorul nivelului rămas al acumulatorului.
Nivel rămas acumulator
Nivelul rămas al acumulatorului este
sufi cient.
Nivelul rămas al acumulatorului este la
jumătate.
Acumulatorul este aproape epuizat.
Reîncărcaţi acumulatorul cât de
repede posibil.
ÎNAINTE DE PUNEREA ÎN FUNCŢIUNE
PRECAUŢIE
Scoateţi acumulatorul înainte de a efectua orice
asamblare.
1. Asamblarea accesoriilor [numa i CG18DL] (Fig. 6)
(1) Introduceţi acul de blocare în orifi ciul de blocare al tijei
principale a ataşamentului coasei şi asiguraţi-vă că tija
principală nu se poate detaşa.
(2) Strângeţi butonul mânerului pentru a-l fi xa ferm.
2. Montarea mânerului circular (Fig. 7)
(1) Sc oateţi şuruburile M6 × 43 (2).
(2) Montaţi mânerul circular pe tija principală astfel încât
să se sprijine de motor.
(3) Aşezaţi siguranţa mânerului la capătul inferior al tijei
principale fi xându-l bine cu şuruburile M6 × 43 (2) şi
piuliţele M6 (2).
NOTĂ
Fixaţi mânerul circular într-un loc care vă permite să-l
ţine
ţi ferm.
3. Montarea capacului de siguranţă (vezi Fig. 8 şi 9)
AVERTISMENT
Montaţi capacul de siguranţă în locul desemnat
acestuia.
Nerespectarea acestui avertisment poate conduce la
rănirea persoanei prin lovirea cu pietre.
NOTĂ
Pentru montaj, utilizaţi cheia hexagonală.
(1) Pentru a monta cuţitul în interiorul protecţiei de capac,
folosiţi şurubul fi letat D4 furnizat. (Fig. 8)
Ataşaţi protecţia capacului la capacul de protecţie.
 Loading...