

Page 1
PROJECTION COLOR TV
OPERATING GUIDE
IMPORTANT SAFEGUARDS
,A
FIRST TIME USE
'=TS-Y
:._,'_?_
,_,-
_F _ _ u_RATEc
_] b_i_ _ ON SCREEN DISPLAY
THE VCRPlus+
REMOTE CONTROL
USEFUL INFORMATION INDEX
2-5
6-13
14-29
30-56
57-63
Page 2
Follow all warnings and instructions marked on this television receiver.
IMPORTANT
CAUTION equilateral triangle, is intended to alert the user Io the
RISK OF ELECTRIC SHOCK product's enclosure that may be of a sufficient rnagnitude
DO NOT OPEN to constitute a dsk of electdc shock to persons.
CAUTION: TO REDUCE THE RISK OF ELECTRIC SHOCK, ] ,_
NO USER SERVICEABLE PARTS INSIDE. intended to alert the user to the presence of important
REFER SERVICING TO QUALIFIED SERVICE PERSONNEL. operating and maintenance (servicing) instr_Jctions in
DO NOT REMOVE COVER (OR BACK). l_The exclamation point within an equilateral triangle, is
presence of uninsulated "dangerous voltage" within the
Theli "tning"ashWit"a ° headsymb°'withinan.
the literature accompanying the appliance.
WARNING:
TO PREVENT FIRE OR SHOCK HAZARD, DO NOT
EXPOSE THIS TELEVISION SYSTEM TO RAIN OR MOISTURE.
NOTE: • There are no user serviceable parts inside the receiver.
• Model and serial numbers are indicated on back side of the set.
POWER SOURCE
This projection color TV is designed to operate on 120 volts 60Hz, AC household current.
Insert power cord into a 120 volt 60Hz outlet.
TO PREVENT ELECTRIC SHOCK, DO NOT USE THE TELEVISION'S PLUG WITH AN EXTENSION
CORD, RECEPTACLE, OR OTHER OUTLET UNLESS THE BLADES AND GROUND TERMINAL
CAN BE FULLY INSERTED TO PREVENT BLADE EXPOSURE.
NEVI-R CONNECT THE TV TO 50Hz, DIRECT CURRENT, OR ANYTHING OTHER THAN THE-
SPECIFIED VOLTAGE.
NOTE:
I
,_+ kCAUTION: Never remove the back cover of the set as this can expose you to very high voltages
This television receiver will display television closed captioning, _ orl_), in accordance
with paragraph 15.119 of the FCC rules.
and other hazards. If the set does not operate properly, unplug the set and call your
dealer or service shop.
2
]
Page 3
SAFETY TIPS
IMPORTANT SAFEGUARDS
CAUTION:
• Read all of these instructions.
SAFETY POINTS YOU SHOULD KNOW ABOUF
YOUR HITACHI TELEVISION RECEIVER
• Save these instructions for later use.
• Follow all warnings and instructions marked
on the television receiver.
Our reputation has been buill on the quality, performance, and ease of service of HITACHI television receivers.
Safety is also foremost in our minds in the design of these units. To help you operate these products pmpedy, this section illustrates safety tips which will be of
benefit to you. Please read it carefully and apply the knowledge you obtain from it to the proper operation of your HITACHI television receiver.
Please fill out your warranty card at once ancr mail it to HITACHI. This will enable HITACHI to notify you promptly in the improbable event that a safety prohlem
should be "fiscovered in your product model.
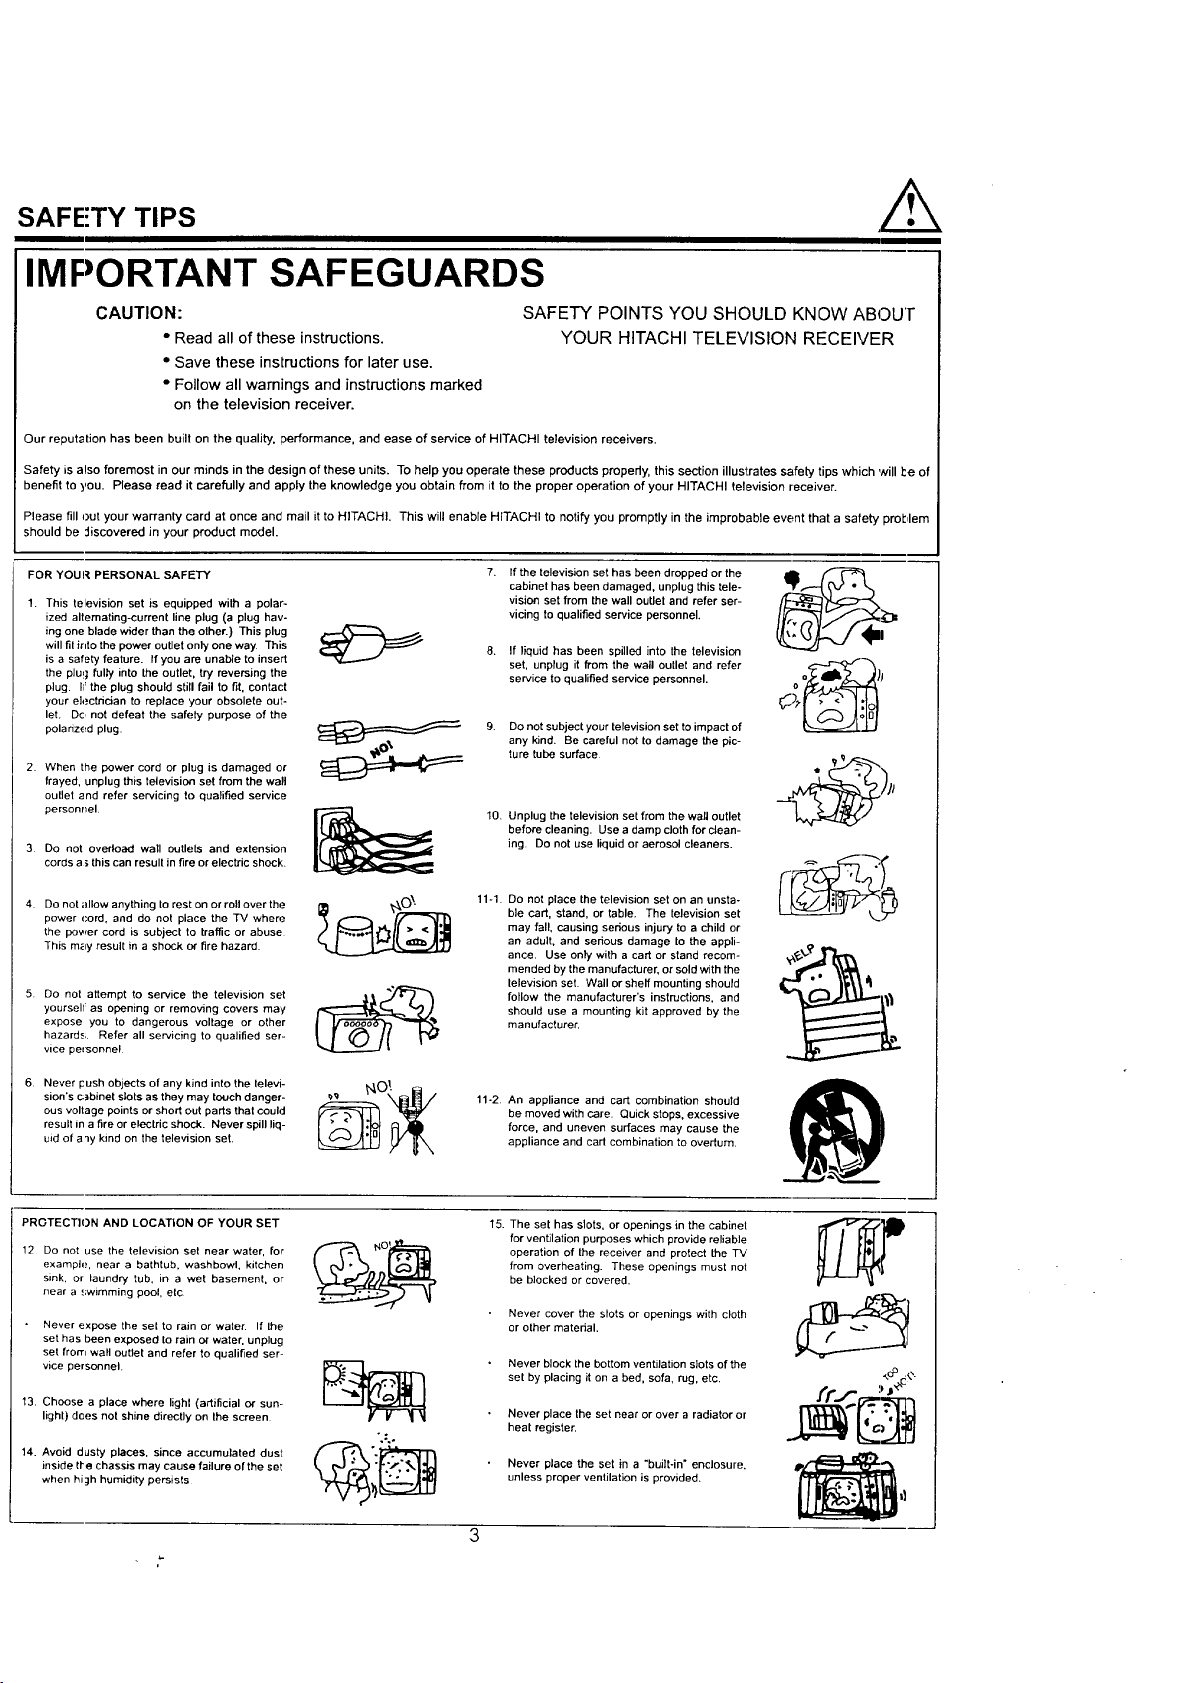
FOR YOUR PERSONAL SAFETY
1. This television set is equipped with a polar-
ized alternating-current line plug (a plug hav-
ing one blade wider than the other.) This plug
will fil irdo the power outlet only one way. This
is a safety feature. If you are unable to insert
the plug fully into the outlet, try reversing the
plug. li: the plug should still fail to fit, contact
your eh._ctdcian to replace your obsolete out-
let. De, not defeat the safety purpose of the
polarized plug.
2. When the power cord or plug is damaged or
frayed, unplug this television set from the wall
culler and refer servicing to qualified service
personnel
3 Do not overload wall outlets and extension
cords a _,this can result in fire or electric shock.
.o=4 7
If the television set has been dropped or the
cabinet has been damaged, unplug this tele-
vision set from the wall outlet and refer ser-
vicing to qualified service personnel,
If liquid has been spilled into the television
set, unpfug it from the wall outlet and refer
service to qualified service personnel.
Do not subject your television set to impact of
any kind. Be careful not to damage the pic-
ture tube surface
10. Unplug the television set from the wall outlet
before cleaning. Use a damp cloth for clean-
ing. Do not use liquid or aerosol cleaners.
o_h
4. Do not allow anything to rest on or roll over the
power cord, and do not place the TV where.-
the power cord is subject to traffic or abuse,
This may result in a shock or fire hazard.
5 Do not attempt to service the television set
yoursell: as opening or remo',4ng covers ma),
expose you to dangerous voltage or other
hazard,.;. Refer all servicing to qualified ser-
vice personnel
6 Never push objects of any kind into the televi-
sion's cabinet slots as they may touch danger-
ous voltage points orshort out parts that couh'l
result in a fire or electric shock. Never spill liq-
uid of a'ly kind on the television set.
PROTECII()N AND LOCATION OF YOUR SET
12 Do not use the television set near water, for
example, near a bathtub, washbowl, kitchen
sink, or laundry tub, in a wet basement, or
near a .';wJmming pool, etc
Never expose the set to rain or water. If the
set has been exposed to rain or water, unplug
set from wall outlet and refer to qualified ser-
vice personnel.
13. Choose a place where lighl (artificial or sun-
lighl) dees not shine directly on the screen.
14. Avoid dusty places, since accumulated dust
inside tre chassis may cause failure of the se_
when hiah humidity persists
11-1.
Do not place the television set on an unsta-
ble cart, stand, or table. The television set
may fall, causing serious injury to a child or
an adult, and serious damage to the appli-
ance. Use only with a cart or stand recom-
mended by the manufacturer, or sold with the
lelevision set. Wall or shelf mounting should
follow the manufacturer's instructions, and
should use a mounting kit approved by the
manufacturer.
11-2 An appliance and cart combination should
be moved with care. Quick stops, excessive
force, and uneven surfaces may cause the
appliance and cart combination to overturn.
15. The set has slots, or openings in the cabinel:
for ventilation purposes which provide reliable
operation of the receiver and protect the TV
from overheating. These openings must not:
be blocked or covered.
Never cover the slots or openings with cloth
or other material.
Never block the bottom ventilation slots of the
set by placing it on a bed, sofa, rug, etc.
Never place the set near or over a radiator or
heat register.
Never place the set in a "built-in" enclosure,
unless proper ventilation is provided.
h q_,llXxC
,o° .e.
Page 4
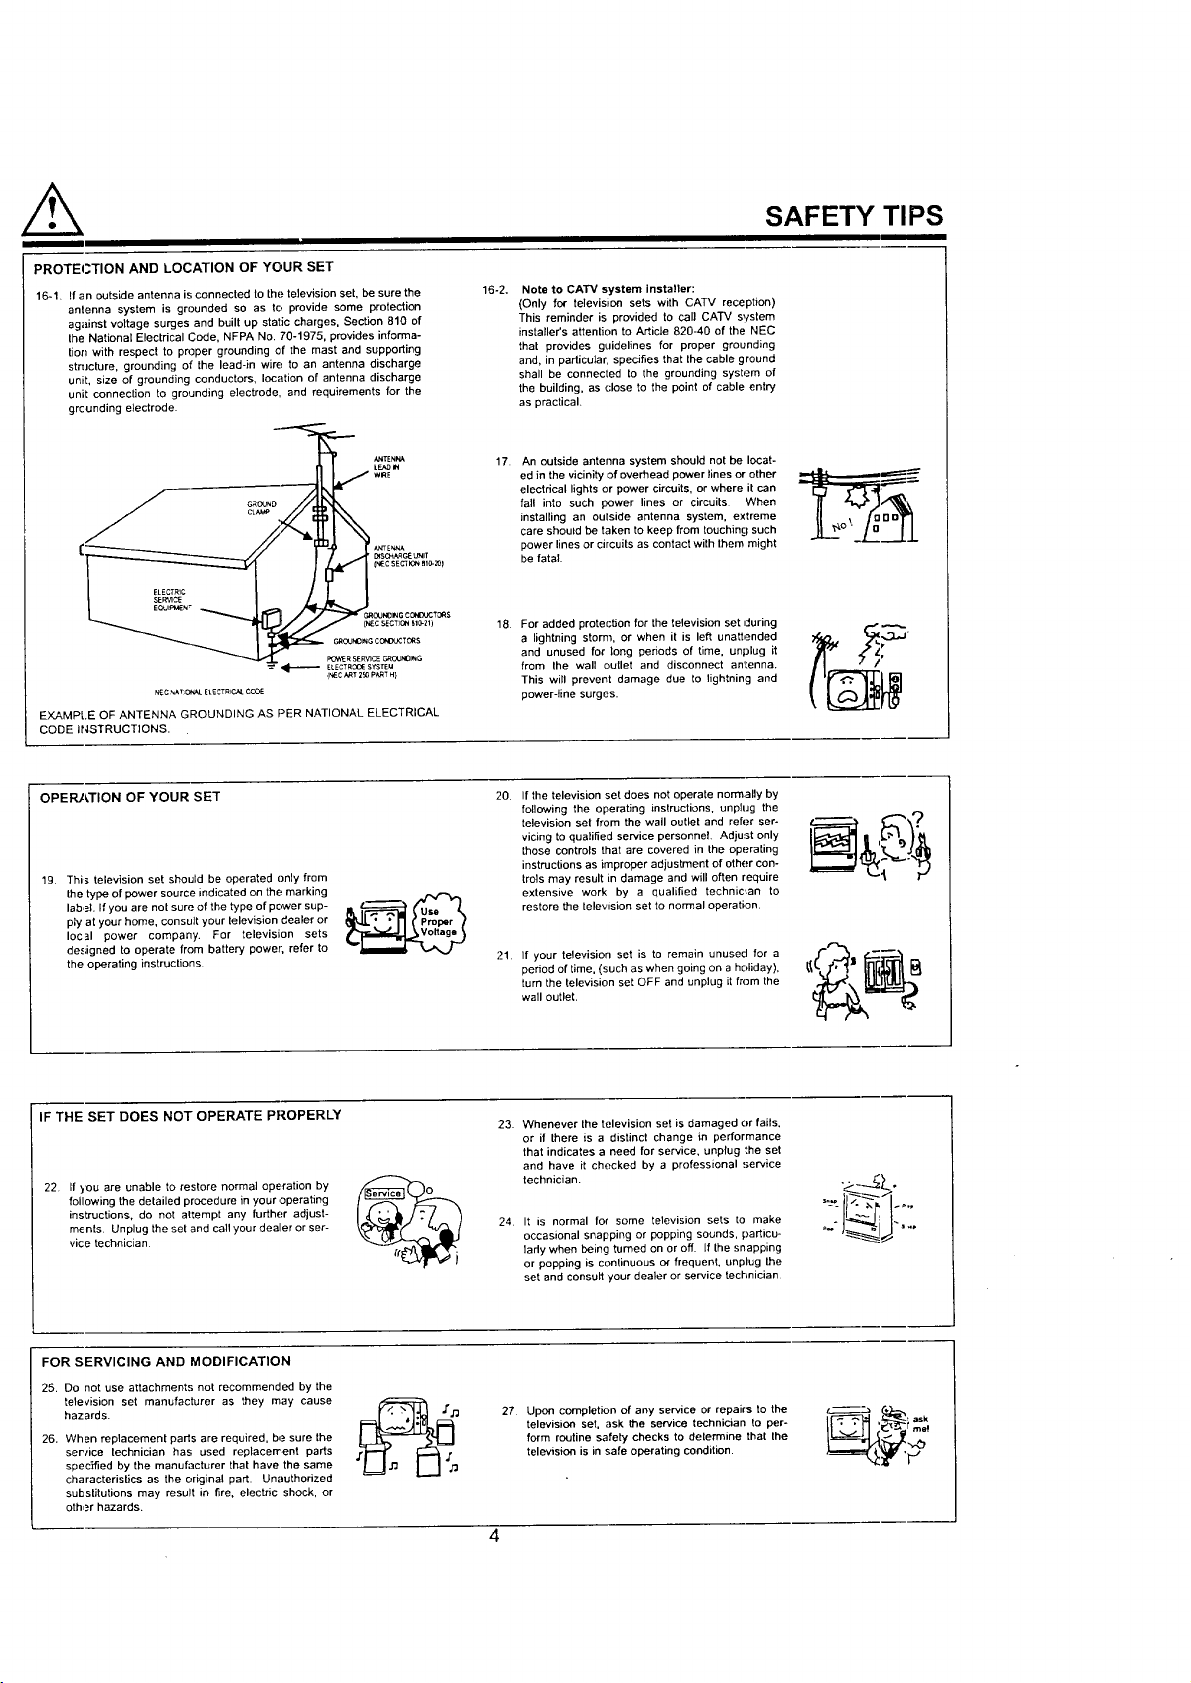
PROTECTION AND LOCATION OF YOUR SET
16-1. If an outside antenna is connected to the television set, be sure the
antenna system is grounded so as to provide some protection
against voltage surges and built up static charges, Section 810 of
the Nafiona_ Electrical Code, NFPA No. 70-1975, provides informa-
tion with respect to proper grounding of the mast and supporting
structure, grounding of the lead-in wire to an antenna discharge
unit, size of grounding conductors, location of antenna discharge
unit connection to grounding electrode, and requirements for the
grcunding electrode.
ct_
_SC_CE UNIT
I_ECSECI_3__1o-_
OUNOI_GCO_CTO_S
(_CSEOTIO__1_-Zl)
CRC_NO_GCO_:TC_tS
_R SER,aC__ROUNO_G
_ E_ECTROOESYSTEM
NEC"_T;O_.EtECTR_C_COOE
EXAMPLE OF ANTENNA GROUNDING AS PER NATIONAL ELECTRICAL
CODE INSTRUCTIONS.
(NEC,V_T2_ P_TH}
16-2.
Note to CATV system installer:
(Only for television sets with CATV reception)
This reminder is provided to call CA'rV system
installer's attention to Article 820-40 of the NEC
that provides guidelines for proper grounding
and, in particular, specifies that the cable ground
shall be connected to the grounding system of
the building, as close to the point of cable entry
as practical.
17.
An outside antenna system should not be locat-
ed in the vicinity of overhead power lines or other
electrical lights or power circuits, or where it can
fall into such power lines or circuits When
installing an oulside antenna system, extreme
care should be taken to keep from touching such
power lines or circuits as contact with lhern might
be fatal.
18. For added protection for the television set during
a lightning stom_, or when it is left unattended
and unused for long periods of time, unplug it
from the wall outlet and disconnect an!:enna.
This will prevent damage due to lightning and
power-line surges.
SAFETY TIPS
OPERATION OF YOUR SET 2O.
19. This television set should be operated only from
the type of power source indicated on the marking
label If you are not sure of the type of power sup-
ply at your home, consult your television dealer or
local power company. For television sets
designed to operate from battery power; refer to
the operating instructions
IF THE SET DOES NOT OPERATE PROPERLY
22 If you are unable to restore normal operation by
following the detailed procedure in your operating
instructions, do not attempt any further adjust-
m_nts Unplug the set and call your dealer or ser-
vice technician
FOR SERVICING AND MODIFICATION
25, Do not use attachments not recommended by the
television set manufacturer as they may cause
hazards.
26. When replacement paris are required, be sure the
ser/ice technician has used replacement parts
specified by the manufacturer that have the same
characteristics as the original part. Unauthorized
substitutions may result in fire, electric shock, or
other hazards.
If the television set does not operate normally by
following the operating instructions, unphJg the
television set from the wall outlet and refer ser-
vicing to qualified service personnel, Adjust only
those controls that are covered in the operating
instructions as improper adjustment of other con-
trois may result in damage and will often require
extensive work by a qualified technic, an to
restore the television set to normal operation.
21.
If your television set is to remain unused for a
period of time. (such as when going on a holiday),
turn the television set OFF and unplug it from the
wall outlet.
23. Whenever the television set is damaged or fails.
or if there is a distinct change in performance
that indicates a need for service, unplug :he set
and have it checked by a professional service
technician.
24 It is normal for some television sets to make
occasional snapping or popping sounds, particu-
lady when being turned on or off. If the snapping
or popping is continuous or frequent, unplug the
set and consult your dealer or service technician
27 Upon completion of any service or repairs to the
television set, ask the service technician to per-
form routine safety checks to determine that the
television is in safe operating condition.
Page 5
PICTURE CAUTIONS
Continuous on-screen displays such as
video games, stock market quotations,
computer generated graphics, and other
fixed (non-moving) patterns can cause per-
manent damage to projection television
WARNING
receivers. Such "PATTERN BURNS" con-
stitute misuse and are NOT COVERED by
your HITACHI Factory Warranty.
When using the Picture-in-Picture function, the sub-picture should not be left permanently
in one corner of the screen or a "PATTERN BURN" may develop over a long period of time.
This projection television receiver was intended mainly for the private viewing of programs
broadcast by TV stations and cable companies and programs from other video sources.
Public viewing may require prior authorization from the broadcaster or owner of the video
program.
5
Page 6
_[ ,ACCESSORIES
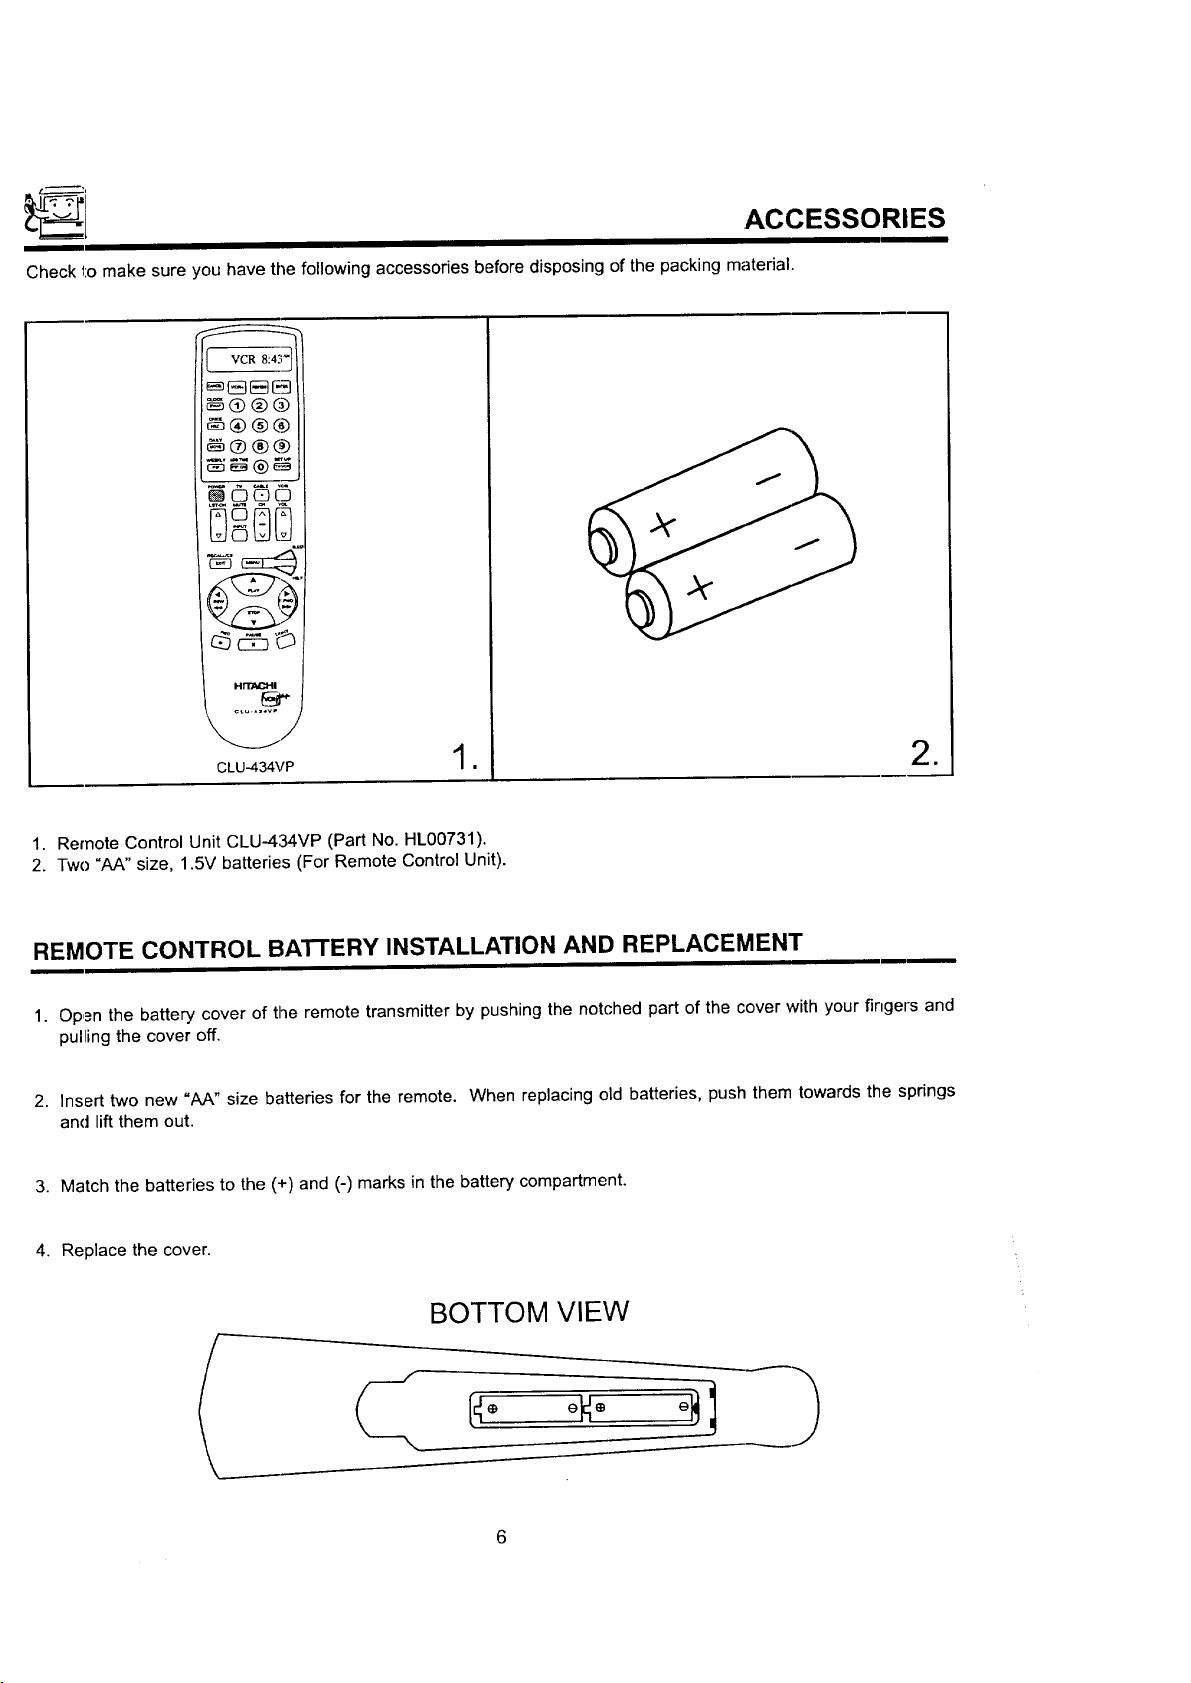
Check 1:omake sure you have the following accessories before disposing of the packing material.
VCR 8:43 _
_ S r=-IC-3
@®®@
_®®®
C3
E)oD[3
CLU-434VP 1 •
1. Remote Control Unit CLU-434VP (Part No, HL00731).
2. Two "AA" size, 1.5V batteries (For Remote Control Unit).
REMOTE CONTROL BATTERY INSTALLATION AND REPLACEMENT
1. Open the battery cover of the remote transmitter by pushing the notched part of the cover with your fingers and
pulling the cover off.
2. Insert two new "AA" size batteries for the remote. When replacing old batteries, push them towards the springs
and lift them out.
3. Match the batteries to the (+) and (-) marks in the battery compartment.
4. Replace the cover.
BOTTOM VIEW
=
< '0
Page 7
HOW "ro SET UP YOUR NEW HITACHI PROJECTION TV
ANTENNA
Unless your TV is connected to a cable TV system or to a centralized antenna system, a good outdoor color q-V
antenna i.'; recommended for best performance. However, if you are located in an exceptionally good signal area
that is free from interference and multiple image ghosts, an indoor antenna may be sufficient.
LOCATION
Select an area where sunlight or bright indoor illumination will not fall directly on the picture screen. Also, be sure that
the location selected allows a free flow of air to and from the perforated back cover of the set.
TOavoid cabinet warping, cabinet color changes, and increased chance of set failure, do not place the TV where: tem-
peratures can become excessively hot, for example, in direct sunlight or near a heating appliance, etc.
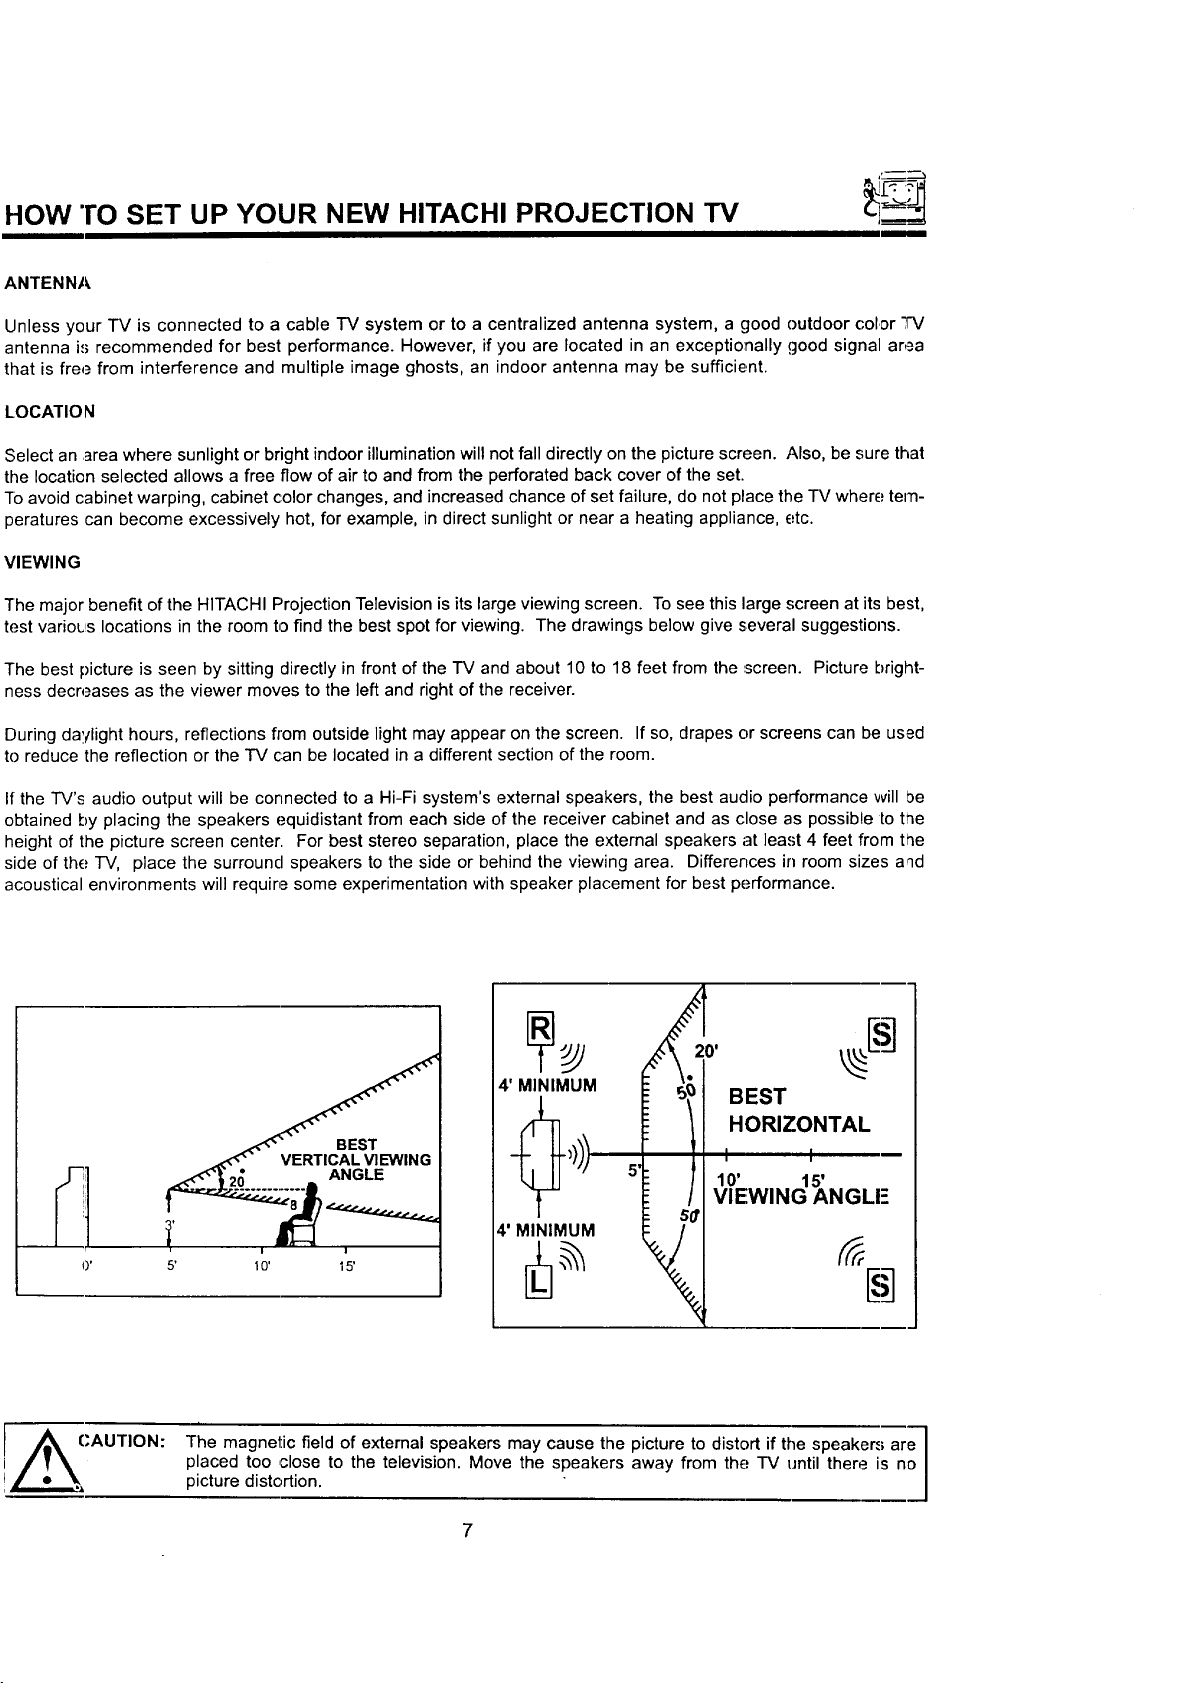
VIEWING
The major benefit of the HITACHI Projection Television is its large viewing screen. To see this large screen at its best,
test varioL_slocations in the room to find the best spot for viewing. The drawings below give several suggestions.
The best picture is seen by sitting directly in front of the TV and about 10 to 18 feet from the ..screen. Picture bright-
ness decreases as the viewer moves to the left and right of the receiver.
During daylight hours, reflections from outside light may appear on the screen. If so, drapes or screens can be used
to reduce the reflection or the TV can be located in a different section of the room.
If the TV's audio output will be connected to a Hi-Fi system's external speakers, the best audio performance will be
obtained by placing the speakers equidistant from each side of the receiver cabinet and as close as possible to the
height of the picture screen center. For best stereo separation, place the external speakers at least 4 feet from toe
side of the.=TV, place the surround speakers to the side or behind the viewing area. Differences in room sizes aqd
acoustical environments will require some experimentation with speaker placement for best performance.
BEST
HORIZONTAL
110' 115' -
VIEWING ANGLI 5
CAUTION:
The magnetic field of external speakers may cause the picture to distort if the speakers are
placed too ,close to the television. Move the speakers away from the: TV until there is no
picture distortion.
]
Page 8
HOOK-UP CABLES AND CONNECTORS
Most video/audio connections between components can be made with shielded video and audio cables that have
phono cDnnectors. For best performance, video cables should use 75-Ohm coaxial shielded wire. Cables can be pur-
chased from most stores that sell audio/video products. Below are illustrations and names of common connectors.
Before purchasing any cables, be sure of the output and input connector types required by the various coml:one.nts.
Also make sure the cables are the correct length.
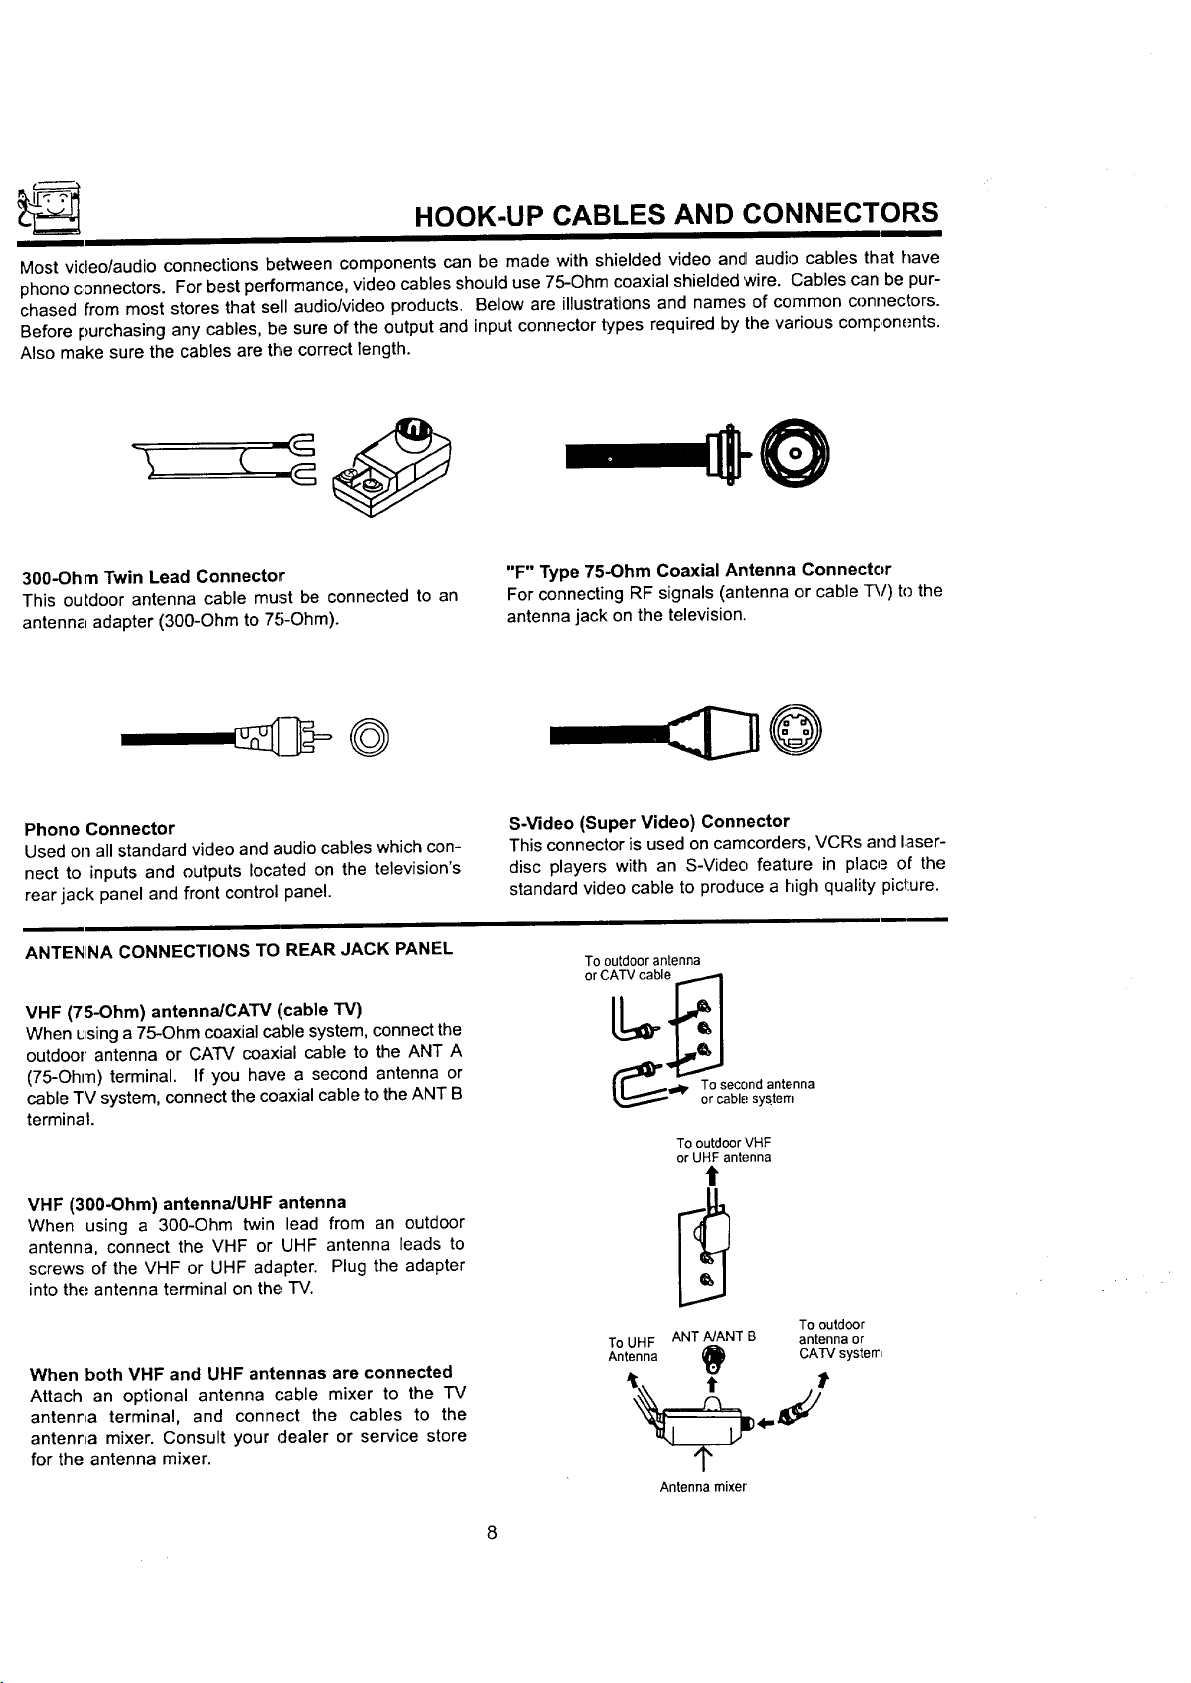
300-Ohm Twin Lead Connector
This outdoor antenna cable must be connected to an
antenn_ adapter (300-Ohm to 75-Ohm).
Phono Connector
Used on all standard video and audio cables which con-
nect to inputs and outputs located on the television's
rear jack panel and front control panel.
ANTENINA CONNECTIONS TO REAR JACK PANEL
VHF (75-Ohm) antenna/CAW (cable "rv)
When _fsing a 75-Ohm coaxial cable system, connect the
outdoor antenna or CATV coaxial cable to the ANT A
(75-Ohm) terminal. If you have a second antenna or
cable TV system, connect the coaxial cable to the ANT B
terminal.
"F" Type 75-Ohm Coaxial Antenna Connector
For connecting RF signals (antenna or cable TV) to the
antenna jack on the television.
S-Video (Super Video) Connector
This connector is used on camcorders, VCRs and laser-
disc players with an S-Video feature in place of the
standard video cable to produce a high quality pict:ure.
To outdoor antenna
_' Tr°cSeb(_°.ny atntrtenna
To outdoor VHF
or UHF antenna
VHF (300-Ohm) antennaiUHF antenna
When using a 300-Ohm twin lead from an outdoor
antenna, connect the VHF or UHF antenna leads to
screws of the VHF or UHF adapter. Plug the adapter
into the antenna terminal on the TV.
When both VHF and UHF antennas are connected
Attach an optional antenna cable mixer to the "IV
antenna terminal, and connect the cables to the
antenna mixer. Consult your dealer or service store
for the antenna mixer.
To UHF ANT NANT B antenna or
To outdoor
Antenna _ CATV system
, - j
Antenna mixer
Page 9
FRONT PANEL CONTROLS
FRONT VIEW
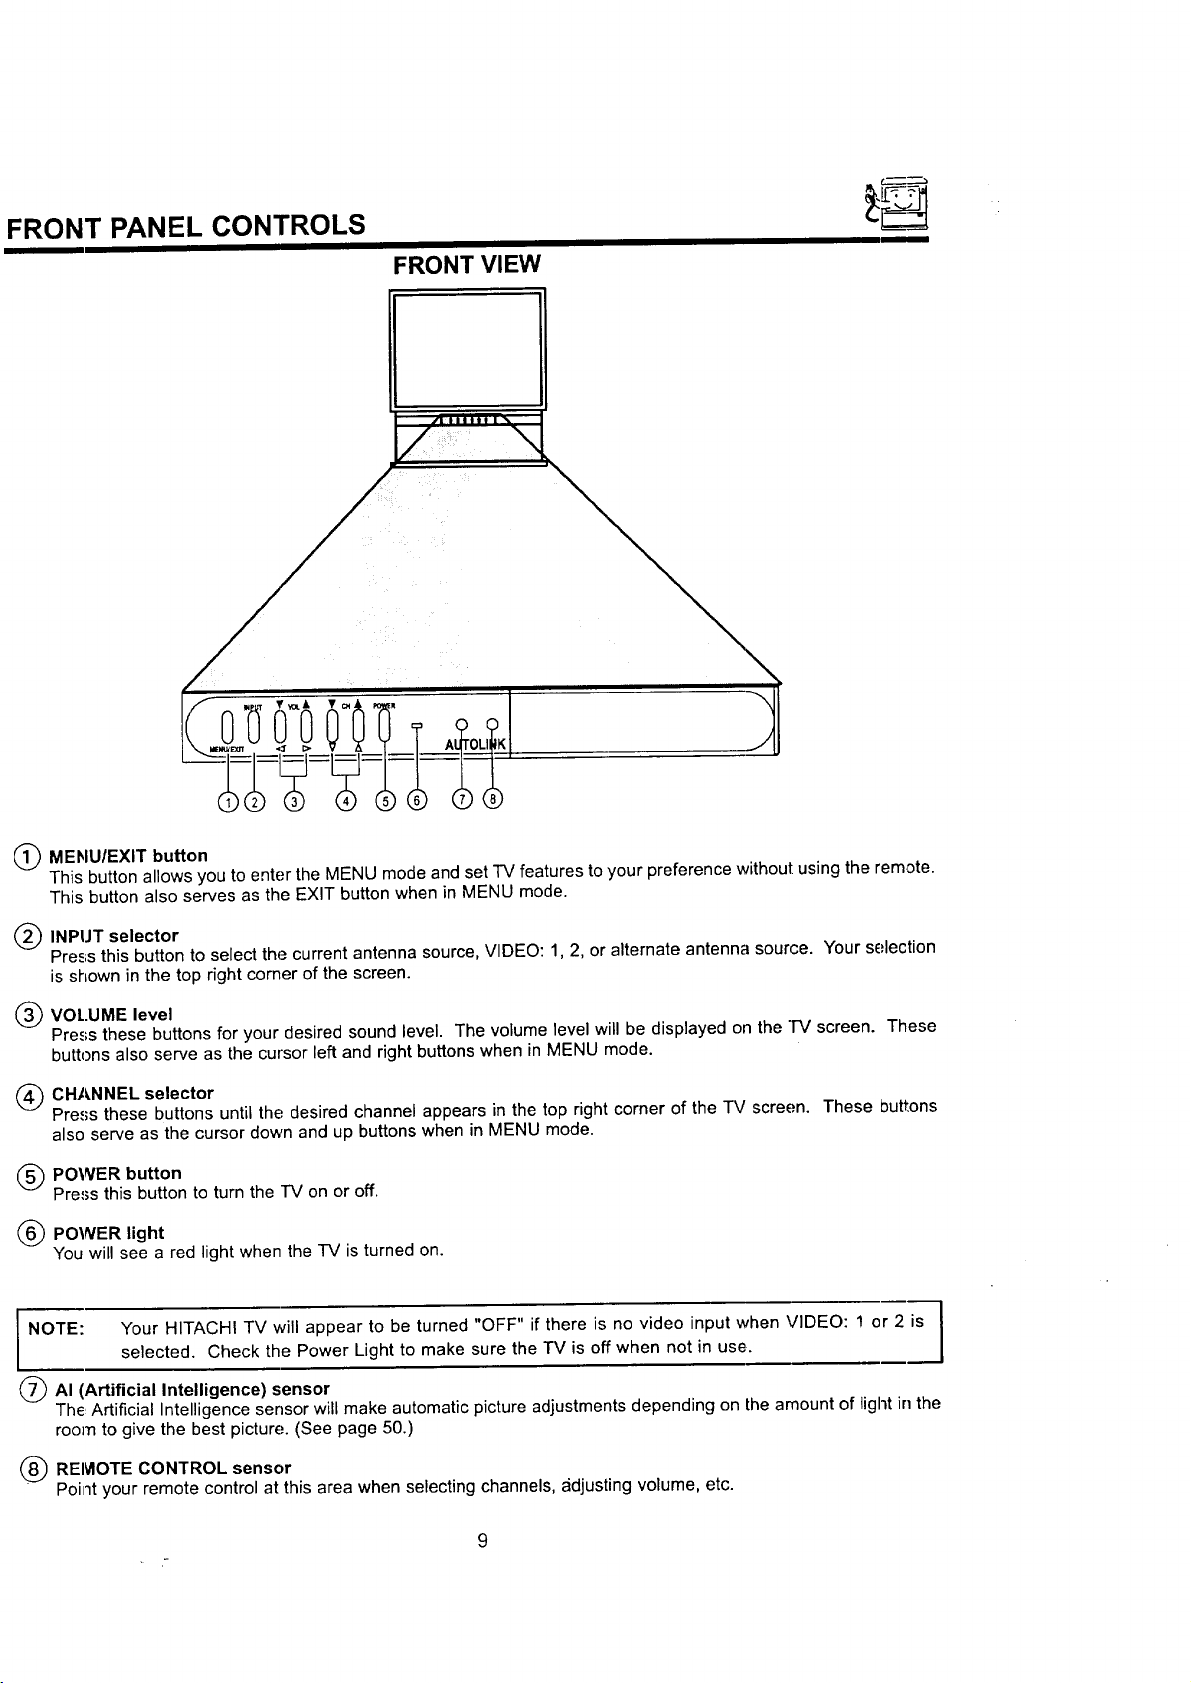
(_ MENUIEXlT button
This button allows you to enter the MENU mode and set TV features to your preference without using the remote.
This button also serves as the EXIT button when in MENU mode.
(_ INPIJT selector
Pres;s this button to select the current antenna source, VIDEO: 1, 2, or alternate antenna source. Your selection
is shown in the top right corner of the screen.
(_ VOI..UME level
Press these buttons for your desired sound level. The volume level will be displayed on the TV screen. These
buttons also serve as the cursor left and right buttons when in MENU mode.
(_ CHANNEL selector
Press these buttons until the desired channel appears in the top right corner of the "IV screen. These Duttons
also serve as the cursor down and up buttons when in MENU mode.
(_ POWER button
Press this button to turn the IV on or off.
(_ POWER light
You will see a red light when the IV is turned on.
I NOTE: Your HITACHI TV will appear to be turned "OFF" if there is no video input when VIDEO: ! or 2 is
(_AI (Artificial Intelligence) sensor
The, Artificial Intelligence sensor will make automatic picture adjustments depending on the amount of light in the
room to give the best picture. (See page 50.)
selected. Check the Power Light to make sure the TV is off when not in use.
(_) REMOTE CONTROL sensor
Point your remote control at this area when selecting channels, _idjusting volume, etc.
9
Page 10
REAR PANEL JACKS
O
REAR SPEAKER J"
8_ONLY
ANT A
Q
TO
[] ®
I--_SP. MATRIX
CONVERTER
O
ANT B
VIDEO
©
L
Q
SURROUND
--_ EXT.
C
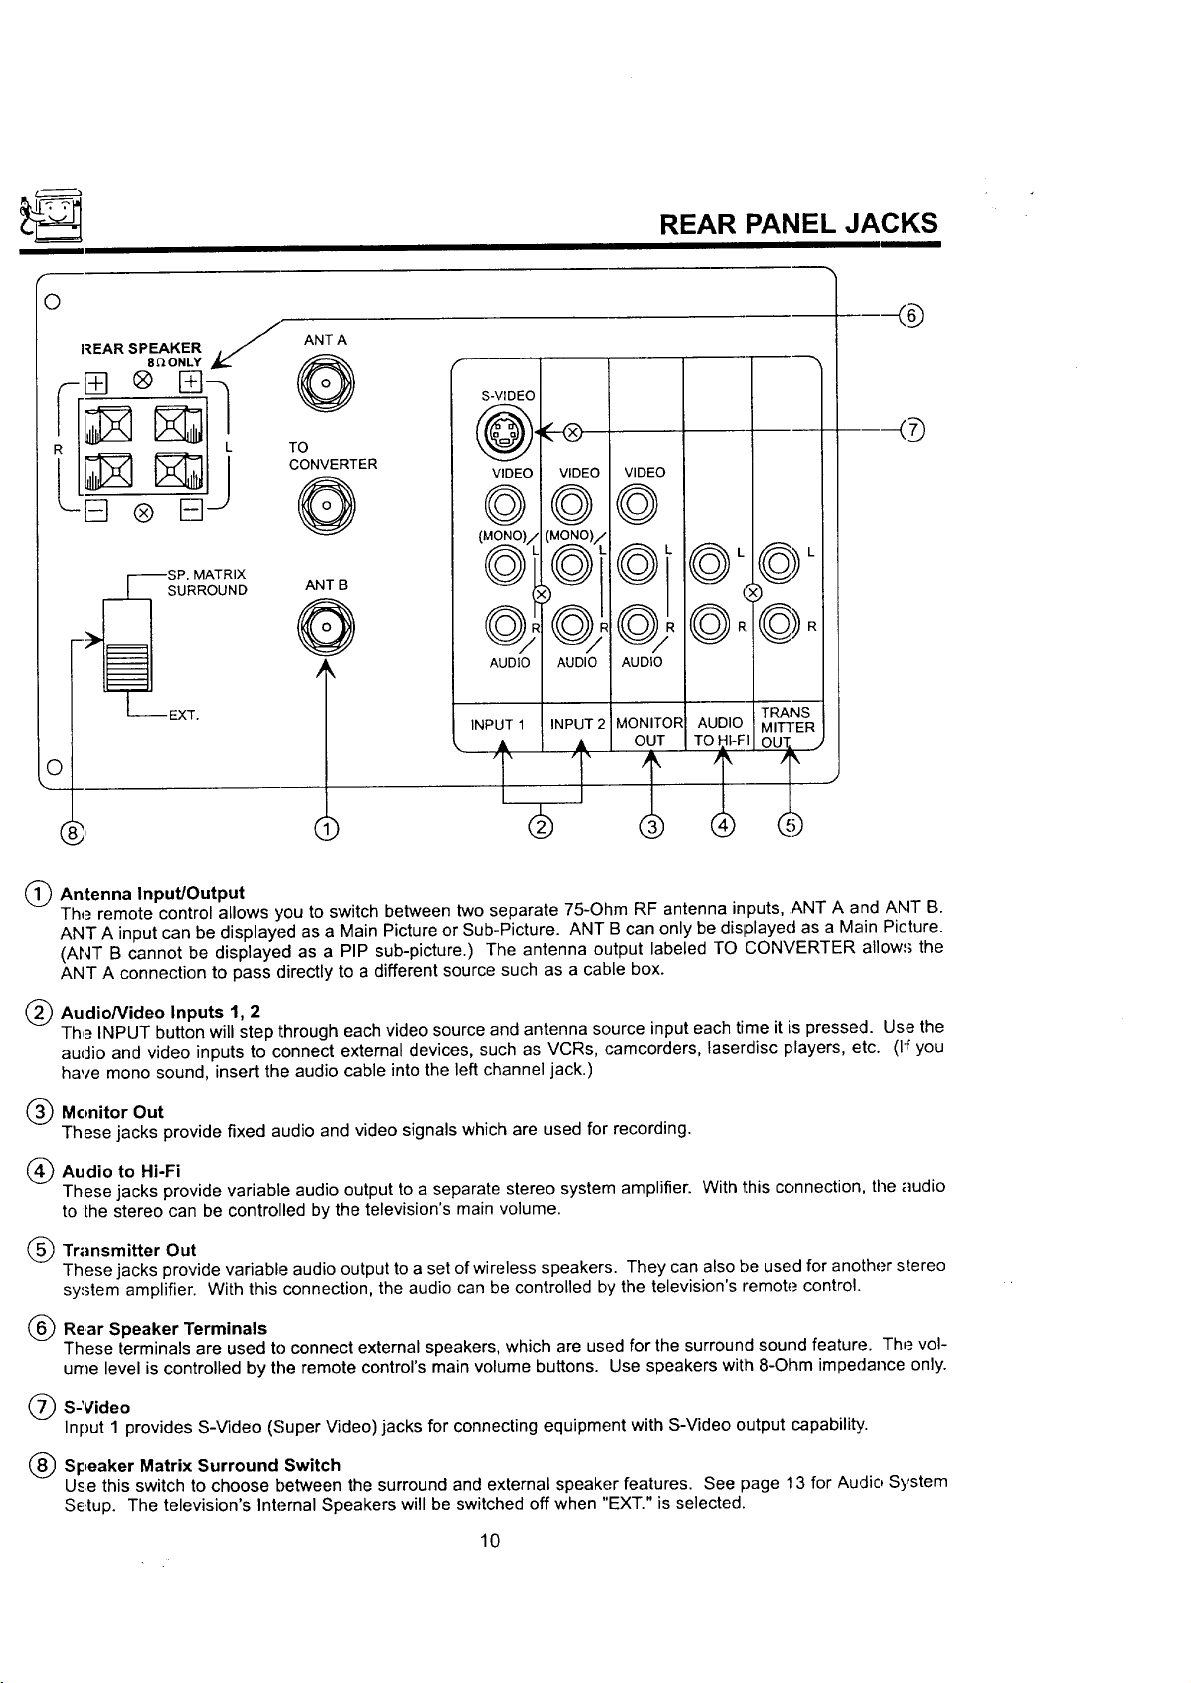
(_ Antenna Input/Output
The remote control allows you to switch between two separate 75-Ohm RF antenna inputs, ANT A and ANT B.
ANT A input can be displayed as a Main Picture or Sub-Picture. ANT B can only be displayed as a Main Picture.
(ANT B cannot be displayed as a PIP sub-picture.) The antenna output labeled TO CONVERTER allow,; the
ANT A connection to pass directly to a different source such as a cable box.
k
AUDIO/AUDIOI AUD
INPUT 1 |INPUT 2/ MON
• / • / ot
()
(_ AudioNideo Inputs 1, 2
The INPUT button will step through each video source and antenna source input each time it is pressed. Use the
audio and video inputs to connect external devices, such as VCRs, camcorders, laserdisc players, etc. (b"you
have mono sound, insert the audio cable into the left channel jack.)
(_) Monitor Out
These jacks provide fixed audio and video signals which are used for recording.
I_ Audio to Hi-Fi
These jacks provide variable audio output to a separate stereo system amplifier. With this connection, the audio
to the stereo can be controlled by the television's main volume.
(_) Transmitter Out
These jacks provide variable audio output to a set of wireless speakers. They can also be used for another stereo
system amplifier. With this connection, the audio can be controlled by the television's remote control.
(_ Rear Speaker Terminals
These terminals are used to connect external speakers, which are used for the surround sound feature. The vol-
ume level is controlled by the remote control's main volume buttons. Use speakers wit!_ 8-Ohm impedance only.
(_) S-Video
Input 1 provides S-Video (Super Video) jacks for connecting equipment with S-Video output capability.
(_) Speaker Matrix Surround Switch
Use this switch to choose between the surround and external speaker features. See page 13 for Audio System
Setup. The television's Internal Speakers will be switched off when "EXT." is selected.
10
Page 11
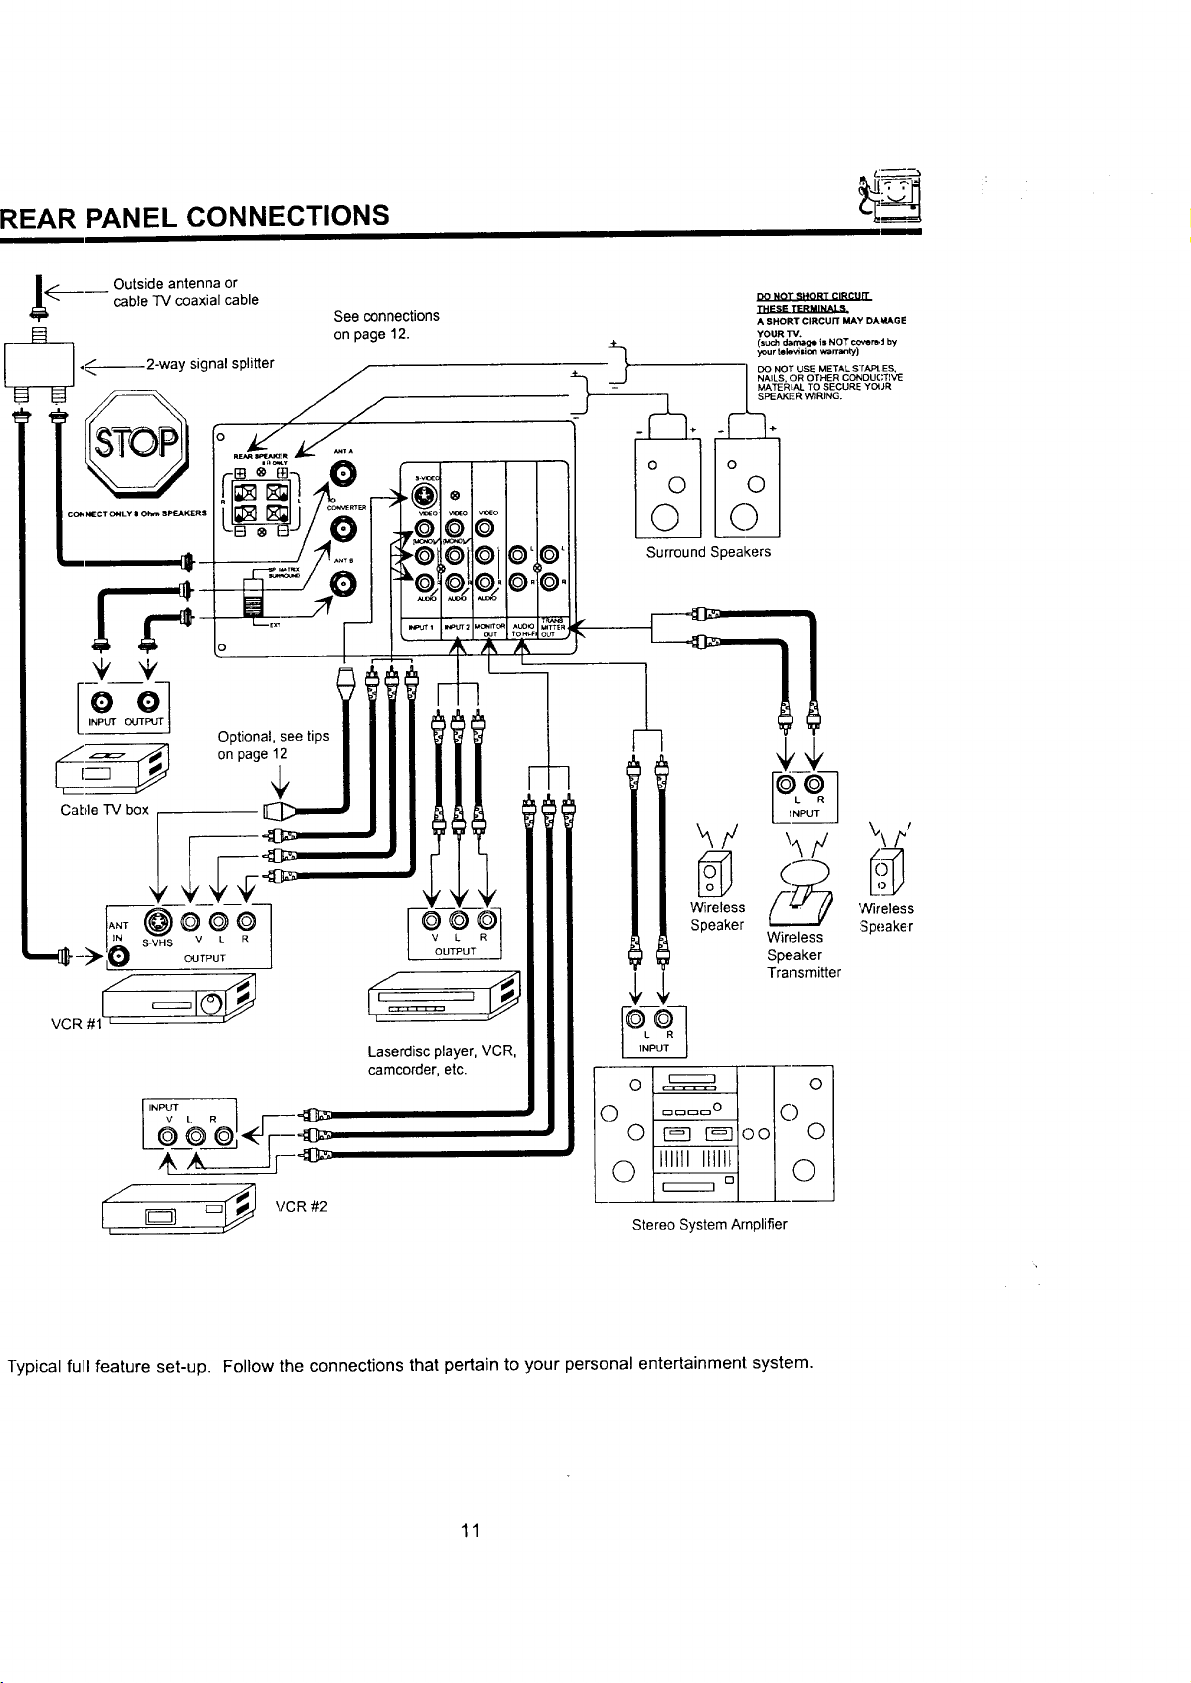
REAR PANEL CONNECTIONS
I
cable IV coaxial cable
_____ Outside antenna or
._ on page 12.
._----_---2-way signal splitter /
See connections
J/--
IISTO-PII°._i _A:-,
[, ol
Optional, see tips
on page 12
Cable IV box
DO NOT SHORT CIRCUIT
ll'lE SE TERMINALS=
A SHORT CIRCUIT MAY DAt4AGE
YOUR "rv.
(suc_ damage ill NOT cover_ J by
your tele.4=io_ warranty)
DO NOT USE METAL SrA_t ES,
NAILS, OR OTHER CONDUCTIVE
MATER_AL TO SECURE YOUR
3
Surround Speakers
SPEAKER WIRING.
@
I
hY _y
_\/,/
Wireless
Speaker
C_JTPUT
/
vc i
iNg L R _---_
"_ [z]l_'] VCR #2
Typical full feature set-up. Follow the connections that pertain to your personal entertainment: system.
I,'=== '_
Laserdisc player, VCR,
camcorder, etc.
) cmc=c=_O
0 F_ F_O0
C) Illlll lllli[
Stereo System Amplifier
D
Wireless
Speaker
Transmitter
Wireless
:Speaker
11
Page 12
REAR SPEAKER TERMINAL CONNECTIONS
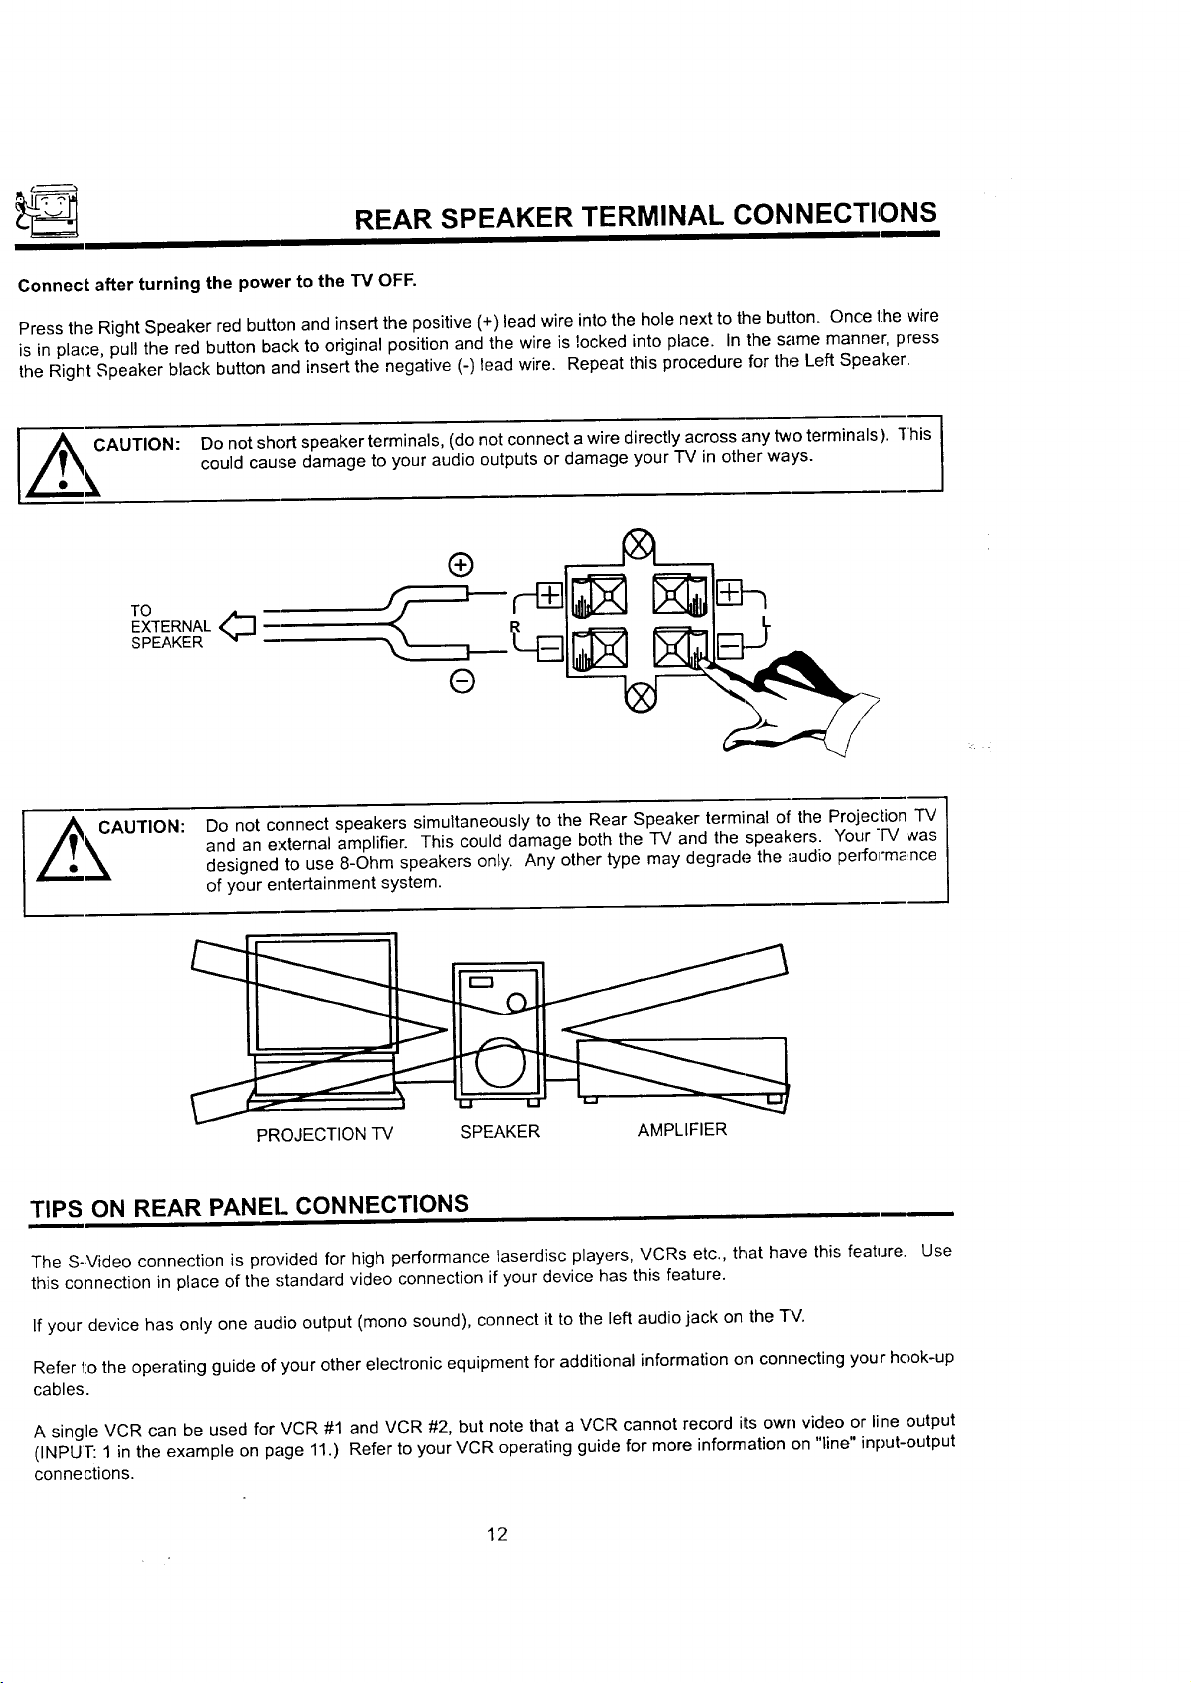
Connec[ after turning the power to the TV OFF.
Press the Right Speaker red button and insert the positive (+) lead wire into the hole next to the button. Once the wire
is in place, pull the red button back to original position and the wire is locked into place. In the same manner, press
the Right Speaker black button and insert the negative (-) lead wire. Repeat this procedure for the Left Speaker.
_e CAUTION: Do not short speaker terminals, (do not connect awire directly across any two terminals). "[his
_, could cause damage to your audio outputs or damage your "IV in other ways.
O
TO m
EXTERNAL(_]
SPEAKER
Do not connect speakers simultaneously to the Rear Speaker terminal of the Projection TV
AUTION:
and an external amplifier. This could damage both the "IV and the speakers. Your IV Jvas
designed to use 8-Ohm speakers only. Any other type may degrade the audio performance
of your entertainment system.
PROJECTION TV SPEAKER AMPLIFIER
TIPS ON REAR PANEL CONNECTIONS
The S-Video connection is provided for high performance laserdisc players, VCRs etc., that have this feature. Use
this connection in place of the standard video connection if your device has this feature.
If your device has only one audio output (mono sound), connect it to the left audio jack on the TV.
Refer 1:othe operating guide of your other electronic equipment for additional information on connecting your hook-up
cables.
A single VCR can be used for VCR #1 and VCR #2, but note that a VCR cannot record its own video or line output
(INPUT: 1 in the example on page 11.) Refer to your VCR operating guide for more information on "line" input-output
connections.
12
Page 13
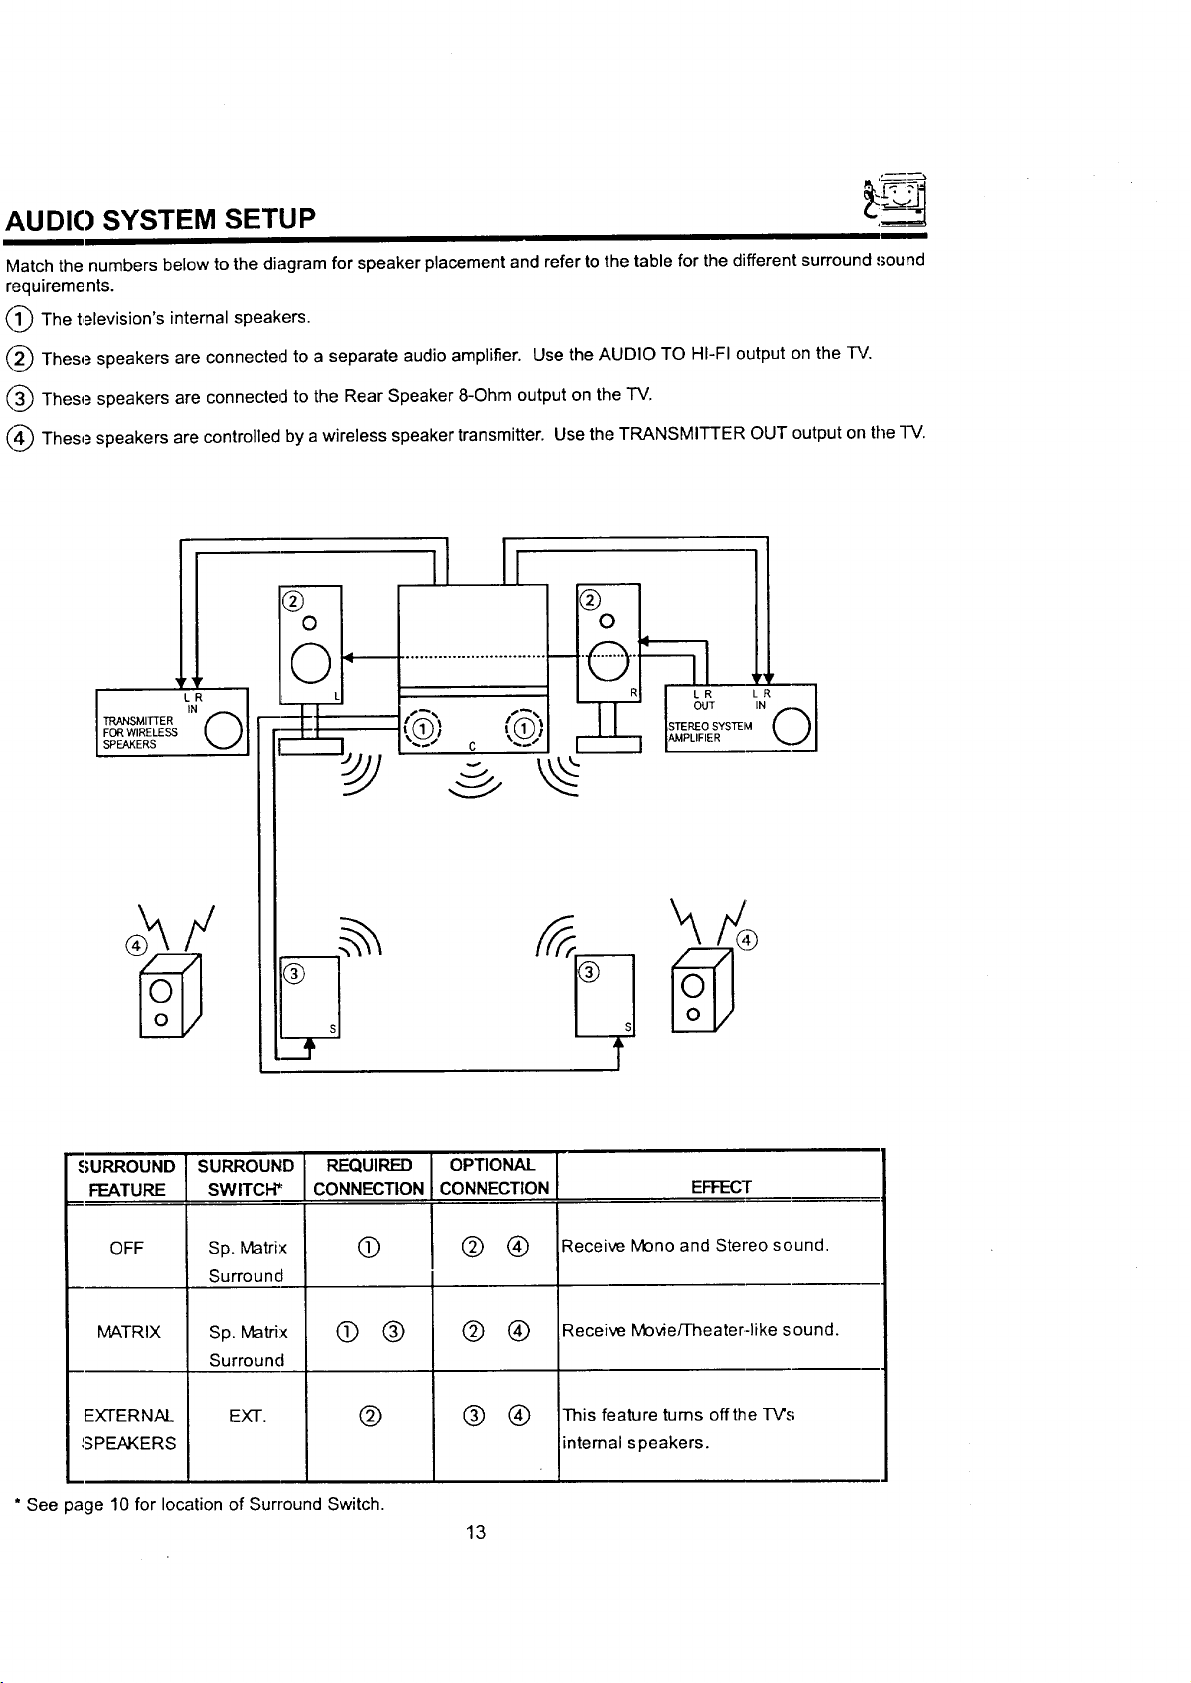
,uo,osYsTEMSETUP
Match the numbers below to the diagram for speaker placement and refer to the table for the different surround sound
requirements.
_1_ The television's internal speakers.
_2_ These speakers are connected to a separate audio amplifier. Use the AUDIO TO HI-FI output on the IV.
_3_ These speakers are connected to the Rear Speaker 8-Ohm output on the "IV.
_4_)These speakers are controlled by a wireless speaker transmitter. Use the TRANSMITTER OUT output on the -IV.
II
;URROUND SURROUND
FEATURE SWITCH"
OFF
MATRIX
EXTERNAL
SPEAKERS
* See page 10 for location of Surround Switch.
Sp. Matrix
Surround
Sp. Matrix
Surround
EXT.
REQUIRED
CONNECTION
®
@ ®
@
OPTIONAL I
CONNECTION
@ ®
@ ®
® ®
13
EFFECT
Receive Mano and Stereo sound.
Receive Movie/Theater-like sound.
This feature turns offthe l-V's
intemal speakers.
Page 14
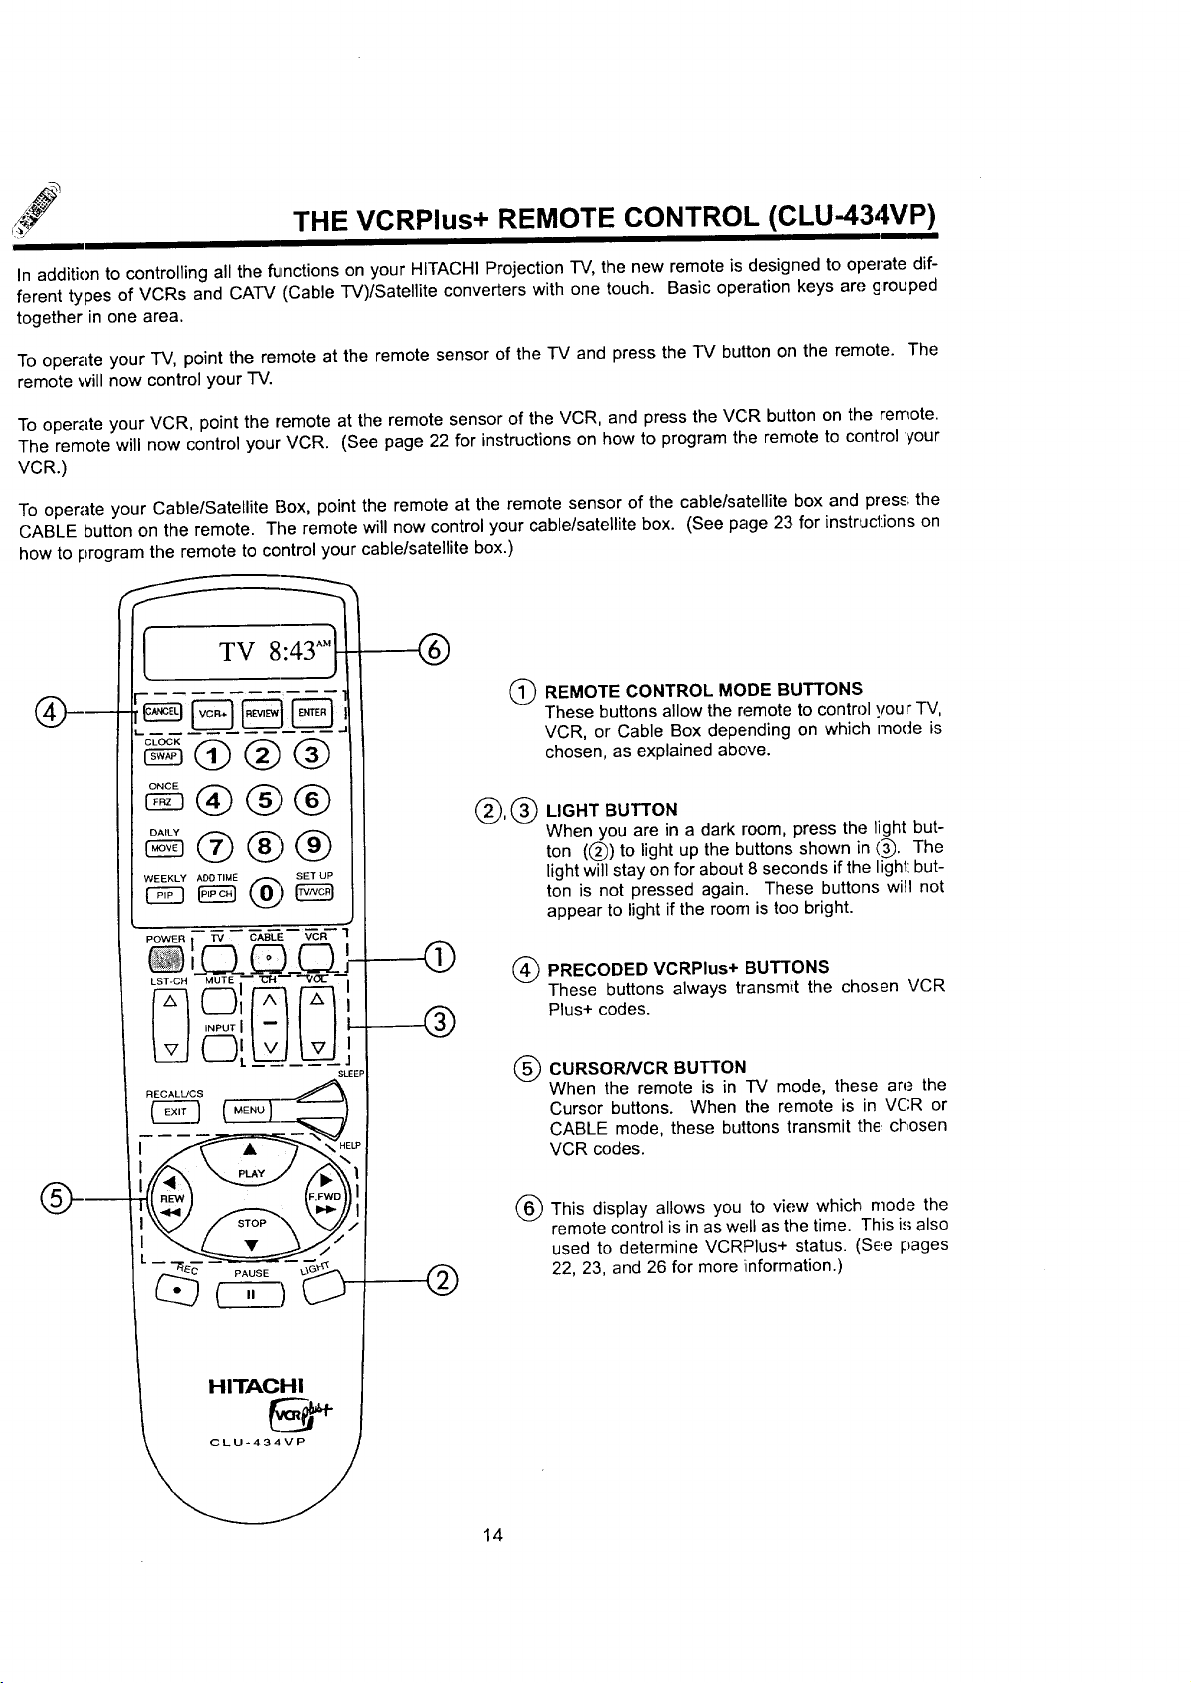
THE VCRPlus+ REMOTE CONTROL (CLU-43,WP)
In addition to controlling all the functions on your HITACHI Projection TV, the new remote is designed to operate dif-
ferent types of VCRs and CATV (Cable TV)/Satellite converters with one touch. Basic operation keys are grouped
together in one area.
To oper_,te your TV, point the remote at the remote sensor of the "IV and press the TV button on the remote. The
remote will now control your "IV.
To operate your VCR, point the remote at the remote sensor of the VCR, and press the VCR button on the remote.
The remote will now control your VCR. (See page 22 for instructions on how to program the remote to control your
VCR.)
To operate your Cable/Satellite Box, point the remote at the remote sensor of the cable/satellite box and press the
CABLE button on the remote. Tile remote will now control your cable/satellite box. (See page 23 for instr,Jcdons on
how to program the remote to control your cable/satellite box.)
TV 8:43 "M
WEEKLY ADO TIME
POWER _ TV CABLE VCR "I
Qt J
w >
SU_EP
®
Q
REMOTE CONTROL MODE BUTTONS
These buttons allow the remote to control _jour "IV,
VCR, or Cable Box depending on which mode is
chosen, as explained above.
®,®
LIGHT BUTTON
When you are in a dark room, press the light but-
ton (@) to light up the buttons shown in @. The
light will stay on for about 8 seconds if the light but-
ton is not pressed again. These buttons will not
appear to light if the room is too bright.
@ PRECODED VCRPlus+ BUTTONS
These buttons always transmit the chosen VCR
Plus+ codes.
CURSORNCR BUTTON
®
When the remote is in TV mode, these are the
Cursor buttons. When the remote is in VCR or
CABLE mode, these buttons transmit the, chosen
VCR codes.
®
This display allows you to view which mode the
remote control is in as well as the time. This is also
used to determine VCRPlus+ status. (See pages
22, 23, and 26 for more information.)
HITACHI
14
Page 15
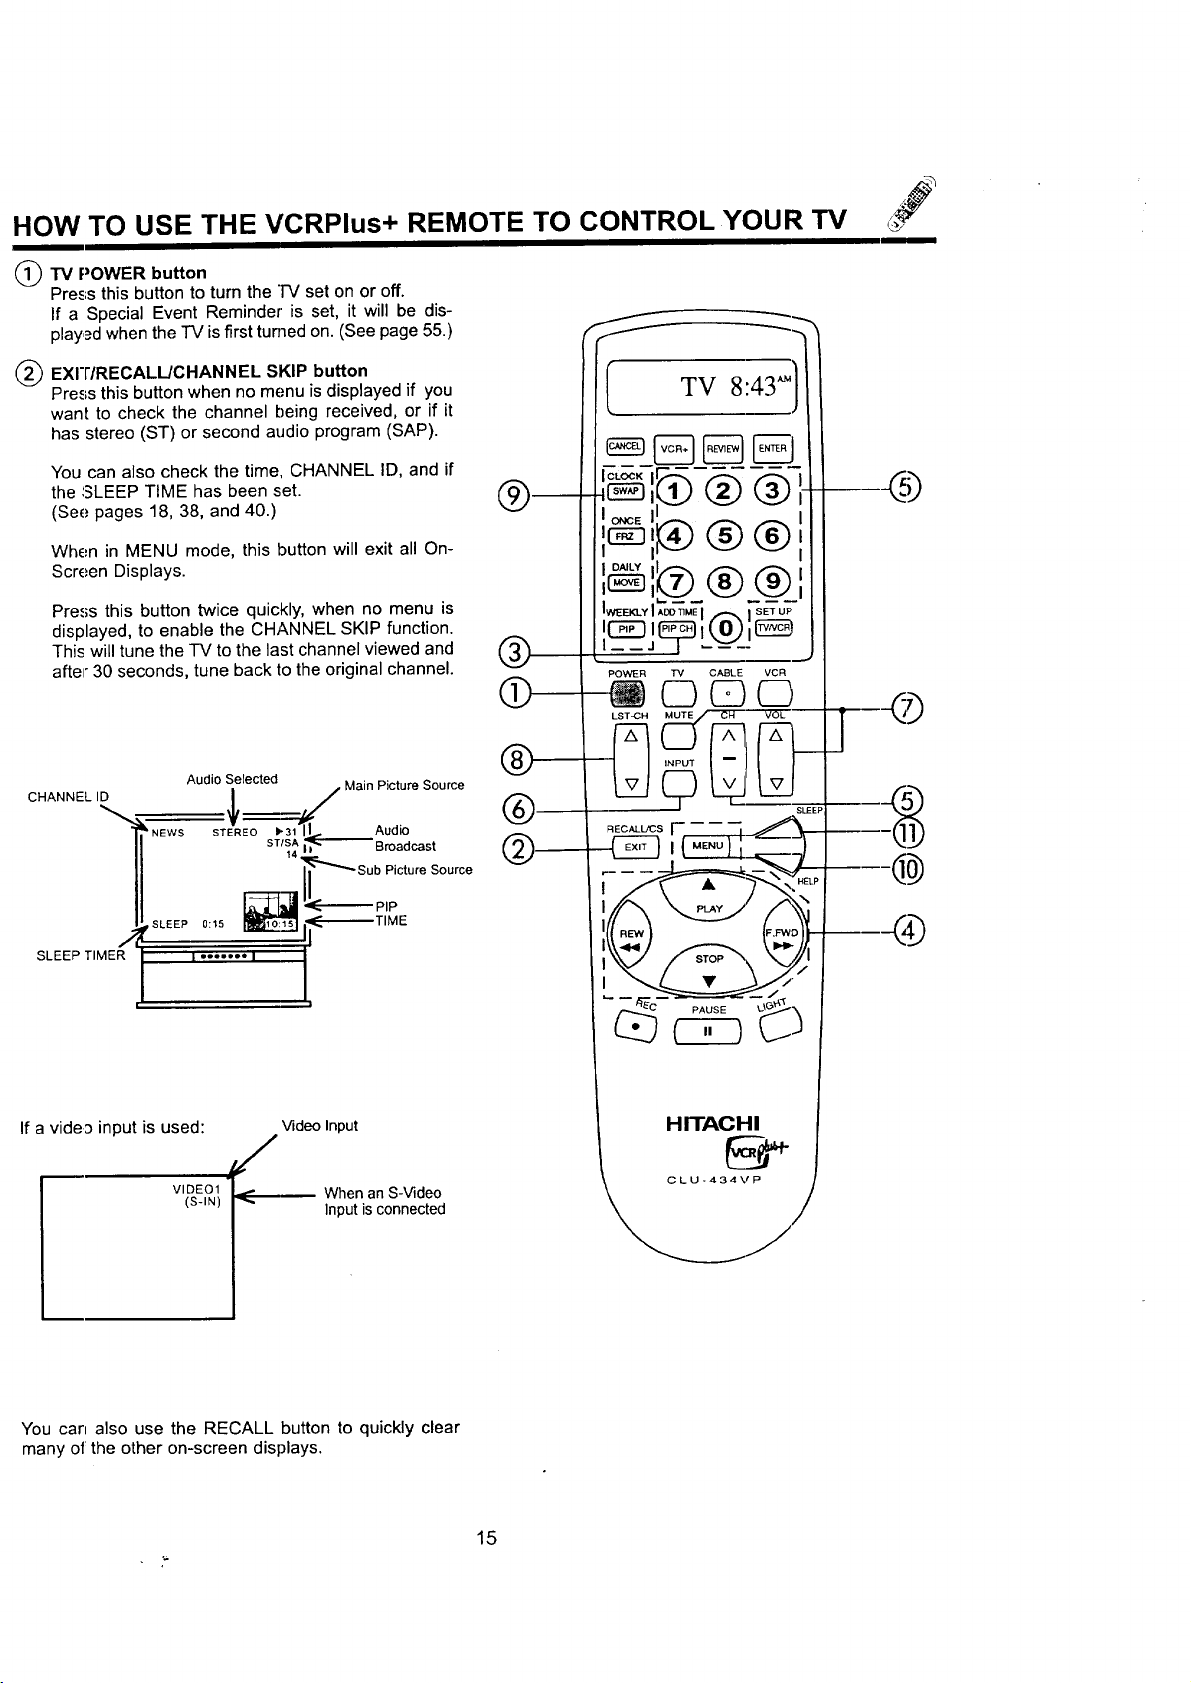
HOW TO USE THE VCRPlus+ REMOTE TO CONTROL YOUR TV
(_l'V POWER button
Press this button to turn the "IV set on or off.
If a Special Event Reminder' is set, it will be dis-
played when the TV is first turned on. (See page 55.)
L"
f
I
(_ EXI'I'/RECALL/CHANNEL SKIP button
Press this button when no menu is displayed if you
want to check the channel being received, or if it
has stereo (ST) or second audio program (SAP).
You can also check the time, CHANNEL ID, and if
the SLEEP TIME has been set.
(See pages 18, 38, and 40.)
When in MENU mode, this button will exit all On-
Screen Displays.
Press this button twice quickly, when no menu is
displayed, to enable the CHANNEL SKIP function.
This will tune the "IV to the last channel viewed and
after 30 seconds, tune back to the original channel.
CHANNELID
SLEEP TIMER
/
Audio Selected
_'1 Ad'
ST/S_ _ Broadcast
_Sub Picture Source
,sLEEP0:,, _ I_--
I'°'''"1 i',
i
i TV 8:43")
®
T%E
PAUSE
If a vide3 input is used: VideoInput
,/
VIDE01 J When an S-Video
(S-IN)
You can also use the RECALL button to quickly clear
many of the other on-screen displays.
Inputisconnected
HITACHI
CLU-434VP
15
Page 16

HOW TO USE THE VCRPlus+ REMOTE TO CONTROL YOUR TV
PIP CH button
Use the PIP CH button to selLectbetween main picture and sub-picture tuning. An arrow next to the channel num-
ber will indicate which channel is being controlled.
MENU, CURSOR buttons
All the On-Screen Display features can be set or adjusted by using these buttons.
The MENU button will start the On-Screen Display.
The CURSOR buttons will highlight functions or adjust and set different features.
CHANNEL SELECTOR buttons
CHANNEL SELECTOR buttons are used to set Family Favorites, Channel Memory, etc..
Enter two or three numbers to select channels. Enter "0" first for channels 1 to 9. For channels 100 and above,
press the 1 button, wait until another dash appears next to the channel display on your "IV, then enter the remain-
ing two numbers using the number buttons.
Channel selection may also be performed by pressing CH up (A) or down (V).
You may also use these buttons for QUICK LIST. Press and hold the CH up (A) or down (V) button arid a win-
dow will appear, allowing you to choose the channel you wish to tune. Release the CH (/k) or (V) button when
the channel you wish to tune is highlighted, and the TV will tune to that channel.
1
I NOTE: The TV may not receive some channels if you are not in the correct SIGNAL SOURCE mode. (See |
@INPUT button
The INPUT button will selert between both antenna signals and the two sets of video input jacks each time the
button is pressed. If the Picture-in-Picture is on, the INPUT button will select between the two sets of video input
jacks and both antenna sources when main channel is chosen with the PiP CH button. If the sub-picture is cho-
sen, the INPUT button will select between the two sets of video input jacks and the ANT A antenna source (ANT
B source cannot be displayed as a PIP sub-picture.)
NOTE:
I ESPN STEREO S T/2SSAI
page 34.)
When ANT A is selected, the channel number in the upper right corner of the screen is in green. When |
ANT B is selected, the channel number is in yellow.
INPUT
©
VIDEO1
(S-IN)
INPUT
VID',_O2
INPUT
©
I
<
J
]
J
16
Page 17
HOW 1"O USE THE VCRPlus+ REMOTE TO CONTROL YOUR TV
I
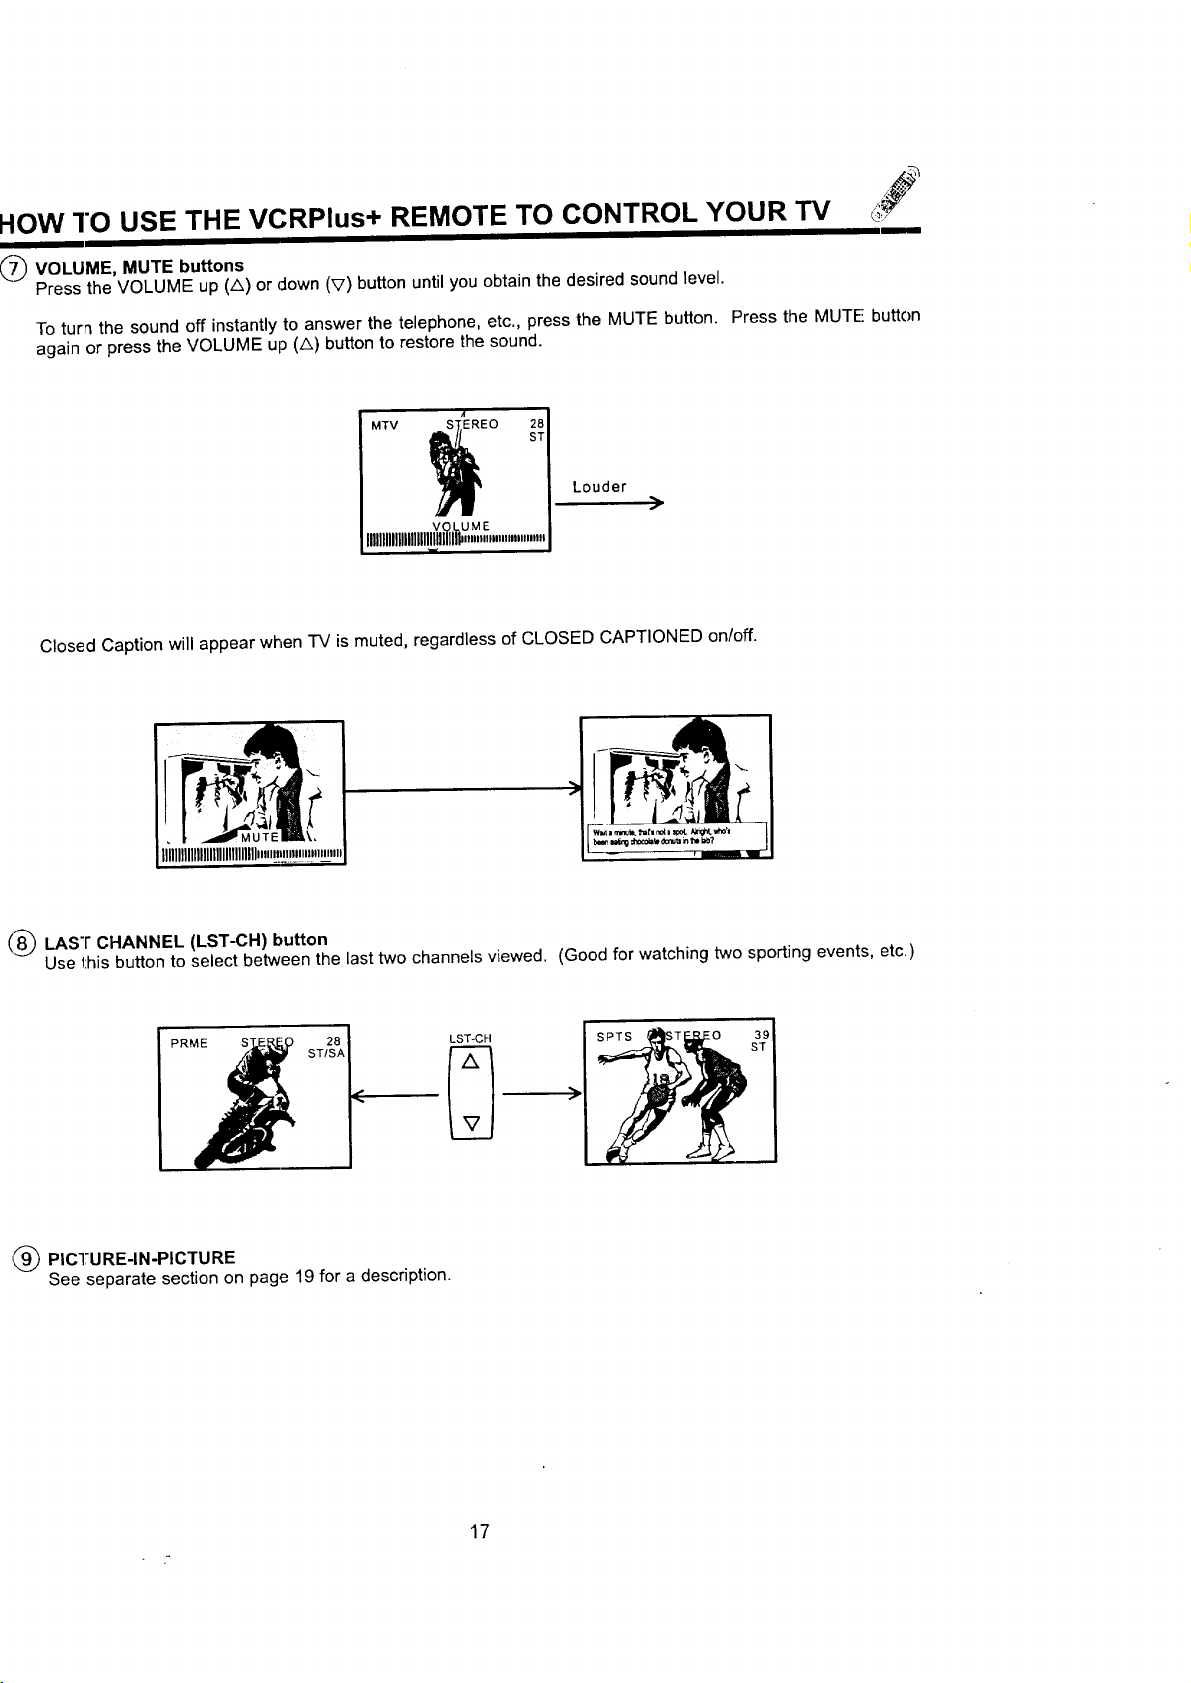
_) VOLUME, MUTE buttons
Press the VOLUME up (A) or down (V) button until you obtain the desired sound level.
To turn the sound off instantly to answer the telephone, etc., press the MUTE button. Press the MUTE button
again or press the VOLUME up (A) button to restore the sound.
ST
I MTV _EO 28
VOLUME
Louder
:)
lllllllllllllllllll_lllllll,""""."".""
Closed Caption will appear when "IV is muted, regardless of CLOSED CAPTIONED on/off.
(,8.8)LAST CHANNEL (LST-CH) button
Use this button to select between the last two channels viewed. (Good for watching two sporting events, etc.)
PRME LST-CH
_) PICTURE-IN-PICTURE
See separate section on page 19 for a description.
)
17
Page 18
_j_ HOW TO USE THE VCRPlus+ REMOTE TO CONTROL YOUR TV
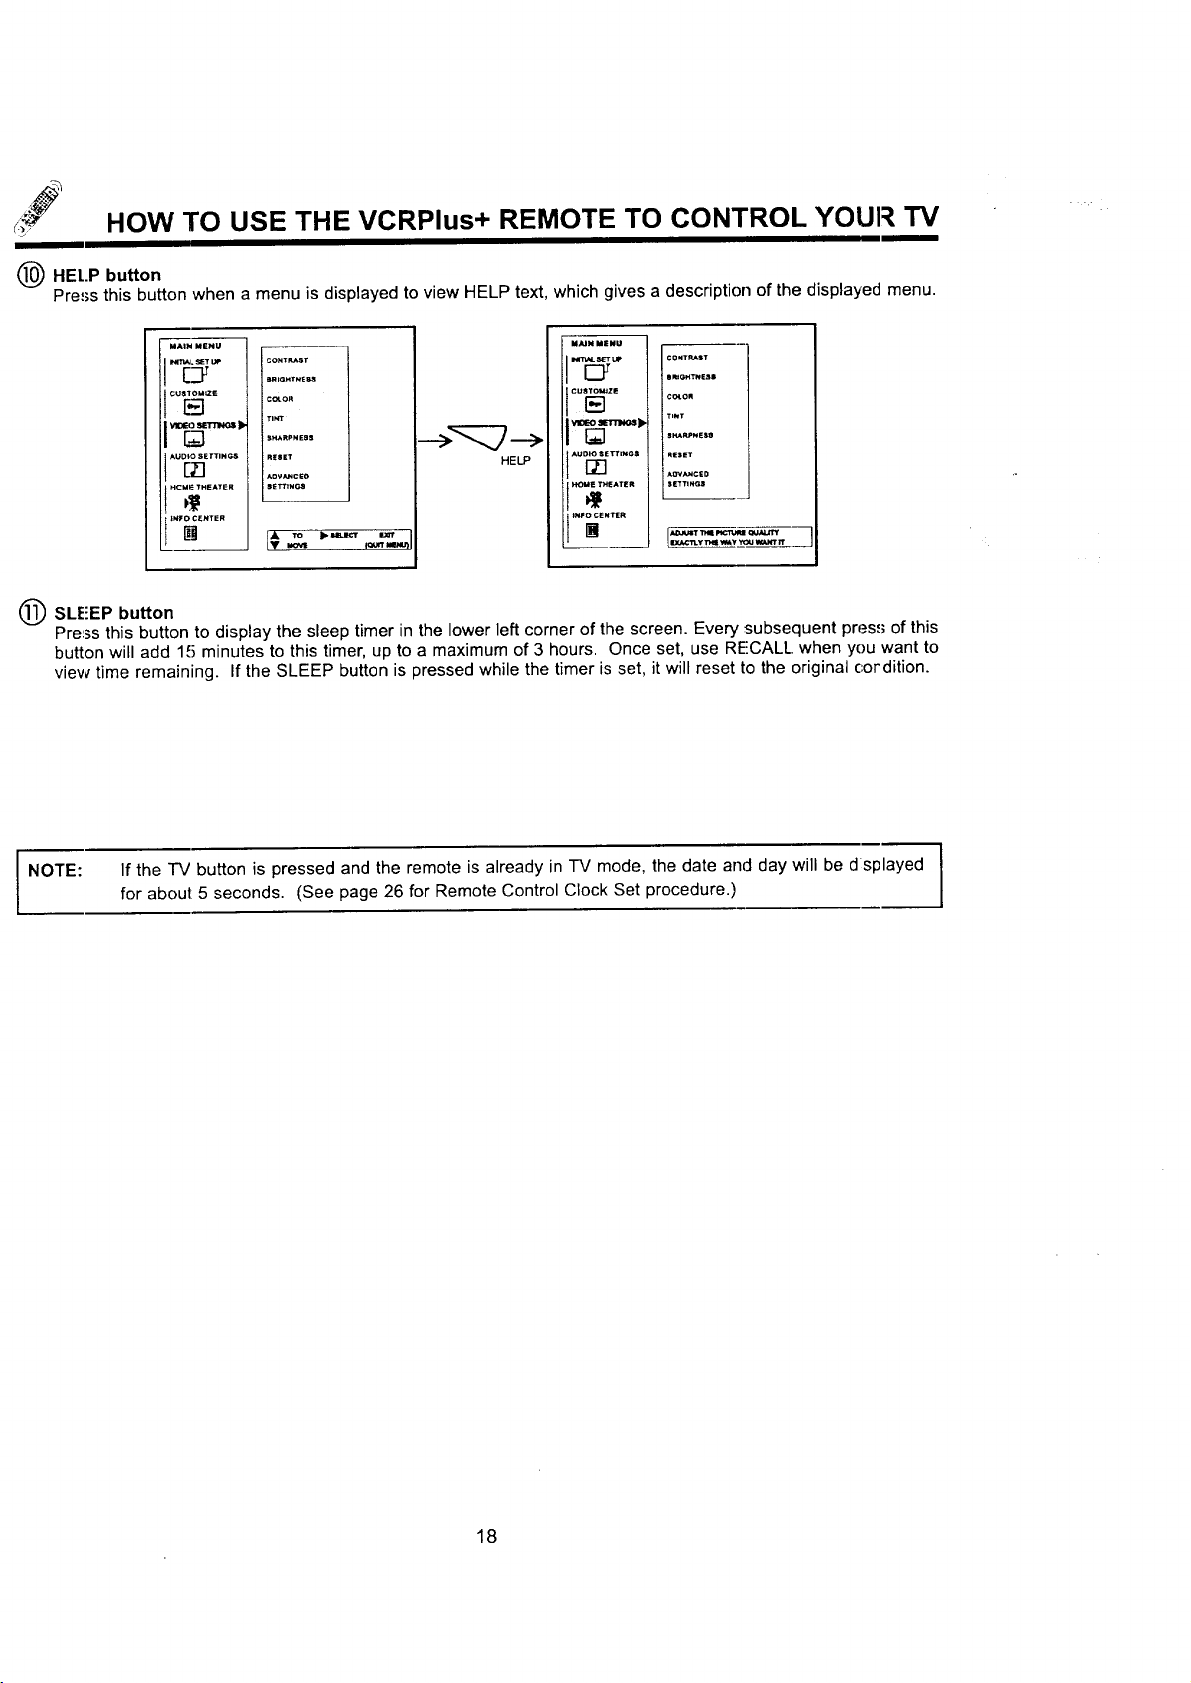
(_ HEI,.P button
Pre'_sthis button when a menu is displayed to view HELP text, which gives a description of the displayed menu.
MAIH MEHU
NT_. SE_UP
_ _rn_slb
HCM_ THEATER
CONTRAST
smm_'r_E_
TIN_
SHARPNESS
RESET
/,OVANCEO
S_TtINC,S
HELP
MAiN MENU
CU_ZE
_NF;ENI_ER
CONTEST
emO_'t_SSS
CO_OR
T;NT
SR_AP._Se
mESET
AOVANC_D
S_NGS
_ SLI:'EP button
Press this button to display the sleep timer in the lower left corner of the screen. Every subsequent pres,,; of this
button will add 15 minutes to this timer, up to a maximum of 3 hours. Once set, use RECALL when you want to
view time remaining. If the SLEEP button is pressed while the timer is set, it will reset to the original cordition.
NOTE:
If the TV button is pressed and the remote is already in TV mode, the date and day will be d splayed /
for about 5 seconds. (See page 26 for Remote Control Clock Set procedure.)
1
J
18
Page 19
:)ICTURE-IN-PICTURE (PIP)
Your HITACHI Projection TV incorporates Dual Tuner technology designed for improved viewing enjoyment. This Dual
Tuner feature allows you to view antenna inputs on both MAIN and PIP sub-pictures simultaneously, with separate tun-
ng control for each. The Dual Tuner can operate with only one input (ANT A only) or two inputs (ANT A and ANT B).
ZkNTA input can be viewed as both the main picture and the sub-picture simultaneously. ANT B can only be viewed
asa main picture. To select between main picture and PIP sub-picture tuning, press the PIP CH button on the remote.
The arrow qext to the channel display will move with every press of the PIP CH button. When the arrow is next to the
top channel display, channel tuning is for the main picture. When the arrow is next to the lower ,channel display, (-han-
nel tuning is for the PIP sub-picture. This method of picture tuning is the same for one antenna input (ANT A only)
and two antenna inputs (ANT A and ANT B).
The Picture-in-Picture feature is convenient when you want to watch more than one program at the same time. You
can watch a TV program while viewing other programs from the ANT A source or any of the video inputs.
k -.
Bad, or TM
®,@-- _®®®
OUTPUT
[ TV 8:43-]
@- _®@@
O- _®®®
???
Back of VCR
HrTAcHI
_t _ .
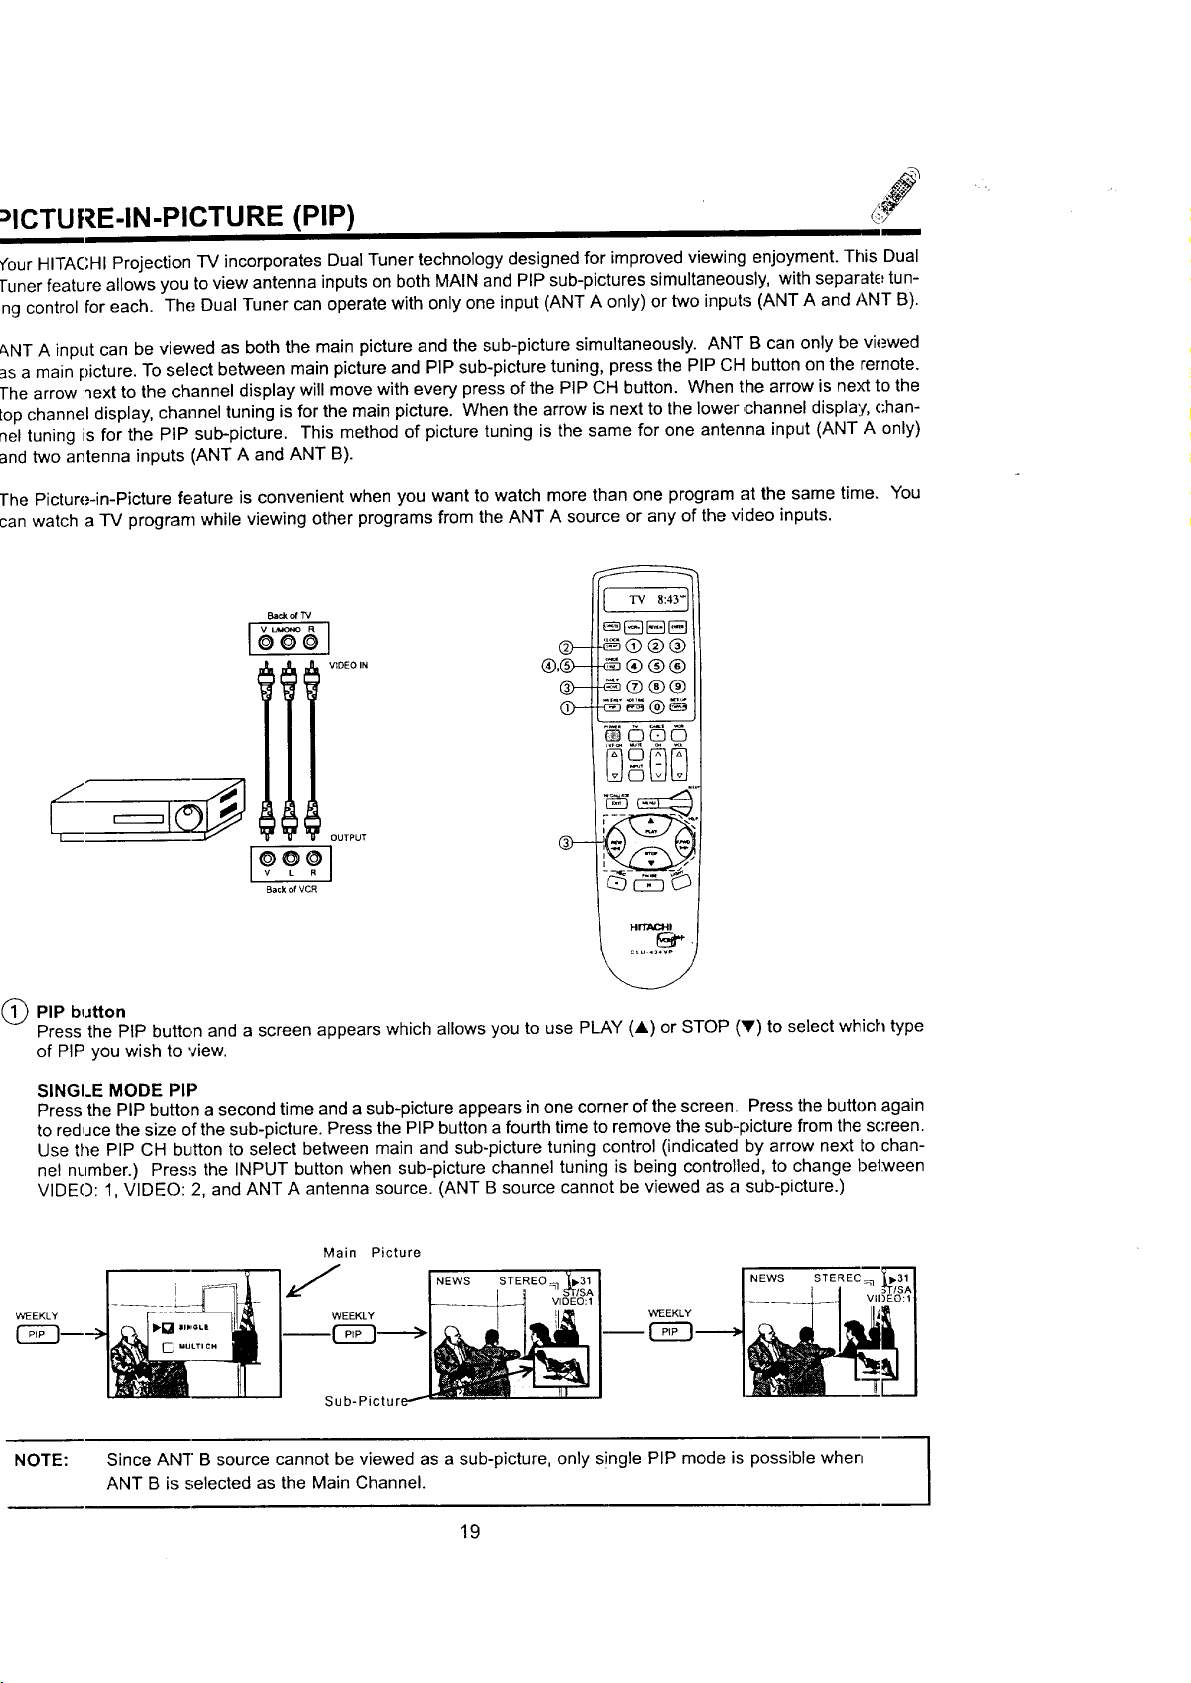
PIP button
Press the PIP button and a screen appears which allows you to use PLAY (A) or STOP (V) to select which type
of PIP you wish to view.
SINGLE MODE PIP
Press the PIP button a second time and a sub-picture appears in one corner of the screen. Press the button again
to reduce the size of the sub-picture. Press the PIP button a fourth time to remove the sub-picture from the screen.
Use the PIP CH button to select between main and sub-picture tuning control (indicated by arrow next to chan-
nel number.) Press the INPUT button when sub-picture channel tuning is being controlled, to change bel_Neen
VIDEO: 1, VIDEO: 2, and ANT A antenna source. (ANT B source cannot be viewed as a sub-picture.)
WEEKLY
NOTE:
Main Picture
NEWS STEREO
WEEKLY
Since ANT B source cannot be viewed as a sub-picture, only s!ngle PIP mode is possible when
ANT B is selected as the Main Channel.
NEWS
19
1
Page 20
PICTURE-IN-PICTURE (PIP)
PICTURE-IN-PICTURE CONT.
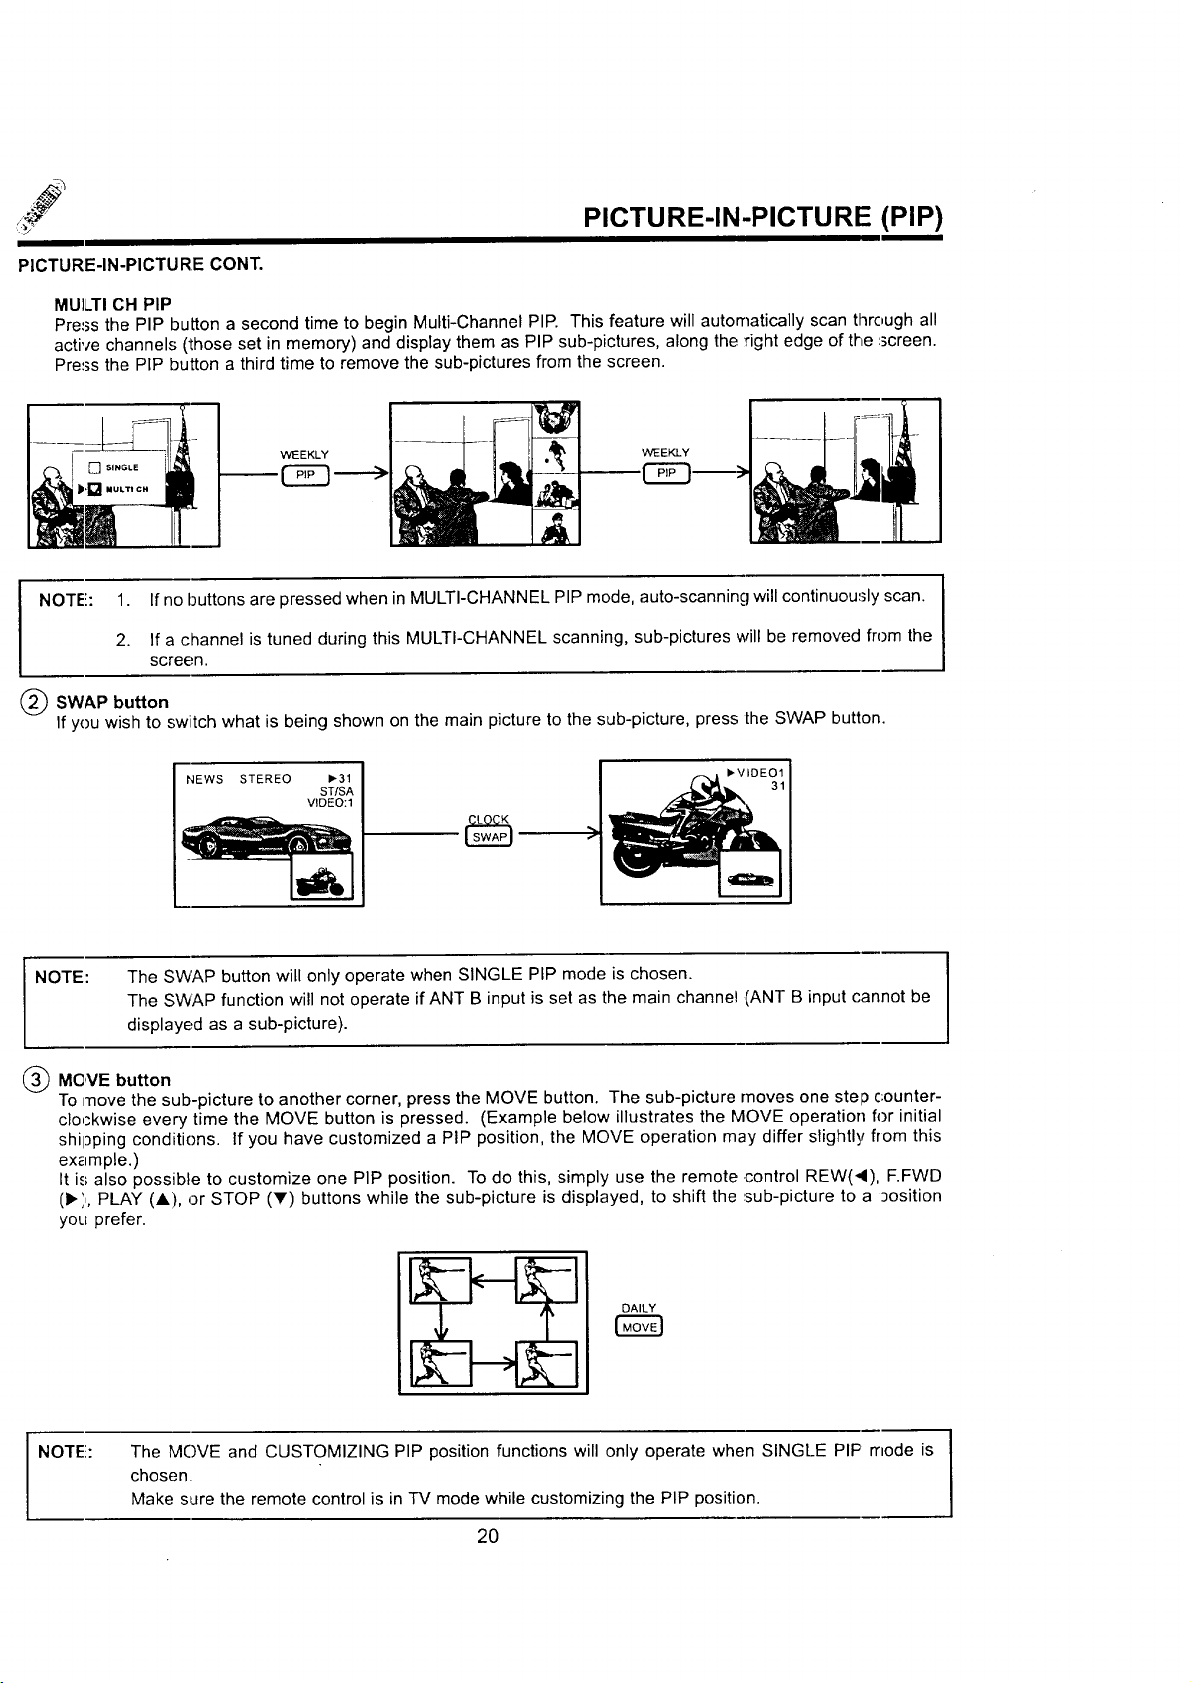
MUI/TI OH PIP
Press the PIP button a second time to begin Multi-Channel PIP. This feature will automatically scan through all
active channels (those set in memory) and display them as PIP sub-pictures, along the right edge of the :_creen.
Press the PIP button a third time to remove the sub-pictures from the screen.
WEEKLY WEEKLY
NOTE!: 1. If no buttons are pressed when in MULTI-CHANNEL PIP mode, auto-scanning will continuously scan.
2. If a channel is tuned during this MULTI-CHANNEL scanning, sub-pictures will be removed from the
screen.
SWAP button
If you wish to switch what is being shown on the main picture to the sub-picture, press the SWAP button.
NEWS STEREO
NOTE: The SWAP button will only operate when SINGLE PIP mode is chosen.
11-31
ST/SA
VIDEO:I
The SWAP function will not operate if ANT B input is set as the main channel .(ANT B input cannot be
displayed as a sub-picture).
(_) MOVE button
To move the sub-picture to another corner, press the MOVE button. The sub-picture moves one step counter-
clockwise every time the MOVE button is pressed. (Example below illustrates the MOVE operation for initial
shil3ping conditions. If you have customized a PIP position, the MOVE operation may differ slightly from this
example.)
It is also possible to customize one PIP position. To do this, simply use the remote .control REW(4), F.FWD
(1_',,,PLAY (A), or STOP (T) buttons while the sub-picture is displayed, to shift the sub-picture to a 3osition
you prefer.
DAILY
NOTE!:
The MOVE and CUSTOMIZING PIP position functions will only operate when SINGLE PIP mode is
chosen
Make s,_rethe remote control is in TV mode while customizing the PIP position.
2O
Page 21

ICTURE-IN-PICTURE (PIP)
II
FREEZE (FRZ) button (With PIP ON)
If you wish to freeze the sub-picture, press the FRZ button. This is convenient when trying to write down the
address for a mail order company, recording statistics for a sporting event, etc. To return the picture to motion,
press the button again.
NOTE:
5_) FREEZE (FRZ) button (With PIP OFF)
Press the FRZ button without a sub-picture and a screen appears which allows you to use PLAY (A.) or STOP
(_') to select which type of FREEZE mode you wish to view.
SINGLE FREEZE
Press the FRZ button a second time to freeze one frame of the picture you are currently viewing. Press this but-
ton again or PIP to return to normal viewing.
STROIBE FREEZE
Press the FRZ button a second time to freeze four frames of the picture you are currently viewing. Press this but-
ton again or PIP to return to normal viewing. This feature is useful for viewing a moving !picture that has rnany
details, for example, a close play in a sporting event or golf swing.
The FREEZE function will only operate when SINGLE PIP mode is chosen.
]
ONCE ONCE
CAUTION: A pattern burn may develop if the sub-picture is left in the same corner permanently. If the
NOTE: 1. Only sound from the main picture can be heard, unless you choose sub-picture audio from HOME
2. Each freeze frame is delayed about 0.1 (1/10) second.
PIP feature is used frequently, occasionally shift the sub-picture to a different comer. You may
also vary its position using the REW (4), F.FWD (1_), PLAY (A), or STOP (V) buttons.
THEATER-WIRELESS SOUND mode and use the TRANSMITTER OUT outputs on the rear panel.
(See page 54.)
21
Page 22

USING THE VCRPlus+ REMOTE TO CONTROL VCR FUNCTIONS
Operating the precoded function for your VCR.
This remote is designed to operate different types of VCRs.
system of your VCR. (Refer to page 25.)
1. Turn ON yourVCR.
2. Aim the remote control at the front of your VCR.
Hold down the VCR button on the remote. After approximately 2 seconds, the message VCR-_ _ will appear in
3.
the remote control display. While still holding down the VCR button, enter the 2 digit preset code that matches
your VCR as shown on page 25. The remote will turn off your VCR when the correct 2 digit presel code is
entered. When this occurs, the remote control is programmed for your VCR. If the VCR does not turn off after 5
seconds, try a different 2 digit preset code.
4.
The remote will now control your VCR.
NOTES:
1. I! your VCR cannot be operated after performing
the above procedures, this means that your
VCR's code has not been precoded into the
remote.
2. Ii1 the unlikely event that your VCR cannot be
operated after performing the above procedures,
please consult your VCR operating guide.
3. The remote control will remember the codes you
have programmed in until the batteries are
removed from the remote control. After replac-
ing the batteries repeat the entire programming
procedure as :stated above.
4. The MENU button will act as the VCR MENU
button for HITACHI VCRs.
5. The SLEEP button will act as your VCR '100'
button if required.
6. The ENTER button will act as your VCR ENTER
button if required.
7. II the VCR button is pressed and the remote is
already in VCR mode, the date and day will be
displayed for about 5 seconds. (See page 26 for
Remote Control Clock Set procedures.)
8. II= the remote has not been programmed for a
VCR and the VCR button is pressed the mes-
sage "Err: SETUP" will be displayed.
You must first program the remote to match the remote
VCR button
Q
This button allows the remote to control your VCR
by setting it to VCR mode.
PRECODED VCR buttons
®
These buttons transmit the chosen precoded VCR
codes.
EXCLUSIVE "IV buttons
®
These buttons are for operating the "IV.
HITACHI
CLU-43,4VP
22
Page 23

USING THE VCRPlus+ REMOTE TO CONTROL
CABLE'/SATELLITE BOX FUNCTIONS
Operating the precoded function for your cable/satellite box.
This remoEe is designed to operate different types of cable boxes and satellite systems. You must first program the
remote to match the remote system in your cable/satellite box. (Refer to page 25.)
1. Turn ON your cable/satellite box.
2. Aim the remote control at the front of your cable/satellite box.
Hold down the CABLE button on the remote. After approximately 2 seconds, the message CAB-_ _ will appear
in the remote control display. While still holding down the CABLE button, enter the 2 digit preset code that match-
es your cable/satellite box as shown on page 25. The remote will turn off your cable/satellite box when the cor-
rect 2 digit preset (:ode is entered. When this occurs, the remote control is programmed for your cable/satellite
box. If the cable/satellite box does not turn off after 5 seconds, try a different 2 digit preset code.
The remote will now control your cable/satellite box.
NOTES:
1. If your cable/satellite box cannot be operated
after performing the above procedures, this
means that your cable/satellite box code has not
bee7 precoded into the remote.
2. In the unlikely event that your cable/satellite box
cannot be operated after performing the above
prooedures, please consult your cable/satellite
box operating guide.
3. The remote control will remember the codes you
have programmed in until the batteries are
removed from the remote control. After replac-
ing the batteries repeat the entire programming
procedure stated above.
4. The SLEEP button will act as your cable/satellite
box '100' button if required.
5. The ENTER button will act as your cable/satel-
lite box ENTER button if required.
6. If the CABLE button is pressed and the remote
is already in CABLE mode, the date and day will
be displayed for about 5 seconds. (See page 26
for Remote Control Clock Set procedure.)
7. If the remote has not been programmed for a
cable box and the CABLE button is pressed, the
me.';sage "ERR: SETUP" will be displayed.
CABLE button
This button allows the remote to control your cable
box by setting it to CABLE mode.
PRECODED CABLE/SATELLITE BOX buttons
These buttons transmit the chosen precoded
CABLE/SATELLITE codes.
EXCLUSIVE TV buttons
These buttons are for operating the -IV.
PRECODED VCR buttons
These buttons transmit the chosen precoded VCR
codes.
HITACHI
CLU-434VP
23
Page 24

USING THE VCRPlus+ REMOTE TO CONTROL
CABLE/SATELLITE BOX AND VCR FUNCTIONS
In addition to controlling all the functions on your HITACHI Projection TV, the new VCRPlus+ remote is desi!;ined to
operate different types of VCRs and CA'I'V (Cable TV)/Satellite converters with one touch. The procedures for pro-
grammirg the remote to control your Cable/Satellite box or VCR have been explained on the previous pages. (See
pages 22 and 23.)
However, many Cable/Satellite boxes and VCRs vary in control functions. For example, in order to change channels,
some VCRs require the user to press an ENTER button after pressing the digit keys. Your VCRPlus+ remote control
allows you to program the remote for these varying control functions, based upon your specific needs.
The following procedure allows you to program the VCRPlus+ remote for your specific needs. The table below gives
a description of each special function which can be programmed into the remote.
1. Press the VCRPlus+ button on the remote.
2. Enter the 4 digit FUNCTION CODE for the special function you wish to enable, according to the table below.
3. Press the ONCE_/[FRZ] button on the remote.
4. Repeat steps 1-3 until all special functions you wish to enable have been programmed into the remote.
5. Press the IV button on the remote to return to normal operation.
If your Cable/Satellite box or VCR does not require these special functions, ,or you do not wi,._hto
I NOTE::
enable these functions, it is not necessary to follow these procedures.
1
FUNCTION CODE
0090
0091
OO92
0093
0O94
OO8O
0081
0082
0083
0084
I FUNCTION DESCRIPTION
User has set the cable brand number but maywish to change the VCR
channel instead of the cable box channel in VCRPlus+ recording.
(See page 29 for details.)
For some VCRs (or Cable boxes), after pressing the digit keys to change the
channel number, the userwill need to press the ENTER keyto confirm the
channel number has been changed. This function enables the remote to automatically
send the ENTER IR code after the channel has been changed.
This function will disable the CH100 function in 0092)
Automaticallysends out the CH100 IR code when a 3 digit channel is entered.
This function will disable ENTER code in 0091)
When a two digit channel is changed, some VCRs (or Cable boxes) mayrequire
,a longer separation time between the two digits. This function makes the separaion
ibetween two digits to be 1 second.
When a two digit channel is changed, some VCRs (or Cable boxes) may require
a shorter separation time between the two digits. This function makes the separation
between two digits to be 0.25 second.
Clear all special function settings.
Clear the 0091 function.
Clear the 0092 function.
'Clear the 0093 function.
Clear the 0094 function.
* Special functions 0091,0092, 0093 and 0094 will be cleared if a new VCR brand number is set.
24
Page 25

CABLE AND VCR CODES
CABLE BRAND .......... CODES
ABC ........... 01, 03, 05, 06, 09,
................. 11, 12, 14, 30
Allegro ..................... 85
Antronix ................ 44
Archer ................ 28, 40, 44
Belcor ...................... 31
Cable Star ................... 31
Century ..................... 40
Citizen ...................... 40
Colour Voice .............. 19, 25
Comtronics ............... 29, 34
Contec ..................... 15
Dae Ryung .................. 06
Eastern ..................... 02
Electricord ................... 37
Everquesl: ................... 13
Focus ...................... 57
Garrard ..................... 40
GC Electronics ............ 31, 44
GE ........................ 67
Gemini ............. 13, 32, 36, 46
General Instrument ...... 09, 24, 51
GoldStar ................. 29, 39
Hamlin ....... 08, 16, 27, 49, 50, 80
Hitachi ...................... 09
Hytex ...................... 05
Jasco .40
Jerrold ......... 03, 09, 10, 12, 13,
................. 30, 51, 75, 83
Macom ..................... 26
Magnavox ................ 21, 62
Memorex .................... 00
Movie Time ............ 35, 37, 42
NSC ............ 35, 36, 42, 68, 69
Oak .................. 05, 15, 47
Panasonic ............. 00, 17, 38
Paragon ................. 00, 76
Philips ....... 19, 21, 22, 23, 24, 25,
........... 40, 46, 54, 59, 79, 81
Pioneer ............... 18, 39, 65
Popular Mechanics ............ 57
Pulsar ...................... 00
RCA ....................... 17
Realistic .................... 44
Recoton .................... 57
Regal .............. 16, 49, 50, 53
Regency ................. .:_ .02
Rembrandt ............... uu, ,_b
Runco ...................... 00
Samsunq ................. 29, 39
Scientifi_ Atlanta . .04, 06, 14, 52, 86
Signal . ; ................. 13, 29
Signatur_ .................... 09
SL Marx .................... 29
Sprucer .................. 17, 55
Starcom ............... 03, 13, 30
Stargate ................. 13, 29
Starquest 59
Starsight _i_iiii_i_158, '13
Sylvania .01
Teleview .29
Texscan .................. 01, 71
Tocom ................ 10, 11, 33
Toshiba ..................... 00
Tusa ....................... 13
TV86 ....................... 35
Unika .................... 40,44
United Artists ................. 05
United Cable ................. 03
Univers_LI ..... 28, 31, 37, 40, 43, 44
Videoway ................... 48
VID Tech .................... 41
Viewstar ...21, 34, 35, 45, 59, 72, 79
Zenith ............. 00, 56, 64, 74
Zentek ...................... 57
SATELLITE BRAND ....... CODES
Drake ...................... 23
General Instrument ............ 61
Jerrold ................... 61, 62
Macom ..................... 73
Primestar ................. 61, 62
RCA .................... 60, 82
Sony ....................... 63
United Satellite ............... 77
Zenith Drake ................ 66
Zenith ................... 70, 78
TELEVISION BRAND ...... CODES
Hitachi ...................... 00
Megatron .................... 00
VCR BRAND ............ CODES
Admiral ..................... 61
Adventura ................... 00
Aiko ....................... 50
Aiwa ....................... 00
Akai ............ 14, 23, 49, 60, 67
American High ................ 09
Asha ....................... 48
Audio Dynamics .............. 04
Audiovox .................... 10
Beaumark ................... 48
Bell & Howell .............. 30, 55
Brandt ...................... 38
Broksonic ........ 33, 37, 43, 51, 52
Calix ....................... 10
Canon ...................... 09
Capehart .................... 05
Carver ...................... 28
CCE .................... 27, 50
Citizen ................... 10, 50
Colt ........................ 27
Craig .............. 10, 19, 27, 48
Curtis Mathes .......... 09, 14, 22
Cybernex ................... 48
Daewoo ...03, 05, 17, 29, 50, 54, 70
Daytron .................. 05, 70
DBX ....................... 04
Dynatech .................... 00
Electrohome ................. 10
Electrophonic ................ 10
Emerex ..................... 06
Emerson . .00, 01, 10, 16, 23, 32, 33,
....... 37, 40, 41, 43, 44, 45, 50,
....................... 51, 52
Fisher .......... 19, 21, 25, 30, 55
Fuji ..................... 07, 09
Funai ........................ 00
Garrard ...................... 00
GE ................ 09, 22, 24, 39
Goldstar ............... 04, 10, 11
Go Video .................... 56
Go Video Deck 1 .............. 62
Go Video Deck 2 ............... 63
Gradiente ................... 00
Harley Davidson .............. 00
Harman/Kardon ............... 11
Harwood .................... 27
Headquarter ................. 18
HI-Q ....................... 19
Hitachi .......... 14, 15, 24, 31, 57
Jensen ..................... 14
JVC ......... 02, 04, 14, 25, 26, 58
KEC .................... 10, 50
Kenwood ........... 04, 11, 14, 26
KLH ....................... 27
Kodak .................... 9, 10
Lloyd ....................... 00
Lloyd's ...................... 40
Logik ....................... 27
LXI ........................ 10
VCR BRAND ............ CODES
cont.)
agnavox ....... 09, 12, 28, 32, 34
Magnin ................ 48
Marantz i_ ............... 09, 28
Marta ....................... 10
Matsushita .................... 09
MEI ......................... 09
Memorex .......... 00, 09, 10, 12,
.............. 18, 19, 20, 30, 48
MGA .................... '16, 23
MGN Technology .............. 48
Minolta .................. 15, 31
Mitsubishi ..... 16, 23, 26, 36, 49, 59
Montgomery Ward .......... 13, 69
Motorola .................. 09, 20
MTC ..................... 00, 48
Multitech .................. 00, 27
NEC ......... 04, 11, 13, 14, :26, 30
Nikko ........................ 10
Noblex ...................... 48
Olympus ................. :_9,47
Optimus ............... 10, 20, 30
Orion ....................... 51
Panasonic .... 09, 35, 46, 47, 53, 66
Penney .... 09, 10, 11, 13, 15, 21, 48
Pentax ................. 15, 24, 31
Philco ...................... 09
Philips ................. 09, 28, 32
Pilot ....................... 10
Pioneer .................. 26, 65
Portland .................. 05, 70
Protec ...................... 27
Pulsar ...................... 12
Quarter ..................... 18
Quartz ...................... 18
Quasar ..................... 09
Radio Shack .............. 00, 10
Radix ...................... 10
Randex ..................... 10
RCA ...... 15, 22, 24, 31, 34, 39, 42
Realistic ........ 00, 09, 10, 18, 19,
................. 20, 25, 30, 48
Ricoh ...................... 08
Runco ...................... 12
Samsung ............... "11, 17, 48
Sanky ................... 12, 20
Sansui ................... 14, 26
Sanyo .18, 19, 30, 48, 55
Scott . ".".". .'i 6," I"-T,32, 33, 37, 43, 44
Sears ........... 09, 10, 15, 18, 19,
................. 21,25, 30, 31
Sharp ................... 20, 61
Shintom ..................... 27
Shogun ..................... 48
Signature 2000 ............ 13, 69
Singer ...................... 27
Sony .............. 06, 07, 08, 09
STS ....................... 15
Sylvania ......... 00, 09, 16, 28, 32
Symphonic ................... 00
Tatung ................... 04, 14
Teac .................. 00, 04, 14
Technics ................. 09, 35
Teknika ............ 00, 09, 10, 64
Telefunken ................... 38
TMK .................... 40, 48
Toshiba ............ 16, 17. 25, 44
Totevision ................. 10, 48
Unitech ...................... 48
Vector ...................... 17
Vector Research ........... 11, 13
Video Concepts ......... 13, 17, 23
Videosonic .................. 48
Wards ....... 00, 09, 15, 19, 20, 22,
................. 27, 34, 44, 48
XR-1000 .............. 00, 09, 27
Yamaha .................. 04, 11
.Zenith .......... 07, 08, 12, 25, 68
25
Page 26

USING THE VCRPlus+ FUNCTIONS
The VCRPlus+ featurE."makes timed recordings a snap. You do not need to enter the specific channel, date, and time
of the program you wish to record. Instead, all you need to do is enter the programs PlusCode (a number of up to
eight digits). This special code is easy to find in your favorite TV program guide or daily newspaper.
Before using the VCRPlus+ function, it is necessary to set the remote control clock as well as assign your local broad-
cast and cable channels to the VCRPlus+ channel codes. The remote should already be programmed to control your
VCR. (See page 22.)
REMOTE CONTROL CLOCK SET
1. Pre.'_sthe VCR+ button on the remote control.
Pre,_s the CLOCK button on the remote and the
following is displayed:
Enter the hour by pressing the digit buttons on the
remote.
Press the ENTER button on the remote and the
following is displayed:
5.
Enter the minute by pressing the digit buttons on
the remote.
6. Pre_s the ENTER button on the remote. Then
press the '1' button for AM or the '2' button for PM
and the following is displayed:
7. Enter the month by pressing the digit buttons on
the remote. (01-January, 02-February, etc.)
Press the ENTER button on the remote and the fol-
8,
lowing is displayed:
g.
Enter the day by pressing the digit buttons on the
remote.
10. Press the ENTER button on the remote and the fol-
lowing is displayed:
11. Enter the last two numbers of the year by p'essing
the digit buttons on the remote.
12. Press the ENTER button on the remote and the
time is now set and displiayed. Remote Control
Clock Set is now complete.
NOTE:
If the batteries are removed from the VCRPlus+ remote control, it may be necessary to repeat the /
Remote Control Clock Set procedure.
VCRPlus+ CHANNEL SET UP
Once the Remote Control Clock Set procedure is com-
plete, it is necessary to assign your local broadcast and
cable channels to the VCRPlus+ channel codes.
To begin, it is necessary to get a copy of a publication
that carries the VCRPlus+ Guide Channel codes in your
area. Your local TV program guide or Sunday newspa-
per TV section should carry these codes, which are two
or three digit numbers located next to each station. (If
you have cable, you may also need to get a copy of your
cable company channel line-up.)
See example to the right.
26
Broadcast Stations
Los Angeles
KCBS (CBS) 02 _
KNBC (NBC) 04
Palm Springs
KMIR (NBC) 36
Cable Stations
{_ Home Box Office 33;
(_ Lifetime 48
(_ Cinemax 45
(_ Showtime 41
The Movie Channel 58
{_ USA Network 44
Sample tetevision listing showing
guide channel numbers.
GUIDE
CH
1
]
Page 27

JSING THE VCRPlus+ FUNCTIONS
I
1. Look at column 1 of the chart to the right. Compare
the stations in column 1 with those in your local "IV
guide or cable company channel line-up. List all
stations you receive in the blank lines of column 1.
2. In colcmn 2, write in the corresponding VCRPlus+
guide channel codes found in your local TV guide
or cable company channel line-up.
3. In column 3, list the channel number on which you
actually receive each station, according to your
local TV guide or cable company channel line-up.
4. You are now ready to assign your local broadcast
and cable channels to the VCRPlus+ channel
codes.
Press the VCR+ button on the remote control and
the following is displayed:
5. Press the SETUP button on the remote and the fol-
lowing is displayed:
Column1
CableandBroadcast
Stations
(call letters)
Column 2
VCRPlus+
Assigned
Channel
(Guide CH)
Column 3
Your Home
Channet
(TV C',H:i
6. Refer to the chart where you have entered numbers
in column 2 and column 3, corresponding to each
local broadcast or cable station. Using the digit but-
tons on the remote, enter the two digit numbers
from column 2 (Guide CH).
7. Press the ENTER button on the remote.
8. Using the digit buttons on the remote, enter the
number from column 3 (IV CH).
9. Press the ENTER button on the remote.
10. Repeat steps 6 through 9 until all rows on your
chart have been completed. (All stations are pro-
grammed.)
11. Repeatedly press the REVIEW button on the
remote to review each entry you have programmed
into the remote. You have reviewed all assigned
station once the following is displayed:
12. If you wish to delete an entry, press REVIEW until
the entry appears, then press the CANCEL button
on the remote one time. Now press the ENTER
button on the remote. The entry has now been
deleted.
13. Once all stations have been assigned and
reviewed, press a remote control mode button (TV,
Cable, or VCR) or ENTER to return the remote to
normal operation.
BroadcastStations
ABC
CBS
NBC
FOX
PBS
NOTE:
1. Be sure to assign your local broadcast and cable
channels to the VCRPlus+ channel code,'_ or your'
VCR will record a different channel than the oqe you I
intended. If the number in column 2 matches the
number in column 3 (VCRPlus+ guide channel code
and actual TV channel are the same), it is not nec-
essary to set up that channel according to the above
procedure. Also, these stat ons w not be shown
upon REVIEW because they are default settings.
2. You can skip this channel setup for any station you
do not plan to record.
3. Only one -IV channel can be programmecl for each!
VCRPlus+ Guide Channel.
4. If the batteries are removed from the VCP,Plus+
remote control, it may be necessary to rep,_at the
VCRPlus+ Channel Set Up procedure.
27
Page 28

USING THE VCRPlus+ FUNCTIONS
USING VCRPlus+ TO RECORD A PROGRAM
Once the Remote Control Clock Set has been set, the remote has been programmed for your VCR, and the
VCRPlus+ channel set up is complete, you may take advantage of this quick and easy method of recording.
To begin, it is necessary to get a copy of a publication that carries the VCRPlus+ PlusCodes. These special
PlusCodes can be found in your favorite TV program guide or newspaper. Below is a sample program listing with
PlusCo,-les next to each program. 10:30 Q_ GOLDENGIRLS(CC) 5599661286
Awaiting the results of an HIV test Rose (Betty PlusCodes
White) has an agonizing 72 hours to kill--if the
uncertainty doesn't kill her first, f'"_
DENNIS MILLER 60 min 854809 / /
MOTORWEEK '92 65064 /
JOY OF MUSIC 69828 ,/
NIGHTLINE (CC)- Ted Koppel 631151 _t/
STARTREK 60 min. 229199
1. Check your TV program guide for the PlusCode of the program you wish to record.
2. Press the VCR+ button on the remote control.
3. Enter the PlusCode found in step 1, using the digit buttons on the remote. If an error is made, press the CAN-
CEL button and re-enter the PlusCode.
4. You must now decide if you want the program to be recorded ONCE (one time only), DAILY (every day), or
WE'EKLY (once a week). Press the button on the remote which corresponds to your choice.
5. The remote control will display program information depending upon which mode was chosen in step 4.
ONCE: date of program, program guide channel, program time
DALLY: DA program guide channel, program time
WEEKLY: day of program, program guide channel, program time
6. Review the program information to make sure it matches the program you wish to record. If it does, then the
remote has been programmed correctly and the display will time-out after about 5 seconds. If it does nDt, press
the CANCEL button on the remote to cancel the entry.
7. Repeat steps 3 through 6 if you wish to program the remote to control more than one _rogram.
8. Once the remote has been programmed with the correct PlusCodes, press a remote control mode button (-IV,
CABLE, or VCR) to return to normal operation.
REVIEW A PROGRAM
Occasionally you may wish to review the VCRPlus+ programs you have entered in the remote control for recording.
1. Press the VCR+ button on the remote control.
2. Repeatedly press the REVIEW button on the remote to review each recording entry.
3. Once all recording entries have been viewed, 'END' will be shown in the remote control display. Press a remote
control mode button (TV, CABLE, or VCR) or the CANCEL button to return the remote to normal operation.
ADD TIME TO PROGRAM
Sometimes you may wish to add time to increase your total recording time. For example, you may specify additional
time when recording sporting events, to allow adequate recording time.
1. Press the VCR+ button on the remote control.
2. Press the REVIEW button on the remote until the program you wish to add time is displayed.
3. Press the ADD TIME button on the remote. Time will be added in 15 minute increments (up to a maximum of
4 hrs., 15 rains.) with each subsequent press of the ADD TIME button.
4. Press the ENTER button to set the added time. It will be entered automatically if no button is pressed for about
5 seconds.
5. Repeat steps 2 through 4 to add time to additional programs.
6. Press a remote control mode button (TV, CABLE, or VCR) to return the remote to normal operation.
NOTE:
When reviewing the VCRPlus+ programs entered in the remote control, you will notice one or several
dashed lines under the date displayed. Each dash represents 1hour or portion thereof.
(i.e., 30 minute program = 1 dashed line, 1 hour 15 minute program = 2 dashed lines.)
28
Page 29

USING THE VCRPlus+ FUNCTIONS
I
DELETE A PROGRAM
You may occasionally wish to delete a program which has been entered into the remote control for recording.
1. Press the VCR+ button on the remote control.
2. Press the REVIEW button on the remote until the program you wish to delete is displayed.
3. Press the CANCEL button on the remote, then 'CANCELLED' will be shown in the remote control display.
4. Repeat steps 2 and 3 to delete additional programs.
5. Press a remote control mode button ('IV, CABLE, or VCR) to return the remote to normal operation.
NOTE:
1. If the program information displayed on the remote does not match the program you wish to record, the wrong
PlusCode has been entered. Check your TV program guide and repeat the above procedure. If the prograrn infor-
mation is still incorrect, make sure the VCRPlus+ Channel Set Up procedure has been completed. (See page 26.)
2. Some stations may have two VCRPlus+ codes. Enter the code which corresponds to the channel on which you
receive the station. Use the REVIEW function (see page 28) to make sure the information programmed into the
remote matches the program you wish to record.
3. The program guide channel displayed with program information on the remote should match the ('olJmn 2
number (page 27) for the station you wish to record.
4. It will not be possible to use this VCRPlus+ record function if the remote control clock is not set or the remote
has not been programmed for your VCR.
5. Make sure there is a blank tape in your VCR for recording.
6. When the remote is programmed to control your VCR only or it controls your VCR and cable box but function
code 0090 has been enabled (see page 24):
• VCR should be off.
• Remote should be aimed at your VCR.
• At the program Start Time, the remote will power on the VCR, tune the correct VCR channel, and start recording.
• .Atthe program End Time, the remote will stop recording and power off the VCR.
7. When the remote is programmed to control your VCR and cable box:
• Cable box should be on.
• VCR should be off.
• Remote should be aimed at your VCR and cable box.
• At the program Start Time, the remote will tune the correct cable box channel, power on the VCR. aqd start
recording.
• At the program End Time, the remote will stop recording and power off the VCR.
8. If 'CLASH' is di._;played when entering a VCRPlus+ program, another program is scheduled for re,sording at
that time.
9. If you enter a program recording mode (ONCE, DAILY, or WEEKLY) which is invalid, the message "Err: CODE"
will be displayed. (i.e., you choose DAILY for a program which is on only once a week ',
10. If recording is manually stopped before VCRPlus+ recording End Time, the remote control will remain in record
mode and turn the VCR off at End Time. To prevent this, delete the program using the: delete procedL_re.
29
Page 30

u ..T COSO
I
1. Press MENU on the remote control to display the different features on your HITACHI Projection TV.
2. Press REW (4), F.FWD (,), PLAY (A), or STOP (V) to
highlight a different feature.
3. Press EXIT on the remote control to quickly exit from a menu.
4. Press HELP on the remote control when a menu is displayed,
and text will appear giving a description of that menu.
This part of the screen shows
what selections are available.
. l
I_ MAIN MENU
INITIAL SET UP
_2
CUSTOMIZE
[]
VIDEO SETTINGS
[]
AUDIO SETTINGS
[Z]
HOME THEATER
S!_EE'>
INFO CENTER
[]
V[VMA TO Exn" 7_,"
O_ (eurr_Nu) l _-
I oooooool
This part of the screen shows which
remote control buttons to use.
30
Page 31

ULTI .TEC OSD
INITIAL SET UP
CUSTOMIZE
VIIDEO SETTINGS
MENU LANGUAGE
PLUG &PLAY
SIGNAL SOURCE
AUTO CHANNEL SET
CHANNEL MEMORY
CHANNEL LIST
CLOCK SET
CONVERGENCE
IADJUST
CHANNEL ID
VIDEO ID
FAMILY FAVORITES
CHILD LOCK
4 EVENT PROGRAM
AUTO LINK
CLOSED CAPTION
MENU BACKGROUND
CONTRAST
BRIGHTNESS
COLOR
TINT
SHARPNESS
RESET
ADVANCED
SETTINGS
Choose English, French, or Spanish text.
Optimum hook up for your system.
Select Antenna or CableTV.
First time set up for channel buttons.
Channel buttons, add, skip
Check channel name, scan, and child ock.
Set before using timer features.
Match red, green, and blue colors tc
make white.
Label channels PAY1, ABC, etc.
Label video inputs VCR1, LASER1, etc.
Allows you to set and view favorite channels.
Block channel picture and sound.
Turn "IV on and off once, daily, or weekly.
Automatically turn TV on with VIDE(): 1 input.
Feature to display dialogue/text.
Select from two types,of backgrouncls.
Adjust contrast.
Adjust brightness.
Adjust color.
Adjust tint.
Adjust sharpness.
Set VIDEO settings to factory preset.
Improve picture performance.
AUDIO SE'rrlNGS
HOMETHEATER
INIFO. CENTER
IBASS (
iTREBLE
BA_LANCE
RESET !
(ADV D !
[SETTINGS 1
_= ITHEATER MODES
lWlRELESS SOUND
SPECIALEVENT
_-- IREMINDER
[CALENDAR
31
Adjust bass.
Adjust treble.
Adjust balance.
Set AUDIO settings to factory preset.
Improve sound performance.
Picture is automatically set.
Adjust audio output for wireless speakers.
Set IV to remind you of birthdays, etc.
Check day, month, year, and special events.
Page 32

w
I INITIAl. SET UP I
INITIAL Si-'TUP
Select INITIAL SETUP when setting your "IV up for the first time. Use PLAY (A) or S-I"OP (V) on
the remote to highlight the function desired.
NOTE:
_MAIN MENU
;I_ET UP
CU[_MIZE
VI_SETT_GS
!"
# To
To see an auto-demonstration of the on-screen display with HELP text displayed, press and hold the
MAIN MENU
CU_M_ZE
I .....,
I i
1 H_ _EATER
j ....
PLUG&PLAy
SI_N*LsOURce
CH_CNELL;ST
o_=,.i
CONVERGENCE
AOJQST
_k-- m
(ourr Me.U_.
POWER button on the TV set for approximately 5 seconds. Press the POWER button on the TV again
to end the auto-demonstration.
.1
MENLI LANGUAGE-'.
J | This feature will allow you to select any one of three different languages for all on-
J
screen displays.
MAIN MENU
CUSTOMIZE
VIDEO SETTtF4_
[]
,_uo_o SETT_NOS
rm
HOME THEATER
[]
i INFOCENre_
PLUO&PLAY
SIGNAl.SOURCE
._UTO _ SET
C.e_,Ue_L
CHANNEL LIST
CLOCK SET
CONVeRGENCe
ADJUST
Use PLAY (4,) or STOP (V) to select the MENU LANGUAGE of your choice.
Press EXIT to quit menu or REW (_I) to return to previous menu.
32
INITIAL SET UP
MENeJ_O,E
PLUG&PL_"
S_L SOURCe
AUTO_L _T
_L Ue_CK'_
_OO( SeT
[_ € "ro eXIT
Page 33

,.,+,...sE+uP
I PLUG & PLAY I This graphic guide function will help you to properly set up your "IV or Home Theater
I System. Simply answer two questions and a graphic will be displayed, showing you the
optimum setup for your personalized system.
MAIN MENU
i +
€_tzE
riVET'tinGS
_u_._ 5TTt_r..8
MENULANGUAGE
PLUO E PLAY
$_GN_. SOURCE
AUTO_ s_r
CHANNEL LIST
ckocx SE_
CONVEROE_:E
AOJUST
_L SET _
.--)
€_I_L LiSt
CLOCKSET
I .....
I _ I 'rkll T
C)CABLE_J_IJ_ BOXN_ED_DF_ SOMEC_ANNEL_
F) _11ELI.m_O_ _Wr_ C_BL__OX]
• ,to _-:mJm'r _Jm
Press PLAY (A) or STOP (V) to highlight the correct answers to both questions.
Press I--.FWD (k) to display the graphic guide.
Press IBXIT to quit menu or F.FWD (k) to begin AUTO CHANNEL SET. (See page 35.)
33
Page 34

INITIAL SETUP
I SIGNAL SOURCE Select ANTENNA if you are using an indoor or outdoor antenna.
cable IV.
MAIN MENU
....
i
I%"-=
MENULANGUAGE
PLUO,PLAY
SIGNAL SOURCE
_TO O4_edE_ SET
OUU_EL M_ORy
C_a_NNEL usr
CLOC_ SET
CO_VERCEMCe
AOJUST
I,i c.....
INrrlAL SETUP
_uo &Pt_y
SI_L gOURCE
AUTO_t. SET
C_Ue_L us'r
CLOCK_lr
II_ ANTENNA
cAwl
_] C^TVZ
NIIAL SET Lie
UENULA'_,A(t
Ptuo &PLay
= oNau. SOURCE
ur_4o_y
_cx_ S_T
[] ANTENNA
I_ CA'rVI
[] cArv2
Select CA'TV if yc,u have
FA TO mOT
!Te.u_e • ucx (=u=._,u_
Press PLAY (A) or STOP (V) to highlight and select the correct SIGNAL SOURCE mode.
Press EXIT to quit MENU or REW (_) to return to previous menu.
RECEPTION BAND
CATV 1 OR CATV 2
AIR
CATV CHANNEL Indicated on
Reception channels for each mode are sh3wn at
the left.
the screen
VH F 2 - 13ch
UHF 14- 69ch
VHF 2 - 13
Mid band A - I
A-5 - A-1
:Super Band J - W
Hyper band
W+l -W+28
Ultra band
2-13
14 - 22
95 - 99
23 - 36
37 - 64
65 -125
Refer to your cable or TV guide for channel identifi-
cation standards.
If certain CATV channels are poor or not possible in
CATV1 mode, set SIGNAl._ SOURCE to CATV2.
W+29-W+84
TO
34
Page 35

INITIIAL SETUP
I AUTO CHANNEL SET I
This feature will automatically store active TV channels in CHANNEL MEMORY. This will
allow you to skip over unused channels when using CHANNEL LIP (ik/or DOWN ('V').
MAIN MENU
SEI"UP
C_IZE
^_]SeTT'"GS
HOME THEATER
INFO CENTER
_UG&PLAY
Sm_ALaOURCE
AUTO_L_T
CH&NNELLIST
CLOCKSET
CC_VERC_mCE
_JUSr
[] I
INITIAL SETUP
PLUO&PLAy
SK_U_ SOURC_
AUTO CI_NNEL SE1
CH_L _ VX_rY
CFL_NN_LLInT
CLOCKSeT
COnVERC_NCe
_JSt
/ Ib,\
INITIAL SET UP
_UG _ etAy []
__ .......... INST_ Ct-I_I_ELS 03S
ctoc_ SET
If the EXIT button is pressed while the AUTO CHANNEL SET function is engaged, programming will stop. If two
antennas are connected, switch antenna inputs with the INPUT button and repeat AUTO CHANNEL SET for the
second antenna input.
Remember to select the correct SIGNAL SOURCE mode before using AUTO CHANNEL SET for tile second
antenna input.
See CFtANNEL MEMORY to add or erase additional channels.
35
Page 36

INITIAL SETUP
Use this function after AUTO CHANNEL SET to add or erase additional chanrtel:3 to the
remote control CHANNEL /k or V buttons.
MAIN MENU
iv, .......
AQO[_]SETTm GS
HOME THEATER
I+
IHFO CENTER
• c_ 41 lu_cK t_n'm=.,,_
u_u LA_mU_
PLUG|PLAY
mGN_SOURCE
CHN@IEL
CHANNEL LIST
CLOCK 61_T
_T
wo_ 1_ MENU}
IP4TUU.SETUP
MEnu L_m_t_m
_Ua & _y
Sm_L
• I..D,- i
CI_ANNmLMBN_t
CI_L tIST
CtC<:_s_r
_T
I CHA_EL U_ I
• E],._ r'Jm-,.._
Add or erase additional channels while still in CHANNEL MEMORY using PLAY (A) or STOP (Y), CHANNEL (/_) or
(V), and number buttons and then add or erase using F.FWD (_).
Press EXIT to quit menu or REW (_) to return to previous menu.
36
Page 37

INITIIAL SETUP
CHFANNEL LIST
This function allows you to review which channels are labeled in CHANNEL ID (NAME),
which have been added to CHANNEL MEMORY (SCAN), and which are protected by
CHILD LOCK (LOCK).
MAIN MENU
m_ss-r U_
CU_._MrZE
VI_]S ETT_GS
AU[_sE'mN_ S
_OUe 1'1tE ATI_.R
INFO CENTER
MeNU
PLUa&PLAy
SIGNAL SOURCE
CHANNEL UST
CLOCK SET
.,_JU_
[]
_IllAL SET UP
PLL_ & _LAy
SX_L SO_R_
,=JTOc.._.e,m s_T
C:_=I_N_EL UST
CLOCXS_T
CO_E_
• 01 .... OH --
o: ¢ss ON
03 VCR OH ON
04 NBC ON
os wxYz ON
I cH NAME SCAN LOCK
o$ ....
07
o| --
• ol --
IA TO LUT
INIT1ALSET LiP
MeNUL_NG_
PLLm&_
•UTO C_:_ set
CH/_mEL LalT
CLOt=(SET
CO_VE_C_
! _OJUST
CN NAME SCAN LOCK
• If SHOP ON --
13 TSZy ON ON
14 NAL ON -
tS-- ON -
17
1| ---
t 12 ABe ON --
11 *--
• :o ._
Press PLAY (A) or STOP (V) to review more channels.
Press EXIT to quit menu or REW (4) to return to previous menu.
37
Page 38

INITIAL SETUP
CLOCK SET
The time must be set before you can
REMINDER, or CALENDAR.
MAIN MENU
mn_-rup
cu_.._Miz E
Aualo SETIaN6S
[]
rN_ CENTER
:,MnAL SET UP
I_'':''AMJ_01 19S_ I
i=_uGAP_Y
S_JROE
uJ_oC_,_,mE_SET
,::_W_l_ UF.MOmt
_=OCK SET
_0Jusr
=eT F_ hmqul
uE_u L_v_V_E
PLUg i PL_V
smh_L source
_OW_EL SET
C_e4_ We_ZW
CHANNELLIST
CLOCK $ET
AOJUST
use 4 EVENT PROGRAM, SPECIAl_ I-VENT
(=urr ulJ,,._
_rr_L SET UP
12:00AM JAN011Dl_6 1
p_ XPL_Y
S_._U_SOJRC_
*_;TOC_W_N_ SET
C)_L UST
CLOO( SET
Use PLAY (A) or STOP (Y) to set the time, date, and year.
Press F.FWD (1_) to change position.
Press EXIT to quit menu or REW (4) to return to previous menu.
38
Page 39

INITIAL SETUP
I CONVE;RGENCE AE)JUST [
Your HITACHI projection TV has three color projection tubes: one for red, one for green, one for blue. When mixed
together in the proper proportion, the output of these three color tubes can produce any color. To prod,Jo, these
colors, however, the beams must be precisely aligned over each other so that the colors can be mixed. The process
of aligning these picture beams is called "convergence".
Over a period of time, the picture tubes can drift out of alignment due to normal bumps and vibrations or moving
the -IV. If you move your TV, or if, after a time, you notice color rings or halos around objects in the picture, you may
want to converge (align) the colors.
To simplify convergence, the following feature allows you to display a test pattern of horizontal and vertical lines
on the screen. Properly converged, the lines appear white, which is actually a combination of the outputs ol:the three
color tubes. The output of the green tube is stationary. The outputs of the red and blue tubes can be adjusted. When
properly aligned, the outputs of all three tubes should be directly over each other to produce the white lines.
RED
/ D-\
-_1 F._ I.- )
\ D,.I_ !
Press PLAY (A) or STOP (V) to move the color displayed up or down.
Press REW (_) or F.FWD (>-) to move the color displayed left or right.
Press MENU to change the color.
Press EXIT to quit menu.
BLUE
RECALL/CS
_s,,__ ='_ _,_
I NOTE: Please use the EXIT button on your remote to quit this menu. To quit this menu without a remote, turn
the -IV off.
39
Page 40

CUSTOMIZE I
CUSTOMIZE
This selection contains advanced features which will make TV viewing easier anl:l more
enjoyable.
CHANNEL ID
Use this feature to give up to 20 channels a name when ANTENNA signal source is
selected and up to 60 channels a name when CATV1 signal source is selected.
MAIN MENU
INleT UP
F_ILy FAVOIRITIES
CHaDLOCK
4eNl_n'_
Ab_'_LINK
_osEo c_,p_1oN
MeNUBACKG'_XSNO
CUSTOMIZE
CHANNEL IO
VIDEOIO
FAMILY
FAVORITES
CHILD LOCK
,iEVENT
PROGRAM
AUTO LINK
CLOSED
CAPTION
MENU
8,_CKGROUNO
O3
I_...... [] E._e_o
N_ CHA',_LC'" CH"I
MAIN MENU
i%MoE
Iv0 E.....
AUO[_]ETnNGS
HOX4_HEA'rE R
INFO CENTER
[]
I%" "
L%.-,,o.
} AUD[[._ETTING _1
_pEo m
_AU_Ly FAWPJTES
CHA.mL© •
C_LOLOCX
4EVENTPROGI_U
J *.UTOL_K
i
[_ 1o _. seLeCT m_r
4 SACK (C_rmu_
Press PLAY (A) or STOP (V) to select letters.
Press F.FWD (1_) to ('hange character position.
Press PLAY (A) or STOP (_r), CHANNEL (/_) or (V), and the number buttons to select and label additiona channels.
The CHANNEL ID will now appear in the top left corner of the screen.
Press EXIT to quit menu or REW (<) to return to previous menu.
The (-k} represents a blank space.
Select [--RASE ID to erase a CHANNEL ID.
NOTE:: If ANT A and ANT B are in the same SIGNAL SOURCE mode (see page 341!,the CHANNEL ID for
both antenna inputs will be the same.
CHANNEL ID will be displayed only when channel is displayed as main picture.
40
Page 41

CUSTOMIZE
I 'VIDEO ID
I Use this feature to give a name to any of the two video inputs.
MAIN MENU
INm[_T UP
I%--
H(3;_HEATE R
_NFO °ENTER
!l []
C_'a.AN/EL _D
WDEO I0
e._,_..YFAvomr_
C_La LOC_
_V=ov=ATo h uuE_ Lm
• _c_ (o.,.,n'.=_
Press F.FWD (1_) to select the video input to be renamed.
Press PLAY (A) or STOP (V) to select letters.
Press F_FWD (1_) to change position.
Press EXIT to quit menu or REW (,4) to return to previous menu.
The (-k_,represents a blank space.
Select RESET to set VIDEO ID to original condition.
CHANNEL ID
VtDEO ID
I FAMJLy
FAVORITE8
CHILD LOCK
4 EVENT
pROGRAM
AUTOLt_K
CLOSED
CAPTION
MENU
BACKOROUNO ! I
v,oEo:1
.Qw El,,2
I NOTE: VIDEO ID will be displayed only when VIDEO input is displayed as main picture.
41
Page 42

CUSTOMIZE
I FAMILY FAVORITES ] This function allows you to group your favorite channels into six personalized categories that
(IVIENU) ] you can rename. A total of 24 channels can be stored in the FAMII.Y FAVORITES function.
MAIK MENU
INIT}AL SET UP
_ v OEO SEn'T_NCS
[]
AODm SlE'rTI_GS
_N:_M_7HEATE_
I,T
PLAY
VE)EO ID
FAJ4LY FAVORfTES )
C_LDLOCX
4_NT PROGRAM
_LNK
CLOSEOCJU_ON
MeNUS*CXO_OUNO
_T mm_
REP,AME FAMILY FAVORITES
[] RIES_'r.XW.S A.O CX_ _ YOU SU_ CH
1_ ts --
,,_
FUENAME FAMM.y FAVORITE S F
[] R_Sk'T _S *,NO CtUm_La pJm YOU SL_R_?) j
To rename the categories, use nEW (,), F.FWD (,), PLAY (,), or STOP (V) to highlight the category you would like
to rename.
Use PLAY' (,) or STOP (V) to change a letter and F.FWD (b.) to select the next character to change.
To reset ,:ategones and channels back to original factory preset, select RESET then press F.FWD (1_).
To enter a channel into a category, highlight a box below the category title.
Press PLAY (_) or STOP (V) or the number buttons to enter the desired channel. Repeat until category has been set
with your favorite channels. The channel to be added is displayed in the top right corner of the screen.
Enter channel 00 to erase a favorite channel.
NOTE:
This function cannot be accessed when ANT B is the main channel.
42
]
Page 43

CUSTOMIZE
Use this function to display FAMILY FAVORITES selections as sub-pictures or to tune the
i FAMILY FAVORITES
(OPERATION)
Press any one of the REW (._), F.FWD (1_),PLAY (A) or STOP (V) buttons.
Select a category heading using REW (4) or EFWD (1_).
main picture to a desired favorite channel.
FAIILY FA_|
Press MENU and the category will be displayed as sub-pictures at the right edge of the screen. This is usc,ful for pre-
viewing a category.
Use REW (4), F.FWID (1_), PLAY (A) or STOP (V) to highlight a favorite channel and the "IV will automaUcally tune
to that channel.
Press EXIT to remove FAMILY FAVORITES OSD from the screen.
NOTE: If a category has some blank channel entries, these channels will appear as black sub-picture.,;. The
remote control must be in TV mode.
43
Page 44

CUSTOMIZE
I CHILD LOCK
This function will block out the picture and sound of the selected channel or video input.
It can also be used to keep the TV from being viewed for a scheduled amount of time that
you set.
The code to enter CHILD LOCK is a four digit key number. The factory preset code is 0000.
Use PL,_'((4,) or STOP (V) or the number keys to select number and F.FWD ()_) to change position.
MAIN MENU
vlceo_o
; F_y SAV_
€_m.D LOC_
4 L'VlEm"PR_;J=._
AUi'OLJ_
_OSeOc_m,_
[_ TO _
4 lack faurr I_u)
--)
CHANNEL ,O
VIDEO IO
F#_,IILy
i FAVORITES
i CHtLD LOCK
} 4 EVENT
PROGRAM
AUTO LINK
CLOSED
CApTiON
MENU
BACKGROUND
CHO_NNEL 03
U _ou,
°. :.. _ IBE6m4
-o ::.- AM IENO
.... CtlANGE SECRET COOE
- _ s_G_T u, rr
CUS_TOMIZE
CHANNEL IO
VIDEO IO
FAMILY
FAVORITES
CHJLD LOCK
4 EVENt
PR(_GRA_
AUTOUNK
CLOSED
CAPTJON
MEnU
I_CKGROUND
L
I_* .... SECRET CODE
• $euect eJOT
..... • w,,:x L_
HOME THEATER
mFOCENTER
[]
Use PLAY (A) or STOP (V) to highlight function and the F.FWD ()_) button to set ON or OFF.
When CHANNEL is turned on, the picture and sound for the chosen channel will be blocked out.
When VIDEO: 1 or 2 is turned on, the picture and sound for the chosen video input will be blocked out (to lock a
Video input, you must be tuned to the input you wish to lock).
When QUICK LOCK is turned on, the picture and sound for channels 3, 4 and all video inputs will be blocked out.
When -IV TIME OLIT is turned on, you can set the BEGIN and END times and the -IV canr ot be viewed during that
time period.
To change the key number, select CHANGE SECRET CODE. Enter a new four digit key number you prefer.
If you forget your key number, use the factory code 7777 to erase your key number. This will reset the key number
back to the factory preset 0000.
NOTE:
If ANT A and ANT B are in the same SIGNAL SOURCE mode (see page 34), when a channel is
locked, it is locked on both antenna inputs.
When using -IV TIME OUT make sure the clock is set (see page 38).
44
Page 45

CUSTOMIZE
I 4 EVENT PROG.
This function will automatically turn the TV on and off, one time only, every day or once
a week.
MAIN MENU
_IT_T UP
cm.oLOCK
4Ev'_,rr PROOrr_U_1_
.....
ct_ _
ATER
INF _,_ ENTIER
CUSTOMIZE
C_ M,'NELl0
Vrl)SO IO
FAMtLY
FAVORITES
CI_ILDLOCK
4 F.VENT
PFtOONAI, I
_.L,'ro UNK
CLOSED
C,IPTIO_
_E:NU
8,1¢KGROUWD '
:____J
..:.. /_iIi w OFF
.. _NNEL
r
CUSTOMIZE
CHANNEl, IO
VmEO _D
FAM=LY
FAVORITES
CHILD LOCK
4 EVENT
PROORAM
AUTO LINK
CLOSED
CAPI_ON
MENU
BACKQROUND
_dLY
Q, O= O_ O,
Press F.FWD (1_) to select PROGRAM 1, 2, 3 or 4.
Press pL_,y (,4,)or STC)P (T) to select the time the TV will turn on and off.
Use F.FWD (b,) to change position.
Press PLAY (4,,) or STOP (T) to highlight then F.FWD (1_)to select MODE: ONCE (one time only) or MODE: DAILY
(-IV will turn on/off at the same time every day), or MODE: WEEKLY (-IV will turn on/off at same time every week).
Press PLt_y (4,,) or STC)P (V), CHANNEL (/k) or (.k/), or number buttons to set the channel the -IV will tun_,to when
it automatically turns on.
NOTE:
The OFF Timer will only activate if the TV was turned on or tuned with the ON Timer and no channel
selection was made after this time. If you change the channel after the ON Timer has been acl:iw]ted,
the OFF Timer will deactivate.
If no remote control button is pressed after ON Timer is activated, the "IV will automatically turn off after
3 hours.
Do not use your TV as a deterrent when away from home by using the ON and OFF TIMERS. |
For safety, the TV should be turned off when you are away from home.
I _AUTION:
3
45
Page 46

CUSTOMIZE
AUTO LINK
Use this function to automatically turn the TV on and tune to VIDEO: 1, when it detects a
VIDEO: 1 input.
__m
M&IN MENU
INIT[_ TUP
I%'"
AUO[_._]ETT_ GS
HOME T_,'IEATER
_NFOCENTER
[]
V_EO
IC_ANN_ mD
_0 LO_
,mev_o_
AU'n3 UNK
_Nu a_xo_4c_mo
• 1o
exff
CUSTOMIZE
CHANNEL tO
VIDEO l0
FAMILY
FAVORTTES
CHfLD LOCK
& EVENT
PROGRAM
AUTO LINK
CtOSEO
CAPTION
M_NU
bACXOROUNO
[] AUTO
[] REMOTE
• TO
Use PLAY (A) or STOP (V) to change AUTO LINK setting.
WHen AUTO is selected, the TV will turn on and tune to VIDEO: 1 automatically, when a VIDEO: 1 input is detected.
This is convenient when you want to watch a movie with your VCR or laserdisc player.
When REMOTE is selected, the TV will turn on and tune to VIDEO: 1 automatically, when a 'VIDEO: 1 input: is detect-
ed and 1:heVCR play button on your remote control is pressed.
This is convenient when you want to record a movie with your VCR and watch it later.
Select OFF to disable this function.
Press EXIT to quit menu or REW (,) to return to previous menu.
46
Page 47

CUSTOMIZE
I -D CAPTION ]
or home video which are displayed on the IV screen. Your local TV program guide
denotes these programs as I_ or [_.
Closed captions are the dialogue, narration, and/or sound effects of a television program
MAIN MENU
INIr_T UP
i%-,z,
iv,, .....
AU_T_INGS
HOME THEATE_
tNf_EN TER
F*_t VFAVt_TES
_DLOC_
4EVe_" eRC,G_
AUTO L_
k_u aJ,cx¢._ou_o
[_ To _ SeLECl e_T
CHANNEL I0 L
VIOEO ID
FAMILY
FAVORITES
CHILD LOCK
4 EVICT
pROgRAM
AUTO L_NK
CLOSED
CAPTION
MENU
BACKGROUND
TL_-,_-=__.___'_ _purr.D_,;_
DISPLAY: ON/OFF will turn the _ display on or off.
MODE: C.C., (Closed Caption) is for the program you are viewing.
MODE: TEXT is for additional information such as news reports or a -IV program guide. This information
cow,_rs the entire screen and viewing the TV program is not possible. TEXT may not be a_ailable
with every I_] program.
CHANN|-L: 1 is used for the primary language (usually English).
CHANNEL: 2 is sometimes used for a second language (may vary by region).
Use PLAY (A) or STOP (V) to highlight the function to change; press F.FWD (1_) to change the function.
Press EXIT to quit menu or REW (4) to return to previous menu.
If you do not have sound, make sure MUTE is not set.
I NOTE:
CCD will display when MUTE is pressed, whether CCD is in the ON or OFF mode.
47
Page 48

IMENU BACKGROUND] This function allows you to choose from two menu backgrounds.
CUSTOMIZE
MAt *4 MENU
tNIT_ALSET UP
CUSTOMIZE
[]
_,loEo SeTtINGS
,OME tHeATER
'NFO CEntER
C_L IO
vloeolo
_v_y ;AVOR_TeS
CHILDLOCX
4 EVENT PROGRAM
AOtOL_
CLOSEDCAP_ION
MENU _¢KGROt._D_
Move <1 eAcx p_Me_,eJb
r ---
CUSTOMtZE
j CHAN_Et ID
vloeo io
FAMILy
FAVORITES
CHINOLOCK
4EVENt
PrOGrA_
AU TO LINK
L____
[] SHADOW
To _ot
CHANGe • I_,,kCK (_T ME_
Use PLAY (A) or STOP (V) to change MENU BACKGROUND setting.
Select SHADOW and a light background is visible. Select CLEAR and no background is visible.
Press EXIT to quit menu or REW (<) to return to previous menu.
48
Page 49

VIDEO SETTINGS
VIDEO SETTINGS
Select VIDEO SETTINGS to adjust picture settings and improve picture Quality.
I
MAIN MENU
I%+
AUD___E TTtN_
i
i HOME THEATER
[NF_ENTER
MAIN MENU
+
AUD[_ETTINGg
NO:_HE_ER
CONTRAST
SmaHT_ISI
CO_OR
i+,,T
aHAAPN_BI
_ESET
!AOVAMCt0
=ET_OE
14, Te I_IE_JU_
IV me_ 41_,¢_
.....
CONTRAST
aA:G_TNESS
cocoa
T_r
SMARP_ES$
mESET
s_rrl_G=
[]
m
-- _aurt
Use the PLAY (A) or STOP (_') buttons to highlight the function to be adjusted.
Press the REW (4) or F.FWD (_) buttons to adjust the function.
Use the PLAY (A) or ',STOP(Y) buttons to highlight RESET or ADVANCED SETTINGS, then the REW (_) button to
return to previous menu.
Press EXIT to quit menu.
I NOTE: If CONTF_ST is selected, you are adjusting CONTRAST. The additional menu items BRIGHTNESS,
BRIGHTNESS
COLOR, TINT, and SHARPNESS can be selected and adjusted in the same manner.
CONTRAST
COLOR
TINT
SHARPNESS
RESET
Use this function to change the contrast between black and white levels in the picture. This
adjustment will only affect the picture when PICTURE SETTINGS AI is OFF. (See page 50.)
Use this function to adjust overall picture brightness.
Use this function to adjust the level of color in the picture.
Use this function to adjust flesh tones so they appear natural.
I Use this function to adjust the amount of fine detail in the picture.
When RESET is selected, press CURSOR • to return video adjustments to faclory preset
conditions.
49
Page 50

VIDEO SETTINGS
I ADVANCED
SETTINGS
I our HITACHI Projection TV has an AI (Artificial Intelligence) function which will _tutomati-cally adjust picture settings to produce the highest quality picture possible.
When AI is highlighted, use F.FWD (1_)to turn the AI on or off.
MAINMENU
TWT
_T
...... .
iQurr
Use PI..AY (A) or STOP (_') to select function.
Use F.FWD (!,-) to change the function setting.
Press FXIT to quit menu or REW (4) to return to previous menu.
AI (ARTIFICIAL INTELLIGENCE)
When lhe AI function is on, the TVs' internal computer will perform the following:
1. Automatically monitor and adjust contrast depending on room lighting (sensor is located in the front panel) to
I_roduce a more natural picture.
2. Automatically monitor and adjust color levels and maintain natural flesh tones.
3. Automatically compensate for weak or strong "IV signals to produce a clear picture.
Turn the AI function off to control other PREFERENCE SETTINGS.
AUTO COLOR
The AUTO COLOR function automatically monitors and adjusts the color to maintain constant color levels even after
a program or channel changes. It also maintains natural flesh tones while preserving fidelity of background colors.
For best picture performance leave the AUTO COLOR function on.
NOISE REDUCTION
The NOISE REDUCTION function automatically reduces conspicuous noise in the picture without degrading
picture quality.
COLOR TEMPERATURE
Set this to WARM for hotter colors with more red, or set to COOL for less intense colors with more blue,
5O
Page 51

AUDIO SETTINGS
AUDIO SETTINGS
Select AUDIO SETTINGS to adjust the TV to your preference and to improve the sound quality.
1
MAIN MENU
BASS
T_EaLE
B_J.ANCE
RES_'T
S_TT_NG=
A_CED
E]
m
[_ TO • To E_ZT
MAIN MENU
_E_ _
i%,,E
iv,oL E......
HOME THEATER
INF_ ENTER
7eES_
BALANCE
RESET
BASS
A0V_CED
SETTINGS
I_SET t.P
cus'roMizE
Au[.._ _BT'nNOS•
NDME THEATER
Use PLAY (A) or STOP (V) to highlight the function to be adjusted.
Press REW (4) or F.FWD (_,) to adjust the function.
Use PLAY (A) or STOP (V) to highlight RESET or ADVANCED SETTINGS, then REW (<) to return to previous _nenu.
Press EXIT to quit menu.
NOTE: If BASS is selected you are adjusting BASS. The additional menu items TREBLE and BALANCE can
be selected and adjusted in the same manner.
BASS ] This function controls the low frequency audio to all speakers.
TREBLE
BALANCE
This function controls the high frequency audio to all speakers.
}
This function will control the left to right balance of the TV internal speakers, the AU[')IO TO
HI FI output, the TRANSMITTER OUT output, and the Surround Speakers.
RESET
I hen RESET is selected, press F.FWD (_) to return audio adjustments to factory preset
conditions.
51
Page 52

AUDIO SETTINGS
I ADVANCED
SETTINGS
Use ADVANCED SETTINGS to improve the sound performance of your TV depending on
listening conditions.
I,tAl_ MENU
ITREBLE
CU_IZ_
HOM_"fHEATER
.....
r RE,_ET ON OFFpEI_ECTVOLI,t_
[_ M_ •se_CT eXXT
eALA_C[
Isxss
ADVANCED Iib
SETTINGS
AeSET
TO •SeLeCT eJOX--
__. <_.U_L
AUto {
I TREe_E i
'_ ' _:_Too
I eAU_E i SeCOnDAU(XOPROC._
[ _J_V_C_D I AUTON_Se _CE_
[ SETnNOS I LDUON_SS
__ __J WTe_U_ SPe_XERS
P_RFECTVOLU_E
TO • Seu_c'r
Press PLAY (,k) or STOP (T) to highlight a function.
Press F.FWD (1_)to change the function setting.
Press EXIT to quit menu or REW (<) to return to previous menu.
MTS MODE
Multi-Channel Television Sound will allow you to select STEREO (a stereo broadcast), SAP (second audio program)
which may be a secondary language, weather report, etc. or MONO (monaural sound) used when receiving a weak
stereo broadcast.
The sources receiw.'d will be displayed below the channel number. The source you select will be displayed to the left
of the channel number. See example below for each selection when both stereo and second audio are received
(monaural is alway.,; received).
STEREO SELECTED SAP SELECTED MONO SELECTED
NEWS STEREO 31
ST/SA
NEWS SAP 31
ST/SA
NEWS 31
PERFIECT VOLUME
This function will automatically adjust volume so each channel has the same average volume level.
AUTO NOISE CANCEL
This function eliminates the noise between stations. If a channel is tuned and is noisy, this function will automatically
eliminate the audio for that channel.
LOUDNESS
This function will improve the quality of both low and high frequency sounds when listening at low volume levels.
INT. SPEAKERS
This flmction is useful when first setting up the external speakers, or if you prefer to use only speakers from a sepa-
rate slereo system.
52
Page 53

HOME" THEATER
I HOMETHEATER Use this function to choose picture settings for a true HOME THEATER experience.
I 'ER MODES I Use this function to choose from automatic picture settings to optimize your TV's
performance.
J
MAIN MENU
I%--
AUOIOSETTINCS
[]
.o)_ TNEATEN
INFO CENTER
UAIN MEnU
_nl_ set uP
CUSTOMIZE
[]
woEo SETTINGS
[]
AUDIO SETTIN _S
HOME THEATER
INFOCE_T_R
[]
[]
THEATER MoDEs _lb
w.q_J_ss SO_*_
• m ).==._r _ I
V_ _urTt_W_
HO_E THEATER
THEATERMODES )_ TY
W_I_ESS SC_NO [] MOVIE
[] Sp_RTS
Use PLAY (A) or STOP (T) to change THEATER MODES settings.
Select "1_/mode to set AI to your preference.
When MOVIE mode is chosen, AI is automatically set to ON.
When SPORTS mode is chosen, AI is automatically set to ON. (AI is automatically made brighter by increasing
contrast, to improve sports viewing.)
Press EXIT to quit menu or REW (4) to return to previous menu.
53
Page 54

HOME THEATER
This feature allows you to choose between two possible variable audio outputs 1ora sepa-
rate set of wireless speakers or another stereo amplifier. The audio output may fce either
MAIN TV AUDIO or SUB PICTURE AUDIO.
I
WIRELESS
SOUND
This feature also allows you to turn the internal speakers on or off, when MAIN TV AUDIO
is chosen. You can also adjust PIP volume if you have chosen SUB PICTURE AUDIO as
your variable audio output.
MAiN MENU
CU[_MIZ E
Vl_E'r'rIN_
Press PLAY (A) or STOP (V) to highlight a function.
Press F.FWD (_,) to select the function.
Press EXIT to quit menu or REW (4) to return to previous menu.
"P_J, TER 1
WIREUESSIK_ND
EI,_S,SW_8OURCI£
"rvINllEm_JLI.SPF.AKB_
MAIN TV AUDIO
When set to MAIN "P/AUDIO mode, your wireless speakers will play the same audio program as played on your TV.
When _et to this mode, you may choose to turn the television's internal speakers on or off. Also, the volume of your
wireless speakers will be controlled by the TV volume control.
SUB PICTURE AUDIO
When ,_;etto SUB PIC,TURE AUDIO mode, your wireless speakers will play the PIP sub-picture audio pro,gram. The
volume of your wireless speakers will now be controlled by the PIP VOL. control, which may be varied from 00 (rain.)
to 32 (max.). If no s,Jb-picture is displayed, the wireless speakers will play the main channel audio program with the
volume being controlled by the "IV volume control.
54
Page 55

INFO CENTER
[]
I INFO.CENTER This function allows your TV to assist you with your busy day to day schedule.
I SPECIAL EVENT | Use this function to set up to six special events into memory.
REMINDER J These events can then be viewed in CALENDAR mode.
MAiNMENU
mlLm
CUSTOMIZE
[]
VIDEO SETT_NOS
AU010 $ETT_N_
[]
_ou_ THEATER
INFO CENTER ]_
[]
• 'ro • ULlCT
MAIN MENU
:: J
CU_MrZE
V_ET'rINOS
INFO CENT1ER
SPECU,L EVENT
l
J
s _ Tw 'r F S
1 ;_ 3 4 S 6
I,:::E::
To • ala._CT
Press F.FWD (11_)to select EVENT 1 to 6.
Press PLAY (A) or STOP (V) to select a letter.
Press F.FWD (,) to change position.
To erase a special event, select ERASE EVENT then press F.FWD (,).
Highlight the day of first reminder using CURSOR buttons, then press F.FWD (k.) to select.
Select d_te of reminder using CURSOR buttons.
To exit date set mode but remain in SPECIAL EVENT REMINDER menu, press the MENU button.
Press EXIT to quit menu or REW (4) to return to previous menu.
NOTE:
Special events set into memory will appear as blinking green dates in CALENDAR mode. A': the
selected time, the message will appear in CALENDAR mode.
When the -IV is turned on. the SPECIAL EVENT REMINDER message will automatically appear at the
selected time.
Each special event message can be a maximum of 20 characters long.
55
Page 56

INFO CENTER
CALENDAR
Use this function to check the day, month, and year.
Dates programmed in SPECIAL EVENT REMINDER will appear blinking and spec al event
message will be displayed.
MAIN _ENU
C_IZE
Vi_SETT_N_S
A_Ei"I'IN GS
[]
¢.&LENO
I_sxumcT _ I
Press PLAY (,) or STOP (V) to change the month.
Press EXIT to quit menu or REW (4) to return to previous menu.
PEC_L EVe.NT
R_NDER
INFO CENTER 1
¢ALZ_,m
• s M "r w T P s
1 z 3 4 s u
? B 9 lO 11 t2 13
14 ls is 17 is t9 2o
• _ • lu,cx .[_
NOTE':
Dates of SPECIAL EVENT REMINDER will appear blinking. Special event message will be displayed
only if current date is within the Day Of First Reminder Specifications as chosen in SPECIAL FVENT
REMINDER. (See page 55.)
CALENDAR will appear blinking when a Special Event message is set.
56
Page 57

CARE OF YOUR HITACHI PROJECTION TV
AND VCRPlus'+ REMOTE CONTROL
Dust the screen and cabinet with a soft cloth.
Clean the screen with a soft cloth moistened in warm water. Dry with a soft cloth ( A mild soap may be used iFthe
screen is extremely dirty).
Place your TV and remote control away from extreme heat, humidity and extremely dusty places.
Remove the plug from the wall outlet if your television will not be used for a long period of time, for instance, when
you go on vacation.
DO NOl"
Do not clean your screen or cabinet with strong cleaners, polishes, or chemically treated cloth.
Do not place rubber or vinyl products or cellophane tape on your set.
Do not touch the screen too often.
Do not subject the remote control to shocks such as dropping it on the floor, etc. Physical damage to the precision
parts m_'tyresult.
Avoid placing the remote control in a high humidity place or getting it wet. Don't leave i! on or near a heater.
Excessive heat or moisture may cause the unit to cease operation.
When the batteries ruq down, remote control operation will become erratic or possibly stop altogether. Replace the
old batteries with two fresh "AA" size batteries.
Exposure of the viewing screen to prolonged direct sunlight or heat may cause the screen to permanently warp,
resultinci in a distorted picture.
57
Page 58

RECEPTION PROBLEMS
• IGNITION NOISE:
Black spots or horizontal streaks may appear, picture may flutter or drift.
Usually caused by interference from automobile ignition systems, qeon
lamps, electrical drills, and other electrical appliances.
• GHOSTS:
Ghosts are caused by the television signal following two paths. One is the
direct path and the other is reflected from tall buildings, hills or sorne other
objects. Changing the direction or position of the antenna may improve
reception. Ghosting may also be caused by defects in the antenna system
such as unshielded leads or connecting several ,.setsto the same antenna
without using multiple antenna couplers.
• SNOW:
If your receiver is located in the fringe area of a television station where
the signal is weak, your picture may be marred by the appearance of :small
dots. When the signal is extremely weak, it may' be necessary to install a
special antenna to improve the picture.
• RADIO FREQUENCY INTERFERENCE:
The interference produces moving ripples or diagonal streaks, and in
some cases, causes loss of contrast in the picture.
58
Page 59

CHECK HERE BEFORE CALLING FOR SERVICE
SYMPTOMS o_/f/,_/_;!, _ _ _ _ _ _ _ ._;
No Pioture,nosound Q • • • • • •
Sound OK, picture poor • • • • • • • •
Picture OK, sound poor • • • • • • •
Picture blurred • • • • • •
Lines or streaksin picture • • • • •
Poor reception on somechannels • • • • •
7
/
Picture rollsvertically • •
No color • • • • • •
Poor color • • • • • • •
This HITACHI Projection Television incorporates advanced power surge protection technology designed to pl'ot_,ct
again._;tcomponent or circuit damage due to internal voltage or power surges.
iF YOUR SET SHOULD APPEAR TO HAVE A LOSS OF POWER, PLEASE FOLLOW THIS PROCEDURE:
1) Press the power switch (ON/OFF switch) once.
2) If there is still no power, wait 30 seconds and press the power switch again.
3) If there is still no power, unplug the power cord from the wall. Wait thirty seconds and plug the power
cord back in. Press the power switch again.
This protective technology should provide for years of lasting entertainment from your HITACHI Projection -television.
59
Page 60

SPECIFICATIONS
Features:
• Superfine Picture Quality
• 850 Line Horizontal Resolution (50FX30B)
• 1000 Line Horizontal Resolution (60FX32B)
• Pure Green and Red Filter Lenses
• Artificial Intelligence System
• VCRPlus+ Remote Control (Controls many VCR brands and Cable/Satellite equipment)
• High Definition On-Screen Display (UltraTEC)
Full set of Input Jacks, including S-Video
• Closed Caption Decoder
• High Resolution Picture-In-Picture with Freeze
Tuned Port Bass Reflex Speakers
Digital Convergence
• DUaLIAntenna Inputs
Auto Link
Inputs:
• Power Input .................. AC 120V, 60Hz
Power Consumption (operating)
50FX30B ........................... 163W
60FX32B ........................... 163W
Power Consumption (Maximum)
50FX30B ........................... 216W
60FX32B ........................... 216W
Antenna input impedance ............. 75 Ohm
Channel coverage ................... 181 ch.
VHF-Band .......................... 2 - 13
UHF-Band ......................... 14 - 69
CATV Mid Band ................... A-5 - A-1
................................. A-I
Super Band ........................... J-W
Hyper Band .................... W+I - W+28
Ultra Band .................... W+29 - W+84
Video ..................... 1.0Vp-p, 75 Ohm
S-Vi,Jeo
Luminance (Y) ............... 1.0Vp-p, 75 Ohm
Chrominance (C) ........... 0.286Vp-p, 75 Ohm
Audio input level ................... 47k Ohm
Average input level ................ 470mVrms
Maximum input level ............... 940mVrms
Outputs:
Video ..................... 1.0Vp-p. 75 Ohm
• Audio (fixed) .............. 470mVrms, lk Ohm
Dimensions:
50FX30B 60FX32B
Height (in.) 51 13/16 60 7/16
• Width (in.) 43 3/16 51 5/16
Depth (in.) 23 1/6 26 3/8
• Weight (Ibs.) 230 362
NOTE:
Due to improvements, specifications in
this operating guide are subject to
change without notice.
6O
Page 61

HITACHI
DIAL TOLL FREE
Hitachi Home Electronics (America), Inc.
To locate an authorized
HITACHI service facility
in the continental U.S.A.
and Canada,
7 days a week, 24 hours; a day
(1-800-448-2244)
Hitachi haLsmade every effort to assure you hours of trouble free operation from your unit. However, should you
require service, a network of Hitachi Authorized Service Facilities has been established in all 50 states and Puerto
Rico. Each facility will provide you with convenient and expedient assistance. Our service hotline operator 'will
direct you to the Hitachi Authorized Service Facility nearest you. Just present proof of purchase and/or delivery
receipts to the Hitachi Authorized :ServiceFacility, and service will be rendered in accordance with the terms of the
limited warranty as stated on your warranty card or operating guide.
i
Should you have any questions regarding warranty, service, operation or technical assistance,
please contact:
Hitachi Home Electronics (America), Inc.
3890 Steve Reynolds Blvd.
Norcross, GA 30093
Tel: 770-279-5600
For TV_; purchased in Canada only, please contact one of the Hitachi offices below, should you
have any questions regarding service, operation or technical assistance.
MONTREAL
942,5Trans Canada
Saint-Laurent, Quebec
H4S 1V3
Tel: (514) 956-9882
Fax:: (514) 956-9761
TORONTO
6740 Campobello Road
Mississauga, Ontario
L5N 2L8
Tel: (905) 821-4545
Fax: (905) 826-6627
61
Hitachi Sales Corporation of Hawaii
3219 Koapaka St.
Honolulu, HI 96819
Tel: 808-839-3621
VANCOUVER
20800 Westminster Hwy., Unit 1103
Richmond, B.C.
V6V 2W3
Tel: (604) 214-0777
Fx: (604) 214-0772
Page 62

NOTES
62
Page 63

NOTES
63
Page 64

HITACHI
QR21021
 Loading...