

Hisun HS750ATV, HS550ATV, HS700ATV-8, HS500ATV-6, HS450ATV-4 Owner's Manual
FORGE
450 | 550 | 750
OWNER’S MANUAL
TM
hisunmotors.com
ATV-Owners-Manual-Rev06301501.indd 1 6/30/2015 2:13:59 PM

Owner's Manual

Owner's Manual
INTRODUCTION
Congratulations on your purchase of the HS750ATV/HS700ATV-8/HS550ATV/HS500ATV-6/
HS450ATV-4. This Owner’s / Operator’s manual will provide you information regarding safe
operation, operational instructions , maintenance and care. Fully understanding this manual and
following all of the instructions herein will provide the knowledge needed to operate this ATV in a
safe and enjoyable manner.
For questions regarding this ATV, please call (972) 446-0760.
IMPORTANT SAFETY MESSAGES
● READ THIS MANUAL CAREFULLY AND COMPLETELY BEFORE OPERATING YOUR ATV. MAKE
SURE YOU UNDERSTAND ALL INSTRUCTIONS.
● PAY CLOSE ATTENTION TO THE WARNING AND CAUTION LABELS ON THE ATV.
● NEVER OPERATE THE ATV WITHOUT PROPER TRAINING OR INSTRUCTION.
● THIS ATV SHOULD NOT BE RIDDEN BY ANYONE UNDER 16 YEARS OF AGE.
Owner's Manual
IMPORTANT MANUAL INFORMATION
FAILURE TO FOLLOW THE WARNINGS CONTAINED IN THIS MANUAL CAN RESULT IN SERIOUS
INJURY OR DEATH.
following notations:
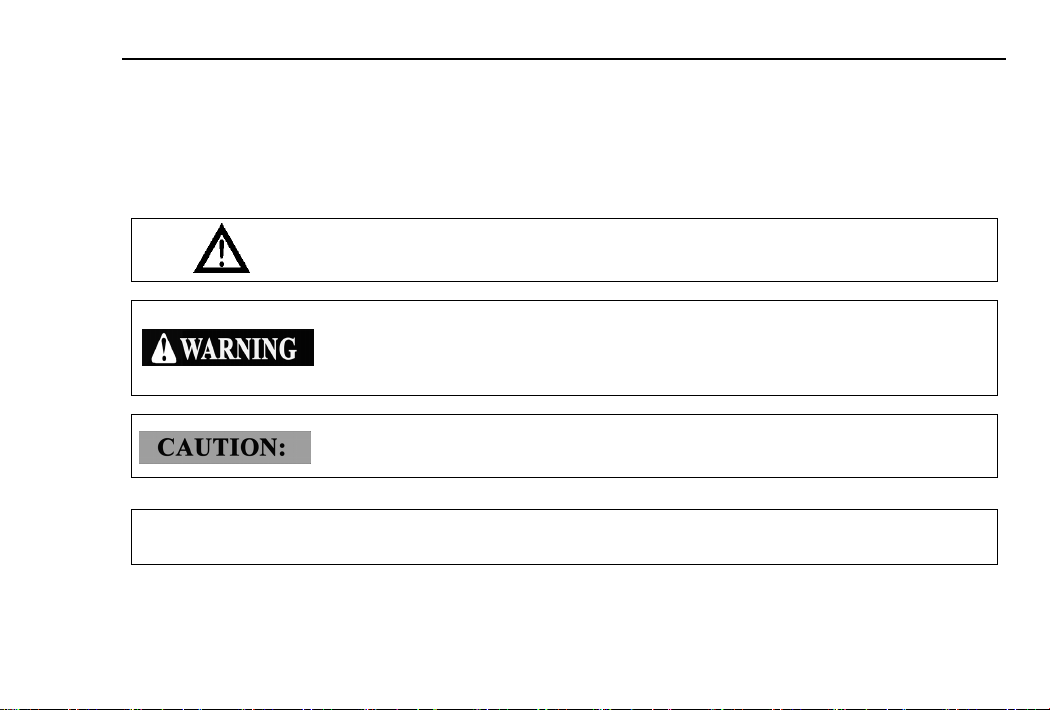
Particularly important information is distinguished in this manual using the
The Safety Alert Symbol means ATTENTION!
YOUR SAFETY IS INVOLVED!
Failure to follow
death to the machine operator, passenger, bystander, or a person
inspecting or repairing the machine.
A CAUTION indicates special precautions that must be taken to avoid
damage to the machine.
WARNING instructions could result in severe injury or
NOTE:
A NOTE
provides key information to make procedures easier or clearer.

Owner's Manual
IMPORTANT NOTICE
This ATV is designed and manufactured for OFF- ROAD use only. It is illegal and unsafe to
operate this ATV on any public street, road or highway.
This ATV complies with all applicable OFF- ROAD noise level and spark arrester laws and
regulations in effect at the time of manufacture.
Please check your local riding laws and regulations before operating this ATV.
When the temperature is below -4°F (-20℃), park the ATV in the place where the
temperature is higher than-4°F (-20℃). Start the ATV after the ATV has warmed up, Please see
page 6-2 on the warming up process.
When the temperature is higher than 100°F (38℃), and you park the ATV after operating
at high speeds, please keep the engine running for 3 minutes at idle and make sure that the
radiator fan continues for 3 minutes to prevent the coolant from boiling. Then turn off the power
switch. Your ATV may have a 3 minute automatic continuous fan after ignition shut down.
When you park the ATV and turn off the engine, please turn the ignition switch fully to shut off
the instrument panel display. With the EFI system used in this ATV, the electric fuel pump
located in the fuel tank can work when the panel display is on. If the fuel pump runs for a long
time it will result in the battery discharging and the electric starter may not work.

Owner's Manual
Location of the Warning and
1
Specification Labels 1-1
Safety Information 2-1
2
Description and Vehicle
3
Identification 3-1
Identification Number Records 3-3
Vehicle Identification Number 3-3
Control Functions 4-1
4
Main Switch 4-1
Indicator and Warning Lights 4-2
Speedometer Unit 4-5
Odometer and Trip Meter Modes 4-5
Clock time adjustment 4-6
Fault Code indicator 4-8
Fuel level indicator 4-8
Handlebar Switches 4-9
Throttle Lever 4-14
Speed Limiter 4-15
Front brake lever
Brake pedal and rear brake lever
Drive select lever
Fuel Tank Cap 4-18
Seat 4-18
Front Carrier 4-19
Rear Carrier 4-20
Front and rear shock absorber
adjustment
Auxiliary DC jack
Pre Operation Checks 5-1
5
Front and rear brake 5-2
Fuel 5-4
Engine Oil 5-6
Differential Gear Oil 5-7
Coolant 5-7
Throttle Lever 5-8
Fittings and Fasteners 5-8
Lights 5-8
4-16
4-16
4-17
4-20
4-22

Owner's Manual
Switches 5-8
Tires 5-9
How to Measure Tire Pressure 5-10
Tire Wear Limit 5-12
Operation 6-1
6
Starting a cold engine 6-1
Starting a Warm Engine 6-2
Warming up 6-2
Engine shut down 6-2
Vehicle Break-in Period
Engine Break-In
Parking 6-7
Parking on a slope 6-7
Accessories and loading 6-8
Your Vehicle 7-1
7
Driving Your Vehicle 7-1
Ride with care and good Judgment 7-1
Apparel 7-4
Speed Limiter
6-5
6-5
7-8
Loading and Accessories 7-8
During Operation 7-9
Modifications 7-11
Exhaust System 7-11
Pay attention to the road
conditions
Turning Your ATV 7-16
Climbing Uphill 7-19
Crossing a slope 7-21
Riding Downhill 7-23
Crossing Through Shallow Water
Riding Over Rough Terrain 7-27
Sliding and Skidding 7-28
Periodic Maintenance and
8
Adjustment 8-1
Periodic Maintenance and Adjustment
Periodic Maintenance Chart for
the Emission Control System 8-2
General Maintenance and
Lubrication Chart 8-3
EFI System 8-5
7-12
7-25
8-1

Owner's Manual
t
A
Engine Oil and Oil Filter cartridge
Final Gear Oil 8-13
Differential Gear Oil 8-14
Cooling System 8-16
Changing the coolant 8-18
Axle Boots 8-21
Spark Plug Inspection 8-22
Air Filter Element Cleaning 8-24
Spark Arrester Cleaning 8-27
V-belt Cooling Duct Check Hose 8-28
V-belt Case Drain Plug 8-29
Valve Clearance Adjustment 8-29
Throttle Lever Adjustment 8-30
Front/Rear Brake Pad check 8-30
Brake Fluid Replacement 8-33
Front Brake Lever Free Play 8-33
Adjusting the rear Brake Lever
Adjusting the Brake Pedal 8-35
Adjusting the rear brake light switch
Lubricating the Brake Lever and
Brake Pedal
8-9
8-34
8-36
8-37
Rear Knuckle Upper and Lower
Pivot Lubrication 8-38
Wheel Removal 8-39
Wheel Installation 8-39
Battery 8-40
Battery Maintenance 8-41
Fuse Replacemen
Replacing
Tail/brake light bulb replacement
Check and solution to common
problems in vehicle 8-46
Cleaning and Storage 9-1
9
Cleaning 9-1
Storage 9-2
Specifications 10-1
10
Fault codes for the Electronic
11
Fuel Injection System
USA EPA Emissions Limited
12
Warranty
Headlight Bulb 8-43
8-41
8-45
11-1
12-1
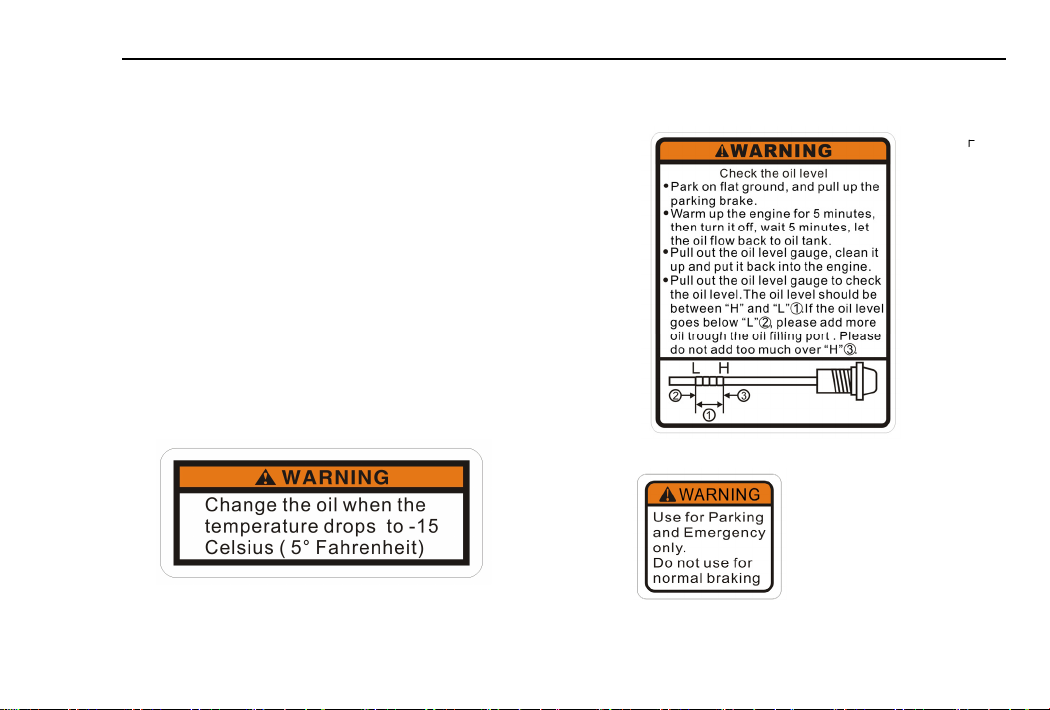
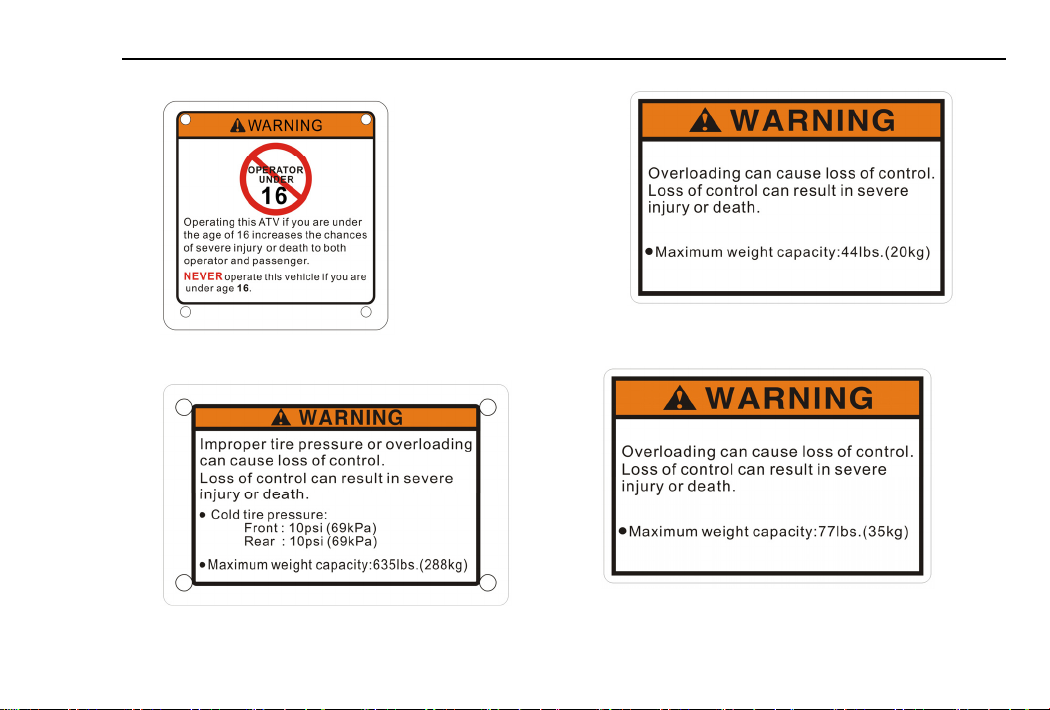
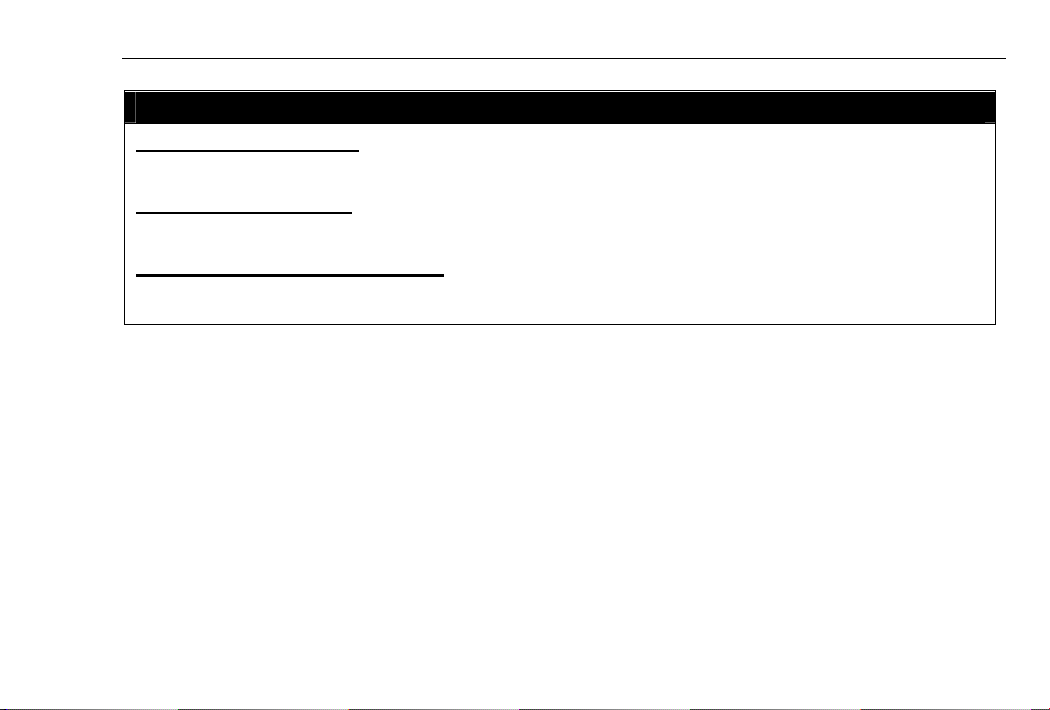
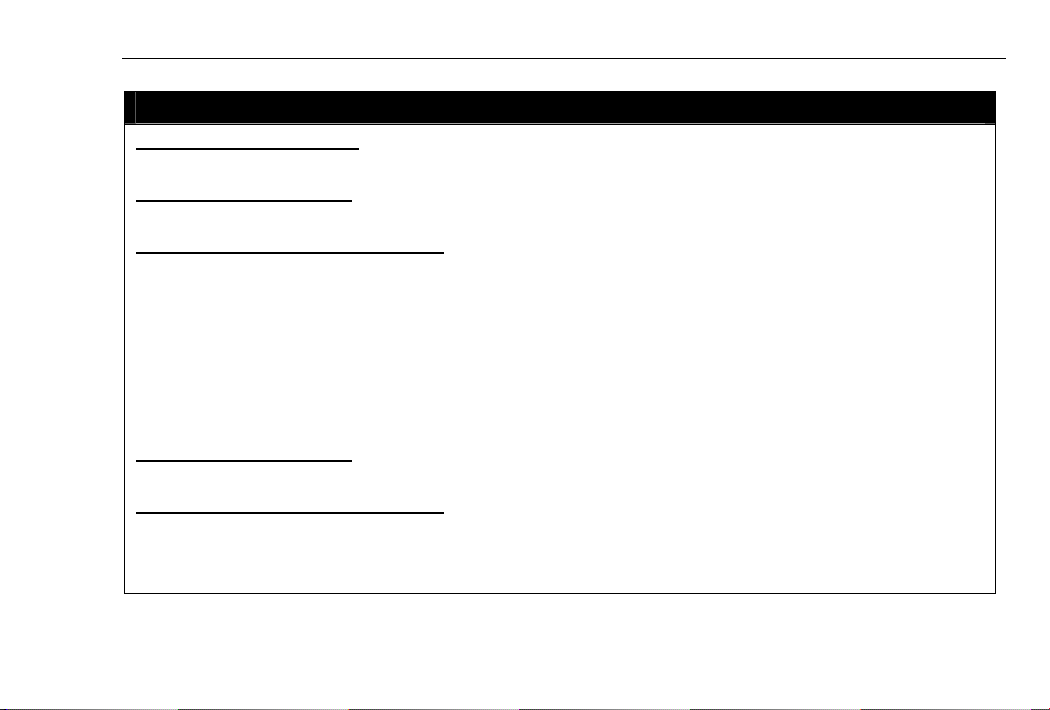
1-1 Location of the Warning and Safety Labels
LOCATION OF THE WARNING AND SPECIFICATION LABELS
Read and understand all of the labels on
your machine. They contain important
information for safe and proper operation of
your ATV.
Never remove any labels from your ATV. If a
label becomes difficult to read or comes off, a
replacement label is available from your
dealer.
[1]
[2]
[3]
[4]
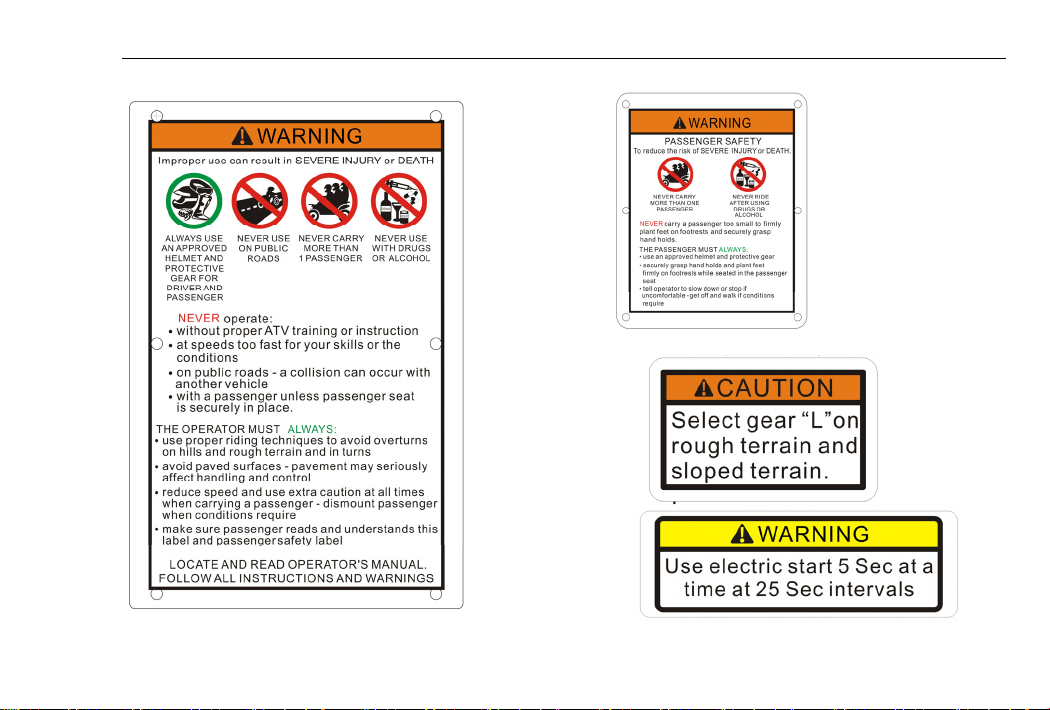
Location of the Warning and Safety Labels 1-2
[5]
[6]
[7]
1-3 Location of the Warning and Safety Labels
[8]
[10]
[9]
[11]

Safety Information 2-1
AN ATV IS NOT A TOY AND CAN BE HAZARDOUS TO OPERATE. An ATV handles
differently from other vehicles including motorcycles and cars. A collision or rollover can occur
quickly, even during routine maneuvers such as turning and riding on hills or over obstacles, if
you fail to take proper precautions.
SEVERE INJURY OR DEATH can result if you do not follow these instructions:
Read this manual and all labels carefully and follow the operating procedures described.
Never operate an ATV without proper training or instruction. Take a Training Course.
Beginners should receive training from a certified instructor.
Always follow the age recommendation:
This vehicle is an ADULT VEHICLE ONLY. Operation is prohibited for anyone under
16 years of age.
Never permit anyone to operate this ATV unless the person has read this manual and all
product labels and has completed a ATV safety training course.
Never allow anyone under the age of 12-years to ride as a passenger on this ATV. This is
SAFETY INFORMATION

2-2 Safety Information
an Adult ATV. Also remember even though a person may fit within the age group to be a
passenger, they may not posses the strength, agility, or judgement to ride safely and could
risk injury.
Never operate an ATV without wearing an approved motorcycle helmet that fits properly.
You should also wear eye protection (goggles or face shield), gloves, boots, long-sleeved
shirt or jacket, and long pants.
Never consume alcohol or drugs before or while operating, or being a passenger, on this
ATV.
Never operate at speeds too fast for your skills or the conditions. Always go at a speed that
is proper for the terrain, visibility and operating conditions, and your experience.
Never attempt wheelies, jumps, or other stunts.
Always inspect your ATV each time you use it to make sure it is in safe operating condition.
Always follow the inspection and maintenance procedures and schedules described in this
manual.
Always keep both hands on the handlebars and both feet on the footboards of the ATV
during operation.
Always go slowly and be extra careful when operating on unfamiliar terrain. Always be alert

Safety Information 2-3
to changing terrain conditions when operating the ATV.
Never operate on excessively rough, slippery or loose terrain until you have learned and
practiced the skills necessary to control the ATV on such terrain. Always be especially
cautious on these kinds of terrain.
Always follow proper procedures for turning as described in this manual. Practice turning
at low speeds before attempting to turn at faster speeds. Do not turn at excessive speed.
Never operate the ATV on hills too steep for the ATV or for your abilities. Practice on
smaller hills before attempting larger hills.
Always follow proper procedures for climbing hills as described in this manual. Check the
terrain carefully before you start up any hill. Never climb hills with excessively slippery or
loose surfaces. Shift your weight forward. Never open the throttle suddenly. Never go over
the top of a hill at high speed.
Always follow proper procedures for going down hills and for braking on hills as described
in this manual. Check the terrain carefully before you start down any hill. Shift your weight
backward. Never go down a hill at high speed. Avoid going down a hill at an angle that
would cause the vehicle to lean sharply to one side. Go straight down the hill where
possible.

2-4 Safety Information
Always follow proper procedures for crossing the side of a hill as described in this manual.
Avoid hills with excessively slippery or loose surfaces. Shift your weight to the uphill side of
the ATV. Never attempt to turn the ATV around on any hill until you have mastered the
turning technique described in this manual on level ground. Avoid crossing the side of a
steep hill if possible.
Always use proper procedures if you stall or roll backwards when climbing a hill. To avoid
stalling, use proper gear range and maintain a steady speed when climbing a hill. If you
stall or roll backwards, follow the special procedure for braking described in this manual.
Dismount on the uphill side or to a side if pointed straight uphill. Turn the ATV around and
remount, following the procedure described in this manual.
Always check for obstacles before operating in a new area. Never attempt to operate over
large obstacles, such as large rocks or fallen trees. Always follow proper procedures when
operating over obstacles as described in this manual.
Always be careful when skidding or sliding. Learn to safely control skidding or sliding by
practicing at low speeds and on level, smooth terrain. On extremely slippery surfaces,
such as ice, go slowly and be very cautious in order to reduce the chance of skidding or
sliding out of control.

Safety Information 2-5
Never operate an ATV in fast flowing water or in water deeper than that recommended in
this manual. Remember that wet brakes may have reduced stopping ability. Test your
brakes after leaving water. If necessary, apply them several times to let friction dry out the
linings.
Always be sure there are no obstacles or people behind you when you operate in
reverse.
When it is safe to proceed in reverse, go slowly.
Always use the size and type tires specified in this manual.
Always maintain proper tire pressure as described in this manual.
Never modify an ATV through improper installation or use of accessories.
Never exceed the stated load capacity for an ATV. Cargo should be properly distributed
and securely attached. Reduce speed and follow instructions in this manual for carrying
cargo or pulling a trailer. Allow greater distance for braking.
2-6 Safety Information
WARNING
POTENTIAL HAZARD
Starting or running the engine in a closed area.
WHAT CAN HAPPEN
Exhaust fumes are poisonous and may cause loss of consciousness and death within a short time.
HOW TO AVOID THE HAZARD
Always operate your ATV in an area with adequate ventilation.
Safety Information 2-7
WARNING
POTENTIAL HAZARD
Improper handling of gasoline.
WHAT CAN HAPPEN
Gasoline can catch fire and you could be burned.
HOW TO AVOID THE HAZARD
Always turn off the engine when refueling. Do not refuel right after the engine has been running and
is still very hot.
Do not spill gasoline on the engine or exhaust pipe/muffler when refueling.
Never refuel while smoking, or while in the vicinity of sparks, open flames, or other sources of
ignition such as the pilot lights of water heaters and clothes dryers.
When transporting the ATV in another vehicle, be sure it is kept upright. Otherwise, fuel may leak
out of the fuel tank.
WHAT CAN HAPPEN
Gasoline is poisonous and can cause injuries.
HOW TO AVOID THE HAZARD
If you swallow some gasoline or inhale a lot of gasoline vapor, or get some gasoline in your eyes,
see your doctor immediately. If gasoline spills on your skin, wash with soap and water. If gasoline
spills on your clothing, change your clothes.

3-1 Description and Vehicle Identification
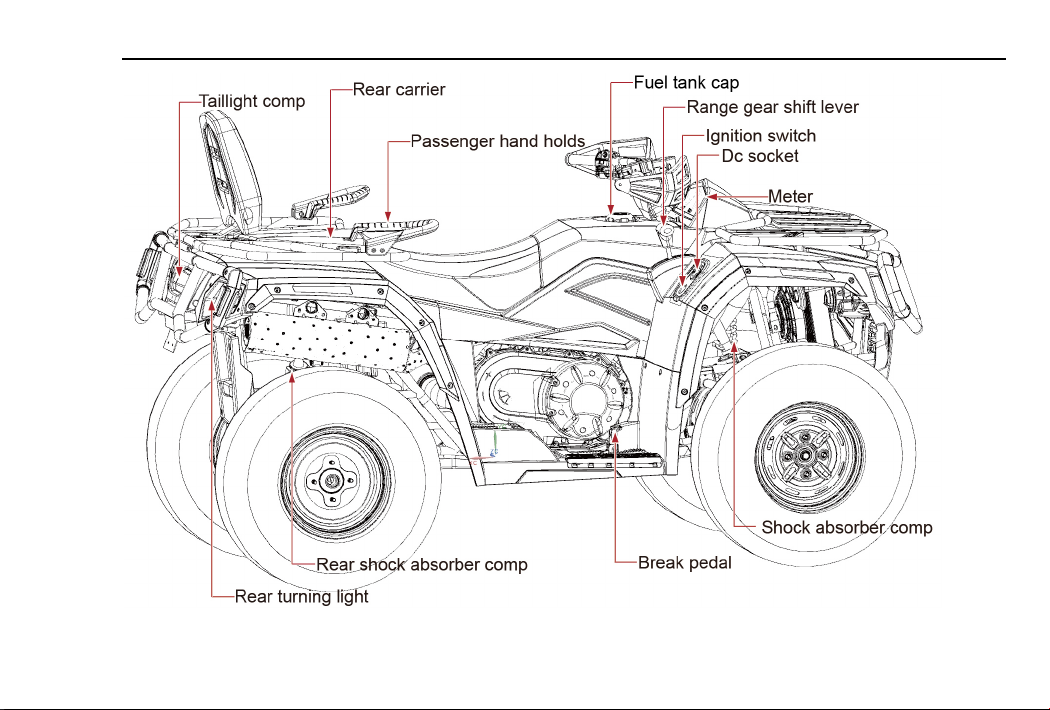
Description and Vehicle Identification 3-2

3-3 Description and Vehicle Identification
NOTE:
The machine you have purchased may differ
slightly from those shown in the figures of
this manual.
Vehicle identification number
The vehicle identification number is stamped
into the frame.
.
Identification number records
Record the key identification number, vehicle
identification number and model label
information in the spaces provided for
assistance when ordering spare parts from a
dealer or for reference in case the vehicle is
stolen.
1.VEHICLE IDENTIFICATION NUMBER:
[1]. Vehicle identification number
NOTE:
The vehicle identification number(VIN) is
used to identify your vehicle .
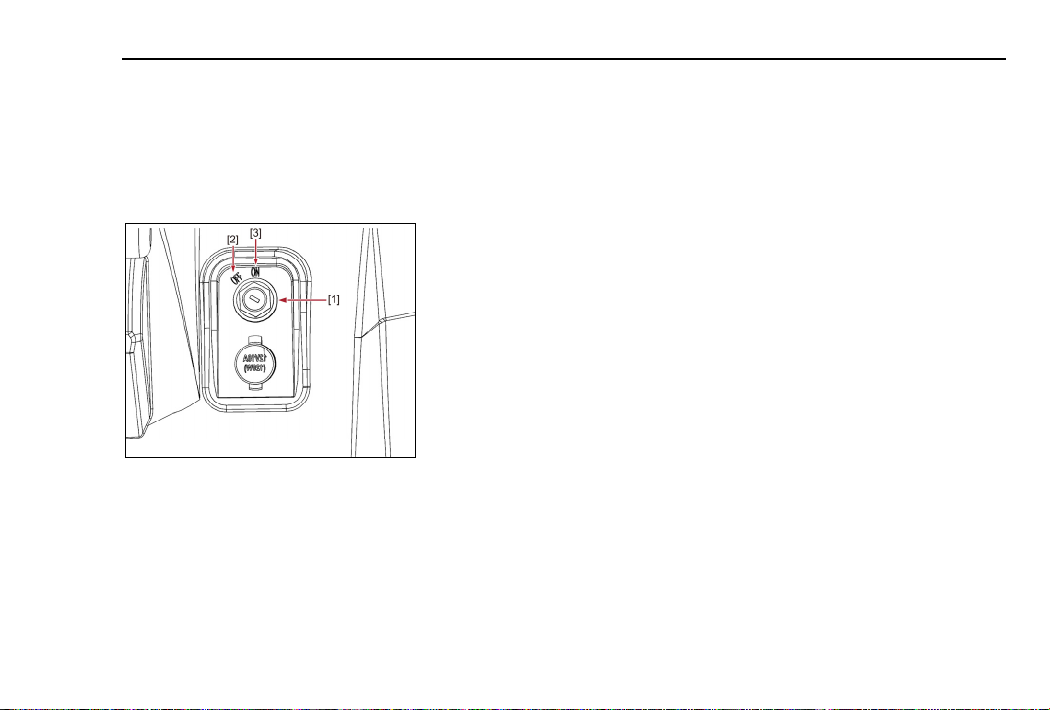
CONTROL FUNCTIONS
Main switch
Functions of the respective switch positions
are as follows:
[1] Ignition switch
[2] “OFF”
[3] “ON”
Control Functions 4-1
ON:
The engine can be started only at this
position and the headlights and taillight come
on when the light switch is on.
OFF:
All electrical circuits are switched off. The key
can be removed in this position.
4-2 Control Functions
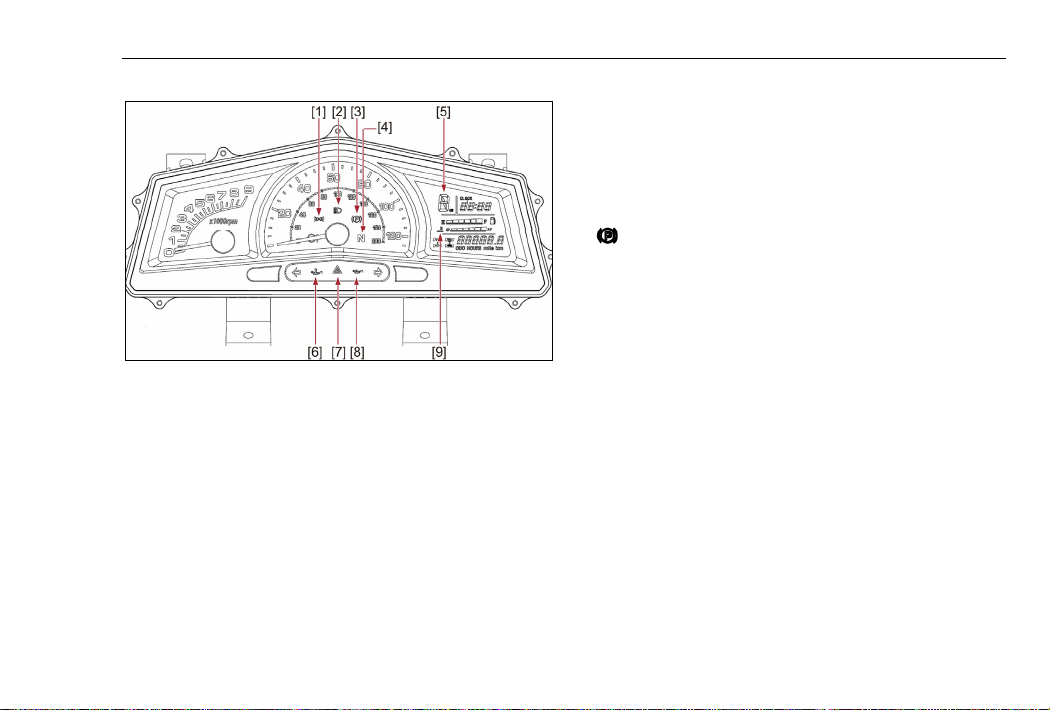
Indicator and Warning Lights
1. Parking light indicator
2. High beam indicator
3. Park position indicator “P”
4. Neutral indicator “N”
5. Gear display
6. Engine oil temperature
7. Emergency flashers indicator
8. Engine Oil-Pressure
9. Coolant temperature gauge
Low-Range Indicator Light “L”
This indicator light comes on when the drive
select lever is in the “L” position.
Mechanical Parking Brake Indicator Light
“
”
This indicator light comes on when the
mechanical parking brake is applied.
High-Range Indicator Light “H”
This indicator light comes on when the drive
select lever is in the “H” position.
Neutral Indicator Light “N”
This indicator light comes on when the drive
select lever is in the “N” position.

Reverse Indicator Light “R”
This indicator light comes on when the drive
select lever is in the “R” reverse position.
Coolant Temperature Warning Light “
When the coolant temperature reaches a
specified level, this light comes on to warn
that the coolant temperature is too hot. If
the light comes on during operation, stop the
engine as soon as it is safe to do so and
allow the engine to cool down for about 15
minutes.
”
CAUTION:
The engine may overheat if the vehicle is
overloaded. If this happens, reduce the
load to specification.
Control Functions 4-3
After restarting, make sure that the light
is out. Continuous use while the light is
on may cause damage to the engine.
High beam indicator
The light being on means headlight is at high
beam mode.
Position light indicator
The light being on means that the position
light fixed in the front headlight has been
turned on.
Emergency indicator“
The light being on means emergency lamp is
on.
”
Use of EPS system If Equipped
The Meter is an important part of ATV.

4-4 Control Functions
The Meter works together with EPS system
and monitors the working condition of EPS
system.
A fault will be displayed by fault indicator light
and fault indicator of EPS system, so the
driver can acknowledge a fault within the
EPS system and take the appropriate
measures.
When a fault occurs in the EPS system, the
fault indicator light will illuminate. At the same
time, fault indicator of EPS system will
display the fault code for maintenance.
If the fault indicator light is illuminated
stop the ATV and turn the ATV to the off
position. After a few moments turn the
ATV to the on position and see if the
EPS indicator light is still illuminated.
If the EPS indicator light is not
illuminated the ATV can be ridden.
In the fault indicator light remains
illuminated take the ATV to an
authorized repair center for
maintenance.
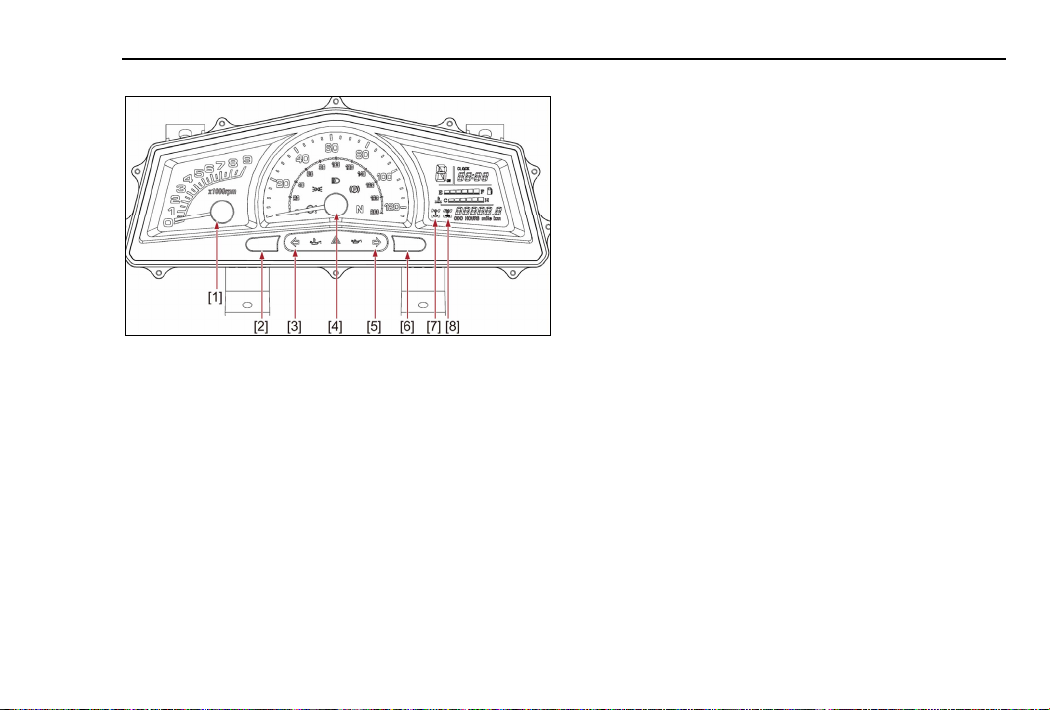
Speedometer Unit
1. RPM indicator
2. Odometer/tripometer/Eng. hours & Clock adjustment
3. Left turn indicator light
4. Speed indicator
5. Right turn indicator light
6. Miles per hour/Kilometers per hour selector button
7. 2WD / 4WD indicator light
8. Differential Lock indicator light
Speedometer unit functions:
Control Functions 4-5
a speedometer (which shows the speed)
an odometer (which shows the total
distance covered)
a tripometer (which can be cleared and
then show any new distances traveled)
an RPM indicator (which shows the
revolutions per minute of the engine)
a clock
an EFI fault code indicator (which shows
the fault code for problems with the EFI )
Odometer and trip meter modes
On the display panel there are two large
buttons, one located on the left side and one
on the right side. Quickly pressing the
button on the left side toggles the display
from the odometer, to the tripometer, and

4-6 Control Functions
then to the hours meter; then it starts the
cycle over.
The odometer displays the total distance
traveled by the ATV. The tripometer records
distances for a specific trip and can record
distances from 0 through 999.9 miles.
To reset a trip meter, select it by pressing the
left button, Press left button to switch to small
mileage (Trip), press the right button for a
long time to reset. The tripometer can be
used to estimate the distance that can be
traveled with a full tank of fuel. This
information will enable you to judge the fuel
consumption.
To change the display from miles per hour to
kilometers per hour press the right side
button on the display. This will also change
the displayed mileage from miles to
kilometers.
Clock time adjustment
Press the left button and hold for three
seconds and the clock goes into the hour
‘set’ mode.
1. Press the right button to set the hour.
2. Press the left button again and the clock
goes into the minute ‘set’ mode.
3. Press the right button to set the minutes.
4. Press the left button again and the clock
will exit the ‘set’ mode.
Four-wheel drive indicator “
”
There are two 4WD indicators on the display
panel. The left 4WD indicator has a blinking

circle on the front axle when the grey and
yellow 4WD selector buttons are pressed in
indicating the “4WD” function has been
activated. This position also indicates that
the 4WD is NOT locked. This allows the
wheels on the left and right sides to rotate at
different speeds to accommodate turning.
Differential gear lock indicator
The right 4WD symbol will show an ‘X’ over
the center of the front axle when the lever is
moved to the right and the yellow differential
gear lock button is set to out position, which
means the differential is not operational and
is locked. When riding an ATV on muddy and
slippery roads or when climbing a steep hill,
Control Functions 4-7
make sure the 4WD lock indicator is on.
When riding on a flat road at a comparatively
high speed, adjust the settings to
“2WD/UNLOCK” and there are no symbols
in either of the 4WD indicators.
Riding an ATV while the differential is
functioning and is NOT locked, may improve
the stability and safety of the ATV operation.
CAUTION:
When the selector is set to 4WD, the right
4WD symbol front axle will have an ‘X’ in the
middle . When riding on good surfaces you
should unlock the differential and press in
the yellow and the gray buttons to the 2WD
unlocked position. There should be no
symbols showing in either the left or right

4-8 Control Functions
4WD indicators.
CAUTION:
If the display indicators flash or the
speedometer does not show the speed while
the ATV is in motion, Ask a dealer to check
the speed sensor and circuits.
Fault code indicator
When the EFI encounters faults, the ECU will
send the fault code to the instrument display,
and it will flash on the clock.
If there are more than one fault code, they
will be shown in rolling sequence. When
fault codes are present, in order to see the
time press the clock button, the time will be
shown. Then after five seconds, the fault
code returns again. Only after the fault is
fixed, will the time show automatically.
The description for the fault codes are shown
in Chapter 11 of this manual.
Fuel level indicator
The fuel level display will indicate the fuel
volume. When the fuel is getting low the fuel
pump symbol will flash
[1]. Fuel level indicator [2]. Fuel level warning indicator
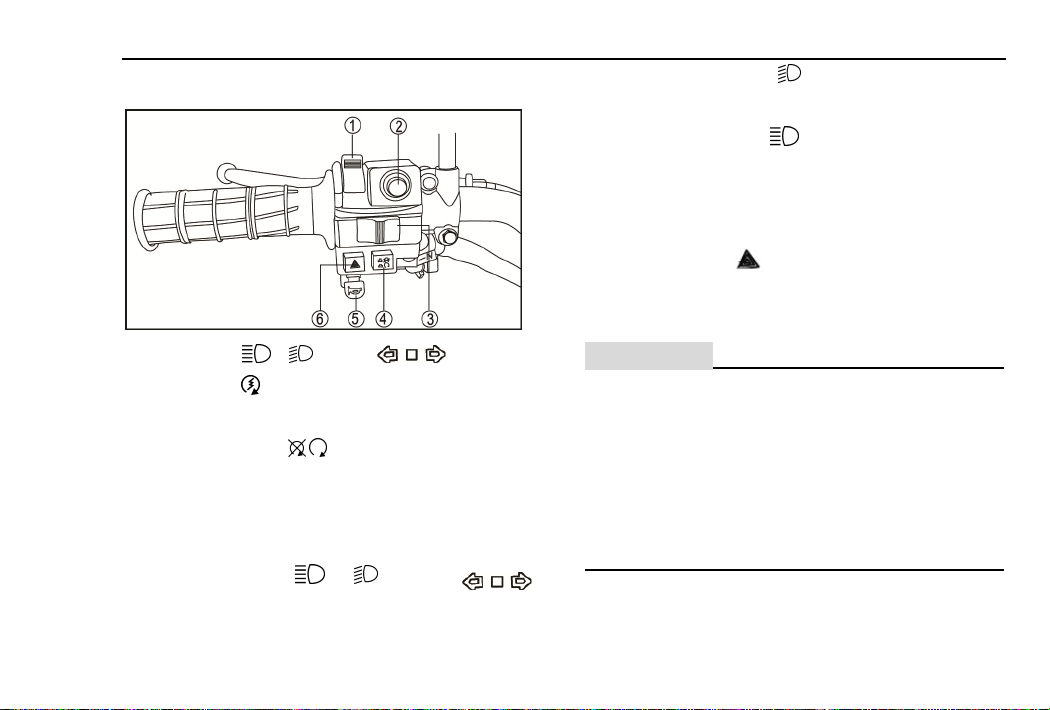
Handlebar switches
1. Light switch “ / / OFF/”
2. Start switch “ ”
3. Left/right turning light switch
4..Engine stop switch “ / ”
5. Horn switch
6. Emergency light switch
Light switch “ / /OFF/ ”
Control Functions 4-9
Set the switch to “ ” to turn on the low
beam and the taillight.
Set the switch to “
” to turn on the high
beam and the taillight.
Set the switch to “OFF” to turn off all the
lights.
Turn switch to "
" position, the emergency
light inside of headlights and tail light are lit.
CAUTION:
Do not use the headlights with the engine
turned off for more than thirty minutes.
The battery may discharge to the point that
the starter motor will not operate properly. If
this should happen, remove the battery and
recharge it.
 Loading...