

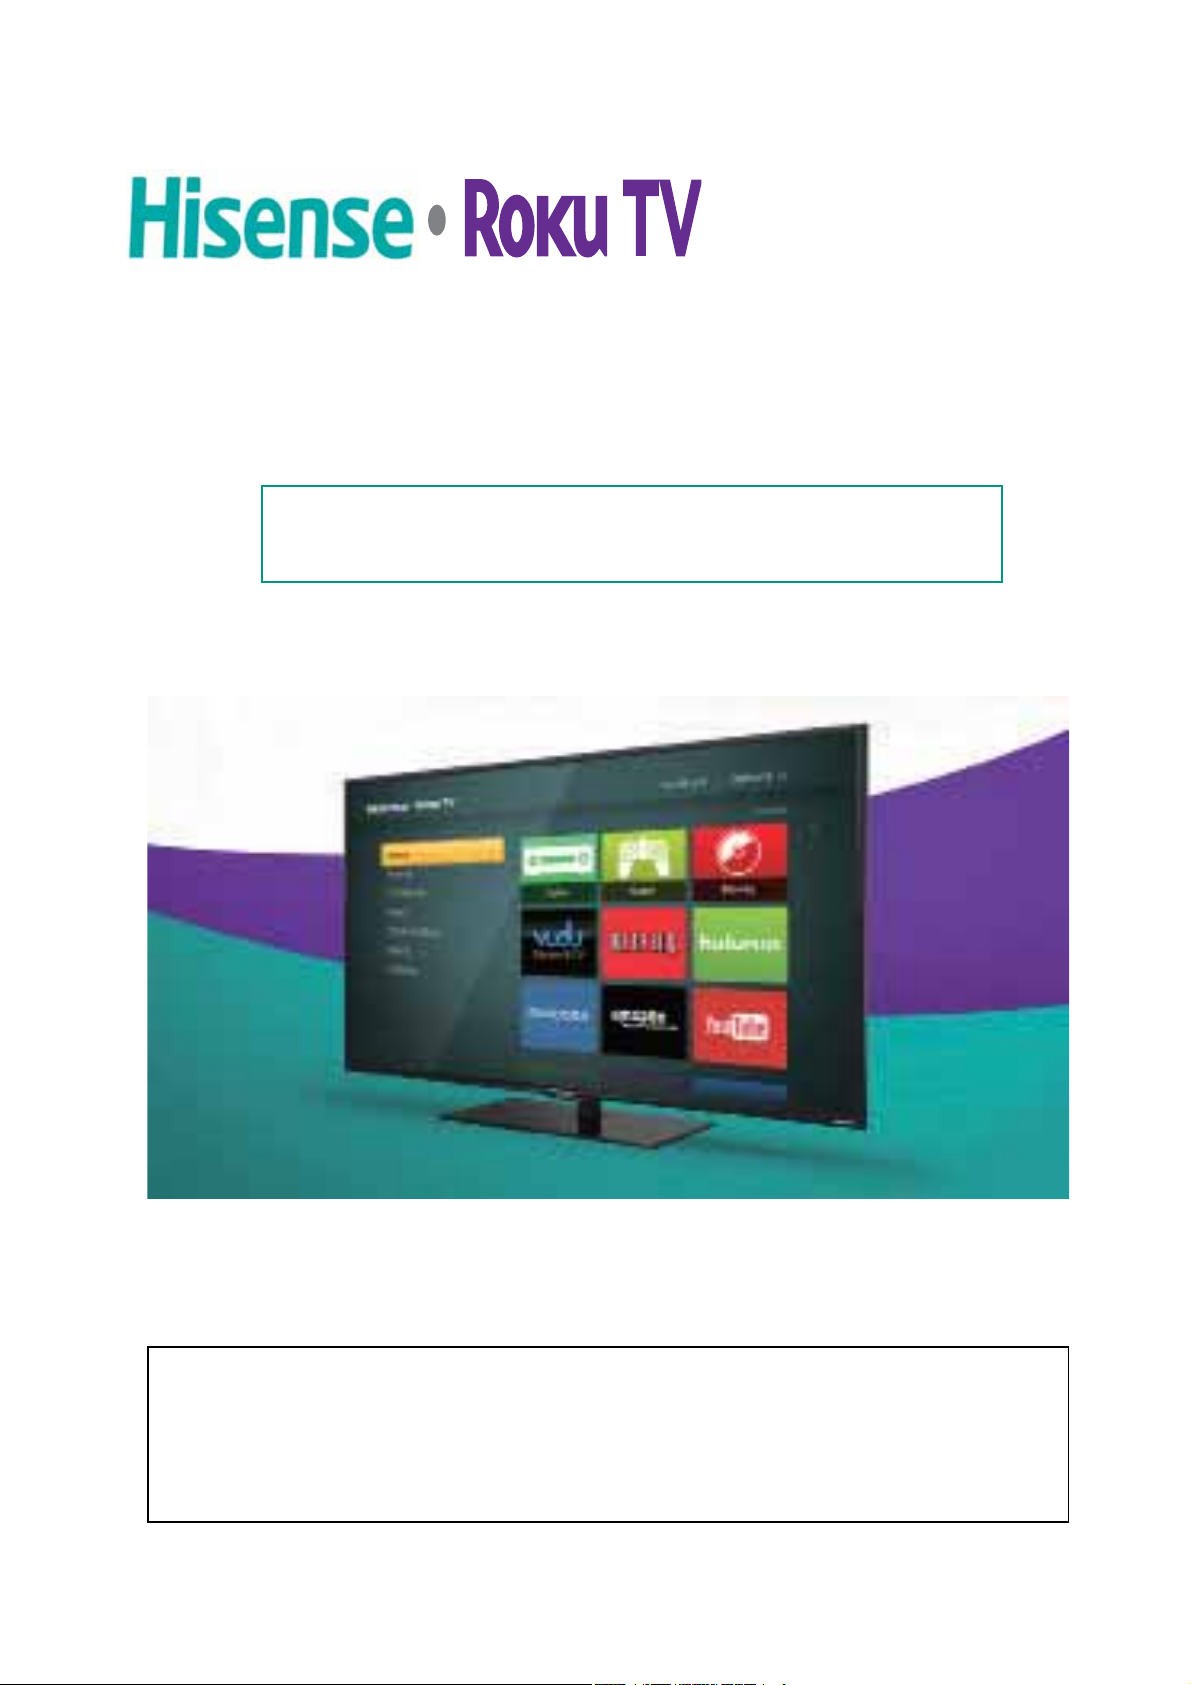
Hisense • Roku TV
H4 Model Series
User Manual
This user manual contains all of the information that you need to
set up, use, maintain and enjoy your TV.

© 2014 Hisense Company Ltd. All Rights Reserved.
All material in this User Manual is the property of Hisense Company Ltd. and its subsidiaries, and is
protected under US and International copyright and/or other intellectual property laws. Reproduction or
transmission of the materials, in whole or in part, in any manner, electronic, print, or otherwise, without the
prior written consent of the Hisense Company Ltd. is a violation of Hisense Company Ltd. rights under the
aforementioned laws.
No part of this publication may be stored, reproduced, transmitted or distributed, in whole or in part, in any
manner, electronic or otherwise, whether or not for a charge or other or no consideration, without the prior
written permission of Hisense Company Ltd.
Requests for permission to store, reproduce, transmit or distribute materials may be made to the following
address:
Hisense USA Corporation
7310 McGinnis Ferry Road
Suwanee, GA 30024.
Hisense, and any and all other Hisense product names, logo’s, slogans or marks are registered trademarks
of Hisense Company Ltd. and its subsidiaries. All other trademarks are the property of their respective
holders.

qualified in the “Energy
The lightning flash with arrowhead symbol, within an
to constitute a risk of electric shock.
The exclamation point within an equilateral triangle is
operating and maintenance (servicing) instructions in
equilateral triangle is intended to alert the user to the
presence of uninsulated dangerous voltage within the
the literature accompanying the appliance.
intended to alert the user to the presence of important
®
Energy Star
Your Hisense TV is ENERGY
STAR
Saving” mode. It meets strict energy
efficiency guidelines set by the U.S.
FCC Statement
NOTE:
This equipment has been tested and found to comply with
the limits for a class B digital Device, pursuant to part 15
of the FCC Rules. These limits are designed to provide
NOTE
Where the MAINS plug or an appliance coupler is used
as the disconnect device, the disconnect device shall
consumption. Depending upon such changed settings, the
Environmental Protection Agency
and Department of Energy. ENERGY
STAR is a joint program of these
government agencies, designed to
promote energy efficient products and practices. Changes to
reasonable protection against harmful interference in a
residential installation. This equipment generates, uses and
can radiate radio frequency energy and, if not installed and
used in accordance with the instructions, may cause harmful
interference to radio Communications. However, there is
power consumption may exceed the limits required for the
certain features, settings, and functionalities of this TV (i.e.
TV Guide, Picture, Sound) can increase or change the power
ENERGY STAR qualification in the “Energy Saving” mode.
measures:
try to correct the interference by one or more of the following
turning the equipment off and on, the user is encouraged to
no guarantee that interference will not occur in a particular
installation. If this equipment does cause harmful interference
to radio or television reception, which can be determined by
remain readily operable.
receiver.
Reorient or relocate the receiving antenna.
from that to which the receiver is connected.
Increase the separation between the equipment and the
Connect the equipment into an outlet on a circuit different
Consult the dealer or an experienced radio/TV technician
WARNING
The manufacturer is not responsible for any radio or TV
interference caused by unauthorized modifications to
this equipment. Such modifications could void the user's
authority.
)
TM
TC2-N1002
for help.
The WiFi Module complies with FCC radiation
exposure limits set forth for an uncontrolled environment.
This device should be installed and operated with a minimum
FCC ID Number WiFi Module:
distance of 20 centimeters between the radiator and your body.
technology.
Hisense and associated logos where applicable are registered trademarks
trademarks or registered trademarks of HDMI Licensing LLC.
I II
of Hisense Group in the United States and/or other countries. All other
trademarks are property of their respective owners. © 2013 Hisense USA,
Corporation. All Rights Reserved.
level of precision technology, however sometimes parts
of the screen may be missing picture elements or have
luminous spots.
LCD Panels are manufactured using an extremely high
This is not a sign of a malfunction.
Do not install the LCD Panel near electronic equipment that
while using infrared devices such as infrared cordless
produces electromagnetic waves. Some equipment placed
headphones.
too near this unit may cause interference.
Effect on infrared devices - There may be interference
Declaration of Conformity
This device complies with part 15 of the FCC Rules.
Operation is subject to the following two conditions:
(1) This device may not cause harmful interference and (2)
This device must accept any interference received, including
interference that may cause undesired operation.
Important Safety Instructions
off the power and unplug all of the equipment from the
wall outlet. Failure to do so may cause an electric shock
and serious personal injury. Read the owner's manual of
the other equipment carefully and follow the instructions
when making any connections.
speaker damage. When you use headphones, (if the unit
is equipped with a headphone jack) keep the volume at a
moderate level. If you use headphones continuously with
high volume sound, it may cause hearing damage.
22. When you connect the product to other equipment, turn
23. Sudden high volume sound may cause hearing or
CONDENSATION:
Moisture will form in the operating section of the unit if the
unit is brought from cool surroundings into a warm room or
if the temperature of the room rises suddenly. When this
happens, unit's performance will be impaired. To prevent
The LCD panel contains almost 3 million thin film transistors,
which provide exceptionally sharp video quality. Occasionally,
a few non-active pixels may appear on the screen as a
fixed black (in the case of a dead pixel), blue, green, or red
point. These non-active pixels do not adversely affect the
Your TV also contains material that can be recycled and
reused. For disposal or recycling information, contact your
local authorities or the Electronic Industries Alliance at
End of life directives
this, let the unit stand in its new surroundings for about an
hour before switching it on, or make sure that the room
temperature rises gradually.
www.eia.org to find a recycler in your area.
Non-active pixels
LCD panel glass to break and injury may occur.
do not touch the liquid in the panel. This may cause skin
Do not press hard or jolt the LCD panel. It may cause the
Condensation may also form during the summer if the unit is
exposed to the breeze from an air conditioner. In such cases,
change the location of the unit.
If the LCD panel is broken, make absolutely sure that you
HOW TO HANDLE THE LCD PANEL:
performance of your TV, and are not considered defects.
inflammation.
If the liquid gets in your mouth, immediately gargle and
consult with your doctor. Also, if the liquid gets in your eyes
or touches your skin, consult with your doctor after rinsing
for at least 15 minutes or longer in clean water.
WARNING
Do not connect this unit to the power using any device
TO USE AC POWER
1. The power cord is attached to the TV at the factory.
Power source
2. Connect the AC cord into an AC outlet.
Possible Adverse Effects on LCD Panel:
If a fixed (non-moving) pattern remains on the LCD Panel
for long periods of time, the image can become permanently
other than the supplied AC cord. This could cause fire,
engrained in the LCD Panel and cause subtle but permanent
ghost images. This type of damage is NOT COVERED BY
YOUR WARRANTY. Never leave your LCD Panel on for long
periods of time while it is displaying the following formats or
images:
electrical shock, or damage.
Do not use with a voltage other than the power voltage
Fixed Images, such as stock tickers, video game patterns,
CAUTION
specified. This could cause fire, electrical shock, or
damage.
When this unit is not used for a long time, (e.g., away on
a trip) in the interest of safety, be sure to unplug it from
the AC outlet.
Do not plug/unplug the AC cord when your hands are
wet. This may cause electrical shock.
example, viewing letterbox style (16:9) media on a normal
(4:3) display (black bars at top and bottom of screen); or
viewing normal style (4:3) media on a widescreen (16:9)
TV station logos, and websites.
Special Formats that do not use the entire screen. For
display (black bars on left and right sides of screen).
The following symptoms are not signs of malfunction
but technical limitation. Therefore we disclaim any
responsibility for these symptoms.
16. An outside antenna system should not be located in
the vicinity of overhead power lines or other electric light or
power circuits, or where it can fall into such power lines or
circuits. When installing an outside antenna system, extreme
care should be taken to keep from touching such power lines
or circuits, as contact with them might be fatal.
Important Safety Instructions
1. Read these instructions.
2. Keep these instructions.
3. Heed all warnings.
4. Follow all instructions.
5. Do not use this apparatus near water.
6. Clean only with dry cloth.
can result in a risk of fire or electric shock.
as they may touch dangerous voltage points or short out
17. Do not overload wall outlets and extension cords, as this
18. Do not push objects through any openings in this unit,
with the manufacturer's instructions.
heat registers, stoves, or other apparatus (including
amplifiers) that produce heat.
grounding-type plug. A polarized plug has two blades with
one wider than the other. A grounding type plug has two
blades and a third grounding prong. The wide blade or the
7. Do not block any ventilation openings. Install in accordance
8. Do not install near any heat sources such as radiators,
9. Do not defeat the safety purpose of the polarized or
third prong are provided for your safety. If the provided
particularly at plugs, convenience receptacles, and the
plug does not fit into your outlet, consult an electrician for
replacement of the obsolete outlet.
10. Protect the power cord from being walked on or pinched
parts that could result in fire or electric shock. Never spill
or spray any type of liquid into the unit.
19. If an outside antenna or cable system is connected to the
point where they exit from the apparatus.
manufacturer.
bracket, or table specified by the
manufacturer, or sold with the
11. Only use attachments/accessories specified by the
12. Use only with cart, stand, tripod,
unit, be sure the antenna or cable system is grounded to
provide some protection against voltage surges and built-
up static charges, Section 810 of the National Electrical
Code, ANSI/NFPA 70, provides information with respect
to proper grounding of the mast and supporting structure,
grounding of the lead-in wire to an antenna discharge
unit, size of grounding conductors, location of antenna
discharge unit, connection to grounding electrodes, and
requirements for the grounding electrode.
technician uses replacement parts specified by the
manufacturer or those that have the same characteristics
as the original part. Unauthorized substitutions may result
in fire, electric shock or other hazards.
ask the service technician to perform safety checks to
determine that the unit is in proper operating condition.
20. When replacement parts are required, be sure the service
apparatus. When a cart is used,
use caution when moving the cart/
apparatus combination to avoid injury
from tip-over.
unused for long periods of time.
Servicing is required when the apparatus has been
damaged in any way, such as power-supply cord or plug
is damaged, liquid has been spilled or objects have fallen
into the apparatus, the apparatus has been exposed to
13. Unplug this apparatus during lightning storms or when
14. Refer all servicing to qualified service personnel.
21. Upon completion of any service or repairs to this unit,
rain or moisture, does not operate normally, or has been
dropped.
splashing, and objects filled with liquids, such as vases,
should not be placed on the apparatus.
15. Apparatus should not be exposed to dripping or
III IV
VI

e
Moving Tiles ................................................................................................. 20
Removing Tiles ............................................................................................ 20
Types of Tiles that Appear on the Home Screen Grid ...................................... 19
Navigating the Home Screen Grid ................................................................... 19
Customizing the Home Screen Grid ................................................................. 20
Putting Batteries in the Remote Control ............................................................... 15
Your Hisense Roku Enhanced Remote ................................................................ 15
Button Descriptions ...............................................................................................16
Using your Hisense Roku TV Remote Control .................................................................... 15
I
I I
I I I - I V
TV LED Status Indicator Lights .............................................................................17
Virtual Keyboard ...................................................................................................17
Virtual Search Keyboard ...................................................................................... 17
TV LED Status Lights and Virtual Keyboards
Turning the TV ‘On’ for the First Time.........................................................................18
First Time Guided Setup
Choose a TV setup mode ..................................................................................... 18
Activate Your Roku Account .................................................................................. 18
Connect to the Internet .........................................................................................18
Navigating the Home Screen
‘Connected’ Mode versus ‘Unconnected’ Mode .................................................... 19
Overview.................................................................................................................... 19
Adding Tiles ................................................................................................. 20
Adding Input Tiles ........................................................................................20
Using the Options Menu .......................................................................................21
Contents Table of Contents
1 2
Tabl
Lifting and Moving the TV ............................................................................... 7
Installing the Stand .........................................................................................7
Installing a Wall Mount Bracket (not included) ............................................... 8
Required Tools ....................................................................................................5
Package Contents ................................................................................................. 5
FCC Statement ...........................................................................................................
Child Safety ................................................................................................................
Important Safety Instructions
Important Safety Instructions ..................................................................................
Register Your TV to Receive Hisense News .............................................................. 5
Getting Started With Setting Up Your TV
Attaching a TV Stand or Wall Mount Bracket ...................................................... 6
Locating Ports and Buttons on Your TV .......................................................... 9
Connecting an antenna, cable or satellite box .......................................................... 10
Connecting an Audio Visual (AV) device with a composite cable .............................. 10
Connecting an AV device with an HDMI cable .......................................................... 11
Connecting a Headphone .......................................................................................... 11
Connecting a PC with a VGA Cable .......................................................................... 11
Connecting an Audio Receiver with a Digital Audio Cable. ....................................... 12
Connecting Devices to the TV
Establishing an Internet Connection
Connecting to a Wireless Network.............................................................................13
Using Your Remote Control
Images throughout this user manual are for illustrative purposes only and may differ from the actual product. Images throughout this user manual are for illustrative purposes only and may differ from the actual product.

About................................................................................................................24
Power...............................................................................................................24
System Restart................................................................................................24
System Update................................................................................................24
Factory Reset..................................................................................................24
Third-Party Licenses.......................................................................................24
Advanced Settings .........................................................................................................25
Customizing Advanced Settings for your TV
Receiving Software Updates .........................................................................................26
Locating the Model and Serial Numbers .......................................................................26
Software Updates and Product ID Numbers
Quick Problem Solving Tips
Quick Problem Solving Tips.................................................................................... 27-28
3 4
Table of Contents Table of Contents
General TV Settings .............................................................................................. 21
Overview of the Roku Channels.............................................................................. 21
Overview of the Roku Channels
Movies .................................................................................................................. 21
TV Shows ............................................................................................................. 21
News .................................................................................................................... 21
Search .................................................................................................................. 22
Channel Store ....................................................................................................... 22
Settings ................................................................................................................. 22
Network ............................................................................................................ 22
Themes..............................................................................................................22
Screensaver.......................................................................................................22
Sound effects volume........................................................................................22
Captions............................................................................................................22
Time..................................................................................................................22
TV Picture Settings...........................................................................................22
TV Inputs..........................................................................................................22
Parental controls (Turning it On)........................................................................ 23
Audio.................................................................................................................23
Hiding the Movie, TV Shows and News Channels ............................................ 23
Resetting Parental Controls ............................................................................. 23
Turning Off Parental Controls.............................................................................23
Changing Your PIN ........................................................................................... 23
System .............................................................................................................. 24
Images throughout this user manual are for illustrative purposes only and may differ from the actual product. Images throughout this user manual are for illustrative purposes only and may differ from the actual product.

STAND COLUMN
BASE
M5 x 12mm
SCREWS
SCREWS
0hPP
STAND COLUMN
STAND COLUMN
Secure the STAND COLUMN to the BASE
Carefully place your TV on a soft, cushioned,
A B
Lifting and Moving the TV
• We recommend that at least 2 people are available to lift and transport the TV.
• Before moving or lifting the TV, disconnect the power cord and all cables.
Installing the Stand
• When holding the TV, face the screen away from you to avoid damage.
• Hold the top and bottom of the TV firmly.
Follow the steps and illustrations below to install the stand.
with four screws.
surface to prevent damage to the screen.
COLUMN with 4 screws.
b. Insert 2 (ST4) screws in the front and 2
(M5) screws in the back.
a. Secure the STAND COVER to the STAND
C
holes located on the bottom of the TV.
a. Align the BASE STAND with the screw
D
b. Secure the BASE STAND to the TV with
STAND COVER
6&5(:6
0hPP
the four screws tightly.
STAND COVER
BASE STAND
TV BACK
Figure 4. Stand Installation steps
Getting Started With Setting Up Your TV Getting Started With Setting Up Your TV
Register Your TV to Receive Hisense News
Thank you for choosing this Hisense • Roku TV. This User Manual provides information about the numerous
features and easy-to-understand connect devices to your TV, attach the TV stand, complete the Guided Setup,
configure your settings, stream content and much more.
Because we value your business, we want to keep you in the know of ‘all things Hisense’. Using your mobile phone,
scan the first QR code to register your TV and the second QR code to access the Support page. Depending on the
www.hisense-usa.com/support/productreg
make and model of your phone, you may need to download a QR code scanning application.
You can also access the Product Registration or Support page by visiting www.hisense-usa.com/support or
Figure 2. Product Support QR Code
12mm); 4 (ST4x16 mm)
Figure 1. Product Registration QR Code
• Hisense • Roku TV
• TV stand
• TV base
• Hisense Roku TV Quick Start Guide
• Important Safety Information and Warranty Card leaflet
• 2 AAA batteries for the remote
• Power cord
• Hisense Roku TV Enhanced Remote Control
PACKAGE CONTENTS
Your package in which you purchased this Hisense Roku TV contains the following items:
• 8 Phillips screws (total): 4 (M5x
5 6
IMPORTANT: Look inside the styrofoam (within the upper and bottom parts of the box) to make sure that you have
removed all items that come with the TV.
REQUIRED TOOLS AND DEVICES
• Phillips screwdriver (not included) to attach the TV stand
• Wi-Fi device or Wireless router (not included) for Internet connectivity

TV Side View
R
OUT
AV IN
AUDIO OUT
DIGITAL
/AUDIO
Ant/Cable
HDMI 1(ARC) VIDEO L
HDMI 2
TV Bottom View
HDMI 3
USB
Locating Ports and Buttons on Your TV
DC 5V 0.5A(MAX)
Hisense Roku TV
Figure 8. Side, Bottom and Button View of the
Locating Ports and Buttons on Your TV
AC power cord
Button View
Getting Started With Setting Up Your TV
Installing a Wall Mount Bracket (not included)
Your TV can be mounted on a wall using a wall mount bracket (not supplied) that can be purchased separately.
Before you begin the installation instructions provided by the wall mount manufacturer, we suggest that you do the
following things:
1. Remove the TV stand if you already attached it.
2. Place the TV face down on a clean, safe and cushioned surface.
3. Place the spacers (not included) in the corresponding bracket holes.
Leave at least this much
space around the set.
(10cm)
4 inches
(30cm)
12 inches
(10cm)
4 inches
inches
8
(6cm)
3
2
(10cm)
4 inches
(30cm)
12 inches
Correct way to attach the TV stand Correct way to attach the wall mount bracket
(10cm)
4 inches
(10cm)
4 inches
Figure 6. Correct way to attach the wall mount
bracket
Leave at least this much
space around the set.
Figure 5. Correct way to attach the TV
stand
CAUTION
• Be sure to use the provider spacers between the TV and the bracket when attaching the mount.
other objects (walls, cabinet sides, and so on) to ensure proper ventilation andd prevent the TV from overheating.
provided) that are 9.5 - 11.5 mm in length when measured from the attaching surface of the mounting hook
• To prevent internal damage to the TV and ensure it is mounted securely, be sure to use fixing screws (not
• When you mount your TV on the wall or place it on furniture, maintain a distance of at least 4 inches between the TV and
Air circulation is blocked.
liable for these kinds of accidents.
• Do not mount the TV at more then a 12 degree tilt.
• Do not use screws that differ from the length and diameter that we have recommended.
• Do not fasten the screws too firmly. This may damage the TV or cause it to fall, leading to personal injury. Hisense is not
professional installer for assistance.
• Be careful when you touch the TV. Some parts may be warm or hot.
• Do not place any type of fabric or papers underneath, on top of, or beside the TV. This can block ventilation and cause a fire.
• For detailed information about installing the wall mount bracket, see the third-party manufacturer’s instructions or contact a
• Do not operate or handle the TV with wet hands
Hisense is not responsible for any damages or injuries that occur due to mishandling or incorrect assembly.
rear cover. The diameter and length of the screws differ depending on the Wall-Mount Bracket model.
Follow instructions provided with the Wall-Mount bracket.
• If you are not sure of your ability to complete the installation, contact a professional installer for assistance.
• The screws that we recommend are 9.5-11.5 mm in length when measured from the attaching surface of the TV
7 8
Wall Wall

DVD
Set-top Box
EXTERNAL DEVICES
HDMI
HDMI Cable
(not included)
HDMI
TV JACK
NOTE
Connecting an AV device with an HDMI cable
This type of connection supports digital connections between HDMI-enabled AV devices such as a Personal Video
Recorder (PVR), DVD, Blu-Ray, AV receiver and digital devices. In addition, some devices (such as a PVR or DVD
player) require an HDMI signal to be set to Output in the settings of the device.
For instructions, please refer to the User Manual for the device.
1. Use an HDMI cable to connect the [HDMI] output jack of the AV device to the [HDMI] jack on the TV.
2. Plug the connected devices into the main socket before switching on the TV.
3. Select one of the HDMI sources as the input source using the [INPUT] button.
Figure 11. Connect an AV device with an HDMI cable
The HDMI connector provides video and audio signals. It is not necessary to connect an
audio cable.
Audio Cable
(not included)
TV JACK
Connecting a Headphone
You can connect headphones or an analog sound bar to the [AUDIO OUT] jack on your set. While the headphone
is connected, the sound from the built-in speakers will be disabled.
Figure 12. Connecting a headphone
Connecting Devices to Your TV Connecting Devices to Your TV
you are using an antenna with twin-lead cable, you may need a 300-75 Ohm adapter (not provided) to connect
it to the back of your TV. Likewise, if you are using several antennas, you may need a combiner (not provided).
Connecting an antenna, cable or satellite box
This section provides the steps to connect various types of devices to the TV.
Connecting Devices to the TV
1. Connect one end of a coaxial cable (not included) to the [RF OUT] jack on the antenna, cable or satellite box. If
2. Connect the other end of the cable to the [ANT/CABLE IN ] jack on the side of the back panel.
3. Select TV as the input source using the [INPUT] button.
Cable
ANT OUT
EXTERNAL DEVICESTV JACK
or
(not included)
ANT/CABLE
VHF/UHF Antenna
(not included)
VCR
EXTERNAL DEVICES
L R
AV IN
TV JACK
VIDEO
AV IN jacks of the TV. (Video = yellow, Audio Left = white, and Audio Right = red).
Connecting an Audio Visual (AV) device with a composite cable
Figure 9. Connect an antenna to the TV
1. Use the audio and video cables to connect the composite video/audio jacks (of the external AV device) to the
2. Plug the connected devices into the main socket before switching on the TV.
3. Select AV as the input source using the [INPUT] button.
DVD Player/Recorder
L
R
White(L)
Red(R)
AV Cable
Red(R)
White(L)
Satellite
antenna
cable
Set-top box
Video
Camera
Video
Yellow(Video)
(not included)
Yellow(Video)
Satellite Receiver
A/V OUT
9 10
Figure 10. Connect an AV device with a composite cable

The LAN Port on
the Wall
LAN Cable
(not included)
Wireless IP sharer
Wireless Wi-Fi device or
Wireless Adapter
built-in the TV set
Establishing an Internet Connection
Connecting to the Internet through a Wireless (Wi-Fi) Device
This section shows how to establish a wireless Internet connection for your TV.
EXTERNAL DEVICES
NOTE
support an external USB network adapter.
Dynamic Host Configuration Protocol (DHCP), your TV can use a DHCP or static IP address to connect to the
wireless network.
IP sharer is currently being used by another device nearby, this will result in interference and communication
failure.
or TKIP-AES (WPS2 Mixed) for your Access Point (AP), then the Hisense TV will not support a connection in
compliance with these Wi-Fi certification specifications.
Our built-in wireless LAN adapter supports the IEEE 802.11 b/g/n communication protocols and we recommend that
you use an IEEE 802.11n router. When you play a video over an IEEEE 802.11 b/g connection, the video may not
play smoothly.
Figure 14. Connect the TV to a wireless network
Speaker
Powerless
Bass Speaker
• You must use the Hisense built-in Wireless LAN Adapter to use a wireless network because the TV does not
• To use a wireless network, your TV must be connected to a wireless IP sharer. If the wireless IP sharer supports
• Select a channel for the wireless IP sharer that is not currently being used. If the channel set for the wireless
• If you apply a security system other than the systems listed below, it will not work with the TV.
• If Pure High-throughput (Greenfield) 802.11N mode is selected and the Encryption type is set to WEP, TKIP
Button Configuration (PBC) or PIN (Personal Identification Number). WPS will automatically configure the SSID.
• If your access point (AP) supports Wi-Fi Protected Setup (WPS), you can connect to the network via Push
11 12
Connecting Devices to Your TV
Connecting an Audio Receiver with a Digital Audio Cable
White(L)
Red(R)
Audio Cable
(not included)
OUT
DIGITAL
of the TV. Another option is to use an RCA Y-cable (1/8”-stereo mini to L/R phono - not provided) to connect
analog sound system to the [AUDIO OUT] jack of the TV.
2. Plug the connected devices into the main socket before switching on the TV.
3. Select the corresponding source on the audio receiver.
1. Use an audio cable to connect the digital [AUDIO IN] jack of the AV device to the digital [AUDIO OUT] jack
AUDIO OUT
TV JACKS
/AUDIO
Figure 13. Connecting an audio receiver with a digital audio cable
Connecting a USB device to the USB port
1. Browse photos, music and movies by inserting your USB device into the [USB] port.
2. Select the Roku Media Player tile from the Home screen.

Using the Remote Control
Hisense Roku Remote Control Button Descriptions
Figure 16. Hisense Roku Remote Control button descriptions
Using the Remote Control
NOTE
In order to ensure that there are no performance issues to control your TV, we recommend that you only use the
Hisense Roku Enhanced Remote Control that came with the TV.
Using Your Hisense Roku TV Enhanced Remote Control
The remote is infrared (IR) and controls all TV and streaming functionality.
Close the battery cover.
Putting Batteries in the Remote Control
1. To open and lift off the battery cover, push the latch in the direction of the up arrow.
2. Insert two AAA size batteries.
Make sure to match the (+) and (-) ends of the batteries with the (+) and (-) ends indicated in the battery compartment.
3.
Do not expose the batteries to excessive heat (such as sunshine, fire or other sources).
Your Hisense Roku Enhanced Remote
13 14
Figure 15. Hisense Roku Remote

First Time Guided Setup
Choose a mode from where you will use the TV
To get started with the setup process:
The Guided Setup Wizard appears the first time you turn on the TV. It guides you step-by-step through the initial
setup and configuration of your television.
Turning the TV On for the First-Time
1. Press the red [POWER] button on your remote to turn on your TV.
Welcome.
I
NOTE
The TV begins to search for local Wi-Fi networks and lists the networks it finds in order, from the strongest to the
After you power on the TV, a Startup page appears that displays a Power On image along with the Hisense
and Roku logos. Next, the boot up splash page appears that displays a themed background and
2. Press OK to start the guided setup.
3. Select Setup for home use or (if you’re a retailer that will set up the TV to display) Setup for store use.
Figure 18. Hisense Roku TV Welcome Page
Connect to the Internet
f you chose not to connect to the Internet and create a Roku account, then you will only see tiles
for each of your inputs and a limited menu of options.
1. Select Connect to the Internet.
weakest signal. After an Internet connection is established, the TV will attempt to determine the time zone in which
2. Choose the Wi-Fi connection.
NOTE
the code that displays.
it is operating. If it is unable to, then you are prompted to manually choose your time zone.
Activate your Roku Account
1. From your mobile phone, tablet, laptop or other Internet-connected device, go to roku.com/link and then enter
Once you have completed creating an account, a confirmation message displays on the screen of your Internet-
connected device. The TV now takes a few moments to update the Home screen with the set of streaming
content that you purchased. Once this has completed, a confirmation message displays on the TV screen and
prompts you to start streaming.
The code displayed on the screen is only valid for a limited amount of time. If it expires before you
are able to enter it on the Roku website, then another one must be generated.
2. Create a Roku account.
The Hisense Roku TV page appears and shows tiles for each of your TV inputs and apps that you have added to
your Roku account. In addition, you will also see the full set of menu options.
the TV is on.
the TV is on.
TV LED Status Lights and Virtual Keyboards
TV State TV LED action What this means
Screensaver Off The screen is communicating that
Off (no power) Off The TV does not have power.
Off (active standby) Off The TV has power and is ready for
On (you are viewing content) Off The screen is communicating that
TV LED Status Indicator Lights
Table 1 provides a status description of the TV LED lights.
you to enjoy.
The TV is initializing.
The TV is updating.
Slow pulsing blink until it has
completely started up
Slow pulsing blink until the update
completes
Starting up after it has been turned
off
On (you are receiving an update
from a USB)
IR received from the remote Dims on and off once The TV is responding to what you
have pressed on the remote.
Patterned blink The TV has lost Wi-Fi connectivity.
On (The TV is on but your Wi-Fi
connection has disconnected)
Virtual Keyboard
The Virtual Keyboard enables you to type in text fields as you navigate throughout different areas of your TV.
To type a character using the remote control, you must be on a TV screen (for example, the Network channel)
where you are prompted to type information.
Figure 17. Virtual search keyboard screenshot
To launch the keyboard, press the OK button on your remote and use the left/right/up/down navigation buttons
to move your cursor.
Virtual Search Keyboard
The Virtual Search Keyboard enables you to search for movies, TV shows and other types of content by typing
in a keyword.
15 16

Navigating the Home Screen
Navigating the Home Screen Grid
The Home button on your remote immediately returns you to the Home screen whether you are watching streaming
TV, live TV or in any other area.
The Back button takes you the previous selection and eventually to the Home screen.
Use the remote control Directional pad (D-pad) to navigate the grid. From the Home screen menu, press the D-pad
right to move into to the grid and then use the 4 D-pad directional buttons to move up, down, right or left.
The tile that is highlighted is the one that you have selected. Press the OK button on your remote to launch it.
Customizing the Home Screen Grid
There are several ways that you can customize the Home screen grid to suit your preference including moving
Moving tiles
tiles, removing tiles and adding tiles.
make space for itself.
reappears with the selected tile surrounded by a border that shows arrowheads pointing in all valid movement
directions.
By default, TV input tiles are located at the top of the screen grid and app and streaming provider tiles are at the
bottom. If you prefer a different layout, then you can move the tiles to suit your preference.
To move tiles on the grid:
1. Using the D-pad buttons on your remote, select the tile that you want to move.
2. Press the STAR (*) button on the remote control.
A Hisense Roku TV Media Player menu displays.
3. Use the D-pad up/down buttons to select Move channel.
4. Press OK on your remote to select Move channel. The pop-up menu goes away and the Home screen grid
6. Press OK on your remote to assign the tile to its current location in the grid.
5. Use the D-pad arrow buttons to move the tile to the new location. As the tile moves, it displaces other tiles to
Removing tiles
You can remove any tile from the Home screen grid except for the offline Roku Media Player tile that appears if
your TV has never been connected to the Internet or linked to a Roku account.
To remove a tile:
1. Using the D-pad buttons on your remote, select the tile that you want to remove.
2. Press the STAR (*) button on the remote control.
A pop-up window (that is labeled based on the name of the tile you have selected) displays.
3. Select Remove channel.
A Confirm Channel Removal window displays
4. Select Remove.
The tile is removed.
Adding tiles
The steps for you to add tiles varies based on whether you want to add streaming provider/app tiles or TV input
tiles.
Adding Apps/Streaming Provider Tiles
To add an App or Streaming Provider tile to the Home screen grid:
1. Go to the Channel Store.
2. Find and select the desired channel or application.
Navigating the Home Screen
the left and grid tiles are on the right. The grid tiles represent physical TV input tiles (HDMI 1, HDMI 2 HDMI 3,
Composite), a TV tuner tile, app tiles that have been factory installed or added from the Channel Store and
Overview of the Hisense Roku TV Home Screen
channel tiles (for example, Netflix, Crackle and so on) that represent streaming content providers.
The Hisense Roku TV Home screen is your starting point for you to view or listen to content. The menu is on
‘Connected’ Mode versus ‘Unconnected’ Mode
Figure 19. Home screen
In ‘Connected’ mode (that is when your TV is connected to the Internet and linked to a Roku account), the Home
screen menu includes selections for:
• Movies
• TV Shows
• News
• Search
• Channel Store
• Settings
If you do not want to use the Movies, TV Shows and News features, you can hide them by turning on the Parental
controls setting. See the ‘Parental Controls’ section for instructions.
17 18
feed displays. When you select an input tile, the TV switches to that particular input and displays the video full
screen.
audio feed displays from the tuner’s current channel. Selecting the TV tuner tile displays the tuner’s current
video feed full-screen, or if blocked by parental controls, displays a PIN entry overlay. You must enter the
correct PIN to display the channel’s audio and video signal.
particular channel launches.
Types of Tiles that Appear on the Home Screen Grid
• Physical TV input tiles: When you select a tile that represents a Physical TV input,a live video and audio
• TV tuner tile: If you select the TV tuner tile, (if available and not blocked by parental control) a live video and
• App tiles: When you select an App tile (for example, Pandora®), the application launches.
In ‘Connected’ mode, your TV will also automatically receive the latest software updates.
In ‘Unconnected’ mode, (that is when you have never connected your TV to the Internet and linked it to a Roku
account), you will only see a limited menu of options (Home and Settings) and tiles for your TV inputs and Roku
Media Player.
You can still use the TV to view live broadcasts (not streaming content) without connecting it to the Internet and a
Roku account; however, in order to maximize your TV viewing experience, we recommend that you connect to the
Internet.
• Channel Tiles: When you select a Channel Tile (for example, Hulu Plus™ or Focus™), the content for that

Menu Channels
The Home screen menu contains ‘channels’ (Movies, TV Shows, Music, News) for you to select from for your
entertainment or settings preferences.
Overview of the Menu Channels
You can find out more information about a particular title when you navigate to the posters that appear on the right
side of the screen. Using the D-pad on your remote, click on a poster to select it.
The price of the movie, rating information and length appears. If you want to view the trailer for the movie, press
Figure 20. Home screen
Movies
The Movies channel contains a library of numerous titles from various genres.
To view the library, select Movies and press the OK button on your remote.
OK on your remote.
Figure 21. Movies channel
A synopsis of the movie appears along with a menu of options from which to choose. You can select ‘Watch
trailer, Add to watchlist, or a rental amount.
TV Shows
The TV Shows channel contains a library of numerous TV show titles from different genres and categories.
To view the library, select TV Shows and press the OK button on your remote. Posters for the TV shows appear
to the right.
Navigating the Home Screen
3. Add the channel/application and select any other options to complete the addition.
The channel/application is added to the end of the Home screen grid.
Adding Input Tiles
By default, tiles for your TV inputs and tuner appear in the Home screen grid. You can always remove them and
add them back to the grid manually or automatically.
To manually add an Input tile to the Home screen grid:
1. Go to Settings > TV Inputs.
2. Select the input you want to add.
3. Set up the input.
To automaticaly add an HDMI input tile to the Home screen grid:
1. Connect a device to any of the HDMI input ports.
2. Turn on the device.
The input and TV tuner tiles appear at the topmost position in the Home screen grid.
Using the Options menu
When possible, the TV will recognize that a device has been connected to the port and add the HDMI tile to
the beginning of the Home screen. The system will also identify the device type and automatically change
The Options feature is only available when you are viewing or listening to live TV content. To access the Options
the default tile label to a device name that is more user-friendly.
menu, press the Asterisk [ ] button on the remote control.
When the Options menu appears, selecting Advanced Picture Settings, displays the Advanced Settings menu.
brightness from the following options:
General TV Settings
The menu of options that display will differ based on whether you are viewing a live TV broadcast from the TV tuner,
• TV brightness: This setting adjusts the brightness of the images on the TV screen. You can adjust the TV
video content from an HDMI input, video from the composite input or watching streaming video from a content
provider.
be turned ‘On’ or ‘Off’ and is for the hearing impaired. Various options are also available to customize the text
style, text size, background color and more.
• Darker: This option is available if you are viewing a darker picture in a dark room.
• Dark: This option is available if you want a slightly dimmer picture that saves energy.
• Normal: This option is for general everyday viewing.
• Bright: This option provides a slightly brighter picture that will be viewed in a light room.
• Brighter: This option makes pictures brighter for bright rooms.
• Eco save: This option enables you to save energy.
• Movie: This option is available if you are going to dim the lights to watch a movie.
• Normal: This option is great for general everyday viewing.
• Sports: This option enables you to maximize your viewing experience while watching sports.
• Vivid: This option is available if you want an intense and bright picture.
• Custom: This option enables you to personalize settings for one of your physical TV inputs.
• High treble: This option brightens high tones.
• Speech: This option is available to make the dialog clearer.
• Normal: This is great for everyday use.
• Music: This option is available if you are listening to music.
• Theater: This option is tuned for movies.
• Big Bass: This option enables you to hear a deeper base/boom.
• Picture mode: This setting provides the following options:
• Audio mode: This setting adjusts the sound quality output from your TV speakers.
• Sleep timer: This setting allows you to program your TV to turn off automatically within different time intervals.
moving images— such as athletic or video games —on your TV screen is refreshed).
• 120 Hz: You can turn this setting ‘On’ or ‘Off’ to affect the refresh rate (that is, the number of times per second
• Closed captioning: This setting provides text on the screen that describe what the speakers are saying. It can
19 20

Menu Channels
Channel Store
The Channel Store consists of 1000+ entertainment channels of various categories.that are free or fee-based.
To access the Channel Store, from the Home menu, select Channel Store and navigate to the right to bring up
library of categories in which to choose.
Posters (or icons) for each channel display. When you select a poster, pricing, ratings and other information
Settings
The Settings channel enables you to customize settings that only pertain to the TV.
Setting Options
Network
Select Network to set up a Wi-Fi connection, view the status of your connection and other details (for example,
Themes
Select Themes to configure the background for your Welcome page that appears when you turn on the TV.
Screensaver
Select the Screensaver to display when the TV is not in use and choose the type of clock that you want to
Sound effects volume
Select this option to adjust the volume for sound effects.
Captions
Select the Captions setting when you want to change the mode to ‘Off or ‘On’. You can also make other changes
from the menu of options.
Time
Select the Time setting when you want to set your TV to turn off automatically within a certain time interval from
the menu options (30 minutes, 1 hour, and so on). You can also set the time (based on your location) from this
setting.
appear.
Figure 24. Channel Store
IP address, Signal strength and so on).
appear on the screen.
When you turn the TV ‘Off’ and back ‘On’, the Sleep Timer becomes disabled.
Menu Channels
You can find out more information about a particular title when you navigate to the posters that appear on the right
side of the screen. Using the D-pad on your remote, click on a poster to select it.
The rating, number of episodes and lead actors appears.
To read a synopsis of the show, press OK on your remote. You can also select the Season of the show.
Figure 22. TV Shows channel
News
The News channel contains a library of News programs in different categories. To view the library, select News and
press the OK button on your remote.
Still images and headlines for the News programs appear to the right of the screen. You can find out more
information (such as the duration of the news program) when you select the still image. Press OK on your remote
to view that particular news program.
Search
The Search channel enables you to search for a movie, TV show, Actor, Channel or Game across multiple
channels.
To access the virtual search keyboard, from the Home screen, select Search and use the D-pad on your remote to
21 22
place your cursor in the text field. Once you have placed the cursor in the text field, begin typing.
Figure 23. Search channel

Menu Channels
Turning ‘Off’ Parental Controls
To turn ‘Off’ Parental Controls:
1. From the Home screen, navigate to the Settings channel.
2. Select Parental Controls.
A virtual number key pad appears to the right of the menu.
3. Using the D-pad on your remote, navigate to the number pad and type a 4-digit password.
4. Confirm the password that you have created by entering it again and select OK.
Menu Channels
A submenu of options (TV tuner, Change PIN and Reset parental controls) appears on the right of the
screen.
4. Select Reset parental controls.
Resetting Parental controls
To reset parental controls:
1. From the Home screen, navigate to the Settings channel.
A confirmation message appears.
2. Select Parental controls
5. Press the Play/Pause button your remote 3 times to erase all parental control settings, including the PIN.
3. Enter your PIN.
screen.
A submenu of options (TV tuner, Change PIN and Reset parental controls) appears on the right of the
3. Select Change PIN.
4. Enter your new 4-digit PIN twice.
Changing Your PIN
To change your PIN for Parental Controls:
1. From the Home screen go to Settings > Parental controls.
2. Enter your PIN and press OK.
A confirmation message appears that states your new PIN has been saved.
5. Select OK.
System
The System feature provides access for you to view information about your TV, customize your power settings
and check for updates manually.
View general information about your Hisense Roku TV such as the model number, software version, IP address
and other details.
About
Power:
Set your TV to automatically turn off under certain conditions (such as after 15 minutes of no signal or 4 hours of
no interaction).
When you navigate to the right, a submenu of options appears to configure your power settings. By default, the
After 15 minutes of no signal setting is enabled. This means that the TV will go into ‘Standby’ mode if no signal
is detected for more then 15 minutes.
System restart
Turn the TV ‘Off’ and then ‘On’ again.
System update
Manually check for software and channel updates.
Factory reset
Reset your TV settings or your entire TV configuration.
Third party licenses
Read information about the third party license.
23 24
TV Picture Settings
Select TV Picture Settings when you want to set the overall brightness for the TV.
TV Inputs
Select TV Inputs when you want to remove or rename a TV input.
Audio
Select Audio when you want to turn TV speakers ‘On’ or ‘Off’, change the menu volume, audio mode or send audio
from the TV back to your home theater receiver.
Parental controls
Select the Parental Controls feature when you want to prevent children from viewing inappropriate content. To use
this feature, enter a 4-digit PIN. Once you have changed your PIN, you can show or hide the Movies, TV shows
and News items from the main menu on the Home screen.
From this menu, you can also block TV tuner programs based on TV and movie ratings.
Turning ON Parental Controls
To turn ‘On’ Parental Controls:
1. From the Home screen navigate to the Settings channel.
2. Select Parental Controls.
A virtual number key pad appears to the right of the menu.
3. Using the D-pad on your remote, navigate to the number pad and type a 4-digit password.
4. Confirm the password that you have created by entering it again and select OK.
A confirmation message appears that states your PIN has been saved.
5. Choose the type of content that you want to block by navigating to TV ratings, Movie ratings, or Block all un-
rated programs and making your selections.
Figure 25. Parental Controls
To hide the Movies & TV Shows or News channels from the Home screen:
Hiding the Movies, TV Shows and News channels.
1. Turn on Parental Controls.
2. Tab over to Home Screen.
3. Select either Hide ‘Movies & TV Shows’ or Hide ‘News.’
4. Tab down to TV Tuner.
A menu of ratings options and descriptions (TV ratings, Movie ratings, Block all unrated programs)
appears to the right side of the screen.
5. Select the ratings option that you want to set controls.

Do not unplug or turn off the TV during a software update. It can result in an incomplete
CAUTION
Receiving Software Updates
Automatic Updates
The Hisense Roku TV checks for software and channel updates automatically once per day. You can also manually
check for updates.
To check for updates manually:
1. From the Home screen go to Settings > System > System Update.
update and cause damage to the TV.
2. Select Check Now.
The TV system begins to check for a new update and generates a confirmation message if you have
All Hisense products have a model and serial number. To locate the model number for your Hisense Roku TV look
the latest update.
in one or all of the following places:
• The side or front of the box in which the TV was purchased
Locating the Model and Serial Numbers
• The back of the TV monitor towards the center
Figure 26. Model and Serial Number locations
To locate the serial number for your TV, look in one or all of the following
places:
• The side or front of the box in which the TV was purchased
• The side of the TV monitor towards the bottom
Customized Advanced Picture Settings Software Updates and Locating TV ID Numbers
screen.
Settings menu are based on the input you have selected.
Backlight: This setting adjusts the overall brightness of the screen.
Brightness: This setting adjusts the dark level of black areas of the picture.
Contrast: This setting adjusts the level of light areas of the picture.
Sharpness: This setting adjusts how sharp or soft the edges of objects in the picture appear.
Color: This setting adjusts the intensity of the color in the picture.
Tint: This setting adjusts the color balance from green to red to obtain accurate skin tones in the picture.
Color temperature: This setting provides the following options:
• Cool: This option creates a slight bluish color and is best for bright rooms.
• Normal: This option is the default setting and does not cause any color change is best for general viewing.
• Warm: This option creates a slight reddish color and is best for dark rooms.
Picture size: This setting provides the following options:
ADVANCED PICTURE SETTINGS
You can access the Advanced Settings menu from the Options menu. The options that appear in the Advanced
• Direct: Choose this option if you want to maintain the aspect ratio of the original picture and see every pixel on the
25 26
it.
• Normal: This option maintains the aspect ratio of the original picture.
• Stretch: This option stretches the picture horizontally.
• Zoom: This option maintains the aspect ratio of the original picture by zooming into the picture without stretching
• Auto: This is the default factory setting that automatically detects and shows the best image size for the picture.
• Reset picture settings: This is available if you want to reset all of your settings.

Quick Problem-Solving Tips
Quick Problem-Solving Tips (continued)
When you experience an issue with your TV, turn it off and on again. If this does not resolve the problem, then refer
Try moving closer to the TV.· Make sure that the batteries are working and
inserted properly. · Make sure nothing is blocking the front of your TV.· !
each time you press a button, then the problem is
not with the remote.
·
REMOTE CONTROL ISSUES POSSIBLE SOLUTIONS
to the tips below. If the problem is still not resolved, then contact our Hisense Electronics Consumer Care Center at
1-888-935-8880 Monday through Friday from 8 A.M. to 8 P.M. EST and Saturday through Sunday from
9 A.M. to 6 P.M. EST.
Your remote control is not working
Customers that are located in Canada should call 1-855-344-7367.
Quick Problem-Solving Tips
] button on the remote control to
Check if the power cord is plugged into a powered
AC outlet.
A power switch on the TV must be turned on. Press
the Power [
activate the unit from Standby.· Check to see if the LED light is either red or blue. If it
is on, then there is power to the TV.
Check for the correct output connection on the
external source and for the correct input connection
on the TV.· Make sure you have made the correct selection for
the input mode for the incoming signal
This is normal. If you have already set up your TV,
it is initializing and searching for previous setting
information.
Check the volume settings.
Check if ‘Mute’ mode is set to “On
from the AC outlet and replug it after 60 seconds.
Check that the Color is set to 50 or higher. · Try different TV channels.
An electric appliance may be affecting the TV. Turn
off any appliances that are nearby and move them
farther away from the TV.· Insert the power plug of the TV set into another
power outlet.
If you are using an external antenna, check the
direction, position and connection of it.
·
·
·
·
·
·
·
·
·
·
·
Quick Problem-Solving Tips
SOUND OR PICTURE ISSUES POSSIBLE SOLUTIONS
When you experience an issue with your TV, turn it off and on again. If this does not resolve the problem, then refer
to the tips below. If the problem is still not resolved, then contact our Hisense Electronics Consumer Care Center at
1-888-935-8880 Monday through Friday from 8 A.M. to 8 P.M. EST and Saturday through Sunday from
9 A.M. to 6 P.M. EST.
You do not hear any sound or see a picture
Customers that are located in Canada should call 1-855-344-7367.
You have connected an external source to your TV and
do not see a picture and/or hear sound
When you turn on your TV, there is a delay for a few
seconds before the picture appears
You see a normal picture but do not hear any sound
You hear sound but do not see a picture or it is in black
and white
Your sound and picture is distorted or appears wavy
Your sound and picture is blurry or cuts out
network screen· If security is enabled on your network, temporarily
If you are getting 3 or more signal-strength bars
above your wireless network, change the location of
your TV or adjust the wireless router. · Make sure there are no obstructions (for example,
cement walls) between your TV and the wireless
router.· Make sure you have selected the correct wireless
router on the Choose wireless network screen.· If your network is secured (passwords are case
sensitive) make sure that you entered the correct
password.
tune the channel.
·
CONNECTIVITY ISSUES POSSIBLE SOLUTIONS
You can not connect to my wireless home network during
the guided setup
If you have turned off SSID broadcasting on your
·
disable it on your router and try connecting again
wireless router, you can add your network by
selecting Add network from the Select wireless
27 28
 Loading...