

Advanced Features
Network Function
NOTICE
To access Internet streaming video services, please note
the follow requirements.
Use of Internet services requires a working broadband
1.
Internet connection (1 to 2 Mbps for SD video, 2.25 to 4.5
Mbps for HD video and 4.5 to 9 Mbps for 1080p and 3D
video.).
Internet-based services are not provided by Hisense,
2.
may change or be discontinued at any time and may be
subject to restrictions imposed by your Internet service
provider. The quality, functionality, or availability of such
services may be affected by the capacity of your Internet
connection. Use of video-on-demand and other Internet
services may require the creation of a separate account
through a computer with internet access.
Certain services may not be available for this TV model.
3.
Video-on-demand and other Internet services may require
4.
payment of one-time and/or recurring charges.
You are solely responsible for any charges incurred as a
5.
result of using Internet-based content, including, without
limitation, communications charges for the provision of
Internet or network services and any charges incurred
for third-party Internet content services, such as video on
demand or subscription services. All third-party services
are provided in accordance with whatever terms and
conditions are established between such third-party
providers and you.
HISENSE MAKES NO REPRESENTATIONS OR
6.
WARRANTIES ABOUT THE CONTENT, AVAILABILITY
OR FUNCTIONALITY OF THE VUDU SERVICE OR
OTHER INTERNET DELIVERED THIRD-PARTY
SERVICES AND DOES NOT WARRANT THAT ANY
OF THEM WILL BE UNINTERRUPTED, ERROR FREE
OR SATISFACTORY. ANY IMPLIED WARRANTY,
INCLUDING BUT NOT LIMITED TO ANY IMPLIED
WARRANTY OF MERCHANTABILITY OR FITNESS
FOR A PARTICULAR PURPOSE OF ANY THIRD PARTY
CONTENT OR SERVICE, IS EXPRESSLY EXCLUDED
AND DISCLAIMED. UNDER NO CIRCUMSTANCES
WILL HISENSE BE LIABLE IN CONTRACT, TORT OR
UNDER ANY OTHER THEORY FOR ANY DAMAGES
ARISING OUT OF OR IN CONNECTION WITH YOUR
USE OF ANY CONTENT OR SERVICE PROVIDED
BY ANY THIRD PARTY, EVEN IF ADVISED OF THE
POSSIBILITY OF SUCH DAMAGES.
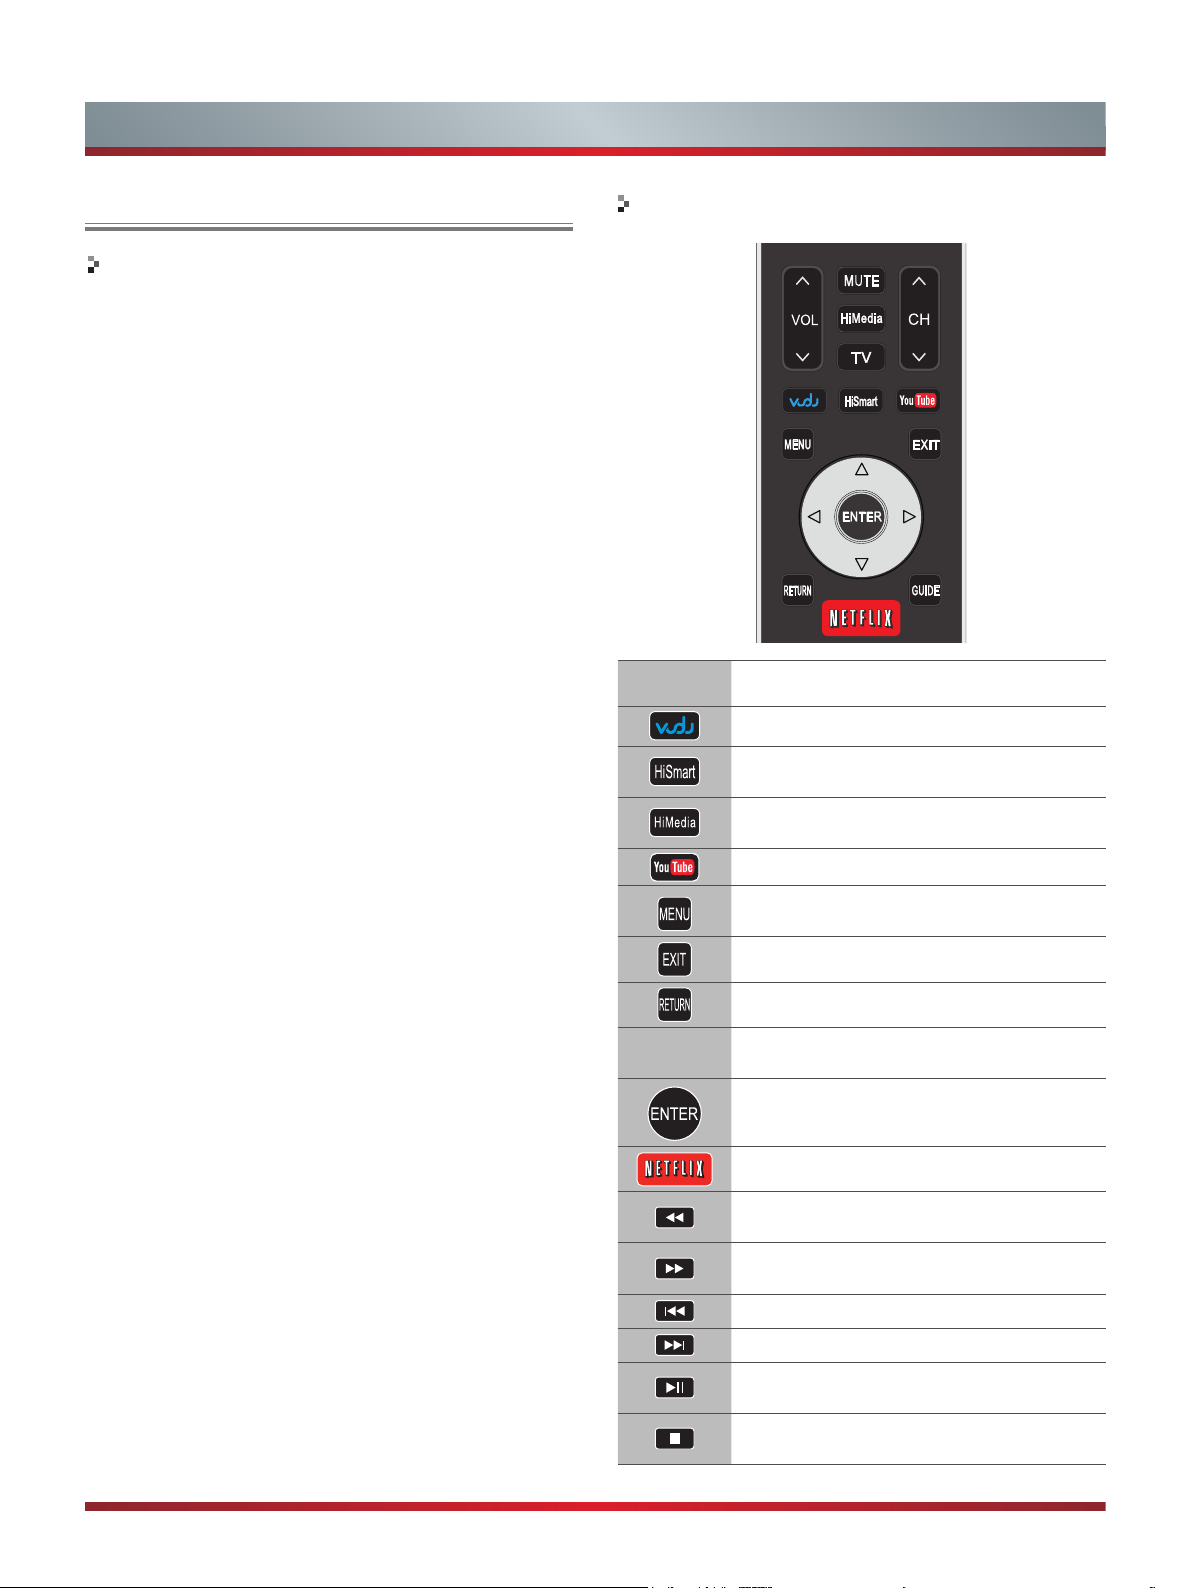
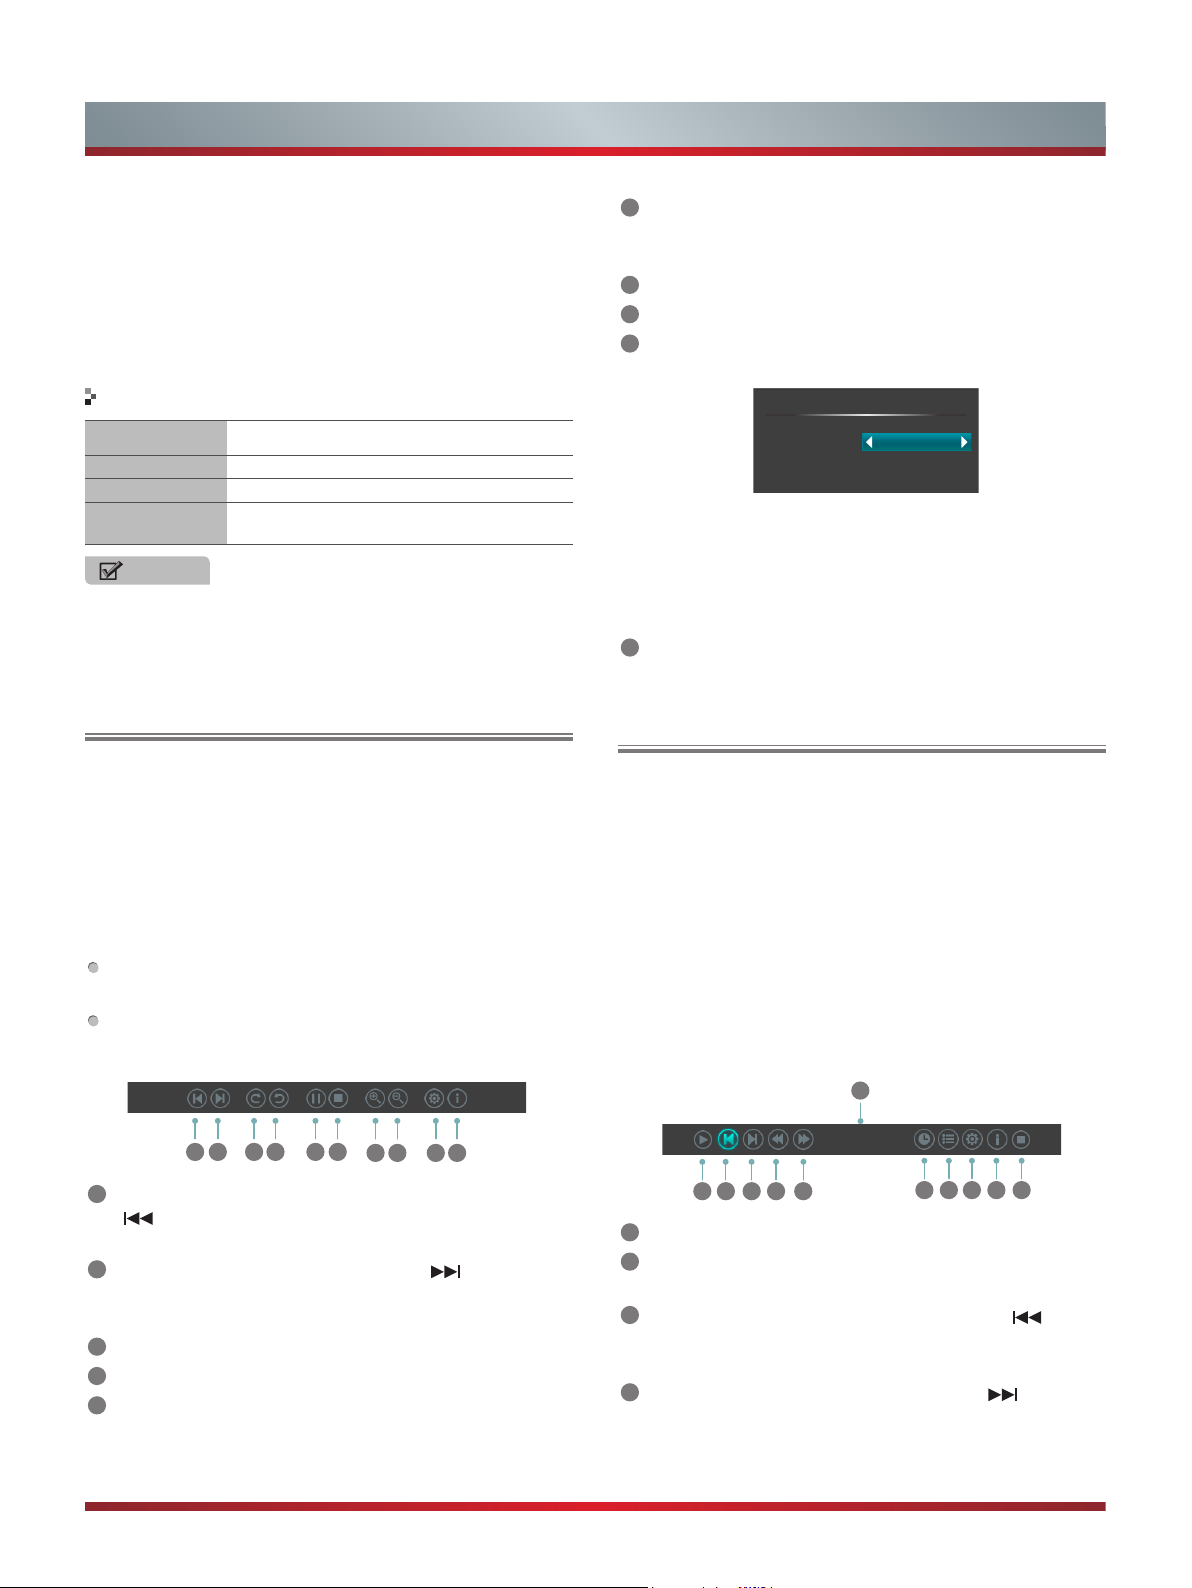
Operational buttons
Button Description
Press to launch VUDU Movies App directly.
Open the HiSmart Hub with links to various
Internet Services.
Open the digital multimedia player.
Press to launch YouTube App directly.
Open the menu.
Close the menu.
Return to the previous menu.
▲/▼/◄/►
Navigate Up / Down / Left / Right or adjust
OSD settings.
Confirm selections.
Press to launch NETFLIX App directly.
Display the TrickPlay screen and fast
reverses playback.
Display the TrickPlay screen and fast
forwards playback.
Play the previous one.
Play the next one.
Pause playback. Press the button to return
to playback.
Stop playback and display the file title
screen.
21
Advanced Features
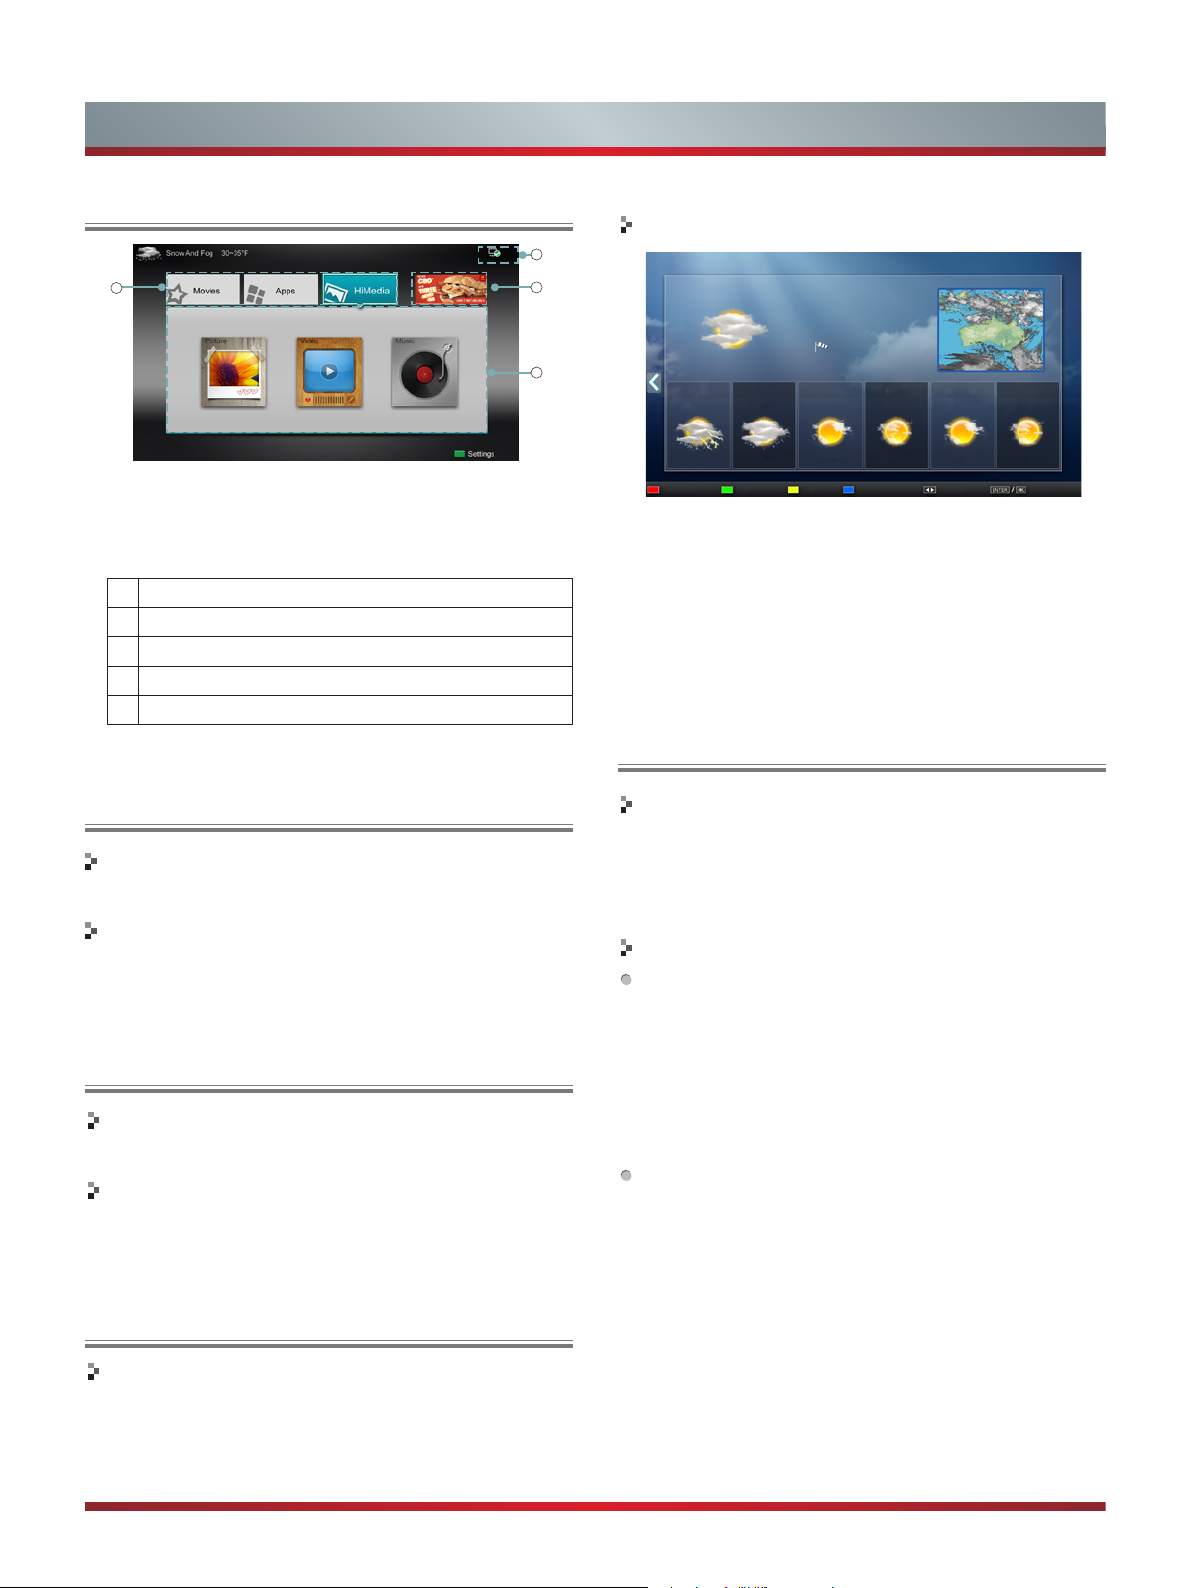
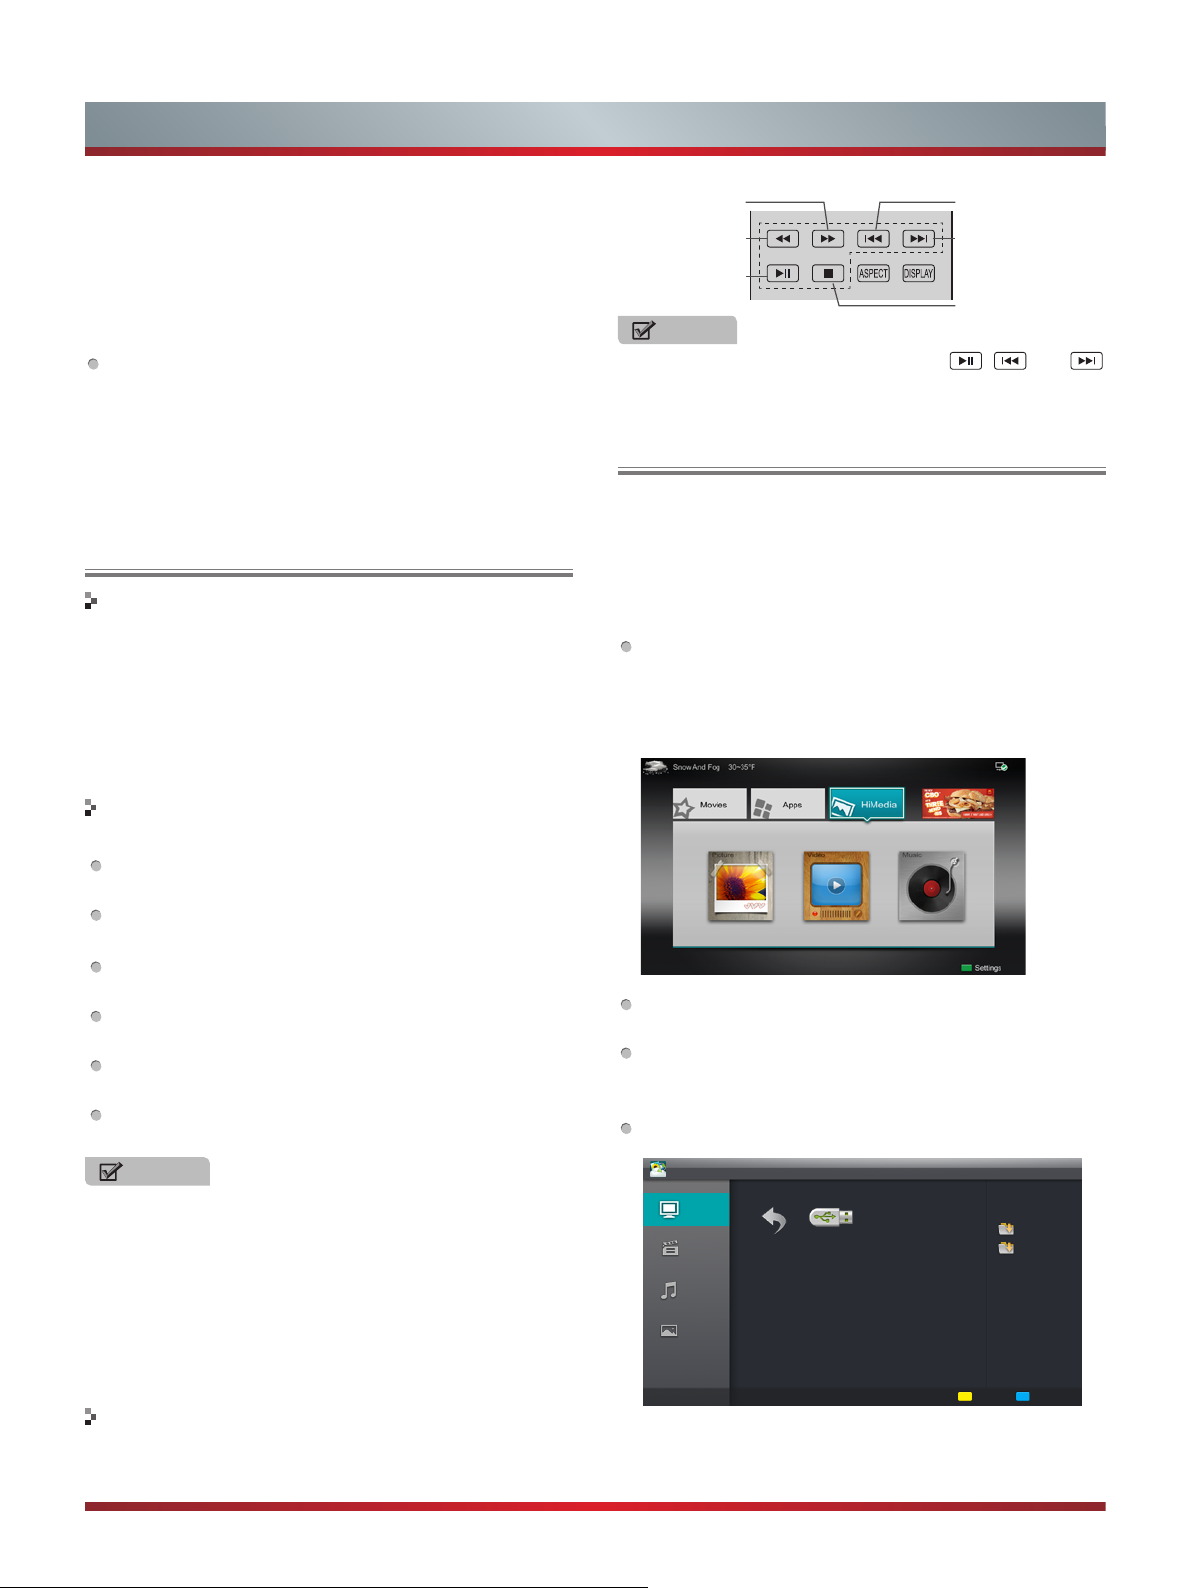
Using the Home Menu
1
1.
Press the [Hi-Smart] button to display Home menu.
2.
Press [◄/►/▲/▼] button to select the interface you
want to view and press [ENTER] to enter the following
description.
No Interface description
Launcher Bar (Movies/Apps/HiMedia)
①
Functional application
②
Advertising
③
Network (Display or set the network status.)
④
3. Press [EXIT] button exit the home mode.
Operation instructions
4
3
2
AccuWeather.com
Today
1/29/2013
20/28
℃
Del this city Add a city ˚C/˚F City List Change Set default
®
21
℃
Sydney
Mostly Cloudy
5 24MPH
2:28 PM Updated
Wednesday
1/30/2013 1/31/2013 1/32/2013 1/33/2013 1/34/2013
20/27
20/27
℃
20/29
℃
Saturday SundayThursday Friday
20/29
℃
20/26
℃
10/10
℃
1. Press the [◄/►] buttons to move the cursor to select
service items in AccuWeather screen and the [ENTER]
button to confirm.
2. To use other features, press the button shown in the help
bar.
3. Press the [Return] button to return to the upper menu, or
the [Exit] button to close the App.
YouTube
Movies
Brief introduction
Display VUDU recommend newest movies information.
Operation introduction
Press the [◄/►] button select the movie and press enter
to confirm.
Apps
Brief introduction
Apps contains all pre-loaded applications of the TV.
Operation introduction
Press the [▲/▼/◄/►] button select the app and press
[ENTER] to confirm.
AccuWeather
Brief introduction
This application provides local and international weather
forecasts, world class weather radar plus up-to-date
weather reports and current conditions.
Brief introduction
The YouTube app allows you to watch original videos,
music videos, feature length movies, previews and trailers
on your TV screen. Search or browse recommendations
with the TV remote.
Operation instructions
To activate your YouTube account for your TV:
Select "Sign in" and "Settings" from the toolbar on the
left side of the application, then go to www.youtube.com/
activate and enter the code you see on the TV screen.
While you enter the code the screen should remain
open, otherwise the code will no longer be valid. Once
completed your account will be activated and you will be
signed in.
To control YouTube from your tablet or smartphone:
Please first check if your mobile device supports YouTube
TV and use the same network connection. To pair your
device to the YouTube screen, you will be prompted
to go to www.youtube.com/pair on your mobile device.
The screen guide to "Pair with TV" will appear. Enter the
pairing code or enter the value of the scanned QR code
on the SmartTV. While you enter the code the screen
should remain open, otherwise the code will no longer
be valid. Select a name for your device then click "Add
TV". Once complete, the YouTube app will show that your
mobile device has been paired. You can now select a
video to watch on YouTube TV using your mobile device.
22
Advanced Features
VUDU Movies
Brief introduction
VUDU is an on-demand service that offers high-definition
movies via the web.
To enjoy movies, please register and log in to your account.
Operation instructions
To access Vudu HD Movies: You can access the VUDU HD
Movies by the following method:
1. Press the [Hi-Smart] button to display home menu.
2. Press [◄/►] button to select the VUDU HD Movies icon
and press [ENTER] to enter it, or press [VUDU] button to
enter directly.
3. Select the Sign Up Now icon on the VUDU HD Movies
interface, and press [ENTER] to enter.
4. Enter your email address to start your VUDU experience.
(Refer to “How to Input the Email Address” on page 23.”)
5 Press [▲/▼/◄/►] button to move the cursor to select
service items in the VUDU HD Movies home page, and
press [ENTER] button to confirm.
6. While watching a movie, press [ENTER] button to display/
exit the tool bar, press [◄/►] button to select the function
icon, and press [ENTER] button to confirm.
7 Press [RETURN] button to return the upper menu, or
press [EXIT] button to close the menu.
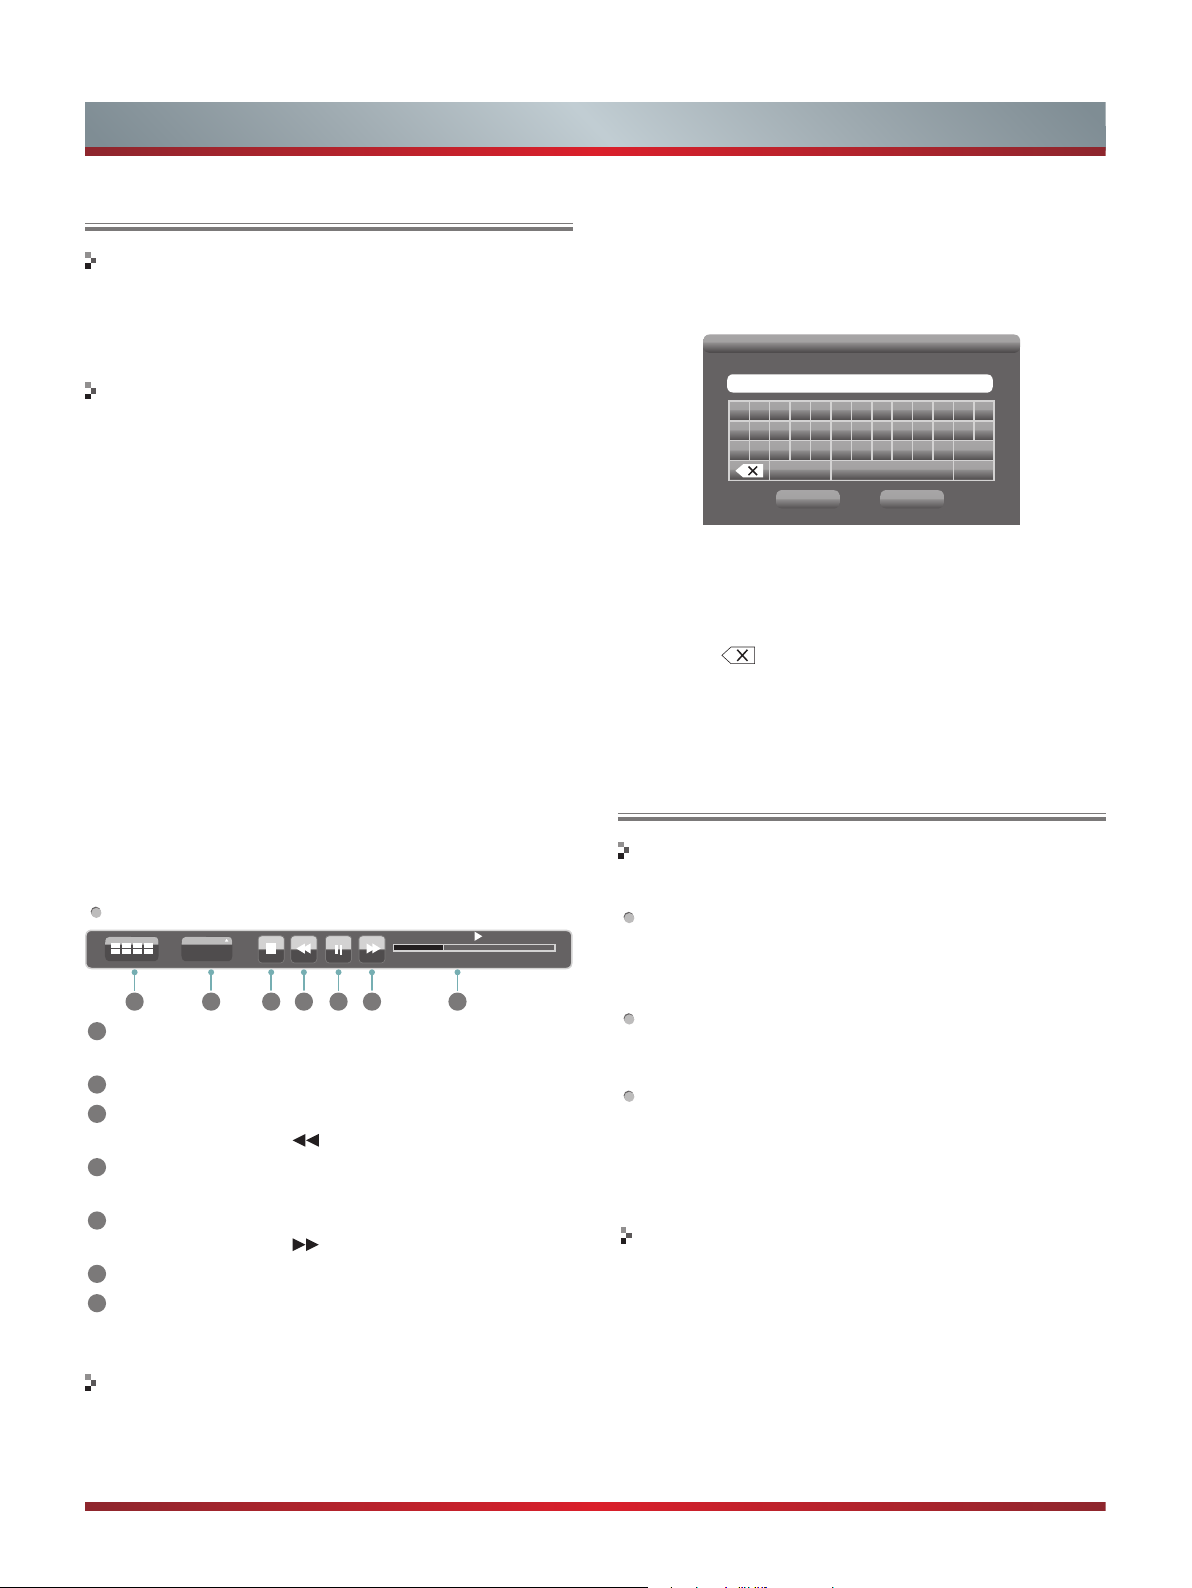
Tool Bar
HDX
1 2 3 4 5 67
1
Press [ENTER] button to enter and press [◄/►] button to
select the chapter.
2
Stop playback.
3
Fast backward. Press [ENTER] to select the backward
speed. You can press [
4
Play/Pause. You can press [►II] button to play/pause
] button to achieve the function.
directly when there is no control bar on the screen.
5
Fast forward. Press [ENTER] button to select the forward
speed. You can press [
6
Progress bar. The progress bar when playing.
7
Press [ENTER] button to select the movies quality HDX, HD
] button to achieve the function.
or SD.
How to Input the Email Address
1. Press [▲/▼/◄/►] button to move the cursor to the
address bar and press [ENTER] button to confirm.
0:00:56 0:02:32
2. Press [ENTER] button to display the keyboard.
There are some shortcuts on the bottom of the keyboard
so that you can input part of the address often used
directly.
Other keys are used as the keyboard of your computer.
Enter email address to begin enjoying VUDU!
Enter email address
a b c d e f g h i j k l m
n o p q r s t u v w x y z
0 1 2 3 4 5 6 7 8 9 @ .com
Enter email address
Symbols Space Shift
Back Done
3. Press [▲/▼/◄/►] button to move the cursor to the
characters you want to select and then press [ENTER]
button to confirm.
If you want to delete one character, move the cursor to
Back key
and press [ENTER] button to confirm.
4. Move the cursor to Done key and press [ENTER] button
to confirm if you have completed the address input. Then
the new address will appear on the address bar.
VUDU Apps
Brief introduction
The applications platform for connected TVs.
VUDU Apps provides customers with access to a wide
range of Internet services and applications including
streaming video, music on demand, photo browsing,
social networking and more.
VUDU Apps supports the development of responsive
apps designed specifically for use on home HD
televisions.
VUDU Apps uses a unique, cloud-based architecture
optimized for consumer electronics devices, including
delivering the latest applications to consumers without
the need for software downloads or frequent firmware
updates.
Operation instructions
You can access the VUDU Apps by the following methods:
1. Press the [Hi-Smart] button to display home menu.
2. Press [◄/►] button to select the VUDU Apps icon and
press [ENTER] to enter it.
3. Press [◄/►/▲/▼] button to select the widget you want to
access, and press [ENTER] to enter it.
4. You can press [RETURN] to return the upper menu or
press [EXIT] button to close the Widgets display.
23
Advanced Features
Netflix
Netix unlimited membership required.
Brief introduction
Instantly watch thousands of TV episodes & movies
streaming over the Internet from Netflix. Unlimited
membership required.
NOTES
For more information on Netflix visit http://www.netflix.
com/help or login to your Netflix account and click “Help”
at the top of the page.
Picture quality depends on the network speed and
original bit rate.
Illustrations are examples and may differ from the actual
Netflix screens. The display and operations may change
as a result of a software update. Use Netflix without
configuring a proxy server. Part or all of Netflix may not
be available when connecting to the Internet via a proxy
server.
Operation instructions
1.
Press the [Hi-Smart] button to display home menu.
2. Press [◄/►] button to select the Netflix icon and press
[ENTER] to enter it, or press [NETFLIX] button to enter
Netflix website directly.
3. Input Email and Password in following window to sign in.
(Refer to “How to Input the Email Address” on page 23)
4. Press [▲/▼/◄/►] button to move the cursor to select
service items in the Netflix home page, and [ENTER]
button to confirm.
5. While watching a movie, press operational buttons to
control the movie.
6. Press [RETURN] button to return the upper menu, or
press [EXIT] button to close the menu.
Vimeo
Brief introduction
Vimeo App provides a variety of HD video. All these video
are mainly divided into two parts: Featured Video and
Categories Video which includes Activism & Non Profits,
Animation &Motion Graphics, Art, Comedy, Education & DIY,
Everyday Life, Experimental, Films, HD, Music, Products &
Equipment, Science & Tech, Sports and others.
When you sign in this App , you can bookmark you favorite
movie and watch the movie last watched.
Operation introduction
You can choose the movie you like to watch in Featured
1.
and Categories in home page.
If you want to sign in vimeo , please choose Setting.
2.
After signing in vimeo, you can save your favorite video
3.
to My Stuff or Watch Later.
Choose Search to search the name of movie or music
4.
you love.
To use other features, press the button showed in the
5
help bar.
Press [RETURN] button to return to the upper menu, or
6
[EXIT] button to close the App.
24

Advanced Features
Pandora
Brief introduction
Pandora is a personalized radio service that streams music
on your TV. Just start with the name of one of your favorite
artists, songs, comedians, or composers and Pandora will
create a custom station that plays similar tracks. Pandora
features hundreds of music and comedy genre stations.
Create up to 100 stations so you can easily switch between
favorites.
For enjoying more movies, please register and log in to your
account.
Press the [Hi-Smart] button to display home menu.
1.
Operation introduction
Press [◄/►] button to select the Pandora icon and press
2.
[ENTER] to enter it.
3. Input Email and Password in following window to sign in.
(Refer to “How to Input the Email Address” on page 23)
4. Press [▲/▼/◄/►] button to move the cursor to select
service items in the Pandora home page, and [ENTER]
button to confirm.
5. Press [RETURN] button to return the upper menu, or
press [EXIT] button to close the menu.
Twitter
Picasa
Brief introduction
With Picasa you can explore featured photos in Google
Picasa Web Album, also you can search your favorite photos
in Google Picasa Web Album. If you have already had a
Google Picasa account, you can enjoy your private photos
stored in Google Picasa Web Album.
Operation introduction
Press the [Hi-Smart] button to display home menu.
1.
Press [◄/►] button to select the Picasa icon and press
2.
[ENTER] to enter it.
3. Press [▲/▼/◄/►] button to move the cursor to select
service items in Picasa screen and [ENTER] button to
confirm.
4. To use other features, press the button showed in the
help bar.
5. Press [RETURN] button to return to the upper menu, or
[EXIT] button to close the App.
Operation introduction
1. Press the [Hi-Smart] button to display the home menu.
2. Press [◄/►] button to select the Twitter icon and press
[ENTER] to enter it.
3. Input Email and password in the following window to sign
in.
4. Press [▲/▼/◄/►] button to move the cursor to select
service items in the Twitter home page, and [ENTER]
button to confirm.
5. Press [ENTER] button to return the upper menu, or press
[EXIT] button to close the menu.
25

Advanced Features
Opera
Brief introduction
The opera browser allows you to browse any URL, edit
or delete folders, add bookmarks and select websites
from the "Favorites" folder.
Operation instructions
How to enter the Opera Browser
1. Press the [Hi-Smart] button to display the home menu.
2. Press the [◄/►/▲/▼] buttons to select the opera icon
and press the [ENTER] button to enter it.
3. Then the default interface will appears on the screen.
There are some function icons on the bottom of the
screen:
21 3 4 5 6 7 9 10
The function of the buttons on the screen:
1. Main page.
Move the cursor to the icon and press the [ENTER]
button to show the main page.
2. Back to previous page.
Move the cursor to the icon and press the [ENTER]
button to return to the previous viewed web page.
3. Forward to next page.
Move the cursor to the icon and press the [ENTER]
button to go forward to the previous viewed web pages.
4. Refresh page.
Move the cursor to the icon and press the [ENTER]
button to refresh the current page.
5. Bookmark manager.
Move the cursor to the icon and press the [ENTER]
button to enter the favorite folder.
6. Add a bookmark.
Move the cursor to the icon and press the [ENTER]
button to add the website to the favorite folder.
7. Help.
Move the cursor to the icon and press the [ENTER]
button for help.
8. Address bar.
Input the website you want to view.
9. Go to the website.
Move the cursor to the icon and press the [ENTER]
button to search the website.
?
8 Address bar
10 Exit Browser.
Move the cursor to the icon and press the [ENTER]
button to close the page.
The function of buttons on the remote control
Key Operation
Exit
Return
▲/▼/◄/►
CH Λ/CH V
Guide
RED
Green Forward to previous viewed web page.
Yellow
Blue
ASPECT Zoom in or Zoom out.
Menu Toolbar
Enter Enter
VOLΛ / VOLV Volume Control
Mute Mute
How to Input a New Address
1. Press the [▲/▼/◄/►] buttons to move the cursor to the
address bar.
2. Press the [ENTER] / [Return] buttons to display / close
the keyboard.
There are some shortcuts on the bottom of the keyboard
so that you can input part of the address often used
directly. Other keys are used as the keyboard of your
computer.
、
1 2
Tab
a
Caps L
Shift
http:// www. .com .org .gov .net Reset
Exit Opera Browser.
Back to previous page or exit current
page; Cancel pop dialoge or soft
keyboard
Up/Down/Left/Right.
Page Up/Page Down.
History of viewed pages.
Back to previous viewed web page.
Open marked page.
Favorite marker.
3 4 5 6 7 8 9 0 - = Back
w
e
r
t
y
u
i
o
p
s
d
f
g
h
j
k
l
;
x
c
v
b
n
m
,
.
z
/
[‘]
Space
\q
Enter
26

Advanced Features
3. Press the [▲/▼/◄/►] buttons to move the cursor to the
characters you want to select and then press the [ENTER]
button to confirm.
If you want to delete one character, move the cursor to
Back key and press the [ENTER] button to confirm. Or if
you want to re-enter all the characters, move the cursor
to Reset key and press the [ENTER] button to confirm.
4. Move the cursor to Enter key and press the [ENTER]
button to confirm to enter the website.
Then the new address will appear on the address bar.
NOTE
The browser supports English language websites.
How to Add a Bookmark
If you want to find the often viewed website from the favorite
folder, you can follow the steps to add it to the folder.
1. First, input the address on the address bar and enter it.
2. Press the [▲/▼/◄/►] buttons to move the cursor to the
and press the [ENTER] button to confirm.
The menu will pop up on the screen.
Add a bookmark
Are you sure to add it?
Name:
Operattp://www.Manufacturer.
How to Add a Folder
You can add a folder to the favorite as follows:
1.
Move the cursor to the
icon and press the [ENTER]
button to confirm. The menu will pop up on the screen.
Add a folder Close bookmark manager
Opera Software
GOGI SDK
Opera technology
Add a folder
Are you sure to add it?
Name:
Add Cancel
?
Http://www.opera.com.au/
2. Move the cursor to “Add a folder” button and press the
[ENTER] button to confirm.
A pop-up menu appears on the screen.
3. Move the cursor to Name bar and press the [ENTER]
button to confirm. Follow the steps 2 to 4 in “How to Input
the New Address” to input the name.
4. Move the cursor to Add button and press the [ENTER]
button to confirm and the new folder has been added.
URL:
Folder:
com.au/
Root folder
Add Cancel
3. Press the [▲/▼/◄/►] buttons to move the cursor to the
icon marked with dashed box on the right screen. Then
press the [ENTER]/ [▲/▼] buttons to confirm to display
the folders.
Add a bookmark
Are you sure to add it?
Name:
URL:
Folder:
OperaHttp://www.Manufacturer.
com.au/
Root folder
Root folder
Opera Software
GOGI SDK
Opera technology
4. Press the [▲/▼] buttons to select the folder you want to
add the bookmark to. And press the [ENTER] button to
confirm.
5. Move the cursor to the Add button and then press the
[ENTER] button to confirm. If you do not want to add the
book mark, move the cursor to the Cancel button and
press the [ENTER] button to confirm.
How to Edit/Delete a Folder/Bookmark
1.
Move the cursor to the
icon and press the [ENTER]
button to confirm. The menu will pop up on the screen.
2. Move the cursor to the folder /bookmark directly and there
will be two icons on the right of it. Move the cursor to one
of the icons and press the [ENTER] button to display a
pop-up menu.
: Edit button.
1).Move the cursor to the Name/URL bar and press the
[ENTER] button to confirm. Follow the steps 2 to 4 in
“How to Input a New Address” to edit it.
Add a folder Close bookmark manager
Opera Software
GOGI SDK
Opera technology
Edit this bookmark
Are you sure to edit it?
Opera
Name:
http://www.opera.com.au/help/warranty
URL:
Edit Cancel
?
Http://www.opera.com.au/
2).Move the cursor to the "Edit" button, then press the
[ENTER] button to confirm and the folder/bookmark
will be saved.
: Delete button.
27

Advanced Features
Move the cursor to the Delete button and press the
[ENTER] button to confirm. Then the folder/bookmark will
be deleted from the favorite folder.
Add a folder Close bookmark manager
Opera Software
GOGI SDK
Opera technology
Delete this bookmark
Are you sure to delete it?
Opera
Name:
http://www.opera.com.au/help/warranty
URL:
Delete Cancel
Http://www.opera.com.au/
?
NOTE
The Name will appear on the pop-up menu for the folder.
How to select the Website from the favorite folder
1.
Move the cursor to the
button to confirm. The menu will pop up on the screen.
Add a folder Close bookmark manager
Opera Software
GOGI SDK
Opera technology
icon and press the [ENTER]
Opera Apps
Brief introduction
The user can browse and launch any application from
the Opera App store dashboard. These applications are
based on the Opera Devices SDK and are displayed
in a layout optimized for widescreen television. In the
Opera TV Store, there are more than 100 high-quality,
HTML5-powered TV apps available. You can choose any
apps you like and either use them online or add them to
"My Apps" for easy use. "My Apps" is located under the
"MORE APPS" section.
Operation instructions
1. Press the [Hi-Smart] button to display the home menu.
2. Press the [▲/▼/◄ /►] buttons to select the Opera Apps
icon and press the [ENTER] button to enter My Apps
interface. You can select the applications you want to
enter and press the [ENTER] button to confirm.
My Apps
iG Receitas vimeo Zing TV
MORE APPS MENU
Http://www.opera.com.au/
?
2. Move the cursor to the folder name and press the [ENTER]
button to confirm.
The websites in the folder will appear in the following
lines.
3. Move the cursor to the website you want to view and
press the [ENTER] button to confirm.
If the website is in the root folder, you can select it
directly, and skip step 2.
How to exit the manager
Move the cursor to the Close bookmark manager icon
and press the [ENTER] button to confirm.
Viewster Yandex
五子棋
3. Press the [Return] button to return to the upper menu or
press the [Exit] button to close the apps.
How to add more apps
1. Press the [▲/▼] buttons to select the "MORE APPS"
button on the top of the screen and press the [ENTER]
button to enter it.
In the More Apps' subpage, the application is classified
by All categories, New, Popular, Watch, Listen, Play,
Socialize, Shop, Read, Use.
2. Press the [◄/►] buttons to select the classification and
press the [▼] button to enter.
3. Press the [▲/ ▼/◄/►] buttons to select the applications
which you want to install and press the [ENTER] button to
enter the installing interface.
4. Press the "ADD TO MY APPS" button to install the
applications or press the "OPEN" button to enter the
application interface directly.
If the applications have been installed, they will be shown
in My Apps interface.
How to remove the installed apps
28
Advanced Features
1. Press the [▲/▼] buttons to select the "MENU" button on
the top of the screen and press the [ENTER] button. A
pop-up menu appears on the screen.
2. Press the [▼] button to select "REMOVE APP" option,
select the application which you want to delete, then
press the [ENTER] button.
SelfService
1. Press the [▲/▼] buttons to select the "MENU" button on
the top of the screen and press the [ENTER] button. A
pop-up menu appears on the screen.
2. Press the [▼] button to select "About" option and press
the [ENTER] button to view the service information.
Digital Media Receiver (HiBeam)
Brief introduction
With the Digital Media Receiver you do not have to crowd
around a small tablet PC or smartphone screen to share
video, music or pictures with friends and family. Simply
browse, discover and beam media files stored on your
Android or iOS device to your TV using the Twonky Beam
application. (You can seach Twonky Beam from Google play
or the Apple App store).
Operation introduction
TV side:
1.
Confirm the TV is connected to a local area network.
(Reference the Network Settings section)
Set DLNA to On. (Reference the DLNA Settings section)
Device Setup:
2.
Download the Twonky Beam application using the link
found on the Hisense website at www.hisense-usa.com.
Confirm the device is connected to the same local area
network as the TV.
Launch the Twonky Beam application, select the video,
music or picture you want the share and beam it to the TV.
You can control the playback using the TV remote or from
the device application.
NOTES
·
Your DMR of TV may not be accessible when there
are some prior applications working (such as Skype
or firmware updating). You need to close these prior
applications or waiting for the firmware updating finished,
then the DMR will work.
·
If a mobile device has access TV, you can set the
access privileges to Allow or Deny in "Menu-NetworkApplications-My Shared Devices"
Media content control function buttons
When viewing video/photo, you can press these buttons on
the remote control to control video/photo.
Fast forward
Fast backward
The previous one
The next one
Play/Pause
Stop
NOTE
When browsing the photos, only the , and
buttons are available.
Digital Media Player (HiMedia)
Please note that Hisense does not assume any responsibility
for any lost data and cannot guarantee perfect compatibility
with all mass storage devices. Be sure to insert the USB
disk/mobile hard disk with standard USB2.0 port or to
connect the TV with other digital devices via DLNA ( Menu
>Network >Applications >DLNA ).
Press the [INPUT] button to display the Source menu,
press the [▲/▼] buttons to highlight the HiMedia source,
then press the [ENTER] button to confirm. (If you want to
exit HiMedia, you can press the [INPUT] button to switch
to other sources).
Press the [Hi-DMP] button to enter the HiMedia mode
directly. Or press the [Hi-Smart] button to enter.
In the HiMedia screen you can press the [◄/►] select the
Picture/Video/Music option, then press [ENTER] to enter/
play the folder/file.
Press [RETURN] to return to the previous directory.
HiMedia
All
Video
Music
Picture
USB1
1. Press the [▲/▼] buttons to switch the media type.
Information
Page up Page down
29
Advanced Features
2. Press the [Yellow/Blue] buttons to turn to the previous/
next page.
3. Press the [▲/▼/◄/►] buttons to select the folder/file you
want to open and then press the [ENTER] button to enter/
play the folder/file.
4. Press the [Return] button to return to the previous
directory.
Playable format list
6
Stop browsing the picture. You can press the [■] button
directly in the remote control when no control bar on the
screen.
7
Zoom in the picture.
8
Zoom out the picture.
9
Option Set. Press the [▲/▼] buttons to select the
options and press the [◄/►] buttons to set them.
Option Set
Files Format Playable format
Photo .jpg
Music .avi(mp3,mpeg,ac3), .mp4, .rm
Video
.avi(H.264, MPEG, Divx), .mkv(H.264, MPEG),
.flv, .mpeg, .wmv(Divx, XviD)
NOTES
We can not promise that this unit will support all the
formats listed above, as the programming tools are
different.
Browse Pictures
1. Press the [◄] button to switch to All or Picture.
2. Press the [▲/▼/◄/►] buttons to select the picture you
want to view.
3. Press the [ENTER] button to display picture.
4. Press the [■/Return] buttons to exit or return to the
previous directory.
When browsing the pictures.
Press the [Info] button to display/exit the picture control
bar.
Press the [◄/►] buttons to select the function icon and
then press the [ENTER] button to confirm.
Speed - Allows you to browse the picture at different
·
Speed:
Effect:
Fast
Box in
speed, such as Fast, Slow, and Medium.
Effect - Select transition effects between images, such
·
as: random, Box in, Box out, Wipe right, Wipe left, Wipe
up, Wipe down, Dissolve, and None.
10
Picture info. Displays information about the pictures.
Enjoy Video Files
1. Press the [◄] button to switch to All or Video.
2. Press the [▲/▼/◄/►] buttons to select the video you
want to view.
3. Press the [ENTER] button to play the video.
4. Press the [■/Return] buttons to exit and return to the
previous directory.
5. Press the [Info] button to display/exit the picture control
bar
6. Press the [◄/►] buttons to select the function icon and
then press the [ENTER] button to confirm.
Function of icons:
1 2 3 4 5 6
1
Browse the previous picture. You can also press the
[
]/[◄] buttons in the remote control directly when no
7 8 9
10
control bar displays on the screen.
2
Browse the next picture. Press the [ ]/[►] buttons
directly in the remote control when no control bar
displays on the screen.
3
Rotate the picture 90 degrees clockwise.
4
Rotate the picture 90 degrees anticlockwise.
5
Play/pause. Press the [►II] button directly when no
control bar displays on the screen.
30
1
00:00:36/00:20:01
2 3 4 5 6
1
The progress bar when playing.
2
Play/Pause. You can press the [►II] button directly to
7 8 9
10 11
play/pause when there is no control bar on the screen.
3
Play the previous video. You can press the [ ] button
directly to achieve the function when no control bar
displayed on the screen.
4
Play the next video. You can press the [ ] button to
achieve the function when no control bar displayed on
the screen.

Advanced Features
5
Fast backward. Then press the [ENTER] button to select
the backward speed. You can press the [◄◄] button to
achieve the function.
6
Fast forward. Then press the [ENTER] button to select
the forward speed. You can press the [►►] button to
achieve the function.
7
Select time to play
Press the [◄/►] buttons to select the position you want
·
to set.
Press the [0~9] buttons to set the time and press the
·
[▲/▼/◄/►] buttons to adjust it.
Press the [ENTER] button to confirm and the video will
·
to play at the time you have set or press the [Return]
button to exit.
8
Play list
Press the [Yellow/Blue] buttons to page up/page down
·
and press the [▲/▼] buttons to select the video.
Press the [ENTER] button to confirm.
·
9
Options
Subtitle Selection:
Repeat:
AUDIO1:
Option Set
Once
No
1/1
Enjoy Music Files
1. Press the [◄] button to switch to All or Music.
2. Press the [▲/▼/◄/►] buttons to select the music you
want to view.
3. Press the [ENTER] button to play the music.
4. All the music is listed on the left. Press the [▲/▼]
buttons to select the music and press the [►] button to
mark it. You can press the [Yellow/Blue] buttons to turn
to the previous /next page. Press the [Green] button to
select the Mode: Mark / All / Single.
5. Press the [Return] button to exit the music playback
interface.
Press the [▲/▼] buttons to select the options in the
·
menu.
Press the [◄/►] buttons to select the settings.
·
Press the [ENTER] button to confirm.
·
10
Program info
·
Allows you to view the program information.
11
Stop playback
NOTE
You can press the [Zoom] button to change the aspect ratio
(Normal, Full Screen, Original Size) while playing the video.
31
Other Information
Troubleshooting
If you experience difculties while using the TV, please check the table below for possible solutions. If the symptoms
persist, please contact Hisense customer care at 1-888-935-8880.
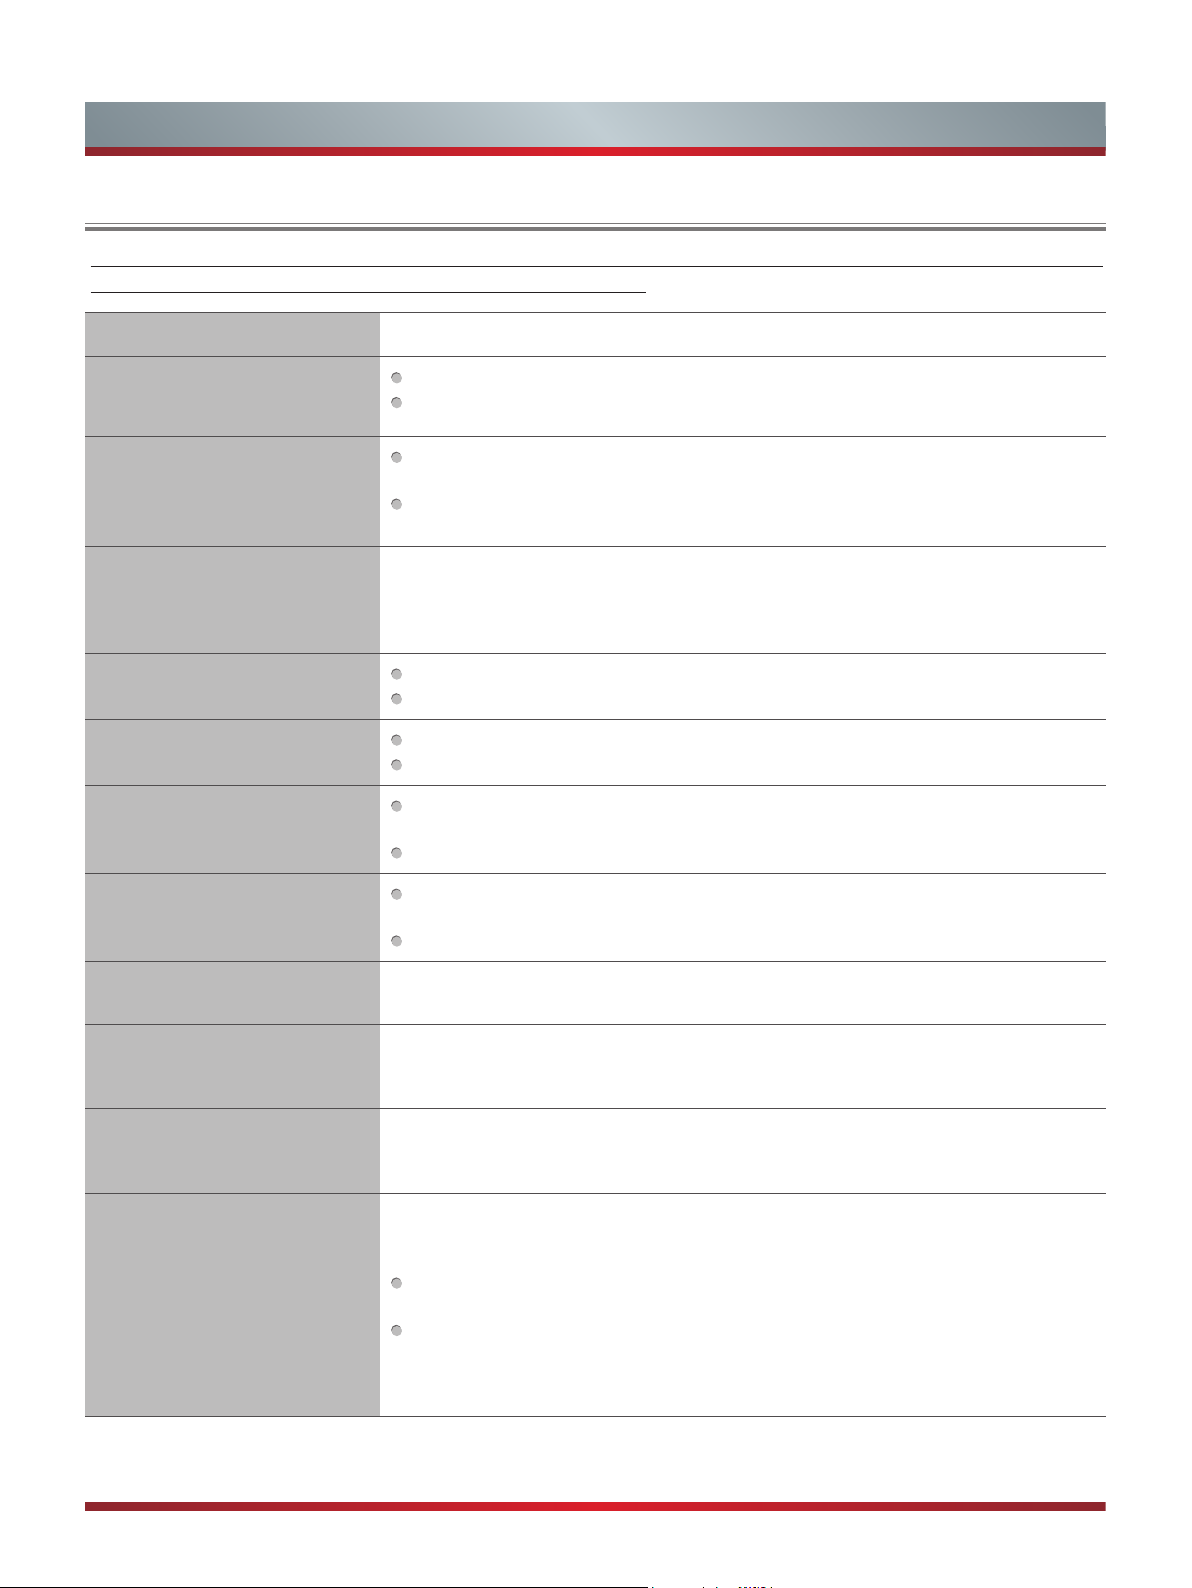
SYMPTOMS POSSIBLE SOLUTIONS
No sound or picture.
I have connected an external
source to my TV and I get no
picture and/or sound.
When I turn on my television,
there is a few second delay
before the picture appears. Is
this normal?
Picture is normal, but no sound.
Sound but no picture or black
and white picture.
Sound and picture distorted or
appear wavy.
Sound and picture is blurry or
cuts out momentarily.
Check if the power cord is in the AC outlet and if it has electricity.
Check if you have pressed [POWER] button on the TV or [POWER] button on the
remote control.
Check for the correct output connection on the external source and for the correct
input connection on the TV.
Make sure you have made the correct selection for the input mode for the incoming
signal.
Yes, this is normal. That is the TV searching for previous setting information and
initializing the TV.
Check the volume settings.
Check if Mute mode is set “on”.
If black and white picture first unplug TV from AC outlet and replug after 60 seconds.
Check Color Setting if picture is black and white.
An electrical appliance may be affecting TV set. Turn off any appliances, if
interference goes away, move appliance farther away from TV.
Insert the power plug of the TV set into another power outlet.
If using an external antenna, check the direction, position and connection of the
antenna.
Adjust the direction of your antenna or reset or fine tune the channel.
Horizontal/vertical stripe on
picture or picture is shaking.
The plastic cabinet makes a
“clicking” type of sound.
Black square appears in the
center of my television screen?
On some channels getting
another language or sometimes
no sound at all.
Check if there is interfering source nearby, such as appliance or electric tool.
“Click” sound can be caused when the room temperature changes. This change
causes the television cabinet to inflate or contract, which makes the sound. This is
normal and TV is OK.
The Closed Caption function is set in the text mode. To remove it, access Closed
Caption from the menu screen and change the Mode setting from text to either CC1 or
off .
That would indicate that the MTS mode on your unit is set to SAP mode. We suggest
setting the MTS mode to either Stereo or Mono . For further instruction, please see
Audio Adjust or MTS/SAP in your user manual.
SAP is Second Audio Program. It’s a second audio channel that is usually used for a
second language or descriptive audio for the visually impaired.
MTS stands for Multichannel Television Sound, a standard that allows the encoding
of 3 channels of audio within a standard NTSC (analog) video signal to a television.
A television that is able to receive MTS Stereo allows you to watch television with
stereo sound.
32
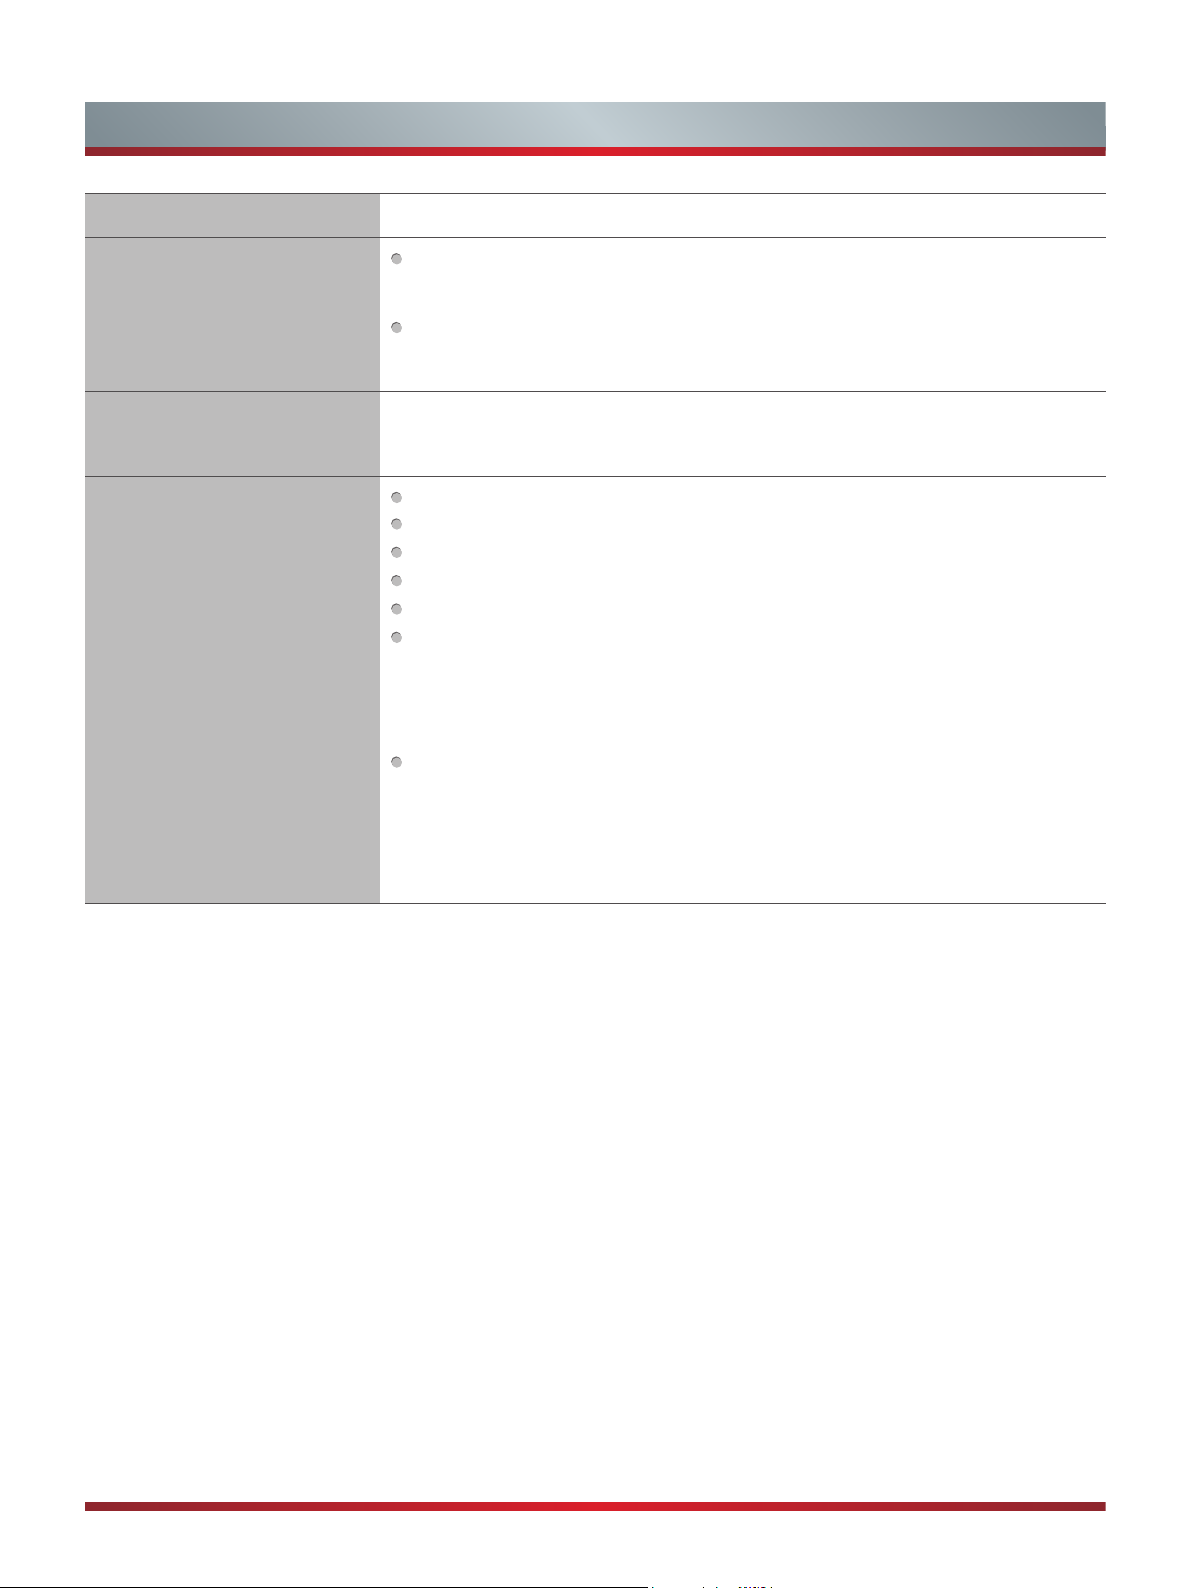
SYMPTOMS POSSIBLE SOLUTIONS
Not getting all of my cable
channels on the television or I’m
only getting 13 channels.
V
[CH
/ V] don’t work when I
set the Channel to Cable? They
work with the Air setting?
Remote control does not work.
Other Information
Check the cable connection for an incoming signal. Make sure the signal is coming
OK. Best way to confirm signal is to use another TV and/or contact your cable
company.
Reprogram your channels. Press [MENU] button on your TV remote control, change
Input Source setting to “Cable”, then use “Auto Channels Search” to reprogram your
channels.
After switching to Cable, please auto program the channels. The TV will “remember” all
the channels then the TV will allow you to surf the channels with [CH
Confirm that TV still has power and is operational.
Change the batteries in the remote control.
Check if the batteries are correctly installed.
Clean the front of the remote control (LED window).
If using a universal remote, be sure to select the TV mode on the remote.
If the remote still does not work:
• Remove and reinstall the batteries correctly to reset the remote or install new
batteries.
• Press the Power button to turn on the TV. With a universal remote if you have reset
or changed the batteries you will need to reprogram the remote for the other units.
Check if there is obstruction between the remote control and the TV.
TIP: If you have a digital camera / camera phone, you can aim the front of the remote
at camera lenses (at this time, the camera should set on camera mode, not play
mode). Observe the camera screen while pressing a button on the remote control; you
should see flashing light on the screen. If there is no light observed, the remote control
is not working. You need to repair or replace the remote control.
V
/V] buttons.
33
 Loading...