


USER'S MANUAL
LCD TV
Before using the TV, Please read this manual thoroughly, retain it for
future reference.
LTDN4 0V68NUS
Part NO.:
English

Table of contents
Important to user
Important safety instructions
Setting up
Pedestal installation instruction
Locating TV buttons and connectors
Connection to other devices
Using the remote control
Identifying the remote control buttons
Brief operations of the remote control
Basic operation
Power on/off
Changing channels/volume
Select input source
Change picture mode
Change sound mode
Mute sound
Set sleep timer
Change view ratio
GUIDE
2
3
5
5
6
8
10
10
11
11
11
11
11
11
12
12
12
12
12
Changing the TV settings
Using the TV Menu
Using the Video Menu
Using the Audio Menu
Using the Setup Menu
Using the Parental Menu
Appendix
Specification
Trouble shooting
Accessories
13
13
14
15
16
18
20
20
21
21
1

Important to user
FCC Statement
NOTE:
The manufacturer is not responsible for any radio or TV interference caused by unauthorized modifications to this
equipment. Such modifications could void the user's authority.
NOTE:
This equipment has been tested and found to comply with the limits for a class B digital
Device, pursuant to part 15 of the FCC Rules. These limits are designed to provide reasonable protection against harmful
interference in a residential installation. This equipment generates, uses and can radiate radio frequency energy and, if not
installed and used in accordance with the instructions, may cause harmful interference to radio Communications. However,
there is no guarantee that interference will not occur in a particular installation. If this equipment does cause harmful
interference to radio or television reception, which can be determined by turning the equipment off and on, the user is
encouraged to try to correct the interference by one or more of the following measures:
1. Reorient or relocate the receiving antenna.
2. Increase the separation between the equipment and the receiver.
3. Connect the equipment into an outlet on a circuit different from that to which the receiver is
connected.
4. Consult the dealer or an experienced radio/TV technician for help.
2
Important safety instructions
Importa nt safet y instru ctions
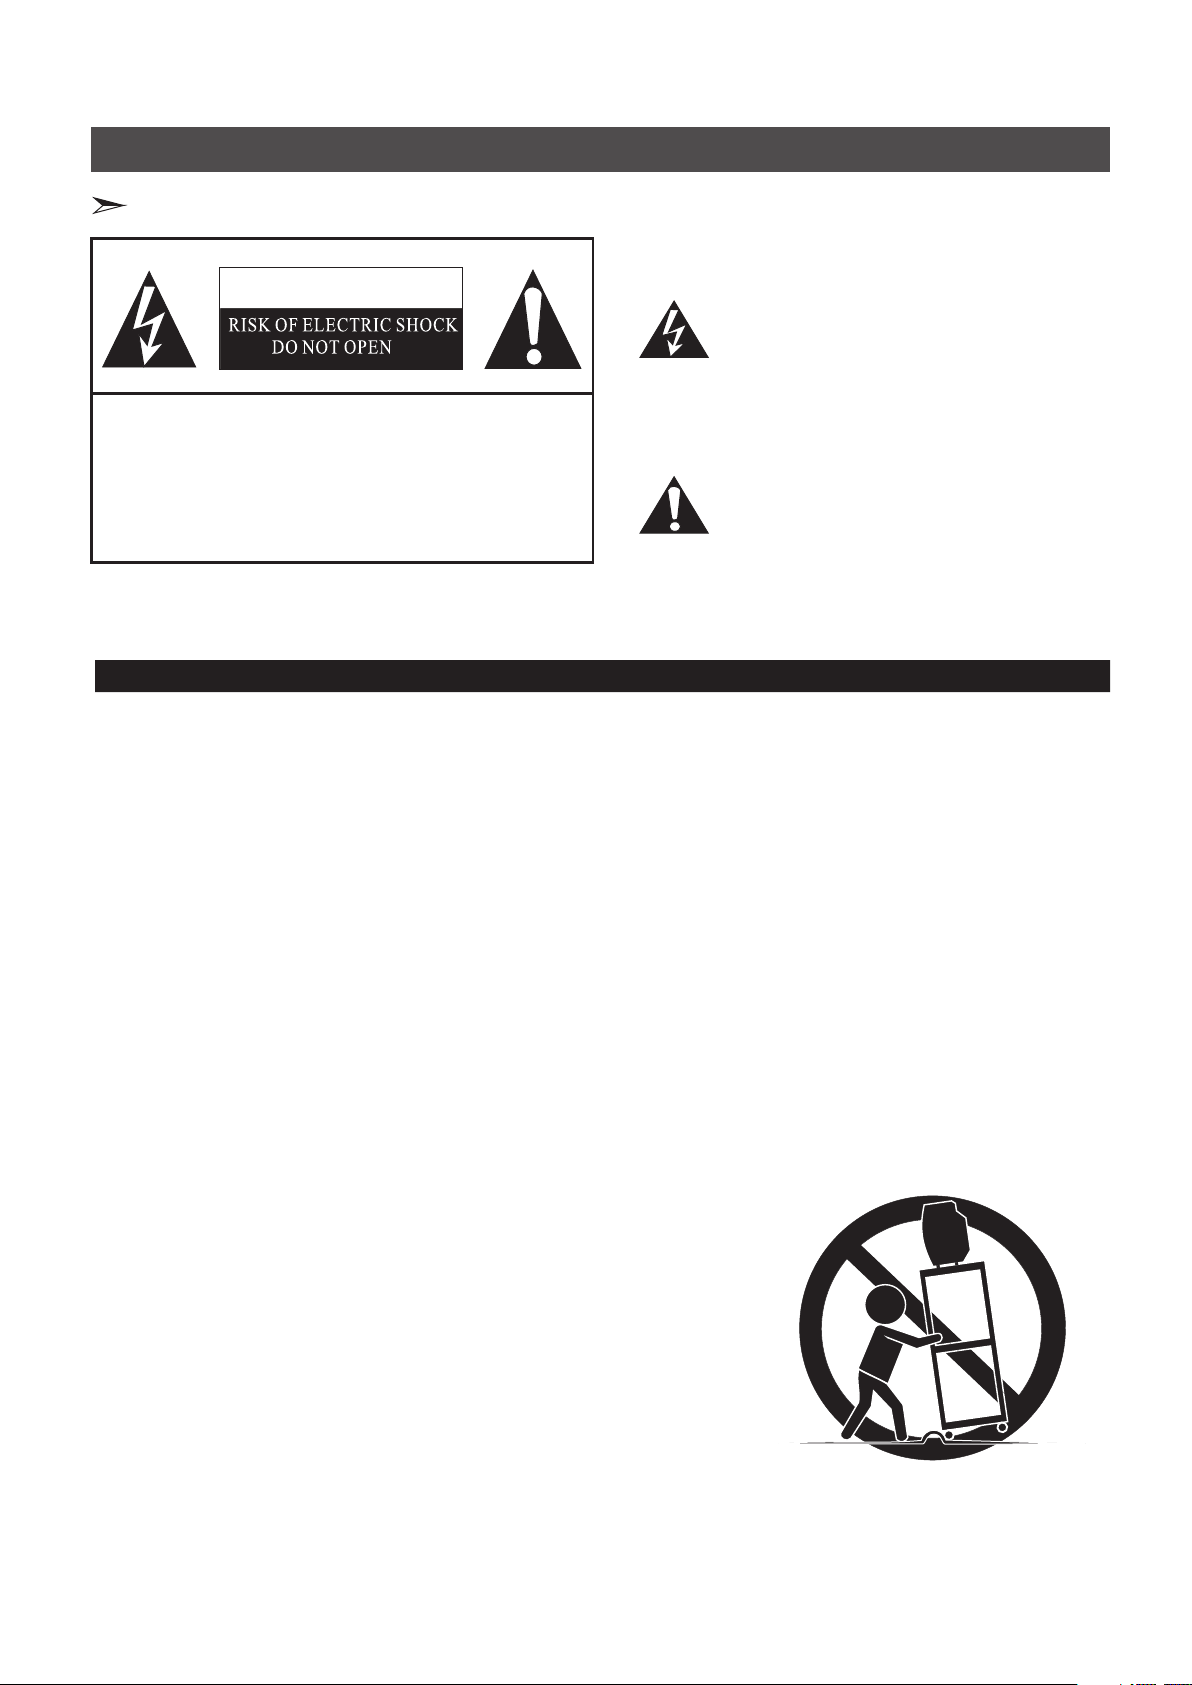
CAUTION
The lightning flas h with arrowhead sy mbol, within an
equilateral tria ngle is intended to a lert the user to the
presence of uninsu lated dangerous v oltage within the
product's enclos ure that may be of sufficient magnitude
to constitute a risk o f electric shock.
CA U T IO N: TO REDUCE THE RIS K OF ELEC TRIC SHOCK, DO NOT REMOVE
COVER(O R BACK). NO USER SERVICEABLE PARTS IN SIDE.
REFER SERVIC IN G TO QUALIFIE D
SERVICE PERSONNEL.
The exclamation po int within an equil ateral triangle i s
intended to alert th e user to the presenc e of important
operating and main tenance( servic ing ) instruction s in
the literature acc ompanying the set .
CAUTION: CHANGES O R MODIFICATIONS NOT EX PRESSLY APPROVED BY TH E PARTY
RESPONSIBLE FOR CO MPLIANCE WITH THE FCC RULES COULD VOID THE
USERS AUTHORITY TO OPERATE THIS EQUIPMENT.
WARNING: TO PREVENT FIRE OR SHOCK HAZARD, DO NOT EXPOSE THIS APPLIA NCE TO RAIN OR MOIST URE.
1. READ THESE INSTRUCTIONS
2. KEEP THESE INSTRUCT IONS
3. HEED ALL WARNINGS
4. FOLLOW ALL INSTRUCTIONS
5. DO NOT USE THIS APPARATUS NEAR WATER
6. CLEAN ONLY WITH DRY CLOTH
7. DO NOT BLOCK ANY VENTI LATION OPENINGS
8. DO NOT INSTALL NEAR ANY HEAT SOURCES
9. DO NOT DEFEAT THE SAFETY PURPOSE OF THE POLARIZED OR GROUNDING-T YPE PLUG
10. PROTECT THE POWE R CORD FROM BEING WALKED ON OR PINCHED PARTICULARLY AT PLUGS, CONVENIENCE
RECEPTACLES, AND THE P OINT WHERE THEY EXIT FR OM THE APPARATUS.
11. ONLY USE ATTACHMENT S/ACCESSORIES SPECIFIED BY THE MANUFACTURE.
12. USE ONLY WITH CART, STAND, TRIPOD, BRACKET, OR TABLE SPECIFIED BY
THE MANUFACTURER, O R SOLD WITH THE APPARATUS. W HEN A CART IS USED,
USE CAUTION WHEN MOV ING THE CART/APPARATUS CO MBINATION TO AVOID
INJURY FROM TIP-OVE R.
S3126A
3
Important safety instructions
Importa nt safet y instru ctions
13. UNPLUG THIS APPARATUS DURING LIGHTNING STO RMS OR WHEN UNUSED FOR LONG PERIODS OF TIME.
14. REFER ALL SERVICING TO QUALIFIED SERV ICE PERSONNEL. SERVICING IS REQUIRED WHEN THE APPARATUS
HAS BEEN DAMAGED IN ANY WAY, SUCH AS POWER-SUPPLY CORD OR PLUG IS DAMAGED, LIQ UID HAS BEEN
SPILLED OR OBJECTS HAVE FA LLEN INTO THE APPARATUS, THE APPARATUS HAS BEEN EXPOSE D TO RAIN OR
MOISTURE, DOES NOT OPERATE NORMALLY, OR HAS BEEN DROP PED.
POWER SOURCE: This TV should be operated only from the type of power so urce indicated on the marking label. If you
15.
are not sure of the type of power supply to your home, consult your appli ance dealer or local power company . For TVs
intended to operat e from battery power, or other sources, refer to t he operating instructions.
16. POWER CORD PROTECTION: Power-supply cords should be route d so that they are not likely to be walked on or pinche d
by items placed upon o r against them, paying particular attenti on to cords at plugs, convenience receptacles, and the
point where they exi t from the appliance.
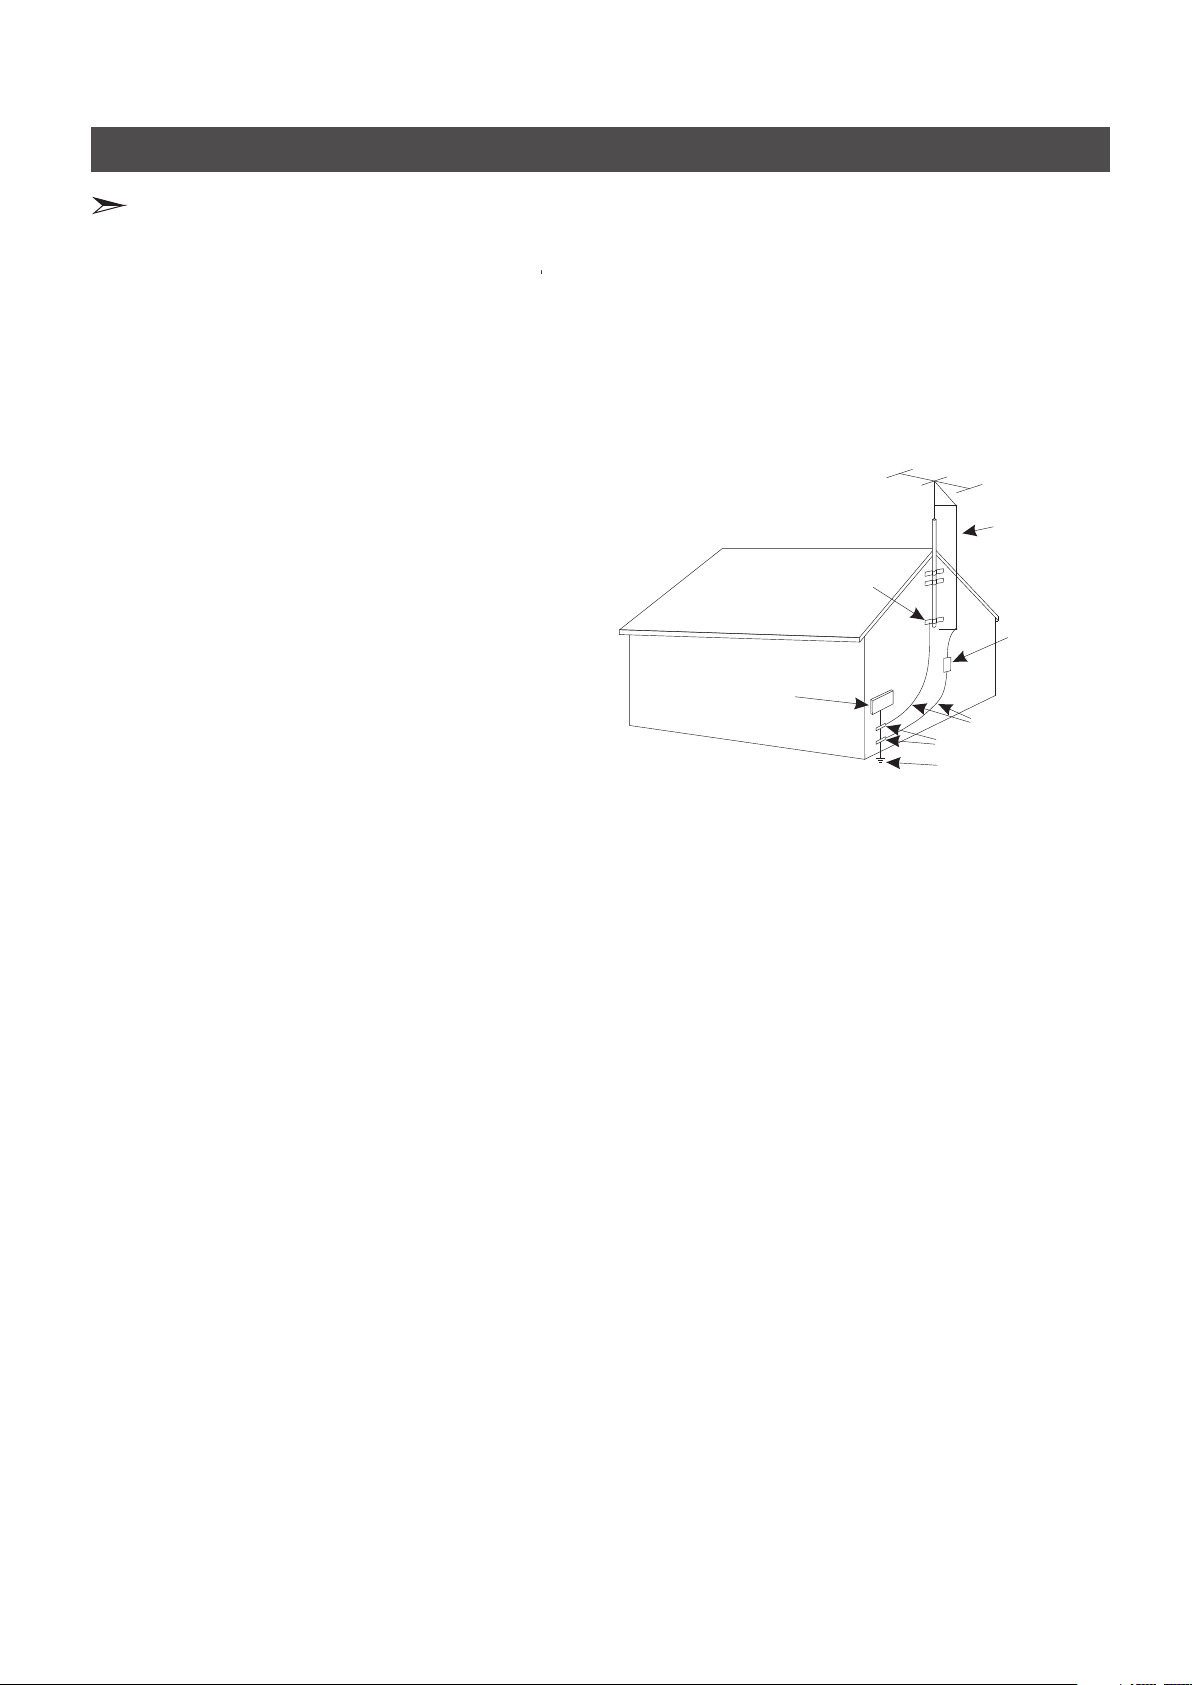
17. OUTDOOR ANTENNA GRO UNDING
If an outside antenn a or cable system is connected to
the TV, be sure the antenna or cable system is groun ded
to provide some protection against voltage surges
and built-up stati c charges. Section 810 of the National
Electrical Code, ANSI/NFPA NO.70,provid es
information with r espect to proper grounding
of the mast and suppor ting structure, grounding
of the lead-in wire to a n antenna discharge unit ,
size of grounding co nductors, location of
antenna discharg e unit, connection to grounding
electrodes, and re quirements for the grounding
electrode.(Fig .A)
18. LIGHTNING: For a dded protection for this TV receiver
during a lightning s torm, or when it is left unattended
and unused for long pe riods of time, unplug it from the
S2898A
wall outlet and disc onnect the antenna or cable system.
This will prevent da mage to the TV due to lightning and power line surg es.
19. POWER LINES: An outside antenna system sh ould not be located in the vicinity of overhead power lines, or othe r electric
light or power circuits, or where it can fall into such power lines or ci rcuits. When installing an outside antenna system,
extreme care shoul d be taken to keep from touching such power lines o r circuits as contact with them might be fatal.
20. OVERLOADING: D o not overload wall outlets and extension cor ds as this can result in a risk of fire or electric sho ck.
21. OBJECT AND LIQUID ENTRY: Never push objects o f any kind into this TV through openings as they may touch dangerous
voltage points or sh ort out parts that could result in fire or electr ic shock. Never spill liquid of any kind into the T V.
22. SERVICING: Do not at tempt to service th is TV yourself as opening or removing covers ma y expose you to dangerous
voltage or other haz ards. Refer all servicing to qualified serv ice personnel.
23. REPLACEMENT PARTS : When replacement parts are required, be sur e the service techn ician uses replacement parts
specified by the man ufacturer that have the same characterist ics as the original part. Unauthorized substitutions may
result in fire, elec tric shock, injury to persons or other hazard s.
24. SAFETY CHECK: Upon c ompletion of any service or repairs to this TV, ask the service technician to perform routin e safety
checks to determin e that the TV is in proper operating condition.
25. The apparatus sh all not be exposed to dripping or splashing and n o objects filled with liquids such as vase, shall be place
on the apparatus.
26. WARNING: Plug the p ower cord into a power outlet where access to the p ower cord connector is readily accessible in
case power dis-con nection is required.
27. ATTENTION: This de vice complies with Part 15 of the FCC Rules. Operation is subject to t he following two conditions:
(1) this device may no t cause harmful interference, and (2) this de vice must accept any interference received, including
interference tha t may cause undesired operation.
28. CAUTION: To reduce the risk of electric sh ock, grounding of c enter pin of this plug must be maintained.
29. WARNING: Plug the p ower cord into a power outlet where access to the power cord connector is readily acces sible, in case if the
power needs to be imme diately disconn ected.
30. ATTENTION: This de vice complies wit h Part 15 of the FCC Rules. Operation is subject to the following two co nditions: (1) thi s
device may not cause h armful interference, and (2) this device must accept any interference receive d, including interference that
may cause undesire d operation.
a). Disposal of pack aging: The packaging of this product is intended to be recycled. Apply to the local authorities for correct disposal.
b). Disposal of batt eries: The batteries supplied do not contain the heavy metals mercury and cadmium . Please check on how to
dispose exhauste d batteries according to local regulations.
c). Note Specifica tions and information are subject to change without notice. If you need further ass istance, please call the customer
support service in y our country.
31. POWER-CORD INS ERT CHECK: When connecting the power cord to th e connector of the TV, make sure the power cord is fully inserted
in the place. Bad cont act may cause high temperature of the connector and the risk of fire o r other damages.
FIGU RE A
EXA MPLE OF AN TENNA GR OUNDI NG AS PER
NATIO NAL ELE CTRIC AL CODE
GRO UND
CLA MP
ELE CTRIC
SERV ICE
EQU IPMEN T
ANT ENNA LEA D
IN WI RE
ANT ENNA
DIS CHARG E UNIT
GRO UNDIN G WIRES
GRO UND CLA MPS
POW ER SERVI CE GROU NDING
ELE CTROD E SYSTE M
4
Setting up
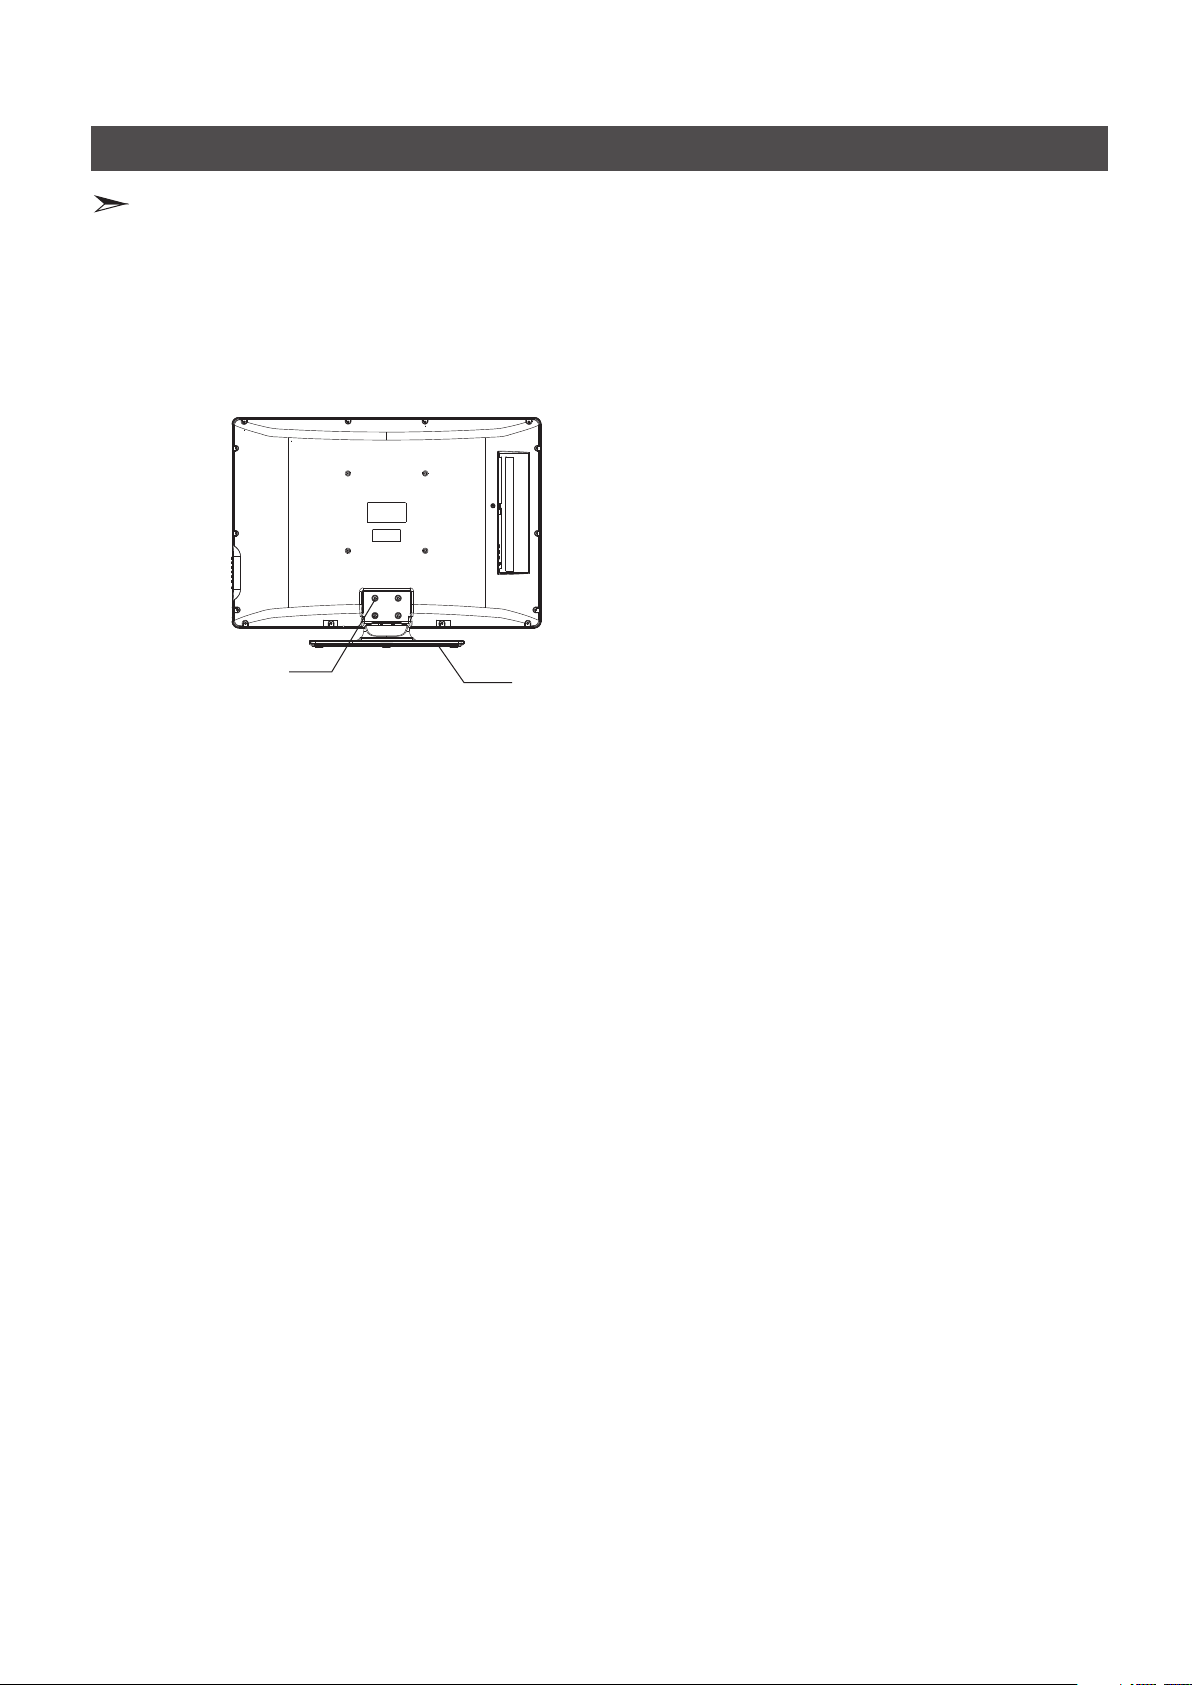
Pedesta l Instal lation I nstruc tion
1. Lay th e soft f roth o n the ta ble wh ich ca n hold e noug h weig ht of th e whol e TV in c ase of c ausi ng dam age to TV or pe rson .
2. Put th e TV on t he fro th ,wi th its b ack up ward s and th e LCD do wnwa rds.
3. Take out the pe dest al, an d insert the pedestal int o the T V suit ably, then p ut the p edes tal to r elev ant po siti on of th e
TV set until al l the ho les ma tch ea ch oth er com plet ely.
4. Fasten the pedestal and the TV set to geth er wit h scre ws.
5. Erect the TV set, a nd put i t on the p rope r posi tion f or wat chin g.
screw
Note:
The abo ve fig ures a re for r efer ence o nly, pleas e refe r to the a ctua l unit s to det ermi ne the a ppea ranc es.
Every hole of t he ped esta l must b e fast ened w ith sc rews !
pedestal
5
Setting up
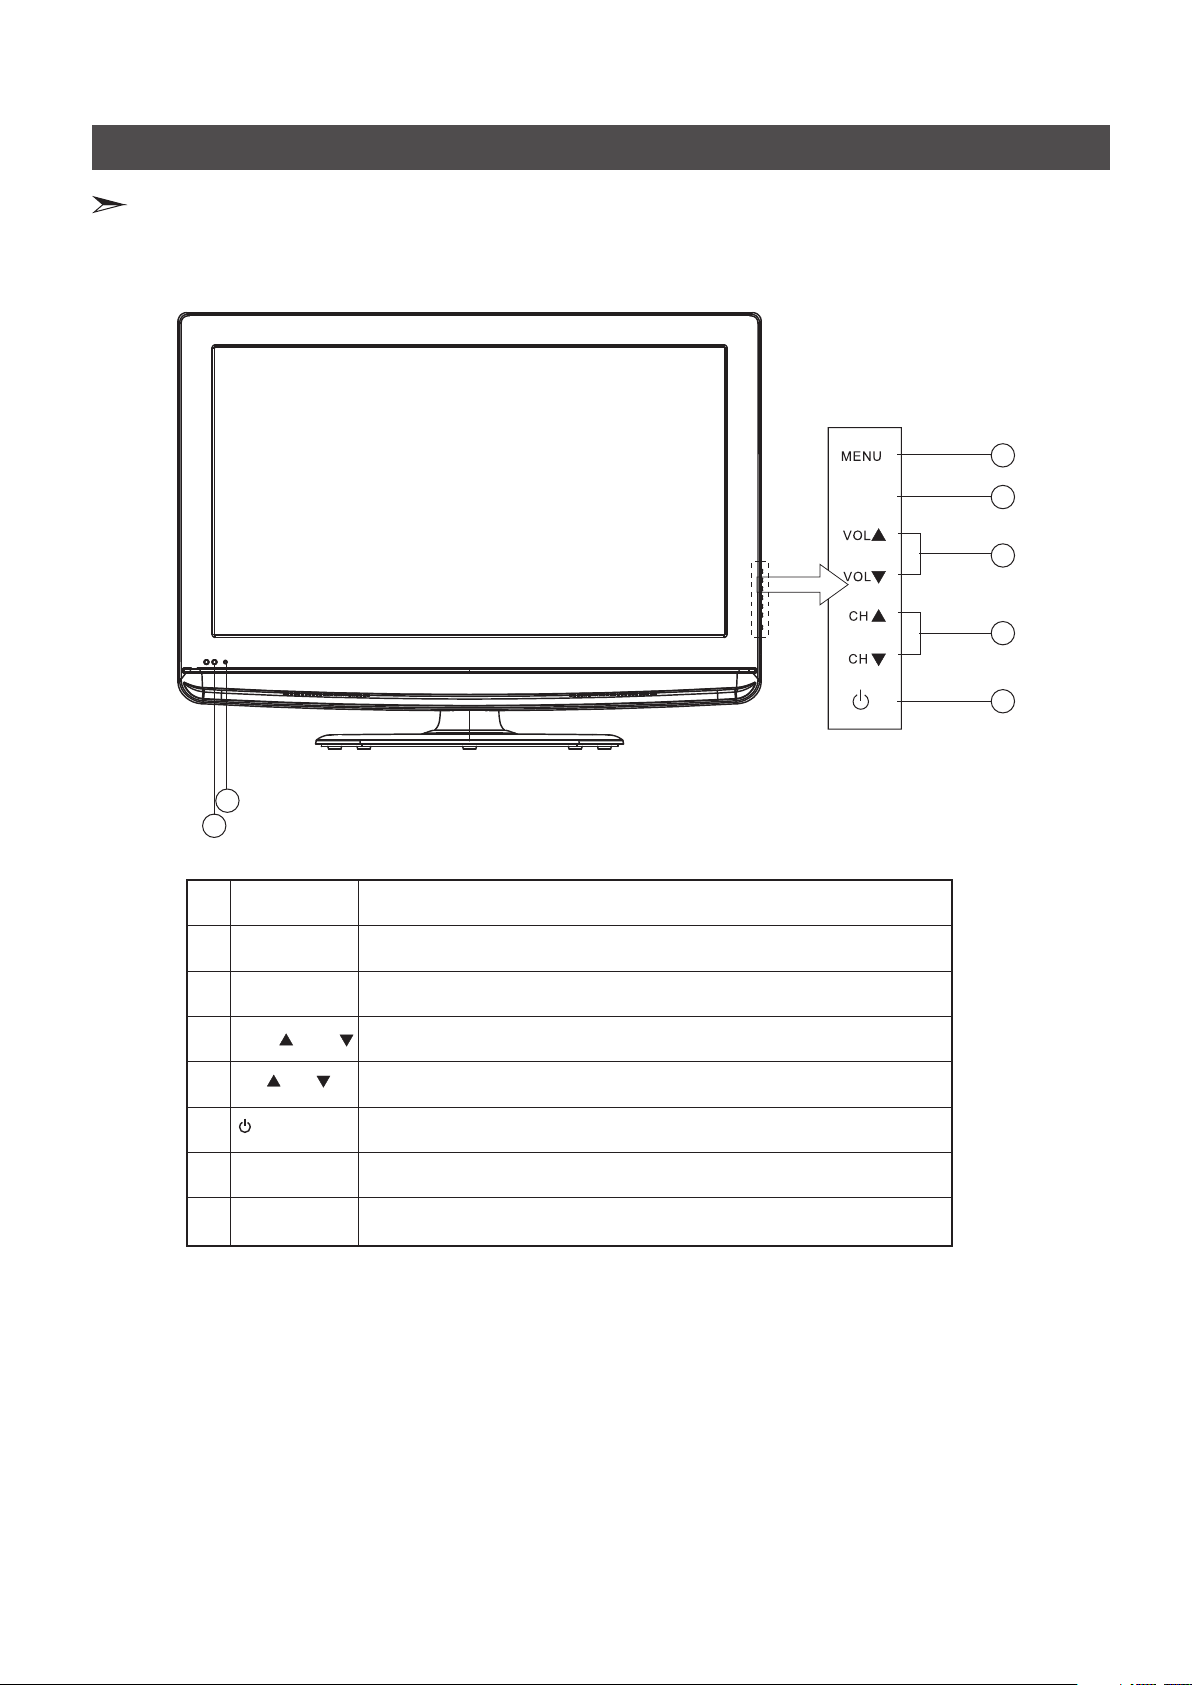
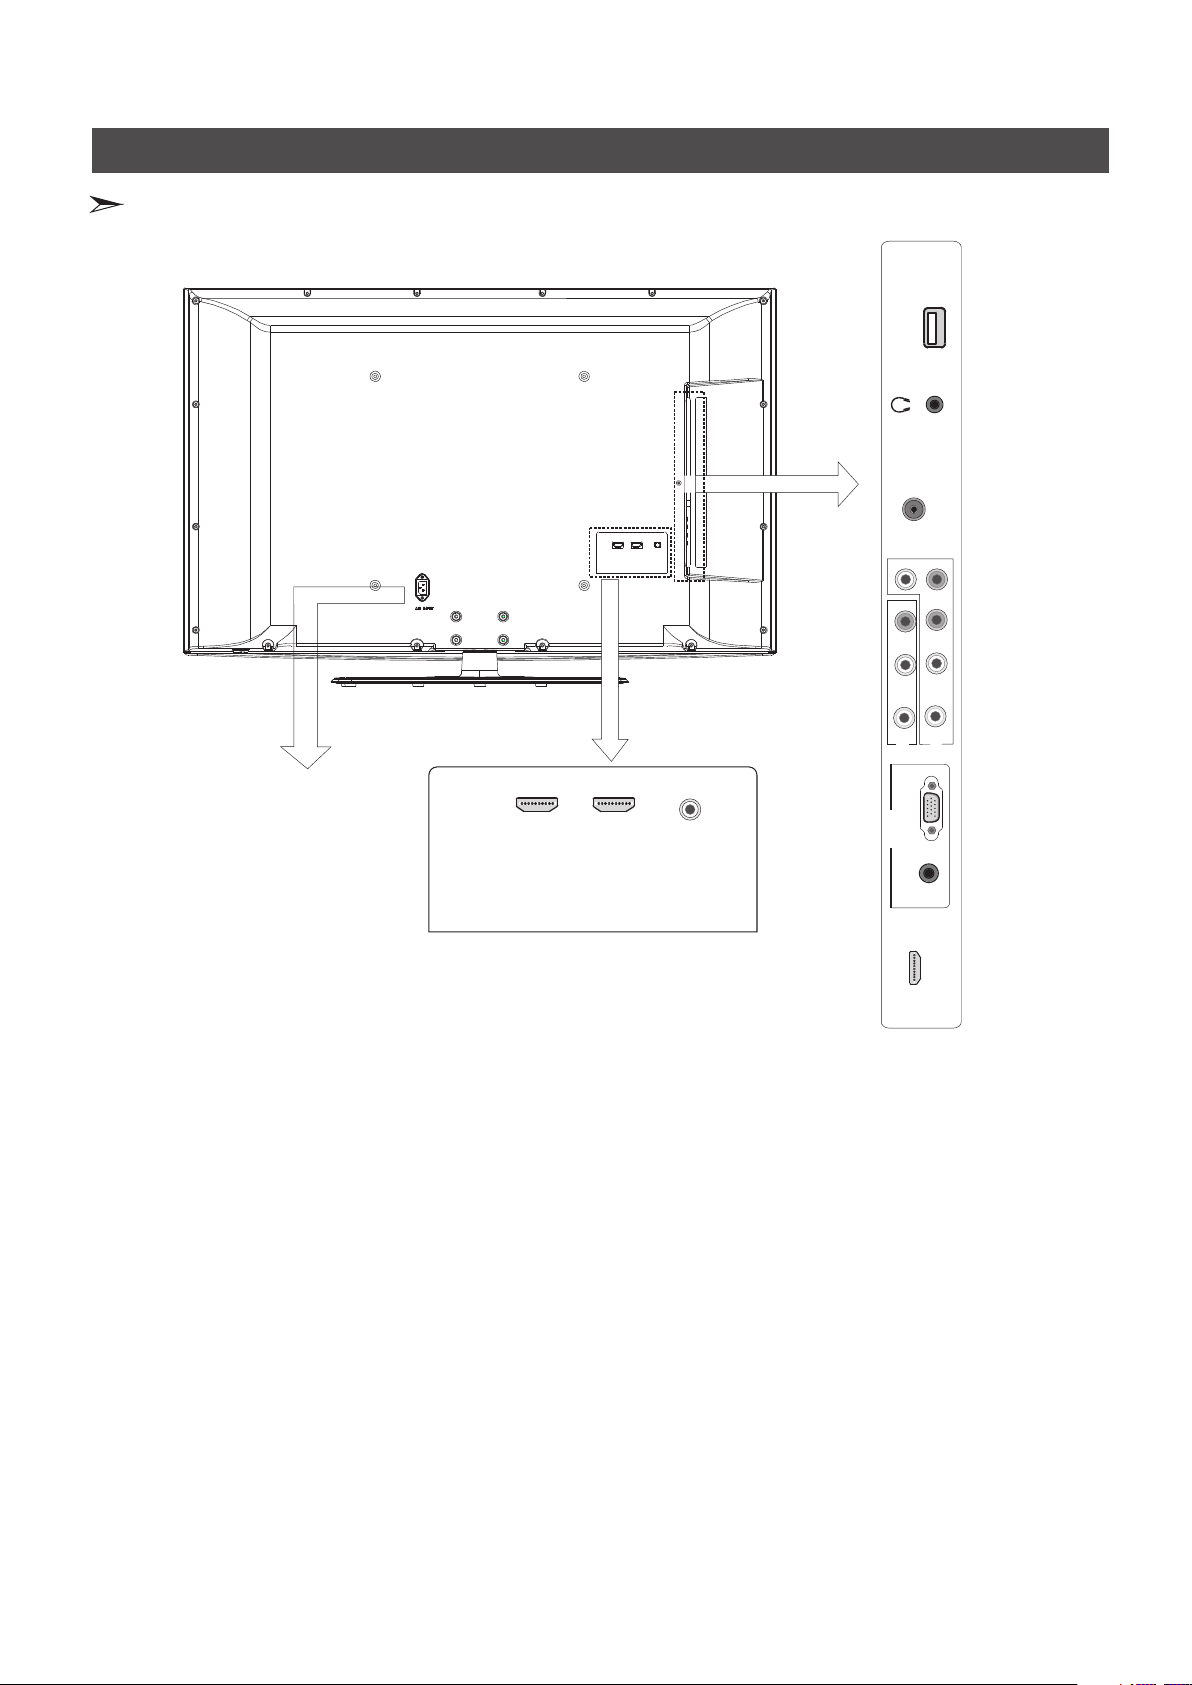
Locatin g TV butto ns and con nectors
Note: T he bel ow fig ures a re for r efer ence o nly, pleas e refe r to the a ctua l unit s to det ermi ne the a ppea ranc e.
1
7
6
NO.
1
2
3
4
5
TV(fr ont)
MENU
INPUT
VOL /VO L
CH CH /
(Standby)
INPUT
Descripti on
Display the onscreen display(OSD) or Exit to close the OSD.
Select the input source. Press INPUT to open the list of input sources.
Raise or lower the sound level. In an OSD menu, press these buttons
to move right or left in the menu or to adjust an item.
Select the next higher or lower channel. In an OSD menu, press these
buttons to move up or down in the menu.
Press to turn your TV on or off (standby mode).
2
3
4
5
Remote control
6
sensor
Power
7
indicator
Receives signals from the remote control. Please do not block.
The light shows whether the TV is on or standby mode.
6
Setting up
Locatin g TV butto ns and con nectors
SERVICE
HEADPHONE
ANT/CABLE
IN
L
R
R
PR
L
PB
Y
VIDEO
AC INPUT
AV
HDMI2 HDMI3
DIGITAL
AUDIO OUT
COMP
VGA
PC
AUDIO IN
HDMI1
7

Setting up
Connect t o other de vices
Warning: Before connecting the TV to any other electronic device, unplug the TV and electronic device AC cords from the AC input.
Not all following terminals are included on your TV. The actual one refer to the part of “ ”Locating TV buttons and connectors
1. Connect to broadcast antenna or the cable TV
To have an optimal picture quality, it is strongly recommended to have an external antenna or a cable TV.
Note:
It is recommended that coaxial cable (75 ) be used to eliminate the interference caused by the mismatched impedance.
n
The antenna cable should not be bound together with the power cord.
n
When using the cable TV, please insert the plug of the coaxial cable (75 ) directly into the antenna outlet.
n
ANT/CABLE
IN
2. Connect to AV devices
your set and the other ends to
Connect a Video RCA cable to an appropriate external A/V device such as a VCR, DVD or
Set-top boxes.
Connect RCA audio cables to “R - L(audio)” on your set and the other ends to corresponding audio out connectors on the
A/V device.
Video in(composite video) transmits video as a single signal.
R
L
Red
White
VCD, DVD, set-top boxes, etc.
VIDEO
AV
Yellow
3. Connect to devices with Component interface
Component video(Y, Pb, Pr)transmits video as separate Y, Pb, Pr signals. Use this connection for high-definition video signals
from a DVD or other equipment.
Connect Component video and audio cables to Component inputs (“PR/CR”, “PB/CB”, “Y”) on the rear of your set and the
other ends to corresponding component video out connectors on the PVR or DVD.
The Y, PB/CB and PR/CR” connectors on your component devices (PVR or DVD) are sometimes labeled Y, B-Y and R-Y or Y,
CB and CR. (Colors for inputs and cables must correspond on both devices.)
R
L
Red
White
Red
Blue
Green
Audio R
Audio L
PR
PB
Y
DVD With Component jacks
4. Connect to devices with HDMI interface
HDMI transmits an all-digital signal and is the recommended choice for playback from a digital DVD or DVR. No sound
connection is needed for HDMI to HDMI connection.
HDMI cable connected to the HDMI connector on the TV.
HDMI
9
The equipment with HDMI output jack
( such as DVD players, set-top boxes, etc.).
8
Setting up
Connect t o other de vices
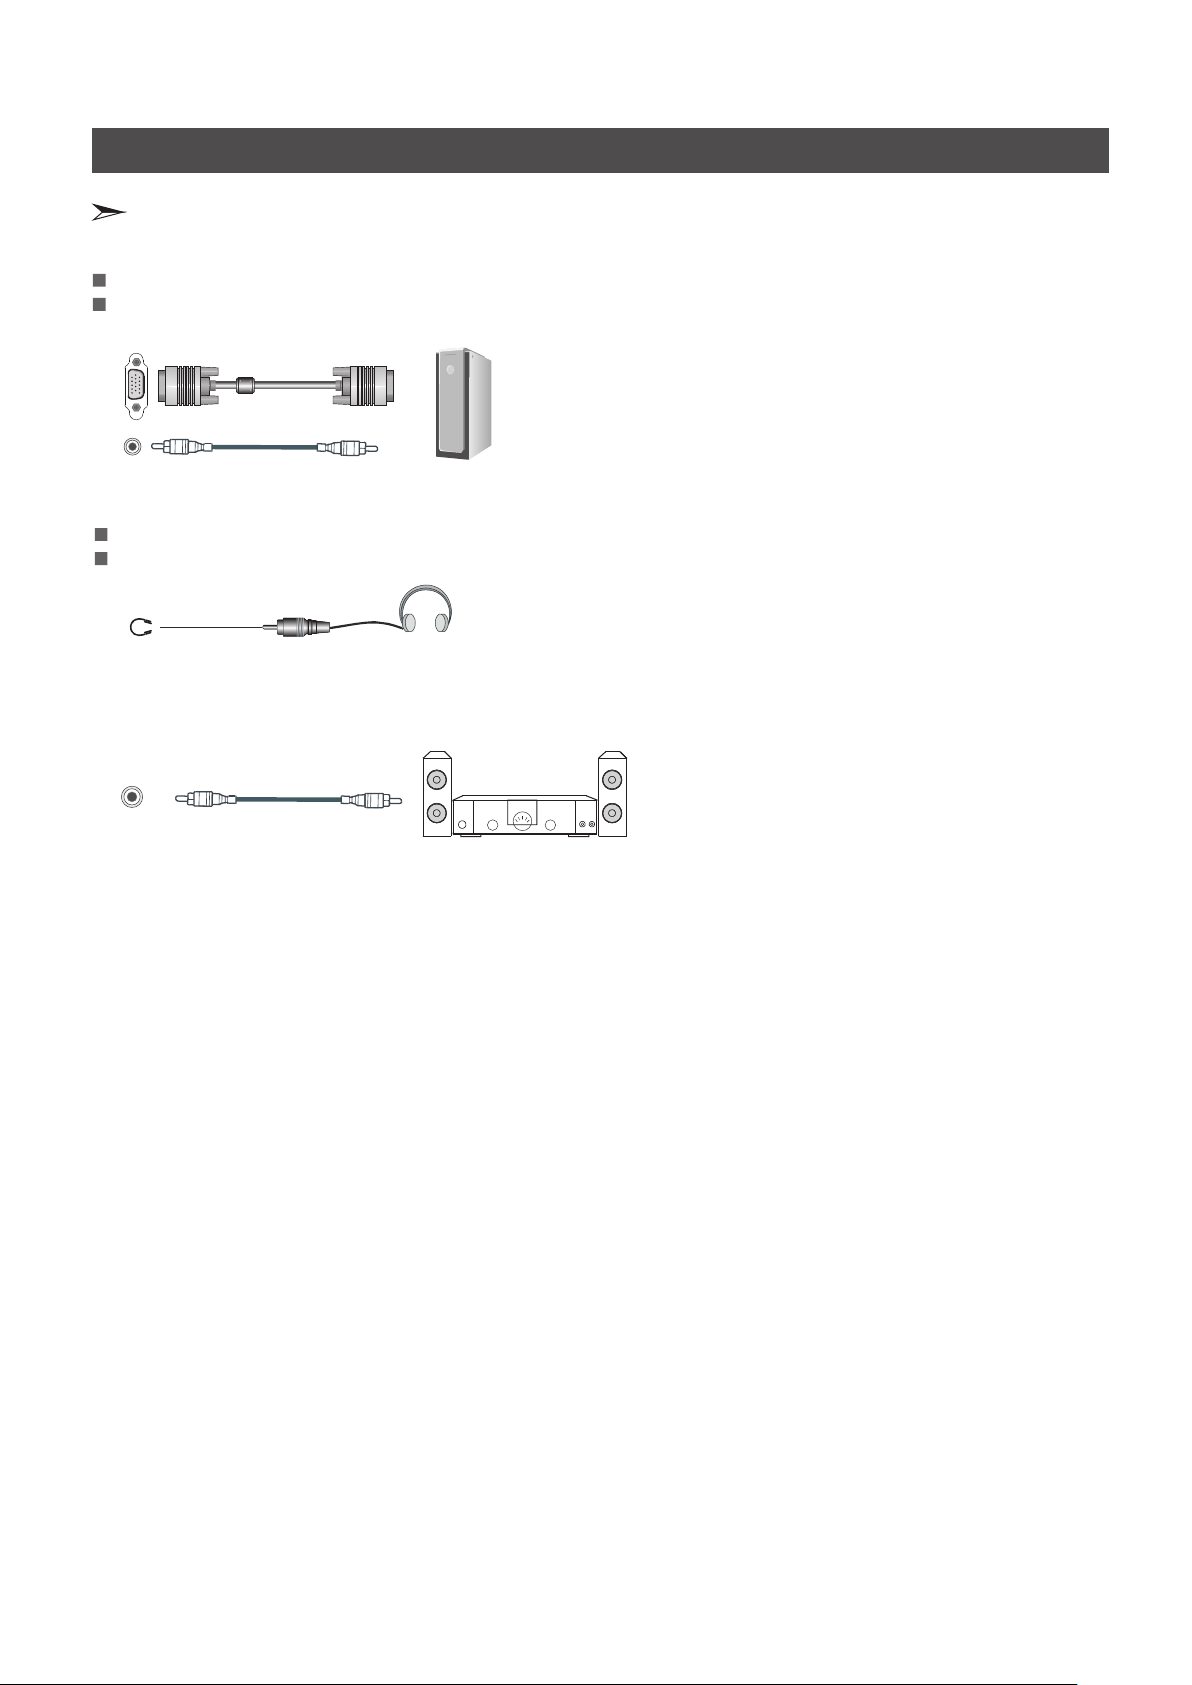
5. Connect to PC
Connect the D- Sub cable to “VGA” on the rear of your set and the other end to the Video Card of your computer.
Connect the stereo audio cable to “PC AUDIO ” on the rear of your set and the other end to “Audio Out” of the sound card on
your computer.
VGA
AUDIO IN
Computer
6. Connect to headphone
Connect the headphone jack of the TV set.
The volume of the headphone is automatically adjusted with the main volume of the TV set.
HEADPHONE
Headp hon e
7. Digital audio
Connect an digital audio device to this jack(Coaxial cable is needed).
Note: DTV and HDMI output only.
DIGITAL
AUDIO OUT
9

Using the remote control
Identif ying the r emote co ntrol buttons
Power on/off
Select AV Component
HDMI VGA source
Zoom button
Electronic Program Guide
AV
ZOO M
COM P
GUI DE
TV
HDM I
PIC TURE
INP UT
VGA
AUD IO
Remote sensing window
Select input source
Enter TV source
Select picture mode
Select sound mode
Display the current channel number
Volume increase
Volume decrease
Menu button
/ / /
control the cursor in
the menu
Direct channel selection
Dash button
VOL
Men u
ENTE R
1 2 3
4 5 6
7 8 9
DIS PLAY
MUT E
0
LAS T
Exi t
Next channel
CH
Previous channel
Mute button
Turn to the u pper menu
Confirm selected operation
Reverts to th e prev iously
selected channel
Special function buttons
Adjust CC mode
CCD
MTS
TEM P
SLE EP
Audio select button
Mono/Stereo/SAP operation
EN-31202AP
Note:
1. Please refer to the practicality.
2. Red/Green/Yellow/Cyan buttons are used for special function.
10
Set the s leep timer
Select color temperature mode

Using the remote control
Brief ope ration s of remot e contro l
Change the batteries
1. Open the battery cover on the back of the remote control.
2. Install two AAA size (1.5V) batteries. Match the “+” and “-” signs on the batteries to the signs on the battery compartment.
3. Close the battery cover.
Note:
1. If the remote control doesn't work normally, unstable, or cannot control the TV, please replace the batteries.
2. If you do not use the remote control for a long time, remove the batteries.
The effective range of remote control
1. The remote control distance: 8 meters in front of the TV set.
2. The remote control angle: taking the television infrared light receiver window as an apex, 6 meters away, its controlled
angle (left to right) is within 30 degrees, while the vertical angle (up to down)is within 30 degrees.
Basic operations
Power on/ off
Connect the Power Cord to the connector on the back of the TV, if the Power cord in accessories. When
1.
connecting the power cord to the connector of the TV, make sure the power cord is fully inserted in the place. Bad contact may
cause high temperature of the connector and the risk of fire or other damages
2.Connect the TV power line to AC outlet.
3. Press the Power button on the TV set. When the TV is on, press the Power button on the remote control, and the TV will
enter Standby state. Press this button again, and you can watch TV normally.
4. Press the Power button again to turn off the TV.
Note:
In order to save power consumption, set the TV in Standby state if you do not watch TV for a short time.
If the TV is turned off , to turn it on agin, please wait at least 5 seconds in case the abnormal phenomena occurred.
Changing Channels/ Volume
1. Press [CH ] button on the remote control, you can change the channels.
(Press [VOL ]button to raise or lower the volume).
2. Press [CH ]button on the front panel of the TV set, you can also change the channels.
(Press [VOL ] button to raise or lower the volume).
3. Press the numeric buttons on the remote control to display the corresponding channels.
Note:
Changing the channels can also be achieved by directly pressing the programme No. If you want to choose the programme No.
from 1 to 9, press the numeric buttons directly. If you want to select a programme No. that double-digit or three-figure, the time
between twice pressing the numbers should not be more than 3 seconds.
/
/
/
/
Select in put sour ce
Choose the current input signal of the main picture. You can press the TV AV COMP HDMI VGA button to choose the source you want or press
[INPUT] button to display the signal inputs. Press [ ]button to select the source you wanted to enter, then press [ ] button to confirm.
You can also press the [ INPUT] button continuously to choose the source you want.
/ /ENTER
Change pi cture mo de
It can be set as Standard, Cinema, User and Vivid. This mode achieves a certain image display effect by setting the
brightness, contrast and color etc.
11

Basic operations
Change so und mode
It can be set as Standard, Speech, User and Music. This mode achieves a special sound effect by setting equalizer.
Mute soun d
Press [Mute] button to turn the sound off, press this button again to turn the sound back on. This function is used to switch off
sound temporarily.
Set sleep t imer
It can set the TV to let it enter into the Standby state automatically, Press this button repeatedly to select the proper sleeping
clock mode, and the clock tells you the remaining time before the TV enters Standby state.
Change vi ew ratio
Press the [ZOOM] button to select from six zoom modes: Wide, Normal, Zoom, Cinema , Panorama, Dot-to-Dot or Auto.
Note: The option of zoom mode is different in different sources
GUIDE
GUIDE: Electronic programme Guide, you can see the programme information.
12
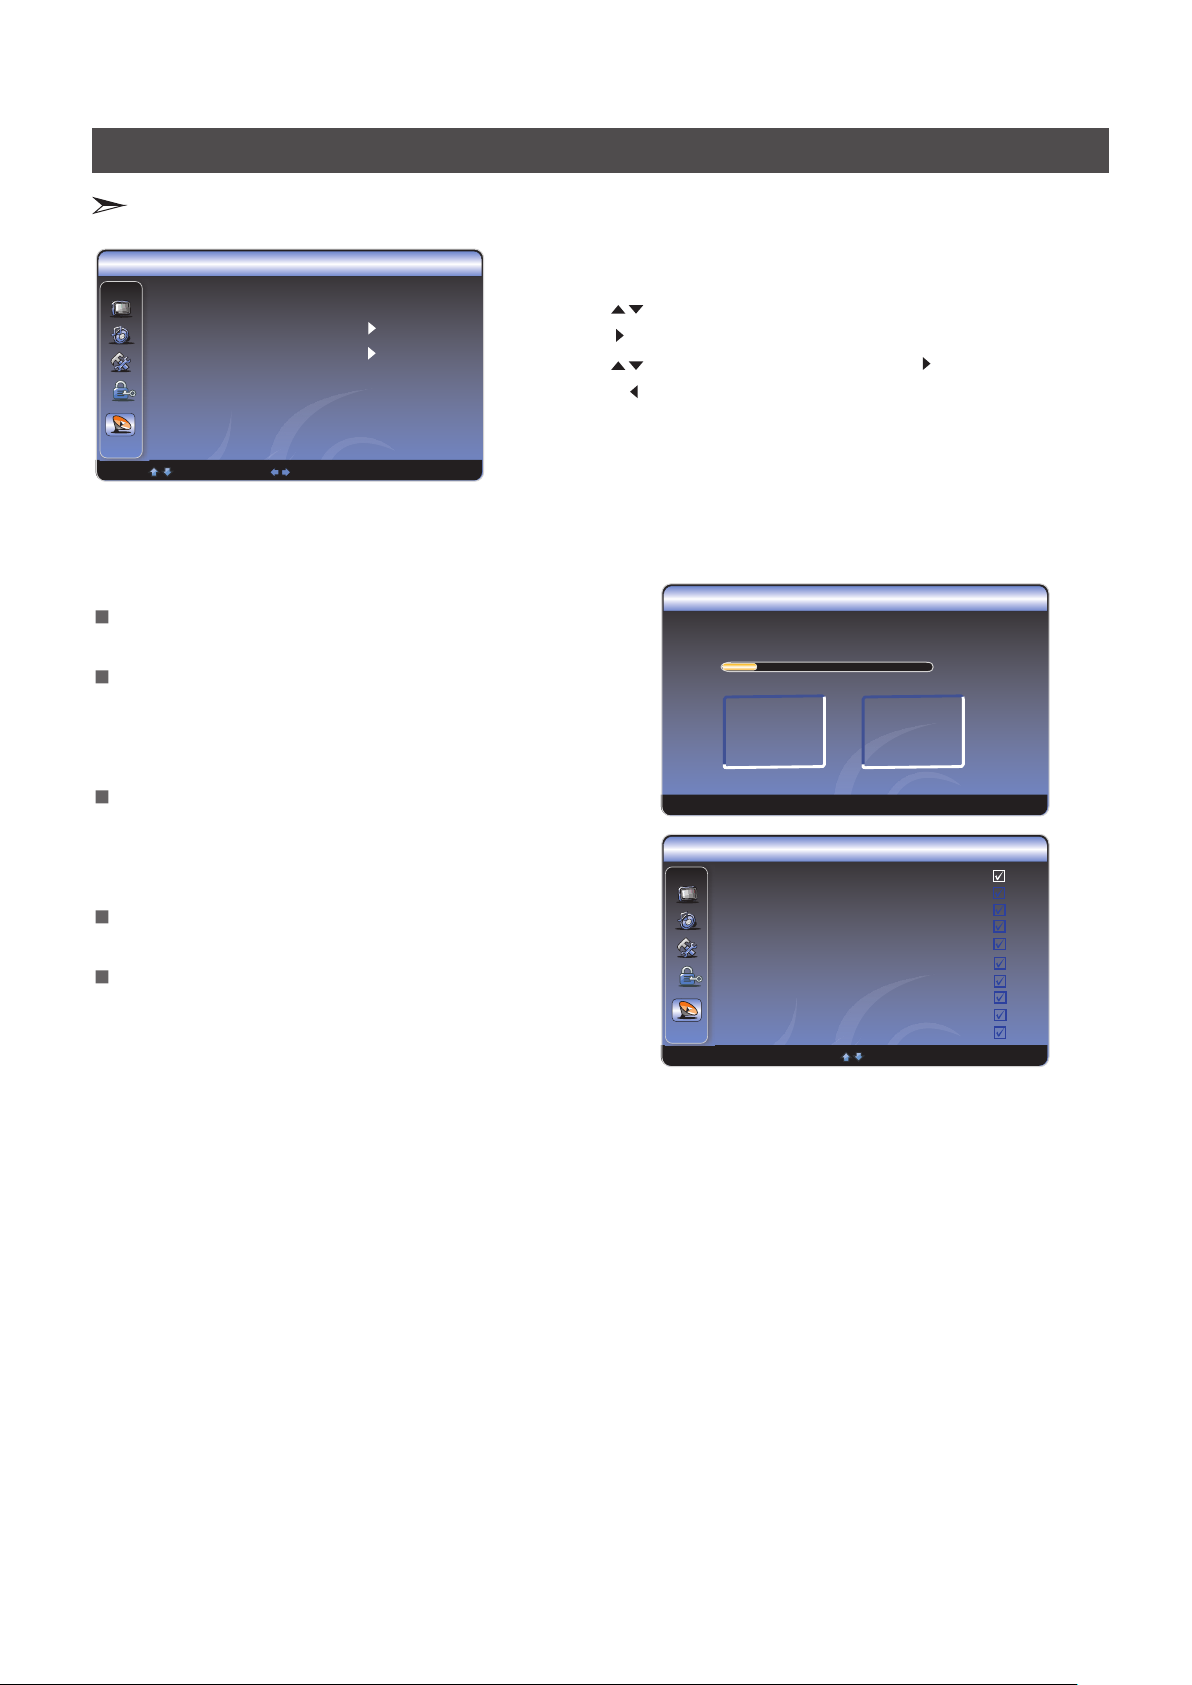
Changing the TV settings
Using the T V Menu
TV
Tuner Mode Antenna
Channel Scan
Channel Skip
MTS Stereo
Audio Language English
1 Press Menu button to display the main menu.
2 Press button to select TV item.
3 Press [ ] button to enter TV menu.
4 Press [ button to select the option, press [ / ] button to enter
or press [ button to exit.
5 When you are finished, press the Menu button to close the menu.
Sele ct
Adju st
You can adjust:
Tuner Mode - Select the TV signal source. You can select
Antenna or Cable.
Channel Scan - Scans for channels that have signals and
stores the channels information in memory.
DTV: The scanned TV programmes in digital signals.
TV: The scanned programmes in analog signals.
Channel Skip - Deletes a channel stored in memory.
When you press CHΛ or CHV, your TV skips the channel
you deleted. You can still tune to the channel using the
number buttons on the remote control.
MTS - Selects the sound mode. You can select Mono,
Stereo, or SAP(Second Audio Program).
Audio Language - Selects the audio language for a program.
SAP (Second Audio Program) - Depending on the particular
program being broadcast, you can listen to a foreign-language
translation.
MENU Back
[ / ]
/
ENTER
/ ] ENTER
/Exit]
Channel Scan
Chan ne l: 0 Sear ch Ty pe An ten na
50
DTV 0 TV 0
Channel Skip
2 Analo g
:Adju st
3 Analo g
4 Analo g
:Adju st
5 Analo g
6 Analo g
7 Analo g
8 Analo g
9 Analo g
10 Anal og
11 Anal og
ENTE R Se t
Sele ct
8%
MENU : Re turn
MENU Back
13

Changing the TV settings
Using the Video Menu
Video
Picture Mo de User
Brightne ss
Contrast
Saturati on
HUE 0
Sharpnes s
Color Te mpe rat ure Standard
Advanced Vide o
Sele ct
Adjus t
MENU B ac k
50
50
50
5
You can adjust:
Picture Mode - Adjusts the Picture Mode. You can select Standard, Cinema, User or Vivid.
Brightness - You can increase or decrease the brightness of the picture. Increasing the brightness can add more light to
dark areas of the picture, while decreasing the brightness can add more darkness to light areas of the picture.
Contrast - You can increase or decrease the contrast of the picture. Increase the contrast to adjust the white areas of the
picture or decrease the contrast to adjust the black areas of the picture.
Saturation - Adjusts the intensity of the colors.
Hue Adjusts the wareLength of the color.
-
Sharpness - You can increase the sharpness level for clearer images or decrease the sharpness level for smoother
images.
Color temperature - Changes the color temperature. You can select the color temperature from three options: Cool,
Standard or Warm.
Advanced Video - Accesses advanced video settings such as DNR, Adaptive Luma Control and Flesh Tone.
1 Press Menu button to display the main menu.
2 Press button to select Video item.
3 Press [ ] button to enter menu.
4 Press [ button to select the option, press [ / ] button to enter
or press [ button to exit.
[ / ]
/
ENTER Video
/ ] ENTER
/Exit]
5 When you are finished, press the Menu button to close the menu.
DNR: It can optimize the picture signal from time and space;
reduce the outside noise interference and return the pure
initial signal. It has four ratings: Low, Standard, Strong and
Off.
Adaptive Luma Control: According to the content of picture, it
can adjust brightness automatically.
Flesh Tone: When this feature is "on" state, the TV could be
the basis of image content, for color correction.
Advance d Video
DNR Low
Adaptive L uma Co ntr ol Off
Flesh Ton e Off
Sele ct
Adjus t
MENU B ac k
14

Changing the TV settings
Using the Audio Menu
Audi o
Balan ce
Surround Sound On
Equal ize r
SPDIF Type PCM
Auto Vol ume Control Off
0
1 Press Menu button to display the main menu.
2 Press button to select Audio item.
3 Press [ ] button to enter menu.
4 Press [ button to select the option, press [ / ] button to enter
or press [ button to exit.
[ / ]
/
ENTER Audio
/ ] ENTER
/Exit]
5 When you are finished, press the Menu button to close the menu.
Sele ct
Adjus t
MENU B ac k
You can adjust:
Balance - Adjusts the volume of the left and right
speakers.
Surround Sound - Turns the surround sound effect on
10db
120Hz
Equa liz er
500Hz 1.5KHz
5KHz
or off.
Equalizer - Weaken or enlarge the sound of the main
0db
frequency points.
SPDIF Type - Selects the SPDIF type. You can select
PCM, Dolby Digital or Off.
-10db
Adjus t
0 0 0 0 0
Sele ct
PCM - PCM is an encoding, mainly used for anolog signal, Dolby mainly used for digital
signal.
Dolby - when the data stream carries Dolby signal, digital SPDIF outputs Dolby data stream.
When the data stream carries no Dolby signal, it transports PCM data stream.
Auto - whe n the da ta str eam ca rrie s Dolb y sign al, di gita l SPDI F outp uts Do lby da ta
strea m. Whe n the da ta str eam ca rrie s no Dol by sig nal, i t tran spor ts PCM d ata st ream .
No matt er the d ata st ream c arri es Dol by str eam or n ot, it o utpu ts PCM d ata st ream .
10KHz
MENU B ac k
Auto Volume Control - Adjust volume according to different audio signal.
Note: Via SPDIF Type, you can choose the digital audio out type. If Auto Volume Control is On, that
means audio out control is activated.
15

Changing the TV settings
Using the S etup Men u
Setu p
OSD Language English
OSD Timeout 15sec
Screen Mode Wide
DPMS On
Time Setup
Caption
Reset Default
Sele ct
Adjus t
MENU B ac k
1 Press Menu button to display the main menu.
2 Press button to select Setup item.
3 Press [ ] button to enter menu.
4 Press [ button to select the option, press [ / ] button to enter
or press [ button to exit.
[ / ]
/
ENTER Setup
/ ] ENTER
/Exit]
5 When you are finished, press the Menu button to close the menu.
You can adjust:
OSD Language - Use the right or left arrow button to choose the OSD Language among English,
and French. Spanish
Screen Mode - Use the arrow button to choose the screen aspect ration from Wide, Normal,
Cinema, Panorama, Dot-to-Dot or Auto. Zoom,
1
Norma l
The ori gina l 4:3 as pect r atio ( 1.33 :1 sig nal)
is pres erve d, so bl ack ba rs are a dded t o the
left an d righ t of the i mage . Stan dard TV
broadcast s are di spla yed wi th a 4:3 a spec t rati o.
Wide
2
When wa tchi ng a sta ndar d broa dcas t or ful l-fr ame
movie i n this m ode, t he dis play i mage i s stre tche d
proportio nate ly to fi ll the TV scr een.
When wa tchi ng a wid escr een (1 .78: 1 sign al)
program or mo vie, t he dis play i mage f ills t he TV
scree n.
Zoom
3
Stret ches t he 4:3 a spec t rati o imag e vert ical ly
and horizontall y to fil l the sc reen a t 1:1. 78
aspect rati o.
Cinema
4
Stret ches t he 4:3 a spec t rati o imag e vert ical ly
and horizontall y to fil l the sc reen a t 1:2. 35
aspect rati o.
16

Changing the TV settings
Using the S etup Men u
Dot to dot
5
Use the f unct ion to s ee the f ull im age wi thou t any cu toff,
when HDMI , Com pone nt, DT V, VG A or AV sign als ar e
inputs.
DPMS - This is a good function for a computer monitor. When DPMS is on, the computer will
screen on or off. For example, if the computer is in sleep mode, the screen will be control the
computer is activated, the screen also is activated. switched off. If the
Time Setup - You can set up the exact time by yourself. You can also set up Sleeper Time and
Sleep Time. Auto
Tim e Set up
Tim e Zon e Eas ter n Time
Tim e
Sleep Timer Off
Sele ct
Adjus t
MENU B ac k
Caption: There are three items in it - Analog Closed
Caption, Digital Closed Caption and Digital Caption Style.
This is a function about caption, display caption by analog
signal and display caption by digital signal.
Analog Closed Caption: CC1, CC2, CC3, Cc4,
TEXT1,TEXT2,TEXT3,TEXT4.
Digital Closed Caption: Service1, Service2, Service3,
Service4, Service5, Service6.
Digital Caption Style: There are two Caption Styles. One is
the automatic function set as the broadcaster, while the
other is the custom style where you can adjust the font size,
color, opacity, background color etc., accordingly.
Reset Default - Every TV has its original setting before
leaving the factory. So this function helps you restore these
settings.
Tim e
Auto Synchronization On
Date 11/01 /20 08
Tim e 01: 16 PM
Tim er Off
Power On timer 12:00 AM
Power Off t ime r 12: 00P M
Sele ct
Anal og C los ed C aptio n Of f
Digi ta l Clo se d Ca pti on O ff
Digi ta l Cap ti on S tyl e
Sele ct
Digital Caption Style
Capt io n Sty le As B ro adc as ter
MENU B ac k
Caption
Adjus t
MENU B ac k
17
Sele ct
Adjus t
MENU B ac k

Inpu t pas swo rd
MENU : Re tu rn
Changing the TV settings
Using the P arenta l Menu
Parental
Chan ge P ass wo rd
Chan ne l Blo ck
Inpu t Bl ock
Prog ra m Blo ck
1 Press Menu button to display the main menu.
2 Press button to select Setup item.
3 Press [ ] button to enter menu.
4 Press [ button to select the option, press [ / ] button to enter
or press [ button to exit.
[ / ]
/
ENTER Setup
/ ] ENTER
/Exit]
5 When you are finished, press the Menu button to close the menu.
ENTE R En ter
Sele ct
MENU E xi t
When you first use this function, the default password is [0000].
Once you input this password, you can: Press [ ] to highlight
an option, then press [ to adjust the option.
/ ]
/
You can adjust:
Change Password - The first time you use this function, use
the default password. If you want to change it, first enter
the new password then enter the same password again.
Channel Block - This function will let you block any channel
you want.
Input Block - You can block the input source with this function.
For example, if you want to block AV input, just highlight
[AV] and press [ENTER].The AV input will not be seen in
the screen.
Clean All - This function will let you clean all the channels
stored on this TV.
Note: If you choose this function, all the programs
you preset will be lost.
? Program Block-
A. Rating Enable is on.
B. U.S. TV Ratings: You can choose TV ratings
according to the illustration on the screen.
C. The settings for U.S. Movie Ratings, Canada
(English) Ratings and Canada (French) Ratings follow Step B.
If you want to block the unrated program, please turn on this
function.
Channel Block
S-1 Di gi tal ATOS -1
:Adju st
Digi ta l ATOS -2
S-2
S-3 Di gi tal ATOS -3
:Adju st
5 Analo g
6 Analo g
7 Analo g
8 Analo g
9 Analo g
10 Anal og
11 Anal og
ENTE R: S et
:Selec t
Input Block
1 TV
:Adju st
AV
2
3 Comp on ent
:Adju st
4 VGA
5 HDMI 1
6 HDMI 2
7 HDMI 3
ENTE R Se t
MENU Ba ck
Program Block
Rati ng E nab le O n
:Adju st
US.T V Ra tin gs
US.M ov ie Ra ti ng s
:Adju st
Cana di an En gl ish Rat in gs
Cana di an Fr en ch R ati ng s
Open V C hi p
Bloc k Un rat ed O ff
MENU :Bac k
18
Sele ct
Adjus t
MENU B ac k

Changing the TV settings
Using the P arenta l Menu
Following is the description of these ratings.
19

Appendix
Specifi cation
Mode l Name
Dime ns io n Wi tho ut s ta nd
(W×H×D) (mm) Wit h st an d
Wei ght(k g)
Wit h sta nd
LCD Panel
Mini mu m siz e(dia go nal )
Scre en resolut io n
Powe r con su mp ti on
Audi o pow er
Refe r to r at ing l ab el
Powe r suppl y
RF NTS C/ ATS C
Rece iv ing sys tems
AV NTS C
480 I/ 60H z、48 0P/60 Hz、
Comp on ent I np ut
720P /6 0Hz、1 08 0I /60 Hz
1080 P/ 60H z
VGA(6 40 ×480 60 Hz)、 SV GA( 8 00×60 0 60 Hz)
VGA Inp ut
VGA (102 4× 768 60H z)
With ou t st an d
HDMI I np ut
LTDN 40V68 NU S
9 70 ×6 15 ×92
9 70 ×6 73 ×30 2
1 5
1 7. 5
1 02
1920 ×1 08 0
185W
7W+7 W
RGB/ 60 Hz ( 64 0× 48 0、800 ×6 00、10 24 ×7 68)
YUV/ 60 Hz (48 0I、4 80 P、720 P、10 80I、1 08 0P )
20
Appendix
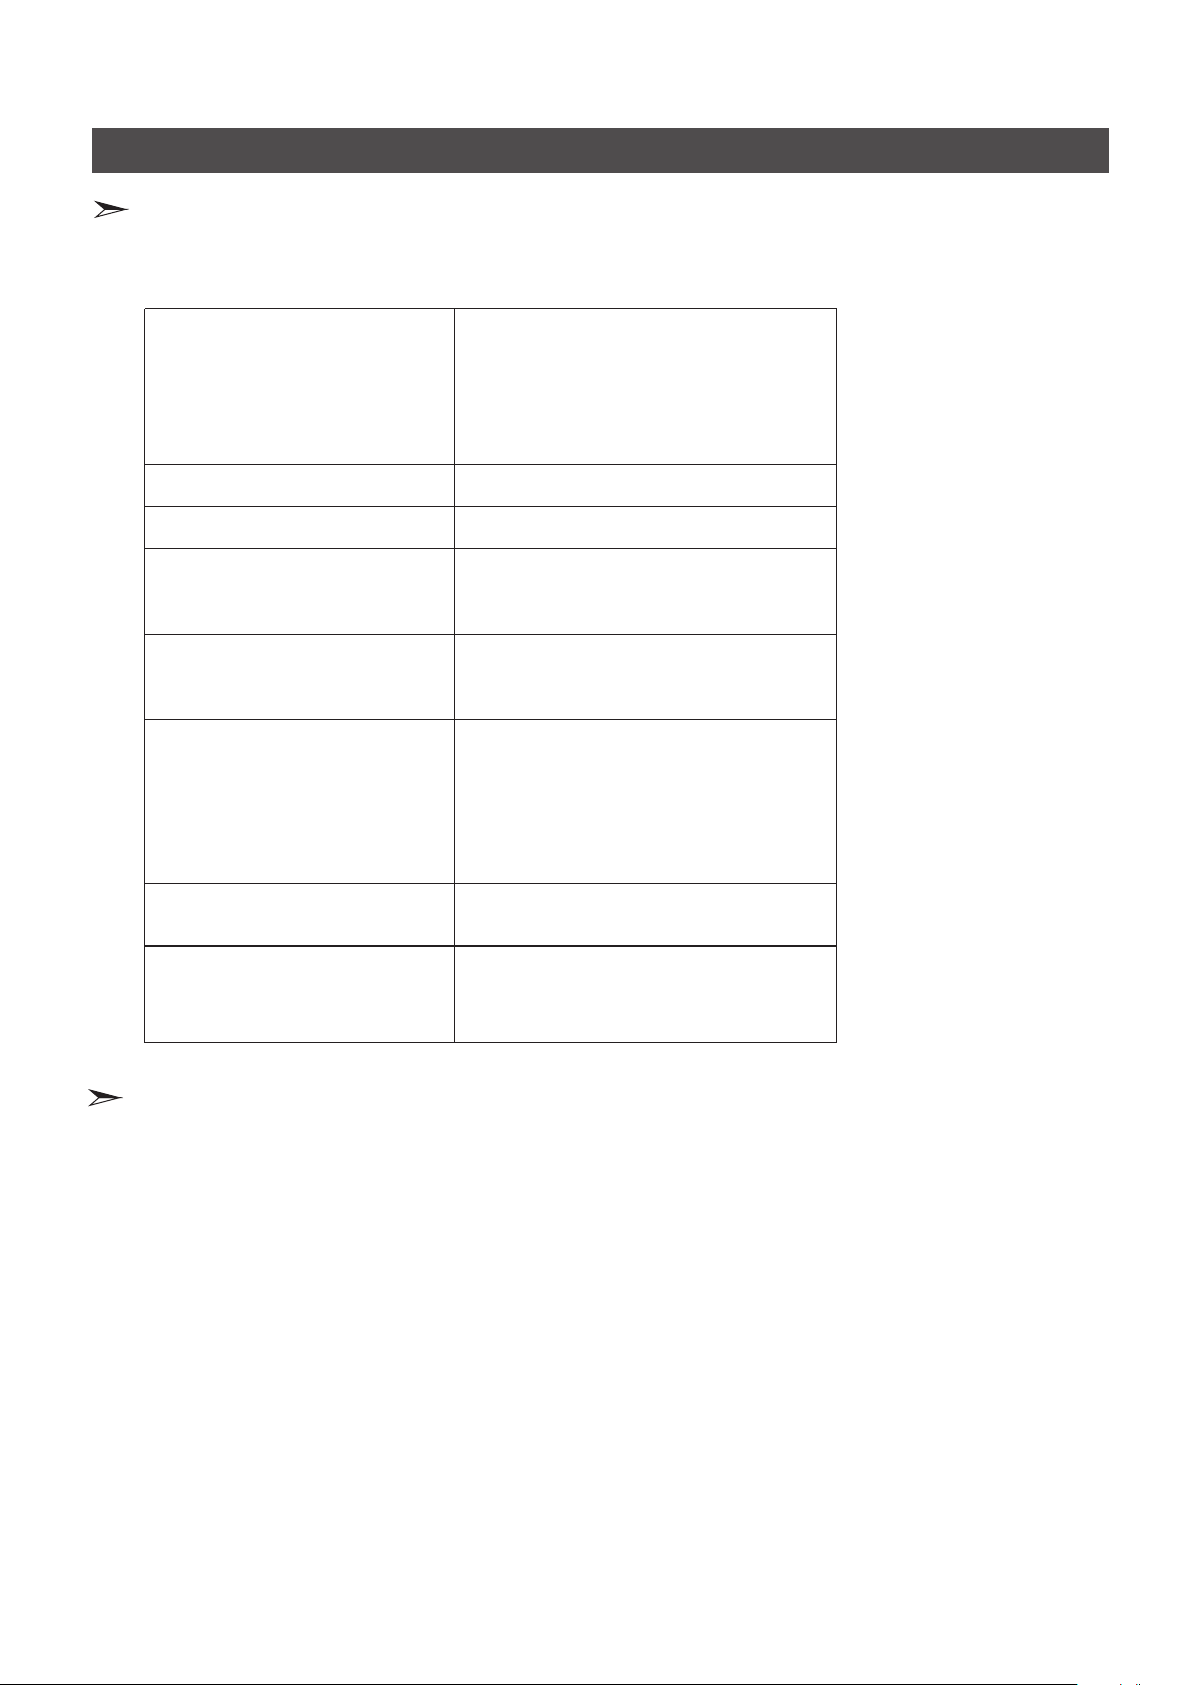
Trouble sh ooting
When there is something wrong with your TV, you can try turning off the TV and then restart it. You can also operate according to the
following chart. If the problem still cannot be solved, please contact the professional technicians.
1. Check if the power line is in the outlet and if it
has electricity.
2. Check if you have pressed Power button on the
No sound or picture
The picture is normal
but there is no sound
No picture and white
or black picture
The sound and picture are
interfered
Unclear picture or picture with snow
The remote control does not work
TV or Power button on the remote control.
3. Check the setting of picture brightness and
contrast.
4. Check the volume.
1. Check the volume.
2. Check if Mute mode is set.
1. Adjust Picture Setting.
2. Check Color System.
1. Try to find the appliance affecting TV set, and
move it far away from the TV set.
2. Try to insert the power plug of the TV set into
another outlet.
1. Check the direction, position and connection of
your antenna.
2. Adjust the direction of your antenna or reset or
fine tune the channel.
1. Change the batteries in the remote control.
2. Clean the upper side of the remote control
(radiating window)
3. Check the contacting points of the batteries.
4. Check if there is obstruction between the
remote control and the monitor.
5. Check if the batteries are correctly installed.
H/V strip or the picture shaking
The cabinet of the TV makes “Click” sound
Acce ssorie s
Remote control...........................1
User's Manual.............................1
Dry Cell Battery...........................2
Power Cord.................................1
Screws for fix pedestal................4
Check if there is an interfering source nearby, such
as appliance or electric tools.
makes "Click" sound''Sometimes the room
temperature change can cause the television
cabinet to inflate or contra, which makes this
sound. This does not mean the TV breaks
down.
21
 Loading...