

32D20
ES-M131006-1
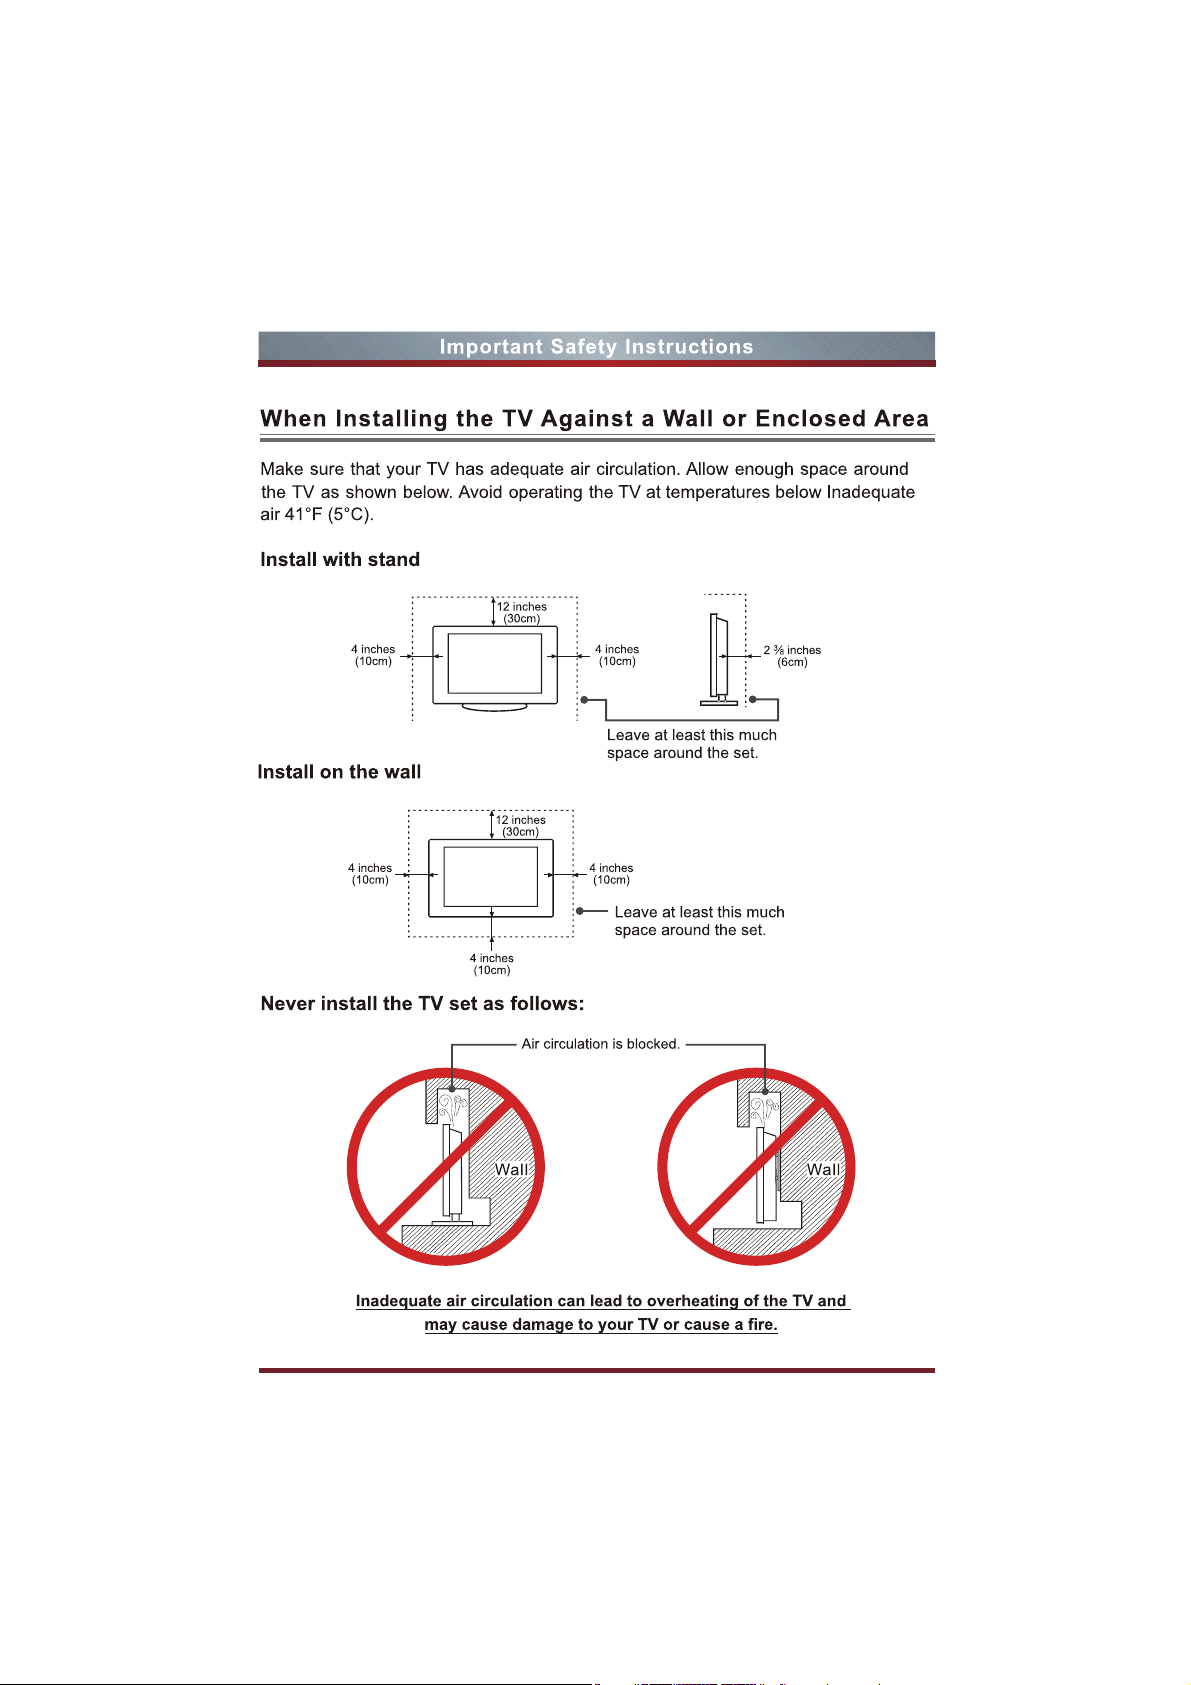
7
8
10
11

The lightning flash with arrowhead symbol,within an equilateral triangle is
intended to alert the user to the presence of uninsulated dangerous
voltage within the product’s enclosure that may be of sufficient magnitude
to constitute a risk of electric shock.
The exclamation point within an equilateral triangle is intended to alert the
user to the presence of important operating and maintenance(servicing)
instructions in the literature accompanying the appliance.
1. Read these instructions.
2. Keep these instructions.
3. Heed all warnings.
4. Follow all instructions.
5. Do not use this apparatus near water.
6. Clean only with dry cloth.
7. Do not block any ventilation openings.Install in accordance with the manufacturer’s
instructions.
8. Do not install near any heat sources such as radiators,heat registers,stoves,or other
apparatus (including amplifiers) that produce heat.
9. To reduce the risk of fire or electric shock,do not expose this apparatus to rain or
moisture.
10. The battery(battery or batteries or battery pack)shall not be exposed to excessive
heat such as sunshine,fire or the like.
11. The mains plug is used as disconnect device,the disconnect device shall remain
readily operable.
12. This equipment is a Class II or double insulated electrical appliance.It has been
designed in such a way that it does not require a safety connection to electrical
earth.
13
2
14.
15
16
17
18
19
20
21
22
23
3

24
25
26
27
456

FCC
Statement
FCC
10:
W9HLCDCOO20
This device complies with Part 15
two
comitions:
accept
Warning:
NOTE:
This equipment has been tested
digital Device, pursuant to part 15 of the FCC Rules. These limits are designed
to
provide reasonable protection against harmful interference
installation. This equipment
and, if
interference
interference will
harmful interference to radio
turning the equipment on and on. the user is encouraged
by one
(1) this device may not cause harmful interference, and (2) this device must
any
intooerence received, induding interference that may cause lrIdesired operation.
Changes or modifications to this unit nol expressly approved by the pa
responsible for compliance
not
installed and used in accordance with the instruc tions, may cause harmful
to
radio
not
occur
or
more of the following measures:
of
the FCC Rules.
cOLId
and
found to comply with the limits for a class B
Opera-tion
is
subject to the following
void the user's authority to operate the equipment
in
generales
, uses and can radiate radio
Communicaticns.
in a particular inslallation . If this equipmenl does cause
or
However,
there
television recepUon, which can
10
frequenty
is
no guarantee
be
determined
try to correcl the interference
rty
a residential
energy
that
by
• Reorient or relocate the receiving antenna.
• Increase the separalion between the equipment
•
Connect
Ihe equipmenl into an outlet
receiver is connecled.
•
Consullthe
Energy
Your Hisense
the
guide
and Department
of
dealer
Star
• •
SlJn:lal'd
the
se
government agenci
or
an
experienced radiolTV technician
TV
is
ENERGY
mode
. It meets strict energy efficiency
by
Ihe U .S.
of
Energy. ENERGY STAR
STAR ® qualified
EnvironMental
es,
desi
on
a circuit differ
Protection
is a joinl
gned
to
and
the receiver.
promole
ent
from that to which the
for
help.
in
Agency
program
energy
efficienl products and practices. Changes to certain features.
ngs, and
setti
Sound) can increase
upon
for
Wr.e,e
"''''''''' '&a<Ii/)'
!
WARNING
The
!!lis equipme
nn
TV
HDM
HDMII..icensiIg
Hisense
Slates
USA,
Manyfactured
~bY~~!Orie~
functionalities of Ihis TV (i.e.
such
changed
the ENERGY
manufacture< is
Incorporates
I.!he
HOM
and
ar\&or
Co<pora
1M MAINS plug
ope<abIe
nt
S
"""
HqHleflnitioo
I
klgo
and
U.
C.
aSsociated.
logos
othe<
COUltnes. All
lioo.
All
Rights
Iroder
Iio::en$(I
STAR qualification
not
moct;t\cation.
H
igII--Dofinition
or
change Ihe power consumplion. Depending
settings, the power consumption may exceed the limits required
Of
an
ap-p
liance couplet ~ used
responsible lor
<:<>Uid
~uItfoodia
MiJtinodia l,terIace
wIle
re
aiJl)lieabie
o&oer
l!8demar!(s
Rtserved. t.",
from
DoItI'y
l.aboratonts.
TV
in
the "Energy Savings·
""y radio
Of
TV In1erf" ,,,nce
..-oid
!I>e
uS&fs autoority.
I
nterla::e
IHOM
I"')
a,.
are "'lialeOO
~ademad.
are
property
01
00:Mb)0
and
!he
Guide, Picture,
ao
Il1o
d
iS<:OrnlOO
","us&d
techrIoIogy.
Irader1a."'-'
...
, ..... _
ri
Hisetlse
tIIeir
re-spective
doobl&-O
$ymbo/
mode
.
! d
e''''e
.
lh<o
dis
conn"ct de. i
b~
unautlloriz&d mod ifications
~odemaOO;ri
Hi:Jrnl
20
1 I
!heUniIed
Hise
rlSl!
of
----~~
'%
_
Groupin
_ .
are
~
~
ce shall
to
•

8

9

NOTE
Features, appearance and specifications are subject to chang e without notice.
Model Name 32D20
With Stand
Dimension
Without Stand
Weight
LCD Panel Minimum size (diagonal) 32 inches
Screen resolution 1366 × 768
Audio power 8 W + 8 W
Power consumption Please refer to the rating label
Power supply 120 V ~ 60 Hz
Receiving
systems
Environmental conditions
VIDEO INPUT
MEDIA
NET 16.5 lbs(6.2 kg)
GROSS 19.8 lbs(7.6 kg)
Analog
Digital
VGA Format
VIDEO
COMPOMENT
HDMI
Photo
Music
Movie
Width: 29.0 inches(738.3 mm)
Height: 19.5 inches(495 mm)
Depth: 7.0 inches(180 mm)
Width: 29.0 inches(738.5 mm)
Height: 17.7 inches(450.5 mm)
Depth: 3.6 inches(90.3 mm)
NTSC
ATSC
Temperature: 5°C-45°C
Humidity: 20%-80% RH
Atmospheric pressure: 86 kPa - 106 kPa
Up to 1920x1080@60Hz
Video System
Video level 1.0 Vp-p +/-5%
480i, 480p, 720p, 1080i, 1080p
480i, 480p, 720p, 1080i, 1080p
.jpeg/.jpg
.mp3
.avi (motion jpeg)
PAL/NTSC
The remote control requires:
• Number of Batteries: 2
• Type : AAA
• Voltage: 1.5Vcc
10


32D20
QUICK SETUP GUIDE
ACCESSORIES LIST1
User Manual Quick Setup Guide
Remote Control Battery (AAA) × 2 Screw (ST4×12F)×4
If the item is not specif ied in the accessories list, it should be provided by customer.
Important Information
INSTALLING THE STAND2
NOTE
Product image is only for reference, actual product may vary in appearance.
1. Attach the stand to the TV set as shown in the picture.
2. Use the screws (ST4X12F)X4 to fix the stand tightly.
CAUTION
Carefully place your TV facedown on a soft, cushioned surface to prevent
damage to the TV or scratching to the screen.
INSTALLING A WALL-MOUNT BRACKET
3
4
MAKING CONNECTIONS
TV Side View
TV Bottom View
ANT/CABLE IN
HDMI/DVI
COMPONENT IN
AV IN
VGA
PC/DVI AUDIO IN
HEADPHONE Connect headphone or analog sound system using RCA Y-cable(1/8"
DIGITAL AUDIO OUT
USB Photo, Music, Movie play and software update.
Connect an antenna or cable TV to this jack.
HDMI (High-Definition Multimedia Interface)provides an uncompressed,
all digital audio/video interface between this TV and any HDMI-device,
such as a set-top box,Blu-ray disc player,or A/V receiver.
Connect to a DVD player, Digital Set-Top-Box, or other A/V devices
with component (YPBPR) video and audio output jacks. Component
audio Jack share with AV IN audio Jack.Support:
480i\480p\576i\576p\1080i\1080p.
Connect to the composite video and audio (L/R) output jacks on
external video devices.
Connect to a PC or other devices with a VGA interface.
-stereo mini to L/R phono-not provided).
Connect to an external digital audio device.
1. If you want to attach the TV to a wall-mount bracket (not provided), you should first
remove the stand if it is pre-attached. Make sure the TV is laid face-down on a clean,
safe, and cushioned surface.
2. Attach purchased bracket on the TV with the 4 screws (Not provided) .
Bracket
Screw
To prevent internal damage to the TV and ensure the TV is mounted securely, be sure
to use fixing screws (Not provided) which are 7 mm to 9 mm in length when measured
from the attaching surface of the mounting hook.
Screws M4
7~9 mm
the TV’s rear cover
3. Follow instructions provided with the wall bracket.
If you are not sure of your ability to complete the installation, contact a
professional installer or service technician for assistance. The manufacturer is
not responsible for any damages or injuries that occur due to mishandling or
incorrect assembly.
Be sure to use the provider spacers between the TV and the bracket when
attaching the mount.
Wall-mount Bracket
Screw
Wall-mount hole
pattern VESA
(mm)
Wall-mount screw
size (mm)
200 × 100
M4
Some external devices impossible insert to this set for individual difference. Please
replace with appropriate external signal cable or increase the adapter to match with the
port in such case.
Check the jacks' for position and type before making any connections.
Loose connections can result in image or color problems. Make sure
that all connections are tight and secure.
ANT/CABLE
ANT/CABLE
VGA & PC / DVI AUDIO IN
Connect to a personal computer’s video and audio output connector.
USB
DC 5V 0.3A(MAX)
DIGITAL AUDIO OUT
AUDIO OUT
Connect to a broadcast antenna or cable TV.
OR
OR
PC/DVI AUDIO IN
VGA
Connect the USB disk with standard USB 2.0 port to this jack.
Data Input from USB Memory Stick only.
Do not connect any device to this jack such as digital camera, keyboard, mouse, etc.
USB
Connect a digital audio device to this jack.
DIGITAL
VHF/UHF Antenna
r.
Cable
ANT OUT
PC
Speaker

BEST
HDMI IN
HDMI
Available devices: DVD, Blu-ray player, Audio Video Receiver,
cable box, satellite receiver, game station.
BETTER
COMPONENT IN
R
L
R
P
B
COMPONENT IN
Available devices: DVD, Blu-ray player,
Audio Video Receiver, cable box,
satellite receiver, game station.
HEADPHONE
Connect headphone or analog sound system using RCA Y-cable
(1/8"-stereo mini to L/R phono-not provided).
GOOD
AV IN
LR
AV IN
VIDEO
Connect the composite video and audio
output jacks of your legacy A/V equipment,
such as a VCR.
6
Turning the TV On for the First Time
1. Press [◄ / ►] to select the language
to be used for menus and message.
2. Press [▼ / ▲] to select go to next step
and press [OK /►] button to go.
1. Press [▲/▼] to select your Picture
Mode: Home Mode or Retail Mode,
press [ENTER] button to confirm.
2. For energy saving, we kindly suggest
you select the Home Mode.
1. Press [▼ / ▲] to select the time zone,
daylight saving time and time format
you want to.
2. Press [◄ / ►] to adjust.
3. Press [▼ / ▲] to select go to next step
and press [OK /►] button to go.
Press [▲/▼] to select your Tuner Mode:
Antenna or Cable, press [ENTER] button
to confirm.
Setup Wizard
Go to next step
Go to next step
CY-M131006
Setup Wizard
/AUDIO OUT
5
VIEWING THE REMOTE CONTROL
Power on/off
Direct channel selection
Dash button
Select a digital sub-channel
Audio select button
Mono/Stereo/SAP operation
Increase volume
Decrease volume
▲
▲
▲/
Move Up/Down/Left/Right
Favorite program controlling button
Select TV AV VGA USB source
Program Your Universal Cable or Satellite Remote Control to Operate Your New
Hisense Television!
If you would like to program your other household remote controls to your new Hisense
television, please consult the User’s Manual supplied by your Cable or Satellite provider.
The Cable or Satellite providers’ User’s Manuals should include instructions on how to
program their remote to your television.
/▲/
or adjust settings
Close the menu
Auto ajust button
Zoom button
& Media player button
Media player button
Select picture mode
Select sound mode
OR
MUTE
INPUT
123
456
789
-
VOL
-
EXIT MENU
ASPECT STILL SLEEP
AUTO
FAVLIST
ADD/ERASE
PICTURE
SOUND
TV AV VGA MEDIA
0
SAP
MTS CCD
DISPLAY
OK
FAV+
CHLIST
LAST
FAV
GUIDE
++
CH.
-
-
Speaker
Select input source
Mute button
Go to the previous channel
Adjust CC mode
Next channel
Previous channel
Display the information banner
Menu button
Sleep timer button
Make the screen stop
Open the DTV program guide
(if available)
Channel list
CHANGE THE BATTERIES
1. Push the back cover to open the battery compartment of the remote control.
2. Insert two AAA size batteries. Make sure to match the (+) and ( - ) ends of the
batteries with the (+) and ( - ) ends indicated in the battery compartment.
3. Close the battery compartment cover.
Please select your preferred mode
Select Move Exit
7
TROUBLE SHOOTING
Select the antenna type then auto scan
Select Move Exit
SYMPTOMS POSSIBLE SOLUTIONS
Check if the power cord is in the AC outlet and if it has
No sound or picture.
I have connected an external
source to my TV and I get no
picture and/or sound.
Picture is normal, but no sound.
Sound but no picture or black
and white picture.
Sound and picture distorted or
appear wavy.
Sound and picture is blurry or
cuts out momentarily.
V
[CH
/ V] don’t work when I
set the Channel to Cable?
They work with the Air setting?
Remote control does not work.
electricity.
Check if you have pressed [POWER] button on the
TV or [POWER] button on the remote control.
Check to see if LED light is either red or blue. If
illuminated, power to TV is OK.
Check for the correct output connection on the external
source and for the correct input connection on the TV.
Make sure you have made the correct selection for
the input mode for the incoming signal.
Check the volume settings.
Check if Mute mode is set “on”.
If black and white picture first unplug TV from AC outlet
and replug after 60 seconds.
Check Color Setting if picture is black and white.
An electrical appliance may be affecting TV set.
Turn off any appliances, if interference goes away,
move appliance farther away from TV.
Insert the power plug of the TV set into another power outlet.
If using an external antenna, check the direction,
position and connection of the antenna.
Adjust the direction of your antenna or reset or fine tune
the channel.
After switching to Cable, please auto program the channels.
The TV will “remember” all the channels then the TV will
allow you to surf the channels with [CH
Confirm that TV still has power and is operational.
Change the batteries in the remote control.
Check if the batteries are correctly installed.
Clean the front of the remote control (LED window).
If using a universal remote, be sure to select the TV mode
on the remote.
If the remote still does not work:
• Remove and reinstall the batteries correctly to reset
the rem ote or install new batteries.
• Press the Power button to turn on the TV. With a universal
remote if you have reset or changed the batteries you
will need to reprogram the remote for the other units.
Check if there is obstruction between the remote control
and the TV.
TIP: If you have a digital camera / camera phone, you can
aim the front of the remote at camera lenses (at this time,
the camera should set on camera mode, not play mode).
Observe the camera screen while pressing a button on the
remote control; you should see flashing light on the screen.
If there is no light observed, the remote control is not
working. You need to repair or replace the remote control.
V
/V] buttons.
1 2
Gently lift up
Insert the batteries
3
Gently push down
Features, appearance and specifications are subject to change without notice.

ES-M131006
English

Getting Started
Contents
Getting Started
Accessories List
Accessories List...............................................................................................
Installing the Stand ..........................................................................................
Viewing the Control Panel ...............................................................................
Viewing the Remote Control ............................................................................
Installing Batteries in the Remote Control .......................................................
Making Connections ........................................................................................
Basic Features
Turning your TV on or off ................................................................................
Selecting the Input Source .............................................................................
Changing Channels / Volume .........................................................................
Shortcuts Instructions .....................................................................................
Turning your TV for the First Time ..................................................................
To Use the Main Menu....................................................................................
Using the Picture Menu ..................................................................................
Using the Sound Menu ...................................................................................
Using the Time Menu......................................................................................
Using the Setup Menu ....................................................................................
Using the Lock Menu ......................................................................................
Using the Channel Menu.................................................................................
PC Setting........................................................................................................
2
2
2
4
5
6
11
11
11
12
13
14
14
15
16
16
17
19
19
USER MANUAL
User Manual Quick Setup Guide
Important Information
Important Information Remote Control Battery×2 Screws: (ST4×12F)×4
Quick Setup Guide
Installing the Stand
NOTES
1. The LCD display is very fragile, and must be protected at all times when removing
the base stand. Be sure that no hard or sharp object, or anything that could
scratch or damage the LCD display, comes into contact with it. DO NOT exert
pressure on the front of the TV at any time because the screen could crack.
2. For tabletop use, the TV must be attached to the provided stand as shown on this
page.
3. To Wall-Mount, theTable-Top Stand must be removed from the TV first,and the
brackets (not provided) must be attached to the TV. Please refer to the Wall
Bracket Installation Instruction(inside the Wall Bracket Box).
WARNING
Be sure to disconnect the AC power cord before installing a stand or Wall-Mount
brackets.
CAUTION
Advanced Features
Digital Media Player....................................................................................... ..
Browse the Pictures.........................................................................................
Enjoy Music Files.............................................................................................
Enjoy Video Files.............................................................................................
Playable Format List........................................................................................
1
21
22
22
23
24
Follow the illustrations below to complete the installation steps:
1. Attach the stand to the TV set as shown in the picture.
2. Use the screws (ST4X12F)X4 to fix the stand tightly.
2

Getting Started Getting Started
Viewing the Control Panel Viewing the Remote Control
Power on/off
Direct channel selection
Select input source
Mute button
MENU INPUT
V
CH VOL
V
Item Description
Remote Sensor
Power Indicator
Receives remote signals from the remote control.
Do not put anything near the sensor, as its function may be affected.
The light is red in standby mode,and it's blue when your TV turns on.
MENU Open or close the OSD menu.
INPUT
V
CH / CH V
VOL / VOL V
V
STANDBY
Select among the different input sources.INPUT also have the “OK”
function in some cases.
Select the channel.
Adjust the volume.
Turn on the TV or put the TV in standby mode.
f
Select a digital sub-channel
Mono/Stereo/SAP operation
V
V
Remote Indicator
Remote Sensor
Favorite program controlling button
Select TV AV VGA USB source
Dash button
Audio select button
Increase volume
Decrease volume
▲
▲
▲/
Move Up/Down/Left/Right
& Media player button
/▲/
or adjust settings
Close the menu
Auto ajust button
Zoom button
Media player button
Select picture mode
Select sound mode
Go to the previous channel
Adjust CC mode
Next channel
Previous channel
Display the information banner
Menu button
Sleep timer button
Make the screen stop
Open the DTV program guide
(if available)
Channel list
NOTES
FOR ILLUSTRATION ONLY.
Powering up or down the TV requires several seconds of processing time.
Do not rapidly turn the TV on/off as abnormal operation may occur.
3 4
Program Your Universal Cable or Satellite Remote Control to Operate Your New
Hisense Television!
If you would like to program your other household remote controls to your new
Hisense television, please consult the User’s Manual supplied by your Cable or
Satellite provider. The Cable or Satellite providers’ User’s Manuals should include
instructions on how to program their remote to your television.

Getting Started Getting Started
Below is a list of Hisense codes for the most common Cable and Satellite providers. Use the
Hisense code that is associated with your Cable or Satellite provider(if applicable).
DIRECTV............................................................................................................................0178 or 10019.
Time Warner Cable...................................................................................................386,0178 or 10178
Comcast ..........................................................................................................................0178 or 10178
Cox Communications ......................................................................................................0178 or 10178
Dish Network .........................................................................................................................627 or 505
AT&T U-verse ....................................................................................................................1346 or 1041.
NOTES
If the Hisense code associated with your Cable or Satellite provider is not listed above, if the
code above does not work, or if you cannot locate the instructions for programming your
household remote to your television, call your local Cable or Satellite provider’s customer
service center.If your Cable or Satellite provider does not have an Hisense code available,
please visit http://www.hisense-usa.com for additional codes.
Installing Batteries in the Remote Control
Change the batteries
1. Push the back cover to open the battery compartment of the remote control.
2. Insert two AAA size batteries. Make sure to match the (+) and ( - ) ends of the
batteries with the (+) and ( - ) ends indicated in the battery compartment.
3. Close the battery compartment cover.
1
Gently lift up
2
Insert the batteries
3
Gently push down
NOTES
1. Dispose of your batteries in a designated disposal area. Do not throw the batteries into a fire.
2. Remove depleted batteries immediately to prevent battery acid from leaking into the battery
compartment.
3. If you do not intend to use the remote control for a long time, remove the batteries.
4. Battery chemicals can cause a rash. If the batteries leak, clean the battery compartment
with a cloth. If chemicals touch your skin, wash immediately.
5. Do not mix old and new batteries.
6. Do not mix alkaline, standard (carbon-zinc) or rechargeable (ni-cad, ni-mh, etc.) batteries.
7. The batteries shall not be exposed to excessive heat such as sunshine,fire or the like.
Making Connections
Item
ANT/CABLE IN Connect an antenna or cable TV to this jack.
HDMI/DVI
COMPONENT IN
AV IN
VGA
PC/DVI AUDIO IN
HEADPHONE
DIGITAL AUDIO OUT
USB
NOTE
Some external devices impossible insert to this set for individual difference. Please
replace with appropriate external signal cable or increase the adapter to match with
the port in such case.
Description
HDMI (High-Definition Multimedia Interface)provides an
uncompressed,all digital audio/video interface between
this TV and any HDMI-device,such as a set-top box,Blu
-ray disc player,or A/V receiver.
Connect to a DVD player, Digital Set-Top-Box, or other
A/V devices with component (YPBPR) video and audio
output jacks. Component audio Jack share with AV IN
audio Jack.Support: 480i\480p\576i\576p\1080i\1080p.
Connect to the composite video and audio (L/R) output
jacks on external video devices.
Connect to a PC or other devices with a VGA interface.
Connect headphone or analog sound system using RCA
Y-cable(1/8"-stereo mini to L/R phono-not provided).
Connect to an external digital audio device.
Photo, Music, Movie play and software update.
5 6

Getting Started Getting Started
NOTES
Getting Started
Check the jacks for position and type before making any connections. Loose
connections can result in image or color problems. Make sure that all
connections are tight and secure.
Not all A/V devices have the ability to connect to a TV, please refer to the
user’s manual of your A/V device for compatibility and connections procedure.
Always unplug the power cord when connecting external equipment.
Connecting an antenna, cable or cable/satellite box
1. Turn off the TV before connecting the antenna.
2. Connect one end of a coaxial cable (not included) to the RF OUT jack on the
antenna, cable or cable/satellite box. If you are using an antenna with twin-lead
cable, you may need a 300-75 ohm adapter (not provided) to connect it to the
back of your TV. Likewise, if you are using several antennas, you may need a
combiner (not provided).
3. Connect the other end of the cable to the ANT/CABLE IN jack on the side of your
TV.
EXTERNAL DEVICESTV JACK
Cable
ANT
CABLE IN
or
ANT OUT
VHF/UHF Antenna
EXTERNAL DEVICES
TV JACK
AV IN
LRVIDEO
White(L)
Red(R)
AV Cable
(not included)
White(L)
Red(R)
Yellow(Video)Yellow(Video)
Video
A/V OUT
L
R
Camera
DVD Player/Recorder
Video
Set-top box
Satellite Receiver
Equipment with A/V jacks
VCR
Satellite
antenna
cable
Connecting an A/V Device with Component (YPBPR) Cable
1. Use a component cable to connect the external A/V device’s component output
jacks to the TV’s YPBPR jacks. Use an audio cable to connect the external A/V
device’s component audio jacks to the TV’s AUDIO (L/R) jacks.
2. Plug the connected devices into the mains socket before switching on the TV.
3. Select the corresponding source from the TV.
TV JACK
R
P
B
P
COMPONENT INAV IN
Y
L
R
PR/C
PB/C
White(L)
Red(R)
R
B
Component
Y
Red(R)
White(L)
PR/C
PB/C
R
B
Component
P
R
P
B
Y
L
Camera
R
EXTERNAL DEVICES
VCR
DVD Player/Recorder
Set-top box
Satellite
antenna
cable
Video
Satellite Receiver
Equipment with A/V jacks
Connecting an A/V Device with Composite Cable
1. Use the audio and video cables to connect the external A/V device’s composite
video/audio jacks to the TV’s jacks. (Video = yellow, Audio Left = white, and
Audio Right = red)
2. Plug the connected devices into the mains socket before switching on the TV.
3. Select the corresponding source from the TV.
7 8
Connecting an A/V Device with HDMI Cable
Support digital connections between HDMI - enabled AV devices such as PVR,
DVD, Blu-ray, AV receiver and digital devices.
Some devices such as PVR or DVD player require HDMI signal to be set to
output in the device's settings.
Please consult your device user manual for instructions.
1. Use an HDMI cable to connect the A/V device’s HDMI output jack to the TV’s
HDMI jack.
2. Plug the connected devices into the mains socket before switching on the TV .
3. Select the corresponding source from the TV.

Getting Started Getting Started
EXTERNAL DEVICES
TV JACK
HDMI
HDMI Cable
(not included)
HDMI
DVD Player/Recorder
Set-top box
Equipment with HDMI jacks
NOTE
The HDMI connector provides both video and audio signals, it’s not necessary to
connect the audio cable.
Connecting a headphone
Headphones can be connected to the HEADPHONE output on your set. (While the
headphone is connected, the sound from the built-in speakers will be disabled.)
EXTERNAL DEVICESTV JACK
HEADPHONE
NOTE
To prevent possible hearing damage, do not listen at high volume levels for long
periods.
Connecting a PC with VGA Cable
1. Use a VGA cable to connect the PC’s VGA output jack to the TV’s VGA jack.
Use an audio cable to connect the PC’s audio output jack to TV’s VGA AUDIO
IN jack.
2. Plug the connected devices into the mains socket before switching on the TV.
3. Select the corresponding source from the TV.
EXTERNAL DEVICES
Computer
PC/DVI
AUDIO IN
TV JACK
PC IN
VGA
Audio Cable
(not included)
VGA Cable
(not included)
NOTE
Primarily this unit is intended for use as an LCD TV. If you want to use it as a
monitor, please contact the manufacturer of the PC Video/Graphic's card for
further support. Perfect compatibility is not warranted.
The VGA cable will not supplied with the product.
We strongly recommend to use VGA cable with 2 cores as shown in the figure.
Connecting an Audio Receiver with Digital Audio out cable
1. Use a coaxial cable to connect the A/V device’s digital audio in jack to the TV’s
DIGITAL AUDIO OUT jack.
2. Plug the connected devices into the mains socket before switching on the TV.
3. Select the corresponding source from the TV.
EXTERNAL DEVICES
TV JACKS
DIGITAL
AUDIO OUT
Coaxial Cable
(not included)
Powerless
Bass Speaker
Speaker
NOTE
When a digital audio system is connected to the DIGITAL AUDIO OUT (COAXIAL)
jack, decrease the volume of both the TV and the system.
5.1 CH (channel) audio is available when the TV is connected to an external
device supporting 5.1 CH.
When the receiver (home theater) is set to on, you can hear sound output from
the TV’s digital audio out jack. When the TV is receiving a DTV signal, the TV will
send 5.1 CH sound to the home theater receiver. When the source is connected
to the TV via HDMI, only 2 CH audio will be heard from the home theater receiver.
If you want to hear 5.1 CH audio, connect the digital audio out jack from your
DVD/Blu-ray player/cable box/STB satellite receiver directly to an amplifier or
home theater.
9 10

Basic Features Basic Features
Turning your TV on or off Shortcuts Instructions
To turn your TV on or off (standby mode):
1. Plug the power cord into an AC power outlet.
2. Press [POWER] button. Your TV turns on.
3. Press [POWER] button again to turn off your TV. When you turn off your TV, it
goes into standby mode.
WARNING
When your TV is in standby mode, it is still receiving power. To completely
disconnect power, unplug the power cord.
NOTE
If your TV does not receive an input signal for several minutes, it automatically
goes into standby mode.
Selecting the Input Source
The first time you turn on your TV, you must select the TV signal source. Your TV
stores this information, so you do not need to change the TV signal source unless
it changes. For example, you change from an outside antenna to cable TV.
To select the video input source:
1. Turn on your TV, then press [INPUT] button on the remote or on the TV. The
Input Source menu opens.
2. Press [▲/▼] button to highlight the input source, then press [OK] button.
Changing Channels / Volume
1. Press the [CH /V] (or [CH +/-]) on the TV/remote control to change the channel.
2. Press the [VOL /V] (or [VOL +/-]) on the TV/remote control to adjust the volume.
3. Press the numeric buttons on the remote control to display the corresponding
channels.
NOTE
Changing the channels can also be achieved by directly entering the channel
number using the numeric keys on the remote control. If you are entering a two or
three digit channel number, the time between key presses should be less than 3
seconds.
V
V
Aspect - Select the screen aspect ratio from Normal, Wide, Zoom and Cinema.
Normal: The original 4:3 aspect ratio (1.33:1 signal) is preserved,
so black bars are added to the left and right of the image.
Standard TV broadcasts are displayed with a 4:3 aspect ratio.
Wide: When watching a standard broadcast or full-frame movie in
this mode, the display image is stretched proportionately to fill the
TV screen. When watching a widescreen (1.78:1 signal) program
or movie, the display image fills the TV screen.
Zoom: Stretch the 4:3 aspect ratio image vertically and
horizontally to fill the screen at 1:1.78 aspect ratio.
Cinema: Stretch the 4:3 aspect ratio image vertically and
horizontally to fill the screen at 1:2.35 aspect ratio.
Point to Point: Use the function to see the full image without any
cutoff, when VGA signal is inputted.
Picture - Press to set the picture mode. It can be set as Standard, Cinema, User and
Vivid. This mode achieves a certain image display effect by setting the brightness,
contrast and color etc.
Sound - Press to set the sound mode. It can be set as Standard, Speech, User and
Music.
Mute - Press to turn the sound off, press this button again to turn the sound back on.
This function is used to switch off sound temporarily.
Sleep - It can set the TV to let it enter into the Standby state automatically. Press this
button repeatedly to select the proper sleeping clock mode, and the clock tells you
the remaining time before the TV enters Standby state.
Display - Display the information banner. The information including channel number,
channel name, current system time, tuner mode, audio stream, video format, audio
language, closed caption mode, parental locks rated,program details, etc.
11 12

Basic Features Basic Features
Turning your TV for the First Time
The Initial Setup menu appears the first time you turn on the TV. It will assist you to
specify the Energy Saving mode.
Connect your TV’s power cord to a power outlet, then press power. The Initial Setup
screen opens.
Select Language
Press [◄ / ►] button on the remote control to
select the language to be used for menus and
message.
Press [▼ / ▲] button on the remote control to
select go to next step and press [OK /►] button
to go.
Select Time
Press [▼ / ▲] button on the remote control to
select the time zone, daylight saving time and
time format you want to.
Press [◄ / ►] button on the remote control to
adjust.
Press [▼ / ▲] button on the remote control to
select go to next step and press [OK /►] button to go.
Select Picture Mode
Press [◄ / ►]button on the remote control to
select Home Mode or Retail Mode.
Press [▼ / ▲] button on the remote control to
select go to next step and press [OK / ►] button
to go.
Auto Scan
Press [◄ / ►] button on the remote control to
select the antenna type,Air or Cable.
Press [▼ / ▲] button on the remote control to
select go to next step and press [OK /►] button
to start auto scan.
To Use the Main Menu
Press [MENU] to display the main menu or return to the previous menu or close the main
menu.
Press [◄/►] to highlight the desired menu icon, and press [OK] to select.
NOTE
If no buttons are pressed,the menu will close automatically after about 10 seconds.
Using the Picture Menu
You can adjust:
Picture Mode - Adjust the Picture Mode. You can
select Standard,Vivid,Soft,User,Ene rgy saving.
Brightness - Increase or decrease the brightness
of the picture. Increasing the brightness can add
more light to dark areas of the picture, while
decreasing the brightness can add more
darkness to light areas of the picture.
Contrast - Increase or decrease the contrast of the picture.Increase the contrast to
adjust the white areas of the picture or decrease the contrast to adjust the black
areas of the picture.
Color - Adjust the intensity of the colors.
Tint - Adjust the hue(Red,Green,Blue) of the picture.
Sharpness - You can increase the sharpness level for clearer images or decrease the
sharpness level for smoother images.
Color Temperature - Adjust the overall color of the picture.
Advanced Settings - Access advanced video settings such as Aspect Ratio,Noise
Reduction,and Dynamic Contrast.
13 14
 Loading...