


Model:32W22
English
The lightning flash with arrowhead symbol, within an
equilateral triangle is intended to alert the user to the
presence of uninsulated dangerous voltage within the
to constitute a risk of electric shock.
The exclamation point within an equilateral triangle is
intended to alert the user to the presence of important
operating and maintenance (servicing) instructions in
the literature accompanying the appliance.
FCC Statement
FCC ID:W9HLCDC0016
This device complies with Part 15 of the FCC Rules. Opera
-tion is subject to the following two conditions: (1) this device
may not cause harmful interference, and (2) this device must
accept any interference received, including interference that
may cause undesired operation.
NOTE:
This equipmen
the limits for a class B digital Device, pursuant to part 15
of the FCC Rules. These limits are designed to provide
reasonable protection against harmful interference in a
residential installation. This equipment generates, uses and
can radiate radio frequency energy and, if not installed and
used in accordance with the instructions, may cause harmful
interference to radio Communications. However, there is
no guarantee that interference will not occur in a particular
installation. If this equipment does cause harmful interference
to radio or television reception, which can be determined by
turning the equipment off and on, the user is encouraged to
try to correct the interference by one or more of the following
measures:
Reorient or relocate the receiving antenna.
Increase the separation between the equipment and the
receiver.
Connect the equipment into an outlet on a circuit different
from that to which the receiver is connected.
Consult the dealer or an experienced radio/TV technician
for help.
t has been tested and found to comply with
Energy Star
Your Hisense TV is ENERGY STAR ®
qualified in the“Standard”mode.It meets
strict energy efficiency guidelines set
by the U.S. Environmental Protection
Agency and Department of Energy.
ENERGY STAR is a joint program of
these government agencies, designed
to promote energy efficient products
and practices. Changes to certain features, settings, and
functionalities of this TV (i.e. TV Guide, Picture, Sound) can
increase or change the power consumption. Depending upon
such changed settings, the power consumption may exceed
the limits required for the ENERGY STAR qualification in the
“Standard” mode.
NOTE
Where the MAINS plug or an appliance coupler is used
as the disconnect device, the disconnect device shall
remain readily operable.
WARNING
The manufacturer is not responsible for any radio or TV
interference caused by unauthorized modifications to
this equipment. Such modifications could void the user's
authority.
TM
) technology.
trademarks or registered trademarks of HDMI Licensing LLC.
Hisense and associated logos where applicable are registered trademarks of Hisense Group in the United States and/or other
countries. All other trademarks are property of their respective owners. 2011 Hisense USA, Corporation. All Rights Reserved.
Manufactured under license from Dolby Laboratories. Dolby and the double-D symbol are trademarks of Dolby Laboratories.
I

Warning: To avoid any injury caused by lean of the product, please always
ensure the whole product was placed within the table surface in horizontal.
II
Important Safety Instructions
1. Read these instructions.
2. Keep these instructions.
3. Heed all warnings.
4. Follow all instructions.
5. Do not use this apparatus near water.
6. Clean only with dry cloth.
7. Do not block any ventilation openings. Install in accordance
with the manufacturer's instructions.
8. Do not install near any heat sources such as radiators,
heat registers, stoves, or other apparatus (including
amplifiers) that produce heat.
9. Do not defeat the safety purpose of the polarized or
grounding-type plug. A polarized plug has two blades with
one wider than the other. A grounding type plug has two
blades and a third grounding prong. The wide blade or the
third prong are provided for your safety. If the provided
plug does not fit into your outlet, consult an electrician for
replacement of the obsolete outlet.
10. Protect the power cord from being walked on or pinched
particularly at plugs, convenience receptacles, and the
point where they exit from the apparatus.
11. Only use attachments/accessories
specified by the manufacturer.
12. Use only with cart, stand, tripod,
bracket, or table specified by the
manufacturer, or sold with the
apparatus. When a cart is used,
use caution when moving the cart/
apparatus combination to avoid injury from tip-over.
13. Unplug this apparatus during lightning storms or when
unused for long periods of time.
14. Refer all servicing to qualified service personnel.
Servicing is required when the apparatus has been
damaged in any way, such as power-supply cord or plug
is damaged, liquid has been spilled or objects have fallen
into the apparatus, the apparatus has been exposed to
rain or moisture, does not operate normally, or has been
dropped.
15. Apparatus should not be exposed to dripping or
splashing, and objects filled with liquids, such as vases,
should not be placed on the apparatus.
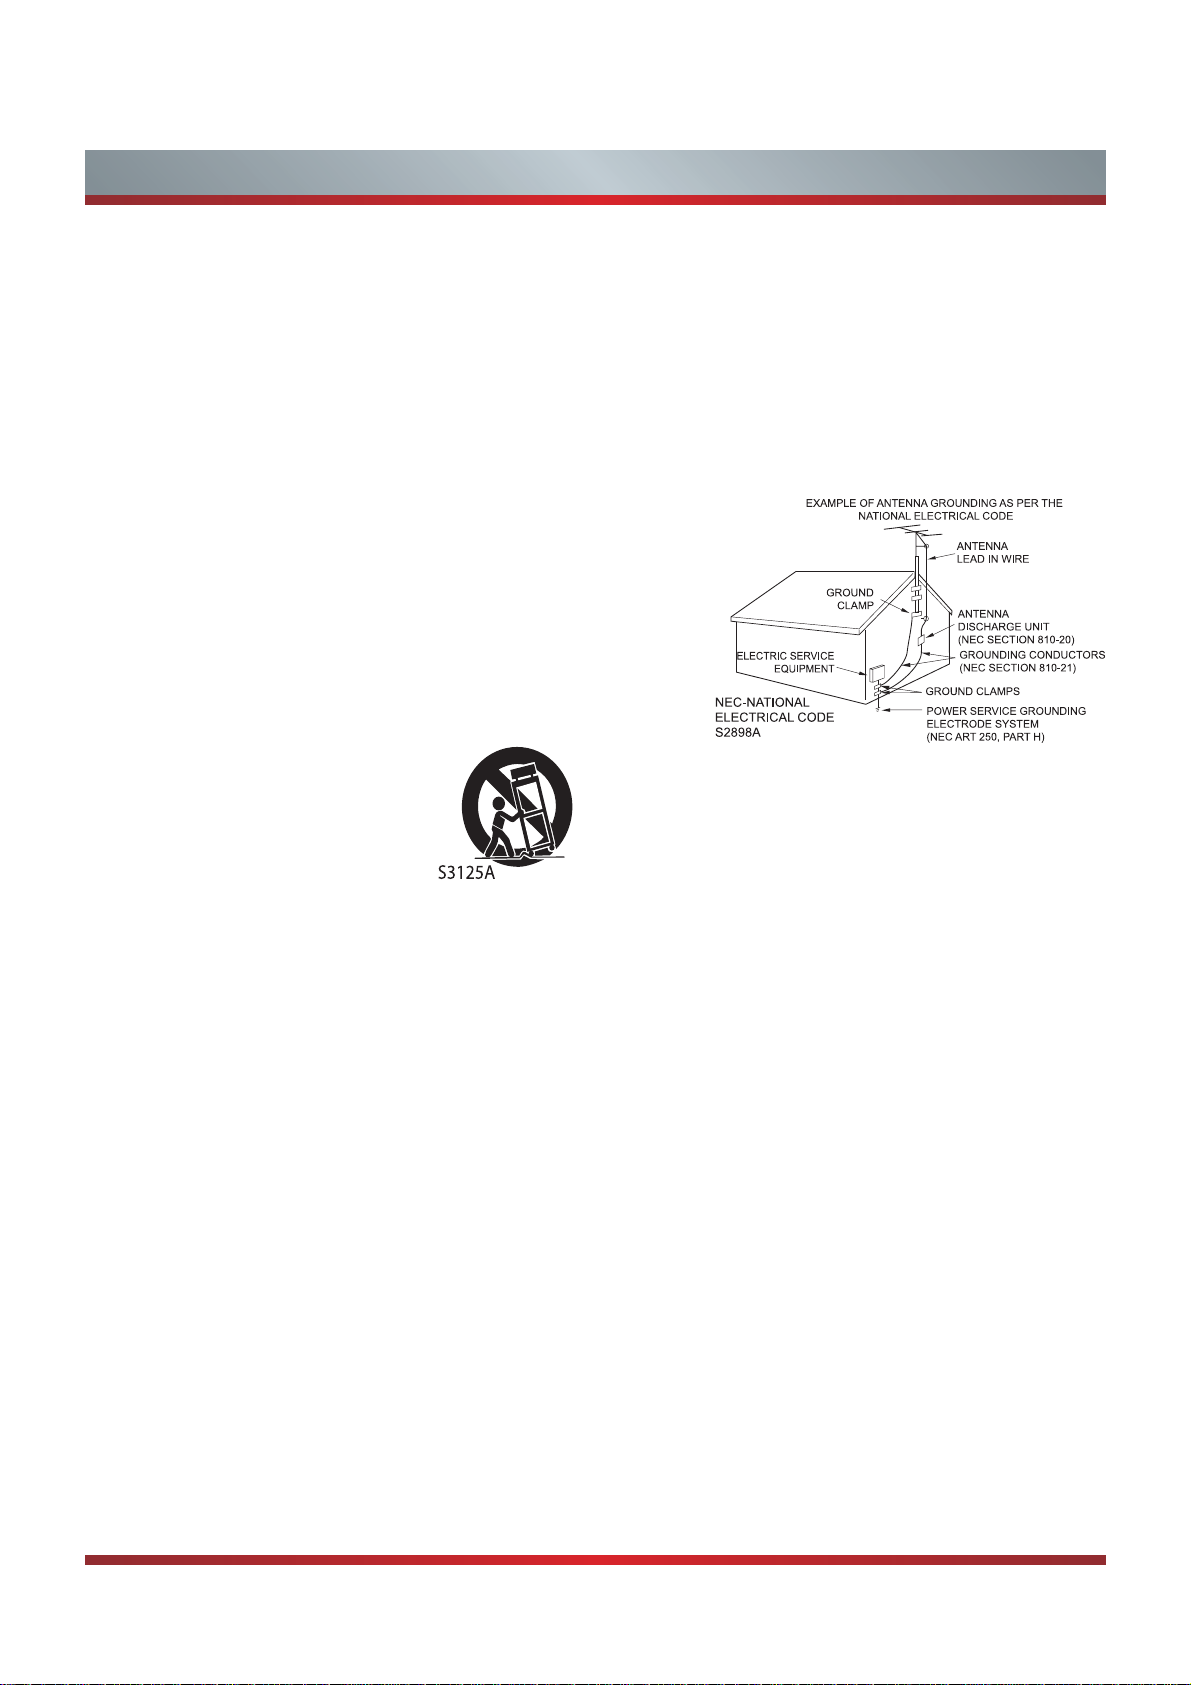
16. An outside antenna system should not be located in the
vicinity of overhead power lines or other electric light or
power circuits, or where it can fall into such power lines
or circuits. When installing an outside antenna system,
extreme care should be taken to keep from touching
such power lines or circuits, as contact with them might
be fatal.
17. Do not overload wall outlets and extension cords, as this
can result in a risk of fire or electric shock.
18. Do not push objects through any openings in this unit,
as they may touch dangerous voltage points or short out
parts that could result in fire or electric shock. Never spill
or spray any type of liquid into the unit.
19. If an outside antenna or cable system is connected to the
unit, be sure the antenna or cable system is grounded to
provide some protection against voltage surges and builtup static charges, Section 810 of the National Electrical
Code, ANSI/NFPA 70, provides information with respect
to proper grounding of the mast and supporting structure,
grounding of the lead-in wire to an antenna discharge
unit, size of grounding conductors, location of antenna
discharge unit, connection to grounding electrodes, and
requirements for the grounding electrode.
20. When replacement parts are required, be sure the service
technician uses replacement parts specified by the
manufacturer or those that have the same characteristics
as the original part. Unauthorized substitutions may result
in fire, electric shock or other hazards.
21. Upon completion of any service or repairs to this unit,
ask the service technician to perform safety checks to
determine that the unit is in proper operating condition.
22. When you connect the product to other equipment, turn
off the power and unplug all of the equipment from the
wall outlet. Failure to do so may cause an electric shock
and serious personal injury. Read the owner's manual of
the other equipment carefully and follow the instructions
when making any connections.
23. Sudden high volume sound may cause hearing or
speaker damage. When you use headphones, (if the unit
is equipped with a headphone jack) keep the volume at a
moderate level. If you use headphones continuously with
high volume sound, it may cause hearing damage.
CONDENSATION:
Moisture will form in the operating section of the unit if the
unit is brought from cool surroundings into a warm room or
if the temperature of the room rises suddenly. When this
happens, unit's performance will be impaired. To prevent
this, let the unit stand in its new surroundings for about an
hour before switching it on, or make sure that the room
temperature rises gradually.
Condensation may also form during the summer if the unit is
exposed to the breeze from an air conditioner. In such cases,
change the location of the unit.
III

Important Safety Instructions
HOW TO HANDLE THE LCD PANEL:
Do not press hard or jolt the LCD panel. It may cause the
LCD panel glass to break and injury may occur.
If the LCD panel is broken, make absolutely sure that you
do not touch the liquid in the panel. This may cause skin
inflammation.
If the liquid gets in your mouth, immediately gargle and
consult with your doctor. Also, if the liquid gets in your eyes
or touches your skin, consult with your doctor after rinsing
for at least 15 minutes or longer in clean water.
Possible Adverse Effects on LCD Panel:
If a fixed (non-moving) pattern remains on the LCD Panel
for long periods of time, the image can become permanently
engrained in the LCD Panel and cause subtle but permanent
ghost images. This type of damage is NOT COVERED BY
YOUR WARRANTY. Never leave your LCD Panel on for long
periods of time while it is displaying the following formats or
images:
Fixed Images, such as stock tickers, video game patterns,
TV station logos, and websites.
Special Formats that do not use the entire screen. For
example, viewing letterbox style (16:9) media on a normal
(4:3) display (black bars at top and bottom of screen); or
viewing normal style (4:3) media on a widescreen (16:9)
display (black bars on left and right sides of screen).
The following symptoms are not signs of malfunction
but technical limitation. Therefore we disclaim any
responsibility for these symptoms.
LCD Panels are manufactured using an extremely high
level of precision technology, however sometimes parts
of the screen may be missing picture elements or have
luminous spots.
This is not a sign of a malfunction.
Do not install the LCD Panel near electronic equipment that
produces electromagnetic waves. Some equipment placed
too near this unit may cause interference.
Effect on infrared devices - There may be interference
while using infrared devices such as infrared cordless
headphones.
End of life directives
Your TV also contains material that can be recycled and
reused. For disposal or recycling information, contact your
local authorities or the Electronic Industries Alliance at
www.eia.org to find a recycler in your area.
Non-active pixels
The LCD panel contains almost 3 million thin film transistors,
which provide exceptionally sharp video quality. Occasionally,
a few non-active pixels may appear on the screen as a
fixed black (in the case of a dead pixel), blue, green, or red
point. These non-active pixels do not adversely affect the
performance of your TV, and are not considered defects.
Power source
TO USE AC POWER
1. The power cord is attached to the TV at the factory.
2. Connect the AC cord into an AC outlet.
WARNING
Do not connect this unit to the power using any device
other than the supplied AC cord. This could cause fire,
electrical shock, or damage.
Do not use with a voltage other than the power voltage
specified. This could cause fire, electrical shock, or
damage.
CAUTION
When this unit is not used for a long time, (e.g., away on
a trip) in the interest of safety, be sure to unplug it from
the AC outlet.
Do not plug/unplug the AC cord when your hands are
wet. This may cause electrical shock.
Declaration of Conformity
This device complies with part 15 of the FCC Rules.
Operation is subject to the following two conditions:
(1) This device may not cause harmful interference and (2)
This device must accept any interference received, including
interference that may cause undesired operation.
IV

Contents
Getting Started
Accessories List...............................................................................................2
Installing the Stand .......................................................................................... 2
Viewing the Control Panel ...............................................................................3
Viewing the Remote Control ............................................................................4
Installing Batteries in the Remote Control .......................................................5
Making Connections ........................................................................................ 6
Basic Features
Turning your TV on or off ................................................................................10
Selecting the Input Source .............................................................................10
Changing Channels / Volume .........................................................................10
Shortcuts Instructions ..................................................................................... 10
Turning your TV for the First Time .................................................................. 11
To Use the Main Menu....................................................................................12
Using the Picture Menu ..................................................................................12
Using the Sound Menu ...................................................................................13
Using the Time Menu......................................................................................13
Using the Setup Menu ....................................................................................13
Using the Lock Menu ......................................................................................14
Using the Channel Menu.................................................................................15
PC Setting.......................................................................................................16
Media Operation..............................................................................................16
Other Information
Trouble Shooting ............................................................................................18
General ........................................................................................................... 20
1
Accessories List
Getting Started
USER MANUAL
User Manual Warranty Card Remote Control Battery × 2 Screws: (ST4
Warranty Card
×12F)×
4
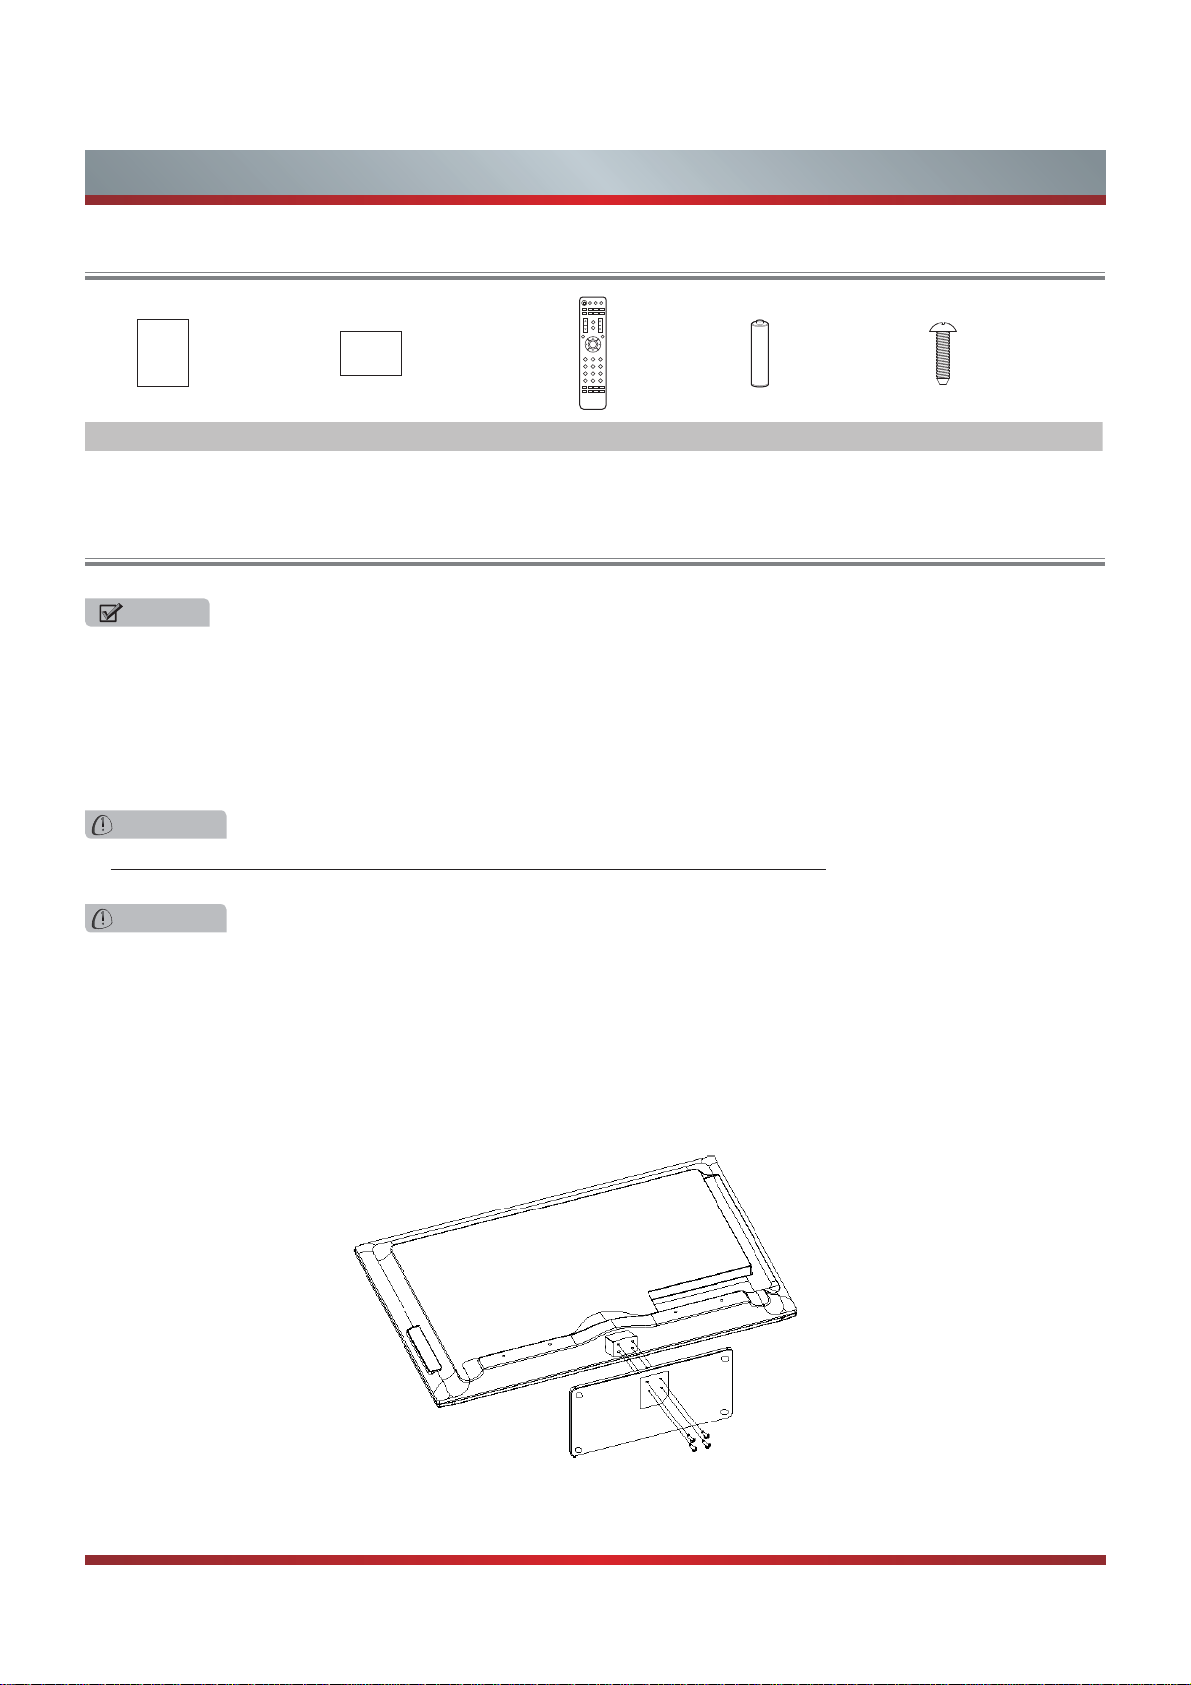
Installing the Stand
NOTES
1. The LCD display is very fragile, and must be protected at all times when removing the base stand. Be sure that no hard or
sharp object, or anything that could scratch or damage the LCD display, comes into contact with it. DO NOT exert pressure
on the front of the TV at any time because the screen could crack.
2. For tabletop use, the TV must be attached to the provided stand as shown on this page.
3. To Wall-Mount, theTable-Top stand must be removed from the TV first,and the brackets (not provided) must be attached to the
TV. Please refer to the Wall Bracket Installation Instruction(inside the Wall Bracket Box).
WARNING
Be sure to disconnect the AC power cord before installing a stand or Wall-Mount brackets.
CAUTION
Use a covered table or bench to lay the TV on and handle the TV carefully to prevent damage to the TV screen or cabinet
during assembly.
Follow the illustrations below to complete the installation steps:
1. Attach the stand to the TV set as shown in the picture.
2. Use the screws
(ST4X12F)X4
to fix the stand tightly.
2
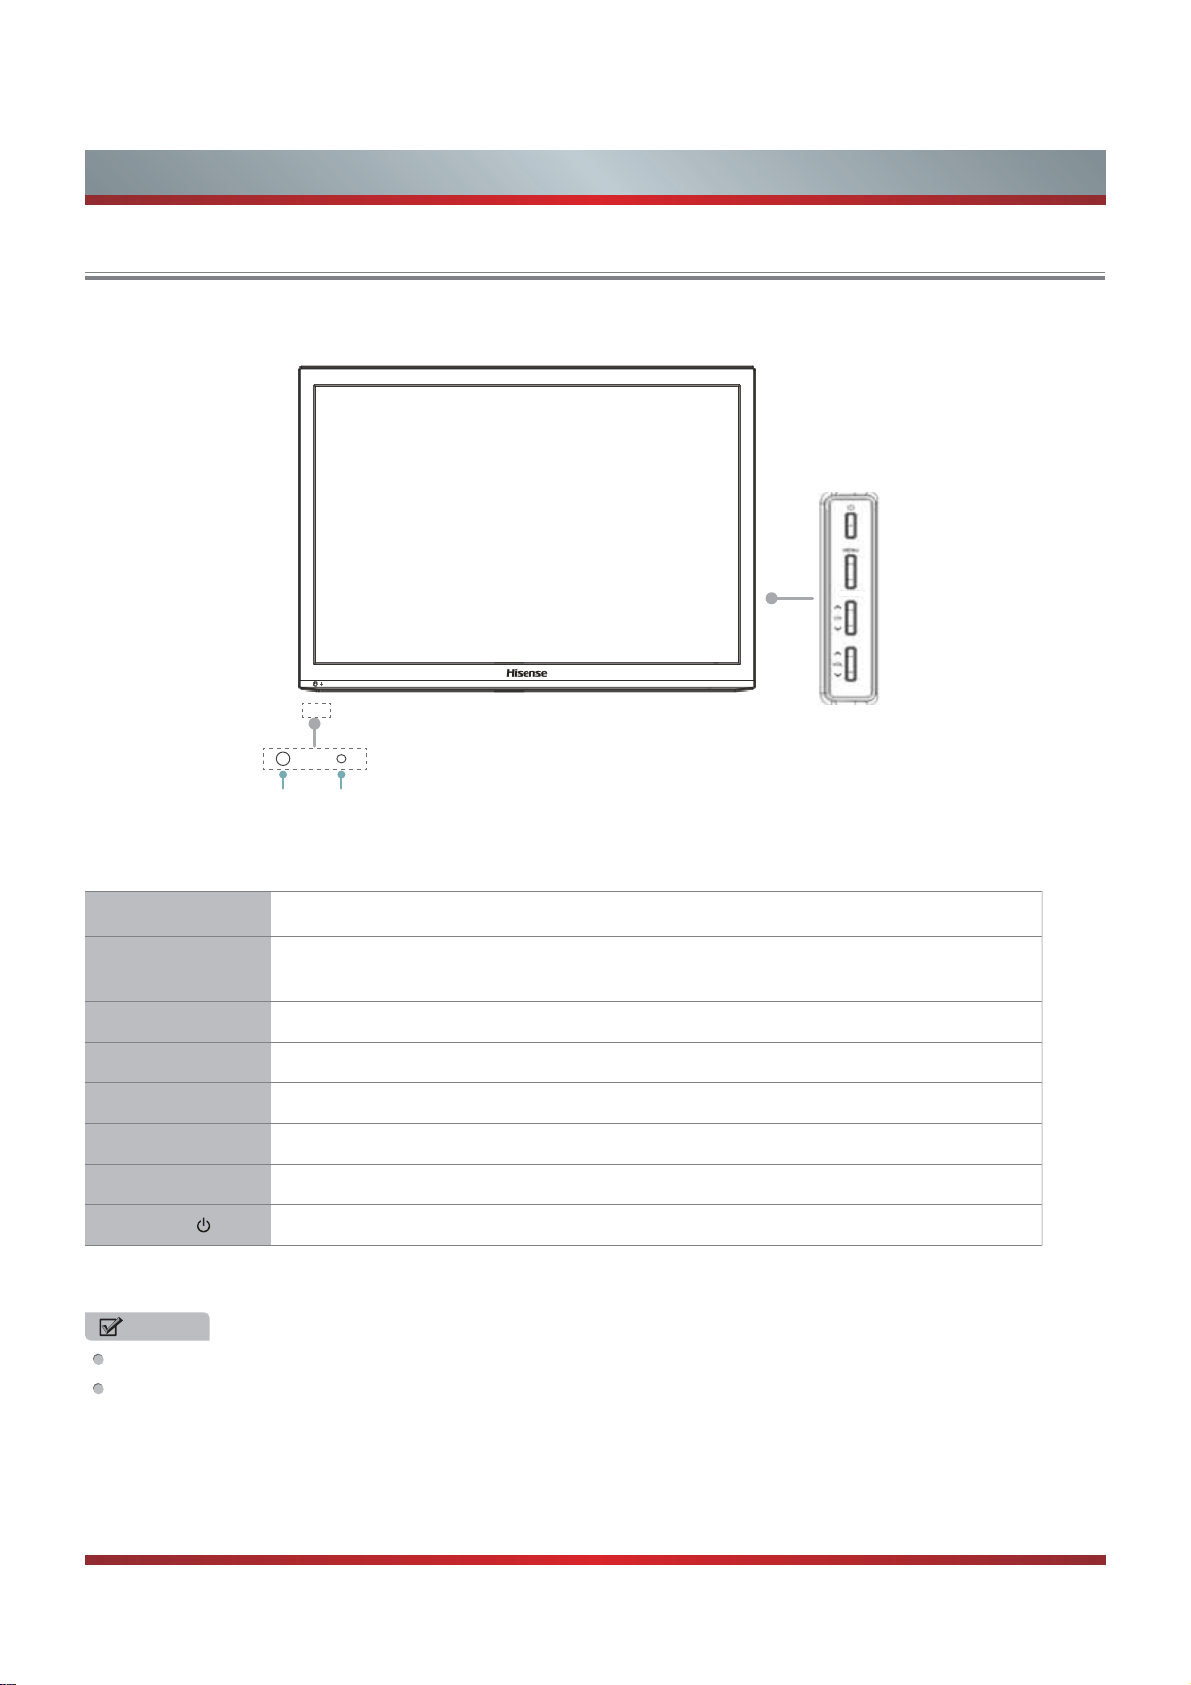
Viewing the Control Panel
Getting Started
MENU
INPUT
INPUT
CH
CH
VOL
VOL
V
V
V
V
Remote sensor Power indicator
Item Description
Power Sensor
Receives remote signals from the remote control.
Do not put anything near the sensor, as its function may be affected.
Power Indicator The light is red in standby mode,and it's green when your TV turns on.
MENU Open or close the OSD menu.
INPUT Select among the different input sources.
V
CH
/ CH
V
/ VOL V
VOL
STANDBY
V
Select the channel.
Adjust the volume.
Turn on the TV or put the TV in standby mode.
INPUT also have the “OK” function in some cases.
NOTES
FOR ILLUSTRATION ONLY.
Powering up or down the TV requires several seconds of processing time. Do not rapidly turn the TV on/off as abnormal
operation may occur.
3
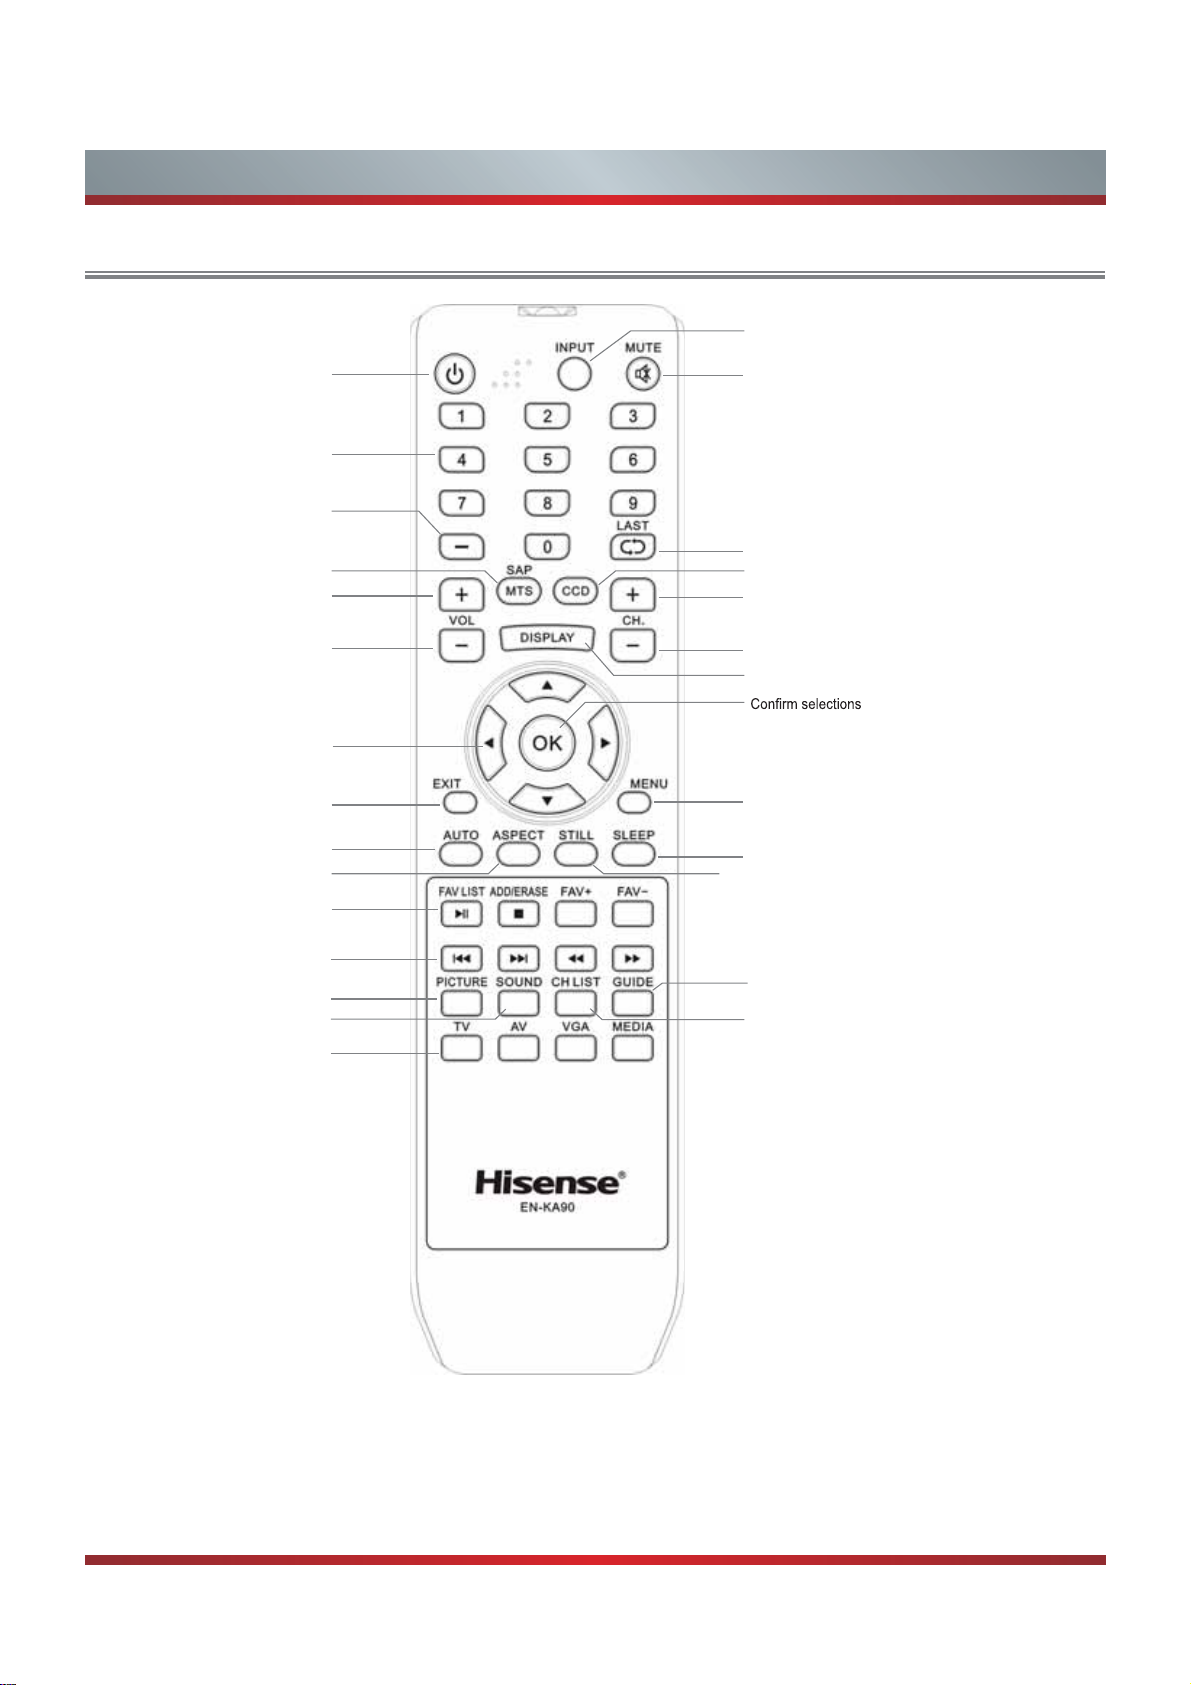
Viewing the Remote Control
Select input source
Power on/off
Direct channel selection
Select a digital sub-channel
Mono/Stereo/SAP operation
Move Up/Down/Left/Right
Favorite program controlling button
& Media player button
Dash button
Audio select button
Increase volume
Decrease volume
▲
▲
▲/
/▲/
or adjust settings
Close the menu
Auto ajust button
Zoom button
Mute button
Go to the previous channel
Adjust CC mode
Next channel
Previous channel
Display the information banner
Menu button
Sleep timer button
Make the screen stop
Media player button
Select picture mode
Select sound mode
Select TV AV VGA USB source
Open the DTV program guide
(if available)
Channel list
Program Your Universal Cable or Satellite Remote Control to Operate Your New Hisense Television!
If you would like to program your other household remote controls to your new Hisense television, please consult the User’s
Manual supplied by your Cable or Satellite provider. The Cable or Satellite providers’ User’s Manuals should include instructions
on how to program their remote to your television.
4

Getting Started
Below is a list of Hisense codes for the most common Cable and Satellite providers. Use the Hisense code that is associated with your Cable or
Satellite provider(if applicable).
DIRECTV...............................................................................................................................................0178 or 10019
Time Warner Cable........................................................................................................................ 3860178 or 10178
Comcast ............................................................................................................................................... 0178 or 10178
Cox Communications ........................................................................................................................... 0178 or 10178
Dish Network .............................................................................................................................................. 627 or 505
AT&T U-verse ......................................................................................................................................... 1346 or 1041
NOTES
If the Hisense code associated with your Cable or Satellite provider is not listed above, if the code above does not work, or if you cannot locate
the instructions for programming your household remote to your television, call your local Cable or Satellite provider’s customer service center.
If your Cable or Satellite provider does not have an Hisense code available, please visit http://www.hisense-usa.com for additional codes.
Installing Batteries in the Remote Control
Change the batteries
1. Push the back cover to open the battery compartment of the remote control.
2. Insert two AAA size batteries. Make sure to match the (+) and ( - ) ends of the batteries with the (+) and ( - ) ends indicated in
the battery compartment.
3. Close the battery compartment cover.
1
Gently lift up
2
Insert the batteries
3
Gently push down
NOTES
1. Dispose of your batteries in a designated disposal area. Do not throw the batteries into a fire.
2. Do not mix battery types or combine used batteries with new ones.
3. Remove depleted batteries immediately to prevent battery acid from leaking into the battery compartment.
4. If you do not intend to use the remote control for a long time, remove the batteries.
5. Batteries should not be exposed to excessive heat, such as sunshine, heat registers, or fire.
6. Battery chemicals can cause a rash. If the batteries leak, clean the battery compartment with a cloth. If chemicals touch your
skin, wash immediately.
7. Do not mix old and new batteries.
8. Do not mix alkaline, standard (carbon-zinc) or rechargeable (ni-cad, ni-mh, etc.) batteries.
9. The batteries shall not be exposed to excessive heat such as sunshine,fire or the like.
The effective range of remote control
1. The remote control distance: 315 inches in front of the TV set.
2. The remote control angle: taking the television infrared light receiver window as an apex, 236 inches away, its controlled
angle (left to right) is within 30 degrees, while the vertical angle (up to down) is within 30 degrees.
5

Making Connections
Getting Started
R
P
N
B
NO ET IN
P
MOC
YP
L
PC/DVI
VGA
USB HDMI1 HDMI2 HDMI3/DVI
USB HDMI1 HDMI2 HDMI3 VGA
PC/DVI
PC/DVI
VGA
USB HDMI1 HDMI2 HDMI3/DVI
Item Description
ANT/CABLE IN Connect an antenna or cable TV to this jack.
HDMI/DVI
HDMI (High-Definition Multimedia Interface)provides an
uncompressed.Support: 480i\480p\576i\576p\1080i\1080p
Connect to a DVD player, Digital Set-Top-Box, or other A/
COMPONENT IN
V devices with component (YP
jacks.
Component audio Jack share AV IN audio Jack.
) video and audio output
BPR
Support: 480i\480p\576i\576p\1080i\1080p
AV IN
VGA
PC/DVI AUDIO IN
Connect to the composite video and audio (L/R) output
jacks on external video devices.
Connect to a PC or other devices with a VGA interface.
AUDIO OUT Connect to a audio device.
DIGITAL AUDIO OUT
USB
Connect to an external digital audio device.
MP3, Jpeg play and software update.
R
VIDEO
RL
AUDIO OUT
NOTE
Some external devices impossible insert to this set for individual difference. Please replace with appropriate external signal
cable or increase the adapter to match with the port in such case.
6

Getting Started
NOTES
Check the jacks for position and type before making any connections. Loose connections can result in image or color
problems. Make sure that all connections are tight and secure.
Not all A/V devices have the ability to connect to a TV, please refer to the user’s manual of your A/V device for compatibility
and connections procedure.
Always unplug the power cord when connecting external equipment.
Connecting an antenna, cable or cable/satellite box
1. Turn off the TV before connecting the antenna.
2. Connect one end of a coaxial cable (not included) to the RF OUT jack on the antenna, cable or cable/satellite box. If you are
using an antenna with twin-lead cable, you may need a 300-75 ohm adapter (not provided) to connect it to the back of your
TV. Likewise, if you are using several antennas, you may need a combiner (not provided).
3. Connect the other end of the cable to the ANT/CABLE IN jack on the side of your TV.
EXTERNAL DEVICESTV JACK
Cable
ANT
CABLE IN
or
ANT OUT
VHF/UHF Antenna
Connecting an A/V Device with Composite Cable
1. Use the audio and video cables to connect the external A/V device’s composite video/audio jacks to the TV’s jacks. (Video =
yellow, Audio Left = white, and Audio Right = red)
2. Plug the connected devices into the mains socket before switching on the TV.
3. Select the corresponding source from the TV.
EXTERNAL DEVICES
TV JACK
AV IN
LRVIDEO
White(L)
Red(R)
AV Cable
(not included)
White(L)
Red(R)
Yellow(Video)Yellow(Video)
L
R
Video
A/V OUT
Video
Camera
VCR
DVD Player/Recorder
Set-top box
Satellite Receiver
Equipment with A/V jacks
Satellite
antenna
cable
7

Getting Started
Connecting an A/V Device with Component (YPBPR) Cable
1. Use a component cable to connect the external A/V device’s component output jacks to the TV’s YPBPR jacks. Use an audio
cable to connect the external A/V device’s component audio jacks to the TV’s AUDIO (L/R) jacks.
2. Plug the connected devices into the mains socket before switching on the TV.
3. Select the corresponding source from the TV.
TV JACK
R
P
B
P
COMPONENT INAV IN
Y
L
R
PR/C
PB/C
Y
White(L)
Red(R)
R
B
Component
Red(R)
White(L)
PR/C
R
PB/C
B
Component
EXTERNAL DEVICES
P
R
P
B
Y
L
R
Video
Camera
DVD Player/Recorder
Set-top box
Satellite Receiver
VCR
Satellite
antenna
cable
Equipment with A/V jacks
Connecting an A/V Device with HDMI Cable
Support digital connections between HDMI - enabled AV devices such as PVR, DVD, Blu-ray, AV receiver and digital devices.
Some devices such as PVR or DVD player require HDMI signal to be set to output in the device's settings.
Please consult your device user manual for instructions.
1. Use an HDMI cable to connect the A/V device’s HDMI output jack to the TV’s HDMI jack.
2. Plug the connected devices into the mains socket before switching on the TV .
3. Select the corresponding source from the TV.
EXTERNAL DEVICES
TV JACK
HDMI
HDMI Cable
(not included)
HDMI
DVD Player/Recorder
Set-top box
Equipment with HDMI jacks
NOTE
The HDMI connector provides both video and audio signals, it’s not necessary to connect the audio cable.
Connecting a AUDIO OUT Cable
Use an audio cable to connect the external A/V device’s audio
_in jacks to the TV’s AUDIO (L/R) jacks.
TV JACK EXTERNAL DEVICES
L
R
AUDIO OUT
8
L
R

Getting Started
Connecting a PC with VGA Cable
1. Use a VGA cable to connect the PC’s VGA output jack to the TV’s VGA jack. Use an audio cable to connect the PC’s audio
output jack to TV’s VGA AUDIO IN jack.
2. Plug the connected devices into the mains socket before switching on the TV.
3. Select the corresponding source from the TV.
EXTERNAL DEVICES
Computer
PC/DVI
AUDIO IN
TV JACK
PC IN
VGA
Audio Cable
(not included)
VGA Cable
(not included)
NOTES
Primarily this unit is intended for use as an LCD TV. If you want to use it as a monitor, please contact the manufacturer of the
PC Video/Graphic's card for further support. Perfect compatibility is not warranted.
The VGA cable will not supplied with the product.
We strongly recommend to use VGA cable with 2 cores as shown in the figure.
Connecting an Audio Receiver with Digital Audio out cable
1. Use a coaxial cable to connect the A/V device’s digital audio in jack to the TV’s DIGITAL AUDIO OUT jack.
2. Plug the connected devices into the mains socket before switching on the TV.
3. Select the corresponding source from the TV.
EXTERNAL DEVICES
TV JACKS
DIGITAL
AUDIO OUT
Coaxial Cable
(not included)
Powerless
Bass Speaker
Speaker
NOTES
When a digital audio system is connected to the DIGITAL AUDIO OUT (COAXIAL) jack, decrease the volume of both the TV
and the system.
5.1 CH (channel) audio is available when the TV is connected to an external device supporting 5.1 CH.
When the receiver (home theater) is set to on, you can hear sound output from the TV’s digital audio out jack. When the TV
is receiving a DTV signal, the TV will send 5.1 CH sound to the home theater receiver. When the source is connected to the
TV via HDMI, only 2 CH audio will be heard from the home theater receiver. If you want to hear 5.1 CH audio, connect the
digital audio out jack from your DVD/Blu-ray player/cable box/STB satellite receiver directly to an amplifier or home theater.
9
Basic Features
Turning your TV on or off
To turn your TV on or off (standby mode):
Plug the power cord into an AC power outlet.
1.
Press [POWER] button. Your TV turns on.
2.
Press [POWER] button again to turn off your TV. When
3.
you turn off your TV, it goes into standby mode.
WARNING
When your TV is in standby mode, it is still receiving
power. To completely disconnect power, unplug the power
cord.
NOTE
If your TV does not receive an input signal for several
minutes, it automatically goes into standby mode.
Selecting the Input Source
The first time you turn on your TV, you must select the TV
signal source. Your TV stores this information, so you do not
need to change the TV signal source unless it changes. For
example, you change from an outside antenna to cable TV.
To select the video input source:
1. Turn on your TV, then press [INPUT] button on the
remote or on the TV. The Input Source menu opens.
2. Press [▲/
press [OK] button.
▲
] button to highlight the input source, then
Changing Channels / Volume
1. Press the [CH
to change the channel.
2. Press the [VOL
control to adjust the volume.
3. Press the numeric buttons on the remote control to
display the corresponding channels.
NOTE
Changing the channels can also be achieved by directly
entering the channel number using the numeric keys on
the remote control. If you are entering a two or three digit
channel number, the time between key presses should be
less than 3 seconds.
V
/V] (or [CH +/-]) on the TV/remote control
V
/V] (or [VOL +/-]) on the TV/remote
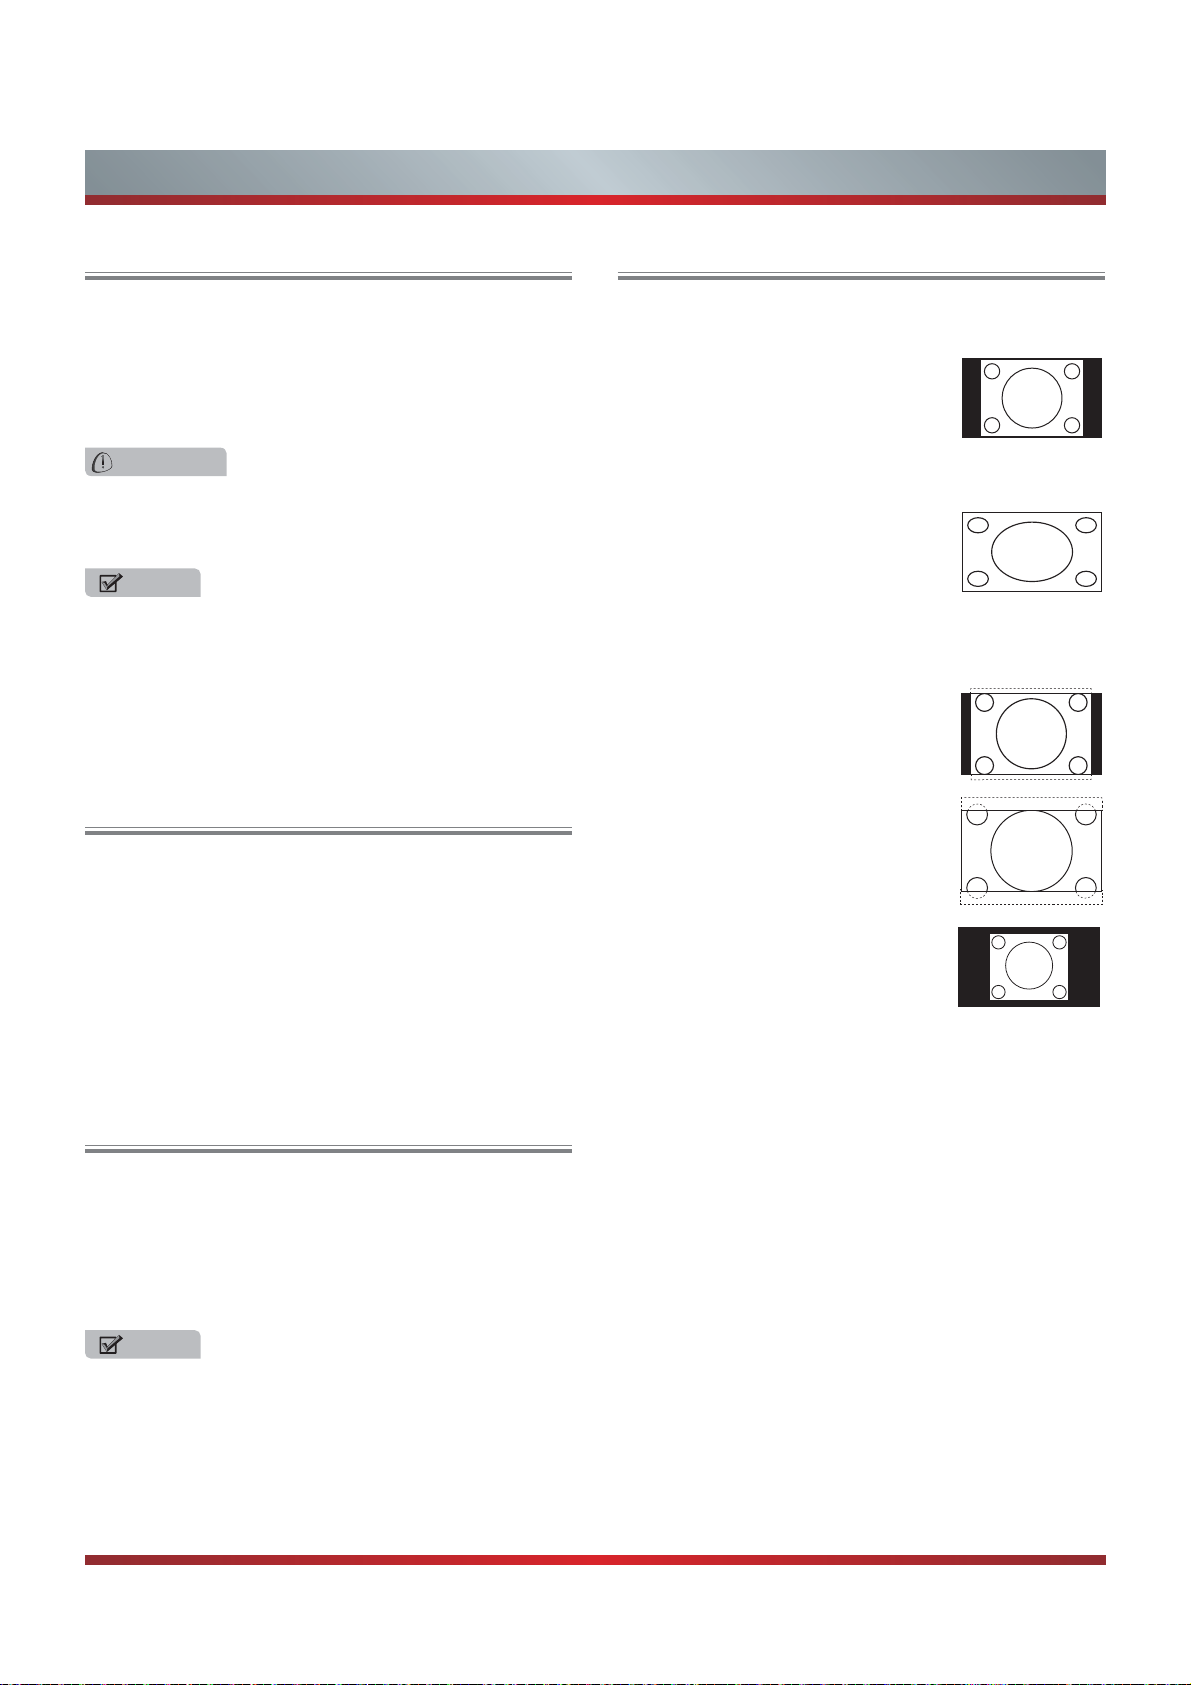
Shortcuts Instructions
Aspect - Select the screen aspect ratio from Normal, Wide,
Zoom and Cinema.
Normal: The original 4:3 aspect
ratio (1.33:1 signal) is preserved,
so black bars are added to the left
and right of the image. Standard TV
broadcasts are displayed with a 4:3
aspect ratio.
Wide: When watching a standard
broadcast or full-frame movie in
this mode, the display image is
stretched proportionately to fill
the TV screen. When watching a
widescreen (1.78:1 signal) program
or movie, the display image fills the
TV screen.
Zoom: Stretch the 4:3 aspect ratio
image vertically and horizontally to
fill the screen at 1:1.78 aspect ratio.
Cinema: Stretch the 4:3 aspect ratio
image vertically and horizontally to
fill the screen at 1:2.35 aspect ratio.
Point to Point: Use the function
to see the full image without any
cutoff, when VGA or HDMI signal is
inputted.
PICTURE - Press to set the picture mode. It can be set as
Standard, Cinema, User and Vivid. This mode achieves
a certain image display effect by setting the brightness,
contrast and color etc.
SOUND - Press to set the sound mode. It can be set as
Standard, Speech, User and Music.
Mute - Press to turn the sound off, press this button again
to turn the sound back on. This function is used to switch off
sound temporarily.
Sleep - It can set the TV to let it enter into the Standby
state automatically. Press this button repeatedly to select
the proper sleeping clock mode, and the clock tells you the
remaining time before the TV enters Standby state.
Guide - Display the information banner. The information
including channel number, channel name, current system
time, tuner mode, audio stream, video format, audio
language, closed caption mode, parental locks rated,
program details, etc.
10

Basic Features
Turning your TV for the First Time
The Initial Setup menu appears the first time you turn on the
TV. It will assist you to specify the Energy Saving mode.
Connect your TV’s power cord to a power outlet, then press
power. The Initial Setup screen opens.
Select Language
Press ◄ / ► button on the remote control to select the
language to be used for menus and message.
Press ▼ / ▲ button on the remote control to select go to
next step and press OK /► button to go.
Select Time
Press ▼ / ▲ button on the remote control to select the time
zone, daylight saving time and time format you want to.
Press ◄ / ► button on the remote control to adjust.
Press ▼ / ▲ button on the remote control to select go to
next step and press OK /► button to go.
Select Picture Mode
Press ◄ / ►button on the remote control to select Home
Mode or Retail Mode.
Press ▼ / ▲ button on the remote control to select go to
next step and press OK / ► button to go.
Auto Scan
Press ◄ / ► button on the remote control to select the
antenna type,Air or Cable.
Press ▼ / ▲ button on the remote control to select go to
next step and press OK /► button to start auto scan.
11
Basic Features
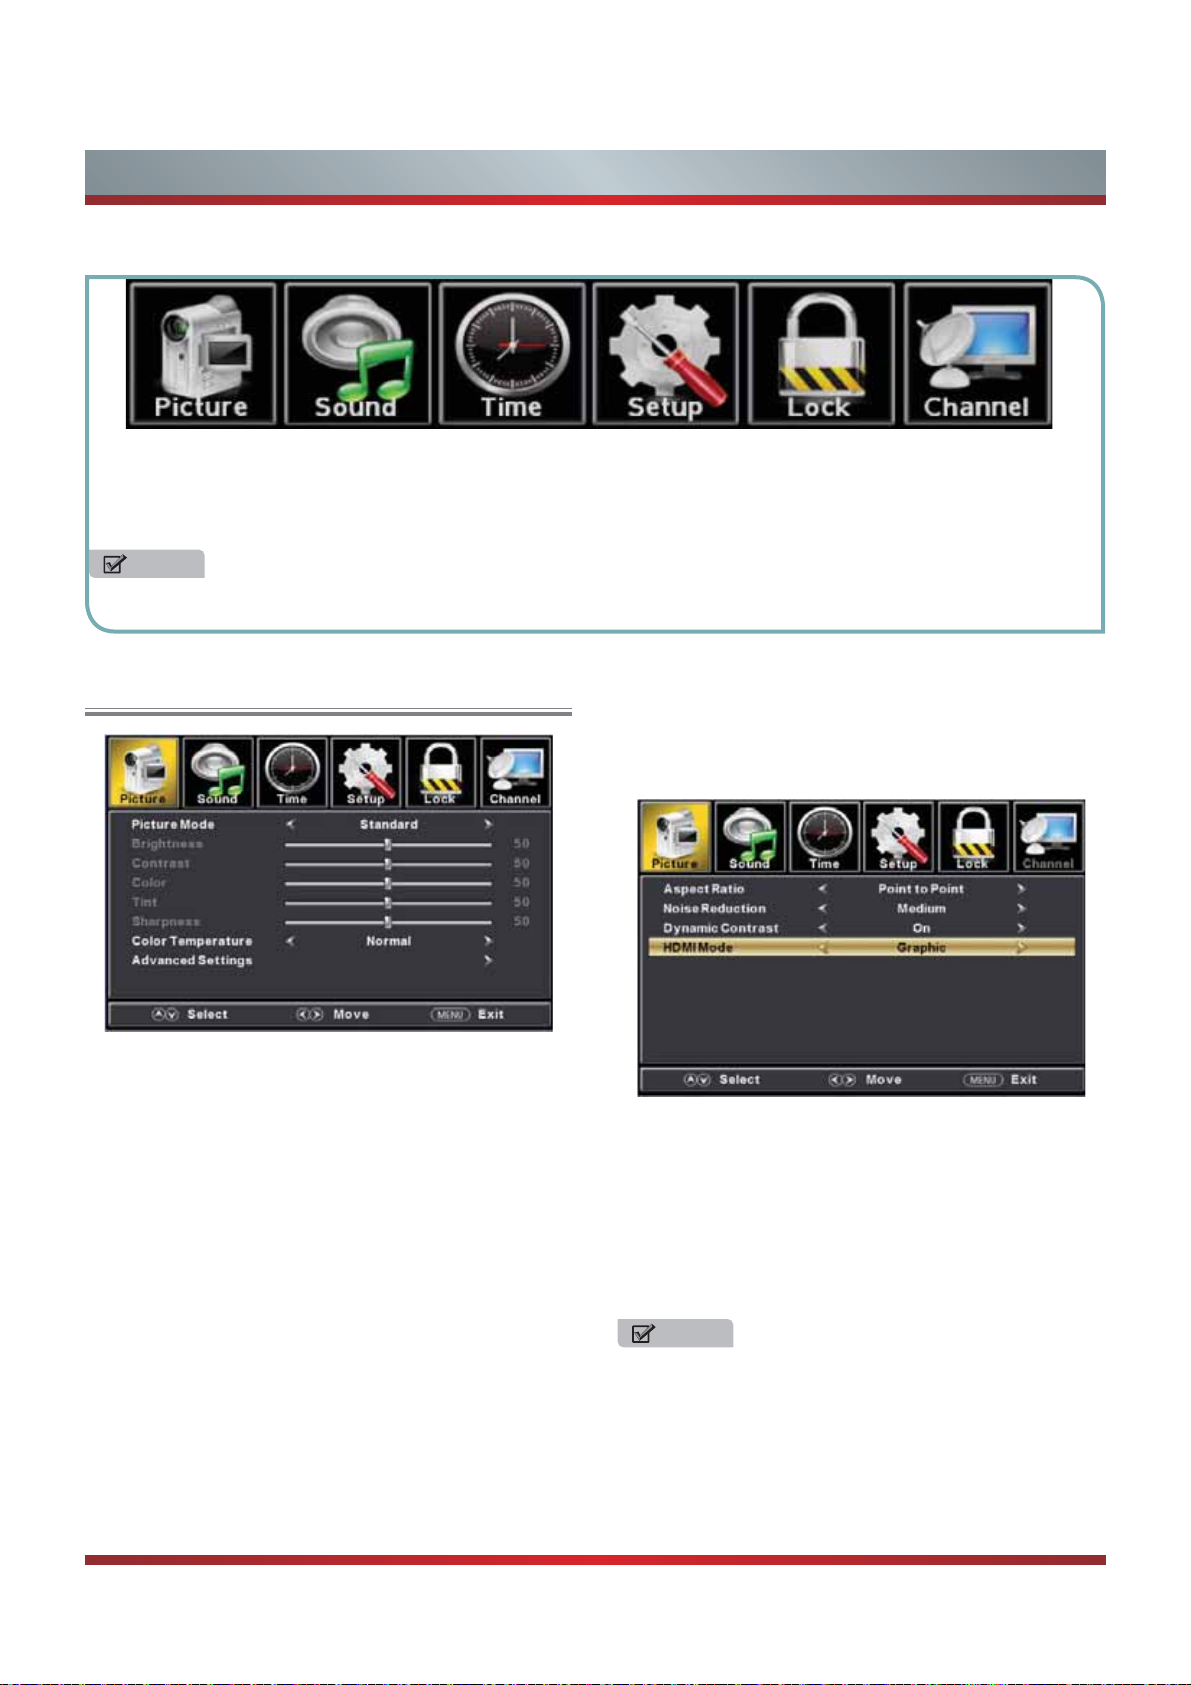
To Use the Main Menu
Press MENU to display the main menu or return to the previous menu or close the main menu.
Press ◄/► to highlight the desired menu icon, and press OK to select.
NOTE
If no buttons are pressed,the menu will close automatically after about 10 seconds.
Using the Picture Menu
Advanced Settings - Access advanced video settings such
as Aspect Ratio,Noise Reduction,and Dynamic Contrast.
You can adjust:
Picture Mode - Adjust the Picture Mode. You can select
Standard,Vivid,Soft,User,Energy swing.
Brightness - Increase or decrease the brightness of the
picture. Increasing the brightness can add more light to dark
areas of the picture, while decreasing the brightness can
add more darkness to light areas of the picture.
Contrast - Increase or decrease the contrast of the picture.
Increase the contrast to adjust the white areas of the picture
or decrease the contrast to adjust the black areas of the
picture.
Color - Adjust the intensity of the colors.
Tint - Adjust the hue(Red,Green,Blue) of the picture.
Sharpness - You can increase the sharpness level for
clearer images or decrease the sharpness level for smoother
images.
Color Temperature - Adjust the overall color of the picture.
Aspect Ratio: Adjust how the picture fills the screen.
Noise Reduction: Select to reduce the noise level of
connected equipment: Off, Low, Medium or High.
Dynamic Contrast: Automatically adjust picture
detail and brightness.
HDMI Mode: Adjust the HDMI output mode.You can
select Graphic or Video.
NOTE
1,The option of “Aspect Ration” is different in different
input source. (For more information, see “Shortcuts
Instructions”)
2,Only select the “Graphic” in “HDMI Mode”,you can just
adjust Aspect Ratio is the Point to Point mode.
12
Basic Features
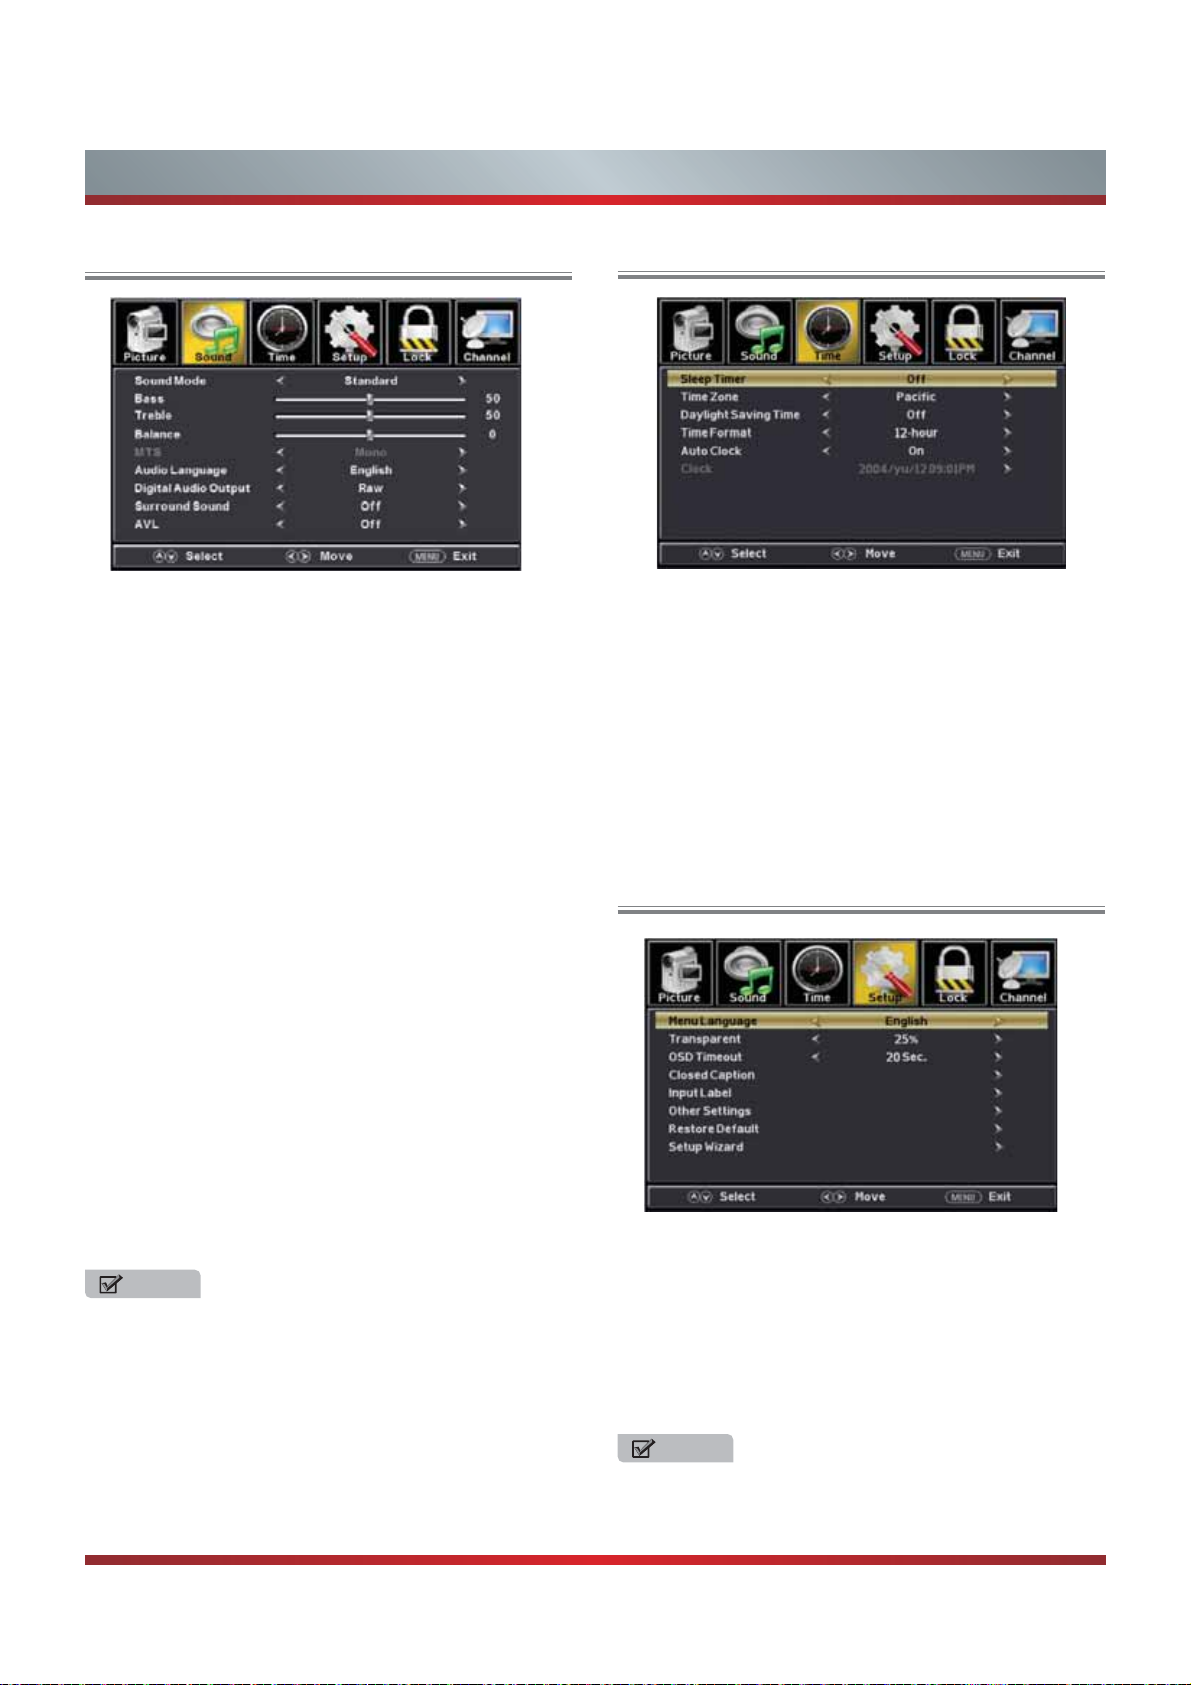
Using the Sound Menu
You can adjust:
Sound Mode - Adjust the Sound Mode. You can select Stan
-dard,Music,Movie,Sports,User.
Bass - Adjust the low frequency sounds.
Treble - Adjust the high frequency sounds.
Balance - Adjust the balance between the left and right
speakers.
MTS - Configures the multi-track sound.
Mono: Sets the sound to mono.
Stereo ton si oerets nehw oerets ot dnuos eht steS :
available, the sound is automatically switched to mono.
SAP: Sets the sound to the second audio program.
Audio Language - Select the language supported by the
chosen digital channel.
Digital audio output - Adjust the form of the digital audio
output.You can select “Raw”,”PCM” or close it by select “Off“.
Using the Time Menu
You can adjust:
Sleep Timer - Set a timer for the TV to turn off automatically.
Time Zone - Select your time zone.
Daylight Saving Time - Set the daylight saving time for
your area.
Time Format - Select your time format.
Auto Clock - Select “On” for automatic date and time setting
using information from broadcast stations in your area.
Clock - Set the time manuslly when “Auto Clock” is “Off“.
Using the Setup Menu
Raw:Source code,the digital audio code is directly
outputted,unprocessed.
PCM: A form of code, pulse code modulation.
Surround Sound - Simulates surround sound and enhances
bass response.
AVL - Automatically adjusts volume to a consistent level;
attenuates loud passages.
NOTE
1,The option of “MTS” is only available in ATV.
2,The option of “Audio Language”is only available in DTV.
3,When “AVL” is “On”, that means audio out control is
activated.
You can adjust:
Menu language - Adjust TV Menu options.
Transparent - Adjust the transparency of the OSD (on
screen display) menu.
OSD Time Out - Adjust the duration of the OSD (on screen
display) menu.
Closed Caption - Adjust Closed Captioning settings.
NOTE
The option of “Closed Caption” is Only available under TV
and AV source.
13
Basic Features
CC Mode - Turn Closed Captioning on/off.
Analog CC - Set Closed Captioning for standard
(analog) program.
Digital CC - Set Closed Captioning for digital
program.
Option - Adjust the digital Closed Captioning setting.
Mode - Set the look of digital Closed Captioning.
Automatic uses broadcaster’s style.
Font Style - Select from 8 font styles(Default /
Font 0 / Font 1 / Font 2 /Font 3 / Font 4 / Font 5 /
Font 6 / Font 7).
Font Size - Adjust the size of the digital Closed
Captioning font.
Font Edge Style - Adjust the edge of the digital
Closed Captioning box.
Font Edge Color - Adjust the
Closed Captioning box.
FG Color - Adjust the color of the digital Closed
Captioning font.
BG Color - Adjust the digital Closed Captioning
background color.
FG Opacity - Adjust the transparency of the digital
Closed Captioning font.
BG Opacity - Adjust the digital Closed Captioning
background transparency.
color of the digital
Setup Wizard - Set the first time installation.
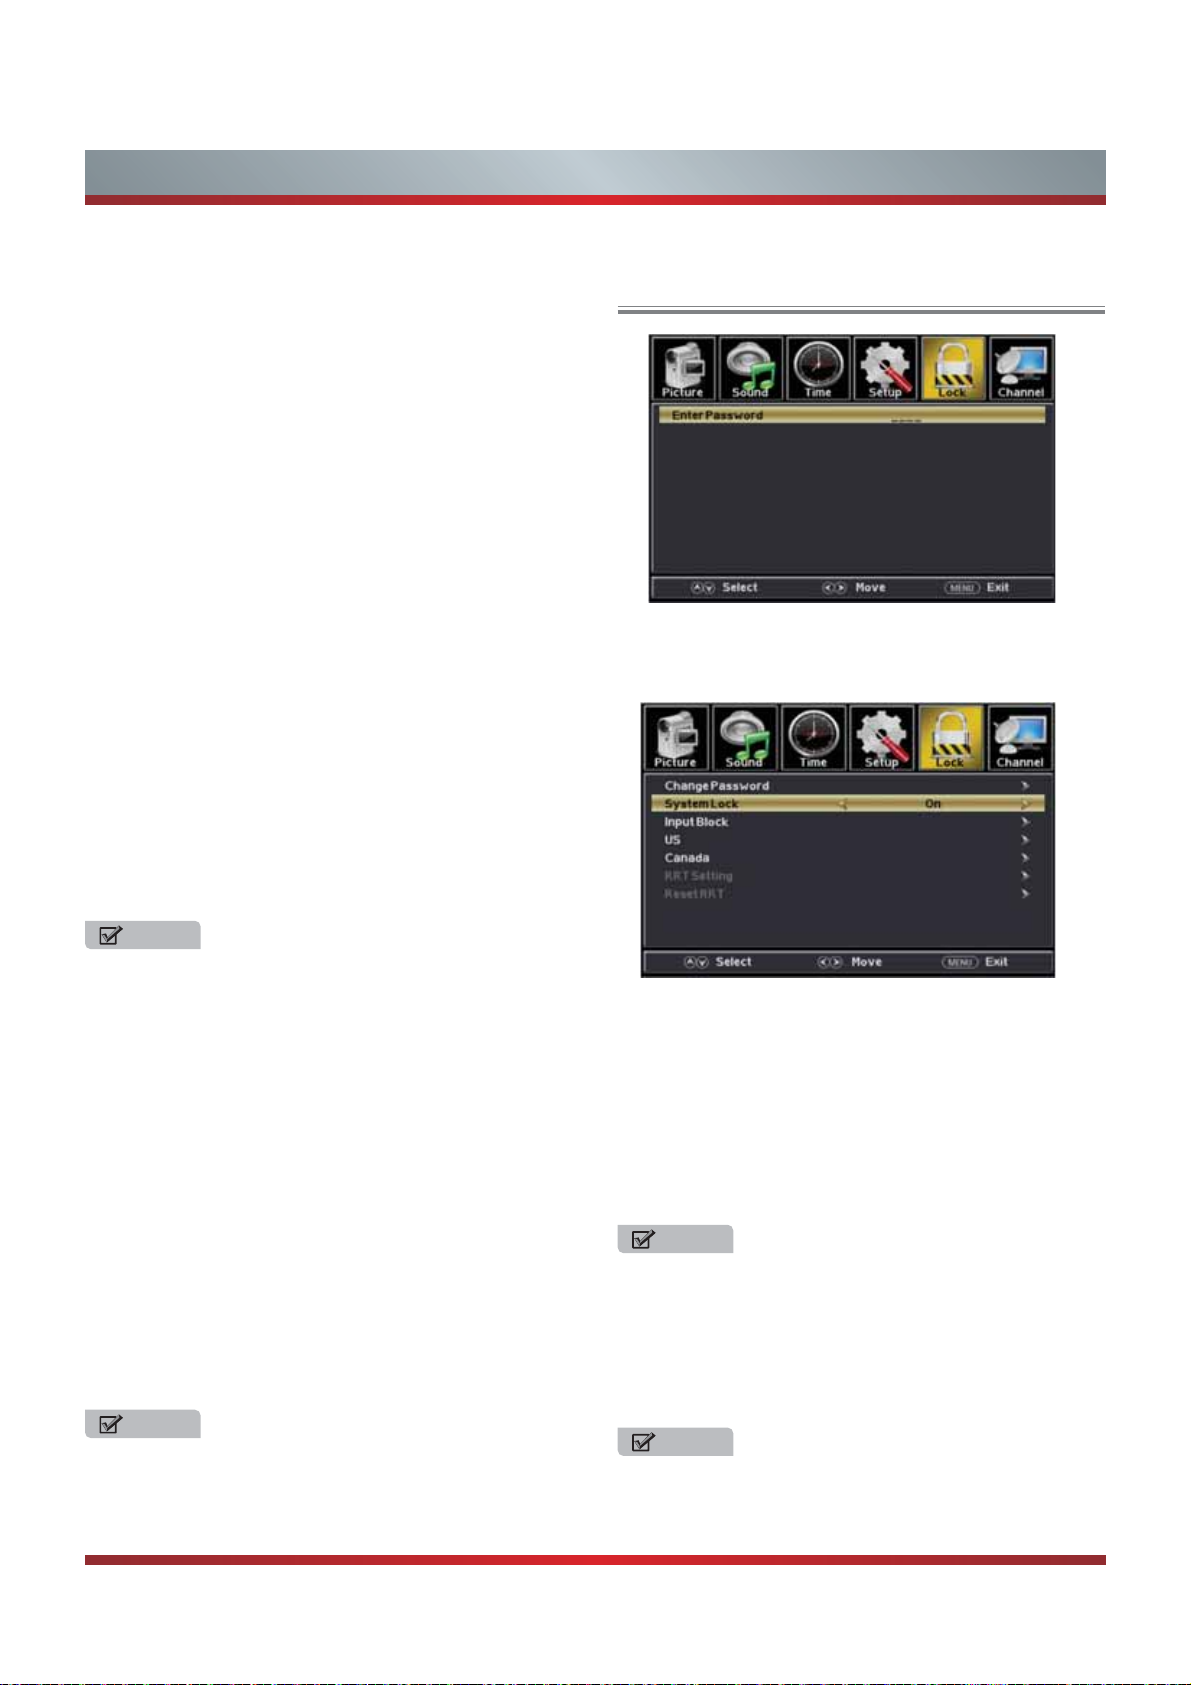
Using the Lock Menu
Enter your 4-digital password. Default password is
0000,and if forget what you set, please call the service
center.
NOTE
All the options can not be adjust while the mode is
Custom.
Input Labels - Create labels for the devices connected to
your TV.
Other Settings - Set the parameter of blue screen and audio
only.
Blue screen - Set the background when there is no
signal. The background will show blue screen when it’s
on and show noise when off.
Audio Only .ffo denrut erutcip eht htiw oidua eht yalP -
When you turn the Audio Only on and exit the OSD
menu, the panel will be dark; and then press any key to
exit the Audio Only status.
Software Update(USB) - Update the TV software.
Select the software in the root of your USB memory.
Press OK button to enter,then press Yes to update
and press No to cancel.
NOTE
The item is available only When current stream has
downloadable rating data.
Restore Default - Change power on options or reset TV to
factory default.
You can adjust:
Change Password - Enter a new 4-digital password then re-
enter it to confirm.
System Lock - Lock or unlock the buttons on the TV.
Input Block - Block or unblock the input sources.
US Rating - Restrict movie and TV programs by US Ratings
Canada Rating - Restrict movie and TV programs by
Canadian Ratings.
NOTE
“US Rating” and “Canada Rating” is available only when
“System Lock” is “On”.
RRT Setting - Display an advance V-Chip rating table for
digital channels.
Reset RRT - Reset the RRT to default.
NOTE
If you choose the “Reset RRT” function, all the programs
you preset in “RRT Setting” will be lost.
14
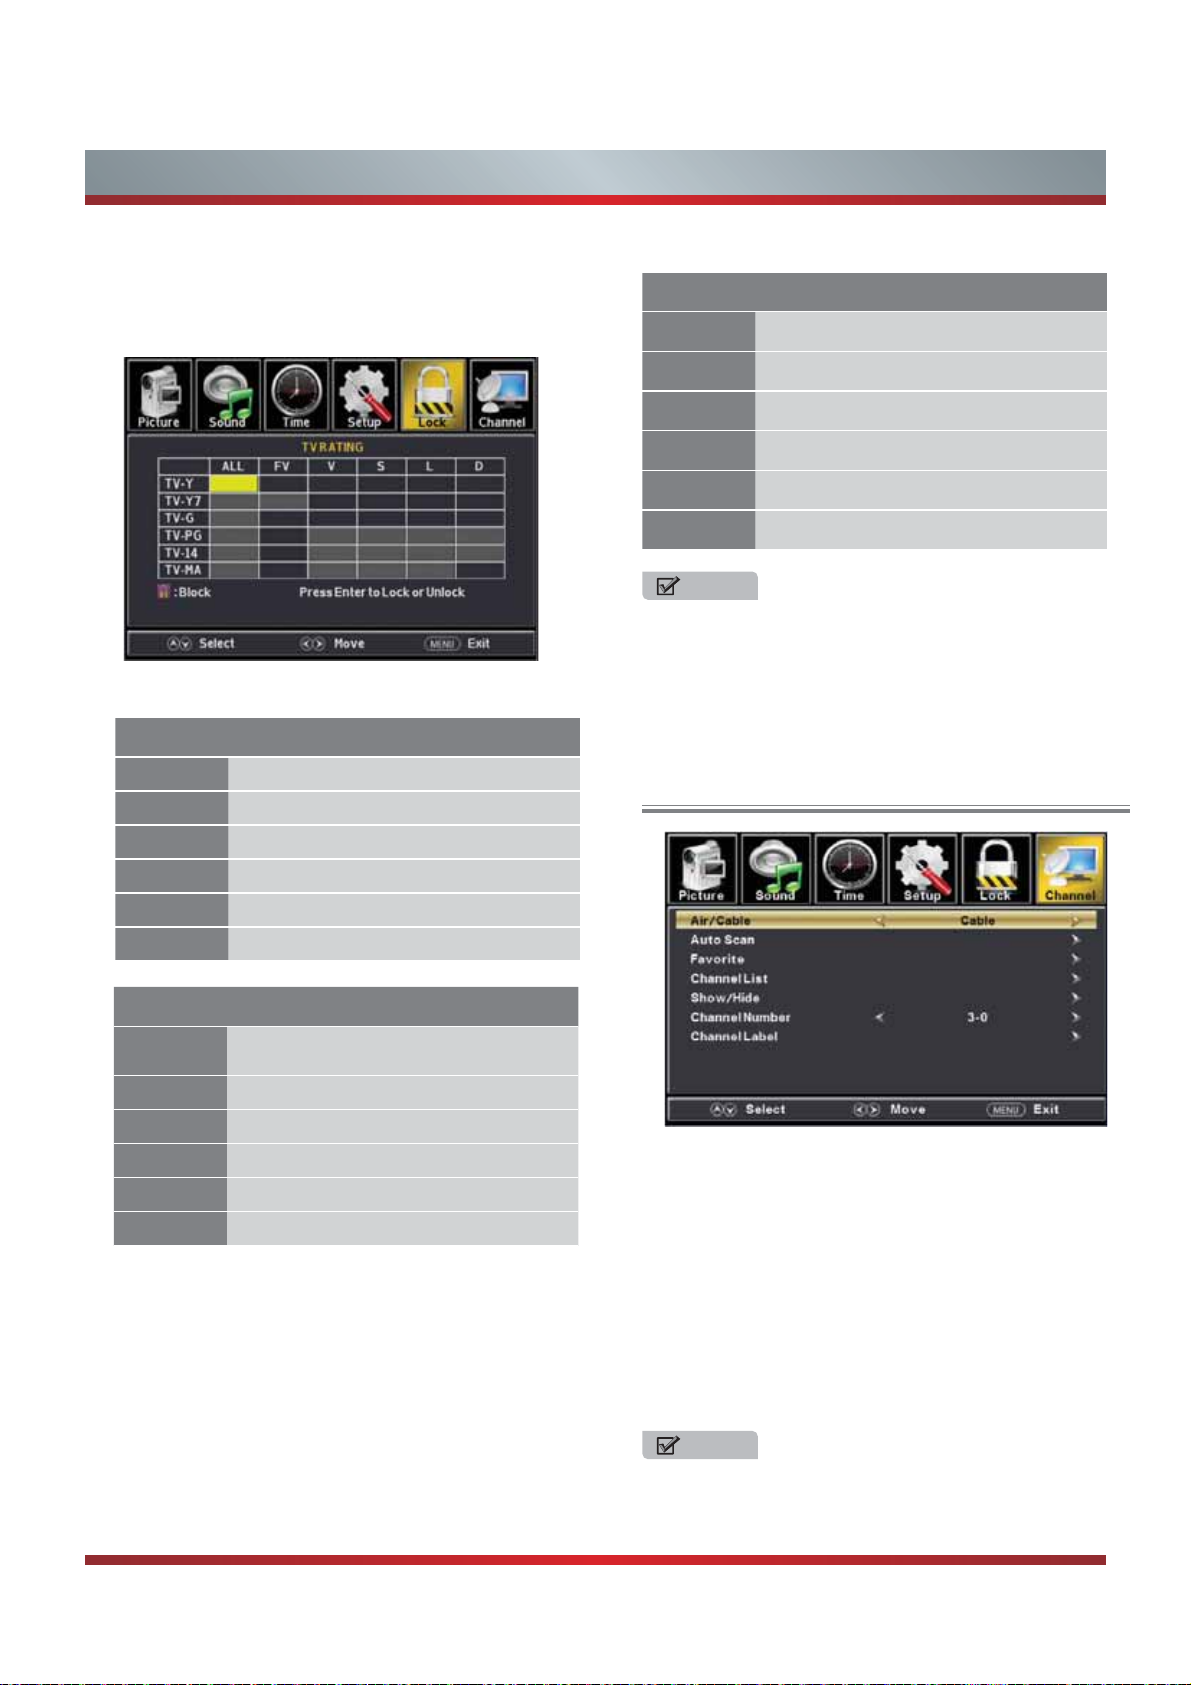
Basic Features
For the United States, the rating setting basically include
the following options: TV, MPAA.
TV - The TV rating compose of two aspects: age-based
and content-based.
U.S. TV Ratings
Age Defined as
TV-Y All children
TV-Y7 Directed to older children
U.S. Movie Ratings
Rating Defined as
G General audience
PG Parental Guidance suggested
PG-13 Parents strongly cautioned
R Restricted
NC-17 No one 17 and under admitted
X Adult audience only
NOTE
The content ratings will increase depending on the level
of the age-based rating. For example, a program with a
TV-PG V rating may contain moderate violence, while a
TV-14 V rating may contain intense violence. So locking
a higher level option will automatically cause locking the
options that has more sensitive level.
Using the Channel Menu
TV-G General audience
TV-PG Parental Guidance suggested
TV-14 Parents Strongly cautioned
TV-MA Mature Audience only
Contents Defined as
A
D Suggestive dialogue
L Strong language
S Sexual situations
V Violence
FV Fantasy Violence
MPAA - This system defines the rating control which come
from MPAA rules
All of the ratings below that rating set
blocked automatically
You can adjust:
Air/Cable - Select signal type.
Auto Scan - Automatically search for channels.
Favorites - Add channels to create a favorite list.
Show/Hide - Show or hide the channels in your program list.
Channel No. - Show the channel number.
Channel Label - Create label for channel,up to 7 characters.
DTV Signal - Display signal strength of selected digital
channels.Only DTV channel is available.
15
NOTE
When the input sonrce is AV / COMPONENT / HDMI /
VGA/ MEDIA, the CHANNEL MENU is unavailable.
Basic Features
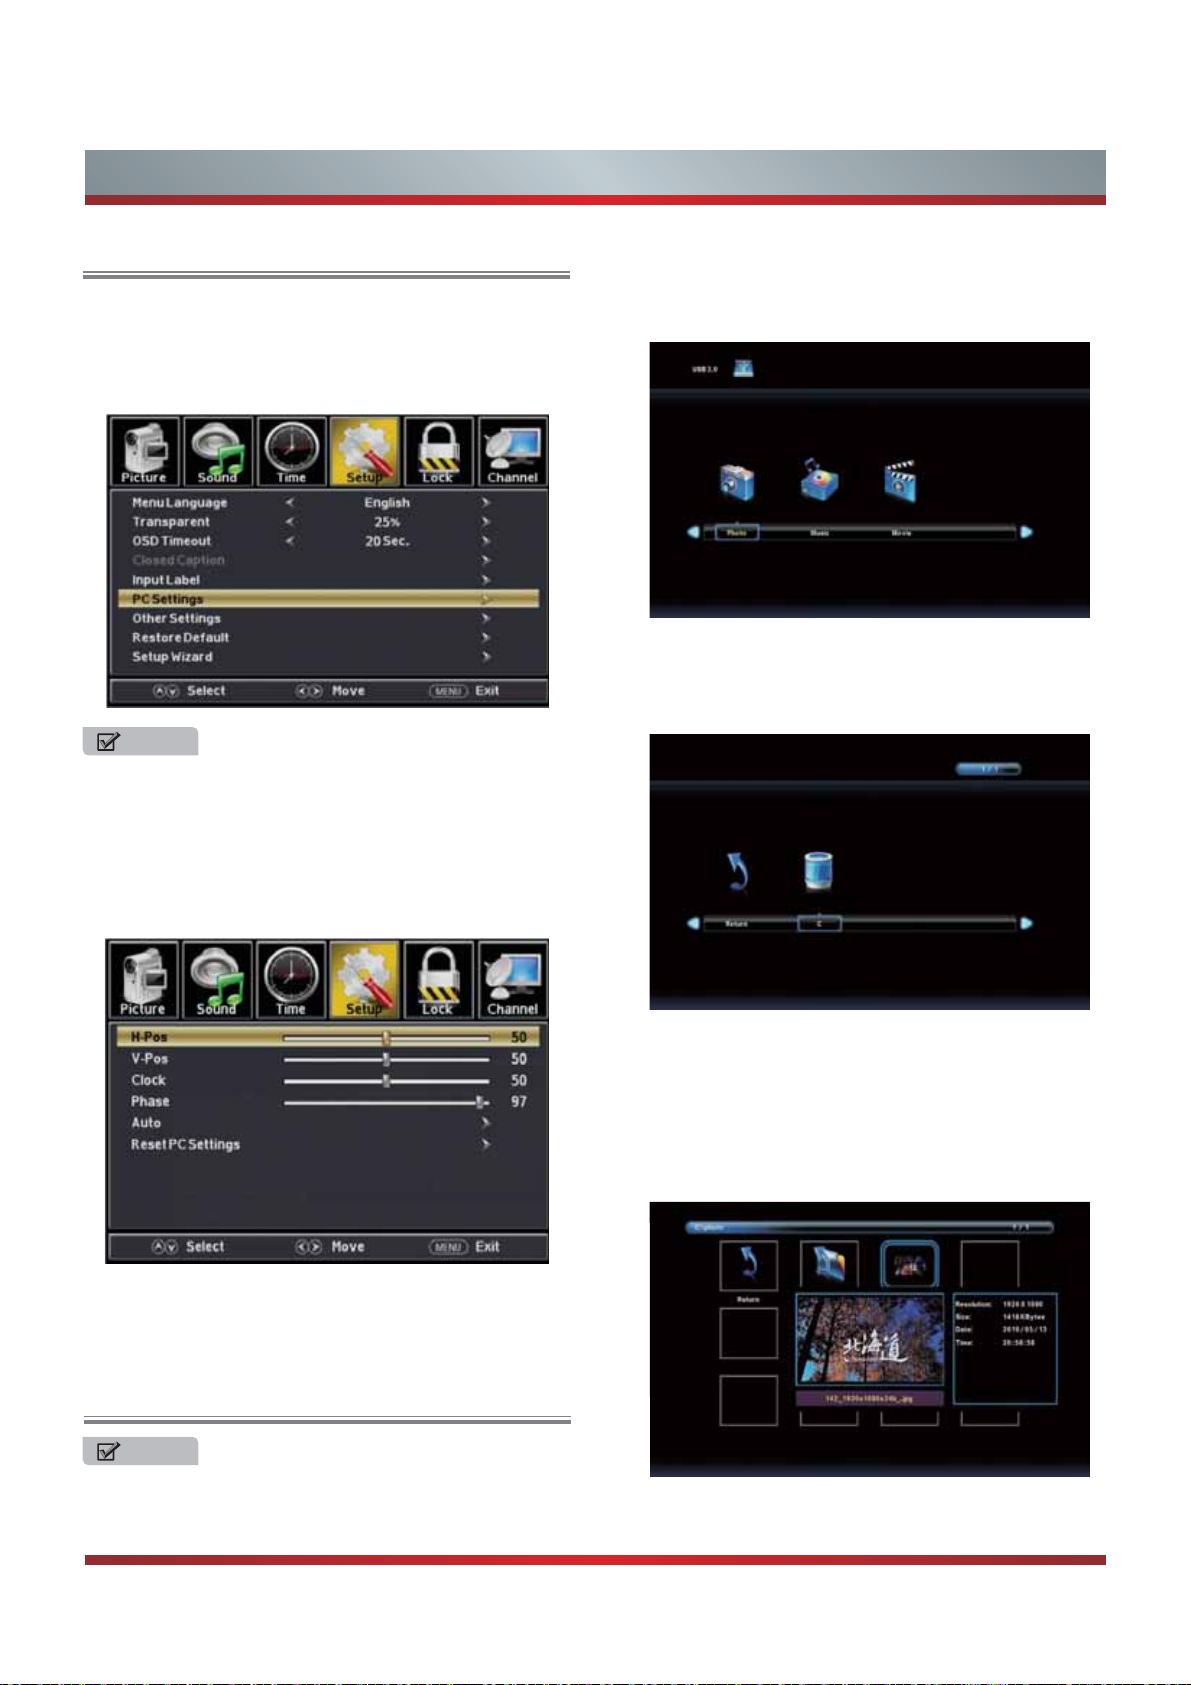
PC Setting
Press INPUT to select VGA source.
Press MENU to enter the main menu, Press ◄ / ► button to
select Setup menu.
Press ▼ to select PC Settings.
NOTE
The item is available only When a PC signal is inputted to
your TV.
You can adjust:
H-Pos - Adjust the horizontal position of the picture.
V-Pos - Adjust the vertical position of the picture.
Clock - Minimize vertical stripes in the screen image.
Press ◄ / ► button to select ME DI A in the Source menu,
then press OK button to enter.
Press ◄ / ► button to select the option you want to adjust
in the main Media menu,then press OK button to enter.
Phase - Minimize horizontal distortion.
Auto - Adjust to the PC signal timing automatically.
Reset PC Settings - Reset Computer Settings to factory mode.
Media Operation
NOTE
Before operating Media menu,Plug in USB device, then
press INPUT button to set the Input Source to Media .
Photo Menu
Press ◄ / ► button to select drive disk you want to watch, then
press OK button to enter.
Press ◄ / ► button to select return option to back .
16
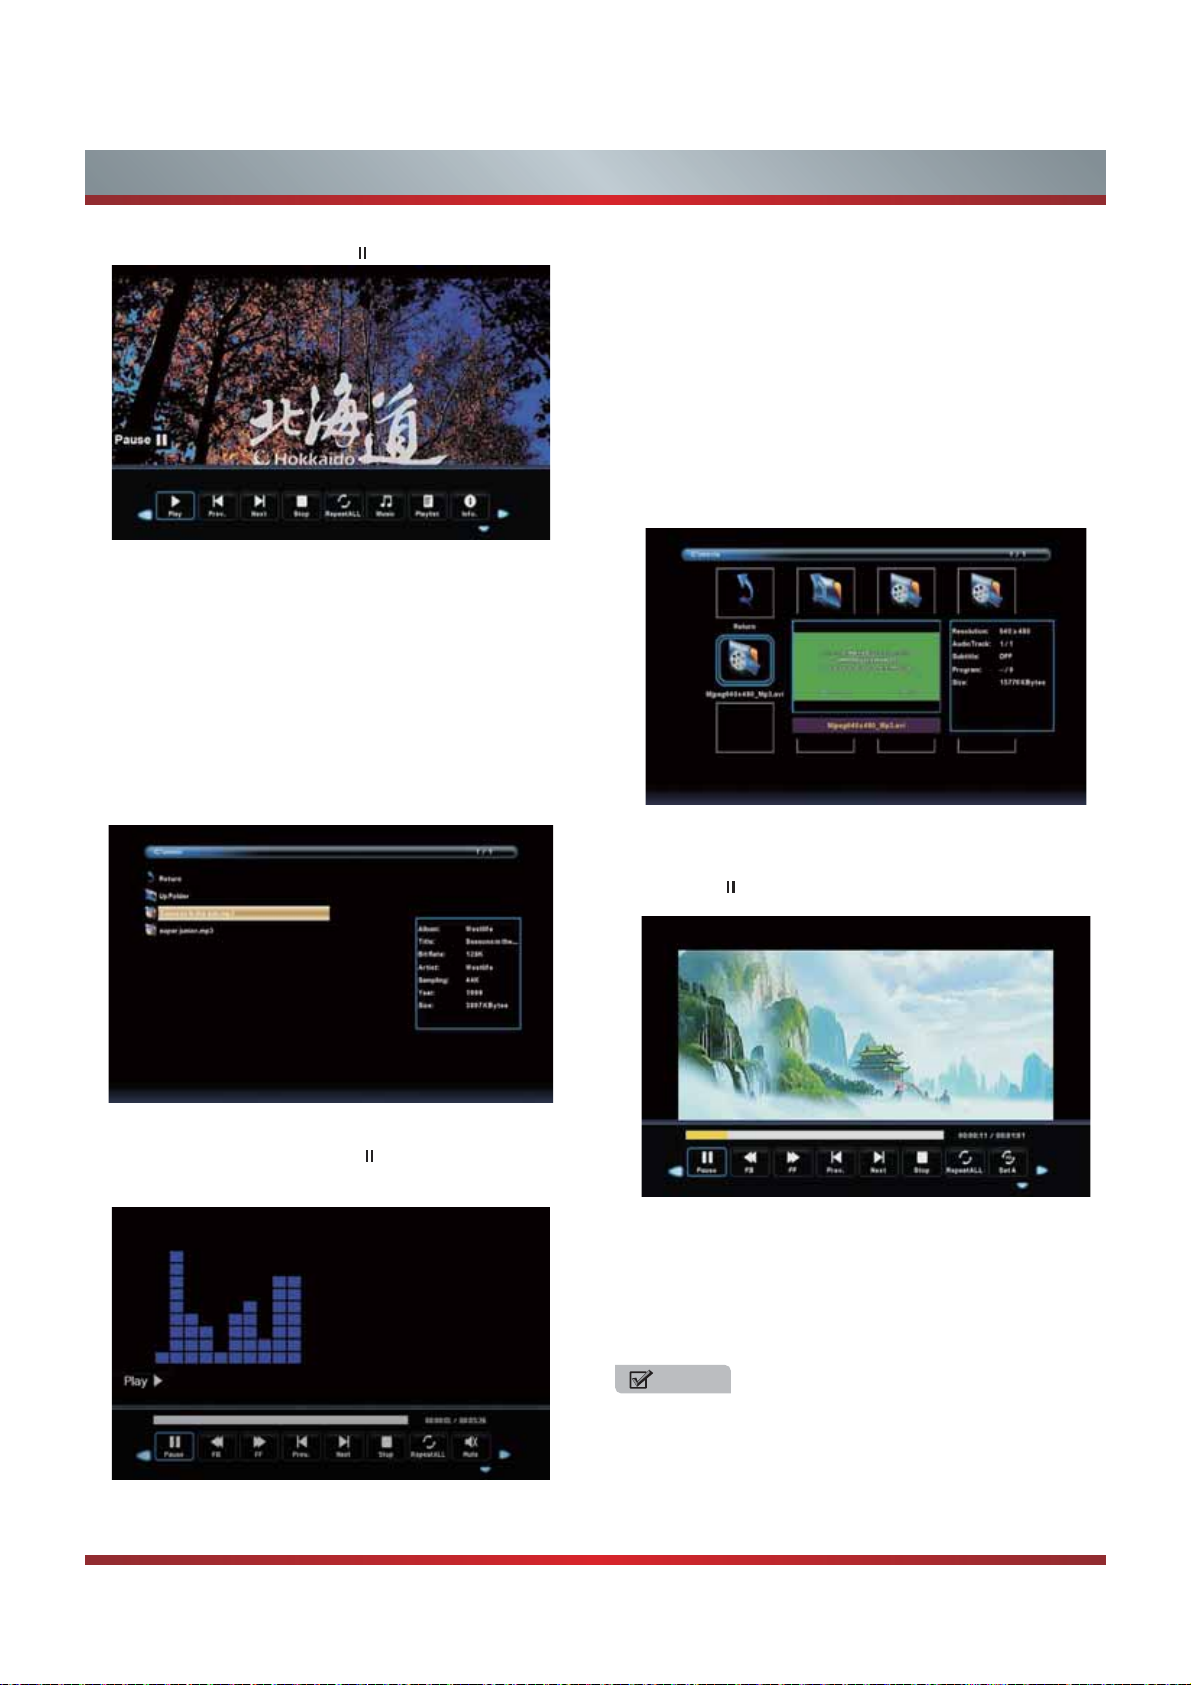
Basic Features
Press ◄ / ► button to select the file you want to watch in the file
selecting menu, then press OK or button to display picture.
◄
Press ◄ / ► button to select the file folder you want to search
in the file selecting menu, then press OK button on your remote
control to enter sub-menu.
Press ◄ / ► button to select “Return” option and press OK to
back to the previous menu.
Music Menu
Press ◄ / ►button to select drive disk, then press OK button to
enter.
Press ◄ / ► button to select return option to back.
Press ◄ / ► button to select menu in the bottom you want to run,
then press OK button to operate.
Press EXIT button to back to the previous menu.
Press button to hide the menu in the bottom.
Movie Menu
Press ◄ / ► button to select drive disk, then press OK button to
enter.
Pres
s◄
/ ► button to select return option to back.
Press button to hide the menu in the bottom. When you press
DISPLAY, the menu in the bottom will appear again.
Press ◄ / ► button to select the file you want to watch in the file
selecting menu.
press OK or button to display and operate file details.
◄
◄
Press ◄ / ► button to select the file you want to watch in the file
selecting menu, then press OK or button to display and
operate file details.
Press ◄ / ► button to select the file folder and press OK button
to enter sub-menu.
◄
Press ◄ / ► button to select menu in the bottom you want to run,
then press OK button to operate.
Press EXIT button to back to the previous menu .
Press button to hide the menu in the bottom.
NOTE
When highlighting the option you select, the file information
will appear on the right and the picture of photo and movie
will be previewed in the center.
17
Other Information
Trouble Shooting
When there is something wrong with your TV, you can try turning off the TV and then restart it. You can also Operate
according to the following chart. If the problem still cannot be solved, please contact the professional technicians.
SYMPTOMS POSSIBLE SOLUTIONS
Check if the power cord is in the AC outlet and if it has electricity.
No sound or picture.
Check if you have pressed [POWER] button on the TV or [POWER] button on the
remote control.
Check to see if LED light is either red or blue. If illuminated, power to TV is OK.
I have connected an external
source to my TV and I get no
picture and/or sound.
When I turn on my television,
there is a few second delay
before the picture appears. Is
this normal?
Picture is normal, but no sound.
Sound but no picture or black
and white picture.
Sound and picture distorted or
appear wavy.
Sound and picture is blurry or
cuts out momentarily.
Horizontal/vertical stripe on
picture or picture is shaking.
Check for the correct output connection on the external source and for the correct
input connection on the TV.
Make sure you have made the correct selection for the input mode for the incoming
signal.
Yes, this is normal. That is the TV searching for previous setting information and
initializing the TV.
Check the volume settings.
Check if Mute mode is set “on”.
If black and white picture first unplug TV from AC outlet and replug after 60 seconds.
Check Color Setting if picture is black and white.
An electrical appliance may be affecting TV set. Turn off any appliances, if
interference goes away, move appliance farther away from TV.
Insert the power plug of the TV set into another power outlet.
If using an external antenna, check the direction, position and connection of the
antenna.
Adjust the direction of your antenna or reset or fine tune the channel.
Check if there is interfering source nearby, such as appliance or electric tool.
The plastic cabinet makes a
“clicking” type of sound.
Black square appears in the
center of my television screen?
“Click” sound can be caused when the room temperature changes. This change
causes the television cabinet to inflate or contract, which makes the sound. This is
normal and TV is OK.
The Closed Caption function is set in the text mode. To remove it, access Closed
Caption from the menu screen and change the Mode setting from text to either CC1 or
off .
18
Trouble Shooting
SYMPTOMS POSSIBLE SOLUTIONS
On some channels getting
another language or sometimes
no sound at all.
Not getting all of my cable
channels on the television or I’m
only getting 13 channels.
V
[CH
/ V] don’t work when I
set the Channel to Cable? They
work with the Air setting?
Other Information
That would indicate that the MTS mode on your unit is set to SAP mode. We suggest
setting the MTS mode to either Stereo or Mono . For further instruction, please see
Audio Adjust or MTS/SAP in your user manual.
SAP is Second Audio Program. It’s a second audio channel that is usually used for a
second language or descriptive audio for the visually impaired.
MTS stands for Multichannel Television Sound, a standard that allows the encoding
of 3 channels of audio within a standard NTSC (analog) video signal to a television.
A television that is able to receive MTS Stereo allows you to watch television with
stereo sound.
Check the cable connection for an incoming signal. Make sure the signal is coming
OK. Best way to confirm signal is to use another TV and/or contact your cable
company.
Reprogram your channels. Press [MENU] button on your TV remote control, change
Input Source setting to “Cable”, then use “Auto Channels Search” to reprogram your
channels.
After switching to Cable, please auto program the channels. The TV will “remember” all
the channels then the TV will allow you to surf the channels with [CH
V
/V] buttons.
Remote control does not work.
Confirm that TV still has power and is operational.
Change the batteries in the remote control.
Check if the batteries are correctly installed.
Clean the front of the remote control (LED window).
If using a universal remote, be sure to select the TV mode on the remote.
If the remote still does not work:
• Remove and reinstall the batteries correctly to reset the remote or install new
batteries.
• Press the Power button to turn on the TV. With a universal remote if you have reset
or changed the batteries you will need to reprogram the remote for the other units.
Check if there is obstruction between the remote control and the TV.
TIP: If you have a digital camera / camera phone, you can aim the front of the remote
at camera lenses (at this time, the camera should set on camera mode, not play
mode). Observe the camera screen while pressing a button on the remote control; you
should see flashing light on the screen. If there is no light observed, the remote control
is not working. You need to repair or replace the remote control.
19
Other Information
General
NOTE
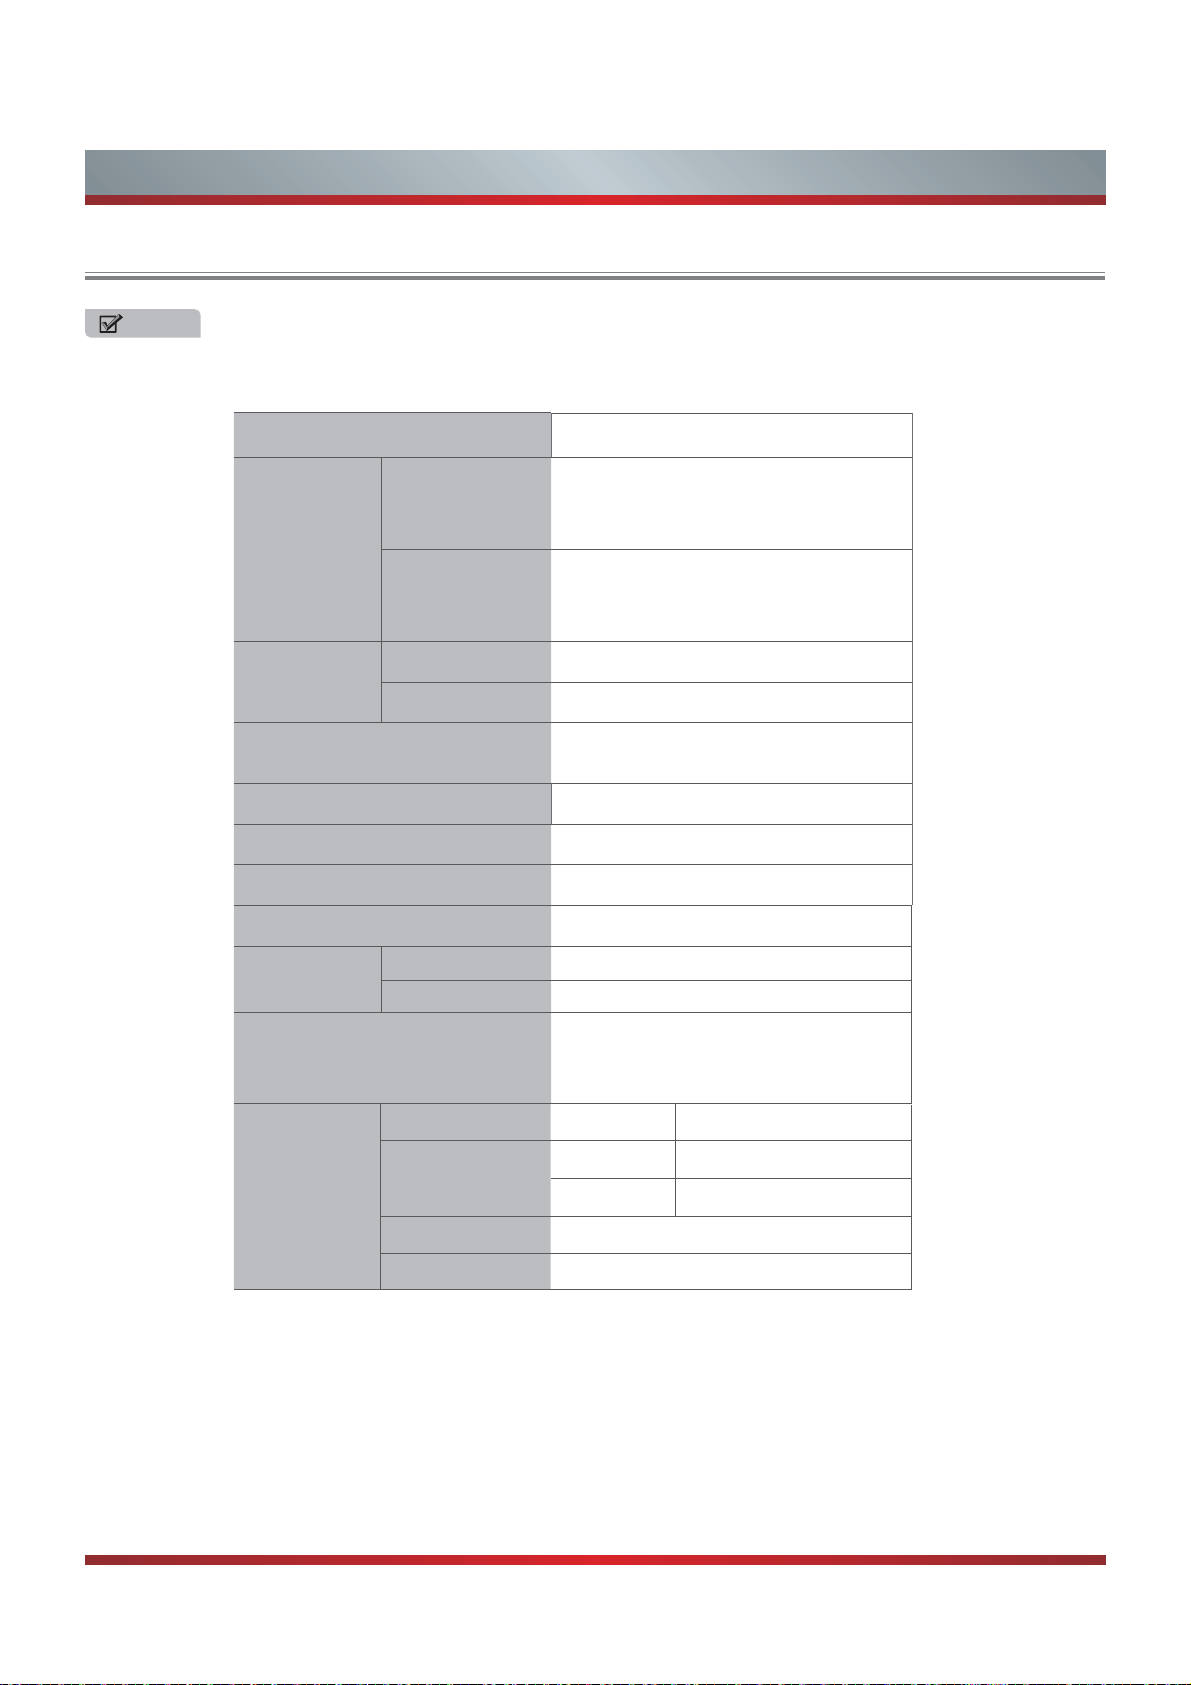
Features, appearance and specifications are subject to change without notice.
Model Name 32W22
Width: 29.7 inches(755 mm)
With Stand
Dimension
Without Stand
Without Stand 16.5 lbs(7.5 kg)
Weight
With Stand 19.8 lbs(9 kg)
Height: 20.2 inches(512 mm)
Depth: 7.0 inches(180mm)
Width: 29.7 inches(755 mm)
Height: 18.2 inches(463 mm)
Depth: 2.8 inches(70 mm)
LCD Panel Minimum size
(diagonal)
Screen resolution 1366 × 768
Audio power 8 W + 8 W
Power consumption Please refer to the rating label
Power supply 120 V ~ 60 Hz
Receiving
systems
Environmental conditions
VIDEO INPUT
Analog
Digital
VGA
VIDEO
Component
HDMI
32 inches
NTSC
ATSC
Temperature: 5°C~ 45°C
Humidity: 20%-80% RH
Atmospheric pressure: 86 kPa - 106 kPa
Format Up to 1920x1080@60Hz
Video System PAL/NTSC
Video level 1.0 Vp-p +/-5%
480i, 480p, 720p, 1080i, 1080p
480i, 480p, 720p, 1080i, 1080p
Made in China
The remote control requires:
• Number of Batteries: 2
• Type: AAA
• Voltage: 1.5Vcc
20
 Loading...