

Page 1

USER S MANUAL'
Before using the TV, Please read this manual
thoroughly, retain it for future reference.
LCD TV
LHDN32V88MH
Part NO.:
English
Page 2

Table of contents
Important safety instructions and Environment
Important safety instructions
Environment
Setting up
Pedestal installation instruction
Locating TV buttons and connectors
Connection to other devices
Using the remote control
Identifying the remote control buttons
Brief operations of the remote control
Basic operation
Power on/off
Changing channels/volume
Startup Menu settings
Select input source
Change picture mode
Change sound mode
Still picture
Mute sound
Set sleep timer
Change view ratio
EPG
Changing the TV settings
Channel settings
Picture settings
Sound settings
Screen settings
Function settings
Parental Control
Digital multimedia function
Brief functions introduction
Function introduction of remote control buttons
Browse pictures
Enjoy music
Play AV files
Appendix
Specification
Trouble shooting
Accessories
2
2
4
5
5
6
8
11
11
12
12
12
13
13
14
14
14
14
14
14
14
14
15
15
16
17
17
18
19
20
20
20
20
21
21
23
23
24
24
1
Page 3
Important safety instructions
Important safety instructions
CAUTION
CAUTION: TO REDUCE THE RISK OF ELEC-
TRIC SHOCK, DO NOT REMOVE
COVER(OR BACK).NO USERSERVICEABLE PARTS INSIDE.
REFER SERVICING TO QUALIFIED
SERVICE PERSONNEL.
The lightning flash with arrowhead symbol, within an
equilateral triangle is intended to alert the user to the
presence of uninsulated dangerous voltage within the
product senclosure that may be of sufficient magnitude
'
to constitute a risk of electric shock.
The exclamation point within an equilateral triangle is
intended to alert the user to the presence of important
operating and maintenance( servicing ) instructions in
the literature accompanying the set.
CAUTION: CHANGES OR MODIFICATIONS NOT EXPRESSLY APPROVED BY THE PARTY
RESPONSIBLE FOR COMPLIANCE WITH THE FCC RULES COULD VOID THEUSERS
AUTHORITY TO OPERATE THIS EQUIPMENT.
1. READ THESE INSTRUCTIONS
2. KEEP THESEINSTRUCTIONS
3. HEED ALL WARNINGS
4. FOLLOW ALL INSTRUCTIONS
5. DO NOT USE THIS APPARATUS NEAR WATER
6. CLEAN ONLY WITH DRY CLOTH
7. DO NOT BLOCK ANY VENTILATION OPENINGS
8. DO NOT INSTALL NEAR ANYHEAT SOURCES
9. DO NOT DEFEAT THE SAFETY PURPOSE OF THEPOLARIZED OR GROUNDING-TYPE PLUG
10. PROTECT THE POWER CORD FROM BEING WALKED ON OR PINCHED PARTICULARLY
ATRECEPTACLES, AND THE POINT WHERE THEY EXIT FROM THE APPARATUS.
11. ONLY USE ATTACHMENTS/ACCESSORIESSPECIFIED BY THE MANUFACTURE. PLUGS,
CONVENIENCE
12. USE ONLY WITH CART, STAND, TRIPOD, BRACKET, OR TABLE SPECIFIED BY
THE MANUFACTURER, OR SOLDWITH THE APPARATUS. WHEN A CART IS
USED, USE CAUTION WHEN MOVING THE CART/APPARATUS COMBINATION
TO AVOIDINJURYFROM TIP-OVER.
S3126A
2
Page 4
Important safety instructions
Important safety instructions
13. UNPLUG THISAPPARATUS DURING LIGHTNING STORMS OR WHEN UNUSED
FORLONGPERIODSOFTIME.
14. REFER ALL SERVICING TO QUALIFIED SERVICE PERSONNEL. SERVICING IS
REQUIRED WHEN THEAPPARATUS HAS BEEN DAMAGED INANY WAY, SUCH AS
POWER-SUPPLY CORDOR PLUG IS DAMAGED, LIQUID HAS BEEN SPILLED OR
OBJECTS HAVE FALLEN INTO THE APPARATUS, THE APPARATUS HAS BEEN
EXPOSED TO RAINOR MOISTURE, DOES NOT OPERATE NORMALLY, OR HASBEEN
DROPPED.
15. POWER SOURCE: This TV should be operated only fromthe type of power source
indicated on the marking label. If you are not sureof the type of power supply to your
home, consult your appliance dealer or local power company .For TVs intended to
operate from battery power,or other sources, refer to the operating instructions.
16. POWER CORD PROTECTION: Power-supply cords should be routed sothat they are not
likely to be walked on or pinched by items placedupon or against them, paying
particular attention to cords at plugs, convenience receptacles, and thepoint where
they exit from the appliance.
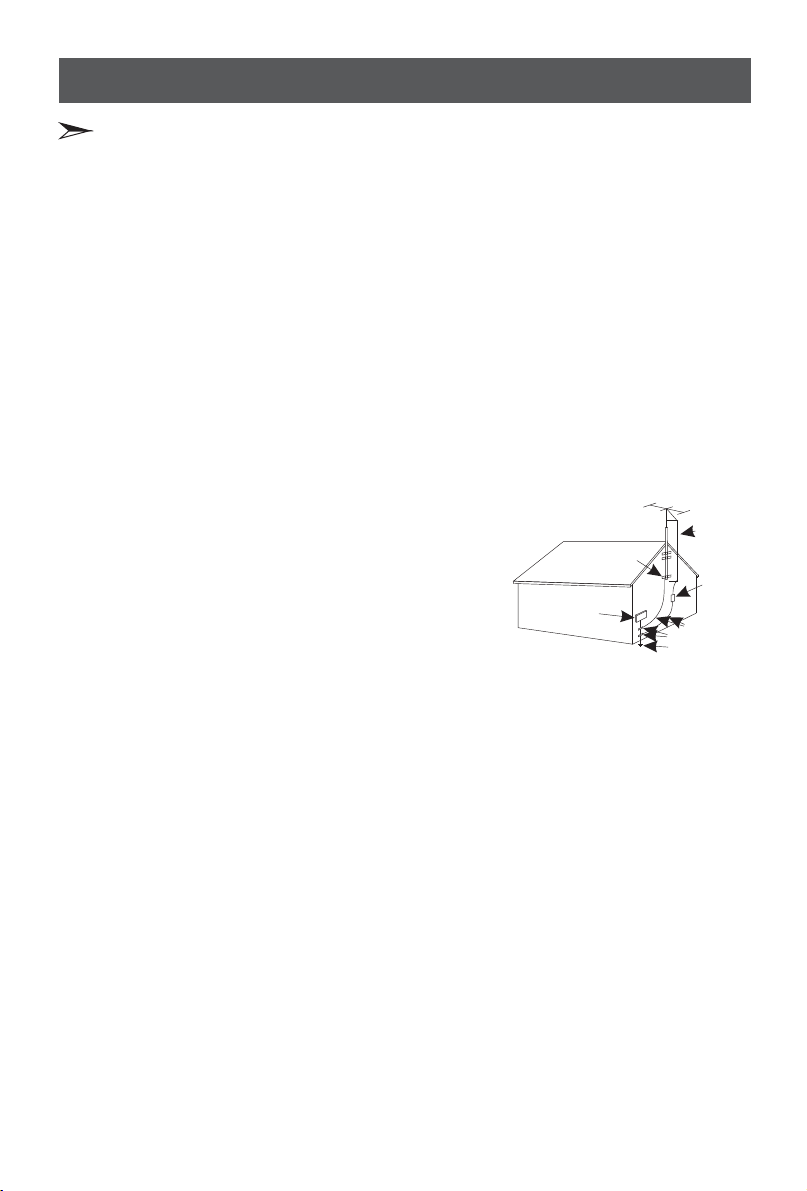
17. OUTDOOR ANTENNA GROUNDING
If an outside antenna or cable system is connected to
the TV, be sure the antenna or cable system is grounded
to provide some protection against voltage surges
and built-up static charges. Section 810 of the National
Electrical Code, ANSI/NFPA NO.70,provides
information with respect to proper grounding
of the mast and supporting structure, grounding
of the lead-in wire to an antenna discharge unit ,
size of grounding conductors, location of antenna discharge unit, connection to
grounding electrodes, and requirements for the grounding electrode.(Fig.A)
18. LIGHTNING: For added protection for this TV receiver duringa lightning storm, or when
it is left unattended and unused for long periods oftime, unplug it from the wall outlet
and disconnect the antenna or cable system. This will preventdamage to the TV due to
lightning and power line surges.
19. POWER LINES:An outside antenna system should not be locatedin the vicinity of
overhead power lines, or other electric light or power circuits,or where it can fall into
such power lines or circuits. When installing an outside antennasystem, extreme care
should be taken to keep from touching such power lines or circuitsas contact with
them might be fatal.
20. OVERLOADING:Do not overload wall outlets and extension cords asthis can result in a
risk of fire or electric shock.
21. OBJECT AND LIQUID ENTRY:Never push objects of any kind into this TV through
openings as they may touch dangerous voltage points or shortout parts that could
result in fire or electric shock. Never spill liquid ofany kind into the TV.
22. SERVICING:Do notattempt to service this TV yourself as opening or removing covers
may expose you to dangerous voltage or other hazards. Referall servicing to qualified
service personnel.
FIGURE A
EXAMPLEOF ANTENNAGROUNDING AS PER
NATIONALELECTRICAL CODE
ELECTRIC
SERVICE
EQUIPMENT
S2898A
GROUND
CLAMP
ANTENN
ANTENN
GROUNDING WIRES
GROUNDCLAMPS
POWERSERVICE GROUNDING
ELECTRODESYSTEM
3
Page 5

Important safety instructions
Important safety instructions
23. REPLACEMENT PARTS: When replacement parts are required, be sure the service
technician uses replacement parts specified by the manufacturer that havethe same
characteristics as the original part. Unauthorized substitutions may result infire,
electric shock, injury to persons or other hazards.
24. SAFETY CHECK:Upon completion of any service or repairs to this TV, ask the service
technician to perform routine safety checks to determine that the TV isin proper
operating condition.
25. The apparatus shall not be exposed to dripping orsplashing and no objects filled with
liquids such as vase, shall be place on the apparatus.
26. WARNING: Plug thepower cord into a power outlet where access to the powercord
connector is readily accessible in case power dis-connection is required.
27. ATTENTION: This device complies with Part 15 ofthe FCC Rules. Operation is subject
to the following two conditions:(1) this device may not cause harmful interference,
and (2) this device must accept any interference received, includinginterference
that may cause undesired operation.
28. CAUTION: To reduce the risk of electric shock, grounding of centre pin of this plug
must be maintained.
FCC Notice
This device has been tested and found to comply with the limits for a Class B digital device
pursuant to Part 15 of the FCC Rules. These limits are designed to provide reasonable protection
against harmful interference in a residential installation. This device generates, uses, and can
radiate radio frequency energy and, if not installed and used in accordance with the instructions,
may cause harmful interference to radio communications.
However, there is no guarantee that interference will not occur in a particular installation. If this
device does cause harmful interference to radio or television reception, which can be determined
by turning the device off and on, the user is encouraged to try to correct the interference by one
or more of the following measures:
Reorient or relocate the receiving antenna
Increase the separation between the device and receiver
Connect the device into an outlet on a circuit different from that to which the receiver is
connected
Consult the dealer or an experienced radio/television technician for help
4
Page 6

Important safety instructions and Environment
Environment
(Waste Electronic Electric Equipment)
WEEE
European Directive 2002/96/EC & 2003/108/EC
The symbol of the dustbin means that this apparatus cannot be
put at the rebus with other current domestic waste. Some components
may be harmful to the environment.
Do not throw away with domestic waste, to deposit it on the
public domain or any other site which is not used for this purpose.
Contact your local authority to know the place of collection.
This apparatus has a particular recycling treatment for the reemployment of the matters which make it up.
The selective collection of waste electronics makes it possible to reduce
the number of substances which are not recycled and thus
contribute to the safeguard of the environment.
(Reduction of Hazardous Substance)
ROHS
barred
dangerous
European Directive 2002/95/EC
This European directive limits the use of dangerous and hazardous
substances which are not recyclable or those of which recycling is
difficult.
This allows recycling easily the EEE and contributes to the safeguard
of the environment.
Substances included in this product match to the RoHS directive.
Battery
Do not throw away battery with common domestic waste. Throw battery
in a collecting zone indicated. Do not throw the pile in fire.
Do not mix different kinds of batteries. Do not combine the worn battery
with the new ones.
Immediately remove the over-heated battery to prevent the acid from
fleeing in the battery compartment.
If you do not intend to use the remote control for a long period of time,
remove the batteries.
5
Page 7
Setting up
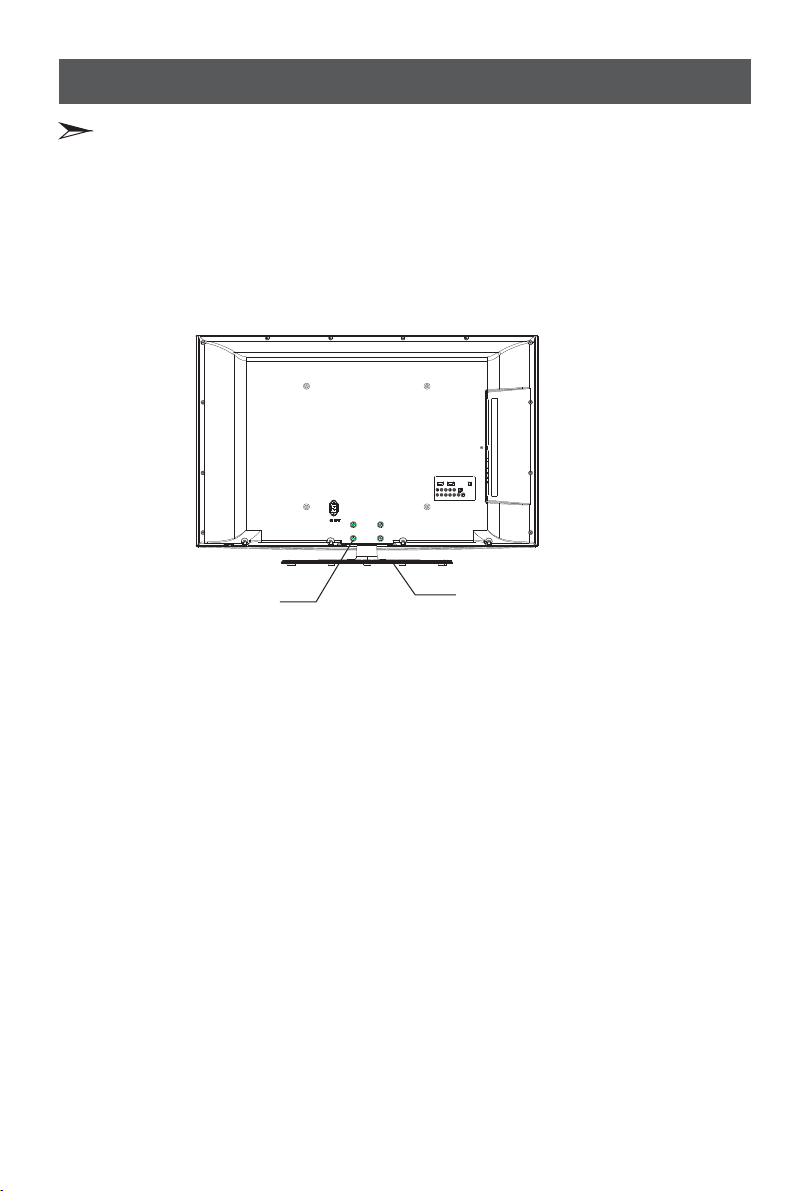
Pedestal Installation Instruction
1. Lay the soft froth on the table which can hold enough weight of the whole TV in case of
causing damage to TV or person.
2. Put the TV on the froth ,with its back upwards and the LCD downwards.
3. Take out the pedestal, and insert the pedestal into the TV suitably, then put the pedestal
to relevant position of the TV set until all the holes match each other completely.
4. Fasten the pedestal and the TV set together with screws.
5. Erect the TV set, and put it on the proper position for watching.
screw
Note:
The above figures are for reference only, please refer to the actual units to determine
the appearances.
Every hole of the pedestal must be fastened with screws!
pedestal
6
Page 8
Setting up
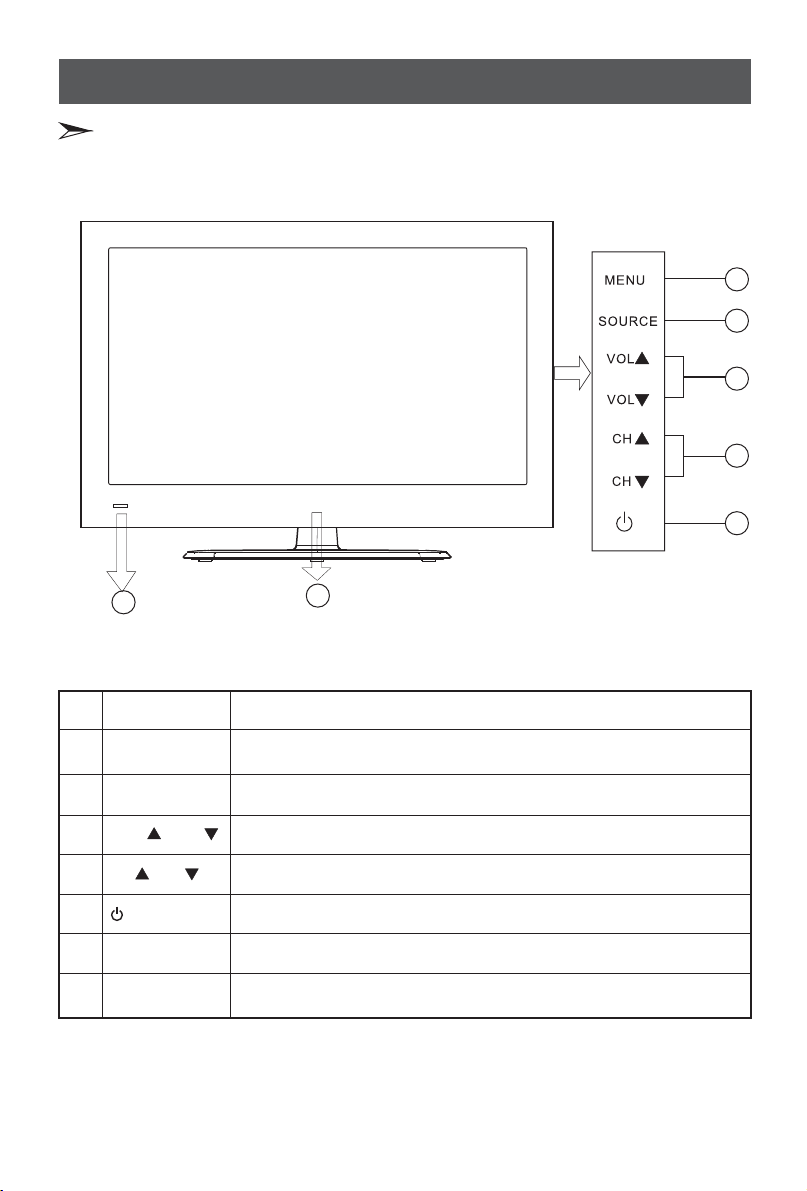
Locating TV buttons and connetors
Note: The below figures are for reference only, please refer to the actual units to determine
the appearance.
1
2
3
4
5
6
NO.
TV(front)
Menu
1
2
Source
3
VOL VOL/
4
CH CH/
5
Remote control
6
sensor
Power
7
indicator
(Standby)
7
Description
Display the onscreen display(OSD) or Exit to close the OSD.
Select the input source. Press Source to open the list of input sources.
And the button will be as the OK function when display the OSD.
Raise or lower the sound level. In an OSD menu, press these buttons
to move right or left in the menu or to adjust an item.
Select the next higher or lower channel. In an OSD menu, press these
buttons to move up or down in the menu.
Press to turn your TV on or off (standby mode).
Receives signals from the remote control. Please do not block.
The light shows whether the TV is on or standby mode.
7
Page 9

Setting up
Locating TV buttons and connetors
USB
ANT IN
MPI
R
P
R
B
P
L
Y
COMP1
AC INPUT
YP
DIGITAL
AUDIO OUT
COMP2
B PR
LRR
AUDIO OUT
HDMI2HDMI3
L
VIDEO
8
L
AV
HDMI1
HEADPHONE
R
VGA
SERVICE
S-VIDEO
HDMI4 PC AUDIO
Page 10

Setting up
Connect to other devices
Warning: Before connecting the TV to any other electronic device, unplug the TV and
electronic device AC cords from the AC input.
Not all following terminals are included on your TV. The actual one refer to the part of
“”Locating TV buttons and connectors
1. Connect to broadcast antenna or the cable TV
To have an optimal picture quality, it is strongly recommended to have an external antenna or a
cable TV.
Note:
n
It is recommended that coaxial cable (75 ) be used to eliminate the interference caused by the
mismatched impedance.
n
The antenna cable should not be bound together with the power cord.
n
When using the cable TV, please insert the plug of the coaxial cable (75 ) directly into the
antenna outlet.
2. Connect to AV devices
Connect a Video RCA cable to an appropriate external A/V
device such as a VCR, DVD or Set-top boxes.
Connect RCA audio cables to “R - L(audio)” on your set and the other ends to corresponding
audio out connectors on the A/V device.
Video in(composite video) transmits video as a single signal.
your set and the other ends to
R
L
VIDEO
Red
White
AV
Yellow
VCD, DVD, set-top boxes, etc.
S-video transmits video in separate color and black-and-white image signals and delivers a
sharper image than a composite video connection.
Connect a S-Video cable to your set and the other ends to an appropriate external A/V device
such as a VCR, DVD or Set-top boxes.
Connect RCA audio cables to “R - L(audio)”(AV) on your set and the other ends to
corresponding audio out connectors on the A/V device.
9
Page 11

Setting up
Connect to other devices
The equipment with S-Video output
S VIDEO-
Red
R
White
L
3. Connect to devices with Component interface
Component video(Y, Pb, Pr)transmits video as separate signals. Use this connection for
high-definition video signals from a DVD or other equipment.
Connect Component video and audio cables to Component inputs (“PR/CR”, “PB/CB”, “Y”) on
the rear of your set and the other ends to corresponding component video out connectors on the
PVR or DVD.
The Y, PB/CB and PR/CR” connectors on your component devices (PVR or DVD) are
sometimes labeled Y, B-Y and R-Y or Y, CB and CR. (Colors for inputs and cables must
correspond on both devices.)
R
L
Red
White
Red
Blue
Green
Audio R
Audio L
P/CRR
P/CBB
Y
4. Connect to devices with HDMI interface
HDMI transmits an all-digital signal and is the recommended choice for playback from a digital
DVD or DVR. No sound connection is needed for HDMI to HDMI connection.
HDMI cable connected to the HDMI connector on the TV.
function ( such as VCD, DVD, set-top
boxes, etc.).
Y, Pb, Pr
DVD With Component jacks
HDMI
The equipment with HDMI output jack
( such as DVD players, set-top boxes, etc.).
5. Connect to
devices with USB interface
Only updating the software for maintenance man.
USB
10
Page 12

Setting up
Connect to other devices
6. Connect to PC
Connect the D- Sub cable to “VGA” on the rear of your set and the other end to the Video
Card of your computer.
Connect the stereo audio cable to “PC AUDIO ” on the rear of your set and the other end to
“Audio Out” of the sound card on your computer.
VGA
PC AUDIO
Computer
7. Connect to headphone
Connect the headphone jack of the TV set.
The volume of the headphone is automatically adjusted with the main volume of the TV set.
HEADPHONE
Headphone
8. Optical audio
Connect an optical audio device to this jack (Toslink optical cable is needed).
Note: DTV and HDMI output only.
COAXIAL
(OPTICAL)
11
Page 13

Using the remote control
Identifying the remote control buttons
Remote sensing window
Power on/off
Direct channel selection
Dash button
Reverts to the previously
selected channel
Select picture mode
Volume increase
Volume decrease
Menu button
/ / /
control the cursor in
the menu
Freeze picture
Zoom button
Set the sleep timer
Audio select button
Mono/Stereo/SAP operation
TV Source
123
456
789
Info
0
Recall
VOL CH
Menu
Zoom
Sleep
HDMI
Still
SAP
Comp.
Picture
OK
EPG
E.S
VGA
Sound
Exit
CC
AV
S-Video
Select input source
Enter TV source
Display the current channel number
Select sound mode
Mute button
Next channel
Previous channel
Turn to the upper menu
Confirm selected operation
Electronic Program Guide
Adjust CC mode
Select AV HDMI Component
VGA sourceS-Video
Set saving mode
DMP
DMP Zoom
CN-31613A
Setup
Note:
1. Please refertothe practicality.
2. Red/Green/Yellow/Cyan buttons are used for specialfunction.
12
Special function buttons
These buttons are invalid
Page 14

Using the remote control
Brief operations of remote control
Change the batteries
1. Open the battery cover on the back of the remote control.
2. Install two AAA size (1.5V) batteries. Match the “+” and “-” signs on the batteries to the signs
on the battery compartment.
3. Close the battery cover.
Note:
1. If the remote control doesn't work normally, unstable, or cannot control the TV, please replace
the batteries.
2. If you do not use the remote control for a long time, remove the batteries.
The effective range of remote control
1. The remote control distance: 8 meters in front of the TV set.
2. The remote control angle: taking the television infrared light receiver window as an apex, 6
meters away, its controlled angle (left to right) is within 30 degrees, while the vertical angle
(up to down)is within 30 degrees.
Basic operations
Basic operations
Power on/off
1.
Connect the Power Cord to the connector on the back of the TV if the Power cord in
accessories When connecting the power cord to the connector of the TV, make sure the power
cord is fully inserted in the place. Bad contact may cause high temperature of the connector and
the risk of fire or other damages
2.Connect the TV power line to AC outlet.
3. Press the Power button on the TV set. When the TV is on, press the Power button on the
remote control, and the TV will enter Standby state. Press this button again, and you can watch
TV normally.
4. Press the Power button again to turn off the TV.
Note:
In order to save power consumption, set the TV in Standby state if you do not watch TV for a
short time, if you do not watch TV for a very long period of time, shut down the main power of the
TV.
If the TV is turned off , to turn it on agin, please wait at least 5 seconds in case the abnormal
phenomena occurred.
.
,
13
Page 15

Basic operations
Changing Channels/ Volume
1. Press [CH ] button on the remote control, you can change the channels.
(Press [VOL ]button to raise or lower the volume).
2. Press [CH ]button on the front panel of the TV set, you can also change the channels.
(Press [VOL ] button to raise or lower the volume).
3. Press the numeric buttons on the remote control to display the corresponding channels.
Note:
Changing the channels can also be achieved by directly pressing the programme No. If you want
to choose the programme No. from 1 to 9, press the numeric buttons directly. If you want to select
a programme No. that double-digit or three-figure, the time between twice pressing the numbers
should not be more than 3 seconds.
/
/
/
/
Select input source
Choose the current input signal of the main picture. First press [Source] button to display the signal
inputs. Press [ ]button to select the source you wanted to enter, then press [ ] button
to confirm.
/ /OK
Change picture mode
It can be set as Normal, Vivid, Sports, Movie, Game and User. This mode achieves a certain image
display effect by setting the brightness, contrast and color etc.
Change sound mode
It can be set as Normal, Rock, Jazz, Classic, Pop and User. This mode achieves a special sound
effect by setting equalizer.
Still picture
Press [Still] button that moving picture will become a still one.
Mute sound
Press [Mute] button to turn the sound off, press this button again to turn the sound back on. This
function is used to switch off sound temporarily.
Set sleep timer
It can set the TV to let it enter into the Standby state automatically, Press this button repeatedly to
select the proper sleeping clock mode, and the clock tells you the remaining time before the TV
enters Standby state.
14
Page 16

Basic operations
Change view ratio
For the various Sources, this unit has set various display modes. Press Zoom button to display
Zoom menu, including ''Auto”, "Full Screen", ''Normal", "Zoom 1", "Zoom 2", "Smart Zoom”,
“Panorama”.
Normal: Shows the standard 4:3 ratio picture image in the center of the TV with dark bars on the
◇
left and right.
Full Screen: This mode display the picture of input source expanded to fill the screen.
◇
Zoom1: Proportionally stretches the TV picture, but clips the top and bottom of the image to
◇
fit the screen. Eliminates black bars.
◇
Zoom2: Zooms further into the middle of the screen and clips off more from the top and bottom.
◇
Panorama: Similar to 16:9 mode, but shows more of the sides.
Note:
The option of zoom mode is different in different sources.
EPG
EPG: Electronic programme Guide, you can see the programme information.
15
Page 17

Changing the TV settings
TV settings
TV
Closed Caption
Tuner Source
Auto Scan
Parental Control
Update EPG
Select:
Enter:
Air
No
OK
Return: Exit:
Exit
The options are:
Show the caption or not. It includes:Closed Caption:
◇
Closed Caption: Show the caption or not. When you choose ”CC Mute”, the caption shows
only in mute mode.
◇
Analog CC Mode: Set the caption mode of analog program.
◇
Digital CC Mode: Set the caption mode of digital program.
◇
User-define Style: Set the caption style by yourself. such as color and font etc.
Tuner Source:
Auto Scan:
P:
arental Control
Select source of tuner.
Searches the channels automatically.
When you first use this function, you can set the password and the password
is effective since then. Only you input this password, you can continue to the next operation.
The Motion Picture Association of America (MPAA) uses a rating system to qualify motion picture
content. Television broadcasters employ a rating system to qualify the content of televison
programs as well. The MPAA and TV ratings allow you to block out programming above the
rating limits you determine.
◇ US MPAA Rating:
Rating
G
PG
PG-13
R
NC-17
X
NR
Defined as
General audience
Parental Guidance suggested
Parents strongly cautioned
Restricted
No one 17 and under admitted
Adult audience only
Not rated
1 Press Menu button to display the main menu.
2 Press button to select TV item.
/
[]
3 Press [ OK] button to enter TV menu.
]
4 Press [ button to select the option, press
[//OK] button to enter or press [ button to exit.
/
]
/Exit
5.When you are finished, press the Menu button to close
the menu.
Menu
16
Page 18

Changing the TV settings
◇ US TV Rating:
The TV ratings are divided into two groups: age-based and content-based.
Age
TV-Y
TV-Y7
TV-G
TV-PG
TV-14
TV-MA
CA English Rating:◇
Rating
E
C
C8+
G
PG
14+
18+
◇ CA French Rating
Rating
E
G
8ans+
13ans+
16ans+
Defined as
All children
Directed to older children
General audience
Parental Guidance suggested
Parents Strongly cautioned
Mature Audience only
Description
Exempt
Children
Children eight years and older
General Programming,suitable for all audiances
Parents Guidance
Viewers 14 years and older
Adult programming
Description
Exempt
General
8+ General Not recommended foryoung children
Programming may notbe suitable for children under
the age of13
Programming is not be suitable for children under
the age of 16
Contents
FV
V
S
L
D
Defined as
Fantasy Violence
Violence
Sexual situations
Strong language
Suggestive dialogue
18ans+
NOTE: As you block rating, all rating higher than the ones you select are blocked as well.
For example, if you choose to block the MPAA rating R,the higher ratings,NC-17 and X,
are automatically blocked too.
Update EPG: Electronic Program Guide
function.
Programming restricted to adults
After searched channels, you can update EPG( ) by this
17
Page 19

Changing the TV settings
Picture settings
Picture
Enter:
User
50
50
50
48
20
6
Neutral
No
OK
Return: Exit:
Exit
Preset Mode
Brightness
Contrast
Saturation
Hue
Sharpness
Backlight
Color Temperature
Video Reset
Select:
The options are:
Preset Mode:
Brightness:
Set the type of picture.
Increases the brightness to add more light to dark areas of the picture. Decreases
the brightness to add more dark to light areas of picture.
Contrast:
Increases the picture level to adjust the white areas of the picture. Decreases the
picture level to adjust the black areas of the picture.
Saturation:
Hue:
Sharpness:
Adjusts the intensity of the color.
Adjusts the wareLength of the color.
Increases the sharpness level to show cleaner and cleaner image. Decreases the
level to show a smoother picture.
Color Temperature:
Video Reset:
Selects the color temperature. You can select Neutral, or .
Reset the parameters above to default settings.
NOTE: Only “Preset Mode” set to “user”, the Brightness, Contrast, Saturation, Hue,
Sharpness can be adjusted. when you adjust them to a proper number, then press OK
button you can exit to the upper menu.
1 Press Menu button to display the main menu.
2 Press button to select Picture item.
3 Press [ ] button to enter menu.
4 Press [ button to select the option, press
[ ] button to enter or press [ button to adjust
/
[]
/
OK Picture
/
]
/
OK ]
/
the option.
5.When you are finished, press the Menu button to close
the menu.
Menu
Cool Warm
18
Page 20

Sound setting
Sound setting
Audio settings
Audio
Enter:
Mono
Both
0
OK
Return: Exit:
Exit
MTS
Digital Audio
Speaker
Balance
Audio Setting
Virtual Surround
Select:
The options are:
Selects the sound mode. You can select Mono, Stereo, or SAP(Second Audio Program).
MTS:
Digital Audio:
Speaker:
Show the current digital audio.
Sets the style of audio output. For example, when you select “Internal”, the audio
output only by internal speaker.
Balance:
Audio Setting:
Adjusts the volume from the left and right speakers.
Selects the audio mode, When you select “User” mode, you can weaken or
enlarge the sound of the main frequency points.
Virtual Surround:
On/Off the virtual Surround function.
1 Press Menu button to display the main menu.
2 Press button to select Audio item.
3 Press [ ] button to enter menu.
4 Press [ button to select the option, press
[ ] button to enter or press [ button to adjust
/
[]
/
OK Audio
/
]
/
OK ]
/
the option.
5.When you are finished, press the Menu button to close
the menu.
Menu
Changing the TV settings
Power settings
Power
DPMS Mode
Sleep
TV ON/OFFTime
Power Mode
Select:
Enter:
Off
E.Saver
OK
Return: Exit:
Exit
The option is:
DPMS Mode:
This is a good function for a computer monitor. When DPMS is on, the computer
will control the screen on or off. For example, the item set to “5 Mins”, computer has no signal
for 5 minutes continually, the screen will be switched off. If the computer is activated, the screen
also is activated.
1 Press Menu button to display the main menu.
2 Press button to select Power item.
3 Press [ ] button to enter menu.
4 Press [ button to select the option, press
[ ] button to enter or press [ button to adjust
/
[]
/
OK Power
/
]
/
OK ]
/
the option.
5.When you are finished, press the Menu button to close
the menu.
Menu
if
19
Page 21

Changing the TV settings
Power settings
TV ON/OFF Time:
Auto Synchronization: Auto adjusts the system time in DTV mode only.
◇
Date/Time: Sets the date/time by number buttons.
◇
Power On Timer: When select “on”, sets the TV ON time by number buttons.
◇
Power Off Timer: When select “on”, sets the TV OFF time by number buttons.
◇
Power Mode:
Adjusts the TV ON/OFF time.
Adjusts saving mode. E. Saver mode will be more energy-efficient.
Changing the TV settings
Function settings
Setting
Language
Aspect Ratio
Zoom V-Position
OSD Timeout
Transparency
Date &Time
Input SourceLabeling
Select:
Enter:
English
Full Screen
0
Off
0
OK
Return: Exit:
Exit
1 Press Menu button to display the main menu.
2 Press button to select Function item.
3 Press [ ] button to enter menu.
4 Press [ button to select the option, press
[ ] button to enter or press [ button to adjust
/
[]
/
OK Function
/
]
/
OK ]
the option.
5.When you are finished, press the Menu button to close
the menu.
Menu
/
The options are:
Language:
Aspect Ratio:
Zoom V-Position:
Sets the menu language.
You can select the picture size which best corresponds to your viewing requirements.
The function works with Aspect Ratio = Zoom1 or Zoom2. It allows users to
adjust the vertical position of video display.
OSD Timeout:
Transparency:
Date&Timer:
Clock Update: When you set Clock Update “Automatically”, the time on the TV is received from
◇
Sets the display time of OSD.
Sets the transparency of OSD.
Sets Clock Update, Time Zone and Daylight Saving.
the digital TV signal.
Time Zone: Selects time zone of your location.
◇
Daylight Saving: This function allows users to enable or disable the Daylight Saving Time function.
◇
Input Source Labeling:
Name the input source.
20
Page 22

Changing the TV settings
Hotel menu settings
Hotel Settings
Enter:
On
100
0
On
No
READ OUT
OK
Return: Exit:
Exit
HOTEL MODE
TV ONSETTING
FUNCTION LOCK
MAX VOLUME
MIN VOLUME
AUTO STANDBY
CHANNEL SETTING
RSR ENABLE
SET SSID
CLONE
Select:
The options are:
HOTEL MODE:
TV ON SETTING:
◇
ON VOLUME: Sets the initial volume only the item is “On” state.
◇
ON VOLUME VALUE: Sets the initial volume when you turn on the TV.
◇
ON SOURCE: Sets the initial source when you turn on the TV.
◇
ON CHANNEL: Switches on channel setting. Only be used when [ON SOURCE] is TV.
◇
ON CHANNEL NUMBER: Sets the initial channel number when you turn on the TV. Only be
Sets hotel mode. Only it was set to “On” state, the items below are available.
Sets the initial state when you turn on the TV.
used when [ON CHANNEL] is “On”.
◇
LOGO: Set the logo when you turn on the TV.
◇
POWER ON: Available options are ON/STANDBY/LAST, Which are switching on, standby and
staying at last status.
◇
BASIC SETTING: If it is set to [On], after AC/DC switching on, picture mode and sound mode
are set to [standard], zoom mode is set to [full screen], and volume is set to [20].
FUNCTION LOCK:
◇
KB LOCK: TV Keyboard lock setting. If it is set to [On], all keyboards can not be used.
◇
Search LOCK: Channel searching lock setting. If it is set to [On], channels can not be searched
Lock some functions.
or changed menu function can not be used.
◇
USER SAVE LOCK: If it is set to [Off], Customer adjusting on picture mode, sound mode and
other functions are not saving to EEPROM. System will reset to the status before adjusting
after restart.
◇
SUBMENU LOCK: If it is set to [On], Customer can only enter the basic picture function menu
(such as brightness, sharpness and color) and Lock Setting menu. Further picture/sound
functions and channel searching menu can not be entered. Meanwhile relevant buttons such
as Sound Mode, Sleep, Zoom on the remote control are not in use.
◇
INPUT SELECTION: Locks some source individually by selecting the pop up sub-menu.The
source can not be accessed after locking.
1 Press Menu button to display the main menu.
2 Press button to select Audio item.
3 Press [ ] button to enter menu.
4 Press [ button to select Balance option, press
[ button to adjust it to 0. and press 5 4 8
/
[]
/
OK Audio
/
]
/
]
buttons to enter hotel menu.
5
Press [ OK] button to enter or press [ ] button to
/
/
adjust the option.
When you are finished, press the Menu button to close
6
Menu
the menu.
21
、、
Page 23

Changing the TV settings
Hotel menu settings
MAX VOLUME:
MIN VOLUME:
AUTO STANDBY:
CHANNEL SETTING:
TUNER SOURCE: Selects source of tuner, including CABLE, HRC, IRC, AIR.
◇
AUTO SCAN: Searches the channels automatically.
◇
PROGRAM GUIDE EDIT: Edit the channels, Including:
◇
Rename the channel: P
◆
/]
[ button to adjust the token of the name. Press Red button to confirm or Green button to
cancel.
Skip the channel: Press Green button to select skip function; press Red button to confirm. If
◆
you want to cancel skip, select this channel and press Green button; press Red button to
confirm.
Delete the channel: Press Blue button to select delete function, and then press Red button to
◆
confirm.
Copy the channel: Press Yellow button to select copy function. Then press button to
◆
move to the desired position and press Red button to confirm.
Swap the channels: If you want to change the order of the programs, press [ ] button; press
◆
/
[ ] button to move to the desired position, and then press [ ] button to confirm.
RSR ENABLE:
SET SSID(Session Identification):
session identification information must be forwarded to the Pro:Idiom device (Hotel TV) to enable
decryption. The SSID is used each time an encrypted channel is tuned and it must contain 20
bytes of information.
CLONE:
Operation is as follows: First insert U disk, and then enter HOTEL MENU, select READ OUT , the
YES option is OK to confirm the next point , after the completion of READ OUT action.
At this point the previous U-disk into the state of the machine need to be copied into the HOTEL
MENU, select WRITE IN , the YES option is OK to confirm the next point, after the completion of
WRITE IN action, the whole auto-CLONE completed after rebooting.
Note: When Use the clone function, the equipment (U disk, etc.) must be connected to the
USB interface.
Sets the maximum volume.
Sets the minimum volume.
If it setted to [On], the TV will auto standby if no input signal for 15 minutes.
Sets and edits channels.
ress Red button to change the name of the selected channel. Press
/]
[
If it setted to [On], activate “Virtual Surround” function.
The SSID is provided by the PPV system provider. This
CLONE feature, you can copy the state of the machine to another machine.
22
Page 24

Specification
Appendix
Model Name
Dimension Without stand
(W H D)(mm)
Weight(kg)
LCD Panel
Minimum size diagonal)
Screen resolution
Power consumption
Audio power
Power supply
Receiving systems
Component Input
VGA Input
HDMI Input
With stand
Without stand
With stand
(
LHDN32V88MH
788×511×101
788×561×252
12
14
81
1366×768
140W
7W+7W
Refer to rating label
RF NTSC/ATSC
AV NT SC
480I/60Hz 480P/60Hz
720P/60Hz 1080I/60Hz
1080P/60Hz
VGA 640×480 60Hz SVGA 800×600 60Hz
XGA 1024×768 60Hz
、
()、( )
()
YUV/60Hz 480I 480P 720P 1080I 1080P
、、
RGB/60Hz 640×480 800×600 1024×768
()
()
、、、 、
、、
23
Page 25

Appendix
Trouble shooting
When there is something wrong with your TV, you can try turning off the TV and then restart it.
You can also operate according to the following chart. If the problem still cannot be solved, please
contact the professional technicians.
1. Check if the power line is in the outlet and if it
has electricity.
2. Check if you have pressed Power button on the
No sound or picture
The picture is normal
but there is no sound
No picture and white
or black picture
The sound and picture are
interfered
Unclear picture or picture with snow
The remote control does not work
TV or Power button on the remote control.
3. Check the setting of picture brightness and
contrast.
4. Check the volume.
1. Check the volume.
2. Check if Mute mode is set.
1. Adjust Picture Setting.
2. Check Color System.
1. Try to find the appliance affecting TV set, and
move it far away from the TV set.
2. Try to insert the power plug of the TV set into
another outlet.
1. Check the direction, position and connection of
your antenna.
2. Adjust the direction of your antenna or reset or
fine tune the channel.
1. Change the batteries in the remote control.
2. Clean the upper side of the remote control
(radiating window)
3. Check the contacting points of the batteries.
4. Check if there is obstruction between the
remote control and the monitor.
5. Check if the batteries are correctly installed.
H/V strip or the picture shaking
The cabinet of the TV makes “Click” sound
Accessories
Remote control...........................1
User's Manual.............................1
Dry Cell Battery...........................2
Power Cord.................................1
Screws for fix pedestal................4
Check if there is an interfering source nearby, such
as appliance or electric tools.
makes "Click" sound''Sometimes the room
temperature change can cause the television
cabinet to inflate or contra, which makes this
sound. This does not mean the TV breaks
down.
24
 Loading...