

Hisense Communications C389, C399 User Manual

COMMUNICATION
S
V
C389/C399
CDMA MOBILE PHONE
User’s Guide
ersion: 1.0
Doc ID: C389_UG_V1.0
C389 User’s Guide
p
y
)
A
p
r
p
y
g
y
r
t
y
p
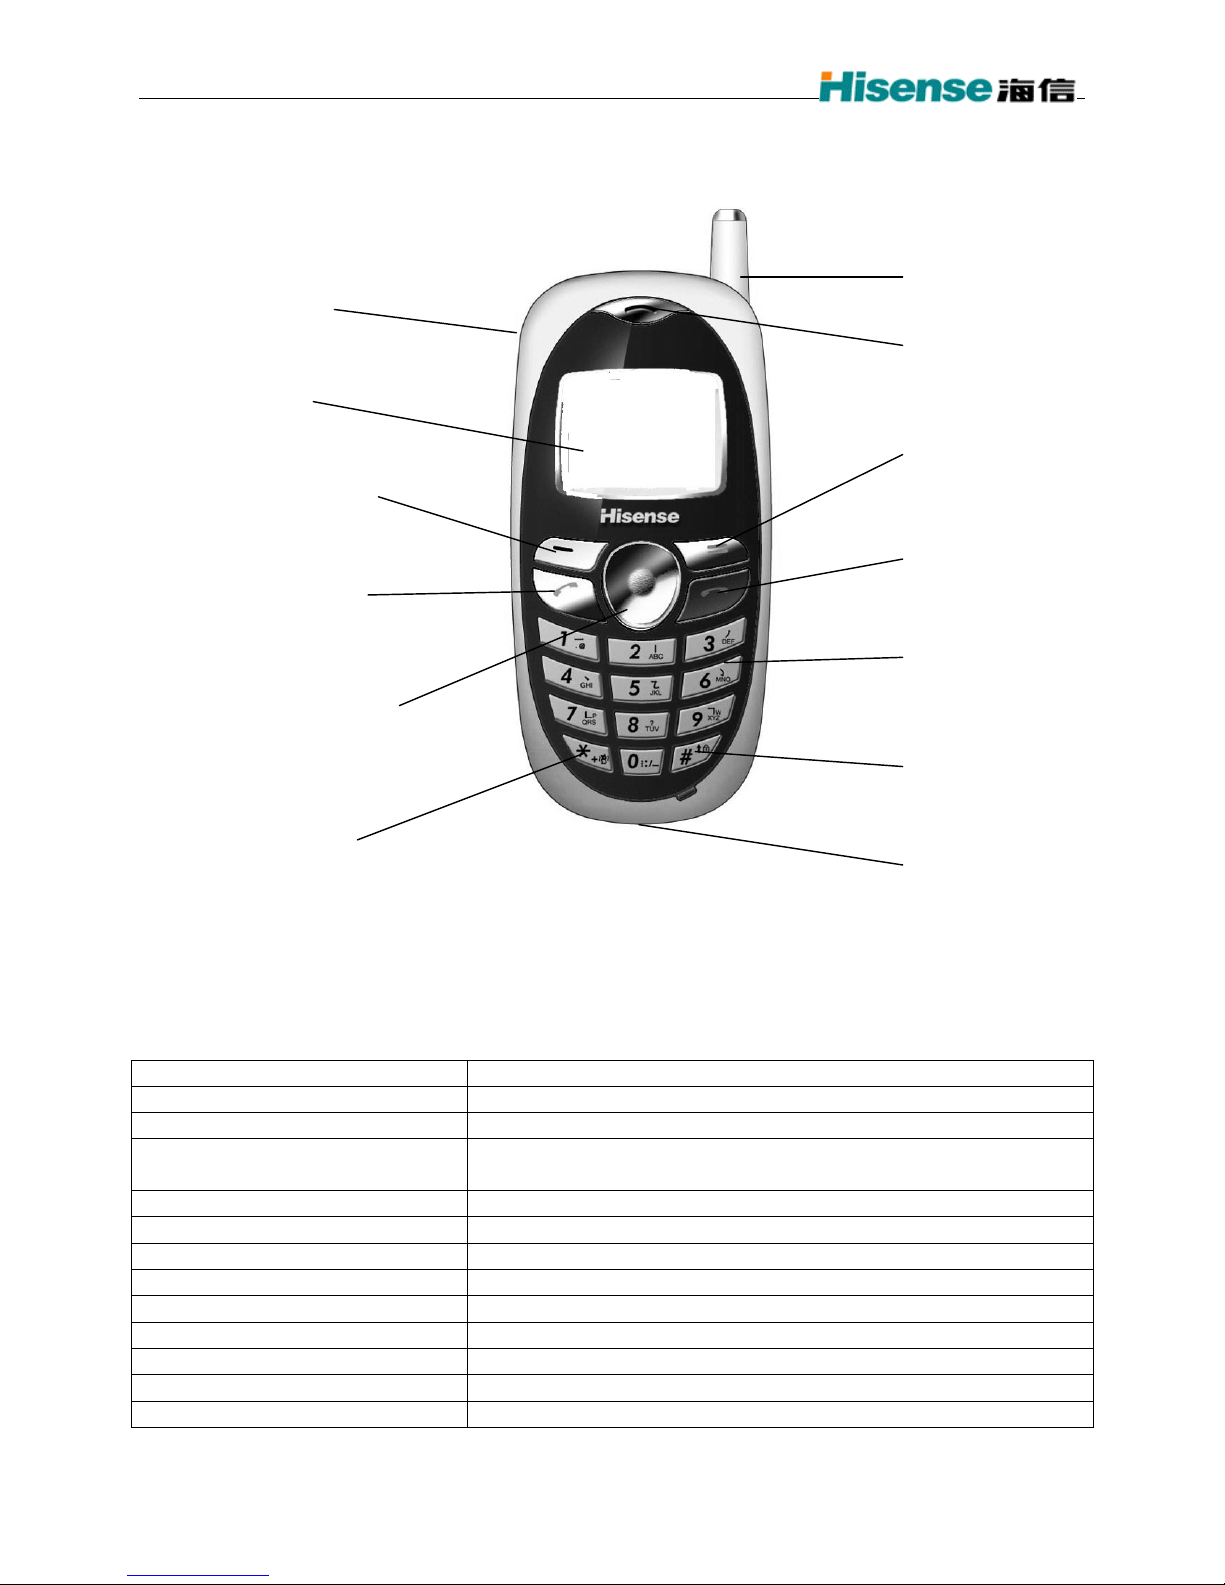
Welcome to your Phone
Headset Jack
for Hands-free Headset
with MUTE button (sold
aratel
se
Display Screen
C or Clear key
Erases the last character in
text entry, or returns to the
previous menu
Call/Send key
Dials a number or answer a
call
Navigation key
4-way navigation for scrolling
through lists and positioning
the cursor. Also accesses
shortcuts from the home
screen.
* key
Switches between uppe
and lower case during tex
entr
ntenna
Earpiece
Selects a menu item or
tion
o
OK or Select key
Select a menu item o
o
tion
End/Power key
Switch the phone on or off,
end a call, or return you to
the home screen
Alphanumeric Keypad
Enter numbers, letters, or
mbols.
s
# key
Insert a space
text entr
durin
Jack
for AC ada
ter (included).
Warning: Inserting an accessory into the incorrect jack will damage the phone.
Performing basic functions
To... From the home screen...
Switch on the phone
Switch off the phone
Make a call
End a call
Answer a call
Verify Own Number
Access voicemail
Lock the keypad
Unlock the keypad
Access the All Contacts list
Mute all sounds
Access Recent Calls list
Created by RRUAN Page 2 of 2 2004-7-16
Press the End/Power key.
Press and hold the End key for approximately 3 seconds.
Enter the number using the alphanumeric keypad and press the
Call/Send key.
Press the End/Power key.
Press the Call/Send key.
Press the OK key to enter the Menu and scroll to Phone Info.
Press and hold the 1 and follow the system prompts.
Press and hold the C/Clear key.
Press 123.
Press the RIGHT navigation key.
Press and hold the UP navigation key.
Press the LEFT navigation key.

C389 User’s Guide
Menu Map
Main Menu
Settings Contacts Recent Calls
Silence All
Auto Key Guard
Supp. Services
Sound
Display
Alerts
Call Timers
Security
Accessories
Sys/Network
Messages Extra Games
Inbox
Create Message
Preformatted Messages
Outbox
R-UIM
Erase Messages
Message Settings
The instructions in this guide assume that your menu appears in Small Icons. To change your menu
display so that it appears as
Navigating the Menus
From the home screen, press the OK key to enter the Menu.
Use the UP and DOWN navigation keys to browse through the menus.
To access soft keys located at the bottom of the display screen, press the DOWN navigation key and
use the LEFT and RIGHT navigation keys to select a soft key function. The display texts relating to
soft key functions are indicated with a reverse white text in solid background, example, Cancel
Press the OK key to select a menu or menu item.
Press the C key to return to the previous screen.
Press the End key to return to the idle screen.
Note: This guide shows you how to select a menu feature as follows: Menu −−> Settings -->
Silence All. This example shows that you must select Menu, scroll to and select Settings, then scroll
to and select Silence All.
Find
View All
Business
Personal
Add New
Add to R-UIM
Speed Dial List
Own Phone Number
R-UIM
Stop Watch
Alarm
Scheduler
Calculator
Large Icons, see “Menu Format” on page .
Missed Calls
Incoming Calls
Outgoing calls
Black Jack
Video Poker
Created by RRUAN Page 3 of 3 2004-7-16
C389 User’s Guide
R
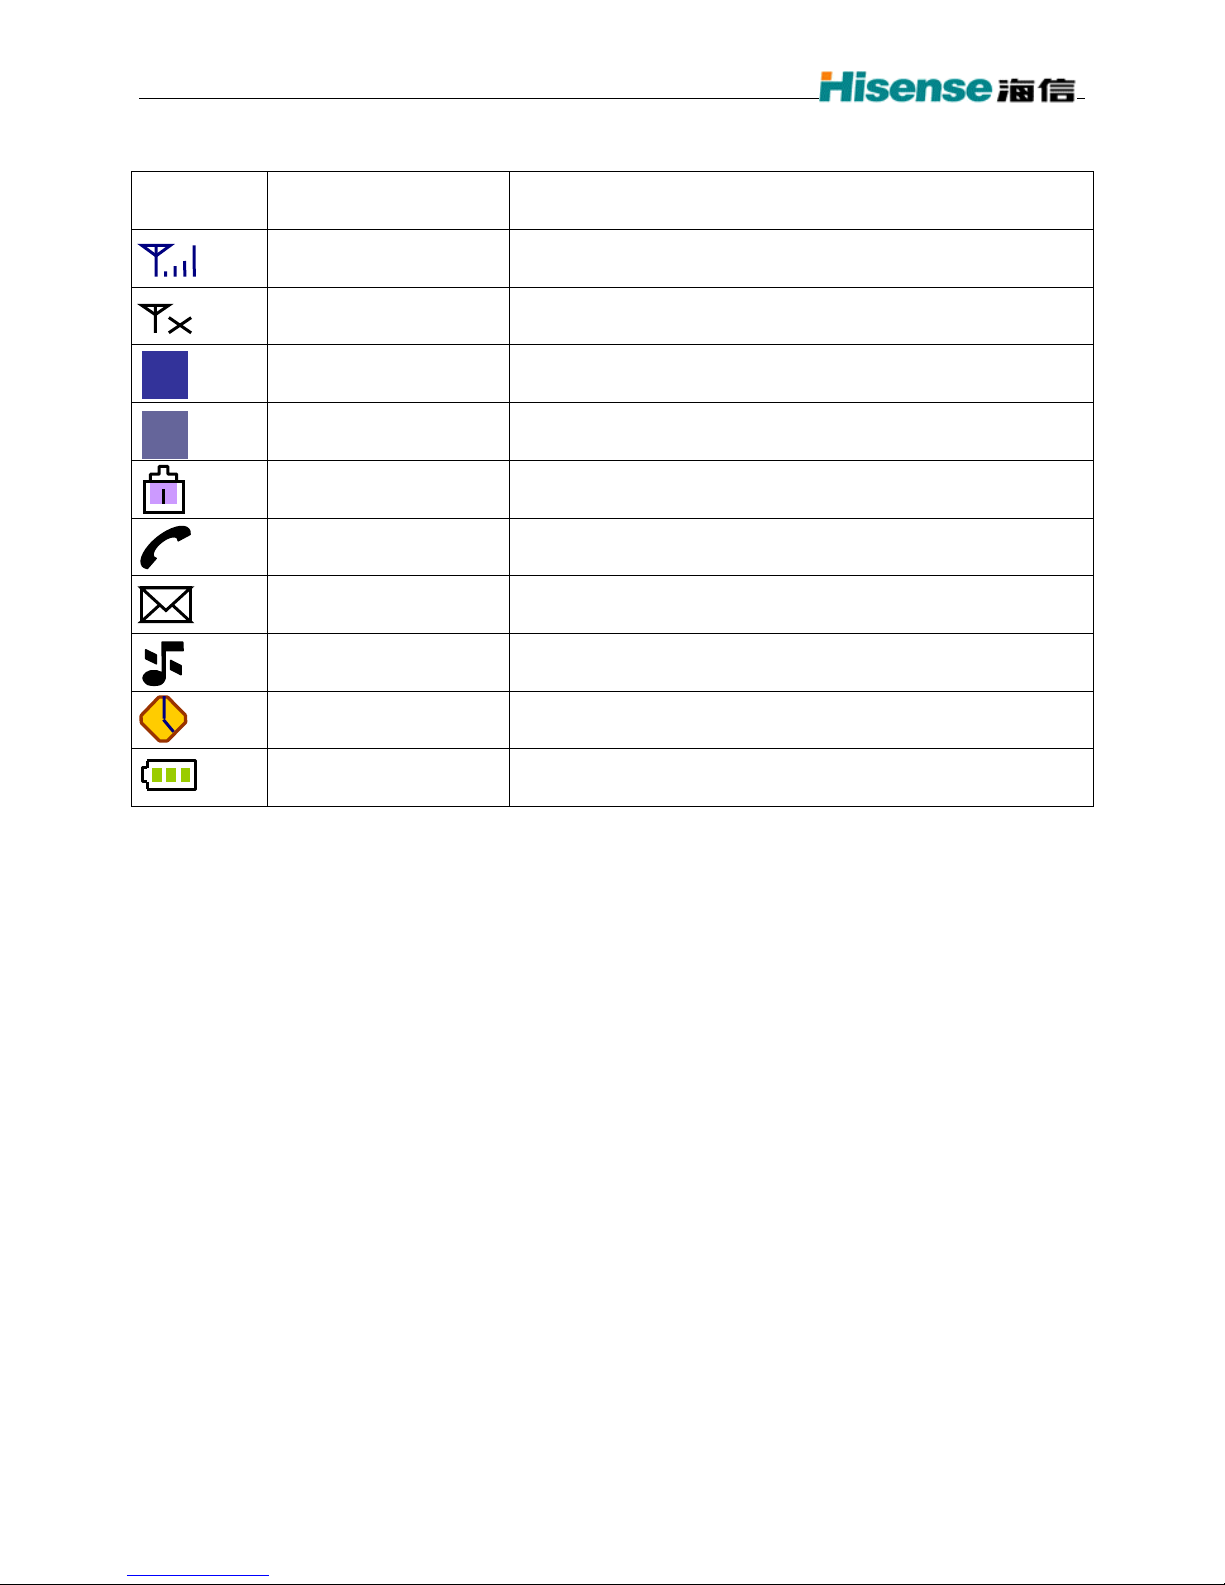
Understanding screen icons
These icons may appear on the screen of your phone.
Icon Function Description
Signal Strength Show the signal strength of the network at your current location.
The more the bars, the stronger the signal.
Network Unavailable Shows that there is no network in service available.
Digital Mode Phone is in CDMA digital mode.
D
Roaming Indicates roaming when home network is not available.
Keypad Lock Indicates the keypad is locked.
In Use Indicates the phone is using the network’s service.
MESSAGES You have received one or more text messages.
Vibrator Indicates that the ringing tone is muted and vibrator is activated
Alarm Alarm or Scheduler has been set.
Battery Battery power indicator. More bars indicate a higher power level.
Created by RRUAN Page 4 of 4 2004-7-16

C389 User’s Guide
Contents
Getting Started 6·································································································
Installing your RUIM card and Battery 6 ········································································
Charging the battery 6 ·····························································································
···············································································Making and Receiving Calls 7
Making a call 7 ······································································································
Answering a call 7
Dealing with missed calls 7
Calls Forwarding 7
Setting up speed dialing 8
Locking the keypad 8
Emergency numbers 9
Making calls using a headset 9
Entering Letters, Numbers, and Symbols 10
Text entry modes 10 ································································································
Switch between Upper and Lower case text input 10
Storing Contacts 12
Saving a phone number 12 ························································································
Saving addresses and notes 12
Editing or erasing a contact 12
Editing a phone number 13
Finding contact information 13
Viewing contacts 13
Sending and Receiving Text Messages 14
Sending text messages 14 ·························································································
Retrieving text messages 14
Erasing messages 15
Setting message alerts 15
Sending and editing preformatted messages 15
Customizing Your Phone 16
Setting vibration mode 16 ·························································································
Keypad Lock 16
Adjusting volume 16
Alert Type 16
Setting the Ringer Type 16
Key Beep 17
Personalizing the screen 17
Setting Alerts 18
Creating a secure environment 18
Using Extras 20
Stopwatch 20 ·········································································································
Alarm 20
Scheduler 20
Calculator 20
Playing Games 22
Black Jack 22 ·········································································································
Video Poker 22
Getting Help 23
··········································································································
··············································································································
·········································································································
··································································································
························································································
··································································································
·······················································································
·······························································································
····························································································
···················································································
·····························································
························································
·····························································································
··················································································
···················································································
························································································
··················································································
·······························································································
································································
······················································································
·······························································································
·························································································
·······························································
··················································································
······································································································
································································································
·······································································································
························································································
························································································
····································································································
···············································································
···································································································
········································································································
································································································
·······································································································
···································································································
Created by RRUAN Page 5 of 5 2004-7-16

C389 User’s Guide
1 GETTING STARTED
This document describes the Hisense phone with CDMA digital service at 800 MHz.
Installing your RUIM card and Battery
The RUIM card is supplied by your service provider when you register as a user. It contains all the
important data pertaining to your line.
1. Hold the phone face down. Slide the battery door off the phone and remove the battery.
2. If necessary, slide the RUIM card lock upward to the end.
3. Insert the RUIM card into its compartment with the metal contacts facing down and the cut corner
to the left.
4. Slide back the RUIM card lock fully until it latches, so that the RUIM card can be properly activated
during power on.
5. Insert the battery, with two tabs on the top aligned with the slots at the top of the battery
compartment and push down.
6. Slide in the battery door.
Important: Make sure that the phone is switched off and is disconnected from the charger before you
insert and remove your RUIM card.
Charging the battery
The battery is not fully charged when you purchase your phone. Fully charge the new battery for
approximately 12 hours before using the phone for the first time.
To charge the battery, connect the AC adapter to the jack located at the bottom left of the phone (as
shown), then connect the adapter’s plug to an AC wall outlet.
The battery icon at the top-right corner of the screen tells you whether the phone is:
Charging (animated icon)
Partially charged
Fully charged
Recharging the battery
You can safely recharge the battery at any time, even if it has a partial charge.
Caring for the battery
This section describes important safety information and tips for improving battery performance.
General safety guidelines
This phone contains integrated Li-Ion battery,
Do not attempt to open the battery compartment and dismantle, puncture, or short-circuit the
battery.
If you have not used the battery for more than a month, recharge it before using your phone.
Avoid exposing the phone to extreme temperatures, direct sunlight, or high humidity.
Never dispose of used batteries in or near a fire. It could lead to explosion. Check with your local
regulations for proper disposal instructions.
Common causes of battery drain
The following operations drain the battery more quickly and thereby adversely affect talk and standby
times:
Playing games frequently.
Frequent use of the backlights.
Using data cables or accessories, such as the Hands-free headset.
Operating when no service is available, or service is available intermittently.
High earpiece and ringer volume settings.
Unacknowledged voicemail and text message alerts.
Created by RRUAN Page 6 of 6 2004-7-16

C389 User’s Guide
2 MAKING AND RECEIVING CALLS
Making a call
1. Make sure you are in an area where the signal can be received. Look for the symbol on the home
screen.
Note:
The more bars you see in this symbol, the stronger the reception. If there are no bars, try to
move to where the reception is better. In some cases, this can be as simple as changing the
direction you are facing.
The phone will go into power save mode when it is left idle for 5 minutes. If you see the message
“POWER SAVE” on the screen, press any key to return to the idle screen.
2. Enter the phone number.
3. Press the
4. Press the
Redialing a number
To redial the last number called, press the Send/Call key twice.
Calling a saved number
If you have already saved a phone number, you can use the All Contacts list to find it quickly.
1. Press the
2. Scroll down the list, find the contact you want, and press the
3. If the number has been added to Speed Dial Lists, you can dial it by pressing its Speed Number and
the
Send/Call key to dial the number.
End/Power key to end the call.
RIGHT navigation key when in idle screen. This brings up a list of all saved contacts.
Send/Call key to dial the number.
Send/Call key directly.
Answering a call
When you receive a call, the phone rings, vibrates, and/or lights up, and an animated phone icon
appears. The number of the caller also appears if it is not restricted. If the number is stored in your
Contacts directory, the contact name appears.
1. To answer the call, press the
2. To mute the ringer or stop the vibration when there is an incoming call, select
3. To put an incoming call on hold, select
4. When Call Waiting supplement service has been activated and the third party calls in when you are
in talking, you can select Answer to hold the current talk and answer the incoming call.
Send/Call key.
Silence.
Answer Hold.
Setting Any Key Answer
1. Select Menu −−> Settings --> Accessories −−> Any Key Answer.
2. Select
All incoming calls can now be answered by pressing any key press except
On or Off and press OK to confirm.
END key, OK key and C key.
Answering calls hands-free
If your phone is attached to an accessory such as a hands-free headset (sold separately), you can set
the headset to answer your calls automatically in 2, 5 or 10 seconds.
1. Select
2. Select
Menu −−> Settings −−> Accessories −−> Headset Autoanswer.
Off, 2 seconds, 5 seconds or 10 seconds and press OK to confirm.
Dealing with missed calls
When you have missed a call, “Missed” appears on your screen.
Press
To view the caller’s number or name, press the
Setting missed call alerts
You can set the alert to beep when you have missed a call.
1. Select
2. Select
OK key or End/Power key to clear the screen.
and select
Missed Calls.
Menu −−> Settings −−> Alert −−> Missed Call.
Enable or Disable and press OK to confirm your selection.
LEFT navigation key to access the Recent Calls list
Created by RRUAN Page 7 of 7 2004-7-16

C389 User’s Guide
Calls Forwarding
You can forward your calls to another phone number.
1. Select
2. Enter the number you wish to forward all your calls to.
3. Press
Viewing recent call details
Details on the last 10 calls you have missed, made or received are stored in the Recent Calls list. You
can get details on the caller’s name and phone number, along with the time and length of the call.
Viewing recent calls
1. Select Menu −−> Recent Calls.
2. Select an option from the list:
3. Press OK to confirm.
Alternatively, press
menu.
4. Select a phone entry.
5. Select an option from the list.
Erase All Recent Call List
You can erase all recent call list from the Recent Calls menu.
1. Select Menu --> Settings --> Security.
2. Enter your four-digit PIN code.
3. Select Erase All Recent Call List.
4. A message appears: “Erase All Recent Call List?”
5. Select Yes to erase all.
Menu −−> Settings −−> Supp. Services −−> Forwarding Number.
OK twice to confirm.
Missed Calls, Incoming Calls or Outgoing Calls.
LEFT navigation key when you are in idle screen to call out the Recent Calls
Call Number dials the phone number
Time shows the time and duration of call
View Number to view the phone number
Edit Number to edit the phone number
Delete Number to delete the phone number
Send SMS Message to send SMS messages to the phone number
Save To Existing to add the phone number to the an existing contact.
Save to R-UIM to add the contact to the RUIM card
Setting up speed dialing
Speed dialing allows you to quickly dial a stored phone number by entering a one- or two-digit speed
dialing location.
1. Locate a saved contact from the
2. Scroll to the phone number and press
3. Select
5. Scroll down to select the speed dial number to which you wish to assign the phone number to and
press
Add to Speed Dial. (Note: Location “1” is reserved for your voicemail number.)
OK to confirm. (Available speed dial numbers for assignment are marked as -empty-)
Contacts list.
OK to select.
To speed dial
From the home screen, enter the one- or two digit speed dial number and press the Send/Call key.
Using 1-Touch Dialing
To dial a phone number, simply press and hold the assigned speed dial number for the phone number.
If it is a two-digit number, press the first number, then press and hold the second. For example, if the
speed dialing number is 15, press
1, then press and hold 5.
Silencing an incoming call
To mute the ringer or stop the vibration when there is an incoming call, select Silence. This action
silences the current call only. The next call will ring as normal.
Adjusting the volume during a call
To adjust the earpiece volume during a call, press the UP or DOWN navigation key.
Locking the keypad
Created by RRUAN Page 8 of 8 2004-7-16
 Loading...