

Page 1

I
Content
Getting ready for use .................................... 1
Part name and function ........................... 1
Inserting the USIM/SIM card.................... 3
Inserting SD card .................................... 4
Installing the battery ................................ 4
Removing the battery .............................. 5
Charging the battery ................................ 5
Battery performance ................................ 6
Turning your phone on and off ................. 7
Desktop manager .................................... 8
Making a call ......................................... 10
Main Function ............................................ 11
Alarms .................................................. 11
Page 2

II
Browser ................................................ 12
Calculator.............................................. 12
Calendar ................................ ............... 13
Call log .................................................. 13
Camera ................................................. 14
Contacts................................................ 14
Downloads ................................ ............ 15
Email .................................................... 15
Firewall ................................................. 16
FM Radio .............................................. 16
Gallery .................................................. 16
Messaging ............................................ 16
Music .................................................... 17
My files ................................................. 18
Note pad ................................ ............... 18
Phone ................................................... 19
Page 3

III
Recorder ............................................... 19
Settings ................................................. 20
Stopwatch ............................................. 24
Voice Dialer ........................................... 25
Voice search ......................................... 25
World time ............................................. 25
Safety information ................................ ...... 26
Warranty Terms and Conditions:Error! Bookmark not defined.
Page 4
1
Getting ready for use
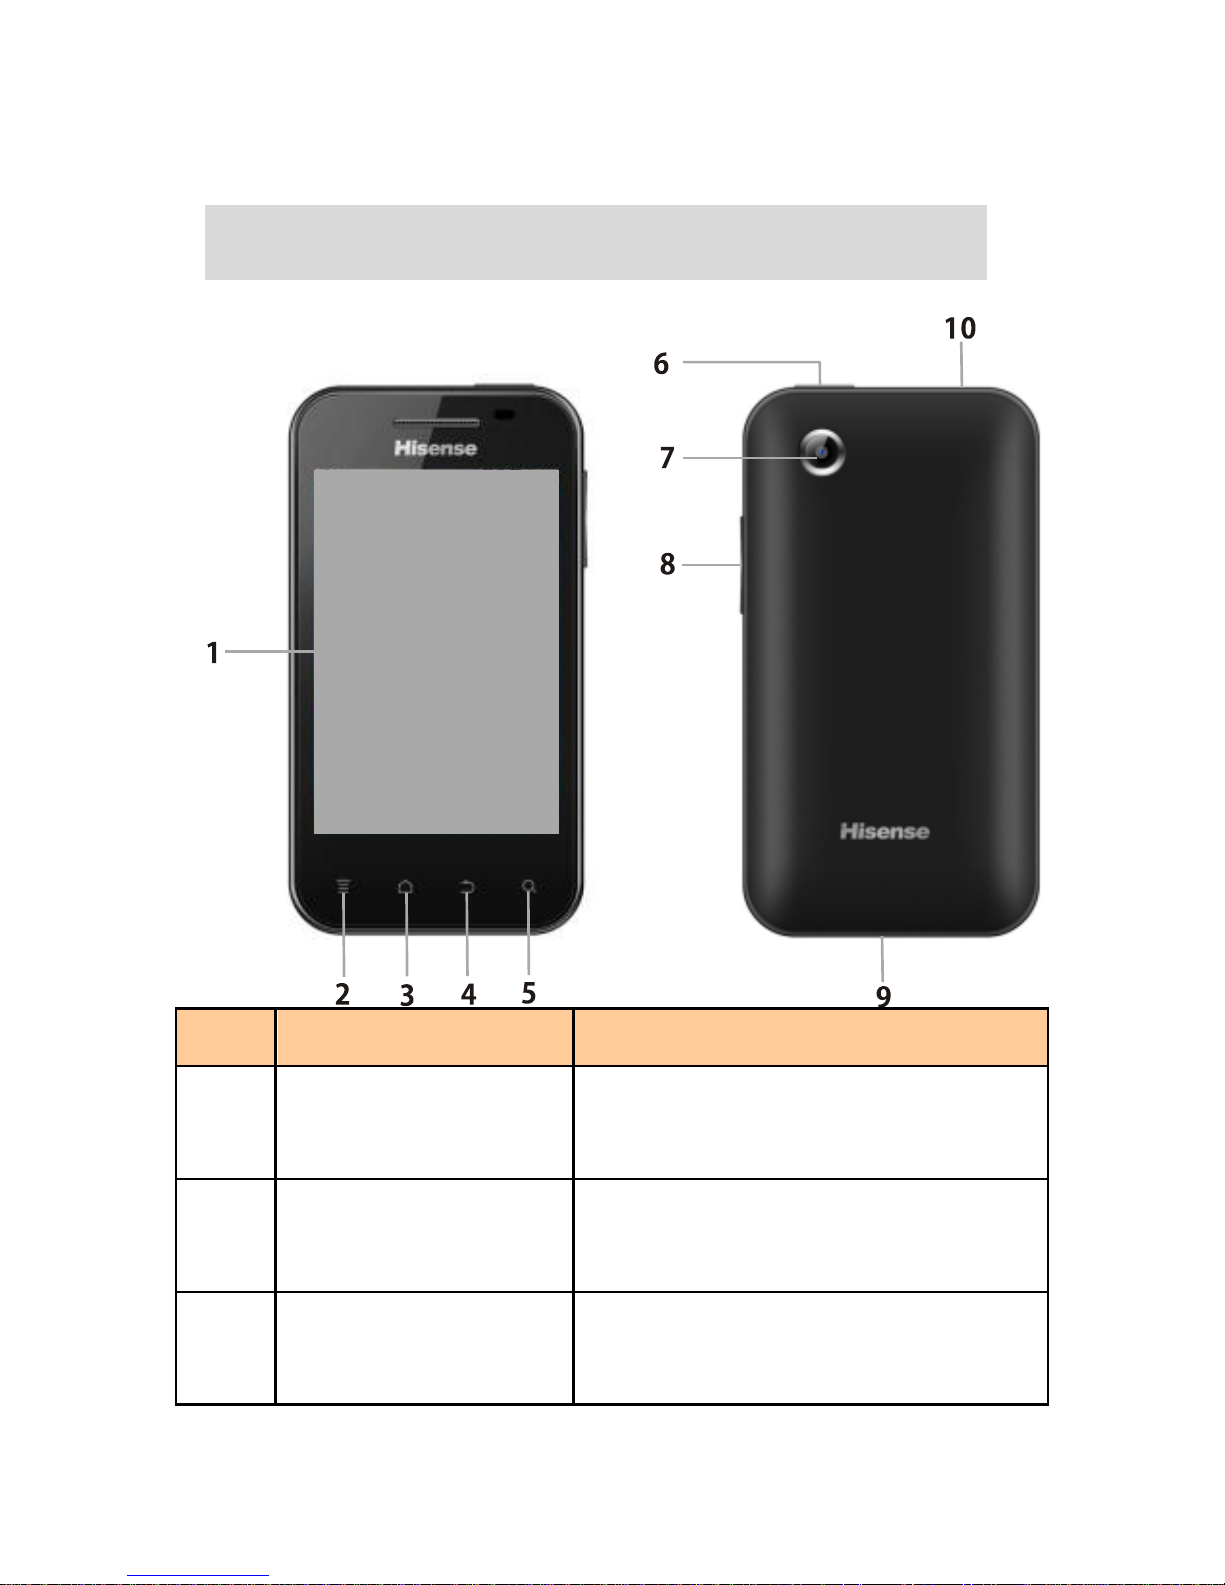
Part name and function
Name
Function
1
MultiTouch
Quick and easy
operation.
2
Menu key
Press to present a
main menu.
3
Home key
Press to return to
home screen.
Page 5

2
4
Return key
Return to previous
menu.
5
Fast
search key
Enter Google
search
interface.
6
Power key
When powered on
press to darken or
lighten the screen
or hold to pop up
option menu. When
powered off hold to
turn on the phone.
7
Camera
Take pictures.
8
Volume
keys
Press to
accommodate the
volume and start up
silence mode when
there is an
incoming call.
9
USB port
Insert data cable.
10
Earphone
jack
Insert earphone.
Page 6

3
Inserting the USIM/SIM
card
Your phone must work with a card
provided by your service provider.
Your card contains all your
subscription information.
Insert USIM/SIM card with the metal
contacts facing down and the cut
corner aligned with that of the slot.
Notes:
1. If no card is installed, or there are
errors in the insertion, or your
card is damaged, the string of
“Please insert a sim card” will
display on the screen after your
phone is powered on.
2. If your card is PIN-locked your
phone will display “unlock PIN”.
You must enter PIN before the
phone can start working. Please
contact your network service
provider if you need.
3. When inserting card, please
Page 7

4
keep it away from possible
damage caused by static,
scratch and bend, and put it
where is not available for
children.
Inserting SD card
Insert SD card with the metal contacts
facing down and the cut corner
aligned with that of the slot;
Installing the battery
You must install and charge the
battery to use your phone. Insert the
ridge at the top of the battery into the
base of the phone, make sure to touch
the metal contact on the phone, then
push the battery down and snap it into
place.
Note:
Your phone is designed to be used
only with original batteries and
Page 8

5
chargers. Use of other batteries or
chargers may cause damage to your
phone and the warranty will be void.
Removing the battery
Make sure your phone is powered off
to avoid the important information
getting lost.
Hold battery bottom and remove the
battery from the phone.
Charging the battery
New batteries are shipped partially
charged. Before you can use your
phone, you need to charge the battery.
Some batteries will have best
performance after several full
charge/discharge cycles.
1. Connect data cable and charger,
plug one end into your phone’s
data port.
2. Plug the other end of the charger
Page 9

6
into the appropriate electrical
outlet (100~240V AC).
3. When your phone indicates that
the battery is fully charged,
remove the charger.
Notes:
1. Before charge, make sure the
battery is installed in the phone.
2. You need longer charging period
with the lower voltage.
3. You need longer time as
operation as charging.
4. The nomal charge temperature is
during 0℃-40℃.
Battery performance
1630mAh (standard
battery)
Standby
time*
120hours
Talk time*
300 minutes
Many conditions can affect
Page 10

7
battery’s standby time, such as
local network conditions, phone’s
settings, frequent operations,
using data services, etc.
The battery performance is also
affected by charge state and
temperature.
The special explanation
about single-pass dual
card dual standby use
You can’t use two cards talking or net
playing at the same time when your
phone inserted two cards. If one card
is talking or net playing, the other
card must turn off the network.
Basic operations
Turning your phone on
and off
Turn on the phone: Press and hold
Power key for more than 3 seconds to
turn on your phone.
Page 11

8
Turn off the phone: Press and hold
Power key to pop up option menu,
select “power off”. If it is powered off
you can not receive, make a call or do
other operations.
Desktop manager
Lock the screen
The screen lock prevents unwanted
actions on the touch screen when
you are not using your phone. When
the phone is left idle for a set period,
the screen locks automatically if you
enabled screen lock in settings
location and security.
Unlock the screen
You can unlock the screen according
to your settings.
The default way is pulling to
right after your screen is enabled
with pressing power key.
Add icon:
Press and hold a selected icon on
Page 12

9
main interface and drag it to desktop
after you feel it vibrating. Put it where
you intend to, then you can release
it.
Delete icon:
Press and hold a selected icon on
desktop, you will find a recycle bin
icon appearing after you feel it
vibrating. At this time drag the icon to
recycle bin, then release.
Status bar
A status bar at the top of the screen
displays phone status information
and notifications.
Add or delete widgets and
change wallpaper
Press on the desktop space, then
pop up the following menu:
shortcuts/ widgets/ folders/
wallpapers.
Notification panel
You can open notifications such as
unread messages or missed calls
Page 13

10
directly from the notification panel.
How to open the panel:
Hold the status bars with your finger,
and drag it downwards.
Making a call
Click to enter dialer interface on idle
screen or main menu screen, input
phone number and click to make a
call, click the End button key to end a
call. If you make a mistake, you can
click to delete the number or hold
it to delete all numbers before the
cursor.
Page 14

11
Main Function
Alarms
You can see three default alarm
clock when enter.
Enter one of them, turn on the alarm:
1. Turn on the alarm.
2. Set the time.
3. Set the repeat times.
4. Set the ringtone.
5. Choose vibrate mode or not.
6. Edit label.
7. Click Done at the bottom of the
screen.
Notes :
1. Press menu key to add more
alarm when enter alarm clock.
2. The alarm clock will still work
even the phone is powered off.
3. Don’t set the phone in silence
mode to guarantee the alarming
effect.
4. Please change the battery in a
Page 15

12
minute or else the information
stored in the phone will be lost.
Browser
Connect the web page with the
mobile network.
You can input different website to view
different web page.
Press menu key you can do:
Open a new window.
Add a new bookmark or manage
bookmarks.
Display all windows you have
opened.
Refresh
Exit the current window.
Do more things such as: forward, go
to homepage, add bookmark and so
on
Calculator
Perform basic calculations such as
addition, subtraction, multiplication
and division.
Page 16

13
Calendar
Click calendar to enter calendar
menu.
Create agenda
1. Press menu key and click “New
agenda” button.
2. Choose memo, appointment,
anniversary, task.
3. Input name and set time.
4. Press menu key and click
“Done” button.
The new agenda will appear on the
calendar menu when you entering
again.
Call log
Enter to view all calls, missed calls,
incoming calls, outgoing calls, and
rejected calls.
Select and view the detailed
information about it.
Hold a selected call pop up submenu:
Edit number before call, Send text
message, Add to contacts, Remove
Page 17

14
from call log.
Camera
You can take photos conveniently by
using camera.
Take photos
Click camera to enter camera
interface.
Click to take photos.
In the preview interface:
1. View photos you have taken.
2. Set white balance, scene mode,
store location, picture quality,
contrast, select storage
position.
Contacts
Click menu key,pop up the submenu:
Search/New contact/ Display
options/Accounts/Import/Export.
Search for a contact
1. Click fast search key or click
“Search”;
2. Enter the first few letters of the
contact name, all contacts beginning
Page 18

15
with these letters appear.
Add a contact
Click“New contact”, you can add a
new contact to the phone or card.
Manage contact
Click the item to view the detail
information about the contact.
Hold the item to view the submenu:
View contact/ Text contact/ Add to
favorites/ Edit contact/ Delete contact.
Downloads
View and manage all download files.
Email
You can configure Email for most
accounts in just a few steps
according the tip on the screen.
The functions of the Email:
1. Receive email and view the text
and attachments via your
phone.
2. Reply and forward a received
email.
Page 19

16
3. Create a new email.
Apart from this, you also can set the
inbox checking frequency.
Firewall
If you turn on the call firewall, you
can set the call firewall mode.
Add the blacklist or whitelist.
FM Radio
You should insert earphone before
using FM Radio.
Search radio settings and play it:
1. Click menu key, select “Scan”
scan all settings.
2. Seclect some settings and play
it.
Gallery
View pictures and videos stored in
phone or memory card.
Messaging
Click “New message” to creat
message.
Create message
Page 20

17
Input receiver’s phone number and
edit contents.
For phone number:
1. You can click the keyboard to
input number directly.
2. You can select number from
messages, contacts or call logs.
3. You can select several numbers
to send.
Notes:
If the message editing is interrupted
by incoming calls, alarm clock,
powering off, the entered texts will be
saved temporarily.
Click “Type to compose” to edit
the message.
Press Menu key, pop up the
submenu.
Music
Click to enter music player.
1. Artists: view different artists’
songs.
2. Albums: view different albums
Page 21

18
list.
3. All songs: view all songs list.
4. Playlists: view current playlist
and saved playlist.
Press menu key when playing a
song, you can do :
View the library details.
Party shuffle.
Add the song to playlist.
Set the song as ringtone.
Delete the song.
My files
View files stored in the phone or
memory card.
Press menu key to pop up sub menu
when entering you can do:
1. Create folder.
2. Sort by name /date / size/type.
3. View folder properties.
4. View memory status.
Note pad
Create note
1. Click “Add note” button when
Page 22

19
entering.
2. Edit contents and title.
3. Click “Save” button to save the
note.
Delete note
1. Hold a note and pop up option
menu.
2. Select “delete”.
Phone
Input phone number, click to
make a call, click to delete the
number you do not need or hold it to
delete all numbers before the cursor.
Recorder
You can record for a long time,
please make sure your phone has
enough storage.
Record :
1. Keep the phone near the sound
source.
2. Click “ ” to record, click “ ” to
stop.
Page 23

20
3. Finish the record, you can
select “save” or “cancel”.
Settings
SIM management
Select the network operator.
Wireless & networks
Turn on Data connect.
Click to turn on Airplane mode.
Click to turn on WLAN or
Bluetooth.
Set the WLAN or Bluetooth.
Set up &manage Virtual Private
Networks.
Set the tethering & portable
hotspot.
Call settings
Select TTY mode or DTMF Tones
from the combobox.
Sound
Set silence mode or not.
Set Vibrate way as: Always/
Never/ Only in silent mode/
Only when not in silent mode.
Page 24

21
Set volume for rington/media
or alarm.
Set your default incoming call
ringtone.
Set your default notification
ringtone.
Turn on/off Audible touch
tones/ Audible selection/
Audible power on and off/
Screen lock sounds/ Haptic
feedback.
Display
Adjust the brightness of the
screen.
Turn on Auto-rotate screen.
Select the animation as the
listed mode.
Adjust the delay before the
screen automatically turns off.
Turn on or off the key
backlight.
Ajust the G-Sensor.
Auto on / off
Set the time of auto power on or off.
Page 25

22
Location &security
Set my location, screen unlock, card
lock, passwords, device administration
and credential storage.
Choose different locating mode:
Use wireless networks, GPS
satellites, turn on or off them.
Lock screen with a pattern,
number, or password.
Select device administrators.
Set the Credential storage.
Applications
Unknown sources:Allow
installing non-market
applications or not.
Select your preferred install
location.
Manage applications:Manage
and remove installed
applications.
Running services: view and
control currently running
services.
Page 26

23
View storage used by the
applications.
View the battery use.
Set options for application
development.
Accounts & sync
Turn on or off background data or
Auto-sync.
Click “Add account”
Privacy
Erase all data in phone.
Storage
View SD card and Internal storage.
Language and keyboard
Select language and input
method.
Set android keyboard or
TouchPal keyboard.
Voice input & output
Voice recognizer settings:
select the Language and set
the SafeSearch as off,
moderate, strict.
Page 27

24
Turn on or off the Block
offensive words.
Accessibility
Turn on Accessibility.
Turn on Power button ends call.
Date and time
Set the date, time, time zone and
formats.
The current date and time will
display on the idle screen if you
choose automatic.
If you do not choose automatic,
please set the date, time zone
and time yourself.
Set the format of time and date.
About phone:
View phone status and software
version.
Stopwatch
Click Stopwatch icon to display the
stopwatch interface.
Click “Start” button to start the watch,
click “Lap”button to record current
Page 28

25
time, click “Stop” button to stop
recording, click “Reset” button to
clear all records.
Voice Dialer
Keep the voice near the mike, say
the number as the examples.
Voice search
Keep the voice near the mike, speak
the content.
World time
Click world time icon to display the
world time interface.
You can view local time of some
cities around the world.
Add City: click “Add City” button,
select some cities (no more
than 3 cities), then click “OK”
button.
Delete selected: click “Delete
selected” button, select some
cities, then click “OK” button.
Page 29

26
Safety information
For safety, only an approved adapter
can be used. It does not bear
responsibility for any faults that may
arise due to non-conformation to this
guide. For example:
Do not, in any way, cause a
short-circuit. It may start a fire or the
phone may explode causing injury.
Do not create a sudden impact on
the battery by throwing it.
Do not dispose off batteries by
putting them in a fire. They may
explode or catch fire due to the
electrolyte within.
Caution
Do not use the phone with a wrong
battery.
Avoid using the phone in high
temperature or humidity. Avoid
spilling any liquid on this phone. If
the phone gets wet, Switch off phone
and turn off AC power supply.
Page 30

27
Keep the phone dry. Submersion,
humidity, and liquids containing
minerals may corrode internal
electronic circuits.
Do not store or use the phone in
dusty or dirty areas as this can
damage the moving parts.
Do not store the phone in hot/ cold
areas.
Do not attempt to open it. Non-expert
handling of the phone could damage
it. Consult your authorized dealer for
assistance.
Do not drop, knock or shake the
phone. Rough handling may break
the internal circuit boards.
Do not use harsh chemicals,
cleaning solvents or strong
detergents to clean the phone. Wipe
it with a soft cloth that has been
slightly dampened in a mild soap and
water solution.
Page 31

28
Do not paint the phone. Paint can
clog the phone’s moving parts and
prevent proper function.
During lightning, do not touch the
power plug or the phone line. It may
result in an electric shock or death.
Do not install the phone under direct
sunlight or on an uneven surface.
Before using the plug, check the
available power voltage. Inaccurate
power voltage may cause fire and
damage.
 Loading...