

Page 1

R
LCD COLOR TV
USER'S MANUAL
TL3220
Part No: IES041201
Page 2

WELCOME TO THE Wonderful World
Dear customer,
Thank you for choosing this LCD color TV. We expect our product and service will comfort you for long. This
manual is to guide you to set up and operate your TV as quickly as possible. Please read all the safety and operation
instructions carefully before you begin and follow that the handbook tells, which we recommend, though we also provide Brief Operating Instructions.
SAFETY CLASS
This is an IEC safety class I product and must be grounded for safety.
CONTENTS
CONTENTS
Important safety instructions
Brief operating instructions
Preparation for your new TV
Selecting a location for theTV
Learning about your TV
Connecting your TV
Connecting to A / V equipments
Connecting to a computer
Connecting to an antenna
................................ .......... .......... .......... .......... .......... ..... 2
................................. .......... .......... .......... .......... .......... ..... 4
................................ .......... .......... .......... .......... .......... ..... 6
.......................... .......... .......... .......... .......... .......... ..... 6
................................. .......... .......... .......... .......... .......... ..... 6
.................................... .......... .......... .......... .......... .......... ..... 7
...................... .......... .......... .......... .......... .......... ..... 7
........................... .......... .......... .......... .......... .......... ..... 8
........................... .......... .......... .......... .......... .......... ..... 8
Connecting to a cable converter box
Using the remote control
.................................... .......... .......... .......... .......... .......... .....10
Preparing the remote control foruse
Learning about the remote control
Using the TV features
....................................... .......... .......... .......... .......... .......... .....12
Understanding the TV features
Basic operations
....................................... .......... .......... .......... .......... .......... .....12
Using the PRESET menu
.............................. .......... .......... .......... .......... .......... .....14
...................... .......... .......... .......... .......... .......... .....11
......................... .......... .......... .......... .......... .......... .....12
Using the PICTURE PARAMETERS menu
Using the AUDIO SETTINGS menu
Using the FUNCTION SETTINGS menu
Using the PC PARAMETERS menu
Using the VCHIP SETUP menu.
Using the PIP menu
. . . . . . . . . . . . . . . . . . . . . . . . . . . . . . . . . . . . . . . . . . . . . . . . . . . . . . . . . . . . . . . . . . . . . . . . . . . . . . . . . . . . . . . . . . . . 19
. . . . . . . . . . . . . . . . . . . . . . . . . . . . . . . . . . . . . . . . . . . . . . . . . . . . . . . . . . . . . . . . . . . . . . . . . . . . . . . .18
Universal Remote Control User's Manual
Appendix
.................................................. .......... .......... .......... .......... .......... .....38
Cleaning and care
Troubleshooting
Specifications
Limited Warranty
...................................... .......... .......... .......... .......... .......... ..... 38
....................................... .......... .......... .......... .......... .......... ..... 39
.......................................... .......... .......... .......... .......... .......... ..... 40
....................................... .......... .......... .......... .......... .......... ..... 41
................. .......... .......... .......... .......... .......... ..... 9
.................... .......... .......... .......... .......... .......... .....10
............ .......... .......... .......... .......... .......... .....14
................... .......... .......... .......... .......... .......... .....15
.............. .......... .......... .......... .......... .......... .....15
................. .......... .......... .......... .......... .......... .....17
.................. .......... .......... .......... .......... .......... .....20
- 1 -
Page 3

WARNING: TO PREVENT FIRE OR SHOCK HAZARD, DO NOT EXPOSE THIS APPLIANCE TO RAIN OR MOISTURE.
The lightning flash with arrowhead symbol, within an
CAUTION
equilateral triangle is intended to alert the user to the
presence of uninsulated dangerous voltage within the
product s enclosure that may be of sufficient magnitude
'
to constitute a risk of electric shock.
CAUTION: TO REDUCE THE RISK OF ELEC-
TRIC SHOCK, DO NOT REMOVE
COVER(OR BACK).NO USER SERVICEABLE PARTS INSIDE.
REFER SERVICING TO QUALIFIED
SERVICE PERSONNEL.
The exclamation point within an equilateral triangle is
intended to alert the user to the presence of important
operating and maintenance(servicing) instructions in
the literature accompanying the TV.
CAUTION: Changes or modifications not expressly approved by the party responsible for compliance with
the FCC Rules could void the users authority to operate this equipment.
WARNING: TO PREVENT FIRE OR SHOCK HAZARD, DO NOT EXPOSE THIS APPLIANCE TO RAIN OR MOISTURE.
CAUTION: The monitor shall not be exposed to dripping or splashing. No objects filled with liquids, such as
vases, shall be placed on the Monitor.
CAUTION: Do Not Place This LCD TV on an unstable cart, stand, or table. The LCD TV may fall, causing
serious injury to a child or adult, and serious damage to the LCD TV. Use only with a cart or
stand recommended by the manufacturer, or sold with the LCD TV.
CAUTION: The installation on the wall which was made from of concrete has passed the safety test of UL.
IMPORTANT SAFETY INSTRUCTIONS
1. READ THESE INSTRUCTIONS
2. KEEP THESE INSTRUCTIONS
3. HEED ALL WARNINGS
4. FOLLOW ALL INSTRUCTIONS
5. DO NOT USE THIS APPARATUS NEAR WATER
Do not use this TV near water. For example, do not use near a bathtub, washbowl, kitchen sink, or laundry tub, in a wet
basement, or near a swimming pool, and the like. The LCD Monitor shall not be exposed to dripping or splashing. No
objects filled with liquids, such as vases, shall be placed on the LCD Monitor.
6. CLEAN ONLY WITH DRY CLOTH
Unplug the TV from the wall outlet before cleaning. Do not use liquid cleaners or aerosol cleaners. Use a damp cloth
for cleaning.
7. DO NOT BLOCK ANY VENTILATION OPENINGS. INSTALL IN ACCORDANCE WITH THE MANUFACTURER
INSTRUCTIONS.
Slots and openings in the cabinet back or bottom are provided for ventilation, to ensure reliable operation of the TV and
to protect it from overheating. These openings must not be blocked or covered. The openings should never be blocked
by placing the TV on a bed, sofa, rug, or other similar surface. This TV should never be placed near or over a radiator or
heat resource. This TV should not be placed in a built-in installation such as a bookcase or rack unless proper
ventilation is provided or the manufacturer's instructions have been adhered to.
'S
- 2 -
Page 4

IMPORTANT SAFETY INSTRUCTION
8. DO NOT INSTALL NEAR ANY HEAT SOURCES SUCH AS RADIATORS, HEAT REGISTERS, STOVES, OR OTHER
APPARATUS (INCLUDE AMPLIFIERS) THAT PRODUCE HEAT.
9. DO NOT DEFEAT THE SAFETY PURPOSE OF THE POLARIZED OR GROUNDING-TYPE PLUG. A POLARIZED PLUG
HAS TWO BLADES WITH ONE WIDER THAN THE OTHER. A GROUNDING TYPE PLUG HAS TWO BLADES AND A
THIRD GROUNDING PRONG. THE WIDE BLADE OR THE THIRD PRONG ARE PROVIDED FOR YOUR SAFETY. IF THE
PROVIDED PLUG DOES NOT FIT INTO YOUR OUTLET, CONSULT AN ELECTRICIAN FOR REPLACEMENT OF THE
OBSOLETE OUTLET.
10. PROTECT THE POWER CORD FROM BEING WALKED ON OR PINCHED PARTICULARLY AT PLUGS, CONVENIENCE
RECEPTACLES, AND THE POINT WHERE THEY EXIT FROM THE APPARATUS.
11. ONLY USE ATTACHMENTS/ACCESSORIES SPECIFIED BY THE MANUFACTURER.
12. USE ONLY WITH CART, STAND, TRIPOD, BRACKET, OR TABLE SPECIFIED BY
THE MANUFACTURER, OR SOLD WITH THE APPARATUS. WHEN A CART IS
USED, USE CAUTION WHEN MOVING THE CART/APPARATUS
COMBINATION TO AVOID INJURY FROM TIP-OVER.
Do not place this TV on an unstable cart, stand, tripod, bracket ,or table.
The TV may fall, causing serious injury to someone, and serious damage
to the appliance. An TV and cart combination should be moved with care.
Quick stops, excessive force, and uneven surfaces may cause theTV
and cart combination to overturn.
13. UNPLUG THIS APPARATUS DURING LIGHTNING STORMS OR WHEN UNUSED
FOR LONG PERIODS OF TIME.
For added Protection for this TV receiver during a lightning storm, or when it is left
unattended and unused for long period of time, unplug it from the wall outlet and disconnect the antenna or cable system.
This will prevent damage to the TV due to lightning and power line surges.
14. REFER ALL SERVICING TO QUALIFIED SERVICE PERSONNEL. SERVICING IS REQUIRED WHEN THE APPARATUS
HAS BEEN DAMAGED IN ANY WAY, SUCH AS POWER-SUPPLY CORD OR PLUG IS DAMAGED, LIQUID HAS BEEN
SPILLED OR OBJECTS HAVE FALLEN INTO THE APPARATUS, THE APPARATUS HAS BEEN EXPOSED TO RAIN OR
MOISTURE, DOES NOT OPERATE NORMALLY, OR HAS BEEN DROPPED.
- 3 -
Page 5
Brief Operating Instructions
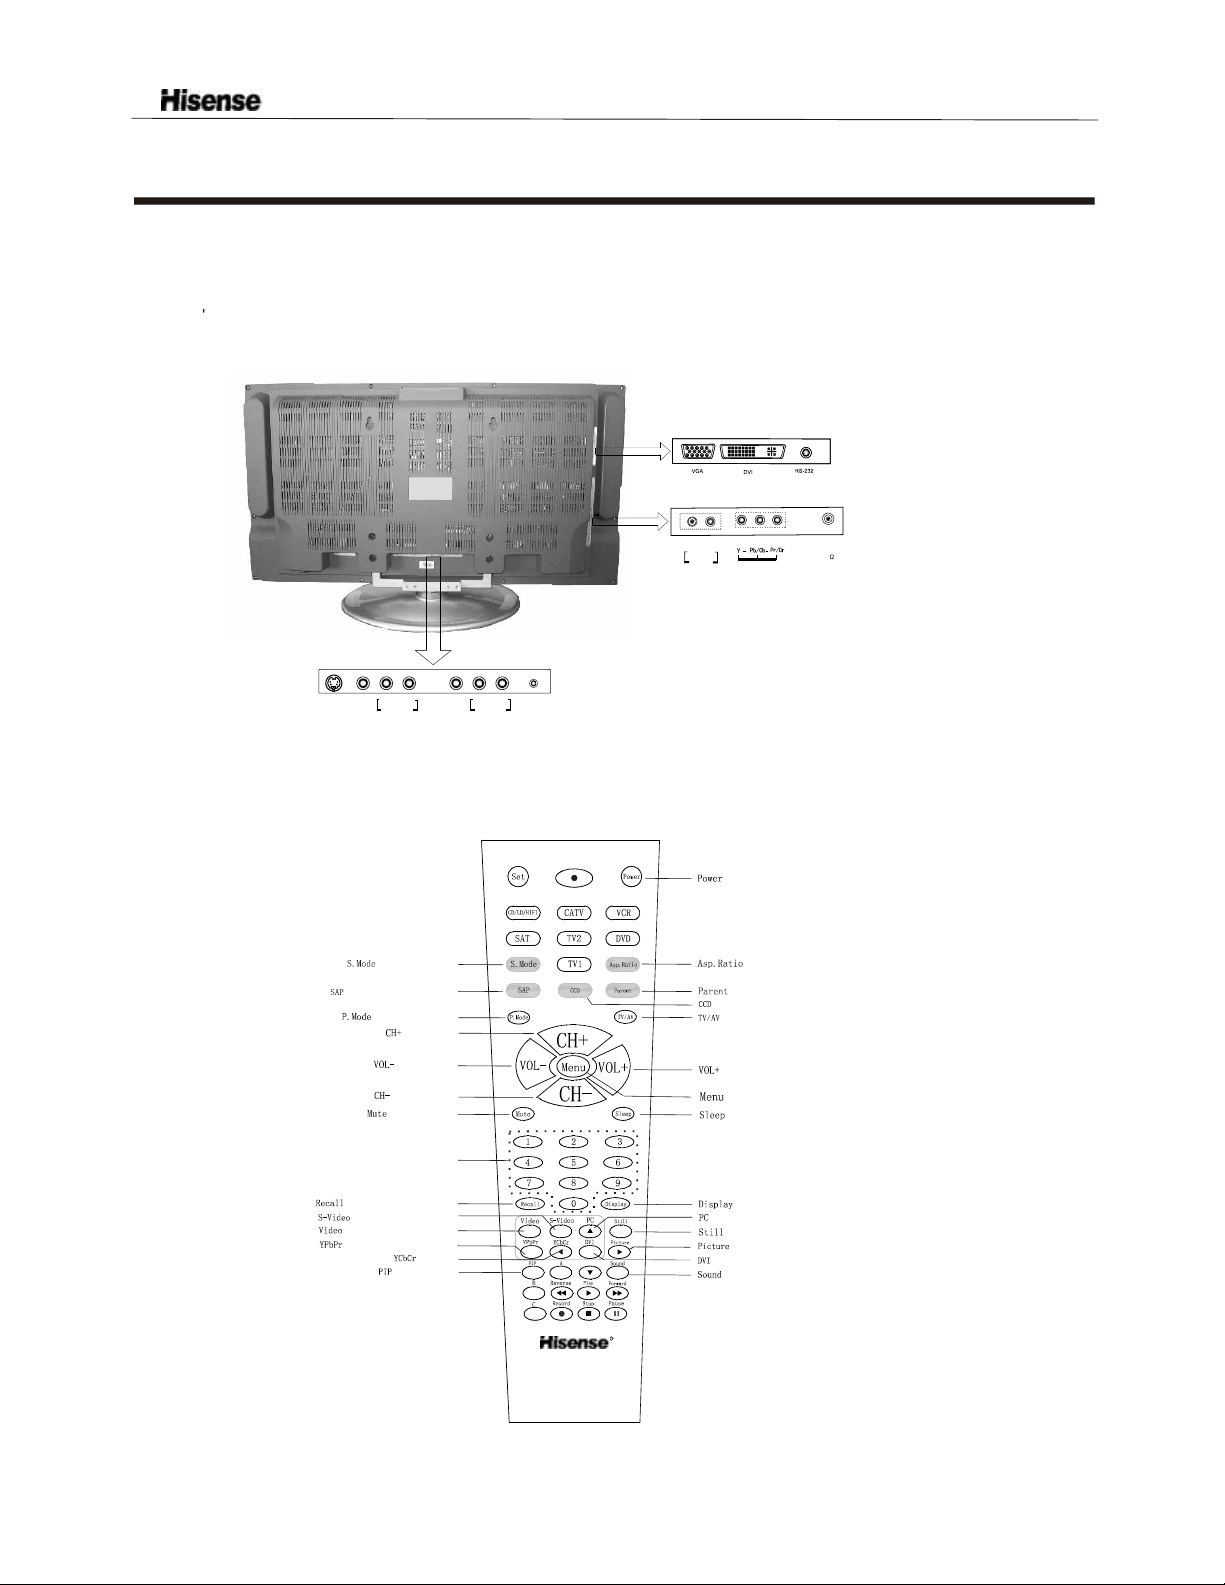
1.Connection
Connect the antenna lead or CATV cable or external equipments(such as Antenna, Cable TV ,VCD,DVD,
VTR,Set top box,etc.)to the corresponding terminals or interface on the TV rear(please refer to the
owner s manual of the equipment to be connected as well)and confirm that the signal source is available
and works normally.
ANT
75
S-VIDEO
INPUT
VIDEO
INPUT
L
AUDIO-IN
L
R
AUDIO
COMPONENT
VIDEO
OUTPUT
L
AUDIO-OUT
R
PC AUDIO
INPUT
R
2.The remote control
Open the back battery cover on the remote control and install two AAA size batteries and then close
the battery cover.
:
Power on/off
:
Select sound mode
:
Mono/stereo/SAP selection
:
Select picture mode
:
Channel up
:
Volume down
:
Channel down
:
Mute the sound
:
Adjust aspect ratio
:
Vchip operation
:
Closed Caption operation
:
Main source selection
:
Volume up
:
Call up the main menu
:
Set the sleep timer
Channel Number
:
selectionchannelDirect
:
Return to previous channel
:
Switch to S-VIDEO mode
:
Switch to VIDEO mode
:
Switch to YPbPr/YCbCr mode
:
No use
:
OFF/PIP/PBP
R
HYDFSR-A205E
:
Display current input
:
Switch to VGA mode
:
Snapshooting
:
Enter the picture menu
:
Switch to DVI mode
:
Enter the sound menu
NOTE: This remote control is all-purpose, these buttons which not be explained are independent of the TV.
- 4 -
Page 6
Brief Operating Instructions
3.Switching on/off
1)Connect the TV to power outlet, the power indicator will be red and then turn blue. Several seconds later,
TV picture will display on the screen.
2)Press stand by button on the machine or the [Power] button on the remote control to turn off the TV.
4.Signal source selection
Press the number [1-9] button or [ or ] button to select TV input; press the [VIDEO] button to select VIDEO input;
press the [S-VIDEO] button to select S-VIDEO input; press the [ YPbPr] button to select YPbPr/YCbCr input; press
the [PC] button to select PC input;press the [DVI] button to select DVI input.
5.Air/Cable selection
You can select the signal receiving method according to the following steps:
1) Press the [MENU] button to enter the main menu.
2) Press the [ or ] button to select the item PRESET.
3) Press the [ or ] button to select the item RF INPUT.
4) Press the [ or ] button to change the item from among Air,
CATV(STD),CATV(HRC) and CATV(IRC).
PRESET
POSITION
SKIP
RF INPUT
AUTO SEARCH
PRESET
AIR
6.Channel search
1) Press the [MENU] button to enter the main menu.
2) Press the [ or ] button to select the item PRESET.
3) Press the [ or ] button to select the itemAuto_search.
3) Press the [ ] button to start auto_searching.
7.Picture parameters adjustment
1) Press the [MENU] button to enter the main menu.
2) Press the [ or ] button to select the item Picture Parameters.
3) Press the [ or ] button to select the item you want to adjust.
4) Press the [ or ] button to adjust the level.
8.AUDIO SETTINGS
1) Press the [MENU] button to enter the main menu.
2) Press the [ or ] button to select the item AUDIO SETTINGS.
3) Press the [ or ] button to select the item you want to adjust.
4) Press the [ or ]button to adjust the level.
POSITION
SKIP
RF INPUT
AUTOSEARCH
PICTURE PARAMETERS
BRIGHTNESS
CONTRAST
SATURATION
HUE
COLOR TEMP
SHARPNESS
FLESHTONE
AUDIO SETTING
BASS
TREBLE
BALANCE
MTS
s
Note: All buttons mentioned above are on the remote control unless indicated otherwise.
- 5 -
Page 7
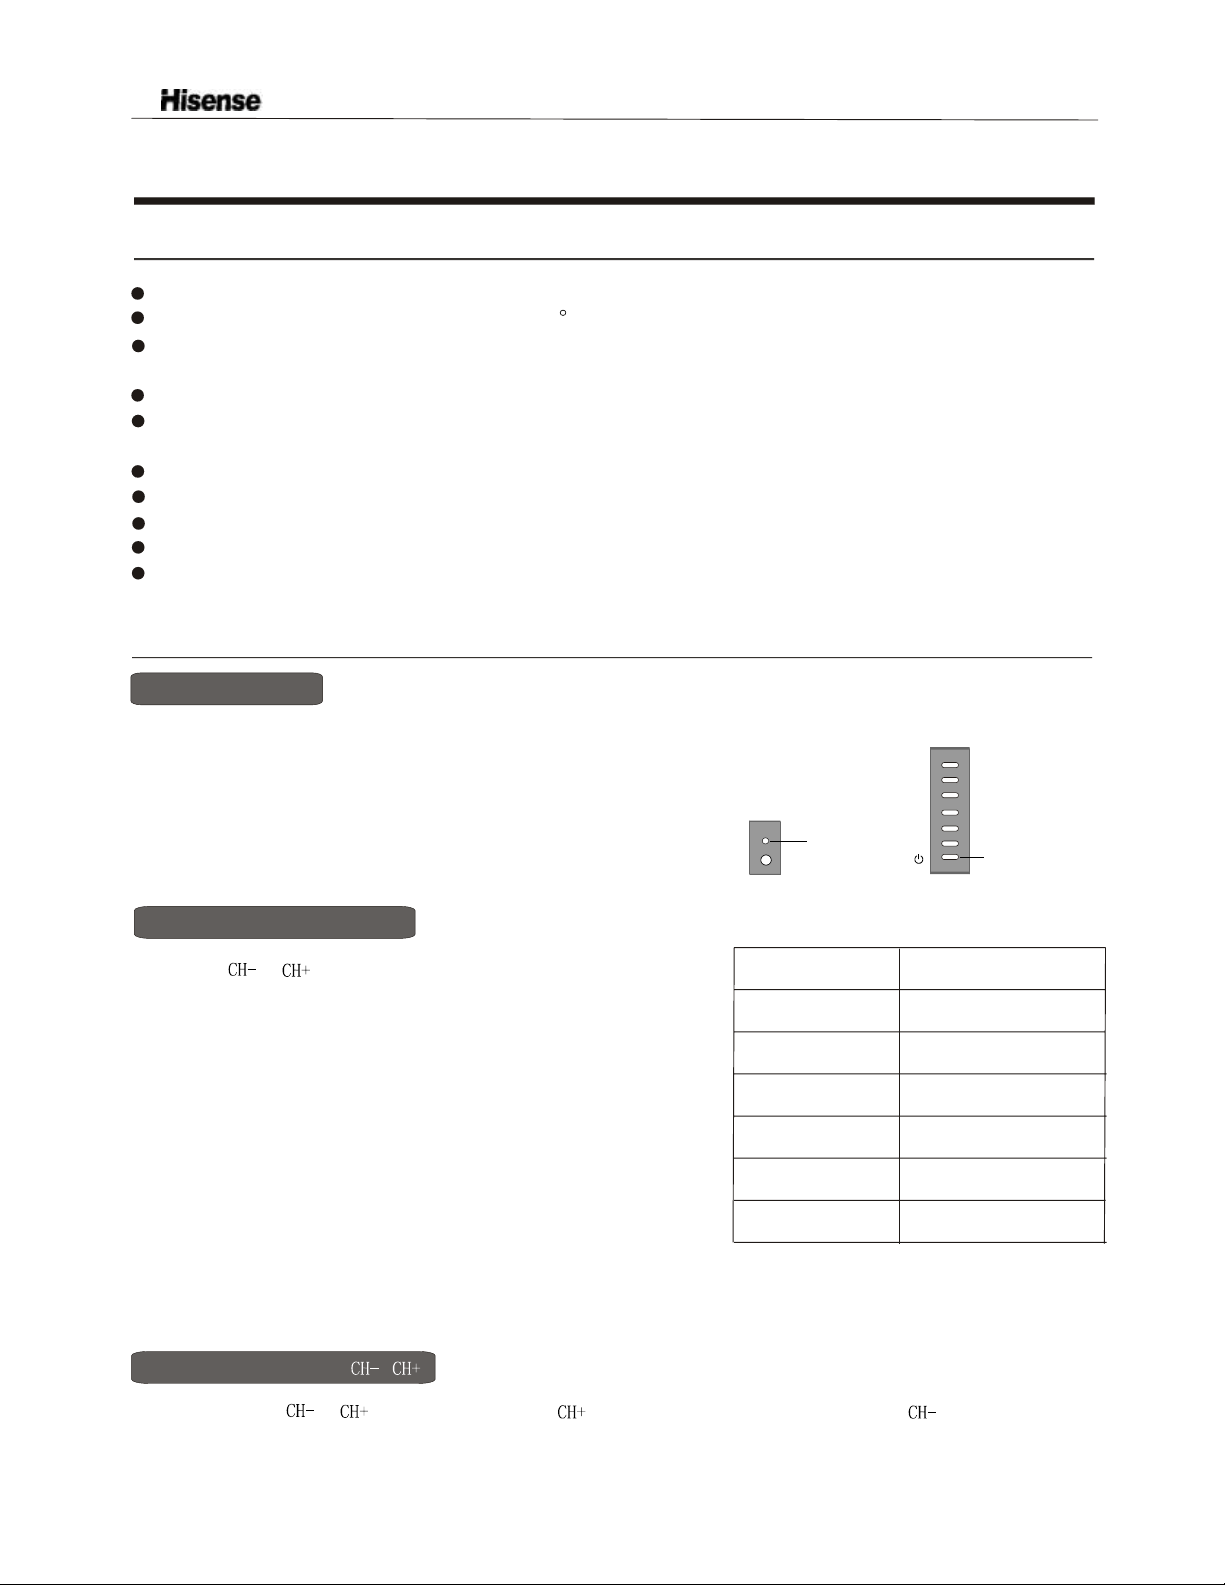
Preparation for Using your new TV
Selecting a location for the TV
1)Place the TV on the floor or on a sturdy platform in a location where light does not directly hit the screen.
2)Place the TV far enough from the walls to allow proper ventilation. Inadequate ventilation may cause
overheating, which may damage the TV.
NOTE: Please contact local dealer for wall mounting.
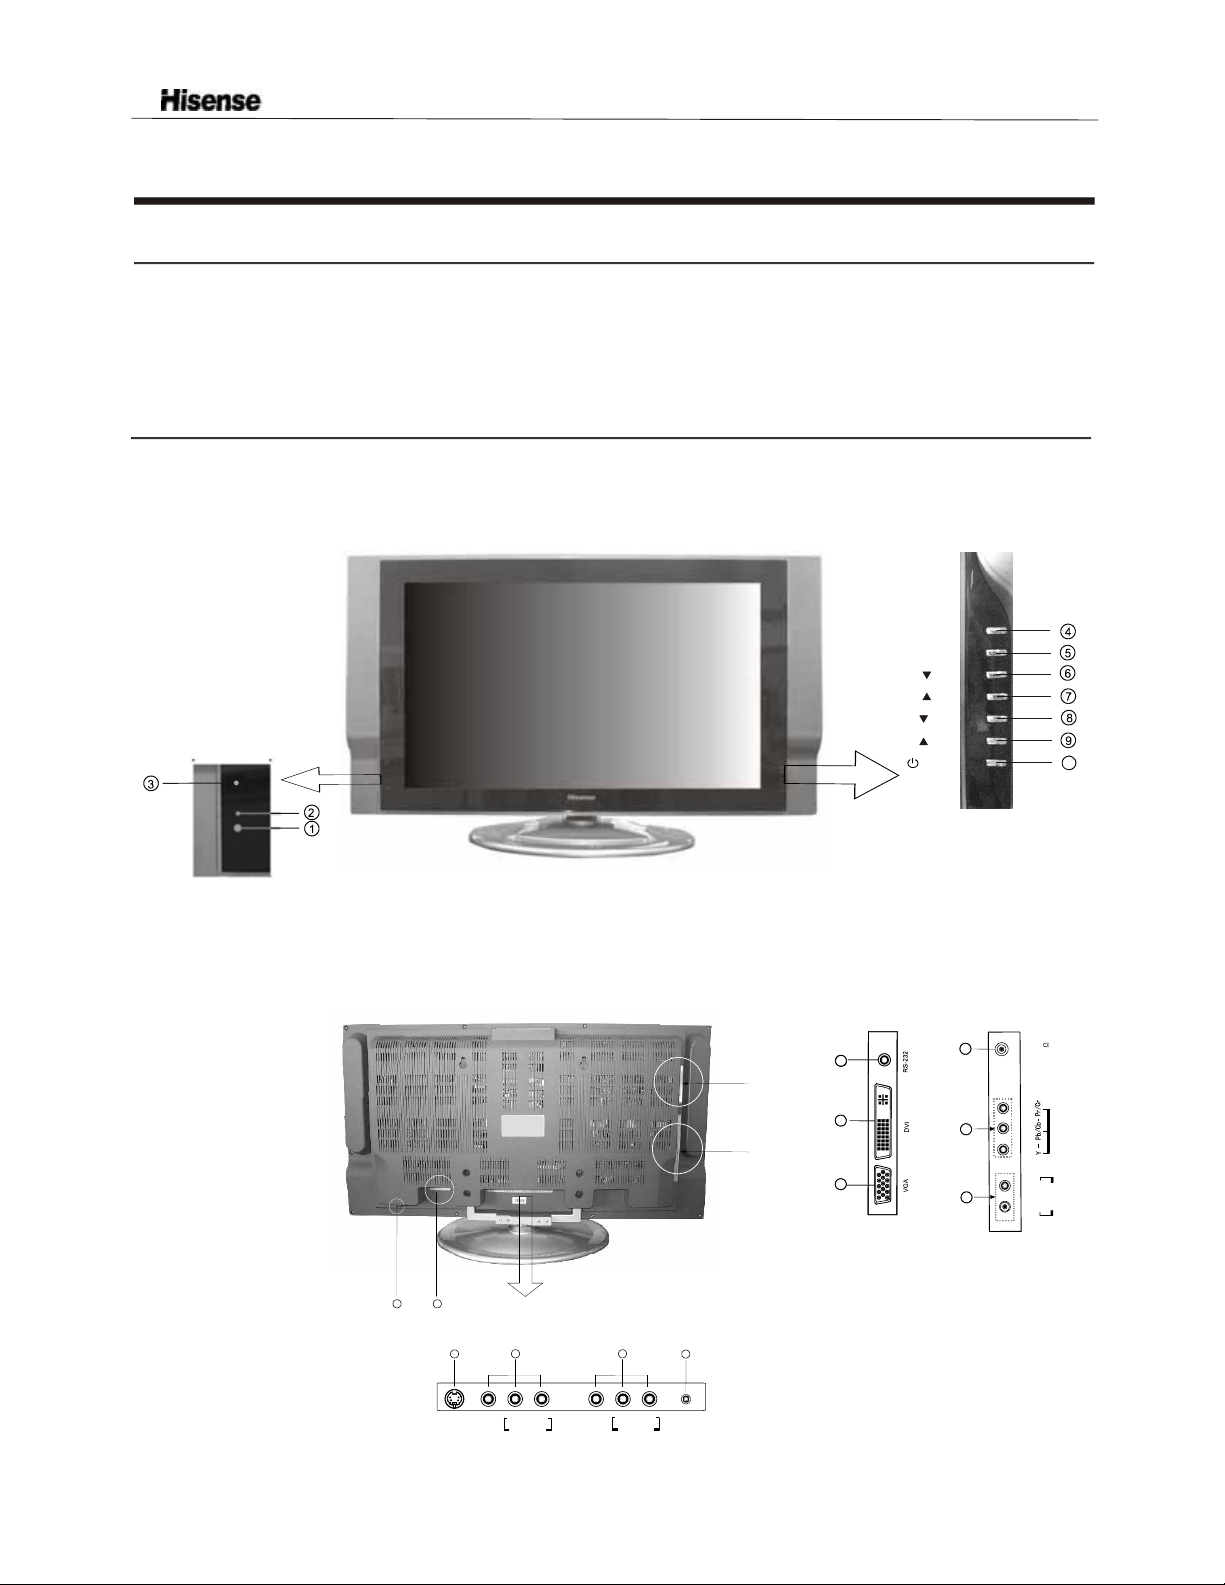
Learning about your TV
You can operate your TV by using the buttons on the front panel or the remote control. The terminals on the
back panel provide all the connections you will need to connect other equipment to your TV.
Front Controls
MENU
SOURCES
VOL
VOL
VOL
CH
CH
1
0
Back Connections
C1
C1
17
20
C1
18
21
C2
19
12
11
VIDEO
OUTPUT
15
L
AUDIO-OUT
16
R
PC AUDIO
INPUT
13
S-VIDEO
INPUT
VIDEO
INPUT
14
L
AUDIO-IN
R
22
Note: The above figures are for reference only, please refer to the actual units to determine their appearance.
- 6 -
C2
ANT
75
R
L
COMPONENT
UDIO
A
Page 8
Preparation for Using your new TV
Remote sensing window
Power indicator
Headphone output
Menu button
Source select
Volume down / cursor left
Volume up / cursor right
Channel down / cursor down
Channel up / cursor up
0
Power button (standby)
11
Power Switch
(ON/OFF)
AC Power Socket
S-Video input
AV input
AV output
PC audio input
RS232C DEBUG input
DVI input
PC VGA input
CATV antenna input
Y/PbPr/YCbCr input
Audio input
Connecting your TV
Caution: Do not plug the TV in until you have finished connecting all of your equipment.
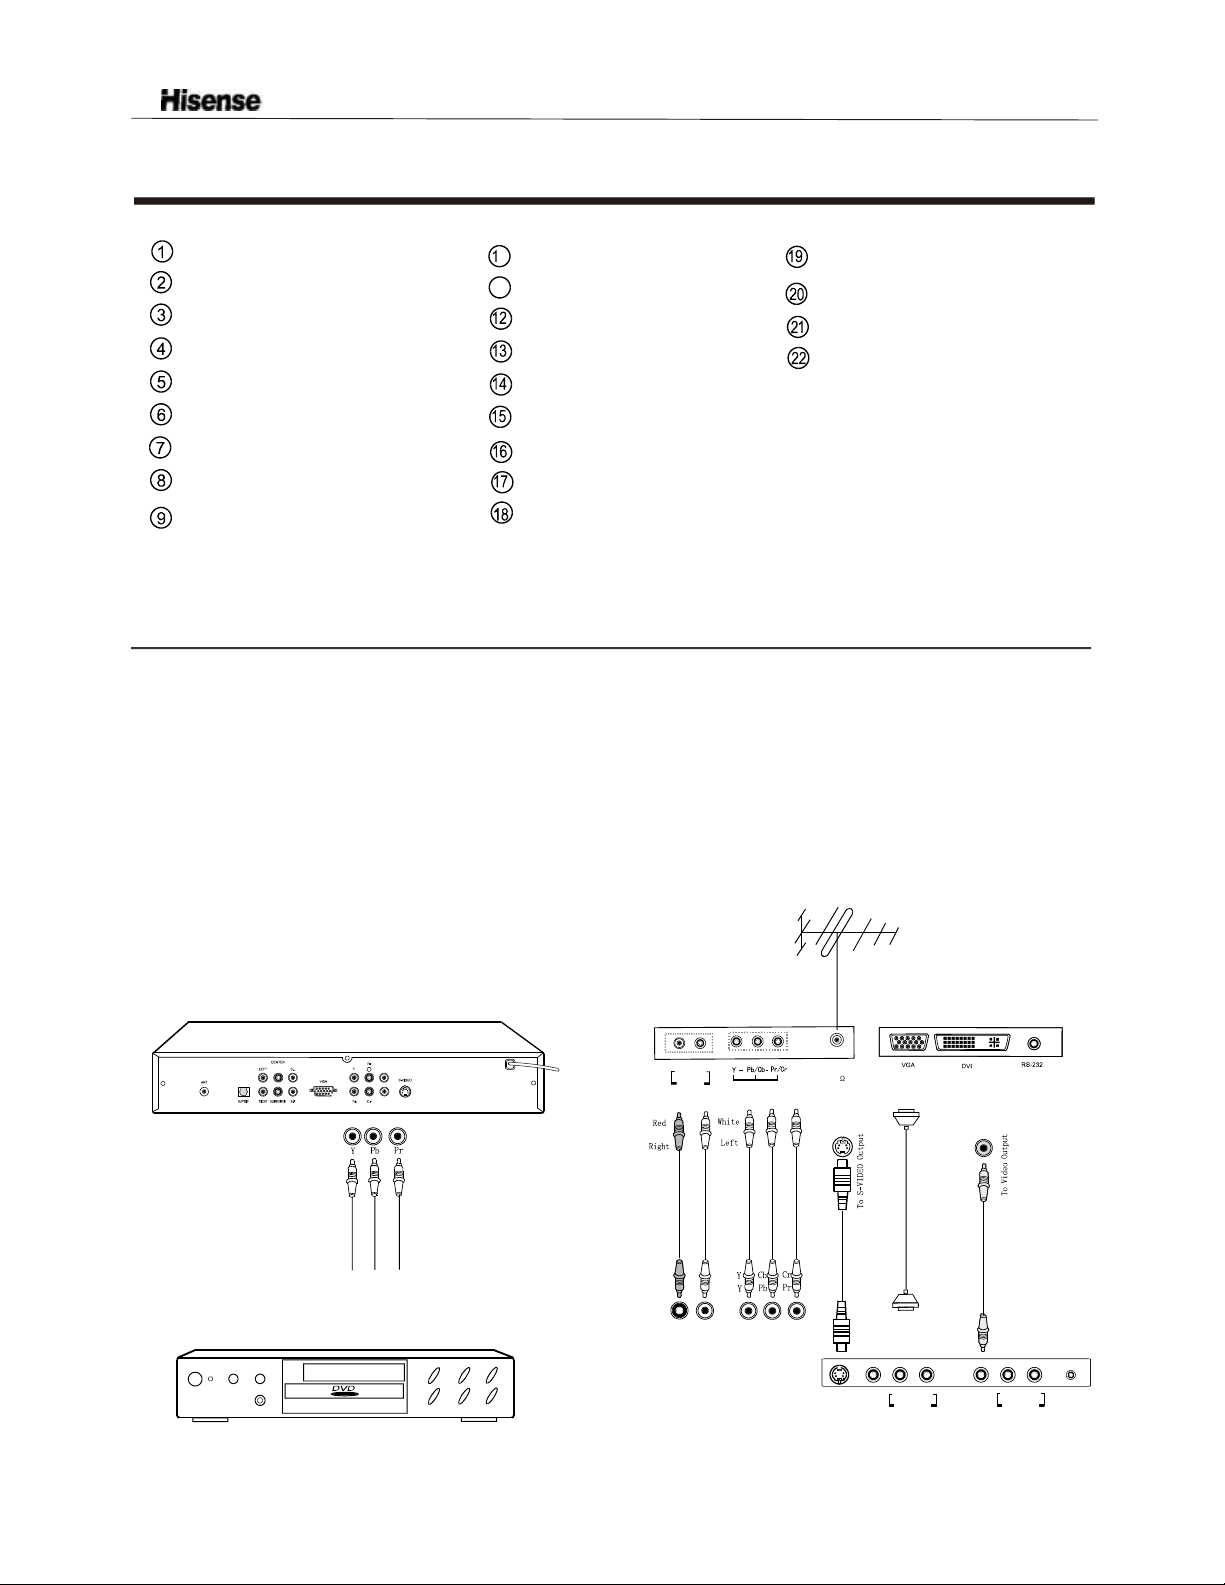
Connecting to A/V equipments
To enjoy its multimedia features, you can connect your to A/V equipments such as VCR, DVD, STB, Satellite
receiver, Camcorder, Audio amplifier etc., and select signal sources using your remote control.
as shown below.
TV
Connect the devices
HDTV STB
VCD, DVD
- 7 -
L
AUDIO
R
COMPONENT
ANT
75
S-VIDEO
INPUT
VIDEO
INPUT
L
AUDIO-IN
R
VIDEO
OUTPUT
L
AUDIO-OUT
R
PC AUDIO
INPU T
Page 9
Preparation for Using your new TV
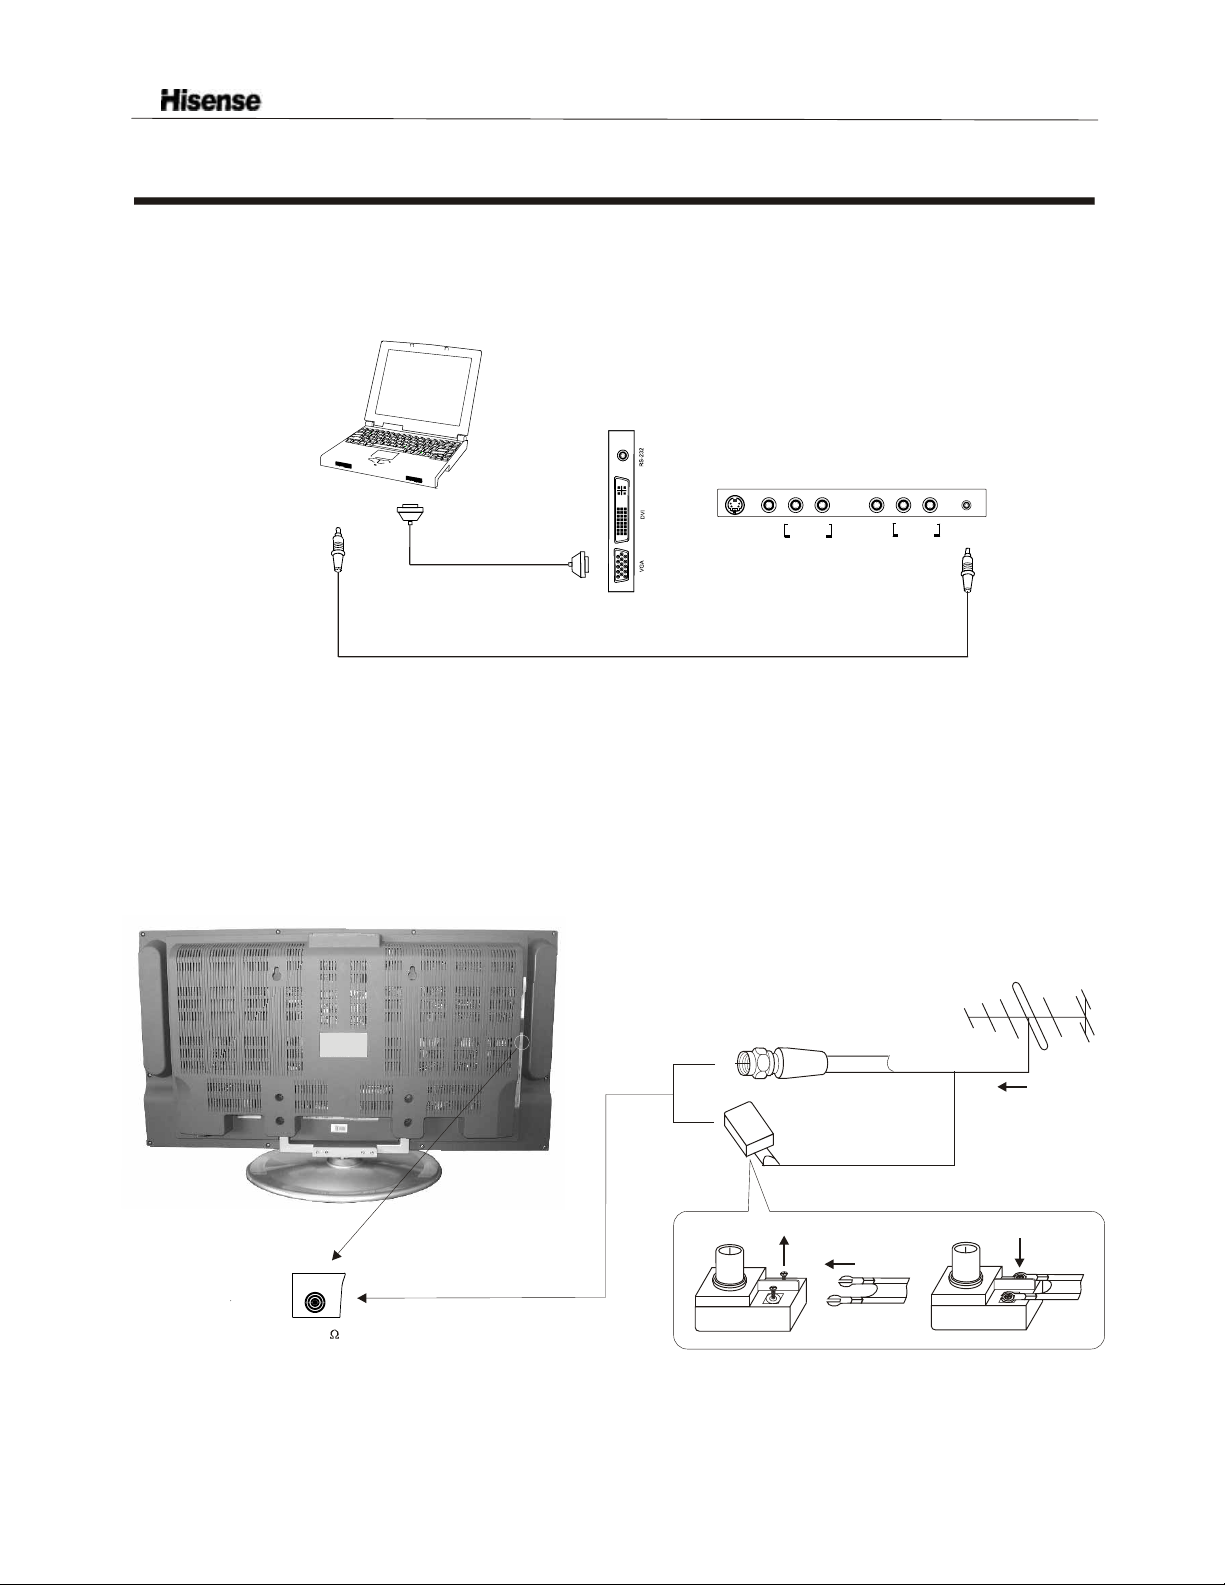
Connecting to a Computer
You can use your TV as a monitor/speakers for connecting through its 15pin standard RGB
interface and PC audio interface.
PC/NB
Connect the devices as shown below.
your computer by
To speaker
To VGA
RGB line
Audio line
S-VIDEO
INPUT
VIDEO
INPUT
L
AUDIO-IN
R
VIDEO
OUTPUT
L
AUDIO-OUT
R
PC AUDIO
INPUT
Connecting to an antenna
To enjoy the terrestrial signal transmitted by your local TV station, you need an indoor or outdoor antenna
(not supplied). Perfect picture quality requires a good signal and generally means that an outdoor antenna
must be used. The exact type and location of the antenna will depend on your particular area. Consult your
local dealer or service personnel for best advice. If you are a subscriber of your local CATV net, the outdoor
or indoor antenna is not needed. Connect the equipments as the following figure.
Plug(not supplied)
COAXIAL CABLE (75 )
ANTENNA SOCKET
ANT 75
Adaptor (not supplied)
- 8 -
TWIN-LEAD FEEDER(300 )
Loosen the screw
Insert the feeder in
The signal comes from:
An outdoor antenna
An indoor antenna
CATV net
Tighten the screw
Page 10
Preparation for Using your new TV
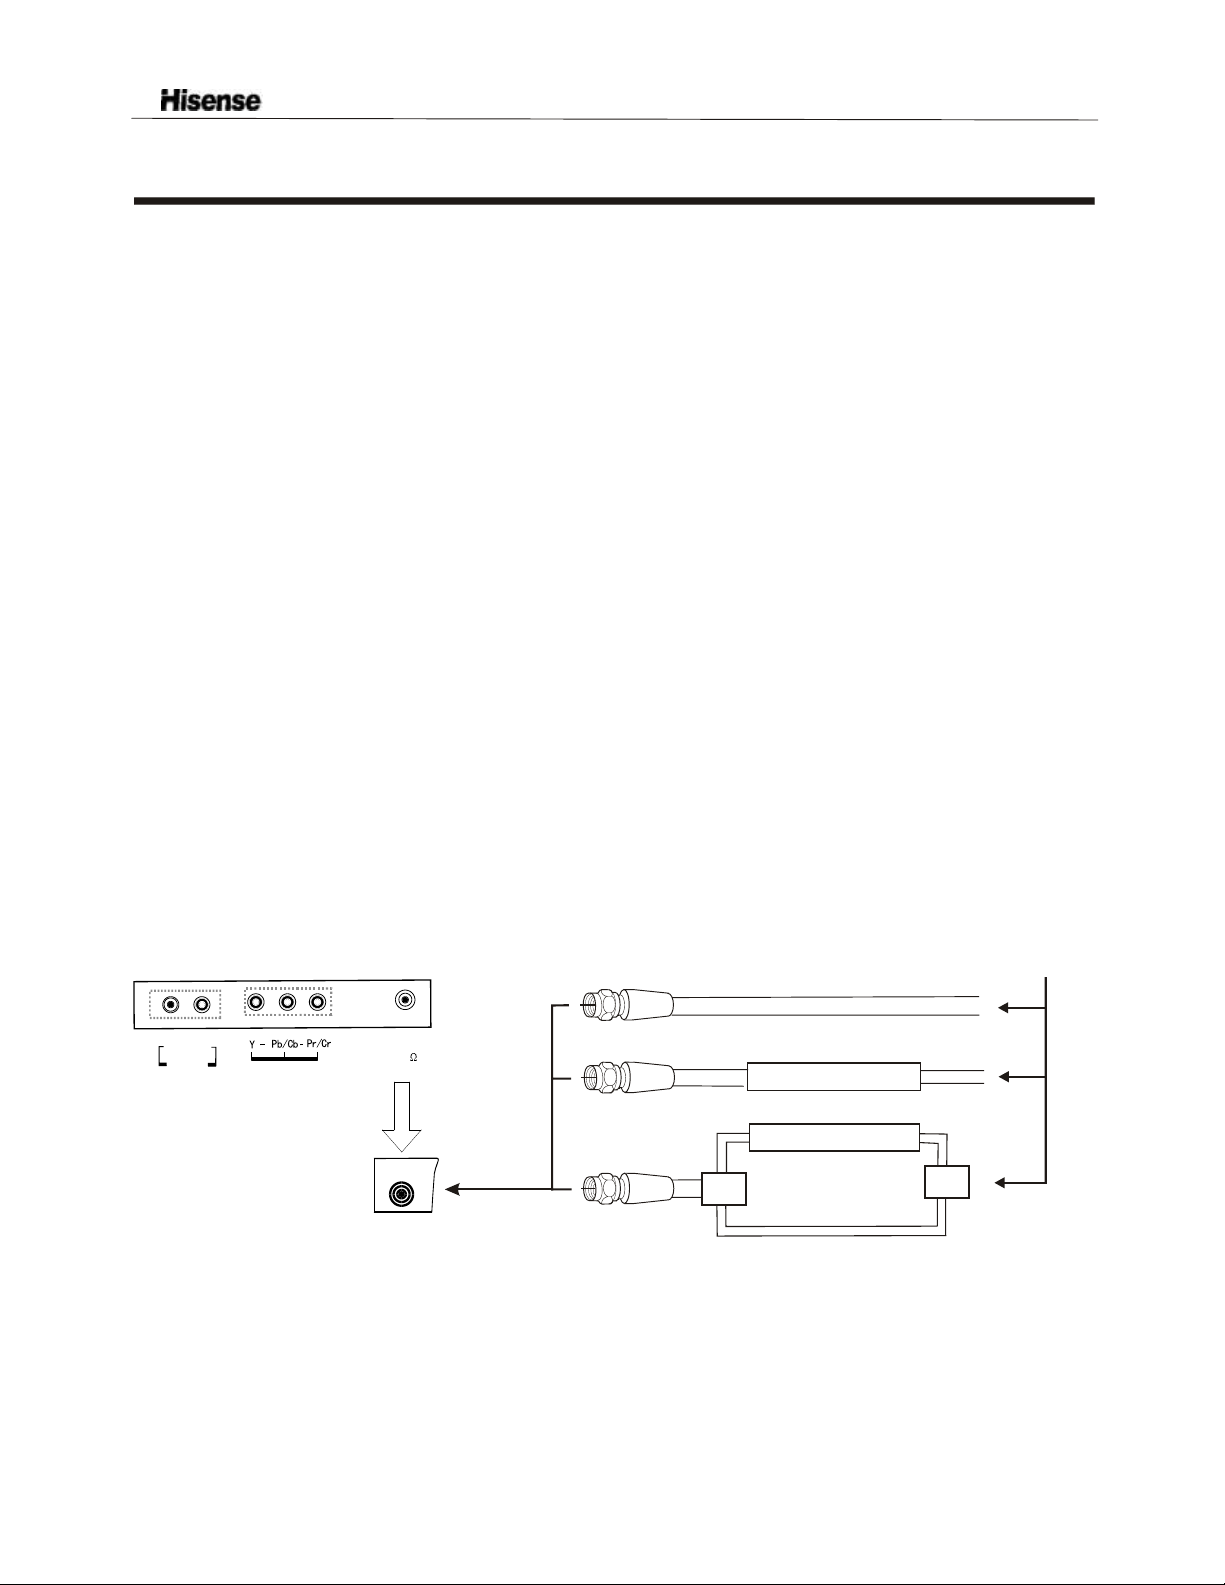
Connecting to a cable converter box
This television has an extended tuning range and can tune most cable channels without using a cable
company supplied converter box. Some cable companies offer premium pay channels in which signal is
scrambled. Descrambling these signals for normal viewing requires the use of a descrambler device which
is generally provided by the cable company.
For subscribers to Basic Cable TV Service
For basic cable service not requiring a Converter/Descrambler box, connect the CATV 75 ohm Coaxial
Cable directly to the Antenna Jack on the back of the television.
For subscribers to Scrambled Cable TV Service
If you subscribe to a cable service which requires the use of a Converter/Descrambler box, connect the
incoming cable to the Converter/Descrambler box and connect the output of the box to the Antenna Jack
on the back of the television. Follow the connections shown below. Set the television to the output of the
Converter/Descrambler box(usually channel 3 or 4)and use the Converter/Descrambler box to select
channels.
For Subscribers to Unscrambled Basic Cable with Scrambled Premium Channels
If you subscribe to a cable service in which basic cable channels are unscrambled and premium channels
require the use of a Converter/Descrambled box, you may wish to use a two-set signal splitter(sometimes
called[two set coupler) and an A/B Switch box from the cable installer or an electronics supply store.
Follow the connections shown below. With the switch in the B position, you can directly tune any
nonscrambled channels on your TV. With the switch in theA position, tune your TV to the output of the
Converter/Descrambler box(usually channel 3 or 4) and use the box to tune scrambled channels.
L
AUDIO
R
COMPONENT
ANT
75
Converter/Descrambler
Converter/Descrambler
Splitter
A/B Switch
Note:
When you use a converter box with your TV, there may be features that you cannot
program using the remote control.
- 9 -
Page 11
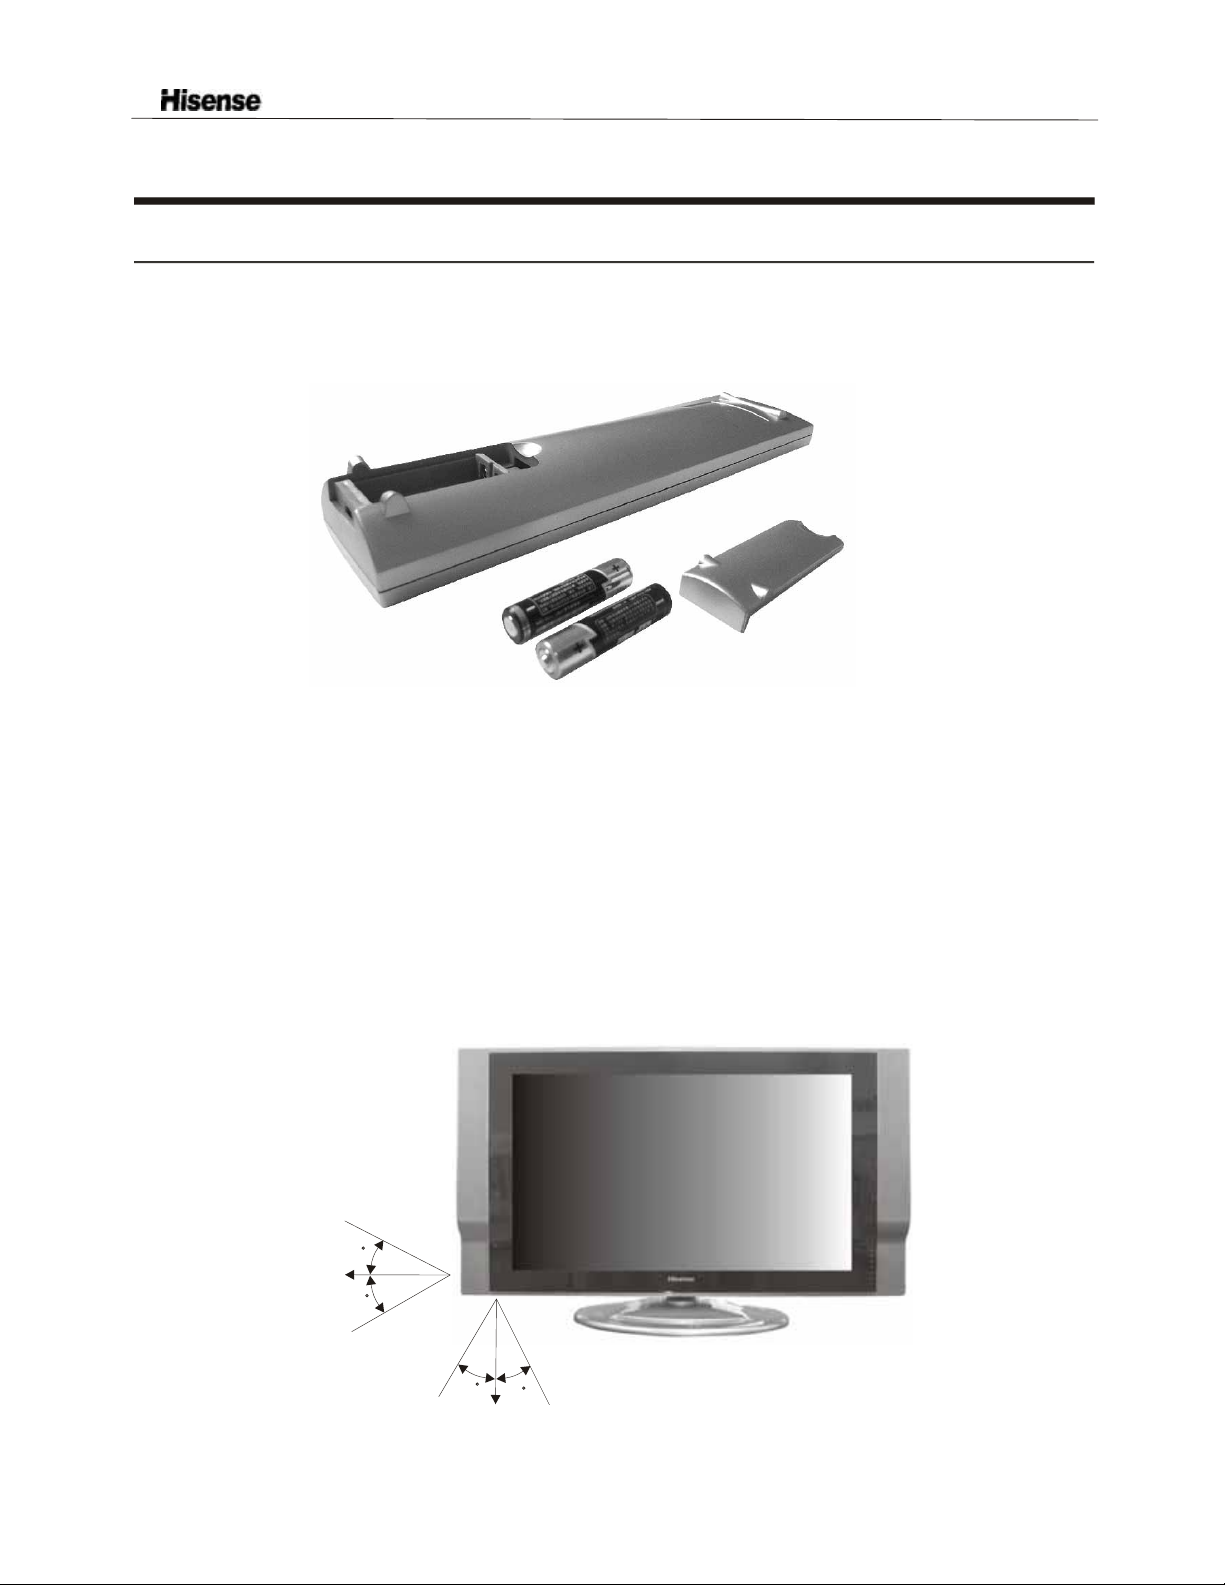
Using the remote control
Preparing the remote control for use
Installing the remote control batteries
1. Open the battery cover on the back of the remote control.
2. Install two AAA size(1.5V) batteries. Match the + and - signs on the batteries to the signs on the battery
compartment.
3. Close the battery cover.
Note:
1.Dispose of your batteries in a designated disposal area. Do not throw batteries into fire.
2.Do not mix battery types or combine used batteries with new ones.
3.Remove dead batteries immediately to prevent battery acid from leaking into the battery compartment.
4.If you do not intend to use the remote control for a long time, remove the batteries.
5.The effective range of remote control is suggested in the figure.
1m
30
8m
30
1m
30
30
8m
3m 3m
-10 -
Page 12
Using the remote control
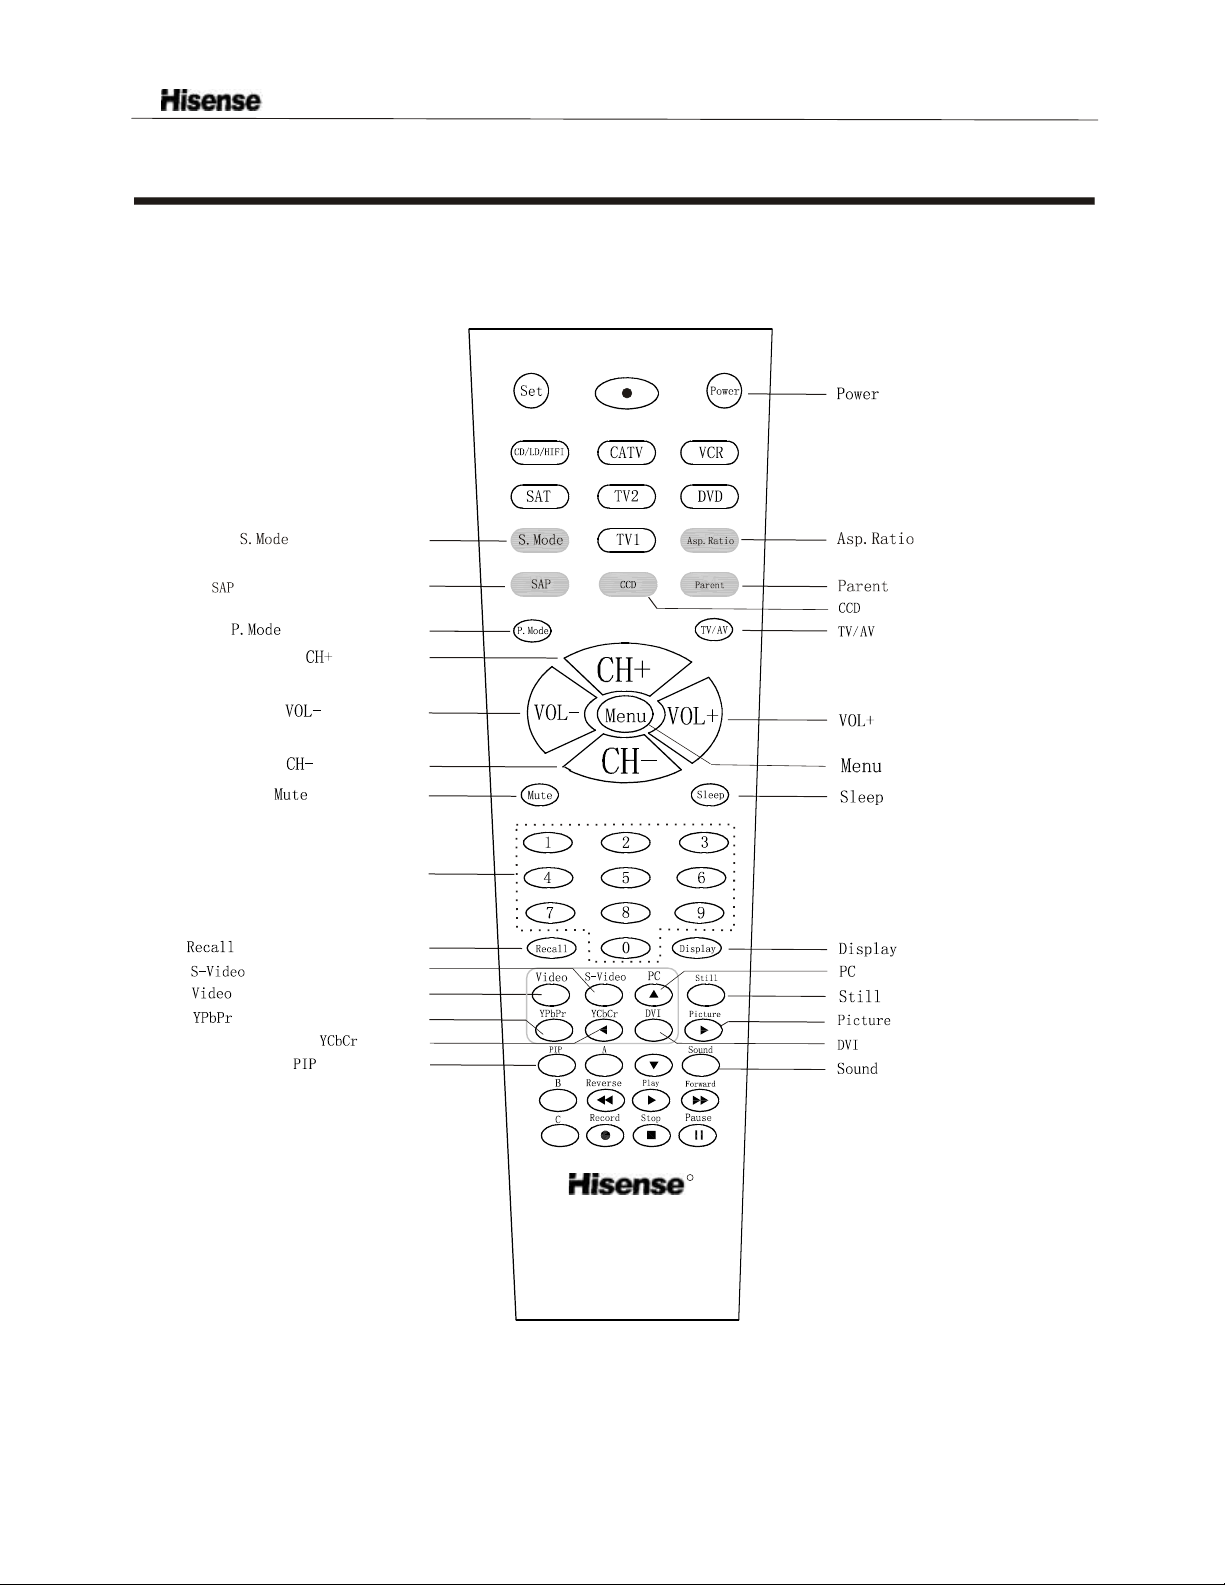
Learning about the remote control
:
Power on/off
:
Mono/stereo/SAP selection
Channel Number
:
Return to previous channel
:
:
Switch to VIDEO mode
:
Switch to YPbPr/YCbCr mode
:
Select sound mode
:
Select picture mode
:
Channel up
:
Volume down
:
Channel down
:
Mute the sound
:
Switch to S-VIDEO mode
selectionchannelDirect
:
No use
:
OFF/PIP/PBP
:
Adjust aspect ratio
:
Vchip operation
:
Closed Caption operation
:
Main source selection
:
Volume up
:
Call up the main menu
:
Set the sleep timer
:
Display current input
:
Switch to VGA mode
:
Snapshooting
:
Enter the picture menu
:
Switch to DVI mode
:
Enter the sound menu
R
HYDFSR-A205E
NOTE: This remote control is all-purpose, these buttons which not be explained are independent of the TV.
-11 -
Page 13
Using the TV features
Understanding the TV features
Multimedia - TV receiver, Video monitor and PC display, all in one.
Wider viewing angle, 16:9 display - over 150 viewing angle, 16:9 ergonomical display panel
Digital display device - truthfully reproducing the images, without distortion or blurring, irrespective
of magnetic or geomagnetic effect.
181 channels selection
Closed caption decoder - You may view specially labelled (cc) TV programs, movies, news,
prerecorded tapes, etc. with either a dialogue caption or text display added to the program.
V-chip - Enables parents to prevent their children from watching inappropriate programs on TV.
BTSC/SAP
Full function universal remote control
Sleep/wake timer
Multi-language OSD
Basic Operations
Power ON/OFF
1. Connect the TV to power outlet, the power indicator will be red
and then
turn blue. Several seconds later, TV picture will display on the screen.
2. Press stand by button on the machine or the POWER button on the remote
control to turn off the TV temporarily.
3. If you decide to shut off the TV for a long time, it is recommended
that you unplug the power from the outlet.
Signal source selection
Press the [ or ] button to selectTV input; press the
[VIDEO] button to select VIDEO input;press the [S-VIDEO]
button to select S-VIDEO input; press the [ YPbPr] button to
select YPbPr/YCbCr input;press the[PC] button to select PC
input;press the [DVI] button to select DVI input.Press the
TV/AV button or source on themachinecan switch among
VGA/DVI/S-VIDEO/AV/TV/Y PB PR.Press[CH+ or CH-] to
select mode, then press [ VOL+]to switch toselect mode you
want to select.
POWER
INDICATOR
DISPLAY
VGA
DVI
S-VIDEO
AV1
TV
YPBPR
POWER BUTTON
(STANDBY)
INPUT TERMINAL
D-Sub15
DVI-D
S-Video
Composite Video
Antenna
YP
BPR/YCBCR
Select channels by [ / ]
You can also use to select channels. ndicates channel number increase; indicates channel
number decrease.
[]or
[ ] i [ ]
-12 -
Page 14

Using the TV features
Select channels by numbers
To select a channel : Press the channel numbers in series to select channel directly.
For example, to seclect channel 120,
then press the button 2, 12- will display, press the button zero, you can enjoy the program of channel 120.
Adjust Volume
When menu is not displayed on the screen, press [ or ]to adjust the volume.
Use PIP button
Press the PIP button to select the OFF/PIP/PBP.
Use [RECALL] button
Press the [ RECALL ] button repeatedly to alternate between the present channel and the previous channel.
Display channel number
Press the button 1, and 1-- will display on the top right corner of the screen,
3 seconds after power on or changing channels, the channel number disappears from the screen. Press [DISPLAY]
button to display the present channel number, but it will also disappear 3 seconds after your pressing.
Select picture modes
You can select the picture mode from among three preset modes and one user-set
mode. Press the [P MODE] button repeatedly to select the desired picture mode.
BRIGHT
STANDARD
SOFT
USER
Select sound modes
You can select the sound mode from among three preset modes and one user-set
mode. Press the [S MODE] button repeatedly to select the desired sound mode.
MUSIC
STANDARD
SPEECH
USER
Use [STILL] button
Press the [ STILL] button to snapshot the present picture, and press any button to return to normal watching.
Use [Asp.Ratio] button
Press the [ Asp.Ratio ] button to adjust the screen aspect ratio
Mute function
Press [Mute] button repeatedly to switch between mute and unmute mode.
-13 -
Page 15

Using the TV features
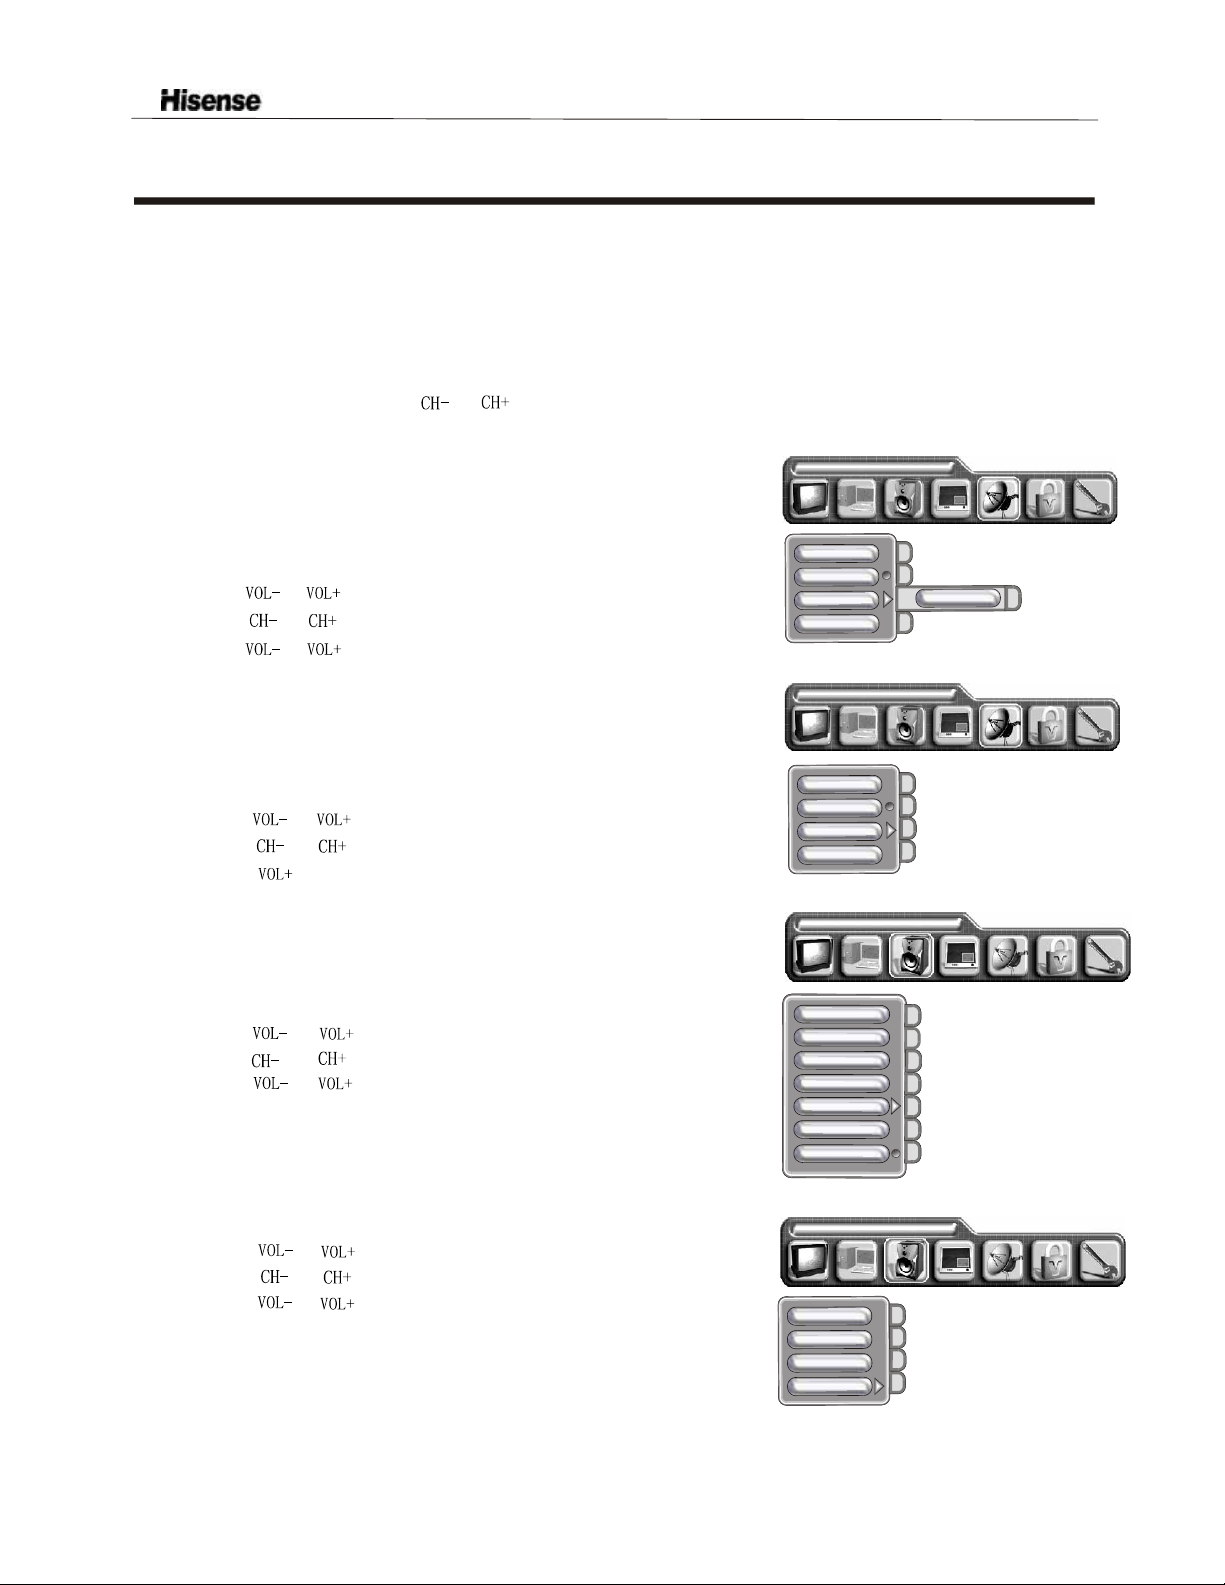
Using the PRESET menu
POSITION
1) Press the [MENU] button to enter the main menu.
2) Press the button to select the item PRESET..
3) Press the button to select POSITION.
4) Press the button to select the present channel.
[ or ]
[ or ]
[ or ]
SKIP
1) Press the MENU button to enter the main menu.
2) Press the button to select the item PRESET.
3) Press the button to select SKIP.
4) Press the button to skip or unskip the present channel.
NOTE: The 'skipped' channels cannot be accessed by , but you can access them by digit (direct select)
[ or ]
[ or ]
[ or ]
[ or ]
button.
RF INPUT
PRESET
POSITION
SKIP
RF INPUT
AUTO_SEARCH
You can set RF INPUT for different incoming RF signals.
1) Press the MENU button to enter the main menu.
2) Press the button to select the item PRESET.
3) Press the button to select RF INPUT.
4) Press the button to switch from among Air, CATV(STD), CATV(HRC), and CATV(IRC).
[ or ]
[ or ]
[ or ]
AUTO-SEARCH
1) Press the MENU button to enter the main menu.
2) Press the button to select the item PRESET.
3) Press the button to select AUTO_SEARCH.
4) Press the button to start auto_searching.
[ or ]
[ or ]
[ ]
Using the PICTURE PARAMETERS menu
Adjust picture parameters
1) Press the MENU button to enter the main menu.
2) Press the button to select the item PICTURE
PARAMETERS.
3) Press the button to select the item you want to adjust.
4) Press the button to adjust the level.
5) The adjusted data is stored automatically in the user mode.
.
[ or ]
[ or ]
[ or ]
PICTURE PARAMETERS
BRIGHTNESS
CONTRAST
SATURATION
HUE
COLOR TEMP
SHARPNESS
FLESHTONE
-14 -
Page 16

Using the TV features
Using the AUDIO SETTINGS menu
Adjust audio settings
AUDIO SETTINGs
1) Press the MENU button to enter the main menu.
2) Press the button to select the item audio settings.
3) Press the button to select the item you want to adjust.
4) Press the button to adjust the level.
5) The adjusted data is stored automatically in the user mode.
[ or ]
[ or ]
[ or ]
BASS
TREBLE
BALANCE
MTS
BTSC / SAP
You can enjoy watching TV while you listen to high-fidelity stereo sound with the BTSC feature. BTSC can
also transmit a second audio program(SAP) containing a second language or other audio information.
1) Press the MENU button to enter the main menu.
2) Press the button to select the item audio setting.
3) Press the button to select BTSC.
4) Press the button to
You may select Press the button to
[ or ]
[ or ]
[ ] [ or ] select the item you want to adjust
from among Mono, Stereo and SAP,
enter BTSC , Press the button to ,
[ ] select the item you want to adjust
NOTE: By pressing the [SAP] button, you can acquire the same effects.
Using the FUNCTION SETTINGS menu
CCD CONTROL
You have two options with the closed caption feature: captions or text.. A caption is a printed version of the dialogue,
narration and/or sound effects of a TV program. Text is information not related to what is appearing on the TV screen.
CCD CONTROL
1) Press the MENU button to enter the main menu.
2) Press the button to select the item FUNCTION SETTINGS,
CCD CONTROL
3) Press the button to select the CCD CONTROL.
4) Press the button to select CCD CONTROL or not.
[ or ] [ or ]
and press the to enter CCD CONTROL menu.
[ ]
[ or ]
[ ]
MODE
1) Press the MENU button to enter the main menu.
Press the button to select the item FUNCTION
2)
SETTINGS, Press the button to select the CCD
CONTROL and press the to enter CCD CONTROL .
3) Press the button to select the MODE.
4) Press the button to enter MODE menu .Press the
[ or ]
[ or ]
[ ]
[ or ]
[ ]
[ or ] button to select your desired mode and press the [ ] button to confirm.
Press the button to select the
FUNCTION SETTINGs
LANGUAGE ENGLISH
CCD CONTROL
COLOR SYSTEM
OSD LANGUAGE
BLANK
TRANSPARENCY
ADVANCE
CLOCK
CCD CONTROL
MODE
DISPLAY
VCHIP
ADVANCE
VCHIP
-15 -
Page 17

Using the TV features
DISPLAY
1) Press the MENU button to enter the main menu.Press
ADVANCE
the [ or ] button to select the FUNCTION SETTINGS.
2) Press the button to select the item CCD
CONTROL,and press the to enter CCD CONTROL menu.
3) Press the button to select the DISPLAY.
4) Press the button to enter DISPLAY menu ,
[ or ]
[ or ]
[ or ]
[ ]
button to select
[ ]
Press the
background between BOX
and SHADOW. Press the [ ] button to confirm.
LANGUAGE
1) Press the MENU button to enter the main menu.
2) Press the button to select the item Function settings.
3) Press the button to select the OSD LANGUAGE.
4) Press the button to enter OSD language menu and change
[ or ]
[ or ]
[ ]
OSD language from among English, Espanol and Francais. Press
the [ ] button to confirm.
BLANK
1) Press the MENU button to enter the main menu.
2) Press the button to select the item .
3) Press the button to select the BLANK.
4) Press the button to select the BLANK or not.
[ or ]
[ or ]
[ or ]
Function settings
ADVANCE
FUNCTION SETTINGs
CCD CONTROL
COLOR SYSTEM
OSD LANGUAGE
BLANK
TRANSPARENCY
ADVANCE
FUNCTION SETTINGs
CCD CONTROL
COLOR SYSTEM
OSD LANGUAGE
BLANK
TRANSPARENCY
ADVANCE
LANGUAGE ENGLISH
CLOCK
CCD CONTROL
MODE
DISPLAY
VCHIP
ADVANCE
LANGUAGE ENGLISH
CLOCK
ENGLISH
VCHIP
FRANCAIS
ADVANCE
ESPANOL
TRANSPARENCY
1) Press the MENU button to enter the main menu.
2) Press the button to select the item Function settings.
3) Press the button to select the TRANSPARENCY.
4) Press the button to adjust the transparency of the OSD.
ADVANCE
1) Press the MENU button to enter the main menu.
2) Press the[ or ] button to select the item Function settings.
3) Press the [ or ] button to select the ADVANCE.
4) Press the [ ] button to enter the ADVANCE menu , press
the[ or ] button and [ ] to select.
MADI: The abbreviation of Motion Adaptive De-Interlacing.When
this function is on, the areas that are not moving in a image will be
fully static and the objects that are moving will have a smooth edge.
FILM MODE: For some special signal, turnning on the FILM MODE will make the image moving more glidingly.
NOTE:The disable items will turn gray.
[ or ]
[ or ]
[ or ]
FUNCTION SETTINGs
CCD CONTROL
COLOR SYSTEM
OSD LANGUAGE
BLANK
TRANSPARENCY
ADVANCE
LANGUAGE ENGLISH
CLOCK
NOISE REDUCE
VCHIP
MADI
FILM DODE
LADI
-16 -
Page 18

Using the TV features
Using the PC PARAMETERS menu
AUTO
1) Press the MENU button to enter the main menu.
) Press the button to select the pc parameters.[ or ]
2
3) Press the button to select the item AUTO,
and press the to adjust the picture position.
[ or ]
[ ]
ADVANCE
CLOCK
1) Press the MENU button to enter the main menu.
) Press the button to select the pc parameters.[ or ]
2
3) Press the button to select the item clock,
and press the to adjust the clock parameters.
[ or ]
[ or ]
ADVANCE
PHASE
1) Press the MENU button to enter the main menu.
) Press the button to select the pc parameters.[ or ]
2
3) Press the button to select the item phase,
and press the to adjust the phase parameters.
[ or ]
[ or ]
ADVANCE
PC PARAMETERS
AUTO
CLOCK
PHASE
POSITION
AUTO COLOR
ADVANCE
POSITION
1) Press the MENU button to enter the main menu.
) Press the button to select the pc parameters.[ or ]
2
3) Press the button to select the item position,
and press the to adjust the horizontal position parameters.
[ or ]
[ or ]
and press the to adjust the vertical position parameters.[CH- or CH+ ]
ADVANCE
AUTO COLOR
1) Press the MENU button to enter the main menu.
) Press the button to select the pc parameters.[ or ]
2
3) Press the button to select the auto color,
and press the to adjust the picture color .
[ or ]
[ ]
NOTE: When you find the screen is abnormal in the condition of the PC source, you can
AUTO and AUTO COLOR ,then press the
for some seconds,and then return normal.
ADVANCE
[ ] button, the screen would become black
-17 -
select the
Page 19

Using the TV features
Using the VCHIP SETUP menu
VCHIP SETUP
VCHIP enables parents to prevent their children from
viewing certain programs or channels.
1) Press the MENU button to enter the main menu.
2) Press the button to select the item VCHIP
[ or ]
SETUP.
PASSWORD ENTER
Password is a four-digit number. The preset password is 1111.
You must enter password to access the next two operations.
1) Press the button to select PASS WORD ENTER,
and press the to enter ENTER the Vchip PASSWORD
[ or ]
[ ] .
CHANGE PASSWORD
1) Press the button to select
2) Input the new password and Confirm the password.
You succeed in changing the password.
PASSWORD CHANGE.[ or ]
VCHIP SETUP
PASSWORD ENTER
PASSWORD CHANGE
MPAA RATING
TV PG RATING
Enter the Vchip Password
OK
CHANGE THE PASSWORD
OK
____
CANCEL
____
CANCEL
MPAA RATTING/TV PG RATTING
1) Press the button to select or , and press to enter it.
2) Press the button to select the rating.
[ or ] [ ]
[ or ]
3) Press the [ ] button to confirm
NOTE: As you block ratings, all ratings higher than the ones you select are blocked as well. For example, if you choose
to block the MPAA rating R, the higher ratings, NC-17 and X, are automatically blocked too.
MPAA RATING TV RATING
-18 -
Page 20

Using the TV features
Rating
About MPAA Ratings
CLOCK
The Motion Picture Association of America(MPAA)
uses a rating system to qualify motion picture
content.Television broadcasters employ a rating
NA
G
PG
system to qualify the content of televison programs
as well.The MPAA and TV ratings work with the
V-CHIP feature and allow you to block out
programming above the rating limits you determine.
PG-13
R
NC-17
X
About TV Ratings
The TV ratings are divided into two groups: age-based and content-based.
Age
NONE
TV-Y
Defined as
Rating not applicable
All children
Contents
V
S
TV-Y7
Directed to older children
L
TV-G
General audience
Defined as
Rating not applicable
General audience
Parental Guidance suggested
Parents strongly cautioned
Restricted
No one 17 and under admitted
Adult audience only
Defined as
Violence
Sexual situations
Strong language
TV-PG
TV-14
Using the PIP menu
TV-MA
Parental Guidance suggested
Parents Strongly cautioned
Mature Audience only
D
ALL
Suggestive dialogue
Above rating applicable
Using the PIP menu
1) Press the MENU button to enter the main menu,
[ or ]
2) Press the
[ ] [ or ]
button to s
[ or ]
elect the PICTURE IN PICTURE.
button to select the PIP size, and press the
button to enter the PIP size,
Press the button
Press the
PICTURE IN PICTURE
to select the OFF/PIP/PBP.Press the [ ] button to confirm.
3) Press the button to select the PIP source, and press
[ ] [ or ]
the button to enter the PIP source, Press the
[ or ]
button to select the pip source.Press the[ ] button to confirm.
4) Press the button to select the PIP position or PIP
brightness or contrast,Press the button to adjust
[ or ]
[ or ]
PIPSIZE
PIP POSITION
PIP SOURCE
PIP BRIGHTNESS
PIP CONTRAST
brightness and contrast.Press the [ ] button to enter the PIP
position.Press the [ or ] and [ or ] button to adjust the vertical and horizontal position.
Note: 1) When main picture is TV/ VIDEO/ S-VIDEO. PIP picture is HDTV/PC/DVI.
2) When main picture is HDTV/PC/DVI. PIP picture is TV/ VIDEO/S-VIDEO
- 19 -
Page 21

Universal Remote Control User's Manual
Application: Universal Remote Control for TV, VCR, SAT, Cable TV, Hi-Fi Audio System, DVD, STB etc.
Application Manual
MANUAL SETTING
1.Look up the three-digit code for your brand and type of device in the Code Tables, then turn on the device.
2.Press and hold the SET key then press the DEVICE Key, then the indicator lights will turn on.
3.Press the three-digit code for your device. Each time LED blinks one time.
4.Press Device Key. The activity indicator should flash, then turn off to indicate that the code is accepted.
Note: If no key on your remote is pressed for 10 seconds, the programming process will stop automatically,
and you will have to start over.
QUICK POWER SCAN (AUTO FIND) SETTING
1.Turn on the device you want the remote to control, and point the remote toward it.
2.Press and hold the SET key then press the DEVICE Key , then the indicator lights will turn on.
3.Press the SET key again, the indicator light will flash.
4.Press the POWER once at a time (setup counter up) until the device turns OFF.
5.Press the SET key to change the scan direction.
6.If device is turn off then press DEVICE key (any), then indicator should flash and turn off to indicate that
the code is accepted.
Note: If no key on your remote is pressed for 30 seconds, the programming process will stop automatically,
and you will have to start over.
If the code is not match with your device, then repeat step 1-6.
POWER SCAN CONCEPTS
1.During the power scan mode, If you press and hold POWER, the power code data is transmitted continuously.
2.During the power scan mode, If you press and release SET, the power code data is transmitted one time in
reverse direction.
3.During the power scan mode, If you press and release DEVICE Key, the current code data is selected.
TEST THE SELECTED CODE
1.Press SET and Digit 1, LED will be flashing. The flashing time is stand for the 1st digit of the selected code.
E.g.: Code=547, LED will be flashing 5 times.
2.Press SET and Digit 2, LED will be flashing,. The flashing time is stand for the 2nd digit of the selected code.
E.g.: Code=547, LED will be flashing 4 times.
3.Press SET and Digit 3, LED will be flashing,. The flashing time is stand for the 3rd digit of the selected code.
E.g.: Code=547, LED will be flashing7 times.
- 20 -
Page 22

Code Table of The Universal Remote
Code Table
CD CODE
ADC 133
ADO 134
Aiwa 054, 118, 135
Akai 136
Atle 070
Caabletime 000, 001, 002
Caravell 095
Denon 022, 137, 039, 041
Dynatech 119
Emerson 120
Fisher 021, 121, 139, 140
GE 141
Haitai 023
Hitachi 122
Inkei 016
Inkel 142
JBL 096
JVC 078, 123, 143
Karcher 024
Kenwood 025, 053, 124, 144, 145
Lenco 058, 059, 060, 061, 062, 063, 064, 065, 066, 067, 073, 024, 074
Luxman 146
Luxor 004
Magnavox 028, 049, 077
Marantz 125, 147
MCS 148
Mission 028
Mitsubishi/MGA 149, 150
Nakamichi 152, 153
NEC 026
Onkyo 086, 154, 088, 155, 126
Optimus 156, 157, 158
Panasonic 127
Philips 027, 028, 042, 077, 035, 036, 037, 040
Pioneer 029, 030, 159
Proton 028
Radiotone 024
RCA 128
Rotel 028, 055, 057
SAE 028
Sansui 076
Sanyo 077, 166
Sharp 025, 041
Sherwood 160
Sony 031, 032, 048, 080, 129, 138, 161, 038, 091, 090
Sylvania 028, 077
Teac 081, 164, 162, 163
Technics 033, 130
Toshiba 151
Victor 078
Yamaha 085, 131, 132, 165
- 21 -
Page 23

Code Table of The Universal Remote
LD CODE
Kenwood 045
Magnavox 044
Panasonic 046
Philips 034
Pioneer 044
RCA 075
Sony 048
Toshiba 044
Zenith 043
Brand of HIFI CODE
Fisher 005
Hitachi 006
Kenwood 003, 007, 008, 009, 010
Lenco 068, 069, 070, 071, 072, 073, 074
Nordmende 024
Onkyo 011, 012
Panasonic 013
Pioneer 020
Sanyo 014
Sharp 007
Sherwood 015, 016, 050, 051
Sony 090
Technics 017
Yamaha 018, 019
Brand of RCVR CODE
Denon 106, 110, 111
JVC 102, 115
Kenwood 101, 104, 100
Magnavox 103
Marantz 107
Onkyo 109, 113
Panasonic 117
Philips 107
RCA 103
Sansui 112
Sharp 105, 111
Sony 098
Teac 116
Technics 114
Yanaha 099, 108
- 22 -
Page 24

Code Table of The Universal Remote
Brand of DVD CODE
Aiwa 087, 118, 041, 058, 153
Ames 136
Apex 115, 122, 127
Atle 041
BBG 000
Classic 136
Daewoo 076, 107, 109
Denon 005, 135, 078
Elta 116, 121
GE 106
Govideo 123
Harman Kardon 073, 125
Hisense 145, 146
Hitachi 007, 075, 131, 1
Integra 138
JVC 006, 071, 088, 128, 019, 150, 155
KLH 009
Konka 089, 090, 133, 134, 137, 141
Lasonic 117
Lenco 039, 040, 041, 042, 043, 044, 045
Magnaox 080, 092, 093, 002, 102, 020, 018, 015, 149
Marantz 102
Mitsubishi/MGA 068, 081, 111,148
Mustek 136
NAD 142
Nakamichi 139
Optimus 075, 103
Oritron 119
Others 011, 064
Panasonic 001, 005, 108, 091, 018, 017
Philco 003, 060
Philips 002, 102, 113, 092, 093, 080, 023, 018, 149
Pionner 082, 075, 103, 078, 054, 029, 147, 152
Proscan 004, 079, 101, 151
Radioshack 104, 143, 144
RCA 104, 106, 143, 144, 114, 101, 079, 004, 046, 151
Rotel 026, 027
Sampo 124
Samsung 072, 077
Sansui 017
Sanyo 094, 110, 018, 020
SEG 129
Sharp 010, 085
Sherwood 120, 021, 022
Shinco 013, 106
Skyworth 059
Sony 083, 095, 096, 112, 061, 019, 021, 014, 033, 034, 157
Sylvania 018
Teac 075, 103, 022, 055
Technics 005, 023
Theta Digital 075, 103
Thomson 012
Toshiba 002, 084, 097, 098, 100, 126, 015, 062, 156
Victor 019, 063
Wharfedale 140
Yamaha 005, 070, 105, 056, 130
Zenith 008, 002, 099, 086, 110, 014
03, 154
- 23 -
Page 25

Code Table of The Universal Remote
Brand of VCR
Admiral 089, 094, 212
Aiko 124, 258
Aiwa 073, 098, 104, 185
Akai 001, 002, 032, 033, 070, 071, 101, 107, 108, 109, 110, 165, 166, 167, 244, 164, 181, 236, 000
Alba 046, 010
American High 087, 120
Amstrad 073
Anitech 010, 034
ASA 011, 054
Asha 114
Audio Dynamics 111, 112
Audiosonic 010
Audiovox 104
Baird 002, 004, 046
Baur 014, 054
Beaumark 114
Bell&howell 095, 099
Blaupunkt 003, 005, 006, 035, 081
Brionvega 012
Brocksonic 094, 113, 123, 178, 222, 186, 245, 248
Bush(UK) 014, 075
Calix 104
Candle 114, 115, 116, 117, 118
Cannon 240, 087, 120, 121
Capehart 119
Carver 090
CCE 105, 124, 272, 258
CGE 020, 083, 073
Citizen 104, 114, 115, 116, 117, 118, 124, 258
Colortyme 111
Colt 105, 272
Crown 046
Curtis Mathes 087, 098, 237, 111, 114, 117, 120, 121, 122, 168
Cybernex 114
Daewoo 046, 115, 116, 118, 123, 245, 258
Dansai 010, 011
DBX 111, 112
Decca 026, 054
Decca(UK) 007, 073, 054
Degraaf 073, 058, 039, 054
Dimensia 106
Dixi 016
Dual 004
Dumont 073, 039, 540
Dynatech 073, 098
Dynatron 011
Elbe 036
Electrohome 104, 125, 080
Electrophonic 104
Elin 018
Emerex 086
Emerson 076, 073, 011, 051, 094, 098, 104, 251, 259, 264, 237, 238, 185, 245, 246, 182, 113, 115, 120, 122,
CODE
123,125, 270, 126, 271, 202, 203, 178, 214, 221, 222, 223, 127, 128, 129, 131, 133, 134, 135, 136,
137, 138,139, 149, 163, 196, 167, 169, 170, 176, 080
- 24 -
Page 26

Code Table of The Universal Remote
Erres 011
Ferguson 030
Fidelity 073
Finlandia 039, 054
Finlux 007, 073, 029, 002, 039, 020, 011, 054
First-line 010
Fisher 009, 020, 039, 037, 095, 096, 097, 099, 140, 141, 142, 283, 197, 204, 229, 266
-Phoeix
Formenti
Fuji 087, 092, 120, 236
Funai 073, 098, 221, 264
GBC 010
GE 087, 098, 106, 114, 120, 121, 143, 168, 230, 261
GEC(UK) 007, 054
Geloso 010
Goldstar /LG 104, 011, 014, 036
Goodmans 075, 046, 073, 018, 010
Govideo 098, 102, 211, 235, 242
Gradiente 098, 100
Granada 054
Granada(UK) 003, 007, 081, 014, 058, 039, 020, 012, 054, 085
Grundig 054
Hanseatic 007, 014, 054
Harley Davidson 098
Harman/Kardon 036, 090, 111
Harwood 105, 272
HCM 010
Headpuarter 095
Hinari 010, 015, 016, 075, 074
HI-Q 229
Hitachi 004, 010, 014, 017, 073, 098, 226, 187, 188, 193, 144, 145, 164, 165
Imperial 083, 018, 073
Ingersol 016
Inno Hit 018, 010, 054
Instant Repl
Interfunk 007, 019, 054
Irradio 011, 010
ITT 039, 020
ITT-Nokia 001, 004, 019, 081, 020, 021, 002
Jc Penney 111, 112, 114, 120, 121, 146, 164, 283, 188, 193, 268
JCL 120
Jensen 144, 145, 165, 188
JVC 001, 004, 021, 042, 043, 044, 047, 030, 100, 111, 112, 117, 165, 171, 180, 228, 008
Karcher 014, 018, 054
KEC 104
Kendo 002
Kenwood 020, 104, 111, 112, 117, 165, 171, 008
KLH 105, 272, 219
Kodak 087, 104, 120
Lenco 046
LG(Goldstar) 111, 117
Lloyd s 098, 073
Loewe Opta 003, 007, 081, 054
Logik 016, 015, 018, 010, 272, 045, 074, 075
Luma 015
Luxor 014, 020, 002
011, 054
ay
120, 264
- 25 -
Page 27

Code Table of The Universal Remote
LXI(sears) 095, 097, 098, 104
M Electroinc 073
Magnadyne 054
Magnasonic 020
Magnavox 087, 088, 090, 098, 103, 120, 121, 147, 162, 282, 172, 241, 190
Magnin 114
Manesth 011
Marantz 003, 007, 011, 036, 054, 087, 090, 114, 120, 121, 148, 186, 240
Mark 011
Marta 011
Matsui 016, 015, 051, 014, 011
Matsushita 087, 120
MEI 087, 120
Memorex 011, 073, 058, 039, 020, 087, 089, 090, 091, 094, 098, 099, 101, 104, 181, 229, 114, 120, 121, 162, 212
Metz 003, 006, 081, 082
Mga 080
Mgn Tech 114
Minerva 003, 006, 081
Minolta 144, 145, 164, 188, 193
Mitsubishi/MGA 007, 010, 043, 054, 089, 205, 179, 215, 224, 232, 188, 253, 008, 082, 167, 104, 125, 149, 080
Montgomery Ward 212, 247
Motorola 087, 089, 212
MTC 073, 018
Multitech 010, 046, 073, 054, 098, 105, 230, 114, 143, 272
Murphy 073
Mutitech 075
N.E.I. 011, 054
NAD 076
NEC 004, 036, 043, 237, 186, 254, 192, 111, 112, 117, 148, 150, 151, 152, 165, 171, 008
Neckerma nn 001, 004, 007, 014, 015, 081, 018, 020, 054
Nikko 104
Nikon 093
Nobliko 003, 081
Nokia 039, 020
Nordmende 001, 004, 049, 021, 024, 043, 042, 044, 047
Olympus 058, 161, 242, 247
Orion 015, 051, 045, 074, 016, 094, 178
Osaka 073
Osaki 011, 073, 010
Others 064, 078, 013, 023, 025, 028, 084, 048, 050, 052, 056, 062, 063, 065, 079, 067, 068, 069, 072
Otto Versand 007, 014, 054
Palladium 002, 070
Panasonic 005, 019, 035, 087, 101, 120, 121, 173, 174, 175, 249, 195, 269
Penney 036, 087, 104
Pentax 017, 144, 145, 164, 188, 193
Pentax Research 117
Perdio 073
Philico 120, 121, 147, 094, 087
Philips 007, 029, 053, 054, 055, 081, 087, 090, 103, 104, 120, 121, 161, 172, 195, 194, 231, 183,
184, 241, 247, 190, 257
Philips/Magnavox 183, 194
Phonola 007, 054
Pilot 011, 104
Pioneer 007, 043, 053, 055, 076, 077, 008, 054, 206, 216, 188, 112, 144, 273, 274, 171
- 26 -
Page 28

Code Table of The Universal Remote
Portland 116, 118
PRE 043
Proline 073
Proscan 106
Pulsar 088, 162
PYE 054
Quarter 095
Quartz 020
Quasar 087, 120, 121, 173, 249, 19
Quelle 003, 006, 007, 015, 026, 081, 018, 011, 054
Radio
Shack/Realistic
Radioshack 197, 204, 212, 181, 229
Randex 104
RCA 057, 089, 247, 256, 261, 262, 195, 188, 249, 255, 260, 193, 261, 262, 233, 239, 155, 156, 199, 207,
Rdix 104
Realistic 073, 058, 018, 039, 020, 011, 087, 089, 094, 095, 097, 098, 099, 104, 195, 229, 197, 204, 212,
Repla
y
REX 004, 021, 042
Ricoh 093
Runco 088, 162
SABA 001, 004, 049, 021, 043, 042,0 44
Saisho 076, 016, 015, 051, 045, 074
Salora 014, 020
Samsung 018, 054, 114, 115, 143, 144, 271, 166, 130, 181, 182, 230, 242, 244, 188
Sanky 088, 089, 162, 212
Sansui 043, 094, 098, 105, 225, 112, 277, 165, 171, 008
Sanyo 020, 039, 095, 097, 099, 104, 114, 229
SBR 054
Schneider 007, 010, 018, 073, 011, 054, 075
Scott 113, 115, 123, 126, 131, 149, 169, 222, 223, 245, 197, 204, 229, 188, 193, 266
Sears 038, 087, 096, 097, 099, 098, 104, 283, 120, 140, 141, 142, 144, 145, 164, 268
SEG 010, 018
SEI-Sinudyne 016
Seleco 032
Senta 083
Sharp 058, 089, 116, 125, 160, 161, 212, 247, 250, 256, 080
Shintom 105, 227, 236, 188, 070, 010, 145, 272, 075
Shogun 114
Siemens 003, 006, 020
Singer 105, 120, 272
Sinudyne 007, 016, 054
Sonoko 046
Sony 026, 057, 059, 060, 061, 027, 073, 086, 087, 092, 093, 098, 278, 243, 189, 263, 200, 132, 177,
STS 120, 164, 188, 193, 040
Sunkai 051
Sunstar 073
Sylvania 073, 087, 090, 098, 213, 221, 241, 264, 120, 121, 147, 149, 172
Symphonic 073, 098, 264, 221
Tandberg 015, 045
Tandy 095
Tashiko 073, 058, 104
114, 120, 121, 125, 140, 141, 161, 080
106, 107, 114, 120, 121, 144, 145, 153, 154, 209, 217, 173, 157, 158, 159, 275, 276, 164, 168
181, 247, 256, 262
269
220, 236, 210
5
- 27 -
Page 29

Code Table of The Universal Remote
Tashiro 104
Tatung 007, 073, 054, 165
TEAC 073, 165
Technics 087, 120
Teknika 073, 011, 087,098, 104,257, 208, 120, 121, 279, 284
Telefunken 001, 004, 021, 041, 042, 044, 049
Telemeister 073
Tenosal 010
Thomas 098
Thomson 001, 004, 021, 043, 047
Thorm 030
Thorn-Ferguson 001, 004, 030, 042, 049
Tivo 197, 263
TMK 015, 237, 259, 114, 122, 139
Tonsai 010
Toshiba 004, 021, 188, 115, 140, 142, 144, 149, 169, 031
Toterision 018, 011, 104, 114
Uher 004, 018
Unitech 018, 114
Vector 036
Vector Research 036, 111, 112, 115
Victor 043, 047, 112
Video 036
Video Concepts 111, 112 ,115, 167
Videosonic 105, 114
Wards 087, 089, 097, 098, 104, 105, 229, 212, 218, 193, 188, 247, 280, 281, 164, 169, 114, 115, 120, 121,
125, 144, 145, 272, 161, 075, 080
Weltblick 011
White Weatinghouse 011, 094,2 64
Xenon 015, 045
XR-1000 087, 098, 105, 120, 272
Yamaha 036, 095, 198, 111, 112, 117, 165
Yoko 018, 011
Zenith 088, 092, 093, 094, 098, 162, 265, 201, 267, 180, 248, 234, 236, 252, 191
- 28 -
Page 30

Code Table of The Universal Remote
Brand of AUX CODE
A mark 018, 023
ABC 074
Akai 025
Alleron 026
Anam 023
Aoc 023
Archer 023
Audio Dynamics 021
Audiovox 023
Autovox 035
AWA 051
Beko 052
Bell&howell 026
Blaupunkt 036
Brionvega 044
Broksonic 023
Cabletime 054
Candle 019
Capehart 016, 017
Carver 020
Chaparral 049
Citizen 017, 019
Concerto 019
Coronado 018
Crosley 020
Crown 018
Daewoo 048
Daytron 017
DBX 021
Denon 065, 041
Dumont 016
Electrohome 019
Emerson 018, 017, 026
Filmnet 046
Fujitsu 026
Funai 026, 24
GE 017
Gibralter 016, 018, 020, 019
Grunpy 026
Hallmark 017
Hitachi 018, 019
Infinity 020
JBL 020
Jensen 025
JVC 025, 021
Kamp 016
Kenwood 025, 021, 069
KMC 018
KTV 018
Lenco 053, 057
Loewe Opta 037
Luxman 019
Luxor 038
LXI 024
LXI(Sears) 020
Magnavox 018, 020, 017, 026, 024
Marantz 021, 20
Megatron 023
Memorex 024, 017, 019
Metz 039, 371
Mitsubishi 016, 017, 065, 370, 026
MTC 016, 019
NAD 065
NEC 016, 019, 026, 021
Nordmende 040
Oceanic(F) 041
Omega 022
Orion 017
Others 047, 028, 031, 032
Panasonic 020, 67
Penney 021, 020, 017
Philco 016, 018
Philips 016
Pionner 021, 065
Portland 016, 018
Praxis 050
Proton 017, 023
Quasar 067
RCA 016
Realistic 024, 019
Rediffusion 042
Samsung 016, 018, 017, 019, 348
Sansui 016, 025, 021
Scott 017, 026
Sears 018, 020, 017, 016, 019
Sharp 018, 045
Signal 022
Signature 018, 017, 026
Signature 2000 016,024
Sony 066, 067, 048, 375
Soun Design 017, 026
Spectravision 023
SSS 016
Starcom 022
Stargate 022
Starquest 022
Supreme 020
Sylvania 020
Symphonic 024
Tatung 043, 025
Teac 025, 024
Techncs 067
Technovision 055
Techwood 019
Teknika 016, 018, 019, 020, 026
Telerent 018
TMK 017, 019
Toshiba 379
tusa 022
Vector Research 021
Victor 025, 021
Video Concepts 021
Vidtech 016, 017
Wards 016, 020, 017, 026, 019, 024, 018
Yamaha 025, 021, 016
Yorx 017
Zonda 023
- 29 -
Page 31

Code Table of The Universal Remote
Brand of TV CODE
A mark 318,360
Aasic Line 144
Abex 374
Accuscan 105,331,336,339,362
Admiral 032,136,243,246,257,253,331,336,347,381,464,487
Aico 363
Aiwa 225,424,471,222
Akai 005,045, 085,087,140,168,224,247,319,354,382
Alba 031
Albiral 001,009
Alleron 344,512
Amark 553
Ambassador 359
Amenicaction 240
Amstrad 006,204,359,551
Atron 185
Anam 105,240,321,339,360
Anam National 455,504,586,484,185
AOC 045,241,319,354,360,373,383,456,520,489,089,081
Archer 360,553
Aristona 149
Arthur 107
ASA 007,009,013,024,026,032,091,107,114,136,142
Audinac 276
Audiosonic 141
Audiovox 105,240,244,339,360,185
Ausind 007,008,024, 091
Autovox 004,007,012,015,024, 041,075,076,091,097,114,134, 591
AWA 033,140,141,169
Baird 143
BCR 005,032,115,046,064
BEKO 151
Bell & Howell 105,381,408,098
Blaupunkt 010,018,020,053,065,085,208
Bradford 105,240.339,185
Brandt 005,032,115,046,064,072
Brionvega 097,136
Broksonic 103,243,247,256,345,350,360,519,530
Bruns 139
BSR 016,019,021,033,219
Bush(UK) 022,107,
Cabletime 212
Candle 045,353,354,376,383,450,501,081,074
Capehart 316,334
Carver 235,327
Celebrity 231,365,382,087
Centruion 334
Century 128,129,136
CGE 007,019,023,024,033,091,128,133,150,151,
CGM 090
Changhong 124,141,173,502
Citizen 045,204,233,475,506,449,450,451
Clairtone 241,489
Clarivox 001, 009,147,148
Classic 502
Colortyme 250,319,384,457,552,081,060,101
Concerto 081
Concierge 566
Conte/Cony 385,489,572
Contec 022,103, 219,339,355,240
Contec/Cony 070,185
Continental 005,032,115,046,064
Coronado 318
Craig 105,240,262,263,264,265,339,185
Crosley 024,025,045,128,136,235
Crown 105,233,240,265,318,339,449
CTC Clatronic 093
Curtis Mather 380,386,449
Curtis Mathes 045,204,247,261,265,331,333,336,348,354,233,237,235,560,503,506,081,135,096
CXC 105,240,339
Daewoo 149,204,233,244,247,277,278,282,313,363,370,372,373,428,449,
031
454,459,540,528,465,544,557,089,081
- 30 -
Page 32

Code Table of The Universal Remote
Daytron 204,334,449,081
Decca(UK) 002,004,026,028,031
Degraaf 107
Denon 237
Dimensia 315,380,560,096
Dorig 110
Dual 041,221
-
Dual
Tec
Dumont 007,024,091,136,566,316
Dynatech 377,222
Edison 005,032,115,046,064
Elbe 001,009
Electroband 365,231,382,489,087
Electtohome 333,335,365,484,583,481,388
Elite 099
Elman 019,029,033
Emerson 129,136,105,204,103,123,233,239,240,243,247,258,262,263,264,265,283,318,319,333,334,
Envision 045,354,374
Europhon 000,004,019,029,030,033,036, 129
Fenner 033,173,207
Ferguson 009,005,032,042,046,064,115
Fidelity(UK) 003,107
Filmnet 214
Finlandia 107,138
Finlux 007,008,009,013,024,025,026,029,034,091,114,142,150,199
Fisher 025,035,041,136,148,151,221,238,267,324,333
Formenti 107,192
FormentiFrance Telecom 228
Frontech 107
Fujitsu 239,344,512,533
Funai 016,141,219,105,005,032,115,046,064,240,339,344,371,239,551,512,476,222
Futuretech 105,240,339
Garrard 222
GBC 002,004,019,025,026,031,033,038,039,040,041,107,138,155
GE 236,321,322,329,331,334,366,481,492,493,560,570,573,574,484,388,447,380,096
GEC(UK) 155
Gelos o 004,019,025,032,033,038,131,132,107
General Electric 246,247,251,286
Genexxa 107
Gibralter 045,316,354,441,385,566
Goldstar/LG 003,004,007,024,033,042,045,077,091,134,153,204,218,318,319,328,334,348,354,
Goodmans 109
Gorenje 151,154
Gradiente 234
Graeta 107
Granada(UK) 002,004,007,024,027,040,043,044,046,047,048,091,107,110,138,085
grosley 007,024,091
Grundig 003,007,010,018,020,024,044,049,050,052,053,065,077,091
Grundy 449,512
Grunpy 105,239,339,344
Hanseatic 007,024,025,027,036,043,051,054, 091,
Hantarex 000
Harley Davidson 222
Harman/kardon 235
Harvard 105,339
Hem-mermann 056
Hinair 033,043,057,058,059,127,138
Hisense 014,017,078,080,086,095,593,106,121,145,176,180,184,187, 194,195,198,202,205,
Hitachi 004,026,029,030,039,040,041,043,046,054,061,063,064,065,066,070,108,155,
Hyper 003,004,007,024,033,091,134,173
Ima 105,339
Imperial 007,019,023,024,033,091,128,133,150,151
Infinity 235,327
Inno Hit 000,004,031,042,059,129,156
Inteq 566
Phoenix
004,011,019,029,033
337,338,339
395,396,397,449,451,452,505,507,555,510,511,561,426,398,399,401,400,523,524,530,
475,534,476,578, 222,070,062,185,186,188,229,217,211,203,200 ,485,486,554,551,491,
003,007,008,024,025,036,037,091,107,140
316,267,583,520,526,513,247,256,272,287,290,291,292,089,070
206,210,213,227,588,589,590,591,592
199,209,237,247,273,274. 317,318,343,480,500,567,467,529,479,
222,434,440,452,385,437,438,439,402,435,436,430,431,432, 433
345,350,355,359,482,504,545,512,489,490,385,390,391,392,393,394,
,343,344,
- 31 -
Page 33

Code Table of The Universal Remote
Interfunk 005,007,024,027,039,044,051,067,068,069,071,091,136
Irradio 008,007,024,038,042,059,091,134,226
ITT 007,024,031,063,091,127,154,
ITT-Nokia 005,007,024,032,039,040,044,048,063,067,068,069,072,073,091,127,143,149,154,158
Janco 215,216
JBL 235,327
JC Penny 096,089,074,135,130,380,388,403,449,458,506,493,560,570,481,573,579,272,247,251
JCB 365,231,382,087
Jensen 378
JVC 070,109,127,159,167,168,270,271,346,234,445,385,404,405,493,527,477,
Kaisui 007,024,091,144
Kamp 105,316,339
Karcher 007,024,026,091,140,144,156
Kawasho 355,382,087
KEC
Kendo 129
Kennedy 025,075,076
Kenwood 045,354,583
Kloss 371,376
Kloss Novabeam 450,501,536,546
KMC 318
Konka 038, 141,173,509,514,525,531
Korting 036, 043,136,138,192
KTV 105,204,045,233,241,247,265,275,276,318,319,339,352,354,489,478,475,451,406,449
Lenco 033,038,164,207
Lenoir 004
LG(GOLDSTAR) 444
Lloyd 222
Loewe Opta 051,137,169,191,209,593,255,571
Logik 028,336,408
Luma 032,079
Luxman 333,347
Luxor 005,007,010,018,024,026,044,046,054,066,082,083,084,091,143,158
LXI(Sears) 235,246,247,255,256,261,267,293,326,327,331,341,351,342,380,560,570,222,096
Magnadyne 000,019,025,029,056,131,132,136
Magnafon 000,003,007,008,024,029,030,036,091
Magnavox 045,239,242,247,255,256,284,288,318,327,328,332,334,344,353,354,371,235,
Majestic 327,408
Marantz 026,027,045,235,266,319,327,335,354
Martin 107
Matsui 004,005,006,028,031,032,040,046,064,085,115,163,170,352
Maximal 057,127
Mcmichael 155
Megatron 237,317,360
MEI 489
Melectronic 221
Memorex 243,245,333,334,335,336,562,507,512,381,408,222
Metz 018,034, 085,088,132,136, 144, 164
MGA 045,245,481,583,512,388,407
Midland 204,233,236,316,493,566,570,441,449
Minerva 010,007,018,024,044,050,052,065,085,091,
Minutz 366,573
Mitsubishi/MGA 005,032,043,045,046,051,064,089,109,113,115,13
Mivar 000,003,007,024,090,091,092,223
MTC 045,241,348,354,377,506,489,222,089,135
Multisystem 140
Multitech 040,093,105,151,153,240,339,352,377,222
Multivisi
on
Murphy 058
Murphy(UK) 040,110
N.E.I. 147
NEC 165,045,247,256,315,319,334,354,375,477,552,484,457,089,101
Neckermann 004,026,043,054,079,094,151
Nikkai 137
Nikko 045,354,363
Nobliko 003,007,008,024,029,050,091,129
Nokia 007,024,058,063,0 91,127,154
Nordmende 088,168,065,097,166
Noshi 232
NTC 363
Oceanic(F) 005,039
Onceas 004
240
546,536,474,508,515,477,583,584,470,472
354,373,388,407,427,563,481,512,583,477,247,256,266,307,315,319
409,495
6,162,163,245,344,224,334,335,
- 32 -
Page 34

Code Table of The Universal Remote
Onwa 105,240,339
Optimus 279
Optonica 347,362,487,171
Orion 005,006,016,028,031,032,046,056,064,085,099,103,105,115,167,168,169,
Osume 022
Otto Versand 025,027,043,051,054,065
Pael 003, 007,008,,024,091
Palladium 177
Panasonic 001,003,019,036,039,065,100,102,104,170,208,251,260,289,290,308,321,322,
Penny 232,233,236,319,325,327,328,329,334,341,342,353,354
Perdio 024,091,007,033,149
Philco 019,023,024,025,133,136,150,151,577,237,243,247,255,273,277,309,318,319,
Philips
Philips/Magnavox 387,389,543,585,488
Phonola 149,156
Pice Club 268
Pilot 204,233,354,449
Pioneer 000,027,065,612,261,279,343,349,410,411,452,556
Polestar
Portland 204,233,247,252,315,318,363,449
-
Prandoni
Praxis 606
Precision 521
Price Club 506
Prism 290
Prosat 001
Proton 334,360,385,412,522,577,580,070
Pulsar 005,316,319,336,56 6,441
Quasar 251,289,321,322,493,478,569,484,406
Quelle 004,005,007,008,009,010,013,024,026,027,028,032,044,046,049,050,051,
Radio Shack 105,204,233,246,256,266,294,339,362,374,222
Radio Shack/Reallistic 380,385,449,535,560,561,583
Radiola 005,032,046,064,115,209,
Radiomarelli 005,032,115,046,064
Radionette 026,058
Rank(UK) 022
RBM(UK) 022,091
RCA 182,157,189,232,236,542,559,564,570,484,535,537,538,581,583,574,575,532,380,
RCA/Proscan 025,246,247,248,249,251,252,285,286,287,319,331,340,343
Realistic 045,105,204,233,320,333,338,339,354,222,171
Rediffusion 005,032,040,046,064,115,154,110
REX 011,021,032,075,076,127
Rhapsody 489,241
Roadstar 038
Rotel 022
Runco 3165,566,441
SABA 000,005,032,046,064,065,072,082,088,107,115,136,166
Saccs 009
Saisho 004,006,028,031,085,102,163
Salora 005,046,047,054,063,064,066,067,073,079,083,094,127,138,143,158,175,215,216,230,
Sambers 000,004,007,008,024,029,030,036,042,091
Sampo 045,204,233,354,449
Samsung 026,033,042,140,141,151,156,190,193,204,208,247,256,268,296,318,334,348,354,
Samsux 204,233
Sansui 045,243,348,354,362,507,519
Sanyo 013,022,026,031,043,058,063,072,109,110,111,112,113,143,148,151,163,175,183,
SBR 149,155
Schneider 005,007,011,015,019,024,025,032,033,035,037,039,041,046,064,091,115,127,149,221,226
Scotch 250,319
Scott 103,105,239,240,265,256,334,339,344,345,348,512,490,385,391,211
Sears 235,239,318,323,324,325,326,327,331,333,334,344,238,380,404,506,512,551,
SEG 093
SEI 005,032,115,046,064
Seleco 011,057,075,127,076
Semivox 240
Prince
224,239,243,334,339,345,566, 507,211
327,358,478,493,484,569
327,341,354,371,235,546,536,474,484,583,385,074,070
003,026,027,071,136,070,172,173,174,074,228,209,024,091,007,149,141,005,032,
115,046,064,155,235,255,284,288,296,297,298,312,327,328,332,356,357,483,484,
583,385,536,472,387,516,425,460,515, 543,546,477,584,585,488
192
007,008,024,032,091,129
058,064,065,067,091,114,115,199,134,
415,429,452,453,454,383,459,461,413,414,496,517,547,549,096,161,160
355,497,503,506,518,583,385,386,417,449,416,458,462,152,130,146
238,250,265,267,295,324,323,333,418,448,558,125
558,560,570,583,116
,
- 33 -
Page 35

Code Table of The Universal Remote
Sharp 022,038,043,053,065,109,114,178,201,171,204,233,565,576,582,487,498,499,
Shogun 250,319
Siarem 000,025,029,136
Sicatel 001,009,022,065
Siemens 010
Siesta 220
Signature 2000 904,903,912,318,319,320,329,334,336,344,347,381,408,578,902,253,257,098
Silver 141,208
Simpson 242,328,353,074
Singer 025,029, 131,136
Sinudyne 005,006,016,025,026,029,031,032,046,056,064,115,136,172,177,219,
Sonic 489
Sonoko 208
Sony 028,109,005,117,118,119,120,163,179,224,123,231,245,330,364,365,369,539,382,
SounDesign 105, 334,339,344,353,239,240,512
Spectravision 587,360
Squareview 551,116
SSS 105,240,339
Starlite 105,240,339
Stern 075,076,127
Sunkai 005,032,115,046,064
Super-Macy 204,353,376,501,450
Supreme 231,327,365,371,382,087
Sylvania 045,247,255,256,327,328,332,341,342,353,354,235,546,551,568,583,584,421,446,
Symphonic 231,265,281,314,398,476,551,485,222,116
Tandberg 114,219,228
Tandy 065,257,487
Tao Wah 196,197
Tatung 002,004,026,028,031,321,484
Teac 222
Technics 321,322,493
TechnolAce 239
Techwood 322,493
Teknika 094,105,233,235,240,245,318,327,335,336,344,353,363,376,239,501,506,512,
Tele+1 214
Teleavia 005,032,046,064,072,115,166
Telefunken 065,072,088,165,166,168
Telerent 318,336
Teleservice 181,212
Tera 385,412,522
Thomas 222
Thomson 065,075,166,088,005,032,046,064,072,168
Thorn- Ferguson 001,005,009,032,042,046,064,115,122,141,166,208
TMK 903,905,165,258,267,334,359
Toshiba 022,043,091,109,123,124,130,126,137,029,030,139,257,261,268,293,300,301,
Tosnic 241
Totevision 233,449
Uher 007,011,012,024,033,035,036,037,075,091,192,221
Ultravox 003,007,024,025,079,091,093,129,136
Universal 091,141,199,026
Universum 026,091,141,199
Univox 001,009
Vector Research 045,354
Vegavox 150
Victor 234,270,404
Videosonic 222
Vidikron 235
Vidtech 247,256,273,334
Viking 204,376,450,501
Vortec 026,065
Voxson 005,007,024,032,046,064,091,115,127,136
Waltham 005,032,046,064,115
Wards 235,239,247,256,258,327,328,329,334,336,341,546,548,560,573,512,515,536,380,
Watson 036
Watt Radio 001,003,025,029,030,056
Wega Color 109,127,043
Weltblick 026
449,385,395,419,420
463,466,469,460,087
515,474,536,476,222
515,385,408,449,222,135
325,326,332,333,348,362,375,506,477,550,458,135
381,391,398,408,422,423,583,490,222,318,319,320,342,344,098,171
- 34 -
Page 36

Code Table of The Universal Remote
White Westinghouse 003,026,036,140,243,244,557,029,030
XR-1000 222
Yamaha 045,583
Yoko 004,033,140
Yorx 334
Zanussi 005,026,032,046,064,075,076,115,
Zenith 181,243,253,254,316,336,363,367,368,494,507,519,534,566,578,408,442,443,468
Zonda 360
Zoppas 005,032,046,064,115
Brand of SAT CODE
Alba 031,060
AlphsStar 127
American High 063
Amstrad 000,001,032,107,053
Ankaro 002
Apollo 026
Astra 001,033,107
Aura 053,106
Barcom 002
Benjamin 089
BEST 075
Bush 060,026
Cambridge 004
Canon 063
Carver 063
Chaparral 003
Columbus 042
Crosley 063
Curtis mathes 063
DNT 033,051,053,106
Drake 145,067,068,069,134,143
Dynasat 110,111
Echostar 006,008,014,033,035,036,079,080,115,082,083,105,003,128
Emme Esse 084,085,086
Eurostar 086
Eursky 044
Expressvu 128
Finlux 039
Fracarro 009,002
Freecom 049
FTE 025
Fuba 037,042
Fuji 063
GE 063,146,010,020,027
General Instruments 148,118,121,133,761
General Electrc 005
Giucar Record 040
Grunding 011,026,104
Haier 114
Hirschman 039,049
Hitachi 103,130,029,030
HTS 128
Hughes Newtwork Sys 126,038,055
Huth 044,099
ITT-Nokia 026,013,041
Jeemon 014
Jerrold 118,121
Johansson 015,001
JVC 128
Kathrein 016,018,042,090,004
Kodak 063
Kosmos 004
Kyostar 023
Lenco 046,049,100,101,102
Leng 001
Luxor 056,019,026
Macom 066
Magnavox 124,125,063,141,144,034
Marantz 063
Maspro 016,021,026,109,001
Maxab 043
- 35 -
Page 37

Code Table of The Universal Remote
Lenco 046,049,100,101,102
Leng 001
Luxor 056,019,026
Macom 066
Magnavox 124,125,063,141,144,034
Marantz 063
Maspro 016,021,026,109,001
Maxab 043
MEI 063
Memorex 125,063
Metz 011
Mina 113
Minerva 011,104
Mitsubishi 108
Morgans 044,018
Motorolat 063
NEC 045,098,112,062,051
Neckermann 044
Next Level 133
Nokia 026
Norsat 051
Obritech 049
Olympus 063
Pace 026,009,139,142
Palcom 022,042
Palladium 044
Palsat 046
Panasonic 116,054,123,766,063
Pansat 077
Penny 063
Philico 063
Philips 026,047,048,097,045,112,124,125,141,144,063,034
Philips/Magnavox 141,144
Pioneer 094,135
Primestat 118,121,076
Prosat 099,073
Proscan 146,010,020,027
Quasar 063
Quelle 011
Radix shack 133
Radix 033,051,053,106
RCA 072,117,119,120,131,010,020,027,061
RC-AK 078
Realistic 063
Rediffusion 062,051
Sakura 023,024,052,033
Salora 019,041,026,035
Samsung 081,095,096,046,049,136
SAT100 001,107
Sateco 049,026
Scientific Atlanta 074
Sears 063
Sharp 137
Siemens 011
Sintrack 050
Skymaster 099
Sony 093,025,122,761,063,012,057
Star Choice 133,091
Strong 025,046,049,100,023
STS 021
STV 037
Sylvania 063
Tada 070
Tantec
Technics 063
Technisat 033,051,052,053,054,106,035,088
Tedelex 087,
Teknika
Telemax 016
Telemeister 024,033,051,053,090,106
Thomas 063
Thorn- Ferguson 026
Toshiba 064,066,129,007,017
Unided Satellite 062
Uniden 125,028,124,065,026,000,096,095
Vortec 053,106
022,042
092
- 36 -
Page 38

Code Table of The Universal Remote
Brand of CABLE CODE
ABC
Adelphia 069
Aeon 004
Allegro 031,033,063
Americast 073
Antronix 045
APO 018
Archer 036,045
Asiagiant 003,015
AT&T 082
Bell&howell 038
BEST 001
Cabletenna 045
Cableview 045
Century 031
Citizen 031
Colour Voice 046,047
Comtronics 028
Contec/Cony 066,043,089
Eastern 009,010,011,012
Emerson 036
Everquest 027,028
Garrard 031
GE 055
Gemini 027,036,054,048
General Instrument 060,077,082,042
GMI 017,020,021
Goldster/LG 030
Goodmind 036
Hamlin 025,078,081,090
Hughes 038
Hytex 024
IEEC 008,016
Jasco 027,033
Jebsee 000
Jeemon 038
Jerrold/GI 037,038,101,102,103,104,042,099,058,077,082
Koka 004,007
Movie Time 070,029,091
NSC 029,070,091
OAK 002,024,043,066,076,092,08
Panasonic 056,044,051
Philips 031,054,046,047,048,105
Philips/Magnavox 061,062
Pioneer 030,035,075,084,049,093
Radio Shack 061,062,063,027,033,036
RCA 056,044,050
Recoton 034
Rembrandt 038
Samsung 028,030,049
Scientific Atlanta 064,065,067,069, 071,075,074,039,040,094,095,096
Sigma 043
Signal 027,028
Signature 038
Skygiant 013,014
Slmarx 028
Sprucer 044,056
Standard Components 097
Star Trak 068
Starcom 027,042,102
Stargate 027,028,036
Starquest 027
Tada 023
Taicom 004
Tandy 079
Tay Shoen 008,019
Telemedia 038
Teleview 028
Tocom 026,041,058,088,103
Toshiba 022
Tusa 027
TV86 029,070,091
United cable 042
Universal 031,032,045
Video Tech 080
024,038,039,041,042,058,065,088,101,102
9
- 37 -
Page 39

Appendix
Cleaning and care
WARNING: Do not try to remove the cabinet back. Refer servicing to qualified service technicians.
To clean the TV screen:
1) Unplug the TV to avoid possible shock hazard.
2) Use a clean cellulose sponge or chamois cloth dampened with a solution of mild detergent and warm
water to clean the TV screen and trim. Do not use too much water as water spilled into the cabinet
can cause damage to the TV.
3) Wipe off any excess moisture with a clean dry cloth.
4) Polish the cabinet with a quality furniture polish to maintain the finish and appearance of the cabinet.
Caution: Never use strong solvents such as thinner, benzene, or other chemicals on or near the cabinet.
These chemicals can damage the finish of the cabinet.
- 38 -
Page 40

Appendix
Troubleshooting
Before calling a service technician, please check the following table for a possible cause of the problem and
some solutions.
Symptoms
TV will not turn on
No picture, no sound
No sound, picture OK
Poor sound, picture OK
Poor picture, sound OK
Unable to select a certain channel
Possible Solutions
Make sure the power cord is plugged in, then press [POWER].
The remote control batteries may be dead. Replace the batteries.
Check if you have set the off timer.
Check the antenna/cable connections.
Press [DISPLAY] to see if you have select the right signal source.
The sound may be muted. Press on the remote control or .
The station may have broadcast difficulties. Try another channel.
Check the speakers cable connections.
The station may have broadcast difficulties. Try another channel
Check the antenna connections.
The station may have broadcast difficulties. Try another channel.
Adjust the picture from the menu.
The channel may be skipped. See SKIP on page 14.
[ >]
Poor color or no color
The remote control does not operate
Disorder display at power on
The station may have broadcast difficulties. Try another channel.
Adjust the HUE and COLOR in the menu.
There may be an obstruction between the remote control and the
remote control sensor.
The batteries may be installed with a wrong polarity.
The remote control batteries may be dead. Replace the batteries.
This may be caused by too short interval between power off and on.
Unplug the power and restart.
- 39 -
Page 41

Appendix
Specifications
TL3220
Diagonal display size
Television system
Channel coverage
Power source
Power consumption
Audio power
Conection Interface
32 inches
NTSC standard
VHF: 2~13 UHF: 14-69 Cable TV: 2~13,A~W, W+1~W+84, A-5~A-1, 4A
120VAC, 60Hz
160W
5W+5W
RF input: Cable/ antenna 1RF 75 VHF/UHF input
VIDEO input: VIDEO 1
S-VIDEO 1Y:
YPbPr/YCbCr 1 Y:
YPbPr/YCbCr :
(480P/60Hz,480i/60Hz,720P/60Hz,1080i/60Hz)
VGA : Analog RGB 15pin 1
(VGA,SVGA,XGA,SXGA signal)
DVI : Digital RGB 30pin 1
(VGA,SVGA,XGA,SXGA signal)
VIDEO output: VIDEO 1
AUDIO input:
AUDIO input:
Other: RS232C 1(for software updating)
AV audio 1 >10K 1.0Vrms input
YPbPr/YCbCr audio 1
PC audio 1(Mini-jack(3.5 ))
AV audio 1
Mini-jack for stereo(3.5 ) 1
75 1.0Vp-p input
75 1.0Vp-p input
75 0.286Vp-p input
C:
75 1.0Vp-p input
75 1.0Vp-p input
75 0.70Vp-p input
75 0.70Vp-p input
Width: 1036mm
Dimensions
Weight
Supplied accessories
Height: 675mm
Depth: 370mm
51Ibs
Remote control,ACcord,Batteries
Design and specifications are subject to change without notice.
CUSTOMER NOTICE: Operate carefully to prevent damage to the screen.
- 40 -
Page 42

HISENSE HOME ENTERTAINMENT WARRANTY
We appreciate your purchase of a HISENSE Home Entertainment product. We take pride in
the quality of our products and have manufactured your new Hom e Entertainment unit to
exacting quality standards. We feel confident that in normal use, it will provide you
with satisfactory performan ce. However, should you experience difficulty, yo u are
protected under the provisions of this war rant y.
HISENSE Home Entertainment products are warranted against manufacturing defects in
materials and workmanship in normal use for the following period from the date of purchase
by the original user, and is conditional upon the unit being installed and used as directed
in the instruction manual.
LCD TV
Parts and Labour 1 Year
Remote Control 90 Days Parts and
Labour
HISENSE's obligation under this warranty shall be limited to the repair, including all
necessary parts and the cost of the labour co nnect ed ther ewith , or at our opt ion the
exchange of any Home Entertainment product which shows evidence of a manufacturing defect
within the warranty peri od.
Replacement parts, furnished in connec tion wi th this wa rran ty shall be warra nted for
a period equal to the unexpired port ion of the origi na l equi pm ent wa rr anty .
CUSTOMER OBLIGATIONS
This warranty applies to the pro duct from the original date of purc hase at retail.
Therefore, the owner must provide a copy of the original, dated bill of sale. No warranty
service will be performed without a bill of sale. Transportation to and from the service
depot is the responsibility of the owner.
WARRANTY EXCLUSIONS
This warranty is extended to HISENSE Home Entertainment products purchased and used in
Canada. This warranty shall not apply to ap pearance or accessory it ems including but
not limited to: antenna, cabinet, cabinet parts, knobs, batteries , connecting cables,
cassette tapes, compact discs. This warranty shall, in addition, not apply to damages
due to handling, transportation, unpacking, set-up, installation, customer adjustments
that are covered in the instruction book , repair or replac ement of par ts supp lied by
other than the HISENSE authorized service depot, any malfunction or failure caused by
or resulting from abnormal environmental conditions, improper unauthorized service,
improper maintenance, modifi cations or repair by the consumer, abuse, misus e, neglect,
accident, fire, flood, or other Ac ts of Go d, and inc or rect lin e volt ag e.
This Home Entertainment product is only warranted to the original retail purchaser. This
warranty becomes void in the event of commercial or rental use. This warranty becomes
void in the event serial numbers are alter ed , defa ce d or rem ov ed.
Page 43

HISENSE reserves the right to make changes in design or to make additions to or
improvements upon this product without incurring any obligation to install the same on
products previously manufactured. The foregoing is in lieu of all other warranties
expressed or implied and HI SENS E n eith er assu me s no r a utho ri zes a ny pers on to as su me
for it any other obligation or liability in connection with the sale or service of this
product. In no event shall HISENSE or its HISENSE de alers be lia ble for specia l or
consequential damage arising from the use of this product, or for any delay in the
performance of this warr anty due to cause beyond our control .
The purchaser may have other rights under existing provincial or federal laws, and where
any terms of this warranty ar e prohibited by such laws, they are deemed null and void,
but the remainder of the warranty sh all re ma in in ef fe ct.
HOW TO OBTAIN SERVICE
Should this product require service, you may obtain specific information on how to obtain
service by contacting the HISENSE Deal er from whom th is prod uct was purc hase d, or by
contacting us directly:
SONIGEM SERVICE
300 Alden Road
Markham, Ontario
L3R 4C1
PHONE: (905) 940-5089 FAX: (90 5) 94 0- 2303
1-800-287-4871
 Loading...