

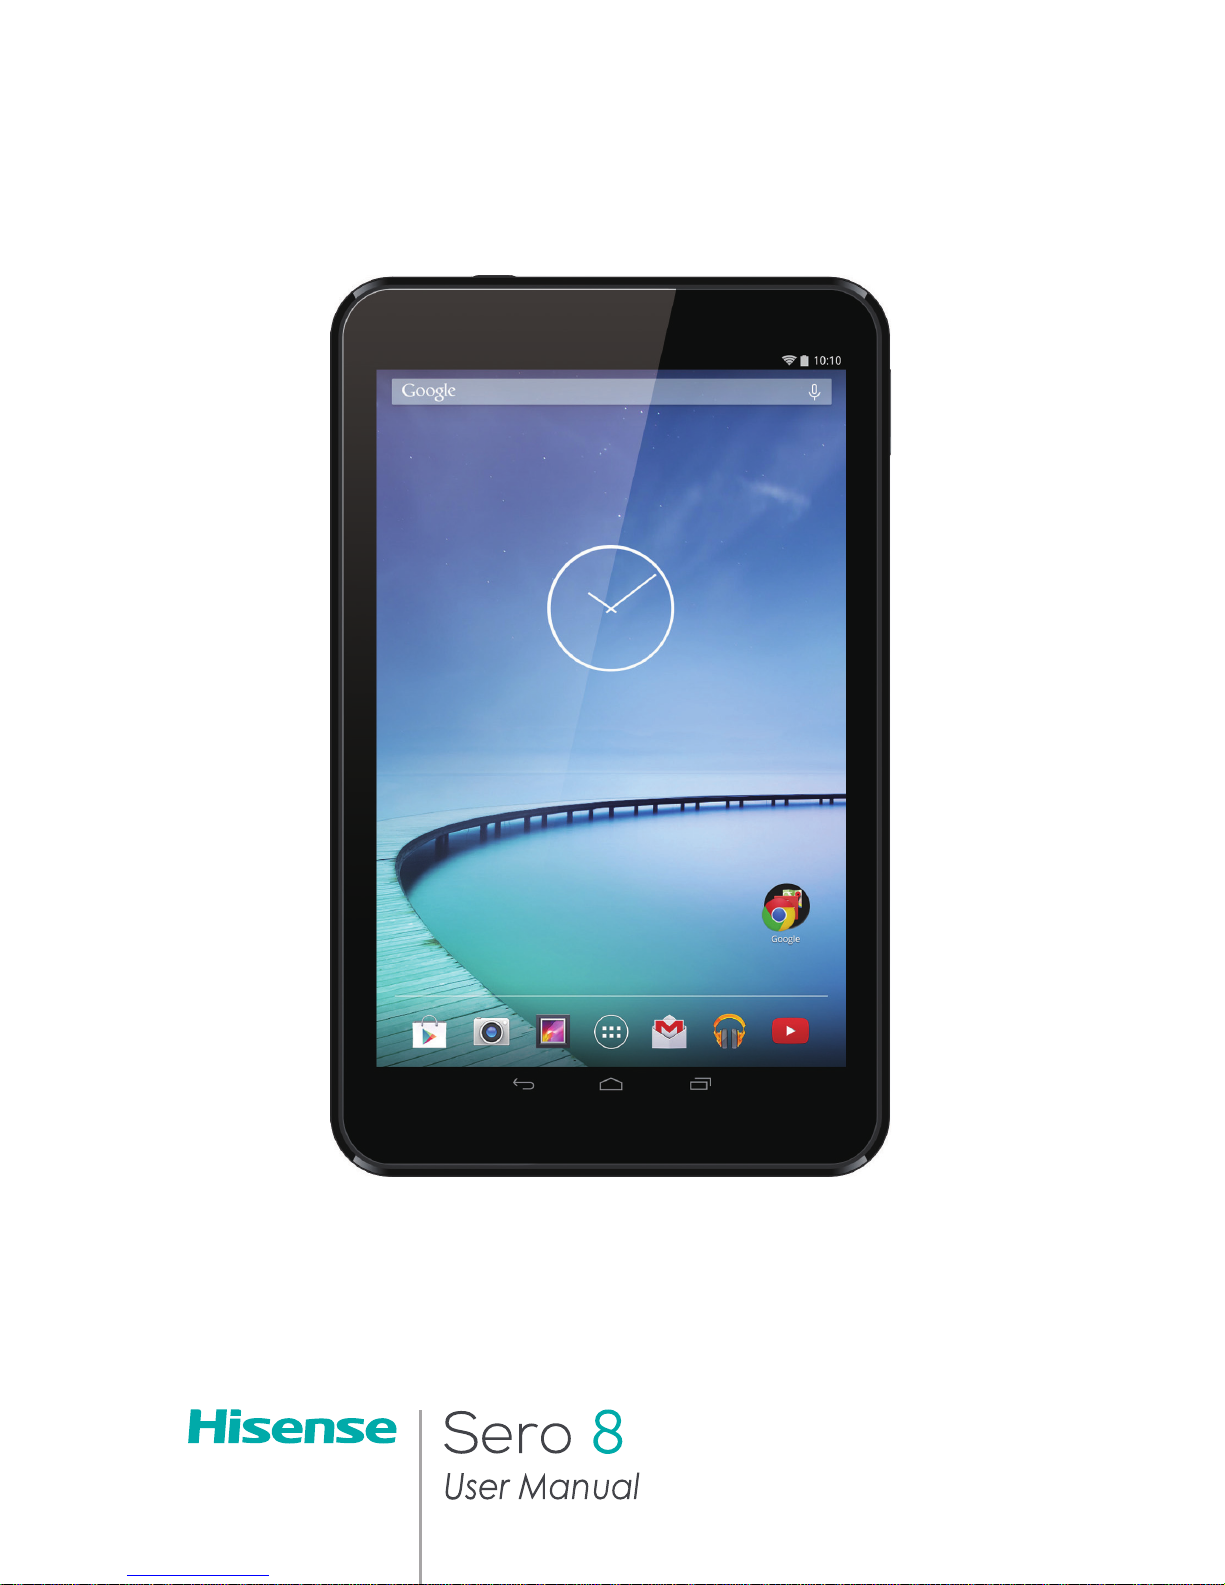
Page 1
Page 2

1
Content
Need to Know ...................................................................................3
Model and Serial Numbers ..................................................................................................3
Getting Started ................................................................................. 4
Package Contents .....................................................................................................................4
Understanding Your Sero 8 Tablet ..................................................................................5
Home Screen ...............................................................................................................................7
Buttons .............................................................................................................................................9
Making Connections ................................................................... 12
Battery ........................................................................................................................................... 12
Micro-USB ................................................................................................................................... 13
Micro SD Card ........................................................................................................................... 14
Headphone ................................................................................................................................ 15
Wi-Fi ................................................................................................................................................15
VPN .................................................................................................................................................. 17
Bluetooth .....................................................................................................................................18
Basic ................................................................................................... 20
Setup Guide ............................................................................................................................... 20
Basic Operation .......................................................................................................................20
Typing ............................................................................................................................................ 23
Sharing .......................................................................................................................................... 25
Security ......................................................................................................................................... 25
Settings .........................................................................................................................................26
Location........................................................................................................................................30
Google Account ...................................................................................................................... 31
Syncing ......................................................................................................................................... 33
Google Now ..............................................................................................................................34
Voice Search & Voice Actions .......................................................................................... 36
Appendix A .................................................................................... 39
Specifications ............................................................................................................................ 39
Page 3

2
Troubleshooting .....................................................................................................................40
Appendix B..................................................................................... 41
Important Safety Instructions ......................................................................................... 41
Certification and Compliance.........................................................................................43
Appendix C .................................................................................... 46
Legal Terms ................................................................................................................................ 46
Copyright and Trademark Notices ...............................................................................55
Page 4

3Need to Know
Need to Know
Read this chapter to learn where to view the model and serial numbers.
Model and Serial Numbers
Model Number
You can go to Settings > SYSTEM > About tablet to view the Model number.
Serial Number
You can go to Settings > SYSTEM > About tablet > Status to view the Serial
number.
1
Page 5
4Getting Started
Getting Started
Read this chapter to learn about Sero 8 features, how to use the controls, and
more.
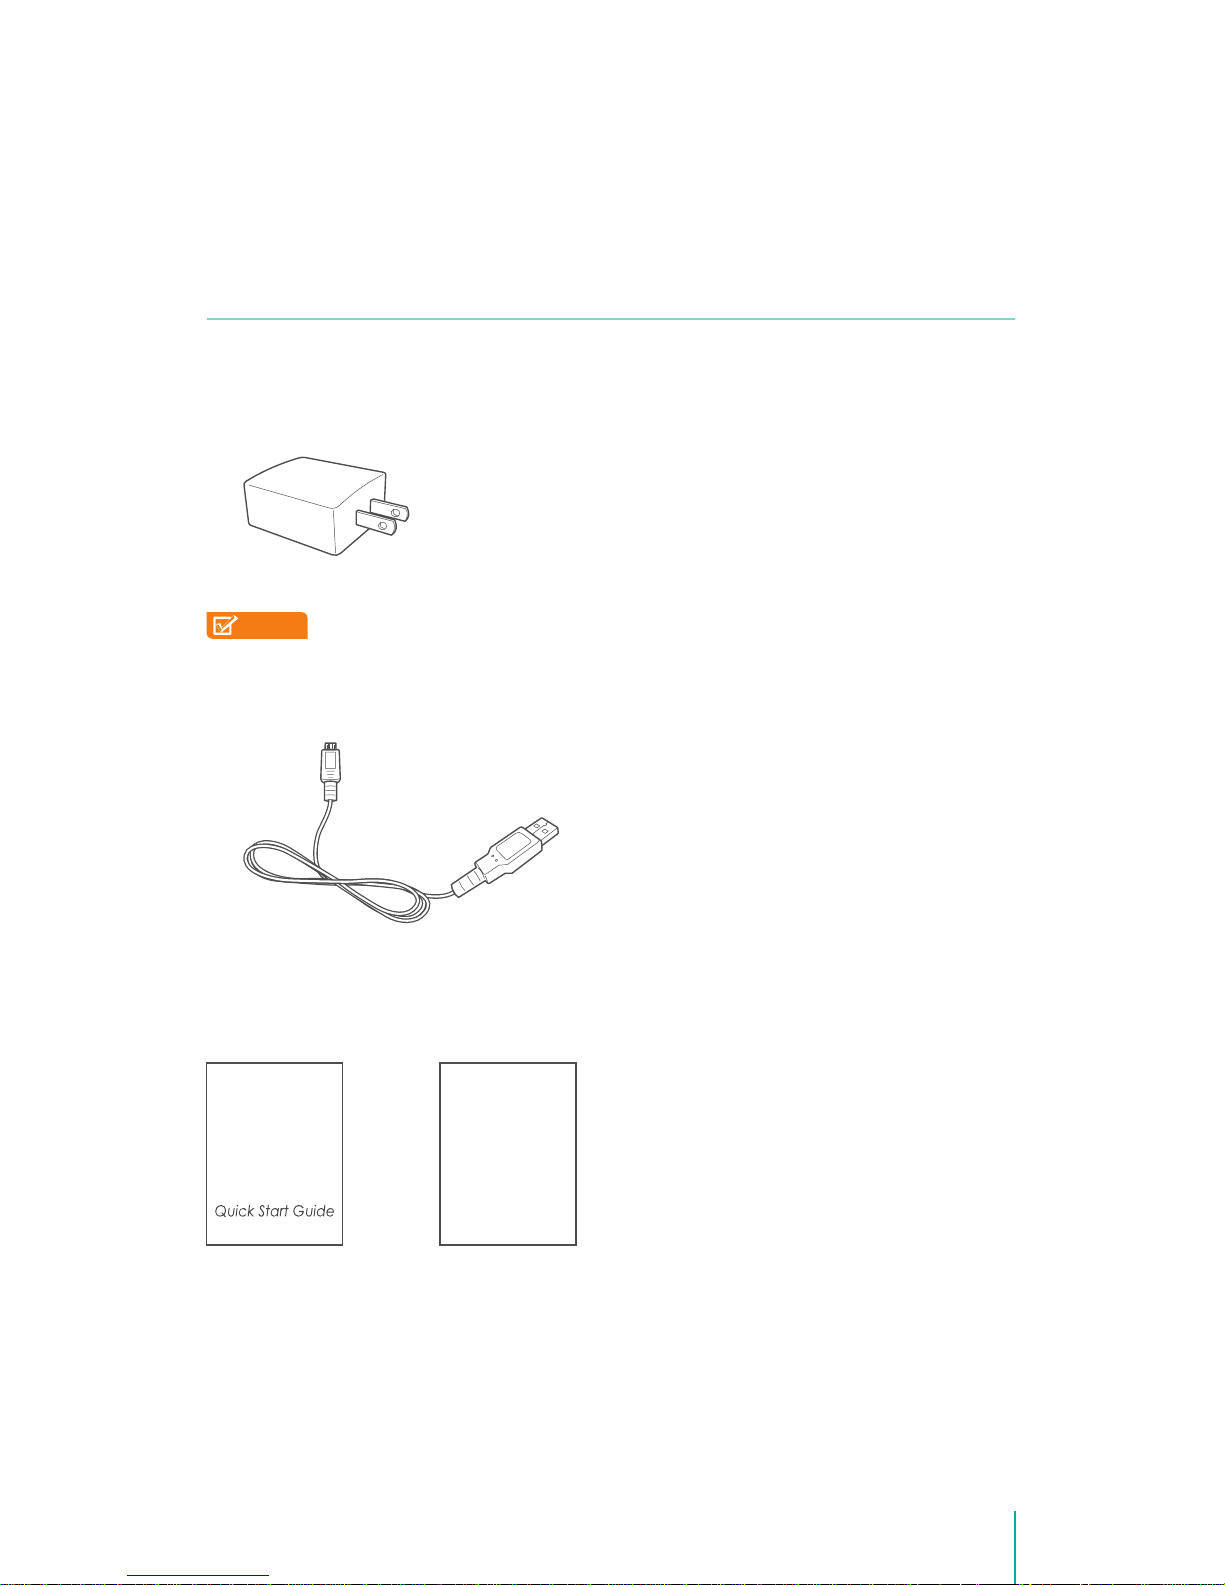
Package Contents
The following items are included with the Sero 8:
Power Adapter
Use the power adapter to connect the outlet to charge the battery.
NOTE
This power adapter is only for reference, it may vary in different
countries.
Micro-USB Cable
Use the USB cable to connect the Sero 8’s Micro-USB port to the power
adapter to charge the battery, or to your computer.
Quick Start Guide & Warranty
Warranty
2
Page 6
5Getting Started
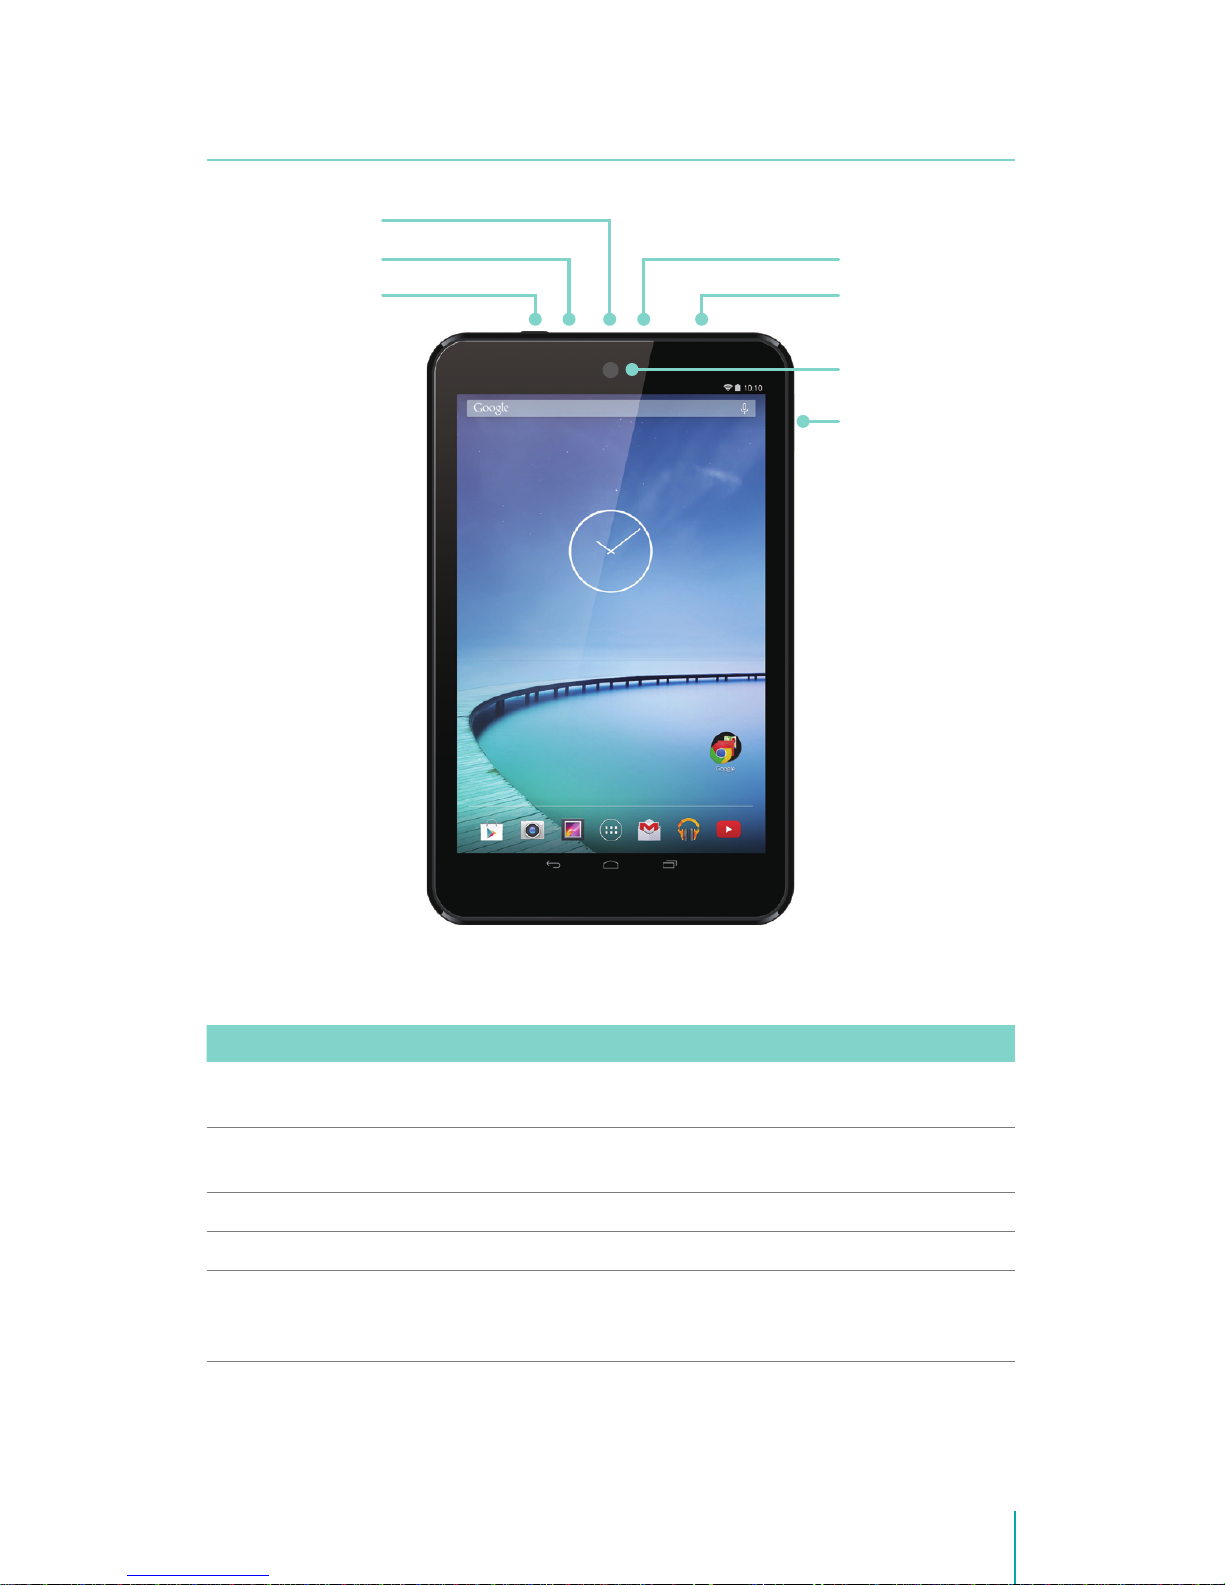
Understanding Your Sero 8 Tablet
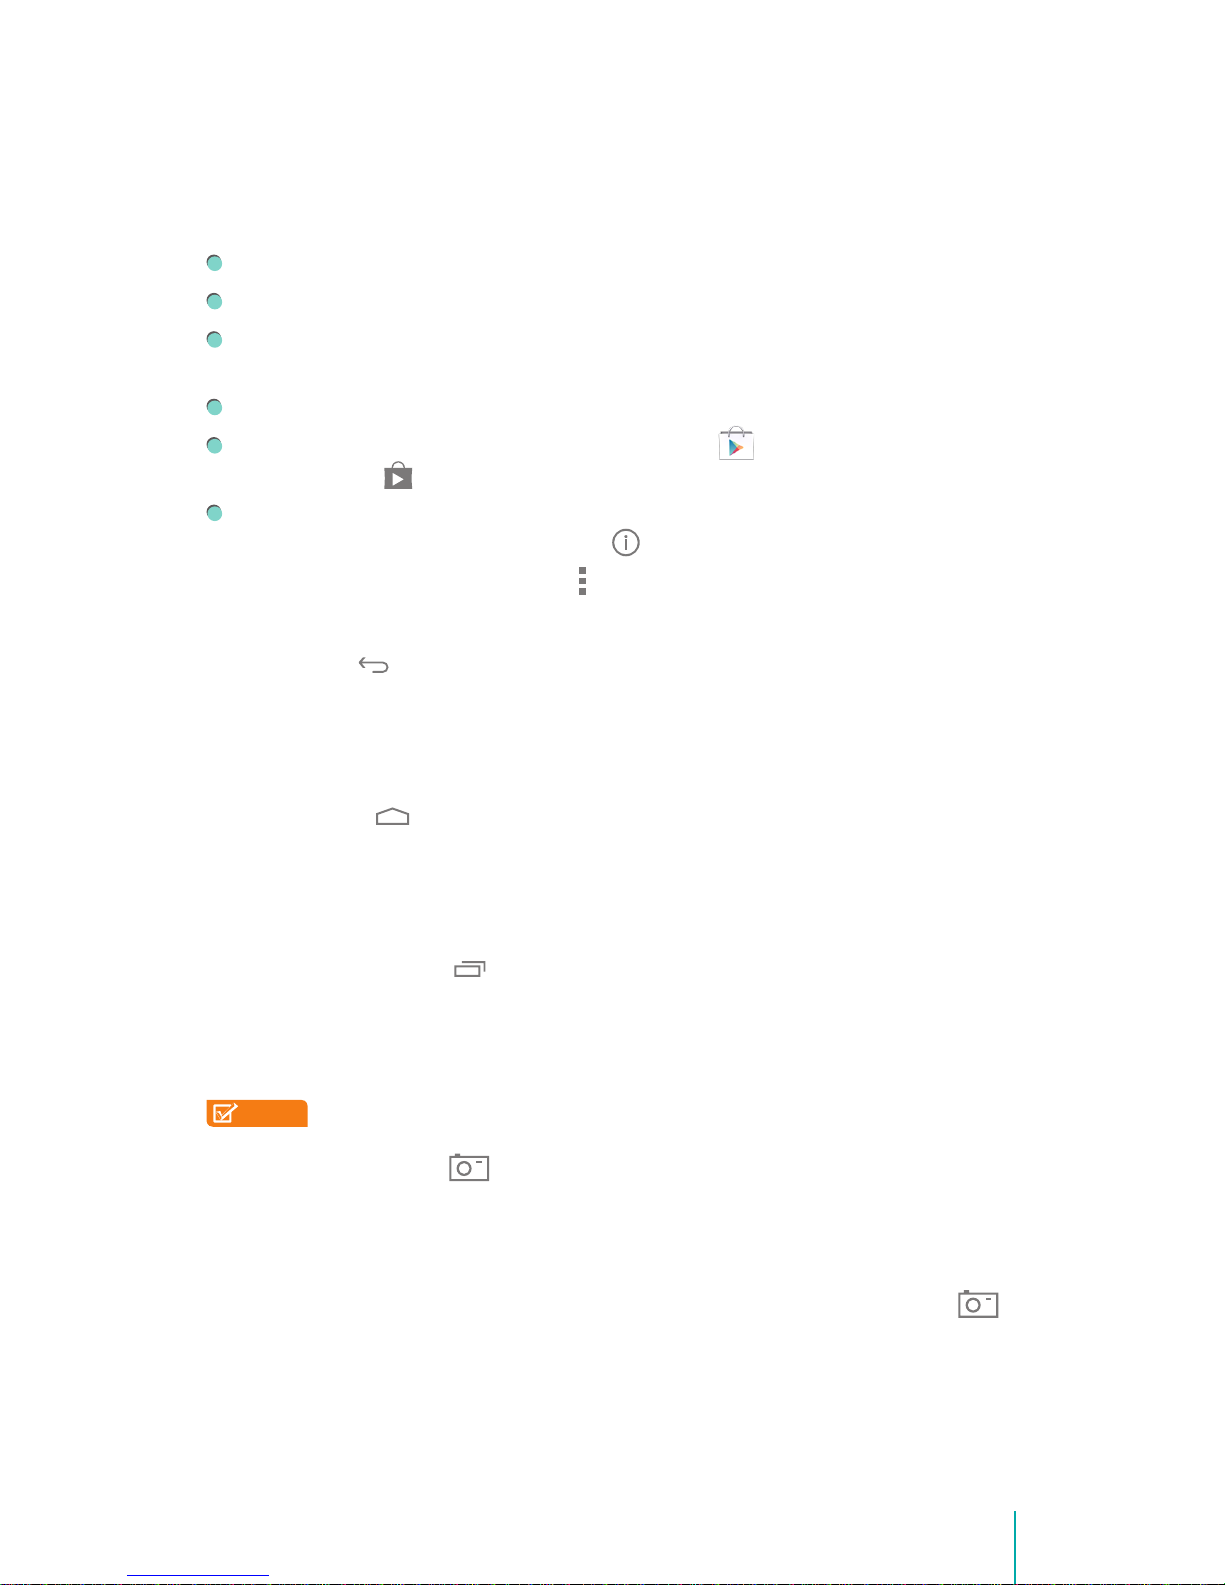
Item Function
Power Button Press & hold to turn on/o; Press it to put/wake the unit in/from
sleep mode.
Volume Up/Down
Buttons
Press to adjust the volume.
Headphone port Headphone connections for personal listening.
Micro SD port Plug microSD card (up to 32G).
Micro-USB port Connect to wall outlet with Micro-USB cable and power adapter
for charging. Connect to a computer, keyboard, more other devices
with USB port.
Headphone port
Power Button
Microphone
Micro-USB port
Micro SD port
Front Camera
Volume Up/
Down Buttons
Page 7
6Getting Started
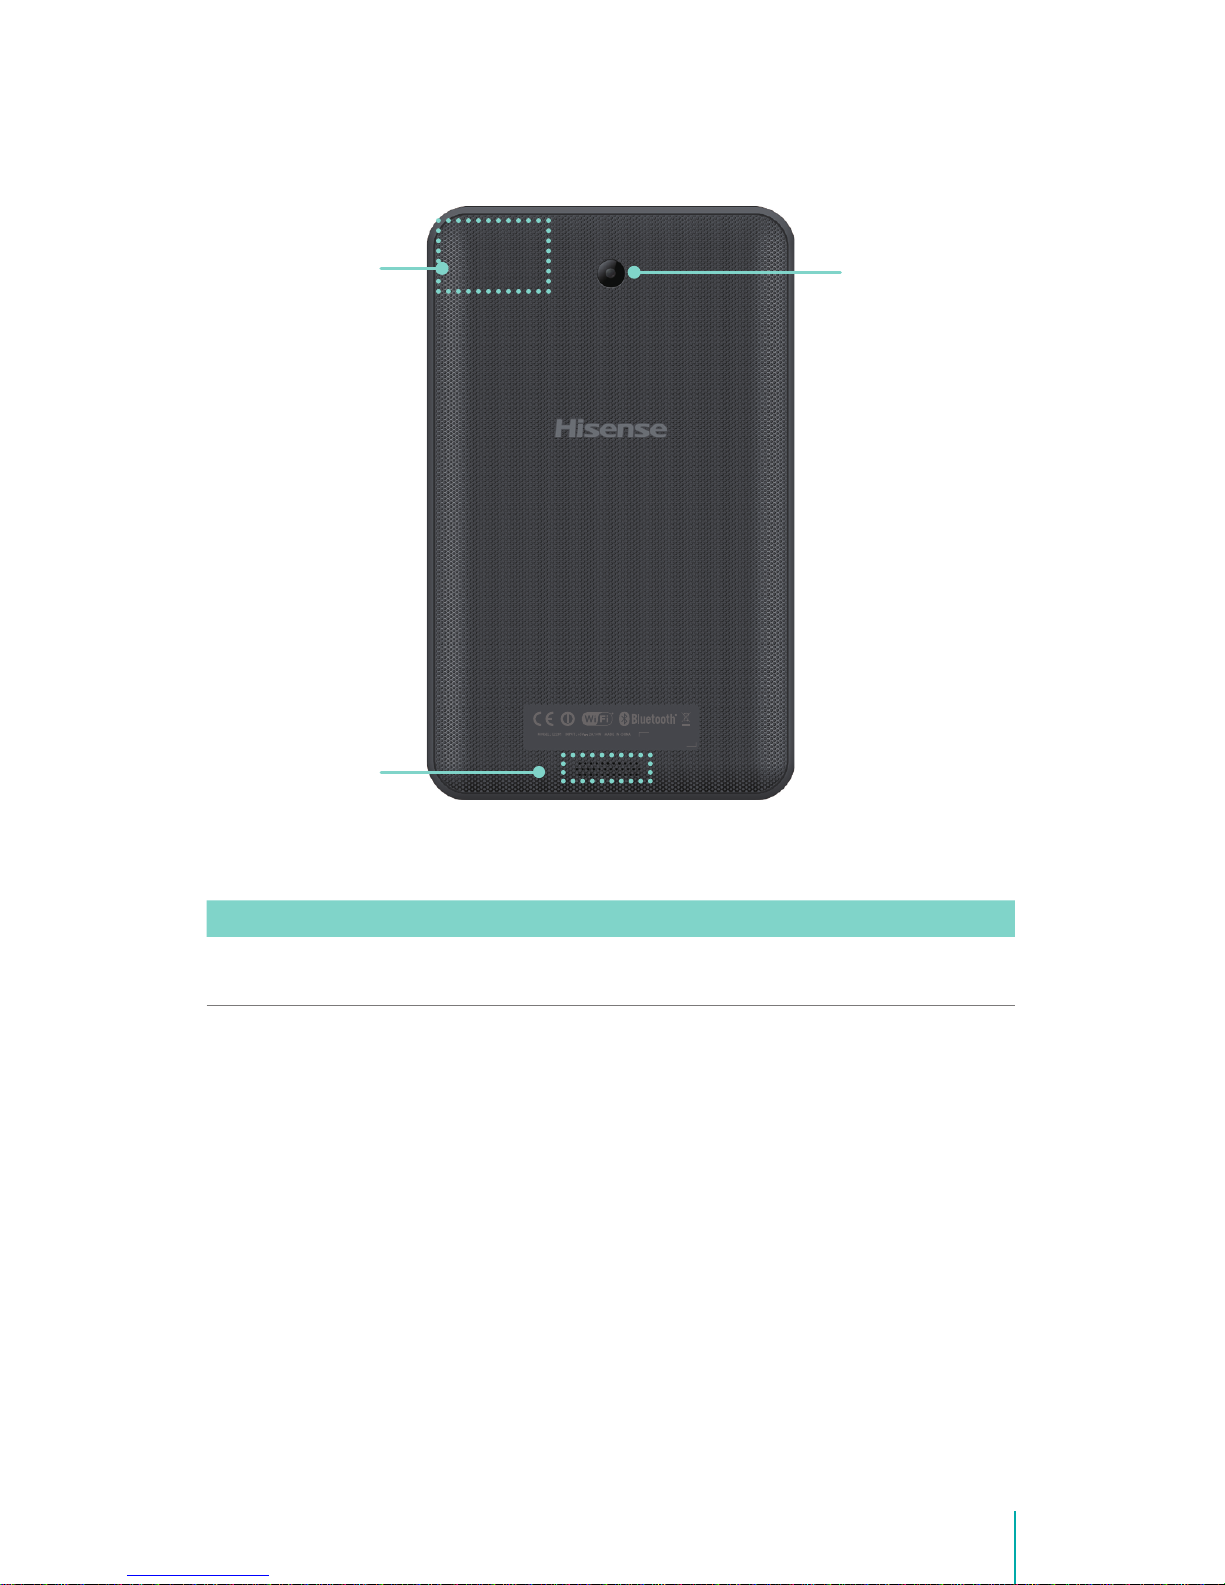
Item Function
Wireless Antenna Support wireless network function.
NOTE
Avoid holding this region when using wireless.
Rear Camera
Wireless Antenna
Speaker
Page 8
7Getting Started
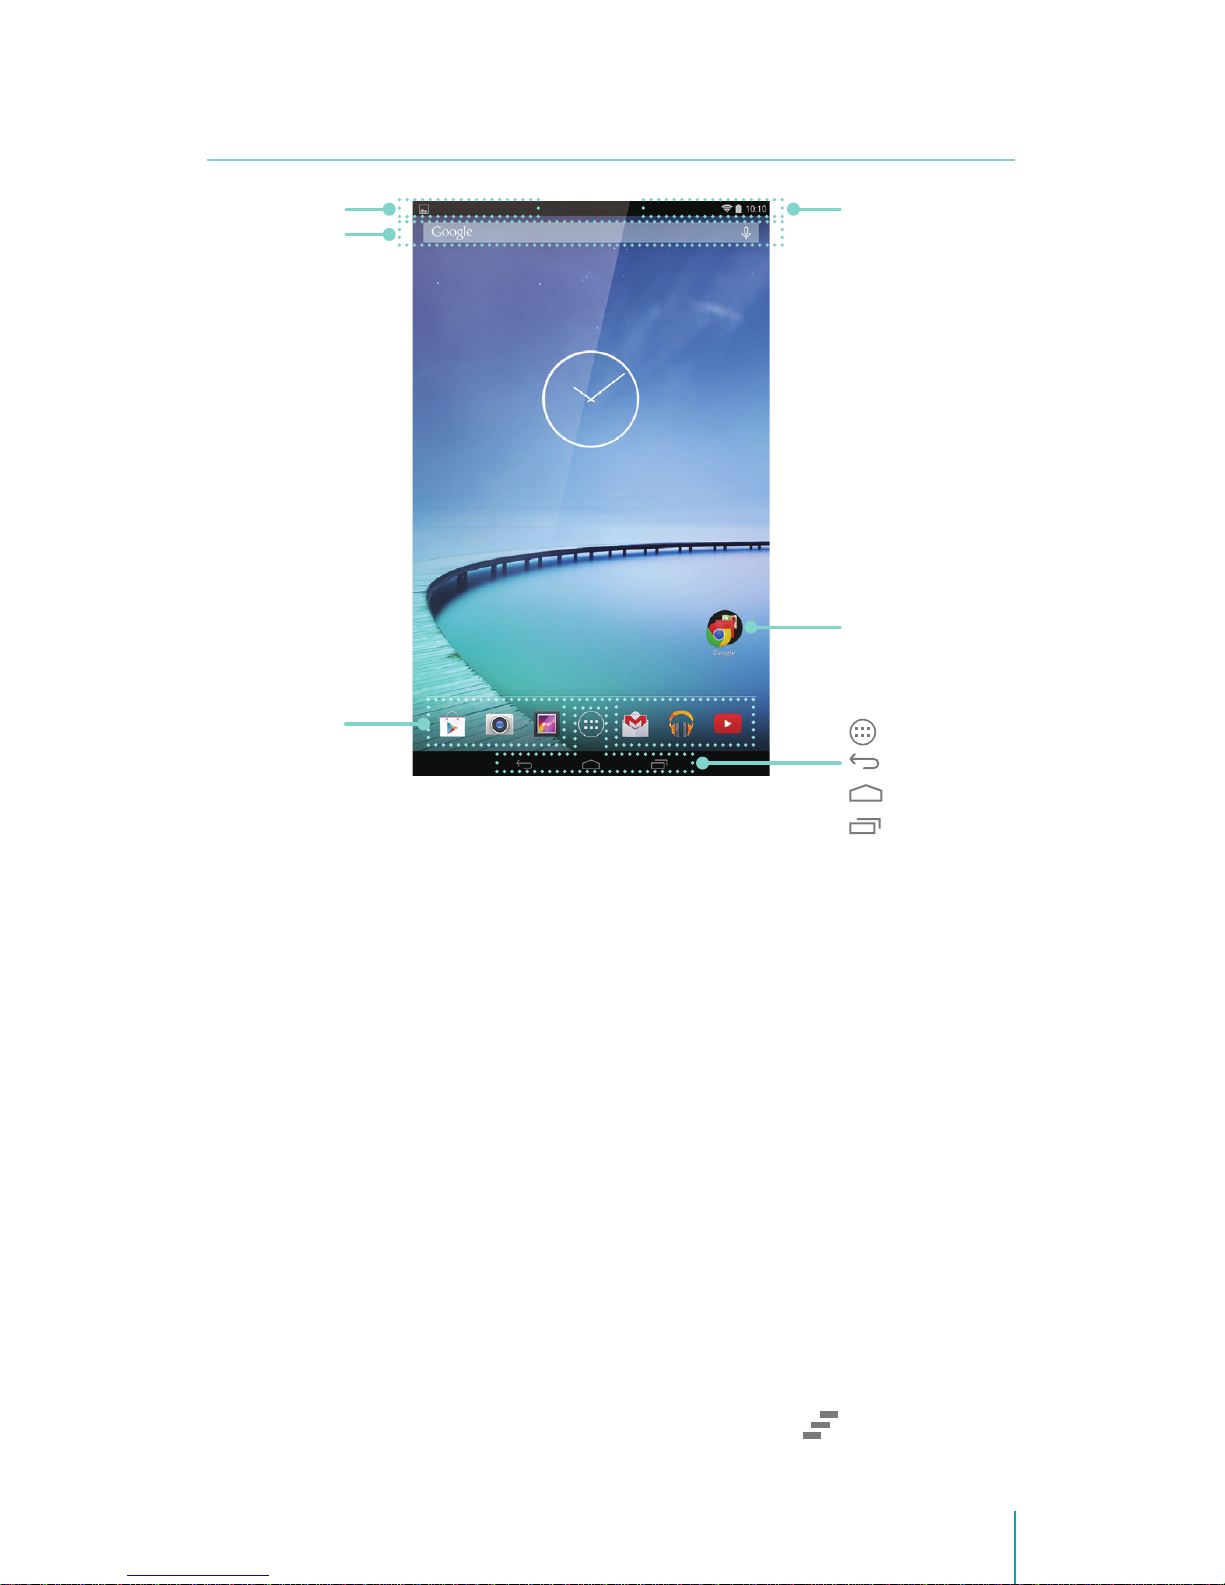
Home Screen
To move between Home screens, slide left or right.
Notification and Status Bar
At the top of the screen, you’ll see indicators that inform you about the status
of your Sero 8. You can open the Notification Tray or the Quick settings by
pressing the Notification or Status bar and dragging it down.
Notification Tray
Notifications can come from the system, a game, an application such as E-mail,
or the music player.
Certain notifications can be expanded to show more information, such as
email previews or calendar events.
To open the related app, tap the notification icon on the left of Notification
Tray. Some notifications also allow you to take specific actions by tapping
icons within the notification. For example, Music notification allow you to
pause/play or play the previous/next music.
When you’re finished with a notification, just slide it away to the left or right. If
you want to dismiss all notifications, tap the Dismiss icon at the top of the
notification.
Status Bar
Google Apps
Navigation Buttons
All Apps
Back
Home
Recent Apps
Notication Bar
Google Search
App Icons
Page 9
8Getting Started
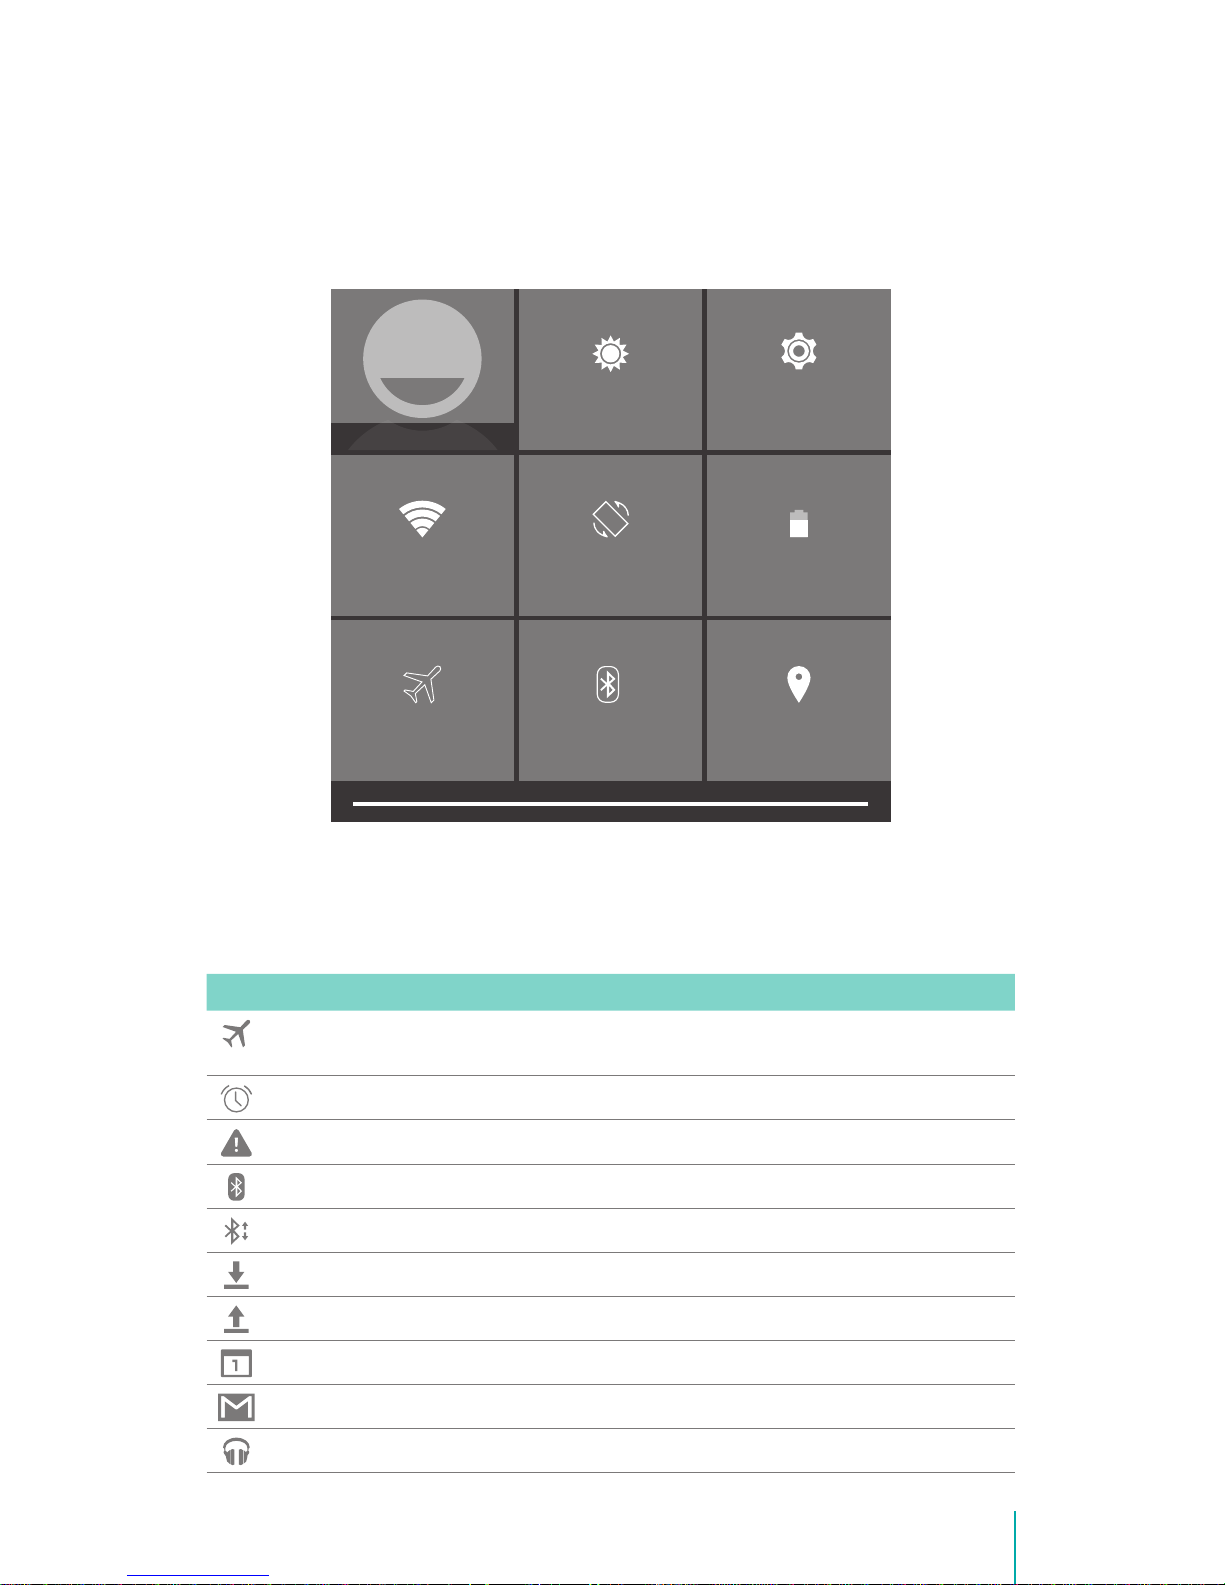
Quick Settings
Tap to display settings for commonly performed tasks, including setting
display brightness, accessing the system/Wi-Fi/Bluetooth settings, locking and
unlocking screen rotation, displaying the percentage of battery, turning on or
off the airplane mode/power saving mode, and so on.
Notification & Status Icons
The table below lists icons that appear the most frequently in the Notification
and Status Bar.
Icon What it means
Airplane mode Shows that airplane mode is on. You can not access the
Internet or use Bluetooth®. Non-wireless features are available.
Alarm An alarm is set.
Alert Install/update/enable Google Play service.
Bluetooth Sero 8 is using the Bluetooth function.
Bluetooth share Incoming le
Downloaded Received les
Uploaded Sent les
Calendar Task reminders.
Message Received new message.
Music Play Music application is running.
BRIGHTNESS SETTINGS
BLUETOOTH OFF LOCATION
AUTO ROTATE 75%
AIRPLANE MODE
WI-FI
OWNER
Page 10
9Getting Started
Icon What it means
Screenshots Screenshot captured.
Silent mode Silent mode is on.
USB tethering Sero 8 has connected to a computer and the USB tethering is
turned on.
Wi-Fi Sero 8 has a Wi-Fi Internet connection. The more bars, the
stronger the connection.
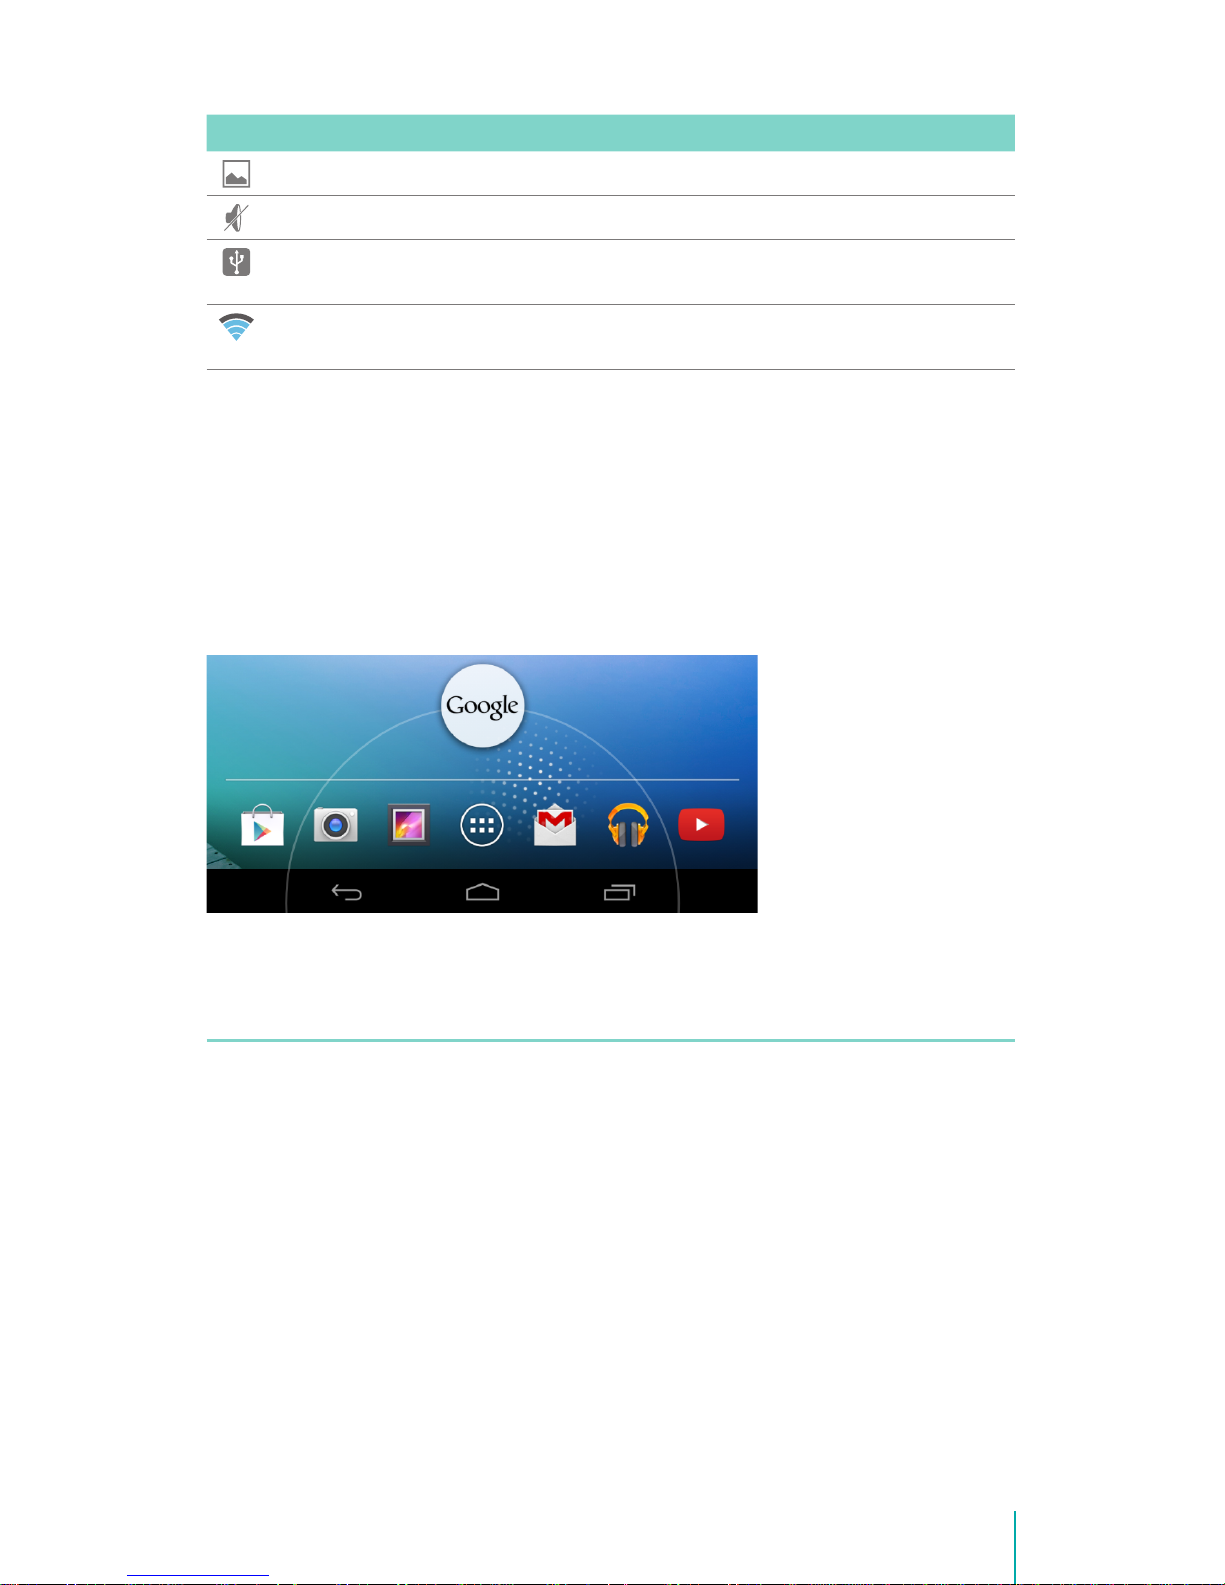
Google Now
Google Now is about getting you just the right information, at just the right
time.
To open Google Now, you can press & hold the Home button at the bottom
of any screen and slide up to the Google Now icon, or tap the Google Search
bar at the top of the screen. For more information about Google Now, See
Google Now on page 34.
Buttons
Power Button
Turn Sero 8 On
Press & hold the Power button until the Hisense logo displays.
Turn Sero 8 Off
In awake mode, press & hold the Power button until a message displays. Next,
tap Power Off > OK. Your Sero 8 will shut down.
Set Airplane / Silent Mode
In awake mode, press & hold the Power button until a message displays. You
can set Airplane mode and Silent mode.
Page 11
10Getting Started
Put Sero 8 in Sleep Mode
Press the Power button to put the Sero 8 in sleep mode.
If you do not touch the screen for several minutes, then the Sero 8 will
automatically go into sleep mode.
Tip: You can go to Settings > DEVICE > Display > Sleep to set the screen
timeout.
Wake Sero 8 From Sleep Mode
Press the Power button to wake the Sero 8 from sleep mode.
Forced Shutdown
If your Sero 8 becomes unresponsive during use, you can press & hold the
Power button for 8 seconds to shut it down. Then press the Power button to
restart it.
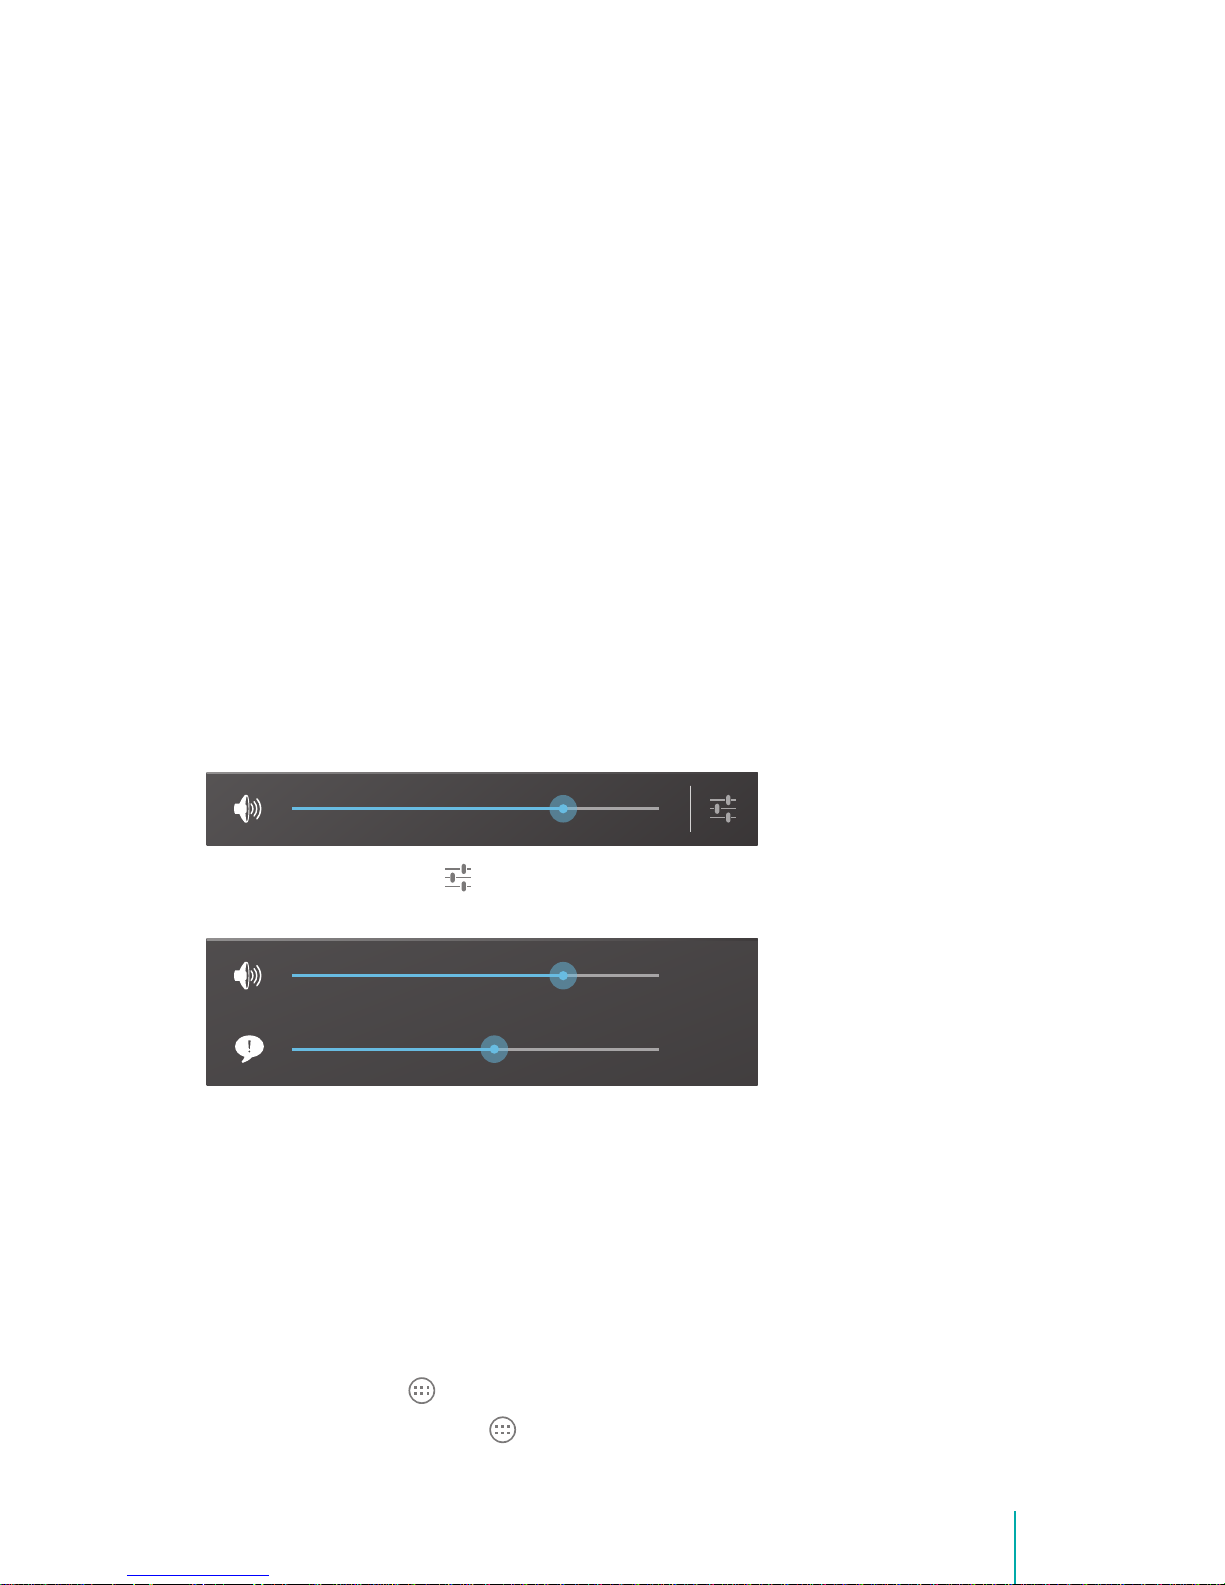
Volume Up/Down Buttons
Silent Mode Off
Press the Volume Up/Down button to increase or decrease the volume. You
can also slide the focus on the volume bar to adjust it.
Press Settings button to stretch the volume bar, then you can adjust the
notifications’ volume.
Tip: You can go to Settings > DEVICE > Sound > Volumes to adjust the volume
of the alarm.
Silent Mode On
Press the Volume Up/Down button to turn off Silent mode, then you can
press the Volume button to increase or decrease the volume.
Navigation Buttons
All Apps Button
Press the All Apps button to enter the All Apps screen. This is where you
can see all your apps, including those downloaded from Google Play. You can
Page 12
11Getting Started
tap the app to open it, drag the app or widget to the Home screen, or buy the
app though Google Play Store. For more information, see Using Apps on page
20.
From All Apps screen, you can:
Move between screens: Slide left or right.
Open an app: Tap its icon.
Move an app icon on a Home screen: Press & hold an icon or widget and
slowly drag it to the location of your choice.
Browse widgets: Tap the Widgets tab at the top of any All Apps screen.
Get more apps: Tap the Google Play Store icon in the list of app icons, or
the Shop icon at the upper right.
View info about an app: Press & hold it, drag it to the top of the screen, and
drop the app over the App Info icon .
Tip: Most apps include a Menu icon near the top or bottom of the screen
that lets you control the app’s settings.
Back Button
Tap this button to open the previous screen you were working in, even if
it was in a different app. Once you go back to the Home screen, no further
history will be available.
Home Button
Tap this button from anywhere on your Sero 8 to return to the Home screen.
If you’re viewing a left or right Home screen, this will open the central Home
screen. To open Google Now, see Google Now on page 9.
Recent Apps Button
Tap this button to view recently used apps. Tap an app to use it again.
You can slide down to see more apps. You can also slide it away to the left or
right.
NOTE
The slide direction will be different as the orientation of the screen.
Screenshots Button
Tap this button to capture the screen. The screenshots is saved in Gallery >
Screenshots.
Tip: You can go to Settings > DEVICE > Screen shot, check the Show the
screenshot button checkbox to showed up the Screenshots button
at the bottom of the screen.
Page 13
12Making Connections
Making Connections
Read this chapter to learn how to connect to an external device and establish
data transmission.
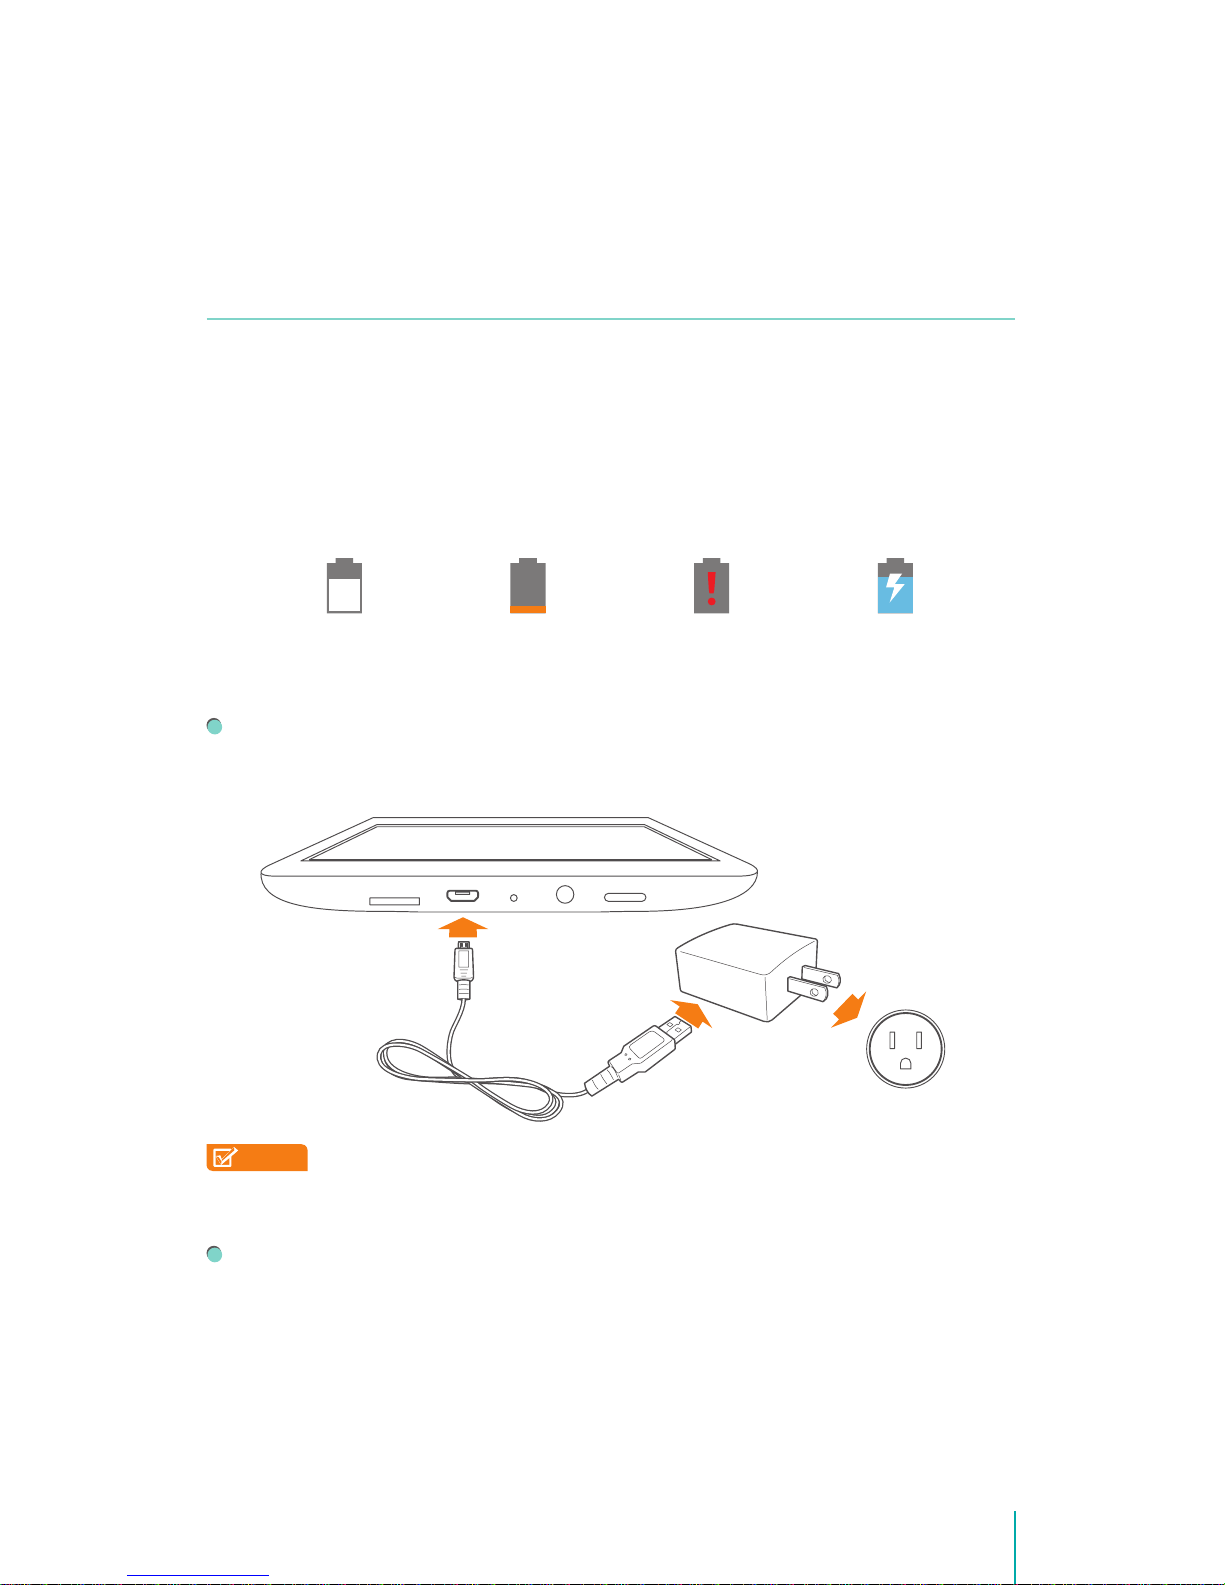
Battery
The Sero 8 has an internal Lithium-ion Polymer rechargeable battery. For
important safety instructions about the battery and charging the Sero 8, see
Important Safety Instructions on page 41.
The Battery Icon
The battery icon in the upper-right corner of the status bar shows the battery
level or charging status.
High battery Low battery Needs to be charged Charging
Charging the Battery
The best way to charge the battery is to plug your Sero 8 into a wall
outlet using the power adapter and Micro-USB cable included with your
accessories.
NOTE
Use the power adapter and Micro-USB cable included with your
accessories. Other power adapters and Micro-USB cables may charge
more slowly or not at all.
The Sero 8 also charges slowly when you connect it to the USB port on your
computer. The battery may drain instead of charge when the battery usage
is large.
Check the Level and Details of Battery
You can check the percentage of battery in Quick Settings, or you can go to
Settings > DEVICE > Battery to check the details of battery. Tap a graph for
more details. The list at the bottom of the screen shows the breakdown of
Micro-USB
Cable
Power
Adapter
Wall Outlet
3
Page 14
13Making Connections
battery usage for individual apps and services.
Extend the Life of Battery
You can extend your battery’s life between charges by turning off features
that you don’t need. You can also monitor how apps and system resources
consume battery power.
If you aren’t using Wi-Fi, you can turn it off.
Turn down screen brightness and set a shorter screen timeout: Settings >
DEVICE > Display.
If you don’t need it, turn off automatic syncing for all apps: Settings >
ACCOUNTS > Google > [Google account-name]. This means you need to
sync manually to collect messages, email, and other recent information, and
won’t receive notifications when updates occur.
Micro-USB
You can use the included Micro-USB cable to connect the Sero 8’s Micro-USB
port to your computer’s USB port.
To change your Sero 8’s USB connection options, go to Settings > DEVICE >
Storage > Menu icon > USB computer connection. You can select the Sero 8
is connected as MTP or PTP.
Connect to a Windows Computer
You can connect your Sero 8 to a Windows computer and transfer music,
pictures, and other files in both directions.
This connection uses the MTP protocol, which is supported by most recent
versions of Windows.
1. When you connect your Sero 8 to the USB port on your computer, its USB
storage is mounted as a drive and appears on your computer screen.
2. You can now copy files back and forth as you would using any other
external device.
3. When you’re finished, simply disconnect the Sero 8 by unplugging the USB
cable.
Connect to a Macintosh Computer
You can connect your Sero 8 to a computer running Mac OS X and transfer
music, pictures, and other files in both directions.
This connection uses the MTP protocol, which is not supported by Mac OS X
natively.
1. You first need to install the free File Transfer application on your Macintosh.
It’s available from www.android.com/filetransfer, along with instructions on
how to install it.
Page 15
14Making Connections
2. After you install File Transfer, follow these steps:
If you are using File Transfer for the first time, double tap it to open it.
After you start File Transfer once, it opens automatically whenever you
connect your Sero 8 to your computer.
Connect your Sero 8 to your computer with a Micro-USB cable.
File Transfer starts, if it’s not already running, and opens a window that
displays the contents of your Sero 8, along with storage space details at the
bottom of the window.
3. You work with this window much as if it was a Finder window: opening and
closing folders, creating new folders, and dragging files to or from it and
other Finder windows.
4. Disconnect the USB cable when you’re finished.
Connect to a Keyboard, a Mouse & Other Devices
You can connect a keyboard, a mouse or other input devices to your Sero 8 via
USB and use it just as you would with a PC.
Tip: To set the Pointer speed, go to Settings > PERSONAL > Language & input
> Mouse/trackpad > Pointer speed.
NOTE
You may need an adapter to connect the keyboard or other device to
your Sero 8’s USB port.
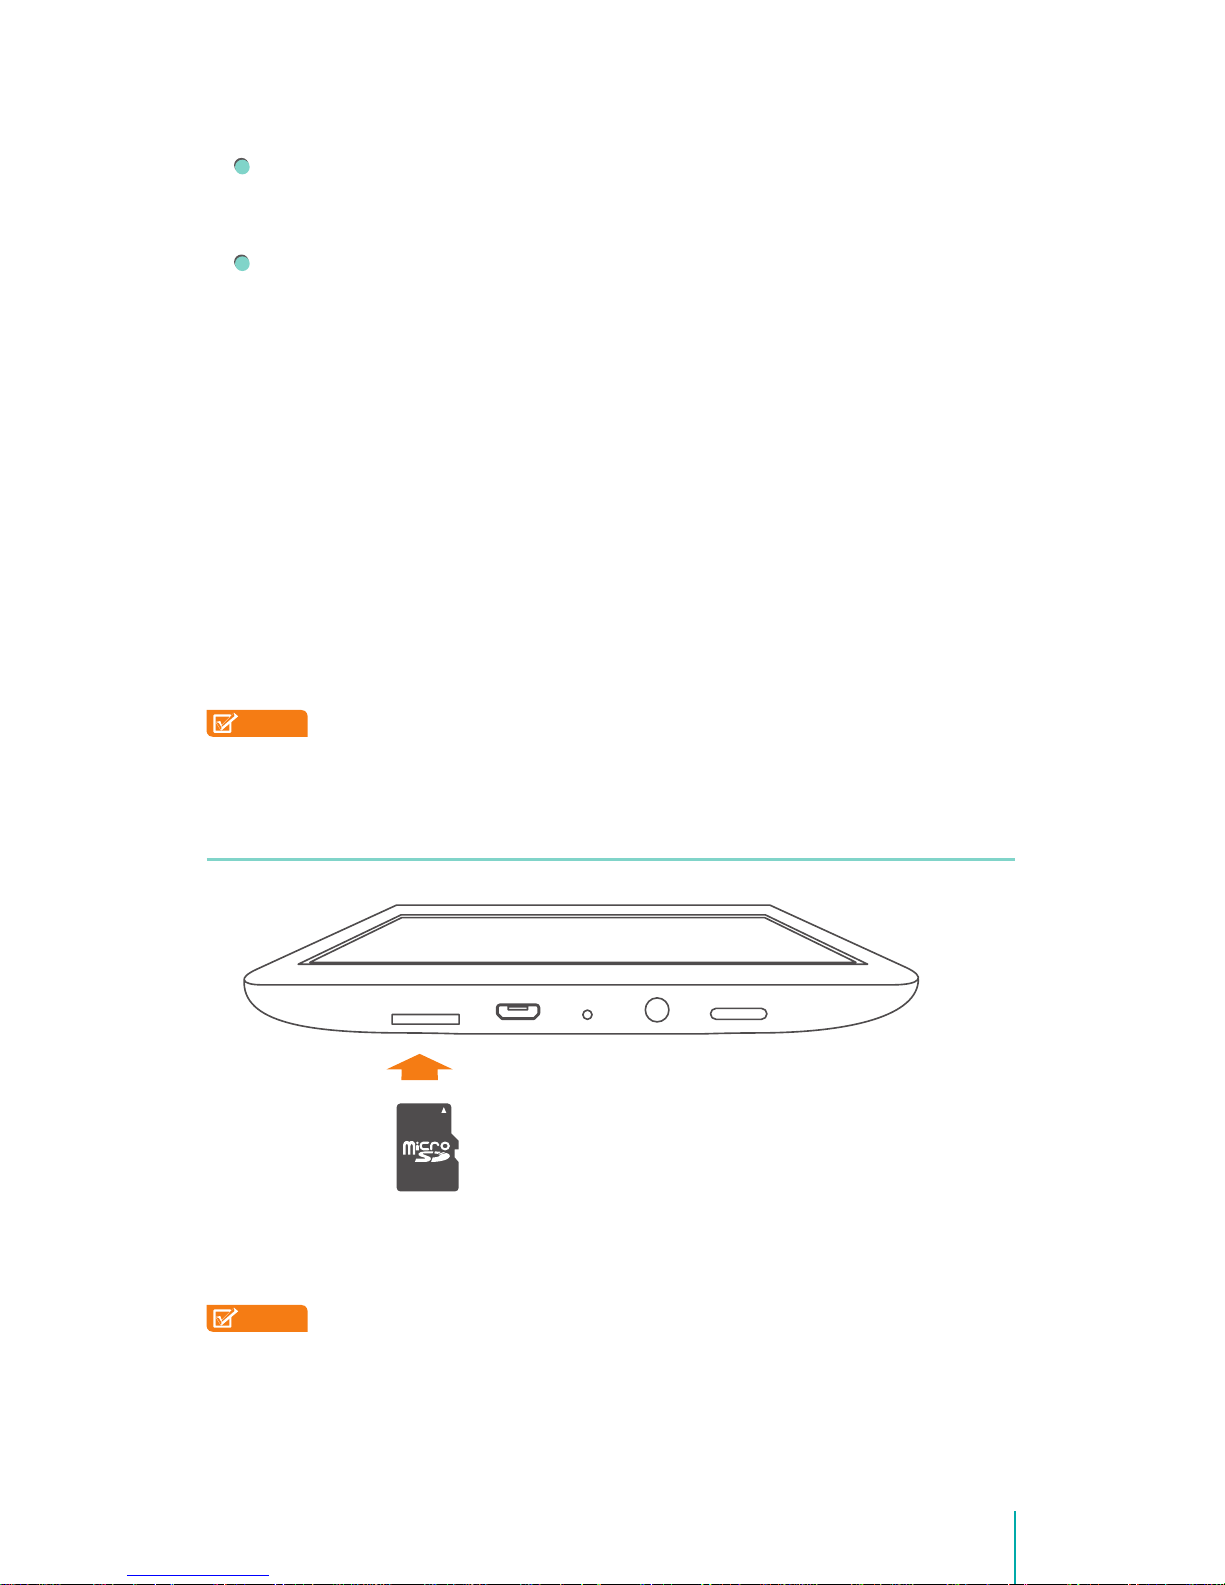
Micro SD Card
Insert the microSD card contacts facing down into the Sero 8’s Micro SD port.
To check the storage of microSD card, go to Settings > DEVICE > Storage.
NOTES
• You can use a microSD TM card and microSDHC TM card.
• Never remove or insert a microSD card while the Sero 8 is powered on.
microSD
Card
Page 16
15Making Connections
Headphone
Headphones can be connected to the Sero 8’s headphone port. For more
information about headphones, see Important Safety Instructions on page 41.
Wi-Fi
You can connect to a wireless access point, or hotspot to use Wi-Fi. Some
hotspots are open and you can simply connect to them. Others implement
security features that require other steps to set up.
NOTES
• To extend the life of your battery between charges, turn off Wi-Fi
when you’re not using it.
• The Wi-Fi function and the Bluetooth function can simultaneous
operation, but can not simultaneous transmit.
Connect to a Wi-Fi Network
If you’re adding a Wi-Fi network when first setting up your device, Wi-Fi is
turned on automatically.
1. Press and drag Quick Settings, tap Wi-Fi icon, or go to Settings > WIRELESS
& NETWORKS > Wi-Fi.
2. Slide the Wi-Fi switch to the ON position. The device scans for available Wi-
Fi networks and displays the names of those it finds. If the device finds a
network that you connected to previously, it connects to it.
3 Tap a network name to see more details or connect to it, and enter a
password if necessary.
NOTE
To modify a network’s settings, press & hold the network name.
Add a Wi-Fi Network
You can add a Wi-Fi network so your device will remember it, along with any
security credentials, and connect to it automatically when it’s in range. You
must also add a Wi-Fi network if the network does not broadcast its name
(SSID), or to add a Wi-Fi network when you are out of range.
Audio left
Audio right
Grounded
Page 17

16Making Connections
1. Turn on Wi-Fi, if it’s not already on.
2. Tap the Plus icon at the top of the screen.
3. Enter the SSID (name) of the network. If necessary, enter security or other
network configuration details.
4. Tap Save.
Forget a Wi-Fi Network
You can make the Sero 8 forget about the details of a Wi-Fi network that you
added. An example would be if you don’t want the Sero 8 to connect to it
automatically or if it is a network that you no longer use.
To forget a Wi-Fi network, go to Settings > WIRELESS & NETWORKS > Wi-Fi >
[the network name] > Forget.
Advanced Wi-Fi Settings
To set the Advanced Wi-Fi, go to Settings > WIRELESS & NETWORKS > Wi-Fi >
Menu icon > Advanced .
Network notification - By default, when Wi-Fi is on, you receive notification
in the Status bar when your device detects an open Wi-Fi network. Uncheck
this option to turn off notification.
Keep Wi-Fi on during sleep - To select whether to put the Sero 8 in sleep
mode when it’s connected to Wi-Fi.
Scanning always available - Check to scan for networks even when Wi-Fi is
turned off.
Wi-Fi optimization - By default, when Wi-Fi is on the battery usage is
optimized.
MAC address - The Media Access Control (MAC) address of your device
when connected to a Wi-Fi network.
IP address - The Internet Protocol (IP) address assigned to the device by
the Wi-Fi network you are connected to (unless you used the IP settings to
assign it a static IP address).
Configure Proxy Settings for a Wi-Fi Network
Some network administrators require you to connect to internal or external
network resources via a proxy server. By default, the Wi-Fi networks you add
are not configured to connect via a proxy, but you can change that for each
Wi-Fi network you’ve added.
1. Press & hold a network in the list of Wi-Fi networks you’ve added.
2. Tap Modify network in the dialog that opens.
3. Select Show advanced options.
4. If the network has no proxy settings, tap None under Proxy Settings, then
tap Manual in the menu that opens.
Page 18
17Making Connections
5. Enter the proxy settings supplied by your network administrator.
6. Tap Save.
NOTE
Proxy settings are used by the browser but may not be used by other
apps.
VPN
Virtual Private Networks (VPNs) allow you to connect to the resources inside
a secured local network, from outside that network. VPNs are commonly
deployed by corporations, schools, and other institutions to let people access
local network resources when not on campus, or when connected to a
wireless network.
To configure VPN access, you must first obtain the details from your network
administrator. Depending on your organization’s solution, you may need to
obtain a VPN app, either from your administrator or on Google Play.
The VPN settings screen allows you to add VPN networks and adjust their
settings. To view this screen and perform the tasks described here, go to
Settings > WIRELESS & NETWORKS > More > VPN.
Add a VPN
1. From the VPN screen, touch the Plus icon to add VPN profile.
2. In the form that appears, fill in the information provided by your network
administrator.
3. Tap Save.
Connect to a VPN
1. From the VPN screen, tap the name of the VPN.
2. In the dialog that opens, enter any requested credentials.
3. Tap Connect.
Tip: When you’re connected to a VPN, a Status icon and notification are
displayed continuously. To disconnect, tap the notification for the VPN
connection.
Edit a VPN
1. From the VPN screen, press & hold the name of the VPN profile.
2. In the dialog that opens, tap Edit profile.
3. Edit the VPN settings you want.
4. Tap Save.
Delete a VPN
1. From the VPN screen, press & hold the name of the VPN profile.
Page 19

18Making Connections
2. Press & hold the VPN you want to delete.
3. In the dialog that opens, touch Delete profile.
Bluetooth
You can use Bluetooth to communicate between the Sero 8 and other
Bluetooth devices, such as a Bluetooth headset over a distance of about 8
meters.
NOTES
• To extend the life of your battery between charges, turn off Bluetooth
when you’re not using it.
• The Wi-Fi function and the Bluetooth function can simultaneous
operation, but can not simultaneous transmit.
To connect to a Bluetooth device, first turn on your Sero 8’s Bluetooth. Then,
the first time you use a new Bluetooth device, you need to “pair” it with your
Sero 8 so that both devices know how to connect securely to each other. After
that, they connect automatically.
To turn Bluetooth on or off, open Quick Settings, tap Bluetooth icon. You can
also go to Settings > WIRELESS & NETWORKS and then slide the Bluetooth
switch.
Pairing Bluetooth Devices
Before you can use a Bluetooth device with the Sero 8, you must first pair it.
1. Make the device you want to pair discoverable. See the documentation that
came with your device to learn how to make it discoverable.
2. Make sure Bluetooth is turned on by going to Settings > WIRELESS &
NETWORKS.
3. Tap Bluetooth. Your Sero 8 scans for and displays the ID of all available
Bluetooth devices in range.
NOTE
If your mobile device stops scanning before your Bluetooth device is
ready, tap Search for devices.
4. Tap the ID of the Bluetooth device in the list to pair with it.
5. Follow the instructions to complete the pairing. If prompted, enter a
passkey, or refer to the documentation that came with the device.
If the pairing is successful, your Sero 8 connects to the device.
Connecting Bluetooth Devices
Once you’ve paired with a Bluetooth device, then you can connect to it
manually if you want to switch devices or reconnect after it is back in range.
1. Go to Settings > WIRELESS & NETWORKS, make sure Bluetooth is turned on.
2. In the list of Paired Devices, tap a paired but unconnected device. When the
Sero 8 and the device are connected, the device is displayed as connected
in the list.
Page 20

19Making Connections
Send Files
1. Make sure Bluetooth is turned on.
2. Press & hold the file you want send, tap share icon > Bluetooth icon .
3. Tap the device you want to send it to. The Sero 8 begins to send the file.
Tip: You can see the sending status in Notification Tray.
Receive Files
1. Make sure Bluetooth is turned on and visible. To set Visibility timeout, go to
Settings > WIRELESS & NETWORKS > Bluetooth > Menu icon > Visibility
timeout.
2. When the Bluetooth share icon is shows up in Notification bar, open
the Notification Tray and tap the notification, follow the instructions to
complete the receiving.
3. To check the information of Bluetooth received, go to Settings > WIRELESS
& NETWORKS > Bluetooth > Menu icon > Show received files.
Tip: You can see the receiving status in Notification Tray.
Rename or Unpair a Bluetooth Device
You can change the name of the Bluetooth device as it appears on your Sero 8.
You can also unpair a Bluetooth device.
1. Go to Settings > WIRELESS & NETWORKS, make sure Bluetooth is turned on.
2. In the Bluetooth settings, tap the Settings icon beside the connected
Bluetooth device you want to configure.
3. A screen opens that allows you to change the device’s name or unpair it.
Page 21

20Basic
Basic
Read this chapter to learn about the Sero 8 basic features.
Setup Guide
Turning Your Sero 8 On for the First Time
To start, turn on your Sero 8 by pressing and holding Power button until
the Hisense logo appears. After the animation appears, follow the on-screen
instructions to set up your Sero 8.
1. Slide up and down to select the language, then tap icon.
2. Connect to a Wi-Fi network. Tap a network name to see more details or
connect to it, and enter a password if necessary.
NOTES
• You can skip connecting progress, and set a Wi-Fi network in Settings
later. For more information, see Wi-Fi on page 15.
• If your skip connecting progress, the following steps will vary.
3. When prompted, sign in the using email address and password for your
Google Account. If you don’t have one yet, go ahead and create one. For
more information about Google Account, see Google Account on page 31.
NOTE
If you do not log in to Google Account, the following steps will vary.
4. Select your Google services.
5. Set up your credit card with Google Wallet.
6. Enter your name.
7. Select your time zone.
Basic Operation
Using Apps
You interact with the Sero 8 using your fingers to tap, double tap, press & hold,
slide, pinch, and rotate objects on the touchscreen.
Tap or Double Tap
To select a feature or item, quickly touch the screen.
Double tap your nger quickly on an item to bring up more details.
4
Page 22

21Basic
Press & Hold
Touch the screen and hold it there for 2 seconds.
In many situations, pressing and holding will open a menu.
Slide or Drag
Touch the screen and slide your nger to another location.
Press and hold on an object and slide it to another location on the
screen.
Zoom
Place two fingers about an inch apart on the screen. Slide them
together to ‘zoom out’.
Slide your ngers apart to ‘zoom in’.
Rotate
Place two ngers about an inch apart on the screen. Rotate them in
clockwise or counter-clockwise.
Rearrange Home Screen
From All Apps screen to Home screen: Tap All Apps button open All
Apps screen, press & hold an icon or widget and slowly to drag it to the
location of your choice. This makes it much easier to change your Home
screen layout.
Move apps or widgets: Press & hold an icon or widget, slowly to drag it to
the screen edge, the screen will switch.
Delete apps or widgets: Press & hold an icon or widget, when the Remove
icon appears at the top of the screen, drag the icon or widget into it.
Press & hold the wallpaper on your Home screen, choose your wallpaper
from Gallery, Live Wallpapers or Wallpapers.
Organize Your Apps With Folders
Make a new folder on your Home screen: Press & hold an icon, slowly to
drag it on top of another app.
Page 23

22Basic
Rename folder: Tap the folder, then tap the name of folder, enter a new
name.
Press & hold an icon, slowly to drag it into / out of a folder.
Manage Downloads
To manage most downloads, tap the Downloads icon on the All Apps
screen.
NOTE
Movies and some other content can be downloaded to your Sero 8 but
won’t show up in the Downloads app.
Google Play streams your purchases and rentals from Google servers while
you’re playing them. They don’t occupy any permanent storage space.
However, you can pin (download) books, movies, and other content in order
to access it oine.
In addition to downloading content from Google Play, you can download les
from Gmail messages or a variety of other sources. Use the Downloads app to
view, reopen, or delete what you’ve downloaded in this way.
Some mobile networks restrict the size of the files you can download, to
manage the demands on their networks or to help you avoid unexpected
charges. When you try to download an oversized-file when connected to
such networks, you may be required to delay downloading until your Sero 8 is
connected to a Wi-Fi network, when the download will resume automatically.
You can view and manage these queued les in the Downloads app as well.
From the Download app:
Tap an item to open it.
Press & hold an item you want to share, then tap the Share icon and
choose a sharing method from the list.
Press & hold an item you want to delete, then tap the Trash icon .
Tip: Files available in the Download app can also be viewed in the Download
directory that’s visible when your Sero 8 is connected to a computer. You
can view and copy files from this directory.
Screen Orientation
You can view many Sero 8 apps in either portrait or landscape orientation.
Rotate the Sero 8 and the screen rotates too, adjusting to fit the new
orientation.
In Quick Settings, you can tap rotation icon to switch the screen rotation
mode: Auto Rotate or Rotation Locked. Or go to Settings > SYSTEM >
Accessibility > Auto-rotate screen.
Gmail Email
Unnamed Folder
Page 24

23Basic
Lock Screen
Unlock Your Sero 8
If you don’t touch the screen for several minutes, the Sero 8 will go into sleep
mode, and the screen will be locked.
To unlock your Sero 8 after waking it from sleep mode, press the lock icon and
drag it to the ridge of the circle.
Tip: You can set your Sero 8 screen lock in many ways. For more information,
see Security on page 25.
Typing
You can enter text using the on-screen keyboard. Some apps open it
automatically. In others, you open it by tapping where you want to type.
To change your Sero 8’s keyboard and input methods, go to Settings >
PERSONAL > Language & input.
Entering Text
Enter text: Tap a text eld to bring up the keyboard, then tap keys on the
keyboard. The letter isn’t entered until you release your nger from the key.
Delete text: Tap to delete selected text or the characters before the
cursor.
ROTATION LOCKEDAUTO ROTATE
Tap a suggestion to type it
Press & hold
it to see Input
options
Tap to hide
the on-screen
keyboard
Press & hold
it to choose a
smiley face
Press & hold
it to type
character at
upper right
Page 25

24Basic
Type capital letters: Tap the Shift key to switch to capital letters for one
letter. Or press & hold Shift key while you type. When you release the
key, the lowercase letters reappear.
Turn caps lock on: Double tap or press & hold Shift key , so it changes to
. Tap Shift key again to return to lowercase.
Editing Text
Move the insertion point: Tap where you want to type. The cursor blinks in
the new position, and a blue tab appears below it. Drag the tab to move
the cursor.
Select text: Press & hold or double tap within the text. The nearest word
highlights, with a tab at each end of the selection. Drag the tabs to change
the selection.
Cut, copy, paste: Select the text you want to manipulate. Then tap Cut, Copy
or Paste icon:
Type Text by Speaking (Speech-to-Text)
You can use Voice Actions to type text by speaking. This feature uses Google’s
speech-recognition service, so your Sero 8 must be connected to a Wi-Fi
network to use it.
You can speak to enter text in most places that you can enter text with the onscreen keyboard.
Tap a text field, or a location in text you’ve already entered in a text field.
Tap the Microphone key on the on-screen keyboard.
When you see the microphone image, speak what you want to type. When
you pause, what you spoke is transcribed by the speech-recognition service
and entered in the text field.
Tip: Say “comma”, “period”, “question mark”, “exclamation mark”, or
“exclamation point” to enter punctuation.
NOTE
To improve processing of your Voice Actions, Google may record a few
seconds of ambient background noise in temporary memory at any
time. This recording remains on the device only briefly and is not sent
to Google.
Edit icon
Page 26

25Basic
Sharing
The Sero 8 gives you lots of ways to share with other people.
In many apps, tap Share or Share icon and choose a sharing method from
the list for sharing. The options vary depending on the app you’re using.
Security
Set Screen Lock
You can set an automatic screen lock to prevent unauthorized access.
NOTE
If your Sero 8’s playing music when the screen locks, you can continue
listening or pause the selection without unlocking.
To adjust your lock settings:
1. Go to Settings > PERSONAL > Security > Screen security > Screen lock.
2. Tap the type of lock you want and follow the on-screen instructions. If you
have previously set a lock, you must enter the pattern, PIN, or password to
unlock the lock settings. You can choose lock options, in order of strength:
Slide - The slide provides no protection, but lets you get to the Home
screen or Google Now quickly.
Face Unlock - Lets you unlock your device by looking at it. This is the least
secure lock option.
Tip: After you set up Face Unlock, look under Settings > PERSONAL >
Security > Screen security for two additional settings: Improve face
matching and Liveness check. Use these to make Face Unlock more
reliable and secure.
Pattern - Lets you draw a simple pattern with your finger to unlock your
Sero 8. This is slightly more secure than Face Unlock.
PIN - Requires four or more numbers. Longer PINs tend to be more
secure.
Password - Requires four or more letters or numbers. This is the most
secure option, as long as you create a strong password.
Tips: For best security, specify a password that
• Is least 8 characters long.
• Contains a mixture of numbers, letters, and special symbols.
• Doesn’t contain any recognizable words or phrases.
Encrypt Your Data
You can encrypt all the data on your Sero 8: Google Accounts, app data, music
and other media, downloaded information, and so on. If you do, you must
enter a numeric PIN or password each time you turn on your device. If you
already set up a screen lock, you must use the same PIN or password. You can’t
have two PINs or passwords.
Page 27

26Basic
NOTE
Encryption is irreversible. The only way to revert to an unencrypted
device is to perform a factory data reset, which erases all your data.
Encryption provides additional protection in case your device is stolen and
may be required or recommended in some organizations. Consult your system
administrator before turning it on. In many cases, the PIN or password you set
for encryption is controlled by the system administrator.
Before turning on encryption, prepare as follows:
1. Set a lock screen PIN or password.
2. Charge the battery.
3. Plug in your Sero 8.
4. Schedule an hour or more for the encryption process: you must not
interrupt it or you will lose some or all of your data.
When you’re ready to turn on encryption:
1. Go to Settings > PERSONAL > Security > Encryption > Encrypt tablet.
2. Read the information about encryption carefully.
The Encrypt tablet button is dimmed if your battery is not charged or
your Sero 8 is not plugged in. If you change your mind about encrypting
your Sero 8, tap the Back button .
NOTE
If you interrupt the encryption process, you will lose data.
3. Tap Encrypt tablet.
4. Enter your lock screen PIN or password and tap Continue.
5. Tap Encrypt tablet again.
The encryption process starts and displays its progress. Encryption can take
an hour or more, during which time your Sero 8 may restart several times.
When encryption is complete, you’re prompted to enter your PIN or password.
Subsequently, you must enter your PIN or password each time you power on
your Sero 8, to decrypt it.
Settings
Settings lets you configure the Sero 8, set app options, add accounts, and
change other preferences. See other chapters for information about settings
for the built-in apps. For example, for Wi-Fi settings, see Wi-Fi on page 15.
WIRELESS & NETWORKS
Data Usage
Data usage refers to the amount of data uploaded or downloaded by your
Sero 8 during a given period. And you can view data usage by app and access
app settings.
Near the top of the screen, there is Data usage cycle. Tap it to choose a
Page 28

27Basic
different cycle. This date range is the period of time for which the graph
displays data usage.
The vertical white lines on the graph show a period of time within the data
usage cycle. This range determines the usage amount displayed just below
the graph. Drag lines to change the period.
View data usage by app: Some apps transfer data in the background - that
is, when you’re not actually using the app, it may download data for future
reference. Some apps allow you to restrict background data usage from the
app’s own settings. Tap the graph for any app for more usage details and
access to its settings.
To view mobile hotspot settings, tap Menu icon > Mobile hotspots.
Airplane Mode
Airplane mode disables the wireless features in order to reduce potential
interference with aircraft operation and other electrical equipment.
To turn Airplane mode on, tap Settings > WIRELESS & NETWORKS > More >
Airplane mode.
When airplane mode is on, appears in the Status Bar at the top of the
screen. No Wi-Fi or Bluetooth signals are emitted from the Sero 8. You won’t be
able to use apps or features that depend on these signals, such as connecting
to the Internet. If allowed by the aircraft operator and applicable laws and
regulations, you can use the Sero 8 and apps that don’t require these signals.
DEVICE
Sound
You can set your Sero 8 to play a sound whenever you get a new message,
email, alert, or reminder. You can also set sounds for pressing icons and locking
your Sero 8.
Display
You can adjust the brightness of the display or the screen timeout. You can set
the wallpaper, or the font size. And you can also set what appears on screen
when sleep mode is on.
Screen Shot
You can select delay time to capture the screen. You can also set the location
of screenshot storage.
Storage
You affect the way apps use internal storage directly and indirectly in many
ways - for example, by:
Page 29

28Basic
Installing or uninstalling apps.
Downloading files in Chrome, Gmail, and other apps.
Creating files (for example, by taking pictures).
Deleting downloaded files or files you created.
Copying files between Sero 8 and a computer via USB or Bluetooth.
You rarely need to manage the way apps use RAM. But you can monitor apps’
RAM usage and stop them if they misbehave.
Apps
You’ll see three tabs at the top of the screen, each displaying a list of apps or
their components:
Downloaded - Displays apps you’ve downloaded on Google Play or other
sources.
Running - Displays all apps, processes, and services that are currently
running or that have cached processes, and how much RAM they are using.
All - Displays all apps that came with the Sero 8 and all apps you
downloaded from Google Play or other sources.
To switch the order of the lists displayed in the Downloaded or All tabs, tap
Menu icon > Sort by name or Sort by size.
To view details about an app or other item listed under any tab, tap its name.
The information and controls available vary among different types of apps, but
commonly include:
Force stop button - Stops an app that is misbehaving. Stopping an app,
process, or service may cause your Sero 8 to stop working correctly. You
may need to restart Sero 8 after doing this.
Uninstall button - Deletes the app and all of its data and settings.
Disable button - Prevents the app from running, but does not uninstall it.
This option is available for some apps and services that can’t be uninstalled.
Clear data button - Delete an app’s settings and other data without
removing the app itself.
Clear cache - If the app stores data in a temporary area of the Sero 8’s
memory, lists how much information is stored, and includes a button for
clearing it.
Clear defaults - If you have configured an app to launch certain file types by
default, you can clear that setting here.
Permissions - Lists the kinds of information about your Sero 8 and data the
app has access to.
Page 30

29Basic
PERSONAL
Backup & Reset
You can back up app data, Wi-Fi passwords, and other settings to Google
servers. You can also restore the Sero 8’s conguration to factory settings.
SYSTEM
Date & Time
You can set time zone, date, time and date format. If Sero 8 connected with a
Wi-Fi, you can also select use network-provided time.
Accessibility
To modify your device’s Accessibility settings:
TalkBack - Controls spoken feedback for visually impaired users.
Captions - Choose to turn on captions for your device.
Magnification gestures - Turn on to toggle zoom in and out, as well as
temporarily magnify what’s under your finger.
Large text - Check to increase the text size on all your device’s screens.
Auto-rotate screen - Check to have the screen auto-rotate in portrait and
landscape modes.
Speak passwords - Check to get spoken feedback while typing passwords.
If this option is not checked, you will need a headset to hear the letters you
type for passwords.
Accessibility shortcut - Lets you quickly enable accessibility features.
Text-to-Speech output - Lets you specify text-to-speech engine details and
speech rate.
Touch & hold delay - Lets you adjust the delay required for the device to
notice that you’re touching and holding an item, for example, to move an
app to a Home screen.
Printing
You can print directly from Sero 8.
Tap Cloud Print to view a list of available printers. To add a printer or manage
settings, tap the Menu icon .
About Tablet
You can view the version information, the status of battery, network, and other
information.
You can also update the software version via the network. There are two ways
to access the update screen:
Page 31

30Basic
If the latest version is checked by system, a notification will appear in the
Notification Bar. Open the Notification Tray and tap the notification.
If you dismiss the update notification, go to Settings > SYSTEM > About
tablet > System updates.
Location
Sero 8 can use different modes to access location information. These modes
replace the GPS satellites and Wi-Fi & mobile network options in previous
versions.
Each mode uses different sources to estimate Sero 8’s location. Apps that have
your permission can use this information to deliver location-based services,
such as the ability to check in, view commute traffic, or find nearby restaurants.
The location icon will display in the top right corner of Sero 8 when precise
location is being used by any app. It means that a mode using more power to
determine your location is turned on.
Location for Sero 8
NOTE
If you set up multiple users, these users may have different location
settings. Be sure to review location settings individually for each user.
To control what location information Sero 8 can use, go to Settings >
PERSONAL > Location.
When the Location switch at the top of the screen is On, you can select one of
the following modes:
High accuracy - High accuracy mode uses Wi-Fi and other sensors to get
the highest-accuracy location for Sero 8.
Battery saving - Battery saving mode allows Sero 8 to estimate your location
using low battery-intensive location sources, such as Wi-Fi.
When the switch is Off, Sero 8 location isn’t shared with any apps.
NOTE
Turning off location for Sero 8 also turns it off for Google apps and
non-Google apps. That means that apps can’t retrieve your device
location, and many useful features will be disabled.
Apps Using Your Location
To know which apps are currently accessing or have recently accessed your
location, go to Settings > PERSONAL > Location > Recent Location Requests.
This list displays apps that have recently received your location. Each app listed
includes the following information:
High battery use - This app receives location information from sources that
may use more battery power.
Low battery use - This app receives location information from only low
battery-intensive sources.
Page 32

31Basic
Selecting an app will bring you to its App info page, where you can view app
permissions and uninstall an app.
Location Services
These settings control location services, such as Google Location Reporting.
Editing location settings may change services across multiple apps. Some
services are linked to an account. Each service can be one of the following:
On - One or more accounts is on for this service.
O - All accounts are off for this service.
Manage Location Reporting & Location History
Location Reporting allows Google to periodically store and use your device’s
most recent location data, as well as activities like driving, walking, and biking,
in connection with your Google Account.
Location History allows Google to store a history of your location data from all
devices where you are logged into your Google Account and have enabled
Location Reporting. You can view and manage your Location History at the
Location History website. You can turn o Location History at any point, but
doing so won’t delete your Location History.
To open or closer Location Reporting, tap Location > Location services >
Google Location Reporting > Location Reporting, slide the switch ON or
OFF.
To open or closer Location History, tap Location > Location services >
Google Location Reporting > Location History, slide the switch ON or OFF.
You can also delete Location History.
NOTE
If you turn off Location History, it’s turned off for all devices associated
with that Google Account.
Google Account
Why Use a Google Account?
A Google Account lets you organize and access your personal information
from any computer or mobile device:
Google Play - Google Play brings together all your favorite content in one
place: movies, books, music, magazines, apps, and more. When you sign
in with your Google Account, you can reach any of this content from any
of your devices – as long as you have a network connection. You can also
shop for more in the Google Play Store.
Synchronize and back up everything - Whether you draft an email, add an
event to your calendar, or add a friend’s address, your work gets backed up
continuously by Google and synchronized with any computer where you
use the same Google Account.
Page 33

32Basic
Access from anywhere - Check your latest calendar, email, text messages, or
social stream, no matter what computer or mobile device you’re using.
Keep your stuff secure and available - Google works round the clock to
protect your personal data from unauthorized access and to ensure that
you get it when you need it, wherever you need it.
Simplify shopping - You can connect your Google account with Google
Wallet, which makes it easy to purchase music, books, apps, and more on
Google Play and other online stores.
Other Google services - Your Google Account also lets you take full
advantage of any other Google apps and services that you may want to use,
such as Gmail, Google Maps, Navigation, Google Play, YouTube, Messenger,
and many more.
Add an Account
You can use multiple Google Accounts and Microsoft Exchange ActiveSync
accounts on your Sero 8. You may also be able to add other kinds of accounts,
depending on your apps. To add some accounts, you may need to obtain
details from your system administrator about the service to which the account
connects. For example, you may need to know the account’s domain or server
address.
1. Go to Settings > ACCOUNTS > Add account.
2. Tap the kind of account to add.
3. Follow the on-screen instructions.
4. Most accounts require a username and password, but the details depend
on the kind of account and the configuration of the service you’re
connecting to.
When you’re finished, the account is added in one of two places:
Google Accounts show up under Settings > ACCOUNTS > Google.
Other accounts show up under Settings > ACCOUNTS on the main Settings
screen.
Remove an Account
You can remove any account and all information associated with it from your
Sero 8, including email, contacts, settings, and so on.
To remove a Google account, go to Settings > ACCOUNTS > Google >
[account-name] > Menu icon > Remove account.
For any other type of account, go to Settings > ACCOUNTS > [account -
type] > [account - name] and look for the Remove option.
Page 34

33Basic
Syncing
Configure Sync Options
You can configure synchronization options for any of your apps. You can also
decide what kinds of data to synchronize for each account.
For some accounts, syncing is two-way; changes that you make to the
information on your Sero 8 are made to the copy of that information on the
web. Your Google Account works this way. Other accounts support only oneway sync: the information on your mobile device is read-only.
Configure Auto-sync for All Apps
To control Auto-sync for all apps that use it, go to Settings > WIRELESS &
NETWORKS > Data usage > Menu icon , and check or uncheck Auto-sync
data.
If you turn off Auto-sync, you need to sync manually to collect messages,
email, and other recent information, and won’t receive notifications when
updates occur. For example, changes that you make in your People app are
automatically made to your Google contacts on the web.
NOTE
Leaving Auto-sync off can help extend your battery life, but will prevent
you from receiving notifications when updates occur.
Configure Google Account Sync Settings
To adjust a single Google Account’s sync settings:
1. Go to Settings > PERSONAL > Accounts > Google.
indicates that none of an account’s information is configured to sync
automatically.
indicates that some or all of an account’s information is configured to
sync automatically.
2. Tap the account whose sync settings you want to change.
3. The Sync Settings screen opens, displaying a list of the kinds of information
the account can sync.
4. Tap items as needed.
Unchecking an option does not remove the information from your Sero 8; it
simply stops it from being kept in sync with the version on the web.
Sync a Google Account Manually
1. Go to Settings > ACCOUNTS > Google.
2. Tap the account whose data you want to sync.
3. Tap Menu icon > Sync now.
Tip: None of an account’s information is configured to sync automatically.
Page 35

34Basic
Google Now
Google Now is about getting you just the right information, at just the right
time. It tells you today’s weather before you start your day, how much traffic
to expect before you leave for work, and even your favorite team’s score while
they’re playing.
All of this happens automatically. Google Now intelligently brings you the
information you want to see, when you want to see it. No digging required.
Turn Google Now On
To open Google Now, you can press & hold the Home button at the bottom
of any screen and slide up to Google Now icon, or tap the Google Search bar
at the top of the screen.
Google Now Cards
A Google Now card is a short snippet of useful information that slides into
view right when you’re most likely to need it. Google Now displays cards when
they’re most likely to be useful and relevant based on the current time and
your current location.
Dismiss Cards
When you’re finished with a card, just slide it left or right to dismiss it from the
Google Now screen.
Adjust Notifications
When a card has a new update, you’ll receive a notification at the top of your
screen. You can slide down the Notification Tray to open the card or dismiss
the notification.
Search
A Google Now card is a short snippet of useful information that slides into
view right when you’re most likely to need it.
Search by Typing
Type your query in the search box on the Google Now card. For more
information, see Typing on page 23.
As you type, suggestions appear below the Search box. The first few
suggestions attempt to complete what you’re typing:
Search, or say “Ok Google”
Page 36

35Basic
To search for a suggestion immediately, tap it.
To search for the contents of the search field, tap the Search icon on
the right side of the on-screen keyboard.
Voice Search
You can use Voice Actions with Google Search to get directions, send
messages, and perform a number of other common tasks. For more
information, see Voice Search & Voice Actions on page 36.
Search Settings
To change your Search settings, scroll to the bottom of the Google Search
screen and tap Menu icon > Settings.
Tablet Search
Choose which apps on Sero 8 appear in your search results, including Google
Play Books, Play Music, and your Contacts.
Accounts & Privacy
These settings control the account for use with Google Search and searchrelated privacy options for that account.
Google Account - If you want to use a different Google Account for search
and Google Now, tap Google Account to sign out or choose to sign in to
another account.
Commute sharing - Choose to share your commute with your Google+
connections.
Google location settings - Choose which apps can access your location, and
choose whether or not to report your location to Google.
Tip: This doesn’t affect the settings for Google’s location service. To turn
those settings off or on, go to Settings > PERSONAL > Location access.
Web History - Turn Web History on to use features like Google Now and get
improved predictions as you search.
Manage Web History - Tap Manage Web History to see your past searches
and sites you’ve visited, delete past searches, and turn Web History on or off.
Personal results - When Personal results is turned on, you’ll see private
search results from Google products like Google Calendar, Gmail, and
Google+.
SafeSearch filter - Filter explicit content from your search results by turning
SafeSearch on.
Contact recognition - If this setting is turned on, you’ll improve voice
searches and actions that include names of people in your contact list.
Search engine storage - Clear space used for search by apps like Gmail and
Chrome.
Page 37

36Basic
Legal - View the legal terms.
Voice Search & Voice Actions
You can use Voice Actions with Google Search to get directions, send
messages, and perform a number of other common tasks. You can also use
Voice Actions to type text by speaking.
Turn Voice Search or Voice Action On
You can initiate a Voice Search or Voice Action in several ways:
Tap the Microphone icon on the Home screen or Google Now screen
and speak.
Tap the search bar on the Home screen and say “Ok Google”.
When you’re viewing the Google Now screen, you don’t have to tap
anything. Just say “Ok Google.”
NOTE
To detect when you say “Ok Google” to launch Voice Search or Voice
Actions, Google analyzes sound picked up by your device’s microphone
in intervals of a few seconds or less. The sound is immediately
discarded after analysis and is not stored on the device or sent to
Google.
Voice Search
After you say “Ok Google” or tap the Microphone icon , Google listens to
what you say and searches for it. If Google isn’t sure what you’re searching for,
it’ll show you some suggestions. Just tap the one you want.
Voice Actions
You can use Voice Actions to perform common tasks, such as sending an
email or opening an app. After tapping the Microphone icon or saying “Ok
Google”, speak the Voice Action you want to use.
Tip: You can say “help” to see examples of the kinds of things you can tell
Google to do for you.
Examples include:
“Set alarm for 8:30 a.m.”
“Send email to Marcus Foster. Subject: Coming tonight? Message: Hope to
see you later.”
“Navigate to Mike’s Bikes in Palo Alto.”
Voice Actions Commands
This table lists some key Voice Actions phrases.
Page 38

37Basic
Say Followed by Examples
“Open” App name “Open Gmail”
“What does my day
look like tomorrow?”
or “Show me my
schedule for the
weekend.”
Say “What does my day
look like tomorrow?” to see
tomorrow’s agenda.
“Create a calendar
event”
“Event description” & “day/
date” & “time”
“Create a calendar event:
Dinner in San Francisco,
Saturday at 7:00PM”
“Listen to TV” Displays TV cards relevant to
the TV show that’s currently
being broadcast
While a TV show is being
broadcast, say “Listen to TV”
“Map of” Address, name, business
name, type of business, or
other location
“Map of Golden Gate Park, San
Francisco.”
“Directions to” or
“Navigate to”
Address, name, business
name, type of business, or
other destination
“Directions to 1299 Colusa
Avenue, Berkeley, California” or
“Navigate to Union Square, San
Francisco.”
“Post to Google+” What you want posted to
Google+
“Post to Google+ I’m going out
of town.”
“What’s this song?” When you hear a song, ask
“What’s this song?”
“Remind me to” What you want to be
reminded about, and when or
where
“Remind me to call John at
6PM.”
“Go to” Search string or URL “Go to Google.com”
“Send email” “To” & contact name, “Subject”
& subject text, “Message”
& message text (speak
punctuation)
“Send email to Hugh Briss,
subject, new shoes, message, I
can’t wait to show you my new
shoes, period.”
“Note to self” Message text “Note to self: remember the
milk”
“Set alarm” “Time” or “for” & time, such
as “10:45 a.m.” or “20 minutes
from now,” “Label” & name of
alarm
“Set alarm for 7:45 p.m., label,
switch the laundry”
“Listen to” Play music in the Google
Play Music app by speaking
the name of a song, artist, or
album
“Listen to: Smells Like Teen
Spirit”
Page 39

38Basic
Speech Settings
Speech settings control different aspects of speech input and output when
you search by voice or use voice actions:
Go to Settings > PERSONAL > Language & input > Speech > Voice Search.
Language - The language you select here for Voice Search input and output
can be different from the language displayed by your Sero 8.
“Ok Google“ hotword detection - When this is checked, you can say “Ok
Google” when viewing the Google Now screen rather than tapping the
Microphone icon to initiate a voice search or action.
Speech output - To turn on speech output only when you’ve got a headset
attached to your Sero 8, select Hands-free only.
Block offensive words - Check to ensure that search results with offensive
language is blocked.
Offline speech recognition - Check to select one or more additional
languages for speech recognition when you don’t have a network
connection.
Bluetooth headset - Check to ensure that you can hear audio through the
Bluetooth.
Go to Settings > PERSONAL > Language & input > Speech > Text-to speech
output.
Preferred engine - You can select the preferred text-to-speech engine if you
installed other engines. Tap settings icon , you can set the language,
view Google TTS options, or install the voice data.
Speech rate - You can adjust the speed at which the text is spoken.
Listen to an example - Play a short demonstration of speech synthesis.
Page 40

39Appendix A
Appendix A
Specifications
Product Name Sero 8
Model E2281
Dimension (L × W × T) 8.23 inches × 5.12 inches × 0.41 inches
(209 mm × 130 mm × 10.5 mm)
Weight 0.99 lbs (450 g)
Display Diagonal 8 inches
Resolution 1280 × 800
Hardware Platform Rockchip RK3188T, 1.4GHz Cortex A9
Storage RAM 1GB
ROM 16GB1
Extendable Memory Micro SD (up to 32G, support hot plug)
Antenna Wi-Fi 802.11 b/g/n
Bluetooth BT 3.0
Cameras Front Camera 0.3 M
Rear Camera 2.0 M
Power AC Power Adapter (5V/ 2A)
Battery Rechargeable2 lithium polymer battery
Battery Capacity 4000 mAh / 3.7 V
Audio Built-in speaker
External Port 3.5 mm stereo headphone port; Micro-USB
port; Micro SD port
Operating Temperature 32°F to 95°F (0°C to 35°C)
Storage Temperature -4°F to 113°F (-20°C to 45°C)
1 : Because the system will occupy part of the memory space, the available user
space will be less than 16GB.
2 : The rechargeable battery in Sero 8 should be replaced only by Hisense Service.
A
Page 41

40Appendix A
Troubleshooting
When there appears to be an issue with your Sero 8, refer to the tips listed
below for a resolution. If the problem still cannot be solved, then contact the
local Hisense Electronics Consumer Care Center or a professional technician.
Sero 8 displays network or service error message
When you are located in places with poor signals, then your Sero 8 may
not be able to connect. Try to move to other places to get a stronger signal
strength.
If you do not make a reservation, some of the options can not be used.
Please contact your service provider for more details.
Touch screen response is slow or incorrect
If the Sero 8’s touch screen response is incorrect, please try the following:
Remove any protective film of the touch screen. The protective film may
prevent the device recognition input.
Make sure that you are fingers are dry and clean before you tap the touch
screen.
Restart the Sero 8 to clear any temporary software bugs.
Make sure that the Sero 8’s software has been upgraded to the latest
version.
Sero 8 is frozen or a serious error appears
If the Sero 8 is frozen or suspended, you may need to close the app
program or reset the tablet.
If the Sero 8 is frozen or slow to respond, press & hold the Power button for
8 seconds to the reset the tablet.
If the problem persists, restore the factory data.
Sero 8 gets warm
When you use your device for a long time, the Sero 8 may be warm to the
touch. This is normal and will not affect the life or performance of the unit.
Page 42

41Appendix B
Appendix B
Important Safety Instructions
1. Read these instructions.
2. Keep these instructions.
3. Heed all warnings.
4. Follow all instructions.
5. Do not defeat the safety purpose of the polarized or grounding-type plug. A
polarized plug has two blades with one wider than the other. A grounding
type plug has two blades and a third grounding prong. The wide blade or
the third prong are provided for your safety. If the provided plug does not
fit into your outlet, consult an electrician for replacement of the obsolete
outlet.
6. Protect the power cord from being walked on or pinched particularly at
plugs, convenience receptacles, and the point where they exit from the
unit.
7. Only use attachments/accessories specified by the manufacturer.
8. Refer all servicing to qualified service personnel. Servicing is required when
the unit has been damaged in any way, such as power-supply cord or plug
is damaged, liquid has been spilled or objects have fallen into the unit, the
unit has been exposed to rain or moisture, does not operate normally, or
has been dropped.
The lightning flash with arrow head symbol,
within an equilateral triangle is intended to
alert the user that parts inside the product
constitute a risk of electric shock to persons.
The exclamation point within an equilateral
triangle is intended to alert the user that
important operating and servicing instructions
are in the papers with the appliance.
WARNING: TO REDUCE THE RISK OF ELECTRIC SHOCK, DO
NOT REMOVE COVER OR BACK. NO USER-SERVICEABLE
PARTS INSIDE. REFER SERVICING TO QUALIFIED SERVICE
PERSONNEL.
WARNING
RISK OF ELECTRIC SHOCK
DO NOT OPEN
B
Page 43

42Appendix B
9. Do not install near any heat sources such as radiators, heat registers, stoves,
or other units (including amplifiers) that produce heat.
10. Unplug this unit during lightning storms or when unused for long periods
of time.
Warning
All packing materials such as internal bags, plastic collars, plastic films, and
carton inserts are not part of this product and should be discarded.
Do not try to disassemble the unit.
Only use a wall outlet to charge your Sero 8 and the power adapter that
came with the device.
Do not expose the unit to moisture or water.
Keep the unit clean by wiping it with a slightly damp cloth.
To prevent hearing damage, never use headphones at excessive volume
levels. Listening to loud sounds for an extended period may cause
temporary or permanent hearing loss.
Never use Sero 8 while operating a motor vehicle or bicycle.
If you feel discomfort in your hands or any pain using Sero 8, please stop
immediately.
In case of long periods of use, take frequent breaks.
If a small part is coming out of the Sero 8, do not try to remove it. Keep it
away from small children.
Never force a connector into a port of Sero 8. If a connector and a port do
not join with reasonable force, make sure that the connector matches the
port and that you have positioned the connector correctly in relation to the
port.
To clean the screen, simply use a soft damp cloth. Do not use alcohol,
solvent, aerosol spray or abrasive cleaners to clean your Sero 8.
The product and the adapter should be periodically examined for
conditions that may result in the risk of fire, electric shock, or injury to
persons and that, in an event such conditions, the adapter should not be
used until properly repaired.
Operate Sero 8 in a place where the temperature is between 0º and 35ºC
(32º to 95ºF). Low or high temperature conditions might temporarily
shorten battery life or cause Sero 8 to temporarily stop working properly.
Avoid dramatic changes in temperature or humidity when using Sero 8, as
condensation may form on or within Sero 8.
Store Sero 8 in a place where the temperature is between -20º and 45ºC (-4º
to 113ºF). Don’t leave Sero 8 in your car because temperatures in parked
cars can exceed this range.
Page 44

43Appendix B
When you’re using Sero 8 or charging the battery, it is normal for Sero 8 to
get warm. The exterior of Sero 8 functions as a cooling surface that transfers
heat from inside the unit to the cooler air outside.
The rechargeable battery in Sero 8 should be replaced only by Hisense
Service.
Do not expose a battery pack or installed batteries to excessive heat such as
sunshine, fire or the like.
If you will not use Sero 8 frequently, then we recommend that you fully
charge and discharge the battery every three months in order to maximize
the battery lifespan.
If you will not use Sero 8 frequently, then we recommend that you keep
the battery level at around 50 percent in order to maximize the battery life
span.
If Sero 8 has not been used for a long period of time, then the battery might
be in an over-discharge protection mode and take longer to charge.
This device is restricted to indoor use when operating in the 2.4 to 2.483
GHz frequency band.
The Wi-Fi function and the Bluetooth function can simultaneously operate,
but can not simultaneously transmit.
Never remove or insert microSD card while the Sero 8 is powered on.
The manufacturer is not responsible for any radio or TV interference caused
by unauthorized modifications to this equipment. Such modifications could
void the user’s authority to operate the equipment.
Sero 8 North America edition is limited using channel 1-11. This limited
operation can be only set by software and was done before the product
down from the product line. All the products for North America marketing
were embedded this limited before shipping. Customers have no way to
choose the channel 12 & 13.
Certification and Compliance
Exposure to Radio Frequency Energy
Sero 8 contains radio transmitters and receivers. When on, Sero 8 sends and
receives radio frequency (RF) energy through its antenna. The Wireless antenna
is located on the back of the device, see Understanding Your Sero 8 Tablet on
page 5 for more details. Sero 8 has been tested and meets the SAR (Specific
Absorption Rate) exposure requirements for WLAN operation.
Sero 8 is designed and manufactured to comply with the limits for exposure
to RF energy set by the Federal Communications Commission (FCC) of the
United State. The exposure standard employs a unit of measurement known
as the specific absorption rate, or SAR. The SAR limit applicable to Sero 8
set by the FCC is 1.6 watts per kilogram (W/kg). Tests for SAR are conducted
Page 45

44Appendix B
using standard operating positions specified by these agencies, with Sero 8
transmitting at its highest certified power level in all tested frequency bands.
Although SAR is determined at the highest certified power level in each
frequency band, the actual SAR level of Sero 8 while in operation can be well
below the maximum value because Sero 8 adjusts its WLAN transmitting
power based in part on orientation and proximity to the wireless network. In
general, the closer you are to a WLAN Router, the lower the WLAN transmitting
power level.
Sero 8 has been tested, and meets the FCC and European Union RF exposure
guidelines for WLAN operation. When tested at direct body contact, Sero 8’s
maximum SAR value for each frequency band is outlined below:
FCC SAR
Frequency Band (MHz) FCC 1g SAR Limit (W/kg) Highest Value (W/kg)
Model: E2281
2412-2462 1.6 1.152
EN SAR
Band EN 10g SAR Limit (W/kg) Highest Value (W/kg)
Model: E2281
Wi-Fi 2.4 GHz 2.0 0.641
Additional Information
For more information from the FCC about exposure to RF energy, see:
www.fcc.gov/oet/rfsafety .
The FCC and the U.S. Food and Drug Administration (FDA) also maintain a
consumer website at www.fda.gov/Radiation-EmittingProducts/default.htm
to address inquiries about the safety of mobile phones. Check the website
periodically for updates.
For information about the scientific research related to RF energy exposure,
see the EMF Research Database maintained by the World Health Organization
at: www.who.int/emf .
FCC Compliance Statement
This device complies with part 15 of the FCC rules. Operation is subject to the
following two conditions: (1) this device may not cause harmful interference,
and (2) this device must accept any interference received, including
interference that may cause undesired operation.
NOTE This equipment has been tested and found to comply with the limits
for a Class B digital device, pursuant to part 15 of the FCC Rules. These limits
are designed to provide reasonable protection against harmful interference
in a residential installation. This equipment generates, uses and can radiate
radio frequency energy and, if not installed and used in accordance with
the instructions, may cause harmful interference to radio communications.
Page 46

45Appendix B
However, there is no guarantee that interference will not occur in a particular
installation. If this equipment does cause harmful interference to radio or
television reception, which can be determined by turning the equipment off
and on, the user is encouraged to try to correct the interference by one or
more of the following measures:
Reorient or relocate the receiving antenna.
Increase the separation between the equipment and receiver.
Connect the equipment to an outlet on a circuit different from that to
which the receiver is connected.
Consult the dealer or an experienced radio/TV technician for help.
Model: E2281
FCC ID: W9HPADP0003
CE Certification
Sero 8 has passed the European CE certification. The
mark demonstrates the compliance with CE directives as
shown on the left.
Disposal and Recycling Information
The symbol means that according to local laws and regulations
your product should be disposed of separately from household
waste. When this product reaches its end of life, take it to a
collection point designated by local authorities. Some collection
points accept products for free. The separate collection and
recycling of your product at the time of disposal will help
conserve natural resources and ensure that it is recycled in a
manner that protects human health and the environment.
Page 47

46Appendix C
Appendix C
Legal Terms
The product/device you have purchased from Hisense Co., Ltd. or it’s Parent
Company, affiliates and/or Subsidiary Company, its successors and/or assigns
(hereinafter referred to as “Hisense”) provides direct access to the internet
through one or more internet provider services (hereinafter referred “Web
Service”). All content and services accessible through this device belong to
Hisense Co., Ltd. “Hisense” is sometimes also referred to herein as “we” or “us”) or
third parties and are protected by copyright, patent, trademark and/or other
intellectual property laws. Such content and services are provided solely for
your personal non-commercial use. You may not use any content or services
in a manner that has not been authorized by the content owner or service
provider or prohibited by law. You may not modify, copy, republish, upload,
post, transmit, translate, sell, create derivative works, exploit, or distribute in
any manner or medium any content or services displayed through this device
except as permitted by applicable law or as authorized in writing by Hisense.
YOU EXPRESSLY ACKNOWLEDGE AND AGREE THAT USE OF THE DEVICE IS
AT YOUR SOLE RISK. TO THE EXTENT PERMITTED BY LAW, THE DEVICE AND
ALL CONTENT AND SERVICES ARE PROVIDED “AS IS”WITHOUT WARRANTY,
CONDITION, TERM, REPRESENTATION OR UNDERTAKING OF ANY KIND, EITHER
EXPRESS OR IMPLIED. TO THE EXTENT PERMITTED BY LAW, HISENSE EXPRESSLY
DISCLAIMS ALL WARRANTIES, CONDITIONS, TERMS, REPRESENTATIONS AND
UNDERTAKINGS WITH RESPECT TO THE DEVICE AND ANY CONTENT AND
SERVICES, EITHER EXPRESSED OR IMPLIED, INCLUDING, BUT NOT LIMITED TO,
WARRANTIES OF MERCHANTABILITY, OF SATISFACTORY QUALITY, FITNESS
FOR A PARTICULAR PURPOSE, OF ACCURACY, OF QUIET ENJOYMENT, AND
NON-INFRINGEMENT OF THIRD PARTY RIGHTS. TO THE EXTENT PERMITTED
BY LAW, HISENSE DOES NOT GUARANTEE THE ACCURACY, VALIDITY,
TIMELINESS, LEGALITY, OR COMPLETENESS OF ANY CONTENT OR SERVICE
MADE AVAILABLE THROUGH THE DEVICE AND DOES NOT WARRANT THAT THE
DEVICE, CONTENT OR SERVICES WILL MEET YOUR REQUIREMENTS, OR THAT
OPERATION OF THE DEVICE OR SERVICES WILL BE UNINTERRUPTED OR ERRORFREE. TO THE EXTENT PERMITTED BY LAW, UNDER NO CIRCUMSTANCES,
INCLUDING NEGLIGENCE, SHALL HISENSE BE LIABLE, WHETHER IN CONTRACT
OR TORT OR OTHERWISE, FOR ANY DIRECT, INDIRECT, INCIDENTAL, SPECIAL OR
CONSEQUENTIAL LOSS OR DAMAGES, LOSS OF PROFIT, REVENUE, INTEREST,
BUSINESS OR CORRUPTION OF DATA, ATTORNEY FEES, EXPENSES, OR ANY
OTHER LOSS OR DAMAGES ARISING OUT OF, OR IN CONNECTION WITH, ANY
INFORMATION CONTAINED IN, OR AS A RESULT OF THE USE OF THE DEVICE,
OR ANY CONTENT OR SERVICE ACCESSED BY YOU OR ANY THIRD PARTY, EVEN
IF ADVISED OF THE POSSIBILITY OF SUCH LOSS OR DAMAGES. IF THE LAW
OF A PARTICULAR JURISDICTION DOES NOT PERMIT HISENSE TO EXCLUDE
WARRANTIES AS CONTAINED HEREIN, THEN HISENSE SHALL BE READ TO
C
Page 48

47Appendix C
PERMIT HISENSE TO LIMIT AND EXCLUDE ANY SUCH WARRANTIES TO THE
MAXIMUM EXTENT AS PERMITTED BY THE LAW.
The country location you have identified during the set-up process may
grant you access to certain content, advertising and services of third parties
or Hisense. The third party content and linked sites are not under our control,
and we have neither reviewed the contents of these third-party web sites,
nor do we claim any responsibility for the access to, maintenance, content
or suitability of, these third-party web sites or applications. You expressly
acknowledge and agree that the identification of your country location and
you’re linking to any third party site or application is entirely at your own risk,
and it is your responsibility to view and abide by the terms of use and privacy
policies applicable to any third party site. You understand and agree that, to
the extent permitted by law, Hisense shall in no event be liable for any direct,
indirect, incidental, special or consequential loss or damages, attorney fees,
expenses, or any other loss or damages arising out of, or in connection with,
your unauthorized access to third party content based on your selection of a
country location or otherwise.
All content and services accessible through this device may be changed,
suspended, removed, terminated or interrupted, or access may be denied or
disabled at any time, without notice, and Hisense makes no representation
or warranty that any content or service will remain available for any period
of time. Content and services are transmitted by means of networks and
transmission facilities over which Hisense has no control. Without limiting
the generality of this Disclaimer, and to the extent permitted by law, Hisense
expressly disclaims any responsibility or liability for any change, interruption,
disabling, removal or suspension of any content or service made available
through this device. Hisense may impose limits on the use, disabling, removal
or suspension of any content or service made available through this device.
Hisense may impose limits on the use of, or access to, certain services
or content in any case and without notice or liability. Hisense is neither
responsible nor liable for customer service related to the third party content
and services. You need to accept the terms of service and privacy policy in
order to use “Hisense Smart” platform on your Tablet. All the applications in
the Tablet are provided by are subject to modification or termination with
or without any notice. Any question or request for service relating to such
content or services should be made directly to the respective third party
applications and service providers.
END USER TERMS AND CONDITIONS FOR HISMART@ SERVICES
Welcome to Hisense Smart Tablet. These End User Terms and Conditions for
HISMART@ Services (these “Terms and Conditions”) are a legal agreement
between you and Hisense. By installing and/or using the embeddable and
executable software application (“Application”), and/or accessing or using the
Content and Services through Hisense Smart Tablet or any other features of
functionality made available on your Hisense device, you are legally bound to
these Terms and Conditions. To the extent permitted by law, Hisense reserves
Page 49

48Appendix C
the right to modify or update these Terms and Conditions from time to time.
DEFINITION
“Content” means all audio and visual elements and ideas offered by Hisense
or third parties including but not limited to data, movies, videos, photographs,
software, games, designs, likenesses, artwork, images, music, sound,
information and other materials, tangible and intangible, including derivative
works, on all media and formats, existing now or in the future. “Service” means
all types of services or functions typically available from the internet, offered
by Hisense or third parties including but not limited to provisions of music,
movie, video, messaging, blogging, chatting, social networking, information,
procurement, disposal, sale, purchase, rental and consultation through your
Hisense device. The Applications, Content and Services collectively shall mean
“HISMART@ Services”. From time to time, Hisense may directly offer and make
available to you certain Applications, Services and/or Contents, and in such
events, your use of such Applications, Services and Contents shall be subject
to these Terms and Conditions. Applications, Content and Services may be
provided locally subject to local laws and regulations, and depending on your
residence and location, you may be limited to types and levels of Applications,
Content and Services. Terms and conditions for the use of such Applications,
Services or Content may differ for each different country, region or market and
subject to relevant local, country and regional laws.
USE OF HISMART@ SERVICES
HISMART@ Services are intended for use by persons 13 years of age or older.
If you are not at lease 13 years of age or older or are legally, or otherwise,
restricted form using HISMART@ Services, please discontinue using HISMART@
Services. If you are not 18 years of age or older, you must have a parent of
guardian’s approval prior to using HISMART@ Services. By using any portion
of HISMART@ Services and accepting the Terms and Conditions, you are
certifying that you are at least 13 years of age, have parental consent if you are
between 13 and 18, and are otherwise not restricted from agreeing to these
Terms and Conditions. The use of any portion of HISMART@ Services (including
the Application, Content and Services) are restricted to only personal, noncommercial purposes. No other used are permitted.
Access to certain Applications Content and/or Services, online or otherwise,
may require registration, the creation of a user account with Hisense or
a third party, and/or a fee. Registration may require providing personal
information and choosing a unique, secret password that may not be shared
with others. Any personal information provided by you to Hisense will be
handled in accordance with our Privacy Policy. Your personal information
must be complete, accurate, and must be YOURS. You shall not use any third
party personal information to create an account in connection with the use
of HISMART@ Services, and you are not allowed to access others’ accounts.
HISENSE RESERVES THE RIGHT TO BLOCK ANY USER ACCOUNT IN THE EVENT
HISENSE REASONABLY DETERMINES THAT THE USE OF HISMART@ SERVICES
Page 50

49Appendix C
IS IN VIOLATIONS OF THESE TERMS AND CONDITIONS, INCLUDING CREATING
ACCOUNTS WITH FALSE INFORMATION. Content and Service offered through
HISMART@ Services that require a fee may not be accessed by persons who
have not paid the appropriate fee. In the event that registration, creation of
a user account, and/or a fee is required for the Service or Content offered
or provided by a third party provider, such registration, creation of a user
account, and/or a fee shall be subject to privacy policies, terms and condition
of the Services and/or Contents of such third party.
SPECIFIC USE OF HISMART@ SERVICES THROUGH HISENSE
APPLICATIONS
Access to certain portions of HISMART@ Services at Hisense Apps may require
registration and creation of a user account and/or a fee. Such registration,
creation of a user account and payment of a fee may be completed on a
webpage run by us (or an affiliate of Hisense) or a third party (including a
payment gateway provider). Such registration may require providing personal
information to such us or third party and choosing a unique, secret password
that may not be shared with others. In the event that registration, creation of
a user account, and/or a fee on such third party or Hisense website is required
for the Service or Content offered or provided through Hisense Apps, such
registration, creation of a user account, and/or a fee shall be subject to privacy
policies, terms and condition of the Services and/or Contents of such website.
RESTRICTIONS AND PROHIBITIONS
You or any third party (directed by You) may not display, copy, store, modify,
sell, publish, broadcast or redistribute any Application, Content and/or Service
(a portion or in its entirety), and such displaying, copying, storing, modification,
sale, publishing, broadcasting or redistribution shall be prohibited unless you
have obtained all necessary rights and permissions from Hisense or relevant
owners or right holders of such Application, Content and/or Service or as
permitted by applicable law. Unauthorized use of the Content or Service is
prohibited and may result in criminal prosecution and/or civil liability.
You may not use any portion of the device for any other purposes, including,
but not limited to, illegal activity, to make unsolicited offers or advertisements,
to impersonate or falsely claim affiliation with any person or entity, to
misrepresent, harass, defraud or defame others, to post, upload, transmit
or disseminate any obscene, unreasonably offensive or any other unlawful
material, to negatively present the HISMART@ Services, nor for any commercial
purposes. Except as expressly permitted by these Terms and Conditions, and
except to the extent that applicable laws prevent Hisense from restraining
you from doing so, you are not allowed to disassemble, reverse engineer,
tamper with the HISMART@ Services, or transmit hidden or malicious code
or to collect information of other users through the HISMART@ Services. You
may not take any action to interrupt the functionality of or tamper with the
Application, Content or Service contained in or provided through HISMART@
Services or its servers or to unreasonably affect others’ use or enjoyment of
Page 51

50Appendix C
HISMART@ Services in any way. ONCE AGAIN, PLEASE NOTE THAT WE RESERVE
THE RIGHT TO BLOCK ACCESS BY ANY USER TO HISMART@ SERVICES AT OUR
SOLE DISCRETION FOR ANY REASON.
GRANT OF LICENSE
Subject to your full compliance with these Terms and Conditions, Hisense
grants you a non-exclusive, limited and personal license to download and use
the Application (other than other Applications which may be governed by
separate license terms) to display, receive or otherwise use (only to the extent
permitted) the Content and Service from your Hisense device only. No other
rights to the Application are granted. The scope of rights for Content and
Service shall be subject to the terms and conditions of the respective Content
and Service and other licensing requirement and restrictions otherwise
imposed or required by the relevant Content and Service providers. All rights
including intellectual property rights in the Application, Content and Service
remain the property of Hisense or the relevant licensors or owners of the
Application, Content and Service. Any breach of the Terms and Conditions will
result in an immediate revocation of the rights granted herein and Hisense
may engage in further legal action to protect any of its rights hereunder
including but not limited to the recovery of monetary damages.
MATERIALS PROVIDED BY YOU
Any Content submitted, uploaded or posted by you or on behalf of you on or
through your Hisense device or HISMART@ Services (“Submitted Content”) will
be considered non-confidential and non-proprietary. We also have the right to
disclose your information as necessary due to any third party who is claiming
that any of your Submitted Content constitutes a violation of their intellectual
property rights, or of their right to privacy. By posting, submitting, uploading
or otherwise transmitting Submitted Content in any way via your Hisense
device, you grant us a perpetual, irrevocable, unrestricted, non-exclusive,
worldwide, fully paid-up, royalty free, sub-licensable license to change, copy,
disclose, license, perform, display, post, publish, distribute, transmit or use
such Submitted Content in any manner and create derivative works thereof
or incorporate the Submitted Consent into other work anywhere in the
world. We have the right to remove any Submitted Content on HISMART@
Services for any reason including if, in our sole opinion, such Submitted
Content is unnecessary, offensive, indecent or objectionable. We do not
control the Submitted Content and do not warrant the nature, accuracy,
integrity, appropriateness or quality of the Submitted Content. You warrant
that any of your Submitted Content does not and will not infringe any third
party intellectual property rights. You are solely responsible for all Submitted
Content that you upload, post, email, transmit or otherwise make available in
any portion of HISMART@ Services. We assume no liability for such Submitted
Content and you are solely responsible for any liability arising from or related
to any Submitted Content posted, uploaded or transmitted by you or on your
behalf or through your Hisense device or HISMART@ Services.
Page 52

51Appendix C
ADVERTISEMENTS AND CUSTOMER SERVICE COMMUNICATIONS
You understand and agree that HISMART@ Services may include
advertisements, certain communications from Hisense or third parties such
as update announcements, administrative messages, newsletters and other
materials (“Communications”). As those advertisements or communications
are part of HISMART@ Services, you may not opt out of receiving these
advertisements or communications. Certain Services and Content may
not be suitable for minors or other users. Such Services and Content may
not be rated or identified as having violent or explicit images or language.
Therefore, you understand and agree that you are using the Services and
Content at your own risk and Hisense shall have no liability to you for any
offensive Services or Content. For purposes of clarity none of your behavioral
or personal information provided for the HISMART@ Services is used in any
Communications.
WARRANTIES AND LIABILITIES: DISCLAIMER
TO THE EXTENT PERMITTED BY LAW, THE APPLICATION, CONTENT AND
SERVICE ARE PROVIDED TO YOU “AS IS” WITHOUT ANY WARRANTIES, TERMS,
REPRESENTATIONS OR UNDERTAKINGS OF ANY KIND, EXPRESS OR IMPLIED,
WITH REGARD TO BUT NOT LIMITED TO THEIR QUALITY, RELIABILITY,
PERFORMANCE, PURPOSE, OR ACCURACY. YOU AGREE TO ASSUME ALL RISKS
OF USING THE APPLICATION, AND, TO THE EXTENT PERMITTED BY LAW, NOT TO
HOLD HISENSE OR ANY OF ITS HOLDINGS, DIRECTORS, OFFICERS, EMPLOYEES,
PARTNERS, CONTRACTORS, LICENSORS OR ADVERTISERS RESPONSIBLE FOR
ANY DAMAGES, LOSSES, OR HARM, TANGIBLE OR INTANGIBLE, INCLUDING BUT
NOT LIMITED TO COMPENSATORY, CONSEQUENTIAL, PUNITIVE, INCIDENTAL,
LOSS OF PROFIT, REVENUE, INTEREST OR BUSINESS, OR CORRUPTION OF DATA
OR ATTORNEY’S FEES ARISING FROM THE USE OF THE APPLICATION, CONTENT
OR SERVICE. To the fullest extent permitted by law, Hisense shall not be held
responsible for any third party Content or Service that may be accessed
through HISMART@ Services, nor shall Hisense be held responsible for hidden
or malicious code contained on or distributed through the HISMART@ Services
or Hisense device by third parties. Hisense does not guarantee that there
will be no interruptions, delays or inaccuracies in the Content or Service and
does not guarantee the continued availability of such Content and Service.
Due to the various capabilities of Hisense devices featuring the HISMART@
Services, as well as limitations in the available Content and Services offered
via HISMART@ Services, certain features, Applications, Content and Services
may not be available on all devices or in all territories. Some features on the
HISMART@ Services may also require additional peripheral devices that are
sold separately. Hisense does not endorse any of the ideas, products, persons,
or opinions expressed in the Content or Service.
Certain legislation may imply warranties or conditions or impose obligations
upon Hisense which cannot be excluded, restricted or modified or cannot
be excluded, restricted or modified except to a limited extent. These Terms
and Conditions must be read subject to these statutory provisions. If these
Page 53

52Appendix C
statutory provisions apply, to the extent to which Hisense is able to do so, its
liability under those provisions will be limited, at is sole and exclusive option,
in the case of services to (a) the supplying of the services again; or (b) the
payment of the cost of having the services supplied again and, in the case of
goods, to (a) the replacement of the goods or the supply of equivalent goods;
(b) the repair of the goods; (c) the payment of the cost of replacing the goods
or of acquiring equivalent goods; or (d) the payment of the cost of having the
goods repaired.
You assume full responsibility for any damages, losses, costs, or harm arising
from your use of the HISMART@ Services. To the extent permitted by law,
Hisense disclaims all liabilities with respect to your use of the HISMART@
Services (regardless of whether or not such use requires registration, creation
of a user account and/or payment of a fee), Content and Service. If any portion
of these Terms and Conditions are illegal or unenforceable or there is a claim
that we have breached any of these Terms and Conditions, it does not affect
or invalidate the other terms. These Terms and Conditions may not be waived
without written consent from Hisense.
ACTIONS REQUIRED BY LAW
Hisense may need to comply with the lawful interception and/or data
retention requirements of local law enforcement agencies from time to time.
Hisense may restrict access to any part of HISMART@ Services and the Hisense
device or terminate your access to the HISMART@ Services, at any time in its
sole discretion if required by law or by the relevant authorities or regulatory
agencies to do so.
Hisense Privacy Policy and Terms and Conditions of Use
The product you have purchased from Hisense provides direct access to the
internet through one or more internet provider services Hisense does not
warrant the accuracy, integrity or completeness of the content provided
through the use of the Web Service. Hisense makes no representation as
to the legality, applicability and/or appropriateness of the use of the Web
Service, or its content. Hisense disclaim all warranties, whether expressed or
implied, including but not limited to the warranties of title, merchantability or
fitness for a particular purpose. No oral advice or written information given by
Hisense or its agents, distributors or employees shall create a warranty.
UNDER NO CIRCUMSTANCES SHALL HISENSE BE LIABLE FOR ANY DIRECT,
INDIRECT, INCIDENTAL, SPECIAL OR CONSEQUENTIAL DAMAGES THAT
RESULT FROM YOUR USE OF OR INABILITY TO USE THE WEB SERVICE,
INCLUDING BUT NOT LIMITED TO RELIANCE BY YOU ON ANY INFORMATION
OBTAINED FROM THE WEB SERVICE THAT RESULTS IN MISTAKES, OMISSIONS,
INTERRUPTIONS, DELETION OR CORRUPTION OF FILES, VIRUSES, DELAYS
IN OPERATION, THIRD PARTY SOFTWARE MALFUNCTIONS OR HARDWARE
MALFUNCTIONS OR TRANSMISSION, OR ANY FAILURE OF PERFORMANCE. THE
FOREGOING LIMITATION OF LIABILITY SHALL APPLY IN ANY ACTION, WHETHER
IN CONTRACT, TORT OR ANY OTHER CLAIM, EVEN IF AN AUTHORIZED
Page 54

53Appendix C
REPRESENTATIVE OF HISENSE HAS BEEN ADVISED OF OR SHOULD HAVE
KNOWLEDGE OF THE POSSIBILITY OF SUCH DAMAGES. User hereby
acknowledges that this limitation of liability shall apply to all Hisense content,
merchandise and services available through the Web Service. These guidelines
and privacy policy are specific to the Hisense.
The Hisense product/device the user direct access to the internet through
one or more internet provider services (“Web Services”). The guidelines and
privacy policy are effective June 1, 2012, and apply to information that may be
gathered through the use of the Web Services provide through the Television
Tablet Product you purchased.
Hisense maintains privacy policies to safeguard personal identifying
information and communications from unauthorized intrusions. By “personal
identifiable information”, we mean any personal information that identifies
you, such as name, address, telephone number, e-mail address, and any
information about activities (online or otherwise) that is directly linked to your
information.
You may choose not to receive marketing communications, if any, from
Hisense in connection with the Web Services provided through your purchase
of the Hisense product/device. You may also tell us how you would like to
be contacted in connection with information you provided to Us via our
online services. If you notify us that you do not want to receive any marketing
information, we:
will not contact you directly with marketing messages in connection with
Hisense online services;
will not disclose your information to others.
If you notify Hisense that you do not want us to use any of your information
in the ways described in this policy, we will honor your request. However, if
you then later provide additional personal information to this site or otherwise
respond to one of Hisense’s online inquiries, we will assume that you have
changed your preference with respect to Hisense’s use of your information.
You may at anytime follow the procedure described above to elect not to be
contacted by Hisense.
Hisense will use commercially reasonable efforts to insure that your personal
information will be kept secure, and We will continue to enhance our security
procedures as new technology becomes available.
Hisense will use commercially reasonable efforts to assure that your e-mail will
be kept private. Hisense will not read or disclose to those parties not affiliated
with Hisense, private e-mail communications except that is required in the
normal course of business.
Hisense will respond to improper conduct. Hisense may use personal
information to investigate and help prevent potentially unlawful activity
or activity that threatens the company or otherwise violates the customer
agreement for any products or services that Hisense provides.
We may use session log data and cookies combined with anonymous
Page 55

54Appendix C
user data (and personal data if you provide it) to track user movement and
behavior. We may use this information to help us or our authorized retailers to
offer to you products and services that may serve your needs and to perform
website-user analytics. We may supply this information to a third party metric
provider to perform the analysis for us and to provide the results to us. Our
relationship with the metric provider is governed by contract. The contract
restricts the metric provider’s use of the data to performing requested
analytics and compiling reports for Hisense. The metric provider is prohibited
from otherwise selling or sharing the information or the results with anyone
else. We use the information and the analytic results to improve our website
and the user’s experience.
Hisense will keep its privacy policy current, and make every effort to promptly
update this web page every time there is a change to this policy.
Hisense recognizes that children, including young teens, may not be able
to make informed choices about personal information requested online.
Accordingly, Hisense does not knowingly target children or teenagers (younger
than eighteen years of age) for collection of information online. Hisense does
not solicit or collect personally identifying information from children and
teenagers under eighteen and does not allow anyone else to do so.
Your use of the Web Services provided through the use of the Hisense product
is at your own risk. Hisense, its suppliers, distributors and the other parties
involved in creating and delivering the content contained in the Web Services,
are not liable for any damages arising from the use of such Web Services.
Through the use of the Hisense product/device and the Web Services, you will
have access to various websites that may also contain links to other websites,
not owned or maintained by authorized Hisense. Such websites are not under
the control of Hisense, and Hisense is not responsible for the content of any
website or any link contained in a linked website.
Hisense reserves the right to modify the information contained on this site at
any time without notice. While Hisense makes all reasonable efforts to ensure
that all material on this site is correct, accuracy cannot be guaranteed and
Hisense does not assume any responsibility for the accuracy, completeness
or authenticity of any information contained on this site. This site and all
information and materials contained herein, is provided to you “as is” without
any warranty of any kind.
The use of the Hisense product and the Web Services is at the user’s risk.
By using the Web Services through the use of the Hisense product, you
acknowledge and agree to be bound by all of the legal terms outlined in this
Privacy Policy as well as by all applicable laws and regulations. Hisense reserves
the right to change this Privacy Policy at any time and without prior notice.
Page 56

55Appendix C
Copyright and Trademark Notices
Hisense and associated logos where applicable are registered trademarks of
Hisense Group in Canada, the United Sates, Mexico and/or other countries. All
other trademarks are property of their respective owners. 2014 Hisense Co.,
Ltd. All Rights Reserved.
The Bluetooth® word mark and logos are registered trademarks owned by
Bluetooth SIG, Inc..
Wi-Fi® is a registered mark of the Wi-Fi Alliance.
Android, Google Play and other marks are trademarks of Google Inc..
Screenshots and product images are simulated and for instructional purposes
only. They may differ from the actual product and are subject to change
without notice. Content shown may vary from actual available content, which
may change without notice.
Page 57

Ver. 14.01
 Loading...