

Page 1

LED LCD TV
LEDN55T28GP
USER’S MANUAL
Before using the TV, Please read this manual
thoroughly, retain it for future reference.
ES-
English
Page 2

Important safety precautions
The flash with the symbol of arrowhead,
inside an equilateral triangle alerts the
user about the presence of a dangerous
tension not isolated inside the product
which can be sufficiently powerful to
constitute a risk of electrocution.
The point of exclamation inside an
equilateral triangle alerts the user about
the presence of important operating
instructions and maintenance in the
document enclosed in the package.
In no case the user is allowed to operate inside
Only a qualified technician from the
manufacture is entitled to operate.
Disposal of Used Electrical & Electronic Equipment
The meaning of the symbol on the product, its accessory or
packaging indicates that this product shall not be treated as
household waste. Please, dispose of this equipment at your
applicable collection point for the recycling of electrical &
electronic equipments waste. In the European Union and Other
European countries which there are separate collection systems
for used electrical and electronic product. By ensuring the
correct disposal of this product, you will help prevent potentially
hazardous to the environment and to human health, which could
otherwise be caused by unsuitable waste handling of this
product. The recycling of materials will help conserve natural
resources. Please do not therefore dispose of your old electrical
and electronic equipment with your household waste. For more
detailed information about recycling of this product, please
contact your local city office, your household waste disposal
service or the shop where you purchased the product.
CAUTION
RISK OFELECTRIC SHOCK
DO NOTOPEN
Do not open the back cover.
the TV set.
1
Page 3

Important safety precautions
Please read the following safeguards for your TV and retain for future reference.
Always follow all warnings and instructions marked on the television.
1. Read, Retain, Follow All Instructions
Read all safeties and operations about the TV. Retain them safely for future reference.
Follow all operations and instructions accordingly.
2. Heed Warnings
Adhere to all warnings on the appliance and in the operating instructions.
3. Cleaning
Unplug the TV from the wall outlet before cleaning. Do not use liquid, abrasive, or aerosol
cleaners. Cleaners can permanently damage the cabinet and screen. Use a soft
dampened cloth for cleaning.
4. Attachments and Equipment
Never add any attachment and/or equipment without approval of the manufacturer as
such additions may result in the risk of fire, electric shock or other personal injury.
5. Water and Moisture
The apparatus shall not be exposed to dripping of splashing and that no objects filled with
liquids, such as vases, shall be placed on the apparatus.
6. Setting
Do not place this TV on an unstable cart, stand or table. Placing the TV on an
unstable base can cause the TV to fall, result in serious personal injuries as well as
damage to the TV. Use only a cart, stand, bracket or table recommended by the
manufacturer or salesperson.
7. Ventilation
Slots and openings in the cabinet are provided for ventilation and to ensure reliable
operation for the TV and to protect it from overheating. Do not cover the ventilation
openings in the cabinet and never place the set in a confined space such as built-in
cabinet unless proper ventilation is provided. Leave a minimum 10 cm gap all around the
unit.
8. Power Source
This TV should be operated only from the type of power source indicated on the marking
label. If you are not sure of the type of power supplied to your home, consult your
appliance dealer or local power company.
2
Page 4

Important safety precautions
9
. Grounding or Polarization
This TV is equipped with a polarized alternating current line plug (a plug having one
blade wider than the other). This plug will fit into the power outlet only one way. This is a
safety feature. If you are unable to insert the plug fully into the outlet, try reversing the
plug. If the plug should still fail to fit, contact your electrician to replace your obsolete
outlet. Do not defeat the safety purpose of the polarized plug.A warning that an apparatus
with CLASS construction shall be connected to a MAINS socket outlet with a protective
earthing connection.
10. Lightning
For added protection for this TV during a lightning storm, or when it is left unattended and
unused for long periods of time, unplug it from the wall outlet and disconnect the antenna
or cable system. This will protect the TV from damage due to lightning and power-line
surge.
11.Power Lines
An outside antenna system should not be located in the vicinity of overhead power lines
or other electric light or power circuits, or where it can fall into such power lines or
circuits. Where installing an outside antenna system, extreme care should be taken to
keep from touching such power lines or circuits as contact with them might be fatal.
12.Overloading
Do not overload wall outlets and extension cords as this can result in a risk of fire or
electric shock.
13.Object and Liquid Entry
Never push object into this TV through openings as they may come up
against dangerous voltage points or short-out parts that could result in fire or electric
shock. Never spill liquid on or into the TV.
14.Outdoor Antenna Grounding
If an outside antenna or cable system is connected with the TV, be sure the antenna or
cable system is grounded so as to provide protection against voltage surges and built-up
static charges. Section 810 of the National Electric Code, ANSI/NFPANo. 701984,provides information with respect to proper grounding of the mast and supporting
structure, grounding of the lead in wire to an antenna discharge unit, connection to
grounding electrodes, and requirements for the grounding electrode.
any kinds of
any kinds of
3
Page 5

Important safety precautions
15.Servicing
Do not attempt to service this TV yourself as opening or removing covers may expose you
to dangerous voltage or other hazards. Refer all servicing to qualified service personnel.
16.Damage Requiring Service
Unplug the TV from the wall outlet and refer servicing to qualified service personnel under
the following conditions:
(a) When the power - supply cord or plug is damaged.
(b) If liquid has been spilled, or objects have fallen into the TV.
(c) If the TV has been exposed to rain or water.
(d) If the TV operates abnormally by following the operating instructions.Adjust only
those controls that are covered by the operating instructions as an improper adjustment
of other controls may result in damage and will often require extensive work by a qualified
technician to restore the TV to its normal operation.
(e) If the TV has been dropped or the cabinet has been damaged.
17.Replacement Parts
When replacement parts are required, be sure the service technician has used
replacement parts specified by the manufacturer or have the same characteristics as the
original part. Unauthorized substitutions may result in fire, electric shock or other
hazards.
18.Safety Check
Upon completion of any service or repair to the TV, ask the service technician to perform
safety checks to determine that the TV is in safe operating condition.
19.Heat
The product should be situated away from heat sources such as radiators, heat registers,
stoves, or other products (including amplifiers) that product heat.
4
Page 6

Table of Contents
View of the Control Panel
Front
Back
Connections to the Other Devices
Using the Remote Control
Installing batteries
Remote control range
View of the Remote Control Panel
Basic Operation
Channel Setting
Picture Setting
Sound Setting
Screen Setting
Function Setting
PC Setting
Using the Teletext
Digital Multimedia Function
Brief function introduction
Keys on the remote control
Digital multimedia interface
Enjoy video files
Enjoy mp3 audio files
Browse the JPEG pictures
Enjoy music when browsing pictures
Browse the text files of TXT format
Base Stand Installation Instruction
Trouble Shooting
Specifications
6
6
7
8
11
11
11
12
13
15
17
18
18
19
20
21
22
22
22
23
23
25
26
27
28
29
30
31
5
Page 7
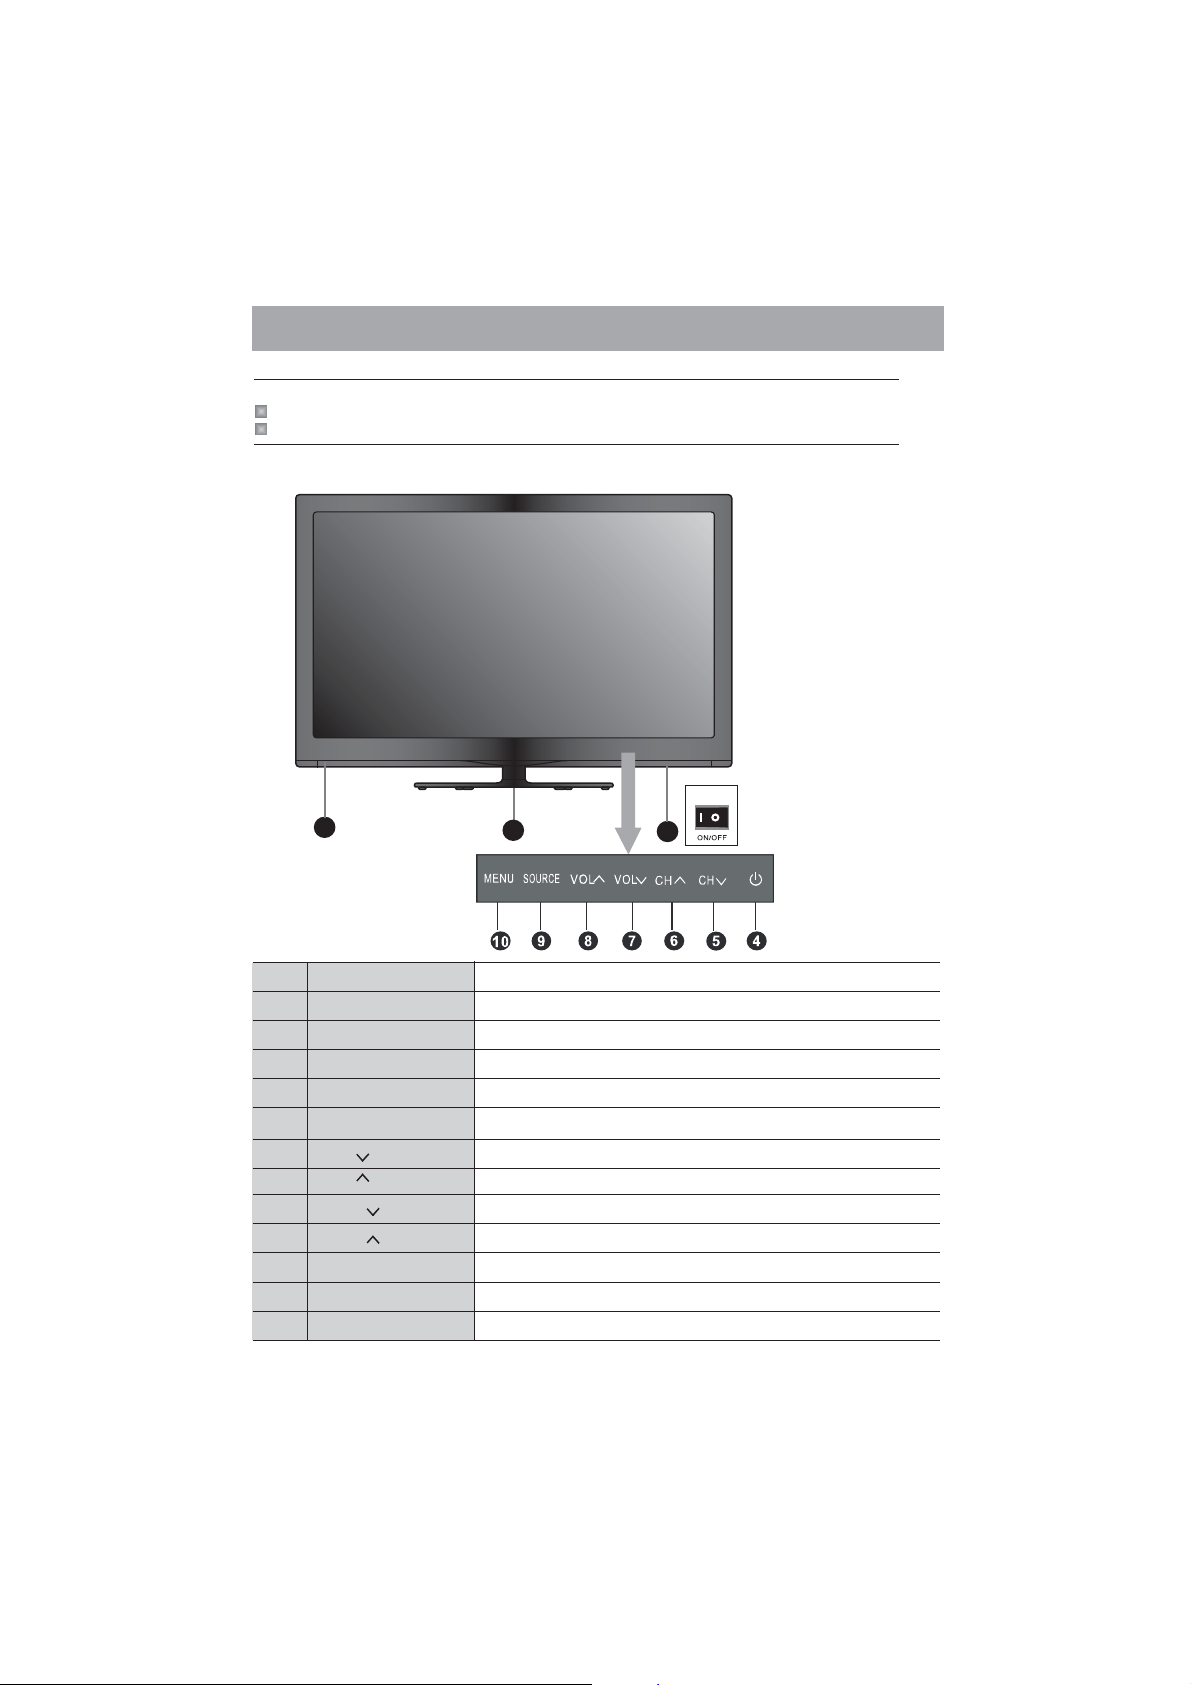
View of the Control Panel
Note:
When adjusting, just press the button slightly instead of pressing it too hard.
The design of this product may be changed without notice,just according the real.
Front
IO/
1
2
3
NO.
1
2
3
4
5
6
7
8
9
10
Component Component Description
Remote receiver
Power indicator
Main power
Power standby
CH
CH
VOL
VOL
SOURCE button
MENU button
Receiving signals from the remote emitter. Do not block.
Indicates standby mode. There will be no light when the
power switch is in the off position.
Press to turn the main power ON or OFF.
Press to turn your TV on or off(standby mode).
Press to go to the previous channel.
Press to go to the next channel.
Press to decrease the volume.
Press to increase the volume.
Press to select the signal source .
Press to activate the on-screen display (OSD).
6
Page 8
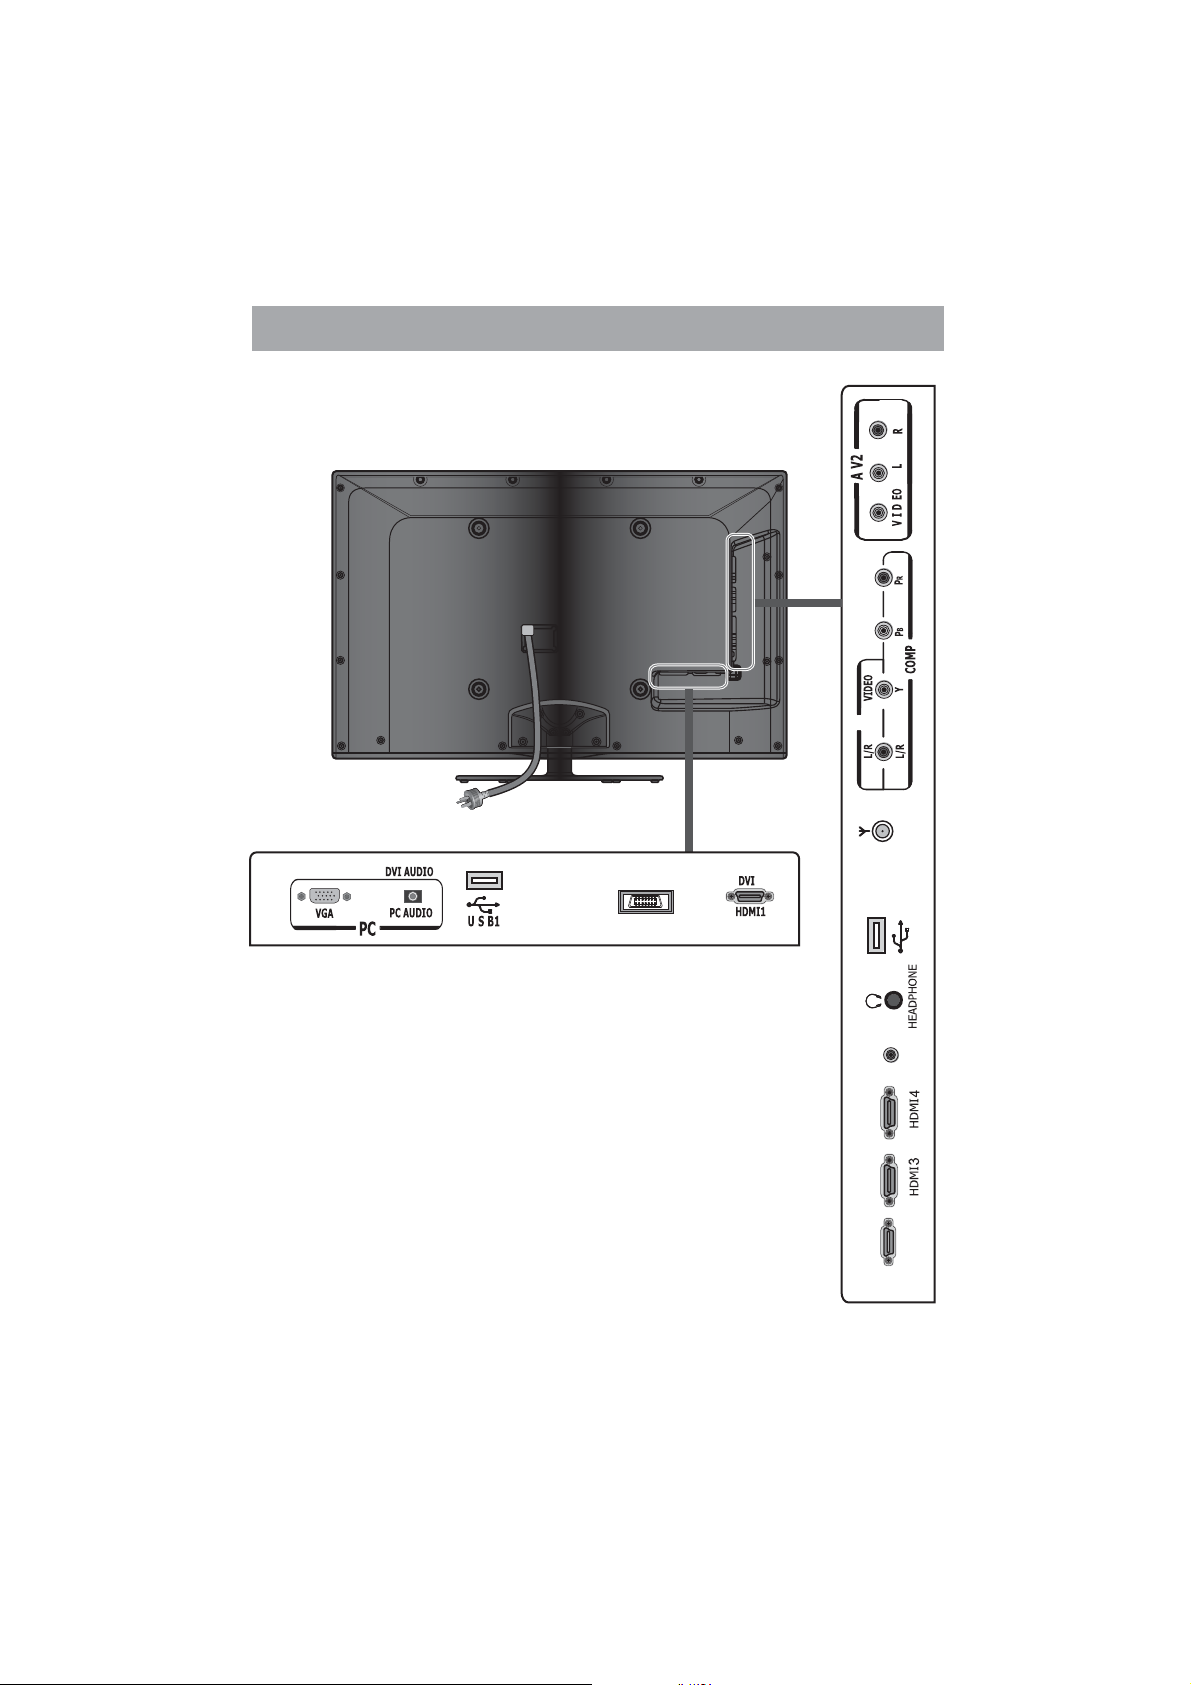
Back
View of the Control Panel
AV1
Power Input
ANT 75 Ω
SCART
USB2
COAXIAL
HDMI2
7
Page 9
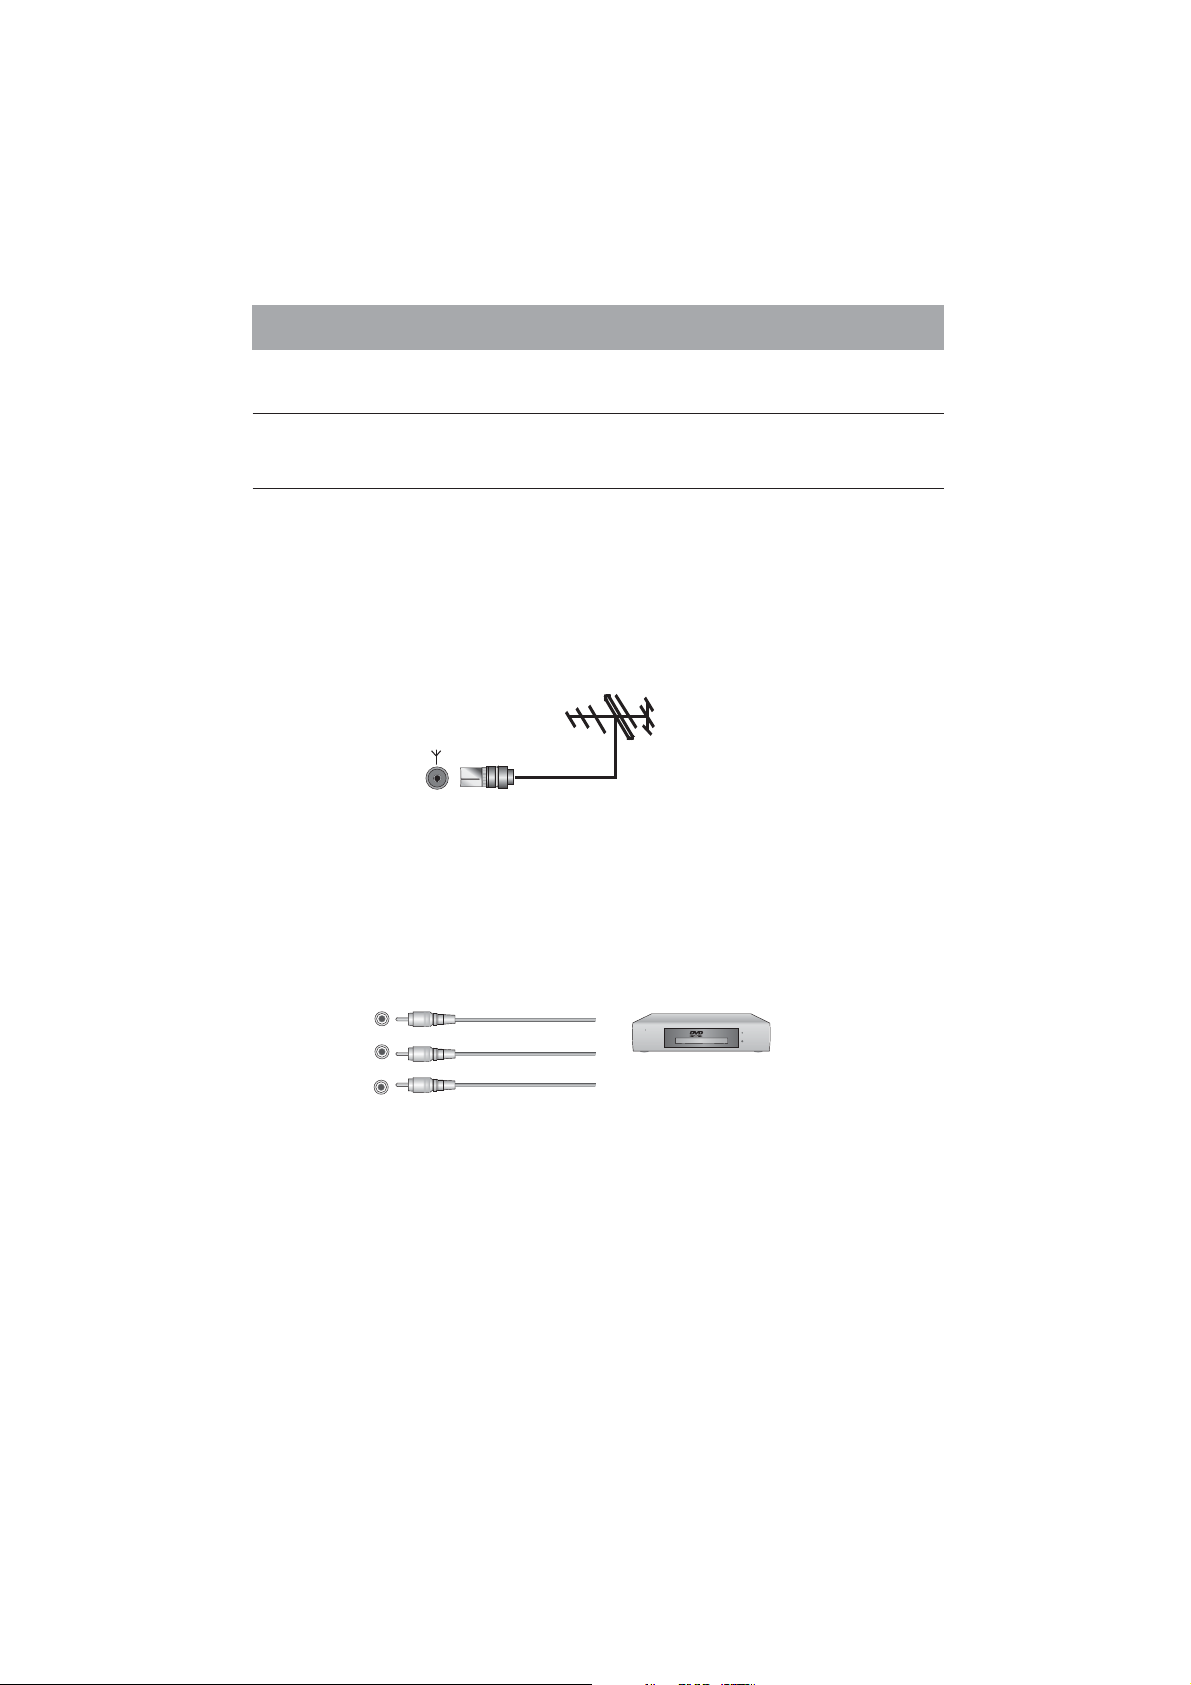
Connections to the Other Devices
Connect to other devices
Warning:
electronic device AC cords from the AC input.
Note:
1. Connect to broadcast antenna or the cable TV
To have an optimal picture quality, it is strongly recommended to have an
external antenna or a cable TV.
Note:
- It is recommended that coaxial cable (75Ω ) be used to eliminate the interference
caused by the mismatched impedance.
- The antenna cable should not be bound together with the power cord.
- When using the cable TV, please insert the plug of the coaxial cable (75 Ω)
directly into the antenna outlet.
2. Connect to AV devices
- Connect video terminal to an appropriate external terminal on A/V device such as a
VCR, DVD or Camcorder with a video cable.
- Connect “R -AUDIO - L” on your set to the corresponding audio terminal with audio
cables on the A/V device.
Note:
the same audio(R/L) terminal. Be sure the “video input” is connected correctly when the
video signal is input.
Before connecting the TV to any other electronic device, unplug the TV and
Not all following terminals are included on your TV. The actual one refer to "Back".
ANT 75Ω
The video of VIDEO INPUT 1 shares with the Y terminal of component and they use
R
L
VIDEO
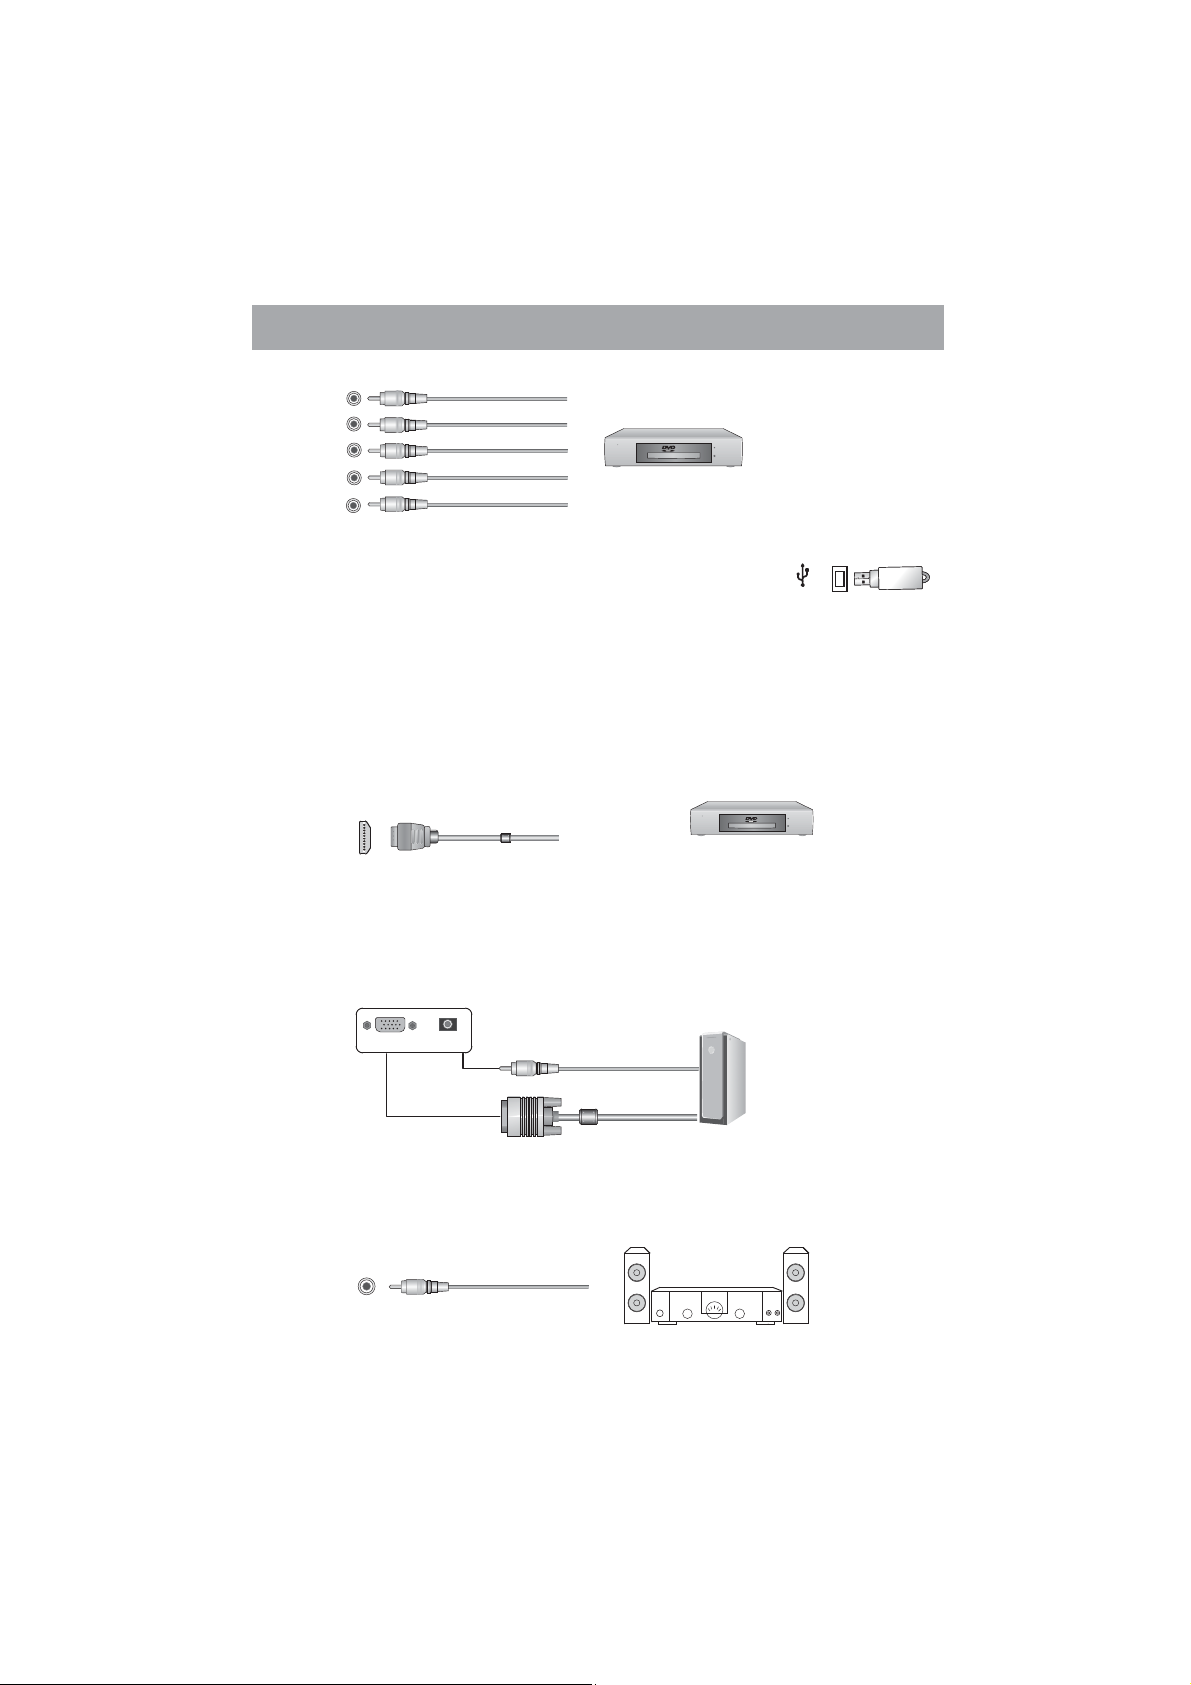
3. Connecting Component Devices (DVD/PVR)
- Component video(Y, Pb, Pr)transmits video as separate Y, Pb, Pr signals.
Use this connection for high-definition video signals from a DVD or other equipment.
-
Connect Component inputs (“PR ”, PB ”, “Y”) and audio(R/L) of your set with
Component video and audio cables
(R/L)out connectors on the PVR or DVD.
The "Y, PB and PR ” connectors on your component devices (PVR or DVD) are
Note:
sometimes marked with Y, B-Y and R-Y or Y, CB and CR. (Colors for inputs and cables
must correspond on both devices.)
to the corresponding component video and audio
The equipment with Video output
function ( such as VCD, DVD,etc.).
8
Page 10
Connections to the Other Devices
R
L
PR
PB
Y
4. Connect to devices with USB interface
This unit has standard USB interface and can be connected to the
standard USB1.1 and USB2.0 disks.
- You can either use the USB connection cord or directly insert the
USB into the USB port at the side of the TV.
5. Connect to devices with HDMI interface
:
HDMI High Definition Multimedia Interface
HDMI transmits an all-digital signal and is the recommended choice for playback
from a digital DVD or DVR. No sound connection is needed for HDMI to HDMI
connection.
- HDMI cable connected to the HDMI connector on the TV.
DVD With Component jacks
USB
HDMI
The equipment with HDMI output jack
( such as DVD players, etc.).
6 Connect to PC.
- Connect the D- Sub cable to “VGA” on the rear of your set and the other end to the
port of your computer.
- Connect “ AUDIO ” on the rear of your set to “Audio Out” on
with the audio cable
your computer.
AUDIO
VGA
7.Coaxial audio
Connect the coaxial audio device to this jack.
COAXIAL
9
Page 11

Connections to the Other Devices
8 Connect to headphone.
- Connect the headphone jack of the TV set.
The volume of the headphone is automatically adjusted with the main volume of the
TV set.
HEADPHONE
9 Connect to the devices with SCART interface.
- It provides a convenient multi-signal connector between the TV set and video
equipment.
CVBS in/out,RGB in
10
Page 12

Using the Remote Control
Installing batteries
Installing the remote control batteries
1. Open the battery cover on the back of the remote control.
2. Install two AAA size(1.5V) batteries. Match the “+” and “-” signs on the
batteries to the signs on the battery compartment.
3. Close the battery cover.
Note:
1.Dispose of your batteries in a designated disposal area. Do not throw the
batteries into fire.
2. Do not mix battery types or combine used batteries with new ones.
3. Remove depleted batteries immediately to prevent battery acid from leaking
into the battery compartment.
4. If you do not intend to use the remote control for a long time, remove the
batteries.
5.The effective range of remote control is suggested in the figure below.
Remote control range
1. The remote control distance: 8 meters in front of the TV set.
2. The remote control angle: taking the television infrared light receiver window
as an apex, 6 meters away, its controlled angle (left to right) is within 30
degrees, while the vertical angle (up to down)is within 30 degrees.
11
Page 13

View of the Remote Control Panel
Remote indicator
Standby button
Numeric button
Recall the channel on
time you have set
Zoom button
Picture mode button
Volume up/down button
Control
Remote sensor
Source selecting button
TV mode switch button
Display the present screen
information such as the
current channel and the input
source.
Sound model button
Mute button
Channel up down button/
Menu button
Exit the OSD On Screen
▲/▼ //◄ ►
up/down/left/right
button
To freeze a picture
Switch between different
Special function button
refer to edit program
on screen
audio languages
instruction()
Sleep button
Note: The design of the remote control is subject to change and may be
different from the actual one.
OK button
HDMI mode switch button
VGA mode switch button
Multimedia function button
support DMP only for the TV
instruction for more information()
TeleText function button
12
Display menu
refer to the multimedia
(
).
Page 14

Basic Operation
Turning your TV on and off
To turn your TV on: Connect the TV to an AC power outlet and turn on the power switch
located below the front right hand side of unit. A few seconds later an image will appear
on the screen.
- Turning off to standby mode: Press [Power Standby] on the front panel or on the remote
control to switch to standby mode. You can activate the unit again by pressing[Power
Standby].
Turn the power switch off when you do not intend to use the TV for long periods,
Notes:
for example overnight. Remove the connection from the wall power outlet if you do not
intend to use the unit for longer period, for example, if you plan to be away for a few days.
Wait at least 5 seconds after turning off if you want to turn on the TV again.
Selecting the video source
Select the video source depending on the video device you have connected to the TV
set .TV, AV, Component, HDMI and DMP can be chose as the video source.
- Press [Source]
/
[ ] to select the source, then press [OK] to enter.
Adjusting the volume
Press [VOL VOLV ] to increase or decrease the volume. Press [Mute] to turn off the
Audio. Press [Mute] again to turn on the Audio.
Changing channels
Press [CH CHV] to go to the or channel. Either, Press the number
- previous next
buttons to select a channel. For example, to select channel 12, press 1, then 2 within 3
seconds.
to select the video source . When the list of video source appears, press
/
/
,VGA
Selecting the sound mode
Press [Sound] one or more times to select the sound mode which you want. Standard,
Live1, Live2, Theater, Music, Speech, User(a mode that you set) mode can be selected.
Selecting the picture mode
- Press [Picture] one or more times to select the picture mode which you want. You can
select Standard, Stadium, Game, Cinema, Concert, Studio and User (a mode that you
defined) mode.
Selecting the aspect ratio
- Press [Zoom] to display the aspect ratio, then press [ to select one mode, press
[►/OK] to confirm.
- You can select Auto, Full screen, Normal, Zoom 1, Zoom 2, Smart Zoom, Dot To Dot
mode.
Note:
The option of aspect is vary with different source.
/]
13
Page 15

Basic Operation
Setting the sleep timer
-
You can specify the time you want your TV to wait before it automatically turns off. Press
[Sleep] one or more times until the remaining time which you want appears.
-
You can select Off, 10 minutes, 20 minutes, 30 minutes, 60 minutes,90 minutes, 120
minutes,180 minutes, 240 minutes.
Note:
If there are no input signal, the TV set will turn to standby mode automatically after
about 15minutes.
To use the OSD
1 Press the [Menu] button to open the main menu.
2 Press the [ ] buttons to select a menu option , then press the [► OK] buttons to enter
/
the menu or item.
3 Press the [ / ] buttons to select an item, then press the [ ] buttons to adjust the
value or press the [ OK] buttons to enter a submenu.
4 In the submenu, you can press the [ to select the item and press the [ ]
/
►
/ ] buttons ◄/►
◄/►
buttons to adjust the value.
5 Press the [Menu] button to return back the previous menu.
6 Press the Exit button to exit the menu.
Note:
The menus in the user’s manual may vary slightly from the actual screen.
Brightness 50
Contrast 50
Color 50
Sharpness 50
Tint 50
Color Temperature Standard
Enhanced Settings
Picture
/
Balance 0
AVC On
EQ
Sound
OSD Language English
Blue Screen On
OSD Time 60S
Transparency Off
Startup Menu Off
DCR
Factory Reset
Option
14
H Position 0
V Position 0
H Size 0
V Size 0
Phase 0
Clock 0
Auto Adjust
SCREEN
Program No. 1
Color System SECAM
Sound System B/G
Fine Tune 0
Manual Install
Auto Install
Program
Channel
Edit
Page 16

Channel Setting
Note: The Channel setting is only available in TV signal.
Using the Channel menu
Program No.
Color System
chosen in all including SECAM,AUTO, PAL and NTSC .
Sound System
chosen in all including B/G, I, D/K and M.
Note: Wrong sound system selected may result in abnormal sound and image.
Fine Tune
distant TV stations, the picture or sound quality might be improved by using the Fine
Tune option .
Manual Install :Manual Install is only needed when analogue channels are not found
under an automatic tune.
Channel
Frequency
Auto Install
in your area automatically.
in the Auto Install menu, You can select the following options and adjust the setting, then
select the Auto Select option to start automatic search, and this will memorize all the
available channels.
Auto Install will take a few minutes; please wait until finished.
:To set the current channel No..
: To set the color system of current channel. There are four modes to be
: To set the sound system of current channel. There are four modes to be
: Under poor reception conditions, or when receiving analogue signals from
Display the current channel.
Display the frequency of the current channel.
: This is the easiest and most effective way to install all channels available
Country
Add channel only Yes
To select the country where you will operate the TV.
No
To only add channels to the existing the TV.
To retune and overwrite the existing channel list.
(It is always recommended to select “No”)
15
Page 17

Channel Setting
Program Edit
searched for channels, you can enter Program Edit menu to select the program you want
to edit.
a. Delete channels
Press the Red button twice to delete the selected channel.
b. Rename channels
Press the [GREEN] button to rename the selected channel Press the [ buttons
to select the characters to represent the station name. Press the [ to
move to the next character and then press the [GREEN] button again to confirm the new
name.
Note: You can rename the channel by no more than 5 characters.
c. Move channels
Press the [YELLOW] button and press the [ to move the selected channel. Press
the [YELLOW] button to confirm.
d. Skip channels
Press the [BLUE] button to skip the selected channel. Press the [BLUE] button again to
undo it.
The skipped channel can not be selected by CH /V on the remote control, but
Note:
they can be selected by using the channel number.
: Allows you to edit TV programs in the Channel list. After having
.
/]
/]
/
◄ ►] buttons
16
Page 18

Picture Setting
Using the Picture menu
Allows you to set your preferred picture mode.
Brightness
◄►
/
[ ]. The grade shows the brightness of the current image.
Contrast
The grade reflects the contrast between the image and the background.
Color
Sharpness
sharpness level for smoother images by pressing [ ].
Tint
: Adjust the color of the image redder or greener to make the image more natural.
Note: Tint can only be available in NTSC system.
Color Temperature
You can select the color temperature from these options: Warmer,
Cooler and Cool.
Enhanced Settings
:
3DNR
outside noise interference and return the pure initial signal. It has four ratings:
Low, Middle, High, and Off.
: It can figure out the faintness of the image edge when the image moves
MFC
quickly. You can select among Off, Weak, Normal, Strong.
Decrease or
: Increase the brightness of the image by pressing the
Decrease or Increase ◄ ►
: the contrast of the image by pressing [ ] .
: Adjust the brightness of the color by pressing [ ] .
: Increase the sharpness level for clearer images or decrease the
: Change the color temperature by pressing [ ].
: Set the advanced function of the TV as follows.
It can optimize the picture signal from time and space; reduce the
◄►
/
◄►
/
Standard, Warm,
/
◄►
/
17
Page 19

Sound Setting
Using the Sound menu
Allows you to select an audio-enhancement technique.
Balance
[ ] buttons.
/
◄►
AVC
range to eliminate large in volume.
: Adjust the balance between the left and right speakers by pressing the
: On or Off can be selected. If On is selected, t
.
he option keeps the audio in a preset
Equalizer
component of 120HZ, 500HZ, 1.5KHZ, 5KHZ, and 10KHZ. Press the [ ] buttons to
weaken or enlarge the sound to the proper value .
:S
et the users' mode of sound, press the [◄ ►] buttons to select the sound
/
/
Screen Setting
Using the Screen menu
Allows adjust the computer’s desktop content.
H Position/V
the [ ] buttons.
◄►
HSize/VSize
Phase
Clock
Auto Adjust
Position
/
: Adjust the horizontal / vertical size of the image (not available in VGA).
: Adjust the VGA phase to match the PC. (VGAmode only)
: Adjust the VGA Clock to match the PC clock. (VGA mode only)
: Auto adjust the image position. (VGA mode only)
: Adjust the horizontal position of the video by pressing
/vertical
18
Page 20

Function Setting
Using the Option menu
OSD Language
P
ress the [◄ ►] buttons to select your desired on-screen menu language.
Blue Screen
blue screen when it's on and show noise when off.
This option is only available in TV signal.
Note:
OSD Time:
Press the [ ] buttons to select the OSD Time and then press the [◄ ►] buttons to
select the display time: Off/10/.../45/60s.
Transparency:
Press the [ ] buttons to select Transparency and then press the [◄ ►] buttons to
select the transparency of the on-screen menu: Off/1/2/3/4.
Startup Menu:
TV.
Press the [ ] buttons to select Startup Menu and then press the [◄ ►] buttons to
select On/Off.
DCR:
Allows to adjust the backlight automatically.
Press the [ ] buttons to select DCR and press[► OK] to enter the submenu.
Press the [◄ ►] buttons to select DCR On/Off.
Press the [◄ ►] buttons to increase or decrease the backlight manually when DCR is set
to be Off.
:
Allows you to select your desired on screen menu language.
/
: Set the background when there is no signal. The background will show
Allows to select the display time of the on-screen menu.
//
Allows to select the transparency of the on-screen menu.
//
Allows to set the Startup Menu On/Off the next time when you turn on
//
//
/
/
Factory Reset
factory. Your TV restores all settings to factory defaults.
: Select “Yes” to resume the parameter setting when the product left the
19
Page 21

PC Setting
PC Setting
Set the PC Software properly to match one of the below options.
Supported VGA Modes:
VGA____ (640×480 /60Hz)
SVGA___ (800×600 /60Hz)
XGA____ (1024×768 /60Hz)
Note: Your PC/Notebook may not be able to display some of these resolutions.
Take Windows XP as an example, and the Windows system display setting is as
illustrated:
1. Right click anywhere on your display, select 'Properties'.
2. Find the Settings tab on the dialogue box, set the screen Resolution.
3. See above details about the resolutions supported by this unit.
4. ClickOKtoexit.
20
Page 22

Using the Teletext
Using the Teletext
Activating Teletext
Select the channel that is broadcasting the desired Teletext program
Press [Text] button on the remote control to enter the Teletext mode and press the same
button to exit the Teletext mode.
1.The following operations should be under the Teletext mode.
Note:
2.There are some multiplex buttons on the remote control for Teletext operation.
Page selection
You can directly input your desired page number by pressing the [0]~[9] buttons. You can
sequentially read pages by pressing
Hold
Some Teletext information is contained on more than one page, the pages automatically
changing after a given reading time. Press [Hold] button to stop the page changing. Press
[Hold] button again to allow the page to change.
Reveal
Some Teletext pages contain quiz or questions with hidden answers Press [Reveal]
button to see the answers Press [Reveal] button to hide the answers again
Cancel
When a page is selected in Teletext mode it may take some time before it becomes
available. Press [Cancel] button to switch to the TV mode. When the required page is
found, the page number will appear at the top of the TV picture. Press [Cancel] button to
return to the selected Teletext page.
..
/
the[ ]buttons.
.
.
Sub.Code
Some Teletext pages contain sub page that require you to input the sub code. Press
[Sub.Code] button, sub-page will display. You can either press [0]~[9] buttons to input the
page or press for page up/down. If you want to quit Sub.Code mode,
press [Sub.Code] button until “pages/sub pages” is disappeared
Index
Teletext index page guides you quickly to your desired page. Press [Index] button to jump
the index page.
Fast Text
The RED, GREEN, YELLOW and BLUE key are used for quick access to colour pages
transmitted by Fast Text broadcast.
/
the[ ]buttons
.
21
Page 23

Digital Multimedia Function
Brief function introduction
With the digital multimedia playing function, this unit can recognize the standard USB 1.1
and USB 2.0 devices, including hard disks and USB flash drives. You can use this unit to
browse photos, listen to music, play audio and video files of multi formats, and so on.
Note:
1. The USB port of the TV support most hard disks, U disks, etc. If the unidentified
phenomenon appears, it does not belong to the breakdown of this unit, for it has
something to do with the driver of the equipment.
2. The USB port provides 5V voltage and the maximum current is 500 mA.
Because the port specification adopted by certain storage devices is different
from that of the standard USB agreement, so it may affect the correct identification of the
multimedia player. This belong to the normal phenomenon.
3. Due to the difference of the equipment and the storage capacity, the time which the
digital multimedia player needs to read the information also differs. The speed of reading
the information may slow down temporarily. That is not the breakdown of this unit.
Keys on the Remote Control
EMP:
Enter the initial page of the multimedia player.
Subtitle:
movie.
Play/Pause (► ):
pause while browsing photos, listening to music, or watching
movies; in forward or rewind state, press this key to resume
playing the audio or video file.
Stop ( ):
return to the main menu; when playing the photo , audio or
video file, press this key to stop.
(Rewind):
preview); the rewind operation is invalid while playing music.
(Forward):
preview); the forward operation is invalid while playing music.
(Previous):
preview mode); press the button to switch to the previous one while browsing the music
files.
(Next):
mode); press the button to switch to the next one while browsing the music files.
Press the button to do the rewind operation in video play state (not
Press the button to do the forward operation in video play state (not
Press the button to play the previous one while playing the movie (not in
Press the button to play the next one while playing the movie (not in preview
Press this key to select the subtitle language of the
װ
Press this key to switch between play and
Press this key to exit from the current state and
22
Page 24

Digital Multimedia Function
Digital multimedia interface
Be sure to insert the U-disk or mobile hard disk with standard USB2.0 port.
Press the [DMP] button to enter the main menu and press the [Exit] button to exit the
menu.
USB
All
MOVIE
MUSIC
PHOTO
TEXT
MOVE
C:\
123_1.MOV
003.jpg
005.jpg 006.jpg 007.jpg
OK
SELECT
002.jpg
123_2.rmvb
RETURN EXIT MEDIA SEL
001.jpg
004.jpg
Information
File Name:
123_3.rmvb
DVD.rmvb
1/1
PAG E
1. Press the [OK] button to enter and all the default type of the file will display on the menu
. .
2 Press the [◄/►] buttons to select the drive icon and then press the [OK] button to enter
.
3 Press the [◄/►/ / ] buttons to select the folder/file you want to open and then press
the [OK] button to enter/play the folder/file.
4 Press the [Menu] button to return to the previous directory.
.
5 Press the [RED] button to filter the current file according to the type of the media.
.
Enjoy video files
Press the [RED] button to switch to ALL or MOVIE.
.
1 Press the [◄/►/ / ] buttons to select the video you want to play.
.
2 Press the [OK] button to play the video.
.
3 Press the [ Exit] buttons to exit the video and return to the previous directory.
.
4 Press the [Menu] button to display/exit the video control bar.
.
5 Press the [◄/►] buttons to select the function icon in the control bar.
.
6 Press the [OK] button to confirm.
7. Press the [Exit] button to exit.
/
1
.
2738495106
00:00:15/02:22:27
11
23
Page 25

Digital Multimedia Function
1
The progress bar when playing.
Play/ Pause the video.
2
You can press the [ ] button directly to play/pause when there is no control bar on
the screen.
Play the previous video
3
You can press the [ ] buttons directly to play the previous video if no control bar
display on the screen.
Play the next video
4
You can press [ ] buttons to directly to play the next video if no control bar display
on the screen.
Fast backward
5
Press the [OK] button to select the play speed. You can press [ ] button to realize
the function.
Fast forward
6
Press [OK] button to select the play speed. You can press [ ] button to realize the
function.
Option
7
1. Press the [◄/►] buttons to select the options in the menu.
2. Press the [◄/►] buttons to select the settings.
Program List
8
1. Press the [ / ] buttons to select the movie.
2. Press the [OK] button to confirm to play.
Select Time
9
1. Press the [◄/►] buttons to select the time format: hour/minute/second.
2. Press [0-9] buttons or the [ / ] buttons to adjust the time.
3. Then press the [OK] button to confirm and the video will jump to play at the time you
have set.
10
Program info
Allows you to view the program information.
11
Stop playback
You can press the [ ] button directly to stop playback.
►װ
Note:
You can press [Zoom] button to change the aspect ratio while playing the movie.
24
Page 26

Digital Multimedia Function
Below is the list of video formats compatible:
Note:
1.If you use the USB 1.1 device to play the movie, the image may not be very smooth. So
you’d better use the USB 2.0 device.
2.This unit only supports the add-on subtitle of .srt. Press Subtitle repeatedly to switch
among different subtitles if the movie has multi subtitles.
3.We can not promise that this unit would support all the formats listed above, as the
programming tools are different.
Enjoy mp3 audio files
1.Press the [RED] button to switch to ALL or MUSIC mode.
2.Press to select the music you want to play.
3.Press the [OK] button to play the music.
4.Press the [YELLOW/BLUE] buttons to turn to the previous/next page and press [ to
mark the music.
5.Press the [GREEN] button to select the REPEAT MODE: One/ MARK/ All.
One: Play the current music repeatedly.
MARK: Play the marked music repeatedly
All: Play all the music repeatedly.
Press to select the music and press the [OK] to confirm.
6.Press to exit the music playback interface.
the [ / /◄/►] buttons
►]
.
the [ / ] buttons
the [ Exit] buttons/
25
Page 27

Digital Multimedia Function
Browse the JPEG pictures
1. Press the [RED] button to select ALL or PHOTO.
2. Press to select the pictures you want to browse.
3. Press the [OK] button to browse the pictures.
4. Press to exit.
the [ / /◄/►] buttons
the [ Exit] buttons/
The image browsing tool bar
Prev Music
Next Music
10
Press the [Menu] button to display/exit the bar. Press the [ buttons to select the
icon in the bar and then press the [OK] button to confirm.
1
Picture Info
Allows you to view the picture information.
Browse the previous picture
2
You can press directly to browse the previous picture when no tool bar
displays on the screen
3
Browse the next picture
You can press directly to browse the next picture when no tool bar
displays on the screen
4
Rotate t
You can press the directly to realize the function when no tool bar displays
on the screen
[ ] button
.
[ ] button
.
he picture 90 degrees clockwise
[►] button
.
+
-
987 12 3 4 5 6
◄/►]
26
Page 28

Digital Multimedia Function
5
Rotate the picture 90 degrees anticlockwise
You can press the directly to realize the function when no tool bar
displays on the screen
6
Play/Pause
You can press the [ ] button directly to play/pause when browsing the picture.
Stop browsing the picture. You can press [ ] button directly to stop browsing
Stop the browsing
You can press the [ ] button directly to stop.
7
Zoom in/out the picture
Press the Zoom] button directly to zoom in/out the picture
And you can press to move the picture in zoom mode
Zoom out the picture Press Zoom button directly to zoom out the picture
Option
8
Show Speed: Press the to select the browsing speed
Show Style Press the to select the browsing method
Background Music Press the to select On Off
When On, you can enjoy the music and browse the picture in the folder at the same
time.
9
Picture Info
Allows you to view the picture information
10
Enjoy music when browsing pictures
When the BGD Music is open and you are enjoying the music and browsing the
pictures.
Press [RED] button to play the previous music in the current directory
Press [GREEN] button to play the next music in the current directory
[.
[ ◄] button
.
►װ
the [ / /◄/►] buttons
..
[◄/►] buttons
:.
[◄/►] buttons
:/.
[◄/►] buttons
.
.
.
.
.
.
27
Page 29

Digital Multimedia Function
Browse the text files of TXT format
1. Press the [RED] button to select ALL or TEXT mode.
2. Press the to select the text you want to view.
3. Press the to confirm.
Press the [ Exit] buttons to exit the browsing interface/.
4.
[ / /◄/►] buttons
[OK] button
2
1
Press the [Menu] button to display/exit the tool bar. Press to select the
corresponding icon and then press the [OK] button to confirm.
View the previous page
1
You can press the [ ] button directly to view the previous page.
2
View the next page
You can press the [ ] button directly to view the next page.
3
Stop browsing
You can press the [ ] button directly to stop.
4
Select page to view
Press [0~9] buttons to input the page number, or press the [ / /◄/►] buttons to
select the page, then press the [OK] button to confirm.
Note: Only the TXT document of BIG5 or UNICODE encoding format is supported. You
should save the original document as the TXT document of the encoding format
mentioned.
4
3
the [◄/►] buttons
28
Page 30

Base Stand Installation Instruction
Put the TV set on the level table on which there is a pad cloth or other soft
material.
Lay down the TV set and make sure the LCD screen is up.
Then fix the base to the set with 4 screws.
Note: The figure below is just for reference, please see the real set.
4 screws
base stand
29
Page 31

Trouble Shooting
When there is something wrong with your TV, you can try turning off the TV and then
restart it. You can also operate according to the following chart. If the problem still cannot
be solved,please contact the professional technicians.
1. Check if the power line is in the outlet and if it
has electricity.
2. Check if you have pressed Power button on the
No sound or picture
The picture is normal
but there is no sound
No picture and white
or black picture
The sound and picture are
interfered
Unclear picture or picture with snow
The remote control does not work
TV or Power button on the remote control.
3. Check the setting of picture brightness and
contrast.
4. Check the volume.
1. Check the volume.
2. Check if Mute mode is set.
1. Adjust Picture Setting.
2. Check Color System.
1. Try to find the appliance affecting TV set, and
move it far away from the TV set.
2. Try to insert the power plug of the TV set into
another outlet.
1. Check the direction, position and connection of
your antenna.
2. Adjust the direction of your antenna or reset or
fine tune the channel.
1. Change the batteries in the remote control.
2. Clean the upper side of the remote control
(radiating window)
3. Check the contacting points of the batteries.
4. Check if there is obstruction between the remote
control and the monitor.
5. Check if the batteries are correctly installed.
H/V strip or the picture shaking
The cabinet of the TV makes “Click” sound
Check if there is interfering source nearby, such as
appliance or electric tools.
Sometimes the room temperature change can
cause the television cabinet to inflate or contra,
which makes the sound. This does not mean the
TV breaks down.
30
Page 32

Specifications
Model Name
Dimension
(WXHXD)(mm)
Weight(kg)
LCD Panel Minimum
size diagonal
()
Screen resolution
Audio power
Power consumption
Power supply
Receiving systems
Environmental conditions
Component Input
VGA Input
HDMI
Without stand
With stand
Without stand
With stand
RF
AV
LEDN55T28GP
1311x826x38.5
1311x881x335
24
30.5
138
1920x1080
10W+10W
Refer to the rating label
Refer to the rating label
PAL/SECAM-D/K I,B/G,
PAL, NTSC, SECAM
Temperature 5°C~ 35°C Humidity 20%-80% RH,
Atmospheric pressure 86kPa-106kPa
480I 480P 576I 576P 720P/60Hz 1080I/50Hz
、、、、 、 、
1080I/60Hz 1080P/50Hz 1080P/60Hz
VGA 640×480/60Hz SVGA 800×600/60Hz
XGA 1024×768/60Hz
RGB/60Hz 640×480,800×600,1024×768
YUV/50Hz 576I,576P,720P 1080I 1080P
YUV/60Hz 480I,480P,720P,1080I,1080P
、、
()、( )
()
()
(,,)
()
Accessory
Remote
Battery
User manual
31
Page 33

 Loading...